Olive CM 200
Table of Contents Introduction ............................................................................................................................................................ 3
System Requirements ......................................................................................................................................... 3
Technical Specifications ..................................................................................................................................... 3
Installation Guide For Windows ..................................................................................................................... 4
Installation Guide For MAC OS ...................................................................................................................... 18
Installation Guide For Linux .......................................................................................................................... 25
IINNTTRROODDUUCCTTIIOONN
With the TATA Photon Whiz, you can easily:
Access the Internet
View the statistics
Make and answer calls
Use the call logs service
Send and receive message
Use the phonebook
SSYYSSTTEEMM RREEQQUUIIRREEMMEENNTTSS
CPU: Pentium4 1GHz or above
Memory: 256MB or above
Hard Disk: 50 MB free disk space
Support Operating System:
o Windows 2000SP4/XP SP2/Vista/Win7 or
o MAC 10.5/10.6 or
o Linux Ubuntu 9.04&8.10
Interface: USB 1.1 or above
Note: If the configuration of your computer is inferior to the recommended configuration,
the running performance of the data modem may be affected.
TTEECCHHNNIICCAALL SSPPEECCIIFFIICCAATTIIOONNSS
Technical Standard: CDMA2000 1X
USB Interface Standard: USB 2.0 Full Speed
Maximum Transmit Power:>24dBm
Data Rate: 153.6kbps
Frequency Band: 800 MHz
Dimensions: 89×28×10.5mm
Weight: 22g
Operating Temperature:0℃ to 55℃
Storage Temperature:-20℃ to 65℃
Operating Humidity:5℃ to 95℃
Storage Humidity:5℃ to 95℃
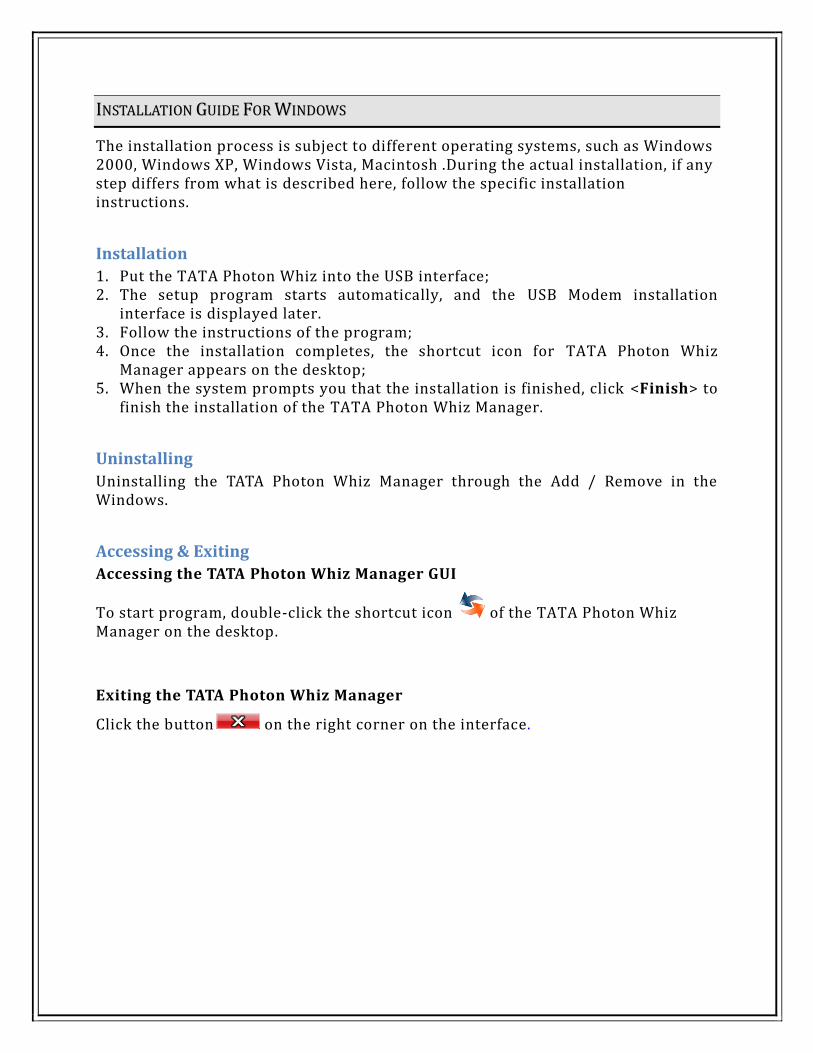
IINNSSTTAALLLLAATTIIOONN GGUUIIDDEE FFOORR WWIINNDDOOWWSS
The installation process is subject to different operating systems, such as Windows 2000, Windows XP, Windows Vista, Macintosh .During the actual installation, if any step differs from what is described here, follow the specific installation instructions.
Installation
1. Put the TATA Photon Whiz into the USB interface; 2. The setup program starts automatically, and the USB Modem installation
interface is displayed later. 3. Follow the instructions of the program; 4. Once the installation completes, the shortcut icon for TATA Photon Whiz
Manager appears on the desktop; 5. When the system prompts you that the installation is finished, click <Finish> to
finish the installation of the TATA Photon Whiz Manager.
Uninstalling
Uninstalling the TATA Photon Whiz Manager through the Add / Remove in the Windows.
Accessing & Exiting
Accessing the TATA Photon Whiz Manager GUI
To start program, double-click the shortcut icon of the TATA Photon Whiz Manager on the desktop.
Exiting the TATA Photon Whiz Manager
Click the button on the right corner on the interface.
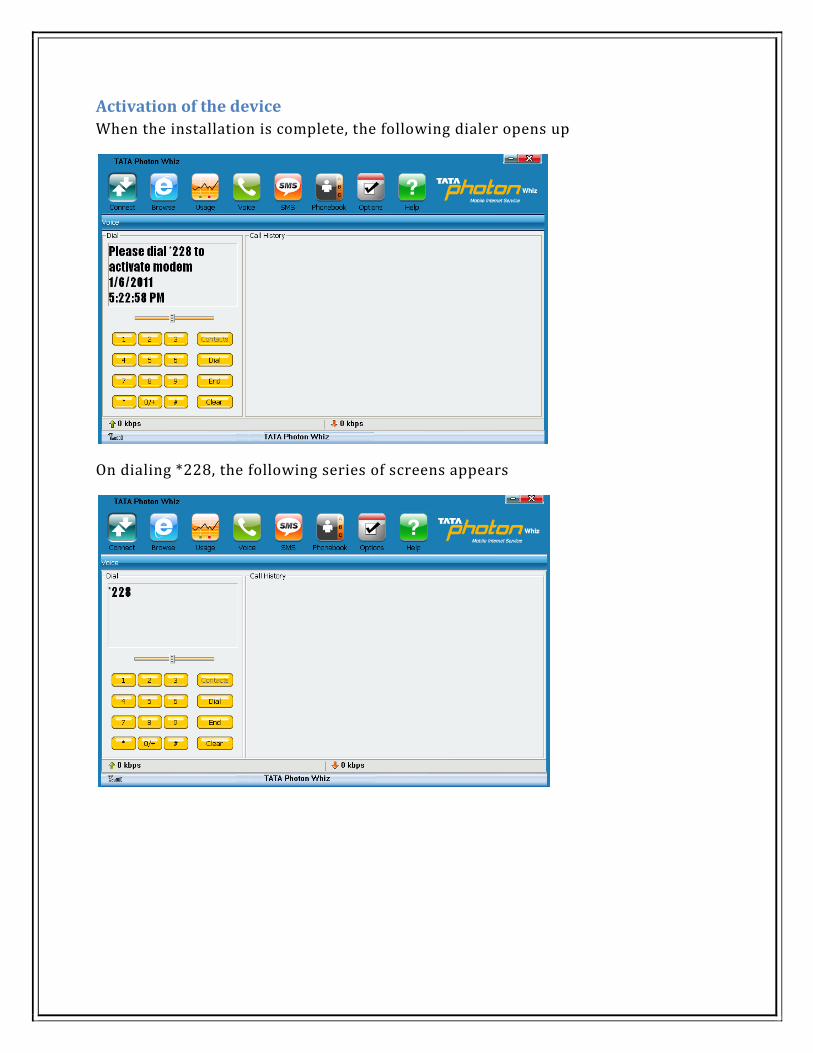
Activation of the device
When the installation is complete, the following dialer opens up
On dialing *228, the following series of screens appears
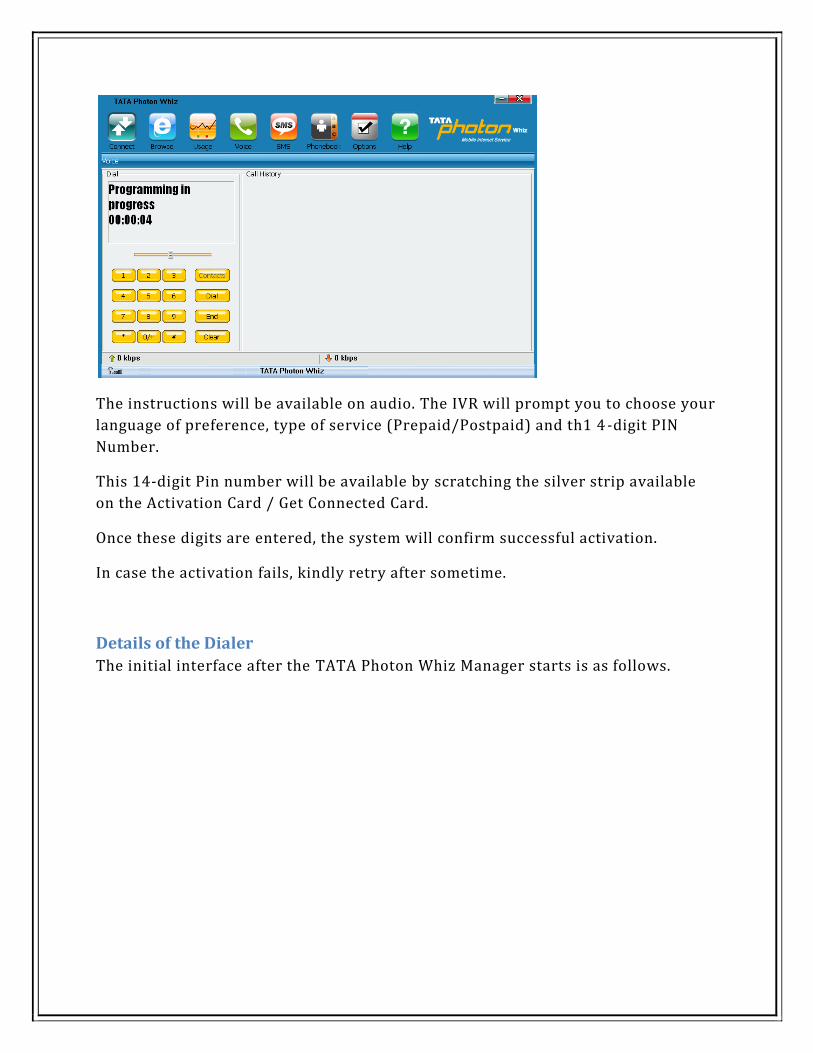
The instructions will be available on audio. The IVR will prompt you to choose your
language of preference, type of service (Prepaid/Postpaid) and th1 4-digit PIN
Number.
This 14-digit Pin number will be available by scratching the silver strip available
on the Activation Card / Get Connected Card.
Once these digits are entered, the system will confirm successful activation.
In case the activation fails, kindly retry after sometime.
Details of the Dialer
The initial interface after the TATA Photon Whiz Manager starts is as follows.
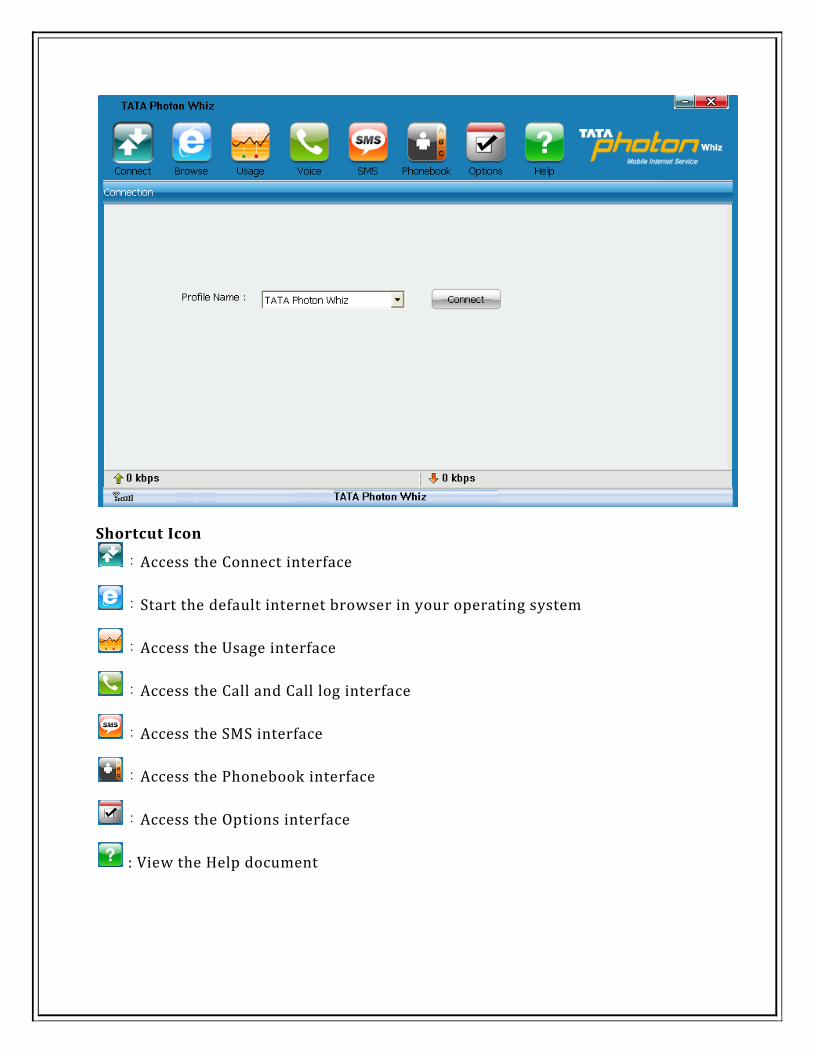
Shortcut Icon
:Access the Connect interface
:Start the default internet browser in your operating system
:Access the Usage interface
:Access the Call and Call log interface
:Access the SMS interface
:Access the Phonebook interface
:Access the Options interface
: View the Help document
Internet Service
Click to display the Connect interface. 1. Choose a profile and click <Connect> to set up a connection;
2. When the connection is set up, click or start the browser on your computer, and then you can access the internet;
3. Click <Disconnect> to disconnect from the network.
Usage Service
Click and access the Usage interface. You can view the content of the statistics, including sent and received statistic values and the duration of the connection.
You can select the operation you need. The operation options are: Reset statistics, Expand all, Collapse all, view net log.
Reset statistics Clear the statistical information
Expand all Start all of the data
Collapse all Close all data
View net log View the information of the network
Note: The above data of the statistic is for your reference only.
Call Service
When you use call service, you need to insert the earphone to the earphone jack on the USB Modem.
Click to display the Voice Call and History interface.
Make a call
The TATA Photon Whiz provides many easy and quick ways to make a call.
Entering a telephone number directly
You can make a call by entering a telephone number directly.
1. Click the telephone keypad on the call interface; 2. Click <Dial> to make a call; 3. Click <End> to hang up.
Note:·You can press <Clear> to delete number on the call interface digit by digit. ·You can press and hold <Clear> to clear the whole number.
Selecting a telephone number in the phonebook
You can make a call by selecting a telephone number in the phonebook.
1. Click <Contacts> and the phonebook interface is displayed. Double-click a contact or select a contact and then click <Dial>. · If there is only one number in the selected contact, then the number is displayed on call interface and dial out.
· If two or more number(s) in the selected contact, double-click the selected number in the pop-up Select interface or click <OK> after selecting the number. The selected number is displayed on the call interface and dial out.
2. Click <End> to hang up.
Selecting a recently dialed number
You can make a call by selecting a number from the recently dialed number.
1. Click Dialed/Received/Missed , and click <Dial> after selecting the number. Then the number is dialed out.
2. Click <End> to hang up.
Answering a call
An alert window is displayed when there is an incoming call. You can choose the options as follows.
1. Click <Answer> to answer the call 2. Click <Reject> to reject the call
Volume Adjustment
You can adjust volume during the call.
Call History
The call history contains information about dialed, received and missed calls. Each kind of call supports up to 50 items.
Missed/Incoming/Outgoing calls
Click Missed / Incoming / Outgoing, and the Missed / Incoming / Outgoing calls interface is displayed.
Saving a number
1. Select an item and click <Save>; 2. The Select Position interface is displayed, and select the position you want to
save; 3. Click <OK>; 4. The New Contact interface is displayed. Enter required relevant information for
this contact. 5. Click <OK> to save the contact.
Deleting a call
You can delete one or more item(s) from the call history.
1. Select one or more item(s), click <Delete>;
2. Click <OK> to confirm.
Making a call
You can dial the number of the call history.
1. Select an item and click <Dial>; 2. The Dial interface is displayed, and the selected number appears automatically
on the interface, and dialed out at the same time.
Sending a message
You can send a message to the number of the call history.
1. Select any item and click <SMS>; 2. The TATA Photon Whiz automatically retrieves the number in the selected
items, and the Write SMS interface is displayed. 3. The retrieved numbers are automatically displayed in the blank field behind
the Contacts. Input the content for the message and click <Send>.SMS
Click to display the SMS interface.
Inbox The inbox stores messages you have received. It supports up to 500 messages. When the inbox is full and a new message is coming, the earliest message in the inbox is deleted automatically. Outbox The messages you have sent out are saved in the Outbox. Up to 500 messages can be stored in the Outbox. When the Outbox is full and an additional message is coming, the earliest message in the Outbox is deleted automatically. Draft The messages that you write on the Write SMS window, if saved, can be store d in the draft. Up to 500 messages can be stored in Draft. Archive The message you have moved from the inbox can be stored in the archive. Up to 500 messages can be stored in the Archive. Viewing a message
You can view a message in the Inbox/Outbox/Draft/Archive directly.
1. Click Inbox/Outbox/Draft/Archive to open and browser the Inbox/Outbox/Draft/Archive.
2. When there is a new message, you can see the alert window. Click < View> to view the message, Click <Cancel> to close the window.
Writing a new message
1. Click and the Write SMS interface is displayed; 2. Enter the telephone number(s) by one of the following ways:
· To enter one or more number directly: In the Contacts textbox, enter the numbers separated by semicolons”;”
· To select a number from the Contacts: Click <Contacts>. Select one or more contact(s) and click <OK>. Select the number to send a message in the pop-up dialog box and click <OK>.
3. Input the message. The maximum length of each message is 160 characters. 4. Click <Templates> to insert message template.
5. Click <Send> to send message.
After the message is sent successfully, it is automatically saved to the Outbox. If the message is sent unsuccessfully, the message is saved to Outbox.
Click <Save> to save message to the Draft. Click <Clear> to clear the message content. Click <Close> to close the window.
Note: · The TATA Photon Whiz supports to send a message to a group of up to 40 numbers.
· When your message contains no more than 160 characters, it is sent as one message. If this limit is exceeded, the message is divided to several messages and sent one by one.
Replying a message
You can reply to a message directly in the inbox.
1. Select a message and click ; 2. The telephone number of the original sender appears automatically in the blank filed behind <Contacts> and you can change it; 3. Input the content for the message to reply; 4. Click <Send> to reply a message. Forwarding a message
In Inbox/Outbox, you can forward a message to other contacts. 1. Select a message and click ; 2. Input the telephone number to forward to, or click <Contacts> to select the number; 3. The content of the message to forward displays automatically in the text box. You can edit it. 4. Click <Send> to forward a message. Deleting a message
In inbox/outbox/draft/Archive, you can delete a message.
1. Select one or more message(s) and click ; 2. Click <OK> to confirm. Extracting a number
You can save the number of a message to the phonebook.
1. Select a message and click ; 2. The Select Number interface is displayed, select the number and click <OK>; 3. The Select Position interface is displayed, select the position and click < OK>; 4. Input the required information of this number; 5. Click <OK>. Searching a message
The TATA Photon Whiz provides the function of searching a message in the SMS.
1. Enter relevant searching term in the text box, and click ; 2. The message that matches the condition specified will be shown on the screen. Making a call You can call back the number of a message sender.
1. Select a message and click .; 2. The Dial interface is displayed. The number of the message sender is displayed and dialed out automatically at the same time. Editing a message In Outbox/Draft, you can edit a message.
1. Select a message and click ;
2. Change the information and click <Send> or <Save>.
Archiving a message
In Inbox, you can archive a message.
1. Select a message and click ; 2. You can archive a message in the Inbox to the Archive.
Resuming a message
1. Select a message and click ; 2. You can resume a message in the Archive to the Inbox.
Transferring a message between PC and USB Modem
You can import the message saved in the PC and USB Modem from one to another.
1. Click and the Transfer SMS interface is displayed; 2. Select the source location and target location in the drop -down box; 3. Select an operation mode:
<Copy> : The SMS in the source location is kept <Move> : The SMS in the source location is deleted
4. Select a message in the source location and click the below arrows:
Click : Transfer the SMS from the below side of the arrow to the above side of the arrow.
Click : Transfer the SMS from the above side of the arrow to the below side of the arrow.
VoiceMail
1. Click <Listen> to open the Voice dialogue box and receive the voicemail. If the <Listen> is blank, which means there is no voice mail.
2. Click <View last voice mail> to view the text message in last voice mail.
3. Click <Clear voice mail icon> to clear the information of the voice mail.
Phonebook Service The TATA Photon Whiz can store up to 500 contacts.
You can create, modify and delete the contacts. You can also send messages to the contacts. The TATA Photon Whiz also supports the import/export of the contacts for your convenience to manage the contacts.
Click to display the phonebook interface.
Creating a contact
1. Click and the Contact interface is displayed; 2. Select an image for the current entry and edit the information of the entry; 3. Click <OK> to save a new contact to the phonebook. Modifying a contact
1. Select a contact and click ; 2. Modify the relative information ; 3. Click <OK> to save. Deleting a contact
1. Select one or more contact(s) from the phonebook and click ; 2. Click <OK> to confirm. Grouping in the phonebook
1. Click and the Group interface is displayed; 2. Click <New> to create a new group;
Input the group name, and click <Edit Member> to add or delete the group member;
Click <OK> to save the group; Click <Cancel> to close the window.
3. Select the group name and click <Edit> to modify the information of this group; 4. Select the group name and click <Delete> to delete this group; 5. Click <Close> to close the window.
Searching a contact The TATA Photon Whiz provides the function of searching a contact in the phonebook.
1. Click and the Search Contact interface is displayed; 2. Enter relevant searching terms in the value text box to click <Search>; 3. Click <Ahead> or <Next> to scroll among the entries which have been found. Making a call You can dial out the number you have selected from the phonebook. 1. Select the contact that contains the number to dial from the phonebook, and
click . If the selected contact contains only one telephone number, the dial interface is displayed automatically. If two or more telephone numbers are contained in the selected contact, the Select number interface is displayed and you are prompted to select one number. After doing that, click <OK> and the dial interface is displayed. The selected number is appears on the dial interface automatically and dialed out automatically at the same time.
Sending a message The TATA Photon Whiz allows you to select a number from the phonebook and send a message.
1. Select a contact from the phonebook;
2. Click and the Write SMS interface is displayed; 3. The Name or number appears in the blank field behind the <Contacts>. Input
the content for the message and Click <Send>. Transferring a contact between PC and USB Modem
You can import the contacts saved in the PC and USB Modem from one to another.
1. Click and the Transfer Dialog is displayed; 2. Select the source location and target location in the drop -down box; 3. You can do follows: <Copy Some>: Copy the selected phonebook entries to the target location; <Move Some>: Move the selected phonebook entries from the source
location to the target location; <Copy All>: Copy all phonebook entries of the source location to the target
location; <Move All>: Move all phonebook entries of the source location to the target
location. Importing a contact
The TATA Photon Whiz allows you to import the contacts from a file in a specified format to the USB Modem contacts. The TATA Photon Whiz supports for importing of the *.csv and *.vcf files.
1. Select “Import PB” option by clicking the right key of the mouse; 2. Select the importing mode; 3. Click <OK> to load the contact to the phonebook.
Exporting a contact
The TATA Photon Whiz allows you to export the contacts from the USB Modem contacts to a file.
1. Select “Export PB” option by clicking the right key of the mouse; 2. Select the desired file format (*csv / *.vcf.); 3. Click <Save> to finish.
Options
Click to display the Options interface.
Text Message Setting
Priority Select the priority level for sending a message.
Validity Period In the period of validity, the message center will repeat to deliver a message till it is received.
Delivery Report You can enable or disable this function. If the function is enabled, after you send a message, the network can send a message to inform you that the receiver has got the message you have sent.
Defer Delivery Select the time for sending a message.
Voice mailbox number Enter the voice mailbox number in the editing box.
Alert Window Check the box, replace the last message automatically when inbox is full; Check the box, and an alert window is displayed whenever a new message comes.
Alert tone If a sound file is selected, it plays on the earphone of TATA Photon Whiz whenever a new message comes. Click <Browse…> to select a sound file.
Click <Save> to save the settings.
Call Settings
Call settings provide you with the following functions: sound, call diverting, call waiting and call privacy.
Sound: If a sound file is selected, it plays on the earphone of TATA Photon Whiz whenever a call comes. Click <Browse…> to select a sound file.
Call diverting: This service enables you to divert some incoming calls to other preset numbers.
Call waiting: You can set enable or disable the call waiting.
Voice privacy: You can enable or disable the voice privacy.
Profile Setting
Creating a profile
1. Click <New> to open the New Profile dialogue box; 2. Enter a new profile name in the Profile Name field; 3. Enter required relevant information for the settings; 4. Click <Save> to finish. Deleting a profile 1. In the Profile Name field, select a profile to delete; 2. Click <Delete>. Modifying a profile 1. In the Profile Name field, select a profile to modify 2. Modify the relevant information for the settings; 3. Click <Save> to finish. Preference Setting Click <Preference> and the Password Confirm interface is displayed. You need to enter the password. The default password is 0000.
Startup Setting
You can set the Dialer to connect internet when program start up, start main window minimized and auto run when USB modem plug in.
Standby / Hibernate Setting
You can set TATA Photon Whiz Manager to prevent or allow standby / hibernate.
Dialer Lock
You can set dialer lock. Dialer lock only locks dialer in same PC.
International prefix
You can select automatic or manual to set the international prefix.
Usage Limit
1. Click <Usage limit> and the Usage Limit interface is displayed; 2. Enter required relevant information for the settings;
3. Click <OK> to save the settings. Modify PWD 1. Click <Modify PWD> and the Modify Password interface is displayed; 2. Enter the current password and the new password, and click <OK> to modify it Diagnostics The TATA Photon Whiz allows you to query information for the USB Modem.
Help Document
Click to display the Help interface. The TATA Photon Whiz provides the function of viewing help document.
IINNSSTTAALLLLAATTIIOONN GGUUIIDDEE FFOORR MMAACC OOSS
Cm200Driver is compatible with Mac OS 10.4 and above version
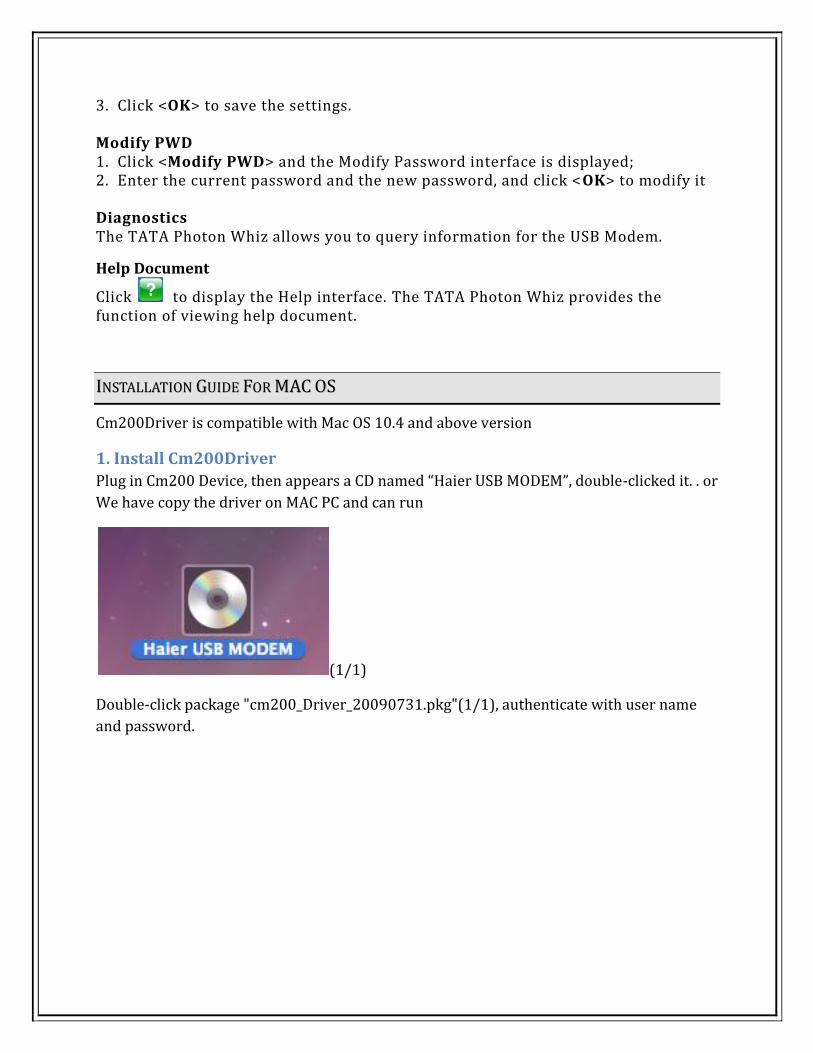
1. Install Cm200Driver
Plug in Cm200 Device, then appears a CD named “Haier USB MODEM”, double-clicked it. . or
We have copy the driver on MAC PC and can run
(1/1)
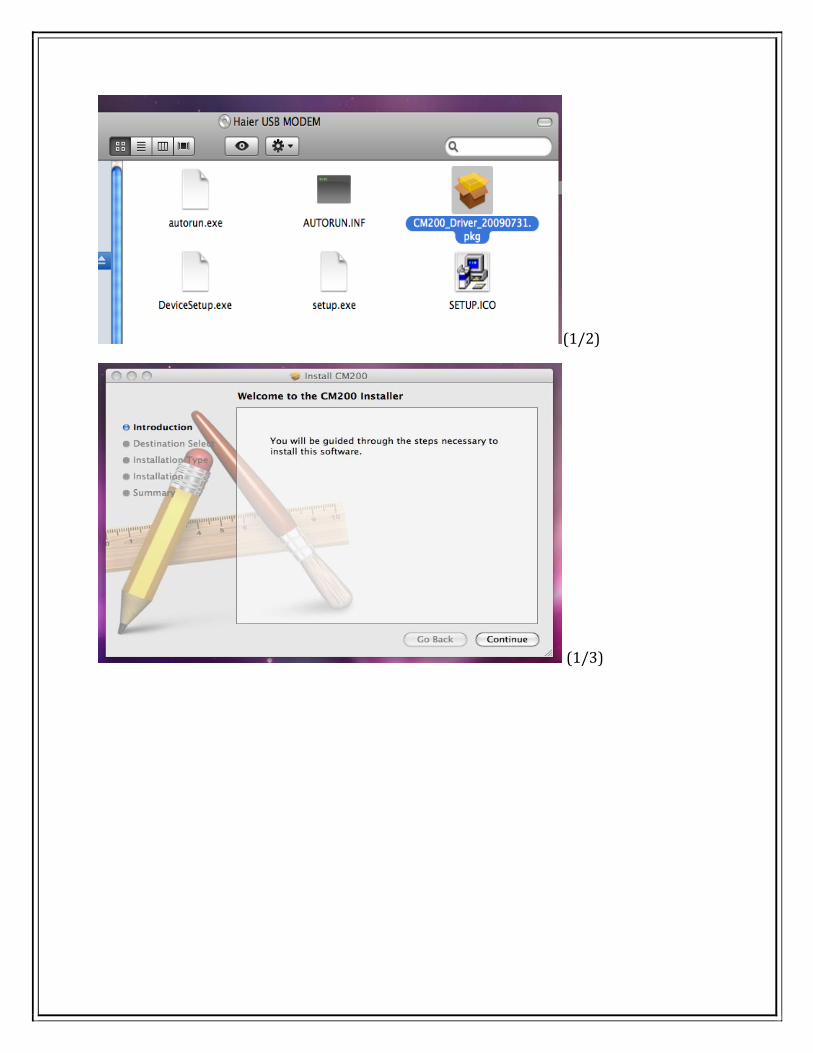
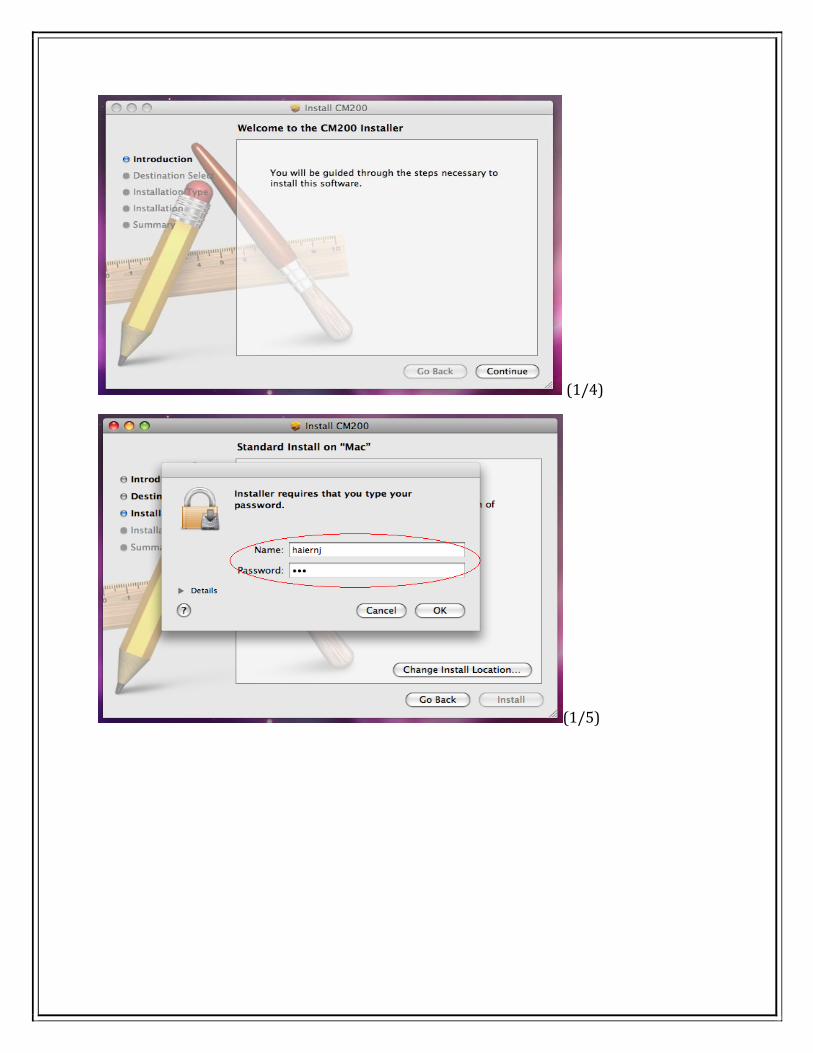
Double-click package "cm200_Driver_20090731.pkg"(1/1), authenticate with user name
and password.
(1/2)
(1/3)
(1/4)
(1/5)
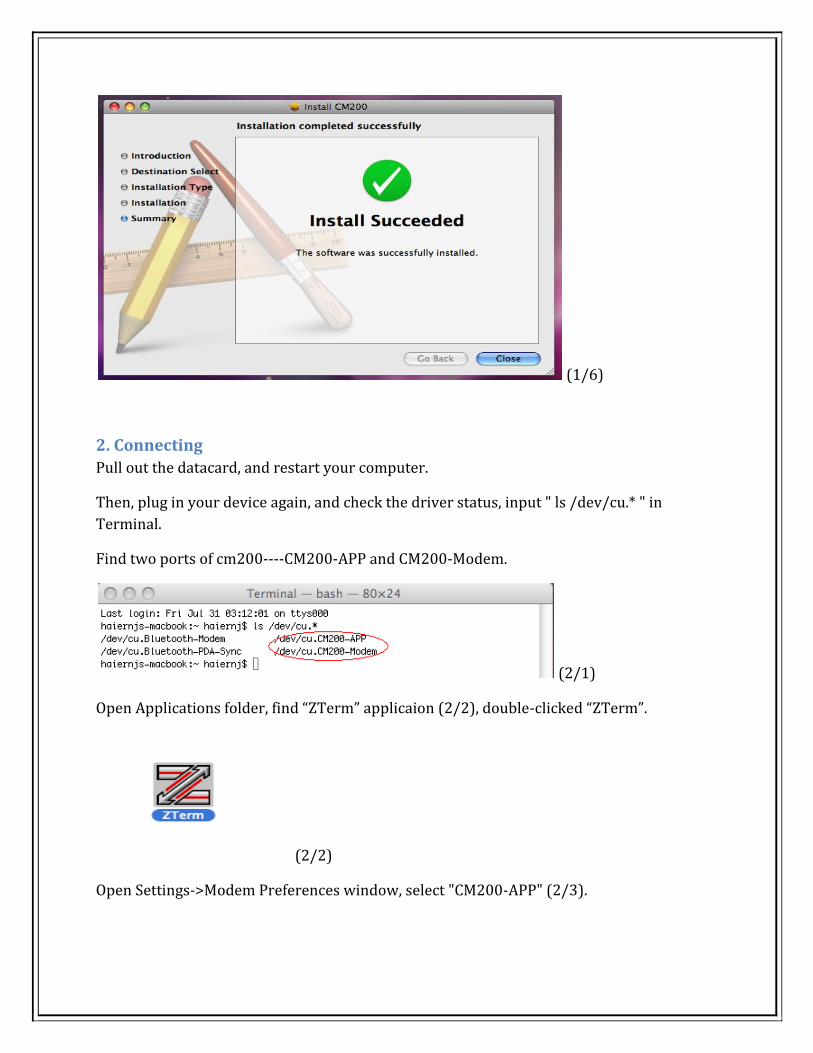
(1/6)
2. Connecting
Pull out the datacard, and restart your computer.
Then, plug in your device again, and check the driver status, input " ls /dev/cu.* " in
Terminal.
Find two ports of cm200----CM200-APP and CM200-Modem.
(2/1)
Open Applications folder, find “ZTerm” applicaion (2/2), double-clicked “ZTerm”.
(2/2)
Open Settings->Modem Preferences window, select "CM200-APP" (2/3).
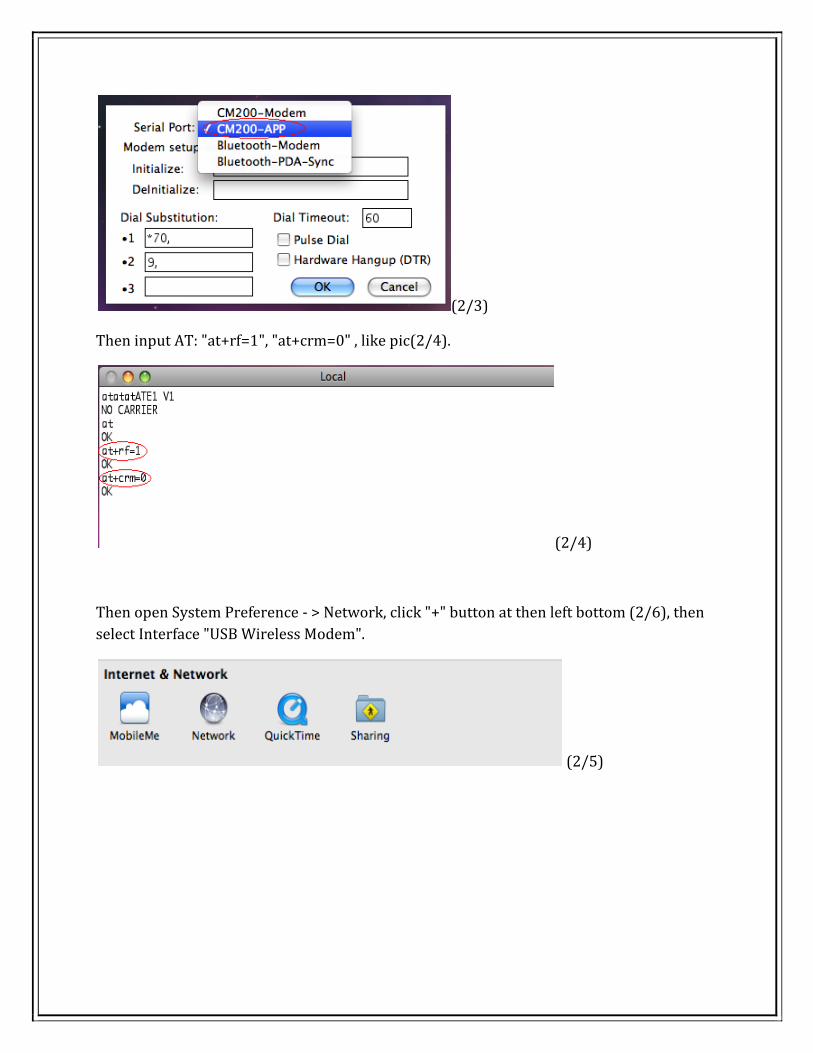
(2/3)
Then input AT: "at+rf=1", "at+crm=0" , like pic(2/4).
(2/4)
Then open System Preference - > Network, click "+" button at then left bottom (2/6), then
select Interface "USB Wireless Modem".
(2/5)
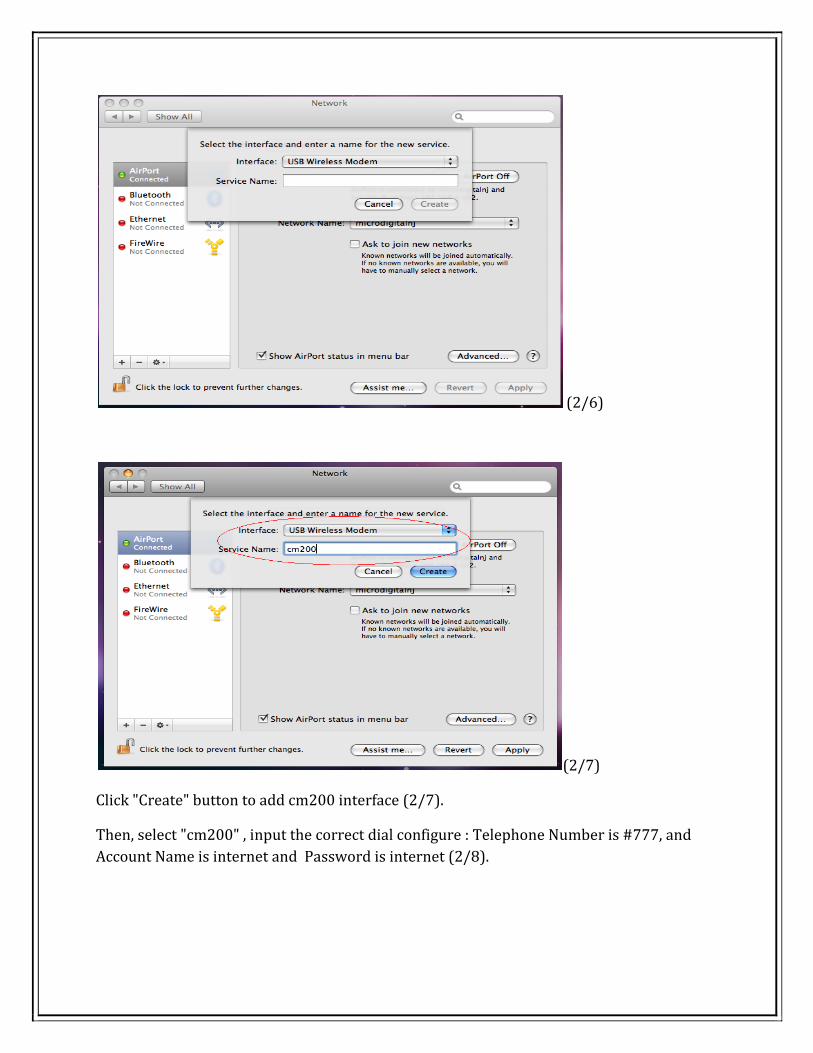
(2/6)
(2/7)
Click "Create" button to add cm200 interface (2/7).
Then, select "cm200" , input the correct dial configure : Telephone Number is #777, and
Account Name is internet and Password is internet (2/8).
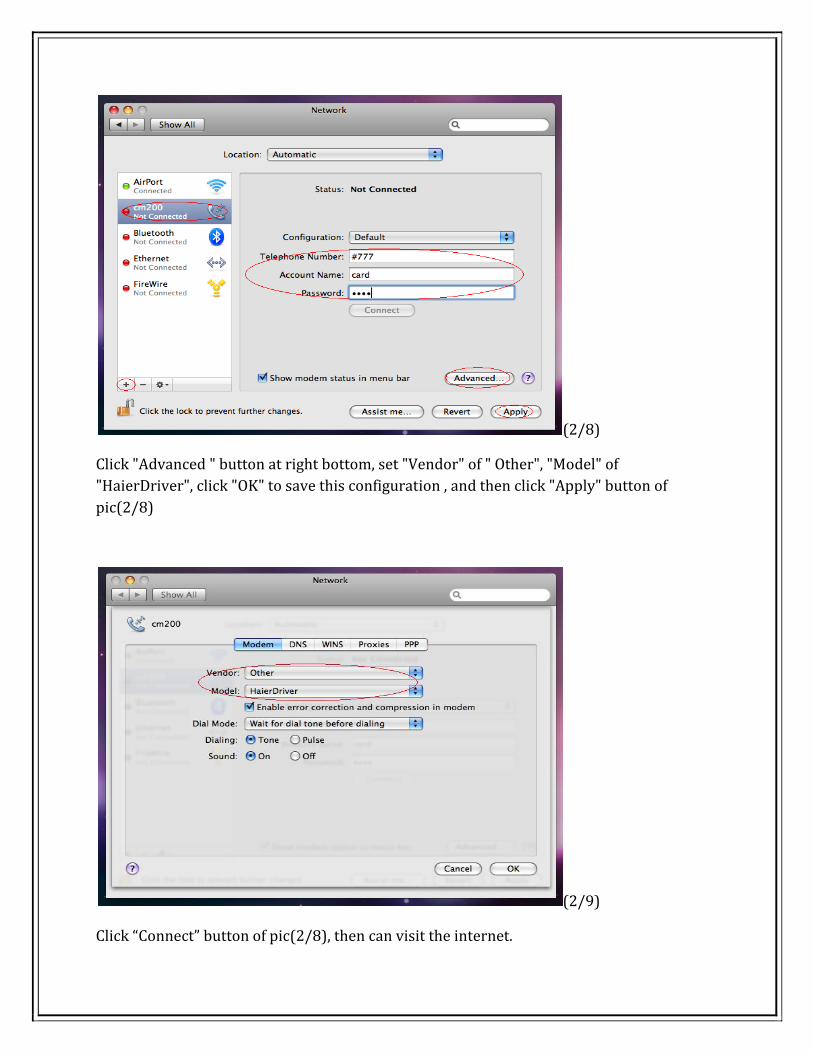
(2/8)
Click "Advanced " button at right bottom, set "Vendor" of " Other", "Model" of
"HaierDriver", click "OK" to save this configuration , and then click "Apply" button of
pic(2/8)
(2/9)
Click “Connect” button of pic(2/8), then can visit the internet.
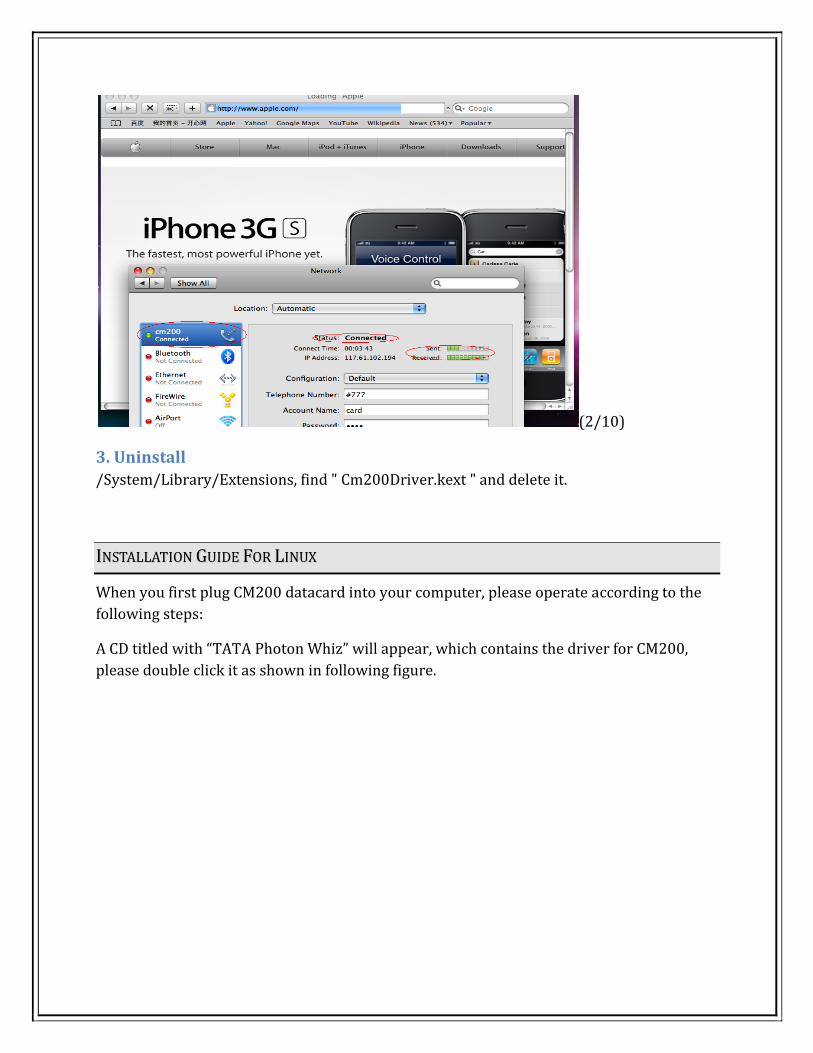
(2/10)
3. Uninstall
/System/Library/Extensions, find " Cm200Driver.kext " and delete it.
IINNSSTTAALLLLAATTIIOONN GGUUIIDDEE FFOORR LLIINNUUXX
When you first plug CM200 datacard into your computer, please operate according to the
following steps:
A CD titled with “TATA Photon Whiz” will appear, which contains the driver for CM200,
please double click it as shown in following figure.
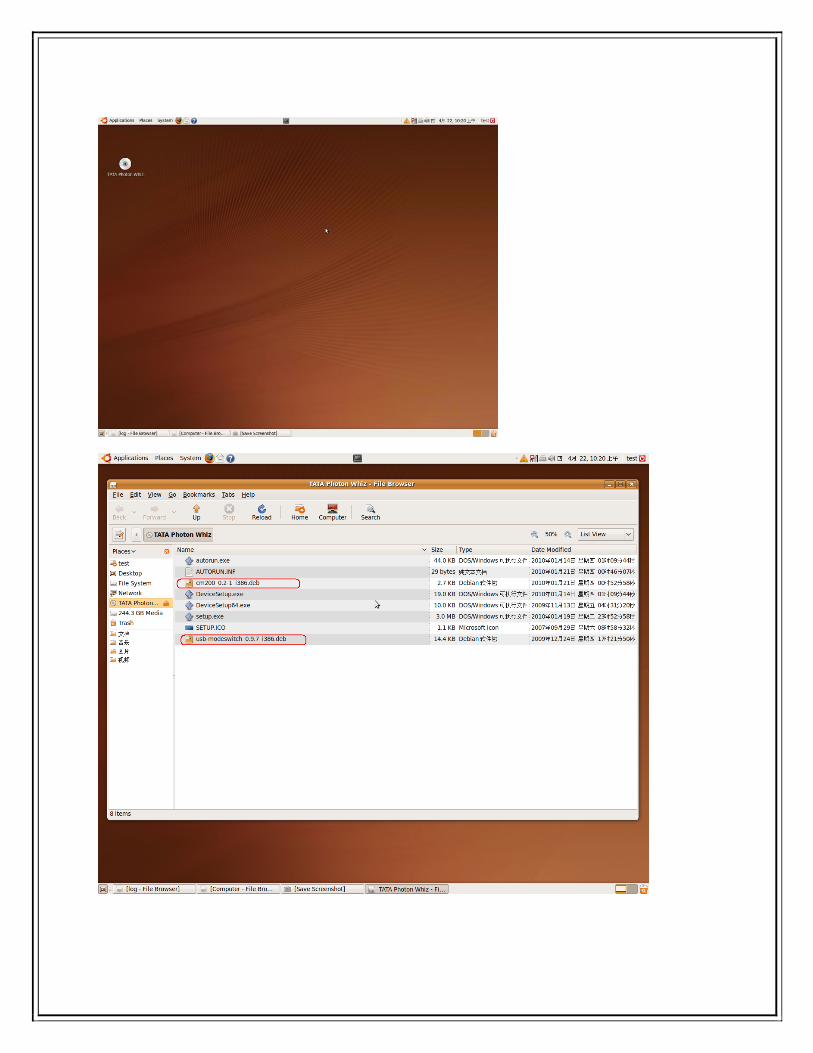
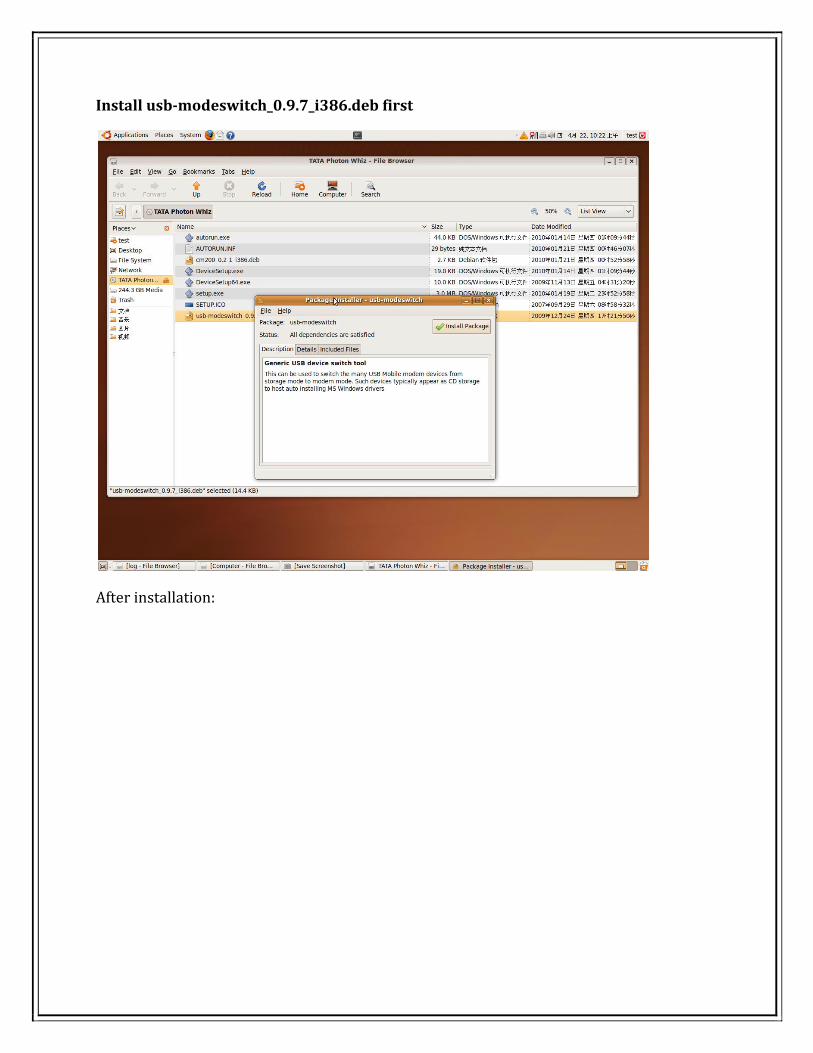
Install usb-modeswitch_0.9.7_i386.deb first
After installation:
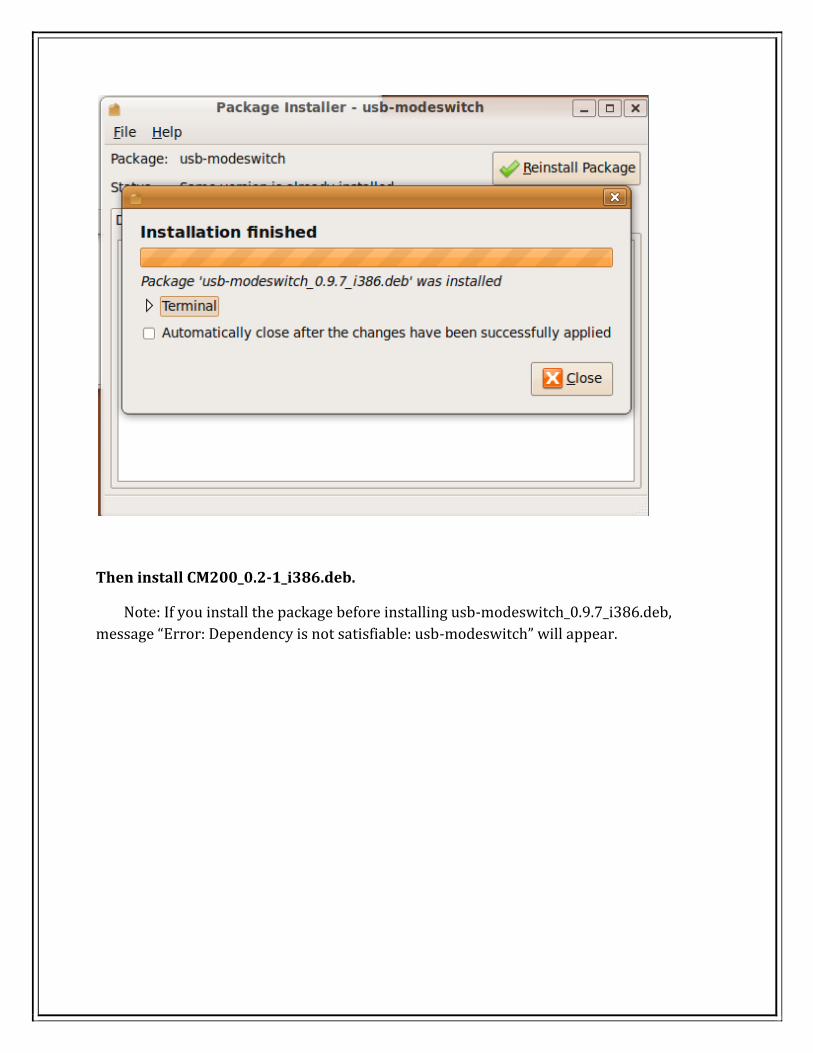
Then install CM200_0.2-1_i386.deb.
Note: If you install the package before installing usb-modeswitch_0.9.7_i386.deb,
message “Error: Dependency is not satisfiable: usb-modeswitch” will appear.
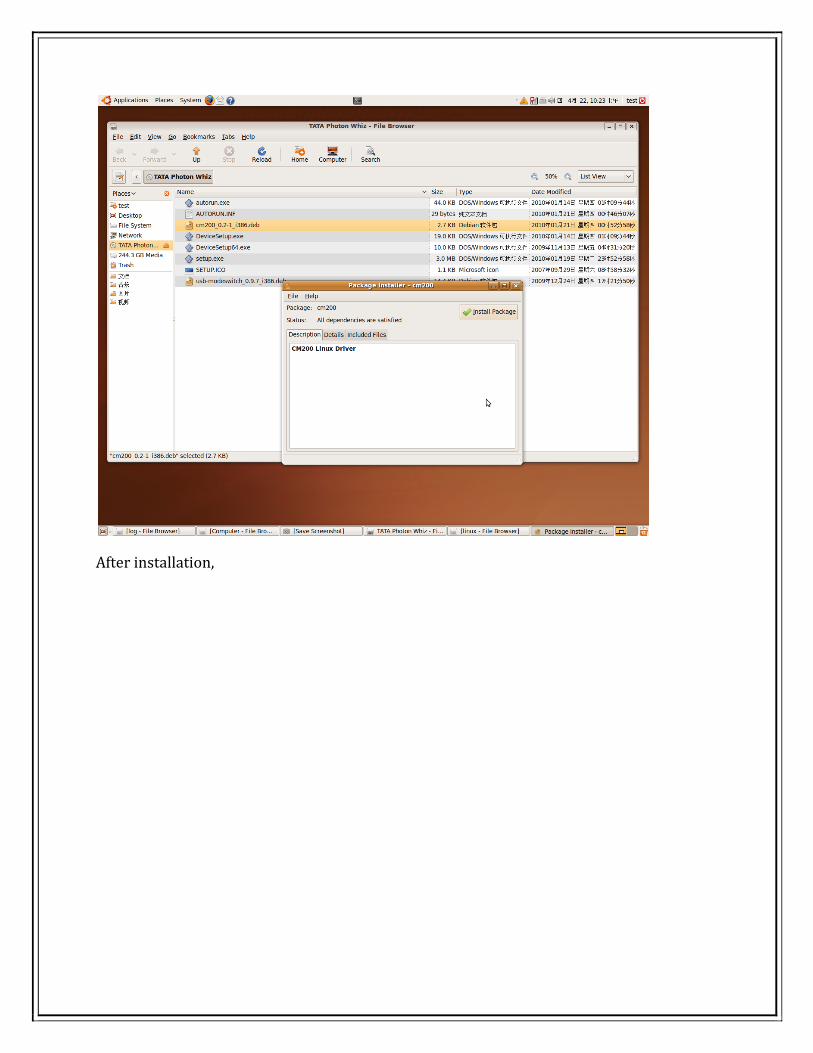
After installation,
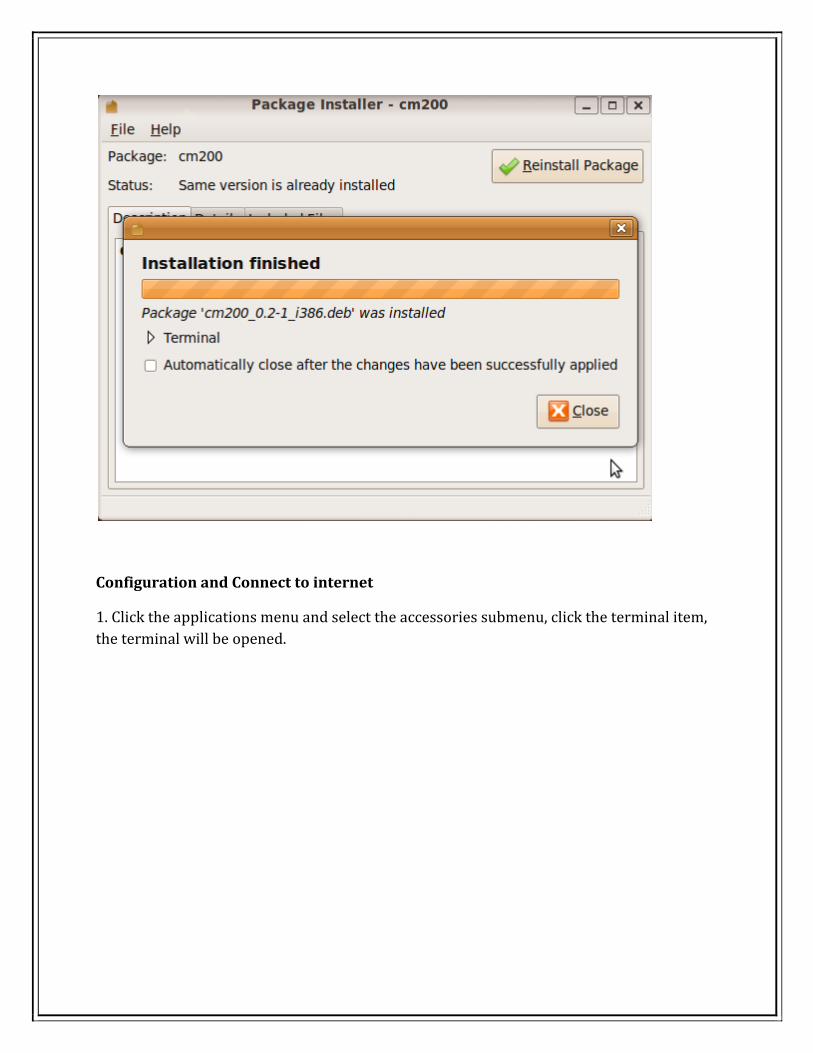
Configuration and Connect to internet
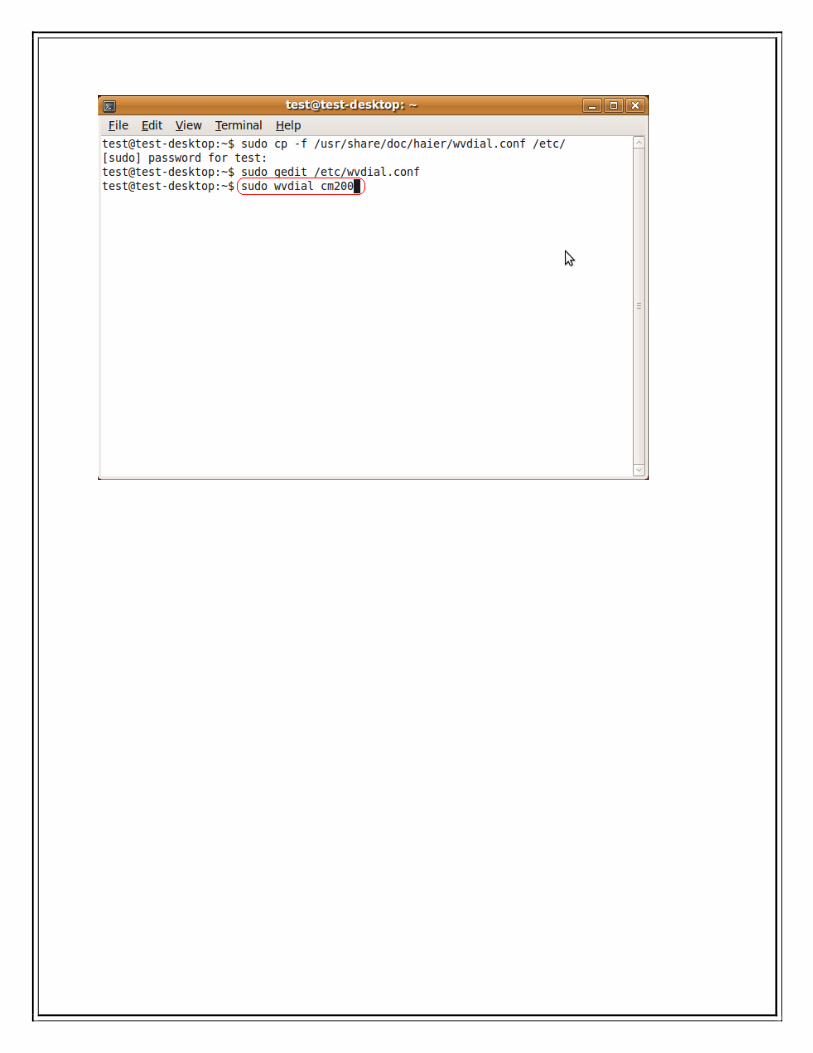
1. Click the applications menu and select the accessories submenu, click the terminal item,
the terminal will be opened.

2. Copy wvdial.config to /etc (enter the following command in terminal)
# sudo cp -f /usr/share/doc/haier/wvdial.conf /etc/
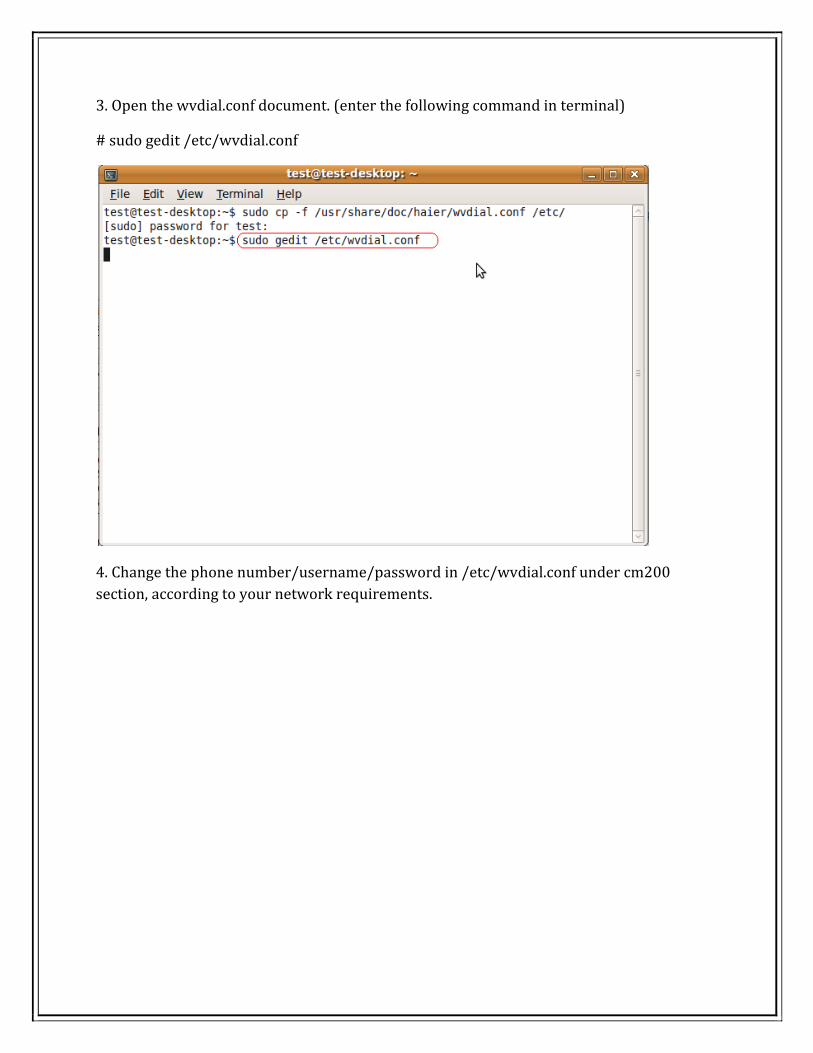
3. Open the wvdial.conf document. (enter the following command in terminal)
# sudo gedit /etc/wvdial.conf
4. Change the phone number/username/password in /etc/wvdial.conf under cm200
section, according to your network requirements.
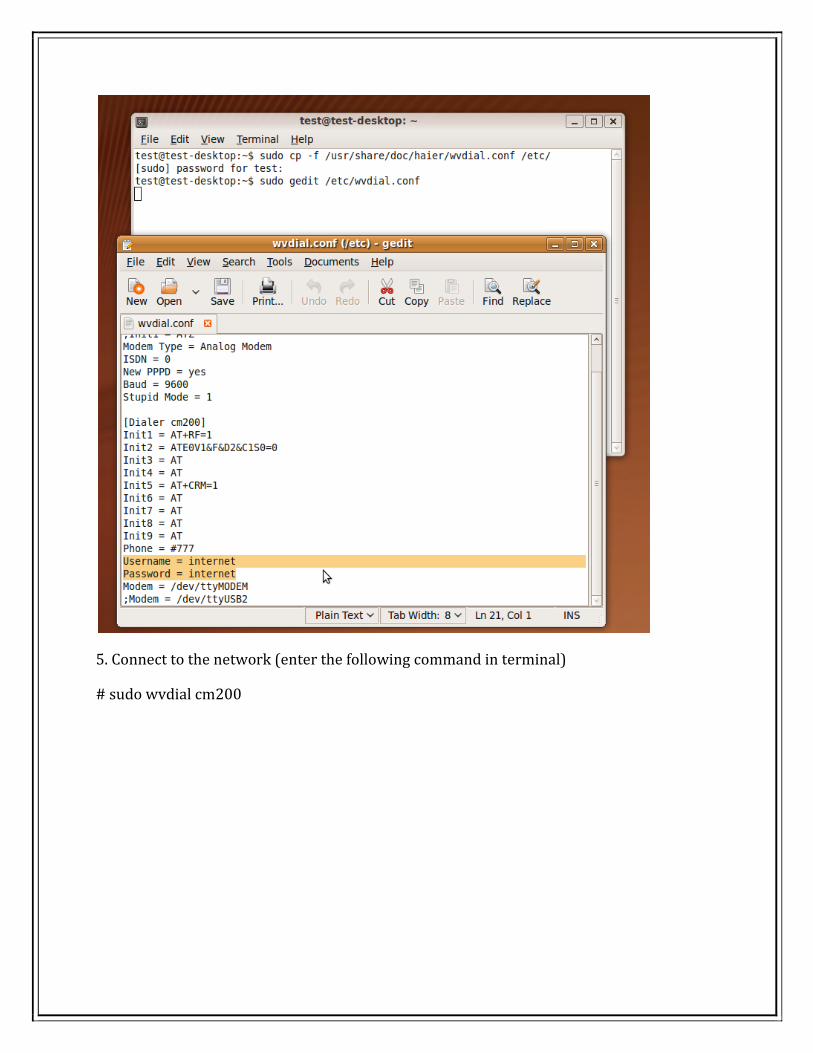
5. Connect to the network (enter the following command in terminal)
# sudo wvdial cm200