ez lab system operating manual -...
TRANSCRIPT

EZ Lab System
Operating Manual
CHEMINSTRUMENTS
510 COMMERCIAL DRIVE
FAIRFIELD, OHIO 45014
(513) 860-1598
www.cheminstruments.com
Revision 3.2
August 25, 2014
2 | P a g e
CHEMINSTRUMENTS EZ Lab System Operating Manual
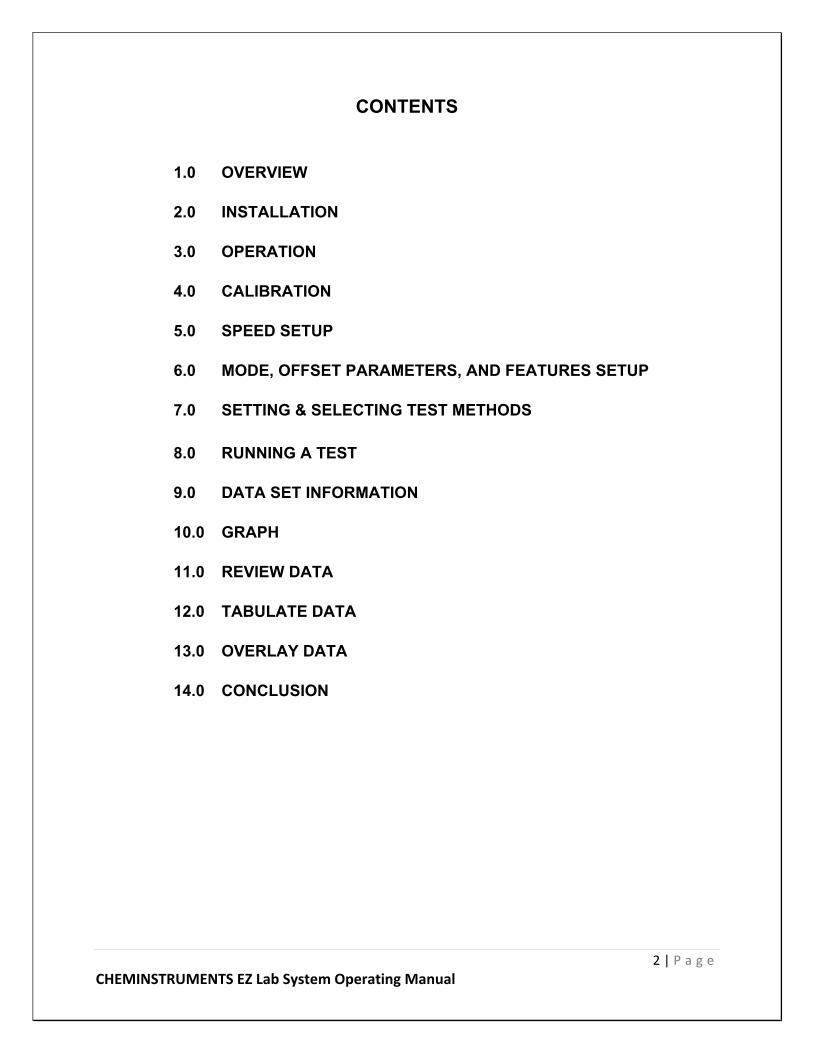
CONTENTS
1.0 OVERVIEW
2.0 INSTALLATION
3.0 OPERATION
4.0 CALIBRATION
5.0 SPEED SETUP
6.0 MODE, OFFSET PARAMETERS, AND FEATURES SETUP
7.0 SETTING & SELECTING TEST METHODS
8.0 RUNNING A TEST
9.0 DATA SET INFORMATION
10.0 GRAPH
11.0 REVIEW DATA
12.0 TABULATE DATA
13.0 OVERLAY DATA
14.0 CONCLUSION

3 | P a g e
CHEMINSTRUMENTS EZ Lab System Operating Manual
1.0 OVERVIEW
The EZ Lab System software is designed to enhance your model 1000 or 1100 ChemInstruments test platforms. This document describes how to use the EZ Lab System. Should you have any problems or questions, please contact ChemInstruments at 513-860-1598, or email us at [email protected].
2.0 INSTALLATION
1. Insert the EZ Lab USB flash drive into the computer. 2. Run the EZLabvXX-setup.exe file from the flash drive. XX represents the
version number of the software. 3. Follow the on-screen instructions to complete the software installation. 4. The installation should have installed an “EZ Data Lab – 1000” program group
and desktop icon on your computer. 5. It will also create a folder on your C: drive named EZ Lab. The EZ Lab System
requires this folder and its sub-folders in order to operate correctly. Please do not delete.
6. Connect the provided RS232 serial cable from the test platform’s RS232 connector to the appropriate COM port on your computer.
3.0 OPERATION
1. Open the EZ Lab System program to display the Main Screen as shown in Figure 1 – Main Screen.
2. Select the appropriate test platform button to activate the program. The operating screen will appear on your display as shown in Figure 2 – Operating Screen.
The Operating Screen is designed to provide all the necessary instructions on your computer screen. However, the following information will provide some additional insight. Not all of the features mentioned are available with every model test platform.
The Operating Screen is divided into 3 sections. The left and right sections are titled “Setup”. Setup includes calibration of the load cell, choosing the units of measure, setting test speed, selecting the test mode and associated features when available.
The center section, titled “Run Test”, is for running a test, status messages, and setting the “Test Parameters” associated with the selected test method.

4 | P a g e
CHEMINSTRUMENTS EZ Lab System Operating Manual
Figure 1 – Main Screen
Figure 2 – Operating Screen

5 | P a g e
CHEMINSTRUMENTS EZ Lab System Operating Manual
4.0 CALIBRATION
In order for the load cell to measure forces correctly, it is necessary to calibrate the system. The following procedure describes the calibration process.
1. Select the “CALIBRATE” button in the Setup section of the Operating Screen. 2. Follow the on-screen instructions exactly. (See Figure 3 – Calibration Screens) 3. Grams are the unit of measure for the calibration process. 4. The calibration process requires 2 known weights – a lighter weight and a heavier
weight. The lighter weight can be no weight at all. 5. Make sure to hang the appropriate weight on the load cell grip when entering the low
and high calibration values. 6. Make sure that the weight is not moving before pressing “Next” or “Finish”. 7. Verify the calibration by hanging some other known weight on the load cell grip and
checking the display in the “Current Load” field.
Figure 3 – Calibration Screens
5.0 SPEED SETUP
The test speed on some of the test platforms can be selected. The following procedure describes the process of setting the test speed.
1. Select the “CHANGE SPEED” or “Parameter Change” button on the Operating Screen.
2. Follow the on-screen instructions. Figure 4 shows a few examples of how to change the speed of a test platform.

6 | P a g e
CHEMINSTRUMENTS EZ Lab System Operating Manual
Figure 4 – Speed and Parameter Setup Screens
6.0 MODE, OFFSET PARAMETERS, AND FEATURES SETUP
Some test platforms have multiple modes of operation, offset parameters, and/or special features that can be selected. Some of the special features include normalize test, auto return, break, and tension relief. The special features selections are contained on the Operating Screen as shown in Figure 2 – Operating Screens. Modes of operation and offset parameters are selected in the “Parameter Change” screen as shown in Figure 4.
Refer to the specific test platform’s operating manual for the details on the features available for a particular test platform.
7 | P a g e
CHEMINSTRUMENTS EZ Lab System Operating Manual
7.0 SETTING & SELECTING TEST METHODS
Individual test parameters must be selected for each test that is to be conducted. These parameters can be saved as a unique test method. This test method can then be accessed at any time by identifying and selecting it for use at a later time. These saved test methods assure consistent and repeatable machine operation from one test and operator to the next. The following procedure explains how to use the Test Methods feature of EZ Lab.
Note: Not all test platforms and their programs provide the ability to save Test Method Parameters.
1. Select the “Test Method Change” button on the Operating Screen. (See Figure 2 – Operating Screen)
2. You will now see the Test Methods screen which allows the user to either select an existing test method or create a new test method. (See Figure 5 – Test Methods Screen)
To create a new test method:
1. Select the “New” button. This will open the Test Method Change screen. (See Figure 6 – Test Method Change Screen)
2. Enter all parameter values for the test method. Be sure to provide a unique name for the test method.
3. Click on the “OK” button to save the test method for future use.
To select an existing test method:
1. Highlight a test method in the list and press the “Select” button. 2. The parameters from the selected test method will be programmed into the
machine.
The “Delete” button will delete the highlighted test method.
The “Delete All” button will delete all created test methods.

8 | P a g e
CHEMINSTRUMENTS EZ Lab System Operating Manual
Figure 5 – Test Methods Screen
Figure 6 – Test Method Change Screen
9 | P a g e
CHEMINSTRUMENTS EZ Lab System Operating Manual
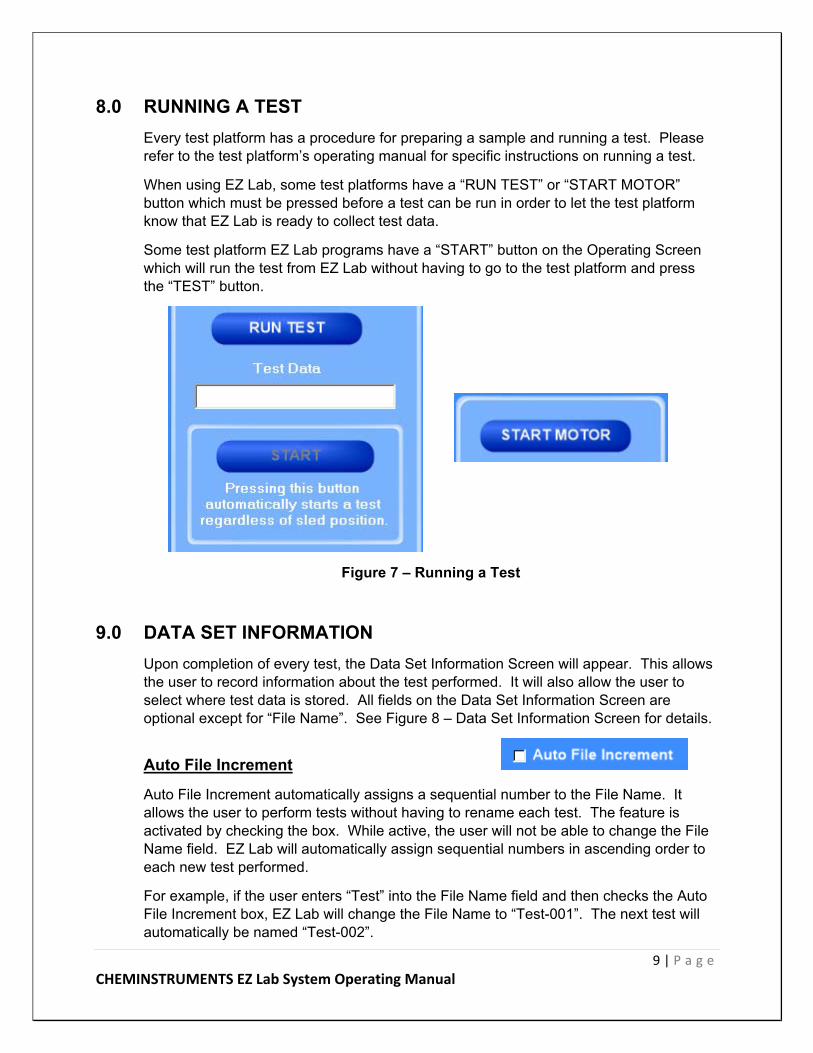
8.0 RUNNING A TEST
Every test platform has a procedure for preparing a sample and running a test. Please refer to the test platform’s operating manual for specific instructions on running a test.
When using EZ Lab, some test platforms have a “RUN TEST” or “START MOTOR” button which must be pressed before a test can be run in order to let the test platform know that EZ Lab is ready to collect test data.
Some test platform EZ Lab programs have a “START” button on the Operating Screen which will run the test from EZ Lab without having to go to the test platform and press the “TEST” button.
Figure 7 – Running a Test
9.0 DATA SET INFORMATION
Upon completion of every test, the Data Set Information Screen will appear. This allows the user to record information about the test performed. It will also allow the user to select where test data is stored. All fields on the Data Set Information Screen are optional except for “File Name”. See Figure 8 – Data Set Information Screen for details.
Auto File Increment
Auto File Increment automatically assigns a sequential number to the File Name. It allows the user to perform tests without having to rename each test. The feature is activated by checking the box. While active, the user will not be able to change the File Name field. EZ Lab will automatically assign sequential numbers in ascending order to each new test performed.
For example, if the user enters “Test” into the File Name field and then checks the Auto File Increment box, EZ Lab will change the File Name to “Test-001”. The next test will automatically be named “Test-002”.

10 | P a g e
CHEMINSTRUMENTS EZ Lab System Operating Manual
Figure 8 – Data Set Information Screen
Normalize Sample
Normalize Sample allows you to record the width of the sample being tested. It is the value that the “Normalize Test” feature uses to calculate force per width. When the graph is displayed, you will notice the y-axis being labeled, “Force/Width”, as shown in Figure 9. The graphed test data will be altered based on the entered sample width. The saved test data file contains the actual measured forces. If the “Normalize Test” feature is disabled and the graph is displayed again, the y-axis will display “Force” values.
11 | P a g e
CHEMINSTRUMENTS EZ Lab System Operating Manual
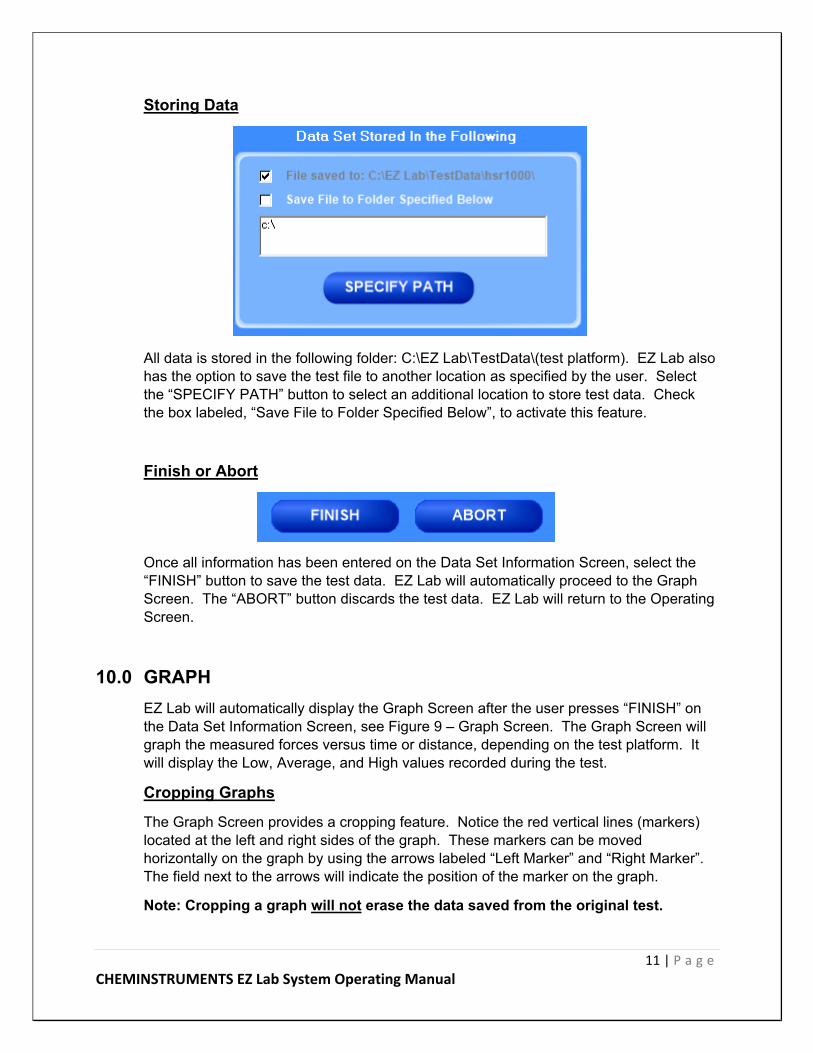
Storing Data
All data is stored in the following folder: C:\EZ Lab\TestData\(test platform). EZ Lab also has the option to save the test file to another location as specified by the user. Select the “SPECIFY PATH” button to select an additional location to store test data. Check the box labeled, “Save File to Folder Specified Below”, to activate this feature.
Finish or Abort
Once all information has been entered on the Data Set Information Screen, select the “FINISH” button to save the test data. EZ Lab will automatically proceed to the Graph Screen. The “ABORT” button discards the test data. EZ Lab will return to the Operating Screen.
10.0 GRAPH
EZ Lab will automatically display the Graph Screen after the user presses “FINISH” on the Data Set Information Screen, see Figure 9 – Graph Screen. The Graph Screen will graph the measured forces versus time or distance, depending on the test platform. It will display the Low, Average, and High values recorded during the test.
Cropping Graphs
The Graph Screen provides a cropping feature. Notice the red vertical lines (markers) located at the left and right sides of the graph. These markers can be moved horizontally on the graph by using the arrows labeled “Left Marker” and “Right Marker”. The field next to the arrows will indicate the position of the marker on the graph.
Note: Cropping a graph will not erase the data saved from the original test.

12 | P a g e
CHEMINSTRUMENTS EZ Lab System Operating Manual
Figure 9 – Graph Screen
Figure 10 – Graph Screen after Cropping

13 | P a g e
CHEMINSTRUMENTS EZ Lab System Operating Manual
Procedure for cropping a graph:
1. Using the arrows, move the left and right markers to the desired location. 2. Select the “RECALCULATE” button to crop the graph. This will change the data
displayed on the graph page to reflect the data of the area inside the markers. The Low, Average, and High values will be updated to reflect the new graph.
3. After selecting “RECALCULATE”, 3 new items will appear on the Graph Screen, a check box labeled, “Save Markers” and 2 buttons labeled “BACK” and “SAVE”.
4. A graph can be recalculated up to 3 times.
Save Markers
EZ Lab records data from the entire test. The “Save Markers” feature will hold the place of the left and right marker for future tests. This will automatically crop all test performed while the feature is enabled. To enable this feature, check the box located next to “Save Markers”. To disable this feature, click the box again and the check mark will disappear. Turning this feature off will reset the left and right markers to the left and right sides of the graph. Future test will not be cropped automatically.
Back
The “BACK” button is used to undo the changes made to the graph when cropping the graph. “BACK” will only undo the last recalculation. When the user gets back to the original graph, the “BACK” button will disappear.
Save
The “SAVE” button will save the cropped data as a new file with the same “File Name” as the original but add the suffix “-RevA”. For example, “Test-001” becomes “Test-001-RevA”. Only one “-RevA” file per original test can be saved. Anytime the user selects the “SAVE” button, “-RevA” will be saved. If the “-RevA” already exists when the “SAVE” button is pressed, EZ Lab will prompt the user if they want to overwrite the existing file.
Auto Scale
The “AUTO SCALE” button will change the scale of the y-axis of the graph. This feature allows for an enhanced view of the graph. The name of the button will change to “FULL SCALE” after pressing “AUTO SCALE”. The “FULL SCALE” button will restore the graph back to the original scale of the y-axis.
14 | P a g e
CHEMINSTRUMENTS EZ Lab System Operating Manual
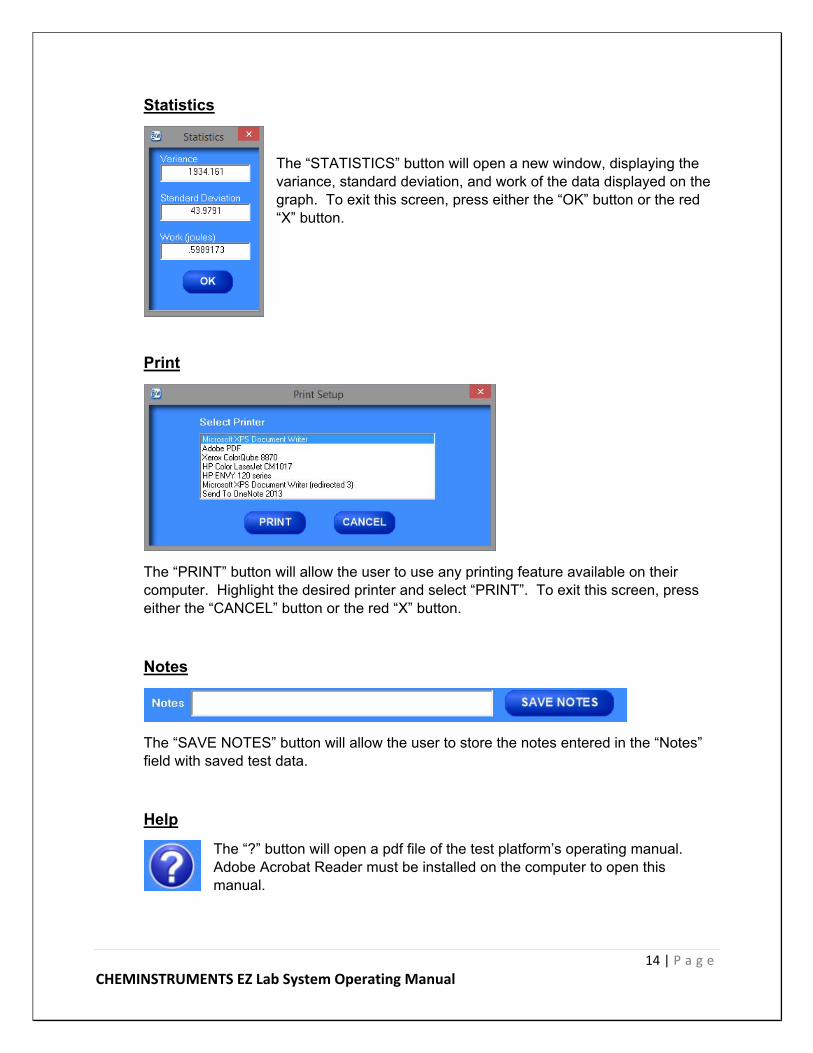
Statistics
The “STATISTICS” button will open a new window, displaying the variance, standard deviation, and work of the data displayed on the graph. To exit this screen, press either the “OK” button or the red “X” button.
The “PRINT” button will allow the user to use any printing feature available on their computer. Highlight the desired printer and select “PRINT”. To exit this screen, press either the “CANCEL” button or the red “X” button.
Notes
The “SAVE NOTES” button will allow the user to store the notes entered in the “Notes” field with saved test data.
Help
The “?” button will open a pdf file of the test platform’s operating manual. Adobe Acrobat Reader must be installed on the computer to open this manual.

15 | P a g e
CHEMINSTRUMENTS EZ Lab System Operating Manual
11.0 REVIEW DATA
The “REVIEW DATA” button is located on the Operating Screen. Review data will allow the user access to previously saved test data and graphs.
Figure 11 – Review Data Screen
Every time the Review Data Screen is accessed, the screen will automatically display the test data located in the C:\EZ Lab\TestData folder on the computer. The tests will be displayed in chronological order with the most recent test appearing at the top of the list. The grid will display the test’s filename, date and time test was performed, low, average, and high values recorded for the test. To access a test file, select the filename. With a test file selected, the filename will be highlighted and the user can view the graph, view file details, add to list, or delete the test.
Graph
The “GRAPH” button will access the Graph Screen as shown in Figure 9. For a description of the graph screen see section 10.0 of this document.

16 | P a g e
CHEMINSTRUMENTS EZ Lab System Operating Manual
File Details
The “FILE DETAILS” button will display all of the information entered in the Data Information Screen. It will also display the test speed, length of test, average, high, low, standard deviation, variance, work, and notes recorded for the test.
Figure 12 – File Details Screen
Delete
The “DELETE” button will permanently delete the selected test file.
Delete All
The “DELETE ALL” button will permanently delete all test files located in the EZ Lab test data folder for the test platform. For example, selecting “DELETE ALL” for the screen in Figure 11, all test data files in the HSR1000 directory would be deleted.

17 | P a g e
CHEMINSTRUMENTS EZ Lab System Operating Manual
Compile Data
In order to compile test data from multiple tests, the user must create a list of the test files to be compiled. To create a list, select a filename and select the “ADD TO LIST” button. The “REMOVE FROM LIST” button will remove the selected file from the list. The “CLEAR LIST” button will remove all files from the list.
Save To Excel
EZ Lab collects data throughout the entire test. This is done by collecting individual data points. These individual data points are used to compute the low, average, and high values displayed on the graph screen and review data screen. The “SAVE TO EXCEL” feature allows the user to create an excel file with a list of the individual data points. See Figure 13 for an example.
Figure 13 – Sample Excel File

18 | P a g e
CHEMINSTRUMENTS EZ Lab System Operating Manual
Tabulate Data
The “TABULATE DATA” button will create a table of data summarizing the average, high, low, standard deviation, variance, and work. See section 12.0 of this document for more information on the Tabulate Data Screen.
Overlay Data
The “OVERLAY DATA” button will create a single graph with test data taken from up to 5 different tests. See section 13.0 of this document for more information on the Overlay Data Screen.
Review Data from other folders
The Review Data Screen also has the ability to list tests from different locations. 1. Use the drop down list at the top of the screen, click on the arrow, and select “Select
files to export to excel, tabulate, or overlay graph”. See Figure 14 for an example.
2. Click on the button to open a “Browse for Folder” window. Select the folder and click “OK”.
3. There is the option to display individual data files, previously saved tabulate files (discussed in section 12.0), and previously save overlay files (discussed in section 13.0)
4. All of the buttons (Graph, File Details, Delete, etc) work exactly the same as previously discussed.
Figure 14 – Another Review Data Screen

19 | P a g e
CHEMINSTRUMENTS EZ Lab System Operating Manual
12.0 TABULATE DATA
The Tabulate Data Screen summarizes the data from a group of tests. It will calculate the average, standard deviation, and variance of the average, high, low, and work values computed during the tests. See Figure 15 for an example tabulate data screen.
Figure 15 – Tabulate Data Screen
Save List
The “SAVE LIST” button will save the table for easy recall at a later time. Follow the on-screen prompts to select a location to save and name the table. The following procedure will detail how to recall the saved tabulate list. 1. From the Review Data Screen, use the drop down list at the top of the screen, click
on the arrow, and select “Select files to export to excel, tabulate, or overlay graph”. 2. Select the option to “Display previously saved tabulate files”. 3. Select the file to tabulate, click “ADD TO LIST”, click “TABULATE DATA”.

20 | P a g e
CHEMINSTRUMENTS EZ Lab System Operating Manual
Save to Excel
The “SAVE TO EXCEL” button will save the table to Microsoft Excel in the same format as displayed on the screen. This allows the user to use any of Excel’s features to further analyze the test data. After selecting the “SAVE TO EXCEL” button, follow the on-screen prompts to select a location and filename to save.
The “PRINT” button will allow the user to print the table using any print feature available on the computer.
13.0 OVERLAY DATA
The Overlay Data Screen creates a single graph with test data taken from up to 5 different tests. See Figure 16 for an example overlay data screen.
The file names of the graphed tests will appear in the box labeled “Legend”. The file names are color coded to correspond with the colors of the graph.
Figure 16 – Overlay Data Screen

21 | P a g e
CHEMINSTRUMENTS EZ Lab System Operating Manual
Cropping Graphs
The Overlay Data Screen provides a cropping feature. Notice the red vertical lines (markers) located at the left and right sides of the graph. These markers can be moved horizontally on the graph by using the arrows labeled “Left Marker” and “Right Marker”. The field next to the arrows will indicate the position of the marker on the graph.
Note: Cropping a graph will not erase the data saved from the original test.
Procedure for cropping a graph:
1. Using the arrows, move the left and right markers to the desired location. 2. Select the “RECALCULATE” button to crop the graph. 3. After selecting “RECALCULATE”, a button labeled “BACK” will appear. 4. A graph can be recalculated up to 3 times. 5. The “BACK” button is used to undo the changes made to the graph when cropping
the graph. “BACK” will only undo the last recalculation. When the user gets back to the original graph, the “BACK” button will disappear.
Save
The “SAVE” button will save the overlay for easy recall at a later time. Follow the on-screen prompts to select a location to save and name the overlay. The following procedure will detail how to recall the saved overlay. 1. From the Review Data Screen, use the drop down list at the top of the screen, click
on the arrow, and select “Select files to export to excel, tabulate, or overlay graph”. 2. Select the option to “Display previously saved overlay files”. 3. Select the file to overlay, click “ADD TO LIST”, click “OVERLAY DATA”.
Stats
The “STATS” button will open a new window and display the average, high, low, standard deviation, variance, and work for the test files on the overlay graph.
The “PRINT” button will allow the user to print the table using any print feature available on the computer.
14.0 CONCLUSION This document has described how to use the EZ Lab System. Should you have any problems or questions, please contact ChemInstruments at 513-860-1598, or email us at [email protected].