explorer 4000dvb digital home communications terminal
TRANSCRIPT

Explorer® 4000DVBDigital HomeCommunicationsTerminal
User’s Installation Guide
2
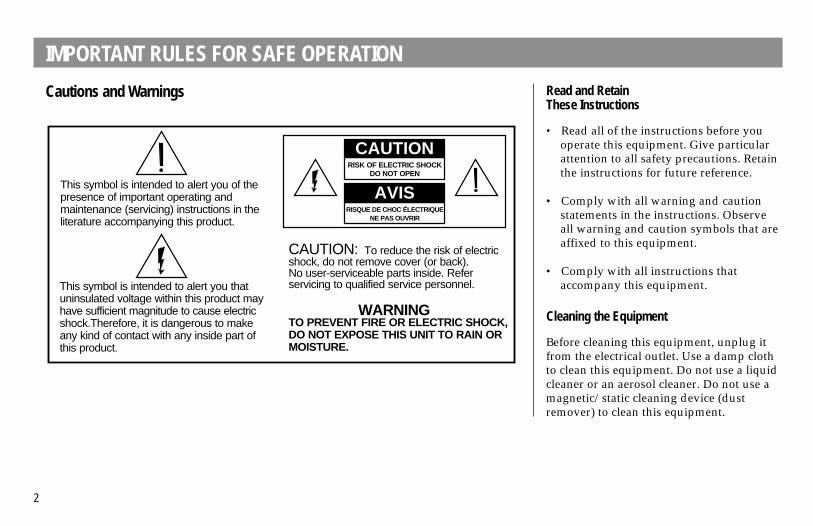
Cautions and Warnings
IMPORTANT RULES FOR SAFE OPERATION
These Instructions
• Read all of the instructions before youoperate this equipment. Give particularattention to all safety precautions. Retainthe instructions for future reference.
• Comply with all warning and cautionstatements in the instructions. Observeall warning and caution symbols that areaffixed to this equipment.
• Comply with all instructions thataccompany this equipment.
Cleaning the Equipment
Before cleaning this equipment, unplug itfrom the electrical outlet. Use a damp clothto clean this equipment. Do not use a liquidcleaner or an aerosol cleaner. Do not use amagnetic/static cleaning device (dustremover) to clean this equipment.
CAUTION: To reduce the risk of electricshock, do not remove cover (or back).No user-serviceable parts inside. Referservicing to qualified service personnel.
WARNINGTO PREVENT FIRE OR ELECTRIC SHOCK,DO NOT EXPOSE THIS UNIT TO RAIN ORMOISTURE.
CAUTIONRISK OF ELECTRIC SHOCK
DO NOT OPEN
AVISRISQUE DE CHOC ÉLECTRIQUE
NE PAS OUVRIR
This symbol is intended to alert you of thepresence of important operating and maintenance (servicing) instructions in the literature accompanying this product.
This symbol is intended to alert you that uninsulated voltage within this product mayhave sufficient magnitude to cause electric shock.Therefore, it is dangerous to make any kind of contact with any inside part of this product.
Read and Retain
3
WARNING:
Avoid electric shock and fire hazard. Never push objectsthrough the openings in this equipment. Objects can touchdangerous voltage points or cause electrical shorts that canresult in electric shock or fire.
AccessoriesDo not use accessories with this equipment unlessrecommended by your cable company.
Liquid or MoistureDo not expose this equipment to liquid or moisture. Do notplace this equipment on a wet surface. Do not spill liquids onor near this equipment.
ServicingDo not open the cover of this equipment. If you open thecover, your warranty will be void. Refer all servicing toqualified personnel only. Contact your cable company forinstructions.
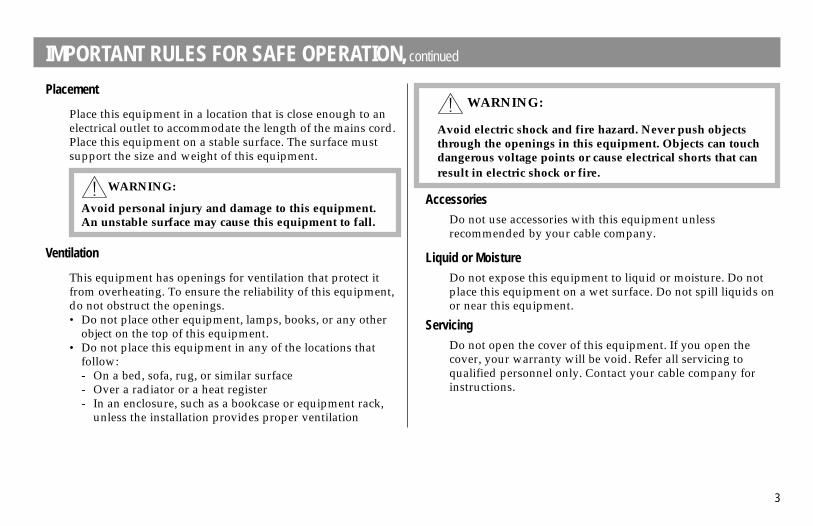
Placement
Place this equipment in a location that is close enough to anelectrical outlet to accommodate the length of the mains cord.Place this equipment on a stable surface. The surface mustsupport the size and weight of this equipment.
WARNING:
Avoid personal injury and damage to this equipment.An unstable surface may cause this equipment to fall.
Ventilation
This equipment has openings for ventilation that protect itfrom overheating. To ensure the reliability of this equipment,do not obstruct the openings.• Do not place other equipment, lamps, books, or any other
object on the top of this equipment.• Do not place this equipment in any of the locations that
follow:- On a bed, sofa, rug, or similar surface- Over a radiator or a heat register- In an enclosure, such as a bookcase or equipment rack,
unless the installation provides proper ventilation
IMPORTANT RULES FOR SAFE OPERATION, continued
4
IMPORTANT RULES FOR SAFE OPERATION, continued
Mains Cord ProtectionArrange all mains cords so that people cannot walk on thecords, place objects on the cords, or place objects against thecords, which can damage the cords. Pay particular attentionto cords that are at plugs, at electrical outlets, and at theplaces where the cords exit the equipment.
Power SourcesA label on this equipment indicates the correct power sourcefor this equipment. Operate this equipment only from anelectrical outlet that has the voltage and frequency that thelabel indicates.
If you are unsure of the type of power supply to yourresidence, consult your cable service provider or your localpower company.
WARNING:
Avoid electric shock and fire hazard. Do not overloadelectrical outlets and extension cords. For equipmentthat requires battery power or other sources to operate,refer to the operating instructions for that equipment.
Damage that Requires ServiceFor damage that requires service, unplug this equipment fromthe electrical outlet. Refer service to qualified servicepersonnel when any of the following occurs:• There is damage to the mains cord or plug• Liquid enters the equipment• A heavy object falls on the equipment• There is exposure to rain or water• Operation is not normal (the instructions describe the
proper operation)• If you drop this equipment, or damage the cabinet of this
equipment• If this equipment exhibits a distinct change in performanceUpon completion of any service or repairs to this equipment(home terminal), the service technician will perform safetychecks to determine that the equipment is in proper operatingcondition.
5
Contents
Explorer 4000DVB Digital Home Communications TerminalGetting Started ......................................................... 5Installing the DHCT ................................................ 7Joining the Explorer eClub ..................................... 8Selecting Your Connection Diagrams ................... 9Understanding the Front Panel ........................... 10Understanding the Back Panel ............................ 11Connecting Optional IR Devices ......................... 12Connecting Entertainment Devices ............... 13-15Using the DHCT .................................................... 16Replacing the Mains Plug Fuse ........................... 17Performance Tips ................................................... 18Notices ..................................................................... 20
Getting Started
Introducing the Explorer 4000DVB DHCTCongratulations! You are about to experiencethe finest in cable programme viewing using theExplorer® 4000DVB Digital Home Communi-cations Terminal (DHCT).The Explorer 4000DVB DHCT is a set-topconverter that can view digital signals andprovides exceptional picture quality.To begin enjoying the features of the DHCT, usethe instructions in this guide to install the DHCTand other optional devices. Learn how to use thebasic functions of the DHCT by reviewing thefront panel diagram. Then, review the back paneldiagram to locate the connections you will need toinstall the DHCT.To obtain additional information about the DHCTand its capabilities, join our online Explorer eClub.See Joining the Explorer eClub, later in this guide.When installation is complete, read the briefinstructions for using the DHCT. If needed, readthe performance tips to give you the best possibleviewing pleasure.If you have any questions, contact your cableservice provider for assistance.

6
Getting Started, continued
Warnings and Cautions
Please read this entire guide before you install oroperate this equipment. Look for the followingsafety symbol throughout this guide:
Read the caution or warning that appears witheach safety symbol throughout this guide.
WARNING:
Electric shock hazard! Before connecting ordisconnecting any cables to this hometerminal, unplug all electronic devices that areor will be connected directly or indirectly tothis unit.
CAUTION:
Do not place a magnet, or any type of magneticor static dust removal device on or near thisequipment. Magnetic/static devices may affectthe operation of this equipment.
7
Installation OverviewThe following stages provide an overview of theinstallation process.
1. Determine the optional electronic devices youwant to connect to your DHCT by using theinformation on page 9.
2. Disconnect all electronic devices from their ACmains receptacle.
3. Connect the DHCT to your TV and VCR using thediagrams on pages 13, 14, and 15.
4. Programme your remote control to operate yourTV and VCR. See your remote control user’sguide.
5. Use your on-screen guide to browse and viewyour programme preferences.
Installing the DHCT
Installation TipsFollow these tips for proper DHCT operation:
• If the AC mains is controlled by a wall switch,make sure the switch is always in the On position.If you switch the AC mains off, your DHCT isunable to receive the periodic data updates thatare sent from the cable service provider.
• To ensure proper ventilation, do not place anyobjects or devices on top of the DHCT.

8
Join the Explorer eClubScientific-Atlanta invites you to join the ExplorereClub. This online club provides news and“what’s up” information about the ExplorerDHCT and offers you a chance to win prizes andother premium items.Access the Explorer eClub by logging on to theInternet and entering our Web addresshttp://www.scientificatlanta.com/explorerclub.Then, follow the instructions to join the club.
Joining the Explorer eClub
To access the Explorer eClub, you must enter theserial number of your DHCT. The number islocated on a white, bar code label on the back ofyour DHCT.
Write the serial number here: __________________Important: If your system requires troubleshootingin the future, your cable service provider mayrequest this number.
RF MAC 0001A6C3575A
SA S/N SABDRPLKPT9707
SerialNumber

9
Selecting Your Connection Diagrams
IntroductionThis section provides a list of electronic devicesthat connect to your DHCT. The Optional Deviceslist includes devices that may be required forspecific combinations of viewing and listeningpreferences. Identify all of your optional devices.Then, go to the page number shown, and use thediagrams and instructions to connect these devicesto the DHCT.
Optional DevicesOptional devices must be installed to providesome of the specific sound and viewingpreferences. Review the list of optional devices,and go to the page shown for instructions onconnecting the device in your system.• IR devices .............................................................. 12• Stereo receiver or amplifier for using
external speakers ................................................. 15
TV and VCR Setup
After you connect your optional devices, if any,use the diagrams on pages 13, 14, and 15 to set upyour TV and VCR.
10
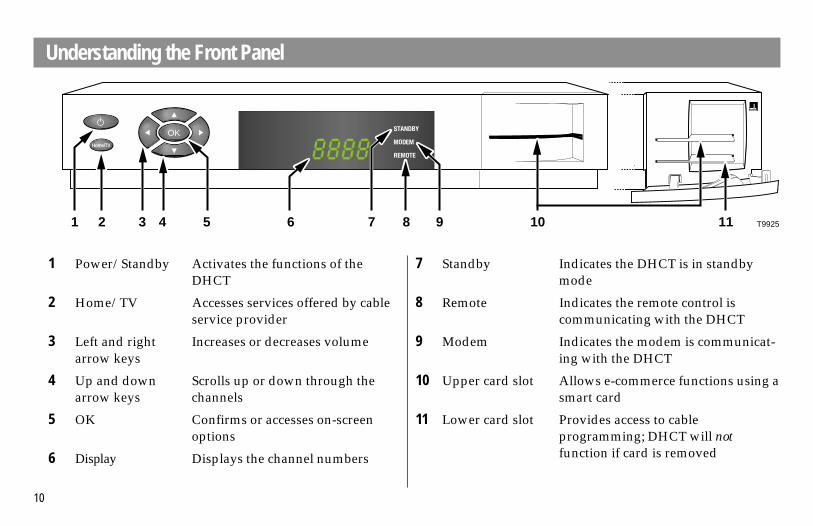
Understanding the Front Panel
1 Power/Standby Activates the functions of theDHCT
2 Home/TV Accesses services offered by cableservice provider
3 Left and right Increases or decreases volumearrow keys
4 Up and down Scrolls up or down through thearrow keys channels
5 OK Confirms or accesses on-screenoptions
6 Display Displays the channel numbers
7 Standby Indicates the DHCT is in standbymode
8 Remote Indicates the remote control iscommunicating with the DHCT
9 Modem Indicates the modem is communicat-ing with the DHCT
10 Upper card slot Allows e-commerce functions using asmart card
11 Lower card slot Provides access to cableprogramming; DHCT will notfunction if card is removed
T992511
OK
2 43 51
Home/TV
8 106 7 9
11
Understanding the Back Panel
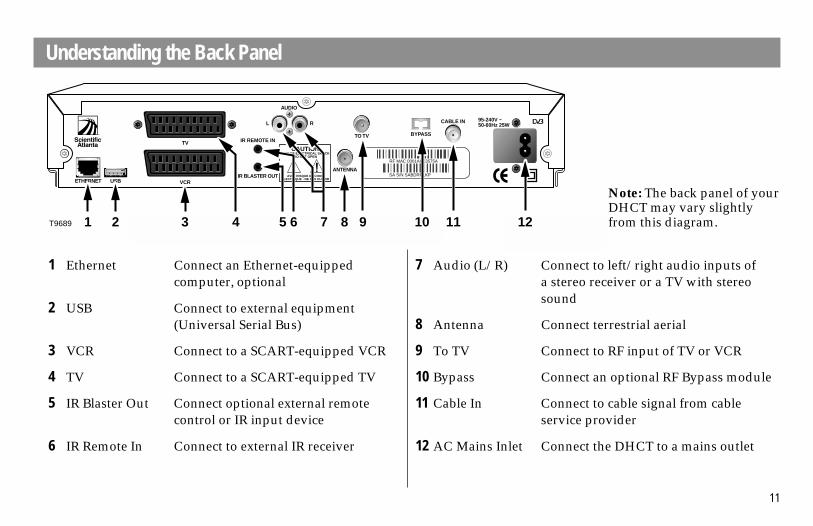
Note: The back panel of yourDHCT may vary slightlyfrom this diagram.
1 Ethernet Connect an Ethernet-equippedcomputer, optional
2 USB Connect to external equipment(Universal Serial Bus)
3 VCR Connect to a SCART-equipped VCR
4 TV Connect to a SCART-equipped TV
5 IR Blaster Out Connect optional external remotecontrol or IR input device
6 IR Remote In Connect to external IR receiver
7 Audio (L/R) Connect to left/right audio inputs ofa stereo receiver or a TV with stereosound
8 Antenna Connect terrestrial aerial
9 To TV Connect to RF input of TV or VCR
10 Bypass Connect an optional RF Bypass module
11 Cable In Connect to cable signal from cableservice provider
12 AC Mains Inlet Connect the DHCT to a mains outlet
L R
IR BLASTER OUT
IR REMOTE INTO TV
AUDIO
VCR
95-240V ~50-60Hz 25W
TV
RISK OF ELECTRICAL SHOCKDO NOT OPEN
AVIS: RISQUE DE CHOCELECTRIQUE - NE PAS OUVRIR
CAUTION
ANTENNA
CABLE IN
BYPASS
ETHERNET USB
RF MAC 0001A6C3575A
SA S/N SABDRPLKP
T9689 1 2 9 11 12103 7 85 64

12
Connecting Optional IR Devices
Connecting IR Devices
Note: Contact your cable service provider foradditional information about the IR Blaster.
After connecting the IR Blaster cable to your DHCT,place the IR transmitter in one of the locations (A, B,C, or D) as shown in the following diagram. Theselocations represent the locations most likely totransmit IR signals to your VCR from the IRtransmitter.
T8512
A
BC
D
Typical VCR
If your cable service provideroffers this feature, a TV or VCRcan be controlled through adevice consisting of an infrared(IR) transmitter and a cable.This device is an IR Blaster.Connect the IR Blaster to yourDHCT as shown.
You can connect an external IRreceiver device to the IRRemote In.
Note: The IR Blaster cable foryour device may appearslightly different from the IRBlaster cable shown in thisdiagram.
T9690
L
IR BLASTER OUT
IR REMOTE IN
AUDIO
IR Transmitter
To ExternalIR Receiver
13
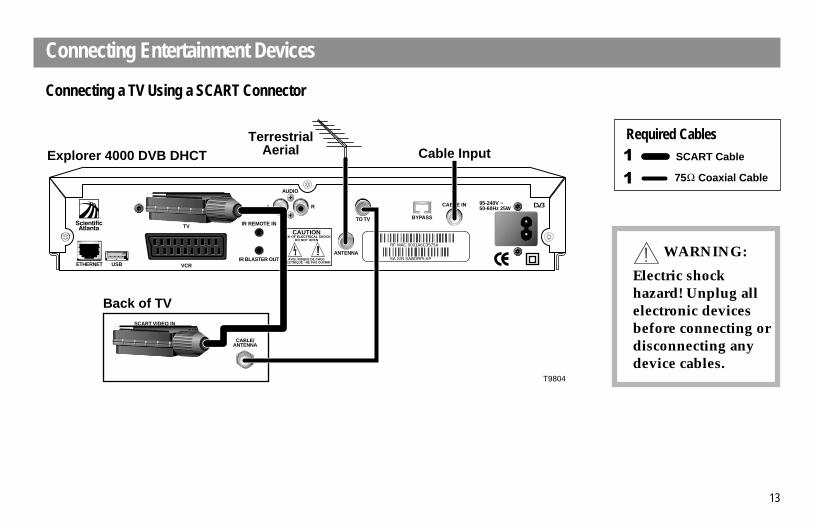
Connecting Entertainment Devices
Connecting a TV Using a SCART Connector
WARNING:
Electric shockhazard! Unplug allelectronic devicesbefore connecting ordisconnecting anydevice cables.
1
1
Required CablesSCART Cable
75 Coaxial Cable
L R
IR BLASTER OUT
IR REMOTE INTO TV
AUDIO
VCR
95-240V ~50-60Hz 25W
TV
RISK OF ELECTRICAL SHOCKDO NOT OPEN
AVIS: RISQUE DE CHOCELECTRIQUE - NE PAS OUVRIR
CAUTION
ANTENNA
CABLE IN
BYPASS
ETHERNET USB
Explorer 4000 DVB DHCT Cable Input
CABLE/ANTENNA
SCART VIDEO IN
Back of TV
T9804
TerrestrialAerial
RF MAC 0001A6C3575A
SA S/N SABDRPLKP
14
Connecting Entertainment Devices, continued
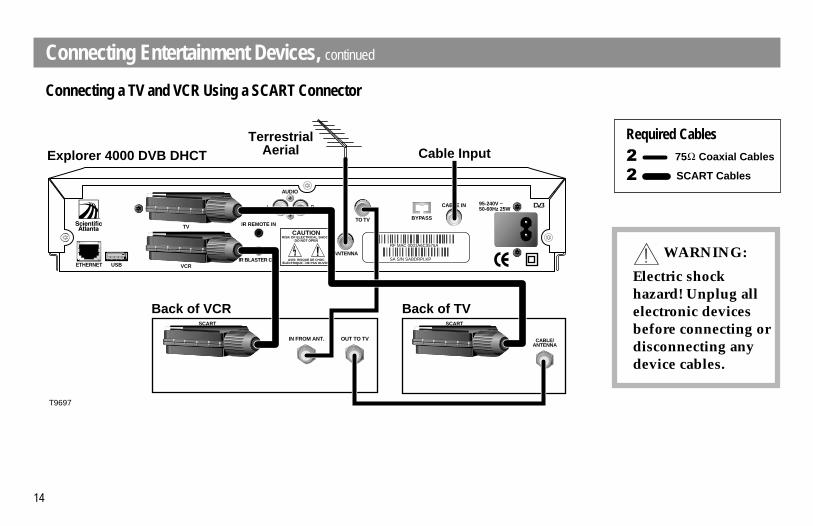
Connecting a TV and VCR Using a SCART Connector
Required Cables
WARNING:
Electric shockhazard! Unplug allelectronic devicesbefore connecting ordisconnecting anydevice cables.
2
2
75 Coaxial Cables
SCART Cables
L R
IR BLASTER OUT
IR REMOTE INTO TV
AUDIO
VCR
95-240V ~50-60Hz 25W
TV
RISK OF ELECTRICAL SHOCKDO NOT OPEN
AVIS: RISQUE DE CHOCELECTRIQUE - NE PAS OUVRIR
CAUTION
ANTENNA
CABLE IN
BYPASS
ETHERNET USB
Explorer 4000 DVB DHCT Cable Input
CABLE/ANTENNA
SCART
Back of TV
OUT TO TVIN FROM ANT.
Back of VCR
T9697
SCART
TerrestrialAerial
RF MAC 0001A6C3575A
SA S/N SABDRPLKP
15
Connecting Entertainment Devices, continued
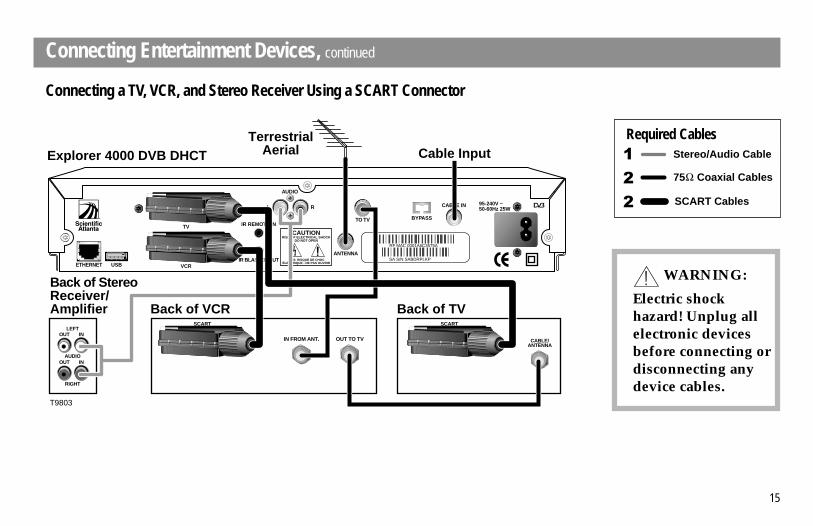
Connecting a TV, VCR, and Stereo Receiver Using a SCART Connector
WARNING:
Electric shockhazard! Unplug allelectronic devicesbefore connecting ordisconnecting anydevice cables.
Required Cables1
2
2
75 Coaxial Cables
SCART Cables
Stereo/Audio Cables
L R
IR BLASTER OUT
IR REMOTE INTO TV
AUDIO
VCR
95-240V ~50-60Hz 25W
TV
RISK OF ELECTRICAL SHOCKDO NOT OPEN
AVIS: RISQUE DE CHOCELECTRIQUE - NE PAS OUVRIR
CAUTION
ANTENNA
CABLE IN
BYPASS
ETHERNET USB
Explorer 4000 DVB DHCT Cable Input
T9803
TerrestrialAerial
RIGHT
INOUT
LEFT
AUDIO
INOUT
Back of StereoReceiver/Amplifier
CABLE/ANTENNA
SCART
Back of TV
OUT TO TVIN FROM ANT.
Back of VCRSCART
RF MAC 0001A6C3575A
SA S/N SABDRPLKP
16
Using the DHCT
Setting Up the DHCT
After you connect the DHCT to any additionalelectronic devices in your system, follow thesesteps to use your DHCT:
1. Verify that the DHCT is connected to the 75 ohmcoaxial cable coming from the wall.
2. Plug the DHCT and other devices into your ACmains receptacle.
Important: Do not press the Power key ( )on the DHCT.
3. Turn on the power to your TV and VCR, andtune your TV and VCR to the input channelassigned by your cable service provider.
4. Press the Power key on the DHCT.5. Programme your remote control to operate your
TV and VCR. (Refer to your remote controluser’s guide for instructions.)
6. Use your remote control keys to operate theDHCT. (Refer to your remote control user’sguide for navigating instructions.)
Using the Basic Functions of the DHCT
Control the volume, select channels, select on-screen functions, and change settings using thekeys on the front panel of the DHCT or the keyson the remote control.
Using the Remote Control and On-Screen Guide
Read the user’s guides that your cable serviceprovider included with the DHCT installationpackage. These guides provide operatinginstructions for using your remote control and theon-screen guide, if applicable.
17
3AT9687
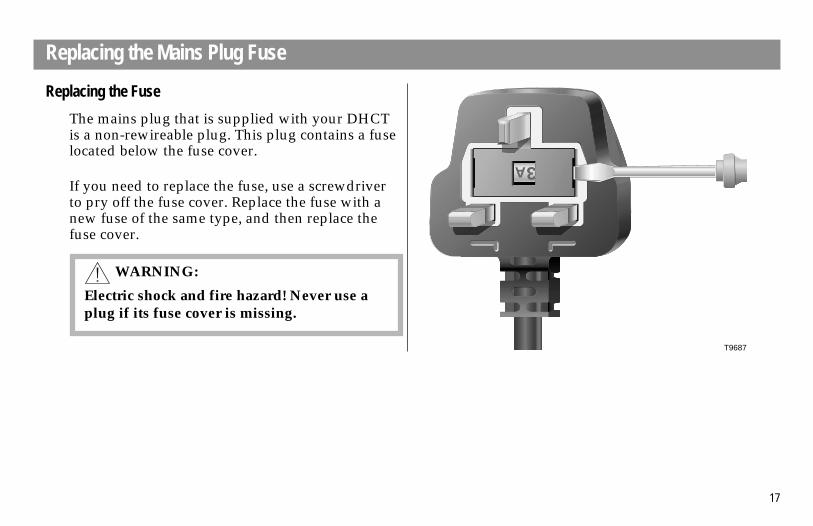
Replacing the Fuse
The mains plug that is supplied with your DHCTis a non-rewireable plug. This plug contains a fuselocated below the fuse cover.
If you need to replace the fuse, use a screwdriverto pry off the fuse cover. Replace the fuse with anew fuse of the same type, and then replace thefuse cover.
Replacing the Mains Plug Fuse
WARNING:
Electric shock and fire hazard! Never use aplug if its fuse cover is missing.

18
Performance Tips
No sound• Properly plug your TV and DHCT into an
electrical outlet.• Verify that all audio, coaxial, and SCART
cables are properly connected.• Verify that the power to your TV is on.• If your setup includes a VCR and/or stereo,
verify that you have properly connected themto the DHCT.
• Verify that your TV is tuned to the properoutput channel.
• Verify that the volume is turned up.No colour• Make sure the current TV programme is
broadcast in colour.• Adjust the TV colour controls.• Verify that all audio, coaxial, and SCART
cables are properly connected.
Check and Correct
If your DHCT does not perform as expected,the following tips may help. If you need furtherassistance, contact your cable service provider.
No picture• Plug your TV and DHCT into an electrical
outlet that is not controlled by a wall switch.• Verify that all cables are properly connected.• Verify that the power to your TV is turned on.• If your system includes a VCR and/or stereo,
verify that you have properly connected themto the DHCT.
• Verify that your TV is tuned to the properoutput channel.
Distorted picture• Verify that all audio, coaxial, and SCART
cables are properly connected.• Adjust the TV to the input channel.

19
Performance Tips, continued
DHCT does not work• If the AC mains is controlled by a wall switch,
make sure the switch is in the On position.• Verify that all cables are properly connected.• Verify that the fuse in the mains plug fuse
holder has not blown. If the fuse has blown,replace the fuse. See Replacing the MainsPlug Fuse on page 17.

© 2001, 2002 Scientific-Atlanta, Inc. All rights reserved Printed in USA www.scientificatlanta.com September 2002 Part Number 745456 Rev C
TrademarksScientific-Atlanta, Scientific-Atlanta arcs logo, andEXPLORER are registered trademarks of Scientific-Atlanta, Inc.“Bringing the Interactive Experience Home” is a trademark ofScientific-Atlanta, Inc.
is a trademark of the DVB Digital Video Broadcasting Project(1991 to 1996). Identification reference 2264.Other trademarks listed herein are the property of their respectiveowners.
Documentation Copyright Notice© 2001 Scientific-Atlanta, Inc. All rights reserved.Printed in the United States of America.Information in this document is subject to change without notice.No part of this document may be reproduced in any form withoutthe express written permission of Scientific-Atlanta, Inc.
Notices
Software Use NoticeScientific-Atlanta, Inc. owns copyrights to the software describedin this document and furnishes the software to you under alicense agreement. You may only use or copy this software inaccordance with the terms of your license agreement.
Firmware Use NoticeScientific-Atlanta, Inc. owns copyrights to the firmware in thisequipment. You may only use the firmware in the equipment inwhich it is provided. Any reproduction or distribution of thisfirmware, or any portion of it, without the express writtenconsent of Scientific-Atlanta, Inc., is prohibited.
DisclaimerScientific-Atlanta, Inc. assumes no responsibility for errors oromissions that may appear in this guide. Scientific-Atlantareserves the right to change this guide at any time without notice.
United States Scientific-Atlanta, Inc., 5030 Sugarloaf Parkway, Box 465447, Lawrenceville, GA 30042;Tel: 770.236.5000 Europe Scientific-Atlanta Europe, GmbH, Westerbachstrasse 28, 61476 Kronberg,Germany; Tel: 49.6173.928.000 Asia-Pacific Scientific-Atlanta (Singapore) Pte. Ltd., 1 Claymore Drive,#08-11 Orchard Towers, Singapore 229594; Tel: 65.733.4314 Latin America Scientific-Atlanta Argentina S.A.,Carlos Pelligrini 1149, Piso 11o, Capital Federal C1009ABW, Buenos Aires, Argentina; Tel: 54.11.4325.2800