eta 9002 & vets 200 data validation software
TRANSCRIPT
(REV--6/7/02)
ETA 9002 & VETS 200 Data Validation
Software
User’s Guide November 7, 2003
i
Table of Contents
Chapter Page I. OVERVIEW ......................................................................................................1 II. INSTALLATION ..............................................................................................3 III. TUTORIAL .....................................................................................................20 IV. REFERENCE GUIDE .....................................................................................50 V. ETA 9002 A-D REPORTING SCHEDULE ...................................................61 VI. RECORD LAYOUTS......................................................................................65

I. OVERVIEW
1
A. User Guide This guide has been written to assist states in using the Employment Service Data Validation Software to produce the 9002 A through E and VETS 200 A through C reports, and to validate data from the reports. The software includes a demo database with sample data, so users can review the full functionality of the software prior to building their own extract files.
The User’s Guide contains the following sections: II. Installation: Provides a step-by-step description of how to install the
software on your PC, including how to load the software when using an SQL database.
III. Tutorial: Provides information on the menus and functions of the
software. Describes how to build an extract file, import data, generate reports and validate a group.
IV. Reference Guide: Provides a condensed list of all the menus and
functions for quick reference. V. ETA 9002 A-D Reporting Schedule: An explanation of the reporting
schedule for the 9002 A through D reports. VI. Record Layouts: Contains the record layout specifications for creating the
files to import into the data validation software. After reviewing this guide, users should contact Mathematica Policy Research, Inc. by emailing [email protected] with any questions on using the software.
I. OVERVIEW
2
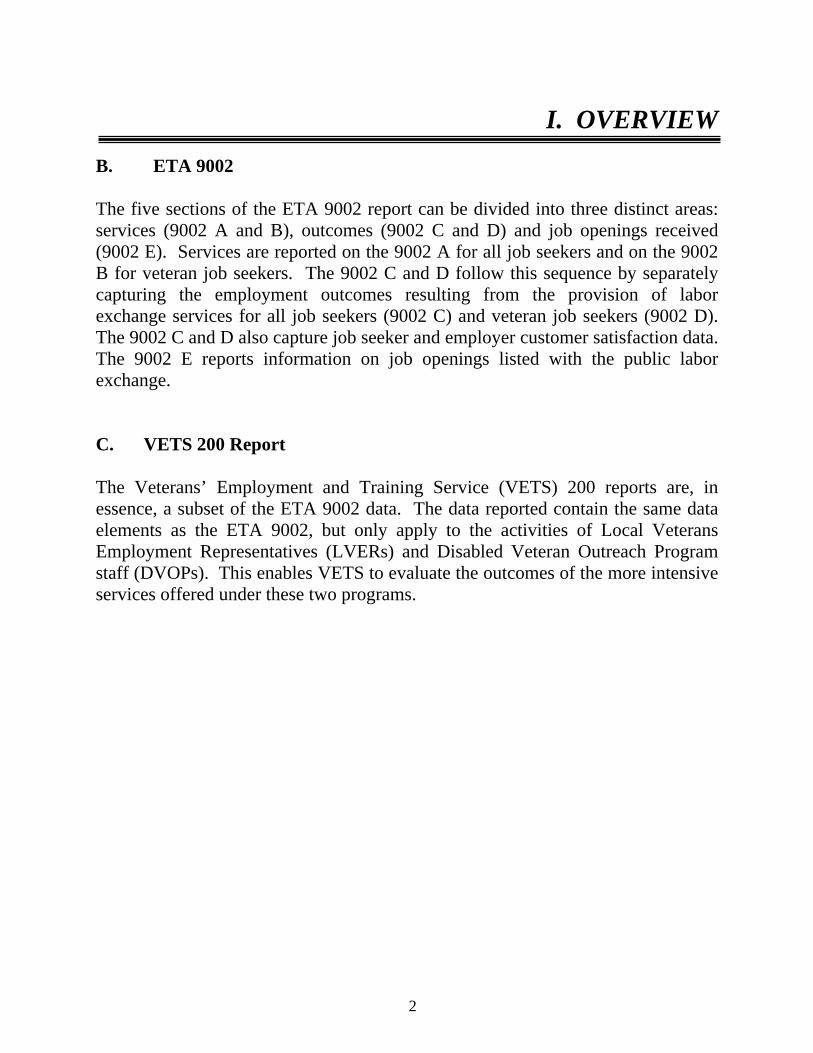
B. ETA 9002 The five sections of the ETA 9002 report can be divided into three distinct areas: services (9002 A and B), outcomes (9002 C and D) and job openings received (9002 E). Services are reported on the 9002 A for all job seekers and on the 9002 B for veteran job seekers. The 9002 C and D follow this sequence by separately capturing the employment outcomes resulting from the provision of labor exchange services for all job seekers (9002 C) and veteran job seekers (9002 D). The 9002 C and D also capture job seeker and employer customer satisfaction data. The 9002 E reports information on job openings listed with the public labor exchange. C. VETS 200 Report The Veterans’ Employment and Training Service (VETS) 200 reports are, in essence, a subset of the ETA 9002 data. The data reported contain the same data elements as the ETA 9002, but only apply to the activities of Local Veterans Employment Representatives (LVERs) and Disabled Veteran Outreach Program staff (DVOPs). This enables VETS to evaluate the outcomes of the more intensive services offered under these two programs.

II. INSTALLATION
3
Step 1 – Uninstalling the Application Before you install a new version of the ES software it is recommended that you uninstall the existing version of the software. Please follow the normal process for uninstalling software on your computer. In addition, if you are using SQL make sure to archive and erase your previous SQL database, as this may not happen automatically during the uninstall process. To uninstall the ES software using Windows 2000 or Windows XP, select Start, then Settings, then Control Panel. In the Control Panel, double click on Add/Remove Programs. Click on ES. Then click on Remove. Follow the InstallShield instructions to remove the software. Users may need to contact their system administrator in order to uninstall the application.

II. INSTALLATION
4
Step 2—Load CD ROM/Download from Internet Before starting installation of the software, quit any other programs that may be running. Insert the setup CD into the CD-ROM drive and open up the CD-ROM directory, or download the software to your PC through the Internet from http://www.workforcesecurity.doleta.gov/employ/rptvalidation.asp. Do not download the software to your C:\Program Files\ folder as this is the default installation location. Click on “Setup.exe”. The InstallShield Wizard window will pop up. Click on the “Next” button. Complete the Customer Information window as necessary, and click on “Next.” Users may need to contact their system administrator in order to install the application. Minimum System Requirements: Operating System – Microsoft Office 97 or better RAM - 128 megabytes Disk Space - 250 megabytes Processor – 100 mhz Pentium III (or equivalent processor) Suggested screen area – 800x600

II. INSTALLATION
5
Step 3—Choose Destination Location The Choose Destination Location window of the InstallShield Wizard Setup allows the user to select the installation directory. The software defaults to C:\Program Files\ES, as shown in the Destination Folder text box. To install the software in a different folder, click on the Browse function and navigate to the desired location. Make note of the software directory that is selected if using a location other than the default C:\Program Files\ES. Even if you have completely uninstalled a previous version of the software, it is possible that there are registry remnants that can be detected by the InstallShield Wizard. Consequently, the following screen may appear. If this screen does not appear, simply follow the ensuing prompts by clicking “Next”, as the Setup Type window is not a required element for successful installation. If the Setup Type window does appear, select Typical and then click Next.
II. INSTALLATION
6
The Start Copying Files window will appear next. You do not need to change any settings in this window, so click “Next”. When installation is complete, the InstallShield Wizard Complete window will pop up. This window may prompt you to restart your computer. Step 4—Restarting Computer After completing the ES InstallShield Wizard installation setup, reboot your computer before continuing any further. If the InstallShield Wizard Complete window does not prompt you to restart your computer, simply restart the computer as you would normally.
II. INSTALLATION
7
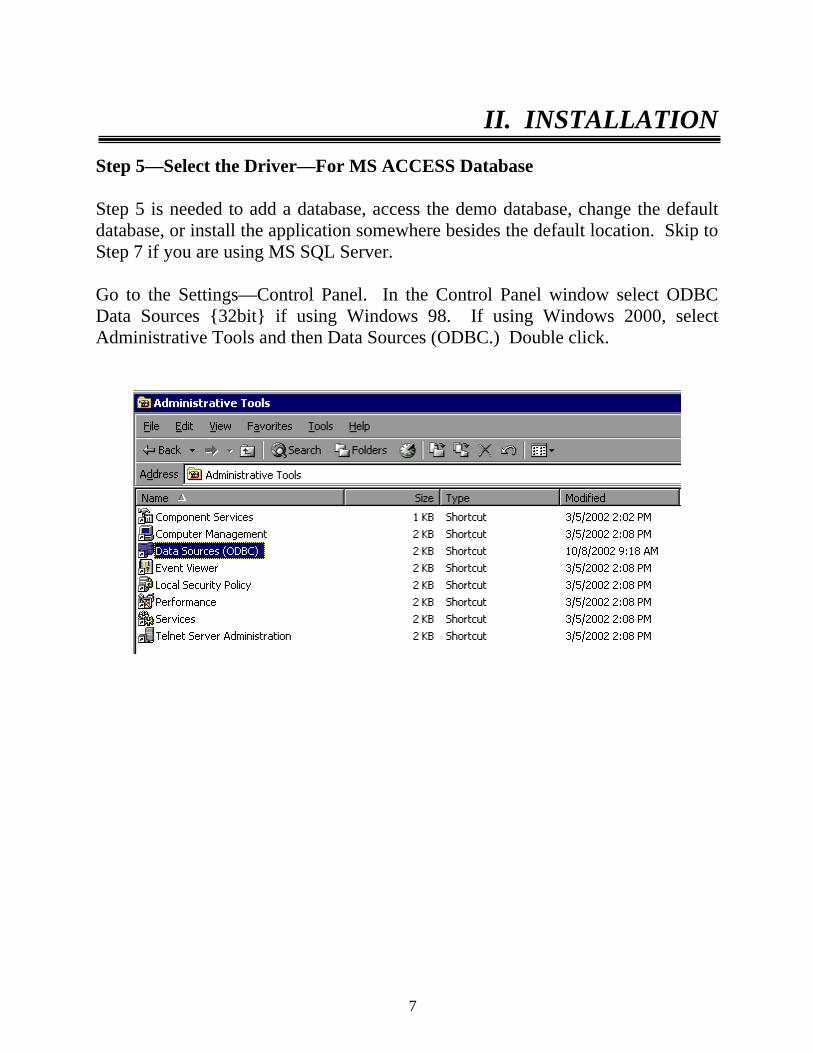
Step 5—Select the Driver—For MS ACCESS Database Step 5 is needed to add a database, access the demo database, change the default database, or install the application somewhere besides the default location. Skip to Step 7 if you are using MS SQL Server. Go to the Settings—Control Panel. In the Control Panel window select ODBC Data Sources {32bit} if using Windows 98. If using Windows 2000, select Administrative Tools and then Data Sources (ODBC.) Double click.

II. INSTALLATION
8
In the ODBC Data Source Administrator window, on the User DSN tab, click “Add,” regardless of the data source name that is highlighted.
In the Create New Data Source window, select the Microsoft Access Driver (.mdb) and click “Finish.”

II. INSTALLATION
9
The ODBC Microsoft Access Setup window will pop up. Enter the data source name, which is “ESDV” and the description, which is ES database. Then go down to “Database” options and click the “Select” button. Note that all database setups in SQL or Access must have a data source name beginning with the prefix “ESDV” and there should be no spaces in the data source name. For example, users should enter “ESDVDemo” as the data source name for the demo database included with the software application. This ensures that these additional databases will appear in the Switch Database function. For more information about the Switch Database function, see Section F of Chapter IV: Reference Guide.
II. INSTALLATION
10
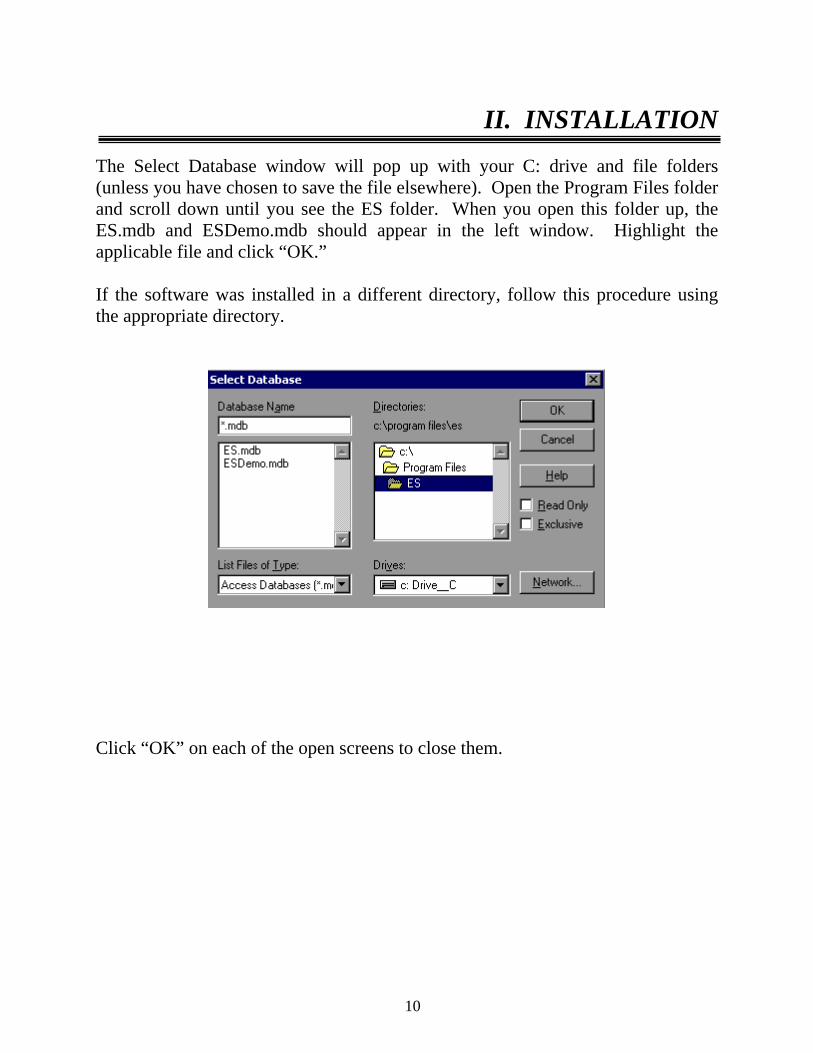
The Select Database window will pop up with your C: drive and file folders (unless you have chosen to save the file elsewhere). Open the Program Files folder and scroll down until you see the ES folder. When you open this folder up, the ES.mdb and ESDemo.mdb should appear in the left window. Highlight the applicable file and click “OK.” If the software was installed in a different directory, follow this procedure using the appropriate directory.
Click “OK” on each of the open screens to close them.

II. INSTALLATION
11
Step 6—Fixing Database/Data Source Errors During Installation For some users of Windows 2000, XP and NT, the data source may not be linked to the correct database or to any databases, which prevents the application from functioning. To determine if the correct database is selected, select the Data Sources (ODBC) in the Control Panel—Administrative Tools, User DSN tab. Check that the ESDV is linked to the right database. To do this, double click on the ESDV Data Source (ODBC) and check the path under the “database” section. If the application was saved to the C: drive then the database (es.mdb) should be in the C:\Program Files\ES\ folder. If the software was saved to another location, ensure that the data source points to this other folder and database. Some users of Windows 2000, XP and NT may also need to set up the ODBC on the System DSN tab under Administrative Tools. Users should try this solution if the application freezes on the initial splash screen. This setup procedure is identical to the procedure used on the User DSN tab. If you are still experiencing difficulties accessing the software after checking the data source, you should consult your system administrator.
II. INSTALLATION
12
Task 7—Manually Registering Files While installing the ES data validation software, users may get an error message stating that a file is not registered or cannot be found. In certain cases, users may get this error message after the software has been installed instead of during the installation process. These error messages can be resolved by manually registering the specific files that failed to register. First, users should check for the unregistered file on their hard drive. The file should be located in C:\Program Files\ES, in C:\winnt\system32 or in a different directory if the software was not installed in the default directory. If the file is on the hard drive, users should follow the steps outlined below to manually register the file. If the file cannot be found, users should contact [email protected]. To manually register the files, go to the Start menu and select Run. In the Run box, in the Open field, type in the regsvr32 command in the following format:
regsvr32 "PathName"
where “Pathname” is the full location of the file including the file name given in the error message. Type in the entire pathname and filename with quotes around it. For example, users with Windows 2000 or XP would type the following in response to an error message noting that the file crviewer.dll is not registered:
regsvr32 "c:\Program Files\ES\crviewer.dll" Windows NT users would type in:
regsvr32 "C:\winnt\system32\crviewer.dll" This manually registers the file that did not register during the batch installation process. Repeat this process for each unregistered file, and reboot your PC.
II. INSTALLATION
13
Step 8—Load the SQL Database—For MS SQL Database Users Only Since the Access database has a maximum capacity of 1.0 gigabytes, states with very large data files may prefer to use the SQL database version of the ES software. The user functionality of the Access and SQL databases is identical. A file named ES.sql is located in the ES folder. This file contains the SQL code required to create and load an SQL database version of the ES Data Validation software. The following steps are necessary to create the SQL version of the ESDV Software: 1. Open the ES.sql file. 2. Modify the “CREATE DATABASE” part of the code to direct the database to
a valid folder on your network. 3. Once you have modified the file, use SQL Query Analyzer to run the ES.sql
script file. Once the steps are complete the database is created. After the SQL database is created, 7 text files need to be imported into the SQL database. Listed below are the names of the text files located in the ES folder. Each file name corresponds to the table name in the database. Select each one and import it into the SQL database.
tblSystem.txt tblSupport.txt tblSamplingDef.txt tblReportedCounts.txt
tblRecordLayout3.txt tblRecordLayout2txt tblRecordLayout.txt tblReportingSchedule.txt
Once all of the files are imported, the SQL version will be ready to run.
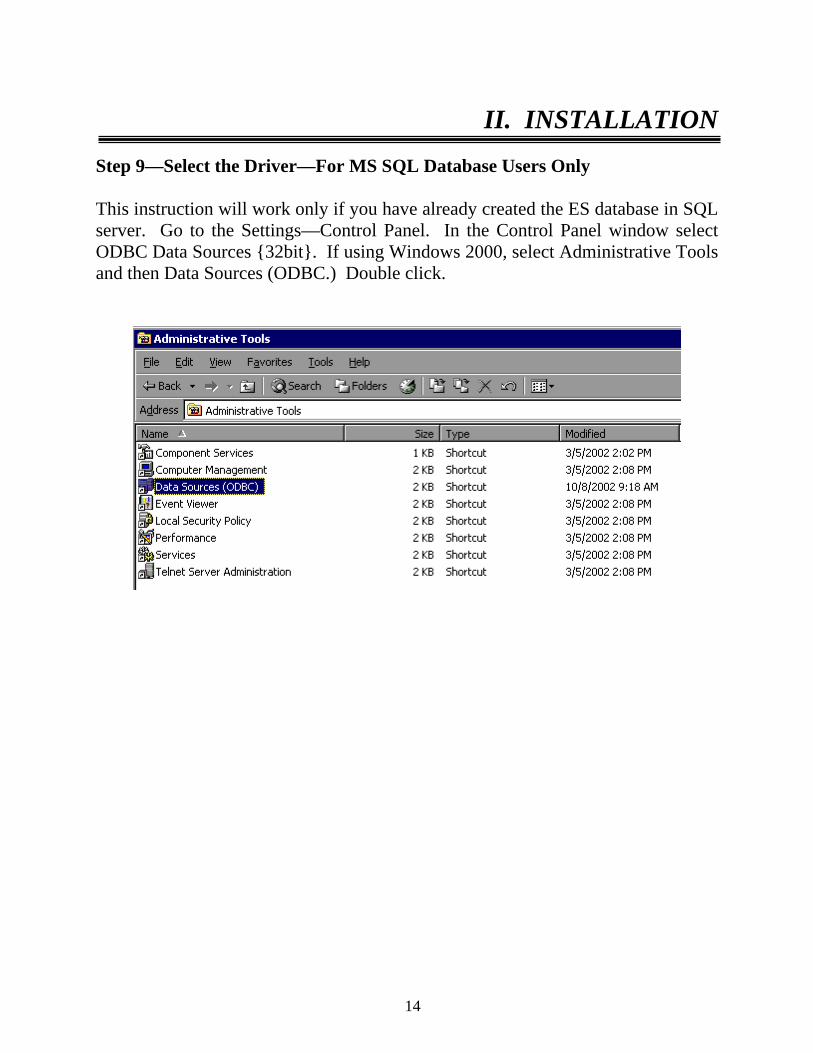
II. INSTALLATION
14
Step 9—Select the Driver—For MS SQL Database Users Only This instruction will work only if you have already created the ES database in SQL server. Go to the Settings—Control Panel. In the Control Panel window select ODBC Data Sources {32bit}. If using Windows 2000, select Administrative Tools and then Data Sources (ODBC.) Double click.
II. INSTALLATION
15
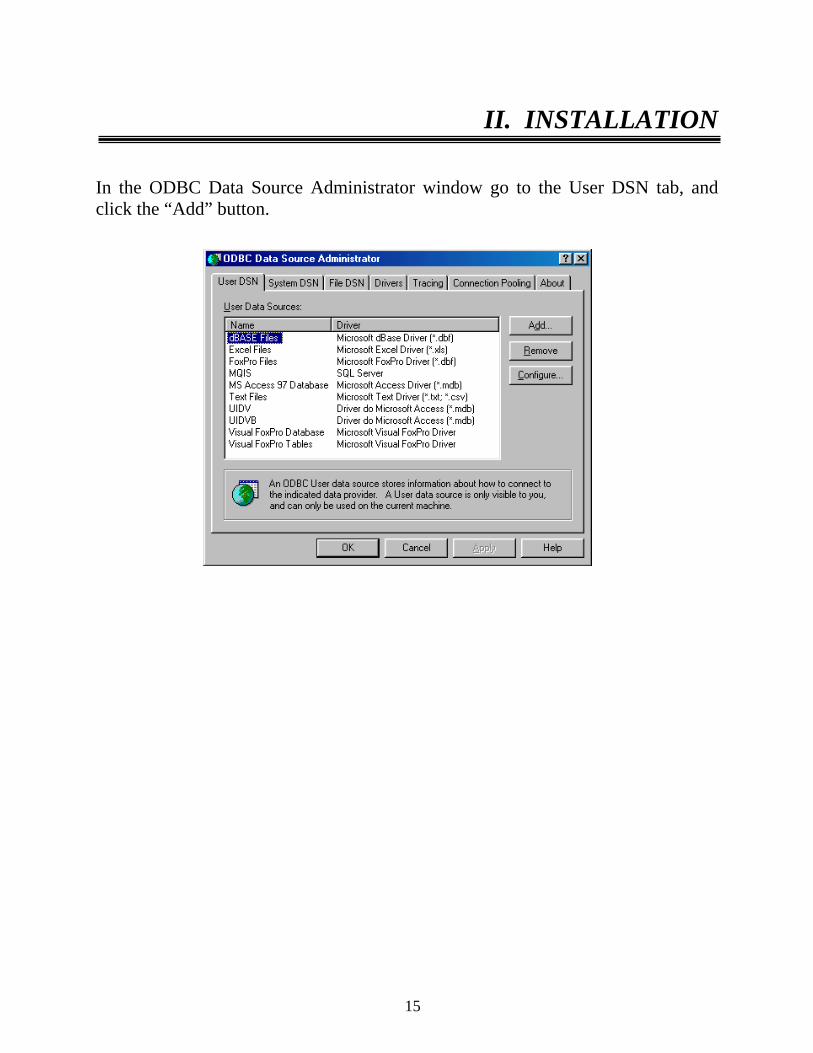
In the ODBC Data Source Administrator window go to the User DSN tab, and click the “Add” button.

II. INSTALLATION
16
In the Create New Data Source window, select the “SQL Server” driver and click “Finish.”

II. INSTALLATION
17
In the Microsoft SQL Server DSN Configuration window enter the data source name, which is “ESDVsql.” Enter the description, which is “ES Data Validation.” Select the Server Name that contains the ESDV database. Press Next to continue.
In the Create a New Data Source to SQL Server window, double click on the second bullet, “With SQL Server authentication using a login ID…..” Then enter Login ID “ESuser”, Password “es.” Press Next.

II. INSTALLATION
18
On the next Microsoft SQL Server DSN Configuration screen that appears, press Next.
Press Finish when the next SQL configuration screen opens.
II. INSTALLATION
19
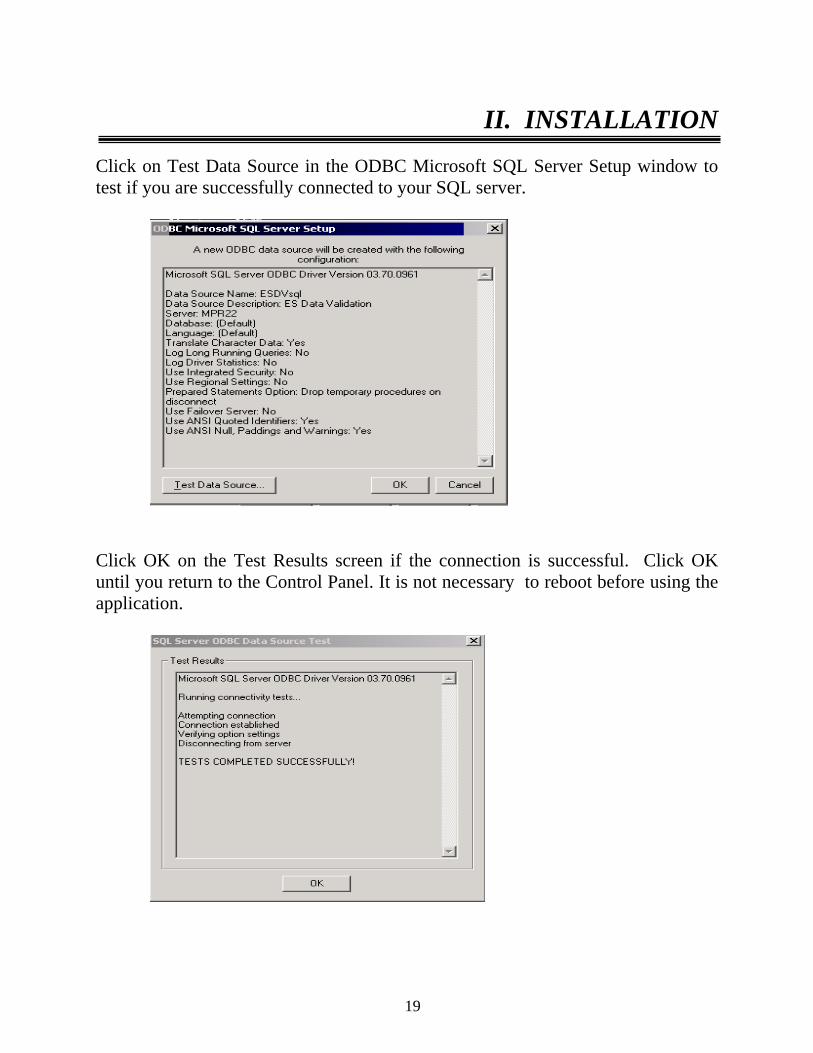
Click on Test Data Source in the ODBC Microsoft SQL Server Setup window to test if you are successfully connected to your SQL server.
Click OK on the Test Results screen if the connection is successful. Click OK until you return to the Control Panel. It is not necessary to reboot before using the application.

III. TUTORIAL
20
This chapter provides information on the reporting and validation functions of the software. Following are brief summaries of each chapter section. A. Signing In Section A describes how to open and sign in to the software for specified groups of data and specified reporting periods. This section also describes how the user can change the reporting options after the initial sign in. B. Importing Records Section B describes how to build and import files of job seeker and job opening records, so the software can produce and validate the 9002 and VETS 200 reports. This section also describes how to access and review duplicate detection and error reports of records rejected by the software during the import process. C. Report Validation Section C describes how to import reported values if a separate software application was used to produce the 9002 and VETS 200 reports. This section also describes how to access and review the report validation summary, produce federal report facsimiles and exportable files (to upload to ETA’s LERS system), and access and analyze job seeker records by performance outcome group. D. Data Element Validation Section D describes how to conduct data element validation for a sample of job seeker records. The data element validation instructions cover how to access and utilize the on-line worksheets, and how to print the worksheets.

III. TUTORIAL
21
A. Signing In Step 1—Opening the Software Go to the Start menu, click on Programs, and then scroll to find ES. Click on ES to open the software.

III. TUTORIAL
22
Step 2— Sign In Screen The Sign In screen provides the user with job seeker or job opening group, report quarter, and state options to select in generating federal reports or conducting validation.
1. First, select the group to be validated from the pull down menu on the top left of the screen. Group 1 consists of job seekers reportable on the 9002 A-D and VETS 200 A-C, while group 2 consists of job openings reportable on the 9002 E.
2. Second, enter the postal code abbreviation for your state in the State field. This labels all worksheets and reports with the state abbreviation.
3. Third, select the program report quarter being validated from the Report Quarter drop down menu. Chapter V of this User’s Guide specifies the date ranges that are autofilled on the sign in screen for each program report quarter through 200404.

III. TUTORIAL
23
Users must click on the “Sign In” button to register the group, state, and report quarter selections. After logging in a list of tips will pop up that provides brief explanations of each function. The ES program year begins on July 1, with the first program quarter ending on September 30, the second program quarter ending on December 31, the third program quarter ending on March 31, and the fourth program quarter ending on June 30. For example, 200201 is the first quarter of program year 2002 (July 1 through September 30, 2002). For each group, the Start and End Date of the period being validated are autofilled based on the applicable reporting period time frames. For both groups, the application will accept alternative dates for management or other purposes, including dates prior to the program start on July 1, 2002. The date ranges may be overwritten if alternate time frames are needed, by selecting the calendar and double clicking on the appropriate year, month and day. All three fields must be selected for this feature to register the date selected. For Group 1, which covers the 9002 A through D and VETS 200 A through C reports, the start and end dates for the 9002 A and B and the 9002 C and D are displayed on separate rows. For the A and B, the dates represent the program quarters covered by the report being validated. For the C and D, the dates represent the range in which a job seeker on the report being validated would have entered employment and/or been retained in employment. The VETS 200 A through C dates track to the 9002 dates. For Group 2, which covers the 9002 E job openings report, the start and end dates represent the program quarters covered by the report being validated. States using the demo database to learn about the software’s functionality should select Group 1 or Group 2 on the Sign In screen. The Group 1 demo Report Quarter is 200301. The group 2 demo Report Quarter is also 200301. See page 9 of this User’s Guide for more information about accessing the demo database.
III. TUTORIAL
24
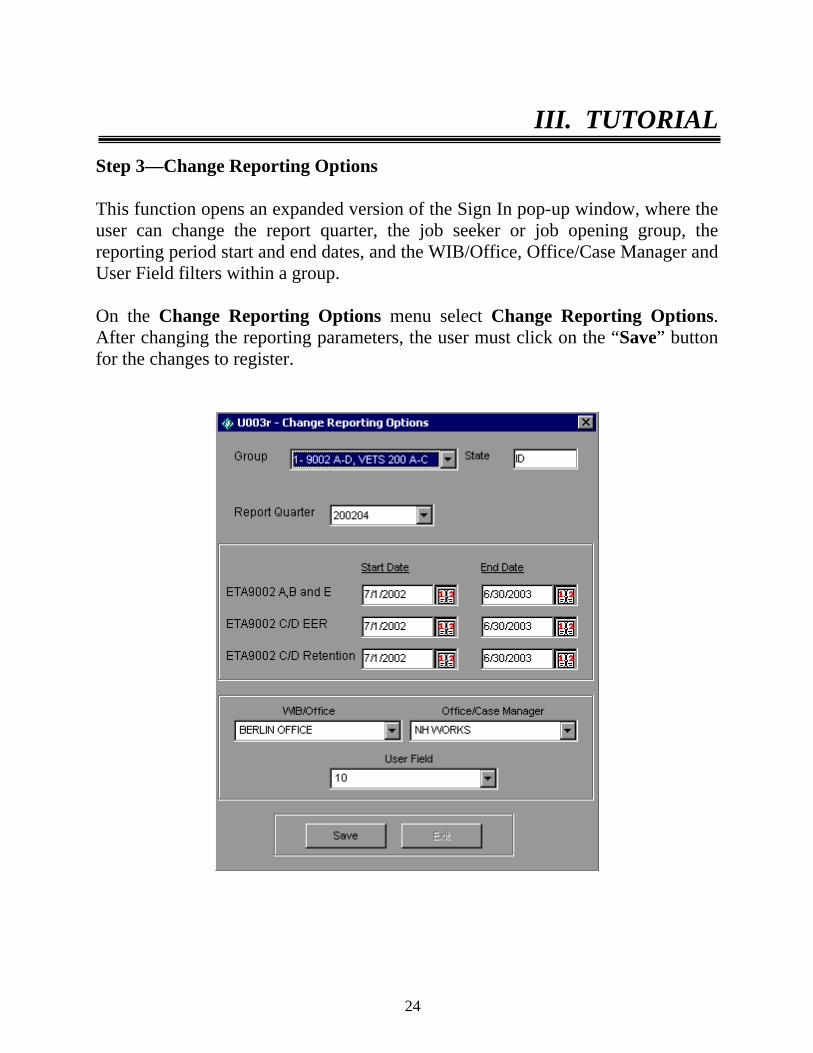
Step 3—Change Reporting Options This function opens an expanded version of the Sign In pop-up window, where the user can change the report quarter, the job seeker or job opening group, the reporting period start and end dates, and the WIB/Office, Office/Case Manager and User Field filters within a group. On the Change Reporting Options menu select Change Reporting Options. After changing the reporting parameters, the user must click on the “Save” button for the changes to register.

III. TUTORIAL
25
States should use the Change Reporting Options screen if, for example, they are importing both group 1 and group 2 files in the same session. After importing group 1 into the application, the user should change the reporting options to group 2, click on “Save” and then import the group 2 file. By selecting a WIB/Office filter, an Office/Case Manager filter and/or a User Field filter the user can view subsets of the imported records. The WIB/Office, Office/Case Manager and User Field drop down menus reflect the data values that appear in the corresponding fields in the imported records. After the user selects filters from the drop down menus and clicks on Save, the source table, report validation table, report validation summary, and facsimile reports will all be reconfigured to reflect the data and results for the selected substate unit. (Currently, the software treats records with multiple office identifiers as belonging to a unique office, rather than to each of the multiple offices identified.) The selected substate unit appears in the footer of the report validation summaries and facsimile reports to distinguish them from the state level reports.

III. TUTORIAL
26
B. Importing Records Two state data files for the period being validated are imported into the software. One file consists of job seeker records (group 1) and the other consists of records of job openings (group 2). Step 1—Create Files of Job Seeker and Job Opening Records Based on the Record Layout Specifications The record layouts for both files are provided in Chapter VI of this User’s Guide. The group 1 record layout covers the 9002 A-D and VETS 200 data; the group 2 record layout covers 9002 E data. Many data elements and data formats on the 9002 A-D record layout are based on the WIASRD for consistency. To view the record layout for the group selected on the software sign in screen, open the Import Data menu, and select Source Table Record Layout. The extract files must be in ASCII, comma delimited .txt format. The software will also accept comma separated (CSV) files if necessary. Fields must be in the order listed on the record layout. Mandatory fields are specified. Blanks are acceptable in optional fields. However, blank or null values are not valid for mandatory fields and will result in the record being rejected. There is an extra field called “User Field” listed at the end of each record layout. This field can be used for any additional data element that the state wishes to include. States are not required to use this field. However, states may want to use this field to organize the source table on a substate level, since the user field appears as a filter on the change reporting options screen.
III. TUTORIAL
27
States might also need the “User Field” as a workaround for preparing the group 2 job openings file. If the state’s system cannot easily generate records of job openings, but only of job orders, the state will need to convert their job order file into a job openings file. This can be done with the user field if in the state every job opening within a job order is identical for reporting purposes. Following the group 2 record layout, pull an extract of job order records putting the number of job openings for the job order in the user field. Then create a routine that will multiply that job order record by the number in the user field to obtain the proper number of job opening records to load into the reporting/validation application. The extract files should be run at the end of the report quarter. Over time the group 1 file will include several quarters of data to accurately account for services and outcomes. Chapter V provides more information about the quarters of data to be included in each extract file. The “Period Report Covers” column of the reporting schedule indicates the quarters of data to be included in the file for each program report quarter.

III. TUTORIAL
28
Step 2—Import Validation File
Once the data are formatted according to the record layouts, open the Import Data menu and select Import From Extract File. Select the file to be imported using the Select File box. Click Open to continue. When the Import File box opens, press Yes on the smaller ES box to continue the loading process. Once this is done, the Import File box will display counters for both the number of records imported successfully and the number of records with errors. The Import File box also includes a cancel button that can be used to stop the loading process.

III. TUTORIAL
29
To view the imported file, open the Import Data menu and select View Source Table. This is a read only screen. However, the columns in the Source Table are sortable to facilitate state review of the imported records. Users can sort on any column in the source table. If the cursor is placed on a particular row of a column, the application will show that row number in red at the bottom of the screen. This enables the user to easily count the number of records with a particular characteristic in the source table. The total number of records in the source table is provided on the lower left corner of the screen.
Group 1 Sample Source Table
III. TUTORIAL
30
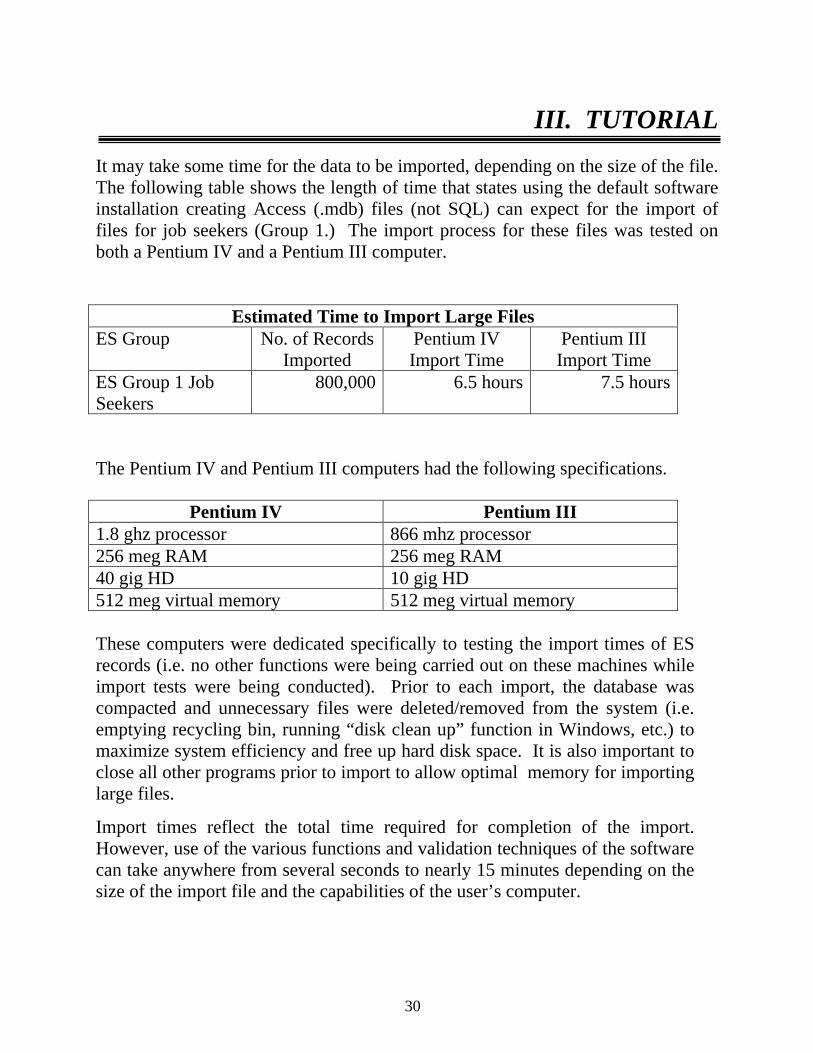
It may take some time for the data to be imported, depending on the size of the file. The following table shows the length of time that states using the default software installation creating Access (.mdb) files (not SQL) can expect for the import of files for job seekers (Group 1.) The import process for these files was tested on both a Pentium IV and a Pentium III computer.
Estimated Time to Import Large Files ES Group No. of Records
Imported Pentium IV Import Time
Pentium III Import Time
ES Group 1 Job Seekers
800,000 6.5 hours 7.5 hours
The Pentium IV and Pentium III computers had the following specifications.
Pentium IV Pentium III 1.8 ghz processor 866 mhz processor 256 meg RAM 256 meg RAM 40 gig HD 10 gig HD 512 meg virtual memory 512 meg virtual memory These computers were dedicated specifically to testing the import times of ES records (i.e. no other functions were being carried out on these machines while import tests were being conducted). Prior to each import, the database was compacted and unnecessary files were deleted/removed from the system (i.e. emptying recycling bin, running “disk clean up” function in Windows, etc.) to maximize system efficiency and free up hard disk space. It is also important to close all other programs prior to import to allow optimal memory for importing large files.
Import times reflect the total time required for completion of the import. However, use of the various functions and validation techniques of the software can take anywhere from several seconds to nearly 15 minutes depending on the size of the import file and the capabilities of the user’s computer.

III. TUTORIAL
31
The import times depend not only upon system capabilities, but also on the number and density of the records. The Microsoft Access database has a capacity of 1.0 gigabytes; thus, the number of records imported is contingent upon the amount of data and number of completed fields in each record. “Overflow” errors are an indication that the Access database has reached maximum capacity and will present as either Windows errors or as import errors within the ES software. “Overflow” errors will be written to the importerror.txt file indicating that the “database has reached maximum size.” Testing of the ES software indicates that files of more than approximately 950,000 records will generate overflow errors in Access.
States with very large data files may use the SQL database version of the ES software. Performance will vary for states using the SQL version based on server speed and contention with other users.
III. TUTORIAL
32
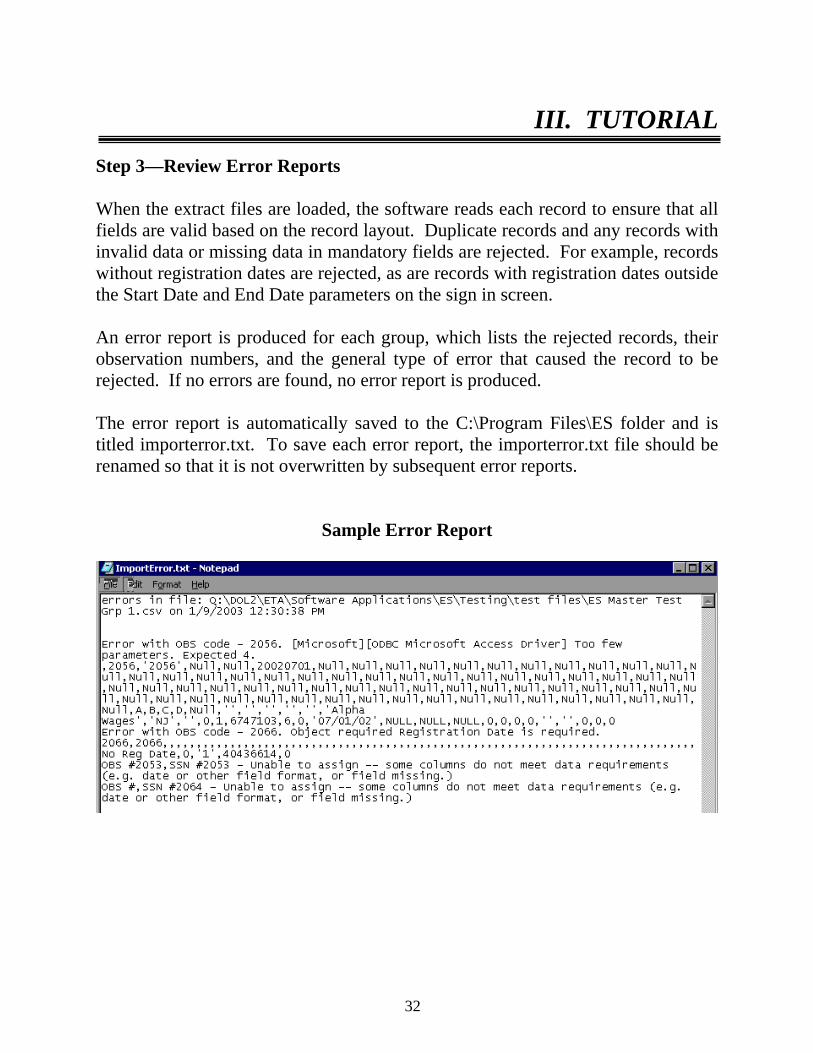
Step 3—Review Error Reports When the extract files are loaded, the software reads each record to ensure that all fields are valid based on the record layout. Duplicate records and any records with invalid data or missing data in mandatory fields are rejected. For example, records without registration dates are rejected, as are records with registration dates outside the Start Date and End Date parameters on the sign in screen. An error report is produced for each group, which lists the rejected records, their observation numbers, and the general type of error that caused the record to be rejected. If no errors are found, no error report is produced. The error report is automatically saved to the C:\Program Files\ES folder and is titled importerror.txt. To save each error report, the importerror.txt file should be renamed so that it is not overwritten by subsequent error reports.
Sample Error Report

III. TUTORIAL
33
The software generates two types of errors – import errors and assignment errors.
• Import errors may occur when the number of columns in the extract file does not match the number of columns specified in the record layout. A common error message in this situation is: “Object required error in column ##. Item is required.” States should compare their import file format to the source table record layout to determine why the number of fields/columns does not match. As shown in the sample error report for observation 2066, when the registration date is missing, the error report will specify “Object required. Registration date is required.” In addition, records may receive a “data type mismatch” error if field values are switched, specifically if text values are placed in a number field.
• Assignment errors may occur if data values are out of the required range.
As shown in the sample error report for observations 2053 and 2064, the error message will state “Unable to assign – some columns do not meet data requirements (e.g. date or other field format, or field missing.)” For example, records with registration dates outside of the range on the sign in screen will appear on the error report with this message.
After reviewing any error reports that are generated, ADP staff should determine if the extract files must be regenerated or reformatted and reloaded. If a very small number of records are rejected, it may not be necessary to re-import the file.

III. TUTORIAL
34
Step 4—View Duplicates This function allows the user to view the duplicate job seeker records identified and rejected by the software. There is no data entry required, it is used for analytical purposes only. Click on the Report Validation menu and select View Duplicates. This opens a window which displays all of the duplicate service records for the job seeker group, including the observation number, SSN, the registration date and the staff assisted service date that are used to determine duplicates. Whenever two or more records for the same SSN have registration dates within four quarters of each other, the most recent record is retained. The duplicate report displays the rejected records, as shown in the sample screen print below.
There is no duplicate detection for group 2—job openings. Step 5—Repeat Same Process for All Groups Follow steps 1 through 4 to import the data for both of the groups.

III. TUTORIAL
35
C. Report Validation In report validation, the software compares the validation counts derived from the extract file to the actual values reported by the states on the ETA 9002 and VETS 200 reports. To conduct report validation, states must prepare and import a separate file of reported counts for each report being validated. Report validation is not applicable to states who use the software to generate the ETA 9002 and VETS 200 reports. However, all states must input their customer satisfaction data, as described on the following page in Step 2—Enter Customer Satisfaction Data. Step 1—Import Reported Data Click on the Import Data menu and select Import Reported Counts. Note that each import file should be formatted according to the reported count record layout which is under the Import Data menu and in Chapter VI of this User Guide. Select the file to be imported using the Select File box. Click Open to continue. The Import File box will show the number of records imported. Repeat this process for each reported counts file to be imported.

III. TUTORIAL
36
Step 2—Enter Customer Satisfaction Data Click on the Report Validation menu and select Enter 9002C Cust. Sat. Scores/Counts. On the entry screen, key enter the state’s reported scores/counts in the appropriate cells. Click on the Exit button when done.
III. TUTORIAL
37
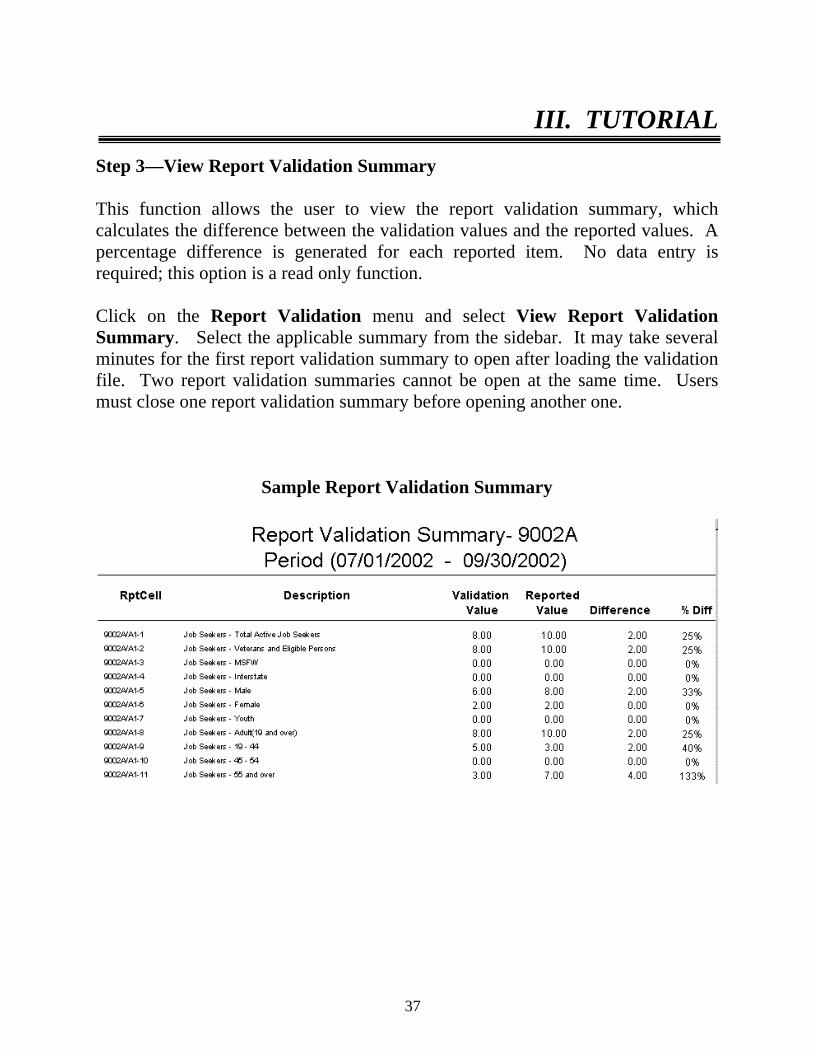
Step 3—View Report Validation Summary This function allows the user to view the report validation summary, which calculates the difference between the validation values and the reported values. A percentage difference is generated for each reported item. No data entry is required; this option is a read only function. Click on the Report Validation menu and select View Report Validation Summary. Select the applicable summary from the sidebar. It may take several minutes for the first report validation summary to open after loading the validation file. Two report validation summaries cannot be open at the same time. Users must close one report validation summary before opening another one.
Sample Report Validation Summary

III. TUTORIAL
38
If users have selected a WIB/Office or Office/Case Manager filter on the Change Reporting Options screen, the report validation summary will be generated for that substate level. The footer of the report will display the selected substate unit. If states use the software to generate reported values, the generated values will appear in the validation value column. The report validation summary will show percent differences of 100 percent, and will not show reported values.

III. TUTORIAL
39
Step 4—View Facsimile Reports The View Facsimiles function displays a copy of the selected report in the format presented in the ET 406. Click on the Report Validation menu and select View Facsimiles. Using the View Facsimiles sidebar, select the applicable 9002 or VETS 200 report to be viewed.
Sample Facsimile Report
The facsimile reports contain the validation values for each report item on the 9002 A through E and the VETS-200 A through C (except for customer satisfaction values, which are the data entered values.)

III. TUTORIAL
40
If users have selected a WIB/Office or Office/Case Manager filter on the Change Reporting Options screen, the facsimile report will be generated for that substate level. The footer of the facsimile report will display the selected substate unit. Click on the printer icon to print the facsimile report using a live printer. To print the facsimile report in Adobe Acrobat (PDF) format, click on the export report button to the right of the printer icon. Note that the facsimile report may not be fully formatted on the screen or in print unless validation values have been calculated for that report.

III. TUTORIAL
41
Step 5—Export ETA Counts or VETS 200 Counts This step produces a file compatible with the Labor Exchange Reporting System (LERS) for each of the five sections of the 9002 report and the three sections of the VETS 200 report. Once generated, these files can be uploaded by the state to the LERS system as the quarterly report submission. Refer to the LERS user guide posted at http://www.uses.doleta.gov/rptvalidation.asp for more information about uploading. Click on the Report Validation menu and select either Export ETA Counts or Export VETS-200 Counts. Next select the section of the 9002 or VETS 200 to be exported. Once selected, the software will indicate that the file has been exported by displaying the message “Done.” The reports are automatically saved to the ES folder and are titled ETA9002A.txt, ETA9002B.txt, ETA9002C.txt, ETA9002D.txt, ETA9002E.txt, VETS200(A).txt, VETS200(B).txt, and VETS200(C).txt. To save each report, the files should be renamed so that they are not overwritten by subsequent reports.
Sample Export File

III. TUTORIAL
42
Following the instructions in the LERS user guide, states can upload these files to LERS as their quarterly report submission. States may receive a LERS error on their upload stating, for example: "The value in row 3 must be equal to the value in row 1 divided by the value in row 2 for that column (5)." This is because in some circumstances the reporting/validation software and LERS round differently from decimals to whole number performance measurement rates. If states do receive such an error they should double check the numerator, denominator and rate in the column indicated. For example, using the above error message, column 5 of the export file may have a value in row 1 of 20, a value in row 2 of 32, and a value in row 3 of 62. Using a calculator the actual rate is 62.5, but the value in the export file is 62. States should manually change the value in the export file from 62 to 63, and reload.

III. TUTORIAL
43
Step 6—View Report Validation Table This function allows the user to view the performance outcome groups for job seekers. This step is not applicable to job openings on the 9002 E. There is no data entry required, this function is used for analytical purposes only. Click on the Report Validation menu and select View Report Validation Table. This opens a window displaying a summary of each group of job seeker performance outcomes and the total number of records and dollar amounts, where applicable, for each group. These outcome groups coincide with the performance outcome groups described in Appendix E of the ET 406 Handbook; users should refer to this appendix for further information on the outcome groups. Double click on the arrow in the far left column of each group to view the detailed records in that group.
Double click to view detailed records

III. TUTORIAL
44
It may take several minutes for the report validation table to open for the first time after loading the validation file.
Detailed Records for Group 7
To sort records in ascending or descending order, double-click the heading of the column you wish to sort. A message indicating the sorted column appears on the tab header. When the cursor is placed on a specific row in a sorted column, a message on the top left of the screen indicates the row number selected. With this functionality, users can analyze the data in each performance outcome group to review the characteristics of job seekers who are successful in program performance (are counted in performance measure numerators and denominators), and the characteristics of job seekers who are not as successful. For example, users can analyze the records in an outcome group to determine if employment prior to registration (the presence of wage record data in RQ-1) appears to be connected to employment and retention success after registration. To increase the width of the columns, go to the intersection of the heading, click the mouse button, and drag it to the desired width.
III. TUTORIAL
45
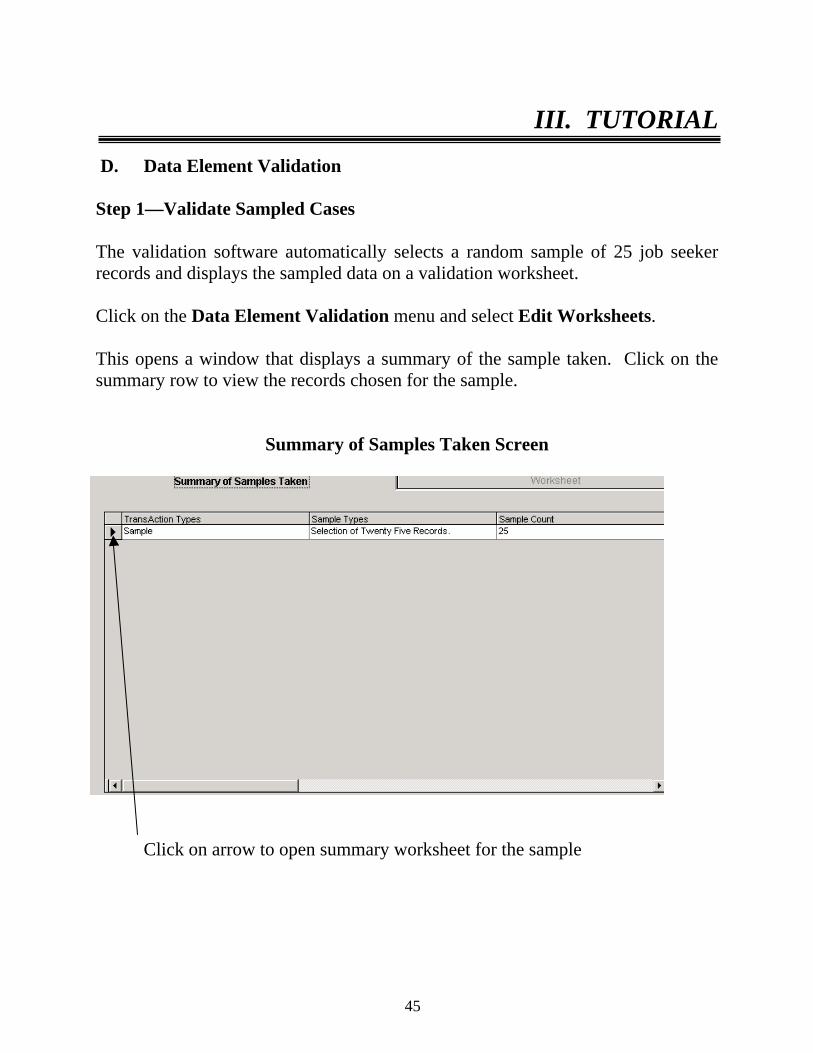
D. Data Element Validation Step 1—Validate Sampled Cases The validation software automatically selects a random sample of 25 job seeker records and displays the sampled data on a validation worksheet. Click on the Data Element Validation menu and select Edit Worksheets. This opens a window that displays a summary of the sample taken. Click on the summary row to view the records chosen for the sample.
Summary of Samples Taken Screen
Click on arrow to open summary worksheet for the sample

III. TUTORIAL
46
This will open up the data element validation worksheet summary for the sample selected. This summary screen is read only.
Worksheet Summary
To access, update, and print individual sampled cases, double click on the row of the applicable case on the worksheet summary. Users should not double click on the column headers, which produces an error message.

III. TUTORIAL
47
This opens an on-line validation worksheet for the selected observation. The on-line worksheet is on four tabs, for validation fields 1 through 20, 21 through 40, 41 through 60, and 61 through 77. This allows easier navigation though all of the data elements.
Sample On-Line Validation Worksheet

III. TUTORIAL
48
The data on the worksheet for each data element should be compared to the data in the state system. The validator begins the validation by looking at the first data element on the worksheet and then locating the corresponding documentation in the state system. This entails checking all necessary screens and other source documentation to determine if this data element is valid. For example, wage record information must be checked against the state wage record files. Check either pass or fail for each element, or leave the checkboxes blank if appropriate. When finished select either Save and Exit or Print at the bottom of the screen. When each record has been validated in its entirety, the summary worksheet and the printed worksheet display the updated information from the tabbed worksheets.

III. TUTORIAL
49
Step 2—Print Validation Worksheets Select Print Worksheets on the Data Element Validation menu to print the sample in batch mode. Click the printer icon at the top left of the screen to begin printing.
Sample Printed Worksheet

IV. REFERENCE GUIDE
50
This chapter of the User’s Guide provides a condensed list of all of the software menus and functions for quick reference. A. File Menu The first menu on the toolbar is called “File.” Options in this menu include: 1. Show Tips at Start-Up Users can choose whether or not the tips appear at Start-up by double clicking on Show Tips at Start-Up. 2. Exit Select this to exit the program.

IV. REFERENCE GUIDE
51
B. Import Data Menu The second menu on the toolbar is called “Import Data.” Options in this menu include: 1. Import From Extract File Select this function to import data into the application. See the record layouts in Chapter VI for the appropriate data record formats. 2. Import Reported Counts Select this function to import the report counts into the application. See the record layout in Chapter VI for the appropriate data record format. 3. Source Table Record Layout This function displays the record layouts for each group. Copies of the record layouts can be found in Chapter VI of this User’s Guide. 4. Reported Counts Record Layout This function displays the record layout used in preparing the import files of reported values. A copy of the record layout can be found in Chapter VI of this User’s Guide. 5. View Source Table This function displays all of the records from the extract file that were successfully imported by the software.

IV. REFERENCE GUIDE
52
C. Change Reporting Options Menu The third menu on the toolbar is called “Change Reporting Options.” The only option in this menu is Change Reporting Options. This function opens an expanded version of the Sign In pop-up window, where the user can change the report quarter, the job seeker or job opening group, and the reporting period beginning and end dates within a group. The user can also select a WIB/Office filter and/or an Office/Case Manager filter to view subsets of the data.

IV. REFERENCE GUIDE
53
D. Report Validation Menu The fourth menu on the toolbar is called “Report Validation.” Options in this menu include: 1. View Report Validation Table This function provides a window where the user can see a summary of the job seeker performance outcome groups and the total number of records and dollars, where applicable, for each group. By clicking on the arrow in the far left column next to a group, the user can view the detailed records in that group. 2. View Report Validation Summary The user selects the applicable report validation summary from the sidebar. This function displays a report that calculates the difference and percent difference between the validation value and the reported value for each report item. 3. View Facsimiles
The user selects the applicable report facsimile from the sidebar, for the 9002 A-E and the VETS 200 A-C. These facsimile reports contain the validation value for each report item (except for customer satisfaction values, which are the data entered values.) The reports are in the format proscribed in the ET 406 Handbook.

IV. REFERENCE GUIDE
54
4. Export ETA Counts This menu command produces a report for each of the five sections of the 9002 report, in the upload format specified by LERS. Select from the sidebar the section of the 9002 to be exported. Once selected, the software will indicate that the file has been exported by displaying the message “Done.” The reports are automatically saved to the ES folder and are titled ETA9002A.txt, ETA9002B.txt, ETA9002C.txt, ETA9002D.txt, and ETA9002E.txt. To save each report, the files should be renamed so that they are not overwritten by subsequent reports. 5. Export VETS-200 Counts This menu command produces a report for each of the three sections of the VETS 200 report, in the upload format specified by LERS. Select from the sidebar the section of the VETS report to be exported. Once selected, the software will indicate that the file has been exported by displaying the message “Done.” The reports are automatically saved to the ES folder and are titled VETS200(A).txt, VETS200(B).txt, and VETS200(C).txt. To save each report, the files should be renamed so that they are not overwritten by subsequent reports.

IV. REFERENCE GUIDE
55
6. View Duplicates This function allows the user to view and print a report listing the duplicate service records identified and rejected by the software. The report displays all of the duplicate service records for the group, including the SSN, the registration date, and the staff assisted service date that are used to determine when duplicate service records exist. Whenever two or more records with the same SSN have registration dates within four quarters of each other, the most recent record is retained. The duplicate report shows the rejected records. 7. Enter 9002C Cust. Sat. Scores/Counts
Click on the Report Validation menu and select Enter 9002C Cust. Sat. Scores/Counts. On the entry screen, key enter the state’s reported scores/counts in the appropriate cells.

IV. REFERENCE GUIDE
56
E. Data Element Validation Menu The fifth menu on the toolbar is called “Data Element Validation.” Options in this menu include: 1. Edit Worksheets: This function provides a window to view a summary of the sample for a particular group. Click on the summary row to view the sample detail. This will open up the data element validation worksheet summary for the sample selected. This summary screen is read only. To access, update, and print individual sampled records, double click on the applicable record. Double click in any column of the first observation to be validated. This will open up a condensed validation worksheet for the particular sampled observation. 2. Print Worksheets This function enables the user to print the worksheets in batch mode.

IV. REFERENCE GUIDE
57
F. Utilities Menu The sixth menu on the toolbar is called “Utilities.” Options in this menu include: 1. Compact Database Eliminates the temporary memory storage by compacting the database. This feature removes unnecessary files remaining in temporary memory storage after an import has been completed, without deleting files required for analysis and validation. In order for the software and database to function properly and efficiently during the import of large files, the user should compact the database prior to every import. Otherwise, errors may result even if the underlying source file is properly formatted. These overload errors may show up in both the error counter on the import screen and as database “overload” errors in the import.txt file. This function is only applicable to Access users. Users should exit the application after compacting and then reopen the application for further use. 2. Fix Database In the event the user receives an error message that says the database is damaged, this function will repair the database.

IV. REFERENCE GUIDE
58
3. Switch Database This function allows the user to select from multiple databases using a drop down menu. The current database may be archived by saving a copy of it in a different location. This functionality may be helpful if you:
• Have archived prior validation findings but still want to easily access them through the application
• Have split the validation file into two databases to keep the size
manageable for large states
• Want to access the state’s validation database as well as the demo database

IV. REFERENCE GUIDE
59
G. Window Menu The seventh menu on the toolbar is called “Window.” Options in this menu include: 1. Cascade Realign open windows to appear in a cascade from the top left corner of the screen.
2. Tile Horizontal Realign open windows horizontally. 3. Tile Vertical Realign open windows vertically. This menu also indicates the name of the open windows, with a check next to the dominant window.

IV. REFERENCE GUIDE
60
H. Help Menu The eighth menu on the toolbar is called “Help.” Options in this menu include: 1. Help Contents This feature is under development. 2. Contacting Mathematica Policy Research, Inc. This feature provides contact information for users who would like additional assistance with installing or using the software. Users should email [email protected], and specify the software version being used, the specific question, and the user’s contact information. 3. About This feature provides the software version number and product development information for the application.

V. ETA 9002 A-D REPORTING SCHEDULE
61
The following report schedule details which 9002 series reports are due each quarter, from the first 9002 A/B report due on 11/14/02 through the first annual performance report due on 8/15/05. The first two columns in the schedule specify the report due date and the applicable program report quarter. The report subject is provided in the third column and the date ranges covered by the report are provided in the fourth column. The dates in the fourth column are autofilled on the report validation sign in screen when the corresponding program report quarter is entered. The fifth column provides comments on the subject of each report. Customer satisfaction measures on the 9002 C cover the same report period as the 9002 A that is due at the same time. Therefore, states may have partial 9002 C reports to submit prior to 11-14-03. Definitions: 1. Report Due Date = 45 days following the report period ending date 2. EER = Entered employment rate. Wage data show up in either of the two
quarters following the registration quarter with at least one new employer when compared to the quarter prior to registration.
3. Retention = Any wages in the second quarter after the entered employment quarter.
4. Wage Record Report Lag = Two quarters
Report Due Date
Program Report Quarter
Report Subject Period Report Covers (Program Report Quarter)
Comments
11/14/02 200201 9002 A/B Regs/Services
7-1-02 to 9-30-02 1st Report (One Quarter)
2/14/03 200202 9002 A/B Regs/Services
7-1-02 to 12-31-02
2nd Report (Two Quarters)

V. ETA 9002 A-D REPORTING SCHEDULE
62
Report Due Date
Program Report Quarter
Report Subject Period Report Covers (Program Report Quarter)
Comments
5/14/03 200203 9002 A/B Regs/Services
7-1-02 to 3-31-03 3rd Report (Three Quarters)
8/14/03 200204 9002 A/B Regs/Services
7-1-02 to 6-30-03 4th Report (Four Quarters of Reg/ Services Data)
200301 9002 A/B Regs/Services
10-1-02 to 9-30-03
Drop a quarter and add a quarter
11/14/03
9002 C/D EER 7-1-02 to 9-30-02 1st Report of EER
200302 9002 A/B Regs/Services
1-1-03 to 12-31-03
Drop a quarter and add a quarter
2/14/04
9002 C/D EER 7-1-02 to 12-31-02
Two quarters of EER data
200303 9002 A/B Regs/Services
4-1-03 to 3-31-04 Drop a quarter and add a quarter
9002 C/D EER 7-1-02 to 3-31-03 Three quarters of EER data
5/15/04
9002 C/D Retention
7-1-02 to 9-30-02 1st report on retention (one quarter)
200304 9002 A/B Regs/Services
7-1-03 to 6-30-04 Drop a quarter and add a quarter
9002 C/D EER 7-1-02 to 6-30-03 1st report of four quarters of EER data
8/14/04
9002 C/D Retention
7-1-02 to 12-31-02
Two quarters of retention

V. ETA 9002 A-D REPORTING SCHEDULE
63
Report Due Date
Program Report Quarter
Report Subject Period Report Covers (Program Report Quarter)
Comments
200401 9002 A/B Regs/Services
10-1-03 to 9-30-04
Drop a quarter and add a quarter
9002 C/D EER 10-1-02 to 9-30-03
Drop a quarter and add a quarter
11/14/04
9002 C/D Retention
7-1-02 to 3-31-03 Three quarters of retention
200402 9002 A/B Regs/Services
1-1-04 to 12-31-04
Drop a quarter and add a quarter
9002 C/D EER 1-1-03 to 12-31-03
Drop a quarter and add a quarter
2/14/05
9002 C/D Retention
7-1-02 to 6-30-03 1st report of four quarters of retention
200403 9002 A/B Regs/Services
4-1-04 to 3-31-05 Drop a quarter and add a quarter
9002 C/D EER 4-1-03 to 3-31-04 Drop a quarter and add a quarter
5/15/05
9002 C/D Retention
10-1-02 to 9-30-03
Drop a quarter and add a quarter
200404 9002 A/B Regs/Services
7-1-04 to 6-30-05
9002 C/D EER 7-1-03 to 6-30-04
8/15/05
9002 C/D Retention
1-1-03 to 12-31-03
ANNUAL REPORT

V. ETA 9002 A-D REPORTING SCHEDULE
64
Example for calculating retention on 2/14/05 report, for the quarter beginning: 7/1/02 10/1/02 1/1/03 4/1/03 7/1/03 10/1/03 1/1/04 4/1/04 7/1/04 10/1/04 1/1/05 4/1/05 Qtr 1 Qtr 2 Qtr 3 Qtr 4 EER EER RET RET LAG LAG Report
Customer Satisfaction Surveys: Results reported quarterly with scores calculated on a PY basis.

VI. RECORD LAYOUTS
65
This chapter includes three record layout specifications. The first two record layouts specify the validation extract file formats for the group 1 (job seeker) and group 2 (job opening) records. The validation extracts should be ASCII files with comma delimited columns. Data must be in the order listed in the record layouts. The Data Type/Format column on the layouts indicates the generic values for text fields. Mandatory fields are specified. Blanks are acceptable in optional fields. However, blank or null values are not valid for mandatory fields and will result in the record being rejected. Quotes are not needed around field values but the files will import with quotes. The third record layout in this section specifies the file format for reported values for each of the 9002 A through E and VETS 200 A through C reports. These files of reported values are imported into the software, which processes each reported value file and compares the reported and validation values. Note that the Labor Exchange Reporting System (LERS) calls for double quotes on the first four fields and this format will also be accepted. Following this third record layout is a sample file of reported values.

Extract file type is - ASCII, comma delimited columns. The record layout should be used to create a file of all ES active job seekers reported for Group 1 - 9002 A-D and VETS 200 A-C. Reconstruction should be done at the end of report period being validated.
Data must be in the order listed below. The Data Type/Format indicates the generic values for text fields. All fields listed as mandatory are required fields.
Employment Service Record Layout
Number Field Name Field Description Data Type/Format
1 OBS Sequential number, starting at 1 Number – 00000000 (Mandatory)
2 SSN The job seekers' Social Security Number Number – 000000000 (Mandatory)
3 Date of Birth Indicate the date of birth of job seeker. Date – YYYYMMDD
4 Gender Male or Female Number – 1 = Male; 2 = Female
5 Date of Registration Indicate the date on which the job seeker registered for services in ES.
Date – YYYYMMDD
6 Program Source of Registration
Indicate whether veteran job seeker was registered by DVOP or LVER staff.
Number: 1 = DVOP2 = LVER
7 Persons with Disability Registered job seeker with any disability as defined in section 3 of the Americans with Disabilities Act of 1990 (42 U.S.C. 12102). The term "disability" means, with respect to an individual (a) a physical or mental impairment that substantially limits one or more of the major life activities of such individual; (b) a record of such an impairment; or (c) being regarded as having such an impairment.
Number - 1 = Yes; 2 = Yes and disability results in a substantial impediment to employment; 3 = No
8 Race: American Indian or Alaska Native
A person having origins in any of the original peoples of North America and South America (including Central America), and who maintains cultural identification through tribal affiliation or community recognition.
Number - 1 = Yes; 2 = No
9 Race: Asian A person having origins in any of the original people of the Far East, Southeast Asia, or the Indian Subcontinent (e.g., India, Pakistan, Bangladesh, Sri Lanka, Nepal, Sikkim, and Bhutan). This area includes, for example, Cambodia, China, Japan, Korea, Malaysia, the Philippine Islands, Thailand, and Vietnam.
Number - 1 = Yes; 2 = No
10 Race: Black or African American
A person having origins in any of the black racial groups of Africa.
Number - 1 = Yes; 2 = No
11 Race: Hawaiian Native or other Pacific Islander
A person having origins in any of the original peoples of Hawaii, Guam, Samoa, or other Pacific Islands.
Number - 1 = Yes; 2 = No
12 Race: White A person having origins in any of the original peoples of Europe, the Middle East, or North Africa.
Number - 1 = Yes; 2 = No
Wednesday, 3 September, 2003 Page 1 of 15
Number Field Name Field Description Data Type/Format
13 Race: Other A person who has identified themselves as having origins from racial categories other than the ones listed.
Number - 1 = Yes; 2 = No
14 More Than One Race A person who has identified themselves as having origins from more than one racial category.
Number - 1 = Yes; 2 = No
15 Hispanic or Latino Registered job seekers who are of Cuban, Mexican, Puerto Rican, South or Central American, or other Spanish culture in origin, regardless of race. NOTE: Ethnicity information (Hispanic, other) is collected separately from race information. Individuals who indicate that they are Hispanic or Latino should also have the opportunity to select one or more racial categories. NOTE: Information on ethnicity should be collected before information on race.
Number - 1 = Yes; 2 = No
16 Veteran and Eligible Person
Registered job seekers who are (Title 38) veterans or eligible persons. A veteran is an individual who served on active duty for a period of more than 180 days and was discharged or released with other than a dishonorable discharge or was discharged or released because of a service connected disability; or as a member of a reserve component under an order to active duty pursuant to section 672 (a), (d), or, (g), 673 (a) of Title 10, U.S.C., served on active duty during a period of war or in a campaign or expedition for which a campaign badge is authorized and was discharged or released from such duty with other than a dishonorable discharge. An eligible person is one who is(a) the spouse of any person who died on active duty or of a service-connected disability; or,(b) the spouse of any member of the Armed Forces serving on active duty who at the time of application for assistance under this part, is listed, pursuant to 38 U.S.C. 101 and the regulations issued thereunder, by the Secretary concerned, in one or more of the following categories and has been so listed for more than 90 days:(i) missing in action(ii) captured in the line of duty by a hostile force, or(iii) forcibly detained or interned in the line of duty by a foreign government or power; or(c ) the spouse of any person who has a total disability permanent in nature resulting from a service-connected disability or the spouse of a veteran who died while a disability so evaluated was in existence.
Number – 1 = Yes <= 180 days (for WIA purposes)2 = Yes > 180 days (for W-P and VETS purposes)3 = No
Wednesday, 3 September, 2003 Page 2 of 15

Number Field Name Field Description Data Type/Format
17 Campaign Badge Veteran
The registered job seeker is a campaign badge veteran if: The individual is a veteran who served on active duty in the U.S. armed forces during a war or in a campaign or expedition for which a campaign badge has been authorized as identified and listed by the Office of Personnel Management (OPM). Please see Appendix B for the current list as of 01/07/2000. For campaigns occurring after this date, updated information may be obtained on the OPM web site:http://www.opm.gov/veterans/html/vgmedal2.htm.
Number - 1 = Yes; 2 = Yes, Vietnam-era veteran; 3 = No
18 Disabled Veteran A disabled veteran is a veteran who is entitled to compensation regardless of rating (including those rated at 0%); or who but for the receipt of military retirement pay would be entitled to compensation, under laws administered by the Department of Veterans Affairs; or was discharged or released from active duty because of a service-connected disability. A veteran rate at 0% for disability is a service-connected disabled veteran who is entitled to compensation (the law does not require receipt of compensation) whether or not he/she receives monetary benefits or compensation. 0% rated disabled veterans may be reevaluated at a later date to 10% or more.
Number - 1 = Yes; 2 = Yes, special disabled; 3 = No
19 Newly Separated Veteran
A newly separated veteran is a Title 38 eligible veteran whose date of separation from active U.S. military service is within the 36 months prior to the beginning of the registration year.
Number - 1 = Yes; 2 = No
20 Special Disabled Veteran A special disabled veteran is a veteran who(a) is entitled to compensation (or who, but for the receipt of military retirement pay would be entitled to compensation) under laws administered by the Department of Veterans Affairs (DVA) for a disability,(i) rated at 30 percent or more or,(ii) rated at 10 or 20 percent in the case of a veteran who has been determined by DVA to have a serious employment handicap; or(b) a person who was discharged or released from active duty because of a service-connected disability.
Number - 2 = Yes, special disabled
21 Transitioning Servicemembers
A Transitioning Servicemember is defined as a servicemember in active duty status (including separation leave) who registers for employment services and is within 24 months of retirement or 12 months of separation.
Number - 2 = Yes
Wednesday, 3 September, 2003 Page 3 of 15

Number Field Name Field Description Data Type/Format
22 Employment Status – Employed
The status of job seekers at date of registration (a) who are currently working as paid employees, or who work in their own businesses, professions; or on their own farms; and (b) who are not working, but who have jobs or businesses from which they are temporarily absent because of temporary lay-off, illness, bad weather, vacation, labor management disputes, or personal reasons, whether they are paid for the time off or are seeking other jobs. Members of the Armed Forces stationed in the U.S. are included.
Number - 1 = Employed
23 Employment Status – Unemployed
The status of job seekers at date of registration (a) who are not employed; or (b) who, although employed, have received notice of termination of employment.
Number - 2 = Not employed
24 Education - In School Job seekers who, at time of registration, are currently attending secondary, vocational, technical, or academic school full-time, or who are between terms and intend to return to school.
Number - 1 = Student, H.S. or less; 2 = Student, attending post-H.S.
25 Education - Not a High School Graduate
Job seekers who, at time of registration, are no longer attending any school and have not received a secondary school diploma or its recognized equivalent.
Number - 00-11 = Not a High School Graduate; 3 = Not attending school; H.S. dropout.
26 Education - High School Graduate or GED
Job seekers who, at time of registration, are not attending any school and have either graduated from high school or hold a GED.
Number - 12 = H.S. Graduate; 88 = Attained H.S. equivalency; 4 = Not attending school; H.S. graduate
27 Education - Post Secondary Degree or Certification
Job seekers who, at time of registration, have received a post-secondary vocational, technical, or academic degree or certificate of successful completion.
Number - 1 = Yes
28 Eligible Claimant Registered job seekers who have filed a claim for unemployment compensation and who, during the registration year, have been determined monetarily eligible for benefit payments under one or more State or Federal unemployment compensation programs.
Number - 1 = Eligible Claimant referred by WPRS; 2 = Eligible claimant not referred by WPRS
Wednesday, 3 September, 2003 Page 4 of 15

Number Field Name Field Description Data Type/Format
29 MSFW Seasonal Farm Worker - Persons who during the preceding 12 months worked at least an aggregate of 25 or more days or parts of days in which some work was performed in farm work, earned at least half of their earned income from farm work, and were not employed in farm work year round by the same employer. For purposes of this definition only, a farm labor contractor is not considered an employer. Non-migrant individuals who are full-time students are excluded. Migrant Farm Worker - Seasonal farm workers who have to travel to do the farm work so that they were unable to return to their permanent residence within the same day. Full-time student traveling in organized groups, rather than with their families, are excluded. Migrant Food Processor - Persons who during the preceding 12 months worked at least an aggregate of 25 or more days or parts of days in which some work was performed in food processing, who earned at least half of his earned income from processing work, and were not employed in food processing year round by the same employer. Migrant food processing workers who are full-time students, but who travel in organized groups rather than with their families, are excluded.
Number - 1 = Yes
30 Interstate Interstate registered job seekers that are the result of ES activities in the placement process involving joint action of local offices or One Stop Centers in different states in distributing job order information and referring and placing of qualified registered job seekers. This includes agricultural placement activity. This should be reported by the job seeker holding state.
Number - 1 = Yes
Wednesday, 3 September, 2003 Page 5 of 15
Number Field Name Field Description Data Type/Format
31 Dislocated Worker Indicate the date of dislocation if job seeker is a dislocated worker. The term ``dislocated worker'' means an individual who--(A)(i) has been terminated or laid off, or who has received a notice of termination or layoff, from employment;(ii)(I) is eligible for or has exhausted entitlement to unemployment compensation; or(II) has been employed for a duration sufficient to demonstrate, to the appropriate entity at a one-stop center referred to in section 134(c), attachment to the workforce, but is not eligible for unemployment compensation due to insufficient earnings or having performed services for an employer that were not covered under a State unemployment compensation law; and(iii) is unlikely to return to a previous industry or occupation;(B)(i) has been terminated or laid off, or has received a notice of termination or layoff, from employment as a result of any permanent closure of, or any substantial layoff at, a plant, facility, or enterprise;(ii) is employed at a facility at which the employer has made a general announcement that such facility will close within 180 days; or(iii) for purposes of eligibility to receive services other than training services described in section 134(d)(4) intensive services described in section 134(d)(3), or supportive services, is employed at a facility at which the employer has made a general announcement that such facility will close;(C) was self-employed (including employment as a farmer, a rancher, or a fisherman) but is unemployed as a result of general economic conditions in the community in which the individual resides or because of natural disasters; or(D) is a displaced homemaker.(10) Displaced homemaker.--The term ``displaced homemaker'' means an individual who has been providing unpaid services to family members in the home and who--(A) has been dependent on the income of another family member but is no longer supported by that income; and(B) is unemployed or underemployed and is experiencing difficulty in obtaining or upgrading employment.
Date – YYYYMMDD
Wednesday, 3 September, 2003 Page 6 of 15

Number Field Name Field Description Data Type/Format
32 Most Recent Date Received Staff Assisted Services
Indicate the most recent date a job seeker received staff-assisted services during the current registration year. Staff-assisted services include: (a) referral to a job, (b) placement in training, (c) reemployment services (d) assessment services, including an assessment interview, testing, counseling, or employability planning, (e) case management, (f) career guidance, (g) job search activities, (h) federal bonding program, (i) job development contacts, (j) tax credit eligibility determination, (k) referral to other services, including skills training, educational services, and supportive services, or (l) any other service requiring significant expenditure of staff time. Application taking/registration and the use of self-service or facilitated self-help services are not included as staff-assisted services.
Date – YYYYMMDD
33 Most Recent Date Received Staff Assisted Services (DVOP)
Indicate the most recent date a registered job seeker received staff-assisted services during the current registration year by DVOP staff. Staff-assisted services include: (a) referral to a job, (b) placement in training, (c) reemployment services (d) assessment services, including an assessment interview, testing, counseling, or employability planning, (e) case management, (f) career guidance, (g) job search activities, (h) federal bonding program, (i) job development contacts, (j) tax credit eligibility determination, (k) referral to other services, including skills training, educational services, and supportive services, or (l) any other service requiring significant expenditure of staff time. Application taking/registration and the use of self-service or facilitated self-help services are not included as staff-assisted services.
Date – YYYYMMDD
34 Most Recent Date Received Staff Assisted Services (LVER)
Indicate the most recent date a registered job seeker received staff-assisted services during the current registration year by LVER staff. Staff-assisted services include: (a) referral to a job, (b) placement in training, (c) reemployment services (d) assessment services, including an assessment interview, testing, counseling, or employability planning, (e) case management, (f) career guidance, (g) job search activities, (h) federal bonding program, (i) job development contacts, (j) tax credit eligibility determination, (k) referral to other services, including skills training, educational services, and supportive services, or (l) any other service requiring significant expenditure of staff time. Application taking/registration and the use of self-service or facilitated self-help services are not included as staff-assisted services.
Date – YYYYMMDD
Wednesday, 3 September, 2003 Page 7 of 15
Number Field Name Field Description Data Type/Format
35 Most Recent Date Provided Case Management Services
Indicate the most recent date a registered job seeker who is a veteran assigned a case manager received career guidance, referral to supportive services, job development contacts, referral to jobs, referral to training, or any combination of those services.
Date – YYYYMMDD
36 Most Recent Date Provided Case Management Services (DVOP)
Indicate the most recent date a registered job seeker who is a veteran assigned a DVOP case manager received career guidance, referral to supportive services, job development contacts, referral to jobs, referral to training, or any combination of those services.
Date – YYYYMMDD
37 Most Recent Date Provided Case Management Services (LVER)
Indicate the most recent date a registered job seeker who is a veteran assigned a LVER case manager received career guidance, referral to supportive services, job development contacts, referral to jobs, referral to training, or any combination of those services.
Date – YYYYMMDD
38 Most Recent Date Received Career Guidance
Indicate the most recent date a job seeker received services which include the provision of information, materials, suggestions, or advice which are intended to assist the job seeker in making occupation or career decisions.
Date – YYYYMMDD
39 Most Recent Date Received Career Guidance (DVOP)
Indicate the most recent date that a registered job seeker received services which include the provision of information, materials, suggestions, or advice by DVOP staff which are intended to assist the job seeker in making occupation or career decisions.
Date – YYYYMMDD
40 Most Recent Date Received Career Guidance (LVER)
Indicate the most recent date that a registered job seeker received services which include the provision of information, materials, suggestions, or advice by LVER staff which are intended to assist the job seeker in making occupation or career decisions.
Date – YYYYMMDD
41 Most Recent Date Referred to Support Services
Indicate the most recent date a registered job seeker was referred to services designed to assist an individual to achieve physical, mental, social or economic well being and reduce or eliminate barriers to employment. These include health and medical services, child care, emergency financial services, relocation assistance, residential support, nutritional and legal services.
Date – YYYYMMDD
42 Most Recent Date Referred to Support Services (DVOP)
Indicate the most recent date a registered job seeker was referred by DVOP staff to services designed to assist an individual to achieve physical, mental, social or economic well being and reduce or eliminate barriers to employment. These include health and medical services, child care, emergency financial services, relocation assistance, residential support, nutritional and legal services.
Date – YYYYMMDD
Wednesday, 3 September, 2003 Page 8 of 15

Number Field Name Field Description Data Type/Format
43 Most Recent Date Referred to Support Services (LVER)
Indicate the most recent date a registered job seeker was referred by LVER staff to services designed to assist an individual to achieve physical, mental, social or economic well being and reduce or eliminate barriers to employment. These include health and medical services, child care, emergency financial services, relocation assistance, residential support, nutritional and legal services.
Date – YYYYMMDD
44 Most Recent Date of Job Search Activities
Indicate the most recent date a registered job seeker was provided services which are designed to help the job seeker plan and carry out a successful job hunting strategy. The services include resume preparation assistance, job search workshops, including the Transition Assistance Program (TAP) workshops, job finding clubs, provision of specific labor market information and development of a job search plan. "Resume Assistance" - Providing instructions on the content and format of resumes and cover letters and providing assistance in the development and production of the same. "Job Search Workshops" - An organized activity that provides instructions on resume writing, application preparation, interviewing skills, and/or job lead development. "Job Finding Clubs" - have all the elements of the ES Job Search Workshop, plus a period of structured application where participants attempt to obtain jobs. "Provision of Specific Labor Market Information" – Information concerning occupational staffing patterns, hiring patterns, working conditions, and pay of firms or industries. "Job Search Planning" - Development of a plan (not necessarily a written plan) that includes the necessary steps and timetables to achieve employment in specific occupational, industry, or geographic area.
Date – YYYYMMDD
Wednesday, 3 September, 2003 Page 9 of 15
Number Field Name Field Description Data Type/Format
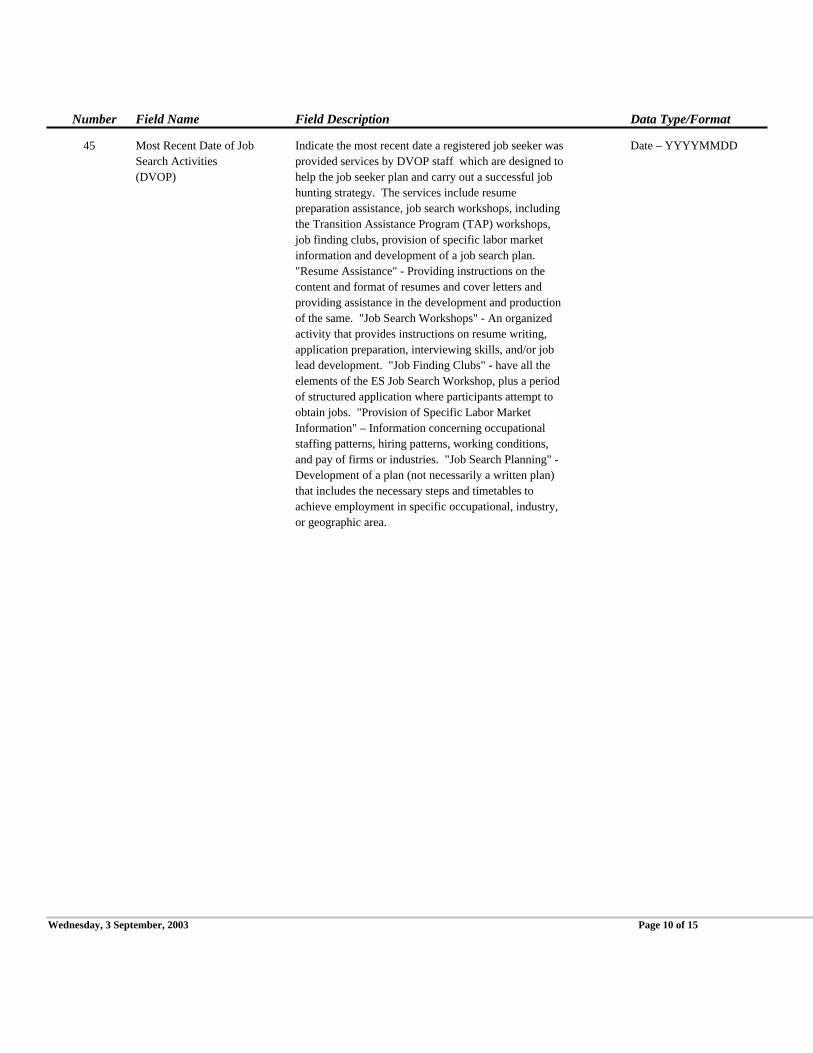
45 Most Recent Date of Job Search Activities (DVOP)
Indicate the most recent date a registered job seeker was provided services by DVOP staff which are designed to help the job seeker plan and carry out a successful job hunting strategy. The services include resume preparation assistance, job search workshops, including the Transition Assistance Program (TAP) workshops, job finding clubs, provision of specific labor market information and development of a job search plan. "Resume Assistance" - Providing instructions on the content and format of resumes and cover letters and providing assistance in the development and production of the same. "Job Search Workshops" - An organized activity that provides instructions on resume writing, application preparation, interviewing skills, and/or job lead development. "Job Finding Clubs" - have all the elements of the ES Job Search Workshop, plus a period of structured application where participants attempt to obtain jobs. "Provision of Specific Labor Market Information" – Information concerning occupational staffing patterns, hiring patterns, working conditions, and pay of firms or industries. "Job Search Planning" - Development of a plan (not necessarily a written plan) that includes the necessary steps and timetables to achieve employment in specific occupational, industry, or geographic area.
Date – YYYYMMDD
Wednesday, 3 September, 2003 Page 10 of 15

Number Field Name Field Description Data Type/Format
46 Most Recent Date of Job Search Activities (LVER)
Indicate the most recent date a registered job seeker was provided services by LVER staff which are designed to help the job seeker plan and carry out a successful job hunting strategy. The services include resume preparation assistance, job search workshops, including the Transition Assistance Program (TAP) workshops, job finding clubs, provision of specific labor market information and development of a job search plan. "Resume Assistance" - Providing instructions on the content and format of resumes and cover letters and providing assistance in the development and production of the same. "Job Search Workshops" - An organized activity that provides instructions on resume writing, application preparation, interviewing skills, and/or job lead development. "Job Finding Clubs" - have all the elements of the ES Job Search Workshop, plus a period of structured application where participants attempt to obtain jobs. "Provision of Specific Labor Market Information" – Information concerning occupational staffing patterns, hiring patterns, working conditions, and pay of firms or industries. "Job Search Planning" - Development of a plan (not necessarily a written plan) that includes the necessary steps and timetables to achieve employment in specific occupational, industry, or geographic area.
Date – YYYYMMDD
47 Most Recent Date Referred to WIA Services
Indicate the most recent date a registered job seeker was referred to a service delivery component funded under Title I of the Workforce Investment Act of 1998.
Date – YYYYMMDD
48 Most Recent Date Referred to WIA Services (DVOP)
Indicate the most recent date a registered job seeker was referred by DVOP staff to a service delivery component funded under Title I of the Workforce Investment Act of 1998.
Date – YYYYMMDD
49 Most Recent Date Referred to WIA Services (LVER)
Indicate the most recent date a registered job seeker was referred by LVER staff to a service delivery component funded under Title I of the Workforce Investment Act of 1998.
Date – YYYYMMDD
50 Most Recent Date Referred to Employment
Indicate the most recent date a registered job seeker was referred to employment. A referral to employment is(a) the act of bringing to the attention of an employer an job seeker or group of registered job seekers who are available for a job and(b) the record of such a referral. It means the same as "referral to a job."
Date – YYYYMMDD
Wednesday, 3 September, 2003 Page 11 of 15

Number Field Name Field Description Data Type/Format
51 Most Recent Date Referred to Employment (DVOP)
Indicate the most recent date a registered job seeker was referred by DVOP staff to employment. A referral to employment is(a) the act of bringing to the attention of an employer an job seeker or group of registered job seekers who are available for a job and(b) the record of such a referral. It means the same as "referral to a job."
Date – YYYYMMDD
52 Most Recent Date Referred to Employment (LVER)
Indicate the most recent date a registered job seeker was referred by LVER staff to employment. A referral to employment is(a) the act of bringing to the attention of an employer an job seeker or group of registered job seekers who are available for a job and(b) the record of such a referral. It means the same as "referral to a job."
Date – YYYYMMDD
53 Most Recent Date Referred to Federal Training
Indicate the most recent date a registered job seeker who is a veteran was referred to any intensive service or training program supported by the Federal Government, such as WIA funded projects, TAA, NAFTA, and Job Corps. This does not include DVA-OJT.
Date – YYYYMMDD
54 Most Recent Date Referred to Federal Training (DVOP)
Indicate the most recent date a registered job seeker who is a veteran was referred by DVOP staff to any intensive service or training program supported by the Federal Government, such as WIA funded projects, TAA, NAFTA, and Job Corps. This does not include DVA-OJT.
Date – YYYYMMDD
55 Most Recent Date Referred to Federal Training (LVER)
Indicate the most recent date a registered job seeker who is a veteran was referred by LVER staff to any intensive service or training program supported by the Federal Government, such as WIA funded projects, TAA, NAFTA, and Job Corps. This does not include DVA-OJT.
Date – YYYYMMDD
56 Most Recent Date Placed in Federal Training
Indicate the most recent date a registered job seeker who is a veteran was verified to have entered any job training program supported by the Federal government such as WIA, Job Corps, etc. This does not include placements in DVA-OJT.
Date – YYYYMMDD
57 Most Recent Date Placed in Federal Training (DVOP)
Indicate the most recent date a registered job seeker who is a veteran was verified by DVOP staff to have entered any job training program supported by the Federal government such as WIA, Job Corps, etc. This does not include placements in DVA-OJT.
Date – YYYYMMDD
58 Most Recent Date Placed in Federal Training (LVER)
Indicate the most recent date a registered job seeker who is a veteran was verified by LVER staff to have entered any job training program supported by the Federal government such as WIA, Job Corps, etc. This does not include placements in DVA-OJT.
Date – YYYYMMDD
Wednesday, 3 September, 2003 Page 12 of 15

Number Field Name Field Description Data Type/Format
59 Most Recent Date Referred to Federal Job
Indicate the most recent date a registered job seeker who is veteran was referred to a job opening filed with a placement office by a department or agency of the Federal government or other entity under the jurisdiction of the U.S. Office of Personnel Management.
Date – YYYYMMDD
60 Most Recent Date Referred to Federal Job (DVOP)
Indicate the most recent date a registered job seeker who is veteran was referred by DVOP staff to a job opening filed with a placement office by a department or agency of the Federal government or other entity under the jurisdiction of the U.S. Office of Personnel Management.
Date – YYYYMMDD
61 Most Recent Date Referred to Federal Job (LVER)
Indicate the most recent date a registered job seeker who is veteran was referred by LVER staff to a job opening filed with a placement office by a department or agency of the Federal government or other entity under the jurisdiction of the U.S. Office of Personnel Management.
Date – YYYYMMDD
62 Most Recent Date Placed in Federal Job
Indicate the most recent date a registered job seeker who is a veteran was placed in a job opening filed with a placement office by a department or agency or other entity under the jurisdiction of the U.S. Office of Personnel Management.
Date – YYYYMMDD
63 Most Recent Date Placed in Federal Job (DVOP)
Indicate the most recent date a registered job seeker who is veteran was placed in a job opening filed with a placement office by a department or agency or other entity under the jurisdiction of the U.S. Office of Personnel Management. (DVOP)
Date – YYYYMMDD
64 Most Recent Date Placed in Federal Job (LVER)
Indicate the most recent date a registered job seeker who is veteran was placed in a job opening filed with a placement office by a department or agency or other entity under the jurisdiction of the U.S. Office of Personnel Management. (LVER)
Date – YYYYMMDD
65 Most Recent Date Referred to a FCJL Job
Indicate the most recent date a registered job seeker who is either a special disabled veteran, Vietnam era veteran, campaign veteran, or newly separated veteran was referred to a job opening listed by an employer identified as a Federal contractor.
Date – YYYYMMDD
66 Most Recent Date Referred to a FCJL Job (DVOP)
Indicate the most recent date a registered job seeker who is either a special disabled veteran, Vietnam era veteran, campaign veteran, or newly separated veteran was referred by DVOP staff to a job opening listed by an employer identified as a Federal contractor.
Date – YYYYMMDD
Wednesday, 3 September, 2003 Page 13 of 15

Number Field Name Field Description Data Type/Format
67 Most Recent Date Referred to a FCJL Job (LVER)
Indicate the most recent date a registered job seeker who is either a special disabled veteran, Vietnam era veteran, campaign veteran, or newly separated veteran was referred by DVOP staff to a job opening listed by an employer identified as a Federal contractor.
Date – YYYYMMDD
68 Most Recent Date Placed in FCJL Job
Indicate the most recent date a registered job seeker who is either a special disabled veteran, Vietnam era veteran, campaign veteran, or newly separated veteran was placed in a FCJL Job.
Date – YYYYMMDD
69 Most Recent Date Placed in FCJL Job (DVOP)
Indicate the most recent date a registered job seeker who is either a special disabled veteran, Vietnam era veteran, campaign veteran, or newly separated veteran was placed in a FCJL Job. (DVOP)
Date – YYYYMMDD
70 Most Recent Date Placed in FCJL Job (LVER)
Indicate the most recent date a registered job seeker who is either a special disabled veteran, Vietnam era veteran, campaign veteran, or newly separated veteran was placed in a FCJL Job. (LVER)
Date – YYYYMMDD
71 Wages 1st Quarter Prior to Registration
Total earnings from wage records in the first quarter before registration quarter.
Number: 00000.00
72 Wages 1st Quarter After Registration Quarter
Total earnings from wage records in the first quarter after registration quarter
Number: 00000.00
73 Wages 2nd Quarter After Registration Quarter
Total earnings from wage records in the second quarter after registration quarter.
Number: 00000.00
74 Wages 3rd Quarter After Registration Quarter
Total earnings from wage records in the third quarter after registration quarter.
Number: 00000.00
75 Wages 4th Quarter After Registration Quarter
Total earnings from wage records in the fourth quarter after registration quarter.
Number: 00000.00
76 Employer Identification Number (1st Quarter Prior to Registration Quarter)
Indicate the unique employer identification number from the wage records first quarter prior to registration quarter.
Alphanumeric (separate multiple EIN’s by semi-colon (;)
77 Employer Identification Number (1st Quarter After Registration Quarter)
Indicate the unique employer identification number from the wage records first quarter after the registration quarter.
Alphanumeric (separate multiple EIN’s by semi-colon (;)
78 Employer Identification Number (2nd Quarter After Registration Quarter)
Indicate the unique employer identification number from the wage records second quarter after the registration quarter.
Alphanumeric (separate multiple EIN’s by semi-colon (;)
79 WIB/Office Indicate the WIB or office from which the participant was provided services.
Text
80 Office/Case Manager Indicate the office or case manager for the participant. Text
Wednesday, 3 September, 2003 Page 14 of 15

Number Field Name Field Description Data Type/Format
81 User Field User defined field Text
Wednesday, 3 September, 2003 Page 15 of 15

Extract file type is - ASCII, comma delimited columns. The record layout should be used to create a file of all ES job openings received reported for Group 2 - 9002 E. Reconstruction should be done at the end of report period being validated. Data must be in the order listed below. The Data Type/Format indicates the generic values for text fields. All fields listed as mandatory are required
fields.
Employment Service Record Layout
Number Field Name Field Description Data Type/Format
1 OBS Sequential number, starting at 1. Number – 00000000 (Mandatory)
2 Date Received Job Opening
Indicate the date the job opening was received. Date – YYYYMMDD (Mandatory)
3 Employer Type Indicate whether the employer type was a federal contractor for a job opening received.
Text: FCJL
4 O*NET SOC Code Indicate the Occupational Information Network classification code for the job opening received.
Number: 11 – 55
5 NAICS Code Indicate the North American Industry Classification System code for the job opening received.
Number: 11 – 92
6 Employer Identification Number
Indicate the unique employer identification number for job opening received.
Alphanumeric
7 WIB/Office Indicate the WIB or office from which the participant was provided services.
Text
8 Office/Case Manager Indicate the office or case manager for the participant. Text
9 User Field User defined field Text
Thursday, 7 November, 2002 Page 1 of 1

Extract file type is - ASCII, comma delimited columns. The record layout should be used to create a file of all reported values for the 9002 A-E and VETS 200 A-C reports. Reported values for each section of the 9002 and VETS 200 reports should be loaded separately. Reconstruction should be done at the end of report period being validated. Data must be in the order listed below. The Data Type/Format indicates the generic values for text fields. For element Number 4 (Report), the text values 9002A through 9002E represent the corresponding sections of the 9002 report. The text values 200A, 200B and 200C represent the VETS 200 A,B and C respectively. All fields listed as mandatory are required fields.
Employment Service Reported Values Record Layout
Number Field Name Field Description Data Type/Format
Row Indicate the row of the report. Number – 1-31 (Mandatory)
1
State State abbreviation Text (Mandatory)2
Quarter End Date Indicate the last day of the report quarter being validated.
Number - YYYYMMDD (Mandatory)
3
Report Indicate the report for which the values are being reported.
Text - 9002A; 9002B; 9002C; 9002D; 9002E; 200A; 200B; 200C (Mandatory)
4
Reported Value Enter the reported value for each applicable row in report.
Number5-26
Friday, 8 November, 2002 Page 1 of 1

VI. RECORD LAYOUTS
83
Employment Service Sample Import File for 9002C Report Values