epson dfx 8500 user manual
TRANSCRIPT

8/22/2019 Epson DFX 8500 User Manual
http://slidepdf.com/reader/full/epson-dfx-8500-user-manual 1/252

8/22/2019 Epson DFX 8500 User Manual
http://slidepdf.com/reader/full/epson-dfx-8500-user-manual 2/252
Printe r Pa rts
paper supports**
sprockets**
** rear tractor unit partsprint head
ribbon cartridge
top cover
paper bail
control panel
power switch
* front tractor unit parts
sprockets*
paper supports*
front cover
serial interface
parallel interface
rear cover
paper separator cover
paper separator
rear flap

8/22/2019 Epson DFX 8500 User Manual
http://slidepdf.com/reader/full/epson-dfx-8500-user-manual 3/252
9-Pin Dot Matrix Printer
All rights reserved. No part of this publication may be reproduced, stored in a retrievalsystem, or transmitted in any form or by any means, mechanical, photocopying, recording,or otherwise, without the prior written permission of SEIKO EPSON CORPORATION.No patent liability is assumed with respect to the use of the information contained herein.
Neither is any liability assumed for damages resulting from the use of the informationcontained herein.
Neither SEIKO EPSON CORPORATION nor its affiliates shall be liable to the purchaserof this product or third parties for damages, losses, costs, or expenses incurred by thepurchaser or third parties as a result of: accident, misuse, or abuse of this product orunauthorized modifications, repairs, or alterations to this product.
SEIKO EPSON CORPORATION shall not be liable against any damages or problemsarising from the use of any options or any consumable products other than thosedesignated as Original EPSON Products or EPSON Approved Products by SEIKO EPSONCORPORATION.
EPSON and EPSON ESC/P are registered trademarks of SEIKO EPSON CORPORATION.
General Notice: Other product names used herein are for identification purposes only and may betrademarks of their respective owners.
Copyright © 1997 by SEIKO EPSON CORPORATION, Nagano, Japan.
User’s Guide
®

8/22/2019 Epson DFX 8500 User Manual
http://slidepdf.com/reader/full/epson-dfx-8500-user-manual 4/252
FC C C o m p lia n c e Sta te m e n t
Fo r Unite d Sta tes Use rs
This equipment has been tested and found to comply with the limits for a Class B digitaldevice, pursuant to Part 15 of the FCC Rules. These limits are designed to provide
reasonable protection against harmful interference in a residential installation. Thisequipment generates, uses and can radiate radio frequency energy and, if not installed andused in accordance with the instructions, may cause harmful interference to radio ortelevision reception. However, there is no guarantee that interference will not occur in aparticular installation. If this equipment does cause interference to radio and televisionreception, which can be determined by turning the equipment off and on, the user isencouraged to try to correct the interference by one or more of the following measures.
G
Reorient or relocate the receiving antenna
G
Increase the separation between the equipment and receiver
G Connect the equipment into an outlet on a circuit different from that to which thereceiver is connected
G
Consult the dealer or an experienced radio/TV technician for help.
WARNING
The connection of a non-shielded equipment interface cable to this equipment willinvalidate the FCC Certification of this device and may cause interference levels whichexceed the limits established by the FCC for this equipment. It is the responsibility of theuser to obtain and use a shielded equipment interface cable with this device. If this
equipment has more than one interface connector, do not leave cables connected to unusedinterfaces.
Changes or modifications not expressly approved by the manufacturer could void theuser’s authority to operate the equipment.
For Ca na dia n Use rs
This Class B digital apparatus meets all requirements of the Canadian Interference-Causing Equipment Regulations.
Cet appareil numérique de la classe B respecte toutes les exigences du Règlement sur le
matériel brouilleur du Canada.
i i

8/22/2019 Epson DFX 8500 User Manual
http://slidepdf.com/reader/full/epson-dfx-8500-user-manual 5/252
De c la ra tio n of C o nfo rm ity
According to ISO/IEC Guide 22 and EN 45014
Manufacturer: SEIKO EPSON CORPORATIONAddress: 3-5, Owa 3-chome, Suwa-shi,
Nagano-ken 392-8502 Japan
Representative: EPSON EUROPE B.V.Address: Prof. J. H. Bavincklaan 5 1183
AT AmstelveenThe Netherlands
Declares that the Product:
Product Name: Dot Matrix PrinterType Name: DFX-8500Model: P970A
Conforms to the following Directive(s) and Norm(s):
Directive 89/336/EEC:EN 55022 Class BEN 61000-3-2EN 61000-3-3EN 50082-1
IEC 801-2IEC 801-3IEC 801-4
Directive 73/23/EEC:EN 60950
March 1998
Y. IshiiPresident of EPSON EUROPE B.V.
i i i

8/22/2019 Epson DFX 8500 User Manual
http://slidepdf.com/reader/full/epson-dfx-8500-user-manual 6/252
Sa fe ty Info rm a tio n
Im p o rta nt Sa fe ty Instruc tio ns Before using the printer, read all of these instructions to make sureyou use the printer safely and effectively. Follow all warnings andinstructions marked on the printer.
G Do not place the printer on an unstable surface or near aradiator or heat source.
G Place the printer on a flat surface. The printer will not operateproperly if it is tilted or at an angle.
G Do not block or cover the openings in the printer’s cabinet. Donot insert objects through the slots.
G
Use only the type of power source indicated on the printer’slabel.
G Connect all equipment to properly grounded power outlets.
Avoid using outlets on the same circuit as photocopiers or aircontrol systems that regularly switch on and off.
G
Do not let the power cord become damaged or frayed.
G If you use an extension cord with the printer, make sure thetotal ampere rating of the devices plugged into the extensioncord does not exceed the cord’s ampere rating. Also, make surethe total ampere rating of all devices plugged into the wall
outlet does not exceed the wall outlet’s ampere rating.G
Unplug the printer before cleaning. Clean with a damp clothonly. Do not spill liquid on the printer.
G Except as specifically explained in this guide, do not attemptto service the printer yourself.
i v

8/22/2019 Epson DFX 8500 User Manual
http://slidepdf.com/reader/full/epson-dfx-8500-user-manual 7/252
G
Unplug the printer and refer servicing to qualified servicepersonnel under the following conditions:
If the power cord or plug is damaged; if liquid has entered
the printer; if the printer has been dropped or the cabinetdamaged; if the printer does not operate normally or exhibitsa distinct change in performance. Adjust only those controlsthat are covered by the operating instructions.
G If you plan to use the printer in Germany, observe thefollowing:
To provide adequate short-circuit protection and over-current
protection for this printer, the building installation must beprotected by a 16 Amp circuit breaker.
Bei Anschluß des Druckers an die Stromversorgung mußsichergestellt werden, daß die Gebäudeinstallation mit einem16 A-Überstromschalter abgesichert ist.
EN ERG Y S TA R C o m p lia nc e
As an ENERGY STAR Partner, EPSON hasdetermined that this product meets the ENERGYSTAR guidelines for energy efficiency.
The International ENERGY STAR Office Equipment Program isa voluntary partnership with the computer and office equipmentindustry to promote the introduction of energy-efficient personal
computers, monitors, printers, fax machines, and copiers in aneffort to reduce air pollution caused by power generation.
v

8/22/2019 Epson DFX 8500 User Manual
http://slidepdf.com/reader/full/epson-dfx-8500-user-manual 8/252
Fo r Unite d King d o m Use rs
Use o f o p tio ns
Epson (UK) Limited shall not be liable against any damages orproblems arising from the use of any options or consumableproducts other than those designated as Original EPSON Productsor EPSON Approved Products by Epson (UK) Limited.
Safety information
wWarning: This appliance must be earthed. Refer to the rating plate
for voltage and check that the appliance voltage corresponds to thesupply voltage.
Important: The wires in the mains lead fitted to this applianceare coloured in accordance with the following code:
Green and yellow — EarthBlue — NeutralBrown — Live
If you have to fit a plug:As the colours of the wires in the mains lead of this appliancemay not correspond with the coloured markings identifyingthe terminals in a plug, please proceed as follows:
The green and yellow wire must be connected to the terminalin the plug which is marked with the letter E or with the Earth
symbol (G
).The blue wire must be connected to the terminal in the plugmarked with the letter N.
The brown wire must be connected to the terminal in the plugmarked with the letter L.
If damage occurs to the plug, replace the cord set or consult aqualified electrician.
Replace fuses only with a fuse of the correct size and rating.
v i

8/22/2019 Epson DFX 8500 User Manual
http://slidepdf.com/reader/full/epson-dfx-8500-user-manual 9/252
Contents
Introduction
Features . . . . . . . . . . . . . . . . . . . . . . . . . . . . . . . . 0-1Options . . . . . . . . . . . . . . . . . . . . . . . . . . . . . . . . 0-2How to Use This Manual . . . . . . . . . . . . . . . . . . . . . . 0-2Warnings, Cautions, and Notes . . . . . . . . . . . . . . . . . . 0-3If You Need Help . . . . . . . . . . . . . . . . . . . . . . . . . . 0-4
Chapter 1 Se tting Up the Printe r
Unpacking the Printer . . . . . . . . . . . . . . . . . . . . . . . 1-2Choosing a Place for the Printer . . . . . . . . . . . . . . . . . . 1-4Installing the Ribbon Cartridge . . . . . . . . . . . . . . . . . . 1-6Plugging in the Printer . . . . . . . . . . . . . . . . . . . . . . . 1-10Connecting the Printer to Your Computer . . . . . . . . . . . . 1-11
Chapter 2 Se tting Up You r So ftw a re
For Windows 95 Users . . . . . . . . . . . . . . . . . . . . . . . 2-2Installing the printer driver using My Computer . . . . . . 2-3Installing the printer driver using plug-and-play . . . . . . 2-4Accessing the printer driver . . . . . . . . . . . . . . . . . . 2-5Changing the printer driver settings . . . . . . . . . . . . . 2-6
For Windows 3.1 Users . . . . . . . . . . . . . . . . . . . . . . . 2-8Installing the printer driver . . . . . . . . . . . . . . . . . . 2-8Accessing the printer driver . . . . . . . . . . . . . . . . . . 2-9Changing the printer driver settings . . . . . . . . . . . . . 2-11
vi i

8/22/2019 Epson DFX 8500 User Manual
http://slidepdf.com/reader/full/epson-dfx-8500-user-manual 10/252
For Windows NT 4.0 Users . . . . . . . . . . . . . . . . . . . . . 2-12Installing the printer driver . . . . . . . . . . . . . . . . . . . 2-12Accessing the printer driver . . . . . . . . . . . . . . . . . . . 2-13Changing the printer driver settings . . . . . . . . . . . . . . 2-15
For Windows NT 3.5x Users . . . . . . . . . . . . . . . . . . . . . 2-16Installing the printer driver . . . . . . . . . . . . . . . . . . . 2-16Accessing the printer driver . . . . . . . . . . . . . . . . . . . 2-17Changing the printer driver settings . . . . . . . . . . . . . . 2-19
For DOS Program Users . . . . . . . . . . . . . . . . . . . . . . . 2-21Installing the printer driver . . . . . . . . . . . . . . . . . . . 2-21
Chapter 3 Pa p e r Ha ndling
Using the Two-Tractor System . . . . . . . . . . . . . . . . . . . 3-2Positioning the paper supply . . . . . . . . . . . . . . . . . . 3-2What paper types you can use . . . . . . . . . . . . . . . . . 3-3
Loading Paper onto the Front Tractor . . . . . . . . . . . . . . . 3-4Loading Paper onto the Rear Tractor . . . . . . . . . . . . . . . . 3-10Adjusting the Paper Position . . . . . . . . . . . . . . . . . . . . 3-17
Adjusting the top-of-form position . . . . . . . . . . . . . . . 3-17Adjusting the printing position . . . . . . . . . . . . . . . . . 3-20
Tearing Off the Printed Pages . . . . . . . . . . . . . . . . . . . . 3-21Tear-off mode . . . . . . . . . . . . . . . . . . . . . . . . . . . 3-21Using the Tear Off button . . . . . . . . . . . . . . . . . . . . 3-23Adjusting the tear-off position . . . . . . . . . . . . . . . . . 3-23
Switching Between Front and Rear Tractors . . . . . . . . . . . 3-26Changing the Paper . . . . . . . . . . . . . . . . . . . . . . . . . 3-28Printing on Multi-Part Forms and Labels . . . . . . . . . . . . . 3-31
Using multi-part forms . . . . . . . . . . . . . . . . . . . . . . 3-32Using labels . . . . . . . . . . . . . . . . . . . . . . . . . . . . 3-33
v i i i

8/22/2019 Epson DFX 8500 User Manual
http://slidepdf.com/reader/full/epson-dfx-8500-user-manual 11/252
Chapter 4 Using the Printe r
Control Panel . . . . . . . . . . . . . . . . . . . . . . . . . . . . 4-2Lights . . . . . . . . . . . . . . . . . . . . . . . . . . . . . . . 4-2
Buttons . . . . . . . . . . . . . . . . . . . . . . . . . . . . . . 4-4Other control panel features . . . . . . . . . . . . . . . . . . 4-8Using DIP Switches . . . . . . . . . . . . . . . . . . . . . . . . . 4-9
Changing DIP switch settings . . . . . . . . . . . . . . . . . 4-9DIP switch tables . . . . . . . . . . . . . . . . . . . . . . . . 4-11DIP switch functions . . . . . . . . . . . . . . . . . . . . . . 4-16
Using the Paper Memory Feature . . . . . . . . . . . . . . . . . 4-22Saving paper memory settings . . . . . . . . . . . . . . . . 4-23
Chapter 5 Using EPSO N Sta tus M o nito r 2
Installing EPSON Status Monitor 2 . . . . . . . . . . . . . . . . 5-2Accessing EPSON Status Monitor 2 . . . . . . . . . . . . . . . . 5-3Checking the Printer Status . . . . . . . . . . . . . . . . . . . . 5-4
Using the EPSON Status Monitor 2 window . . . . . . . . . 5-4Using the Printer Status window . . . . . . . . . . . . . . . 5-8
Setting Monitoring Preferences . . . . . . . . . . . . . . . . . . 5-10Turning on background monitoring . . . . . . . . . . . . . 5-10Using the background monitoring icon . . . . . . . . . . . 5-12
Using the Paper Memory Utility . . . . . . . . . . . . . . . . . 5-12Accessing the paper memory utility . . . . . . . . . . . . . 5-13Registering or changing your paper settings . . . . . . . . . 5-13
i x

8/22/2019 Epson DFX 8500 User Manual
http://slidepdf.com/reader/full/epson-dfx-8500-user-manual 12/252
Chapter 6 Using Printer Options
Using the Pull Tractor . . . . . . . . . . . . . . . . . . . . . . . . 6-2Installing the pull tractor . . . . . . . . . . . . . . . . . . . . 6-2
Using the pull tractor with the front tractor . . . . . . . . . . 6-5Using the pull tractor with the rear tractor . . . . . . . . . . 6-9Removing the pull tractor . . . . . . . . . . . . . . . . . . . . 6-11
Using the Perforation Cutter . . . . . . . . . . . . . . . . . . . . 6-12Installing the perforation cutter . . . . . . . . . . . . . . . . . 6-13Attaching the perforated paper output attachment
and output tray . . . . . . . . . . . . . . . . . . . . . . . . . 6-16Paper handling . . . . . . . . . . . . . . . . . . . . . . . . . . 6-18Removing the perforation cutter . . . . . . . . . . . . . . . . 6-20
Using the Paper Cutter . . . . . . . . . . . . . . . . . . . . . . . . 6-24Installing the paper cutter . . . . . . . . . . . . . . . . . . . . 6-24Paper handling . . . . . . . . . . . . . . . . . . . . . . . . . . 6-28Removing the paper cutter . . . . . . . . . . . . . . . . . . . 6-32
Interface Cards . . . . . . . . . . . . . . . . . . . . . . . . . . . . 6-35Installing an interface card . . . . . . . . . . . . . . . . . . . 6-36Using a serial interface card (C82305] or C82306] ) . . . . . 6-38
Chapter 7 M a inte na nc e a nd Tra nsp orta tion
Replacing the Ribbon Cartridge . . . . . . . . . . . . . . . . . . 7-2Cleaning the Printer . . . . . . . . . . . . . . . . . . . . . . . . . 7-4Transporting the Printer . . . . . . . . . . . . . . . . . . . . . . . 7-5
x

8/22/2019 Epson DFX 8500 User Manual
http://slidepdf.com/reader/full/epson-dfx-8500-user-manual 13/252
Chapter 8 Troubleshooting
Using the Error Indicators . . . . . . . . . . . . . . . . . . . . . 8-3Printing a Self Test . . . . . . . . . . . . . . . . . . . . . . . . . 8-5
Using the Hex Dump Mode . . . . . . . . . . . . . . . . . . . . 8-6Problems and Solutions . . . . . . . . . . . . . . . . . . . . . . . 8-7Power supply . . . . . . . . . . . . . . . . . . . . . . . . . . 8-8Paper handling . . . . . . . . . . . . . . . . . . . . . . . . . 8-9Operation . . . . . . . . . . . . . . . . . . . . . . . . . . . . . 8-13Printout . . . . . . . . . . . . . . . . . . . . . . . . . . . . . . 8-15Options . . . . . . . . . . . . . . . . . . . . . . . . . . . . . . 8-18
Clearing a Paper Jam . . . . . . . . . . . . . . . . . . . . . . . . 8-19
App end ix A Specif ications
Printer Specifications . . . . . . . . . . . . . . . . . . . . . . . . A-2Printing . . . . . . . . . . . . . . . . . . . . . . . . . . . . . . A-2Paper . . . . . . . . . . . . . . . . . . . . . . . . . . . . . . . A-4Mechanical . . . . . . . . . . . . . . . . . . . . . . . . . . . . A-13Electrical . . . . . . . . . . . . . . . . . . . . . . . . . . . . . A-14
Environmental . . . . . . . . . . . . . . . . . . . . . . . . . . A-14Safety approvals . . . . . . . . . . . . . . . . . . . . . . . . . A-15CE marking . . . . . . . . . . . . . . . . . . . . . . . . . . . . A-15
Parallel Interface Specifications . . . . . . . . . . . . . . . . . . A-16Forward channel . . . . . . . . . . . . . . . . . . . . . . . . . A-16Reverse channel . . . . . . . . . . . . . . . . . . . . . . . . . A-16
Serial Interface Specifications . . . . . . . . . . . . . . . . . . . A-17Optional Perforation Cutter Specifications . . . . . . . . . . . . A-17
App end ix B Prin te r C om m a nds a nd C ha ra c te r Ta b le s
EPSON ESC/P Control Codes . . . . . . . . . . . . . . . . . . . B-2Barcode commands . . . . . . . . . . . . . . . . . . . . . . . B-3
IBM 2381 Plus Emulation Control Codes . . . . . . . . . . . . . B-6Character Tables . . . . . . . . . . . . . . . . . . . . . . . . . . . B-7
xi

8/22/2019 Epson DFX 8500 User Manual
http://slidepdf.com/reader/full/epson-dfx-8500-user-manual 14/252
Append ix C C onta c ting C ustom e r Sup p ort
For United States and Canada Users . . . . . . . . . . . . . . . . C-2For United Kingdom and the Republic of Ireland Users . . . . . C-4
Enquiry Desk . . . . . . . . . . . . . . . . . . . . . . . . . . . C-4Customer Support . . . . . . . . . . . . . . . . . . . . . . . . C-4Faxon EPSON . . . . . . . . . . . . . . . . . . . . . . . . . . . C-5EPtec - Bulletin Board Service for latest drivers and utilities C-5World Wide Web . . . . . . . . . . . . . . . . . . . . . . . . . C-5
For Australian Users . . . . . . . . . . . . . . . . . . . . . . . . . C-6EPSON FAXBACK . . . . . . . . . . . . . . . . . . . . . . . . C-6EPSON Bulletin Board System . . . . . . . . . . . . . . . . . C-6Internet URL http://www.epson.com.au . . . . . . . . . . . C-6Your dealer . . . . . . . . . . . . . . . . . . . . . . . . . . . . C-6EPSON Helpdesk . . . . . . . . . . . . . . . . . . . . . . . . . C-7
For Singapore Users . . . . . . . . . . . . . . . . . . . . . . . . . C-7For Hong Kong Users . . . . . . . . . . . . . . . . . . . . . . . . C-7
Internet home page . . . . . . . . . . . . . . . . . . . . . . . . C-8Electronic bulletin board system . . . . . . . . . . . . . . . . C-8Technical Support Hotline . . . . . . . . . . . . . . . . . . . . C-8
For Philippines Users . . . . . . . . . . . . . . . . . . . . . . . . C-8
G lo ssa ry
In d ex
xi i

8/22/2019 Epson DFX 8500 User Manual
http://slidepdf.com/reader/full/epson-dfx-8500-user-manual 15/252
Introduction
The EPSON DFX-8500 printer is an advanced dot matrix printer
designed for business applications. The printer combines highperformance and reliability with a wide range of features,including high speed printing and automatic paper handling.
Features
G High speed draft mode printing of up to 1120 characters per
second (cps) at 10 characters per inch (cpi).
G
Built-in front and rear push tractors for convenient paperhandling. This dual system lets you switch between differenttypes of continuous paper quickly and easily. The printerremembers separate top-of-form positions for each tractor.
G Eight barcode fonts, as well as three bit-map fonts.
G The ability to print on multi-part forms consisting of oneoriginal plus up to six copies at the front tractor.
G
A convenient control panel that allows direct selection of fonts.
G Support of advanced EPSON ESC/P® commands and IBM®
2380/2381 Plus emulation.
G
A printer driver and a status monitor utility that let youchange printer settings easily.
G A paper memory utility that lets you register paperinformation in the printer.
Introduction 1

8/22/2019 Epson DFX 8500 User Manual
http://slidepdf.com/reader/full/epson-dfx-8500-user-manual 16/252
Opt ions
The following options are available for your printer:
G The Pull tractor (#8309) improves the handling of heavymulti-part forms and labels. It also enhances printingalignment on preprinted forms.
G The Perforation cutter (C81507 ] ) and Paper cutter (C81500 ] )make it easier to handle continuous paper by cutting off printed documents for you.
G
Interface cards are available to supplement the printer’s built-in serial and parallel interfaces. Chaper 6 providesguidelines for choosing the right interface and instructionsfor installing an interface card.
How to Use This M a nua l
This manual provides illustrated, step-by-step instructions forsetting up and operating your printer.
Chapter 1 contains information on unpacking, setting up, andconnecting the printer. Be sure to read this chapter first.
Chapter 2 explains how to set up your software, which includesa printer driver for Microsoft® Windows® operating systems.
Chapter 3 includes important information on paper handling andprinting on various types of paper.
Chapter 4 describes how to use your printer’s control panelfunctions, change DIP switch settings, and use the paper memoryfeature.
Chapter 5 explains how to use the EPSON Status Monitor 2 forWindows 95.
2 Introduction

8/22/2019 Epson DFX 8500 User Manual
http://slidepdf.com/reader/full/epson-dfx-8500-user-manual 17/252
Chapter 6 explains how to use optional accessories with yourprinter.
Chapter 7 provides printer maintenance and transportation
guidelines.
Chapter 8 contains troubleshooting tips. If the printer does notoperate properly or the printed results are not what you expect,see this chapter for a list of problems and solutions.
Appendix A gives the printer’s specifications.
Appendix B lists ESC/P emulation commands and the printer’s built-in character tables.
Appendix C explains how to contact customer support if youneed assistance.
A glossary and an index are provided at the end of this manual.
Wa rning s, C a utions, a nd N ote s
This guide uses the following conventions:
w Warnings must be followed to avoid bodily injury.
cCautions must be observed to avoid damage to your equipment.
Notes contain important information and useful tips on the operationof your printer.
Introduction 3

8/22/2019 Epson DFX 8500 User Manual
http://slidepdf.com/reader/full/epson-dfx-8500-user-manual 18/252
If You Ne e d He lp
If you need assistance in setting up or using your printer, seeAppendix C for guidelines on how to get customer support.
4 Introduction

8/22/2019 Epson DFX 8500 User Manual
http://slidepdf.com/reader/full/epson-dfx-8500-user-manual 19/252
Chapter 1
Se tting Up the Printe r
Unpacking the Printer . . . . . . . . . . . . . . . . . . . . . . . 1-2
Choosing a Place for the Printer . . . . . . . . . . . . . . . . . . 1-4
Installing the Ribbon Cartridge . . . . . . . . . . . . . . . . . . 1-6
Plugging in the Printer . . . . . . . . . . . . . . . . . . . . . . . 1-10
Connecting the Printer to Your Computer . . . . . . . . . . . . 1-11
1
Setting Up the Printer 1-1

8/22/2019 Epson DFX 8500 User Manual
http://slidepdf.com/reader/full/epson-dfx-8500-user-manual 20/252
Unp a c king the Printe r
Because the printer weighs approximately 29 kg (64 lbs), youshould not lift or carry it alone. Two people should carry it
by the bottom, as shown here:
1-2 Setting Up the Printer

8/22/2019 Epson DFX 8500 User Manual
http://slidepdf.com/reader/full/epson-dfx-8500-user-manual 21/252
In addition to this guide, your printer box should include twoEPSON printer driver diskettes, two Status Monitor softwarediskettes, a Notice Sheet, and the following items:
Note:
Depending on your printer model, the power cord may be
permanently attached to the printer. Also the shape of the powercord plug varies depending on the country in which you bought
your printer; be sure the plug you have is right for your location.
printer
ribbon cartridge
power cord
screwdriver
optional connectorlock nuts
1
Setting Up the Printer 1-3

8/22/2019 Epson DFX 8500 User Manual
http://slidepdf.com/reader/full/epson-dfx-8500-user-manual 22/252
You must remove all protective materials packed around andinside your printer before you set it up and turn on the power.Follow the directions on the Notice Sheet to remove thesematerials. A screwdriver has been included for removing the
transportation screw.
Save all packing and protective materials, including theprotective locking clips on the paper tension unit and thetransportation screw, in case you need to ship the printerin the future. It should always be transported in its originalpackaging, or equivalent materials.
cCaution :There are several versions of the printer designed for differentvoltages, and it is not possible to adjust the printer for use atanother voltage. If the label on the back of the printer does notshow the correct voltage for your country, contact your dealer.
C ho o sing a Pla c e for the Printe r
When selecting a place to set up your printer, be sure to followthese guidelines:
G Place the printer on a flat, stable surface, close enough tothe computer for the interface cable to reach it.
G Leave adequate room around the printer for easy operationand maintenance.
G Avoid locations that are subject to direct sunlight, excessiveheat, moisture, or dust.
G Use a properly grounded electrical outlet; do not use anadapter plug.
G Place the printer where you can easily unplug the power
cord.
1-4 Setting Up the Printer

8/22/2019 Epson DFX 8500 User Manual
http://slidepdf.com/reader/full/epson-dfx-8500-user-manual 23/252
G Avoid electrical outlets controlled by wall switches orautomatic timers. An interruption of power can eraseinformation in the memory of your printer or computer.
G Avoid outlets on the same circuit as large motors orother appliances that can cause voltage fluctuations.
G Keep the entire computer system away from potentialsources of electromagnetic interference, such asloudspeakers or the base units of cordless telephones.
If you plan to use a printer stand, follow these guidelines:
G Use a stand that supports at least 58 kg (128 lbs).
G Never use a stand that tilts the printer. The printer shouldalways be kept level.
G If you plan to load continuous paper through the bottom of the printer, choose a stand that provides an unobstructedpaper path.
G Position your printer’s power cord and interface cable sothey do not interfere with paper feeding. If possible, securethe cables to a leg of the printer stand.
1
Setting Up the Printer 1-5

8/22/2019 Epson DFX 8500 User Manual
http://slidepdf.com/reader/full/epson-dfx-8500-user-manual 24/252
Insta lling the Rib b o n C a rtrid g e
Before installing the ribbon cartridge, make sure that theprotective packing materials have been removed and that thepower cord is not plugged into an electrical outlet. Remove theribbon cartridge from the box and plastic bag. Then followthese steps:
1. Open the top cover as shown below.
w Warning:
Never move the print head while the printer is turned onunless instructed to because this can damage the printer.
Also, if you have been using the printer, the print headmay be hot; let it cool for a few minutes before touching it.
1-6 Setting Up the Printer

8/22/2019 Epson DFX 8500 User Manual
http://slidepdf.com/reader/full/epson-dfx-8500-user-manual 25/252
2. Slide the print head to the open section of the paper bail asshown below.
3. Remove the separator from the middle of the ribboncartridge and discard it. Then detach the ribbon guidefrom the cartridge (but not from the ribbon) and turnthe ribbon-tightening knob in the direction of the arrowto take up any slack in the ribbon.
Position the printhead here.
separator
ribbon guide
1
Setting Up the Printer 1-7

8/22/2019 Epson DFX 8500 User Manual
http://slidepdf.com/reader/full/epson-dfx-8500-user-manual 26/252
4. Hold the ribbon cartridge with both hands and lower itinto the printer as shown below. Pulling the cartridgetoward you, slide the notches nearest you over the twocorresponding pins in the printer. Then push the cartridge
down into position until the other two slots snap into placeover the mounting pins in the printer.
5. Press lightly on both sides of the cartridge to make sureit is locked in place.
1-8 Setting Up the Printer

8/22/2019 Epson DFX 8500 User Manual
http://slidepdf.com/reader/full/epson-dfx-8500-user-manual 27/252
6. Insert the ribbon guide over the metal pins on each sideof the print head as shown below. The smaller end of theguide should be on top, with its angled edge facing backtoward the platen. Turn the ribbon-tightening knob again
to remove any slack in the ribbon.
7. Slide the print head from side to side to see that it movessmoothly and that the ribbon is not twisted or creased.
ribbon guide
print head
1
Setting Up the Printer 1-9

8/22/2019 Epson DFX 8500 User Manual
http://slidepdf.com/reader/full/epson-dfx-8500-user-manual 28/252
8. Close the top cover.
Plug g ing in the Printe r
1. Make sure the printer is turned off. (The “” symbol on thepower switch located on the lower right side of the printershould be pressed down.)
2. Check the label on the back of the printer to make sure thevoltage matches that of your electrical outlet.
c Caution: If the rated voltage and your outlet voltage do not match,contact your dealer for assistance. Do not plug in the
power cord.
3. If the power cord is not attached to the printer, connect theappropriate end to the AC inlet on the printer’s rear panel.
4. Plug the power cord into a properly grounded electricaloutlet.
1-10 Setting Up the Printer

8/22/2019 Epson DFX 8500 User Manual
http://slidepdf.com/reader/full/epson-dfx-8500-user-manual 29/252
C o nne c ting the Prin te r to Yo ur C o m p ute r
Your printer has two separate interface connections:a Centronics® compatible parallel interface and an RS-232C-compatible serial interface. If you are not sure which one isrequired by your computer, check your computer manual.
Note:
Your printer has an auto interface mode function that allows youto connect to more than one interface at a time. See “Using DIPSwitches” in Chapter 4.
If you have a suitable shielded cable, you should be able toconnect the printer immediately. If you have one of the fewcomputers that requires a different type of interface, youneed to use an optional interface card. See Chapter 6.
parallel interface
serial interface
1
Setting Up the Printer 1-11

8/22/2019 Epson DFX 8500 User Manual
http://slidepdf.com/reader/full/epson-dfx-8500-user-manual 30/252
Follow the steps below to connect a parallel or serial interfacecable to the printer.
1. Make sure both the printer and computer are turned off.
2. Open the rear cover by grasping it on each side and pullingdown.
3. Plug the cable connector securely into the printer’s parallelor serial interface connector.
rear cover
serial interface
parallel interfac e
1-12 Setting Up the Printer

8/22/2019 Epson DFX 8500 User Manual
http://slidepdf.com/reader/full/epson-dfx-8500-user-manual 31/252
4. If you are connecting the parallel interface, squeeze the wireclips together until they lock in place on either side of theconnector. If your cable has a ground wire, connect it to theprinter’s ground connector as shown below.
If you are connecting the serial interface, fasten the screwson the cable connector. (If your cable has a ground wire,connect it to the printer’s ground connector as shownabove.)
Note:
If the screws that come with the cable do not fit into the connectorlock nuts on the interface, replace the lock nuts with the optionallock nuts provided with the printer.
1
Setting Up the Printer 1-13

8/22/2019 Epson DFX 8500 User Manual
http://slidepdf.com/reader/full/epson-dfx-8500-user-manual 32/252
5. Open the plastic clamp to the right or left of the interfaceconnectors by pulling out its top tab. Insert the cable in theplastic clamp and close the clamp, as shown below.
6. Close the rear cover.
cCaution:
Always close the rear cover before using the printer.
1-14 Setting Up the Printer

8/22/2019 Epson DFX 8500 User Manual
http://slidepdf.com/reader/full/epson-dfx-8500-user-manual 33/252
7. Plug the other end of the cable into the computer. (If thereis a ground wire at the computer end of the cable, attach itto the ground connector at the back of the computer.)
Before using the printer’s serial interface, you need to selectserial communication by changing the printer’s DIP switchsettings. You may also need to change two other serial interfacesettings, serial baud rate and parity, before your printer andcomputer can communicate properly. See “Using DIPSwitches” in Chapter 4 for more information.
1
Setting Up the Printer 1-15

8/22/2019 Epson DFX 8500 User Manual
http://slidepdf.com/reader/full/epson-dfx-8500-user-manual 34/252
1-16 Setting Up the Printer

8/22/2019 Epson DFX 8500 User Manual
http://slidepdf.com/reader/full/epson-dfx-8500-user-manual 35/252
Chapter 2
Se tting Up Yo ur So ftw a re
For Windows 95 Users . . . . . . . . . . . . . . . . . . . . . . . 2-2Installing the printer driver using My Computer . . . . . . 2-3Installing the printer driver using plug-and-play . . . . . . 2-4Accessing the printer driver . . . . . . . . . . . . . . . . . . 2-5Changing the printer driver settings . . . . . . . . . . . . . 2-6
For Windows 3.1 Users . . . . . . . . . . . . . . . . . . . . . . . 2-8Installing the printer driver . . . . . . . . . . . . . . . . . . 2-8Accessing the printer driver . . . . . . . . . . . . . . . . . . 2-9Changing the printer driver settings . . . . . . . . . . . . . 2-11
For Windows NT 4.0 Users . . . . . . . . . . . . . . . . . . . . 2-12Installing the printer driver . . . . . . . . . . . . . . . . . . 2-12Accessing the printer driver . . . . . . . . . . . . . . . . . . 2-13Changing the printer driver settings . . . . . . . . . . . . . 2-15
For Windows NT 3.5x Users . . . . . . . . . . . . . . . . . . . . 2-16Installing the printer driver . . . . . . . . . . . . . . . . . . 2-16Accessing the printer driver . . . . . . . . . . . . . . . . . . 2-17Changing the printer driver settings . . . . . . . . . . . . . 2-19
For DOS Program Users . . . . . . . . . . . . . . . . . . . . . . 2-21Installing the printer driver . . . . . . . . . . . . . . . . . . 2-21
2
Setting Up Your Software 2-1

8/22/2019 Epson DFX 8500 User Manual
http://slidepdf.com/reader/full/epson-dfx-8500-user-manual 36/252
The EPSON printer software that comes with your printerincludes the printer driver software, plus a status monitorutility and paper memory utility for use with Windows 95.
A printer driver is software that allows your computer tocontrol the printer. You need to install the printer driver soyour software applications can take full advantage of theprinter’s capabilities.
See the appropriate section below for installing the printersoftware for your version of Windows (or DOS):
G For Windows 95, see the next section.
G For Windows 3.1, see page 2-8.
G For Windows NT 4.0, see page 2-12.
G For Windows NT 3.5x, see page 2-16.
G For DOS programs, see page 2-21.
Note:
Before you install the printer software, it is a good idea to makebackup copies of the EPSON printer software disks.
Fo r W ind o w s 95 Use rs
Follow the steps below to install the printer driver forWindows 95. For instructions on installing the EPSON StatusMonitor 2 utility, see Chapter 5.
2-2 Setting Up Your Software

8/22/2019 Epson DFX 8500 User Manual
http://slidepdf.com/reader/full/epson-dfx-8500-user-manual 37/252
Insta lling the p rinte r d rive r using M y C o m p ute r
1. Make sure Windows 95 is running and the printer is off.
2. Insert Disk 1 of your printer driver software in a disk drive.Double-click the My Computer icon, and then double-clickthe drive in which you inserted the disk.
3. Double-click the Setup.exe icon, then select your printericon in the EPSON Printer Driver Setup dialog box shown
below. Click OK and follow the on-screen instructions.
After you install your printer driver for Windows 95, you caninstall the EPSON Status Monitor 2 utility program. This utilitymonitors the status of your printer, alerts you when errorsoccur, and provides you with troubleshooting tips. SeeChapter 5 for instructions on installing the Status Monitor.
2
Setting Up Your Software 2-3

8/22/2019 Epson DFX 8500 User Manual
http://slidepdf.com/reader/full/epson-dfx-8500-user-manual 38/252
Insta lling the p rinte r d rive r using p lug - a nd - p la y
If your computer has an IEEE-1284 compatible, bidirectionalparallel port, you can install the printer driver using the
Windows 95 plug-and-play feature. See your computerdocumentation for more information.
1. Make sure the printer is connected to your computer asdescribed on page 1-11.
2. First turn on your printer and then turn on the computer.Your computer starts loading Windows 95.
3. If you use a password, enter it at the prompt. You see theNew Hardware Found screen.
Note: If you do not see the New Hardware Found screen, or if yourun into any kind of problem, click Cancel and follow theinstructions under “Installing the printer driver using MyComputer” on page 2-3.
4. Make sure the screen displays your printer model name.Then click the Driver from disk provided by hardwaremanufacturer radio button.
Note: The next time you turn on your computer after you install thedriver, Windows 95 may display the New Hardware Found
screen again. If this happens, select the Do not install a driverradio button and then click OK . This screen will not appear again.
5. Click OK . You see the Install From Disk screen.
6. Insert Disk 1 of your printer driver software in a disk drive.
7. If you inserted the disk in drive A, type “Win95” and click
OK . Otherwise, change the drive letter in the Copymanufacturer’s files from box and click OK .
2-4 Setting Up Your Software

8/22/2019 Epson DFX 8500 User Manual
http://slidepdf.com/reader/full/epson-dfx-8500-user-manual 39/252
8. You can type a unique name for the printer in the printername box in the Add Printer Wizard dialog box. Werecommend that you keep the model name as shown.
To use the printer as the default printer for Windows 95applications, select Yes. (No is the default setting.)
9. Click the Finish button. The program copies the files toyour hard disk and adds an icon to the Printers folderusing the printer model name or the name you selected.
Once you install your printer driver for Windows 95, you caninstall the EPSON Status Monitor 2 utility program. This utilitymonitors the status of your printer, alerts you when errorsoccur, and provides you with troubleshooting tips. SeeChapter 5 for instructions on installing and using the StatusMonitor.
Before you start printing, you should make sure that theprinter driver settings match your document requirements.While many Windows applications override the printer
settings made with the driver, some do not.
See the next sections for instructions on how to access theprinter driver and change settings if necessary.
A c c e ssing the p rinte r d rive r
You can access the printer driver two ways:
G From a Windows application—any driver settings youchange apply only to the application you are currentlyusing.
G From the Start menu—any driver settings you changeapply to all your Windows applications.
2
Setting Up Your Software 2-5

8/22/2019 Epson DFX 8500 User Manual
http://slidepdf.com/reader/full/epson-dfx-8500-user-manual 40/252
A c c e ssing the p rinte r d rive r fro m Windo w s a p p lic a tion s
To access the printer driver from your Windows application,select Print Setup or Print from the File menu. The Printer or
Print Setup dialog box appears. From the Print dialog box,choose Printer, Setup, Properties, or Options, depending onthe options available in your application. (You may need tochoose a combination of these options.) The Properties windowappears. The Paper and Graphics menus contain the printerdriver settings. Click the tabs at the top of the window to openthese menus.
A c c e ssing the p rinte r d rive r fro m the Sta rt m e nu When you access the printer driver from the Windows 95Start menu, the settings you make apply to any Windowsapplications you open afterward. To access the printer driverfrom the Start menu, follow these steps:
1. Click the Start button, and then point to Settings.
2. Click Printers.3. Right-click your printer icon, and click Properties. The
Properties window appears.
4. The Paper and Graphics menus contain the printer driversettings. Click the tabs at the top of the window to openthese menus.
C ha ng ing the p rinte r d rive r se tting s
Before printing, check that the printer driver settings on thePaper and Graphics menus are appropriate for the kind of document you want to print, and change the settings asneeded. When you are finished making changes, click OK to apply the settings, or click Restore Defaults to return
the settings to their factory defaults.
2-6 Setting Up Your Software

8/22/2019 Epson DFX 8500 User Manual
http://slidepdf.com/reader/full/epson-dfx-8500-user-manual 41/252
Pap er me nu
G Paper size Select the size of the paper loaded in the printer.If you don’t see your paper size, use the scroll
bar to scroll through the list. If your paper sizeis not included in the list, click Custom andenter the correct paper size in the dialog boxthat appears.
G Orientation Select Portrait or Landscape.
G Paper source Select the paper source that best meets yourneeds. There are three cutting method options
for both the front and rear tractors in thePaper source list if the optional perforationcutter is installed. For details, see “Using thePerforation Cutter” in Chapter 6.
Grap hics menu
G Resolution Click the printing resolution you want.
G Dithering You can leave this option set to Fine, which isthe default setting, or select another ditheringpattern, depending on the kind of printout youwant. The display to the left of the ditheringoptions shows the effect of each setting.
G Intensity Move the slider to make your printout lighteror darker.
After you’ve checked your printer driver settings, you areready to print. If you have any problems while printing, seeChapter 8 for troubleshooting guidelines.
2
Setting Up Your Software 2-7

8/22/2019 Epson DFX 8500 User Manual
http://slidepdf.com/reader/full/epson-dfx-8500-user-manual 42/252
Fo r W ind o w s 3.1 Use rs
If you are using Windows 3.1, follow the instructions below toinstall and access the printer driver.
Insta lling the p rinte r d rive r
1. Make sure Windows 3.1 is running and the ProgramManager window is open.
2. Insert Disk 1 of your printer driver software in a disk drive.
3. Choose Run from the File menu. The following dialog boxappears:
4. Type A:\ SETUP. (If you inserted the driver disk in a driveother than “A”, substitute the appropriate letter.) Click OK .The EPSON Printer Driver Setup dialog box appears:
2-8 Setting Up Your Software

8/22/2019 Epson DFX 8500 User Manual
http://slidepdf.com/reader/full/epson-dfx-8500-user-manual 43/252
5. Select your printer and click OK . The installation program begins copying the printer driver files. After a fewmoments, the installation program creates the EPSONprogram group in Windows.
6. When the installation is complete, click OK to exit.
Windows will now use the EPSON DFX-8500 printer as itsdefault printer on port LPT1. If you need to change the defaultprinter or the port assignment, use the Printers utility in theControl Panel.
Before you start printing, you should make sure that theprinter driver settings match your document requirements.While many Windows applications override the printersettings made with the driver, some do not.
See the next sections for instructions on how to access theprinter driver and change settings.
A c c e ssing the p rinte r d rive r
You can access the printer driver two ways:
G From a Windows application—any driver settings youchange apply only to the application you are using.
G From the Control Panel—any driver settings you changeapply to all your Windows applications.
2
Setting Up Your Software 2-9

8/22/2019 Epson DFX 8500 User Manual
http://slidepdf.com/reader/full/epson-dfx-8500-user-manual 44/252
A c c e ssing the p rinte r d rive r fro m Windo w s a p p lic a tion s
To access the printer driver from your windows application,select Print Setup or Print from the File menu. If you choose
Print Setup, you see your application’s Print Setup dialog box,where you can make settings for paper size, paper source, andorientation. Some applications also feature an Options button,which allows you to access the printer driver’s Options dialog
box.
If you choose Print, you see your application’s Print dialog box.Choose Printer, Setup, or Options, depending on the optionsavailable in your application software. (You may need tochoose a combination of these options.)
Note:
Your application software may not let you access all the driversettings.
A c c e ssing the p rinte r d rive r fro m the C o ntro l Pa ne l
When you access the printer driver from the Control Panel,the settings you make apply to any Windows applicationsyou open afterward. To access the printer driver from theControl Panel, follow these steps:
1. In the Main window, double-click the Control Panel icon.
2. Double-click the Printers icon. The Printers dialog boxappears.
3. Make sure your printer is highlighted, then click Setup.The printer driver settings window appears.
2-10 Setting Up Your Software

8/22/2019 Epson DFX 8500 User Manual
http://slidepdf.com/reader/full/epson-dfx-8500-user-manual 45/252
C ha ng ing the p rinte r d rive r se tting s
Before printing, check that the printer driver settings areappropriate for the kind of document you want to print, and
change the settings as needed. When you are finished makingchanges, click OK to apply the settings, or click Cancel tocancel your changes.
If you accessed the printer driver from your application, someof the settings below may appear in your application’s PageSetup dialog box. If you accessed the driver from the ControlPanel, these settings appear in the printer driver settings
window.G Resolution Click the printing resolution you want.
G Paper Size Select the size of the paper loaded in theprinter. If you don’t see your paper size,use the scroll bar to scroll through the list.If your paper size is not included in the list,click User Defined Size and enter the correct
paper size in the dialog box that appears.
G Paper Source Select the paper source that best meets yourneeds. There are three cutting method optionsfor both the front and rear tractors in thePaper Source list if the optional perforationcutter is installed. For details, see “Using thePerforation Cutter” in Chapter 6.
G Orientation Select Portrait or Landscape. The diagramon the screen changes according to theorientation you select.
2
Setting Up Your Software 2-11

8/22/2019 Epson DFX 8500 User Manual
http://slidepdf.com/reader/full/epson-dfx-8500-user-manual 46/252
To access the following settings from your application, youmay need to click Printer, Setup, Options, or somecombination of these buttons. If you accessed the driver fromthe Control Panel, click Options to access these settings.
G Dithering You can leave this option set to Fine, which isthe default setting, or select another ditheringpattern depending on the kind of printoutyou want.
G Intensity Move the slider to make your printoutControl lighter or darker.
After you’ve checked your printer driver settings, you areready to print. If you have any problems while printing, seeChapter 8 for troubleshooting guidelines.
Fo r W ind o w s N T 4.0 Use rs
If you are using Windows NT 4.0, follow the instructions belowto install and access the printer driver.
Note:
Printer driver installation may require network administration privileges. Ask your network administrator for more details.
Insta lling the p rinte r d rive r
1. Make sure Windows NT 4.0 is running and the printer is off.
2. Insert Disk 1 of your printer driver software in a disk drive.Double-click the My Computer icon, and then double-clickthe drive in which you inserted the disk.
2-12 Setting Up Your Software

8/22/2019 Epson DFX 8500 User Manual
http://slidepdf.com/reader/full/epson-dfx-8500-user-manual 47/252
3. Double-click the Setup.exe icon, then select your printericon in the EPSON Printer Driver Setup dialog box shown
below. Click OK and follow the on-screen instructions.
Before you start printing, you should make sure that theprinter driver settings match your document requirements.While many Windows applications override the printersettings made with the driver, some do not.
See the next section for instructions on how to access the
printer driver and change settings if necessary.
A c c e ssing the p rinte r d rive r
You can access the printer driver two ways:
G From a Windows application—any driver settings youchange apply only to the application you are currently
using.
G From the Start menu—any driver settings you changeapply to all your Windows applications.
2
Setting Up Your Software 2-13

8/22/2019 Epson DFX 8500 User Manual
http://slidepdf.com/reader/full/epson-dfx-8500-user-manual 48/252
A c c e ssing the p rinte r d rive r fro m Windo w s a p p lic a tion s
To access the printer driver from your Windows application,select Print Setup or Print from the File menu. If you choose
Print Setup, you see your application’s Print Setup dialog box.If you choose Print, you see your application’s Print dialog box.
To access the printer driver from the Print dialog box, choosePrinter, Setup, Properties, or Options, depending on theoptions available in your application. (You may need to choosea combination of these options.) The Properties windowappears. The Page Setup and Advanced menus contain theprinter driver settings. Click the tabs at the top of the windowto open these menus.
A c c e ssing the p rinte r d rive r fro m the Sta rt m e nu
When you access the printer driver from the Windows NTStart menu, the settings you make apply to any Windowsapplications you open afterward.
To access the printer driver from the Start menu, follow thesesteps:
1. Click the Start button, and then point to Settings.
2. Click Printers.
3. Right-click your printer icon, and click Document Defaults.The screen diaplays the Default Document Properties
window, which contains the Page Setup and Advancedmenus. Click the tabs at the top of the windows to openthese menus.
2-14 Setting Up Your Software

8/22/2019 Epson DFX 8500 User Manual
http://slidepdf.com/reader/full/epson-dfx-8500-user-manual 49/252
C ha ng ing the p rinte r d rive r se tting s
Before printing, check that the printer driver settings on thePage Setup and Advanced menus are appropriate for the kind
of document you want to print, and change settings as needed.When you are finished making changes, click OK to apply thesettings, or click Cancel to return the settings to their previousvalues.
Page Setup me nu
G Paper Size Select the size of the paper you want to
use. If you don’t see your paper size,select it from the Paper Size list.
G Paper Source Select the paper source that best meets yourneeds. There are three cutting method optionsfor both the front and rear tractors in thePaper source list if the optional perforationcutter is installed. For details, see “Using thePerforation Cutter” in Chapter 6.
G Orientation Select Portrait or Landscape.
Adva nc ed menu
G Paper/ Check the Paper Size, Orientation, andOutput Paper Source settings you made on the Page
Setup menu and change them if necessary.
Select the paper source and then choose papersize from the Change Setting list box.
G Graphic Select Resolution and then choose theprinting resolution from the Change Settinglist box.
2
Setting Up Your Software 2-15

8/22/2019 Epson DFX 8500 User Manual
http://slidepdf.com/reader/full/epson-dfx-8500-user-manual 50/252
G Document Double-click Halftone Color Adjustment toOptions open this dialog box. Click Print Quality and
select Letter Quality or Draft Quality. ClickPrint Text as Graphicsor Metafile Spooling
and select On or Off in each list box.
After you’ve checked your printer driver settings, you areready to print. If you have any problems while printing, seeChapter 8 for troubleshooting guidelines.
Fo r W ind o w s N T 3.5x Use rs
If you are using Windows NT 3.5x, follow the instructions below to install and access the printer driver.
Note:
Printer driver installation may require network administration privileges. Ask your network administrator for more details.
Insta lling the p rinte r d rive r
1. Make sure Windows NT 3.5x is running and the ProgramManager window is open.
2. Insert Disk 1 of your printer driver software in a disk drive.
3. From the File menu, select Run. You see the Run dialog box.
2-16 Setting Up Your Software

8/22/2019 Epson DFX 8500 User Manual
http://slidepdf.com/reader/full/epson-dfx-8500-user-manual 51/252
4. In the command line box, type A:\ SETUP, and click OK .If you inserted the driver disk in a drive other than “A”,substitute the appropriate letter.
5. Select your printer icon in the EPSON Printer Driver Setupdialog box as shown below. Click OK and follow theon-screen instructions.
Before you start printing, you should make sure that theprinter driver settings match your document requirements.
While many Windows applications override the printersettings made with the driver, some do not.
Now you see the Printer Setup dialog box. For detailedinstructions, see page 2-19. You can also access this dialog
box as described in the next sections.
See the next sections for instructions on how to access theprinter driver and change settings.
A c c e ssing the p rinte r d rive r
You can access the printer driver two ways:
G From a Windows application—any driver settings youchange apply only to the application you are using.
G From the Control Panel—any driver settings you changeapply to all your Windows applications.
2
Setting Up Your Software 2-17

8/22/2019 Epson DFX 8500 User Manual
http://slidepdf.com/reader/full/epson-dfx-8500-user-manual 52/252
A c c e ssing the p rinte r d rive r fro m Windo w s a p p lic a tion s
To access the printer driver from your Windows application,select Print Setup or Print from the File menu. The Print or Print
Setup dialog box appears. Make sure that your printer isselected and then click Printer, Setup, Properties, or Options.You may need to click a combination of these buttons. You seethe Document Properties dialog box, which contains the Formand Orientation settings. To open the Advanced DocumentProperties dialog box, you may need to click Options. TheAdvanced Document Properties dialog box includes theGraphics Resolution, Color, and Optimization settings.
Note:
Your application software may not let you access all the printer driversettings.
A c c e ssing the p rinte r d rive r fro m the C o ntro l Pa ne l
When you access the printer driver from the Windows NT 3.5xControl Panel, the settings you make apply to any applications
you open afterward. To access the printer driver from theControl Panel, follow these steps:
1. In the Main window, double-click the Print Manager icon.The Print Manager window appears.
2. Make sure your printer is highlighted, then click Printer,and select Properties. The Printer Properties dialog box
appears.
2-18 Setting Up Your Software

8/22/2019 Epson DFX 8500 User Manual
http://slidepdf.com/reader/full/epson-dfx-8500-user-manual 53/252
3. Click the Detailsbutton, then click J ob Default. You seethe Document Properties dialog box, which includes theForm and Orientation settings described below.
If you want to access the form source settings, click theSet Up button instead of the Detailsbutton. You see thePrinter Setup dialog box, which includes the Forms Sourceand Forms Name settings described below.
4. Click Options to open the Advanced Document Propertiesdialog box, which contains the Graphics Resolution, Color,and Optimization settings.
C ha ng ing the p rinte r d rive r se tting s
Before printing, check that the printer driver settings areappropriate for the kind of document you want to print, andchange the settings as needed. When you are finished makingchanges, click OK to apply the settings, or click Cancel tocancel your settings.
Printer Setup d ia log b ox
G Forms Select the paper source that best meets yourSource needs. There are three cutting method options
for both the front and rear tractors in thePaper source list if the optional perforationcutter is installed. For details, see “Using the
Perforation Cutter” in Chapter 6.G Forms Select the kind of form loaded in the printer.
Name If you don’t see your form, select it from theName list. You can select a different kind of form for each source. Select the source firstand then choose the kind of form you wantfrom the Name list.
2
Setting Up Your Software 2-19

8/22/2019 Epson DFX 8500 User Manual
http://slidepdf.com/reader/full/epson-dfx-8500-user-manual 54/252
Doc ument Properties d ia log b ox
G Form Select the kind of form loaded in the printer.If you don’t see your form, select it from the
Form list.G Orientation Select Portrait or Landscape. The diagram
on the screen changes according to theorientation you select.
Advanc ed Doc ument Prop erties d ia log box
G Graphics Click the printing resolution you want. If you
Resolution don’t see your resolution, select it from theGraphics Resolution list.
G Optimization Turn the Print Text as Graphics setting onor off.
If you need to make settings for contrast, brightness, inputRGB Gamma, and so forth, click Halftone. The Halftone
Color Adjustment dialog box appears. For details, click Help in this dialog box.
After you’ve checked your printer driver settings, you areready to print. If you have any problems while printing, seeChapter 8 for troubleshooting guidelines.
2-20 Setting Up Your Software

8/22/2019 Epson DFX 8500 User Manual
http://slidepdf.com/reader/full/epson-dfx-8500-user-manual 55/252
Fo r DO S Pro g ra m Use rs
If you are using DOS programs (not Windows applications),follow the instructions below to install the printer driver.
Insta lling the p rinte r d rive r
To install a printer driver in most DOS applications, you mustselect the printer you are using during the installation or setupprocedure.
Choose the EPSON DFX-8500 printer at the appropriate step inthe procedure. If the list in your application does not includethe DFX-8500 printer, choose the first available printer fromthis list:
DFX-8000DFX-5000+DFX-5000FX-2170
FX-1170
If none of these printers is listed, choose the first one availablefrom the following:
FXEXLX
RXMXEPSON printerStandard printerDraft printer
Note:
If your application does not list a suitable alternative, contact thesoftware manufacturer to see if an update is available.
2
Setting Up Your Software 2-21

8/22/2019 Epson DFX 8500 User Manual
http://slidepdf.com/reader/full/epson-dfx-8500-user-manual 56/252
2-22 Setting Up Your Software

8/22/2019 Epson DFX 8500 User Manual
http://slidepdf.com/reader/full/epson-dfx-8500-user-manual 57/252
Chapter 3
Pa p e r Ha nd ling
Using the Two-Tractor System . . . . . . . . . . . . . . . . . . . 3-2Positioning the paper supply . . . . . . . . . . . . . . . . . 3-2What paper types you can use . . . . . . . . . . . . . . . . . 3-3
Loading Paper onto the Front Tractor . . . . . . . . . . . . . . . 3-4
Loading Paper onto the Rear Tractor . . . . . . . . . . . . . . . 3-10
Adjusting the Paper Position . . . . . . . . . . . . . . . . . . . . 3-17Adjusting the top-of-form position . . . . . . . . . . . . . . 3-17Adjusting the printing position . . . . . . . . . . . . . . . . 3-20
Tearing Off the Printed Pages . . . . . . . . . . . . . . . . . . . 3-21Tear-off mode . . . . . . . . . . . . . . . . . . . . . . . . . . 3-21Using the Tear Off button . . . . . . . . . . . . . . . . . . . 3-23Adjusting the tear-off position . . . . . . . . . . . . . . . . . 3-23
Switching Between Front and Rear Tractors . . . . . . . . . . . 3-26
Changing the Paper . . . . . . . . . . . . . . . . . . . . . . . . . 3-28
Printing on Multi-Part Forms and Labels . . . . . . . . . . . . . 3-31Using multi-part forms . . . . . . . . . . . . . . . . . . . . . 3-32Using labels . . . . . . . . . . . . . . . . . . . . . . . . . . . 3-33
3
Paper Handling 3-1

8/22/2019 Epson DFX 8500 User Manual
http://slidepdf.com/reader/full/epson-dfx-8500-user-manual 58/252
Using the Tw o - Tra c to r Sy ste m
Your printer’s paper handling system consists of a front pushtractor and a rear push tractor. Both tractors are easy to loadand operate, and both accommodate a wide variety of papertypes, including labels and multi-part forms. The printerautomatically adjusts to the thickness of your loaded paper, soyou don’t need to make any manual adjustments to the paperthickness settings.
You can print on continuous paper from 4 inches (101 mm) to16 inches (406 mm) wide. Your printer senses the paper width
automatically.
When using more than two types of paper, load the paper youuse most often onto the front tractor. The front tractor, which iseasier to reach, will be available for the paper you change morefrequently. Use only the front tractor for printing on labels,continuous forms with labels, overlapping multi-part forms,and overlapping multi-part forms with labels.
Note:
G
Before using your paper, check that it matches the specificationsdescribed in Appendix A. Also make sure your paper has astraight edge.
G
If continuous paper is fed past the sprocket (on the last page, for example), the paper may not feed properly.
Po sitio ning the p a p e r sup p ly
You can load continuous paper from both the front and therear, so be sure to leave enough room around the printer forthe two stacks of fresh paper and for the printed stack. Makesure you align your paper supply with the paper loaded inthe tractor so the paper feeds smoothly into the printer.
3-2 Paper Handling

8/22/2019 Epson DFX 8500 User Manual
http://slidepdf.com/reader/full/epson-dfx-8500-user-manual 59/252
The following illustration shows three ways to position yourprinter and paper: with the front tractor loaded, with the reartractor loaded, and with both tractors loaded.
Note:
Make sure that your stack of printed pages does not interfere withthe rear tractor’s paper supply.
W ha t p a pe r ty pe s y ou c a n use
You can use the continuous paper types listed below. (Forsome paper types, the rear tractor is not available.)
C o ntinuo us Pa p e r Ty p e s Fro nt Tra c to r Re a r Tra c to r
Single-sheet available available
Multi-part available available
Labels available not available
C ontinuous forms with labels available not available
Overlapping multi-part forms available not available
Overlapping multi-part forms
with labelsavailable not available
3
Paper Handling 3-3

8/22/2019 Epson DFX 8500 User Manual
http://slidepdf.com/reader/full/epson-dfx-8500-user-manual 60/252
Loa d ing Pa p e r on to the Fro nt Tra c tor
Follow these steps to load paper onto the front tractor:
1. Turn off the printer, then open the printer’s front cover bylifting up the middle of its bottom edge until it locks inplace, as shown below.
2. Release the sprocket lock levers on both the right and leftsprockets by pulling each lever down.
c Caution:
Do not try to pull on or remove the elastic cord from thetractor.
front cover
sprocket loc k lever
3-4 Paper Handling

8/22/2019 Epson DFX 8500 User Manual
http://slidepdf.com/reader/full/epson-dfx-8500-user-manual 61/252
3. Position the left sprocket so that the sprocket pins are tothe left of the arrow mark on the scale. Lock it into place
by pushing up the sprocket lock lever.
4. Now slide the right sprocket to approximately match thewidth of your paper. (Do not lock it in place yet.)
arrow mark on the scale
3
Paper Handling 3-5

8/22/2019 Epson DFX 8500 User Manual
http://slidepdf.com/reader/full/epson-dfx-8500-user-manual 62/252
5. Slide the two paper supports so that they are spaced evenly between the two sprockets.
6. Open both sprocket covers.
paper supports
sprocket cover
3-6 Paper Handling

8/22/2019 Epson DFX 8500 User Manual
http://slidepdf.com/reader/full/epson-dfx-8500-user-manual 63/252
7. Be sure your paper has a clean, straight edge, and then fitthe first five holes in the paper over the sprocket pins asshown below. The side of the paper that you want to printon should be facing you. Now close the sprocket covers.
8. Slide the right sprocket so that the paper is straight and hasno wrinkles. Lock the sprocket in place by pushing up thesprocket lock lever. After you lock the right sprocket, itmay still move slightly; this is normal.
Note:
Be careful not to pull the paper too tightly when adjusting theright sprocket.
sprocket loc k lever
3
Paper Handling 3-7

8/22/2019 Epson DFX 8500 User Manual
http://slidepdf.com/reader/full/epson-dfx-8500-user-manual 64/252
9. Pull the printer’s front cover out slightly and lower it until itis closed.
c Caution:
G Do not push the front cover directly down; always pull itout slightly before closing.
G Before turning on the printer, be absolutely sure you haveremoved all protective materials. (See the Notice Sheet forinstructions.) Turning on the printer while the print headcannot move may seriously damage the mechanism.
10. Turn on the printer. The print head moves to the left andthe Powerand Paper Out lights come on. Also, either thefront or rear tractor arrow on the Tractor Select indicatorlights up, depending on which tractor was selected whenthe printer was turned off last.
3-8 Paper Handling

8/22/2019 Epson DFX 8500 User Manual
http://slidepdf.com/reader/full/epson-dfx-8500-user-manual 65/252
11. Check the Tractor Select indicator to see which tractor isselected:
G If the front tractor arrow light is red, press the LF/FF
Load button to load the paper.
G If the rear tractor arrow light is red, press theFront/Rearbutton to switch to the front tractor.When the printer switches tractors, it also loadsthe paper automatically.
The Tractor Select indicator changes to green and thePaper Out light turns off. The paper is now loaded to thetop-of-form position. If it looks like the printing will starttoo high or low on the page, adjust the paper position asdescribed on page 3-17.
3
Paper Handling 3-9

8/22/2019 Epson DFX 8500 User Manual
http://slidepdf.com/reader/full/epson-dfx-8500-user-manual 66/252
Loa d ing Pa p e r on to the Re a r Tra c tor
Follow the steps below to load paper onto the rear tractor. (Youdo not need to remove the paper from the front tractor first.)
1. Turn off the printer.
2. Open the printer’s top cover as shown below.
3. Open the rear flap at the back of the top cover.
rear flap
3-10 Paper Handling

8/22/2019 Epson DFX 8500 User Manual
http://slidepdf.com/reader/full/epson-dfx-8500-user-manual 67/252
4. Release the sprocket lock levers on the rear tractor’s rightand left sprockets by pushing each lever back.
c Caution:
Do not try to pull on or remove the elastic cord from thetractor.
5. Position the left sprocket so that the sprocket pins are tothe left of the arrow mark on the scale. Lock it in place by
pulling the sprocket lock lever forward.
sprocket lock lever
arrow mark on the scale
3
Paper Handling 3-11

8/22/2019 Epson DFX 8500 User Manual
http://slidepdf.com/reader/full/epson-dfx-8500-user-manual 68/252
6. Now slide the right sprocket to approximately matchthe width of your paper. (Do not lock it in place yet.)
7. Slide the two paper supports so they are spaced evenly between the two sprockets.
paper supports
3-12 Paper Handling

8/22/2019 Epson DFX 8500 User Manual
http://slidepdf.com/reader/full/epson-dfx-8500-user-manual 69/252
8. Open both sprocket covers.
9. Make sure your paper has a clean, straight edge. With theside of the paper you want to print on facing down, insertyour paper through the opening at the rear of the printer.
Note:
You may find it easier to load the paper by standing to the side.That way you can feed the paper with one hand and pull it
through with the other.
sprocket cover
3
Paper Handling 3-13

8/22/2019 Epson DFX 8500 User Manual
http://slidepdf.com/reader/full/epson-dfx-8500-user-manual 70/252
10. Fit the first five holes in the paper over the sprocket pins asshown below. Now close the sprocket covers.
11. Slide the right sprocket to remove any slack in the paper.Make sure the paper is straight and has no wrinkles. Pullthe sprocket lock lever forward to lock the sprocket inplace. After you lock the right sprocket, it may still moveslightly; this is normal.
Note:
Be careful not to pull the paper too tightly when adjusting theright sprocket.
sprocket lock lever
3-14 Paper Handling

8/22/2019 Epson DFX 8500 User Manual
http://slidepdf.com/reader/full/epson-dfx-8500-user-manual 71/252
12. Close the top cover and the rear flap. The paper is nowloaded in the standby position.
13. Turn on the printer. The print head moves to the left andthe Powerand Paper Out lights come on. Also, either thefront or rear tractor arrow on the Tractor Select indicatorlights up, depending on which tractor was selected whenthe printer was turned off last.
3
Paper Handling 3-15

8/22/2019 Epson DFX 8500 User Manual
http://slidepdf.com/reader/full/epson-dfx-8500-user-manual 72/252
14. Check the Tractor Select indicator to see which tractor isselected:
G If the rear tractor arrow light is red, press the LF/FF
Load button to load the paper.
G If the front tractor arrow light is red, press theFront/Rearbutton to switch to the rear tractor. Whenthe printer switches tractors, it also loads the paperautomatically.
The Tractor Select indicator changes to green and thePaper Out light turns off. The paper is now loaded to thetop-of-form position. If it looks like the printing will starttoo high or low on the page, adjust the paper position asdescribed in the next section.
3-16 Paper Handling

8/22/2019 Epson DFX 8500 User Manual
http://slidepdf.com/reader/full/epson-dfx-8500-user-manual 73/252
A d justing the Pa p e r Po sitio n
You can adjust the top-of-form position as well as the printingposition at any point on the page by using the TOF and Micro
Feed buttons. The printer then remembers the newtop-of-form position. When you use the optional pull tractor,you can adjust the paper position as described below.
Note:
The printing position (based on the top-of-form position) is controlledby your software. To change the print position, adjust your software’s
print settings. Use the following procedure only if your software does
not allow print position adjustment.
A d justing the to p - o f- fo rm p o sitio n
The top-of-form position is the position to which the printerfeeds the paper when it loads it or performs a form feed. Thisposition is important because it determines where the printing
begins on each page. If the printing is too high or low on thepage, you can adjust the top-of-form position eitherpermanently or temporarily depending on how you use the TOF button.
G When you want to permanently change the top-of-formposition, you enter the top-of-form mode using the TOFcontrol panel button. The printer remembers the newtop-of-form position even after the printer is turned off,
reset, or initialized. (The printer remembers separatetop-of-form positions for the front and rear tractors.)
G When you want to temporarily change the top-of-formposition, you adjust the position using the Micro Feed
buttons during pause status without entering top-of-formmode. The printer remembers the temporary top-of-formposition until the next time you load paper, switch tractors,
or turn off the printer. See “Adjusting the printing position”on page 3-20.
3
Paper Handling 3-17

8/22/2019 Epson DFX 8500 User Manual
http://slidepdf.com/reader/full/epson-dfx-8500-user-manual 74/252
You can set the top-of-form position from 2.6 mm (0.1 inch)to 33.9 mm (1.33 inch) below the top edge of the paper. Thefactory setting is 5.8 mm (0.2 inch).
Follow the steps below to reset (permanently change) thetop-of-form position.
c Caution:
To adjust the top-of-form position when labels are loaded inthe printer, use the forward-feeding (top) Micro Feed buttononly; do not enter the top-of-form mode. (See “Adjusting the
printing position” later in this chapter.) Never feed labels
backward through the printer.
1. Make sure the printer is turned on and the desired tractoris selected (the corresponding tractor arrow should be lit).
2. Open the top cover.
3. Press the TOF button to enter top-of-form mode. The printer beeps once, and the TOF light flashes. Also, the printeradvances the paper so that the top-of-form position is linedup with the red line on the clear plastic ribbon protector.
3-18 Paper Handling

8/22/2019 Epson DFX 8500 User Manual
http://slidepdf.com/reader/full/epson-dfx-8500-user-manual 75/252
4. Use the Micro Feed buttons to feed the paper to thedesired top-of-form position. The red line on the ribbonprotector shows you where the bottom edge of your firstline of text will print. This position is based on the first
printable line of text. If your software inserts a top marginof five lines, your text will actually print five lines belowthe top-of-form position.
Note:
The red line on the ribbon protector can be used as a referenceonly when you are in top-of-form mode. At all other times your
top-of-form position is hidden behind the print ribbon.
5. Press the TOF button again to exit and save your newtop-of-form position. Then close the top cover.
Note:
If you enter top-of-form mode right after loading paper, you can setthe loading and top-of-form positions at the same time. (When you
use the optional pull tractor, you cannot adjust the loading position.)
3
Paper Handling 3-19

8/22/2019 Epson DFX 8500 User Manual
http://slidepdf.com/reader/full/epson-dfx-8500-user-manual 76/252
A d justing the p rinting p o sitio n
You may need to adjust the printing position in the middle of a page, or to adjust the top-of-form position when using labels.
When you move the printing position, you temporarily changethe top-of-form position by the same amount. For example,if you adjust the printing in the middle of the page so that itfalls a half-inch lower, the next page will begin printing ahalf-inch lower as well. The printer remembers this temporarytop-of-form position until the next time you load paper, switchtractors, or turn off the printer. To adjust the printing position
or top-of-form position, follow these steps:1. Start printing your document. When you reach the text that
you want to align at a particular spot on the page, press thePause button to stop printing.
2. Use the Micro Feed buttons to adjust the position whereyou want your next line of text to fall. Press the button onceto feed the paper forward or backward in 1/216-inch
increments, or hold it down to move the papercontinuously.
c Caution:
If you are printing on labels, continuous forms withlabels, or overlapping multi-part forms, use only the
forward-feeding (top) Micro Feed button.
3. When you are finished, press the Pause button to resumeprinting your document.
3-20 Paper Handling

8/22/2019 Epson DFX 8500 User Manual
http://slidepdf.com/reader/full/epson-dfx-8500-user-manual 77/252
Te a ring O ff the Printe d Pa g e s
After you finish printing, you can use the tear-off feature toadvance continuous paper on the push tractor to the tear-off edge of the printer. You can then easily tear off printed sheets.When you resume printing, the printer automatically feedspaper back to the loading position.
This feature lets you save paper that would normally be lost between documents.
You can use the tear-off feature in two ways: by turning on
DIP switch 3-1 to select automatic tear-off mode, or by pressingthe Tear Off button on the control panel. (See Chapter 4 forinformation on changing DIP switch settings.)
If the perforation between pages is not aligned with the tear-off edge, you can adjust the tear-off position using the micro-feedfeature. The printer remembers this new tear-off position.
cCaution:
Never use the tear-off feature to reverse feed labels, overlappingmulti-part forms, continuous forms with labels, or overlappingmulti-part forms with labels. Do not use the tear-off featurewhen the optional pull tractor is installed or when using the
paper memory feature (described in Chapter 4).
Te a r- o ff m od e
When you select tear-off mode with DIP switch 3-1, the printerautomatically advances continuous paper to the tear-off position when you finish printing.
The printer advances paper to the tear-off position only whenthe printer receives a full page of data or a form feed commandand no more data is received for three seconds.
3
Paper Handling 3-21

8/22/2019 Epson DFX 8500 User Manual
http://slidepdf.com/reader/full/epson-dfx-8500-user-manual 78/252
Follow these steps to select tear-off mode:
1. Make sure the printer is turned off.
2. Turn DIP switch 3-1 on.
3. Turn the printer on.
When tear-off mode is on and you print on continuous paperon the push tractor, the printer advances the final printed pageto the tear-off position. Then you can tear off all printed pages.
If the perforation is not aligned with the tear-off edge, adjustthe tear-off position as described on page 3-23.
When you resume printing, the printer automatically feedsthe paper back to the loading position and begins printing.
3-22 Paper Handling

8/22/2019 Epson DFX 8500 User Manual
http://slidepdf.com/reader/full/epson-dfx-8500-user-manual 79/252
Using the Te a r O ff b utto n
Whether or not the printer is in tear-off mode, you can use the Tear Off button to advance continuous paper to the tear-off
position by following the steps below.
1. Make sure printing has finished. Then press the Tear Off button. The printer advances the paper to the tear-off edgeand the Tear Off light comes on.
2. Tear off all printed pages. If the perforation is not alignedwith the tear-off edge, adjust the tear-off position as
described in the next section.3. When you resume printing, the printer feeds the paper back
to the loading position and begins printing. (You can alsomanually feed the paper back to the loading position bypressing the Tear Off button again.)
A d justing the te a r- o ff p o sitio n
If the paper’s perforation is not aligned with the tear-off edge,follow these steps:
l. Turn on the printer and select the desired tractor.
2. Open the paper separator cover (the flap on the toppart of the printer’s top cover). This exposes the printer’stear-off edge.
3
Paper Handling 3-23
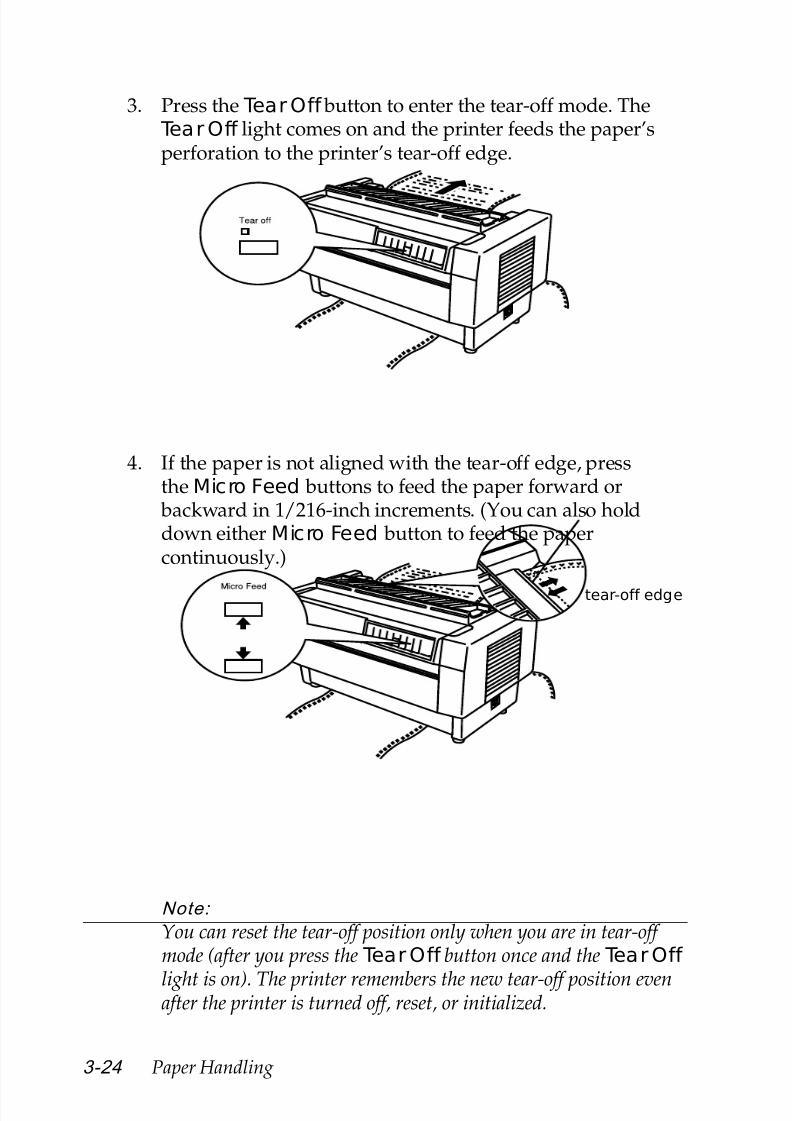
8/22/2019 Epson DFX 8500 User Manual
http://slidepdf.com/reader/full/epson-dfx-8500-user-manual 80/252
3. Press the Tear Off button to enter the tear-off mode. The Tear Off light comes on and the printer feeds the paper’sperforation to the printer’s tear-off edge.
4. If the paper is not aligned with the tear-off edge, pressthe Micro Feed buttons to feed the paper forward or backward in 1/216-inch increments. (You can also holddown either Micro Feed button to feed the papercontinuously.)
Note:
You can reset the tear-off position only when you are in tear-off mode (after you press the Tear Off button once and the Tear Off
light is on). The printer remembers the new tear-off position evenafter the printer is turned off, reset, or initialized.
tear-off edge
3-24 Paper Handling
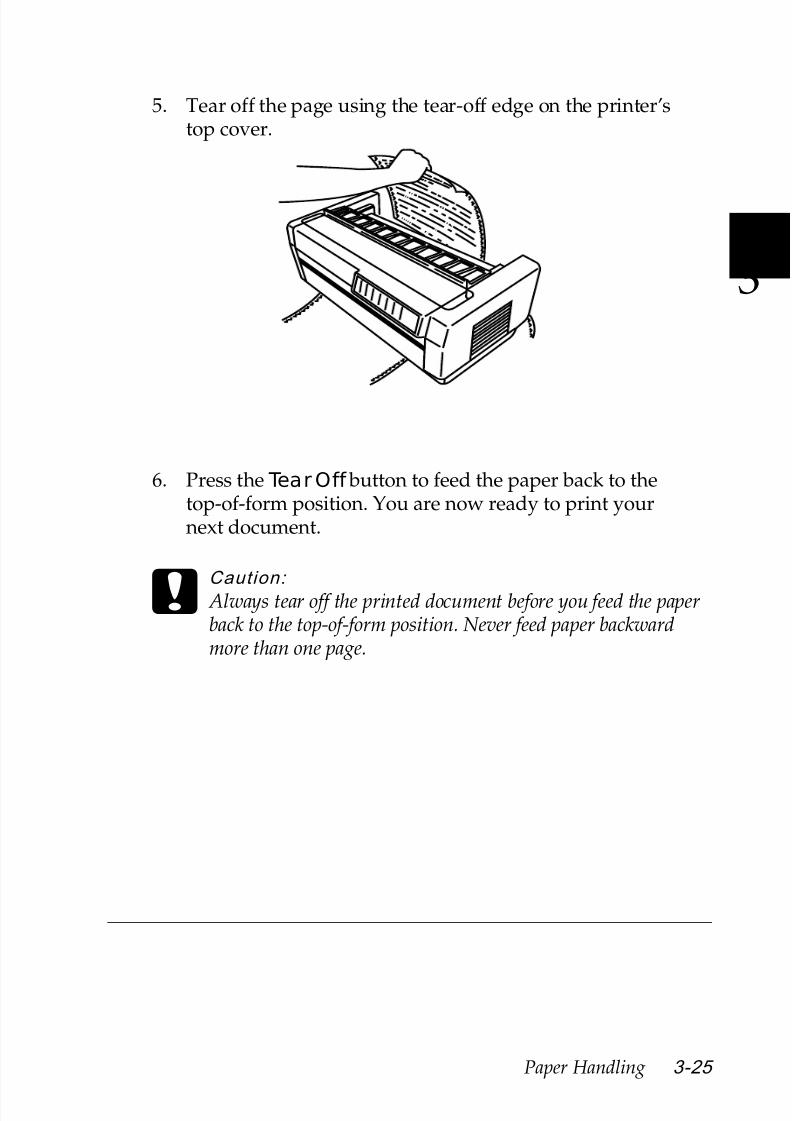
8/22/2019 Epson DFX 8500 User Manual
http://slidepdf.com/reader/full/epson-dfx-8500-user-manual 81/252
5. Tear off the page using the tear-off edge on the printer’stop cover.
6. Press the Tear Off button to feed the paper back to thetop-of-form position. You are now ready to print yournext document.
cCaution:
Always tear off the printed document before you feed the paperback to the top-of-form position. Never feed paper backwardmore than one page.
3
Paper Handling 3-25

8/22/2019 Epson DFX 8500 User Manual
http://slidepdf.com/reader/full/epson-dfx-8500-user-manual 82/252
Sw itc hing Be tw e e n Fro nt a nd Re a r Tra c tors
You can easily switch between paper loaded on the fronttractor and paper loaded on the rear tractor. The instructions
below explain how to switch from the front tractor to the reartractor, but you can follow the same steps to switch from therear tractor to the front tractor. (To switch tractors when theoptional pull tractor is installed, see Chapter 6.)
c Caution:
Never switch between tractors if labels are already loaded inthe printer. First remove the labels by tearing off the fresh
supply below the tractor and pressing LF/FF Load to ejectthe remaining labels.
Before you start, make sure the printer is turned on and thatthe front tractor is selected (the front tractor arrow on the Tractor Select indicator should be lit). If you are in the middleof printing a document, wait for the printer to finish printing
before you switch tractors. Then follow these steps:
1. If no paper is loaded in the rear tractor, load paper to thestandby position (the first five pins of the sprockets), asdescribed in steps 2 through 13 on page 3-10.
3-26 Paper Handling

8/22/2019 Epson DFX 8500 User Manual
http://slidepdf.com/reader/full/epson-dfx-8500-user-manual 83/252
2. If you have a printed document or excess paper still in theprinter, use the tear-off feature described in the previoussection to tear off the document or excess paper.
c Caution:
Always tear off the printed document and any excess paper before switching tractors. Never feed more than
one page backward through the printer.
3. Press the Front/Rearbutton to switch to the rear tractor.The front-loaded paper automatically feeds back to thestandby position and the rear-loaded paper advances tothe top-of-form position.
3
Paper Handling 3-27

8/22/2019 Epson DFX 8500 User Manual
http://slidepdf.com/reader/full/epson-dfx-8500-user-manual 84/252
C h a n g in g th e Pa p e r
This section describes how to change paper on the front tractor, but you can follow the same steps when you change the paperon the rear tractor.
Before you start, make sure the printer is turned on and thefront tractor is selected. (If you are changing the paper on therear tractor, the rear tractor should be selected instead.)
c Caution:
Never change paper using this procedure if labels, continuous
forms with labels, overlapping multi-part forms, oroverlapping multi-part forms with labels are already loaded inthe printer. Remove the labels by tearing off the fresh supplybelow the tractor and pressing LF/FF Load to eject theremaining labels. Then load the new paper as described earlierin this chapter.
1. If you have a printed document still in the printer, use the
tear-off feature described earlier to tear off the document orexcess paper.
c Caution:
Always tear off printed documents before changing the paper. Never feed more than one page backward throughthe printer.
3-28 Paper Handling

8/22/2019 Epson DFX 8500 User Manual
http://slidepdf.com/reader/full/epson-dfx-8500-user-manual 85/252
2. Press the Front/Rearbutton to switch to the rear tractor. Thefront-loaded paper automatically feeds back to the standbyposition.
3. Open the printer’s front cover. (To change the rear-loadedpaper, open the printer’s top cover and the rear flap.)
3
Paper Handling 3-29

8/22/2019 Epson DFX 8500 User Manual
http://slidepdf.com/reader/full/epson-dfx-8500-user-manual 86/252
4. Open the sprocket covers and remove the paper from thetractor.
5. Load the new paper as described in steps 2 through 11 onpage 3-4 (or for rear-loaded paper, steps 4 through 14
beginning on page 3-11).
sprocket cover
3-30 Paper Handling

8/22/2019 Epson DFX 8500 User Manual
http://slidepdf.com/reader/full/epson-dfx-8500-user-manual 87/252
Printing o n M ulti- Pa rt Fo rm s a nd La b e ls
Your printer can print on both single-sheet and continuousmulti-part forms, as well as on labels.
You can print on various types of paper, including multi-partforms and labels. Your printer can also handle a variety of paper thicknesses, from thin paper to seven sheets (or sixsheets on the rear tracor) including the original. The printerautomatically adjusts to the width and thickness of your paper.
When you print on multi-part forms and labels, the positioning
of your text on the page can be critical. For more informationon aligning your text, see the sections on adjusting top-of-formand printing positions earlier in this chapter. You should alsocheck both your printer and your software page length settings
before you load labels or forms.
If you are using multi-part forms or labels, you may want touse the optional pull tractor. See Chapter 6.
cCaution:
When printing on labels, be absolutely sure that your printingstays within the printable area of the label to prevent damageto the print head. For more information on the printable area,see Appendix A.
3
Paper Handling 3-31

8/22/2019 Epson DFX 8500 User Manual
http://slidepdf.com/reader/full/epson-dfx-8500-user-manual 88/252
Using m ulti- p a rt fo rm s
You can use multi-part (carbonless) forms with up to six sheets,including the original, on the rear tractor. On the front tractor,
you can use forms with up to seven sheets.
You load continuous multi-part forms the same way you loadany other type of continuous paper. Before loading multi-partforms, however, make sure the paper has a clean straight edgeand does not separate or tear apart. For instructions, see thesections on loading paper earlier in this chapter.
When you use the paper memory feature described inChapter 4, the DFX-8500 can print on multi-part forms thatvary in thickness, such as forms with labels on them or formsthat overlap slightly where they are glued together. Theseforms are thicker in the label area and in the places where theyoverlap or are joined together, as shown below.
cCaution:
Be sure to use the paper memory feature before you print onmulti-part forms that vary in thickness. See “Using the Paper
Memory Feature” in Chapter 4 for instructions.
When you print on these forms, make sure that the printing fitswithin the printable area and that the top-of-form position isset properly. For more information about the printable area, seethe section on paper specifications in Appendix A.
Overlapping multi-part forms Continuous forms with labels
3-32 Paper Handling

8/22/2019 Epson DFX 8500 User Manual
http://slidepdf.com/reader/full/epson-dfx-8500-user-manual 89/252
Using la b e ls
When selecting labels for printing, always choose the typemounted on continuous paper with sprocket holes for use
with a tractor. Load labels in the front tractor only, followingthe instructions for loading continuous paper. See “LoadingPaper Onto the Front Tractor” on page 3-4.
c Caution:
Never use the Tear Off, Front/Rear, or reverse-feeding(bottom) Micro Feed button when labels are loaded in the
printer. Never feed labels backward through the printer
because they can easily come off the backing and jam the printer.
Although you must never feed labels backward, you can stilluse the automatic paper handling features if you follow theseprecautions:
G Instead of using the Tear Off button to remove printed
labels, press the LF/FF Load button until the last printedlabel is at the point where you can tear it off easily.
G Before using the Front/Rearbutton to switch tractors orchange paper, remove the entire supply of labels. Removelabels by tearing off the fresh supply at a perforation belowthe tractor. Then press the LF/FF Load button to eject theremaining labels.
G
When adjusting the top-of-form or printing position, useonly the forward-feeding (top) Micro Feed button.
c Caution:
Because labels are especially sensitive to extreme temperaturesand humidity, use them only under normal operatingconditions.
3
Paper Handling 3-33

8/22/2019 Epson DFX 8500 User Manual
http://slidepdf.com/reader/full/epson-dfx-8500-user-manual 90/252
3-34 Paper Handling

8/22/2019 Epson DFX 8500 User Manual
http://slidepdf.com/reader/full/epson-dfx-8500-user-manual 91/252
Chapter 4
Using the Printe r
Control Panel . . . . . . . . . . . . . . . . . . . . . . . . . . . . . 4-2Lights . . . . . . . . . . . . . . . . . . . . . . . . . . . . . . . 4-2Buttons . . . . . . . . . . . . . . . . . . . . . . . . . . . . . . 4-4Other control panel features . . . . . . . . . . . . . . . . . . 4-8
Using DIP Switches . . . . . . . . . . . . . . . . . . . . . . . . . 4-9
Changing DIP switch settings . . . . . . . . . . . . . . . . . 4-9DIP switch tables . . . . . . . . . . . . . . . . . . . . . . . . . 4-11DIP switch functions . . . . . . . . . . . . . . . . . . . . . . 4-16
Using the Paper Memory Feature . . . . . . . . . . . . . . . . . 4-22Saving paper memory settings . . . . . . . . . . . . . . . . . 4-23
4
Using the Printer 4-1

8/22/2019 Epson DFX 8500 User Manual
http://slidepdf.com/reader/full/epson-dfx-8500-user-manual 92/252
C o ntro l Pa ne l
The control panel consists of indicator lights and buttons, andgives you access to several powerful features.
Lights
Power On when the power switch is on andpower is supplied to the printer.
Paper Out On when the printer is out of paper.Comes on when there is no paper
positioned behind the print head, evenif paper is loaded on the tractors in thestandby position.
Flashes when paper is jammed in theprinter.
Ribbon Blinks when the ribbon is jammed inthe printer.
Paper Select Displays the paper memory that isregistered in the printer. See page 4-22for details.
4-2 Using the Printer

8/22/2019 Epson DFX 8500 User Manual
http://slidepdf.com/reader/full/epson-dfx-8500-user-manual 93/252
Font The font selection status is displayed bytwo font lights on the control panel:
o o Super Draft
o n Draftn o Romann n Sans serif
n =On, o =Off
Pitch The pitch selection status is displayed bythree pitch lights on the control panel:
o o n 10 cpio n o 12 cpio n n 15 cpin o o 17 cpin o n 20 cpin n o PS (Proportional Spacing)
n = on, o = off
Copy On when the printer is in copy mode(to select darker printing).
TOF(Top of Form)
On when the printer is in top-of-formmode. The printer remembers any changeyou make to the top-of-form positionwhen this light on.
Tear Off On when the printer is in tear-off mode.The printer remembers any change youmake to the tear-off position when thislight is on.
Pause On when printing is paused.
Blinks when the print head is hot. Pressto temporally stop printing and resume
printing.
4
Using the Printer 4-3

8/22/2019 Epson DFX 8500 User Manual
http://slidepdf.com/reader/full/epson-dfx-8500-user-manual 94/252
Tractor SelectFront
On when the front tractor is selected. Thelight is green when paper is loaded (evenif the paper is in the standby position), andred when the tractor is out of paper.
Tractor SelectRear
On when the rear tractor is selected. Thelight is green when paper is loaded (evenif the paper is in the standby position), andred when the tractor is out of paper.
Buttons
Paper Select Selects one of the following papernumbers: 1, 2, 3, 4, 5, 6, 7, 8, 0, a, or b.
Select a or b if you have registered paperinformation using the DIP switches andcontrol panel. See page 4-22 for details.
Select 1 to 8 if you have registered paper
information using the paper memoryutility. See Chapter 5 for more information.
Font Selects one of the following fonts: SuperDraft, Draft, Roman, or Sans Serif.
4-4 Using the Printer

8/22/2019 Epson DFX 8500 User Manual
http://slidepdf.com/reader/full/epson-dfx-8500-user-manual 95/252
Pitch Selects the characters per inch for printing.Press the button until the light appearsnext to the desired pitch. (Your softwaresetting overrides this setting.)
Copy Lets you print the document darker. This button is available in SuperDraft and Draftmode only and is disabled if you use thestatus monitor utility and select a papernumber from 1 to 8.
TOF(Top of Form)
Lets you enter and exit the top-of-formmode to adjust the top-of-form position.
This button is available when the topcover is open.
If your printing begins too high or low onthe page, you can reset the top-of-formposition by entering top-of-form modeand using micro feed to adjust theposition. The printer remembers this newtop-of-form position even after it is turnedoff, reset, or initialized. Also, the printerremembers separate top-of-form positionsfor the front and rear tractors.
See “Adjusting the top-of-form position”in Chapter 3.
Tear Off Feeds the paper to the printer’s tear-off edge and puts the printer in tear-off mode.
If the perforation on your paper does notalign exactly with the printer’s tear-off edge, use the Micro Feed buttons toadjust the tear-off position. See “Adjustingthe tear-off position” in Chapter 3.
4
Using the Printer 4-5

8/22/2019 Epson DFX 8500 User Manual
http://slidepdf.com/reader/full/epson-dfx-8500-user-manual 96/252
This button can also be used to run theprinter’s NLQ self test. See “Printing a Self Test” in Chapter 8.
c Caution:
Never press the Tear Off button when labels are loaded inthe printer. Use the LF/FF Load button to feed the printedlabels to a point where they can be torn off.
LF/FF Load LF advances paper one line at a time. Tofeed your paper forward one line, press
this button once.FF advances continuous paper to the top of the next page. Press and hold the buttonfor about one second.
Load loads paper on the push tractor of the selected paper path when no paper iscurrently loaded.
This button can also be used to run thedraft self test. See “Printing a Self Test” inChapter 8.
Micro Feed These two buttons advance or reverse theloaded paper in 1/216-inch increments.The top button advances the paper and the
bottom button reverses it. You can use
these buttons to adjust the top-of-form,tear-off, and printing positions.
To reset the top-of-form position, pressthe TOF button to enter top-of-form mode.Then use the Micro Feed buttons to movethe paper to the desired position. See“Adjusting the top-of-form position” inChapter 3.
4-6 Using the Printer

8/22/2019 Epson DFX 8500 User Manual
http://slidepdf.com/reader/full/epson-dfx-8500-user-manual 97/252
To reset the tear-off position, press the Tear Off button to enter tear-off mode andfeed the paper to the tear-off position.Then use the Micro Feed buttons to move
the paper to the desired position. See“Adjusting the tear-off position” inChapter 3.
To adjust the printing position, presseither Micro Feed button to advance orreverse the paper to the desired position.See “Adjusting the printing position” in
Chapter 3.
c Caution:
When labels are loaded, use only the top Micro Feedbutton. Never feed labels backward through the printer.
Pause Press to temporarily stop printing. Pressagain to resume printing.
Hold down for at least 3 seconds to resetthe printer’s control panel settings.
Tractor SelectFront/Rear
Selects the front or rear tractor. If you have been using paper loaded on one tractor, firstremove the printed output before pressingthis button to switch the tractor. When youswitch between tractors, the paper already
loaded in the printer is fed backward to thestandby position, and the paper on thenewly selected tractor is loaded.
c Caution:
Never use the Front/Rearbutton when labels are loadedin the printer. Always tear off any printed pages or excess
paper so you don’t feed more than one page backwardthrough the printer.
4
Using the Printer 4-7

8/22/2019 Epson DFX 8500 User Manual
http://slidepdf.com/reader/full/epson-dfx-8500-user-manual 98/252
O the r c ontrol p a ne l fe a ture s
Self test By holding down the LF/FF Load or Tear Off button while you turn on the
printer, you can start the printer’s self test. The self test prints the characters inthe printer’s ROM (Read Only Memory).See “Printing a Self Test” in Chapter 8.
Hex dump By holding down both the LF/FF Load and Tear Off buttons while you turn on theprinter, you can turn on the hex dumpmode. This feature prints the codes thatare sent to the printer so that advancedusers can find the cause of communicationproblems between the computer andprinter. See “Using the Hex Dump Mode”in Chapter 8 for more information.
Print settings By holding down the Pause button whileyou turn on the printer, you can print the
current DIP switch settings. See the nextsection for more information.
Paper memorysetting
By holding down the Paper Select buttonwhile you turn on the printer, you canregister the paper form information whenyou use multi-part forms that overlap orforms with labels on them. See “Using thePaper Memory Feature” on page 4-22.
4-8 Using the Printer

8/22/2019 Epson DFX 8500 User Manual
http://slidepdf.com/reader/full/epson-dfx-8500-user-manual 99/252
Using DIP Sw itc he s
Your printer has five sets of DIP switches which control printerfunctions such as page length and printing speed. DIP switchsettings are shown in the DIP switch tables starting on page4-11. Descriptions of all the DIP switch functions are provided
beginning on page 4-16.
Because the factory (default) settings are designed toaccommodate the needs of most users, you may never need tochange any DIP switch settings.
Note: You can print the current DIP switch settings by holding down thePause button while you turn on the printer.
C ha ng ing DIP sw itc h se tting s
1. Turn off the printer.
2. Open the printer’s front cover by lifting the middle of its bottom edge until it locks in place.
3. The DIP switches are located in a small compartment on thefront paper guide, behind the front tractor paper. If paper isloaded on the front tractor, either remove it or lift it out of
the way so you can reach the DIP switches.
4
Using the Printer 4-9

8/22/2019 Epson DFX 8500 User Manual
http://slidepdf.com/reader/full/epson-dfx-8500-user-manual 100/252
4. Open the DIP switch cover.
5. Use a pointed instrument, such as the tip of a ballpoint pen,to turn the switch either on or off. A DIP switch is on whenit is up, and off when it is down.
Note:
Always make sure that the printer is turned off before changingany DIP switches.
6. Close the DIP switch cover and replace the paper.
7. Close the front cover.
8. Turn on the printer to initialize the new settings. When youchange a DIP switch setting, the new setting takes effect
only after you turn on or reset the printer.
4-10 Using the Printer

8/22/2019 Epson DFX 8500 User Manual
http://slidepdf.com/reader/full/epson-dfx-8500-user-manual 101/252
DIP sw itc h ta b le s
The following tables list the settings for each DIP switch.For more information about each feature, see the explanations
following the tables.
DIP switch 1
Sw itc h De sc rip tio n O N O FF
1-1 C haracter table See Tables A-1 and Table A-2
1-2
1-3
1-4
1-5
1-6
1-7 Skip over perforation Active Inactive
1-8 Print direction Uni-d. Bi-d.
DIP switch 2
Sw itc h De sc rip tio n O N O FF
2-1 Page length for front
tractor
See Table B
2-2
2-3
2-4
2-5 Page length for rear
tractor
See Table C
2-6
2-7
2-8
4
Using the Printer 4-11

8/22/2019 Epson DFX 8500 User Manual
http://slidepdf.com/reader/full/epson-dfx-8500-user-manual 102/252
DIP switc h 3
Sw itc h D e sc rip tio n O N O FF
3-1 Auto tear off Active Inactive
3-2 Zero slash Active Inactive3-3 Auto line feed Active Inactive
3-4 Buzzer (beep) Inactive Active
3-5 Auto CR (IBM 2381 Plus) Active Inactive
3-6 IBM character table Table 1 Table 2
3-7 Auto cut mode Active Inactive
3-8 Software IBM 2381 Plus ESC/P
DIP switc h 4
Sw itc h D e sc rip tio n O N O FF
4-1 Input buffer Inactive Active
4-2Auto I/F (interface)
wait time
30 sec. 10 sec.
4-3 I/F (interface) mode See Table D
4-4
4-5 Serial parity See Table E
4-6
4-7 Serial baud rate See Table F
4-8
DIP switc h 5
Sw itc h D e sc rip tio n O N O FF
5-1Overlapping multi-part
forms
Active Inactive
5-2Continuous forms with
labels
Active Inactive
5-3 Skip over binding Active Inactive
5-4 Paper memory Memory b Memory a
* DIP switches 5-5 to 5-8 are not used.
4-12 Using the Printer

8/22/2019 Epson DFX 8500 User Manual
http://slidepdf.com/reader/full/epson-dfx-8500-user-manual 103/252
Table A-1 Charac ter tab le (standard model)
C ha ra c te r ta b le SW 1 - 1 SW 1 - 2 SW 1- 3 SW 1- 4 SW 1 - 5 SW 1 - 6
PC437 (US,
Standard Europe)
OFF OFF OFF OFF OFF OFF
PC850 (Multilingual) OFF OFF OFF OFF OFF ON
PC860 (Portuguese) OFF OFF OFF OFF ON OFF
PC861 (Icelandic) OFF OFF OFF OFF ON ON
PC863(Canadian-French)
OFF OFF OFF ON OFF OFF
PC865 (Nordic) OFF OFF OFF ON OFF ON
Abicomp OFF OFF OFF ON ON OFF
BRASCII OFF OFF OFF ON ON ON
Roman 8 OFF OFF ON OFF OFF OFF
ISO Latin 1 OFF OFF ON OFF OFF ON
Italic U.S.A OFF OFF ON OFF ON OFF
Italic France OFF OFF ON OFF ON ON
Italic Germany OFF OFF ON ON OFF OFF
Italic U.K OFF OFF ON ON OFF ON
Italic Denmark OFF OFF ON ON ON OFF
Italic Sweden OFF OFF ON ON ON ON
Italic Italy OFF ON OFF OFF OFF OFF
Italic Spain OFF ON OFF OFF OFF ON
PC437 is selected by all other switch combinations.
Table A-2 Cha rac ter tab le (availab le in certa in countries)
C ha ra c te r ta b le SW 1 - 1 SW 1 - 2 SW 1- 3 SW 1- 4 SW 1 - 5 SW 1 - 6
PC437 (US,
Standard Europe)
OFF OFF OFF OFF OFF OFF
PC850 (Multilingual) OFF OFF OFF OFF OFF ON
PC437 Greek OFF OFF OFF OFF ON OFF
PC852 (East Europe) OFF OFF OFF OFF ON ON
PC853 (Turkish) OFF OFF OFF ON OFF OFF
Continued on the next page
4
Using the Printer 4-13

8/22/2019 Epson DFX 8500 User Manual
http://slidepdf.com/reader/full/epson-dfx-8500-user-manual 104/252
C ha ra c te r ta b le SW 1- 1 SW 1 -2 SW 1 - 3 SW 1- 4 SW 1- 5 SW 1 - 6
PC855 (Cyrillic) OFF OFF OFF ON OFF ON
PC857 (Turkish) OFF OFF OFF ON ON OFF
PC866 (Russian) OFF OFF OFF ON ON ONPC869 (Greek) OFF OFF ON OFF OFF OFF
MAZOWIA (Poland) OFF OFF ON OFF OFF ON
Code MJ K (CSFR) OFF OFF ON OFF ON OFF
ISO 8859-7
(Latin/Greek)
OFF OFF ON OFF ON ON
ISO Latin 1T (Turkish) OFF OFF ON ON OFF OFF
Bulgaria (Bulgarian) OFF OFF ON ON OFF ON
Estonia (Estonia) OFF OFF ON ON ON OFF
PC774 (LST 1283:1993) OFF OFF ON ON ON ON
ISO 8859-2 OFF ON OFF OFF OFF OFF
PC866LAT. (Latvian) OFF ON OFF OFF OFF ON
PC866UKR OFF ON OFF OFF ON OFF
PC APTEC (Arabic) OFF ON OFF OFF ON ON
PC708 (Arabic) OFF ON OFF ON OFF OFF
PC720 (Arabic) OFF ON OFF ON OFF ON
PC AR864 (Arabic) OFF ON OFF ON ON OFF
PC860 (Portuguese) OFF ON OFF ON ON ON
PC861 (Icelandic) OFF ON ON OFF OFF OFF
PC865 (Nordic) OFF ON ON OFF OFF ON
Italic U.S.A OFF ON ON OFF ON OFF
Italic France OFF ON ON OFF ON ON
Italic Germany OFF ON ON ON OFF OFF
Italic U.K OFF ON ON ON OFF ON
Italic Denmark OFF ON ON ON ON OFF
Italic Sweden OFF ON ON ON ON ON
Italic Italy ON OFF OFF OFF OFF OFF
Italic Spain ON OFF OFF OFF OFF ON
PC437 is selected by all other switch combinations.
4-14 Using the Printer

8/22/2019 Epson DFX 8500 User Manual
http://slidepdf.com/reader/full/epson-dfx-8500-user-manual 105/252
Tab le B Page length for front trac tor
Pa ge le ngth for
front tractor
SW 2 -1 SW 2 -2 SW 2 - 3 SW 2 - 4
11 inches OFF OFF OFF OFF
4 inches OFF OFF ON ON
5.5 inches OFF ON OFF OFF
6 inches OFF ON OFF ON
7 inches OFF ON ON OFF
8 inches OFF ON ON ON
8.5 inches ON OFF OFF OFF
70/6 inches ON OFF OFF ON
12 inches ON OFF ON OFF
14 inches ON OFF ON ON
17 inches ON ON OFF OFF
Tab le C Page length for rear trac tor
Pa ge le ngth for
re a r t ra c tor
SW 2 -5 SW 2 -6 SW 2 - 7 SW 2 - 8
11 inches OFF OFF OFF OFF
4 inches OFF OFF ON ON
5.5 inches OFF ON OFF OFF
6 inches OFF ON OFF ON
7 inches OFF ON ON OFF
8 inches OFF ON ON ON
8.5 inches ON OFF OFF OFF
70/6 inches ON OFF OFF ON
12 inches ON OFF ON OFF
14 inches ON OFF ON ON
17 inches ON ON OFF OFF
4
Using the Printer 4-15

8/22/2019 Epson DFX 8500 User Manual
http://slidepdf.com/reader/full/epson-dfx-8500-user-manual 106/252
Table D I/F (interfac e) mode
I/ F m o d e SW 4- 3 SW 4 - 4
Auto OFF OFF
Parallel I/F OFF ONSerial I/F ON OFF
Optional I/F ON ON
Table E Serial parity
Se ria l p a rity SW 4- 5 SW 4 -6
None OFF OFF
Odd OFF ON
Even ON OFF
Ignore ON ON
Table F Seria l baud rate
Se ria l b a ud ra te SW 4- 7 SW 4 -8
19200 OFF OFF
09600 OFF ON
04800 ON OFF
02400 ON ON
DIP sw itc h fun c tio ns
The printer’s DIP switch functions are described below.
Charac ter tab le
When DIP switches 1-1 through 1-6 are set on and off invarious combinations, you can select the character tables.If you use the IBM mode, you can use all character tableslisted in Table A-1 except the Italic table (U.S.A, France,Germany, U.K, Denmark, Sweden, Italy and Spain). SeeAppendix B for complete character tables.
4-16 Using the Printer

8/22/2019 Epson DFX 8500 User Manual
http://slidepdf.com/reader/full/epson-dfx-8500-user-manual 107/252
Skip over perfora tion
When DIP switch 1-7 is on, the printer inserts a one-inchmargin between the last line printed on one page and the first
line printed on the next page. By adjusting your top-of-formposition, you can get half the margin at the bottom of one pageand half at the top of the next page. See “Adjusting thetop-of-form position” in Chapter 3. Since most applicationprograms insert their own top and bottom margins, you shoulduse this feature only if your program does not provide them.
Print d irec tion
When DIP switch 1-8 is on, you can set unidirectional printing.When DIP switch 1-8 is off, you can set bidirectional. Printingis normally bidirectional; however, unidirectional printingallows for precise vertical printing alignment.
Page length (for front/ rea r trac tor)
To set page lengths other than those listed in Table B (Front)
and Table C (Rear), see the printer commands in Appendix B.Be sure to set the page length to match the paper you plan touse.
Auto tea r off
When DIP switch 3-1 is on, the printer automatically feedscontinuous paper to the printer’s tear-off edge. To adjust thetear-off position, use the Micro Feed buttons to align thepaper’s perforation with the printer’s tear-off edge. See“Adjusting the tear-off position” in Chapter 3.
Zero slash
When DIP switch 3-2 is on, the printer prints slashed zeros (0).When the DIP switch is off, the printer prints open zeros (0).This feature is useful for clearly distinguishing between an
uppercase “O” character and a zero when printing documentssuch as program lists.
4
Using the Printer 4-17

8/22/2019 Epson DFX 8500 User Manual
http://slidepdf.com/reader/full/epson-dfx-8500-user-manual 108/252
Auto line feed
When DIP switch 3-3 is on, the printer adds a line feed (LF)command to every carriage return (CR) code sent by the
application program software. When the switch is off, linefeeds occur only when the software sends line feed commandsto the printer. Since most computers and application programsautomatically add line feeds to carriage returns, you should usethis feature only if your text is printing all on one line.
Buzzer (beep )
The printer beeps when an error occurs. See Chapter 8,
“Troubleshooting,” for more information. If you do not wantthe printer to beep, turn DIP switch 3-4 on.
Auto CR (carria ge return)
This function is available only in IBM 2381 Plus emulationmode. When DIP switch 3-5 is on, each line feed (LF) code orESC J code is accompanied by a carriage return (CR) code so
the printer moves the next printing position to the left margin.When the switch is off, you must send a CR code after the linefeed code to move the printing position to the left margin.
IBM c harac ter ta b le
This function is available only in IBM 2381 Plus emulationmode. When DIP switch 3-6 is on to select table 1, hex codes80H to 9FH of the character tables are used for the controlcodes. When DIP switch 3-6 is off to select table 2, hex codes80H to 9FH are used for characters. See Appendix B forcharacter samples.
4-18 Using the Printer

8/22/2019 Epson DFX 8500 User Manual
http://slidepdf.com/reader/full/epson-dfx-8500-user-manual 109/252
Auto c ut mod e
This function is available only when the optional perforationcutter (C81507] ) is installed in the printer. When DIP switch
3-7 is on, the perforation cutter cuts each page at the perforationautomatically. Note the following when you turn on thisfunction:
G Make sure the paper is at least 4 inches long.
G Do not change the top of form position using the TOF button.
G Do not feed the paper using the Micro Feed button.
G Never cut labels, overlapping multi-part forms, continuousforms with labels, and overlapping multi-part forms withlabels.
G If you set the cutting method through the printer driver’spaper source setting, it overrides Auto cut mode.
Software
When DIP switch 3-8 is on, the printer operates in IBM 2381Plus emulation mode. When this DIP switch is off, the printeroperates in EPSON ESC/P mode.
Input buffer
The printer’s input buffer provides additional memory to freeup the computer more quickly when you print large amountsof text or graphics. The input buffer is enabled when DIPswitch 4-1 is off. To disable the buffer, turn DIP switch 4-1 on.
4
Using the Printer 4-19

8/22/2019 Epson DFX 8500 User Manual
http://slidepdf.com/reader/full/epson-dfx-8500-user-manual 110/252
Auto I/ F (interfac e) wa it time
When the printer is in the auto interface mode and it receivesno data from the currently selected interface for the amount of
time specified with this setting, it determines which interface isreceiving data and switches to that interface. You can specify10 seconds when DIP switch 4-2 is off. To specify 30 seconds,turn DIP switch 4-2 on.
I/ F (interface) mod e
You may need to change DIP switches 4-3 and 4-4 so that yourprinter and computer can communicate properly. These DIP
switches control the interface mode. (You may also need toselect a different serial baud rate. See the section below onserial baud rate.)
Table D (page 4-16) lists the DIP switch settings for automatic,parallel, serial, and optional interface modes. When you selectAuto, the printer automatically selects the interface that isreceiving data, and uses that interface until the end of the print
job. This setting allows you to share the printer among multiplecomputers without changing the interface mode.
Seria l parity
If your computer is set up for serial communication, you needto change DIP switchs 4-5 and 4-6 so that your printer andcomputer can communicate properly. These DIP switchescontrol the serial interface parity.
Table E (page 4-16) lists the DIP switch settings for none, odd,even, and ignore parity.
4-20 Using the Printer

8/22/2019 Epson DFX 8500 User Manual
http://slidepdf.com/reader/full/epson-dfx-8500-user-manual 111/252
Seria l ba ud ra te
If your computer is set up for serial communication you mayneed to change the serial bit (also known as baud) rate setting.
The serial baud rate is the rate at which the printer receivesdata from the computer.
DIP switches 4-7 and 4-8 control the serial baud rate. Table F(page 4-16) lists the DIP switch settings for the printer’s four
baud rate settings. Check your computer manual or applicationprogram for the correct serial baud rate setting. Your computerand printer should always be set to the same baud rate.
Overlapp ing multi-part forms, Continuous forms w ith la bels,Pap er memory
By setting DIP switches 5-1, 5-2, and 5-4, you can print onmulti-part forms that vary in thickness. See “Using the PaperMemory Feature” on page 4-22.
Skip over binding
When DIP switch 5-3 is on, the print head avoids the bindingarea along the right and left edges of multi-part forms duringpaper feeding. This makes paper feeding easier and preventspaper jams.
4
Using the Printer 4-21

8/22/2019 Epson DFX 8500 User Manual
http://slidepdf.com/reader/full/epson-dfx-8500-user-manual 112/252
Using the Pa p e r M e m ory Fe a ture
When you use multi-part forms that overlap, or forms withlabels on them, you can use the paper memory feature for
better print quality. It automatically adjusts the gap betweenthe print head and the platen based upon the type of paperset in memory. This should give you better print quality.
cCaution:
When using overlapping multi-part forms, you may cause a paper jam if you press the Tear Off , Front/Rear, TOF orreverse-feeding (bottom) Micro Feed button. Tear off the fresh supply at a perforation below the front tractor only and press the LF/FF Load button to eject the remaining forms.
Note:
The paper memory feature is available only with the front tractor.
Overlapping multi-part forms Continuous forms with labels
4-22 Using the Printer

8/22/2019 Epson DFX 8500 User Manual
http://slidepdf.com/reader/full/epson-dfx-8500-user-manual 113/252
Sa v ing p a p e r m e m ory se ttings
This procedure requires setting several DIP switches. See thesection on changing DIP switch settings earlier in this chapter.
1. Make sure the printer is turned off.
2. Turn DIP switch 5-4 off to save your settings for memory aor on for memory b.
3. Select the page length by turning DIP switches 2-1 andthrough 2-4 on or off in various combinations as shown
below.
Page length settings
Pa g e le ng th SW 2 -1 SW 2 -2 SW 2 - 3 SW 2 - 4
11 inches OFF OFF OFF OFF
4 inches OFF OFF ON ON
5.5 inches OFF ON OFF OFF
6 inches OFF ON OFF ON
7 inches OFF ON ON OFF
8 inches OFF ON ON ON
8.5 inches ON OFF OFF OFF
70/6 inches ON OFF OFF ON
12 inches ON OFF ON OFF
14 inches ON OFF ON ON
17 inches ON ON OFF OFF
4
Using the Printer 4-23

8/22/2019 Epson DFX 8500 User Manual
http://slidepdf.com/reader/full/epson-dfx-8500-user-manual 114/252
4. Select the paper type by turning DIP switches 5-1, 5-2, and5-3 on or off as shown below.
O v e rla p p in g m u lti- p a rt fo rm s SW 5 -1
Inactive OFF
Active ON
M u lti- pa rt fo rm s w ith la b e ls SW 5-2
Inactive OFF
Active ON
Sk ip o ve r b ind ing SW 5 - 3Inactive OFF
Active ON
5. For overlapping multi-part forms without labels, hold downthe Paper Select button and turn on the printer. (Theprinter beeps once when it saves settings for memory a andtwice for memory b.) The printer saves the overlapping
form information in the memory area you selected. Whenthe information is saved, the printer beeps and is ready toprint. You have now finished all of the steps for savinginformation on forms.
For continuous forms with labels or overlapping multi-partforms with labels, hold down the Paper Select button andturn on the printer. (The printer beeps once when it savessettings for memory a and twice for memory b.) The printerloads and checks the forms. When the check is finished, theprinter beeps continuously until you open the printer’s topcover.
4-24 Using the Printer

8/22/2019 Epson DFX 8500 User Manual
http://slidepdf.com/reader/full/epson-dfx-8500-user-manual 115/252
6. Open the printer cover.
w
Warning:If you have been using the printer, the print head may behot; let it cool for a few minutes before touching it.
7. Move the pointer (the point where the two lines intersect) tothe label’s upper left corner. Use the Micro Feed buttons tomove the paper up or down and manually move the printhead left or right.
8. Press the TOFbutton. The printer beeps once. If the settings
are not correct, the printer beeps five times. If this happens,repeat step 7.
9. Move the pointer to the label’s lower right corner. Use theMicro Feed buttons to move the paper up or down andmanually move the print head left or right.
4
Using the Printer 4-25

8/22/2019 Epson DFX 8500 User Manual
http://slidepdf.com/reader/full/epson-dfx-8500-user-manual 116/252
10. Press the TOF button. The printer beeps twice. If thesettings are not correct, the printer beeps five times.If this happens, repeat step 9.
11. Close the printer cover. The printer saves the continuousforms with labels information in the memory area youselected. The memory number you selected is displayedand the printer beeps three times, indicating that it is readyto print.
To load paper memory settings, simply press the Paper Select button until the desired paper number is displayed.
4-26 Using the Printer

8/22/2019 Epson DFX 8500 User Manual
http://slidepdf.com/reader/full/epson-dfx-8500-user-manual 117/252
Chapter 5
Using EPSO N Sta tus M o nito r 2
Installing EPSON Status Monitor 2 . . . . . . . . . . . . . . . . 5-2
Accessing EPSON Status Monitor 2 . . . . . . . . . . . . . . . . 5-3
Checking the Printer Status . . . . . . . . . . . . . . . . . . . . 5-4Using the EPSON Status Monitor 2 window . . . . . . . . 5-4Using the Printer Status window . . . . . . . . . . . . . . . 5-8
Setting Monitoring Preferences . . . . . . . . . . . . . . . . . . 5-10Turning on background monitoring . . . . . . . . . . . . . 5-10Using the background monitoring icon . . . . . . . . . . . 5-12
Using the Paper Memory Utility . . . . . . . . . . . . . . . . . 5-12Accessing the paper memory utility . . . . . . . . . . . . . 5-13Registering or changing your paper settings . . . . . . . . 5-13
5
Using EPSON Status Monitor 2 5-1

8/22/2019 Epson DFX 8500 User Manual
http://slidepdf.com/reader/full/epson-dfx-8500-user-manual 118/252
EPSON Status Monitor 2 is a utility that comes with yourprinter for use with Windows 95. It allows you to monitor yourprinter’s status, alerts you when printer errors occur, andprovides troubleshooting instructions when needed. This
chapter tells you how to use the Status Monitor to get printerstatus information and how to set the background monitoringfeature to automatically alert you whenever your printer’sstatus changes.
When you install the EPSON Status Monitor 2, the PaperMemory utility is also installed automatically. This utilityallows you to register up to eight types of paper. For more
information, see page 5-12.
Note:
To monitor a DFX-8500 printer through a network, you must installan optional Type B Ethernet Interface Card (C82357 ] ) in your
printer and use the Status Monitor utility that comes with theinterface card. See the manual that comes with the interface card forinstructions on using the Status Monitor in a network environment.
Insta lling EPSO N Sta tus M o nito r 2
To install the Status Monitor, follow these steps:
1. Make sure that you have installed the printer driverfor Windows 95. If not, install the printer driver forWindows 95 as described in Chapter 2.
Note:
If you installed the Status Monitor before the driver, install the printer driver, then install the Status Monitor again.
2. Insert Disk 1 of the EPSON Status Monitor 2 software in adisk drive.
3. Click START, then Run.
5-2 Using EPSON Status Monitor 2

8/22/2019 Epson DFX 8500 User Manual
http://slidepdf.com/reader/full/epson-dfx-8500-user-manual 119/252
4. Type A:\ SETUP (if you inserted the disk in a drive otherthan “A”, substitute the appropriate letter) and click OK .
5. Follow the on-screen instructions, then click FINISH to
complete the installation procedure.
After you install EPSON Status Monitor 2 and restart yourcomputer, the Status Monitor starts automatically and addsa printer-shaped background monitoring icon to the taskbarat the bottom of your computer screen.
Before using the Status Monitor, be sure to read the READMEfile in the Epson folder on your hard drive. This file containsthe latest information on the Status Monitor.
A c c e ssing EPSO N Sta tus M o nito r 2
To open the EPSON Status Monitor 2 window, double-clickthe background monitoring icon. You see the window shown
below. You can also open this window fromStart
. ClickStart
,point to Programs, point to Epson, then click the EPSONStatus Monitor 2 icon.
5
Using EPSON Status Monitor 2 5-3

8/22/2019 Epson DFX 8500 User Manual
http://slidepdf.com/reader/full/epson-dfx-8500-user-manual 120/252
C he c king the Printe r Sta tus
This section describes how to use the Status Monitor menusto get general and detailed printer status information. Fordetailed printer status information, see “Using the PrinterStatus window” on page 5-8.
Using the EPSO N Sta tus M o nito r 2 w ind o w
The main features of the EPSON Status Monitor 2 window aredescribed below.
Insta lled Printers list
This list displays information on the EPSON printers connecteddirectly to your computer. If you select List from the Viewmenu, this list diplays only the printer names and icons. If youselect Details, the list displays the Printer Name, Status, and
Job Count.
The Printer Name column displays the names and icons of EPSON printers connected to your computer. You can addor delete printers to be monitored by choosing Add Printer or Delete Printer from the Settings menu. To save computermemory, delete printers you do not need to monitor. (Thisdoes not remove the printer driver from your computer.)
The icons that appear beside the printer names change color
to reflect changes in printer status. Green indicates a readystatus, yellow indicates the need for routine maintenance, redindicates a printer error that makes printing impossible, anda dimmed icon indicates a communication problem betweenthe Status Monitor and the printer. See online help for moreinformation.
5-4 Using EPSON Status Monitor 2

8/22/2019 Epson DFX 8500 User Manual
http://slidepdf.com/reader/full/epson-dfx-8500-user-manual 121/252
The Status column displays brief messages describing thecurrent status of the printer. The Job Count column displaysthe number of jobs waiting to print.
Note:
You can rearrange the order of the printers in the list by clickingthe Printer Name, Status, or Job Count.
Printer menu
This menu allows you to get detailed information on printerand print job status for any printer you select in the Installed
Printers list.
Click the Printer menu on the EPSON Status Monitor 2window to access the following settings:
G Printer Status Opens the Printer Status window,which provides detailed informationon the selected printer’s status.
G Job Status Provides details on jobs waiting toprint.
G Close Closes the EPSON Status Monitor 2window.
G Select PaperMemory
Not available.
For more information on using the Printer Status window,see page 5-8.
5
Using EPSON Status Monitor 2 5-5

8/22/2019 Epson DFX 8500 User Manual
http://slidepdf.com/reader/full/epson-dfx-8500-user-manual 122/252
View me nu
This menu lets you control the appearance and content of theEPSON Status Monitor 2 window and the Installed Printers list.
Click the View menu on the EPSON Status Monitor 2 windowto access the following settings:
G Toolbar/Status bar
Displays or hides the toolbar and status bar in the EPSON Status Monitor 2window.
G Large icon
/Small icon
Changes the size of the printer icons
appearing in the Installed Printers list.
G List Displays only the printer name in theInstalled Printers list.
G Details Displays the printer name, status, and jobs waiting to print in the InstalledPrinters list.
G Refresh Updates the status information shownin the Installed Printers list.
Sett ings menu
This menu allows you to control the Status Monitor’smonitoring interval and background monitoring feature, aswell as add and delete printers from the Installed Printers list.
5-6 Using EPSON Status Monitor 2

8/22/2019 Epson DFX 8500 User Manual
http://slidepdf.com/reader/full/epson-dfx-8500-user-manual 123/252
Click the Settings menu on the EPSON Status Monitor 2window to access the following settings:
G Monitoring
Preferences
Opens the Monitoring Preferences
dialog box, where you can adjust themonitoring interval and change the
background monitoring settings for theselected printer. For more information,see “Turning on backgroundmonitoring” on page 5-10.
G Add Printer
/Delete Printer
Allows you to select which printers
you would like to monitor.G Background
MonitoringAllows you to turn the backgroundmonitoring feature on or off.
Note:
The Background Monitoring and Status Alert settings are not available while theStatus Monitor’s basic background feature
is off.
G Select backgroundmonitoringicon
Changes the shape of the backgroundmonitoring icon that appears on thetaskbar when background monitoringis enabled.
For more information on using background monitoring, see
page 5-10.
5
Using EPSON Status Monitor 2 5-7

8/22/2019 Epson DFX 8500 User Manual
http://slidepdf.com/reader/full/epson-dfx-8500-user-manual 124/252
Help me nu
Choose Help Topics from this menu to get online help aboutthe Epson Status Monitor 2. Click About to view the Status
Monitor’s version number and copyright information.
Toolba r
Many of the commands available on the EPSON StatusMonitor 2 window menus can be accessed directly by clickingthe buttons on this toolbar. If you point to a toolbar button,the corresponding menu command appears briefly on yourscreen, and an explanation of the button’s function appears inthe status bar at the bottom of the EPSON Status Monitor 2window.
Using the Printe r Sta tus w ind o w
The Printer Status window shown below provides detailedinformation on the status of a selected printer. To open it,
double-click a printer in the Installed Printers list, or select theprinter and then choose Printer Statusfrom the Printer menu of the EPSON Status Monitor 2 window. You see this window:
5-8 Using EPSON Status Monitor 2

8/22/2019 Epson DFX 8500 User Manual
http://slidepdf.com/reader/full/epson-dfx-8500-user-manual 125/252
You can also access the Printer Status window by clicking theDetailsbutton in a Status Alert dialog box. (For informationon the Status Alert dialog box, see “Setting MonitoringPreferences” on page 5-10.)
To open the menus in the Printer Status window, click the tabsalong the top.
Current Sta tus menu
This menu gives you detailed printer status informationthrough a graphic display and a status message box. The
appearance of the printer illustration in the graphic displaychanges to reflect the current status, described in the adjacentmessage box. If a printer error occurs, troubleshooting tipsappear in the message box at the bottom of this menu.
Consuma bles menu
This menu gives you information on paper that you registeredusing the paper memory utility. For instructions on registering
or changing the paper information, see “Using the PaperMemory Utility” on page 5-12.
The arrow beside the paper names changes color to reflect theloading status. Green indicates the paper is ready for printing,yellow indicates you need to select the paper source, and redindicates that the paper is not loaded.
Printe r Information menu
If your printer is connected to your computer through anetwork, this menu provides information on networkconnections and other printer resources.
5
Using EPSON Status Monitor 2 5-9

8/22/2019 Epson DFX 8500 User Manual
http://slidepdf.com/reader/full/epson-dfx-8500-user-manual 126/252
Se tting M on ito ring Pre fe re nc e s
In the Monitoring Preference dialog box, you can adjust themonitoring interval and turn on background monitoring.The monitoring interval is the period of time between statusinformation updates for the selected printer. You can set theinterval when you turn on background printing, as described
below.
When you turn on background monitoring, the Status Monitorchecks the selected printer status “in the background”whenever you are using your computer (even if an application
is running) and informs you of the printer status by displayingthe Status Alert dialog box in the lower right corner of yourcomputer screen. The Status Alert dialog box contains shortmessages describing printer status, and provides a Details
button that allows you to open the Printer Status window for aselected printer.
Turning o n b a c kg ro und m o nito ring
Follow the steps below to turn on background monitoring andspecify when the Status Alert dialog box appears.
1. Make sure the Status Monitor is active. (It is active if aprinter-shaped icon appears on the taskbar at the bottomof your screen.) If the Status Monitor is inactive, open theEPSON Status Monitor 2 window, as described on page 5-3.
Then point to Background Monitoring on the Settingsmenu and click Monitor from restart or Monitor now toenable Status Monitor.
Note:
The Background Monitoring and Status Alert settings are notavailable while the Status Monitor is inactive.
5-10 Using EPSON Status Monitor 2

8/22/2019 Epson DFX 8500 User Manual
http://slidepdf.com/reader/full/epson-dfx-8500-user-manual 127/252
2. Select the printer you want to monitor from the InstalledPrinters list, and then click Monitoring Preferences onthe Settings menu. You see this dialog box:
3. Use the slider to adjust the monitoring interval, if necessary.
Note:
Setting a short monitoring interval may cause some applicationsto run more slowly.
4. Click Monitor this printer to turn on background monitoringfor the selected printer and to view the Status Alert options.
5. Click the Status Alert options to specify when you want theStatus Alert dialog box to appear.
6. Click OK to save your settings and close the MonitoringPreferences dialog box.
5
Using EPSON Status Monitor 2 5-11

8/22/2019 Epson DFX 8500 User Manual
http://slidepdf.com/reader/full/epson-dfx-8500-user-manual 128/252
Using the b a c kg round m onitoring ic on
A printer-shaped background monitoring icon appears on thetaskbar whenever the Status Monitor is active.
Double-clicking the background monitoring icon opens theEPSON Status Monitor 2 window. Right-clicking this iconopens a pop-up menu where you can choose whether theStatus Alert dialog box will appear in front of other windowson the desktop. This pop-up menu also allows you todeactivate Status Monitor. When you deactivate StatusMonitor, the background monitoring icon disappears from
the taskbar. To activate Status Monitor again, see step 1 of “Turning on background monitoring” on page 5-10.
Using the Pa p e r M e m ory Utility
This utility allows you to register up to eight types of paperwith specific printing parameters so your computer and printer
can easily determine how to handle individual print jobs. Thisshould give you better print quality and you can see what typeof paper is currently loaded in the printer (through the StatusMonitor) even if you are far away from the printer.
Note:
G The paper memory utility was installed automatically when youinstalled the EPSON Status Monitor 2.
G You cannot register multi-part forms that overlap or forms withlabels on them using the paper memory utility. If you want toregister these items, see “Using the Paper Memory Feature” inChapter 4.
5-12 Using EPSON Status Monitor 2

8/22/2019 Epson DFX 8500 User Manual
http://slidepdf.com/reader/full/epson-dfx-8500-user-manual 129/252
A c c e ssing the p a p e r m e m ory utility
To access this utility, follow these steps:
1. If paper is loaded in the printer, first eject the paper. Thenselect the memory number 0 by pressing the Paper Select
button. Make sure the printer is ready to print. If theprinter is in pause status, press the Pause button to returnit to an active state.
2. Click Start, and point to Programs, and Epson, then clickthe Paper memory utility.
Re g iste ring o r c ha ng ing y o ur p a p e r se tting s
Follow these steps to register or change paper information:
1. Click your printer from the Printer list, and then clickShow List. The Paper Memory List window appears:
5
Using EPSON Status Monitor 2 5-13

8/22/2019 Epson DFX 8500 User Manual
http://slidepdf.com/reader/full/epson-dfx-8500-user-manual 130/252
2. Click the memory number to register a new paper or anexisting one, and then click Modify. You see the ModifyPaper Memory dialog box:
3. Enter (or check) the appropriate information for each setting below:
G Paper Name You can type a unique name for thepaper. If the printer has informationon memory a or memory b, you canonly name them.
G Paper Source Click the paper source you want to use.
G Paper Size Select the size of paper you want toregister in memory. If you use standardsize paper, click Standard and selectyour paper size.
G Paper Type Select the type of paper you’re using.
If you are using crimped multi-partforms, check Crimped.
5-14 Using EPSON Status Monitor 2

8/22/2019 Epson DFX 8500 User Manual
http://slidepdf.com/reader/full/epson-dfx-8500-user-manual 131/252
G LoadingStatus
Select whether the paper is loaded ornot.
G Print Intensity Select the print intensity. Select Dark if
you want to print at a darker intensity.
4. When you are finished registering or making changes, clickOK . The Paper Memory List window appears again.
If you want to print these settings, click Print. The printerprints the list of memory numbers, names, and feed types.
5. Click Save. The comfirmation message appears.
6. Make sure the printer is not printing, and then click Yes.The Paper memory window appears. You see the currentpaper memory settings. A yellow arrow appears beside thepaper names that you loaded in the Loading Status setting.
When you are finished using the paper memory utility, clickClose. You can see this setting on the Printer status window’s
consumables menu.
5
Using EPSON Status Monitor 2 5-15

8/22/2019 Epson DFX 8500 User Manual
http://slidepdf.com/reader/full/epson-dfx-8500-user-manual 132/252
5-16 Using EPSON Status Monitor 2
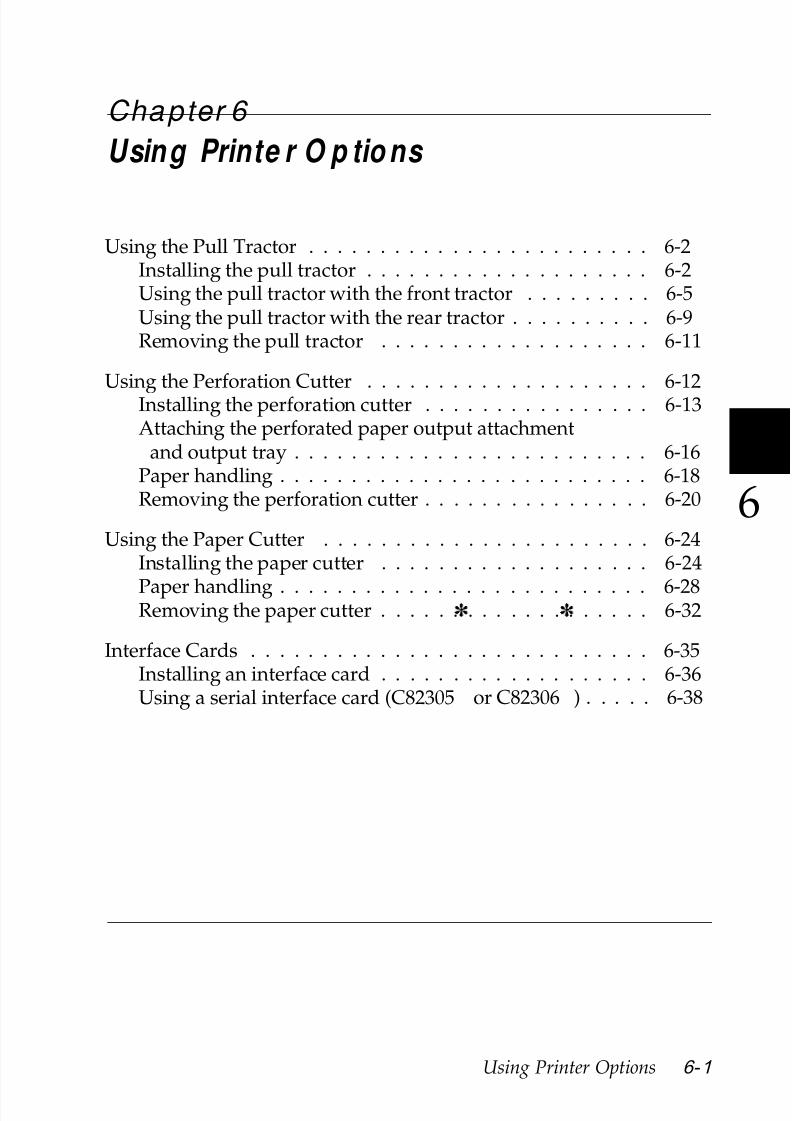
8/22/2019 Epson DFX 8500 User Manual
http://slidepdf.com/reader/full/epson-dfx-8500-user-manual 133/252
Chapter 6
Using Printe r O p tio ns
Using the Pull Tractor . . . . . . . . . . . . . . . . . . . . . . . . 6-2Installing the pull tractor . . . . . . . . . . . . . . . . . . . . 6-2Using the pull tractor with the front tractor . . . . . . . . . 6-5Using the pull tractor with the rear tractor . . . . . . . . . . 6-9Removing the pull tractor . . . . . . . . . . . . . . . . . . . 6-11
Using the Perforation Cutter . . . . . . . . . . . . . . . . . . . . 6-12Installing the perforation cutter . . . . . . . . . . . . . . . . 6-13Attaching the perforated paper output attachment
and output tray . . . . . . . . . . . . . . . . . . . . . . . . . 6-16Paper handling . . . . . . . . . . . . . . . . . . . . . . . . . . 6-18Removing the perforation cutter . . . . . . . . . . . . . . . . 6-20
Using the Paper Cutter . . . . . . . . . . . . . . . . . . . . . . . 6-24Installing the paper cutter . . . . . . . . . . . . . . . . . . . 6-24
Paper handling . . . . . . . . . . . . . . . . . . . . . . . . . . 6-28Removing the paper cutter . . . . . . . . . . . . . . . . . . . 6-32
Interface Cards . . . . . . . . . . . . . . . . . . . . . . . . . . . . 6-35Installing an interface card . . . . . . . . . . . . . . . . . . . 6-36Using a serial interface card (C82305] or C82306] ) . . . . . 6-38
6
Using Printer Options 6-1

8/22/2019 Epson DFX 8500 User Manual
http://slidepdf.com/reader/full/epson-dfx-8500-user-manual 134/252
Using the Pull Tra c to r
The optional pull tractor (#8309) provides optimum continuouspaper handling. The pull tractor is especially useful withcontinuous multi-part forms and labels. For best results, usethe pull tractor with either the printer’s front or rear built-intractor, as described in this section.
Note:
When the pull tractor is installed, the tear-off feature is not available.
Insta lling the p ull tra c to r
To install the pull tractor, you need a cross-head screwdriver.
Note:
If you are going to be using the pull tractor with the built-in reartractor, you should load paper onto the rear tractor before installingthe pull tractor. See “Loading Paper onto the Rear Tractor” in
Chapter 3.
1. Turn off the printer and open the paper separator cover.
6-2 Using Printer Options

8/22/2019 Epson DFX 8500 User Manual
http://slidepdf.com/reader/full/epson-dfx-8500-user-manual 135/252
2. Use a cross-head screwdriver to remove the two screwssecuring the paper separator to the printer. Then lift thepaper separator off the printer.
3. Using the two screws you just removed from the printer’soriginal paper separator, install the paper separator thatcomes with the pull tractor.
6
Using Printer Options 6-3

8/22/2019 Epson DFX 8500 User Manual
http://slidepdf.com/reader/full/epson-dfx-8500-user-manual 136/252
4. Close the paper separator cover and open the printer’s topcover.
5. Holding the pull tractor with its gears to the left, fit thetractor’s front notches over the mounting shaft of theprinter.
6-4 Using Printer Options

8/22/2019 Epson DFX 8500 User Manual
http://slidepdf.com/reader/full/epson-dfx-8500-user-manual 137/252
6. Open the paper bail using the tab on its right side. Then tiltthe pull tractor back until its rear latches click into placeover the printer’s rear mounting pins.
7. Gently close the paper bail (do not apply excess pressure),and then close the printer’s top cover.
Using the p ull tra c to r w ith the fro nt tra c to r If you are using labels or multi-part forms with more than sixparts (including the original), you should use the pull tractorwith the printer’s built-in front tractor.
You can switch between the front and rear tractors at any timewhen you are using the pull tractor. Just press the Front/Rear
button and then use the LF/FF Load button to feed the paper
the additional distance to the pull tractor. (Labels requirespecial handling. See “Using labels” in Chapter 3.)
To tear off documents, press the LF/FF Load button to advancethe paper to a point where it can be torn off.
To use the pull tractor with the front tractor, follow these steps:
1. Turn on the printer and open the top cover.
6
Using Printer Options 6-5

8/22/2019 Epson DFX 8500 User Manual
http://slidepdf.com/reader/full/epson-dfx-8500-user-manual 138/252
2. Make sure paper is loaded on the front tractor to thetop-of-form position. If paper is already loaded on thetractor but it is in the standby position, press theFront/Rearor LF/FF Load button (depending on which
tractor is selected) to load the paper to the top-of-formposition. (If no paper is loaded on the front tractor, loadpaper as described in Chapter 3.)
3. Once you have paper loaded on the printer’s front tractor,use the LF/FF Load button to advance the paper to the pulltractor.
4. Release both sprocket lock levers on the pull tractor bypulling them toward you. Then open both sprocket covers.
5. Adjust the sprockets to match the width of your paper.
6-6 Using Printer Options

8/22/2019 Epson DFX 8500 User Manual
http://slidepdf.com/reader/full/epson-dfx-8500-user-manual 139/252
6. Slide the two paper supports so they are spaced evenly between the two sprockets.
7. Fit the sprocket holes of the paper over the sprocket pins.If there is slack in the paper or if the holes in the paper donot align properly with the sprocket pins, pull the paperslightly and use the pull tractor knob to adjust the positionof the paper as shown below. Slide the knob to the rightfirst, and then turn it as necessary.
c Caution:
Be sure the sprockets on the built-in front tractor andthe optional pull tractor are aligned.
6
Using Printer Options 6-7

8/22/2019 Epson DFX 8500 User Manual
http://slidepdf.com/reader/full/epson-dfx-8500-user-manual 140/252
8. Close the sprocket covers.
9. Adjust the two sprockets until the paper is straight andsmooth, and then lock the sprockets into place.
c Caution:
Be sure the sprockets are not too far apart. Your papercould jam if they pull the paper too tightly or tear theedges of the paper holes. To remove any excess tension in
your paper, release the right sprocket and lock it again.
10. Adjust the top-of-form position as described in Chapter 3,if necessary.
11. Close the top cover. Press the LF/FF Load button to feedthe paper out the back of the printer. Make sure the edgeof the first sheet emerges below the paper separator.
6-8 Using Printer Options

8/22/2019 Epson DFX 8500 User Manual
http://slidepdf.com/reader/full/epson-dfx-8500-user-manual 141/252
Using the p ull tra c to r w ith the re a r tra c to r
If you are using labels or multi-part forms with more than sixsheets (including the original), do not use the rear tractor; use
the front tractor as described in the previous section.
You can switch between the front and rear tractors at any timewhen you are using the pull tractor. Just press the Front/Rear
button and then use the LF/FF Load button to feed the paperthe additional distance to the pull tractor.
To tear off printed pages, press the LF/FF Load button to
advance the paper to a point where it can be torn off.The following steps explain how to load paper using theoptional pull tractor (already installed) with the printer’s
built-in rear tractor. If you have not yet installed the pulltractor, load paper onto the rear tractor and then install thepull tractor as described earlier in this chapter.
1. Turn off the printer, then open the top cover.
Note:
If paper is loaded on the rear tractor, in either the top-of-formor standby position, skip to Step 6.
2. Pull the levers on the pull tractor toward you to releasethe pull tractor.
6
Using Printer Options 6-9

8/22/2019 Epson DFX 8500 User Manual
http://slidepdf.com/reader/full/epson-dfx-8500-user-manual 142/252
3. Tilt the tractor forward so that its pins rest on the metalframe of the printer.
4. Load paper onto the rear tractor as described beginningon page 3-10, steps 3 through 11.
5. Open the paper bail by lifting the tab on its right side.Then tilt the pull tractor back until the rear latches click
into place over the printer’s rear mounting pins.
6. Turn on the printer, and use the LF/FF Load button toadvance the paper to the pull tractor.
Now follow steps 4 through 11 starting on page 6-6.
6-10 Using Printer Options

8/22/2019 Epson DFX 8500 User Manual
http://slidepdf.com/reader/full/epson-dfx-8500-user-manual 143/252
Re m o ving the p ull tra c to r
To remove the pull tractor you’ll need a cross-head screwdriverand the paper separator that was originally installed on the
printer.
1. Remove any paper installed on the tractor and turn off theprinter.
2. Open the top cover and locate the levers that lock the pulltractor in place on the printer. Pull these levers forward torelease the pull tractor. Then lift the tractor up and out of
the printer.
3. Close the printer’s top cover and open the paper separatorcover.
6
Using Printer Options 6-11

8/22/2019 Epson DFX 8500 User Manual
http://slidepdf.com/reader/full/epson-dfx-8500-user-manual 144/252
4. Use a cross-head screwdriver to remove the two screwssecuring the paper separator to the printer. Then removethe paper separator that came with the pull tractor.
5. Using the two screws, reinstall the original paper separatorand close the paper separator cover.
Using the Pe rfo ra tio n C utte r
The optional perforation cutter (C81507 ] ) makes usingcontinuous paper easier by cutting off the perforation of your
printed documents for you. When you use the perforationcutter, be sure to set the page length to match your paper.
The perforation cutter comes with the perforated paper outputattachment and the perforated paper output tray. To attach theperforated paper output attachment and the output tray, seepage 6-16.
cCaution: G When the perforation cutter is installed, never cut labels,
overlapping multi-part forms, continuous forms withlabels, or overlapping multi-part forms with labels.
G Make sure that the paper thickness and perforationbetween pages are within the specified ranges. See the
paper specifications in Appendix A.
G
Make sure the paper is at least 4 inches long.If you plan to load continuous paper from the rear tractor, besure to leave enough room around the printer for the attachedperforated paper output attachment and the output tray, andfor the stack of fresh paper. Make sure you align your papersupply with the paper loaded in the tractor so the paper feedssmoothly into the printer.
6-12 Using Printer Options

8/22/2019 Epson DFX 8500 User Manual
http://slidepdf.com/reader/full/epson-dfx-8500-user-manual 145/252
The following illustration shows a way to position your paperwith the rear tractor loaded.
Insta lling the p e rfo ra tio n c utte r
The steps below show you how to install the perforation cutter.You will need a cross-head screwdriver.
Note:
If you plan to use the perforation cutter with the built-in rear tractor,
you need to load paper onto the rear tractor before you install the perforation cutter. See “Loading Paper onto the Rear Tractor” inChapter 3.
1. Turn off the printer and open the paper separator cover.
6
Using Printer Options 6-13

8/22/2019 Epson DFX 8500 User Manual
http://slidepdf.com/reader/full/epson-dfx-8500-user-manual 146/252
2. Use a cross-head screwdriver to remove the two screwssecuring the paper separator to the printer. Then lift off thepaper separator. Store the paper separator and screws forlater use.
3. Close the paper separator cover and open the rear flap andremove it by lifting up to pull the pegs on the rear flap out
of the notches at the back of the printer. Store the rear flapfor later use.
4. Open the top cover.
rear flap
6-14 Using Printer Options

8/22/2019 Epson DFX 8500 User Manual
http://slidepdf.com/reader/full/epson-dfx-8500-user-manual 147/252
5. Hold the perforation cutter by its handle with the connectorfacing to the right. Then lower the perforation cutter intothe space at the back of the printer, fitting the pins on thesides of the perforation cutter into the notches in the printer.
6. After the perforation cutter is in place, push back theperforation cutter handle flat. Then close the top cover.
7. Plug the perforation cutter’s connector securely into the
connector inside the printer.
6
Using Printer Options 6-15

8/22/2019 Epson DFX 8500 User Manual
http://slidepdf.com/reader/full/epson-dfx-8500-user-manual 148/252
Atta c hing the p e rfora te d p a p e r outp ut a tta c hm e nt a nd outp ut tra y
The perforation cutter comes with the perforated paper output
attachment and the perforated paper output tray for stackingprinted sheets. You can stack up to 200 sheets of paper or100 multi-part forms on the output tray.
Note:
G Stacked pages may be turned over on the output tray.
G Do not allow the printer to stack more than 200 sheets of paper
or 100 multi-part forms on the output tray.
G Remove the output tray when you will be printing hundreds of pages and will not need to cut the printed pages.
To attach the perforated paper output attachment and theoutput tray, follow these steps:
1. Open the paper separator cover and attach the output
attachment as shown below.
output attachment
6-16 Using Printer Options

8/22/2019 Epson DFX 8500 User Manual
http://slidepdf.com/reader/full/epson-dfx-8500-user-manual 149/252
2. Close the paper separator cover and position the output trayon the output attachment to accommodate the page lengthof paper you use:
You are now ready to use the perforation cutter as described inthe next section.
cCaution:
G You cannot open the top cover while the perforated paperoutput attachment and the output tray is attached. If youwant to open the top cover, you need to remove them first.
G When you are ready to reload the paper onto the reartractor, first remove the perforation cutter. See “Removingthe perforation cutter” later in this chapter.
second step: less than 9 inches
fourth step: 12 inches or more
third step: 10 to 11 inches
output tray
6
Using Printer Options 6-17

8/22/2019 Epson DFX 8500 User Manual
http://slidepdf.com/reader/full/epson-dfx-8500-user-manual 150/252
Pa p e r ha nd ling
This section describes how to use the perforation cutter withcontinuous paper. Before printing with the perforation cutter
installed, set the page length to match your paper using yoursoftware or the printer’s DIP switchs (as described inChapter 4).
Note:
G EPSON recommends that the perforation between pages is foldedwhen using the perforation cutter.
G The last page may not be ejected completely. If this happens, gently pull it out of the printer.
G The perforation cutter can not cut the last 11 inches of continuous paper, but you can print on it.
C utting o ff a p rinte d d oc um e nt
You can cut off a printed document using one of the following
methods:
G If you set the cutting method through the printer driver,the printer driver setting overrides the DIP switch’s autocut mode setting.
You can select the following from the printer driver’s papersource settings:
Tractor Front: Do not cut
Tractor Front: Cut last page only
Tractor Front: Cut each page
Tractor Rear: Do not cut
Tractor Rear: Cut last page only
Tractor Rear: Cut each page
6-18 Using Printer Options
8/22/2019 Epson DFX 8500 User Manual
http://slidepdf.com/reader/full/epson-dfx-8500-user-manual 151/252
G Turn on auto cut mode with DIP switch 3-7; the perforationcutter will cut off each page automatically. See “Using DIPSwitches” in Chapter 4.
G Select the printer’s tear-off mode as follows:
1. Make sure printing has finished. Open the paper separatorcover. You see the perforation cutter’s tear-off edge.
2. Press the Tear Off button to enter tear-off mode. The printerfeeds the paper’s perforation to the perforation cutter’stear-off edge.
3. If the paper is not aligned with the tear-off edge, adjust thetear-off position by pressing the Micro Feed buttons.
4. Press the Tear Off button again. The printer cuts off yourprinted document and feeds the fresh paper back to thetop-of-form position.
Sw itc hing tra c to rs
To switch tractors when the perforation cutter is installed,follow these steps:
1. Make sure the printer is turned on. If you are in the middleof printing a document, wait for the printer to finishprinting before you switch tractors.
2. If no paper is loaded in the tractor you want to use, load
paper as described in Chapter 3.
3. Press the Front/Rearbutton to switch to the other tractor.The printer cuts off the printed document, feeds the paperon the tractor backward to the standby position, and thenadvances the paper on the other tractor to the loadingposition.
6
Using Printer Options 6-19

8/22/2019 Epson DFX 8500 User Manual
http://slidepdf.com/reader/full/epson-dfx-8500-user-manual 152/252
Re m ov ing the p e rfora tio n c utte r
To remove the perforation cutter, follow the steps below. Afteryou remove the perforation cutter, store it in its original box
and packing materials.
1. Cut off any printed document in the printer as described inthe previous section.
2. Turn off the printer and open the paper separator cover.
3. Remove the perforated paper output attachment and theoutput tray from the printer.
6-20 Using Printer Options

8/22/2019 Epson DFX 8500 User Manual
http://slidepdf.com/reader/full/epson-dfx-8500-user-manual 153/252
3. Unplug the paper cutter’s connector from the printer.
4. Open the top cover. Grasp the handle on the perforationcutter and lift the perforation cutter up and out of theprinter. 6
Using Printer Options 6-21

8/22/2019 Epson DFX 8500 User Manual
http://slidepdf.com/reader/full/epson-dfx-8500-user-manual 154/252
5. Close the top cover and open the paper separator cover.
6. Reattach the paper separator using the two screws that youremoved before.
6-22 Using Printer Options

8/22/2019 Epson DFX 8500 User Manual
http://slidepdf.com/reader/full/epson-dfx-8500-user-manual 155/252
7. Close the paper separator cover.
8. To reattach the rear flap, fit the pegs on the rear flap into thenotches at the back of the printer. Then close the rear flap.
6
Using Printer Options 6-23

8/22/2019 Epson DFX 8500 User Manual
http://slidepdf.com/reader/full/epson-dfx-8500-user-manual 156/252
Using the Pa p e r C utte r
The optional paper cutter (C81500] ) makes using continuouspaper easier by cutting off your printed documents for you.When you use the paper cutter, be sure to set the page lengthto match your paper using either your software or the printer’sDIP switchs (described in Chapter 4).
c Caution:
G Do not use the paper cutter to cut the perforation. If youwant to cut the perforation of your document, use theoptional perforation cutter (C81507] ).
G Do not use more than 6 sheets (1 original + 5 copies) of continuous paper.
G Do not use multi-part forms that vary in thickness withthe optional paper cutter. This includes forms with labelson them and forms that overlap slightly where they are
glued together.
Insta lling the p a p e r c utte r
Follow the steps below to install the paper cutter.
Note:
If you plan to use the paper cutter with the built-in rear tractor, youneed to load paper onto the rear tractor before you install the paper
cutter. See “Loading Paper onto the Rear Tractor” in Chapter 3.
6-24 Using Printer Options

8/22/2019 Epson DFX 8500 User Manual
http://slidepdf.com/reader/full/epson-dfx-8500-user-manual 157/252
1. Turn off the printer and open the paper separator cover.
2. Use a cross-head screwdriver to remove the two screwssecuring the paper separator to the printer. Then lift off thepaper separator. Store the paper separator and screws forlater use.
3. Close the paper separator cover and open the top cover.
6
Using Printer Options 6-25

8/22/2019 Epson DFX 8500 User Manual
http://slidepdf.com/reader/full/epson-dfx-8500-user-manual 158/252
4. Hold the paper cutter by its handle with the connectorfacing to the right. Then lower it into the space at the backof the printer, fitting the pins on the sides of the papercutter into the notches in the printer.
5. After the paper cutter is in place, tilt the paper cutter handleforward. Then close the top cover.
6-26 Using Printer Options

8/22/2019 Epson DFX 8500 User Manual
http://slidepdf.com/reader/full/epson-dfx-8500-user-manual 159/252
6. Open the rear flap and remove it by lifting up to pull the pegson the rear flap out of the notches at the back of the printer.Then plug the paper cutter’s connector securely into theconnector inside the printer.
7. To replace the rear flap, fit the pegs on the rear flap into the
notches at the back of the printer. Then close the rear flap.
6
Using Printer Options 6-27

8/22/2019 Epson DFX 8500 User Manual
http://slidepdf.com/reader/full/epson-dfx-8500-user-manual 160/252
Pa p e r ha nd ling
This section describes how to use the paper cutter withcontinuous paper. When you use the paper cutter, you need
to set the page length to match your paper.
C utting o ff a p rinte d d oc um e nt
To cut off a printed document, follow the steps below:
1. Be sure that the printer is turned on and that it is in pausestatus. (Press the Pause button to turn on the Pause light.)
2. Press the Tear Off button. The printer advances the paperso that the perforation at the end of the last printed page isnear the cutting line of the paper cutter.
6-28 Using Printer Options

8/22/2019 Epson DFX 8500 User Manual
http://slidepdf.com/reader/full/epson-dfx-8500-user-manual 161/252
3. If you loaded new paper onto the current tractor since thelast time you cut off a document, you may need to adjustthe cutting position. Open the paper separator cover anduse the Micro Feed buttons to adjust the cutting position
with the cutting line. Then close the paper separator cover.
Note:
You can set the cutting position, from 3.0 mm (0.12 inch) to25.4 mm (1.0 inch) below the perforation at the end of the last
printed page. The factory setting of the cutting position is3.0 mm (0.12 inch) below the position.
4. Press the Tear Off button. The printer cuts off your printeddocument and feeds the fresh paper back to the top-of-formposition.
6
Using Printer Options 6-29

8/22/2019 Epson DFX 8500 User Manual
http://slidepdf.com/reader/full/epson-dfx-8500-user-manual 162/252
5. Press the Pause button to turn off the Pause mode so theprinter is ready to print.
Note:
The next printing position after the paper is cut depends on thecutting position and the top-of-form position, as described below.
G When the cutting position is above the top-of-form position, the printer starts printing at the top-of-form position on the same page.
G When the cutting position is below the top-of-form position, the printer starts printing at the top-of-form position on the next page.
printing positioncutting positiontop-of-form position
printing position
cutting position
top-of-form position
top-of-form position
6-30 Using Printer Options

8/22/2019 Epson DFX 8500 User Manual
http://slidepdf.com/reader/full/epson-dfx-8500-user-manual 163/252
Sw itc hing tra c to rs
To switch tractors when the paper cutter is installed, follow thesteps below:
1. Make sure the printer is turned on. If you are in the middle of printing a document, wait for the printer to finish printing
before you switch tractors.
2. If no paper is loaded in the tractor you want to use, loadpaper as described in Chapter 3.
3. Press the Front/Rearbutton to switch to the other tractor.
The printer cuts off the printed document, feeds the paperon the tractor backward to the standby position, and thenadvances the paper on the other tractor to the loadingposition.
cCaution:
When you load paper on the tractor, be sure that the first pageis torn off exactly at the perforation, and that the first fourholes in the paper fit over the sprocket pins.
6
Using Printer Options 6-31

8/22/2019 Epson DFX 8500 User Manual
http://slidepdf.com/reader/full/epson-dfx-8500-user-manual 164/252
Re m oving the p a p e r c utte r
To remove the paper cutter, follow the steps below. After youremove the paper cutter, store it in its original box and packing
materials.
1. Cut off any printed document in the printer as described inthe previous section.
2. Turn off the printer.
3. Open the rear flap and remove it by lifting up to pull thepegs on the flap out of the notches at the back of the printer.Then unplug the paper cutter’s connector from the printer.
6-32 Using Printer Options

8/22/2019 Epson DFX 8500 User Manual
http://slidepdf.com/reader/full/epson-dfx-8500-user-manual 165/252
4. To replace the rear flap, fit the pegs on the flap into thenotches at the back of the printer. Then close the flap.
5. Open the top cover. Grasp the handle on the paper cutterand lift the paper cutter up and out of the printer.
6
Using Printer Options 6-33

8/22/2019 Epson DFX 8500 User Manual
http://slidepdf.com/reader/full/epson-dfx-8500-user-manual 166/252
6. Close the top cover and open the paper separator cover.
7. Reattach the paper separator using the two screws that youremoved earlier.
8. Close the paper separator cover.
6-34 Using Printer Options

8/22/2019 Epson DFX 8500 User Manual
http://slidepdf.com/reader/full/epson-dfx-8500-user-manual 167/252
In te rfa c e C a rd s
You can use optional interface cards to supplement yourprinter’s built-in serial and parallel interfaces. The EPSONinterface cards below are compatible with your printer.(Not all of these interfaces are available worldwide.)
N um b e r N a m e
C82305] /C82306] Serial interface
C82307] /C82308] 32KB intelligent serial interface
C82310] /C82311] 32KB intelligent parallel interface
C82312] Local Talk interface
C82313] 32KB IEEE-488 interface
C82314] Coax interface
C82315] Twinax interface
C82345] IEEE-1284 parallel interface
C82357] Ethernet interface
*The asterisk is a substitute for the last digit, which varies by country.
If you are not sure whether you need an optional interface orwould like to know more about interfaces, contact your EPSONdealer.
Note:
Your printer has an auto interface mode function that allows youto connect to more than one interface at a time. See “Using DIP
Switches” in Chapter 4.
Coax and twinax interfaces enable the printer to communicatewith an IBM minicomputer or mainframe via coax or twinaxprotocol. This allows EPSON printers to function as local IBMprinters without the addition of any other circuitry orcomponents.
6
Using Printer Options 6-35

8/22/2019 Epson DFX 8500 User Manual
http://slidepdf.com/reader/full/epson-dfx-8500-user-manual 168/252
Insta lling a n inte rfa c e c a rd
Follow the steps below to install an optional interface card.
Note:
If you install an optional interface card, make sure your printer’s DIPswitches are set for automatic or optional interface. See Chapter 4 forinformation on setting DIP switches.
1. Turn off both your printer and your computer. Then removeall power and interface cables from the printer.
2. Turn the printer so that the rear cover faces you.
3. Open the rear cover.
4. Be sure to set any switches and jumpers on the card, as
necessary. See the interface card’s manual for details. Makesure that you set jumper J G to on, or the card will not workproperly. (To set the jumper to on, cover both wires of theterminal with the rectangular jumper plug.)
rear cover
6-36 Using Printer Options

8/22/2019 Epson DFX 8500 User Manual
http://slidepdf.com/reader/full/epson-dfx-8500-user-manual 169/252
5. Use a screwdriver to remove the screws securing theinterface shield plate; remove the shield plate.
6. Slide the interface card into the grooves in the interface slot.Push it in firmly to make sure it connects to the printer’sinternal socket.
7. Secure the interface with the screws provided with the card.
8. Plug the connector cable into the interface card as shown.
6
Using Printer Options 6-37

8/22/2019 Epson DFX 8500 User Manual
http://slidepdf.com/reader/full/epson-dfx-8500-user-manual 170/252
9. Plug the other end of the cable into your computer.
10. Close the interface cover.
11. Plug the power cord into your printer and an electrical outlet.
Using a se ria l inte rfa c e c a rd (C 82305 ]
or C 82306 ]
)
To use a serial interface card (C82305] or C82306] ), see thesections below to set the correct baud rate, handshake timing,and error handling. For all other data transfer conventions,such as word structure and communications protocol, see yourinterface card manual.
Se le c ting a b a ud ra te
You can select from the following baud rates: 300, 600, 1200,2400, 4800, 9600, and 19200 bps (bits per second). To set the
baud rate, see the bit-rate selection table in your interface cardmanual.
Ha nd sha ke tim ing
When the unused area for data in the input buffer drops to256 bytes, the printer outputs an X-OFF code or sets the DTRflag to 1 (MARK) to indicate that it cannot receive data. Whenthe unused area increases to 512 bytes, the printer outputs anX-ON code or sets the DTR flag to 0 (SPACE) to indicate thatit is ready to receive data.
Erro r ha nd ling
When the printer detects a parity error, it prints an asterisk ( ] ).The printer ignores all other errors, including framing andoverrun errors.
6-38 Using Printer Options

8/22/2019 Epson DFX 8500 User Manual
http://slidepdf.com/reader/full/epson-dfx-8500-user-manual 171/252
Chapter 7
M a inte na nc e a nd Tra nsp orta tio n
Replacing the Ribbon Cartridge . . . . . . . . . . . . . . . . . . 7-2
Cleaning the Printer . . . . . . . . . . . . . . . . . . . . . . . . . 7-4
Transporting the Printer . . . . . . . . . . . . . . . . . . . . . . 7-5
M a i n t e n a n c e
7
Maintenance and Transportation 7-1

8/22/2019 Epson DFX 8500 User Manual
http://slidepdf.com/reader/full/epson-dfx-8500-user-manual 172/252
Re p la c ing the Rib b on C a rtrid ge
When printing becomes too faint, you need to replace theribbon. Use the #8766 EPSON replacement cartridge only.
w Warning:
If the printer has been used recently, the print head may be hot.Let it cool before attempting to replace the ribbon.
To replace the ribbon cartridge, follow these steps:
1. Press the Pause button. Then turn off the printer.
2. Open the printer’s top cover and slide the print head to theexposed part of the paper bail.
3. Lift the ribbon guide off the print head as shown below.
7-2 Maintenance and Transportation

8/22/2019 Epson DFX 8500 User Manual
http://slidepdf.com/reader/full/epson-dfx-8500-user-manual 173/252
4. Pull up on the side of the ribbon cartridge as shown belowto release it from the printer’s mounting pins. Remove thecartridge by lifting it up and away from you.
c Caution:
Make sure you don’t pull on the flat gold cable beneath theribbon cartridge.
To install the new cartridge, see “Installing the RibbonCartridge,” in Chapter 1.
M a i n t e n a n c e
7
Maintenance and Transportation 7-3

8/22/2019 Epson DFX 8500 User Manual
http://slidepdf.com/reader/full/epson-dfx-8500-user-manual 174/252
C le a ning the Printe r
To keep your printer operating at its best, you should clean itthoroughly several times a year. Follow these steps:
1. Turn off the printer and close all of its covers. Then removeany paper as well as the paper guide. If you have installedthe optional pull tractor, perforation cutter, or paper cutter,remove it.
2. Use a soft brush to carefully brush away all dust and dirtfrom the outer case.
3. If the outer case or paper guide is still dirty or dusty, cleanit with a soft, clean cloth dampened with mild detergentdissolved in water. Keep all of the covers closed to preventwater from getting inside the printer.
w Warning:
Be careful not to get water on the printer mechanism orelectronic components.
c Caution:
G Never use alcohols or thinners to clean the printer. Thesechemicals can damage the printer components as well asthe case.
G Do not use a hard or abrasive brush.
G Do not spray the inside of the printer with lubricants;unsuitable oils can damage the mechanism. Contact yourEPSON dealer if you think lubrication is needed.
7-4 Maintenance and Transportation

8/22/2019 Epson DFX 8500 User Manual
http://slidepdf.com/reader/full/epson-dfx-8500-user-manual 175/252
Tra nsp o rting the Printe r
If you need to transport your printer some distance, carefullyrepack it using the original box and packing materials asdescribed below.
w Warning:
Even when you need to carry the printer only a short distance,do not carry it by yourself. The printer should always becarried by two people holding the printer at the bottom.
1. Turn off the printer and remove any paper loaded in the
printer. If any printer options are installed, remove them.
2. Unplug the power cord from the electrical outlet and the back of the printer. Disconnect the interface cable from theprinter.
3. Remove the ribbon cartridge.
4. Install the protective materials onto the printer as shownon the Notice Sheet.
5. Repack the printer, ribbon cartridge, and power cord in theoriginal packing materials and place them in the printer’soriginal box.
M a i n t e n a n c e
7
Maintenance and Transportation 7-5

8/22/2019 Epson DFX 8500 User Manual
http://slidepdf.com/reader/full/epson-dfx-8500-user-manual 176/252
7-6 Maintenance and Transportation

8/22/2019 Epson DFX 8500 User Manual
http://slidepdf.com/reader/full/epson-dfx-8500-user-manual 177/252
Chapter 8
Troubleshooting
Using the Error Indicators . . . . . . . . . . . . . . . . . . . . . 8-3
Printing a Self Test . . . . . . . . . . . . . . . . . . . . . . . . . 8-5
Using the Hex Dump Mode . . . . . . . . . . . . . . . . . . . . 8-6
Problems and Solutions . . . . . . . . . . . . . . . . . . . . . . 8-7
Power supply . . . . . . . . . . . . . . . . . . . . . . . . . . 8-8Paper handling . . . . . . . . . . . . . . . . . . . . . . . . . 8-9Operation . . . . . . . . . . . . . . . . . . . . . . . . . . . . . 8-13Printout . . . . . . . . . . . . . . . . . . . . . . . . . . . . . . 8-15Options . . . . . . . . . . . . . . . . . . . . . . . . . . . . . . 8-18
Clearing a Paper Jam . . . . . . . . . . . . . . . . . . . . . . . . 8-19
8
T r o u b l e s h o o t i n g
Troubleshooting 8-1

8/22/2019 Epson DFX 8500 User Manual
http://slidepdf.com/reader/full/epson-dfx-8500-user-manual 178/252
This chapter describes what you can do if you are havingproblems printing. It is divided into these sections:
G Using the Error Indicators. This section describes how to
use the control panel lights as error indicators so you candiagnose and fix printer problems.
G Printing a Self Test. This section explains how to run theprinter’s self test to determine whether the problem lieswith the printer or the computer.
G Using Hex Dump Mode. This section describes the printer’shex dump mode. Experienced users may want to use thismode to pinpoint communication problems.
G Problems and Solutions. This section describes how tosolve problems with the power supply, paper handling,printer operation, and the quality of the printout.
G Clearing a Paper Jam. This section shows you how to cleara paper jam.
Use the information in this chapter to pinpoint the source of your printer problem, and then try the recommended solutions.If none of these solution fixes your problem, see Appendix C,“Contacting Customer Support.”
8-2 Troubleshooting

8/22/2019 Epson DFX 8500 User Manual
http://slidepdf.com/reader/full/epson-dfx-8500-user-manual 179/252
Using the Erro r Ind ic a to rs
You can identify many common printer problems with thelights on the control panel. If your printer stops working andthe lights are on or flashing, use the following table of panellight patterns to diagnose the problem, then follow therecommended corrective measures.
Sta te ofpa ne l lig ht
Beeppattern
Prob le m a nd solution
n Paper Out
n Pause •••
No pa pe r is loa de d in the pr inte r.
Load paper in the printer. The Paper Out light
turns off and the printer resumes printing.
•••
The pa pe r is not loa de d c orre c tly .
Remove and reload paper correctly. See
“Loading Paper” in Chapter 3.
f Paper Out
n Pause • • • • •
Pa pe r ha s ja m m e d in the printe r.
To clear the paper jam, see “Clearing a Paper J am” later in this chapter.
f Ribbonn Pause • • • • •
Rib b o n h a s ja m m e d .
Remove and re-install the ribbon cartridge. See“Replacing the Ribbon Cartridge” in Chapter 7.
f Paper Out
f Ribbon
n Pause• • • • •
The loa de d p a pe r m a y be th ic ker tha n the
spe c ifie d ra nge s.
Press the Pause button. The printer starts printing
very slowly. Make sure that the paper thickness is
within the specified ranges. See the paper
spec ifications in Appendix A.
f Pause
−
The print he a d is ove rhe a te d.
Wait a few minutes; the printer will resumeprinting automatically once the print head cools.
8
T r o u b l e s h o o t i n g
Troubleshooting 8-3

8/22/2019 Epson DFX 8500 User Manual
http://slidepdf.com/reader/full/epson-dfx-8500-user-manual 180/252
Sta te o fpa ne l light
Beeppa tte rn
Prob le m a nd so lution
n Pause
•••
The p rinte r top c o ve r is op e n.
Close the cover and press the Pause button.
Th e p a p e r se l e c te d d o e s n o t m a tc h th e p a p e r
loa d e d in the p rinter .
Load the correct paper or select the
appropriate paper setting.
The p rinte r fa ils to sw itc h to a nd fe e d the p ro p e r
p a p e r .
Remove any paper in the printer and then press
the Pause button to reload the paper youselected.
f all lights+
Paper Select
indicates “E”and any
number by
turns.
−
A n unkno wn p rinter e rror ha s oc c urre d .
Turn off the printer and leave it for severalminutes; then turn on the printer again. If the
error occurs again, contact your dealer.
The printer may turn off all lights after 12
seconds. Also in this case, turn off the printer and
leave it for several minutes; then turn on theprinter again. If the error occurs again, contact
your dealer.
n = on, f = flashing••• = short interval, • • • = long interval
8-4 Troubleshooting

8/22/2019 Epson DFX 8500 User Manual
http://slidepdf.com/reader/full/epson-dfx-8500-user-manual 181/252
Printing a Se lf Te st
Running the printer’s self test helps you determine whether theproblem comes from the printer or the computer:
G If the self test results are satisfactory, the printer is workingproperly and the problem is probably caused by yourprinter driver settings, application settings, computer, orinterface cable. (Be sure to use a shielded interface cable.)
G If the self test does not print properly, there is a problemwith the printer. See “Problems and Solutions” on page 8-7
for possible causes and solutions to the problem.To perform a self test, follow these steps:
1. Make sure that the printer is turned off and that the paperis set on the front or rear tractor. (See Chapter 3 for moreinformation on loading and using paper.)
cCaution:
Whenever you turn off the power, wait at least fiveseconds before turning it back on; otherwise you maydamage the printer.
2. While holding down the LF/FF Load or Tear Off button,turn on the printer. The LF/FF Load button performs adraft self test. The Tear Off button performs a near letterquality (NLQ) self test.
In a few seconds, the printer starts the self test, in which aseries of characters is printed.
Note:
If you want to temporarily stop the self test, press the Pausebutton. To resume the test, press the Pause button again.
8
T r o u b l e s h o o t i n g
Troubleshooting 8-5

8/22/2019 Epson DFX 8500 User Manual
http://slidepdf.com/reader/full/epson-dfx-8500-user-manual 182/252
3. To end the self test, press the Pause button to stop printing.Tear off the page if necessary, and then turn off the printer.
cCaution:
Do not turn off the printer while it is printing. Always pressthe Pause button to stop printing and then turn off the
printer.
Usin g th e He x Du m p M o d e
The printer can print data in hex dump mode, which allowsexperienced users to find the cause of communication problems
between the printer and a software program. In hex dumpmode, the printer prints all data received as characters inhexadecimal values.
To use hex dump mode, follow these steps:
1. Make sure that paper is loaded in the printer.
2. Hold down both the LF/FF Load and Tear Off buttonswhile you turn on the printer.
3. Next, run a software program and send a print job to theprinter. Your printer prints all the codes it receives fromthe software in hexadecimal format.
8-6 Troubleshooting

8/22/2019 Epson DFX 8500 User Manual
http://slidepdf.com/reader/full/epson-dfx-8500-user-manual 183/252
By comparing the characters printed in the right columnwith the printout of the hexadecimal codes, you can checkthe codes being received by the printer. If characters areprintable, they appear in the right column as ASCII
characters. Nonprintable codes, such as control codes,are represented by dots.
4. To turn off hex dump mode, press the Pause button, andthen turn off the printer.
Prob le m s a nd Solutio ns
This section divides printer problems into four categories:
Power supply . . . . page 8-8
Paper handling . . . page 8-9
Operation . . . . . . . page 8-13
Printout . . . . . . . . page 8-15
Options . . . . . . . . page 8-18
See the section for the type of problem you have and look forthe description of your problem. The most likely causes andsolutions are listed first, so try them in the order that they arelisted until the problem is solved.
8
T r o u b l e s h o o t i n g
Troubleshooting 8-7

8/22/2019 Epson DFX 8500 User Manual
http://slidepdf.com/reader/full/epson-dfx-8500-user-manual 184/252
Po w e r sup p ly
The lights come on briefly but then go off and stay off.
Cause What to do
The printer’s voltage ratingmay not match the voltage of your electrical outlet.
Check the printer and the outletvoltage ratings. If the voltages do notmatch, unplug the printer immediatelyand contact your dealer.
wWarning:
Do not reconnect the power cord to an electrical outlet thatdoes not have matching voltage.
The printer does not work and the control panel lights are off.
Cause What to do
The power cord is notproperly plugged into theelectrical outlet.
Turn off the printer, make sure thepower cord is firmly plugged into theelectrical outlet, and turn the printer back on.
The printer is turned off. Press the Powerswitch located on thelower right side of the printer. ThePower light should come on.
The electrical outlet iscontrolled by an outsideswitch or automatic timer.
Use a different outlet.
The electrical outlet is out of order.
Plug another electrical device into theoutlet to determine whether the outletis working. If it is not, use a differentoutlet.
A printer error has occurredand the control panel lightsgo off after 12 seconds.
Turn off the printer and leave it forseveral minutes; then turn on theprinter again. If the error occurs again,
contact your dealer.
8-8 Troubleshooting

8/22/2019 Epson DFX 8500 User Manual
http://slidepdf.com/reader/full/epson-dfx-8500-user-manual 185/252
Pa p e r ha nd ling
The printer does not feed continuous paper properly.
Cause What to do
The wrong tractor may beselected.
Check if the correct tractor arrow is liton the Tractor Select indicator.
If the wrong tractor is selected, be surepaper is loaded to the standby positionon the tractor you want to use. Thenpress the Front/Rearbutton to switch
to that tractor.
If the Paper Select displays amemory number other than “0”, pressthe Pause button. Then press theFront/Rearbutton to switch to thattractor.
The printer may be out of
paper.
Load paper onto the tractor. The
tractor arrow on the Tractor Selectindicator should be green.
Note:
If paper jams in the paper path, see “Clearing a Paper Jam” later in thischapter.
Paper jams, does not feed smoothly, or feeds at a slant.
Cause What to do
The paper supply is too farfrom the printer.
Make sure your paper supply ispositioned within 1 meter (3.28 feet)of the printer.
The rear cover is open. Close the rear cover before trying tofeed the paper.
8
T r o u b l e s h o o t i n g
Troubleshooting 8-9

8/22/2019 Epson DFX 8500 User Manual
http://slidepdf.com/reader/full/epson-dfx-8500-user-manual 186/252
The paper is not mounted onthe sprockets correctly.
Check the paper on the sprockets to be sure the paper’s sprocket holes fitcorrectly over the sprocket pins.
The holes on the sides of the papermay not be aligned with each other.Reposition the paper on the sprocketpins.
The sprockets are notpositioned for the width of your paper.
Move the right sprocket to the right toremove any slack in the paper, or tothe left to release tension in the paper.
The sprocket cover may beopen or sprocket lock leversmay be unlocked.
Close the sprocket covers. Be sure thesprockets are positioned to match thewidth of your paper. Then lock themin place by pressing the sprocket locklevers to lock.
You may not be using paperwithin specifications.
Be sure you’re using the right type of paper. See the paper specifications inAppendix A.
The print head is catchingthe binding area of yourmulti-part forms.
Turn on DIP switch 5-3 to select theskip over binding function.
Note:
If paper jams in the paper path, see “Clearing a Paper Jam” later in thischapter.
The printer does not load continuous paper.
Cause What to do
The paper comes off thetractor.
Re-attach the paper to the tractor.
8-10 Troubleshooting

8/22/2019 Epson DFX 8500 User Manual
http://slidepdf.com/reader/full/epson-dfx-8500-user-manual 187/252
Skip over perforation does not work.
Cause What to do
You have turned on DIP
switch 1-7 when the printerwas on.
To make any new DIP switch settings
effective, turn off the printer and thenturn it back on.
Your application softwaremay cancel the skip overperforation set by DIPswitch 1-7.
Check that your application software’ssettings are correct.
Skip over perforation is set, but the perforation does not fall
in the center of the skip.
Cause What to do
The page length is setincorrectly.
Set DIP switch 2 to match your paperlength.
The top of form position is
too high or too low.
Adjust the top of form position so that
the perforation is centered within theskip area.
The top of form position changes while printing several pages.
Cause What to do
The paper may be too heavyfor the tractor.
Use the specified weight of paper.See the paper specifications in
Appendix A.
When you require highly accuratepaper feeding such as when you printcarbon copies, use the optional pulltractor (#8309). See Chapter 6.
8
T r o u b l e s h o o t i n g
Troubleshooting 8-11

8/22/2019 Epson DFX 8500 User Manual
http://slidepdf.com/reader/full/epson-dfx-8500-user-manual 188/252
When you switch between front and rear tractors, the paper
jams or the printer does not feed the paper back to the standby
position.
Cause What to do
The printer may have reversefed too many pages.
Use the tear off feature to tear off theprinted document or any excess paperso that the printer needs to reversefeed only one page. Then press theFront/Rearbutton to switch tractors.
You may be trying to switch
tractors when labels areloaded in the printer.
Labels jam when they are fed
backward, so always remove anylabels loaded in the printer beforeyou switch tractors. To remove labelsloaded in the printer, tear off the freshsupply below the tractor and press theLF/FF Load button to eject theremaining labels.
When you switch between front and rear tractors, the printer
does not load paper onto the selected tractor.
Cause What to do
The printer may be out of paper.
Load paper onto the tractor. Thetractor arrow on the Tractor Selectindicator should be green.
8-12 Troubleshooting

8/22/2019 Epson DFX 8500 User Manual
http://slidepdf.com/reader/full/epson-dfx-8500-user-manual 189/252
Ope r a t i on
The Pa use light is off but the printer does not print.
Cause What to do
The interface cable is notplugged in securely.
Confirm that both ends of the cable between the printer and the computerare fastened securely. If the cable isconnected correctly, run a self test asdescribed on page 8-5.
Your interface cable does notmeet the printer and/orcomputer specifications.
Use an interface cable that meets therequirements of both the printer andcomputer. See Chapter 1 and yourcomputer documentation.
Your software is not properlyset up for your printer.
Make sure that your printer isproperly selected in your applicationsoftware. If necessary, install orreinstall the printer driver software asdescribed in Chapter 2.
The Pa p e r O u t and Pa use lights are on and the printer does
not print.
Cause What to do
The printer is out of paper forthe specified paper source.
Make sure that paper is loaded in theprinter from the current paper source.Press the Pause button to resume
printing.
8
T r o u b l e s h o o t i n g
Troubleshooting 8-13

8/22/2019 Epson DFX 8500 User Manual
http://slidepdf.com/reader/full/epson-dfx-8500-user-manual 190/252
The printer sounds like it is printing, but nothing prints.
Cause What to do
The ribbon cartridge is not
installed properly.
Install the ribbon cartridge as
described in Chapter 1.
The ribbon is worn out. Replace the old ribbon cartridge witha new one as described in Chapter 7.
The printer makes a strange noise, and the printer stops
abruptly.
Cause What to do
The paper is jammed. See page 8-19 to clear the paper jam.
The ribbon is jammed because of too much slack ora worn ribbon.
Remove any slack from the ribbon byturning the ribbon-tightening knob orreplace it with a new one. Then pressthe Pause button to resume printing.
You did not remove all
protective materials.
Remove all protective materials after
turnning off the printer. Then turn onthe printer.
The printer stops printing and the Pause light is flashing.
Cause What to do
The print head is overheated. Wait a few minutes; the printer will
resume printing automatically oncethe print head cools.
8-14 Troubleshooting

8/22/2019 Epson DFX 8500 User Manual
http://slidepdf.com/reader/full/epson-dfx-8500-user-manual 191/252
Printout
Part of the printout is missing, or dots are missing in random
positions.Cause What to do
The ribbon cartridge is notinstalled properly.
Re-install the ribbon cartridge asdescribed in Chapter 1.
There is too much slack in theribbon or the ribbon hascome loose.
Remove any slack from the ribbon orreplace the ribbon cartridge with anew one. See “Replacing the Ribbon
Cartridge” in Chapter 7.
Lines of dots are regularly missing in printouts.
Cause What to do
The ribbon cartridge is notinstalled correctly, and theribbon is twisting or
slackening.
Stop printing and reinstall it asdescribed in Chapter 1.
The print head may bedamaged.
Stop printing and contact your dealerto have the print head replaced.
wWarning:
Never attempt to replace the head yourself because other parts of the printer must bechecked at the same time.
The typestyles or characters set in your application software
cannot be printed.
Cause What to do
Your application software isnot correctly configured.
Make sure that your applicationsoftware is correctly configured for
your printer.
8
T r o u b l e s h o o t i n g
Troubleshooting 8-15

8/22/2019 Epson DFX 8500 User Manual
http://slidepdf.com/reader/full/epson-dfx-8500-user-manual 192/252
Incorrect characters are printed.
Cause What to do
Your printer and the
computer may not becommunicating correctly.
Make sure that you use the correct
interface cable and that thecommunications protocol is correct.
The wrong character table isselected in your software.
Select the correct character table usingyour software or DIP switch 1 asdescribed in Chapter 4. Note that thecharacter table setting in your softwareoverrides the setting selected with theDIP switch.
The font selected using the the control panel does not print.
Cause What to do
Software settings override thecontrol panel settings.
Use your software to select the font.
Printing starts too high or too low on the page.
Cause What to do
The top margin setting inyour software may beincorrect.
Check that the margins are setcorrectly in your program. See“Printable area” in Appendix A.
The size of the paper loaded
in the printer does not matchthe paper size setting withinyour application software.
Load the correct size of paper, or
change the paper size setting withinyour application software or printerdriver to match the size of paper youare using.
8-16 Troubleshooting

8/22/2019 Epson DFX 8500 User Manual
http://slidepdf.com/reader/full/epson-dfx-8500-user-manual 193/252
All the text is printed on the same line.
Cause What to do
No line feed command is sent
at the end of each line of text.
Make sure that auto line feed is set to
ON using DIP switch 3-3 so that theprinter automatically adds a line-feedcode to each carriage return. See“Using DIP Switchs” in Chapter 4.
The text is printed with extra blank lines between lines of text.
Cause What to do
Two line feed commands are being sent at the end of eachline of text.
Make sure that auto line feed is set toOFF using DIP switch 3-3.
The line-space setting in yourapplication software is wrong.
Adjust the line-space setting with yourapplication software.
Page length does not match the length of paper being used.Cause What to do
The page size setting in yourapplication or the printerdriver may not match the sizeof paper you are using.
Check the paper size setting in yourapplication or printer driver.
Page length for tractor may
be set incorrectly using theDIP switches.
Change DIP switch 2 to select the
correct page length for the tractor. See“Using DIP Switches” in Chapter 4.
8
T r o u b l e s h o o t i n g
Troubleshooting 8-17

8/22/2019 Epson DFX 8500 User Manual
http://slidepdf.com/reader/full/epson-dfx-8500-user-manual 194/252
Printing starts lower on the page than you expected, or the
bottom of a page is printed at the top of the next page.
Cause What to do
The top and bottom marginsettings in your applicationsoftware may be incorrect.
Adjust them in your applicationsoftware.
Opt ions
The perforation cutter is installed and the printer does not
feed continuous paper properly.
Cause What to do
The perforation cutter’sconnector is not pluggedsecurely into the printer.
Turn off the printer then check theperforation cutter connector.
The perforation cutter is installed and the paper is not cutproperly.
Cause What to do
The printer driver setting isnot set correctly.
Select the paper source you want touse in the printer driver. See Chapter 2.
You didn’t set the auto cutmode.
Turn on DIP switch 3-7 to select autocut mode. However, any setting made
in the printer driver overrides the autocut mode setting.
You don’t set the page lengthto match your paper.
Set the page length to match yourpaper.
8-18 Troubleshooting

8/22/2019 Epson DFX 8500 User Manual
http://slidepdf.com/reader/full/epson-dfx-8500-user-manual 195/252
Paper jams, does not feed smoothly.
Cause What to do
The perforation cutter is not
correctly installed.
Remove the perforation cutter and
then reinstall it, making sure themounting notches and pins fit togetherproperly. See “Installing theperforation cutter” in Chapter 6.
You may not be using paperwithin specifications.
Be sure you’re using the right type of paper. See the paper specifications inAppendix A.
C le a rin g a Pa p e r Ja m
To clear a paper jam, follow these steps:
1 Turn off the printer.
2. Open the printer’s top cover.
3. Remove continuous paper from the printer if it is loaded.If continuous paper is jammed in the printer, tear off thefresh supply at the rear of the printer.
4. If the paper is caught in the paper ejection area, gently pullit out of the printer.
5. Close the printer cover and turn the printer back on. Makesure the Paper Out light is not flashing and the Pauselight is not on.
8
T r o u b l e s h o o t i n g
Troubleshooting 8-19

8/22/2019 Epson DFX 8500 User Manual
http://slidepdf.com/reader/full/epson-dfx-8500-user-manual 196/252
8-20 Troubleshooting

8/22/2019 Epson DFX 8500 User Manual
http://slidepdf.com/reader/full/epson-dfx-8500-user-manual 197/252
Append ix A
Specif ications
Printer Specifications . . . . . . . . . . . . . . . . . . . . . . . . A-2Printing . . . . . . . . . . . . . . . . . . . . . . . . . . . . . . A-2Paper . . . . . . . . . . . . . . . . . . . . . . . . . . . . . . . A-4Mechanical . . . . . . . . . . . . . . . . . . . . . . . . . . . . A-13Electrical . . . . . . . . . . . . . . . . . . . . . . . . . . . . . A-14Environmental . . . . . . . . . . . . . . . . . . . . . . . . . . A-14
Safety approvals . . . . . . . . . . . . . . . . . . . . . . . . . A-15CE marking . . . . . . . . . . . . . . . . . . . . . . . . . . . A-15
Parallel Interface Specifications . . . . . . . . . . . . . . . . . . A-16Forward channel . . . . . . . . . . . . . . . . . . . . . . . . A-16Reverse channel . . . . . . . . . . . . . . . . . . . . . . . . . A-16
Serial Interface Specifications . . . . . . . . . . . . . . . . . . . A-17
Optional Perforation Cutter Specifications . . . . . . . . . . . . A-17
A
Specifications A-1

8/22/2019 Epson DFX 8500 User Manual
http://slidepdf.com/reader/full/epson-dfx-8500-user-manual 198/252
Printe r Sp e c ific a tio ns
Printing
Printing method: 9-pin impact dot matrix
Printing speed:
C ha ra c te rs p e r inc h Q ua lity C ha ra c te rs/ se c o nd / line
10 cpi High-speed draft 1120
10 cpi Normal draft 840
10 cpi Near letter quality 210
12 cpi Draft 1008
12 cpi Near letter quality 252
Printing direction: Bidirectional logic seeking for text andgraphics printing. Unidirectional text orgraphics printing can be selected usingsoftware commands.
Line spacing: 1/6-inch or programmable increments of
1/216-inchPaper feed speed:
Continuous 0.25/m/sec/line (9.9 inches per second)
Note:
Paper feed speed drops to 6 inches per second when the optional pull tractoris mounted.
A-2 Specifications

8/22/2019 Epson DFX 8500 User Manual
http://slidepdf.com/reader/full/epson-dfx-8500-user-manual 199/252
Printable columns:
C h a ra c te rs p e r in c h M a x im u m p rin te d c h a ra c te rs p e r c o lu m n
10 cpi 136
12 cpi 163
15 cpi 204
17 cpi 233
20 cpi 272
Buffer: 128KB or 0KB (DIP switch selectable)
Character fonts: Characters per inch available
Fo nt A v a ila b le p itc he s ( c p i)
EPSON Super Draft 10
EPSON Draft 10, 12, 15
EPSON Roman (NLQ) 10, 12, 15, proportional
EPSON Sans serif (NLQ) 10, 12, 15, proportional
Character tables: One Italic and 10 graphical charactertables. (26 graphical character tables
are available in certain countries.)See Appendix B for more informationon the available character tables.
Character sets: 13 international character sets
A
Specifications A-3

8/22/2019 Epson DFX 8500 User Manual
http://slidepdf.com/reader/full/epson-dfx-8500-user-manual 200/252
P a p e r
Note:
Use recycled paper, labels, envelopes, postcards, overlapping forms, and
continuous forms with labels only under normal temperature and humidityconditions as follows:
Temperature 15° to 25°C (59° to 77°F) Humidity 20% to 60% RH
C ontinuo us p a p e r ( inc lud ing c o ntinuo us m ulti- p a rt form s)
o The sprocket hole must be a circle or notched circle.
o The holes must be cleanly cut.o
At the perforation between pages, the horizontal and verticalperforation cuts should not cross, as shown below.
o The ratio of the cut/uncut length at the perforation should be between 3:1 and 5:1.
o
The perforation between pages should not extend all the way tothe edges of the paper, as shown below.
o The thickness of the perforation part when extended should be1 mm or less.
OK OK OK No good
printing side1 mm or less
A-4 Specifications

8/22/2019 Epson DFX 8500 User Manual
http://slidepdf.com/reader/full/epson-dfx-8500-user-manual 201/252
o If you use continuous paper whose page length (A in theillustration) is under 101.6 mm (4 inches), make sure that thelength between folds (B) is over 101.6 mm (4 inches).
For continuous multi-part forms:
o The form sheets of continuous multi-part forms should besecurely joined together along the left and right edges bycrimping or spot-gluing. For the best printing quality, usemulti-part forms joined with spot-gluing.
o Never use continuous multi-part forms that are joined withmetal staples or bar-gluing.
o The thickness of the folding part when extended should be thesame as or less than the total thickness.
A
B
spot-gluing
1 inchor less
printing sidecrimping
3 inchesor less
1 inch
or less 3 inches
or less
spot-gluing
and crimping
on each side
metal staplingbar-gluing
Same as total thicknessor less
printing side
A
Specifications A-5

8/22/2019 Epson DFX 8500 User Manual
http://slidepdf.com/reader/full/epson-dfx-8500-user-manual 202/252
o The binding area should be flat and should have no creases.
o The sprocket holes of all sheets in the form should be alignedproperly.
o
The binding position should be outside the printable area.
Width 101 to 406 mm (4 to 16 inches)
Length/page 101 to 431 mm (4 to 17 inches)
Number of copies
Front 7 sheets (1 original + 6 copies)
Rear 6 sheets (1 original + 5 copies)
Total thickness
Front 0.53 mm (0.021 inch) maximum
Rear 0.46 mm (0.018 inch) maximum
Weight
Single sheets 52.6 to 82.7 g/m2 (14 to 22 lb)
Multi-part forms 41.4 to 56.4 g/m2 (11 to 15 lb) (weight/part)
and within the total thicknessQuality Plain paper, recycled paper, and carbonless
Printable area
Note:
Position the sprockets or set your application software so that the printerdoes not print outside the printable area.
printable area
printable area
CC
A
A The minimum top margin(below the perforation) is2.6 mm (0.1 inch).
B The minimum bottom margin(above the perforation) is 4.2 mm(0.165 inch).
C The minimum left or right margin is13 mm (0.51 inch).The maximum printable width is345.4 mm (13.6 inches).
B
A-6 Specifications

8/22/2019 Epson DFX 8500 User Manual
http://slidepdf.com/reader/full/epson-dfx-8500-user-manual 203/252
Labels
o Labels should be securely attached to the backing sheet and thelabel surface should be flat.
o
Labels should not peel off their backing sheet under theconditions below.
o When using labels whose backing sheet is entirely covered, makesure the cuts around the edges of the labels are perforated.
o When using labels whose backing sheet is not covered with thelabel material, see the illustration below.
Backing sheet
Width 101 to 406 mm (4 to 16 inches)
Length 88.9 mm (3.5 inches) minimum
label
27 mm
wrapping drum radius 27 mm
wrapping angle 180°wrapping time 24 hoursambient temperature 40°Cambient humidity 30%
label
several uncut areas
on each sidelabel sheet
backing sheet
corner radius is
2 to 3 mm
labelbacking sheet
label
A
Specifications A-7

8/22/2019 Epson DFX 8500 User Manual
http://slidepdf.com/reader/full/epson-dfx-8500-user-manual 204/252
Labels
Size 63.5 mm W × 23.8 mm H(2.5 inches W × 15/16 inch H)101 mm W × 23.8 mm H(4 inches W × 15/16 inch H)101 mm W × 27.0 mm H(4 inches W × 17/16 inch H)
Total thickness 0.19 mm (0.0075 inch) maximumThe difference in thickness must be lessthan 0.12 mm (0.0047 inch).
Quality Plain paper or the same quality labels withcontinuous backing sheet
Printable area
Continuous forms with labels
Same as labels except for the following:
The label on your form should be placed within the shaded area above, but not on the vertical or horizontal perforation.
A
BA 13 mm (0.51 inch) or more
B 2.6 mm (0.1 inch) or more
A
B
label
continuousforms
perforation
A
C
(side view)
A-8 Specifications

8/22/2019 Epson DFX 8500 User Manual
http://slidepdf.com/reader/full/epson-dfx-8500-user-manual 205/252
Area measurements
Printable area
Area measurements
labelprintable area
on a label
B
C
G
F
GF
E E
D
D
AA
A 13 mm (0.51 inch)
B 2.6 mm (0.1 inch) or more
C 4.2 mm (0.165 inch) or more
D 12.5 mm (0.49 inch) or more
E 65 mm (2.56 inches) or more
F 2 mm (0.08 inch) or more
G 5 mm (0.2 inch) or more
A 13 mm (0.51 inch)
B 55 mm (2.17 inches)
C Total thickness : 0.53 mm (0.021 inch) maximum
A
Specifications A-9

8/22/2019 Epson DFX 8500 User Manual
http://slidepdf.com/reader/full/epson-dfx-8500-user-manual 206/252
O ve rla p p ing m ulti-p a rt fo rm s
Same as continuous paper (multi-part) except for the following:
Area measurements
Printable area
A
B
A
D
E
C
perforationthe bottom edge of
overlapping form
the top of
overlapping form
the bottom edgeof the glue point
area
backing sheet
(side view)
A 13 ± 3 mm (0.51 ± 0.12 inch)
B 13.3 mm (0.52 inch) or less
C From the perforation to the top of the next overlapping form:3.3 mm (0.13 inch) or more
D From the perforation to the bottom edge of the glue point area:17 mm (0.67 inch) or less
E Total thickness including glue point dilation:0.7 mm (0.028 inch) or less
B
B
C
AA
B
A-10 Specifications

8/22/2019 Epson DFX 8500 User Manual
http://slidepdf.com/reader/full/epson-dfx-8500-user-manual 207/252
Area measurements
O ve rla p p ing m ulti-p a rt form s w ith la b e ls
Same as labels except for the following:
The label on your form should be placed within the shaded area above, but not on the vertical or horizontal perforation.
Area measurements
labelB
A
E
F
D
C
A 13 ± 3 mm (0.51 ± 0.12 inch)
B 80 mm (3.15 inches)
C 4.2 mm (0.165 inch)
D Thickness of the area where the label is attached:0.53 mm (0.02 inch) or less
E From the perforation to the top of the next overlapping form:3.3 mm (0.13 inch) or more
F From the perforation to the bottom edge of the glue point area:17 mm (0.67 inch) or less
G From the perforation to the bottom edge of the previous
overlapping form: 13.3 mm (0.52 inch) or lessH Total thickness including glue point dilation:
0.7 mm (0.028 inch) or less
perforation
the bottom edge
of overlapping
form
the top of
overlapping form
the bottom edge of
the glue point area
(side view)
backing sheet
G
H
A
A 19 mm (0.75 inch) or more
B 21.2 mm (0.84 inch) or more
C 4.2 mm (0.17 inch) or more
A
Specifications A-11

8/22/2019 Epson DFX 8500 User Manual
http://slidepdf.com/reader/full/epson-dfx-8500-user-manual 208/252
Printable area
Area measurements:
Pre -p rin te d p a pe r
Pre-printed paper is paper with white space in the middle and ruled lines,letters, or figures printed in the top and bottom margins. The margins are
printed the first time the paper is loaded in the printer, and a document isprinted in the white space the second time the paper is loaded in theprinter. The margin areas are often used for letterheads, borders, and soon. You can make your own pre-printed paper or you can purchase it.
You cannot preprint in the area with the diagonal shading shown in theillustrations below, and you can preprint only with colors whosereflectivity is under 60% (for instance black). Avoid punching holes in therestricted area shown below because punctures are also recognized ascolors whose reflectivity is under 60%.
printable area
on a label
B
B
F
E
FE
D D
C
C
AA
A 19 mm (0.748 inch) or more
B 21.2 mm (0.83 inch) or more
C 12.5 mm (0.49 inch) or more
D 65 mm (2.56 inches) or more
E 2 mm (0.08 inch) or more
F 5 mm (0.2 inch) or more
G 4.2 mm (0.165 inch) or more
G
label
A-12 Specifications

8/22/2019 Epson DFX 8500 User Manual
http://slidepdf.com/reader/full/epson-dfx-8500-user-manual 209/252
Before printing on pre-printed sheets, verify that the area your documentwill print on does not overlap the pre-printed area by printing separatesample sheets and comparing their printed areas.
M e c h a n i c a l
Paper feed methods: Push tractor (front and rear)Push-pull feed with optional pull tractor
Total print volume: 26 million lines (except print head)
Print head life: 400 million characters
Ribbon: Cartridge ribbon, available in black only(#8766). Do not use ribbons for 24-pinprinters.Ribbon life expectancy is 15 millioncharacters (at 14 dots/character).
Dimensions and weight: Height: 369 mm (14.5 inches)Width: 700 mm (27.6 inches)Depth: 382 mm (15.0 inches)Weight: 29 kg (approx. 64 lb)
12mm
12mm
12mm
12mm
continuous paperA
Specifications A-13

8/22/2019 Epson DFX 8500 User Manual
http://slidepdf.com/reader/full/epson-dfx-8500-user-manual 210/252
Electrical
120 V model:
Rated voltage AC 120 V
Input voltage range AC 99 to 132 V
Rated frequency range 50 to 60 Hz
Input frequency range 49.5 to 60.5 Hz
Rated current 3.5 A (max. 7.5 A)
Power consumption Approx. 160 W (ISO/IEC 10561Letter Pattern)Energy Star compliant
220-240 V model:
Rated voltage AC 220 to 240 V
Input voltage range AC 198 to 264 V
Rated frequency range 50 to 60 Hz
Input frequency range 49.5 to 60.5 Hz
Rated current 1.4 A (max. 3.5 A)
Power consumption Approx. 160 W (ISO/IEC 10561Letter Pattern)Energy Star compliant
This product is also designed for IT power systems with Phase to Phasevoltage 220-240V.
Environmental
Temperature: Operation: 5°C to 35°C (41°F to 95°F)Storage: −30°C to 60°C (−22°F to 140°F)
Humidity: Operation: 10% to 80% RH withoutcondensation
Storage: 5% to 85% RH withoutcondensation
A-14 Specifications

8/22/2019 Epson DFX 8500 User Manual
http://slidepdf.com/reader/full/epson-dfx-8500-user-manual 211/252
Sa fe ty a p p rova ls
120 V model:
Safety standards UL1950 with D3CSA C22.2 No. 950 with D3
EMI FCC part 15 subpart B class BCSA C108.8 class B
230 V model:
Safety standards EN 60950 (VDE, NEMKO)
EMI EN 55022 (CISPR pub. 22) class BAS/NZS 3548 class B
Acoustic noise: Approx. 58 dB (A) (ISO 7779 pattern)
C E m a rk ing
230 V model:
Low Voltage Directive 73/23/EEC: EN60950
EMC Directive 89/336/EEC: EN55022 class B
EN61000-3-2EN61000-3-3EN50082-1
IEC801-2IEC801-3IEC801-4
A
Specifications A-15

8/22/2019 Epson DFX 8500 User Manual
http://slidepdf.com/reader/full/epson-dfx-8500-user-manual 212/252
Pa ra lle l Inte rfa c e Sp e c ific a tion s
The printer comes with a bidirectional, 8-bit, parallel interface and aType-B optional interface slot.
Forw a rd c ha nne l
Transmission mode: 8-bit parallel, IEEE-1284 compatibilitymode
Adaptable connector: 57-30360 (Amphenol) or equivalent
Synchronization: STROBE pulse
Handshaking: BUSY and ACKNLG signalsSignal level: TTL compatible (IEEE-1284 level 1 device)
Re ve rse c ha nne l
Transmission mode: IEEE-1284 nibble mode
Adaptable connector: 57-30360 (Amphenol) or equivalent
Synchronization: Refer to the IEEE-1284 specification
Handshaking: Refer to the IEEE-1284 specification
Signal level: IEEE-1284 level 1 device
Data transmissiontiming: Refer to the IEEE-1284 specification
Extensibility request: The printer responds to the extensibilityrequest in the affirmative when the
request is 00H or 04H, which means:00H: Request nibble mode of reverse channeltransfer
04H: Request device ID in nibble mode of reverse channel transfer
A-16 Specifications

8/22/2019 Epson DFX 8500 User Manual
http://slidepdf.com/reader/full/epson-dfx-8500-user-manual 213/252
Se ria l Inte rfa c e Sp e c ific a tion s
The DFX-8500 built-in serial interface is an RS-232C asynchronousinterface with the following characteristics.
Data format: 1 start bitData word length: 8 bitsOdd, even, no parity, or ignore1 or more stop bit
Signal level: Mark logical “1” (−3 V to −25 V)Space logical “0” (+3 V to +25 V)
Handshaking: Handshaking by DTR signal or Xon/Xoff.
Bit rate: 2400, 4800, 9600, 19200 bpsConnector plug: EIA 25-pin connector
O p tio na l Pe rfora tio n C utte r Sp e c ific a tio ns
The specifications below apply to the optional perforation cutter(C81507] ).
Paper:
Width 101 to 406 mm (4 to 16 inches)
Length/page 101 to 431 mm (4 to 17 inches)
Number of copies 7 sheets (1 original + 6 copies)
Total thickness 0.53 mm (0.021 inches) maximum
Weight
Single sheets 52.6 to 82.7 g/m2
(14 to 22 lb)Multi-part forms 41.4 to 56.4 g/m2 (11 to 15 lb) × n (n ≤ 7)
and within the total thickness
Note:
You cannot use labels, overlapping multi-part forms, continuous forms withlabels, or overlapping multi-part forms with labels.
A
Specifications A-17

8/22/2019 Epson DFX 8500 User Manual
http://slidepdf.com/reader/full/epson-dfx-8500-user-manual 214/252
Environmental:
Temperature Operation: 5° to 35°C (41° to 95°F)Storage: −30° to 60°C (−22° to 140°F)
Humidity (withoutcondensation) Operation: 10% to 80% RHStorage: 5% to 85% RH
Dimensions and weight Height: 130 mm (5.1 inches)Width: 510 mm (20.1 inches)Depth: 110 mm (4.3 inches)Weight: 6.4 kg (2.9 lb)
A-18 Specifications

8/22/2019 Epson DFX 8500 User Manual
http://slidepdf.com/reader/full/epson-dfx-8500-user-manual 215/252
Append ix B
Prin te r C o m m a nd s a n d C h a ra c te r
Tables
EPSON ESC/P Control Codes . . . . . . . . . . . . . . . . . . . B-2Barcode commands . . . . . . . . . . . . . . . . . . . . . . . B-3
IBM 2381 Plus Emulation Control Codes . . . . . . . . . . . . . B-6
Character Tables . . . . . . . . . . . . . . . . . . . . . . . . . . . B-7
B
Printer Commands and Character Tables B-1

8/22/2019 Epson DFX 8500 User Manual
http://slidepdf.com/reader/full/epson-dfx-8500-user-manual 216/252
EPSO N ESC / P C on tro l C od e s
Selecting EPSON ESC/P printer in your software allows you to use themost advanced font and graphics handling available. See the ESC/P
Reference Manual for details.General operation:
ESC@, ESC U, ESC EM
Paper feeding:FF, LF, ESC 0, ESC 1, ESC 2, ESC 3, ESC A, CR
Page format:ESC ( C, ESC C, ESC C 0, ESC Q, ESC l, ESC ( c, ESC N, ESC O
Print position motion:ESC $, ESC ¥, ESC D, HT, ESC B, VT, ESC J
Font selection:ESC k, ESC x, ESC P, ESC M, ESC g, ESC p, ESC 4, ESC 5, ESC E, ESC F,ESC !
Font enhancement:ESC W, DC 4, SO, DC2, SI, ESC w, ESC G, ESC H, ESC T, ESC S, ESC -
Spacing:ESC Space, ESC ( U
Character handling:ESC t, ESC ( t, ESC R, ESC %, ESC &, ESC : ESC 1, ESC 6, ESC 7
Bit image:
ESC *, ESC K, ESC L, ESC Y, ESC Z, ESC ^
Bar code:ESC ( B
B-2 Printer Commands and Character Tables

8/22/2019 Epson DFX 8500 User Manual
http://slidepdf.com/reader/full/epson-dfx-8500-user-manual 217/252
Ba rc o d e c o m m a nd s
Your printer has powerful barcode printing capabilities and includes thefollowing resident barcode fonts: EAN-13, EAN-8, Interleaved 2 of 5,
UPC-A, UPC-E, Code 39, Code 128, and POSTNET. See the Barcodecommands below:
ESC ( B Select Barcode Printing
Format:
ASCII code: ESC ( B m nDecimal: 27 40 66 m nHexadecimal: 1B 28 42 m n
Function:
ESC ( B n1 n2 k m s v1 v2 c datan = (n1 + (256 × n2))
k: Select Barcodek = 0: EAN - 13, 1: EAN - 8, 2: Interleaved 2 of 5, 3: UPC - A,
4: UPC - E, 5: Code 39, 6: Code 128, 7: POSTNET
m: Module width (120 dpi)
m = 2: 2 dots, 3: 3 dots, 4: 4 dots, 5: 5 dotss: Space adjustment value-3 ≤ s ≤ 3 (1/240 inch units)
v1, v2: Bar lengthv1 + v2 × 256 (1/72-inch units)
G The v1 and v2 values are ignored when POSTNET is selected.
G The long bar length of POSTNET is always 0.125 inch; the short bar
length is always 0.050 inch.
B
Printer Commands and Character Tables B-3

8/22/2019 Epson DFX 8500 User Manual
http://slidepdf.com/reader/full/epson-dfx-8500-user-manual 218/252
c: Control flag
Bit 0 = Check digit
0: The printer does not add A check digit.1: The printer adds A check digit.
Bit 1 = Human readable character (HRC)
0: The printer adds the HRC.1: The printer does not add the HRC.
Bit 2 = Position of flag character (for EAN-13 and UPC-A only)
0: Center1: Under
Bits 3−7 = Not used
Barcode data
Barcode data corresponds to the barcode symbology. The data number of each barcode type is constant. The barcode is printed only if the followingvalid characters are set.
Ba rc o d e typ e N um b e r o f va lid
c ha ra c te rs 1 (HEX)
Num be r of va lid
c ha ra c te rs 2 (HEX)
EAN-13
EAN-8
Interleaved 2 of 5UPC-A
UPC-E
Code 39Code 128
POSTNET
0D
8
2 to FF0C
0C or 8
1 to FF2 to FF
6 or 0A or 0C
0C
7
2 to FF0B
0B or 7
1 to FF2 to FF
5 or 9 or 0B
Number of valid c haracters 1: Control flag c b0=0Number of valid c haracters 2: Control flag c b0=1
B-4 Printer Commands and Character Tables

8/22/2019 Epson DFX 8500 User Manual
http://slidepdf.com/reader/full/epson-dfx-8500-user-manual 219/252
The valid data of each barcode type is described below. If invalid data isincluded in the barcode data string, the barcode is not printed.
Ba rc o d e ty p e Ba rc o d e d a ta
EAN13
EAN-8
UPC-AUPC-E
Interleaved 2 of 5
POSTNETCode 39
Code 128
0-9 (Hex 30-39)
0-9 (Hex 30-39)
0-9 (Hex 30-39)0-9 (Hex 30-39)
0-9 (Hex 30-39)
0-9 (Hex 30-39)0-9 (Hex 30-39), (Hex 41-5A), (Hex 20, 24, 25,
2B, 2D, 2E, 2F)
Set A, Set B, Set C
The following conditions are required for barcode printing:G Barcode printing is always performed unidirectionally. However,
when it is mixed with raster bit image data, neither barcode nor raster bit image data is printed.
G A barcode is not printed when part of the barcode extends beyond theright margin.
G When barcode data and text data are mixed in a data sequence, barcode and text are printed in the same place.
G The start and stop (*) characters of Code 39 are added to humanreadable characters.
G The initial data of Code 128 (Set A, B, or C) is identified as the firstdata of Code 128, and must be hexadecimal (41, 42, and 43respectively).
G When Code 128 Set C and Interleaved 2 of 5 are selected, barcode datarequires an even number data string. However, if an odd numberstring is sent, a 0 is automatically added, making it an even number
data string.G The barcode print start position (except POSTNET) is always 7/72
inch above the baseline.
B
Printer Commands and Character Tables B-5

8/22/2019 Epson DFX 8500 User Manual
http://slidepdf.com/reader/full/epson-dfx-8500-user-manual 220/252
IBM 238 1 Plus Em ula tio n C on tro l C od e s
This printer emulates the IBM Proprinter with the following commands.For detailed information, see IBM’s 2381 Plus reference manual.
General operation:NUL, DC3, ESC j, BEL, CAN, DC1, ESC Q, ESC [ K, ESC U, ESC [ F
Paper feeding:FF, LF, ESC 5, ESC A, ESC 0, ESC 1, ESC 2, ESC 3, CR, ESC ]
Page format:ESC C, ESC C0, ESC X, ESC N, ESC O, ESC 4
Print position motion:ESC d, ESC R, ESC D, HT, ESC B, VT, ESC J
Font selection:DC2, ESC P, ESC :, ESC E, ESC F, ESC I, ESC [d, ESC [I
Font enhancement:DC4, SO, ESC SO, ESC W, ESC [ @, SI, ESC SI, ESC G, ESC H, ESC T,ESC S, ESC -, ESC _
Spacing:BS, SP
Character handling:ESC 6, ESC 7, ESC [ T, ESC ^, ESC ¥
Bitimage:ESC K, ESC L, ESC Y, ESC Z
Barcode:
ESC [f, ESC [p
Download:
ESC = (only Draft mode)
B-6 Printer Commands and Character Tables

8/22/2019 Epson DFX 8500 User Manual
http://slidepdf.com/reader/full/epson-dfx-8500-user-manual 221/252
C ha ra c te r Ta b le s
These character tables are selected with the DIP switches or by using asoftware command.
Note:
Characters for hex codes 00 through 7F for most tables are the same as those forPC437. Therefore, some tables may only list characters for hex codes 80 throughFF.
Tables with an asterisk (*) after the table name are available only in somecountries.
When you select the IBM character table with DIP switch 3-6 as described
in Chapter 4, 00 to 1FH and 80 to 9FH are replaced for Table 1 selection,as shown below. Also when Table 2 is selected with DIP switch 3-6, 00 to1FH are replaced as shown below.
table 1 table 2
B
Printer Commands and Character Tables B-7

8/22/2019 Epson DFX 8500 User Manual
http://slidepdf.com/reader/full/epson-dfx-8500-user-manual 222/252
PC 437 (USA, sta nd a rd Euro p e )
PC 850 ( M ultiling ua l) PC 860 (Po rtug ue se )
B-8 Printer Commands and Character Tables

8/22/2019 Epson DFX 8500 User Manual
http://slidepdf.com/reader/full/epson-dfx-8500-user-manual 223/252
PC 861 ( Ic e la nd ic ) PC 863 (C a na d ia n- Fre nc h)
PC 865 (N o rd ic ) A b ic o m p
B
Printer Commands and Character Tables B-9

8/22/2019 Epson DFX 8500 User Manual
http://slidepdf.com/reader/full/epson-dfx-8500-user-manual 224/252
Ro m a n 8
BRA SC II ISO La tin 1
B-10 Printer Commands and Character Tables

8/22/2019 Epson DFX 8500 User Manual
http://slidepdf.com/reader/full/epson-dfx-8500-user-manual 225/252
PC 437 G re e k PC 852 (Ea st Euro p e )*
PC 853 (Turk ish)* PC 855 (C y rillic )*
B
Printer Commands and Character Tables B-11
8/22/2019 Epson DFX 8500 User Manual
http://slidepdf.com/reader/full/epson-dfx-8500-user-manual 226/252
PC 857 ( Turk ish)* PC 866 (Russia n)*
PC 869 ( G re e k )* M A ZO WIA (Po la nd )*
B-12 Printer Commands and Character Tables

8/22/2019 Epson DFX 8500 User Manual
http://slidepdf.com/reader/full/epson-dfx-8500-user-manual 227/252
C o d e M JK (C SFR) * ISO 8859- 7 (La tin / G re e k )*
ISO La tin 1T (Turk ish) * Bu lg a ria (Bu lg a ria n) *
B
Printer Commands and Character Tables B-13

8/22/2019 Epson DFX 8500 User Manual
http://slidepdf.com/reader/full/epson-dfx-8500-user-manual 228/252
Esto nia (Esto nia )* PC 774 (LST 1283 : 1993)*
ISO 8859 - 2* PC 866 LA T. (La tvia n)*
B-14 Printer Commands and Character Tables

8/22/2019 Epson DFX 8500 User Manual
http://slidepdf.com/reader/full/epson-dfx-8500-user-manual 229/252
PC 866UKR* PC A PTEC (A ra b ic ) *
PC 708 (A ra b ic )* PC 720 (A ra b ic ) *
B
Printer Commands and Character Tables B-15

8/22/2019 Epson DFX 8500 User Manual
http://slidepdf.com/reader/full/epson-dfx-8500-user-manual 230/252
PC A R864 (A ra b ic )* Ita lic
No character is availablefor hex code 15 in theitalic character table.
B-16 Printer Commands and Character Tables

8/22/2019 Epson DFX 8500 User Manual
http://slidepdf.com/reader/full/epson-dfx-8500-user-manual 231/252
Inte rna tion a l c ha ra c te r se ts
You can select one of the following international character sets with theDIP switches or by sending the ESC R command. For example, when youselect “Italic France,” the characters in the “France” row on the table
below are used in the italic character table.
The following eight international character sets can be selected with theDIP switches or with the ESC R command.
The following five additional sets can be selected only with the ESC Rcommand.
B
Printer Commands and Character Tables B-17

8/22/2019 Epson DFX 8500 User Manual
http://slidepdf.com/reader/full/epson-dfx-8500-user-manual 232/252
Sym b ol se t
Characters defined in the following symbol set can be printed using theESC \ (characters) or ESC ^ (one character) software command. This isavailable in the IBM emulation mode.
B-18 Printer Commands and Character Tables

8/22/2019 Epson DFX 8500 User Manual
http://slidepdf.com/reader/full/epson-dfx-8500-user-manual 233/252
Append ix C
C o nta c ting C ustom e r Sup p o rt
For United States and Canada Users . . . . . . . . . . . . . . . C-2
For United Kingdom and the Republic of Ireland Users . . . . C-4Enquiry Desk . . . . . . . . . . . . . . . . . . . . . . . . . . C-4Customer Support . . . . . . . . . . . . . . . . . . . . . . . . C-4Faxon EPSON . . . . . . . . . . . . . . . . . . . . . . . . . . C-5
EPtec - Bulletin Board Service for latest drivers and utilities C-5World Wide Web . . . . . . . . . . . . . . . . . . . . . . . . C-5
For Australian Users . . . . . . . . . . . . . . . . . . . . . . . . C-6EPSON FAXBACK . . . . . . . . . . . . . . . . . . . . . . . C-6EPSON Bulletin Board System . . . . . . . . . . . . . . . . . C-6Internet URL http://www.epson.com.au . . . . . . . . . . C-6Your dealer . . . . . . . . . . . . . . . . . . . . . . . . . . . . C-6EPSON Helpdesk . . . . . . . . . . . . . . . . . . . . . . . . C-7
For Singapore Users . . . . . . . . . . . . . . . . . . . . . . . . . C-7
For Hong Kong Users . . . . . . . . . . . . . . . . . . . . . . . . C-7Internet home page . . . . . . . . . . . . . . . . . . . . . . . C-8Electronic bulletin board system . . . . . . . . . . . . . . . C-8Technical Support Hotline . . . . . . . . . . . . . . . . . . . C-8
For Philippines Users . . . . . . . . . . . . . . . . . . . . . . . . C-8
C
Contacting Customer Support C-1

8/22/2019 Epson DFX 8500 User Manual
http://slidepdf.com/reader/full/epson-dfx-8500-user-manual 234/252
If your printer is not operating properly and you cannot solve theproblem using the troubleshooting information in this guide, contactcustomer support services for assistance.
We will be able to help you much more quickly if you give us the
following information:Serial number of your printer.(The serial number label is on the back of the printer.)
Printer model.
Brand and model of your computer.
Printer software version.(Click the Aboutbutton in your printer driver.)
Windows version (for example, NT, 95, or 3.1) you are using.
Software application(s) you normally use with your printer andtheir version number(s).
For Unite d Sta te s a nd C a na d a Use rs
If you purchased your printer in the United States or Canada, EPSON
provides customer support through the following services:
Elec tronic support servic es
Se rv ic e A c c e ss
World Wide Web From the Internet, you can reach EPSON’s home
page at ht tp : / /www.epson.com .
EPSON Internet FTP Site If you have Internet FTP capability, use your Web
browser (or other software for FTP downloading) to
log onto f tp.epson.com with the user name
a n o n y m o u s and your e-mail address as the
password.
EPSON Download Service You can ca ll the EPSON Download Service a t
(800 ) 442 -2007. Set your communications software
to 8 data b its, 1 stop bit, no parity. Modem speed
can be up to 28.8 Kbps.
EPSON Forum on
CompuServe®
Members of CompuServe can type G O EPSO N at
the menu prompt to reach the Epson America
Forum. For a free introductory CompuServe
membership, call (800) 848-8199 and ask for
representative #529.
C-2 Contacting Customer Support

8/22/2019 Epson DFX 8500 User Manual
http://slidepdf.com/reader/full/epson-dfx-8500-user-manual 235/252
Automated telep hone servic es
Se rv ic e A c c e ss
EPSON SoundAdvice™ For pre-recorded answers to commonly asked
questions about EPSON products 24 hours a day,
seven days a week, call (800) 442-2110 .
EPSON FaxAdvice™ Access EPSON’s technical information library by
calling (800) 442-2110 . You must provide a return
fax number to use this service.
EPSON Referral Service For the location of your nearest Authorized EPSON
Reseller or Customer Care Center, call (800)
442-2110 .
EPSON also provides technical support and information on theinstallation, configuration, and operation of EPSON products. Dial(800) 922-8911, (310) 782-2600 (U.S.), or (905) 709-9475 (Canada), 6 A.M. to6 P.M., Pacific Time, Monday through Friday.
Before you call, please have the following information ready:
G Product name
G Product serial number
G Computer configuration
G
Description of the problemYou can purchase ink cartridges, paper, manuals, accessories, and partsfrom EPSON Accessories at (800) 873-7766 (U.S. sales only). In Canada,please call (800) 873-7766 for dealer referral.
Note:
If you need help using software with an EPSON product, see the documentation for that program for technical support information.
C
Contacting Customer Support C-3

8/22/2019 Epson DFX 8500 User Manual
http://slidepdf.com/reader/full/epson-dfx-8500-user-manual 236/252
For Unite d King d om a nd the Re p ub lic o f Ire la nd Use rs
If you purchased your printer in the UK or the Republic of Ireland,Epson (UK) Limited provides a range of customer services and technicalsupport.
Note:
For customers in the Republic of Ireland, please use the correct dialing codeswhen dialing the UK telephone numbers listed in the following sections. Forexample the Enquiry Desk fax number, 01442 227271, should be dialed as0044 1442 227271 from the Republic of Ireland.
Enq uiry D e sk
The Enquiry Desk team can be contacted by calling 0800 220546 in the UKor 1 800 409132 from the Republic of Ireland, by faxing 01442 227271, orvia the Internet at [email protected]. They can provide the followinginformation:
G Information and literature on new EPSON products (also availablefrom Faxon EPSON)
G Where to purchase genuine EPSON consumables, accessories andoptions
C usto m e r Sup p o rt
Our Customer Support team can provide the following services:
G Technical information on installing, configuring, and operating
your EPSON productsG Arranging for faulty EPSON products to be repaired within the
warranty period
For information on contacting our Customer Support team, please seethe Service and Support Information booklet that came with your EPSONproduct.
If this booklet is not available, details can be found on Faxon EPSONfaxback service, EPtec Bulletin Board Service or on EPSON’s World Wide
Web site. See below for details.
C-4 Contacting Customer Support

8/22/2019 Epson DFX 8500 User Manual
http://slidepdf.com/reader/full/epson-dfx-8500-user-manual 237/252
Fa xo n EPSO N
Contact Faxon EPSON Faxback Service for:
G Literature and specifications on the latest EPSON products
G Support information including troubleshooting tips, switch settingsand driver information
To use Faxon EPSON, call 01442 227332 using a touch-tone phone. Youwill be asked to follow a simple routine to register your document requestand once you have entered your telephone and fax numbers, FaxonEPSON will fax a copy of the document catalogue to your fax machine.
When you have found the documents that you need in the catalogue, callFaxon EPSON again and enter the document ID numbers. The documents
will be faxed to you automatically.
EPte c - Bulle tin Bo a rd Se rvic e fo r la te st d rive rs a nd utilitie s
You can call the EPSON Bulletin Board Service on 01442 227479. Nomembership is required. Make sure that your communications softwareis set to 8 data bits, 1 stop bit, no parity bit, ANSI terminal modeemulation and a modem speed of up to 28.8 Kbps. Supported protocolsinclude Xmodem, Ymodem and Zmodem. See the documentation thatcame with your communications software and modem for moreinformation.
When you first connect to the Bulletin Board Service, you will be askedfor your name, company name, phone number and a password (whichyou can invent yourself).
Wo rld Wid e We b
If you can connect to the Internet and have a Web browser, you can accessEPSON’s World Wide Web site at http://www.epson.com. Here you willfind information on the latest EPSON products, software drivers, andanswers to frequently asked questions.
C
Contacting Customer Support C-5

8/22/2019 Epson DFX 8500 User Manual
http://slidepdf.com/reader/full/epson-dfx-8500-user-manual 238/252
Fo r A ustra lia n Use rs
EPSON Australia wishes to provide you with a high level of CustomerService. As well as this User’s Guide, we provide the following sources
for obtaining information:
EPSO N FA X BA C K
EPSON FAXBACK will fax you the latest specifications and pricing formost EPSON products offered in Australia. There is also technicalinformation including details of the latest software and drivers available.Phone (02) 9903 9075 and the system will guide you through a number
of choices before faxing the information to your fax machine.
EPSO N Bulle tin Boa rd Sy ste m
This is where you can download the latest software and drivers. Visitthe BBS to check out the latest versions. If you have a modem, phone(02) 9417 5090.
In te rne t URL http :/ / w w w .e p son.c om .a u
Access the Epson Australia World Wide Web pages. Worth taking yourmodem here for the occasional surf! You can get the same information asoffered on the EPSON FAXBACK and the EPSON Bulletin Board plusmore.
Your d e a le r Don’t forget that your dealer can often help identify and resolveproblems. The dealer should always be the first call for advice onproblems. They can often solve problems quickly and easily as well asgive you advice on the next step to take.
C-6 Contacting Customer Support

8/22/2019 Epson DFX 8500 User Manual
http://slidepdf.com/reader/full/epson-dfx-8500-user-manual 239/252
EPSO N He lp d e sk
EPSON Helpdesk is provided as a final backup to make sure our clientshave access to advice. Operators on the Helpdesk can aid you in
diagnosing hardware and software problems. They can also advise you onthe latest EPSON products and where the nearest dealer or service agentis located. Many types of queries are answered here.
The Helpdesk numbers are:
Phone: (02) 9903 9040Fax: (02) 9903 9189
We encourage you to have all the relevant information on hand when youring. The more information you prepare, the faster we can help solve the
problem. This information includes the User’s Guide for your EPSONproduct, type of computer, operating system, application programs, andany other information you feel is required.
Fo r Sing a p o re Use rs
Contact the telephone and fax numbers below:
Phone: (065) 337-7911Fax: (065) 334-1185
Fo r Ho ng Ko ng Use rs
To obtain technical support as well as other after-sales services, users arewelcome to contact EPSON Hong Kong Limited.
C
Contacting Customer Support C-7

8/22/2019 Epson DFX 8500 User Manual
http://slidepdf.com/reader/full/epson-dfx-8500-user-manual 240/252
In te rne t hom e p a g e
EPSON Hong Kong has established a local home page in both Chineseand English on the Internet to provide users with the following
information:G Product information
G Answers to Frequently Asked Questions (FAQs)
G Latest versions of EPSON printer drivers
Users can access our World Wide Web home page at:http://www.epson.com.hk.
Ele c tro nic b ulle tin b o a rd syste m
An electronic bulletin board system (BBS) is also available to obtainprinter information and the latest versions of printer drivers. You can logon to the following number for the BBS service:
BBS: (852) 2827-4244
Te c hnic a l Sup p o rt Ho tline You can also contact our technical staff at the following telephone and faxnumbers:
Phone: (852) 2585-4399Fax: (852) 2827-4383
Fo r Ph ilip p ine s Use rs To obtain technical support as well as other after sales services, users arewelcome to contact the EPSON Philippines Representative Office at thetelephone and fax numbers below:
Phone: (632) 813-6552Fax: (632) 813-6545BBS: (632) 814-0595
C-8 Contacting Customer Support

8/22/2019 Epson DFX 8500 User Manual
http://slidepdf.com/reader/full/epson-dfx-8500-user-manual 241/252
G lo ssa ry
These definitions apply specifically to printers.
applicationA software program that helps you carry out a particular task such asword processing or financial planning.
ASCIIAmerican Standard Code for Information Interchange. A standardizedcoding system for assigning numerical codes to letters and symbols.
baud rateA measure of the speed of data transmission. Usually equivalent to bits
per second. Also called serial bit rate.bidirectional printingPrinting in which the print head moves from left to right on every otherline and from right to left on the others. This increases the speed of printing.
bitA binary digit (0 or 1), which is the smallest unit of information used by aprinter or computer.
bufferSee memory.
byteA unit of information consisting of eight bits.
character setA collection of letters, numbers, and symbols that provides you with thecharacters used in a particular language.
character table
A portion of a character set that can be used for graphic symbols or italiccharacters.
characters per inch (cpi)A measure of the size of text characters, often referred to as pitch. 10 cpi isthe printer’s default setting.
continuous paperPaper that has sprocket-feed holes on both sides, is perforated betweenpages, and is supplied in a folded stack. Also called fanfold paper.
Glossary GL-1

8/22/2019 Epson DFX 8500 User Manual
http://slidepdf.com/reader/full/epson-dfx-8500-user-manual 242/252
continuous forms with labelsA kind of continuous paper that has one label on each page. This isdifferent from label paper, which consists entirely of labels. When printingon continuous forms with labels, the printer must adjust the height of the
print heads for the extra thickness of the labels. Before printing on thiskind of paper, measure the label thickness using the paper memoryfeature.
defaultA value or setting that takes effect when the equipment is turned on, reset,or initialized.
DIP switchesSmall switches in a printer that control various printer functions and setthe default status of the printer when it is turned on or initialized. DIP
stands for dual inline package.dot matrixA method of printing in which each letter or symbol is formed by apattern (matrix) of individual dots.
draftOne of three print qualities available on your printer. Draft uses less dotsper character for faster printing. See also high-speed draft and near letterquality.
driverSee printer driver.
ESC (escape)A special control code used to begin most printer commands.
ESC/PAbbreviation for EPSON Standard Code for Printers (read E-S-C-P), asystem of commands that lets you control your printer using yourcomputer’s software. The system is standard for all EPSON printers andsupported by most software programs for personal computers.
fanfold paperSee continuous paper.
fontA style of type designated by a name such as Roman or Sans Serif.
form feed (FF)A control code and control panel button that advances the paper to thenext top-of-form position.
GL-2 Glossary

8/22/2019 Epson DFX 8500 User Manual
http://slidepdf.com/reader/full/epson-dfx-8500-user-manual 243/252
hex dumpA troubleshooting feature that helps advanced users detect the cause of communication problems between the printer and computer. When theprinter is in hex dump mode, it prints each code that it receives in
hexadecimal notation and ASCII code. Also called data dump.high-speed draftOne of three print qualities available on your printer. High-speed draftuses a minimum number of dots per character to produce extremelyhigh-speed printing. See also draft and near letter quality.
initializeTo establish the initial default status of the printer by turning the printeron or sending an INIT signal.
input buffer
See memory.
interfaceThe connection between the computer and the printer. A parallel interfacetransmits data one character or code at a time, and a serial interfacetransmits data one bit at a time.
line feed (LF)A control code and control panel button that advances the paper one linespace.
memoryThe printer, like a computer, has a memory. When you print a file from acomputer, the contents of the file are transferred quickly from thecomputer’ s memory to the printer’s memory. The printer then printsinformation from its own memory. This frees the computer to do otherwork while the printer is still working. The printer memory is sometimescalled the buffer, or the input buffer.
micro feedA feature that adjusts the top-of-form, printing, and tear-off positions.
near letter quality (NLQ)One of three print qualities available on your printer. Near letter qualityreduces the print speed and increases the number of dots per character toproduce high-resolution characters. See also draft and high-speed draft.
Glossary GL-3

8/22/2019 Epson DFX 8500 User Manual
http://slidepdf.com/reader/full/epson-dfx-8500-user-manual 244/252
overlapping multi-part formsA kind of continuous paper that provides you with multi-part forms. Thepage length of the multi-part forms is longer than that of the backingcontinuous paper. So when extended, one page’s multi-part forms overlap
the next page’s multi-part forms. The thickness of this overlapping area isthicker than the printable area.
overlapping multi-part forms with labelsThis kind of continuous paper is a combination of overlapping multi-partforms and continuous forms with labels. Be sure to follow any specialinstructions intended for either type. For this paper, make the thicknesssettings using the paper memory feature.
paper bailThe part of the printer that holds the paper flat against the platen.
parallel interfaceSee interface.
parityA method for a computer and printer to check the reliability of datatransmission.
pitchThe number of characters per inch (cpi). The standard is 10 cpi.
platen
The silver plate behind the paper bail that provides a backing for theprinting.
printable areaThe area of a page on which the printer can print. It is smaller than thephysical size of the page due to margins.
printer driverA software program that sends commands from the computer for usingthe functions of a particular printer.
printing positionThe position on the page where text or graphics will print. The printingcan be adjusted using the Micro Feed buttons.
pull tractorAn optional paper feeder that is useful when printing on preprinted ormulti-part forms.
GL-4 Glossary

8/22/2019 Epson DFX 8500 User Manual
http://slidepdf.com/reader/full/epson-dfx-8500-user-manual 245/252
push tractorA device that feeds continuous paper through the printer. Both the frontand rear built-in tractors are push tractors; they push the paper throughthe printer to the print head.
RAMRandom Access Memory. The portion of the printer’s memory that is usedas a buffer and for storing user-defined characters.
resetTo return a printer to its defaults by sending a command or an INITsignal, or by turning the printer off and then back on again.
self testA method of checking the operation of the printer. When you run the self test, the printer prints the built-in characters in its ROM (Read OnlyMemory).
serial interfaceSee interface.
standby positionThe position the paper is in after you manually load it onto the first fewpins of the tractor sprockets. When the printer switches tractors, itautomatically reverses the previously loaded paper back to this position.
tear-off position
The position the printer feeds the paper to when you press the Tear Off button. This position can be adjusted using micro feed so that the paper’sperforation meets the printer’s tear-off edge.
top-of-form positionThe position on the paper that the printer recognizes as the first printableline. The printer feeds the paper to this position when it loads the paper.This position can be adjusted using micro feed.
user-defined characters
Characters that are defined and stored in the printer by the user. Alsoknown as download characters.
Glossary GL-5

8/22/2019 Epson DFX 8500 User Manual
http://slidepdf.com/reader/full/epson-dfx-8500-user-manual 246/252
GL-6 Glossary

8/22/2019 Epson DFX 8500 User Manual
http://slidepdf.com/reader/full/epson-dfx-8500-user-manual 247/252
I n d e x
A
Adjusting thepaper position, 3-17–20printing position, 3-20tear-off position, 3-23–25top-of-form position, 3-17–19
Auto CR (carriage return) setting,4-18
Auto cut mode setting, 4-19Auto I/F wait time setting, 4-20Auto line feed setting, 4-18Auto tear off setting, 4-17
B
Barcode commands, B-3–5Beep patterns, 8-3–4Bidirectional (Bi-d) printing, print
direction setting, 4-17
Buttons, control panel, 4-4–7Buzzer (beep) setting, 4-18
C
Cables. See Interface cableChanging paper, 3-28–30Character tables, B-7–18Character table setting, 4-16
Choosing a place for the printer,1-4–5
Cleaning the printer, 7-4Clearing a paper jam, 8-19Command lists, B-2–6Connecting the printer, 1-11–15
Continuous forms with labels
setting, 4-21using, 3-3
Control codesESC/P, B-2–5IBM 2381 Plus emulation, B-6
Control panel functions, 4-2–8 buttons, 4-4–7lights, 4-2–4other features, 4-8
Copy button, 4-5light, 4-3
Customer support, C-1–8
D
DIP switchfunctions, 4-16–21changing settings, 4-9–10tables, 4-11–16
Dithering setting, 2-7, 2-12DOS, driver installation, 2-21Driver. See Printer driver
E
Emulation, IBM, 4-19EPSON Status Monitor 2 utility,
5-2–12checking the printer status, 5-4–9installing, 5-2–3setting monitoring preferences,
5-10–12Error indicators, 8-3–4ESC/P, 4-19, B-2–5
IN-1

8/22/2019 Epson DFX 8500 User Manual
http://slidepdf.com/reader/full/epson-dfx-8500-user-manual 248/252
F
Features, printer, 1Font
button, 4-4lights, 4-3
Front/Rear button, 4-7
H
Hex dump, 4-8, 8-6–7
I
IBM character table setting, 4-18IBM emulation mode, 4-19, B-6I/F mode setting, 4-20Input buffer setting, 4-19Intensity setting, 2-7, 2-12Interface cable, connecting, 1-11–15Interface specifications, A-16–17Interface cards, 6-35–38International character sets, B-17Italic character table, B-16
L
Labelsprinting on, 3-31–33using, 3-3, 3-33
LF/FF Load button, 4-6Lights, control panel, 4-2–4Line feed, auto, 4-18Loading paper
onto the front tractor, 3-4–9onto the rear tractor, 3-10–16
M
Maintenance, 7-2–4Micro Feed button, 4-6–7Multi-part forms
printing on, 3-31–32setting, 4-21using, 3-3, 3-32
O
Options, 2interface cards, 6-35–38paper cutter, 6-24–34perforation cutter, 6-12–23pull tractor, 6-2–12
Orientation setting, 2-7, 2-11, 2-15,2-20
Output attachment and output tray,attaching, 6-16–17
Overlapping multi-part formssetting, 4-21using, 3-3
P
Page length for front/rear tractorsetting, 4-17
Paperchanging, 3-28–30loading, 3-4–16positioning, 3-2–3
Paper cutterinstalling, 6-24–27removing, 6-32–34paper handling, 6-28–31
Paper jam, clearing, 8-19Paper memory feature, 4-22–26Paper memory utility, 5-12–15Paper Out light, 4-2, 8-3Paper Select
button, 4-4
light, 4-2
IN -2

8/22/2019 Epson DFX 8500 User Manual
http://slidepdf.com/reader/full/epson-dfx-8500-user-manual 249/252
Paper size setting, 2-7, 2-11, 2-15Paper source setting, 2-7, 2-11, 2-15Parallel interface specification, A-16Pause
button, 4-7light, 4-3, 8-3–4
Perforation cutterattaching the output attachment
and output tray, 6-16–17installing, 6-13–15removing, 6-20–23paper handling, 6-18–19
Perforated paper output attachmentand output tray, attaching,
6-16–17Pitch button, 4-5light, 4-3
Plugging in the printer, 1-10Positioning the paper supply, 3-2–3Power light, 4-2Print direction setting, 4-17Printer driver
accessing,
Windows 3.1, 2-9–10Windows 95, 2-5–6Windows NT 3.5x, 2-17–19Windows NT 4.0, 2-13–14
changing,Windows 3.1, 2-11–12Windows 95, 2-6–7Windows NT 3.5x, 2-19–20Windows NT 4.0, 2-15–16
installing for,DOS, 2-21Windows 3.1, 2-8–9Windows 95, 2-3–5Windows NT 3.5x, 2-16–17Windows NT 4.0, 2-12–13
Printer specifications, A-2–15Printing position, adjusting, 3-20Print settings, 4-8
Problems and solutions, 8-7–19Pull tractor
installing, 6-2–5removing, 6-11–12with the front tractor, 6-5–8with the rear tractor 6-9–10
R
Resolution setting, 2-7, 2-11, 2-20Ribbon cartridge,
installing, 1-6–10replacing, 7-2–3
Ribbon light, 4-2, 8-3
S
Safety instructions, iv-vSaving paper memory settings,
4-23–26Self test, printing 4-8, 8-5–6Serial baud rate setting, 4-21Serial interface specification, A-17Serial interface card, 6-38Serial parity setting, 4-20Skip over binding setting, 4-21Skip over perforation setting, 4-17Software setting, 4-19Specifications
parallel interface, A-16perforation cutter, A-17–18printer, A-2–15
serial interface, A-17Sprocketcover, 3-6, 3-13lock lever, 3-4, 3-7, 3-11
Status monitor, 5-2-12Switching between front and rear
tractors, 3-26–27, 6-19, 6-31Symbol set, B-18
IN-3

8/22/2019 Epson DFX 8500 User Manual
http://slidepdf.com/reader/full/epson-dfx-8500-user-manual 250/252
T
Tear Off button, 4-5–6light, 4-3
Tear-off mode, 3-21–22position, adjusting, 3-23–25
Tearing off printed pages, 3-21–25TOF
button, 4-5light, 4-3
Top-of-formposition, adjusting the, 3-17–19
Tractors, switching, 3-26–27, 6-19,6-31Tractors, using, 3-2–33Tractor Select
button, 4-7lights, 4-4
Transporting the printer, 7-5Troubleshooting
error indicators, 8-3–4hex dump, 8-6–7
operation, 8-13–14options, 8-18–19paper handling, 8-9–12power supply, 8-8printout, 8-15–18problems and solutions, 8-7–19self test, 8-5–6
U
Unidirectional (Uni-d) printing,print direction setting, 4-17
Unpacking the printer, 1-2–4Utility,
EPSON Status Monitor 2, 5-2–12Paper memory, 5-12–15
W
Windows printer driverWindows 3.1, 2-8–12Windows 95, 2-2–7Windows NT 3.5x, 2-16–20Windows NT 4.0, 2-12–16
Z
Zero slash setting, 4-17
IN -4

8/22/2019 Epson DFX 8500 User Manual
http://slidepdf.com/reader/full/epson-dfx-8500-user-manual 251/252
EPSON OVERSEAS MARKETING LOCATIONS
EPSON AMERICA, INC.
20770 Madrona Ave.
P.O. Box 2842
Torrance, CA 90509-2842
Phone: (800) 922-8911
Fax: (310) 782-5220
EPSON UK LTD.
Campus 100, Maylands Avenue,
Hemel Hempstead, Herts,
HP2 7TJ, U.K.
Phone: (+44) 01442 261144
Fax: (+44) 01442 227227
EPSON DEUTSCHLAND GmbH
Zülpicher Straße 6,
40549 Düsseldorf Germany
Phone: (0211) 56030
Telex: 8584786
EPSON FRANCE S.A.
68 bis, rue Marjolin
92300, Levallois-Perret, France
Phone: 33.1.40.87.37.37
Telex: 610657
EPSON AUSTRALIA PTY. LTD.
70 GIBBES STREET, CHATSWOOD 2067 NSW.
Phone: 2-9903-9000
Fax: 2-9903-9177
EPSON SINGAPORE PTE. LTD.
No. 1 Temasek Avenue #36-00
Millenia Tower, Singapore 039192
Phone: (065) 33 77 911
Fax: (065) 33 41 185
EPSON HONG KONG LTD.
Rooms 4706-10, 47/F,
China Resources Bldg.,26 Harbour Road, Wanchai, Hong Kong
Phone: 2585-4300
Fax: 2827-7083
EPSON TAIWAN TECHNOLOGY &
TRADING LTD.
10F, No. 287 Nanking E. Road, Sec. 3,Taipei, Taiwan, R.O.C.
Phone: (02) 717-7360
Fax: (02) 712-9164
EPSON ITALIA S.p.A.
V.le F.lli Casiraghi 427
20099 Sesto S.Giovanni
MI, Italy
Phone: 2-262331
Fax: 2-2440750
EPSON IBERICA S.A.
Av. de Roma, 18-26
08290 Cerdanyola del Valles
Barcelona, Spain
Phone: 582. 15.00
Fax: 582. 15.55
SEIKO EPSON CORPORATION
(Hirooka Office)
80 Harashinden, Hirooka
Shiojiri-shi, Nagano-ken
399-07 Japan
EPSON PORTUGAL, S.A.
R. do Progresso, 471, 1º Perafita
4460 Matosinhos, Portugal
Phone: (02) 996 14 02
Fax: (02) 996 14 11
1996 October

8/22/2019 Epson DFX 8500 User Manual
http://slidepdf.com/reader/full/epson-dfx-8500-user-manual 252/252