eog1102cox - electrolux.co.id · maintenance of the appliance without supervision. • children...
TRANSCRIPT
EOG1102COX
EN Oven User Manual 2ID Oven Buku petunjuk 25

CONTENTS1. SAFETY INFORMATION....................................................................................32. SAFETY INSTRUCTIONS..................................................................................43. PRODUCT DESCRIPTION................................................................................ 74. BEFORE FIRST USE......................................................................................... 75. DAILY USE......................................................................................................... 86. CLOCK FUNCTIONS......................................................................................... 97. USING THE ACCESSORIES............................................................................. 98. ADDITIONAL FUNCTIONS.............................................................................. 119. HINTS AND TIPS............................................................................................. 1110. CARE AND CLEANING..................................................................................1611. TROUBLESHOOTING....................................................................................1812. INSTALLATION.............................................................................................. 2013. TECHNICAL DATA.........................................................................................24
WE’RE THINKING OF YOUThank you for purchasing an Electrolux appliance. You’ve chosen a product thatbrings with it decades of professional experience and innovation. Ingenious andstylish, it has been designed with you in mind. So whenever you use it, you canbe safe in the knowledge that you’ll get great results every time.Welcome to Electrolux.Visit our website for:
Get usage advice, brochures, trouble shooter, service information:www.electrolux.com/webselfservice
Register your product for better service:www.registerelectrolux.com
Buy Accessories, Consumables and Original spare parts for your appliance:www.electrolux.com/shop
CUSTOMER CARE AND SERVICEAlways use original spare parts.When contacting our Authorised Service Centre, ensure that you have thefollowing data available: Model, PNC, Serial Number.The information can be found on the rating plate.
Warning / Caution-Safety information General information and tips Environmental information
Subject to change without notice.
www.electrolux.com2

1. SAFETY INFORMATIONBefore the installation and use of the appliance, carefullyread the supplied instructions. The manufacturer is notresponsible for any injuries or damages that are theresult of incorrect installation or usage. Always keep theinstructions in a safe and accessible location for futurereference.
1.1 Children and vulnerable people safety• This appliance can be used by children aged from 8
years and above and persons with reduced physical,sensory or mental capabilities or lack of experienceand knowledge if they have been given supervision orinstruction concerning the use of the appliance in asafe way and understand the hazards involved.
• Do not let children play with the appliance.• Keep all packaging away from children and dispose of
it appropriately.• Keep children and pets away from the appliance when
it operates or when it cools down. Accessible parts arehot.
• If the appliance has a child safety device, this shouldbe activated.
• Children shall not carry out cleaning and usermaintenance of the appliance without supervision.
• Children aged 3 years and under must be kept awayfrom this appliance when it is in operation at all times.
1.2 General Safety• Only a qualified person must install this appliance and
replace the cable.• WARNING: The appliance and its accessible parts
become hot during use. Care should be taken to avoidtouching heating elements. Children less than 8 yearsof age shall be kept away unless continuouslysupervised.
ENGLISH 3

• Always use oven gloves to remove or put inaccessories or ovenware.
• Before maintenance cut the power supply.• Ensure that the appliance is switched off before
replacing the lamp to avoid the possibility of electricshock.
• Do not use a steam cleaner to clean the appliance.• Do not use harsh abrasive cleaners or sharp metal
scrapers to clean the glass door since they canscratch the surface, which may result in shattering ofthe glass.
• If the mains power supply cable is damaged, it mustbe replaced by the manufacturer, its AuthorisedService Centre or similarly qualified persons to avoidan electrical hazard.
• To remove the shelf supports first pull the front of theshelf support and then the rear end away from theside walls. Install the shelf supports in the oppositesequence.
2. SAFETY INSTRUCTIONSThis appliance is suitable for thefollowing markets: ID
2.1 InstallationWARNING!Only a qualified person mustinstall this appliance.
• Remove all the packaging.• Do not install or use a damaged
appliance.• Follow the installation instruction
supplied with the appliance.• Always take care when moving the
appliance as it is heavy. Always usesafety gloves and enclosed footwear.
• Do not pull the appliance by thehandle.
• Keep the minimum distance from theother appliances and units.
• Make sure that the appliance isinstalled below and adjacent safestructures.
• The sides of the appliance must stayadjacent to appliances or to units withthe same height.
• Do not operate the appliance withoutthe cavity bottom cover. It is afunctional safety component.
• The appliance is equipped with anelectric cooling system. It must beoperated with the electric powersupply.
2.2 Electrical connectionWARNING!Risk of fire and electricalshock.
• All electrical connections should bemade by a qualified electrician.
• The appliance must be earthed.
www.electrolux.com4

• Make sure that the electricalinformation on the rating plate agreeswith the power supply. If not, contactan electrician.
• Always use a correctly installedshockproof socket.
• Do not use multi-plug adapters andextension cables.
• Make sure not to cause damage tothe mains plug and to the mainscable. Should the mains cable need tobe replaced, this must be carried outby our Authorised Service Centre.
• Do not let mains cables touch orcome near the appliance door,especially when the door is hot.
• The shock protection of live andinsulated parts must be fastened insuch a way that it cannot be removedwithout tools.
• Connect the mains plug to the mainssocket only at the end of theinstallation. Make sure that there isaccess to the mains plug after theinstallation.
• If the mains socket is loose, do notconnect the mains plug.
• Do not pull the mains cable todisconnect the appliance. Always pullthe mains plug.
• Use only correct isolation devices: lineprotecting cut-outs, fuses (screw typefuses removed from the holder), earthleakage trips and contactors.
• The electrical installation must havean isolation device which lets youdisconnect the appliance from themains at all poles. The isolationdevice must have a contact openingwidth of minimum 3 mm.
• This appliance complies with theE.E.C. Directives.
2.3 Gas connection• All gas connections must be made by
a qualified person.• Before installation, make sure that the
local distribution conditions (nature ofthe gas and gas pressure) and theadjustment of the appliance arecompatible.
• Make sure that there is air circulationaround the appliance.
• The information about the gas supplyis on the rating plate.
• This appliance is not connected to adevice, which evacuates the productsof combustion. Make sure to connectthe appliance according to currentinstallation regulations. Pay attentionto requirements regarding adequateventilation.
2.4 UseWARNING!Risk of injury, burns andelectrical shock or explosion.
• This appliance is for household useonly.
• Do not change the specification of thisappliance.
• Make sure that the ventilationopenings are not blocked.
• Do not let the appliance stayunattended during operation.
• Deactivate the appliance after eachuse.
• Be careful when you open theappliance door while the appliance isin operation. Hot air can release.
• Do not operate the appliance with wethands or when it has contact withwater.
• Do not apply pressure on the opendoor.
• Do not use the appliance as a worksurface or as a storage surface.
• Open the appliance door carefully.The use of ingredients with alcoholcan cause a mixture of alcohol andair.
• Do not let sparks or open flames tocome in contact with the appliancewhen you open the door.
• Do not put flammable products oritems that are wet with flammableproducts in, near or on the appliance.
WARNING!Risk of damage to theappliance.
• To prevent damage or discoloration tothe enamel:– do not put aluminium foil directly
on the bottom of the appliance.
ENGLISH 5

– do not put water directly into thehot appliance.
– do not keep moist dishes andfood in the appliance after youfinish the cooking.
– be careful when you remove orinstall the accessories.
• Discoloration of the enamel has noeffect on the performance of theappliance.
• Use a deep pan for moist cakes. Fruitjuices cause stains that can bepermanent.
• This appliance is for cookingpurposes only. It must not be used forother purposes, for example roomheating.
• Always cook with the oven doorclosed.
• If the appliance is installed behind afurniture panel (e.g. a door) makesure the door is never closed whenthe appliance is in operation. Heatand moisture can build up behind aclosed furniture panel and causesubsequent damage to the appliance,the housing unit or the floor. Do notclose the furniture panel until theappliance has cooled downcompletely after use.
2.5 Care and cleaningWARNING!Risk of injury, fire, ordamage to the appliance.
• Before maintenance, deactivate theappliance and disconnect the mainsplug from the mains socket.
• Make sure the appliance is cold.There is the risk that the glass panelscan break.
• Replace immediately the door glasspanels when they are damaged.Contact the Authorised ServiceCentre.
• Be careful when you remove the doorfrom the appliance. The door isheavy!
• Clean regularly the appliance toprevent the deterioration of thesurface material.
• Clean the appliance with a moist softcloth. Only use neutral detergents. Donot use any abrasive products,abrasive cleaning pads, solvents ormetal objects.
• If you use an oven spray, obey thesafety instructions on the packaging.
• Do not clean the catalytic enamel (ifapplicable) with any kind of detergent.
2.6 Internal light• The type of light bulb or halogen lamp
used for this appliance is only forhousehold appliances. Do not use itfor house lighting.
WARNING!Risk of electrical shock.
• Before replacing the lamp, disconnectthe appliance from the power supply.
• Only use lamps with the samespecifications.
2.7 DisposalWARNING!Risk of injury or suffocation.
• Contact your municipal authority forinformation on how to discard theappliance correctly.
• Disconnect the appliance from themains supply.
• Cut off the mains electrical cableclose to the appliance and dispose ofit.
• Flat the external gas pipes.
2.8 Service• To repair the appliance contact an
Authorised Service Centre.• Use original spare parts only.
www.electrolux.com6

3. PRODUCT DESCRIPTION3.1 General overview
1
52 3
11
4
1
12
5
4
3
2
1
6
7
8
10
9
1 Control panel2 Knob for the oven functions3 Knob for the Minute Minder4 Knob for the gas control5 Power indicator6 Air vents for the cooling fan7 Heating element8 Lamp9 Turnspit hole10 Oven cavity bottom plate11 Shelf support, removable12 Shelf positions
3.2 Accessories• Wire shelf
For cookware, cake tins, roasts.• Aluminium baking tray
For cakes and biscuits.• Turnspit
For roasting larger joints of meat andpoultry.
4. BEFORE FIRST USEWARNING!Refer to Safety chapters.
4.1 Oven cavity bottom plateWhen you buy the appliance, at first theoven cavity bottom plate is positioned onthe accessories. Before you use theappliance for the first time, place thebottom plate on the burner area, asshown in the "Product description"chapter.
4.2 Initial CleaningRemove all accessories and removableshelf supports from the appliance.
Refer to "Care and cleaning"chapter.
Clean the appliance and the accessoriesbefore first use.
Put the accessories and the removableshelf supports back to their initialposition.
4.3 PreheatingPreheat the empty appliance before firstuse.1. Set the maximum temperature.2. Let the appliance operate for 1 hour.3. Set the function .4. Let the appliance operate for 15
minutes.Accessories can become hotter thanusual. The appliance can emit an odourand smoke. This is normal. Make surethat the airflow is sufficient.Let the oven cool down. Dampen a softcloth with warm water and a little mildwashing-up liquid and use this to cleanthe oven cavity.
ENGLISH 7

5. DAILY USEWARNING!Refer to Safety chapters.
5.1 Oven functions
Oven function ApplicationOff position The appliance is off.
Light To activate the lamp without a cooking function.
Turnspit To roast larger pieces of meat on the spit rod.
5.2 Power indicatorThe power indicator comes on when youturn the knob for the oven functions.
5.3 Knob for the gas control
Symbol FunctionHeat only from the bottom of the oven. Range of temperature ad‐justment (150 °C - 250 °C).
Heats from the top.
5.4 Ignition of oven gas burnerOven safety device:The gas oven has athermocouple. It stops thegas flow if the flame goesout.
1. Press the knob for the gas controland turn it to .
2. Keep the knob for the gas controlpushed for 15 seconds or less to letthe thermocouple warm up. If not, thegas flow is interrupted.Do not release the knob until theflame comes on.
Do not keep the knob for theoven functions pushed formore than 15 seconds. If theoven burner does not lightafter 15 seconds, releasethe knob for the ovenfunctions, turn it into offposition, open the oven doorand try to light the ovenburner again after minimum1 minute.
5.5 After igniting the oven gasburner1. Release the knob for the gas control.2. Turn the knob for the gas control to
set the necessary heat setting.
www.electrolux.com8
Control the flame trough the holes in thebottom of the oven.
5.6 Using the grillOven safety device:The gas oven has athermocouple. It stops thegas flow if the flame goesout.
1. Open the oven door.2. Press the knob for the gas control
and turn it to . Keep the knob forthe gas control pushed for 15seconds or less.
Do not release the knob until theflame comes on.
If the grill burner doesnot come on or if itaccidentally goes out,release the knob for thegas control and turn it tothe Off position. Leavethe oven door open.After one minute, try tolight the grill again.
3. Release the knob for the gas control.4. Close the oven door.
6. CLOCK FUNCTIONS6.1 Minute MinderUse it to set a countdown time for anoven function.
This function has no effecton the operation of theappliance.
Turn the knob for the timer as far as itgoes, then turn it to necessary timeperiod.After the time period is completed, anacoustic signal sounds.
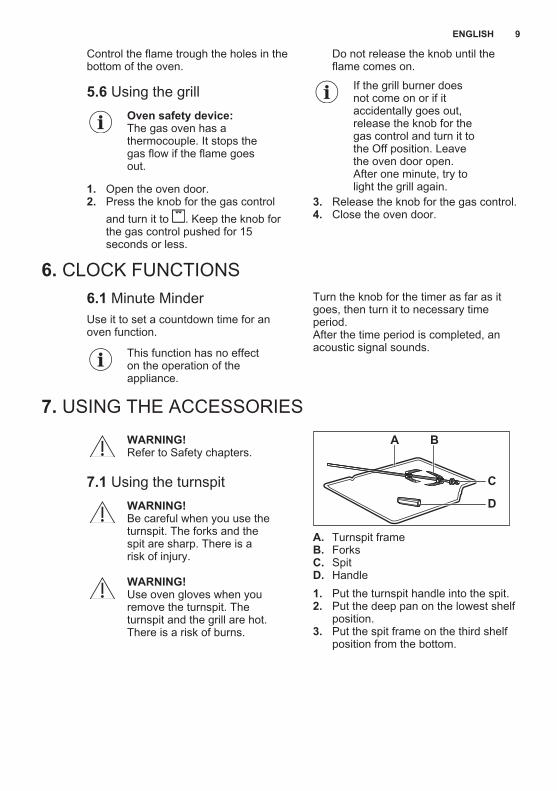
7. USING THE ACCESSORIESWARNING!Refer to Safety chapters.
7.1 Using the turnspitWARNING!Be careful when you use theturnspit. The forks and thespit are sharp. There is arisk of injury.
WARNING!Use oven gloves when youremove the turnspit. Theturnspit and the grill are hot.There is a risk of burns.
A B
D
C
A. Turnspit frameB. ForksC. SpitD. Handle1. Put the turnspit handle into the spit.2. Put the deep pan on the lowest shelf
position.3. Put the spit frame on the third shelf
position from the bottom.
ENGLISH 9

4. Install the first fork on the spit, thenput the meat on the turnspit andinstall the second fork.
5. Use the screws to tighten the forks.6. Put the tip of the spit into the turnspit
hole.7. Lay the back side of the spit on the
turnspit frame.Refer to "Product description"chapter.
8. Remove the turnspit handle.9. Select a function with the turnspit
position. The turnspit rotates.10. Ignite the grill burner. Refer to the
cooking tables.
7.2 Inserting the accessoriesWire shelf:Push the shelf between the guide bars ofthe shelf support and make sure that thefeet point down.
Baking tray:Push the baking tray between the guidebars of the shelf support.
Wire shelf and baking tray together:Push the baking tray between the guidebars of the shelf support and the wireshelf on the guide bars above.
Small indentation at the topincrease safety. Theindentations are also anti-tipdevices. The high rimaround the shelf preventscookware from slipping ofthe shelf.
www.electrolux.com10

8. ADDITIONAL FUNCTIONS8.1 Cooling fanWhen the appliance operates, thecooling fan activates automatically tokeep the surfaces of the appliance cool.
If you deactivate the appliance, thecooling fan can continue to operate untilthe appliance cools down.
9. HINTS AND TIPSWARNING!Refer to Safety chapters.
The temperature and bakingtimes in the tables areguidelines only. Theydepend on the recipes andthe quality and quantity ofthe ingredients used.
9.1 General information• The appliance has five shelf positions.
Count the shelf positions from thebottom of the appliance floor.
• Moisture can condense in theappliance or on the door glass panels.This is normal. Always stand backfrom the appliance when you open theappliance door while cooking. Todecrease the condensation, operatethe appliance for 10 minutes beforecooking.
• Clean the moisture after each use ofthe appliance.
• Do not put the objects directly on theappliance floor and do not putaluminium foil on the componentswhen you cook. This can change thebaking results and cause damage tothe enamel.
9.2 Baking cakes• Do not open the oven door before 3/4
of the set cooking time is up.
9.3 Cooking meat and fish• Use a deep pan for very fatty food to
prevent the oven from stains that canbe permanent.
• Leave the meat for approximately 15minutes before carving so that thejuice does not seep out.
• To prevent too much smoke in theoven during roasting, add some waterinto the deep pan. To prevent thesmoke condensation, add water eachtime after it dries up.
9.4 Cooking timesCooking times depend on the type offood, its consistency, and volume.Initially, monitor the performance whenyou cook. Find the best settings (heatsetting, cooking time, etc.) for yourcookware, recipes and quantities whenyou use this appliance.
9.5 Cooking tablesPreheat the empty oven for10 minutes before cooking.
CasserolesFood Quantity
(kg)Shelf posi‐tion
Tempera‐ture (°C)
Time (min)
Lasagna 1.5 - 2.5 4 180 45 - 50
Cannelloni 1.5 - 2.5 4 180 45 - 50
ENGLISH 11

Food Quantity(kg)
Shelf posi‐tion
Tempera‐ture (°C)
Time (min)
Potato gratin 1.5 - 2.5 4 180 33 - 40
Macaroni oven 1.5 - 2.5 4 180 45 - 50
Kebab Hala 1.5 - 2.5 4 190 35 - 40
MeatFood Quantity
(kg)Shelf posi‐tion
Tempera‐ture (°C)
Time (min)
Sheep 1.7 3 180 - 200 80 - 100
Chicken 1 - 1.8 3 220 - 230 80 - 90
Duck 1.8 - 2.5 3 220 - 230 100 - 120
Goose 2.5 - 3.5 3 220 - 230 160 - 180
Rabbit 2 3 180 - 190 60 - 80
Goat 1.8 3 170 - 180 60 - 90
PizzaFood Quantity
(kg)Shelf posi‐tion
Tempera‐ture (°C)
Time (min)
Thin 1.4 - 1.5 3 or 4 200 - 210 20 - 30
Thick 1.4 - 1.5 3 or 4 200 - 210 25 - 30
Calzone 1.4 - 1.5 3 or 4 190 - 200 25 - 30
CakesFood Quantity
(kg)Shelf posi‐tion
Tempera‐ture (°C)
Time (min)
Flat cake 0.6 - 1.0 4 170 - 180 20 - 30
Sponge cake 1.0 - 1.5 4 170 - 180 40 - 50
Feter Mshaltet 1.2 - 1.5 3 or 4 190 40 - 45
GrillingFood Quantity (kg) Shelf position Time (min)
Burgers1) 0.6 (6 pieces) 4 20 - 30
Toast browning1) 0.5 4 9 - 12
Toast Hawai1) 6 pieces 4 7 - 14
1) Preheat the oven for 3 minutes.
www.electrolux.com12

9.6 Gas oven cookingThe time does not includepreheating.Always preheat the emptyoven for 10 minutes.
Meat & PoultryFood Quantity
(kg)Tempera‐ture (°C)
Time (min) Shelf posi‐tion
Comments
Beef withbone
1 min. 50 - 65 3 On the wireshelf. Put adeep pan onthe secondshelf posi‐tion.
Beef withoutbone
1 190 55 - 65 3 On the wireshelf. Put adeep pan onthe secondshelf posi‐tion.
Lamb 1 min. 50 - 65 3 On the wireshelf. Put adeep pan onthe secondshelf posi‐tion.
Pork 1 180 - 190 85 - 95 3 On the wireshelf. Put adeep pan onthe secondshelf posi‐tion.
Chicken /Rabbit
1,2 220 - 230 85 - 95 3 On the wireshelf. Put adeep pan onthe secondshelf posi‐tion.
Duck 1 190 90 - 100 3 On the wireshelf. Put adeep pan onthe secondshelf posi‐tion.
Turkey 4,5 - 5,5 160 220 - 250 2 In a deeppan.
ENGLISH 13

Food Quantity(kg)
Tempera‐ture (°C)
Time (min) Shelf posi‐tion
Comments
Baked vege‐tables
1 160 - 3 Varies ac‐cording tothe vegeta‐ble.
PastryFood Quantity
(kg)Tempera‐ture (°C)
Time (min) Shelf posi‐tion
Comments
Fruit tart - 165 50 - 60 4 In a 26 cmround mouldon the wireshelf
Fruit pie - min. 50 - 60 4 In a 26 cmround mouldon the wireshelf
Sausagerolls
- 180 30 - 40 4 In an alumi‐nium bakingtray
Choux pas‐try
- 190 35 - 45 4 In an alumi‐nium bakingtray
Vol au vents - 170 25 - 35 4 In an alumi‐nium bakingtray
Jam tarts - 165 50 - 60 4 In a 30 cmround mouldon the wireshelf
PuddingsFood Quantity
(kg)Tempera‐ture (°C)
Time (min) Shelf posi‐tion
Comments
Egg Custardin a BainMarie
- min. 70 - 85 3 9 ceramicglasses in adeep panwith 2 cm ofwater
www.electrolux.com14

CakesFood Quantity
(kg)Tempera‐ture (°C)
Time (min) Shelf posi‐tion
Comments
Rich fruitcake
- min. 160 - 170 4 In a 20 cmmould onthe wireshelf
Plain fruitcake
- min. 160 - 170 4 In a 20 cmmould onthe wireshelf
Madeira - min. 115 - 130 4 In a 20 cmmould onthe wireshelf
Small cake - min. - 170 40 - 65 4 In an alumi‐nium bakingtray
Gingerbread
- min. 45 - 55 4 In an alumi‐nium bakingtray
BreadFood Quantity
(kg)Tempera‐ture (°C)
Time (min) Shelf posi‐tion
Comments
Breadloaves
0,5 180 - 190 50 - 60 4 In an alumi‐nium bakingtray
Breadloaves
1 180 - 190 60 - 70 4 In an alumi‐nium bakingtray
Rolls andbuns
- 180 - 190 25 - 35 4 In an alumi‐nium bakingtray
9.7 GrillingPreheat the empty oven for3 minutes before cooking.
Food Quantity Time (min) Shelf posi‐tionPieces (g) 1st side 2nd side
Fillet steaks 4 800 13 - 15 13 - 15 4
Beef steaks 4 600 12 - 15 12 - 15 4
ENGLISH 15

Food Quantity Time (min) Shelf posi‐tionPieces (g) 1st side 2nd side
Sausages 8 - 12 - 15 12 - 15 4
Pork chops 4 600 12 - 16 12 - 16 4
Chicken (cutin 2)
2 1000 35 - 40 30 - 35 4
Kebabs 4 - 15 - 20 12 - 15 4
Breast ofchicken
4 400 13 - 15 13 - 15 4
Hamburger 6 600 13 - 16 12 - 15 4
Fish fillet 4 400 13 - 15 12 - 14 4
Toastedsandwiches
4 - 6 - 5 - 7 - 4
Toast 4 - 6 - 2 - 4 2 - 3 4
9.8 TurnspitUse the turnspit with the bottom ovenburner.
Preheat the empty oven for10 minutes before cooking.
Food Quantity(g)
Temperature(°C)
Time (min) Shelf posi‐tion
Poultry 1000 - 1200 190 - 200 75 - 85 3
Roasts 800 - 1000 190 - 200 75 - 85 3
10. CARE AND CLEANINGWARNING!Refer to Safety chapters.
10.1 Notes on cleaning• Clean the front of the appliance with a
soft cloth with warm water and acleaning agent.
• To clean metal surfaces, use adedicated cleaning agent.
• Clean the appliance interior after eachuse. Fat accumulation or other foodremains may result in a fire.
• Clean stubborn dirt with a specialoven cleaner.
• Clean all accessories after each useand let them dry. Use a soft cloth withwarm water and a cleaning agent.
• If you have nonstick accessories, donot clean them using aggressiveagents, sharp-edged objects or adishwasher. It can cause damage tothe nonstick coating.
www.electrolux.com16

10.2 Stainless steel oraluminium appliances
Clean the oven door with adamp cloth or sponge only.Dry it with a soft cloth.Do not use steel wool, acidsor abrasive materials as theycan damage the ovensurface. Clean the ovencontrol panel with the sameprecautions.
10.3 Cleaning the door gasket• Regularly do a check of the door
gasket. The door gasket is around theframe of the oven cavity. Do not usethe appliance if the door gasket isdamaged. Contact an AuthorisedService Centre.
• To clean the door gasket, refer to thegeneral information about cleaning.
10.4 Removing the shelfsupportsTo clean the oven, remove the shelfsupports.1. Pull the front of the shelf support
away from the side wall.
2. Pull the rear end of the shelf supportaway from the side wall and removeit.
21
Install the shelf supports in the oppositesequence.
10.5 Cleaning the oven doorThe oven door has two glass panels.You can remove the oven door and theinternal glass panel to clean it.
The oven door can close ifyou try to remove theinternal glass panel beforeyou remove the oven door.
CAUTION!Do not use the appliancewithout the internal glasspanel.
1. Open the door fully and hold the twodoor hinges.
2. Lift and turn the levers on the twohinges.
3. Close the oven door halfway to thefirst opening position. Then pullforward and remove the door from itsseat.
ENGLISH 17

4. Put the door on a soft cloth on astable surface.
5. Hold the door trim (B) on the topedge of the door at the two sides andpush inwards to release the clip seal.
1
2
B
6. Pull the door trim to the front toremove it.
7. Hold the door glass panel by its topedge and carefully pull it out. Makesure the glass slides out of thesupports completely.
8. Clean the glass panel with water andsoap. Dry the glass panel carefully.
When the cleaning is completed, installthe glass panel and the oven door. Do
the above steps in the oppositesequence.The screen-printing zone must face theinner side of the door. Make sure thatafter the installation the surface of theglass panel frame on the screen-printingzones is not rough when you touch it.Make sure that you install the internalglass panel in the seats correctly.
A
10.6 Replacing the lampPut a cloth on the bottom of the interiorof the appliance. It prevents damage tothe lamp glass cover and the cavity.
WARNING!Danger of electrocution!Disconnect the fuse beforeyou replace the lamp.The lamp and the lamp glasscover can be hot.
CAUTION!Always hold the halogenlamp with a cloth to preventgrease residue from burningon the lamp.
1. Deactivate the appliance.2. Remove the fuses from the fuse box
or deactivate the circuit breaker.
The back lamp1. Turn the lamp glass cover
counterclockwise to remove it.2. Clean the glass cover.3. Replace the lamp with a suitable 300
°C heat-resistant lamp.4. Install the glass cover.
11. TROUBLESHOOTINGWARNING!Refer to Safety chapters.
www.electrolux.com18
11.1 What to do if...
Problem Possible cause RemedyThe oven does not heatup.
The oven is deactivated. Activate the oven.
The oven does not heatup.
The fuse is blown. Make sure that the fuse isthe cause of the malfunc‐tion. If the fuse is blownagain and again, contact aqualified electrician.
The oven does not oper‐ate.
The automatic ignitiondoes not work.
Ignite the burner manuallywith a long match. Hold theflame near the hole in thebottom of the oven cavity.At the same time push theknob for the gas controland turn it counterclock‐wise to the maximum tem‐perature. When the flamecomes on, keep the knobfor the gas control pushedfor 15 seconds or less tolet the thermocouple warmup. If not, the gas flow isinterrupted.
The lamp does not oper‐ate.
The lamp is defective. Replace the lamp.
Steam and condensationsettle on the food and inthe cavity of the oven.
You left the dish in theoven for too long.
Do not leave the dishes inthe oven for longer than 15- 20 minutes after thecooking process ends.
The flame extinguishes im‐mediately after ignition.
Thermocouple is not heat‐ed up sufficiently.
After lightning the flame,keep the knob for the gascontrol pushed for 15 sec‐onds or less.
11.2 Service dataIf you cannot find a solution to theproblem yourself, contact your dealer oran Authorised Service Centre.The necessary data for the servicecentre is on the rating plate. The rating
plate is on the front frame of theappliance cavity. Do not remove therating plate from the appliance cavity.
We recommend that you write the data here:Model (MOD.) .........................................
Product number (PNC) .........................................
ENGLISH 19

We recommend that you write the data here:Serial number (S.N.) .........................................
12. INSTALLATIONWARNING!Refer to Safety chapters.
12.1 Gas connectionWARNING!Before the gas connection,disconnect the mains plugfrom the mains socket ordeactivate the fuse in thefuse box. Close the primaryvalve of the gas supply.
The gas supply ramp is on the rear sideof the appliance.
WARNING!Do not use rubber flexiblepipes!
Do not fully put the oven into the built-incabinet (approximately 30 cm).Connection with a flexible metallicpipe or a rigid metallic pipe:
A B C
A. Gas supply ramp, end of shaft withramp
B. WasherC. ElbowPut the supplied gasket between the pipeand the gas supply ramp. Turn the pipeto the 1/2" gas supply ramp.1. Use a 22 mm spanner to tighten the
nuts. Keep the gas supply ramp inthe correct position. Do not applyforce to the gas supply circuit.
WARNING!Do not use a flame tocheck for leaks!
2. Fully move the oven into the built-incabinet.
WARNING!Do not squeeze the gassupply ramp and thepipe when you move theoven into the built-incabinet.
3. Seal the connection correctly. Use aleak detection to control it.
12.2 Adjustment to differenttypes of gas
Let only an authorizedperson do the adjustment todifferent types of gas.
If the appliance is set fornatural gas you can changeit to liquid gas, with thecorrect injectors.The gas rate is adjusted tosuit.
WARNING!Before you replace theinjectors, make sure that thegas knobs are in the Offposition. Disconnect theappliance from the electricalsupply. Let the appliancecool down. There is a risk ofinjury.
12.3 Gas grill injectorreplacement1. Release the screws which keep the
grill burner in position (A).
www.electrolux.com20
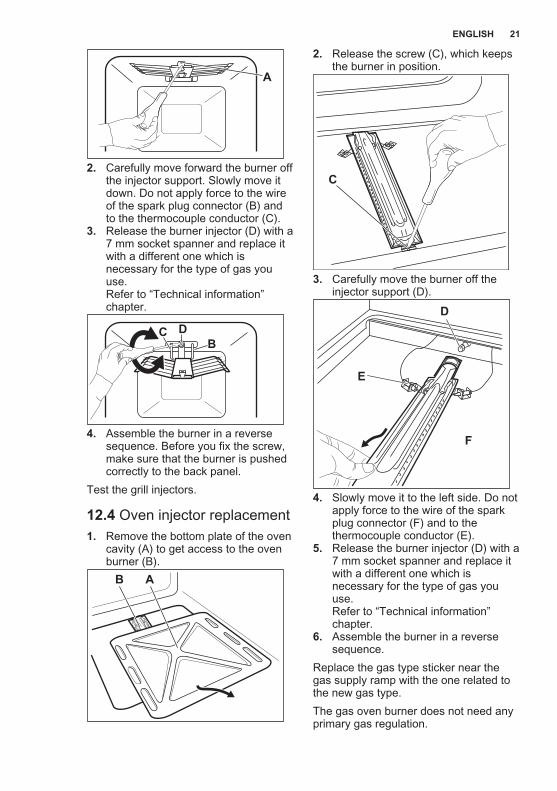
A
2. Carefully move forward the burner offthe injector support. Slowly move itdown. Do not apply force to the wireof the spark plug connector (B) andto the thermocouple conductor (C).
3. Release the burner injector (D) with a7 mm socket spanner and replace itwith a different one which isnecessary for the type of gas youuse.Refer to “Technical information”chapter.
DC
B
4. Assemble the burner in a reversesequence. Before you fix the screw,make sure that the burner is pushedcorrectly to the back panel.
Test the grill injectors.
12.4 Oven injector replacement1. Remove the bottom plate of the oven
cavity (A) to get access to the ovenburner (B).
AB
2. Release the screw (C), which keepsthe burner in position.
C
3. Carefully move the burner off theinjector support (D).
D
E
F
4. Slowly move it to the left side. Do notapply force to the wire of the sparkplug connector (F) and to thethermocouple conductor (E).
5. Release the burner injector (D) with a7 mm socket spanner and replace itwith a different one which isnecessary for the type of gas youuse.Refer to “Technical information”chapter.
6. Assemble the burner in a reversesequence.
Replace the gas type sticker near thegas supply ramp with the one related tothe new gas type.The gas oven burner does not need anyprimary gas regulation.
ENGLISH 21
Make sure that the gassupply pressure of theappliance obeys therecommended values.
If the supply gas pressure ischangeable or different fromthe necessary pressure, youmust fit an applicablepressure adjuster on the gassupply pipe.
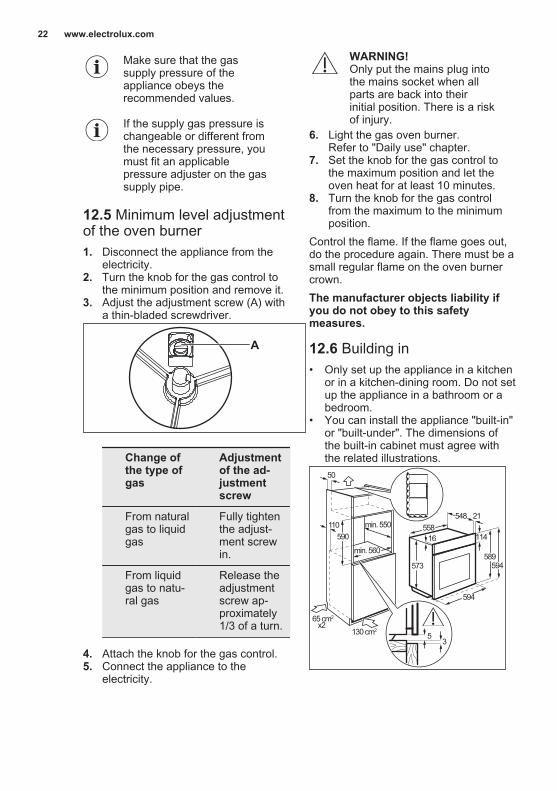
12.5 Minimum level adjustmentof the oven burner1. Disconnect the appliance from the
electricity.2. Turn the knob for the gas control to
the minimum position and remove it.3. Adjust the adjustment screw (A) with
a thin-bladed screwdriver.
A
Change ofthe type ofgas
Adjustmentof the ad‐justmentscrew
From naturalgas to liquidgas
Fully tightenthe adjust‐ment screwin.
From liquidgas to natu‐ral gas
Release theadjustmentscrew ap‐proximately1/3 of a turn.
4. Attach the knob for the gas control.5. Connect the appliance to the
electricity.
WARNING!Only put the mains plug intothe mains socket when allparts are back into theirinitial position. There is a riskof injury.
6. Light the gas oven burner.Refer to "Daily use" chapter.
7. Set the knob for the gas control tothe maximum position and let theoven heat for at least 10 minutes.
8. Turn the knob for the gas controlfrom the maximum to the minimumposition.
Control the flame. If the flame goes out,do the procedure again. There must be asmall regular flame on the oven burnercrown.The manufacturer objects liability ifyou do not obey to this safetymeasures.
12.6 Building in• Only set up the appliance in a kitchen
or in a kitchen-dining room. Do not setup the appliance in a bathroom or abedroom.
• You can install the appliance "built-in"or "built-under". The dimensions ofthe built-in cabinet must agree withthe related illustrations.
min. 550
589
594
11416
573
590
min. 560
594
558
21548
65 cm2
x2130 cm2
110
50
35
www.electrolux.com22

min. 550
110600
min. 560
558
589
594
11416
573 594
21548
65 cm2
x2 130 cm2
min. 4 mm
35
• There must be a clearance ofminimum 4 mm between the topsurface of the appliance and the innertop of the cabinet.
• When you install the appliance "built-under" (below a hob), install the hobbefore the oven unit.
• The materials must be resistant to atemperature increase of minimum 60°C above the ambient temperature.
• There must be a continuous air supplyaround the oven in order to not havethe oven become too hot.
• For correct operation, the ovencabinet must have a minimumopening of 130 cm² in the front or onthe sides (a minimum of 65 cm² foreach side). The manufacturerrecommends a 130 cm² opening inthe front for a brick cabinet and a 65cm² opening for each side for awooden cabinet.
• When you install a hob above theoven, make different electricalconnections for the hob and for theoven.Only make connections with correctcables for the power supplied.
Make sure that after theinstallation there is easyaccess to the appliance ifrepairs or maintenance arenecessary.
12.7 Securing the appliance tothe cabinet
AB
12.8 Electrical installationThe manufacturer is notresponsible if you do notfollow the safety precautionsfrom the Safety chapters.
This appliance is supplied only with amain cable.
12.9 CableCable types applicable for installation orreplacement:H05 V2V2-F (T90), H05 BB-FFor the section of the cable refer to thetotal power on the rating plate. You canalso refer to the table:
Total power (W) Section of the ca‐ble (mm²)
maximum 1380 3 x 0.75
maximum 2300 3 x 1
maximum 3680 3 x 1.5
The earth cord (green / yellow cable)must be 2 cm longer than phase andneutral cables (blue and brown cables).
ENGLISH 23
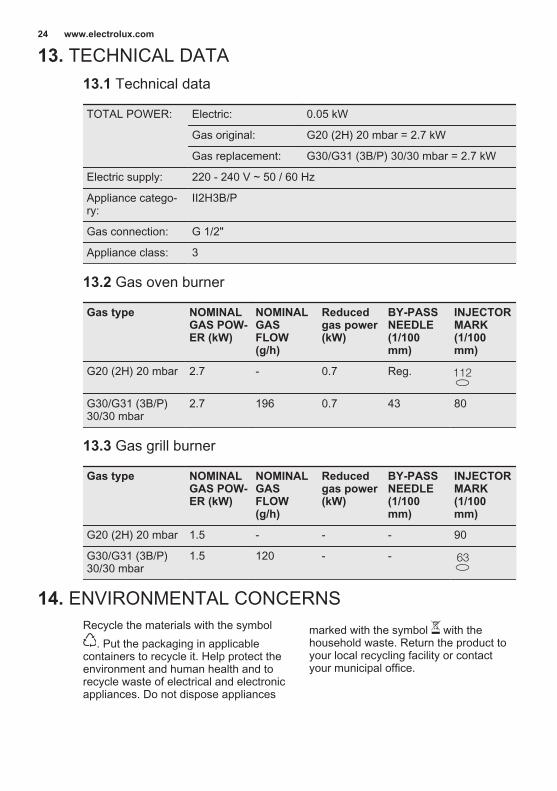
13. TECHNICAL DATA13.1 Technical data
TOTAL POWER: Electric: 0.05 kW
Gas original: G20 (2H) 20 mbar = 2.7 kW
Gas replacement: G30/G31 (3B/P) 30/30 mbar = 2.7 kW
Electric supply: 220 - 240 V ~ 50 / 60 Hz
Appliance catego‐ry:
II2H3B/P
Gas connection: G 1/2"
Appliance class: 3
13.2 Gas oven burner
Gas type NOMINALGAS POW‐ER (kW)
NOMINALGASFLOW(g/h)
Reducedgas power(kW)
BY-PASSNEEDLE(1/100mm)
INJECTORMARK(1/100mm)
G20 (2H) 20 mbar 2.7 - 0.7 Reg.
G30/G31 (3B/P)30/30 mbar
2.7 196 0.7 43 80
13.3 Gas grill burner
Gas type NOMINALGAS POW‐ER (kW)
NOMINALGASFLOW(g/h)
Reducedgas power(kW)
BY-PASSNEEDLE(1/100mm)
INJECTORMARK(1/100mm)
G20 (2H) 20 mbar 1.5 - - - 90
G30/G31 (3B/P)30/30 mbar
1.5 120 - -
14. ENVIRONMENTAL CONCERNSRecycle the materials with the symbol
. Put the packaging in applicablecontainers to recycle it. Help protect theenvironment and human health and torecycle waste of electrical and electronicappliances. Do not dispose appliances
marked with the symbol with thehousehold waste. Return the product toyour local recycling facility or contactyour municipal office.
www.electrolux.com24

DAFTAR ISI1. INFORMASI KESELAMATAN.......................................................................... 262. PANDUAN KESELAMATAN.............................................................................273. DESKRIPSI PRODUK...................................................................................... 304. SEBELUM PENGGUNAAN PERTAMA KALI...................................................305. PENGGUNAAN SEHARI-HARI........................................................................ 316. FUNGSI JAM.................................................................................................... 327. MENGGUNAKAN AKSESORIS....................................................................... 328. FUNGSI TAMBAHAN....................................................................................... 349. PETUNJUK DAN SARAN.................................................................................3410. MERAWAT DAN MEMBERSIHKAN...............................................................4011. PENYELESAIAN MASALAH.......................................................................... 4312. PEMASANGAN.............................................................................................. 4413. DATA TEKNIS................................................................................................ 48
KAMI MEMIKIRKAN ANDATerima kasih telah membeli peralatan Electrolux. Anda telah memilih produk yangmemiliki pengalaman dan inovasi profesional selama puluhan tahun. Canggihdan bergaya, peralatan ini dirancang supaya khusus untuk Anda. Jadi saatdigunakan, Anda akan merasa yakin untuk mendapatkan hasil terbaik setiapsaat.Selamat datang di Electrolux.Kunjungi situs web kami untuk:
Dapatkan saran penggunaan, brosur, pemecahan masalah, informasi layanan:www.electrolux.com/webselfservice
Mendaftarkan produk untuk layanan yang lebih baik:www.registerelectrolux.com
Beli Aksesori, Bahan habis-pakai dan Suku cadang asli untuk peralatan Anda:www.electrolux.com/shop
KEPEDULIAN DAN LAYANAN PELANGGANKami merekomendasikan penggunaan suku cadang asli.Ketika menghubungi Pusat Layanan Resmi kami, pastikan anda sudahmenyiapkan data-data berikut: Model, PNC, Nomor Seri.Informasi tersebut dapat ditemukan di pelat rating.
Informasi Peringatan / Hati-hati Informasi dan tips umum Informasi lingkungan
Dapat berubah tanpa pemberitahuan.
25

1. INFORMASI KESELAMATANSebelum memasang dan menggunakan peralatan,bacalah dengan saksama petunjuk yang disertakan.Produsen tidak bertanggung jawab terhadap setiapcedera dan kerusakan yang diakibatkan pemasanganatau penggunaan yang tidak benar. Selalu simpanpetunjuk di tempat yang aman dan mudah dijangkausebagai rujukan di kemudian hari.
1.1 Keselamatan manula dan anak-anak• Peralatan ini dapat digunakan oleh anak-anak berusia
8 tahun ke atas dan orang-orang denganketerbatasan fisik, pengindraan atau mental, ataukurang pengalaman dan pengetahuan, jika merekatelah diberikan pengawasan dan instruksi yangberkaitan dengan penggunaan peralatan tersebutsecara aman dan memahami bahaya yang dapatditimbulkan.
• Jangan biarkan anak-anak bermain dengan perangkatini.
• Jauhkan semua kemasan dari anak-anak dan buangdengan benar.
• Jauhkan anak-anak dan hewan peliharaan dariperalatan yang sedang dioperasikan atau mendingin.Komponen yang dapat dijangkau dalam kondisipanas.
• Jika peralatan ini dilengkapi perangkat keselamatanuntuk anak, fungsi tersebut harus diaktifkan.
• Jangan biarkan anak-anak mencuci dan melakukanperawatan terhadap peralatan tanpa pengawasan.
• Selalu jauhkan anak-anak berusia 3 tahun ke bawahdari peralatan yang sedang dioperasikan.
1.2 Keselamatan Umum• Hanya orang yang kompeten yang boleh memasang
peralatan ini dan mengganti kabelnya.
www.electrolux.com26

• PERINGATAN: Peralatan dan komponen yang dapatdijangkau akan menjadi panas selama penggunaan.Berhati-hatilah untuk tidak menyentuh elemenpemanas. Anak-anak di bawah usia 8 tahun harusdijauhkan dari peralatan ini kecuali jika selalu diawasi.
• Selalu gunakan sarung tangan oven untukmengeluarkan atau memasukkan aksesori atauperanti oven.
• Matikan sumber listrik sebelum perawatan.• Pastikan peralatan dimatikan sebelum mengganti
lampu untuk mencegah kemungkinan sengatan listrik.• Jangan gunakan pembersih uap untuk membersihkan
peralatan.• Jangan gunakan pembersih abrasif yang kasar atau
alat pengikis logam tajam untuk membersihkan pintukaca karena akan menimbulkan goresan di kaca danmengakibatkan kaca pecah.
• Jika kabel catu daya rusak, penggantian hanya bolehdilakukan oleh pabrik, Pusat Layanan Resmi, atauorang yang memiliki kualifikasi serupa untukmenghindari bahaya tersengat listrik.
• Untuk melepaskan penyangga rak, pertama-tamatariklah bagian depan penyangga rak lalu tarik ujungbelakang dari sisi samping. Pasang penyangga rakdalam urutan berlawanan.
2. PANDUAN KESELAMATANMesin ini cocok untuk pasar berikut ini:ID
2.1 PemasanganPERINGATAN!Hanya orang yang kompetenyang boleh memasangperalatan ini.
• Buka seluruh kemasan.• Jangan memasang atau
menggunakan peralatan yang telahrusak.
• Ikuti petunjuk pemasangan yangdisertakan bersama peralatan ini.
• Selalu berhati-hati ketikamemindahkan peralatan yang beratini. Selalu gunakan sarung tanganpelindung dan alas kaki tertutup.
• Jangan menarik peralatan ini padapegangannya.
• Pertahankan jarak minimum dariperalatan dan unit lain.
• Pastikan peralatan dipasang di bawahkonstruksi yang aman danberdekatan.
27

• Bagian samping peralatan harus tetapberdekatan dengan peralatan atauunit yang tingginya sama.
• Jangan operasikan peralatan tanpapenutup bagian bawah rongga.Penutup tersebut adalah komponenkeamanan fungsional.
• Peralatan dilengkapi dengan sistempendinginan elektrik. Peralatan harusdioperasikan dengan suplai dayaelektrik.
2.2 Sambungan listrikPERINGATAN!Risiko kebakaran dansengatan listrik.
• Semua sambungan listrik harusdilakukan oleh teknisi listrik yangkompeten.
• Peralatan ini harus dihubungkan kearde.
• Pastikan informasi listrik pada pelatrating sesuai dengan catu daya. Jikatidak, hubungi teknisi listrik.
• Selalu gunakan soket tahan kejutanlistrik yang dipasang dengan benar.
• Jangan gunakan adaptor multi-stekerdan kabel ekstensi.
• Pastikan untuk tidak merusak stekerdan kabel jaringan listrik. Jika kabeljaringan listrik harus diganti,penggantian ini harus dilakukan olehPusat Servis Resmi.
• Jangan biarkan kabel jaringan listrikbersentuhan atau mendekati pintuperalatan, terutama jika pintuperalatan masih panas.
• Perlindungan kejut pada bagian yangterisolasi dan aktif harusdikencangkan agar tidak dapatdilepas tanpa peralatan.
• Sambungkan steker jaringan listrikdengan soket jaringan listrik di akhirpemasangan. Pastikan adanya aksesdengan steker jaringan listrik setelahpemasangan.
• Jika soket jaringan listrik kendur,jangan sambungkan steker jaringanlistrik.
• Jangan tarik kabel listrik untukmemutus sambungan peralatan.Selalu tarik steker jaringan listrik.
• Gunakan hanya peralatan isolasiyang tepat: pengaman jaringan dayaputus, sekering (sekering modelsekrup yang dilepas dari tempatpemasangannya), pemutus-sambungkebocoran arus hubungan ke tanah.
• Instalasi listrik harus memilikiperangkat isolasi yangmemungkinkan pemutusansambungan peralatan dari jaringanlistrik pada semua kutub. Lebarlubang kontak perangkat isolasi inisekurang-kurangnya harus sebesar 3mm.
• Peralatan ini telah sesuai denganpedoman E.E.C.
2.3 Sambungan gas• Semua saluran gas harus dipasang
oleh teknisi resmi.• Sebelum pemasangan, pastikan
bahwa kondisi distribusi setempat(sifat gas dan tekanan gas) danpenyesuaian peralatan telah sesuai.
• Pastikan terdapat sirkulasi udara disekitar peralatan.
• Informasi mengenai suplai gasterdapat pada pelat rating.
• Peralatan ini tidak terhubung padasuatu perangkat yang mengeluarkanproduk pembakaran. Pastikan Andamenghubungkan peralatan sesuaidengan aturan pemasangan terkini.Perhatikan kriteria ventilasi yangmencukupi.
2.4 PenggunaanPERINGATAN!Risiko cedera, terbakar dansengatan listrik atauledakan.
• Peralatan ini hanya digunakan untukkeperluan rumah tangga.
• Jangan mengubah spesifikasiperalatan ini.
• Pastikan lubang ventilasi tidakterhalang.
• Jangan meninggalkan peralatanselama dioperasikan.
• Matikan peralatan setelah selesaidigunakan.
www.electrolux.com28

• Berhati-hatilah ketika membuka pintuperalatan saat sedang dioperasikan.Udara panas akan dihembuskankeluar.
• Jangan mengoperasikan peralatandengan tangan yang basah atau saatperalatan terkena air.
• Jangan menekan pintu yang terbuka.• Jangan gunakan peralatan sebagai
landasan untuk kerja atau sebagailandasan penyimpanan.
• Bukalah pintu peralatan secara hati-hati. Penggunaan bahan yangmengandung alkohol dapatmenyebabkan percampuran alkoholdan udara.
• Hindarkan peralatan dari percikan apiatau nyala api ketika pintu dibuka.
• Jangan letakkan produk yang mudahterbakar, atau benda yang dibasahiproduk yang mudah terbakar, didalam, di dekat atau di atasperangkat.
PERINGATAN!Risiko kerusakan peralatan.
• Untuk mencegah kerusakan atauperubahan warna pada enamel:– jangan meletakkan kertas
aluminium langsung pada bagianbawah perangkat.
– jangan memasukkan air langsungke dalam perangkat yang panas.
– jangan menyimpan makanan danhidangan yang lembap di dalamperalatan setelah selesaimemasak.
– berhati-hatilah ketika melepasatau memasang aksesori.
• Pemudaran warna lapisan cat tidakberpengaruh pada kinerja perangkat.
• Gunakan loyang tinggi untuk kuebasah. Jus buah menimbulkan nodayang dapat menjadi permanen.
• Peralatan ini hanya digunakan untukkeperluan memasak. Perangkat tidakboleh digunakan untuk keperluanlainnya, misalnya untuk memanaskanruangan.
• Pastikan pintu oven tertutup saatmemasak.
• Jika alat ini dipasang di belakangpanel furnitur (misalnya pintu)pastikan pintu tidak tertutup ketika
alat tersebut beroperasi. Panas dankelembapan akan meningkat di balikpanel furnitur yang tertutup dan dapatmenyebabkan kerusakan lanjut padaalat, barang-barang rumah atau padalantai. Jangan menutup panel furnitursampai alat benar-benar dinginsetelah digunakan.
2.5 Perawatan danpembersihan
PERINGATAN!Risiko cedera, kebakaranatau kerusakan padaperalatan.
• Sebelum melakukan perawatan,matikan perangkat dan cabut stekerlistrik dari stopkontak.
• Pastikan peralatan sudah dingin.Panel kaca memiliki risiko pecah.
• Ganti segera panel kaca pintu jikamengalami kerusakan. Hubungi PusatLayanan Resmi.
• Berhati-hatilah ketika melepas pintudari peralatan. Pintunya berat!
• Bersihkan peralatan secara teraturuntuk mencegah penurunan kualitasmaterial permukaan.
• Bersihkan perangkat dengan kainlembut yang lembap. Gunakan hanyadetergen netral. Jangan gunakanproduk abrasif, bantalan pembersihabrasif, bahan pelarut, atau bendalogam apa pun.
• Jika menggunakan semprotan oven,patuhi petunjuk keselamatan padakemasan.
• Jangan bersihkan enamel katalitis(jika ada) dengan deterjen apa pun.
2.6 Lampu internal• Jenis bola lampu atau lampu halogen
yang digunakan pada peralatan inihanya diperuntukkan bagi peralatanrumah tangga. Jangan digunakanuntuk penerangan rumah.
PERINGATAN!Risiko sengatan listrik.
• Sebelum mengganti lampu, putussambungan listriknya.
29

• Gunakan hanya lampu denganspesifikasi yang sama.
2.7 PembuanganPERINGATAN!Risiko cedera atau sesaknapas.
• Hubungi pihak yang berwenang didaerah Anda untuk mendapatkaninformasi tentang cara membuangperalatan secara tepat.
• Lepaskan sambungan peralatan daricatu daya.
• Potong kabel listrik yang dekatdengan peralatan dan buang.
• Ratakan pipa gas eksternal.
2.8 Servis• Untuk memperbaiki peralatan hubungi
Pusat Servis Resmi.• Hanya gunakan suku cadang yang
asli.
3. DESKRIPSI PRODUK3.1 Ikhtisar umum
1
52 3
11
4
1
12
5
4
3
2
1
6
7
8
10
9
1 Panel kontrol2 Kenop fungsi oven3 Kenop untuk Pengingat Menit4 Kenop kontrol gas5 Indikator arus listrik6 Ventilasi udara untuk kipas pendingin7 Elemen pemanas8 Lampu9 Lubang turnspit10 Pelat dasar rongga oven11 Penyangga rak, dapat dilepas12 Posisi rak
3.2 Aksesori• Rak kawat
Untuk peralatan memasak, loyangkaleng kue, dan pembakaran.
• Loyang panggang aluminium
Untuk kue dan biskuit.• Turnspit
Untuk memanggang ruas dagingbesar atau unggas.
4. SEBELUM PENGGUNAAN PERTAMA KALIPERINGATAN!Silakan baca babKeselamatan.
4.1 Pelat dasar rongga ovenSaat Anda membeli perangkat, pertamapelat dasar rongga oven diletakkan padaaksesoris. Sebelum Anda menggunakan
perangkat pertama kali, letakkan pelatdasar pada area pemanas, sepertiditunjukkan dalam bab "Penjelasanproduk".
4.2 Pembersihan AwalLepas semua aksesori dan dudukan rakyang dapat dilepas dari peralatan.
www.electrolux.com30

Lihat bab "Perawatan danpembersihan".
Bersihkan peralatan dan aksesorisebelum digunakan untuk pertama kali.Letakkan aksesori dan dudukan rak yangdapat dilepas kembali ke posisi aslinya.
4.3 Pemanasan awalPanaskan terlebih dahulu peralatan yangkosong sebelum penggunaan pertamakali.1. Atur suhu maksimal.2. Biarkan peralatan beroperasi selama
1 jam.
3. Atur fungsi .4. Biarkan peralatan bekerja selama 15
menit.Aksesori dapat menjadi lebih panas daribiasanya. Peralatan dapat mengeluarkanbau dan asap. Ini merupakan hal yangnormal. Pastikan bahwa aliran udaramemadai.Biarkan oven mendingin. Basahi laplembut dengan air hangat dan sedikitcairan pencuci yang lembut, dangunakan untuk membersihkan ronggaoven.
5. PENGGUNAAN SEHARI-HARIPERINGATAN!Silakan baca babKeselamatan.
5.1 Fungsi oven
Fungsi oven AplikasiPosisi mati Perangkat mati.
Lampu Untuk mengaktifkan lampu tanpa fungsi memasak.
Turnspit Untuk memanggang daging berukuran besar padabatang pemanggang.
5.2 Indikator arus listrikIndikator daya menyala saat Andamemutar tombol putar untuk fungsi oven.
5.3 Kenop kontrol gas
Simbol FungsiPanaskan hanya dari bagian dasar oven. Rentang penyesuaian su‐hu (150 °C - 250 °C).
Panaskan dari bagian atas.
31

5.4 Pengapian tungku oven gasPerangkat keselamatanoven:Oven gas memiliki sebuahtermokopel. Perangkat inimenghentikan aliran gas jikaapi padam.
1. Tekan kenop kontrol gas dan putarke .
2. Tekan terus kenop kontrol gasselama 15 detik atau kurang agartermokopel memanas. Jika tidak,aliran gas akan terhenti.Jangan melepaskan kenop sebelumapi menyala.
Jangan terus menekankenop fungsi open selamalebih dari 15 detik. Jikatungku oven tidak menyalasetelah 15 detik, lepaskankenop fungsi oven, putar keposisi mati, buka pintu ovendan coba kembalimenyalakan tungku ovensetelah minimal 1 menit.
5.5 Setelah menyalakanpemanas gas oven1. Lepaskan tombol putar untuk kontrol
gas.2. Putar tombol putar untuk kontrol gas
untuk menetapkan pengaturanpemanasan yang diperlukan.
Kendalikan api melalui lubang yang adadi bagian dasar oven.
5.6 Menggunakan pemanggangPerangkat keamananoven:Oven gas ini memilikitermokopel. Jika apinyamati, aliran gas akandihentikan.
1. Buka pintu oven.2. Tekan tombol putar untuk kontrol gas
dan putar ke . Terus tekan kenopkontrol gas selama 15 detik ataukurang.Jangan lepaskan tombol putarhingga ada api yang keluar.
Jika pemanaspemanggang tidakmenyala atau jika secaratidak sengaja mati,lepaskan tombol putaruntuk kontrol gas danputar ke posisi Mati.Biarkan pintu oventerbuka. Setelah satumenit, coba nyalakan apipemanggang kembali.
3. Lepaskan tombol putar untuk kontrolgas.
4. Tutup pintu oven.
6. FUNGSI JAM6.1 Pengingat MenitGunakan untuk menyetel waktu hitungmundur untuk fungsi oven.
Fungsi ini tidakmempengaruhipengoperasian peralatan.
Putar kenop timer sejauh mungkin,kemudian putar ke periode waktu yangdiinginkan.Setelah periode waktu terselesaikan,akan terdengar sinyal suara.
7. MENGGUNAKAN AKSESORISPERINGATAN!Silakan baca babKeselamatan.
www.electrolux.com32

7.1 Menggunakan spit putarPERINGATAN!Hati-hati saat Andamenggunakan spit putar.Garpu dan spit sangat tajam.Ada risiko cidera.
PERINGATAN!Gunakan sarung tangansaat Anda melepas spitputar. Spit putar danpembakar bisa panas. Adarisiko luka bakar.
A B
D
C
A. Rangka spit putarB. GarpuC. SpitD. Handel1. Letakkan gagang spit putar ke dalam
spit.2. Letakkan nampan tinggi pada posisi
rak terendah.3. Letakkan rangka spit ke dalam posisi
rak ketiga dari bawah.
4. Pasang garpu pertama pada spit,kemudian letakkan daging pada spitputar dan pasang garpu kedua.
5. Gunakan obeng untukmengencangkan garpu.
6. Letakkan tip pada spit ke dalamlubang spit putar.
7. Baringkan sisi belakang spit padarangka spit putar.Lihat bab "Deskripsi produk".
8. Lepaskan gagang spit putar.9. Pilih fungsi dengan posisi spit putar.
Spit putar berputar.10. Nyalakan pembakar panggangan.
Silahkan baca tabel masak.
7.2 Memasukkan aksesoriRak kawat:Dorong rak antara batangan pemandupada dudukan rak dan pastikan ujungnyamengarah ke bawah.
Nampan pemanggang:Dorong nampan pemanggang antarabatangan pemandu pada dudukan rak.
33

Rak kawat dan nampan pemanggangbersama-sama:Dorong nampan pemanggang antarabatangan pemandu pada dudukan rakdan rak kawat pada batangan pemandudi atas.
Lekukan kecil di bagian atasakan meningkatkankeamanan. Lekukantersebut juga membuatperangkat tidak mudahtergelincir. Bagian tepi yangtinggi di sekeliling rakmencegah peralatanmemasak tergelincir padarak.
8. FUNGSI TAMBAHAN8.1 Kipas pendinginKetika perabot beroperasi, kipaspendingin hidup secara otomatis untukmenjaga permukaan peralatan tetap
dingin. Jika dinonaktifkan, kipaspendingin akan terus beroperasi hinggaperalatan menjadi dingin.
9. PETUNJUK DAN SARANPERINGATAN!Silakan baca babKeselamatan.
Suhu dan waktumemanggang di dalam tabelhanya merupakan panduan.Suhu dan waktumemanggang tergantungpada resep serta kualitasdan kuantitas bahan yangdigunakan.
9.1 Informasi Umum• Peralatan mempunyai empat posisi
rak. Hitunglah posisi rak dari bagiandasar lantai peralatan.
• Kelembaban dapat mengembun didalam peralatan atau di panel kacapintu. Ini merupakan hal yang normal.Selalu menjauh dari peralatan saatAnda membuka pintu peralatan ketikamemasak. Untuk mengurangipengembunan, operasikan peralatanselama 10 menit sebelum memasak.
• Bersihkan kelembaban setiap kaliselesai menggunakan peralatan.
www.electrolux.com34
• Jangan meletakkan benda langsungdi atas lantai peralatan dan janganmenempatkan foil aluminium padakomponen saat Anda memasak. Inidapat mengubah hasilpemanggangan dan dapat merusakenamel.
9.2 Memanggang kue• Jangan membuka pintu oven sebelum
melewati 3/4 dari waktu memasakyang telah ditetapkan.
9.3 Memasak daging dan ikan• Gunakan loyang dalam untuk
makanan yang sangat berlemak untukmencegah kotornya oven yang dapatmenjadi permanen.
• Biarkan daging selama sekitar 15menit sebelum mengiris sehingga saridaging tidak keluar.
• Untuk mencegah terlalu banyak asapdi dalam oven selama membakar,
tambahkan air ke loyang dalam.Untuk mencegah mengembunnyaasap, tambahkan air setiap kalimengering.
9.4 Waktu memasakWaktu memasak tergantung pada jenismakanan, konsistensinya, danvolumenya.Pertama-tama, pantau dahulu performasaat Anda memasak. Temukanpengaturan terbaik (setelan panas,waktu memasak, dll.) untuk alat masak,resep, dan jumlahnya ketika Andamenggunakan peralatan ini.
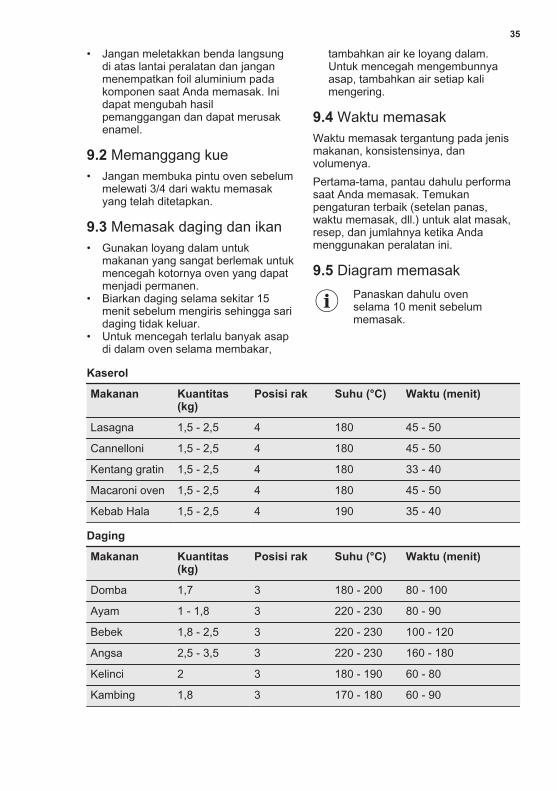
9.5 Diagram memasakPanaskan dahulu ovenselama 10 menit sebelummemasak.
KaserolMakanan Kuantitas
(kg)Posisi rak Suhu (°C) Waktu (menit)
Lasagna 1,5 - 2,5 4 180 45 - 50
Cannelloni 1,5 - 2,5 4 180 45 - 50
Kentang gratin 1,5 - 2,5 4 180 33 - 40
Macaroni oven 1,5 - 2,5 4 180 45 - 50
Kebab Hala 1,5 - 2,5 4 190 35 - 40
DagingMakanan Kuantitas
(kg)Posisi rak Suhu (°C) Waktu (menit)
Domba 1,7 3 180 - 200 80 - 100
Ayam 1 - 1,8 3 220 - 230 80 - 90
Bebek 1,8 - 2,5 3 220 - 230 100 - 120
Angsa 2,5 - 3,5 3 220 - 230 160 - 180
Kelinci 2 3 180 - 190 60 - 80
Kambing 1,8 3 170 - 180 60 - 90
35

PizzaMakanan Kuantitas
(kg)Posisi rak Suhu (°C) Waktu (menit)
Tipis 1,4 - 1,5 3 atau 4 200 - 210 20 - 30
Tebal 1,4 - 1,5 3 atau 4 200 - 210 25 - 30
Calzone 1,4 - 1,5 3 atau 4 190 - 200 25 - 30
KueMakanan Kuantitas
(kg)Posisi rak Suhu (°C) Waktu (menit)
Kue datar 0,6 - 1,0 4 170 - 180 20 - 30
Kue spons 1,0 - 1,5 4 170 - 180 40 - 50
Feter Mshaltet 1,2 - 1,5 3 atau 4 190 40 - 45
PembakaranMakanan Kuantitas (kg) Posisi rak Waktu (menit)
Burgers1) 0,6 (6 potongan) 4 20 - 30
Panggang kecokla‐tan1)
0,5 4 9 - 12
Panggang Hawai1) 6 potong 4 7 - 14
1) Panaskan dahulu oven selama 3 menit.
9.6 Memasak dengan oven gasWaktu memasak tidaktermasuk pemanasansebelumnya.Panaskan dahulu ovendalam kondisi kosongselama 10 menit.
Daging Sapi & UnggasMakanan Kuantitas
(kg)Suhu (°C) Waktu (me‐
nit)Posisi rak Komentar
Daging sapidengan tu‐lang
1 min. 50 - 65 3 Di rak ka‐wat. Letak‐kan pinggantinggi padaposisi rakkedua.
www.electrolux.com36

Makanan Kuantitas(kg)
Suhu (°C) Waktu (me‐nit)
Posisi rak Komentar
Daging sapitanpa tulang
1 190 55 - 65 3 Di rak ka‐wat. Letak‐kan pinggantinggi padaposisi rakkedua.
Domba 1 min. 50 - 65 3 Di rak ka‐wat. Letak‐kan pinggantinggi padaposisi rakkedua.
Daging babi 1 180 - 190 85 - 95 3 Di rak ka‐wat. Letak‐kan pinggantinggi padaposisi rakkedua.
Ayam / Ke‐linci
1,2 220 - 230 85 - 95 3 Di rak ka‐wat. Letak‐kan pinggantinggi padaposisi rakkedua.
Bebek 1 190 90 - 100 3 Di rak ka‐wat. Letak‐kan pinggantinggi padaposisi rakkedua.
Kalkun 4,5 - 5,5 160 220 - 250 2 Dalam ping‐gan tinggi.
SayuranPanggang
1 160 - 3 Bervariasitergantungdari sayu‐rannya.
Kue KeringMakanan Kuantitas
(kg)Suhu (°C) Waktu (me‐
nit)Posisi rak Komentar
Tar buah - 165 50 - 60 4 Dalam lo‐yang bundarberdiameter26 cm padarak kawat
37

Makanan Kuantitas(kg)
Suhu (°C) Waktu (me‐nit)
Posisi rak Komentar
Pai buah - min. 50 - 60 4 Dalam lo‐yang bundarberdiameter26 cm padarak kawat
Rol sosis - 180 30 - 40 4 Dalam lo‐yang pang‐gang alumi‐nium
Kue sus - 190 35 - 45 4 Dalam lo‐yang pang‐gang alumi‐nium
Vol au vent - 170 25 - 35 4 Dalam lo‐yang pang‐gang alumi‐nium
Tar selai - 165 50 - 60 4 Dalam lo‐yang bundarberdiameter30 cm padarak kawat
PudingMakanan Kuantitas
(kg)Suhu (°C) Waktu (me‐
nit)Posisi rak Komentar
Egg Custarddalam BainMarie
- min. 70 - 85 3 9 gelas ke‐ramik dalampinggantinggi de‐ngan air se‐tinggi 2 cm
KueMakanan Kuantitas
(kg)Suhu (°C) Waktu (me‐
nit)Posisi rak Komentar
Roti buah - min. 160 - 170 4 Dalam lo‐yang beru‐kuran 20 cmpada rak ka‐wat
www.electrolux.com38

Makanan Kuantitas(kg)
Suhu (°C) Waktu (me‐nit)
Posisi rak Komentar
Kue buahpolos
- min. 160 - 170 4 Dalam lo‐yang beru‐kuran 20 cmpada rak ka‐wat
Madeira - min. 115 - 130 4 Dalam lo‐yang beru‐kuran 20 cmpada rak ka‐wat
Kue kecil - min. - 170 40 - 65 4 Dalam lo‐yang pang‐gang alumi‐nium
Roti jahe - min. 45 - 55 4 Dalam lo‐yang pang‐gang alumi‐nium
RotiMakanan Kuantitas
(kg)Suhu (°C) Waktu (me‐
nit)Posisi rak Komentar
Loyang roti 0,5 180 - 190 50 - 60 4 Dalam lo‐yang pang‐gang alumi‐nium
Loyang roti 1 180 - 190 60 - 70 4 Dalam lo‐yang pang‐gang alumi‐nium
Roti rol danbulat
- 180 - 190 25 - 35 4 Dalam lo‐yang pang‐gang alumi‐nium
9.7 PembakaranPanaskan dahulu ovenselama 3 menit sebelummemasak.
39
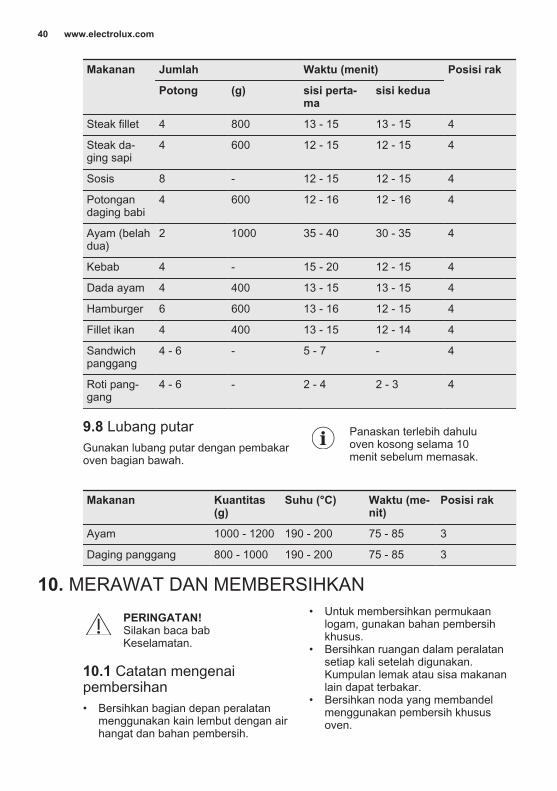
Makanan Jumlah Waktu (menit) Posisi rakPotong (g) sisi perta‐
masisi kedua
Steak fillet 4 800 13 - 15 13 - 15 4
Steak da‐ging sapi
4 600 12 - 15 12 - 15 4
Sosis 8 - 12 - 15 12 - 15 4
Potongandaging babi
4 600 12 - 16 12 - 16 4
Ayam (belahdua)
2 1000 35 - 40 30 - 35 4
Kebab 4 - 15 - 20 12 - 15 4
Dada ayam 4 400 13 - 15 13 - 15 4
Hamburger 6 600 13 - 16 12 - 15 4
Fillet ikan 4 400 13 - 15 12 - 14 4
Sandwichpanggang
4 - 6 - 5 - 7 - 4
Roti pang‐gang
4 - 6 - 2 - 4 2 - 3 4
9.8 Lubang putarGunakan lubang putar dengan pembakaroven bagian bawah.
Panaskan terlebih dahuluoven kosong selama 10menit sebelum memasak.
Makanan Kuantitas(g)
Suhu (°C) Waktu (me‐nit)
Posisi rak
Ayam 1000 - 1200 190 - 200 75 - 85 3
Daging panggang 800 - 1000 190 - 200 75 - 85 3
10. MERAWAT DAN MEMBERSIHKANPERINGATAN!Silakan baca babKeselamatan.
10.1 Catatan mengenaipembersihan• Bersihkan bagian depan peralatan
menggunakan kain lembut dengan airhangat dan bahan pembersih.
• Untuk membersihkan permukaanlogam, gunakan bahan pembersihkhusus.
• Bersihkan ruangan dalam peralatansetiap kali setelah digunakan.Kumpulan lemak atau sisa makananlain dapat terbakar.
• Bersihkan noda yang membandelmenggunakan pembersih khususoven.
www.electrolux.com40
• Bersihkan seluruh aksesori setiap kaliselesai digunakan dan keringkanlah.Gunakan kain yang lembut dengan airhangat dan bahan pembersih.
• Jika Anda memilki aksesoris antilengket, jangan membersihkannyamenggunakan bahan pembersih yangkeras, benda dengan tepian tajamatau mesin pencuci piring. Hal inidapat merusak lapisan anti lengket.
10.2 Peralatan baja antikaratatau aluminium
Bersihkan pintu ovendengan kain lembap atauspons saja. Keringkandengan kain yang lembut.Jangan gunakan wol baja,bahan asam atau abrasifkarena cara ini dapatmenimbulkan kerusakanpada permukaan oven.Bersihkan panel kontroloven dengan cara yangsama.
10.3 Membersihkan perapatpintu• Periksalah perapat pintu secara
berkala. Perapat pintu terletak disekeliling bingkai rongga oven.Jangan gunakan peralatan jikaperapat pintu rusak. Hubungi PusatServis Resmi.
• Untuk membersihkan perapat pintu,bacalah informasi umum tentangpembersihan.
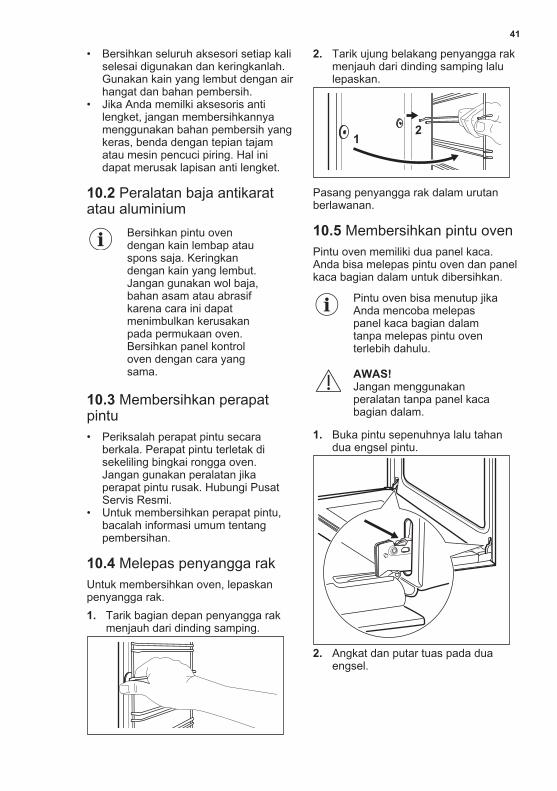
10.4 Melepas penyangga rakUntuk membersihkan oven, lepaskanpenyangga rak.1. Tarik bagian depan penyangga rak
menjauh dari dinding samping.
2. Tarik ujung belakang penyangga rakmenjauh dari dinding samping lalulepaskan.
21
Pasang penyangga rak dalam urutanberlawanan.
10.5 Membersihkan pintu ovenPintu oven memiliki dua panel kaca.Anda bisa melepas pintu oven dan panelkaca bagian dalam untuk dibersihkan.
Pintu oven bisa menutup jikaAnda mencoba melepaspanel kaca bagian dalamtanpa melepas pintu oventerlebih dahulu.
AWAS!Jangan menggunakanperalatan tanpa panel kacabagian dalam.
1. Buka pintu sepenuhnya lalu tahandua engsel pintu.
2. Angkat dan putar tuas pada duaengsel.
41

3. Tutup pintu oven setengah ke posisipembukaan pertama. Lalu tarik kedepan dan lepaskan pintu daritempatnya.
4. Letakkan pintu di atas kain lembutpada permukaan yang stabil.
5. Tahan panel pintu (B) di tepi ataspintu di kedua belah sisi dan dorongke dalam untuk melepaskan segelklip.
1
2
B
6. Tarik panel pintu ke depan untukmelepasnya.
7. Pegang panel kaca pintu padabagian tepi atas lalu tarik keluar
dengan hati-hati. Pastikan bahwakaca keluar dari penyangga secarautuh.
8. Bersihkan panel kaca dengan air dansabun. Keringkan panel kaca denganhati-hati.
Saat pembersihan sudah selesai,pasang panel kaca dan pintu oven.Lakukan langkah-langkah di atas dalamurutan berlawanan.Zona lembar kasa harus menghadap kesisi dalam dari pintu. Pastikan bahwasetelah pemasangan bagian permukaandari bingkai panel kaca pada zonalembar kasa tidak terasa kasar ketikaAnda menyentuhnya.Pastikan bahwa Anda memasang panelkaca bagian dalam pada tempatnyadengan benar.
A
10.6 Mengganti lampuLetakkan kain pada bagian dasar interiorperalatan. Hal ini mencegah kerusakanpada rongga dan penutup kaca lampu.
PERINGATAN!Sengatan listrik! Putuskansekering sebelum Andamengganti lampu.Lampu dan penutup kacalampu dapat menjadi panas.
AWAS!Selalu pegang lampuhalogen dengan kain untukmencegah terbakarnyaresidu gemuk di lampu.
www.electrolux.com42

1. Nonaktifkan perabot.2. Lepas sekering dari kotak sekering
atau nonaktifkan pemutus arus.
Lampu belakang1. Putar penutup lampu kaca
berlawanan arah jarum jam untukmelepas.
2. Bersihkan penutup kaca.3. Ganti lampu dengan lampu tahan
panas 300 °C yang cocok.4. Pasang penutup kaca.
11. PENYELESAIAN MASALAHPERINGATAN!Silakan baca babKeselamatan.
11.1 Apa yang dilakukan jika...
Masalah Kemungkingan penye‐bab
Perbaikan
Oven tidak mau panas. Oven dinonaktifkan. Nyalakan oven.
Oven tidak mau panas. Sekring rusak. Pastikan sekring adalahpenyebab gangguan fung‐si. Jika sekring rusak beru‐lang kali, hubungi teknisilistrik yang kompeten.
Oven tidak beroperasi. Pemantik otomatis tidakbekerja.
Hidupkan tungku secaramanual dengan sebuahkorek api panjang. Dekat‐kan api ke lubang yang ter‐dapat pada bagian dasarrongga oven. Pada saatbersamaan, tekan tombolpemutar untuk kontrol gasdan putar melawan arahjarum jam ke suhu maksi‐mal. Saat api menyala, te‐tap tekan tombol pemutaruntuk kontrol gas selama15 detik atau kurang untukmembuat termokopel me‐manas. Jika tidak, alirangas akan terhambat.
Lampu tidak beroperasi. Lampu mengalami kerusa‐kan.
Ganti lampu.
Uap dan embun mengen‐dap pada makanan dan dirongga oven.
Masakan ditinggalkan ter‐lalu lama di dalam oven.
Jangan tinggalkan masa‐kan di dalam oven lebihdari 15 - 20 menit setelahberakhirnya proses mema‐sak.
43

Masalah Kemungkingan penye‐bab
Perbaikan
Nyala api segera padamsetelah penyalaan kompor.
Termokopel tidak mema‐nas dengan cukup.
Setelah menyalakan api,terus tekan kenop kontrolgas selama 15 detik ataukurang.
11.2 Data layananJika masalah tidak terpecahkan, hubungipenjual atau Pusat Servis Resmi.Data yang diperlukan untuk pusat servisterdapat pada pelat rating. Pelat rating
terdapat pada bingkai depan ronggaperalatan. Jangan melepas pelat ratingdari rongga peralatan.
Kami anjurkan Anda menulis data di sini:Model (MOD.) .........................................
Nomor produk (PNC) .........................................
Nomor seri (S.N.) .........................................
12. PEMASANGANPERINGATAN!Silakan baca babKeselamatan.
12.1 Sambungan gasPERINGATAN!Sebelum menyambung gas,lepaskan steker utama darisoket utama atau matikansekering dalam kotaksekering. Tutuplah katuputama dari suplai gas.
Saluran suplai gas berada pada bagianbelakang peralatan.
PERINGATAN!Jangan menggunakan pipakaret lentur!
Jangan memasukkan oven secarakeseluruhan ke dalam kabinet built-in(kira-kira 30 cm).Sambungan dengan pipa metalik yangfleksibel atau pipa metalik kaku:
A B C
A. Saluran suplai gas, ujung porosdengan saluran
B. PembasuhC. SikuLetakkan gasket yang disuplai di antarapipa dan saluran suplai gas. Putar pipake 1/2" saluran suplai gas.1. Gunakan kunci 22 mm untuk
mengencangkan mur. Pastikansaluran suplai gas pada posisi yangtepat. Jangan menangani sirkuitsuplai gas dengan kasar.
PERINGATAN!Jangan gunakan apiuntuk memeriksakebocoran!
www.electrolux.com44
2. Memindahkan oven secarakeseluruhan ke dalam kabinet built-in.
PERINGATAN!Jangan menekansaluran suplai gas danpipa ketika Andamemindahkan oven kedalam kabinet built-in.
3. Segel sambungan dengan benar.Gunakan alat pendeteksi kebocoranuntuk memeriksa kebocoran.
12.2 Penyesuaian denganberbagai jenis gas
Hanya personil resmi yangboleh melakukanpenyesuaian untuk berbagaijenis gas.
Jika peralatan diatur untukgas alam, Anda dapatmengubahnya menjadi gascair dengan menggunakaninjektor yang tepat.Aliran gas dapat diatur agarsesuai.
PERINGATAN!Sebelum Anda menggantiinjektor, pastikan bahwakenop gas berada padaposisi Off. Cabut peralatandari aliran listrik. Biarkanperalatan mendingin.Terdapat risiko cedera.
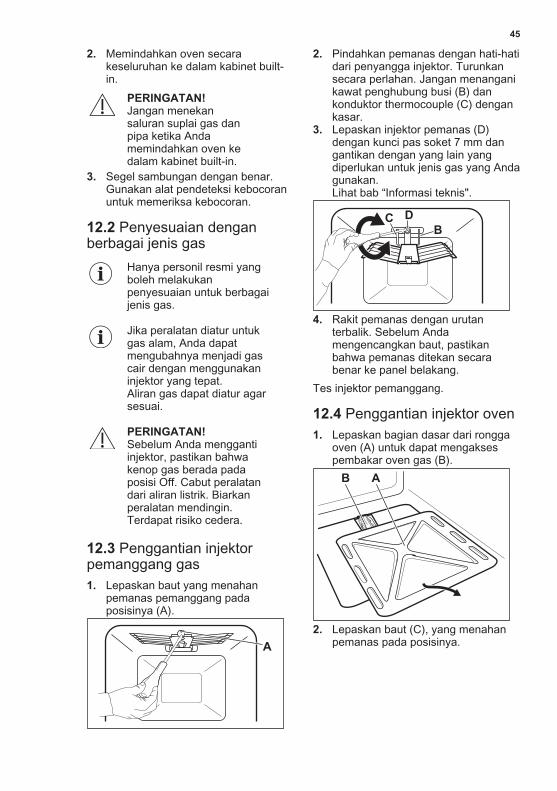
12.3 Penggantian injektorpemanggang gas1. Lepaskan baut yang menahan
pemanas pemanggang padaposisinya (A).
A
2. Pindahkan pemanas dengan hati-hatidari penyangga injektor. Turunkansecara perlahan. Jangan menanganikawat penghubung busi (B) dankonduktor thermocouple (C) dengankasar.
3. Lepaskan injektor pemanas (D)dengan kunci pas soket 7 mm dangantikan dengan yang lain yangdiperlukan untuk jenis gas yang Andagunakan.Lihat bab “Informasi teknis".
DC
B
4. Rakit pemanas dengan urutanterbalik. Sebelum Andamengencangkan baut, pastikanbahwa pemanas ditekan secarabenar ke panel belakang.
Tes injektor pemanggang.
12.4 Penggantian injektor oven1. Lepaskan bagian dasar dari rongga
oven (A) untuk dapat mengaksespembakar oven gas (B).
AB
2. Lepaskan baut (C), yang menahanpemanas pada posisinya.
45
C
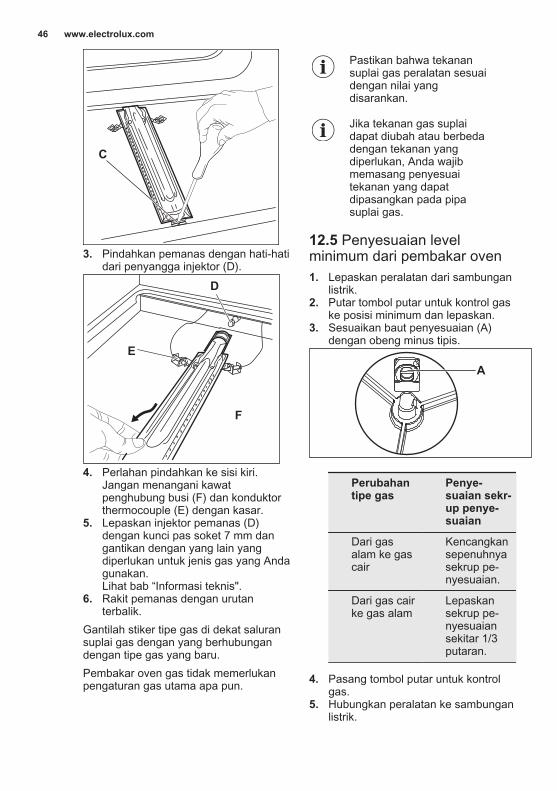
3. Pindahkan pemanas dengan hati-hatidari penyangga injektor (D).
D
E
F
4. Perlahan pindahkan ke sisi kiri.Jangan menangani kawatpenghubung busi (F) dan konduktorthermocouple (E) dengan kasar.
5. Lepaskan injektor pemanas (D)dengan kunci pas soket 7 mm dangantikan dengan yang lain yangdiperlukan untuk jenis gas yang Andagunakan.Lihat bab “Informasi teknis".
6. Rakit pemanas dengan urutanterbalik.
Gantilah stiker tipe gas di dekat saluransuplai gas dengan yang berhubungandengan tipe gas yang baru.Pembakar oven gas tidak memerlukanpengaturan gas utama apa pun.
Pastikan bahwa tekanansuplai gas peralatan sesuaidengan nilai yangdisarankan.
Jika tekanan gas suplaidapat diubah atau berbedadengan tekanan yangdiperlukan, Anda wajibmemasang penyesuaitekanan yang dapatdipasangkan pada pipasuplai gas.
12.5 Penyesuaian levelminimum dari pembakar oven1. Lepaskan peralatan dari sambungan
listrik.2. Putar tombol putar untuk kontrol gas
ke posisi minimum dan lepaskan.3. Sesuaikan baut penyesuaian (A)
dengan obeng minus tipis.
A
Perubahantipe gas
Penye‐suaian sekr‐up penye‐suaian
Dari gasalam ke gascair
Kencangkansepenuhnyasekrup pe‐nyesuaian.
Dari gas cairke gas alam
Lepaskansekrup pe‐nyesuaiansekitar 1/3putaran.
4. Pasang tombol putar untuk kontrolgas.
5. Hubungkan peralatan ke sambunganlistrik.
www.electrolux.com46

PERINGATAN!Tancapkan steker listrik kesoket utama hanya setelahsemua bagian kembali keposisi semula. Ada risikocidera.
6. Nyalakan injektor api oven gas.Lihat bab “Penggunaan sehari-hari".
7. Atur tombol putar untuk kontrol gaske posisi maksimum dan biarkanoven memanas selama setidaknya10 menit.
8. Putar tombol putar untuk kontrol gasdari posisi maksimum ke posisiminimum.
Kendalikan besaran apinya. Jika apimati, ulangi prosedurnya. Akan ada apikecil yang muncul di bagian mahkotapembakar oven.Produsen akan menolak kewajibannyajika Anda tidak mematuhi tindakankeamanan ini.
12.6 Memasang di dalamtembok• Pasanglah peralatan hanya di dapur
atau ruang makan yang memilikidapur. Jangan memasang peralatandi kamar mandi atau kamar tidur.
• Anda dapat memasang peralatan inidengan cara "built-in" atau "built-under". Dimensi dari kabinet built-inharus sesuai dengan ilustrasi yangberkaitan.
min. 550
589
594
11416
573
590
min. 560
594
558
21548
65 cm2
x2130 cm2
110
50
35
min. 550
110600
min. 560
558
589
594
11416
573 594
21548
65 cm2
x2 130 cm2
min. 4 mm
35
• Harus terdapat jarak sebesar 4 mmantara permukaan atas dari peralatandengan bagian dalam atas darikabinet.
• Ketika Anda memasang peralatansecara "built-under" (di bawah rak),pasanglah rak sebelum unit ovennya.
• Material yang digunakan harus tahanterhadap pertambahan suhu sebesarminimum 60°C di atas temperaturlingkungan.
• Harus terdapat suplai udara terus-menerus di sekitar oven, supaya oventidak menjadi terlalu panas.
• Untuk pengoperasian yang benar,kabinet oven harus memiliki bukaanminimum 130 cm² di bagian depanatau pada bagian samping (minimum65 cm² untuk setiap sisi). Produsenmerekomendasikan bukaan 130 cm²di depat untuk kabinet dari bata danbukaan 65 cm² untuk setiap sisi untukkabinet dari kayu.
• Ketika Anda memasang rak di atasoven, buatlah sambungan listrikberbeda untuk rak dan untuk oven.Buatlah sambungan hanya dengankabel yang sesuai dengan arus listrik.
Pastikan bahwa setelahpemasangan, terdapatakses yang mudah keperalatan jika dibutuhkanperbaikan ataupemeliharaan.
47

12.7 Mengamankan peralatanpada kabinet
AB
12.8 Instalasi ListrikProdusen tidak bertanggungjawab jika Anda tidakmengikuti peringatankeselamatan pada babKeselamatan.
Peralatan ini hanya disertai dengankabel utama.
12.9 KabelJenis kabel yang dapat digunakan untukinstalasi listrik atau penggantiannya:H05 V2V2-F (T90), H05 BB-FUntuk bagian kabel, silakan membacadaya total pada pelat rating. Anda jugadapat melihat pada tabel:
Total daya (W) Bagian kabel(mm²)
maksimum 1380 3 x 0.75
maksimum 2300 3 x 1
maksimum 3680 3 x 1.5
Kabel arde (kabel hijau/kuning) harus 2cm lebih panjang daripada kabel fasedan netral (kabel biru dan coklat).
13. DATA TEKNIS13.1 Data teknis
DAYA TOTAL: Listrik: 0.05 kW
Gas asli: G20 (2H) 20 mbar = 2.7 kW
Pengganti gas: G30/G31 (3B/P) 30/30 mbar = 2.7 kW
Suplai listrik: 220 - 240 V ~ 50 / 60 Hz
Kategori peralatan: II2H3B/P
Sambungan gas: G 1/2"
Kelas peralatan: 3
13.2 Tungku oven gas
Jenis gas DAYAGAS NO‐MINAL(kW)
ALIRANGAS NO‐MINAL(g/j)
Daya gastereduksi(kW)
JARUMBY-PASS(1/100mm)
TANDA IN‐JEKTOR(1/100mm)
G20 (2H) 20 mbar 2,7 - 0,7 Reg.
G30/G31 (3B/P)30/30 mbar
2,7 196 0,7 43 80
www.electrolux.com48

13.3 Tungku panggangan gas
Jenis gas DAYAGAS NO‐MINAL(kW)
ALIRANGAS NO‐MINAL(g/j)
Daya gastereduksi(kW)
JARUMBY-PASS(1/100mm)
TANDA IN‐JEKTOR(1/100mm)
G20 (2H) 20 mbar 1,5 - - - 90
G30/G31 (3B/P)30/30 mbar
1,5 120 - -
14. KEPEDULIAN LINGKUNGANDaur ulang material yang memiliki simbol
. Taruh kemasan dalam wadah yangsesuai untuk mendaur-ulang. Bantumelindungi lingkungan dan kesehatanmanusia dan untuk mendaur-ulanglimbah peralatan listrik dan elektronik.Jangan membuang peralatan yang
memiliki simbol ini bersama denganlimbah rumah tangga. Kembalikanproduk lke fasilitas daur ulang di tempatAnda atau hubungi kantor pemdasetempat.
*
49

www.electrolux.com50

51

www.electrolux.com/shop
8673
4018
3-A-
4220
16