enmasse - guide line
DESCRIPTION
EnMasse - Guide Line EnMasse - Guide Line EnMasse - Guide LineTRANSCRIPT
Introduction What is En Masse?
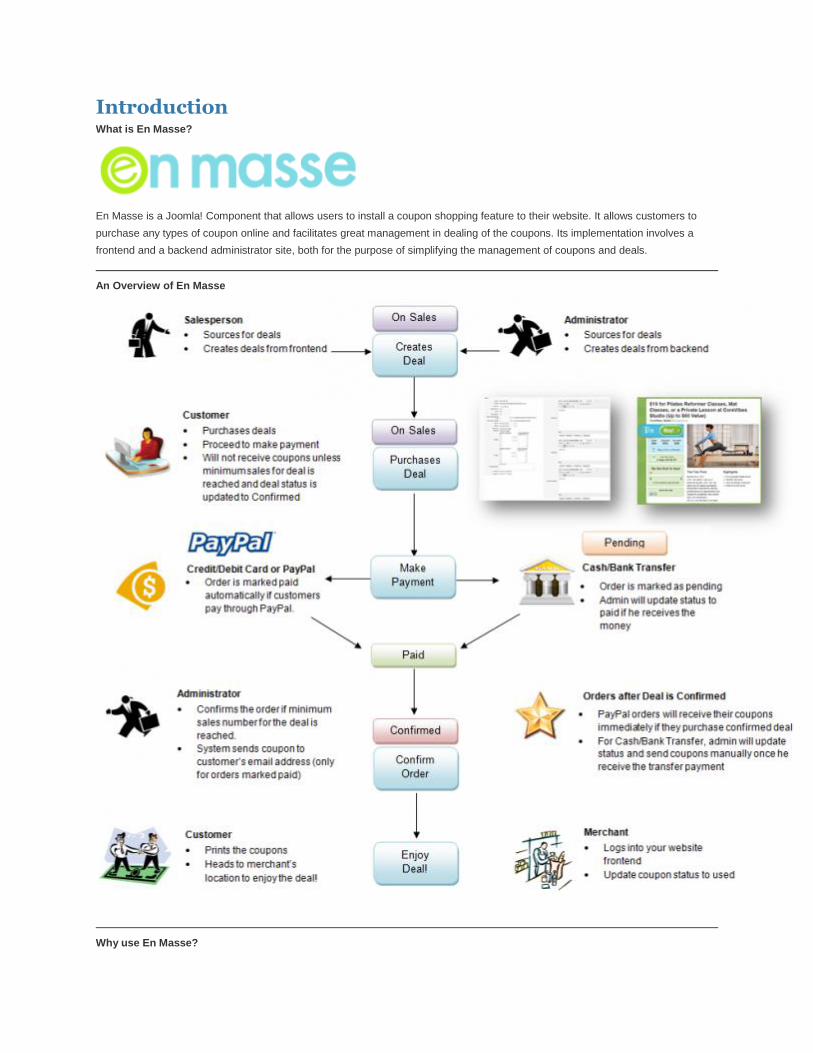
En Masse is a Joomla! Component that allows users to install a coupon shopping feature to their website. It allows customers to
purchase any types of coupon online and facilitates great management in dealing of the coupons. Its implementation involves a
frontend and a backend administrator site, both for the purpose of simplifying the management of coupons and deals.
An Overview of En Masse
Why use En Masse?
Recently, there has been an up-roar in the area of e-commerce, with portals such as Groupon, 8coupons, Couponcabin, Sgdeals,
GreatDeals and Tip-it. We foresee the promising increase of similar portals as it can be catered to many different industries such as
F & B, beauty care and many more. We provide a quick and easy method to obtain such a feature to be added to your Joomla!
website, thereby allowing you to bring more services to your customers.
Furthermore, En Masse provides a better solution to bulk buying. It provides opportunities for additional revenue to be brought in to
the associated merchant through advertisement spaces present on its sleek and spacious UI.
Its installation is quick and easy, involving very little technical know-how or background. This is complemented by its user-friendly
design in both its storefront and administrative backend.
Businesses looking for an easy and effective electronic coupon solution need look no further with En Masse’s full range of features
and solutions.
En Masse comes as a package that works on all Joomla version 1.5.X, 1.6.X and 1.7.X.
What will you get if you purchase En Masse subscription plan?
1. Direct access to download the latest En Masse version.
2. Lifetime & Customization usage rights
3. You will receive the following support from Matamko during your subscription period:
o Technical Support - We will try our best to look into your problem and help to resolve it by all means. This support only
covers issues within En Masse itself and we will not resolve issues regarding Joomla!
o Security Patch and Fix - We will provide support on the new patch and fix when the new version of En Masse is released.
o User Manual - Access to our step by step manual on how to use En Masse, how to install integrations and handle your
website efficiently
o Community Forum - Access to En Masse support forum where you can post any discussions, suggestions to new features in
upcoming versions of En Mass. This is for members to connect and chat about in Matamko products.
o Ticketing System - Have your voice heard. You can submit any issues and questions via our ticketing system and we will
cater to your issues from here.
4. You will be able to download the latest version of En Masse that is released every month. It will consists of new integrated
features and functions which you may suggest or request from us.
To read more, you can visit Pre-Sales Guide!
System Requirement
PHP version 4.3.X and 5.X.X and above
MYSQL version 4.X.X and above
Optional for enabling CURL library (Need to enable it at the php.ini)
Enabling GD library for generating the image of the serial number's barcode (Please contact your server administrator)

Installation Preparation
Please ensure that you have installed Joomla 1.x on the server with System Requirement. If you have not, please follow
the Guideline Document for Joomla Install
Component Installation
1. Back-end ⇒ Extensions ⇒ Extension Manager.
2. Click "Choose File" to upload new component.
3. Find the path of En Masse. Choose file "com_enmasse_joomla1.6_and_1.7.zip".
4. Click "Upload & Install" to install new component.
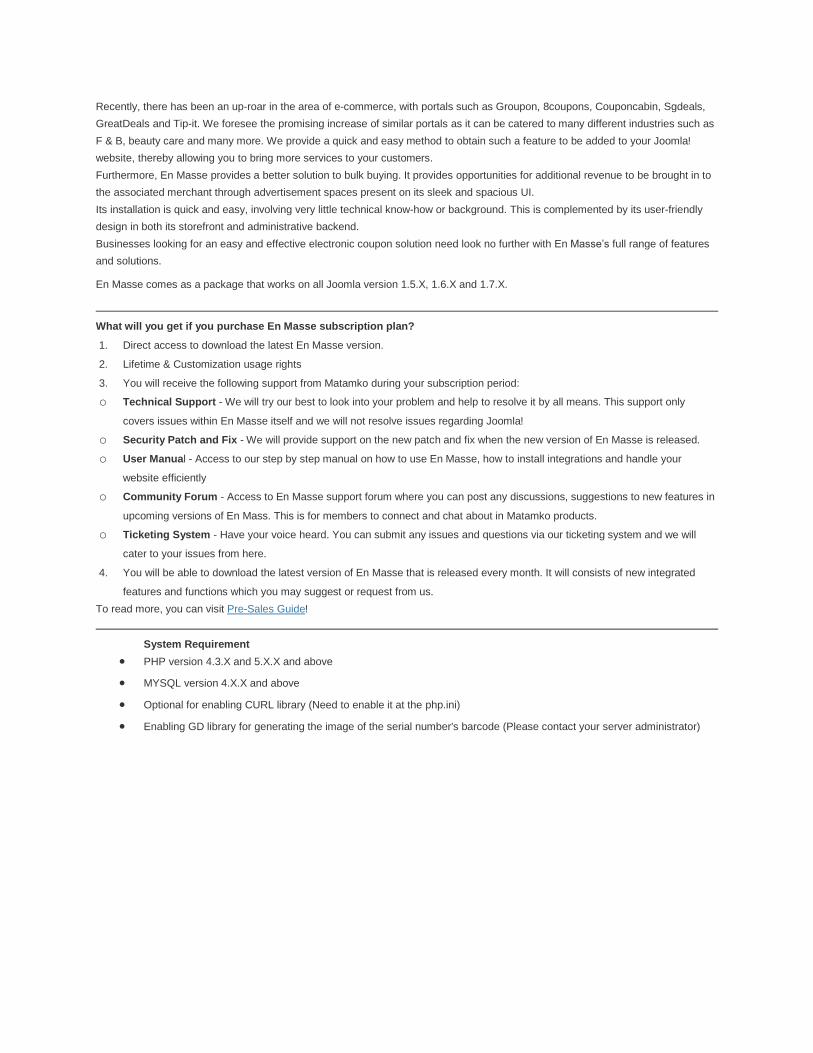
5. After installing a new En Masse Component. You'll see
Module Installation
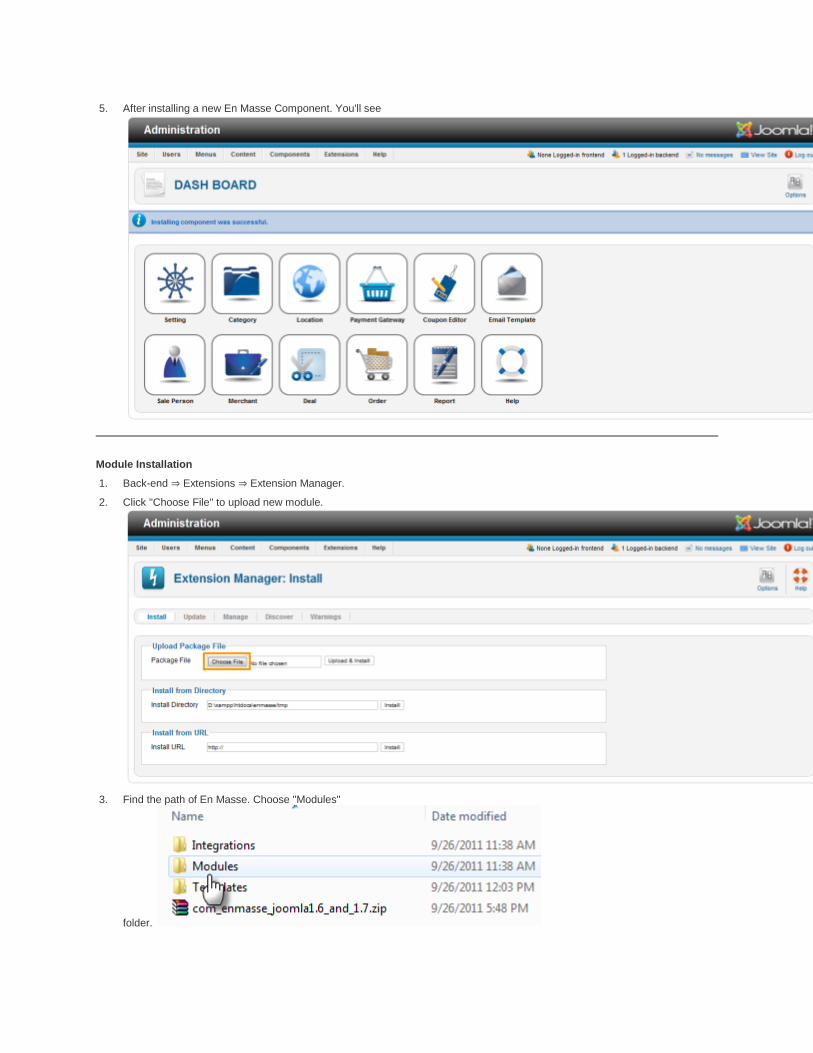
1. Back-end ⇒ Extensions ⇒ Extension Manager.
2. Click "Choose File" to upload new module.
3. Find the path of En Masse. Choose "Modules"
folder.

4. Choose file "mod_enmasse_deal_side.zip".
5. Click "Upload & Install" to install new module.
6. Repeat step 2 with files "mod_enmasse_summarized_cart.zip" and "mod_enmasse_your_location.zip".
Template Installation
1. Back-end ⇒ Extensions ⇒ Extension Manager.
2. Click "Choose File" to upload new module.
3. Find the path of En Masse. Choose "Templates"
folder.
4. Choose file "enmasse_17.zip".
5. Click "Upload & Install" to install new templates.
6. Congratulations, you have completed all steps of basic installation.
Configuration
TEMPLATE

1. Back-end ⇒ Extensions ⇒ Template Manager.
2. Find the template named "enmasse_17 - Default", set it to default.
3. Then when you load your home page you will get result:
MENU CONFIGURATION
1. Back-end ⇒ Menus ⇒ Main Menu ⇒ Add New Menu Item.

2. Click "Select" to choose menu item type.
3. Find "En Masse" area, then click "Listing of Deal".

4. Type "Menu title". If you want you can choose "Parent item".
5. Click "Save & New".
6. Repeat step 2 with menu items "Deal of the Day", ",Upcoming Deal", "List of Expired Deal", "Merchant", "My Orders", "My Sales",
"Subscription page".
7. When you finished all steps with menu items.
Back-end ⇒ Extensions ⇒ Module Manager ⇒ Main Menu.
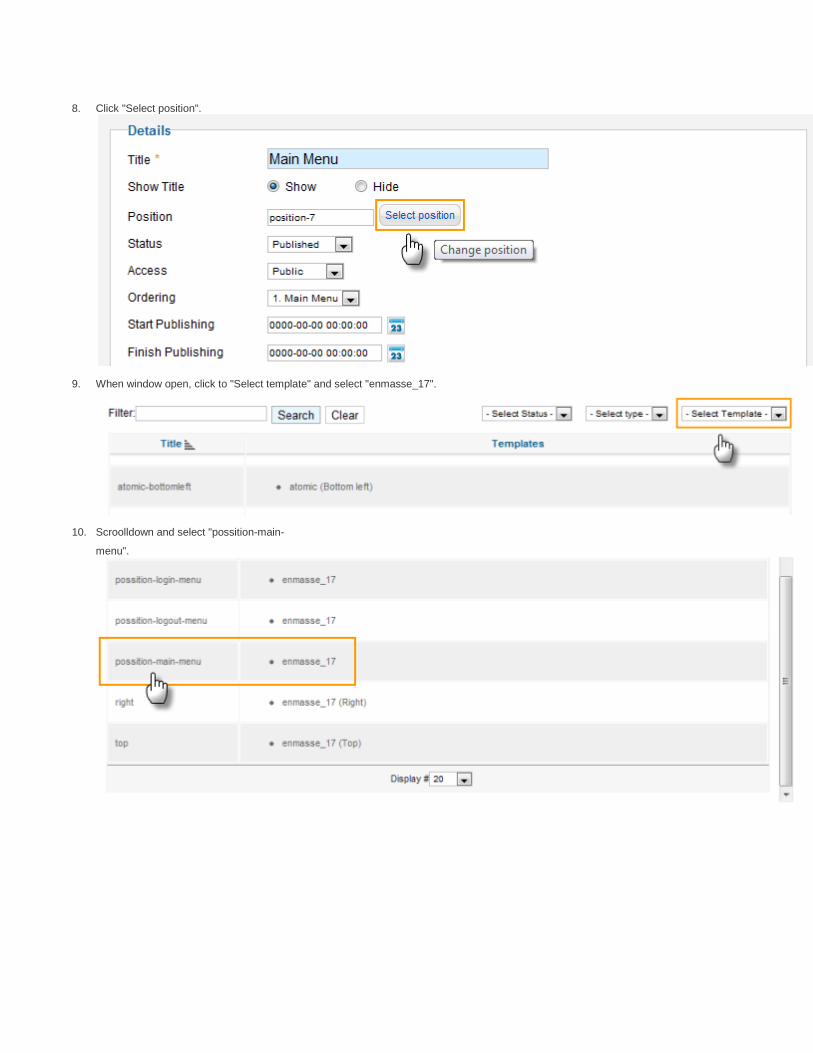
8. Click "Select position".
9. When window open, click to "Select template" and select "enmasse_17".
10. Scroolldown and select "possition-main-
menu".
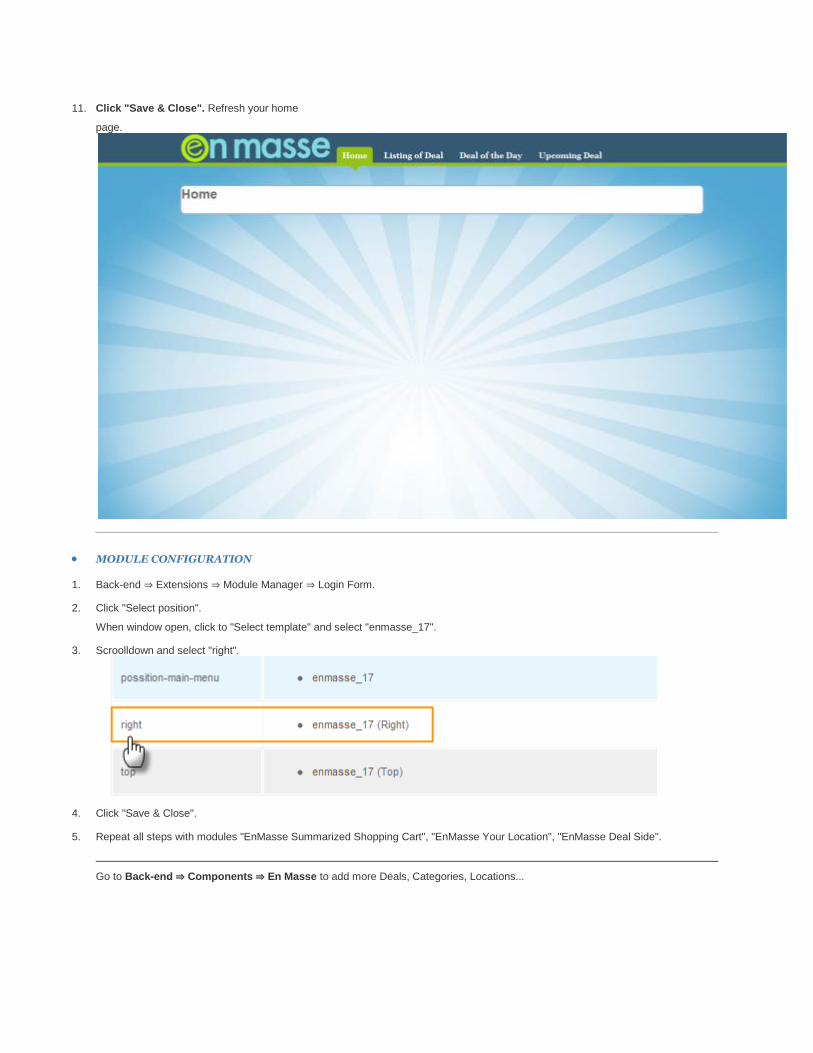
11. Click "Save & Close". Refresh your home
page.
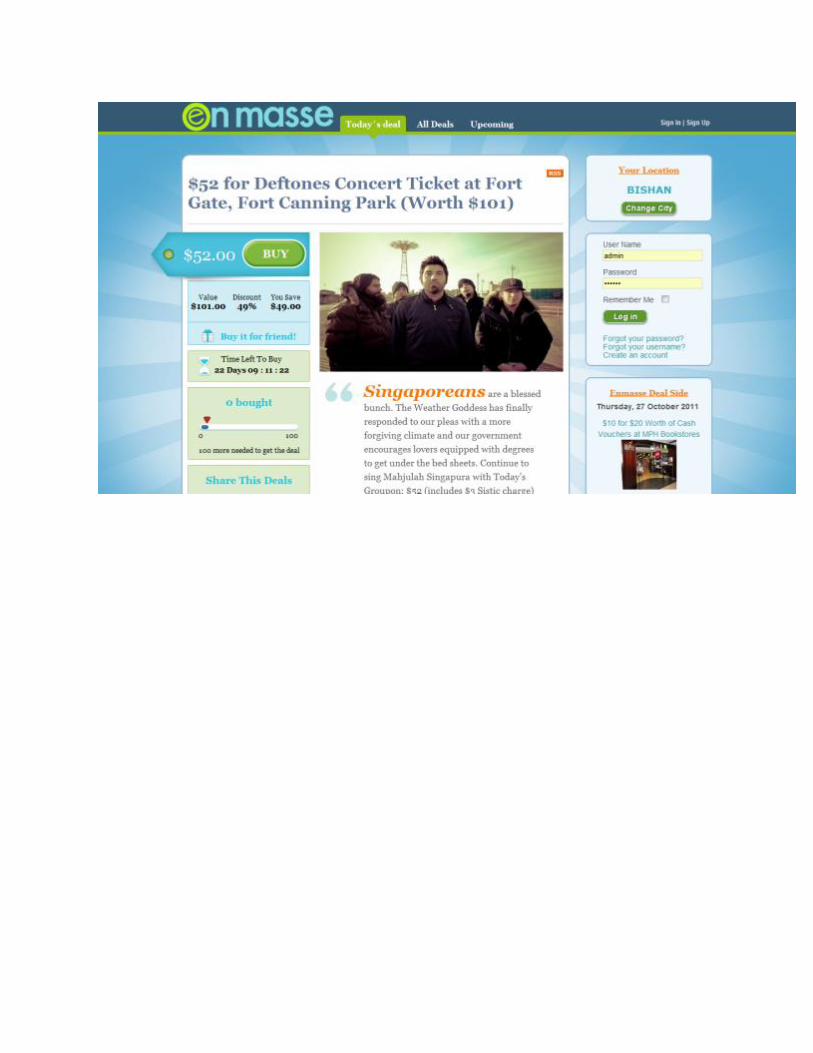
MODULE CONFIGURATION
1. Back-end ⇒ Extensions ⇒ Module Manager ⇒ Login Form.
2. Click "Select position".
When window open, click to "Select template" and select "enmasse_17".
3. Scroolldown and select "right".
4. Click "Save & Close".
5. Repeat all steps with modules "EnMasse Summarized Shopping Cart", "EnMasse Your Location", "EnMasse Deal Side".
Go to Back-end ⇒ Components ⇒ En Masse to add more Deals, Categories, Locations...
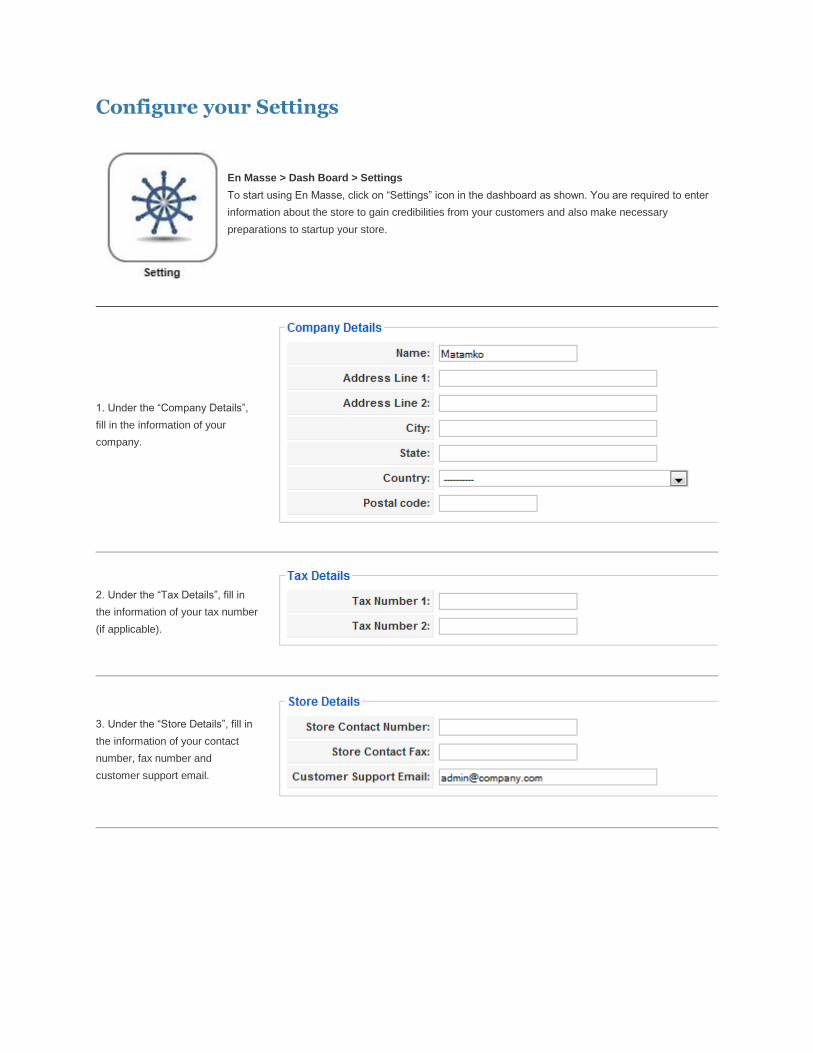
Configure your Settings
En Masse > Dash Board > Settings
To start using En Masse, click on “Settings” icon in the dashboard as shown. You are required to enter
information about the store to gain credibilities from your customers and also make necessary
preparations to startup your store.
1. Under the “Company Details”,
fill in the information of your
company.
2. Under the “Tax Details”, fill in
the information of your tax number
(if applicable).
3. Under the “Store Details”, fill in
the information of your contact
number, fax number and
customer support email.

4. Under the “Currency Details”,
fill in the information of your
currency in use, currency prefix
(for e.g. “USD$”), the thousands
separator and number of decimal
places to use. For countries that
have a currency postfix (for e.g
“100₫” Vietnam dong), enter it in
“Currency Postfix”.
5. Under the “Terms and
Conditions”, select the Joomla
article that contains the
information to the terms and
conditions in using your services
via En Masse.
6.Under the “Frontend Layout”,
select the En Masse template to
use in the frontend. You can use
this to change the color theme of
the storefront as well.
7. Once you are done with configuring the settings page, you would need to first create entries “Category”, “Location”, “Merchant”
and “Payment Gateway” before you can create your first deal. You would first need to create a Joomla user before proceeding to
creating Joomla entries.

How to create a User Accounts?
Joomla! > Site > User Manager
You will need to create Joomla! User Accounts to allow your Salesperson and Merchants to access deals and coupon information
from the frontend.
Before you create their profiles in En Masse, you will first create their login account in Joomla!. This page shows the creation of
ordinary accounts for anyone to login to the website. You will need to match these accounts to Salesperson/Merchant profiles in En
Masse to identify these accounts as Salesperson or Merchant. You can read more in these manuals: Salesperson Management and
Merchant Management.

1. Click on “User Manager” under
“Site”. This is where you control
user access in your website.
2. You will see a list of user
accounts. To add a new user
account, click on at the
top right hand corner. To delete,
select the unwanted user
accounts by ticking the checkbox
on the left column and
press . You can edit their
account information by ticking the
checkbox and pressing .
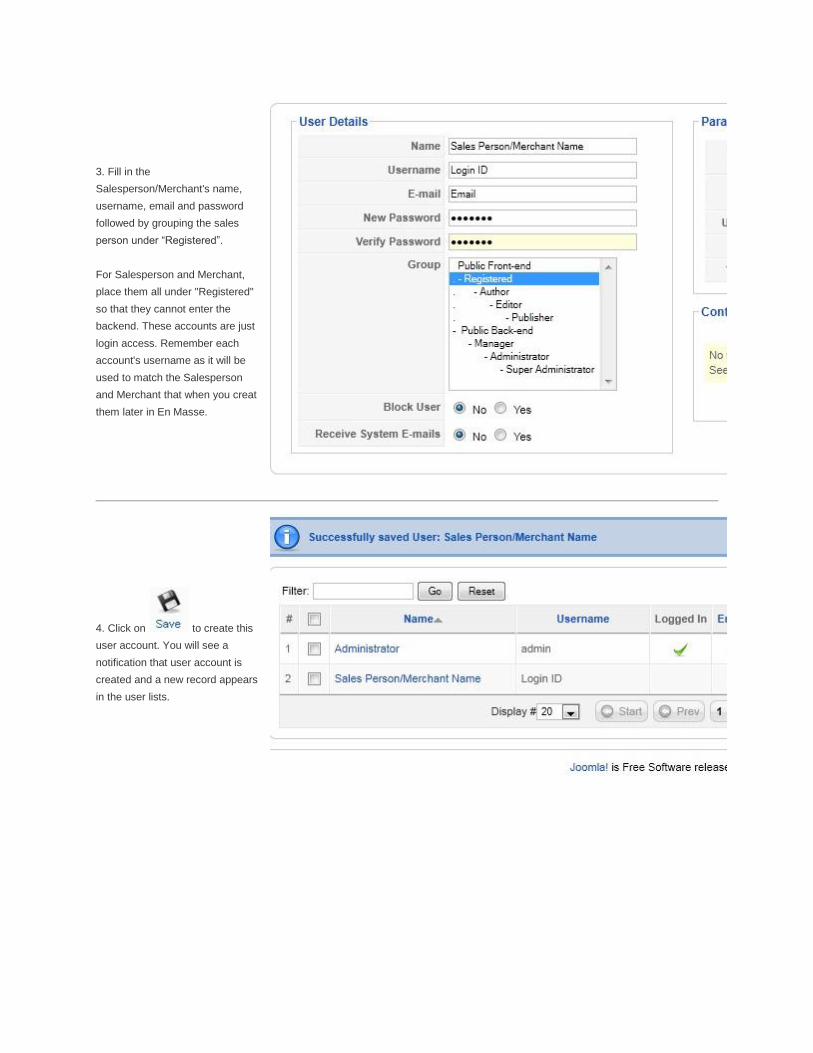
3. Fill in the
Salesperson/Merchant's name,
username, email and password
followed by grouping the sales
person under “Registered”.
For Salesperson and Merchant,
place them all under "Registered"
so that they cannot enter the
backend. These accounts are just
login access. Remember each
account's username as it will be
used to match the Salesperson
and Merchant that when you creat
them later in En Masse.
4. Click on to create this
user account. You will see a
notification that user account is
created and a new record appears
in the user lists.

Creating & Managing Salespersons
En Masse > Dash Board > Sales Person
After you have created user accounts in Joomla! (User Management), click on the “Sales Persons” icon
in the dashboard. The Salesperson management allows you to create a list of Salesperson who will
source and work with Merchants in bringing deals to your website. The Salespersons will only be able to
add deals in En Masse through Joomla frontend. To allow them to login to your website frontend as a
Salesperson, you need to match the Joomla! user account with his En Masse Salesperson profile.
1. In Salesperson
Management page,
you can see the list of
Salespersons. To
create a new
Salesperson profile,
simply click
on at the top
right hand corner.
You can choose to
view their information
by clicking on their
name.
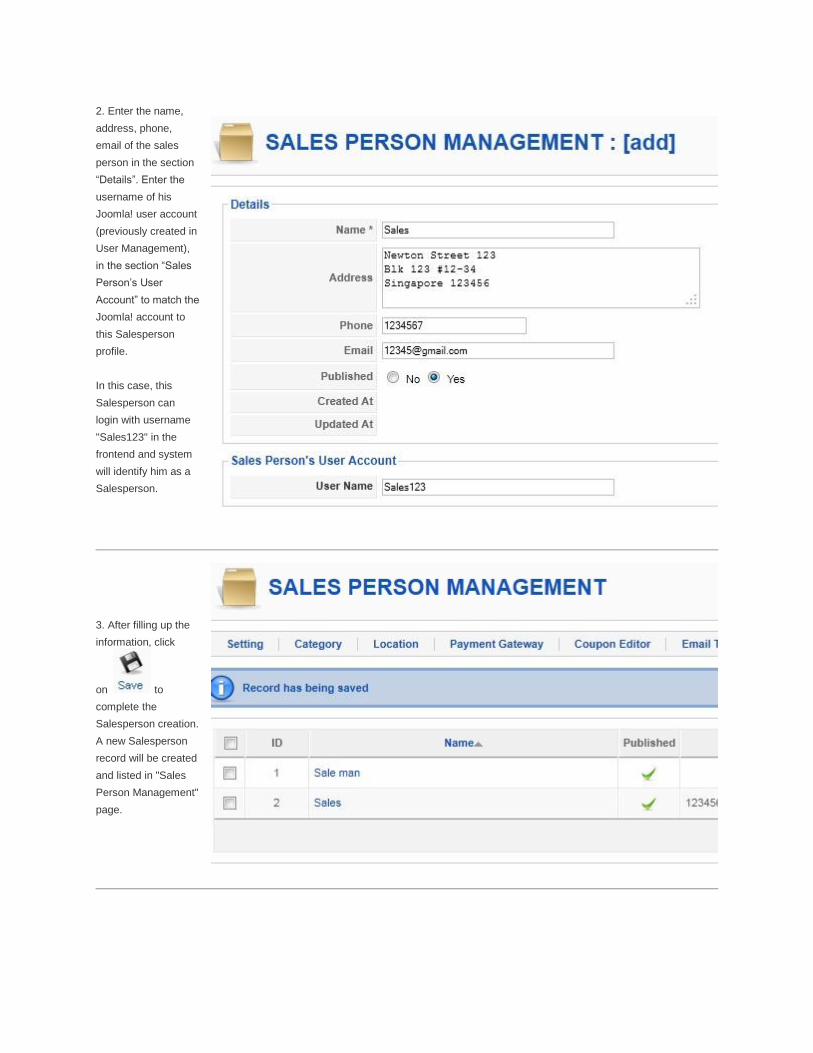
2. Enter the name,
address, phone,
email of the sales
person in the section
“Details”. Enter the
username of his
Joomla! user account
(previously created in
User Management),
in the section “Sales
Person’s User
Account” to match the
Joomla! account to
this Salesperson
profile.
In this case, this
Salesperson can
login with username
"Sales123" in the
frontend and system
will identify him as a
Salesperson.
3. After filling up the
information, click
on to
complete the
Salesperson creation.
A new Salesperson
record will be created
and listed in "Sales
Person Management"
page.

4. Once this is done,
this Salesperson can
access “My Sales”
page in the frontend
(you can create this
as a Menu Item) via
En Masse in Joomla’s
menu portion. They
cannot access
Merchant's page as
system identifies the
login as
Salesperson.
5. This page is only
available to
Salespersons who
are matched with a
Joomla! user account.
Other registered
users will not be able
to access this page.
After a Salesperson
logs in, he/she can
view their sales for
the deal they bring in
and “add new deal” to
En Masse in Joomla’s
frontend, but on
pending mode.
For more information
on adding a deal
through frontend,
click on "Deal
Management".

Creating & Managing Merchants
En Masse > Dash Board > Merchant
After you have created user accounts in Joomla! (User Management), click on the “Merchant” icon in the
dashboard. The Merchant management allows you to create a list of Merchants whom are organizations
that provide the deals to the customers. Merchants can only list the coupons in the deals they provide
and update the status of the coupon if customers come in with the coupon. This can only be done in the
frontend. To allow them to login to your website frontend as a Merchant, you need to match the Joomla!
user account with his En Masse Merchant profile.
1. In Merchant
Management page, you
can see the list of
Merchants. To create a
new Merchant profile,
simply click on
at the top right hand
corner. You can choose
to view their information
by clicking on their
name.
2. Enter the necessary
information of the
Merchant in the section
“Details”. You can assign
a Salesperson to this
Merchant to know which
Salesperson is
responsible for creating
deals for this Merchant.
Enter the username of
his Joomla! user account
(previously created in
User Management), in
the section “Merchant’s
User Account” to match
the Joomla! account to
this Merchant profile.

3. To show the location
of the Merchant or where
the deal will be situated
at, simply enter the
latitude and longtitude of
the location under
"Google Map". You can
obtain the latitude and
longtitude of a location
fromGetLatLon.com by
entering the address in
the search bar. Adjust
the size of the google
map by changing the
width and height
attribute.
After filling up the
information, click
on to complete
the Merchant creation. A
new Merchant record will
be created and listed in
"Merchant Management"
page.
4. In the frontend,
Merchant information will
be shown in the deal
information if it is
assigned the deal. (See
Deal Management) The
google map will be
shown below the
Merchant's information
too.
5. In the frontend, this
page is only available to
Merchants who are
matched with a Joomla!
user account. Other
registered users will not
be able to access this
page.
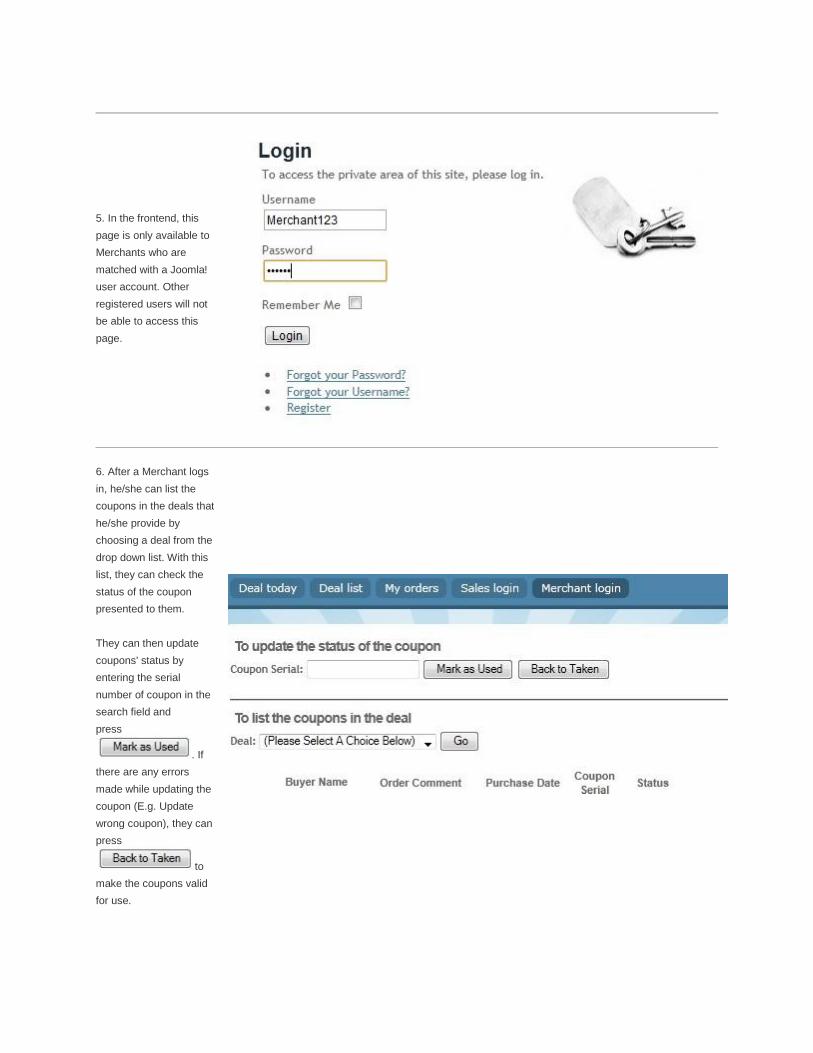
6. After a Merchant logs
in, he/she can list the
coupons in the deals that
he/she provide by
choosing a deal from the
drop down list. With this
list, they can check the
status of the coupon
presented to them.
They can then update
coupons' status by
entering the serial
number of coupon in the
search field and
press
. If
there are any errors
made while updating the
coupon (E.g. Update
wrong coupon), they can
press
to
make the coupons valid
for use.

Creating & Managing Categories
En Masse > Dash Board > Category
Different categories of deals are needed to organise the deals on your web and allow customers to find
the deals effectively. It can range from Food, Entertainment to Sports, Apparels and more. It is best to
keep the Categories as relevant as possible to give a good search result. You will assign a category to a
deal when you create the deal.
1. Click on the “Category
Management” icon from
the dashboard. You see
a list of the categories
which defines the types
of deals. To create a new
Category, simply click
on at the top
right hand corner. You
can choose to edit other
Categories by pressing
the name.
2. Enter the necessary
information of the
Category and
press to
complete the creation.
You will see a new
record in the list of
Category.

3. In the frontend, people
can see the new
Category in the drop
down list and search for
deals that are in this
Category. This bar will
appear on top of any list
of deals.
When
Salesperson/Administrat
or creates a deal, they
can assign the deal to a
Category via the
Category drop down list.
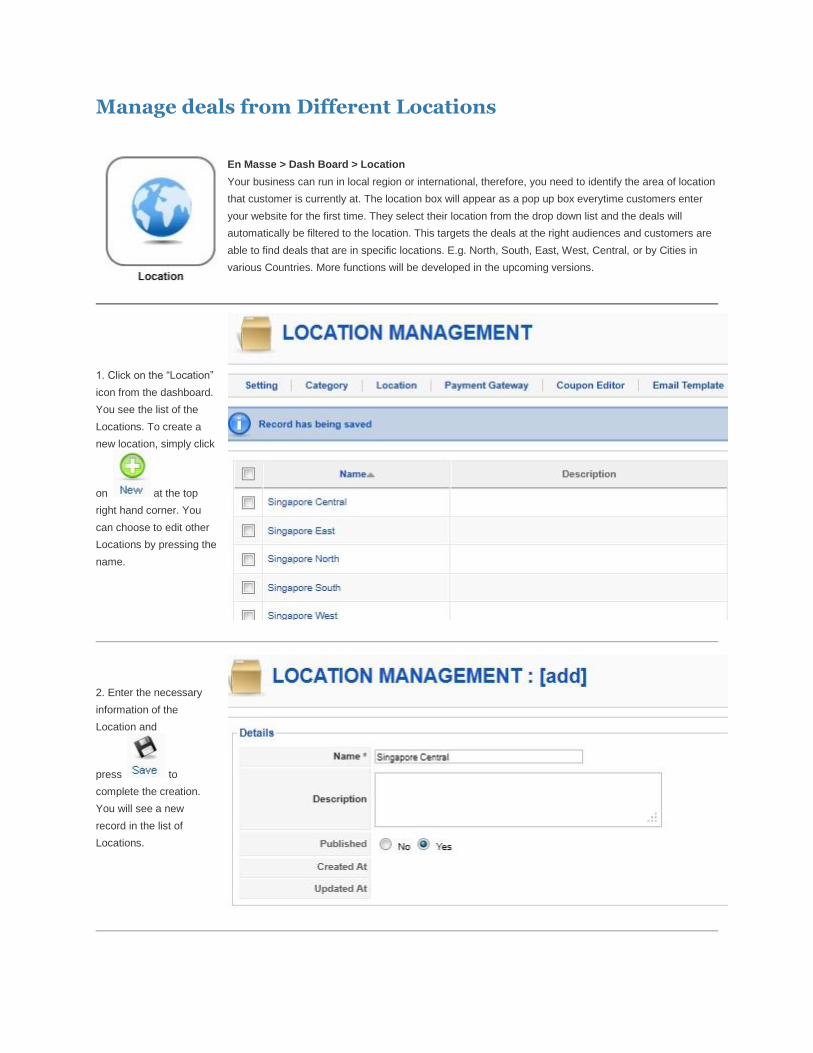
Manage deals from Different Locations
En Masse > Dash Board > Location
Your business can run in local region or international, therefore, you need to identify the area of location
that customer is currently at. The location box will appear as a pop up box everytime customers enter
your website for the first time. They select their location from the drop down list and the deals will
automatically be filtered to the location. This targets the deals at the right audiences and customers are
able to find deals that are in specific locations. E.g. North, South, East, West, Central, or by Cities in
various Countries. More functions will be developed in the upcoming versions.
1. Click on the “Location”
icon from the dashboard.
You see the list of the
Locations. To create a
new location, simply click
on at the top
right hand corner. You
can choose to edit other
Locations by pressing the
name.
2. Enter the necessary
information of the
Location and
press to
complete the creation.
You will see a new
record in the list of
Locations.
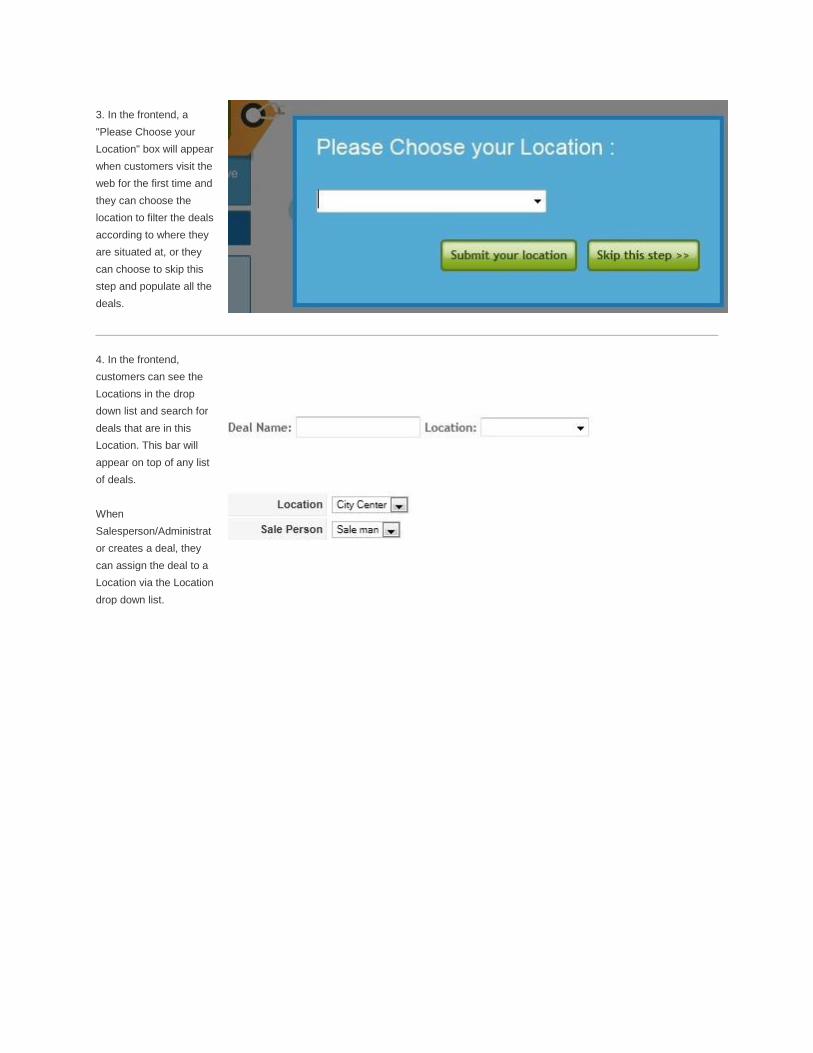
3. In the frontend, a
"Please Choose your
Location" box will appear
when customers visit the
web for the first time and
they can choose the
location to filter the deals
according to where they
are situated at, or they
can choose to skip this
step and populate all the
deals.
4. In the frontend,
customers can see the
Locations in the drop
down list and search for
deals that are in this
Location. This bar will
appear on top of any list
of deals.
When
Salesperson/Administrat
or creates a deal, they
can assign the deal to a
Location via the Location
drop down list.

How to configure the payment gateways for customers?
En Masse > Dash Board > Payment Gateway
To start accepting payments over the internet when user purchase the
coupons, you must first configure your Payment Gateway at the backend.
Users can choose their preferred Payment Gateway when they checkout
their shopping cart. En Masse can support multiple gateways (more option
in upcoming versions) and there are currently two methods of payment: By
Credit/Debit Card or Paypal and Cash/Bank Transfer. Please check if you can successfully
receive the payment as En Masse will not be responsible if any payment is lost. *Please note
that Paypal will not charge any transaction /refund fee if you refund to the customers, therefore
no costs will be incurred at all if you refund the customers
1. To configure, click
on “Payment
Gateway” icon at the
dashboard. You will
see a list of
supported payment
gateway in this
page. You can
choose to edit the
payment gateway by
pressing on the
name.
Credit/Debit Card or Paypal Option
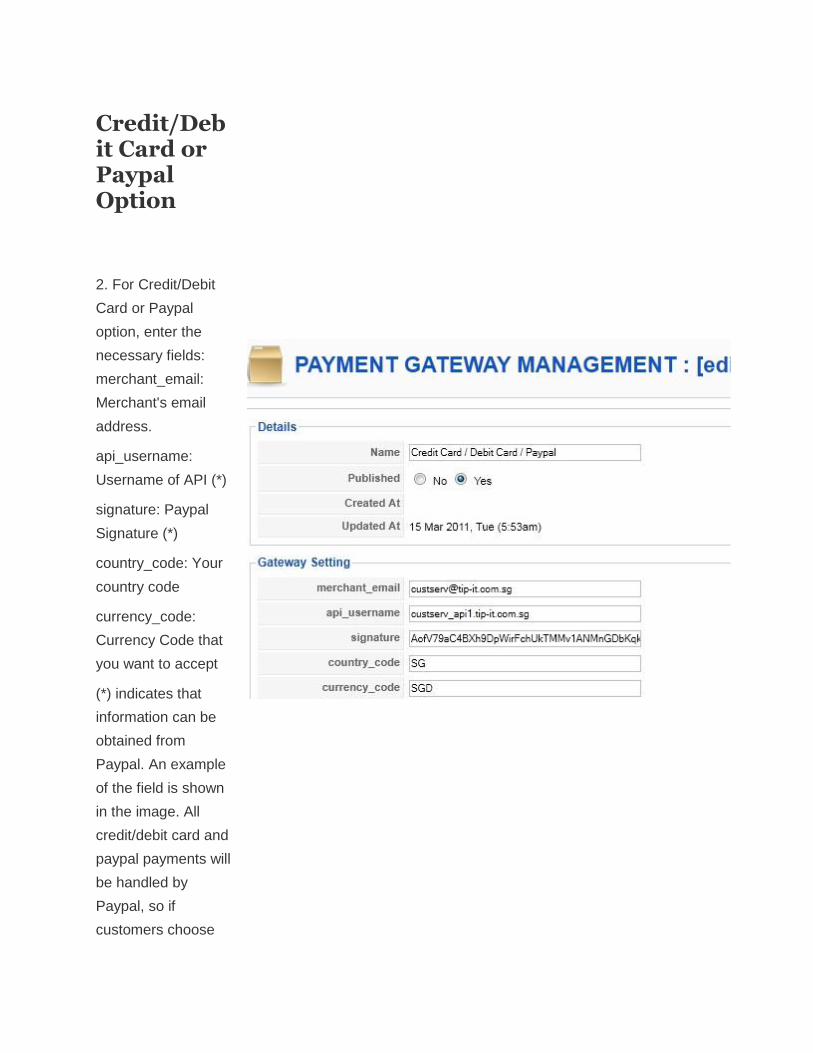
2. For Credit/Debit
Card or Paypal
option, enter the
necessary fields:
merchant_email:
Merchant's email
address.
api_username:
Username of API (*)
signature: Paypal
Signature (*)
country_code: Your
country code
currency_code:
Currency Code that
you want to accept
(*) indicates that
information can be
obtained from
Paypal. An example
of the field is shown
in the image. All
credit/debit card and
paypal payments will
be handled by
Paypal, so if
customers choose

this option, they will
be redirected to
Paypal for payment.
Simply follow the
steps below to
obtain the
information from
Paypal.
3. Go
to Paypal.com and
login with your
Paypal account.
Your account must
be a Premiere or
Business account in
order to synchronize
your account for
your website
payment. (Look for
Paypal Express
Checkout)
4. After logging in,
click "Profile" under
the "My Account"
tab.

5. You will see four
major tabs in the
"My Profile" page.
Click on "My Selling
Preferences".
6. A list of options
will be populated
and under "API
Access", click
"Update".

7. Click "View API
Signature".
8. Your API
information will
appear on this page.
Copy down the API
Username and
Signature and fill
these information in
the respective fields.
(Refer to Point 2)
Cash/Bank Transfer Option
9. For Cash/Bank
Transfer option, you
will need to state
down the
instructions for them
to make payment.
For example, "Go to
your bank account
and transfer the
money to account
number:...., Payment
within 3 days." and
more. This message
will appear when
user press confirm
check out with this
payment option.
For this mode of
payment, order statu
s will be “Pending”
once the customer
makes the purchase.
Upon receipt of cash
from the customer,
administrators must
update the status of
the Order to “Paid”
under “Order
management” in the
backend.

How to manage your deals?
En Masse > Dash Board > Deal
After you have all your Saleperson and Merchant ready, you can start to
create deals. A deal is the selling of a particular type of coupon (E.g. 50%
off at Jack's Place) and it can be created by Administrator and Salesperson
only. Deals can be added from frontend (Salesperson) and backend
(Administrator). There are four status for a deal: Pending, On Sales,
Confirmed, Voided. Administrator can choose to publish (show) or unpublish (hide) a deal.
Please refer to the flow chart below on how you can manage the deals.

1. In Deal
Management page,
you can see the list
of Deals. To create
a new deal, simply
click on at
the top right hand
corner.

2. Frontend and
backend will
experience the
same format as
shown on the right.
Fill in the
necessary
information of the
deal in the
respective fields.
Enter the name of
the deal. For e.g.,
“50% off Merchant
ABC. Only $20 for
$45 worth of
coffee.”
Enter the
description of the
deal. This can be
background
information about
the merchant, the
location,
information about
the deal.
Enter a short
description of the
deal. It is
recommended to
be limited to 1 - 3
sentences of text
(no html) that
describes the deal.
Enter the original

price of the deal
(without discounts).
Enter the retail
price of the deal
(the selling price).
Upload the deal
image to display for
this deal.
Select the start and
end date of the
deal. This is the
validity from which
a user can buy the
deal.
Enter the minimum
quantity of the deal,
this is the minimum
number that must
be met before a
deal is confirmed.
Any number of
deals sold beyond
this will cause the
status of the deal to
become “cancelled”
at the expiry date.
At the “Merchant”
drop-down box,
select the merchant
associated with this
deal.
At the “Category”
drop-down box,
select the category

that this deal
belongs to.
At the “Location”
drop-down box,
select the location
of this deal.
At the “Sales
Person” drop-down
box, select the
sales-person who
brought in this deal.

3. Continue filling
up the information
and please take
extra care on the
terms & conditions.
You won't want any
misunderstandings
to happen with your
customers.
Enter any highlights
that you want, E.g.
The environment of
the restaurant is
almost like a 5 star
hotel.
Enter Terms and
Conditions that are
approved by
Merchant. E.g.
Valid only on
Weekdays and
Saturdays.
For backend
administrator, click
on to save
the deal. Deal will
be on sales
immediately if
added from
backend.
For frontend
Salesperson, click
on

to save the deal.
Deal will be in
pending mode if
added from
frontend. If deal is
in pending mode, it
will not be
displayed in the
frontend.
4. Administrator
can manage the
deals via the
following ways:
Approve the deals
that are in pending
mode. These are
deals added from
the frontend.
Confirm
the deals once
deals pass their
minimum quantity.
Void deals
that did not
manage to reach
minimum quantity,

or deal is off.
Publish or
unpublish a deal to
unhide/hide the
deal.

How to edit the Coupons?
En Masse > Dash Board > Coupon
Coupons will be issued to customers according to their orders via sending
of email. Customers will not receive their coupons when they checkout so
do put a reminder to inform them about this issue. These coupons will only
be issued to them when the deal is confirmed by the Administrator
(See Deal Management). This means that deal is on and customers can
print out the coupons that they received in email to claim their treats. All coupons will be marked
with a serial number for Merchants to track the coupons.
1. Click on the
“Coupon Editor” icon
from the dashboard.
You a list of fields
that the coupon
contains. These
fields are:
dealName: Name of
the Deal (E.g. 10%
off Ala Carte Dishes)
serial: Serial
number/Barcode to
identify the coupon
merchantName:
Merchants that offer
this deal (E.g. Jack's
Place Restaurant)
highlight: Highlights
of Deals previously
keyed into the deal
information
personName: Name
of coupon holder
(Must be specified
when customers
checkout
term: Terms &
Conditions of the
coupon previously
keyed into the deal
information (E.g. Not
valid during public
holidays and
weekends)
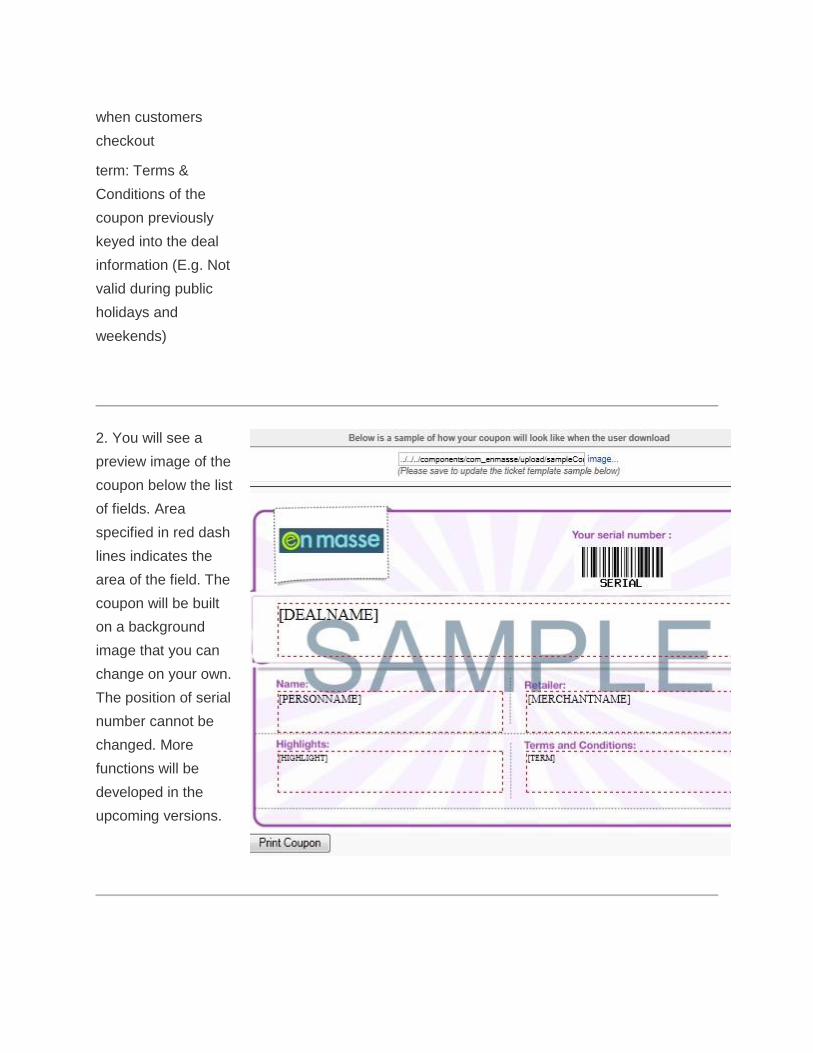
2. You will see a
preview image of the
coupon below the list
of fields. Area
specified in red dash
lines indicates the
area of the field. The
coupon will be built
on a background
image that you can
change on your own.
The position of serial
number cannot be
changed. More
functions will be
developed in the
upcoming versions.

3. To change the
positions of the
fields, press "Edit" on
the most right
column in the list of
field.
X: Move the area
left/right. Most left is
0, most right is about
600.
Y: Move the area
up/down. Most top is
0, most bottom is
about 350.
Width: Width of the
area.
Height: Height of the
area.
Font size: Size of the
words that will be
printed for that field.
Smallest Readable:
7, Biggest: 60~70.
Press to save
the changes and the
coupon preview will
be updated. However
this setting will not be
saved until you press
the again in
the main screen
(where the list and
preview coupon are).
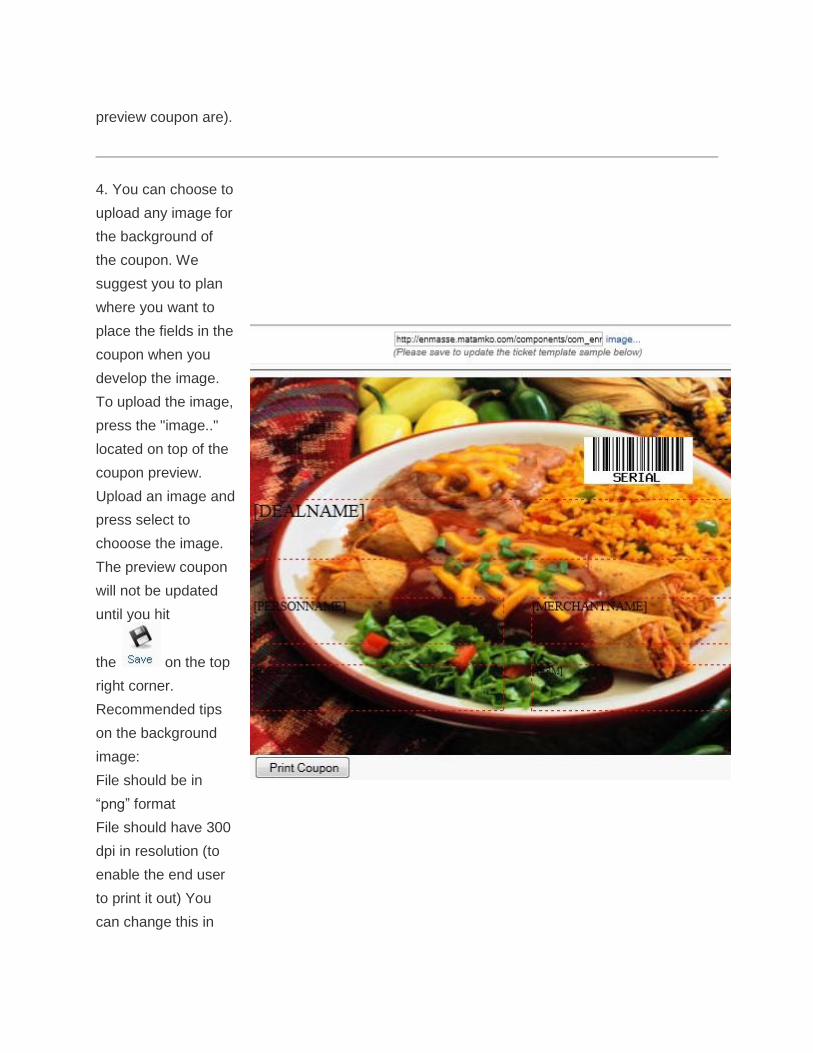
4. You can choose to
upload any image for
the background of
the coupon. We
suggest you to plan
where you want to
place the fields in the
coupon when you
develop the image.
To upload the image,
press the "image.."
located on top of the
coupon preview.
Upload an image and
press select to
chooose the image.
The preview coupon
will not be updated
until you hit
the on the top
right corner.
Recommended tips
on the background
image:
File should be in
“png” format
File should have 300
dpi in resolution (to
enable the end user
to print it out) You
can change this in

photoshop properties
page.
File should be
5.76cm in width and
3.6cm in height
(About 630 x 390 px)
File should not be
too dark so that the
fields can be seen
when printed out. A
bad example is
shown on the right.
You may wish to
print the coupon by
pressing
.
5. A good example
will be the image
shown on the right.
We will develop a
font changing
function in the next
upcoming versions.

How to edit the Emails that are sent out to the customers?
En Masse > Dash Board > Email Template
There are four types of emails that will be sent out to customers at different
phase. Firstly, be it paid/unpaid, buyers will receive a receipt via email after
they have successfully made an order in the website with a type of payment
gateway. Secondly, they will receive an email informing them that deal is
confirmed when Administrator press "Confirm Deal" at Deal Management
page. Another batch of email containing the link to coupons will be sent to the delivery email
that buyer has specified in the order. It can be their friends or relatives and they can download
and print the coupons for use once they receive it. Lastly, when the Administrator has voided a
deal, an email will be sent to the buyers on the cancellation of the deal and refund procedures.
See Order Management for more information about what buyers will key in when they create an
order.
1. Click on the
“Email Template”
icon from the
dashboard. You a
see the four types of
email that you can
edit. You will not be
able to add or delete
any emails.

2. This receipt email
will only be sent to
buyer's email
address once they
checkout
successfully.
To edit, click on the
receipt under the
column "Name". All
tags will
automatically be
replaced by:
$buyerName:
Buyer’s name
$buyerEmail:
Buyer's email
$deliveryName:
Name of coupons
receiver
$devlieryEmail:
Email of coupons
receiver
$orderID: Order ID
generated by the
system
$dealNAme: Title of
the Deal
$totalPrice: Total
price of the order
$createdAt: Date of
order
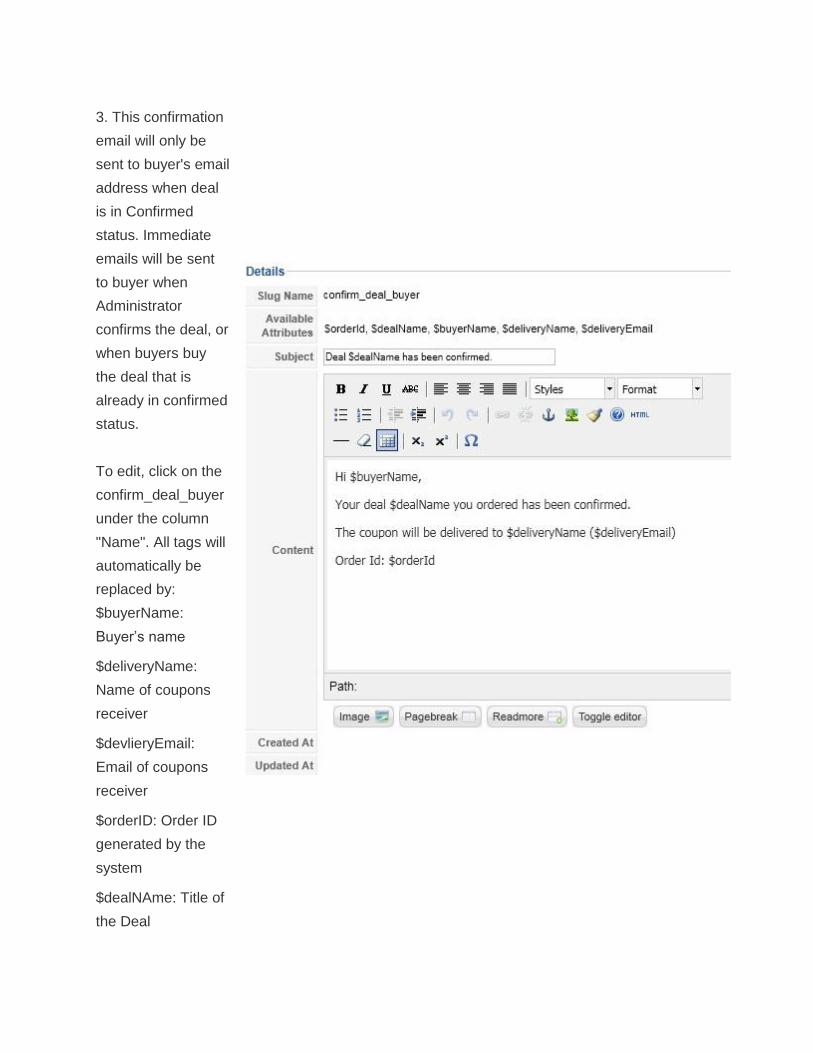
3. This confirmation
email will only be
sent to buyer's email
address when deal
is in Confirmed
status. Immediate
emails will be sent
to buyer when
Administrator
confirms the deal, or
when buyers buy
the deal that is
already in confirmed
status.
To edit, click on the
confirm_deal_buyer
under the column
"Name". All tags will
automatically be
replaced by:
$buyerName:
Buyer’s name
$deliveryName:
Name of coupons
receiver
$devlieryEmail:
Email of coupons
receiver
$orderID: Order ID
generated by the
system
$dealNAme: Title of
the Deal
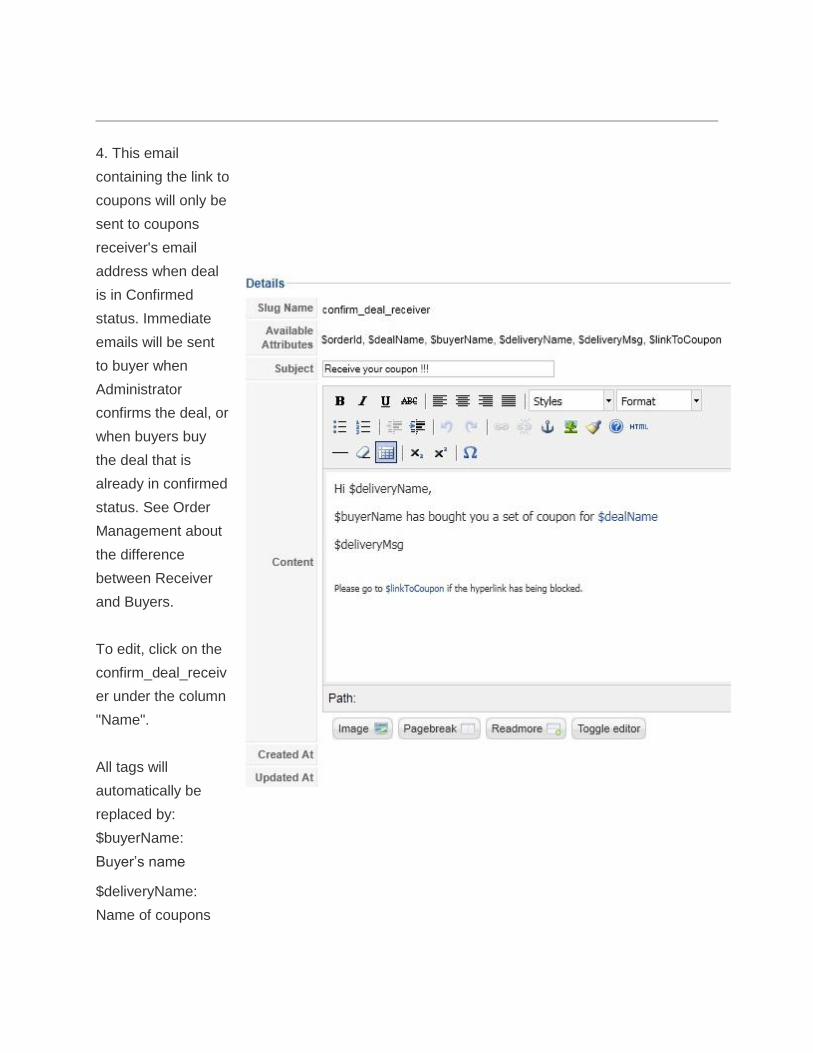
4. This email
containing the link to
coupons will only be
sent to coupons
receiver's email
address when deal
is in Confirmed
status. Immediate
emails will be sent
to buyer when
Administrator
confirms the deal, or
when buyers buy
the deal that is
already in confirmed
status. See Order
Management about
the difference
between Receiver
and Buyers.
To edit, click on the
confirm_deal_receiv
er under the column
"Name".
All tags will
automatically be
replaced by:
$buyerName:
Buyer’s name
$deliveryName:
Name of coupons
receiver
$orderID: Order ID
generated by the
system
$dealNAme: Title of
the Deal
$deliveryMsg:
Message typed by
buyer when he/she
creates the order
$linkToCoupon: Link
to get the coupon
images if the image
does not load.
Do write down other
information such as
instructions on how
to use the coupons
and more.

5. This cancellation
email will
immediately be sent
to buyer's email
address when
Administrator voids
a deal.
To edit, click on the
void_deal under the
column "Name". All
tags will
automatically be
replaced by:
$buyerName:
Buyer’s name
$orderID: Order ID
generated by the
system
$dealNAme: Title of
the Deal
$refundAmt: Amount
to be refunded to
the buyer
Also include the
refund procedures
to inform customers
how you will refund
the money to them.

How to place and manage your orders?
En Masse > Dash Board > Order
You will need to know how customers create an order in the frontend and
how to manage the orders at the backend. There are five status for an
order: Pending, Paid, Unpaid, Delivered and Refunded. Please refer to the
chart below to learn more about the change of status of an order. More
functions and improvements will be made in the upcoming versions so stay
tune.

Frontend
1. Customers can add
deal to their cart by
pressing the "BUY"
button. The cart can
contain 1 deal only.
(Improvements will be
made in upcoming
versions) 1 Quantity of
the deal will be added
to the cart and they can
proceed to check out.
2. They will be rediect
to this page upon
pressing the "BUY"
button. This is the
shopping cart. Name,
price and quantity of the
deal will be shown
inside the cart and user
can choose to change
the quantity. They can
press to
update the
quantity,
to empty cart to delete

the deal in cart,
or to
proceed to check out.
3. Buyers must login in
order to checkout. If
they are not logged in,
they will be redirected
to the login page. They
will be redirected to
check out page after
logging in.
If buyers are logged in,
they will be redirected
to the check out page
straight away. This
page will show what is
in the cart and below
the cart will be the
image shown on the
right. Buyers need to
key in the name and
email of the person who
will receive the coupons
and choose the method
of payment.
Take note that the
receiver's name will be
verfied by the merchant
and the name must
match his/her personal
identification card. If
---

buyer wishes to receive
the coupons himself, he
can enter his own
particulars.
There are two methods
of payment:
PayPal/Credit/Debit
Card and Cash/Bank
Transfer.
After keying the
information,
press
to
check out and a receipt
will be emailed to
buyer's email.
4. If customers choose
PayPal checkout, a
message "You will be
redirected to Paypal in
a moment. Please
wait..." will appear at
the top of the page and
they will be redirected
to Paypal paying page.
They can pay by their
credit/debit card by
pressing "Continue"
under "Don't have a
PayPal account?" or
login to their PayPal
---

account on the right.
5. They will be
prompted to key in their
credit/debit card
information if they
select "Continue" under
"Don't have a PayPal
account?". If they
change their mind, they
can use the login box
on the right to login their
PayPal account to
make payment.
After making payment,
a confirmation email will
be sent by PayPal to
inform them payment is
successful. Buyers will

be redirected back to
the deals website to
continue shopping.
If they skip the payment
procedure, the order will
be automatically
marked as Unpaid. If
payment is successful,
order will be
automatically marked
as Paid.
6. If buyers pay by
Cash/Bank Transfer,
they will be redirected
to this page after
pressing
.
This page will give
instructions on how to
make payment via
Cash/Bank Transfer, for
example, state the bank
account number, email
them the receipt and
more.

Backend
1. In Order
Management page, you
can see the list of
Orders that are created
by customers. You can
use the Status drop
down list to filter the
orders according to
their Status, or search
for the Orders via the
Deal Name.

2. To edit an order, click
on the ID of the Order in
the list. You can only
update the status of the
order or add comment
to the order.

3. If order is confirmed,
a link to the coupons
will be sent to receiver's
email stated in the order
and the order status will
be automatically
marked as Delivered.
If order is voided, an
email will be sent to
buyer's email stating
the refund procedures.
Once administrator has
manually refunded the
money to the buyers,
the status of the orders
has to be manually
updated to Refunded.
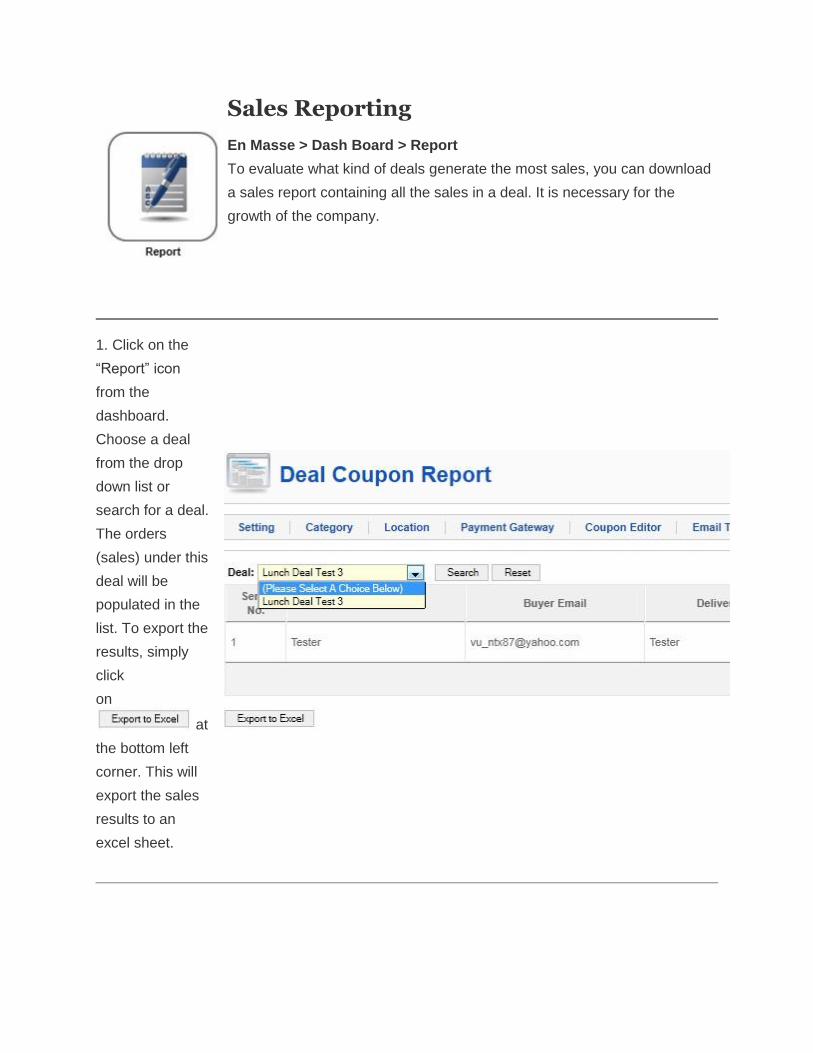
Sales Reporting
En Masse > Dash Board > Report
To evaluate what kind of deals generate the most sales, you can download
a sales report containing all the sales in a deal. It is necessary for the
growth of the company.
1. Click on the
“Report” icon
from the
dashboard.
Choose a deal
from the drop
down list or
search for a deal.
The orders
(sales) under this
deal will be
populated in the
list. To export the
results, simply
click
on
at
the bottom left
corner. This will
export the sales
results to an
excel sheet.
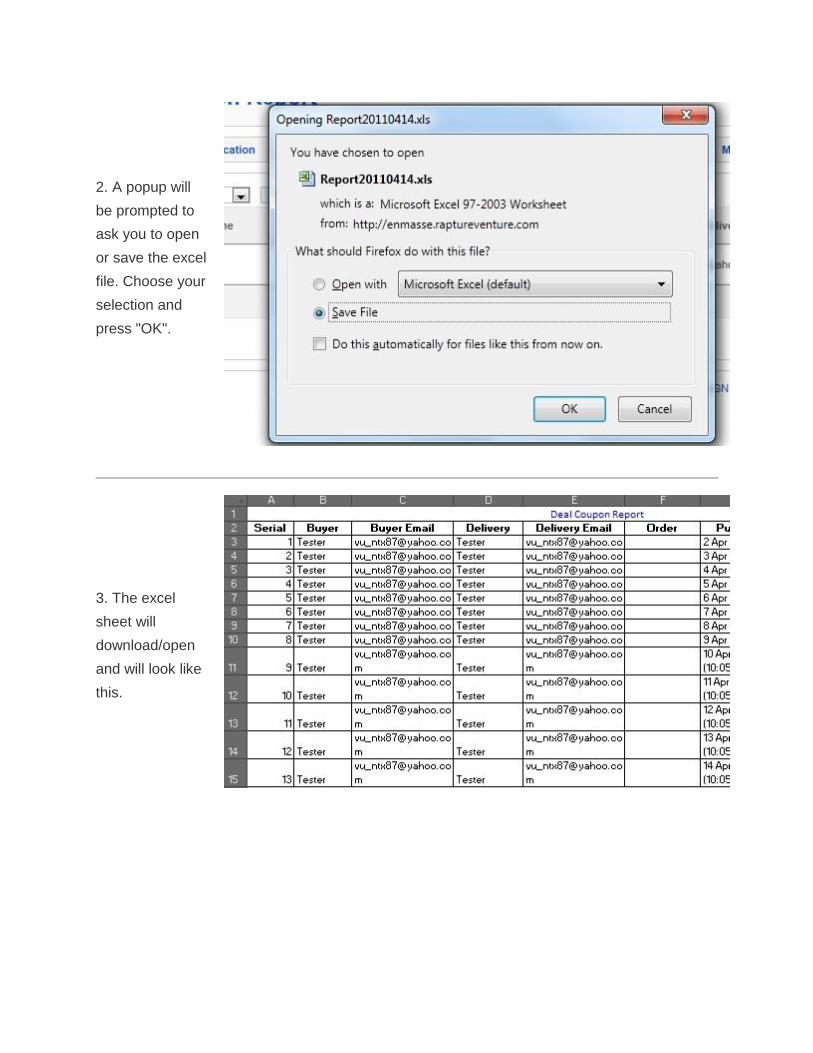
2. A popup will
be prompted to
ask you to open
or save the excel
file. Choose your
selection and
press "OK".
3. The excel
sheet will
download/open
and will look like
this.

Creating RSS & Menu Items
After doing all the preparations, you will need to create the menu item for users to navigate to
the respective page. Also, you will want your users to easily see the website's RSS (Real
Simple Syndication) feed. Read more from RSS Wiki. It is simple to create menu items and also
RSS feed.
Creating Menu Items
1. Under Menu > Main Menu (or
any menu that you want to put
the menu items to), click
on to create a new menu
item. You will see the different
types of menu items you can
create. Click on En Masse and
the list of En Masse menu items
will be populated. There are 7
types of menu items you can
create.

2. Firstly, List of Deal lists down
all the deals in your website.
Customers can filter or search the
list by Deal Name, Loation,
Category and even sort by deal
name, end date and price. You
will not need to specify anything
for this menu item, except for the
title.
3. Next, it is the Deal of the Day.

4. Next, the Upcoming Deal lists
down all the deals that have not
yet started (Start date is bigger
than today's date). You do not
need to specify anything when
creating the menu item, except
for the title.
5. Next, the List of Expired Deals
will list down all the deals that
have expired. (End date lesser
than today's date). You do not
need to specify anything when
creating the menu item, except
for the title.
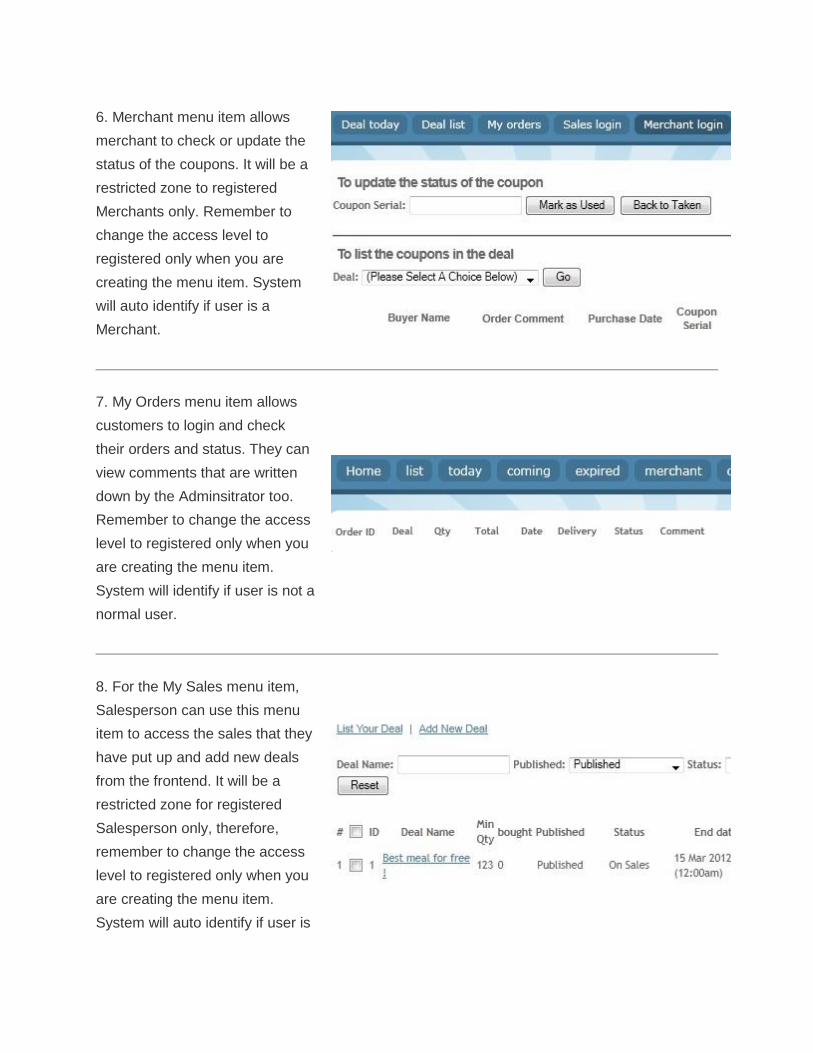
6. Merchant menu item allows
merchant to check or update the
status of the coupons. It will be a
restricted zone to registered
Merchants only. Remember to
change the access level to
registered only when you are
creating the menu item. System
will auto identify if user is a
Merchant.
7. My Orders menu item allows
customers to login and check
their orders and status. They can
view comments that are written
down by the Adminsitrator too.
Remember to change the access
level to registered only when you
are creating the menu item.
System will identify if user is not a
normal user.
8. For the My Sales menu item,
Salesperson can use this menu
item to access the sales that they
have put up and add new deals
from the frontend. It will be a
restricted zone for registered
Salesperson only, therefore,
remember to change the access
level to registered only when you
are creating the menu item.
System will auto identify if user is

a Merchant.
RSS Feeds
1. Under Menu > Main Menu (or
any menu that you want to place
the RSS feed to), click on
to create a new menu item. You
will see the different types of
menu items you can create. Click
on "External Link".

2. In the menu item creation
page, insert the link:
components/com_enmasse/views
/rss/today. This will link the menu
item to the RSS Feed for your
website.

Creating Deal Side and Summarised Shopping Cart
Currently, En Masse has incorporated two modules in the
component: Deal Side and Summarized Shopping Cart
It is easy to create a deal side to feature a particular deal and
a summarised shopping cart in selective pages of the
webpage. Having the purpose to drive the sales for that deal,
customers can easily gain access to popular deals with the
deal side module. They can also have quick access to their
shopping cart with the Summarized shopping cart module .
You do not need to download a seperate file for this module
as it is already incorporated in the component itself.
1. Click on the
“Module
Management”
under
Extensions.
You will see all
the modules
that are
currently in the
website. To
create the side
module, simply

click on
at the top right
hand corner.
2. Select
EnMasse Deal
Side or
EnMasse
Summarized
Shopping
Cart.

3. This applies
for both
modules.
Enter the title,
and choose the
position that
you want to
place the
modules at. It
is
recommended
to place it at
the right side of
the page. You
might also
want to choose
the pages
under Menu
Selection on
which page will
this module
appear.
4. For Deal
Side Module,
enter the Deal
ID you want to
show in the
module. You
can obtain the
Deal ID from
Deal
Management

Listing Page.
Press to
save the
module.

Integration with ACYMailing Starter
Start integrating En Masse with ACYMailing component now! Follow the steps below to
subscribe users to your mailing lists (newsletters) through the email pop up prompt when users
visit your website. If you have not purchase your ACYMailing component, do it now by clicking
here!
Please note that ACYMailing Enterprise and Starter have different features and accessibilities,
that is why we have two different methods for integration with ACYMailing Component.
Install & Configure ACYMailing Enterprise
1. The first two
things you need are
En Masse Version
1.5 and ACYMailing
Enterprise version.
Have them installed
to your backend. You
may refer to En
Masse Installation,
the same steps
applies to
ACYMailing
component.

2. After you have
successfully installed
ACYMailing and En
Masse 1.5, go to En
Masse > Location
Management page.
Add a new Location.
This will create a
new ACYMailing
Lists in order to cater
to deals and users
from this location.
3. Go to ACYMailing
> Lists and you will
see that a new list is
added according to
the new location you
have just created.
Things to note:
Prefix - "EnMasse –
(Location Name)"
Update - When you
update the location
name in En Masse >
Location
Management, the
respective list in
ACYMailing will be
updated
automatically.
Delete - When you
delete the location in
En Masse > Location
Management, the
respective list in
ACYMailing will not
be deleted and you
will need to delete it
manually.
Important - Do not
change the name of
the list in ACYMailing
List as it will break
the linkage between
both components
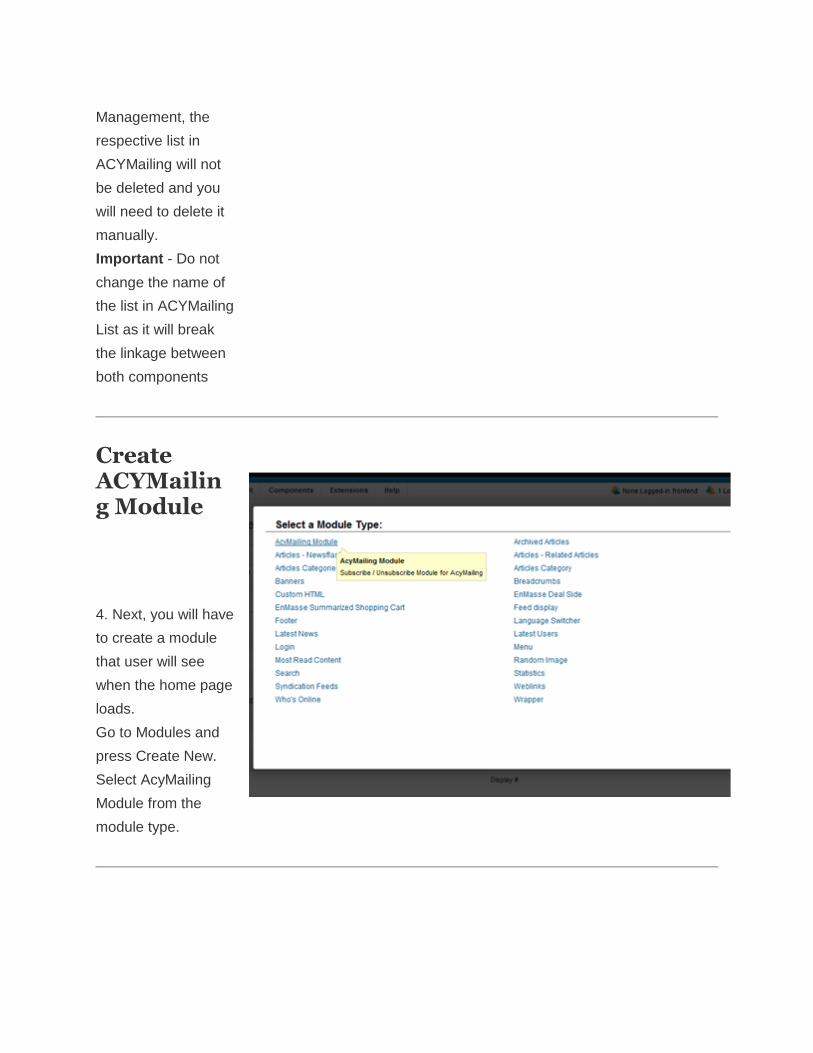
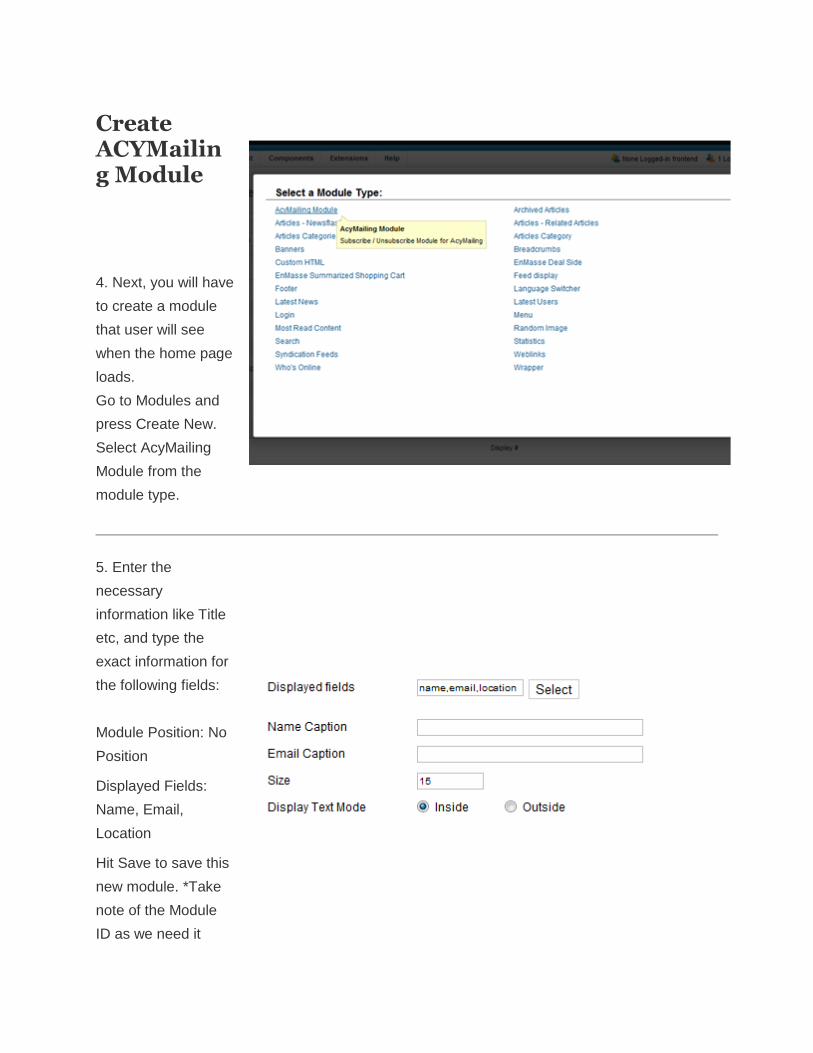
Create ACYMailing Module
4. Next, you will have
to create a module
that user will see
when the home page
loads.
Go to Modules and
press Create New.
Select AcyMailing
Module from the
module type.
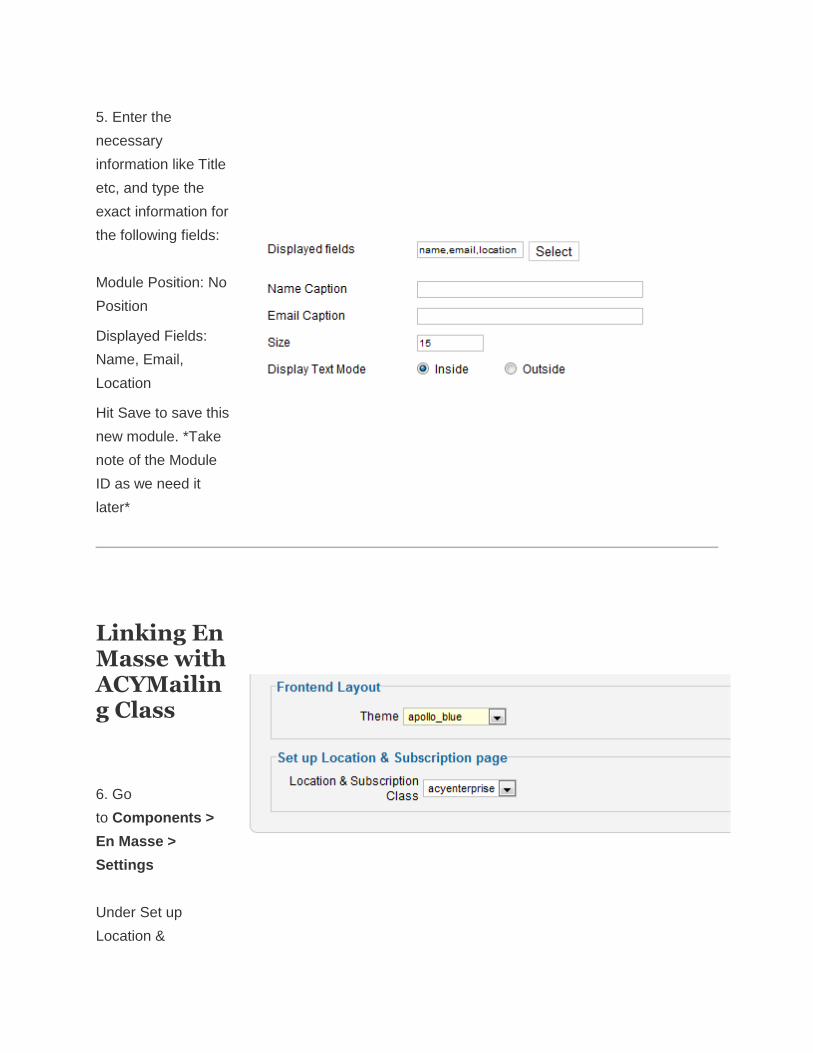
5. Enter the
necessary
information like Title
etc, and type the
exact information for
the following fields:
Module Position: No
Position
Displayed Fields:
Name, Email,
Location
Hit Save to save this
new module. *Take
note of the Module
ID as we need it
later*
Linking En Masse with ACYMailing Class
6. Go
to Components >
En Masse >
Settings
Under Set up
Location &
Subscription page,
select acyenterprise
from the drop down
list and hit Save to
save the settings.
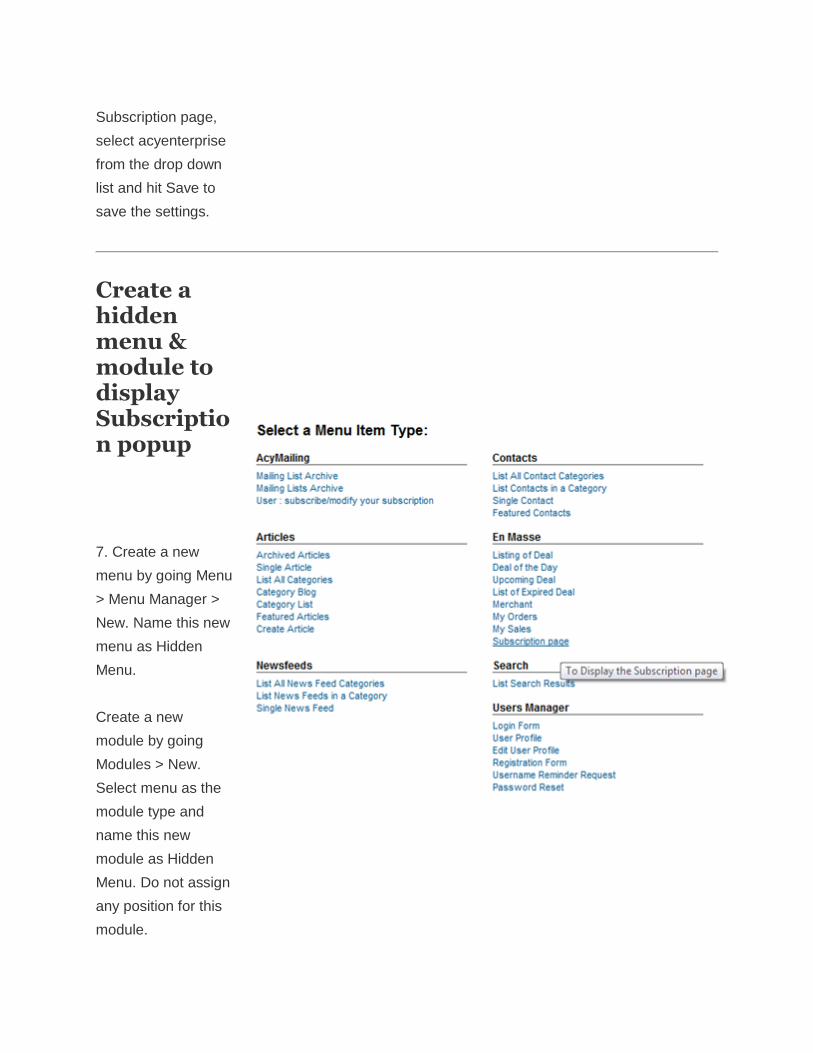
Create a hidden menu & module to display Subscription popup
7. Create a new
menu by going Menu
> Menu Manager >
New. Name this new
menu as Hidden
Menu.
Create a new
module by going
Modules > New.
Select menu as the
module type and
name this new
module as Hidden
Menu. Do not assign
any position for this
module.

8. Next, go back to
Menu > Hidden
Menu.
Create a new menu
item under this
Hidden Menu. Select
En Masse >
Subscription Page as
the menu type and
enter the necessary
fields. Under Basic
Parameters >
Acymailing Module
ID, enter the
ACYmailing Module
ID that you have
created above.
Hit Save after done.
Set this new menu
item as Home after
saving it. (Press on
the Star)

Results
9. Make sure you
have added some
locations in En
Masse > Location
Management.
You will see the
subscription module
appear when you
load your home
page. Users can
enter their email and
they will be
subscribed to the
newsletter/mailing
lists upon pressing
Submit your location
button.
You can see the
subscribers at the
backend of
ACYMailing
component.
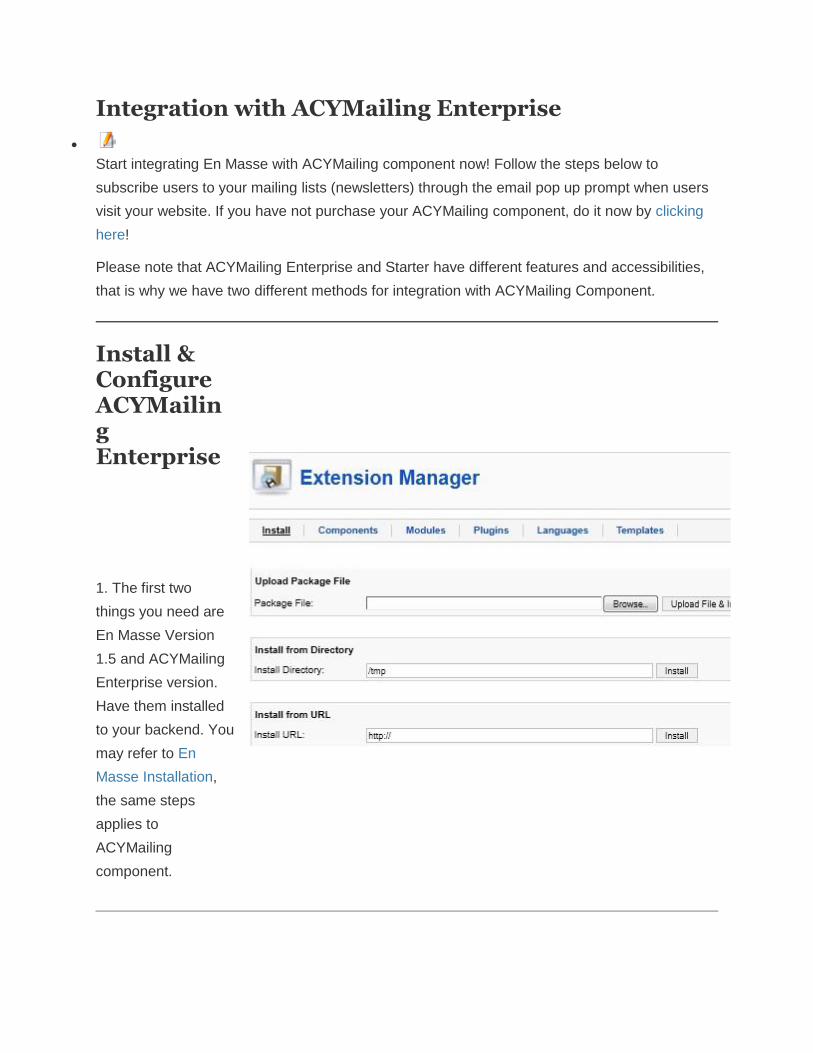
Integration with ACYMailing Enterprise
Start integrating En Masse with ACYMailing component now! Follow the steps below to
subscribe users to your mailing lists (newsletters) through the email pop up prompt when users
visit your website. If you have not purchase your ACYMailing component, do it now by clicking
here!
Please note that ACYMailing Enterprise and Starter have different features and accessibilities,
that is why we have two different methods for integration with ACYMailing Component.
Install & Configure ACYMailing Enterprise
1. The first two
things you need are
En Masse Version
1.5 and ACYMailing
Enterprise version.
Have them installed
to your backend. You
may refer to En
Masse Installation,
the same steps
applies to
ACYMailing
component.

2. After you have
successfully installed
ACYMailing and En
Masse 1.5, go to
Components >
ACYMailing >
Configuration page.
You will see the
different settings that
you can change for
your ACYMailing.
Under Mail
Configuration >
Custom Fields, click
on New Field.
3. Enter the exact
information below
amd hit
Lable : location
Column name :
location
Field type : Single
dropdown
Create ACYMailing Module
4. Next, you will have
to create a module
that user will see
when the home page
loads.
Go to Modules and
press Create New.
Select AcyMailing
Module from the
module type.
5. Enter the
necessary
information like Title
etc, and type the
exact information for
the following fields:
Module Position: No
Position
Displayed Fields:
Name, Email,
Location
Hit Save to save this
new module. *Take
note of the Module
ID as we need it

later*
Linking En Masse with ACYMailing Class
6. Go
to Components >
En Masse >
Settings
Under Set up
Location &
Subscription page,
select acyenterprise
from the drop down
list and hit Save to
save the settings.
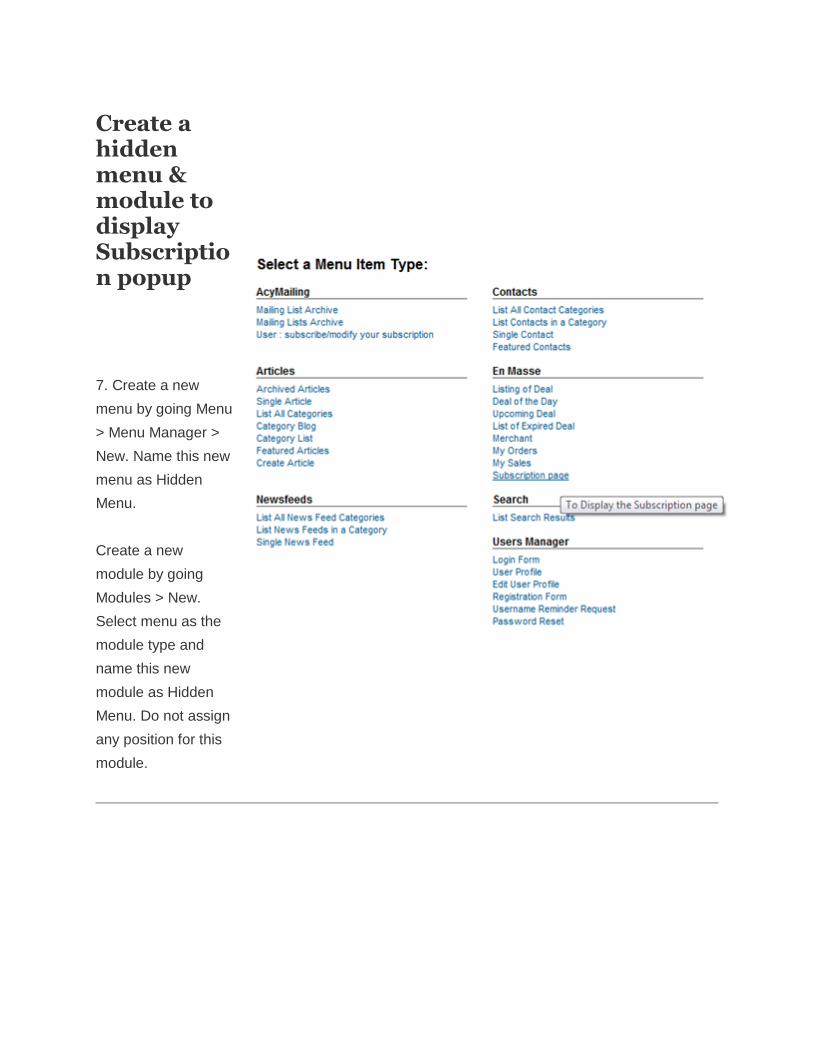
Create a hidden menu & module to display Subscription popup
7. Create a new
menu by going Menu
> Menu Manager >
New. Name this new
menu as Hidden
Menu.
Create a new
module by going
Modules > New.
Select menu as the
module type and
name this new
module as Hidden
Menu. Do not assign
any position for this
module.

8. Next, go back to
Menu > Hidden
Menu.
Create a new menu
item under this
Hidden Menu. Select
En Masse >
Subscription Page as
the menu type and
enter the necessary
fields. Under Basic
Parameters >
Acymailing Module
ID, enter the
ACYmailing Module
ID that you have
created above.
Hit Save after done.
Set this new menu
item as Home after
saving it. (Press on
the Star)
Results
9. Make sure you
have added some
locations in En
Masse > Location
Management.

You will see the
subscription module
appear when you
load your home
page. Users can
enter their email and
they will be
subscribed to the
newsletter/mailing
lists upon pressing
Submit your location
button.
You can see the
subscribers at the
backend of
ACYMailing
component.