endeca® workbench: administrator's guide - oracle · chapter 1 working with endeca workbench...
TRANSCRIPT

Endeca® WorkbenchAdministrator's Guide
Version 2.1.1 • November 2011

Contents
Preface.............................................................................................................................7About this guide............................................................................................................................................7Who should use this guide............................................................................................................................7Conventions used in this guide.....................................................................................................................8Contacting Endeca Customer Support.........................................................................................................8
Chapter 1: Working with Endeca Workbench...........................................9The Workbench login page...........................................................................................................................9
Logging in to Endeca Workbench as an administrator..........................................................................9Application-specific login pages..........................................................................................................10
About backing up and restoring an Endeca project....................................................................................10Backing up the instance configuration.................................................................................................10Restoring a backup of the instance configuration................................................................................11About downloading the instance configuration....................................................................................11Backing up the Web Studio store.........................................................................................................11Restoring a backup of the Web Studio store.......................................................................................12Backing up the Endeca Workbench configuration files........................................................................12Restoring a backup of the Endeca Workbench configuration files.......................................................13
Specifying which MDEX Engine to use with Workbench............................................................................14About specifying which Dgraphs to update with configuration changes.....................................................15About viewing system logs..........................................................................................................................15
Log file naming and rolling...................................................................................................................16Configuring the Endeca Workbench logs............................................................................................16
About the Endeca Tools Service.................................................................................................................17About changing the Endeca Tools Service ports.................................................................................17Changing the Endeca Tools Service port............................................................................................18Changing the Endeca Tools Service shutdown port............................................................................19
Using Endeca Workbench over a high-latency network..............................................................................20
Chapter 2: Managing users in Endeca Workbench................................23About users, roles, and permissions in Endeca Workbench.......................................................................23
About the Endeca Workbench predefined admin user........................................................................24About Endeca Workbench user roles.........................................................................................................24
About custom user roles in Endeca Workbench..................................................................................25About role names and descriptions for multiple locales.......................................................................27Enabling custom roles in Endeca Workbench.....................................................................................27
About assigning rule group permissions to Workbench users....................................................................28
Chapter 3: Managing System Operations with Endeca Workbench.....29About the EAC Administration Console of Endeca Workbench..................................................................29About provisioning an application using Endeca Workbench.....................................................................29
Provisioning an application using Endeca Workbench........................................................................30Disabling provisioning in the EAC Admin Console..............................................................................30
About performing system operations..........................................................................................................31About running a baseline update from Endeca Workbench................................................................31About starting and stopping the MDEX Engine...................................................................................31About starting and stopping the Log Server........................................................................................31Rolling Log Server logs.......................................................................................................................31
About monitoring system status..................................................................................................................32Viewing component logs......................................................................................................................32Refreshing the status information........................................................................................................32
Chapter 4: Setting Up the Preview Application for Endeca Workbench.33Preview application overview......................................................................................................................33Preview application requirements...............................................................................................................34
Domain requirement............................................................................................................................34
iii

Javascript domain requirements..........................................................................................................34Embedded hidden form requirement...................................................................................................34Frame requirement..............................................................................................................................35URL-based state..................................................................................................................................35Cookie name.......................................................................................................................................35
About instrumenting your application..........................................................................................................35Instrumenting the navigation results page...........................................................................................36Instrumenting the record page.............................................................................................................36
About configuring the preview application..................................................................................................37About using pre-existing applications..................................................................................................37About enabling and disabling the display of the preview application...................................................37
About using the preview application with Page Builder...............................................................................38
Chapter 5: LDAP Integration with Endeca Workbench..........................39About LDAP integration with Endeca Workbench.......................................................................................39
Authentication of users in Endeca Workbench with LDAP enabled.....................................................39User profiles for LDAP users and groups............................................................................................40Roles and permissions for LDAP users and groups............................................................................40Administrators in Endeca Workbench with LDAP................................................................................41Workflow notifications for LDAP users and groups..............................................................................41
Enabling LDAP authentication in Endeca Workbench................................................................................42About disabling LDAP authentication for Endeca Workbench....................................................................43Configuration of the Webstudio login profile for LDAP................................................................................43
Templates used in the Webstudio profile.............................................................................................44About configuration parameters for the Webstudio profile...................................................................45Configuration parameters for the Webstudio profile.............................................................................45Configuration parameters for identity information stored in LDAP.......................................................48LDAP path parameters........................................................................................................................48About specifying multiple values for parameters in the Webstudio......................................................49Specifying the location of the configuration file....................................................................................49Specifying the location of the configuration file using Windows Services............................................50
Troubleshooting user authentication in Endeca Workbench with LDAP enabled........................................51
Chapter 6: SSL Configuration..................................................................53About configuring SSL in Endeca Workbench............................................................................................53
Enabling the SSL version of Endeca Workbench................................................................................53Modifying the server.xml for the Endeca Tools Service.......................................................................54
SSL considerations for the preview application and Workbench extensions..............................................55Configuring the default preview application to require SSL connections.............................................55
Chapter 7: Customizing Endeca Workbench..........................................57The navigation menu and launch page.......................................................................................................57
Navigation menu nodes.......................................................................................................................57Node titles for multiple locales.............................................................................................................58Predefined menu nodes in Endeca Workbench...................................................................................59About navigation menu leaf items........................................................................................................59Predefined menuitem elements...........................................................................................................60Updating the Endeca Workbench menu and launch page...................................................................61
Workbench extensions................................................................................................................................62About configuring extensions in Endeca Workbench...........................................................................62Extension element attributes...............................................................................................................63Enabling extensions in Endeca Workbench.........................................................................................64URL tokens and Workbench extensions..............................................................................................64URL token reference............................................................................................................................65Token-based authentication for Workbench extensions.......................................................................66Theming extensions to match Endeca Workbench..............................................................................68Troubleshooting Workbench extensions..............................................................................................68
Other customization options.......................................................................................................................69Hiding the list of applications on the login page..................................................................................69Customizing the number of rules displayed in Rule Manager.............................................................70About encoding workflow emails.........................................................................................................71
Endeca® Workbenchiv

Copyright and disclaimer
Product specifications are subject to change without notice and do not represent a commitment onthe part of Endeca Technologies, Inc. The software described in this document is furnished under alicense agreement.The software may not be reverse engineered, decompiled, or otherwise manipulatedfor purposes of obtaining the source code. The software may be used or copied only in accordancewith the terms of the license agreement. It is against the law to copy the software on any mediumexcept as specifically allowed in the license agreement.
No part of this document may be reproduced or transmitted in any form or by any means, electronicor mechanical, including photocopying and recording, for any purpose without the express writtenpermission of Endeca Technologies, Inc.
Copyright © 2003-2011 Endeca Technologies, Inc. All rights reserved. Printed in USA.
Portions of this document and the software are subject to third-party rights, including:
Corda PopChart® and Corda Builder™ Copyright © 1996-2005 Corda Technologies, Inc.
Outside In® Search Export Copyright © 2011 Oracle. All rights reserved.
Rosette® Linguistics Platform Copyright © 2000-2011 Basis Technology Corp. All rights reserved.
Teragram Language Identification Software Copyright © 1997-2005 Teragram Corporation. All rightsreserved.
Trademarks
Endeca, the Endeca logo, Guided Navigation, MDEX Engine, Find/Analyze/Understand, GuidedSummarization, Every Day Discovery, Find Analyze and Understand Information in Ways Never BeforePossible, Endeca Latitude, Endeca InFront, Endeca Profind, Endeca Navigation Engine, Don't Stopat Search, and other Endeca product names referenced herein are registered trademarks or trademarksof Endeca Technologies, Inc. in the United States and other jurisdictions. All other product names,company names, marks, logos, and symbols are trademarks of their respective owners.
The software may be covered by one or more of the following patents: US Patent 7035864, US Patent7062483, US Patent 7325201, US Patent 7428528, US Patent 7567957, US Patent 7617184, USPatent 7856454, US Patent 7912823, US Patent 8005643, US Patent 8019752, US Patent 8024327,US Patent 8051073, US Patent 8051084, Australian Standard Patent 2001268095, Republic of KoreaPatent 0797232, Chinese Patent for Invention CN10461159C, Hong Kong Patent HK1072114, EuropeanPatent EP1459206, European Patent EP1502205B1, and other patents pending.
v

Preface
Endeca® InFront enables businesses to deliver targeted experiences for any customer, every time, inany channel. Utilizing all underlying product data and content, businesses are able to influence customerbehavior regardless of where or how customers choose to engage — online, in-store, or on-the-go.And with integrated analytics and agile business-user tools, InFront solutions help businesses adaptto changing market needs, influence customer behavior across channels, and dynamically manage arelevant and targeted experience for every customer, every time.
InFront Workbench with Experience Manager provides a single, flexible platform to create, deliver,and manage content-rich, multichannel customer experiences. Experience Manager allows non-technicalusers to control how, where, when, and what type of content is presented in response to any search,category selection, or facet refinement.
At the core of InFront is the Endeca MDEX Engine,™ a hybrid search-analytical database specificallydesigned for high-performance exploration and discovery. InFront Integrator provides a set of extensiblemechanisms to bring both structured data and unstructured content into the MDEX Engine from avariety of source systems. InFront Assembler dynamically assembles content from any resource andseamlessly combines it with results from the MDEX Engine.
These components — along with additional modules for SEO, Social, and Mobile channel support —make up the core of Endeca InFront, a customer experience management platform focused on deliveringthe most relevant, targeted, and optimized experience for every customer, at every step, across allcustomer touch points.
About this guideThis guide describes the tasks involved in the configuration and administration of an Endecaimplementation using Endeca Workbench, as well as the administration of the Endeca Workbenchinstance itself.
Endeca Workbench contains configuration and administrative functionality for system administratorsas well as business logic functionality for business users. Endeca Workbench provides the primarymeans to administer your Endeca implementation in a Tools environment.
Note: Unless otherwise indicated, whenever this document specifies Endeca Workbench, itapplies to any Workbench edition.
Who should use this guideThis guide is intended for system administrators and others who are managing the day-to-day operationsof the Endeca Information Access Platform, as well as developers who are deploying an Endecaimplementation.
Endeca Workbench is a Web-based tool intended for business users and system administrators. Forbusiness user information, see the Endeca Workbench User’s Guide.
With Endeca Workbench, system administrators can perform any of the following tasks:
• Perform system operations such as running baseline updates or starting and stopping the MDEXEngine or Log Server.
• Monitor the status of system components such as Forge, Dgidx, MDEX Engine, Log Server, andReport Generator.
• Configure SSL settings, report generation, and set up a preview application for dynamic businessrule testing.
• Provision the hosts available to an Endeca implementation.• Provision the applications available to an Endeca implementation.• Provision the scripts, such as the report generator script, or a baseline update script to an Endeca
implementation.
Endeca Workbench and Developer Studio require the Endeca Application Controller (EAC) to controland communicate with other components and hosts in an Endeca implementation.
Conventions used in this guideThis guide uses the following typographical conventions:
Code examples, inline references to code elements, file names, and user input are set in monospacefont. In the case of long lines of code, or when inline monospace text occurs at the end of a line, thefollowing symbol is used to show that the content continues on to the next line: ¬
When copying and pasting such examples, ensure that any occurrences of the symbol and thecorresponding line break are deleted and any remaining space is closed up.
Contacting Endeca Customer SupportThe Endeca Support Center provides registered users with important information regarding Endecasoftware, implementation questions, product and solution help, training and professional servicesconsultation as well as overall news and updates from Endeca.
You can contact Endeca Standard Customer Support through the Support section of the EndecaDeveloper Network (EDeN) at http://eden.endeca.com.
Endeca ConfidentialEndeca® Workbench Administrator's Guide
| Preface8
Chapter 1
Working with Endeca Workbench
This section discusses a variety of administrative tasks associated with Endeca Workbench.
The Workbench login pageThe default URL of the Endeca Workbench login page is http://WebStudioHost:8006.
If you used a different HTTP Connector port when you configured Endeca Workbench, substitute thatport number for 8006.
Logging in to Endeca Workbench as an administratorUpon installation, Endeca Workbench has a predefined administrator user with full administrationprivileges.
To log in to Endeca Workbench:
1. In a Web browser, navigate to the Workbench login page.
The default login page is http://WebStudioHost:8006.
2. Specify a username and password. The username and password for the predefined administratorare both admin.
3. If you have an application provisioned, select the application to access. An admin user can alsolog in to Endeca Workbench without any applications provisioned in the system.
Note: If you have not yet provisioned an application, you only have access to the EAC AdminConsole and EAC Settings within Endeca Workbench. For information about configuring asample application, see the Endeca Getting Started Guide.
4. Click Log In.
After your initial login, you can change the password of the predefined admin user or create additionalusers and administrators. For details, see “Managing Users in Endeca Workbench."
Related LinksManaging users in Endeca Workbench on page 23
This section describes the Endeca Workbench user and permissions model, and how tomanage users within Endeca Workbench.
Application-specific login pagesThe URL for an application-specific login page is http://WebStudioHost:port/login/AppName.The value of AppName is the name you provided when creating the application using EndecaWorkbench (or eaccmd or the custom Web services interface).
For example, if you created an application named “wine” on localhost using the default port for theEndeca Tools Service, the URL is http://localhost:8006/login/wine.
About backing up and restoring an Endeca projectThe backup process allows you to take a snapshot of your project including its users, rule groups, andpermissions data.
This process does not include the provisioning information for an application.
For backup purposes, an Endeca project is composed of three pieces:
• Instance configuration — the Endeca project files created by Developer Studio.• Web Studio store — a directory that contains a database of users, rule groups, and associated
permission information.• Configuration files — XML and properties files that customize the behavior of an Endeca Workbench
installation.
Together, the instance configuration and the Web Studio store are the backup.The two are a snapshotof your project and all its associated user and permission information.
Backing up the instance configurationThe instance configuration is created in Developer Studio and consists of pipeline components, Endecaproperties and dimensions, precedence rules, dynamic business rules, and user profiles.
To back up the instance configuration:
1. Stop the Endeca Tools Service.
2. Copy the emanager directory, including all its subdirectories, from %ENDECA_TOOLS_CONF%\state(on Windows) or $ENDECA_TOOLS_CONF/state/ (on UNIX) to another location.
Note: Recall that the default location of %ENDECA_TOOLS_CONF% on Windows isC:\Endeca\Workbench\workspace.
3. Start the Endeca Tools Service.
Related LinksRestoring a backup of the instance configuration on page 11
You can only restore backups of the instance configuration within the same major.minorrelease version, for example between 1.0.0 and an installation of a later 1.0.x version, butnot between a 1.0.x version and a 1.1.x version.
About downloading the instance configuration on page 11The Instance Configuration page under Application Settings in Endeca Workbench allowsyou to view and download the instance configuration that is currently being used by EndecaWorkbench.
Endeca ConfidentialEndeca® Workbench Administrator's Guide
Working with Endeca Workbench | About backing up and restoring an Endeca project10

Restoring a backup of the instance configurationYou can only restore backups of the instance configuration within the same major.minor releaseversion, for example between 1.0.0 and an installation of a later 1.0.x version, but not between a 1.0.xversion and a 1.1.x version.
To restore a backup of the instance configuration:
1. Stop the Endeca Tools Service.
2. Delete the emanager directory from %ENDECA_TOOLS_CONF%\state\ (on Windows) or $ENDE¬CA_TOOLS_CONF/state/ (on UNIX).
3. Copy the backup emanager directory to %ENDECA_TOOLS_CONF%\state\ (on Windows) or$ENDECA_TOOLS_CONF/state/ (on UNIX).
4. Start the Endeca Tools Service.
Related LinksBacking up the instance configuration on page 10
The instance configuration is created in Developer Studio and consists of pipeline components,Endeca properties and dimensions, precedence rules, dynamic business rules, and userprofiles.
About downloading the instance configuration on page 11The Instance Configuration page under Application Settings in Endeca Workbench allowsyou to view and download the instance configuration that is currently being used by EndecaWorkbench.
About downloading the instance configurationThe Instance Configuration page under Application Settings in Endeca Workbench allows you to viewand download the instance configuration that is currently being used by Endeca Workbench.
The project XML files that make up the instance configuration are zipped into one file. This feature isintended primarily for debugging and support purposes. See the Endeca Workbench Help for how todownload an instance configuration.
For information on transferring your instance configuration from staging to production environment,and using the emgr_update utility, see the section “Transferring Endeca Implementations BetweenEnvironments” in the Endeca IAP Administrator's Guide.
Related LinksBacking up the instance configuration on page 10
The instance configuration is created in Developer Studio and consists of pipeline components,Endeca properties and dimensions, precedence rules, dynamic business rules, and userprofiles.
Restoring a backup of the instance configuration on page 11You can only restore backups of the instance configuration within the same major.minorrelease version, for example between 1.0.0 and an installation of a later 1.0.x version, butnot between a 1.0.x version and a 1.1.x version.
Backing up the Web Studio storeThe Web Studio store contains information such as users and permissions, as well as previewapplication settings.
Endeca® Workbench Administrator's GuideEndeca Confidential
11Working with Endeca Workbench | About backing up and restoring an Endeca project

To back up the Web Studio store:
1. Stop the Endeca Tools Service.
2. Copy the webstudiostore directory, including all its subdirectories, from %ENDE¬CA_TOOLS_CONF%\state (on Windows) or $ENDECA_TOOLS_CONF/state/ (on UNIX) to anotherlocation.
Note: Recall that the default location of %ENDECA_TOOLS_CONF% on Windows isC:\Endeca\Workbench\workspace.
3. Start the Endeca Tools Service.
Related LinksRestoring a backup of the Web Studio store on page 12
You can restore backups of the Web Studio store to an installation of the same version orlater.
Restoring a backup of the Web Studio storeYou can restore backups of the Web Studio store to an installation of the same version or later.
To restore a backup of the Web Studio store:
1. Stop the Endeca Tools Service.
2. Delete the webstudiostore directory from %ENDECA_TOOLS_CONF%\state\ (on Windows) or$ENDECA_TOOLS_CONF/state/ (on UNIX).
3. Copy the backup of the webstudiostore directory, including all its subdirectories, to %ENDE¬CA_TOOLS_CONF%\state (on Windows) or $ENDECA_TOOLS_CONF/state/ (on UNIX) to anotherlocation.
Note: Recall that the default location of %ENDECA_TOOLS_CONF% on Windows isC:\Endeca\Workbench\workspace.
4. Start the Endeca Tools Service.
Related LinksBacking up the Web Studio store on page 11
The Web Studio store contains information such as users and permissions, as well as previewapplication settings.
Backing up the Endeca Workbench configuration filesEndeca Workbench uses several configuration files located in %ENDECA_TOOLS_CONF%\conf (onWindows) or $ENDECA_TOOLS_CONF/conf (on UNIX) to customize the behavior of various aspectsof Endeca Workbench.
DescriptionFile name
Configuration for user authentication using LDAPLogin.conf
Endeca ConfidentialEndeca® Workbench Administrator's Guide
Working with Endeca Workbench | About backing up and restoring an Endeca project12
DescriptionFile name
Miscellaneous configuration parameters forWorkbench
webstudio.properties
Configuration for the Endeca Workbench systemlog and audit log
webstudio.log4j.properties
Definitions of Workbench extensionsws-extensions.xml
Definitions of the Endeca Workbench navigationmenu and launch page
ws-mainMenu.xml
Definitions of custom Workbench user rolesws-roles.xml
To preserve the settings controlled by each of these files, simply copy them to another location.
Related LinksRestoring a backup of the Endeca Workbench configuration files on page 13
In general, you should only restore backups of configuration files to the same exact versionof Workbench, for example, from version 1.0.1 to version 1.0.1, but not from 1.0.1 to anyother 1.0.x version.
Restoring a backup of the Endeca Workbench configuration filesIn general, you should only restore backups of configuration files to the same exact version ofWorkbench, for example, from version 1.0.1 to version 1.0.1, but not from 1.0.1 to any other 1.0.xversion.
Upgrading your installation may introduce configuration changes that require you to manually mergeyour configuration files. For more details about changes to the Endeca Workbench configuration files,see the Endeca Migration Guide.
To restore a backup of the Endeca Workbench configuration files:
1. Stop the Endeca Tools Service.
2. Copy the backup files to %ENDECA_TOOLS_CONF%\conf (on Windows) or $ENDE¬CA_TOOLS_CONF/conf (on UNIX).
3. Start the Endeca Tools Service.
Related LinksBacking up the Endeca Workbench configuration files on page 12
Endeca Workbench uses several configuration files located in %ENDECA_TOOLS_CONF%\conf(on Windows) or $ENDECA_TOOLS_CONF/conf (on UNIX) to customize the behavior ofvarious aspects of Endeca Workbench.
Endeca® Workbench Administrator's GuideEndeca Confidential
13Working with Endeca Workbench | About backing up and restoring an Endeca project
Specifying which MDEX Engine to use with WorkbenchEndeca Workbench queries an MDEX Engine for information such as preview status message, BLANK,and BLANK.You can designate a specific Dgraph or Agraph to use with Workbench by defining aWebStudioMDEX property on the appropriate component and setting it to true.
By default, Endeca Workbench queries the first MDEX Engine returned by the EAC. If you have multipleMDEX Engine components in your environment, you can designate a specific MDEX Engine thatWorkbench uses for all MDEX queries.
There are two ways to designate a specific Dgraph or Agraph for use with Workbench:
• Specify the property on the Dgraph or Agraph component in the EAC provisioning file, or via theAppConfig.xml file in the Deployment Template. For details, see the Endeca EAC Guide or theDeployment Template Usage Guide, respectively.
• Specify the property on the Dgraph or Agraph component using the EAC Admin Console in EndecaWorkbench. For details, see the Endeca Workbench Help.This option is provided as a conveniencefor development or staging environments; however, in a production environment Endecarecommends using the Deployment Template.
You can use this property in combination with the WebStudioSkipConfigUpdate property on otherDgraphs in your application. In this case:
• If you set the WebStudioMDEX property to true on a Dgraph, ensure that it does not also havethe WebStudioSkipConfigUpdate property set to true.
• If you set the WebStudioMDEX property to true on an Agraph, ensure that none of its childDgraphs have the WebStudioSkipConfigUpdate property set to true.
Note: To ensure that the preview application and the status messages are in sync, the previewapplication should also be configured to point to the same MDEX Engine using the eneHostand enePort parameters within the preview application URL.
Priority order for selecting an MDEX
Workbench chooses an MDEX Engine to query based on the following order:
1. The first Agraph component returned by the EAC that has WebStudioMDEX = true2. The first Agraph component returned by the EAC that does not have WebStudioMDEX = true3. The first Dgraph component returned by the EAC that has WebStudioMDEX = true4. The first Dgraph component returned by the EAC that does not have WebStudioMDEX = true
Related LinksAbout specifying which Dgraphs to update with configuration changes on page 15
By default, Endeca Workbench updates all Dgraphs that are defined in your applicationwhenever a user saves changes to the instance configuration (including changes to dynamicbusiness rules, keyword redirects, thesaurus entries, and so on).
Endeca ConfidentialEndeca® Workbench Administrator's Guide
Working with Endeca Workbench | Specifying which MDEX Engine to use with Workbench14
About specifying which Dgraphs to update withconfiguration changes
By default, Endeca Workbench updates all Dgraphs that are defined in your application whenever auser saves changes to the instance configuration (including changes to dynamic business rules,keyword redirects, thesaurus entries, and so on).
Beginning in 5.1.5, it is possible to specify which Dgraphs are updated with configuration changesmade in Workbench. Omitting some Dgraphs from the update process can offer performanceimprovements when saving changes. It also allows you to control which servers can be updated directlyby business users working in Endeca Workbench.You specify that a Dgraph should not be updatedby Endeca Workbench by defining a custom EAC property of WebStudioSkipConfigUpdate set to trueon the appropriate component.You can do this using one of the following methods:
• Specify the property on the Dgraph component in the EAC provisioning file or via the AppConfig.xmlfile in the Deployment Template. For details, see the Endeca EAC Guide or the DeploymentTemplate Usage Guide.
• Specify the property on the Dgraph component using the EAC Admin Console in Workbench. Fordetails, see the Endeca Workbench Help.This option is provided as a convenience for developmentor staging environments, however, in a production environment Endeca recommends using theDeployment Template.
Because only Dgraphs are updated with configuration changes, this property does not apply to Agraphcomponents.
If you omit one or more Dgraphs from the update process, you may want to specify which MDEXEngine is used for preview to ensure that the information displayed in the preview status messagesreflects the configuration changes made in Endeca Workbench.
Related LinksSpecifying which MDEX Engine to use with Workbench on page 14
Endeca Workbench queries an MDEX Engine for information such as preview status message,BLANK, and BLANK.You can designate a specific Dgraph or Agraph to use with Workbenchby defining a WebStudioMDEX property on the appropriate component and setting it to true.
About viewing system logsThe Endeca Workbench logs are located in %ENDECA_TOOLS_CONF%\logs (on Windows) or $ENDE¬CA_TOOLS_CONF/logs (on UNIX).
The following logs can be found in this directory:
DescriptionFile name
System log for Endeca Workbench, includingactivity such as user logins, updates to instanceconfiguration, and Endeca Workbench errors.
webstudio.log
Audit log for activity such as dynamic business ruleand search configuration changes. Logging for
webstudio_audit.log
rules includes the name of the rule being modified,when it was modified, who modified it (based on
Endeca® Workbench Administrator's GuideEndeca Confidential
15Working with Endeca Workbench | About specifying which Dgraphs to update with configuration changes

DescriptionFile name
Endeca Workbench user name), and any noteassociated with the change.
Related LinksLog file naming and rolling on page 16
By default, the Endeca Workbench system log and audit log have a maximum size of 1MB.Each of the logs is part of a four-log rotation.
Configuring the Endeca Workbench logs on page 16By editing the configuration file, you can control the log level, the maximum file size, and thenumber of files in the log rotation.You can also optionally direct the output of any EndecaWorkbench logger to the console or to another file.
Log file naming and rollingBy default, the Endeca Workbench system log and audit log have a maximum size of 1MB. Each ofthe logs is part of a four-log rotation.
Related LinksAbout viewing system logs on page 15
The Endeca Workbench logs are located in %ENDECA_TOOLS_CONF%\logs (on Windows)or $ENDECA_TOOLS_CONF/logs (on UNIX).
Configuring the Endeca Workbench logs on page 16By editing the configuration file, you can control the log level, the maximum file size, and thenumber of files in the log rotation.You can also optionally direct the output of any EndecaWorkbench logger to the console or to another file.
Configuring the Endeca Workbench logsBy editing the configuration file, you can control the log level, the maximum file size, and the numberof files in the log rotation.You can also optionally direct the output of any Endeca Workbench loggerto the console or to another file.
Both the Endeca Workbench system log and audit log are configured by thewebstudio.log4j.properties file, located in %ENDECA_TOOLS_CONF%\conf (on Windows) or$ENDECA_TOOLS_CONF/conf (on UNIX).
To configure the behavior of the Endeca Workbench logs:
1. Stop the Endeca Tools Service.
2. Navigate to %ENDECA_TOOLS_CONF%\conf (on Windows) or $ENDECA_TOOLS_CONF/conf (onUNIX).
3. Open the webstudio.log4j.properties file.
4. Modify the configuration file as needed. For more information, see the comments inwebstudio.log4j.properties and the log4j documentation at http://logging.apache.org/log4j/.
5. Save and close the file.
6. Start the Endeca Tools Service.
Related Links
Endeca ConfidentialEndeca® Workbench Administrator's Guide
Working with Endeca Workbench | About viewing system logs16

About viewing system logs on page 15The Endeca Workbench logs are located in %ENDECA_TOOLS_CONF%\logs (on Windows)or $ENDECA_TOOLS_CONF/logs (on UNIX).
Log file naming and rolling on page 16By default, the Endeca Workbench system log and audit log have a maximum size of 1MB.Each of the logs is part of a four-log rotation.
About the Endeca Tools ServiceThe Endeca Tools Service is an application server that runs the Endeca Workbench.
On Windows, the Endeca Workbench installation program starts the service automatically and theservice is set to restart automatically during system restarts. If you accept the installation defaults, theservice runs on port 8006. In the Windows Services console, the service displays as Endeca ToolsService.
On UNIX, you must manually start the Endeca Tools Service after installation. If you accept theinstallation defaults, the service runs on port 8006.
Start the Endeca Tools Service using:
$ENDECA_TOOLS_ROOT/server/bin/startup.sh
Stop the Endeca Tools Service using:
$ENDECA_TOOLS_ROOT/server/bin/shutdown.sh
About changing the Endeca Tools Service portsYou can change either or both of the Endeca Tools Service ports, as long as you choose a new portthat is not being used.
The ports on which the Endeca Tools Service and Endeca Workbench listen are specified in theserver.xml file, which is located in the %ENDECA_TOOLS_CONF%\conf directory ($ENDE¬CA_TOOLS_CONF/conf for UNIX).
The server.xml file also specifies the default server port. The default values are:
• Port 8084 for the Endeca Tools Service shutdown port.• Port 8006 for the Endeca Tools Service port.
Related LinksChanging the Endeca Tools Service port on page 18
You can change the Endeca Tools Service port by editing the server.xml file located inthe %ENDECA_TOOLS_CONF%\conf directory ($ENDECA_TOOLS_CONF/conf for UNIX).
Changing the Endeca Tools Service shutdown port on page 19You can change the Endeca Tools Service shutdown port by editing the server.xml filelocated in the %ENDECA_TOOLS_CONF%\conf directory ($ENDECA_TOOLS_CONF/conf forUNIX).
Endeca® Workbench Administrator's GuideEndeca Confidential
17Working with Endeca Workbench | About the Endeca Tools Service
Changing the Endeca Tools Service portYou can change the Endeca Tools Service port by editing the server.xml file located in the %ENDE¬CA_TOOLS_CONF%\conf directory ($ENDECA_TOOLS_CONF/conf for UNIX).
To change the Endeca Tools Service port:
1. Open the server.xml file in a text editor.
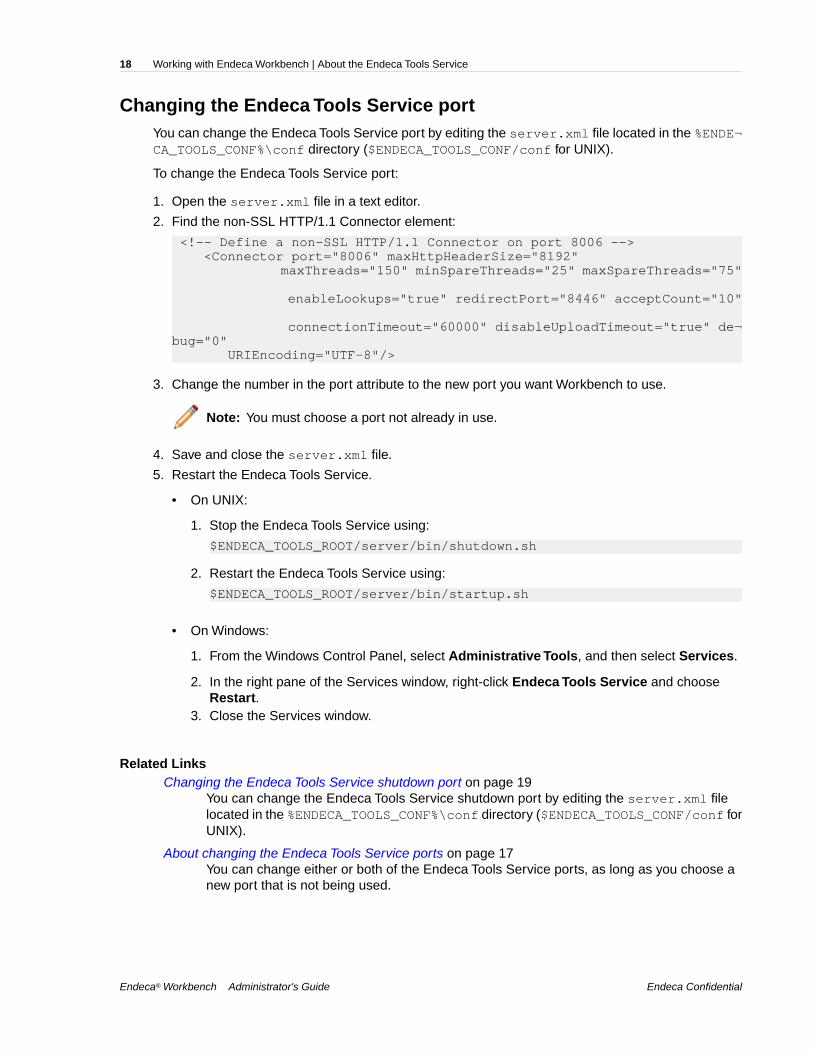
2. Find the non-SSL HTTP/1.1 Connector element:
<!-- Define a non-SSL HTTP/1.1 Connector on port 8006 --> <Connector port="8006" maxHttpHeaderSize="8192" maxThreads="150" minSpareThreads="25" maxSpareThreads="75"
enableLookups="true" redirectPort="8446" acceptCount="10"
connectionTimeout="60000" disableUploadTimeout="true" de¬bug="0" URIEncoding="UTF-8"/>
3. Change the number in the port attribute to the new port you want Workbench to use.
Note: You must choose a port not already in use.
4. Save and close the server.xml file.
5. Restart the Endeca Tools Service.
• On UNIX:
1. Stop the Endeca Tools Service using:
$ENDECA_TOOLS_ROOT/server/bin/shutdown.sh
2. Restart the Endeca Tools Service using:
$ENDECA_TOOLS_ROOT/server/bin/startup.sh
• On Windows:
1. From the Windows Control Panel, select Administrative Tools, and then select Services.
2. In the right pane of the Services window, right-click Endeca Tools Service and chooseRestart.
3. Close the Services window.
Related LinksChanging the Endeca Tools Service shutdown port on page 19
You can change the Endeca Tools Service shutdown port by editing the server.xml filelocated in the %ENDECA_TOOLS_CONF%\conf directory ($ENDECA_TOOLS_CONF/conf forUNIX).
About changing the Endeca Tools Service ports on page 17You can change either or both of the Endeca Tools Service ports, as long as you choose anew port that is not being used.
Endeca ConfidentialEndeca® Workbench Administrator's Guide
Working with Endeca Workbench | About the Endeca Tools Service18
Changing the Endeca Tools Service shutdown portYou can change the Endeca Tools Service shutdown port by editing the server.xml file located inthe %ENDECA_TOOLS_CONF%\conf directory ($ENDECA_TOOLS_CONF/conf for UNIX).
To change the Endeca Tools Service shutdown port:
1. Open the server.xml file in a text editor.
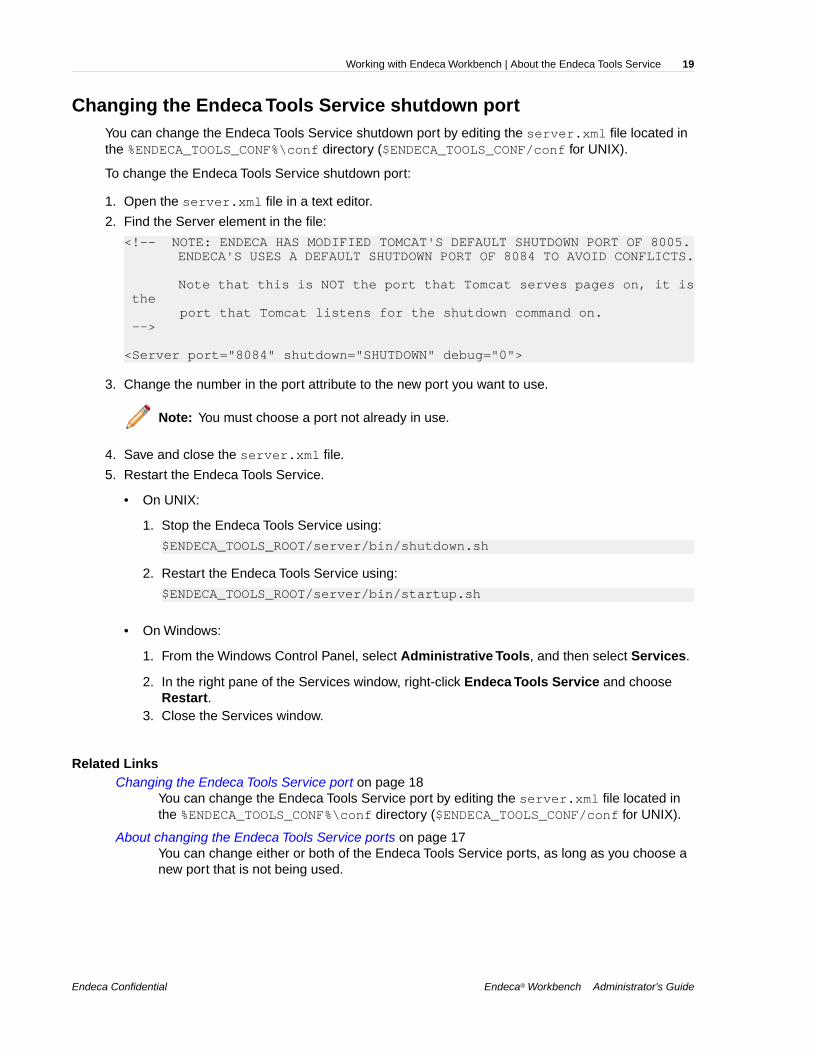
2. Find the Server element in the file:
<!-- NOTE: ENDECA HAS MODIFIED TOMCAT'S DEFAULT SHUTDOWN PORT OF 8005. ENDECA'S USES A DEFAULT SHUTDOWN PORT OF 8084 TO AVOID CONFLICTS.
Note that this is NOT the port that Tomcat serves pages on, it is the port that Tomcat listens for the shutdown command on. -->
<Server port="8084" shutdown="SHUTDOWN" debug="0">
3. Change the number in the port attribute to the new port you want to use.
Note: You must choose a port not already in use.
4. Save and close the server.xml file.
5. Restart the Endeca Tools Service.
• On UNIX:
1. Stop the Endeca Tools Service using:
$ENDECA_TOOLS_ROOT/server/bin/shutdown.sh
2. Restart the Endeca Tools Service using:
$ENDECA_TOOLS_ROOT/server/bin/startup.sh
• On Windows:
1. From the Windows Control Panel, select Administrative Tools, and then select Services.
2. In the right pane of the Services window, right-click Endeca Tools Service and chooseRestart.
3. Close the Services window.
Related LinksChanging the Endeca Tools Service port on page 18
You can change the Endeca Tools Service port by editing the server.xml file located inthe %ENDECA_TOOLS_CONF%\conf directory ($ENDECA_TOOLS_CONF/conf for UNIX).
About changing the Endeca Tools Service ports on page 17You can change either or both of the Endeca Tools Service ports, as long as you choose anew port that is not being used.
Endeca® Workbench Administrator's GuideEndeca Confidential
19Working with Endeca Workbench | About the Endeca Tools Service
Using Endeca Workbench over a high-latency networkIf users are connecting to Workbench over a high-latency network, certain cache settings in the Webbrowser may improve performance.
Workbench pages reference a number of assets such as images, CSS files, and JavaScript files.These assets are relatively static and are typically cached by the browser.They are served with HTTPheaders that instruct the browser not to check for new versions of these files for a period of six hours.This results in better page load performance for users who connect to Endeca Workbench over ahigh-latency network.
To configure Web browsers for caching of Workbench resources:
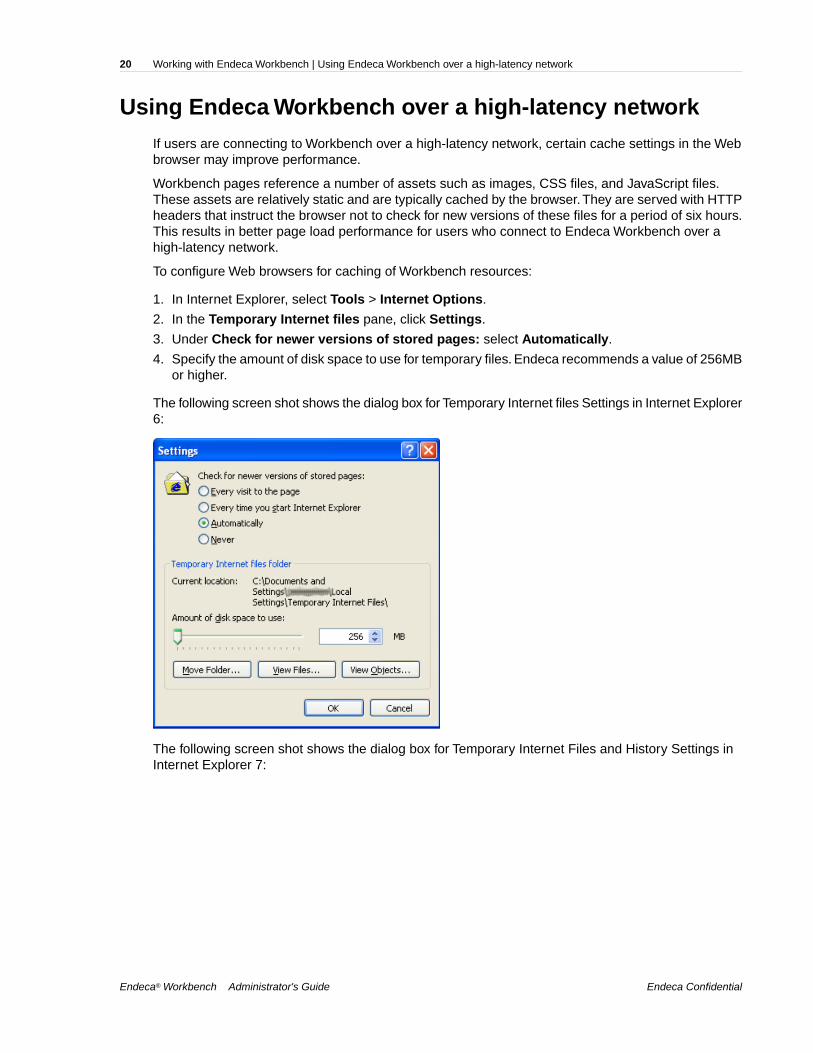
1. In Internet Explorer, select Tools > Internet Options.
2. In the Temporary Internet files pane, click Settings.
3. Under Check for newer versions of stored pages: select Automatically.
4. Specify the amount of disk space to use for temporary files. Endeca recommends a value of 256MBor higher.
The following screen shot shows the dialog box for Temporary Internet files Settings in Internet Explorer6:
The following screen shot shows the dialog box for Temporary Internet Files and History Settings inInternet Explorer 7:
Endeca ConfidentialEndeca® Workbench Administrator's Guide
Working with Endeca Workbench | Using Endeca Workbench over a high-latency network20

Endeca® Workbench Administrator's GuideEndeca Confidential
21Working with Endeca Workbench | Using Endeca Workbench over a high-latency network

Chapter 2
Managing users in Endeca Workbench
This section describes the Endeca Workbench user and permissions model, and how to manage userswithin Endeca Workbench.
About users, roles, and permissions in Endeca WorkbenchEndeca Workbench users, roles, and permissions are defined by an Endeca Workbench administrator.
Endeca Workbench users log in to an application in Endeca Workbench with basic user name andpassword authentication. Before a business user can log in to an application in Endeca Workbench,an Endeca Workbench administrator or a user with the settings role must create a profile for the userthat includes the following:
• user name• password• roles and permissions• user identity information such as first name, last name, and email address
Roles dictate which Endeca Workbench features are available to users. User identity informationprovides a way to associate name and contact information with user names in Endeca Workbench.
If you have Endeca Workbench configured to use LDAP for user authentication, an administrator cancreate a user profile where the password and identity information is stored and managed in an LDAPdirectory. LDAP integration also allows you to assign roles and permissions across an entire LDAPgroup rather than configuring each user individually. For more information about configuring EndecaWorkbench with LDAP, see the section “LDAP Integration with Endeca Workbench.”
Each business user profile is associated with a specific application. A business user profile cannotspan multiple applications. In cases where you might want to grant the same user access to multipleapplications, an administrator can create a number of identical business user profiles for any numberof applications. Administrators, on the other hand, span applications across Endeca Workbench. Forinformation about the process to add users and modify user information, passwords, and roles, seethe Endeca Workbench Help.
Related LinksLDAP Integration with Endeca Workbench on page 39
This section describes how to configure Endeca Workbench to use LDAP for userauthentication.
About Endeca Workbench user roles on page 24Endeca Workbench user roles control user access to each function in the Endeca Workbench.
About assigning rule group permissions to Workbench users on page 28Rule group permissions control how Endeca Workbench users access rule groups and therules contained in the groups.
About the Endeca Workbench predefined admin userEndeca Workbench has a predefined administrator with full administration privileges.
An administrator is granted all roles in the system.The user name for the predefined Endeca Workbenchadministrator is admin and the default password is admin. After signing in as the admin user, you canmodify the password but not the user name.
The admin user can create additional users and administrators in Endeca Workbench. Only anadministrator can create other administrators. An administrator can also delete other administrators,including the predefined admin user, as long as there is always at least one administrator in the system.If you have LDAP authentication enabled, see the section “Administrators in Endeca Workbench withLDAP.”
An administrator is not associated with an application in the same way that business users are. Eachbusiness user is associated with a particular application. Administrators span applications, so anadministrator can add or remove applications without being affected by that addition or removal.
Related LinksAdministrators in Endeca Workbench with LDAP on page 41
If you have LDAP enabled, you can create profiles for both LDAP users and LDAP groupsas administrators in Endeca Workbench.
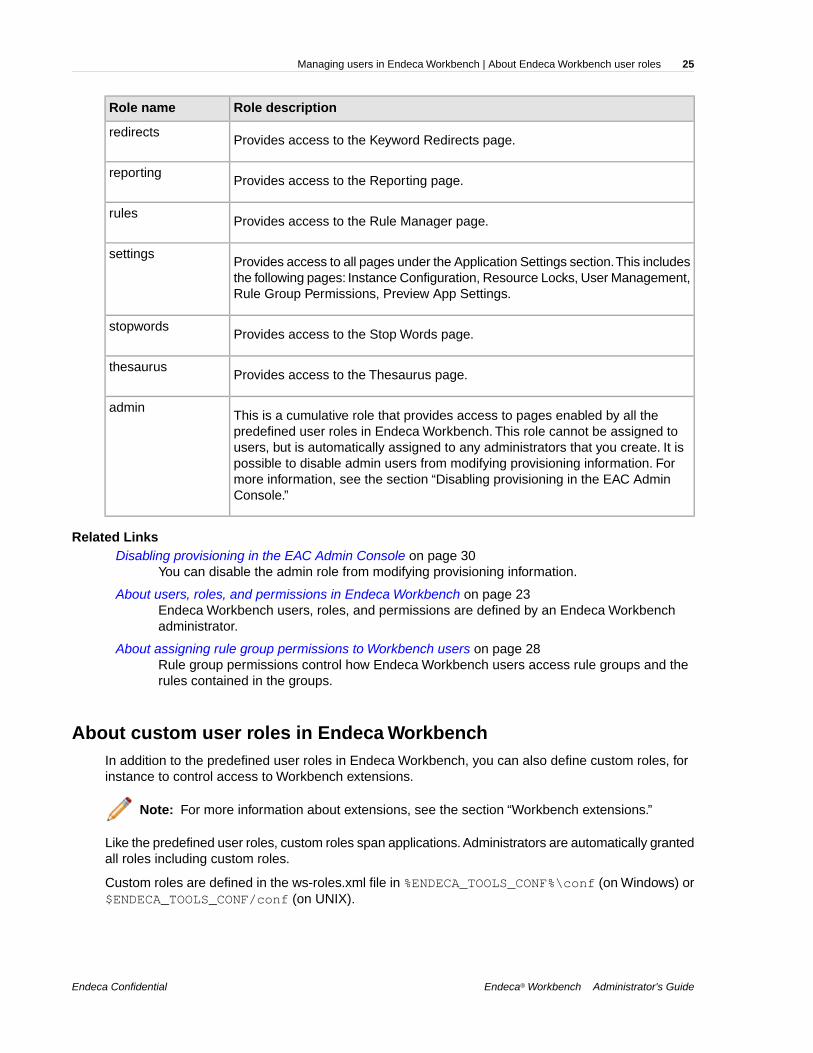
About Endeca Workbench user rolesEndeca Workbench user roles control user access to each function in the Endeca Workbench.
An Endeca Workbench administrator can assign users any of the roles in the table below. A user whodoes not have any roles assigned is unable to log in to Endeca Workbench. For information abouthow to add and configure users, see the Endeca Workbench Help.
Role descriptionRole name
Provides access to the Dimension Order page.dimorder
Provides access to the EAC Admin Console page. Users with this role cannotmodify provisioning information on the EAC Admin Console. However, they canstart and stop Endeca components and EAC scripts.
eacconsole
Provides access to the Page Builder.pages
Note: This role applies only to Workbench editions that feature the EndecaPage Builder.
Provides access to the Phrases page.phrases
Endeca ConfidentialEndeca® Workbench Administrator's Guide
Managing users in Endeca Workbench | About Endeca Workbench user roles24
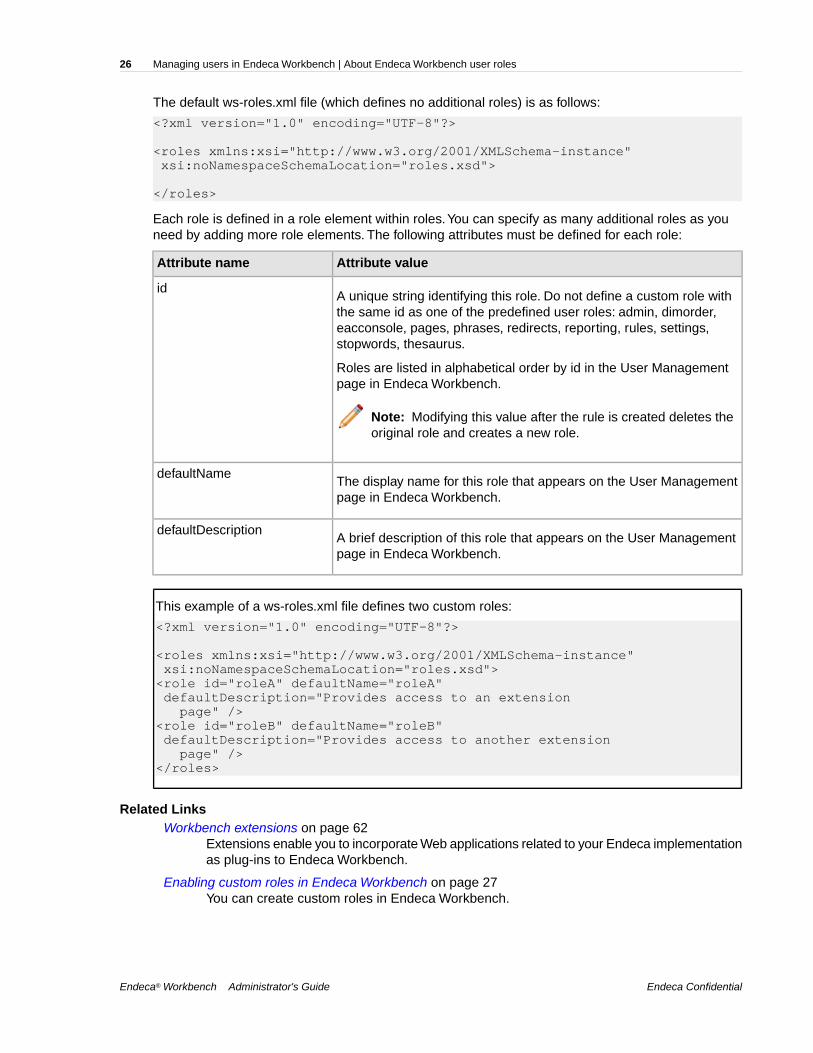
Role descriptionRole name
Provides access to the Keyword Redirects page.redirects
Provides access to the Reporting page.reporting
Provides access to the Rule Manager page.rules
Provides access to all pages under the Application Settings section.This includesthe following pages: Instance Configuration, Resource Locks, User Management,Rule Group Permissions, Preview App Settings.
settings
Provides access to the Stop Words page.stopwords
Provides access to the Thesaurus page.thesaurus
This is a cumulative role that provides access to pages enabled by all thepredefined user roles in Endeca Workbench. This role cannot be assigned to
admin
users, but is automatically assigned to any administrators that you create. It ispossible to disable admin users from modifying provisioning information. Formore information, see the section “Disabling provisioning in the EAC AdminConsole.”
Related LinksDisabling provisioning in the EAC Admin Console on page 30
You can disable the admin role from modifying provisioning information.
About users, roles, and permissions in Endeca Workbench on page 23Endeca Workbench users, roles, and permissions are defined by an Endeca Workbenchadministrator.
About assigning rule group permissions to Workbench users on page 28Rule group permissions control how Endeca Workbench users access rule groups and therules contained in the groups.
About custom user roles in Endeca WorkbenchIn addition to the predefined user roles in Endeca Workbench, you can also define custom roles, forinstance to control access to Workbench extensions.
Note: For more information about extensions, see the section “Workbench extensions.”
Like the predefined user roles, custom roles span applications. Administrators are automatically grantedall roles including custom roles.
Custom roles are defined in the ws-roles.xml file in %ENDECA_TOOLS_CONF%\conf (on Windows) or$ENDECA_TOOLS_CONF/conf (on UNIX).
Endeca® Workbench Administrator's GuideEndeca Confidential
25Managing users in Endeca Workbench | About Endeca Workbench user roles
The default ws-roles.xml file (which defines no additional roles) is as follows:
<?xml version="1.0" encoding="UTF-8"?>
<roles xmlns:xsi="http://www.w3.org/2001/XMLSchema-instance" xsi:noNamespaceSchemaLocation="roles.xsd">
</roles>
Each role is defined in a role element within roles.You can specify as many additional roles as youneed by adding more role elements. The following attributes must be defined for each role:
Attribute valueAttribute name
A unique string identifying this role. Do not define a custom role withthe same id as one of the predefined user roles: admin, dimorder,
id
eacconsole, pages, phrases, redirects, reporting, rules, settings,stopwords, thesaurus.
Roles are listed in alphabetical order by id in the User Managementpage in Endeca Workbench.
Note: Modifying this value after the rule is created deletes theoriginal role and creates a new role.
The display name for this role that appears on the User Managementpage in Endeca Workbench.
defaultName
A brief description of this role that appears on the User Managementpage in Endeca Workbench.
defaultDescription
This example of a ws-roles.xml file defines two custom roles:
<?xml version="1.0" encoding="UTF-8"?>
<roles xmlns:xsi="http://www.w3.org/2001/XMLSchema-instance" xsi:noNamespaceSchemaLocation="roles.xsd"><role id="roleA" defaultName="roleA" defaultDescription="Provides access to an extension page" /><role id="roleB" defaultName="roleB" defaultDescription="Provides access to another extension page" /></roles>
Related LinksWorkbench extensions on page 62
Extensions enable you to incorporate Web applications related to your Endeca implementationas plug-ins to Endeca Workbench.
Enabling custom roles in Endeca Workbench on page 27You can create custom roles in Endeca Workbench.
Endeca ConfidentialEndeca® Workbench Administrator's Guide
Managing users in Endeca Workbench | About Endeca Workbench user roles26
About role names and descriptions for multiple localesIf you support multiple locales in Endeca Workbench, you can optionally specify localized names anddescriptions for custom roles.
Localized names are defined in a names element within role that contains one or more name elements.Localized descriptions are defined in a descriptions element within role that contains one or moredescription elements.
The name and description elements require a locale attribute whose value is a valid ISO languagecode.
This example of a ws-roles.xml file defines a custom role with separate names and descriptionsfor English and French.
<?xml version="1.0" encoding="UTF-8"?>
<roles xmlns:xsi="http://www.w3.org/2001/XMLSchema-instance" xsi:noNamespaceSchemaLocation="roles.xsd"> <role id="localized" defaultName="localized" defaultDescription="A role with localized names" > <names> <name locale="en">localized</name> <name locale="fr">localisé</name> </names> <descriptions> <description locale="en">A localized role</description> <description locale="fr">Un rôle localisé</description> </descriptions> </role></roles>
Endeca Workbench checks for a name and description that matches the locale defined in the currentinstallation of Endeca Workbench. If no matching localized name or description is found, the default¬Name and defaultDescription values are used.
Related LinksEnabling custom roles in Endeca Workbench on page 27
You can create custom roles in Endeca Workbench.
Enabling custom roles in Endeca WorkbenchYou can create custom roles in Endeca Workbench.
To update Endeca Workbench to use custom user roles:
1. Make a backup of your Web Studio store and Endeca Workbench customization files (especiallyws-roles.xml).
For information about backing up your Web Studio store, see the section “About backing up andrestoring an Endeca project."
2. Stop the Endeca Tools Service.
3. Navigate to %ENDECA_TOOLS_CONF%\conf (on Windows) or $ENDECA_TOOLS_CONF/conf (onUNIX).
4. Open the ws-roles.xml file in a text editor and add or modify roles as necessary.
For more information see the section “About custom user roles in Endeca Workbench."
Endeca® Workbench Administrator's GuideEndeca Confidential
27Managing users in Endeca Workbench | About Endeca Workbench user roles

5. Save and close the file.
6. Start the Endeca Tools Service.
Note: Deleting a role causes all the user assignments to that role to be deleted across allapplications. Modifying the id attribute of a role deletes the original role (and its correspondinguser assignments) and creates a new role with the new id. Modifications to any other attributesare saved when you update Endeca Workbench and user assignments are preserved.To recovera deleted role along with its user assignments, restore the backups made in Step 1. Forinformation about backing up your project, see the section “About backing up and restoring anEndeca project."
Related LinksAbout custom user roles in Endeca Workbench on page 25
In addition to the predefined user roles in Endeca Workbench, you can also define customroles, for instance to control access to Workbench extensions.
About role names and descriptions for multiple locales on page 27If you support multiple locales in Endeca Workbench, you can optionally specify localizednames and descriptions for custom roles.
About assigning rule group permissions to Workbenchusers
Rule group permissions control how Endeca Workbench users access rule groups and the rulescontained in the groups.
An administrator uses Endeca Workbench to assign rule group permissions in either of two ways:
• Assign by group on the Rule Group Permissions page• Assign by user name on the User Management page
There are four permission levels available for rule group access. A user may have one of the followingpermissions for each rule group:
• Approve—The user has permission to view, edit, and approve rules in the group.• Edit—The user has permission to view and edit rules in the group but no permission to approve
rules.• View—The user has permission to view rules in the group but no permission to edit or approve
rules.• None—The user has no permission to view, edit, or approve rules in the group. Users with this
permission do not see the rule group displayed in Endeca Workbench.
Administrators are automatically assigned Approve permissions in all rule groups. See the EndecaWorkbench Help for the procedures to assign rule group permissions to Endeca Workbench users.
Related LinksAbout users, roles, and permissions in Endeca Workbench on page 23
Endeca Workbench users, roles, and permissions are defined by an Endeca Workbenchadministrator.
About Endeca Workbench user roles on page 24Endeca Workbench user roles control user access to each function in the Endeca Workbench.
Endeca ConfidentialEndeca® Workbench Administrator's Guide
Managing users in Endeca Workbench | About assigning rule group permissions to Workbench users28
Chapter 3
Managing System Operations with EndecaWorkbench
This section describes the system administration and maintenance tasks available in the Administrationsection of Endeca Workbench.
About the EAC Administration Console of EndecaWorkbench
The EAC Administration Console page provides a way for administrators to establish and modifysystem provisioning, start and stop system components, and run EAC scripts.
The Administration Console of Endeca Workbench is divided into three sections:
• Hosts – shows a view of your application organized by the hosts you provision.This view indicatesthe host name, host alias, port and configuration options.You can modify the hosts configurationoptions, start or stop a component on a host, and see the status of a component on a host.
• Components – shows a view of your application organized by the Endeca components provisionedfor an application.You can create components on this tab but not hosts.
• Scripts – show the EAC scripts available to an application and allows you to add, remove, run,and monitor EAC scripts.You can stop and start system operations run by EAC scripts, such asbaseline updates.
About provisioning an application using Endeca WorkbenchProvisioning is the task of defining the location and configuration of the Endeca resources (such asForge and the MDEX Engine) that control your Endeca application.
You can use EAC Administration Console page to provision an Endeca application.
The provisioning functionality of the EAC Admin console is provided as a convenience in developmentand staging environments. For production environments, Endeca recommends using the DeploymentTemplate to provision your application. For more information about the Deployment Template, seethe Deployment Template Usage Guide.

Provisioning an application using Endeca WorkbenchYou can use EAC Administration Console page to provision an Endeca application.
Note: The provisioning functionality of the EAC Admin console is provided as a conveniencein development and staging environments. For production environments, Endeca recommendsusing the Deployment Template to provision your application. For more information about theDeployment Template, see the Deployment Template Usage Guide.
To provision an application:
1. Using a Web browser, log in to Endeca Workbench.
2. Add one or more applications. The procedure to add or remove an application is described in theEndeca Workbench Help.
3. Add one or more hosts. The procedure to add or remove a host is described in the EndecaWorkbench Help.
4. Add Endeca components to the hosts.You should set one Forge, and at least one Indexer (Dgidx)and one MDEX Engine (Dgraph). The procedure to add components is described in the EndecaWorkbench Help.
5. Add EAC scripts. The procedure to add EAC scripts is described in the Endeca Workbench Help.
Disabling provisioning in the EAC Admin ConsoleYou can disable the admin role from modifying provisioning information.
By default, Endeca Workbench administrators can modify provisioning information on the EAC AdminConsole page. If necessary, you can disable the admin role from modifying provisioning information.
Note: Endeca recommends that you use the Deployment Template to manage provisioning ina production environment.
If you disable provisioning, you can still use the EAC Admin Console to start and stop Endecacomponents and EAC scripts or to monitor the status of components or scripts.
To disable the admin role from modifying provisioning:
1. Stop the Endeca Tools Service.
2. Navigate to %ENDECA_TOOLS_CONF%\conf (on Windows) or $ENDECA_TOOLS_CONF/conf (onUNIX).
3. Open the webstudio.properties file in a text editor.
4. Change the com.endeca.webstudio.allow.eac. provisioning property from true to false asshown:
com.endeca.webstudio.allow.eac.provisioning=false
5. Save and close the file.
6. Start the Endeca Tools Service.
Endeca ConfidentialEndeca® Workbench Administrator's Guide
Managing System Operations with Endeca Workbench | About provisioning an application using EndecaWorkbench
30

About performing system operationsSystem operations include running updates, starting and stopping Endeca components, backing upprojects, and so on.
The Scripts tab of the EAC Administration Console is where you run baseline updates that controlEndeca components such as Forge, Dgidx, the MDEX Engine (both Dgraph and Agraph), the ReportGenerator, and the Log Server. The Hosts and Components tab is where you run individual Endecacomponents.
For information about other system operations, transferring your instance configuration from a stagingto production environment, and using the emgr_update utility, see “Transferring Endeca ImplementationsBetween Environments” in the Endeca IAP Administrator's Guide.
About running a baseline update from Endeca WorkbenchA baseline update completely rebuilds the Endeca application, including running Forge on the sourcedata, running Dgidx to produce the Endeca records and indices, and starting one or more MDEXEngines with the new indices.
See the Endeca Workbench Help for the process to run a baseline update using your EAC script.
About starting and stopping the MDEX EngineYou can view and change the status of an MDEX Engine from the Components tab of the EACAdministration Console.
If the status of the MDEX Engine is Running, the Start link (next to the MDEX Engine label) is disabledand only the Stop link is available. If the status is Stopped, only the Start link can be used. When youstart an MDEX Engine, it starts with any options that you specified in Arguments field of componentconfiguration.
See the Endeca Workbench Help for the process to start and stop the MDEX Engine.
About starting and stopping the Log ServerYou can start and stop the Log Server from the Components tab of the EAC Administration Console.
If the status of the Log Server is Running, the Start link (next to the Log Server label) is disabled andonly the Stop link is available. If the status is Pending or Stopped, only the Start link can be used.
See the Endeca Workbench Help for the process to start and stop the Log Server.
Rolling Log Server logsYou cannot roll the logs created by the Log Server from the EAC Admin Console. However, you canroll the logs with a URL command.
To roll the logs use the following URL command:
http://logserverhost:logserverport/roll
For example, this command:
http://web002:8002/roll
Endeca® Workbench Administrator's GuideEndeca Confidential
31Managing System Operations with Endeca Workbench | About performing system operations

rolls the Log Server that is running on port 8002 on the host named web002.
About monitoring system statusEach host and component that you provision in an Endeca application displays its system status onthe EAC Admin Console page of Endeca Workbench.
Endeca Workbench displays a summary of the component’s status in the collapsed view of the Hoststab and Components tab.You can access details about each component (except the Log Server,which does not log its own activities) via the status link next to each component. Clicking the statuslink displays start time, duration (how long the component has been running), and the last time EndecaWorkbench checked the component’s status. With Auto-Refresh selected, Endeca Workbenchautomatically refreshes status at frequent intervals.
Viewing component logsTo view the latest log for an Endeca component (except for the Log Server which does not log its ownactions), check the value of Log File for a component as indicated on the Components tab of theAdministration Console page. Then browse to the Log File directory and open the component log.
Refreshing the status informationYou can manually refresh the status display by clicking the Refresh Status button.
You can also set the page to be refreshed automatically (at a pre-set interval) by checking the AutoRefresh checkbox. This option is useful when a baseline update is in progress and the system statechanges frequently. By default, this option is turned off because the overall system state changesinfrequently.
Endeca ConfidentialEndeca® Workbench Administrator's Guide
Managing System Operations with Endeca Workbench | About monitoring system status32
Chapter 4
Setting Up the Preview Application forEndeca Workbench
This section describes how to set up a custom Endeca application so that it functions as the EndecaWorkbench’s preview application.
Preview application overviewThe preview application is the end-user application that displays in the bottom frame of the RuleManager page in Endeca Workbench.
Business users search and navigate to specific locations in the preview application that then becomethe basis for configured dynamic business rules.
It is important to remember that the only purpose of the preview application is to present the data thatyou are changing via Endeca Workbench. It is not necessary for the preview application to be an exactrepresentation of your final front-end application, as long as it is using the correct data. The businesslogic that is built into Endeca Workbench is not tied to the physical representation of the front-endapplication. It is good practice, however, to make sure that your preview application represents yourfinal application closely enough so that business users know if their changes are correct. By default,Endeca Workbench is configured to use a copy of the JSP reference implementation as the previewapplication.
Note: The JSP reference implementation that is used as the preview application for EndecaWorkbench is stored in $ENDECA_TOOLS_ROOT/server/webapps/endeca_jspref (%ENDE¬CA_TOOLS_ROOT%\server\webapps\endeca_jspref on Windows). Do not confuse thiswith the regular JSP reference implementation in $ENDECA_REFERENCE_DIR/endeca_jspref(%ENDECA_REFERENCE_DIR%\endeca_jspref on Windows).
This chapter describes how to set up your own custom application to be the preview application forthe Rule Manager. For additional information about using the preview application with the Page Builder(for Workbench editions that feature the Endeca Page Builder), see the Endeca Content AssemblerAPI Developer’s Guide.
Endeca Workbench communicates with the preview application via settings you specify on the PreviewApp Settings page. The URL Mapping subsection lets you change the default preview application toyour own custom preview application.
Preview application requirementsIn order to use a custom Endeca application as your Workbench preview application, the customapplication must meet several requirements. This section describes those requirements.
Domain requirementThe preview application and Endeca Workbench must reside in the same domain (for example,endeca.com).
Javascript domain requirementsIf Endeca Workbench and your custom preview application do not reside on the same host and port,you must declare the Javascript domain in two locations inside the preview application’s code.
• Navigation results page (the page that shows the set of records that correspond to a user’s query).• Record page (the page that displays information about a single record).
Endeca Workbench communicates with and controls the preview application via Javascript. As a result,both Endeca Workbench and the preview application must have the same Javascript domain property.The domain property provides security for scripts that run in different browser windows but need tocommunicate with one another.
When you specify the Javascript domain, you can also include the port number of the server. Thisensures that you are referring to the exact host machine and port number. For example, if the customapplication is on an application server running on port 8080, you can declare the Javascript domainwith the following:
document.domain = "example.com:8080";
You can also use the host machine’s IP address, the fully qualified domain name, the machine name(such as web004), or localhost, but be aware that different browsers have varying support for thedifferent host name formats.
Note: In addition, Endeca Workbench’s Preview App settings page provides a field whereyou must enter this information. This is analogous to declaring the domain in your Javascriptheaders.
Embedded hidden form requirementYou must embed small hidden HTML forms on the preview application’s navigation results and recordpages.
The Application Instrumentation Library offers convenient methods to do this. See the section “AboutInstrumenting your application” for more information.
Related LinksAbout instrumenting your application on page 35
To use a custom application as the preview application in Endeca Workbench, you mustembed small, hidden HTML forms.
Endeca ConfidentialEndeca® Workbench Administrator's Guide
Setting Up the Preview Application for Endeca Workbench | Preview application requirements34
Frame requirementThe preview application must not use frames, because they are likely to collide with the frames ofEndeca Workbench itself.
URL-based stateThe preview application must use URLs to handle navigation and search requests, as opposed to ahidden cookie or session state.
The URLs should allow the substitution of search terms and navigation components. See the section“About using pre-existing applications” for more information.
Related LinksAbout using pre-existing applications on page 37
If you are using a pre-existing application that uses parameters other than the standardEndeca parameters (N, Ntk, Ntt, Nmpt, Nmrf, and R) as your preview application, you canstill map the URLs.
Cookie nameEndeca Workbench uses cookies to maintain a user’s session. The name of the session cookie usedby Endeca Workbench is ESESSIONID.
In rare cases it is possible for the cookie name to collide with a cookie of the same name on the sameapplication server. This conflict can occur if you are running your application on an application serveron the same host as Endeca Workbench and using ESESSIONID for two purposes. In this situation,a user may have their session unexpectedly terminated. To resolve this issue, you can either run theapplication on another host (that is, a host other than the one Endeca Workbench is on), or customizeyour application server to use a different cookie name (other than ESESSIONID) through customdirectives on the specific application server.
About instrumenting your applicationTo use a custom application as the preview application in Endeca Workbench, you must embed small,hidden HTML forms.
These hidden HTML forms must be embedded in two places within the preview application pages:
• Navigation results page (the page that shows the set of records that correspond to a user’s query).• Record page (the page that displays information about a single record).
Endeca provides an Application Instrumentation Library with convenient methods to do this. TheApplication Instrumentation Library is a simple library, consisting of two functions, one for the navigationresults page and one for the record page. A version is provided for both supported languages—Javaand .NET.
Note: The Endeca RAD Toolkit for ASP.NET also includes an Instrumentation Library. Fordetails about instrumenting applications built with the RAD Toolkit for ASP.NET, see the EndecaRAD Toolkit for ASP.NET Developer's Guide.
Endeca® Workbench Administrator's GuideEndeca Confidential
35Setting Up the Preview Application for Endeca Workbench | About instrumenting your application
Related LinksEmbedded hidden form requirement on page 34
You must embed small hidden HTML forms on the preview application’s navigation resultsand record pages.
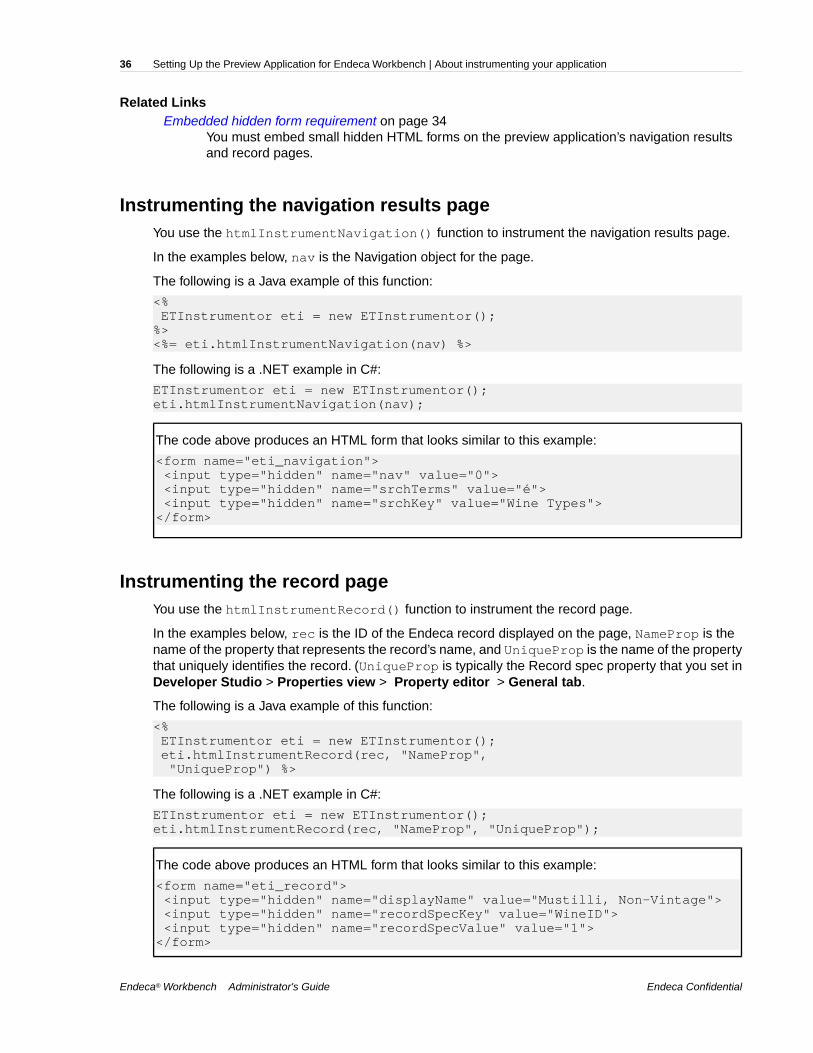
Instrumenting the navigation results pageYou use the htmlInstrumentNavigation() function to instrument the navigation results page.
In the examples below, nav is the Navigation object for the page.
The following is a Java example of this function:
<% ETInstrumentor eti = new ETInstrumentor();%><%= eti.htmlInstrumentNavigation(nav) %>
The following is a .NET example in C#:
ETInstrumentor eti = new ETInstrumentor();eti.htmlInstrumentNavigation(nav);
The code above produces an HTML form that looks similar to this example:
<form name="eti_navigation"> <input type="hidden" name="nav" value="0"> <input type="hidden" name="srchTerms" value="é"> <input type="hidden" name="srchKey" value="Wine Types"></form>
Instrumenting the record pageYou use the htmlInstrumentRecord() function to instrument the record page.
In the examples below, rec is the ID of the Endeca record displayed on the page, NameProp is thename of the property that represents the record’s name, and UniqueProp is the name of the propertythat uniquely identifies the record. (UniqueProp is typically the Record spec property that you set inDeveloper Studio > Properties view > Property editor > General tab.
The following is a Java example of this function:
<% ETInstrumentor eti = new ETInstrumentor(); eti.htmlInstrumentRecord(rec, "NameProp", "UniqueProp") %>
The following is a .NET example in C#:
ETInstrumentor eti = new ETInstrumentor();eti.htmlInstrumentRecord(rec, "NameProp", "UniqueProp");
The code above produces an HTML form that looks similar to this example:
<form name="eti_record"> <input type="hidden" name="displayName" value="Mustilli, Non-Vintage"> <input type="hidden" name="recordSpecKey" value="WineID"> <input type="hidden" name="recordSpecValue" value="1"></form>
Endeca ConfidentialEndeca® Workbench Administrator's Guide
Setting Up the Preview Application for Endeca Workbench | About instrumenting your application36

About configuring the preview applicationAfter instrumenting your custom application, you must provide URL mappings on the Preview AppSettings page of Endeca Workbench.
For the procedure on adding URL mappings on the Preview App Settings page, see the EndecaWorkbench Help.
About using pre-existing applicationsIf you are using a pre-existing application that uses parameters other than the standard Endecaparameters (N, Ntk, Ntt, Nmpt, Nmrf, and R) as your preview application, you can still map the URLs.
There are two requirements:
• The URLs must contain parameters that map to navigation, search key, and search term parameters.In order to enable full functionality (including date-based triggers and the ability to preview inactiverules), the URLs must also contain the preview time and rule filter parameters.
• The navigation, search key, search term parameters, record ID, preview time, and rule filterparameters must use the same encoding as the standard Endeca N, Ntk, Ntt, R, Nmpt, and Nmrfparameters, respectively.
Related LinksURL-based state on page 35
The preview application must use URLs to handle navigation and search requests, as opposedto a hidden cookie or session state.
About enabling and disabling the display of the preview applicationBy default, the URL mappings are filled in with URLs for the preview application of the JSP referenceimplementation. This enables Endeca Workbench to display the preview application for the JSPreference implementation.
If you clear out the default URL settings, the preview application does not display, and thepreview-related options, such as Show in Preview, do not appear in the Rule List page of the RuleManager (or the Page Builder in versions of Endeca Workbench that feature the Endeca Page Builder).
If the display of the preview application is disabled because you previously removed the settings forthe URL mappings, you may enable it again.
To enable the display of the preview application, you can use either of the two options:
• Enter the URLs for the preview application of the reference implementation (these URLs originallywere filled in as default settings),
or
• Enter the URL settings for your own application.
For information about the default URL settings used for the JSP reference implementation, see theEndeca Workbench Help.
Endeca® Workbench Administrator's GuideEndeca Confidential
37Setting Up the Preview Application for Endeca Workbench | About configuring the preview application
About using the preview application with Page BuilderThe Page Builder shares the same preview application as the Rule Manager, but interacts with itsomewhat differently.
Because pages created in the Page Builder depend on the specific cartridges in your application, youshould replace the default preview application with one that can render pages appropriately based onthe templates you have created. This ensures that the preview application can provide an accuraterepresentation of the way pages display in the final front-end application. In addition, in order to allowcontent administrators to save their progress and preview pages incrementally, the application shouldbe able to gracefully handle empty sections or cartridges that have not been fully configured.
Note that if the Navigation results page of your preview application is not instrumented, the statusmessages for dynamic pages do not update when previewing by navigating in the preview application,making it difficult to determine why a page may not be firing. (The status messages do update whenpreviewing through the Location links in the List View.)
Although the Rule Manager enables users to specify rule targets by navigating within the previewapplication, the Page Builder does not have similar functionality in the Record Selector. Therefore, ifyou are using the preview application only for the Page Builder, the Record page does not need to beinstrumented. The Record URL field in the Preview App Settings page in Endeca Workbench cannotbe empty, but it is not used by the Page Builder.
Endeca ConfidentialEndeca® Workbench Administrator's Guide
Setting Up the Preview Application for Endeca Workbench | About using the preview application withPage Builder
38
Chapter 5
LDAP Integration with Endeca Workbench
This section describes how to configure Endeca Workbench to use LDAP for user authentication.
About LDAP integration with Endeca WorkbenchLDAP integration also allows you to assign roles and permissions across an entire LDAP group ratherthan configuring each user individually.
If you have Endeca Workbench configured to use LDAP for user authentication, an administrator cancreate a user profile in Endeca Workbench that is associated with a user in an LDAP directory.
For users who are configured in Endeca Workbench to authenticate via LDAP, the password andidentity information such as name and email address are maintained in the LDAP directory. EndecaWorkbench does not write any data to the LDAP directory. Any roles and permissions assigned to anLDAP user profile in Endeca Workbench are stored in the Endeca Workbench database.
LDAP user and group profiles can be used in combination with the traditional Endeca Workbench userprofiles that an administrator configures manually. Users can authenticate via either method on thesame instance of Endeca Workbench and in the same application.
Optionally, you can enable SSL for communication between Endeca Workbench and your LDAPserver.
Endeca Workbench supports integration with LDAP servers that comply with LDAP version 3.
Authentication of users in Endeca Workbench with LDAP enabledUser authentication via LDAP can be used in combination with the traditional method of authenticationfor users that are configured manually in Endeca Workbench.
Endeca Workbench follows this order of events when a user attempts to log in:
1. Endeca Workbench checks whether the user name matches the name of any manually configuredWorkbench user profile in the current application. If such a user exists, Endeca Workbench attemptsto authenticate the user against the password stored in the Workbench user profile.
2. If no manually configured user of that name exists, Endeca Workbench attempts to authenticatethe user against the LDAP directory.
3. If the user also has a profile configured as an LDAP user in Endeca Workbench, then any associatedroles and permissions are applied. If the user is an administrator or if the user profile has the
Override LDAP Group Permissions option selected, then the user enters Endeca Workbench withthe roles and permissions specified in the user profile.
4. Otherwise, Endeca Workbench checks the LDAP directory for any groups of which the user is amember. If any of these groups have a profile configured in Endeca Workbench, then any rolesand permissions associated with all the groups are applied to the user. For more details aboutinheritance of LDAP group roles and permissions, see the section “Roles and permissions for LDAPusers and groups.”
Related LinksEnabling LDAP authentication in Endeca Workbench on page 42
LDAP authentication for Endeca Workbench is disabled by default.
Troubleshooting user authentication in Endeca Workbench with LDAP enabled on page 51If a user cannot log in to Endeca Workbench, one of several error messages displays.
Roles and permissions for LDAP users and groups on page 40The user profiles you create in Endeca Workbench allow you to assign roles and rule grouppermissions to an LDAP user or group.
User profiles for LDAP users and groupsIf LDAP authentication is enabled for Endeca Workbench, you have the option of creating user profilesin Endeca Workbench for individual users or groups managed in an LDAP directory.
A user profile is uniquely identified in Endeca Workbench by the combination of the user name anduser type (Workbench user, LDAP user, or LDAP group) in each application. Administrators are uniquelyidentified by the combination of user name and user type across all of Endeca Workbench. In the casethat an LDAP directory defines a user and a group with the same name, this allows profiles to exist inEndeca Workbench for both the user and the group. Once a user profile is created and saved in EndecaWorkbench, the user type cannot be changed.
Note that because of the order in which Endeca Workbench handles logins, an Workbench user alwaystakes precedence over an LDAP user. For example, if there is a manually configured Endeca Workbenchuser named lsmith, a user with the name lsmith in the LDAP directory will not be able to log in withthe credentials stored in LDAP, even if there is a user profile in Endeca Workbench for lsmith as anLDAP user or as a member of an LDAP group.
However, there is no conflict between manually configured users and LDAP groups. For example, ifEndeca Workbench has a manually configured user named Marketing, and also has a profile for anLDAP group named Marketing, members of the Marketing group in LDAP are able to log in to EndecaWorkbench using their LDAP credentials as long as there are no conflicts between the LDAP username and the name of a manually configured Workbench user. (For example, if one of the users inthe group has the name Marketing in the LDAP directory, the Workbench user named Marketing willstill take precedence.)
For more information on creating user profiles in Endeca Workbench, see the Endeca WorkbenchHelp.
Roles and permissions for LDAP users and groupsThe user profiles you create in Endeca Workbench allow you to assign roles and rule group permissionsto an LDAP user or group.
Endeca ConfidentialEndeca® Workbench Administrator's Guide
LDAP Integration with Endeca Workbench | About LDAP integration with Endeca Workbench40
Users that exist in the LDAP directory but do not have a profile and associated roles specified inEndeca Workbench, either as an individual or as a member of an LDAP group, cannot log in to EndecaWorkbench.
A user who authenticates via LDAP is assigned the union of all roles associated with all groups ofwhich that user is a member. For each rule group in the application, a user who is a member of multipleLDAP groups defined in Endeca Workbench is assigned the broadest permission associated with anyof the LDAP groups of which that user is a member.
If you create an LDAP user profile in Endeca Workbench for an individual who is also a member ofone or more LDAP groups defined in Endeca Workbench, that user is assigned any roles you specifyon the User Management page in addition to any roles that the user inherits from membership in LDAPgroups. If you specify rule group permissions for an LDAP user who is also a member of an LDAPgroup, then for each rule group, the user is assigned either the permission specified on the UserManagement page or the broadest permission associated with any of the user’s LDAP groups, whicheveris broader.You can override this behavior by specifying Override LDAP Group Permissions whencreating the profile in Endeca Workbench. If you select this option, the user is assigned only the rolesand permissions you specify in the user profile, and does not inherit any roles or permissions fromLDAP groups.
Administrators in Endeca Workbench with LDAPIf you have LDAP enabled, you can create profiles for both LDAP users and LDAP groups asadministrators in Endeca Workbench.
Note that the same precedence rules apply when logging in to Endeca Workbench as fornon-administrators, so that if a manually configured user profile exists for either an administrator ornon-administrator in Endeca Workbench, a user will not be able to log in via LDAP with the same username.
Note that administrators can delete other administrators, including the predefined admin user, butthere must be at least one manually configured Endeca Workbench administrator. This is to ensurethat changes to the LDAP directory or disabling of LDAP authentication for Endeca Workbench cannotdisable all administrator logins.
Related LinksAbout the Endeca Workbench predefined admin user on page 24
Endeca Workbench has a predefined administrator with full administration privileges.
Workflow notifications for LDAP users and groupsFor users who authenticate via LDAP, Endeca Workbench uses the email address that is stored inthe LDAP directory for workflow notification messages.
Any time a user makes a change to the workflow state of a dynamic business rule or a landing pagein Endeca Workbench, the user has the option to launch an email client to send a change notification.Workflow notifications are addressed to all approvers associated with a modified rule group or landingpage group, and also to the most recent editor of a rule or page if it has a pending request. Whenevera rule or landing page is modified, Endeca Workbench saves the user name of the editor who madethe change for notification purposes, whether the user is defined as an Workbench user, an LDAPuser, or a member of an LDAP group.
Endeca Workbench looks up a user’s email address in the Workbench user profile or in the LDAPdirectory as appropriate. If an approver for a rule group is an LDAP group, then Endeca Workbenchattempts to find an email address associated with the group in LDAP.
Endeca® Workbench Administrator's GuideEndeca Confidential
41LDAP Integration with Endeca Workbench | About LDAP integration with Endeca Workbench
When a user changes the workflow state of a rule or page (by activating, deactivating, requestingactivation, requesting deactivation, canceling a request for activation, or rejecting a request) and clicksSave Changes (or Save All Changes in the Page Builder), Endeca Workbench writes a message tothe log similar to the following:
INFO: User mmartin made a workflow state change.INFO: Email addresses were retrieved for the following users or groups: Workbench User batkins, LDAP User lsmithINFO: Email addresses could not be found for the following users or groups: LDAP Group rule_approvers, Workbench User admin
This information is only captured in the log; the user in Endeca Workbench does not see any messageabout whether email addresses could be found.
Because Endeca Workbench launches another application to send the email and the user can editthe list of recipients before sending the message, the Workbench log cannot record whether an emailwas sent, or the actual recipients of the message.
Enabling LDAP authentication in Endeca WorkbenchLDAP authentication for Endeca Workbench is disabled by default.
Because LDAP configuration is unique to each LDAP server and directory, enabling LDAP authenticationfor Endeca Workbench is a manual process.
To enable LDAP authentication in Endeca Workbench:
1. Stop the Endeca Tools Service.
2. Navigate to %ENDECA_TOOLS_CONF%\conf (on Windows) or $ENDECA_TOOLS_CONF/conf (onUNIX).
3. Open the webstudio.properties file, and locate the com.endeca.webstudio.useLdapproperty, for example:
# LDAP Authenticationcom.endeca.webstudio.useLdap=false
4. Change the value of the property to true, for example:
com.endeca.webstudio.useLdap=true
5. Save and close the file.
6. Open the Login.conf file. This file contains a sample configuration for LDAP authentication.
Note: By default, Endeca Workbench uses the authentication profile in this location.Youcan specify an alternate configuration file. For more information, see “Specifying the locationof the configuration file.”
7. Uncomment and modify the Webstudio profile according to your LDAP configuration.
For details about profile parameters, see “Configuration of the Webstudio login profile for LDAP.”
8. Save and close the file.
9. Start the Endeca Tools Service.
Related LinksAuthentication of users in Endeca Workbench with LDAP enabled on page 39
Endeca ConfidentialEndeca® Workbench Administrator's Guide
LDAP Integration with Endeca Workbench | Enabling LDAP authentication in Endeca Workbench42
User authentication via LDAP can be used in combination with the traditional method ofauthentication for users that are configured manually in Endeca Workbench.
About disabling LDAP authentication for Endeca Workbench on page 43If you disable LDAP authentication for Endeca Workbench by setting the property com.en¬deca.webstudio.useLdap=false in the webstudio.properties file, the options tocreate a user profile for an LDAP user or an LDAP group do not display in Endeca Workbench.
Troubleshooting user authentication in Endeca Workbench with LDAP enabled on page 51If a user cannot log in to Endeca Workbench, one of several error messages displays.
Specifying the location of the configuration file on page 49By default, Endeca Workbench uses %ENDECA_TOOLS_CONF%\conf\Login.conf (onWindows) or $ENDECA_TOOLS_CONF/conf/Login.conf (on UNIX) as its configurationfile.
Specifying the location of the configuration file using Windows Services on page 50By default, Endeca Workbench uses %ENDECA_TOOLS_CONF%\conf\Login.conf (onWindows) or $ENDECA_TOOLS_CONF/conf/Login.conf (on UNIX) as its configurationfile.
Configuration of the Webstudio login profile for LDAP on page 43Endeca Workbench uses the Java Authentication and Authorization Service (JAAS) toauthenticate users against an LDAP directory.
About disabling LDAP authentication for Endeca WorkbenchIf you disable LDAP authentication for Endeca Workbench by setting the property com.endeca.web¬studio.useLdap=false in the webstudio.properties file, the options to create a user profilefor an LDAP user or an LDAP group do not display in Endeca Workbench.
All new user profiles you create must be manually configured in Endeca Workbench. Any users whowere configured as LDAP users or as members of an LDAP group are no longer able to log in toEndeca Workbench. Although they are inactive, any existing user profiles for LDAP users or LDAPgroups remain in Endeca Workbench and can be edited by an administrator.
Related LinksEnabling LDAP authentication in Endeca Workbench on page 42
LDAP authentication for Endeca Workbench is disabled by default.
Troubleshooting user authentication in Endeca Workbench with LDAP enabled on page 51If a user cannot log in to Endeca Workbench, one of several error messages displays.
Configuration of the Webstudio login profile for LDAPEndeca Workbench uses the Java Authentication and Authorization Service (JAAS) to authenticateusers against an LDAP directory.
The configuration information that Endeca Workbench uses for LDAP authentication is stored in aprofile named Webstudio in %ENDECA_TOOLS_CONF%\conf\Login.conf (on Windows) or$ENDECA_TOOLS_CONF/conf/Login.conf (on UNIX). A sample profile is included in this locationby default, but you should modify its parameters as needed for your LDAP configuration.You can alsospecify an alternate location for the configuration file.
Endeca® Workbench Administrator's GuideEndeca Confidential
43LDAP Integration with Endeca Workbench | About disabling LDAP authentication for Endeca Workbench

If you want to configure JAAS authentication for other applications running in the Endeca Tools Service,for example your own Endeca application or Workbench extensions, create additional profiles withunique names in this same Login.conf file. For more information on configuring JAAS authenticationfor your Endeca application using LDAP or a local password file, see the Endeca Security Guide.
Note: A Login.conf file exists in %ENDECA_CONF%\etc (on Windows) and $ENDE¬CA_CONF/etc (on UNIX). This file contains a sample profile for file-based authentication andis not used by Endeca Workbench.
Related LinksEnabling LDAP authentication in Endeca Workbench on page 42
LDAP authentication for Endeca Workbench is disabled by default.
Specifying the location of the configuration file on page 49By default, Endeca Workbench uses %ENDECA_TOOLS_CONF%\conf\Login.conf (onWindows) or $ENDECA_TOOLS_CONF/conf/Login.conf (on UNIX) as its configurationfile.
Specifying the location of the configuration file using Windows Services on page 50By default, Endeca Workbench uses %ENDECA_TOOLS_CONF%\conf\Login.conf (onWindows) or $ENDECA_TOOLS_CONF/conf/Login.conf (on UNIX) as its configurationfile.
Templates used in the Webstudio profileWorkbench allows templates to be supplied for certain configuration parameters in the WebstudioJAAS profile.
These templates, indicated by %{} escapes, allow values from the authentication operation, such asa user or group name entered in Workbench, or specific values from the user or group objects in LDAP,to be substituted into the parameter value. Templates also allow you to extract information from theLDAP user or group object such as the exact user or group name as specified in the LDAP directory,or identity information that is stored in LDAP. The %{} escapes are expanded as follows:
DescriptionEscape
The name of the LDAP user as entered in the Add User page inWorkbench, or the user name entered by a user at the WorkbenchLogin page.
%{#username}
The name of the LDAP group as entered in the Add User page inWorkbench.
%{#groupname}
The distinguished name of the user or group object in the LDAP directory.%{#dn}
The value of the path field at index n in the distinguished name of theuser or group object in LDAP.
%{#dn:n}
For example, if the value in the %{#dn} field is cn=joe,ou=Peo¬ple,dc=foo,dc=com, then the value “People” will be substituted for%{#dn:1}, while “joe” will be substituted for %{#dn:0}. Note that
Endeca ConfidentialEndeca® Workbench Administrator's Guide
LDAP Integration with Endeca Workbench | Configuration of the Webstudio login profile for LDAP44
DescriptionEscape
unlike the value of %{#dn}, which is the raw value returned from theLDAP server, the values returned by this template are not LDAP escaped.
The value in the specified field of the user object (or group object whenused in the groupTemplate or findGroupTemplate parameter) underconsideration.
%{#fieldname}
About configuration parameters for the Webstudio profileYou specify the values of configuration parameters for LDAP authentication as quoted strings.
If there are any quotation marks (") or backslashes (\) in the string, they must be escaped. For example,if you have the following string:
"A string with an "embedded quote" and a \backslash"
In the profile, it should be specified as follows:
"A string with an \"embedded quote\" and a \\backslash"
For most parameter values, single quotation marks (') do not need to be escaped and the values youspecify for the parameters can include non-ASCII UTF-8 characters. For additional restrictions on theuserPath, groupPath, and findGroupPath parameters, see “LDAP path parameters."
For a full list of the parameters that can be specified in the profile, see the section "Configurationparameters for the Webstudio profile."
Configuration parameters for the Webstudio profileThis section provides a reference of parameters that can be specified in the Webstudio profile.
The following is a full list of the parameters that can be specified in the profile:
DescriptionParameter
A URL specifying the name and port of the LDAP server to beused for authentication.You can specify multiple LDAP servers.
serverInfo
Note that the protocol portion of the URL (that is, ldap://) mustbe in all-lowercase.
The query that is passed to the LDAP server to find an individualuser.You can use the %{#username} template to insert the
userPath
name entered in the Add User page (when using the CheckName function), or or the name entered in the Endeca WorkbenchLogin page, into the query.
A template that specifies how to produce the username from theuser object returned by the userPath query.
userTemplate
This template allows Endeca Workbench to automatically correctthe case (capital or lowercase) of the username to match the
Endeca® Workbench Administrator's GuideEndeca Confidential
45LDAP Integration with Endeca Workbench | Configuration of the Webstudio login profile for LDAP
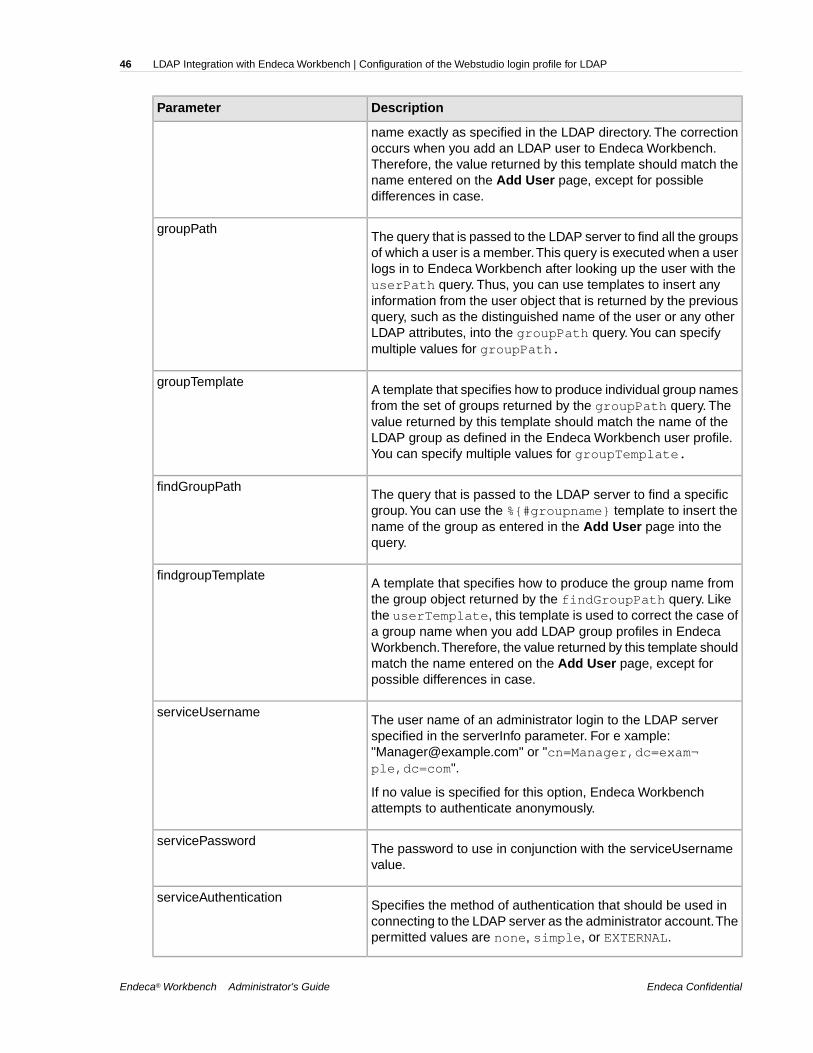
DescriptionParameter
name exactly as specified in the LDAP directory. The correctionoccurs when you add an LDAP user to Endeca Workbench.Therefore, the value returned by this template should match thename entered on the Add User page, except for possibledifferences in case.
The query that is passed to the LDAP server to find all the groupsof which a user is a member.This query is executed when a user
groupPath
logs in to Endeca Workbench after looking up the user with theuserPath query. Thus, you can use templates to insert anyinformation from the user object that is returned by the previousquery, such as the distinguished name of the user or any otherLDAP attributes, into the groupPath query.You can specifymultiple values for groupPath.
A template that specifies how to produce individual group namesfrom the set of groups returned by the groupPath query. The
groupTemplate
value returned by this template should match the name of theLDAP group as defined in the Endeca Workbench user profile.You can specify multiple values for groupTemplate.
The query that is passed to the LDAP server to find a specificgroup.You can use the %{#groupname} template to insert the
findGroupPath
name of the group as entered in the Add User page into thequery.
A template that specifies how to produce the group name fromthe group object returned by the findGroupPath query. Like
findgroupTemplate
the userTemplate, this template is used to correct the case ofa group name when you add LDAP group profiles in EndecaWorkbench.Therefore, the value returned by this template shouldmatch the name entered on the Add User page, except forpossible differences in case.
The user name of an administrator login to the LDAP serverspecified in the serverInfo parameter. For e xample:
serviceUsername
"[email protected]" or "cn=Manager,dc=exam¬ple,dc=com".
If no value is specified for this option, Endeca Workbenchattempts to authenticate anonymously.
The password to use in conjunction with the serviceUsernamevalue.
servicePassword
Specifies the method of authentication that should be used inconnecting to the LDAP server as the administrator account.Thepermitted values are none, simple, or EXTERNAL.
serviceAuthentication
Endeca ConfidentialEndeca® Workbench Administrator's Guide
LDAP Integration with Endeca Workbench | Configuration of the Webstudio login profile for LDAP46
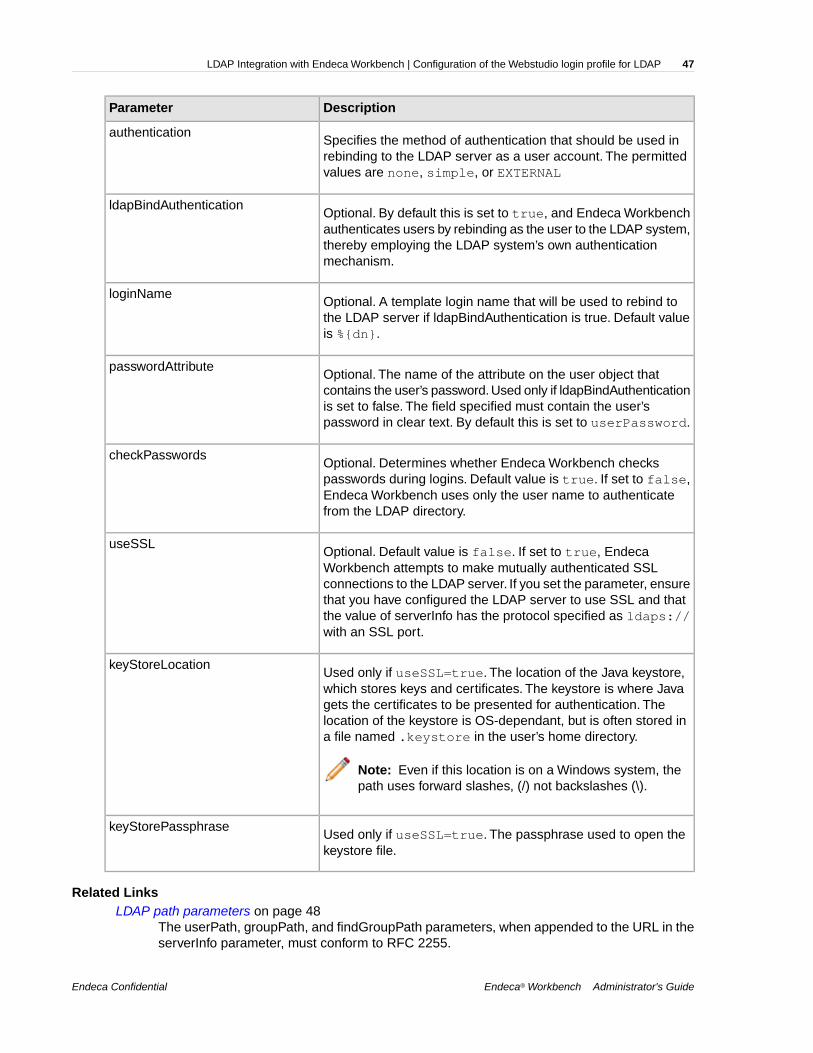
DescriptionParameter
Specifies the method of authentication that should be used inrebinding to the LDAP server as a user account. The permittedvalues are none, simple, or EXTERNAL
authentication
Optional. By default this is set to true, and Endeca Workbenchauthenticates users by rebinding as the user to the LDAP system,
ldapBindAuthentication
thereby employing the LDAP system’s own authenticationmechanism.
Optional. A template login name that will be used to rebind tothe LDAP server if ldapBindAuthentication is true. Default valueis %{dn}.
loginName
Optional. The name of the attribute on the user object thatcontains the user’s password. Used only if ldapBindAuthentication
passwordAttribute
is set to false. The field specified must contain the user’spassword in clear text. By default this is set to userPassword.
Optional. Determines whether Endeca Workbench checkspasswords during logins. Default value is true. If set to false,
checkPasswords
Endeca Workbench uses only the user name to authenticatefrom the LDAP directory.
Optional. Default value is false. If set to true, EndecaWorkbench attempts to make mutually authenticated SSL
useSSL
connections to the LDAP server. If you set the parameter, ensurethat you have configured the LDAP server to use SSL and thatthe value of serverInfo has the protocol specified as ldaps://with an SSL port.
Used only if useSSL=true. The location of the Java keystore,which stores keys and certificates. The keystore is where Java
keyStoreLocation
gets the certificates to be presented for authentication. Thelocation of the keystore is OS-dependant, but is often stored ina file named .keystore in the user’s home directory.
Note: Even if this location is on a Windows system, thepath uses forward slashes, (/) not backslashes (\).
Used only if useSSL=true. The passphrase used to open thekeystore file.
keyStorePassphrase
Related LinksLDAP path parameters on page 48
The userPath, groupPath, and findGroupPath parameters, when appended to the URL in theserverInfo parameter, must conform to RFC 2255.
Endeca® Workbench Administrator's GuideEndeca Confidential
47LDAP Integration with Endeca Workbench | Configuration of the Webstudio login profile for LDAP
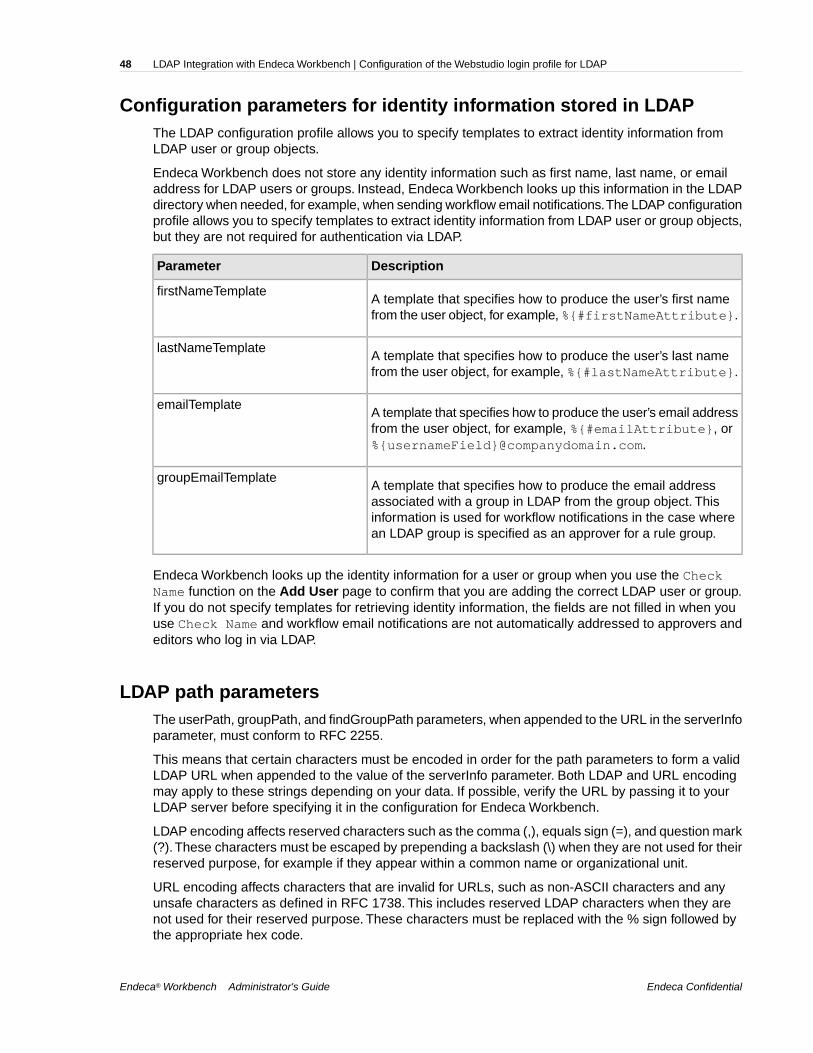
Configuration parameters for identity information stored in LDAPThe LDAP configuration profile allows you to specify templates to extract identity information fromLDAP user or group objects.
Endeca Workbench does not store any identity information such as first name, last name, or emailaddress for LDAP users or groups. Instead, Endeca Workbench looks up this information in the LDAPdirectory when needed, for example, when sending workflow email notifications.The LDAP configurationprofile allows you to specify templates to extract identity information from LDAP user or group objects,but they are not required for authentication via LDAP.
DescriptionParameter
A template that specifies how to produce the user’s first namefrom the user object, for example, %{#firstNameAttribute}.
firstNameTemplate
A template that specifies how to produce the user’s last namefrom the user object, for example, %{#lastNameAttribute}.
lastNameTemplate
A template that specifies how to produce the user’s email addressfrom the user object, for example, %{#emailAttribute}, or%{usernameField}@companydomain.com.
emailTemplate
A template that specifies how to produce the email addressassociated with a group in LDAP from the group object. This
groupEmailTemplate
information is used for workflow notifications in the case wherean LDAP group is specified as an approver for a rule group.
Endeca Workbench looks up the identity information for a user or group when you use the CheckName function on the Add User page to confirm that you are adding the correct LDAP user or group.If you do not specify templates for retrieving identity information, the fields are not filled in when youuse Check Name and workflow email notifications are not automatically addressed to approvers andeditors who log in via LDAP.
LDAP path parametersThe userPath, groupPath, and findGroupPath parameters, when appended to the URL in the serverInfoparameter, must conform to RFC 2255.
This means that certain characters must be encoded in order for the path parameters to form a validLDAP URL when appended to the value of the serverInfo parameter. Both LDAP and URL encodingmay apply to these strings depending on your data. If possible, verify the URL by passing it to yourLDAP server before specifying it in the configuration for Endeca Workbench.
LDAP encoding affects reserved characters such as the comma (,), equals sign (=), and question mark(?).These characters must be escaped by prepending a backslash (\) when they are not used for theirreserved purpose, for example if they appear within a common name or organizational unit.
URL encoding affects characters that are invalid for URLs, such as non-ASCII characters and anyunsafe characters as defined in RFC 1738. This includes reserved LDAP characters when they arenot used for their reserved purpose. These characters must be replaced with the % sign followed bythe appropriate hex code.
Endeca ConfidentialEndeca® Workbench Administrator's Guide
LDAP Integration with Endeca Workbench | Configuration of the Webstudio login profile for LDAP48
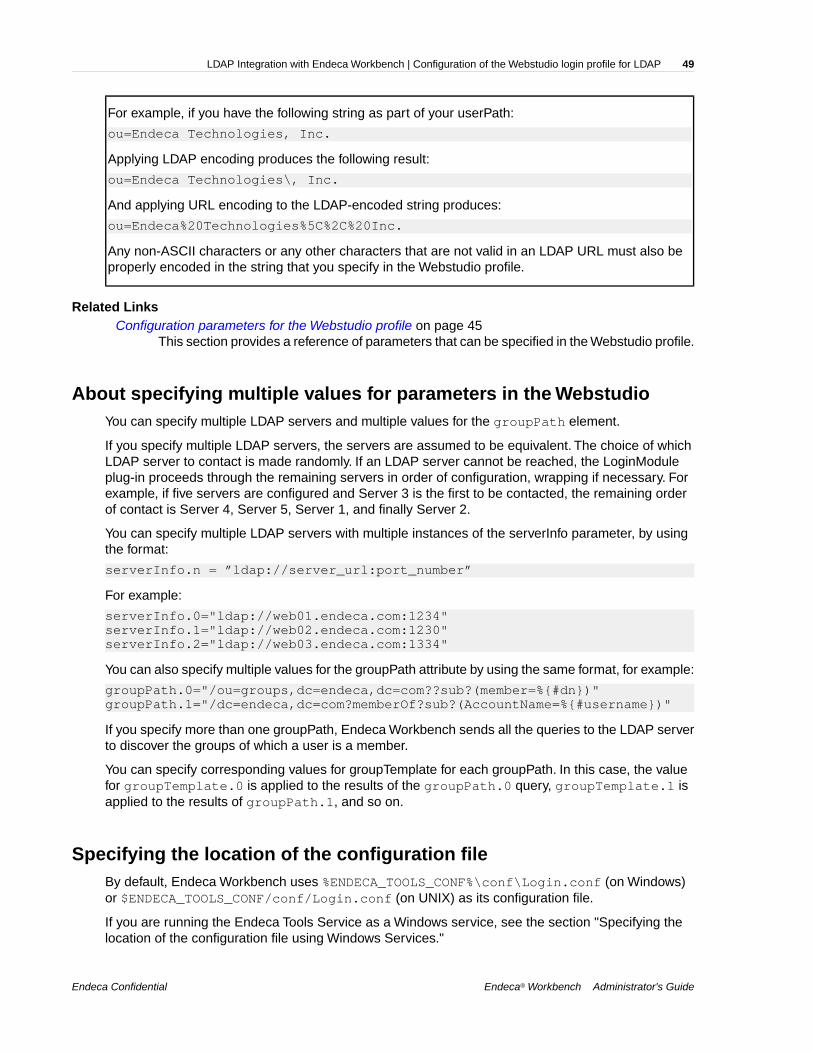
For example, if you have the following string as part of your userPath:
ou=Endeca Technologies, Inc.
Applying LDAP encoding produces the following result:
ou=Endeca Technologies\, Inc.
And applying URL encoding to the LDAP-encoded string produces:
ou=Endeca%20Technologies%5C%2C%20Inc.
Any non-ASCII characters or any other characters that are not valid in an LDAP URL must also beproperly encoded in the string that you specify in the Webstudio profile.
Related LinksConfiguration parameters for the Webstudio profile on page 45
This section provides a reference of parameters that can be specified in the Webstudio profile.
About specifying multiple values for parameters in the WebstudioYou can specify multiple LDAP servers and multiple values for the groupPath element.
If you specify multiple LDAP servers, the servers are assumed to be equivalent. The choice of whichLDAP server to contact is made randomly. If an LDAP server cannot be reached, the LoginModuleplug-in proceeds through the remaining servers in order of configuration, wrapping if necessary. Forexample, if five servers are configured and Server 3 is the first to be contacted, the remaining orderof contact is Server 4, Server 5, Server 1, and finally Server 2.
You can specify multiple LDAP servers with multiple instances of the serverInfo parameter, by usingthe format:
serverInfo.n = ”ldap://server_url:port_number”
For example:
serverInfo.0="ldap://web01.endeca.com:1234"serverInfo.1="ldap://web02.endeca.com:1230"serverInfo.2="ldap://web03.endeca.com:1334"
You can also specify multiple values for the groupPath attribute by using the same format, for example:
groupPath.0="/ou=groups,dc=endeca,dc=com??sub?(member=%{#dn})"groupPath.1="/dc=endeca,dc=com?memberOf?sub?(AccountName=%{#username})"
If you specify more than one groupPath, Endeca Workbench sends all the queries to the LDAP serverto discover the groups of which a user is a member.
You can specify corresponding values for groupTemplate for each groupPath. In this case, the valuefor groupTemplate.0 is applied to the results of the groupPath.0 query, groupTemplate.1 isapplied to the results of groupPath.1, and so on.
Specifying the location of the configuration fileBy default, Endeca Workbench uses %ENDECA_TOOLS_CONF%\conf\Login.conf (on Windows)or $ENDECA_TOOLS_CONF/conf/Login.conf (on UNIX) as its configuration file.
If you are running the Endeca Tools Service as a Windows service, see the section "Specifying thelocation of the configuration file using Windows Services."
Endeca® Workbench Administrator's GuideEndeca Confidential
49LDAP Integration with Endeca Workbench | Configuration of the Webstudio login profile for LDAP
You can substitute any configuration file that includes a JAAS profile named Webstudio. The file doesnot have to be named Login.conf, but it should be saved in UTF-8 format.
If you want to store the configuration file in a different location, you can pass this location to the JavaJVM. How you specify the location depends on how you run the Endeca Tools Service.
If you want to store the configuration file in a different location, you can pass this location to the JavaJVM. How you specify the location depends on how you run the Endeca Tools Service.
If you are running the Endeca Tools Service on Windows from the command line or on UNIX:
1. Navigate to:
• %ENDECA_TOOLS_ROOT%\server\bin (Windows).• $ENDECA_TOOLS_ROOT/server/bin (UNIX).
2. Open the setenv.bat (Windows) or setenv.sh (UNIX).
3. Locate the line that begins with set JAVA_OPTS, for example:
set JAVA_OPTS=-Xmx1024m -XX:MaxPermSize=128m -Djava.security.auth.lo¬gin.config=%ENDECA_TOOLS_CONF%/conf/Login.conf
4. Change the path of the -Djava.security.auth.login.config parameter to point to the location of yourconfiguration file.
Related LinksEnabling LDAP authentication in Endeca Workbench on page 42
LDAP authentication for Endeca Workbench is disabled by default.
Specifying the location of the configuration file using Windows Services on page 50By default, Endeca Workbench uses %ENDECA_TOOLS_CONF%\conf\Login.conf (onWindows) or $ENDECA_TOOLS_CONF/conf/Login.conf (on UNIX) as its configurationfile.
Configuration of the Webstudio login profile for LDAP on page 43Endeca Workbench uses the Java Authentication and Authorization Service (JAAS) toauthenticate users against an LDAP directory.
Specifying the location of the configuration file using Windows ServicesBy default, Endeca Workbench uses %ENDECA_TOOLS_CONF%\conf\Login.conf (on Windows)or $ENDECA_TOOLS_CONF/conf/Login.conf (on UNIX) as its configuration file.
If you are running the Endeca Tools Service on UNIX or on Windows from a command line, see thesection "Specifying the location of the configuration file."
You can substitute any configuration file that includes a JAAS profile named Webstudio. The file doesnot have to be named Login.conf, but it should be saved in UTF-8 format.
If you want to store the configuration file in a different location, you can pass this location to the JavaJVM. How you specify the location depends on how you run the Endeca Tools Service.
If you want to store the configuration file in a different location, you can pass this location to the JavaJVM. How you specify the location depends on how you run the Endeca Tools Service.
If you are running the Endeca Tools Service on Windows from the command line or on UNIX:
Endeca ConfidentialEndeca® Workbench Administrator's Guide
LDAP Integration with Endeca Workbench | Configuration of the Webstudio login profile for LDAP50
1. Open the Registry Editor and look for the following key:
HKEY_LOCAL_MACHINE\SOFTWARE\Apache Software Foundation\ Procrun 2.0\EndecaToolsService\Parameters\Java\Options
Note: In the Registry Editor Explorer pane, expand the folders until you reach Java. Thenclick on the Java folder and look for the Options setting in the right pane.
2. Right click Options.
3. Choose Modify.
The Edit Multi-String dialog box displays.
4. Locate the following parameter:
-Djava.security.auth.login.config=%ENDECA_TOOLS_CONF%/conf/Login.conf
5. Change the path to point to the location of your configuration file.
Related LinksEnabling LDAP authentication in Endeca Workbench on page 42
LDAP authentication for Endeca Workbench is disabled by default.
Specifying the location of the configuration file on page 49By default, Endeca Workbench uses %ENDECA_TOOLS_CONF%\conf\Login.conf (onWindows) or $ENDECA_TOOLS_CONF/conf/Login.conf (on UNIX) as its configurationfile.
Configuration of the Webstudio login profile for LDAP on page 43Endeca Workbench uses the Java Authentication and Authorization Service (JAAS) toauthenticate users against an LDAP directory.
Troubleshooting user authentication in Endeca Workbenchwith LDAP enabled
If a user cannot log in to Endeca Workbench, one of several error messages displays.
Incorrect Username or Password
If the user is entering the correct LDAP user name and password, there may be a manually configuredWorkbench user in the same application with the same user name or a Workbench administrator withthe same user name.
A user with a manually configured profile always takes precedence over a user authenticating viaLDAP. For more details about the behavior of users with the same name, see “User profiles for LDAPusers and groups.”
You have no roles to access Endeca Workbench
This can mean that a profile was created for this user, or for a group of which this user is a member,that was not assigned any roles. This message also displays when a user who exists in the LDAPdirectory attempts to log in to Endeca Workbench, but no profile exists in Endeca Workbench for theuser or for any group of which the user is a member. A user who does not have any associated rolescannot log in to Endeca Workbench.
Endeca® Workbench Administrator's GuideEndeca Confidential
51LDAP Integration with Endeca Workbench | Troubleshooting user authentication in Endeca Workbenchwith LDAP enabled
An error occurred while trying to validate your credentials
This error displays when any error occurs other than a user name-password mismatch or an absenceof roles. It can indicate anything from a connectivity issue with the LDAP server to a mistake in theconfiguration in the Webstudio login profile located in %ENDECA_TOOLS_CONF%\conf\Login.conf(on Windows) or $ENDECA_TOOLS_CONF/conf/Login.conf (on UNIX). For more information aboutthe login profile, see “Configuration of the Webstudio login profile for LDAP.”
The message “An error occurred while querying the LDAP server” when using the Check Name functionin the Add User page indicates the same set of possible issues.
Check the Endeca Workbench log, which is located in %ENDECA_TOOLS_CONF%\logs\webstu¬dio.#.log (on Windows) or $ENDECA_TOOLS_CONF/logs/webstudio.#.log (on UNIX) for moreinformation about the causes of authentication failures. In most cases, the solution is to adjust theLDAP query strings to return the desired results. If possible, test the query URLs against your LDAPserver using an indepedent tool in order to confirm that they behave as expected and that each queryfor a user or group that exists in the directory returns a unique user or group object.
Related LinksEnabling LDAP authentication in Endeca Workbench on page 42
LDAP authentication for Endeca Workbench is disabled by default.
Authentication of users in Endeca Workbench with LDAP enabled on page 39User authentication via LDAP can be used in combination with the traditional method ofauthentication for users that are configured manually in Endeca Workbench.
About disabling LDAP authentication for Endeca Workbench on page 43If you disable LDAP authentication for Endeca Workbench by setting the property com.en¬deca.webstudio.useLdap=false in the webstudio.properties file, the options tocreate a user profile for an LDAP user or an LDAP group do not display in Endeca Workbench.
User profiles for LDAP users and groups on page 40If LDAP authentication is enabled for Endeca Workbench, you have the option of creatinguser profiles in Endeca Workbench for individual users or groups managed in an LDAPdirectory.
Configuration of the Webstudio login profile for LDAP on page 43Endeca Workbench uses the Java Authentication and Authorization Service (JAAS) toauthenticate users against an LDAP directory.
Endeca ConfidentialEndeca® Workbench Administrator's Guide
LDAP Integration with Endeca Workbench | Troubleshooting user authentication in Endeca Workbenchwith LDAP enabled
52

Chapter 6
SSL Configuration
This section describes how to configure your Endeca Workbench to use SSL for Web browserconnections only. For information about configuring Endeca Workbench to use SSL to communicatewith the EAC Central Server, see the Endeca Security Guide.
About configuring SSL in Endeca WorkbenchSSL is disabled by default for Endeca Workbench as a server.
To enable SSL security between Endeca Workbench and its clients, you need to do the following:
• Enable the SSL version of Endeca Workbench.• Set up a certificate for the Endeca Workbench server. For details, see the Endeca Security Guide.
The server certificate for Endeca Workbench must be issued to the fully qualified domain nameof the server.
• Modify the server.xml file for the Endeca Tools Service to enable the HTTPS connector andpoint to the new keystore.
Clients can make secure connections to Endeca Workbench either by taking advantage of a redirectfrom the non-SSL port or, if you have disabled the non-SSL port or do not wish to use the redirect, bymaking an HTTPS connection directly to the SSL port.
Endeca Workbench supports version 3.0 of the Secure Sockets Layer (SSL) protocol for itscommunication endpoints.
Enabling the SSL version of Endeca WorkbenchThe non-SSL version of Endeca Workbench is installed by default.
To enable the SSL version of Endeca Workbench:
1. Stop the Endeca Tools Service.
2. Navigate to %ENDECA_TOOLS_CONF%\conf\Standalone\localhost (on Windows) or $ENDE¬CA_TOOLS_CONF/conf/Standalone/localhost (on UNIX).
3. Open the ROOT.xml file.
4. Locate the line in which the docBase is defined.For example:
docBase="C:\Endeca\Workbench\version\server/workbench-2.0.0.303533.war"
Note: The file name in the example may not match the one in your installation.
5. Change this to point to the SSL version of the WAR by adding -ssl to the filename.For example:
docBase="C:\Endeca\Workbench\version\server/workbench-2.0.0.303533-ssl.war"
6. Save and close the file.
7. Start the Endeca Tools Service.
If you want to restore the non-SSL version at a later date, you can reverse the process by editing theROOT.xml file accordingly.
Modifying the server.xml for the Endeca Tools ServiceBefore you can use SSL with Endeca Workbench, you must edit its server.xml file as described.
This procedure assumes you have already generated server certificates for Endeca Workbench asdescribed in the Endeca Security Guide and uploaded them to the Endeca Workbench server.
To enable the HTTPS connector:
1. Stop the Endeca Tools Service.
2. Navigate to %ENDECA_TOOLS_CONF%\conf (on Windows) or $ENDECA_TOOLS_CONF/conf (onUNIX).
3. Open the server.xml file.
4. Locate and remove the comments around the Connector element for port 8446 as follows:
<!-- Define a SSL HTTP/1.1 Connector on port 8446 --> <Connector port="8446" maxHttpHeaderSize="8192" SSLEnabled="true" maxThreads="150" minSpareThreads="25" maxSpareThreads="75" enableLookups="false" disableUploadTimeout="true" acceptCount="100" scheme="https" secure="true" clientAuth="false" sslProtocol="TLS" keystoreFile="conf/eac.ks" keystorePass="eacpass" truststoreFile="conf/ca.ks" truststorePass="eacpass" URIEncoding="UTF-8"/>
5. Optionally, change the port number to something other than 8446 if you do not want to use thatdefault.
If you do not use the default port, update the redirectPort attribute on the non-SSL HTTPconnector to point to the new port as in the following example:
<!-- Define a non-SSL HTTP/1.1 Connector on port 8006 --> <Connector port="8006" maxHttpHeaderSize="8192" maxThreads="150" minSpareThreads="25" maxSpareThreads="75" enableLookups="true" redirectPort="8446" acceptCount="10" connectionTimeout="60000" disableUploadTimeout="true" debug="0" URIEncoding="UTF-8"/>
6. If you want to disable the redirect from the non-secure port to the secure port, comment out thenon-SSL connector in the server.xml file. By default, the redirect is enabled.
Endeca ConfidentialEndeca® Workbench Administrator's Guide
SSL Configuration | About configuring SSL in Endeca Workbench54
Caution: If you choose to disable the non-SSL connector, the Deployment Template andthe emgr_update utility cannot communicate with Endeca Workbench and you must manuallyupdate your application's instance configuration.
7. Update the keystoreFile, keystorePass, truststoreFile, and truststorePass withthe appropriate values for your certificates.
The keystoreFile and truststoreFile values should be the paths to the location where youuploaded your keystore and truststore files. These paths can be specified as absolute paths, orpaths relative to ENDECA_TOOLS_CONF, although the files themselves can be located anywhereon the server.
8. Save and close the file.
9. Start the Endeca Tools Service.
SSL considerations for the preview application andWorkbench extensions
If you have Endeca Workbench running under SSL and your preview application or any Workbenchextensions do not use SSL, a browser message displays when you navigate to Endeca Workbenchwarning you that the site contains both secure and nonsecure items.
In order to prevent this message from displaying, you must do the following:
• Configure the URLs of the preview application to use HTTPS and an SSL port. For informationabout specifying the URLs for the preview application, see the Endeca Workbench Help.
• Configure any Workbench extensions to use HTTPS and an SSL port. For information aboutconfiguring Workbench extensions, see “Workbench extensions.”
Note that even if you have an internal redirect set up to forward connections from a non-SSL port toa secure SSL port, the browser warning appears because the initial connection is being made overHTTP.
Related LinksWorkbench extensions on page 62
Extensions enable you to incorporate Web applications related to your Endeca implementationas plug-ins to Endeca Workbench.
Configuring the default preview application to require SSL connectionsIf you want all communication with the preview application to use SSL, you can add a security constraintto the web.xml file.
The configuration file for the default preview application is found in %ENDECA_TOOLS_ROOT%\serv¬er\webapps\endeca_jspref\WEB-INF (on Windows) or $ENDECA_TOOLS_ROOT/server/we¬bapps/endeca_jspref/WEB-INF (on UNIX) and includes a commented-out security constraint asfollows:
<!-- Uncomment the following section if you want to force the jsp_ref app to use ssl--><!--
Endeca® Workbench Administrator's GuideEndeca Confidential
55SSL Configuration | SSL considerations for the preview application and Workbench extensions

<security-constraint> <web-resource-collection> <web-resource-name>Entire Site</web-resource-name> <url-pattern>/*</url-pattern> <http-method>GET</http-method> <http-method>POST</http-method> </web-resource-collection> <user-data-constraint> <transport-guarantee>CONFIDENTIAL</transport-guarantee> </user-data-constraint></security-constraint>-->
To enable this constraint, remove the comments around the <security-constraint> element.This forces connections to the application on the non-SSL port to be redirected to the SSL port definedin server.xml.
Endeca ConfidentialEndeca® Workbench Administrator's Guide
SSL Configuration | SSL considerations for the preview application and Workbench extensions56
Chapter 7
Customizing Endeca Workbench
This section describes how to customize the Endeca Workbench interface and how to add extensionsto Endeca Workbench.
The navigation menu and launch pageYou can configure the items in the navigation menu on the left and on the launch page of EndecaWorkbench by modifying the ws-mainMenu.xml file in %ENDECA_TOOLS_CONF%\conf (on Windows)or $ENDECA_TOOLS_CONF/conf (on UNIX).
By editing ws-mainMenu.xml, you can do any of the following:
• Add a new menu item.• Remove an item from the menu.• Specify the order in which the menu items display.• Specify whether an item is in the top-level menu or in a submenu.• Specify whether a menu item displays on the launch page.
Related LinksUpdating the Endeca Workbench menu and launch page on page 61
The menu items on the launch page of Endeca Workbench are configurable.
Navigation menu nodesA menu item is either a leaf or a node. A node is a top-level menu item that does not link directly toany pages.
Instead it has children that are leaf items and are displayed in a submenu. Nodes cannot be displayedon the launch page. Each node is defined in a <menunode> element in ws-mainMenu.xml that takesthe following attributes:
Attribute valueAttribute name
The id of a predefined node in Endeca Workbench or a uniquestring identifying a custom node. For more information on
id
predefined nodes, see “Predefined menu nodes in EndecaWorkbench.”
Attribute valueAttribute name
The display name for this node that appears in the navigationmenu. This attribute is required for all custom nodes.
defaultTitle
A menunode element requires one or more child menuitem elements.
This example of a ws-mainMenu.xml file defines a custom menu node with extensions as its childitems.
<?xml version="1.0" encoding="UTF-8"?>
<mainmenu xmlns:xsi="http://www.w3.org/2001/XMLSchema-instance" xsi:noNamespaceSchemaLocation="mainMenu.xsd"> <menunode id="myextensions" defaultTitle="My Extensions"> <menuitem id="extensionA"/> <menuitem id="extensionB"/> </menunode></mainmenu>
Related LinksPredefined menuitem elements on page 60
This section is a reference table listing all of the predefined pages and corresponding idsavailable in the ws-mainMenu.xml file.
About navigation menu leaf items on page 59A leaf is a menu item that links to a page, and can also have an entry on the launch page.
Node titles for multiple localesIf you customize a menu for multiple locales in Workbench, you can optionally specify localized titlesfor custom menu nodes in a titles element within menunode that contains one or more title elements.
The title element requires a locale attribute whose value is a valid ISO language code.
This example of a ws-mainMenu.xml file defines a custom menu node with titles in both Englishand French.
<?xml version="1.0" encoding="UTF-8"?>
<mainmenu xmlns:xsi="http://www.w3.org/2001/XMLSchema-instance" xsi:noNamespaceSchemaLocation="mainMenu.xsd"> <menunode id="myextensions" defaultTitle="My Extensions"> <titles> <title locale="en">Access Extensions</title> <title locale="fr">Accéder aux extensions</title> </titles> <menuitem id="extensionA"/> <menuitem id="extensionB"/> </menunode></mainmenu>
Workbench checks for a title that matches the locale defined in the current installation of Workbench.If no matching localized title is found, the defaultTitle value is used.
Endeca ConfidentialEndeca® Workbench Administrator's Guide
Customizing Endeca Workbench | The navigation menu and launch page58

Predefined menu nodes in Endeca WorkbenchThere are several predefined menu nodes in Endeca Workbench.You can specify the placement ofthe predefined nodes in the menu and what items display under them, but you cannot modify the titlesor specify localized titles.
The predefined nodes in Endeca Workbench are as follows:
Node descriptionNode id
Search ConfigurationsearchConfig
View Reportsreporting
Application Settingssettings
EAC Administrationeacconsole
About navigation menu leaf itemsA leaf is a menu item that links to a page, and can also have an entry on the launch page.
A leaf can be either in the top-level menu or in a submenu as the child of a node. Leaf items cannothave child items. Menu items display in the order in which they are listed in ws-mainMenu.xml.
Each leaf in the menu is defined in a menuitem element in ws-mainMenu.xml that takes the followingattributes:
Required?Attribute valueAttribute name
yesThe id of a predefined page in Endeca Workbench or the id of anextension as defined in ws-extensions.xml. For more informationabout extensions, see “Workbench extensions."
id
noIf set to true, the menu item displays on the launch page in the orderin which it is listed in ws-mainMenu.xml. Default value is false.
onLaunchPage
Note: For a full list of predefined pages and their corresponding ids, see "Predefined menuitemelements."
This example of a ws-mainMenu.xml file defines a menu that shows top-level leaf items, itemsnested within a predefined node, and items nested within a custom node. Items that have onLaunch¬Page="true" display in the launch page regardless of whether they are in the top-level menu or ina submenu.
<?xml version="1.0" encoding="UTF-8"?>
<mainmenu xmlns:xsi="http://www.w3.org/2001/XMLSchema-instance" xsi:noNamespaceSchemaLocation="mainMenu.xsd"> <menuitem id="rules" onLaunchPage="true"/> <menuitem id="redirects" onLaunchPage="true"/>
Endeca® Workbench Administrator's GuideEndeca Confidential
59Customizing Endeca Workbench | The navigation menu and launch page
<menunode id="searchConfig"> <menuitem id="thesaurus" onLaunchPage="true"/> <menuitem id="phrases"/> <menuitem id="stopwords"/> </menunode> <menunode id="myextensions" defaultTitle="My Extensions"> <menuitem id="extensionA" onLaunchPage="true"/> <menuitem id="extensionB"/> </menunode></mainmenu>
Related LinksPredefined menuitem elements on page 60
This section is a reference table listing all of the predefined pages and corresponding idsavailable in the ws-mainMenu.xml file.
Navigation menu nodes on page 57A menu item is either a leaf or a node. A node is a top-level menu item that does not linkdirectly to any pages.
Workbench extensions on page 62Extensions enable you to incorporate Web applications related to your Endeca implementationas plug-ins to Endeca Workbench.
Predefined menuitem elementsThis section is a reference table listing all of the predefined pages and corresponding ids available inthe ws-mainMenu.xml file.
The predefined pages and their corresponding ids are as follows:
Menu item idWorkbench page
rulesRule Manager
redirectsKeyword Redirects
thesaurusThesaurus
phrasesPhrases
stopwordsStop Words
dimorderDimension Order
reporting.currentDailyCurrent Report (Daily)
reporting.currentWeeklyCurrent Report (Weekly)
reporting.dailyDaily Reports
reporting.weeklyWeekly Reports
eacMonitorEAC Monitor
settings.usersUser Management
settings.permissionsRule Group Permissions
settings.locksResource Locks
Endeca ConfidentialEndeca® Workbench Administrator's Guide
Customizing Endeca Workbench | The navigation menu and launch page60
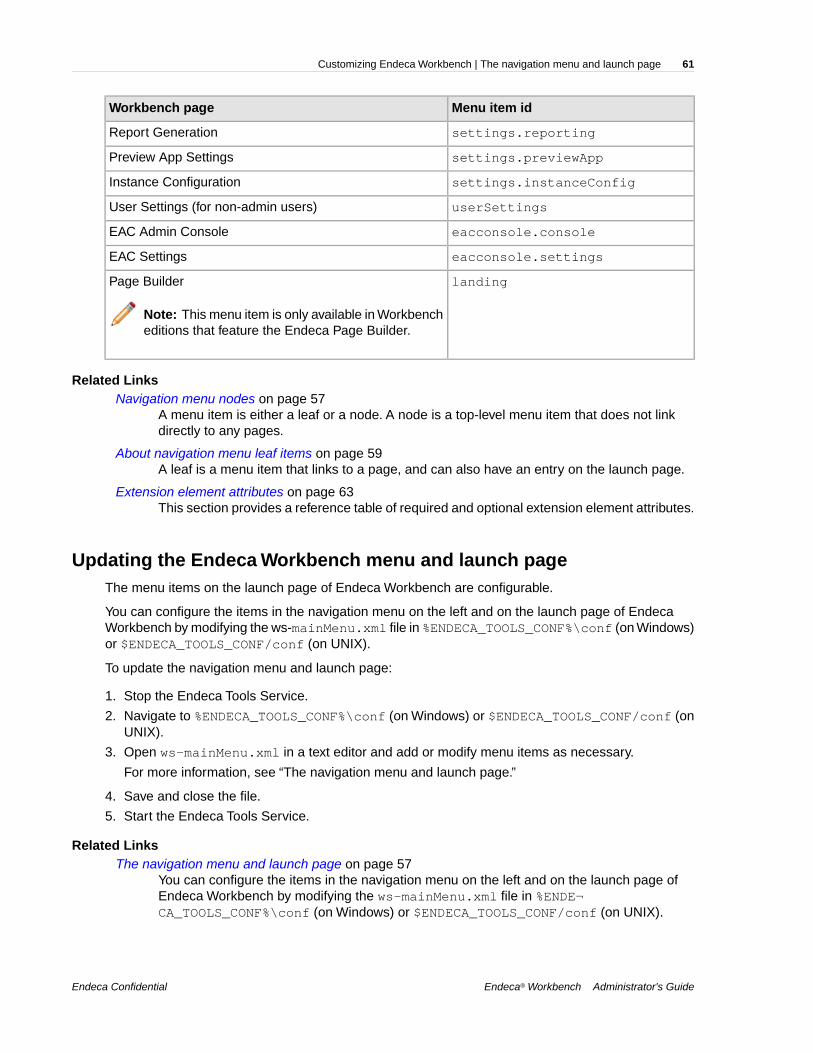
Menu item idWorkbench page
settings.reportingReport Generation
settings.previewAppPreview App Settings
settings.instanceConfigInstance Configuration
userSettingsUser Settings (for non-admin users)
eacconsole.consoleEAC Admin Console
eacconsole.settingsEAC Settings
landingPage Builder
Note: This menu item is only available in Workbencheditions that feature the Endeca Page Builder.
Related LinksNavigation menu nodes on page 57
A menu item is either a leaf or a node. A node is a top-level menu item that does not linkdirectly to any pages.
About navigation menu leaf items on page 59A leaf is a menu item that links to a page, and can also have an entry on the launch page.
Extension element attributes on page 63This section provides a reference table of required and optional extension element attributes.
Updating the Endeca Workbench menu and launch pageThe menu items on the launch page of Endeca Workbench are configurable.
You can configure the items in the navigation menu on the left and on the launch page of EndecaWorkbench by modifying the ws-mainMenu.xml file in %ENDECA_TOOLS_CONF%\conf (on Windows)or $ENDECA_TOOLS_CONF/conf (on UNIX).
To update the navigation menu and launch page:
1. Stop the Endeca Tools Service.
2. Navigate to %ENDECA_TOOLS_CONF%\conf (on Windows) or $ENDECA_TOOLS_CONF/conf (onUNIX).
3. Open ws-mainMenu.xml in a text editor and add or modify menu items as necessary.
For more information, see “The navigation menu and launch page.”
4. Save and close the file.
5. Start the Endeca Tools Service.
Related LinksThe navigation menu and launch page on page 57
You can configure the items in the navigation menu on the left and on the launch page ofEndeca Workbench by modifying the ws-mainMenu.xml file in %ENDE¬CA_TOOLS_CONF%\conf (on Windows) or $ENDECA_TOOLS_CONF/conf (on UNIX).
Endeca® Workbench Administrator's GuideEndeca Confidential
61Customizing Endeca Workbench | The navigation menu and launch page
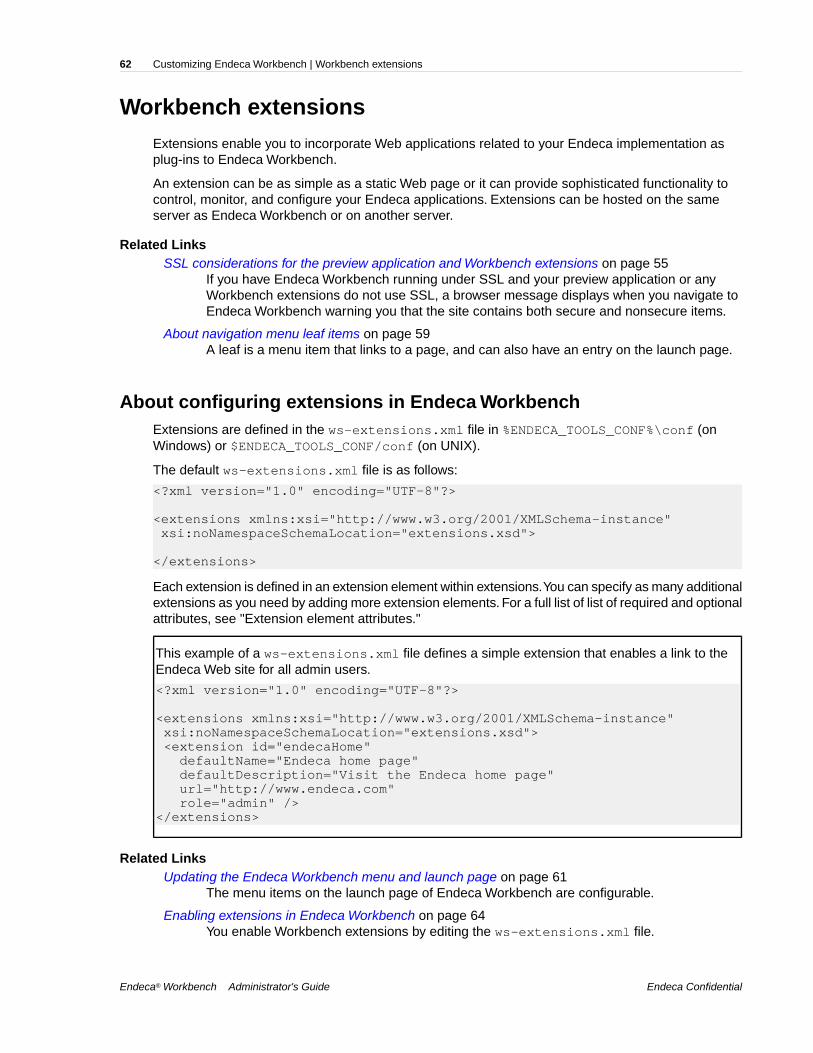
Workbench extensionsExtensions enable you to incorporate Web applications related to your Endeca implementation asplug-ins to Endeca Workbench.
An extension can be as simple as a static Web page or it can provide sophisticated functionality tocontrol, monitor, and configure your Endeca applications. Extensions can be hosted on the sameserver as Endeca Workbench or on another server.
Related LinksSSL considerations for the preview application and Workbench extensions on page 55
If you have Endeca Workbench running under SSL and your preview application or anyWorkbench extensions do not use SSL, a browser message displays when you navigate toEndeca Workbench warning you that the site contains both secure and nonsecure items.
About navigation menu leaf items on page 59A leaf is a menu item that links to a page, and can also have an entry on the launch page.
About configuring extensions in Endeca WorkbenchExtensions are defined in the ws-extensions.xml file in %ENDECA_TOOLS_CONF%\conf (onWindows) or $ENDECA_TOOLS_CONF/conf (on UNIX).
The default ws-extensions.xml file is as follows:
<?xml version="1.0" encoding="UTF-8"?>
<extensions xmlns:xsi="http://www.w3.org/2001/XMLSchema-instance" xsi:noNamespaceSchemaLocation="extensions.xsd">
</extensions>
Each extension is defined in an extension element within extensions.You can specify as many additionalextensions as you need by adding more extension elements. For a full list of list of required and optionalattributes, see "Extension element attributes."
This example of a ws-extensions.xml file defines a simple extension that enables a link to theEndeca Web site for all admin users.
<?xml version="1.0" encoding="UTF-8"?>
<extensions xmlns:xsi="http://www.w3.org/2001/XMLSchema-instance" xsi:noNamespaceSchemaLocation="extensions.xsd"> <extension id="endecaHome" defaultName="Endeca home page" defaultDescription="Visit the Endeca home page" url="http://www.endeca.com" role="admin" /> </extensions>
Related LinksUpdating the Endeca Workbench menu and launch page on page 61
The menu items on the launch page of Endeca Workbench are configurable.
Enabling extensions in Endeca Workbench on page 64You enable Workbench extensions by editing the ws-extensions.xml file.
Endeca ConfidentialEndeca® Workbench Administrator's Guide
Customizing Endeca Workbench | Workbench extensions62
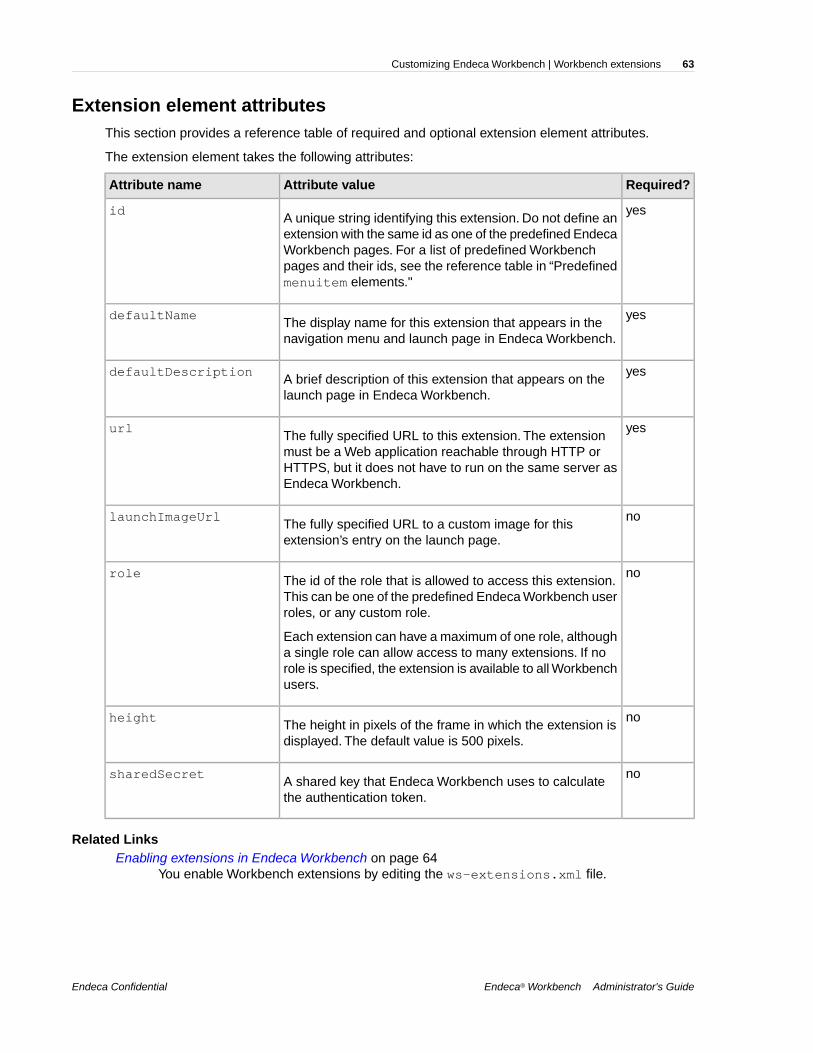
Extension element attributesThis section provides a reference table of required and optional extension element attributes.
The extension element takes the following attributes:
Required?Attribute valueAttribute name
yesA unique string identifying this extension. Do not define anextension with the same id as one of the predefined Endeca
id
Workbench pages. For a list of predefined Workbenchpages and their ids, see the reference table in “Predefinedmenuitem elements."
yesThe display name for this extension that appears in thenavigation menu and launch page in Endeca Workbench.
defaultName
yesA brief description of this extension that appears on thelaunch page in Endeca Workbench.
defaultDescription
yesThe fully specified URL to this extension. The extensionmust be a Web application reachable through HTTP or
url
HTTPS, but it does not have to run on the same server asEndeca Workbench.
noThe fully specified URL to a custom image for thisextension’s entry on the launch page.
launchImageUrl
noThe id of the role that is allowed to access this extension.This can be one of the predefined Endeca Workbench userroles, or any custom role.
role
Each extension can have a maximum of one role, althougha single role can allow access to many extensions. If norole is specified, the extension is available to all Workbenchusers.
noThe height in pixels of the frame in which the extension isdisplayed. The default value is 500 pixels.
height
noA shared key that Endeca Workbench uses to calculatethe authentication token.
sharedSecret
Related LinksEnabling extensions in Endeca Workbench on page 64
You enable Workbench extensions by editing the ws-extensions.xml file.
Endeca® Workbench Administrator's GuideEndeca Confidential
63Customizing Endeca Workbench | Workbench extensions
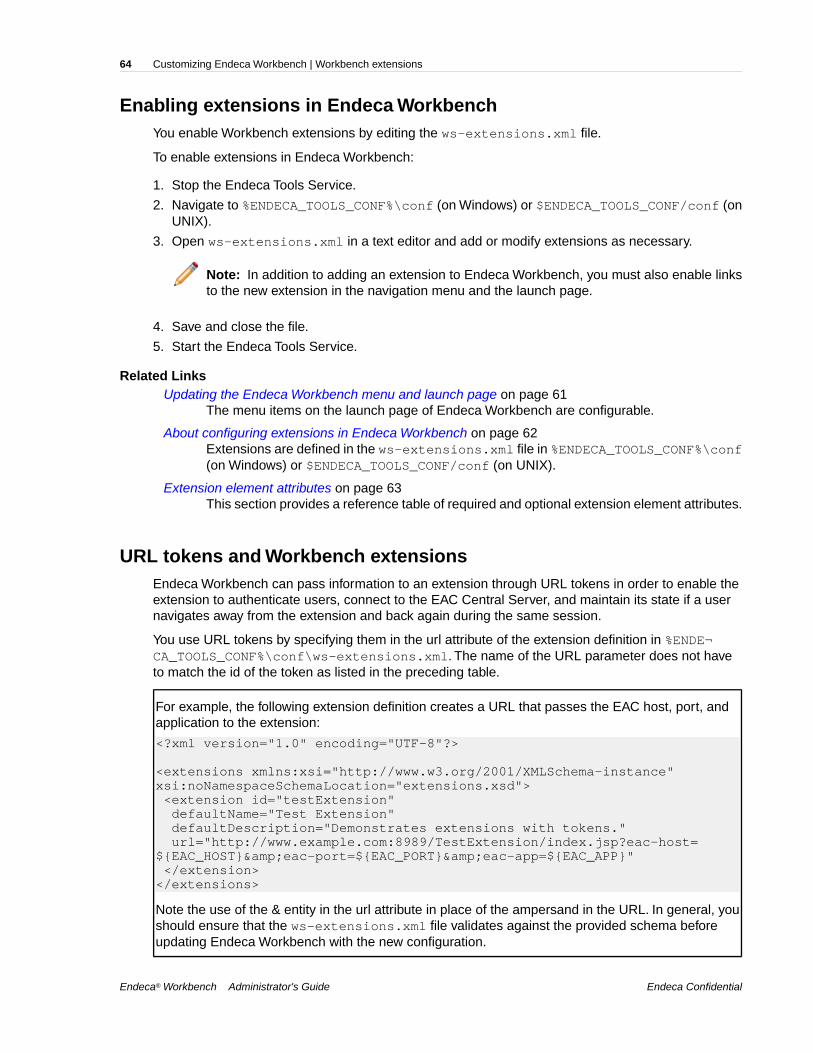
Enabling extensions in Endeca WorkbenchYou enable Workbench extensions by editing the ws-extensions.xml file.
To enable extensions in Endeca Workbench:
1. Stop the Endeca Tools Service.
2. Navigate to %ENDECA_TOOLS_CONF%\conf (on Windows) or $ENDECA_TOOLS_CONF/conf (onUNIX).
3. Open ws-extensions.xml in a text editor and add or modify extensions as necessary.
Note: In addition to adding an extension to Endeca Workbench, you must also enable linksto the new extension in the navigation menu and the launch page.
4. Save and close the file.
5. Start the Endeca Tools Service.
Related LinksUpdating the Endeca Workbench menu and launch page on page 61
The menu items on the launch page of Endeca Workbench are configurable.
About configuring extensions in Endeca Workbench on page 62Extensions are defined in the ws-extensions.xml file in %ENDECA_TOOLS_CONF%\conf(on Windows) or $ENDECA_TOOLS_CONF/conf (on UNIX).
Extension element attributes on page 63This section provides a reference table of required and optional extension element attributes.
URL tokens and Workbench extensionsEndeca Workbench can pass information to an extension through URL tokens in order to enable theextension to authenticate users, connect to the EAC Central Server, and maintain its state if a usernavigates away from the extension and back again during the same session.
You use URL tokens by specifying them in the url attribute of the extension definition in %ENDE¬CA_TOOLS_CONF%\conf\ws-extensions.xml. The name of the URL parameter does not haveto match the id of the token as listed in the preceding table.
For example, the following extension definition creates a URL that passes the EAC host, port, andapplication to the extension:
<?xml version="1.0" encoding="UTF-8"?>
<extensions xmlns:xsi="http://www.w3.org/2001/XMLSchema-instance"xsi:noNamespaceSchemaLocation="extensions.xsd"> <extension id="testExtension" defaultName="Test Extension" defaultDescription="Demonstrates extensions with tokens." url="http://www.example.com:8989/TestExtension/index.jsp?eac-host=${EAC_HOST}&eac-port=${EAC_PORT}&eac-app=${EAC_APP}" </extension></extensions>
Note the use of the & entity in the url attribute in place of the ampersand in the URL. In general, youshould ensure that the ws-extensions.xml file validates against the provided schema beforeupdating Endeca Workbench with the new configuration.
Endeca ConfidentialEndeca® Workbench Administrator's Guide
Customizing Endeca Workbench | Workbench extensions64
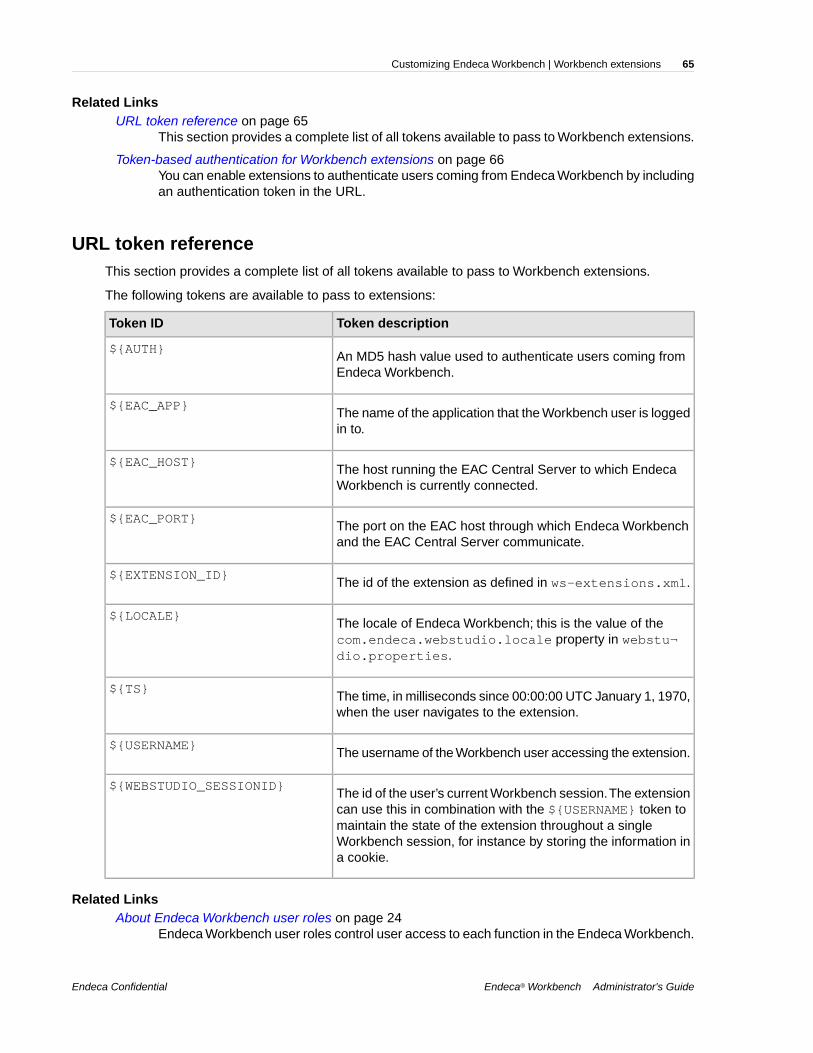
Related LinksURL token reference on page 65
This section provides a complete list of all tokens available to pass to Workbench extensions.
Token-based authentication for Workbench extensions on page 66You can enable extensions to authenticate users coming from Endeca Workbench by includingan authentication token in the URL.
URL token referenceThis section provides a complete list of all tokens available to pass to Workbench extensions.
The following tokens are available to pass to extensions:
Token descriptionToken ID
An MD5 hash value used to authenticate users coming fromEndeca Workbench.
${AUTH}
The name of the application that the Workbench user is loggedin to.
${EAC_APP}
The host running the EAC Central Server to which EndecaWorkbench is currently connected.
${EAC_HOST}
The port on the EAC host through which Endeca Workbenchand the EAC Central Server communicate.
${EAC_PORT}
The id of the extension as defined in ws-extensions.xml.${EXTENSION_ID}
The locale of Endeca Workbench; this is the value of thecom.endeca.webstudio.locale property in webstu¬dio.properties.
${LOCALE}
The time, in milliseconds since 00:00:00 UTC January 1, 1970,when the user navigates to the extension.
${TS}
The username of the Workbench user accessing the extension.${USERNAME}
The id of the user’s current Workbench session.The extensioncan use this in combination with the ${USERNAME} token to
${WEBSTUDIO_SESSIONID}
maintain the state of the extension throughout a singleWorkbench session, for instance by storing the information ina cookie.
Related LinksAbout Endeca Workbench user roles on page 24
Endeca Workbench user roles control user access to each function in the Endeca Workbench.
Endeca® Workbench Administrator's GuideEndeca Confidential
65Customizing Endeca Workbench | Workbench extensions

URL tokens and Workbench extensions on page 64Endeca Workbench can pass information to an extension through URL tokens in order toenable the extension to authenticate users, connect to the EAC Central Server, and maintainits state if a user navigates away from the extension and back again during the same session.
About navigation menu leaf items on page 59A leaf is a menu item that links to a page, and can also have an entry on the launch page.
Token-based authentication for Workbench extensions on page 66You can enable extensions to authenticate users coming from Endeca Workbench by includingan authentication token in the URL.
Token-based authentication for Workbench extensionsYou can enable extensions to authenticate users coming from Endeca Workbench by including anauthentication token in the URL.
Endeca Workbench calculates the value of the token by generating an MD5 hash from a portion ofthe URL and a shared secret. The portion of the URL that is used for the hash consists of everythingafter the host name and port, including the leading slash, but excluding the value of the AUTH tokenitself. The shared secret is a string that is specified in ws-extensions.xml and is also stored in theextension itself.
For example, the following ws-extensions.xml file defines an extension with a URL that uses theAUTH and TS tokens:
<?xml version="1.0" encoding="UTF-8"?>
<extensions xmlns:xsi="http://www.w3.org/2001/XMLSchema-instance" xsi:noNamespaceSchemaLocation="extensions.xsd"> <extension id="authExtension" defaultName="Authenticated Extension" defaultDescription="Demonstrates token-based authentication." url="http://localhost:8080/AuthExtension/index.jsp?timestamp=${TS}&auth=${AUTH}" role="admin" sharedSecret="secret!@#$%^*(987654321" /></extensions>
In this case, the value of the authentication token is the hash of a string that looks similar to this:
/AuthExtension/index.jsp?timestamp=1189702462936&auth=secret!@#$%^*(987654321
The extension can verify that a user is coming from Endeca Workbench by calculating the hash of thesame string and comparing the result to the value of the AUTH token.This ensures that the user visitingthe extension has logged in to Endeca Workbench and has the role (if any) that is required to accessthe extension.
Because the AUTH token is based in part on the URL, it is recommended that you include the timestamp of the request to introduce some variation in the value of the token. The time stamp can alsobe used to filter out stale requests and limit the possibility of an eavesdropper reusing the same URLto gain access to the extension.
The following Java code shows how the extension defined in the preceding example can authenticateusers from Endeca Workbench:
// These values depend on what you defined in ws-extensions.xmlString extensionSecret="secret!@#$%^*(987654321";final String authTokenParameterName = "auth";
Endeca ConfidentialEndeca® Workbench Administrator's Guide
Customizing Endeca Workbench | Workbench extensions66

final String timeStampParameterName = "timestamp";
// Set the tolerance, in milliseconds, before a request is considered too oldint allowedTimeStampSlackInMS = 5 * 60 * 1000;
// Calculate the hash of the substring of the URL and the shared secretString url = request.getRequestURI() + "?" + request.getQueryString();String findAuthToken = "&" + authTokenParameterName + "=";url = url.substring(0, url.indexOf(findAuthToken) + findAuthToken.length());String authCode = request.getParameter(authTokenParameterName);
MessageDigest md = MessageDigest.getInstance("MD5");byte[] md5Hash = md.digest((url + extensionSecret).getBytes("UTF-8"));
StringBuffer hashCode = new StringBuffer();
for(int i : md5Hash){ String str = Integer.toHexString(i+128); if (str.length() < 2) { str = "0" + str; } hashCode.append(str);}
// Compare the hash to the value of the AUTH tokenif (!hashCode.toString().equals(authCode)){ // Authentication fails because AUTH token did not match}
// Compare the time stamp of the request to the current time stamplong currentTime = new Date().getTime();long ts = Long.parseLong(request.getParameter(timeStampParameterName));
if ( Math.abs(ts - currentTime) > allowedTimeStampSlackInMS){ // Authentication fails because request is too old}
The example extension places the AUTH token at the end of the URL, making it more convenient tobuild the substring of the URL for the hash.
However, the AUTH token can be in any position in the URL. For instance, the URL can be defined inws-extensions.xml is as follows:
url="http://localhost:8080/AuthExtension/index.jsp?auth=${AUTH}&timestamp=${TS}"
This would result in a URL similar to this:
http://localhost:8080/AuthExtension/in¬dex.jsp?auth=dc40570f2e7111fbe1af820a854ca817×tamp=1189702462936
The value of the authentication token would be the hash of a string similar to this:
/AuthExtension/index.jsp?auth=×tamp=1189702462936secret!@#$%^*(987654321
In this case the code in the extension to remove the value of the authentication token from the URLwould be more complex.
Endeca® Workbench Administrator's GuideEndeca Confidential
67Customizing Endeca Workbench | Workbench extensions

Related LinksURL tokens and Workbench extensions on page 64
Endeca Workbench can pass information to an extension through URL tokens in order toenable the extension to authenticate users, connect to the EAC Central Server, and maintainits state if a user navigates away from the extension and back again during the same session.
Theming extensions to match Endeca WorkbenchEndeca Workbench provides a public cascading style sheet that includes the most common styleelements in Endeca Workbench.
You can use the style sheet in your extension to give it a look and feel similar to that of the EndecaWorkbench interface.
To use the Endeca Workbench public cascading style sheet:
1. Add the following line within the head element of your HTML document:
<link rel="stylesheet" type="text/css" href="http://hostname:8006/stylesheets/public.css"/>
The host name is the name or IP address of the Endeca Workbench server.
2. Replace 8006 with the Endeca Workbench port if it is not running on the default port.
Note: The public.css file cannot be edited. If you want to specify additional styles or modifythe default styles, create a separate style sheet and apply it to your application.
For more information about the styles defined in the public style sheet, see the comments within thepublic.css file. The file can be viewed at the following URL on the Endeca Workbench server:
http://hostname:port/stylesheets/public.css
Troubleshooting Workbench extensionsThis section provides troubleshooting information about Workbench extensions.
If the extension does not have a link in the navigation menu or launch page:
• Stop and restart the Endeca Tools Service. Changes to the XML configuration files for extensions,roles, and the navigation menu do not go into effect until the service is restarted.
• Ensure that you have the required Workbench user role to access the extension.• Ensure that a menu item for the extension is specified in ws-mainMenu.xml and that the id
attribute matches the id of the extension as defined in ws-extensions.xml. Defining an extensionin ws-extensions.xml does not automatically add a link to the navigation menu in EndecaWorkbench.
If you want an extension to have an entry on the launch page, specify onLaunchPage="true"in the menuitem element for the extension in ws-mainMenu.xml.
• If you have no applications defined in Endeca Workbench, the only links that display in the navigationmenu are for the EAC Admin Console and EAC Settings. To enable display of the full EndecaWorkbench menu, you must first provision an application.
Endeca ConfidentialEndeca® Workbench Administrator's Guide
Customizing Endeca Workbench | Workbench extensions68
If the link displays in the menu but the extension does not display when you click the link:
• Ensure that the URL for the extension specified in ws-extensions.xml is a valid HTTP or HTTPSURL. A Workbench extension must be a Web application running in a Web server.
If an error message displays after updating ws-extensions.xml:
There may be a problem with your XML configuration files that prevents Endeca Workbench fromstarting up. The error messages in the Endeca Workbench log can help you identify whether one ofthe following is the case:
• One or more of the XML configuration files is missing. The following files must be present in %EN¬DECA_TOOLS_CONF%\conf (on Windows) or $ENDECA_TOOLS_CONF/conf (on UNIX):
• ws-extensions.xml and its associated schema, extensions.xsd• ws-mainMenu.xml and its associated schema, mainMenu.xsd• ws-roles.xml and its associated schema, roles.xsd
The files are created in this location when you install Endeca. By default, the ws-extensions.xmland ws-roles.xml files define no extensions or additional roles. The ws-mainMenu.xml filecontrols the display of the navigation menu and launch page.
If you have deleted one of these files, you can restore the default file by copying it from %ENDE¬CA_TOOLS_ROOT%\workspace_template\conf (on Windows) or $ENDE¬CA_TOOLS_ROOT/workspace_template/conf (on UNIX).
• One or more of the configuration files contains badly formed or invalid XML.
Ensure that the configuration files contain well-formed XML. In particular, check that any ampersandthat is used within an attribute value is specified as the & entity.
Use an XML tool to validate any configuration files that you have edited against the associatedschema in %ENDECA_TOOLS_CONF%\conf (on Windows) and $ENDECA_TOOLS_CONF/conf (onUNIX).
Related LinksUpdating the Endeca Workbench menu and launch page on page 61
The menu items on the launch page of Endeca Workbench are configurable.
Other customization optionsYou can customize other aspects of Endeca Workbench functionality.
Hiding the list of applications on the login pageBy default, Endeca Workbench shows all available Endeca applications in a drop-down list on thelogin page.
Business users can log in to any application that an administrator has added them to. In cases whereyou do not want Endeca Workbench users to see all available Endeca Workbench applications on thelogin page, you can hide the drop-down list of applications displayed in Endeca Workbench.
To hide the drop-down list of applications on the login page of Endeca Workbench:
1. Stop the Endeca Tools Service.
Endeca® Workbench Administrator's GuideEndeca Confidential
69Customizing Endeca Workbench | Other customization options

2. Open the webstudio.properties file located in %ENDECA_TOOLS_CONF%\conf (on Windows)or $ENDECA_TOOLS_CONF\conf (on UNIX).
3. Locate the com.endeca.webstudio.hide.login.application.dropdown property, forexample:
# Hides the dropdown for selecting an application# on the login page.com.endeca.webstudio.hide.login.application.dropdown=false
4. Set the value of the property to true, for example:
com.endeca.webstudio.hide.login.application.dropdown=true
5. Save and close the webstudio.properties file.
6. Start the Endeca Tools Service.
Customizing the number of rules displayed in Rule ManagerYou can customize the number of rules that display per page in the rule list, as well as other paginationsettings.
To customize the pagination settings in Rule Manager:
1. Stop the Endeca Tools Service.
2. Navigate to %ENDECA_TOOLS_CONF%\conf (on Windows) or $ENDECA_TOOLS_CONF/conf (onUNIX).
3. Open the webstudio.properties file in a text editor.
4. Edit the Rule Manager rule list settings as desired.
DescriptionOption
Sets the maximum number of page links that display at the bottomof the rule list. By default, the maximum is set at 11.
com.endeca.webstu¬dio.numPageLinks
Sets the number of rules that display per page in the rule list. Thedefault setting is 20. Any value that is not defined in com.ende¬ca.webstudio.rulesPerPageChoices defaults to 20.
com.endeca.webstu¬dio.defaultRulesPer¬Page
A comma-separated list of values that defines the options to supplyfor the number of rules to display per page in the rule list. By default,
com.endeca.webstu¬dio.rulesPerPageChoic¬es the choices are 20, 50, 100, and All. Any non-integer value displays
all available rules.
Note: If there are groups in your application that have verylarge numbers of rules, it is recommended that you avoidviewing all rules at once. Doing so may increase the pageload time.
5. Save and close the file.
6. Start the Endeca Tools Service.
Endeca ConfidentialEndeca® Workbench Administrator's Guide
Customizing Endeca Workbench | Other customization options70

About encoding workflow emailsYou can configure Endeca Workbench to support non-ASCII characters in workflow emails.
Any time a user makes a change to the workflow state of a dynamic business rule or a landing pagein Endeca Workbench, the user has the option to launch an email client to send a change notification.For more information about workflow in Endeca Workbench, see the Endeca Workbench User’s Guideand the Endeca Workbench Help.
To support non-ASCII characters in workflow emails, you can configure Endeca Workbench to useUTF-8 encoding. Note that some email clients, including Microsoft Outlook 2003, do not support UTF-8encoding in mailto URLs, which causes extended characters not to display properly.You should onlyenable UTF-8 encoding if you are certain that it is supported on all email clients in your organization.
The default setting in Endeca Workbench encodes workflow email notifications using the escapefunction in JavaScript. On most systems this results in ISO-8859-1 encoding (which is supported byOutlook), but the actual encoding may depend on system settings on the client machine.
Enabling UTF-8 encoding for workflow emails
To support non-ASCII characters in workflow emails, you can configure Endeca Workbench to useUTF-8 encoding.
Note: Although UTF-8 support varies depending on the default email client on each user’smachine, this setting applies to all workflow email messages created by Endeca Workbench.
To enable UTF-8 URL encoding in workflow emails:
1. Stop the Endeca Tools Service.
2. Navigate to %ENDECA_TOOLS_CONF%\conf (on Windows) or $ENDECA_TOOLS_CONF/conf (onUNIX).
3. Open the webstudio.properties file, and locate the com.endeca.webstudio.useUTF8In¬MailToUrls property, for example:
# URL encoding for workflow emailscom.endeca.webstudio.useUTF8InMailToUrls=false
4. Change the value of the property to true, for example:
com.endeca.webstudio.useUTF8InMailToUrls=true
5. Save and close the file.
6. Restart the Endeca Tools Service.
• On UNIX:
1. Stop the Endeca Tools Service using:
$ENDECA_TOOLS_ROOT/server/bin/shutdown.sh
2. Restart the Endeca Tools Service using:
$ENDECA_TOOLS_ROOT/server/bin/startup.sh
• On Windows:
1. From the Windows Control Panel, select Administrative Tools, and then select Services.
Endeca® Workbench Administrator's GuideEndeca Confidential
71Customizing Endeca Workbench | Other customization options
2. In the right pane of the Services window, right-click Endeca Tools Service and chooseRestart.
3. Close the Services window.
Endeca ConfidentialEndeca® Workbench Administrator's Guide
Customizing Endeca Workbench | Other customization options72
Index
A
admin userabout 24
audit logsconfiguring 16
authenticationtoken-based 66
B
backing up 10business rules
backing up 10
C
components 29Components tab 31configuration files
backing up 12cookies
in Endeca Workbench 35
D
Dgraphupdates 15
dimensionsbacking up 10
E
EAC Administration Consoleprovisioning an application 29
Endeca projectrestoring 10
Endeca Tools Servicedefault ports 17
Endeca Workbenchauthentication troubleshooting 51configuration files 12cookies 35extension element attributes 63extensions and URL tokens 64extensions authentication 66extensions introduced 62extensions troubleshooting 68extensions, enabling 64user roles 24Webstudio JAAS profile 44
Endeca Workbench Administrator's Guideabout 7
ESESSIONID 35extensions
authentication 66configuring 62element attributes reference table 63enabling 64introduced 62troubleshooting 68URL token reference table 65URL tokens 64
F
findGroupPath 48
G
groupPath 48
H
Host tab 31Hosts 29
I
instance configurationabout downloading 11
L
launch pageconfiguring 57
LDAPabout disabling 43administrators 41and Java Authentication and Authorization Service(JAAS) 43ASCII characters 48authentication of users 39authentication troubleshooting 51groupPath 49groupTemplate 49integration with Endeca Workbench 39RFC 2255 48roles and permissions 41serverInfo 49servers 49SSL integration 39user profiles 40
LDAP (continued)Webstudio profile 45workflow notifications 41
leaf 59Log Server
start 31status 31stop 31
M
MDEX Enginechange status 31view status 31
menu itemelements 57leaf 57node 57nodes for multiple locales 58
menu nodesfor multiple locales 58
menuitempredefined elements reference table 60
menuitems 59
N
navigation menuconfiguring 57
P
permissionsabout 23backing up 12rule groups 28
pipeline componentsbacking up 10
pre-existing applicationmapping URLs 37
precedence rulesbacking up 10
predefined administratorabout 24
preview applicationabout configuring 37about enabling and disabling 37backing up settings 12configuring for SSL 55HTML forms 35overview 33SSL considerations 55state requirements 35URL mappings 37with Page Builder 38
propertiesbacking up 10
R
rolesabout 23custom for multiple locales 27
rule groupspermissions 28
S
scripts 29Scripts tab 31SSL
configuring the default preview application 55considerations 55enable 53
system logsabout viewing 15configuring 16
system statusmonitoring 32
T
troubleshootingextensions 68LDAP authentication 51
U
URL tokens 64URLs
mapping 37user profiles
backing up 10user roles
custom 25default 25descriptions 24
userPath 48users
about 23backing up 12
UTF-8 encodingabout 71
W
Webstudio profileconfiguration parameters 45configuration parameters reference table 45template reference table 44
webstudio_audit.log 15webstudio.log 15WebStudioMDEX setting 14workflow emails
encoding 71
Endeca® Workbench74
Index

workflow notificationswith LDAP 41
ws-mainMenu.xml 59
75
Index
