encapsulation training handbook - mass. · pdf filean encapsulant is a liquid coating that...
TRANSCRIPT

Encapsulation
Training Handbook Massachusetts Department of Public Health Childhood Lead Poisoning Prevention Program 1-800-532-9571
Revised 2015
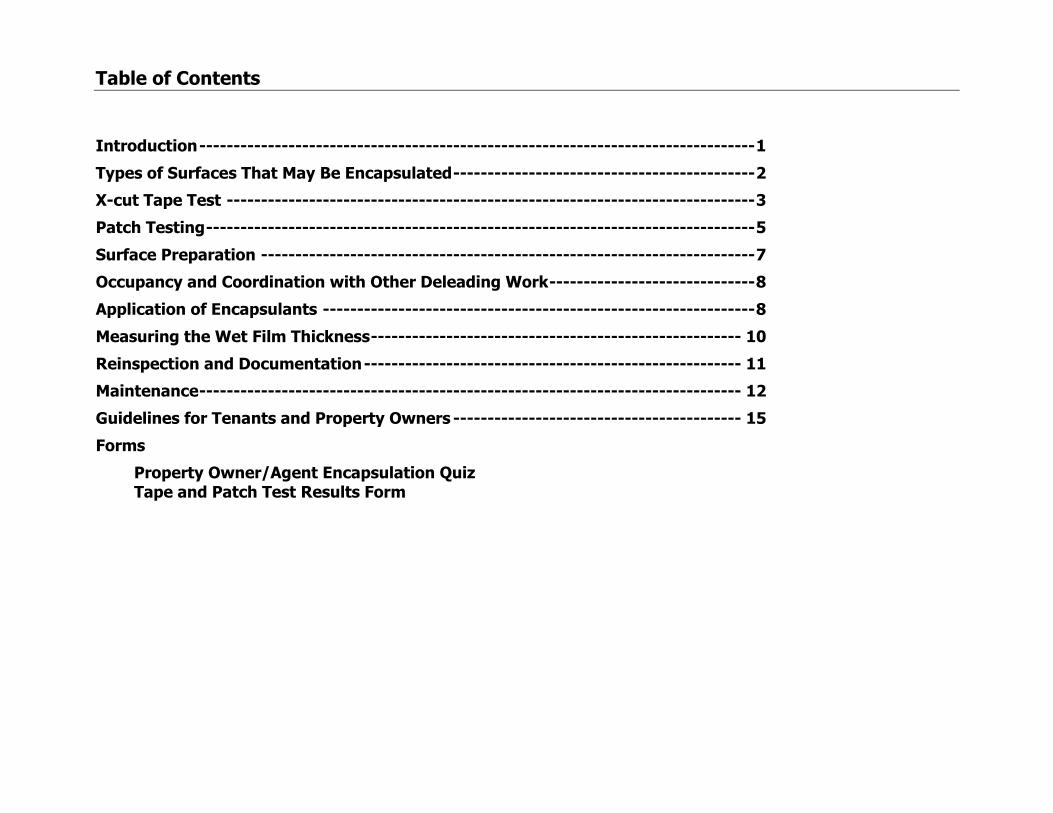
Table of Contents
Introduction --------------------------------------------------------------------------------- 1
Types of Surfaces That May Be Encapsulated -------------------------------------------- 2
X-cut Tape Test ----------------------------------------------------------------------------- 3
Patch Testing -------------------------------------------------------------------------------- 5
Surface Preparation ------------------------------------------------------------------------ 7
Occupancy and Coordination with Other Deleading Work ------------------------------ 8
Application of Encapsulants --------------------------------------------------------------- 8
Measuring the Wet Film Thickness ------------------------------------------------------ 10
Reinspection and Documentation ------------------------------------------------------- 11
Maintenance ------------------------------------------------------------------------------- 12
Guidelines for Tenants and Property Owners ------------------------------------------ 15
Forms
Property Owner/Agent Encapsulation Quiz Tape and Patch Test Results Form

1
Introduction Why should you delead your home? Children can become lead poisoned when they swallow lead dust or paint chips. Lead poisoning can damage a child’s brain, nervous system, kidneys and red blood cells. Even at low levels, lead in a child’s blood can cause learning and behavioral problems. The Lead Law requires compliance in homes built before 1978 where a child less than six years old lives. In 1994 changes were made to the Lead Law to make deleading easier and less costly. These changes included the approval of special encapsulant products for deleading. What is an encapsulant? An encapsulant is a liquid coating that dries to form a long-lasting barrier over lead paint. Paint is not an encapsulant. In Massachusetts, only the products tested by David Litter Laboratories and approved by the Childhood Lead Poisoning Prevention Program, CLPPP, can be used to delead. These products have this seal on them:
Who can apply an encapsulant? Homeowners or a person hired by the owner (agent) can apply the encapsulants as long as he or she completes the training described in this booklet. Agents must be at least 18 years old. Licensed Deleaders and Moderate risk Deleaders (licensed lead safe renovators with an additional 4 hour moderate risk training and MR license) can also apply encapsulants according to this training.

2
Types of Surfaces that May be Encapsulated The Lead Law requires three kinds of lead hazards be corrected:
1. Chipping or peeling lead paint anywhere on the property 2. Lead paint on the moveable/impacted parts of windows 3. Lead paint on accessible, mouthable surfaces below five feet
Where can you use encapsulants? Encapsulants are only as good as the surface to which they are applied. For this reason, encapsulants will not work on peeling paint or the moveable or impacted parts of windows. Encapsulants can work well on mouthable surfaces such as window sills and casings, door casings, baseboards, and some parts of stairs, so long as the paint is in very good condition. These surfaces cannot be encapsulated: floors, stair treads, thresholds, any exterior surface, as well as the sashes, parting beads, window wells, and the interior, exterior, and header stops of moveable windows and any surfaces in rooms ruled out by the lead inspector. Can you encapsulate surfaces in your home? To find out which surfaces may be encapsulated in your home, you must: (1) have a lead inspection by a licensed lead inspector, (2) complete this training handbook and receive an authorization number from CLPPP, and (3) do the required surface assessment. The lead inspection identifies the lead hazards and rules out any room with adhesion problems. The surface assessment tests the strength of the bond between the paint layers and the wood/plaster, etc. (substrate) beneath. Even surfaces that look like they are in good condition may not pass the surface tests. That is why it is extremely important that you do the surface tests and rule out inappropriate surfaces. The existing paint layer(s) must be very strong for encapsulants to work properly and keep children safe from the underlying lead paint. If an encapsulant is applied to a surface that is not strong enough, it can cause the paint layers to come apart and fall from the surface. Training The owner or the agent hired to do the work must complete the required training. The person applying the encapsulant must review all of the enclosed information, take the quiz, and mail it back to CLPPP before doing the surface assessment. CLPPP will mail back the authorization number. Surface Assessment: Choosing Surfaces to Test Remember to focus mostly on the woodwork in the home (the mouthable lead hazards). Do not test any surfaces you cannot or do not plan to encapsulate. You should also check the Product Fact Sheet for the encapsulant you want to use. Look over the surfaces listed as not recommended. While these surfaces can be encapsulated legally, they may not be warrantied by the manufacturer and may need more regular maintenance. For example, door jambs are not recommended for encapsulation because there may be clearance problems with the door. Once you have ruled out the surfaces that are not in very good condition, you must choose the surfaces for the X-cut Tape Test.

3
X-cut Tape Test The X-cut Tape Test shows if the painted component can withstand normal wear and tear. Do one X-cut Tape Test for each type of architectural component you plan to encapsulate in a room. For each type of component, test the one in the worst condition. If these components pass, then the ones with surfaces in even better condition will not need to be tested. If a component fails, any components of the same type also fail, unless tested individually. For example: Mr. Smith’s kitchen has ten types of components that might be eligible for encapsulation: doors, door casings, door jambs, window casings, window sills, window aprons, walls, baseboards, a chair rail and a ceiling. Mr. Smith wants to encapsulate three types of components: the window casings, window sills, and aprons of two windows. He must do three X-cut Tape Tests: one on a window casing, one on a window sill, and one on an apron. If the test on the apron fails, both aprons would be ineligible. However, if he did an additional test on the second apron and it passed, then he could encapsulate the second apron. Performing and Scoring the X-cut Tape Test Equipment: water, soap, paper towels, sharp utility knife, metal ruler, pencil, flashlight, tape (3M 600 2” wide tape is recommended, but 2” wide clear packing tape can be used). Procedure:
1. Clean, rinse, and dry the surface. 2. Using the ruler as a guide, make two cuts in the shape of an X. The cuts should be at least two inches long and must go
through all the paint layers to the wood, plaster, or substrate beneath. Be careful not to push too hard or to tilt the blade while cutting, because the surface will be more likely to fail.
3. Check the cuts with the flashlight to make sure they went through all of the paint layers to the substrate. If the cut did not, repeat step two in a different spot. Do not deepen the cut.
4. Cover the X with a piece of tape. You may want to fold the top edge of the tape over so pulling the tape off is easier. 5. Smooth the tape and rub with the eraser end of a pencil. 6. Wait about 90 seconds. 7. Pull the tape straight down in a quick smooth motion. 8. Look at the tape and score. (See diagrams on page 4)
The test allows for a very small amount of paint removal, 1/16” or less on either side of the X, to account for the paint displaced by the cuts. In practice, there is a 1/8” safety zone surrounding the X mark on the tape.
To measure the paint removal, hold the ruler perpendicular to the X mark on the tape and measure out 1/16”. Do not measure along the X mark within the safety zone.
Surfaces which fail can be prepared by a licensed deleader to be re-tested, but they cannot be encapsulated until they pass the test.
9. Record the results on the Tape and Patch Test Results form in the center of this booklet. 10. Wipe up any dust or paint chips you may have created using a wet sponge or wet paper towels.

4
Scoring the X-cut Tape Test: Pass: Paint removal is within 1/16” from the X mark (the safety zone includes paint removal that is exactly 1/16”). Fail: Paint removal is more than 1/16” away from the X (outside of the safety zone)
PASS FAIL FAIL
All paint removed is within Paint removed outside the safety zone. Paint chip is removed outside of the safety zone. the safety zone. This is a failure
even if the chip is smaller than 1/16”.
5
Patch Testing Applying an Encapsulant Patch for Testing Choose and buy an encapsulant. Be sure the seal shown on page 1 is on the container. You must now apply a small patch of the selected encapsulant and test it. Apply and test one patch in each room where you plan to encapsulate. Choose one of the surfaces where an X-Cut Tape Test was done. If possible, pick a part of the component that requires little surface preparation (see page 7) and that is not easily seen (the patch may leave a bump). Avoid the area on the component that was already cut for the first test. The patch should be 6”x 6” in area. If you apply the patch to a narrow surface, like a door casing, the shape of the patch can change, but the same area, 36 square inches, must be covered (ex: 4”x 9” or 3”x12”). The requirements of the encapsulant patch application are the same as when you do the whole encapsulation job. For detailed directions, read the sections on surface preparation and encapsulant application on pages 7-10. Briefly, surfaces should be cleaned and deglossed before brushing or rolling on the encapsulant patch. Apply each patch to the right thickness (wet film thickness), allow it to dry at least to the touch. The longer the patch dries the more likely it is to pass the tests. Waiting at least a week is a good idea. The wet film thickness and cure time, the amount of time it takes for the encapsulant to dry fully, vary from product to product. This information is on the Product Fact Sheets and manufacturers’ materials. Manufacturers may offer information on how to speed up dry time for faster patch testing. Testing the Encapsulant Patch Visual Patch Test Check the patch for bubbling, cracking, or any other defects. Score and record results on the Tape and Patch Test Results Form at the end of this booklet. Scoring the Visual Patch Test Pass: 10% or less of the patch has defects. Fail: more than 10% of the patch has defects. The patch either fails or a new patch must be applied and tested. (See p. 6) X-Cut Tape Test on the Patch Equipment: sharp utility knife, metal ruler, pencil, flashlight, tape (3M 600 two inch wide tape is recommended, but two inch wide clear packing tape can be used).

6
Procedure 1. Using the ruler as a guide, make two cuts in the shape of an X. The cuts should be at least two inches long and must go
through the encapsulant and all the paint layers to the wood, plaster, or substrate beneath. Be careful not to push too hard or to tilt the blade while cutting, because the surface will be more likely to fail.
2. Check the cuts with the flashlight to make sure they went through all of the layers to the substrate. If the cut did not, repeat
step two in a different spot. Do not deepen the cut.
3. Cover the X with a piece of tape. You may want to fold the top edge of the tape over so pulling the tape off is easier.
4. Smooth the tape and rub with the eraser end of a pencil.
5. Wait about 90 seconds.
6. Pull the tape straight down in a quick smooth motion.
7. Look at the tape, score, and record results. Make the measurements exactly as shown for the X-cut tape test on page 4. Note: the scoring is different. See below.
Scoring X-cut Tape Patch Test Pass: 1/2” or less of the encapsulant was pulled off from the X. Fail: more than 1/2” was pulled off from the X . The patch either fails or a new patch must be applied and tested. (See below.) Patch Failure If a patch tests fails, you should find out the reason for the failure. Sometimes, you may pull off a piece of encapsulant that has either all or some of the paint layers on the back side. This shows that the bond between the paint layer(s) and the substrate is too weak to encapsulate. Therefore, you must choose a different deleading method. If a patch fails as described above, either the entire room is considered ineligible for encapsulation or you must patch test each type of component being considered. If there is another failure, all components of the same type also fail, unless each component is patch tested individually. Sometimes, poor application or surface preparation can cause the patch to bubble and fail the visual test. It can also cause the X-cut Tape on the Patch to fail. This may be the case if you remove a piece of encapsulant without any of the paint layers attached to the back of it. If you decide the application or surface preparation may have caused the failure, then apply and test a new patch. Note: If at any point during the patch testing you can gently lift more than 1/2” of encapsulant with the knife, it fails. As described above, the paint, if any, on the back of the lifted encapsulant piece determines the possibility of re-testing with a new patch.

7
Recording Scores for the Surface Assessment/Making your Deleading Plan
The owner or agent who completed the tests and applied the encapsulant patch must record all of the results on the Tape and Patch Test Results Form at the end of this booklet. This is the proof that the surfaces were tested and found to be strong enough for encapsulants. IF YOU DO NOT HAVE THIS PROOF TO GIVE TO THE INSPECTOR, THE WORK WILL NOT BE APPROVED AND YOU WILL HAVE TO RE-DELEAD USING A DIFFERENT METHOD. In reality, the surface assessment is done during the planning stages of a deleading job so that you can plan alternative deleading methods for surfaces that fail. It is much easier to make corrections earlier in the process when timing of deleading work, ordering stock, and clean up are still flexible. Send this completed form to your inspector as you plan the job so s/he can make sure you are completing the surface assessment correctly. Once you complete the entire encapsulation job, fill out the Deleading Invoice. This is a written statement that you did the work according to the training and the Lead Law regulations. Give this form to the lead inspector at the final inspection. Keep a copy.
Surface Preparation Once you know where you can encapsulate, you need to get the surfaces ready. They must be intact and clean - free from dirt, grease, oil, smoke, mildew, etc. for the encapsulant to bond well. The kind of preparation work needed determines who can do it. Work that must be done by a licensed deleader or a moderate risk authorized person: Making paint intact: Check the inspection report for any surfaces marked loose. Surfaces must be intact to be encapsulated. Before you can apply the encapsulant, a licensed deleader or moderate risk authorized person must make the loose surfaces intact and a lead inspector must check all surfaces made intact. If a surface has been ruled out for moderate risk because it’s in very bad shape, then only a deleader can make it intact. Many times the cost of preparing and encapsulating surfaces marked loose on the inspection report is more expensive than other deleading methods. Loose surfaces are not good choices for encapsulation. Work that can be done by an owner/agent authorized to apply encapsulants: Cleaning: Use soap and water to remove dirt and grease. To kill mildew or other growth, use a bleach mixture - one part bleach to four parts water. Leave the solution on for 15 minutes to be sure all of the mildew is killed. Carefully rinse and dry all the surfaces you clean. If any soap or bleach is left on the surface, it will weaken the bond of the encapsulant. Note: Bleach and some soaps are skin irritants. Wear rubber gloves and safety goggles as directed on product labels. Non-dust-generating deglossing: Before applying the encapsulant, degloss (take the shine off) the painted surface. For most cases, use paint deglosser available in hardware stores. Follow the directions on the box for mixing and applying the solution. Remember to wear your safety equipment and to rinse and dry the surfaces thoroughly. Sometimes, a surface may need wet scouring to degloss. If you need to wet scour, be careful not to generate dust. Disturbing lead paint and making dust is DANGEROUS! Use a wet SOS pad or fine steel wool to gently rub the shine off the surface. Keep the surface and the SOS pad wet while you work. Thoroughly rinse and dry the surface. Dump any dirty water down the toilet. Double bag the used SOS pads or steel wool and throw them away. Remember to wear your safety equipment and to rinse and dry the surfaces thoroughly.

8
Minor surface repairs: The surface must be free from holes, dents or cracks. Fill with spackling compound, wood putty, paintable acrylic joint compound or other suitable filler. Smooth with a damp sponge to remove extra compound and reduce shrinkage. Caulk all seams and areas around fixtures to create a smooth surface for the encapsulant to stick to. Following manufacturers’ recommendations, remove or mask (cover with masking or painting tape) all hardware, such as light fixtures. Use drop cloths to cover places you do not want encapsulated. Finally, read the manufacturers’ recommendations on the Product Fact Sheets and product literature to get exact information on the surface preparation for the encapsulant you have selected.
Occupancy and Coordination with Other Deleading Work Occupancy Occupants must temporarily move out for moderate and high risk work inside the home, such as making paint intact. Occupants do not need to move out for some deleading activities, like encapsulation. If you are brushing or rolling the encapsulant on, then the occupants only need to stay out of the work area (the room you are working in). If you are spraying on the encapsulant, the occupants need to stay out of the home for the work day. This is because the spray equipment is dangerous if used improperly. Notification You must notify the occupants and the offices listed on the Deleading Notification form ten days before beginning any deleading work. If the unit is vacant or it is your own home, you do not need to wait ten days before starting, but you will still need to notify the agencies listed on the Deleading Notification form. You will receive the Deleading Notification form when you receive your authorization number. Coordination with Other Deleading Work Apply encapsulants after all other work is done. Avoid any dust settling on the drying encapsulant as well as bumping or hitting encapsulated surfaces before they have fully dried.
Application of Encapsulants Applying the Encapsulant The information on the next few pages is a general summary for encapsulant application. For the complete information, review the Product Fact Sheets and manufacturers’ literature for the encapsulant you chose. Make sure the encapsulant container has the DL Laboratories seal on it (page 1). Fill the last column of the Tape and Patch Test Results Form with the product information found on the can and the seal.

9
Check the coverage rate of the product, the number of coats to apply, how thick each coat must be, and the amount of time you must wait between coats and for the full cure. This information is on the Product Fact Sheets. Do not thin or tint the encapsulant. Do not store the encapsulant in very hot or very cold places.
Application Equipment Brushes or Rollers Use high quality equipment. Polyester/nylon brushes and a tapered trim brush for a smooth finish are recommended. A roller should have a 1/2 inch to 3/4 inch nap. Spray Application Spray equipment may consist of high pressure airless, conventional air spray, high volume low pressure (HVLP), and electrostatic equipment. Equipment should be in good condition. Follow manufacturers’ specific recommendations for spraying procedures, including pressure settings and tip size. Do not leave spray equipment unattended when not in use. Important Application Tips to Pass Reinspection Avoid eye and skin contact. Wear safety equipment listed on the Product Fact Sheets. Encapsulate the entire architectural component. Do not forget areas like the underside of a window sill or the edge of a door casing. Some components are made of more than one piece of wood, like the two sides and top pieces of wood that make up a door casing. You must encapsulate each of these pieces to do the entire component. Do not stop at the 5 foot mark. Apply the encapsulant liberally and evenly. Pay close attention to the thickness (see page 10) and to the number of coats applied. The encapsulant should not be too thin or too thick. Avoid sloppy application – no bare spots, thin spots, heavy drips, rough edges around fixtures or corners. Minimize brush marks. Your work will be checked carefully. If you are using a brush to paint or cut in a wet edge before rolling, do a small amount at a time. This prevents the wet edge from drying before covering with the roller.

10
Measuring the Wet Film Thickness Applying the encapsulant to the correct thickness is extremely important. Each Product Fact Sheet gives you information on the right thickness of the wet encapsulant (wet film thickness), the number of coats to apply, and the right thickness of the encapsulant when it dries (dry film thickness). When you receive your authorization number, you will receive a wet film gauge. The gauge has four sides with different sized teeth (the difference in size is not easily seen with the naked eye). Each tooth has a number that represents the thickness of the encapsulant. Periodically check the wet film thickness with the gauge while applying the encapsulant. Using the wet film gauge
1. Choose the edge of the gauge with the numbered tooth matching the required wet film thickness for the product.
2. Rest the two corners of this edge perpendicular to the surface. Do not drag, slide or tilt the gauge.
3. Lift the gauge from the surface and read.
4. Some of the teeth should have encapsulant on them. The highest numbered tooth with encapsulant on it is the wet film thickness. If none of the teeth have encapsulant on them, use the next smallest side and so on. If all of the teeth have encapsulant on them, use the next largest side to find out the exact thickness.
5. Wipe the gauge clean with a damp cloth.
6. Repeat frequently while applying the encapsulant.
Cleanup Follow the manufacturers’ instructions for the removal of the masking and for specific cleanup tips. Most encapsulant equipment, in addition to any oversprays or drips, cleans easily with warm soapy water.

11
Reinspection and Documentation Reinspecting Encapsulated Surfaces Once all of the work is done, a licensed lead paint inspector must check the encapsulated surfaces. The inspector makes sure:
1. No prohibited surfaces, rooms ruled out for encapsulation, or loose surfaces not reinspected for authorized making intact had encapsulants applied
2. Surfaces were tested properly and results documented correctly on the Tape and Patch Tests Results Form
3. Surfaces are encapsulated in their entirety
4. Surfaces are free from defects such as drips, brush marks, and thin spots and
5. The work area was cleaned up. The inspector cannot approve any work until these conditions are met.
If you do not have the completed Tape and Patch Test Results Form, you will not pass the reinspection and you will have to re-delead encapsulated surfaces using a different deleading method. Documentation Copy of a completed Tape and Patch Test Results Form given to the inspector during the planning phase of the deleading job/before the reinspection of encapsulants so that the inspector can ensure the assessment was correct before encapsulants were applied Copy of the Deleading Invoice given to the inspector on-site at the reinspection Keep all lead-related documents in a safe place. These documents should include:
A Letter of Full Deleading Compliance or a Letter of Interim Control, issued by the inspector or risk assessor when the required work is done. These documents qualify you (the property owner) for a state income tax credit.
The inspection or risk assessment report with the reinspection information completed, which lists the hazardous areas and the work done to correct them.
The Product Fact Sheet for the encapsulant used, which has care and maintenance information, as well as CLPPP and
manufacturers’ phone numbers.
Maintenance logs, which track yearly checks and any repair work done on the encapsulants (see page 13).

12
Maintenance Maintaining Encapsulants Properly applied encapsulants should have few, if any, problems. Most products are warrantied for 10 - 20 years. If the encapsulants are broken or worn away, they will not protect occupants from exposure to lead paint or lead dust. You must check encapsulants for damage on a regular basis. Checking Encapsulants for Damage The first check should happen six months after the work is done. After that, check encapsulants at least once a year and whenever an occupant reports damage. Look for:
dirt cracks peeling thin spots dents chemical damage holes sagging water damage
Cleaning and Repairing Encapsulants Keep encapsulated surfaces clean. Check with the encapsulant manufacturer before using heavy-duty or chemical cleaners. You can repair some damage using caulking, spackling or other material recommended by the manufacturer, including the encapsulant itself. If there is a lot of damage, you may want to seek repair advice or assistance from CLPPP or the encapsulant manufacturer.

13
Encapsulant Maintenance Record
Room
Location
Product used
Condition
Repair (how)
Date
Be sure to keep track of all yearly checks and any repair work. Use the chart above, or one like it, to record the information.

14
Encapsulant Maintenance Record
Room
Location
Product used
Condition
Repair (how)
Date
Be sure to keep track of all yearly checks and any repair work. Use the chart above, or one like it, to record the information.

15
Guidelines for Property Owners and Tenants Property owners and tenants should work together to make sure encapsulants stay in good condition. These simple guidelines along with the chart on the back must be given to any tenants living in a home with encapsulated surfaces. What is important to know about encapsulated surfaces? If encapsulants are broken or worn away, they will not protect occupants from lead paint chips or lead dust. Encapsulants look like paint, but they are not the same. Encapsulants are designed to be strong and last a long time. Encapsulants should not sag or peel off and they must not have holes, cracks, dents, water stains, or bubbles on their surfaces. It is all right to hang pictures or curtain rods on encapsulated surfaces. Encapsulants should be wiped clean when spills occur. Who must take care of the encapsulated surfaces? Property owners should check encapsulants at least once a year. Property owners should repair any damaged encapsulants. Tenants should be careful not to damage encapsulated surfaces. If a surface becomes damaged, the tenant should call the property owner or manager at the number below as soon as possible. Owner/Manager Phone #

16
This information should be filled out by the property owner. A copy should be given to the tenants or placed in the unit.
Street Apt. Community
Room Common Area
Location of Encapsulant
Date Applied
Massachusetts Department of Public Health • Childhood Lead Poisoning Prevention Program
Tape and Patch Test Results Form
Information for the columns must be transferred from the Lead Inspection form. Lead Inspection done by: ________________________________________________________________________________________ Name License # Date of Inspection Address where encapsulants will be applied (record exactly the same as on inspection report):
_________________________________________________________________________________________ Street Unit# Town/City Zip Room #________________ One Form Per Room Page of Inspection - Do NOT Combine Rooms
Side (Circle)
Surface (Room page) Make Sure Encapsulants
Ruled Out Box is NOT
Does This Surface Stick, Rub, or Get Hit a Lot? (Circle Yes/ No) If Yes, Encapsulants Will Not Work
Is the Surface Circled Loose on the Report? If Yes Record Lic # of MR, OM, AM, or Deleader Who Made Intact
X-cut Tape Test (Pass or Fail)
A B C D O/C Wall (Inside to Inside) YES NO
A B C D Baseboard YES YES NO
A B C D Chair Rail YES NO
A B C D Door YES NO
A B C D Door Casing YES NO
A B C D Door Jamb YES YES NO
A B C D Closet Door YES NO
A B C D Closet Door Casing YES NO
A B C D Closet Door Jamb YES YES NO
A B C D Closet Baseboard YES NO
A B C D Closet Shelf YES NO
A B C D Closet Support YES NO
A B C D Window Sill YES NO
A B C D Window Apron YES NO
A B C D Window Casing YES NO
A B C D Int. Stops (Only if VR/ MR window)
YES NO
A B C D Mantel YES NO
A B C D Cabinet Frame YES NO
A B C D Cabinet Door YES NO
A B C D A B C D YES NO
A B C A B C D YES NO
A B C D A B C D YES NO
Authorized Person’s Signature _______________________________ Auth #___________ Date: __________ Inspector Signature (If performed X-Cuts)_____________________________Lic#_______ Date:___________ If you will need more space to record test results, photocopy this sheet or call 800-532-9571 and one will be mailed to you.
P Patch Test Results
Side Surface Visual Patch Test (Pass or Fail)
X-cut Tape Test on Patch (P or F)
Encapsulant used Cert.#/Lot #
A B C D
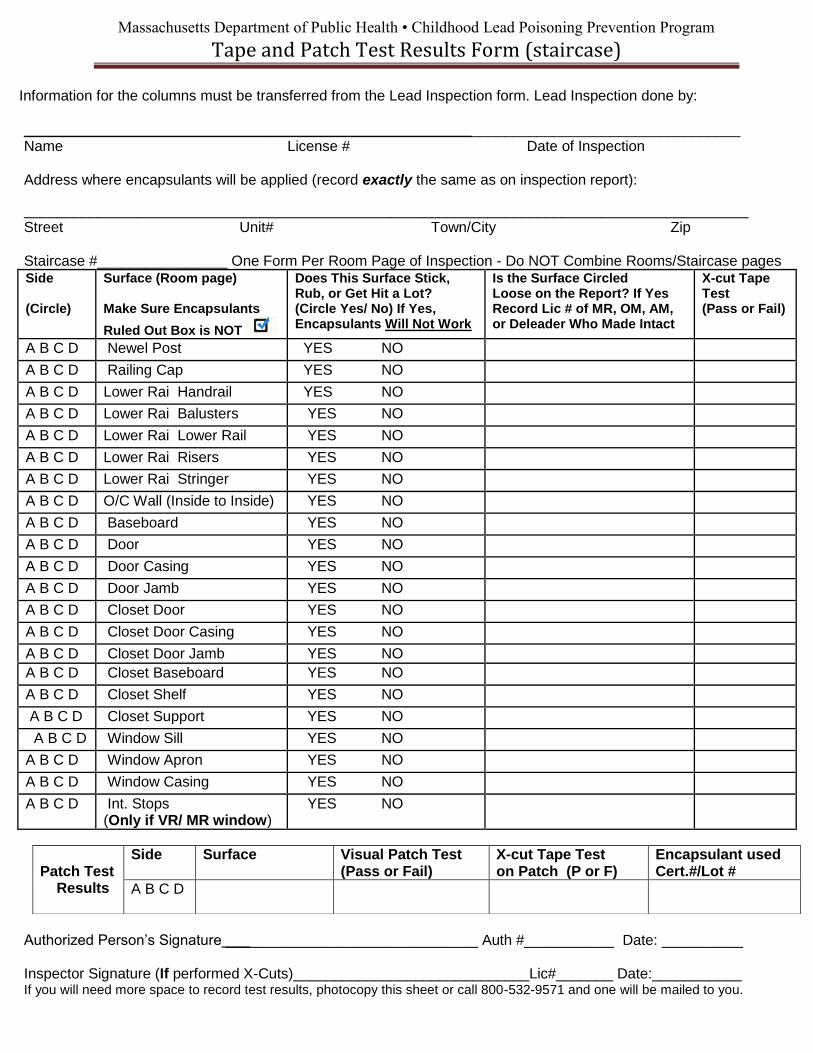
Massachusetts Department of Public Health • Childhood Lead Poisoning Prevention Program
Tape and Patch Test Results Form (staircase)
Information for the columns must be transferred from the Lead Inspection form. Lead Inspection done by: ________________________________________________________________________________________ Name License # Date of Inspection Address where encapsulants will be applied (record exactly the same as on inspection report):
_________________________________________________________________________________________ Street Unit# Town/City Zip Staircase #________________ One Form Per Room Page of Inspection - Do NOT Combine Rooms/Staircase pages Side (Circle)
Surface (Room page) Make Sure Encapsulants
Ruled Out Box is NOT
Does This Surface Stick, Rub, or Get Hit a Lot? (Circle Yes/ No) If Yes, Encapsulants Will Not Work
Is the Surface Circled Loose on the Report? If Yes Record Lic # of MR, OM, AM, or Deleader Who Made Intact
X-cut Tape Test (Pass or Fail)
A B C D Newel Post YES NO
A B C D Railing Cap YES NO
A B C D Lower Rai Handrail YES NO
A B C D Lower Rai Balusters YES NO
A B C D Lower Rai Lower Rail YES NO
A B C D Lower Rai Risers YES NO
A B C D Lower Rai Stringer YES NO
A B C D O/C Wall (Inside to Inside) YES NO
A B C D Baseboard YES NO
A B C D Door YES NO
A B C D Door Casing YES NO
A B C D Door Jamb YES NO
A B C D Closet Door YES NO
A B C D Closet Door Casing YES NO
A B C D Closet Door Jamb YES NO
A B C D Closet Baseboard YES NO
A B C D Closet Shelf YES NO
A B C D Closet Support YES NO
A B C D Window Sill YES NO
A B C D Window Apron YES NO
A B C D Window Casing YES NO
A B C D Int. Stops (Only if VR/ MR window)
YES NO
Authorized Person’s Signature _______________________________ Auth #___________ Date: __________ Inspector Signature (If performed X-Cuts)_____________________________Lic#_______ Date:___________ If you will need more space to record test results, photocopy this sheet or call 800-532-9571 and one will be mailed to you.
P Patch Test Results
Side Surface Visual Patch Test (Pass or Fail)
X-cut Tape Test on Patch (P or F)
Encapsulant used Cert.#/Lot #
A B C D
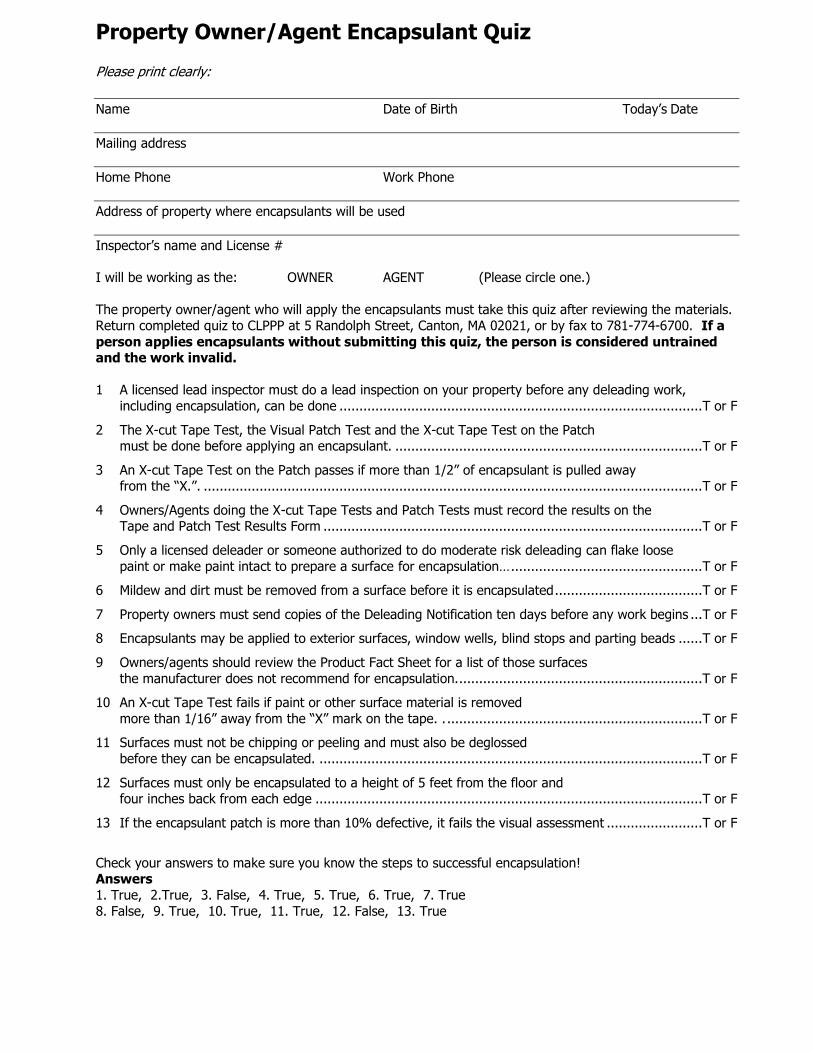
Property Owner/Agent Encapsulant Quiz Please print clearly:
Name Date of Birth Today’s Date
Mailing address
Home Phone Work Phone
Address of property where encapsulants will be used
Inspector’s name and License # I will be working as the: OWNER AGENT (Please circle one.)
The property owner/agent who will apply the encapsulants must take this quiz after reviewing the materials.
Return completed quiz to CLPPP at 5 Randolph Street, Canton, MA 02021, or by fax to 781-774-6700. If a
person applies encapsulants without submitting this quiz, the person is considered untrained and the work invalid.
1 A licensed lead inspector must do a lead inspection on your property before any deleading work,
including encapsulation, can be done ........................................................................................... T or F
2 The X-cut Tape Test, the Visual Patch Test and the X-cut Tape Test on the Patch must be done before applying an encapsulant. ............................................................................. T or F
3 An X-cut Tape Test on the Patch passes if more than 1/2” of encapsulant is pulled away from the “X.”. ............................................................................................................................. T or F
4 Owners/Agents doing the X-cut Tape Tests and Patch Tests must record the results on the Tape and Patch Test Results Form ............................................................................................... T or F
5 Only a licensed deleader or someone authorized to do moderate risk deleading can flake loose
paint or make paint intact to prepare a surface for encapsulation… ................................................ T or F
6 Mildew and dirt must be removed from a surface before it is encapsulated ..................................... T or F
7 Property owners must send copies of the Deleading Notification ten days before any work begins ... T or F
8 Encapsulants may be applied to exterior surfaces, window wells, blind stops and parting beads ...... T or F
9 Owners/agents should review the Product Fact Sheet for a list of those surfaces
the manufacturer does not recommend for encapsulation..............................................................T or F
10 An X-cut Tape Test fails if paint or other surface material is removed
more than 1/16” away from the “X” mark on the tape. . ................................................................ T or F
11 Surfaces must not be chipping or peeling and must also be deglossed
before they can be encapsulated. ................................................................................................ T or F
12 Surfaces must only be encapsulated to a height of 5 feet from the floor and four inches back from each edge ................................................................................................. T or F
13 If the encapsulant patch is more than 10% defective, it fails the visual assessment ........................ T or F
Check your answers to make sure you know the steps to successful encapsulation! Answers
1. True, 2.True, 3. False, 4. True, 5. True, 6. True, 7. True
8. False, 9. True, 10. True, 11. True, 12. False, 13. True