emc documentum system · emc®documentum®system version7.2 upgradeandmigrationguide emccorporation...
TRANSCRIPT
EMC® Documentum® SystemVersion 7.2
Upgrade and Migration Guide
EMC CorporationCorporate Headquarters
Hopkinton, MA 01748-91031-508-435-1000www.EMC.com

Legal Notice
Copyright © 1994-2016 EMC Corporation. All Rights Reserved.
EMC believes the information in this publication is accurate as of its publication date. The information is subject to changewithout notice.
THE INFORMATION IN THIS PUBLICATION IS PROVIDED “AS IS.” EMC CORPORATIONMAKES NO REPRESENTATIONSOR WARRANTIES OF ANY KINDWITH RESPECT TO THE INFORMATION IN THIS PUBLICATION, AND SPECIFICALLYDISCLAIMS IMPLIED WARRANTIES OF MERCHANTABILITY OR FITNESS FOR A PARTICULAR PURPOSE.
Use, copying, and distribution of any EMC software described in this publication requires an applicable software license.
For the most up-to-date listing of EMC product names, see EMC Corporation Trademarks on EMC.com. Adobe and Adobe PDFLibrary are trademarks or registered trademarks of Adobe Systems Inc. in the U.S. and other countries. All other trademarksused herein are the property of their respective owners.
Documentation Feedback
Your opinion matters. We want to hear from you regarding our product documentation. If you have feedbackabout how we can make our documentation better or easier to use, please send us your feedback directly [email protected]

Table of Contents
Preface ................................................................................................................................. 9
Chapter 1 Upgrade and Migration Overview ................................................................ 13Upgrade and Migration .................................................................................... 13Understanding Migration.................................................................................. 14Order of New Product Installation..................................................................... 15Order of System Updates .................................................................................. 16
Chapter 2 Planning the Documentum System Upgrade ............................................... 19System Upgrade Strategies................................................................................ 19Changes that Impact Content Server Upgrade or Migration................................. 22Linking to the 32-bit Oracle Client Library on Linux ....................................... 22Upgrading Multiple Repositories to the Same Version..................................... 23
Mapping Your Current Configuration ................................................................ 23Designing a Documentum 7.x Configuration ...................................................... 26Addressing Hardware Concerns.................................................................... 26Upgrading Third-party Software ................................................................... 27Planning for Global Registries ....................................................................... 27Mapping a Documentum 7.x Configuration ................................................... 28
Planning Upgrade and Migration to Documentum 7.x ........................................ 28Setting Up a Test Environment ...................................................................... 28Creating the Test Environment .................................................................. 28
Migrating a TCS-Enabled Docbase to a New Server ........................................ 29Client-First Migration ................................................................................... 29
Planning Upgrade for Repositories in a Federation ............................................. 30Guidelines for Upgrading a Distributed Configuration ................................... 30
Planning the Upgrade or Migration of the AEK Key to Lockbox .......................... 31Enabling Remote Key Management ................................................................... 31
Chapter 3 Upgrading Content Server ........................................................................... 33Upgrade Checklist ............................................................................................ 33Changing the Database Operating System and Version ................................... 35Preparing DB2 databases for Upgrade............................................................ 36Migrating the Database to UTF-8 ................................................................... 36The database_refresh_interval Key ................................................................ 36Ensuring the Completion of Automatic Tasks Before Upgrading...................... 36Ensuring that the dm_server_config Object is Unlocked .................................. 37
Upgrading to 64-bit Content Server ................................................................... 3764-bit ODBC and DSN Libraries .................................................................... 38Errors During Upgrade ................................................................................. 39Components Not Supported after Upgrade .................................................... 39Migrating Custom Plug-ins ........................................................................... 40Upgrading Content Server on Red Hat Linux 5.x Systems ............................... 40
3

Table of Contents
Upgrading the Content Server Software ............................................................. 40Upgrading Content Server Installed with Cluster Services................................... 44Upgrading Content Server in a Distributed or Load-BalancedConfiguration................................................................................................... 45Upgrading the BOCS Server .......................................................................... 47Upgrading the DMS Server ........................................................................... 47
Post-Upgrade Tasks .......................................................................................... 48Improving Performance after Upgrade........................................................... 48Extending the Oracle Tablespace Size............................................................. 48Enhancements after Upgrade ........................................................................ 49Reinstalling D2 Client Libraries ..................................................................... 49Rebuilding the database views ...................................................................... 49
Chapter 4 Upgrade Scenarios ...................................................................................... 51Upgrading Content Server 6.5 SP2 to 7.2 —Windows/SQL Server ....................... 51Upgrading Content Server 6.5 SP3 to 7.2 — AIX/DB2 .......................................... 55Upgrading Content Server 6.5 SP3 to 7.2 —Windows/SQL Server ....................... 59Upgrading Content Server 6.7 to 7.2 —Windows/Oracle..................................... 63Upgrading Content Server 6.7 SP1 to 7.2 — Linux/Oracle .................................... 64Upgrading Content Server 6.7 SP2 to 7.2 — Solaris/Oracle................................... 68Upgrading Content Server 7.0 to 7.2 —Windows/SQL ........................................ 72Upgrading Content Server 7.1 to 7.2 — Linux/Oracle .......................................... 75
Chapter 5 Migrating Content Server ............................................................................ 77Understanding the Migration Process ................................................................ 77Migration Checklist .......................................................................................... 79Planning a Migration ........................................................................................ 80Migration Methods ........................................................................................... 81Method 1: Migrating a Repository ................................................................. 82Method 2: Copying a Repository ................................................................... 83
Migrating Data Using SQL Server...................................................................... 85Consolidating Repositories................................................................................ 86Migrating Data from Earlier Versions of Content Server ...................................... 90Migrating XML Content to the XML Store .......................................................... 90Using DQL to Migrate Content to an XML Store ................................................. 91Migrating Custom Content Server Methods ....................................................... 91Migrating DocApps and BOF2 Modules............................................................. 91Post-Migration Tasks ........................................................................................ 92
Chapter 6 Migrating DFC Customizations .................................................................... 93Java Class Changes ........................................................................................... 93Configuring DFC for Native IPv4 Operations ..................................................... 94Configuring 6.7 Clients to Work with Content Server 7.x ..................................... 94Migrating Customizations to Business Objects.................................................... 94Migrating DMCL API Calls to DFC API Calls..................................................... 95Search Service .................................................................................................. 95Full Format Specifications No Longer Accepted.................................................. 95
4

Table of Contents
Character String Handling Improved ................................................................. 95Aspects, a New BOF Module Type for Developers .............................................. 96JMX Management of DfPreferences and dfc.properties........................................ 96DFC Deployment ............................................................................................. 96Configuration for AAC Tokens .......................................................................... 97Setting the Maximum Number of Results Per Source .......................................... 97DFC Does Not Support Linked Store Storage Areas ........................................... 97External Storage ............................................................................................... 97DFC Does Not Support Optical Storage Devices ................................................. 98
Chapter 7 Migrating DFS Customizations .................................................................... 99Upgrading the DFS .NET Productivity Layer...................................................... 99Upgrading from a Version Earlier Than 7.x .................................................. 100Upgrading from a Pre–7.x Minor Version or Service Pack .............................. 101
Restoring Trusted Certificates after Upgrading UCF ......................................... 101Trusted Login is Disabled By Default ............................................................... 102Cookie Consistency Check .............................................................................. 102.NET Framework Update ................................................................................ 102
Chapter 8 Migrating CMIS Customizations ................................................................ 103getFolderParent Returns Feed.......................................................................... 103
Chapter 9 Migration Scenarios .................................................................................. 105Migrating Content Server 6.5 SP2 to 7.2 —Windows/SQL Server ....................... 105
Appendix A Migrating DMCL APIs to DFC .................................................................... 111Overview ....................................................................................................... 111Methods with no corresponding DFC method .................................................. 111Methods with corresponding DFC methods ..................................................... 112
Appendix B Object Type and Property Changes ........................................................... 119New object types ............................................................................................ 119Changed object types ...................................................................................... 120Changed object types with new properties ....................................................... 127
Appendix C dfc.properties ............................................................................................ 129Overview ....................................................................................................... 129Changes to existing key names ........................................................................ 129dmcl.ini key migration to dfc.properties........................................................... 132Obsolete dmcl.ini and session configuration options ......................................... 133Obsolete dfc.properties keys............................................................................ 135
Appendix D LDAP Certificates ...................................................................................... 137
5

Table of Contents
List of Figures
Figure 1. System Installation Order, New Documentum System ............................................ 15Figure 2. System Update Order, Existing Documentum System ............................................. 16Figure 3. System Upgrade Scenarios .................................................................................... 21Figure 4. Upgrade Steps from 32-bit Content Server to 64-bit Content Server .......................... 38Figure 5. Pre-7.x 32-bit Content Server Environment ............................................................. 78Figure 6. Migration Process ................................................................................................. 79
6

Table of Contents
List of Tables
Table 1. Upgrade and Migration of Product Components .................................................... 13Table 2. Content Server and Database Server Host Worksheet .............................................. 23Table 3. Application Server Host Worksheet ....................................................................... 24Table 4. Index Server Host Worksheet ................................................................................ 24Table 5. Client Machine Worksheet .................................................................................... 25Table 6. Customized Components Worksheet ..................................................................... 25Table 7. Memory Consumption by Documentum Executables.............................................. 26Table 8. Parameters required by dm_acs_install.ebs script ................................................... 46Table 9. Base and Upgraded OS/DB/CS Versions ................................................................. 52Table 10. Base and Upgraded OS/DB/CS Versions ................................................................. 55Table 11. Base and Upgraded OS/DB/CS Versions ................................................................. 59Table 12. Base and Upgraded OS/DB/CS Versions ................................................................. 63Table 13. Base and Upgraded OS/DB/CS Versions ................................................................. 64Table 14. Base and Upgraded OS/DB/CS Versions ................................................................. 68Table 15. Base and Upgraded OS/DB/CS Versions ................................................................. 73Table 16. Base and Upgraded OS/DB/CS Versions ................................................................. 76Table 17. Migration Checklist .............................................................................................. 79Table 18. Premigration Tasks ............................................................................................... 80Table 19. DFS .NET Productivity Layer Upgrade Matrix........................................................ 99Table 20. Base and Upgraded OS/DB/CS Versions ............................................................... 105Table 21. DMCL API methods and corresponding DFC methods ......................................... 112Table 22. New object types ................................................................................................ 119Table 23. Changed object types .......................................................................................... 120Table 24. New object properties ......................................................................................... 127Table 25. Name changes for existing dfc.properties since version 6.5 and dfc.new
properties ...................................................................................................... 129Table 26. dfc.properties keys migrated from dmcl.ini file..................................................... 132Table 27. Obsolete session configuration options................................................................. 134Table 28. Obsolete dfc.properties keys................................................................................ 135
7

Table of Contents
8

Preface
This guide describes the necessary steps to upgrade an existing EMC Documentum 6.5 SP2, 6.5 SP3,6.6, 6.7 SPx, 7.0, 7.1 implementation to Documentum 7.x
Intended audienceThis guide is for IT personnel who are upgrading the Documentum system, including Documentumcustom applications.
Document scopeThis guide describes how to upgrade a Documentum system and migrate customizations to theupgraded Content Server. Refer to the EMC Documentum Content Server Installation Guide foradditional detailed planning information.
The release for upgrade to Documentum 7.x is supported from Documentum 6.5 SP2 onwards. If youare upgrading an earlier version, first upgrade to Documentum 6.5 SP2, and then to Documentum 7.x.
For migration, this guide provides appropriate instructions to move existing customizations inDocumentum 6.6 to Documentum 7.x. This guide includes instructions to optimize your systemby disabling unwanted new behaviors or activating earlier features that have been deprecated or"turned off” by default for 6.5 and later versions.
This guide does not focus on new features, except where a new feature changes or replaces existingbehavior in custom applications.
All references to 6.5 and later in this document refer to Documentum 6.5 SP2 and all versions thatfollow it, including Documentum 7.x.
All references to 7.x in this document refer to Documentum 7.2.
Revision historyThe following changes have been made to this document.
9

Preface
Revision Date Description
September 2016 Updated the “Preupgrade Tasks” sections for the Linux/AIX/Solaris upgrade scenarios in Chapter 4, Upgrade Scenarios.
June 2016 Added the notes about standard jobs in the section,Upgrading the Content Server Software, page 40.
May 2016 Updated the section, Upgrading Content Server in aDistributed or Load-Balanced Configuration, page 45.
July 2015 Added upgrade information from Red Hat EnterpriseLinux 6.4 to Red Hat Enterprise Linux 7.0.
May 2015 Added upgrade information for SUSE Linux Enterprise.
February 2015 Initial publication.
TerminologyThe following table provides a definition of the commonly used terms in this guide.
Term Definition
Upgrade Refers to moving seamlessly from a previous version ofthe software to a more recent version. When hardwareand third-party applications are compatible with the newversion, and the existing version supports direct upgrade, anin-place move from an earlier version of EMC products canbe performed.
Migration Refers to moving customizations from one Content Serverinstance to another. It can refer to moving from anunsupported environment to a supported one, such asan upgrade that cannot be done in place due to lack ofcompatibility or the need to update/change hardware, or theneed tomove from an unsupported operating system/platformto a supported one. It can also refer to moving data fromone location, server, or repository to another. The process ofmigration involves creating a repository and then copying thecontent from the old repository to the new repository.
Compatibility Refers to software components that are intended towork together seamlessly. For example, different clientsthat can independently modify objects in the repositorywithout conflicts, or an environment where Content Serverapplications, repositories, or client applications of different
10

Preface
versions coexist in an implementation (mixed versionenvironments) without conflicts or errors.
11

Preface
12

Chapter 1Upgrade and Migration Overview
This chapter provides a conceptual overview of upgrade and migration of a Documentum instance.
Topics include:• Upgrade and Migration, page 13
• Understanding Migration, page 14
• Order of New Product Installation, page 15
• Order of System Updates, page 16
Upgrade and MigrationThis guide covers upgrade and migration of Documentum platform applications.
You must be on Documentum 6.5 SP2 or later to perform an in-place upgrade to Documentum 7.x.Direct in-place upgrade to Documentum 7.x is supported from Documentum 6.5 SP2, but only ifthe existing operating system/database/hardware combination is also supported for Documentum7.x. Otherwise, a migration is required to move to a supported platform. The EMC DocumentumEnvironment and System Requirements Guide provides information about the supported operatingsystem, database, and hardware in Documentum 7.x.
Note: The EMC Documentum System Upgrade and Migration Guide that is included with your sourceand target versions provides instructions on upgrading from a version earlier to Documentum 6.5 SP2.
Migration refers to moving from an unsupported version to a supported version of the sameoperating system and database. It does not refer to moving from one operating system/database toanother (for example, Solaris to Linux). Migration between operating system/database platformsrequires a fresh installation and engagement with Professional Services.
You can migrate existing customizations such as DocApps, Documentum Archive (DAR) files, andbusiness objects. Table 1, page 13 shows components that can be migrated, upgraded, or both.
Table 1. Upgrade and Migration of Product Components
Component Migrate Upgrade
Content Server X X
Custom DocApp/DAR files X
13

Upgrade and Migration Overview
Component Migrate Upgrade
Service-based Business Objects(SBOs)
X
Type-based Business Object(TBOs)
X
Java methods X X
If you are installing a new Content Server instance, move and modify (as required) the custom Javamethods, DocApps, DARs, SBOs, and TBOs to the new Content Server instance.
Note:• DocApps, SBOs, TBOs (BOF2 version), and Java methods bundled as SBOs continue to work in anupgraded Content Server.
• You can disable the new features or activate prior features that have been deprecated or turned offby default for Documentum 7.x. This guide does not describe new features, except where theychange or replace existing behavior in custom applications.
Check the installation guide for each application that you are upgrading for specific considerations.
Before you perform the upgrade, check the list of products that are compatible with Documentum 7.xprovided in the EMC Documentum Environment and System Requirements Guide.
The EMC Documentum Content Server System Object Reference Guide provides information about new,changed, deprecated, and obsolete object types and properties.
For information about deprecated, new, and obsolete properties in dfc.properties, seedfcfull.properties.
Understanding MigrationMigration is a straightforward process. You document the current configuration, plan your upgradeconfiguration, and then upgrade the individual system components in a sequence that minimizesimpact on your users.
Migration can be separated into two basic tasks:• Install and configure Documentum 6.5 SP2 or later software.
• Move configurations and customizations to the new servers.— Enable features that you want to keep.
— Disable new features that you do not want.
— Enable new features for existing custom components.
The Chapter 5, Migrating Content Server chapter provide more information about the migrationprocess.
Most of the new features in Documentum 6.5 SP2 and later versions are enabled by default. Thisguide provides the steps for enabling new features that are not enabled by default.
14

Upgrade and Migration Overview
Order of New Product InstallationFigure 1, page 15 shows the recommended installation order for new Documentum systems. Theserver in this diagram is the host for the RDBMS, Content Server, or Index Server.
Figure 1. System Installation Order, New Documentum System
The recommended installation and upgrade order for new Documentum systems is as follows.1. Documentum Content Server
2. Documentum Administrator (DA)
3. Documentum XML Store
4. Documentum Content Storage Services (CSS)
5. Documentum Trusted Content Services (TCS)
6. Documentum Content Services for Centera (CSEC)
7. Documentum Content Intelligent Services (CIS)
8. Documentum xPlore
9. Documentum High Volume Server (HVS)
10. Documentum Content Transformation Services (CTS)
11. Documentum Thumbnail Server
12. Documentum Branch Office Caching Services (BOCS)
13. Documentum Foundation Services (DFS), including any custom DFS applications
14. Documentum Content Management Interoperability Services (CMIS), including any customCMIS applications
15

Upgrade and Migration Overview
15. Documentum Foundation Classes (DFC), including any custom DFC applications
16. xCelerated Composition Platform (xCP) 2.x
• Documentum Process Engine
• Documentum Process Integrator
The coexistence of xCP 2.x and Documentum 6.7.x applications on the Documentum 7.x platformexists. The “Upgrading to enable xCP and Documentum clients to coexist” section in the EMCDocumentum System Upgrade and Migration Guide, Release 6.7 SP2 provides information about thecoexistence of xCP 2.x and Documentum 6.7.x applications scenarios.
Order of System UpdatesFigure 2, page 16 shows the recommended order in which to upgrade system components. The serverin this diagram is the host for the RDBMS, Content Server, or Index Server.
Figure 2. System Update Order, Existing Documentum System
Caution: For Content Server, host operating system, or RDBMS upgrades, ensure that theproduct version is supported by the Content Server version you are installing. For application
16

Upgrade and Migration Overview
server operating system or server upgrades, ensure that the product version is supported bythe WDK-based application you are installing. The EMC Documentum Environment and SystemRequirements Guide covers this information.
In some cases, you must uninstall upgrades to existing Documentum system installations beforeinstalling a new version.
The EMC Documentum Environment and System Requirements Guide provides information onDocumentum product compatibility. When there are version compatibility restrictions, upgradingone product generally requires upgrading interoperating products to the same version or to a majorversion family. In most cases, compatibility conflicts result from client applications that add newfunctionality to Content Server. In these cases, upgrading Content Server before the client applicationis especially important.
17

Upgrade and Migration Overview
18

Chapter 2Planning the Documentum SystemUpgrade
Upgrading a system requires planning. Know your starting point, choose a destination, then pick thebest route to get there. This chapter provides some practical advice for plotting your course fromDocumentum 6.5 SP2, 6.5 SP3, 6.6, 6.7 SPx, 7.0, and 7.1 to Documentum 7.x.
Topics in this chapter include:• System Upgrade Strategies, page 19
• Changes that Impact Content Server Upgrade or Migration, page 22
• Mapping Your Current Configuration, page 23
• Designing a Documentum 7.x Configuration, page 26
• Planning Upgrade and Migration to Documentum 7.x, page 28
• Planning Upgrade for Repositories in a Federation, page 30
System Upgrade StrategiesA Documentum system upgrade involves development, test, and production phases.• Development — In this phase, you move customizations from an old product version to the newversion and then verify that they still work properly.
• Test — In this phase, you deploy and run the full set of products to emulate the productionsystem as closely as possible. This is frequently done on virtual hosts. Once all your system testspass, you can upgrade the production system.
• Production — In this phase, you upgrade the existing production system in place with the verifiedcustomizations.
Note: The Content Server/database component (the repository) is the only part of the system forwhich there is an upgrade script. All other system product components require fresh installation.
The upgrade strategy provided in this section addresses upgrading all products in the system to thesame version number, resulting in a homogeneous system.
Figure 3, page 21 shows the high-level decision points involved when moving from a test system toa production system. Functional testing of new customizations and manual migration of existingcustomizations into new client version is a part of the development phase.
19

Planning the Documentum System Upgrade
If you want to upgrade the repository, create a copy of the production repository in your test systemon which you can run the upgrade. The Setting Up a Test Environment, page 28 section providesmore information about creating a repository copy. If you want to change the database operatingsystem, you can use the utilities available through the third-party database to export the database andimport it into a new database instance on the different operating system. After running the ContentServer configuration program to reestablish the connection between the existing Content Serverinstance and the new database instance, run Content Server to upgrade the entire repository.
If you are performing a fresh install instead of an upgrade, migrate your data files to the new ContentServer and database instances. There are several third-party utilities, such as Crown Partners,Bluefish, and FME, which you can use to perform this data migration.
An EMC Documentum system requires a global registry repository that matches the version family ofthe system clients. The global registry is a central location used to store common objects used byall repositories, such as SBO network locations, BOCS settings, and user settings. After installing orupgrading the test system repository, install a global registry repository that matches the version ofthe client applications, and install the client software. If your client software versions are to remain asthe same version as your production system, you can copy the customized files from your productionsystem directly over to the same version client instance on the test system. If the client versionsoftware is different, migrate your customizations to the new client files.
After migrating to the test system, ensure that your system is running properly by conducting systemtests. After all your system tests pass, you can upgrade the production system. Typically, yourproduction system is taken offline for a weekend while performing an in–place upgrade.
Note: You can use virtual machine hosts for the entire system or for system components. Usingvirtual machines, you can swap out preupgraded system images on the same physical host tominimize the downtime of an in-place upgrade.
The production system contains new content and full-text indexes generated since the repository wascopied or you migrated your data to the new repository.
20

Planning the Documentum System Upgrade
Figure 3. System Upgrade Scenarios
21

Planning the Documentum System Upgrade
Changes that Impact Content Server Upgradeor MigrationThis section describes miscellaneous changes that can affect the migration to Content Server 7.x.
Linking to the 32-bit Oracle Client Library on Linux
In Documentum 6.7, for Linux, the way Content Server links to the Oracle Client library was changed.Prior to Documentum 6.7, a static link to the 32-bit Oracle Client library was used. From 6.7 onwards,Content Server does not link with the 32-bit Oracle Client library at build time, but rather dynamicallylinks to it at runtime. Consequently, you must install a 32-bit Oracle Client on the Content Serverhost, and add the directory containing the client libraries to the appropriate environment variable(LD_LIBRARY_PATH for Linux) of the repository owner before configuring or starting Content Server.
In Documentum 7.1, all the UNIX ports of Content Server are 64-bit. Therefore, the 32-bit Oracleclient libraries are not required and the LD_LIBRARY_PATH environment variable should directly beset to the 64-bit Oracle client libraries.
If you are upgrading from a Content Server version prior to Documentum 6.5 SP2, the earlierversion of the repository does not start when Oracle version is upgraded to Oracle 11g Release2. You need to upgrade Content Server to Documentum 6.7 to perform any operations with therepository before upgrade.
22

Planning the Documentum System Upgrade
If you are upgrading from Documentum 6.5 SP2 or 6.5 SP3 or 6.6 or 6.7 or 7.0 to Documentum 7.xand want to perform any operations with the repository after the Oracle version upgrade to Oracle11g Release 2, the EMC Documentum Content Server Installation Guide for instructions on configuringthe repository with Oracle.
Upgrading Multiple Repositories to the Same Version
When upgrading Content Server from 6.5 SP2 or later to 7.x, first upgrade the software and thenthe repository.
If Content Server comprises of multiple repositories, ensure that you upgrade all repositories to7.x. You cannot have multiple repositories of different versions on the same Windows host sincedifferent method server binaries are used for different versions. If you retain a repository at a 6.5SP2 version, the 6.5 SP2 repository uses the latest 7.x method server executable to launch JMS basedon the registry entries on the Windows host.
It is recommended that you upgrade all repositories in Content Server to the same version.
Mapping Your Current ConfigurationThe following system configuration diagrams and sample worksheets provide a starting point fordocumenting the infrastructure of your current system. You may already have similar diagrams fromwhich you can get much of this information. If you do not, be sure to keep a copy of the existingplan to help with future migrations.
Take the time to verify that any existing diagrams reflect the current configuration.
Complete one copy of Table 2, page 23 for each server host and client configuration used in yourcurrent system (for example, Content Server, full-text indexing server, Federated Search Server,or application server).
Table 2. Content Server and Database Server Host Worksheet
Item Value
Hardware andProcessors
Memory
Operating system andversion
Content Server version
RDBMS and version
Repository size Number of objects:
Storage space required:
23

Planning the Documentum System Upgrade
Global Registry? [ ] Yes [ ] No
Java/JRE version
DFC version
Other product version
Other product version
Other product version
Table 3. Application Server Host Worksheet
Item Value
Hardware andprocessors
Memory
Operating system andversion
HTTP Server version
Java version
DFC version
Other product andversion
Other product andversion
Other product andversion
Table 4. Index Server Host Worksheet
Item Value
Hardware andprocessors
Memory
Operating system andversion
HTTP server version
Java version
DFC version
Other product andversion
24

Planning the Documentum System Upgrade
Other product andversion
Other product andversion
Table 5. Client Machine Worksheet
Item Value
Operating system andversion
Browser and version
Java version
Other product andversion
Other product andversion
Other product andversion
Table 6. Customized Components Worksheet
Product CustomizedComponents
Customizationtype
CustomizationDescription
Disposition
• 6.5 and laterCompatible
• Needs changes
• Obsolete
• 6.5 and laterCompatible
• Needs changes
• Obsolete
• 6.5 and laterCompatible
• Needs changes
• Obsolete
25

Planning the Documentum System Upgrade
Designing a Documentum 7.x ConfigurationThis section discusses some of the design decisions you must make before implementing aDocumentum 7.x configuration. Departmental systems are configurations where Content Server,RDBMS, and global registry all reside on the same host machine. Enterprise systems are configurationscontaining multiple Content Servers, data repositories, and distributed services to improveperformance in high traffic or geographically dispersed environments.
Addressing Hardware Concerns
Verify that the hardware you are currently using will continue to meet your needs for the foreseeablefuture. In particular, if you have been hosting more than one server on a single machine (for example,Content Server and an application server), this is a good time to divide the functions between twoor more server hosts to boost performance. When upgrading to Documentum 7.x, ensure that atleast 10 GB of memory is available.
You can also make an estimation on the required memory by calculating the memory consumption ofeach of the Documentum executables. The following table lists the memory consumption for eachexecutable of Documentum based on their count.
Table 7. Memory Consumption by Documentum Executables
Documentum executable name Count Memory consumption (MB)
DMBASIC method server(Master)
1 1
Agent 5 2560
Note: Each agent requires 512 MBof memory.
Java Method Server 1 1300
Agent executable 1 512
Documentum.exe 1 X
Total 9 4.373 GB
Note: The table lists the memory consumption for a single docbase if the database is installed inanother machine. If you have multiple docbases, multiply the total memory with the number ofdocbases. For example, if you have two docbases, the total memory required would be 8.6 GB (thatis, 2 X 4.3). The memory consumptions values are derived or obtained after testing the product inthe EMC testing environment. Every effort is made to simulate common customer usage scenariosbut actual results may vary due to differences in hardware and software configurations, data, andother variables.
26

Planning the Documentum System Upgrade
Upgrading Third-party Software
Verify that the third-party software, such as operating system, database, and so on, you are currentlyusing with the existing version is still supported, or upgrade to the supported versions as necessary.If the third-party component does not have a direct upgrade path to the supported version, then thereis no direct upgrade path for the Content Server upgrade. The EMC Documentum Environment andSystem Requirements Guide provides information about supported third-party software version.
Planning for Global Registries
Designate one of the repositories in your version 6.5 or later system as the global registry. Decidewhich of your repositories to use as the global registry. If you already have a Documentum 5.3 SP6,6.0, or 6.0 SPx global registry, upgrade to Documentum 7.x.
During repository configuration, you are prompted with the message Do you want to add thisrepository to another global repository. You can select one of the following options:
• Yes
Provide the repository name and the login credentials (user login name and password) of theglobal registry user in that repository. The DFC instance on the current host is configured toaccess the remote global registry repository.
• No
Provide a user login name and password for the global registry user in the repository you arecurrently configuring. Record the login name and password; use this login name and password toconfigure other repositories in your system to allow them to access the global registry. The localDFC instance is also configured to access this global registry.
Regardless of whether you designate the repository as a global registry or not, the global registry useris created for all repositories. The global registry user (dm_bof_registry), is the repository user whoseaccount DFC clients use to connect to the repository to access required service-based objects and userinformation. The user has read access to objects in /System/Modules only.
• If you configure the repository as a global registry, provide the user login name and passwordfor the user and set the user state to Active.
This can be any arbitrary user login name and password. Do not use the credentials of therepository or installation owners.
• If you do not configure the repository as a global registry, the user is created with a default valuefor the login name, and the user state is set to Inactive.
If you later enable the repository as a global registry, use Documentum Administrator to changethe user state to Active and provide the user with a user login name and password that youchoose. The EMC Documentum Content Server Installation Guide provides instructions on enablingthe repository as a global registry.
27

Planning the Documentum System Upgrade
Mapping a Documentum 7.x Configuration
For each server host and client configuration, complete a planning document. You can use the sameforms used for mapping your current configuration (see Mapping Your Current Configuration,page 23).
Planning Upgrade and Migration toDocumentum 7.xNow that you know your starting point and your destination, you can choose the best upgrade andmigration path. The recommended configuration is a homogeneous Documentum 6.5 or later system.The migration paths described in this section allow your applications to continue working andminimize impact on your users, but your users cannot get the full benefits of features in Documentum6.5 or later versions until the migration is complete.
Setting Up a Test Environment
Before migrating your production system, EMC Documentum recommends that you set up a testenvironment. Set up an environment that includes the same hardware, RDBMS, and softwareconfigurations as your production system, including a copy of your production repository. Settingup a test environment allows you to practice migrating your systems, as well as troubleshoot anymigration problems, before committing changes to your production system.
Creating the Test Environment
You cannot create copies of more than one repository in a single new installation if the repositorieswere created in different installations.
Use the instructions for creating a repository copy on the same platform as the original repository.The procedure is not supported for moving a repository from one platform to another.
Before upgrading a repository, create an environment in which to test the upgrade process. To dothis, create a new installation using the original Content Server software version, copy the repository,copy the content files, and upgrade that copy. Perform tests on the copy ensuring to exercise standardfunctionality and customizations. After the upgraded copy is tested completely, upgrade the originalrepository.
For example, if you are copying two repositories, Paris and London, that were created in separateContent Server installations, you need to copy them to separate Content Server installations. Creatinga repository copy requires you to copy the aek.key and dbpasswd.txt files from the originalrepository host to the repository copy host, because each repository copy must have access to theaek.key and dbpasswd.txt files from its original installation.
If you are copying two repositories, Tokyo and Beijing, that were created in the same ContentServer installation, you can create their copies in the same new installation, with the aek.key and
28
Planning the Documentum System Upgrade
dbpasswd.txt files from the original installation copied to the installation where you create thecopies.
The Method 2: Copying a Repository, page 83 section in the Chapter 5, Migrating Content Serverchapter provides the steps for copying a repository.
Migrating a TCS-Enabled Docbase to a New Server
To migrate content from an encrypted store in a source repository to a target repository, perform thefollowing steps:1. Copy the content from an encrypted store to a non-encrypted store on the source repository.
2. Copy the repository. The Method 2: Copying a Repository, page 83 section in the Chapter 5,Migrating Content Server chapter provides the steps for copying a repository.
3. Create a new encrypted store in the target repository and migrate the content from thenon-encrypted store to the newly created encrypted store in the target repository.
Client-First Migration
If your system uses only DFS, custom DFC, or customWDK clients, you have the option of migratingthe client applications first. Refer to the installation or deployment guide for the client application fordetailed instructions.
ACS and BOCS Version Compatibility and Migration — Parallel streaming from AcceleratedContent Server (ACS) is used only if both ACS and Unified Client Facilities (UCF) (WDK or DFSapplications) are version 6.5 or later. Parallel streaming from Branch Office Caching Services (BOCS)is used only if ACS, BOCS, and UCF are version 6.5 or later.
Note: When you upgrade the BOCS to version 6.5 or later, update the BOCS version specification inthe global registry using Documentum Administrator. For BOCS 6.0, specify the version as 2.0. ForBOCS 6.5 to 6.7, specify the version as 2.1. For BOCS 7.0, specify the version as 2.3.
WDK Clients Compatibility and Migration — WDK-based clients are compatible withDocumentum 5.3 SP6 and 6.0 Content Servers. Based on the version to which you have migrated,some WDK features of that version are available, such as features that run in JavaScript on the client.Other features are not available until you complete the migration to Documentum 6.5 or later, such aslightweight system objects, data partitioning, batch processing, and scoping.
The following procedures describe the steps to migrate from Documentum 5.3 SP6, 6.0, or 6.0 SPx toDocumentum 6.5 or later, migrating the clients first.
To migrate from Documentum 5.3 SP6, 6.0, or 6.0 SPx to Documentum 7.x:1. Upgrade the application server and client browsers.
2. Enable the global registry in a version 6 repository in order to support version 6 clientfeatures that require a global registry. The EMC Documentum Content Server Installation Guideprovides instructions for enabling a global repository. Documentum 6.5 or later clients with aDocumentum 5.3 SP6 global registry are not supported.
29

Planning the Documentum System Upgrade
3. Upgrade the Content Servers in place.
4. Restart Content Server.
5. Configure one Content Server as the version 6.5 or later global registry. If you had a globalregistry in version 6.0, you can upgrade that server in place using the same settings.
Planning Upgrade for Repositories in aFederationA Federation is two or more repositories that are bound together to facilitate management of globalusers, groups, and access control lists (ACLs) in a multi-repository distributed configuration. Onerepository in the set is the governing repository. The remaining repositories are member repositories.
Keeping objects synchronized in multiple repositories can be time consuming and error-prone whenthe work is done manually in each repository. A repository federation automates much of the process.
Only certain combinations of different repository versions can work together as a Federation. Planyour upgrade so that all participating repositories are supported.
When you upgrade repositories (that work together as a Federation), ensure that the upgradedrepository versions (in a nonhomogeneous Federation) can work together as a Federation.
The EMC Documentum Content Server Distributed Configuration Guide provides more informationabout configuration requirements in a Federation.
Guidelines for Upgrading a Distributed Configuration
Use these guidelines when deciding how to upgrade a distributed configuration.
Repository Federations — EMC Documentum supports federations that contain repositories ofdifferent versions. In a mixed version environment, upgrade the governing repository first.
Repositories with Object Replication — Upgrade the source repository, then the target repositories.If you have a group of repositories where each repository is both a source and a target, then theupgrade can begin with any of the repositories. This situation can apply, for example, if objects arereplicated from repository A to repository B, repository B to repository C, and from repository C torepository A. Although you can replicate between repositories that are different versions, attributesthat are only in the newer version cannot be replicated.
Repositories with Distributed or Load-Balanced Content — Shut down the primary ContentServer and all remote Content Servers. Upgrade the primary Content Server first, then upgradethe remote Content Servers.
The Upgrading Content Server in a Distributed or Load-Balanced Configuration, page 45 sectionprovides the steps for upgrading Content Server in a distributed or load-balanced configuration.
30
Planning the Documentum System Upgrade
Planning the Upgrade or Migration of the AEKKey to LockboxFrom the 7.2 release, you can upgrade the AEK key to a stronger algorithm during the repositoryupgrade as follows:• By choosing stronger algorithm for the AEK key: You can upgrade the AEK key algorithm to AES128/192/256 algorithm. The Post-Migration Tasks section of Migrating Content Server 6.5 SP2 to 7.2— Windows/SQL Server, page 105 contain the procedure for this process.
• By enabling lockbox for the AEK key: You can move an existing AEK key to lockbox or create anew upgraded AEK key in the lockbox. The Post-Migration Tasks section of Migrating ContentServer 6.5 SP2 to 7.2 —Windows/SQL Server, page 105 contain the procedure for this process.
Note: During the upgrade process, use the same passphrase for the new AEK key. After theupgrade is complete, change the passphrase. Use dm_crypto_change_passphrase to change thepassphrase and then run the dm_crypto_boot utility with the new passphrase.
For example:dm_crypto_change_passphrase -keyname CSaek [-lockbox lockbox.lb -lockboxpassphrase
<lockboxpassphrase>] -passphrase genuine -newpassphrase glorious
Caution: If you select the Upgrade AEK key option, it results in changing the AEK keyand re-encrypting the repository keys and other related data such as CNT files. Hence, it isrecommended to take a backup of the AEK key and CNT files before the upgrading the AEK key.
The EMC Documentum Content Server Installation Guide contains detailed information about creatingstrong AEK/lockbox options.
Enabling Remote Key ManagementFrom Release 7.2 onwards, you can enable Remote Key Management (RKM) for supported upgradesduring upgrade or post upgrade.
Once you enable RKM, the Docbase Key (DBK), Login Ticket Key (LTK), File Store Key (FSK), andPrivate/Public Key (PPK) retain the same value as that before upgrade, even if you upgrade the AEKkey algorithm. In the RKM server, the key classes need to be created with the same algorithm thatwas used for these keys before upgrade. Only the value of the AEK key is changed.
For migration, it is recommended that you enable remote key management after migration.
The EMC Documentum Content Server Installation Guide contains detailed information aboutconfiguring the remote key management.
31

Planning the Documentum System Upgrade
32

Chapter 3Upgrading Content Server
This chapter describes how to upgrade from a previous release and how to upgrade repositoriesto Content Server 7.x. Always consider upgrading one Documentum product within the contextof upgrading the entire Documentum system.
Note: You cannot upgrade to Content Server 7.x from a version earlier than 6.5 SP2. If your currentinstallation is an earlier version, upgrade it to Content Server 6.5 SP2 or later before you upgradeto 7.x.
This chapter contains the following topics:• Upgrade Checklist, page 33
• Upgrading to 64-bit Content Server, page 37
• Upgrading the Content Server Software, page 40
• Upgrading Content Server Installed with Cluster Services, page 44
• Upgrading Content Server in a Distributed or Load-Balanced Configuration, page 45
• Post-Upgrade Tasks, page 48
Each step in the upgrade process must be to a platform that is fully supported by Documentum.Depending on the Content Server release from which you are upgrading, you may need to upgradethe operating system or database. The documentation provided by the operating system or databasevendor contains information on upgrading those components of the system. After each upgrade step,test the repository to ensure that all functions are normal.
Note: Windows Server 2003 is not a supported environment for Content Server 7.x. You mustupgrade your operating system to a supported environment before upgrading Content Server.
Caution: After upgrading, you cannot revert to previous versions of Content Server.
Upgrade ChecklistPerform the following tasks for upgrading Content Server:
1. Review the EMC Documentum Content Server Release Notes.
2. Review the EMC Documentum Content Server Installation Guide.
33

Upgrading Content Server
3. If you are installing the xPlore indexing server, review the EMC Documentum xPlore InstallationGuide.
4. Review the Upgrading to 64-bit Content Server, page 37 section on what sequence to use inupgrading your installation, especially if you are upgrading from a 32-bit to a 64-bit ContentServer.
5. Back up the repository. For the steps, refer to the EMC Documentum Content Server Administrationand Configuration Guide.
6. Optionally, you can take a backup of all users that are part of the Admin group and any customizedattribute like group_address.
7. Decide whether to enable extended services, such as:• Retention Policy Services
• Trusted Content Services
• Content Services for EMC Centera
• Content Storage Services
• Records Manager
The “Content Server optional modules” section in the EMC Documentum Content Server InstallationGuide provides more information.
8. Temporarily increase the amount of rollback space available in the RDBMS. The number ofrollback segments should be commensurate with the size of the repository and should be insegments of equal size. Refer to the database documentation for the steps.
9. Ensure that you have sufficient disk space on the computer hosting the database.
10. Run the repository consistency checker script and correct any errors you find. The EMCDocumentum Administrator User Guide and Chapter 3, Upgrading Content Server provides thesteps for running the consistency checker.
11. Ensure that the dm_server_config object is unlocked. The Ensuring that the dm_server_configObject is Unlocked, page 37 provides more information.
12. Shut down the repository and all servers running against the repository.
13. Close the Documentum Server Manager User Interface.
14. Shut down any local connection brokers.
34
Upgrading Content Server
15. On Linux/Solaris/AIX:
a. Set the $DOCUMENTUM environment variable same as that in the base version.
b. Modify the $DM_HOME variable in the installation owner’s .cshrc or .profile file to point to$DOCUMENTUM/product/7.x. The EMC Documentum Content Server Installation Guideprovides more information.
c. Set the $DOCUMENTUM_SHARED environment variable same as that in the base version. Donot delete this environment variable.
d. Modify the library path variable in the installation owner’s .cshrc or .profile file to point to thelocation of the shared libraries required by the server. The EMC Documentum Content ServerInstallation Guide provides more information.
e. If you are using Oracle as the database, modify the $ORACLE_HOME environment variable topoint to the 64-bit libraries.
f. Determine the root password. This is the operating system root password. The root passwordis required to complete the upgrade. Refer to the Linux/Solaris/AIX documentation formore information.
16. Determine the installation owner username and password. Refer to the EMC Documentum ContentServer Installation Guide, and consult the database administrator.
17. Determine the names of the repositories you are upgrading.
18. Determine the Content Server version from which you are upgrading.
Note: In a fresh installation of Documentum 7.x, all files are installed in a single directory as definedby the %DOCUMENTUM% environment variable. For example, in a fresh installation, the defaultdirectory is C:\Documentum. In the earlier versions of Documentum, the default directory wasC:\Program Files\Documentum. When you upgrade the older versions of Documentum to7.x, the existing installation directories are retained. Only the new 64-bit Java files are installed inthe new Documentum 7.x installation directory.
Changing the Database Operating System and Version
When migrating your database to a new operating system (host) and database version, complete thedatabase migration first before upgrading Content Server. After migrating the database, run theContent Server configuration program to reestablish the repository with the new database instance.Then upgrade Content Server to upgrade the entire repository.
Refer to the database vendor documentation for information on migrating the repository databasefiles to a new database instance. The Content Server configuration program connects ContentServer to the new database host, unless the database connection string, database owner name, orpassword has changed.
Note: While upgrading the Windows operating system, the \etc\services file is replaced asa part of the upgrade. Because of this, the entries that were added for the repository before theupgrade is lost. After upgrading the operating system, manually add the repository service entriesto the \etc\services file.
35

Upgrading Content Server
Preparing DB2 databases for Upgrade
Prior to upgrading Content Server on AIX with a DB2 database, create a temporary tablespace withan 8K page size. Then, backup all tables into the new tablespace.
To create an 8K temporary tablespace, run the following command:db2 CREATE TEMPORARY TABLESPACE TEMPSPACE2 PAGESIZE = 8192
Migrating the Database to UTF-8
If the database was installed with a code page other than UTF-8 under a previous version of ContentServer, you do not have to migrate the database to UTF-8 to upgrade Content Server. However, to usethe multilingual functions of Content Server, migrate the database to UTF-8.
EMC Documentum supports upgrading repositories by using the existing database code page.• On Oracle, you can migrate existing repositories to Unicode using the tools provided by Oracle.Contact Oracle for any support you require in migrating the database.
• On DB2, all repositories should have been created by using Unicode. They do not need to bemigrated. If the DB2 repository does not use Unicode, migrate the database by using IBM tools.Contact IBM for any support you require.
• On Microsoft SQL Server, you cannot migrate the database to Unicode.
The database_refresh_interval Key
During Content Server installation or upgrade, the change checker process runs once per minute bydefault. The process updates type caches as types are created or altered. Before you upgrade, ensurethat the key is set to 1 minute or delete it from the server.ini file.
Ensuring the Completion of Automatic Tasks BeforeUpgrading
If you are using a repository of Documentum 6.5 or earlier, ensure that all automatic tasks arecompleted before shutting down the repository for upgrade; otherwise, unfinished automatic taskswill fail.
Use the following Documentum Query Language (DQL) query to obtain the number of activeautomatic tasks in the repository:select count(r_object_id) from dmi_workitem wherer_auto_method_id> '0000000000000000' andr_runtime_state in (0,1)
If the query returns a nonzero value, active automatic tasks still must be processed and you must waitfor them to complete. If it returns 0, the repository contains no more active automatic tasks, and youcan safely stop the repository. If the query returns 0, run the query a few more times to ensure thatno new automatic tasks are being generated.
36

Upgrading Content Server
Ensuring that the dm_server_config Object is Unlocked
If you attempt to upgrade Content Server and the dm_server_config object is locked, the upgrademay fail. To check if the object is locked, log in to your database as the database owner and use thefollowing SQL query to get the object ID of the server configuration object:SQL> select r_object_id from dm_server_config_s
Use the object ID in the following query to verify whether the configuration is locked:SQL> select r_object_id, r_lock_owner from dm_sysobject_swhere r_object_id = '<object ID>'
If there is a lock owner, then the object is locked.
To unlock the object, use the following SQL (except for Oracle):SQL> update dm_sysobject_s set r_lock_owner = ' ' set r_lock_machine = ' 'set r_lock_date = ' ' where r_object_id = '<object ID>'
For Oracle, use:Oracle> update dm_sysobject_s set r_lock_owner = ' ' set r_lock_machine = ' 'set r_lock_date = null where r_object_id = '<object ID>'
Commit the change:SQL> commit
Finally, restart the repository.
Upgrading to 64-bit Content ServerUpgrading to the 64-bit Content Server is supported only if there is an upgrade path on theunderlying operating system and RDBMS. For example, upgrading the 32-bit Content Server on 32-bitWindows Server 2008 to the 64-bit Content Server is not supported because there is no supportedupgrade path from 32-bit Windows Server 2008 to 64-bit Windows Server 2008.
If your operating system and database meet the requirements specified in the EMC DocumentumEnvironment and System Requirements Guide, you can directly upgrade from 32-bit Content Server 6.5SP2 or later directly to 64-bit Content Server 7.x. For this upgrade path, the underlying operatingsystem must be 64-bit.
Use the following approach to upgrade from 32-bit Content Server 6.5 SP2 or later to 64-bit ContentServer 7.x:
1. Upgrade the operating system to the supported version, if necessary.
2. Upgrade the database, if necessary.
3. Perform one of the following steps depending on the type of database being used:
• SQL Server: Upgrade or install a 64-bit version of the database client on the Content Serverhost machine. When you install the 64-bit database client, copy the DSNs from the 32-bitODBC driver to the 64-bit driver if used by your database. When you redefine the DSN,
37

Upgrading Content Server
use the same level or later level of client library. For more information, see 64-bit ODBCand DSN Libraries, page 38.
• Oracle: Create an ORACLE_HOME environment variable in Windows that points to the locationof the 64-bit TNSNAMES.ORA file. Copy the entries from the 32-bit TNSNAMES.ORA file intothe 64-bit TNSNAMES.ORA file.
4. Upgrade from 32-bit Content Server 6.5 SP2 or later to 64-bit Content Server 7.x.
You may see database connection errors in the repository logs, since the combination of a 32-bitContent Server and a 64-bit database client is not supported. These errors can be ignored.
During the upgrade from 32-bit to 64-bit, Content Server, you cannot upgrade the authenticationplug-ins that you have installed. You must replace the 32-bit authentication plug-ins with the 64-bitplug-ins. You can find the plug-ins in the %DM_HOME%\install\external_apps\authpluginsfolder.
• Do not probe log files before the entire upgrade is completed. Partial upgrade is not supported.Upgrade the binaries, the connection broker, and the repositories at the same time.
• For operating systems that do not support IPv6 in versions prior to Documentum 6.5, upgrade theoperating system first. For example, in the case of Red Hat Linux, you must upgrade the operatingsystem first if it did not support IPv6 in versions prior to Documentum 6.5.
• If the 32-bit Content Server is installed on a 32-bit operating system, migrate the repository to the64-bit version of the operating system and then upgrade the Content Server. If the 64-bit version ofthe operating system is not supported, you must upgrade the operating system to the supportedversion before upgrading the Content Server.
• If you are migrating your database to a new operating system and database version, you mustperform the migration before upgrading Content Server. After completing the database migration,run the Content Server configuration program to reestablish the repository with the new databaseinstance; then upgrade Content Server to upgrade the entire repository.
Figure 4. Upgrade Steps from 32-bit Content Server to 64-bit Content Server
64-bit ODBC and DSN Libraries
64-bit Content Server requires 64-bit database client libraries for the Oracle database or Microsoft SQLServer. For the Oracle database, update the ORACLE_HOME variable to the 64-bit installed path, andtnsnames.ora should take the appropriate entries. For Microsoft SQL Server, update the DSN entryfrom 32-bit to 64-bit and verify that DSN is pointing to the 64-bit SQL libraries.
38

Upgrading Content Server
To migrate the ODBC and DSN libraries from versions for 32-bit Content Server to versions forthe 64-bit Content Server, follow these steps:
1. Run the 32-bit ODBC DSN utility. Browse to C:\Windows\SysWOW64 and double-clickodbcad32.exe. The ODBC Data Source Administrator dialog box opens.
2. Note down all the DSN entries. These are the 32-bit DSNs present in 32-bit operating systemregistry.
3. Run the 64-bit ODBC DSN utility. Browse to C:\Windows\System32 and double-clickodbcad32.exe.
4. In the ODBC Data Source Administrator dialog box, on the System DSN tab, add the 32-bitDSN entries ensuring that the same values are used as in step 2 and click OK.
Errors During Upgrade
If you upgrade from 32-bit Content Server 6.5 SP2 or later to 64-bit Content Server 7.x using thesecond approach described in Upgrading to 64-bit Content Server, page 37, you might encountererrors. During the upgrade, at an intermediate stage where, for example, the 64-bit database clientlibraries are installed with 32-bit Content Server and a 64-bit RDBMS is running, the system will bein an unstable state. You can expect to see errors if any of these systems are running. Validation offeatures or functionality during this intermediate step is not permitted. Continue with the upgradeand run the 64-bit Content Server installer before testing the system.
For example, if you are migrating from 6.5 SP2 to 64-bit Content Server 6.7, you might see docbasicconnection errors during the intermediate step of installing 32-bit Content Server 6.7. These errors areexpected.
When upgrading a repository from 32-bit to 64-bit, Content Server automatically recompiles thedocbasic expressions during their execution. This recompilation occurs because the underlyinglibrary changes from 32-bit to 64-bit.
This recompilation process can increase the execution time of the method, which contains theseexpressions. If a very small method timeout value was specified, the operation can result in aMETHOD_TIMEOUT error. However, the method continues running even after the timeout error isreported.
Therefore, when upgrading a repository, watch out for these timeout errors and ensure the properstate of the method before retrying the operation.
Components Not Supported after Upgrade
FAST was the default search engine prior to the Documentum 6.6 Content Server. FAST is notsupported on the 64-bit Content Server. At a minimum, disable the FAST component on the 64-bitContent Server. It is recommended that you uninstall the FAST component during migration from32-bit Content Server 6.7 to 64-bit Content Server 6.7. Documentum 7.x uses the xPlore searchengine. The EMC Documentum xPlore Installation Guide provides information about migrating FASTdata to xPlore.
39

Upgrading Content Server
Migrating Custom Plug-ins
Migrate all 32-bit custom plug-ins to the 64-bit architecture. The 64-bit Content Server does notsupport 32-bit custom plug-ins.
Upgrading Content Server on Red Hat Linux 5.xSystems
Red Hat Linux does not support upgrading the operating system from Linux 5.x to 6.x. If you want toupgrade Content Server 6.7 or earlier running on a Red Hat Linux 5.x system to Content Server 7.xthat runs on Red Hat Linux 6.x, you must follow the migration procedure described in Chapter 5,Migrating Content Server.
Upgrading the Content Server SoftwareThe length of time required to upgrade a repository depends on the size of the repository. Allowsufficient time for backing up the repository and performing the upgrade.
To upgrade the Content Server software:1. Back up the repository. Several third-party tools are available that you can use.
2. If the repository contains customized repository formats (dm_format objects), back up thecustomized formats.Repository formats are upgraded by the dm_apply_formats.ebs script, which reads valuesfrom the formats.csv file. If the attributes of a format in the repository do not match theformat descriptions in the formats.csv file, the script overwrites the existing values withthe values in the file.
3. Run the Consistency Checker tool.Consistency Checker is a script that looks for repository inconsistencies, such as users withnonexistent groups, permissions sets with nonexistent users, and sysobjects that point tononexistent content files. Fixing inconsistencies in the repository improves the quality of the datain the repository and results in a smoother upgrade. The syntax is:dmbasic -fconsistency_checker.ebs -eEntry_Point -- repository_namesuperuser password
• repository_name is the name of the repository against which you are running the ConsistencyChecker tool.
• superuser is the username of a repository superuser.
• password is the password for the superuser’s account.
The results of the Consistency Checker tool are directed to standard output.
4. Fix the inconsistencies reported by the Consistency Checker tool as errors.The EMC Documentum Content Server Administration and Configuration Guide provides informationabout the Consistency Checker tool.
40

Upgrading Content Server
5. Upgrade the operating system if necessary.
6. Upgrade the database if necessary.
7. Disable all jobs.• On Windows, disable jobs in all repositories on the host.
• On Linux/Solaris/AIX, disable jobs in all repositories in the installation you are upgrading.
Note: Ensure that you make a note of the arguments and values of the standard jobs especially ofthe LDAPSynchronization job, before the upgrade. After the upgrade, these jobs will have thedefault values and arguments. Hence it is recommended to save the settings before the upgrade.
8. For the upgrade on a Windows host, shut down the repositories and connection brokers.
a. Click Start > Programs > Documentum > Server Manager.
b. Select the correct Content Server and click Stop.
c. Click the Connection Broker tab.
d. Select each connection broker.
e. Click Stop.
9. For the upgrade on a Linux/Solaris/AIX host, shut down the repositories and connection brokers.
a. For each repository, run the dm_shutdown_repository script, where repository is the name ofthe Content Server to be stopped.
b. Stop each connection broker using the dm_stop_docbroker utility.The EMC Documentum Content Server Administration and Configuration Guide provides thesteps for using the dm_stop_docbroker utility.
10. Shut down the application server.• To shut down the application server on Windows, stop the service called Documentum JavaMethod Server. Ensure that the application server does not start automatically after a hostrestart.
• To shut down the Java Method Server service on Linux/Solaris/AIX, run script$DOCUMENTUM_SHARED/<jboss folder>/server/stopMethodServer.sh.
11. Run the Content Server installation program.
a. To launch the 64-bit Content Server Installer:• On Windows, run serverSetup.exe.
• On Linux/Solaris/AIX, run serverSetup.bin.
b. The installer displays a message stating that you are trying to upgrade the older versionand asks if you want to proceed. Click Yes.
c. Accept the license agreement and click Next.
d. Perform one of the following steps:• In the Windows installer, type the installation owner password and click Next.
• In the Linux/Solaris/AIX installer, type the Root User Password and click Next.
e. Review the installation summary and click Install to begin installation.
41

Upgrading Content Server
f. Specify if you want to enter license keys for optional modules of Content Server and clickNext.• Yes: On the next page, select the optional modules you want to install and entercorresponding license keys.
• No: You can always enter license keys for optional modules later using the Content Serverconfiguration program.
g. To launch the Content Server configuration program and configure the repository, selectConfigure now and click Done.
Note: When upgrading, if you select this option or the Configure later option, you will beprompted to select the connection modes (Native, Secure, and Native and Secure) for therepository upgrade.
During the connection broker upgrade, you will not be prompted to select the connectionmodes.
12. Upgrade the connection broker.
a. If you want to manually enable the use of certificates when upgrading the connection broker,follow these steps:
i. Stop the connection broker service.
ii. Modify broker.ini file by adding following properties:• secure_connect_mode
• keystore_file
• keystore_pwd_file
• cipherlist
iii. Modify the dfc.properties file by adding following properties:• dfc.security.ssl.truststore
• dfc.security.ssl.truststore_password
• dfc.security.ssl.use_existing_truststore
iv. Restart the connection broker service.The EMC Documentum Content Server Installation Guide provides more information aboutthe broker.ini and dfc.properties properties and the values you can specify withexamples.
b. In the Documentum Content Server Configuration Program wizard, select Connectionbroker and click Next.
c. In the Windows installer, type the installation owner password and click Next.
d. Select Upgrade a connection broker.
e. Select the connection broker to upgrade from the list, and click Next.
f. Complete the configuration, select Perform additional configuration, and click Next.
13. Upgrade the repository.
a. Click Upgrade an existing repository.
42

Upgrading Content Server
b. Select the repository to upgrade from the list, and click Next.
c. Type the Connection Broker Port and Connection Broker Host and click Next.
d. Select the Connection Mode for the repository and click Next. If you select the Secure orNative and Secure options, select Use certificate on the next page, provide the requireddetails, and then click Next.
e. In the Windows installer, type the SMTP server name and the owner’s email address andclick Next.
f. Select the module you want to activate for the repository and click Next.
g. Specify whether you want to change the xDB superuser password and click Next.
Note: This configuration screen only appears if you are upgrading from pre-7.0 ContentServer to 7.x.
h. Type the repository owner password and the Database administrator name and password,and then click Next.
Note: During the upgrade process, a message might appear stating that the repository is notavailable. Before you click Yes in the message box, ensure that the repository is up andrunning by checking the <Documentum_Home>\dba\log\<repository>.log file.
i. After the upgrade completes, select Finish configuration and click Next.
14. If you upgraded from an installation using FAST full-text indexing, and selected xPlore full-textindexing, restart Content Server again after you complete the Content Server configuration.
15. After you complete the Content Server configuration, create a nonunique index on thedm_sysobject.r_object_id and r_aspect_name properties by using the followingMAKE_INDEX command:EXECUTE make_index WITH type_name='dm_sysobject',attribute='r_aspect_name',use_id_col=true
The inclusion of the use_id_col argument set to true automatically causes Content Server toinclude the r_object_id column in the index.
Note: Before you create the index, verify if it exists already. Check if dm_sysobject has an index onr_aspect_name and r_object_id. If the index does not exist, then create it by using the above DQL.
16. If you are upgrading a repository in a distributed environment that uses a BOCS andasynchronous write jobs, create an index on the dmr_content_s (i_parked_state,r_object_id) properties. Use the following MAKE_INDEX command to do so:EXECUTE make_index WITH type_name='dmr_content',attribute='i_parked_state',use_id_col=true,id_in_front=false
17. After the upgrade is complete: on Windows, delete directory %DOCUMENTUM%\<OLD_JBOSS_HOME> (for example, c:\documentum\jboss4.3.0); On Linux/AIX/Solaris, delete directory$DOCUMENTUM_SHARED/<OLD_JBOSS_HOME>.
18. Enable all the disabled jobs.
a. In Documentum Administrator, navigate to Administrator > Job Management > Jobs.
b. For each of the previously disabled jobs, right-click the job and select Properties.
c. In the Properties window, set the State option to Active.
43

Upgrading Content Server
Note: After the upgrade is complete, the standard jobs will have the default values andarguments. Hence set the values of the jobs again to the custom values and arguments assignedbefore upgrade.
19. On a Windows upgrade, the Startup Type is set to Manual for the Documentum Docbase Servicerepository name service. If you want the repository to automatically start after a server reboot,navigate to Start > All Programs > Administrative Tools > Services, and set the Startup Typeto Automatic.
20. Set the JAVA_HOME and PATH environment variables to the JDK 1.7 directory after youcomplete the upgrade.
21. Optionally, run dm_filestore_unique.class in %DM_HOME%\install\tools($DM_HOME/install/tools in Linux/Solaris/AIX) to create a filestore lock file after upgrade.Processing result (success or failure) can be found in the log file.
22. After upgrade, ensure that you add the backed up list of users to the Admin group. Also, ensurethat you manually update the backed up customized attribute.
Note: If you are upgrading Content Server in a cluster environment and are using a non-defaultdatapath for Content Server, update headstart.ebs to retrieve the correct location object:retrieve,c,dm_location where file_system_path like '%content_storage_01%'
Upgrading Content Server Installed withCluster ServicesUse the following procedure to upgrade Content Server installed with Microsoft Cluster Services.This procedure applies to upgrades on active/passive, active/active, single-repository, andmultirepository configurations.
To upgrade an active/passive, single-repository cluster:1. Shut down the Content Servers on both nodes.
This shuts down the repository.
2. Shut down both hosts.
3. Restart the first node.Do not restart Content Server on the first node.
4. On the first node, upgrade the Content Server software. The Upgrading the Content ServerSoftware, page 40 section provides the steps.
5. Upgrade and configure the repository and connection broker.
6. Open the Services dialog box and verify that the application server was created correctly.If the Documentum Java Method Server is started, it was created correctly.
7. Test the repository to verify that it is functioning correctly.
8. Shut down the repository on the first node.
9. Shut down the first node.
44

Upgrading Content Server
10. Start the second node.
11. Start the connection broker on the second node.
12. Upgrade the Content Server software on the second node. The Upgrading the Content ServerSoftware, page 40 section provides the steps.
13. Start the configuration program and select Custom Configuration.
14. Select Upgrade and the repository to upgrade.
15. When the configuration program reaches the panel on which scripts are run, click Cancel.Do not run the scripts. The application server is created and the repository is upgraded.
16. To start the application server instance that is running the Java Method Server and ACS server,restart the Windows hosts after the upgrade is completed.
Upgrading Content Server in a Distributed orLoad-Balanced ConfigurationUse the following procedure to upgrade the Content Server in a distributed or load-balancedconfiguration.
To upgrade a distributed or load-balanced configuration:Note: On Windows, do not reboot the remote hosts by using Terminal Services. Reboot the remotehosts directly from those hosts.
1. On the primary host, upgrade Content Server, connection brokers, and repository.
2. On each remote host, upgrade Content Server and connection broker, but do not install arepository.
3. Run the cfsConfigurationProgram to Upgrade content-file server.
Note: Make sure that you use the same key file name as the primary host.
4. To create an acs config object in the repository for each of the ACS servers installed witheach remote Content Server (that is, if there are three remote Content Servers, create three acsconfig objects), run one of the following scripts on each remote Content Server host:• Windows: %DM_HOME%\install\admin\dm_acs_install.ebs
• Linux/AIX/Solaris: $DM_HOME/install/admin/dm_acs_install.ebs
The syntax is as followsdmbasic -f dm_acs_install.ebs -e Install -- repository_name user_name passwordacs_name server_config_name Java_method_server_port acs_protocol CleanupCacheAcsObjectCacheAcsDescriptionFile HostName
Table 8, page 46 describes the parameters. The acs config object is created in server configmode and uses the network locations, connection broker projection targets, and stores from theassociated server config object. If you must change the mode to acs config mode, inwhich you manually set network locations, connection broker projection targets, and stores, useDocumentum Administrator to change the mode and create the manual settings.
Note: Do not use the Documentum API or DQL to modify the new acs config object.
45

Upgrading Content Server
Table 8. Parameters required by dm_acs_install.ebs script
Parameter Description and values
acs_name Object name of the acs config object youare creating. This name can be any arbitraryname, but the name must be unique amongthe object names of acs config objectsand the server config objects of boththe primary Content Server and any remoteContent Server.
acs_protocol Communication protocol used by the ACSserver. Valid values are http and https.
CacheAcsDescriptionFile File to store object dump of candidatedm_bocs_config objects. SeeCleanupCacheAcs description.
CleanupCacheAcsObject Set to F.
Note: T was only required when upgradingfrom a previous version from whichupgrading is no longer supported.
HostName Fully-qualified domain name of host. Thisvalue is used to set the acs_url attributeof the dm_acs_config used by the servernamed in dm_server_name.
Java_method_server_port Port where the application server on theremote Content Server host listens, whichwas provided during remote Content Serverinstallation. Do not change this port numberafter the initial configuration.
password Password for the superuser account.
repository_name Name of the repository served by the remoteContent Server and its ACS server, where theacs config object is being created.
server_config_name Object name of the server config object ofthe remote Content Server.
user_name Username of a user with superuser privileges,for example, the installation owner.
5. If the remote Content Servers are installed in a different file-system path from the primaryContent Server, create new site-specific location objects for locations that are new in the upgradedrepository.
a. Using Documentum Administrator, connect to the repository.
b. Create site-specific dm_dba and auth_plugin location objects that contain the locations oneach of the remote sites of $DOCUMENTUM/dba (Linux/AIX/Solaris) or %DOCUMENTUM%\dba(Windows) and the authentication plug-in.
46

Upgrading Content Server
c. In the server config object for the remote Content Server, set the auth_plugin_locationand dba_location to the location objects you created.
6. Start the application server.
Upgrading the BOCS Server
A BOCS server is a caching server. It is a separate, optional product with its own installer. It is notinstalled with Content Server. The EMC Documentum Content Server Distributed Configuration Guideprovides more information about BOCS.
The BOCS server is one component of a distributed configuration. When upgrading the ContentServer in a distributed configuration, you may want to upgrade the BOCS server as well to uselatest features available in BOCS/ACS.
To upgrade the BOCS server:1. Log on as the owner of the existing BOCS installation.
2. Download and extract the compressed distribution file to a temporary location on the BOCSserver host.
3. Stop the current BOCS server and its components.
4. Follow the installation steps provided in the “Installing BOCS” section in the EMC DocumentumContent Server Distributed Configuration Guide.
5. Migrate acs.properties from the previous version’s location to the new location.
Upgrading the DMS Server
In a distributed configuration, the DMS server facilitates the precaching for BOCS server andasynchronous write operations for remote users. The EMC Documentum Content Server DistributedConfiguration Guide provides more information about DMS. You can only upgrade DMS from 7.0 to7.1 because In Documentum 7.0, the DMS installation was integrated with Content Server.
To upgrade the DMS server:1. Ensure that you have Content Server 7.0 and DMS 7.0 installed in your environment.
2. Ensure that the connection broker and the global repository are configured for Content Server 7.0.
3. Upgrade Content Server 7.0 to 7.1. For the steps, see Upgrading the Content Server Software,page 40.
4. Upgrade the connection broker and global repository to 7.1.
5. Upgrade DMS to 7.1.
47

Upgrading Content Server
a. Use the Content Server configuration program to upgrade DMS:• Linux/AIX/Solaris: Run $DM_HOME/install/Server_Configuration_Program.shand select Documentum Messaging Service (DMS).
• Windows: Click Start > All Programs > Documentum > Documentum Server Managerand on the Utilities tab, click Server Configuration, and then select DocumentumMessaging Service (DMS).
b. Complete the upgrade as instructed.During the DMS upgrade, the old DMS installation is deleted from JBOSS 5.1.0 and DMS 7.1 isinstalled in JBOSS 7.1.1.
Post-Upgrade TasksAfter you upgrade Content Server to 7.x, perform the following tasks to improve the overallperformance of Content Server.
Improving Performance after Upgrade
To avoid performance degradation after upgrading to Content Server 7.x, you must configure thevalues of the following two parameters:
• Number of method server threads: The method_server_threads parameter affects the numberof worker threads. Depending on the number of dmbasic jobs, you can tune this value. For alloperating systems, in the server.ini file, set method_server_threads = 3
• Java virtual machine (JVM) heap memory: The java.ini file specifies the options to the JVM,which is used by the dmbasic method server. This includes settings for the minimum andmaximum heap memory for the JVM. Depending on your environment, you can tune this heapmemory in the java.ini file:— For Window, set
JAVA_OPTIONS=" -Xcheck:jni -XX:+RestoreMXCSROnJNICalls -Xms256m -Xmx512m"
Xms specifies the startup heap value and Xmx specifies the maximum heap size for the Javaheap. These values should be set or tuned cautiously to avoid allocating too much or too littleheap memory. Allocating too much heap memory reduces the system’s memory for otherprocesses. Allocating too little causes Java programs to crash with heap errors.
Extending the Oracle Tablespace Size
After you upgrade Content Server from 6.5 SP2 and later to 7.x, you must manually extend the Oracletablespace size based on your requirements. This is because the default Oracle tablespace size, whichis set to 2 GB, might be insufficient and may lead to tablespace-related issues in Documentum 7.x.
48

Upgrading Content Server
Enhancements after Upgrade
The 64-bit Content Server utilizes the underlying hardware and its components for better performanceand scalability. All features are supported and work except those specifically mentioned below.
The Java Method Server runs 64-bit Java, which is bundled with the 64-bit Content Server installer.The dmbasic method server also uses the 64-bit Java Method Server.
Reinstalling D2 Client Libraries
D2 client JARS go missing on Content Server after Content Server is upgraded to 7.x. This occursbecause the Content Server upgrade operation creates a new JBOSS folder, where the existing D2client JARs are not preserved. Therefore, you must reinstall the D2 client JARS after upgrading theContent Server. The EMC Documentum D2 Installation Guide provides the steps for installing D2.
Rebuilding the database views
DQL statements are translated into SQL statements that query the database views. Content Servercreates and maintains these views, which in some rare instances, may get corrupted. In such cases,after completing the upgrade process, you need to rebuild the database views. The views_validattribute indicates the status of the views. It is part of dm_type object, so there is one views_validattribute per Documentum object type. By setting the value of this attribute to false (0), you canforce the Content Server to recreate the views.
1. Shut down the repository.
2. Connect to the database used by the repository through a SQL Editor. Connect as the repositoryowner.
3. Update the views_valid attribute for each corrupted object type using the following command:SQL> UPDATE dm_type_s SET views_valid = 0 WHERE name ='dm_document';
4. If you are not sure which views to rebuild, you can rebuild the views for all the existing objecttypes using the following command:SQL> UPDATE dm_type_s SET views_valid = 0;
5. Commit the changes in the database.
6. Restart the repository.After the views are recreated, the views_valid attribute will be automatically set to true (1).
49

Upgrading Content Server
50

Chapter 4Upgrade Scenarios
This chapter describes some of the supported scenarios for upgrading a previous version of ContentServer to 7.2. Each scenario describes the upgrade path for the Content Server including the base andupgraded versions of the operating system, database, and Content Server, and the steps you needto perform for the upgrade.
Note: Although there can be multiple upgrade scenarios depending on the operating system/databasecombination, it is not possible to document all of those scenarios. This chapter only covers theupgrade of AIX/Oracle from 6.6 to 7.2
However, for a particular operating system/database combination, the upgrade steps do not varymuch across Content Server versions. For example, if you are upgrading Content 6.6 on Linux/Oracleplatform, use the upgrade steps covered in the “Upgrading Content Server 6.7 SP1 to 7.2 —Linux/Oracle” scenario.
This chapter contains the following topics:• Upgrading Content Server 6.5 SP2 to 7.2 — Windows/SQL Server
• Upgrading Content Server 6.5 SP3 to 7.2 — AIX/DB2
• Upgrading Content Server 6.7 to 7.2 — Windows/Oracle
• Upgrading Content Server 6.7 SP1 to 7.2 — Linux/Oracle
• Upgrading Content Server 6.7 SP2 to 7.2 — Solaris/Oracle
• Upgrading Content Server 7.0 to 7.2 — Windows/SQL
• Upgrading Content Server 7.1 to 7.2 — Linux/Oracle
Upgrading Content Server 6.5 SP2 to 7.2 —Windows/SQL ServerThis upgrade scenario provides the instructions for upgrading the 32-bit Content Server 6.5 SP2installed on the Windows 2008 R2 (64-bit) operating system and using SQL Server 2008 SP1 as thedatabase. The upgrade process involves a direct upgrade of the operating system to Windows Server2008 R2 SP1 (64-bit) and the upgrading the database to SQL Server 2012. Finally, the 32-bit ContentServer 6.5 SP2 is upgraded to 64-bit Content Server 7.2.
The following table lists the base and upgraded versions of the Content Server, operating system, anddatabase that are supported in this upgrade scenario.
51

Upgrade Scenarios
Table 9. Base and Upgraded OS/DB/CS Versions
Base Version Upgraded Version
Operating System Windows 2008 R2 (64-bit) Windows Server 2008 R2 SP1(64-bit)
Database SQL Server 2008 SP1 SQL Server 2012 SP1
Content Server 32-bit Content Server 6.5 SP2 64-bit Content Server 7.2
Preupgrade Tasks1. Review the Chapter 3, Upgrading Content Server chapter.
2. If you are installing the xPlore indexing server, review the EMC Documentum xPlore InstallationGuide.
3. Back up the repository.
4. Optionally, you can take a backup of all users that are part of the Admin group. Also, ensure thatyou take the backup of the customized attribute like group_address.
5. If the repository contains customized repository formats (dm_format objects), back up thecustomized formats.
6. Temporarily increase the amount of rollback space available in the RDBMS. The number ofrollback segments should be commensurate with the size of the repository and should be insegments of equal size. For the steps, refer to the database documentation.
7. Ensure that you have sufficient disk space on the computer hosting the database.
8. Run the Consistency Checker tool. The syntax is:dmbasic -fconsistency_checker.ebs -eEntry_Point -- <repository_name><superuser> <password>
9. Fix the inconsistencies reported by the Consistency Checker tool as errors.
10. Ensure that the dm_server_config object is unlocked.
Upgrade Tasks1. Upgrade the Windows operating system to Windows Server 2008 R2 SP1 (64-bit).
2. Apply the SP2 patch to SQL Server 2008 SP1.
3. Upgrade the database to SQL Server 2012 SP1.
4. Update the DSN entry from 32-bit to 64-bit and verify that DSN is pointing to the 64-bit SQLlibraries. The 64-bit ODBC and DSN Libraries, page 38 section provides more information aboutmigrating the ODBC and DSN libraries from versions for 32-bit Content Server to versions forthe 64-bit Content Server.
5. Disable all jobs in all repositories on the host.
a. In Documentum Administrator, navigate to Administrator > Job Management > Jobs.
b. Right-click the job and select Properties.
c. In the Properties window, set the State as Inactive.
6. Shut down the repositories and connection brokers.
52

Upgrade Scenarios
a. Click Start > Programs > Documentum > Server Manager.
b. Select the correct Content Server and click Stop.
c. On the Connection Broker tab, select each connection broker, and then click Stop.
7. To shut down the application server on Windows, stop the service called Documentum JavaMethod Server. Ensure that the application server does not start automatically after a host restart.• Click Start > Control Panel > Administrative Tools > Services, select the Java Method Server,and then click Stop.
8. During the upgrade from 32-bit to 64-bit, Content Server, you cannot upgrade theauthentication plug-ins that you have installed. You need to replace the 32-bitauthentication plug-ins with the 64-bit plug-ins. You can find the plug-ins in the%DM_HOME%\install\external_apps\authplugins folder.
9. Run the Content Server installation program.
a. Run serverSetup.exe (Windows) to launch the 64-bit Content Server Installer.
b. Click Yes when the installer displays a message stating that you are trying to upgrade theolder version and asks if you want to proceed.
c. Accept the license agreement and click Next.
d. Type the installation owner password and click Next.
e. Review the installation summary and click Install to begin installation.
f. Specify if you want to enter license keys for optional modules of Content Server and clickNext.• Yes: On the next page, select the optional modules you want to install and entercorresponding license keys. You can enable extended services such as Trusted ContentServices, Content Services for EMC Centera, Content Storage Services, and so on.
• No: You can always enter license keys for optional modules later using the Content Serverconfiguration program.
g. To launch the Content Server configuration program and configure the repository, selectConfigure now and click Done.
10. Upgrade the connection broker.
a. In the Documentum Content Server Configuration Program wizard, select Connectionbroker and click Next.
b. Type the installation owner password and click Next.
c. Select Upgrade a connection broker.
d. Select the connection broker to upgrade from the list and click Next.
e. Complete the configuration, select Perform additional configuration, and click Next.
11. Upgrade the existing repository.
a. On the configuration program options page, select Repository and then click Next.
b. Select Upgrade an existing repository.
c. Select the repository to upgrade from the list, and click Next.
53

Upgrade Scenarios
d. You can choose if you want to upgrade AEK key or continue with the existing AEK key. Takea backup of the AEK key. For creating new AEK key, refer to EMC Documentum ContentServer 7.2 Installation Guide.By enabling the lockbox option, you can move the existing AEK key or the new AEK keyinto the lockbox. For more infrmation on lockbox, refer to EMC Documentum Content Server7.2 Installation Guide.
e. Type the Connection Broker Port and Connection Broker Host and click Next.
f. Select the Connection Mode for the repository and click Next. If you select the Secure orNative and Secure options, select Use certificate on the next page, provide the requireddetails, and then click Next.
g. Type the SMTP server name and the owner’s email address and click Next.
h. Select the module you want to activate for the repository and click Next.
i. Specify whether you want to change the xDB superuser password and click Next.
j. Type the Repository owner password and the Database administrator name and password,and then click Next.
k. Select Finish configuration and click Next.
12. If you upgraded from an installation using FAST full-text indexing, and selected xPlorefull-text indexing, you must restart Content Server again after you complete the Content Serverconfiguration.
13. After you complete the Content Server configuration, create a nonunique index on thedm_sysobject.r_object_id and r_aspect_name properties by using the followingMAKE_INDEX command:EXECUTE make_index WITH type_name='dm_sysobject', attribute='r_aspect_name',use_id_col=true
The inclusion of the use_id_col argument set to true automatically causes Content Server toinclude the r_object_id column in the index.
14. If you are upgrading a repository in a distributed environment that uses a BOCS andasynchronous write jobs, create an index on the dmr_content_s (i_parked_state,r_object_id) properties. Use the following MAKE_INDEX command to do so:EXECUTE make_index WITH type_name='dmr_content', attribute='i_parked_state',use_id_col=true,id_in_front=false
Post-Upgrade Tasks1. After the upgrade is complete, delete directory %DOCUMENTUM%\<OLD_JBOSS_HOME>.
2. Enable all the disabled jobs.
a. In Documentum Administrator, navigate to Administrator > Job Management > Jobs.
b. For each of the previously disabled jobs, right-click the job and select Properties.
c. In the Properties window, set the State option to Active.
3. On a Windows upgrade, the Startup Type is set toManual for the Documentum Docbase Servicerepository name service. If you want the repository to automatically start after a server reboot,navigate to Start > All Programs > Administrative Tools > Services, and set the Startup Typeto Automatic.
54

Upgrade Scenarios
4. Set the JAVA_HOME and PATH environment variables to the JDK 1.7 directory after you completethe upgrade.
5. Optionally, run dm_filestore_unique.class in %DM_HOME%\install\tools to create afilestore lock file after upgrade. Processing result (success or failure) can be found in the log file.
6. After upgrade, ensure that you add the backed up list of users to the Admin group. Also, ensurethat you manually update the backed up customized attribute.
7. After the upgrade is complete, perform the following checks:
a. Check whether the <Docbroker>.log file in the <Documentum_Home>\dba\log\ foldercontains any warning messages related to DM_DOCBROKER_W_SSL_HANDSHAKE_FAILED.
b. Check whether the <Docbase>.log file in the <Documentum_Home>\dba\log\ foldercontain any exceptions or errors.
c. Check for error messages in the <JBOSS_Home>\server\DctmServer_MethodServer\log\server.log file.
d. To check the Documentum version, in the command prompt, run the following command:documentum -version
e. To check the DFC version, ensure that the JRE bin path is set in the PATH variable, and thenin the command prompt, run the following command:java DfShowVersion
f. You can also check the Documentum version mentioned in the repository and connectionbroker log files.
8. Review the Post-Upgrade Tasks, page 48 section for other post-upgrade tasks that you mightneed to perform.
Upgrading Content Server 6.5 SP3 to 7.2 —AIX/DB2This upgrade scenario provides the instructions for upgrading the 32-bit Content Server 6.5 SP3installed on the IBM AIX 6.1 TL3 operating system and using DB2 9.7 Fix Pack 1 as the database.The upgrade process involves a direct upgrade of the operating system to IBM AIX 7.1 TL3 andupgrading the database to DB2 Enterprise 10.5 Fix Pack 3. Finally, the 32-bit Content Server 6.5SP3 is upgraded to 64-bit Content Server 7.2.
The following table lists the base and upgraded versions of the Content Server, operating system, anddatabase that are supported in this upgrade scenario.
Table 10. Base and Upgraded OS/DB/CS Versions
Base Version Upgraded Version
Operating System IBM AIX 6.1 TL3 IBM AIX 7.1 TL3
Database DB2 9.7 Fix Pack 1 DB2 Enterprise 10.5 Fix Pack 3
Content Server 32-bit Content Server 6.5 SP3 64-bit Content Server 7.2
55

Upgrade Scenarios
Preupgrade Tasks1. Review the Chapter 3, Upgrading Content Server chapter.
2. Before upgrading Content Server on AIX with a DB2 database, create a temporary tablespacewith an 8K page size. To create an 8K temporary tablespace, run the following command:db2 CREATE TEMPORARY TABLESPACE TEMPSPACE2 PAGESIZE = 8192
3. Backup all tables into the new tablespace.
4. Back up the repository.
5. Optionally, you can take a backup of all users that are part of the Admin group. Also, ensure thatyou take the backup of the customized attribute like group_address.
6. If the repository contains customized repository formats (dm_format objects), back up thecustomized formats.
7. Temporarily increase the amount of rollback space available in the RDBMS. The number ofrollback segments should be commensurate with the size of the repository and should be insegments of equal size. For the steps, refer to the database documentation.
8. Ensure that you have sufficient disk space on the computer hosting the database.
9. Run the Consistency Checker tool. The syntax is:dmbasic -fconsistency_checker.ebs -eEntry_Point -- <repository_name><superuser> <password>
10. Fix the inconsistencies reported by the Consistency Checker tool as errors.
11. Ensure that the dm_server_config object is unlocked.
12. Ensure that you perform the tasks mentioned in step 15 in the Upgrade Checklist, page 33.
Upgrade Tasks1. Upgrade the AIX operating system to IBM AIX 7.1 TL3.
2. Upgrade the DB2 database to DB2 Enterprise 10.5 Fix Pack 3.
3. Disable all jobs in all repositories in the installation you are upgrading.
a. In Documentum Administrator, navigate to Administrator > Job Management > Jobs.
b. Right-click the job and select Properties.
c. In the Properties window, set the State as Inactive.
4. Shut down the repositories and connection brokers.
a. For each repository, run the dm_shutdown_repository script, where repository is thename of the Content Server to be stopped.
b. Stop each connection broker using the dm_stop_docbroker utility on the command line:% dm_stop_docbroker [-Ppassword][-B[batch]] [-Nport_number][-Sservice_name]
5. To shut down the application server on AIX, stop the service called Documentum Java MethodServer. Ensure that the application server does not start automatically after a host restart.• Run the script $DOCUMENTUM_SHARED/<JBOSS>/server/stopMethodServer.sh.
6. Run the Content Server installation program.
56

Upgrade Scenarios
a. Run serverSetup.bin to launch the 64-bit Content Server Installer.
b. Click Yes when the installer displays a message stating that you are trying to upgrade theolder version and asks if you want to proceed.
c. Accept the license agreement and click Next.
d. Review the installation summary and click Install to begin installation.
e. Specify if you want to enter license keys for optional modules of Content Server and clickNext.• Yes: On the next page, select the optional modules you want to install and entercorresponding license keys. You can enable extended services such as Trusted ContentServices, Content Services for EMC Centera, Content Storage Services, and so on.
• No: You can always enter license keys for optional modules later using the Content Serverconfiguration program.
f. To launch the Content Server configuration program and configure the repository, selectConfigure now and click Done.
7. Upgrade the connection broker.
a. In the Documentum Content Server Configuration Program wizard, select Connectionbroker and click Next.
b. Type the root password and the dmadmin group for running the $DOCUMENTUM/dba/dm_root_task script.
c. Select Upgrade a connection broker.
d. Select the connection broker to upgrade from the list and click Next.
e. Complete the configuration, select Perform additional configuration, and click Next.
8. Upgrade the existing repository.
a. On the configuration program options page, select Repository and then click Next.
b. Select Upgrade an existing repository.
c. Select the repository to upgrade from the list, and click Next.
d. Type the Connection Broker Port and Connection Broker Host and click Next.
e. Select the Connection Mode for the repository and click Next. If you select the Secure orNative and Secure options, select Use certificate on the next page, provide the requireddetails, and then click Next.
f. Select whether you want to create a global repository. If yes, specify the login name andpassword for the global repository.
g. Select the modules you want to activate for the repository and click Next.
h. Specify whether you want to change the xDB superuser password and click Next.
i. Type the Repository owner password and the Database administrator name and password,and then click Next.
j. Select Finish configuration and click Next.
57

Upgrade Scenarios
9. If you upgraded from an installation using FAST full-text indexing, and selected xPlorefull-text indexing, you must restart Content Server again after you complete the Content Serverconfiguration.
10. After you complete the Content Server configuration, create a nonunique index on thedm_sysobject.r_object_id and r_aspect_name properties by using the followingMAKE_INDEX command:EXECUTE make_index WITH type_name='dm_sysobject', attribute='r_aspect_name',use_id_col=true
The inclusion of the use_id_col argument set to true automatically causes Content Server toinclude the r_object_id column in the index.
11. If you are upgrading a repository in a distributed environment that uses a BOCS andasynchronous write jobs, create an index on the dmr_content_s (i_parked_state,r_object_id) properties. Use the following MAKE_INDEX command to do so:EXECUTE make_index WITH type_name='dmr_content', attribute='i_parked_state',use_id_col=true,id_in_front=false
Post-Upgrade Tasks1. After the upgrade is complete, delete the directory $DOCUMENTUM_SHARED/<OLD_JBOSS
_HOME>.
2. Enable all the disabled jobs.
a. In Documentum Administrator, navigate to Administrator > Job Management > Jobs.
b. For each of the previously disabled jobs, right-click the job and select Properties.
c. In the Properties window, set the State option to Active.
3. Set the JAVA_HOME and PATH environment variables to the JDK 1.7 directory after you completethe upgrade.
4. Optionally, run dm_filestore_unique.class in $DM_HOME/install/tools to create afilestore lock file after upgrade. Processing result (success or failure) can be found in the log file.
5. After upgrade, ensure that you add the backed up list of users to the Admin group. Also, ensurethat you manually update the backed up customized attribute.
6. After the upgrade is complete, perform the following checks:
a. Check whether the <Docbroker>.log file in the <Documentum_Home>/dba/log/ foldercontains any warning messages related to DM_DOCBROKER_W_SSL_HANDSHAKE_FAILED.
b. Check whether the <Docbase>.log file in the <Documentum_Home>/dba/log/ foldercontain any exceptions or errors.
c. Check for error messages in the <JBOSS_Home>/server/DctmServer_MethodServer/log/server.log file.
d. To check the Documentum version, in the command prompt, run the following command:documentum -version
e. To check the DFC version, ensure that the JRE bin path is set in the PATH variable, and then inthe command prompt, run the following command:java DfShowVersion
58

Upgrade Scenarios
f. You can also check the Documentum version mentioned in the repository and connectionbroker log files.
7. Review the Post-Upgrade Tasks, page 48 section for other post-upgrade tasks that you mightneed to perform.
Upgrading Content Server 6.5 SP3 to 7.2 —Windows/SQL ServerThis upgrade scenario provides the instructions for upgrading the 32-bit Content Server 6.5 SP3installed on the Windows 2008 R2 (64-bit) operating system and using SQL Server 2008 SP1 as thedatabase. The upgrade process involves a direct upgrade of the operating system to Windows Server2008 R2 SP1 (64-bit) and the upgrading the database to SQL Server 2012 SP1. Finally, the 32-bitContent Server 6.6 is upgraded to 64-bit Content Server 7.2.
The following table lists the base and upgraded versions of the Content Server, operating system, anddatabase that are supported in this upgrade scenario.
Table 11. Base and Upgraded OS/DB/CS Versions
Base Version Upgraded Version
Operating System Windows 2008 R2 (64-bit) Windows Server 2008 R2 SP1(64-bit)
Database SQL Server 2008 SP1 SQL Server 2012 SP1
Content Server 32-bit Content Server 6.5 SP3 64-bit Content Server 7.2
Preupgrade Tasks1. Review the Chapter 3, Upgrading Content Server chapter.
2. If you are installing the xPlore indexing server, review the EMC Documentum xPlore InstallationGuide.
3. Back up the repository.
4. Optionally, you can take a backup of all users that are part of the Admin group. Also, ensure thatyou take the backup of the customized attribute like group_address.
5. If the repository contains customized repository formats (dm_format objects), back up thecustomized formats.
6. Temporarily increase the amount of rollback space available in the RDBMS. The number ofrollback segments should be commensurate with the size of the repository and should be insegments of equal size. For the steps, refer to the database documentation.
7. Ensure that you have sufficient disk space on the computer hosting the database.
8. Run the Consistency Checker tool. The syntax is:dmbasic -fconsistency_checker.ebs -eEntry_Point -- <repository_name><superuser> <password>
9. Fix the inconsistencies reported by the Consistency Checker tool as errors.
59

Upgrade Scenarios
10. Ensure that the dm_server_config object is unlocked.
Upgrade Tasks1. Upgrade the Windows operating system to Windows Server 2008 R2 SP1 (64-bit).
2. Apply the SP2 patch to SQL Server 2008 SP1.
3. Upgrade the database to SQL Server 2012 SP1.
4. Update the DSN entry from 32-bit to 64-bit and verify that DSN is pointing to the 64-bit SQLlibraries. The 64-bit ODBC and DSN Libraries, page 38 section provides more information aboutmigrating the ODBC and DSN libraries from versions for 32-bit Content Server to versions forthe 64-bit Content Server.
5. Disable all jobs in all repositories on the host.
a. In Documentum Administrator, navigate to Administrator > Job Management > Jobs.
b. Right-click the job and select Properties.
c. In the Properties window, set the State as Inactive.
6. Shut down the repositories and connection brokers.
a. Click Start > Programs > Documentum > Server Manager.
b. Select the correct Content Server and click Stop.
c. On the Connection Broker tab, select each connection broker, and then click Stop.
7. To shut down the application server on Windows, stop the service called Documentum JavaMethod Server. Ensure that the application server does not start automatically after a host restart.• Click Start > Control Panel > Administrative Tools > Services, select the Java Method Server,and then click Stop.
8. During the upgrade from 32-bit to 64-bit, Content Server, you cannot upgrade theauthentication plug-ins that you have installed. You need to replace the 32-bitauthentication plug-ins with the 64-bit plug-ins. You can find the plug-ins in the%DM_HOME%\install\external_apps\authplugins folder.
9. Run the Content Server installation program.
a. Run serverSetup.exe (Windows) to launch the 64-bit Content Server Installer.
b. Click Yes when the installer displays a message stating that you are trying to upgrade theolder version and asks if you want to proceed.
c. Accept the license agreement and click Next.
d. Type the installation owner password and click Next.
e. Review the installation summary and click Install to begin installation.
60

Upgrade Scenarios
f. Specify if you want to enter license keys for optional modules of Content Server and clickNext.• Yes: On the next page, select the optional modules you want to install and entercorresponding license keys. You can enable extended services such as Trusted ContentServices, Content Services for EMC Centera, Content Storage Services, and so on.
• No: You can always enter license keys for optional modules later using the Content Serverconfiguration program.
g. To launch the Content Server configuration program and configure the repository, selectConfigure now and click Done.
10. Upgrade the connection broker.
a. In the Documentum Content Server Configuration Program wizard, select Connectionbroker and click Next.
b. Type the installation owner password and click Next.
c. Select Upgrade a connection broker.
d. Select the connection broker to upgrade from the list and click Next.
e. Complete the configuration, select Perform additional configuration, and click Next.
11. Upgrade the existing repository.
a. On the configuration program options page, select Repository and then click Next.
b. Select Upgrade an existing repository.
c. Select the repository to upgrade from the list, and click Next.
d. You can choose if you want to upgrade AEK key or continue with the existing AEK key. Takea backup of the AEK key. For creating new AEK key, refer to EMC Documentum ContentServer 7.2 Installation Guide.By enabling the lockbox option, you can move the existing AEK key or the new AEK keyinto the lockbox. For more infrmation on lockbox, refer to EMC Documentum Content Server7.2 Installation Guide.
e. Type the Connection Broker Port and Connection Broker Host and click Next.
f. Select the Connection Mode for the repository and click Next. If you select the Secure orNative and Secure options, select Use certificate on the next page, provide the requireddetails, and then click Next.
g. Type the SMTP server name and the owner’s email address and click Next.
h. Select the module you want to activate for the repository and click Next.
i. Specify whether you want to change the xDB superuser password and click Next.
j. Type the Repository owner password and the Database administrator name and password,and then click Next.
k. Select Finish configuration and click Next.
12. If you upgraded from an installation using FAST full-text indexing, and selected xPlorefull-text indexing, you must restart Content Server again after you complete the Content Serverconfiguration.
61

Upgrade Scenarios
13. After you complete the Content Server configuration, create a nonunique index on thedm_sysobject.r_object_id and r_aspect_name properties by using the followingMAKE_INDEX command:EXECUTE make_index WITH type_name='dm_sysobject', attribute='r_aspect_name',use_id_col=true
The inclusion of the use_id_col argument set to true automatically causes Content Server toinclude the r_object_id column in the index.
14. If you are upgrading a repository in a distributed environment that uses a BOCS andasynchronous write jobs, create an index on the dmr_content_s (i_parked_state,r_object_id) properties. Use the following MAKE_INDEX command to do so:EXECUTE make_index WITH type_name='dmr_content', attribute='i_parked_state',use_id_col=true,id_in_front=false
Post-Upgrade Tasks1. After the upgrade is complete, delete directory %DOCUMENTUM%\<OLD_JBOSS_HOME>.
2. Enable all the disabled jobs.
a. In Documentum Administrator, navigate to Administrator > Job Management > Jobs.
b. For each of the previously disabled jobs, right-click the job and select Properties.
c. In the Properties window, set the State option to Active.
3. On a Windows upgrade, the Startup Type is set toManual for the Documentum Docbase Servicerepository name service. If you want the repository to automatically start after a server reboot,navigate to Start > All Programs > Administrative Tools > Services, and set the Startup Typeto Automatic.
4. Set the JAVA_HOME and PATH environment variables to the JDK 1.7 directory after you completethe upgrade.
5. Optionally, run dm_filestore_unique.class in %DM_HOME%\install\tools to create afilestore lock file after upgrade. Processing result (success or failure) can be found in the log file.
6. After upgrade, ensure that you add the backed up list of users to the Admin group. Also, ensurethat you manually update the backed up customized attribute.
7. After the upgrade is complete, perform the following checks:
a. Check whether the <Docbroker>.log file in the <Documentum_Home>\dba\log\ foldercontains any warning messages related to DM_DOCBROKER_W_SSL_HANDSHAKE_FAILED.
b. Check whether the <Docbase>.log file in the <Documentum_Home>\dba\log\ foldercontain any exceptions or errors.
c. Check for error messages in the <JBOSS_Home>\server\DctmServer_MethodServer\log\server.log file.
d. To check the Documentum version, in the command prompt, run the following command:documentum -version
e. To check the DFC version, ensure that the JRE bin path is set in the PATH variable, and thenin the command prompt, run the following command:java DfShowVersion
62

Upgrade Scenarios
f. You can also check the Documentum version mentioned in the repository and connectionbroker log files.
8. Review the Post-Upgrade Tasks, page 48 section for other post-upgrade tasks that you mightneed to perform.
Upgrading Content Server 6.7 to 7.2 —Windows/OracleThis upgrade scenario provides the instructions for upgrading the 64-bit Content Server 6.7 installedon the Windows 2008 R2 (64-bit) operating system and using Oracle 11g (11.2.0.1) as the database.The upgrade process involves a direct upgrade of the operating system to Windows Server 2008R2 SP1 (64-bit) and the upgrading the database to Oracle 12c (12.1.0.2). Finally, the 64-bit ContentServer 6.7 is upgraded to 64-bit Content Server 7.2.
The following table lists the base and upgraded versions of the Content Server, operating system, anddatabase that are supported in this upgrade scenario.
Table 12. Base and Upgraded OS/DB/CS Versions
Base Version Upgraded Version
Operating System Windows 2008 R2 (64-bit) Windows Server 2012 (64-bit)
Database Oracle 11g (11.2.0.1) Oracle 12c (12.1.0.2)
Content Server 64-bit Content Server 6.7 64-bit Content Server 7.2
Preupgrade TasksFollow the steps provided in the Preupgrade Tasks, page 59 section.
Upgrade Tasks1. Upgrade the Windows operating system to Windows Server 2012 (64-bit).
2. Upgrade the Oracle database to Oracle 12c (12.1.0.2).
3. After you upgrade the database, create an ORACLE_HOME environment variable in Windowsthat points to the location of the 64-bit tnsnames.ora file. The entries from the 32-bittnsnames.ora file have to be copied into the 64-bit tnsnames.ora file.
4. Follow steps 5 - 14 in the Upgrade Tasks, page 60 section.
Post-Upgrade TasksFollow the steps provided in the Post-Upgrade Tasks, page 62 section.
63

Upgrade Scenarios
Upgrading Content Server 6.7 SP1 to 7.2 —Linux/OracleThis upgrade scenario provides the instructions for upgrading the 32-bit Content Server 6.7 SP1installed on the Red Hat Enterprise Linux 6.1 (64-bit) operating system and using Oracle 11g (11.2.0.3)as the database. The upgrade process involves a direct upgrade of the operating system to Red HatEnterprise Linux 6.5 (64-bit) and upgrading the database to Oracle 12c (12.1.0.2). Finally, the 32-bitContent Server 6.7 SP1 is upgraded to 64-bit Content Server 7.2.
The following table lists the base and upgraded versions of the Content Server, operating system, anddatabase that are supported in this upgrade scenario.
Table 13. Base and Upgraded OS/DB/CS Versions
Base Version Upgraded Version
Red Hat Enterprise Linux 6.1(64-bit)
Red Hat Enterprise Linux 6.5(64-bit)
Red Hat Enterprise Linux 6.1(64-bit)
Red Hat Enterprise Linux 7.0(64-bit) [2]
Operating System
SUSE Linux Enterprise 11.1(64-bit)
SUSE Linux Enterprise 12(64-bit) [1]
Database Oracle 11g (11.2.0.3) Oracle 12c (12.1.0.2)
Content Server 32-bit Content Server 6.7 SP1 64-bit Content Server 7.2
[1] You cannot perform the upgrade from SUSE Linux Enterprise 11.1 to SUSE Linux Enterprise 12directly. This upgrade process consists of two steps:• Perform the upgrade from SUSE Linux Enterprise 11.1 to SUSE Linux Enterprise 11.3.
• Perform the upgrade from SUSE Linux Enterprise 11.3 to SUSE Linux Enterprise 12.
[2] You cannot perform the upgrade from Red Hat Enterprise Linux 6.1 to Red Hat EnterpriseLinux 7.0 directly. This upgrade process consists of two steps:
• Perform the upgrade from Red Hat Enterprise Linux 6.1 to Red Hat Enterprise Linux 6.5.
• Perform the upgrade from Red Hat Enterprise Linux 6.5 to Red Hat Enterprise Linux 7.0.
Preupgrade Tasks1. Review the Chapter 3, Upgrading Content Server chapter.
2. Back up the repository.
3. Optionally, you can take a backup of all users that are part of the Admin group. Also, ensure thatyou take the backup of the customized attribute like group_address.
4. If the repository contains customized repository formats (dm_format objects), back up thecustomized formats.
64

Upgrade Scenarios
5. Temporarily increase the amount of rollback space available in the RDBMS. The number ofrollback segments should be commensurate with the size of the repository and should be insegments of equal size. For the steps, refer to the database documentation.
6. Ensure that you have sufficient disk space on the computer hosting the database.
7. Run the Consistency Checker tool. The syntax is:dmbasic -fconsistency_checker.ebs -eEntry_Point -- <repository_name><superuser> <password>
8. Fix the inconsistencies reported by the Consistency Checker tool as errors.
9. Ensure that the dm_server_config object is unlocked.
10. Ensure that you perform the tasks mentioned in step 15 in the Upgrade Checklist, page 33.
Upgrade Tasks1. Upgrade the Linux operating system to Red Hat Enterprise Linux 6.5 (64-bit)/ SUSE Enterprise
Linux 12 (64-bit)
2. Upgrade the Oracle database to Oracle 12c (12.1.0.2).
3. Disable all jobs in all repositories in the installation you are upgrading.
a. In Documentum Administrator, navigate to Administrator > Job Management > Jobs.
b. Right-click the job and select Properties.
c. In the Properties window, set the State as Inactive.
4. Shut down the repositories and connection brokers.
a. For each repository, run the dm_shutdown_repository script, where repository is thename of the Content Server to be stopped.
b. Stop each connection broker using the dm_stop_docbroker utility on the command line:% dm_stop_docbroker [-Ppassword][-B[batch]] [-Nport_number][-Sservice_name]
5. To shut down the application server on Linux, stop the service called Documentum Java MethodServer. Ensure that the application server does not start automatically after a host restart.• Run the script $DOCUMENTUM_SHARED/<JBOSS>/server/stopMethodServer.sh.
6. Run the Content Server installation program.
a. Run serverSetup.bin to launch the 64-bit Content Server Installer.
b. Click Yes when the installer displays a message stating that you are trying to upgrade theolder version and asks if you want to proceed.
c. Accept the license agreement and click Next.
d. In the Root User Password box, type the password, and click Next.
e. Review the installation summary and click Install to begin installation.
65

Upgrade Scenarios
f. Specify if you want to enter license keys for optional modules of Content Server and clickNext.• Yes: On the next page, select the optional modules you want to install and entercorresponding license keys. You can enable extended services such as Trusted ContentServices, Content Services for EMC Centera, Content Storage Services, and so on.
• No: You can always enter license keys for optional modules later using the Content Serverconfiguration program.
g. To launch the Content Server configuration program and configure the repository, selectConfigure now and click Done.
7. Upgrade the connection broker.
a. In the Documentum Content Server Configuration Program wizard, select Connectionbroker and click Next.
b. Select Upgrade a connection broker.
c. Select the connection broker to upgrade from the list and click Next.
d. Complete the configuration, select Perform additional configuration, and click Next.
8. Upgrade the existing repository.
a. On the configuration program options page, select Repository and then click Next.
b. Select Upgrade an existing repository.
c. Select the repository to upgrade from the list, and click Next.
d. You can choose if you want to upgrade AEK key or continue with the existing AEK key. Takea backup of the AEK key. For creating new AEK key, refer to EMC Documentum ContentServer 7.2 Installation Guide.By enabling the lockbox option, you can move the existing AEK key or the new AEK keyinto the lockbox. For more infrmation on lockbox, refer to EMC Documentum Content Server7.2 Installation Guide.
e. Type the Connection Broker Port and Connection Broker Host and click Next.
f. Select the Connection Mode for the repository and click Next. If you select the Secure orNative and Secure options, select Use certificate on the next page, provide the requireddetails, and then click Next.
g. Select the modules you want to activate for the repository and click Next.
h. Specify whether you want to change the xDB superuser password and click Next.
i. Type the Repository owner password and the Database administrator name and password,and then click Next.
j. Select Finish configuration and click Next.
9. If you upgraded from an installation using FAST full-text indexing, and selected xPlorefull-text indexing, you must restart Content Server again after you complete the Content Serverconfiguration.
10. After you complete the Content Server configuration, create a nonunique index on thedm_sysobject.r_object_id and r_aspect_name properties by using the followingMAKE_INDEX command:
66

Upgrade Scenarios
EXECUTE make_index WITH type_name='dm_sysobject', attribute='r_aspect_name',use_id_col=true
The inclusion of the use_id_col argument set to true automatically causes Content Server toinclude the r_object_id column in the index.
11. If you are upgrading a repository in a distributed environment that uses a BOCS andasynchronous write jobs, create an index on the dmr_content_s (i_parked_state,r_object_id) properties. Use the following MAKE_INDEX command to do so:EXECUTE make_index WITH type_name='dmr_content', attribute='i_parked_state',use_id_col=true,id_in_front=false
Post-Upgrade Tasks1. After the upgrade is complete, delete the directory $DOCUMENTUM_SHARED/<OLD_JBOSS
_HOME>.
2. Enable all the disabled jobs.
a. In Documentum Administrator, navigate to Administrator > Job Management > Jobs.
b. For each of the previously disabled jobs, right-click the job and select Properties.
c. In the Properties window, set the State option to Active.
3. Set the JAVA_HOME and PATH environment variables to the JDK 1.7 directory after you completethe upgrade.
4. Optionally, run dm_filestore_unique.class in $DM_HOME/install/tools to create afilestore lock file after upgrade. Processing result (success or failure) can be found in the log file.
5. After upgrade, ensure that you add the backed up list of users to the Admin group. Also, ensurethat you manually update the backed up customized attribute.
6. After the upgrade is complete, perform the following checks:
a. Check whether the <Docbroker>.log file in the <Documentum_Home>/dba/log/ foldercontains any warning messages related to DM_DOCBROKER_W_SSL_HANDSHAKE_FAILED.
b. Check whether the <Docbase>.log file in the <Documentum_Home>/dba/log/ foldercontain any exceptions or errors.
c. Check for error messages in the <JBOSS_Home>/server/DctmServer_MethodServer/log/server.log file.
d. To check the Documentum version, in the command prompt, run the following command:documentum -version
e. To check the DFC version, ensure that the JRE bin path is set in the PATH variable, and then inthe command prompt, run the following command:java DfShowVersion
f. You can also check the Documentum version mentioned in the repository and connectionbroker log files.
7. Review the Post-Upgrade Tasks, page 48 section for other post-upgrade tasks that you mightneed to perform.
67
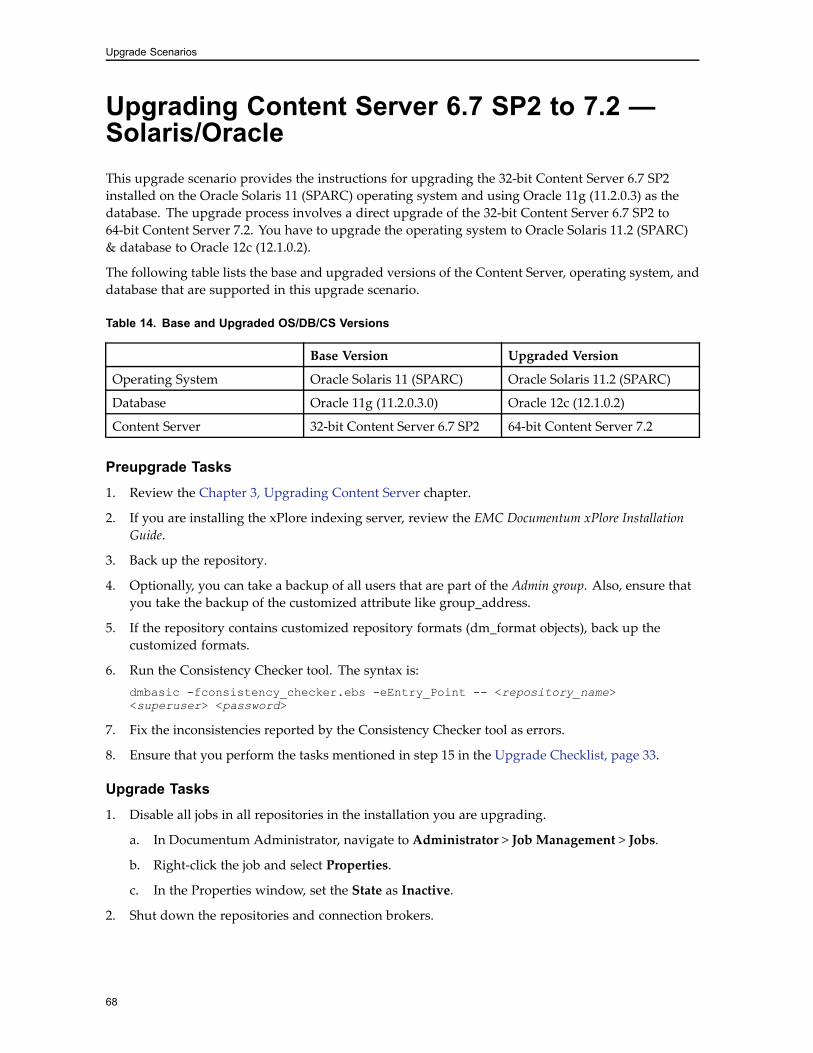
Upgrade Scenarios
Upgrading Content Server 6.7 SP2 to 7.2 —Solaris/OracleThis upgrade scenario provides the instructions for upgrading the 32-bit Content Server 6.7 SP2installed on the Oracle Solaris 11 (SPARC) operating system and using Oracle 11g (11.2.0.3) as thedatabase. The upgrade process involves a direct upgrade of the 32-bit Content Server 6.7 SP2 to64-bit Content Server 7.2. You have to upgrade the operating system to Oracle Solaris 11.2 (SPARC)& database to Oracle 12c (12.1.0.2).
The following table lists the base and upgraded versions of the Content Server, operating system, anddatabase that are supported in this upgrade scenario.
Table 14. Base and Upgraded OS/DB/CS Versions
Base Version Upgraded Version
Operating System Oracle Solaris 11 (SPARC) Oracle Solaris 11.2 (SPARC)
Database Oracle 11g (11.2.0.3.0) Oracle 12c (12.1.0.2)
Content Server 32-bit Content Server 6.7 SP2 64-bit Content Server 7.2
Preupgrade Tasks1. Review the Chapter 3, Upgrading Content Server chapter.
2. If you are installing the xPlore indexing server, review the EMC Documentum xPlore InstallationGuide.
3. Back up the repository.
4. Optionally, you can take a backup of all users that are part of the Admin group. Also, ensure thatyou take the backup of the customized attribute like group_address.
5. If the repository contains customized repository formats (dm_format objects), back up thecustomized formats.
6. Run the Consistency Checker tool. The syntax is:dmbasic -fconsistency_checker.ebs -eEntry_Point -- <repository_name><superuser> <password>
7. Fix the inconsistencies reported by the Consistency Checker tool as errors.
8. Ensure that you perform the tasks mentioned in step 15 in the Upgrade Checklist, page 33.
Upgrade Tasks1. Disable all jobs in all repositories in the installation you are upgrading.
a. In Documentum Administrator, navigate to Administrator > Job Management > Jobs.
b. Right-click the job and select Properties.
c. In the Properties window, set the State as Inactive.
2. Shut down the repositories and connection brokers.
68

Upgrade Scenarios
a. For each repository, run the dm_shutdown_repository script, where repository is thename of the Content Server to be stopped.
b. Stop each connection broker using the dm_stop_docbroker utility on the command line:% dm_stop_docbroker [-Ppassword][-B[batch]] [-Nport_number][-Sservice_name]
3. To shut down the application server on Solaris, stop the service called Documentum Java MethodServer. Ensure that the application server does not start automatically after a host restart.• Run the script $DOCUMENTUM_SHARED/<JBOSS>/server/stopMethodServer.sh.
4. During the upgrade from 32-bit to 64-bit, Content Server, you cannot upgrade theauthentication plug-ins that you have installed. You need to replace the 32-bitauthentication plug-ins with the 64-bit plug-ins. You will find the plug-ins in the%DM_HOME%\install\external_apps\authplugins folder.
5. Run the Content Server installation program.
a. Run serverSetup.bin to launch the 64-bit Content Server Installer.
b. Click Yes when the installer displays a message stating that you are trying to upgrade theolder version and asks if you want to proceed.
c. Accept the license agreement and click Next.
d. Type the installation owner password and click Next.
e. Review the installation summary and click Install to begin installation.
f. Specify if you want to enter license keys for optional modules of Content Server and clickNext.• Yes: On the next page, select the optional modules you want to install and entercorresponding license keys. You can enable extended services such as Trusted ContentServices, Content Services for EMC Centera, Content Storage Services, and so on.
• No: You can always enter license keys for optional modules later using the Content Serverconfiguration program.
g. To launch the Content Server configuration program and configure the repository, selectConfigure now and click Done.
6. Upgrade the connection broker.
a. In the Documentum Content Server Configuration Program wizard, select Connectionbroker and click Next.
b. Select Upgrade a connection broker.
c. Select the connection broker to upgrade from the list and click Next.
d. Complete the configuration, select Perform additional configuration, and click Next.
7. Upgrade the existing repository.
a. On the configuration program options page, select Repository and then click Next.
b. Select Upgrade an existing repository.
c. Select the repository to upgrade from the list, and click Next.
69

Upgrade Scenarios
d. You can choose if you want to upgrade AEK key or continue with the existing AEK key. Takea backup of the AEK key. For creating new AEK key, refer to EMC Documentum ContentServer 7.2 Installation Guide.By enabling the lockbox option, you can move the existing AEK key or the new AEK keyinto the lockbox. For more infrmation on lockbox, refer to EMC Documentum Content Server7.2 Installation Guide.
e. Type the Connection Broker Port and Connection Broker Host and click Next.
f. Select the Connection Mode for the repository and click Next. If you select the Secure orNative and Secure options, select Use certificate on the next page, provide the requireddetails, and then click Next.
g. Specify the XML Store port, the XML Store directory location, the page size, and thenclick Next.
h. Select the modules you want to activate for the repository and click Next.
i. Specify whether you want to change the xDB superuser password and click Next.
j. Type the Repository owner password and the Database administrator name and password,and then click Next.
k. Select Finish configuration and click Next.
8. If you upgraded from an installation using FAST full-text indexing, and selected xPlorefull-text indexing, you must restart Content Server again after you complete the Content Serverconfiguration.
9. After you complete the Content Server configuration, create a nonunique index on thedm_sysobject.r_object_id and r_aspect_name properties by using the followingMAKE_INDEX command:EXECUTE make_index WITH type_name='dm_sysobject', attribute='r_aspect_name',use_id_col=true
The inclusion of the use_id_col argument set to true automatically causes Content Server toinclude the r_object_id column in the index.
10. If you are upgrading a repository in a distributed environment that uses a BOCS andasynchronous write jobs, create an index on the dmr_content_s (i_parked_state,r_object_id) properties. Use the following MAKE_INDEX command to do so:EXECUTE make_index WITH type_name='dmr_content', attribute='i_parked_state',use_id_col=true,id_in_front=false
Post-Upgrade Tasks1. After the upgrade is complete, delete the directory $DOCUMENTUM_SHARED/<OLD_JBOSS_HOM>.
2. Enable all the disabled jobs.
a. In Documentum Administrator, navigate to Administrator > Job Management > Jobs.
b. For each of the previously disabled jobs, right-click the job and select Properties.
c. In the Properties window, set the State option to Active.
3. Set the JAVA_HOME and PATH environment variables to the JDK 1.7 directory after you completethe upgrade.
70

Upgrade Scenarios
4. Optionally, run dm_filestore_unique.class in $DM_HOME/install/tools to create afilestore lock file after upgrade. Processing result (success or failure) can be found in the log file.
5. After upgrade, ensure that you add the backed up list of users to the Admin group. Also, ensurethat you manually update the backed up customized attribute.
6. After the upgrade is complete, perform the following checks:
a. Check whether the <Docbroker>.log file in the <Documentum_Home>/dba/log/ foldercontains any warning messages related to DM_DOCBROKER_W_SSL_HANDSHAKE_FAILED.
b. Check whether the <Docbase>.log file in the <Documentum_Home>/dba/log/ foldercontain any exceptions or errors.
c. Check for error messages in the <JBOSS_Home>/server/DctmServer_MethodServer/log/server.log file.
d. To check the Documentum version, in the command prompt, run the following command:documentum -version
e. To check the DFC version, ensure that the JRE bin path is set in the PATH variable, and then inthe command prompt, run the following command:java DfShowVersion
f. You can also check the Documentum version mentioned in the repository and connectionbroker log files.
7. Run the Federation job.
a. Log in to Documentum Administrator as the repository owner of the governing repository.
b. Set the connection broker to all machines on which the repositories are installed.
c. Add more repositories by providing the machine IP addresses and connection broker ports.
d. To create a Federation, navigate to Configuration > Federations.
e. Click File > New > Federation.
f. Select the governing repository and click Next.
g. Provide the repository owner name and password and then click Next.
h. Provide a name for the Federation and then click Next. Click Next.
i. To add member repositories, click theMembers tab to access the Federation ConfigurationProperties - Members page.
j. To add a member repository, click Add to access the Choose Member Repositories page.
k. Locate the repository that you want to add, select the repository name, then click Addand OK.
l. Type the name and password of a user who has superuser privileges in the new memberrepository and click OK.
m. Click Finish.
n. Set $DM_HOME\bin in your classpath.
o. Restart the machine.
71
Upgrade Scenarios
p. Create a user in the global repository and run the dm_FederationUpdate script.
q. Confirm the successful creation of the Federation by checking if the newly created user hasbeen propagated to the member repositories.
8. Run the Replication job.
a. Ensure that there are two repositories that are running to perform replication.
b. In Documentum Administrator, navigate to File > New > Replication Job.
c. In the New Replication Job window, type a name for the job.
d. Set the Trace Level to 10 and then click Next.
e. On the Schedule tab, click Next.
f. On the From Source tab, provide the administrator credentials, set the source repository,specify the source repository path, and then click Next.
g. On the To Target tab, provide the administrator credentials, set the target repository, specifythe target repository path, and then click Next.
h. On the Replication Options tab, click Next.
i. On the SysObject Info tab, provide the title and subject and then click Finish.
j. Under Jobs, right-click the newly created job and click Run.
k. After the replication job completes, verify that all data has been replicated from source tothe target repository.
9. Run the LDAP sync job.
a. In Documentum Administrator, navigate to Administration > Job Management > Jobs.
b. Search for dm_LDAPSync, select it, and then click Run.
10. Review the Post-Upgrade Tasks, page 48 section for other post-upgrade tasks that you mightneed to perform.
Upgrading Content Server 7.0 to 7.2 —Windows/SQLThis upgrade scenario provides the instructions for upgrading the 64-bit Content Server 7.0 installedon the Windows Server 2008 R2 SP1 (64-bit) operating system and using SQL Server 2012 as thedatabase. The upgrade process involves a direct upgrade of the operating system to Windows Server2012 R2 (64-bit) and the upgrading the database to SQL Server 2012 SP2. Finally, the 64-bit ContentServer 7.0 is upgraded to 64-bit Content Server 7.2.
The following table lists the base and upgraded versions of the Content Server, operating system, anddatabase that are supported in this upgrade scenario.
72

Upgrade Scenarios
Table 15. Base and Upgraded OS/DB/CS Versions
Base Version Upgraded Version
Operating System Windows Server 2008 R2 SP1(64-bit)
Windows Server 2012 R2(64-bit)
Database SQL Server 2012 SQL Server 2012 SP2
Content Server 64-bit Content Server 7.0 64-bit Content Server 7.2
Preupgrade Tasks1. Review the Chapter 3, Upgrading Content Server chapter.
2. Back up the repository.
3. Optionally, you can take a backup of all users that are part of the Admin group. Also, ensure thatyou take the backup of the customized attribute like group_address.
4. If the repository contains customized repository formats (dm_format objects), back up thecustomized formats.
5. Temporarily increase the amount of rollback space available in the RDBMS. The number ofrollback segments should be commensurate with the size of the repository and should be insegments of equal size. For the steps, refer to the database documentation.
6. Ensure that you have sufficient disk space on the computer hosting the database.
7. Run the Consistency Checker tool. The syntax is:dmbasic -fconsistency_checker.ebs -eEntry_Point -- <repository_name><superuser> <password>
8. Fix the inconsistencies reported by the Consistency Checker tool as errors.
9. Ensure that the dm_server_config object is unlocked.
Upgrade Tasks1. Upgrade the Windows operating system to Windows Server 2012 R2 (64-bit).
2. Upgrade the database to SQL Server 2012 SP2.
3. Disable all jobs in all repositories on the host.
a. In Documentum Administrator, navigate to Administrator > Job Management > Jobs.
b. Right-click the job and select Properties.
c. In the Properties window, set the State as Inactive.
4. Shut down the repositories and connection brokers.
a. Click Start > Programs > Documentum > Server Manager.
b. Select the correct Content Server and click Stop.
c. On the Connection Broker tab, select each connection broker, and then click Stop.
73

Upgrade Scenarios
5. To shut down the application server on Windows, stop the service called Documentum JavaMethod Server. Ensure that the application server does not start automatically after a host restart.• Click Start > Control Panel > Administrative Tools > Services, select the Java Method Server,and then click Stop.
6. Run the Content Server installation program.
a. Run serverSetup.exe (Windows) to launch the 64-bit Content Server Installer.
b. Click Yes when the installer displays a message stating that you are trying to upgrade theolder version and asks if you want to proceed.
c. Accept the license agreement and click Next.
d. Type the installation owner password and click Next.
e. Review the installation summary and click Install to begin installation.
f. Specify if you want to enter license keys for optional modules of Content Server and clickNext.• Yes: On the next page, select the optional modules you want to install and entercorresponding license keys. You can enable extended services such as Trusted ContentServices, Content Services for EMC Centera, Content Storage Services, and so on.
• No: You can always enter license keys for optional modules later using the Content Serverconfiguration program.
g. To launch the Content Server configuration program and configure the repository, selectConfigure now and click Done.
7. Upgrade the connection broker.
a. In the Documentum Content Server Configuration Program wizard, select Connectionbroker and click Next.
b. Type the installation owner password and click Next.
c. Select Upgrade a connection broker.
d. Select the connection broker to upgrade from the list and click Next.
e. Complete the configuration, select Perform additional configuration, and click Next.
8. Upgrade the existing repository.
a. On the configuration program options page, select Repository and then click Next.
b. Select Upgrade an existing repository.
c. Select the repository to upgrade from the list, and click Next.
d. You can choose if you want to upgrade AEK key or continue with the existing AEK key. Takea backup of the AEK key. For creating new AEK key, refer to EMC Documentum ContentServer 7.2 Installation Guide.By enabling the lockbox option, you can move the existing AEK key or the new AEK keyinto the lockbox. For more infrmation on lockbox, refer to EMC Documentum Content Server7.2 Installation Guide.
e. Type the Connection Broker Port and Connection Broker Host and click Next.
74

Upgrade Scenarios
f. Select the Connection Mode for the repository and click Next. If you select the Secure orNative and Secure options, select Use certificate on the next page, provide the requireddetails, and then click Next.
g. Type the SMTP server name and the owner’s email address and click Next.
h. Select the module you want to activate for the repository and click Next.
i. Specify whether you want to change the xDB superuser password and click Next.
j. Type the Repository owner password and the Database administrator name and password,and then click Next.
k. Select Finish configuration and click Next.
9. If you upgraded from an installation using FAST full-text indexing, and selected xPlorefull-text indexing, you must restart Content Server again after you complete the Content Serverconfiguration.
10. After you complete the Content Server configuration, create a nonunique index on thedm_sysobject.r_object_id and r_aspect_name properties by using the followingMAKE_INDEX command:EXECUTE make_index WITH type_name='dm_sysobject', attribute='r_aspect_name',use_id_col=true
The inclusion of the use_id_col argument set to true automatically causes Content Server toinclude the r_object_id column in the index.
11. If you are upgrading a repository in a distributed environment that uses a BOCS andasynchronous write jobs, create an index on the dmr_content_s (i_parked_state,r_object_id) properties. Use the following MAKE_INDEX command to do so:EXECUTE make_index WITH type_name='dmr_content', attribute='i_parked_state',use_id_col=true,id_in_front=false
Post-Upgrade TasksFollow the steps provided in the Post-Upgrade Tasks, page 62 section.
Upgrading Content Server 7.1 to 7.2 —Linux/OracleThis upgrade scenario provides the instructions for upgrading the 64-bit Content Server 7.1 installedon the Red Hat Enterprise Linux 6.4 (64-bit) operating system and using Oracle 11g (11.2.0.3.0) asthe database. The upgrade process involves a direct upgrade of the operating system to Red HatEnterprise Linux 6.5 (64-bit) and upgrading the database to Oracle 12c (12.1.0.2). Finally, the 64-bitContent Server 7.1 is upgraded to 64-bit Content Server 7.2.
The following table lists the base and upgraded versions of the Content Server, operating system, anddatabase that are supported in this upgrade scenario.
75

Upgrade Scenarios
Table 16. Base and Upgraded OS/DB/CS Versions
Base Version Upgraded Version
Operating System Red Hat Enterprise Linux 6.4(64-bit)
Red Hat Enterprise Linux 6.5(64-bit)
Red Hat Enterprise Linux 6.4(64-bit)
Red Hat Enterprise Linux 7.0(64-bit) [1]
Database Oracle 11g (11.2.0.3.0) Oracle 12c (12.1.0.2)
Content Server 64-bit Content Server 7.1 64-bit Content Server 7.2
[1] You cannot perform the upgrade from Red Hat Enterprise Linux 6.4 to Red Hat EnterpriseLinux 7.0 directly. This upgrade process consists of two steps:
• Perform the upgrade from Red Hat Enterprise Linux 6.4 to Red Hat Enterprise Linux 6.5.
• Perform the upgrade from Red Hat Enterprise Linux 6.5 to Red Hat Enterprise Linux 7.0.
Preupgrade Tasks1. Review the Chapter 3, Upgrading Content Server chapter.
2. Back up the repository.
3. Optionally, you can take a backup of all users that are part of the Admin group. Also, ensure thatyou take the backup of the customized attribute like group_address.
4. If the repository contains customized repository formats (dm_format objects), back up thecustomized formats.
5. Run the Consistency Checker tool. The syntax is:dmbasic -fconsistency_checker.ebs -eEntry_Point -- <repository_name><superuser> <password>
6. Fix the inconsistencies reported by the Consistency Checker tool as errors.
7. Ensure that the dm_server_config object is unlocked.
8. Ensure that you perform the tasks mentioned in step 15 in the Upgrade Checklist, page 33.
Upgrade TasksFollow the steps 3 through 11 in the Upgrade Tasks, page 65 section.
Post-Upgrade TasksFollow the steps provided in the Post-Upgrade Tasks, page 67 section.
76

Chapter 5Migrating Content Server
Installing a new instance of Content Server 7.x, and migrating data from a previous version on aseparate host, requires a procedure different from an upgrade.
This section addresses any variation from the basic scenario to known issues surrounding theconfiguration of your Documentum 7.x Content Server.
This chapter contains the following topics:• Understanding the Migration Process, page 77
• Migration Checklist, page 79
• Planning a Migration, page 80
• Migration Methods, page 81
• Migrating Data Using SQL Server, page 85
• Migrating Data from Earlier Versions of Content Server, page 90
• Migrating XML Content to the XML Store, page 90
• Using DQL to Migrate Content to an XML Store, page 91
• Migrating Custom Content Server Methods, page 91
• Migrating DocApps and BOF2 Modules, page 91
Understanding the Migration ProcessContent Server migration involves three phases:• Migrating the 32-bit Content Server to the platform running a 64-bit operating system.
• Configuring the Content Server to use the existing repository.
• Upgrading the 32-bit Content Server and repository to 64-bit Content Server 7.x.
To understand the migration process, consider the following scenario as a typical deployment of apre-7.x 32-bit Content Server in your environment.
Host 1 is running a 32-bit operating system on which a 32-bit pre-7.x Content Server is installed.Host 2 is the 64-bit database server running on a 64-bit operating system. In case you have a 32-bitdatabase server, you must upgrade it to 64-bit. The 32-bit database client libraries are installed on
77

Migrating Content Server
Host 1 and are configured to point to the database server on Host 2. The following diagram illustratesthe described environment.
Figure 5. Pre-7.x 32-bit Content Server Environment
You want to upgrade the 32-bit pre-7.x Content Server on 32-bit operating system to 64-bit ContentServer 7.x. Since Content Server 7.x requires a 64-bit operating system to run on and because nodirect upgrade of a 32-bit operating system to its 64-bit version is supported, a migration of therepository is required before you can upgrade.
To migrate the repository, create another system, Host 3, which runs a 64-bit operating system that iscompatible with the Content Server on Host 1. The 32-bit database client libraries are also installed onHost 3 and configured to point to Host 2 . Install the same 32-bit Content Server that is running onHost 1 on Host 3. Perform a migration of the repository filestores and content from Host 1 to Host 3.
After completing all the migration tasks, configure the Content Server to use the existing repository.Upgrade the operating system on Host 3 to the 64-bit supported version for Content Server 7.x, asspecified in the EMC Documentum Environment and System Requirements Guide. Upgrade the databaseon Host 2 to the supported version. Upgrade the database client libraries to the supported 64-bitversion. Finally, upgrade the 32-bit Content Server and repository to 64-bit Content Server 7.x.
The following diagram illustrates the entire migration process.
78

Migrating Content Server
Figure 6. Migration Process
Migration ChecklistPerform the following tasks for migrating Content Server.
Table 17. Migration Checklist
Step Documentation
1. Prepare a plan for your migration. See Planning a Migration, page 80.
2. Back up your repository. Several third-party tools are available forbackup.
3. Clean up your repository. The “Repository maintenance” section in theEMC Documentum Content Server Administrationand Configuration Guide provides moreinformation.
4. Run the Consistency Checker utility. The Upgrading the Content Server Software,page 40 provides the steps.
5. Fix any errors identified by the ConsistencyChecker.
6. Back up your cleaned, consistent repository. Several third-party tools are available forbackup.
79

Migrating Content Server
Step Documentation
7. Ensure that filestore_01 is online. You can check this two ways:
1. Using Documentum Administrator, go tothe Storage node and verify that filestore_01shows as online.
2. Dump the filestore and check the r_statusattribute.
API>retrieve,c,dm_filestore where
name='filestore_01' API>dump,c,l
Valid values are: 0, for on-line; 1, for off-line;2, for read-only.
8. Install the 32-bit pre–7.x Content Server onthe target host.
The EMC Documentum Content Server InstallationGuide provides the installation steps.
9. Migrate the repository. See Migration Methods, page 81.
10. Configure Content Server to use yourexisting repository.
The EMC Documentum Content Server InstallationGuide provides the steps.
11. Upgrade Content Server and repository to7.x.
The Upgrading the Content Server Software,page 40 provides the upgrade steps.
Planning a MigrationBefore you create the repository copy, complete these tasks and note any appropriate values inthe Value column:
Table 18. Premigration Tasks
Task Resource Value
Decide whether to copy thecontent files.
Obtain the repository name. Consult the repositoryadministrator.
repository name: ____________
Obtain the repository ID fromthe server.ini file.
Consult the repositoryadministrator.
repository ID: ____________
Obtain the repository owner’sname and password.
Consult the repositoryadministrator.
repository owner:____________
Create a database instanceseparate from the databaseinstance used by the productionrepository.
Consult the DBA.
80

Migrating Content Server
Obtain connection informationfor the alternative databaseinstance.
Consult the DBA and databasedocumentation
connection: ____________
Identify a target host on whichto create the repository copy.
target host: ____________
Obtain the system oradministrator usernameand password for the database.
Consult the DBA. admin user name:____________
Note the drive on which theproduction repository resides.
drive: ____________
Decide whether to create thecopy on the equivalent drive.
Decide whether to create thecopy on a drive equivalentto the drive on which theproduction repository resides.If the copy is on a differentdrive, there are additional stepsyou must perform.
Migration MethodsWhen migration a repository, you can use the following two methods depending on the type ofenvironment:
• Migrating a repository
• Copying a repository
If the target operating system supports upgrade from source operating system, use the Copying arepository method. For example, Content Server 7.0 on 64-bit Windows Server 2008 R2 to ContentServer 7.1 on 64-bit Windows Server 2012.
If the target operating system does not support upgrade, use theMigrating a repository method.For example, Content Server 6.5 on 32-bit Windows Server 2003 R2 to Content Server 7.1 on 64-bitWindows Server 2012.
In the instructions that follow, the target repository host is called the target host. The source repositoryis called the production repository.
Caution: The instructions that follow assume that the production repository is running on thenetwork while the target host is tested. However, shut down the production repository or take itoff the network while you test the target host. Conflicts and data corruption can result fromhaving two repositories on the network with the same name and repository ID.
81

Migrating Content Server
Method 1: Migrating a RepositoryTo migrate a repository:1. On the target host, install the 64-bit version of the operating system and the 32-bit version of
the database client libraries.
2. Create a new Content Server installation and repository (the repository copy) of the sameversion number as the production repository. The EMC Documentum Content Server InstallationGuide provides the installation steps.
3. Copy $DOCUMENTUM/dba/secure/aek.key and $DOCUMENTUM/data from the productionrepository host to the same locations on the target host.
4. Create a new connection broker on the target host using the Content Server ConfigurationProgram. From $DM_HOME/install, double-click Server_Configuration_Program.exeto run the Content Server Configuration Program.
5. Configure the repository.• When you create the new repository, ensure that you use the same repository name, repositoryID, and repository owner name and password as the production repository.
• Ensure that you use the same database instance used by the production repository. In theinstaller, ensure that you select the option to use an existing database user account.
• If you are using LDAP for user authentication, copy the ldap*.cnt files from the originalhost to the repository copy host. In addition, copy the LDAP certificate database to therepository copy host.
6. Copy the $DOCUMENTUM/dba/config/<docbase-name>/dbpasswd.txt file fromproduction repository host to the same location on the target host after providing the XMLStore details.
7. Ensure that the repository configuration completes successfully.
8. Retrieve all the dm_jms_config objects from the repository copy and verify that the base_uriattribute and projection_targets attribute are set correctly.
a. Start IDQL and connect to the repository as the installation owner.
b. Run the following command to get a list of all dm_jms_config objects:select * from dm_jms_config
c. Run the following command to change each projection target:update dm_jms_config objects set projection_targets[x]='new_target'where r_object_id='object_id'
d. Run the following command to change each base URI:update dm_jms_config objects set base_uri[x]='new_base_uri'where r_object_id='object_id'
9. If you are testing the migration of a Web content management repository, modify the user objectsto reflect the new authentication domain.
a. Start IDQL and connect to the repository as the installation owner.
b. Run the following commands:update dm_user objects
82

Migrating Content Server
set user_os_domain =’new_machine_name’ where user_os_domain =’old_machine_name’
c. Disconnect from the repository and exit IDQL.
10. If Content Server and content files of the copy reside on a drive different from the drive usedby the production repository, use IDQL to update the file_system_path attribute of thedm_location and dm_mount_point objects to the new location:update dm_location objects
set file_system_path='newpath' where file_system_path='old path'
update dm_mount_point objects
set file_system_path='newpath' where file_system_path='old path'
11. Restart Content Server.
Method 2: Copying a RepositoryTo copy a repository:1. Shut down the production repository.
2. On the target host, create a new Content Server installation and repository (the repository copy)of the same version number as the production repository. The EMC Documentum Content ServerInstallation Guide provides the installation steps.• When you create the repository copy, ensure that you use the same repository name,repository ID, and repository owner name and password as the production repository.
• Ensure that you use a different database instance from the instance used by the productionrepository and that you provide the correct connection information when you install.
For example, under Oracle the tnsnames.ora on the host where the repository copy residesmust point to the Oracle instance used by the copy, not the instance used by the productionrepository.
• Ensure that the repository copy projects to a connection broker different from the connectionbroker used by the production repository.
• Copy the $DOCUMENTUM/dba/secure/aek.key and $DOCUMENTUM/dba/secure/dbpasswd.txt files from the original host to the same location on the repository copy host.
• If you are using LDAP for user authentication, copy the ldap*.cnt files from the originalhost to the repository copy host.
3. Apply to the repository copy any patches you applied to the production repository.
4. Connect to the database instance serving the production repository.
5. Use the database vendor’s tools to export all objects owned by the repository owner and exportthe schema for the tables comprising the repository.Contact the database vendor for any technical support you would need to use the database tools.
6. On the production repository host’s file system, create a backup of the $DOCUMENTUM/data/repository_name directory. This is the directory containing the repository’s content files.
7. Stop the repository copy.
83

Migrating Content Server
8. Connect as the database system administrator to the database instance that is serving therepository copy. For example, on Oracle, connect as the System account.
9. Destroy the existing tablespaces or database by using the dm_DeleteTableSpace.sql script in$DOCUMENTUM/dba/config/repository_name/.The scripts are database-specific. Run the script using the tools provided by the database vendor.
10. Delete the physical database file from the file system.The name and location of the physical file are in the dm_CreateTableSpace.sql script.
11. Create new tablespaces or databases for the repository copy by using the dm_CreateTableSpace.sql script in $DOCUMENTUM/dba/config/repository_name/.The scripts are database-specific. Run the script by using the tools provided by the databasevendor.
12. Import the database export taken from the production repository into the newly createdtablespaces or database.
13. Verify that the database tables have the correct value for the test system host name by checkingthe following values:• r_host_name and web_server_loc in dm_server_config_s
• host_name in dm_mount_point_s
• target_server in dm_job_s
• projection_targets in dm_server_config_r
• object_name from dm_sysobject_s where r_object_type =’dm_acs_config’
• acs_base_url in dm_acs_config_r
14. Connect to the database that is serving the repository copy as the repository owner .
15. If any of the values in Step 13 are incorrect, use SQL Server to correct the values.
16. Set the server to rebuild the Documentum views with this SQL Server statement:update dm_type_s set views_valid=0
17. If you are testing operations that require the content files, copy the content file backup from theproduction repository to the file system of the repository copy.
18. Navigate to the DOCUMENTUM/dba/config/repository_name directory and open theserver.ini file in a text editor.
19. Ensure that the preserve_existing_types key in the SERVER_STARTUP section is set to TRUE:preserve_existing_types=T
20. Ensure that the crypto configuration parameters are set in the SERVER_STARTUP section.
• For the repository created on pre 7.0 version, add the following settings to server.ini file:
#RKM configuration parameterscrypto_mode = 3DES_RSA1024_SHA256crypto_keystore = Local
84

Migrating Content Server
• For the repository created in 7.0 or 7.x versions, the settings present in server.ini file onthe source machine must be copied to server.ini file of target machine.
21. Save the server.ini file.
22. Start Content Server for the repository copy.
23. Retrieve all the dm_jms_config objects from the repository copy and verify that the base_uriattribute and projection_targets attribute are set correctly.
a. Start IDQL and connect to the repository as the installation owner.
b. Run the following command to get a list of all dm_jms_config objects:select * from dm_jms_config
c. Run the following command to change each projection target:update dm_jms_config objects set projection_targets[x]='new_target'where r_object_id='object_id'
d. Run the following command to change each base URI:update dm_jms_config objects set base_uri[x]='new_base_uri'where r_object_id='object_id'
e. Restart Content Server for the changes to take effect.
24. If you are testing the migration of a Web content management repository, modify the user objectsto reflect the new authentication domain.
a. Start IDQL and connect to the repository as the installation owner.
b. Run the following commands:update dm_user objectsset user_os_domain =’new_machine_name’where user_os_domain =’old_machine_name’
c. Disconnect from the repository and exit IDQL.
25. If Content Server and content files of the copy reside on a drive different from the drive used bythe production repository, use IDQL to update the file_system_path attribute of the dm_locationand dm_mount_point objects to the new location:update dm_location objectsset file_system_path='newpath' where file_system_path='old path'update dm_mount_point objectsset file_system_path='newpath' where file_system_path='old path'
26. Deactivate all jobs by changing the is_inactive attribute on all job objects to TRUE.
Migrating Data Using SQL ServerWhen migrating data using SQL Server 2008, you can use SQL Server Management Studio to importdata or to export data from a source database table to a destination table.
When migrating data using SQL Server 2005, you can use SQL Server Management Studio to importdata or to export data from a source database table to a destination table. If you use this mechanismfor importing or exporting data, you may find that the identity columns of the destination tables do
85

Migrating Content Server
not contain the same identity values as the source tables. This is a known issue with the SQL ServerImport and Export Wizard, For more information, refer to the Microsoft support article.
To resolve this issue, follow these steps:
1. In the Column Mappings dialog box, select the Enable identity insert option.
2. UnderMappings, select a source table.
3. Select Create destination table and then click Edit SQL.
4. In the Create Table SQL Statement dialog box, replace the CREATE TABLE SQL statement witha SQL statement that includes an IDENTITY clause as shown in the following example:
CREATE TABLE [dbo].[stud]([roll] [smallint] IDENTITY(1,1) NOT NULL,[name] [nvarchar](50) NULL,
CONSTRAINT [PK_stud] PRIMARY KEY CLUSTERED(
[roll] ASC)WITH (PAD_INDEX = OFF, STATISTICS_NORECOMPUTE = OFF, IGNORE_DUP_KEY = OFF,ALLOW_ROW_LOCKS = ON, ALLOW_PAGE_LOCKS = ON) ON [PRIMARY]) ON [PRIMARY]
Note: Assuming that dbo is the schema name.
5. Click OK and then click OK.
6. Proceed with the remaining steps in the SQL Server Import and Export Wizard.
7. You may need to update the query optimization statistics and recreate indexes to improve thedatabase performance by using the following SQL statements:Exec sp_MSForEachTable 'Update Statistics? WITH FULLSCAN'
EXEC sp_MSforeachtable @command1="print '?' DBCC DBREINDEX ('?')"
For more information on updating statistics, refer to this Microsoft article, UPDATE STATISTICS(Transact-SQL). For more information about recreating indexes, refer to the Microsoft article,DBCC DBREINDEX (Transact-SQL) or About the Missing Indexes Feature.
Note: If you are using Windows Server 2008 R2 and see database performance issues, check thePower Options settings in the Control Panel. The default power plan setting of Balanced is notrecommended for SQL Server because of performance issues. Instead, set the power plan optionto High performance. For more information, refer to the Microsoft article, Degraded overallperformance on Windows Server 2008 R2.
Consolidating RepositoriesIn this release, you can perform the consolidation of repositories for the same versions of the ContentServer. Ensure that the version of Content Server is 7.2 with AEK key residing in the RSA lockbox.
In addition, ensure that the source and target machines have separate database instances of SQLServer. In this release, the consolidation of repositories has been tested for theWindows SQL Serveronly.
To consolidate repositories, you must configure the Content Server on both the source and targetmachines. On both the machines, you have to set non-default and unique values for repository
86

Migrating Content Server
name and repository ID. In addition, set different and unique names for the AEK key and lockbox,other than the default values.
For example, on the source machine, set the path for the Documentum folder asC:/DocumentumSource, repository name as repo1, and repository ID as 12345.
Once the configuration of the Content Server is complete, perform the following steps to consolidatethe repositories on both the machines:
1. To migrate the SQL Server backup to the target machine, take the backup of the SQL Serverdatabase from SQL Server Management Studio and copy it to the target machine.
2. Copy the backup database file from the source to the target machine. Navigate to the SQL servermanagement studio application of the target machine. Right click database-restore database andselect the location from where you have copied the backup file.
3. Create new tablespaces or databases for the repository copy by using the dm_CreateTableSpace.sql script in $DocumentumSource/dba/config/<repository_name>. Thescripts are database-specific. Run the script by using the tools provided by the database vendor.
4. Ensure that you note down the following environment variables that are set in the sourcemachine in a .bat file on the target machine.ClassPath
dfcpath
DM_HOME
DOCUMENTUM
JAVA_HOME
path
Once you create the .bat file on the target machine, ensure that you update the values of theenvironment variables as per the folders in the target host.
5. Copy the Documentum folder from the source host to the target host.
For example, copy the C:\DocumentumSource folder on the source host to theC:\DocumentumTarget folder on the target host.
6. On the target host, change the name of the docbroker.ini.
For example, change the name of docbroker.ini to docbrokermig.ini.
7. On the target host, change the name of the connection broker in the dm_documentum_config.txt file.
For example, if you want to change the name of the connection broker to Docbroker_Mig, makethe following change in the dm_documentum_config.txt file:[DOCBROKER_DocbrokerMig]
NAME=DocbrokerMig
8. In the dfc.properties file, make the following changes:
• Change the port of the connection broker from the default value to 1889.
• Change the value of dfc.data.dir and dfc.tokenstorage.dir to the updated folderpaths.
• Change the host name of the connection broker to the host name of the target machine.
87

Migrating Content Server
9. In the server.ini file, make the following changes:
• Update the path of the dbpasswd.txt file.
• Change the port of the connection broker from the default value to 1889.
• Change the value of the user_auth_target variable to the host name of the target machine.
• Change the value of the [DOCBROKER_PROJECTION_TARGET] host variable to the hostname of the target.
10. Add the names of the connection broker and the repository in C:\Windows\System32\drivers\etc\services along with the modified port and the name of the connection broker.
For example, if you have set the name of the connection broker as DocbrokerMig, then makechanges as follows:
DocbrokerMig 1889/tcp #docbroker
DocbrokerMig_s 1890/tcp #docbroker for secure connect
dm_reponame 49625/tcp
dm_ reponame _s 49626/tcp #Documentum Docbase Servicerepo256aes
11. Modify the default value of the port from 908X to any other value so that there is no port conflict.Make this modification in the following files:
• %DOCUMENTUM%\jboss7.1.1\server\DctmServer_MethodServer\configuration\standalone.xml
• %DOCUMENTUM%\jboss7.1.1\server\DctmServer_MethodServer\configuration\dctm.properties
• %DOCUMENTUM%\jboss7.1.1\server\DctmServer_MethodServer\configuration\standalone_xml_history\standalone.boot.xml
• %DOCUMENTUM%\jboss7.1.1\server\DctmServer_MethodServer\configuration\standalone_xml_history\standalone.initial.xml
• %DOCUMENTUM%\jboss7.1.1\server\DctmServer_MethodServer\configuration\standalone_xml_history\standalone.last.xml
• %DOCUMENTUM%\jboss7.1.1\server\DctmServer_MethodServer\deployments\acs.ear\lib\configs.jar\jmx.properties
• %DOCUMENTUM%\jboss7.1.1\server\startMethodServer.cmd
• %DOCUMENTUM%\jboss7.1.1\server\stopMethodServer.cmd
12. Update the folder names and paths in the following files:
• %DOCUMENTUM%\jboss7.1.1\server\serviceConfig\MethodServer\conf\wrapper.conf
• %DOCUMENTUM%\jboss7.1.1\server\DctmServer_MethodServer\deployments\ServerApps.ear\DmMethods.war\WEB-INF\web.xml
• %DOCUMENTUM%\jboss7.1.1\server\DctmServer_MethodServer\deployments\acs.ear\lib\configs.jar\dfc.properties
• %DOCUMENTUM%\jboss7.1.1\server\DctmServer_MethodServer\deployments\acs.ear\lib\configs.jar\log4j.properties
88

Migrating Content Server
• %DOCUMENTUM%\jboss7.1.1\server\DctmServer_MethodServer\deployments\XhiveConnector.ear\APP-INF\classes\dfc.properties
• %DOCUMENTUM%\jboss7.1.1\server\DctmServer_MethodServer\deployments\XhiveConnector.ear\APP-INF\classes\log4j.properties
• %DOCUMENTUM%\jboss7.1.1\server\DctmServer_MethodServer\deployments\ServerApps.ear\APP-INF\classes\dfc.properties
• %DOCUMENTUM%\jboss7.1.1\server\DctmServer_MethodServer\deployments\ServerApps.ear\APP-INF\classes\log4j.properties
• %DOCUMENTUM%\jboss7.1.1\bin\dctmServerStatus.bat
13. Update the folder name, port, and host name in the following files:
• %DOCUMENTUM%\jboss7.1.1\server\serviceConfig\MethodServer\conf\DmMethodServer.xml
• %DOCUMENTUM%\jboss7.1.1\server\DctmServer_MethodServer\deployments\acs.ear\lib\configs.jar\config\acs.properties
• %DOCUMENTUM%\jboss7.1.1\server\DctmServer_MethodServer\deployments\acs.ear\lib\configs.jar\config\acsfull.properties
• %DOCUMENTUM%\product\7.2\bin\xdb.properties
• %DOCUMENTUM%\xhive_storage\XhiveDatabase.bootstrap
• %DOCUMENTUM%\jboss7.1.1\server\DctmServer_MethodServer\deployments\XhiveConnector.ear\XhiveConnector.war\WEB-INF\web.xml
14. Update the following values in the database tables in the target host:
• dm_server_config_s in r_host_name
• dm_server_config_r in app_server_uri
• dm_acs_config_r in acs_base_url
• dm_jms_config_s in base_url
• dm_user_s in user_os_domain
• dm_user_s in user_login_domain
• dm_user_s in user_global_unique_id
• dm_mount_point_s in host_name
• dm_job_s in target_server
Note: Update the value of any job that has old hostname, method, or parameters.
• dm_client_rights_s in host_name
• dm_client_registration_s in host_name
• dm_extern_store_r in a_storage_param_value
• dmr_content_s in set_client
• dm_sysobject_s in r_lock_machine
• dm_audittrail_s in host_name
89

Migrating Content Server
• dm_sysprocess_config_r in base_uri
• dm_sysprocess_config_r in projection_targets
• dm_location_s in file_system_path
• dm_mount_point_s in file_system_path
• dmr_content_s in set_file
• dm_method_s in method_verb
• dm_audittrail_s in attribute_list
• dm_audittrail_s in string_2
• dm_sysobject_s in subject
• dm_type_s in views_valid
15. To start the connection broker, the repository, and the Java Method Server, perform the followingstep in the same command prompt where you executed the .bat file:start %DM_HOME%\bin\dmdocbroker.exe -init_file %DOCUMENTUM%\dba\Docbroker1.ini-logfile %DOCUMENTUM%\dba\log\Docbroker1.Docbroker.log -port 1889
start %DM_HOME%\bin\documentum.exe -docbase_name <repository_name> -securityacl -init_file %DOCUMENTUM%\dba\config\<repository_name>\server.ini -install_owner Administrator -logfile %DOCUMENTUM%\dba\log\<repository_name>.log
16. If you have enabled the repository with the lockbox option, then it may not come up after themigration. To facilitate the repository with the lockbox enabled, run the following command:dm_crypto_boot -keyname <AEK_key_name> -lockbox <lockbox_name>.lb -lockboxpassphrase
<lockbox_passphrase> -passphrase <AEK_passphrase>
To verify, run the following command:dm_crypto_create -check -keyname <AEK_key_name> -lockbox
<lockbox_name>.lb -lockboxpassphrase <lockbox_passphrase>-passphrase <AEK_passphrase>
If you have used the custom paraphrase, then run the following command:dm_crypto_boot -passphrase <AEK_passphrase> -all
Migrating Data from Earlier Versions of ContentServerThere are no special requirements or considerations when migrating data from earlier versions ofContent Server to 64-bit Content Server. Follow the standard procedures for your migration utility(for example, Crown Partners, Bluefish, FME).
Migrating XML Content to the XML StoreThe EMC Documentum XML Store 6.5 SP1 Migration Guide provides information on migrating theXML content to the XML store in Content Server.
90

Migrating Content Server
Note: Before migrating the XML content to an XML store, Content Server must be upgraded andmigrated to Documentum 6.5 or later.
Using DQL to Migrate Content to an XML StoreYou can migrate XML files from an existing Documentum file store to an XML Store, between XMLStores, and out of an XML Store using an update DQL query. To migrate,• Run DQL Query as UPDATE dm_sysobject OBJECTS set a_storage_type = ’xhive_store_01’ wherea_storage_type = ’filestore_01’ and a_content_type = ’xml’
Note: This procedure migrates only the current version of the object.
Migrating Custom Content Server MethodsAfter upgrading Content Server, run the Configurator tool to configure the internal Java MethodServer service. The Configurator tool writes the location of the Java methods to the internal methodserver. The location of the methods directory is written to the web.xml file in the method serverdeployment directory, for example, C:\Documentum\<JBOSS_HOME>\server\DctmServer_MethodServer\deploy\ServerApps.ear\DmMethods.war\WEB-INF:<init-param><param-name>methodlocation-1</param-name><param-value>C:\Documentum\dba\java_methods</param-value>
</init-param>
Your custom Content Server methods located in %DOCUMENTUM%\dba\java_methods (Windows)or $DOCUMENTUM/dba/java_methods (Linux/AIX/Solaris) continue to work. If you are migratingto a new Content Server installation, copy the methods from this directory to the same folder locationin the new Content Server installation.
Migrating DocApps and BOF2 ModulesBOF 2 modules and DocApps do not need to be changed when you upgrade Content Server toDocumentum 6.0 or later. If you want to change a DocApp or module on an upgraded Documentum6.0 or later Content Server, create a project in Composer and add your BOF2 modules or DocApp.The EMC Documentum Composer 6.7 User Guide provides more information about working withmodules and Documentum Archive (DAR) files.
Note: EMC recommends that you use DARs instead of DocApps whenever possible.
Use the Composer project migration utility to migrate a DocApp or a DocApp archive to a DAR file:New > Project > Documentum Project > Documentum Project from Repository DocApp. Composergenerates a DAR file that can be installed in a new instance of Content Server or edited in place inan upgraded Content Server instance. The "Migrating DocApps" chapter in the EMC DocumentumComposer 6.7 User Guide provides more information.
91

Migrating Content Server
If you want your DFC 5.3 SP6 clients to use upgraded BOF2 modules , perform the following tasks:1. Compile them for a Java 1.4.x target <javac target=1.4> to make them compatible with older
virtual machines.
2. Compile them against DFC 5.3 SP6 rather than DFC 6.0 or later to ensure that they do notaccidentally reference new interfaces.
To migrate custom Business Objects in an environment of 5.3 SP6 clients that access Content Server6.0 or later, do the following:• SBO
Install your 5.3 SP6 DocApps in the 5.3 SP6 global registry. Do not upgrade this global registry.
• Module or TBO
Make sure that your code works with DFC 5.3 SP6. It must compile with JDK 1.4.2 and must notuse any classes or methods that are new in DFC 6.0 or later.
Post-Migration TasksComplete all migration-related tasks described in this chapter. Review and complete the tasksdescribed in the following chapters, if necessary:• Chapter 6, Migrating DFC Customizations
• Chapter 7, Migrating DFS Customizations
• Chapter 8, Migrating CMIS Customizations
• Appendix A, Migrating DMCL APIs to DFC
After completing the migration of the repository, you need to upgrade the repository and ContentServer to 7.x. The Upgrading the Content Server Software, page 40 provides the steps for upgradingContent Server.
92

Chapter 6Migrating DFC Customizations
The Documentum Java-Com Bridge (DJCB) and Primary Interop Assembly (PIA) are deprecatedfrom version 6.
The following topics describe how to migrate DFC customizations to version 6.5 SP2 or later:• Java Class Changes, page 93
• Configuring DFC for Native IPv4 Operations, page 94
• Configuring 6.7 Clients to Work with Content Server 7.x, page 94
• Migrating Customizations to Business Objects, page 94
• Migrating DMCL API Calls to DFC API Calls, page 95
• Search Service, page 95
• Full Format Specifications No Longer Accepted, page 95
• Character String Handling Improved, page 95
• Aspects, a New BOF Module Type for Developers, page 96
• JMX Management of DfPreferences and dfc.properties, page 96
• DFC Deployment, page 96
• Configuration for AAC Tokens, page 97
• Setting the Maximum Number of Results Per Source, page 97
• DFC Does Not Support Linked Store Storage Areas , page 97
• External Storage, page 97
• DFC Does Not Support Optical Storage Devices, page 98
Java Class ChangesNew classes, methods, and class members, as well as changed or deprecated methods and members,are documented in diff files available on EMC Online Support with the current migration guide.There are diff sets comparing DFC classes of versions 5.3 SP6 to 6.0 and 6.0 SPx to 6.5 SP2 and later.
93

Migrating DFC Customizations
Configuring DFC for Native IPv4 OperationsSince: version 6.5
To configure DFC installed on a dual-stack machine for native IPv4 operation, perform the following:• Specify a host with an IPv4 address in the dfc.properties file as the value of
dfc.docbroker.host.
• Disable the dual-stack operation for JVM.
A custom property setting in the JVM determines the communications protocol used by theoperating system. By default, this custom property java.net.preferIPv4Stack is set toFalse to support dual-stack communications. To configure a host for native IPv4, set thisproperty to True.
Configuring 6.7 Clients to Work with ContentServer 7.xIf you install the version of 6.7 SP2 for the clients such as TaskSpace to work with a fresh ContentServer 7.x, you must perform the following steps to update the dm_bof_registry user password sinceContent Server 7.x uses a different encryption algorithm (FIPS/SHA1) than that used by earlierversions of Content Server (MD5):1. Decrypt the dm_bof_registry user password using the decrypt API of the RegistryPasswordUtils
class in DFC 7.x to get the plain text password.
2. Encrypt the plain text password using the encrypt API of the RegistryPasswordUtils class inDFC 6.7SP2 on the client.
3. Place the encrypted password in dfc.properties on the client.
Migrating Customizations to Business ObjectsSince: version 6
The Business Object Framework (BOF) provides a framework for your customizations that can beaccessed from various client applications and service-based architecture. The following kinds of DFCcustomizations should be migrated to Business Objects:• Core custom action execution logic
• Process automation, for example, creating renditions during checkin, creating workflows aftercheckin
• Custom data handlers
• Helper methods in utility classes, for example, attaching or detaching a lifecycle, promoting ordemoting a document
• Business validation, for example, permitting an export operation
94

Migrating DFC Customizations
Examples of BOF classes
Updating Attributes of an Object Based on its Location — Generally, you organize documentsin a meaningful folder hierarchy. You can also set one or more attributes on an object based on thelocation in which it is imported or created. The BOF module contains a TBO that sets the attributeafter the operation, based on the parent folder.
Attaching a Lifecycle During a Checkin Operation — An SBO can be used to perform an operationafter checkin, such as attaching a lifecycle. Other possible operations include promoting a workflowor creating a rendition.
Migrating DMCL API Calls to DFC API CallsSince: version 6
The C++ DMCL API has been replaced with the Java-based DFC API. These core changes, whilesignificant, are largely transparent to the DFC user. C++ applications that interact directly with theDMCL continue to work as a copy of DMCL continues to be provided. New Documentum 6 featuresare not available through DMCL, however.
The Appendix A, Migrating DMCL APIs to DFC section provides a map of DMCL APIs to DFC APIs.
Search ServiceThe DFC search service replaces prior mechanisms for building and running queries. You can use theIDfQuery interface, which is not part of the search service, for simple queries.
The search service provides the ability to run searches across multiple Documentum repositoriesand external repositories as well. The Javadocs for the com.documentum.fc.client.search packagedescribe how to use this capability.
Full Format Specifications No Longer AcceptedSince: version 6
DFC methods such as setFile that previously accepted a full format specification no longer do so.Those methods accept only a format name, such as txt or word, for the format argument.
Character String Handling ImprovedSince: version 6
In previous releases, if you attempted to set a character string property with a value that exceededthe defined length of the property, DFC silently truncated the value to the maximum length of the
95

Migrating DFC Customizations
property, then set the property. For Documentum 6, DFC throws an exception instead of truncatingthe value and setting the property.
To use the pre-Documentum 6 behavior, set the dfc.compatibility.truncate_long_valuesproperty in the dfc.properties file to T. This property is False by default.
Aspects, a New BOF Module Type forDevelopersSince: version 6
Documentum 6 supports aspects, a new framework for extending object behavior and attributes.Aspects are a type of BOF entity that can be dynamically attached to object instances in order toprovide fields and methods beyond the standard ones for the object type. The extended behaviorcan include functionality that applies to types across the object hierarchy. For example, an aspectcould label objects as retainable or web-viewable, and this single aspect could be applied to multipledistinct object types.
Aspects can speed development and improve code reuse, because the extended attributes andbehavior do not alter the underlying type definitions. You can create aspects and associate themwith an individual object or an object type. If you associate them with an object type, the aspect isautomatically associated with each new object of the specified object type. Aspects can also haveproperties defined for them. Properties defined for an aspect appear to users as if they are definedfor the object type of the object to which the aspect is attached.
JMX Management of DfPreferences anddfc.propertiesIn J2EE DFC-based applications, JMX agent, and Managed Bean (MBean) components manage activesettings in DfPreferences and persistent settings in dfc.properties. The settings are displayedin Documentum Administrator, which separates active settings (in DfPreferences) from persistentsettings (in dfc.properties).
DFC DeploymentDFC is deployed with each application or product that requires it, using a standard J2EE deploymentstrategy. In the J2EE deployment process, the dfc.jar file and related files are packaged in aproduct’s WAR file so that each DFC instance can have its own DFC configuration.
96

Migrating DFC Customizations
Configuration for AAC TokensIf you are using AAC tokens configured to be valid only when sent from applications on particularhost machines, set the dfc.machine.id key in the dfc.properties file used by those clientapplications. Set the key to the machine ID of the host from which the AAC token is sent.
Setting the Maximum Number of Results PerSourceAdministrators can enhance performance by adjusting the maximum number of results returned persource as the result of a query. The default value is 350. The maximum number of results to retrieveis set in the dfc.properties file using the parameter dfc.search.max_results_per_sourceas follows:dfc.search.max_results_per_source=number_of_results
For example:dfc.search.max_results_per_source=350
DFC Does Not Support Linked Store StorageAreasSince version 6.5, DFC does not support linked store storage areas. As a consequence, the followingitems are deprecated:• The dm_linkedstore object type, which represents linked store storage areas
• The dmi_linkrecord object type, which records the links between a linked storage area and filestores
• The CLEAN_LINKS administration method, which removes orphaned link records, if needed
External StorageIf you are using an external storage area and the plug-in is configured to execute on the clienthost, reconfigure the plug-in to execute on the server. In 6.5 and later versions, DFC does notsupport executing the plug-in on the client. To configure the plug-in to execute on the server, set thea_exec_mode property of the storage object to F (false). The storage object is one of dm_extern_file,dm_extern_free, or dm_extern_url, depending on the type of external storage you are using.
97

Migrating DFC Customizations
DFC Does Not Support Optical Storage DevicesDFC does not support optical storage devices with version 6.5.
98

Chapter 7Migrating DFS Customizations
This chapter covers operations you must perform when migrating DFS customizations to DFS 7.x.It also includes functionality and compatibility changes that you must consider after migratingto DFS 7.x.
This chapter covers the following topics:• Upgrading the DFS .NET Productivity Layer, page 99
• Restoring Trusted Certificates after Upgrading UCF, page 101
• Trusted Login is Disabled By Default, page 102
• Cookie Consistency Check, page 102
• .NET Framework Update, page 102
Upgrading the DFS .NET Productivity LayerThe following table provides you with an overview of the supported upgrade paths and thecorresponding configurations needed for the upgrade.
Table 19. DFS .NET Productivity Layer Upgrade Matrix
New VersionOriginal Version
6.6 Pn 6.7 SPy Pn 7.0 Pn 7.1 Pn
6.6 Pm B A, D A, C, D A, C, D
6.7 SPx Pm B A, C, D A, C, D
7.0 Pm B A, C, D
7.1 Pm B
SP = Service Pack; SPx, SPy = Service Pack 1, Service Pack 2, and so on, (x < y)
P = Patch; Pm, Pn = Patch 1, Patch 2, and so on, (m < n)
Option A: recompile – recompile the DFS-based application.
Option B: xcopy – replace old versions with new ones without recompile.
Option C: publisher policy – install new versions to global assembly cache (GAC) and make bothversions coexist.
99

Migrating DFS Customizations
Option D: application/machine configuration – configure the application configuration file or machineconfiguration file to redirect assemblies. The Microsoft article, Redirecting Assembly Versionsprovides more information.
Detailed information is covered in the following topics:• Upgrading from a Version Earlier Than 7.x, page 100
• Upgrading from a Pre–7.x Minor Version or Service Pack, page 101
The Microsoft article, Deploying Assemblies provides more information about .NET deployment.
Upgrading from a Version Earlier Than 7.x
To upgrade from a version earlier than 7.x, you install the DFS 7.x productivity layer assemblies tothe GAC. You can upgrade from these versions:• 6.5 SP2
• 6.6
• 6.7 (or later minor version or SP)
To upgrade:1. Deploy the new DFS 7.x productivity layer assemblies in one of the following ways:
• If a working directory does not exist, then install it to the GAC.
Note: Administrator privileges are required to perform GAC operations.
• If a working directory does exist, then use the xcopy command to copy it to the workingdirectory.
2. Deploy the publisher policy assemblies as follows:
a. Choose the publisher policy assembly from the DFS SDK with appropriate version.For example, if you are upgrading from 6.6 to 7.x, choose the assemblyPolicy.6.6.Emc.Documentum.FS.XXX.DLL from the SDK in the emc-dfs-sdk-7.x\lib\dotnet\PublisherPolicy directory.
b. Install the publisher policy assembly to the GAC.The Microsoft article, Installing an Assembly into the Global Assembly Cache provides moreinformation about installing assemblies to the GAC.
Once you have installed the assemblies to the GAC, they are shared by all of the applications on themachine. If you have multiple DFS-based applications on the same machine and you do not want toupgrade DFS for some of them, you can bypass the publisher policy assemblies in those applicationsby modifying the application configuration file. The Microsoft article, Redirecting Assembly Versionsprovides more information about bypassing the publisher policy assemblies.
To uninstall the upgraded assemblies from the GAC, you simply delete the assemblies from the GAC.The Microsoft article, Removing an Assembly from the Global Assembly Cache provides informationabout deleting assemblies from the GAC.
100

Migrating DFS Customizations
Upgrading from a Pre–7.x Minor Version or ServicePack
To upgrade, use the xcopy command to replace your existing DFS .NET productivity layer assembliesin your DFS application’s working directory with the new DFS SDK assemblies.
Restoring Trusted Certificates after UpgradingUCFIn DFS 7.x, UCF expects that JRE 7 is installed on the client. If JRE 7 is not found on the client, UCFautomatically upgrades JRE to version 7. In some SSL environments, the UCF client may haveimported some trusted certificates to the UCF JRE’s cacerts store before the upgrading. Thesetrusted certificates will be lost during the JRE upgrading. Therefore, you have to import the trustedcertificates into the cacerts store of the upgraded JRE. To do this, perform the following steps:
1. Encrypt the trust/key store password:
a. Navigate to the following directory:Profile}\Documentum\ucf\${HOSTNAME}\shared\bin\7.x.0000.<minor_version>
b. Run following command in the console:java -cp ".\ucf-client-api.jar;.\ucf-client-impl.jar"com.documentum.ucf.common.util.spi.BaseCipher <trust/key store password>
You will see the output that resembles the following:cipher.name: ${cypher.name} cipher.secret.key:${cipher.secret.key} cipher.secret.key.algorithm:${cipher.secret.key.algorithm} Encrypted password(e.g. https.truststore.password): ${https.keystore/truststore.password}Password encoding (e.g. https.truststore.password.encoding):{https.keystore/truststore.password.encoding}
2. Configure the UCF client:
a. Locate and open the following configuration file:${User Profile}\Documentum\ucf\${HOSTNAME}\shared\config\ucf.client.config.xml
b. Add following options, and then save the file.<configuration name="com.documentum.ucf">.... <option name="https.keystore.file">
<value>${https.truststore.file}</value></option> <option name="https.keystore.password">
<value>{https.keystore/truststore.password}</value></option> <option name="https.keystore.password.encoding">
<value>{https.keystore/truststore.password.encoding}</value></option> <option name="cipher.name">
<value>${cypher.name}</value></option> <option name="cipher.secret.key">
101

Migrating DFS Customizations
<value>${cipher.secret.key}</value></option> <option name="cipher.secret.key.algorithm">
<value>${cipher.secret.key.algorithm}</value></option> <option name="https.truststore.file">
<value>${https.truststore.file}</value></option> <option name="https.truststore.password">
<value>{https.keystore/truststore.password}</value></option> <option name="https.truststore.password.encoding">
<value>{https.keystore/truststore.password.encoding}</value></option> </configuration>
</configurations>
Trusted Login is Disabled By DefaultDFS 7.x enhances the trusted login mechanism for DFS server so that it is disabled by default.Because of this change, users who do not provide the correct password cannot access DFS servicesin default settings. DFS server enables trusted login only if you explicitly enable it by setting thedfc.session.allow_trusted_login property to true in the dfc.properties file.
Cookie Consistency CheckPreviously, the DFS client enforced the check of cookie consistency. In DFS 7.x, the DFS serverenforces check of cookie consistency.
.NET Framework UpdateIn previous releases, UCF .NET depends on the availability of .NET Framework 3.5 SP1 on the clientmachine on which the UCF assembly files are downloaded. Starting from DFS 7.x, the client machinemust have .NET Framework 4.0 installed to support the .NET UCF integration.
102

Chapter 8Migrating CMIS Customizations
This chapter covers operations you must perform and some functionality and compatibility changesthat you must note after migrating to CMIS 7.x.
This chapter covers the following topic:• getFolderParent Returns Feed, page 103
getFolderParent Returns FeedThe return type of the getFolderParent method is changed to Feed.
Previously, the getFolderParent method returned entries. To unify the returns ofgetFolderParent and getOjectParents, the getFolderParent method now returnsfeeds. As a result of this change, you have to modify your code for the applications that use thegetFolderParent method.
103

Migrating CMIS Customizations
104

Chapter 9Migration Scenarios
This chapter describes some of the supported scenarios for migrating and upgrading a previousversion of Content Server to 7.2.
Note: Although there can be multiple migration scenarios depending on the operatingsystem/database combination, it is not possible to document all of those scenarios. This chapter onlycovers some of those scenarios that were tested. However, for a particular operating system/databasecombination, the migration steps do not vary much across Content Server versions.
This chapter contains the following topics:• Migrating Content Server 6.5 SP2 to 7.2 — Windows/SQL Server, page 105
Migrating Content Server 6.5 SP2 to 7.2 —Windows/SQL ServerThis migration scenario provides the step-by-step instructions for migrating and upgrading the32-bit Content Server 6.5 SP2 installed on the Windows 2008 SP2 (32-bit) operating system andusing SQL Server 2008 SP2 (64-bit) as the database with SQL Server 2008 SP2 (32-bit) client. Themigration process involves:1. Installing 32-bit Content Server 6.5 SP2 on a target host running Windows 2008 SP2 (64-bit)
operating system.
2. Migrating the repository from the source host to the target host.
3. Upgrading the operating system on the target host to Windows Server 2012 (64-bit).
4. Upgrading the database to SQL Server 2012 SP1.
5. Upgrading the Content Server to 7.1.
The following table lists the base and upgraded versions of the Content Server, operating system, anddatabase that are supported in this migration scenario.
Table 20. Base and Upgraded OS/DB/CS Versions
Base Version Upgraded Version
Operating System Windows Server 2008 SP2(32-bit)
Windows Server 2012 (64-bit)
105

Migration Scenarios
Database SQL Server 2008 SP2 (64-bit)with 32-bit client libraries
SQL Server 2012 SP1
Content Server 32-bit Content Server 6.6 64-bit Content Server 7.2
Premigration Tasks1. Back up the repository. If the repository contains customized repository formats (dm_format
objects), back up the customized formats.
2. Clean up the repository.
3. Run the Consistency Checker tool. The syntax is:dmbasic -fconsistency_checker.ebs -eEntry_Point -- <repository_name><superuser> <password>
4. Fix the inconsistencies reported by the Consistency Checker tool as errors.
5. Back up your cleaned, consistent repository.
6. Ensure that filestore_01 is online using any one of the following methods:• Using Documentum Administrator, go to the Storage node and verify that filestore_01 showsas online.
• Dump the filestore and check the r_status attribute:API>retrieve,c,dm_filestore where name='filestore_01' API>dump,c,l
Migration Tasks1. On the target host, install Windows 2008 SP2 (64-bit) operating system and the 32-bit SQL Server
2008 SP1 database client libraries.
2. Install the 32-bit Content Server 6.6. The EMC Documentum Content Server 6.6 Installation Guideprovides the instructions for installed Content Server.
3. Copy %DOCUMENTUM%\dba\secure\aek.key and %DOCUMENTUM%\data from the productionrepository host to the same locations on the target host.
4. Create a new connection broker on the target host using the Content Server ConfigurationProgram.
a. From %DM_HOME%\install, run Server_Configuration_Program.exe
b. Type the password for the installation owner and click Next.
c. Select Custom configuration and click Next.
d. When you configure a repository, optionally select the check box to enable databasepartitioning. By default, database partitioning is disabled.
e. Select the option to configure both connection broker and repository and click Next.
f. Choose Create a new connection broker and click Next.
g. Type a connection broker name (default: Docbroker) and the port number on which theconnection broker listens, or accept the defaults. The default port is 1489. If you are using thedefault port number, ensure that the next port number (1490) is available for use becausethe connection broker requires that two ports be reserved.
106

Migration Scenarios
h. Click Automatic to have the connection broker automatically start when the host starts, orclick Manual for manual startup.
i. Select the mode in which the connection broker connects to the repository and click Next.
j. To continue with the server configuration, select the Continue with server configurationcheck box and click Next.
k. Select Create a repository and click Next.
5. Configure the repository.
a. Select Create a new repository and click Next.
b. To enable Content Storage Services, select the check box, type the license key, and click Next.
c. To enable Retention Policy Services, select the check box, type the license key, and click Next.
d. To enable Federated Records Services, select the check box, type the license key, and clickNext.
e. To enable Records Manager, select the check box, type the license, and click Next.
f. To enable Physical Records Manager, select the check box, type the license, and click Next.
g. Click Next to accept the default data directory location or browse for a different location.
h. Click Next to accept the default share directory location or type a new location.
i. Click Next to accept the default fully qualified domain name.
j. To enable data partitioning, select the check box and click Next.
k. When you provide the repository information, ensure that you use the same repository name,repository ID, and repository owner name and password as the production repository.
l. Select the authentication domain. If you are using LDAP for user authentication, copy theldap*.cnt files from the original host to the repository copy host. In addition, copy theLDAP certificate database to the repository copy host.
m. Specify whether Content server starts automatically or manually and click Next.
n. Select the option to use an existing database user account and storage, and click Next. Youmust you the same database instance used by the production repository.
o. On SQL Server, select an ODBC data source.
p. Type the username for an existing DB user, the DB user’s password, the DB administratorusername and password, and then click Next.
q. Choose the correct index tablespace or datafile name and click Next.
r. Accept or modify the Content Server initialization values and click Next.
s. Configure the data files or data devices.
t. Provide the SMTP server information.
u. Decide whether to designate the current repository as a global registry.
v. Accept or modify the repository configuration scripts and click Next.
w. Choose whether to restart Content Server to enable SSL client connections.
107

Migration Scenarios
x. Specify the port that the XML Store should use and the directory where the XML Storeshould be created.
y. Click Finish.
6. Copy the %DOCUMENTUM%\dba\config\<docbase-name>\dbpasswd.txt file fromproduction repository host to the same location on the target host after providing the XMLStore details.
7. Ensure that the repository configuration completes successfully.
8. Retrieve all the dm_jms_config objects from the repository copy and verify that the base_uriattribute and projection_targets attribute are set correctly.
a. Start IDQL and connect to the repository as the installation owner.
b. Run the following command to get a list of all dm_jms_config objects:select * from dm_jms_config
c. Run the following command to change each projection target:update dm_jms_config objects set projection_targets[x]='new_target'where r_object_id='object_id'
d. Run the following command to change each base URI:update dm_jms_config objects set base_uri[x]='new_base_uri'where r_object_id='object_id'
9. If you are testing the migration of a Web content management repository, modify the user objectsto reflect the new authentication domain.
a. Start IDQL and connect to the repository as the installation owner.
b. Run the following commands:update dm_user objects
set user_os_domain =’new_machine_name’ where user_os_domain =’old_machine_name’
c. Disconnect from the repository and exit IDQL.
10. If Content Server and content files of the copy reside on a drive different from the drive usedby the production repository, use IDQL to update the file_system_path attribute of thedm_location and dm_mount_point objects to the new location:update dm_location objects
set file_system_path='newpath' where file_system_path='old path'
update dm_mount_point objects
set file_system_path='newpath' where file_system_path='old path'
11. Review the Chapter 5, Migrating Content Server and complete the remaining migration-relatedtasks.
12. Restart Content Server.
108

Migration Scenarios
Post-Migration TasksIf you want to move the 3DES AEK key to lockbox, then perform the following steps:
1. Run Server_Configuration_Program.exe. Select Upgrade an existing repository. ClickNext.
2. Select Keep AEK key unchanged. Click Next.
3. Select Enable Lockbox. Specify the Lockbox file name and Lockbox passphrase. Click Next.
4. Complete the configuration of the repository.
5. Review the Post-Migration Tasks, page 92 section and complete the remaining migration-relatedtasks.
If you want to upgrade the 3DES AEK algorithm to AES 128/192/256 algorithm and use lockbox, thenperform the following steps:
1. Run Server_Configuration_Program.exe. Select Upgrade an existing repository. ClickNext.
2. Select Upgrade AEK key. Click Next.
3. Select Create new or update existing AEK key.
4. Select AEK algorithm as per your choice. Specify the information for AEK key name, AEKpassphrase, Lockbox file name, and Lockbox passphrase. Select Enable Lockbox.
5. Complete the configuration of the repository.
6. Review the Post-Migration Tasks, page 92 section and complete the remaining migration-relatedtasks.
Preupgrade TasksFollow the steps provided in the Preupgrade Tasks, page 59 section.
Upgrade Tasks1. Upgrade the operating system to Windows Server 2012 (64-bit).
2. Upgrade the database to SQL Server 2012 SP1.
3. Follow the steps 4 through 27 in the Upgrade Tasks, page 60 section.
Post-Upgrade TasksFollow the steps provided in the Post-Upgrade Tasks, page 62 section.
109

Migration Scenarios
110

Appendix A
Migrating DMCL APIs to DFC
This chapter provides information that can help you migrate a DMCL-based application to a DFCapplication. Refer to the EMC Documentum Foundation Classes Release Notes for any known limitationsor exceptions to the material in this appendix.
OverviewThere are essentially three languages used to access the platform: Java, DocBasic, and C++.
If you are using Java for your customizations, they continue to work in Documentum 6.5 or later.There have been no changes to the methods or interfaces of existing classes.
In previous releases, DocBasic applications accessed the DMCL via dmcl40.dll (on Windows). InDocumentum 6.5 or later, DocBasic applications automatically access the new dmcl.dll, whichpasses instructions back and forth to DFC via an emulator.
C++ accesses DMCL through dynamic links. The applications continue to work, but they areworking with, in essence, the 6.0 version of DMCL (with some bug fixes). C++ applications using thedmcl40.dll do not have access to methods or interfaces introduced in version 6.5.
Methods with no corresponding DFC methodThe following methods are not implemented in DFC 6.5 and later:• Listmessage
• Lpq
• Reset
• Unprint
111

Migrating DMCL APIs to DFC
Methods with corresponding DFC methodsTable 21, page 112 lists the DMCL API methods and the corresponding DFC methods. The listing isintended to help you migrate a DMCL-based application to DFC. It is not intended as a completelisting of all DFC methods.
Table 21. DMCL API methods and corresponding DFC methods
DFC correspondenceDMCL API method
Interface Method name
Abort, for transactions IDfSession
IDfSessionManager
abortTrans
abortTransaction
Abort, for work flow IDfWorkflow abort
Acquire IDfWorkItem acquire
Addigsignature IDfSysObject addDigitalSignature
Addesignature IDfSysObject addESignature
Addactivity IDfProcess addActivity
Addlink IDfProcess addLink
Addnote IDfSysObject
IDfPackage
addNote
appendNote
Addpackage IDfWorkflow
IDfWorkitem
addPackage
addPackageEx
Addpackageinfo IDfActivity addPackageInfo, addPackageInfoEx
Addport IDfActivity addPort
Addrendition IDfSysObject addRendition, addRenditionEx,addRenditionEx2, addRenditionEx3,
Addroutecase IDfActivity addRouteCase, addConditionRouteCase
Anyevents IDfSession hasEvents
Append IDfTypedObject appendBoolean, appendInt,appendDouble, appendId, appendString,appendTime, appendValue
Appendcontent IDfSysObject appendContent, appendContentEx
Appendfile IDfSysObject appendFile
Appendpart IDfSysObject appendPart
Appendstate IDfPolicy appendState
Apply IDfSession, IDfQuery apply, in IDfSession
execute, in IDfQuery
Archive IDfSession archive
112

Migrating DMCL APIs to DFC
Assemble IDfSysObject assemble
Assume IDfSession assume
Attach IDfSysObject attachPolicy, detachPolicy
Audit IDfAuditTrailManager registerEventForType,registerEventForObject, registerEvents,register EventsFromQuery,registerEventsInFolder
Authenticate IDfClient
IDfSession
IDfSessionManager
authenticate
Begintran IDfSession
IDfSessionManager
beginTrans
beginTransaction
Bindfile IDfSysObject bindFile
Branch IDfSysObject branch
Cachequery IDfQuery execute
Changepassword IDfSession changePassword
Checkin IDfSysObject checkin
Checkinapp IDfSysObject checkinEx
Checkout IDfSysObject checkout, checkoutEx
Close IDfCollection close
Commit IDfSession
IDfSessionManager
commitTrans
commitTransaction
Complete IDfWorkitem complete, completeEx, completeEx2
Connect IDfSessionManager
IDfClient
newSession
Count IDfTypedObject getAttrCount
Create IDfSession newObject, newObjectWithType
Createaudit IDfAuditTrailManager createAudit
Datatype IDfTypedObject getAttrDataType
Delegate IDfWorkitem delegateTask
Demote IDfSysObject demote, scheduleDemote,cancelScheduleDemote
Dequeue IDfSession dequeue
Dereference IDfReplica
IDfMirror
dereferenceReplica
dereferenceMirror
113
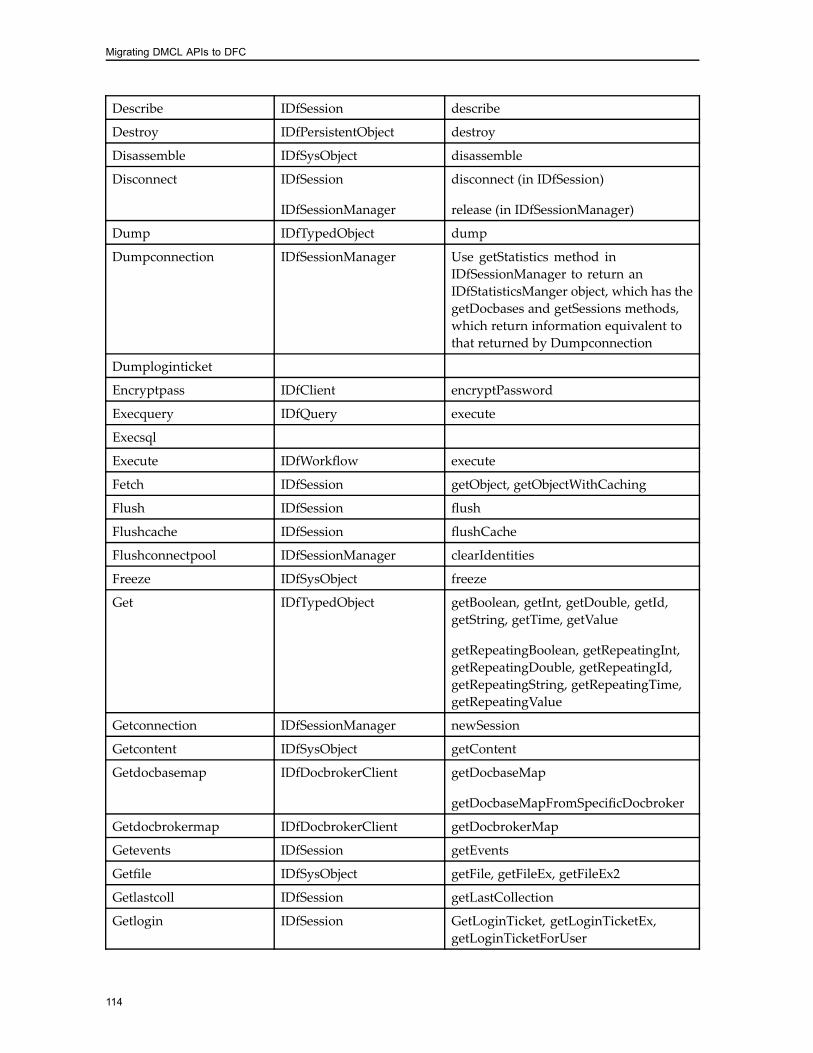
Migrating DMCL APIs to DFC
Describe IDfSession describe
Destroy IDfPersistentObject destroy
Disassemble IDfSysObject disassemble
Disconnect IDfSession
IDfSessionManager
disconnect (in IDfSession)
release (in IDfSessionManager)
Dump IDfTypedObject dump
Dumpconnection IDfSessionManager Use getStatistics method inIDfSessionManager to return anIDfStatisticsManger object, which has thegetDocbases and getSessions methods,which return information equivalent tothat returned by Dumpconnection
Dumploginticket
Encryptpass IDfClient encryptPassword
Execquery IDfQuery execute
Execsql
Execute IDfWorkflow execute
Fetch IDfSession getObject, getObjectWithCaching
Flush IDfSession flush
Flushcache IDfSession flushCache
Flushconnectpool IDfSessionManager clearIdentities
Freeze IDfSysObject freeze
Get IDfTypedObject getBoolean, getInt, getDouble, getId,getString, getTime, getValue
getRepeatingBoolean, getRepeatingInt,getRepeatingDouble, getRepeatingId,getRepeatingString, getRepeatingTime,getRepeatingValue
Getconnection IDfSessionManager newSession
Getcontent IDfSysObject getContent
Getdocbasemap IDfDocbrokerClient getDocbaseMap
getDocbaseMapFromSpecificDocbroker
Getdocbrokermap IDfDocbrokerClient getDocbrokerMap
Getevents IDfSession getEvents
Getfile IDfSysObject getFile, getFileEx, getFileEx2
Getlastcoll IDfSession getLastCollection
Getlogin IDfSession GetLoginTicket, getLoginTicketEx,getLoginTicketForUser
114

Migrating DMCL APIs to DFC
Getmessage IDfSession getMessage
Getpath IDfSysObject getPath, getPathEx, getPathEx2
Getservermap IDfDocbrokerClient getServerMap
getServerMapFromSpecificDocbroker
Grant IDfSysObject grant,
see also grantPermit
Halt IDfWorkflow halt, haltEx, haltAll
Id IDfSession
IDfTypedObject
getIdByQualification (in IDfSession)
getObjectId (in IDfTypedObject)
Initcrypto IDfClient initCrypto
Insert IDfTypedObject insertBoolean, insertInt, insertDouble,insertId, insertString, insertTime,insertValue
Insertcontent IDfSysObject insertContent, insertContentEx
Insertfile IDfSysObject insertFile, insertFileEx
Insertpart IDfSysObject insertPart
Insertstate IDfPolicy insertState
Install IDfActivity, IDfPolicy,IDfProcess
install
Invalidate IDfActivity, IDfPolicy,IDfProcess
invalidate
Iscached
Kill IDfSession killSession (for sessions)
flushObject (for SysObjects)
Link IDfSysObject link
Listconnection IDfSessionManager Use getStatistics method inIDfSessionManager to return anIDfStatisticsManager object, whichhas the getDocbases and getSessionsmethods, which return informationequivalent to that returned byListconnection
Locate IDfTypedObject findBoolean, findInt, findDouble, findId,findString, findTime, findValue
Lock IDfPersistentObject lock
Mark IDfSysObject mark
Mount IDfSysObject mount
Movestate IDfPolicy moveState
115

Migrating DMCL APIs to DFC
Next IDfCollection next
Offset IDfTypedObject findAttrIndex
Pause IDfWorkitem pause
Print IDfSysObject print
Promote IDfSysObject promote, schedulePromote,cancelSchedulePromote
Prune IDfSysObject prune
Publish_dd IDfSession publishDataDictionary
Purgelocal IDfSession purgeLocalFiles
Query_cmd IDfQuery execute
Query IDfQuery execute
Queue IDfSysObject
IDfWorkflow
IDfWorkitem
queue
Readquery IDfQuery execute
Refresh IDfReplica
IDfMirror
refreshReplica
refreshMirror
Register IDfSysObject registerEvent
Reinit IDfSession reinit
Remove IDfTypedObject remove
Removeactivity IDfProcess removeActivity
Removecontent IDfSysObject removeContent
Removelink IDfProcess removeLink
Removenote IDfSysObject removeNote
Removepackage IDfWorkitem removePackage
Removepackageinfo IDfActivity removePackageInfo
Removepart IDfSysObject removePart
Removeport IDfActivity removePort
Removerendition IDfSysObject removeRendition, removeRenditionEx,removeRenditionEx2
Removeroutecase IDfActivity removeRouteCase
Removestate IDfActivity removeState
Repeat IDfWorkitem repeat
Repeating IDfTypedObject isAttrRepeating
116

Migrating DMCL APIs to DFC
Resolvealias IDfSysObject
IDfSession
resolveAlias
Restart IDfSession
IDfWorkflow
restart
restartAll (for work flow)
Restore IDfSession restore
Resume for lifecycles: IDfSysObject
IDfworkflow
IDfWorkitem
resume, scheduleResume,cancelScheduleResume (IDfSysObject)
resume, resumeAll (IDfWorkflow)
resume (IDfWorkitem)
Retrieve IDfSession
IDfTypedObject
getIdByQualification (in IDfSession)
getObjectId (in IDfTypedObject)
Revert IDfPersistentObject revert
Revoke IDfSysObject revoke
see also revokePermit
Save IDfPersistentObject save
Saveasnew IDfSysObject saveAsNew
Seek IDfContentCollection seek, seekEx
Set IDfTypedObject setBoolean, setInt, setDouble, setId,setString, setTime, setValue
setRepeatingBoolean, setRepeatingInt,setRepeatingDouble, setRepeatingId,setRepeatingString, setRepeatingTime,setRepeatingValue
Setbatchhint IDfSession setBatchHint
Setcontent IDfSysObject setContent, setContentEx, setContentEx2
Setcontentattrs setContentAttrs
Setdoc IDfSysObject setIsVirtualDocument
Setfile IDfSysObject setFile, setFileEx
Setoutput IDfWorkitem setOutput, setOutputByActivities
Setpath IDfSysObject setPath
Setperformers IDfWorkflow setPerformers
Setpriority IDfWorkitem setPriority
Setsupervisor IDfWorkflow updateSupervisorName
Shutdown IDfSession shutdown
Signoff IDfPersistentObject signoff
117

Migrating DMCL APIs to DFC
Suspend IDfSysObject suspend, scheduleSuspend,cancelScheduleSuspend
Trace IDfSession TraceDMCL
Truncate IDfTypedObject removeAll, truncate
Type IDfSession getTypeDescription
Unaudit IDfAuditTrailManager unRegisterEvent,unRegisterEventForType,unregisterEvents,unRegisterEventsFromQuery,unRegisterEventsInFolder,unRegisterAllEvents
Unfreeze IDfSysObject unfreeze
Uninstall IDfActivity, IDfPolicy,IDfProcess
uninstall
Unlink IDfSysObject unLink
Unlock IDfSysObject cancelCheckOut
Unmark IDfSysObject unMark
Unregister IDfSysObject unRegisterEvent
Updatepart IDfSysObject updatePart, updatePartEx
Useacl IDfSysObject useACL
Validate IDfActivity, IDfPolicy,IDfProcess
validate, validateProcessAndActivities
Values IDfTypedObject getValueCount
Vdmpath IDfObjectPath getAccessPath, getAccessibleFolderIds
Vdmpathdql IDfObjectPath getAccessPath, getAccessibleFolderIds
Verifyaudit IDfPersistentObject verifyAudit
Verifyesignature IDfSysObject verifySignature
118

Appendix B
Object Type and Property Changes
These tables describe types and properties that are new, changed, deprecated, or obsolete sinceDocumentum 6.7 SP1.
New object typesTable 22, page 119 lists the new object types in Documentum 7.x.
Table 22. New object types
Type Name Description Properties
dmc_bpm_lsm Models a synchronizingsplit-join block (LSM) within aworkflow template.
• join_act
• process_id
• start_act
• step_act
dmc_mq_config Defines the configurationobject of a message queue. Aninstance of dmc_mq_config iscreated when a message queueis created.
• queue_name
• max_redeliveries
• retain_dead_message
• retain_period
• expiration_interval
• default_priority
• delivery_timeout
• queue_users
• permissions
119

Object Type and Property Changes
Changed object typesTable 23, page 120 lists the properties that have their lengths extended in Documentum 7.x.
Table 23. Changed object types
Type Name Properties Data type Description
user_name char(255) Length of the propertyhas been extended from32 to 255.
user_group_name char(255) Length of the propertyhas been extended from32 to 255.
user_login_name char(255) Length of the propertyhas been extended from80 to 255.
acl_domain char(255) Length of the propertyhas been extended from32 to 255.
user_admin char(255) Length of the propertyhas been extended from32 to 255.
user_delegation char(255) Length of the propertyhas been extended from32 to 255.
default_folder char(450) for SQL Server,char(740) for Oracle
Length of the propertyhas been extended.
dm_user
user_ldap_dn char(512) Length of the propertyhas been extended from256 to 512.
group_name char(255) Length of the propertyhas been extended from32 to 255.
owner_name char(255) Length of the propertyhas been extended from32 to 255.
group_admin char(255) Length of the propertyhas been extended from32 to 255.
group_global_unique_id char(400) Length of the propertyhas been extended from255 to 400.
users_names char(255) Length of the property hasbeen extended from 32 to
dm_group
120

Object Type and Property Changes
Type Name Properties Data type Description
255. Forms a compositeindex with r_object_id.
groups_names char(255) Length of the property hasbeen extended from 32 to255. Forms a compositeindex with r_object_id.
i_supergroups_names char(255) Length of the property hasbeen extended from 32 to255. Used in an index byitself.
i_nondyn_supergroups_names
char(255) Length of the property hasbeen extended from 32 to255. Forms a compositeindex with r_object_id.
r_modifier char(255) Length of the property hasbeen extended from 32 to255. Used in an index byitself.
owner_name char(255) Length of the property hasbeen extended from 32 to255. Used in an index byitself.
group_name char(255) Length of the propertyhas been extended from32 to 255.
r_lock_owner char(255) Length of the propertyhas been extended from32 to 255.
acl_domain char(255) Length of the property hasbeen extended from 32 to255. Forms a compositeindex with acl_name.
dm_sysobject
r_creator_name char(255) Length of the propertyhas been extended from32 to 255.
121

Object Type and Property Changes
Type Name Properties Data type Description
owner_name char(255) Length of the propertyhas been extended from32 to 255. Forms twocomposite indexes:one with (i_partition,object_name) and anotherwith (object_name,r_object_id, i_partition).
dm_acl
r_accessor_name char(255) Length of the propertyhas been extended from32 to 255.
dmi_package r_note_writer char(255) Length of the propertyhas been extended from32 to 255.
supervisor_name char(255) Length of the propertyhas been extended from32 to 255.
sent_by char(255) Length of the propertyhas been extended from32 to 255.
dequeued_by char(255) Length of the propertyhas been extended from32 to 255. Forms onecomposite index with(name, sign_off_user,task_state, priority,date_sent).
sign_off_user char(255) Length of the property hasbeen extended from 32 to255. Form two compositeindexes: one with (name,dequeued_by, task_state,priority, date_sent) andanother with (item_id,task_state, name, priority,date_sent, r_object_id).
dmi_queue_item
name char(255) Length of the propertyhas been extended from32 to 255.
dmi_registry user_name char(255) Length of the propertyhas been extended from32 to 255.
122

Object Type and Property Changes
Type Name Properties Data type Description
dmi_wf_attachment
r_creator_name char(255) Length of the propertyhas been extended from32 to 255.
dm_alias_set owner_name char(255) Length of the propertyhas been extended from32 to 255.
dm_audit_policy
accessor_name char(255) Length of the propertyhas been extended from32 to 255.
group_name char(255) Length of the propertyhas been extended from32 to 255.
owner char(255) Length of the propertyhas been extended from32 to 255.
dm_type
group_global_unique_id char(400) Length of the propertyhas been extended from255 to 400.
default_group char(255) Length of the propertyhas been extended from27 to 255.
dmi_type_info
acl_domain char(255) Length of the propertyhas been extended from32 to 255.
dm_ftindex_agent_config
queue_user char(255) Length of the propertyhas been extended from64 to 255.
dm_registered
table_owner char(255) Length of the propertyhas been extended from64 to 255.
dm_activity performer_name char(255) Length of the propertyhas been extended from66 to 255.
r_performer_name char(255) Length of the propertyhas been extended from32 to 255.
dm_workitem
r_ext_performer char(255) Length of the propertyhas been extended from32 to 255.
123

Object Type and Property Changes
Type Name Properties Data type Description
user_name char(255) Length of the propertyhas been extended from32 to 255.
owner_name char(255) Length of the propertyhas been extended from32 to 255.
dm_audittrail
acl_domain char(255) Length of the propertyhas been extended from32 to 255.
dm_audittrail_acl
accessor_name char(255) Length of the propertyhas been extended from32 to 255.
group_admin char(255) Length of the propertyhas been extended from32 to 255.
users_names char(255) Length of the propertyhas been extended from32 to 255.
dm_audittrail_group
groups_names char(255) Length of the propertyhas been extended from32 to 255.
dm_category category_owner char(255) Length of the propertyhas been extended from32 to 255.
modifier char(255) Length of the propertyhas been extended from32 to 255.
dm_category_assign
pre_modifier char(255) Length of the propertyhas been extended from32 to 255.
auto_user char(255) Length of the propertyhas been extended from32 to 255.
dm_ci_config
manual_user char(255) Length of the propertyhas been extended from32 to 255.
dm_client_rights
allowed_roles char(255) Length of the propertyhas been extended from32 to 255.
dm_docbase_config
a_bpaction_run_as char(255) Length of the propertyhas been extended from32 to 255.
124

Object Type and Property Changes
Type Name Properties Data type Description
dm_docset_run
run_owner char(255) Length of the propertyhas been extended from32 to 255.
dm_message_address
user_name char(255) Length of the property hasbeen extended from 32 to255. This type has beenchanged to registeredtable.
dm_partition_scheme
owner_name char(255) Length of the propertyhas been extended from32 to 255.
dm_qual_comp
valid_groups char(255) Length of the propertyhas been extended from32 to 255.
r_ref_creator char(255) Length of the propertyhas been extended from32 to 255.
dm_reference
i_ref_acl_domain char(255) Length of the propertyhas been extended from32 to 255.
supervisor_name char(255) Length of the propertyhas been extended from32 to 255.
task_owner char(255) Length of the propertyhas been extended from32 to 255.
r_task_user char(255) Length of the propertyhas been extended from32 to 255.
dm_router
r_sign_off_user char(255) Length of the propertyhas been extended from32 to 255.
operator_name char(255) Length of the propertyhas been extended from32 to 255.
dm_server_config
r_install_owner char(255) Length of the propertyhas been extended from32 to 255.
dm_webc_config
notification_user char(255) Length of the propertyhas been extended from32 to 255.
125

Object Type and Property Changes
Type Name Properties Data type Description
dm_webc_target
transfer_user char(255) Length of the propertyhas been extended from32 to 255.
r_creator_name char(255) Length of the propertyhas been extended from32 to 255.
supervisor_name char(255) Length of the propertyhas been extended from32 to 255.
r_last_performer char(255) Length of the propertyhas been extended from32 to 255.
dm_workflow
r_performers char(255) Length of the propertyhas been extended from32 to 255.
creator_name char(255) Length of the propertyhas been extended from32 to 255.
dmc_completed_workflow
supervisor_name char(255) Length of the propertyhas been extended from32 to 255.
dmc_completed_workitem
performer_name char(255) Length of the propertyhas been extended from32 to 255.
dmc_module a_privilege_roles char(255) Length of the propertyhas been extended from32 to 255.
dmc_wfsdrp_parent
performer_name char(255) Length of the propertyhas been extended from32 to 255.
dmc_workqueue_policy
owner_name char(255) Length of the propertyhas been extended from32 to 255.
dmc_workqueue_doc_profile
owner_name char(255) Length of the propertyhas been extended from32 to 255.
126

Object Type and Property Changes
Type Name Properties Data type Description
user_name char(255) Length of the propertyhas been extended from32 to 255.
dmc_workqueue_user_profile
owner_name char(255) Length of the propertyhas been extended from32 to 255.
dmc_wq_user_skill
user_name char(255) Length of the propertyhas been extended from32 to 255.
Changed object types with new propertiesTable 24, page 127 lists the new properties added to existing object types in Documentum 7.x.
Table 24. New object properties
Type Name Properties Data type
dm_ftquery_subscription
zone_value integer
dm_user root_log_dir char(255)
r_creation_date timedm_type
r_modified_date time
Dm_acs_config dormancy_status string(32)
activity_urn string(512)Dm_activity
lsm_id ID
dormancy_status string(32)
i_crypto_keys_expiry_date time
i_expired_crypto_keys string(255)
r_crypto_keystore string(32)
Dm_docbase_config
r_crypto_mode string(64)
Dm_ldap_config group_tree_sync Boolean
Dm_process system_name string(512)
Dmr_content content_state integer
Dmi_wf_timer r_is_initialized integer
Dmi_change_record dormancy_change_count integer
Dmi_workitem a_control_instruction string(32)
127

Object Type and Property Changes
The EMC Documentum Content Server System Object Reference Guide provides additional informationabout the new, changed, deprecated, and obsolete object types and properties.
128

Appendix C
dfc.properties
These topics are included:• Overview, page 129
• Changes to existing key names, page 129
• dmcl.ini key migration to dfc.properties, page 132
• Obsolete dmcl.ini and session configuration options, page 133
• Obsolete dfc.properties keys, page 135
OverviewIn version 6, DFC replaced the Server API as the API for Content Server. As part of this change, thedmcl.ini file became obsolete and its relevant entries were migrated to the dfc.properties file.In addition, the naming conventions for entries in the dfc.properties file were standardized. Thisappendix describes the changes to the dfc.properties file.
Changes to existing key namesTable 25, page 129, describes the changes to existing key names. Both new and old names are listed.For backward compatibility, both new and old names continue to work in Documentum 7.x. Invalidentries do not generate an error, but have no effect on functionality.
Table 25. Name changes for existing dfc.properties since version 6.5 and dfc.new properties
Old name New name
dfc.acs.avail.refresh.frequency dfc.acs.avail.refresh_interval
dfc.acs.config.refresh.frequency dfc.acs.config.refresh_interval
dfc.admin.ldif.file.charset dfc.admin.ldif_file_charset
dfc.cacs.check.http.method dfc.bocs.check.http_method
dfc.cacs.check.keep.number dfc.bocs.check.keep_number
dfc.cache.append.name dfc.bof.cache.append_name
129

dfc.properties
Old name New name
dfc.bof.cacheconsistency.interval dfc.bof.cache.currency_check_interval
dfc.bof.registry.connect.attempt.interval dfc.globalregistry.connect_attempt_interval
dfc.bof.registry.preload.enabled dfc.bof.cache.enable_preload
dfc.bof.registry.password dfc.globalregistry.password
dfc.bof.registry.repository dfc.globalregistry.repository
dfc.bof.registry.username dfc.globalregistry.username
dfc.cache.ddinfo.globalCacheSize dfc.cache.ddinfo.size
dfc.cache.dir dfc.cache_dir
client_cache_size dfc.cache.object.size
dfc.cache.query.globalCacheSize dfc.cache.query.size
dfc.core.truncate_long_values dfc.compatibility.truncate_long_values
dfc.config.timeout dfc.config.check_interval
dfc.checkout.dir dfc.data.checkout_dir
dfc.data.dir dfc.data.dir
dfc.docbase.max_deadlock_retries dfc.session.max_deadlock_retries
dfc.docbase.max_error_retries dfc.session.max_error_retries
dfc.exception.include_decoration No change
dfc.exception.include_id No change
dfc.export.dir dfc.data.export_dir
dfc.housekeeping.cleanup.interval,dfc.resources.cleanup_interval
dfc.bof.cache.cleanup_interval
dfc.max.vdm.children.flush.count dfc.vdm.max_child_flush_count
dfc.recordInlineDescendants dfc.xml.record_inline_descendants
dfc.registry.file No change
dfc.registry.mode No change
dfc.resources.diagnostics.enabled dfc.diagnostics.resources.enable
dfc.search.docbase.brokers dfc.search.docbase.broker_count
dfc.search.ecis.adapter.domain dfc.search.external_sources.adapter.domain
dfc.search.ecis.broker_count, dfc.search.ecis.brokers
dfc.search.external_sources.broker_count
dfc.search.ecis.enable dfc.search.external_sources.enable
dfc.search.ecis.host dfc.search.external_sources.host
dfc.search.ecis.password dfc.search.external_sources.password
dfc.search.ecis.port dfc.search.external_sources.port
dfc.search.ecis.request_timeout, dfc.search.ecis.access.timeout
dfc.search.external_sources.request_timeout
130

dfc.properties
Old name New name
dfc.search.ecis.rmi_name, dfc.search.ecis.name dfc.search.external_sources.rmi_name
dfc.search.ecis.username, dfc.search.ecis.login dfc.search.external_sources.username
dfc.search.formatcache.timeout dfc.search.formatcache.refresh_interval
dfc.search.fulltext.enabled dfc.search.fulltext.enable
dfc.search.sourcecache.timeout dfc.search.sourcecache.refresh_interval
dfc.search.typecache.timeout dfc.search.typecache.refresh_interval
None dfc.search.matching_terms_computing.enable
dfc.session.dynamic_delay No change
dfc.session.pool.enabled, connect_pooling_enabled
dfc.session.pool.enable
dfc.session.pool.timeout dfc.session.pool.expiration_interval
dfc.session.surrogate.check.interval dfc.session.surrogate.check_interval
dfc.session.surrogate.mode No change
dfc.storagepolicy.diagnostics.enabled dfc.storagepolicy.enable
dfc.storagepolicy.ignore.rule.errors dfc.storagepolicy.ignore_rule_errors
dfc.storagepolicy.validation.interval dfc.storagepolicy.validation_interval
dfc.strictURI dfc.xml.use_strict_uri
dfc.tracing.baseTraceFileName dfc.tracing.file_prefix
dfc.tracing.enabled, r_trace_level dfc.tracing.enable
dfc.tracing.entrancePointExprs dfc.tracing.method_name_filter
dfc.tracing.loggingMode dfc.tracing.file_creation_mode
dfc.tracing.maxFileSize dfc.tracing.max_file_size
dfc.tracing.mode No change
dfc.tracing.stackDepth dfc.tracing.max_stack_depth
dfc.tracing.threadNameExprs dfc.tracing.thread_name_filter
dfc.tracing.timestampDateFormat dfc.tracing.date_format
dfc.tracing.traceFileDirectory dfc.tracing.dir
dfc.tracing.userNameExprs dfc.tracing.user_name_filter
dfc.user.dir dfc.data.user_dir
dfc.validation.expr.currency.check dfc.validation.expr.currency_check_interval
dfc.validation.expr.debug.all No change
dfc.validation.expr.debug.code No change
dfc.validation.expr.debug.eval No change
dfc.validation.expr.debug.tree No change
dfc.validation.expr.disable_java No change
131

dfc.properties
Old name New name
dfc.validation.overrides.currency.check dfc.validation.overrides.currency_check_interval
dfc.session.recycle_interval, connect_recycle_interval
dfc.session.reuse_limit
None dfc.validation.allow.empty_string.list_complete
None dfc.search.xquery.option.parallel_execution.enable
None dfc.session.load_balance_strategy
None dfc.session.max_server_choice_age
None dfc.session.keepalive.enable
None dfc.connection.unused_connection_timeout
None dfc.xml.suppress_default_namespace_decl
None dfc.internal.purge_far_connections
Note: Compatibility is ensured with previous properties that refer to "ecis”.
dmcl.ini key migration to dfc.propertiesTable 26, page 132 describes the dmcl.ini keys that migrated to the dfc.properties file sinceDocumentum 6.5.
Table 26. dfc.properties keys migrated from dmcl.ini file
dmcl.ini key Corresponding new dfc.properties key
application_code dfc.application_code
batch_hint_size dfc.batch_hint_size
backup_host dfc.docbroker.host
backup_port dfc.docbroker.port
backup_protocol dfc.docbroker.protocol
backup_service dfc.docbroker.service
backup_timeout dfc.docbroker.timeout
castore_write_max_attempts dfc.content.castore.max_write_attempts
castore_write_sleep_interval dfc.content.castore.write_sleep_interval
client_date_format dfc.date_format
client_locale dfc.locale
connect_pooling_enabled dfc.session.pool.enable
connect_retry_limit dfc.session.max_connect_retries
ini_file_path dfc.config.file
132

dfc.properties
dmcl.ini key Corresponding new dfc.properties key
local_clean_on_init dfc.data.local_clean_on_init
local_diskfull_limit dfc.data.local_diskfull_limit
local_path dfc.data.local_dir
local_purge_on_diskfull dfc.data.local_purge_on_diskfull
max_session_count dfc.session.max_count*
primary_host dfc.docbroker.host
primary_port dfc.docbroker.port
primary_protocol dfc.docbroker.protocol
primary_service dfc.docbroker.service
primary_timeout dfc.docbroker.timeout
ref_binding_label dfc.reference.binding_label
secure_connect_default dfc.session.secure_connect_default
token_storage_path dfc.tokenstorage.dir
token_storage_enabled dfc.tokenstorage.enable
umask dfc.data.umask
use_compression dfc.content.use_compression
use_content_server dfc.content.use_content_server
*The settings from dmcl.ini from your current configuration are transferred after an upgrade. Thismight cause an issue if the dmcl.ini property dfc.max_session_count is set to a low sessioncount. EMC recommends that you remove this property setting from the dmcl.ini file beforeperforming an upgrade.
Obsolete dmcl.ini and session configurationoptionsTable 27, page 134 lists the dmcl.ini keys that are obsolete since Documentum 6.5 and haveno equivalent to set in dfc.properties. It also lists properties formerly present in the sessionconfiguration objects that are obsolete in Documentum 6.5 and later versions.
133

dfc.properties
Table 27. Obsolete session configuration options
Entry Source Comments
block_during_rpc dmcl.ini Is specific to native codeDMCL.
client_codepage dmcl.ini none
client_os_codepage dmcl.ini none
connect_callback_enabled api config and session configobjects
none
connect_failure_callback api config and session configobjects
none
connect_failure_data api config and session configobjects
none
connect_success_callback api config and session configobjects
none
connect_success_data api config and session configobjects
none
content_callback_data api config and session configobjects
none
content_callback_function api config and session configobjects
none
local_diskfull_warn dmcl.ini none
network_callback_data api config and session configobjects
none
network_callback_function api config and session configobjects
none
new_connection_callback none
new_connection_data none
nfs_enabled dmcl.ini
r_trace_file dmcl.ini Replaced by new tracingimplementation—referto the EMC DocumentumAdministrator User Guide forinformation.
r_trace_level dmcl.ini Replaced by new tracingimplementation—referto the EMC DocumentumAdministrator User Guide forinformation.
client_cache_size dmcl.ini Implementation now allowsper-session caches todynamically adapt to freememory.
134

dfc.properties
Entry Source Comments
connect_timeout dmcl.ini Is specific to native codeDMCL.
connect_recycle_interval dmcl.ini Is specific to native codeDMCL.
exception_count Is specific to native codeDMCL.
exception_count_interval Is specific to native codeDMCL.
terminate_on_exception Is specific to native codeDMCL.
i_override_list
cache_queries
max_connection_per_session
use_local_always dmcl.ini Option to use server commonarea is not available in DFC 6.5,so this becomes unneeded.
use_local_on_copy dmcl.ini Option to use server commonarea is not available in DFC 6.5,so this becomes unneeded.
Obsolete dfc.properties keysTable 28, page 135 lists the dfc.properties keys that are obsolete since version 6.5. Setting thesekeys has no effect on DFC 7.x.
Table 28. Obsolete dfc.properties keys
Entry Source Comments
dfc.tracing.combineDMCL dfc.properties Replaced by new tracingimplementation—referto the EMC DocumentumAdministrator User Guide forinformation.
dfc.tracing.compactMode dfc.properties Replaced by new tracingimplementation—referto the EMC DocumentumAdministrator User Guide forinformation.
135

dfc.properties
Entry Source Comments
dfc.tracing.recordParameters dfc.properties Replaced by new tracingimplementation—referto the EMC DocumentumAdministrator User Guide forinformation.
dfc.tracing.recordReturnValue dfc.properties Replaced by new tracingimplementation—referto the EMC DocumentumAdministrator User Guide forinformation.
136
Appendix D
LDAP Certificates
When you upgrade to 7.2 from a previous version in Microsoft Windows, you may need to importthe LDAP certificates again as the hash value might have changed. Use DA to import the LDAPcertificate again. If you need to import this certificate manually, then perform the following steps:
Note: The name of the LDAP certificate depends on the hash value generated for it.
1. openssl x509 -hash -in <filename>
The openssl version that is recommended is 1.0.0 or higher.
2. Attach Process Monitor and add the following values:filter process name = "documentum.exe"
event class = "file system"
exclude "<docbase>.log”
Run the LDAP synchronization job and try authenticating an LDAP server user that has gotsynced. Search for ldapdb and fetch the hashvalue that is required. Rename the certificate filewith this hash value.
3. Modify the dm_start_<repo> file by adding the prefix truss (Solaris) or strace(AIX/Linux).Run the LDAP synchronization job and try authenticating an LDAP server user that got synced.Search for ldapdb and fetch the hashvalue that is required. Rename the certificate file withthis hash value.
137

LDAP Certificates
138

Index
6.7 clientsdm_bof_registry, 94
64-bit Content Serverupgrading to, 37
AACS, 29aek.key file, 28
BBOCS, 29BOCS servers
described, 47BOF, 94BOF2 modules
migrating, 91
CCLEAN_LINKS, 97CMIS
customizations, 103getFolderParent, 103
configurationdepartmental system, 26enterprise system, 26
consistency checker utility, 79
Ddatabase
changing location, 35, 38changing version, 35, 38upgrading DB2 database, 36
database_refresh_interval key, 36databases
requirements for upgrade, 36UTF-8, 36
DFCdeployment, 96
methods, 112migrating, 93search, 95
DFC classesmigration, 93
dfc.properties, 129DfPreferences, 96dmcl.ini key migration, 132key names, 129obsolete dmcl.ini keys, 133obsolete keys, 135
DfPreferencesJMX management, 96
DFSmigrating, 99
differencesDFC Java classes, 93
distributed configurationsupgrading, 45
distributed content, 30dm_bof_registry, 27dm_extern_file, 97dm_linkedstore, 97DMCL APIs, 111
migrating, 95dmi_linkrecord, 97DocApps
migrating, 91DQL
migrating content, 91DSN, 38dump and load, 35, 38
Ffiles
aek.key, 28
Gglobal registry
139

Index
defined, 27
Iinstallation order
new system, 15internationalization
UTF-8, 36IPv4 configuration, 94
Llinked store storage areas, 97
Mmigrating
BOF2 and DocApps, 91migrating Content Server, 77
6.6 to 7.1, 105checklist, 79custom methods, 91migration methods, 81migration process, 77migration utility, 90planning, 80post-migration tasks, 92scenarios, 105Windows/SQL Server platform, 105XML store, 90
migrationclient first, 29overview, 14
modulesmigrating, 91
Oobject replication, 30object types
changed, 120new, 119new properties, 127
ODBC, 38optical storage devices, 98
PPlanning worksheet
application server host, 24client machine, 25
Content Server host, 23customized components, 25index server host, 24
Rrepositories
copying, 28federation, 30precopying tasks, 28
repository copies, 28repository federations
upgrading, 30root password, 35
SSBO, 94SQL Server 2005, 85system updates
order, 16
TTBO, 94Terminal Services, 45testing an upgrade, 28third-party software, 27
Uupgrade
overview, 13strategies, 19
UpgradeBOCS servers, 47
upgrading Content Server6.5 SP3 to 7.1, 51, 596.7 SP1 to 7.1, 646.7 SP2 to 7.1, 686.7 to 7.1, 637.0 to 7.1, 72, 75active automatic tasks, 36checklist, 33cluster services, 44custom plug-ins, 40database_refresh_interval key, 36described, 33distributed configurations, 45distributed content, 30dm_server_config object, 37
140

Index
effects on system, 33errors, 39FAST, 39Linux/Oracle platform, 64, 75object replication, 30post-upgrade, 48Red Hat Linux 5.x, 40repository federations, 30scenarios, 51software, 40Solaris/Oracle platform, 68
testing, 28UTF-8, 36Windows/Oracle platform, 72Windows/SQL Server platform, 51, 59,
63
WWindows requirements
Terminal Services, 45
141