emc data domain boost for oracle recovery manager 1.1 ... · emc data domain boost for oracle...
TRANSCRIPT
EMC Data Domain Boost for Oracle Recovery Manager 1.1 Administration Guide
Backup Recovery Systems DivisionData Domain LLC2421 Mission College Boulevard, Santa Clara, CA 95054866-WE-DDUPE; 408-980-4800
300-025-005 Rev. 01February 15, 2012
2
Copyright © 2013 EMC Corporation. All Rights Reserved.
EMC believes the information in this publication is accurate as of its publication date. The information is subject to change without notice.
THE INFORMATION IN THIS PUBLICATION IS PROVIDED “AS IS.” EMC CORPORATION MAKES NO REPRESENTATIONS OR WARRANTIES OF ANY KIND WITH RESPECT TO THE INFORMATION IN THIS PUBLICATION, AND SPECIFICALLY DISCLAIMS IMPLIED WARRANTIES OF MERCHANTABILITY OR FITNESS FOR A PARTICULAR PURPOSE.
Use, copying, and distribution of any EMC software described in this publication requires an applicable software license.
EMC, EMC2, and Data Domain are registered trademarks, and Global Compression is a trademark of EMC Corporation in the United States and/or other countries.
All other trademarks used herein are the property of their respective owners.

Contents
Contents . . . . . . . . . . . . . . . . . . . . . . . . . . . . . . . . .3
About This Guide . . . . . . . . . . . . . . . . . . . . . . . . . . .9
Audience . . . . . . . . . . . . . . . . . . . . . . . . . . . . . . . . . . . 9
Related Documents . . . . . . . . . . . . . . . . . . . . . . . . . . . . 9
RMAN Documentation . . . . . . . . . . . . . . . . . . . . . . . . 9
Access to Documents at Data Domain . . . . . . . . . . . . . 10
Access Data Domain Documents . . . . . . . . . . . . . . 10
Conventions . . . . . . . . . . . . . . . . . . . . . . . . . . . . . . . . 11
Data Domain Support . . . . . . . . . . . . . . . . . . . . . . . . . . 12
1 Introducing Data Domain Boost for RMAN . . . . . . . .13
Supported Configurations . . . . . . . . . . . . . . . . . . . . . . . 14
2 DD Boost Features . . . . . . . . . . . . . . . . . . . . . . .15
Distributed Segment Processing . . . . . . . . . . . . . . . . . . . 15
Advanced Load Balancing and Link Failover . . . . . . . . . . . 18
Configuration Restrictions . . . . . . . . . . . . . . . . . . . . 20
Encrypted Managed File Replication . . . . . . . . . . . . . . . . 21
Low-Bandwidth Optimization . . . . . . . . . . . . . . . . . . . . 22
3 Configuring the Data Domain System . . . . . . . . . . .23
RMAN plugin and DD OS Upgrades . . . . . . . . . . . . . . . 23
Firewalls and Ports . . . . . . . . . . . . . . . . . . . . . . . . . 23
EMC Data Domain Boost for Recovery Manager 1.1 Administration Guide 3
Enabling DD Boost on a Data Domain System . . . . . . . . . . .24
Configuring the DD Boost Server . . . . . . . . . . . . . . . . . . .25
Creating Storage Units . . . . . . . . . . . . . . . . . . . . . . .25
Configuring Distributed Segment Processing . . . . . . . . .26
Configuring Advanced Load Balancing and Link Failover .26
Enabling Low-Bandwidth Optimization . . . . . . . . . . . .28
Enabling Encrypted File Replication. . . . . . . . . . . . . . .28
4 Configuring DD Boost for RMAN . . . . . . . . . . . . . . 31
Installing the RMAN Plugin on Database Servers . . . . . . . . .31
Configuring RMAN. . . . . . . . . . . . . . . . . . . . . . . . . . . . .38
Linux or Solaris Environment . . . . . . . . . . . . . . . . . . .38
Windows Environment. . . . . . . . . . . . . . . . . . . . . . . .40
Oracle Database 11g . . . . . . . . . . . . . . . . . . . . . .40
Oracle Database 10g . . . . . . . . . . . . . . . . . . . . . .42
Register Each Data Domain System . . . . . . . . . . . . . . .42
Replication . . . . . . . . . . . . . . . . . . . . . . . . . . . . . . .43
5 Data Domain System Administration . . . . . . . . . . 47
Restricting DD Boost Access to Specific Database Servers. . .47
File Replication Version Compatibility . . . . . . . . . . . . . . .48
Modifying an Interface Group . . . . . . . . . . . . . . . . . . . . .49
Removing Advanced Load Balancing and Link Failover Configuration . . . . . . . . . . . . . . . . . . . . . . . . . . . . .50
6 Basic Troubleshooting . . . . . . . . . . . . . . . . . . . . 53
Investigating Problems . . . . . . . . . . . . . . . . . . . . . . . . .53
Reporting Problems . . . . . . . . . . . . . . . . . . . . . . . . . . .54
4
Data Domain System Settings for File-Replication . . . . . . . 54
Lockbox Troubleshooting Information . . . . . . . . . . . . . . . 54
Failure to Load Media Management Library . . . . . . . . . . . 55
7 Using the DD Boost Commands . . . . . . . . . . . . . .59
ddboost Command Options . . . . . . . . . . . . . . . . . . . . . . 60
access . . . . . . . . . . . . . . . . . . . . . . . . . . . . . . . . . 60
ddboost access add clients . . . . . . . . . . . . . . . . . 60
ddboost access delete clients . . . . . . . . . . . . . . . . 60
ddboost access reset . . . . . . . . . . . . . . . . . . . . . 60
ddboost access show . . . . . . . . . . . . . . . . . . . . . 60
destroy. . . . . . . . . . . . . . . . . . . . . . . . . . . . . . . . . 60
disable . . . . . . . . . . . . . . . . . . . . . . . . . . . . . . . . . 61
enable . . . . . . . . . . . . . . . . . . . . . . . . . . . . . . . . . 61
file-replication. . . . . . . . . . . . . . . . . . . . . . . . . . . . 61
file-replication option reset . . . . . . . . . . . . . . . . . 61
file-replication option set . . . . . . . . . . . . . . . . . . 61
file-replication option show . . . . . . . . . . . . . . . . . 62
file-replication reset stats . . . . . . . . . . . . . . . . . . 62
file-replication show active . . . . . . . . . . . . . . . . . 62
file-replication show detailed-file-history . . . . . . . . 63
file-replication show detailed-history . . . . . . . . . . 63
file-replication show file-history . . . . . . . . . . . . . . 64
file-replication show history . . . . . . . . . . . . . . . . 64
file-replication show performance . . . . . . . . . . . . 65
file-replication show stats . . . . . . . . . . . . . . . . . . 66
EMC Data Domain Boost for Recovery Manager 1.1 Administration Guide 5
ifgroup. . . . . . . . . . . . . . . . . . . . . . . . . . . . . . . . . .67
ifgroup add interface . . . . . . . . . . . . . . . . . . . . . .67
ifgroup del interface . . . . . . . . . . . . . . . . . . . . . .68
ifgroup disable . . . . . . . . . . . . . . . . . . . . . . . . . .68
ifgroup enable . . . . . . . . . . . . . . . . . . . . . . . . . .68
ifgroup reset . . . . . . . . . . . . . . . . . . . . . . . . . . .69
ifgroup show config . . . . . . . . . . . . . . . . . . . . . . .69
ifgroup status . . . . . . . . . . . . . . . . . . . . . . . . . . .69
option . . . . . . . . . . . . . . . . . . . . . . . . . . . . . . . . . .69
option reset . . . . . . . . . . . . . . . . . . . . . . . . . . . .69
option set . . . . . . . . . . . . . . . . . . . . . . . . . . . . .69
option show . . . . . . . . . . . . . . . . . . . . . . . . . . . .70
reset . . . . . . . . . . . . . . . . . . . . . . . . . . . . . . . . . . .70
reset stats . . . . . . . . . . . . . . . . . . . . . . . . . . . . .70
reset user-name . . . . . . . . . . . . . . . . . . . . . . . . .70
set user-name . . . . . . . . . . . . . . . . . . . . . . . . . . . . .70
show . . . . . . . . . . . . . . . . . . . . . . . . . . . . . . . . . . .71
show connections . . . . . . . . . . . . . . . . . . . . . . . .71
show histogram . . . . . . . . . . . . . . . . . . . . . . . . . .73
show stats . . . . . . . . . . . . . . . . . . . . . . . . . . . . .73
show user-name . . . . . . . . . . . . . . . . . . . . . . . . .74
status . . . . . . . . . . . . . . . . . . . . . . . . . . . . . . . . . .74
storage-unit . . . . . . . . . . . . . . . . . . . . . . . . . . . . . .74
storage-unit create . . . . . . . . . . . . . . . . . . . . . . .74
storage-unit delete . . . . . . . . . . . . . . . . . . . . . . .74
storage-unit show . . . . . . . . . . . . . . . . . . . . . . . .74
6
Appendix A: Checklists and Notes . . . . . . . . . . . . . . .75
Installation and Configuration Checklist . . . . . . . . . . . . . 75
Configure the Data Domain system . . . . . . . . . . . . . . 75
Download and install the RMAN Plugin . . . . . . . . . . . . 75
Configure RMAN for your environment . . . . . . . . . . . . 76
Test the Installation by using sbttest (Optional) . . . 76
Backup Examples:. . . . . . . . . . . . . . . . . . . . . . . . . . 77
Appendix B: Performing a Backup with Oracle Enterprise Manager. . . . . . . . . . . . . . . . . . . . . . . . . . . . . . . . .79
Appendix C: Install and Configure RMAN Plugin for Multiple SIDs Under One ORACLE_HOME . . . . . . . . . . . . . . . . .89
EMC Data Domain Boost for Recovery Manager 1.1 Administration Guide 7

8
About This Guide
This guide explains how to install, configure, and use Data Domain Boost (DD Boost) for Recovery Manager (RMAN) with Data Domain systems.
AudienceThis guide is for system administrators who are familiar with Oracle backup applications and general backup administration.
Related DocumentsThe following Data Domain documents provide additional information:
• DD OS Release Notes Version 5.2
• DD OS 5.2 Initial Configuration Guide
• DD OS 5.2 Administration Guide
• DD OS 5.2 Command Reference Guide
• Data Domain Expansion Shelf Hardware Guide
• The Data Domain system installation and setup guides for each of the supported platforms (for example DD890, DD670, and so forth).
RMAN Documentation11g Release 2: From the Oracle Database Documentation Library at www.oracle.com/pls/db112/homepage, navigate to the Database Administration folder and select Backup and Recovery.
• Oracle Database Backup and Recovery User’s Guide
• Oracle Database Backup and Recovery Reference
EMC Data Domain Boost for Recovery Manager 1.1 Administration Guide 9

10g Release 2: From the Oracle Database Library at www.oracle.com/pls/db102/homepage, select the Administration tab and locate the Backup and Recovery heading.
• Oracle Database Backup and Recovery Reference
• Oracle Database Backup and Recovery Advanced User’s Guide
Access to Documents at Data DomainThe Documentation page at https://my.datadomain.com/documentation provides access to three categories of documents that are related to use of Data Domain products:
• User guides, under Product Documentation.
• Guides for how to integrate Data Domain systems with backup applications, under Integration Documentation.
• Matrices that show which components are compatible with each other, under Compatibility Matrices:
• Data Domain hardware product numbers
• Data Domain operating system (DD OS) versions
• Backup software versions
• Backup software server and client operating system versions
Access Data Domain Documents
1. Log into the support portal at: https://my.datadomain.com/documentation.
2. To view end user documents, click Product Documentation and then perform the following steps:
a. Select the Data Domain model from the Platform list and click View.
b. On the row for the correct Data Domain operating system (DD OS) version, click View under Documentation.
c. Click the desired title.
10 About This Guide
3. To view integration-related documents, perform the following steps:
a. Click Integration Documentation.
b. Select a vendor from the Vendor menu.
c. Select the desired title from the list and click View.
4. To view compatibility matrices, perform the following steps.
a. Click Compatibility Matrices.
b. Select the desired title from product menu.
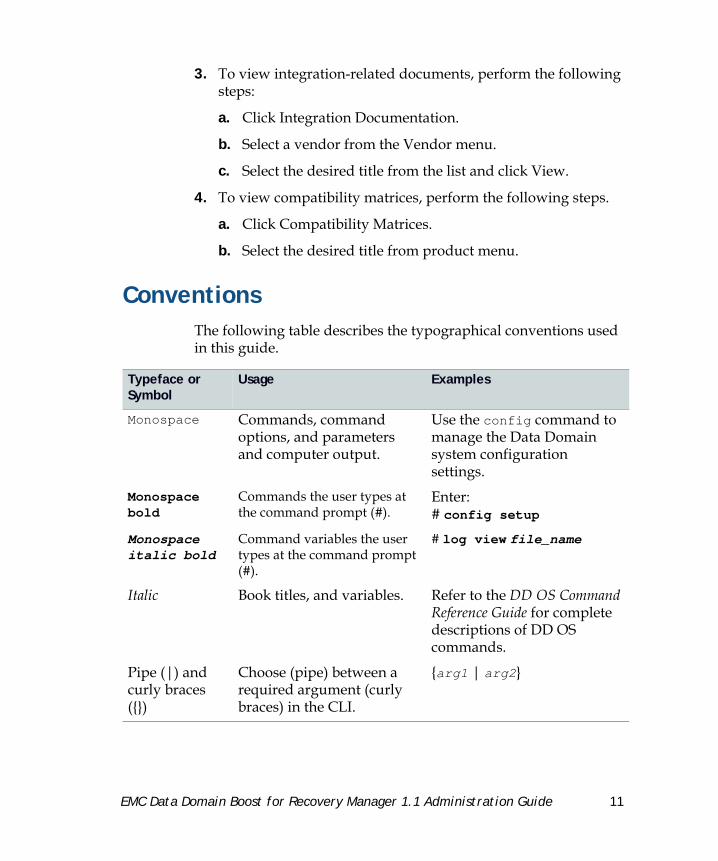
ConventionsThe following table describes the typographical conventions used in this guide.
Typeface or Symbol
Usage Examples
Monospace Commands, command options, and parameters and computer output.
Use the config command to manage the Data Domain system configuration settings.
Monospace bold
Commands the user types at the command prompt (#).
Enter:# config setup
Monospace italic bold
Command variables the user types at the command prompt (#).
# log view file_name
Italic Book titles, and variables. Refer to the DD OS Command Reference Guide for complete descriptions of DD OS commands.
Pipe (|) and curly braces ({})
Choose (pipe) between a required argument (curly braces) in the CLI.
{arg1 | arg2}
EMC Data Domain Boost for Recovery Manager 1.1 Administration Guide 11
Data Domain SupportTo resolve issues with Data Domain products, contact your contracted support provider or visit us online athttps://my.datadomain.com.
Brackets ([]) and ellipses (...)
One or more (list with commas and ellipses) optional (bracket) arguments in the CLI.
[arg1, arg2, ...]
Typeface or Symbol
Usage Examples
12 About This Guide
1 Introducing Data Domain Boost for RMAN
EMC Data Domain Boost (DD Boost) for Recovery Manager (RMAN) enables database servers to communicate with Data Domain systems in an optimized way, without the need to use a backup application, and to improve performance while reducing data transferred over the LAN. In the context of Oracle RMAN, there are two components to the software:
• An RMAN plugin that you install on each database server. This plugin includes the DD Boost libraries for communicating with the DD Boost server running on the Data Domain system.
• The DD Boost server that runs on Data Domain systems.
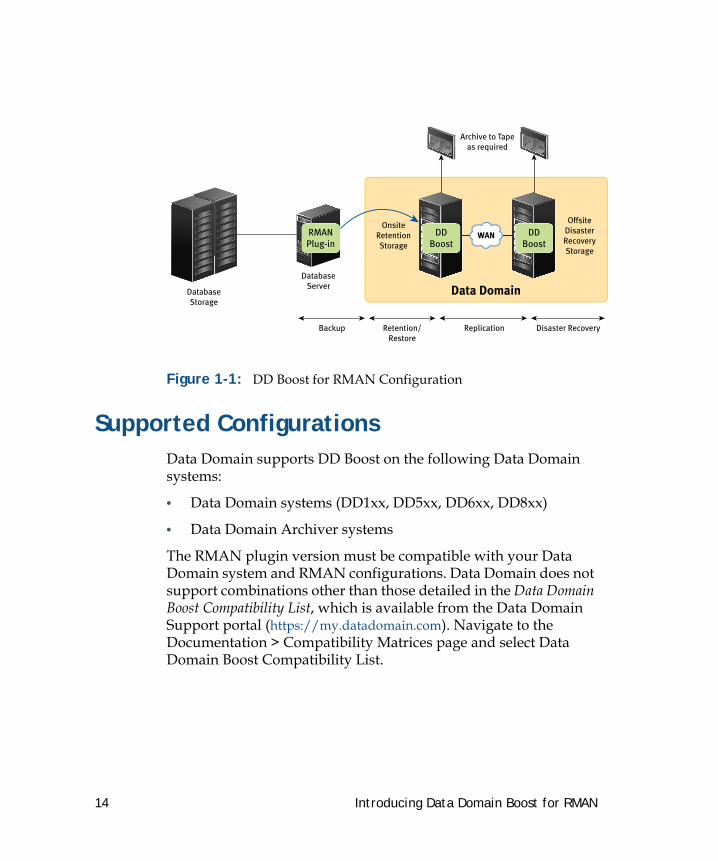
RMAN sets policies that control when backups and replications occur. Administrators manage backup, replication, and restore from a single console and can use all of the features of DD Boost, including WAN-efficient replicator software. RMAN manages all files (collections of data) in the catalog, even those created by the Data Domain system.
The Data Domain system exposes pre-made disk volumes called storage units to a DD Boost-enabled database server. Multiple database servers, each with the Data Domain RMAN plugin, can use the same storage unit on a Data Domain system as a storage server. Each database server can run a different operating system, provided that it is supported by Data Domain.
Figure 1-1 shows an example configuration of Data Domain Boost for RMAN.
EMC Data Domain Boost for Recovery Manager 1.1 Administration Guide 13
DDBoost
Data Domain
DDBoost
WAN
Archive to Tapeas required
OffsiteDisasterRecoveryStorage
OnsiteRetentionStorage
DatabaseServer
Backup Retention/Restore
Replication Disaster Recovery
DatabaseStorage
RMANPlug-in
Figure 1-1: DD Boost for RMAN Configuration
Supported ConfigurationsData Domain supports DD Boost on the following Data Domain systems:
• Data Domain systems (DD1xx, DD5xx, DD6xx, DD8xx)
• Data Domain Archiver systems
The RMAN plugin version must be compatible with your Data Domain system and RMAN configurations. Data Domain does not support combinations other than those detailed in the Data Domain Boost Compatibility List, which is available from the Data Domain Support portal (https://my.datadomain.com). Navigate to the Documentation > Compatibility Matrices page and select Data Domain Boost Compatibility List.
14 Introducing Data Domain Boost for RMAN
2 DD Boost Features
DD Boost for RMAN provides the following features:
• Distributed Segment Processing on page 15
• Advanced Load Balancing and Link Failover on page 18
• Encrypted Managed File Replication on page 21
• Low-Bandwidth Optimization on page 22
For instructions on how to configure these features, see Chapter 4, Configuring the Data Domain System.
Distributed Segment ProcessingDistributed segment processing allows parts of the deduplication process to be performed by the RMAN plugin, which avoids sending duplicate data to the Data Domain system that is configured as a storage server. The option to distribute the processing is enabled or disabled on the Data Domain system. The RMAN plugin negotiates with the Data Domain system for the current setting of the option and behaves appropriately. Therefore, the RMAN plugin offers two modes of operation for sending backup data to a Data Domain system: one with distributed segment processing enabled and the other with distributed segment processing disabled.
Distributed segment processing provides the following benefits:
• Potentially higher throughput—because the RMAN plugin sends only unique data to a Data Domain system versus sending all of the data over the LAN. Throughput improvements depend on the redundant nature of the data being backed up, the overall workload on the database server, and the capability of the database server. In general, greater throughput is attained with higher redundancy, greater database server workload, and database server capability.
EMC Data Domain Boost for Recovery Manager 1.1 Administration Guide 15
• The network bandwidth requirements are significantly reduced since only the unique data is sent over the LAN to the Data Domain systems.
• Recovery from failed backups can potentially proceed much faster. If a large backup fails in the middle or towards the end, when it is restarted by RMAN, the data already sent to the Data Domain system does not have to be resent. This results in faster completion of the backup on retry.
See the DD OS Administration Guide for more information about local compression and its configuration.
You manage distributed segment processing via the ddboost option commands. Data Domain recommends that you use distributed segment processing if your network connection is 1 Gb Ethernet. See Configuring Distributed Segment Processing on page 26.
Distributed Segment Processing Disabled
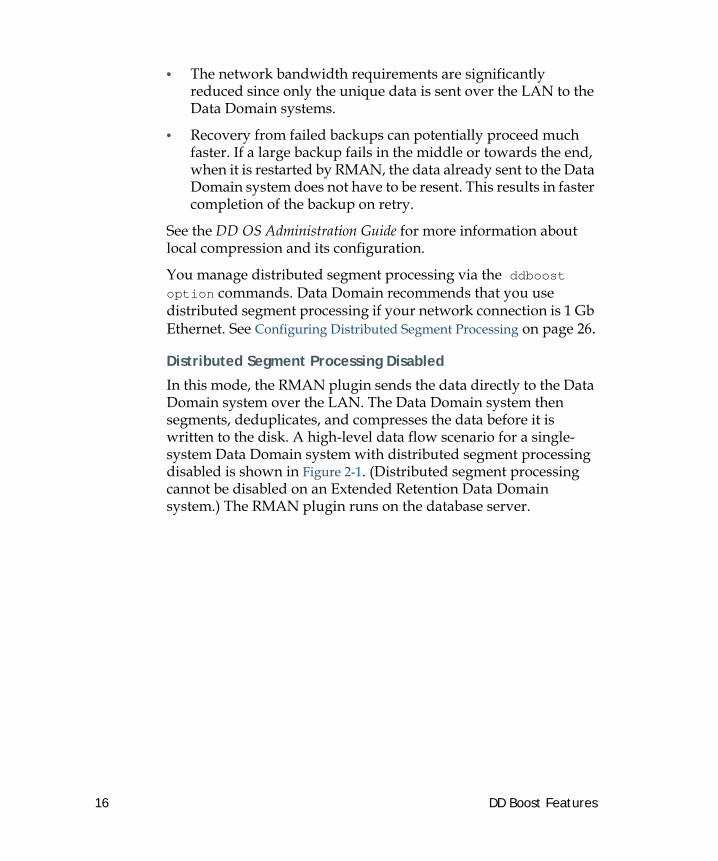
In this mode, the RMAN plugin sends the data directly to the Data Domain system over the LAN. The Data Domain system then segments, deduplicates, and compresses the data before it is written to the disk. A high-level data flow scenario for a single-system Data Domain system with distributed segment processing disabled is shown in Figure 2-1. (Distributed segment processing cannot be disabled on an Extended Retention Data Domain system.) The RMAN plugin runs on the database server.
16 DD Boost Features
Database Server
Data Domainsystem
Data Domain RMAN Plug-in
Data
Segment A B C D E B D
Fingerprint
Filter
Compress
Write
A B C D E
Data
Figure 2-1: High-Level Data Flow with Distributed Segment Processing Disabled
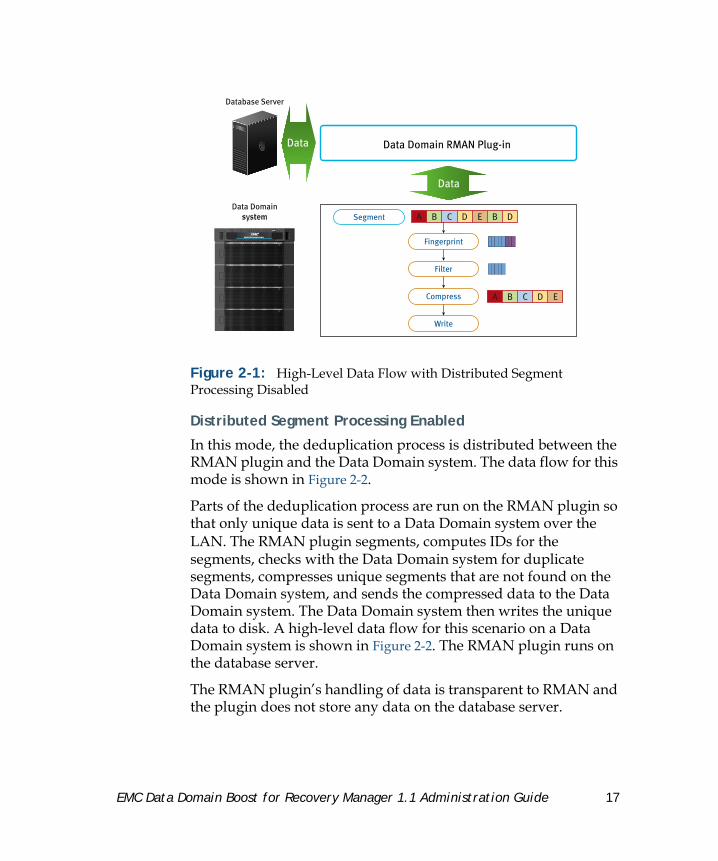
Distributed Segment Processing Enabled
In this mode, the deduplication process is distributed between the RMAN plugin and the Data Domain system. The data flow for this mode is shown in Figure 2-2.
Parts of the deduplication process are run on the RMAN plugin so that only unique data is sent to a Data Domain system over the LAN. The RMAN plugin segments, computes IDs for the segments, checks with the Data Domain system for duplicate segments, compresses unique segments that are not found on the Data Domain system, and sends the compressed data to the Data Domain system. The Data Domain system then writes the unique data to disk. A high-level data flow for this scenario on a Data Domain system is shown in Figure 2-2. The RMAN plugin runs on the database server.
The RMAN plugin’s handling of data is transparent to RMAN and the plugin does not store any data on the database server.
EMC Data Domain Boost for Recovery Manager 1.1 Administration Guide 17
Data Domainsystem
Data Domain RMAN Plug-in
Segment A B C D E B D
Fingerprint
Filter
Compress
Write
A B C D E
Database Server
Figure 2-2: High-Level Data Flow with Distributed Segment Processing Enabled
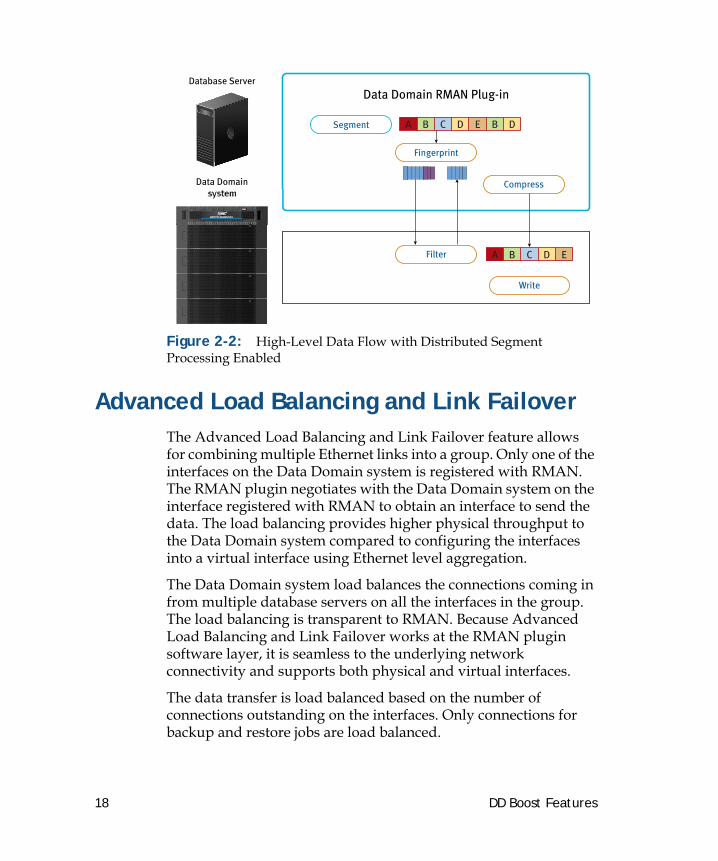
Advanced Load Balancing and Link FailoverThe Advanced Load Balancing and Link Failover feature allows for combining multiple Ethernet links into a group. Only one of the interfaces on the Data Domain system is registered with RMAN. The RMAN plugin negotiates with the Data Domain system on the interface registered with RMAN to obtain an interface to send the data. The load balancing provides higher physical throughput to the Data Domain system compared to configuring the interfaces into a virtual interface using Ethernet level aggregation.
The Data Domain system load balances the connections coming in from multiple database servers on all the interfaces in the group. The load balancing is transparent to RMAN. Because Advanced Load Balancing and Link Failover works at the RMAN plugin software layer, it is seamless to the underlying network connectivity and supports both physical and virtual interfaces.
The data transfer is load balanced based on the number of connections outstanding on the interfaces. Only connections for backup and restore jobs are load balanced.
18 DD Boost Features
Notes:
• The file replication connection between the Data Domain systems is not part of the load balancing. A single IP address is used for the target Data Domain system.
• It is recommended that you exclude one interface from the interface group (ifgroup) and reserve it for the file replication path between the source and target Data Domain systems. Every RMAN plugin must be able to connect to every interface that is a member of the interface group on the Data Domain system.
Figure 2-3 shows an example high-level configuration diagram. The interface marked in red is registered with RMAN.
RMAN Plug-in RMAN Plug-in RMAN Plug-in RMAN Plug-in
Network LayerAggregation
NIC NICDD Boost
Interface Group-4 ports in the group
Figure 2-3: Example of Advanced Load Balancing and Link Failover Configuration
The Advanced Load Balancing and Link Failover feature can be used in conjunction with other network layer aggregation and failover technologies. The sample configuration in Figure 2-3 shows one such possibility. The links connecting the database servers and the switch that connects to Data Domain system are put in an aggregated failover mode. This configuration provides end-to-end network failover functionality. Any of the available aggregation technologies can be used between the database server and the switch.
EMC Data Domain Boost for Recovery Manager 1.1 Administration Guide 19

The Advanced Load Balancing and Link Failover functionality also works in conjunction with other network layer functionality on the Data Domain systems, including VLAN tagging and IP aliasing. This functionality allows additional flexibility in segregating traffic into multiple virtual networks, all of which run over the same physical links on the Data Domain system.
Note: See the DD OS Administration Guide for more information about how to configure VLAN tagging and IP aliasing on a Data Domain system.
Benefits of Advanced Load Balancing and Link Failover are as follows:
• Eliminates the need to register multiple storage servers (one for each interface) with RMAN, which can potentially simplify installation management.
• If one of the interfaces in the group goes down while the Data Domain system is still operational, the subsequent incoming backup jobs are routed to the available interfaces.
• The backup and restore jobs are automatically load balanced on multiple interfaces in the group, which can potentially result in higher utilization of the links.
• All in-flight jobs to the failed interface transparently are failed over to healthy operational links. From the point of view of RMAN, the jobs continue uninterrupted.
For more information, see Configure Advanced Load Balancing and Link Failover on page 26.
Configuration Restrictions• Interfaces can be added only to the group using an IP address.
• Even though the Advanced Load Balancing and Link Failover feature works with mixed 1GbE interfaces and 10 GbE interfaces in a group, this is not a recommended setup. It is recommended to have interfaces with the same link speed in a group.
20 DD Boost Features
• Since only one interface group is supported on the Data Domain system, for connecting more than one database server, a switch is needed in the middle.
Encrypted Managed File ReplicationBy default, the database servers set up file replication jobs between two Data Domain systems without encryption after authenticating them using the pre-configured DD Boost user name and password. If the encrypted file replication feature is enabled, when a replication job is set up by the database servers, the session between the source and destination Data Domain systems is encrypted using Secure Sockets Layer (SSL), ensuring all image data and metadata is sent encrypted over the WAN.
Enabling this option on the Data Domain system is transparent to RMAN. When RMAN requests the Data Domain system to perform a file replication job, the source and destination systems negotiate automatically to perform encryption without knowledge of RMAN. Encrypted file replication uses the ADH-AES256-SHA cipher suite. There is no ability to configure a different suite in DD OS.
Encrypted file replication is available to a Data Domain system with an installed Replicator license, and applies to all file replication jobs on that system. Both the source and the destination Data Domain systems that are participating in file replication jobs must have this option enabled. Otherwise, replication will fail.
Encrypted file replication can be used in conjunction with the encryption of data-at-rest feature available on DD OS with the optional Encryption license. When encrypted file replication is used with the encryption of data-at-rest feature, the encrypted backup image data is encrypted again using SSL for sending over a WAN.
Notes:
• Both the source and the destination Data Domain systems must be running DD OS 5.0 or later to use this feature.
• Enabling this feature does not require restarting the file system on a Data Domain system.
EMC Data Domain Boost for Recovery Manager 1.1 Administration Guide 21
• The low-bandwidth optimization and the encryption options can be used in conjunction with each other.
For more information, see Enabling Encrypted File Replication on page 28 and the discussion of this topic in the DD OS Administration Guide.
Low-Bandwidth OptimizationThe low-bandwidth Replicator option reduces the WAN bandwidth utilization. This option is useful if file replication is being performed over a low-bandwidth network (WAN) link. This option provides additional compression during data transfer and is recommended only for file replication jobs that occur over WAN links that have fewer than 6 Mb/s of available bandwidth.
The low-bandwidth optimization option is available to Data Domain systems with an installed Replicator license. The option is enabled on a Data Domain system and applies to all file replication jobs on that system.
Enabling this option on Data Domain system is transparent to RMAN. When RMAN requests a Data Domain system to perform a file replication job, the source and destination systems automatically perform the additional compression without involving RMAN.
Each Data Domain system that will participate in managed file replication must have this option enabled.
For more information, see Enabling Low-Bandwidth Optimization on page 28, and the discussion of this topic in the DD OS Administration Guide.
22 DD Boost Features
3 Configuring the Data Domain System
This chapter describes the following tasks:
• Enabling DD Boost on a Data Domain System
• Configuring the DD Boost Server
Note: Complete descriptions of commands used in this guide are provided in the DD OS Command Reference Guide.
RMAN plugin and DD OS UpgradesThe RMAN plugin and the DD OS maintain compatibility as defined in the Data Domain Boost Compatibility List. Consult that list before upgrading either the RMAN plugin or the DD OS.
Firewalls and PortsThe Data Domain system as it is initially configured does not work through a firewall (a database server to a Data Domain system, or from one Data Domain system to another). If you need the Data Domain system to work in the presence of a firewall, contact your network support provider.
The following ports must be open in a firewall for DD Boost backups and file replication to work:
• TCP 2049 (NFS)
• TCP 2051 (Replication)
• TCP 111 (NFS portmapper)
• TCP xxx (Select a port for NFS mountd. The default MOUNTD port is 2052.)
EMC Data Domain Boost for Recovery Manager 1.1 Administration Guide 23
Enabling DD Boost on a Data Domain SystemEvery Data Domain system that is enabled for Data Domain Boost must have a unique name. You can use the Data Domain system’s DNS name, which is always unique.
Enable DD Boost
1. On the Data Domain system, log in as an administrative user.
2. Verify that the file system is enabled and running by entering:
# filesys status
The file system is enabled and running.
3. Add the DD Boost license using the license key that Data Domain provided:
# license add license-key
License “ABCE-BCDA-CDAB-DABC” added.
4. Establish the DD Boost username and password for the Data Domain system.
Note: Only one user can be configured for DD Boost access on a Data Domain system at any time. The username and password that you configure in this step must match the username and password you provide in the task Register Each Data Domain System on page 42.
# user add username password password
# ddboost set user-name user-name
Note: If the username is changed or deleted, the change in access rights does not affect any current operations. For example, deleting the current clients from the DD Boost access list using the "ddboost access del clients" command will not stop a file backup that is already in progress. All operations in progress will continue. The change in access rights will not cause existing operations to fail. It is recommended to change access rights only when no RMAN operations are in progress. The "ddboost disable" command can be used to prevent operations while access is changed. Disabling DD Boost will terminate any existing operations, so be careful that no RMAN
24 Configuring the Data Domain System
operations are in progress when disabling DD Boost. After changing access, "ddboost enable" will re-enable DD Boost and allow RMAN operations that will now be subject to the changed access rights.
5. Enable DD Boost by entering:
# ddboost enable
DD Boost enabled
Configuring the DD Boost ServerThe tasks in this section configure the DD Boost Server.
• Creating Storage Units on page 25
• Configuring Distributed Segment Processing on page 26
• Configuring Advanced Load Balancing and Link Failover on page 26
• Enabling Low-Bandwidth Optimization on page 28
• Enabling Encrypted File Replication on page 28
Creating Storage UnitsCreate one or more storage units on each Data Domain system that will be used with RMAN. Each storage unit name on a single Data Domain system must be unique. However, the same storage unit name can be used on more than one Data Domain system. When performing file replication with RMAN, the storage unit name on the two Data Domain systems used in the replication must be the same.
1. On the Data Domain system, enter:
# ddboost storage-unit create storage_unit_name
2. Repeat the above step for each Boost-enabled Data Domain system.
EMC Data Domain Boost for Recovery Manager 1.1 Administration Guide 25
Configuring Distributed Segment ProcessingThe distributed segment processing option is configured on the Data Domain system and applies to all the database servers and the RMAN plugins installed on them. If distributed segment processing is disabled on the Data Domain system, then the data flow from the database servers is as shown in Figure 2-1 on page 17. If distributed segment processing is enabled, then the data flows as shown in Figure 2-2 on page 18.
The option can be configured using the following command:
# ddboost option set distributed-segment-processing {enabled | disabled}
Note: Enabling or disabling the distributed segment processing option does not require a restart of the Data Domain file system.
Distributed segment processing is supported with RMAN plugin 1.0 communicating with a Data Domain system that is running DD OS 5.0 or later.
Distributed segment processing is enabled by default on a system initially installed with DD OS 5.2. If a system is upgraded from DD OS 5.1.x or 5.0.x to DD OS 5.2, distributed segment processing is left in its previous state.
Configuring Advanced Load Balancing and Link Failover
If an interface group is configured, when the Data Domain system receives data from the database server clients, the data transfer is load balanced and distributed as separate jobs on the private network, providing higher throughput, especially for customers who use multiple 1 GbE connections. See Advanced Load Balancing and Link Failover on page 18 for details.
Configure Advanced Load Balancing and Link Failover
Create an interface group on the Data Domain system by adding existing interfaces to the group and registering the Data Domain system with RMAN, as described below.
26 Configuring the Data Domain System
1. Add the interfaces into the group (the interfaces must already have been created with the net command):
# ddboost ifgroup add interface 192.168.1.1
# ddboost ifgroup add interface 192.168.1.2
# ddboost ifgroup add interface 192.168.1.3
# ddboost ifgroup add interface 192.168.1.4
Note: Only one interface group can be created and this group cannot be named.
2. Select one interface on the Data Domain system to register with RMAN. It is recommended that you create a failover aggregated interface and register that interface with RMAN.
Note: It is not mandatory to use an interface in the ifgroup to register with RMAN. An interface that is not part of the ifgroup can also be used to register with RMAN. It is recommended that the interface be registered with a resolvable name using DNS or any other name resolution mechanism.
3. Enable the feature on the Data Domain system:
# ddboost ifgroup enable
Verify the configuration:
# ddboost ifgroup show config
Interface
-------------
192.168.1.1
192.168.1.2
192.168.1.3
192.168.1.4
-------------
After the interface group is set up, you can add or delete interfaces from the group. See Modifying an Interface Group on page 49.
Note: You can manage Advanced Load Balancing and Link Failover via the ddboost ifgroup command (see ifgroup on
EMC Data Domain Boost for Recovery Manager 1.1 Administration Guide 27
page 67) or from the Enterprise Manager Data Management > DD Boost view (see the DD OS Administration Guide).
Enabling Low-Bandwidth Optimization To enable the low-bandwidth option, enter:
# ddboost file-replication option set low-bw-optim enabled
Low bandwidth optimization for file-replication set to “enabled”.
Note: Enabling or disabling the low-bandwidth optimization option does not require a restart of the Data Domain file system. However, after low-bandwidth optimization is enabled, a full cleaning cycle on the Data Domain system is needed for it to be effective.
Low-bandwidth optimization can be monitored and managed with the ddboost file-replication command (see file-replication on page 61) or from the Enterprise Manager Data Management > DD Boost view (see the DD OS Administration Guide).
No configuration changes are necessary on the database server as this feature is transparent to RMAN.
Notes:
• Enabling this feature takes additional resources (CPU and memory) on the Data Domain system, so it is recommended that this option be used only when file replication is being done over low-bandwidth networks with less than 6 Mbps aggregate bandwidth.
• For more information on this feature, see the DD OS Administration Guide.
Enabling Encrypted File ReplicationTo enable the encrypted file replication option, enter:
# ddboost file-replication option set encryption enabled
28 Configuring the Data Domain System

The output indicates that the encryption you requested was enabled.
See the commands listed under file-replication on page 61 for more details on how to monitor and manage the encryption option for file replication.
Turning on this feature takes additional resources (CPU and memory) on the Data Domain system.
Note: Enabling or disabling the encrypted file replication option does not require a restart of the Data Domain file system. For more information on this feature, see discussion of this topic in the DD OS Administration Guide
EMC Data Domain Boost for Recovery Manager 1.1 Administration Guide 29

30 Configuring the Data Domain System
4 Configuring DD Boost for RMAN
This chapter covers the following topics:
• Installing the RMAN Plugin on Database Servers on page 31
• Configuring RMAN on page 38
Note: Complete descriptions of ddboost commands used in this guide are provided in the DD OS Command Reference Guide.
Installing the RMAN Plugin on Database Servers
Note: Before installing the RMAN plugin, make sure that no backup or restore processes are running.
If this is an uprade of a preexisting Windows DD Boost RMAN plugin, the installation may fail unless all Oracle instances are stopped. It is recommended that you stop all Oracle instances before proceeding with a Windows installation.
Installation should be performed for each ORACLE_HOME directory that will be used with RMAN, setting ORACLE_HOME and ORACLE_SID appropriately for each installation. Installing other than to the ORACLE_HOME directory will prevent the plugin from working.
The RMAN plugin software must be installed on database servers that need to access the Data Domain system.
Perform the download and installation steps for your environment described in the following sections.
EMC Data Domain Boost for Recovery Manager 1.1 Administration Guide 31
bhome_1
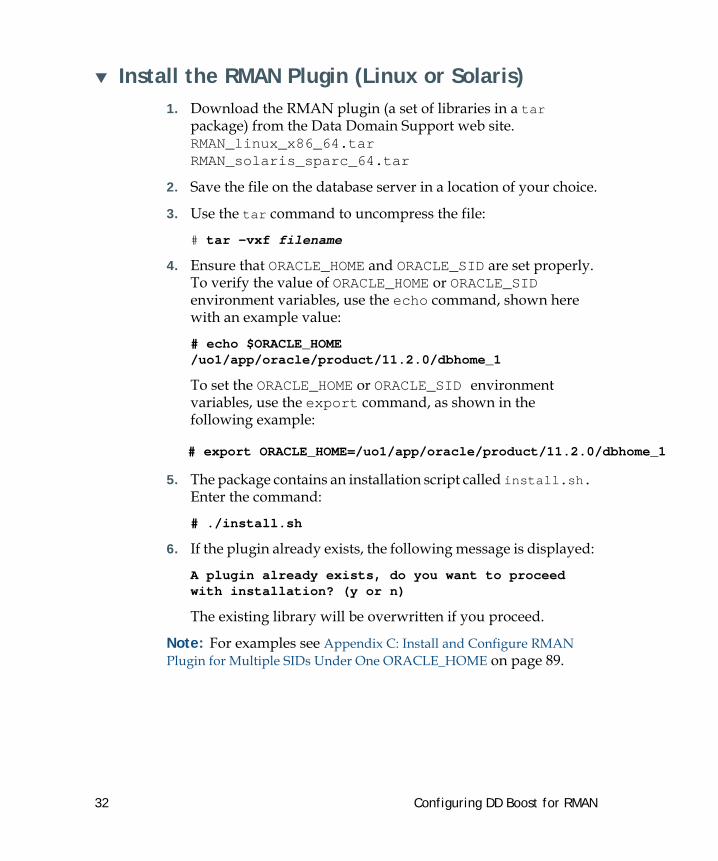
Install the RMAN Plugin (Linux or Solaris)1. Download the RMAN plugin (a set of libraries in a tar
package) from the Data Domain Support web site.RMAN_linux_x86_64.tarRMAN_solaris_sparc_64.tar
2. Save the file on the database server in a location of your choice.
3. Use the tar command to uncompress the file:
# tar -vxf filename
4. Ensure that ORACLE_HOME and ORACLE_SID are set properly. To verify the value of ORACLE_HOME or ORACLE_SID environment variables, use the echo command, shown here with an example value:
# echo $ORACLE_HOME/uo1/app/oracle/product/11.2.0/dbhome_1
To set the ORACLE_HOME or ORACLE_SID environment variables, use the export command, as shown in the following example:
5. The package contains an installation script called install.sh. Enter the command:
# ./install.sh
6. If the plugin already exists, the following message is displayed:
A plugin already exists, do you want to proceed with installation? (y or n)
The existing library will be overwritten if you proceed.
Note: For examples see Appendix C: Install and Configure RMAN Plugin for Multiple SIDs Under One ORACLE_HOME on page 89.
# export ORACLE_HOME=/uo1/app/oracle/product/11.2.0/d
32 Configuring DD Boost for RMAN
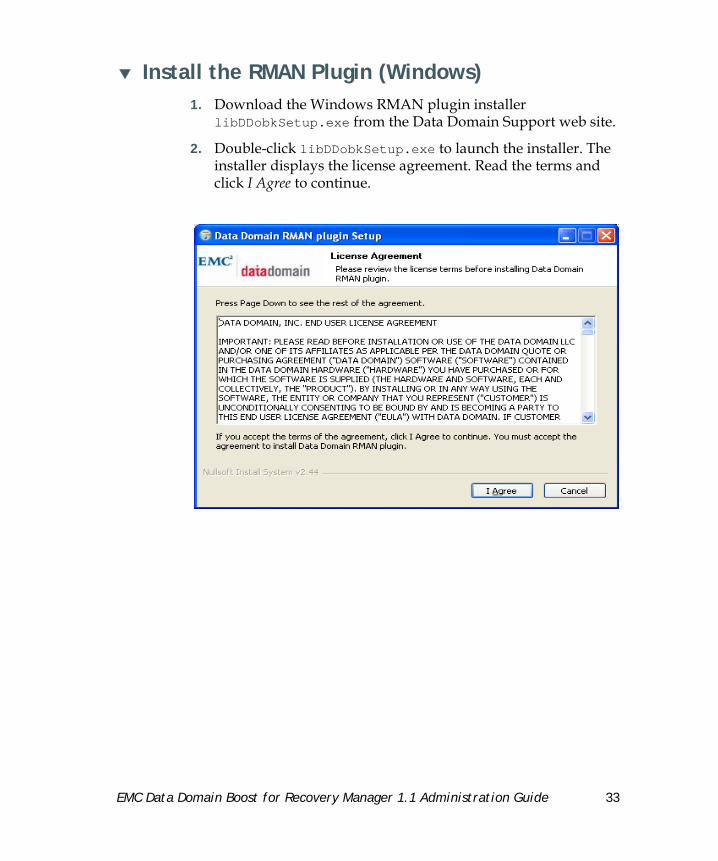
Install the RMAN Plugin (Windows)1. Download the Windows RMAN plugin installer
libDDobkSetup.exe from the Data Domain Support web site.
2. Double-click libDDobkSetup.exe to launch the installer. The installer displays the license agreement. Read the terms and click I Agree to continue.
EMC Data Domain Boost for Recovery Manager 1.1 Administration Guide 33
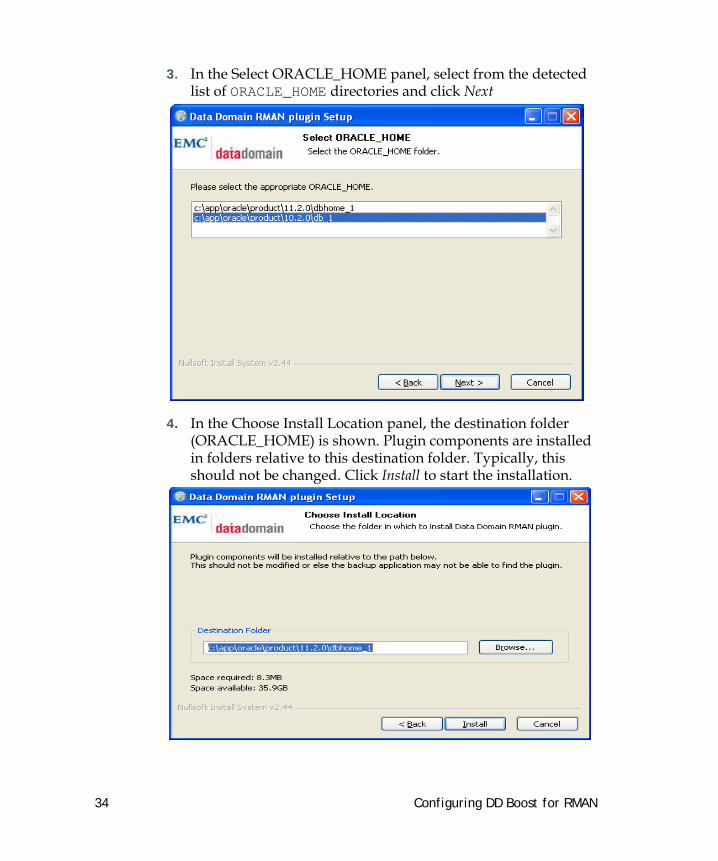
3. In the Select ORACLE_HOME panel, select from the detected list of ORACLE_HOME directories and click Next
4. In the Choose Install Location panel, the destination folder (ORACLE_HOME) is shown. Plugin components are installed in folders relative to this destination folder. Typically, this should not be changed. Click Install to start the installation.
34 Configuring DD Boost for RMAN
A progress bar monitors the installation.
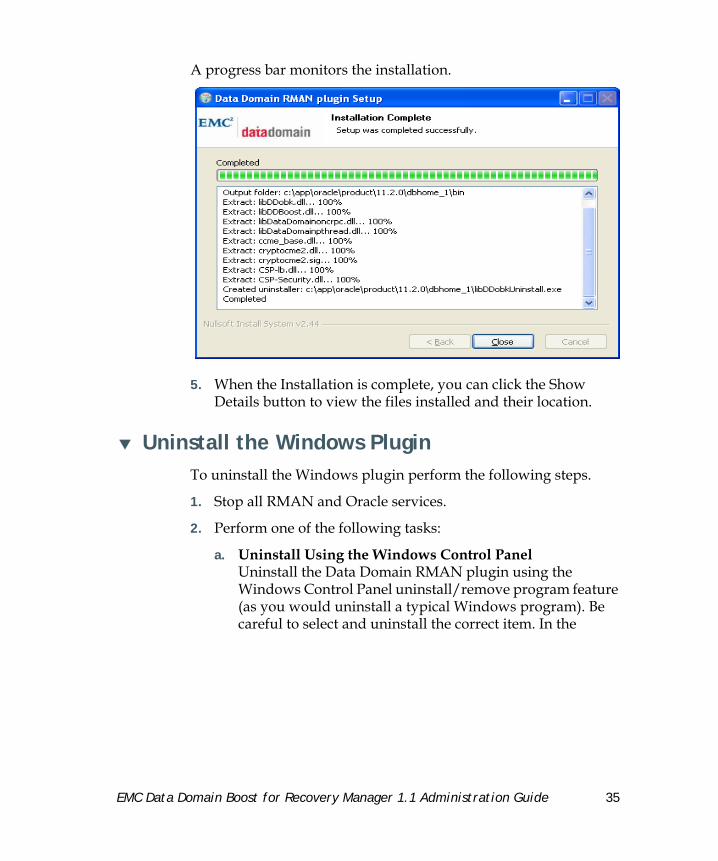
5. When the Installation is complete, you can click the Show Details button to view the files installed and their location.
Uninstall the Windows PluginTo uninstall the Windows plugin perform the following steps.
1. Stop all RMAN and Oracle services.
2. Perform one of the following tasks:
a. Uninstall Using the Windows Control PanelUninstall the Data Domain RMAN plugin using the Windows Control Panel uninstall/remove program feature (as you would uninstall a typical Windows program). Be careful to select and uninstall the correct item. In the
EMC Data Domain Boost for Recovery Manager 1.1 Administration Guide 35
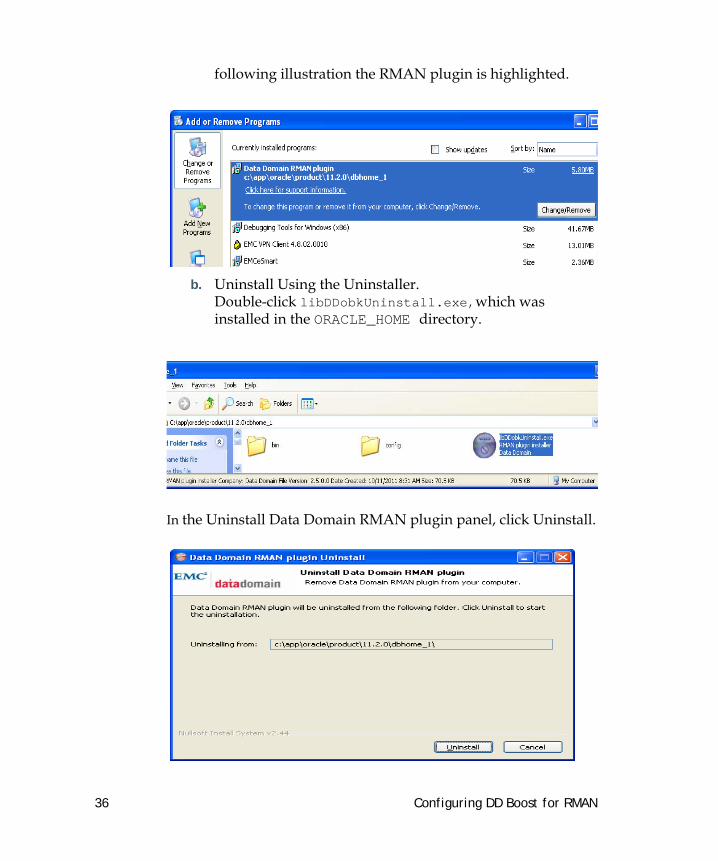
following illustration the RMAN plugin is highlighted.
b. Uninstall Using the Uninstaller.Double-click libDDobkUninstall.exe,which was installed in the ORACLE_HOME directory.
In the Uninstall Data Domain RMAN plugin panel, click Uninstall.
36 Configuring DD Boost for RMAN
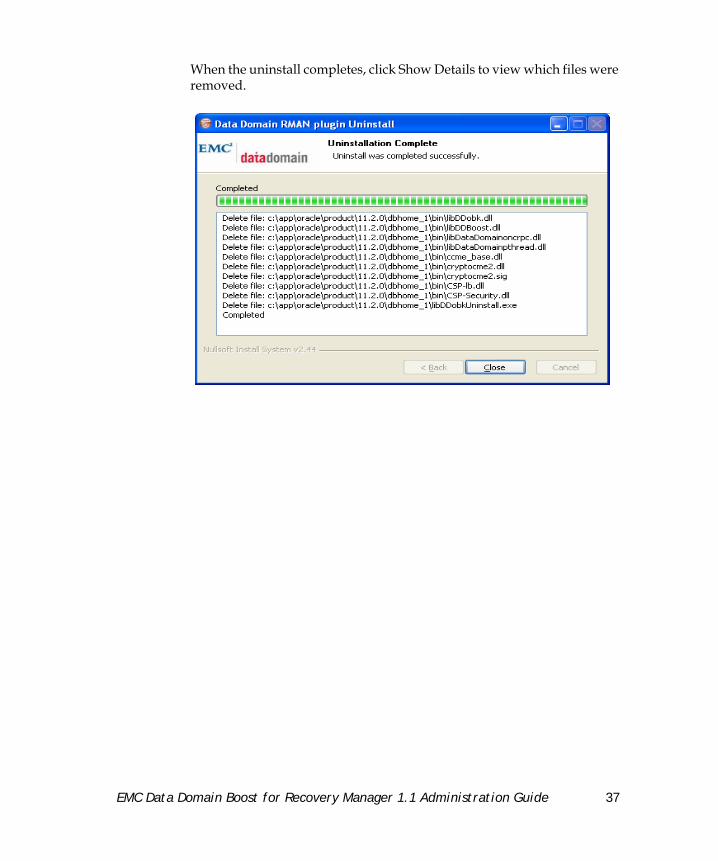
When the uninstall completes, click Show Details to view which files were removed.
EMC Data Domain Boost for Recovery Manager 1.1 Administration Guide 37
PARMS so,
Configuring RMANPerform the configuration for your environment and register each Data Domain system.
• Linux or Solaris Environment on page 38
• Windows Environment on page 40
• Register Each Data Domain System on page 42
Linux or Solaris EnvironmentFrom within RMAN, configure a channel.
Note: The storage unit specified in the command below must already exist on the Data Domain system.
The following text shows the command syntax for configuring a channel in a Linux or Solaris environment.
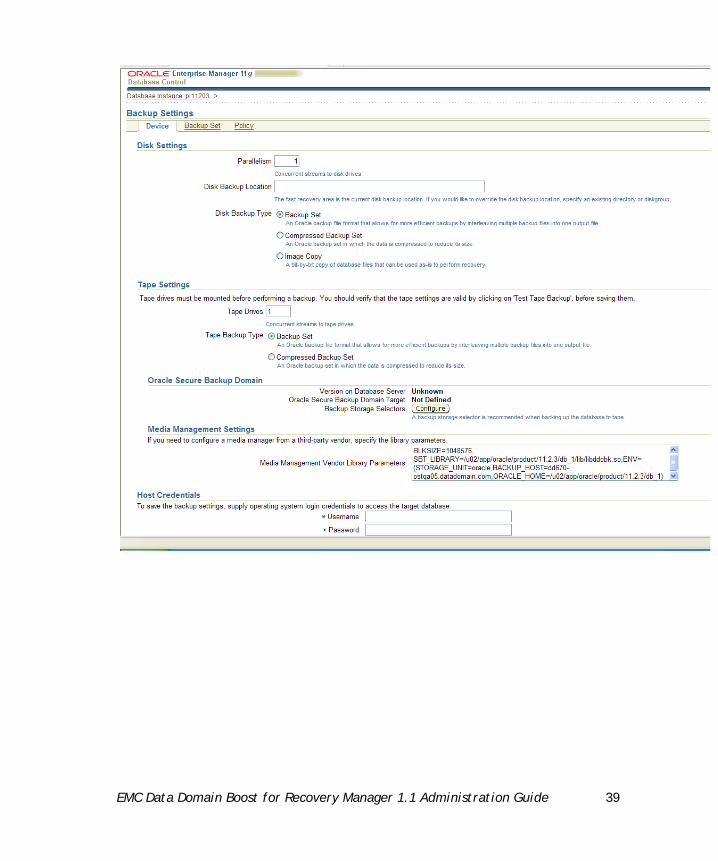
The configuration that you specify is also displayed in the Media Management Settings field of the Oracle Enterprise Manager (OEM).
An example of a Linux or Solaris configuration as viewed in the OEM is shown in the following illustration.
RMAN> CONFIGURE CHANNEL DEVICE TYPE 'SBT_TAPE' TRACE trace-level 'BLKSIZE=1048576, SBT_LIBRARY=path-to-$ORACLE_HOME/lib/libddobk.ENV=(STORAGE_UNIT=storage-unit-on-Data-Domain-system, BACKUP_HOST=hostname-of-Data-Domain-system,ORACLE_HOME=path-to-$ORACLE_HOME)';
38 Configuring DD Boost for RMAN
EMC Data Domain Boost for Recovery Manager 1.1 Administration Guide 39
48576,
th-to-
Windows EnvironmentIn a Windows environment the configuration syntax differs between Oracle Database 11g and 10g.
Oracle Database 11g
From within RMAN, configure a channel.
Note: The storage unit specified in the command below must already exist on the Data Domain system.
The following text shows the command syntax for configuring a channel in a Windows environment for Oracle Database 11g:
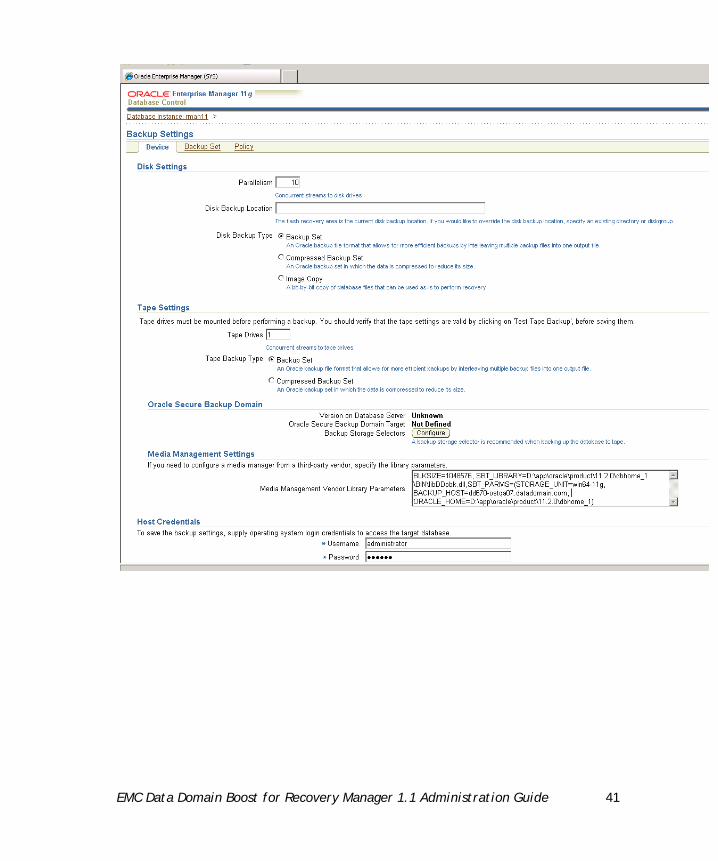
The configuration that you specify is also displayed in the Media Management Settings field of the Oracle Enterprise Manager (OEM).
An example of a Windows configuration as viewed in the OEM is shown in the following illustration.
RMAN> CONFIGURE CHANNEL DEVICE TYPE 'SBT_TAPE' PARMS 'BLKSIZE=10SBT_LIBRARY=path-to-$ORACLE_HOME\BIN\libDDobk.dll, SBT_PARMS=(STORAGE_UNIT=storage-unit-on-Data-Domain-system,BACKUP_HOST=hostname-of-Data-Domain-system,ORACLE_HOME=pa$ORACLE_HOME)';
40 Configuring DD Boost for RMAN
EMC Data Domain Boost for Recovery Manager 1.1 Administration Guide 41

Y=path--on-
Oracle Database 10g
From within RMAN, configure a channel.
Note: The storage unit specified in the command below must already exist on the Data Domain system.
The following text shows the command syntax for configuring a channel in a Windows environment for Oracle Database 10g:
The configuration that you specify is also displayed in the Media Management Settings field of the Oracle Enterprise Manager (OEM).
Register Each Data Domain SystemTo be able to connect to a Data Domain system, run a script such as the example below. Edit the script for your environment. This task is required only once per Data Domain system.
The username is the ddboost user that you set with the user add command and ddboost set username command in Step 4 of the task Enabling DD Boost on a Data Domain System on page 24. The password is the one that you set up with the DD OS CLI user command referred to in the Notes at the end of that task section. The servername server is the name of the Data Domain system exactly as specified by the BACKUP_HOST value in the CONFIGURE CHANNEL command. The servername is case-sensitive, and the same form of the name must be used in this command as in the CONFIGURE CHANNEL command. For example, if server1.domain.com was used when configuring the channel, you must also use server1.domain.com here. Do not use
RMAN> CONFIGURE CHANNEL DEVICE TYPE 'SBT_TAPE' PARMS 'SBT_LIBRARto-$ORACLE_HOME\BIN\libDDobk.dll, ENV=(STORAGE_UNIT=storage-unitData-Domain-system,BACKUP_HOST=hostname-of-Data-Domain-system,ORACLE_HOME=path-to-$ORACLE_HOME)';
RUN {ALLOCATE CHANNEL C1 TYPE SBT_TAPE PARMS 'SBT_LIBRARY=path-to-$ORACLE_HOME/lib/libddobk.so';send 'set username user password word servername server';RELEASE CHANNEL C1;}
42 Configuring DD Boost for RMAN
SERVER1.domain.com or server1. An IP address can be used, if that same IP address was used in the CONFIGURE CHANNEL command
Now you are ready to perform backups and restores to and from your Data Domain system using 'device type sbt_tape'. If you want all your backups to go to the Data Domain system, configure SBT_TAPE as your default device using the following command:
RMAN>CONFIGURE DEFAULT DEVICE TYPE TO 'SBT_TAPE';
ReplicationTo perform file replication, use a command similar to the one shown below. Edit the script command for your environment, specifying the Data Domain system that is the destination system for the file replication. Specifying copies 2 requires an installed Replicator license on the source Data Domain system. Making a backup specifying copies 2 requires Oracle Enterprise Edition.
Specifying copies 2 instructs the DD Boost RMAN plugin to perform Managed File Replication to the second Data Domain system. The second Data Domain system name is specified as part of the file name of the second copy. This is the 'destination-system' in the command below.
The two file names specified in this command must be identical except for the inclusion of 'destination-system' in the second name. The RMAN plugin requires that the file names of the two copies be identical. The underscore character "_" is also required. Omitting the underscore in the file names will result in an error and the backup will fail. Any changes made to the file name formats shown must include an underscore character and must guarantee that the file names are identical, except for 'destination-system' in the name for the second copy. This means that using Oracle formats such as %U and %c is not allowed, as these Oracle formats include the copy number in the generated file name and thus result
EMC Data Domain Boost for Recovery Manager 1.1 Administration Guide 43
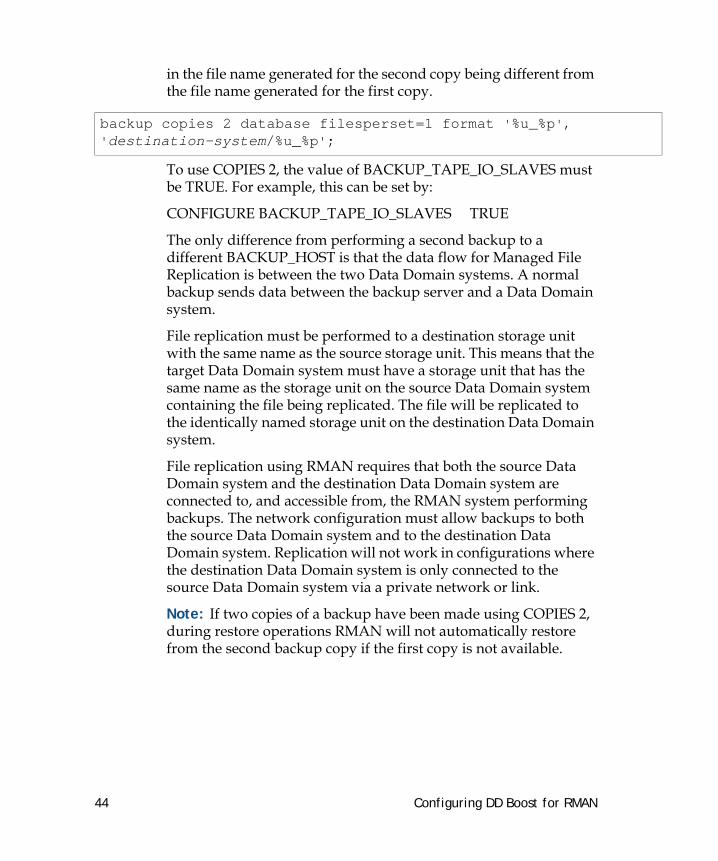
in the file name generated for the second copy being different from the file name generated for the first copy.
To use COPIES 2, the value of BACKUP_TAPE_IO_SLAVES must be TRUE. For example, this can be set by:
CONFIGURE BACKUP_TAPE_IO_SLAVES TRUE
The only difference from performing a second backup to a different BACKUP_HOST is that the data flow for Managed File Replication is between the two Data Domain systems. A normal backup sends data between the backup server and a Data Domain system.
File replication must be performed to a destination storage unit with the same name as the source storage unit. This means that the target Data Domain system must have a storage unit that has the same name as the storage unit on the source Data Domain system containing the file being replicated. The file will be replicated to the identically named storage unit on the destination Data Domain system.
File replication using RMAN requires that both the source Data Domain system and the destination Data Domain system are connected to, and accessible from, the RMAN system performing backups. The network configuration must allow backups to both the source Data Domain system and to the destination Data Domain system. Replication will not work in configurations where the destination Data Domain system is only connected to the source Data Domain system via a private network or link.
Note: If two copies of a backup have been made using COPIES 2, during restore operations RMAN will not automatically restore from the second backup copy if the first copy is not available.
backup copies 2 database filesperset=1 format '%u_%p', 'destination-system/%u_%p';
44 Configuring DD Boost for RMAN
nahpei_1
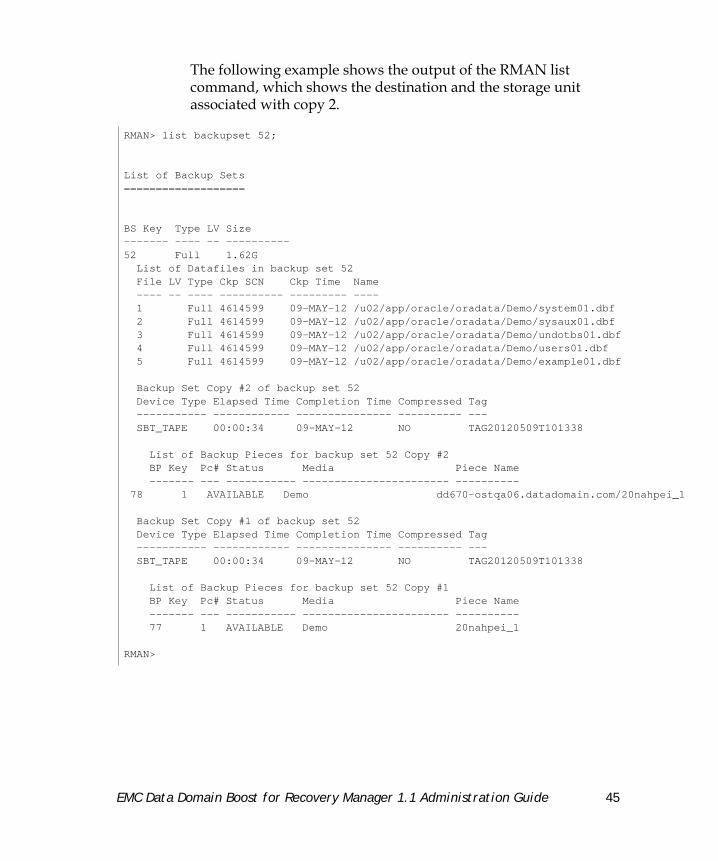
The following example shows the output of the RMAN list command, which shows the destination and the storage unit associated with copy 2.
RMAN> list backupset 52;
List of Backup Sets===================
BS Key Type LV Size------- ---- -- ----------52 Full 1.62G List of Datafiles in backup set 52 File LV Type Ckp SCN Ckp Time Name ---- -- ---- ---------- --------- ---- 1 Full 4614599 09-MAY-12 /u02/app/oracle/oradata/Demo/system01.dbf 2 Full 4614599 09-MAY-12 /u02/app/oracle/oradata/Demo/sysaux01.dbf 3 Full 4614599 09-MAY-12 /u02/app/oracle/oradata/Demo/undotbs01.dbf 4 Full 4614599 09-MAY-12 /u02/app/oracle/oradata/Demo/users01.dbf 5 Full 4614599 09-MAY-12 /u02/app/oracle/oradata/Demo/example01.dbf
Backup Set Copy #2 of backup set 52 Device Type Elapsed Time Completion Time Compressed Tag ----------- ------------ --------------- ---------- --- SBT_TAPE 00:00:34 09-MAY-12 NO TAG20120509T101338
List of Backup Pieces for backup set 52 Copy #2 BP Key Pc# Status Media Piece Name ------- --- ----------- ----------------------- ---------- 78 1 AVAILABLE Demo dd670-ostqa06.datadomain.com/20
Backup Set Copy #1 of backup set 52 Device Type Elapsed Time Completion Time Compressed Tag ----------- ------------ --------------- ---------- --- SBT_TAPE 00:00:34 09-MAY-12 NO TAG20120509T101338
List of Backup Pieces for backup set 52 Copy #1 BP Key Pc# Status Media Piece Name ------- --- ----------- ----------------------- ---------- 77 1 AVAILABLE Demo 20nahpei_1
RMAN>
EMC Data Domain Boost for Recovery Manager 1.1 Administration Guide 45

46 Configuring DD Boost for RMAN
5 Data Domain System Administration
This chapter covers the following topics:
• Restricting DD Boost Access to Specific Database Servers on page 47
• File Replication Version Compatibility on page 48
• Modifying an Interface Group on page 49
Note: Complete descriptions of commands used in this guide are provided in the DD OS Command Reference Guide.
Restricting DD Boost Access to Specific Database Servers
By default, when the DD Boost service is enabled on a Data Domain system, the service is accessible to all database servers. The administrator of the Data Domain system may use the ddboost access command to override this default, and restrict access to a certain set of database servers.
This example shows removing the default access permission (for all servers), then adding new access permissions for two specific database servers, databaseserver1.datadomain.com and databaseserver2.datadomain.com:
This set of steps establishes a set of access controls which enables DD Boost access only to the two specified database servers.
ddboost disableddboost access del clients *ddboost access add clients databaseserver1.datadomain.com databaseserver2.datadomain.comddboost enable
EMC Data Domain Boost for Recovery Manager 1.0 Administration Guide 47
If there are no specific access controls established, the ddboost enable operation installs the default access control, which allows all hosts to access the DD Boost service. However, if there are any access control entries established, the ddboost enable operation does not modify the access control list, thus allowing the already-installed access controls to be honored.
Notes:
• Disabling DD Boost disables data access to all database servers.
• Administrators need to ensure that no backup jobs are running to the Data Domain system during these operations.
• A fully-qualified domain name, an IP address, or a DNS resolvable name of the client must be specified during the modification of the client access list.
File Replication Version CompatibilityThe Data Domain policy of upgrade compatibility for file replication follows:
• All maintenance and patch versions within a family, are backwardly compatible. A family is identified by the first two digits of the release number, such as 5.1. For example, 5.1.0.0, 5.1.0.2, 5.1.1.0, and 5.1.2.0 are backward compatible.
• File replication is backward compatible across two consecutive release families, such as 4.9 and 5.0, although only the current release within each family is tested.
• The destination Data Domain system must be at the highest version. Cases in which the destination node is at a lower revision than the source node or nodes are not supported.
• For bidirectional file replication, both destination and source must run the same release.
• File replication over WAN should use the Data Domain replication command to adjust for low bandwidth and long latency.
• To configure encrypted file replication, both the source and the destination must run DD OS 5.0 or later.
48 Data Domain System Administration

Modifying an Interface GroupAfter the interface group is set up, you can add or delete interfaces from the group. The following example shows how to remove an interface from the configured interface group on the Data Domain system.
1. Make sure that no jobs are active from RMAN to the Data Domain system on the interface that you wish to remove from the group. You can do this from the Data Domain system by checking the status of existing connections in the interface group by enter the following command:
# ddboost show connections
Sample output
Client Connections:
Max Client Connections: 149
ifgroup status: Enabled
Interface ifgroup -------------- Connections --------
member Backup Restore Control * Total
----------------- -------- -------- -------- -------- --------
192.168.54.138 yes 15 0 2 17
192.168.52.192 yes 15 0 3 18
192.168.55.206 yes 16 0 3 19
----------------- -------- -------- -------- -------- --------
Total Connections 46 0 8 54
----------------- -------- -------- -------- -------- --------* Control connections for file-replication, file operations
:
EMC Data Domain Boost for Recovery Manager 1.0 Administration Guide 49
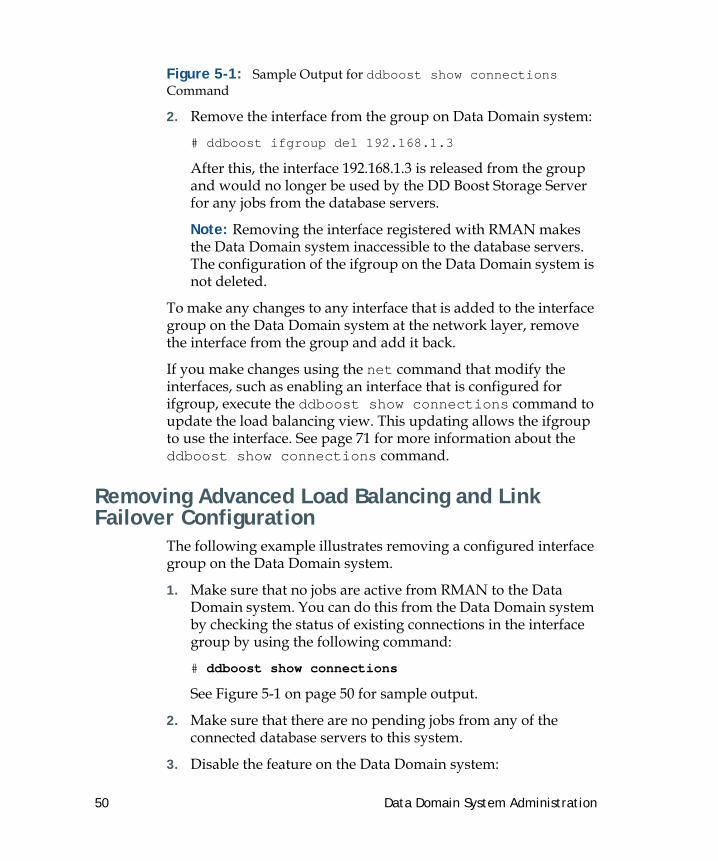
Figure 5-1: Sample Output for ddboost show connections Command
2. Remove the interface from the group on Data Domain system:
# ddboost ifgroup del 192.168.1.3
After this, the interface 192.168.1.3 is released from the group and would no longer be used by the DD Boost Storage Server for any jobs from the database servers.
Note: Removing the interface registered with RMAN makes the Data Domain system inaccessible to the database servers. The configuration of the ifgroup on the Data Domain system is not deleted.
To make any changes to any interface that is added to the interface group on the Data Domain system at the network layer, remove the interface from the group and add it back.
If you make changes using the net command that modify the interfaces, such as enabling an interface that is configured for ifgroup, execute the ddboost show connections command to update the load balancing view. This updating allows the ifgroup to use the interface. See page 71 for more information about the ddboost show connections command.
Removing Advanced Load Balancing and Link Failover Configuration
The following example illustrates removing a configured interface group on the Data Domain system.
1. Make sure that no jobs are active from RMAN to the Data Domain system. You can do this from the Data Domain system by checking the status of existing connections in the interface group by using the following command:
# ddboost show connections
See Figure 5-1 on page 50 for sample output.
2. Make sure that there are no pending jobs from any of the connected database servers to this system.
3. Disable the feature on the Data Domain system:
50 Data Domain System Administration
# ddboost ifgroup disable
4. Reset the interface group:
# ddboost ifgroup reset
All the interfaces are released from the group. However, database servers can still access the DD Boost storage server on the Data Domain system on the interface registered with RMAN. In the example above, the Data Domain system is still registered with RMAN using 192.168.1.1.
EMC Data Domain Boost for Recovery Manager 1.0 Administration Guide 51

52 Data Domain System Administration
6 Basic Troubleshooting
This chapter provides basic troubleshooting tips that might enable customers to resolve issues on their own. For issues that cannot be resolved, customers should contact their contracted support providers.
This chapter covers the following topics:
• Investigating Problems on page 53
• Reporting Problems on page 54
• Data Domain System Settings for File-Replication on page 54
• Lockbox Troubleshooting Information on page 54
• Failure to Load Media Management Library on page 55
For more information, see the Data Domain Knowledge Base, which is available at https://my.datadomain.com.
Investigating ProblemsWhen investigating a problem, be aware that the DD Boost software has components on both a Data Domain system and an RMAN system. The two environments must be compatible. The following troubleshooting considerations apply to both systems:
• Supported Configurations
Ensure that you have a supported configuration as specified in the Data Domain Boost Compatibility List. A supported configuration can become unsupported if any component changes.
This list is available from the Data Domain Support portal (https://my.datadomain.com). Navigate to the Documentation > Compatibility Matrices page and select Data Domain Boost Compatibility List.
• Authorization Failures
EMC Data Domain Boost for Recovery Manager 1.0 Administration Guide 53
If you encounter authorization failures, ensure that all of the systems have correct access credentials for the other systems.
Reporting ProblemsWhen reporting a problem to Data Domain always include:
• The sbtio.log file (This is critical for analysis.)
• Output of the RMAN command: show all
• All RMAN commands that you used.
If possible, delete the sbtio.log file, recreate the issue in as few steps as possible, then capture the sbtio.log file to send with your problem report. Set TRACE level to 5 (with the CONFIGURE CHANNEL command) when attempting to recreate your problem.
RMAN determines where the sbtio.log file is located. The sbtio.log files are usually located in the directory defined by the user_dump_dest initialization variable or in the $ORACLE_HOME/rdbms/log directory. If all else fails, go to the $ORACLE_HOME directory and try a find command to locate it.
Data Domain System Settings for File-Replication
For all DD OS versions, the replication throttle command controls replication. Setting the throttle too low can lead to file replication problems. See the 5.1 DD OS Administration Guide for information on using the replication throttle command to display or control the throttle settings.
Lockbox Troubleshooting InformationThe ddboost.config file is the DD Boost RMAN configuration file. It contains the saved username/password pairs for the DD systems you are using. If you are connecting to system ddr-system as user ddr-user with password user-password, then there is an entry in this file that says when making connections to ddr-system make the connection using username ddr-user with password
54 Basic Troubleshooting
user-password. This file is encrypted and maintained with the RSA lockbox libraries (which are installed as part of the DD Boost RMAN plugin) hence some of the error strings returned in sbtio.log say lockbox.
If you change the hostname of the Data Domain system without changing it in all the scripts etc., then attempts to connect to ddr-system fail because there is no host with that name. If you use the new hostname in all scripts, then a new entry for that system is added with the new hostname to ddboost.config.
The ddboost.config file is located in the ORACLE_HOME/config directory. If it is not found, it is created. Thus, when you specify the ORACLE_HOME directory, it must contain a /config directory. Not having this directory present can cause failure to create the ddboost.config file.
If you uninstall the boost library, check to see that the old ddboost.config file(s) are deleted. There are four:
• ddboost.config
• ddboost.config.bak
• ddboost.config.FCD
• ddboost.config.bak.FCD
When installing the RMAN DD Boost plugin, make sure that you have a writable /config directory in your specified ORACLE_HOME directory.
Deleting the ddboost.config file(s) is never a problem because the entries will be re-created on demand if the RMAN scripts are rerun.
Failure to Load Media Management LibraryAfter installation and configuration of the RMAN plugin is completed, attempts to use the RMAN plugin sometimes result in RMAN failures with the RMAN error message “Failed to load Media Management Library” as shown in the following RMAN error report:
EMC Data Domain Boost for Recovery Manager 1.0 Administration Guide 55

RMAN-00571: =====================================RMAN-00569: ===ERROR MESSAGE STACK FOLLOWS======RMAN-00571: =====================================
==========================================
RMAN-03009: failure of allocate command on dd0 channel at 01/07/2013 13:40:36
ORA-19554: error allocating device, device type: SBT_TAPE, device name:
ORA-27211: Failed to load Media Management Library
This error usually occurs in a Unix environment (Linux, Solaris, HP/UX, or AIX). The error message indicates that RMAN has not been able to locate one of the required libraries, either libddobk.so or libDDBoost.so or both. In different Linux environments, the search rules used for locating shared libraries, such as the RMAN plugin libraries, are complex. The search rules can depend on the settings of various environment variables, such as LD_LIBRARY_PATH, LD_LIBRARY_PATH_64, or LD_RUN_PATH. These rules and environment variables may be set in your environment by other applications and may cause RMAN to be unable to locate the needed libraries.
If you encounter this error in a Unix environment, the following steps can help find the source of the problem and correct it.
1. Check that the pathname of the libddobk.so library was correctly specified in the RMAN configuration command. (See Configuring RMAN on page 38.) If this is not correct, the libddobk.so library cannot be found. Check that the libddobk.so exists in the specified directory and the directory and the library file have appropriate access for the user.
2. Check that the Oracle home directory was correctly specified in the RMAN configuration command. (See Configuring RMAN on page 38.) If this is not correct, the libDDBoost.so library cannot be found. Check that the /lib subdirectory exists in the Oracle home directory and that the libDDboost.so library exists in this directory and that the directory and library file have appropriate access for the user.
56 Basic Troubleshooting
3. Use the ldd command on the libddobk.so library to see if the libraries it uses can be found, as shown in the following example:
# ldd libddobk.so
libpthread.so.0 => /lib64/libpthread.so.0 (0x00002aaaaabf1000)
librt.so.1 => /lib64/librt.so.1 (0x00002aaaaad06000)
libm.so.6 => /lib64/libm.so.6 (0x00002aaaaae20000)
libdl.so.2 => /lib64/libdl.so.2 (0x00002aaaaafa7000)
libDDBoost.so => not found
libc.so.6 => /lib64/libc.so.6 (0x00002aaaab420000)
/lib64/ld-linux-x86-64.so.2 (0x0000555555554000)
All the libraries should show as resolving. If libDDBoost.so is shown as “not found” as in this example, then that is the missing library. Note that libDDBoost.so may be shown as “not found” even though there is a libDDBoost.so file in the same directory as libddobk.so.
4. Correcting the problem depends on your environment and your other applications. One possible solution is to place a link to the libDDBoost.so library in a place where other libraries are being found. In this example, placing a link to libDDBoost.so in /lib64 can solve the problem:
cd /lib64ln –s /u01/app/oracle/product/11.2.0/db_home1/lib/libDDBoost.so libDDBoost.so
It may be possible to solve the problem by adding the directory containing libDDBoost.so to an environment variable such as LD_LIBRARY_PATH, LD_LIBRARY_PATH_64, or LD_RUN_PATH. Use caution when using or modifying environment variables, as their use varies from system to system and changing them might impact other applications.
5. After making your change, use ldd to verify that the library is resolved:
# ldd libddobk.so
EMC Data Domain Boost for Recovery Manager 1.0 Administration Guide 57
libpthread.so.0 => /lib64/libpthread.so.0 (0x00002aaaaabf1000)
librt.so.1 => /lib64/librt.so.1 (0x00002aaaaad06000)
libm.so.6 => /lib64/libm.so.6 (0x00002aaaaae20000)
libdl.so.2 => /lib64/libdl.so.2 (0x00002aaaaafa7000)
libDDBoost.so => /u01/app/oracle/product/11.2.0/db_home1/lib/libDDBoost.so (0x00002aaaab0ab000)
libc.so.6 => /lib64/libc.so.6 (0x00002aaaab420000)
/lib64/ld-linux-x86-64.so.2 (0x0000555555554000)
58 Basic Troubleshooting

7 Using the DD Boost Commands
This chapter describes the DD Boost commands that you use to manage the DD Boost feature on the Data Domain system.
Note: For information about configuring DD Boost using the graphical-user interface-based Enterprise Manager, see the DD OS 5.1 Administration Guide.
The ddboost command includes the following options.
access Manage DD Boost access for clients. Page 60
destroy Delete all storage units and their contents from the Data Domain system.
Page 60
disable Disable DD Boost. Page 61
enable Enable DD Boost. Page 61
file-replication
Set, reset, or show the status of the low- bandwidth optimization and/or encryption option for file replication. Show or reset statistics, history, and performance.
Page 61
ifgroup For Advanced Load Balancing and Link Failover: Manage interface group (IP addresses) on a Data Domain private network that processes data transfer.
Page 67
option Set, reset, or show the status of the distributed segment processing feature.
Page 69
reset Delete the DD Boost user and reset statistics. Clear all job connection counters shown in the output of the ddboost show connections command in the event that network connection is lost.
Page 70
set user-name Set the DD Boost user name when DD boost is enabled
Page 70
show Show the DD Boost connections, DD Boost histogram, or statistics.
Page 71
EMC Data Domain Boost for Recovery Manager 1.0 Administration Guide 59
ddboost Command Options
accessManage DD Boost access for clients.
ddboost access add clients
ddboost access add clients client-list
Add clients to DD Boost access list.
ddboost access delete clients
ddboost access del clients client-list
Delete clients from DD Boost access list.
ddboost access reset
ddboost access reset
Reset DD Boost client access list to factory default.
ddboost access show
ddboost access show
Show DD Boost client access list.
destroyddboost destroy
Administrators use this command to delete all storage units and their contents from the Data Domain system. The command
status Show whether DD Boost is enabled or disabled.
Page 74
storage-unit Create and delete a storage unit, or list the storage units and files in a storage unit.
Page 74
60 Using the DD Boost Commands
permanently removes all of the data (files) contained in the storage units.
You must also manually remove (expire) the corresponding catalog entries.
disableddboost disable
Administrators use this command to disable DD Boost for the Data Domain system.
enableddboost enable
Administrators use this command to enable DD Boost.
Whenever the user, user ID (UID), or group ID (GID) changes, the Data Domain system updates all files and storage units the next time that the ddboost enable command is issued.
file-replication
file-replication option reset
ddboost file-replication option reset {low-bw-optim | encryption}
Administrators can use this command to reset low-bandwidth optimization and/or encryption to its default value, which is disabled.
file-replication option set
ddboost file-replication option set {encryption {enabled | disabled}|low-bw-optim {enabled | disabled}
This command must be entered on both Data Domain systems—the source and destination (target) systems. Only an administrator can set these two options.
Encryption must be enabled on both the source and destination systems.
EMC Data Domain Boost for Recovery Manager 1.0 Administration Guide 61
Low-bandwidth optimization, which is disabled by default, is designed for use on networks with less than 6 Mbps aggregate bandwidth. Do not use this option if maximum filesystem write performance is required.
After you enable low-bandwidth optimization on both systems, both systems must undergo a full cleaning cycle to prepare the existing data. Enter this CLI command on the source and destination systems:
# filesys clean start
The amount of time the cleaning cycle takes depends on the amount of data currently on the Data Domain system.
file-replication option show
ddboost file-replication option show [low-bw-optim]| [encryption]
Use this command to show whether low-bandwidth optimization and/or encryption is enabled or disabled for file replication.
file-replication reset stats
ddboost file-replication reset stats
Administrators can use this command to reset file-replication statistics when DD Boost is enabled.
file-replication show active
ddboost file-replication show active
Use this command to show the status of a DD Boost file replication transfer to a Data Domain system. Prior to DD OS 5.1, this command only showed the status of DD Boost file replication transfers outbound from a Data Domain system. On a DD OS 5.1, this command also shows the status of DD Boost file replication transfers inbound to a Data Domain system.
The low-bandwidth optimization status output indicates either that it is enabled and running, or that it is enabled but there is a configuration mismatch.
62 Using the DD Boost Commands
file-replication show detailed-file-history
ddboost file-replication show detailed-file-history [duration duration{day | hr}]
This command shows the file-replication history over time. The output is organized by file; it is not cumulative data. You must specify a duration.
The data for each file name is organized by date, time, and direction (outbound or inbound). Values are given in KB for pre-compressed, post-filtered, post-low-bw-option, post-compressed, and network data. The last value is an error code; 0 indicates no error occurred. A sample line with a description of each column follows:
• Date: 2010/06/16
• Time: 07:48:22
• Direction: Outbound
• File name: /data/col1/x-ddp1/PEOST_00000001:0000000000:BEOST:4:0::
• Pre-compressed: 3,765,837
• Post-filtered: 30,802
• Post-low-bw-optim: 30,802
• Post-compressed: 17,423
• Network: 65,550
• Error code: 0
file-replication show detailed-history
ddboost file-replication show detailed-history [duration duration{day | hr}] [interval hr]
This command shows the file-replication history over time. A cumulative history is shown, as opposed to a view by file name. You must specify a duration.
Data is organized by date, time, and direction (outbound or inbound). Cumulative values are given in KB for pre-compressed,
EMC Data Domain Boost for Recovery Manager 1.0 Administration Guide 63
Errors
0
0
post-filtered, post-low-bw-option, post-compressed, and network data. The last value is an error code; 0 indicates no error occurred.
file-replication show file-history
ddboost file-replication show file-history [duration duration{day | hr}]
Use this command to show the data transfer history for inbound and outbound traffic on each file in Data Domain system’s backup directory for a given duration at a specified interval. The following is shown for inbound and outbound traffic by date and time:
• amount of pre-compressed data in KB
• amount of post-compressed data in KB
• network transfer data in KB
• low-bandwidth optimization factor
• number of errors
file-replication show history
ddboost file-replication show history [duration duration{day | hr}] [interval hr]
Use this command to show the data transfer history between the source and destination (target) Data Domain systems. The following information is shown for inbound and outbound traffic for a given duration at a specified interval:
• amount of pre-compressed data in KB
• amount of post-compressed data in KB
Example of ddboost file-replication show file history command output:
Date Time Direction Filename Pre-Comp (KB)
Post-Comp (KB)
Network (KB)
Low-bw-optim
2009/08/31 15:13:09 Inbound /backup/source.tar
47,738 26,634 27,527 1.32
2009/08/31 15:13:09 Outbound /backup/destin.tar
14,327 8,638 9,034 1.21
64 Using the DD Boost Commands
rs
• network transfer data in KB
• low-bandwidth optimization factor
• number of errors
file-replication show performance
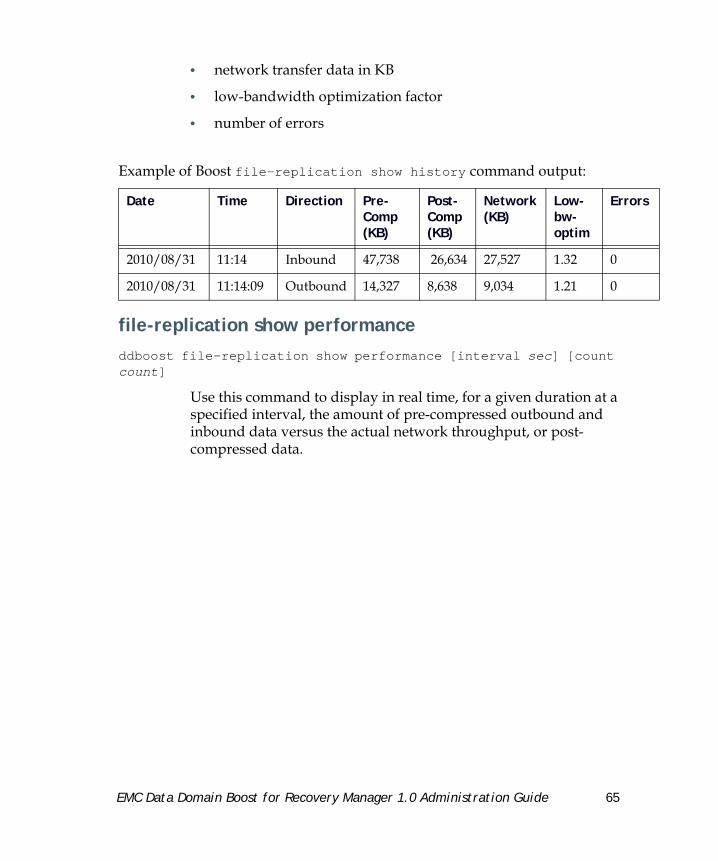
ddboost file-replication show performance [interval sec] [count count]
Use this command to display in real time, for a given duration at a specified interval, the amount of pre-compressed outbound and inbound data versus the actual network throughput, or post-compressed data.
Example of Boost file-replication show history command output:
Date Time Direction Pre-Comp (KB)
Post-Comp (KB)
Network (KB)
Low-bw-optim
Erro
2010/08/31 11:14 Inbound 47,738 26,634 27,527 1.32 0
2010/08/31 11:14:09 Outbound 14,327 8,638 9,034 1.21 0
EMC Data Domain Boost for Recovery Manager 1.0 Administration Guide 65
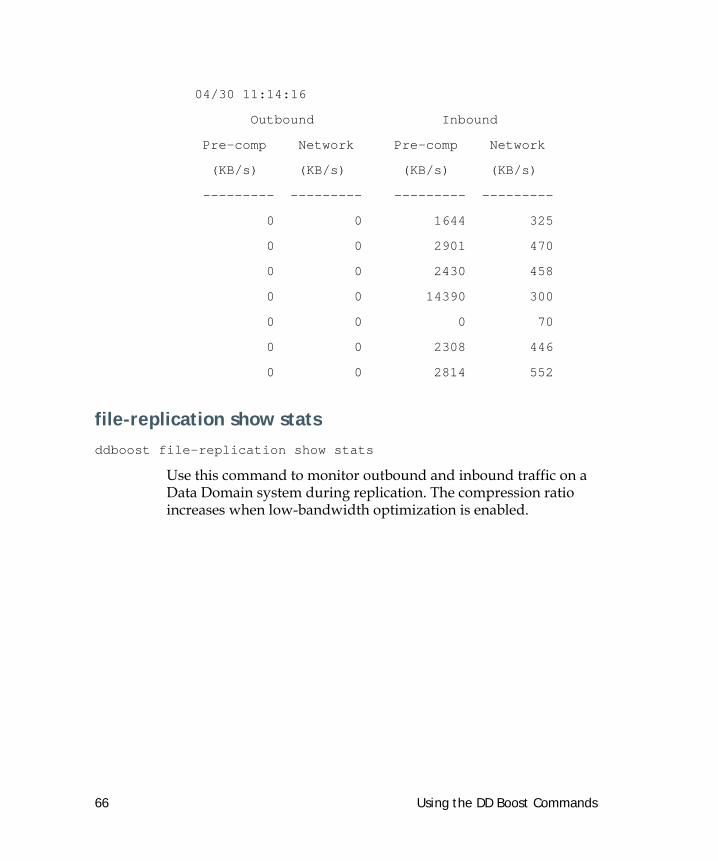
04/30 11:14:16
Outbound Inbound
Pre-comp Network Pre-comp Network
(KB/s) (KB/s) (KB/s) (KB/s)
--------- --------- --------- ---------
0 0 1644 325
0 0 2901 470
0 0 2430 458
0 0 14390 300
0 0 0 70
0 0 2308 446
0 0 2814 552
file-replication show stats
ddboost file-replication show stats
Use this command to monitor outbound and inbound traffic on a Data Domain system during replication. The compression ratio increases when low-bandwidth optimization is enabled.
66 Using the DD Boost Commands
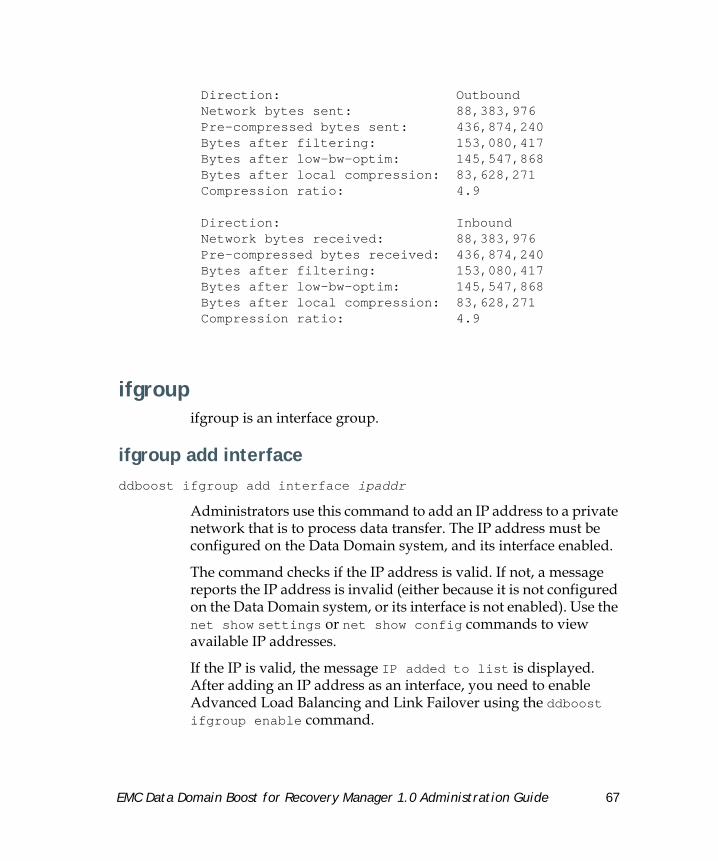
Direction: OutboundNetwork bytes sent: 88,383,976Pre-compressed bytes sent: 436,874,240Bytes after filtering: 153,080,417Bytes after low-bw-optim: 145,547,868Bytes after local compression: 83,628,271Compression ratio: 4.9
Direction: InboundNetwork bytes received: 88,383,976Pre-compressed bytes received: 436,874,240Bytes after filtering: 153,080,417Bytes after low-bw-optim: 145,547,868Bytes after local compression: 83,628,271Compression ratio: 4.9
ifgroupifgroup is an interface group.
ifgroup add interface
ddboost ifgroup add interface ipaddr
Administrators use this command to add an IP address to a private network that is to process data transfer. The IP address must be configured on the Data Domain system, and its interface enabled.
The command checks if the IP address is valid. If not, a message reports the IP address is invalid (either because it is not configured on the Data Domain system, or its interface is not enabled). Use the net show settings or net show config commands to view available IP addresses.
If the IP is valid, the message IP added to list is displayed. After adding an IP address as an interface, you need to enable Advanced Load Balancing and Link Failover using the ddboost ifgroup enable command.
EMC Data Domain Boost for Recovery Manager 1.0 Administration Guide 67
Notes:
• If an interface (or a NIC that has multiple interfaces) fails, all the in-flight jobs to that interface transparently fail over to a healthy interface in the ifgroup. Any jobs that are started subsequent to the failure are routed to the healthy interfaces. You can add public or private IP addresses for data transfer connections.
• It is not recommended that you use 1 GigE and 10 GigE connections in the same interface group.
• You can add public or private IP addresses for data transfer connections.
ifgroup del interface
ddboost ifgroup del interface ipaddr
Administrators use this command to remove a valid IP address added as an interface.
If you are attempting to delete the last IP address interface, you are informed that the ifgroup will be disabled and are given the option of terminating this command.
ifgroup disable
ddboost ifgroup disable
Administrators use this command to disable the Advanced Load Balancing and Link Failover option for new jobs. Currently running jobs are not affected and continue to run.
If DD Boost is disabled, the message disabled is displayed.
ifgroup enable
ddboost ifgroup enable
Administrators use this command to enable Advanced Load Balancing and Link Failover. At least one IP address must have already been added.
68 Using the DD Boost Commands
ifgroup reset
ddboost ifgroup reset
Administrators use this command to remove the interfaces for Advanced Load Balancing and Link Failover and to disable the ifgroup.
The ddboost ifgroup reset command is equivalent to issuing the ddboost ifgroup disable command followed by issuing multiple ddboost ifgroup del interface interface ipaddr commands.
ifgroup show config
ddboost ifgroup show config
Display IP addresses added to the interface group.
ifgroup status
ddboost ifgroup status
Use this command to show whether Link Aggregation is enabled or disabled.
option
option reset
ddboost option reset distributed-segment processing
Administrators use this command to reset distributed segment processing to the default option, which is enabled.
option set
ddboost option set distributed-segment-processing {enabled | disabled}
Administrators can use this command to enable or disable the distributed segment processing feature on the DD OS. By default, it is enabled for DD OS 5.1. If this feature presents any problem for
EMC Data Domain Boost for Recovery Manager 1.0 Administration Guide 69
a database server, use this command to disable the feature on the Data Domain system.
Distributed segment processing is supported only if the feature is enabled on the Data Domain system.
Notes:
• Distributed segment processing is enabled by default in DD OS 5.1.
• If a system is upgraded from DD OS 4.9 to DD OS 5.0 and the boost option was disabled before the upgrade, then the distributed-segment-processing option is disabled after the upgrade.
option show
ddboost option show distributed-segment-processing
Use this command to show whether the distributed segment processing option is enabled or disabled.
reset
reset stats
ddboost reset stats
Administrators use this command as follows:
• to reset all statistics when DD Boost is enabled, or
• as a network recovery procedure to clear job connections after the network connection has been lost.
reset user-name
ddboost reset user-name
Delete and reset the DD Boost user name.
set user-nameddboost set user-name user-name
70 Using the DD Boost Commands
Set the DD Boost user name when DD Boost is enabled.
show
show connections
ddboost show connections
Use this command to show the following information:
• the number of active clients, and for each active client:
• the client’s name
• whether or not the client is idle (yes/no)
• the number of installed CPUs
• the amount of memory in MiB
• the installed RMAN plugin version number
• the name and version of the operating system
• the RMAN version number.
• the number of connections that a system uses for DD Boost, and whether these connections are spread across interfaces using Advanced Load Balancing and Link Failover. (See sample output for client connections below.)
• the number of connections used for a given group, even when the interface has been removed from the ifgroup.
• an overview of interfaces available for DD Boost.
EMC Data Domain Boost for Recovery Manager 1.0 Administration Guide 71

Client Connections:
Max Client Connections: 149
ifgroup status: Enabled
Interface ifgroup -------------- Connections --------
member Backup Restore Control * Total
----------------- -------- -------- -------- -------- --------
192.168.54.138 yes 15 0 2 17
192.168.52.192 yes 15 0 3 18
192.168.55.206 yes 16 0 3 19
----------------- -------- -------- -------- -------- --------
Total Connections 46 0 8 54
----------------- -------- -------- -------- -------- --------* Control connections for file-replication, file operations
72 Using the DD Boost Commands
show histogram
ddboost show histogram [op]
Use this command to display a DD Boost histogram for the Data Domain system.
show stats
ddboost show stats [interval seconds] [count count]
Use this command to show the output of previous show stats command, the number of bytes written to and read from files contained in storage units, and the number of files created and deleted from storage units. The number of errors encountered for each operation is also shown. Optionally, you can show statistics for a specific number of seconds. The count displays the number of lines equal to the count value.
If distributed segment processing is enabled, the number of bytes transferred via distributed segment processing and the amount of compression achieved is displayed.
op The name of the operation.
mean-ms The mathematical mean time for completion of the operations.
stddev The standard deviation for time to complete operations, derived from the mean time.
max-s The maximum time taken for a single operation.
2,4,6,8, or 10ms
The number of operations that took less than the specified number of milliseconds (ms).
100ms The number of operations that took between 10 ms and 100 ms.
1s The number of operations that took between 100 ms and one second.
10s The number of operations that took between 1 second and 10 seconds.
>10s The number of operations that took over 10 seconds.
EMC Data Domain Boost for Recovery Manager 1.0 Administration Guide 73
show user-name
ddboost show user-name
Display the current DD Boost user.
statusddboost status
Enter this command to determine whether DD Boost is enabled or disabled.
storage-unit
storage-unit create
ddboost storage-unit create storage-unit-name
Administrators use this command to create a storage unit with a given name.
storage-unit delete
ddboost storage-unit delete storage-unit-name
Administrators use this command to delete a specified storage unit and all of its contents. You must also manually remove (expire) the corresponding catalog entries.
storage-unit show
ddboost storage-unit show [compression] [storage-unit-name]
Use this command to display the names of all storage units or, optionally, the names of all files in a specified storage unit.
To display the compression for all storage units (the original byte size, global compression, and local compression for all storage units), enter the compression option.
Note: To interrupt the output of this command, press Ctrl+C.
74 Using the DD Boost Commands

Appendix A: Checklists and Notes
Installation and Configuration Checklist
Configure the Data Domain systemFor details about steps 1 - 6, refer to Chapter 3, Configuring the Data Domain System.
1. Add the DD Boost License.
2. Establish the servername, username and password for the Data Domain system.
Note: The server name, user name, and password must exactly match what is used in the send command of step 10.
3. Enable DD Boost.
4. Create a logical storage unit. (This name is the “STORAGE_UNIT=” PARM used in step 9.)
5. Enable Distributed Segment Processing.
6. Check connectivity. (Can I “ping” the DDR server name from the backup server?)Ensure firewall is not blocking ports.
Download and install the RMAN PluginFor details about steps 7 - 8, refer to Chapter 4, Configuring DD Boost for RMAN.
7. Download RMAN plugin.
8. Run install/setup
EMC Data Domain Boost for Recovery Manager 1.0 Administration Guide 75
Configure RMAN for your environmentFor details about steps 9 - 11, refer to Chapter 4, Configuring DD Boost for RMAN.
9. CONFIGURE CHANNEL DEVICE TYPE 'SBT_TAPE'(Setting correct “PARMS” is essential here.)
10. ALLOCATE CHANNEL (Setting library and issuing “send” command for servername, username, and password). The servername, username, and password must match exactly what is used in step 2.
11. CONFIGURE DEFAULT DEVICE TYPE 'SBT_TAPE'
Test the Installation by using sbttest (Optional)
sbttest is a diagnostic tool provided by Oracle. Before running sbttest with the DD Boost plugin, you must set the following system environment variables, using the same values that are required in the PARMS fields of step 9.
ORACLE_HOME
BACKUP_HOST
STORAGE_UNIT
Linux Example:
export ORACLE_HOME=/oracle_home
export BACKUP_HOST=MyDDR
export STORAGE_UNIT=MyStorageUnitName
sbttest MyFileName -trace MyTraceFileName-libname=/oracle_home/lib/libddobk.so
After successfully running sbttest you should remove the BACKUP_HOST and STORAGE_UNIT system environment variables.
76
Backup Examples:RMAN> backup copies 2 database format '%u_%p', 'destinationsystem/%u_%p'filesperset=1;
RMAN> backup database format '%u_%p';
EMC Data Domain Boost for Recovery Manager 1.0 Administration Guide 77

78
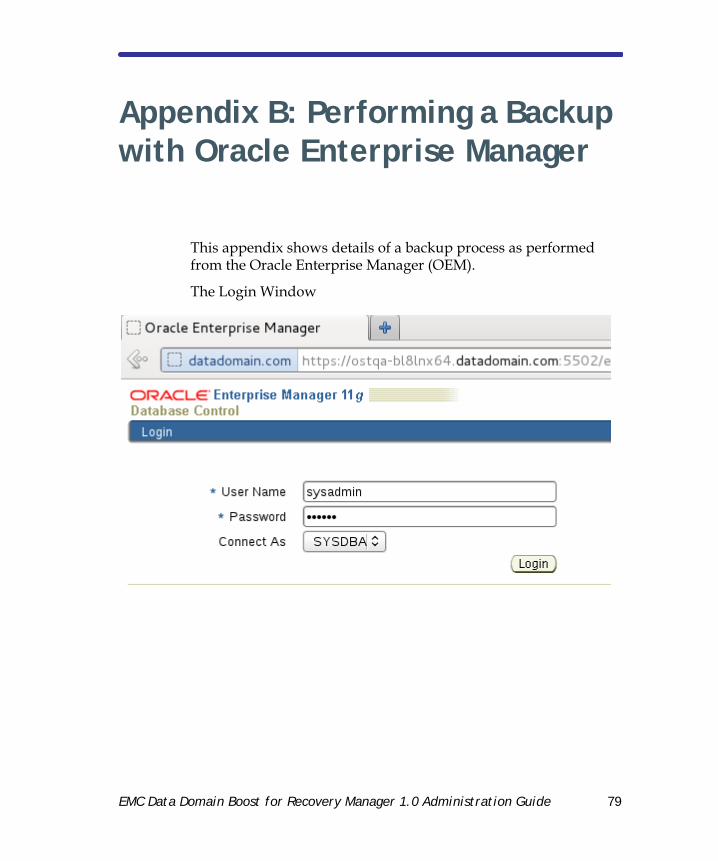
Appendix B: Performing a Backup with Oracle Enterprise Manager
This appendix shows details of a backup process as performed from the Oracle Enterprise Manager (OEM).
The Login Window
EMC Data Domain Boost for Recovery Manager 1.0 Administration Guide 79
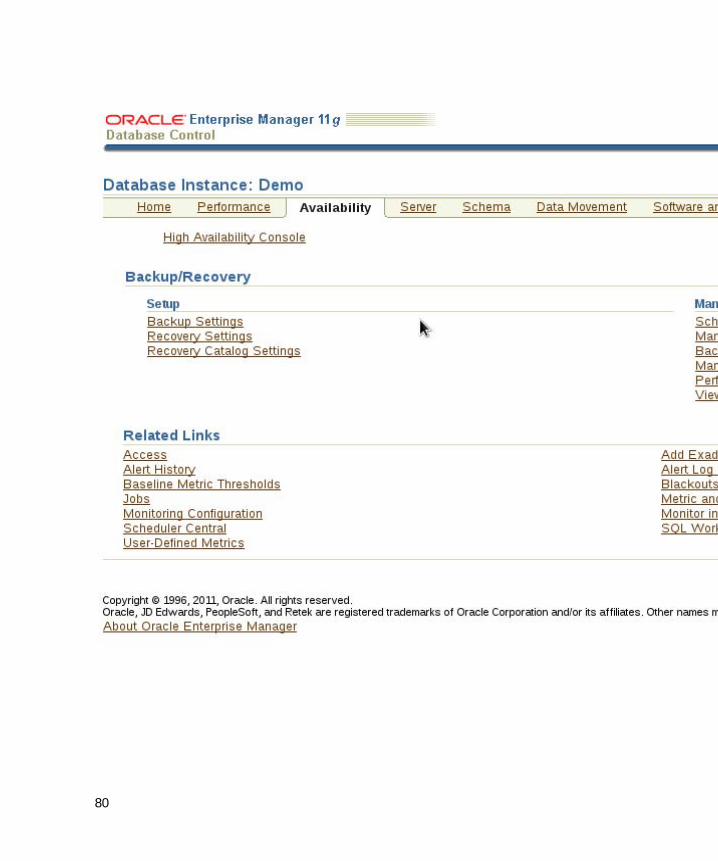
80
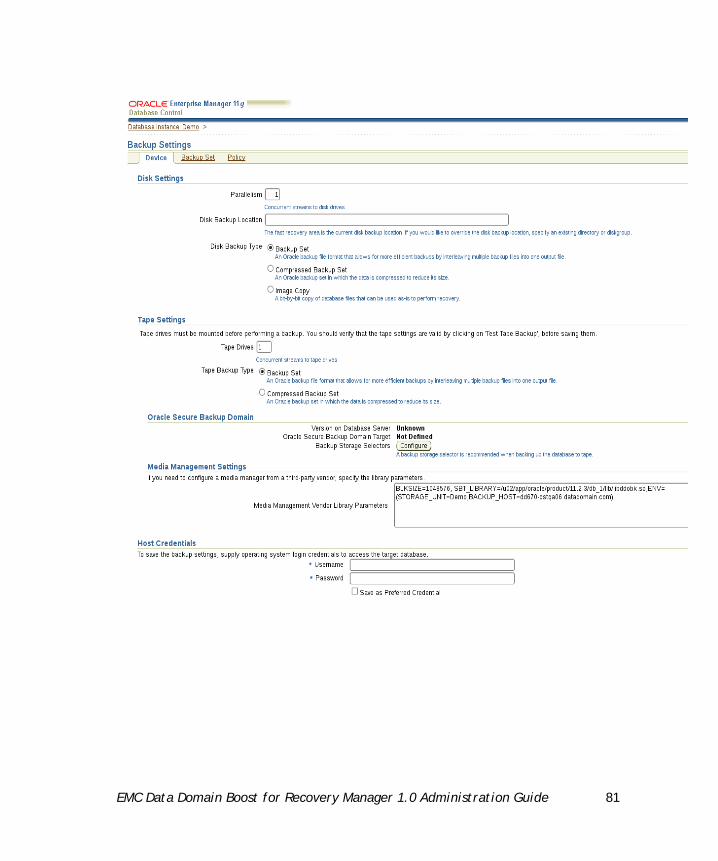
EMC Data Domain Boost for Recovery Manager 1.0 Administration Guide 81
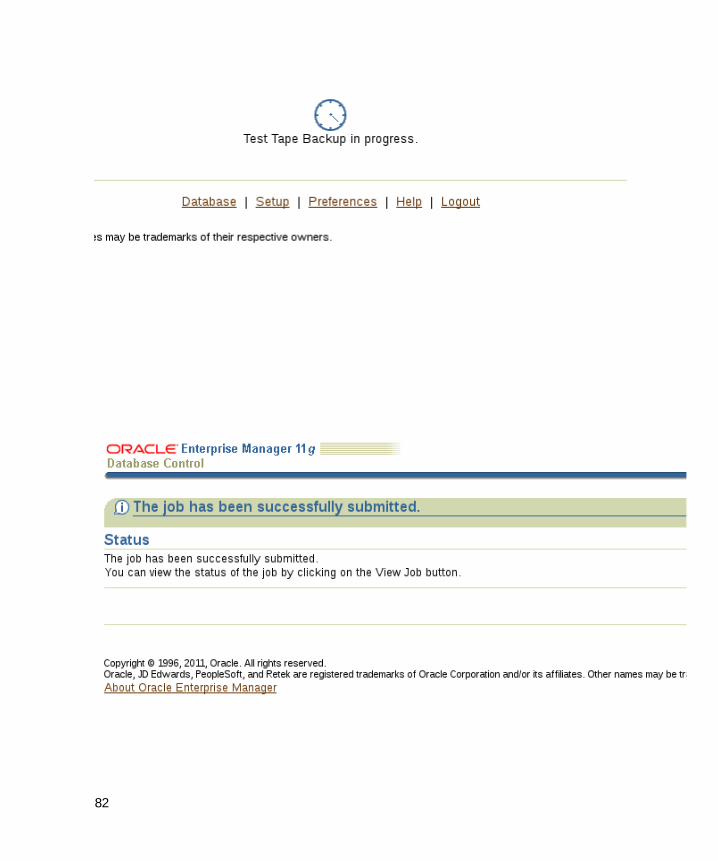
82

EMC Data Domain Boost for Recovery Manager 1.0 Administration Guide 83
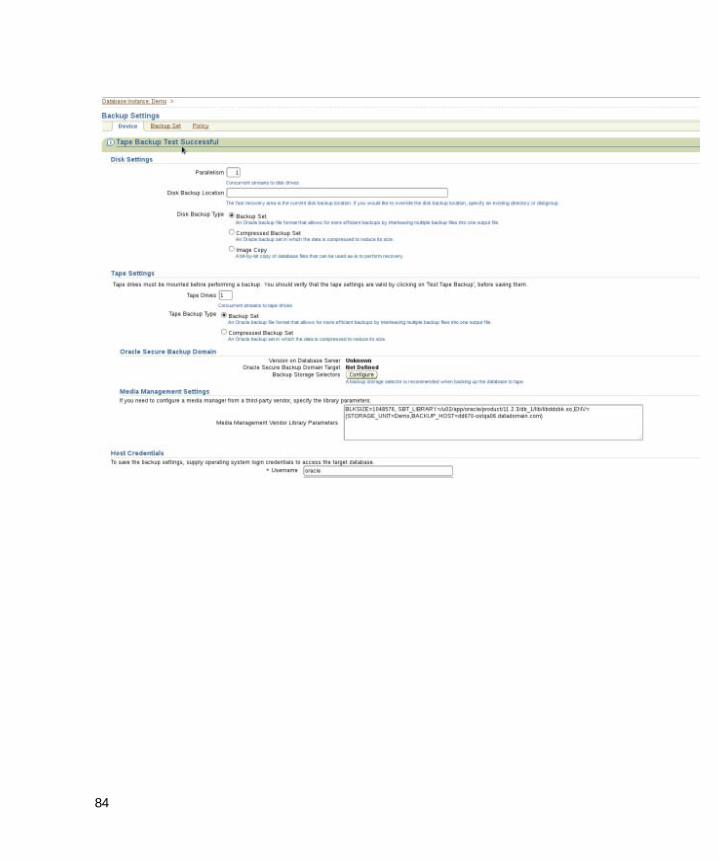
84
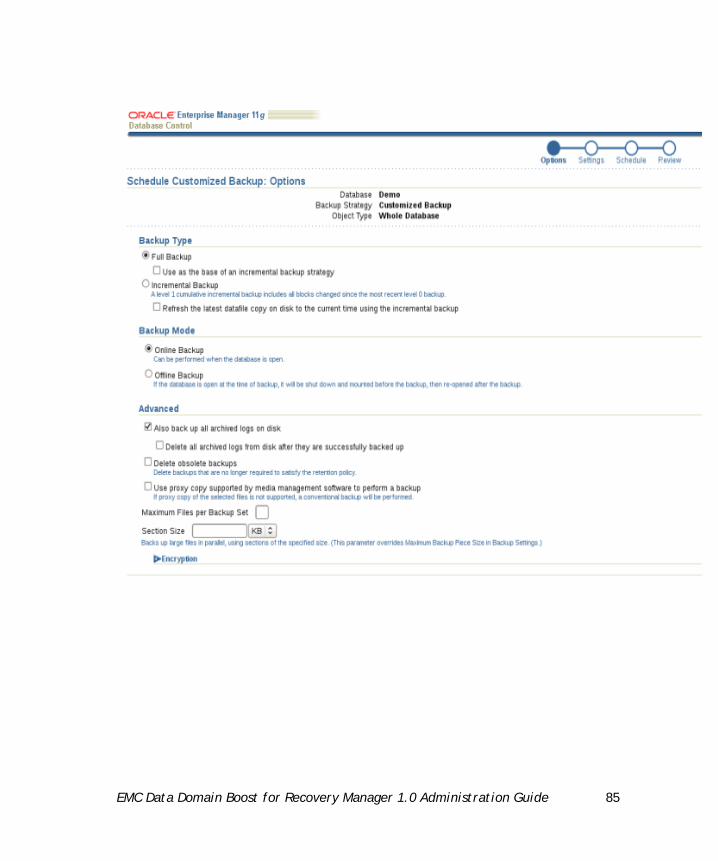
EMC Data Domain Boost for Recovery Manager 1.0 Administration Guide 85
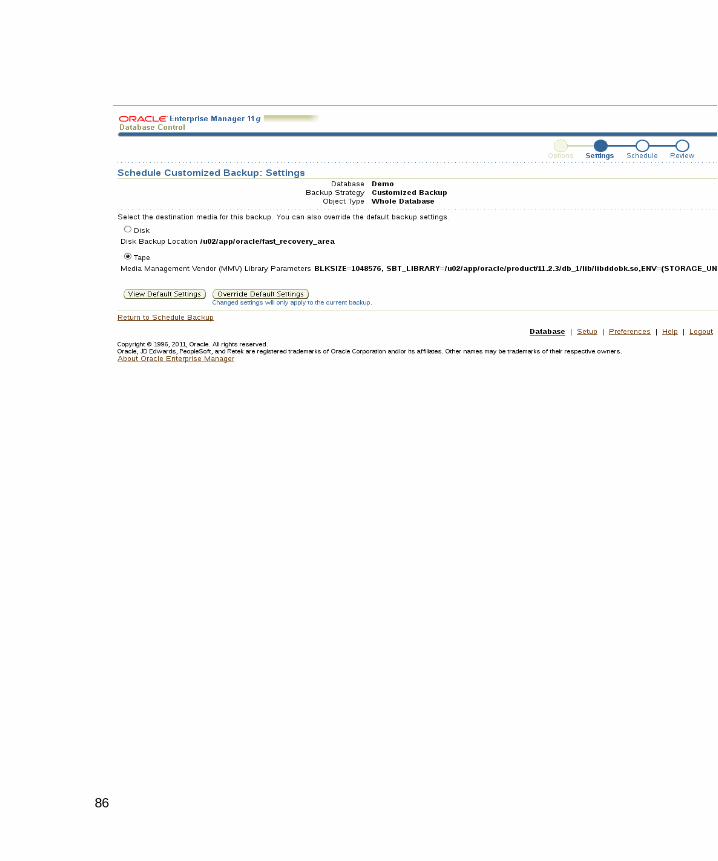
86
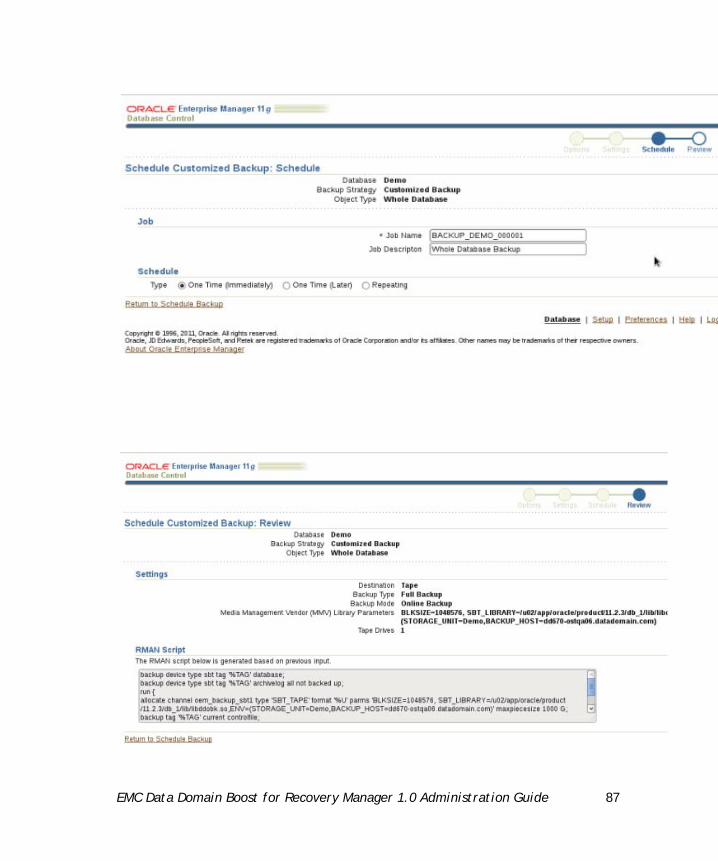
EMC Data Domain Boost for Recovery Manager 1.0 Administration Guide 87
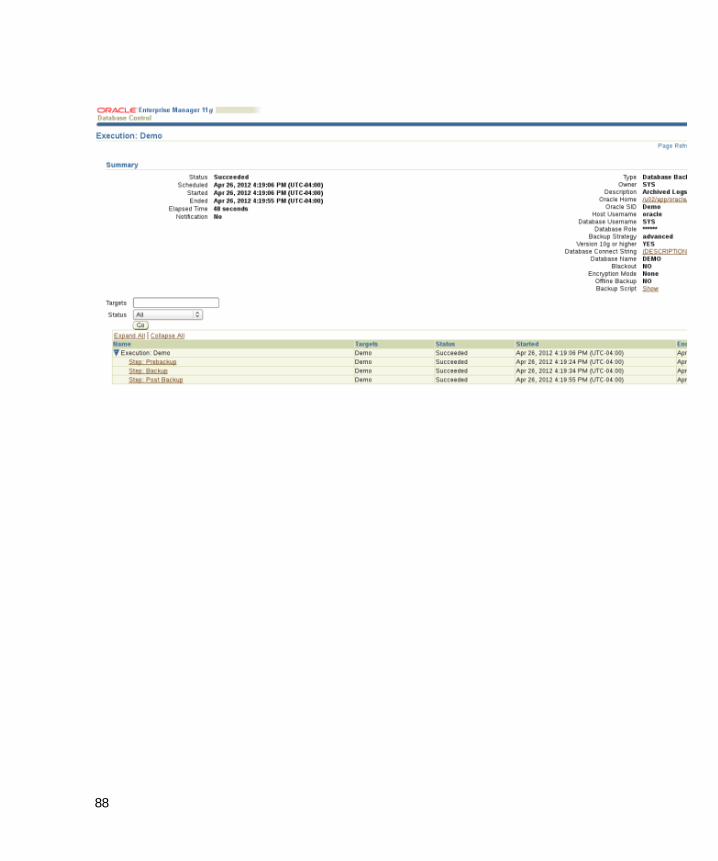
88

Appendix C: Install and Configure RMAN Plugin for Multiple SIDs Under One ORACLE_HOME
This appendix provides screen captures to show the process of installing and configuring the RMAN plugin for multiple Oracle databases (SIDs) unde one ORACLE_HOME. For details about specific commands and tasks refer to the main chapters of this document or to the references listed in About This Guide on page 9.
Screen 1 shows two SIDs, rman11 and rman2, under the same ORACLE_HOME:/u01/app/oracle/product/11.2.0/dbhome_1
Screen 1: Two RMAN Instances Under One ORACLE_HOME
EMC Data Domain Boost for Recovery Manager 1.0 Administration Guide 89
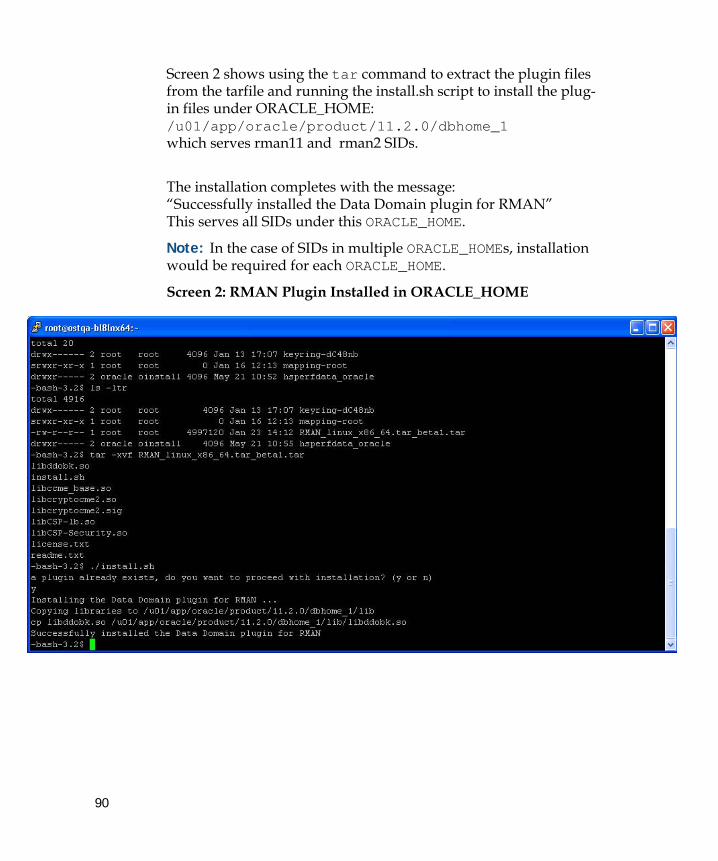
Screen 2 shows using the tar command to extract the plugin files from the tarfile and running the install.sh script to install the plug-in files under ORACLE_HOME: /u01/app/oracle/product/11.2.0/dbhome_1which serves rman11 and rman2 SIDs.
The installation completes with the message:“Successfully installed the Data Domain plugin for RMAN”This serves all SIDs under this ORACLE_HOME.
Note: In the case of SIDs in multiple ORACLE_HOMEs, installation would be required for each ORACLE_HOME.
Screen 2: RMAN Plugin Installed in ORACLE_HOME
90
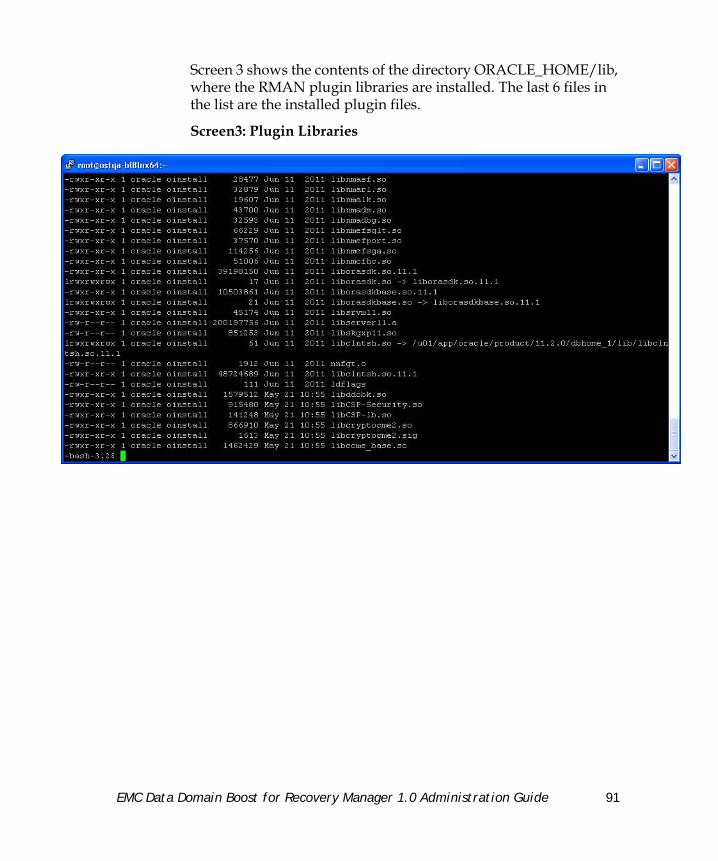
Screen 3 shows the contents of the directory ORACLE_HOME/lib, where the RMAN plugin libraries are installed. The last 6 files in the list are the installed plugin files.
Screen3: Plugin Libraries
EMC Data Domain Boost for Recovery Manager 1.0 Administration Guide 91
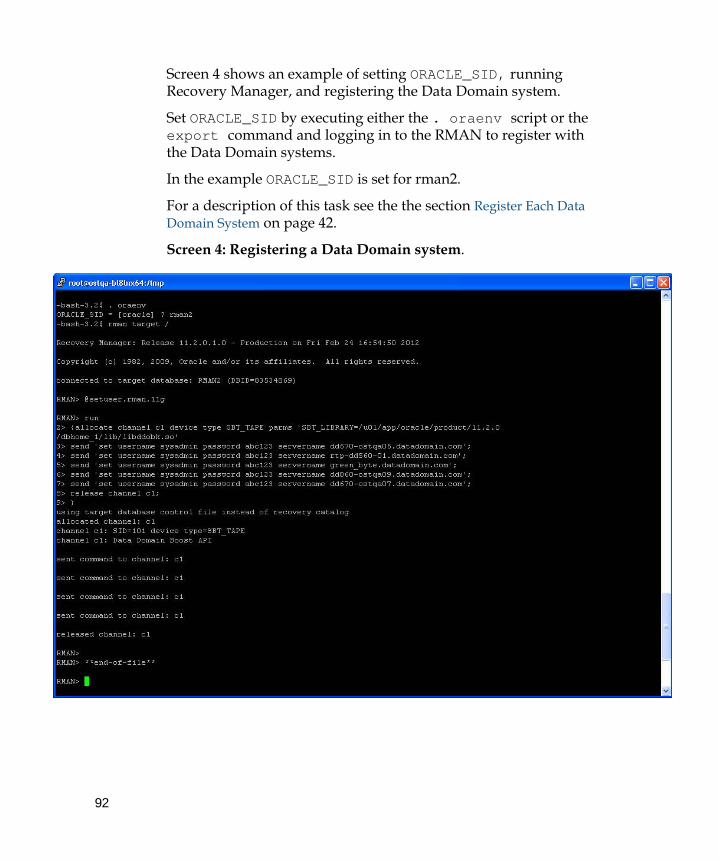
Screen 4 shows an example of setting ORACLE_SID, running Recovery Manager, and registering the Data Domain system.
Set ORACLE_SID by executing either the . oraenv script or the export command and logging in to the RMAN to register with the Data Domain systems.
In the example ORACLE_SID is set for rman2.
For a description of this task see the the section Register Each Data Domain System on page 42.
Screen 4: Registering a Data Domain system.
92
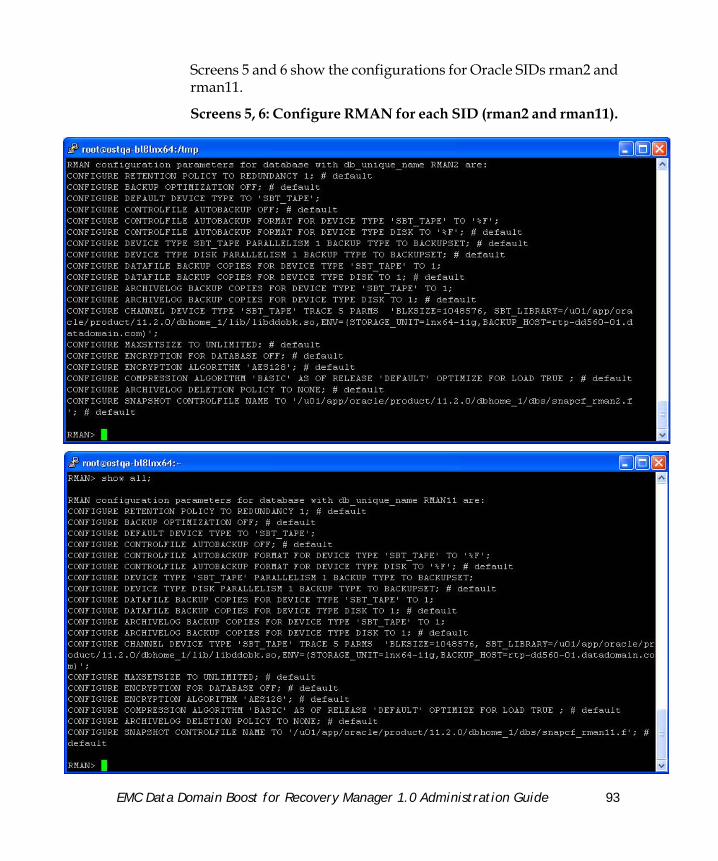
Screens 5 and 6 show the configurations for Oracle SIDs rman2 and rman11.
Screens 5, 6: Configure RMAN for each SID (rman2 and rman11).
EMC Data Domain Boost for Recovery Manager 1.0 Administration Guide 93
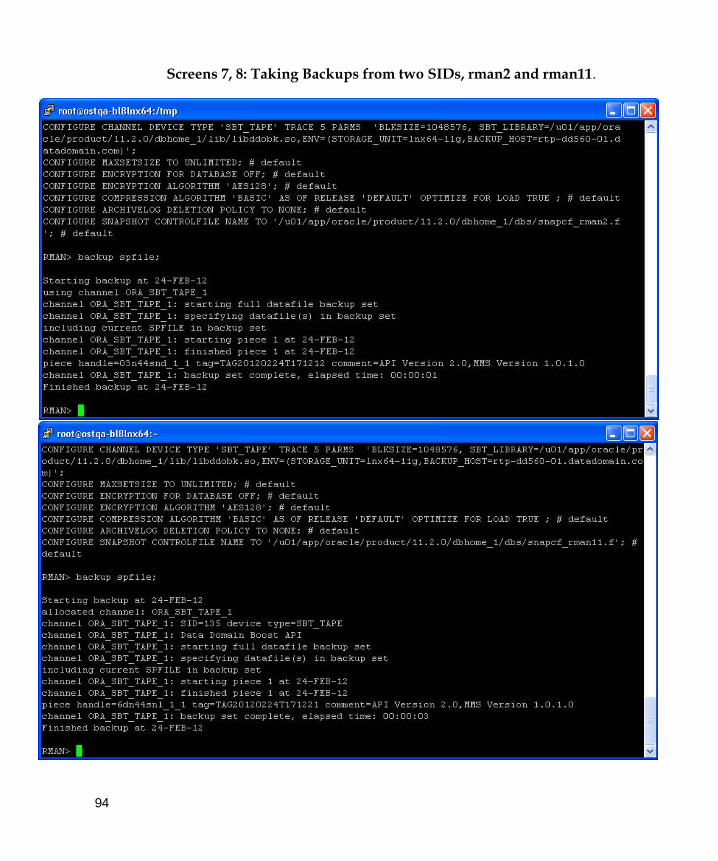
Screens 7, 8: Taking Backups from two SIDs, rman2 and rman11.
94