eclipse 3.0 covers eclipse cookbook - inf.ed.ac.uk solutions ... eclipse cookbook tm covers eclipse...
TRANSCRIPT
Task-Oriented Solutions to Over 175 Common Problems
Steve Holzner
EclipseCookbook TM
CoversEclipse 3.0
This is the Title of the Book, eMatter EditionCopyright © 2004 O’Reilly & Associates, Inc. All rights reserved.
140
Chapter 6CHAPTER 6
Using Eclipse in Teams
6.0 IntroductionProfessional developers frequently work in teams, and Eclipse is up to the task.Eclipse supports the Concurrent Versions System (CVS) for this purpose. If you’reworking in a team, you have to coordinate your development work with others toavoid conflicts. You’re all sharing the same code, which means your work of geniusmight be destroyed unintentionally by someone else’s thoughtless efforts.
Source control precludes those kinds of problems because it controls access toshared code in a well-defined way. Besides controlling access to code, source controlmaintains a history of changes so that you can restore the code from earlier versions.Because it maintains a history of your code, not only can you restore code againstearlier versions, but you can also compare the current code to earlier versions to seethe differences at a glance.
Like much else in the Java world, CVS is an open source project. CVS first appearedin 1986, when it was a set of Unix shell scripts; it wasn’t until 1989 that dedicatedCVS software first appeared. Today, CVS is available on many operating systemsacross the board, from Unix and Linux to Windows.
For details on CVS, take a look at http://www.cvshome.org.
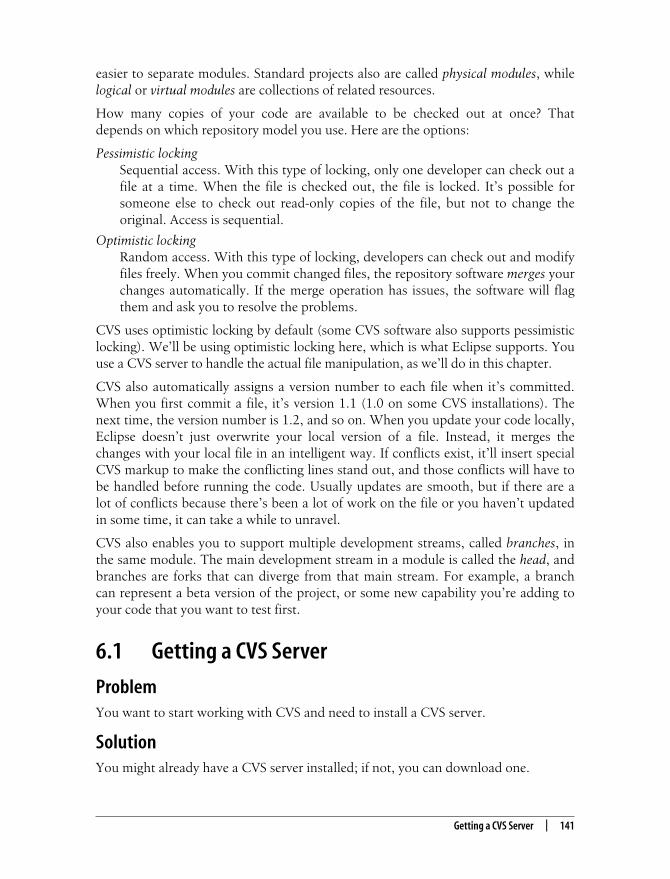
The CVS repository is where developers store code files to be shared. To retrieve afile from the repository, you check that file out of the repository. When you want tostore your newly changed version of the file, you commit it to the repository.Refreshing your copy of the code from the repository is called updating it.
CVS also has slightly different terminology than Eclipse; what’s a project to Eclipse isa module to CVS. Each module gets its own directory in the repository, making it
This is the Title of the Book, eMatter EditionCopyright © 2004 O’Reilly & Associates, Inc. All rights reserved.
Getting a CVS Server | 141
easier to separate modules. Standard projects also are called physical modules, whilelogical or virtual modules are collections of related resources.
How many copies of your code are available to be checked out at once? Thatdepends on which repository model you use. Here are the options:
Pessimistic lockingSequential access. With this type of locking, only one developer can check out afile at a time. When the file is checked out, the file is locked. It’s possible forsomeone else to check out read-only copies of the file, but not to change theoriginal. Access is sequential.
Optimistic lockingRandom access. With this type of locking, developers can check out and modifyfiles freely. When you commit changed files, the repository software merges yourchanges automatically. If the merge operation has issues, the software will flagthem and ask you to resolve the problems.
CVS uses optimistic locking by default (some CVS software also supports pessimisticlocking). We’ll be using optimistic locking here, which is what Eclipse supports. Youuse a CVS server to handle the actual file manipulation, as we’ll do in this chapter.
CVS also automatically assigns a version number to each file when it’s committed.When you first commit a file, it’s version 1.1 (1.0 on some CVS installations). Thenext time, the version number is 1.2, and so on. When you update your code locally,Eclipse doesn’t just overwrite your local version of a file. Instead, it merges thechanges with your local file in an intelligent way. If conflicts exist, it’ll insert specialCVS markup to make the conflicting lines stand out, and those conflicts will have tobe handled before running the code. Usually updates are smooth, but if there are alot of conflicts because there’s been a lot of work on the file or you haven’t updatedin some time, it can take a while to unravel.
CVS also enables you to support multiple development streams, called branches, inthe same module. The main development stream in a module is called the head, andbranches are forks that can diverge from that main stream. For example, a branchcan represent a beta version of the project, or some new capability you’re adding toyour code that you want to test first.
6.1 Getting a CVS Server
ProblemYou want to start working with CVS and need to install a CVS server.
SolutionYou might already have a CVS server installed; if not, you can download one.
This is the Title of the Book, eMatter EditionCopyright © 2004 O’Reilly & Associates, Inc. All rights reserved.
142 | Chapter 6: Using Eclipse in Teams
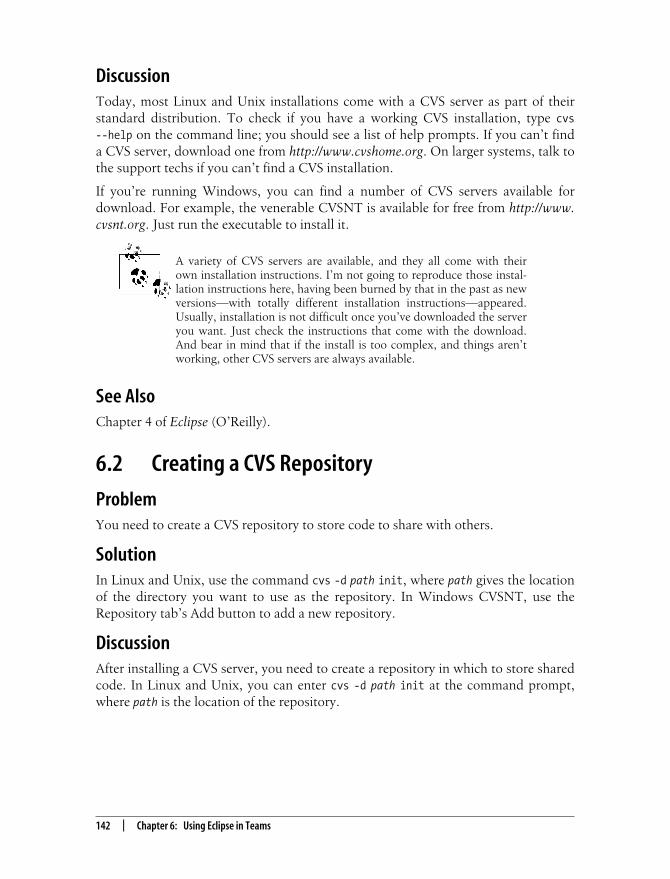
DiscussionToday, most Linux and Unix installations come with a CVS server as part of theirstandard distribution. To check if you have a working CVS installation, type cvs
--help on the command line; you should see a list of help prompts. If you can’t finda CVS server, download one from http://www.cvshome.org. On larger systems, talk tothe support techs if you can’t find a CVS installation.
If you’re running Windows, you can find a number of CVS servers available fordownload. For example, the venerable CVSNT is available for free from http://www.cvsnt.org. Just run the executable to install it.
A variety of CVS servers are available, and they all come with theirown installation instructions. I’m not going to reproduce those instal-lation instructions here, having been burned by that in the past as newversions—with totally different installation instructions—appeared.Usually, installation is not difficult once you’ve downloaded the serveryou want. Just check the instructions that come with the download.And bear in mind that if the install is too complex, and things aren’tworking, other CVS servers are always available.
See AlsoChapter 4 of Eclipse (O’Reilly).
6.2 Creating a CVS Repository
ProblemYou need to create a CVS repository to store code to share with others.
SolutionIn Linux and Unix, use the command cvs -d path init, where path gives the locationof the directory you want to use as the repository. In Windows CVSNT, use theRepository tab’s Add button to add a new repository.
DiscussionAfter installing a CVS server, you need to create a repository in which to store sharedcode. In Linux and Unix, you can enter cvs -d path init at the command prompt,where path is the location of the repository.
This is the Title of the Book, eMatter EditionCopyright © 2004 O’Reilly & Associates, Inc. All rights reserved.
Connecting Eclipse to a CVS Repository | 143
When creating a repository, bear in mind that the permissions andownership for path have to allow access to all members of the develop-ment team.
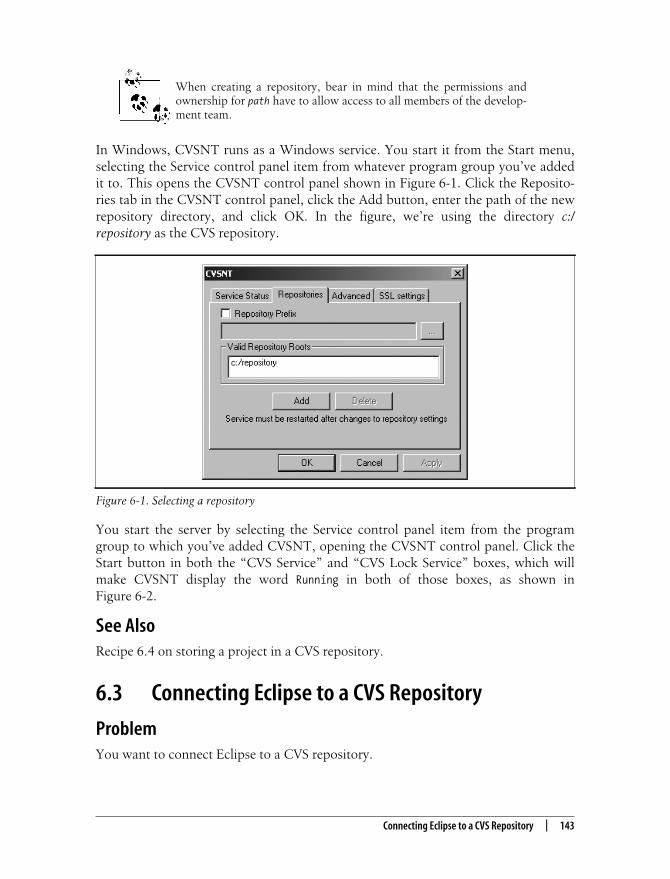
In Windows, CVSNT runs as a Windows service. You start it from the Start menu,selecting the Service control panel item from whatever program group you’ve addedit to. This opens the CVSNT control panel shown in Figure 6-1. Click the Reposito-ries tab in the CVSNT control panel, click the Add button, enter the path of the newrepository directory, and click OK. In the figure, we’re using the directory c:/repository as the CVS repository.
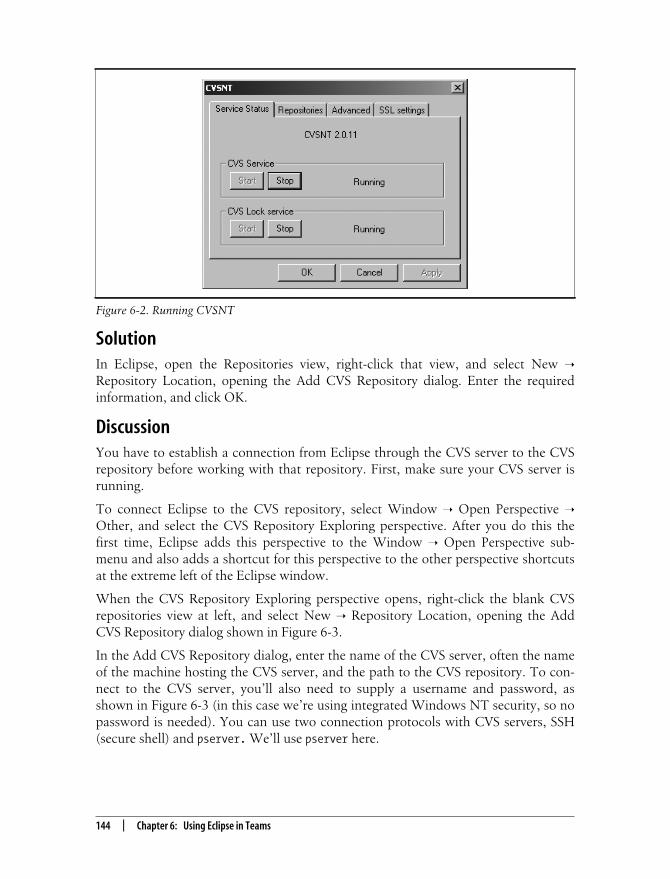
You start the server by selecting the Service control panel item from the programgroup to which you’ve added CVSNT, opening the CVSNT control panel. Click theStart button in both the “CVS Service” and “CVS Lock Service” boxes, which willmake CVSNT display the word Running in both of those boxes, as shown inFigure 6-2.
See AlsoRecipe 6.4 on storing a project in a CVS repository.
6.3 Connecting Eclipse to a CVS Repository
ProblemYou want to connect Eclipse to a CVS repository.
Figure 6-1. Selecting a repository
This is the Title of the Book, eMatter EditionCopyright © 2004 O’Reilly & Associates, Inc. All rights reserved.
144 | Chapter 6: Using Eclipse in Teams
SolutionIn Eclipse, open the Repositories view, right-click that view, and select New ➝
Repository Location, opening the Add CVS Repository dialog. Enter the requiredinformation, and click OK.
DiscussionYou have to establish a connection from Eclipse through the CVS server to the CVSrepository before working with that repository. First, make sure your CVS server isrunning.
To connect Eclipse to the CVS repository, select Window ➝ Open Perspective ➝
Other, and select the CVS Repository Exploring perspective. After you do this thefirst time, Eclipse adds this perspective to the Window ➝ Open Perspective sub-menu and also adds a shortcut for this perspective to the other perspective shortcutsat the extreme left of the Eclipse window.
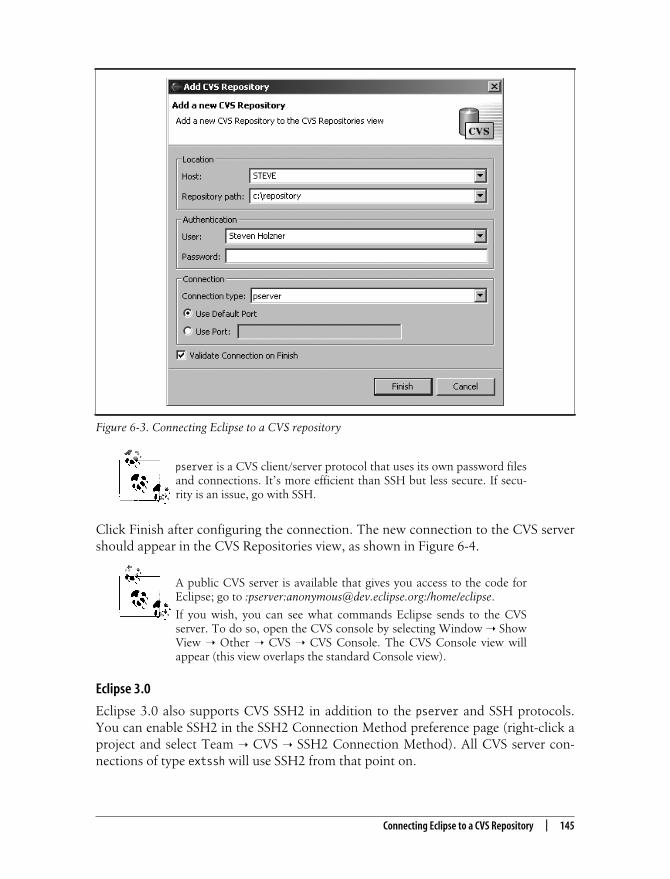
When the CVS Repository Exploring perspective opens, right-click the blank CVSrepositories view at left, and select New ➝ Repository Location, opening the AddCVS Repository dialog shown in Figure 6-3.
In the Add CVS Repository dialog, enter the name of the CVS server, often the nameof the machine hosting the CVS server, and the path to the CVS repository. To con-nect to the CVS server, you’ll also need to supply a username and password, asshown in Figure 6-3 (in this case we’re using integrated Windows NT security, so nopassword is needed). You can use two connection protocols with CVS servers, SSH(secure shell) and pserver. We’ll use pserver here.
Figure 6-2. Running CVSNT
This is the Title of the Book, eMatter EditionCopyright © 2004 O’Reilly & Associates, Inc. All rights reserved.
Connecting Eclipse to a CVS Repository | 145
pserver is a CVS client/server protocol that uses its own password filesand connections. It’s more efficient than SSH but less secure. If secu-rity is an issue, go with SSH.
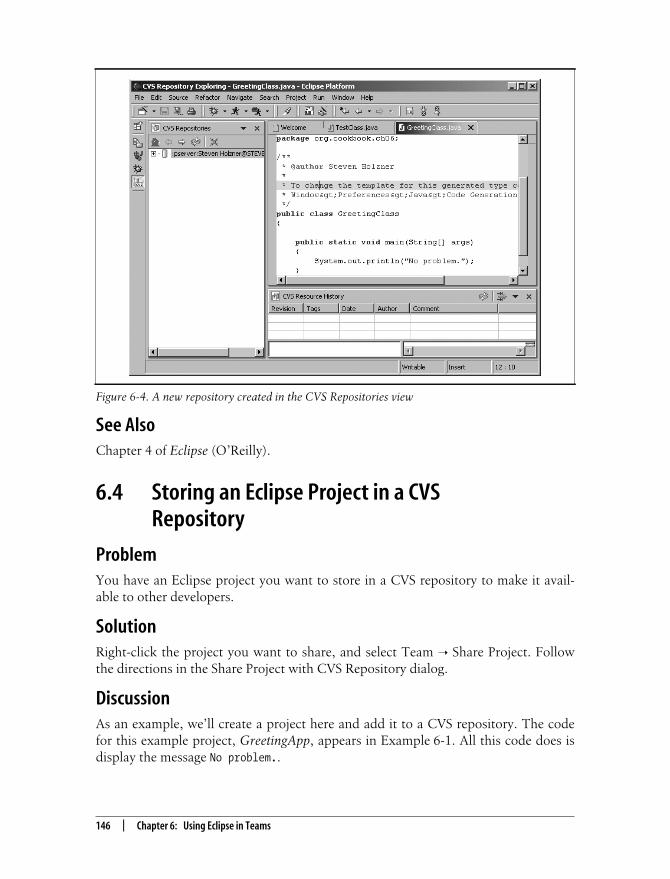
Click Finish after configuring the connection. The new connection to the CVS servershould appear in the CVS Repositories view, as shown in Figure 6-4.
A public CVS server is available that gives you access to the code forEclipse; go to :pserver:[email protected]:/home/eclipse.
If you wish, you can see what commands Eclipse sends to the CVSserver. To do so, open the CVS console by selecting Window ➝ ShowView ➝ Other ➝ CVS ➝ CVS Console. The CVS Console view willappear (this view overlaps the standard Console view).
Eclipse 3.0
Eclipse 3.0 also supports CVS SSH2 in addition to the pserver and SSH protocols.You can enable SSH2 in the SSH2 Connection Method preference page (right-click aproject and select Team ➝ CVS ➝ SSH2 Connection Method). All CVS server con-nections of type extssh will use SSH2 from that point on.
Figure 6-3. Connecting Eclipse to a CVS repository
This is the Title of the Book, eMatter EditionCopyright © 2004 O’Reilly & Associates, Inc. All rights reserved.
146 | Chapter 6: Using Eclipse in Teams
See AlsoChapter 4 of Eclipse (O’Reilly).
6.4 Storing an Eclipse Project in a CVSRepository
ProblemYou have an Eclipse project you want to store in a CVS repository to make it avail-able to other developers.
SolutionRight-click the project you want to share, and select Team ➝ Share Project. Followthe directions in the Share Project with CVS Repository dialog.
DiscussionAs an example, we’ll create a project here and add it to a CVS repository. The codefor this example project, GreetingApp, appears in Example 6-1. All this code does isdisplay the message No problem..
Figure 6-4. A new repository created in the CVS Repositories view
This is the Title of the Book, eMatter EditionCopyright © 2004 O’Reilly & Associates, Inc. All rights reserved.
Storing an Eclipse Project in a CVS Repository | 147
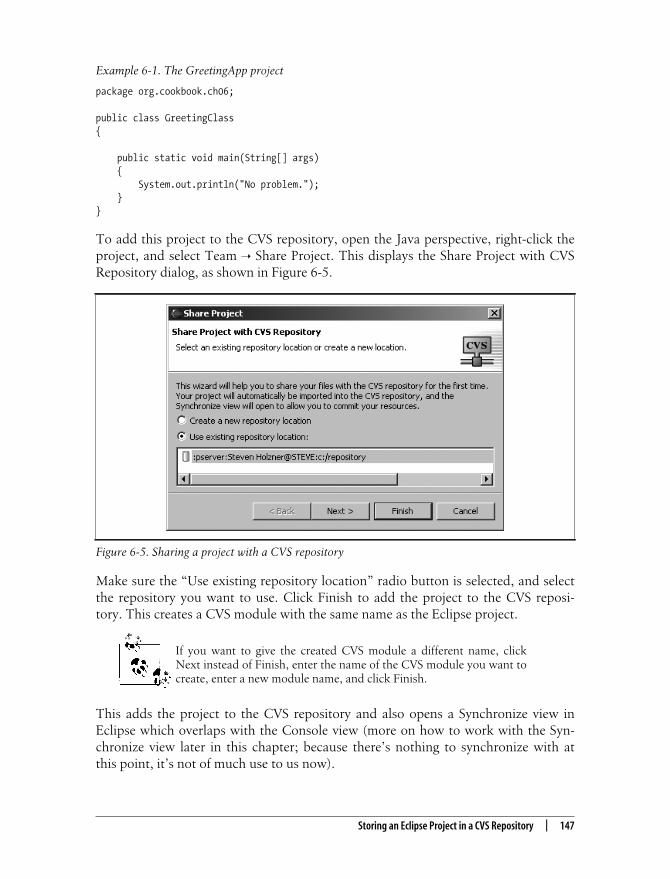
To add this project to the CVS repository, open the Java perspective, right-click theproject, and select Team ➝ Share Project. This displays the Share Project with CVSRepository dialog, as shown in Figure 6-5.
Make sure the “Use existing repository location” radio button is selected, and selectthe repository you want to use. Click Finish to add the project to the CVS reposi-tory. This creates a CVS module with the same name as the Eclipse project.
If you want to give the created CVS module a different name, clickNext instead of Finish, enter the name of the CVS module you want tocreate, enter a new module name, and click Finish.
This adds the project to the CVS repository and also opens a Synchronize view inEclipse which overlaps with the Console view (more on how to work with the Syn-chronize view later in this chapter; because there’s nothing to synchronize with atthis point, it’s not of much use to us now).
Example 6-1. The GreetingApp project
package org.cookbook.ch06;
public class GreetingClass
{
public static void main(String[] args)
{
System.out.println("No problem.");
}
}
Figure 6-5. Sharing a project with a CVS repository
This is the Title of the Book, eMatter EditionCopyright © 2004 O’Reilly & Associates, Inc. All rights reserved.
148 | Chapter 6: Using Eclipse in Teams
See AlsoRecipe 6.5 on committing files to the CVS repository.
6.5 Committing Files to the CVS Repository
ProblemYou’ve edited a file, saved your changes, and want to send it to the CVS repository sothat others can access it.
SolutionRight-click a file, and select Team ➝ Commit.
DiscussionIn Recipe 6.4, you saw how to add a project to a CVS repository. To share your code,you have to check in code files. This requires two steps: first, you add a file to theCVS repository, which registers the file with the CVS server but doesn’t actuallyupload it; then you commit the file, which uploads it to the repository.
Technically, the way to send files to the CVS repository is to add them to Eclipse’sversion control and then commit them. You do that by right-clicking the files andselecting Team ➝ Add to Version Control. Then select Team ➝ Commit to committhe files.
However, Eclipse gives you a shortcut here. To commit all the files in a project, right-click the project, and select Team ➝ Commit. When you do, Eclipse displays theAdd to CVS Version Control dialog. Click the Details button and check the check-boxes matching the files you want to add to CVS version control; Eclipse will list allthe files in the project, including your Java source files and the .project and .classpathfiles. Then click Yes.
If you want to check in and check out projects as Eclipse projects, besure to commit the .project and .classpath files.
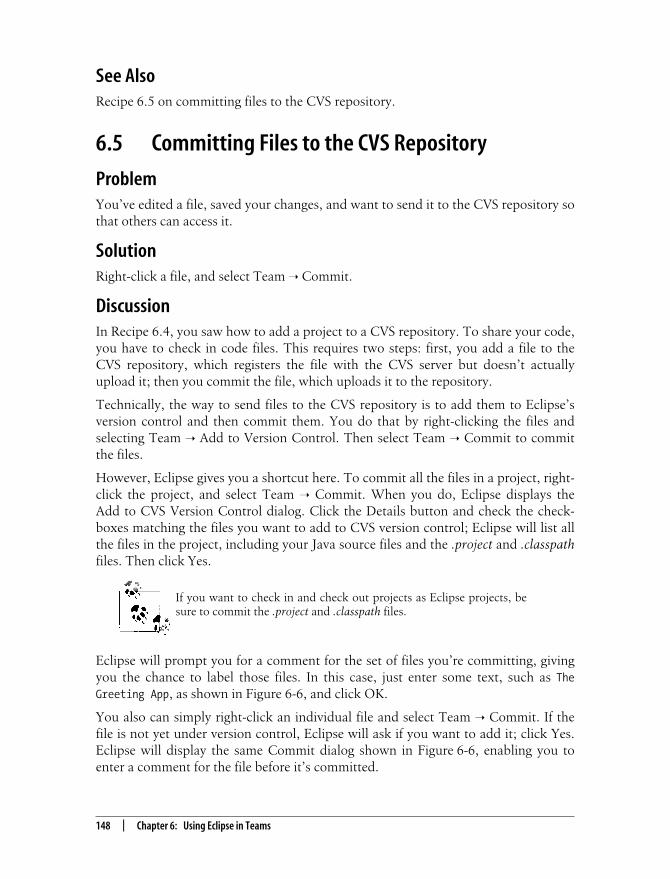
Eclipse will prompt you for a comment for the set of files you’re committing, givingyou the chance to label those files. In this case, just enter some text, such as The
Greeting App, as shown in Figure 6-6, and click OK.
You also can simply right-click an individual file and select Team ➝ Commit. If thefile is not yet under version control, Eclipse will ask if you want to add it; click Yes.Eclipse will display the same Commit dialog shown in Figure 6-6, enabling you toenter a comment for the file before it’s committed.
This is the Title of the Book, eMatter EditionCopyright © 2004 O’Reilly & Associates, Inc. All rights reserved.
Visually Labeling Files Under Version Control | 149
When the file is committed, it’s uploaded to the CVS repository and given a versionnumber. Eclipse also will use a special decoration for files under version control ifyou tell it to do so; see Recipe 6.6.
See AlsoRecipe 6.6 on visually labeling files under version control; Chapter 4 of Eclipse(O’Reilly).
6.6 Visually Labeling Files Under VersionControl
ProblemYou want to see at a glance what files in a project are under version control.
SolutionTurn on CVS decorations by selecting Window ➝ Preferences ➝ Workbench ➝ LabelDecorations, check the CVS checkbox, and click OK.
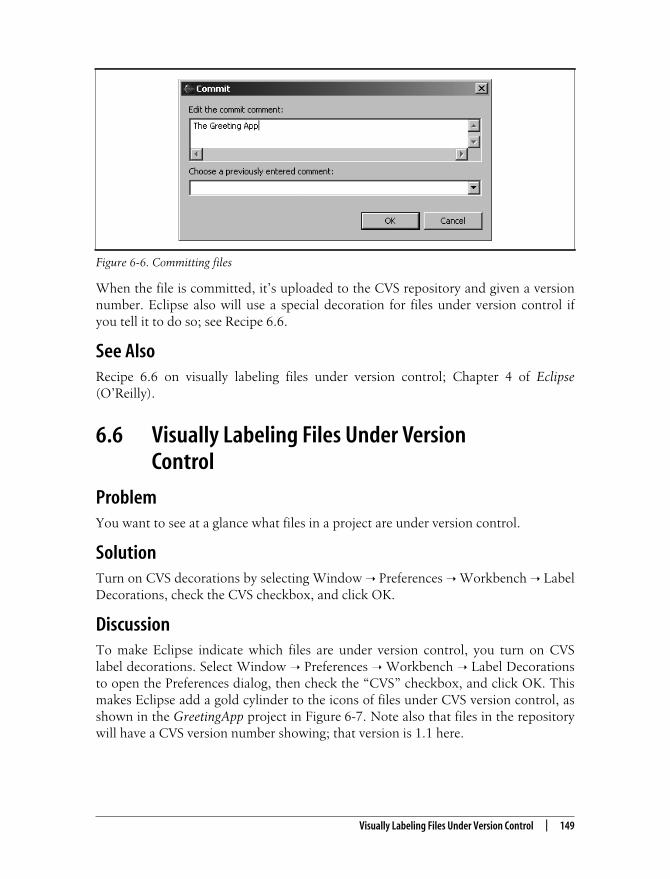
DiscussionTo make Eclipse indicate which files are under version control, you turn on CVSlabel decorations. Select Window ➝ Preferences ➝ Workbench ➝ Label Decorationsto open the Preferences dialog, then check the “CVS” checkbox, and click OK. Thismakes Eclipse add a gold cylinder to the icons of files under CVS version control, asshown in the GreetingApp project in Figure 6-7. Note also that files in the repositorywill have a CVS version number showing; that version is 1.1 here.
Figure 6-6. Committing files
This is the Title of the Book, eMatter EditionCopyright © 2004 O’Reilly & Associates, Inc. All rights reserved.
150 | Chapter 6: Using Eclipse in Teams
See AlsoChapter 4 of Eclipse (O’Reilly).
6.7 Examining the CVS Repository
ProblemYou want to explore the CVS repository from inside Eclipse.
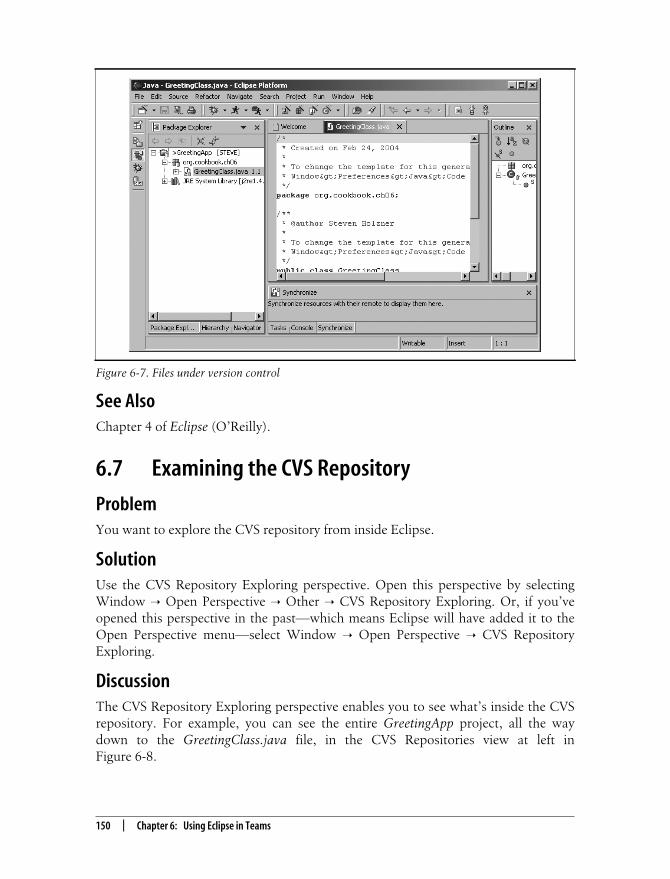
SolutionUse the CVS Repository Exploring perspective. Open this perspective by selectingWindow ➝ Open Perspective ➝ Other ➝ CVS Repository Exploring. Or, if you’veopened this perspective in the past—which means Eclipse will have added it to theOpen Perspective menu—select Window ➝ Open Perspective ➝ CVS RepositoryExploring.
DiscussionThe CVS Repository Exploring perspective enables you to see what’s inside the CVSrepository. For example, you can see the entire GreetingApp project, all the waydown to the GreetingClass.java file, in the CVS Repositories view at left inFigure 6-8.
Figure 6-7. Files under version control
This is the Title of the Book, eMatter EditionCopyright © 2004 O’Reilly & Associates, Inc. All rights reserved.
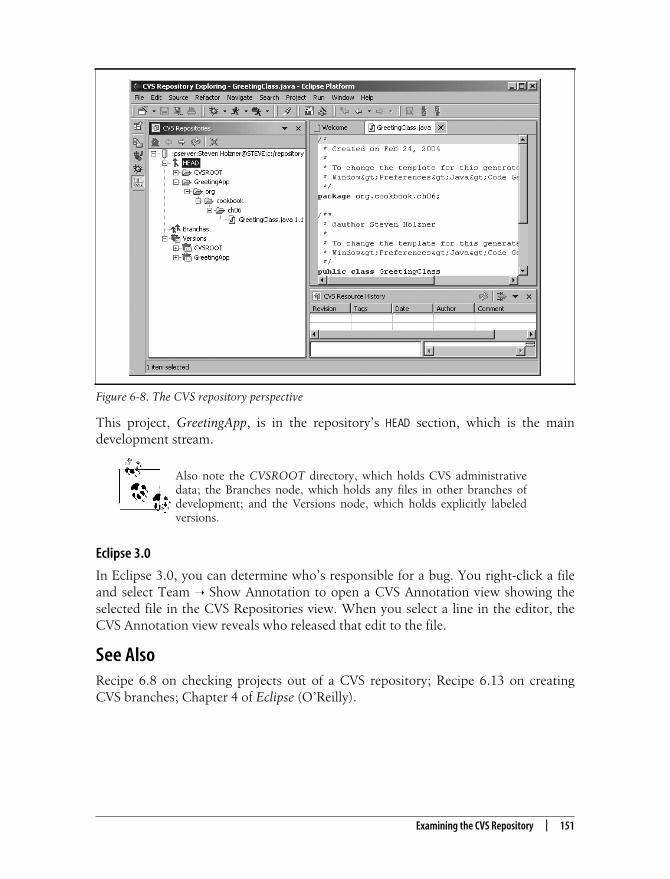
Examining the CVS Repository | 151
This project, GreetingApp, is in the repository’s HEAD section, which is the maindevelopment stream.
Also note the CVSROOT directory, which holds CVS administrativedata; the Branches node, which holds any files in other branches ofdevelopment; and the Versions node, which holds explicitly labeledversions.
Eclipse 3.0
In Eclipse 3.0, you can determine who’s responsible for a bug. You right-click a fileand select Team ➝ Show Annotation to open a CVS Annotation view showing theselected file in the CVS Repositories view. When you select a line in the editor, theCVS Annotation view reveals who released that edit to the file.
See AlsoRecipe 6.8 on checking projects out of a CVS repository; Recipe 6.13 on creatingCVS branches; Chapter 4 of Eclipse (O’Reilly).
Figure 6-8. The CVS repository perspective
This is the Title of the Book, eMatter EditionCopyright © 2004 O’Reilly & Associates, Inc. All rights reserved.
152 | Chapter 6: Using Eclipse in Teams
6.8 Checking Projects Out of a CVS Repository
ProblemSomeone wants to check out a project of yours from the CVS repository.
SolutionIn Eclipse, right-click a file in the CVS Repositories view, and click Check Out As.Then use the Check Out dialog to check out the item.
DiscussionIf other people want to check out a module that you’ve stored in a CVS repository,they have to create a connection to the repository as we did earlier in this chapter. Todo this, they should right-click the CVS Repositories view; select New ➝ RepositoryLocation; and enter the name of the CVS server, the location of the repository, theusername, the password, and the type of connection.
They can then open the CVS Repositories view to explore the files in the repository.To check out the GreetingApp module, they can right-click the module in the Reposi-tories view and click Check Out As from the context menu. Eclipse will open theNew Project dialog and automatically create a new project corresponding to the CVSmodule.
If you’re sharing an Eclipse project, and each CVS module has its own Eclipse .project file, you can select Check Out As Project from the Repositories view’s con-text menu, which checks out an Eclipse project and adds it to the Package Explorer.Note that if your code isn’t in a project of a kind that Eclipse can recognize, it willask you what type of project to create.
See AlsoChapter 4 of Eclipse (O’Reilly).
6.9 Updating Your Code from a CVS Repository
ProblemYou want to update your local code with the code in a CVS repository.
SolutionRight-click the file, and select Team ➝ Update, then resolve any conflicts. Alterna-tively, if you just want to replace your version with what’s in the CVS repository,right-click the file and select Replace With ➝ Latest From HEAD.
This is the Title of the Book, eMatter EditionCopyright © 2004 O’Reilly & Associates, Inc. All rights reserved.
Updating Your Code from a CVS Repository | 153
DiscussionFor example, say that someone checked out your code and changed this line:
public static void main(String[] args)
{
System.out.println("No problem.");}
to this:
public static void main(String[] args)
{
System.out.println("No problems at all.");}
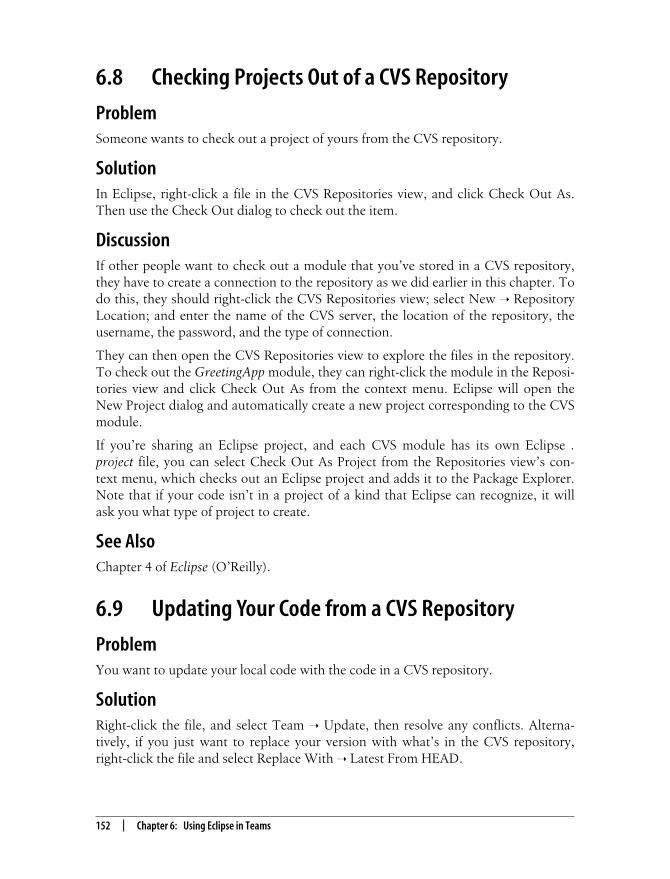
When she makes these changes in his version of Eclipse, a > character appears infront of files that haven’t yet been committed, as shown in Figure 6-9.
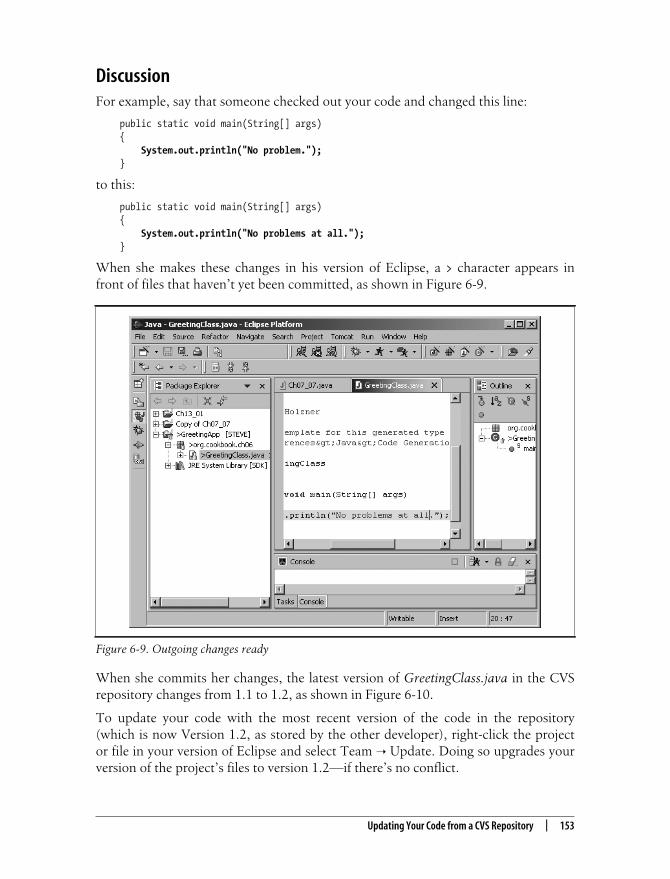
When she commits her changes, the latest version of GreetingClass.java in the CVSrepository changes from 1.1 to 1.2, as shown in Figure 6-10.
To update your code with the most recent version of the code in the repository(which is now Version 1.2, as stored by the other developer), right-click the projector file in your version of Eclipse and select Team ➝ Update. Doing so upgrades yourversion of the project’s files to version 1.2—if there’s no conflict.
Figure 6-9. Outgoing changes ready
This is the Title of the Book, eMatter EditionCopyright © 2004 O’Reilly & Associates, Inc. All rights reserved.
154 | Chapter 6: Using Eclipse in Teams
If you’ve changed this line of code yourself to something such as this:
public static void main(String[] args)
{
System.out.println("No problems here.");}
there will be a conflict with the new line in the new version, version 1.2, of the file.Eclipse will mark that conflict by listing both versions in your code with some addedCVS markup such as this:
public static void main(String[] args) {
<<<<<<< GreetingClass.java System.out.println("No problems here.");======= System.out.println("No problems at all.");>>>>>>> 1.2 }
}
It’s up to you to handle these conflicts in your code (Eclipse is not going to compileyour code until the CVS markup has been dealt with and removed). Letting Eclipsehandle updates like this is one way to handle updates from the CVS repository, but ifthe changes are substantial, it’s best to synchronize with the repository, an issue wediscuss in Recipe 6.10.
Figure 6-10. A new version in the CVS repository
This is the Title of the Book, eMatter EditionCopyright © 2004 O’Reilly & Associates, Inc. All rights reserved.
Synchronizing Your Code with the CVS Repository | 155
Note that if you just want to replace your version of a file with the latest version ofthe file in the main development stream for the project in the CVS repository, right-click the file and select Replace With ➝ Latest From HEAD.
6.10 Synchronizing Your Code with the CVSRepository
ProblemYou’ve got a lot of changes from the version of a file in the CVS repository and wantto get your code up to speed.
SolutionRight-click the project and select Team ➝ Synchronize with Repository. Then take alook at the synchronization issues that Eclipse displays side by side.
DiscussionSynchronizing with the repository enables you to compare changes that have beenmade side by side in an easier format than the update merge format. For instance,say that the version of the code in the repository uses this code:
public static void main(String[] args)
{
System.out.println("No problems at all.");}
But you’ve changed that line of code to this:
public static void main(String[] args)
{
System.out.println("No problems here.");}
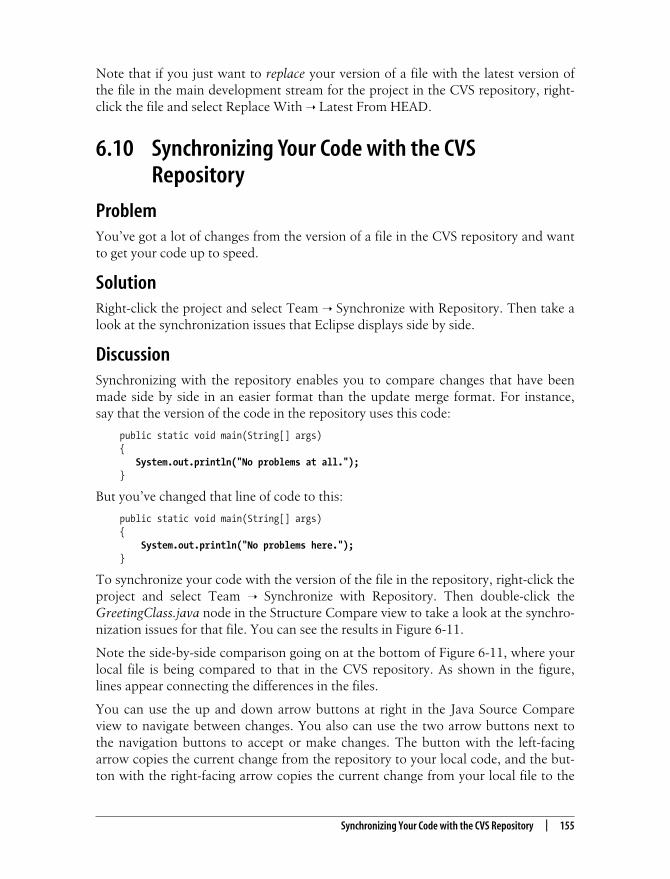
To synchronize your code with the version of the file in the repository, right-click theproject and select Team ➝ Synchronize with Repository. Then double-click theGreetingClass.java node in the Structure Compare view to take a look at the synchro-nization issues for that file. You can see the results in Figure 6-11.
Note the side-by-side comparison going on at the bottom of Figure 6-11, where yourlocal file is being compared to that in the CVS repository. As shown in the figure,lines appear connecting the differences in the files.
You can use the up and down arrow buttons at right in the Java Source Compareview to navigate between changes. You also can use the two arrow buttons next tothe navigation buttons to accept or make changes. The button with the left-facingarrow copies the current change from the repository to your local code, and the but-ton with the right-facing arrow copies the current change from your local file to the
This is the Title of the Book, eMatter EditionCopyright © 2004 O’Reilly & Associates, Inc. All rights reserved.
156 | Chapter 6: Using Eclipse in Teams
repository. After you’ve synchronized your version of the code with that in the repos-itory, commit your changes to the repository.
Eclipse 3.0
Eclipse 3.0 has a handy way to look at changes in the local document as compared tothe version of that document in the CVS repository. Right-click the Quick Diff ruler,and set the Set QuickDiff Reference item to CVS Repository. This makes the Quick-Diff bar compare recent changes to those in the CVS repository—very handy.
See AlsoRecipe 4.6 on comparing files against local history; Recipe 4.7 on restoring elementsand files from local history; Recipe 6.9 on updating code from a repository; Chapter4 of Eclipse (O’Reilly).
6.11 Creating Code Patches
ProblemYou need to coordinate your development with another team of developers using apatch they can install to update their code.
Figure 6-11. Synchronizing code

This is the Title of the Book, eMatter EditionCopyright © 2004 O’Reilly & Associates, Inc. All rights reserved.
Creating Code Patches | 157
SolutionCreate a code patch so that they can update their code. (Note that this is a codepatch, not a binary patch. Eclipse can use this patch to update source code to matchanother version.)
DiscussionSay your version of the code displays the text "No problems here.":
public static void main(String[] args)
{
System.out.println("No problems here.");}
But the code the other team is using from the CVS repository displays "No problems
at all.":
public static void main(String[] args)
{
System.out.println("No problems at all.");}
To update the other developers without changing version numbers, you can create acode patch. To create a code patch, Eclipse compares your local code to what’s inthe repository and creates a patch file holding the differences.
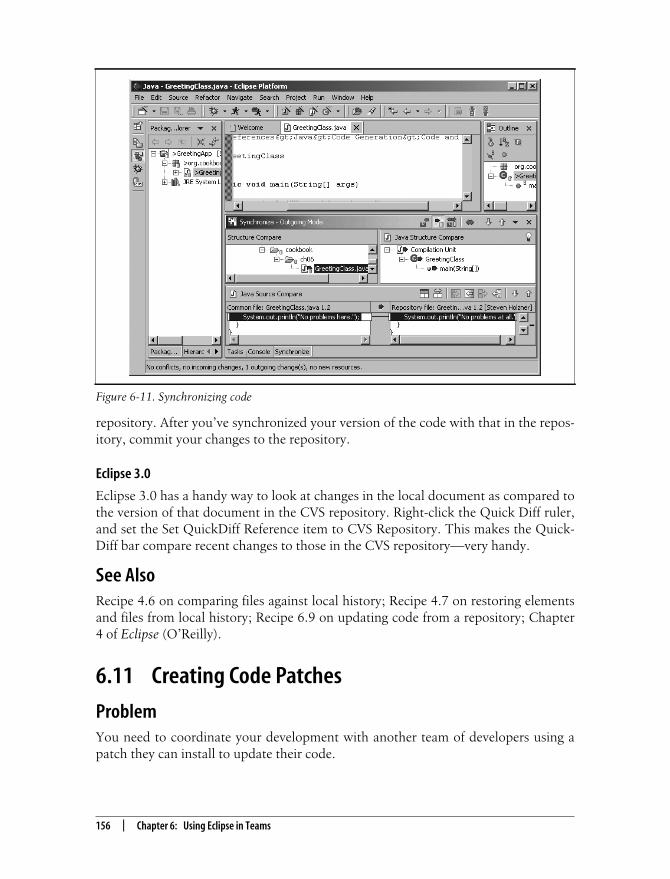
To create a code patch using your local version of a file as the version to which thepatch will update the version in the repository, save your file locally, right-click it,and select Team ➝ Create Patch, opening the dialog shown in Figure 6-12.
In this example, we’ll save the file named patch in the current workspace, as shownin Figure 6-12. Click the Finish button to save the patch.
This creates the text file named patch. Here’s what that file looks like; you can seethe line to remove marked with a - and the line to add marked with a +:
Index: GreetingClass.java
===================================================================
RCS file: c:/repository/GreetingApp/org/cookbook/ch06/GreetingClass.java,v
retrieving revision 1.2
diff -u -r1.2 GreetingClass.java
--- GreetingClass.java 25 Feb 2004 16:34:07 -0000 1.2
+++ GreetingClass.java 25 Feb 2004 18:12:18 -0000
@@ -17,6 +17,6 @@
public static void main(String[] args)
{
- System.out.println("No problems at all.");
+ System.out.println("No problems here.");
}
}
This is the Title of the Book, eMatter EditionCopyright © 2004 O’Reilly & Associates, Inc. All rights reserved.
158 | Chapter 6: Using Eclipse in Teams
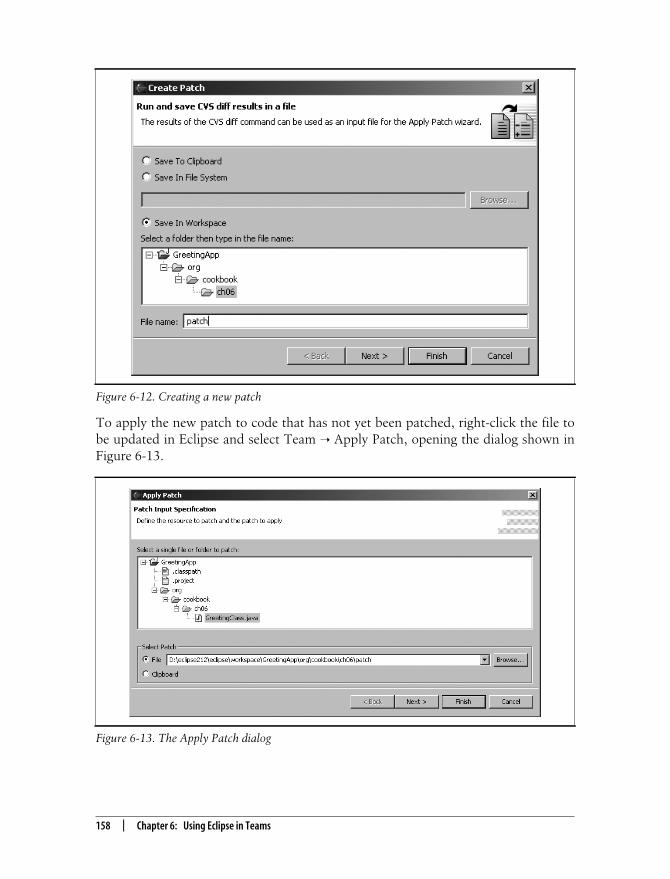
To apply the new patch to code that has not yet been patched, right-click the file tobe updated in Eclipse and select Team ➝ Apply Patch, opening the dialog shown inFigure 6-13.
Figure 6-12. Creating a new patch
Figure 6-13. The Apply Patch dialog
This is the Title of the Book, eMatter EditionCopyright © 2004 O’Reilly & Associates, Inc. All rights reserved.
Naming Code Versions | 159
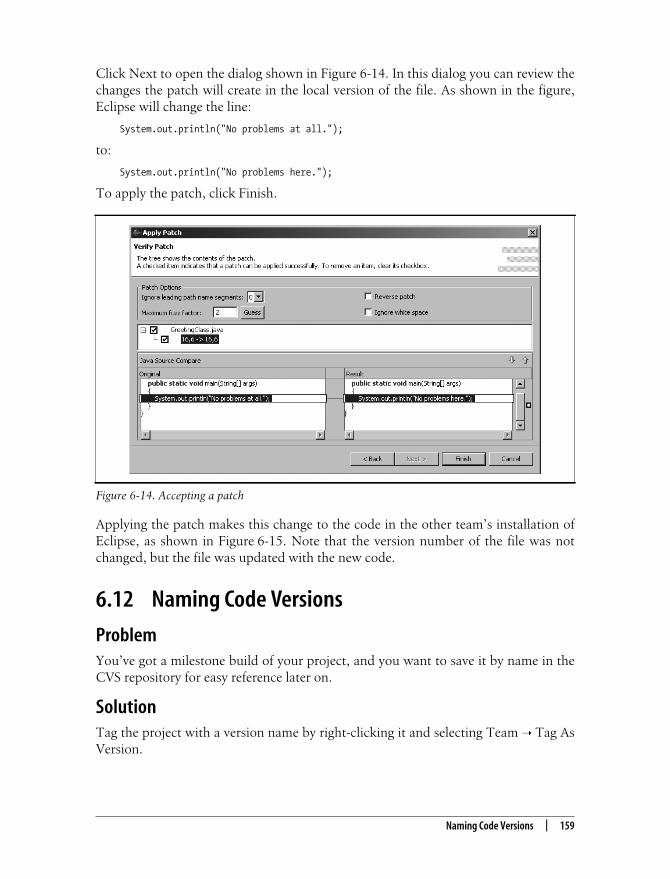
Click Next to open the dialog shown in Figure 6-14. In this dialog you can review thechanges the patch will create in the local version of the file. As shown in the figure,Eclipse will change the line:
System.out.println("No problems at all.");
to:
System.out.println("No problems here.");
To apply the patch, click Finish.
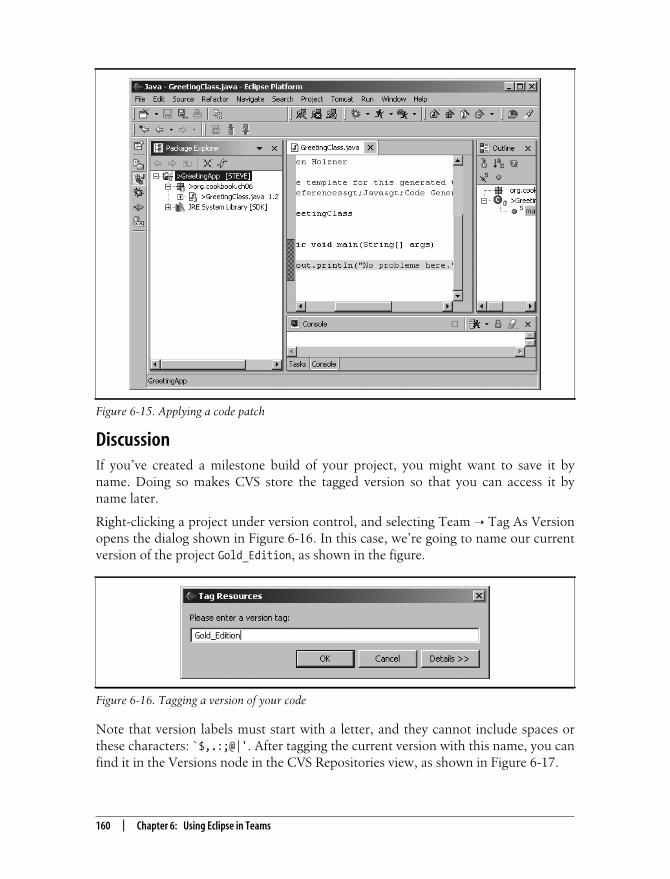
Applying the patch makes this change to the code in the other team’s installation ofEclipse, as shown in Figure 6-15. Note that the version number of the file was notchanged, but the file was updated with the new code.
6.12 Naming Code Versions
ProblemYou’ve got a milestone build of your project, and you want to save it by name in theCVS repository for easy reference later on.
SolutionTag the project with a version name by right-clicking it and selecting Team ➝ Tag AsVersion.
Figure 6-14. Accepting a patch
This is the Title of the Book, eMatter EditionCopyright © 2004 O’Reilly & Associates, Inc. All rights reserved.
160 | Chapter 6: Using Eclipse in Teams
DiscussionIf you’ve created a milestone build of your project, you might want to save it byname. Doing so makes CVS store the tagged version so that you can access it byname later.
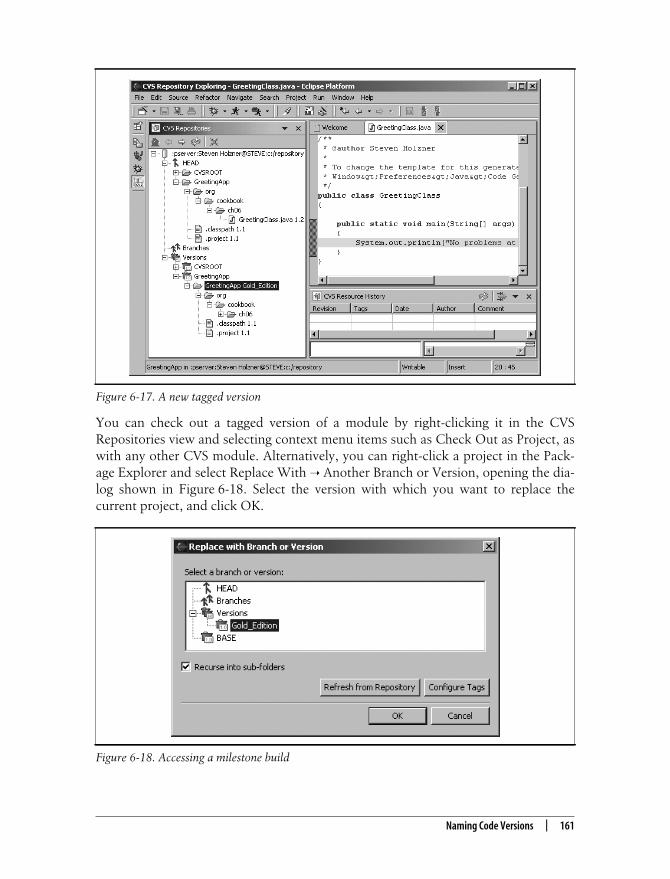
Right-clicking a project under version control, and selecting Team ➝ Tag As Versionopens the dialog shown in Figure 6-16. In this case, we’re going to name our currentversion of the project Gold_Edition, as shown in the figure.
Note that version labels must start with a letter, and they cannot include spaces orthese characters: `$,.:;@|'. After tagging the current version with this name, you canfind it in the Versions node in the CVS Repositories view, as shown in Figure 6-17.
Figure 6-15. Applying a code patch
Figure 6-16. Tagging a version of your code
This is the Title of the Book, eMatter EditionCopyright © 2004 O’Reilly & Associates, Inc. All rights reserved.
Naming Code Versions | 161
You can check out a tagged version of a module by right-clicking it in the CVSRepositories view and selecting context menu items such as Check Out as Project, aswith any other CVS module. Alternatively, you can right-click a project in the Pack-age Explorer and select Replace With ➝ Another Branch or Version, opening the dia-log shown in Figure 6-18. Select the version with which you want to replace thecurrent project, and click OK.
Figure 6-17. A new tagged version
Figure 6-18. Accessing a milestone build
This is the Title of the Book, eMatter EditionCopyright © 2004 O’Reilly & Associates, Inc. All rights reserved.
162 | Chapter 6: Using Eclipse in Teams
See AlsoRecipe 6.4 on storing an Eclipse project in CVS; Recipe 6.5 on committing files tothe repository.
6.13 Creating CVS Branches
ProblemYou want to develop a new version of your code, such as a beta version, by creating anew branch in your development tree.
SolutionAdd a new branch to your project’s development tree by selecting Team ➝ Branch.
DiscussionCVS also enables you to create new branches in your code’s development tree. Suchbranches can act as alternate streams of development for your code; e.g., you mightwant to develop a new version of your code that uses prompts in another language.
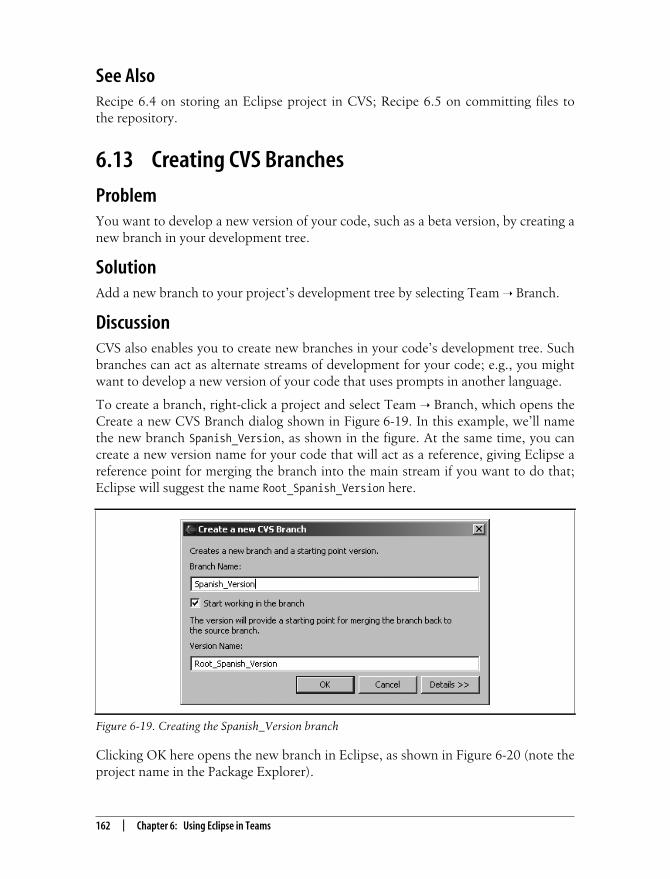
To create a branch, right-click a project and select Team ➝ Branch, which opens theCreate a new CVS Branch dialog shown in Figure 6-19. In this example, we’ll namethe new branch Spanish_Version, as shown in the figure. At the same time, you cancreate a new version name for your code that will act as a reference, giving Eclipse areference point for merging the branch into the main stream if you want to do that;Eclipse will suggest the name Root_Spanish_Version here.
Clicking OK here opens the new branch in Eclipse, as shown in Figure 6-20 (note theproject name in the Package Explorer).
Figure 6-19. Creating the Spanish_Version branch
This is the Title of the Book, eMatter EditionCopyright © 2004 O’Reilly & Associates, Inc. All rights reserved.
Creating CVS Branches | 163
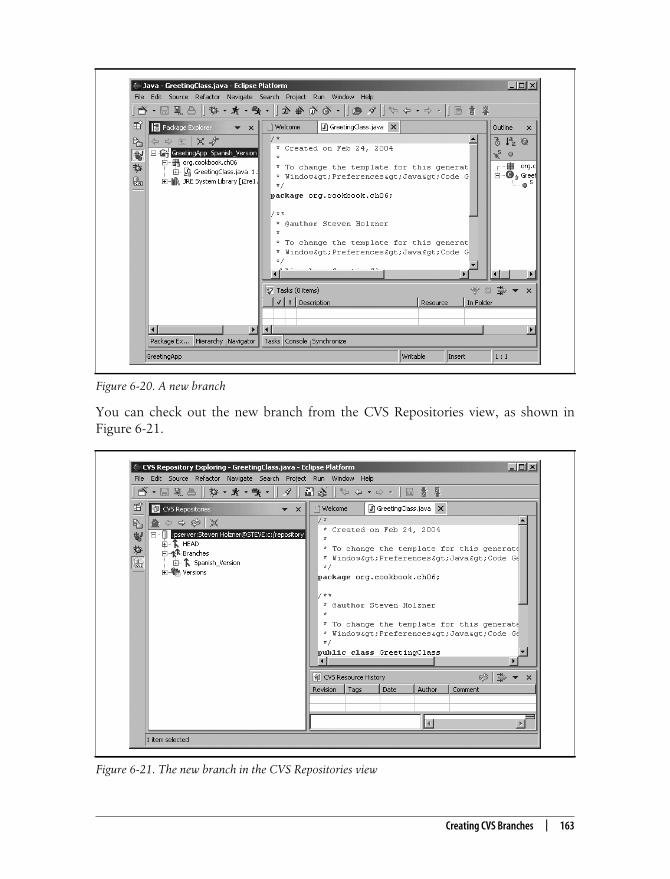
You can check out the new branch from the CVS Repositories view, as shown inFigure 6-21.
Figure 6-20. A new branch
Figure 6-21. The new branch in the CVS Repositories view
This is the Title of the Book, eMatter EditionCopyright © 2004 O’Reilly & Associates, Inc. All rights reserved.
164 | Chapter 6: Using Eclipse in Teams
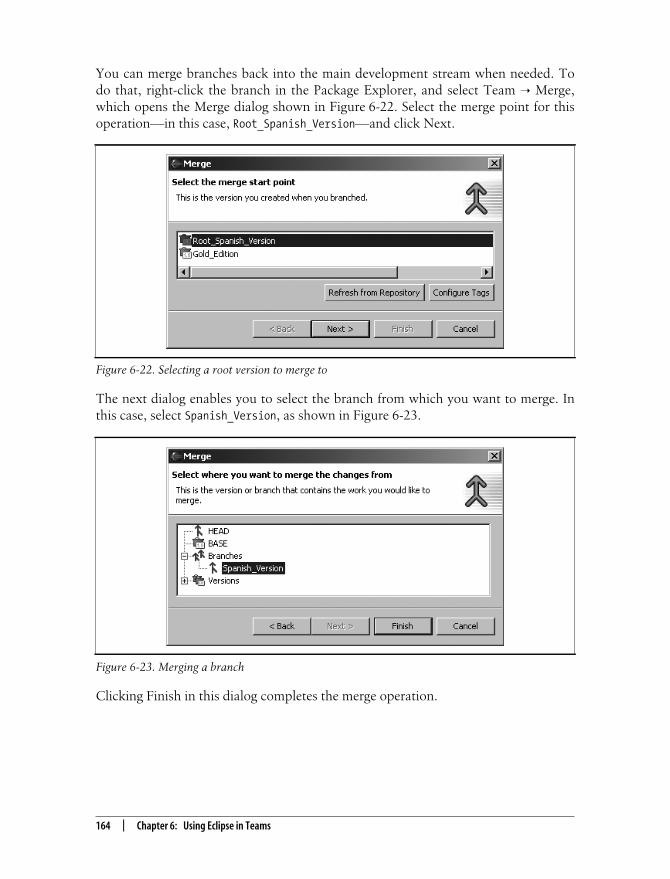
You can merge branches back into the main development stream when needed. Todo that, right-click the branch in the Package Explorer, and select Team ➝ Merge,which opens the Merge dialog shown in Figure 6-22. Select the merge point for thisoperation—in this case, Root_Spanish_Version—and click Next.
The next dialog enables you to select the branch from which you want to merge. Inthis case, select Spanish_Version, as shown in Figure 6-23.
Clicking Finish in this dialog completes the merge operation.
Figure 6-22. Selecting a root version to merge to
Figure 6-23. Merging a branch