dynax-maxxum 800si en
DESCRIPTION
Minolta Maxxum Dynax AlphaTRANSCRIPT
INSTRUCTION MANUALE
BASICOPERATION
FOCUSBASICS
FLASHBASICS
SUBJECTPROGRAMMODES
EXPOSUREBASICS
ADVANCEDAUTOFOCUS
ADVANCEDEXPOSURE
ADVANCEDFLASH
ADDITIONALFEATURES
APPENDIX
2152EE 17/10/97 10:50 AM Page 1
1
Thank you for purchasing the Minolta Dynax/Maxxum 800si. The 800sifeatures Minolta's highly acclaimed 14-Segment Honeycomb PatternMetering, a built-in high-power zoom flash, and built-in Intelligent Cardfunctions. The built-in flash covers focal lengths from 24 to 80mm and hasa guide number of up to 20. A screw-type PC terminal and Rear-flashsync function give you maximum control over flash exposures.The High-Speed Autofocus, Predictive Focus Control functions, and topshutter speed of 1/8000 second mean the 800si responds quickly,accurately, and flexibly to virtually any motion, composition, or lightingcondition in the moment of a shutter release.The 800si also offers full control over all camera systems. In addition, youcan select any of the four local focus areas, take spot meter readings,lock exposure and focus separately or together, and use Memory to saveand later recall three groups of your most often used camera settings.This manual has been designed to help you understand the operation ofyour camera and its functions. Please familiarize yourself with the namesof the controls and their locations on the camera, then read this manualthoroughly.
This device complies with Part 15 of the FCC Rules. Operation is subject to the following two conditions:(1) This device may not cause harmful interference, and (2) this device must accept any interferencereceived, including interference that may cause undesired operation. Changes or modifications notapproved by the party responsible for compliance could void the user's authority to operate theequipment. This equipment has been tested and found to comply with the limits for a Class B digitaldevice, pursuant to Part 15 of the FCC Rules. These limits are designed to provide reasonable protectionagainst harmful interference in a residential installation. This equipment generates, uses and can radiateradio frequency energy and, if not installed and used in accordance with the instructions, may causeharmful interference to radio communications. However, there is no guarantee that interference will notoccur in a particular installation. If this equipment does cause harmful interference to radio or televisionreception, which can be determined by turning the equipment off and on, the user is encouraged to try tocorrect the interference by one or more of the following measures:• Reorient or relocate the receiving antenna.• Increase the separation between the equipment and the receiver.• Connect the equipment to an outlet on a circuit different from that to which the receiver is connected.• Consult the dealer or an experienced radio/TV technician for help.
This Class B digital apparatus meets all requirements of the Canadian Interference-Causing EquipmentRegulations.
This mark on your camera certifies that this camera meets the requirements of the EU(European Union) concerning interference causing equipment regulations. CE stands forConformité Européenne (European Conformity).
FOR PROPER AND SAFE USE
Read and understand all warnings and cautions before using thisproduct.
Batteries may become hot or explode due to improper use.• Use only the batteries specified in this instruction manual.• Do not install the batteries with the polarity (+/–) reversed.• Do not subject batteries to fire or high temperatures.• Do not attempt to recharge, short, or disassemble.
Use caution, accidents may occur when using this product near youngchildren.
Keep batteries or things that could be swallowed away from youngchildren. Contact a doctor immediately if an object is swallowed.
Immediately remove the batteries and discontinue use if...• the camera is dropped or subjected to an impact in which the interior
is exposed.• the product emits a strange smell, heat, or smoke.
Do not disassemble. Electric shock may occur if a high voltage circuitinside the camera is touched. Take your camera to a Minolta ServiceFacility when repairs are required.
Do not look directly at the sun through the viewfinder.
Fire may occur if the camera is subjected to focused sunlight. Replacethe lens cap when the product is not being used.
WARNING
2152EE 17/10/97 10:50 AM Page 2
TABLE OF CONTENTS
2 3
BASIC OPERATION
FOCUS BASICS
FLASH BASICS
SUBJECT PROGRAMMODES
EXPOSURE BASICS
ADVANCEDAUTOFOCUS
ADVANCED EXPOSURE
ADVANCED FLASH
ADDITIONALFEATURES
APPENDIX
Names of Parts.............................4
Loading the Film...........................16Handling the Camera ...................18Diopter Adjustment .......................19
Special Focusing Situations .........30Manual Focus...............................31
Flash Range .................................36Red-Eye Reduction ......................38
Landscape Mode..........................43Close-up Mode .............................44
A: Aperture Priority Mode .............53S: Shutter Priority Mode ...............56
Focus Frame ................................67Wide Focus Area..........................67
AE Lock ........................................75Exposure Bracketing ....................77Flash Bracketing...........................79
Flash Compensation ....................91Wireless/Remote Off-cameraFlash Control ................................92
For Owners of the Quartz DateModel............................................112Depth-of-Field Preview.................114
Troubleshooting............................123Care and Storage.........................126
For Proper and Safe Use..................................1
Standard Accessories .......................................11Installing the Batteries ......................................12Battery Condition Indicators..............................13Attaching and Removing the Lens....................14
Focus Signals ...................................................26Focus Lock .......................................................27
Using the Built-in Flash.....................................34Flash Signals ....................................................35
Subject Program Selection ...............................41Portrait Mode ....................................................42
Exposure Modes...............................................49P: Programmed Autoexposure Mode ...............51
Autofocus Modes ..............................................64Changing the Autofocus Mode .........................66
Metering............................................................71Selecting a Metering Method............................73Exposure Compensation ..................................74
High-speed Flash Sync.....................................87Slow-shutter Sync.............................................88Rear-flash Sync ................................................89
Memory .............................................................99Customized Settings.........................................102Data Memory ....................................................106
Program-reset button........................................120Accessory Information ......................................121
Quick Operation ...........................8
Eye-Start.......................................20Shooting in Full-Auto Mode..........22Rewinding the Film.......................24
AF Illuminator ...............................32
Fill Flash .......................................39
Sports Mode .................................45Night Portrait Mode ......................46
M: Manual Exposure Mode ..........59Bulb ..............................................62
Local Focus Area..........................68Release Priority ............................69
Multiple Exposure.........................81Metering Index..............................84
PC Terminal ..................................97
Setting Film Speed Manually .......115Self-timer ......................................117Film-drive Modes..........................118
Technical Details ..........................129
2152EE 17/10/97 10:50 AM Page 2

NAMES OF PARTS
4 5
BODY
1
2
3
4
5 6 7 8 9 10
111213
14
15
16
17
18192021
22
33
34
35
2324
25 26 27
29
30
31
32
( 13 )
( 9 )
28
A
B
C
DE
FG
H
1.Grip sensor (20)2. AF illuminator/Self-timer lamp
(32, 117)3. Front control dial4. Shutter-release button5. Data panel (6)6. Program-reset button (9, 120)7. Built-in flash (34-39)8. Subject program button (41-47)9. Memory-recall button (101)
10. Memory-number lever (100)11. Exposure-mode button (50)
12. PC terminal (97)13. Strap eyelet (11)14. Flash-compensation button (91)15. Lens release (14-15)16. Back-cover release (16)17. Focus-mode button (31)18. Exposure-compensation
button (74)19. Mirror*20. Lens contacts*21. Depth-of-field preview button
(114)
22. Eyepiece sensor* (20)23. Viewfinder*24. Main switch25. Eyepiece cup (11)26. Accessory shoe27. Diopter-adjustment dial (19)28. AE-lock button (75-76, 88, 95)
29. Rear control dial 30. Control panel door31. AF button (28-29, 68)32. Remote-control terminal (62)33. Eye-start switch (21)34. Rewind button (24)35. Film window (16)
A. Data-memory button (108, 111)B. Self-timer/drive-mode button (77-83, 117,
118)C. AF-mode button (66)D. Flash-mode button (38, 89, 92-96)E. Metering-mode button (73)F. Enter button (100)G. ISO button (115)H. Adjust button (69, 77, 81, 104-105, 109-111)
CONTROL PANEL
For information on specific parts, refer to the page numbers shownin parenthesis.
* Do not touch.
2152EE 17/10/97 10:51 AM Page 4
NAMES OF PARTS
6 7
DATA PANEL VIEWFINDER
1 2 3 4 5 6
78
9101112
1314
151617181920212223
1
6
7 8 9 10 11 12 13 14 15
2 33
4
35
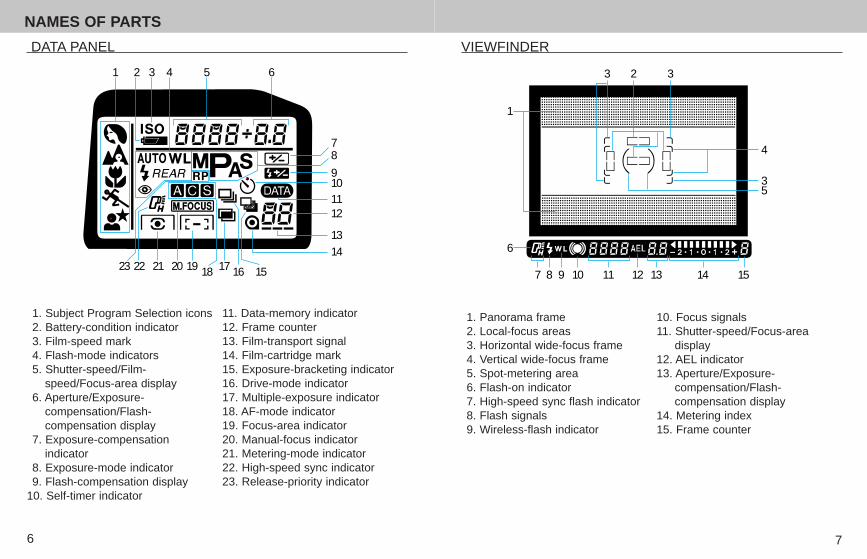
1. Subject Program Selection icons2. Battery-condition indicator3. Film-speed mark 4. Flash-mode indicators5. Shutter-speed/Film-
speed/Focus-area display6. Aperture/Exposure-
compensation/Flash-compensation display
7. Exposure-compensationindicator
8. Exposure-mode indicator9. Flash-compensation display
10. Self-timer indicator
1. Panorama frame2. Local-focus areas3. Horizontal wide-focus frame4. Vertical wide-focus frame5. Spot-metering area6. Flash-on indicator7. High-speed sync flash indicator8. Flash signals9. Wireless-flash indicator
11. Data-memory indicator12. Frame counter13. Film-transport signal14. Film-cartridge mark15. Exposure-bracketing indicator16. Drive-mode indicator17. Multiple-exposure indicator18. AF-mode indicator19. Focus-area indicator20. Manual-focus indicator21. Metering-mode indicator22. High-speed sync indicator23. Release-priority indicator
10. Focus signals11. Shutter-speed/Focus-area
display12. AEL indicator13. Aperture/Exposure-
compensation/Flash-compensation display
14. Metering index15. Frame counter
2152EE 17/10/97 10:51 AM Page 6
QUICK OPERATION
8 9
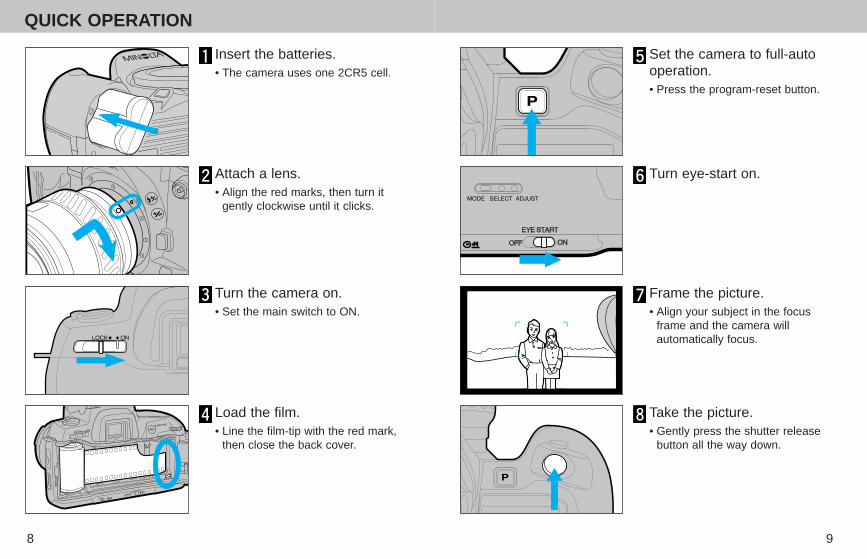
Insert the batteries.• The camera uses one 2CR5 cell.
Attach a lens.• Align the red marks, then turn it
gently clockwise until it clicks.
Turn the camera on.• Set the main switch to ON.
Load the film.• Line the film-tip with the red mark,
then close the back cover.
Set the camera to full-autooperation.• Press the program-reset button.
Turn eye-start on.
Frame the picture.• Align your subject in the focus
frame and the camera willautomatically focus.
Take the picture.• Gently press the shutter release
button all the way down.
2152EE 17/10/97 10:51 AM Page 8

10
STANDARD ACCESSORIES
11
NECKSTRAP
Attach the neckstrap as shown.
EYEPIECE CUP
Attach the eyepiece cup asshown.
EYEPIECE AND ACCESSORY SHOE CAPS
An eyepiece cap is attached to thestrap. Before using the self-timer ormaking long exposures, removethe the eyepiece cup and attachthe cap to the viewfinder eyepieceto prevent stray light from enteringthe camera and affecting exposure.
The camera also comes with an accessory-shoe cap whichprotects the accessory-shoe contacts. When using a flash or otheraccessory, slide the accessory-shoe cap into the eyepiece cap forsafekeeping.
BASICOPERATION
2152EE 17/10/97 10:51 AM Page 10
INSTALLING THE BATTERIES
12 13
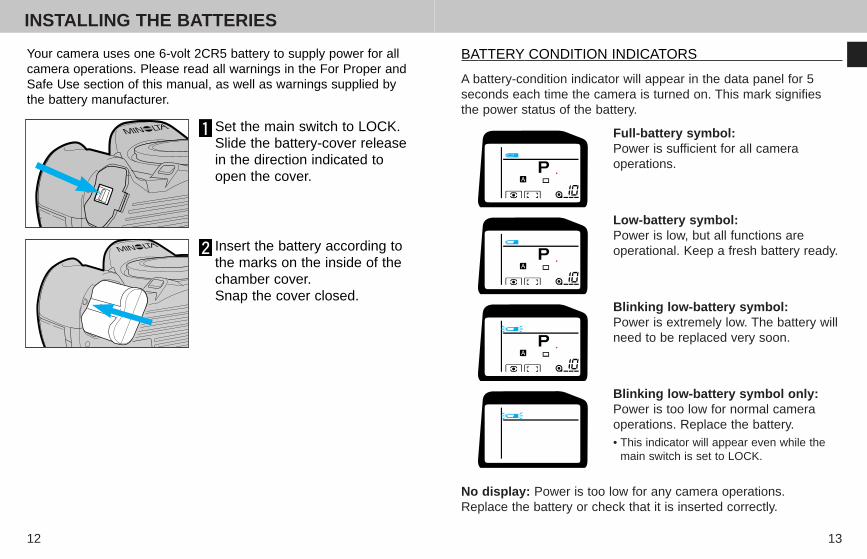
Your camera uses one 6-volt 2CR5 battery to supply power for allcamera operations. Please read all warnings in the For Proper andSafe Use section of this manual, as well as warnings supplied bythe battery manufacturer.
Set the main switch to LOCK.Slide the battery-cover releasein the direction indicated toopen the cover.
Insert the battery according tothe marks on the inside of thechamber cover.Snap the cover closed.
BATTERY CONDITION INDICATORS
Full-battery symbol:Power is sufficient for all cameraoperations.
Low-battery symbol:Power is low, but all functions areoperational. Keep a fresh battery ready.
Blinking low-battery symbol:Power is extremely low. The battery willneed to be replaced very soon.
Blinking low-battery symbol only:Power is too low for normal cameraoperations. Replace the battery.• This indicator will appear even while the
main switch is set to LOCK.
No display: Power is too low for any camera operations.Replace the battery or check that it is inserted correctly.
A battery-condition indicator will appear in the data panel for 5seconds each time the camera is turned on. This mark signifiesthe power status of the battery.
2152EE 17/10/97 10:51 AM Page 12
ATTACHING AND REMOVING THE LENS
14 15
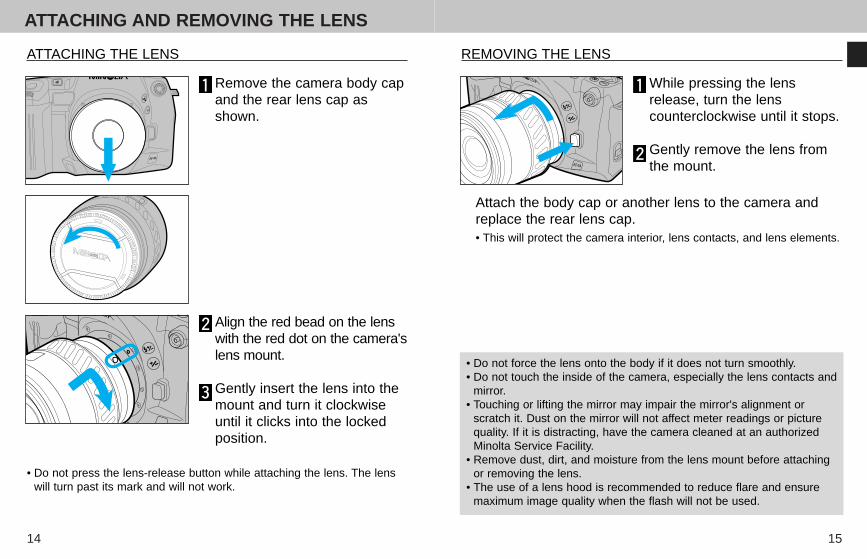
Remove the camera body capand the rear lens cap asshown.
Align the red bead on the lenswith the red dot on the camera'slens mount.
Gently insert the lens into themount and turn it clockwiseuntil it clicks into the lockedposition.
• Do not press the lens-release button while attaching the lens. The lenswill turn past its mark and will not work.
ATTACHING THE LENS
While pressing the lensrelease, turn the lenscounterclockwise until it stops.
Gently remove the lens fromthe mount.
REMOVING THE LENS
• Do not force the lens onto the body if it does not turn smoothly.• Do not touch the inside of the camera, especially the lens contacts and
mirror.• Touching or lifting the mirror may impair the mirror's alignment or
scratch it. Dust on the mirror will not affect meter readings or picturequality. If it is distracting, have the camera cleaned at an authorizedMinolta Service Facility.
• Remove dust, dirt, and moisture from the lens mount before attachingor removing the lens.
• The use of a lens hood is recommended to reduce flare and ensuremaximum image quality when the flash will not be used.
Attach the body cap or another lens to the camera andreplace the rear lens cap.• This will protect the camera interior, lens contacts, and lens elements.
2152EE 17/10/97 10:51 AM Page 14
LOADING FILM
16 17
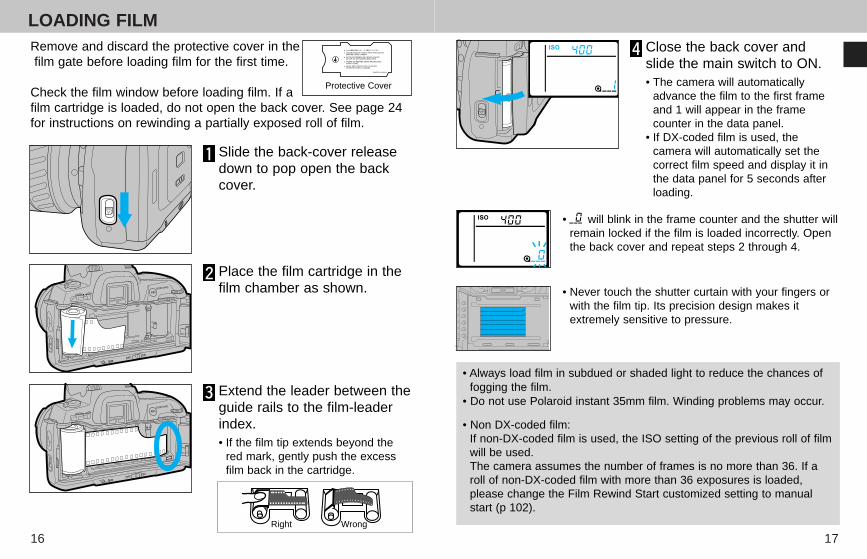
Remove and discard the protective cover in thefilm gate before loading film for the first time.
Check the film window before loading film. If afilm cartridge is loaded, do not open the back cover. See page 24for instructions on rewinding a partially exposed roll of film.
Slide the back-cover releasedown to pop open the backcover.
Place the film cartridge in thefilm chamber as shown.
Extend the leader between theguide rails to the film-leaderindex.• If the film tip extends beyond the
red mark, gently push the excessfilm back in the cartridge.
Close the back cover andslide the main switch to ON. • The camera will automatically
advance the film to the first frameand 1 will appear in the framecounter in the data panel.
• If DX-coded film is used, thecamera will automatically set thecorrect film speed and display it inthe data panel for 5 seconds afterloading.
• will blink in the frame counter and the shutter willremain locked if the film is loaded incorrectly. Openthe back cover and repeat steps 2 through 4.
• Never touch the shutter curtain with your fingers orwith the film tip. Its precision design makes itextremely sensitive to pressure.
• Always load film in subdued or shaded light to reduce the chances offogging the film.
• Do not use Polaroid instant 35mm film. Winding problems may occur.
• Non DX-coded film:If non-DX-coded film is used, the ISO setting of the previous roll of filmwill be used. The camera assumes the number of frames is no more than 36. If aroll of non-DX-coded film with more than 36 exposures is loaded,please change the Film Rewind Start customized setting to manualstart (p 102).
Protective Cover
Right Wrong
2152EE 17/10/97 10:52 AM Page 16

DIOPTER ADJUSTMENTHANDLING THE CAMERA
18 19
Hold the camera grip firmly with your right hand while supportingthe lens with your left hand. Keep your elbows at your side andyour feet shoulder-width apart to hold the camera steady. Alwayskeep the camera strap around your neck or wrist in the event youaccidentally drop the camera.• Do not touch the focusing ring of an AF lens or the end of the lens barrel
of an xi-Series Autozoom lens.• Do not block the AF illuminator when autofocus is in use.• Use a tripod when shooting with long shutter speeds or a telephoto lens.
Press the shutter-release button partway down to activate thecamera's autofocus and autoexposure systems. Gently press theshutter-release button all-the-way down to take the picture - neveruse a quick jab.
Slide the main switch to on.
Look through the viewfinderand turn the diopter-adjustmentdial until the focus frameoutlines appear the sharpest.• If the focus frame does not appear,
press the shutter-release buttonpartway down.
• Turn the dial in the + direction if youare farsighted. Turn the dial in the –direction if you are nearsighted.
If you are near or far sighted, use the diopter adjustment to adjustthe eyepiece for your eyesight. The diopter adjustment range isfrom -2.5 to + 0.5 diopters.
✎ If additional correction is needed, a Minolta Eyepiece Corrector can beattached to the camera's eyepiece.
✎ The diopter adjustment dial is easier to turn if the eyepiece cup isremoved.
HOLDING THE CAMERA
PRESSING THE SHUTTER RELEASE BUTTON
2152EE 17/10/97 10:52 AM Page 18
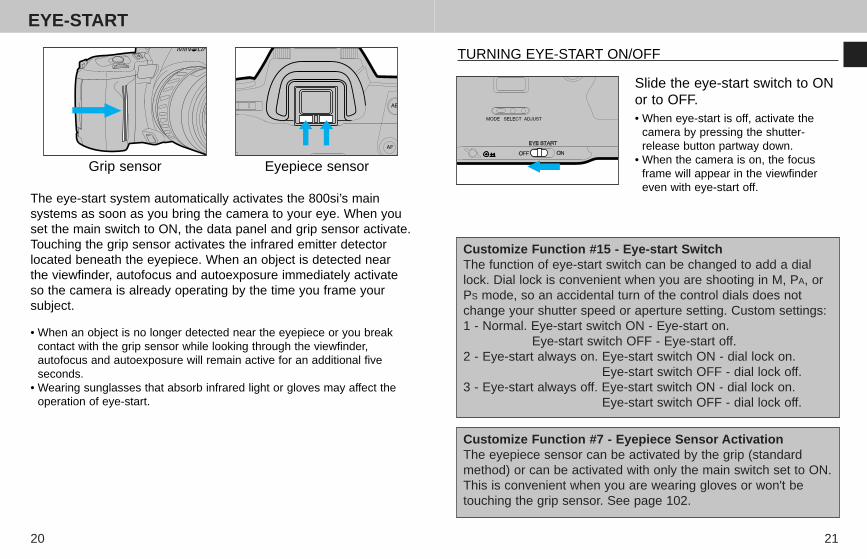
EYE-START
20 21
The eye-start system automatically activates the 800si’s mainsystems as soon as you bring the camera to your eye. When youset the main switch to ON, the data panel and grip sensor activate.Touching the grip sensor activates the infrared emitter detectorlocated beneath the eyepiece. When an object is detected nearthe viewfinder, autofocus and autoexposure immediately activateso the camera is already operating by the time you frame yoursubject.
• When an object is no longer detected near the eyepiece or you breakcontact with the grip sensor while looking through the viewfinder,autofocus and autoexposure will remain active for an additional fiveseconds.
• Wearing sunglasses that absorb infrared light or gloves may affect theoperation of eye-start.
Grip sensor Eyepiece sensor
TURNING EYE-START ON/OFF
Slide the eye-start switch to ONor to OFF.• When eye-start is off, activate the
camera by pressing the shutter-release button partway down.
• When the camera is on, the focusframe will appear in the viewfindereven with eye-start off.
Customize Function #15 - Eye-start SwitchThe function of eye-start switch can be changed to add a diallock. Dial lock is convenient when you are shooting in M, PA, orPS mode, so an accidental turn of the control dials does notchange your shutter speed or aperture setting. Custom settings:1 - Normal. Eye-start switch ON - Eye-start on.
Eye-start switch OFF - Eye-start off.2 - Eye-start always on. Eye-start switch ON - dial lock on.
Eye-start switch OFF - dial lock off.3 - Eye-start always off. Eye-start switch ON - dial lock on.
Eye-start switch OFF - dial lock off.
Customize Function #7 - Eyepiece Sensor ActivationThe eyepiece sensor can be activated by the grip (standardmethod) or can be activated with only the main switch set to ON.This is convenient when you are wearing gloves or won't betouching the grip sensor. See page 102.
2152EE 17/10/97 10:52 AM Page 20
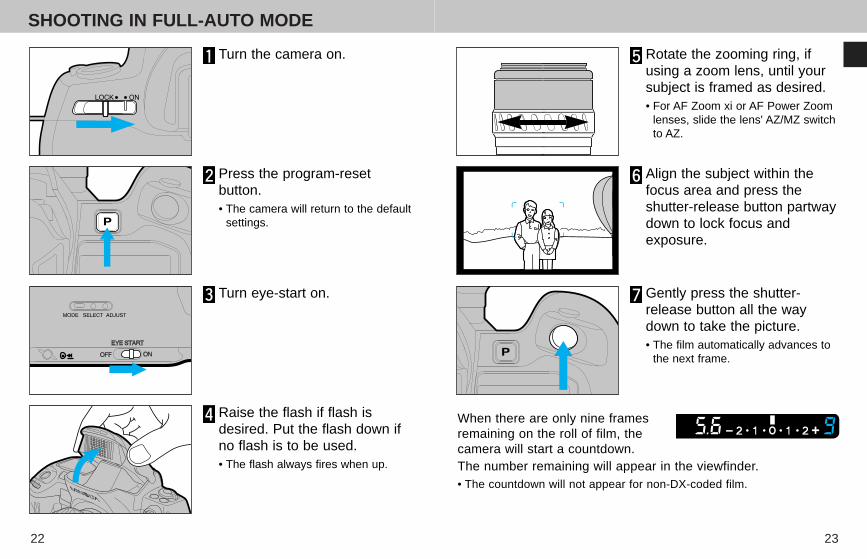
SHOOTING IN FULL-AUTO MODE
22 23
Turn the camera on.
Press the program-resetbutton.• The camera will return to the default
settings.
Turn eye-start on.
Raise the flash if flash isdesired. Put the flash down ifno flash is to be used.• The flash always fires when up.
Rotate the zooming ring, ifusing a zoom lens, until yoursubject is framed as desired.• For AF Zoom xi or AF Power Zoom
lenses, slide the lens' AZ/MZ switchto AZ.
Gently press the shutter-release button all the waydown to take the picture.• The film automatically advances to
the next frame.
When there are only nine framesremaining on the roll of film, thecamera will start a countdown.The number remaining will appear in the viewfinder.• The countdown will not appear for non-DX-coded film.
Align the subject within thefocus area and press theshutter-release button partwaydown to lock focus andexposure.
2152EE 17/10/97 10:52 AM Page 22
REWINDING THE FILM
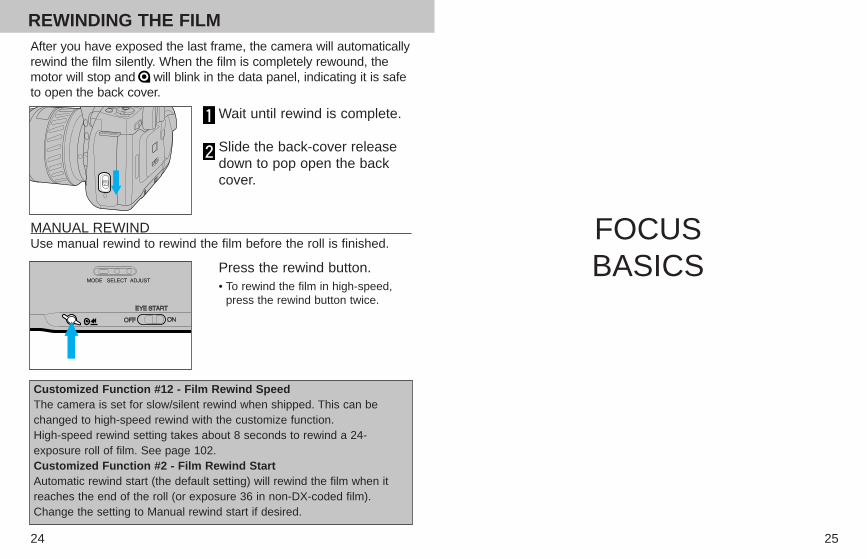
24 25
After you have exposed the last frame, the camera will automaticallyrewind the film silently. When the film is completely rewound, themotor will stop and will blink in the data panel, indicating it is safeto open the back cover.
Wait until rewind is complete.
Slide the back-cover releasedown to pop open the backcover.
Press the rewind button.• To rewind the film in high-speed,
press the rewind button twice.
MANUAL REWIND Use manual rewind to rewind the film before the roll is finished.
Customized Function #12 - Film Rewind SpeedThe camera is set for slow/silent rewind when shipped. This can bechanged to high-speed rewind with the customize function.High-speed rewind setting takes about 8 seconds to rewind a 24-exposure roll of film. See page 102.Customized Function #2 - Film Rewind StartAutomatic rewind start (the default setting) will rewind the film when itreaches the end of the roll (or exposure 36 in non-DX-coded film).Change the setting to Manual rewind start if desired.
FOCUSBASICS
2152EE 17/10/97 10:52 AM Page 24
FOCUS LOCKFOCUS SIGNALS
26 27
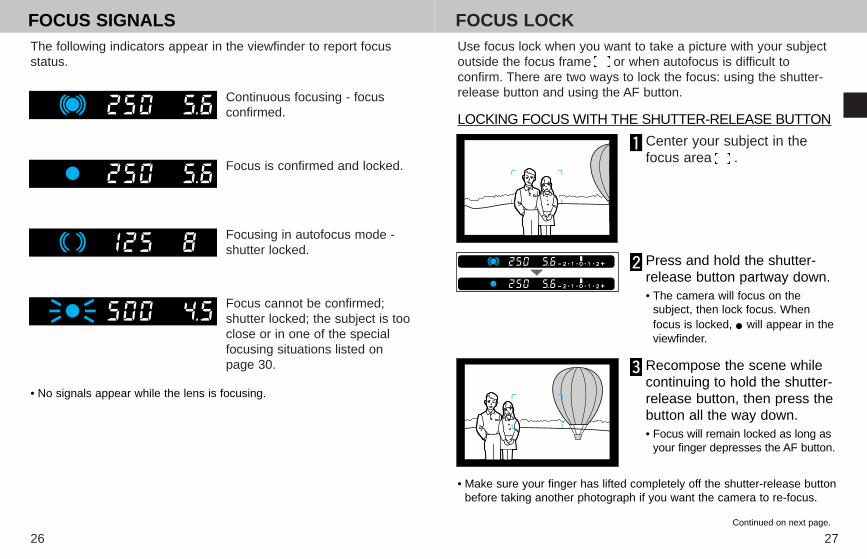
The following indicators appear in the viewfinder to report focusstatus.
Continuous focusing - focusconfirmed.
Focus is confirmed and locked.
Focusing in autofocus mode -shutter locked.
Focus cannot be confirmed;shutter locked; the subject is tooclose or in one of the specialfocusing situations listed onpage 30.
Use focus lock when you want to take a picture with your subjectoutside the focus frame or when autofocus is difficult toconfirm. There are two ways to lock the focus: using the shutter-release button and using the AF button.
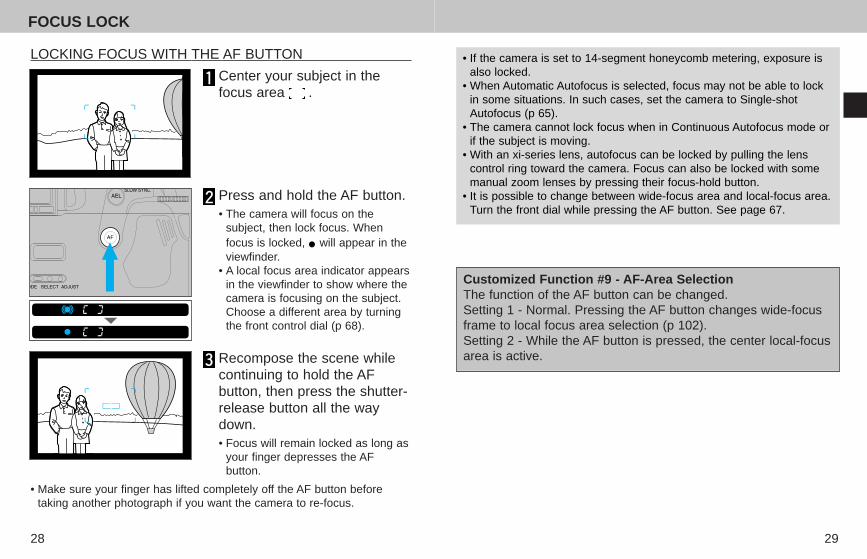
Center your subject in thefocus area .
Press and hold the shutter-release button partway down.• The camera will focus on the
subject, then lock focus. Whenfocus is locked, will appear in theviewfinder.
Recompose the scene whilecontinuing to hold the shutter-release button, then press thebutton all the way down.• Focus will remain locked as long as
your finger depresses the AF button.
LOCKING FOCUS WITH THE SHUTTER-RELEASE BUTTON
• No signals appear while the lens is focusing.
• Make sure your finger has lifted completely off the shutter-release buttonbefore taking another photograph if you want the camera to re-focus.
Continued on next page.
2152EE 17/10/97 10:52 AM Page 26
FOCUS LOCK
28 29
Center your subject in thefocus area .
Press and hold the AF button.• The camera will focus on the
subject, then lock focus. Whenfocus is locked, will appear in theviewfinder.
• A local focus area indicator appearsin the viewfinder to show where thecamera is focusing on the subject.Choose a different area by turningthe front control dial (p 68).
Recompose the scene whilecontinuing to hold the AFbutton, then press the shutter-release button all the waydown.• Focus will remain locked as long as
your finger depresses the AFbutton.
LOCKING FOCUS WITH THE AF BUTTON • If the camera is set to 14-segment honeycomb metering, exposure isalso locked.
• When Automatic Autofocus is selected, focus may not be able to lockin some situations. In such cases, set the camera to Single-shotAutofocus (p 65).
• The camera cannot lock focus when in Continuous Autofocus mode orif the subject is moving.
• With an xi-series lens, autofocus can be locked by pulling the lenscontrol ring toward the camera. Focus can also be locked with somemanual zoom lenses by pressing their focus-hold button.
• It is possible to change between wide-focus area and local-focus area.Turn the front dial while pressing the AF button. See page 67.
Customized Function #9 - AF-Area SelectionThe function of the AF button can be changed.Setting 1 - Normal. Pressing the AF button changes wide-focusframe to local focus area selection (p 102).Setting 2 - While the AF button is pressed, the center local-focusarea is active.
• Make sure your finger has lifted completely off the AF button beforetaking another photograph if you want the camera to re-focus.
2152EE 17/10/97 10:53 AM Page 28
MANUAL FOCUSSPECIAL FOCUSING SITUATIONS
30 31
In situations like those described below, it may be difficult orimpossible for the camera to focus accurately; you may need touse focus lock (p 27) or manual focus (p 31).
If two subjects at differentdistances overlap within thefocus frame.
If a subject composed ofalternating light and dark linescompletely fills the focusframe.
If the subject within the focusframe is very bright, very dark,or low in contrast.
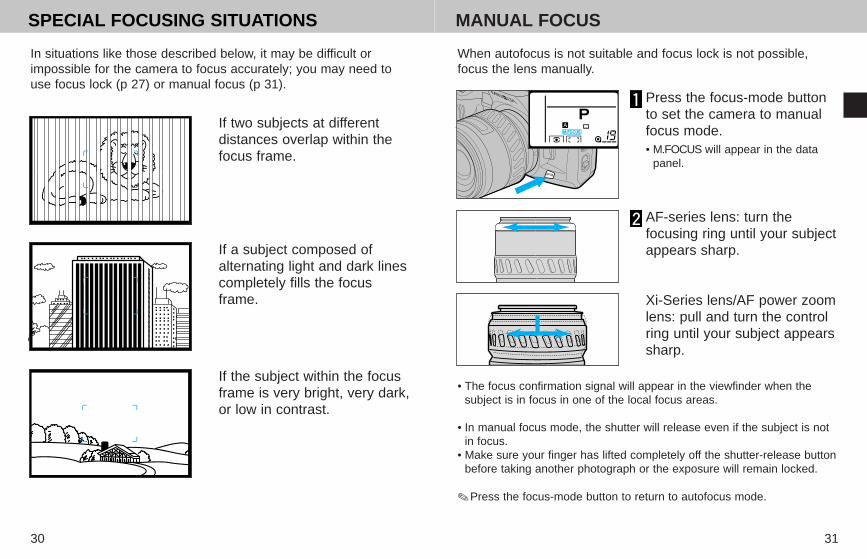
Press the focus-mode buttonto set the camera to manualfocus mode.• M.FOCUS will appear in the data
panel.
W
AF-series lens: turn thefocusing ring until your subjectappears sharp.
Xi-Series lens/AF power zoomlens: pull and turn the controlring until your subject appearssharp.
• The focus confirmation signal will appear in the viewfinder when thesubject is in focus in one of the local focus areas.
• In manual focus mode, the shutter will release even if the subject is notin focus.
• Make sure your finger has lifted completely off the shutter-release buttonbefore taking another photograph or the exposure will remain locked.
✎ Press the focus-mode button to return to autofocus mode.
When autofocus is not suitable and focus lock is not possible,focus the lens manually.
2152EE 17/10/97 10:53 AM Page 30
AF ILLUMINATOR
32 33
In low light situations or when thecontrast of your main subject istoo low to be read by the AFsensors, the autofocus illuminatorwill activate automatically. The AFilluminator projects a pattern oflines onto your subject which theAF sensors detect and use tofocus.
• Be careful not to obstruct the AF illuminator while holding the camera.• The range of the AF illuminator is 0.7 - 7m.• The AF illuminator will not operate if the camera is in Continuous
Autofocus Mode (p 64).• The AF illuminator will not operate with a 300mm or longer focal length
lens (excluding the AF Zoom/AF Zoom xi 100-300 and AF Zoom 75-300).
• The AF illuminator will not operate with the 3x-1x Macro Zoom.• When a program flash is attached, its AF illuminator will be active in
place of the camera’s AF illuminator.
FLASH BASICS
2152EE 17/10/97 10:53 AM Page 32
FLASH SIGNALSUSING THE BUILT-IN FLASH
34 35
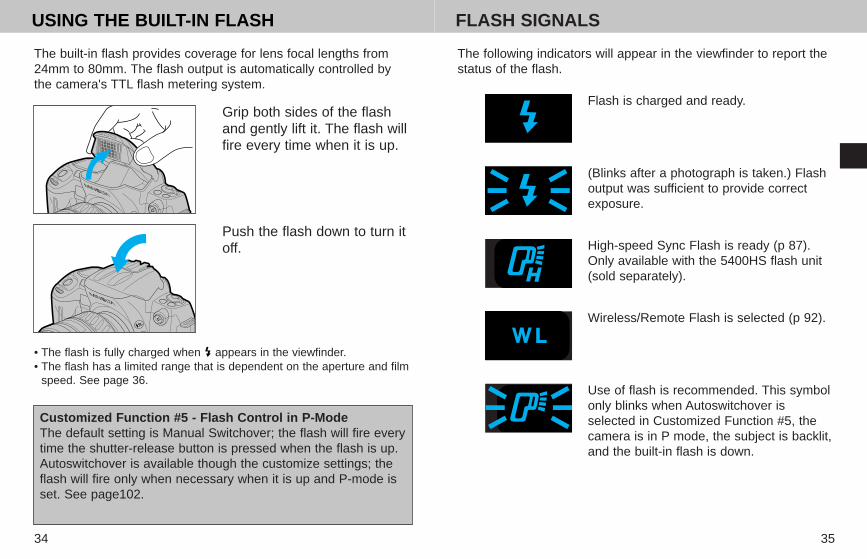
Grip both sides of the flashand gently lift it. The flash willfire every time when it is up.
Push the flash down to turn itoff.
The built-in flash provides coverage for lens focal lengths from24mm to 80mm. The flash output is automatically controlled bythe camera's TTL flash metering system.
• The flash is fully charged when appears in the viewfinder.• The flash has a limited range that is dependent on the aperture and film
speed. See page 36.
Customized Function #5 - Flash Control in P-ModeThe default setting is Manual Switchover; the flash will fire everytime the shutter-release button is pressed when the flash is up.Autoswitchover is available though the customize settings; theflash will fire only when necessary when it is up and P-mode isset. See page102.
The following indicators will appear in the viewfinder to report thestatus of the flash.
Flash is charged and ready.
(Blinks after a photograph is taken.) Flashoutput was sufficient to provide correctexposure.
High-speed Sync Flash is ready (p 87).Only available with the 5400HS flash unit(sold separately).
Wireless/Remote Flash is selected (p 92).
Use of flash is recommended. This symbolonly blinks when Autoswitchover isselected in Customized Function #5, thecamera is in P mode, the subject is backlit,and the built-in flash is down.
2152EE 17/10/97 10:53 AM Page 34
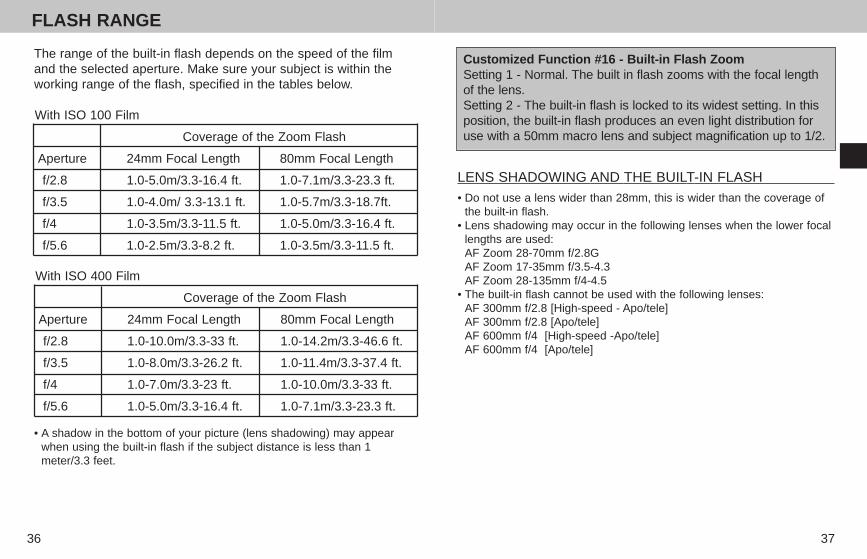
FLASH RANGE
36 37
The range of the built-in flash depends on the speed of the filmand the selected aperture. Make sure your subject is within theworking range of the flash, specified in the tables below.
With ISO 100 Film
Coverage of the Zoom Flash
Aperture 24mm Focal Length 80mm Focal Length
f/2.8 1.0-5.0m/3.3-16.4 ft. 1.0-7.1m/3.3-23.3 ft.
f/3.5 1.0-4.0m/ 3.3-13.1 ft. 1.0-5.7m/3.3-18.7ft.
f/4 1.0-3.5m/3.3-11.5 ft. 1.0-5.0m/3.3-16.4 ft.
• A shadow in the bottom of your picture (lens shadowing) may appearwhen using the built-in flash if the subject distance is less than 1meter/3.3 feet.
LENS SHADOWING AND THE BUILT-IN FLASH • Do not use a lens wider than 28mm, this is wider than the coverage of
the built-in flash.• Lens shadowing may occur in the following lenses when the lower focal
lengths are used:AF Zoom 28-70mm f/2.8GAF Zoom 17-35mm f/3.5-4.3AF Zoom 28-135mm f/4-4.5
• The built-in flash cannot be used with the following lenses:AF 300mm f/2.8 [High-speed - Apo/tele]AF 300mm f/2.8 [Apo/tele]AF 600mm f/4 [High-speed -Apo/tele]AF 600mm f/4 [Apo/tele]
f/5.6 1.0-2.5m/3.3-8.2 ft. 1.0-3.5m/3.3-11.5 ft.
With ISO 400 Film
Coverage of the Zoom Flash
Aperture 24mm Focal Length 80mm Focal Length
f/2.8 1.0-10.0m/3.3-33 ft. 1.0-14.2m/3.3-46.6 ft.
f/3.5 1.0-8.0m/3.3-26.2 ft. 1.0-11.4m/3.3-37.4 ft.
f/4 1.0-7.0m/3.3-23 ft. 1.0-10.0m/3.3-33 ft.
f/5.6 1.0-5.0m/3.3-16.4 ft. 1.0-7.1m/3.3-23.3 ft.
Customized Function #16 - Built-in Flash ZoomSetting 1 - Normal. The built in flash zooms with the focal lengthof the lens.Setting 2 - The built-in flash is locked to its widest setting. In thisposition, the built-in flash produces an even light distribution foruse with a 50mm macro lens and subject magnification up to 1/2.
2152EE 17/10/97 10:53 AM Page 36
FILL FLASH
39
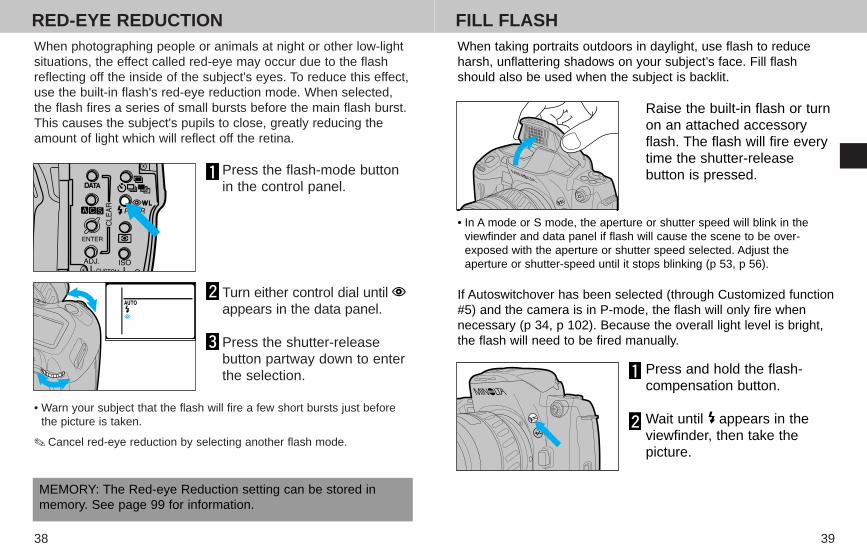
RED-EYE REDUCTION
38
When photographing people or animals at night or other low-lightsituations, the effect called red-eye may occur due to the flashreflecting off the inside of the subject's eyes. To reduce this effect,use the built-in flash's red-eye reduction mode. When selected,the flash fires a series of small bursts before the main flash burst.This causes the subject's pupils to close, greatly reducing theamount of light which will reflect off the retina.
Press the flash-mode buttonin the control panel.
Turn either control dial untilappears in the data panel.
Press the shutter-releasebutton partway down to enterthe selection.
• Warn your subject that the flash will fire a few short bursts just beforethe picture is taken.
✎ Cancel red-eye reduction by selecting another flash mode.
MEMORY: The Red-eye Reduction setting can be stored inmemory. See page 99 for information.
When taking portraits outdoors in daylight, use flash to reduceharsh, unflattering shadows on your subject’s face. Fill flashshould also be used when the subject is backlit.
Raise the built-in flash or turnon an attached accessoryflash. The flash will fire everytime the shutter-releasebutton is pressed.
Press and hold the flash-compensation button.
Wait until appears in theviewfinder, then take thepicture.
• In A mode or S mode, the aperture or shutter speed will blink in theviewfinder and data panel if flash will cause the scene to be over-exposed with the aperture or shutter speed selected. Adjust theaperture or shutter-speed until it stops blinking (p 53, p 56).
If Autoswitchover has been selected (through Customized function#5) and the camera is in P-mode, the flash will only fire whennecessary (p 34, p 102). Because the overall light level is bright,the flash will need to be fired manually.
2152EE 17/10/97 10:53 AM Page 38

SUBJECT PROGRAM SELECTION
4140
Subject program selection lets you choose one of the five subjectprogram modes listed below. These program modes customizethe exposure settings for the type of picture you will be taking.
Portrait Mode - for portrait photography
Landscape Mode - for scenic and travel photography
Close-up Mode - for close-up photography
Sports Mode - for sports and action photography
Night Portrait Mode - for night portrait and night scenephotography
MEMORY: The Subject Program selections can be stored inmemory. See page 99 for information.
• Pressing the program-reset button returns the camera to its programsettings (p 120).
SUBJECT PROGRAMMODES
2152EE 17/10/97 10:53 AM Page 40
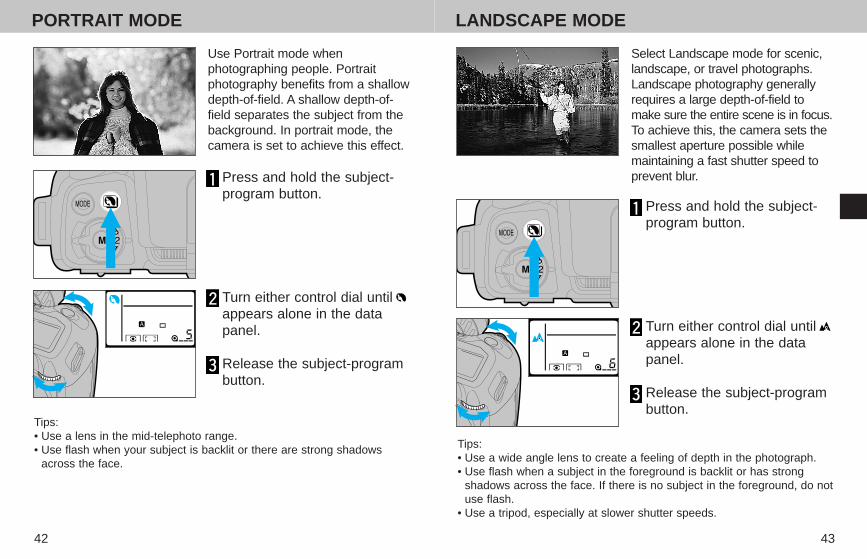
LANDSCAPE MODE
43
PORTRAIT MODE
42
Select Landscape mode for scenic,landscape, or travel photographs.Landscape photography generallyrequires a large depth-of-field tomake sure the entire scene is in focus.To achieve this, the camera sets thesmallest aperture possible whilemaintaining a fast shutter speed toprevent blur.
Press and hold the subject-program button.
Turn either control dial untilappears alone in the datapanel.
Release the subject-programbutton.
Tips:• Use a wide angle lens to create a feeling of depth in the photograph.• Use flash when a subject in the foreground is backlit or has strong
shadows across the face. If there is no subject in the foreground, do notuse flash.
• Use a tripod, especially at slower shutter speeds.
Use Portrait mode whenphotographing people. Portraitphotography benefits from a shallowdepth-of-field. A shallow depth-of-field separates the subject from thebackground. In portrait mode, thecamera is set to achieve this effect.
Press and hold the subject-program button.
Turn either control dial untilappears alone in the datapanel.
Release the subject-programbutton.
Tips:• Use a lens in the mid-telephoto range.• Use flash when your subject is backlit or there are strong shadows
across the face.
2152EE 17/10/97 10:54 AM Page 42
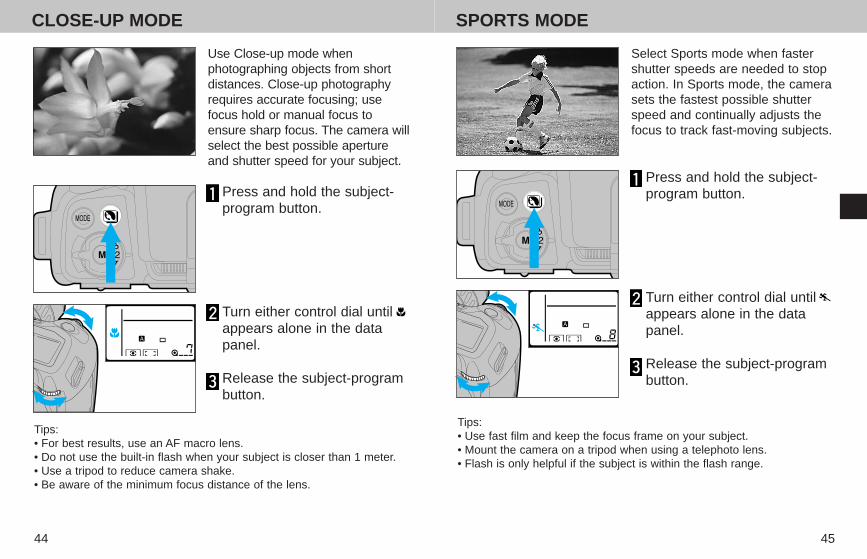
SPORTS MODE
45
CLOSE-UP MODE
44
Select Sports mode when fastershutter speeds are needed to stopaction. In Sports mode, the camerasets the fastest possible shutterspeed and continually adjusts thefocus to track fast-moving subjects.
Press and hold the subject-program button.
Turn either control dial untilappears alone in the datapanel.
Release the subject-programbutton.
Tips:• Use fast film and keep the focus frame on your subject.• Mount the camera on a tripod when using a telephoto lens.• Flash is only helpful if the subject is within the flash range.
Use Close-up mode whenphotographing objects from shortdistances. Close-up photographyrequires accurate focusing; usefocus hold or manual focus toensure sharp focus. The camera willselect the best possible apertureand shutter speed for your subject.
Press and hold the subject-program button.
Turn either control dial untilappears alone in the datapanel.
Release the subject-programbutton.
Tips: • For best results, use an AF macro lens.• Do not use the built-in flash when your subject is closer than 1 meter.• Use a tripod to reduce camera shake.• Be aware of the minimum focus distance of the lens.
2152EE 17/10/97 10:54 AM Page 44
47
NIGHT PORTRAIT MODE
46
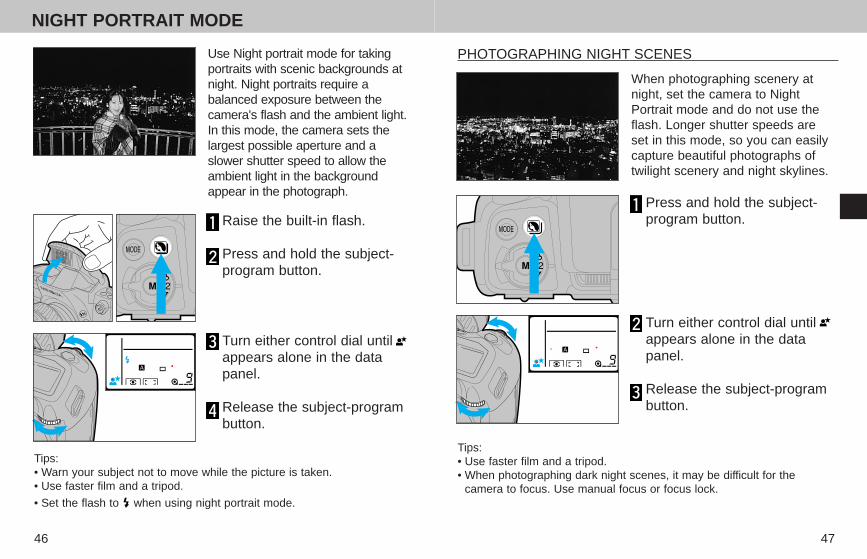
When photographing scenery atnight, set the camera to NightPortrait mode and do not use theflash. Longer shutter speeds areset in this mode, so you can easilycapture beautiful photographs oftwilight scenery and night skylines.
Press and hold the subject-program button.
Turn either control dial untilappears alone in the datapanel.
Release the subject-programbutton.
Tips:• Use faster film and a tripod.• When photographing dark night scenes, it may be difficult for the
camera to focus. Use manual focus or focus lock.
Use Night portrait mode for takingportraits with scenic backgrounds atnight. Night portraits require abalanced exposure between thecamera's flash and the ambient light.In this mode, the camera sets thelargest possible aperture and aslower shutter speed to allow theambient light in the backgroundappear in the photograph.
Raise the built-in flash.
Press and hold the subject-program button.
Turn either control dial untilappears alone in the datapanel.
Release the subject-programbutton.
Tips:• Warn your subject not to move while the picture is taken.• Use faster film and a tripod.
• Set the flash to when using night portrait mode.
PHOTOGRAPHING NIGHT SCENES
2152EE 17/10/97 10:54 AM Page 46
EXPOSURE MODES
4948
P - (PROGRAM) -Programmed Autoexposure ModeP mode (PROGRAM) is ideal when you want to give your fullattention to the subject and give the camera control over exposure.
A - Aperture Priority ModeIn A mode, you select the aperture and the camera automaticallysets the shutter speed required for proper exposure. Use thismode when you want to control depth of field.
S - Shutter Speed Priority ModeYou select the shutter speed in S mode and the cameraautomatically sets the aperture for the best exposure. Use Smode to have full control over shutter speed settings.
M - Manual ModeIn M mode, you have full control of exposure and the camera'smeter index will show you how your settings relate to the TTLmeter.
MEMORY: The Exposure Mode setting can be stored inmemory. See page 99 for information.
The 800si has four exposure modes.
EXPOSUREBASICS
Continued on next page.
2152EE 17/10/97 10:54 AM Page 48
P - PROGRAM EXPOSURE MODE
51
EXPOSURE MODES
50
P mode (PROGRAM) is ideal when you want to give your fullattention to the subject and give the camera control over exposure.When focused on your main subject, Expert Program Selectionautomatically analyzes subject size, motion, and magnification aswell as lens focal length. Then, it sets the shutter speed andaperture according to the scene requirements.
While pressing the exposure-mode button, turn eithercontrol dial until P appears in the data panel.
Release the exposure-mode button to enter the selection.
Compose your scene and take the picture.
PA AND PS: CREATIVE EXPOSURE CONTROL
PA - Turn the rear control dial untilthe desired aperture setting appearsin the viewfinder and body datapanels. PA appears in the body datapanel. • The aperture will not change, even if
lighting conditions change. Theshutter-speed value will be setautomatically.
After the AE system has been activated, you can change the shutterspeed or aperture, automatically set by Expert Program Selection, in1/2-stop increments while maintaining a correct exposure.
✎ Using the exposure-mode button to set P mode will not change anyother camera settings. To return all camera settings to default, pressthe program-reset button.
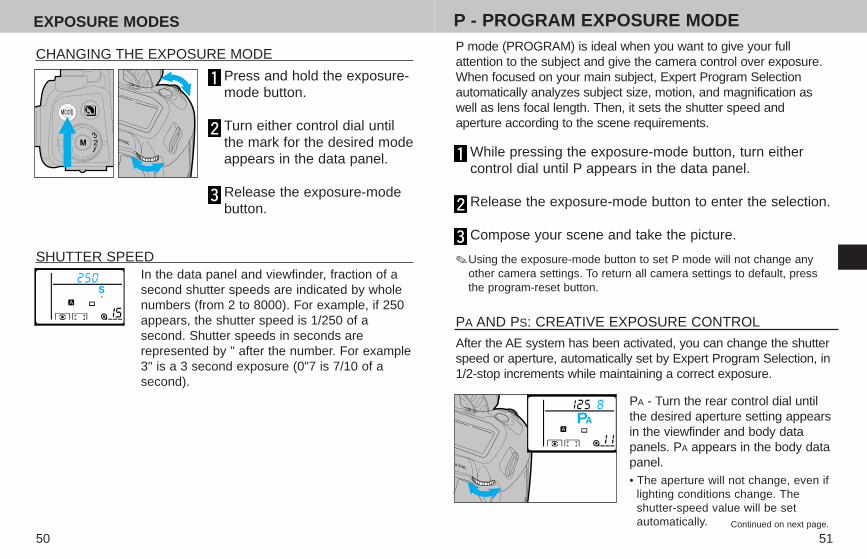
In the data panel and viewfinder, fraction of asecond shutter speeds are indicated by wholenumbers (from 2 to 8000). For example, if 250appears, the shutter speed is 1/250 of asecond. Shutter speeds in seconds arerepresented by " after the number. For example3" is a 3 second exposure (0"7 is 7/10 of asecond).
SHUTTER SPEED
Press and hold the exposure-mode button.
Turn either control dial untilthe mark for the desired modeappears in the data panel.
Release the exposure-modebutton.
CHANGING THE EXPOSURE MODE
Continued on next page.
2152EE 17/10/97 10:54 AM Page 50
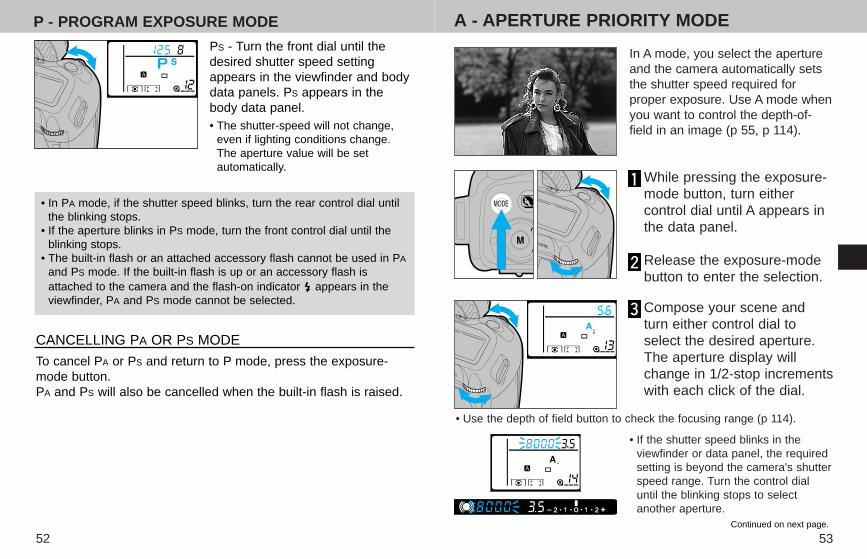
A - APERTURE PRIORITY MODE
53
P - PROGRAM EXPOSURE MODE
52
In A mode, you select the apertureand the camera automatically setsthe shutter speed required forproper exposure. Use A mode whenyou want to control the depth-of-field in an image (p 55, p 114).
While pressing the exposure-mode button, turn eithercontrol dial until A appears inthe data panel.
Release the exposure-modebutton to enter the selection.
Compose your scene andturn either control dial toselect the desired aperture.The aperture display willchange in 1/2-stop incrementswith each click of the dial.
• Use the depth of field button to check the focusing range (p 114).
• If the shutter speed blinks in theviewfinder or data panel, the requiredsetting is beyond the camera's shutterspeed range. Turn the control dialuntil the blinking stops to selectanother aperture.
• In PA mode, if the shutter speed blinks, turn the rear control dial untilthe blinking stops.
• If the aperture blinks in PS mode, turn the front control dial until theblinking stops.
• The built-in flash or an attached accessory flash cannot be used in PA
and PS mode. If the built-in flash is up or an accessory flash isattached to the camera and the flash-on indicator appears in theviewfinder, PA and PS mode cannot be selected.
PS - Turn the front dial until thedesired shutter speed settingappears in the viewfinder and bodydata panels. PS appears in thebody data panel. • The shutter-speed will not change,
even if lighting conditions change.The aperture value will be setautomatically.
CANCELLING PA OR PS MODE
To cancel PA or PS and return to P mode, press the exposure-mode button.PA and PS will also be cancelled when the built-in flash is raised.
Continued on next page.
2152EE 17/10/97 10:55 AM Page 52
55
A - APERTURE PRIORITY MODE
54
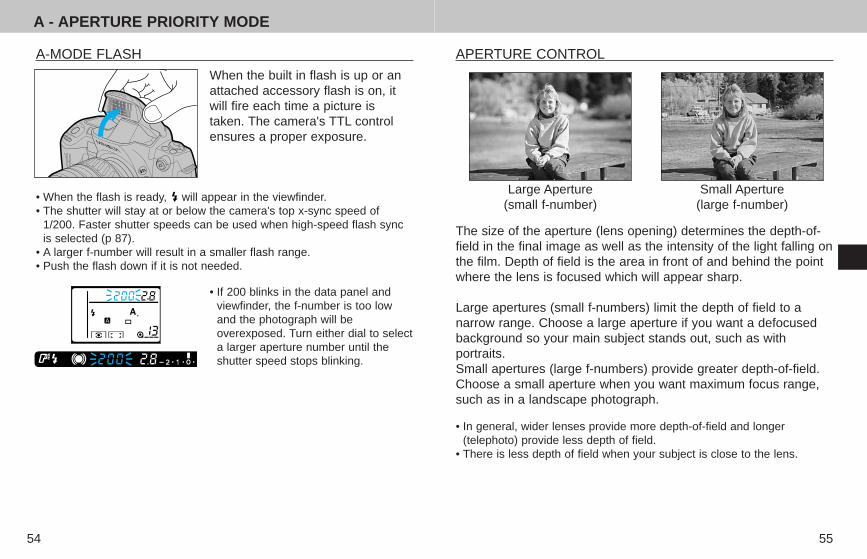
Large Aperture(small f-number)
Small Aperture(large f-number)
The size of the aperture (lens opening) determines the depth-of-field in the final image as well as the intensity of the light falling onthe film. Depth of field is the area in front of and behind the pointwhere the lens is focused which will appear sharp.
Large apertures (small f-numbers) limit the depth of field to anarrow range. Choose a large aperture if you want a defocusedbackground so your main subject stands out, such as withportraits.Small apertures (large f-numbers) provide greater depth-of-field.Choose a small aperture when you want maximum focus range,such as in a landscape photograph.
• In general, wider lenses provide more depth-of-field and longer(telephoto) provide less depth of field.
• There is less depth of field when your subject is close to the lens.
APERTURE CONTROLA-MODE FLASH
• When the flash is ready, will appear in the viewfinder.• The shutter will stay at or below the camera's top x-sync speed of
1/200. Faster shutter speeds can be used when high-speed flash syncis selected (p 87).
• A larger f-number will result in a smaller flash range.• Push the flash down if it is not needed.
When the built in flash is up or anattached accessory flash is on, itwill fire each time a picture istaken. The camera's TTL controlensures a proper exposure.
• If 200 blinks in the data panel andviewfinder, the f-number is too lowand the photograph will beoverexposed. Turn either dial to selecta larger aperture number until theshutter speed stops blinking.
2152EE 17/10/97 10:55 AM Page 54
57
S - SHUTTER PRIORITY MODE
56
S-MODE FLASH
• When the flash is ready, will appear in the viewfinder.• Choose a shutter speed of 1/200 or slower, as this is the sync speed.
The aperture is set automatically.• A larger f-number will result in a smaller flash range.• Push the flash down if it is not needed.
When the built in flash is up or anattached accessory flash is on, itwill fire each time a picture istaken. The camera's TTL controlensures a proper exposure.
• If the aperture blinks in the data paneland viewfinder, the aperture requiredfor proper exposure is beyond thelens' range. Turn the dial to selectanother shutter-speed until theaperture stops blinking.
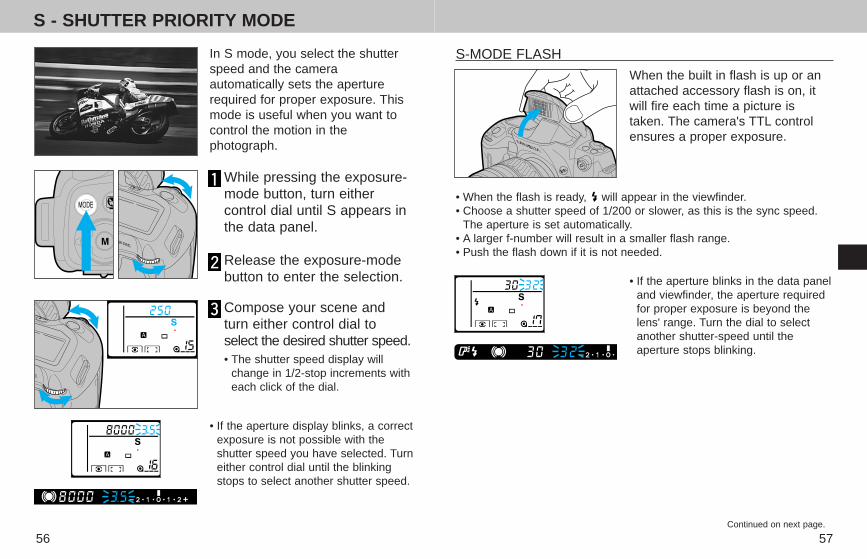
In S mode, you select the shutterspeed and the cameraautomatically sets the aperturerequired for proper exposure. Thismode is useful when you want tocontrol the motion in thephotograph.
While pressing the exposure-mode button, turn eithercontrol dial until S appears inthe data panel.
Release the exposure-modebutton to enter the selection.
Compose your scene andturn either control dial toselect the desired shutter speed.• The shutter speed display will
change in 1/2-stop increments witheach click of the dial.
• If the aperture display blinks, a correctexposure is not possible with theshutter speed you have selected. Turneither control dial until the blinkingstops to select another shutter speed.
Continued on next page.
2152EE 17/10/97 10:55 AM Page 56
M - MANUAL MODE
59
S - SHUTTER PRIORITY MODE
58
In M mode, you have full control of exposure and the camera'smeter index will show you how your settings relate to the TTLmeter.
While pressing the exposure-mode button, turn eithercontrol dial until M appears inthe data panel.
Release the exposure-modebutton to enter the selection.• The metering index will appear in
the viewfinder.
Compose your scene. Turnthe front dial to change theshutter speed.
Turn the rear dial to changethe aperture.• The shutter speed and aperture
displays will change in 1/2-stopincrements.
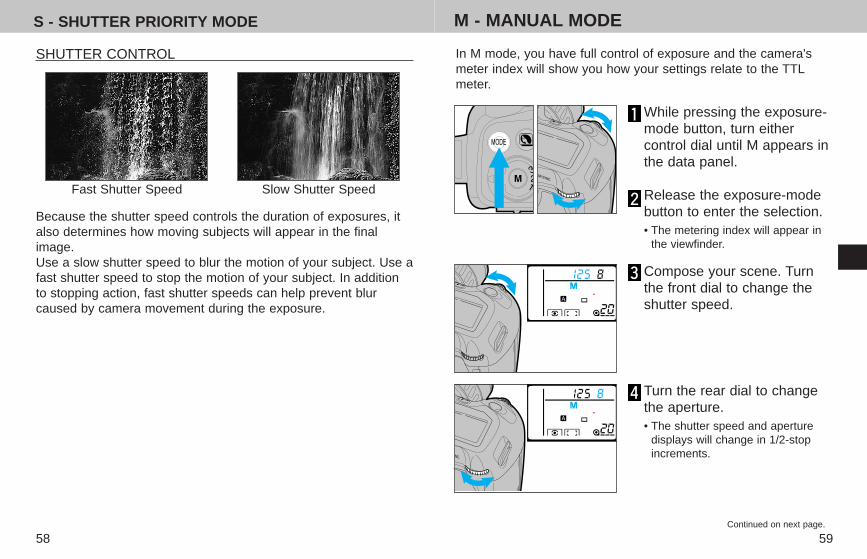
Fast Shutter Speed Slow Shutter Speed
Because the shutter speed controls the duration of exposures, italso determines how moving subjects will appear in the finalimage.Use a slow shutter speed to blur the motion of your subject. Use afast shutter speed to stop the motion of your subject. In additionto stopping action, fast shutter speeds can help prevent blurcaused by camera movement during the exposure.
SHUTTER CONTROL
Continued on next page.
2152EE 17/10/97 10:55 AM Page 58
61
MANUAL MODE
60
M-MODE FLASH
When the built in flash is up oran attached accessory flash ison, it will fire each time a pictureis taken. The camera's TTLcontrol ensures a properexposure.
METER INDEX
In manual mode, the metering index will show you how theexposure you have set compares with the camera's meterreading. The 0 position on the index represents the camera'ssuggested exposure using the current metering method. Thepointer indicates your settings in relation to the reading in EVs.• For Metering Index Information, see page 85.• For Metering Methods, see page 71.
Your settings match the camera'srecommended exposure.
+ 1 EV the camera's recommendedexposure
– 1.5 EV the camera's recommendedexposure
+ 2.5 EV the camera's recommendedexposure
– 2.5 EV the camera's recommendedexposure
– 3.0 EV or below the camera'srecommended exposure
+ 3.0 EV or above the camera'srecommended exposure
• When the flash is ready, will appear in the viewfinder.• Choose a shutter speed of 1/200 or slower, as this is the sync speed.• A larger f-number will result in a smaller flash range.• Push the flash down if it is not needed.
2152EE 17/10/97 10:55 AM Page 60

63
BULB
62
When bulb is selected, the shutter will remain open as long as theshutter-release button is pressed. Use the bulb function to makelong exposures.
While in M mode, turn thefront control dial to the leftuntil "bulb" appears in theviewfinder and the data panel.
Turn the rear control dial toselect the aperture.
Mount the camera on a tripod.
Compose the scene and focus the lens.• If the scene is too dark for autofocus to operate, press the focus-
mode button and focus the lens manually.• Attach the eyepiece cap (p 11).
Press and hold the shutter-release button to take thepicture.• The shutter will remain open as long as the button is pressed.
Remove the remote control terminalcover. Then, insert the remote cord'splug into the terminal.• The shutter will remain open as long as
you hold the remote control buttondown.
✎ To reduce or prevent blurring of the photograph, attach either theRemote Cord RC-1000S or RC-1000L (both sold separately).
ADVANCEDAUTOFOCUS
2152EE 17/10/97 10:55 AM Page 62
65
AUTOFOCUS MODES
64
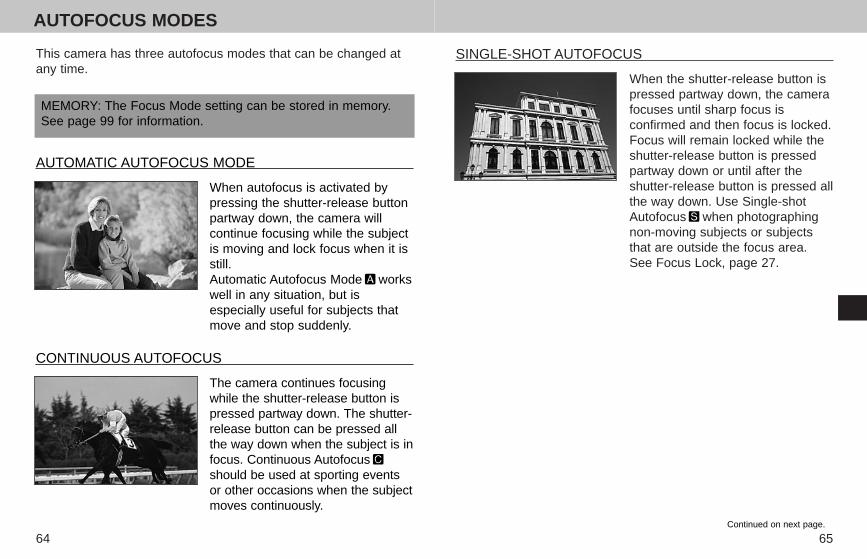
SINGLE-SHOT AUTOFOCUS
When the shutter-release button ispressed partway down, the camerafocuses until sharp focus isconfirmed and then focus is locked.Focus will remain locked while theshutter-release button is pressedpartway down or until after theshutter-release button is pressed allthe way down. Use Single-shotAutofocus when photographingnon-moving subjects or subjectsthat are outside the focus area.See Focus Lock, page 27.
This camera has three autofocus modes that can be changed atany time.
MEMORY: The Focus Mode setting can be stored in memory.See page 99 for information.
When autofocus is activated bypressing the shutter-release buttonpartway down, the camera willcontinue focusing while the subjectis moving and lock focus when it isstill.Automatic Autofocus Mode workswell in any situation, but isespecially useful for subjects thatmove and stop suddenly.
The camera continues focusingwhile the shutter-release button ispressed partway down. The shutter-release button can be pressed allthe way down when the subject is infocus. Continuous Autofocusshould be used at sporting eventsor other occasions when the subjectmoves continuously.
AUTOMATIC AUTOFOCUS MODE
CONTINUOUS AUTOFOCUS
Continued on next page.
2152EE 17/10/97 10:56 AM Page 64
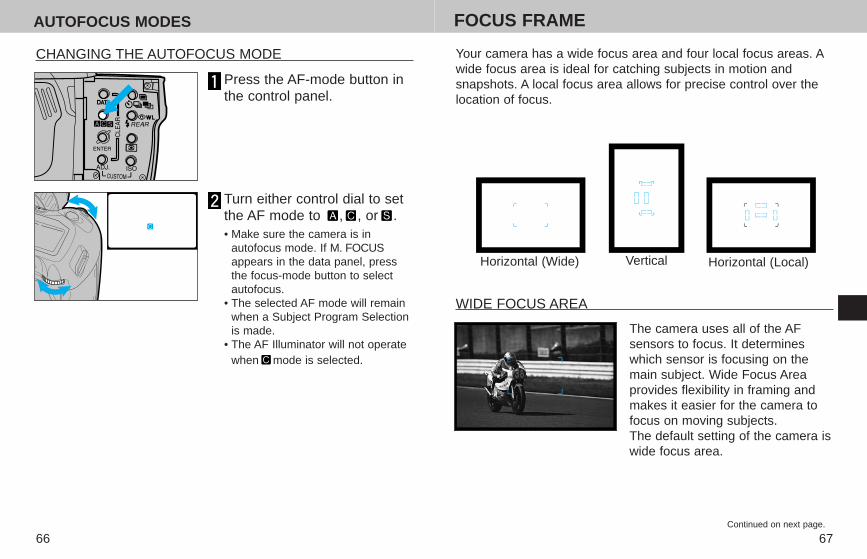
FOCUS FRAME
67
AUTOFOCUS MODES
66
Your camera has a wide focus area and four local focus areas. Awide focus area is ideal for catching subjects in motion andsnapshots. A local focus area allows for precise control over thelocation of focus.
WIDE FOCUS AREA
The camera uses all of the AFsensors to focus. It determineswhich sensor is focusing on themain subject. Wide Focus Areaprovides flexibility in framing andmakes it easier for the camera tofocus on moving subjects.The default setting of the camera iswide focus area.
Press the AF-mode button inthe control panel.
CHANGING THE AUTOFOCUS MODE
Turn either control dial to setthe AF mode to , , or .• Make sure the camera is in
autofocus mode. If M. FOCUSappears in the data panel, pressthe focus-mode button to selectautofocus.
• The selected AF mode will remainwhen a Subject Program Selectionis made.
• The AF Illuminator will not operatewhen mode is selected.
Continued on next page.
Horizontal (Wide) Vertical Horizontal (Local)
2152EE 17/10/97 10:56 AM Page 66
RELEASE PRIORITY
69
FOCUS FRAME
68
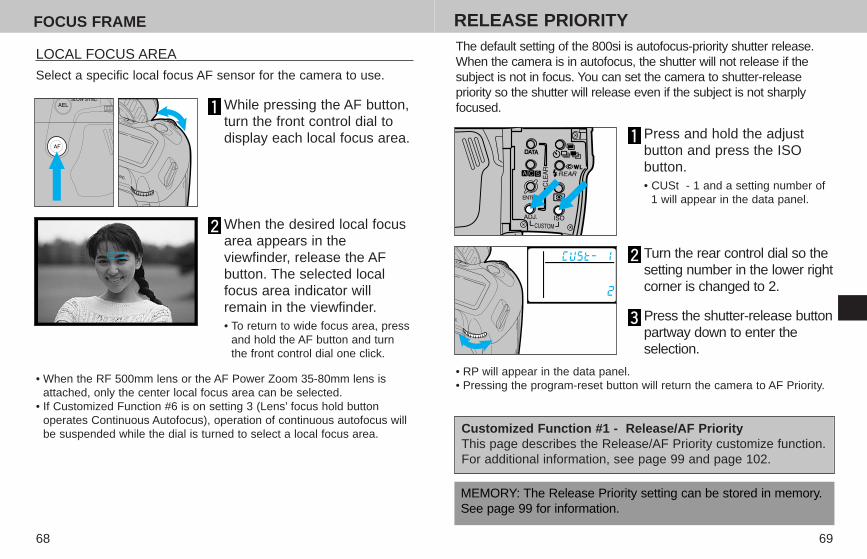
The default setting of the 800si is autofocus-priority shutter release.When the camera is in autofocus, the shutter will not release if thesubject is not in focus. You can set the camera to shutter-releasepriority so the shutter will release even if the subject is not sharplyfocused.
Press and hold the adjustbutton and press the ISObutton.• CUSt - 1 and a setting number of
1 will appear in the data panel.
Turn the rear control dial so thesetting number in the lower rightcorner is changed to 2.
Press the shutter-release buttonpartway down to enter theselection.
• RP will appear in the data panel.• Pressing the program-reset button will return the camera to AF Priority.
MEMORY: The Release Priority setting can be stored in memory.See page 99 for information.
Customized Function #1 - Release/AF PriorityThis page describes the Release/AF Priority customize function.For additional information, see page 99 and page 102.
LOCAL FOCUS AREA
While pressing the AF button,turn the front control dial todisplay each local focus area.
When the desired local focusarea appears in theviewfinder, release the AFbutton. The selected localfocus area indicator willremain in the viewfinder.• To return to wide focus area, press
and hold the AF button and turnthe front control dial one click.
• When the RF 500mm lens or the AF Power Zoom 35-80mm lens isattached, only the center local focus area can be selected.
• If Customized Function #6 is on setting 3 (Lens’ focus hold buttonoperates Continuous Autofocus), operation of continuous autofocus willbe suspended while the dial is turned to select a local focus area.
Select a specific local focus AF sensor for the camera to use.
2152EE 17/10/97 10:56 AM Page 68
METERING
7170
Your camera takes meter readings of the light in the scene todetermine the correct exposure. The 800si has three methods oftaking meter readings. Use the method most appropriate for yoursubject.
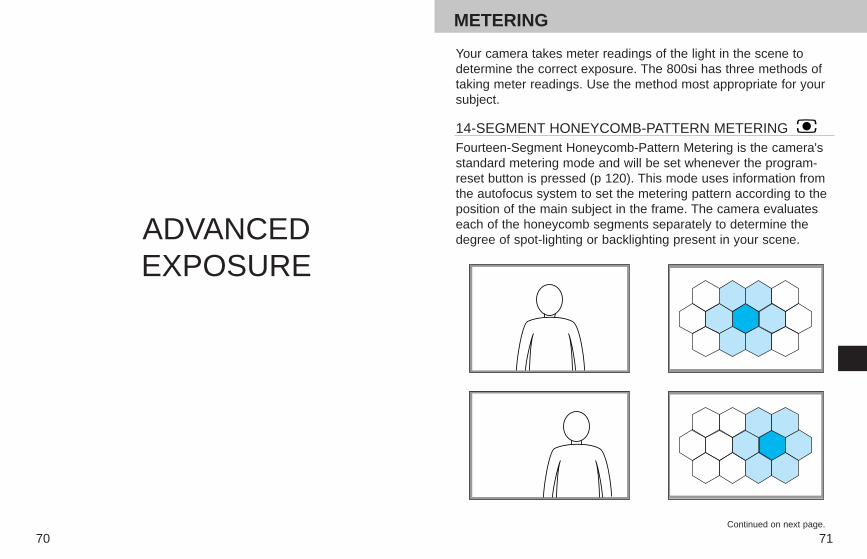
14-SEGMENT HONEYCOMB-PATTERN METERING Fourteen-Segment Honeycomb-Pattern Metering is the camera'sstandard metering mode and will be set whenever the program-reset button is pressed (p 120). This mode uses information fromthe autofocus system to set the metering pattern according to theposition of the main subject in the frame. The camera evaluateseach of the honeycomb segments separately to determine thedegree of spot-lighting or backlighting present in your scene.ADVANCED
EXPOSURE
Continued on next page.
2152EE 17/10/97 10:56 AM Page 70
73
METERING
72
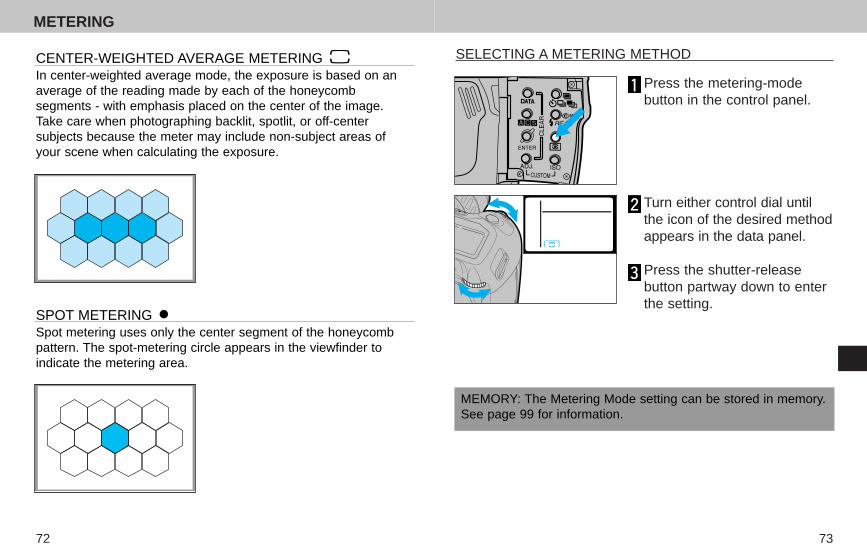
SELECTING A METERING METHOD
Press the metering-modebutton in the control panel.
Turn either control dial untilthe icon of the desired methodappears in the data panel.
Press the shutter-releasebutton partway down to enterthe setting.
MEMORY: The Metering Mode setting can be stored in memory.See page 99 for information.
CENTER-WEIGHTED AVERAGE METERING In center-weighted average mode, the exposure is based on anaverage of the reading made by each of the honeycombsegments - with emphasis placed on the center of the image.Take care when photographing backlit, spotlit, or off-centersubjects because the meter may include non-subject areas ofyour scene when calculating the exposure.
SPOT METERING Spot metering uses only the center segment of the honeycombpattern. The spot-metering circle appears in the viewfinder toindicate the metering area.
2152EE 17/10/97 10:56 AM Page 72
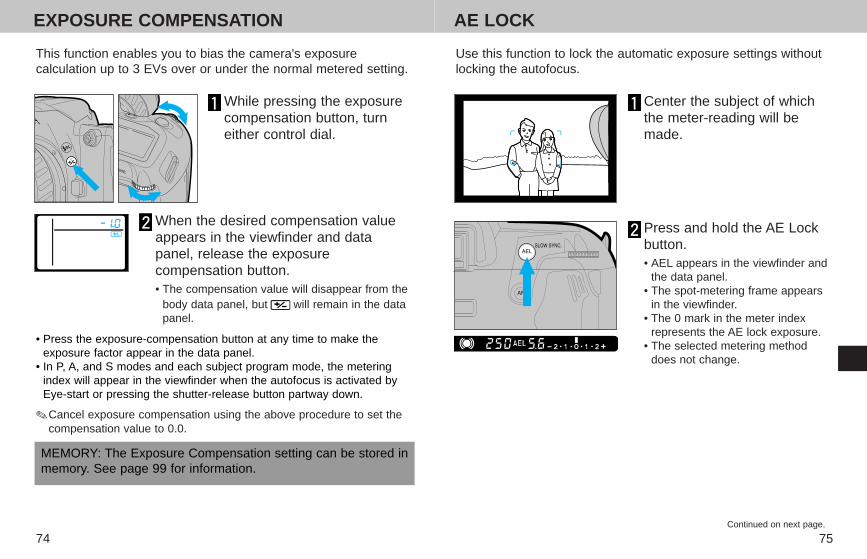
AE LOCK
75
EXPOSURE COMPENSATION
74
Use this function to lock the automatic exposure settings withoutlocking the autofocus.
Center the subject of whichthe meter-reading will bemade.
Press and hold the AE Lockbutton.• AEL appears in the viewfinder and
the data panel.• The spot-metering frame appears
in the viewfinder. • The 0 mark in the meter index
represents the AE lock exposure.• The selected metering method
does not change.
This function enables you to bias the camera's exposurecalculation up to 3 EVs over or under the normal metered setting.
While pressing the exposurecompensation button, turneither control dial.
When the desired compensation valueappears in the viewfinder and datapanel, release the exposurecompensation button.• The compensation value will disappear from the
body data panel, but will remain in the datapanel.
MEMORY: The Exposure Compensation setting can be stored inmemory. See page 99 for information.
• Press the exposure-compensation button at any time to make theexposure factor appear in the data panel.
• In P, A, and S modes and each subject program mode, the meteringindex will appear in the viewfinder when the autofocus is activated byEye-start or pressing the shutter-release button partway down.
✎ Cancel exposure compensation using the above procedure to set thecompensation value to 0.0.
Continued on next page.
2152EE 17/10/97 10:57 AM Page 74

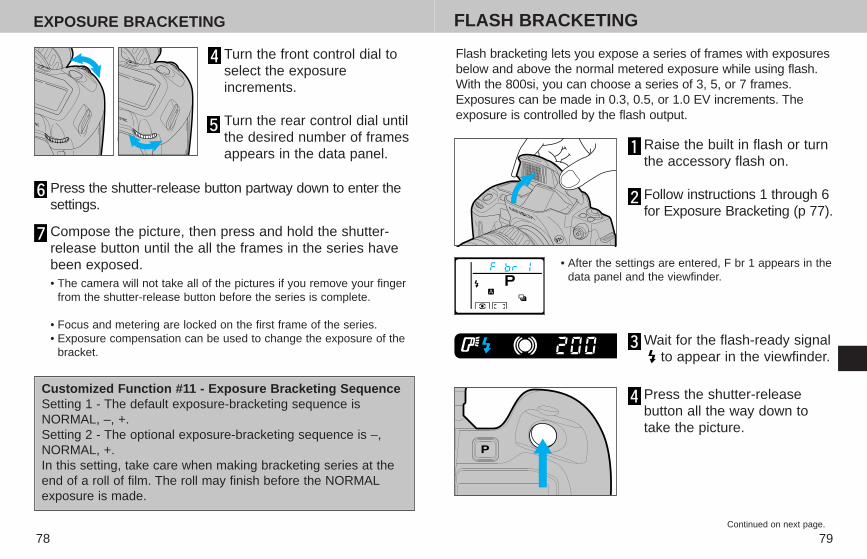
EXPOSURE BRACKETING
77
AE LOCK
76
Exposure bracketing lets you expose a series of frames withexposures below and above the normal metered exposure. Thisfunction is especially useful when shooting with reversal film,because of the film's low tolerance for exposure error. With the 800si, you can choose a series of 3, 5, or 7 frames. Theexposures can be made in 0.3, 0.5, or 1.0 EV increments.
Press the drive-mode buttonin the control panel.
Turn either control dial untilthe exposure-bracketingindicator appears in thedata panel.
Press the adjust button in thecontrol panel.• The exposure-bracketing indicator
will start blinking.
While holding the AE-lockbutton, recompose the picture.• A mark on the meter index will
indicate the difference between thelocked exposure (0) and theexposure value of the areacurrently being read.
• Do not release the AE lock buttonuntil after the picture is taken.
Press the shutter-release button all the way down to takethe photograph.• Exposure will remain locked as long as your finger depresses the
AE-lock button.
✎ If the flash is up and appears in the viewfinder, Slow-shutterSync will be activated (p 88). The spot-metering frame and asecond mark on the index meter will not appear.
Customize Function #10 - AE Lock ButtonSetting 1 - In default operation the AE lock button is only activewhile it is being pressed.Setting 2 - The operation of the AE-lock button can be changedso AE lock is active after the button is pressed. AE lock remainsactive until the AE-lock button is pressed a second time. In thissetting, AE lock is also cancelled by turning the camera off,turning on the flash, or removing the lens.
Continued on next page.
2152EE 17/10/97 10:57 AM Page 76
FLASH BRACKETING
79
EXPOSURE BRACKETING
78
Flash bracketing lets you expose a series of frames with exposuresbelow and above the normal metered exposure while using flash.With the 800si, you can choose a series of 3, 5, or 7 frames.Exposures can be made in 0.3, 0.5, or 1.0 EV increments. Theexposure is controlled by the flash output.
Raise the built in flash or turnthe accessory flash on.
Follow instructions 1 through 6for Exposure Bracketing (p 77).
• After the settings are entered, F br 1 appears in thedata panel and the viewfinder.
Wait for the flash-ready signalto appear in the viewfinder.
Turn the front control dial toselect the exposureincrements.
Turn the rear control dial untilthe desired number of framesappears in the data panel.
Press the shutter-release button partway down to enter thesettings.
Compose the picture, then press and hold the shutter-release button until the all the frames in the series havebeen exposed.• The camera will not take all of the pictures if you remove your finger
from the shutter-release button before the series is complete.
• Focus and metering are locked on the first frame of the series.• Exposure compensation can be used to change the exposure of the
bracket.
Customized Function #11 - Exposure Bracketing SequenceSetting 1 - The default exposure-bracketing sequence isNORMAL, –, +.Setting 2 - The optional exposure-bracketing sequence is –,NORMAL, +.In this setting, take care when making bracketing series at theend of a roll of film. The roll may finish before the NORMALexposure is made.
Press the shutter-releasebutton all the way down totake the picture.
Continued on next page.
2152EE 17/10/97 10:57 AM Page 78
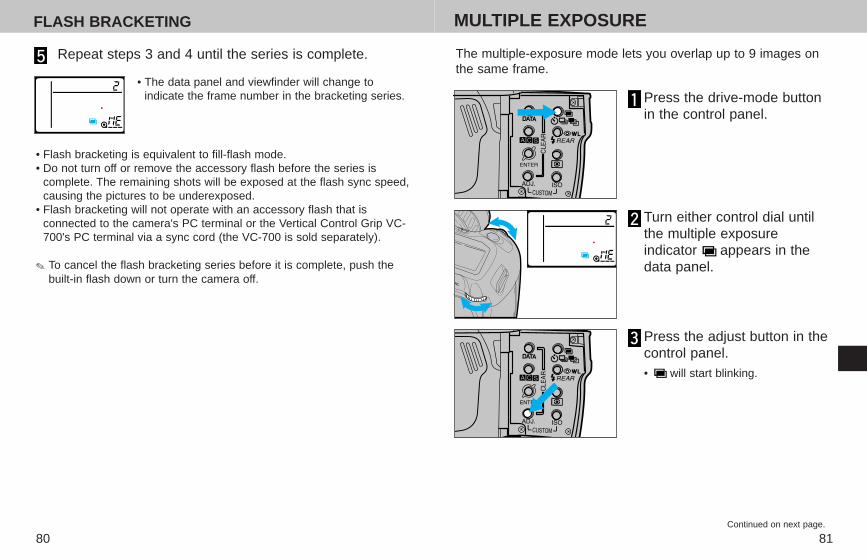
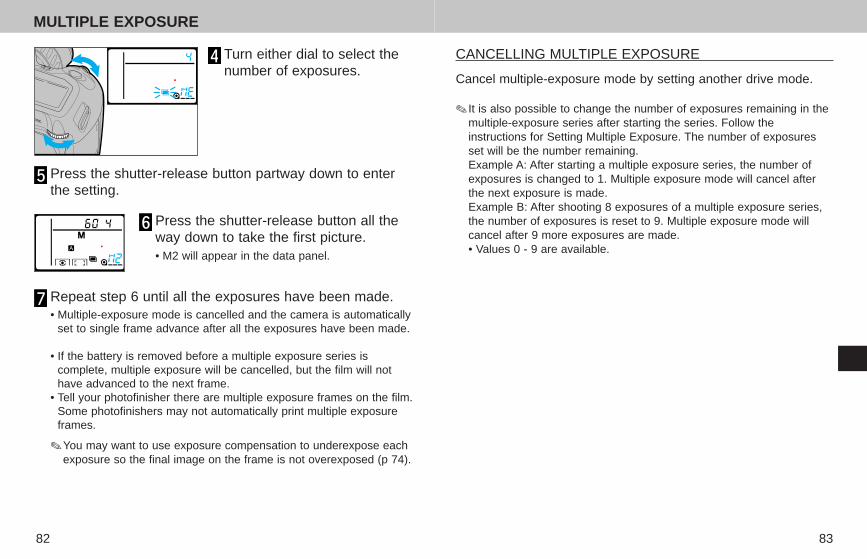
MULTIPLE EXPOSURE
81
FLASH BRACKETING
80
Press the drive-mode buttonin the control panel.
Turn either control dial untilthe multiple exposureindicator appears in thedata panel.
Press the adjust button in thecontrol panel.• will start blinking.
The multiple-exposure mode lets you overlap up to 9 images onthe same frame.
Repeat steps 3 and 4 until the series is complete.
• Flash bracketing is equivalent to fill-flash mode.• Do not turn off or remove the accessory flash before the series is
complete. The remaining shots will be exposed at the flash sync speed,causing the pictures to be underexposed.
• Flash bracketing will not operate with an accessory flash that isconnected to the camera's PC terminal or the Vertical Control Grip VC-700's PC terminal via a sync cord (the VC-700 is sold separately).
✎ To cancel the flash bracketing series before it is complete, push thebuilt-in flash down or turn the camera off.
• The data panel and viewfinder will change toindicate the frame number in the bracketing series.
Continued on next page.
2152EE 17/10/97 10:57 AM Page 80
83
MULTIPLE EXPOSURE
82
CANCELLING MULTIPLE EXPOSURE
Cancel multiple-exposure mode by setting another drive mode.
✎ It is also possible to change the number of exposures remaining in themultiple-exposure series after starting the series. Follow theinstructions for Setting Multiple Exposure. The number of exposuresset will be the number remaining.Example A: After starting a multiple exposure series, the number ofexposures is changed to 1. Multiple exposure mode will cancel afterthe next exposure is made.Example B: After shooting 8 exposures of a multiple exposure series,the number of exposures is reset to 9. Multiple exposure mode willcancel after 9 more exposures are made.• Values 0 - 9 are available.
Turn either dial to select thenumber of exposures.
Press the shutter-release button partway down to enterthe setting.
Press the shutter-release button all theway down to take the first picture.• M2 will appear in the data panel.
Repeat step 6 until all the exposures have been made.• Multiple-exposure mode is cancelled and the camera is automatically
set to single frame advance after all the exposures have been made.
• If the battery is removed before a multiple exposure series iscomplete, multiple exposure will be cancelled, but the film will nothave advanced to the next frame.
• Tell your photofinisher there are multiple exposure frames on the film.Some photofinishers may not automatically print multiple exposureframes.
✎ You may want to use exposure compensation to underexpose eachexposure so the final image on the frame is not overexposed (p 74).
2152EE 17/10/97 10:57 AM Page 82
85
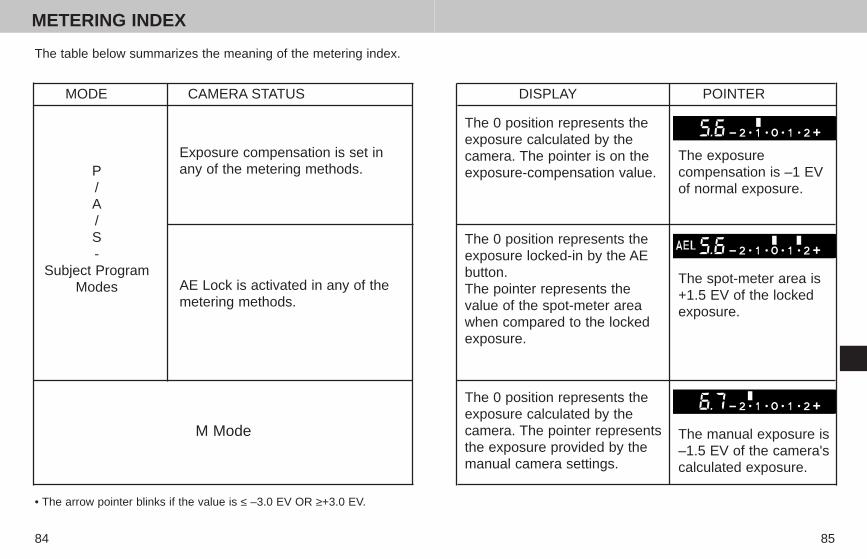
METERING INDEX
84
DISPLAY POINTER
The 0 position represents theexposure calculated by thecamera. The pointer is on theexposure-compensation value.
The 0 position represents theexposure locked-in by the AEbutton.The pointer represents thevalue of the spot-meter areawhen compared to the lockedexposure.
The 0 position represents theexposure calculated by thecamera. The pointer representsthe exposure provided by themanual camera settings.
The table below summarizes the meaning of the metering index.
MODE CAMERA STATUS
P/A/S -
Subject ProgramModes
Exposure compensation is set inany of the metering methods.
AE Lock is activated in any of themetering methods.
M Mode
• The arrow pointer blinks if the value is ≤ –3.0 EV OR ≥+3.0 EV.
The exposurecompensation is –1 EVof normal exposure.
The spot-meter area is+1.5 EV of the lockedexposure.
The manual exposure is–1.5 EV of the camera'scalculated exposure.
2152EE 17/10/97 10:57 AM Page 84
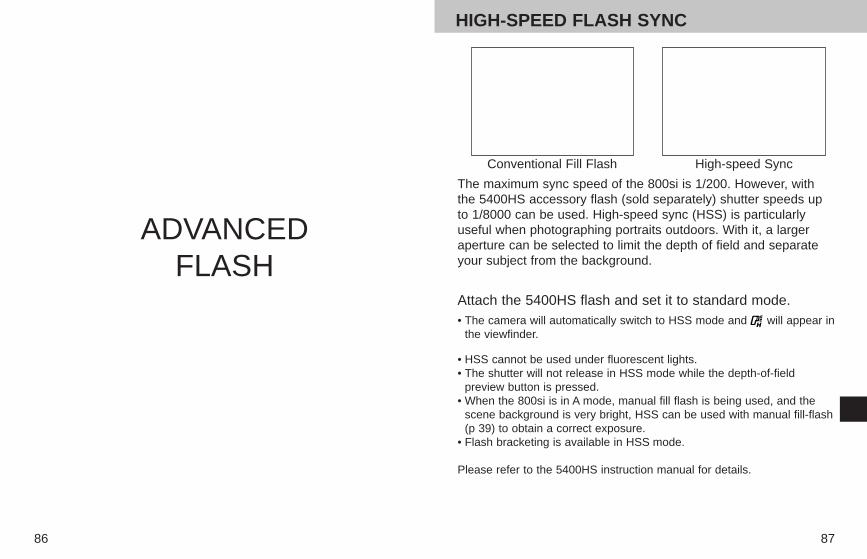
HIGH-SPEED FLASH SYNC
87
Conventional Fill Flash High-speed Sync
The maximum sync speed of the 800si is 1/200. However, withthe 5400HS accessory flash (sold separately) shutter speeds upto 1/8000 can be used. High-speed sync (HSS) is particularlyuseful when photographing portraits outdoors. With it, a largeraperture can be selected to limit the depth of field and separateyour subject from the background.
Attach the 5400HS flash and set it to standard mode.• The camera will automatically switch to HSS mode and will appear in
the viewfinder.
• HSS cannot be used under fluorescent lights.• The shutter will not release in HSS mode while the depth-of-field
preview button is pressed.• When the 800si is in A mode, manual fill flash is being used, and the
scene background is very bright, HSS can be used with manual fill-flash(p 39) to obtain a correct exposure.
• Flash bracketing is available in HSS mode.
Please refer to the 5400HS instruction manual for details.
86
ADVANCED FLASH
2152EE 17/10/97 10:57 AM Page 86
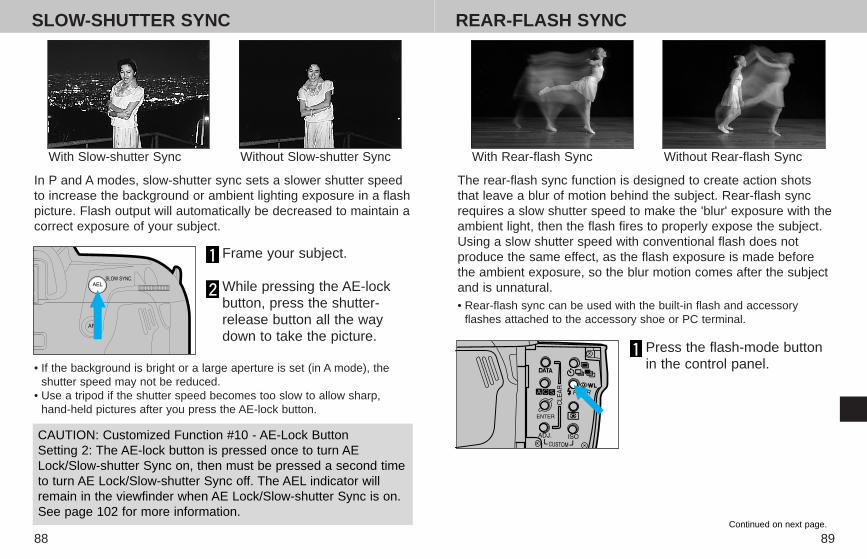
REAR-FLASH SYNC
89
SLOW-SHUTTER SYNC
88
With Rear-flash Sync Without Rear-flash Sync
The rear-flash sync function is designed to create action shotsthat leave a blur of motion behind the subject. Rear-flash syncrequires a slow shutter speed to make the 'blur' exposure with theambient light, then the flash fires to properly expose the subject.Using a slow shutter speed with conventional flash does notproduce the same effect, as the flash exposure is made beforethe ambient exposure, so the blur motion comes after the subjectand is unnatural.• Rear-flash sync can be used with the built-in flash and accessory
flashes attached to the accessory shoe or PC terminal.
Press the flash-mode buttonin the control panel.
With Slow-shutter Sync Without Slow-shutter Sync
In P and A modes, slow-shutter sync sets a slower shutter speedto increase the background or ambient lighting exposure in a flashpicture. Flash output will automatically be decreased to maintain acorrect exposure of your subject.
Frame your subject.
While pressing the AE-lockbutton, press the shutter-release button all the waydown to take the picture.
• If the background is bright or a large aperture is set (in A mode), theshutter speed may not be reduced.
• Use a tripod if the shutter speed becomes too slow to allow sharp,hand-held pictures after you press the AE-lock button.
CAUTION: Customized Function #10 - AE-Lock ButtonSetting 2: The AE-lock button is pressed once to turn AELock/Slow-shutter Sync on, then must be pressed a second timeto turn AE Lock/Slow-shutter Sync off. The AEL indicator willremain in the viewfinder when AE Lock/Slow-shutter Sync is on.See page 102 for more information.
Continued on next page.
2152EE 17/10/97 10:58 AM Page 88
91
REAR-FLASH SYNC
90
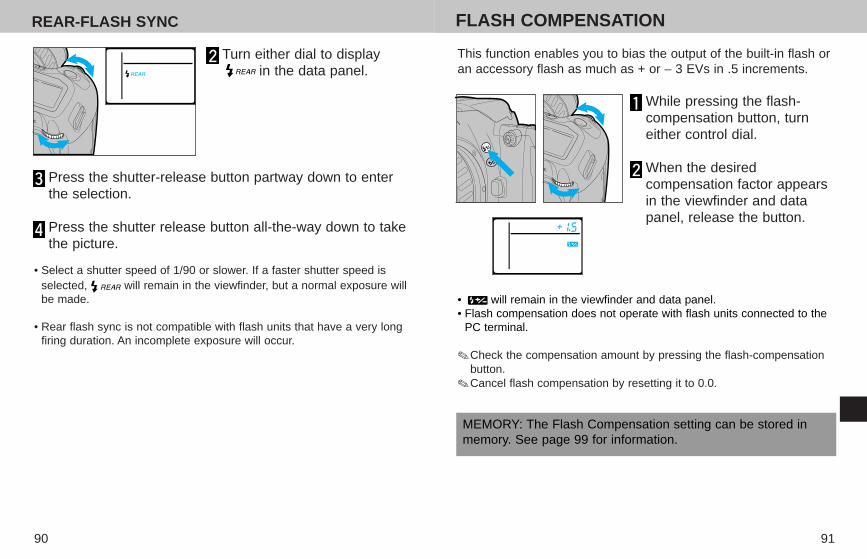
This function enables you to bias the output of the built-in flash oran accessory flash as much as + or – 3 EVs in .5 increments.
While pressing the flash-compensation button, turneither control dial.
When the desiredcompensation factor appearsin the viewfinder and datapanel, release the button.
MEMORY: The Flash Compensation setting can be stored inmemory. See page 99 for information.
• will remain in the viewfinder and data panel.• Flash compensation does not operate with flash units connected to the
PC terminal.
✎ Check the compensation amount by pressing the flash-compensationbutton.
✎ Cancel flash compensation by resetting it to 0.0.
FLASH COMPENSATION
Press the shutter-release button partway down to enterthe selection.
Press the shutter release button all-the-way down to takethe picture.
• Select a shutter speed of 1/90 or slower. If a faster shutter speed isselected, will remain in the viewfinder, but a normal exposure willbe made.
• Rear flash sync is not compatible with flash units that have a very longfiring duration. An incomplete exposure will occur.
Turn either dial to displayin the data panel.
2152EE 17/10/97 10:58 AM Page 90
93
WIRELESS/REMOTE OFF-CAMERA FLASH
92
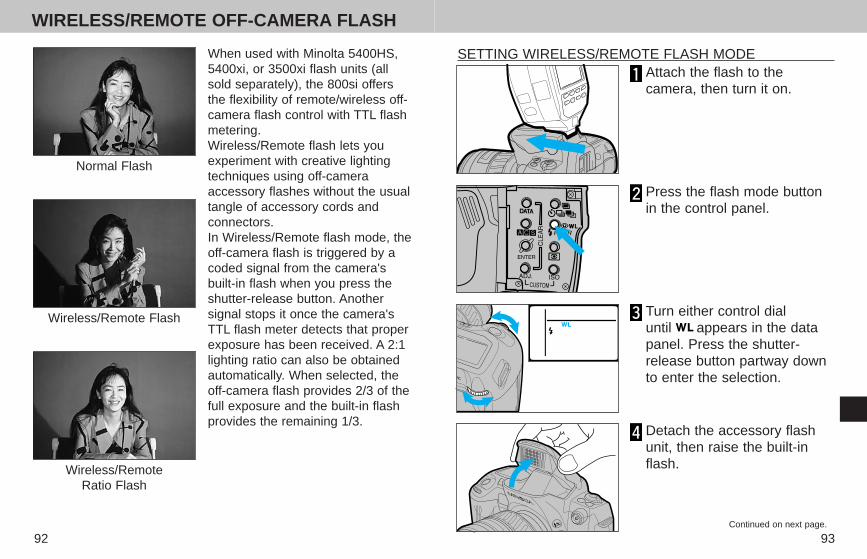
SETTING WIRELESS/REMOTE FLASH MODE Attach the flash to thecamera, then turn it on.
Press the flash mode buttonin the control panel.
Turn either control dialuntil appears in the datapanel. Press the shutter-release button partway downto enter the selection.
Detach the accessory flashunit, then raise the built-inflash.
When used with Minolta 5400HS,5400xi, or 3500xi flash units (allsold separately), the 800si offersthe flexibility of remote/wireless off-camera flash control with TTL flashmetering.Wireless/Remote flash lets youexperiment with creative lightingtechniques using off-cameraaccessory flashes without the usualtangle of accessory cords andconnectors. In Wireless/Remote flash mode, theoff-camera flash is triggered by acoded signal from the camera'sbuilt-in flash when you press theshutter-release button. Anothersignal stops it once the camera'sTTL flash meter detects that properexposure has been received. A 2:1lighting ratio can also be obtainedautomatically. When selected, theoff-camera flash provides 2/3 of thefull exposure and the built-in flashprovides the remaining 1/3.
Normal Flash
Wireless/Remote Flash
Wireless/Remote Ratio Flash
Continued on next page.
2152EE 17/10/97 10:58 AM Page 92
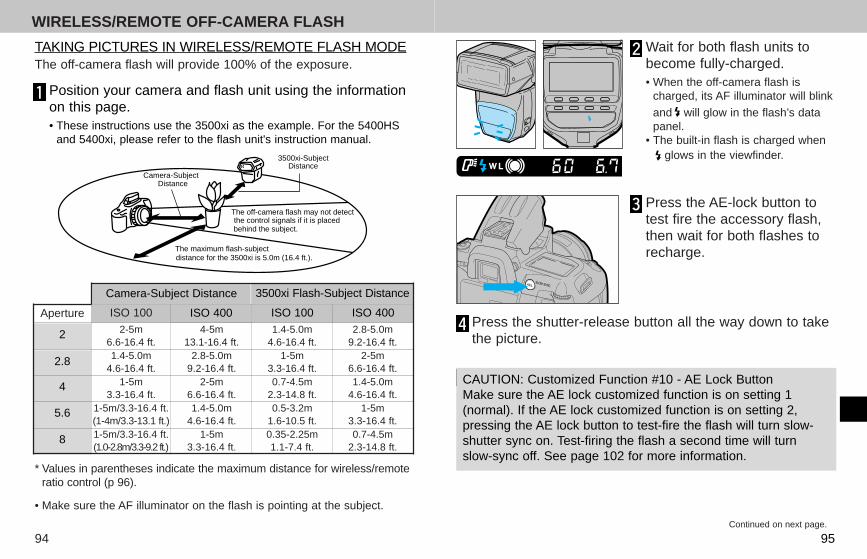
ISO 100
2
2.8
4
5.6
8
ISO 400 ISO 100 ISO 400
Camera-Subject Distance 3500xi Flash-Subject Distance
95
WIRELESS/REMOTE OFF-CAMERA FLASH
94
Wait for both flash units tobecome fully-charged.• When the off-camera flash is
charged, its AF illuminator will blink
and will glow in the flash’s datapanel.
• The built-in flash is charged whenglows in the viewfinder.
Press the AE-lock button totest fire the accessory flash,then wait for both flashes torecharge.
Press the shutter-release button all the way down to takethe picture.
CAUTION: Customized Function #10 - AE Lock ButtonMake sure the AE lock customized function is on setting 1(normal). If the AE lock customized function is on setting 2,pressing the AE lock button to test-fire the flash will turn slow-shutter sync on. Test-firing the flash a second time will turnslow-sync off. See page 102 for more information.
TAKING PICTURES IN WIRELESS/REMOTE FLASH MODE
Position your camera and flash unit using the informationon this page.• These instructions use the 3500xi as the example. For the 5400HS
and 5400xi, please refer to the flash unit's instruction manual.
Camera-Subject Distance
3500xi-Subject Distance
The maximum flash-subjectdistance for the 3500xi is 5.0m (16.4 ft.).
The off-camera flash may not detectthe control signals if it is placed behind the subject.
Aperture2-5m
6.6-16.4 ft.1.4-5.0m
4.6-16.4 ft.1-5m
3.3-16.4 ft.1-5m/3.3-16.4 ft.(1-4m/3.3-13.1 ft.)1-5m/3.3-16.4 ft.(1.0-2.8m/3.3-9.2 ft.)
4-5m13.1-16.4 ft.
2.8-5.0m9.2-16.4 ft.
2-5m6.6-16.4 ft.1.4-5.0m
4.6-16.4 ft.1-5m
3.3-16.4 ft.
1.4-5.0m4.6-16.4 ft.
1-5m3.3-16.4 ft.0.7-4.5m
2.3-14.8 ft.0.5-3.2m
1.6-10.5 ft.0.35-2.25m1.1-7.4 ft.
2.8-5.0m9.2-16.4 ft.
2-5m6.6-16.4 ft.1.4-5.0m
4.6-16.4 ft.1-5m
3.3-16.4 ft.0.7-4.5m
2.3-14.8 ft.
The off-camera flash will provide 100% of the exposure.
• Make sure the AF illuminator on the flash is pointing at the subject.
* Values in parentheses indicate the maximum distance for wireless/remoteratio control (p 96).
Continued on next page.
2152EE 17/10/97 10:59 AM Page 94
97
WIRELESS/REMOTE OFF-CAMERA FLASH
96
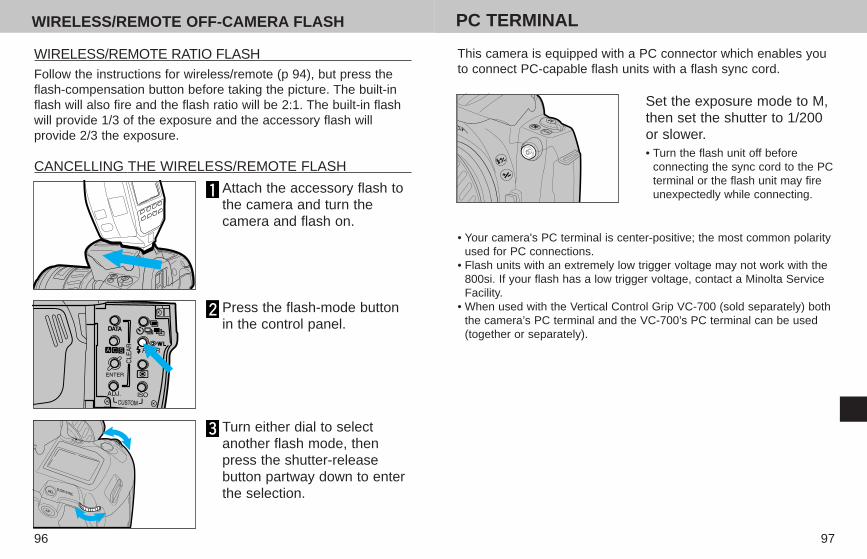
This camera is equipped with a PC connector which enables youto connect PC-capable flash units with a flash sync cord.
Set the exposure mode to M,then set the shutter to 1/200or slower.• Turn the flash unit off before
connecting the sync cord to the PCterminal or the flash unit may fireunexpectedly while connecting.
• Your camera's PC terminal is center-positive; the most common polarityused for PC connections.
• Flash units with an extremely low trigger voltage may not work with the800si. If your flash has a low trigger voltage, contact a Minolta ServiceFacility.
• When used with the Vertical Control Grip VC-700 (sold separately) boththe camera’s PC terminal and the VC-700’s PC terminal can be used(together or separately).
PC TERMINAL
CANCELLING THE WIRELESS/REMOTE FLASH
Attach the accessory flash tothe camera and turn thecamera and flash on.
Press the flash-mode buttonin the control panel.
Turn either dial to selectanother flash mode, thenpress the shutter-releasebutton partway down to enterthe selection.
Follow the instructions for wireless/remote (p 94), but press theflash-compensation button before taking the picture. The built-inflash will also fire and the flash ratio will be 2:1. The built-in flashwill provide 1/3 of the exposure and the accessory flash willprovide 2/3 the exposure.
WIRELESS/REMOTE RATIO FLASH
2152EE 17/10/97 10:59 AM Page 96
9998
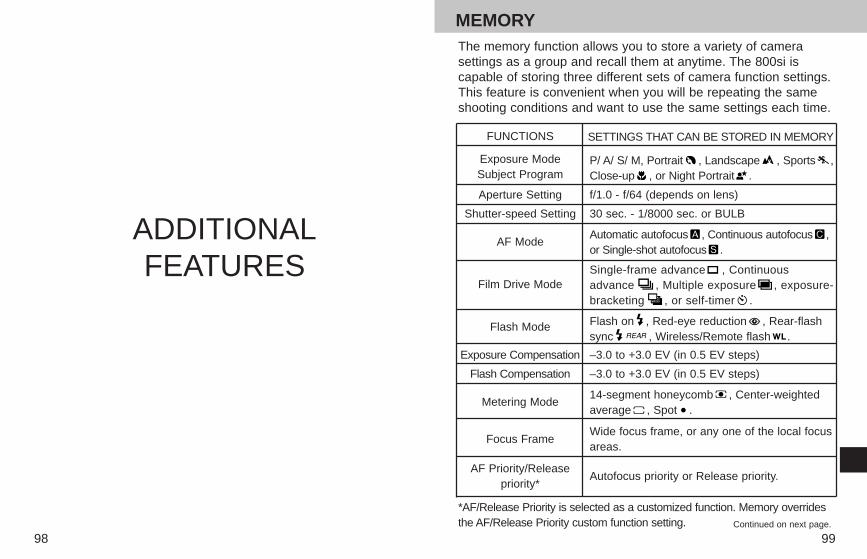
The memory function allows you to store a variety of camerasettings as a group and recall them at anytime. The 800si iscapable of storing three different sets of camera function settings.This feature is convenient when you will be repeating the sameshooting conditions and want to use the same settings each time.
FUNCTIONS SETTINGS THAT CAN BE STORED IN MEMORY
Exposure ModeSubject Program
P/ A/ S/ M, Portrait , Landscape , Sports ,Close-up , or Night Portrait .
Aperture Setting f/1.0 - f/64 (depends on lens)
Shutter-speed Setting 30 sec. - 1/8000 sec. or BULB
AF ModeAutomatic autofocus , Continuous autofocus ,or Single-shot autofocus .
Film Drive ModeSingle-frame advance , Continuousadvance , Multiple exposure , exposure-bracketing , or self-timer .
Flash Mode Flash on , Red-eye reduction , Rear-flashsync , Wireless/Remote flash .
Exposure Compensation –3.0 to +3.0 EV (in 0.5 EV steps)
Flash Compensation –3.0 to +3.0 EV (in 0.5 EV steps)
Metering Mode14-segment honeycomb , Center-weightedaverage , Spot .
Focus FrameWide focus frame, or any one of the local focusareas.
AF Priority/Releasepriority*
Autofocus priority or Release priority.
*AF/Release Priority is selected as a customized function. Memory overridesthe AF/Release Priority custom function setting.
ADDITIONALFEATURES
Continued on next page.
MEMORY
2152EE 17/10/97 10:59 AM Page 98
101
MEMORY
100
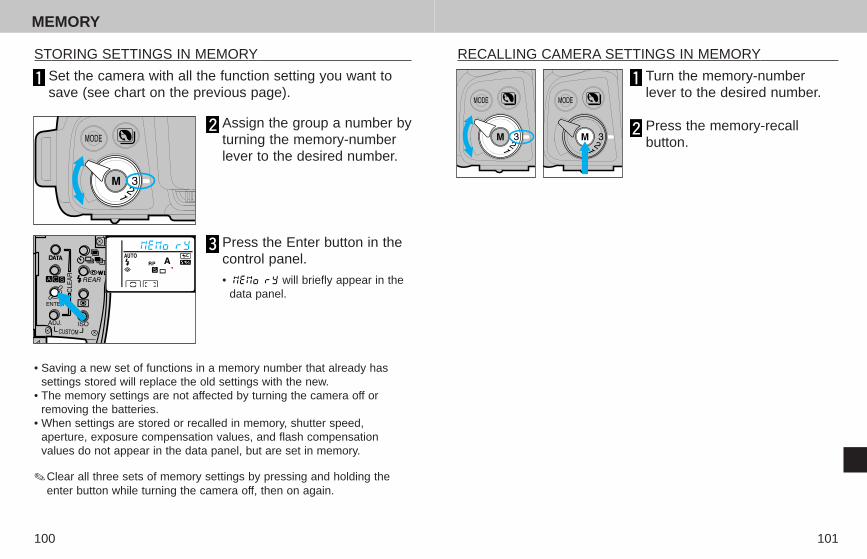
✎ Clear all three sets of memory settings by pressing and holding theenter button while turning the camera off, then on again.
STORING SETTINGS IN MEMORY
Set the camera with all the function setting you want tosave (see chart on the previous page).
Assign the group a number byturning the memory-numberlever to the desired number.
Press the Enter button in thecontrol panel.
• will briefly appear in thedata panel.
RECALLING CAMERA SETTINGS IN MEMORY
Turn the memory-numberlever to the desired number.
Press the memory-recallbutton.
• Saving a new set of functions in a memory number that already hassettings stored will replace the old settings with the new.
• The memory settings are not affected by turning the camera off orremoving the batteries.
• When settings are stored or recalled in memory, shutter speed,aperture, exposure compensation values, and flash compensationvalues do not appear in the data panel, but are set in memory.
2152EE 17/10/97 10:59 AM Page 100
103
CUSTOMIZED SETTINGS
102
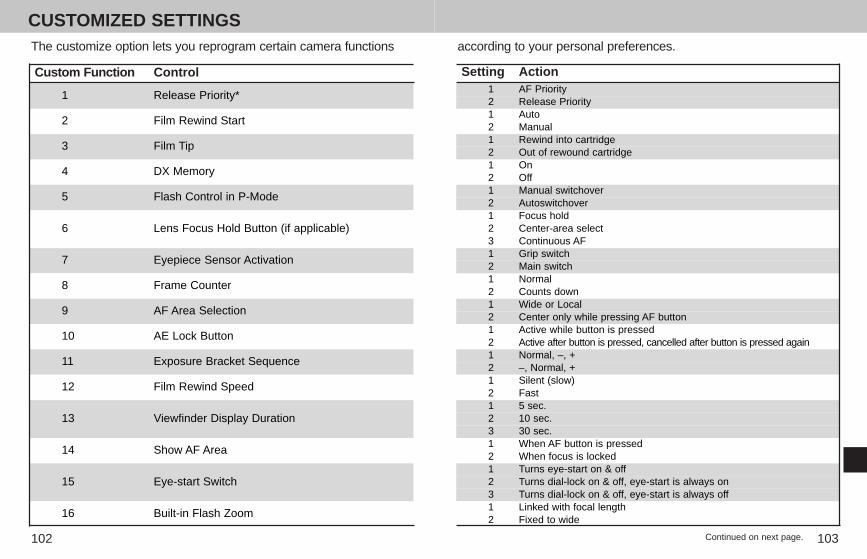
1 AF Priority2 Release Priority1 Auto2 Manual1 Rewind into cartridge2 Out of rewound cartridge 1 On2 Off1 Manual switchover2 Autoswitchover1 Focus hold 2 Center-area select3 Continuous AF1 Grip switch2 Main switch1 Normal2 Counts down1 Wide or Local 2 Center only while pressing AF button1 Active while button is pressed2 Active after button is pressed, cancelled after button is pressed again1 Normal, –, +2 –, Normal, +1 Silent (slow)2 Fast1 5 sec.2 10 sec.3 30 sec.1 When AF button is pressed2 When focus is locked1 Turns eye-start on & off 2 Turns dial-lock on & off, eye-start is always on3 Turns dial-lock on & off, eye-start is always off1 Linked with focal length 2 Fixed to wide
Setting Action
according to your personal preferences. The customize option lets you reprogram certain camera functions
1 Release Priority*
2 Film Rewind Start
3 Film Tip
4 DX Memory
5 Flash Control in P-Mode
6 Lens Focus Hold Button (if applicable)
7 Eyepiece Sensor Activation
8 Frame Counter
9 AF Area Selection
10 AE Lock Button
11 Exposure Bracket Sequence
12 Film Rewind Speed
13 Viewfinder Display Duration
14 Show AF Area
15 Eye-start Switch
16 Built-in Flash Zoom
Custom Function Control
Continued on next page.
2152EE 17/10/97 10:59 AM Page 102

105
CUSTOMIZED SETTINGS
104
Press the shutter-release button partway down to enterthe selections.• Turning the camera off or removing the batteries will not affect the
Customized Function Settings.
Note: When Customized Function #15 - Eye-start Switch is onsetting 2 or 3, the dials are completely disabled when the switchis set to ON. In this case, the only function the dials will operateis the Customized Setting.
RESETTING ALL THE CUSTOMIZED SETTINGS TO 1
Press and hold the adjustbutton in the control panel.
Slide the main switch to LOCKthen return it to ON.• When the operation is complete,
will blink in the data panel and everycustom setting will be set to 1.
✎ Release Priority is the only customized function that can be set inmemory. It is also the only customized function that can be changed bythe memory-recall button and program-reset button.
CHANGING THE CUSTOMIZED SETTINGS
While pressing the adjustbutton, press the ISO button.
Turn the front dial to select thenumber of the CustomizedFunction.• In the example: Customized
Function #3 - Film Tip has beenselected.
Turn the rear dial to changethe setting.• In the example: Setting 2 - (leaving
the film tip out of a rewoundcartridge) has been selected.
• Repeat steps 2 and 3 until all the desired functions are selected.
All customized settings were set to1 before your camera wasshipped.
2152EE 17/10/97 11:00 AM Page 104
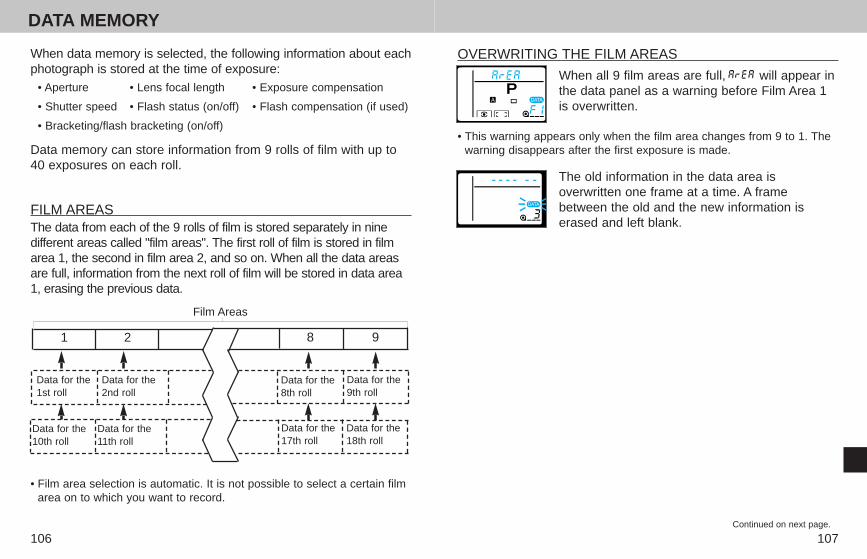
107
DATA MEMORY
106
When data memory is selected, the following information about eachphotograph is stored at the time of exposure:
FILM AREAS The data from each of the 9 rolls of film is stored separately in ninedifferent areas called "film areas". The first roll of film is stored in filmarea 1, the second in film area 2, and so on. When all the data areasare full, information from the next roll of film will be stored in data area1, erasing the previous data.
• Film area selection is automatic. It is not possible to select a certain filmarea on to which you want to record.
1 2 98
Data for the1st roll
Data for the2nd roll
Data for the9th roll
Data for the8th roll
Data for the10th roll
Data for the11th roll
Data for the18th roll
Data for the17th roll
Film Areas
Data memory can store information from 9 rolls of film with up to40 exposures on each roll.
• Aperture • Lens focal length • Exposure compensation
• Shutter speed • Flash status (on/off) • Flash compensation (if used)
• Bracketing/flash bracketing (on/off)
When all 9 film areas are full, will appear inthe data panel as a warning before Film Area 1is overwritten.
The old information in the data area isoverwritten one frame at a time. A framebetween the old and the new information iserased and left blank.
• This warning appears only when the film area changes from 9 to 1. Thewarning disappears after the first exposure is made.
OVERWRITING THE FILM AREAS
Continued on next page.
2152EE 17/10/97 11:00 AM Page 106
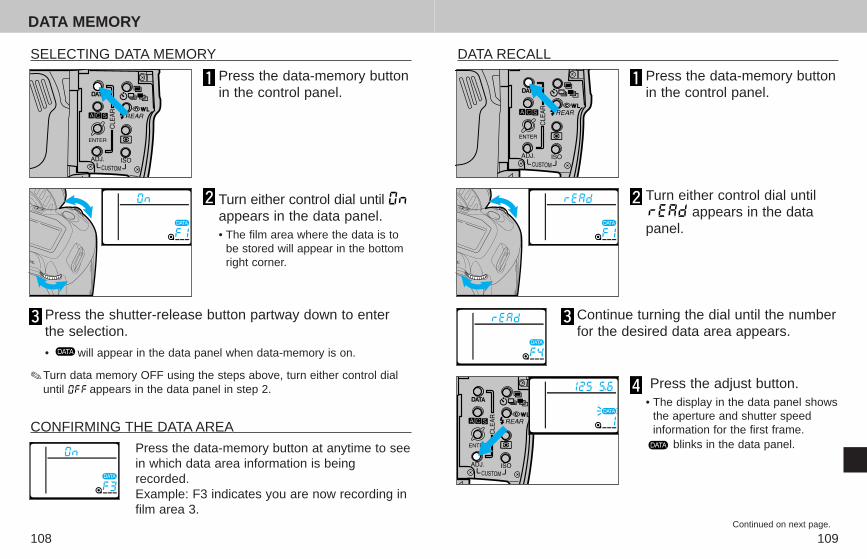
109
DATA MEMORY
108
DATA RECALL
Press the data-memory buttonin the control panel.
Turn either control dial untilappears in the data
panel.
Continue turning the dial until the numberfor the desired data area appears.
Press the adjust button.• The display in the data panel shows
the aperture and shutter speedinformation for the first frame.
blinks in the data panel.
SELECTING DATA MEMORY
Press the data-memory buttonin the control panel.
Turn either control dial untilappears in the data panel.• The film area where the data is to
be stored will appear in the bottomright corner.
Press the shutter-release button partway down to enterthe selection.
• will appear in the data panel when data-memory is on.
Press the data-memory button at anytime to seein which data area information is beingrecorded.Example: F3 indicates you are now recording infilm area 3.
CONFIRMING THE DATA AREA
✎ Turn data memory OFF using the steps above, turn either control dialuntil appears in the data panel in step 2.
Continued on next page.
2152EE 17/10/97 11:00 AM Page 108
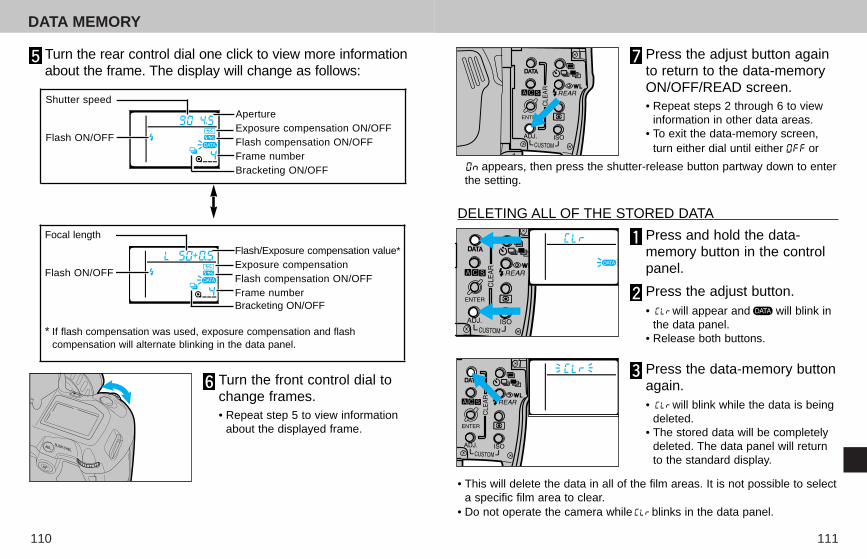
111
DATA MEMORY
110
DELETING ALL OF THE STORED DATA
Press and hold the data-memory button in the controlpanel.
Press the adjust button.• will appear and will blink in
the data panel.• Release both buttons.
Press the data-memory buttonagain.• will blink while the data is being
deleted.• The stored data will be completely
deleted. The data panel will returnto the standard display.
• This will delete the data in all of the film areas. It is not possible to selecta specific film area to clear.
• Do not operate the camera while blinks in the data panel.
Press the adjust button againto return to the data-memoryON/OFF/READ screen.• Repeat steps 2 through 6 to view
information in other data areas.• To exit the data-memory screen,
turn either dial until either or
appears, then press the shutter-release button partway down to enterthe setting.
Turn the rear control dial one click to view more informationabout the frame. The display will change as follows:
Flash/Exposure compensation value*Exposure compensation Flash compensation ON/OFFFrame numberBracketing ON/OFF
* If flash compensation was used, exposure compensation and flashcompensation will alternate blinking in the data panel.
Flash ON/OFF
ApertureExposure compensation ON/OFFFlash compensation ON/OFFFrame numberBracketing ON/OFF
Focal length
Flash ON/OFF
Shutter speed
Turn the front control dial tochange frames.• Repeat step 5 to view information
about the displayed frame.
2152EE 17/10/97 11:00 AM Page 110
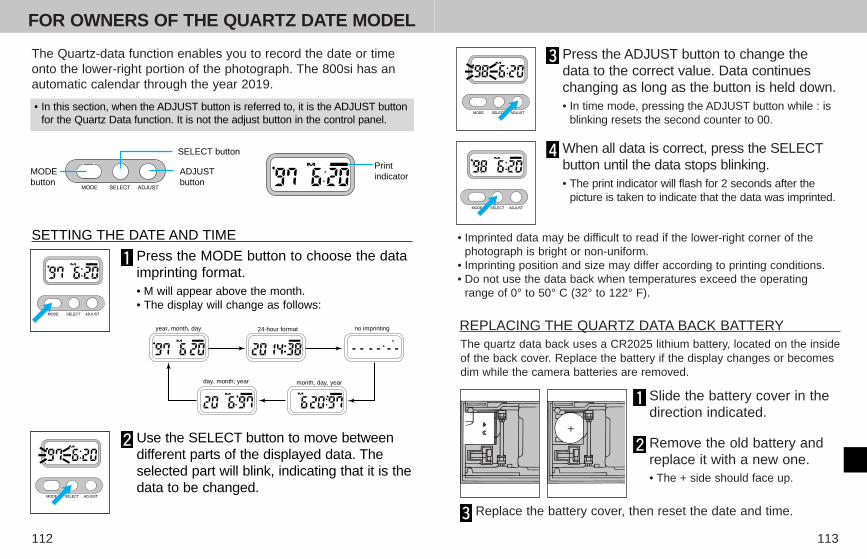
113
FOR OWNERS OF THE QUARTZ DATE MODEL
112
Press the ADJUST button to change thedata to the correct value. Data continueschanging as long as the button is held down.• In time mode, pressing the ADJUST button while : is
blinking resets the second counter to 00.
When all data is correct, press the SELECTbutton until the data stops blinking.• The print indicator will flash for 2 seconds after the
picture is taken to indicate that the data was imprinted.
• Imprinted data may be difficult to read if the lower-right corner of thephotograph is bright or non-uniform.
• Imprinting position and size may differ according to printing conditions.• Do not use the data back when temperatures exceed the operating
range of 0° to 50° C (32° to 122° F).
REPLACING THE QUARTZ DATA BACK BATTERY
Slide the battery cover in thedirection indicated.
Remove the old battery andreplace it with a new one.• The + side should face up.
Replace the battery cover, then reset the date and time.
The quartz data back uses a CR2025 lithium battery, located on the insideof the back cover. Replace the battery if the display changes or becomesdim while the camera batteries are removed.
The Quartz-data function enables you to record the date or timeonto the lower-right portion of the photograph. The 800si has anautomatic calendar through the year 2019.
• In this section, when the ADJUST button is referred to, it is the ADJUST buttonfor the Quartz Data function. It is not the adjust button in the control panel.
SETTING THE DATE AND TIME
Press the MODE button to choose the dataimprinting format.• M will appear above the month.• The display will change as follows:
Use the SELECT button to move betweendifferent parts of the displayed data. Theselected part will blink, indicating that it is thedata to be changed.
year, month, day 24-hour format no imprinting
day, month, year month, day, year
Print indicatorADJUST
button
SELECT button
MODE button
2152EE 17/10/97 11:01 AM Page 112
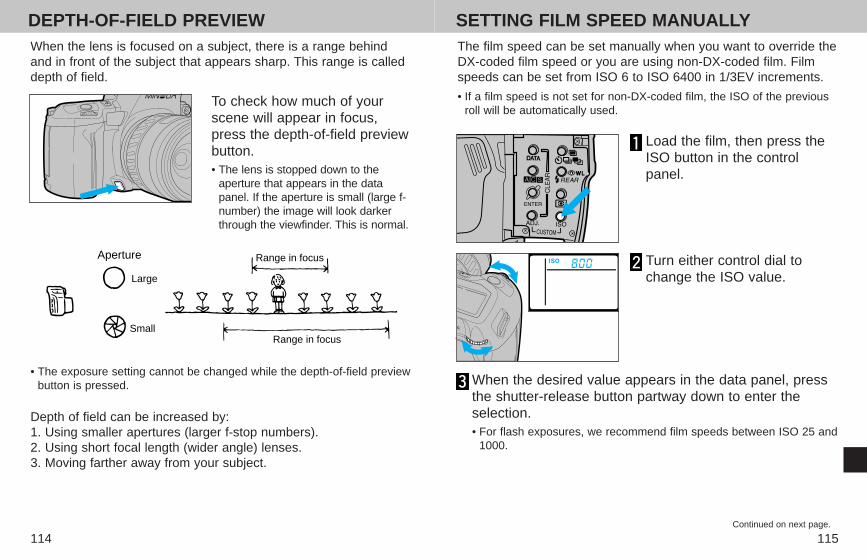
SETTING FILM SPEED MANUALLY
115
DEPTH-OF-FIELD PREVIEW
114
The film speed can be set manually when you want to override theDX-coded film speed or you are using non-DX-coded film. Filmspeeds can be set from ISO 6 to ISO 6400 in 1/3EV increments.
Load the film, then press theISO button in the controlpanel.
Turn either control dial tochange the ISO value.
When the desired value appears in the data panel, pressthe shutter-release button partway down to enter theselection.• For flash exposures, we recommend film speeds between ISO 25 and
1000.
• If a film speed is not set for non-DX-coded film, the ISO of the previousroll will be automatically used.
When the lens is focused on a subject, there is a range behindand in front of the subject that appears sharp. This range is calleddepth of field.
To check how much of yourscene will appear in focus,press the depth-of-field previewbutton.• The lens is stopped down to the
aperture that appears in the datapanel. If the aperture is small (large f-number) the image will look darkerthrough the viewfinder. This is normal.
Aperture
Large
Small
Range in focus
Range in focus
• The exposure setting cannot be changed while the depth-of-field previewbutton is pressed.
Depth of field can be increased by:1. Using smaller apertures (larger f-stop numbers).2. Using short focal length (wider angle) lenses.3. Moving farther away from your subject.
Continued on next page.
2152EE 17/10/97 11:01 AM Page 114
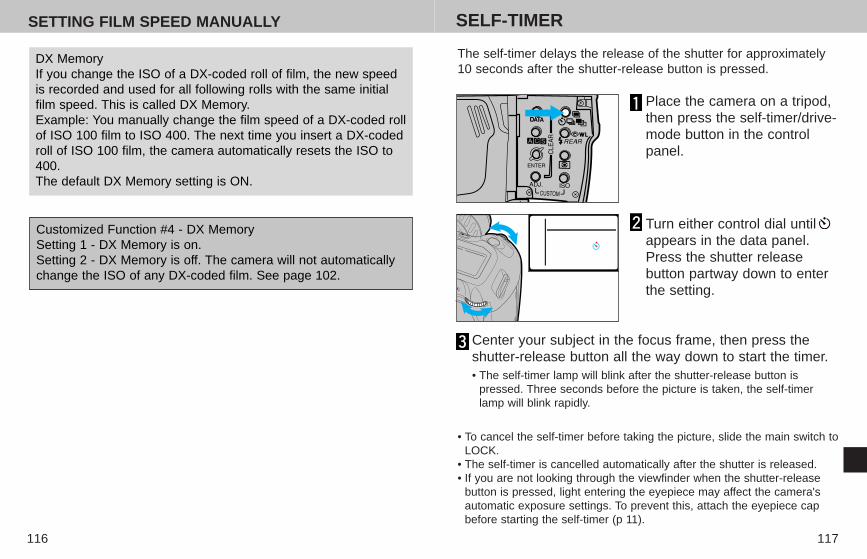
SELF-TIMER
117
SETTING FILM SPEED MANUALLY
116
The self-timer delays the release of the shutter for approximately10 seconds after the shutter-release button is pressed.
Place the camera on a tripod,then press the self-timer/drive-mode button in the controlpanel.
Turn either control dial untilappears in the data panel.Press the shutter releasebutton partway down to enterthe setting.
Center your subject in the focus frame, then press theshutter-release button all the way down to start the timer.• The self-timer lamp will blink after the shutter-release button is
pressed. Three seconds before the picture is taken, the self-timerlamp will blink rapidly.
• To cancel the self-timer before taking the picture, slide the main switch toLOCK.
• The self-timer is cancelled automatically after the shutter is released.• If you are not looking through the viewfinder when the shutter-release
button is pressed, light entering the eyepiece may affect the camera'sautomatic exposure settings. To prevent this, attach the eyepiece capbefore starting the self-timer (p 11).
Customized Function #4 - DX MemorySetting 1 - DX Memory is on.Setting 2 - DX Memory is off. The camera will not automaticallychange the ISO of any DX-coded film. See page 102.
DX MemoryIf you change the ISO of a DX-coded roll of film, the new speedis recorded and used for all following rolls with the same initialfilm speed. This is called DX Memory. Example: You manually change the film speed of a DX-coded rollof ISO 100 film to ISO 400. The next time you insert a DX-codedroll of ISO 100 film, the camera automatically resets the ISO to400. The default DX Memory setting is ON.
2152EE 17/10/97 11:01 AM Page 116
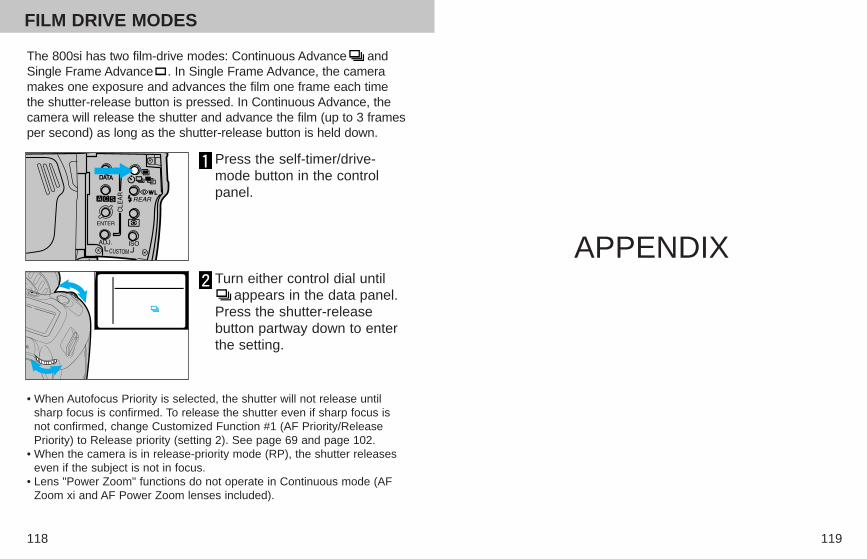
119
FILM DRIVE MODES
118
APPENDIX
The 800si has two film-drive modes: Continuous Advance andSingle Frame Advance . In Single Frame Advance, the cameramakes one exposure and advances the film one frame each timethe shutter-release button is pressed. In Continuous Advance, thecamera will release the shutter and advance the film (up to 3 framesper second) as long as the shutter-release button is held down.
Press the self-timer/drive-mode button in the controlpanel.
Turn either control dial untilappears in the data panel.
Press the shutter-releasebutton partway down to enterthe setting.
• When Autofocus Priority is selected, the shutter will not release untilsharp focus is confirmed. To release the shutter even if sharp focus isnot confirmed, change Customized Function #1 (AF Priority/ReleasePriority) to Release priority (setting 2). See page 69 and page 102.
• When the camera is in release-priority mode (RP), the shutter releaseseven if the subject is not in focus.
• Lens "Power Zoom" functions do not operate in Continuous mode (AFZoom xi and AF Power Zoom lenses included).
2152EE 17/10/97 11:01 AM Page 118
ACCESSORY INFORMATION
121
PROGRAM RESET BUTTON
120
The Minolta 800si was designed to work specifically with lenses,flash units and other accessories manufactured and distributed byMinolta. Using incompatible products with this camera may resultin unsatisfactory performance or damage to the camera oraccessories.
COMPATIBILITY OF LENSES AND ACCESSORIES
Lenses
• All Minolta AF lenses can be used with this camera. • Manual focus lenses (MD or MC) cannot be used with the 800si.• If using an AF Zoom xi or AF Power Zoom lens, display the
current focal length of the lens by pulling the zoom ring towardthe camera body. If eye-start is off, the focal length can bedisplayed by pressing the shutter-release button partway downwhile pulling the zoom ring.
Flash Units
• All Minolta i, si, and HS series flash units, as well as the VectisSF-1 flash, are compatible with this camera. With these flashunits, the flash always fires when the flash unit is on. (UnlessCustomized Function #6 is on setting 2; Autoswitchover. In thiscase, the flash will fire only when necessary when it is on and thecamera is in P mode.)
• For AF series flash units (4000AF, 2800AF, 1800AF, and Macroflash 1200AF), the Flash Shoe Adapter FS-1100 is required.When the flash is on, it will fire every time the shutter is released.The AF illuminator will not activate.
• X-series flash units can only be used when connected to thecamera's PC terminal by a sync cord.
Press the program-reset button to return the following camerafunctions to their program settings.
Function Program Setting PageExposure mode P mode 51
Subject Program None (P mode) 51
Focus area Wide 67
Focus Autofocus 31
AF Mode Automatic autofocus 64
Metering mode 14-segment honeycomb pattern
Exposure compensation +/– 0.0 74
Flash compensation +/– 0.0 91
Film-drive mode Single frame advance 118
Self-timer Off 117
Wireless Flash Off 92
Rear-flash Sync Off 89
Shutter-release mode Autofocus priority 69
• The program-reset button will not change:- Red-eye Reduction (on/off)- Data Memory (on/off)- Film Speed (ISO setting)
• If you have a dedicated accessory flash attached to the 800si, pressingthe program-reset button will also return it to its own program settings.Refer to the flash instruction manual for details.
71
Continued on next page.
2152EE 17/10/97 11:01 AM Page 120
TROUBLESHOOTING
123
Indicators blink in the viewfinder and data panel when there is aproblem with exposure.
Indicator Cause SolutionScene or subjectbrightness isbeyond thecamera’s meteringrange.
Light level isbeyond the rangeof available shutterspeeds andapertures.
The requiredshutter speed isbeyond the rangeof the camera.
The requiredaperture is beyondthe range of thecamera.
Select alarger/smalleraperture until thedisplay stopsblinking.
Select afaster/slowershutter speed untilthe display stopsblinking.
For bright scenes,attach a neutraldensity (ND) filteror reduce theoverall brightnessof the scene.For dark scenes,increase thebrightness of thearea with flash.
P/A/S/Mand
SubjectProgramModes
P
PA/A
PS/S
BLINKING INDICATORS
Mode
122
To attach the Vertical Control Grip VC-700(sold separately), the battery chambercover must first be removed. Open thebattery chamber and gently press thecover back until it snaps off. Reattach thecover by aligning the notch with the barand gently pressing them back together.
• Never twist the battery cover when removing or reattaching it.• The VC-700’s spot button will function like the camera’s AE-lock button.
VERTICAL CONTROL GRIP VC-700
Others• The following accessories are not compatible with the 800si:
Control Grip CG-1000 Data Receiver DR-1000Creative Expansion Cards Vertical Control Grip VC-507
• Please contact a Minolta Service Facility before using the Close-up Defuser CD-1000.
PANORAMA ADAPTER
The camera’s viewfinder frame must be changed to panoramawhen the Minolta Panorama Adapter (sold separately) is insertedinto the camera. Even if the adapter is not inserted, you can usethe panorama frame to compose your shots and later have themprinted as panoramic pictures.
While pressing the AF and subject-program buttons, slide the main switchfrom LOCK to ON.• The panorama frame will appear in the
viewfinder.• Repeat the procedure to return to the
standard frame. Continued on next page.
2152EE 17/10/97 11:01 AM Page 122
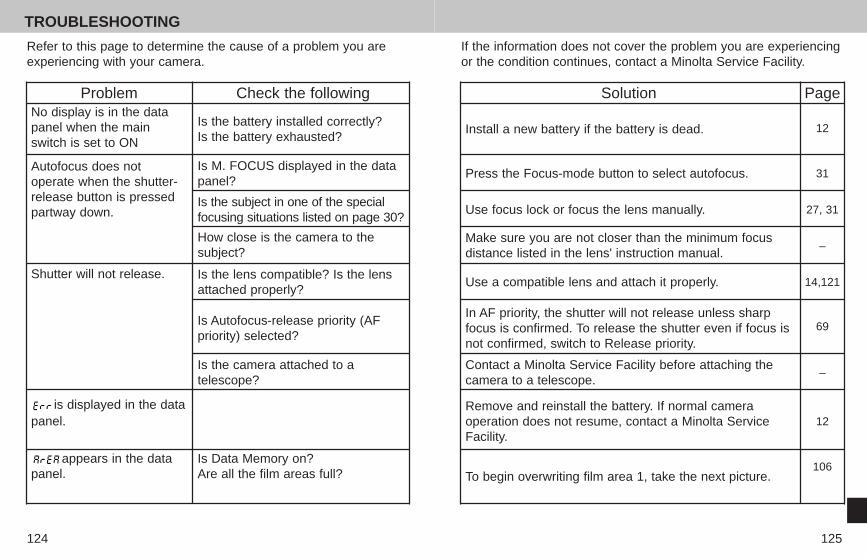
125
TROUBLESHOOTING
124
Solution Page
Press the Focus-mode button to select autofocus. 31
Use focus lock or focus the lens manually. 27, 31
Make sure you are not closer than the minimum focusdistance listed in the lens' instruction manual.
–
Use a compatible lens and attach it properly. 14,121
In AF priority, the shutter will not release unless sharpfocus is confirmed. To release the shutter even if focus isnot confirmed, switch to Release priority.
69
Contact a Minolta Service Facility before attaching thecamera to a telescope.
–
Remove and reinstall the battery. If normal cameraoperation does not resume, contact a Minolta ServiceFacility.
12
Install a new battery if the battery is dead. 12
To begin overwriting film area 1, take the next picture.106
If the information does not cover the problem you are experiencingor the condition continues, contact a Minolta Service Facility.
Refer to this page to determine the cause of a problem you areexperiencing with your camera.
Problem Check the following
Autofocus does notoperate when the shutter-release button is pressedpartway down.
Shutter will not release.
is displayed in the datapanel.
Is M. FOCUS displayed in the datapanel?
Is the subject in one of the specialfocusing situations listed on page 30?
How close is the camera to thesubject?
Is the lens compatible? Is the lensattached properly?
Is Autofocus-release priority (AFpriority) selected?
Is the camera attached to atelescope?
appears in the datapanel.
Is Data Memory on?Are all the film areas full?
No display is in the datapanel when the mainswitch is set to ON
Is the battery installed correctly? Is the battery exhausted?
2152EE 17/10/97 11:01 AM Page 124
127
CARE AND STORAGE
126
BEFORE IMPORTANT EVENTS• Check the camera's operation carefully or take test photographs. • Minolta is not responsible for damages incurred by equipment
malfunction.
OPERATING TEMPERATURES AND CONDITIONS• This camera is designed for use from –20° to 50°C (–4° to
122°F).• Never leave your camera where it may be subjected to extreme
temperatures, such as the glove compartment of a car.• In colder temperatures, the data panel response time will be
slow. The display will temporarily darken in higher temperatures.The display will be restored when the camera is returned tonormal temperatures.
• Never subject your camera to extreme humidity.• To prevent condensation from forming when bringing the camera
from a cold exterior to a warm building, place it in a plastic bag.Allow it to come to room temperature before removing it from thebag.
CLEANING• If the camera or lens barrel is dirty, wipe it gently with a soft,
clean, dry cloth. If the camera or lens comes in contact withsand, gently blow away loose particles - wiping may scratch thesurface.
• To clean the lens surface, first brush away any dust or sand, then(if necessary) moisten a lens tissue with lens cleaning fluid andgently wipe the lens in a circular motion, starting from the center.
• Never place lens fluid directly on the lens.• Never touch the interior of the camera, especially the mirror and
shutter curtain. Dust on the mirror will not affect the picturequality.
• Never use compressed air to clean the camera's interior, doingso may cause damage to sensitive interior parts.
• Never use organic solvents to clean the camera.• Never touch the lens surface with your fingers.
STORAGE
When storing your camera for extended periods, please followthese guidelines:
• Remove all batteries from the camera.• Attach the protective caps.• Store in a cool, dry, and well-ventilated area away from dust and
chemicals (such as moth balls). For very long periods, place thecamera in an airtight container with a silica gel drying agent.
• Periodically release the camera's shutter to keep it operatingproperly.
• Before using after prolonged storage, check the camera'soperation to make sure it is functioning properly.
Continued on next page.
2152EE 17/10/97 11:01 AM Page 126
TECHNICAL DETAILS
129
CARE AND STORAGE
128
Camera Type: 35mm single lens reflex (SLR) with built-in flash, autoexposure (AE), and action-predictive autofocus (AF)
Lens Mount: Minolta A-type bayonet mount (Maxxum/Dynax lenses)
Focus:Type: Through-the-lens (TTL) phase detection, multi metering with CCD line sensor metering cell. Autofocus and manual focus modes. AF Sensitivity Range: EV -1 to19 (ISO 100)AF Illuminator: Built-in LED with range of 0.7 - 7m. Automatically activated in low-light, low-contrast situationsAF Control: Single-shot, continuous, automatic AF-mode selection.
Exposure:Modes: P, PA, PS, A, S, M, and 5 Subject Program modes (Portrait, Landscape, Close-up, Sports, Night portrait/scene)Type: TTL metering; direct TTL metering for flash.Metering Cell: 14-segment honeycomb pattern SPC for ambient light and flash-metering SPC for flash.Metering Range (f/1.4 lens): Multi-segment metering: EV 0 - 20, EV 3- 20 (spot metering)Film-speed Setting: Automatic setting for DX-coded film from ISO 25 to 6400. Manual setting from ISO 6 to 6400, 1/3 EV increments. With flash, ISO 25 - 1000.
BATTERIES• Battery performance decreases with lower operating
temperatures. When photographing in cold weather, werecommend you keep the camera and spare batteries inside yourcoat to keep them warm when you are not shooting. Coldbatteries will regain some of their charge when they warm up.
• The low-battery symbol may appear even with a fresh battery,depending on storage conditions. To restore camera power, turnthe main switch to LOCK and then to ON.
CAMERA HANDLING• Never touch the camera's shutter curtain, mirror, or lens contacts.• Never subject the camera to impact.• The 800si is neither waterproof nor splashproof.- Inserting/removing film or batteries with wet hands may damagethe camera.- Take care when using the camera at the beach or near water.Costly or irreparable damage to the camera may occur.- If the camera gets wet, immediately discontinue use and contacta Minolta Service Facility listed on the back cover of this manual.
Continued on next page.
2152EE 17/10/97 11:02 AM Page 128
131
TECHNICAL DETAILS
130
Film Transport:Loading: Auto loading (automatically advances to the first frame when back cover is closed)Drive Modes: Single frame, continuous (3 frames/sec.), self-timer, exposure or flash bracketing, multiple exposure (2 - 9 exposures)Rewind: Auto rewind, manual start (Count-down display)Rewind Time: Standard (slow/silent) - approx 23 sec (36 exp. roll), High speed - approx. 12 sec (36 exp. roll)Frame counter: Forward (shows number of exposures taken)
Data Panel: Backlit on-body LCD (automatically illuminatedin low-light situations)
Power: 2CR5 x 1Battery Performance: 60 rolls with flash 0% (at 20°C)
22 rolls with flash 50% (at 20°C)13 rolls with flash 100% (at 20°C)
Dimensions: 153.5 x 107 x 71.5mm (WxHxD)Weight: 628g (without battery)
640g (with Quartz Data Back, without battery)
Specifications are based on the latest information available at thetime of printing and are subject to change.
Shutter:Type: Electronically-controlled, vertical-traverse, focal-plane shutter.Speeds: Bulb, 30 sec. - 1/8000 sec. Maximum flash sync speed is 1/200 (synchronizes with all speeds in HSS mode).
Built-in Flash:GN: 14 - 20 (ISO 100 in meters)Control: Manual up/downCoverage: 24 - 80mm angle of viewRecycling Time: Approx. 3 sec.Modes: Fill flash, Fill-flash with red-eye reduction, Wireless flash, Rear-flash sync, (Flash cancel) Rear-flash-sync is compatible with the built-in flash and all usable dedicated flashes.Dedicated Flashes: Compatible
Viewfinder:Type: Eye-level fixed pentaprism with 92 x 94%field of viewEyerelief: High-eyepoint; approx. 22.9mm from the eyepiece,18.9mm from the eyepiece frameFocusing Screen: Acute matte (interchangeable on service basis)Magnification: 0.75x (with 50mm at ∞)Diopter: -1 Diopter Adjustment: -2.5 to +0.5 diopter
2152EE 17/10/97 11:02 AM Page 130

133132
NOTESNOTES
2152EE 17/10/97 11:02 AM Page 132
Minolta Co., Ltd. 3-13, 2-Chome, Azuchi-Machi, Chuo-Ku, Osaka 541, Japan
Minolta GmbH Kurt-Fischer-Strasse 50, D-22923 Ahrensburg, GermanyMinolta France S.A. 365 Route de Saint-Germain, F-78420 Carrieres-Sur-Seine, FranceMinolta (UK) Limited Rooksley Park, Precedent Drive, Rooksley, Milton Keynes, MK13 8HF, EnglandMinolta Austria Ges. m.b.H. Amalienstrasse 59-61, A-1131 Wien, AustriaMinolta Camera Benelux B.V. Zonnebaan 39, P.O. Box 6000, NL-3600 HA Maarssen, The Netherlands
Belgium Branch Kontichsesteenweg 38, B-2630 Aartselaar, BelgiumMinolta (Schweiz) AG Riedstrasse 6, CH-8953 Dietikon, SwitzerlandMinolta Svenska AB P.O.Box 9058, Albygatan 114, S-17109 Solna, Sweden
Finland Branch Niittykatu 6 PL 37, SF-02201 Espoo, FinlandMinolta Portugal Limitada Rua Afonso Lopes Vieira 55-B, P-1700 Lisboa, PortugalMinolta Corporation
Head Office 101 Williams Drive, Ramsey, New Jersey 07446, U.S.A.Los Angeles Branch 11150 Hope Street Cypress, CA 90630, U.S.A.
Minolta Canada Inc.Head Office 369 Britannia Road East, Mississauga, Ontario L4Z 2H5, CanadaVancouver Branch 230-3771 Jacombs Road, Richmond, B.C. V6V 2L9, Canada
Minolta Hong Kong Limited Room 208, 2/F, Eastern Center, 1065 King’s Road, Quarry Bay, Hong Kong, ChinaMinolta Singapore (Pte) Ltd. 10, Teban Gardens Crescent, Singapore 608923Shanghai Minolta Optical Products Co., Ltd. 368 Minolta Road, Songjiang, Shanghai, China
© 1997 Minolta Co., Ltd. under the Berne Conventionand universal Copyright Convention
9222-2152-11 ( P9706-A706)Printed in Japan
2152EE 17/10/97 11:02 AM Page 134