dss player version 7 - idictate · dss player version 7 ... 5 troubleshooting ... connecting a...
TRANSCRIPT


2 / 121
Contents
11 INTRODUCTION........................................................................................................................................ 5
1.1 DSS PLAYER FUNCTIONS ································································································· 6 1.2 AUDIO FILE FORMATS AND FUNCTIONS SUPPORTED BY DSS PLAYER ············································· 8 1.3 DEVICES SUPPORTED BY DSS PLAYER ················································································· 9 1.4 SCREEN LAYOUT OF DSS PLAYER ······················································································10 1.5 OPERATING CONDITIONS FOR DSS PLAYER ··········································································11 1.6 ATTENTION ··················································································································12 1.7 TRADEMARKS AND LICENSES·····························································································13 1.8 USING THE HELP SYSTEM ································································································14 1.9 STARTING AND EXITING DSS PLAYER ··················································································15
22 BASIC OPERATIONS..............................................................................................................................17
2.1 DOWNLOADING A FILE ·····································································································18 2.1.1 Downloading All Files ······························································································18 2.1.2 Downloading Files from a Specified Folder ··································································19 2.1.3 Downloading Specified Files ·····················································································21
2.2 PLAYING FILES ·············································································································22 2.2.1 Starting and Stopping Playback ·················································································22 2.2.2 Playing Encrypted Files ···························································································25 2.2.3 Moving the Playback Position ···················································································26 2.2.4 Skipping to a Specified Position·················································································28 2.2.5 Adjusting the Playback Conditions ·············································································29 2.2.6 Intro Scanning ·······································································································32
2.3 CREATING A NEW FILE ····································································································33 2.4 EDITING FILES ··············································································································35
2.4.1 Adding Comments to an Audio File·············································································35 2.4.2 Converting to AIFF File Format ·················································································37 2.4.3 Splitting a File into Two (DSS Player Plus) ···································································38 2.4.4 Joining Multiple Files (DSS Player Plus)······································································39 2.4.5 Inserting an Index Mark ···························································································40 2.4.6 Recording a Verbal Comment ···················································································41 2.4.7 Adding a Recording to a File ·····················································································43 2.4.8 Partially Deleting Files·····························································································45
2.5 MANAGING FILES AND FOLDERS·························································································46 2.5.1 Creating a Subfolder ·······························································································46 2.5.2 Deleting Folders·····································································································48 2.5.3 Renaming Folders ··································································································48 2.5.4 Modifying the Properties of a File···············································································49

3 / 121
2.5.5 Moving Files ·········································································································49 2.5.6 Deleting File(s) ······································································································55
33 MISCELLANEOUS CONFIGURATIONS ................................................................................................ 56
3.1 CUSTOMIZING THE DISPLAY OF THE MAIN SCREEN···································································57 3.2 CUSTOMIZING THE AUDIO LIST WINDOW DISPLAY ····································································58 3.3 CONFIGURING FOOT SWITCH/HAND CONTROLLER OPERATIONS ··················································61 3.4 CHANGING THE AUTO-START (DEVICE DETECTOR) SETTING OF DSS PLAYER ··································63 3.5 USING THE DEVICE AS A USB SPEAKER/MICROPHONE······························································64 3.6 SHARING FOLDERS ········································································································65 3.7 SETTING DSS PLAYER PREFERENCES ·················································································66 3.8 UPGRADING TO DSS PLAYER PLUS ····················································································67
44 DEVICE MANAGEMENT FUNCTIONS...................................................................................................69
4.1 RENAMING A FOLDER IN THE DEVICE ···················································································70 4.2 TRANSFERRING VOICE GUIDANCE ······················································································71 4.3 TRANSFERRING DATE AND TIME ·························································································73 4.4 CONFIGURING THE DEVICE (DSS PLAYER PLUS)·····································································74
4.4.1 Devices with Device Configuration Support··································································76 4.4.2 Device Configuration for DS-7000/3500 ······································································77
55 TROUBLESHOOTING.............................................................................................................................85
5.1 NO AUDIO OUTPUT DURING PLAYBACK·················································································86 5.2 DON'T KNOW HOW TO CHECK THE PLAYBACK VOLUME ·····························································86 5.3 THE RECORDER DOESN’T APPEAR ON THE DEVICE WINDOW ······················································87 5.4 PROBLEMS WITH OTHER DEVICES ······················································································87 5.5 MUSIC FILES CANNOT BE COPIED TO A RECORDER··································································88
66 APPENDIX ...............................................................................................................................................89
6.1 MENU LISTS ················································································································90 6.1.1 DSS Player Menu···································································································90 6.1.2 File Menu ·············································································································91 6.1.3 Edit Menu·············································································································92 6.1.4 Display Menu ········································································································93 6.1.5 Play Menu ············································································································94 6.1.6 Device Menu·········································································································95 6.1.7 Help Menu············································································································96
6.2 AUDIO LIST WINDOW DISPLAY COLUMNS ··············································································97 6.2.1 Dictation Folder Display Columns ··············································································97 6.2.2 Music Folder Display Columns ··················································································98
6.3 FILE PROPERTIES··········································································································99

4 / 121
6.3.1 General Tab ··········································································································99 6.3.2 Details Tab·········································································································· 100
6.4 DSS PLAYER PREFERENCE SETTINGS ··············································································· 101 6.4.1 DSS Player Preference Settings ·············································································· 101
6.5 COMPONENT NAMES AND FUNCTIONS················································································ 104 6.6 DEVICE FUNCTIONS ····································································································· 113 6.7 GLOSSARY ················································································································ 114
77 INDEX .................................................................................................................................................... 116

5 / 121
11 Introduction
DSS Player is software that allows for easy playback, editing, and management of audio files on
a personal computer (PC).
Connecting a device (such as an Olympus IC digital voice recorder) in combination with RecMic
(hereinafter referred to as the device) to a PC via USB expands the functions of the
applications with a combination of the device and the PC.
This section introduces DSS Player.
DSS Player Functions
Audio File Formats and Functions Supported by DSS Player
Devices Supported by DSS Player
Screen Layout of DSS Player
Operating Conditions for DSS Player
Attention
Trademarks and licenses
Using the Help System
Starting and Exiting DSS Player

6 / 121
1.1 DSS Player Functions
DSS Player has the following functions.
Audio Recording Functions
x Supported audio formats
x A recording can be made with DSS Player using an Audio-capable recorder or RecMic.
x A recording can be inserted into or overwrite a recorded file.
Audio Playback Support Functions
x The following playback support functions are available for easier listening.
Speed control
Noise cancellation
Tone adjustment
Channel partitioning for stereophonic sound (DSS Player Plus only)
x An index mark enables jumping to any position.
x Easy fast-forwarding and rewinding are provided.
Audio File Editing Functions
x A verbal comment can be recorded at any position.
x An audio file can be partially deleted.
x An audio file can be split into two (DSS Player Plus) and files with the same format can be joined.
(DSS Player Plus only)
Encrypted File Playback Functions
x Encrypted files can be played. (DSS Pro format only)

7 / 121
Device Management Functions
x DSS Player is automatically launched when connecting the device.
x A recorder can be utilized as a USB speaker or USB microphone for a PC.
x A foot switch can be connected.
x Files recorded with a recorder can easily be transferred to and from a PC.
x Various settings for the Device can easily be configured, including the recording/playback modes,
music playback modes, time, and folder renaming. (DSS Player Plus only)
x Guidance files can be checked and automatically transferred to a Voice Guidance-enabled device.
Upgrading to DSS Player Plus
Upgrading to DSS Player Plus enables the use of the following functions.
x The menu settings for a recorder can be modified.
x Audio files can be divided at any position in the file.
x Multiple audio files can be joined into a single audio file.
x Channels can be switched to modes such as right-side only playback for stereophonic sound during
playback.

8 / 121
1.2 Audio File Formats and Functions Supported by DSS Player
DSS Player can handle five audio file formats: DSS, DSS Pro, WMA, WAV, AIFF, and MP3.
Supported functions for each format are listed in the following table.
Functions DSS DSS Pro WMA AIFF MP3 WAV File Playback *1
File recording
File editing *2
Conversion to AIFF
file
File split *2
File Joining *2
Comment editing *2
Index mark *2
Playback speed
adjustment
Noise cancellation
Tone control
Channel switching
Priority setting *2
: Supported : Not supported
*1 : Flip4Mac™ Windows Media® Components for QuickTime allows for direct playback of WMA files withDSS Player. The WMA file playback function is available without charge. For details, see the Flip4Mac website.
System Requirements Mac OS X version 10.5.8 or later QuickTime version 7 or later Downloading Windows Media® Components for QuickTime
*2 : WMA files recorded with an Olympus recorder have DSS headers and can be edited with DSS Player.
DSS Player cannot play WMA files protected with DRM (Digital Rights Management), which restricts the distribution and playback of contents for copyright protection.

9 / 121
1.3 Devices Supported by DSS Player
DSS Player supports the following Olympus devices.
For information on a specific recorder and its functions, refer to the following section:
Functional Support of Recorders for DSS Player
Device Types Models Digital voice recorder DS-7000/3500
DS-5500
DS-5000/5000iD/3400
DS-2500
DS-2400/2800
RecMic (Digital microphone for
dictation)
DR-1200/2100/2200/2300
Foot switch RS-27/28
RS-31
Hand controller RS-32
10 / 121
1.4 Screen Layout of DSS Player
DSS Player has these three screens:
x Main Screen
This is the main screen of DSS Player. This screen is used to organize and play files.
The Direct Recording screen and Playback Control screen are launched via the Main
screen.
x Direct Recording Screen
This screen is used to create (record) and edit files with a DSS Player-compatible
device. Exiting the screen brings the user back to the Main screen.
x Playback Control Screen
This screen is specialized for playing files. It is used to perform tasks such as
writing documents while listening to audio files. Exiting the screen brings the user
back to the Main screen.

11 / 121
1.5 Operating Conditions for DSS Player
The following table lists the operating conditions for DSS Player.
Items Conditions
OS Mac OSX 10.5.8 - 10.6.7 (32bit)
Mac OSX 10.6.7 - 10.9 (64bit)
CPU Power PC G3 500MHz or higher
Intel Core Solo / Duo 1.5GHz or higher
Memory 256MB or more
HDD space 200MB or more
Drive CD-ROM drive installed
Display 1024 * 768 pixels or higher, 32,000
colors or more
USB port *1 One or more ports available
Audio input/output Headphone or speaker output
Others An Internet connection
Macintosh Safari 3.0.4 or later,
mozilla Firefox 3.6.20 or later
QuickTime7 or later (7.2 or later
recommended)
Flip4Mac installed (WMA playback)*2
*1 : Operation with add-on USB ports is not guaranteed. Installing DSS Player requires the privileges of
Administrator. *2 : Flip4Mac™ Windows Media® Components for QuickTime allows for direct playback of WMA files with
DSS Player. The WMA file playback function is available without charge. For details, see the Flip4Mac website.
System Requirements: Mac OS X version 10.5.8 or later, QuickTime version 7 or later, Windows Media® Components for QuickTime downloaded.
Currently supported OSes are listed on our website. For the latest information, please visit http://www.olympus-global.com/en/global/.

12 / 121
1.6 Attention
x You may not copy all or part of this software or related documentation, except for personal use.
Reproduction of this software and related documentation is prohibited.
x We are not responsible for any losses caused by the use of this software, or any claims made by third
parties.
x At the time of publication, the contents of this document are deemed to be accurate. If you notice any
discrepancies or missing information, please inform Olympus.
x This software can be used only under the specified operating conditions.
x The specifications of this software and the contents of this document are subject to change without
notice. For the latest information, please visit http://www.olympus-global.com/en/global/.

13 / 121
1.7 Trademarks and licenses
x QuickTime and the QuickTime logo are trademarks of Apple Computer, Inc., and Macintosh is a
registered trademark in the US and other countries.
x Other company and product names mentioned in this document are trademarks or registered
trademarks of their respective owners.
x License for AES encryption
The Application Software is based in part on software by the following copyright owner.
Copyright (c) 2002, Dr Brian Gladman, Worcester, UK. All rights reserved.
LICENSE TERMS
The free distribution and use of this software in both source and binary form is allowed (with or
without changes) provided that:
1. distributions of this source code include the above copyright notice, this list of conditions and
the following disclaimer;
2. distributions in binary form include the above copyright notice, this list of conditions and the
following disclaimer in the documentation and/or other associated materials;
3. the copyright holder's name is not used to endorse products built using this software without
specific written permission.
ALTERNATIVELY, provided that this notice is retained in full, this product may be distributed under
the terms of the GNU General Public License (GPL), in which case the provisions of the GPL apply
INSTEAD OF those given above.
DISCLAIMER
This software is provided 'as is' with no explicit or implied warranties in respect of its properties,
including, but not limited to, correctness and/or fitness for purpose.

14 / 121
1.8 Using the Help System
If you are unsure of how to use DSS Player or having trouble with its operation, the Help system
can be used to resolve the problem.
Search Using the Table of Contents
Clicking the Table of Contents button in the upper-left corner of the screen displays the table
of contents in the left frame. The Table of Contents frame summarizes topics for each category.
Clicking on a menu item displays the corresponding contents in the right frame.
Search Using the Index
Clicking Index in the table of contents opens the Index page.
Clicking a desired word displays its related topics.
Displaying the Last Selected Contents
Clicking the Back button on the browser displays the last selected topic.

15 / 121
1.9 Starting and Exiting DSS Player
To start or exit DSS Player, perform the following steps.
Starting
Auto-starting
Exiting
DSS Player automatically launches when a supported device is connected to the PC.
Starting
Procedure
1. Execute /Applications/DSS Player via such means as Finder.
When the application launches for the first time, the Serial Number Registration dialog box appears.
2. Enter the serial number.
For the serial number information, see the CD packaging supplied with the product. If a correct serial number is entered, the Main Screen appears.
Once the serial number has been registered, double-clicking a DSS file or DSS
Pro file in the Finder automatically launches the Playback Control Screen.
Auto-starting
Procedure
1. Connect a supported device to a USB port on the PC.
DSS Player automatically launches.

16 / 121
Disabling auto-starting can be selected.
Exiting
If you are in the Playback Control or Direct Recording screen, return to the Main screen to exit
the program.
Procedure
1. On the Main Screen, select [Quit DSS Player] from the [DSS Player] menu.
Or click the button on the upper-left corner of the Main screen. DSS Player closes.

17 / 121
22 Basic Operations
Let's use DSS Player.
Downloading a File
Playing Files
Creating a New File
Editing Files
Managing Files and Folders

18 / 121
2.1 Downloading a File
Downloading refers to copying a file from the device to the PC. To download a file, follow the
procedures described below. Downloaded files are stored in the Download tray.
Relocating the Dictation folder.
It defaults to the [%HomeDirectory%:Document:DSS Player:Message] folder.
There are the following three types of downloading.
Downloading All Files
Downloading Files from a Specified Folder
Downloading Specified Files
2.1.1 Downloading All Files
To download all files from the device, perform the following steps.
When performing the [Download All] operation, files in the Music folder cannot be downloaded.
For information on a specific recorder and its functions, refer to the following section:
Functional Support of Recorders for DSS Player
Procedure
1. Connect a supported device to a USB port on the PC.
2. Switch on the device.
The Main Screen automatically launches. The Device Window shows the model of the recorder and file information.
If a device is connected or disconnected while the Main Screen is open, the device information is automatically updated in the Device Window.
3. Verify that the device is in Storage mode.
If it is in Audio mode, select [Switch to Storage mode] from the [Device] menu to switch to [Storage mode].
4. Click on the tool bar.

19 / 121
Or select the Device Window or device and then select [Download All] from the context menu. Or select [Download All] from the [Device] menu.
All files from every folder on the device will be downloaded (copied) into the corresponding folders A-G in the Download tray. The file name format is "User ID (leading four characters) + four-digit number".
・ The files on the device can be automatically deleted at the time of downloading. ・ Downloading can be automatically started when the device is detected. ・ The Download tray can be relocated.
2.1.2 Downloading Files from a Specified Folder
To download all files in a specified folder at once, perform the following steps.
For information on a specific recorder and its functions, refer to the following section:
Functional Support of Recorders for DSS Player
Procedure
1. Connect a supported device to a USB port on the PC.
2. Switch on the device.
The Main Screen automatically launches.
3. Select the device and select [Download Folder A] (or B-G) from the context menu.
Or select [Download Folder A] (or B-G) from the [Device] menu. If multiple devices are connected, the Device Selection screen appears.
4. Select the device and click the [OK] button.
Files from the specified folder are downloaded (copied) into the corresponding folder in the
20 / 121
Download tray.
This screen is not displayed if only one device is connected.

21 / 121
2.1.3 Downloading Specified Files
To download one or more specified files, perform the following steps.
For information on a specific recorder and its functions, refer to the following section:
Functional Support of Recorders for DSS Player
Procedure
1. Connect a supported device to a USB port on the PC.
2. Switch on the device.
The Main Screen automatically launches.
3. Select a folder from the Device Window .
Files in the folder are listed in the Audio List Window.
4. Select one or more files to download in the Audio List Window.
5. Select [Download the selected file(s)] from the [Device] menu.
The selected files are downloaded into the corresponding folder (for example, folder A to folder A) in the Download tray in the Audio List Window. If the device has no folder, the files are downloaded into folder A.

22 / 121
2.2 Playing Files
This section describes how to play files.
On the Main Screen, double-clicking a file starts playback.
Double-clicking DSS or DSS Pro files in the Finder automatically launches the Direct Recording
Screen to start playback.
For information on a specific recorder and its functions, refer to the following section:
Functional Support of Recorders for DSS Player
The following functions are available.
Starting and Stopping Playback
Playing Encrypted Files
Moving the Playback Position
Skipping to a Specified Position
Adjusting the Playback Conditions
Intro Scanning
2.2.1 Starting and Stopping Playback
Operations such as playback, stopping, fast-forwarding, and rewinding are available like on a
standard audio recorder.
The Playback Control bar on the Main Screen and the Direct Recording Screen offer the same
operations available during playback.
For information on a specific recorder and its functions, refer to the following section:
Functional Support of Recorders for DSS Player
Procedure
1. Double-click a file in the Audio List Window to begin playback.
Or select the file and click . Or select the file and select [Play] from the [Play] menu.
Playback of the file begins. The Position control (▽) indicates the current playback position.

23 / 121
shows the total time length of the file with white characters and the current position with blue characters.
2. Click on during playback to stop playing the file.
Or select [Stop] from the [Play] menu. Playback of the file stops.
Clicking on again after stopping playback resumes play from a position specified with [Auto Short-Rewind] in the [Play] menu.
Selecting a file to play in the Audio List Window on the Main Screen and selecting [Switch to the Playback Control Window] from the [Display] menu displays the Playback Control Screen.

24 / 121
Operate with a Foot Switch or Hand Controller
A foot switch (RS-27/28/31) or hand controller (RS-32) can be used to control playback when
using the Playback Control bar on the Main Screen or the Playback Control Screen.
Connecting a foot switch or hand controller does not start DSS Player automatically.
Foot switch and hand controller settings can be modified.
Functions DSS Player Foot Switch Operations
Playback
Press the pedal that is
assigned the PLAY/PAUSE
function
Stop
Release the pedal that is
assigned the PLAY/PAUSE
function
Start fast-forwarding
Press the pedal that is
assigned the FF function
Stop fast-forwarding Releasing .
Release the pedal that is
assigned the FF function
Start rewinding
Press the pedal that is
assigned the REW function
Stop rewinding Releasing .
Release the pedal that is
assigned the REW function
Functions DSS Player Hand Controller Operations Playback
Press and release the button
that is assigned the PLAY/PAUSE
function
Stop
Press and release the button
that is assigned the PLAY/PAUSE
function during playback
Start fast-forwarding
Press the button that is
assigned the FF function
Stop fast-forwarding Releasing .
Release the button that is
assigned the FF function
Start rewinding
Press the button that is
assigned the REW function
Stop rewinding Releasing .
Release the button that is
assigned the REW function

25 / 121
2.2.2 Playing Encrypted Files
Playing encrypted files requires password entry.
Only DSS Pro encrypted files can be played with DSS Player. Playback of other encrypted file formats is not supported.
Procedure
1. Double click a file in the Audio List Window to begin playback.
Or select the file and click . Or select the file and select [Play] from the [Play] menu.
The password entry dialog box appears. If the default password configured in the General tab on the Preferences dialog box is
identical to the password for the encrypted file, the password entry dialog box does not appear and playback starts immediately.
2. Type in the password for the file and click the [OK] button.
Playback of the file begins. If the entered password is wrong, an error message appears and the file is not played.
Selecting a file to play in the Audio List Window on the Main Screen and selecting [Switch to the Playback Control Window] from the [Display] menu displays the Playback Control Screen.

26 / 121
2.2.3 Moving the Playback Position
This section describes how to play a file from a specified position.
Moving to a Desired Position
Changing the Time Scale
Moving the Position Control using the Keyboard
Moving to a Desired Position
The starting point can be moved to any position by dragging the Position control.
Procedure
1. Click on the desired position on the Direct Recording Screen or drag the Position control to the position directly.
The Position control moves to the specified position.
Changing the Time Scale
The playback timescale can be changed.
Procedure
1. Click or on .
The time scale is changed. The width of the Play bar can be set to 1, 10, 30, or 60 minutes, or to the full length of the file.
2. Move the Position control to the right or left end of the Play bar.
The starting point moves to an adjacent block. The next or last 10-minute window appears if the time scale is set to 10 minutes.

27 / 121
Moving the Position Control with the Keyboard
If the Play bar is selected (surrounded with a dotted line), the Position control can be moved
with the keyboard.
Keyboard Operations Position Control
Moves to the left
Moves to the right
Home Moves to the beginning of a file
End Moves to the end of a file

28 / 121
2.2.4 Skipping to a Specified Position
This function is used to skip to a position marked with an index mark or verbal comment.
Skipping to an Index marked Position
Skipping to a Verbal commented Position
Skipping to an Index-marked Position
An index mark is represented by a red triangle ( ) on the Playback Control bar. Index marks
should be configured in advance.
Procedure A
1. Click on or .
The Position control skips to the nearest index mark before or after the current position.
Note that if there is a verbal comment before or after the current position, the Position control moves to the verbal comment rather than the next index mark.
Procedure B
1. Select [List of index marks] from the [Play] menu.
The [View All Index Marks] dialog box appears.
2. Select an index mark and click the [Skip] button.
The Position control skips to the specified index marked position.

29 / 121
Skipping to a Verbal-commented Position
Procedure
1. Click on or .
The Position control skips to the start or end of the nearest verbal comment before or after the current position. Verbal comments are represented by light blue indicators on the Play bar.
Note that if there is an index mark before or after the current position, the Position control moves to the index marked position rather than the next verbal comment.
2.2.5 Adjusting the Playback Conditions
Playback conditions can be adjusted in DSS Player to provide easier listening of recorded files.
The functions can be selected from the Playback Control bar on the Main Screen or from the
Playback Control Screen.
Adjusting the Volume
Adjusting the Speed
Suppressing Noise
Adjusting the Tone
Switching the Channels
Adjusting the Volume
This function is used to adjust the playback volume.
Procedure
1. Drag the slider on the Volume Adjustment control.
Playback volume is adjusted.
Adjusting the Speed
Playback speed adjustment allows for slow playback during complicated sections of a recording,
and fast playback during less complicated sections.

30 / 121
Procedure
1. Click or , or drag the slider on the Playback Speed Adjustment control.
The playback speed can be adjusted to nine levels between 50% and 200% without changing the voice pitch (sound pitch).
When the playback speed of a stereo-recorded file is set to a number other than 100%, the audio output switches to mono.
Suppressing Noise
The noise cancellation effect is useful when listening to files with a high level of background
interference.
Procedure
1. Click or or drag the slider on the Noise Cancellation control.
The noise cancellation effect can be adjusted to four levels; OFF, 1, 2, and 3.
In some recording environments, noise cancellation may not work effectively. At certain noise cancellation levels (1-3), the volume level may become too low or the sound quality may change.

31 / 121
Adjusting the Tone
Emphasis is placed on the low pitch side when shifting to the B {bass} side and on the high
pitch side when shifting to the T {treble} side. In general, shifting to the T side provides
easier listening.
Procedure
1. Click or or drag the slider on the Tone Adjustment control.
The tone can be adjusted in increments of 1% from 100% on the B side to 100% on the T side.
Switching the Channels
Channel switching may provide easier listening.
This function is only available in DSS Player Plus. DSS Player does not support this function.
Channel switching is disabled for a files recorded in mono.
Procedure
1. Select a channel with [Channel] in the [Play] menu.
Play files in accordance to the following table.
Items Description Stereo Play as stereophonic sound.
Monaural Play as monophonic sound.
Play left
channel only.
Play only the left track of stereophonic
sound.
Play right
channel only.
Play only the right track of stereophonic
sound.

32 / 121
2.2.6 Intro Scanning
This function sequentially plays through the first 5 seconds of all the files displayed or
selected in the Audio List window. Once all the files have been played, the player beeps to
indicate the end of playback. Files with a total recording time of less than 5 seconds are
played through before playing the next file. Files are highlighted in the Audio List Window
during playback.
Procedure
1. Click on the tool bar.
Or select [Intro Scan] from the [Play] menu. Files displayed in the Audio List Window are intro scanned sequentially starting with the selected file. If no file is selected, the Intro Scan begins with the first file on the list.
2. Click on .
Or select [Stop] from the [Play] menu. The Intro Scan stops.

33 / 121
2.3 Creating a New File
A new file can be created in the Direct Recording Screen using a digital voice recorder or
RecMic as a microphone (a direct recording). The buttons on a supported digital voice
recorder or RecMic can be used exactly the same as the menus or buttons on the Direct
Recording Screen.
The volume, status, and ID of a recorded sound file are displayed in the status bar during a direct recording.
For information on a specific recorder, refer to the following section. ⇒Setting Preferences of DSS Player
Procedure
1. Connect a supported digital voice recorder or RecMic to a USB port on the PC.
2. Verify that the device is in Audio mode.
If it is in Storage mode, select [Switch to Audio mode] from the [Device] menu toswitch to Audio mode.
3. Click on the tool bar.
Or select [New] from the [File] menu. The Direct Recording Screen opens. When creating a new file, the folder name is "Dictation tray", and the file name format is "the leading four characters of User ID + four-digit sequential number + .DSS".
4. Select the microphone sensitivity.
Select Conference mode or Dictation mode .
Microphone sensitivity can be set for specific devices such as the RecMic series and some digital voice recorders in the Direct Recording Screen. The microphone sensitivity button is disabled in non-compatible models. If this is the case, set the microphone input level in the sound settings of the operating system.
=> Functional Support of Recorders for DSS Player
5. Clicking on starts recording, and clicking on stops it.
Settings can be changed so that recording continues while is being held, and stops when it is released.
is the button for recording verbal comments. Use for normal recording.

34 / 121
6. Click on the tool bar.
The [Confirmation] dialog box for saving a file appears.
7. Clicking the [OK] button saves the file in the Dictation tray.
Clicking the [Cancel] button brings the user back to the file being edited without saving it. Clicking the [Delete] button cancels the edit and brings the user back to the Main Screen.
Operating with a Recorder’s Buttons
The buttons on a connected recorder can be used as the playback/recording operation buttons for
DSS Player in the Direct Recording Screen.
The foot switch settings can be modified.
Direct Recording Window Menus
/Buttons Recorder Buttons Description
Play Plays the audio file being edited.
Record Records sound.
Stop Stops playback or recording.
/ Rewind/Fast-
forward
Moves the playback position.
/
Delete Specifies a range for partial
deletion and performs it.
Index Inserts an index mark at a playback
position.
NEW Creates a new file.
REV Moves the playback position.
Volume Up/Down Adjusts the volume.

35 / 121
2.4 Editing Files
Edited files are always saved as new files. MP3, AIFF, and general WMA files cannot be edited. See Audio File Formats and Functions Supported by DSS Player.
DSS files, DSS Pro files, or WMA files recorded with an Olympus recorder can be edited.
The following functions are available.
Adding Comments to an Audio File
Converting to AIFF File Formatdu
Splitting a File into Two (DSS Player Plus)
Joining Multiple Files (DSS Player Plus)
Inserting an Index Mark
Recording a Verbal Comment
Adding a Recording to a File
Partially Deleting Files
2.4.1 Adding Comments to an Audio File
Comments of up to 100 one-byte characters, or 50 two-byte characters in length can be added to
each file.
Procedure
1. Select a file in the Audio List Window and select [Edit Comment] from the context menu.
Or select [Edit Comment] from the File menu. The Edit Comment dialog box appears.
2. Type in a comment.

36 / 121
Up to 100 one-byte characters can be entered.
3. Click the [OK] button.
The comment is added to the file and displayed in the Comment field on the Audio List Window.

37 / 121
2.4.2 Converting to AIFF File Format
This function converts files selected in the Audio List Window to AIFF format.
Note that converting a DSS or DSS Pro file to AIFF format results in loss of the high compression rate (which is a benefit of the DSS format) and any DSS-specific information, such as index marks.
Procedure
1. Select a file in the Audio List Window and click on the tool bar.
Or select [Convert to AIFF file] from the [File] menu. An AIFF file is created in the same folder in which the original file is located.
・You can also select the audio format when converting DSS/DSS Pro files to AIFF files.

38 / 121
2.4.3 Splitting a File into Two (DSS Player Plus)
Files selected in the Audio List Window can be split into and saved as two files in the same
folder.
This function is only available in DSS Player Plus. DSS Player does not support this function.
Procedure
1. Select a file in the Audio List Window and click on the tool bar.
Or select [Split] from the [File] menu. The File Split dialog box appears.
2. Type in file names for the two split files in [The first half of the file] and [The second half of the file] fields.
3. Specify the splitting position with the slider.
Checking [Displays for 20 seconds] zooms in to display a range of 20 seconds centered around the slider position, allowing for a more precise position adjustment. The contents of the files can be verified using the [START] and [STOP] buttons.
4. Click the [Split] button.
The file is split at the slider position and the first and second halves of the file are saved with the specified names in the original folder. The original file also remains intact.

39 / 121
2.4.4 Joining Multiple Files (DSS Player Plus)
Multiple files selected in the Audio List Window can be joined into and saved as a single file
in the same folder.
・This function is only available in DSS Player Plus. DSS Player does not support this function. Only the files with the same recording format and recording mode can be joined.
・Joining two split files again may insert a noise into the joining point.
Procedure
1. Select files to be joined in the Audio List Window and click on the tool bar.
Or select [Join] from the [File] menu. The Join Files dialog box appears. The contents of the files can be verified using the [PLAY] and [STOP] buttons.
2. Determine the joining order with the [Up] and [Down] buttons.
3. Type in a file name for the joined file in the [The file name after being joined] field.
4. Click the [Combine] button.
The joined file is saved in the same folder as the original files. The original files remain intact.

40 / 121
2.4.5 Inserting an Index Mark
An index mark can be inserted or deleted with the Playback Control bar in the Main Screen or on
the Direct Recording Screen.
・This function supports DSS files, DSS Pro files, and WMA/WAV/MP3 files with the
DSS header. ・Index marks cannot be inserted in a verbal commented portion.
Inserting an Index Mark
To insert an index mark, perform the following steps. The maximum number of settable index marks
is 32 for DSS Pro files (.DS2), and 16 for DSS (.DSS), WMA files with the DSS header (.WMA), MP3
files (.MP3), and WAV files (.WAV).
Procedure
1. Select a file in the Audio List Window.
The file is displayed on the Play bar.
2. Click on the tool bar.
Or select [Insert index mark] from the [Play] menu. An index mark is inserted at the Position control location.
Deleting an Index Mark
To delete an index mark, perform the following steps.
Procedure A
1. Align the Position control with the index mark to be deleted by clicking or
.
2. Click on the tool bar.
Or select [Delete index mark] from the [Play] menu. The index mark is deleted.
Procedure B
1. Select [List of index mark] from the [Play] menu.
The View All Index Marks dialog box appears. Index marks positions are displayed in the HH.MM.SS format.

41 / 121
2. Select an index mark and click the [Delete] button.
The specified index mark is deleted. Multiple index marks can be deleted at the same time.
3. Click the[close]button.
The screen returns to the Main Screen.
2.4.6 Recording a Verbal Comment
Verbal comments can be recorded as additional voice comments while recording. They are displayed
in blue on the Play bar for visibility. You can play verbal comments only or skip them by
clicking or .
Only DSS Pro format file supports this function. Even if [Recording a Verbal Comment] is enabled, verbal comments cannot be recorded with DSS format file.
Configuring Verbal Comment Recording
Configuration is required in advance to record verbal comments.
Procedure
1. Click [Preferences] on the DSS Player menu.
The Preferences dialog box will appear.
2. Click [Record] to display Record tab.
3. Click [Format] and select [DSS Pro format].
4. Check [Add Verbal Comment].
5. Click [OK].

42 / 121
Verbal comment recording icon will be displayed on the Direct Recording screen.
Record a Verbal Comment While Recording
Verbal comment recording continues while is being pressed, comments displayed in blue on
the Play bar. To return to normal recording, release to stop recording verbal comments.
1. Click on the Direct Recording Screen to start recording.
During normal recording, verbal comment recording continues while the button is being held and returns to normal recording once it is released.
Verbal comments are represented by a light blue indicator. The current position can be
moved to the start or end of a previous verbal comment or index mark with or
.
2. Continue pressing to record.
A verbal comment will be recorded while pressing this icon and the comment data will be displayed in blue on the Play bar.
3. Release .
DSS Player will return to normal recording.
Recording Verbal Comments to Recorded Audio File
Verbal comments can be recorded to an audio file.
Procedure
1. Move the Position control to the intended recording position on the Direct Recording Screen.
2. Select the recording mode.
Selecting initiates the Insert recording mode. Selecting initiates the Overwrite recording mode.
3. A verbal comment is recorded while pressing . Releasing the button stops recording.
Verbal comments are displayed in blue. Click or to move to an index mark or to the beginning or end position of the previous verbal comment.
4. Click on the tool bar to stop recording.
A Confirmation dialog box for saving a file will appear.

43 / 121
5. Clicking [Save] saves the file in the Dictation tray under a different name.
Clicking the Cancel button brings the user back to the file being edited without saving it. Clicking the Delete button erases the edited file and brings the user back to the Main Screen. (The original audio file won’t be changed)
When recording a verbal comment, its recording quality is based on the settings at the time of recording. The original file will remain in the original folder. If changes need to be made, access and edit the original file again.
2.4.7 Adding a Recording to a File
This function adds a recording to an existing audio file. In general, additional recordings are
appended to the end of the file, however Overwrite or Insert recordings can be made at any point
in the file by stopping and moving the playback position. Additional recordings are saved in the
Dictation tray.
The volume, status, and user ID of a recorded sound are displayed on the status bar during a direct recording.
Procedure
1. Connect a supported digital voice recorder or RecMic to a USB port on the PC.
2. Select the file to be edited and click on the tool bar.
Or select [Edit] from the [File] menu. The Direct Recording Screen appears.
3. Move the Position control to the intended recording position.
4. Select the recording mode.
Select to enter Insert recording mode, and select to enter Overwrite recording mode.
5. Set the microphone sensitivity.
Select Conference mode or Dictation mode .
6. Click to start recording.
7. Click to stop recording.

44 / 121
8. Click on the tool bar to exit recording.
The [Confirmation] dialog box for saving a file appears.
9. Clicking the [Save] button saves the file under another name in the Dictation tray.
Clicking the [Cancel] button brings the user back to the file being edited without saving it. Clicking the [Delete] button cancels the edit and brings the user back to the Main Screen.
When adding a recording to a file, its recording quality is based on the current settings. The original file remains in the original folder. If a problem occurs during recording, access and edit the original file again.

45 / 121
2.4.8 Partially Deleting Files
To partially delete an audio file, perform the following steps. A partially deleted file is
saved in the Dictation tray.
Procedure
1. Select a file to be configured, and click on the tool bar.
Or select [Edit] from the [File] menu. The Direct Recording Screen appears.
2. Align the Position control with a deletion start position and click .
The deletion start position is locked.
Clicking again unlocks the start position.
3. Align the Position control with a deletion end position and click .
The [Confirmation] dialog box for deletion appears.
4. Click the [OK] button.
The specified range is deleted.
5. Click on the tool bar to exit the recording.
The [Confirmation] dialog box for saving the file appears.
6. Click the [Save] button.
The file is saved in the Dictation tray under a new name. Clicking the [Cancel] button brings the user back to the file being edited without saving it. Clicking the [Delete] button cancels the edit and brings the user back to the Main Screen.
The original file remains in the original folder. If a problem occurs, access and edit the original file again.

46 / 121
2.5 Managing Files and Folders
Folders selected in the Audio List Window and the Device Window can be edited according to
applications.
The following functions are available.
Creating a Subfolder
Deleting Folders
Renaming Folders
Modifying the Properties of a File
Moving Files
Deleting File(s)
2.5.1 Creating a Subfolder
This function creates a new subfolder.
A subfolder cannot be created in the Download tray and in the Dictation tray.
Up to 20 one-byte characters can be used for a folder name (note that for a folder in a recorder, the maximum character count is 8), but the following one-byte characters are unavailable: \ / : * ? " < > |
Procedure
1. Select a folder in the Audio List Window and the Device Window, and select [Create a folder] from the context menu.
Or select [Create a folder] from the [File] menu. The [Create a new folder] dialog box appears.
2. Type in a folder name and click the [OK] button.

47 / 121
A new subfolder is created in the selected folder.

48 / 121
2.5.2 Deleting Folders
This function deletes a previously created subfolder.
Only user-created subfolders can be deleted. The Download tray, Dictation tray, and Folders A-G cannot be deleted.
Procedure
1. Select a folder in the Audio List Window and the Device Window, and select [Delete the folder] from the context menu.
Or select [Delete the folder] from the [File] menu. The selected folder is deleted.
2.5.3 Renaming Folders
This function renames a folder.
The Dictation folder, Device Manager, Download tray, and Dictation tray cannot be renamed.
Procedure
1. Select a folder in the Audio List Window and select [Rename the folder] from the context menu.
Or click [Rename the folder] on the [File] menu. The folder name field becomes editable.
2. Edit the folder name and click the [Enter] key.
The folder name is changed.
Up to 20 one-byte characters can be used for a folder name (note that for a folder in a recorder, the maximum character count is 8), but the following one-byte characters are unavailable: \ / : * ? " < > |
Folder names for the device follow the character count rule of the device. Refer to Renaming a Folder on a Device.

49 / 121
2.5.4 Modifying the Properties of a File
This function modifies the properties of a DSS or DSS Pro file.
Procedure
1. Select a file and select [Properties] from the context menu.
Or select [Properties] from the [File] menu. The dialog box for XXX.DSS Properties appears. Modify the properties as needed.
Refer to Details on Displayed Columns.
2. Click the [OK] button.
The screen closes and the properties of the DSS file are updated.
2.5.5 Moving Files
DSS Player has some rules and restrictions on copying and moving files in order to preserve
their contents. It is important to understand those restrictions when managing files.
The following functions are available.
Moving a File within the Dictation Folder
Importing Files
Exporting Files
Copying to a Specified Location
Uploading to the Device
Moving a File within the Dictation Folder
In the Dictation folder, files can be dragged and dropped freely to move them.
Procedure A
1. Select a file in the Audio List Window, and drag and drop it into a destination folder in the Audio File Window.

50 / 121
The file moves to the folder.
Procedure B
1. Select a file in the Audio List Window and select [Move to folder] from the [Edit] menu in the context menu. Or select [Move to folder] from the [Edit] menu.
The [Select destination folder] dialog box appears.
2. Select the destination folder in the Audio List Window and click the [OK] button.
The file is moved to the specified folder.
Importing Files
Importing is copying or moving audio files into the Dictation folder from an outside location.
Procedure
1. Select [Import] from the [File] menu.
The Import screen appears.
2. Specify the files to be imported in the upper section of the screen.
Clicking the [New Folder] button creates a new folder within the specified folder.

51 / 121
3. When moving files, check [After importing the file, delete the original file].
4. Select a folder in the Dictation folder from the [Specify the import folder] box.
5. Click the [Open] button.
The specified files are copied or moved to the selected folder.

52 / 121
Exporting Files
Exporting is copying or moving audio files from the Dictation folder to an outside location.
This function is used to backup a file.
Procedure
1. Select files in the Audio List Window and select [Export] from the [File] menu.
The Export screen appears.
2. Specify an export destination folder in the upper section of the screen.
3. When moving the files, check [After exporting the file, delete the original file].
Clicking the [New Folder] button creates a new folder in the specified folder.
4. Click the [Export] button.
The files are copied to the specified folder.
Copying to a Specified Location
This function copies files to any location.
Procedure
1. Select a file in the Audio List Window and select [Copy] from the [Edit] menu.
The specified files are copied to the clipboard.
2. Select a destination folder in the Audio List Window or specify the folder in the Finder, and then select [Paste] from the [Edit] menu.

53 / 121
The files are copied to the specified folder.

54 / 121
Uploading to the Device
Uploading is copying files from the Audio List Window to a connected device.
File types not supported by the device cannot be uploaded.
Refer to Downloading Files.
Procedure
1. Verify that the device is in Storage mode.
If it is in Audio mode, select [Switch to Storage mode] from the [Device] menu to switch to Storage mode.
2. Select a file in the Audio List Window and click on the tool bar.
Or select [Upload] from the context menu. Select [Upload] from the [File] menu.
The Upload screen appears.
3. Select an upload destination device and folder, and click the [OK] button.
The selected file is copied to the specified folder in the device.

55 / 121
2.5.6 Deleting File(s)
To delete files, perform the following steps.
Procedure
1. Select a file in the Audio List Window and select [Delete] from the context menu.
Or select [Delete] from the [Edit] menu. The selected file is deleted.

56 / 121
33 Miscellaneous Configurations
This section describes various applications of DSS Player.
Customizing the Display of the Main Screen
Customizing the Audio List Window Display
Configuring Foot Switch Operations
Changing the Auto-start (Device Detector) Setting of DSS Player
Using the Device as a USB Speaker/Microphone
Sharing Folders
Setting DSS Player Preferences
Upgrading to DSS Player Plus

57 / 121
3.1 Customizing the Display of the Main Screen
The tool bar, status bar, and Playback Control bar on the Main Screen, and the grids in the
Audio List window can be shown or hidden at the user's discretion. Settings can be changed in
the Display menu.
Procedure
1. Select [Hide the tool bar] from the [Display] menu.
The tool bar is hidden. Selecting [Show the tool bar] from the [Display] menu displays it again. The status bar, Playback Control bar, and grids can also be displayed or hidden.

58 / 121
3.2 Customizing the Audio List Window Display
You can customize how files are displayed in the Audio List window.
Interchanging Displayed Columns for a File
Sorting Displayed Files
Selecting Displayed Fie Types
Changing Displayed Columns for a File
Rearranging Displayed Columns for a File
Displayed columns in the Audio List Window can be rearranged.
Procedure
1. Drag and drop a column name on the Header bar.
The order of the displayed columns changes.
Refer to Changing Displayed Columns for a File.
Sorting Displayed Files
The order of displayed files can be changed.
Procedure
1. Select a column as a sort key by selecting [Sort by] from the [Display] menu.
Files are sorted by the selected column in ascending sequence.
Selecting Displayed Fie Types
Files types displayed in the Dictation Folder can be customized. (e.g. DSS files only, or DSS
files and WMA files).
Procedure
1. Click on the toolbar and then click the file type toolbar button.
Or select [Current view] from the [Display] menu and select one or more file types. Displayed file types change.

59 / 121
When a folder in the device is displayed, the current view always shows all files.
Changing Displayed Columns for a File
Columns displayed on the header bar in the Audio List Window can be added, deleted, or
interchanged.
Procedure
1. Select [Audio File] or [Music File] from [Columns to display] in the [Display] menu.
The [Columns to Display] dialog box appears.
2. Move columns to display to the [Columns to display] box and columns not to display to the [Not currently displayed] box by dragging and dropping them.
Note that the File Name and Priority columns cannot be hidden. The order of columns displayed in the Audio List Window can be changed by rearranging the columns listed on this screen. Clicking the [Reset] button resets the display of the screen.
3. Click the [OK] button.
The screen closes and the Audio List Window display is updated.

60 / 121
Refer to Properties of a File.

61 / 121
3.3 Configuring Foot Switch/Hand Controller Operations
The foot switch (RS-27/28/31) and the hand controller (RS-32) can be use used to do playback
operations when they are connected.
Procedure
1. Connect a foot switch or hand controller.
is displayed on the tool bar.
2. Click on the tool bar.
The [Foot switch setting] dialog box appears. Select the model of the foot switch or hand controller being used from the list in the upper left of the dialog box.
The following settings can be selected with Center, Left, Right, or Top. (The dialog box varies depending on the model.)
Foot Switch Operations Description REW Rewinds when the pedal/button is pressed.
Stops rewinding when the pedal/button is
released.
FF Fast-forwards when the pedal/button is
pressed. Stops fast-forwarding when the
pedal/button is released.
PLAY/PAUSE When the pedal on the foot switch is
pressed, the dictation file plays. When the
button on the hand controller is pressed,
the dictation file plays or stops.
DISABLE Disables the pedal/button.

62 / 121
INDEX Insert an index mark.
Index marks are not inserted if one already
exists.
COMMENT Display Comment dialog box.
EOF/BOF Move cursor to end of time bar. If its
already at the end, it moves to the start.
Speed Control Switch playback speed between x1 and x1.5.
Noise Cancel Switch noise cancel between ON (Level 2)
and OFF.
3. Select functions to be assigned to the buttons on the foot switch or hand controller from the list, and click the [OK] button.
The foot switch or hand controller can be used as playback operation buttons when using the Playback Control bar on the Main Screen.
Connecting a foot switch or hand controller does not start DSS Player automatically.

63 / 121
3.4 Changing the Auto-start (Device Detector) Setting of DSS Player
After DSS Player has been installed, "Device Detector" automatically starts DSS Player when a
recorder is connected to a USB port on the PC.
To configure DSS Player to not automatically start, perform the following steps.
Procedure
1. Select - [System Preferences] from the menu bar, and click the [DSS Player] icon.
The configuration screen appears.
2. Click [OFF].
Auto-start is disabled.

64 / 121
3.5 Using the Device as a USB Speaker/Microphone
A recorder connected to the PC as a USB audio device can be used as a microphone or speaker.
USB speaker and USB microphone capabilities cannot be used simultaneously.
Using a Recorder as a USB Microphone
Supported recorders can be used as a microphone when making a recording with DSS Player.
Procedure
1. Connect a recorder to the PC.
The Main Screen launches. Opening the [Remote Edit] window automatically enables the recorder to be used as a USB microphone.
Using a Recorder as a USB Speaker.
Supported recorders can be used as a speaker when playing audio files. When specified as a
speaker, other software on the PC also uses the digital recorder as a speaker.
Procedure
1. Connect a recorder to a USB port on the PC.
The Main Screen launches.
2. Select [Switch to Audio mode] from the [Device] menu to switch to Audio mode.
3. Select [Use the recorder speaker] from [Select the audio output] in the [Device]menu.
The USB-connected recorder is used as a speaker.

65 / 121
3.6 Sharing Folders
The Download tray, which stores audio files, can be linked to a shared folder over a network.
Audio files in the Download tray can be shared among the network users.
Shared folders on the network should only be configured by a network administrator.
Procedure
1. Prepare a shared folder on the network.
2. Start DSS Player.
3. Select [Preferences] from the [DSS Player] menu and click the [Select folder] button on the [Download folder] tab.
The [Select folder] dialog box appears.
4. Set the shared folder configured in step 1 as the Download folder.
Multiple users now have access to the same folder over the network.

66 / 121
3.7 Setting DSS Player Preferences
To set DSS Player preferences, perform the following steps.
Procedure
1. Start DSS Player.
2. Select [Preferences] from the [DSS Player] menu.
The General tab on the [Preferences] dialog box appears.
The Preferences screen cannot be used while playing an audio file.
Refer to Preference Settings of DSS Player
3. Click the [OK] button.
Changes are applied to the application and the Preferences screen closes. Clicking the [Cancel] button cancels the changes and exits the screen.

67 / 121
3.8 Upgrading to DSS Player Plus
DSS Player Plus is an upgraded version of the DSS Player software. Purchasing a license key
allows you to easily upgrade DSS Player to DSS Player Plus.
DSS Player Plus Functions
DSS Player Plus adds the following functions.
x Audio files recorded with a recorder can be split at any position in the file.
x Multiple audio files recorded with a recorder can be joined into a single file.
x The method for playing stereo-recorded sound can be selected.
x The menu settings for a recorder can be modified via PC.
Upgrading to DSS Player Plus
To upgrade to DSS Player Plus, perform the following steps.
Procedure
1. Select [Purchase DSS Player Plus] from the [Help] menu.
If the system is connected to the Internet, the Upgrade website opens.
2. Following the steps on the website, purchase an upgrade license.
3. Select [Upgrade to DSS Player Plus] from the [Help] menu.
The [Upgrade to DSS Player Plus] dialog box appears.
4. Type in the license number and click the [OK] button.
5. Restart DSS Player.

68 / 121
DSS Player is successfully upgraded to DSS Player Plus. The name on the application's title bar changes to "DSS Player Plus – Main Window," and the DSS Player Plus-specific functions, such as file splitting, are enabled.

69 / 121
44 Device Management Functions
Functions provided by the device can be managed in DSS Player. These functions are dependent on
the connected device.
The following functions are available.
Renaming a Folder in the Device
Transferring Voice Guidance
Transferring Date and Time
Configuring the Device (DSS Player Plus)

70 / 121
4.1 Renaming a Folder in the Device
Folders on the device displayed in the Device Window can be renamed using the following steps.
When using DSS Player Plus, folders on the device can also be renamed using the recorder's
template.
Refer to Configuring the Device (DSS Player Plus).
Procedure
1. Right-click a drive in the Device Window and select [Rename the folder].
Or select [Rename the folder] from the [File] menu. The folder name field becomes editable.
2. Type in a folder name in accordance with the maximum character count and character type specified for each model, and press the [Enter] key.
The folder name field is changed.
For the maximum number and type of characters that can be entered, refer to the instruction manual for the recorder.

71 / 121
4.2 Transferring Voice Guidance
Voice guidance files in specific languages can be transferred from DSS Player to a recorder with
voice guidance capability, which uses an audio file to inform the user of the operational status
of the recorder.
Transferring Voice Guidance Automatically
To automatically transfer a voice guidance file, perform the following steps based on the
device's settings.
If DSS Player has been installed in a Japanese environment, the Japanese and English voice guidance files are transferred. For a multilingual installation, the English voice guidance file is transferred.
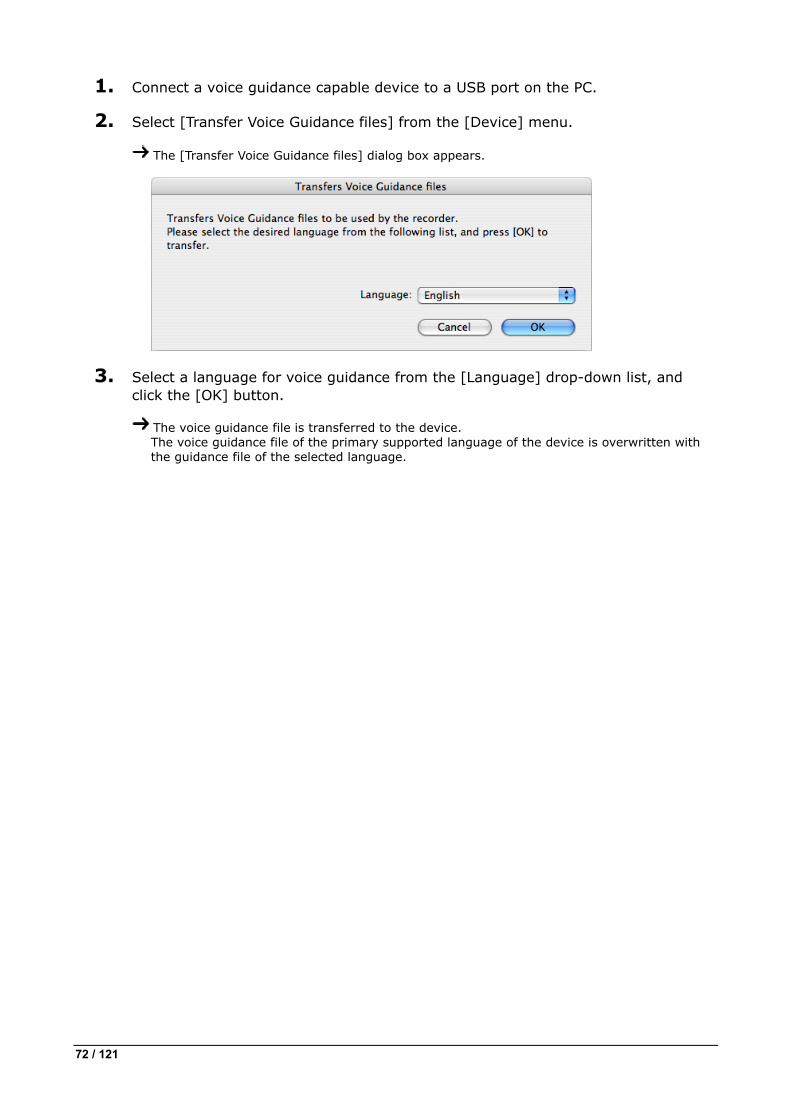
1. Connect a voice guidance capable device to a USB port on the PC.
DSS Player reads the voice guidance ON/OFF setting in the General Voice dialog box. If the voice guidance capability is ON, DSS Player checks the recorder for guidance files immediately after launch of the software, and detection of a device connection. If voice guidance files are missing from the recorder, the [File Transfer] dialog box appears.
2. Click the [OK] button.
One or more voice guidance files are transferred. If a transfer error occurs, an error message is displayed.
Transferring Voice Guidance Manually
To manually transfer a voice guidance file in a desired language, perform the following steps.
Procedure
72 / 121
1. Connect a voice guidance capable device to a USB port on the PC.
2. Select [Transfer Voice Guidance files] from the [Device] menu.
The [Transfer Voice Guidance files] dialog box appears.
3. Select a language for voice guidance from the [Language] drop-down list, and click the [OK] button.
The voice guidance file is transferred to the device. The voice guidance file of the primary supported language of the device is overwritten with the guidance file of the selected language.

73 / 121
4.3 Transferring Date and Time
To transfer date and time data from the PC to a recorder, perform the following steps.
Transferring Automatically
With the following settings configured, date and time data is automatically transferred when the
device is connected to a USB port on the PC.
Procedure
1. Select [Preferences] from the [DSS Player] menu in the menu bar.
The [Preferences] dialog box appears.
2. On the [Connect] tab, check [Set date and time when the device is connected] and click the [OK] button.
Transferring Manually
Date and time data can also be manually transferred from the PC to a recorder.
Procedure
1. Click on the tool bar.
Click [Transfer the date/time] from the [Device] menu. If multiple devices that can receive the date and time data are selected, the device selection dialog box appears.
2. Select a destination device.
The date and time data is transferred to the recorder.
The date and time data cannot be transferred while playing an audio file.

74 / 121
4.4 Configuring the Device (DSS Player Plus)
Device settings can be configured via DSS Player Plus.
See the Devices with Device Configuration Support.
Procedure
1. Connect a recorder to the USB port on the PC.
2. Select [Device Setting] from the [Device] menu.
The [Device Setting] dialog box appears. (The screen image below is for the DS-7000). The functions displayed in gray on the screen are unavailable with the connected recorder.
Device name (user ID)
Displays the device type and user ID.
Settings menu
Displays available settings in tree form.
Setting details
Displays details of the item selected in (2).
Reset button
Clicking this button resets the device settings.
Cancel button

75 / 121
Clicking this button closes the screen without saving changes.
OK button
Clicking this button updates the device settings.
3. Select an item from the [Settings] menu on the left to switch the individual settings screen.
4. Edit items as needed.
For information on each setting, refer to the instruction manual for the recorder.
5. Click the [OK] button.
Configured information is transferred to the recorder.
Clicking the [Reset] button resets the recorder to its default settings. Clicking the [Cancel] button closes the screen without saving changes.

76 / 121
4.4.1 Devices with Device Configuration Support
Devices that can be configured via DSS Player Plus are listed below. This section describes the
configuration of DS-7000/3500.
DS-7000
DS-5500
DS-5000
DS-3500
DS-3400
DS-2800
DS-2500
DS-2400

77 / 121
4.4.2 Device Configuration for DS-7000/3500
This section explains DS-7000/3500 setting items and functions.
Common Settings
General
Recording
Display
Administrative Settings
General
Display
Device Security
Author List
Worktype List
Device Folders
Recording
Programmable Buttons
Hands Free
Common Settings
General
Items Functions Beep Sound Selects beep ON/OFF.
Power Save Selects power saving time.
USB Class Selects composite mode or storage mode as the USB
connection mode.
Switches the card being accessed. Card Select
Disable SD Card Slot Selecting this check box disabled SD Card Slot
operation so it is no longer recognized from the
PC.
Cue/Review
Settings(Sound)
Selects whether or not to play sound while fast-
forwarding or rewinding during play back.
Cue/Review
Settings(Speed)
Sets the Cue/Review speed. Move the indicator to
the left or right to decrease or increase the
speed respectively.
Recording
Items Functions Recording Mode Selects the recording mode.

78 / 121
Microphone Sensitivity Selects microphone sensitivity.
VCVA Mode Selects VCVA mode (voice-activated recording)
ON/OFF.
Display
Items Functions Backlight –
Lighting Time
Specifies the backlight illumination time when the
device is operated.
Backlight –
Dim light time
Specifies the dim backlight time after the
“Lighting Time” elapses. When the dim light mode is entered while “Always ON” is selected, the backlight will remain lit in the dim light mode until the next device
operation.
Backlight –
Brightness
Specifies backlight brightness.
A larger value indicates a higher level of
backlight brightness.
LED Mode Selects LED ON/OFF.
Date Format Specifies the date display format.
Clock Format Specifies either 12-hour or 24-hour time display
format.
Language Switches the device display language.

79 / 121
Administrative Settings
General
Items Functions
Disable Erase button When this option is enabled, a file cannot be
deleted by pressing the device [ERASE] button.
Disable Menu button When this option is enabled, the menu screen is
not displayed when the device [MENU] button is
pressed.
Accessibility
Disable Rewind button When this option is enabled, rewind is not
performed when the device [Rewind] (|◀◀) button
is pressed.
Splash Message Configures settings for the splash messages
displayed when the device is turned on.
If you enter text with “Custom” enabled, the entered text will appear when the power is
switched on. Up to 32 characters can be
entered. Both capital and lower-case letters
are recognized.
Slide Switch Guide When [ON] is selected, the slider switch button
is positioned on the right side of the LCD.
* DS-7000 only
Main Button Guide When [ON] is selected, the main button
allocation is displayed on the right side of
the LCD.
* DS-3500 only
Error Sounds a beep when an error occurs.
Pre-end Sounds a beep when remaining recordable time
runs low. An alarm sounds when remaining
recordable time reaches 60 seconds, 30 seconds,
and 10 seconds.
Notification After password validation is successful, a beep
sounds if remaining battery power is low or to
notify the user of certain other important
operations or events.
Button Operation Sounds a beep whenever a device button
operation is performed.
Alarm
Recording Start/Stop Sounds a beep whenever recording is started or
stopped.

80 / 121
Display
Items Functions Upper Area Selects the contents displayed in the top
information display area.
Middle Area Selects the contents displayed in the middle
information display area.
Lower Area Selects the contents displayed in the lower
information display area.

81 / 121
Device Security
Items Functions PIN code To enable Security, click the [PIN Code change]
button then enter the PIN code.
Enable Device Lock function to prevent unauthorized access to the device This option can be enabled only when a PIN code
setting is configured. When it is enabled, the
following two items can be set.
Prompt for device PIN code to authenticate user Select the device lock timing from [At power-
on] or [At power-on and wake-up from stand-by].
Device Lock
Limit the maximum number of device access attempts to Specifies how many unsuccessful consecutive PIN
code authentication attempts are allowed before
the device locks up.
Author List
Items Functions Author List A maximum of 10 authors can be registered.
The checked author is set as the default
author.
Author Selection Prompt for Author ID at Power-on. With this enabled, the Author List is displayed
when the device is turned on. (However, if only
one has been registered, it is not displayed.)
Worktype List
Items Functions Worktype List A maximum of 20 worktypes of work can be
registered.
The checked worktype is set as the default
worktype.
Worktype Selection Prompt for Worktype ID on new recordings. With this enabled, Worktype List is shown when
new recording is performed so that you can
select the Worktype to be set in a dictation
file. However, if only one has been registered,
it is not displayed.
Device Folders
Items Functions Folder Property(General)
Enabled Enables/disables folders.

82 / 121
Folder Name You can input up to 16 single-byte alphanumeric
English characters for a folder name.
Worktype Specifies the Worktype specified for dictation
files recorded to this folder.
Specifying a Worktype here always uses the
Worktype specified for the folder without
displaying the Worktype List, even if “Prompt for Worktype ID on new recordings.” is enabled for “Worktype selection” on the [Worktype] screen.
Auto Lock Specifies whether dictation files recorded to
the folder should be locked.
Encryption Specifies whether dictation files recorded to
the folder should be encrypted. This setting
can be configured when the folder is enabled,
and “DSS Pro” is selected for the “DSS Format” setting on the [Administrative Settings] -
[Recording] screen. “DSS Classic” encryption is not supported by the device.
Selections Description
No Do not encrypt.
Standard Encrypt using a 128-bit key.
High Encrypt using a 256-bit key.
Folder
Property(Security)
Password Specifies the password to be used for
encryption. Click the button in the setting
field, and use the displayed Encryption
Password dialog box to make the setting. Enter
a password in the [Password] and [Confirm
Password] fields using 4 to 16 one-byte
alphanumeric characters.
The password is the same as the password for
the [Encryption] Standard mode and High mode.
An encryption key, suitable for the specified
encryption mode, is generated from the
password, with a key length that is in
accordance with the encryption mode set within
the program.
Recording
Items Functions

83 / 121
DSS Format Selects the DSS recording format.
The default recording format for DSS Classic is
DSS.
The default recording format for DSS Pro is
DS2.
When DSS Classic mode is switched from “DSSPro”, the following items are checked:
• If the recording format is set to QP, it is changed
to SP, and QP is prevented from being selected.
=>[Common Settings] – [Recording]• The Encryption attribute is set to “NO” and is
prevented from being modified.
=>[Administrative Settings] – [Device Folders]Record Function Selects the recording operation.
File download Specifies a file to be downloaded.
Programmable Buttons
Items Functions New and Slide Switch
Functions
Selects Type A, Type B, or Type C as the
functions assigned to each position of the
slide switch and the buttons above the slide
switch.
* DS-7000 only
Main Button Functions Selects either Type A or Type B as the function
assigned to the main switch button.
* DS-3500 only
Programmable Buttons Customizes the functions that are assigned to
the function buttons [F1], [F2], and [F3] on
the device.
Rec Mode Selects whether or not the REC button must be
held down to record.
* DS-3500 only

84 / 121
Hands Free
Items Functions Operation Settings Selects hands free operations.
Device Settings Selects how to use the foot pedal or hand
controller and the functions to be assigned to
their switches.

85 / 121
55 Troubleshooting
This section describes common problems with DSS Player and their solutions.
No Audio Output during Playback
Don't Know How to Check the Playback Volume
The Recorder Doesn’t Appear on the Device Window
Problems with Other Devices
Music Files Cannot Be Copied to a Recorder

86 / 121
5.1 No Audio Output during Playback
If the system does not output any sound when playing an audio file, perform the following steps.
Procedure
1. Check the Connections
Make sure that devices are properly connected to the PC and that they are all powered on.
2. Check the Speakers
Make sure that the speaker volume is not set too low. Increase the speaker volume and proceed to the next step.
3. Check the Sound Device
Select - [System Preferences] click the [Sound] and [Output] icons successively, and make sure of the following: ・ The sound board is functional. ・ The main volume is not set to the minimum level.
5.2 Don't Know How to Check the Playback Volume
Follow the procedures described below.
1. Check the Sound Device
Select - [System Preferences] click the Sound and Output icons successively, and make sure the of following: ・ The sound board is functional. ・ The main volume is not set to the minimum level.

87 / 121
5.3 The Recorder Doesn’t Appear on the Device Window
Follow the procedures described below to find the problem.
Procedure
1. Disconnect the USB cable from the recorder.
2. Select a submenu from the recorder menu, and select [Storage Class] from the USB Class menu.
The recorder is recognized, and the Device Window shows the model of the recorder and file information.
3. Make sure that the recorder is not in inactive mode and that the Hold switch is not turned on.
4. Connect the USB cable to the recorder again, and verify that the LCD panel displays "Storage class device connected to PC."
The recorder is recognized, and the Device Window shows the model of the recorder and file information.
If the LCD panel still does not display "Storage class device connected to PC" even after step 4, the communication driver may be malfunctioning. Refer to Problems with the Communication Driver.
5.4 Problems with Other Devices
For information on problems with devices other than recorders, such as a PCMCIA card or
removable drive, refer to the instruction manual for that device.

88 / 121
5.5 Music Files Cannot Be Copied to a Recorder
Your usage could be in violation of copyright restrictions. Confirm the following items:
x DRM-protected WMA files cannot be used with DSS Player.
x DRM-protected WMA files purchased from sources such as music distribution services cannot be
played or transferred without first being licensed. Verify that a license file is stored for DRM-protected
files. For more information on license files, please contact your music distributor.
x WMA files purchased from sources such as music distribution services can be copied to only one
portable device or memory card. You may not copy a WMA file to a new device if it has already been
copied to another portable device.

89 / 121
66 Appendix
This section provides detailed information on menu lists and displayed item lists. Refer to the
tables as needed.
Menu Lists
Audio List Window Display Columns
File Properties
DSS Player Preference Settings
Component Names and Functions
Device Functions
Glossary

90 / 121
6.1 Menu Lists
This section provides menu-by-menu descriptions of the command functions available in the menu
bar.
DSS Player Menu
File Menu
Edit Menu
Display Menu
Play Menu
Device Menu
Help Menu
6.1.1 DSS Player Menu
The DSS Player menu in the menu bar provides the following commands.
Command Names Shortcut Keys Buttons Functions
About DSS Player - - Displays the version
information and serial number
of DSS Player.
Preferences Command+. - Sets the downloading and
connection conditions for DSS
Player.
Quit DSS Player - - Exits DSS Player.
Other commands are standard Mac commands. Refer to Mac User manuals for more information.

91 / 121
6.1.2 File Menu
The File menu in the menu bar provides the following commands.
Command Names Shortcut Keys Buttons Functions
New Command+N Opens the Direct Recording
Screen and creates a new audio
file (DSS file).
Edit Command+O Opens the Direct Recording
Screen, which is used to edit
files selected in the Audio List Window.
Convert to AIFF file
- Converts a specified file into
an AIFF file and saves it in a
specified folder. The file name
format of the resulting AIFF
file is "original file name
+ .AIF".
Import File - - Copies or moves a specified
file to one of Folders A-G.
Export File - - Copies files selected in the
Audio List window to any
specified folder. After the
folder browsing dialog box
opens, the destination folder
is specified. This function is
used to back up files.
Split Shift + Command+S
Splits a file selected in the
Audio List window.
(This function is only
available in DSS Player Plus.)
Join Shift + Command+J
Joins multiple files selected
in the Audio List window. (This
function is only available in
DSS Player Plus.)
Create a folder
Shift + Command+N
- Creates a subfolder in the
folder selected in the Audio File window.
Delete the folder
- - Deletes all subfolders and
files in a selected folder.
Rename the folder
- - Renames a folder or subfolder
selected in the Audio File window, or a recorder folder
selected in the Device window.
Edit Comment
- - Edits comments on DSS files. Up
to 100 one-byte characters or
50 two-byte characters can be
entered.
Properties Command+I - Displays information on a file
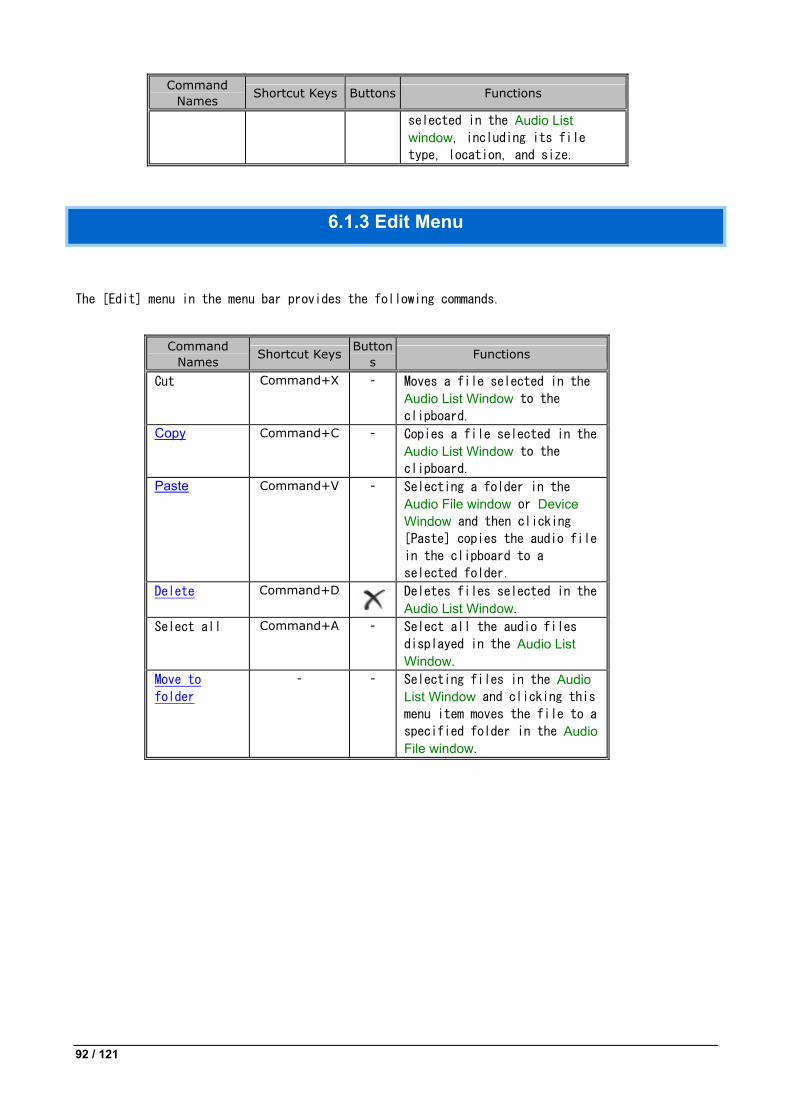
92 / 121
Command Names Shortcut Keys Buttons Functions
selected in the Audio List window, including its file
type, location, and size.
6.1.3 Edit Menu
The [Edit] menu in the menu bar provides the following commands.
Command
Names Shortcut Keys Buttons Functions
Cut Command+X - Moves a file selected in the
Audio List Window to the
clipboard.
Copy Command+C - Copies a file selected in the
Audio List Window to the
clipboard.
Paste Command+V - Selecting a folder in the
Audio File window or Device Window and then clicking
[Paste] copies the audio file
in the clipboard to a
selected folder.
Delete Command+D
Deletes files selected in the
Audio List Window.
Select all Command+A - Select all the audio files
displayed in the Audio List Window.
Move to
folder
- - Selecting files in the Audio List Window and clicking this
menu item moves the file to a
specified folder in the Audio File window.

93 / 121
6.1.4 Display Menu
The [Display] menu in the menu bar provides the following commands.
Command Names Shortcut Keys Buttons Functions
Switch to the
Playback
Control Window
- - Selecting a file in the Audio List window and then clicking
this menu item switches the
screen to the Playback Control screen.
Hide the tool
bar
- - Clicking this menu item hides
the tool bar.
Hide the
status bar
- - Clicking this menu item hides
the status bar.
Hide the
Playback
Control Bar
- - Clicking this menu item hides
the Playback Control bar.
Show the grid - - Clicking this menu item
displays ruled lines on the
Audio List window.
Current view -
Selects file types to display
in the Audio List window from
the five audio file formats
supported by DSS Player (DSS /
DS2 (DSS Pro) / WMA / AIFF /
MP3 / WAV).
Colums to
display
- - Edits columns to display on
the header bar in the Audio List window.
Sort by - - The columns on the header bar
in the Audio List window are
displayed as menu items. Files
are sorted in the order of
checked columns.
Refresh Command+R
- Retrieves information on files
in a selected folder and
updates the display of the
Audio List window.

94 / 121
6.1.5 Play Menu
The [Play] menu in the menu bar provides the following commands.
Command
Names Shortcut Keys Buttons Functions
Play Command+P
Plays a selected file or the first file in the Audio List Window if none is selected from the Position control point on the Play bar.
Stop Command+S
Clicking this menu item, during a playback stops playback.
FF Command+F
Fast-forwards a file. Hold this button to speed up fast-forwarding.
REW Command+B
Rewinds a file. Hold this button to speed up rewinding.
Next Index
mark
Command+→
The Position control moves to the next index marked position.
Prev. Index
mark
Command+←
The Position control moves to the previous index marked position.
Next Verbal
Comment
Shift+ Command+
→ The Position control moves to the start or end of the next verbal comment.
Prev. Verbal
Comment
Shift+ Command+
← The Position control moves to the start or end of the previous verbal comment.
Noise
Cancellation
-
Set the level of noise cancellation to 0, 1, 2, or 3. The larger the number, the higher the noise cancellation effect.
Channel - - Selects a channel for audio playback. Stereo- Plays audio file with stereophonic sound. (This function is available only in DSS Player Plus.) Monaural- Plays audio file with monophonic sound. Play left channel only: Plays only the left track of a stereophonic sound file. Play right channel only: Plays only the right track of a stereophonic sound file.
Auto Short-
Rewind
- - When is clicked, moves the Position control back by a specified amount of time, and stops playback. The time can be selected from 0.0, 0.3, 0.5, 1.0, 2.0, 2.5, 3.0, 4.0, and 5.0 seconds.
Insert index
mark
Command+J
Inserts an index mark at the Position control point for a selected file. The maximum number of settable index marks is 16 for a DSS file and 32 for a DSS Pro file.
Delete index
mark
Shift+ Command+J
Deletes an index mark.
List of
index marks
- - The View All Index Marks dialog box appears.
Intro Scan Command+H
Sequentially plays only the first 5 seconds of the files selected or displayed in the Audio List window.

95 / 121
6.1.6 Device Menu
The [Device] menu in the menu bar provides the following commands.
Command Names Shortcut Keys Buttons Functions Download Folder
A-G
Shift +
Command + A-G
-
Downloads all files in Folders A-G
from the devices displayed in the
Device Window (recorder, PCMCIA
card, or removable drive) into the
corresponding Folders A-G in the
Download tray on the Audio File window.
Download the
selected file(s)
-
- Downloads only selected files into
the Download tray on the Audio File window.
Download All Shift +
Command+M
Downloads all files from the
devices displayed in the Device Window into the corresponding
Folders A-G in the Download tray.
Files in the device that have no
folder are downloaded into Folder
A.
Upload Shift +
Command+U
Uploads the files selected in the
Audio List window onto the device
displayed in the Device Window.
Select the
Speaker
-
-
Allows selection between the
speaker supplied with the PC or
the one provided by a connected
digital voice recorder during
playback.
Switch to
audio/storage
mode
-
- Clicking this menu item switches a
connected device to Audio or
Storage mode.
Transfer the
date/time
-
Transfers the date and time data
from the PC to a device.
Device Setting -
- With this menu item, the functions
of a connected device can be
configured using a PC.
Transfer Voice
Guidance files
- -
Transfers voice guidance files.

96 / 121
6.1.7 Help Menu
The [Help] menu in the menu bar provides the following commands.
Command Names Shortcut Keys Buttons Functions
DSS Player Help Command+? - Displays the DSS Player help files.
Purchase DSS
Player Plus
- - Links to the website where you can purchase an upgrade license. (This menu item is hidden in DSS Player Plus.)
Upgrade to DSS
Player Plus
- Displays the upgrade license entry box. This menu item is not displayed after the upgrade is complete. (It is hidden in DSS
Player Plus.)

97 / 121
6.2 Audio List Window Display Columns
This section describes the columns displayed on the Audio List window.
Dictation Folder Display Columns
Music Folder Display Columns
6.2.1 Dictation Folder Display Columns
The following columns can be displayed in the Dictation folder. Actual displayed columns are set
by selecting [Display] menu [Columns to Display] and [Dictation Folder] successively from the
menu bar.
*Table contents need to be confirmed*
Items DSS/DSS Pro files WMA files *1
WMA/WAV/AIFF/MP3 files Default Setting
File Name The file name.
An icon indicating the file
type is displayed before the
file name.
The file name.
An icon indicating the
file type is displayed
before the file name.
Always displayed
Created Date The date and time when the
file was created.
The date and time when
the file was created.
Recording
Finished Date
The date and time when the
file transfer was completed.
Same as the Created Date.
Recording Length The recording length of a
file.
The recording length of a
file.
Priority The priority level can be set
to a number from 1 to 15,
which reflects user-defined
priority.
Disabled
Comment Comment entered with Edit
Comment.
Disabled
Status The editing status of a file.
(Pending or Complete).
Disabled
User ID The user ID of a file. The user ID of a file. Recording mode DSS files
LP/SP/QP
WMA files *1
LP/SP/HQ/XQ/Stereo
LP/Stereo HQ/Stereo XQ
The sampling frequency,
(stereo or mono)
File types DSS, DSS Pro WMA, WAV, MP3, AIFF Work Type The work type set on a
recorder.
Unsupported

98 / 121
Transfer Date The date and time when the
file was downloaded to DSS
Player.
Same as the Created Date.
: Shown by default, : Hidden by default
*1: Only WMA files recorded with an Olympus recorder are supported.
6.2.2 Music Folder Display Columns
The following columns are displayed for the Music folder.
Items Description Default Setting
Title Displays the title. Always displayed
Artist Displays the artist name. Album Displays the album name. Genre Displays the genre. Length Displays the recording time length. File name. Displays the file name. Track No. Displays the track. Bit-rate Displays the bit-rate. Protection Displays the protection status.
: Shown by default, : Hidden by default

99 / 121
6.3 File Properties
This section describes the properties displayed in the File Properties dialog box.
Refer to Modifying the Properties of a file.
General Tab
Details Tab
6.3.1 General Tab
The General tab provided by [Properties] in the [File] menu displays the following items.
Items Editing Description
File Name OK File name input field.
File Type NO Displays the file type and
sound quality.
File Path NO Displays the file location.
Clicking "…" opens the Finder
and allows the user to change
the location of the file.
Size NO Displays the file size.
Recording Length NO Displays the recording
length.
Created Date NO Displays the date and time
the file was created.
Finished Date NO Displays the date and time
the file editing was
finished.
Transfer Date NO Displays the date and time
when the file was transferred
to DSS Player.
Comment OK Comment input field. Up to
100 one-byte characters can
be entered.
Attribute : Locked OK Checking this option protects
the file from deletion. When
attempting to delete a
protected file, you are
prompted for confirmation.
Attribute : Priority OK Checking this option sets the
file to high priority. The
file is displayed in red in

100 / 121
Items Editing Description the Device window and the
symbol appears on the
Playback Control bar.
6.3.2 Details Tab
The Details tab under[Properties] in the [File] menu displays the following items.
Items Editing Description
DSS License NO Displays the DSS license.
Job No NO Displays the Job number.
User ID OK Displays the user ID configured
in the recorder. Up to 16
numeric characters, alphabetic
upper-case characters, and
underscore can be entered.
Work Type ID OK Classifies audio files.
Audio Quality NO Displays the audio quality.
Priority Level OK Specifies the priority level for
the file. Priority can be set
from 1 to 15.
The number of indexes NO Displays the number of indexes
inserted into the file.
Transcribe Status NO Displays the status of
documentation.
File Status NO Displays the status of the file.

101 / 121
6.4 DSS Player Preference Settings
DSS Player Preference Settings
6.4.1 DSS Player Preference Settings
Selecting [Preferences] from the [DSS Player] menu in the menu bar displays the following items.
Preference Settings
General Tab
Password The field for the default password, which is used
when playing encrypted files (DSS Pro format). With
this item selected, the password entry dialog box
does not appear when an encrypted file is opened.
Passwords can contain 4 to 16 one-byte alphanumeric
characters excluding the following: \ / * ? “ < > Confirm password This field becomes editable when characters are typed
in the Password field. For confirmation, type in the
same string as the password above.
Set date/time With this option checked, the date and time data on
the PC is automatically transferred to the recorder
on connection.
Size of Tool bar
icons
The size of icons on the tool bar can be set to big
or small.
File Conversion You can also select the audio format when converting
DSS/DSS Pro files to AIFF files.
Download Tab Delete With this option checked, audio files on the device
are deleted when the file has been downloaded from
the device to the PC.
Convert to AIFF file With this option checked, an AIFF file is created in
the same folder as the original file when it is
downloaded from the device to the PC. If an AIFF file
with the same name already exists in the folder, "_1"
is appended to the name of the newly created AIFF
file.
Download Tray Folder Sets the location of each folder in the Download
tray. If the folder location is changed, the files
downloaded before the change remain in their original
place.
Folder aliases (custom folders) can be added to
Dictation folder.
Auto Download With this option checked, all audio files on the

102 / 121
device are downloaded automatically when DSS Player
detects the device. If a file with the same name
already exists in the Download tray, the file is not
downloaded.

103 / 121
Recording Tab Audio format The recording file format can be set from the
following options:
DSS 12kHz SP
DSS Pro 12kHz Mono
DSS Pro 16kHz Mono
Voice comment For DSS Pro format files, checking this option
enables verbal comments to be recorded in the Direct
Recording Screen.
Record button Sets the preferences for the Record button. With this
option checked, recording continues while the button
is being held down, and stops when it is released. If
unchecked, pressing the button once starts the
recording and pressing it once more stops it.
104 / 121
6.5 Component Names and Functions
This section describes the names and functions of the components of DSS Player.
Main Screen
Playback Control Screen
Direct Recording Screen
Audio File Window (Main Screen)
Device Window (Main Screen)
Audio List Window (Main Screen)

105 / 121
Main Screen
This section describes the names and functions of the Main screen components. The boundaries
between the Audio File window, Device window, and Audio List window can be adjusted.
Tool bar
Displays the tool bar buttons. Available icons vary depending on the
status of the connection with the device and the selected files.
Playback Control bar
Used to play a file selected in the Audio List window. It can be
operated in a way similar to the Playback Control screen.
Audio File window
Displays folders on the PC that contain audio files managed by DSS
Player, including files downloaded from a recorder or device and
files recorded with DSS Player.
Device window
Displays the folders on a connected device or card. Selecting a
folder displays audio files in the folder in the Audio List window.
Audio List window
Displays detailed information on audio files in the folder selected
in the Audio File window or Device window.
Status bar
Displays the recording volume (only during recording), current status
(during playback, recording, and inactivity period), ID of the
connected recorder, and the number of files in a selected folder.

106 / 121
Playback Control Screen
This section describes the names and functions of the Playback Control screen.
Play bar and Position control
Graphically displays which part of the current file is being played.
Priority switch
Clicking this icon changes the priority of the file. A red mark means that
the file is assigned high priority. In the Audio List window, information on
the file is displayed in red.
Verbal comments
The verbal comment sections of an audio file are displayed in light blue.
Index marks
Clicking inserts an index mark at the Position control point. Up to 16
index marks can be inserted into a DSS file.
Operation buttons
Pressing these buttons moves the Playback Position control.
: Moves to the beginning of the file.
: Moves to the previous index mark or to the start (or end) of a
verbal comment.
: Rewinds the file. Holding down the button speeds up rewinding.
/ :Starts playback. Press this button again during
playback to stop.
: Fast-forwards the file. Holding down the button speeds up fast-
forwarding.
: Moves to the next index mark or to the start (or end) of a verbal
comment.
: Moves to the end of the file.
Playback position/Recording Recording length
The playback position of a file is displayed in blue, and the total
recording length is displayed in white. The time format is HH:MM:SS.

107 / 121
Timescale control
Displays the timescale of the Play bar. When playing a file, the time frame
can be changed from a minimum width of 1-minute to full scale. Clicking or
changes the timescale.
Volume Adjustment control
Allows the adjustment of output sound volume. This function is not available
with older model sound boards that do not have the electronic volume
adjustment capability. In that case, adjust the volume manually.
Audio output display
Displays the current audio playback status. In the case of a monaural
recording, the L and R outputs are displayed as the same height.
Playback Speed Adjustment control
Clicking and or dragging the slider can adjust the playback speed without changing the voice pitch (sound pitch).
Noise Cancellation control
Clicking and or dragging the slider adjusts the noise cancellation
effect to one of four levels: 0, 1, 2, and 3.
Tone Adjustment control
Clicking and or dragging the slider adjusts the tone in increments of
1% from 100% on the B {bass} side to 100% on the T {treble} side.

108 / 121
Direct Recording Screen
The Direct recording component names and functions are described here.
Tool bar
Displays the tool bar buttons used in the Direct Recording screen.
Play bar and Position control
Graphically displays which part of the current file is being played.
Operation buttons
Pressing these buttons moves the Playback Position control.
: Moves to the beginning of a file.
: Starts recording.
: Records a verbal comment when held down.
: Moves to the previous index mark or to the start (or end) of a
verbal comment.
: Rewinds the file. Holding down the button speeds up rewinding.
/ : Starts playback. Press this button again during
playback to stop.
: Fast-forwards the file. Hold down the button to speed up fast-
forwarding.
: Moves to the next index mark or to the start (or end) of a verbal
comment.
: Moves to the end of the file.
Status bar
Displays the volume, status, and user ID of the recorded sound.
Priority switch
Clicking this icon switches the priority on or off. A red mark means that the
file is marked high priority. Information on the file is displayed in red in
the Audio List window.
/ Recording Mode switch
Selects Insert or Overwrite recording mode.

109 / 121
/ Microphone Sensitivity switch
Selects Conference or Dictation mode.
Verbal comments
The verbal comment parts of an audio file are displayed in light blue.
Index marks
Clicking inserts an index mark at the Position control point. Up to 16
index marks can be inserted into a DSS file and up to 32 index marks can be
inserted into a DSS Pro file.
Playback position/Recording time length
The playback position of the file is displayed in blue, and the total
recording length is displayed in white. The time format is HH:MM:SS.
Timescale control
Displays the timescale of the Play bar. When playing a file, the timescale can
be changed from a minimum width of 1-minute to full scale. Clicking or
changes the timescale. (During recording, it is fixed to 1 minute.)
Volume Adjustment control
Adjusts the output sound volume. This function is not available when using an
older model sound board that does not have the electronic volume adjustment
capability. In that case, adjust the volume manually.
Audio output display
Displays the current audio playback status. In the case of a monaural
recording, the L and R outputs are displayed as the same height.
Playback Speed Adjustment control
Clicking and or dragging the slider adjusts the playback speed without
changing the voice pitch (sound pitch).
Noise Cancellation control
Clicking and or dragging the slider adjusts the noise cancellation
effect to one of four levels: 0, 1, 2, and 3.
Tone Adjustment control
Clicking and or dragging the slider adjusts the tone in increments of
1% from 100% on the B {bass} side to 100% on the T {treble} side.

110 / 121
Audio File Window (Main Screen)
The Audio File window on the Main screen displays the folder structure expanded from the
Dictation folder.
Dictation folder
This is the root folder.
Selecting [Create Folder] from the context menu creates a
folder in the Dictation folder.
Download tray
Files downloaded from recorders or recording media are managed
in this folder. Subfolders cannot be created in the Download
tray.
Folders A-G
These folders store downloaded files. Folders A-G can be
renamed but cannot be deleted. Subfolders can be created and
renamed in Folders A-G.
Subfolders
Subfolders can be created in the Dictation folder or Folders
A-G. Subfolders can also be created in an existing subfolder.
They can be renamed and deleted freely.
Files can be dragged and dropped from other folders into a
subfolder.
Dictation tray
This folder stores audio files created and edited in the
Direct Recording screen. The files edited in the Direct
Recording screen are always stored in the Dictation tray.
The Dictation tray cannot be deleted.

111 / 121
Device Window (Main Screen)
This window lists the devices currently connected to the USB ports on the PC, and audio files
and folders on the devices. Displayed contents vary depending on which models of devices are
used.
When connecting or disconnecting an Olympus IC recorder, a PCMCIA card adapter with a memory
card containing the folders for Olympus an IC recorder, or a USB reader/writer, the names of
these devices are displayed in the Device window.
Device Manager
This is the main folder.
Devices
Device names (user IDs) are displayed.
Folders A-G
The number of folders varies depending on the type and model
of the device. Folders A-G can be renamed, but cannot be
deleted
Music folder
Music files on a device are displayed here.

112 / 121
Audio List Window (Main Screen)
The Audio List window displays information on DSS/DSS Pro/WAVE/WMA/MP3 files in the folder
selected in the Audio File window or Device window.
When the Music folder on a device is selected, detailed information on music files in the folder
are listed (up to the second tier under the Music folder).
Columns to Display
Dragging and dropping the columns to change their display
order.
Displayed file types
Clicking or selecting [Current view] from the [Display]
menu changes the displayed file types.

113 / 121
6.6 Device Functions
This section lists the functions of devices.
Functional Support of Recorders for DSS Player
Functional Support of Recorders for DSS Player
Some devices have limitations on DSS Player functions. The following table summarizes the
functional support for DSS Player by device model.
: Supported, * : Partially supported, : Unsupported
Dictation folder Download/Upload : Supported file types are listed.
Functions Models
Direct Recording (Creating a new file)
Direct Recording
(Mic sensitivity control)
Dictation folder
Download
Dictation folder Upload
Device Menu
setting
DS-7000 DSS, DSS Pro DSS, DSS Pro DS-5500 DSS, DSS Pro DSS, DSS Pro DS-5000 DSS, DSS Pro DSS, DSS Pro *
DS-3500 DSS, DSS Pro, WAV, MP3
DSS, DSS Pro, WAV, MP3
DS-3400 DSS, DSS Pro DSS, DSS Pro *
DS-2500 DSS Pro DSS, DSS Pro DS-2800 DSS Pro DSS, DSS Pro *
DS-2400 DSS Pro DSS, DSS Pro *

114 / 121
6.7 Glossary
Composite Mode
Composite mode enables a connected device to be used as a microphone, speaker, or HID (Human-
Interface Device). The DS-7000/3500/2500/ 5000/3400/2400 can also serve as a storage device in
Composite mode.
Direct Recording
A recording method that records audio data directly onto the hard disks of a PC connected to a
Direct Recording device. The Olympus devices that support this function include recorders that can
be used as microphone devices, as well as the DR-2100/1200/2200/2300.
DRM
This stands for Digital Rights Management. It is a general term for the technologies that protect the
copyrights of digitally created contents and regulate the use and replication of them. To play a
music file protected with DRM or copy it to a portable device, a "license file", which is provided by
the author or distributor of the file, needs to be obtained. DSS Player cannot play DRM-protected
WMA files.
DSS
An audio file format using DSS (Digital Speech Standard), an audio compression technology jointly
developed by OLYMPUS and two other companies. This technology can downsize data, placing less
stress on the users when they try to open a file. All of Olympus recorder models support DSS. The
file name format is "XXX.DSS".
DSS Pro
An audio file format enhanced from the DSS standard. The file name format is "XXX.DS2". Key
differences from the DSS standard include the QP (Quality Play) mode for high-grade recording, an
increase from 16 to 32 in the number of settable index marks, and the support for audio file
encryption. It also supports verbal comments.
MP3
An MPEG-1-based audio compression method. Like other major audio compression technologies, it
uses a lossy compression method that achieves a high compression rate by removing less audible
portions of data. Only MP3 playback is supported by DSS Player.
Noise Cancellation
An operation that reduces noise output by extracting and filtering out noise components from an
audio file.

115 / 121
Priority
This is represented by 16 priority levels from 0 to 15, and allows the user to prioritize dictations.
Storage Mode
Storage mode enables a recorder’s memory or memory card to be used as a regular removable
drive when the device is connected to the PC via USB.
Verbal comments
A verbal comment gives the typist instructions via dictation. It is recorded with a start and end
position in an audio file, and is displayed separately from the main recording body of the file. A
verbal comment recording is combined with the main recording body as a single file.
WAV
A standard audio file format for Windows. It is also referred to as the WAVE format. The
specifications include the saving format for recording a digitally converted audio signal.
WMA
A standard audio format for Windows. This technology is a component of Windows Media, a
multimedia technology incorporated into Windows, and a standard audio compression technique.

116 / 121
77 Index
Add-on USB port
Administrator privileges
<AIFF>
Conversion to AIFF (menu) Conversion to AIFF
Conversion to AIFF file
Audio class connected with PC
Auto Short-Rewind (menu) Auto Short-Rewind
<Channel>
Channel (menu) Channel
Channel switching
<Comment>
Edit Comment (menu) Edit Comment
Edit Comment dialog box
Conference mode
Copy (menu) Copy
Copyright restriction
Create a new folder dialog box
Current view (menu) Current view
Cut (menu)
Delete (menu) Delete
<Device>
Device menu
Device settings (menu) Device settings
Device Detector
Dictation mode
Digital microphone
Digital voice recorder
Direct Recording Direct Recording (Glossary)
Direct Recording screen
RecMic
<Display>
Columns to display (menu) Columns to display
Columns to display dialog box
Display menu
<Download>
Download

117 / 121
Download All (menu) Download All
Download All (menu) Download All
Download the selected file(s) (menu) Download the selected file(s)
Download the selected files (menu) Download the selected files
<DSS Player>
About DSS Player (menu)
DSS Player Menu
Quit DSS Player
<DSS Player Plus>
Purchase DSS Player Plus
Upgrade to DSS Player Plus (menu) Upgrade to DSS Player Plus
<Edit>
Edit (menu) Edit
Edit menu
Encrypted file
Export File (menu) Export
FF (menu) Fast forward
<File>
Edit files (menu) Edit Files
Encrypted files
File menu
File Properties dialog box
File Split dialog box
File Transfer dialog box
Join Files dialog box
Music files
<Folder>
Create a folder (menu) Create a folder
Create a new folder dialog box
Delete a folder (menu) Delete a folder
Download Folders A-G (menu) Download Folders A-G
Move to folder (menu) Move to folder
Rename a folder (menu) Rename a folder
Select folder dialog box
<Foot switch>
Foot switch
Operating with a Foot Switch
General-Voice dialog box
Help menu
Hide the status bar (menu) Hide the status bar

118 / 121
Hide the tool bar (menu) Hide the tool bar
Import File (menu) Import
<Index mark>
Delete index mark (menu) Delete index mark
Index mark
Insert index mark (menu) Insert index mark
List of index marks (menu) List of index marks List of index marks
Next Index mark (menu) Next Index mark
Prev. Index mark (menu) Prev. Index mark
View All Index Marks dialog box
Insert recording
Intro Scan (menu) Intro Scan
Join (menu) Join
License
Main screen
Music file
Music folder
New (menu) New
Next Index mark (menu) Next Index mark
Next Verbal Comment (menu) Next Verbal Comment
<Noise Cancellation>
Noise Cancellation (menu) Noise Cancellation
Noise Cancellation control
Olympus Home Page
Operating conditions
Overwrite recording
Partial deletion
Password entry dialog box
Paste (menu) Paste
PCMCIA card
<Playback>
Hide the Playback Control Bar (menu) Hide the Playback Control Bar
Intro Scan (menu) Intro Scan
Play (menu) Play
Play menu
Playback Control screen
Playback Speed Adjustment control
Playback volume
Switch to the Playback Control Window (menu) Switch to the Playback Control Window
<Preferences>

119 / 121
Preferences (menu) Preferences
Preferences dialog box
Prev. Index mark (menu) Prev. Index mark
Prev. Verbal Comment (menu) Prev. Verbal Comment
Properties
<Recorder>
Editing a Recorder's Template
Recorder buttons
Refresh
Removable drive
Rewind (menu) Rewind
Select all (menu)
Select Speaker (menu) Select Speaker
Serial Number Registration dialog box
Show the grid (menu) Show the grid
Sort by (menu) Sort by
<Sound>
Checking the Sound Device
Sound
<Sound volume>
Transfer Voice Guidance files (menu) Transfer Voice Guidance files
Volume Adjustment control
Split (menu) Split
Stop (menu) Stop
<Storage>
Storage class
Switch to Storage mode (menu) Switch to Storage mode
Subfolder
Supported function
Switch to Audio mode (menu)
System preferences
Text comment
Tone Adjustment control
Trademark
Transfer the date/time (menu) Transfer the date/time
Upload (menu) Upload
<USB>
USB microphone function
USB speaker
<Verbal comment>

120 / 121
Next Verbal Comment (menu) Next Verbal Comment
Prev. Verbal Comment (menu) Prev. Verbal Comment
Recording a Verbal Comment
XXX.DSS Properties dialog box

Copyright© 2008-2015 OLYMPUS CORPORATION