dss player pro r5 - northland business...
TRANSCRIPT
DSS Player Pro R5
Installation Guide

2 / 70
Contents
11 IINNTTRROODDUUCCTTIIOONN······················································································································································································44
1.1 DSS Player Pro R5 Outline ········································································5 1.1.1 System Configurations of DSS Player Pro ··················································· 6 1.1.2 Modules and Tools ·················································································· 8
1.2 Operating Conditions················································································9 1.3 Trademarks and Copyrights·····································································10 1.4 Supported Devices·················································································11 1.5 Contents of the Installation CD································································12
22 SSYYSSTTEEMM CCOONNFFIIGGUURRAATTIIOONN ················································································································································1133
2.1 Stand-alone System···············································································14 2.2 Workgroup System ················································································15
33 PPRREEPPAARRAATTIIOONN BBEEFFOORREE IINNSSTTAALLLLAATTIIOONN ······································································································1166
3.1 Licenses·······························································································17 3.1.1 Other License Keys ··············································································· 18
44 IINNSSTTAALLLLAATTIIOONN MMEETTHHOODDSS··················································································································································1199
4.1 Determining the System Configuration ·····················································20 4.2 Installing from a CD···············································································21 4.3 Installation for a Stand-alone System·······················································22 4.4 Installation for a Workgroup System·························································23
4.4.1 If not performing application sharing······················································· 23 4.4.2 If performing application sharing ···························································· 24
55 PPRROOCCEEDDUURREE FFOORR IINNSSTTAALLLLIINNGG FFRROOMM AA CCDD····························································································2255
5.1 Installing DSS Player Pro for Stand-alone Systems ····································· 26 5.1.1 Starting the programs ··········································································· 29
5.2 Installing DSS Player Pro for Workgroup Systems·······································30 5.2.1 Starting the programs ··········································································· 34
5.3 Installing Manager Tool ··········································································35 5.3.1 Starting the programs ··········································································· 38
5.4 Installing License Manager······································································39 5.4.1 Starting the programs ··········································································· 42
5.5 Upgrading Installation ············································································43 5.6 Installing through the Maintenance Mode ·················································· 44 5.7 Installing Citrix/Terminal Service Virtual Driver ·········································· 45
5.7.1 When using Citrix Presentation Server ····················································· 45 5.7.2 When using Terminal Service·································································· 46
66 IINNSSTTAALLLLAATTIIOONN RREEGGAARRDDIINNGG SSEERRVVEERR AADDMMIINNIISSTTRRAATTOORR ····················································4477
6.1 User Group Setting ················································································48 6.2 Auto Distribution by MSI Packages (Silent Installation) ·······························49
6.2.1 If registering applications to be distributed, with a group policy··················· 50 6.2.2 Registering applications to be automatically distributed, with the log-in script 53

3 / 70
6.3 Installation Options Regarding MSI ··························································54 6.3.1 Method for specifying installation options ················································· 54 6.3.2 Installation option list regarding DPro5.msi ·············································· 54 6.3.3 Installation option list regarding DSS Citrix Client Driver ···························· 55 6.3.4 Installation option list regarding DSS Terminal Client Driver························ 56 6.3.5 Specification examples of installation options············································ 56
77 OOTTHHEERR MMAATTTTEERRSS ············································································································································································5577
7.1 Repository Setting ·················································································58 7.1.1 Repository setting procedure·································································· 58
7.2 How To Open a Port of the Firewall···························································60
88 TTRROOUUBBLLEESSHHOOOOTTIINNGG ··································································································································································6611
8.1 Launcher Not Starting ············································································62 8.2 In cases where the default port number has already been used by IIS or others63 8.3 Starting Dictation Module or Transcription Module Not Allowed ····················· 64
99 SSUUPPPPOORRTT CCOONNTTAACCTTSS································································································································································6655
1100 GGLLOOSSSSAARRIIEESS ······················································································································································································6666

4 / 70
11 Introduction This section describes the outline of DSS Player Pro.

5 / 70
1.1 DSS Player Pro R5 Outline DSS Player Pro R5 is a Dictation/Transcription system that supports assignments of various sizes, from individual users to multiple users. It can be used to capture audio data highly compressed with an Olympus VoiceTrek series IC recorder (hereinafter referred to as "the recorder"), and allows for real-time playback, editing, and insertion of index information. DSS Player Pro R5 and the recorder support the playback of DSS, an international standard for audio recording, Microsoft-promoted WMA, and MP3. With peripheral devices connected, such as a DirectRec or foot switch, it provides a variety of additional functions, including audio streaming recording and remote control playback. It also supports the Terminal Service, allowing this product to be used via the Terminal Service with the DSS Terminal Service Client Driver. It also supports the Terminal Service, so using the DSS Terminal Service Client Driver allows this product to be used via the Terminal Service. In addition to the Release 4 features, Release 5 offers the following functions:
• Support for playback, editing, and encryption of DSS Pro files
• Improved dictation comments, such as instructional comments and verbal comments
• Support for the Microsoft® DirectShow® Filter
• Support for Citrix Presentation Server/Terminal Service
• Easy-to-see and intuitive graphical user interfaces
• Option dialog boxes that allow for centralized management of settings
• Button customization to link device buttons with commands, and to edit their details
• Administrative functions (with System Configuration Program) and settings of users, devices, and updates
For installation procedures of DSS Player Pro R5, please consult this Install Guide. For the functions of DSS Player Pro R5, please consult Help of the individual applications after installation.
For the latest information, visit Olympus’s website at http://www.olympus-global.com/en/global/.

6 / 70
1.1.1 System Configurations of DSS Player Pro DSS Player Pro offers two system variants with different administrative configurations.
• Stand-alone System
With this configuration, an individual user enters the supplied license ID (for a single license), installs the system, and configures applications. User profiles (various settings for each user) are located on local PCs and managed by individual users.
About silent installation with a multi-license ID
Silent installation with a multi-license ID can standardize the settings of multiple users. For information on how to achieve this, refer to “6.2 Auto Distribution by MSI Packages (Silent Installation)”.

7 / 70
• Workgroup System
With this system configuration, an administrator installs and configures the modules for each user, and centrally manages and operates them under a multi-license. This system requires License Manager to be installed to manage the multi-license. User profiles are placed in a shared folder on the file server. The administrator uses System Configuration Program to assist each user in configurations and installations. A significant part of the user profile settings can be configured and locked in with System Configuration Program.

8 / 70
1.1.2 Modules and Tools
• Dictation Module This is an application for an author. It is mainly used to download an Dictation file recorded with a DVR (Digital Voice Recorder), or to record an Dictation file directly onto a PC. It can automatically send a downloaded or directly recorded Dictation file via email or FTP. It also has the ability to automatically receive a transcribed document file and to manage it with a link to the corresponding Dictation file.
• Transcription Module This is an application for a Transcriptionist. The application can notify the Transcriptionist of the arrival of a new Dictation file and switch to a smaller screen at the onset for easier transcription. It automatically receives and captures Dictation files, via email or FTP, for transcription. It has document management capability that can automatically start your word processor software before transcription, and can manage a document with a link to the corresponding Dictation file. In addition, if the original Dictation file was received via email or FTP, the application can automatically send a document file to a specified destination immediately after transcription has been completed.
• System Configuration Program This is an application for an administrator. It is used to deploy and manage DSS Player Pro R5 in an organization. System Configuration Program consists of System Customization Program and Device Customization Program. System Customization Program facilitates installation and updates of modules for end users (Dictation Module and Transcription Module), manages application settings for end users (author and Transcriptionist), and updates firmware management. Device Customization Program can customize, import, and export device settings.
• License Manager This is an application to manage licenses. It manages the licenses and accounts of Dictation Module and Transcription Module in a workgroup system. The application can change each license account by grouping multiple single licenses as a multi-license.

9 / 70
1.2 Operating Conditions The following table lists the operating conditions.
Item Condition
OS Microsoft® Windows® 2000 Professional Operating System SP4 Microsoft® Windows®XP Professional Edition SP2 / Home Edition SP2 Microsoft® Windows®XP 64-bit Professional Edition SP2 / Home Edition SP2 Microsoft® Windows Vista® Ultimate / Enterprise / Business / Home Premium / Home Basic Microsoft® Windows Vista® Ultimate 64-bit edition / Enterprise 64-bit edition / Business 64-bit edition / Home Premium 64-bit edition / Home Basic 64-bit edition Microsoft® Windows® Server 2003 Operating System Microsoft® Windows® Server 2003 Operating System x64 edition
CPU Microsoft® Windows®2000/XP: Intel Pentium III 550MHz or higher Microsoft® Windows Vista®: 800 MHz or higher Microsoft® Windows® Server 2003: 550MHz or higher
Memory Microsoft® Windows® 2000/XP: 128MB or more (256MB or more recommended) Microsoft® Windows Vista®: 500MB or more (1GB or more recommended) Microsoft® Windows® Server 2003: 256MB or more
HDD’s free space
70MB or more (700MB or more with .NET Framework 2.0 not installed)
Drive CD-ROM drive installed Display Resolution : 800 x 600 pixels or higher
65,536 colors or more (16.77 milion colors or more recommended) Browser Microsoft® Internet Explorer 6.0 or later (with the latest Service Pack applied) USB With the Dictation Module and Transcription Module:
One or more USB ports available Audio device With the Dictation Module and Transcription Module:
A Microsoft WDM- or MME-compliant and Windows-compatible sound device Others With Citrix Presentation Server:
Citrix Presentation Server 4.0/4.5 (A Citrix License separately required) With Terminal Service: Microsoft® Windows® Server 2003 Terminal Service (* A TS CAL license separately required)
Supported Languages
English, French, German, Italian, Spanish, and Russian
Installing DSS Player Pro R5 requires the privileges of Administrator.
Currently supported OSes are listed on our Web page. For the latest information, please visit the Olympus Web site at http://www.olympus-global.com/en/global/.

10 / 70
1.3 Trademarks and Copyrights
• Microsoft, Windows, Windows Media, Windows Server, Outlook, DirectX, Active Directory, and DirectShow are trademarks or registered trademarks of Microsoft Corporation in the United States and/or other countries.
• Citrix, ICA (Independent Computing Architecture), MetaFrame, and Program Neighborhood are trademarks or registered trademarks of Citrix Systems, Inc. in the United States and/or other countries.
• Crystal Reports and Crystal Enterprise are trademarks or registered trademarks of Business Objects SA. and/or its affiliates in the United States and/or other countries.
• Nuance, Dragon, and NaturallySpeaking are trademarks or registered trademarks of Nuance Communucations Inc. and/or its affiliates in the United States and/or other countries.
• GroupWise, Netware, and Novell are trademarks or registered trademarks of Novell, Inc. and/or its affiliates in the United States and/or other countries.
• Lotus Domino and Lotus Notes are trademarks or registered trademarks of IBM Corporation and/or its affiliates in the United States and/or other countries.
• Baltech Transponder is a trademark or registered trademark of BALTECH AG and/or its affiliates in the United States and/or other countries.
• Inner Media, DynaZip, and Active Delivery are trademarks or registered trademarks of Inner Media Inc. and/or its affiliates in the United States and/or other countries.
• SocketTools is a trademark or registered trademark of Catalyst Development Corporation.
• Other company and product names mentioned in this document are trademarks or registered trademarks of their respective owners.

11 / 70
1.4 Supported Devices For supported devices, consult Help of Dictation Module and Transcription Module of DSS Player Pro R5.

12 / 70
1.5 Contents of the Installation CD The installation CD automatically starts a launcher. After the launcher has started, you can install the following applications:
8.3 Starting Dictation Module or Transcription Module Not Allowed
Folder Name Description DSSProR5 Folder which consists of Dictation Module and Transcription Module.
Depending on the license key type, one or both Dictation Module and Transcription Module can be installed.
LicenseManager Folder which contains the License Manager installer. When building up a workgroup system, it is necessary to install License Manager.
ManagerTool Folder which contains the System Configuration Program’s installer. This allows users and updates to be managed for a workgroup system. Installing System Configuration Program needs the repository (shared folder) setting enabled beforehand.
Citrix Folder which contains client drivers for use with Citrix Presentation Server. This is the driver installation for client PCs when DSS Player Pro is used as an open application in a Citrix Presentation Server environment.
TerminalService Folder which contains client drivers for the use of a terminal service. This is the driver installation for client PCs when DSS Player Pro is used as a terminal service application.
Manuals Folder which contains Install Guides provided in the individual languages.
Redist Folder which contains components needed for individual modules.
13 / 70
22 System Configuration While DSS Player Pro R5 can be used on a single PC, it also allows selection of various system configurations depending on network environments and scales.
14 / 70
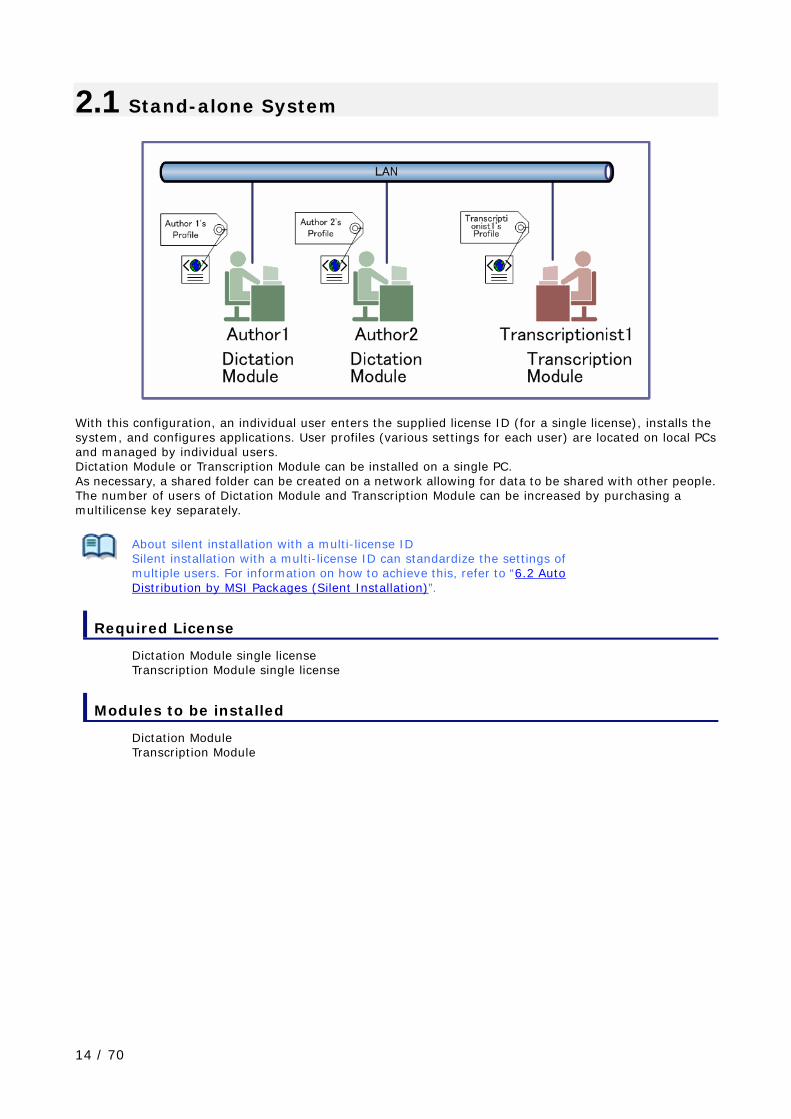
2.1 Stand-alone System
With this configuration, an individual user enters the supplied license ID (for a single license), installs the system, and configures applications. User profiles (various settings for each user) are located on local PCs and managed by individual users. Dictation Module or Transcription Module can be installed on a single PC. As necessary, a shared folder can be created on a network allowing for data to be shared with other people. The number of users of Dictation Module and Transcription Module can be increased by purchasing a multilicense key separately.
About silent installation with a multi-license ID Silent installation with a multi-license ID can standardize the settings of multiple users. For information on how to achieve this, refer to “6.2 Auto Distribution by MSI Packages (Silent Installation)”.
Required License
Dictation Module single license Transcription Module single license
Modules to be installed
Dictation Module Transcription Module

15 / 70
2.2 Workgroup System With this system configuration, an administrator installs and configures the modules for each user, and centrally manages and operates them under a multi-license. A workgroup system is suitable to build a mid-sized Dictation/Transcription system, which is used by several groups of people. Using System Configuration Program allows user profile management, device setting, and updates management. For a Citrix Presentation Server or Terminal Service environment, a server-client environment can be built by installing drivers in the servers and clients.
User profiles are placed in a shared folder on the file server. The administrator uses System Configuration Program to assist each user in configurations and installations. A significant part of the user profile settings can be configured and locked in with System Configuration Program. This system requires License Manager to be installed to manage the multi-license. Moreover, a multi-license key for Dictation Module or Transcription Module is needed. For a multi-license key, see “9 Support Contacts”.
Required License
Dictation Module multi-user license Transcription Module multi-user license
Modules to be installed
Dictation Module Transcription Module License Manager System Configuration Program

16 / 70
33 Preparation before Installation This section describes the preparation needed before installation.

17 / 70
3.1 Licenses A license is required to use DSS Player Pro. DSS Player Pro is provided under the following two types of licenses:
• Single License This is the license ID, issued with a recorder or foot switch, that allows single licensing of DSS Player Pro. A recorder license allows Dictation Module and Transcription Module to be installed on a PC. A foot switch license allows only Transcription Module to be installed on a PC.
• Multi-license This is the combined license ID that groups several single licenses into one license ID for both Dictation Module and Transcription Module. A multi-license is managed as a floating license.
• Decoder License This is the license for redistribution of DSS and DSS Pro decoders. A redistribution contract allows acquisition of a decoder license ID and redistribution of the decoder. To enable the decoder, the license ID needs to be registered when installing it.
About the multi-license key With License Manager, only the multi-license key can be registered. The single license and other licenses are not available.
Purchasing an Initial or Additional Multi-license
In exchange for a corresponding number of single licenses, a multi-license is available without charge. Please see “9 Support Contacts” for contact details.
Other License Keys
DSS Player Pro R5 license keys vary depending on the system. Use the appropriate license for each system. See “9 Support Contacts” for information on re-issuance or replacement of a license. The following table shows the licensing scheme for DSS Player Pro R5 system configurations.
System Name Required License License Server Stand-alone System Dictation Module single license
Transcription Module single license Not required
Multi-license*1 Workgroup System Dictation Module multi-license
Transcription Module multi-license License Manager
*1 :If not using centralized user management with System Configuration Program and sharing data
only, a stand-alone system can be configured under a multi-license (DSS Player Pro R4.10 compatible).
Please see “9 Support Contacts” for contact details.
About purchase of a license key In exchange for a corresponding number of single licenses, a multi-license is available without charge.
For add-on licenses, product versions need to be purchased separately. Please see “9 Support Contacts” for contact details.

18 / 70
3.1.1 Other License Keys The licenses needed depending on the server configuration are listed below. Required licenses differ depending on the system configuration. You can fully use the functions of DSS Player Pro R5 by purchasing the following licenses and building up proper environments. For the license key purchase method, contact the relevant issuer.
System Name Required License Issuer
Terminal Service License needed to use a terminal service. (TS-CAL) The same amount of licenses needs to be purchased as the number of users accessing the system at any one time.
Microsoft Corporation
Citrix Presentation Server
License needed to use Citrix Presentation Server. The same amount of licenses needs to be purchased as the number of users accessing the system at any one time.
Citrix Systems

19 / 70
44 Installation Methods You can install DSS Player Pro and the other modules using a CD or Active Directory service. Installation using a CD needs to be performed on individual PCs. In cases where Active Directory service is used, distributed installers are automatically started when individual client’s Pcs are started and installation is executed. For other installers, use CDs for installation.

20 / 70
4.1 Determining the System Configuration Before installing DSS Player Pro R5, determine the system configuration to be used for the installation. For the configurable systems, see “2 System Configuration”. After determining the system configuration, confirm the modules to be installed on individual PCs.
System Name Modules to be installed PC needed at least
Stand-alone System DSS Player Pro One or more client PCs DSS Player Pro One or more client PCs License Manager One client PC
Workgroup System
Manager Tool - System Configuration Program - Device Customization Program
One or more client PCs
A stand-alone system needs one or more client PCs. A workgroup system needs a license server PC which manages licenses and a manager PC which manages user profiles and others.

21 / 70
4.2 Installing from a CD After inserting the CD, the following launcher screen appears:
Select the appropriate button depending on the intended system configuration.
Button name Function
Language Selection Switches languages of programs to be installed. Installation Guide Starts this Install Guide.
DSS Player Pro Installation
Performs installation for a stand-alone system. For procedural information, see “ 14.3 Installation for a Stand-alone System”.
Installation for a Workgroup System
To install a workgroup system, you need to refer directly to the inside of the CD and specify an installation option; you cannot use the launcher.
For details, see “5.2 Installing DSS Player Pro for Workgroup Systems ”.
Starting the launcher
If the launcher screen does not appear after inserting the CD, select [My Computer] from Windows’ [Start] menu, click the CD-ROM icon, then double-click “Launcher.exe”.

22 / 70
4.3 Installation for a Stand-alone System Follow the procedure in “5.1 Installing DSS Player Pro for Stand-alone Systems” to install from the CD.

23 / 70
4.4 Installation for a Workgroup System The installation procedure for the server and client differs depending on whether performing application sharing through Citrix Presentation Server and Terminal Service or not.
4.4.1 If not performing application sharing If not performing application sharing, use the following procedure to install:
Procedure 1. Create a shared folder on the network.
Create a shared folder (repository) on the server connected with the network, so that user profiles can be managed through the folder. 7.1 Repository Setting
2. Install Manager Tool.
Follow the procedure in “5.3 Installing Manager Tool” to install Manager Tool.
3. Install License Manager.
Follow the procedure in “5.4 Installing License Manager” to install License Manager.
Installing with the Active Directory service
To automate the installation of Dictation Module and Transcription Module with the Active Directory service, see “6.2 Auto Distribution by MSI Packages (Silent Installation)”.
4. Install Dictation Module and Transcription Module.
Follow the procedure in “5.2 Installing DSS Player Pro for Workgroup Systems” to install.

24 / 70
4.4.2 If performing application sharing
Procedure 1. Create a shared folder on the network.
Create a shared folder (repository) on the server connected with the network, so that user profiles can be managed through the folder. 7.1 Repository Setting
2. Install Manager Tool.
Follow the procedure in “5.3 Installing Manager Tool” to install Manager Tool.
3. Install License Manager.
Follow the procedure in “5.4 Installing License Manager” to install License Manager.
Installing with the Active Directory service
To automate the installation of Dictation Module and Transcription Module with the Active Directory service, see “6.2 Auto Distribution by MSI Packages (Silent Installation)”.
4. Install DSS Player Pro.
Install Dictation Module and Transcription Module on a server PC on which Citrix Presentation Server or Terminal Service has already been set up. If you possess a multi-license ID, follow the procedure in “5.2 Installing DSS Player Pro for Workgroup Systems”to install.
5. Install Citrix/Terminal Service Virtual Driver.
If you intend application sharing, you need to install Virtual Driver on a client PC. 5.7 Installing Citrix/Terminal Service Virtual Driver

25 / 70
55 Procedure for Installing from a CD Using the CD allows the following programs to be installed:
• DSS Player Pro for Stand-alone Systems
• DSS Player Pro for Workgroup Systems
• Manager Tool
• License Manager
• Citrix Client Virtual Driver
• Terminal Service Client Virtual Driver For installation from the administration server to a client, see “6 Installation Regarding Server Administrator”.

26 / 70
5.1 Installing DSS Player Pro for Stand-alone Systems Use the following procedure to install DSS Player Pro for Stand-alone Systems:
Procedure
1. In the launcher screen shown after inserting the CD, click [DSS Player Installation].
The installation program automatically starts and Welcome Dialog appears.
2. Click [Next].
License Agreement Dialog appears.

27 / 70
3. Accept the license agreement, and click [Next].
Customer Information Dialog appears.
4. Enter a user name, a company name, and a license ID for a stand-alone system, and then click [Next].
Destination Folder Dialog appears.

28 / 70
5. Specify a program folder for installation, and then click [Next].
Select Basic Setting Dialog appears.
6. Specify the storage location of the data folder for user information, and then click [Next].
If you intend shared use of audio data on the PC, check the “All User Settings” checkbox. Ready to Install the Program Dialog appears.

29 / 70
7. Check installation settings.
A progress dialog appears during the installation.
When the installation is complete, Complete Dialog appears.
8. Click [Finish].
5.1.1 Starting the programs
After restarting, you can launch Dictation Module and Transcription Module from the Start menu using the following procedures:
• [All Programs] - [Olympus DSS Player Pro] - “Dictation Module”
• [All Programs] - [Olympus DSS Player Pro] - “Transcription Module”

30 / 70
5.2 Installing DSS Player Pro for Workgroup Systems
Use the following procedure to install SS Player Pro for Workgroup Systems:
Procedure 1. Open DSS Player Pro R5’s folder and execute the following command with an
administrator privilege.
Setup.exe /v”SYSTEM=WORKGROUP” The installer for DSS Player Pro for Workgroup Systems starts.
2. In the language selection dialog box, select a language to be installed.
The installation program automatically starts and Welcome Dialog appears.
31 / 70
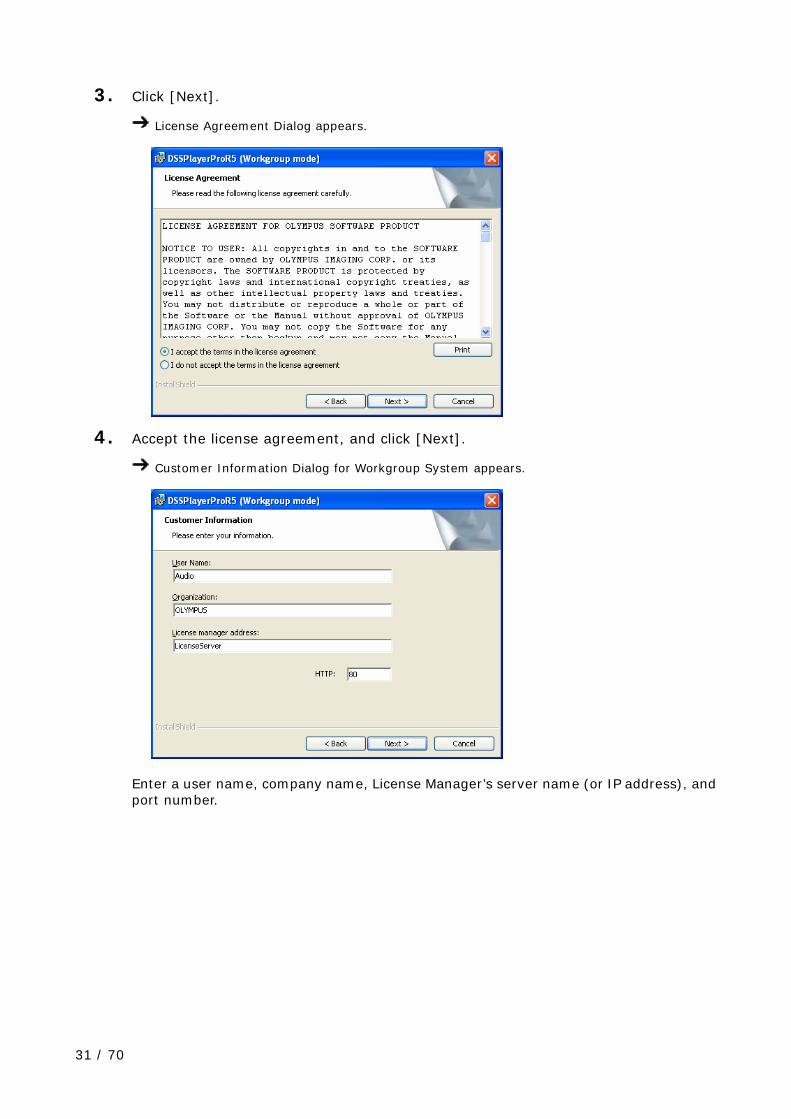
3. Click [Next].
License Agreement Dialog appears.
4. Accept the license agreement, and click [Next].
Customer Information Dialog for Workgroup System appears.
Enter a user name, company name, License Manager’s server name (or IP address), and port number.

32 / 70
5. Enter a user name, a company name, and a license ID for a stand-alone system, and then click [Next].
Custom Setup Dialog appears.
6. Check either Dictation Module or Transcription Module, and then click [Next].
If installing Citrix Server Virtual Driver and Terminal Service Virtual Driver, check the respective checkboxes.
Destination Folder Dialog appears.
33 / 70
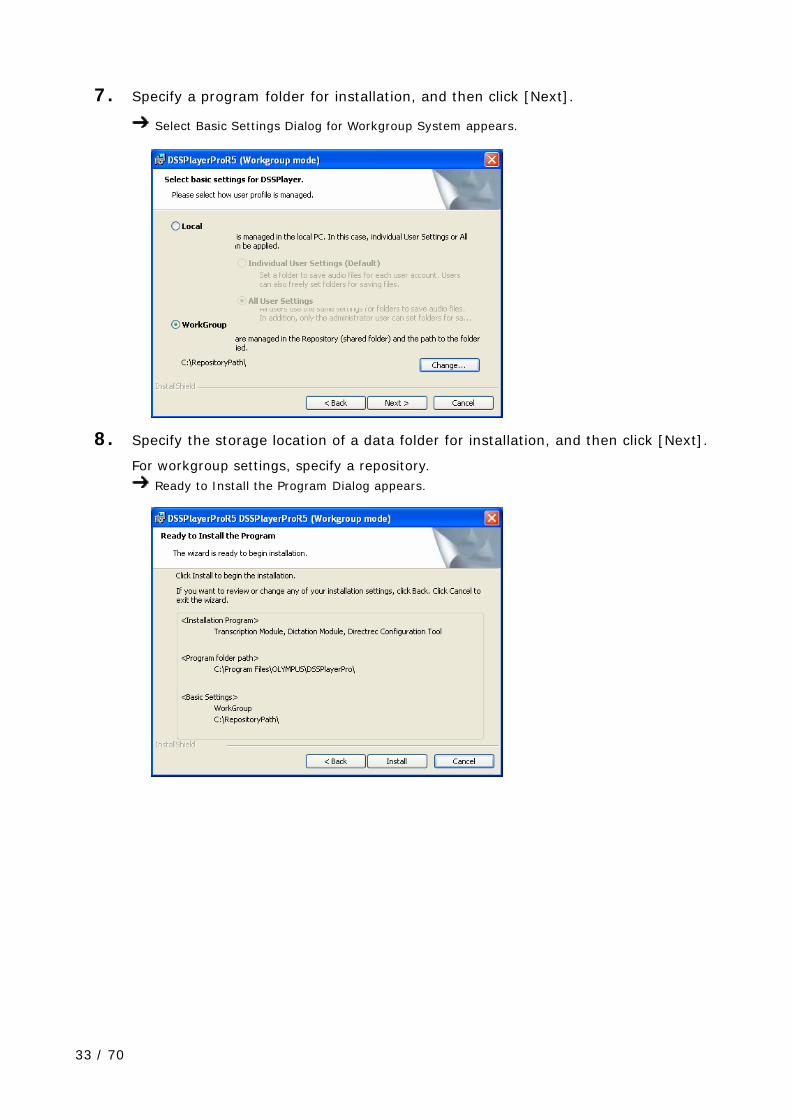
7. Specify a program folder for installation, and then click [Next].
Select Basic Settings Dialog for Workgroup System appears.
8. Specify the storage location of a data folder for installation, and then click [Next].
For workgroup settings, specify a repository. Ready to Install the Program Dialog appears.
34 / 70
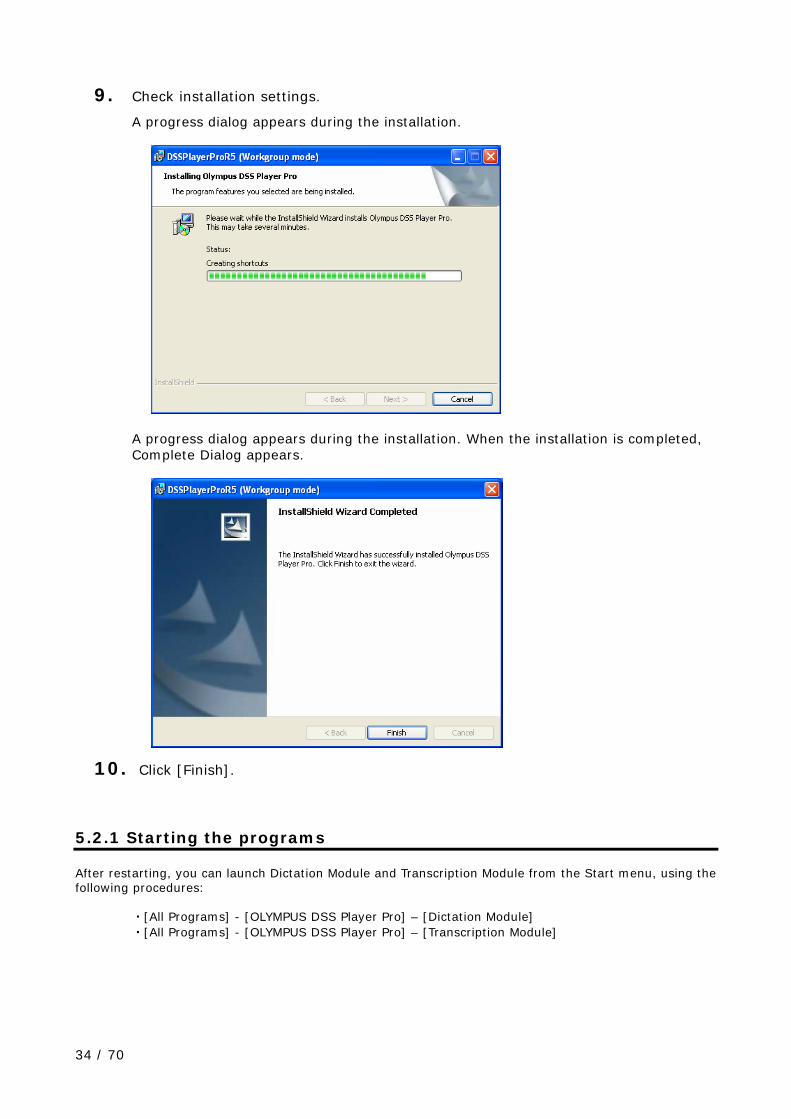
9. Check installation settings.
A progress dialog appears during the installation.
A progress dialog appears during the installation. When the installation is completed, Complete Dialog appears.
10. Click [Finish].
5.2.1 Starting the programs After restarting, you can launch Dictation Module and Transcription Module from the Start menu, using the following procedures:
・[All Programs] - [OLYMPUS DSS Player Pro] – [Dictation Module] ・[All Programs] - [OLYMPUS DSS Player Pro] – [Transcription Module]

35 / 70
5.3 Installing Manager Tool Use the following procedure to install Manager Tool:
Procedure 1. Double-click Setup.exe in the ManagerTool folder.
The installation program for Manager Tool is executed.
2. Select the language to install in the Choose Setup Language Dialog.
The installation program automatically starts and Welcome Dialog appears.

36 / 70
3. Click [Next].
License Agreement Dialog appears.
4. Accept the license agreement, and click [Next].
Custom Information Dialog appears.

37 / 70
5. Enter a user name, a company name, and then click [Next].
Repository location Dialog appears.
6. Use the [Change] button to specify a folder for repository, and then click [Next].
Ready to Install the Program Dialog appears.

38 / 70
7. Check installation settings.
A progress dialog appears during the installation.
A progress dialog appears during the installation. When the installation is completed, Complete Dialog appears.
8. Click [Finish].
5.3.1 Starting the programs After restarting, you can launch the individual modules from the Start menu using the following procedures:
• [All Programs] - [Olympus DSS Player Pro] - [Manager Tool] - “System Configuration Program”
• [All Programs] - [Olympus DSS Player Pro] - [Manager Tool] - “Device Customization Program”

39 / 70
5.4 Installing License Manager Use the following procedure to install License Manager:
Procedure 1. Double-click Setup.exe in the LicenseManager folder.
The installation program automatically starts and Welcome Dialog appears.
2. Click [Next].
License Agreement Dialog appears.

40 / 70
3. Accept the license agreement, and click [Next].
Customer Information Dialog appears.
4. Enter a user name, company name, Dictation Module’s multi-license ID, and Transcription Module’s multi-license ID, and then click [Next].
License Server Information Dialog appears.
The license IDs can be updated with the License Manager’s management console after the installation.
41 / 70
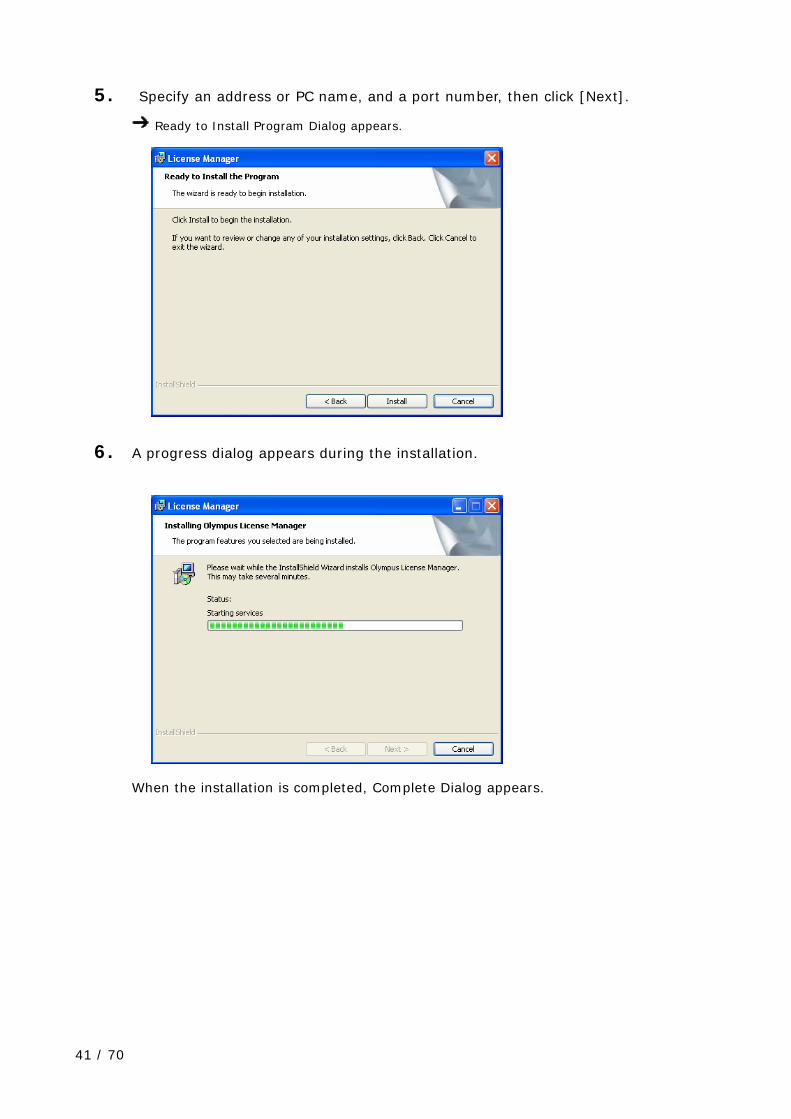
5. Specify an address or PC name, and a port number, then click [Next].
Ready to Install Program Dialog appears.
6. A progress dialog appears during the installation.
When the installation is completed, Complete Dialog appears.

42 / 70
7. Click [Finish].
5.4.1 Starting the programs After restarting, you can launch the individual modules from the Start menu using the following procedures:
[All Programs] - [Olympus DSS Player Pro] – “License Manager”

43 / 70
5.5 Upgrading Installation If the PC has DSS Player Pro R4 already installed, you can upgrade it to DSS Player Pro R5 by executing the installer of DSS Player Pro R5 on the PC.
You cannot upgrade from an older version than DSS Player Pro R4 to DSS Player Pro R5.
Also note that upgrading to the Workgroup System version needs a separate license key.
Procedure Use the following procedure to upgrade to R5:
1. Start the installer of DSS Player Pro R5.
With DSS Player Pro R4 installed, start the installer of DSS Player Pro R5. For the installation procedure, see “4 Installation Methods”.
Follow the wizard to proceed.
2. In the Upgrade Confirmation dialog box, click [Yes].
3. Follow the wizard to finish upgrading.
To restore DSS Player Pro R4 after upgrading to R5, uninstall R5, and then reinstall R4.

44 / 70
5.6 Installing through the Maintenance Mode In cases where either Dictation Module or Transcription Module of DSS Player Pro R5 has already been installed, you can additionally install the other one through the maintenance mode.
To install modules in the stand-alone system or workgroup system environment, the modules’ license keys are needed.
For details about license keys, see “3.1 Licenses”.
Procedure Use the following procedure to install:
1. From Windows Start menu, select [Control Panel] → [Add/Remove Programs].
2. Start the maintenance mode of DSS Player Pro.
From the list of “Add/Remove Programs”, select DSS Player Pro, and then click [Change/Delete].
3. Start the maintenance mode of DSS Player Pro.
Selecting “Change” causes the installer for maintenance to start. Follow the wizard to enter the license key and install the module you want to add.

45 / 70
5.7 Installing Citrix/Terminal Service Virtual Driver
For a system where Citrix Presentation Server or Terminal Service has been setup, you may install DSS Player Pro R5 on a server PC and then install Client Driver on client PCs, so that the applications on the server are shared among multiple clients. Before installing Client Driver in the client PC, install DSS Player Pro (Dictation Module and Transcription Module) on the server PC. The installation procedure differs depending on the server's environment.
You cannot install the Client Drivers of both Citrix Presentation Server and Terminal Service on the same client PC. Choose and install the appropriate Client Driver depending on the server environment.
For the installation of DSS Player Pro, see “4 Installation Methods”.
5.7.1 When using Citrix Presentation Server
Use the following procedure to set up on a client PC:
Procedure
1. Uninstall DSS Player Pro.
If DSS Player Pro R5 or R4 has been installed on the client PC, DSS Citrix Client Driver and Terminal Service Client Driver cannot be installed. Be sure to uninstall DSS Player Pro R5/R4.
2. Check Citrix Presentation Server Client (Citrix Neighborhood).
Confirm that the client PC has Citrix Presentation Server Client (Citrix Neighborhood) installed. If not, it has to be installed before continuing.
3. Install Citrix Client Virtual Driver.
Double-click Setup.exe in the “Citrix” folder on the CD to install.
4. Execute Dictation Module and Transcription Module.
Start Citrix Presentation Server Client (Citrix Neighborhood), and start the Dictation Module and Transcription Module.

46 / 70
5.7.2 When using Terminal Service
Use the following procedure to set up on the client:
Procedure
1. Uninstall DSS Player Pro.
If DSS Player Pro R5 or R4 has been installed on the client PC, DSS Citrix Client Driver and Terminal Service Client Driver cannot be installed. Be sure to uninstall DSS Player Pro R5/R4.
2. Install Citrix Presentation Server Client (Citrix Neighborhood).
Confirm that the client PC has Citrix Presentation Server Client (Citrix Neighborhood) installed. If not, it has to be installed before continuing.
3. Install Terminal Service Virtual Driver.
Double-click Setup.exe in the “TerminalService” folder on the CD to install.
4. Execute Dictation Module and Transcription Module.
Connect to the server with Terminal Service, and execute Dictation Module and Transcription Module on the server.

47 / 70
66 Installation Regarding Server Administrator This section describes the installation method regarding the Server Administrator.

48 / 70
6.1 User Group Setting If DSS Player Pro’s users and other uses are present when the network’s user management is performed with Active Directory, we recommend that a user group of DSS Player Pro users is created for management purposes. For user group settings, see the manual of the relevant operating system.

49 / 70
6.2 Auto Distribution by MSI Packages (Silent Installation)
DSS Player Pro R5 can download software (updates) from the OLYMPUS download server and holds it in its own repository folder. Normally, like updating through the Internet, the client’s PC searches the repository folder for updates. If the client PC detects an update, it downloads the update data and performs updating according to the user’s instructions. Also, this task can be forcibly performed by a server through auto distribution by MSI packages (silent installation). An administrator can forcibly install applications (updates) on client PCs by disclosing MSI, with OS’s group policy setting. Auto distribution by MSI packages can be performed for users managed through Active Directory, with Windows Server 2003. Auto distribution by MSI packages requires the following files:
File Description
DSSPlayer.msi
Installers and updates of Dictation Module and Transcription Module Installer and updates of Management Module
license.dat Multi-license data file of multi-licenses For the license key purchase method, see “9 Support Contacts” for contact information.
DSSPlayer.mst File that defines msi installation options This can be generated with System Configuration Program.
Only installers and updates of DSSPlayer.msi can be automatically distributed with MSI. Other supplied applications are not capable of this function.
- For the construction and set-up methods of Active Directory, consult Help of your OS
(Windows Server 2003).
- If .mst file is missing, installation is performed with the MSI’s default setting.
Two distribution methods using the Active Directory are available. Select whichever is appropriate depending on your situation.
50 / 70
6.2.1 If registering applications to be distributed, with a group policy Use the following procedure to register:
Procedure
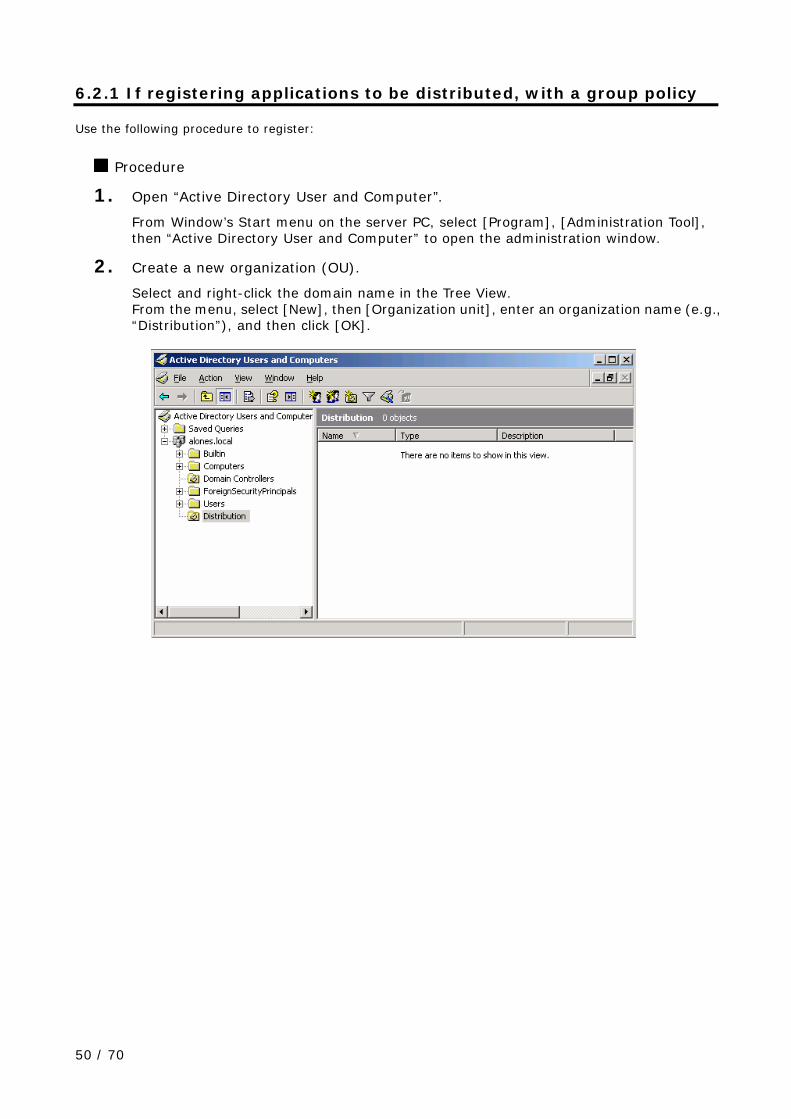
1. Open “Active Directory User and Computer”.
From Window’s Start menu on the server PC, select [Program], [Administration Tool], then “Active Directory User and Computer” to open the administration window.
2. Create a new organization (OU).
Select and right-click the domain name in the Tree View. From the menu, select [New], then [Organization unit], enter an organization name (e.g., “Distribution”), and then click [OK].

51 / 70
3. Create a new group.
Select the created organization name (“Distribution”), and then select [New], then [Group]. Enter a group name (e.g., “Group 1”), and then specify a group range. Check the group type’s “Distribution” checkbox and then follow the wizard to create a group.
4. Register group members.
Select the created group (Group1), and then select “Properties” from the context menu. Select the “Member” tab, and then click [Add] to specify a computer or user to be registered under the group.
5. Create a new group policy.
Select the created organization name (“Distribution”), and then select “Properties” from the context menu.
Distribution’s property dialog box appears.

52 / 70
6. In the Property dialog box, select the “Group policy” tab and then create a new group policy object with the [New] button. Open the group policy window with the [Edit] button.
7. Register software to be automatically distributed.
In the tree, select “Software setting”, then “Software installation”. In the context menu, select [New], then [Package]. In the file dialog box, select msi to be automatically distributed, and then select “Allocate” in the software deployment dialog box.
8. Registration is complete.
Registration is complete. For allocated client PCs, installation is automatically performed during the startup, at the timing set by the group policy.

53 / 70
6.2.2 Registering applications to be automatically distributed, with the log-in script Use the following procedure to register applications to be automatically distributed with the log-in script:
Procedure
1. Open “Active Directory User and Computer”.
From Window’s Start menu on the server PC, select [Program], [Administration Tool], then “Active Directory User and Computer” to open the administration window.
2. Open a user’ property.
Select a “User” folder in the tree view, and from the list, select a user or user group to be distributed to. Then select [Property] from the context menu to open the user’s property dialog.
3. Select a user with the Environment tab.
Select the “Environment” tab in the dialog box, and then check “Start the following program when logging on”. Enter the program’s file name, command option, and the startup directory, and then click [OK]. Specify the file name and command option as follows: msiexec *****msi /q OPTION1=1 OPTION2=2 etc...
Specifying a command option
For the method for specifying a command option when executing with MSI, see “6.3 Installation Options Regarding MSI”.

54 / 70
6.3 Installation Options Regarding MSI The installers that support installation options of DSS Player Pro R5 are as follows:
• DSSPlayer.msi :msi image of Dictation Module / Transcription Module
• CitrixClientVD.msi :msi image of DSS Citrix Client Driver
• TerminalClientVD.msi :msi image of DSS Terminal Service Client Driver
6.3.1 Method for specifying installation options When specifying an install option to install, use one of the following methods:
Specification method Description
Specifying with a command line msiexec /I <msi full path name> SYSTEM=STANDALONE… By adding options, you can execute installation through application of options from the command line.
Specifying with an MST file You can specify an option with an MST file generated with System Configuration Program. msiexec /I <. msi full path name > TRANSFORMS= < msi full path name > For the method for generating an MST file, see System Configuration Program Help.
Specifying with Setup.ini Adding options to the [Startup] section with Setup.ini causes options to be automatically applied when installation is executed. Example: [Setup] SYSTEM=STANDALONE :
6.3.2 Installation option list regarding DSSPlayer.msi
The table below provides the list of installation options available through the installer of DSS Player Pro R5. The MSI’s installation options are described with “option name = value”.
Option Value Description System
SYSTEM {STANDALONE | WORKGROUP }
Select a system type to be installed.
Stand-alone Workgroup
USER User name set on the PC Specify a user name for installation.
Stand-alone Workgroup
COMPANYNAME
Company name set on the PC
Specify a company name for installation.
Stand-alone Workgroup
LICENSE License file name Specify a license file name for installation.
Stand-alone
CITRIXSVD INST Specify this option when installing as an open application in a Citrix Presentation Server environment.
Stand-alone Workgroup
TERMINALSVD INST Specify this option when installing applications on the server with Terminal Service.
Stand-alone Workgroup

55 / 70
DEST Application installation destination
Specify this option when specifying an application installation destination. If not specified, the applications are installed in the %Program Files%\Olympus\DSS Player Pro folder.
Stand-alone Workgroup
SETTING { INDIVIDUAL | ALLUSER } Specify whether the environment setting and audio data are to be applied according to each PC user who logs in or they are to be shared among all users.
Stand-alone Workgroup
LM License manager name Specify the PC that has License Manger installed.
Workgroup
PORT Port number (Default: 80)
Specify an HTTP port number.
Workgroup
DCT INST Specify this option when installing Direct Configuration Tool. Without “DM=INST” selected, installation is not performed.
Stand-alone Workgroup
DM INST Specify this option when installing Dictation Module.
Stand-alone Workgroup
TM INST Specify this option when installing Transcription Module.
Stand-alone Workgroup
REPOSITORY Repository’s address Specify with \\{repository’s PC name}\{repository’s folder name}
Workgroup
6.3.3 Installation option list regarding DSS Citrix Client Virtual Driver
Option Value Description System
DEST Application installation destination
Specify this option when specifying an application installation destination. If not specified, the applications are installed in the %Program Files%\Olympus\CitrixClientVD folder.
Stand-alone Workgroup

56 / 70
6.3.4 Installation option list regarding DSS Terminal Client Virtual Driver
Option Value Description System
DEST Application installation destination
Specify this option when specifying an application installation destination. If not specified, the applications are installed in the %Program Files%\Olympus\ TerminalClientVD folder.
Stand-alone Workgroup
6.3.5 Specification examples of installation options The following are specification examples of installation options:
When installing Work Group System’s Dictation Module with the command line
msiexec /i DSSPlayer.msi SYSTEM=WORKGROUP LICENSE=LICENSE.DAT DCT=INST DM=INST REPOSITORY=\\ShareServer\Repository
When installing Work Group System’s Transcription Module with an MST file generated with System Configuration Program
msiexec /i {Full path} DSSPlayer.msi TRANSFORMS={Full path } DSSPlayer.mst
If you specfy an MSI or MST file in the command fine,give the full path.

57 / 70
77 Other Matters This section provides reference information.

58 / 70
7.1 Repository Setting For Workgroup System, a shared folder which is called a repository needs to be created. The shared folder is managed with a management tool and is used to store profiles and updates.
Note for repository setting
A repository folder will contain the profiles of all users and module updates, so specify a drive that has a sufficient amount of empty space.
7.1.1 Repository setting procedure
Use the following procedure to set a repository:
■ Procedure 1. From the Windows’ menu, select [Start], and then right-click [My Computer].
2. Form the context menu, select “Manage” to open the computer’s management tree.
3. From the computer’s management tree, select “System tool”, “Shared folder”, then “Share”.
4. From the computer’s management menu, select [Action] then [New Share].
5. Open "Share a Folder” wizard, and then click [Next].

59 / 70
6. Enter the name of a shared folder, and then click [Next].
7. For the access privilege, check the [Use custom share and folder permissions] checkbox, and then click [Customize].
8. For the access privilege, assign read and write privileges to DSS Player Pro R5 users.
9. Click [Finish] to complete the setting.

60 / 70
7.2 How To Open a Port of the Firewall In cases where the firewall is managed with the Active Directory’s group policy, the firewall has to be set on the server. For networks not managed with Active Directory, settings have to be made on each individual PC.
When creating settings with the Active Directory service’s group policy
■ Procedure 1. From the Windows’ Start menu, select [Control Panel], [Network and Internet
Connections], then “Windows Firewall”.
2. Click the “Exception” tab, and then click [Add port].
3. Set the name, TCP/UDP, and port number of the exception port.
When creating settings on client PCs
■ Procedure 1. From the Windows’ Start menu, select [Control Panel], [Network and Internet
Connections], then “Windows Firewall”.
2. Click the “Exception” tab, and then click [Add port].
3. Set the name, TCP/UDP, and port number of the exception port.

61 / 70
88 Troubleshooting Read this section when you encounter any problems.

62 / 70
8.1 Launcher Not Starting When inserting the CD, if the launcher does not start, it means that the auto start CD setting has not been made. Use the following procedure to manually start the launcher.
■ Procedure 1. In the Windows’ Start menu, select [My Computer], and then open the CD-ROM
drive.
2. Open the “DSSProR5” folder in the CD, and then double-click “Launcher.exe”.
How to make auto start CD work
To make auto start of CD work for the next time, make the following setting:
■ Procedure 1. From the Window’s Start menu, select [Run], and then enter “GPEDIT.MSC”.
2. In the Group Policy, select “Local computer policy”, “Management template”, then “System”, and then select “Disable auto play function”.
3. Right-click the CD and select “Property” in the context menu.
4. Select “Enable” in the dialog, and then click [OK].

63 / 70
8.2 In cases where the default port number has already been used by IIS or others When installing a workgroup system, the standard port number may have already been used by IIS (Internet Information Service) or others. If this is the case, specify a port number other than the standard port numbers (for HTTP, 80; for HTTPS, 443) during installation. If specifying another port number, be sure to open the specified port number through the firewall setting on the OS.
64 / 70
8.3 Starting Dictation Module or Transcription Module Not Allowed After Dictation Module and/or Transcription Module have been installed, they can be used for 60 days without connection to the license server. However, if 60 days passes without connection, they cannot be started. The server administrator needs to check that settings regarding connection to the license sever, the license server name, port number, firewall settings, and others are appropriate.

65 / 70
99 Support Contacts
For Purchasing License Keys
To purchase the following license keys, please contact your dealer or distributor.
• Dictation Module multi-license key
• Transcription Module multi-license key
Asking about Malfunctions
When submitting a query, the information below needs to be provided to our support staff along with the details of your problem. Please keep the following data handy.
• Type of PC (manufacturer and model)
• Amount of memory
• Hard disk space
• Name and version of the OS
• Connected peripheral devices
For assistance in solving a problem such as a malfunction, please contact your dealer or distributor. Please note that it may take a some time to answer your query, depending on our investigations.
Other Support
Various types of information, including product specifications, PC connections, support for OSes, and FAQs, is available on our Web site. For the latest information, please visit the Olympus Web site at http://www.olympus-global.com/en/global/.
These descriptions are subject to change.

66 / 70
1100 Glossaries
Backup With a folder configured for backup, the audio files dropped into that folder can be automatically backed up to a specified folder.
Citrix Presentation Server A client/server system that allows a shared server application to be started from multiple client OSes including Windows, Macintosh, and Linux.
Clean A folder attribute and a way to delete files. Old files can be deleted through one of two methods: by directly deleting them or by moving them to the Recycle Box and then deleting them with the delete option of the box. Setting the Clean attribute enables automatic cleanup of old files.
Composite Mode This mode supports multiple device classes. Recorders support the Audio and HID classes (note that DS-5000 supports the Audio, HID, and Storage classes).
Direct Record A recording method that records audio data directly onto the hard disk drive in a PC with a connected DirectRecording device. DR-1000 and DR-2000 are the devices specialized for direct recording. Some DVR models also support direct recording.
DRM This stands for Digital Rights Management. It is a general term for the technologies that protect the copyrights of digitally-created contents and regulate the use and replication of them.
DSS This stands for Digital Speech Standard.
This voice encoding standard has been developed by Olympus and two other companies. It can downsize audio data while maintaining sound quality. All of Olympus recorder models support DSS. DSS-compliant audio files have the "DSS" extension.
DSS Pro An audio standard enhanced from the classic DSS.
Key differences from the DSS standard include QP (Quality Play) mode for high-grade recording, an increase from 16 to 32 in the number of settable index marks, support for audio file encryption, and support for verbal comment recording. DSS-compliant audio files have the "DS2" extension.
FTP This stands for File Transfer Protocol. This is a protocol used for transferring a file over the TCP/IP network.
Hot Key A function that allows an application's operation or a button operation on the device to be assigned to a key on the keyboard and to be executed simply by pressing the key. It can be

67 / 70
customized and enables the user to work more efficiently by registering frequently used functions.
HTTPS A protocol that integrates SSL (Secure Sockets Layer) encrypted communication into HTTP.
Instruction Comment An Instruction Comment is an instruction or other message recorded for a Transcriptionist. It can be recorded only with DirectRecord and cannot be created when making a recording with a standalone recorder. It is maintained as a file separately from an audio file and is recorded to provide a Transcriptionist with instructions.
Job Data A collective term for several basic settings, e.g. Author ID, Worktype, Option Items, and Comments.
By centrally managing these settings as Job Data on the application side, each dictation can be edited and configured more easily.
Noise Cancel An operation that reduces noise output by extracting and filtering out noise components from an audio file. The cancellation effect can be adjusted to three different levels.
MP3 An MPEG-1-based audio compression method. Like other major audio compression techniques, it uses a lossy compression method that achieves a high compression rate by deducting less audible portions from sound data. DSS Player supports it only for playback. The file extension is .MP3.
MSI Package A Windows Installer-compliant package for installation. DSS Player Pro R5 executes the MSI packages of modules when performing installations and upgrades.
OLE When dragging and dropping an audio file to a document file, it can be configured to be an embedded object or a linked object.
An embedded object brings all audio data into the file, resulting in a larger amount of data, while the file with audio data embedded can be played on another PC that has DSS Player installed. A file linked with audio data only retains the file name and path of the audio file, resulting in a smaller amount of data, while the file may not be able to be played if it cannot refer to the audio data path.
Option Item An item associated with a Worktype. Up to 10 items can be registered with combinations of values.
Option Items can be input with such tools as Baltech Transponder and a barcode reader.
Ownership An attribute that, based on an Author's privilege, prevents an audio file from moving to the Finished folder in Transcription Module after the file has been transcribed. It inhibits audio files from automatically moving to the finished folder of Transcription Module just when transcription is finished.

68 / 70
Priority Level This is represented by the 16 priority levels of 0 to 15, and allows the user to prioritize dictations.
Proxy This is a boundary that separates an internal network from the external Internet. It is a computer or software that connects to the Internet on behalf of an internal computer that cannot directly access the external network. A proxy centrally controls the access traffic between the Internet and the internal network, and blocks unauthorized accesses.
Repository A hierarchically structured database that stores shared data managed by System Configuration Program. It stores user profiles, profiles of groups, and Update information.
Stand-alone System The basic system of DSS Player Pro R5. It represents a system environment in which Dictation Module and Transcription Module run on local PCs and management tools such as System Configuration Program are not used.
Storage Mode In this mode, the device is recognized as large storage media when connected to a PC.
The memory or memory card installed in the recorder is recognized as a removable drive, and the files stored there can be accessed like those on a hard disk drive.
Terminal Service This is a client service provided by Windows Server. It can execute applications and services provided by the server on the client side. A separate license such as TS-CAL is required to use this function.
VCVA A capability that enables sound-initiated recording (called Variable Control Voice Actuator) in order to improve usability and efficiency for prolonged recording. It halts recording after a certain period of silence and resumes it in response to sound. The sound level to initiate recording can be adjusted. A level setting optimized for a recording environment ensures efficient recording. For recording intended for voice recognition, it is recommended to disable the VCVA function.
Verbal Comment A voice comment that is embedded in audio file data. A verbal comment can be recorded with a supported recorder. It is provided to transcribe audio data immediately after commentary. A verbal comment is recorded at any position in an audio file based on the need for instructions.
WAV A standard audio file format for Windows. It is also referred to as the WAVE format. The specifications include the saving format for recording a digitally converted audio signal. The file extension is .WAV.
WMA A standard audio format for Windows. This technology is a component of Windows Media, a multimedia technology incorporated in Windows, and is a standard audio compression technique. The file extension is .WMA.

69 / 70
Workgroup System The middle-class system of DSS Player Pro R5. It represents a multi-user system environment in which multiple licenses are managed by License Manager and user settings can be maintained with System Configuration Program.
Worktype This is the data used to classify dictations. The user can classify the types and Authors of dictations with the application by selecting a Worktype on the recorder when making a new recording.
Using Option Items associated with a Worktype, additional attributes can be provided.

Copyright © 2008 OLYMPUS IMAGING CORP.