drip irrigation handbook - home - the urban …...we stock over 10,000 irrigation and landscape...
TRANSCRIPT

• Drip irrigation • Sprinkler Systems • Outdoor Lighting • Pond & Fountain Equipment •
The Urban Farmer Store®
DRIP IRRIGATION HANDBOOKThe Catalog for Getting Started
25th Anniversary Edition – by Tom Bressan

Parts Catalog Drip emitters ................................................... 11 Sprays ............................................................. 12 Emitter line, Sub-surface emitter line .............. 13 Tubing ............................................................. 14 Fittings ............................................................ 15 Punches, Stakes, and Clips .............................. 16 Backflow preventers ........................................ 17 Filters ............................................................... 17 Pressure regulators .......................................... 18 Fertilizer injectors ............................................ 18 Hose-end controls ........................................... 21 Irrigation Timers .............................................. 19 Valves, Wire, and Splices ................................. 20 Instant Manifolds/Useful Items ....................... 21 Self-Adjusting Evapotranspiration Controllers 22 Sprinkler to Drip Conversion + multi-outlet emitters ........................................................... 23 Pumps... .......................................................... 24 Introduction to Spriklers & Rotors .................. 24 Introduction to Outdoor Lighting .................. 26 Ordering Information .............................27
Our GuaranteeThere is a 30-day money back guarantee on
all products. If you are not entirely satisfied with any product, return it within 30 days and we will promptly refund your total purchase less shipping charges. Defective parts will be repaired or replaced free of charge when they are returned freight pre-paid within one year of purchase. We carry products that have been field tested for their dependability and durability. Some products carry manufacturer’s warranties for longer than one year. Please write for specific warranty information.
Introduction ................................................................1Applications Landscape ..........................................................2 Containers .........................................................2 Vegetables ..........................................................3 Lawns .................................................................4 Orchards ............................................................5 Vineyards ...........................................................5Design Planning .............................................................6 Emitter placement .............................................6 Sizing your components ....................................7Assembly Hose-thread assembly ........................................8 Pipe-thread assembly .........................................8 Lines and Fittings ...............................................8 Emitters ..............................................................9 Assembly tips .....................................................9System Use Scheduling ...................................................... 10 Maintenance ................................................... 10
When we published our first do-it-yourself manual and drip catalog in 1981, The Urban Farmer already had five years experience designing and installing drip systems. Our publications on drip irrigation are used in college horticultural classes and distributed by water departments nationwide to help people conserve water. As well as being a mail order house, we have three stores located in the San Francisco Bay Area. We stock over 10,000 irrigation and landscape products, including lawn sprinklers, outdoor lighting, and water feature supplies. This catalog focuses on reliable high-quality examples of the most commonly used drip irrigation parts. If you need other choices or more help, experienced sales staff are available to answer questions and fill tele-phone orders. Please visit urbanfarmerstore.com for more information.
Monday through Friday from 7:30 am to 5:30 pm PST and Saturday 9:30 am to 5 pm.
CONTENTS
® THE URBAN FARMER STORE IS A REGISTERED SERVICE MARK OF THE URBAN FARMER STORE, INC. ALL OTHERS ARE THE SERVICE MARKS OR TRADE MARKS OF THEIR RESPECTIVE OWNERS AND MAY BE REGISTERED. ©2006 THE URBAN FARMER STORE, INC. ALL RIGHTS RESERVED.
�����������
�������
�����������

1Availability, price, shipping charges, and sales tax subject to change without notice
© 2006 THE URBAN FARMER STORE®
install. Since no trenching is needed, you can install a system in an exist-ing landscape with no damage to your plants’ root systems. Tubing will be overgrown by ground cover, or it can be quickly concealed with mulch. Drip irrigation also allows you to water a large area from a small water source, since it uses water more slowly than other methods.
Installing drip to new plants will help them develop deep roots which are more resistant to dry spells.
However, the greatest advantage for the home gardener is time savings. The simple action of opening a valve replaces all the time spent watering by hand. With the addition of an auto-matic timer, you can go on vacation or cope with a busy schedule while your garden flourishes without you.
How To Use This HandbookThe following pages will help you
design, purchase, and install a drip ir-rigation system tailored to your own garden. The last half of this catalog illustrates a selection of drip compo-nents and other products that we have found useful for home gardeners.
All the products shown here are proven, low-cost agricultural quality equipment suitable for use in home gardens. When a farmer installs and operates several acres of drip equip-ment, any weaknesses in design or manufacture become apparent pretty quickly.
If you don’t find what you are looking for, call us. We carry a larger inventory of both drip and sprinkler equipment than this catalog represents, and will usually have the irrigation part you need. We encourage you to draw your garden on the graph paper in the back of the catalog and start laying plans for your drip system.
AdvantagesA drip system produces healthy,
fast-growing plants. In fact, improved crop yields were the primary force be-hind the development of drip irrigation for agriculture.
In traditional watering methods there is an extreme fluctuation in the water content, temperature, and aera-tion of the soil, resulting in plant stress. Drip watering keeps the moisture content of soil relatively constant and ensures that oxygen remains available to the root system.
For many gardeners, water conser-vation is the main reason for installing a drip system. When you water your garden, your purpose is to water plants rather than soil. Drip irrigation gives you the ability to put water exactly where it’s needed and keep paths and areas between plants dry. This reduces both waste and weeding.
You can regulate precisely the amount of water used during irrigation so that nearly all of it remains in the root zone. Water lost to evaporation is negligible compared to overhead wa-tering.
Traditional watering methods deliver water faster than most soils can absorb. If water exceeds the soil’s percolation rate, it can only run off the surface, taking valuable topsoil and nutrients with it. On a slope, drip can be designed for minimum run-off and, is often the only means of bringing a hillside into cultivation.
Another advantage of drip is that you can deliver equal amounts of water to plants over a wide area. This is very hard to accomplish with other methods of irrigation. Drip irrigation saves so much water that it is required by Cali-fornia law as the way to water narrow or sparse plantings in new commercial and larger residential landscapes.
A drip irrigation system is easy to
Drip irrigation is the slow and precise delivery of water to chosen plantings. It uses flexible polyethylene tubing with devices for dripping water (emitters) and low-volume sprays. The systems are easy to install, require no trenching, and the only tools needed are pruning shears and a punch.
Drip irrigation maintains near-perfect moisture levels in the root zone of plants, avoiding the too wet/too dry swings typical of overhead watering. Drip systems are controlled by hand or by an automatic timer, and can also be used to apply fertilizers directly to the roots of plants.Drip systems irrigate all types of landscape: shrubs, trees, perennial beds, ground covers, annuals and lawns. Drip is the best choice to water roof gardens, containers on decks and patios, row crops and kitchen gardens, orchards, and vineyards. Systems range in size from a few hanging baskets to several thousand acres of crops.
Introduction to Drip Irrigation

Call toll-free: 1-800-753-DRIP Fax: (415) 661-7826 Visa & Mastercard accepted 2
© 2006 THE URBAN FARMER STORE®
LandscapeLandscape plantings with various
water needs are often mixed together in one garden. Ideally, each group of plants with similar needs is watered by a separate zone of the irrigation system, controlled by a valve.
In practice the number of zones you set up will also be influenced by the size of the garden. A small ornamental garden is often divided into only two zones—one requiring frequent, relatively shallow watering and the other infrequent, deeper water. A large landscape might require dif-ferent zones for hedges, trees, a shade garden, perennial beds in full sun, an area of native plants and so on.
You’ve probably noticed that certain areas of your garden dry out faster than others, depending on ex-posure to sun and wind, differing soil drainage, and competition from tree roots for available water. A small gar-den where the plants have essentially similar water needs can be handled with a single zone. You can insert faster drippers or more drippers to take care of thirstier plants.
Hedges, perennial beds, and trees each lend themselves to different styles of drip layout. Dense plantings such as hedges, annual borders, and ground covers are typically watered using emitter lines, tubing with pre-
a good idea to keep a few repair parts on hand just in case.
ContainersPlants in containers, which dry
out faster than those in the ground, are prime candidates for an automatic drip system. Hand watering is very time consuming and the plants suffer im-mediately when watering is neglected.
A container drip system should always be zoned separately because its watering schedule is unique. Con-tainer plants need frequent waterings for only 2 to 5 minutes at a time.
In a container system, a 1/2" or 3/8" line is run below or behind the plants, under the railing, or under the deck it-self. Smaller tubing (1/4") goes to each container. The 1/4" tubing is available in various colors to help hide it. It can also be run through the container’s drainage hole.
All but the smallest containers need several emitters placed in them because their soil is so loose that water from each emitter moves down-ward without much sideways spread. The irrigation strategy is to place drip emitters 6" apart, or to attach small ad-justable bubblers to spread the water. Useful products from the catalog are mini-inline emitters, 1/4" emitter lines, shrubblers, and vortex sprays, all il-
Landscape
APPLICATIONS
inserted drip emitters spaced at regular intervals. Irregular plantings such as shrubs and perennial beds are most often watered with individual drippers chosen for the needs of each plant.
...each group of plants with similar needs is watered by a separate zone of the irrigation system, controlled by a valve.
Small sprays attached to the drip system are also useful in mixed land-scape. A common design is to water the ground cover between shrubs with sprays, while adding extra water near the base of each shrub with drip emit-ters. Another good use of sprays is to water small plants or ground cover growing among rocks or flagstones. For a summary of drip vs. microsprays see the comparison chart on page 7.
The best layout to water trees and large shrubs is to stake a tail of emitter line halfway between the trunk and can-opy. Newly planted trees need at least two drippers directly on their root ball.
The flexibility of drip irrigation al-lows one to remove individual emitters from a system by replacing them with a “goof plug” or to add new emitters or lines to a system with little worry about design. If a line is accidentally cut, it easily is repaired with a connector. It’s
������
����������
�������
����������
�����
������������
���������������
��������������������������

3Availability, price, shipping charges, and sales tax subject to change without notice
© 2006 THE URBAN FARMER STORE®
lustrated on pages 11-13. In containers less than 6" diameter, individual drip emitters will suffice.
A single 1/4" line can supply wa-ter to several containers. Add up the flow rates of the emitters that you are planning to use and compare with the maximum flow rates for the different types of 1/4" tubing (page 14). Emit-ters for containers can apply as little as 1/2 gallon per hour or as much as 10 gph.
Adjusting the number and size of emitters in a container drip system takes some experimenting, especially if the containers are of different sizes. Run the system and see which con-tainers the water runs out of first. You either have to decrease the flow in these or increase the flow rate to the other containers on the system. This process will also help you set the run time for the system.
VegetablesVegetables prosper when the sur-
rounding soil is kept quite moist, but frequent overhead watering encourag-es rust, mildew, blossom damage, and
disease. Closely spaced drip emit-ters can thoroughly water an area without wetting the plant leaves. In the rich soil of a well-prepared veg-etable bed, drip irrigation produces spectacular growth and yields.
Rows and intensive beds are watered using emitter lines, with drippers 12" apart along the line. If plants are more widely spaced and deeply rooted (for example, toma-toes and squash), a single emitter can be placed at the base of each plant.
Root crops such as carrots, onions, and radishes can be planted two deep on each side of a single emitter line. With plants such as corn, strawberries, and peppers, one row on each side is preferable.
In intensive bed gardening, the system should be set up with parallel emitter lines 16" apart. If the bed is 4 feet wide, three lines will give com-plete coverage. This system does not need to be changed when plantings change. Extra sprays and even indi-vidual emitters can be added for any plants that need extra water.
In the rich soil of a well- prepared vegetable bed, drip irrigation produces spectacu-lar growth and yields.
If overhead water is needed, for instance when growing salad greens from seed in a hot climate, then half-circle jet sprays can be installed on poly tubing along the edges of the beds instead of using parallel emitter lines.
Polytubing & emitterline used in drip irrigation contains no lead and are proven safe & non-toxic for watering food crops. Garden hoses & porous "soaker" hoses may contain lead & other toxins.
�������
�����������
��������
�������������� �����������
�����������
��������������
Containers
Vegetables
Emitters
1/2" Poly
Path
Emitter line
Tee
APPLICATIONS

Call toll-free: 1-800-753-DRIP Fax: (415) 661-7826 Visa & Mastercard accepted 4
© 2006 THE URBAN FARMER STORE®
LawnsDrip irrigation for lawn watering
is finally moving out of the experi-mental stage. Five years of indepen-dent tests at the Center for Irrigation Technology comparing many prod-ucts and installation methods in the extreme heat of California’s Central Valley give us confidence in recommending this option. When properly installed with air vents and automatic flushing ends, subsur-face emitter lines are proving very reliable.
The advantages over conven-tional lawn sprinklers include signifi-cant water savings, especially on hot or windy sites, and a surprising de-cline in turf diseases. Weed invasion may also be significantly reduced in healthy, dense turf since there is no topical moisture to encourage seed germination.
Subsurface lawn irrigation is particularly valuable on lawns where efficient sprinkler layout is difficult, such as steep slopes, long narrow strips, and odd shapes of all sorts.
A typical layout for a subsurface lawn system is shown below. Emit-ter lines are placed in parallel rows 4" to 6" below the soil. Spacing var-
ies with soil type. In heavy clay soils, use 18" between lines, with emitters 18" apart on the lines. Tighter spacing is needed in lighter soils because the lateral water spread is not as great. The closest spacing ever needed is 12" between lines, with emitters 12" apart on the lines.
The lines are connected by head-ers on both ends. An automatic flush valve is attached to the header farthest from the water supply and is located in a valve box (see diagram). The flush valve allows any sediment to escape from the tubing each time the system starts up, and then closes down after it expels about 1 gallon of water.
The air vent operates after the system has shut down and is drain-ing. It permits air to replace water in the tubing and minimizes suction of sediment into the emitters. An air vent should be installed for each zone at the high point and can be buried in a valve box that has good drainage. If an anti-siphon valve is used to turn the system on and off, you do not need an additional air vent.
Emitter lines can be placed un-der the soil in several ways: by hand trenching; with a mechanical trencher that cuts a narrow slot; or with a pipe-
pulling vibratory plow. Another pos-sibility when you’re undertaking exten-sive soil amendment is to lay the tubing before the final 4" of soil is spread. Site conditions will usually suggest the most economical approach.
An advantage of drip for lawns is the good control you have over the amount of water that different areas receive. For instance, if a berm, a slope, and flat areas of turf are irrigated on the same valve, you can place tubing close together on the berm to increase the pre-cipitation rate and use normal spacing for the flat areas, with greater distance between lines as you approach the bot-tom of the slope. Emitter lines next to walkways and patios should be located no more than 4" from the hard edge to prevent dry strips.
Subsurface lawn irrigation is particularly valuable on lawns where efficient sprinkler layout is difficult, such as steep slopes, windy areas, long narrow strips and odd shapes of all sorts.
Lawns
APPLICATIONS
Air Vent
Flush Valve

5Availability, price, shipping charges, and sales tax subject to change without notice
© 2006 THE URBAN FARMER STORE®
Tubing
Emitters
OrchardsDrip irrigation is widely used
in commercial orchards. Slow, deep waterings and precision control encourage tree growth without the oversaturation and weeds that flood or sprinkler irrigation can bring. Equal amounts of water can be de-livered to each tree.
The changing water needs of growing trees can be easily met if you size your piping to the trees’ mature water needs. Saplings can start with one emitter at the base of each tree, and emitters can be added as needed. The drawings below illus-trate some common layouts:
1. Run lines down rows of trees and place emitters at base of each tree.
2. Run lines along rows about 3 feet on either side of trees to encourage balanced root growth.
3. “Tee off” each line with a loop around each tree to water the entire circumference of the root zone.
4. Use sprays with sandy soil if cul-tivation methods allow. One or two jet sprays on stands can cover the entire root zone of a tree.
VineyardsEven the largest and most old-
fashioned wine-grape growers have converted to drip irrigation, and for good reason: Drip irrigation provides excellent water management, reduces runoff and erosion on slopes, discour-ages harmful mold, and produces better fruit.
The preferred method of installa-tion is to tie tubing to a wire suspended about 18" off the ground attached to the grape stakes. At this height, the tubing doesn’t interfere with weeding.
Once tied on, the tubing is allowed to unwind for a few days so that when the emitters are punched into the
bottom of the tubing, they stay pointed down. The drip will then fall where intended instead of running along the tubing. Since vineyard rows are often long and on uneven terrain, pressure-compensating emitters should be used.
A typical layout involves a rigid PVC supply line underground at the ends of the rows, flexible PVC with a hose-thread filter to bring water for each row above ground, and then 1/2" poly tubing along each row. Each vine is watered with one, or better yet, two emitters. Lateral lines can be over 1000' long depending on emitter size and vine spacing.
Trees
Vineyards
A fertilizer injector is a useful addition to your vineyard or orchard dripsystem. By allowing you to deliver nutrients di-rectly to the root zone, an injector can help pro-duce maximum plant growth. It can also be used to treat mineral de-posits and algae growth. Using only the existing water pressure, they are simple to install and re-quire no outside power sources.
1
3
2
4
APPLICATIONS

Call toll-free: 1-800-753-DRIP Fax: (415) 661-7826 Visa & Mastercard accepted 6
© 2006 THE URBAN FARMER STORE®
run as a single unit. If, however, a zone needs more than the hose bibb is able to deliver at one time, it can be divided into as many smaller zones as necessary.
To determine the hose bibb’s flow rate, run the water at full force into a measured bucket and time how long it takes to fill. If, for example, a 5-gallon bucket takes 30 seconds to fill, then the flow is 10 gallons per minute (gpm), or 600 gallons per hour (gph). Figure that maximum usable flow is 75 percent of the flow rate into the bucket—in this example 7.5 gpm or 450 gph. This is the largest zone that the source can supply at one time.
Finally, mark on your drawing the tubing and emitters for each zone and make up a list of materials, including fittings, that you need for the project.
Emitter PlacementThe most important factors are the
size of the root zone and type of soil. Make sure that you are watering more than 50% of the root zone. Refer to the chart below for guidelines. Shallow roots require closer emitter spacing than deep roots because the system run time will be shorter, giving less lateral spread from each emitter.
Water moves downwards in soil due to gravity and from particle to par-ticle in all directions due to capillary action. In coarse sandy soil, gravity
SELECTION, NUMBER & SPACING OF EMITTERS
Flow Rate Number of Placement of (gph) Emitters Emitters
Low shrubs (2-3') 1.0 1-2 at plant
Shrubs and trees (3-5') 1.0 2 6-12" either side
Shrubs and trees (5-10') 2.0 2-3 2' from trunk
Shrubs and trees (10-20') 2.0 3-4 3' apart
Trees (over 20') 2.0 6 or more 4' apart
Flower beds 1.0 1 at plant
Ground cover 1.0 1 at plant
Vegetables, closely spaced 0.5-1.0 1 every 12"
PlanningTo aid planning and design, all
systems should be sketched to scale on graph paper. (You can use the inside back cover of this catalog.) Draw a plan of your yard or garden indicating areas of ground cover, flower and veg-etable beds, lawns, and patios. Note on your drawing the location of hedges, shrubs, trees, and also retaining walls and driveways that will act as barriers to your piping.
Take an overall look at the area to be watered. Notice if the area slopes, how steeply it slopes and in which di-rection. Also note areas of shade from trees or the house, and areas where tree roots will compete for moisture with your plantings. This is the time to divide your garden into zones to be watered separately (see Landscape, page 2). Then decide whether each area is best watered with drippers or microsprays.
Draw a plan of your yard or garden indicating areas of ground cover, flower and vegetable beds, lawns, and patios.
The next step is to compare the flow rate from your water source to the flow that each proposed zone will need. Most zones in home systems use less water than the faucet (hose bibb) is capable of delivering, and they can
DESIGN
affects water movement more than capillary action. In finer soils such as clay, capillary action is much stronger, so water will tend to spread before penetrating very deep. An emitter in sandy soil may suffice for an area 16" in diameter, while the same emitter in clay soil may wet an area 24" or more in diameter.
...irrigating new plantings, you need at least one dripper directly on each root ball.
A field test is useful. Slowly drip water from a garden hose on the soil to be irrigated. After half an hour, check to see how deep and wide the water has spread. Be sure to dig down into the soil away from the obvious wet area on the surface to see the extent of coverage.
Drip emitters are typically avail-able in flow rates of 1/2, 1, or 2 gallons per hour. Factors that influence the choice of flow rate include: (1) dif-ferent rates are used to give different amounts of water to plants on the same system; (2) sandy soil takes a fast drip rate, while a 2 gph dripper in clay soil produces a puddle of water and may result in dirty water getting back into the drip tubing; (3) choos-ing slower drippers allows you to use more in a single zone, and allows lon-ger runs of tubing.

7Availability, price, shipping charges, and sales tax subject to change without notice
© 2006 THE URBAN FARMER STORE®
If you do not use pressure-com-pensating emitters, more attention must be paid to keeping line-pressure values within acceptable limits. The maximum flow rates mentioned above for 3/8" and 1/2" tubing should be re-duced by a third, to 66 gph and 210 gph respectively, and the maximum elevation change should be 10 feet.
This is as much engineering as most home drip systems require. Higher flow rates can be handled by larger poly tubing or buried PVC pipe with risers for different areas. Once the tubing is laid out, extra drippers to water new plantings can be easily added. If expansion takes you over your usable flow rate, dividing the sys-tem into two or more parts is a simple solution. But no matter how large or small your system, a scale drawing is crucial in determining your needs.
other tubing sizes and maximum line length for different emitter lines.
Elevation change is another fac-tor that leads to pressure variations. If the tubing runs downhill, pressure in-creases by .433 psi per vertical foot. An equal amount of pressure is lost when the system runs uphill. If the difference between high and low points of the system is no more than 25 vertical feet and pressure-compensating emitters are used, then the pressure variation is ac-ceptable.
On a hilly site with greater eleva-tion changes, the main problem is that the pressure starts to strain the tubing and fittings. Our solution is to start with a 20 psi pressure regulator at the top of the slope, and install an extra 20 psi pressure regulator every 25 feet down. We run tubing with emitters across the slope with a single supply line down the slope.
When irrigating new plantings, you need at least one dripper directly on each root ball. Water doesn’t move well from surrounding soil into the growing medium in which container-grown plants are raised, and they are particularly vulnerable to drying out because of their small root zone. On a slope, put drippers on the uphill side of the plants that you are watering.
Sizing your componentsAfter you have determined the
number, output, and placement of emitters, mark them on your sketch. Draw in the lines to connect the emitters, noting the length of tubing and connectors needed.
Add up the flow of each drip-per to arrive at the total flow of the zone. Once you have determined the total flow, select the appropriate filter, pressure regulator, and tubing. For systems using 180 gph or less, a head assembly such as the hose bibb head assembly illustrated on page 8 is sufficient. Even on a small system a Y-filter may be preferable because it is so much easier to clean.
Add up the flow of each dripper to arrive at the total flow of the zone.
Tubing should be sized to keep pressure loss within acceptable limits so that each emitter is able to put out its expected flow. Pressure ranges for each emitter type are given on page 11 in the parts catalog. You’ll notice that pressure compensating emitters provide a constant flow rate over a wide range of pressures.
Pressure is always lost to friction as water flows through tubing. Fric-tion is greater at high flow rates and in smaller tubing. 1/2-inch tubing can be used for flows up to 320 gph. 3/8" tubing, sometimes preferable for its low profile and extra flexibility, will carry up to 100 gph. Check the cata-log pages for recommended flows of
• can be completely hidden by mulch, protected from view and from damage
• need a large number to water an area of ground cover or an annual flower bed
• give precise placement of water
• minimum water loss by evaporation
• in most landscapes, the coverage provided by a drip system will improve as the plants mature. As roots grow deeper, the duration of watering lengthens, and each dripper will irrigate a wider area
• maintenance of a drip system requires careful, if infrequent, inspection
• cannot be completely hidden; vulnerable to disturbance by children and pets
• can be placed 5-8 feet apart so less tubing is needed; easier to cultivate around the system
• not as precise as drippers–not good for planters on decks, for instance. Can increase weed growth
• lose 20–30% of their water to evaporation
• coverage from sprays can deteriorate as the plants grow, blocking the spray patterns
• sprays can also be blocked by weed growth
• if problems develop with a spray system they are more easily seen
MICRO SPRAYSEMITTERS
Here are some factors to consider when deciding between drippers or sprays for a particular area
DESIGN

Call toll-free: 1-800-753-DRIP Fax: (415) 661-7826 Visa & Mastercard accepted 8
© 2006 THE URBAN FARMER STORE®
separate circuit. Be sure that the casing of the filter is strong enough to take full, constant water pressure (we recommend the Amiad filter, page 17), and use a brass adjustable pressure regulator.
A standard vacuum breaker will be useless if installed on the supply line to one or more valves, because the plastic float inside it becomes stuck to its seat when the device is left under constant pressure. Rather, a vacuum breaker
must be placed after each valve. We can supply backflow preventers to go on a constant pressure line, if necessary.
Lines and FittingsPolyethylene tubing is run from the
source of water to the plant, where the emitter is attached. Emitter line (poly tubing with pre-installed emitters) is used where a continuous band of water is needed.
The head assembly is the connec-tion between the source of water and the drip irrigation system. At the least, it includes a backflow preventer, filter, and pressure regulator.
Hose bibb head assembly1. An timer connects to the hose bibb. Without a timer you must remember to turn it on and off manually.2. A vacuum breaker, the simplest back-flow preventer, connects after the timer. These should not be under constant pres-sure. 3. An in-line screen filter attaches to the vacuum breaker to keep rust and other water impurities from clogging the emit-ters. 4. A preset pressure regulator installs after the filter to reduce pressure in the lines to 25-30 psi. 5. A compression fitting connects the assembly to your tubing.
These items cost about $100 and can be installed in two minutes.
The most common addition to the basic head assembly is a fertilizer injec-tor, which allows you to feed your plants while you water. Drip systems pose spe-cial problems with the usual methods of fertilizing, which rely on overhead water to dissolve and spread the nutrients. An injector allows you to apply fertilizer with the same accuracy as your watering system. All injectors should be installed downstream from a backflow preventer (no one wants to drink fertilizer!).
Pipe-thread head assemblyMost pipe-threaded systems start
with an electric anti-siphon valve wired to a timer. The Y-filter screws directly into the valve, then the pressure regula-tor, and then the pipe-thread to tubing adapter connects to your lines.
All pipe-threaded joints require at least 3 wraps of teflon tape before you screw them together. An alternative set-up is to install a filter and an adjust-able pressure regulator on the supply line leading to more than one automatic valve, with each valve controlling a
Pipe-thread assembly
ASSEMBLY
Hose thread is the coarse thread used on the outlet side of hose bibbs and on the fittings of garden hoses. Hose-threaded components are typically lighter weight and will not carry as much water flow as pipe-threaded parts. The vacuum breaker goes after the timer.
All hose-thread assembly Deluxe hose bib assemblyFor easier servicing & higher flow rates, switch to pipe thread with an FHT X FPT adapter after the vacuum breaker, then you can use the better pipe thread Y filter & pressure regulator, just like the pipe thread system.
CH12, p.16 CHHVB, p.17
DI900, p.18
AM39, p.17
SEPR30L, p.18
1C7MP, p.16
DI900, p.18
CHHVB, p.17
SH63C, p.16
HEPR25, p.16
1C7FH, p.16
1HTF, p.18
SH84B, p.16
item number, page item number, page
parts are replaceable & last longer. Better suited to high water pressure & provides higher flow rates. Requires irrigation timer (see pages 19 & 22).
AM39, p.17
SEPR30L, p.18
1C7MP, p.16
SU80075, p.17
LL75ASVUB, p.17
1) turn off house water2) remove hose bibb3) screw in 4" brass nipple 4) screw on threaded tee5) screw short nipple into tee side6) add gate valve to nipple7) move hose bibb to tee front8) turn house water back on9) build valve manifold

9Availability, price, shipping charges, and sales tax subject to change without notice
© 2006 THE URBAN FARMER STORE®
Assembly Tips1. Start the installation at the
water source, working out to the laterals.
2. Be aware of the type of thread in your fittings. Forcing a hose-thread fitting onto a pipe-thread fitting can strip threads and cause leaks.
3. When pipe-thread connections are made, wrap threads with at least three layers of Teflon tape before connecting.
4. Check the correct direction of flow on valves and head assembly parts. All pipe-thread components have an arrow on them that points in the direction of water flow. Hose-thread parts are even more foolproof: all inlets are female and all outlets are male, which makes correct installation natural when the parts are screwed onto a hose bibb.
5. Do not tighten plastic hose thread fittings with a wrench. If you need to use a wrench on plastic pipe-thread fittings, be very gentle.
6. If you want to use your hose bibb to connect a garden hose & a drip system, use a hose Y shut-off. This turns one hose bibb into two, each with its own shut-off.
7. Be careful to keep dirt out of the tubing during assembly. After laying out the lines, open the ends and let water run through to flush them.
8. Letting the tubing sit in the sun will make it easier to manipulate. Dipping the end of the tubing into hot water makes it easier to connect the fittings.
9. Do not force the tubing too far into compression fittings, as this may interfere with water flow (1" into the fitting is enough).
10. When installing pipe under a sidewalk, let water dig for you. Attach a garden hose to a stiff piece of pipe and work the pipe under the structure.
11. When you punch a hole for an emitter or connector, hold the punch at a right angle to the tubing. This makes a round hole which will seal tightly around the barb of the emitter.
�������
�����������
�����������
������������������������
�����
��������������
���������������
���������������
���������������
�����������
�����������������
Poly tubing has many advantages. It is resistant to ultra-violet damage from the sun, giving it a life of 15-25 years. It is light, flexible, and easy to move. Its fittings require no glue or clamps. It has “memory”—when emit-ters are inserted, it seals around their barbs. With both compression and barbed fittings, the tubing is pushed into place, and its elasticity and memory hold it secure. A barbed fitting fits in-side the tubing; a compression fitting fits over it.
Fittings are available to make sharp turns (elbows), branch lines (tees), and to make the transition between differ-ent sizes of tubing. At the end of each line is an end cap with provision for flushing the line. Couplings allow you to extend lines or replace damaged sec-tions.
As lines are laid out, the tubing may have to be secured until it takes shape. This can be done with stakes de-signed for this purpose. Leaving a little slack in the lines will allow for expan-sion and contraction from temperature changes, and will help prevent emitters from moving out of position.
EmittersOnce the lines are in place and
flushed, the emitters can be installed.
Simply make a hole in the tubing with a hole punch, then pop the barbed end of the emitter into the hole. If you punch a hole in the wrong place, it can be fixed with a goof plug.
There are four ways to install emit-ters. The most common method is to place the emitter directly on the line. This way you only have to punch the hole and pop in the emitter.
Another way is to install a connector into the line, run 1/4" tubing to the place where the water is desired, and push the emitter into the end of the tubing. A third way is to place the emitter on the tubing and use 1/8" or 1/4" tubing to transport the water to the base of each plant. Finally, you can cut 1/4" tubing and insert an in-line emitter that drips and also allows water to pass through to the next emitter.
To install a spray, first punch a hole in the main line and insert a 1/4" con-nector. A short length of 1/4" tubing then leads from the connector to a stake. The spray screws directly into the stake and can be raised with an extender if it is blocked by plants.
Some misters are supplied already attached to a spike which pushes into the soil, and a barb to which you attach 1/4" tubing to supply water. Others are designed to be attached directly to tub-ing above the plants—in a greenhouse or above a hanging basket, for example.
ASSEMBLY

Call toll-free: 1-800-753-DRIP Fax: (415) 661-7826 Visa & Mastercard accepted 10
© 2006 THE URBAN FARMER STORE®
We suggest that you plan a com-plete inspection of your system at the beginning of each season. This may be all that you need to do unless there is much foot traffi c or animal damage.
The other time to check your sys-tem carefully is after any new planting or garden maintenance that may have damaged the tubing. Turn on your sys-tem when it is quiet and listen for leaks.
If you are having trouble with your system, conduct the standard mainte-nance procedures fi rst. If the problem is a single emitter, replace it. If it is more widespread, look for a break in the lines. If the problem cannot be determined by observation, it may be a result of inadequate water supply or faulty system design. Feel free to call the Urban Farmer Store for assistance.
Goof plugs can be used to plug holes from which emitters have been removed. They are very simple to use, and are indispensable when doing re-pair work or changing your pattern of plantings. Likewise, couplings come in very handy when any repair needs to be done on a damaged section of line. Simply cut out the damaged sec-tion and install a new piece using the couplings to connect the two pieces together.
occasional deep watering and those that prefer frequent shallow watering. This can be partly accomplished by using emitters of higher output on the deep rooted plants. If this is not practical because of other factors, a compromise can be reached by doing shallow water-ings on a frequent basis as well as oc-casional deep waterings.
The new self adjusting evapotrans-piration controllers take the guesswork out of scheduling. These new control-lers apply exactly the right amount of water for each zone throughout the year, automatically, while reducing landscape water use by 20-50%. See page 22 for more information.
Maintenance Occasional maintenance should be carried out on all drip irriga-tion systems. Inspect the fl ow from each emitter, fl ush lines by unscrewing the end caps and turning the water on, and clean the fi lter. The development of drip irrigation products–now in their third decade–has led to successful and trou-ble-free systems for both the farmer and the homeowner. The design of a system using fi ltration and quality emitters will make maintenance a simple yearly task. Visual inspection of the system is the best way to observe performance, and can be done in minutes while gardening.
SchedulingThe object of each watering is
to bring the moisture in the root zone up to a satisfactory level. Once the desired moisture content is reached, no more water should be applied. Too much water cuts off necessary oxygen and washes nutrients out of the reach of the roots. Before the soil has dried out too much the system should be run again. In this way the plants can be maintained in near optimal condi-tions.
The new self-adjusting evapotranspiration control-lers take the guesswork out of scheduling. See page 22.
Many factors affect how much water should be applied in any one period of time. Among these are: soil type, root depth, air temperature, hu-midity, and the plant’s maturity. With drip irrigation it is possible to take all of these factors into account to provide ideal growing conditions for your plants.
The chart below lists times and intervals for watering different plants. Keep in mind that both are greatly affected by the factors mentioned above. The most important of those factors are depth of the root zone and soil composition. The deeper the roots and the fi ner the soil, the longer the watering time must be, but you can reduce the frequency of watering. A fi ne soil such as clay cannot absorb water very quickly, but will hold the moisture for a longer period of time.
Shallow root zones and sandy soil types will require frequent waterings of a shorter duration. Observe plant and soil moisture conditions, consult local experts (agricultural extension agents, nursery personnel), and adjust watering times and intervals to maxi-mize growth and minimize water use.
In a system with mixed plantings, such as in most landscaping designs, some compromises may have to be made between plants that require
WATERING SCHEDULE GUIDELINES
Type of Plant Time Intervals (in hours) (in days)
Low shrubs (2 - 3') 2 3
Shrubs and trees (3 - 5') 3 4
Shrubs and trees (5 -10') 4 5
Shrubs and trees (10 - 20') 5 6
Trees (20' or over) 6 7
Flower beds 1 2
Ground covers 1 2
Vegetables - close spacing .5-1 2
Vegetables - wide spacing 1.5 2
Potted plants 1-10 min. 1
SYSTEM USE

11Availability, price, shipping charges, and sales tax subject to change without notice
© 2006 THE URBAN FARMER STORE®
Item Catalog # Price
1/4 gph Yellow IDCOR025 .321/2 gph Red IDCOR05 .321 gph Black IDCOR1 .322 gph Green IDCOR2 .32
1/2 gph Red AFIF05 .441 gph Black AFIF10 .44 2 gph Green AFIF20 .44
1/2 gph Red RDPC05 .381 gph Black RDPC10 .382 gph Green RDPC20 .38Inserter 1PCPIT 1.00
1/2 gph Red NFPCJR05 .381 gph Gray NFPCJR10 .382 gph Green NFPCJR20 .38
1/2 gph Red 1MIN05 .401 gph Black 1MIN10 .40
360° barb SPSHRUB .65360° spike SPSHRUBSTK .75
180° barb SPSHRUB180 .65180° spike SPSHSTK180 .75
inline 360° barb SPSHRUBIN .65
Drip Emitters Emitters are the most important part of any drip irrigation system. They should deliver water at a predictable rate and resist clogging. In a large or hilly system, the emitter should com-pensate for variations in line pressure. Emitter types are: Simple orifi ce—fl ow is limited by a very small hole. Laminar fl ow—water travels through a long spiral or tube, permitting a larger opening than the simple orifi ce emitter. Turbulent fl ow—turbulence reduces water pressure, allowing the fl ow path of a laminar fl ow emitter to
be widened. This decreases clogging problems and provides partial pres-sure compensation. Diaphragm—a silicone rubber orifi ce constricts as the pressure increases. This results in full pressure compensation, making them the emitter of choice for large systems and systems on slopes. Diaphragm emitters also resist clogging, since de-bris is expelled through the large, re-laxed orifi ce at the beginning and end of each irrigation cycle.
gph = gallons per hour
➞
➞
Turbulent fl ow design allows use of a larger water passage, which minimizes clogging. Widely used agricul-tural emitter with good uniformity of manufacture. 1/4" inlet. By NETAFIM.
Isofl ow diaphragm emitter, full pressure compensation from 10 to 50 psi. Can be cleaned out with a paperclip without removing it from the system. 1/4" inlet. By AGRI-FIM.
PC Plus™ labyrinth/diaphragm disc design. A self-piercing barb allows the emitter to be pushed directly in the supply line. 1/4" tubing can be attached to both inlet and outlet. By AGRIFIM.
PCjr next generation pressure compensating self fl ushing emitters provide uniform fl ow between 7 and 50 psi with 1.5 psi check valve that holds back up to a 3.5 foot column of water. 1/4" tubing can be attached to both inlet (always colored) or outlet (always black) By Netafi m.
Mini-Inline turbulent fl ow design with two 1/4" barbs. Main fl ow of water passes through the emitter and contin-ues down the line, while the drip comes from an orifi ce on the side of the emitter. Used to make a chain of emitters, 6" to 12" apart, for use in planters. End the line with a Turbulent fl ow, PC Plus™ or Isofl ow emitter. By AGRIFIM.
Shrubbler emitters are fully adjustable from a gentle stream pattern for wide coverage to a precise drip action. Particularly useful to spread the water in loose soil such as in containers, or where a high fl ow rate is required (ad-justable from 0 to 13 gph). Available in full-circle or half- circle models, and with either a 1/4" barb or a 5" spike with barb. By ANTELCO.

12
THE URBAN FARMER STOREPARTS CATALOG
Order toll-free: 1-800-753-DRIP Fax: (415) 661-7826 Visa & Mastercard accepted
Weather Tec mister comes with a built-in stake which allows you to point the spray in the desired di-rection. Throws a narrow cone of water, usually at an individual plant. By WEATHER TEC.
O-Jet spray one-piece construction, comes in 90°, 180° and 30°- 30° pattern outputs. By OLSON.
Stake holds jet sprays and mini-sprinklers. 13.5" overall length with 1/4" barb for tubing on input. Spray tips screw directly into stake. By GLOBAL.
Varijet sprays come in 90°, 180° and 360° models. Maximum output 40 gph with a 22' diameter. Down-ward adjustment reduces both area and gallonage.
Hydro-pop sprays connect to regular 1/4" drip tub-ing with simple compression and pop up at 15 psi minimum. Available in 6" and 12" and with optional protector attachment to keep soil out. Use with any threaded spray nozzle. By AGRIFIM.
Varirotor rotating sprinkler with shut-off uses from 0-30 gph wide open and waters a circle up to 30' in di-ameter, with good control for smaller areas. Note: low precipitation rate makes it hard to balance this spray with the jet sprays. By ANTELCO.
Vortex spray Spectrum 360 jets throw a heavy, full-circle spray. Adjustable up to 5.5' radius, 0-20gph. One with a screw base like a jet spray, the other with built-in spike. By ANTELCO.
Mister 2 gph output, good for hanging plants, bonsai. Attach to mainline with 1/4" tubing or use with optional stake. By TORO AG.
Sprays
Item Catalog # Price
3 gph WTMS3 1.105 gph WTMS5 1.10
Black 90° OJETBK090 .40Black 30°-30° OJETBK030 .40Black 180° OJETBK180 .40Blue 90° OJETBU090 .40Blue 180° OJETBU180 .40Blue 30°-30° OJETBU030 .40Green 90° OJETGR090 .40Green 180° OJETGR180 .40Green 30°-30° OJETGR030 .40Red 90° OJETRD090 .40Red 180° OJETRD180 .40Red 30°-30° OJETRD030 .40
Stake MJSS .60
Varijet 90° VJ90 .95Varijet 180° VJ180 .95Varijet 360° VJ360 .95
6" pop-up height AFHPJR 5.2512" pop-up height AFPH 5.50Protector AFPUPS 2.00
Varirotor 360° VRS360 1.50
360° spray SPSPRAY .65360° w/ spike SPSPRAYSTK .75
2 gph mister RJMS2 .65stake RJMSST .38
Misters have the lowest output and produce the smallest droplets. They are in the 2–5 gph range and are directed at one or two plants. Jet sprays have a small deflection cap that directs a stream of water into a specific pattern
(i.e., 90°, 180°, etc.) to cover an area of plantings. Vortex sprays throw a full circle spray up to an 11' diameter. Mini-sprinklers water a full-circle by spin-ning small droplets or streams in a 360° arc to 25' diameter.
Sprays used with drip irrigation differ from conventional sprinklers in that they water more slowly and oper-ate at low pressures. This allows them to be used successfully in systems with drip emitters.
GP
H@ 20 psi
90° 180°30° - 30°
BLACK 6 4' 5' 5' BLUE 10 5' 6' 6'GREEN 17 6' 7' 7'RED 24 7' 8' 8'
Distances above are radius

13
PARTS CATALOG
Availability, price, shipping charges, and sales tax subject to change without notice
THE URBAN FARMER STORE
Emitter line is also available with a slow-release herbicide mixed into the plastic of each emitter. This means that the lines can be buried—particularly under lawns—without the problem of roots growing into the emitters. Typical spacing for burial under lawns is to use tubing with drippers 12" apart, and space the laterals from 12" to 18" apart depending on soil type. See Lawns (page 4) for installation details of air vents and automatic drain valves in valve boxes.Rootguard Emitter Line is 1/2" tubing with 1 gph turbulent flow emitters installed 12" apart. Manufactured by Toro the DL2000 has the herbicide Tre-flan™ fused into the emitter path to prevent root intrusion. This protection should last from 18 to 25 years depending on soil temperature. Maximum lateral length is 110'. By TORO.
Other brands, flow rates & spacings are available. Call to discuss options for your particular needs.
12" spacing, 100' roll RGP21201 71.68
12" spacing, 300' roll RGP21203 188.84
Auto flush valve, 1/2" MPT NFFV 13.82
Air vent, 1/2" MPT NFAVRV 9.42
6" round valve box BR70 5.60
Emitter line cut away showing turbulent flow labyrinth
1/4" Emitter Line is available with 1/2 gph emitters on 6" or 12" spacing. 6" spacing is best used to water plants in very loose soils, such as window boxes and other con-tainers with annual plantings. 12" spacing can be used for small vegetable beds and to make loops around the base of trees and shrubs. Attach the emitter line to larger tubing with 1/4" connectors (or 1/4" on/off valves to con-trol each row of vegetables). End each line with a goof plug or diaphragm-type dripper for extra flushing action. Maximum length is 19' for 6" spacing, 33' for 12" spac-ing. By DRIP IN & PEPCO.
1/2" Emitter Line with 1/2 gph turbulent flow emitters on 12" spacing is our most frequently used emitter line. The large labyrinth flow path gives an emitter resistant to clogging problems. 1/2" line is also available with emit-ters spaced 18" or 24" apart (500' rolls only). Maximum lateral length is 200' for 12" spacing, 260' for 18" spac-ing, 320' for 24" spacing. By DRIP IN.
A drip system using emitter lines is much quicker to lay out than installing individual emitters, and is the best answer for dense plantings or plants on regular spacing. If the plants are spaced irregularly or have different water needs, it's best to stick to individual emitters.
Emitter lines consist of polyethyl-ene tubing with drip emitters installed by the factory at regular intervals. Traditionally emitter line has used tur-bulent flow (or labyrinth) emitters, and now pressure compensating emitters
Emitter Line
Sub-surface Emitter Line
are also available. The emitters are installed as part of the tubing extrusion process, resulting in a sturdy product that can take light foot traffic and is easy to handle. The lines are best in-stalled on or near the soil surface, of-ten covered with a layer of mulch.
Item Catalog # Price
1/4" Emitter Line
6" spacing, 100' roll PDL0206 34.00
12" spacing, 100' roll PDL0212 24.00
1/2" Emitter Line
12" spacing, 100' roll PDL7100 34.00
12" spacing, 500' roll PDL7500 150.00
18" spacing, 500' roll
24" spacing, 500' roll
(only available in 500' rolls, call for pricing)

14
THE URBAN FARMER STOREPARTS CATALOG
Order toll-free: 1-800-753-DRIP Fax: (415) 661-7826 Visa & Mastercard accepted
1/2" PE is used for mainline in most systems. Actual dimensions are .700" OD, .600" ID. Maximum flow rate approx 320 gph, depending on length.
3/8" PE is more flexible and easier to hide than 1/2", so is used for lateral lines & deck systems. Actual dimensions are .455" OD, .375" ID. Flow rate to 100 gph.
1/4" PE has actual dimensions of .250" OD, .170" ID. Flow rate to 15 gph, or more on a short run to a single spray.
1/4" PVC is extra flexible for easier use around containers. Dimensions are .275" OD, .160" ID. Flow rate to 12 gph.
1/8" PE has actual dimensions of .185" OD, .125" ID. Use on the outlet side of micro-flapper emitters.
Item Catalog # Price
1/2 X 100 PE050100 16.901/2 X 500 PE050500 60.50
3/8 X 100 PE040100 10.503/8 X 500 PE040500 42.50
1/4 X 100 PE025100 5.501/4 X 500 PE025500 25.00
1/4 X 100 PF025100 9.75
1/8 X 100 PE012100 4.25
Compression adapters
Tubing
Polyethylene tubing is the standard supply line for drip irrigation systems. It is flexible, resists UV radiation, and has “memory” which
makes it easy to connect—no glue or clamps needed. Choose tubing large enough to carry water for all the emitters and sprays that may be attached to it. Figure that 3/8" tubing will carry
up to 100 gph. 1/2" tubing will carry 320 gph. Larger sizes are available for higher flow rates.
OD = outside diameter
ID = inside diameter
Multidiameter FittingsMultidiameter fittings, new from Rain Bird, work well with all of the PE tubing diameters commonly called "half inch" indicated by black, blue, green & brown compression rings (see above). If you want to stock only one size in your kit that's sure to fit everything you might encounter (except 3/8"), these are the ones!
Compression adapters can be used to make custom fittings. They glue into standard PVC fit-tings to make compression fittings for PE tubing. If you need to connect to other brands of tubing, send us a small sample or bring it with you to one of our stores.
BLACK Socket AdapterGlues into 3/4" PVC fitting or onto 1/2" pipe Fits .700" OD PE......................................................
BLUE (or Black) Compression AdapterGlues into 1/2" PVC fitting. Fits .700" OD PE............
GREEN Compression AdapterGlues into 1/2" PVC fitting. Fits .620" OD PE............
BROWN Compression AdapterGlues into 1/2" PVC fitting. Fits Netafim Techline......
RED Compression AdapterGlues into 1/2" PVC fitting. Fits 3/8" PE....................
.700 OD AFSA700 .75
.700 OD (1/2") 1CA7 .25
.620 OD 1CA6 .25
.660 OD 1CA66 .25
.400 OD (3/8") 1CA4 .25
Elbow RBMDCFEL 1.22Coupling RBMDCFCOUP 1.03Tee RBMDCFTEE 1.521/2" FPT insert RBMD50FPT .621/2" MPT insert RBMD50MPT .623/4" FPT insert RBMD75FPT .623/4" MPT insert RBMD75MPT .62Flush cap RBMDCAP .62

15
PARTS CATALOG
Availability, price, shipping charges, and sales tax subject to change without notice
THE URBAN FARMER STORE
FittingsItem Catalog # Price
1/4" barb 1T2 .253/8" 1T4 .901/2" 1T7 .901/2 x 1/2 x 3/8 1T774 .903/8 x 3/8 x 1/2 1T447 .90
1/4" barb 1L2 .253/8" 1L4 .901/2" 1L7 .90
1/4" barb 1C2 .153/8" 1C4 .551/2" 1C7 .551/2 x 3/8" 1C74 .55
3/8 " 1E4 .703/8 " flush 1E4FE 1.501/2 " 1E7 .701/2 " flush 1E7FE 1.75
3/8" x 3/4"MPT 1C4MP .951/2" x 3/4"MPT 1C7MP .953/8" x FHT 1C4FH .981/2" x FHT 1C7FH .98
1/2" poly x 1/2"FPT swivel tee 1TS7 1.80 swivel elbow 1LS7 1.80
Pkg of 10 1GP .50
T Fittings for 1/2" and 3/8" tubing work on a principle that makes it easy to get the tubing into them, but much harder to pull it out. These compression fittings cause minimal pressure loss. Size of branch is stated last. Sim-ple barbed tees are used for 1/4" tubing. No glue is used to hold poly tubing into fittings.
L Fittings for 1/2" and 3/8" tubing are compression type as above. Barbed elbows are used for 1/4" tubing. Drip tubing is flexible, so turns can be made without kinking. But elbows are useful around decks, patios, and in re-stricted spaces, where sharp 90˚ turns are needed.
Couplings for 1/2" or 3/8" tubing are used to add to a system, repair damaged sections or to connect one size to another. 1/4" connectors are used to connect 1/4" tubing to 1/2" or 3/8" (punch a hole in the larger tubing with a hole punch) or to connect 1/4" to itself.
End caps for 1/2" and 3/8" tubing with screwcap (hose thread) allow the system to be flushed out periodically. Automatically flushing end caps for above-ground use are also available that flush some water at the beginning and end of every watering period. This helps to purge the system of any silt that might build up in the tubing.
Thread-to-tubing adapter makes the final connec-tion between the head assembly and the PE drip tubing. Hose-thread adapters swivel like the female end of a gar-den hose. Pipe-thread adapters need Teflon tape to make the connection watertight.
Swivel fittings are used to connect 1/2" tubing to 1/2" MPT risers from underground PVC. They can be used when retrofitting drip to an existing sprinkler system, or if you use PVC to distribute the water to several beds and then need to switch to 1/2" poly.
Goof plugs stop the leak if you wish to remove a drip-per, spray, or 1/4" connector. One size fits most.
MHT Male Hose Thread (always 3/4")FHT Female Hose Thread (always 3/4")MPT Male Pipe ThreadFPT Female Pipe Thread

16
THE URBAN FARMER STOREPARTS CATALOG
Order toll-free: 1-800-753-DRIP Fax: (415) 661-7826 Visa & Mastercard accepted
On/Off valves are used to control sections of a system. 3/8" and 1/2" shut-offs are useful for individual control of vegetable beds, or areas of landscape with low water needs. The 1/4" on/off valve is excellent for turning off sprayers, supply lines to containers, or individual rows of 1/4" emitter line in a small vegetable bed.
Hose Y shut-off allows a drip system and a garden hose (or 2 drip systems) to run from one faucet. Goose-neck swivel lets hose bib accessories hang straight from the Y. Brass bodies, on/off valve for each outlet.
Hose-thread to pipe-thread adapters are avail-able to allow connections between incompatible com-ponents. Most FHT fittings swivel and all include a hose washer. Pipe thread fittings should be wrapped with Tef-lon tape to be watertight. Hose thread is always 3/4".
Teflon tape wraps around male pipe-thread to ensure a watertight seal. Do not use pipe dope or compound near automatic valves or on plastic threaded parts. 520" x 1/2" roll.
Blue & Green Punch makes holes in the walls of 1/2" and 3/8" tubing for emitters and connectors. Its long handle enables powerful leverage when used with a com-bination of pressure and rotation. The other end has a hex fitting in the end to help install Ojets.
Ergonomic squeeze punch uses the power of its lever handle to reduce hand fatigue. Remove tubing cradle insert for larger tubing diameters. Replaceable spring-loaded punch bit retracts after every punch. It streamlines workflow, reduces stress, and makes clean holes.
Orange & Yellow Punch Keys have hex fitting in handles. Use in 1/2" and 3/8" tubing to make holes for 1/8" and 1/4" fittings & emitters – the yellow is sharper!
3", 6" & 9" long galvanized wire stakes hold 1/4", 3/8", 1/2" & 3/4" respective sizes of poly tubing in place. Estimate one stake for every 5' of tubing or so.
Plastic stakes hold 1/4" & 1/8"tubing in place.
Mounting clips attach PE tubing to wood.
Item Catalog # Price
1/4" barbed shut-off 1SO2 .993/8" shut-off 1SO4 1.951/2" shut-off 1SO7 1.95Hose thread shut-off 1SOH 1.95
Brass Y shut-off SH63C 8.50Gooseneck swivel SH84B 6.39
3/4"MPT x MHT 1TRANS .751/2"MPT x MHT RBDP11 .89FHT x FHT CH07 2.52MHT x 3/4"MPT CH08 1.99 or 1/2"FPT FHT x 3/4"MPT CH09 2.09or 1/2"FPT FHT x 3/4"FPT CH12 2.73FHT x 1/2"FPT CH13 2.60
1/2" X 520" 5TT05 1.38
Blue punch 1/8" 1PBU 2.50Green punch 1/4" 1PGR 2.50
Ergonomic squeeze punch w/ blue bit AGPUNCH 13.50Extra blue bit 1/8" 1PBITB 1.85Extra green bit 1/4" 1PBITG 1.54
Orange punch 1POR .95Yellow punch 1PK .95
3" stake 1S2M .10Pack of 50 1S2M50 4.50
6" stake 1S7 .14Pack of 50 1S750 5.50
9" stake 1S7L .18Pack of 50 1S7L50 8.00
1/4" & 1/8"stake 1S2 .16
1/8" clip 1MC1 .101/4" clip 1MC2 .103/8" clip 1MC4 .151/2" clip 1MC7 .35
Stakes & Clips
Punches
Fittings
orange yellow

17
PARTS CATALOG
Availability, price, shipping charges, and sales tax subject to change without notice
THE URBAN FARMER STORE
������
�����������������������
������������������
��������������
��������� �����������
Item Catalog # Price
Plastic vacuum HEVB 3.75 breaker
Brass vacuum CHHVB 4.90 breaker
Filter 1HTF 5.00
3/4" Filter AM39 13.251" Filter AM391E 15.95
3/4" Filter AM3900 25.501" Filter AM3901 69.00
Water Connection
Backflow Preventer
Hose-thread vacuum breaker FHT x MHT screws onto a regular garden faucet to prevent back-si-phonage. Must be above high point of irrigation system. Plastic or brass models.
Hose-thread filter FHT x MHT. Good for small systems with clean water supply. 150 mesh washable screen. Maximum flow 180 gph.
Y-filter MPT x MPT. Large filtration area, spin-clean flow pattern. Easy to clean filter screen. Install after valve, maximum flow 3/4"-6 gpm, 1"-8 gpm. Both come with 155 mesh screen and are MPT x MPT.
Y-filter with flush valve. MPT x MPT. Has an extra-heavy casing and can be installed on the supply line to several valves. 3/4" max flow-13 gpm. 1" max flow-20 gpm. Both come with 155 mesh screen and are MPT x MPT.
Filters
blowouts. Use 25 or 30 psi for most systems, or 20 psi if you are starting at the top of a slope because the water gains pressure as it travels downhill. A fertilizer injector can be inserted before the filter (see page 18). It al-lows you to use any soluble fertilizer with precise control over the concen-tration and amount. Make sure that the fertilizer is truly water soluble and that the backflow preventer is work-ing.
A filter protects the small openings of drippers, sprays, and emitter lines from clogging. It contains a fine mesh screen that can be rinsed and reused. Y-filters are the easiest type to clean and allow higher flow rates. A pressure regulator reduces the high water pressure in home plumbing from the normal 45-100 lbs per sq. in. (psi) to 30 psi or less, depending on the model used. This lower pressure greatly increases the life of your tubing and fittings and will reduce leaks and
The following components are commonly used at the beginning of a drip system. A backflow pre-venter is required for all watering systems that are connected to the household water supply. The most common and reliable type is an anti-siphon device that eliminates the possibility of back siphonage of irrigation water. The anti-siphon is usually part of the irrigation valve, or it can screw onto a regular gar-den hose bibb.

18
THE URBAN FARMER STOREPARTS CATALOG
Order toll-free: 1-800-753-DRIP Fax: (415) 661-7826 Visa & Mastercard accepted
Pressure RegulatorsHendrickson pre-set 25 lb pressure regulator, used in small systems from a hose bibb. FHT x MHT.
Senninger pre-set 20 and 30 lb pressure regulators, used in most systems. 3/4" FPT inlet and outlet, will handle flows from 1/10th to 8 gpm. 1" FPT inlet and outlet, set at 30 psi for flows up to 20 gpm.
Wilkins BR4 series adjustable pressure regulator. Pres-sure range is 15-150 psi, maximum inlet pressure 400 psi. Bronze body with union and composite bell housing. May be installed in any position. 3/4" and 1" models.
EZ-Flo Automatic Fertilizer Injectors feed through a garden hose, drip system, or after the irrigation zone, every time you water. It can be connected after any valve on an existing sprinkler or drip irrigation system as long as the unit is only under pressure while it is operating. Gardeners have long loved this unit for its ability to feed their flowers, trees and shrubs without constantly refilling the tank. Hose bib and drip units come in three tank sizes:
Item Catalog # Price
25 psi HEPR25 $5.75
3/4" FPT/20psi SEPR20L 8.453/4" FPT/30psi SEPR30L 8.451" FPT/30psi SEPR30M 9.95
Pipe thread regulator with union3/4" FPT WIBR407 49.351" FPT WIBR410 66.89
Fertilizer Injectors
Hose End Controls
Digital Water Timer Runs with up to 4 start times per day or as seldom as once a week. Operate it manu-ally without having to reprogram. Watering durations can be set to last from one minute to 11 hours. The most common installation is to attach a hose Y shut-off and gooseneck swivel (page 16) to your faucet and at-tach the timer to one branch. The EZ model is easy to program with one dial to select preset frequency and another dial to select preset duration. Both operate reli-ably with low flow and low water pressure and have a 3 year warranty. One 9-volt battery, required (not in-cluded) that can last up to one year.
Use a hose end control to automatically operate a moveable lawn sprinkler or drip system up to 4 gallons per minute maximum.
Catalog # Price DI9001D Digital 49.95DIEZ 2-dial analog 44.953B9 9-Volt battery 3.20
OR62018 17.99WaterMaster Mechanical Timer You turn it on, it turns itself off, so you can go about your day with-out another thought. This sturdy valve gives accurate control at any water flow and can run for up to 2 hours. No battery required.
3/4 gallon (2.8 liters) EZ2005HB 49.951.3 gallon (5 liters) EZ2013HB 63.903 gallon (11.4 liters) EZ2030HB 74.95
3 recommended water-soluble seasonal fertilizers in 5 pound plastic bags:
Spring 25-15-10 EZ251510 17.50Summer 28-8-18 EZ288185 17.50Fall 10-20-30 EZ1020305 17.50
Optional PVC pipe connection accessories:
Thread tap kit EZTHD 6.25¾" Coupling Socket EZC075 10.001" Coupling Socket EZC100 10.50
Optional Sprinkler ConnectionHose/Drip Connection

19
PARTS CATALOG
Availability, price, shipping charges, and sales tax subject to change without notice
THE URBAN FARMER STORE
Electric Timers & Valves
Irrigation Timers
Hunter Pro C
3 Station Outdoor Timer
HUPC300 $157.00
3 Station Indoor Timer
HUPC300I 129.00
Both expandable up to 15 Stations
3 Station Expansion Module
HUPCM300 39.00
9 Station Expansion Module from 6-15
HUPCM900 159.00
2) automatic solenoid valves which attach to the water supply and open and close to send water to each ir-rigation zone. These often include anti-si-phon type backflow preventers, in which case they should be installed at least 12" higher than the highest point they control.
3) valve wire which is similar to, but slightly larger than, telephone cable. It can be run through crawl spaces, stapled above ground to a house or fence, or buried in soil.
1) a timer which is plugged into regular 110v power and can be pro-grammed with start and stop times, and days of the week for watering to occur. The timer sends a low-voltage signal out to the valves.
Hunter Pro C series is an incredibly versatile, next-generation irrigation control platform with a full 2-year warranty. Mod-ular design lets you customize unit to desired number of stations with expansion modules. Buy only the number of stations you need in units of three. Large easy-to-read LCD display for simplified programming. Three programs (A,B,C) with multiple start times. Independent programming handles many different watering requirements. Choice of independent day scheduling options: days of the week, odd/even, or 31 day interval for maximum flexibility with global water budget/seasonal adjustment. Easily change run time of all zones from 10% to 150%. The new evapotranspiration Hunter ET-System (see page 22) runs the Pro-C platform and can cut landscape water use by up to 50% without stressing lawn or plants. Its non-volatile memory holds programs indefinitely and its design incorporates microcircuit protection with no fuses to worry about.
4 Station Indoor HUXC-400-I $79.00
4 Station Outdoor HUXC-400 109.95
A permanent automatic control system consists of three parts:
Easily installs on any automatic irriga-tion system–Versatile enough to work with all popular controllers Constructed of high impact thermo-plastic and aluminum– Built sturdy for years of trouble-free operation.
The Hunter Mini-Clik shuts sprinklers off in a storm and keeps them off, automatically compensating for the amount of rainfall that occurred. There's no simpler way to ensure that your system isn't watering when it isn't necessary.
Adjusts to actuate at various rainfall quantities–Set from 1/8" to 1" based upon your local conditions Includes 25 feet of 20 gauge two con-ductor wire–Fast and easy mounting out of sight
Hunter Mini-Clik Rain Sensor
MC502 27.99
Hunter XC 4 Station Controller is designed for those who don’t want a big controller, but do want one with all the features that meet their irrigation requirements. Available in 4 station indoor & outdoor models, the XC offers all the features you would expect to find only on more expensive units: intuitive dial programming; seasonal adjustment (from 0% to 150%); easy on-screen adjustment (in 10% increments); 3 programs with multiple start times; accommodates repeat watering requirements, morning, afternoon and evening: large LCD display with interactive icons; choice of independent day scheduling options; rain sensor com-patible (but will not support ET System); & non-volatile memory.
20
THE URBAN FARMER STOREPARTS CATALOG
Order toll-free: 1-800-753-DRIP Fax: (415) 661-7826 Visa & Mastercard accepted
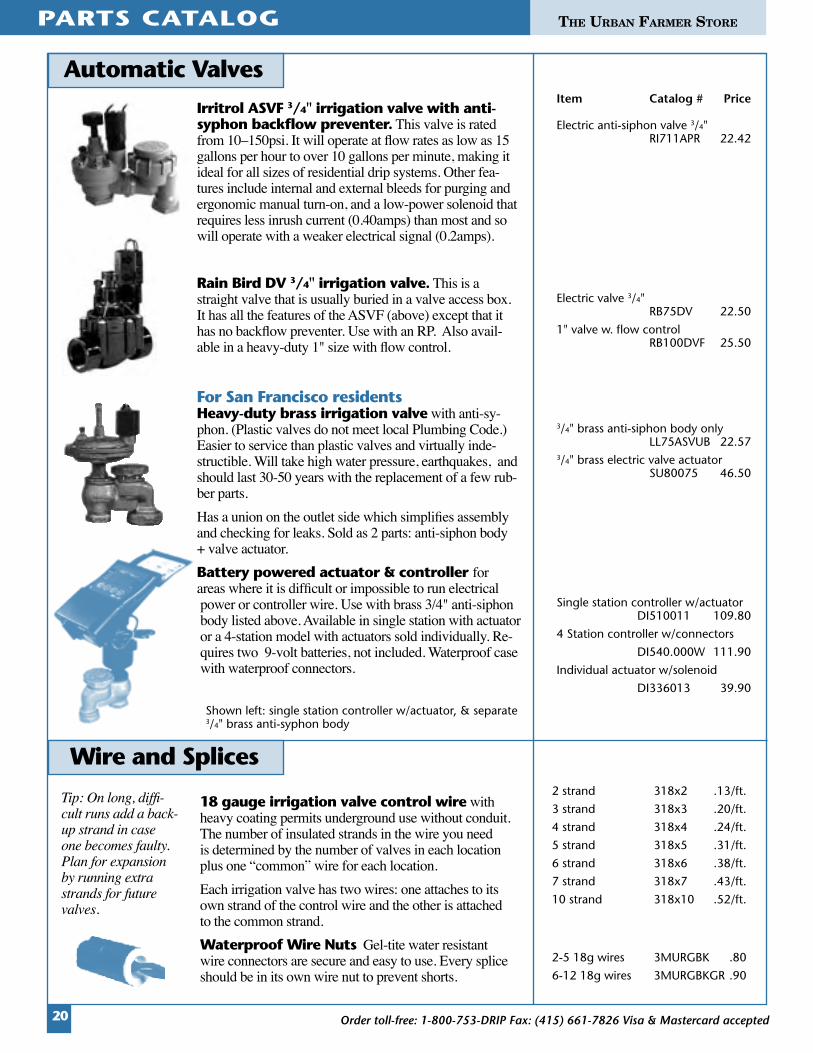
Automatic ValvesItem Catalog # Price
Electric anti-siphon valve 3/4" RI711APR 22.42
Electric valve 3/4" RB75DV 22.50
1" valve w. flow control RB100DVF 25.50
3/4" brass anti-siphon body only LL75ASVUB 22.573/4" brass electric valve actuator SU80075 46.50
Single station controller w/actuator DI510011 109.80
4 Station controller w/connectors
DI540.000W 111.90
Individual actuator w/solenoid
DI336013 39.90
Irritrol ASVF 3/4" irrigation valve with anti-syphon backflow preventer. This valve is rated from 10–150psi. It will operate at flow rates as low as 15 gallons per hour to over 10 gallons per minute, making it ideal for all sizes of residential drip systems. Other fea-tures include internal and external bleeds for purging and ergonomic manual turn-on, and a low-power solenoid that requires less inrush current (0.40amps) than most and so will operate with a weaker electrical signal (0.2amps).
Rain Bird DV 3/4" irrigation valve. This is a straight valve that is usually buried in a valve access box. It has all the features of the ASVF (above) except that it has no backflow preventer. Use with an RP. Also avail-able in a heavy-duty 1" size with flow control.
For San Francisco residentsHeavy-duty brass irrigation valve with anti-sy-phon. (Plastic valves do not meet local Plumbing Code.) Easier to service than plastic valves and virtually inde-structible. Will take high water pressure, earthquakes, and should last 30-50 years with the replacement of a few rub-ber parts.Has a union on the outlet side which simplifies assembly and checking for leaks. Sold as 2 parts: anti-siphon body + valve actuator.Battery powered actuator & controller for areas where it is difficult or impossible to run electrical
Tip: On long, diffi-cult runs add a back-up strand in case one becomes faulty. Plan for expansion by running extra strands for future valves.
18 gauge irrigation valve control wire with heavy coating permits underground use without conduit. The number of insulated strands in the wire you need is determined by the number of valves in each location plus one “common” wire for each location. Each irrigation valve has two wires: one attaches to its own strand of the control wire and the other is attached to the common strand. Waterproof Wire Nuts Gel-tite water resistant wire connectors are secure and easy to use. Every splice should be in its own wire nut to prevent shorts.
2 strand 318x2 .13/ft.
3 strand 318x3 .20/ft.
4 strand 318x4 .24/ft.
5 strand 318x5 .31/ft.
6 strand 318x6 .38/ft.
7 strand 318x7 .43/ft.
10 strand 318x10 .52/ft.
2-5 18g wires 3MURGBK .80
6-12 18g wires 3MURGBKGR .90
Wire and Splices
power or controller wire. Use with brass 3/4" anti-siphon body listed above. Available in single station with actuator or a 4-station model with actuators sold individually. Re-quires two 9-volt batteries, not included. Waterproof case with waterproof connectors.
Shown left: single station controller w/actuator, & separate 3/4" brass anti-syphon body

21
PARTS CATALOG
Availability, price, shipping charges, and sales tax subject to change without notice
THE URBAN FARMER STORE
1" Schedule 80 PVC instant manifolds assemble with-out tools. O-ring seals elimi-nate glue, tape, paste, and dope. No sweat!
Instant manifolds require a special nipple for each valve and an end-cap. Connect manifolds together for any number of anti-sy-phon combination or globe valves. Integral unions make it easy to install and replace 1" or 3/4" valves. They're lightweight, com-pact, strong, and UV resistant.
Item Part # PriceSingle outlet manifold 301010 $5.17Double outlet manifold 3010102 10.11Triple outlet manifold 3010103 15.16Quad outlet manifold 3010104 20.161" end cap 348010 1.121" to 1" nipple 08303 1.201" to 3/4" nipple 08303131 1.34
Instant Manifolds
Useful things
Clear & Green Garden Tie for tying vines, plants, vegetables, and espalier. Strong & flexible. Will not girdle tender stems or growing branches. Clear tape disappears. Green colored tape blends with foliage.
1/2" x 300'-Clear 6GTC $1.79 1" x 150'-Clear 6GTC1 3.49 1/2" x 300'-Green 6GT 1.59 1" x 150'-Green 6STT 3.29
Rain Bird Irrigation Supplement is water bound in the form of a solid gel. It is an ideal irrigation supplement for use in establishing native plant material where permanent irrigation is not required as well as new plant material in existing landscape areas. Rain Bird IS increases survival rates of transplants by providing continuous moisture needed to reduce the stress of relocation.
RBISGP30 30-day gel pack $1.40 RBISQT 60-day quart $3.18
Hose thread water pressure gauge helps when planning or troubleshooting an irrigation system. Clear face accurately identifies static pressure in psi (shown above). Water flow and pressure guage also available for identifying dynamic pressure and flow
Pressure Only ORGAUGE $6.25 Flow & Pressure TO99501 49.00

22
THE URBAN FARMER STOREPARTS CATALOG
Order toll-free: 1-800-753-DRIP Fax: (415) 661-7826 Visa & Mastercard accepted
Self-Adjusting Evapotranspiration ControllersWe selected the three best new controllers that use evapotranspriation technology to cut landscape water use by up to 50% while enabling lush, thriving plants. This is the biggest breakthrough for landscape water conservation since the introduction of drip irrigation over 30 years ago. Two are offered as upgrades for our most popular controllers and one is ideal for new landscapes. In order to ensure cor-rect installation and optimum performance pre-purchase training is required. Typically the return on the investment cost for these systems is realized within two years. Once correctly installed, they operate trouble-free without manual adjustments or wasteful watering.
Evapotranspiration (ET) is the amount of water that is lost from the soil through evaporation and plant use. As the days get longer and warmer from March to August, ET, or the plant’s need for water, gradu-ally increases. Besides the length of day, temperature, humidity, and rainfall all are factored into watering schedules.
When the rain usually ends in March, irrigation controllers traditionally are turned on and then left running on a preset schedule until well into the fall when it begins raining again. This sched-ule waters too much on some days and not enough on others, either wasting water or causing plant stress. More efficient irrigation scheduling would readjust the system run times to match the changing plant water needs daily, and would water less as days get cooler and shorter in the fall.
ET irrigation controllers readjust themselves automatically as often as needed without manual repro-gramming–using three sources of information:
1. Built in logic has solar radiation values for every micro climate, permanently stored onboard in memory, by postal zip code or latitude. The Hunter ET System sensor measures actual soloar radiation on site.
2. Entered data about each zone to be watered like, soil type, plant type, irrigation type (sprinklers or drip), and slope.
3. Real-time data from on-site sensors or wireless ET weather data service enabling fast response to unexpected rain storms and heat waves.
Runs the expandable Hunter Pro C, ACC & ICC, controller platforms, not included
Upgrade panel for Irritrol Rain Dial controllers or as new indoor or outdoor rated models
New expandable controller one plug-in model is rated for indoor or outdoors locations-ideal for new landscapes!
Number of stations:
How offered:
Same as Pro C or ICC platformPro C max=15 ICC max=48
6, 9, or 12 4 expandable to 8, 12, & 16, or16 expandable to 24
Real time weather data: Onsite sensor array (included) tracks: solar radiation, relative humidity, temperature, and pre-cipitiation.
ET Weather Data Subscription Service (wireless). One year included with purchase, cost $5 per month thereafter.
On-site weather monitor–com-mercial or residential grades available. Without a weather monitor, the controller can operate in standard mode like a regular controller.
List prices:
Pre-purchase training: Recommended-Free class in stores Required-Free classes in stores Required-Free classes in stores
ET System ET System module with sensor array..........$399.ET Wind Optional Anemometer..................$399.Pro C (required)Indoor 3 station expandable to 15..............$126.Outdoor 3 station expandable to 15...........$157.Expansion modules3 station expansion module..........................$39.9 station expansion module........................$159.
Upgrades from Rain Dial6 Station Smart Dial Upgrade Panel...........$559.9 Station Smart Dial Upgrade Panel...........$599.12 Station Smart Dial Upgrade Panel.........$649.Indoor rated models6 Station Smart Dial Indoor.........................$619.9 Station Smart Dial Indoor.........................$659.12 Station Smart Dial Indoor.......................$719.Outdoor rated models6 Station Smart Dial Outdoor......................$659.9 Station Smart Dial Outdoor......................$699.
Rated for indoor or outdoor useSmartline 4 station expandable to 16....$156.95Smartline 16 station expandable to 24..$336.90Expansion modules4 station expansion module......................$46.9512 station expansion module.................$179.95Weather monitorsCommercial On-Site Weather Monitor...$299.95Residential 0n-Site Weather Monitor.....$199.95
Check for rebate offers
& incentive programs from
your water provider on these items!
This is the biggest breakthrough for landscape water conservation since the introduction of drip irrigation over 30 years ago.
Hunter ET System
Irritrol Smart Dial
Weathermatic Smartline

23
PARTS CATALOG
Availability, price, shipping charges, and sales tax subject to change without notice
THE URBAN FARMER STORE
Octa-Bubbler w/8 fl ow controls installed, fl ow rate per outlet 2gph PP816 8.50 6gph PP856 8.50 10gph PP896 8.50 20gph PP8186 8.50
Extra fl ow controls 2gph PP8160 .25 6gph PP8560 .25 10gph PP8960 .25 20gph PP81860 .25Outlet plug PP2135 .06Bug plug PPBUGPLUG .06
Quadra Bubbler 2gph PPBLU 3.80 6gph PPBLK 3.80 10gph PPRED 3.80 20gph PPGRN 3.80Clamp Plate PPPLATE .50Plug PPPLUG .06
Why convert? Simple answer: it's better for most plants and it uses water more effi ciently. Drip irrigation converts a high-pressure stream to a slow emission of droplets that can be placed exactly where water is needed in the plant's root zone. Unlike sprays and sprinklers, there is no evaporation loss, and the amount of water each plant receives can be tailored to suit its needs. Drip will maximize the amount of water avail-able to the roots of plants grown on slopes because the slow delivery of water won’t run off the surface before having a chance to soak into the soil.
Sometimes converting to sprinklers to drip is made necessary by site conditons. Extra service can be squeezed from an existing sprinkler sys-tem as the galvanized pipes corrode near the end of its useful life. While the corroded pipes can no longer eff ectively carry enough water to run the sprinkler system, there is often plenty of pressure and fl ow for a new drip system. Rust and iron particles in these kinds of retrofi tted systems can pose a problem for the drip emitters, so replace or clean the drip system fi lters often. As shrubs and perennials mature and grow, they often block the distribution pattern of sprinklers and prevent water from reaching the intended spots. When conversion is indicated for any of these reasons there are three viable approaches.
Full drip conversion
One or more zones of an existing sprinkler system can be completely converted to a conventional drip system. The fi rst step is to insert a fi lter and pressure regulator near the beginning of the system. The best place is often right after the control valve. Use schedule 80 (gray) pipe and fi ttings above ground after the pressure regulator. The existing underground pipe continues to dis-tribute the water, and saves a lot of digging.
Partial drip conversion
Alternatively, a fi lter and pressure regulator can be attached to a sprinkler riser and the drip system laid out from this point. The main drawback to this method is cost. If you wish to use several risers as connection points for the drip system, you will need to purchase a fi lter and pressure regulator and hiding them from view can be a challenge.
Sprinkler body retrofi t
For partial conversion applications, Rain Bird makes a convenient sprinkler body replace-ment, which contains a fi lter, and pressure regulator. Just unscrew the old sprinkler body and screw on the retrofi t body and attach a connector for the drip-tubing.
1/2" MPT swivel outlet
30 psi pressure regulator
200-mesh fi lter
Rugged, UV-resistant 1800 body
Sprinkler to Drip Conversion
Multi-outlet emitters
If you have a small area of shrubs watered by a few sprinkler heads, multi-outlet emitters can be screwed directly onto each sprinkler riser, without the need for a separate fi lter or pressure regulator. Water fl ows from the multi-outlet emitter from its four or eight 1/4” PE tube connections, through the tub-ing and then to the plants.
The advantage of this system is ease of in-stallation and no need for a fi lter or pressure regulator. They operate at pressures be-tween 10 and 80 psi and should not be use with emitters at the end of tubing runs.
Quadra-Bubbler has four 1/4" barbed outlets to attach tub-ing. Available in 4 diff erent fl ow rates, with all outlets giving equal fl ow. Inlet connection is ½" FPT, same as most conventional sprinklers, so that it screws onto a regular sprinkler riser.
Octa-Bubbler has eight 1/4" barbed outlets to attach tubing. Available in 4 diff erent fl ow rates, with all outlets giving equal fl ow. Individual fl ow controls can easily be installed to give diff erent fl ows from diff erent outlets on the same Octa-Bubbler. Inlet connection is 1/2" FPT, same as most conventional sprinklers, so that it screws onto a regular sprinkler riser or swing joint.
With full, partial zone, or sprinkler body retrofi t conversions, heads are removed and replaced with parts, including a PVC fi tting, and special compression or barbed adapt-ers. Flexible, black polyethylene (PE) tubing, attached in place of the sprinkler heads, allows the use of standard drip irrigation devices to deliver water to your various plants. Add emitters, misters and micro sprays as needed. Remove and cap sprinkler heads not needed for drip. Using this method, one fi lter and pressure regulator can serve hundreds of emitters. Drip lines can be left on the surface, or covered by a layer of soil or mulch to become invisible.
Retrofi t body RBXRETRO $18.85
Use these convenient fi ttings to adapt the 1/2" MPT on a Schedule 80 riser or Rain Bird retrofi t body to 1/4" or 1/2" PE tub-ing in full, partial, or retrofi t conversions. Cap or plug old & unused sprinkler body risers, swing joints, & fi ttings.
A. Swivel tee 1TS7 1.80B. Swivel el 1LS7 1.80C. ¼" X 4 OR61004W 3.29D. ¼"+½" MPT 1RAC2 1.48E. ¼" X 2 1T22FP 2.93½" PVC T plug 450005 1.12½" PVC T cap 448005 .79
EB C D
A
Insert a schedule 80 nipple or male adapter and schedule 80 pipe after the pressure reg-ulator. Glue this to the exisiting pipe below ground using the appropriate fi tting.

24
THE URBAN FARMER STOREPARTS CATALOG
Order toll-free: 1-800-753-DRIP Fax: (415) 661-7826 Visa & Mastercard accepted
We carry a wide range of pumps–for garden ornaments & fountains and large water features & ponds. Most of the pumps are designed to be submersible; some may be used either in or out of the water. With any water feature the simplest installa-tion is to place the pump in the bottom of the water feature and use the pump to push the water to the top of the installation. To determine the size pump needed for a project, you need to know two things: the overall height you need to pump and the volume of flow desired. Take a garden hose and find the volume that seems pleasing to you and then take a 5-gallon bucket and measure how long it takes to fill it. You then can figure how many gallons per hour at what height you need for the desired effect. If you are trying to circulate the water for clarity, we suggest that you move half the volume of the pond per hour. To figure this, multiply the length (in feet) x width x depth x 7.50 to find out how many gallons the pond contains. If there are fish in the pond you may need to circulate up to twice the volume of the pond per hour.
Mag Drive Pumps
Supreme Mag-Drive Pumps are designed to fulfill the needs of serious pond and wa-ter garden enthusiasts. They require intake pre-filtration and one is provided. The power unit is encased in waterproof epoxy which creates a magnetic field; this drives a ceramic mag-netic impeller. This makes for an extremely energy- efficient unit, operating at a fraction of the cost for electricity as mechanical drive pumps. Fish safe, these pumps will operate in fresh or salt water, submerged or in-line. (So long as water is gravity-fed to the pump's inlet, it can operate out of the water.) Models 65, 80 & 140 have 6-foot grounded power cords, while the larger models come with a standard 18-foot grounded power cord.
14 reliable models capable of pumping from 65 to 5000 gallons per hour
We stock replacement impellers and impeller housings for most models to keep your pump running for years.
Visit urbanfarmerstore.com/product lines forlinks to more products & information
Model Watts Full GPH 2 ft. 4 ft. 6 ft. 8 ft. 10 ft. 12 ft. Max Cord ListNumber Used Open Head Outlet-male Length Price
SMPM65 5 65 – – – – – – 1.66 ft 1/4” 6 feet $19.50SMPM80 6 75 25 – – – – – 2 feet 1/4" 6 feet 27.50SMPM140 9 140 135 20 – – – – 4 feet 1/4" 6 feet 34.75SMPM190 19 190 160 135 60 – – – 7 feet 3/8” NPT 10 feet 52.75 SMPM250 24 250 210 125 35 – – – 6 feet 1/2" NPT 18 feet 75.75 SMPM350 35 350 320 260 175 75 – – 9 feet 1/2" NPT 18 feet 85.75SMPM500 45 500 410 320 180 85 25 – 10 feet 1/2" NPT 18 feet 95.75SMPM700 70 700 550 475 400 300 120 – 12 feet 1/2" NPT 18 feet 104.62SMPM950 93 950 900 800 720 600 400 220 13 feet 3/4" NPT 18 feet 145.75SMPM1200 110 1200 1150 1125 1050 825 700 525 14 feet 3/4" NPT 18 feet 185.75SMPM1800 145 1800 1630 1375 1125 950 850 750 19 feet 3/4" NPT 18 feet 225.75SMPM2400 265 2400 2200 1900 1650 1500 1250 1050 20 feet 1" NPT 18 feet 250.00SMPM3600 360 3600 3500 3200 2000 2600 2300 1850 24 feet 1" NPT 18 feet 275.50SMPM5000 475 5000 4950 4700 4000 3600 3000 2800 28 feet 1½" NPT 18 feet 375.75
The Pro Hy-Drive Waterfall Pump design combines the the benefits of magnetic and direct drive technologies to deliver an extremely quiet, energy efficient, low maintenance pumping source. These high-capacity hybrid pumps go easy on the wattage yet are powerful enough to create a dynamic attractive waterfall or power a large skimmer or filter. They are oil-free fish-safe and designed for continuous use. The heavy-duty polypropylene enclosure has a built in carry handle and an effective molded-in debris screen. They are equally at home underwater as a submersible pump, or can be plumbed in-line and used externally once the enclosure is removed. Even when used submerged in shallow water, the pump can be used horizontally and will not create a visible vortex. These versatile pumps, available in three capacities, have a one year warranty.
Model Watts Full GPH 3 ft. 5 ft. 10 ft. 15 ft. 17 ft. 20 ft. Max Cord ListNumber Used Open Head Outlet-male Length Price
SMHY3200 180 3200 2600 2480 1650 – – – 15 feet 1½" NPT 20 feet $220.00SMHY4000 220 4000 3800 3200 2500 10 – – 17 feet 1½" NPT 20 feet 258.00SMHY4800 280 4800 4450 4000 3350 2000 10 – 20 feet 1½" NPT 20 feet 298.00

25
PARTS CATALOG
Availability, price, shipping charges, and sales tax subject to change without notice
THE URBAN FARMER STORE
Introduction to Sprinkling SystemsSprinkling systems are the most efficient way to water large, evenly covered areas of the landscape, most commonly lawn. With very few devices an entire area can be watered. They work best in large, regular sided areas, where spray is not blocked by plant material. The range of sprinkler options is significant, but all owe their lineage to the brass spray head or the impact rotor. Sprays, which can be on risers or on pop ups ranging from 2" to 12", can throw water in a pattern up to a 15’ radius. Rotors, historically the loud splashing impact type, are now predominantly gear-driven. Resi-dential and light commercial rotors that throw a radius of between 16’ to 40’ are available. Commercial/professional rotors that throw a radius of between 40’ to 70’ are available for large turf applications such as sports fields and parks. The Urban Farmer Store stocks all options from the three leading sprinkler companies: Hunter, Rain Bird, and Toro.
Rotors—Like spray heads, rotors have body options from shrub to 12" pop ups. But unlike sprays the nozzles are usually a single stream throw-ing a long distance at different volumes and trajectories. The patterns are made by gear ad-justment in the sprinkler body. A rack of nozzles usually comes free with each sprinkler.
The range of rotors from shrub to 12" pop up, and from residential to com-mercial is wide. Residential rotors usually cost less than $25. Commerical rotors can cost upwards of $50.
The options that we have in sprinklers are too vast to include in these pages, and most manufacturers have territorial restrictions on distributor sales.
Spray Heads—Spray heads are made up of two parts, the nozzle which determines the pattern of spray and the body which varies from the shrub type that stays above-ground on a riser, and the popup type which is completly hidden until used, and range from 2" to 12" in popup height. They are now made of plastic and use a spring for attachment. There are doz-ens of nozzles and improvements that make them better each year by Rain Bird, Toro, and Hunter.Depending on the nozzle chosen and the height of the pop up used The prices range from about $5. to over $10. each
Sprinkler systems require good design and measurements before sprinklers are chosen. Start with a scale site plan, note water sources and measure them in gallon per minute (see Planning on page 6). Then come into one of our stores and we will help you with sprinkler selection, valving and pipe sizing.
Distributor

26
THE URBAN FARMER STOREPARTS CATALOG
Order toll-free: 1-800-753-DRIP Fax: (415) 661-7826 Visa & Mastercard accepted
Introduction to Landscape Lighting
Fixtures come in a wide array of types, sizes, and finishes. Each fixture takes a specific lamp type (incandescent, Xenon, or quartz-halogen). Each lamp (bulb), in turn, comes in a variety of watt-ages and beam spreads. Choosing the appropriate lamp for a specific effect is the first step in design. Choosing the fixture to house the lamp is secondary. Uplights can turn trees and specimen plants into focal points of your garden. Pathlights illuminate walkways and beautify the landscape, while enabling safe and comfortable movement on stairs, paths, and driveways. Spotlights, both up-lights and downlights, can high-light sculptures, water, and archi-tectural features. Backlighting and wall-washing floodlights produce beautiful silhouettes, shadows, and textures, creating mood and interest in the garden.
Lighting Cable comes in several sizes or gauges. Twelve, ten, or eight gauge cable tends to be the most commonly used, depend-ing on the length of wire run and the wattage load. Choosing the correct size of cable is necessary to avoid excessive voltage-drop, which leads to the dimming of lamps at the end of wire runs. Correctly sizing wire and plan-ning logical wire runs is a simple but essential step in designing a lighting system that can grow and change with your garden.
Transformers are required for 12-volt lighting systems to step-down 120-volt power. Selection is based on the total number of watts needed for a system, and for each zone of the system. Transformers come in wattages ranging from 100 to 1000 watts. As the garden changes and grows, allow for extra wattage on the transformer to grow with it, whether it be to add additional fixtures or increase the wattage of existing ones. Multi-tap transformers make it easy to cor-rect for voltage-drop by sending more voltage to cable runs far away from the transformer, and less voltage to closer cable runs.
Low voltage landscape lighting systems, consisting of a transformer, lamps, fixtures, and special cable, offer many advantages over 120-volt lighting besides the obvious factor of safety. Low-voltage lamps use electricity more efficiently, giving more light per watt of power used. 12-volt lamps also last longer than 110-volt incandes-cent lamps, reducing maintenance on the systems. The flexibility of the wiring — no conduit is needed — makes installation easy and allows you to move fixtures as the garden grows and changes. Modern 12-volt systems can tackle any residential lighting job, from groups of 50-foot oak trees to the smallest city garden. The Urban Farm-er Store carries only the highest quality products from carefully selected manufacturers. Our expert staff will be glad to help you plan your lighting design and specify the power requirements of the transformer and cable you will need. Local customers please ask about our free overnight loaner lighting kits containing a variety of fixtures so that you can experiment in your own garden with the different effects. Request a copy of our Outdoor Lighting Basics or view it online at urbanfarmerstore.com.
Path Light
Quartz-Halogen Lamp
12-gauge low-voltage lighting cable (shown actual size)
DRIPPERS
Landscape Lighting
The bay area's harsh marine climate takes a rapid toll on lesser quality products so we offer only the highest quality available. Some of the more than 15 manufacturers we distribute include:
FX Luminaire
Lumiere
Hadco NightLife
Kim
Focus
Nightscaping
Arroyo Craftsman
Coe Studios
Unique
VistaRequest a copy of our Outdoor Lighting Basics or view it online at urbanfarmerstore.com.
Multi-tap Outdoor Plug-in Transformer

27
PARTS CATALOG
Availability, price, shipping charges, and sales tax subject to change without notice
THE URBAN FARMER STORE
Method of payment
Check Money order Charge to my credit card
Visa Mastercard
Expires (month/year) 00/00 ___________
card # _______________________ ____________________
Signature ________________________________________
41 2 3mail phone faxe-mail
ORDER FORM
2833 VICENTE STREET SAN FRANCISCO, CA 94116 • (415) 661-2204(800) 753-DRIP (3747) • FAX (415) 661-7826 • urbanfarmerstore.comTHE URBAN FARMER STORE
SHIPPING INFORMATION: (if different from mailing address)
Name __________________________________________________________
Company ______________________________________________________
Address ________________________________________________________
City __________________________State ________ Zip _________________
Phone # ________________________________________________________
When mailing or faxing, please use our order form whenever possible to avoid confusion. Include the catalog number of each part. We invite you to phone in your order and charge it to your Visa or Mastercard. Please have your order form completed as much as possible when you call. Phone hours Mon-Fri 7:30-5:30, Sat 9:30-5 Pacifi c Time. Order on the web, by e-mail, or by fax 24 hours a day. When e-mailing orders, please include all information required on this form and send to [email protected].
ORDERED BY:
Name __________________________________________________________
Company ______________________________________________________
Address ________________________________________________________
City __________________________State ________ Zip _________________
Phone # ________________________________________________________
SUBTOTAL
QUANTITY ORDERED TOTALDESCRIPTION
PRICE PER UNIT
CATALOG NUMBER
Four convenient ways to order
Shipping & Handling ChargesTo all orders please add the following shipping and handling charges based on the pre-tax subtotal on the order form. For all orders outside the conti-nental United States and Canada shipping will be charged at cost.
Up to $25.00 ... $6.50Up to $50.00 ... $8.00Up to $75.00 .. $10.00Up to $100.00 $12.00
Up to $150.00 .....$15.00Up to $200.00 .....$19.50Up to $400.00 .....$27.50Over $400.00.........Free
BACK PAGESUBTOTAL
8.5% TAX
(CA RESIDENTS ONLY)
TOTALAMOUNT DUE
SHIPPING CHARGES

28
THE URBAN FARMER STOREPARTS CATALOG
Order toll-free: 1-800-753-DRIP Fax: (415) 661-7826 Visa & Mastercard accepted
Mail Order Instructions
size or weight limits. In that case we ship by common carrier. UPS cannot deliver to Post Office Boxes, so please provide a street address and include a phone number. All items are insured through the carrier and any claims for damage should be placed with them – save all cartons. If your shipping ad-dress is different than your mailing ad-dress, please list both.
Questions & CommentsIf you have any questions or com-
ments about any products or informa-tion contained in this catalog, please write to us. We will be happy to re-spond. We would appreciate any sug-gestions or criticism that you may have that can help us improve our services. Our aim is to provide the best products with the necessary information to use them, so your feedback is important.
Delivery TimeWe process all orders within two
working days. If any delay is antici-pated, we will notify you immediately, by phone, mail or e-mail. Please allow 7 to 10 working days for transit.
Back OrderIf we are ever forced to back order
an essential item on your order you will be notified immediately by phone, e-mail or mail. Because we know that the installation of an entire system can be delayed due to the lack of a single part, we will await your approval of a back order before processing the rest of your order for shipment.
Address & Shipping Informa-tion
We do all of our shipping via UPS except when a package exceeds their
Phone Orders (800) 753-DRIP
(7:30 am-5:30 pm PST)
FAX Orders (415) 661-7826
(24 hours)
QUANTITY ORDERED TOTALDESCRIPTION
PRICE PER UNIT
BACK PAGE SUBTOTAL (BRING TO FRONT PAGE)
Please let us know if you have a friend who would like our catalog.
Name_____________________________________________________________
Address___________________________________________________________
City_______________________________________________________________
State_______________________________________Zip______________
Thank you.
CATALOG NUMBER
GuaranteeIf, upon inspection you are not
entirely satisfied with the products you ordered, return them within 30 days and your money, less shipping and handling charges, will be promptly refunded. Defective parts will be repaired or re-placed free of charge if returned to us freight prepaid within one year of pur-chase. Some products as noted carry manufacturer’s warranties for longer than one year. We try to carry only products known for their success and dependability in commercial use and with the expectation that you will be totally satisfied.
Methods of PaymentIn order to avoid confusion, please
use our order blank whenever pos-sible. Be sure to include the catalog number of each part. Payment can be made by check, money order, Visa, and MasterCard. You are invited to phone in your order and use your charge card. Please have your order form completed when you call, $10 minimum.
MAIL ORDER FORM

DESIGN YOUR SYSTEM HERE

653 East Blithedale M
ill Valley, CA 94941 (415) 380-3840N
ext to Sloat Garden Center
RIC
HM
ON
D2121 San Joaquin StreetRichm
ond, CA 94804(510) 524-1604Exit Central Avenue off I-80 &
I-580N
ext to American Soil &
Stone Products
MILL V
ALLEY
2833 Vicente Street San Francisco, CA 94116 (415) 661-2204At 40th Ave. in the Sunset
SAN
FRA
NC
ISCO
Printed environmentally
Please recycle
Ord
er toll free (8
00) 7
53-3
747
Fax (4
15) 6
61-7
862
For d
riving
directio
ns &
ho
urs o
f op
eration
visit urb
anfarm
erstore.co
m
E. Blithedale
Camino
Alto
Miller
Ave.
LomitaDr
MILL VA
LLEY
SAU
SALITO
SAN
RAFA
EL
The U
rban
Farm
er Store
SAN
FRANCISCO BAY
Miller Ave.
Go
lden
G
ate B
ridg
e
Golden
Gate
Park
40th
Market
Bay
Brid
ge
The
Urb
anFarm
er Sto
re
SA
N F
RA
NC
ISC
O
Portola
19th Ave. Park Presidio
Sloat
Vicen
te
Sunset101
�������������������� �����������������
����������������������������������
��������������
������������������
������������
�������
���������������
����������
��������
������
����������������������