
Introduc)on to Structure-‐based Drug Design with Schrodinger Suite
12/05/2012
Kwon Ho (John) Hong
Minnesota Supercompu)ng Ins)tute

Stages of Drug Discovery and Development
Early Discovery
Lead ID & Op4miza4on
Pre-‐clinical IND Phase
I Phase II, III & Registra4on
Target ID Assay development HTS Virtual screening Lead ID De novo design Medicinal Chemistry Combinatorial Chemistry SAR Cheminforma4cs Structure-‐based drug design
ADME Toxicity In vivo efficacy Synthesis scale-‐up
Efficacy Determine Dosage Safety assessments Adverse reac4on from long term use
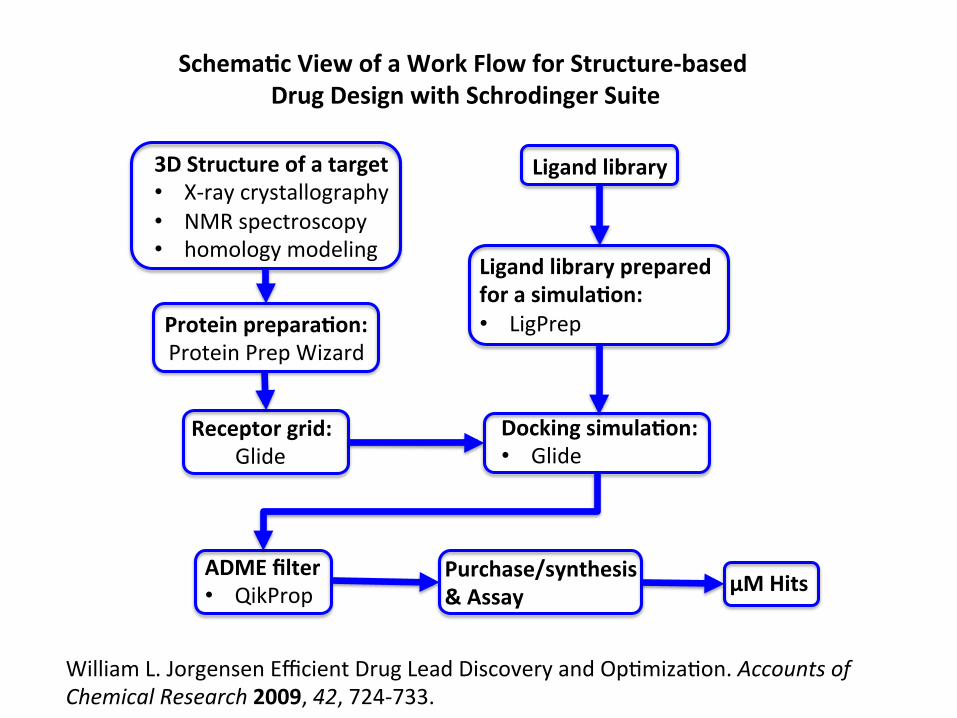
3D Structure of a target • X-‐ray crystallography • NMR spectroscopy • homology modeling
Ligand library
Receptor grid: Glide
Docking simula)on: • Glide
ADME filter • QikProp
Ligand library prepared for a simula)on: • LigPrep Protein prepara)on:
Protein Prep Wizard
Schema)c View of a Work Flow for Structure-‐based Drug Design with Schrodinger Suite
Purchase/synthesis & Assay μM Hits
William L. Jorgensen Efficient Drug Lead Discovery and Op4miza4on. Accounts of Chemical Research 2009, 42, 724-‐733.
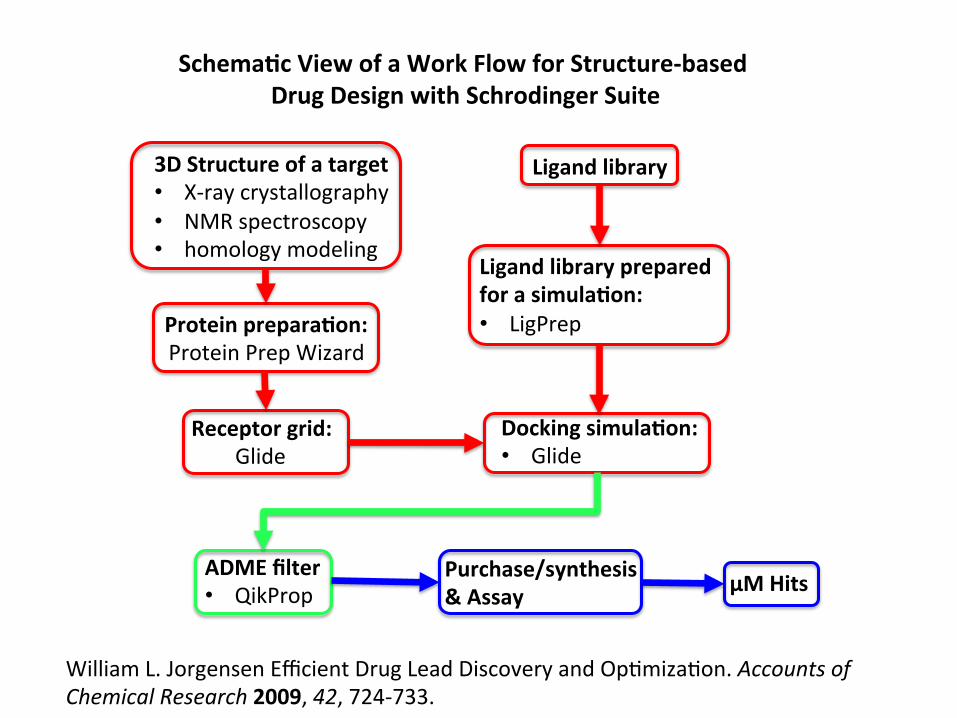

Be able to run basic opera4ons in the Maestro interface such as: • Build a structure. • Import structures into Maestro. • View structures saved in the Project Table. • Save our work in Maestro. • Export structures. • Save a view in the screen in PNG format. Be able to prepare proteins using Protein Prepara4on Wizard. Be able to generate a receptor grid for docking simula4ons in Glide. Be able to prepare ligands for docking simula4ons. Be able to set up and run a docking simula4on in Glide. Be able to calculate physicochemical proper4es with QikProp.
The goal is to:

From a terminal window: module load schrodinger maestro &
Opening Maestro from a Command Line
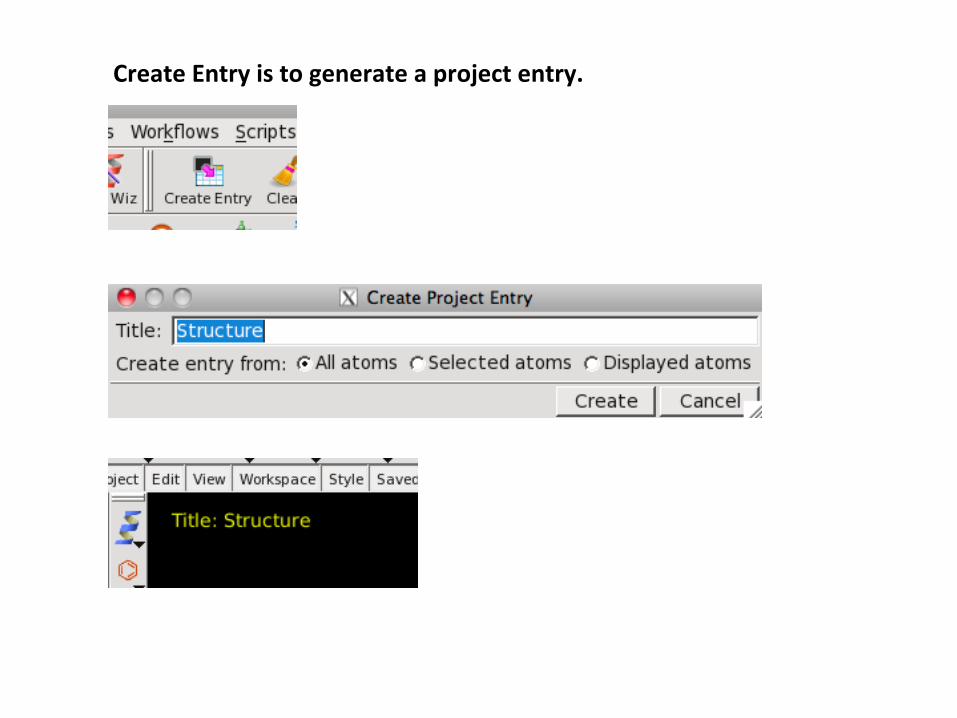
Create Entry is to generate a project entry.
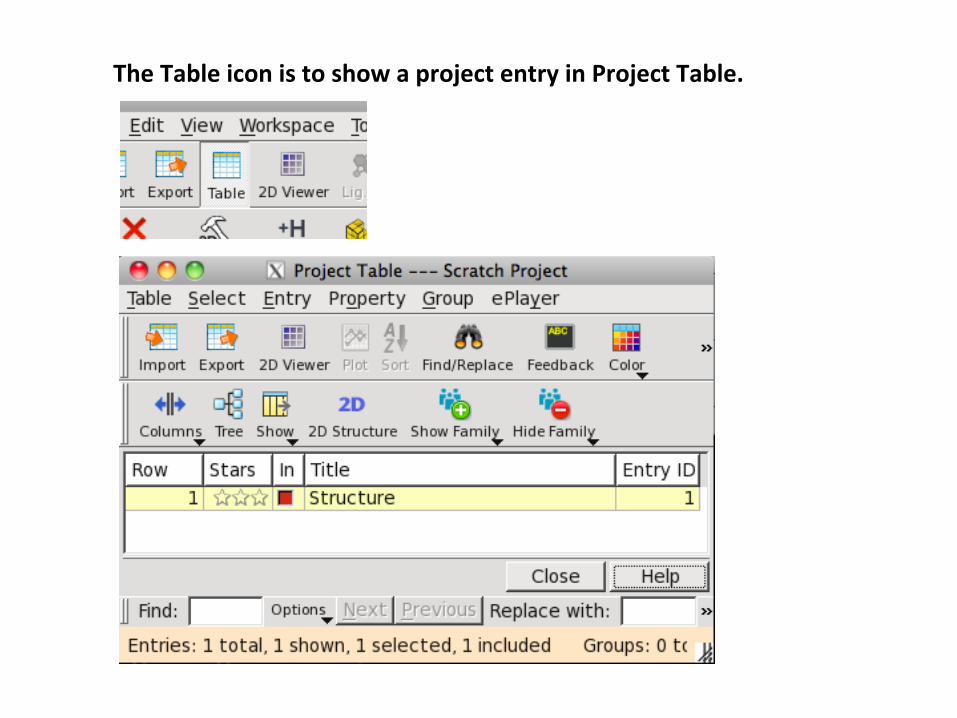
The Table icon is to show a project entry in Project Table.
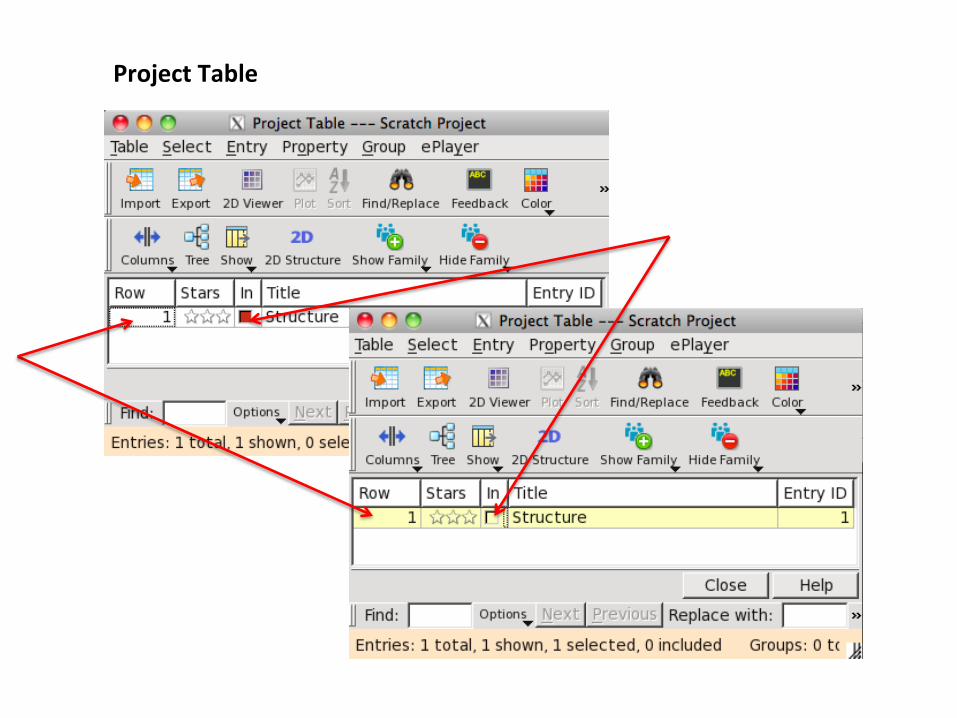
Project Table

To save a structure or structures, select the structures in Project Tabel and then click Export.
Saving a Structure

Saving a Structure
Input the name of a file and select a file type. Then, click Save.
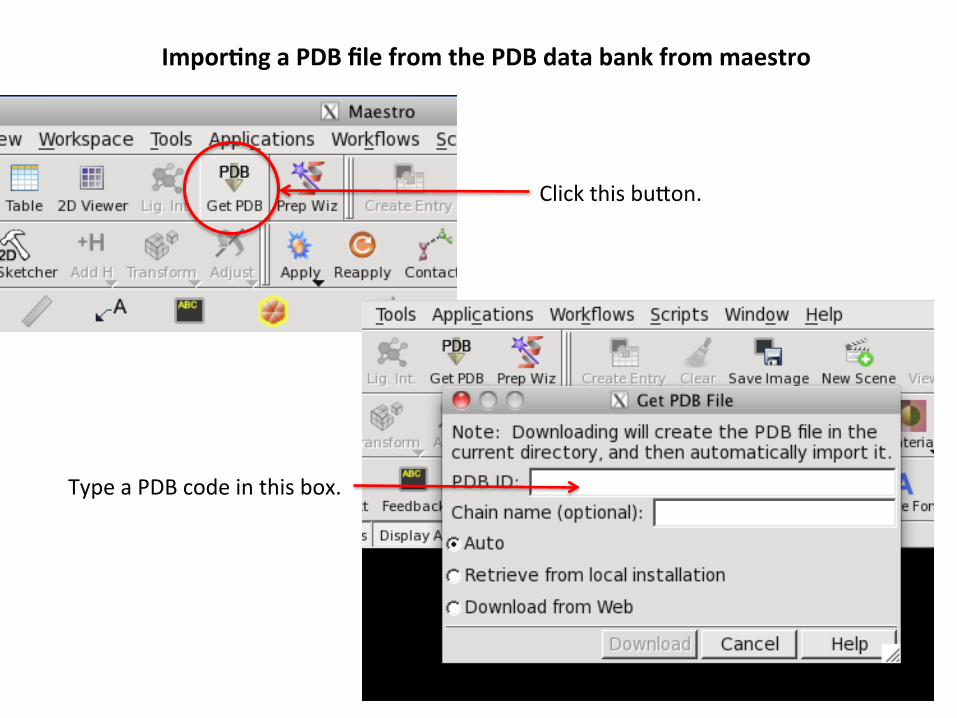
Impor)ng a PDB file from the PDB data bank from maestro
Click this bu\on.
Type a PDB code in this box.

Error message(?) Just ignore this!
Aaer you input a PDB ID and click Download, you’ll get a message below.
Impor)ng a PDB file from the PDB data bank from maestro
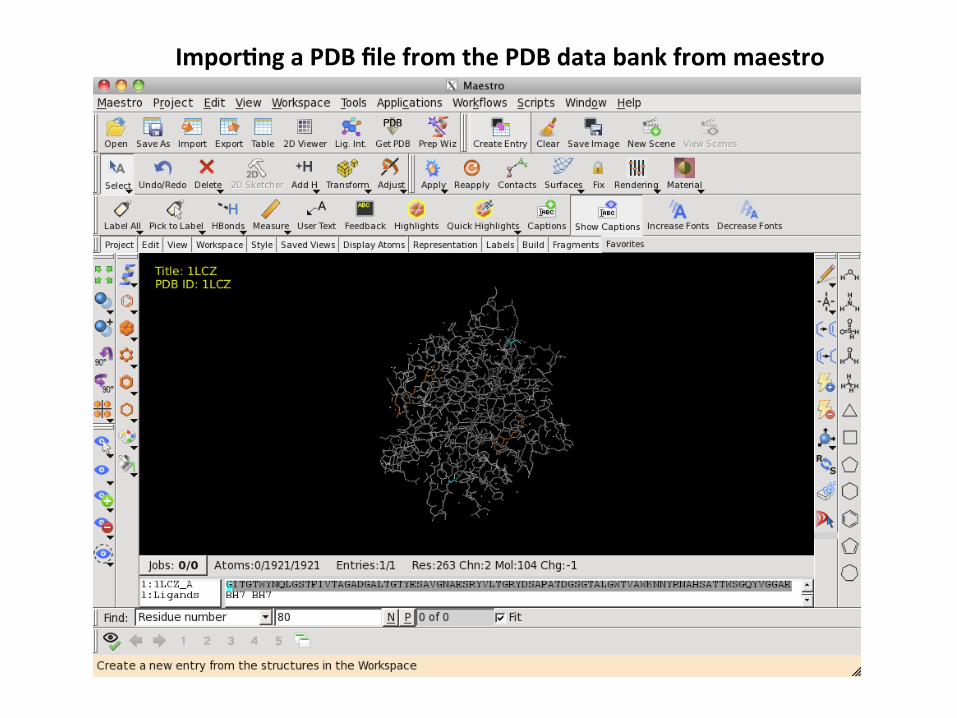
Impor)ng a PDB file from the PDB data bank from maestro

In order to convert the structure to a cartoon, click on the triangle of the icon with helix as shown below and then you will see a list of func4ons. Choose Show Ribbons for All Residues. You can try other op4ons for other opera4ons.
Making a simple view of the structure in the workspace
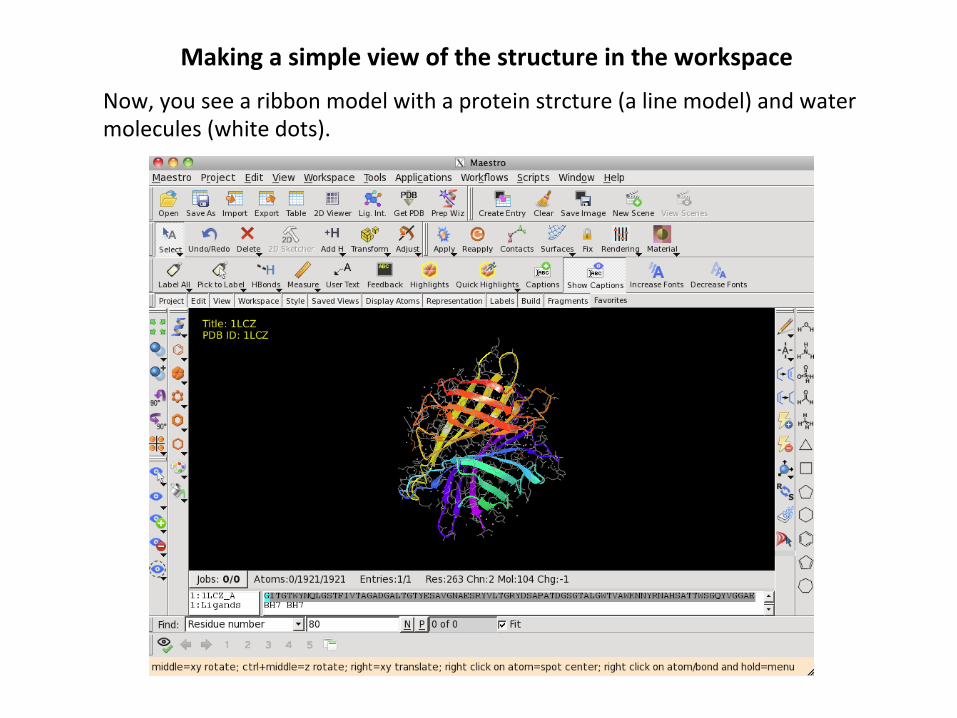
Now, you see a ribbon model with a protein strcture (a line model) and water molecules (white dots).
Making a simple view of the structure in the workspace

Hiding the line structure of the protein (not dele4ng).
Making a simple view of the structure in the workspace
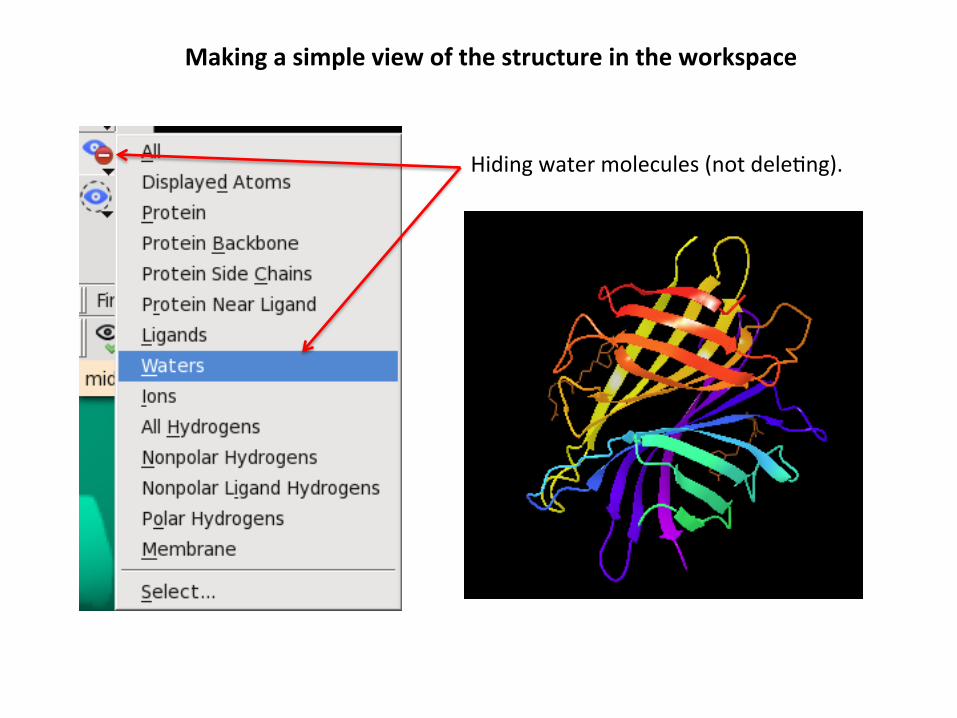
Hiding water molecules (not dele4ng).
Making a simple view of the structure in the workspace

Protein Prepara)on
From Workflows tab, choose Protein Prepara)on Wizard.
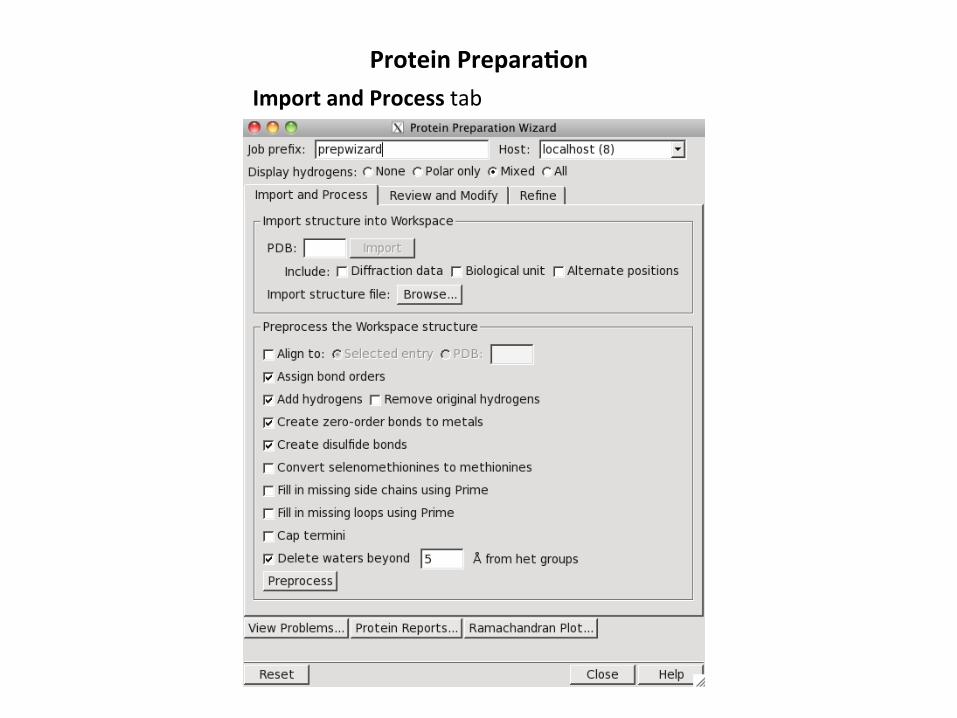
Protein Prepara)on Import and Process tab

Review and Modify tab
Protein Prepara)on

Protein Prepara)on Refine tab
H-‐bond assignment Restrained minimiza4on

Aaer the process is done, a message pops up as shown below. Click Incorporate Now.
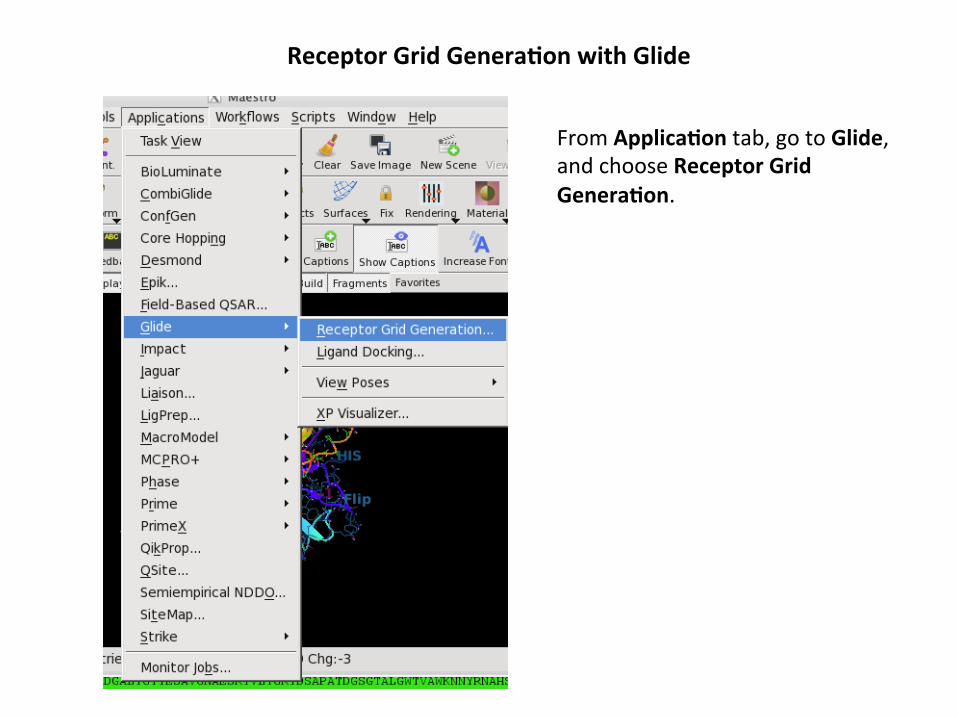
Receptor Grid Genera)on with Glide
From Applica)on tab, go to Glide, and choose Receptor Grid Genera)on.
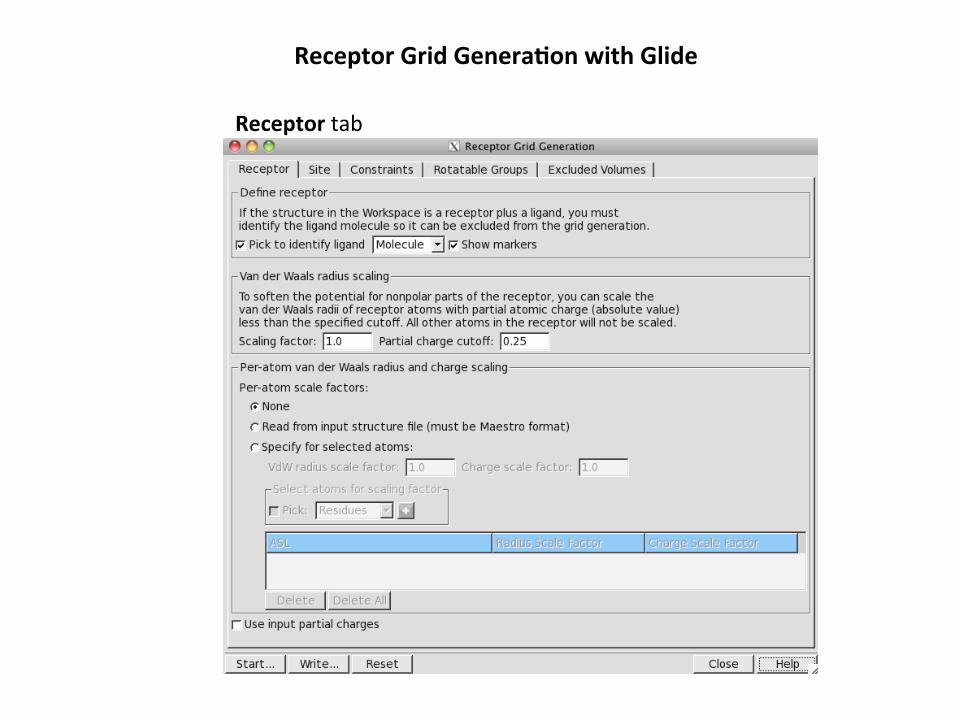
Receptor Grid Genera)on with Glide
Receptor tab

Receptor Grid Genera)on with Glide
Receptor tab: aaer you iden4fy a ligand, the ligand is highlighted as show below.

Receptor Grid Genera)on with Glide Site tab: When you open Site tab, a grid box is shown.
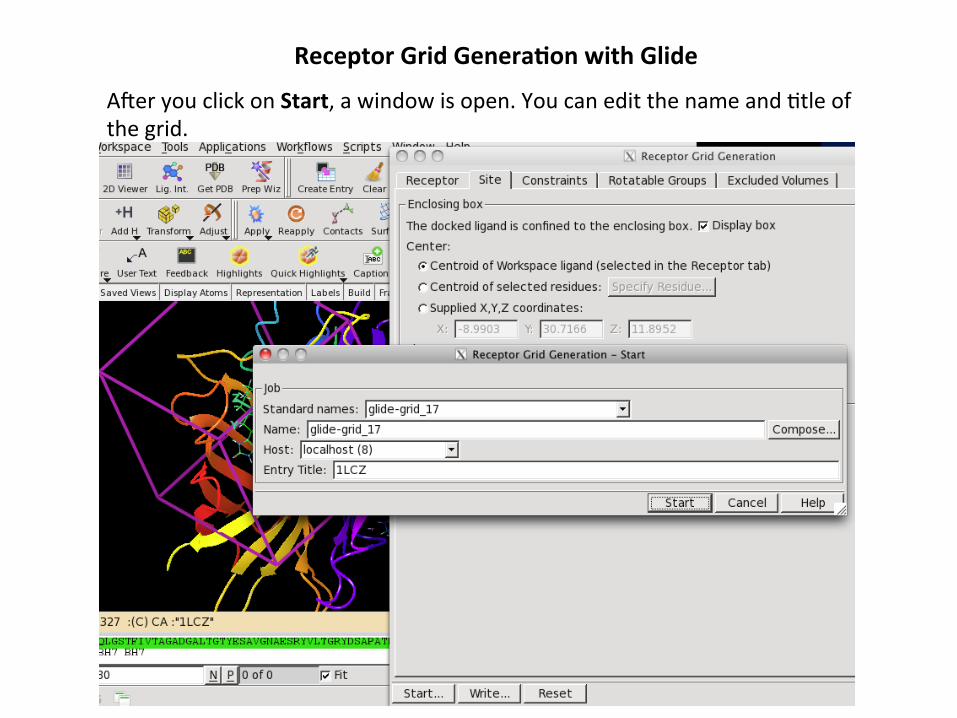
Receptor Grid Genera)on with Glide
Aaer you click on Start, a window is open. You can edit the name and 4tle of the grid.

An example of a name of a grid
Receptor Grid Genera)on with Glide

Monitoring Jobs
From Applica)on, choose Monitor Jobs…. A window will be open showing you a job status as shown below. When you choose a job, you can see the status of the job.

Example of a project table
Managing a Work in the Workspace from Project Table
You can open the project table by clicking this icon (Table).

Extrac)ng the Ligand from a PDB Structure by Dele)ng the Protein and water molecules and ions.

Managing a Work in the Workspace from Project Table
The workspace shows a structure selected from the project table. If you click the box, a corresponding structure is displayed in the workspace.

You can edit values. To do it: 1. Place a cursor by
double clicking the cell.
2. Edit the value. 3. Hit “Enter” on your
keyboard. 4. You will see a
window for a Tip. Click OK.
5. The new value is displayed in the project table.
Changing Values in the Project Table

Dele)ng an Object from Maestro
From Delete, choose Select…. The window below is displayed with Atom tab ac4vated. Go to Molecule tab.

Dele)ng an Object from Maestro
Aaer selec4ng the molecule of interest, it is highlighted. Click Add.

Dele)ng an Object from Maestro
Then, the molecule is added to ASL box. Click Invert.

That opera4on inverts the selec4on. Then, click OK.
Dele)ng an Object from Maestro

Structure aaer bond orders are assigned:
Assigning Bond Orders (Tools >> Assign Bond Orders) Resul4ng structure is displayed in the workspace as shown below.

Adding H atoms by double clicking Add H:
Structure aaer H atoms are added:

Ligand Prepara)on with LigPrep

From Applica)ons, choose LigPrep. Then, LigPrep window will be displayed.
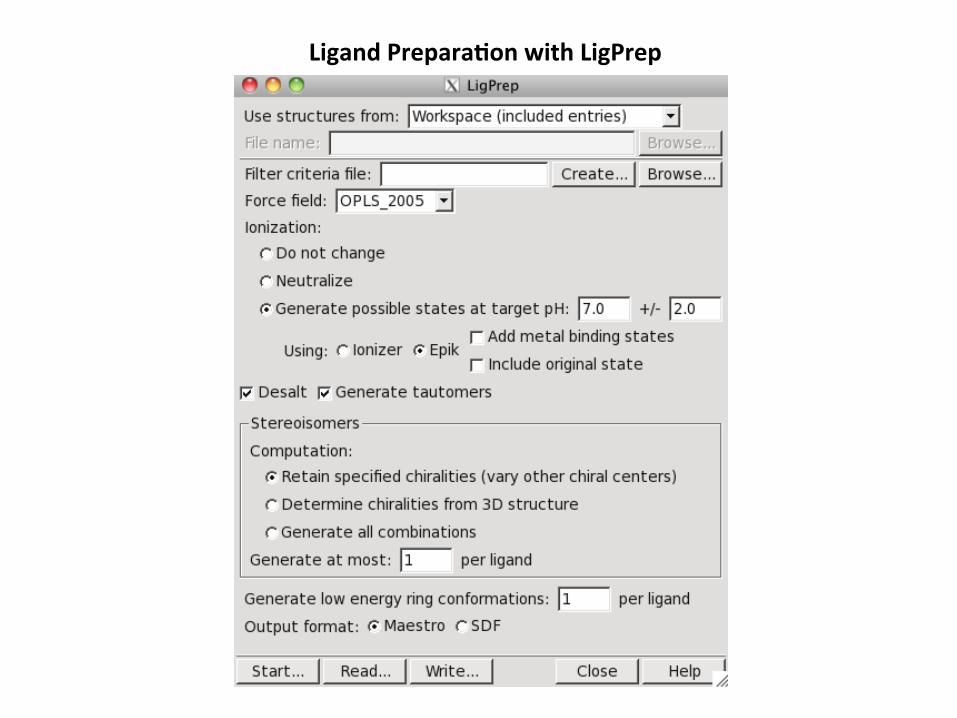
Ligand Prepara)on with LigPrep

Ligand Prepara)on with LigPrep
Add a file name in the box below.
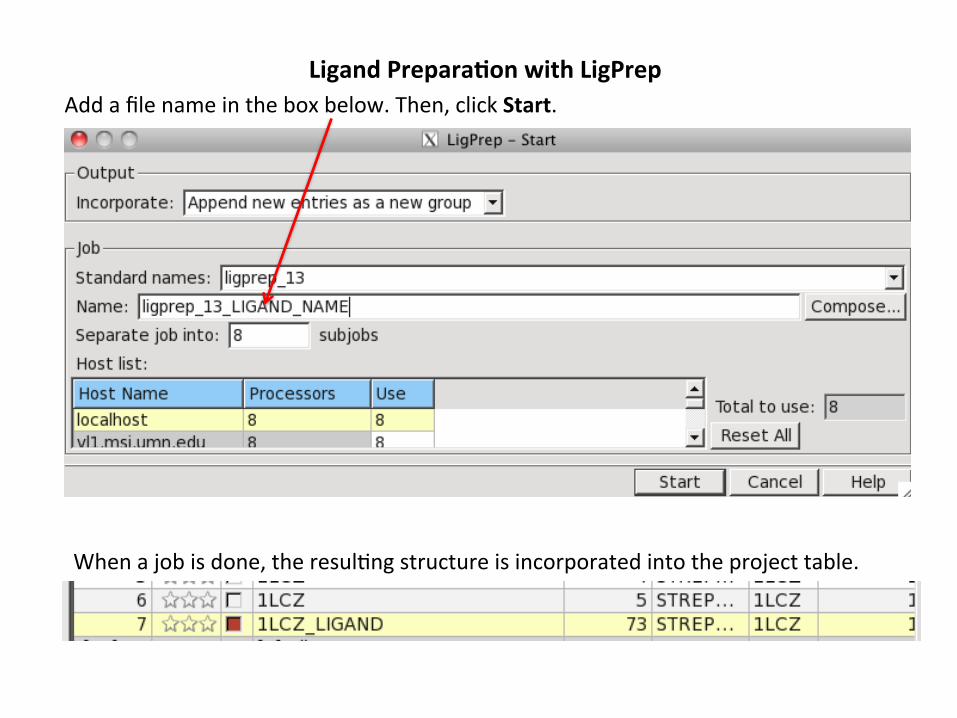
Ligand Prepara)on with LigPrep
When a job is done, the resul4ng structure is incorporated into the project table.
Add a file name in the box below. Then, click Start.
Glide Docking

Go to Applica)ons >> Glide >> Ligand Docking

Ligand Docking window is shown below.

From Seengs tab, browse a grid file (it is a zip file.)

Select the op4ons for a docking simula4on.

From Ligands tab, indicate where you will get the ligand from.
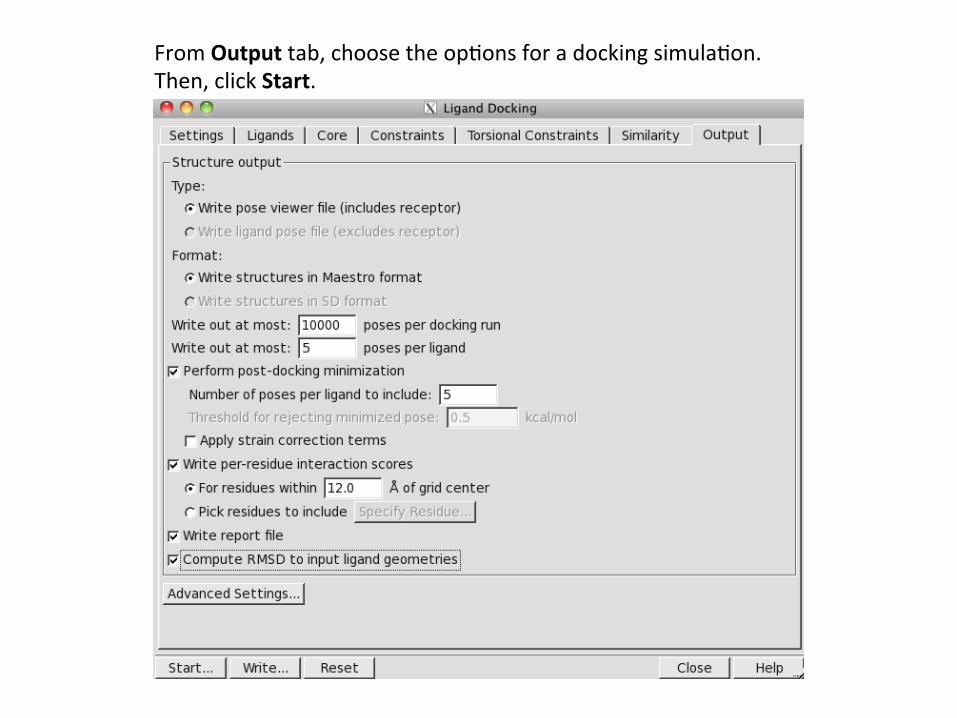
From Output tab, choose the op4ons for a docking simula4on. Then, click Start.

Aaer that, you will see the window below asking you a output file name of the docking simula4on. Add the file name and click Start.

Viewing a Pose View File from Maestro.

Click Import and select a file with “pv.maegz”.

A docking pose of a ligand is displayed with the receptor. Open the project table by clicking Table.

Shown below is a screenshot of an example of a project table. By dragging the sliding bar, you will see values from the docking simula4on you run.
ADME Filter: QikProp

From Applica)on tab, open QikProp. Iden4fy the loca4on where structures and select op4ons. Then, click Start.
In QikProp Start window, type the job name and click Start.

Scp –r [email protected]:/home/msi/user_is/directory/file_name .

Thank you !


