double output, isolated ssr flyback converter for smart ... · a low cost rcd (r9-c5-d9) clamp is...
TRANSCRIPT

IntroductionThe STEVAL-VP26K02F evaluation board implements a double output isolated flyback with secondary side regulation (SSR), specifically designed to supply smart meter and PLC systems.
The evaluation board has been developed using the VIPER267KDTR offline high-voltage converter which features a 1050 V avalanche-rugged power section, PWM operation at 60 kHz with frequency jittering for lower EMI, current limiting with 700 mA fixed set point, on-board soft-start, safe auto-restart after fault and low standby power.The power supply provides 12 V at 700 mArms (1 A peak) to the power line modem (PLM) and the analog circuitry, and 6 V at 200 mA to supply digital circuitry and other low voltage parts.The power supply is designed to operate across a three-phase input mains from 50 to 290 VAC, but can also be connected to a single phase mains from 85 to 500 VAC.
Figure 1. STEVAL-VP26K02F evaluation board top
RELATED LINKS The board can also be configured for PSR operation. Refer to STEVAL-VP26K03F
Double output, isolated SSR Flyback converter for Smart Meter and Power Line Communication systems using VIPER267KDTR
AN5374
Application note
AN5374 - Rev 1 - October 2019For further information contact your local STMicroelectronics sales office.
www.st.com

1 Features and specifications
Table 1. STEVAL-VP26K02F electrical specifications
Parameter Min. Typ. Max.
Operative AC main input voltage (3-phase connection) 50 VAC - 290 VAC
Operative AC main input voltage (2-phase connection) 85 VAC - 500 VAC
Mains frequency 47 Hz - 63 Hz
Output voltage 1 – VOUT1 11 V 12 V 13 V
Output current 1 – IOUT110 mA - 700 mA (rms)
- - 1000 mA (peak)
Output voltage 2 – VOUT2 5.5 V 6 V 6.5 V
Output current 2 – IOUT2 10 mA - 200 mA
Maximum peak power - - 13.2 W
Maximum rms power - - 9.6 W
Efficiency at full load - 78% -
Ambient operating temperature -40 °C - 85 °C
AN5374Electrical specifications
AN5374 - Rev 1 page 2/27

1.1 Schematic diagrams
Figure 2. STEVAL-VP26K02F schematic - input section
F2
L4
N
S
CK1
D2RV1
D3
R8
C1
L2
F1
R2
C2
R6
D7R5
R0b (*)
R
D8
R1
D5
+HV
RV2
D6RV3
T
R0a (*)
RV4
D1
L3
D4 NTC2
F3
L1
R3
NTC1
R7
AN
5374 - Rev 1
page 3/27
AN
5374Schem
atic diagrams

Figure 3. STEVAL-VP26K02F schematic - converter section
OPTO1R17 (*)
L6
6V
R16
D10
+ HV
R14
D9
R22
C15
Vsec2
C7
Vsec1
Vsec2
Vsec1
FB
IC2
C13
DRAIN
Dz1
12V
C17
C5
C20
R10 (*)
OPTO1
IC1 VIPER26K
R15
C19
VDD
COMP
R13 (*)
C22
R9
R19
T1
C12
C11
D13
C16
C21
GND
C8
CONTROL
D12
R18
C14
C12
AN
5374 - Rev 1
page 4/27
AN
5374Schem
atic diagrams

1.2 Bill of materials
Table 2. STEVAL-VP26K02F bill of materials
Item Q.ty Ref. Part/Value Description Manufacturer Order code
1 3 R1, R2, R3 22 Ohm TH 1 W±5% TH
Metal oxideresistors TE Connectivity P1W22RJ
2 4 R5, R6, R7,R8
1 MOhm 1206 0.33W ±5% SMD Resistors Panasonic ERJP08J105V
3 1 R9 220 KOhm 12060.25 W ±5% SMD Resistor Panasonic ERJT08J224V
4 4R10, R13,R0a, R0b,R17
0 Ohm 0603 0.25W ±1% SMD Resistors Vishay CRCW06030000Z0EAHP
5 1 R14 10 Ohm 0603 0.1W ±1% SMD Resistor TE Connectivity CRG0603F10R
6 1 R15 150Ω 0603 0.1 W±1% SMD Resistor Panasonic ERJ3BSFR15V
7 1 R16 22KΩ 0603 0.1 W±1% SMD Resistor Vishay CRCW060322K0FKEA
8 1 R18 15 kΩ 0603 0.1 W±1% SMD Resistor TE Connectivity CRG0603F15K
9 1 R19 130kΩ 0603 0.1 W±1% SMD Resistor Vishay CRCW0603130KFKEA
10 1 R22 47Ω 0603 0.125 W±1% SMD Resistor TE Connectivity CRG0805F47R
11 7
C6, C9,C18, R11,R12, R20,R21, Q1,CK1
Capacitors (notconnected)
12 2 C1, C2
68 µF TH D=18mm, H=25 mm,P=7.5 mm 400 Vcc- 105°C ±20% TH
Electroliticcapacitors Rubycon 400BXC68MEFC18X25
13 1 C5 1 nF 630 Vdc 1206630 Vdc ±5% SMD
Multi layercapacitor TDK C3216C0G2J102J085AA
14 1 C7 10 nF 0603 200Vdc ±5% SMD
Multi layercapacitor Murata GRM188B11H103KA01D
15 1 C8
47 µF H D=4 mm,H=7 mm, P=1.5mm 35 Vdc ±20%TH
Electrolyticcapacitor Rubycon
16 2 C10, C11
220 µF TH D=6.3mm, H=11 mm,P=2.5 mm 25 Vcc,+105°C ±20% SMD
Electrolyticcapacitors Rubycon 35ZLH220MEFC8X11.5
17 1 C19 100 pF 0603 250Vdc ±5% SMD
Multi layercapacitor TDK CGA3E3C0G2E101J080AA
18 2 C12, C15 100 nF 0603 25Vcc ±10% SMD
Multi layercapacitors KEMET C0603C104K3RACTU
AN5374Bill of materials
AN5374 - Rev 1 page 5/27

Item Q.ty Ref. Part/Value Description Manufacturer Order code
19 1 C13
470 µF TH D=10mm, H=12.5 mm,P=5 mm 35 Vcc,+105°C ±20% TH
Electrolyticcapacitor Rubycon 25ZLH470MEFC10X12.5
20 1 C14
100 µF TH D=6.3mm, H=11 mm,P=2.5 mm 35 Vcc,+105°C ±20% TH
Electrolyticcapacitor Rubycon 35ZLH100MEFC6.3X11
21 1 C16 82 nF 0603 ±10%SMD
Multi layercapacitor Murata GRM033R61C823KE84
22 1 C172.2 nF TH 8 mm X5 mm, P 7.5 mm250 Vac TH
X1 Y2 Capacitor Murata DE2E3KY222MA2BM01F
23 2 C20, C21 1 μF 0603 25 Vdc±10% SMD
Multi layercapacitors Murata GRM188C81E105KAADD
24 1 C22 220 pF 0603 50Vdc ±5% SMD
Multi layercapacitor Kemet C0603C221J5GACTU
25 3 F1, F2, F3 2 A 10.1 mm X1.43 mm SMD Fuses Schurter 3403.0169.24
26 1 T1 LP 1.5 mH, out1 12V, out2 6 V TH
Flybacktransformer Wurth Eleltronik 750318135
27 4 L1, L2, L3,L4
1 mH TH, D 8mm,P 5mm, H 10mmTH
Inductors Wurth Elektronik 7447728102
28 1 L6
3.3 µH / 33 mOHMLu x La: 0,157 x0,157" (4,00 x 4,00mm) 3.23 A TH
Inductor Wurth ElectronicsInc 74404043033A
29 2 NTC1,NTC2
10 Ohm TH 9 mmX 4 mm, P 5 mmTH
PTC Murata NTPA7100LBMB0
30 1 Dz1 22 V SOD 123 0.5A SMD Zener diode ON Semiconductor MMSZ22T1G
31 4 VR1, VR2,VR3, VR4
Vrms=275, THserie 14, 16.5 mmX 4.5 mmVDCmax=350 VWmax=155 J TH
Metal oxidevaristors Wurth Elektronik 820442711E
32 8D1, D2, D3,D4, D5, D6,D7, D8
RGP02-20E-E3/54TH Axial, Body 5.2x 2.7 1800 V TH
High voltagerectifier diodes Vishay RGP02-20E-E3/54
33 1 D9 MRA4007T3GSMA SMD Rectifier diode ON Semiconductor MRA4007T3G
34 1 D10 STPS1150A SMA150 V 1 A SMD
150 V powerSchottky rectifier ST STPS1150A
35 1 D12 STPS2200U SMA200 V 2 A SMD
High voltage powerSchottky rectifier ST STPS2200UF
36 1 D13 STPS1H100A SMA100 V 1 A SMD
SMA(flat), SMBpower Schottkyrectifier
ST STPS1H100A
37 1 Opto1 SFH610A-2 DIP4SMD Optocoupler Vishay SFH610A-2
38 1 IC2 TS432ILT 1.24 VSMD
Adjustable shuntvoltage reference ST TS432ILT
AN5374Bill of materials
AN5374 - Rev 1 page 6/27

Item Q.ty Ref. Part/Value Description Manufacturer Order code
39 1 IC1 1050 V SMD High voltageconverter ST VIPER267KDTR
40 2 M1 M.4 TH 2-way terminalblock Phoenix Contact 1706785
41 1 M2 M.3 TH 3-way terminalblock Phoenix Contact 1725669
42 4 H1, H2, H3,H4 9.5 mm Hex spacers Richco HS 4 3
1.3 Transformer
Table 3. Transformer characteristics
Manufacturer Wurth Elektonik
Part number 750318135
Core E16
Primary Inductance 1.5 mH ±10%
Saturation current 950 mA (20% roll-off from initial)
Leakage inductance 100 µH typ., 200 µH max.
Primary-to-auxiliary turns ratio 5.03 ±1%
Primary-to-sec1 turns ratio 10.94 ±1%
Primary-to- sec2 turns ratio 10.94 ±1%
Figure 4. Dimensional drawing, pin placement (distances, bottom view) and electrical diagrams
9
10
8
7
5
4
3
2
PRI120-375Vdc
60KHz
AUX13V - 10mA
SEC (5-2)12V - 1.0mA
SEC6V - 200mA
.480[12.20]
.138(3)[3.50]
φ.043(10)[1.10]
.106(5)[2.70]
RECOMMENDEDP.C. PATTERN, COMPONENT SIDE
CL
AN5374Transformer
AN5374 - Rev 1 page 7/27

Figure 5. Dimensional drawing and pin placement diagram (bottom, side and top view)
AN5374Transformer
AN5374 - Rev 1 page 8/27

2 Circuit description
2.1 Input stage and filtering
The input stage is designed for the power supply to sustain operation at up to 500 VAC. It consists of three fuses(F1, F2 and F3) implemented to prevent catastrophic failure and two input NTCs to limit the inrush current of thecapacitors during startup and to protect the three-phase bridge rectifier (BR). The total required resistance of theNTC is divided into two for safe operation of the NTC components without exceeding the allowed voltage ratingacross them.The total bulk capacitance consists of two capacitors in series for a total voltage rating above the maximumoperating rectified input voltage (730VDC approx.); resistors R5 to R8 ensure equal voltage sharing between thecapacitors.Special care has been placed on filtering conducted converter noise to render powerline communication lesssensitive to the switching power supply. Both differential and common mode filters have been implemented.
2.2 Snubber network
A low cost RCD (R9-C5-D9) clamp is implemented for the snubber network to limit the leakage inductancevoltage spike by dissipating the associated energy during MOSFET turn-off to ensure reliable power supplyoperation.The 1050 BVDSS voltage of the VIPER26K means that further protection against input overvoltage using a paralleltransil diode is not required.The adoption of this low-cost clamp configuration helps to improve EMC performance through smooth drainvoltage ringing slopes, and the absence of the transil eliminates a loop that could degrade EMI performance.
RELATED LINKS Appendix B Effect of output LC post filter stage in flyback converters on page 20
2.3 HV converter
The core of the power supply is the VIPER267KDTR offline high-voltage converter with 1050 V avalanche-ruggedpower section with a maximum RDS(on) ≤ 8.5 Ω, and a current-mode 60 kHz fixed frequency PWM controller.The device includes several features which considerably reduce the overall BoM cost and improve systemreliability.Control is achieved by adjusting the voltage on COMP pin, which transfers the output voltage information via theoptocoupler. Capacitor C7 connected across the pin is used for appropriate loop compensation.During normal operation, the VDD pin is powered by the output of the auxiliary winding of the transformer, which isrectified by diode D10 and capacitor C8. Resistor R4 is used to filter the auxiliary spikes at turn-off, and limitvoltage fluctuation on the pin. Capacitor C19 is used to filter any narrow voltage spikes entering the VDD pin. Aclamp network consisting of R22 and Dz1 is connected across the VDD pin to avoid transient voltages exceedingthe absolute maximum rating of the pin.
2.4 Output stage
The secondary of the transformer is designed for a two-output option: the secondary windings are wound using astack arrangement to improve the cross regulation of the non-regulated output.The first secondary signal is rectified by diode D12 and filtered by output capacitor C13, and is designed to allowsufficient AC ripple capability to avoid component overheating. The L6-C14 post filter is used to further reduce theresidual output ripple, while capacitors C15 and C21 further reduce the output switching noise.The other secondary signal is rectified by diode D13 and capacitor C11.The output voltage is sensed by voltage divider R18 and R19 and compared with the internal 1.24 V reference ofthe TS432 shunt voltage reference; its output is then converted via the optocoupler into a current control signal forthe primary PWM IC.
AN5374Circuit description
AN5374 - Rev 1 page 9/27

3 Performance data
3.1 Output voltage characteristics
The line and load regulation of the board is measured at the PCB output connectors for both 115 VAC and230 VAC.
Figure 6. Line regulation at different loads
Figure 7. Load regulation at 115 VAC and 230 VAC
AN5374Performance data
AN5374 - Rev 1 page 10/27
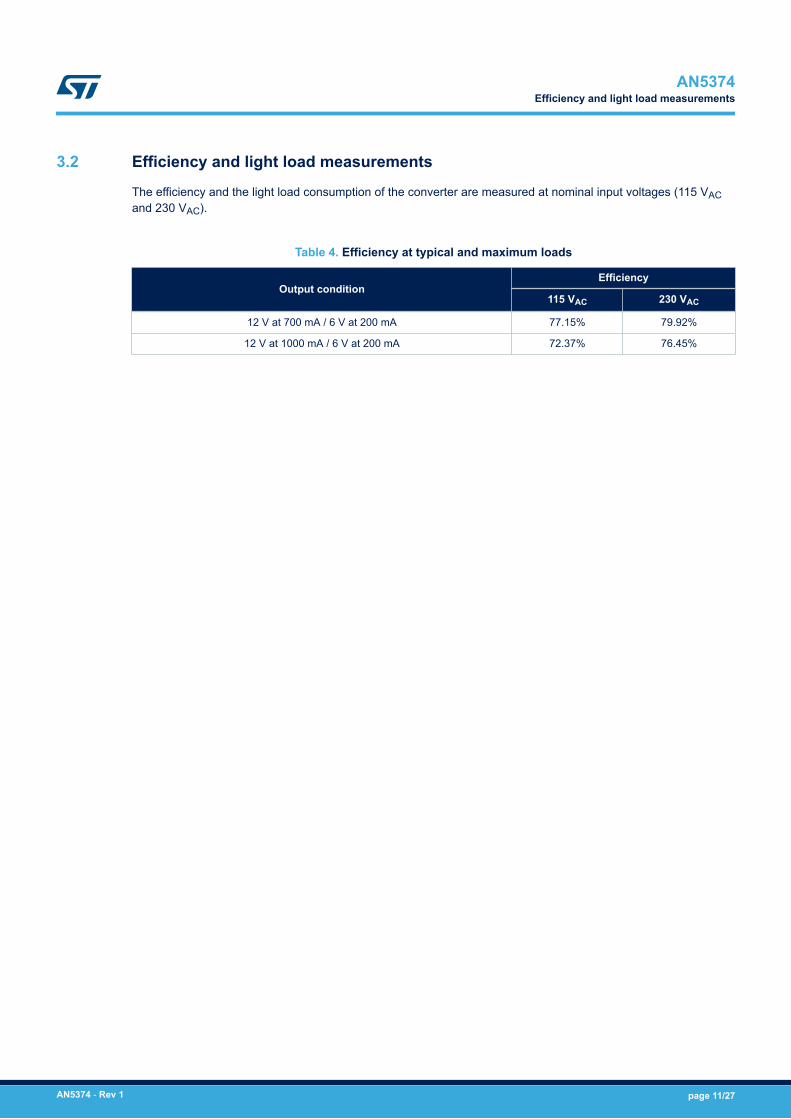
3.2 Efficiency and light load measurements
The efficiency and the light load consumption of the converter are measured at nominal input voltages (115 VACand 230 VAC).
Table 4. Efficiency at typical and maximum loads
Output conditionEfficiency
115 VAC 230 VAC
12 V at 700 mA / 6 V at 200 mA 77.15% 79.92%
12 V at 1000 mA / 6 V at 200 mA 72.37% 76.45%
AN5374Efficiency and light load measurements
AN5374 - Rev 1 page 11/27

4 Typical waveforms
In TX mode, the load on output 1 changes from 10 to 1000 mA with a 1-Hz repetition rate and 70% duty cycle.Output 2 is loaded at typical values (200 mA).During PLM operation, it is important that the output voltage remains regulated within specification limits to ensurecorrect operation of the PLM power amplifier (see Figure 8 and Figure 9). The output voltage is quite stable andclean with no abnormal oscillation during load changes and the steady-state values are within specification byvery good margins.
Figure 8. Output voltage and current at 115 VAC (single phase connection)
Figure 9. Output voltage and current at 230 VAC (single phase connection)
The drain voltage and the drain current waveforms are reported for the two nominal input voltages and for 500VAC(see Figure 10 to Figure 12).
AN5374Typical waveforms
AN5374 - Rev 1 page 12/27

Figure 10. Drain voltage and drain current at 115 VAC (single phase connection)
Figure 11. Drain voltage and drain current at 230 VAC (single phase connection)
AN5374Typical waveforms
AN5374 - Rev 1 page 13/27

Figure 12. Drain voltage and drain current at 500 VAC (single phase connection)
The output voltage ripple at 12 V output at nominal input voltage and full load is also measured (see Figure 13). Itmust be very low in order to ensure appropriate sensitivity during PLM operation . The measured value isextremely low at around 0.1% of the nominal output voltage.
Figure 13. Low frequency ripple at 230 VAC (single phase connection)
AN5374Typical waveforms
AN5374 - Rev 1 page 14/27

5 Noise measurements
The pre-compliance tests for conducted noise emissions as per EN55022 (Class B) European normative wereperformed using a Quasi-Peak detector and an Average detector of the conducted art nominal mains voltage, andcompared with the associated limits.Figure 14 and Figure 15 show that the measured results are well within their respective limits by a very goodmargin.
Figure 14. LINE conducted disturbance
Figure 15. NEUTRAL conducted disturbance
AN5374Noise measurements
AN5374 - Rev 1 page 15/27

6 Conclusion
We tested our double output isolated SSR flyback converter design based on the VIPER267KDTR, and wedemonstrated that the input filter setup, its compliance with the European standards for smart metering and PLCapplications, as well as for Electromagnetic compatibility, and the overall performance of the board render itsuitable for use in Smart Meter and PLC systems.
AN5374Conclusion
AN5374 - Rev 1 page 16/27

Appendix A CCM flyback converter transfer functionThe control-to-output transfer function of the flyback converter in CCM, Gvc s , is given by the approximation:
Gvc s ≈ HO ∙ 1 + sωZ1 ∙ 1− sωZ21 + sωP1 (1)
Gain, poles and zero are defined below: HO = n ∙ ROHCOMP ∙ 1− D1 + D (2)
ωZ1 = 1RC ∙ CO (3)
ωZ2 = n2 ∙ 1− D 2 ∙ ROD ∙ L (4)ωP1 = 1 + DRO ∙ CO (5)
A.1 CCM flyback type-2 compensator designTo compensate the CCM flyback, we use a type-2 compensator featuring the integrator effect that provides highDC gain to minimize static error, as well as a pole-zero pair to boost the phase according to the phase margintarget.
The compensator is determined using a manual pole-zero placement technique in which the zero is placed in thevicinity of the power stage dominant pole to cancel its effect and the pole position is adjusted to achieve therequired phase margin.Follow the procedure below to design compensation with a type 2 compensator:
Step 1. Select the crossover frequency fC and the phase margin Φm :
For CCM flyback, the crossover frequency must be selected as low as possible with respect to theRHP zero ωZ2 in order to limit the phase degradation that it introduces.
As a general rule, you should set fC to below 20% of the RHP zero.
Step 2. Evaluate the gain and phase of the plant at crossover frequency:Gvc fC = Gvc 2 ∙ π ∙ fC (6)Φvc fC = arg Gvc 2 ∙ π ∙ fC (7)
Step 3. Design the compensator to have following gain and phase (at fC ):
The compensated open-loop gain must attain unit gain at fC , with the required phase margin.Gc fC = Gc 2 ∙ π ∙ fC = 1Gvc fC (8)Φc fC = arg Gc 2 ∙ π ∙ fC = 90− 180 + Φm−Φvc fC (9)
Step 4. Cancel the pole of the plant fP p by placing the zero of the compensator fZ c in the neighborhood( α = 1 to 5): fZ c = ωZ c2 ∙ π = α ∙ fP p (10)
Step 5. Place the pole of the compensator to boost the phase and to obtain the desired phase margin:fP c = fCtan tan−1 fCfZ c − Φc fC (11)
AN5374CCM flyback converter transfer function
AN5374 - Rev 1 page 17/27

Step 6. Calculate the gain Gco :Gco = Gc fC ∙ ωC ∙ 1 + fCfP c 2
1 + fCfZ c 2 (12)
GC s is thus determined.
A.2 Compensator implementationFigure 16 shows the complete schematic arrangement for the type-2 error amplifier in secondary side regulation(SSR). The resistors R1 and R2 are used to define the output voltage setpoint. The resistor ROPTO is used to biasthe emitter, while the resistor RBIAS is used to provide the minimum biasing current to the reference voltage IC.The capacitors C1 and CFB are used for the compensation, even if the other components also affect the overallcompensator transfer function.
Figure 16. Secondary feedback implementation using secondary reference voltage and optocoupler
Ref
TS432
Rfb
Cfb
Vdd
Ropto
FB pin
GND
Dout
R1
Cout
Rbias
C1
OPTO
Vout
R2
OPTO
The transfer function of the compensator can be expressed as:
GC s = CTR ∙ RFBROPTO ∙ 1 + 1s ∙ R1 ∙ C11 + s ∙ RFB ∙ CFB+ COPTO (13)
In the equation, capacitor COPTO is the intrinsic capacitor across the collector that introduces a pole in the transferfunction and limits the frequency response. As this pole becomes part of the controller transfer function, specifictest measurements are required to determine the correct value as close as possible to the real operatingconditions of the selected optocoupler.Component selection is based on the procedure shown below.
Step 1. First calculate the value of the resistor RBIAS .The purpose of this resistor is to provide the minimum bias current to the reference IC necessary forcorrect operation. Considering that the forward voltage of the opto-diode is almost constant (typically ≈1 V), the value of RBIAS is simply given by:RBIAS ≤ VFIBIAS (14)
AN5374Compensator implementation
AN5374 - Rev 1 page 18/27

Step 2. The next step is the selection of R1 .
The value must be high enough to minimize the residual losses across the output, but low enough toensure that the input current of the REF pin of the reference IC is negligible compared with the currentacross R1 itself: a general rule is to set the current across R1 30 to 50 higher than the REF inputcurrent.
Step 3. Select resistor R2 to define the output voltage set-point:R2 = R1 ∙ VREFVOUT − VREF (15)
Step 4. Calculate the value of capacitor C1 to fix the zero fZ c :C1 = 12 ∙ π ∙ R1 ∙ fZc (16)
Step 5. Set the value of ROPTO to fix the mid-band gain Gco :ROPTO = CTR ∙ RFBGco (17)
Step 6. Check that ROPTO satisfies the following equation:
This is to ensure the minimum current through the optodiode to properly drive the FB pin with thecurrent IFB , ensuring the full dynamic of the pin.ROPTO ≤ VOUT − VF − VREFIFBCTR + VFRBIAS (18)
Step 7. Set the value of CFB to fix the proper phase boost of the compensator:CFB = 12 ∙ π ∙ RFB ∙ fPc − COPTO (19)
The design of GC s is now ready.
Table 5. Summary of compensator component calculations and results
Part Ref. equation Theoretical value Selected valueRBIAS ≤ VFIBIAS 19.5 kΩ 22 kΩ
R1 - 130 kΩ 130 kΩ
R2 R1 ∙ VREFVOUT − VREF 15.1 kΩ 15 kΩ
C1 12 ∙ π ∙ R1 ∙ fZc 79 nF 82 nF
ROPTO CTR ∙ RFBGco 147 Ω 150 Ω
CFB 12 ∙ π ∙ RFB ∙ fPc − COPTO 11 nF 10 nF
The resulting crossover frequency fC and phase margin Φm are:fC ≈ 2.7kHzΦm ≈ 77.68°
AN5374Compensator implementation
AN5374 - Rev 1 page 19/27

Appendix B Effect of output LC post filter stage in flyback convertersLarge capacitors are usually used in flyback converters to build the output filter, and it is important to factor in theRMS ripple rating and the parasitic resistance ESR when determining the size of the capacitor to satisfy theoutput ripple specification.When the requirement of the ripple is very tight, a simple low cost LC filter can be used to attenuate the ripple tothe desired level instead of using a large number of capacitors that increase the cost.
Figure 17. Output LC post filter for ripple reduction
Vout
Rc
Lf1
Co1 Cf1
Ro
Rf
Although this solution is very simple and cost effective, it changes the behavior of the plant and extra care mustbe placed to deal with the compensation design.Assuming that CO is much larger than CF , the total transfer function of the plant in presence of the LC filter can beexpressed as:
G′vc s = Gvc s ∙ 1 + sωZF1 + sωF ∙ QF + sωF 2 (20)
Where: ωF = 1LF ∙ CF (21)
QF = 11RO ∙ LFCF + RF+ RC ∙ CFLF (22)
Where Gvc s is the transfer function of the plant without the filter, given in Eq. (1).
The presence of the LC output post filter introduces a further zero and a pair of poles in the transfer function. Thiscauses a peak at frequency ωF/2π to appear in the amplitude diagram and a sudden 180° reduction of the phaseto occur at the same frequency. Therefore, when you use an LC post filter, it is necessary to design its resonancefrequency well above the crossover frequency to keep the resonance peak outside the converter band and toavoid eroding the phase margin or going as far as making the system unstable.In our board, the LC filter in designed to have the pole pair at frequency fF = 8.76kHz , with a quality factor equalto QF = 0.801 , ensuring negligible phase margin erosion at the crossover frequency.
RELATED LINKS 2.2 Snubber network on page 9
AN5374Effect of output LC post filter stage in flyback converters
AN5374 - Rev 1 page 20/27

Appendix C Layout guidelines and design recommendationsAn appropriate PCB layout is essential for the correct operation of any switch-mode converter. It ensures thedelivery of clean signals to the IC and higher immunity to external and switching noise, as well as reducingradiated and conducted electromagnetic interference, all of which help a given solution satisfy EMC requirements.Below are some general concepts to keep in mind when designing SMPS circuit layouts.Separate signal and power tracks:• Traces carrying signal currents should generally be run at a distance from other tracks carrying pulsed
currents or with rapidly changing voltages.• Signal ground traces should be connected to the IC signal ground, GND, using a single "star point", placed
close to the IC.• Power ground traces should be connected to the IC power ground, GND.• The compensation network should be connected to the COMP, maintaining the trace to GND as short as
possible.• In two-layer PCBs, it is a good practice to route signal traces on one PCB side and power traces on the
other side.
Filter sensitive pins and crucial points on the circuit:• A small high-frequency bypass capacitor to GND might be useful to get a clean bias voltage for the signal
part of the IC and protect the IC itself during EFT/ESD tests.• A low ESL ceramic capacitor (a few hundred pF up to 0.1 µF) should be connected across VCC and GND,
placed as close as possible to the IC.• With flyback topologies, when the auxiliary winding is used, it is suggested to connect the VCC capacitor on
the auxiliary return and then to the main GND using a single track.
Keep power loops as confined as possible:• Minimize the area circumscribed by current loops where highly pulsed currents flow in order to reduce its
parasitic self-inductance and the radiated electromagnetic field; this will greatly reduce the electromagneticinterferences produced by the power supply during the switching.
• In a flyback converter the most critical loops are:– The one with the input bulk capacitor, the power switch and the power transformer– the one with the snubber.– the one with the secondary winding, the output rectifier and the output capacitor.
• In a buck converter the most critical loop is:– The one with the input bulk capacitor, the power switch, the power inductor, the output capacitor and
the free-wheeling diode.
Reduce line lengths as any wire will act as an antenna:• With the very short rise times exhibited by EFT pulses, any antenna has the capability of receiving high
voltage spikes. Shorter lines reduce the level of radiated energy received and lower the spikes resulting fromelectrostatic discharges. This will also keep both resistive and inductive effects to a minimum.
• All traces carrying high currents, especially if pulsed (tracks of the power loops), should be as short and wideas possible.
Optimize track routing:• as levels of pickup from static discharges are likely to be greater closer to the extremities of the board, it is
wise to keep any sensitive lines away from these areas.• Input and output lines will often need to reach the PCB edge at some stage, but they can be routed away
from the edge as soon as possible where applicable.• Since vias are considered inductive elements, they should be kept to a minimum in signal paths and avoided
in power paths.
Improve thermal dissipation:• An adequate copper area must be provided under the DRAIN pins to dissipate heat• It is not recommended to place large copper areas on the GND.
AN5374Layout guidelines and design recommendations
AN5374 - Rev 1 page 21/27

Finally, in order to improve immunity against fast transient and capacitive noise injection, since pin number 4 ismechanically connected to the controller die pad of the frame, it is highly recommended to connect it to GND.
Figure 18. Recommended routing of flyback converter
AN5374Layout guidelines and design recommendations
AN5374 - Rev 1 page 22/27

Revision history
Table 6. Document revision history
Date Version Changes
21-Oct-2019 1 Initial release.
AN5374
AN5374 - Rev 1 page 23/27

Contents
1 Features and specifications. . . . . . . . . . . . . . . . . . . . . . . . . . . . . . . . . . . . . . . . . . . . . . . . . . . . . . . .2
1.1 Schematic diagrams . . . . . . . . . . . . . . . . . . . . . . . . . . . . . . . . . . . . . . . . . . . . . . . . . . . . . . . . . . . . 3
1.2 Bill of materials . . . . . . . . . . . . . . . . . . . . . . . . . . . . . . . . . . . . . . . . . . . . . . . . . . . . . . . . . . . . . . . . 5
1.3 Transformer . . . . . . . . . . . . . . . . . . . . . . . . . . . . . . . . . . . . . . . . . . . . . . . . . . . . . . . . . . . . . . . . . . . 7
2 Circuit description . . . . . . . . . . . . . . . . . . . . . . . . . . . . . . . . . . . . . . . . . . . . . . . . . . . . . . . . . . . . . . . . .9
2.1 Input stage and filtering . . . . . . . . . . . . . . . . . . . . . . . . . . . . . . . . . . . . . . . . . . . . . . . . . . . . . . . . . 9
2.2 Snubber network . . . . . . . . . . . . . . . . . . . . . . . . . . . . . . . . . . . . . . . . . . . . . . . . . . . . . . . . . . . . . . . 9
2.3 HV converter . . . . . . . . . . . . . . . . . . . . . . . . . . . . . . . . . . . . . . . . . . . . . . . . . . . . . . . . . . . . . . . . . . 9
2.4 Output stage . . . . . . . . . . . . . . . . . . . . . . . . . . . . . . . . . . . . . . . . . . . . . . . . . . . . . . . . . . . . . . . . . . 9
3 Performance data. . . . . . . . . . . . . . . . . . . . . . . . . . . . . . . . . . . . . . . . . . . . . . . . . . . . . . . . . . . . . . . . .10
3.1 Output voltage characteristics . . . . . . . . . . . . . . . . . . . . . . . . . . . . . . . . . . . . . . . . . . . . . . . . . . . 10
3.2 Efficiency and light load measurements . . . . . . . . . . . . . . . . . . . . . . . . . . . . . . . . . . . . . . . . . . . 11
4 Typical waveforms. . . . . . . . . . . . . . . . . . . . . . . . . . . . . . . . . . . . . . . . . . . . . . . . . . . . . . . . . . . . . . . .12
5 Noise measurements . . . . . . . . . . . . . . . . . . . . . . . . . . . . . . . . . . . . . . . . . . . . . . . . . . . . . . . . . . . . .15
6 Conclusion . . . . . . . . . . . . . . . . . . . . . . . . . . . . . . . . . . . . . . . . . . . . . . . . . . . . . . . . . . . . . . . . . . . . . . .16
Appendix A CCM flyback converter transfer function . . . . . . . . . . . . . . . . . . . . . . . . . . . . . . . . .17
A.1 CCM flyback type-2 compensator design. . . . . . . . . . . . . . . . . . . . . . . . . . . . . . . . . . . . . . . . . . 17
A.2 Compensator implementation . . . . . . . . . . . . . . . . . . . . . . . . . . . . . . . . . . . . . . . . . . . . . . . . . . . 18
Appendix B Effect of output LC post filter stage in flyback converters. . . . . . . . . . . . . . . . .20
Appendix C Layout guidelines and design recommendations . . . . . . . . . . . . . . . . . . . . . . . . .21
Revision history . . . . . . . . . . . . . . . . . . . . . . . . . . . . . . . . . . . . . . . . . . . . . . . . . . . . . . . . . . . . . . . . . . . . . . .23
AN5374Contents
AN5374 - Rev 1 page 24/27

List of figuresFigure 1. STEVAL-VP26K02F evaluation board top . . . . . . . . . . . . . . . . . . . . . . . . . . . . . . . . . . . . . . . . . . . . . . . . . 1Figure 2. STEVAL-VP26K02F schematic - input section . . . . . . . . . . . . . . . . . . . . . . . . . . . . . . . . . . . . . . . . . . . . . . 3Figure 3. STEVAL-VP26K02F schematic - converter section . . . . . . . . . . . . . . . . . . . . . . . . . . . . . . . . . . . . . . . . . . . 4Figure 4. Dimensional drawing, pin placement (distances, bottom view) and electrical diagrams. . . . . . . . . . . . . . . . . . . 7Figure 5. Dimensional drawing and pin placement diagram (bottom, side and top view) . . . . . . . . . . . . . . . . . . . . . . . . . 8Figure 6. Line regulation at different loads . . . . . . . . . . . . . . . . . . . . . . . . . . . . . . . . . . . . . . . . . . . . . . . . . . . . . . . 10Figure 7. Load regulation at 115 VAC and 230 VAC . . . . . . . . . . . . . . . . . . . . . . . . . . . . . . . . . . . . . . . . . . . . . . . . . 10Figure 8. Output voltage and current at 115 VAC (single phase connection) . . . . . . . . . . . . . . . . . . . . . . . . . . . . . . . . 12Figure 9. Output voltage and current at 230 VAC (single phase connection) . . . . . . . . . . . . . . . . . . . . . . . . . . . . . . . . 12Figure 10. Drain voltage and drain current at 115 VAC (single phase connection) . . . . . . . . . . . . . . . . . . . . . . . . . . . . . 13Figure 11. Drain voltage and drain current at 230 VAC (single phase connection) . . . . . . . . . . . . . . . . . . . . . . . . . . . . . 13Figure 12. Drain voltage and drain current at 500 VAC (single phase connection) . . . . . . . . . . . . . . . . . . . . . . . . . . . . . 14Figure 13. Low frequency ripple at 230 VAC (single phase connection) . . . . . . . . . . . . . . . . . . . . . . . . . . . . . . . . . . . . 14Figure 14. LINE conducted disturbance. . . . . . . . . . . . . . . . . . . . . . . . . . . . . . . . . . . . . . . . . . . . . . . . . . . . . . . . . . 15Figure 15. NEUTRAL conducted disturbance. . . . . . . . . . . . . . . . . . . . . . . . . . . . . . . . . . . . . . . . . . . . . . . . . . . . . . 15Figure 16. Secondary feedback implementation using secondary reference voltage and optocoupler . . . . . . . . . . . . . . . 18Figure 17. Output LC post filter for ripple reduction . . . . . . . . . . . . . . . . . . . . . . . . . . . . . . . . . . . . . . . . . . . . . . . . . . 20Figure 18. Recommended routing of flyback converter . . . . . . . . . . . . . . . . . . . . . . . . . . . . . . . . . . . . . . . . . . . . . . . 22
AN5374List of figures
AN5374 - Rev 1 page 25/27

List of tablesTable 1. STEVAL-VP26K02F electrical specifications . . . . . . . . . . . . . . . . . . . . . . . . . . . . . . . . . . . . . . . . . . . . . . . . . 2Table 2. STEVAL-VP26K02F bill of materials . . . . . . . . . . . . . . . . . . . . . . . . . . . . . . . . . . . . . . . . . . . . . . . . . . . . . . . 5Table 3. Transformer characteristics . . . . . . . . . . . . . . . . . . . . . . . . . . . . . . . . . . . . . . . . . . . . . . . . . . . . . . . . . . . . . 7Table 4. Efficiency at typical and maximum loads . . . . . . . . . . . . . . . . . . . . . . . . . . . . . . . . . . . . . . . . . . . . . . . . . . . 11Table 5. Summary of compensator component calculations and results. . . . . . . . . . . . . . . . . . . . . . . . . . . . . . . . . . . . 19Table 6. Document revision history . . . . . . . . . . . . . . . . . . . . . . . . . . . . . . . . . . . . . . . . . . . . . . . . . . . . . . . . . . . . . 23
AN5374List of tables
AN5374 - Rev 1 page 26/27

IMPORTANT NOTICE – PLEASE READ CAREFULLY
STMicroelectronics NV and its subsidiaries (“ST”) reserve the right to make changes, corrections, enhancements, modifications, and improvements to STproducts and/or to this document at any time without notice. Purchasers should obtain the latest relevant information on ST products before placing orders. STproducts are sold pursuant to ST’s terms and conditions of sale in place at the time of order acknowledgement.
Purchasers are solely responsible for the choice, selection, and use of ST products and ST assumes no liability for application assistance or the design ofPurchasers’ products.
No license, express or implied, to any intellectual property right is granted by ST herein.
Resale of ST products with provisions different from the information set forth herein shall void any warranty granted by ST for such product.
ST and the ST logo are trademarks of ST. For additional information about ST trademarks, please refer to www.st.com/trademarks. All other product or servicenames are the property of their respective owners.
Information in this document supersedes and replaces information previously supplied in any prior versions of this document.
© 2019 STMicroelectronics – All rights reserved
AN5374
AN5374 - Rev 1 page 27/27