whirlpool range stove oven repair manual rs386pxeb0
TRANSCRIPT
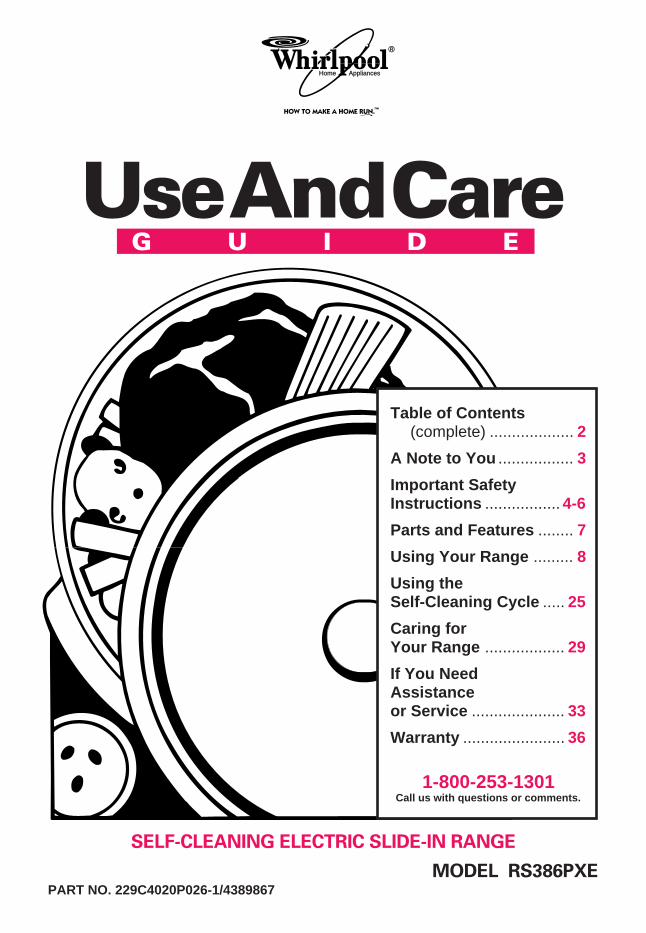
Table of Contents(complete) ................... 2
A Note to You ................. 3
Important SafetyInstructions ................. 4-6
Parts and Features ........ 7
Using Your Range ......... 8
Using theSelf-Cleaning Cycle ..... 25
Caring forYour Range .................. 29
If You NeedAssistanceor Service ..................... 33
Warranty ....................... 36
1-800-253-1301Call us with questions or comments.
Use And CareG U I D E
SELF-CLEANING ELECTRIC SLIDE-IN RANGE
MODEL RS386PXEPART NO. 229C4020P026-1/4389867
Home Appliances
2
Table of ContentsPage
A Note to You ........................................... 3
Important Safety Instructions .............. 4-6
Parts and Features ................................... 7
Using Your Range .................................... 8
Using the surface units ......................... 8
Positioning racks and pans ................. 10
For best air circulation ........................ 11
Using aluminum foil for baking............ 11
The electronic oven control ................. 12
Setting the clock ................................. 13
Using the electronic Minute Timer ...... 13
Using the off/cancel pad ..................... 14
Audible signals .................................... 14
Baking/roasting ................................... 15
Adjusting the oven temperaturecontrol ................................................. 16
Broiling ................................................ 17
Broiling tips ......................................... 18
PageEnergy saving tips .............................. 19
Using the electronic MEALTIMER™control ................................................. 19
The oven vent ..................................... 23
The storage drawer ............................. 23
The anti-tip bracket ............................. 24
Using the Self-Cleaning Cycle .............. 25
Before you start .................................. 25
Setting the controls ............................. 26
Special tips ......................................... 28
How the cycle works ........................... 28
Caring for Your Range ........................... 29
Cleaning the cooktop .......................... 29
Cleaning other range parts ................. 31
The oven light ..................................... 32
If You Need Assistance or Service ....... 33
Warranty .................................................. 36

3
A Note to YouThank you for buying a WHIRLPOOL® appliance.Because your life is getting busier and more complicated, WHIRLPOOL ranges are easy touse, save time, and help you manage your home better. To ensure that you enjoy years oftrouble-free operation, we developed this Use and Care Guide. It is full of valuable informationabout how to operate and maintain your appliance properly and safely. Please readit carefully.
Also, please complete and mail in the Ownership Registration Card provided with your appli-ance. The card helps us notify you about any new information on your appliance.
Please record your model’s information.Whenever you call our Consumer AssistanceCenter at 1-800-253-1301 or request servicefor your appliance, you need to know yourcomplete model number and serial number.You can find this information on the modeland serial number plate (see diagram onpage 7 for location of plate).
Please also record the purchase date ofyour appliance and your dealer’s name,address, and telephone number.
Keep this book and the sales slip together in a safe place for future reference.
Model Number ______________________
Serial Number ______________________
Purchase Date ______________________
Dealer Name _______________________
Dealer Address _____________________
Dealer Phone _______________________
Our Consumer AssistanceCenter number is toll-free. 1-800-253-1301
4
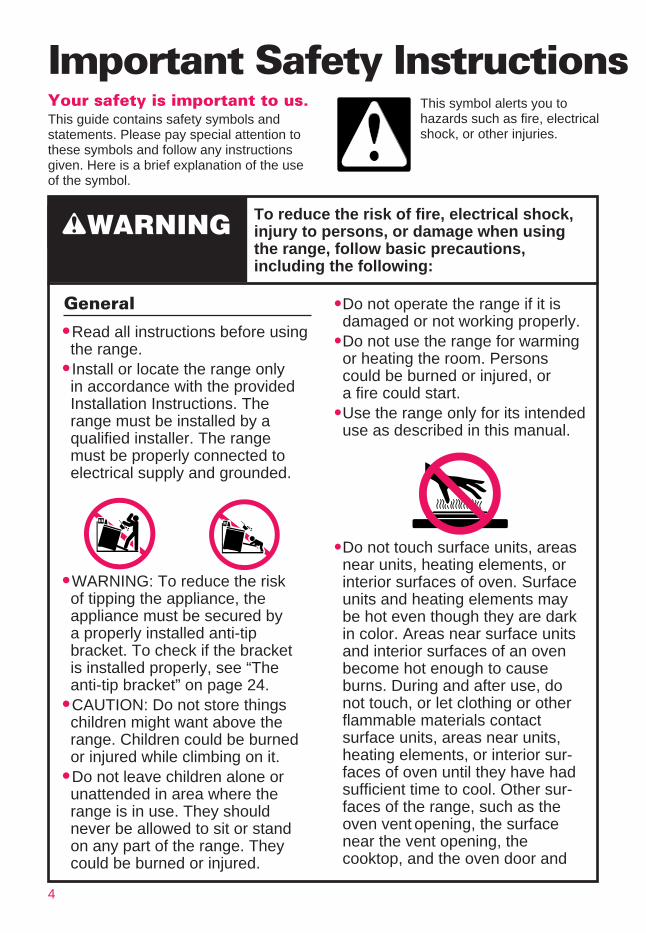
Your safety is important to us.This guide contains safety symbols andstatements. Please pay special attention tothese symbols and follow any instructionsgiven. Here is a brief explanation of the useof the symbol.
wWARNING
•Do not operate the range if it isdamaged or not working properly.
•Do not use the range for warmingor heating the room. Personscould be burned or injured, ora fire could start.
•Use the range only for its intendeduse as described in this manual.
•Do not touch surface units, areasnear units, heating elements, orinterior surfaces of oven. Surfaceunits and heating elements maybe hot even though they are darkin color. Areas near surface unitsand interior surfaces of an ovenbecome hot enough to causeburns. During and after use, donot touch, or let clothing or otherflammable materials contactsurface units, areas near units,heating elements, or interior sur-faces of oven until they have hadsufficient time to cool. Other sur-faces of the range, such as theoven vent opening, the surfacenear the vent opening, thecooktop, and the oven door and
Important Safety Instructions
To reduce the risk of fire, electrical shock,injury to persons, or damage when usingthe range, follow basic precautions,including the following:
General
•Read all instructions before usingthe range.
• Install or locate the range onlyin accordance with the providedInstallation Instructions. Therange must be installed by aqualified installer. The rangemust be properly connected toelectrical supply and grounded.
•WARNING: To reduce the riskof tipping the appliance, theappliance must be secured bya properly installed anti-tipbracket. To check if the bracketis installed properly, see “Theanti-tip bracket” on page 24.
•CAUTION: Do not store thingschildren might want above therange. Children could be burnedor injured while climbing on it.
•Do not leave children alone orunattended in area where therange is in use. They shouldnever be allowed to sit or standon any part of the range. Theycould be burned or injured.
This symbol alerts you tohazards such as fire, electricalshock, or other injuries.
5
IMPORTANT SAFETY INSTRUCTIONS
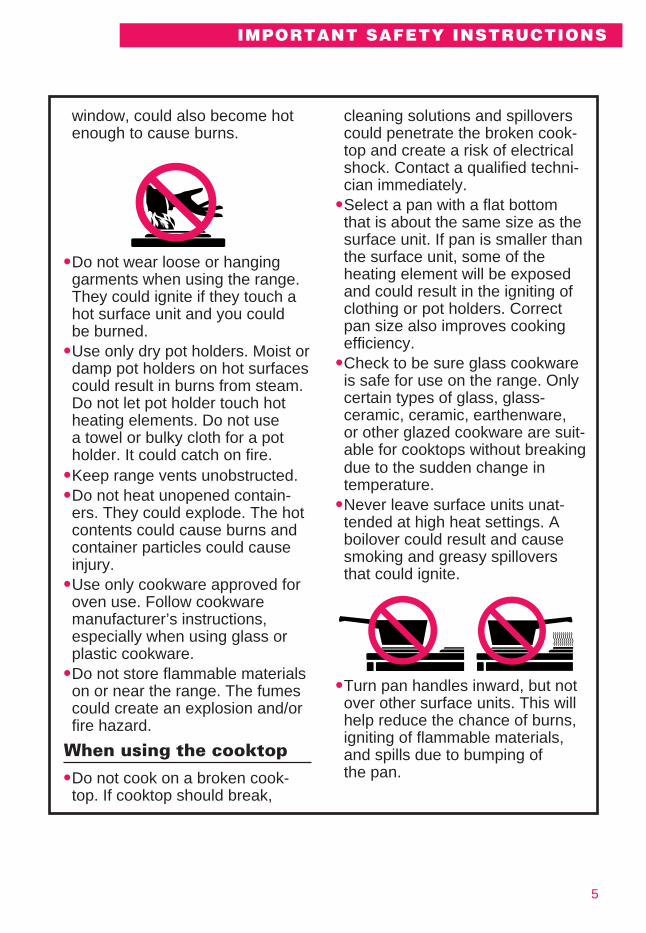
cleaning solutions and spilloverscould penetrate the broken cook-top and create a risk of electricalshock. Contact a qualified techni-cian immediately.
•Select a pan with a flat bottomthat is about the same size as thesurface unit. If pan is smaller thanthe surface unit, some of theheating element will be exposedand could result in the igniting ofclothing or pot holders. Correctpan size also improves cookingefficiency.
•Check to be sure glass cookwareis safe for use on the range. Onlycertain types of glass, glass-ceramic, ceramic, earthenware,or other glazed cookware are suit-able for cooktops without breakingdue to the sudden change intemperature.
•Never leave surface units unat-tended at high heat settings. Aboilover could result and causesmoking and greasy spilloversthat could ignite.
•Turn pan handles inward, but notover other surface units. This willhelp reduce the chance of burns,igniting of flammable materials,and spills due to bumping ofthe pan.
window, could also become hotenough to cause burns.
•Do not wear loose or hanginggarments when using the range.They could ignite if they touch ahot surface unit and you couldbe burned.
•Use only dry pot holders. Moist ordamp pot holders on hot surfacescould result in burns from steam.Do not let pot holder touch hotheating elements. Do not usea towel or bulky cloth for a potholder. It could catch on fire.
•Keep range vents unobstructed.•Do not heat unopened contain-ers. They could explode. The hotcontents could cause burns andcontainer particles could causeinjury.
•Use only cookware approved foroven use. Follow cookwaremanufacturer’s instructions,especially when using glass orplastic cookware.
•Do not store flammable materialson or near the range. The fumescould create an explosion and/orfire hazard.
When using the cooktop
•Do not cook on a broken cook-top. If cooktop should break,
6
When using the oven
•Always position oven rack(s) indesired location while oven iscool. If a rack must be removedwhile oven is hot, do not let potholder contact hot heatingelements in oven.
•Use care when opening ovendoor. Let hot air or steam escapebefore removing or replacingfood.
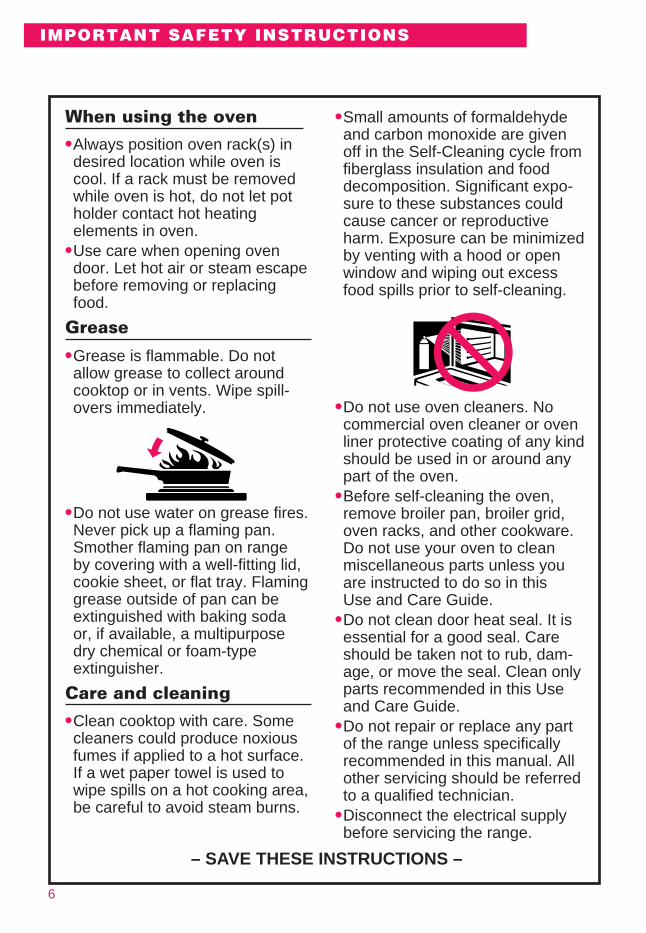
Grease
•Grease is flammable. Do notallow grease to collect aroundcooktop or in vents. Wipe spill-overs immediately.
•Do not use water on grease fires.Never pick up a flaming pan.Smother flaming pan on rangeby covering with a well-fitting lid,cookie sheet, or flat tray. Flaminggrease outside of pan can beextinguished with baking sodaor, if available, a multipurposedry chemical or foam-typeextinguisher.
Care and cleaning
•Clean cooktop with care. Somecleaners could produce noxiousfumes if applied to a hot surface.If a wet paper towel is used towipe spills on a hot cooking area,be careful to avoid steam burns.
•Small amounts of formaldehydeand carbon monoxide are givenoff in the Self-Cleaning cycle fromfiberglass insulation and fooddecomposition. Significant expo-sure to these substances couldcause cancer or reproductiveharm. Exposure can be minimizedby venting with a hood or openwindow and wiping out excessfood spills prior to self-cleaning.
•Do not use oven cleaners. Nocommercial oven cleaner or ovenliner protective coating of any kindshould be used in or around anypart of the oven.
•Before self-cleaning the oven,remove broiler pan, broiler grid,oven racks, and other cookware.Do not use your oven to cleanmiscellaneous parts unless youare instructed to do so in thisUse and Care Guide.
•Do not clean door heat seal. It isessential for a good seal. Careshould be taken not to rub, dam-age, or move the seal. Clean onlyparts recommended in this Useand Care Guide.
•Do not repair or replace any partof the range unless specificallyrecommended in this manual. Allother servicing should be referredto a qualified technician.
•Disconnect the electrical supplybefore servicing the range.
– SAVE THESE INSTRUCTIONS –
IMPORTANT SAFETY INSTRUCTIONS
7
FRONTREARFRONT REAR
ON/OFF CLOCK STOPTIME
COOKTIME CLEAN BROIL BAKE
CANCEL
OFF
TIMER
ON
DELAYOVEN ON
TIMERSTOPCLEAN
HR
BAKECLEAN
BROILLOCK
OVENLIGHT
SURFACEHEATING
PUSH TO TURNPUSH TO TURN
OFF
HI
LOOFF
HI
LOOFF
HI
LOOFF
HI
LO
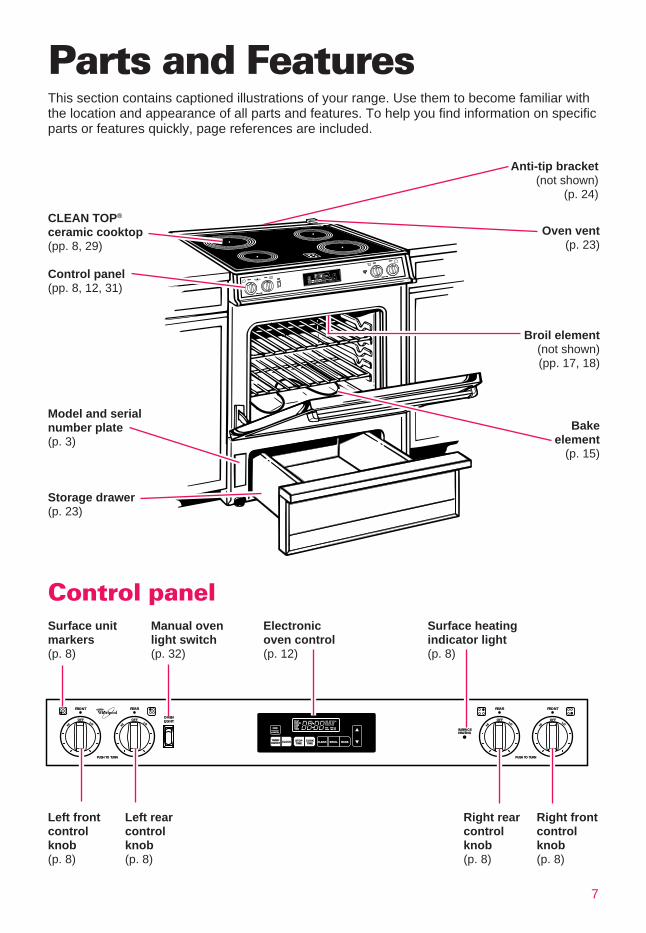
Surface unitmarkers(p. 8)
Manual ovenlight switch(p. 32)
Control panel
Parts and FeaturesThis section contains captioned illustrations of your range. Use them to become familiar withthe location and appearance of all parts and features. To help you find information on specificparts or features quickly, page references are included.
Surface heatingindicator light(p. 8)
Electronicoven control(p. 12)
Right frontcontrolknob(p. 8)
Right rearcontrolknob(p. 8)
Left rearcontrolknob(p. 8)
Left frontcontrolknob(p. 8)
OVENLIGHT
FRONT
REAR
FRONT
REAR
ON/OFFON/OFFCLOCKCLOCK
STOPTIME
COOKTIME
CLEANCLEAN BROIL BAKECANCEL
OFF
TIMERTIMER
ON
DELAYDELAYOVEN ONOVEN ON
TIMERTIMERSTOPSTOPCLEANCLEAN
HR
BAKE
CLEAN
BROIL
LOCK
SURFACEHEATING
PUSH TO TURN
PUSH TO TURN
OFFOFF
HI
LO
OFFOFF
HI
LO
OFFOFF
HI
HI
LOLO
OFFOFF
HI
LOLO
HOT SURFACEHOT SURFACE
Oven vent(p. 23)
Broil element(not shown)(pp. 17, 18)
Bakeelement
(p. 15)
CLEAN TOP®
ceramic cooktop(pp. 8, 29)
Control panel(pp. 8, 12, 31)
Model and serialnumber plate(p. 3)
Storage drawer(p. 23)
Anti-tip bracket(not shown)
(p. 24)
8
wWARNING
Fire HazardTurn all controls off when donecooking.Failure to do so can result in death,fire, or burns.
Until you get used to the settings, use thechart at right as a guide. For best results,start cooking at the high setting; then turnthe control knob down to continue cooking.
HOT SURFACE
Using Your RangeTo get the best cooking results, you should use your range the correct way. This section tellsyou what you need to know to use your range safely and efficiently.
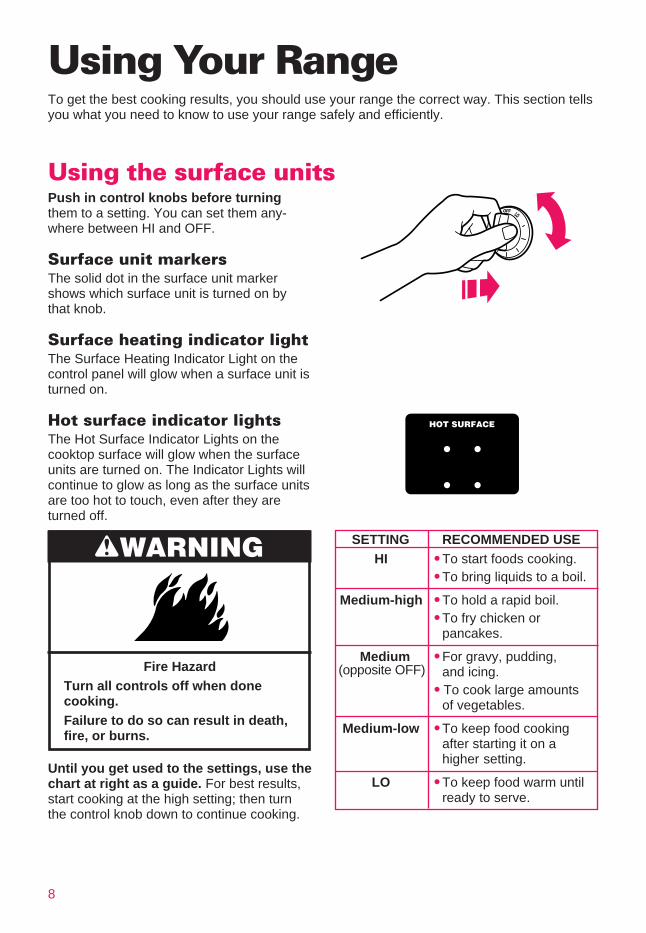
Using the surface unitsPush in control knobs before turningthem to a setting. You can set them any-where between HI and OFF.
Surface unit markersThe solid dot in the surface unit markershows which surface unit is turned on bythat knob.
Surface heating indicator lightThe Surface Heating Indicator Light on thecontrol panel will glow when a surface unit isturned on.
Hot surface indicator lightsThe Hot Surface Indicator Lights on thecooktop surface will glow when the surfaceunits are turned on. The Indicator Lights willcontinue to glow as long as the surface unitsare too hot to touch, even after they areturned off.
SETTING RECOMMENDED USEHI • To start foods cooking.
• To bring liquids to a boil.
Medium-high • To hold a rapid boil.• To fry chicken or
pancakes.
Medium • For gravy, pudding,and icing.
(opposite OFF • To cook large amountsof vegetables.
Medium-low • To keep food cookingafter starting it on ahigher setting.
LO • To keep food warm untilready to serve.
(opposite OFF)
OFF LO
9
USING YOUR RANGE
Using the ceramic glasscooktopCooking on the ceramic glass cooktop isalmost the same as cooking on coil surfaceunits. There are, however, a few differences:• The surface unit will glow red when it is
turned on. You will see the element cyclingon (glowing red) and off – even on HIsetting – to maintain the proper tempera-ture setting you have selected.
• Sliding metal pans on ceramic glasscooktop surface could leave marks. Wipingoff the cooktop before and after each usewill help keep the surface free from stainsand provide the most even heating. Seepages 29 and 30 for care and cleaningsuggestions.
Cookware tips• Select a pan that is about the same size
as the surface unit.• NOTE: For best results and greater
energy efficiency, use only flat-bottomedcookware that makes good contact with thesurface units. Cookware with rounded,warped, ribbed (such as some porcelainenamelware) or dented bottoms couldcause uneven heating and poor cookingresults.
You can, however, use the newercookware available with slightly indentedbottoms or very small expansion channels.This cookware is specially designed toprovide the good contact needed for bestcooking results.
Also, woks, canners, and teakettles withflat bottoms suitable for use on yourcooktop are now available in most storesthat sell housewares.
• The pan should have straight sides and atight-fitting lid.
• Choose medium to heavy gauge (thick-ness) pans that are fairly lightweight.
• The pan material (metal or glass) affectshow fast heat transfers from the surfaceunit through the pan material and howevenly heat spreads over the pan bottom.Choose pans that provide the best cookingresults.
• Handles should be made of sturdy, heat-resistant material and be securely attachedto the pan.
• With your hand, feel the bottom of yourpans while they are cool for nicks andscratches. Nicks and scratches on panbottoms will scratch the ceramic glasscooktop.
• Make sure bottoms of pans are clean anddry before using on cooktop.
• Avoid spillovers on cooktop. Use panswith tall sides.
• Do not cook food directly on cooktop.
NOTE: Do not leave empty cookware, orcookware which has boiled dry, on a hotsurface unit. The cookware could overheatand damage the cookware or surface unit.
Home canning information• Use the largest surface unit for best
results. Also, use a canner/pan whichcan be centered over the surface unit.
• Start with hot water. This reduces thetime the control is set on high. Reduceheat setting to lowest position neededto keep water boiling.
• Refer to your canner manual for specificinstructions.
10
USING YOUR RANGE
Positioning racks and pansTo remove racks:1. Pull rack toward you.
2. Tilt up front end.
3. Pull rack out.
To replace racks:1. Place rack on rack guides.
2. Tilt up front end.
3. Push rack in until it clears the stop.
4. Lower front and push rack in the rest ofthe way.
General guidelines• Before turning on the oven, place oven
racks where you need them.• Be sure the rack(s) is level.• Use pot holders or oven mitts to protect
your hands if rack(s) must be moved whilethe oven is hot.
• For baking/roasting with 1 rack,place the rack so the top of the food willbe centered in the oven.
• When baking/roasting on 2 racks,arrange racks on the bottom and 3rdlevel from the bottom.
• Do not place items on the oven doorwhen it is open.
Rack placement for specificfoods:
FOOD
Frozen pies, largeroasts, turkeys,angel food cake
Bundt cakes,most quickbreads, yeastbreads,casseroles, meats
Cookies, biscuits,muffins, cakes,nonfrozen pies
RACK POSITION
Lowest level or 2ndlevel from bottom
2nd level frombottom
2nd or 3rd levelfrom bottom
NOTE: For recommended rack placementwhen broiling, see “Broiling rack positionchart” on page 18.
Bakeware tips• When baking with insulated cookie
sheets or baking pans, place them in thebottom third of the oven. You may need toincrease the recommended baking times,so test for doneness before removing fromthe oven.
• For most baking, reduce the oventemperature by 25°F, but use the samebaking time when using ovenproof glass-ware or dark pans. These pans absorbheat, producing darker bottom browningand crispier crusts. When baking pies andbread, you can use the temperature calledfor in the recipe.

11
For best air circulationHot air must circulate around the pans in theoven for even heat to reach all parts of theoven. This results in better baking.• Place the pans so that one is not directly
over the other.• For best results, allow 11⁄2 to 2 inches
(4-5 cm) of space around each pan andbetween pans and oven walls.
• Use only one cookie sheet in the oven ata time.
Use the following as a guide to determinewhere to place the pans:1 panPlace in the center of the oven rack.2 pansPlace in opposite corners of the oven rack.3 or 4 pansPlace in opposite corners on each ovenrack. Stagger pans so no pan is directlyover another.
Using aluminum foil for bakingUse aluminum foil to catch spilloversfrom pies or casseroles:• Place the foil on the oven rack below the
rack with the food. Turn up foil edges andmake sure foil is about 1 inch (3 cm)larger all around than the dish holdingthe food.
• Do not cover the entire rack with alumi-num foil. It will reduce air circulation andcause poor cooking results.
• Do not line oven bottom or entire ovenrack with foil or other liners. It could affectthe quality of your baking.
USING YOUR RANGE
12
The electronic oven control
USING YOUR RANGE
ON/OFF CLOCK STOPTIME
COOKTIME CLEAN BROIL BAKE
CANCEL
OFF
TIMER
ON
DELAYOVEN ON
TIMERSTOPCLEAN
HR
BAKECLEAN
BROILLOCK
Display/clock• When you first plug in the range, a time
of day and “PF” will appear in the tempera-ture display. If, after you set the clock(page 13), “PF” again appears on thedisplay, your electricity was off for a while.Reset the clock.
• When you are using the oven or MinuteTimer, the display will show times,temperature settings, and what commandpads have been pressed.
• When showing the time of day, thedisplay will show the hour and minutes.
• When you are using the Minute Timer,the display will show minutes and secondsin the following sequence:– For settings under 1 minute, the
display will count down each second.– For settings from 1-10 minutes, the
display will count down minutes andseconds.
• When you are using Cook Time and/orStop Time, the display will show hoursand minutes.
Command padsThe command pads tell the oven what to doand in what order. A few examples:– Clock tell s the oven you are going to set
the clock.– Off/Cancel tells the oven to turn off.– Increase/Decrease pads change time or
temperature. Press them briefly to changetime or temperature by a small amount.Press and hold to change by a largeramount.
Timeron/offpad
Clockpad
Stoptimepad
Cooktimepad
Cleanpad
Broilpad
Bakepad
Off/cancelpad
Electronicdisplay
Increase/decreasepads
13
USING YOUR RANGE
Setting the clockThe clock must be set for the automaticoven timing functions to work properly.1. Press the Clock pad.
2. Use the Increase/Decrease pads to setthe time of day. Press the “up” (▲) or“down” (▼) pad until the correct timeshows on the display.
3. Press the Clock pad.
NOTES:• You cannot change time of day during a
Time Bake or Self-Cleaning cycle.• You can see current time of day while
another function is running by pressingthe Clock pad.
Using the electronic Minute TimerThe Minute Timer does not start or stop theoven. It works like a kitchen timer. It can beset in hours and minutes up to 9 hours,55 minutes.1. Press the Timer On/Off pad.
2. Use the Increase/Decrease pads to setthe desired time. Press the “up” (▲) or“down” (▼) pad until the correct timeshows on the display. The Minute Timerwill start automatically within a fewseconds after you release the pad.
CLOCK
CLOCK
ON/OFFTIMER
continued on next page
14
USING YOUR RANGE
After the countdown is over, three shorttones will sound, followed by one tone thatsounds every 6 seconds until you press anyother command pad.
To reset the Minute Timer:Repeat Steps 1 and 2 on page 13.
To cancel the Minute Timer:Press Timer On/Off pad until TIMER stopsflashing on the display (about 4 seconds).
Using the off/cancel padThe Off/Cancel pad will cancel any functionexcept for the Clock and Timer functions.When you press the Off/Cancel pad, thedisplay will show the time of day or, ifMinute Timer is also being used, the timeremaining.
Audible signalsAudible signals tell you if a function isentered correctly or not. They also tell youwhen a cycle is completed.
To shut off repeating end-of-timercountdown signal:1. Press and hold the Off/Cancel pad for
10 seconds.2. A short tone will sound to tell you the
signal has been changed.
Repeat the above steps to turn the signalback on.
ON/OFFTIMER
CANCEL
OFF
15
USING YOUR RANGE
Baking/roasting1. Position the rack(s) properly before
turning on the oven. For further informa-tion, see “Positioning racks and pans”on page 10.
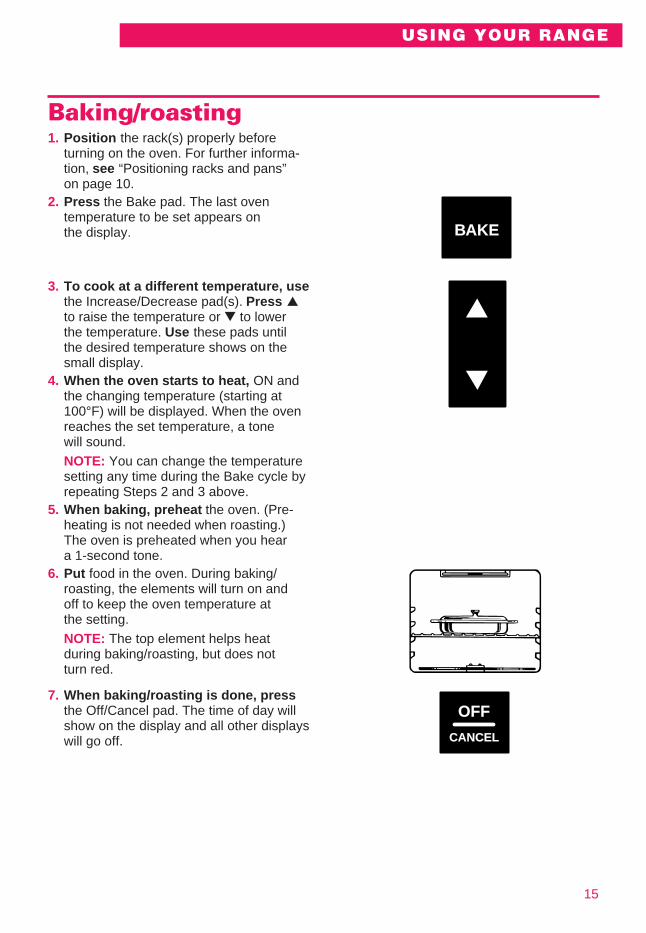
2. Press the Bake pad. The last oventemperature to be set appears onthe display.
3. To cook at a different temperature, usethe Increase/Decrease pad(s). Press ▲to raise the temperature or ▼ to lowerthe temperature. Use these pads untilthe desired temperature shows on thesmall display.
4. When the oven starts to heat, ON andthe changing temperature (starting at100°F) will be displayed. When the ovenreaches the set temperature, a tonewill sound.
NOTE: You can change the temperaturesetting any time during the Bake cycle byrepeating Steps 2 and 3 above.
5. When baking, preheat the oven. (Pre-heating is not needed when roasting.)The oven is preheated when you heara 1-second tone.
6. Put food in the oven. During baking/roasting, the elements will turn on andoff to keep the oven temperature atthe setting.
NOTE: The top element helps heatduring baking/roasting, but does notturn red.
7. When baking/roasting is done, pressthe Off/Cancel pad. The time of day willshow on the display and all other displayswill go off.
BAKE
CANCEL
OFF
16
USING YOUR RANGE
Adjusting the oven temperature controlAlthough your new oven is properly adjustedto provide accurate temperatures, it maycook faster or slower than your old oven.
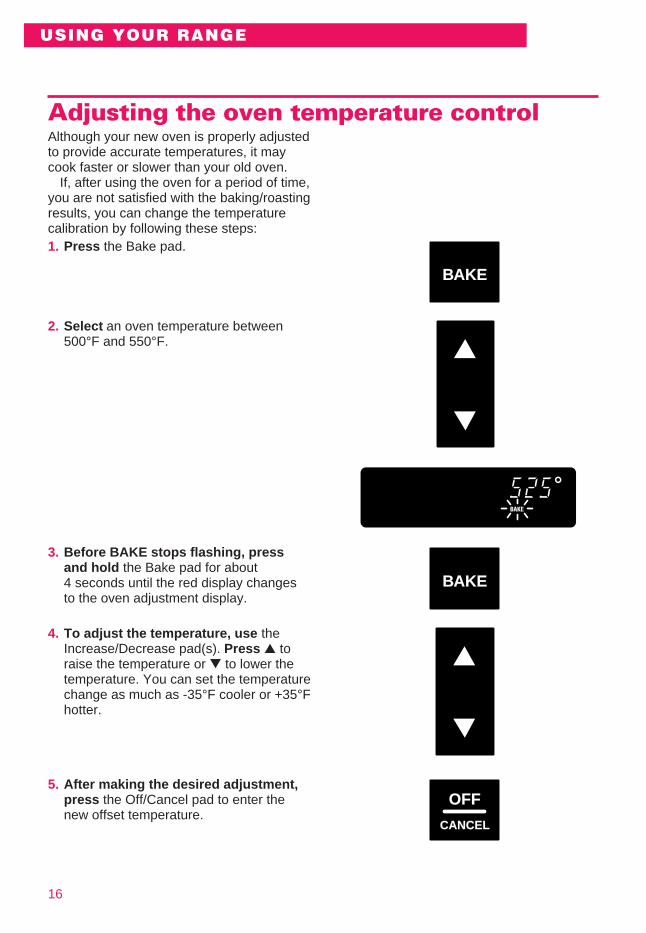
If, after using the oven for a period of time,you are not satisfied with the baking/roastingresults, you can change the temperaturecalibration by following these steps:1. Press the Bake pad.
2. Select an oven temperature between500°F and 550°F.
3. Before BAKE stops flashing, pressand hold the Bake pad for about4 seconds until the red display changesto the oven adjustment display.
4. To adjust the temperature, use theIncrease/Decrease pad(s). Press ▲ toraise the temperature or ▼ to lower thetemperature. You can set the temperaturechange as much as -35°F cooler or +35°Fhotter.
5. After making the desired adjustment,press the Off/Cancel pad to enter thenew offset temperature.
BAKE
BAKE
BAKE
CANCEL
OFF
17
Broiling1. Position the rack before turning the oven
on. See “Broiling rack position chart” onpage 18.
2. Put the broiler pan and food on the rack.3. Close the door to the Broil Stop position
(open about 4 inches [10 cm]). The doorwill stay open by itself.
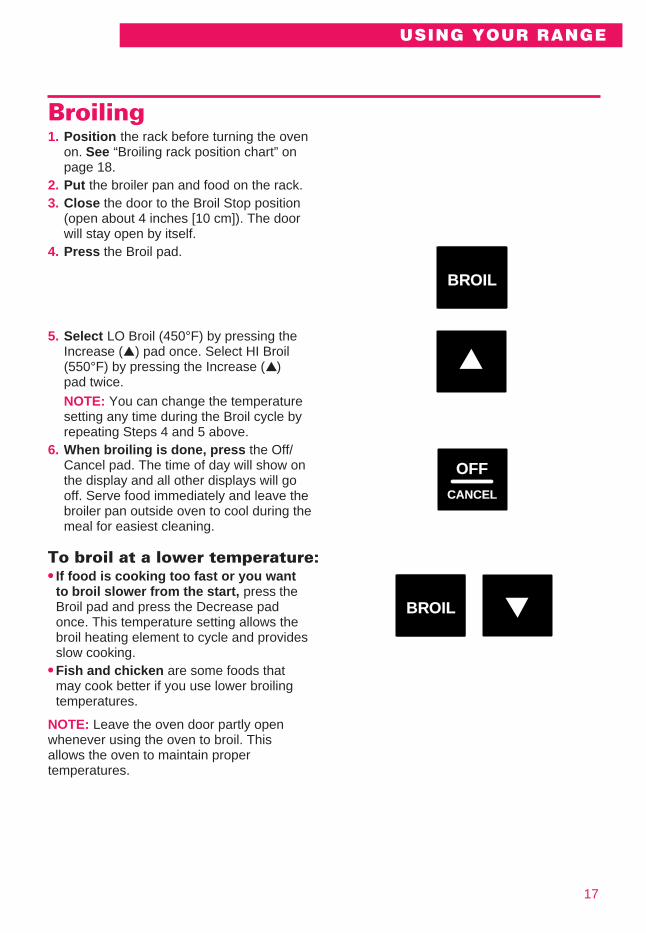
4. Press the Broil pad.
5. Select LO Broil (450°F) by pressing theIncrease (▲) pad once. Select HI Broil(550°F) by pressing the Increase (▲)pad twice.
NOTE: You can change the temperaturesetting any time during the Broil cycle byrepeating Steps 4 and 5 above.
6. When broiling is done, press the Off/Cancel pad. The time of day will show onthe display and all other displays will gooff. Serve food immediately and leave thebroiler pan outside oven to cool during themeal for easiest cleaning.
To broil at a lower temperature:• If food is cooking too fast or you want
to broil slower from the start, press theBroil pad and press the Decrease padonce. This temperature setting allows thebroil heating element to cycle and providesslow cooking.
• Fish and chicken are some foods thatmay cook better if you use lower broilingtemperatures.
NOTE: Leave the oven door partly openwhenever using the oven to broil. Thisallows the oven to maintain propertemperatures.
BROIL
CANCEL
OFF
BROIL
USING YOUR RANGE
18
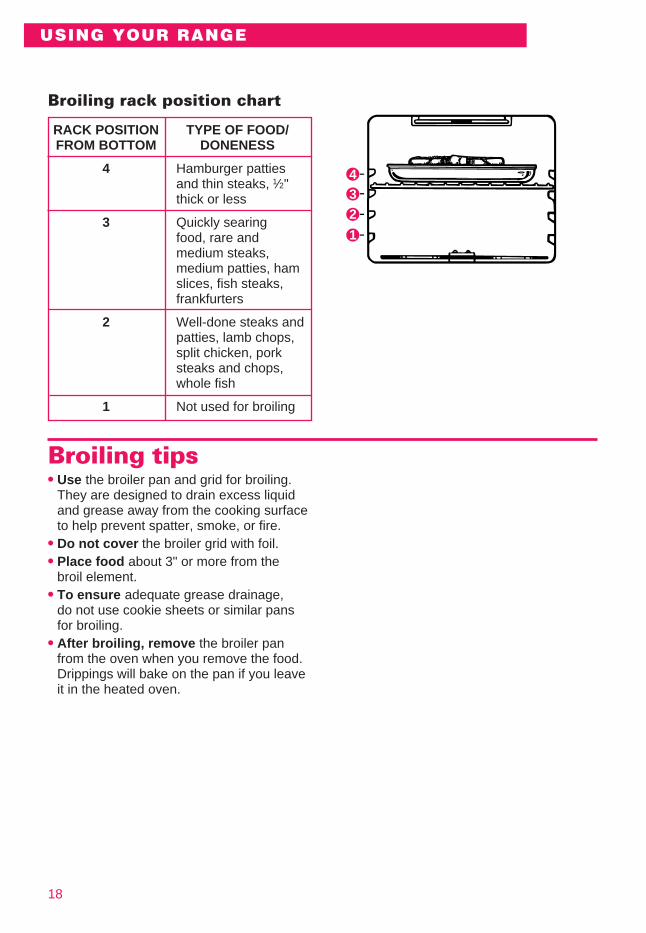
USING YOUR RANGE
RACK POSITIONFROM BOTTOM
4
3
2
1
TYPE OF FOOD/DONENESS
Hamburger pattiesand thin steaks, 1⁄2"thick or less
Quickly searingfood, rare andmedium steaks,medium patties, hamslices, fish steaks,frankfurters
Well-done steaks andpatties, lamb chops,split chicken, porksteaks and chops,whole fish
Not used for broiling
Broiling tips• Use the broiler pan and grid for broiling.
They are designed to drain excess liquidand grease away from the cooking surfaceto help prevent spatter, smoke, or fire.
• Do not cover the broiler grid with foil.• Place food about 3" or more from the
broil element.• To ensure adequate grease drainage,
do not use cookie sheets or similar pansfor broiling.
• After broiling, remove the broiler panfrom the oven when you remove the food.Drippings will bake on the pan if you leaveit in the heated oven.
Broiling rack position chart
43
2
1
19
Energy saving tipsAlthough the energy used for cooking isusually a very small percentage of the totalenergy used in the home, cooking energycan be used efficiently. Here are some tipsto help you save energy when using yourcooking product:• Use pans with flat bottoms, straight sides,
and tight-fitting lids.• Match the pan to the surface unit size.• Cook with a minimum of liquid or grease
to help shorten cooking time.• Preheat pans only when recommended
and for the shortest time possible.• Start food on higher heat settings, then
set surface unit control on low or off tofinish cooking. Use retained heat forcooking when possible.
• Use the more efficient surface unitsinstead of the oven when possible.
Using the electronic MEALTIMERTM controlThe electronic MEALTIMER control isdesigned to turn the oven on and off at timesyou set, even when you are not around.
Delayed time baking/roasting is ideal forfoods which do not require a preheatedoven, such as meats and casseroles. Donot use delayed time cooking for cakes,cookies, etc. – they will not rise properly.
Before using the electronic MEALTIMERcontrol, make sure the clock is set to thecorrect time of day. (See “Setting the clock”on page 13.)
To start baking/roasting nowand stop automatically:1. Position the oven rack(s) properly and
put food in the oven.
USING YOUR RANGE
• Turn on the surface unit only after placingfilled pan on the unit.
• “Oven peeking” may cause heat loss,longer cooking times, and unsatisfactorybaking results. Rely on your timer to keeptrack of the cooking time.
• Bake cakes, pies, or cookies when ovenis warm. Best time to bake is right aftera meal has been cooked in the oven.
• Preheat the oven no longer than necessary.• Plan your meals for the most efficient use
of the range. When using the oven to cookone food, try to cook the rest of the meal init also.
• Do not preheat when broiling, roasting, orcooking items such as casseroles.
wWARNINGFood Poisoning Hazard
Do not let food sit in oven more thanone hour before or after cooking.Failure to follow the above can resultin death, food poisoning, or sickness.
continued on next page
20
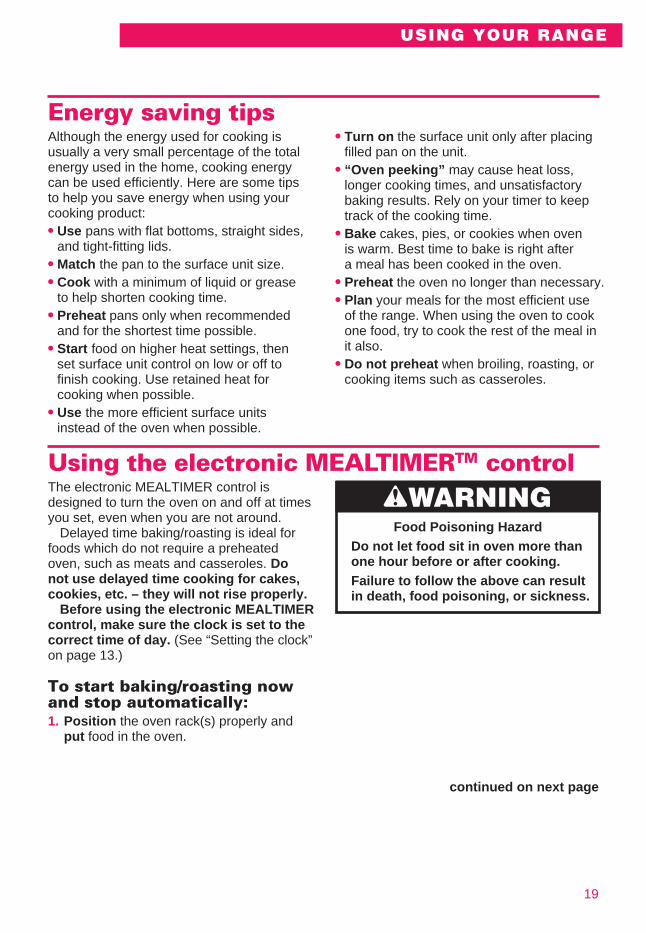
2. Press the Cook Time pad.
3. Press the Increase pad until the desiredbaking/roasting time shows on the display.
4. Press the Bake pad. The last oven temp-erature to be set appears on the display.NOTE: If this step is not done, a tonewill sound.
5. Press Increase or Decrease pad until thedesired temperature shows on the display.
6. When the oven starts to heat, ON andthe changing temperature (starting at100°F) will be displayed. When the ovenreaches the set temperature, a tone willsound.NOTE: You can change the temperaturesetting any time during the Bake cycle byrepeating Steps 4 and 5 above.
7. Remove food from the oven.NOTE: Even though oven shuts off auto-matically, food continues cooking aftercontrols are off.
USING YOUR RANGE
COOKTIME
BAKE
21
USING YOUR RANGE
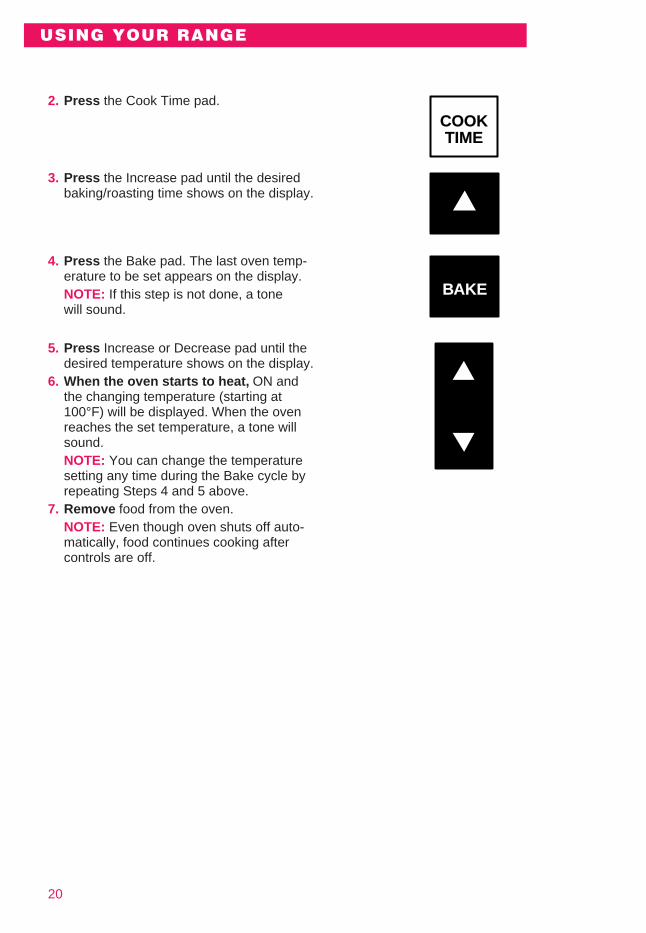
To delay start and stopautomatically:1. Position the oven rack(s) properly and
put food in the oven.
2. Press the Cook Time pad.
3. Press the Increase pad until the desiredbaking/roasting time shows on thedisplay.
4. Press the Stop Time pad. The timedisplayed will be the time of day plus thecook time. For example, if the currenttime of day is 2:00 and the cook time is3 hours, the display will show 5:00.
5. Press the Increase pad to set the stoptime. If you have set a 7:00 stop time anda 3-hour cook time, the oven will turn onat 4:00.
COOKTIME
(example for 3 hours)
STOPTIME
TIMESTOP
(example for 5:00 stop time, beforestop time is set)
TIMESTOP
(example for 7:00 stop time)
continued on next page
22
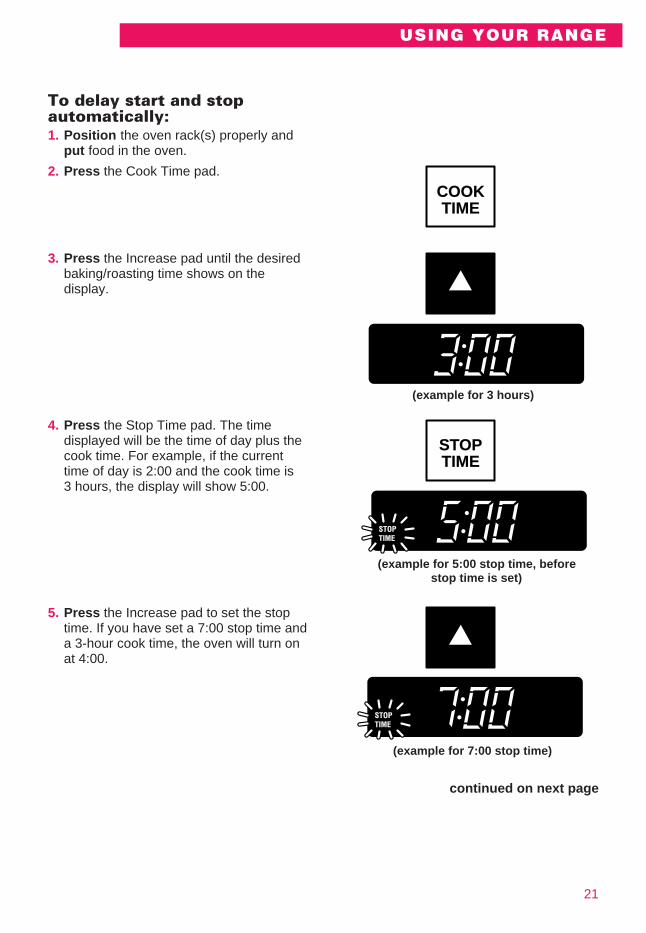
6. Press the Bake pad. The last oven temp-erature to be set appears on the display.NOTE: If this step is not done, a tonewill sound.
7. Press Increase or Decrease pad until thedesired temperature shows on the display.
8. At the set start time (4:00 in exampleabove), the oven will turn on automati-cally. When the oven starts to heat, ONand the changing temperature (starting at100°F) will be displayed. When the ovenreaches the set temperature, a tone willsound. The oven will continue to cook forthe programmed 3 hours and shut offautomatically at 7:00.NOTE: You can change the temperaturesetting any time during the Bake cycle byrepeating Steps 6 and 7 above.
9. Remove food from the oven.NOTE: Even though oven shuts offautomatically, foods continue cookingafter controls are off. The low tempera-ture zone of this range (between 150°Fand 200°F) keeps hot, cooked foodswarm.
To cancel the MEALTIMER™ controlsetting:• Press Off/Cancel pad to return the display
to the time of the day.
USING YOUR RANGE
BAKE
CANCEL
OFF
23
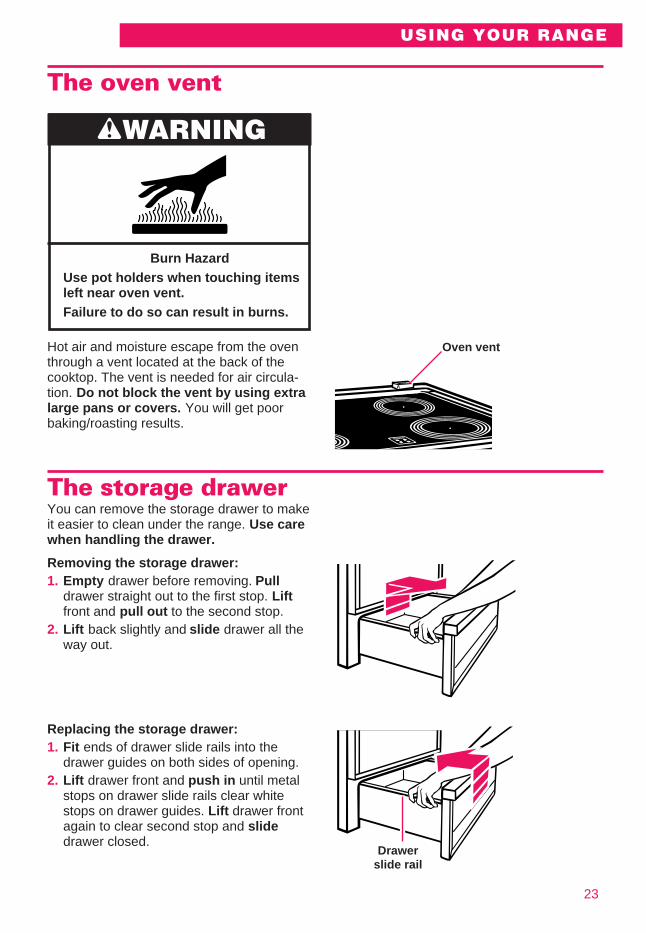
USING YOUR RANGE
The oven vent
wWARNING
Burn HazardUse pot holders when touching itemsleft near oven vent.Failure to do so can result in burns.
Hot air and moisture escape from the oventhrough a vent located at the back of thecooktop. The vent is needed for air circula-tion. Do not block the vent by using extralarge pans or covers. You will get poorbaking/roasting results.
The storage drawerYou can remove the storage drawer to makeit easier to clean under the range. Use carewhen handling the drawer.
Removing the storage drawer:1. Empty drawer before removing. Pull
drawer straight out to the first stop. Liftfront and pull out to the second stop.
2. Lift back slightly and slide drawer all theway out.
Replacing the storage drawer:1. Fit ends of drawer slide rails into the
drawer guides on both sides of opening.2. Lift drawer front and push in until metal
stops on drawer slide rails clear whitestops on drawer guides. Lift drawer frontagain to clear second stop and slidedrawer closed.
Oven vent
Drawerslide rail
24
USING YOUR RANGE
The anti-tip bracketThe range will not tip during normal use. However, tipping can occur if you apply too muchforce or weight to the open door without the anti-tip bracket properly secured.
wWARNINGTip Over Hazard
Connect anti-tip bracket to floor or wall.Reconnect anti-tip bracket, if the range is moved.Do not push down on the open oven door.Follow the Installation Instructions.Do not let children climb onto the oven door.Failure to do so can result in death, burns, or other injury.
To verify the anti-tip bracketis engaged:• Grasp rear of range and carefully try to tilt
forward. If anti-tip bracket is attached tofloor or wall correctly, range should not tiltforward.
• See Installation Instructions for furtherdetails.
Backguard
Mainback
Bracketoptionallocation
Bracket factorylocation
Chain
Washerand screw
Chain
25
Using the Self-Cleaning CycleThe Self-Cleaning cycle saves you from the toil and mess that often come with hand-cleaningthe oven interior. Like the other functions of your oven, you operate the Self-Cleaning cyclewith the easy-to-use electronic control. Please review the instructions in this section to keepyour oven spotless.
wWARNINGBurn Hazard
Do not touch the oven during the Self-Cleaning cycle.Keep children away from oven during Self-Cleaning cycle.Do not use commercial oven cleaners in your oven.Failure to follow the above can result in burns, or illness frominhaling dangerous fumes.
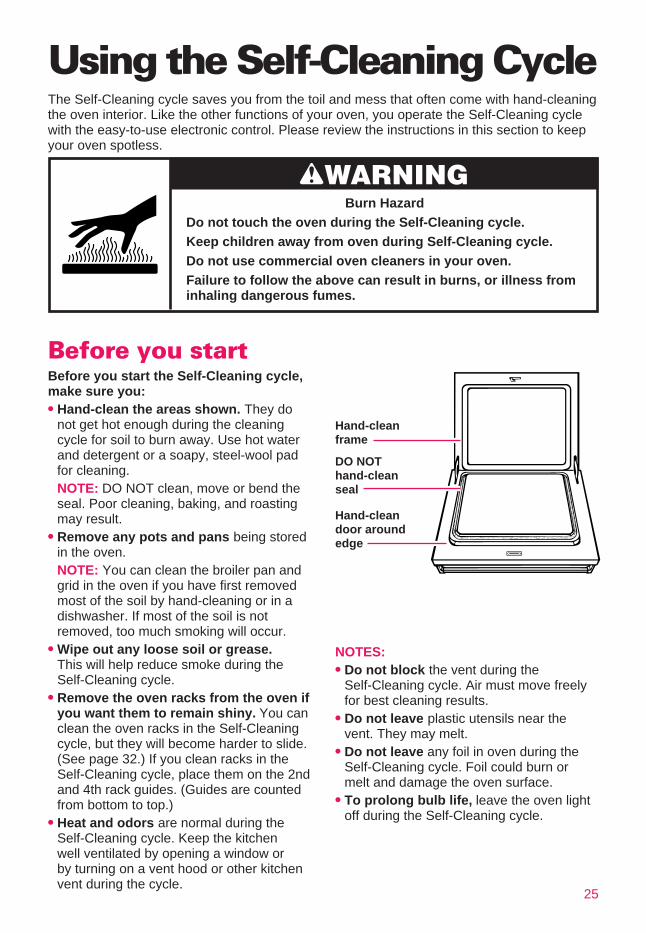
Before you startBefore you start the Self-Cleaning cycle,make sure you:• Hand-clean the areas shown. They do
not get hot enough during the cleaningcycle for soil to burn away. Use hot waterand detergent or a soapy, steel-wool padfor cleaning.NOTE: DO NOT clean, move or bend theseal. Poor cleaning, baking, and roastingmay result.
• Remove any pots and pans being storedin the oven.NOTE: You can clean the broiler pan andgrid in the oven if you have first removedmost of the soil by hand-cleaning or in adishwasher. If most of the soil is notremoved, too much smoking will occur.
• Wipe out any loose soil or grease.This will help reduce smoke during theSelf-Cleaning cycle.
• Remove the oven racks from the oven ifyou want them to remain shiny. You canclean the oven racks in the Self-Cleaningcycle, but they will become harder to slide.(See page 32.) If you clean racks in theSelf-Cleaning cycle, place them on the 2ndand 4th rack guides. (Guides are countedfrom bottom to top.)
• Heat and odors are normal during theSelf-Cleaning cycle. Keep the kitchenwell ventilated by opening a window orby turning on a vent hood or other kitchenvent during the cycle.
Hand-cleandoor aroundedge
DO NOThand-cleanseal
Hand-cleanframe
NOTES:• Do not block the vent during the
Self-Cleaning cycle. Air must move freelyfor best cleaning results.
• Do not leave plastic utensils near thevent. They may melt.
• Do not leave any foil in oven during theSelf-Cleaning cycle. Foil could burn ormelt and damage the oven surface.
• To prolong bulb life, leave the oven lightoff during the Self-Cleaning cycle.
26
Setting the controlsMake sure the clock is set to the correct timeof day. (See “Setting the clock” on page 13.)
To start the Self-Cleaningcycle now:1. Press the Clean pad. The display will
show “----”.
2. To set the cleaning time, press theIncrease or Decrease pad until thedesired cleaning time shows on thedisplay. You can set the cleaning timeanywhere between 2 and 4 hours.• Use 2 hours for light soil.• Use 3-4 hours for moderate to
heavy soil.3. Once you have set the cleaning time
ON will appear on the display. The Self-Cleaning cycle will begin automaticallywithin a few seconds.
To delay the start ofSelf-Cleaning cycle:1. Press the Clean pad. The display will
show “----”.
2. To set the cleaning time, press theIncrease or Decrease pad until thedesired cleaning time shows on thedisplay. You can set the cleaning timeanywhere between 2 and 4 hours.• Use 2 hours for light soil.• Use 3-4 hours for moderate to
heavy soil.
USING THE SELF-CLEANING CYCLE
CLEAN
CLEAN
27
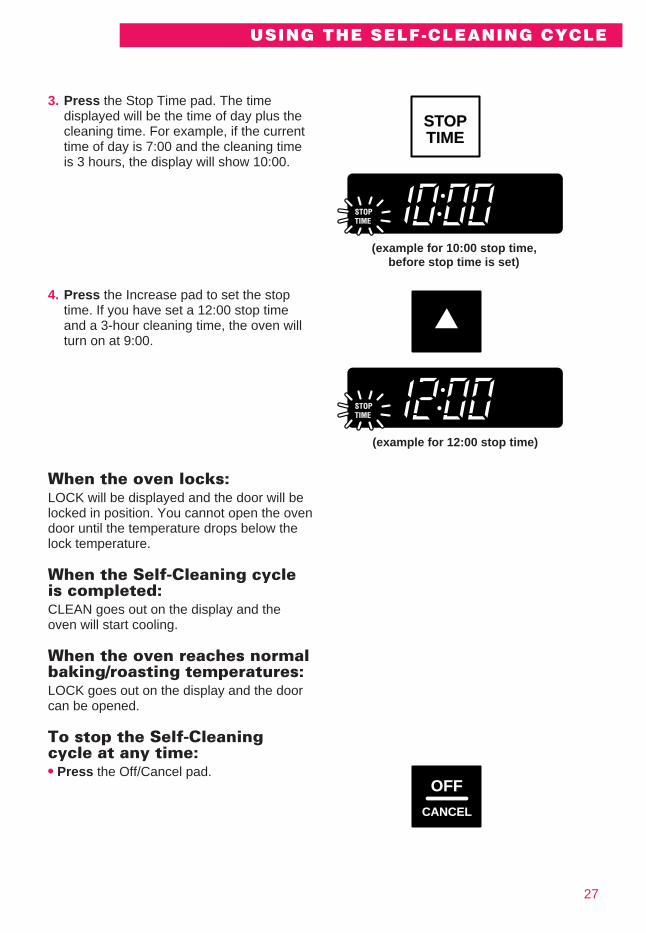
USING THE SELF-CLEANING CYCLE
3. Press the Stop Time pad. The timedisplayed will be the time of day plus thecleaning time. For example, if the currenttime of day is 7:00 and the cleaning timeis 3 hours, the display will show 10:00.
4. Press the Increase pad to set the stoptime. If you have set a 12:00 stop timeand a 3-hour cleaning time, the oven willturn on at 9:00.
When the oven locks:LOCK will be displayed and the door will belocked in position. You cannot open the ovendoor until the temperature drops below thelock temperature.
When the Self-Cleaning cycleis completed:CLEAN goes out on the display and theoven will start cooling.
When the oven reaches normalbaking/roasting temperatures:LOCK goes out on the display and the doorcan be opened.
To stop the Self-Cleaningcycle at any time:• Press the Off/Cancel pad.
STOPTIME
TIMESTOP
(example for 10:00 stop time,before stop time is set)
TIMESTOP
(example for 12:00 stop time)
CANCEL
OFF
28
Special tips• Keep the kitchen well ventilated during the
Self-Cleaning cycle to help get rid of heat,odors, and smoke.
• After the oven is cool, wipe up anyresidue or ash with a damp cloth orsponge. If any spots remain, clean with amild abrasive cleanser or cleaning sponge.
• Clean the oven before it gets heavilysoiled. Cleaning a very soiled oventakes longer and results in more smokethan usual.
• If the Self-Cleaning cycle does not getthe oven as clean as you expected, thecycle may not have been set long enoughor you may not have prepared the ovenproperly. Set the Self-Cleaning cyclelonger the next time and hand-clean areasnoted on page 25.
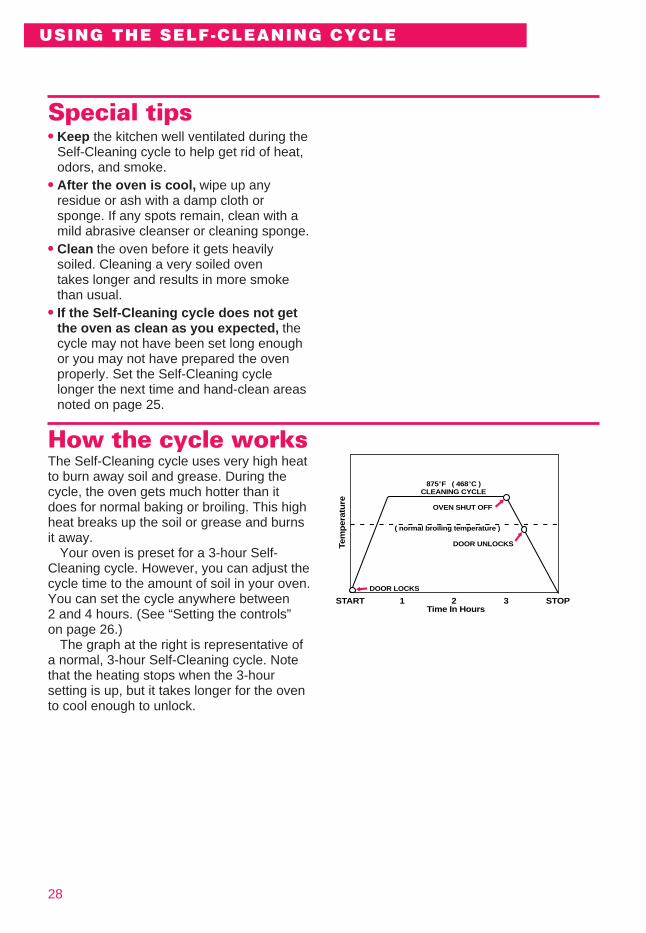
How the cycle worksThe Self-Cleaning cycle uses very high heatto burn away soil and grease. During thecycle, the oven gets much hotter than itdoes for normal baking or broiling. This highheat breaks up the soil or grease and burnsit away.
Your oven is preset for a 3-hour Self-Cleaning cycle. However, you can adjust thecycle time to the amount of soil in your oven.You can set the cycle anywhere between2 and 4 hours. (See “Setting the controls”on page 26.)
The graph at the right is representative ofa normal, 3-hour Self-Cleaning cycle. Notethat the heating stops when the 3-hoursetting is up, but it takes longer for the ovento cool enough to unlock.
USING THE SELF-CLEANING CYCLE
875°F ( 468°C )CLEANING CYCLE
OVEN SHUT OFF
DOOR UNLOCKS
DOOR LOCKS
( normal broiling temperature )
START 1 2 3 STOP Time In Hours
Tem
per
atu
re
29
Caring for Your RangeYour range is designed for easy care. You can do most cleaning with items found aroundyour home. Cleaning your range whenever spills or soiling occurs will help to keep it lookingand operating like new.
NOTE: Let cooktop cool before cleaning.
Cleaning the cooktopThis cooktop is designed for easy care.However, ceramic cooktops need to bemaintained differently than standard electricopen-coil elements. Foods spilled directly onthe cooktop will not burn off as on open-coilelements. Because of this, the surfaceshould be dust-free and soil-free beforeheating. Your cooktop has been prepolished at thefactory for improved protection andcleanability. The Cooktop Polishing Cremeand razor scraper (both included with yourrange), and paper towels or a sponge, are allyou need to clean your cooktop. For propercleaning methods, please review “Cleaningtips” on page 30. Follow them after each useto ensure top performance and to preservethat uniquely elegant look.
30
To avoid damaging the cooktop, followthese instructions:• Sugar spills and soils (such as jellies and
candy syrups) can cause pitting on thecooktop if not removed while the ceramicsurface is still warm. Remove as soon aspossible after the spill occurs.
• Do not use the cooktop as a cutting board.• Do not allow anything that may melt (such
as plastic or aluminum foil) to come incontact with the surface while it is hot.
• Do not use the ceramic cooktop to cookpopcorn that comes in prepackagedaluminum containers. The container couldleave aluminum marks on the cooktop thatcannot be removed completely.
• Do not use steel wool, plastic cleaningpads, abrasive powdered cleansers,chlorine bleach, rust remover, ammonia,or glass cleaning products with ammonia.These could damage the cooktop surface.
• Dropping heavy or hard objects on thecooktop could crack it. Be careful withheavy skillets. Do not store jars or cansabove the cooktop.
Cleaning tipsWhat to use:• Cooktop Polishing Creme (included
with your range) with paper towel orclean, damp sponge – This creme hasbeen developed especially for cleaningand protecting your cooktop. When using,follow instructions on container.
• Razor scraper – Use to remove cooked-onsoils from your ceramic cooktop. To avoidscratches, keep the razor blade as flatagainst the cooktop as possible. Storerazor blades out of reach of children.
Steps to follow:1. Most spills can be wiped off easily using
a paper towel or clean, damp sponge assoon as Hot Surface Indicator Light(s)go off.
2. For stubborn spills, rub CooktopPolishing Creme into cooked-on soilusing a paper towel. If some soil remains,leave some creme on the spot(s) andfollow Step 3.
3. Carefully scrape spots with the razorscraper.
4. Finish by polishing entire cooktop withCooktop Polishing Creme and a papertowel.
Additional tips:• Remove dark streaks, specks, and
discoloration with Cooktop PolishingCreme.
• Remove metal marks (from copper oraluminum pans) with Cooktop PolishingCreme before heating the cooktop again.If heated before cleaning, metal marksmay not come off.
• Tiny scratches or abrasions do notaffect cooking. In time, these will becomeless visible as a result of cleaning. Toprevent scratches and abrasions, useCooktop Polishing Creme regularly.
• Nonabrasive cleanser with damp papertowel or sponge can be used as analternative method for removing cooked-onsoils. Always rinse and dry yourcooktop thoroughly after using cleanser toprevent streaking or staining.
To order the Cooktop Polishing Creme(Part No. 3184477) or a razor scraper(Part No. 3183488), call 1-800-253-1301.You will hear a recording. Follow the stepsto place an order.
CARING FOR YOUR RANGE
31
CARING FOR YOUR RANGE
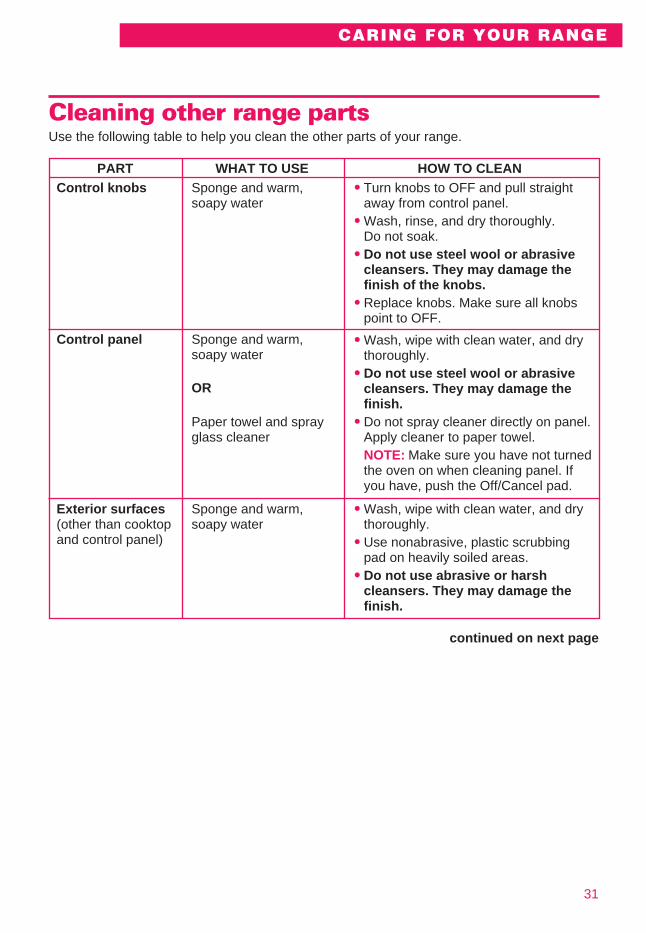
Cleaning other range partsUse the following table to help you clean the other parts of your range.
PARTControl knobs
Control panel
Exterior surfaces(other than cooktopand control panel)
HOW TO CLEAN• Turn knobs to OFF and pull straight
away from control panel.• Wash, rinse, and dry thoroughly.
Do not soak.• Do not use steel wool or abrasive
cleansers. They may damage thefinish of the knobs.
• Replace knobs. Make sure all knobspoint to OFF.
• Wash, wipe with clean water, and drythoroughly.
• Do not use steel wool or abrasivecleansers. They may damage thefinish.
• Do not spray cleaner directly on panel.Apply cleaner to paper towel.NOTE: Make sure you have not turnedthe oven on when cleaning panel. Ifyou have, push the Off/Cancel pad.
• Wash, wipe with clean water, and drythoroughly.
• Use nonabrasive, plastic scrubbingpad on heavily soiled areas.
• Do not use abrasive or harshcleansers. They may damage thefinish.
WHAT TO USESponge and warm,soapy water
Sponge and warm,soapy water
OR
Paper towel and sprayglass cleaner
Sponge and warm,soapy water
continued on next page
32
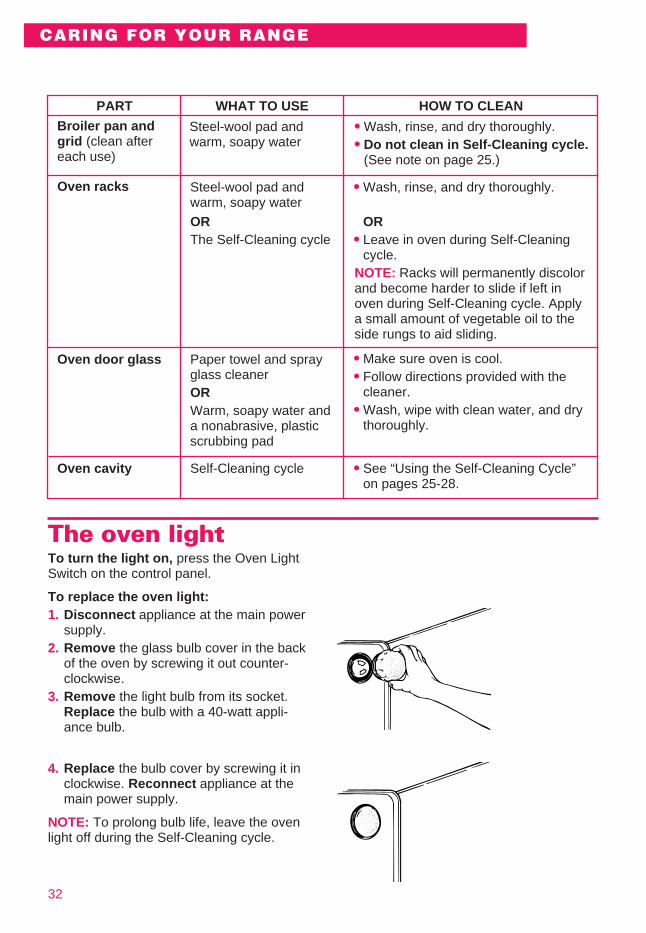
CARING FOR YOUR RANGE
PART WHAT TO USE
Steel-wool pad andwarm, soapy water
Steel-wool pad andwarm, soapy water
ORThe Self-Cleaning cycle
Paper towel and sprayglass cleanerORWarm, soapy water anda nonabrasive, plasticscrubbing pad
Self-Cleaning cycle
• Wash, rinse, and dry thoroughly.• Do not clean in Self-Cleaning cycle.
(See note on page 25.)
• Wash, rinse, and dry thoroughly.
OR• Leave in oven during Self-Cleaning
cycle.NOTE: Racks will permanently discolorand become harder to slide if left inoven during Self-Cleaning cycle. Applya small amount of vegetable oil to theside rungs to aid sliding.
• Make sure oven is cool.• Follow directions provided with the
cleaner.• Wash, wipe with clean water, and dry
thoroughly.
• See “Using the Self-Cleaning Cycle”on pages 25-28.
HOW TO CLEAN
Broiler pan andgrid (clean aftereach use)
Oven racks
Oven door glass
Oven cavity
The oven lightTo turn the light on, press the Oven LightSwitch on the control panel.
To replace the oven light:1. Disconnect appliance at the main power
supply.2. Remove the glass bulb cover in the back
of the oven by screwing it out counter-clockwise.
3. Remove the light bulb from its socket.Replace the bulb with a 40-watt appli-ance bulb.
4. Replace the bulb cover by screwing it inclockwise. Reconnect appliance at themain power supply.
NOTE: To prolong bulb life, leave the ovenlight off during the Self-Cleaning cycle.
33
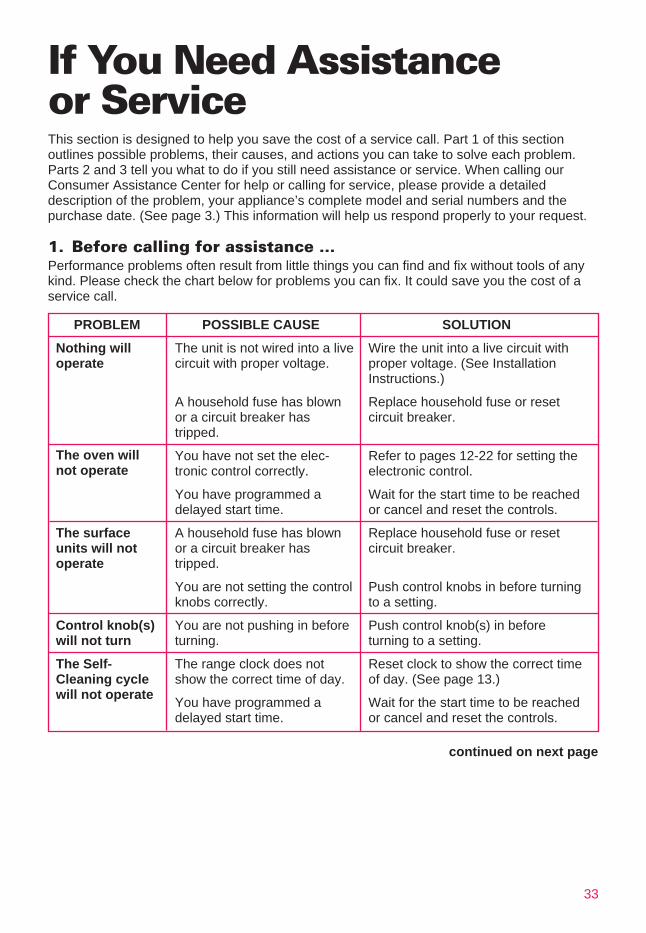
If You Need Assistanceor ServiceThis section is designed to help you save the cost of a service call. Part 1 of this sectionoutlines possible problems, their causes, and actions you can take to solve each problem.Parts 2 and 3 tell you what to do if you still need assistance or service. When calling ourConsumer Assistance Center for help or calling for service, please provide a detaileddescription of the problem, your appliance’s complete model and serial numbers and thepurchase date. (See page 3.) This information will help us respond properly to your request.
1. Before calling for assistance …Performance problems often result from little things you can find and fix without tools of anykind. Please check the chart below for problems you can fix. It could save you the cost of aservice call.
SOLUTION
Wire the unit into a live circuit withproper voltage. (See InstallationInstructions.)
Replace household fuse or resetcircuit breaker.
Refer to pages 12-22 for setting theelectronic control.
Wait for the start time to be reachedor cancel and reset the controls.
Replace household fuse or resetcircuit breaker.
Push control knobs in before turningto a setting.
Push control knob(s) in beforeturning to a setting.
Reset clock to show the correct timeof day. (See page 13.)
Wait for the start time to be reachedor cancel and reset the controls.
POSSIBLE CAUSE
The unit is not wired into a livecircuit with proper voltage.
A household fuse has blownor a circuit breaker hastripped.
You have not set the elec-tronic control correctly.
You have programmed adelayed start time.
A household fuse has blownor a circuit breaker hastripped.
You are not setting the controlknobs correctly.
You are not pushing in beforeturning.
The range clock does notshow the correct time of day.
You have programmed adelayed start time.
PROBLEM
Nothing willoperate
The oven willnot operate
The surfaceunits will notoperate
Control knob(s)will not turn
The Self-Cleaning cyclewill not operate
continued on next page
34
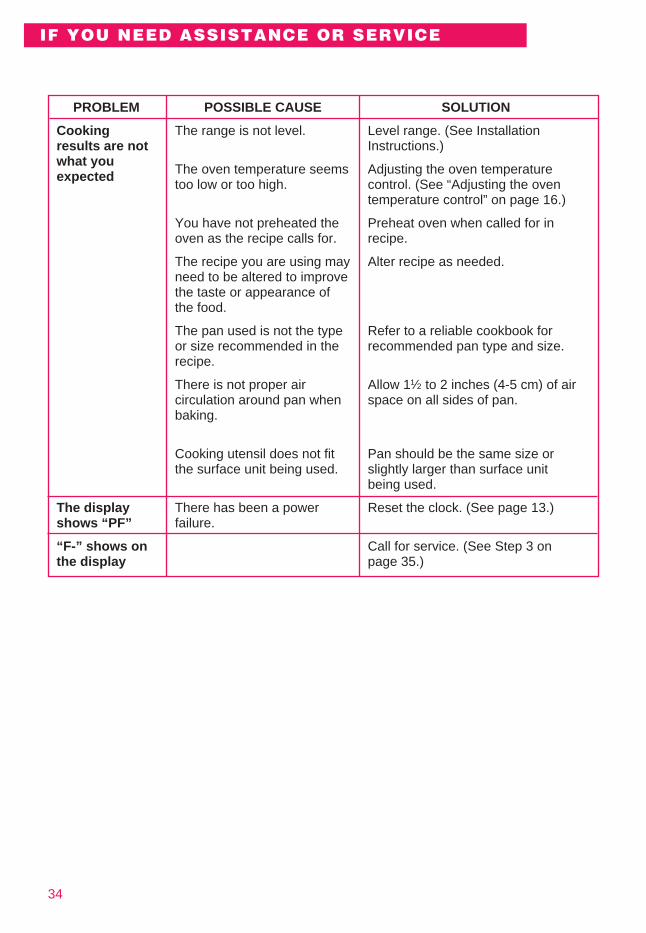
IF YOU NEED ASSISTANCE OR SERVICE
PROBLEM
Cookingresults are notwhat youexpected
The displayshows “PF”
“F-” shows onthe display
POSSIBLE CAUSE
The range is not level.
The oven temperature seemstoo low or too high.
You have not preheated theoven as the recipe calls for.
The recipe you are using mayneed to be altered to improvethe taste or appearance ofthe food.
The pan used is not the typeor size recommended in therecipe.
There is not proper aircirculation around pan whenbaking.
Cooking utensil does not fitthe surface unit being used.
There has been a powerfailure.
SOLUTION
Level range. (See InstallationInstructions.)
Adjusting the oven temperaturecontrol. (See “Adjusting the oventemperature control” on page 16.)
Preheat oven when called for inrecipe.
Alter recipe as needed.
Refer to a reliable cookbook forrecommended pan type and size.
Allow 11⁄2 to 2 inches (4-5 cm) of airspace on all sides of pan.
Pan should be the same size orslightly larger than surface unitbeing used.
Reset the clock. (See page 13.)
Call for service. (See Step 3 onpage 35.)
35
2. If you need assistance …Call the Whirlpool Consumer AssistanceCenter telephone number. Dial toll-freefrom anywhere in the U.S.A.1-800-253-1301and talk with one of our trained consultants.The consultant can instruct you in how toobtain satisfactory operation from your appli-ance or, if service is necessary, recommenda qualified service company in your area.
If you prefer, write to:
Whirlpool Brand Home AppliancesConsumer Assistance Centerc/o Correspondence Dept.2000 North M-63Benton Harbor, MI 49022-2692
Please include a daytime phone number inyour correspondence.
3. If you need service …Whirlpool has a nation-wide network ofauthorized Whirlpoolservice companies.
Whirlpool service technicians are trained tofulfill the product warranty and provide after-warranty service, anywhere in the UnitedStates. To locate the authorized Whirlpoolservice company in your area, call ourConsumer Assistance Center telephonenumber (see Step 2) or look in your tele-phone directory Yellow Pages under:
• APPLIANCE-HOUSEHOLD- • WASHING MACHINES &MAJOR, SERVICE & REPAIR DRYERS, SERVICE & REPAIR
- See: Whirlpool Appliances or - See: Whirlpool Appliances orAuthorized Whirlpool Service Authorized Whirlpool Service(Example: XYZ Service Co.) (Example: XYZ Service Co.)
IF YOU NEED ASSISTANCE OR SERVICE
4. If you need FSP®
replacement parts …FSP is a registered trademark of WhirlpoolCorporation for quality parts. Look for thissymbol of quality whenever you need areplacement part for your WHIRLPOOL®
appliance. FSP replacement parts will fit rightand work right, because they are made to thesame exacting specifications used to buildevery new WHIRLPOOL appliance.
To locate FSP replacement parts in yourarea, refer to Step 3 above or call theWhirlpool Consumer Assistance Centernumber in Step 2.
5. If you are not satisfiedwith how the problemwas solved …
• Contact the Major Appliance ConsumerAction Program (MACAP). MACAP is agroup of independent consumer experts thatvoices consumer views at the highest levelsof the major appliance industry.
• Contact MACAP only when the dealer,authorized servicer, and Whirlpool havefailed to resolve your problem.
Major Appliance Consumer Action Program20 North Wacker DriveChicago, IL 60606
• MACAP will in turn inform us of your action.
SERVICE
®
® Registered Trademark/TM Trademark of Whirlpool, U.S.A.PART NO. 229C4020P026-1/4389867© 1996 Whirlpool Corporation Printed in U.S.A.
3/96
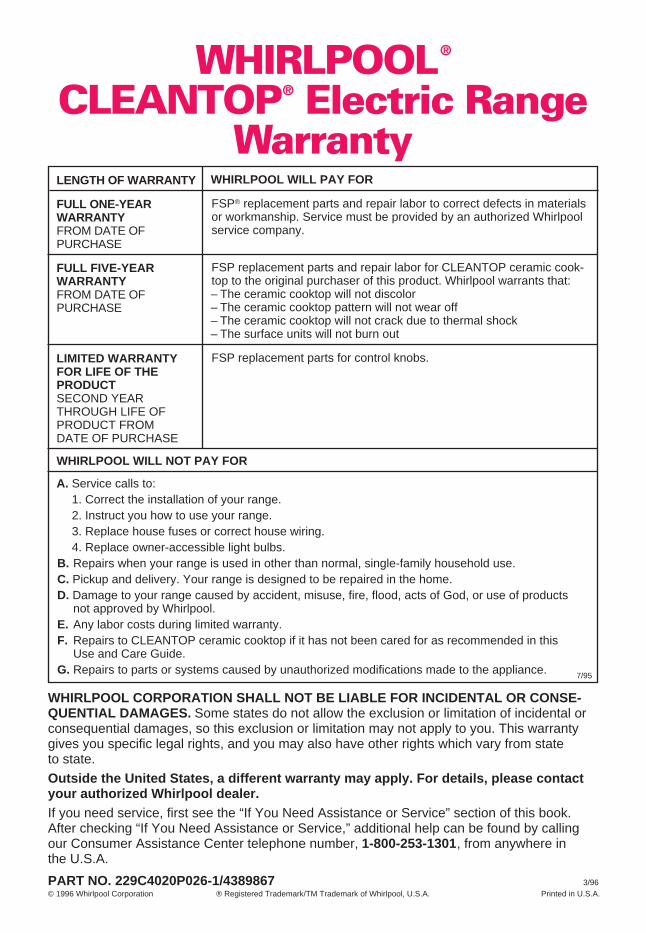
WHIRLPOOL®
CLEANTOP® Electric RangeWarranty
WHIRLPOOL WILL PAY FOR
FSP® replacement parts and repair labor to correct defects in materialsor workmanship. Service must be provided by an authorized Whirlpoolservice company.
FSP replacement parts and repair labor for CLEANTOP ceramic cook-top to the original purchaser of this product. Whirlpool warrants that:– The ceramic cooktop will not discolor– The ceramic cooktop pattern will not wear off– The ceramic cooktop will not crack due to thermal shock– The surface units will not burn out
FSP replacement parts for control knobs.
LENGTH OF WARRANTY
FULL ONE-YEARWARRANTYFROM DATE OFPURCHASE
FULL FIVE-YEARWARRANTYFROM DATE OFPURCHASE
LIMITED WARRANTYFOR LIFE OF THEPRODUCTSECOND YEARTHROUGH LIFE OFPRODUCT FROMDATE OF PURCHASE
WHIRLPOOL WILL NOT PAY FOR
A. Service calls to:1. Correct the installation of your range.2. Instruct you how to use your range.3. Replace house fuses or correct house wiring.4. Replace owner-accessible light bulbs.
B. Repairs when your range is used in other than normal, single-family household use.C. Pickup and delivery. Your range is designed to be repaired in the home.D. Damage to your range caused by accident, misuse, fire, flood, acts of God, or use of products
not approved by Whirlpool.E. Any labor costs during limited warranty.F. Repairs to CLEANTOP ceramic cooktop if it has not been cared for as recommended in this
Use and Care Guide.G. Repairs to parts or systems caused by unauthorized modifications made to the appliance.
WHIRLPOOL CORPORATION SHALL NOT BE LIABLE FOR INCIDENTAL OR CONSE-QUENTIAL DAMAGES. Some states do not allow the exclusion or limitation of incidental orconsequential damages, so this exclusion or limitation may not apply to you. This warrantygives you specific legal rights, and you may also have other rights which vary from stateto state.
Outside the United States, a different warranty may apply. For details, please contactyour authorized Whirlpool dealer.If you need service, first see the “If You Need Assistance or Service” section of this book.After checking “If You Need Assistance or Service,” additional help can be found by callingour Consumer Assistance Center telephone number, 1-800-253-1301, from anywhere inthe U.S.A.
7/95