vsx-820-s/-k - pioneer
TRANSCRIPT

Operating InstructionsMode d’emploiИнструкции по эксплуатации
Discover the benefits of registering your product online at http://www.pioneer.co.uk (or http://www.pioneer.eu).
Découvrez les nombreux avantages offerts en enregistrant votre produit en ligne maintenant sur http://www.pioneer.fr (ou http://www.pioneer.eu).
Зарегистрируйте Baшe изделие на http://www.pioneer-rus.ru (или http://www.pioneer.eu). Oзнакомьтесь с преимуществами регистрации в Интернет
VSX-820-S/-K
VSX-820_SYXCN_En.book 1 ページ 2010年4月12日 月曜日 午後6時52分
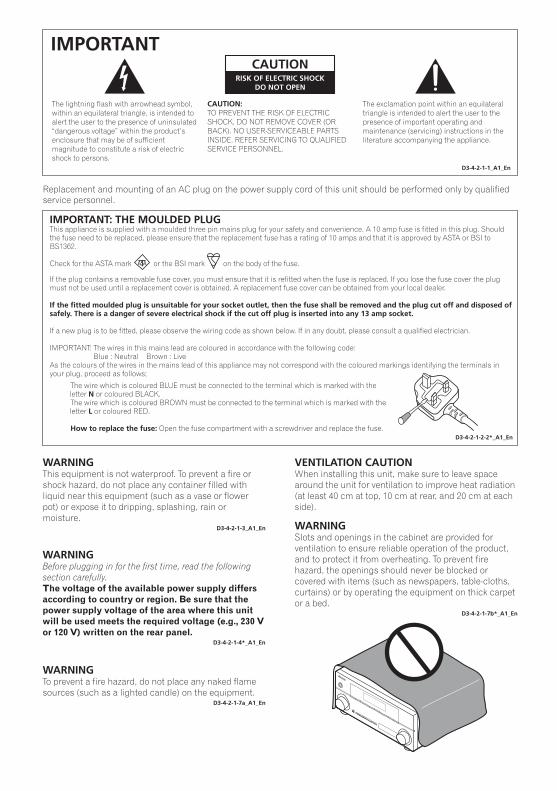
The exclamation point within an equilateral triangle is intended to alert the user to the presence of important operating and maintenance (servicing) instructions in the literature accompanying the appliance.
The lightning flash with arrowhead symbol, within an equilateral triangle, is intended toalert the user to the presence of uninsulated“dangerous voltage” within the product’s enclosure that may be of sufficientmagnitude to constitute a risk of electric shock to persons.
CAUTION:TO PREVENT THE RISK OF ELECTRIC SHOCK, DO NOT REMOVE COVER (OR BACK). NO USER-SERVICEABLE PARTSINSIDE. REFER SERVICING TO QUALIFIEDSERVICE PERSONNEL.
CAUTIONRISK OF ELECTRIC SHOCK
DO NOT OPEN
IMPORTANT
D3-4-2-1-1_A1_En
WARNINGThis equipment is not waterproof. To prevent a fire orshock hazard, do not place any container filled withliquid near this equipment (such as a vase or flower pot) or expose it to dripping, splashing, rain ormoisture.
D3-4-2-1-3_A1_En
WARNINGBefore plugging in for the first time, read the followingsection carefully.The voltage of the available power supply differsaccording to country or region. Be sure that the power supply voltage of the area where this unit will be used meets the required voltage (e.g., 230 V or 120 V) written on the rear panel.
D3-4-2-1-4*_A1_En
WARNINGTo prevent a fire hazard, do not place any naked flamesources (such as a lighted candle) on the equipment.
D3-4-2-1-7a_A1_En
VENTILATION CAUTIONWhen installing this unit, make sure to leave space around the unit for ventilation to improve heat radiation (at least 40 cm at top, 10 cm at rear, and 20 cm at eachside).
WARNINGSlots and openings in the cabinet are provided for ventilation to ensure reliable operation of the product,and to protect it from overheating. To prevent firehazard, the openings should never be blocked orcovered with items (such as newspapers, table-cloths, curtains) or by operating the equipment on thick carpetor a bed.
D3-4-2-1-7b*_A1_En
D3-4-2-1-2-2*_A1_En
Replacement and mounting of an AC plug on the power supply cord of this unit should be performed only by qualified service personnel.
IMPORTANT: THE MOULDED PLUGThis appliance is supplied with a moulded three pin mains plug for your safety and convenience. A 10 amp fuse is fitted in this plug. Should the fuse need to be replaced, please ensure that the replacement fuse has a rating of 10 amps and that it is approved by ASTA or BSI toBS1362.
Check for the ASTA mark or the BSI mark on the body of the fuse.
If the plug contains a removable fuse cover, you must ensure that it is refitted when the fuse is replaced. If you lose the fuse cover the plugmust not be used until a replacement cover is obtained. A replacement fuse cover can be obtained from your local dealer.
If the fitted moulded plug is unsuitable for your socket outlet, then the fuse shall be removed and the plug cut off and disposed of safely. There is a danger of severe electrical shock if the cut off plug is inserted into any 13 amp socket.
If a new plug is to be fitted, please observe the wiring code as shown below. If in any doubt, please consult a qualified electrician.
IMPORTANT: The wires in this mains lead are coloured in accordance with the following code: Blue : Neutral Brown : LiveAs the colours of the wires in the mains lead of this appliance may not correspond with the coloured markings identifying the terminals inyour plug, proceed as follows;
The wire which is coloured BLUE must be connected to the terminal which is marked with the letter N or coloured BLACK.The wire which is coloured BROWN must be connected to the terminal which is marked with the letter L or coloured RED.
How to replace the fuse: Open the fuse compartment with a screwdriver and replace the fuse.
VSX-820_SYXCN_En.book 2 ページ 2010年4月12日 月曜日 午後6時52分
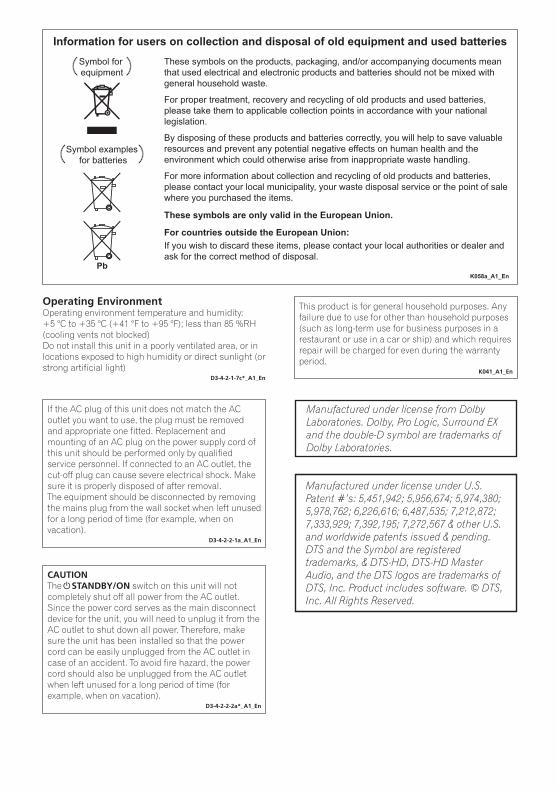
Information for users on collection and disposal of old equipment and used batteriesThese symbols on the products, packaging, and/or accompanying documents mean that used electrical and electronic products and batteries should not be mixed with general household waste.
For proper treatment, recovery and recycling of old products and used batteries, please take them to applicable collection points in accordance with your national legislation.
By disposing of these products and batteries correctly, you will help to save valuable resources and prevent any potential negative effects on human health and the environment which could otherwise arise from inappropriate waste handling.
For more information about collection and recycling of old products and batteries, please contact your local municipality, your waste disposal service or the point of sale where you purchased the items.
These symbols are only valid in the European Union.
For countries outside the European Union:If you wish to discard these items, please contact your local authorities or dealer and ask for the correct method of disposal.
K058a_A1_En
Symbol examplesfor batteries
Symbol for equipment
Pb
Operating EnvironmentOperating environment temperature and humidity:+5 °C to +35 °C (+41 °F to +95 °F); less than 85 %RH (cooling vents not blocked)Do not install this unit in a poorly ventilated area, or inlocations exposed to high humidity or direct sunlight (or strong artificial light)
D3-4-2-1-7c*_A1_En
If the AC plug of this unit does not match the ACoutlet you want to use, the plug must be removed and appropriate one fitted. Replacement and mounting of an AC plug on the power supply cord ofthis unit should be performed only by qualified service personnel. If connected to an AC outlet, the cut-off plug can cause severe electrical shock. Makesure it is properly disposed of after removal.The equipment should be disconnected by removing the mains plug from the wall socket when left unusedfor a long period of time (for example, when on vacation).
D3-4-2-2-1a_A1_En
CAUTIONThe STANDBY/ON switch on this unit will notcompletely shut off all power from the AC outlet.Since the power cord serves as the main disconnect device for the unit, you will need to unplug it from the AC outlet to shut down all power. Therefore, makesure the unit has been installed so that the powercord can be easily unplugged from the AC outlet incase of an accident. To avoid fire hazard, the powercord should also be unplugged from the AC outlet when left unused for a long period of time (forexample, when on vacation).
D3-4-2-2-2a*_A1_En
This product is for general household purposes. Any failure due to use for other than household purposes (such as long-term use for business purposes in a restaurant or use in a car or ship) and which requires repair will be charged for even during the warranty period.
K041_A1_En
Manufactured under license from Dolby Laboratories. Dolby, Pro Logic, Surround EX and the double-D symbol are trademarks of Dolby Laboratories.
Manufactured under license under U.S. Patent #’s: 5,451,942; 5,956,674; 5,974,380; 5,978,762; 6,226,616; 6,487,535; 7,212,872; 7,333,929; 7,392,195; 7,272,567 & other U.S. and worldwide patents issued & pending. DTS and the Symbol are registeredtrademarks, & DTS-HD, DTS-HD Master Audio, and the DTS logos are trademarks of DTS, Inc. Product includes software. © DTS, Inc. All Rights Reserved.
VSX-820_SYXCN_En.book 3 ページ 2010年4月12日 月曜日 午後6時52分
4En
Thank you for buying this Pioneer product. Please read through these operating instructions so you will know how to operate your model properly. After you have finished reading the instructions, put them away in a safe place for future reference.
ContentsFlow of settings on the receiver . . 6
01 Before you startChecking what’s in the box . . . . . . . . . . . . . . . 7Loading the batteries . . . . . . . . . . . . . . . . . . . 7Installing the receiver . . . . . . . . . . . . . . . . . . . 7
Ventilation . . . . . . . . . . . . . . . . . . . . . . . . . . 8
02 Controls and displaysFront panel . . . . . . . . . . . . . . . . . . . . . . . . . . . 9
Operating range of remote control . . . . . . . 10Display . . . . . . . . . . . . . . . . . . . . . . . . . . . . . 11Remote control . . . . . . . . . . . . . . . . . . . . . . . 13
03 Connecting your equipmentPlacing the speakers. . . . . . . . . . . . . . . . . . . 16
Hints on the speaker placement . . . . . . . . . 17Connecting the speakers . . . . . . . . . . . . . . . 18
Connect the surround back or front height speakers . . . . . . . . . . . . . . . . . . . . . 19Switching the speaker system . . . . . . . . . . 20
Making cable connections . . . . . . . . . . . . . . 20HDMI cables . . . . . . . . . . . . . . . . . . . . . . . 20About HDMI . . . . . . . . . . . . . . . . . . . . . . . . 21Analog audio cables . . . . . . . . . . . . . . . . . . 21Digital audio cables . . . . . . . . . . . . . . . . . . 21Video cables . . . . . . . . . . . . . . . . . . . . . . . . 21
About video outputs connection . . . . . . . . . . 22Connecting a TV and playback components . . . 23
Connecting using HDMI . . . . . . . . . . . . . . . 23Connecting your component with no HDMI terminal . . . . . . . . . . . . . . . . . . . . . . 24
Connecting a satellite receiver or other digital set-top box . . . . . . . . . . . . . . . . . . . . . 25Connecting an HDD/DVD recorder, VCR and other video sources . . . . . . . . . . . . . . . . 25Using the component video jacks . . . . . . . . . 26Connecting other audio components . . . . . . 26Connecting antennas . . . . . . . . . . . . . . . . . . 27
Using external antennas. . . . . . . . . . . . . . . 27Connecting to the front panel video terminal . . . . . . . . . . . . . . . . . . . . . . . . . . . . 28Plugging in the receiver . . . . . . . . . . . . . . . . 28
04 Basic SetupAutomatically setting up for surround sound (MCACC) . . . . . . . . . . . . . . . . . . . . . . 29
Other problems when using the Auto MCACC Setup. . . . . . . . . . . . . . . . . . . . . . . 31
05 Listening to your systemBasic playback . . . . . . . . . . . . . . . . . . . . . . . 32Auto playback . . . . . . . . . . . . . . . . . . . . . . . . 33Listening in surround sound . . . . . . . . . . . . . 33
Using the Advanced surround effects . . . . . 34Listening in stereo . . . . . . . . . . . . . . . . . . . . . 35Using Front Stage Surround Advance . . . . . . 35Using Stream Direct . . . . . . . . . . . . . . . . . . . 36Using the Sound Retriever. . . . . . . . . . . . . . . 36Better sound using Phase Control. . . . . . . . . 36Listening with Acoustic Calibration EQ . . . . . 37Using surround back channel processing . . . 37Setting the Up Mix function. . . . . . . . . . . . . . 38Setting the Audio options . . . . . . . . . . . . . . . 38Choosing the input signal . . . . . . . . . . . . . . . 41Using the headphone . . . . . . . . . . . . . . . . . . 41
06 The System Setup menuUsing the System Setup menu . . . . . . . . . . . 42Manual speaker setup . . . . . . . . . . . . . . . . . . 43
Speaker Setting . . . . . . . . . . . . . . . . . . . . . 43Crossover Network . . . . . . . . . . . . . . . . . . . 45Channel Level . . . . . . . . . . . . . . . . . . . . . . . 45Speaker Distance . . . . . . . . . . . . . . . . . . . . 46
The Input Assign menu . . . . . . . . . . . . . . . . . 46The Pre Out Setting . . . . . . . . . . . . . . . . . . . . 47
07 Using the tunerListening to the radio. . . . . . . . . . . . . . . . . . . 48
Improving FM stereo sound . . . . . . . . . . . . 48Saving station presets . . . . . . . . . . . . . . . . . . 48
Listening to station presets . . . . . . . . . . . . . 49Naming preset stations. . . . . . . . . . . . . . . . 49
An introduction to RDS . . . . . . . . . . . . . . . . . 50Searching for RDS programs . . . . . . . . . . . 50Displaying RDS information . . . . . . . . . . . . 51
VSX-820_SYXCN_En.book 4 ページ 2010年4月12日 月曜日 午後6時52分
EnglishItaliano
FrançaisNederlands
EspañolDeutsch
EnglishFrançais
Deutsch
NederlandsItaliano
Español
5En
08 Making recordingsMaking an audio or a video recording . . . . . . 52
09 Controlling the rest of your systemSetting the remote to control other components . . . . . . . . . . . . . . . . . . . . . . . . . 53Selecting preset codes directly . . . . . . . . . . . 53Clearing all the remote control settings. . . . . 54Controls for TVs . . . . . . . . . . . . . . . . . . . . . . . 55Controls for other components . . . . . . . . . . . 56Preset Code List . . . . . . . . . . . . . . . . . . . . . . 57
10 Other connectionsConnecting an iPod. . . . . . . . . . . . . . . . . . . . 66
Connecting your iPod to the receiver . . . . . 66iPod playback . . . . . . . . . . . . . . . . . . . . . . . 67Watching photos and video content . . . . . . 68About iPod . . . . . . . . . . . . . . . . . . . . . . . . . 68
Connecting a USB device . . . . . . . . . . . . . . . 69Connecting your USB device to the receiver . . . . . . . . . . . . . . . . . . . . . . . . . . . . 69Basic playback controls . . . . . . . . . . . . . . . 69Compressed audio compatibility. . . . . . . . . 70
Bluetooth® ADAPTER for Wireless Enjoyment of Music. . . . . . . . . . . . . . . . . . . . 71
Wireless music play . . . . . . . . . . . . . . . . . . 71Connecting Optional Bluetooth ADAPTER . . . . . . . . . . . . . . . . . . . . . . . . . . 71Pairing Bluetooth ADAPTER and Bluetooth wireless technology device . . . . . 72Listening to Music Contents of Bluetooth wireless technology device with Your System . . . . . . . . . . . . . . . . . . . . 72
11 Additional informationTroubleshooting . . . . . . . . . . . . . . . . . . . . . . 74
HDMI . . . . . . . . . . . . . . . . . . . . . . . . . . . . . 77Important information regarding the HDMI connection . . . . . . . . . . . . . . . . . . . . 78iPod messages . . . . . . . . . . . . . . . . . . . . . . 78USB messages . . . . . . . . . . . . . . . . . . . . . . 79
Resetting the main unit . . . . . . . . . . . . . . . . . 79Specifications . . . . . . . . . . . . . . . . . . . . . . . . 80Cleaning the unit . . . . . . . . . . . . . . . . . . . . . . 80
VSX-820_SYXCN_En.book 5 ページ 2010年4月12日 月曜日 午後6時52分
6En
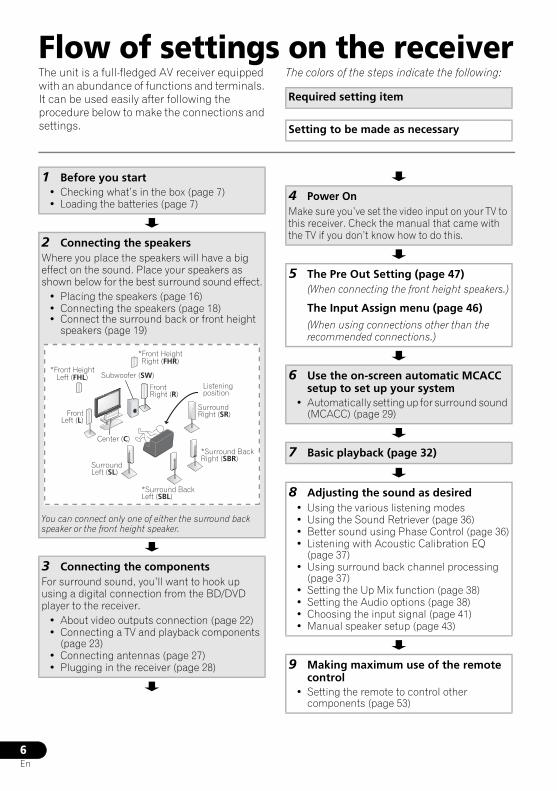
Flow of settings on the receiverThe unit is a full-fledged AV receiver equipped with an abundance of functions and terminals. It can be used easily after following the procedure below to make the connections and settings.
The colors of the steps indicate the following:
Required setting item
Setting to be made as necessary
1 Before you start• Checking what’s in the box (page 7)• Loading the batteries (page 7)
2 Connecting the speakersWhere you place the speakers will have a big effect on the sound. Place your speakers as shown below for the best surround sound effect.
• Placing the speakers (page 16)• Connecting the speakers (page 18)• Connect the surround back or front height
speakers (page 19)
You can connect only one of either the surround back speaker or the front height speaker.
3 Connecting the componentsFor surround sound, you’ll want to hook up using a digital connection from the BD/DVD player to the receiver.
• About video outputs connection (page 22)• Connecting a TV and playback components
(page 23)• Connecting antennas (page 27)• Plugging in the receiver (page 28)
FrontLeft (L)
*Front HeightLeft (FHL)
*Front HeightRight (FHR)
SurroundLeft (SL)
*Surround BackLeft (SBL)
*Surround BackRight (SBR)
SurroundRight (SR)
Center (C)
Subwoofer (SW)Listeningposition
FrontRight (R)
4 Power OnMake sure you’ve set the video input on your TV to this receiver. Check the manual that came with the TV if you don’t know how to do this.
5 The Pre Out Setting (page 47)(When connecting the front height speakers.)
The Input Assign menu (page 46)(When using connections other than the recommended connections.)
6 Use the on-screen automatic MCACC setup to set up your system
• Automatically setting up for surround sound (MCACC) (page 29)
7 Basic playback (page 32)
8 Adjusting the sound as desired• Using the various listening modes• Using the Sound Retriever (page 36)• Better sound using Phase Control (page 36)• Listening with Acoustic Calibration EQ
(page 37)• Using surround back channel processing
(page 37)• Setting the Up Mix function (page 38)• Setting the Audio options (page 38)• Choosing the input signal (page 41)• Manual speaker setup (page 43)
9 Making maximum use of the remote control
• Setting the remote to control other components (page 53)
VSX-820_SYXCN_En.book 6 ページ 2010年4月12日 月曜日 午後6時52分
Before you start 01
7En
EnglishFrançais
Deutsch
NederlandsItaliano
Español
Chapter 1:
Before you start
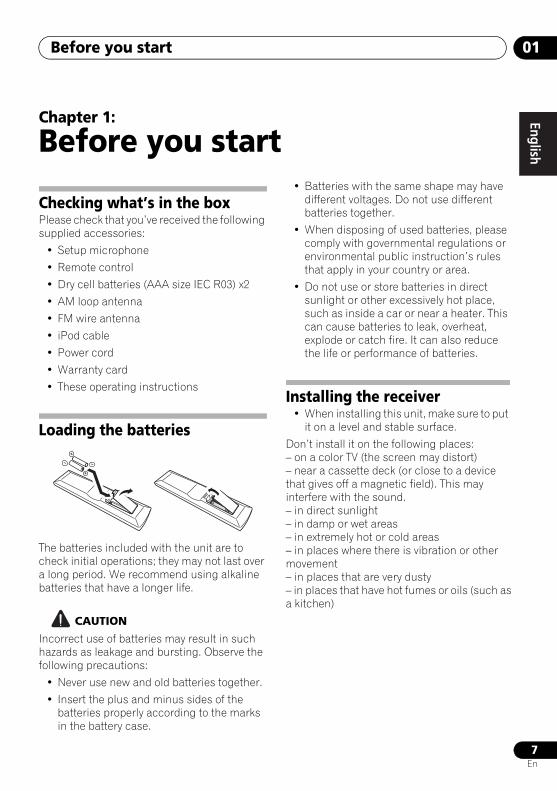
Checking what’s in the boxPlease check that you’ve received the following supplied accessories:
• Setup microphone
• Remote control
• Dry cell batteries (AAA size IEC R03) x2
• AM loop antenna
• FM wire antenna
• iPod cable
• Power cord
• Warranty card
• These operating instructions
Loading the batteries
The batteries included with the unit are to check initial operations; they may not last over a long period. We recommend using alkaline batteries that have a longer life.
CAUTION
Incorrect use of batteries may result in such hazards as leakage and bursting. Observe the following precautions:
• Never use new and old batteries together.
• Insert the plus and minus sides of the batteries properly according to the marks in the battery case.
• Batteries with the same shape may have different voltages. Do not use different batteries together.
• When disposing of used batteries, please comply with governmental regulations or environmental public instruction’s rules that apply in your country or area.
• Do not use or store batteries in direct sunlight or other excessively hot place, such as inside a car or near a heater. This can cause batteries to leak, overheat, explode or catch fire. It can also reduce the life or performance of batteries.
Installing the receiver• When installing this unit, make sure to put
it on a level and stable surface.
Don’t install it on the following places:– on a color TV (the screen may distort)– near a cassette deck (or close to a device that gives off a magnetic field). This may interfere with the sound.– in direct sunlight– in damp or wet areas– in extremely hot or cold areas– in places where there is vibration or other movement– in places that are very dusty– in places that have hot fumes or oils (such as a kitchen)
VSX-820_SYXCN_En.book 7 ページ 2010年4月12日 月曜日 午後6時52分

Before you start01
8En
VentilationWhen installing this unit, make sure to leave space around the unit for ventilation to improve heat dispersal (at least 40 cm at the top). If not enough space is provided between the unit and walls or other equipment, heat will build up inside, interfering with performance and/or causing malfunctions.
Slot and openings in the cabinet are provided for ventilation and to protect the equipment from overheating. To prevent fire hazard, do not place anything directly on top of the unit, make sure the openings are never blocked or covered with items (such as newspapers, table-cloths and curtains), and do not operate the equipment on thick carpet or a bed.
Receiver
40 cm
VSX-820_SYXCN_En.book 8 ページ 2010年4月12日 月曜日 午後6時52分
Controls and displays 02
9En
EnglishFrançais
Deutsch
NederlandsItaliano
Español
Chapter 2:
Controls and displays
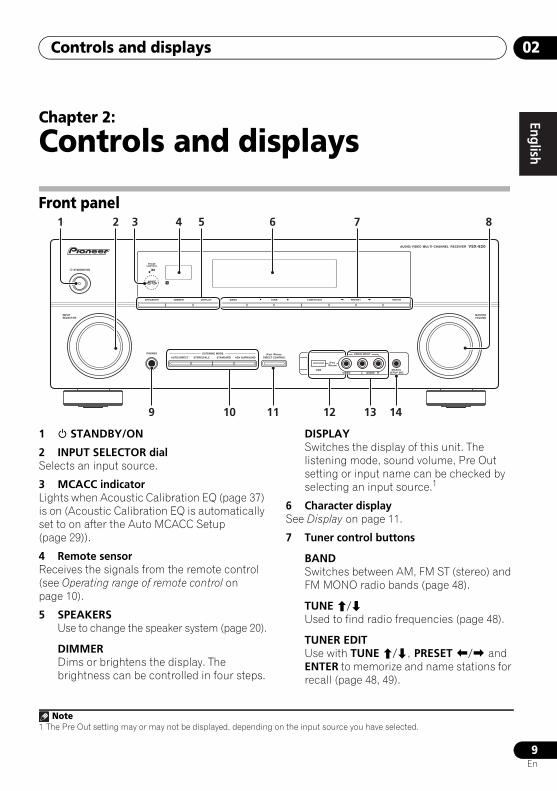
Front panel
1 STANDBY/ON
2 INPUT SELECTOR dialSelects an input source.
3 MCACC indicatorLights when Acoustic Calibration EQ (page 37) is on (Acoustic Calibration EQ is automatically set to on after the Auto MCACC Setup (page 29)).
4 Remote sensorReceives the signals from the remote control (see Operating range of remote control on page 10).
5 SPEAKERSUse to change the speaker system (page 20).
DIMMERDims or brightens the display. The brightness can be controlled in four steps.
DISPLAYSwitches the display of this unit. The listening mode, sound volume, Pre Out setting or input name can be checked by selecting an input source.1
6 Character displaySee Display on page 11.
7 Tuner control buttons
BANDSwitches between AM, FM ST (stereo) and FM MONO radio bands (page 48).
TUNE /Used to find radio frequencies (page 48).
TUNER EDITUse with TUNE /, PRESET / and ENTER to memorize and name stations for recall (page 48, 49).
SPEAKERS
AUTO/DIRECT STEREO/ALC STANDARD
LISTENING MODE
ADV SURROUND DIRECT CONTROLiPod iPhone
DIMMER DISPLAY BAND TUNE TUNER EDIT PRESET ENTER
PHONES
INPUTSELECTOR
STANDBY/ON
PHASECONTROL
MASTERVOLUME
MCACCSETUP MIC
AUDIO/ VIDEO MULTI- CHANNEL RECEIVER VSX-820
VIDEO INPUT
AUDIOL RVIDEO
iPodiPhone
USB
1 2 7 854 63
9 1110 141312
Note1 The Pre Out setting may or may not be displayed, depending on the input source you have selected.
VSX-820_SYXCN_En.book 9 ページ 2010年4月12日 月曜日 午後6時52分

Controls and displays02
10En
PRESET /Use to select preset radio stations (page 49).
8 MASTER VOLUME dial
9 PHONES jackUse to connect headphones. When the headphones are connected, there is no sound output from the speakers (page 41).
10 Listening mode buttons
AUTO/DIRECTSwitches between Auto surround mode (Auto playback on page 33) and Stream Direct playback. Stream Direct playback bypasses the tone controls for the most accurate reproduction of a source (page 36).
STEREO/ALCSwitches between stereo playback, Auto level control stereo mode (page 35) and Front Stage Surround Advance modes (page 35).
STANDARDPress for Standard decoding and to switch between the various 2 Pro Logic II, 2 Pro Logic IIx, 2 Pro Logic IIz and NEO:6 options (page 32).
ADV SURROUNDSwitches between the various surround modes (page 34).
11 iPod iPhone DIRECT CONTROLChange the receiver’s input to the iPod and enable iPod operations on the iPod (page 68).
12 iPod iPhone/USB terminalUse to connect your Apple iPod or USB mass storage device as an audio source (page 66 and page 69).
13 AUDIO/VIDEO inputSee Connecting to the front panel video terminal on page 28.
14 MCACC SETUP MIC jackUse to connect a microphone when performing Auto MCACC setup.
Operating range of remote controlThe remote control may not work properly if:
• There are obstacles between the remote control and the receiver’s remote sensor.
• Direct sunlight or fluorescent light is shining onto the remote sensor.
• The receiver is located near a device that is emitting infrared rays.
• The receiver is operated simultaneously with another infrared remote control unit.
30°
7 m
30°
VSX-820_SYXCN_En.book 10 ページ 2010年4月12日 月曜日 午後6時52分
Controls and displays 02
11En
EnglishFrançais
Deutsch
NederlandsItaliano
Español
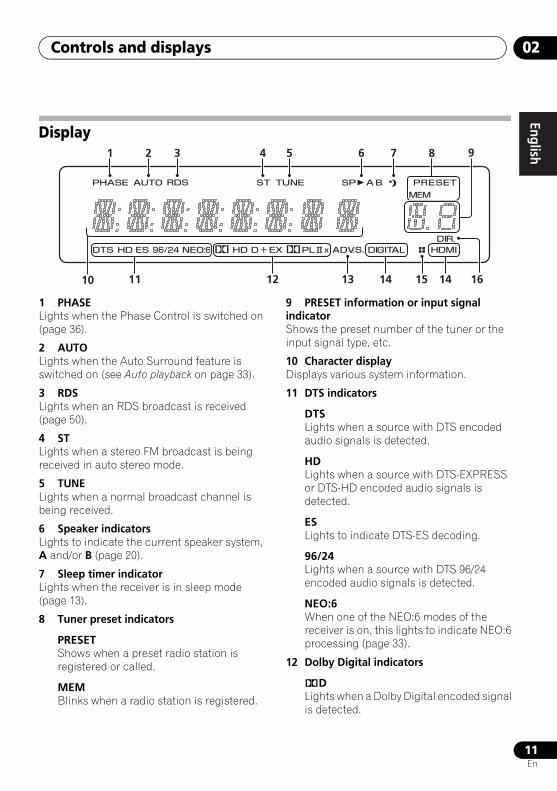
Display
1 PHASELights when the Phase Control is switched on (page 36).
2 AUTOLights when the Auto Surround feature is switched on (see Auto playback on page 33).
3 RDSLights when an RDS broadcast is received (page 50).
4 STLights when a stereo FM broadcast is being received in auto stereo mode.
5 TUNELights when a normal broadcast channel is being received.
6 Speaker indicatorsLights to indicate the current speaker system, A and/or B (page 20).
7 Sleep timer indicatorLights when the receiver is in sleep mode (page 13).
8 Tuner preset indicators
PRESETShows when a preset radio station is registered or called.
MEMBlinks when a radio station is registered.
9 PRESET information or input signal indicatorShows the preset number of the tuner or the input signal type, etc.
10 Character display Displays various system information.
11 DTS indicators
DTSLights when a source with DTS encoded audio signals is detected.
HDLights when a source with DTS-EXPRESS or DTS-HD encoded audio signals is detected.
ESLights to indicate DTS-ES decoding.
96/24Lights when a source with DTS 96/24 encoded audio signals is detected.
NEO:6When one of the NEO:6 modes of the receiver is on, this lights to indicate NEO:6 processing (page 33).
12 Dolby Digital indicators
2DLights when a Dolby Digital encoded signal is detected.
1 2 3 4 5 6 7 8
11 12 13 14 14 1615
9
10
VSX-820_SYXCN_En.book 11 ページ 2010年4月12日 月曜日 午後6時52分
Controls and displays02
12En
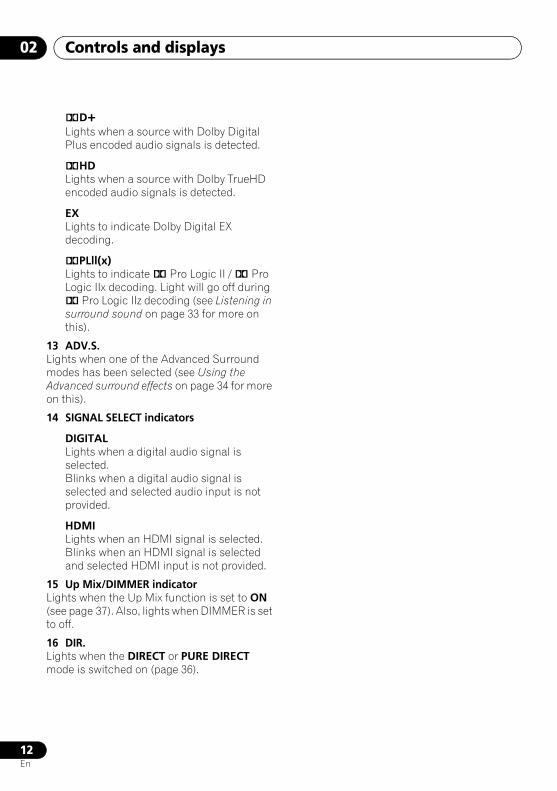
2D+Lights when a source with Dolby Digital Plus encoded audio signals is detected.
2HDLights when a source with Dolby TrueHD encoded audio signals is detected.
EXLights to indicate Dolby Digital EX decoding.
2PLll(x)Lights to indicate 2 Pro Logic II / 2 Pro Logic IIx decoding. Light will go off during 2 Pro Logic IIz decoding (see Listening in surround sound on page 33 for more on this).
13 ADV.S.Lights when one of the Advanced Surround modes has been selected (see Using the Advanced surround effects on page 34 for more on this).
14 SIGNAL SELECT indicators
DIGITALLights when a digital audio signal is selected.Blinks when a digital audio signal is selected and selected audio input is not provided.
HDMILights when an HDMI signal is selected.Blinks when an HDMI signal is selected and selected HDMI input is not provided.
15 Up Mix/DIMMER indicatorLights when the Up Mix function is set to ON (see page 37). Also, lights when DIMMER is set to off.
16 DIR.Lights when the DIRECT or PURE DIRECT mode is switched on (page 36).
VSX-820_SYXCN_En.book 12 ページ 2010年4月12日 月曜日 午後6時52分
Controls and displays 02
13En
EnglishFrançais
Deutsch
NederlandsItaliano
Español
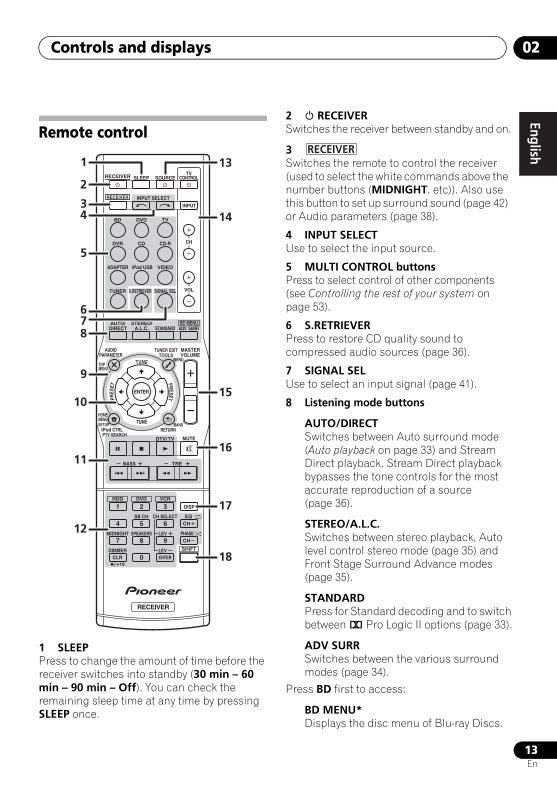
Remote control
1 SLEEPPress to change the amount of time before the receiver switches into standby (30 min – 60 min – 90 min – Off). You can check the remaining sleep time at any time by pressing SLEEP once.
2 RECEIVER Switches the receiver between standby and on.
3Switches the remote to control the receiver (used to select the white commands above the number buttons (MIDNIGHT, etc)). Also use this button to set up surround sound (page 42) or Audio parameters (page 38).
4 INPUT SELECTUse to select the input source.
5 MULTI CONTROL buttonsPress to select control of other components (see Controlling the rest of your system on page 53).
6 S.RETRIEVERPress to restore CD quality sound to compressed audio sources (page 36).
7 SIGNAL SELUse to select an input signal (page 41).
8 Listening mode buttons
AUTO/DIRECT Switches between Auto surround mode (Auto playback on page 33) and Stream Direct playback. Stream Direct playback bypasses the tone controls for the most accurate reproduction of a source (page 36).
STEREO/A.L.C.Switches between stereo playback, Auto level control stereo mode (page 35) and Front Stage Surround Advance modes (page 35).
STANDARDPress for Standard decoding and to switch between 2 Pro Logic II options (page 33).
ADV SURRSwitches between the various surround modes (page 34).
Press BD first to access:
BD MENU*Displays the disc menu of Blu-ray Discs.
BD DVD
INPUT SELECT
SOURCESLEEPTV
CONTROL
DIMMER
TV
INPUT
1
4
7MIDNIGHT
HDD
CH
RECEIVER
DVR CD CD-R
ADAPTER iPod USB VIDEO
TUNER S.RETRIEVER SIGNAL SEL
BD MENU
ENTER
STANDARD ADV SURRSTEREO/
A.L.C.AUTO/
DIRECT
VOL
+10
2
5
8SPEAKERS LEV
LEV
SB CH
DISP
CLR
EQ
PHASE
DVD
3
6
9
0 ENTER
CH
CH
CH SELECT
VCR
SHIFT
MUTE
RETURN
AUDIOPARAMETER
TUNER EDITTOOLS
MASTERVOLUME
iPod CTRLPTY SEARCH
BAND
MENU
HOMEMENUSETUP
DTV/ TV
/
TREBASS
TOPMENU
RECEIVER
TUNE
TUNE
PRESETPRES
ET
RECEIVER
1
2
13
14
15
16
17
34
5
678
9
10
11
12
18
RECEIVER
VSX-820_SYXCN_En.book 13 ページ 2010年4月12日 月曜日 午後6時52分
Controls and displays02
14En
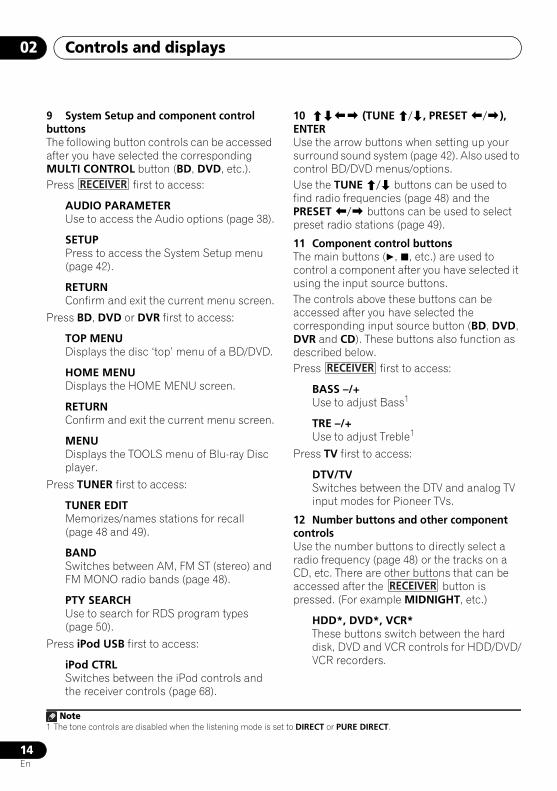
9 System Setup and component control buttonsThe following button controls can be accessed after you have selected the corresponding MULTI CONTROL button (BD, DVD, etc.). Press first to access:
AUDIO PARAMETERUse to access the Audio options (page 38).
SETUPPress to access the System Setup menu (page 42).
RETURNConfirm and exit the current menu screen.
Press BD, DVD or DVR first to access:
TOP MENUDisplays the disc ‘top’ menu of a BD/DVD.
HOME MENUDisplays the HOME MENU screen.
RETURNConfirm and exit the current menu screen.
MENUDisplays the TOOLS menu of Blu-ray Disc player.
Press TUNER first to access:
TUNER EDITMemorizes/names stations for recall (page 48 and 49).
BANDSwitches between AM, FM ST (stereo) and FM MONO radio bands (page 48).
PTY SEARCHUse to search for RDS program types (page 50).
Press iPod USB first to access:
iPod CTRLSwitches between the iPod controls and the receiver controls (page 68).
10 (TUNE /, PRESET /), ENTERUse the arrow buttons when setting up your surround sound system (page 42). Also used to control BD/DVD menus/options.Use the TUNE / buttons can be used to find radio frequencies (page 48) and the PRESET / buttons can be used to select preset radio stations (page 49).
11 Component control buttonsThe main buttons (, , etc.) are used to control a component after you have selected it using the input source buttons.The controls above these buttons can be accessed after you have selected the corresponding input source button (BD, DVD, DVR and CD). These buttons also function as described below.Press first to access:
BASS –/+Use to adjust Bass1
TRE –/+Use to adjust Treble1
Press TV first to access:
DTV/TVSwitches between the DTV and analog TV input modes for Pioneer TVs.
12 Number buttons and other component controlsUse the number buttons to directly select a radio frequency (page 48) or the tracks on a CD, etc. There are other buttons that can be accessed after the button is pressed. (For example MIDNIGHT, etc.)
HDD*, DVD*, VCR*These buttons switch between the hard disk, DVD and VCR controls for HDD/DVD/VCR recorders.
RECEIVER
Note1 The tone controls are disabled when the listening mode is set to DIRECT or PURE DIRECT.
RECEIVER
RECEIVER
VSX-820_SYXCN_En.book 14 ページ 2010年4月12日 月曜日 午後6時52分
Controls and displays 02
15En
EnglishFrançais
Deutsch
NederlandsItaliano
Español
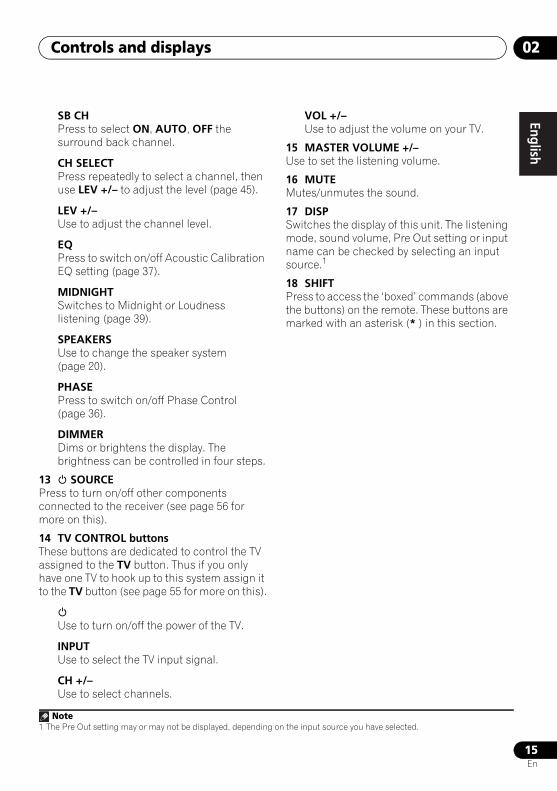
SB CHPress to select ON, AUTO, OFF the surround back channel.
CH SELECTPress repeatedly to select a channel, then use LEV +/– to adjust the level (page 45).
LEV +/–Use to adjust the channel level.
EQPress to switch on/off Acoustic Calibration EQ setting (page 37).
MIDNIGHTSwitches to Midnight or Loudness listening (page 39).
SPEAKERSUse to change the speaker system (page 20).
PHASEPress to switch on/off Phase Control (page 36).
DIMMERDims or brightens the display. The brightness can be controlled in four steps.
13 SOURCEPress to turn on/off other components connected to the receiver (see page 56 for more on this).
14 TV CONTROL buttonsThese buttons are dedicated to control the TV assigned to the TV button. Thus if you only have one TV to hook up to this system assign it to the TV button (see page 55 for more on this).
Use to turn on/off the power of the TV.
INPUTUse to select the TV input signal.
CH +/–Use to select channels.
VOL +/–Use to adjust the volume on your TV.
15 MASTER VOLUME +/–Use to set the listening volume.
16 MUTEMutes/unmutes the sound.
17 DISPSwitches the display of this unit. The listening mode, sound volume, Pre Out setting or input name can be checked by selecting an input source.1
18 SHIFTPress to access the ‘boxed’ commands (above the buttons) on the remote. These buttons are marked with an asterisk (* ) in this section.
Note1 The Pre Out setting may or may not be displayed, depending on the input source you have selected.
VSX-820_SYXCN_En.book 15 ページ 2010年4月12日 月曜日 午後6時52分

Connecting your equipment03
16En
Chapter 3:
Connecting your equipment
Placing the speakersBy connecting the left and right front speakers (L/R), the center speaker (C), the left and right surround speakers (SL/SR), and the subwoofer (SW), a 5.1 ch surround system can be enjoyed.Further, by using an external amplifier, you can connect the left and right surround back speakers (SBL/SBR) and the left and right front height speaker (FHL/FHR) to boost your system up to a 7.1 ch surround system.
• You can also connect one surround back speaker (SB) and enjoy a 6.1 ch surround system.To achieve the best possible surround sound, install your speakers as shown below.
a. This layout is available only when the additional amplifier is connected to the unit and the surround back or front height speakers are connected to the amplifier. For details, see Connect the surround back or front height speakers on page 19.
120
120
SL
L
SW
C
R
SR
120
120
SL
L
SW
C
R
SR
SB
120
120
SL
L
FHL
FHR
SW
C
R
SR
90
90
60SL
L
SW
C
R
SR
SBL
SBR
5.1 channel surround system:
7.1 channel surround (Surround back) system: a
7.1 channel surround (Front height) system: a
6.1 channel surround (Surround back) system: a
VSX-820_SYXCN_En.book 16 ページ 2010年4月12日 月曜日 午後6時52分
Connecting your equipment 03
17En
EnglishFrançais
Deutsch
NederlandsItaliano
Español
Hints on the speaker placementWhere you put your speakers in the room has a big effect on the quality of the sound. The following guidelines should help you to get the best sound from your system.
• The subwoofer can be placed on the floor. Ideally, the other speakers should be at about ear-level when you’re listening to them. Putting the speakers on the floor (except the subwoofer), or mounting them very high on a wall is not recommended.
• For the best stereo effect, place the front speakers 2 m to 3 m apart, at equal distance from the TV.
• If you’re going to place speakers around your CRT TV, use shielded speakers or place the speakers at a sufficient distance from your CRT TV.
• If you’re using a center speaker, place the front speakers at a wider angle. If not, place them at a narrower angle.
• Place the center speaker above or below the TV so that the sound of the center channel is localized at the TV screen. Also, make sure the center speaker does not cross the line formed by the leading edge of the front left and right speakers.
• It is best to angle the speakers towards the listening position. The angle depends on the size of the room. Use less of an angle for bigger rooms.
• Surround and surround back speakers should be positioned 60 cm to 90 cm higher than your ears and titled slight downward. Make sure the speakers don’t face each other. For DVD-Audio, the speakers should be more directly behind the listener than for home theater playback.
• If the surround speakers cannot be set directly to the side of the listening position with a 7.1-channel system, the surround effect can be enhanced by turning off the Up Mix function (see Setting the Up Mix function on page 38).
• Try not to place the surround speakers farther away from the listening position than the front and center speakers. Doing so can weaken the surround sound effect.
• Place the left and right front height speakers at least one meter directly above the left and right front speakers.
CAUTION
• Make sure that all speakers are securely installed. This not only improves sound quality, but also reduces the risk of damage or injury resulting from speakers being knocked over or falling in the event of external shocks such as earthquakes.
Important
• To connect the surround back or front height speakers, an additional amplifier is required. Connect the additional amplifier to the PRE OUT SURR BACK/FRONT HEIGHT outputs of this unit and connect the surround back or front height speakers to the additional amplifier (see Connect the surround back or front height speakers on page 19).The Pre Out setting must be set if the above connections are performed. Select SURR.BACK if the surround back speaker is connected and HEIGHT if the front height speaker is connected (If neither the surround back speaker nor the front height speaker is connected, either setting will suffice) (see The Pre Out Setting on page 47).
VSX-820_SYXCN_En.book 17 ページ 2010年4月12日 月曜日 午後6時52分
Connecting your equipment03
18En
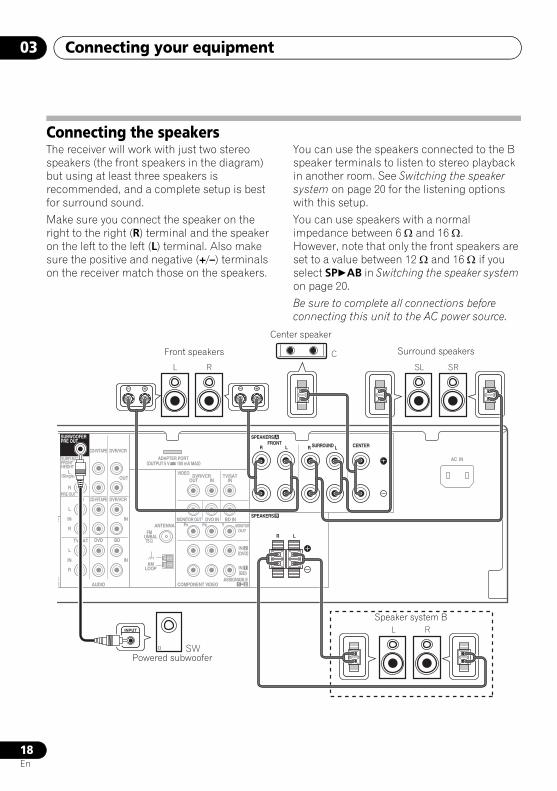
Connecting the speakersThe receiver will work with just two stereo speakers (the front speakers in the diagram) but using at least three speakers is recommended, and a complete setup is best for surround sound.
Make sure you connect the speaker on the right to the right (R) terminal and the speaker on the left to the left (L) terminal. Also make sure the positive and negative (+/–) terminals on the receiver match those on the speakers.
You can use the speakers connected to the B speaker terminals to listen to stereo playback in another room. See Switching the speaker system on page 20 for the listening options with this setup.
You can use speakers with a normal impedance between 6 Ω and 16 Ω.However, note that only the front speakers are set to a value between 12 Ω and 16 Ω if you select SPAB in Switching the speaker system on page 20.
Be sure to complete all connections before connecting this unit to the AC power source.
AC INSURR BACK /FRONTHEIGHT
L(Single)
R
R
L
IN
R
L
IN
IN
OUT
IN
CD
TV/SAT DVD BD
DVR/VCR
MONITOR OUTPR PB Y
R L
DVD IN BD IN
OUTMONITOR
COMPONENT VIDEO
TV/SATIN
DVR/VCROUT IN
FRONTR L
CD-R/TAPE
DVR/VCR CD-R/TAPE
PRE OUT
E
EAUDIO
ADAPTER PORT
VIDEO
(OUTPUT 5 V 100 mA MAX)
(BD)IN 1
(DVD)IN 2
ASSIGNABLE
SPEAKERS
1
B
SPEAKERS A
2
ANTENNAFM
UNBAL75
AMLOOP
VOLTAGE SELECTOR
110-127 V 220-240 V
SUBWOOFERPRE OUT
CENTERSURROUNDR L
SW
L
C
R SL SR
L R
Center speaker
Surround speakersFront speakers
Powered subwoofer
Speaker system B
VSX-820_SYXCN_En.book 18 ページ 2010年4月12日 月曜日 午後6時52分
Connecting your equipment 03
19En
EnglishFrançais
Deutsch
NederlandsItaliano
Español
Bare wire connectionsA-Speaker terminals:
1 Twist exposed wire strands together.
2 Loosen terminal and insert exposed wire.
3 Tighten terminal.
B-Speaker terminals:
1 Twist exposed wire strands together.
2 Push open the tabs and insert exposed wire.
3 Release the tabs.
CAUTION
• These speaker terminals carry HAZARDOUS LIVE voltage. To prevent the risk of electric shock when connecting or disconnecting the speaker cables, disconnect the power cord before touching any uninsulated parts.
• Make sure that all the bare speaker wire is twisted together and inserted fully into the speaker terminal. If any of the bare speaker wire touches the back panel it may cause the power to cut off as a safety measure.
Connect the surround back or front height speakersConnect the PRE OUT outputs of the unit and additional amplifier to add a surround back or front height speaker.
• If the surround back speaker or the front height speaker is connected, set the Pre Out setting (see The Pre Out Setting on page 47).
• You can use the additional amplifier on the surround back channel pre-outs for a single speaker as well. In this case plug the amplifier into the left (L (Single)) terminal only.
1 2 3
10 mm
1 2 3
10 mm
IN BD
SURR BACK /FRONTHEIGHT
L(Single)
R
R
L
IN
R
L
IN
IN
OUT
IN
CD
TV/SAT DVD BD
DVR/VCR
M
CD-R/TAPE
DVR/VCR CD-R/TAPE
PRE OUT
DVD
TV/SAT
COAXIAL
OPTICAL
(CD)IN
ASSIGNABLE
ASSIGNABLE
OUT
HDMI
DVR/VCR 1
(CD-R/TAPE)IN
AUDIO
ADAPTER (OUTPUT 5 V 1
1
1 2
IN 2
SUBWOOFERPRE OUT
ANTENNAFM
UNBAL75
AMLOOP
INPUTL R
ANALOG
SBL/FHL SBR/FHR
Surround back or front height speakers Surround back or
front height channel amplifier
VSX-820_SYXCN_En.book 19 ページ 2010年4月12日 月曜日 午後6時52分
Connecting your equipment03
20En
Switching the speaker systemThree speaker system settings are possible using the SPEAKERS button.
• Use the SPEAKERS button on the front panel to select a speaker system setting.1
Press repeatedly to choose a speaker system option:
• SPA – Sound is output from the speakers connected to the A speaker terminals and PRE OUT SURR BACK/FRONT HEIGHT (multichannel playback is possible).
• SPB – Sound is output from the two speakers connected to speaker system B (only stereo playback is possible).
• SPAB – Sound is output from speaker system A, the two speakers in speaker system B, and the subwoofer. Multichannel sources are downmixed only when the STEREO or ALC mode is selected for stereo output from speaker systems A and B.2
• SP – No sound is output from the speakers.
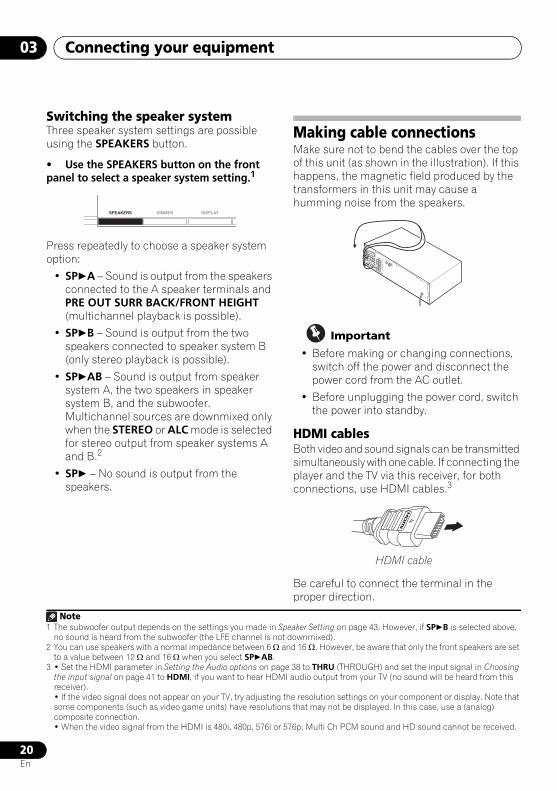
Making cable connectionsMake sure not to bend the cables over the top of this unit (as shown in the illustration). If this happens, the magnetic field produced by the transformers in this unit may cause a humming noise from the speakers.
Important
• Before making or changing connections, switch off the power and disconnect the power cord from the AC outlet.
• Before unplugging the power cord, switch the power into standby.
HDMI cablesBoth video and sound signals can be transmitted simultaneously with one cable. If connecting the player and the TV via this receiver, for both connections, use HDMI cables.3
Be careful to connect the terminal in the proper direction.
Note1 The subwoofer output depends on the settings you made in Speaker Setting on page 43. However, if SPB is selected above,
no sound is heard from the subwoofer (the LFE channel is not downmixed).2 You can use speakers with a normal impedance between 6 Ω and 16 Ω. However, be aware that only the front speakers are set
to a value between 12 Ω and 16 Ω when you select SPAB.
SPEAKERS DIMMER DISPLAY
3 • Set the HDMI parameter in Setting the Audio options on page 38 to THRU (THROUGH) and set the input signal in Choosing the input signal on page 41 to HDMI, if you want to hear HDMI audio output from your TV (no sound will be heard from this receiver).• If the video signal does not appear on your TV, try adjusting the resolution settings on your component or display. Note that some components (such as video game units) have resolutions that may not be displayed. In this case, use a (analog) composite connection.• When the video signal from the HDMI is 480i, 480p, 576i or 576p, Multi Ch PCM sound and HD sound cannot be received.
HDMI cable
VSX-820_SYXCN_En.book 20 ページ 2010年4月12日 月曜日 午後6時52分
Connecting your equipment 03
21En
EnglishFrançais
Deutsch
NederlandsItaliano
Español
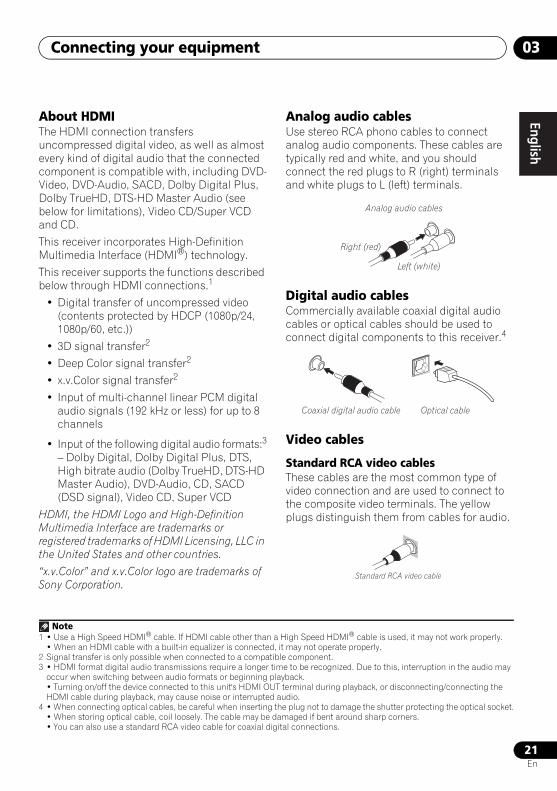
About HDMIThe HDMI connection transfers uncompressed digital video, as well as almost every kind of digital audio that the connected component is compatible with, including DVD-Video, DVD-Audio, SACD, Dolby Digital Plus, Dolby TrueHD, DTS-HD Master Audio (see below for limitations), Video CD/Super VCD and CD.
This receiver incorporates High-Definition Multimedia Interface (HDMI®) technology.
This receiver supports the functions described below through HDMI connections.1
• Digital transfer of uncompressed video (contents protected by HDCP (1080p/24, 1080p/60, etc.))
• 3D signal transfer2
• Deep Color signal transfer2
• x.v.Color signal transfer2
• Input of multi-channel linear PCM digital audio signals (192 kHz or less) for up to 8 channels
• Input of the following digital audio formats:3
– Dolby Digital, Dolby Digital Plus, DTS, High bitrate audio (Dolby TrueHD, DTS-HD Master Audio), DVD-Audio, CD, SACD (DSD signal), Video CD, Super VCD
HDMI, the HDMI Logo and High-Definition Multimedia Interface are trademarks or registered trademarks of HDMI Licensing, LLC in the United States and other countries.
“x.v.Color” and x.v.Color logo are trademarks of Sony Corporation.
Analog audio cablesUse stereo RCA phono cables to connect analog audio components. These cables are typically red and white, and you should connect the red plugs to R (right) terminals and white plugs to L (left) terminals.
Digital audio cablesCommercially available coaxial digital audio cables or optical cables should be used to connect digital components to this receiver.4
Video cables
Standard RCA video cablesThese cables are the most common type of video connection and are used to connect to the composite video terminals. The yellow plugs distinguish them from cables for audio.
Note1 • Use a High Speed HDMI® cable. If HDMI cable other than a High Speed HDMI® cable is used, it may not work properly.
• When an HDMI cable with a built-in equalizer is connected, it may not operate properly.2 Signal transfer is only possible when connected to a compatible component.3 • HDMI format digital audio transmissions require a longer time to be recognized. Due to this, interruption in the audio may
occur when switching between audio formats or beginning playback.• Turning on/off the device connected to this unit's HDMI OUT terminal during playback, or disconnecting/connecting the HDMI cable during playback, may cause noise or interrupted audio.
4 • When connecting optical cables, be careful when inserting the plug not to damage the shutter protecting the optical socket.• When storing optical cable, coil loosely. The cable may be damaged if bent around sharp corners.• You can also use a standard RCA video cable for coaxial digital connections.
Right (red)
Analog audio cables
Left (white)
Coaxial digital audio cable Optical cable
Standard RCA video cable
VSX-820_SYXCN_En.book 21 ページ 2010年4月12日 月曜日 午後6時52分
Connecting your equipment03
22En
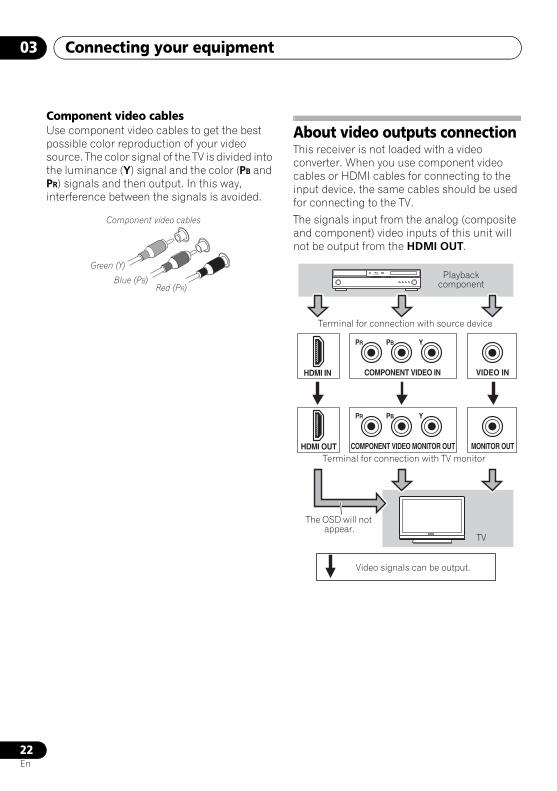
Component video cablesUse component video cables to get the best possible color reproduction of your video source. The color signal of the TV is divided into the luminance (Y) signal and the color (PB and PR) signals and then output. In this way, interference between the signals is avoided.
About video outputs connectionThis receiver is not loaded with a video converter. When you use component video cables or HDMI cables for connecting to the input device, the same cables should be used for connecting to the TV.
The signals input from the analog (composite and component) video inputs of this unit will not be output from the HDMI OUT.
Green (Y)
Blue (PB)Red (PR)
Component video cables
VIDEO IN
PR PB Y
COMPONENT VIDEO INHDMI IN
MONITOR OUT
PR PB Y
HDMI OUT COMPONENT VIDEO MONITOR OUT
Terminal for connection with source device
Terminal for connection with TV monitor
Playback component
TV
The OSD will not appear.
Video signals can be output.
VSX-820_SYXCN_En.book 22 ページ 2010年4月12日 月曜日 午後6時52分
Connecting your equipment 03
23En
EnglishFrançais
Deutsch
NederlandsItaliano
Español
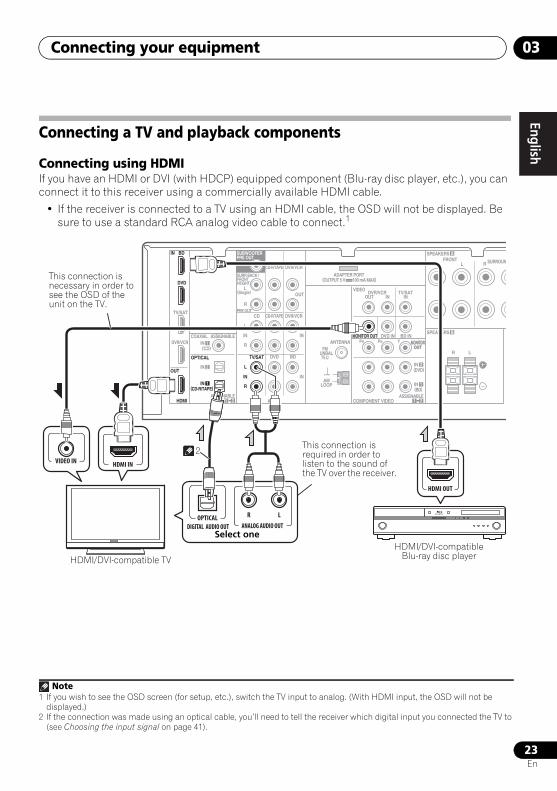
Connecting a TV and playback components
Connecting using HDMIIf you have an HDMI or DVI (with HDCP) equipped component (Blu-ray disc player, etc.), you can connect it to this receiver using a commercially available HDMI cable.
• If the receiver is connected to a TV using an HDMI cable, the OSD will not be displayed. Be sure to use a standard RCA analog video cable to connect.12
Note1 If you wish to see the OSD screen (for setup, etc.), switch the TV input to analog. (With HDMI input, the OSD will not be
displayed.)2 If the connection was made using an optical cable, you’ll need to tell the receiver which digital input you connected the TV to
(see Choosing the input signal on page 41).
IN BD
SURR BACK /FRONTHEIGHT
L(Single)
R
R
L
IN
R
L
IN
IN
OUT
IN
CD
TV/SAT DVD BD
DVR/VCR
MONITOR OUTPR PB Y
R L
DVD IN BD IN
OUTMONITOR
COMPONENT VIDEO
TV/SATIN
DVR/VCROUT IN
FRONTR L
CD-R/TAPE
DVR/VCR CD-R/TAPE
PRE OUT
DVD
TV/SAT
COAXIAL
OPTICAL
(CD)IN
ASSIGNABLE
ASSIGNABLE
OUT
HDMI
DVR/VCR 1
(CD-R/TAPE)IN
AUDIO
ADAPTER PORT
VIDEO
(OUTPUT 5 V 100 mA MAX)
1(BD)IN 1
(DVD)IN 2
1 2ASSIGNABLE
SPEAKERS
1
B
SPEAKERS A
2
IN 2
SUBWOOFERPRE OUT
ANTENNAFM
UNBAL75
AMLOOP
SURROUNR
VIDEO IN
HDMI OUT
HDMI IN
DIGITAL AUDIO OUTOPTICAL R L
ANALOG AUDIO OUT
MONITOROUT
Select one
HDMI/DVI-compatible TVHDMI/DVI-compatible
Blu-ray disc player
This connection is required in order to listen to the sound of the TV over the receiver.
This connection is necessary in order to see the OSD of the unit on the TV.
2
VSX-820_SYXCN_En.book 23 ページ 2010年4月12日 月曜日 午後6時52分
Connecting your equipment03
24En
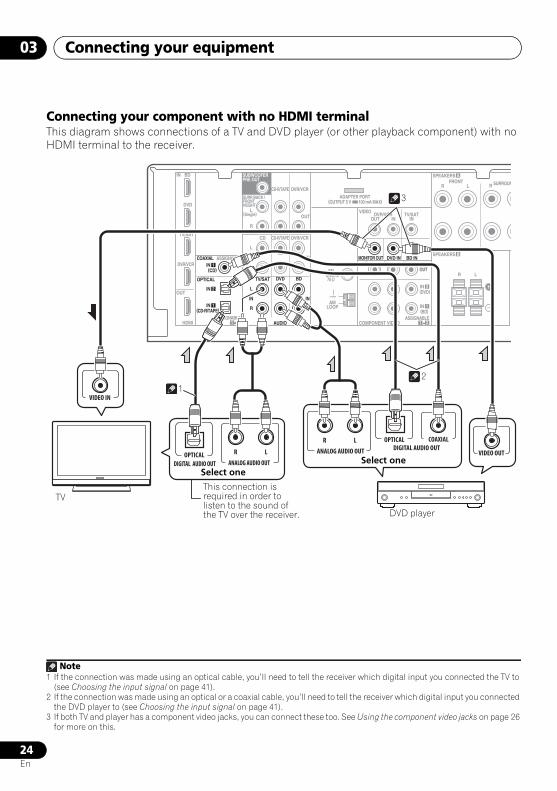
Connecting your component with no HDMI terminalThis diagram shows connections of a TV and DVD player (or other playback component) with no HDMI terminal to the receiver.123
Note1 If the connection was made using an optical cable, you’ll need to tell the receiver which digital input you connected the TV to
(see Choosing the input signal on page 41).2 If the connection was made using an optical or a coaxial cable, you’ll need to tell the receiver which digital input you connected
the DVD player to (see Choosing the input signal on page 41).3 If both TV and player has a component video jacks, you can connect these too. See Using the component video jacks on page 26
for more on this.
MONITOROUT
IN BD
SURR BACK /FRONTHEIGHT
L(Single)
R
R
L
IN
R
L
IN
IN
OUT
IN
CD
TV/SAT DVD BD
DVR/VCR
MONITOR OUTPR PB Y
R L
DVD IN BD IN
OUTMONITOR
COMPONENT VIDEO
TV/SATIN
DVR/VCROUT IN
FRONTR L
CD-R/TAPE
DVR/VCR CD-R/TAPE
PRE OUT
DVD
TV/SAT
COAXIAL
OPTICAL
(CD)IN
ASSIGNABLE
ASSIGNABLE
OUT
HDMI
DVR/VCR 1
(CD-R/TAPE)IN
AUDIO
ADAPTER PORT
VIDEO
(OUTPUT 5 V 100 mA MAX)
1(BD)IN 1
(DVD)IN 2
1 2ASSIGNABLE
SPEAKERS
1
B
SPEAKERS A
2
IN 2
SUBWOOFERPRE OUT
ANTENNAFM
UNBAL75
AMLOOP
SURROUNR
R LDIGITAL AUDIO OUTANALOG AUDIO OUT
COAXIAL
VIDEO OUT
OPTICAL
DIGITAL AUDIO OUTOPTICAL R L
ANALOG AUDIO OUT
VIDEO IN
Select one
TV
DVD player
This connection is required in order to listen to the sound of the TV over the receiver.
Select one
1 2
3
VSX-820_SYXCN_En.book 24 ページ 2010年4月12日 月曜日 午後6時52分

Connecting your equipment 03
25En
EnglishFrançais
Deutsch
NederlandsItaliano
Español
Connecting a satellite receiver or other digital set-top boxSatellite and cable receivers, and terrestrial digital TV tuners are all examples of so-called ‘set-top boxes’.12
Connecting an HDD/DVD recorder, VCR and other video sourcesThis receiver has audio/video inputs and outputs suitable for connecting analog or digital video recorders, including HDD/DVD recorders and VCRs.
• Only the signals that are input to the VIDEO IN terminal can be output from the VIDEO OUT terminal.
• Audio signals that are input through the digital terminal will not be output from the analog terminal.
Note1 If the connection was made using an optical cable, you’ll need to tell the receiver which digital input you connected the set-
top box or video component to (see Choosing the input signal on page 41).2 If the set-top box or video component also has an HDMI or a component video output, you can connect this too. See Connecting
using HDMI on page 23 or Using the component video jacks on page 26 for more on this.
SURR BACK /FRONTHEIGHT
L(Single)
R
R
L
IN
R
L
IN
IN
OUT
IN
CD
TV/SAT DVD BD
DVR/VCR
MONITOR OUTPR PB Y
DVD IN BD INM
COMPONENT VIDEO
TV/SATIN
DVR/VCROUT IN
CD-R/TAPE
DVR/VCR CD-R/TAPE
PRE OUT
COAXIAL
OPTICAL
(CD)IN
ASSIGNABLE
ASSIGNABLE
1
(CD-R/TAPE)IN
AUDIO
ADAPTER PORT
VIDEO
(OUTPUT 5 V 100 mA MAX)
1
1 2ASSIGNA
IN 2
SUBWOOFERPRE OUT
ANTENNAFM
UNBAL75
AMLOOP
DIGITAL AUDIO OUT
OPTICAL R LANALOG AUDIO OUT
VIDEO OUTSelect one
STB
2 1
MONITOROUT
SURR BACK /FRONTHEIGHT
L(Single)
R
R
L
IN
R
L
IN
IN
OUT
IN
CD
TV/SAT DVD BD
DVR/VCR
MONITOR OUTPR PB Y
DVD IN BD IN
OUTMONITOR
COMPONENT VIDEO
TV/SATIN
DVR/VCROUT IN
CD-R/TAPE
DVR/VCR CD-R/TAPE
PRE OUT
COAXIAL
OPTICAL
(CD)IN
ASSIGNABLE
ASSIGNABLE
1
(CD-R/TAPE)IN
AUDIO
ADAPTER PORT
VIDEO
(OUTPUT 5 V 100 mA MAX)
1(BD)IN 1
(DVD)IN 2
1 2ASSIGNABLE
1 2
IN 2
SUBWOOFERPRE OUT
ANTENNAFM
UNBAL75
AMLOOP
PLAYR LDIGITAL
AUDIO OUT ANALOG AUDIO OUTR L
ANALOG AUDIO IN
OPTICAL
VIDEO OUT
VIDEO IN
REC
Select one
DVR, VCR, LD player, etc.
1
2
VSX-820_SYXCN_En.book 25 ページ 2010年4月12日 月曜日 午後6時52分
Connecting your equipment03
26En
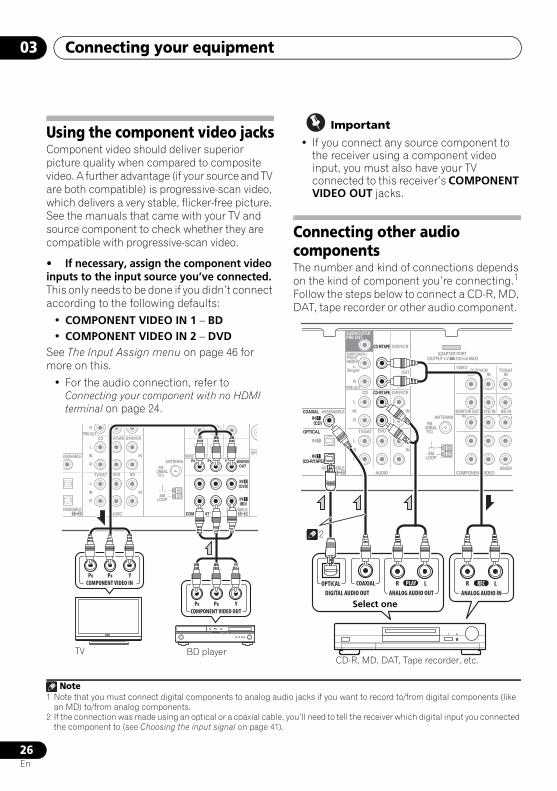
Using the component video jacksComponent video should deliver superior picture quality when compared to composite video. A further advantage (if your source and TV are both compatible) is progressive-scan video, which delivers a very stable, flicker-free picture. See the manuals that came with your TV and source component to check whether they are compatible with progressive-scan video.
• If necessary, assign the component video inputs to the input source you’ve connected. This only needs to be done if you didn’t connect according to the following defaults:
• COMPONENT VIDEO IN 1 – BD• COMPONENT VIDEO IN 2 – DVD
See The Input Assign menu on page 46 for more on this.
• For the audio connection, refer to Connecting your component with no HDMI terminal on page 24.
Important
• If you connect any source component to the receiver using a component video input, you must also have your TV connected to this receiver’s COMPONENT VIDEO OUT jacks.
Connecting other audio componentsThe number and kind of connections depends on the kind of component you’re connecting.1 Follow the steps below to connect a CD-R, MD, DAT, tape recorder or other audio component.2
R
R
L
IN
R
L
IN
IN
IN
CD
TV/SAT DVD BD
DVR/VCR
MONITOR OUTPR PB Y
DVD IN BD IN
OUTMONITOR
COMPONENT VIDEO
CD-R/TAPE PRE OUT
SSIGNABLE
SSIGNABLEAUDIO
(BD)IN 1
(DVD)IN 2
1 2ASSIGNABLE
SPE
1 2
ANTENNAFM
UNBAL75
AMLOOP
COMPONENT VIDEO INPR YPB
COMPONENT VIDEO OUTPR YPB
BD playerTV
Note1 Note that you must connect digital components to analog audio jacks if you want to record to/from digital components (like
an MD) to/from analog components.2 If the connection was made using an optical or a coaxial cable, you’ll need to tell the receiver which digital input you connected
the component to (see Choosing the input signal on page 41).
SURR BACK /FRONTHEIGHT
L(Single)
R
R
L
IN
R
L
IN
IN
OUT
IN
CD
TV/SAT DVD BD
DVR/VCR
MONITOR OUTPR PB Y
DVD IN BD INM
COMPONENT VIDEO
TV/SATIN
DVR/VCROUT IN
CD-R/TAPE
DVR/VCR CD-R/TAPE
PRE OUT
COAXIAL
OPTICAL
(CD)IN
ASSIGNABLE
ASSIGNABLE
1
(CD-R/TAPE)IN
AUDIO
ADAPTER PORT
VIDEO
(OUTPUT 5 V 100 mA MAX)
1
1 2ASSIGN
IN 2
SUBWOOFERPRE OUT
ANTENNAFM
UNBAL75
AMLOOP
PLAYR L
DIGITAL AUDIO OUT ANALOG AUDIO OUT
COAXIAL R L
ANALOG AUDIO IN
RECOPTICAL
Select one
CD-R, MD, DAT, Tape recorder, etc.
2
VSX-820_SYXCN_En.book 26 ページ 2010年4月12日 月曜日 午後6時52分 26
Connecting your equipment 03
27En
EnglishFrançais
Deutsch
NederlandsItaliano
Español
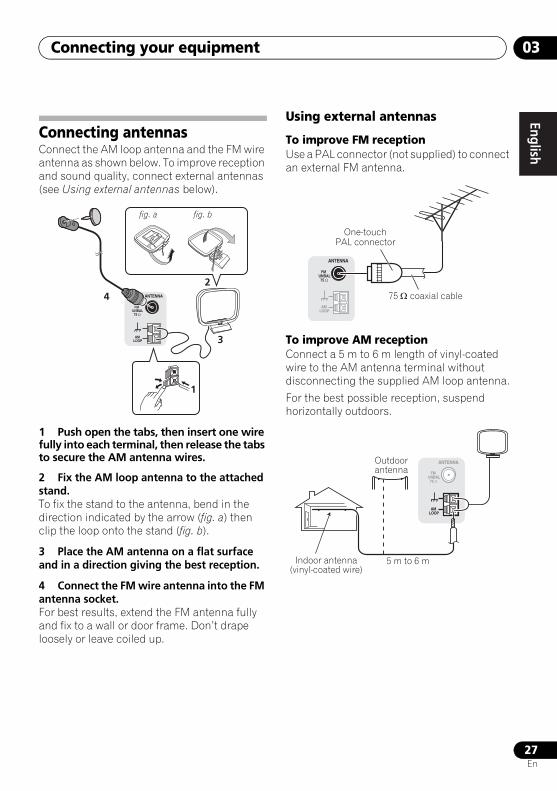
Connecting antennasConnect the AM loop antenna and the FM wire antenna as shown below. To improve reception and sound quality, connect external antennas (see Using external antennas below).
1 Push open the tabs, then insert one wire fully into each terminal, then release the tabs to secure the AM antenna wires.
2 Fix the AM loop antenna to the attached stand.To fix the stand to the antenna, bend in the direction indicated by the arrow (fig. a) then clip the loop onto the stand (fig. b).
3 Place the AM antenna on a flat surface and in a direction giving the best reception.
4 Connect the FM wire antenna into the FM antenna socket.For best results, extend the FM antenna fully and fix to a wall or door frame. Don’t drape loosely or leave coiled up.
Using external antennas
To improve FM receptionUse a PAL connector (not supplied) to connect an external FM antenna.
To improve AM receptionConnect a 5 m to 6 m length of vinyl-coated wire to the AM antenna terminal without disconnecting the supplied AM loop antenna.
For the best possible reception, suspend horizontally outdoors.
ANTENNA
AM LOOP
2
1
3
4
fig. a fig. b
ANTENNA
FM UNBAL
75 Ω
AM LOOP
One-touch PAL connector
75 Ω coaxial cable
ANTENNA
FM UNBAL
75 Ω
AM LOOP
Outdoor antenna
5 m to 6 mIndoor antenna (vinyl-coated wire)
VSX-820_SYXCN_En.book 27 ページ 2010年4月12日 月曜日 午後6時52分 27
Connecting your equipment03
28En
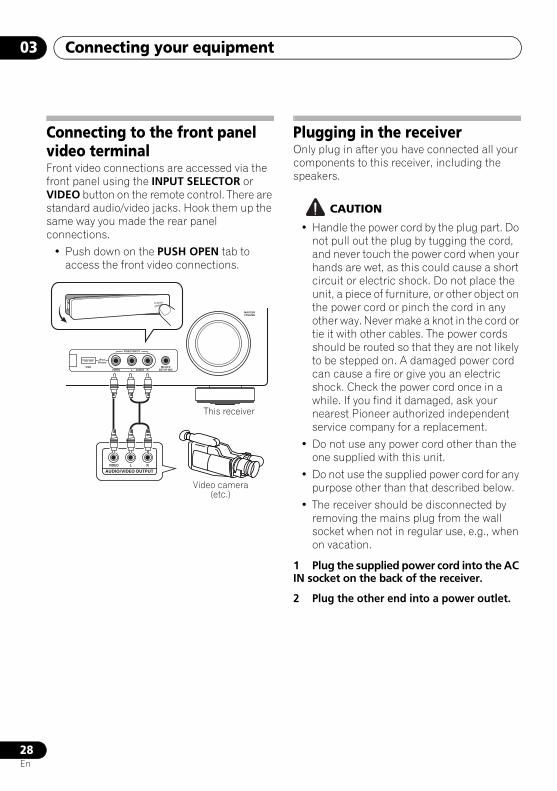
Connecting to the front panel video terminalFront video connections are accessed via the front panel using the INPUT SELECTOR or VIDEO button on the remote control. There are standard audio/video jacks. Hook them up the same way you made the rear panel connections.
• Push down on the PUSH OPEN tab to access the front video connections.
Plugging in the receiverOnly plug in after you have connected all your components to this receiver, including the speakers.
CAUTION
• Handle the power cord by the plug part. Do not pull out the plug by tugging the cord, and never touch the power cord when your hands are wet, as this could cause a short circuit or electric shock. Do not place the unit, a piece of furniture, or other object on the power cord or pinch the cord in any other way. Never make a knot in the cord or tie it with other cables. The power cords should be routed so that they are not likely to be stepped on. A damaged power cord can cause a fire or give you an electric shock. Check the power cord once in a while. If you find it damaged, ask your nearest Pioneer authorized independent service company for a replacement.
• Do not use any power cord other than the one supplied with this unit.
• Do not use the supplied power cord for any purpose other than that described below.
• The receiver should be disconnected by removing the mains plug from the wall socket when not in regular use, e.g., when on vacation.
1 Plug the supplied power cord into the AC IN socket on the back of the receiver.
2 Plug the other end into a power outlet.
MASTERVOLUME
MCACCSETUP MIC
VIDEO INPUT
AUDIOL RVIDEO
iPodiPhone
USB
CONTROL ON / OFF
LVIDEO R
AUDIO/VIDEO OUTPUT
This receiver
Video camera (etc.)
VSX-820_SYXCN_En.book 28 ページ 2010年4月12日 月曜日 午後6時52分
Basic Setup 04
29En
EnglishFrançais
Deutsch
NederlandsItaliano
Español
Chapter 4:
Basic Setup
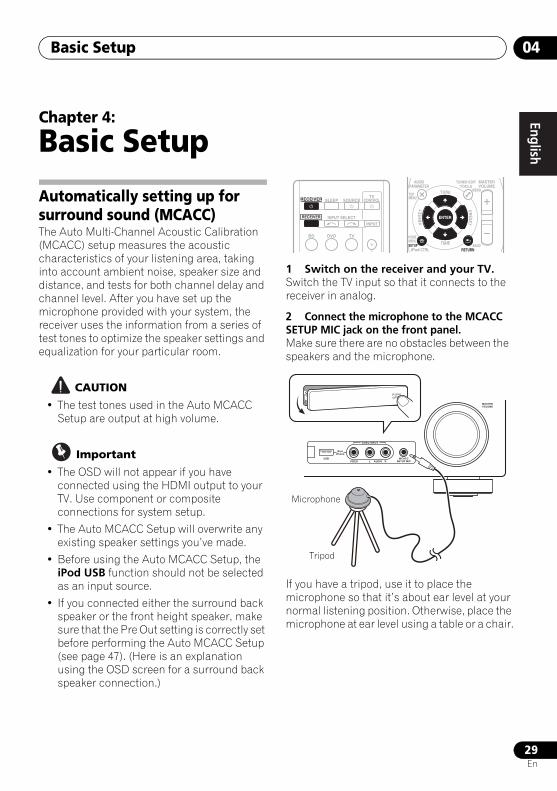
Automatically setting up for surround sound (MCACC)The Auto Multi-Channel Acoustic Calibration (MCACC) setup measures the acoustic characteristics of your listening area, taking into account ambient noise, speaker size and distance, and tests for both channel delay and channel level. After you have set up the microphone provided with your system, the receiver uses the information from a series of test tones to optimize the speaker settings and equalization for your particular room.
CAUTION
• The test tones used in the Auto MCACC Setup are output at high volume.
Important
• The OSD will not appear if you have connected using the HDMI output to your TV. Use component or composite connections for system setup.
• The Auto MCACC Setup will overwrite any existing speaker settings you’ve made.
• Before using the Auto MCACC Setup, the iPod USB function should not be selected as an input source.
• If you connected either the surround back speaker or the front height speaker, make sure that the Pre Out setting is correctly set before performing the Auto MCACC Setup (see page 47). (Here is an explanation using the OSD screen for a surround back speaker connection.)
1 Switch on the receiver and your TV.Switch the TV input so that it connects to the receiver in analog.
2 Connect the microphone to the MCACC SETUP MIC jack on the front panel. Make sure there are no obstacles between the speakers and the microphone.
If you have a tripod, use it to place the microphone so that it’s about ear level at your normal listening position. Otherwise, place the microphone at ear level using a table or a chair.
BD DVD
INPUT SELECT
SOURCESLEEPTV
CONTROL
TV
INPUT
RECEIVER
RECEIVER ENTER
RETURN
AUDIOPARAMETER
TUNER EDITTOOLS
MASTERVOLUME
iPod CTRLBAND
MENU
HOMEMENUSETUP
TOPMENU
TUNE
TUNE
PRESETPRES
ET
MASTERVOLUME
MCACCSETUP MIC
VIDEO INPUT
AUDIOL RVIDEO
iPodiPhone
USB
CONTROL ON / OFF
Tripod
Microphone
VSX-820_SYXCN_En.book 29 ページ 2010年4月12日 月曜日 午後6時52分
Basic Setup04
30En
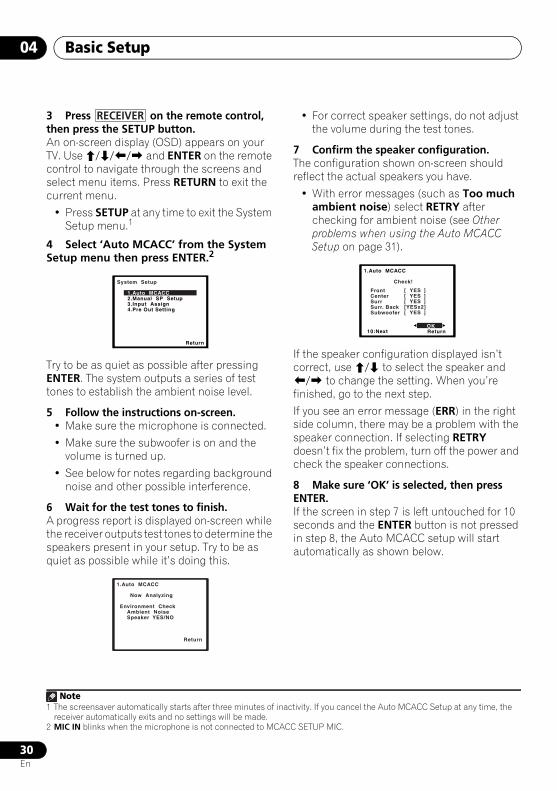
3 Press on the remote control, then press the SETUP button.An on-screen display (OSD) appears on your TV. Use /// and ENTER on the remote control to navigate through the screens and select menu items. Press RETURN to exit the current menu.
• Press SETUP at any time to exit the System Setup menu.1
4 Select ‘Auto MCACC’ from the System Setup menu then press ENTER.2
Try to be as quiet as possible after pressing ENTER. The system outputs a series of test tones to establish the ambient noise level.
5 Follow the instructions on-screen.• Make sure the microphone is connected.
• Make sure the subwoofer is on and the volume is turned up.
• See below for notes regarding background noise and other possible interference.
6 Wait for the test tones to finish.A progress report is displayed on-screen while the receiver outputs test tones to determine the speakers present in your setup. Try to be as quiet as possible while it’s doing this.
• For correct speaker settings, do not adjust the volume during the test tones.
7 Confirm the speaker configuration.The configuration shown on-screen should reflect the actual speakers you have.
• With error messages (such as Too much ambient noise) select RETRY after checking for ambient noise (see Other problems when using the Auto MCACC Setup on page 31).
If the speaker configuration displayed isn’t correct, use / to select the speaker and / to change the setting. When you’re finished, go to the next step.
If you see an error message (ERR) in the right side column, there may be a problem with the speaker connection. If selecting RETRY doesn’t fix the problem, turn off the power and check the speaker connections.
8 Make sure ‘OK’ is selected, then press ENTER.If the screen in step 7 is left untouched for 10 seconds and the ENTER button is not pressed in step 8, the Auto MCACC setup will start automatically as shown below.
Note1 The screensaver automatically starts after three minutes of inactivity. If you cancel the Auto MCACC Setup at any time, the
receiver automatically exits and no settings will be made.2 MIC IN blinks when the microphone is not connected to MCACC SETUP MIC.
RECEIVER
System Setup
1.Auto MCACC2.Manual SP Setup3.Input Assign4.Pre Out Setting
Return
1.Auto MCACC
Now Analyzing
Environment Check Ambient Noise Speaker YES/NO
Return
1.Auto MCACC
Check!
OK Return 10:Next
Front CenterSurrSurr. BackSubwoofer
[ YES ][ YES ][ YES ][YESx2][ YES ]
VSX-820_SYXCN_En.book 30 ページ 2010年4月12日 月曜日 午後6時52分
Basic Setup 04
31En
EnglishFrançais
Deutsch
NederlandsItaliano
Español
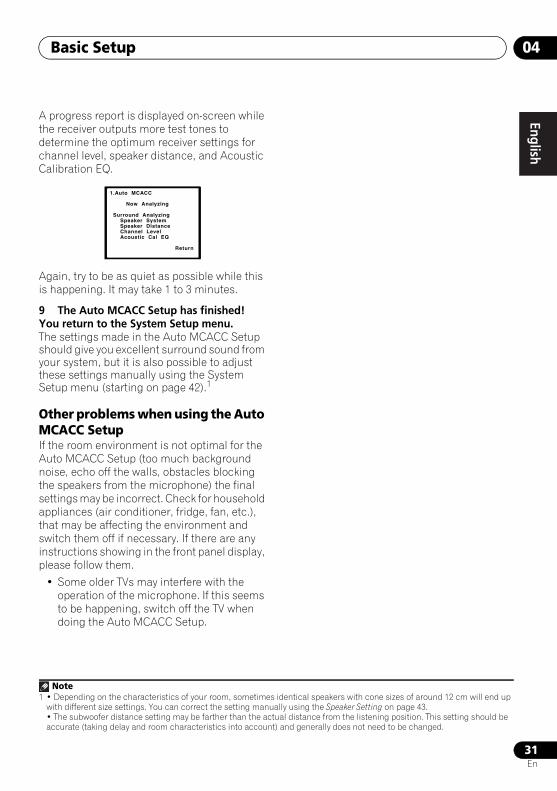
A progress report is displayed on-screen while the receiver outputs more test tones to determine the optimum receiver settings for channel level, speaker distance, and Acoustic Calibration EQ.
Again, try to be as quiet as possible while this is happening. It may take 1 to 3 minutes.
9 The Auto MCACC Setup has finished! You return to the System Setup menu.The settings made in the Auto MCACC Setup should give you excellent surround sound from your system, but it is also possible to adjust these settings manually using the System Setup menu (starting on page 42).1
Other problems when using the Auto MCACC Setup If the room environment is not optimal for the Auto MCACC Setup (too much background noise, echo off the walls, obstacles blocking the speakers from the microphone) the final settings may be incorrect. Check for household appliances (air conditioner, fridge, fan, etc.), that may be affecting the environment and switch them off if necessary. If there are any instructions showing in the front panel display, please follow them.
• Some older TVs may interfere with the operation of the microphone. If this seems to be happening, switch off the TV when doing the Auto MCACC Setup.
Note1 • Depending on the characteristics of your room, sometimes identical speakers with cone sizes of around 12 cm will end up
with different size settings. You can correct the setting manually using the Speaker Setting on page 43.• The subwoofer distance setting may be farther than the actual distance from the listening position. This setting should be accurate (taking delay and room characteristics into account) and generally does not need to be changed.
1.Auto MCACC
Now Analyzing
Surround Analyzing Speaker System Speaker Distance Channel Level Acoustic Cal EQ
Return
VSX-820_SYXCN_En.book 31 ページ 2010年4月12日 月曜日 午後6時52分
Listening to your system05
32En
Chapter 5:
Listening to your system Important
• The listening modes and many features described in this section may not be available depending on the current source, settings and status of the receiver.
Basic playbackHere are the basic instructions for playing a source (such as a DVD disc) with your home theater system.
1 Switch on your system components and receiver.Start by switching on the playback component (for example a DVD player), your TV1 and subwoofer (if you have one), then the receiver (press RECEIVER).
• Make sure the setup microphone is disconnected.
2 Select the input function you want to play.You can use the input function buttons on the remote control, INPUT SELECT, or the front panel INPUT SELECTOR dial.2
3 Press AUTO/DIRECT to select ‘AUTO SURROUND’ and start playback of the source.3
If you’re playing a Dolby Digital or DTS surround sound DVD disc, you should hear surround sound. If you are playing a stereo source, you will only hear sound from the front left/right speakers in the default listening mode.
It is possible to check on the front panel display whether or not surround sound playback is being performed properly.
When using a surround back speaker, 2D+PLIIx is displayed when playing Dolby Digital 5.1-channel signals, and DTS+NEO:6 is displayed when playing DTS 5.1-channel signals.
When not using a surround back speaker, 2D is displayed when playing Dolby Digital signals.
If the display does not correspond to the input signal and listening mode, check the connections and settings.
4 Use the volume control to adjust the volume level.Turn down the volume of your TV so that all sound is coming from the speakers connected to this receiver.
Note1 Make sure that the TV’s video input is set to this receiver (for example, if you connected this receiver to the VIDEO jacks on
your TV, make sure that the VIDEO input is now selected).2 If you need to manually switch the input signal type press SIGNAL SEL (page 41).3 • You may need to check the digital audio output settings on your DVD player or digital satellite receiver. It should be set to
output Dolby Digital, DTS and 88.2 kHz / 96 kHz PCM (2 channel) audio, and if there is an MPEG audio option, set this to convert the MPEG audio to PCM.• Depending on your DVD player or source discs, you may only get digital 2 channel stereo and analog sound. In this case, the receiver must be set to a multichannel listening mode if you want multichannel surround sound.
VSX-820_SYXCN_En.book 32 ページ 2010年4月12日 月曜日 午後6時52分
Listening to your system 05
33En
EnglishFrançais
Deutsch
NederlandsItaliano
Español
Auto playbackThe simplest, most direct listening option is the Auto Surround feature. With this, the receiver automatically detects what kind of source you’re playing and selects multichannel or stereo playback as necessary.1
• While listening to a source, press AUTO/DIRECT2 for auto playback of a source.Press repeatedly until AUTO SURROUND shows briefly in the display (it will then show the decoding or playback format). Check the digital format indicators in the display to see how the source is being processed.
Listening in surround soundUsing this receiver, you can listen to any source in surround sound. However, the options available will depend on your speaker setup and the type of source you’re listening to.
The following modes provide basic surround sound for stereo and multichannel sources.
• While listening to a source, press STANDARD.If the source is Dolby Digital, DTS, or Dolby Surround encoded, the proper decoding format will automatically be selected and shows in the display.
When the surround back and front height speaker are not connected.
With two channel sources, you can select from:
• DOLBY PLII MOVIE – Up to 5.1 channel sound, especially suited to movie sources
• DOLBY PLII MUSIC3 – Up to 5.1 channel sound, especially suited to music sources
• DOLBY PLII GAME – Up to 5.1 channel sound, especially suited for video games
• NEO:6 CINEMA – Up to 5.1 channel sound, especially suited to movie sources
• NEO:6 MUSIC – Up to 5.1 channel sound, especially suited to music sources4
• DOLBY PRO LOGIC – 4.1 channel surround sound
When the front height speaker is connected.With two channel sources, you can select from:
• DOLBY PLII MOVIE – See above• DOLBY PLII MUSIC – See above• DOLBY PLII GAME – See above• DOLBY PLIIz HEIGHT – Up to 7.1 channel
sound5
• NEO:6 CINEMA – See above
• NEO:6 MUSIC – See above
• DOLBY PRO LOGIC – See above
• Straight Decode – Plays back without the DOLBY PLII, DOLBY PLIIz HEIGHT and NEO:6 effects.
Note1 Stereo surround (matrix) formats are decoded accordingly using NEO:6 CINEMA or DOLBY PLIIx MOVIE (see Listening in
surround sound above for more on these decoding formats).2 For more options using this button, see Using Stream Direct on page 36.
BD MENUSTANDARD ADV SURR
STEREO/A.L.C.
AUTO/DIRECT
BD MENUSTANDARD ADV SURR
STEREO/A.L.C.
AUTO/DIRECT
3 When listening to 2-channel sources in DOLBY PLII MUSIC mode, there are three further parameters you can adjust: C.WIDTH, DIMEN., and PNRM.. See Setting the Audio options on page 38 to adjust them.
4 When listening to 2-channel sources in NEO:6 CINEMA or NEO:6 MUSIC mode, you can also adjust the C.IMG effect (see Setting the Audio options on page 38).
5 When listening to 2-channel sources in DOLBY PLIIz HEIGHT mode, you can also adjust the H.GAIN effect (see Setting the Audio options on page 38).
VSX-820_SYXCN_En.book 33 ページ 2010年4月12日 月曜日 午後6時52分
Listening to your system05
34En
With multichannel sources, you can select from:
• DOLBY PLIIz HEIGHT – Up to 7.1 channel sound1
• Straight Decode – Plays back without the DOLBY PLIIz HEIGHT effects.
When the surround back speaker is connected.2
If you connected surround back speakers, see also Using surround back channel processing on page 37.
With two channel sources, you can select from:
• DOLBY PLIIx MOVIE – Up to 7.1 channel sound, especially suited to movie sources
• DOLBY PLIIx MUSIC – Up to 7.1 channel sound, especially suited to music sources3
• DOLBY PLIIx GAME – Up to 7.1 channel sound, especially suited to video games
• NEO:6 CINEMA – Up to 6.1 channel sound, especially suited to movie sources
• NEO:6 MUSIC – Up to 6.1 channel sound, especially suited to music sources4
• DOLBY PRO LOGIC – 4.1 channel surround sound (sound from the surround speakers is mono)
With multichannel sources, if you have connected surround back speaker(s) and have selected SB ON, you can select (according to format):
• DOLBY PLIIx MOVIE – See above (only available when you’re using two surround back speakers)
• DOLBY PLIIx MUSIC – See above
• DOLBY DIGITAL EX – Creates surround back channel sound for 5.1 channel sources and provides pure decoding for 6.1 channel sources (like Dolby Digital Surround EX)
• DTS-ES – Allows you to hear 6.1 channel playback with DTS-ES encoded sources
• DTS NEO:6 – Allows you to hear 6.1 channel playback with DTS encoded sources
Using the Advanced surround effectsThe Advanced surround feature creates a variety of surround effects. Try different modes with various soundtracks to see which you like.
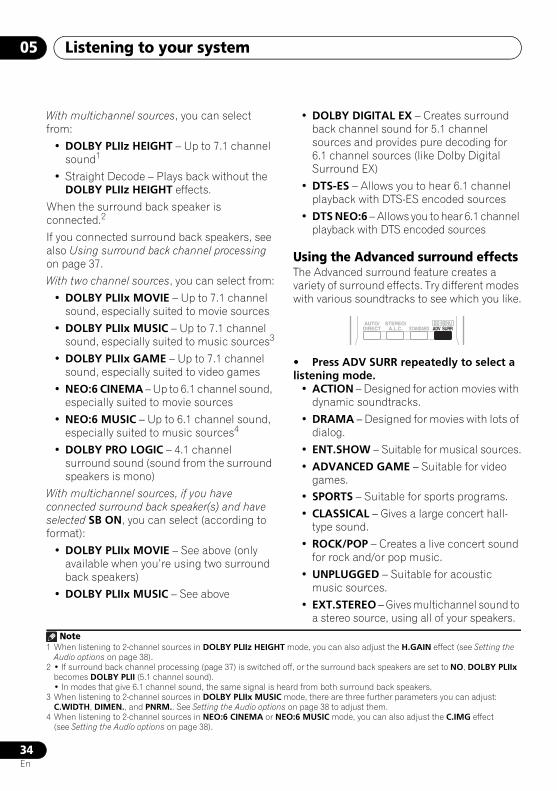
• Press ADV SURR repeatedly to select a listening mode.
• ACTION – Designed for action movies with dynamic soundtracks.
• DRAMA – Designed for movies with lots of dialog.
• ENT.SHOW – Suitable for musical sources.
• ADVANCED GAME – Suitable for video games.
• SPORTS – Suitable for sports programs.
• CLASSICAL – Gives a large concert hall-type sound.
• ROCK/POP – Creates a live concert sound for rock and/or pop music.
• UNPLUGGED – Suitable for acoustic music sources.
• EXT.STEREO – Gives multichannel sound to a stereo source, using all of your speakers.
Note1 When listening to 2-channel sources in DOLBY PLIIz HEIGHT mode, you can also adjust the H.GAIN effect (see Setting the
Audio options on page 38).2 • If surround back channel processing (page 37) is switched off, or the surround back speakers are set to NO, DOLBY PLIIx
becomes DOLBY PLII (5.1 channel sound).• In modes that give 6.1 channel sound, the same signal is heard from both surround back speakers.
3 When listening to 2-channel sources in DOLBY PLIIx MUSIC mode, there are three further parameters you can adjust: C.WIDTH, DIMEN., and PNRM.. See Setting the Audio options on page 38 to adjust them.
4 When listening to 2-channel sources in NEO:6 CINEMA or NEO:6 MUSIC mode, you can also adjust the C.IMG effect (see Setting the Audio options on page 38).
BD MENUSTANDARD ADV SURR
STEREO/A.L.C.
AUTO/DIRECT
VSX-820_SYXCN_En.book 34 ページ 2010年4月12日 月曜日 午後6時52分
Listening to your system 05
35En
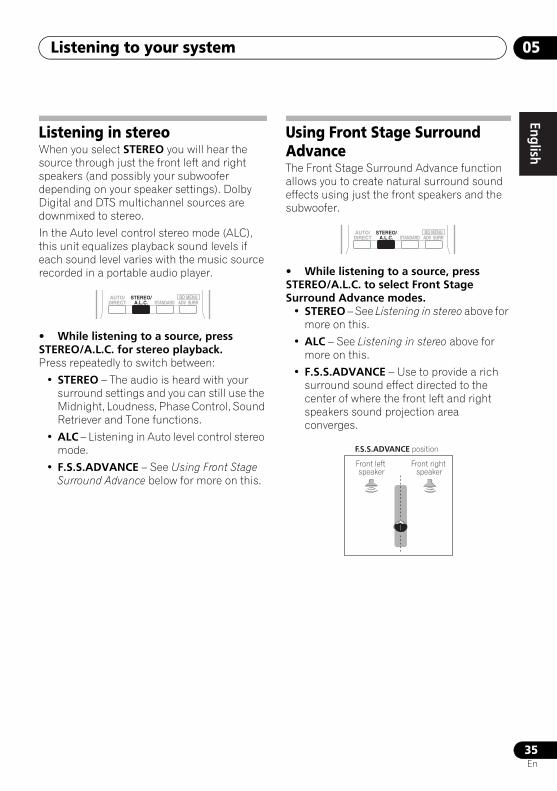
EnglishFrançais
Deutsch
NederlandsItaliano
Español
Listening in stereoWhen you select STEREO you will hear the source through just the front left and right speakers (and possibly your subwoofer depending on your speaker settings). Dolby Digital and DTS multichannel sources are downmixed to stereo.
In the Auto level control stereo mode (ALC), this unit equalizes playback sound levels if each sound level varies with the music source recorded in a portable audio player.
• While listening to a source, press STEREO/A.L.C. for stereo playback.Press repeatedly to switch between:
• STEREO – The audio is heard with your surround settings and you can still use the Midnight, Loudness, Phase Control, Sound Retriever and Tone functions.
• ALC – Listening in Auto level control stereo mode.
• F.S.S.ADVANCE – See Using Front Stage Surround Advance below for more on this.
Using Front Stage Surround AdvanceThe Front Stage Surround Advance function allows you to create natural surround sound effects using just the front speakers and the subwoofer.
• While listening to a source, press STEREO/A.L.C. to select Front Stage Surround Advance modes.
• STEREO – See Listening in stereo above for more on this.
• ALC – See Listening in stereo above for more on this.
• F.S.S.ADVANCE – Use to provide a rich surround sound effect directed to the center of where the front left and right speakers sound projection area converges.
BD MENUSTANDARD ADV SURR
AUTO/DIRECT
STEREO/A.L.C.
BD MENUSTANDARD ADV SURR
AUTO/DIRECT
STEREO/A.L.C.
F.S.S.ADVANCE position
Front left speaker
Front right speaker
VSX-820_SYXCN_En.book 35 ページ 2010年4月12日 月曜日 午後6時52分
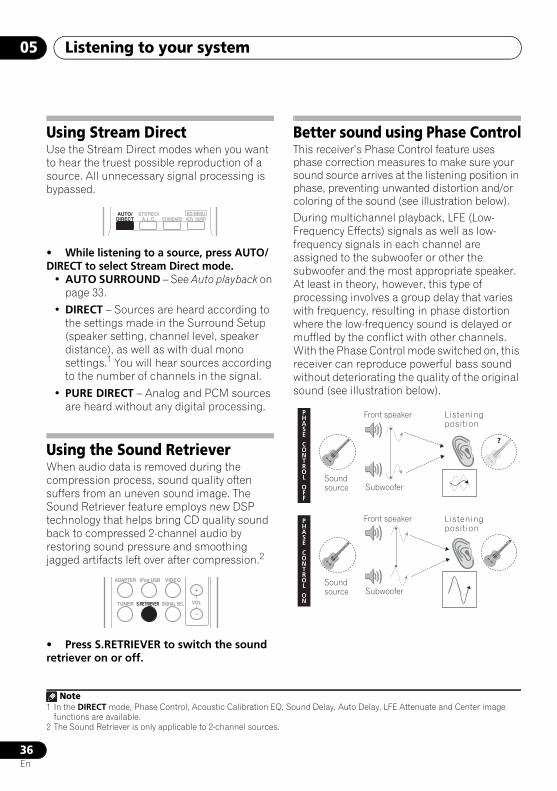
Listening to your system05
36En
Using Stream DirectUse the Stream Direct modes when you want to hear the truest possible reproduction of a source. All unnecessary signal processing is bypassed.
• While listening to a source, press AUTO/DIRECT to select Stream Direct mode.
• AUTO SURROUND – See Auto playback on page 33.
• DIRECT – Sources are heard according to the settings made in the Surround Setup (speaker setting, channel level, speaker distance), as well as with dual mono settings.1 You will hear sources according to the number of channels in the signal.
• PURE DIRECT – Analog and PCM sources are heard without any digital processing.
Using the Sound RetrieverWhen audio data is removed during the compression process, sound quality often suffers from an uneven sound image. The Sound Retriever feature employs new DSP technology that helps bring CD quality sound back to compressed 2-channel audio by restoring sound pressure and smoothing jagged artifacts left over after compression.2
• Press S.RETRIEVER to switch the sound retriever on or off.
Better sound using Phase ControlThis receiver’s Phase Control feature uses phase correction measures to make sure your sound source arrives at the listening position in phase, preventing unwanted distortion and/or coloring of the sound (see illustration below).During multichannel playback, LFE (Low-Frequency Effects) signals as well as low-frequency signals in each channel are assigned to the subwoofer or other the subwoofer and the most appropriate speaker. At least in theory, however, this type of processing involves a group delay that varies with frequency, resulting in phase distortion where the low-frequency sound is delayed or muffled by the conflict with other channels. With the Phase Control mode switched on, this receiver can reproduce powerful bass sound without deteriorating the quality of the original sound (see illustration below).
Note1 In the DIRECT mode, Phase Control, Acoustic Calibration EQ, Sound Delay, Auto Delay, LFE Attenuate and Center image
functions are available.2 The Sound Retriever is only applicable to 2-channel sources.
BD MENUSTANDARD ADV SURR
STEREO/A.L.C.
AUTO/DIRECT
ADAPTER iPod USB VIDEO
TUNER S.RETRIEVER SIGNAL SEL VOL
?
Sound source
Sound source
Listening position
Listening position
Front speaker
Subwoofer
Front speaker
Subwoofer
P H A S E
CONT R OL
O FF
P H A S E
CONT R OL
ON
VSX-820_SYXCN_En.book 36 ページ 2010年4月12日 月曜日 午後6時52分
Listening to your system 05
37En
EnglishFrançais
Deutsch
NederlandsItaliano
Español
Phase Control technology provides coherent sound reproduction through the use of phase matching1 for an optimal sound image at your listening position. The default setting is on and we recommend leaving Phase Control switched on for all sound sources.
• Press , then press PHASE to switch the Phase Control on or off.
Listening with Acoustic Calibration EQYou can listen to sources using the Acoustic Calibration Equalization set in Automatically setting up for surround sound (MCACC) on page 29. Refer to these pages for more on Acoustic Calibration Equalization.
• While listening to a source, press , then press EQ to switch the
Acoustic Calibration EQ on or off.The MCACC indicator on the front panel lights when Acoustic Calibration EQ is active.2
Using surround back channel processingYou can have the receiver automatically use 6.1 or 7.1 decoding for 6.1 encoded sources (for example, Dolby Digital EX or DTS-ES), or you can choose to always use 6.1 or 7.1 decoding (for example, with 5.1 encoded material). With 5.1 encoded sources, a surround back channel will be generated, but the material may sound better in the 5.1 format for which it was originally encoded (in which case, you can simply switch surround back channel processing off).
• With a 7.1-channel surround system, audio signals that have undergone matrix decoding processing through surround back channel processing to which the Up Mix function is added are output from the surround back speakers.
• Press , then press SB CH repeatedly to cycle the surround back channel options.Each press cycles through the options as follows:
• SB ON – Matrix decoding processing for generating the surround back component from the surround component is turned on.
Note1 Phase matching is a very important factor in achieving proper sound reproduction. If two waveforms are ‘in phase’, they crest
and trough together, resulting in increased amplitude, clarity and presence of the sound signal. If a crest of a wave meets a trough (as shown in the upper section of the diagram above) then the sound will be ‘out of phase’ and an unreliable sound image will be produced.• If your subwoofer has a phase control switch, set it to the plus (+) sign (or 0°). However, the effect you can actually feel when PHASE CONTROL is set to ON on this receiver depends on the type of your subwoofer. Set your subwoofer to maximize the effect. It is also recommended you try changing the orientation or the place of your subwoofer.• Set the built-in lowpass filter switch of your subwoofer to OFF. If this cannot be done on your subwoofer, set the cutoff frequency to a higher value.• If the speaker distance is not properly set, you may not have a maximized PHASE CONTROL effect.• The PHASE CONTROL mode cannot be set to ON in the following cases:– When the PURE DIRECT mode is switched on.– When the headphones are connected.
2 You can’t use Acoustic Calibration EQ with Stream Direct mode and it has no effect with headphones.
INPUT SELECT
SOURCESLEEPTV
CONTROL
INPUT
RECEIVER
RECEIVER
DIMMER
1
4
7MIDNIGHT
HDD
2
5
8SPEAKERS LEV
LEV
SB CH
DISP
EQ
PHASE
DVD
3
6
9
CH
CH
CH SELECT
VCR
SHIFT
RECEIVER
INPUT SELECT
SOURCESLEEPTV
CONTROL
INPUT
RECEIVER
RECEIVER
DIMMER
1
4
7MIDNIGHT
HDD
2
5
8SPEAKERS LEV
LEV
SB CH
DISP
EQ
PHASE
DVD
3
6
9
CH
CH
CH SELECT
VCR
SHIFT
RECEIVER
INPUT SELECT
SOURCESLEEPTV
CONTROL
INPUT
RECEIVER
RECEIVER
DIMMER
1
4
7MIDNIGHT
HDD
2
5
8SPEAKERS LEV
LEV
SB CH
DISP
EQ
PHASE
DVD
3
6
9
CH
CH
CH SELECT
VCR
SHIFT
RECEIVER
VSX-820_SYXCN_En.book 37 ページ 2010年4月12日 月曜日 午後6時52分
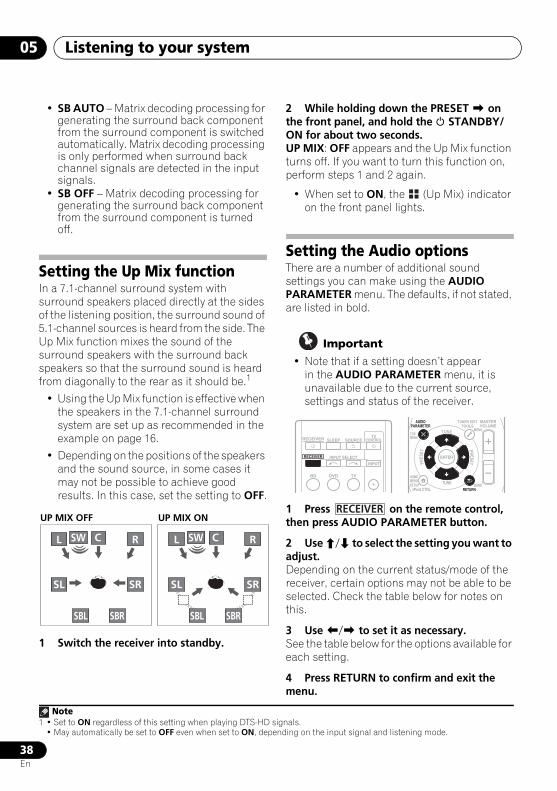
Listening to your system05
38En
• SB AUTO – Matrix decoding processing for generating the surround back component from the surround component is switched automatically. Matrix decoding processing is only performed when surround back channel signals are detected in the input signals.
• SB OFF – Matrix decoding processing for generating the surround back component from the surround component is turned off.
Setting the Up Mix functionIn a 7.1-channel surround system with surround speakers placed directly at the sides of the listening position, the surround sound of 5.1-channel sources is heard from the side. The Up Mix function mixes the sound of the surround speakers with the surround back speakers so that the surround sound is heard from diagonally to the rear as it should be.1
• Using the Up Mix function is effective when the speakers in the 7.1-channel surround system are set up as recommended in the example on page 16.
• Depending on the positions of the speakers and the sound source, in some cases it may not be possible to achieve good results. In this case, set the setting to OFF.
1 Switch the receiver into standby.
2 While holding down the PRESET on the front panel, and hold the STANDBY/ON for about two seconds.UP MIX: OFF appears and the Up Mix function turns off. If you want to turn this function on, perform steps 1 and 2 again.
• When set to ON, the (Up Mix) indicator on the front panel lights.
Setting the Audio optionsThere are a number of additional sound settings you can make using the AUDIO PARAMETER menu. The defaults, if not stated, are listed in bold.
Important
• Note that if a setting doesn’t appear in the AUDIO PARAMETER menu, it is unavailable due to the current source, settings and status of the receiver.
1 Press on the remote control, then press AUDIO PARAMETER button.
2 Use / to select the setting you want to adjust.Depending on the current status/mode of the receiver, certain options may not be able to be selected. Check the table below for notes on this.
3 Use / to set it as necessary.See the table below for the options available for each setting.
4 Press RETURN to confirm and exit the menu.
Note1 • Set to ON regardless of this setting when playing DTS-HD signals.
• May automatically be set to OFF even when set to ON, depending on the input signal and listening mode.
CSWL R
SL SR
SBL SBR SBL SBR
CSWL R
SL SR
UP MIX OFF UP MIX ON
BD DVD
INPUT SELECT
SOURCESLEEPTV
CONTROL
TV
INPUT
RECEIVER
RECEIVER ENTER
RETURN
AUDIOPARAMETER
TUNER EDITTOOLS
MASTERVOLUME
iPod CTRLC GO
BAND
MENU
HOMEMENUSETUP
TOPMENU
TUNE
TUNE
PRESETPRES
ET
RECEIVER
VSX-820_SYXCN_En.book 38 ページ 2010年4月12日 月曜日 午後6時52分
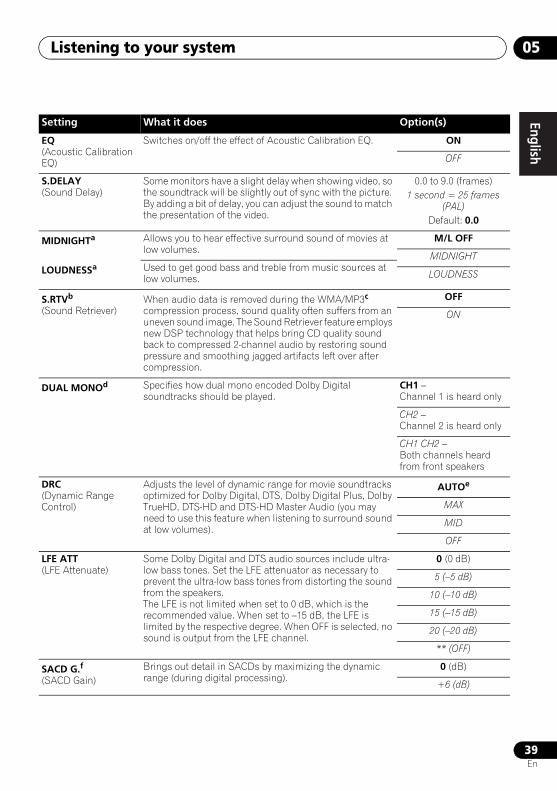
Listening to your system 05
39En
EnglishFrançais
Deutsch
NederlandsItaliano
Español
Setting What it does Option(s)
EQ(Acoustic Calibration EQ)
Switches on/off the effect of Acoustic Calibration EQ. ON
OFF
S.DELAY(Sound Delay)
Some monitors have a slight delay when showing video, so the soundtrack will be slightly out of sync with the picture. By adding a bit of delay, you can adjust the sound to match the presentation of the video.
0.0 to 9.0 (frames)1 second = 25 frames
(PAL)Default: 0.0
MIDNIGHTa Allows you to hear effective surround sound of movies at low volumes.
M/L OFF
MIDNIGHTLOUDNESSa Used to get good bass and treble from music sources at
low volumes. LOUDNESS
S.RTVb
(Sound Retriever)When audio data is removed during the WMA/MP3c
compression process, sound quality often suffers from an uneven sound image. The Sound Retriever feature employs new DSP technology that helps bring CD quality sound back to compressed 2-channel audio by restoring sound pressure and smoothing jagged artifacts left over after compression.
OFF
ON
DUAL MONOd Specifies how dual mono encoded Dolby Digital soundtracks should be played.
CH1 – Channel 1 is heard only
CH2 – Channel 2 is heard only
CH1 CH2 – Both channels heard from front speakers
DRC (Dynamic Range Control)
Adjusts the level of dynamic range for movie soundtracks optimized for Dolby Digital, DTS, Dolby Digital Plus, Dolby TrueHD, DTS-HD and DTS-HD Master Audio (you may need to use this feature when listening to surround sound at low volumes).
AUTOe
MAX
MID
OFF
LFE ATT(LFE Attenuate)
Some Dolby Digital and DTS audio sources include ultra-low bass tones. Set the LFE attenuator as necessary to prevent the ultra-low bass tones from distorting the sound from the speakers.The LFE is not limited when set to 0 dB, which is the recommended value. When set to –15 dB, the LFE is limited by the respective degree. When OFF is selected, no sound is output from the LFE channel.
0 (0 dB)
5 (–5 dB)
10 (–10 dB)
15 (–15 dB)
20 (–20 dB)
** (OFF)
SACD G.f
(SACD Gain)Brings out detail in SACDs by maximizing the dynamic range (during digital processing).
0 (dB)
+6 (dB)
VSX-820_SYXCN_En.book 39 ページ 2010年4月12日 月曜日 午後6時52分
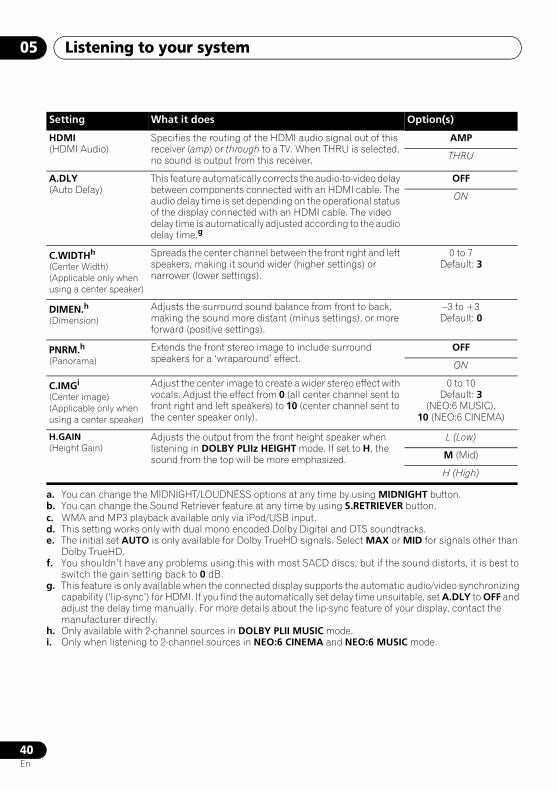
Listening to your system05
40En
a. You can change the MIDNIGHT/LOUDNESS options at any time by using MIDNIGHT button.b. You can change the Sound Retriever feature at any time by using S.RETRIEVER button.c. WMA and MP3 playback available only via iPod/USB input.d. This setting works only with dual mono encoded Dolby Digital and DTS soundtracks.e. The initial set AUTO is only available for Dolby TrueHD signals. Select MAX or MID for signals other than
Dolby TrueHD.f. You shouldn’t have any problems using this with most SACD discs, but if the sound distorts, it is best to
switch the gain setting back to 0 dB.g. This feature is only available when the connected display supports the automatic audio/video synchronizing
capability (‘lip-sync’) for HDMI. If you find the automatically set delay time unsuitable, set A.DLY to OFF and adjust the delay time manually. For more details about the lip-sync feature of your display, contact the manufacturer directly.
h. Only available with 2-channel sources in DOLBY PLII MUSIC mode.i. Only when listening to 2-channel sources in NEO:6 CINEMA and NEO:6 MUSIC mode.
HDMI(HDMI Audio)
Specifies the routing of the HDMI audio signal out of this receiver (amp) or through to a TV. When THRU is selected, no sound is output from this receiver.
AMP
THRU
A.DLY(Auto Delay)
This feature automatically corrects the audio-to-video delay between components connected with an HDMI cable. The audio delay time is set depending on the operational status of the display connected with an HDMI cable. The video delay time is automatically adjusted according to the audio delay time.g
OFF
ON
C.WIDTHh
(Center Width)(Applicable only when using a center speaker)
Spreads the center channel between the front right and left speakers, making it sound wider (higher settings) or narrower (lower settings).
0 to 7Default: 3
DIMEN.h
(Dimension)Adjusts the surround sound balance from front to back, making the sound more distant (minus settings), or more forward (positive settings).
–3 to +3Default: 0
PNRM.h
(Panorama)Extends the front stereo image to include surround speakers for a ‘wraparound’ effect.
OFF
ON
C.IMGi
(Center image) (Applicable only when using a center speaker)
Adjust the center image to create a wider stereo effect with vocals. Adjust the effect from 0 (all center channel sent to front right and left speakers) to 10 (center channel sent to the center speaker only).
0 to 10 Default: 3
(NEO:6 MUSIC),10 (NEO:6 CINEMA)
H.GAIN(Height Gain)
Adjusts the output from the front height speaker when listening in DOLBY PLIIz HEIGHT mode. If set to H, the sound from the top will be more emphasized.
L (Low)
M (Mid)
H (High)
Setting What it does Option(s)
VSX-820_SYXCN_En.book 40 ページ 2010年4月12日 月曜日 午後6時52分
Listening to your system 05
41En
EnglishFrançais
Deutsch
NederlandsItaliano
Español
Choosing the input signalOn this receiver, it is possible to switch the input signals for the different inputs as described below.1
• Press SIGNAL SEL to select the input signal corresponding to the source component. When DIGITAL (C1/O1/O2) or HDMI (H) is selected and the selected audio input is not provided, A (analog) is automatically selected.
Each press cycles through the following:
• A – Selects the analog inputs.
• DIGITAL – Selects the digital input. The coaxial 1 input is selected for C1, and the optical 1 or 2 audio input is selected for O1 or O2.
• HDMI – Selects an HDMI signal. H can be selected for BD, DVD, TV/SAT or DVR/VCR input. For other inputs, HDMI cannot be selected.2
When set to DIGITAL or HDMI, 2 lights when a Dolby Digital signal is input, and DTS lights when a DTS signal is input.
When the HDMI is selected, the A and DIGITAL indicators are off (see page 12).
Using the headphone• Insert the headphone into the PHONES jack.The sound is heard from the headphone and no sound is heard from the speakers connected to this receiver. The listening mode when the sound is heard from the headphone can be selected only from STEREO or ALC.
Note1 • When digital input (optical or coaxial) is selected, this receiver can only play back Dolby Digital, PCM (32 kHz to 96 kHz) and
DTS (including DTS 96 kHz / 24 bit) digital signal formats. The compatible signals via the HDMI terminals are: Dolby Digital, DTS, SACD (DSD 2 ch), PCM (32 kHz to 192 kHz sampling frequencies), Dolby TrueHD, Dolby Digital Plus, DTS-EXPRESS, DTS-HD Master Audio and DVD Audio (including 192 kHz). With other digital signal formats, set to A (analog).• You may get digital noise when a LD or CD player compatible with DTS is playing an analog signal. To prevent noise, make the proper digital connections (page 23) and set the signal input to C1/O1/O2 (DIGITAL).• Some DVD players don’t output DTS signals. For more details, refer to the instruction manual supplied with your DVD player.
2 When the HDMI option in Setting the Audio options on page 38 is set to THRU, the sound will be heard through your TV, not from this receiver.
VSX-820_SYXCN_En.book 41 ページ 2010年4月12日 月曜日 午後6時52分 41
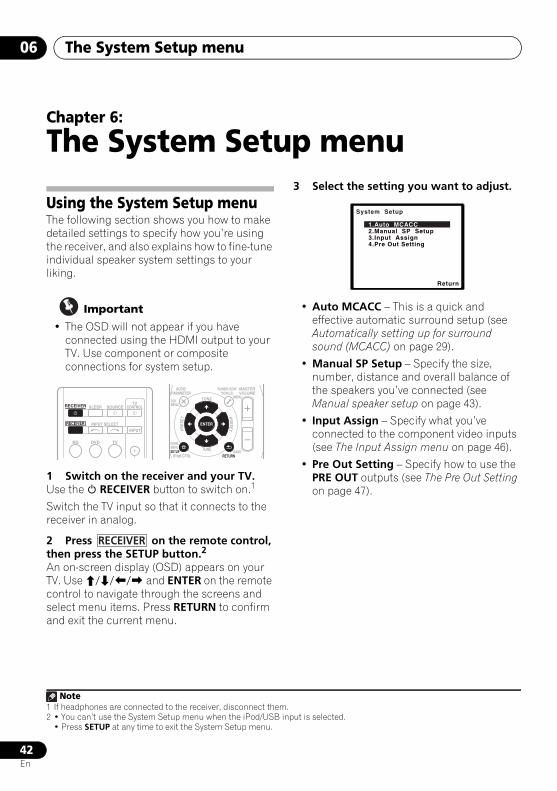
The System Setup menu06
42En
Chapter 6:
The System Setup menu
Using the System Setup menuThe following section shows you how to make detailed settings to specify how you’re using the receiver, and also explains how to fine-tune individual speaker system settings to your liking.
Important
• The OSD will not appear if you have connected using the HDMI output to your TV. Use component or composite connections for system setup.
1 Switch on the receiver and your TV.Use the RECEIVER button to switch on.1
Switch the TV input so that it connects to the receiver in analog.
2 Press on the remote control, then press the SETUP button.2
An on-screen display (OSD) appears on your TV. Use /// and ENTER on the remote control to navigate through the screens and select menu items. Press RETURN to confirm and exit the current menu.
3 Select the setting you want to adjust.
• Auto MCACC – This is a quick and effective automatic surround setup (see Automatically setting up for surround sound (MCACC) on page 29).
• Manual SP Setup – Specify the size, number, distance and overall balance of the speakers you’ve connected (see Manual speaker setup on page 43).
• Input Assign – Specify what you’ve connected to the component video inputs (see The Input Assign menu on page 46).
• Pre Out Setting – Specify how to use the PRE OUT outputs (see The Pre Out Setting on page 47).
Note1 If headphones are connected to the receiver, disconnect them.2 • You can’t use the System Setup menu when the iPod/USB input is selected.
• Press SETUP at any time to exit the System Setup menu.
BD DVD
INPUT SELECT
SOURCESLEEPTV
CONTROL
TV
INPUT
RECEIVER
RECEIVER ENTER
RETURN
AUDIOPARAMETER
TUNER EDITTOOLS
MASTERVOLUME
iPod CTRLBAND
MENU
HOMEMENUSETUP
TOPMENU
TUNE
TUNE
PRESETPRES
ET
RECEIVER
System Setup
1.Auto MCACC2.Manual SP Setup3.Input Assign4.Pre Out Setting
Return
VSX-820_SYXCN_En.book 42 ページ 2010年4月12日 月曜日 午後6時52分
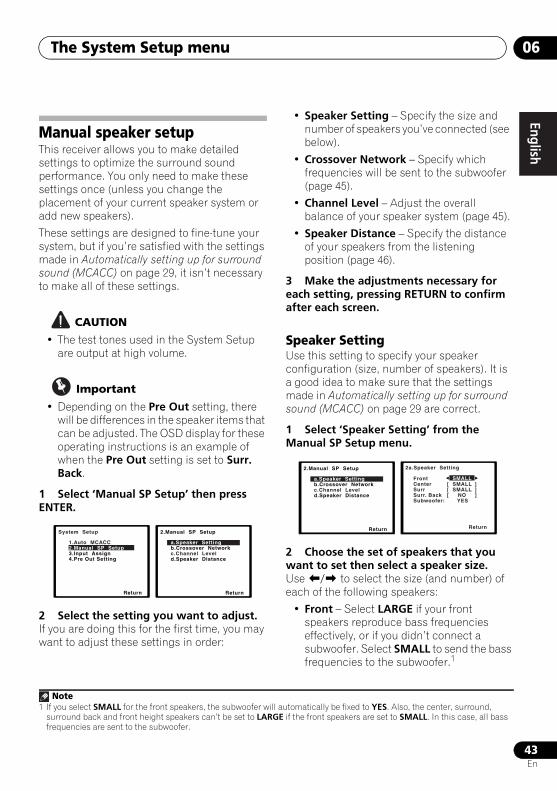
The System Setup menu 06
43En
EnglishFrançais
Deutsch
NederlandsItaliano
Español
Manual speaker setupThis receiver allows you to make detailed settings to optimize the surround sound performance. You only need to make these settings once (unless you change the placement of your current speaker system or add new speakers).
These settings are designed to fine-tune your system, but if you’re satisfied with the settings made in Automatically setting up for surround sound (MCACC) on page 29, it isn’t necessary to make all of these settings.
CAUTION
• The test tones used in the System Setup are output at high volume.
Important
• Depending on the Pre Out setting, there will be differences in the speaker items that can be adjusted. The OSD display for these operating instructions is an example of when the Pre Out setting is set to Surr. Back.
1 Select ‘Manual SP Setup’ then press ENTER.
2 Select the setting you want to adjust.If you are doing this for the first time, you may want to adjust these settings in order:
• Speaker Setting – Specify the size and number of speakers you’ve connected (see below).
• Crossover Network – Specify which frequencies will be sent to the subwoofer (page 45).
• Channel Level – Adjust the overall balance of your speaker system (page 45).
• Speaker Distance – Specify the distance of your speakers from the listening position (page 46).
3 Make the adjustments necessary for each setting, pressing RETURN to confirm after each screen.
Speaker SettingUse this setting to specify your speaker configuration (size, number of speakers). It is a good idea to make sure that the settings made in Automatically setting up for surround sound (MCACC) on page 29 are correct.
1 Select ‘Speaker Setting’ from the Manual SP Setup menu.
2 Choose the set of speakers that you want to set then select a speaker size.Use / to select the size (and number) of each of the following speakers:
• Front – Select LARGE if your front speakers reproduce bass frequencies effectively, or if you didn’t connect a subwoofer. Select SMALL to send the bass frequencies to the subwoofer.1
System Setup
1.Auto MCACC2.Manual SP Setup3.Input Assign4.Pre Out Setting
Return
2.Manual SP Setup
Return
a.Speaker Settingb.Crossover Networkc.Channel Leveld.Speaker Distance
Note1 If you select SMALL for the front speakers, the subwoofer will automatically be fixed to YES. Also, the center, surround,
surround back and front height speakers can’t be set to LARGE if the front speakers are set to SMALL. In this case, all bass frequencies are sent to the subwoofer.
2.Manual SP Setup
Return
a.Speaker Settingb.Crossover Networkc.Channel Leveld.Speaker Distance
2a.Speaker Setting
Front CenterSurrSurr. BackSubwoofer:
Return
[ SMALL ][ SMALL ][ NO ] YES
SMALL
VSX-820_SYXCN_En.book 43 ページ 2010年4月12日 月曜日 午後6時52分
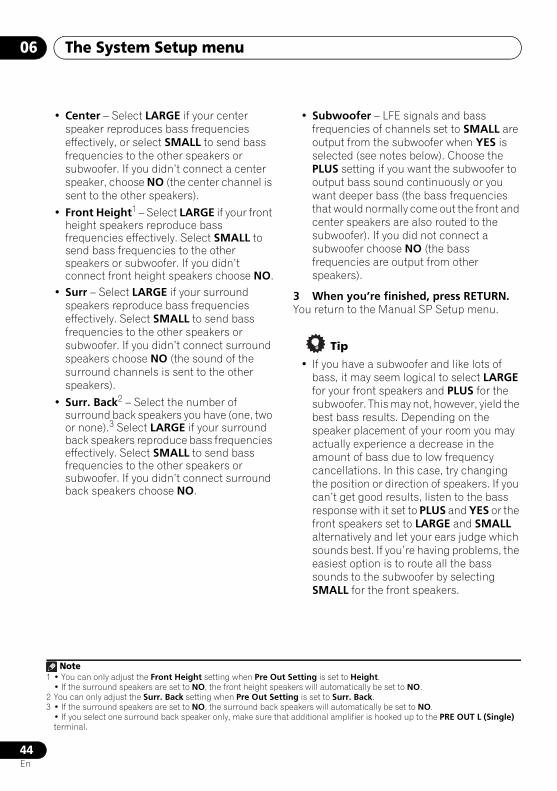
The System Setup menu06
44En
• Center – Select LARGE if your center speaker reproduces bass frequencies effectively, or select SMALL to send bass frequencies to the other speakers or subwoofer. If you didn’t connect a center speaker, choose NO (the center channel is sent to the other speakers).
• Front Height1 – Select LARGE if your front height speakers reproduce bass frequencies effectively. Select SMALL to send bass frequencies to the other speakers or subwoofer. If you didn’t connect front height speakers choose NO.
• Surr – Select LARGE if your surround speakers reproduce bass frequencies effectively. Select SMALL to send bass frequencies to the other speakers or subwoofer. If you didn’t connect surround speakers choose NO (the sound of the surround channels is sent to the other speakers).
• Surr. Back2 – Select the number of surround back speakers you have (one, two or none).3 Select LARGE if your surround back speakers reproduce bass frequencies effectively. Select SMALL to send bass frequencies to the other speakers or subwoofer. If you didn’t connect surround back speakers choose NO.
• Subwoofer – LFE signals and bass frequencies of channels set to SMALL are output from the subwoofer when YES is selected (see notes below). Choose the PLUS setting if you want the subwoofer to output bass sound continuously or you want deeper bass (the bass frequencies that would normally come out the front and center speakers are also routed to the subwoofer). If you did not connect a subwoofer choose NO (the bass frequencies are output from other speakers).
3 When you’re finished, press RETURN.You return to the Manual SP Setup menu.
Tip
• If you have a subwoofer and like lots of bass, it may seem logical to select LARGE for your front speakers and PLUS for the subwoofer. This may not, however, yield the best bass results. Depending on the speaker placement of your room you may actually experience a decrease in the amount of bass due to low frequency cancellations. In this case, try changing the position or direction of speakers. If you can’t get good results, listen to the bass response with it set to PLUS and YES or the front speakers set to LARGE and SMALL alternatively and let your ears judge which sounds best. If you’re having problems, the easiest option is to route all the bass sounds to the subwoofer by selecting SMALL for the front speakers.
Note1 • You can only adjust the Front Height setting when Pre Out Setting is set to Height.
• If the surround speakers are set to NO, the front height speakers will automatically be set to NO.2 You can only adjust the Surr. Back setting when Pre Out Setting is set to Surr. Back.3 • If the surround speakers are set to NO, the surround back speakers will automatically be set to NO.
• If you select one surround back speaker only, make sure that additional amplifier is hooked up to the PRE OUT L (Single) terminal.
VSX-820_SYXCN_En.book 44 ページ 2010年4月12日 月曜日 午後6時52分
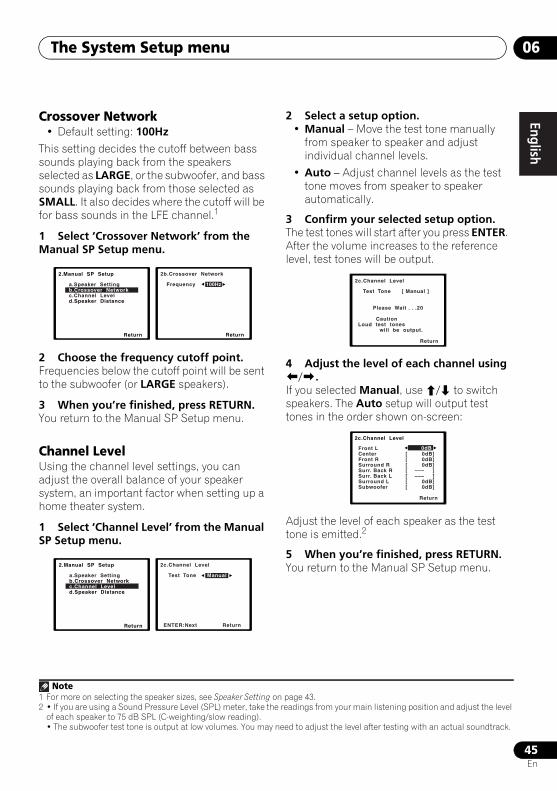
The System Setup menu 06
45En
EnglishFrançais
Deutsch
NederlandsItaliano
Español
Crossover Network• Default setting: 100Hz
This setting decides the cutoff between bass sounds playing back from the speakers selected as LARGE, or the subwoofer, and bass sounds playing back from those selected as SMALL. It also decides where the cutoff will be for bass sounds in the LFE channel.1
1 Select ‘Crossover Network’ from the Manual SP Setup menu.
2 Choose the frequency cutoff point.Frequencies below the cutoff point will be sent to the subwoofer (or LARGE speakers).
3 When you’re finished, press RETURN.You return to the Manual SP Setup menu.
Channel LevelUsing the channel level settings, you can adjust the overall balance of your speaker system, an important factor when setting up a home theater system.
1 Select ‘Channel Level’ from the Manual SP Setup menu.
2 Select a setup option.• Manual – Move the test tone manually
from speaker to speaker and adjust individual channel levels.
• Auto – Adjust channel levels as the test tone moves from speaker to speaker automatically.
3 Confirm your selected setup option.The test tones will start after you press ENTER. After the volume increases to the reference level, test tones will be output.
4 Adjust the level of each channel using /.If you selected Manual, use / to switch speakers. The Auto setup will output test tones in the order shown on-screen:
Adjust the level of each speaker as the test tone is emitted.2
5 When you’re finished, press RETURN.You return to the Manual SP Setup menu.
Note1 For more on selecting the speaker sizes, see Speaker Setting on page 43.
2.Manual SP Setup
Return
a.Speaker Settingb.Crossover Networkc.Channel Leveld.Speaker Distance
2b.Crossover Network
Return
Frequency 100Hz
2.Manual SP Setup
Return
a.Speaker Settingb.Crossover Networkc.Channel Leveld.Speaker Distance
2c.Channel Level
Test Tone Manual
ENTER:NextReturn
2 • If you are using a Sound Pressure Level (SPL) meter, take the readings from your main listening position and adjust the level of each speaker to 75 dB SPL (C-weighting/slow reading).• The subwoofer test tone is output at low volumes. You may need to adjust the level after testing with an actual soundtrack.
2c.Channel Level
Test Tone [ Manual ]
Please Wait . . .20 Caution Loud test tones will be output.
Return
2c.Channel Level
Front L CenterFront RSurround RSurr. Back RSurr. Back LSurround LSubwoofer
Return
[ 0dB][ 0dB][ 0dB][ ––– ][ ––– ][ 0dB][ 0dB]
0dB
VSX-820_SYXCN_En.book 45 ページ 2010年4月12日 月曜日 午後6時52分

The System Setup menu06
46En
Tip
• You can change the channel levels at any time by press , then press CH SELECT and LEV +/– on the remote control. You can also press CH SELECT and use / to select the channel, and then use / to adjust the channel levels.
Speaker DistanceFor good sound depth and separation from your system, you need to specify the distance of your speakers from the listening position. The receiver can then add the proper delay needed for effective surround sound.
1 Select ‘Speaker Distance’ from the Manual SP Setup menu.
2 Adjust the distance of each speaker using /.You can adjust the distance of each speaker in 0.1 m increments.
3 When you’re finished, press RETURN.You return to the Manual SP Setup menu.
The Input Assign menuYou only need to make settings in the Input Assign menu if you didn’t hook up your equipment according to the default settings for the component video inputs.
• Default settings:
Component 1 – BD
Component 2 – DVD
Important
• If you connect any source component to the receiver using a component video input, you should also have your TV connected to this receiver’s COMPONENT VIDEO OUT output (down converting component video is not possible after assigning an input).
If you didn’t make component video connections according to the defaults above, you must assign the numbered input to the component you’ve connected (or else you may see the video signal of a different component). For more on this, see Using the component video jacks on page 26.
1 Press on the remote control, then press the SETUP button.An on-screen display (OSD) appears on your TV. Use /// and ENTER on the remote control to navigate through the screens and select menu items. Press RETURN to confirm and exit the current menu.
RECEIVER
2.Manual SP Setup
Return
a.Speaker Settingb.Crossover Networkc.Channel Leveld.Speaker Distance
2d.Speaker Distance
Front L CenterFront RSurround RSurr. Back RSurr. Back LSurround LSubwoofer
Return
3.0 m [ 3.0 m ][ 3.0 m ][ 3.0 m ][ –––– ][ –––– ][ 3.0 m ][ 3.0 m ]
RECEIVER
System Setup
1.Auto MCACC2.Manual SP Setup3.Input Assign4.Pre Out Setting
Return
VSX-820_SYXCN_En.book 46 ページ 2010年4月12日 月曜日 午後6時52分
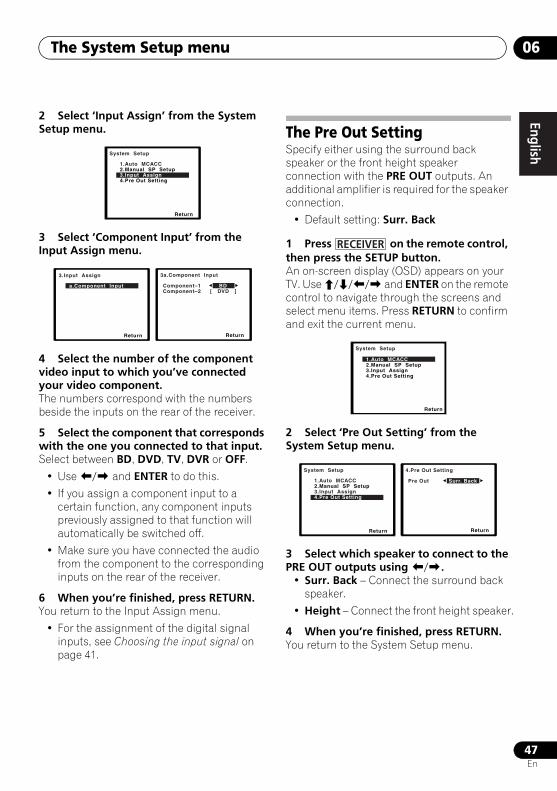
The System Setup menu 06
47En
EnglishFrançais
Deutsch
NederlandsItaliano
Español
2 Select ‘Input Assign’ from the System Setup menu.
3 Select ‘Component Input’ from the Input Assign menu.
4 Select the number of the component video input to which you’ve connected your video component.The numbers correspond with the numbers beside the inputs on the rear of the receiver.
5 Select the component that corresponds with the one you connected to that input.Select between BD, DVD, TV, DVR or OFF.
• Use / and ENTER to do this.
• If you assign a component input to a certain function, any component inputs previously assigned to that function will automatically be switched off.
• Make sure you have connected the audio from the component to the corresponding inputs on the rear of the receiver.
6 When you’re finished, press RETURN.You return to the Input Assign menu.
• For the assignment of the digital signal inputs, see Choosing the input signal on page 41.
The Pre Out SettingSpecify either using the surround back speaker or the front height speaker connection with the PRE OUT outputs. An additional amplifier is required for the speaker connection.
• Default setting: Surr. Back
1 Press on the remote control, then press the SETUP button.An on-screen display (OSD) appears on your TV. Use /// and ENTER on the remote control to navigate through the screens and select menu items. Press RETURN to confirm and exit the current menu.
2 Select ‘Pre Out Setting’ from the System Setup menu.
3 Select which speaker to connect to the PRE OUT outputs using /.
• Surr. Back – Connect the surround back speaker.
• Height – Connect the front height speaker.
4 When you’re finished, press RETURN.You return to the System Setup menu.
System Setup
1.Auto MCACC2.Manual SP Setup3.Input Assign4.Pre Out Setting
Return
3.Input Assign
Return
a.Component Input
3a.Component Input
Return
Component–1 BD Component–2 [ DVD ]
RECEIVER
System Setup
1.Auto MCACC2.Manual SP Setup3.Input Assign4.Pre Out Setting
Return
System Setup
1.Auto MCACC2.Manual SP Setup3.Input Assign4.Pre Out Setting
Return
4.Pre Out Setting
Return
Pre Out Surr. Back
VSX-820_SYXCN_En.book 47 ページ 2010年4月12日 月曜日 午後6時52分 47
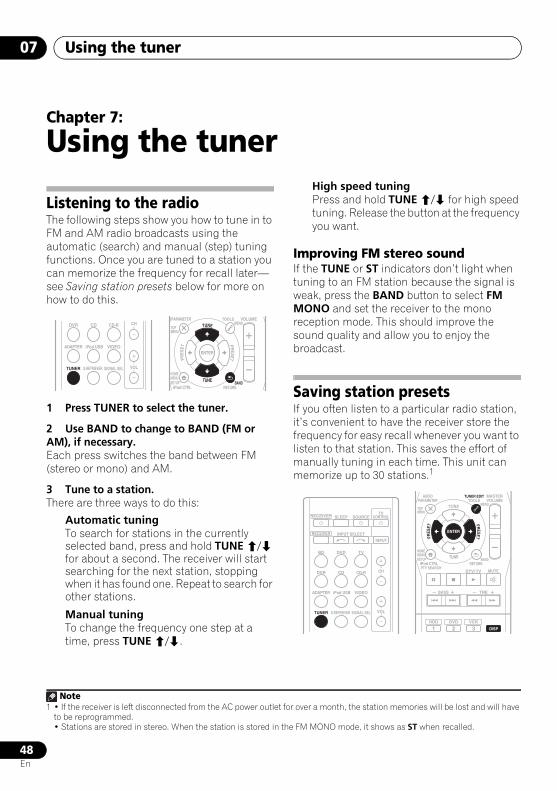
Using the tuner07
48En
Chapter 7:
Using the tuner
Listening to the radioThe following steps show you how to tune in to FM and AM radio broadcasts using the automatic (search) and manual (step) tuning functions. Once you are tuned to a station you can memorize the frequency for recall later—see Saving station presets below for more on how to do this.
1 Press TUNER to select the tuner.
2 Use BAND to change to BAND (FM or AM), if necessary.Each press switches the band between FM (stereo or mono) and AM.
3 Tune to a station.There are three ways to do this:
Automatic tuningTo search for stations in the currently selected band, press and hold TUNE / for about a second. The receiver will start searching for the next station, stopping when it has found one. Repeat to search for other stations.
Manual tuningTo change the frequency one step at a time, press TUNE /.
High speed tuningPress and hold TUNE / for high speed tuning. Release the button at the frequency you want.
Improving FM stereo soundIf the TUNE or ST indicators don’t light when tuning to an FM station because the signal is weak, press the BAND button to select FM MONO and set the receiver to the mono reception mode. This should improve the sound quality and allow you to enjoy the broadcast.
Saving station presetsIf you often listen to a particular radio station, it’s convenient to have the receiver store the frequency for easy recall whenever you want to listen to that station. This saves the effort of manually tuning in each time. This unit can memorize up to 30 stations.1
CHDVR CD CD-R
ADAPTER iPod USB VIDEO
TUNER S.RETRIEVER SIGNAL SEL VOL
ENTER
RETURN
PARAMETER TOOLS VOLUME
iPod CTRLBAND
MENU
HOMEMENUSETUP
TOPMENU
TUNE
TUNEPR
ESETPRES
ET
Note1 • If the receiver is left disconnected from the AC power outlet for over a month, the station memories will be lost and will have
to be reprogrammed.• Stations are stored in stereo. When the station is stored in the FM MONO mode, it shows as ST when recalled.
BD DVD
INPUT SELECT
SOURCESLEEPTV
CONTROL
TV
INPUT
CH
RECEIVER
DVR CD CD-R
ADAPTER iPod USB VIDEO
TUNER S.RETRIEVER SIGNAL SEL VOL
RECEIVER
1HDD
ENTER
2 DISP
DVD
3VCR
MUTE
RETURN
AUDIOPARAMETER
TUNER EDITTOOLS
MASTERVOLUME
iPod CTRLPTY SEARCH
BAND
MENU
HOMEMENUSETUP
DTV/ TV
TREBASS
TOPMENU
TUNE
TUNE
PRESETPRES
ET
VSX-820_SYXCN_En.book 48 ページ 2010年4月12日 月曜日 午後6時52分
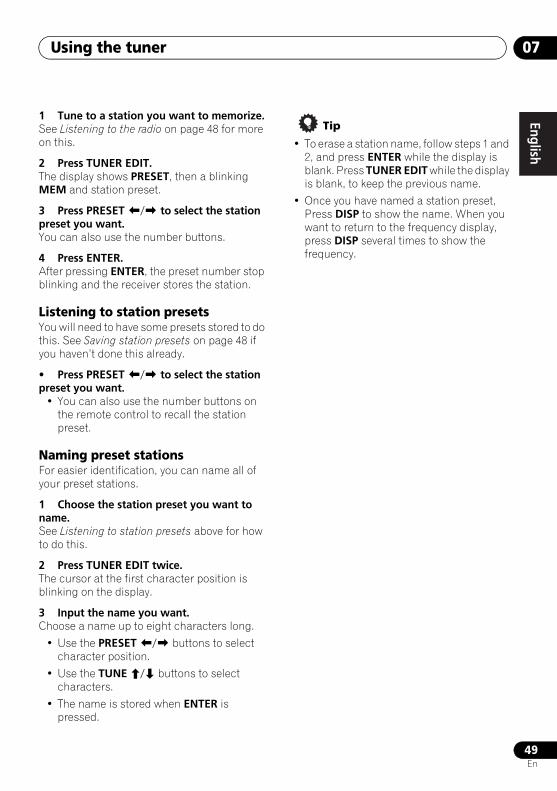
Using the tuner 07
49En
EnglishFrançais
Deutsch
NederlandsItaliano
Español
1 Tune to a station you want to memorize.See Listening to the radio on page 48 for more on this.
2 Press TUNER EDIT.The display shows PRESET, then a blinking MEM and station preset.
3 Press PRESET / to select the station preset you want.You can also use the number buttons.
4 Press ENTER.After pressing ENTER, the preset number stop blinking and the receiver stores the station.
Listening to station presetsYou will need to have some presets stored to do this. See Saving station presets on page 48 if you haven’t done this already.
• Press PRESET / to select the station preset you want.
• You can also use the number buttons on the remote control to recall the station preset.
Naming preset stationsFor easier identification, you can name all of your preset stations.
1 Choose the station preset you want to name.See Listening to station presets above for how to do this.
2 Press TUNER EDIT twice.The cursor at the first character position is blinking on the display.
3 Input the name you want.Choose a name up to eight characters long.
• Use the PRESET / buttons to select character position.
• Use the TUNE / buttons to select characters.
• The name is stored when ENTER is pressed.
Tip
• To erase a station name, follow steps 1 and 2, and press ENTER while the display is blank. Press TUNER EDIT while the display is blank, to keep the previous name.
• Once you have named a station preset, Press DISP to show the name. When you want to return to the frequency display, press DISP several times to show the frequency.
VSX-820_SYXCN_En.book 49 ページ 2010年4月12日 月曜日 午後6時52分
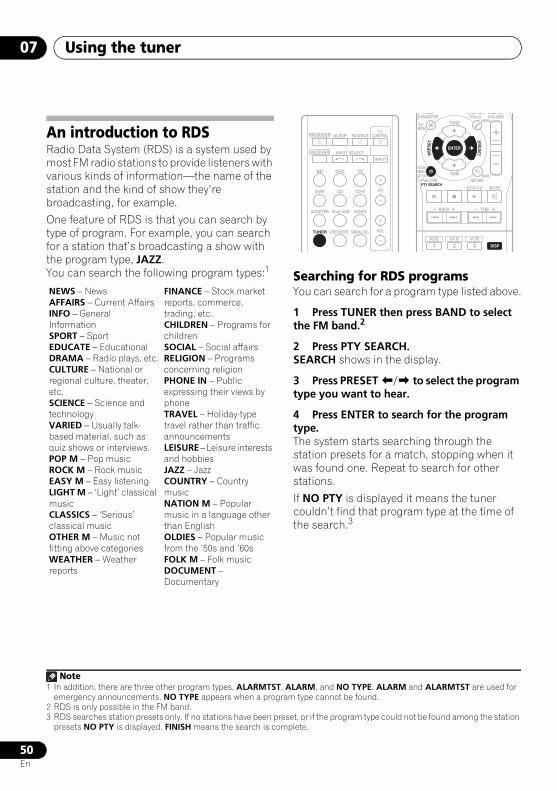
Using the tuner07
50En
An introduction to RDSRadio Data System (RDS) is a system used by most FM radio stations to provide listeners with various kinds of information—the name of the station and the kind of show they’re broadcasting, for example.
One feature of RDS is that you can search by type of program. For example, you can search for a station that’s broadcasting a show with the program type, JAZZ.You can search the following program types:1 Searching for RDS programs
You can search for a program type listed above.
1 Press TUNER then press BAND to select the FM band.2
2 Press PTY SEARCH.SEARCH shows in the display.
3 Press PRESET / to select the program type you want to hear.
4 Press ENTER to search for the program type.The system starts searching through the station presets for a match, stopping when it was found one. Repeat to search for other stations.
If NO PTY is displayed it means the tuner couldn’t find that program type at the time of the search.3
NEWS – NewsAFFAIRS – Current AffairsINFO – General InformationSPORT – SportEDUCATE – EducationalDRAMA – Radio plays, etc.CULTURE – National or regional culture, theater, etc.SCIENCE – Science and technologyVARIED – Usually talk-based material, such as quiz shows or interviews.POP M – Pop musicROCK M – Rock musicEASY M – Easy listening LIGHT M – ‘Light’ classical musicCLASSICS – ‘Serious’ classical musicOTHER M – Music not fitting above categoriesWEATHER – Weather reports
FINANCE – Stock market reports, commerce, trading, etc.CHILDREN – Programs for childrenSOCIAL – Social affairsRELIGION – Programs concerning religionPHONE IN – Public expressing their views by phoneTRAVEL – Holiday-type travel rather than traffic announcementsLEISURE – Leisure interests and hobbiesJAZZ – JazzCOUNTRY – Country musicNATION M – Popular music in a language other than EnglishOLDIES – Popular music from the ’50s and ’60sFOLK M – Folk musicDOCUMENT – Documentary
Note1 In addition, there are three other program types, ALARMTST, ALARM, and NO TYPE. ALARM and ALARMTST are used for
emergency announcements. NO TYPE appears when a program type cannot be found.2 RDS is only possible in the FM band.3 RDS searches station presets only. If no stations have been preset, or if the program type could not be found among the station
presets NO PTY is displayed. FINISH means the search is complete.
BD DVD
INPUT SELECT
SOURCESLEEPTV
CONTROL
TV
INPUT
CH
RECEIVER
DVR CD CD-R
ADAPTER iPod USB VIDEO
TUNER S.RETRIEVER SIGNAL SEL VOL
RECEIVER
1HDD
ENTER
2 DISP
DVD
3VCR
MUTE
RETURN
AUDIOPARAMETER
TUNER EDITTOOLS
MASTERVOLUME
iPod CTRLPTY SEARCH
BAND
MENU
HOMEMENUSETUP
DTV/ TV
TREBASS
TOPMENU
TUNE
TUNE
PRESETPRES
ET
VSX-820_SYXCN_En.book 50 ページ 2010年4月12日 月曜日 午後6時52分
Using the tuner 07
51En
EnglishFrançais
Deutsch
NederlandsItaliano
Español
Displaying RDS informationUse the DISP button to display the different types of RDS information available.1
• Press DISP for RDS information.Each press changes the display as follows:
• Listening mode
• Master volume
• Radio Text (RT) – Messages sent by the radio station. For example, a talk radio station may provide a phone number as RT.
• Program Service Name (PS) – The name of the radio station.
• Program Type (PTY) – This indicates the kind of program currently being broadcast.
• Current tuner frequency (FREQ)
Note1 • If any noise is picked up while displaying the RT scroll, some characters may be displayed incorrectly.
• If you see NO TEXT in the RT display, it means no RT data is sent from the broadcast station. The display will automatically switch to the PS data display (if no PS data, NO NAME is displayed).• In the PTY display, NO PTY may be shown.
VSX-820_SYXCN_En.book 51 ページ 2010年4月12日 月曜日 午後6時52分

Making recordings08
52En
Chapter 8:
Making recordings
Making an audio or a video recordingYou can make an audio or a video recording from the built-in tuner, or from an audio or video source connected to the receiver (such as a CD player or TV).
Keep in mind you can’t make a digital recording from an analog source or vice-versa, so make sure the components you are recording to/from are hooked up in the same way (see Connecting your equipment on page 16 for more on connections).
If you want to record a video source, you also need to use the same type of connection for the source as for the recorder. For example, you can’t record a component hooked up to composite video jacks with a recorder hooked up to the component video outputs (see page 26 for more on video connections).
1 Select the source you want to record.Use the MULTI CONTROL buttons (or INPUT SELECT).
2 Select the input signal (if necessary).Press the button then press SIGNAL SEL to select the input signal corresponding to the source component (see page 41 for more on this).
3 Prepare the source you want to record.Tune to the radio station, load the CD, video, DVD etc.
4 Prepare the recorder.Insert a blank tape, MD, video etc. into the recording device and set the recording levels.
Refer to the instructions that came with the recorder if you are unsure how to do this. Most video recorders set the audio recording level automatically—check the component’s instruction manual if you’re unsure.
5 Start recording, then start playback of the source component.1
BD DVD
INPUT SELECT
SOURCESLEEPTV
CONTROL
TV
INPUT
CH
RECEIVER
DVR CD CD-R
ADAPTER iPod USB VIDEO
TUNER S.RETRIEVER SIGNAL SEL VOL
RECEIVER
Note1 • The receiver’s volume, balance, tone (bass, treble, loudness), and surround effects have no effect on the recorded signal.
• Some digital sources are copy-protected, and can only be recorded in analog.• Some video sources are copy-protected. These cannot be recorded.
RECEIVER
VSX-820_SYXCN_En.book 52 ページ 2010年4月12日 月曜日 午後6時52分
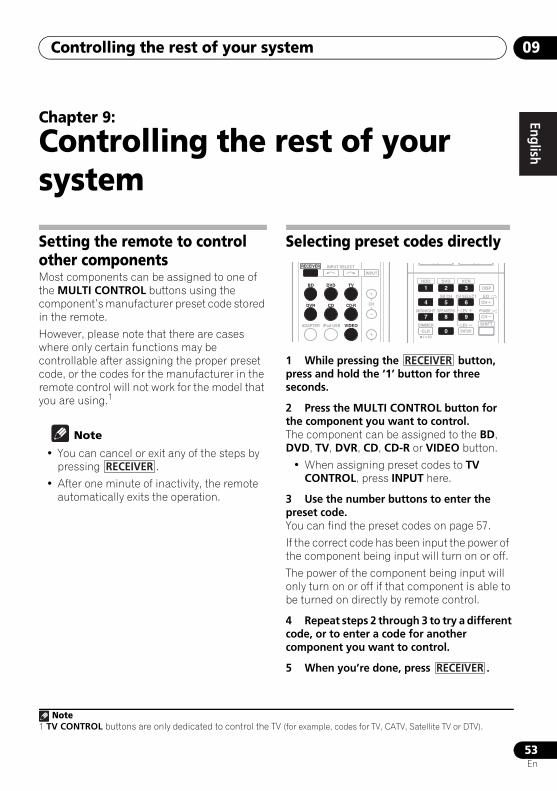
Controlling the rest of your system 09
53En
EnglishFrançais
Deutsch
NederlandsItaliano
Español
Chapter 9:
Controlling the rest of your system
Setting the remote to control other componentsMost components can be assigned to one of the MULTI CONTROL buttons using the component’s manufacturer preset code stored in the remote.
However, please note that there are cases where only certain functions may be controllable after assigning the proper preset code, or the codes for the manufacturer in the remote control will not work for the model that you are using.1
Note
• You can cancel or exit any of the steps by pressing .
• After one minute of inactivity, the remote automatically exits the operation.
Selecting preset codes directly
1 While pressing the button, press and hold the ‘1’ button for three seconds.
2 Press the MULTI CONTROL button for the component you want to control.The component can be assigned to the BD, DVD, TV, DVR, CD, CD-R or VIDEO button.
• When assigning preset codes to TV CONTROL, press INPUT here.
3 Use the number buttons to enter the preset code.You can find the preset codes on page 57.
If the correct code has been input the power of the component being input will turn on or off.
The power of the component being input will only turn on or off if that component is able to be turned on directly by remote control.
4 Repeat steps 2 through 3 to try a different code, or to enter a code for another component you want to control.
5 When you’re done, press .
Note1 TV CONTROL buttons are only dedicated to control the TV (for example, codes for TV, CATV, Satellite TV or DTV).
RECEIVER
BD DVD
INPUT SELECT
TV
INPUT
CHDVR CD CD-R
ADAPTER iPod USB VIDEO
RECEIVER
DIMMER
1
4
7MIDNIGHT
HDD
+10
2
5
8SPEAKERS LEV
LEV
SB CH
DISP
CLR
EQ
PHASE
DVD
3
6
9
0 ENTER
CH
CH
CH SELECT
VCR
SHIFT
/
RECEIVER
RECEIVER
VSX-820_SYXCN_En.book 53 ページ 2010年4月12日 月曜日 午後6時52分
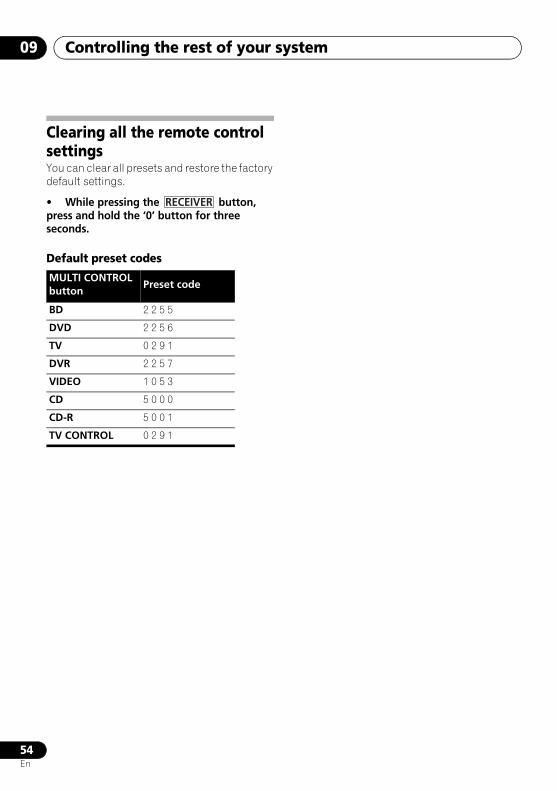
Controlling the rest of your system09
54En
Clearing all the remote control settingsYou can clear all presets and restore the factory default settings.
• While pressing the button, press and hold the ‘0’ button for three seconds.
Default preset codes
MULTI CONTROL button
Preset code
BD 2 2 5 5
DVD 2 2 5 6
TV 0 2 9 1
DVR 2 2 5 7
VIDEO 1 0 5 3
CD 5 0 0 0
CD-R 5 0 0 1
TV CONTROL 0 2 9 1
RECEIVER
VSX-820_SYXCN_En.book 54 ページ 2010年4月12日 月曜日 午後6時52分
Controlling the rest of your system 09
55En
EnglishFrançais
Deutsch
NederlandsItaliano
Español
Controls for TVsThis remote control can control components after entering the proper codes or teaching the receiver the commands (see Controlling the rest of your system on page 53 for more on this). Use the MULTI CONTROL buttons to select the component.
• The TV CONTROL buttons on the remote control are dedicated to control the TV assigned to the TV CONTROL INPUT button.
Button(s) Function Components
TV CONTROL Switches the DTV on or off. DTV
Switches the TV or CATV between standby and on. Cable TV/Satellite TV/TV
TV CONTROL INPUT
Switches the TV input. (Not possible with all models.) TV
TV CONTROL CH +/–
Selects channels. Cable TV/Satellite TV/TV/DTV
TV CONTROL VOL +/–
Adjust the TV volume. Cable TV/Satellite TV/TV/DTV
SOURCE Press to switch the component assigned to the TV button on or off.
Cable TV/Satellite TV/TV/DTV
DTV/TV Switches between the DTV and analog TV input modes for Pioneer TVs.
TV/DTV
TOP MENU Switches TEXT ON/OFF for TVs. TV
HOME MENU Use as the GUIDE button for navigating. Cable TV/Satellite TV/TV/DTV
RETURN Use to select closed captioning with DTV. DTV
Number buttons
Use to select a specific TV channel. Cable TV/Satellite TV/TV/DTV
ENTER Use to enter a channel. Cable TV/Satellite TV/TV/DTV
MENU Press to display the DTV menu. DTV
Select the menu screen. Cable TV/Satellite TV/TV
&ENTER
Press to select or adjust and navigate items on the menu screen.
Cable TV/Satellite TV/TV/DTV
CH +/– Selects channels. Cable TV/Satellite TV/TV/DTV
VSX-820_SYXCN_En.book 55 ページ 2010年4月12日 月曜日 午後6時52分
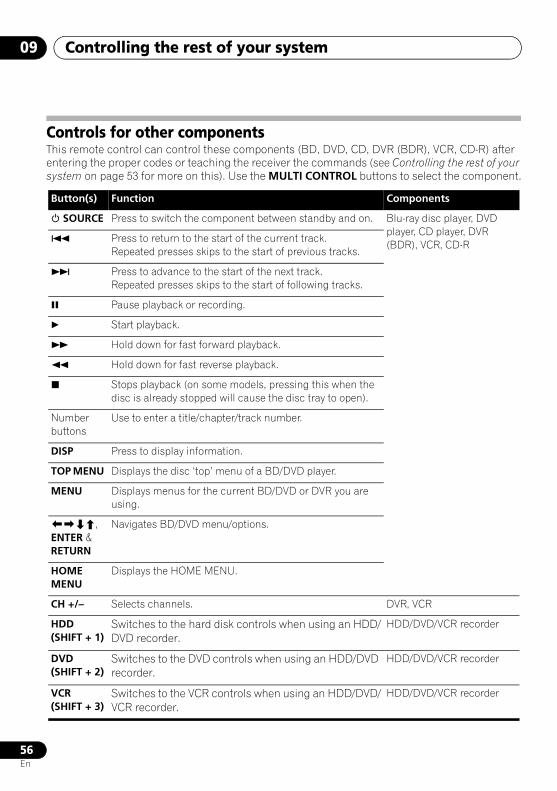
Controlling the rest of your system09
56En
Controls for other componentsThis remote control can control these components (BD, DVD, CD, DVR (BDR), VCR, CD-R) after entering the proper codes or teaching the receiver the commands (see Controlling the rest of your system on page 53 for more on this). Use the MULTI CONTROL buttons to select the component.
Button(s) Function Components
SOURCE Press to switch the component between standby and on. Blu-ray disc player, DVD player, CD player, DVR (BDR), VCR, CD-R
Press to return to the start of the current track. Repeated presses skips to the start of previous tracks.
Press to advance to the start of the next track. Repeated presses skips to the start of following tracks.
Pause playback or recording.
Start playback.
Hold down for fast forward playback.
Hold down for fast reverse playback.
Stops playback (on some models, pressing this when the disc is already stopped will cause the disc tray to open).
Number buttons
Use to enter a title/chapter/track number.
DISP Press to display information.
TOP MENU Displays the disc ‘top’ menu of a BD/DVD player.
MENU Displays menus for the current BD/DVD or DVR you are using.
, ENTER & RETURN
Navigates BD/DVD menu/options.
HOME MENU
Displays the HOME MENU.
CH +/– Selects channels. DVR, VCR
HDD (SHIFT + 1)
Switches to the hard disk controls when using an HDD/DVD recorder.
HDD/DVD/VCR recorder
DVD (SHIFT + 2)
Switches to the DVD controls when using an HDD/DVD recorder.
HDD/DVD/VCR recorder
VCR (SHIFT + 3)
Switches to the VCR controls when using an HDD/DVD/VCR recorder.
HDD/DVD/VCR recorder
VSX-820_SYXCN_En.book 56 ページ 2010年4月12日 月曜日 午後6時52分
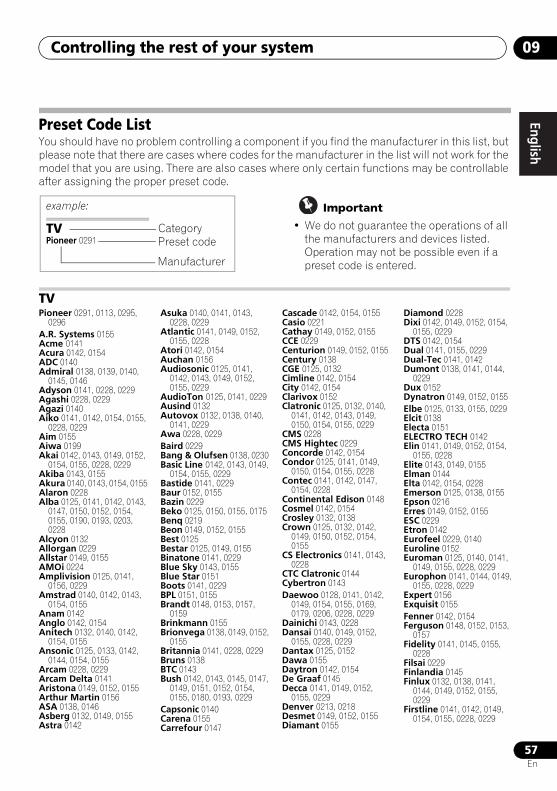
Controlling the rest of your system 09
57En
EnglishFrançais
Deutsch
NederlandsItaliano
Español
Preset Code ListYou should have no problem controlling a component if you find the manufacturer in this list, but please note that there are cases where codes for the manufacturer in the list will not work for the model that you are using. There are also cases where only certain functions may be controllable after assigning the proper preset code.
Important
• We do not guarantee the operations of all the manufacturers and devices listed. Operation may not be possible even if a preset code is entered.
TVPioneer 0291
example:
CategoryPreset code
Manufacturer
TV Pioneer 0291, 0113, 0295,
0296A.R. Systems 0155 Acme 0141 Acura 0142, 0154 ADC 0140 Admiral 0138, 0139, 0140,
0145, 0146 Adyson 0141, 0228, 0229 Agashi 0228, 0229 Agazi 0140 Aiko 0141, 0142, 0154, 0155,
0228, 0229 Aim 0155 Aiwa 0199 Akai 0142, 0143, 0149, 0152,
0154, 0155, 0228, 0229 Akiba 0143, 0155 Akura 0140, 0143, 0154, 0155 Alaron 0228 Alba 0125, 0141, 0142, 0143,
0147, 0150, 0152, 0154, 0155, 0190, 0193, 0203, 0228
Alcyon 0132 Allorgan 0229 Allstar 0149, 0155 AMOi 0224 Amplivision 0125, 0141,
0156, 0229 Amstrad 0140, 0142, 0143,
0154, 0155 Anam 0142 Anglo 0142, 0154 Anitech 0132, 0140, 0142,
0154, 0155 Ansonic 0125, 0133, 0142,
0144, 0154, 0155 Arcam 0228, 0229 Arcam Delta 0141 Aristona 0149, 0152, 0155 Arthur Martin 0156 ASA 0138, 0146 Asberg 0132, 0149, 0155 Astra 0142
Asuka 0140, 0141, 0143, 0228, 0229
Atlantic 0141, 0149, 0152, 0155, 0228
Atori 0142, 0154 Auchan 0156 Audiosonic 0125, 0141,
0142, 0143, 0149, 0152, 0155, 0229
AudioTon 0125, 0141, 0229 Ausind 0132 Autovox 0132, 0138, 0140,
0141, 0229 Awa 0228, 0229 Baird 0229 Bang & Olufsen 0138, 0230 Basic Line 0142, 0143, 0149,
0154, 0155, 0229 Bastide 0141, 0229 Baur 0152, 0155 Bazin 0229 Beko 0125, 0150, 0155, 0175 Benq 0219 Beon 0149, 0152, 0155 Best 0125 Bestar 0125, 0149, 0155 Binatone 0141, 0229 Blue Sky 0143, 0155 Blue Star 0151 Boots 0141, 0229 BPL 0151, 0155 Brandt 0148, 0153, 0157,
0159 Brinkmann 0155 Brionvega 0138, 0149, 0152,
0155 Britannia 0141, 0228, 0229 Bruns 0138 BTC 0143 Bush 0142, 0143, 0145, 0147,
0149, 0151, 0152, 0154, 0155, 0180, 0193, 0229
Capsonic 0140 Carena 0155 Carrefour 0147
Cascade 0142, 0154, 0155 Casio 0221 Cathay 0149, 0152, 0155 CCE 0229 Centurion 0149, 0152, 0155 Century 0138 CGE 0125, 0132 Cimline 0142, 0154 City 0142, 0154 Clarivox 0152 Clatronic 0125, 0132, 0140,
0141, 0142, 0143, 0149, 0150, 0154, 0155, 0229
CMS 0228 CMS Hightec 0229 Concorde 0142, 0154 Condor 0125, 0141, 0149,
0150, 0154, 0155, 0228 Contec 0141, 0142, 0147,
0154, 0228 Continental Edison 0148 Cosmel 0142, 0154 Crosley 0132, 0138 Crown 0125, 0132, 0142,
0149, 0150, 0152, 0154, 0155
CS Electronics 0141, 0143, 0228
CTC Clatronic 0144 Cybertron 0143 Daewoo 0128, 0141, 0142,
0149, 0154, 0155, 0169, 0179, 0206, 0228, 0229
Dainichi 0143, 0228 Dansai 0140, 0149, 0152,
0155, 0228, 0229 Dantax 0125, 0152 Dawa 0155 Daytron 0142, 0154 De Graaf 0145 Decca 0141, 0149, 0152,
0155, 0229 Denver 0213, 0218 Desmet 0149, 0152, 0155 Diamant 0155
Diamond 0228 Dixi 0142, 0149, 0152, 0154,
0155, 0229 DTS 0142, 0154 Dual 0141, 0155, 0229 Dual-Tec 0141, 0142 Dumont 0138, 0141, 0144,
0229 Dux 0152 Dynatron 0149, 0152, 0155 Elbe 0125, 0133, 0155, 0229 Elcit 0138 Electa 0151 ELECTRO TECH 0142 Elin 0141, 0149, 0152, 0154,
0155, 0228 Elite 0143, 0149, 0155 Elman 0144 Elta 0142, 0154, 0228 Emerson 0125, 0138, 0155 Epson 0216 Erres 0149, 0152, 0155 ESC 0229 Etron 0142 Eurofeel 0229, 0140 Euroline 0152 Euroman 0125, 0140, 0141,
0149, 0155, 0228, 0229 Europhon 0141, 0144, 0149,
0155, 0228, 0229 Expert 0156 Exquisit 0155 Fenner 0142, 0154 Ferguson 0148, 0152, 0153,
0157 Fidelity 0141, 0145, 0155,
0228 Filsai 0229 Finlandia 0145 Finlux 0132, 0138, 0141,
0144, 0149, 0152, 0155, 0229
Firstline 0141, 0142, 0149, 0154, 0155, 0228, 0229
VSX-820_SYXCN_En.book 57 ページ 2010年4月12日 月曜日 午後6時52分
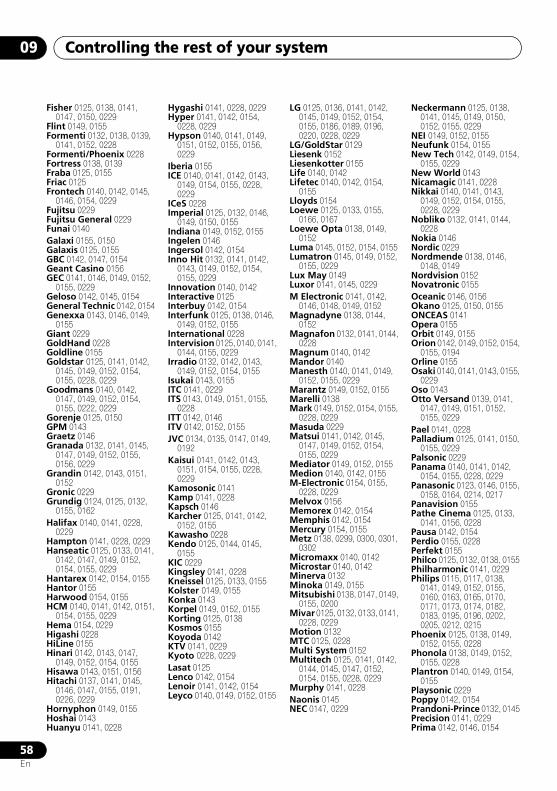
Controlling the rest of your system09
58En
Fisher 0125, 0138, 0141, 0147, 0150, 0229
Flint 0149, 0155 Formenti 0132, 0138, 0139,
0141, 0152, 0228 Formenti/Phoenix 0228 Fortress 0138, 0139 Fraba 0125, 0155 Friac 0125 Frontech 0140, 0142, 0145,
0146, 0154, 0229 Fujitsu 0229 Fujitsu General 0229 Funai 0140 Galaxi 0155, 0150 Galaxis 0125, 0155 GBC 0142, 0147, 0154 Geant Casino 0156 GEC 0141, 0146, 0149, 0152,
0155, 0229 Geloso 0142, 0145, 0154 General Technic 0142, 0154 Genexxa 0143, 0146, 0149,
0155 Giant 0229 GoldHand 0228 Goldline 0155 Goldstar 0125, 0141, 0142,
0145, 0149, 0152, 0154, 0155, 0228, 0229
Goodmans 0140, 0142, 0147, 0149, 0152, 0154, 0155, 0222, 0229
Gorenje 0125, 0150 GPM 0143 Graetz 0146 Granada 0132, 0141, 0145,
0147, 0149, 0152, 0155, 0156, 0229
Grandin 0142, 0143, 0151, 0152
Gronic 0229 Grundig 0124, 0125, 0132,
0155, 0162 Halifax 0140, 0141, 0228,
0229 Hampton 0141, 0228, 0229 Hanseatic 0125, 0133, 0141,
0142, 0147, 0149, 0152, 0154, 0155, 0229
Hantarex 0142, 0154, 0155 Hantor 0155 Harwood 0154, 0155 HCM 0140, 0141, 0142, 0151,
0154, 0155, 0229 Hema 0154, 0229 Higashi 0228 HiLine 0155 Hinari 0142, 0143, 0147,
0149, 0152, 0154, 0155 Hisawa 0143, 0151, 0156 Hitachi 0137, 0141, 0145,
0146, 0147, 0155, 0191, 0226, 0229
Hornyphon 0149, 0155 Hoshai 0143 Huanyu 0141, 0228
Hygashi 0141, 0228, 0229 Hyper 0141, 0142, 0154,
0228, 0229 Hypson 0140, 0141, 0149,
0151, 0152, 0155, 0156, 0229
Iberia 0155 ICE 0140, 0141, 0142, 0143,
0149, 0154, 0155, 0228, 0229
ICeS 0228 Imperial 0125, 0132, 0146,
0149, 0150, 0155 Indiana 0149, 0152, 0155 Ingelen 0146 Ingersol 0142, 0154 Inno Hit 0132, 0141, 0142,
0143, 0149, 0152, 0154, 0155, 0229
Innovation 0140, 0142 Interactive 0125 Interbuy 0142, 0154 Interfunk 0125, 0138, 0146,
0149, 0152, 0155 International 0228 Intervision 0125, 0140, 0141,
0144, 0155, 0229 Irradio 0132, 0142, 0143,
0149, 0152, 0154, 0155 Isukai 0143, 0155 ITC 0141, 0229 ITS 0143, 0149, 0151, 0155,
0228 ITT 0142, 0146 ITV 0142, 0152, 0155 JVC 0134, 0135, 0147, 0149,
0192 Kaisui 0141, 0142, 0143,
0151, 0154, 0155, 0228, 0229
Kamosonic 0141 Kamp 0141, 0228 Kapsch 0146 Karcher 0125, 0141, 0142,
0152, 0155 Kawasho 0228 Kendo 0125, 0144, 0145,
0155 KIC 0229 Kingsley 0141, 0228 Kneissel 0125, 0133, 0155 Kolster 0149, 0155 Konka 0143 Korpel 0149, 0152, 0155 Korting 0125, 0138 Kosmos 0155 Koyoda 0142 KTV 0141, 0229 Kyoto 0228, 0229 Lasat 0125 Lenco 0142, 0154 Lenoir 0141, 0142, 0154 Leyco 0140, 0149, 0152, 0155
LG 0125, 0136, 0141, 0142, 0145, 0149, 0152, 0154, 0155, 0186, 0189, 0196, 0220, 0228, 0229
LG/GoldStar 0129 Liesenk 0152 Liesenkotter 0155 Life 0140, 0142 Lifetec 0140, 0142, 0154,
0155 Lloyds 0154 Loewe 0125, 0133, 0155,
0166, 0167 Loewe Opta 0138, 0149,
0152 Luma 0145, 0152, 0154, 0155 Lumatron 0145, 0149, 0152,
0155, 0229 Lux May 0149 Luxor 0141, 0145, 0229 M Electronic 0141, 0142,
0146, 0148, 0149, 0152 Magnadyne 0138, 0144,
0152 Magnafon 0132, 0141, 0144,
0228 Magnum 0140, 0142 Mandor 0140 Manesth 0140, 0141, 0149,
0152, 0155, 0229 Marantz 0149, 0152, 0155 Marelli 0138 Mark 0149, 0152, 0154, 0155,
0228, 0229 Masuda 0229 Matsui 0141, 0142, 0145,
0147, 0149, 0152, 0154, 0155, 0229
Mediator 0149, 0152, 0155 Medion 0140, 0142, 0155 M-Electronic 0154, 0155,
0228, 0229 Melvox 0156 Memorex 0142, 0154 Memphis 0142, 0154 Mercury 0154, 0155 Metz 0138, 0299, 0300, 0301,
0302 Micromaxx 0140, 0142 Microstar 0140, 0142 Minerva 0132 Minoka 0149, 0155 Mitsubishi 0138, 0147, 0149,
0155, 0200 Mivar 0125, 0132, 0133, 0141,
0228, 0229 Motion 0132 MTC 0125, 0228 Multi System 0152 Multitech 0125, 0141, 0142,
0144, 0145, 0147, 0152, 0154, 0155, 0228, 0229
Murphy 0141, 0228 Naonis 0145 NEC 0147, 0229
Neckermann 0125, 0138, 0141, 0145, 0149, 0150, 0152, 0155, 0229
NEI 0149, 0152, 0155 Neufunk 0154, 0155 New Tech 0142, 0149, 0154,
0155, 0229 New World 0143 Nicamagic 0141, 0228 Nikkai 0140, 0141, 0143,
0149, 0152, 0154, 0155, 0228, 0229
Nobliko 0132, 0141, 0144, 0228
Nokia 0146 Nordic 0229 Nordmende 0138, 0146,
0148, 0149 Nordvision 0152 Novatronic 0155 Oceanic 0146, 0156 Okano 0125, 0150, 0155 ONCEAS 0141 Opera 0155 Orbit 0149, 0155 Orion 0142, 0149, 0152, 0154,
0155, 0194 Orline 0155 Osaki 0140, 0141, 0143, 0155,
0229 Oso 0143 Otto Versand 0139, 0141,
0147, 0149, 0151, 0152, 0155, 0229
Pael 0141, 0228 Palladium 0125, 0141, 0150,
0155, 0229 Palsonic 0229 Panama 0140, 0141, 0142,
0154, 0155, 0228, 0229 Panasonic 0123, 0146, 0155,
0158, 0164, 0214, 0217 Panavision 0155 Pathe Cinema 0125, 0133,
0141, 0156, 0228 Pausa 0142, 0154 Perdio 0155, 0228 Perfekt 0155 Philco 0125, 0132, 0138, 0155 Philharmonic 0141, 0229 Philips 0115, 0117, 0138,
0141, 0149, 0152, 0155, 0160, 0163, 0165, 0170, 0171, 0173, 0174, 0182, 0183, 0195, 0196, 0202, 0205, 0212, 0215
Phoenix 0125, 0138, 0149, 0152, 0155, 0228
Phonola 0138, 0149, 0152, 0155, 0228
Plantron 0140, 0149, 0154, 0155
Playsonic 0229 Poppy 0142, 0154 Prandoni-Prince 0132, 0145 Precision 0141, 0229 Prima 0142, 0146, 0154
VSX-820_SYXCN_En.book 58 ページ 2010年4月12日 月曜日 午後6時52分
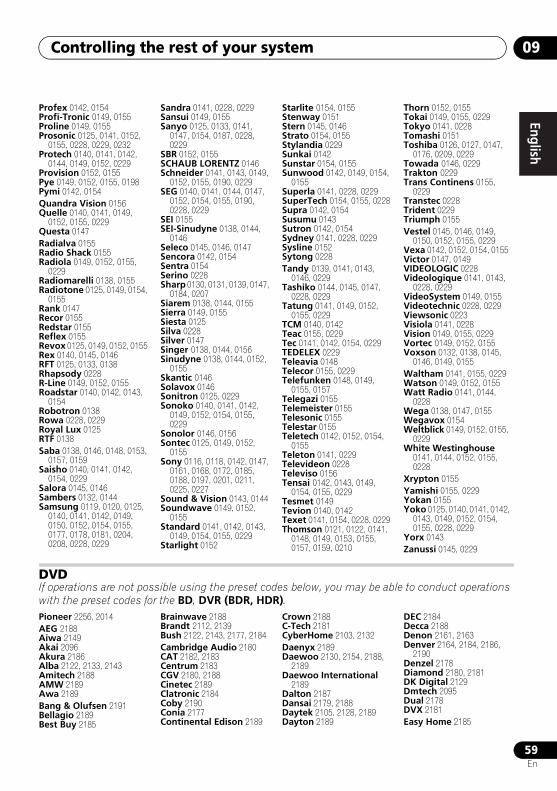
Controlling the rest of your system 09
59En
EnglishFrançais
Deutsch
NederlandsItaliano
Español
Profex 0142, 0154 Profi-Tronic 0149, 0155 Proline 0149, 0155 Prosonic 0125, 0141, 0152,
0155, 0228, 0229, 0232 Protech 0140, 0141, 0142,
0144, 0149, 0152, 0229 Provision 0152, 0155 Pye 0149, 0152, 0155, 0198 Pymi 0142, 0154 Quandra Vision 0156 Quelle 0140, 0141, 0149,
0152, 0155, 0229 Questa 0147 Radialva 0155 Radio Shack 0155 Radiola 0149, 0152, 0155,
0229 Radiomarelli 0138, 0155 Radiotone 0125, 0149, 0154,
0155 Rank 0147 Recor 0155 Redstar 0155 Reflex 0155 Revox 0125, 0149, 0152, 0155 Rex 0140, 0145, 0146 RFT 0125, 0133, 0138 Rhapsody 0228 R-Line 0149, 0152, 0155 Roadstar 0140, 0142, 0143,
0154 Robotron 0138 Rowa 0228, 0229 Royal Lux 0125 RTF 0138 Saba 0138, 0146, 0148, 0153,
0157, 0159 Saisho 0140, 0141, 0142,
0154, 0229 Salora 0145, 0146 Sambers 0132, 0144 Samsung 0119, 0120, 0125,
0140, 0141, 0142, 0149, 0150, 0152, 0154, 0155, 0177, 0178, 0181, 0204, 0208, 0228, 0229
Sandra 0141, 0228, 0229 Sansui 0149, 0155 Sanyo 0125, 0133, 0141,
0147, 0154, 0187, 0228, 0229
SBR 0152, 0155 SCHAUB LORENTZ 0146 Schneider 0141, 0143, 0149,
0152, 0155, 0190, 0229 SEG 0140, 0141, 0144, 0147,
0152, 0154, 0155, 0190, 0228, 0229
SEI 0155 SEI-Sinudyne 0138, 0144,
0146 Seleco 0145, 0146, 0147 Sencora 0142, 0154 Sentra 0154 Serino 0228 Sharp 0130, 0131, 0139, 0147,
0184, 0207 Siarem 0138, 0144, 0155 Sierra 0149, 0155 Siesta 0125 Silva 0228 Silver 0147 Singer 0138, 0144, 0156 Sinudyne 0138, 0144, 0152,
0155 Skantic 0146 Solavox 0146 Sonitron 0125, 0229 Sonoko 0140, 0141, 0142,
0149, 0152, 0154, 0155, 0229
Sonolor 0146, 0156 Sontec 0125, 0149, 0152,
0155 Sony 0116, 0118, 0142, 0147,
0161, 0168, 0172, 0185, 0188, 0197, 0201, 0211, 0225, 0227
Sound & Vision 0143, 0144 Soundwave 0149, 0152,
0155 Standard 0141, 0142, 0143,
0149, 0154, 0155, 0229 Starlight 0152
Starlite 0154, 0155 Stenway 0151 Stern 0145, 0146 Strato 0154, 0155 Stylandia 0229 Sunkai 0142 Sunstar 0154, 0155 Sunwood 0142, 0149, 0154,
0155 Superla 0141, 0228, 0229 SuperTech 0154, 0155, 0228 Supra 0142, 0154 Susumu 0143 Sutron 0142, 0154 Sydney 0141, 0228, 0229 Sysline 0152 Sytong 0228 Tandy 0139, 0141, 0143,
0146, 0229 Tashiko 0144, 0145, 0147,
0228, 0229 Tatung 0141, 0149, 0152,
0155, 0229 TCM 0140, 0142 Teac 0155, 0229 Tec 0141, 0142, 0154, 0229 TEDELEX 0229 Teleavia 0148 Telecor 0155, 0229 Telefunken 0148, 0149,
0155, 0157 Telegazi 0155 Telemeister 0155 Telesonic 0155 Telestar 0155 Teletech 0142, 0152, 0154,
0155 Teleton 0141, 0229 Televideon 0228 Televiso 0156 Tensai 0142, 0143, 0149,
0154, 0155, 0229 Tesmet 0149 Tevion 0140, 0142 Texet 0141, 0154, 0228, 0229 Thomson 0121, 0122, 0141,
0148, 0149, 0153, 0155, 0157, 0159, 0210
Thorn 0152, 0155 Tokai 0149, 0155, 0229 Tokyo 0141, 0228 Tomashi 0151 Toshiba 0126, 0127, 0147,
0176, 0209, 0229 Towada 0146, 0229 Trakton 0229 Trans Continens 0155,
0229 Transtec 0228 Trident 0229 Triumph 0155 Vestel 0145, 0146, 0149,
0150, 0152, 0155, 0229 Vexa 0142, 0152, 0154, 0155 Victor 0147, 0149 VIDEOLOGIC 0228 Videologique 0141, 0143,
0228, 0229 VideoSystem 0149, 0155 Videotechnic 0228, 0229 Viewsonic 0223 Visiola 0141, 0228 Vision 0149, 0155, 0229 Vortec 0149, 0152, 0155 Voxson 0132, 0138, 0145,
0146, 0149, 0155 Waltham 0141, 0155, 0229 Watson 0149, 0152, 0155 Watt Radio 0141, 0144,
0228 Wega 0138, 0147, 0155 Wegavox 0154 Weltblick 0149, 0152, 0155,
0229 White Westinghouse
0141, 0144, 0152, 0155, 0228
Xrypton 0155 Yamishi 0155, 0229 Yokan 0155 Yoko 0125, 0140, 0141, 0142,
0143, 0149, 0152, 0154, 0155, 0228, 0229
Yorx 0143 Zanussi 0145, 0229
DVDIf operations are not possible using the preset codes below, you may be able to conduct operations with the preset codes for the BD, DVR (BDR, HDR).Pioneer 2256, 2014AEG 2188 Aiwa 2149 Akai 2096 Akura 2186 Alba 2122, 2133, 2143 Amitech 2188 AMW 2189 Awa 2189 Bang & Olufsen 2191 Bellagio 2189 Best Buy 2185
Brainwave 2188 Brandt 2112, 2139 Bush 2122, 2143, 2177, 2184 Cambridge Audio 2180 CAT 2182, 2183 Centrum 2183 CGV 2180, 2188 Cinetec 2189 Clatronic 2184 Coby 2190 Conia 2177 Continental Edison 2189
Crown 2188 C-Tech 2181 CyberHome 2103, 2132 Daenyx 2189 Daewoo 2130, 2154, 2188,
2189 Daewoo International
2189 Dalton 2187 Dansai 2179, 2188 Daytek 2105, 2128, 2189 Dayton 2189
DEC 2184 Decca 2188 Denon 2161, 2163 Denver 2164, 2184, 2186,
2190Denzel 2178 Diamond 2180, 2181 DK Digital 2129 Dmtech 2095 Dual 2178 DVX 2181 Easy Home 2185
VSX-820_SYXCN_En.book 59 ページ 2010年4月12日 月曜日 午後6時52分
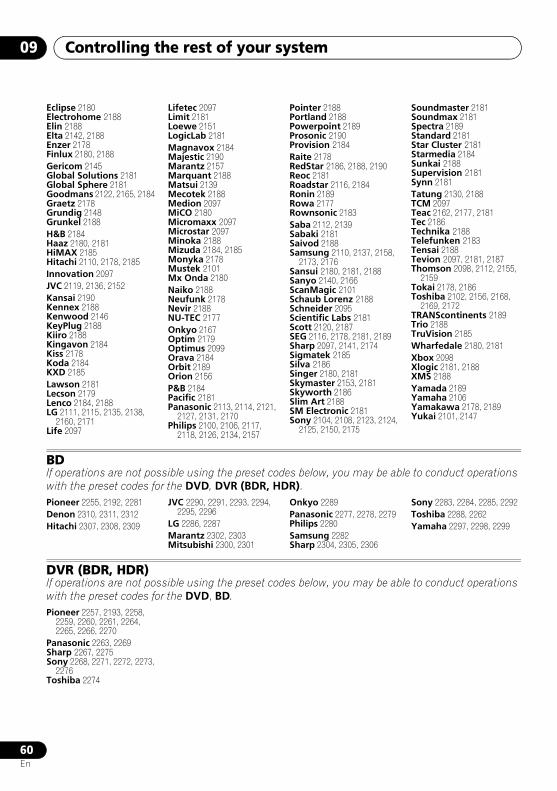
Controlling the rest of your system09
60En
Eclipse 2180 Electrohome 2188 Elin 2188 Elta 2142, 2188 Enzer 2178 Finlux 2180, 2188 Gericom 2145 Global Solutions 2181 Global Sphere 2181 Goodmans 2122, 2165, 2184 Graetz 2178 Grundig 2148 Grunkel 2188 H&B 2184 Haaz 2180, 2181 HiMAX 2185 Hitachi 2110, 2178, 2185 Innovation 2097 JVC 2119, 2136, 2152 Kansai 2190 Kennex 2188 Kenwood 2146 KeyPlug 2188 Kiiro 2188 Kingavon 2184 Kiss 2178 Koda 2184 KXD 2185 Lawson 2181 Lecson 2179 Lenco 2184, 2188 LG 2111, 2115, 2135, 2138,
2160, 2171 Life 2097
Lifetec 2097 Limit 2181 Loewe 2151 LogicLab 2181 Magnavox 2184 Majestic 2190 Marantz 2157 Marquant 2188 Matsui 2139 Mecotek 2188 Medion 2097 MiCO 2180 Micromaxx 2097 Microstar 2097 Minoka 2188 Mizuda 2184, 2185 Monyka 2178 Mustek 2101 Mx Onda 2180 Naiko 2188 Neufunk 2178 Nevir 2188 NU-TEC 2177 Onkyo 2167 Optim 2179 Optimus 2099 Orava 2184 Orbit 2189 Orion 2156 P&B 2184 Pacific 2181 Panasonic 2113, 2114, 2121,
2127, 2131, 2170 Philips 2100, 2106, 2117,
2118, 2126, 2134, 2157
Pointer 2188 Portland 2188 Powerpoint 2189 Prosonic 2190 Provision 2184 Raite 2178 RedStar 2186, 2188, 2190 Reoc 2181 Roadstar 2116, 2184 Ronin 2189 Rowa 2177 Rownsonic 2183 Saba 2112, 2139 Sabaki 2181 Saivod 2188 Samsung 2110, 2137, 2158,
2173, 2176 Sansui 2180, 2181, 2188 Sanyo 2140, 2166 ScanMagic 2101 Schaub Lorenz 2188 Schneider 2095 Scientific Labs 2181 Scott 2120, 2187 SEG 2116, 2178, 2181, 2189 Sharp 2097, 2141, 2174 Sigmatek 2185 Silva 2186 Singer 2180, 2181 Skymaster 2153, 2181 Skyworth 2186 Slim Art 2188 SM Electronic 2181 Sony 2104, 2108, 2123, 2124,
2125, 2150, 2175
Soundmaster 2181 Soundmax 2181 Spectra 2189 Standard 2181 Star Cluster 2181 Starmedia 2184 Sunkai 2188 Supervision 2181 Synn 2181 Tatung 2130, 2188 TCM 2097 Teac 2162, 2177, 2181 Tec 2186 Technika 2188 Telefunken 2183 Tensai 2188 Tevion 2097, 2181, 2187 Thomson 2098, 2112, 2155,
2159 Tokai 2178, 2186 Toshiba 2102, 2156, 2168,
2169, 2172 TRANScontinents 2189 Trio 2188 TruVision 2185 Wharfedale 2180, 2181 Xbox 2098 Xlogic 2181, 2188 XMS 2188 Yamada 2189 Yamaha 2106 Yamakawa 2178, 2189 Yukai 2101, 2147
BDIf operations are not possible using the preset codes below, you may be able to conduct operations with the preset codes for the DVD, DVR (BDR, HDR).Pioneer 2255, 2192, 2281Denon 2310, 2311, 2312 Hitachi 2307, 2308, 2309
JVC 2290, 2291, 2293, 2294, 2295, 2296
LG 2286, 2287 Marantz 2302, 2303 Mitsubishi 2300, 2301
Onkyo 2289 Panasonic 2277, 2278, 2279Philips 2280 Samsung 2282 Sharp 2304, 2305, 2306
Sony 2283, 2284, 2285, 2292 Toshiba 2288, 2262 Yamaha 2297, 2298, 2299
DVR (BDR, HDR)If operations are not possible using the preset codes below, you may be able to conduct operations with the preset codes for the DVD, BD.Pioneer 2257, 2193, 2258,
2259, 2260, 2261, 2264, 2265, 2266, 2270
Panasonic 2263, 2269 Sharp 2267, 2275 Sony 2268, 2271, 2272, 2273,
2276 Toshiba 2274
VSX-820_SYXCN_En.book 60 ページ 2010年4月12日 月曜日 午後6時52分
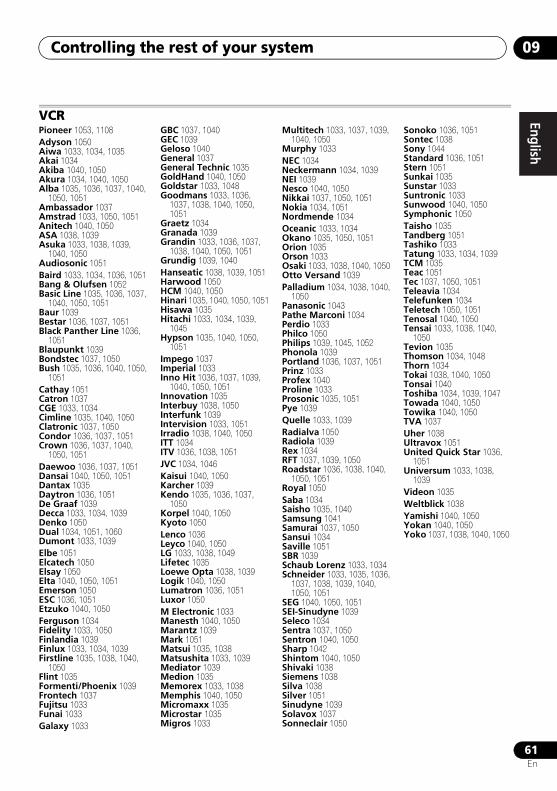
Controlling the rest of your system 09
61En
EnglishFrançais
Deutsch
NederlandsItaliano
Español
VCR Pioneer 1053, 1108Adyson 1050 Aiwa 1033, 1034, 1035 Akai 1034 Akiba 1040, 1050 Akura 1034, 1040, 1050 Alba 1035, 1036, 1037, 1040,
1050, 1051 Ambassador 1037 Amstrad 1033, 1050, 1051 Anitech 1040, 1050 ASA 1038, 1039 Asuka 1033, 1038, 1039,
1040, 1050 Audiosonic 1051 Baird 1033, 1034, 1036, 1051 Bang & Olufsen 1052 Basic Line 1035, 1036, 1037,
1040, 1050, 1051 Baur 1039 Bestar 1036, 1037, 1051 Black Panther Line 1036,
1051 Blaupunkt 1039 Bondstec 1037, 1050 Bush 1035, 1036, 1040, 1050,
1051 Cathay 1051 Catron 1037 CGE 1033, 1034 Cimline 1035, 1040, 1050 Clatronic 1037, 1050 Condor 1036, 1037, 1051 Crown 1036, 1037, 1040,
1050, 1051 Daewoo 1036, 1037, 1051 Dansai 1040, 1050, 1051 Dantax 1035 Daytron 1036, 1051 De Graaf 1039 Decca 1033, 1034, 1039 Denko 1050 Dual 1034, 1051, 1060Dumont 1033, 1039 Elbe 1051 Elcatech 1050 Elsay 1050 Elta 1040, 1050, 1051 Emerson 1050 ESC 1036, 1051 Etzuko 1040, 1050 Ferguson 1034 Fidelity 1033, 1050 Finlandia 1039 Finlux 1033, 1034, 1039 Firstline 1035, 1038, 1040,
1050 Flint 1035 Formenti/Phoenix 1039 Frontech 1037 Fujitsu 1033 Funai 1033 Galaxy 1033
GBC 1037, 1040 GEC 1039 Geloso 1040 General 1037 General Technic 1035 GoldHand 1040, 1050 Goldstar 1033, 1048 Goodmans 1033, 1036,
1037, 1038, 1040, 1050, 1051
Graetz 1034 Granada 1039 Grandin 1033, 1036, 1037,
1038, 1040, 1050, 1051 Grundig 1039, 1040 Hanseatic 1038, 1039, 1051 Harwood 1050 HCM 1040, 1050 Hinari 1035, 1040, 1050, 1051 Hisawa 1035 Hitachi 1033, 1034, 1039,
1045Hypson 1035, 1040, 1050,
1051Impego 1037 Imperial 1033 Inno Hit 1036, 1037, 1039,
1040, 1050, 1051 Innovation 1035 Interbuy 1038, 1050 Interfunk 1039 Intervision 1033, 1051 Irradio 1038, 1040, 1050 ITT 1034 ITV 1036, 1038, 1051 JVC 1034, 1046 Kaisui 1040, 1050 Karcher 1039 Kendo 1035, 1036, 1037,
1050 Korpel 1040, 1050 Kyoto 1050 Lenco 1036 Leyco 1040, 1050 LG 1033, 1038, 1049 Lifetec 1035 Loewe Opta 1038, 1039 Logik 1040, 1050 Lumatron 1036, 1051 Luxor 1050 M Electronic 1033 Manesth 1040, 1050 Marantz 1039 Mark 1051 Matsui 1035, 1038 Matsushita 1033, 1039 Mediator 1039 Medion 1035 Memorex 1033, 1038 Memphis 1040, 1050 Micromaxx 1035 Microstar 1035 Migros 1033
Multitech 1033, 1037, 1039, 1040, 1050
Murphy 1033 NEC 1034 Neckermann 1034, 1039 NEI 1039 Nesco 1040, 1050 Nikkai 1037, 1050, 1051 Nokia 1034, 1051 Nordmende 1034 Oceanic 1033, 1034 Okano 1035, 1050, 1051 Orion 1035 Orson 1033 Osaki 1033, 1038, 1040, 1050 Otto Versand 1039 Palladium 1034, 1038, 1040,
1050 Panasonic 1043 Pathe Marconi 1034 Perdio 1033 Philco 1050 Philips 1039, 1045, 1052 Phonola 1039 Portland 1036, 1037, 1051 Prinz 1033 Profex 1040 Proline 1033 Prosonic 1035, 1051 Pye 1039 Quelle 1033, 1039 Radialva 1050 Radiola 1039 Rex 1034 RFT 1037, 1039, 1050 Roadstar 1036, 1038, 1040,
1050, 1051 Royal 1050 Saba 1034 Saisho 1035, 1040 Samsung 1041 Samurai 1037, 1050 Sansui 1034 Saville 1051 SBR 1039 Schaub Lorenz 1033, 1034 Schneider 1033, 1035, 1036,
1037, 1038, 1039, 1040, 1050, 1051
SEG 1040, 1050, 1051 SEI-Sinudyne 1039 Seleco 1034 Sentra 1037, 1050 Sentron 1040, 1050 Sharp 1042 Shintom 1040, 1050 Shivaki 1038 Siemens 1038 Silva 1038 Silver 1051 Sinudyne 1039 Solavox 1037 Sonneclair 1050
Sonoko 1036, 1051 Sontec 1038 Sony 1044 Standard 1036, 1051 Stern 1051 Sunkai 1035 Sunstar 1033 Suntronic 1033 Sunwood 1040, 1050 Symphonic 1050 Taisho 1035 Tandberg 1051 Tashiko 1033 Tatung 1033, 1034, 1039 TCM 1035 Teac 1051 Tec 1037, 1050, 1051 Teleavia 1034 Telefunken 1034 Teletech 1050, 1051 Tenosal 1040, 1050 Tensai 1033, 1038, 1040,
1050 Tevion 1035 Thomson 1034, 1048 Thorn 1034 Tokai 1038, 1040, 1050 Tonsai 1040 Toshiba 1034, 1039, 1047 Towada 1040, 1050 Towika 1040, 1050 TVA 1037 Uher 1038 Ultravox 1051 United Quick Star 1036,
1051Universum 1033, 1038,
1039 Videon 1035 Weltblick 1038 Yamishi 1040, 1050 Yokan 1040, 1050 Yoko 1037, 1038, 1040, 1050
VSX-820_SYXCN_En.book 61 ページ 2010年4月12日 月曜日 午後6時52分
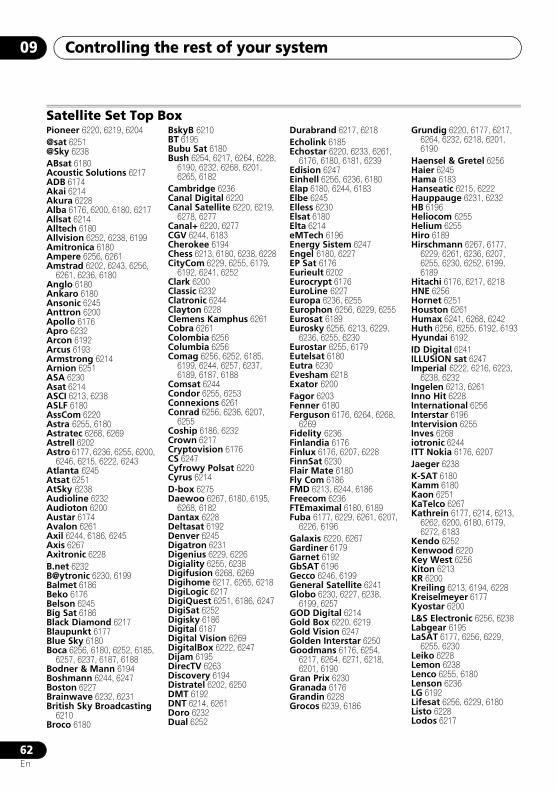
Controlling the rest of your system09
62En
Satellite Set Top BoxPioneer 6220, 6219, 6204@sat 6251 @Sky 6238 ABsat 6180 Acoustic Solutions 6217 ADB 6174 Akai 6214 Akura 6228 Alba 6176, 6200, 6180, 6217 Allsat 6214 Alltech 6180 Allvision 6252, 6238, 6199 Amitronica 6180 Ampere 6256, 6261 Amstrad 6202, 6243, 6256,
6261, 6236, 6180 Anglo 6180 Ankaro 6180 Ansonic 6245 Anttron 6200 Apollo 6176 Apro 6232 Arcon 6192 Arcus 6193 Armstrong 6214 Arnion 6251 ASA 6230 Asat 6214 ASCI 6213, 6238 ASLF 6180 AssCom 6220 Astra 6255, 6180 Astratec 6268, 6269 Astrell 6202 Astro 6177, 6236, 6255, 6200,
6246, 6215, 6222, 6243 Atlanta 6245 Atsat 6251 AtSky 6238 Audioline 6232 Audioton 6200 Austar 6174 Avalon 6261 Axil 6244, 6186, 6245 Axis 6267 Axitronic 6228 B.net 6232 B@ytronic 6230, 6199 Balmet 6186 Beko 6176 Belson 6245 Big Sat 6186 Black Diamond 6217 Blaupunkt 6177 Blue Sky 6180 Boca 6256, 6180, 6252, 6185,
6257, 6237, 6187, 6188 Bodner & Mann 6194 Boshmann 6244, 6247 Boston 6227 Brainwave 6232, 6231 British Sky Broadcasting
6210 Broco 6180
BskyB 6210 BT 6195 Bubu Sat 6180 Bush 6254, 6217, 6264, 6228,
6190, 6232, 6268, 6201, 6265, 6182
Cambridge 6236 Canal Digital 6220 Canal Satellite 6220, 6219,
6278, 6277 Canal+ 6220, 6277 CGV 6244, 6183 Cherokee 6194 Chess 6213, 6180, 6238, 6228 CityCom 6229, 6255, 6179,
6192, 6241, 6252 Clark 6200 Classic 6232 Clatronic 6244 Clayton 6228 Clemens Kamphus 6261 Cobra 6261 Colombia 6256 Columbia 6256 Comag 6256, 6252, 6185,
6199, 6244, 6257, 6237, 6189, 6187, 6188
Comsat 6244 Condor 6255, 6253 Connexions 6261 Conrad 6256, 6236, 6207,
6255 Coship 6186, 6232 Crown 6217 Cryptovision 6176 CS 6247 Cyfrowy Polsat 6220 Cyrus 6214 D-box 6275 Daewoo 6267, 6180, 6195,
6268, 6182 Dantax 6228 Deltasat 6192 Denver 6245 Digatron 6231 Digenius 6229, 6226 Digiality 6255, 6238 Digifusion 6268, 6269 Digihome 6217, 6265, 6218 DigiLogic 6217 DigiQuest 6251, 6186, 6247 DigiSat 6252 Digisky 6186 Digital 6187 Digital Vision 6269 DigitalBox 6222, 6247 Dijam 6195 DirecTV 6263 Discovery 6194 Distratel 6202, 6250 DMT 6192 DNT 6214, 6261 Doro 6232 Dual 6252
Durabrand 6217, 6218 Echolink 6185 Echostar 6220, 6233, 6261,
6176, 6180, 6181, 6239 Edision 6247 Einhell 6256, 6236, 6180 Elap 6180, 6244, 6183 Elbe 6245 Elless 6230 Elsat 6180 Elta 6214 eMTech 6196 Energy Sistem 6247 Engel 6180, 6227 EP Sat 6176 Eurieult 6202 Eurocrypt 6176 EuroLine 6227 Europa 6236, 6255 Europhon 6256, 6229, 6255 Eurosat 6189 Eurosky 6256, 6213, 6229,
6236, 6255, 6230 Eurostar 6255, 6179 Eutelsat 6180 Eutra 6230 Evesham 6218 Exator 6200 Fagor 6203 Fenner 6180 Ferguson 6176, 6264, 6268,
6269 Fidelity 6236 Finlandia 6176 Finlux 6176, 6207, 6228 FinnSat 6230 Flair Mate 6180 Fly Com 6186 FMD 6213, 6244, 6186 Freecom 6236 FTEmaximal 6180, 6189 Fuba 6177, 6229, 6261, 6207,
6226, 6196 Galaxis 6220, 6267 Gardiner 6179 Garnet 6192 GbSAT 6196 Gecco 6246, 6199 General Satellite 6241 Globo 6230, 6227, 6238,
6199, 6257 GOD Digital 6214 Gold Box 6220, 6219 Gold Vision 6247 Golden Interstar 6250 Goodmans 6176, 6254,
6217, 6264, 6271, 6218, 6201, 6190
Gran Prix 6230 Granada 6176 Grandin 6228 Grocos 6239, 6186
Grundig 6220, 6177, 6217, 6264, 6232, 6218, 6201, 6190
Haensel & Gretel 6256 Haier 6245 Hama 6183 Hanseatic 6215, 6222 Hauppauge 6231, 6232 HB 6196 Heliocom 6255 Helium 6255 Hiro 6189 Hirschmann 6267, 6177,
6229, 6261, 6236, 6207, 6255, 6230, 6252, 6199, 6189
Hitachi 6176, 6217, 6218 HNE 6256 Hornet 6251 Houston 6261 Humax 6241, 6268, 6242 Huth 6256, 6255, 6192, 6193 Hyundai 6192 ID Digital 6241 ILLUSION sat 6247 Imperial 6222, 6216, 6223,
6238, 6232 Ingelen 6213, 6261 Inno Hit 6228 International 6256 Interstar 6196 Intervision 6255 Inves 6268 iotronic 6244 ITT Nokia 6176, 6207 Jaeger 6238 K-SAT 6180 Kamm 6180 Kaon 6251 KaTelco 6267 Kathrein 6177, 6214, 6213,
6262, 6200, 6180, 6179, 6272, 6183
Kendo 6252 Kenwood 6220 Key West 6256 Kiton 6213 KR 6200 Kreiling 6213, 6194, 6228 Kreiselmeyer 6177 Kyostar 6200 L&S Electronic 6256, 6238 Labgear 6195 LaSAT 6177, 6256, 6229,
6255, 6230 Leiko 6228 Lemon 6238 Lenco 6255, 6180 Lenson 6236 LG 6192 Lifesat 6256, 6229, 6180 Listo 6228 Lodos 6217
VSX-820_SYXCN_En.book 62 ページ 2010年4月12日 月曜日 午後6時52分
Controlling the rest of your system 09
63En
EnglishFrançais
Deutsch
NederlandsItaliano
Español
Logik 6217 Logix 6192 Lorenzen 6256, 6229, 6255,
6226, 6231, 6257, 6237 Luxor 6236, 6207, 6265 M Electronic 6179 Manata 6256, 6180 Manhattan 6176, 6251 Marantz 6214 Maspro 6177, 6180 Matsui 6177, 6217, 6271,
6228, 6268, 6269 Max 6255 Maximum 6192, 6238 Mediabox 6220, 6219 Mediacom 6198 MediaSat 6220, 6219, 6236,
6278, 6277 Medion 6256, 6229, 6180,
6230, 6192, 6252, 6238, 6199, 6228
Medison 6180 Mega 6214 MegaSat 6189 Metronic 6256, 6200, 6180,
6179, 6202, 6250, 6238, 6244
Metz 6177 Micro 6236, 6255, 6200, 6180,
6231 Micro Elektronic 6180 Micro Technology 6180 Micromaxx 6229 Microstar 6229, 6192, 6226 Microtec 6180 Mitsubishi 6176 Morgan’s 6214, 6256, 6180,
6252, 6199 Multibroadcast 6174 Multichoice 6174 Myryad 6214 Mysat 6180 MySky 6212, 6211 NEOTION 6238 Netsat 6263 Neuhaus 6236, 6255, 6180 Neuling 6256, 6252, 6257,
6188 Neusat 6180 Neveling 6226 Newton 6261 NextWave 6193 Nichimen 6254 Nikko 6214, 6180 Noda Electronic 6202 Nokia 6220, 6176, 6207, 6206 Nordmende 6176 Octagon 6200 OctalTV 6231 Onn 6217, 6218 Opentel 6252, 6199 Optex 6213, 6180, 6250,
6244, 6203, 6228 Orbis 6252, 6238, 6199 Orbitech 6213, 6236, 6215,
6222, 6216, 6223
P/Sat 6252 Pace 6220, 6214, 6176, 6181,
6273, 6212, 6211 Pacific 6217 Packard Bell 6267 Palcom 6229, 6226, 6239 Palladium 6261, 6236 Palsat 6236 Panasonic 6176, 6178 Panda 6177, 6176, 6255 Pansat 6191 Pass 6183 Patriot 6256 peeKTon 6186, 6245 Philips 6220, 6177, 6214,
6275, 6219, 6277, 6268, 6232, 6179, 6200, 6176, 6263
Phoenix 6245 Phonotrend 6233 Pilotime 6278 Pino 6238 Pixx 6191 Planet 6261 PMB 6180, 6203 Polytron 6261 Portland 6195 Preisner 6256, 6261, 6243,
6185 Premier 6219 Primacom 6267 Pro Basic 6220, 6184 Proline 6217 Promax 6176 Proscan 6234 Quelle 6229, 6255 Radiola 6214 Radix 6261, 6243 Rainbow 6200 RCA 6234 Rebox 6196 Regal 6227 RFT 6214 Roadstar 6220, 6180 Rollmaster 6244 Rover 6180 Rownsonic 6183 SAB 6227, 6251 Saba 6255, 6230, 6202, 6184 Sabre 6176 Sagem 6275, 6258, 6277 Saivod 6245 Salora 6252 Samsung 6220, 6198, 6197,
6273, 6253 Sanyo 6228 SAT 6236 Sat Control 6251 Sat Partner 6236, 6200 Sat Team 6180 SAT+ 6239 Satcom 6255 Satec 6180 Satelco 6252 Satplus 6222 SatyCon 6247
Schaecke 6200 Schaub Lorenz 6196, 6245 Schneider 6198, 6227 Schwaiger 6267, 6256, 6262,
6255, 6230, 6202, 6192, 6238, 6199, 6186, 6257, 6247, 6232, 6187, 6188
Scientific Atlanta 6209 SCS 6229, 6230 Sedea Electronique 6256,
6213, 6198, 6250, 6228 Seemann 6261 SEG 6213, 6192, 6227, 6217,
6228 Septimo 6202 Serd 6199 Servimat 6203 ServiSat 6180, 6227 Shark 6247 Sharp 6265, 6218 Siemens 6177, 6261, 6238 Sigmatek 6245 Silva 6229 SilverCrest 6187 Skantin 6180 SKR 6180 SKT 6256 SKY 6263, 6210, 6212, 6211 SKY Italia 6220, 6212 Sky XL 6227, 6199 Skymaster 6233, 6180, 6192,
6238, 6239, 6183, 6203, 6184
Skymax 6214, 6244 Skypex 6230 Skyplus 6230, 6252, 6238,
6199 SkySat 6213, 6236, 6255,
6180 Skyvision 6238 SL 6256, 6229, 6230, 6231,
6257, 6232 SM Electronic 6233, 6180,
6239 Smart 6256, 6261, 6180,
6243, 6252, 6246, 6244, 6257, 6247
SmartVision 6186 Sony 6235, 6220, 6219, 6176 SR 6256 Star Sat 6196 Starland 6180 Starlite 6214 Stream 6212 Stream System 6251 Strong 6220, 6228, 6256,
6200, 6180, 6245, 6217, 6239
Sumin 6199 Sunny 6251 Sunsat 6180 Sunstar 6174, 6256 SuperMax 6193 Supratech 6244 Systec 6238 Tantec 6176 Targa 6191
Tatung 6176 TBoston 6227, 6245 Tecatel 6233 Technical 6228 Technika 6217, 6232, 6218 TechniSat 6213, 6261, 6176,
6236, 6215, 6222, 6216, 6223
Technomate 6250 Technosat 6193 Technosonic 6254, 6232 Technotrend 6232 Technowelt 6256, 6255 Techwood 6213, 6217,
6228, 6218 Telasat 6255 TELE System 6261, 6227,
6239, 6203 Teleciel 6200 Teleka 6261, 6236, 6255,
6200 Telesat 6255 Telestar 6213, 6236, 6215,
6222, 6216, 6223, 6227, 6238, 6228, 6232
Teletech 6213 Televes 6256, 6176, 6236,
6196, 6251, 6238, 6257 Telewire 6252 Tempo 6193 Tevion 6254, 6180, 6239,
6232, 6184 Thomson 6220, 6219, 6180,
6255, 6176, 6265, 6277, 6234, 6264, 6210, 6212
Thorn 6176 Tiny 6232 Tioko 6256 Titan 6189, 6184 TNT SAT 6258 Tokai 6214 Tonna 6176, 6236, 6180,
6203 Topfield 6198 Toshiba 6176, 6217 Trevi 6227 Triasat 6236 Triax 6220, 6214, 6256, 6189,
6253, 6228, 6203, 6261, 6213, 6257, 6244, 6195, 6264, 6227, 6243, 6180, 6236
Turnsat 6180 Twinner 6180, 6203 Unisat 6214, 6256 United 6227 Univers 6189 Universum 6177, 6213,
6229, 6255, 6230, 6215, 6227
Van Hunen 6226 Variosat 6177 VEA 6245 Ventana 6214 Vestel 6213, 6227, 6217, 6218 VH Sat 6229 Viasat 6273
VSX-820_SYXCN_En.book 63 ページ 2010年4月12日 月曜日 午後6時52分
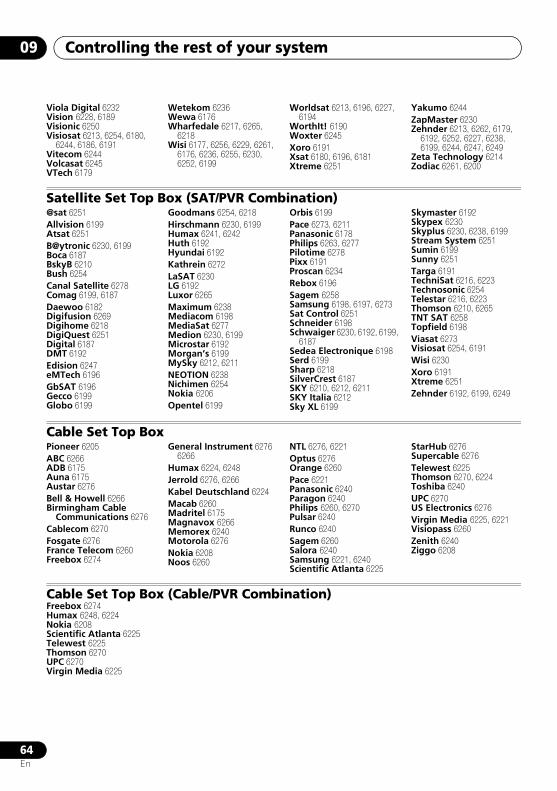
Controlling the rest of your system09
64En
Viola Digital 6232 Vision 6228, 6189 Visionic 6250 Visiosat 6213, 6254, 6180,
6244, 6186, 6191 Vitecom 6244 Volcasat 6245 VTech 6179
Wetekom 6236 Wewa 6176 Wharfedale 6217, 6265,
6218 Wisi 6177, 6256, 6229, 6261,
6176, 6236, 6255, 6230, 6252, 6199
Worldsat 6213, 6196, 6227, 6194
WorthIt! 6190 Woxter 6245 Xoro 6191 Xsat 6180, 6196, 6181 Xtreme 6251
Yakumo 6244 ZapMaster 6230 Zehnder 6213, 6262, 6179,
6192, 6252, 6227, 6238, 6199, 6244, 6247, 6249
Zeta Technology 6214 Zodiac 6261, 6200
Satellite Set Top Box (SAT/PVR Combination)@sat 6251 Allvision 6199 Atsat 6251 B@ytronic 6230, 6199 Boca 6187 BskyB 6210 Bush 6254 Canal Satellite 6278 Comag 6199, 6187 Daewoo 6182 Digifusion 6269 Digihome 6218 DigiQuest 6251 Digital 6187 DMT 6192 Edision 6247 eMTech 6196 GbSAT 6196 Gecco 6199 Globo 6199
Goodmans 6254, 6218 Hirschmann 6230, 6199 Humax 6241, 6242 Huth 6192 Hyundai 6192 Kathrein 6272 LaSAT 6230 LG 6192 Luxor 6265 Maximum 6238 Mediacom 6198 MediaSat 6277 Medion 6230, 6199 Microstar 6192 Morgan’s 6199 MySky 6212, 6211 NEOTION 6238 Nichimen 6254 Nokia 6206 Opentel 6199
Orbis 6199 Pace 6273, 6211 Panasonic 6178 Philips 6263, 6277 Pilotime 6278 Pixx 6191 Proscan 6234 Rebox 6196 Sagem 6258 Samsung 6198, 6197, 6273 Sat Control 6251 Schneider 6198 Schwaiger 6230, 6192, 6199,
6187Sedea Electronique 6198 Serd 6199 Sharp 6218 SilverCrest 6187 SKY 6210, 6212, 6211SKY Italia 6212 Sky XL 6199
Skymaster 6192 Skypex 6230 Skyplus 6230, 6238, 6199 Stream System 6251 Sumin 6199 Sunny 6251 Targa 6191 TechniSat 6216, 6223 Technosonic 6254 Telestar 6216, 6223 Thomson 6210, 6265 TNT SAT 6258 Topfield 6198 Viasat 6273 Visiosat 6254, 6191 Wisi 6230 Xoro 6191 Xtreme 6251 Zehnder 6192, 6199, 6249
Cable Set Top BoxPioneer 6205 ABC 6266 ADB 6175 Auna 6175 Austar 6276 Bell & Howell 6266 Birmingham Cable
Communications 6276 Cablecom 6270 Fosgate 6276 France Telecom 6260 Freebox 6274
General Instrument 6276 6266
Humax 6224, 6248 Jerrold 6276, 6266 Kabel Deutschland 6224 Macab 6260 Madritel 6175 Magnavox 6266 Memorex 6240 Motorola 6276 Nokia 6208 Noos 6260
NTL 6276, 6221 Optus 6276 Orange 6260 Pace 6221 Panasonic 6240 Paragon 6240 Philips 6260, 6270 Pulsar 6240 Runco 6240 Sagem 6260 Salora 6240 Samsung 6221, 6240 Scientific Atlanta 6225
StarHub 6276 Supercable 6276 Telewest 6225 Thomson 6270, 6224 Toshiba 6240 UPC 6270 US Electronics 6276 Virgin Media 6225, 6221 Visiopass 6260 Zenith 6240 Ziggo 6208
Cable Set Top Box (Cable/PVR Combination) Freebox 6274 Humax 6248, 6224 Nokia 6208 Scientific Atlanta 6225 Telewest 6225 Thomson 6270 UPC 6270 Virgin Media 6225
VSX-820_SYXCN_En.book 64 ページ 2010年4月12日 月曜日 午後6時52分
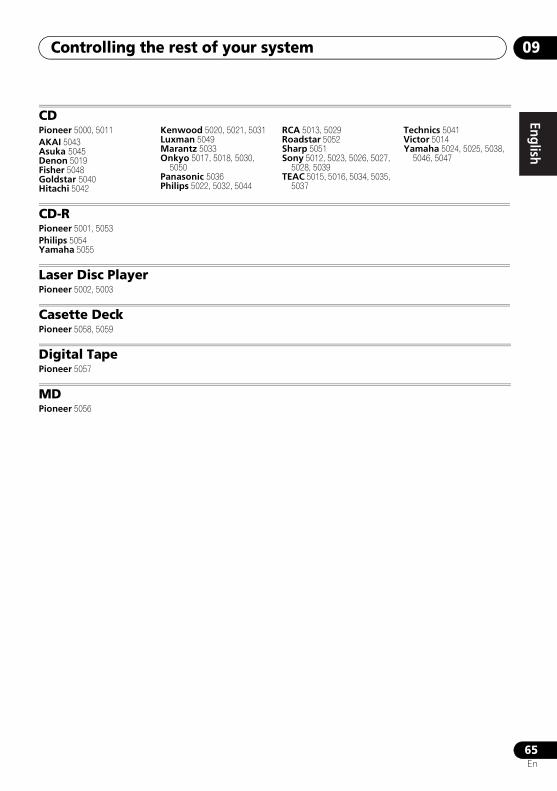
Controlling the rest of your system 09
65En
EnglishFrançais
Deutsch
NederlandsItaliano
Español
CDPioneer 5000, 5011 AKAI 5043 Asuka 5045 Denon 5019 Fisher 5048 Goldstar 5040 Hitachi 5042
Kenwood 5020, 5021, 5031 Luxman 5049 Marantz 5033 Onkyo 5017, 5018, 5030,
5050 Panasonic 5036 Philips 5022, 5032, 5044
RCA 5013, 5029 Roadstar 5052 Sharp 5051 Sony 5012, 5023, 5026, 5027,
5028, 5039TEAC 5015, 5016, 5034, 5035,
5037
Technics 5041 Victor 5014 Yamaha 5024, 5025, 5038,
5046, 5047
CD-RPioneer 5001, 5053Philips 5054Yamaha 5055
Laser Disc PlayerPioneer 5002, 5003
Casette DeckPioneer 5058, 5059
Digital TapePioneer 5057
MDPioneer 5056
VSX-820_SYXCN_En.book 65 ページ 2010年4月12日 月曜日 午後6時52分

Other connections10
66En
Chapter 10:
Other connections CAUTION
• Before making or changing the connections, switch off the power and disconnect the power cord from the power outlet. Plugging in components should be the last connection you make with your system.
• Do not allow any contact between speaker wires from different terminals.
Connecting an iPodThis receiver has a dedicated iPod terminal that will allow you to control playback of audio content from your iPod using the controls of this receiver.1
• Push down on the PUSH OPEN tab to access the iPod terminal.
Connecting your iPod to the receiver1 Set this receiver to the standby mode, and then use the iPod cable to connect your iPod to the iPod terminal on the front panel of this receiver.For the cable connection, refer to also the operating instructions for iPod.
2 Switch the receiver on and press the iPod USB input source button to switch the receiver to the iPod. The front panel display shows Loading while the receiver verifies the connection and retrieves data from the iPod.
Note1 • This system is compatible with the audio and the video of the iPod nano, iPod (fifth generation), iPod classic, iPod touch and
iPhone (iPod shuffle not supported). However, that some of the functions may be restricted for some models. Note, however, compatibility may vary depending on the software version of your iPod and iPhone. Please be sure to use the latest available software version.• iPod and iPhone are licensed for reproduction of non-copyrighted materials or materials the user is legally permitted to reproduce.• Features such as the equalizer cannot be controlled using this receiver, and we recommend switching the equalizer off before connecting.• Pioneer cannot under any circumstances accept responsibility for any direct or indirect loss arising from any inconvenience or loss of recorded material resulting from the iPod failure.
MASTERVOLUME
MCACCSETUP MIC
VIDEO INPUT
AUDIOL RVIDEO
iPodiPhone
USB
CONTROL ON / OFF
MENU
Music
Genius >PlaylistsArtistsAlbumsSongsRadioGenresComposersAudiobooks
This receiver
iPod
iPod cable
VSX-820_SYXCN_En.book 66 ページ 2010年4月12日 月曜日 午後6時52分
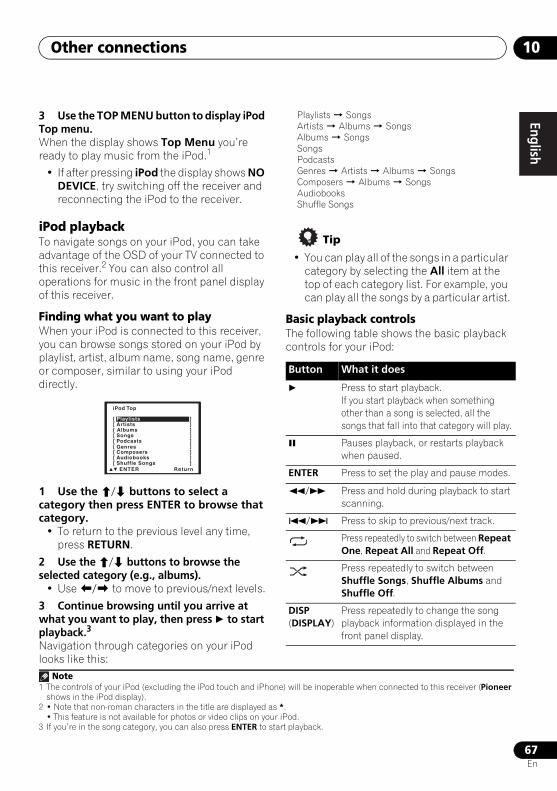
Other connections 10
67En
EnglishFrançais
Deutsch
NederlandsItaliano
Español
3 Use the TOP MENU button to display iPod Top menu.When the display shows Top Menu you’re ready to play music from the iPod.1
• If after pressing iPod the display shows NO DEVICE, try switching off the receiver and reconnecting the iPod to the receiver.
iPod playbackTo navigate songs on your iPod, you can take advantage of the OSD of your TV connected to this receiver.2 You can also control all operations for music in the front panel display of this receiver.
Finding what you want to playWhen your iPod is connected to this receiver, you can browse songs stored on your iPod by playlist, artist, album name, song name, genre or composer, similar to using your iPod directly.
1 Use the / buttons to select a category then press ENTER to browse that category.
• To return to the previous level any time, press RETURN.
2 Use the / buttons to browse the selected category (e.g., albums).
• Use / to move to previous/next levels.
3 Continue browsing until you arrive at what you want to play, then press to start playback.3
Navigation through categories on your iPod looks like this:
Playlists SongsArtists Albums SongsAlbums SongsSongsPodcastsGenres Artists Albums SongsComposers Albums SongsAudiobooksShuffle Songs
Tip
• You can play all of the songs in a particular category by selecting the All item at the top of each category list. For example, you can play all the songs by a particular artist.
Basic playback controlsThe following table shows the basic playback controls for your iPod:
Note1 The controls of your iPod (excluding the iPod touch and iPhone) will be inoperable when connected to this receiver (Pioneer
shows in the iPod display). 2 • Note that non-roman characters in the title are displayed as *.
• This feature is not available for photos or video clips on your iPod.3 If you’re in the song category, you can also press ENTER to start playback.
iPod Top
[ Playlists ] [ Artists ] [ Albums ] [ Songs ] [ Podcasts ] [ Genres ] [ Composers ] [ Audiobooks ] [ Shuffle Songs ]
ENTER Return
Button What it does
Press to start playback.If you start playback when something other than a song is selected, all the songs that fall into that category will play.
Pauses playback, or restarts playback when paused.
ENTER Press to set the play and pause modes.
/ Press and hold during playback to start scanning.
/ Press to skip to previous/next track.
Press repeatedly to switch between Repeat One, Repeat All and Repeat Off.
Press repeatedly to switch between Shuffle Songs, Shuffle Albums and Shuffle Off.
DISP(DISPLAY)
Press repeatedly to change the song playback information displayed in the front panel display.
VSX-820_SYXCN_En.book 67 ページ 2010年4月12日 月曜日 午後6時52分
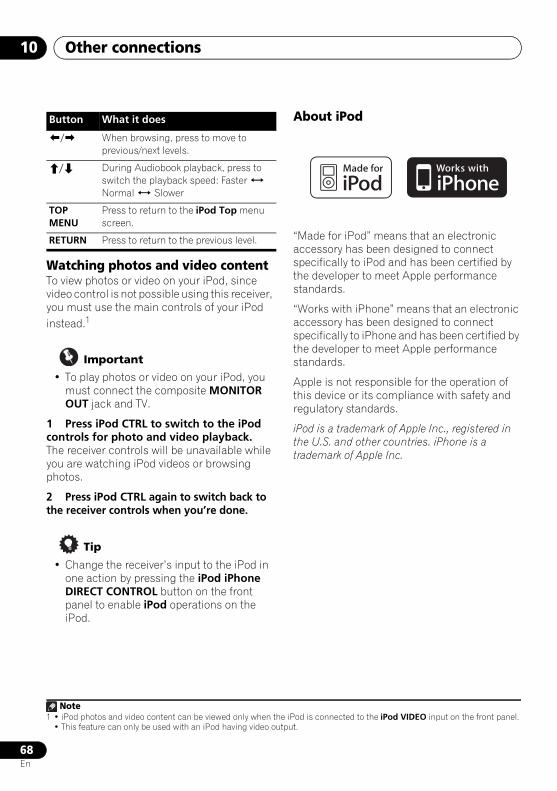
Other connections10
68En
Watching photos and video contentTo view photos or video on your iPod, since video control is not possible using this receiver, you must use the main controls of your iPod instead.1
Important
• To play photos or video on your iPod, you must connect the composite MONITOR OUT jack and TV.
1 Press iPod CTRL to switch to the iPod controls for photo and video playback.The receiver controls will be unavailable while you are watching iPod videos or browsing photos.
2 Press iPod CTRL again to switch back to the receiver controls when you’re done.
Tip
• Change the receiver’s input to the iPod in one action by pressing the iPod iPhone DIRECT CONTROL button on the front panel to enable iPod operations on the iPod.
About iPod
“Made for iPod” means that an electronic accessory has been designed to connect specifically to iPod and has been certified by the developer to meet Apple performance standards.
“Works with iPhone” means that an electronic accessory has been designed to connect specifically to iPhone and has been certified by the developer to meet Apple performance standards.
Apple is not responsible for the operation of this device or its compliance with safety and regulatory standards.
iPod is a trademark of Apple Inc., registered in the U.S. and other countries. iPhone is a trademark of Apple Inc.
/ When browsing, press to move to previous/next levels.
/ During Audiobook playback, press to switch the playback speed: Faster Normal Slower
TOP MENU
Press to return to the iPod Top menu screen.
RETURN Press to return to the previous level.
Note1 • iPod photos and video content can be viewed only when the iPod is connected to the iPod VIDEO input on the front panel.
• This feature can only be used with an iPod having video output.
Button What it does
VSX-820_SYXCN_En.book 68 ページ 2010年4月12日 月曜日 午後6時52分
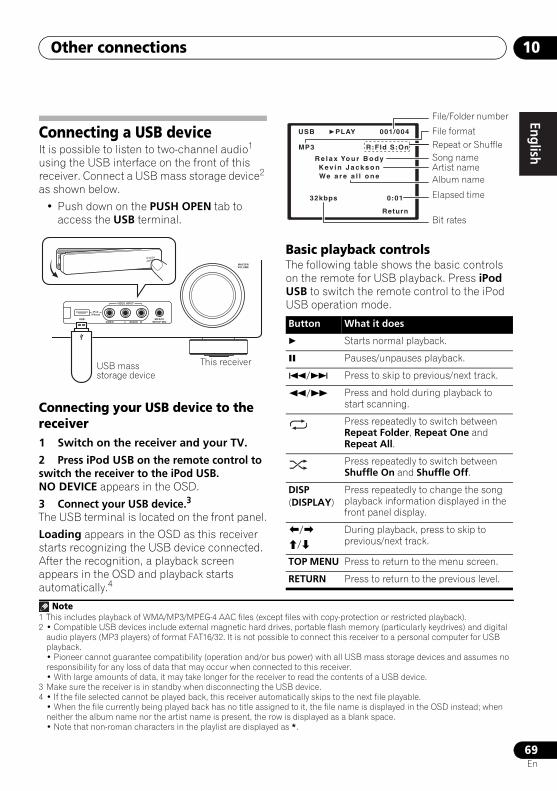
Other connections 10
69En
EnglishFrançais
Deutsch
NederlandsItaliano
Español
Connecting a USB deviceIt is possible to listen to two-channel audio1 using the USB interface on the front of this receiver. Connect a USB mass storage device2 as shown below.
• Push down on the PUSH OPEN tab to access the USB terminal.
Connecting your USB device to the receiver1 Switch on the receiver and your TV.
2 Press iPod USB on the remote control to switch the receiver to the iPod USB.NO DEVICE appears in the OSD.
3 Connect your USB device.3
The USB terminal is located on the front panel.
Loading appears in the OSD as this receiver starts recognizing the USB device connected. After the recognition, a playback screen appears in the OSD and playback starts automatically.4
Basic playback controlsThe following table shows the basic controls on the remote for USB playback. Press iPod USB to switch the remote control to the iPod USB operation mode.
Note1 This includes playback of WMA/MP3/MPEG-4 AAC files (except files with copy-protection or restricted playback).2 • Compatible USB devices include external magnetic hard drives, portable flash memory (particularly keydrives) and digital
audio players (MP3 players) of format FAT16/32. It is not possible to connect this receiver to a personal computer for USB playback.• Pioneer cannot guarantee compatibility (operation and/or bus power) with all USB mass storage devices and assumes no responsibility for any loss of data that may occur when connected to this receiver.• With large amounts of data, it may take longer for the receiver to read the contents of a USB device.
3 Make sure the receiver is in standby when disconnecting the USB device.4 • If the file selected cannot be played back, this receiver automatically skips to the next file playable.
• When the file currently being played back has no title assigned to it, the file name is displayed in the OSD instead; when neither the album name nor the artist name is present, the row is displayed as a blank space.• Note that non-roman characters in the playlist are displayed as *.
MASTERVOLUME
MCACCSETUP MIC
VIDEO INPUT
AUDIOL RVIDEO
iPodiPhone
USB
CONTROL ON / OFF
This receiverUSB mass storage device
Button What it does
Starts normal playback.
Pauses/unpauses playback.
/ Press to skip to previous/next track.
/ Press and hold during playback to start scanning.
Press repeatedly to switch between Repeat Folder, Repeat One and Repeat All.
Press repeatedly to switch between Shuffle On and Shuffle Off.
DISP(DISPLAY)
Press repeatedly to change the song playback information displayed in the front panel display.
//
During playback, press to skip to previous/next track.
TOP MENU Press to return to the menu screen.
RETURN Press to return to the previous level.
USB
R:Fld S:On
001/004PLAY
Return
R e l a x Yo u r B o dyKev i n J a ck s o nWe a r e a l l o n e
32kbps 0:01
MP3
File/Folder number
File formatRepeat or ShuffleSong nameArtist nameAlbum name
Elapsed time
Bit rates
VSX-820_SYXCN_En.book 69 ページ 2010年4月12日 月曜日 午後6時52分
Other connections10
70En
Important
If a USB Error message lights in the display, try following the points below:
• Switch the receiver off, then on again.
• Reconnect the USB device with the receiver switched off.
• Select another input source (like BD), then switch back to iPod USB.
• Use a dedicated AC adapter (supplied with the device) for USB power.
For more information on error messages, see USB messages on page 79.
If this doesn’t remedy the problem, it is likely your USB device is incompatible.
Compressed audio compatibilityNote that although most standard bit/sampling rate combinations for compressed audio are compatible, some irregularly encoded files may not play back. The list below shows compatible formats for compressed audio files:
• MP3 (MPEG-1/2/2.5 Audio Layer 3) – Sampling rates: 8 kHz to 48 kHz; Bit rates: 8 kbps to 320 kbps (128 kbps or higher recommended); File extension: .mp3
• WMA (Windows Media Audio) – Sampling rates: 32 kHz / 44.1 kHz; Bit rates: 32 kbps to 192 kbps (128 kbps or higher recommended); File extension: .wma; WMA9 Pro and WMA lossless encoding: No
• AAC (MPEG-4 Advanced Audio Coding) – Sampling rates: 11.025 kHz to 48 kHz; Bit rates: 16 kbps to 320 kbps (128 kbps or higher recommended); File extension: .m4a; Apple lossless encoding: No
Other compatibility information• VBR (variable bit rate) MP3/WMA/MPEG-4
AAC playback: Yes1
• DRM (Digital Rights Management) protection compatible: Yes (DRM-protected audio files will not play in this receiver.)
About MPEG-4 AACAdvanced Audio Coding (AAC) is at the core of the MPEG-4 AAC standard, which incorporates MPEG-2 AAC, forming the basis of the MPEG-4 audio compression technology. The file format and extension used depend on the application used to encode the AAC file. This receiver plays back AAC files encoded by iTunes® bearing the extension ‘.m4a’. DRM-protected files will not play, and files encoded with some versions of iTunes® may not play.
Apple and iTunes are trademarks of Apple Inc., registered in the U.S. and other countries.
About WMA
The Windows Media logo printed on the box indicates that this receiver can playback Windows Media Audio content.
WMA is an acronym for Windows Media Audio and refers to an audio compression technology developed by Microsoft Corporation. This receiver plays back WMA files encoded using Windows Media® Player bearing the extension ‘.wma’. Note that DRM-protected files will not play, and files encoded with some versions of Windows Media® Player may not play.
Windows Media, and the Windows logo are trademarks or registered trademarks of Microsoft Corporation in the United States and/or other countries.
Note1 Note that in some cases playback time will not be displayed correctly.
VSX-820_SYXCN_En.book 70 ページ 2010年4月12日 月曜日 午後6時52分
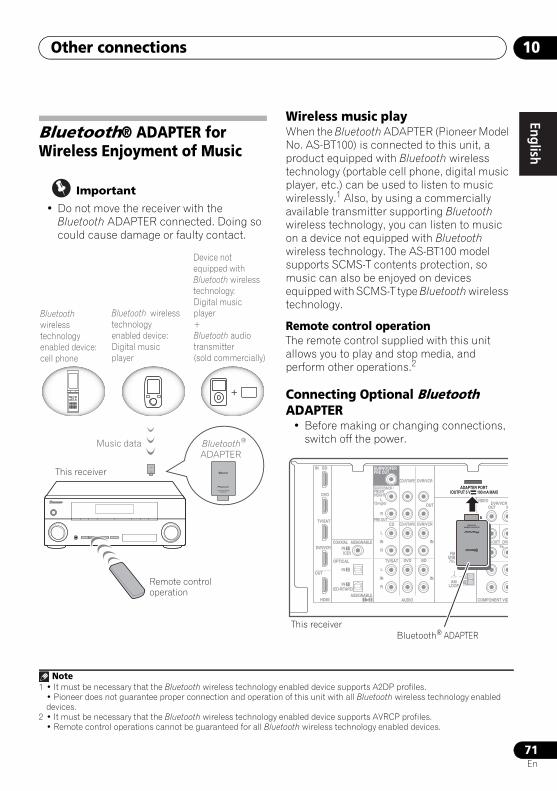
Other connections 10
71En
EnglishFrançais
Deutsch
NederlandsItaliano
Español
Bluetooth® ADAPTER for Wireless Enjoyment of Music
Important
• Do not move the receiver with the Bluetooth ADAPTER connected. Doing so could cause damage or faulty contact.
Wireless music playWhen the Bluetooth ADAPTER (Pioneer Model No. AS-BT100) is connected to this unit, a product equipped with Bluetooth wireless technology (portable cell phone, digital music player, etc.) can be used to listen to music wirelessly.1 Also, by using a commercially available transmitter supporting Bluetooth wireless technology, you can listen to music on a device not equipped with Bluetooth wireless technology. The AS-BT100 model supports SCMS-T contents protection, so music can also be enjoyed on devices equipped with SCMS-T type Bluetooth wireless technology.
Remote control operationThe remote control supplied with this unit allows you to play and stop media, and perform other operations.2
Connecting Optional Bluetooth ADAPTER
• Before making or changing connections, switch off the power.
This receiver
Remote control operation
Music data Bluetooth®
ADAPTER
Bluetooth wireless technology enabled device:cell phone
Bluetooth wireless technologyenabled device:Digital music player
Device not equipped with Bluetooth wireless technology:Digital music player+Bluetooth audiotransmitter (sold commercially)
Note1 • It must be necessary that the Bluetooth wireless technology enabled device supports A2DP profiles.
• Pioneer does not guarantee proper connection and operation of this unit with all Bluetooth wireless technology enabled devices.
2 • It must be necessary that the Bluetooth wireless technology enabled device supports AVRCP profiles.• Remote control operations cannot be guaranteed for all Bluetooth wireless technology enabled devices.
IN BD
SURR BACK /FRONTHEIGHT
L(Single)
R
R
L
IN
R
L
IN
IN
OUT
IN
CD
TV/SAT DVD BD
DVR/VCR
MONITOR OUTPR PB
DVD
COMPONENT VID
DVR/VCROUT IN
CD-R/TAPE
DVR/VCR CD-R/TAPE
PRE OUT
DVD
TV/SAT
COAXIAL
OPTICAL
(CD)IN
ASSIGNABLE
ASSIGNABLE
OUT
HDMI
DVR/VCR 1
(CD-R/TAPE)IN
AUDIO
ADAPTER PORT
VIDEO
(OUTPUT 5 V 100 mA MAX)
1
1 2
IN 2
SUBWOOFERPRE OUT
ANTENNAFM
UNBAL75
AMLOOP
Bluetooth® ADAPTERThis receiver
VSX-820_SYXCN_En.book 71 ページ 2010年4月12日 月曜日 午後6時52分
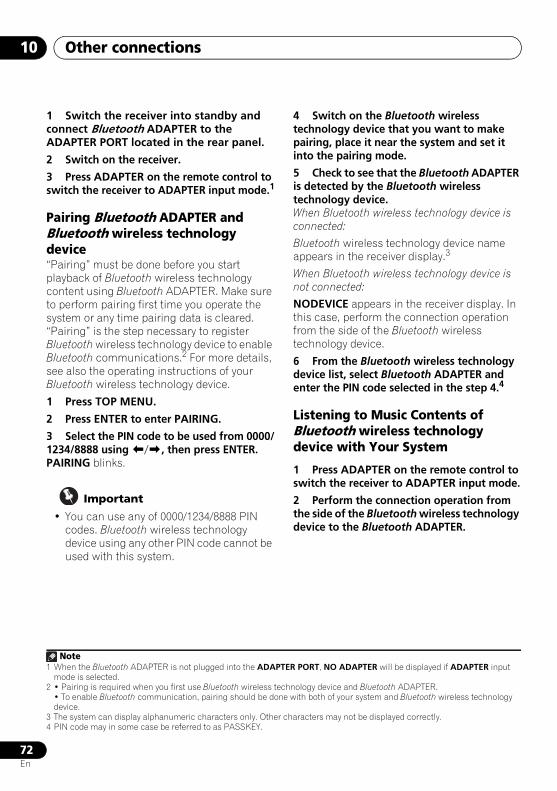
Other connections10
72En
1 Switch the receiver into standby and connect Bluetooth ADAPTER to the ADAPTER PORT located in the rear panel.
2 Switch on the receiver.
3 Press ADAPTER on the remote control to switch the receiver to ADAPTER input mode.1
Pairing Bluetooth ADAPTER and Bluetooth wireless technology device“Pairing” must be done before you start playback of Bluetooth wireless technology content using Bluetooth ADAPTER. Make sure to perform pairing first time you operate the system or any time pairing data is cleared. “Pairing” is the step necessary to register Bluetooth wireless technology device to enable Bluetooth communications.2 For more details, see also the operating instructions of your Bluetooth wireless technology device.
1 Press TOP MENU.
2 Press ENTER to enter PAIRING.
3 Select the PIN code to be used from 0000/1234/8888 using /, then press ENTER.PAIRING blinks.
Important
• You can use any of 0000/1234/8888 PIN codes. Bluetooth wireless technology device using any other PIN code cannot be used with this system.
4 Switch on the Bluetooth wireless technology device that you want to make pairing, place it near the system and set it into the pairing mode.
5 Check to see that the Bluetooth ADAPTER is detected by the Bluetooth wireless technology device.When Bluetooth wireless technology device is connected:
Bluetooth wireless technology device name appears in the receiver display.3
When Bluetooth wireless technology device is not connected:
NODEVICE appears in the receiver display. In this case, perform the connection operation from the side of the Bluetooth wireless technology device.
6 From the Bluetooth wireless technology device list, select Bluetooth ADAPTER and enter the PIN code selected in the step 4.4
Listening to Music Contents of Bluetooth wireless technology device with Your System
1 Press ADAPTER on the remote control to switch the receiver to ADAPTER input mode.
2 Perform the connection operation from the side of the Bluetooth wireless technology device to the Bluetooth ADAPTER.
Note1 When the Bluetooth ADAPTER is not plugged into the ADAPTER PORT, NO ADAPTER will be displayed if ADAPTER input
mode is selected.2 • Pairing is required when you first use Bluetooth wireless technology device and Bluetooth ADAPTER.
• To enable Bluetooth communication, pairing should be done with both of your system and Bluetooth wireless technology device.
3 The system can display alphanumeric characters only. Other characters may not be displayed correctly.4 PIN code may in some case be referred to as PASSKEY.
VSX-820_SYXCN_En.book 72 ページ 2010年4月12日 月曜日 午後6時52分
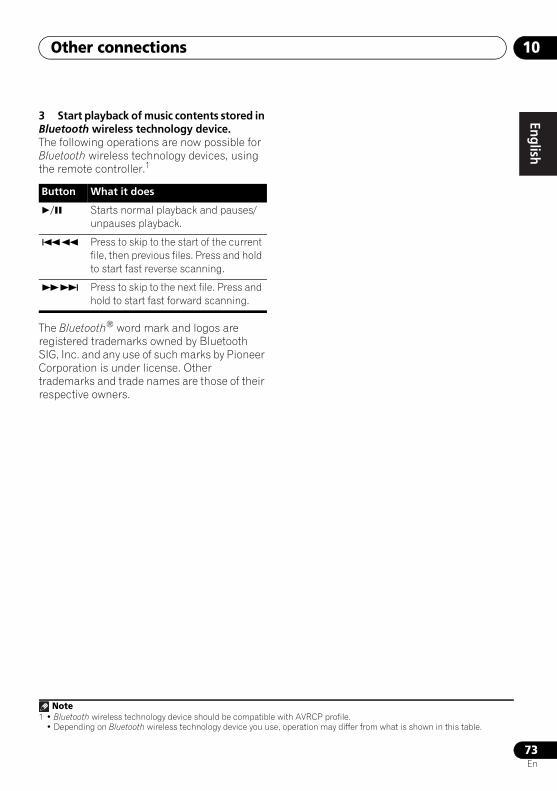
Other connections 10
73En
EnglishFrançais
Deutsch
NederlandsItaliano
Español
3 Start playback of music contents stored in Bluetooth wireless technology device.The following operations are now possible for Bluetooth wireless technology devices, using the remote controller.1
The Bluetooth® word mark and logos are registered trademarks owned by Bluetooth SIG, Inc. and any use of such marks by Pioneer Corporation is under license. Other trademarks and trade names are those of their respective owners.
Button What it does
/ Starts normal playback and pauses/unpauses playback.
Press to skip to the start of the current file, then previous files. Press and hold to start fast reverse scanning.
Press to skip to the next file. Press and hold to start fast forward scanning.
Note1 • Bluetooth wireless technology device should be compatible with AVRCP profile.
• Depending on Bluetooth wireless technology device you use, operation may differ from what is shown in this table.
VSX-820_SYXCN_En.book 73 ページ 2010年4月12日 月曜日 午後6時52分
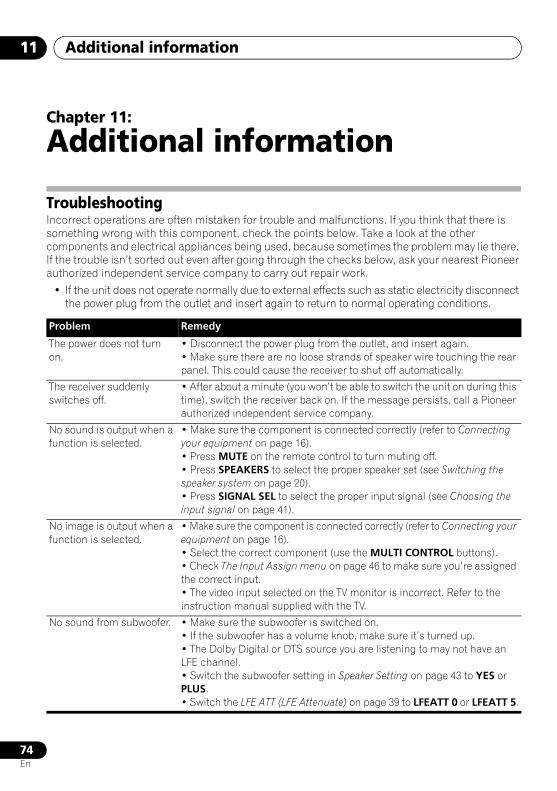
Additional information11
74En
Chapter 11:
Additional information
TroubleshootingIncorrect operations are often mistaken for trouble and malfunctions. If you think that there is something wrong with this component, check the points below. Take a look at the other components and electrical appliances being used, because sometimes the problem may lie there. If the trouble isn’t sorted out even after going through the checks below, ask your nearest Pioneer authorized independent service company to carry out repair work.
• If the unit does not operate normally due to external effects such as static electricity disconnect the power plug from the outlet and insert again to return to normal operating conditions.
Problem Remedy
The power does not turn on.
• Disconnect the power plug from the outlet, and insert again.• Make sure there are no loose strands of speaker wire touching the rear panel. This could cause the receiver to shut off automatically.
The receiver suddenly switches off.
• After about a minute (you won’t be able to switch the unit on during this time), switch the receiver back on. If the message persists, call a Pioneer authorized independent service company.
No sound is output when a function is selected.
• Make sure the component is connected correctly (refer to Connecting your equipment on page 16).• Press MUTE on the remote control to turn muting off.• Press SPEAKERS to select the proper speaker set (see Switching the speaker system on page 20).• Press SIGNAL SEL to select the proper input signal (see Choosing the input signal on page 41).
No image is output when a function is selected.
• Make sure the component is connected correctly (refer to Connecting your equipment on page 16).• Select the correct component (use the MULTI CONTROL buttons).• Check The Input Assign menu on page 46 to make sure you’re assigned the correct input.• The video input selected on the TV monitor is incorrect. Refer to the instruction manual supplied with the TV.
No sound from subwoofer. • Make sure the subwoofer is switched on.• If the subwoofer has a volume knob, make sure it’s turned up.• The Dolby Digital or DTS source you are listening to may not have an LFE channel.• Switch the subwoofer setting in Speaker Setting on page 43 to YES or PLUS.• Switch the LFE ATT (LFE Attenuate) on page 39 to LFEATT 0 or LFEATT 5.
VSX-820_SYXCN_En.book 74 ページ 2010年4月12日 月曜日 午後6時52分
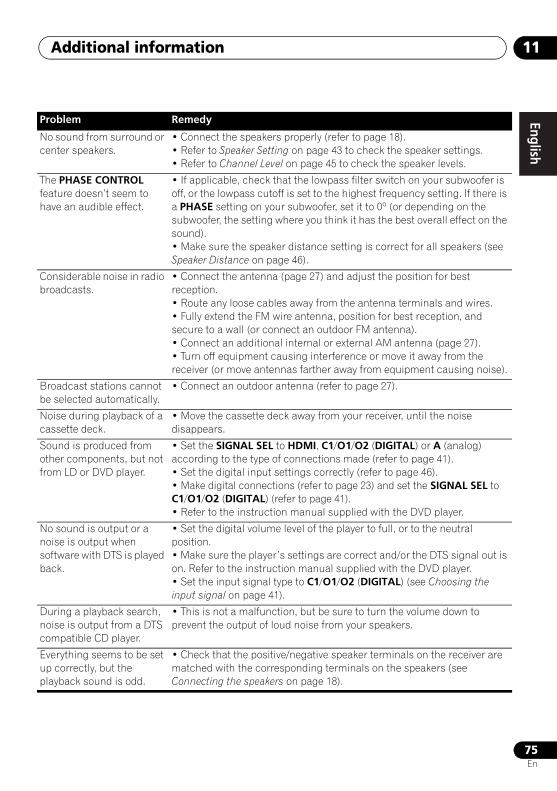
Additional information 11
75En
EnglishFrançais
Deutsch
NederlandsItaliano
Español
No sound from surround or center speakers.
• Connect the speakers properly (refer to page 18).• Refer to Speaker Setting on page 43 to check the speaker settings.• Refer to Channel Level on page 45 to check the speaker levels.
The PHASE CONTROL feature doesn’t seem to have an audible effect.
• If applicable, check that the lowpass filter switch on your subwoofer is off, or the lowpass cutoff is set to the highest frequency setting. If there is a PHASE setting on your subwoofer, set it to 0º (or depending on the subwoofer, the setting where you think it has the best overall effect on the sound).• Make sure the speaker distance setting is correct for all speakers (see Speaker Distance on page 46).
Considerable noise in radio broadcasts.
• Connect the antenna (page 27) and adjust the position for best reception.• Route any loose cables away from the antenna terminals and wires.• Fully extend the FM wire antenna, position for best reception, and secure to a wall (or connect an outdoor FM antenna).• Connect an additional internal or external AM antenna (page 27).• Turn off equipment causing interference or move it away from the receiver (or move antennas farther away from equipment causing noise).
Broadcast stations cannot be selected automatically.
• Connect an outdoor antenna (refer to page 27).
Noise during playback of a cassette deck.
• Move the cassette deck away from your receiver, until the noise disappears.
Sound is produced from other components, but not from LD or DVD player.
• Set the SIGNAL SEL to HDMI, C1/O1/O2 (DIGITAL) or A (analog) according to the type of connections made (refer to page 41).• Set the digital input settings correctly (refer to page 46).• Make digital connections (refer to page 23) and set the SIGNAL SEL to C1/O1/O2 (DIGITAL) (refer to page 41).• Refer to the instruction manual supplied with the DVD player.
No sound is output or a noise is output when software with DTS is played back.
• Set the digital volume level of the player to full, or to the neutral position.• Make sure the player’s settings are correct and/or the DTS signal out is on. Refer to the instruction manual supplied with the DVD player.• Set the input signal type to C1/O1/O2 (DIGITAL) (see Choosing the input signal on page 41).
During a playback search, noise is output from a DTS compatible CD player.
• This is not a malfunction, but be sure to turn the volume down to prevent the output of loud noise from your speakers.
Everything seems to be set up correctly, but the playback sound is odd.
• Check that the positive/negative speaker terminals on the receiver are matched with the corresponding terminals on the speakers (see Connecting the speakers on page 18).
Problem Remedy
VSX-820_SYXCN_En.book 75 ページ 2010年4月12日 月曜日 午後6時52分
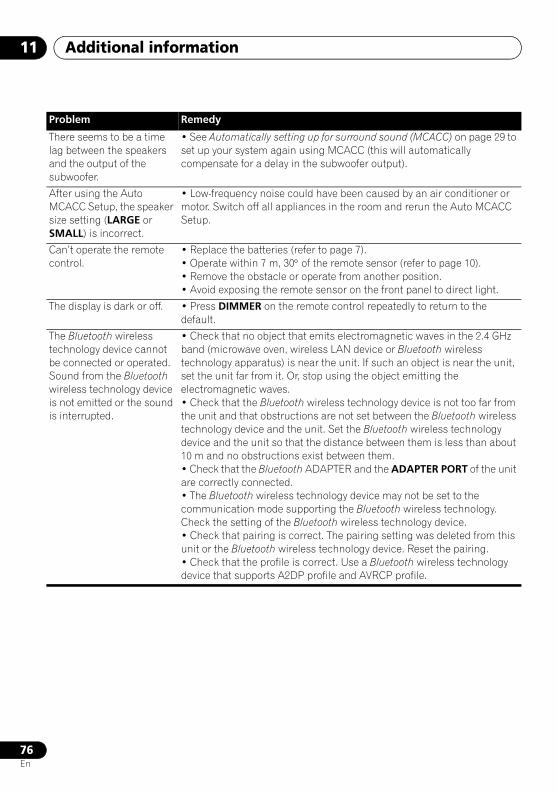
Additional information11
76En
There seems to be a time lag between the speakers and the output of the subwoofer.
• See Automatically setting up for surround sound (MCACC) on page 29 to set up your system again using MCACC (this will automatically compensate for a delay in the subwoofer output).
After using the Auto MCACC Setup, the speaker size setting (LARGE or SMALL) is incorrect.
• Low-frequency noise could have been caused by an air conditioner or motor. Switch off all appliances in the room and rerun the Auto MCACC Setup.
Can’t operate the remote control.
• Replace the batteries (refer to page 7).• Operate within 7 m, 30° of the remote sensor (refer to page 10).• Remove the obstacle or operate from another position.• Avoid exposing the remote sensor on the front panel to direct light.
The display is dark or off. • Press DIMMER on the remote control repeatedly to return to the default.
The Bluetooth wireless technology device cannot be connected or operated. Sound from the Bluetooth wireless technology device is not emitted or the sound is interrupted.
• Check that no object that emits electromagnetic waves in the 2.4 GHz band (microwave oven, wireless LAN device or Bluetooth wireless technology apparatus) is near the unit. If such an object is near the unit, set the unit far from it. Or, stop using the object emitting the electromagnetic waves.• Check that the Bluetooth wireless technology device is not too far from the unit and that obstructions are not set between the Bluetooth wireless technology device and the unit. Set the Bluetooth wireless technology device and the unit so that the distance between them is less than about 10 m and no obstructions exist between them. • Check that the Bluetooth ADAPTER and the ADAPTER PORT of the unit are correctly connected.• The Bluetooth wireless technology device may not be set to the communication mode supporting the Bluetooth wireless technology. Check the setting of the Bluetooth wireless technology device. • Check that pairing is correct. The pairing setting was deleted from this unit or the Bluetooth wireless technology device. Reset the pairing.• Check that the profile is correct. Use a Bluetooth wireless technology device that supports A2DP profile and AVRCP profile.
Problem Remedy
VSX-820_SYXCN_En.book 76 ページ 2010年4月12日 月曜日 午後6時52分
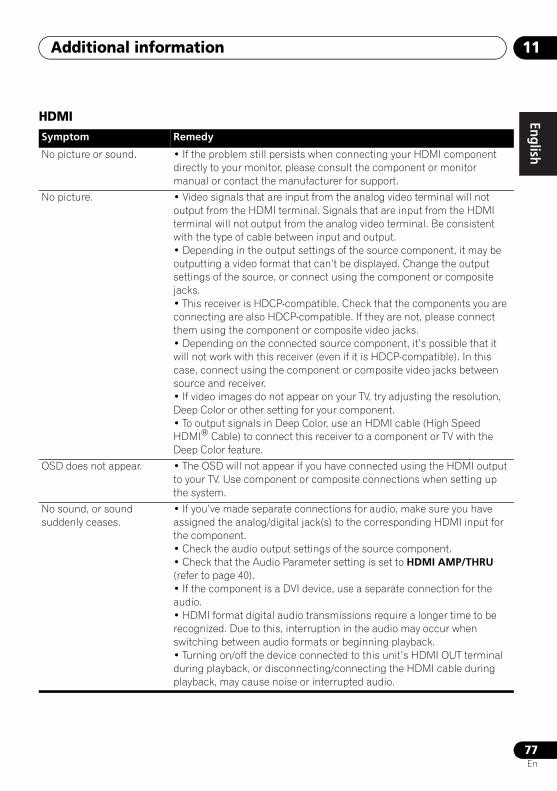
Additional information 11
77En
EnglishFrançais
Deutsch
NederlandsItaliano
Español
HDMISymptom Remedy
No picture or sound. • If the problem still persists when connecting your HDMI component directly to your monitor, please consult the component or monitor manual or contact the manufacturer for support.
No picture. • Video signals that are input from the analog video terminal will not output from the HDMI terminal. Signals that are input from the HDMI terminal will not output from the analog video terminal. Be consistent with the type of cable between input and output.• Depending in the output settings of the source component, it may be outputting a video format that can’t be displayed. Change the output settings of the source, or connect using the component or composite jacks.• This receiver is HDCP-compatible. Check that the components you are connecting are also HDCP-compatible. If they are not, please connect them using the component or composite video jacks.• Depending on the connected source component, it’s possible that it will not work with this receiver (even if it is HDCP-compatible). In this case, connect using the component or composite video jacks between source and receiver.• If video images do not appear on your TV, try adjusting the resolution, Deep Color or other setting for your component.• To output signals in Deep Color, use an HDMI cable (High Speed HDMI® Cable) to connect this receiver to a component or TV with the Deep Color feature.
OSD does not appear. • The OSD will not appear if you have connected using the HDMI output to your TV. Use component or composite connections when setting up the system.
No sound, or sound suddenly ceases.
• If you’ve made separate connections for audio, make sure you have assigned the analog/digital jack(s) to the corresponding HDMI input for the component. • Check the audio output settings of the source component.• Check that the Audio Parameter setting is set to HDMI AMP/THRU (refer to page 40).• If the component is a DVI device, use a separate connection for the audio.• HDMI format digital audio transmissions require a longer time to be recognized. Due to this, interruption in the audio may occur when switching between audio formats or beginning playback.• Turning on/off the device connected to this unit’s HDMI OUT terminal during playback, or disconnecting/connecting the HDMI cable during playback, may cause noise or interrupted audio.
VSX-820_SYXCN_En.book 77 ページ 2010年4月12日 月曜日 午後6時52分
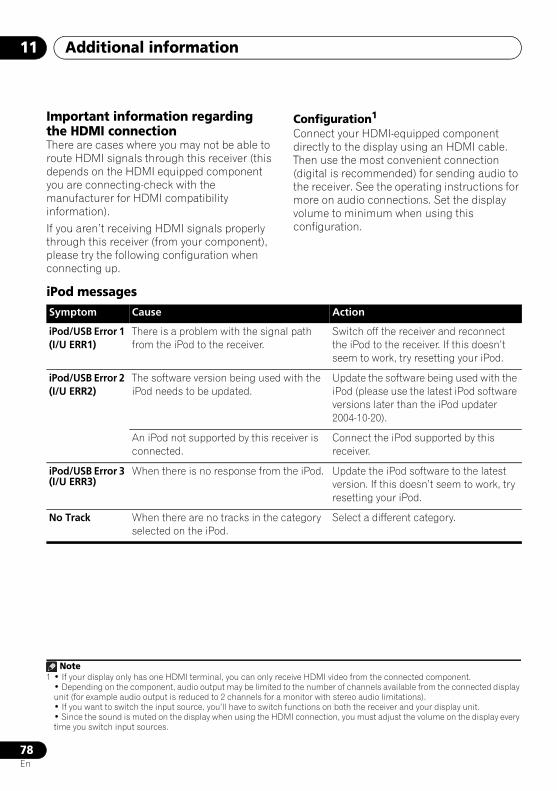
Additional information11
78En
Important information regarding the HDMI connectionThere are cases where you may not be able to route HDMI signals through this receiver (this depends on the HDMI equipped component you are connecting-check with the manufacturer for HDMI compatibility information).
If you aren’t receiving HDMI signals properly through this receiver (from your component), please try the following configuration when connecting up.
Configuration1
Connect your HDMI-equipped component directly to the display using an HDMI cable. Then use the most convenient connection (digital is recommended) for sending audio to the receiver. See the operating instructions for more on audio connections. Set the display volume to minimum when using this configuration.
iPod messages
Note1 • If your display only has one HDMI terminal, you can only receive HDMI video from the connected component.
• Depending on the component, audio output may be limited to the number of channels available from the connected display unit (for example audio output is reduced to 2 channels for a monitor with stereo audio limitations).• If you want to switch the input source, you’ll have to switch functions on both the receiver and your display unit.• Since the sound is muted on the display when using the HDMI connection, you must adjust the volume on the display every time you switch input sources.
Symptom Cause Action
iPod/USB Error 1 (I/U ERR1)
There is a problem with the signal path from the iPod to the receiver.
Switch off the receiver and reconnect the iPod to the receiver. If this doesn’t seem to work, try resetting your iPod.
iPod/USB Error 2 (I/U ERR2)
The software version being used with the iPod needs to be updated.
Update the software being used with the iPod (please use the latest iPod software versions later than the iPod updater 2004-10-20).
An iPod not supported by this receiver is connected.
Connect the iPod supported by this receiver.
iPod/USB Error 3 (I/U ERR3)
When there is no response from the iPod. Update the iPod software to the latest version. If this doesn’t seem to work, try resetting your iPod.
No Track When there are no tracks in the category selected on the iPod.
Select a different category.
VSX-820_SYXCN_En.book 78 ページ 2010年4月12日 月曜日 午後6時52分
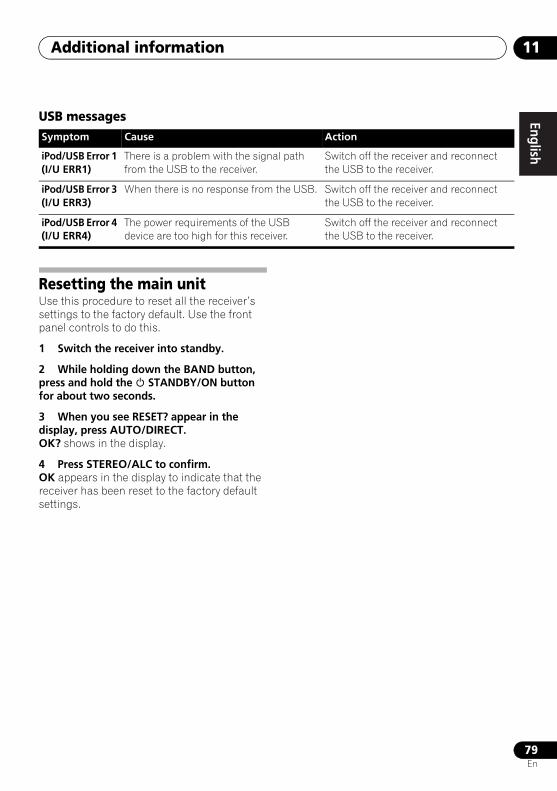
Additional information 11
79En
EnglishFrançais
Deutsch
NederlandsItaliano
Español
USB messages
Resetting the main unitUse this procedure to reset all the receiver’s settings to the factory default. Use the front panel controls to do this.
1 Switch the receiver into standby.
2 While holding down the BAND button, press and hold the STANDBY/ON button for about two seconds.
3 When you see RESET? appear in the display, press AUTO/DIRECT.OK? shows in the display.
4 Press STEREO/ALC to confirm.OK appears in the display to indicate that the receiver has been reset to the factory default settings.
Symptom Cause Action
iPod/USB Error 1 (I/U ERR1)
There is a problem with the signal path from the USB to the receiver.
Switch off the receiver and reconnect the USB to the receiver.
iPod/USB Error 3 (I/U ERR3)
When there is no response from the USB. Switch off the receiver and reconnect the USB to the receiver.
iPod/USB Error 4 (I/U ERR4)
The power requirements of the USB device are too high for this receiver.
Switch off the receiver and reconnect the USB to the receiver.
VSX-820_SYXCN_En.book 79 ページ 2010年4月12日 月曜日 午後6時52分 79
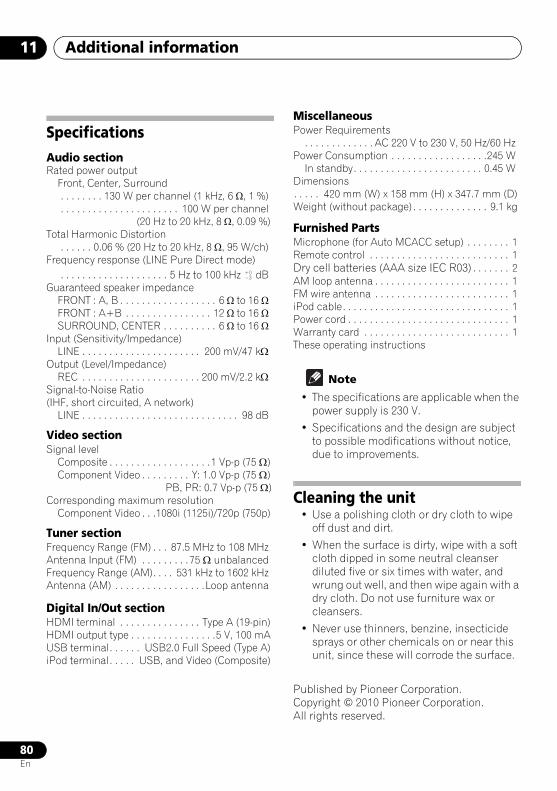
Additional information11
80En
SpecificationsAudio sectionRated power output
Front, Center, Surround . . . . . . . . 130 W per channel (1 kHz, 6 Ω, 1 %) . . . . . . . . . . . . . . . . . . . . . . 100 W per channel
(20 Hz to 20 kHz, 8 Ω, 0.09 %)Total Harmonic Distortion
. . . . . . 0.06 % (20 Hz to 20 kHz, 8 Ω, 95 W/ch)Frequency response (LINE Pure Direct mode)
. . . . . . . . . . . . . . . . . . . . 5 Hz to 100 kHz dBGuaranteed speaker impedance
FRONT : A, B . . . . . . . . . . . . . . . . . . 6 Ω to 16 ΩFRONT : A+B . . . . . . . . . . . . . . . . 12 Ω to 16 ΩSURROUND, CENTER . . . . . . . . . . 6 Ω to 16 Ω
Input (Sensitivity/Impedance)LINE . . . . . . . . . . . . . . . . . . . . . . 200 mV/47 kΩ
Output (Level/Impedance)REC . . . . . . . . . . . . . . . . . . . . . . 200 mV/2.2 kΩ
Signal-to-Noise Ratio (IHF, short circuited, A network)
LINE . . . . . . . . . . . . . . . . . . . . . . . . . . . . . 98 dB
Video sectionSignal level
Composite . . . . . . . . . . . . . . . . . . .1 Vp-p (75 Ω)Component Video . . . . . . . . . Y: 1.0 Vp-p (75 Ω)
PB, PR: 0.7 Vp-p (75 Ω)Corresponding maximum resolution
Component Video . . .1080i (1125i)/720p (750p)
Tuner sectionFrequency Range (FM) . . . 87.5 MHz to 108 MHzAntenna Input (FM) . . . . . . . . .75 Ω unbalancedFrequency Range (AM). . . . 531 kHz to 1602 kHzAntenna (AM) . . . . . . . . . . . . . . . . .Loop antenna
Digital In/Out sectionHDMI terminal . . . . . . . . . . . . . . . Type A (19-pin)HDMI output type . . . . . . . . . . . . . . . .5 V, 100 mAUSB terminal. . . . . . USB2.0 Full Speed (Type A)iPod terminal. . . . . USB, and Video (Composite)
MiscellaneousPower Requirements
. . . . . . . . . . . . . AC 220 V to 230 V, 50 Hz/60 HzPower Consumption . . . . . . . . . . . . . . . . . .245 W
In standby. . . . . . . . . . . . . . . . . . . . . . . . 0.45 WDimensions. . . . . 420 mm (W) x 158 mm (H) x 347.7 mm (D)Weight (without package) . . . . . . . . . . . . . . 9.1 kg
Furnished PartsMicrophone (for Auto MCACC setup) . . . . . . . . 1Remote control . . . . . . . . . . . . . . . . . . . . . . . . . . 1Dry cell batteries (AAA size IEC R03) . . . . . . . 2AM loop antenna . . . . . . . . . . . . . . . . . . . . . . . . . 1FM wire antenna . . . . . . . . . . . . . . . . . . . . . . . . . 1iPod cable. . . . . . . . . . . . . . . . . . . . . . . . . . . . . . . 1Power cord . . . . . . . . . . . . . . . . . . . . . . . . . . . . . . 1Warranty card . . . . . . . . . . . . . . . . . . . . . . . . . . . 1These operating instructions
Note
• The specifications are applicable when the power supply is 230 V.
• Specifications and the design are subject to possible modifications without notice, due to improvements.
Cleaning the unit• Use a polishing cloth or dry cloth to wipe
off dust and dirt.
• When the surface is dirty, wipe with a soft cloth dipped in some neutral cleanser diluted five or six times with water, and wrung out well, and then wipe again with a dry cloth. Do not use furniture wax or cleansers.
• Never use thinners, benzine, insecticide sprays or other chemicals on or near this unit, since these will corrode the surface.
Published by Pioneer Corporation.Copyright © 2010 Pioneer Corporation.All rights reserved.
VSX-820_SYXCN_En.book 80 ページ 2010年4月12日 月曜日 午後6時52分 80

Additional information 11
81En
EnglishFrançais
Deutsch
NederlandsItaliano
Español
VSX-820_SYXCN_En.book 81 ページ 2010年4月12日 月曜日 午後6時52分
Ce point d’exclamation, placé dans un triangle équilatéral, a pour but d’attirer l’attention de l’utilisateur sur la présence, dans les documents qui accompagnentl’appareil, d’explications importantes du point de vue de l’exploitation ou del’entretien.
Ce symbole de l’éclair, placé dans un triangle équilatéral, a pour but d’attirer l’attention de l’utilisateur sur la présence, à l’intérieur du coffret de l’appareil, de“tensions dangereuses” non isolées d’unegrandeur suffisante pour représenter un risque d’électrocution pour les êtres humains.
ATTENTION :POUR ÉVITER TOUT RISQUED’ÉLECTROCUTION, NE PAS ENLEVER LE COUVERCLE (NI LE PANNEAU ARRIÈRE).AUCUNE PIÈCE RÉPARABLE PARL’UTILISATEUR NE SE TROUVE À L’INTÉRIEUR. CONFIER TOUT ENTRETIEN À UN PERSONNEL QUALIFIÉ UNIQUEMENT.
ATTENTIONDANGER D´ELECTROCUTION
NE PAS OUVRIR
IMPORTANT
D3-4-2-1-1_A1_Fr
AVERTISSEMENTCet appareil n’est pas étanche. Pour éviter les risques d’incendie et de décharge électrique, ne placez près delui un récipient rempli d’eau, tel qu’un vase ou un potde fleurs, et ne l’exposez pas à des gouttes d’eau, des éclaboussures, de la pluie ou de l’humidité.
D3-4-2-1-3_A1_Fr
AVERTISSEMENTAvant de brancher l’appareil pour la première, lisezattentivement la section suivante.La tension de l’alimentation électrique disponiblevarie selon le pays ou la région. Assurez-vous que la tension du secteur de la région où l’appareil serautilisé correspond à la tension requise (par ex. 230 V ou 120 V), indiquée sur le panneau arrière.
D3-4-2-1-4*_A1_Fr
AVERTISSEMENTPour éviter les risques d’incendie, ne placez aucuneflamme nue (telle qu’une bougie allumée) sur l’appareil.
D3-4-2-1-7a_A1_Fr
PRÉCAUTION DE VENTILATIONLors de l’installation de l’appareil, veillez à laisser un espace suffisant autour de ses parois de manière à améliorer la dissipation de chaleur (au moins 40 cm sur le dessus, 10 cm à l’arrière et 20 cm de chaque côté).
AVERTISSEMENTLes fentes et ouvertures du coffret sont prévues pour laventilation, pour assurer un fonctionnement stable del’appareil et pour éviter sa surchauffe. Pour éviter les risques d’incendie, ne bouchez jamais les ouvertures etne les recouvrez pas d’objets, tels que journaux, nappes ou rideaux, et n’utilisez pas l’appareil posé sur un tapis épais ou un lit.
D3-4-2-1-7b*_A1_Fr
Milieu de fonctionnementTempérature et humidité du milieu de fonctionnement :De +5 °C à +35 °C (de +41 °F à +95 °F) ; Humiditérelative inférieure à 85 % (orifices de ventilation non obstrués)N’installez pas l’appareil dans un endroit mal ventilé ou un lieu soumis à une forte humidité ou en plein soleil (ou à une forte lumière artificielle).
D3-4-2-1-7c*_A1_Fr
Ce produit est destiné à une utilisation domestique générale. Toute panne due à une utilisation autre qu'à des fins privées (comme une utilisation à des fins commerciales dans un restaurant, dans un autocar ou sur un bateau) et qui nécessite une réparation sera aux frais du client, même pendant la période de garantie.
K041_A1_Fr
VSX-820_SYXCN_Fr.book 2 ページ 2010年4月12日 月曜日 午後6時59分
K058a_A1_Fr
Pb
Information à destination des utilisateurs sur la collecte et l’élimination des équipements et batteries usagés
Ces symboles qui figurent sur les produits, les emballages et/ou les documents d’accompagnement signifient que les équipements électriques et électroniques etbatteries usagés ne doivent pas être jetés avec les déchets ménagers et font l’objetd’une collecte sélective.
Pour assurer l’enlèvement et le traitement appropriés des produits et batteriesusagés, merci de les retourner dans les points de collecte sélective habilitésconformément à la législation locale en vigueur.
En respectant les circuits de collecte sélective mis en place pour ces produits, vouscontribuerez à économiser des ressources précieuses et à prévenir les impactsnégatifs éventuels sur la santé humaine et l’environnement qui pourraient résulterd’une mauvaise gestion des déchets.
Pour plus d’information sur la collecte et le traitement des produits et batteriesusagés, veuillez contacter votre municipalité, votre service de gestion des déchets ou le point de vente chez qui vous avez acheté ces produits.
Ces symboles ne sont valables que dans les pays de l’Union Européenne.Pour les pays n’appartenant pas à l’Union Européenne :Si vous souhaitez jeter ces articles, veuillez contacter les autorités ou revendeurs locaux pour connaître les méthodes d’élimination appropriées.
Exemples de marquagepour les batteries
Marquage pour leséquipements
Si la fiche d’alimentation secteur de cet appareil neconvient pas à la prise secteur à utiliser, la fiche doit être remplacée par une appropriée. Ceremplacement et la fixation d’une fiche secteur sur lecordon d’alimentation de cet appareil doivent êtreeffectués par un personnel de service qualifié. En cas de branchement sur une prise secteur, la fiche decoupure peut provoquer une sérieuse déchargeélectrique. Assurez-vous qu’elle est éliminée correctement après sa dépose.L’appareil doit être déconnecté en débranchant safiche secteur au niveau de la prise murale si vousprévoyez une période prolongée de non utilisation (par exemple avant un départ en vacances).
D3-4-2-2-1a_A1_Fr
ATTENTIONL’interrupteur STANDBY/ON de cet appareil necoupe pas complètement celui-ci de sa prise secteur.Comme le cordon d’alimentation fait office dedispositif de déconnexion du secteur, il devra êtredébranché au niveau de la prise secteur pour que l’appareil soit complètement hors tension. Parconséquent, veillez à installer l’appareil de tellemanière que son cordon d’alimentation puisse êtrefacilement débranché de la prise secteur en cas d’accident. Pour éviter tout risque d’incendie, lecordon d’alimentation sera débranché au niveau dela prise secteur si vous prévoyez une périodeprolongée de non utilisation (par exemple avant un départ en vacances).
D3-4-2-2-2a*_A1_Fr
Fabriqué sous licence de Dolby Laboratories. Les termes « Dolby », « Pro Logic » et « Surround EX », ainsi que le sigle double D sont des marques commerciales de Dolby Laboratories.
Fabriqué sous licence sous couvert des brevets U.S. N° : 5,451,942; 5,956,674; 5,974,380; 5,978,762; 6,226,616; 6,487,535; 7,212,872; 7,333,929; 7,392,195; 7,272,567 et d’autres brevets U.S. et mondiaux, émis et en cours d’enregistrement. DTS et le symbole sont des marques déposées, et DTS-HD, DTS-HD Master Audio et les logos DTS sont des marques commerciales de DTS, Inc. Logiciel inclus dans ce produit. © DTS, Inc. Tous droits réservés.
VSX-820_SYXCN_Fr.book 3 ページ 2010年4月12日 月曜日 午後6時59分
4Fr
Nous vous remercions pour cet achat d’un produit Pioneer. Nous vous demandons de lire soigneusement ce mode d’emploi ; vous serez ainsi à même de faire fonctionner l’appareil correctement. Après avoir bien lu le mode d’emploi, le ranger dans un endroit sûr pour pouvoir s’y référer ultérieurement.
Table des matièresOrganigramme des réglages sur le récepteur . . . . . . . . . . . . . . . . . . . . . 6
01 Avant de commencerVérification des accessoires livrés avec l’appareil . . . . . . . . . . . . . . . . . . . . . . . . . . . . . 7Mise en place des piles . . . . . . . . . . . . . . . . . . 7Installation du récepteur . . . . . . . . . . . . . . . . . 7
Ventilation . . . . . . . . . . . . . . . . . . . . . . . . . . 8
02 Commandes et affichagesPanneau frontal . . . . . . . . . . . . . . . . . . . . . . . 9
Portée de la télécommande . . . . . . . . . . . . 10Affichage . . . . . . . . . . . . . . . . . . . . . . . . . . . 11Télécommande . . . . . . . . . . . . . . . . . . . . . . . 13
03 Raccordement de votre équipementInstallation des enceintes . . . . . . . . . . . . . . . 16
Conseils d’installation des enceintes . . . . . 17Raccordement des enceintes . . . . . . . . . . . . 18
Connectez les enceintes surround arrière ou surround avant-haut . . . . . . . . . . . . . . . . . . 19Permutation du système d’enceintes . . . . . 20
Raccordements des câbles . . . . . . . . . . . . . . 20Câbles HDMI . . . . . . . . . . . . . . . . . . . . . . . 20À propos de HDMI . . . . . . . . . . . . . . . . . . . 21Câbles audio analogiques . . . . . . . . . . . . . 21Câbles audio numériques. . . . . . . . . . . . . . 21Câbles vidéo . . . . . . . . . . . . . . . . . . . . . . . . 21
À propos du raccordement des sorties vidéo . . . . . . . . . . . . . . . . . . . . . . . . . . . . . . . 22Raccordement d’un téléviseur et de périphériques de lecture . . . . . . . . . . . . . . . . 23
Connexion au moyen de l’interface HDMI . . . . . . . . . . . . . . . . . . . . . . . . . . . . . 23Raccordement d’un équipement dépourvu de borne HDMI. . . . . . . . . . . . . . . . . . . . . . 24
Raccordement d’un récepteur satellite ou d’un boîtier décodeur numérique . . . . . . . . . 25Raccordement d’un enregistreur HDD/DVD, magnétoscope et autres sources vidéo . . . . . 25Utilisation des prises femelles vidéo en composantes . . . . . . . . . . . . . . . . . . . . . . . . 26Raccordement d’autres appareils audio . . . . 26
Raccordement des antennes. . . . . . . . . . . . . 27Utilisation des antennes externes . . . . . . . . 27
Raccordement à la borne vidéo du panneau frontal . . . . . . . . . . . . . . . . . . . . . . . . . . . . . . 28Branchement du récepteur . . . . . . . . . . . . . . 28
04 Configuration de baseConfiguration automatique du son surround (MCACC) . . . . . . . . . . . . . . . . . . . . . . . . . . . . 29
Autres problèmes lors de l’utilisation de la configuration MCACC automatique . . . . . . 31
05 Écoute de sources à l’aide de votre systèmeLecture de base . . . . . . . . . . . . . . . . . . . . . . . 32Lecture en mode Auto . . . . . . . . . . . . . . . . . . 33Écoute d’une source en son surround. . . . . . 33
Utilisation des effets surround avancés . . . 34Écoute en mode stéréo . . . . . . . . . . . . . . . . . 35Utilisation de la fonction Front Stage Surround Advance . . . . . . . . . . . . . . . . . . . . 35Utilisation des modes Stream Direct . . . . . . . 36Utilisation de la fonction Sound Retriever . . . 36Un meilleur son grâce à la fonction Phase Control . . . . . . . . . . . . . . . . . . . . . . . . . . . . . 36Écoute avec la fonction Acoustic Calibration EQ . . . . . . . . . . . . . . . . . . . . . . . . . . . . . . . . . 37Utilisation du traitement de canal surround arrière . . . . . . . . . . . . . . . . . . . . . . . . . . . . . . 37Réglage de la fonction Up Mix. . . . . . . . . . . . 38Réglage des options audio . . . . . . . . . . . . . . 38Choix du signal d’entrée . . . . . . . . . . . . . . . . 41Utilisation du casque d’écoute . . . . . . . . . . . 41
06 Menu de configuration du systèmeUtilisation du menu de configuration du système . . . . . . . . . . . . . . . . . . . . . . . . . . . . . 42Réglage manuel des enceintes . . . . . . . . . . . 43
Réglage des enceintes . . . . . . . . . . . . . . . . 43Réseau de recouvrement . . . . . . . . . . . . . . 45Niveau des canaux . . . . . . . . . . . . . . . . . . . 45Distance des enceintes. . . . . . . . . . . . . . . . 46
Menu d’affectation d’entrée . . . . . . . . . . . . . 46Configuration de l’option Pre Out . . . . . . . . . 47
VSX-820_SYXCN_Fr.book 4 ページ 2010年4月12日 月曜日 午後6時59分
5Fr
EnglishFrançais
Deutsch
NederlandsItaliano
Español
07 Utilisation du tunerPour écouter la radio . . . . . . . . . . . . . . . . . . . 48
Amélioration du son stéréo FM . . . . . . . . . . 48Mémorisation de stations préréglées . . . . . . 48
Pour écouter les stations préréglées. . . . . . 49Attribution de noms aux stations préréglées. . . . . . . . . . . . . . . . . . . . . . . . . . 49
Présentation du système RDS . . . . . . . . . . . . 50Recherche de programmes RDS . . . . . . . . 50Affichage d’informations RDS . . . . . . . . . . 51
08 EnregistrementFaire un enregistrement audio ou vidéo . . . . 52
09 Commander le reste de votre systèmeConfigurer la télécommande pour commander d’autres composants. . . . . . . . . . . . . . . . . . . 53Sélectionner directement des codes de préréglage . . . . . . . . . . . . . . . . . . . . . . . . . . . 53Suppression de tous les réglages de la télécommande . . . . . . . . . . . . . . . . . . . . . . . 54Commandes pour les téléviseurs. . . . . . . . . . 55Commandes pour autres composants. . . . . . 56Liste des codes de préréglage . . . . . . . . . . . . 57
10 Autres raccordementsConnexion d’un iPod . . . . . . . . . . . . . . . . . . . 66
Raccordement de votre iPod au récepteur . . . . . . . . . . . . . . . . . . . . . . . . . . 66Lecture de l’iPod . . . . . . . . . . . . . . . . . . . . . 67Visualisation de photos et de contenu vidéo . . . . . . . . . . . . . . . . . . . . . . . . . . . . . . 68À propos d’iPod . . . . . . . . . . . . . . . . . . . . . 68
Raccordement d’un appareil USB . . . . . . . . . 69Raccordement de votre périphérique USB au récepteur . . . . . . . . . . . . . . . . . . . . . . . . 69Commandes de lecture de base . . . . . . . . . 69Compatibilité des fichiers audio compressés . . . . . . . . . . . . . . . . . . . . . . . . 70
ADAPTATEUR Bluetooth® pour profiter de la musique sans fil . . . . . . . . . . . . . . . . . . . . . . 71
Lecture de musique sans fil . . . . . . . . . . . . 71Raccordement de l’ADAPTATEUR Bluetooth optionnel. . . . . . . . . . . . . . . . . . . . . . . . . . . 71Appairage de l’ADAPTATEUR Bluetooth et du périphérique sans fil Bluetooth . . . . . . . 72Écoute de musique avec votre système à partir d’un équipement sans fil Bluetooth . . . . . . . . . . . . . . . . . . . . . . . . . . 73
11 Informations complémentairesGuide de dépannage . . . . . . . . . . . . . . . . . . . 74
HDMI . . . . . . . . . . . . . . . . . . . . . . . . . . . . . 77Information importante concernant la connexion HDMI . . . . . . . . . . . . . . . . . . . . . 78iPod messages . . . . . . . . . . . . . . . . . . . . . . 78Messages USB . . . . . . . . . . . . . . . . . . . . . . 79
Réinitialisation de l’unité principale . . . . . . . . 79Spécifications . . . . . . . . . . . . . . . . . . . . . . . . 80Nettoyage de l’appareil . . . . . . . . . . . . . . . . . 80
VSX-820_SYXCN_Fr.book 5 ページ 2010年4月12日 月曜日 午後6時59分
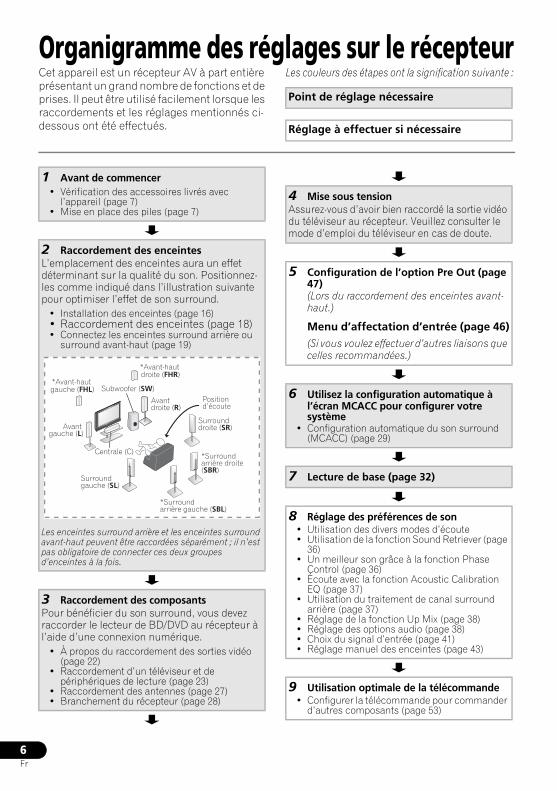
6Fr
Organigramme des réglages sur le récepteurCet appareil est un récepteur AV à part entière présentant un grand nombre de fonctions et de prises. Il peut être utilisé facilement lorsque les raccordements et les réglages mentionnés ci-dessous ont été effectués.
Les couleurs des étapes ont la signification suivante :
Point de réglage nécessaire
Réglage à effectuer si nécessaire
1 Avant de commencer• Vérification des accessoires livrés avec
l’appareil (page 7)• Mise en place des piles (page 7)
2 Raccordement des enceintesL’emplacement des enceintes aura un effet déterminant sur la qualité du son. Positionnez-les comme indiqué dans l’illustration suivante pour optimiser l’effet de son surround.
• Installation des enceintes (page 16)• Raccordement des enceintes (page 18)• Connectez les enceintes surround arrière ou
surround avant-haut (page 19)
Les enceintes surround arrière et les enceintes surround avant-haut peuvent être raccordées séparément ; il n’est pas obligatoire de connecter ces deux groupes d’enceintes à la fois.
3 Raccordement des composantsPour bénéficier du son surround, vous devez raccorder le lecteur de BD/DVD au récepteur à l’aide d’une connexion numérique.
• À propos du raccordement des sorties vidéo (page 22)
• Raccordement d’un téléviseur et de périphériques de lecture (page 23)
• Raccordement des antennes (page 27)• Branchement du récepteur (page 28)
Avant gauche (L)
*Avant-haut gauche (FHL)
*Avant-haut droite (FHR)
Surround gauche (SL)
*Surround arrière gauche (SBL)
*Surround arrière droite (SBR)
Surround droite (SR)
Centrale (C)
Subwoofer (SW)Position d’écoute
Avant droite (R)
4 Mise sous tensionAssurez-vous d’avoir bien raccordé la sortie vidéo du téléviseur au récepteur. Veuillez consulter le mode d’emploi du téléviseur en cas de doute.
5 Configuration de l’option Pre Out (page 47)(Lors du raccordement des enceintes avant-haut.)
Menu d’affectation d’entrée (page 46)(Si vous voulez effectuer d’autres liaisons que celles recommandées.)
6 Utilisez la configuration automatique à l’écran MCACC pour configurer votre système
• Configuration automatique du son surround (MCACC) (page 29)
7 Lecture de base (page 32)
8 Réglage des préférences de son• Utilisation des divers modes d’écoute• Utilisation de la fonction Sound Retriever (page
36)• Un meilleur son grâce à la fonction Phase
Control (page 36)• Écoute avec la fonction Acoustic Calibration
EQ (page 37)• Utilisation du traitement de canal surround
arrière (page 37)• Réglage de la fonction Up Mix (page 38)• Réglage des options audio (page 38)• Choix du signal d’entrée (page 41)• Réglage manuel des enceintes (page 43)
9 Utilisation optimale de la télécommande• Configurer la télécommande pour commander
d’autres composants (page 53)
VSX-820_SYXCN_Fr.book 6 ページ 2010年4月12日 月曜日 午後6時59分
7Fr
EnglishFrançais
Deutsch
NederlandsItaliano
Español
Chapitre 1 :
Avant de commencer
Vérification des accessoires livrés avec l’appareilVeuillez vérifier que les accessoires suivants sont livrés avec l’appareil :
• Microphone de configuration
• Télécommande
• Piles à anode sèche (AAA IEC R03) x2
• Antenne cadre AM
• Antenne filaire FM
• Câble iPod
• Cordon d’alimentation
• Carte de garantie
• Ce mode d’emploi
Mise en place des piles
Les piles de la télécommande fournies avec l’appareil permettent d’effectuer les premières opérations ; il est possible qu’elles ne durent pas très longtemps. Nous recommandons l’usage de piles alcalines, dont la durée de vie est supérieure.
ATTENTION
Une mauvaise utilisation des piles peut provoquer des accidents tels que fuites ou explosions. Veuillez observer les recommandations suivantes :
• N’utilisez jamais des piles neuves et usagées dans le même appareil.
• Insérez les piles en respectant les indications de polarité situées à l’intérieur du boîtier.
• Des piles de même forme peuvent avoir des voltages différents. N’utilisez jamais des piles de voltage différent dans le même appareil.
• Au moment d’éliminer les piles usagées, veuillez respecter les réglementations gouvernementales ou les recommandations publiques relatives à la protection de l’environnement en vigueur dans votre pays ou région.
• N’utilisez ni ne conservez les piles sous la lumière directe du soleil ou dans un endroit excessivement chaud, comme une voiture ou à proximité d’un appareil de chauffage. Les piles risqueraient de fuir, de surchauffer, d’exploser ou de s’enflammer. Ceci pourrait aussi réduire la durée de vie et les performances des piles.
Installation du récepteur• Lors de l’installation de l’appareil, assurez-
vous que ce dernier est posé sur une surface plane et stable.
N’installez pas l’appareil dans les endroits suivants :
– sur un téléviseur couleur (les images à l’écran pourraient être déformées)
– à proximité d’une platine à cassettes (ou d’un appareil qui produit un champ magnétique). Le son pourrait s’en trouver affecté.
– à la lumière directe du soleil
– à l’humidité
– à des températures extrêmes
– en présence de vibrations ou autres mouvements
– à la poussière
– à la fumée ou aux émanations graisseuses (cuisine par ex.)
VSX-820_SYXCN_Fr.book 7 ページ 2010年4月12日 月曜日 午後6時59分
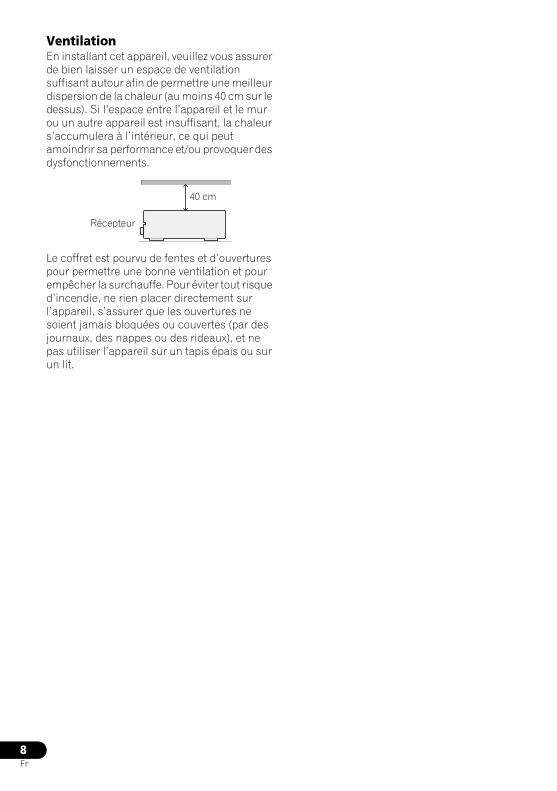
8Fr
VentilationEn installant cet appareil, veuillez vous assurer de bien laisser un espace de ventilation suffisant autour afin de permettre une meilleur dispersion de la chaleur (au moins 40 cm sur le dessus). Si l’espace entre l’appareil et le mur ou un autre appareil est insuffisant, la chaleur s’accumulera à l’intérieur, ce qui peut amoindrir sa performance et/ou provoquer des dysfonctionnements.
Le coffret est pourvu de fentes et d’ouvertures pour permettre une bonne ventilation et pour empêcher la surchauffe. Pour éviter tout risque d’incendie, ne rien placer directement sur l’appareil, s’assurer que les ouvertures ne soient jamais bloquées ou couvertes (par des journaux, des nappes ou des rideaux), et ne pas utiliser l’appareil sur un tapis épais ou sur un lit.
Récepteur
40 cm
VSX-820_SYXCN_Fr.book 8 ページ 2010年4月12日 月曜日 午後6時59分
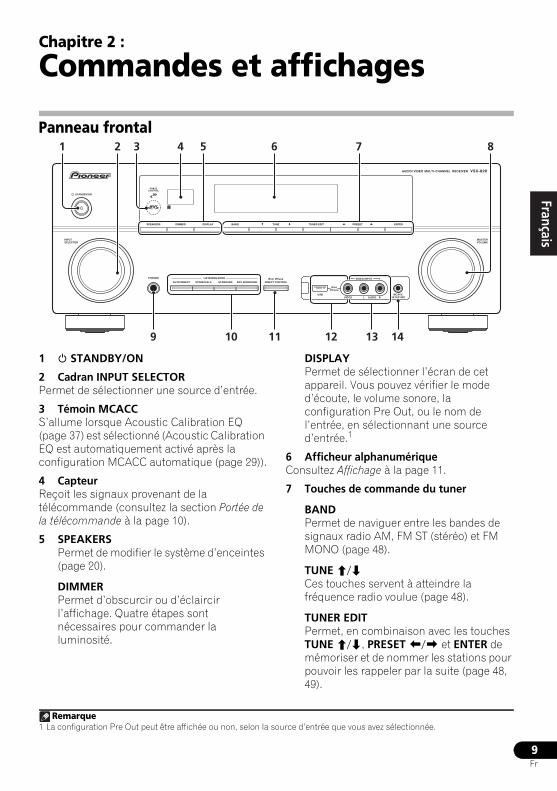
9Fr
EnglishFrançais
Deutsch
NederlandsItaliano
Español
Chapitre 2 :
Commandes et affichages
Panneau frontal
1 STANDBY/ON
2 Cadran INPUT SELECTORPermet de sélectionner une source d’entrée.
3 Témoin MCACCS’allume lorsque Acoustic Calibration EQ (page 37) est sélectionné (Acoustic Calibration EQ est automatiquement activé après la configuration MCACC automatique (page 29)).
4 CapteurReçoit les signaux provenant de la télécommande (consultez la section Portée de la télécommande à la page 10).
5 SPEAKERSPermet de modifier le système d’enceintes (page 20).
DIMMERPermet d’obscurcir ou d’éclaircir l’affichage. Quatre étapes sont nécessaires pour commander la luminosité.
DISPLAYPermet de sélectionner l’écran de cet appareil. Vous pouvez vérifier le mode d’écoute, le volume sonore, la configuration Pre Out, ou le nom de l’entrée, en sélectionnant une source d’entrée.1
6 Afficheur alphanumériqueConsultez Affichage à la page 11.
7 Touches de commande du tuner
BANDPermet de naviguer entre les bandes de signaux radio AM, FM ST (stéréo) et FM MONO (page 48).
TUNE /Ces touches servent à atteindre la fréquence radio voulue (page 48).
TUNER EDITPermet, en combinaison avec les touches TUNE /, PRESET / et ENTER de mémoriser et de nommer les stations pour pouvoir les rappeler par la suite (page 48, 49).
SPEAKERS
AUTO/DIRECT STEREO/ALC STANDARD
LISTENING MODE
ADV SURROUND DIRECT CONTROLiPod iPhone
DIMMER DISPLAY BAND TUNE TUNER EDIT PRESET ENTER
PHONES
INPUTSELECTOR
STANDBY/ON
PHASECONTROL
MASTERVOLUME
MCACCSETUP MIC
AUDIO/ VIDEO MULTI- CHANNEL RECEIVER VSX-820
VIDEO INPUT
AUDIOL RVIDEO
iPodiPhone
USB
1 2 7 854 63
9 1110 141312
Remarque1 La configuration Pre Out peut être affichée ou non, selon la source d’entrée que vous avez sélectionnée.
VSX-820_SYXCN_Fr.book 9 ページ 2010年4月12日 月曜日 午後6時59分
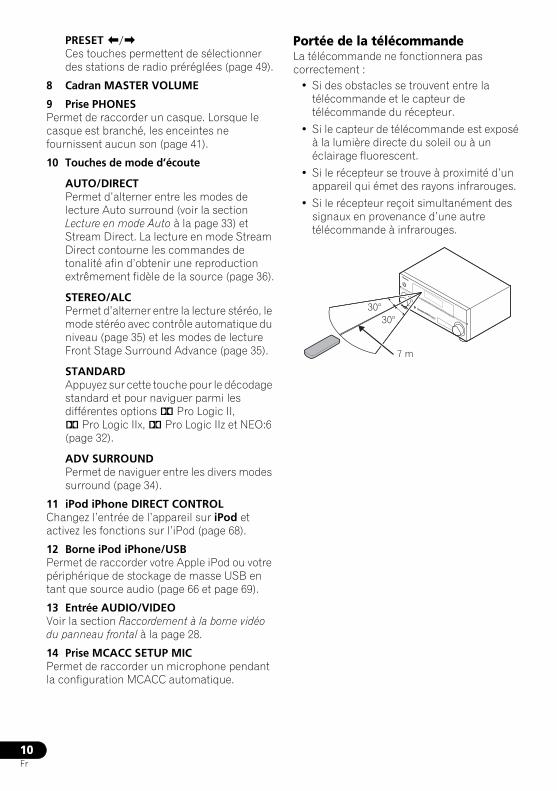
10Fr
PRESET /Ces touches permettent de sélectionner des stations de radio préréglées (page 49).
8 Cadran MASTER VOLUME
9 Prise PHONESPermet de raccorder un casque. Lorsque le casque est branché, les enceintes ne fournissent aucun son (page 41).
10 Touches de mode d’écoute
AUTO/DIRECTPermet d’alterner entre les modes de lecture Auto surround (voir la section Lecture en mode Auto à la page 33) et Stream Direct. La lecture en mode Stream Direct contourne les commandes de tonalité afin d’obtenir une reproduction extrêmement fidèle de la source (page 36).
STEREO/ALCPermet d’alterner entre la lecture stéréo, le mode stéréo avec contrôle automatique du niveau (page 35) et les modes de lecture Front Stage Surround Advance (page 35).
STANDARDAppuyez sur cette touche pour le décodage standard et pour naviguer parmi les différentes options 2 Pro Logic II, 2 Pro Logic IIx, 2 Pro Logic IIz et NEO:6 (page 32).
ADV SURROUNDPermet de naviguer entre les divers modes surround (page 34).
11 iPod iPhone DIRECT CONTROLChangez l’entrée de l’appareil sur iPod et activez les fonctions sur l’iPod (page 68).
12 Borne iPod iPhone/USBPermet de raccorder votre Apple iPod ou votre périphérique de stockage de masse USB en tant que source audio (page 66 et page 69).
13 Entrée AUDIO/VIDEOVoir la section Raccordement à la borne vidéo du panneau frontal à la page 28.
14 Prise MCACC SETUP MICPermet de raccorder un microphone pendant la configuration MCACC automatique.
Portée de la télécommandeLa télécommande ne fonctionnera pas correctement :
• Si des obstacles se trouvent entre la télécommande et le capteur de télécommande du récepteur.
• Si le capteur de télécommande est exposé à la lumière directe du soleil ou à un éclairage fluorescent.
• Si le récepteur se trouve à proximité d’un appareil qui émet des rayons infrarouges.
• Si le récepteur reçoit simultanément des signaux en provenance d’une autre télécommande à infrarouges.
30°
7 m
30°
VSX-820_SYXCN_Fr.book 10 ページ 2010年4月12日 月曜日 午後6時59分
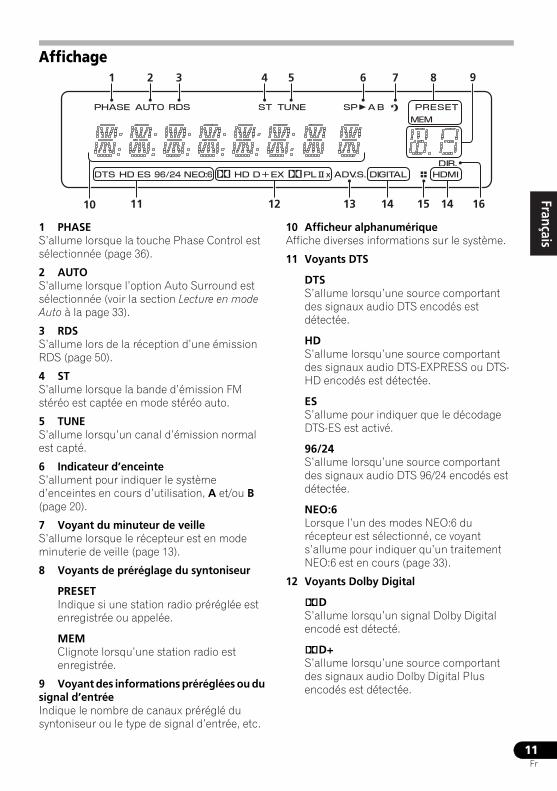
11Fr
EnglishFrançais
Deutsch
NederlandsItaliano
Español
Affichage
1 PHASES’allume lorsque la touche Phase Control est sélectionnée (page 36).
2 AUTOS’allume lorsque l’option Auto Surround est sélectionnée (voir la section Lecture en mode Auto à la page 33).
3 RDSS’allume lors de la réception d’une émission RDS (page 50).
4 STS’allume lorsque la bande d’émission FM stéréo est captée en mode stéréo auto.
5 TUNES’allume lorsqu’un canal d’émission normal est capté.
6 Indicateur d’enceinteS’allument pour indiquer le système d’enceintes en cours d’utilisation, A et/ou B (page 20).
7 Voyant du minuteur de veilleS’allume lorsque le récepteur est en mode minuterie de veille (page 13).
8 Voyants de préréglage du syntoniseur
PRESETIndique si une station radio préréglée est enregistrée ou appelée.
MEMClignote lorsqu’une station radio est enregistrée.
9 Voyant des informations préréglées ou du signal d’entréeIndique le nombre de canaux préréglé du syntoniseur ou le type de signal d’entrée, etc.
10 Afficheur alphanumériqueAffiche diverses informations sur le système.
11 Voyants DTS
DTSS’allume lorsqu’une source comportant des signaux audio DTS encodés est détectée.
HDS’allume lorsqu’une source comportant des signaux audio DTS-EXPRESS ou DTS-HD encodés est détectée.
ESS’allume pour indiquer que le décodage DTS-ES est activé.
96/24S’allume lorsqu’une source comportant des signaux audio DTS 96/24 encodés est détectée.
NEO:6Lorsque l’un des modes NEO:6 du récepteur est sélectionné, ce voyant s’allume pour indiquer qu’un traitement NEO:6 est en cours (page 33).
12 Voyants Dolby Digital
2DS’allume lorsqu’un signal Dolby Digital encodé est détecté.
2D+S’allume lorsqu’une source comportant des signaux audio Dolby Digital Plus encodés est détectée.
1 2 3 4 5 6 7 8
11 12 13 14 14 1615
9
10
VSX-820_SYXCN_Fr.book 11 ページ 2010年4月12日 月曜日 午後6時59分
12Fr
2HDS’allume lorsqu’une source comportant des signaux audio Dolby TrueHD encodés est détectée.
EXS’allume pour indiquer que le décodage Dolby Digital EX est activé.
2PLll(x)S’allume pour indiquer que le décodage 2 Pro Logic II / 2 Pro Logic IIx est activé. Le voyant s’éteint lorsque le décodage 2 Pro Logic IIz est utilisé. (Pour plus d’informations à ce sujet, voir la section Écoute d’une source en son surround à la page 33.)
13 ADV.S.S’allume lorsque l’un des modes Advanced Surround a été sélectionné (Pour plus d’informations, voir la section Utilisation des effets surround avancés à la page 34).
14 Voyants SIGNAL SELECT
DIGITALS’allume lorsqu’un signal audio numérique est sélectionné.
Clignote lorsqu’un signal audio numérique est sélectionné et que l’entrée audio sélectionnée n’existe pas.
HDMIS’allume lorsqu’un signal HDMI est sélectionné.
Clignote lorsqu’un signal HDMI est sélectionné et que l’entrée HDMI sélectionnée n’existe pas.
15 Voyant Up Mix/DIMMERS’allume lorsque la fonction Up Mix est activée (ON) (voir la page 38). S’allume également lorsque DIMMER est désélectionné.
16 DIR.S’allume lorsque le mode DIRECT ou PURE DIRECT est sélectionné (page 36).
VSX-820_SYXCN_Fr.book 12 ページ 2010年4月12日 月曜日 午後6時59分
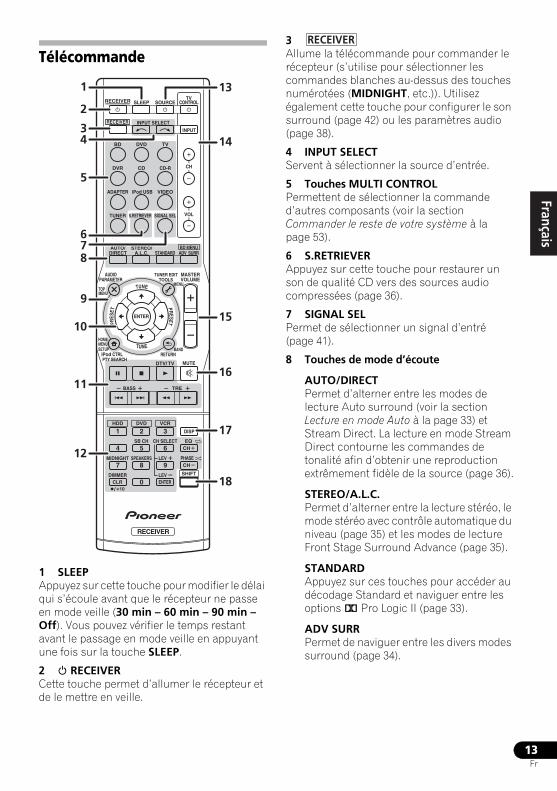
13Fr
EnglishFrançais
Deutsch
NederlandsItaliano
Español
Télécommande
1 SLEEPAppuyez sur cette touche pour modifier le délai qui s’écoule avant que le récepteur ne passe en mode veille (30 min – 60 min – 90 min – Off). Vous pouvez vérifier le temps restant avant le passage en mode veille en appuyant une fois sur la touche SLEEP.
2 RECEIVER Cette touche permet d’allumer le récepteur et de le mettre en veille.
3Allume la télécommande pour commander le récepteur (s’utilise pour sélectionner les commandes blanches au-dessus des touches numérotées (MIDNIGHT, etc.)). Utilisez également cette touche pour configurer le son surround (page 42) ou les paramètres audio (page 38).
4 INPUT SELECTServent à sélectionner la source d’entrée.
5 Touches MULTI CONTROLPermettent de sélectionner la commande d’autres composants (voir la section Commander le reste de votre système à la page 53).
6 S.RETRIEVERAppuyez sur cette touche pour restaurer un son de qualité CD vers des sources audio compressées (page 36).
7 SIGNAL SELPermet de sélectionner un signal d’entré (page 41).
8 Touches de mode d’écoute
AUTO/DIRECT Permet d’alterner entre les modes de lecture Auto surround (voir la section Lecture en mode Auto à la page 33) et Stream Direct. La lecture en mode Stream Direct contourne les commandes de tonalité afin d’obtenir une reproduction extrêmement fidèle de la source (page 36).
STEREO/A.L.C.Permet d’alterner entre la lecture stéréo, le mode stéréo avec contrôle automatique du niveau (page 35) et les modes de lecture Front Stage Surround Advance (page 35).
STANDARDAppuyez sur ces touches pour accéder au décodage Standard et naviguer entre les options 2 Pro Logic II (page 33).
ADV SURRPermet de naviguer entre les divers modes surround (page 34).
BD DVD
INPUT SELECT
SOURCESLEEPTV
CONTROL
DIMMER
TV
INPUT
1
4
7MIDNIGHT
HDD
CH
RECEIVER
DVR CD CD-R
ADAPTER iPod USB VIDEO
TUNER S.RETRIEVER SIGNAL SEL
BD MENU
ENTER
STANDARD ADV SURRSTEREO/
A.L.C.AUTO/
DIRECT
VOL
+10
2
5
8SPEAKERS LEV
LEV
SB CH
DISP
CLR
EQ
PHASE
DVD
3
6
9
0 ENTER
CH
CH
CH SELECT
VCR
SHIFT
MUTE
RETURN
AUDIOPARAMETER
TUNER EDITTOOLS
MASTERVOLUME
iPod CTRLPTY SEARCH
BAND
MENU
HOMEMENUSETUP
DTV/ TV
/
TREBASS
TOPMENU
RECEIVER
TUNE
TUNE
PRESETPRES
ET
RECEIVER
1
2
13
14
15
16
17
34
5
678
9
10
11
12
18
RECEIVER
VSX-820_SYXCN_Fr.book 13 ページ 2010年4月12日 月曜日 午後6時59分
14Fr
Appuyez d’abord sur BD pour accéder au menu :
BD MENU*Permet d’afficher le menu des disques Blu-ray.
9 Touches de Configuration du système et de commande d’autres composantsPour utiliser les touches de commande suivantes, appuyez d’abord sur la touche MULTI CONTROL correspondante (BD, DVD, etc.). Appuyez d’abord sur pour accéder au menu :
AUDIO PARAMETERPermet d’accéder aux options audio (page 38).
SETUPAppuyez pour accéder au menu de configuration du système (page 42).
RETURNPermet de confirmer et de quitter l’écran du menu affiché.
Appuyez d’abord sur BD, DVD ou sur DVR pour accéder au menu :
TOP MENUPermet d’afficher le menu ‘supérieur’ d’un BD/DVD.
HOME MENUPermet d’afficher l’écran HOME MENU.
RETURNPermet de confirmer et de quitter l’écran du menu affiché.
MENUPermet d’afficher le menu TOOLS du lecteur de disques Blu-ray.
Appuyez d’abord sur TUNER pour accéder au menu :
TUNER EDITPermet de mémoriser/nommer des stations de radio à rappeler (page 48 et 49).
BANDPermet de naviguer entre les bandes de signaux radio AM, FM ST (stéréo) et FM MONO (page 48).
PTY SEARCHPermet de rechercher des programmes de type RDS (page 50).
Appuyez d’abord sur iPod USB pour accéder au menu :
iPod CTRLPermet de basculer entre les commandes de l’iPod et celles du récepteur (page 68).
10 (TUNE /, PRESET /), ENTERUtilisez les touches fléchées pour régler votre système de son surround (page 42). Elle permet aussi de commander les menus/options BD/DVD.Les touches TUNE / permettent de rechercher une fréquence radio (page 48) et les touches PRESET / servent à rechercher une station de radio préréglée (page 49).
11 Touches de commande de composantsLes touches principales (, , etc.) servent à commander un composant une fois que vous l’avez sélectionné avec les touches de source d’entrée.Vous pouvez accéder aux commandes se trouvant au-dessus de ces touches après avoir sélectionné la touche de source d’entrée correspondante (BD, DVD, DVR ou CD). Ces touches fonctionnent également comme décrit ci-dessous.Appuyez d’abord sur pour accéder au menu :
BASS –/+Permettent d’ajuster les graves1
TRE –/+Permettent d’ajuster les aigus1
RECEIVER
Remarque1 Les commandes de tonalité sont désactivées lorsque le mode d’écoute est réglé sur DIRECT ou sur PURE DIRECT.
RECEIVER
VSX-820_SYXCN_Fr.book 14 ページ 2010年4月12日 月曜日 午後6時59分
15Fr
EnglishFrançais
Deutsch
NederlandsItaliano
Español
Appuyez d’abord sur TV pour accéder au menu :
DTV/TVPermet de basculer entre les modes d’entrée DTV et TV analogique pour les téléviseurs Pioneer.
12 Touches numériques et commandes pour d’autres composantsLes touches numériques permettent d’accéder directement à une fréquence radio (page 48) ou aux pistes d’un CD, etc. Elles permettent aussi d’accéder à d’autres fonctions après avoir appuyé sur la touche . (Par exemple, MIDNIGHT, etc.)
HDD*, DVD*, VCR*Ces touches permettent de naviguer entre les commandes du disque dur, du DVD et du VCR pour les enregistreurs HDD/DVD/VCR.
SB CHAppuyez sur cette touche pour sélectionner le mode ON, AUTO, ou OFF pour le canal surround arrière.
CH SELECTAppuyez sur cette touche plusieurs fois pour sélectionner un canal, puis sur LEV +/– pour régler le niveau sur (page 45).
LEV +/–Permettent d’ajuster le niveau des canaux.
EQAppuyez sur cette touche pour sélectionner/désélectionner le réglage Acoustic Calibration EQ (page 37).
MIDNIGHTPermet de sélectionner le mode d’écoute Midnight ou Loudness (page 39).
SPEAKERSPermet de modifier le système d’enceintes (page 20).
PHASEAppuyez sur cette touche pour activer/désactiver Phase Control (page 36).
DIMMERPermet d’obscurcir ou d’éclaircir l’affichage. Quatre étapes sont nécessaires pour commander la luminosité.
13 SOURCEAppuyez sur cette touche pour mettre sous/hors tension d’autres composants connectés au récepteur (voir page 56 pour plus d’informations à ce sujet).
14 Touches TV CONTROLCes touches servent à commander le téléviseur affecté à la touche TV. Ainsi, si vous n’avez qu’un téléviseur à raccorder à ce système, affectez-le à la touche TV (voir page 55 pour plus d’informations à ce sujet).
Cette touche permet d’allumer et d’éteindre le téléviseur.
INPUTCette touche permet de sélectionner le signal d’entrée du téléviseur.
CH +/–Ces touches servent à sélectionner les chaînes.
VOL +/–Ces touches permettent de régler le volume du téléviseur.
15 MASTER VOLUME +/–Permet de régler le volume d’écoute.
16 MUTEPermet de couper/restaurer le son.
17 DISPPermet de sélectionner l’écran de cet appareil. Vous pouvez vérifier le mode d’écoute, le volume sonore, la configuration Pre Out, ou le nom de l’entrée, en sélectionnant une source d’entrée.1
18 SHIFTAppuyez sur cette touche pour accéder aux commandes ‘encadrées’ (situées au-dessus des touches) de la télécommande. Ces touches sont indiquées par un astérisque (*) dans cette section.
RECEIVER
Remarque1 La configuration Pre Out peut être affichée ou non, selon la source d’entrée que vous avez sélectionnée.
VSX-820_SYXCN_Fr.book 15 ページ 2010年4月12日 月曜日 午後6時59分
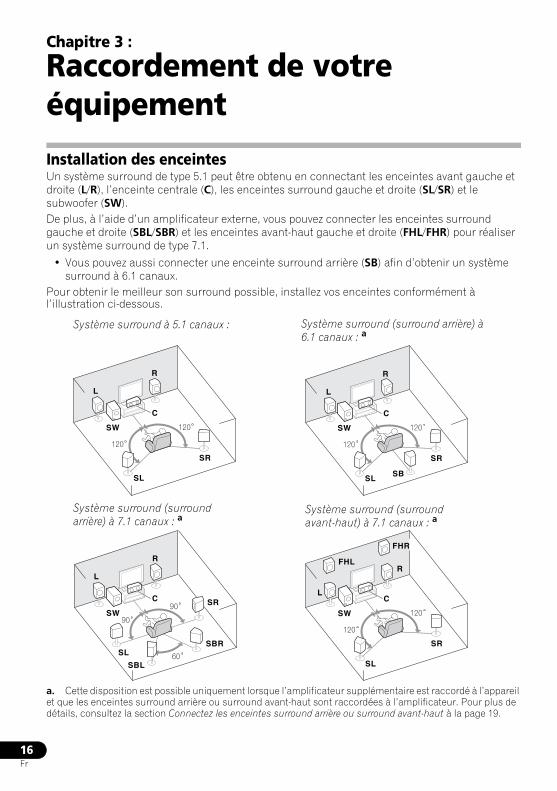
16Fr
Chapitre 3 :
Raccordement de votre équipement
Installation des enceintesUn système surround de type 5.1 peut être obtenu en connectant les enceintes avant gauche et droite (L/R), l’enceinte centrale (C), les enceintes surround gauche et droite (SL/SR) et le subwoofer (SW).De plus, à l’aide d’un amplificateur externe, vous pouvez connecter les enceintes surround gauche et droite (SBL/SBR) et les enceintes avant-haut gauche et droite (FHL/FHR) pour réaliser un système surround de type 7.1.
• Vous pouvez aussi connecter une enceinte surround arrière (SB) afin d’obtenir un système surround à 6.1 canaux.
Pour obtenir le meilleur son surround possible, installez vos enceintes conformément à l’illustration ci-dessous.
a. Cette disposition est possible uniquement lorsque l’amplificateur supplémentaire est raccordé à l’appareil et que les enceintes surround arrière ou surround avant-haut sont raccordées à l’amplificateur. Pour plus de détails, consultez la section Connectez les enceintes surround arrière ou surround avant-haut à la page 19.
120
120
SL
L
SW
C
R
SR
120
120
SL
L
SW
C
R
SR
SB
120
120
SL
L
FHL
FHR
SW
C
R
SR
90
90
60SL
L
SW
C
R
SR
SBL
SBR
Système surround à 5.1 canaux :
Système surround (surround arrière) à 7.1 canaux : a
Système surround (surround avant-haut) à 7.1 canaux : a
Système surround (surround arrière) à 6.1 canaux : a
VSX-820_SYXCN_Fr.book 16 ページ 2010年4月12日 月曜日 午後6時59分
17Fr
EnglishFrançais
Deutsch
NederlandsItaliano
Español
Conseils d’installation des enceintesL’emplacement des enceintes dans la pièce d’écoute a une grande influence sur la qualité du son obtenu. Les conseils suivants vous permettront d’obtenir le meilleur son avec votre système.
• Le caisson de basses peut être placé sur le sol. L’idéal est de placer les autres enceintes au niveau de vos oreilles en position d’écoute. Il est déconseillé de poser les enceintes sur le sol (à l’exception du caisson de graves) ou de les installer très haut en position murale.
• Pour obtenir un effet stéréo optimal, écartez les enceintes avant de 2 à 3 mètres en les plaçant à égale distance du téléviseur.
• Si vous prévoyez de placer les enceintes à côté d’un téléviseur à écran cathodique, utilisez des enceintes protégées contre les interférences électromagnétiques, ou placez les enceintes à une distance suffisante de l’écran.
• Si vous utilisez une enceinte centrale, placez les enceintes avant à un angle plus grand. Sinon, placez-les à un angle plus étroit.
• Placez l’enceinte centrale au-dessus ou en dessous du téléviseur de sorte que le son du canal central semble provenir de l’écran du téléviseur. Assurez-vous également que l’enceinte centrale ne traverse pas la ligne formée par le bord d’attaque des enceintes avant gauche et droite.
• Il vaut mieux placer les enceintes de manière à réaliser un angle ouvert vers la position d’écoute. L’angle dépend de la taille de la pièce. Utilisez un angle inférieur pour les pièces plus grandes.
• Les enceintes surround et surround arrière doivent être placées 60 cm à 90 cm plus haut que vos oreilles et légèrement inclinées vers le bas. Assurez-vous que les enceintes ne sont pas face à face. Pour les signaux DVD-Audio, les enceintes doivent être plus rapprochées de l’auditeur que lors de la lecture sur un appareil de cinéma à domicile.
• Si les enceintes surround ne peuvent pas être placées directement à côté de la position d’écoute dans un système à 7.1 canaux, l’effet surround pourra être amélioré en désactivant la fonction Up Mix (voir la section Réglage de la fonction Up Mix à la page 38).
• Essayez de placer les enceintes surround à la même distance de la position d’écoute que les enceintes avant et centrale. Sinon, l’effet de son surround sera affaibli.
• Placez les enceintes avant-haut gauche et droite à au moins un mètre à la verticale au-dessus des enceintes avant gauche et droite.
ATTENTION• Assurez-vous que toutes les enceintes sont
correctement installées. Ceci permet non seulement d’améliorer la qualité du son, mais aussi de réduire les risques de dommages ou de blessures, en empêchant les enceintes d’être renversées ou de tomber en cas de choc externe ou de secousse telle qu’un tremblement de terre.
Important• Vous devez disposer d’un amplificateur
supplémentaire pour raccorder les enceintes surround arrière ou surround avant-haut. Raccordez l’amplificateur supplémentaire aux sorties PRE OUT SURR BACK/FRONT HEIGHT de cet appareil et raccordez les enceintes surround arrière ou les enceintes surround avant-haut à l’amplificateur supplémentaire (voir la section Connectez les enceintes surround arrière ou surround avant-haut à la page 19).
Les paramètres Pre Out doivent être configurés lorsque les raccordements ci-dessus sont réalisés. Sélectionnez SURR.BACK dans le cas où les enceintes surround arrière sont connectées et HEIGHT lorsque les enceintes surround avant-haut sont raccordées (Si aucune des enceintes surround arrière et surround avant-haut ne sont connectées, n’importe quelle option convient) (voir la section Configuration de l’option Pre Out à la page 47).
VSX-820_SYXCN_Fr.book 17 ページ 2010年4月12日 月曜日 午後6時59分
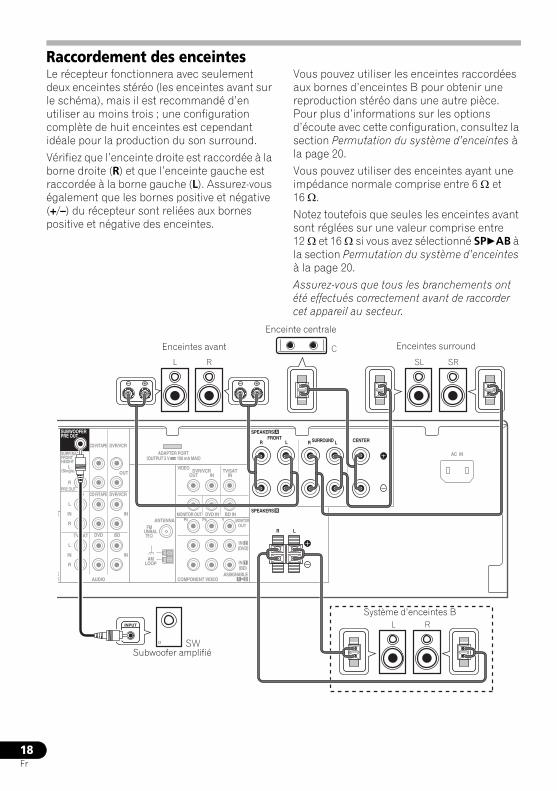
18Fr
Raccordement des enceintesLe récepteur fonctionnera avec seulement deux enceintes stéréo (les enceintes avant sur le schéma), mais il est recommandé d’en utiliser au moins trois ; une configuration complète de huit enceintes est cependant idéale pour la production du son surround.
Vérifiez que l’enceinte droite est raccordée à la borne droite (R) et que l’enceinte gauche est raccordée à la borne gauche (L). Assurez-vous également que les bornes positive et négative (+/–) du récepteur sont reliées aux bornes positive et négative des enceintes.
Vous pouvez utiliser les enceintes raccordées aux bornes d’enceintes B pour obtenir une reproduction stéréo dans une autre pièce. Pour plus d’informations sur les options d’écoute avec cette configuration, consultez la section Permutation du système d’enceintes à la page 20.
Vous pouvez utiliser des enceintes ayant une impédance normale comprise entre 6 Ω et 16 Ω.
Notez toutefois que seules les enceintes avant sont réglées sur une valeur comprise entre 12 Ω et 16 Ω si vous avez sélectionné SPAB à la section Permutation du système d’enceintes à la page 20.
Assurez-vous que tous les branchements ont été effectués correctement avant de raccorder cet appareil au secteur.
AC INSURR BACK /FRONTHEIGHT
L(Single)
R
R
L
IN
R
L
IN
IN
OUT
IN
CD
TV/SAT DVD BD
DVR/VCR
MONITOR OUTPR PB Y
R L
DVD IN BD IN
OUTMONITOR
COMPONENT VIDEO
TV/SATIN
DVR/VCROUT IN
FRONTR L
CD-R/TAPE
DVR/VCR CD-R/TAPE
PRE OUT
E
EAUDIO
ADAPTER PORT
VIDEO
(OUTPUT 5 V 100 mA MAX)
(BD)IN 1
(DVD)IN 2
ASSIGNABLE
SPEAKERS
1
B
SPEAKERS A
2
ANTENNAFM
UNBAL75
AMLOOP
VOLTAGE SELECTOR
110-127 V 220-240 V
SUBWOOFERPRE OUT
CENTERSURROUNDR L
SW
L
C
R SL SR
L R
Enceinte centrale
Enceintes surroundEnceintes avant
Subwoofer amplifié
Système d’enceintes B
VSX-820_SYXCN_Fr.book 18 ページ 2010年4月12日 月曜日 午後6時59分
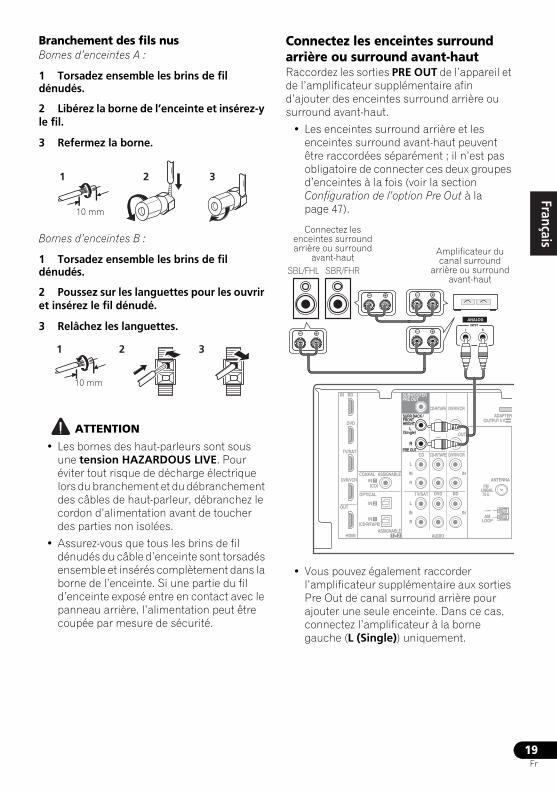
19Fr
EnglishFrançais
Deutsch
NederlandsItaliano
Español
Branchement des fils nusBornes d’enceintes A :
1 Torsadez ensemble les brins de fil dénudés.
2 Libérez la borne de l’enceinte et insérez-y le fil.
3 Refermez la borne.
Bornes d’enceintes B :
1 Torsadez ensemble les brins de fil dénudés.
2 Poussez sur les languettes pour les ouvrir et insérez le fil dénudé.
3 Relâchez les languettes.
ATTENTION
• Les bornes des haut-parleurs sont sous une tension HAZARDOUS LIVE. Pour éviter tout risque de décharge électrique lors du branchement et du débranchement des câbles de haut-parleur, débranchez le cordon d’alimentation avant de toucher des parties non isolées.
• Assurez-vous que tous les brins de fil dénudés du câble d’enceinte sont torsadés ensemble et insérés complètement dans la borne de l’enceinte. Si une partie du fil d’enceinte exposé entre en contact avec le panneau arrière, l’alimentation peut être coupée par mesure de sécurité.
Connectez les enceintes surround arrière ou surround avant-hautRaccordez les sorties PRE OUT de l’appareil et de l’amplificateur supplémentaire afin d’ajouter des enceintes surround arrière ou surround avant-haut.
• Les enceintes surround arrière et les enceintes surround avant-haut peuvent être raccordées séparément ; il n’est pas obligatoire de connecter ces deux groupes d’enceintes à la fois (voir la section Configuration de l’option Pre Out à la page 47).
• Vous pouvez également raccorder l’amplificateur supplémentaire aux sorties Pre Out de canal surround arrière pour ajouter une seule enceinte. Dans ce cas, connectez l’amplificateur à la borne gauche (L (Single)) uniquement.
1 2 3
10 mm
1 2 3
10 mmIN BD
SURR BACK /FRONTHEIGHT
L(Single)
R
R
L
IN
R
L
IN
IN
OUT
IN
CD
TV/SAT DVD BD
DVR/VCR
M
CD-R/TAPE
DVR/VCR CD-R/TAPE
PRE OUT
DVD
TV/SAT
COAXIAL
OPTICAL
(CD)IN
ASSIGNABLE
ASSIGNABLE
OUT
HDMI
DVR/VCR 1
(CD-R/TAPE)IN
AUDIO
ADAPTER (OUTPUT 5 V 1
1
1 2
IN 2
SUBWOOFERPRE OUT
ANTENNAFM
UNBAL75
AMLOOP
INPUTL R
ANALOG
SBL/FHL SBR/FHR
Connectez les enceintes surround arrière ou surround
avant-hautAmplificateur du canal surround
arrière ou surround avant-haut
VSX-820_SYXCN_Fr.book 19 ページ 2010年4月12日 月曜日 午後6時59分
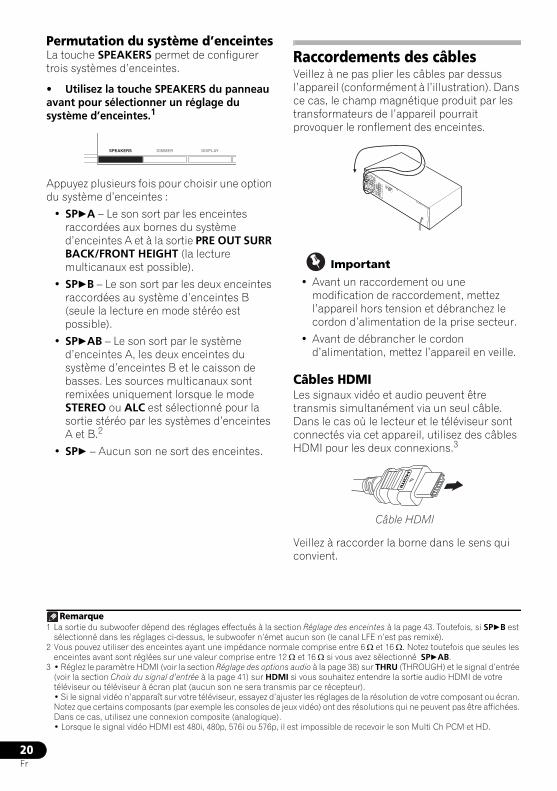
20Fr
Permutation du système d’enceintesLa touche SPEAKERS permet de configurer trois systèmes d’enceintes.
• Utilisez la touche SPEAKERS du panneau avant pour sélectionner un réglage du système d’enceintes.1
Appuyez plusieurs fois pour choisir une option du système d’enceintes :
• SPA – Le son sort par les enceintes raccordées aux bornes du système d’enceintes A et à la sortie PRE OUT SURR BACK/FRONT HEIGHT (la lecture multicanaux est possible).
• SPB – Le son sort par les deux enceintes raccordées au système d’enceintes B (seule la lecture en mode stéréo est possible).
• SPAB – Le son sort par le système d’enceintes A, les deux enceintes du système d’enceintes B et le caisson de basses. Les sources multicanaux sont remixées uniquement lorsque le mode STEREO ou ALC est sélectionné pour la sortie stéréo par les systèmes d’enceintes A et B.2
• SP – Aucun son ne sort des enceintes.
Raccordements des câblesVeillez à ne pas plier les câbles par dessus l’appareil (conformément à l’illustration). Dans ce cas, le champ magnétique produit par les transformateurs de l’appareil pourrait provoquer le ronflement des enceintes.
Important
• Avant un raccordement ou une modification de raccordement, mettez l’appareil hors tension et débranchez le cordon d’alimentation de la prise secteur.
• Avant de débrancher le cordon d’alimentation, mettez l’appareil en veille.
Câbles HDMILes signaux vidéo et audio peuvent être transmis simultanément via un seul câble. Dans le cas où le lecteur et le téléviseur sont connectés via cet appareil, utilisez des câbles HDMI pour les deux connexions.3
Veillez à raccorder la borne dans le sens qui convient.
Remarque1 La sortie du subwoofer dépend des réglages effectués à la section Réglage des enceintes à la page 43. Toutefois, si SPB est
sélectionné dans les réglages ci-dessus, le subwoofer n’émet aucun son (le canal LFE n’est pas remixé).2 Vous pouvez utiliser des enceintes ayant une impédance normale comprise entre 6 Ω et 16 Ω. Notez toutefois que seules les
enceintes avant sont réglées sur une valeur comprise entre 12 Ω et 16 Ω si vous avez sélectionné SPAB.
SPEAKERS DIMMER DISPLAY
3 • Réglez le paramètre HDMI (voir la section Réglage des options audio à la page 38) sur THRU (THROUGH) et le signal d’entrée (voir la section Choix du signal d’entrée à la page 41) sur HDMI si vous souhaitez entendre la sortie audio HDMI de votre téléviseur ou téléviseur à écran plat (aucun son ne sera transmis par ce récepteur).• Si le signal vidéo n’apparaît sur votre téléviseur, essayez d’ajuster les réglages de la résolution de votre composant ou écran. Notez que certains composants (par exemple les consoles de jeux vidéo) ont des résolutions qui ne peuvent pas être affichées. Dans ce cas, utilisez une connexion composite (analogique).• Lorsque le signal vidéo HDMI est 480i, 480p, 576i ou 576p, il est impossible de recevoir le son Multi Ch PCM et HD.
Câble HDMI
VSX-820_SYXCN_Fr.book 20 ページ 2010年4月12日 月曜日 午後6時59分
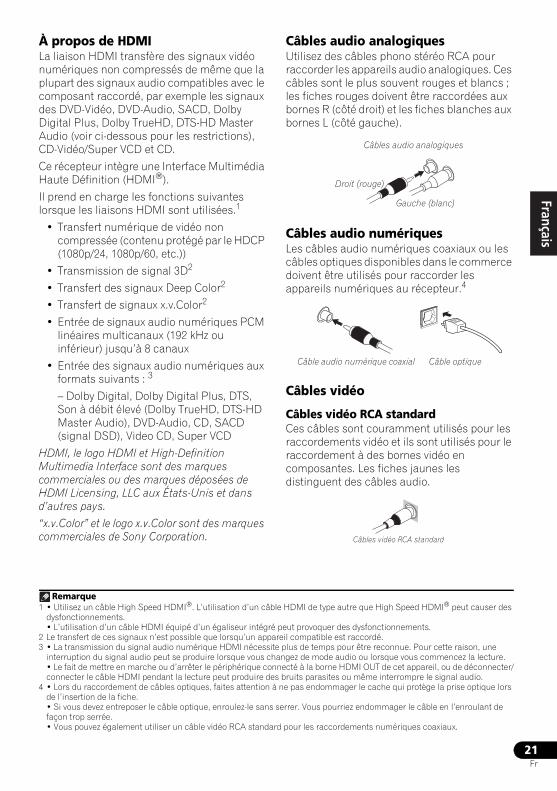
21Fr
EnglishFrançais
Deutsch
NederlandsItaliano
Español
À propos de HDMILa liaison HDMI transfère des signaux vidéo numériques non compressés de même que la plupart des signaux audio compatibles avec le composant raccordé, par exemple les signaux des DVD-Vidéo, DVD-Audio, SACD, Dolby Digital Plus, Dolby TrueHD, DTS-HD Master Audio (voir ci-dessous pour les restrictions), CD-Vidéo/Super VCD et CD.
Ce récepteur intègre une Interface Multimédia Haute Définition (HDMI®).
Il prend en charge les fonctions suivantes lorsque les liaisons HDMI sont utilisées.1
• Transfert numérique de vidéo non compressée (contenu protégé par le HDCP (1080p/24, 1080p/60, etc.))
• Transmission de signal 3D2
• Transfert des signaux Deep Color2
• Transfert de signaux x.v.Color2
• Entrée de signaux audio numériques PCM linéaires multicanaux (192 kHz ou inférieur) jusqu’à 8 canaux
• Entrée des signaux audio numériques aux formats suivants : 3
– Dolby Digital, Dolby Digital Plus, DTS, Son à débit élevé (Dolby TrueHD, DTS-HD Master Audio), DVD-Audio, CD, SACD (signal DSD), Video CD, Super VCD
HDMI, le logo HDMI et High-Definition Multimedia Interface sont des marques commerciales ou des marques déposées de HDMI Licensing, LLC aux États-Unis et dans d’autres pays.
“x.v.Color” et le logo x.v.Color sont des marques commerciales de Sony Corporation.
Câbles audio analogiquesUtilisez des câbles phono stéréo RCA pour raccorder les appareils audio analogiques. Ces câbles sont le plus souvent rouges et blancs ; les fiches rouges doivent être raccordées aux bornes R (côté droit) et les fiches blanches aux bornes L (côté gauche).
Câbles audio numériquesLes câbles audio numériques coaxiaux ou les câbles optiques disponibles dans le commerce doivent être utilisés pour raccorder les appareils numériques au récepteur.4
Câbles vidéo
Câbles vidéo RCA standardCes câbles sont couramment utilisés pour les raccordements vidéo et ils sont utilisés pour le raccordement à des bornes vidéo en composantes. Les fiches jaunes les distinguent des câbles audio.
Remarque1 • Utilisez un câble High Speed HDMI®. L’utilisation d’un câble HDMI de type autre que High Speed HDMI® peut causer des
dysfonctionnements.• L’utilisation d’un câble HDMI équipé d’un égaliseur intégré peut provoquer des dysfonctionnements.
2 Le transfert de ces signaux n’est possible que lorsqu’un appareil compatible est raccordé.3 • La transmission du signal audio numérique HDMI nécessite plus de temps pour être reconnue. Pour cette raison, une
interruption du signal audio peut se produire lorsque vous changez de mode audio ou lorsque vous commencez la lecture.• Le fait de mettre en marche ou d’arrêter le périphérique connecté à la borne HDMI OUT de cet appareil, ou de déconnecter/connecter le câble HDMI pendant la lecture peut produire des bruits parasites ou même interrompre le signal audio.
4 • Lors du raccordement de câbles optiques, faites attention à ne pas endommager le cache qui protège la prise optique lors de l’insertion de la fiche.• Si vous devez entreposer le câble optique, enroulez-le sans serrer. Vous pourriez endommager le câble en l’enroulant de façon trop serrée.• Vous pouvez également utiliser un câble vidéo RCA standard pour les raccordements numériques coaxiaux.
Droit (rouge)
Câbles audio analogiques
Gauche (blanc)
Câble audio numérique coaxial Câble optique
Câbles vidéo RCA standard
VSX-820_SYXCN_Fr.book 21 ページ 2010年4月12日 月曜日 午後6時59分
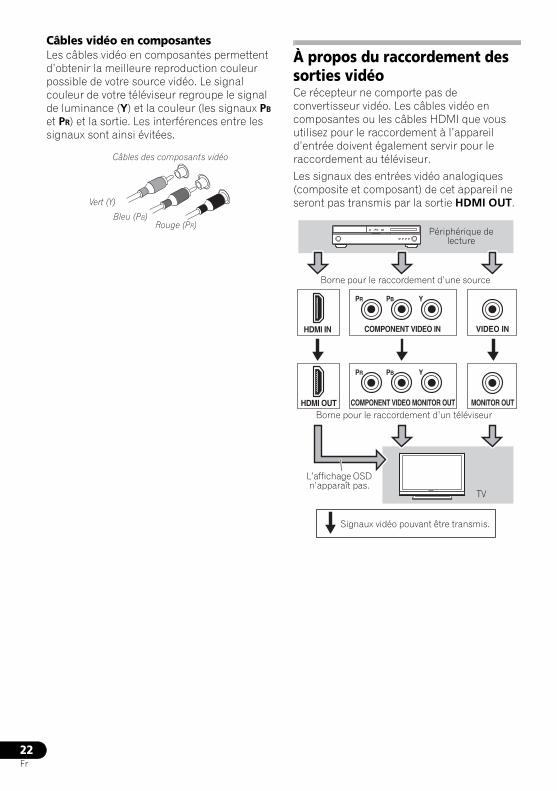
22Fr
Câbles vidéo en composantesLes câbles vidéo en composantes permettent d’obtenir la meilleure reproduction couleur possible de votre source vidéo. Le signal couleur de votre téléviseur regroupe le signal de luminance (Y) et la couleur (les signaux PB
et PR) et la sortie. Les interférences entre les signaux sont ainsi évitées.
À propos du raccordement des sorties vidéoCe récepteur ne comporte pas de convertisseur vidéo. Les câbles vidéo en composantes ou les câbles HDMI que vous utilisez pour le raccordement à l’appareil d’entrée doivent également servir pour le raccordement au téléviseur.
Les signaux des entrées vidéo analogiques (composite et composant) de cet appareil ne seront pas transmis par la sortie HDMI OUT.Vert (Y)
Bleu (PB)Rouge (PR)
Câbles des composants vidéo
VIDEO IN
PR PB Y
COMPONENT VIDEO INHDMI IN
MONITOR OUT
PR PB Y
HDMI OUT COMPONENT VIDEO MONITOR OUT
Borne pour le raccordement d’une source
Borne pour le raccordement d’un téléviseur
Périphérique de lecture
TV
L’affichage OSD n’apparaît pas.
Signaux vidéo pouvant être transmis.
VSX-820_SYXCN_Fr.book 22 ページ 2010年4月12日 月曜日 午後6時59分
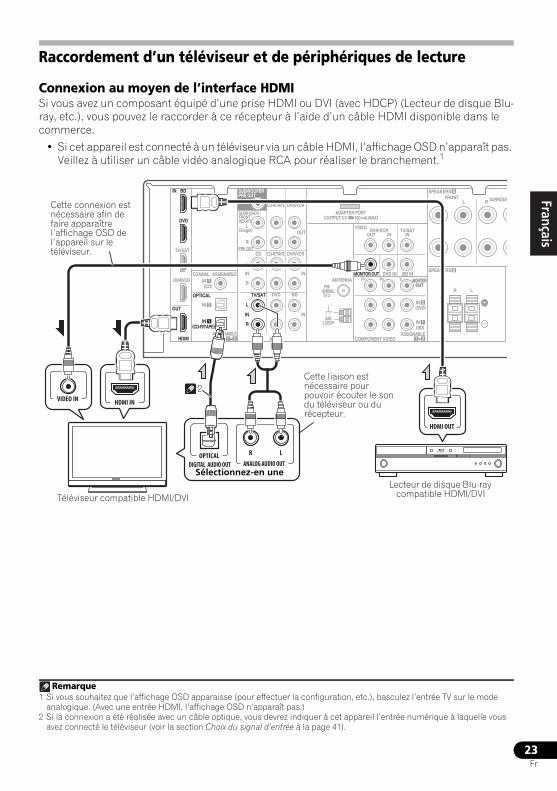
23Fr
EnglishFrançais
Deutsch
NederlandsItaliano
Español
Raccordement d’un téléviseur et de périphériques de lecture
Connexion au moyen de l’interface HDMISi vous avez un composant équipé d’une prise HDMI ou DVI (avec HDCP) (Lecteur de disque Blu-ray, etc.), vous pouvez le raccorder à ce récepteur à l’aide d’un câble HDMI disponible dans le commerce.
• Si cet appareil est connecté à un téléviseur via un câble HDMI, l’affichage OSD n’apparaît pas. Veillez à utiliser un câble vidéo analogique RCA pour réaliser le branchement.12
Remarque1 Si vous souhaitez que l’affichage OSD apparaisse (pour effectuer la configuration, etc.), basculez l’entrée TV sur le mode
analogique. (Avec une entrée HDMI, l’affichage OSD n’apparaît pas.)2 Si la connexion a été réalisée avec un câble optique, vous devrez indiquer à cet appareil l’entrée numérique à laquelle vous
avez connecté le téléviseur (voir la section Choix du signal d’entrée à la page 41).
IN BD
SURR BACK /FRONTHEIGHT
L(Single)
R
R
L
IN
R
L
IN
IN
OUT
IN
CD
TV/SAT DVD BD
DVR/VCR
MONITOR OUTPR PB Y
R L
DVD IN BD IN
OUTMONITOR
COMPONENT VIDEO
TV/SATIN
DVR/VCROUT IN
FRONTR L
CD-R/TAPE
DVR/VCR CD-R/TAPE
PRE OUT
DVD
TV/SAT
COAXIAL
OPTICAL
(CD)IN
ASSIGNABLE
ASSIGNABLE
OUT
HDMI
DVR/VCR 1
(CD-R/TAPE)IN
AUDIO
ADAPTER PORT
VIDEO
(OUTPUT 5 V 100 mA MAX)
1(BD)IN 1
(DVD)IN 2
1 2ASSIGNABLE
SPEAKERS
1
B
SPEAKERS A
2
IN 2
SUBWOOFERPRE OUT
ANTENNAFM
UNBAL75
AMLOOP
SURROUNR
VIDEO IN
HDMI OUT
HDMI IN
DIGITAL AUDIO OUTOPTICAL R L
ANALOG AUDIO OUT
MONITOROUT
Sélectionnez-en une
Téléviseur compatible HDMI/DVILecteur de disque Blu-ray
compatible HDMI/DVI
Cette liaison est nécessaire pour pouvoir écouter le son du téléviseur ou du récepteur.
Cette connexion est nécessaire afin de faire apparaître l’affichage OSD de l’appareil sur le téléviseur.
2
VSX-820_SYXCN_Fr.book 23 ページ 2010年4月12日 月曜日 午後6時59分
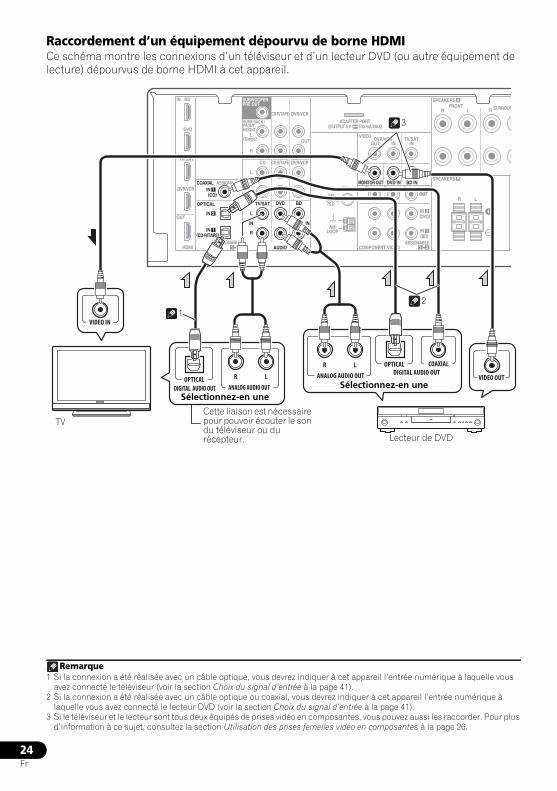
24Fr
Raccordement d’un équipement dépourvu de borne HDMICe schéma montre les connexions d’un téléviseur et d’un lecteur DVD (ou autre équipement de lecture) dépourvus de borne HDMI à cet appareil.123
Remarque1 Si la connexion a été réalisée avec un câble optique, vous devrez indiquer à cet appareil l’entrée numérique à laquelle vous
avez connecté le téléviseur (voir la section Choix du signal d’entrée à la page 41).2 Si la connexion a été réalisée avec un câble optique ou coaxial, vous devrez indiquer à cet appareil l’entrée numérique à
laquelle vous avez connecté le lecteur DVD (voir la section Choix du signal d’entrée à la page 41).3 Si le téléviseur et le lecteur sont tous deux équipés de prises vidéo en composantes, vous pouvez aussi les raccorder. Pour plus
d’information à ce sujet, consultez la section Utilisation des prises femelles vidéo en composantes à la page 26.
MONITOROUT
IN BD
SURR BACK /FRONTHEIGHT
L(Single)
R
R
L
IN
R
L
IN
IN
OUT
IN
CD
TV/SAT DVD BD
DVR/VCR
MONITOR OUTPR PB Y
R L
DVD IN BD IN
OUTMONITOR
COMPONENT VIDEO
TV/SATIN
DVR/VCROUT IN
FRONTR L
CD-R/TAPE
DVR/VCR CD-R/TAPE
PRE OUT
DVD
TV/SAT
COAXIAL
OPTICAL
(CD)IN
ASSIGNABLE
ASSIGNABLE
OUT
HDMI
DVR/VCR 1
(CD-R/TAPE)IN
AUDIO
ADAPTER PORT
VIDEO
(OUTPUT 5 V 100 mA MAX)
1(BD)IN 1
(DVD)IN 2
1 2ASSIGNABLE
SPEAKERS
1
B
SPEAKERS A
2
IN 2
SUBWOOFERPRE OUT
ANTENNAFM
UNBAL75
AMLOOP
SURROUNR
R LDIGITAL AUDIO OUTANALOG AUDIO OUT
COAXIAL
VIDEO OUT
OPTICAL
DIGITAL AUDIO OUTOPTICAL R L
ANALOG AUDIO OUT
VIDEO IN
Sélectionnez-en une
TV
Lecteur de DVD
Cette liaison est nécessaire pour pouvoir écouter le son du téléviseur ou du récepteur.
Sélectionnez-en une
1 2
3
VSX-820_SYXCN_Fr.book 24 ページ 2010年4月12日 月曜日 午後6時59分

25Fr
EnglishFrançais
Deutsch
NederlandsItaliano
Español
Raccordement d’un récepteur satellite ou d’un boîtier décodeur numériqueLes récepteurs satellites et par câble, ainsi que les syntoniseurs de téléviseur numérique terrestre sont tous des exemples de ce que l’on appelle boîtiers décodeurs.12
Raccordement d’un enregistreur HDD/DVD, magnétoscope et autres sources vidéoCe récepteur est muni d’entrées et de sorties audio/vidéo adaptées au raccordement d’enregistreurs analogiques ou numériques, tels que des magnétoscopes ou des enregistreurs HDD/DVD.
• Seuls les signaux qui sont envoyés sur la borne VIDEO IN peuvent être sortis au niveau de la borne VIDEO OUT.
• Les signaux qui sont envoyés sur la borne numérique ne peuvent pas être sortis au niveau de la borne analogique.
Remarque1 Si la connexion a été réalisée avec un câble optique, vous devrez indiquer à cet appareil l’entrée numérique à laquelle vous
avez connecté le boîtier décodeur ou l’équipement vidéo (voir la section Choix du signal d’entrée à la page 41).2 Si le boîtier décodeur ou l’équipement vidéo possède aussi une sortie HDMI ou une sortie vidéo en composantes, vous pouvez
également la raccorder. Pour plus d’informations, consultez les sections Connexion au moyen de l’interface HDMI à la page 23 et Utilisation des prises femelles vidéo en composantes à la page 26.
SURR BACK /FRONTHEIGHT
L(Single)
R
R
L
IN
R
L
IN
IN
OUT
IN
CD
TV/SAT DVD BD
DVR/VCR
MONITOR OUTPR PB Y
DVD IN BD INM
COMPONENT VIDEO
TV/SATIN
DVR/VCROUT IN
CD-R/TAPE
DVR/VCR CD-R/TAPE
PRE OUT
COAXIAL
OPTICAL
(CD)IN
ASSIGNABLE
ASSIGNABLE
1
(CD-R/TAPE)IN
AUDIO
ADAPTER PORT
VIDEO
(OUTPUT 5 V 100 mA MAX)
1
1 2ASSIGNA
IN 2
SUBWOOFERPRE OUT
ANTENNAFM
UNBAL75
AMLOOP
DIGITAL AUDIO OUT
OPTICAL R LANALOG AUDIO OUT
VIDEO OUTSélectionnez-en une
STB
2 1
MONITOROUT
SURR BACK /FRONTHEIGHT
L(Single)
R
R
L
IN
R
L
IN
IN
OUT
IN
CD
TV/SAT DVD BD
DVR/VCR
MONITOR OUTPR PB Y
DVD IN BD IN
OUTMONITOR
COMPONENT VIDEO
TV/SATIN
DVR/VCROUT IN
CD-R/TAPE
DVR/VCR CD-R/TAPE
PRE OUT
COAXIAL
OPTICAL
(CD)IN
ASSIGNABLE
ASSIGNABLE
1
(CD-R/TAPE)IN
AUDIO
ADAPTER PORT
VIDEO
(OUTPUT 5 V 100 mA MAX)
1(BD)IN 1
(DVD)IN 2
1 2ASSIGNABLE
1 2
IN 2
SUBWOOFERPRE OUT
ANTENNAFM
UNBAL75
AMLOOP
PLAYR LDIGITAL
AUDIO OUT ANALOG AUDIO OUTR L
ANALOG AUDIO IN
OPTICAL
VIDEO OUT
VIDEO IN
REC
Sélectionnez-en une
DVR, magnétoscope, lecteur LD, etc.
1
2
VSX-820_SYXCN_Fr.book 25 ページ 2010年4月12日 月曜日 午後6時59分
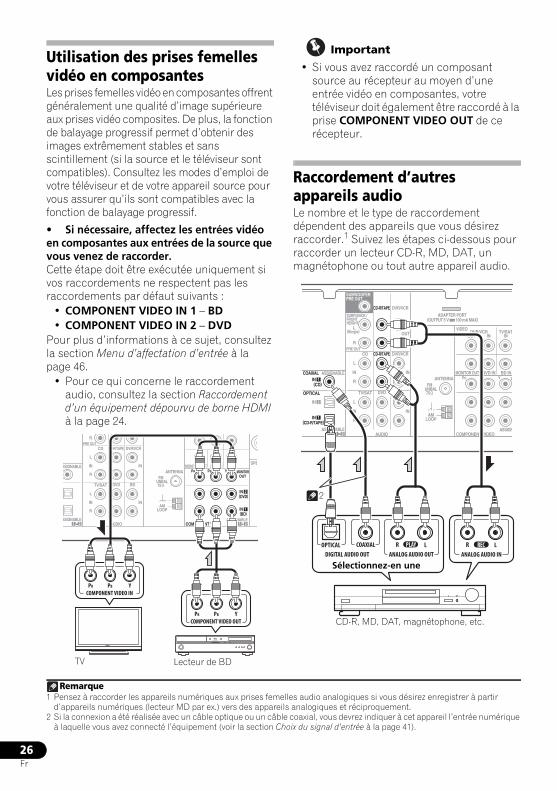
26Fr
Utilisation des prises femelles vidéo en composantesLes prises femelles vidéo en composantes offrent généralement une qualité d’image supérieure aux prises vidéo composites. De plus, la fonction de balayage progressif permet d’obtenir des images extrêmement stables et sans scintillement (si la source et le téléviseur sont compatibles). Consultez les modes d’emploi de votre téléviseur et de votre appareil source pour vous assurer qu’ils sont compatibles avec la fonction de balayage progressif.
• Si nécessaire, affectez les entrées vidéo en composantes aux entrées de la source que vous venez de raccorder. Cette étape doit être exécutée uniquement si vos raccordements ne respectent pas les raccordements par défaut suivants :
• COMPONENT VIDEO IN 1 – BD • COMPONENT VIDEO IN 2 – DVD
Pour plus d’informations à ce sujet, consultez la section Menu d’affectation d’entrée à la page 46.
• Pour ce qui concerne le raccordement audio, consultez la section Raccordement d’un équipement dépourvu de borne HDMI à la page 24.
Important
• Si vous avez raccordé un composant source au récepteur au moyen d’une entrée vidéo en composantes, votre téléviseur doit également être raccordé à la prise COMPONENT VIDEO OUT de ce récepteur.
Raccordement d’autres appareils audioLe nombre et le type de raccordement dépendent des appareils que vous désirez raccorder.1 Suivez les étapes ci-dessous pour raccorder un lecteur CD-R, MD, DAT, un magnétophone ou tout autre appareil audio.2
R
R
L
IN
R
L
IN
IN
IN
CD
TV/SAT DVD BD
DVR/VCR
MONITOR OUTPR PB Y
DVD IN BD IN
OUTMONITOR
COMPONENT VIDEO
CD-R/TAPE PRE OUT
SSIGNABLE
SSIGNABLEAUDIO
(BD)IN 1
(DVD)IN 2
1 2ASSIGNABLE
SPE
1 2
ANTENNAFM
UNBAL75
AMLOOP
COMPONENT VIDEO INPR YPB
COMPONENT VIDEO OUTPR YPB
Lecteur de BDTV
Remarque1 Pensez à raccorder les appareils numériques aux prises femelles audio analogiques si vous désirez enregistrer à partir
d’appareils numériques (lecteur MD par ex.) vers des appareils analogiques et réciproquement.2 Si la connexion a été réalisée avec un câble optique ou un câble coaxial, vous devrez indiquer à cet appareil l’entrée numérique
à laquelle vous avez connecté l’équipement (voir la section Choix du signal d’entrée à la page 41).
SURR BACK /FRONTHEIGHT
L(Single)
R
R
L
IN
R
L
IN
IN
OUT
IN
CD
TV/SAT DVD BD
DVR/VCR
MONITOR OUTPR PB Y
DVD IN BD INM
COMPONENT VIDEO
TV/SATIN
DVR/VCROUT IN
CD-R/TAPE
DVR/VCR CD-R/TAPE
PRE OUT
COAXIAL
OPTICAL
(CD)IN
ASSIGNABLE
ASSIGNABLE
1
(CD-R/TAPE)IN
AUDIO
ADAPTER PORT
VIDEO
(OUTPUT 5 V 100 mA MAX)
1
1 2ASSIGN
IN 2
SUBWOOFERPRE OUT
ANTENNAFM
UNBAL75
AMLOOP
PLAYR L
DIGITAL AUDIO OUT ANALOG AUDIO OUT
COAXIAL R L
ANALOG AUDIO IN
RECOPTICAL
Sélectionnez-en une
CD-R, MD, DAT, magnétophone, etc.
2
VSX-820_SYXCN_Fr.book 26 ページ 2010年4月12日 月曜日 午後6時59分
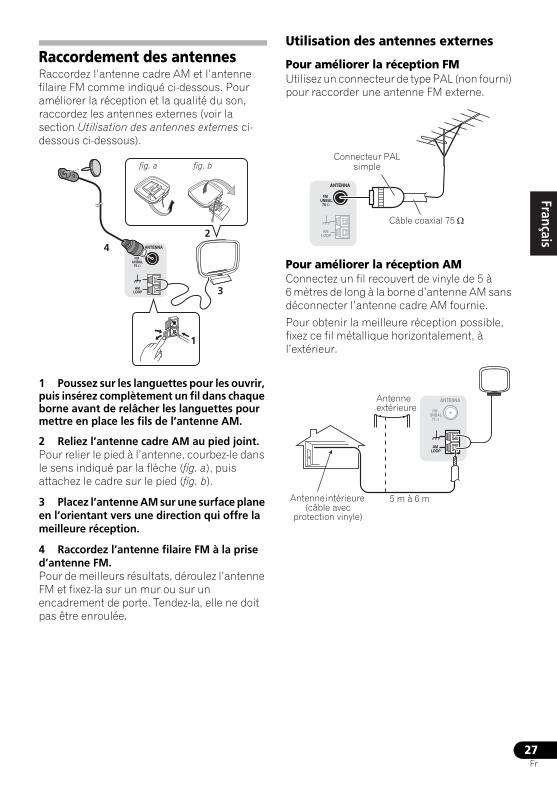
27Fr
EnglishFrançais
Deutsch
NederlandsItaliano
Español
Raccordement des antennesRaccordez l’antenne cadre AM et l’antenne filaire FM comme indiqué ci-dessous. Pour améliorer la réception et la qualité du son, raccordez les antennes externes (voir la section Utilisation des antennes externes ci-dessous ci-dessous).
1 Poussez sur les languettes pour les ouvrir, puis insérez complètement un fil dans chaque borne avant de relâcher les languettes pour mettre en place les fils de l’antenne AM.
2 Reliez l’antenne cadre AM au pied joint.Pour relier le pied à l’antenne, courbez-le dans le sens indiqué par la flèche (fig. a), puis attachez le cadre sur le pied (fig. b).
3 Placez l’antenne AM sur une surface plane en l’orientant vers une direction qui offre la meilleure réception.
4 Raccordez l’antenne filaire FM à la prise d’antenne FM.Pour de meilleurs résultats, déroulez l’antenne FM et fixez-la sur un mur ou sur un encadrement de porte. Tendez-la, elle ne doit pas être enroulée.
Utilisation des antennes externes
Pour améliorer la réception FMUtilisez un connecteur de type PAL (non fourni) pour raccorder une antenne FM externe.
Pour améliorer la réception AMConnectez un fil recouvert de vinyle de 5 à 6 mètres de long à la borne d’antenne AM sans déconnecter l’antenne cadre AM fournie.
Pour obtenir la meilleure réception possible, fixez ce fil métallique horizontalement, à l’extérieur.
ANTENNA
AM LOOP
2
1
3
4
fig. a fig. b
ANTENNA
FM UNBAL
75 Ω
AM LOOP
Connecteur PAL simple
Câble coaxial 75 Ω
ANTENNA
FM UNBAL
75 Ω
AM LOOP
Antenne extérieure
5 m à 6 mAntenne intérieure (câble avec
protection vinyle)
VSX-820_SYXCN_Fr.book 27 ページ 2010年4月12日 月曜日 午後6時59分
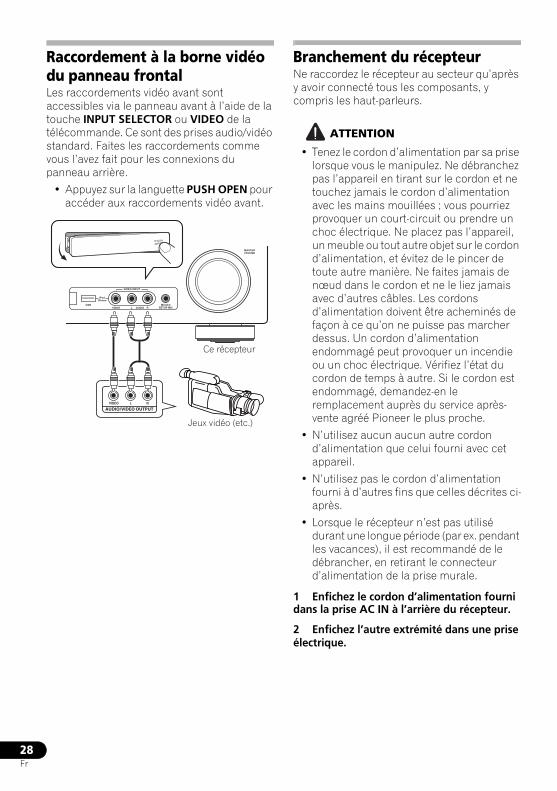
28Fr
Raccordement à la borne vidéo du panneau frontalLes raccordements vidéo avant sont accessibles via le panneau avant à l’aide de la touche INPUT SELECTOR ou VIDEO de la télécommande. Ce sont des prises audio/vidéo standard. Faites les raccordements comme vous l’avez fait pour les connexions du panneau arrière.
• Appuyez sur la languette PUSH OPEN pour accéder aux raccordements vidéo avant.
Branchement du récepteurNe raccordez le récepteur au secteur qu’après y avoir connecté tous les composants, y compris les haut-parleurs.
ATTENTION
• Tenez le cordon d’alimentation par sa prise lorsque vous le manipulez. Ne débranchez pas l’appareil en tirant sur le cordon et ne touchez jamais le cordon d’alimentation avec les mains mouillées ; vous pourriez provoquer un court-circuit ou prendre un choc électrique. Ne placez pas l’appareil, un meuble ou tout autre objet sur le cordon d’alimentation, et évitez de le pincer de toute autre manière. Ne faites jamais de nœud dans le cordon et ne le liez jamais avec d’autres câbles. Les cordons d’alimentation doivent être acheminés de façon à ce qu’on ne puisse pas marcher dessus. Un cordon d’alimentation endommagé peut provoquer un incendie ou un choc électrique. Vérifiez l’état du cordon de temps à autre. Si le cordon est endommagé, demandez-en le remplacement auprès du service après-vente agréé Pioneer le plus proche.
• N’utilisez aucun aucun autre cordon d’alimentation que celui fourni avec cet appareil.
• N’utilisez pas le cordon d’alimentation fourni à d’autres fins que celles décrites ci-après.
• Lorsque le récepteur n’est pas utilisé durant une longue période (par ex. pendant les vacances), il est recommandé de le débrancher, en retirant le connecteur d’alimentation de la prise murale.
1 Enfichez le cordon d’alimentation fourni dans la prise AC IN à l’arrière du récepteur.
2 Enfichez l’autre extrémité dans une prise électrique.
MASTERVOLUME
MCACCSETUP MIC
VIDEO INPUT
AUDIOL RVIDEO
iPodiPhone
USB
CONTROL ON / OFF
LVIDEO R
AUDIO/VIDEO OUTPUT
Ce récepteur
Jeux vidéo (etc.)
VSX-820_SYXCN_Fr.book 28 ページ 2010年4月12日 月曜日 午後6時59分

29Fr
EnglishFrançais
Deutsch
NederlandsItaliano
Español
Chapitre 4 :
Configuration de base
Configuration automatique du son surround (MCACC)Le système de calibrage acoustique multicanaux (Multi-Channel Acoustic Calibration, MCACC) mesure les caractéristiques acoustiques de votre position d’écoute en tenant compte du bruit ambiant, de la taille et de la distance des enceintes et des tests sur le retard et le niveau de canal. Une fois que vous avez installé le microphone fourni avec votre système, le récepteur utilise les informations provenant d’une série de tonalités de test afin d’optimiser les réglages d’enceinte et l’égalisation pour une pièce spécifique.
ATTENTION
• Les tonalités de test utilisées dans la configuration MCACC automatique sont générées à un volume élevé.
Important
• L’affichage à l’écran n’apparaît pas si vous avez effectué la connexion au téléviseur via la sortie HDMI. Utilisez la connexion en composantes ou la connexion composite pour configurer le système.
• La configuration MCACC automatique remplace tous les réglages précédemment effectués pour les enceintes.
• Vous ne devez pas sélectionner la fonction iPod USB en tant que source d’entrée si vous prévoyez d’utiliser la configuration MCACC automatique.
• Si vous avez raccordé les enceintes surround arrière ou les enceintes surround avant-haut, vérifiez que le paramètre Pre Out est correctement réglé avant d’exécuter la configuration automatique MCACC (voir page 47). (Voici un exemple expliquant l’utilisation de l’affichage OSD lorsque des enceintes surround arrière sont connectées.)
1 Allumez le récepteur et votre téléviseur.Réglez l’entrée TV de sorte que la connexion à l’appareil se fasse en mode analogique.
2 Connectez le microphone à la prise MCACC SETUP MIC sur le panneau avant. Assurez-vous qu’il n’y a pas d’obstacles entre les enceintes et le microphone.
Si vous avez un trépied, utilisez-le pour y placer le microphone afin qu’il soit au niveau des oreilles à votre position d’écoute normale. Sinon, placez le microphone au niveau des oreilles en utilisant une table ou une chaise.
BD DVD
INPUT SELECT
SOURCESLEEPTV
CONTROL
TV
INPUT
RECEIVER
RECEIVER ENTER
RETURN
AUDIOPARAMETER
TUNER EDITTOOLS
MASTERVOLUME
iPod CTRLBAND
MENU
HOMEMENUSETUP
TOPMENU
TUNE
TUNE
PRESETPR
ESET
MASTERVOLUME
MCACCSETUP MIC
VIDEO INPUT
AUDIOL RVIDEO
iPodiPhone
USB
CONTROL ON / OFF
Trépied
Microphone
VSX-820_SYXCN_Fr.book 29 ページ 2010年4月12日 月曜日 午後6時59分
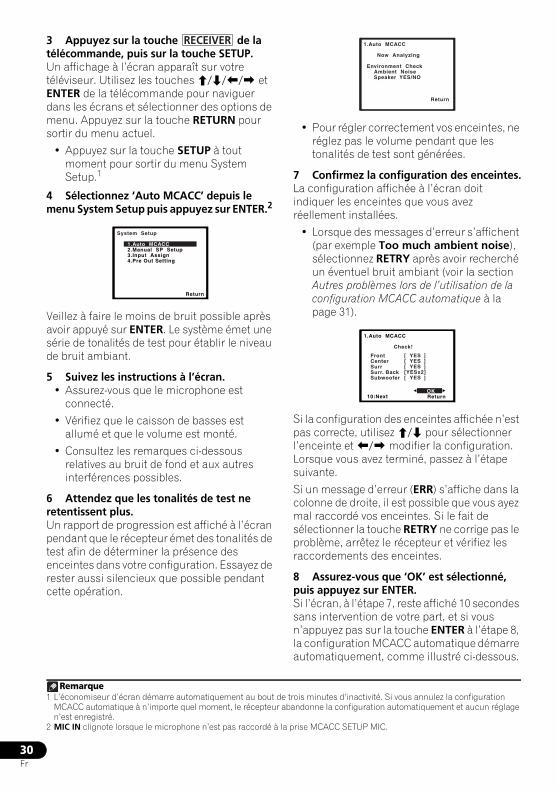
30Fr
3 Appuyez sur la touche de la télécommande, puis sur la touche SETUP.Un affichage à l’écran apparaît sur votre téléviseur. Utilisez les touches /// et ENTER de la télécommande pour naviguer dans les écrans et sélectionner des options de menu. Appuyez sur la touche RETURN pour sortir du menu actuel.
• Appuyez sur la touche SETUP à tout moment pour sortir du menu System Setup.1
4 Sélectionnez ‘Auto MCACC’ depuis le menu System Setup puis appuyez sur ENTER.2
Veillez à faire le moins de bruit possible après avoir appuyé sur ENTER. Le système émet une série de tonalités de test pour établir le niveau de bruit ambiant.
5 Suivez les instructions à l’écran.• Assurez-vous que le microphone est
connecté.
• Vérifiez que le caisson de basses est allumé et que le volume est monté.
• Consultez les remarques ci-dessous relatives au bruit de fond et aux autres interférences possibles.
6 Attendez que les tonalités de test ne retentissent plus.Un rapport de progression est affiché à l’écran pendant que le récepteur émet des tonalités de test afin de déterminer la présence des enceintes dans votre configuration. Essayez de rester aussi silencieux que possible pendant cette opération.
• Pour régler correctement vos enceintes, ne réglez pas le volume pendant que les tonalités de test sont générées.
7 Confirmez la configuration des enceintes.La configuration affichée à l’écran doit indiquer les enceintes que vous avez réellement installées.
• Lorsque des messages d’erreur s’affichent (par exemple Too much ambient noise), sélectionnez RETRY après avoir recherché un éventuel bruit ambiant (voir la section Autres problèmes lors de l’utilisation de la configuration MCACC automatique à la page 31).
Si la configuration des enceintes affichée n’est pas correcte, utilisez / pour sélectionner l’enceinte et / modifier la configuration. Lorsque vous avez terminé, passez à l’étape suivante.
Si un message d’erreur (ERR) s’affiche dans la colonne de droite, il est possible que vous ayez mal raccordé vos enceintes. Si le fait de sélectionner la touche RETRY ne corrige pas le problème, arrêtez le récepteur et vérifiez les raccordements des enceintes.
8 Assurez-vous que ‘OK’ est sélectionné, puis appuyez sur ENTER.Si l’écran, à l’étape 7, reste affiché 10 secondes sans intervention de votre part, et si vous n’appuyez pas sur la touche ENTER à l’étape 8, la configuration MCACC automatique démarre automatiquement, comme illustré ci-dessous.
Remarque1 L’économiseur d’écran démarre automatiquement au bout de trois minutes d’inactivité. Si vous annulez la configuration
MCACC automatique à n’importe quel moment, le récepteur abandonne la configuration automatiquement et aucun réglage n’est enregistré.
2 MIC IN clignote lorsque le microphone n’est pas raccordé à la prise MCACC SETUP MIC.
RECEIVER
System Setup
1.Auto MCACC2.Manual SP Setup3.Input Assign4.Pre Out Setting
Return
1.Auto MCACC
Now Analyzing
Environment Check Ambient Noise Speaker YES/NO
Return
1.Auto MCACC
Check!
OK Return 10:Next
Front CenterSurrSurr. BackSubwoofer
[ YES ][ YES ][ YES ][YESx2][ YES ]
VSX-820_SYXCN_Fr.book 30 ページ 2010年4月12日 月曜日 午後6時59分

31Fr
EnglishFrançais
Deutsch
NederlandsItaliano
Español
Un rapport de progression apparaît à l’écran pendant que le récepteur émet davantage de tonalités de test afin de déterminer les réglages optimum du récepteur en matière de niveau des canaux, distance des enceintes et calibrage Acoustic Calibration EQ.
De nouveau, essayez de rester aussi silencieux que possible pendant cette opération. Celle-ci peut prendre 1 à 3 minutes.
9 La configuration MCACC automatique est terminée ! Vous retournez au menu de configuration du système.Les réglages faits dans la configuration MCACC automatique devraient donner un excellent son surround à votre système, mais il est aussi possible d’ajuster ces réglages manuellement en utilisant le menu System Setup (voir page 42).1
Autres problèmes lors de l’utilisation de la configuration MCACC automatique Si l’environnement de la pièce n’est pas optimal pour la configuration MCACC automatique (trop de bruit de fond, écho dans les murs, obstacles entre les enceintes et le microphone) il se peut que les réglages finaux soient incorrects. Vérifiez s’il y a des équipements domestiques (climatiseur, réfrigérateur, ventilateur, etc.) qui pourraient affecter l’environnement et éteignez-les si nécessaire. Si des instructions apparaissent sur l’écran du panneau avant, veuillez les suivre.
• Certains vieux téléviseurs peuvent interférer avec le fonctionnement du microphone. Si cela semble arriver, éteignez le téléviseur pendant la configuration MCACC automatique.
Remarque1 • Selon les caractéristiques de votre pièce, parfois, des enceintes identiques avec des tailles de cône d’environ 12 cm se
retrouveront avec des réglages de taille différents. Vous pouvez corriger le réglage manuellement à l’aide de la section Réglage des enceintes à la page 43.• Le réglage de la distance du subwoofer peut être supérieur à la distance réelle de la position d’écoute. Ce réglage doit être précis (en tenant compte des caractéristiques de retard et de la pièce) et il n’a généralement pas besoin d’être changé.
1.Auto MCACC
Now Analyzing
Surround Analyzing Speaker System Speaker Distance Channel Level Acoustic Cal EQ
Return
VSX-820_SYXCN_Fr.book 31 ページ 2010年4月12日 月曜日 午後6時59分
32Fr
Chapitre 5 :
Écoute de sources à l’aide de votre système
Important
• Les modes d’écoute et de nombreuses fonctions décrites dans la présente section peuvent ne pas être disponibles en fonction de la source, des paramètres et de l’état actuels du récepteur.
Lecture de baseVoici les instructions de base pour lire une source (telle qu’un DVD) avec votre système home cinéma.
1 Allumez les composants de votre système et votre récepteur.Allumez en premier lieu l’équipement de lecture (par exemple, un lecteur DVD), votre téléviseur1 et le caisson de graves (si vous en avez un), puis le récepteur (appuyez sur RECEIVER).
• Assurez-vous de débrancher le microphone de configuration.
2 Sélectionnez la fonction d’entrée que vous souhaitez lire.Vous pouvez utiliser les touches de fonction d’entrée la touche INPUT SELECT de la télécommande, ou encore la molette INPUT SELECTOR du panneau avant.2
3 Appuyez sur AUTO/DIRECT pour sélectionner AUTO SURROUND, puis lancez la lecture de la source.3
Si vous lisez un DVD Dolby Digital ou DTS en son surround, vous devez entendre un son surround. Si vous lisez une source stéréo, vous entendez uniquement du son provenant des enceintes avant gauche/droite en mode d’écoute par défaut.
Il est possible de voir l’affichage sur le panneau avant, que la lecture en mode surround s’effectue correctement ou non.
Si vous utilisez une enceinte surround arrière, 2D+PLIIx s’affiche pendant la lecture des signaux Dolby Digital à 5.1 canaux et DTS+NEO:6 s’affiche pour la lecture des signaux DTS à 5.1 canaux.
Si vous n’utilisez pas d’enceinte surround arrière, 2D s’affiche pour la lecture de signaux Dolby Digital.
Si l’affichage ne correspond pas aux signaux présents et au mode d’écoute, vérifiez les liaisons et les réglages.
4 Utilisez la commande du volume pour régler le niveau de celui-ci.Coupez le volume de votre téléviseur pour que le son provienne intégralement des enceintes connectées à ce récepteur.
Remarque1 Assurez-vous que l’entrée vidéo du téléviseur est réglée sur ce récepteur (par exemple, si vous avez raccordé ce récepteur aux
prises VIDEO de votre téléviseur, assurez-vous que l’entrée VIDEO est bien sélectionnée).2 Si vous devez modifier manuellement le type de signal d’entrée, appuyez sur SIGNAL SEL (page 41).3 • Vous devrez peut-être vérifier les réglages de sortie audio numérique de votre lecteur DVD ou de votre récepteur satellite
numérique. Celui-ci doit être réglé pour générer du son Dolby Digital, DTS et 88,2 kHz / 96 kHz PCM (2 canaux) ; s’il existe une option pour son MPEG, activez-la pour convertir le son MPEG en PCM.• Selon votre lecteur DVD ou vos disques sources, il se peut que vous n’obteniez qu’un son analogique 2 canaux (stéréo). Dans ce cas, si vous désirez un son surround multicanaux, l’appareil doit être placé en mode d’écoute multicanaux.
VSX-820_SYXCN_Fr.book 32 ページ 2010年4月12日 月曜日 午後6時59分
33Fr
EnglishFrançais
Deutsch
NederlandsItaliano
Español
Lecture en mode AutoLa fonction Auto Surround correspond à l’option d’écoute en mode direct la plus simple. Grâce à cette fonction, le récepteur détecte automatiquement le type de source que vous écoutez et sélectionne un mode de lecture multicanaux ou stéréo selon les besoins.1
• Au moment d’écouter une source, appuyez sur AUTO/DIRECT2 pour lancer la lecture de la source en mode auto.Appuyez sur cette touche plusieurs fois jusqu’à ce que AUTO SURROUND s’affiche brièvement (le format de décodage ou de lecture apparaîtra ensuite). Vérifiez les indicateurs de format numérique sur l’afficheur pour suivre le traitement de la source.
Écoute d’une source en son surroundCe récepteur permet d’écouter n’importe quelle source en son surround. Toutefois, les options disponibles dépendront de la configuration de vos enceintes et du type de source que vous écoutez.
Les modes suivants offrent un son surround de base pour les sources stéréo et multicanaux.
• Lors de l’écoute d’une source, appuyez sur la touche STANDARD.Si la source présente un encodage Dolby Digital, DTS ou Dolby Surround, le format de décodage adéquat sera automatiquement sélectionné et apparaîtra sur l’afficheur.
Lorsque les enceintes surround arrière et les enceintes surround avant-haut ne sont pas raccordées.
Les options suivantes sont disponibles avec les sources à deux canaux :
• DOLBY PLII MOVIE – Les sons jusqu’à 5.1 canaux sont particulièrement adaptés aux sources cinématographiques
• DOLBY PLII MUSIC3 – Les sons jusqu’à 5.1 canaux, particulièrement adaptés aux sources musicales
• DOLBY PLII GAME – Les sons jusqu’à 5.1 canaux sont particulièrement adaptés aux jeux vidéo
• NEO:6 CINEMA – Les sons jusqu’à 5.1 canaux sont particulièrement adaptés aux sources cinématographiques
• NEO:6 MUSIC – Offre un son à 5.1 canaux et convient particulièrement à la musique4
• DOLBY PRO LOGIC – Son surround à 4.1 canaux
Lorsque les enceintes surround avant-haut sont raccordées.Les options suivantes sont disponibles avec les sources à deux canaux :
• DOLBY PLII MOVIE – Voir ci-dessus• DOLBY PLII MUSIC – Voir ci-dessus• DOLBY PLII GAME – Voir ci-dessus• DOLBY PLIIz HEIGHT – Sons jusqu’à
7.1 canaux5
• NEO:6 CINEMA – Voir ci-dessus
• NEO:6 MUSIC – Voir ci-dessus
• DOLBY PRO LOGIC – Voir ci-dessus
Remarque1 Les formats stéréo surround (matrix) sont alors décodés au moyen de NEO:6 CINEMA ou de DOLBY PLIIx MOVIE (pour plus
d’informations sur ces formats de décodage, consultez la section Écoute d’une source en son surround au-dessus).2 Pour d’autres options utilisant cette touche, consultez la section consultez la section Utilisation des modes Stream Direct à la
page 36.
BD MENUSTANDARD ADV SURR
STEREO/A.L.C.
AUTO/DIRECT
BD MENUSTANDARD ADV SURR
STEREO/A.L.C.
AUTO/DIRECT
3 Lors de l’écoute de sources à 2 canaux en mode DOLBY PLII MUSIC, vous pouvez régler trois paramètres supplémentaires : C.WIDTH, DIMEN., et PNRM.. Pour plus d’informations sur ces paramètres, consultez la section Réglage des options audio à la page 38.
4 Lorsque vous écoutez des sources à 2 canaux en mode NEO:6 CINEMA ou NEO:6 MUSIC, vous avez également la possibilité d’ajuster l’effet C.IMG (voir la section Réglage des options audio à la page 38).
5 Lors de l’écoute de sources à 2 canaux en mode DOLBY PLIIz HEIGHT, il est aussi possible de régler l’effet H.GAIN (voir la section Réglage des options audio à la page 38).
VSX-820_SYXCN_Fr.book 33 ページ 2010年4月12日 月曜日 午後6時59分
34Fr
• Décodage brut – Lecture sans effets DOLBY PLII, DOLBY PLIIz HEIGHT ou NEO:6.
Les options suivantes sont disponibles avec les sources multicanaux :
• DOLBY PLIIz HEIGHT – Sons jusqu’à 7.1 canaux1
• Décodage brut – Lecture sans effets DOLBY PLIIz HEIGHT.
Lorsque l’enceinte surround arrière est raccordée.2
Si vous avez raccordé des enceintes surround arrière, consultez également la section Utilisation du traitement de canal surround arrière à la page 37.
Les options suivantes sont disponibles avec les sources à deux canaux :
• DOLBY PLIIx MOVIE – Les sons jusqu’à 7.1 canaux sont particulièrement adaptés aux sources cinématographiques
• DOLBY PLIIx MUSIC – Les sons jusqu’à 7.1 canaux sont particulièrement adaptés aux sources musicales3
• DOLBY PLIIx GAME – Les sons jusqu’à 7.1 canaux sont particulièrement adaptés aux jeux vidéo
• NEO:6 CINEMA – Les sons jusqu’à 6.1 canaux sont particulièrement adaptés aux sources cinématographiques
• NEO:6 MUSIC – Offre un son à 6.1 canaux et convient particulièrement à la musique4
• DOLBY PRO LOGIC – Offre un son surround à 4.1 canaux (le son des enceintes surround est mono)
Avec des sources multicanaux, si vous avez raccordé une ou plusieurs enceintes surround arrière et que vous avez sélectionné SB ON, vous pouvez choisir (selon le format) :
• DOLBY PLIIx MOVIE – Voir ci-dessus (disponible uniquement lorsque vous utilisez deux enceintes surround arrière)
• DOLBY PLIIx MUSIC – Voir ci-dessus
• DOLBY DIGITAL EX – Offre un son de canal surround arrière pour les sources à 5.1 canaux et un décodage pur pour les sources à 6.1 canaux (par exemple, Dolby Digital Surround EX)
• DTS-ES – Permet la lecture à 6.1 canaux des sources DTS-ES encodées
• DTS NEO:6 – Permet la lecture à 6.1 canaux des sources DTS encodées
Utilisation des effets surround avancésLa fonction surround avancé permet de créer différents effets surround. Essayez différents modes sur différentes bandes sonores pour déterminer le mode que vous préférez.
• Appuyez plusieurs fois sur la touche ADV SURR pour sélectionner un mode d’écoute.
• ACTION – Convient aux films d’action dotés d’un son dynamique.
• DRAMA – Convient aux films comportant beaucoup de dialogues.
• ENT.SHOW – Convient pour la reproduction de sources musicales.
• ADVANCED GAME – Convient aux jeux vidéo.
• SPORTS – Convient aux programmes sportifs.
• CLASSICAL – Permet de recréer le son d’une grande salle de concert.
Remarque1 Lors de l’écoute de sources à 2 canaux en mode DOLBY PLIIz HEIGHT, il est aussi possible de régler l’effet H.GAIN (voir la
section Réglage des options audio à la page 38).2 • Si le traitement de canal surround arrière (voir page 37) est désélectionné ou si les enceintes surround arrière sont réglées
sur NO, DOLBY PLIIx devient DOLBY PLII (son à 5.1 canaux).• Dans les modes offrant un son à 6.1 canaux, le même signal sort des deux enceintes surround arrière.
3 Lors de l’écoute de sources à 2 canaux en mode DOLBY PLIIx MUSIC, vous pouvez régler trois paramètres supplémentaires : C.WIDTH, DIMEN., et PNRM.. Pour plus d’informations sur ces paramètres, consultez la section Réglage des options audio à la page 38.
4 Lorsque vous écoutez des sources à 2 canaux en mode NEO:6 CINEMA ou NEO:6 MUSIC, vous avez également la possibilité d’ajuster l’effet C.IMG (voir la section Réglage des options audio à la page 38).
BD MENUSTANDARD ADV SURR
STEREO/A.L.C.
AUTO/DIRECT
VSX-820_SYXCN_Fr.book 34 ページ 2010年4月12日 月曜日 午後6時59分

35Fr
EnglishFrançais
Deutsch
NederlandsItaliano
Español
• ROCK/POP – Permet de reproduire l’ambiance ‘live’ pour la musique pop et/ou rock.
• UNPLUGGED – Convient à la reproduction de sources musicales acoustiques.
• EXT.STEREO – Permet de recréer un son multicanaux à partir d’une source stéréo, en utilisant toutes vos enceintes.
Écoute en mode stéréoLorsque vous sélectionnez STEREO, la source est seulement reproduite sur les enceintes avant droite et gauche (et éventuellement sur votre caisson de basses (subwoofer) selon vos réglages d’enceintes). Les sources multicanaux Dolby Digital et DTS sont remixées en stéréo.
En mode de contrôle automatique du niveau (ALC), le récepteur ajuste le niveau de lecture en fonction du niveau de la source musicale enregistrée sur un lecteur audio portable.
• Lors de l’écoute d’une source, appuyez sur STEREO/A.L.C. pour une lecture en mode stéréo.Appuyez plusieurs fois pour naviguer entre :
• STEREO – L’audio est reproduit selon vos réglages surround et vous pouvez toujours utiliser les fonctions Midnight, Loudness, Phase Control, Sound Retriever et Tone.
• ALC – Écoute en mode de contrôle automatique du niveau.
• F.S.S.ADVANCE – Reportez-vous à la section Utilisation de la fonction Front Stage Surround Advance ci-dessous pour plus d’informations.
Utilisation de la fonction Front Stage Surround AdvanceLa fonction Front Stage Surround Advance vous permet de créer des effets sonores naturels de type surround en utilisant seulement les enceintes avant et le caisson de basses (subwoofer).
• Pendant l’écoute d’une source, appuyez sur STEREO/A.L.C. pour sélectionner les modes Front Stage Surround Advance.
• STEREO – Consultez Écoute en mode stéréo au-dessus plus amples informations à ce sujet.
• ALC – Consultez Écoute en mode stéréo au-dessus plus amples informations à ce sujet.
• F.S.S.ADVANCE – Produit un effet sonore surround très riche au centre de la zone de convergence acoustique des enceintes avant droite et gauche.
BD MENUSTANDARD ADV SURR
AUTO/DIRECT
STEREO/A.L.C.
BD MENUSTANDARD ADV SURR
AUTO/DIRECT
STEREO/A.L.C.
Enceinteavant gauche
Enceinteavant droite
La position F.S.S.ADVANCE
VSX-820_SYXCN_Fr.book 35 ページ 2010年4月12日 月曜日 午後6時59分
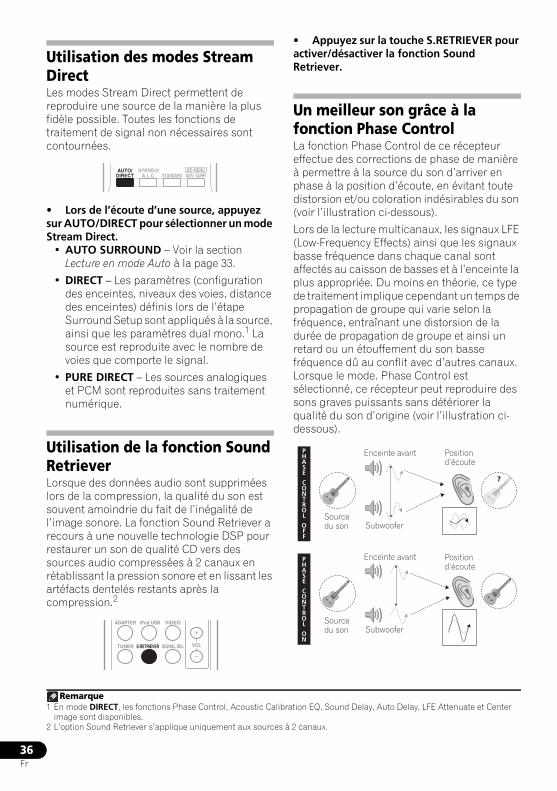
36Fr
Utilisation des modes Stream DirectLes modes Stream Direct permettent de reproduire une source de la manière la plus fidèle possible. Toutes les fonctions de traitement de signal non nécessaires sont contournées.
• Lors de l’écoute d’une source, appuyez sur AUTO/DIRECT pour sélectionner un mode Stream Direct.
• AUTO SURROUND – Voir la section Lecture en mode Auto à la page 33.
• DIRECT – Les paramètres (configuration des enceintes, niveaux des voies, distance des enceintes) définis lors de l’étape Surround Setup sont appliqués à la source, ainsi que les paramètres dual mono.1 La source est reproduite avec le nombre de voies que comporte le signal.
• PURE DIRECT – Les sources analogiques et PCM sont reproduites sans traitement numérique.
Utilisation de la fonction Sound RetrieverLorsque des données audio sont supprimées lors de la compression, la qualité du son est souvent amoindrie du fait de l’inégalité de l’image sonore. La fonction Sound Retriever a recours à une nouvelle technologie DSP pour restaurer un son de qualité CD vers des sources audio compressées à 2 canaux en rétablissant la pression sonore et en lissant les artéfacts dentelés restants après la compression.2
• Appuyez sur la touche S.RETRIEVER pour activer/désactiver la fonction Sound Retriever.
Un meilleur son grâce à la fonction Phase ControlLa fonction Phase Control de ce récepteur effectue des corrections de phase de manière à permettre à la source du son d’arriver en phase à la position d’écoute, en évitant toute distorsion et/ou coloration indésirables du son (voir l’illustration ci-dessous).
Lors de la lecture multicanaux, les signaux LFE (Low-Frequency Effects) ainsi que les signaux basse fréquence dans chaque canal sont affectés au caisson de basses et à l’enceinte la plus appropriée. Du moins en théorie, ce type de traitement implique cependant un temps de propagation de groupe qui varie selon la fréquence, entraînant une distorsion de la durée de propagation de groupe et ainsi un retard ou un étouffement du son basse fréquence dû au conflit avec d’autres canaux. Lorsque le mode. Phase Control est sélectionné, ce récepteur peut reproduire des sons graves puissants sans détériorer la qualité du son d’origine (voir l’illustration ci-dessous).
Remarque1 En mode DIRECT, les fonctions Phase Control, Acoustic Calibration EQ, Sound Delay, Auto Delay, LFE Attenuate et Center
image sont disponibles.2 L’option Sound Retriever s’applique uniquement aux sources à 2 canaux.
BD MENUSTANDARD ADV SURR
STEREO/A.L.C.
AUTO/DIRECT
ADAPTER iPod USB VIDEO
TUNER S.RETRIEVER SIGNAL SEL VOL
?
PHASE
CONTROL
OFF
PHASE
CONTROL
ON
Source du son
Source du son
Position d’écoute
Position d’écoute
Enceinte avant
Subwoofer
Enceinte avant
Subwoofer
VSX-820_SYXCN_Fr.book 36 ページ 2010年4月12日 月曜日 午後6時59分
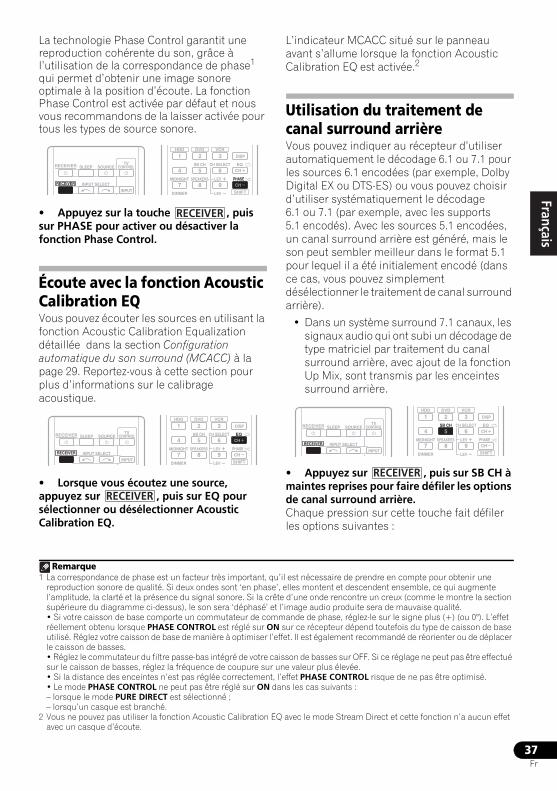
37Fr
EnglishFrançais
Deutsch
NederlandsItaliano
Español
La technologie Phase Control garantit une reproduction cohérente du son, grâce à l’utilisation de la correspondance de phase1 qui permet d’obtenir une image sonore optimale à la position d’écoute. La fonction Phase Control est activée par défaut et nous vous recommandons de la laisser activée pour tous les types de source sonore.
• Appuyez sur la touche , puis sur PHASE pour activer ou désactiver la fonction Phase Control.
Écoute avec la fonction Acoustic Calibration EQVous pouvez écouter les sources en utilisant la fonction Acoustic Calibration Equalization détaillée dans la section Configuration automatique du son surround (MCACC) à la page 29. Reportez-vous à cette section pour plus d’informations sur le calibrage acoustique.
• Lorsque vous écoutez une source, appuyez sur , puis sur EQ pour sélectionner ou désélectionner Acoustic Calibration EQ.
L’indicateur MCACC situé sur le panneau avant s’allume lorsque la fonction Acoustic Calibration EQ est activée.2
Utilisation du traitement de canal surround arrièreVous pouvez indiquer au récepteur d’utiliser automatiquement le décodage 6.1 ou 7.1 pour les sources 6.1 encodées (par exemple, Dolby Digital EX ou DTS-ES) ou vous pouvez choisir d’utiliser systématiquement le décodage 6.1 ou 7.1 (par exemple, avec les supports 5.1 encodés). Avec les sources 5.1 encodées, un canal surround arrière est généré, mais le son peut sembler meilleur dans le format 5.1 pour lequel il a été initialement encodé (dans ce cas, vous pouvez simplement désélectionner le traitement de canal surround arrière).
• Dans un système surround 7.1 canaux, les signaux audio qui ont subi un décodage de type matriciel par traitement du canal surround arrière, avec ajout de la fonction Up Mix, sont transmis par les enceintes surround arrière.
• Appuyez sur , puis sur SB CH à maintes reprises pour faire défiler les options de canal surround arrière.Chaque pression sur cette touche fait défiler les options suivantes :
Remarque1 La correspondance de phase est un facteur très important, qu’il est nécessaire de prendre en compte pour obtenir une
reproduction sonore de qualité. Si deux ondes sont ‘en phase’, elles montent et descendent ensemble, ce qui augmente l’amplitude, la clarté et la présence du signal sonore. Si la crête d’une onde rencontre un creux (comme le montre la section supérieure du diagramme ci-dessus), le son sera ‘déphasé’ et l’image audio produite sera de mauvaise qualité.• Si votre caisson de base comporte un commutateur de commande de phase, réglez-le sur le signe plus (+) (ou 0°). L’effet réellement obtenu lorsque PHASE CONTROL est réglé sur ON sur ce récepteur dépend toutefois du type de caisson de base utilisé. Réglez votre caisson de base de manière à optimiser l’effet. Il est également recommandé de réorienter ou de déplacer le caisson de basses.• Réglez le commutateur du filtre passe-bas intégré de votre caisson de basses sur OFF. Si ce réglage ne peut pas être effectué sur le caisson de basses, réglez la fréquence de coupure sur une valeur plus élevée.• Si la distance des enceintes n’est pas réglée correctement, l’effet PHASE CONTROL risque de ne pas être optimisé.• Le mode PHASE CONTROL ne peut pas être réglé sur ON dans les cas suivants :– lorsque le mode PURE DIRECT est sélectionné ;– lorsqu’un casque est branché.
INPUT SELECT
SOURCESLEEPTV
CONTROL
INPUT
RECEIVER
RECEIVER
DIMMER
1
4
7MIDNIGHT
HDD
2
5
8SPEAKERS LEV
LEV
SB CH
DISP
EQ
PHASE
DVD
3
6
9
CH
CH
CH SELECT
VCR
SHIFT
RECEIVER
INPUT SELECT
SOURCESLEEPTV
CONTROL
INPUT
RECEIVER
RECEIVER
DIMMER
1
4
7MIDNIGHT
HDD
2
5
8SPEAKERS LEV
LEV
SB CH
DISP
EQ
PHASE
DVD
3
6
9
CH
CH
CH SELECT
VCR
SHIFT
RECEIVER
2 Vous ne pouvez pas utiliser la fonction Acoustic Calibration EQ avec le mode Stream Direct et cette fonction n’a aucun effet avec un casque d’écoute.
INPUT SELECT
SOURCESLEEPTV
CONTROL
INPUT
RECEIVER
RECEIVER
DIMMER
1
4
7MIDNIGHT
HDD
2
5
8SPEAKERS LEV
LEV
SB CH
DISP
EQ
PHASE
DVD
3
6
9
CH
CH
CH SELECT
VCR
SHIFT
RECEIVER
VSX-820_SYXCN_Fr.book 37 ページ 2010年4月12日 月曜日 午後6時59分
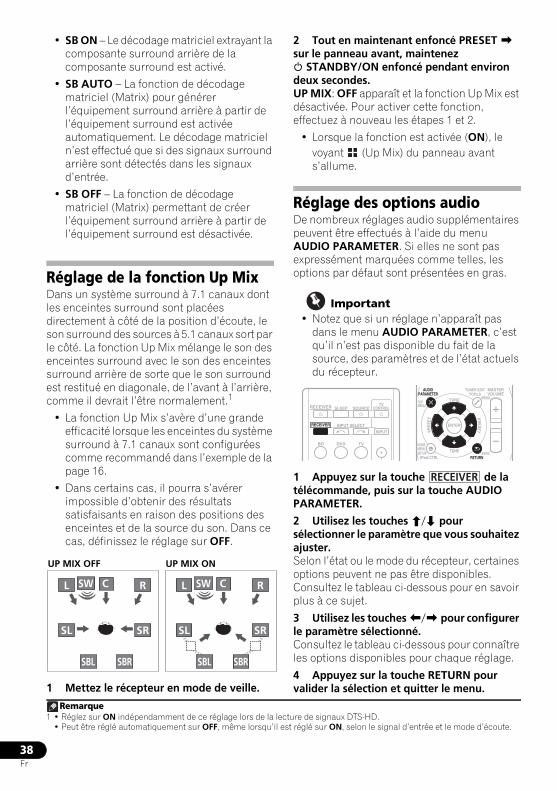
38Fr
• SB ON – Le décodage matriciel extrayant la composante surround arrière de la composante surround est activé.
• SB AUTO – La fonction de décodage matriciel (Matrix) pour générer l’équipement surround arrière à partir de l’équipement surround est activée automatiquement. Le décodage matriciel n’est effectué que si des signaux surround arrière sont détectés dans les signaux d’entrée.
• SB OFF – La fonction de décodage matriciel (Matrix) permettant de créer l’équipement surround arrière à partir de l’équipement surround est désactivée.
Réglage de la fonction Up MixDans un système surround à 7.1 canaux dont les enceintes surround sont placées directement à côté de la position d’écoute, le son surround des sources à 5.1 canaux sort par le côté. La fonction Up Mix mélange le son des enceintes surround avec le son des enceintes surround arrière de sorte que le son surround est restitué en diagonale, de l’avant à l’arrière, comme il devrait l’être normalement.1
• La fonction Up Mix s’avère d’une grande efficacité lorsque les enceintes du système surround à 7.1 canaux sont configurées comme recommandé dans l’exemple de la page 16.
• Dans certains cas, il pourra s’avérer impossible d’obtenir des résultats satisfaisants en raison des positions des enceintes et de la source du son. Dans ce cas, définissez le réglage sur OFF.
1 Mettez le récepteur en mode de veille.
2 Tout en maintenant enfoncé PRESET sur le panneau avant, maintenez STANDBY/ON enfoncé pendant environ deux secondes.UP MIX: OFF apparaît et la fonction Up Mix est désactivée. Pour activer cette fonction, effectuez à nouveau les étapes 1 et 2.
• Lorsque la fonction est activée (ON), le voyant (Up Mix) du panneau avant s’allume.
Réglage des options audioDe nombreux réglages audio supplémentaires peuvent être effectués à l’aide du menu AUDIO PARAMETER. Si elles ne sont pas expressément marquées comme telles, les options par défaut sont présentées en gras.
Important• Notez que si un réglage n’apparaît pas
dans le menu AUDIO PARAMETER, c’est qu’il n’est pas disponible du fait de la source, des paramètres et de l’état actuels du récepteur.
1 Appuyez sur la touche de la télécommande, puis sur la touche AUDIO PARAMETER.
2 Utilisez les touches / pour sélectionner le paramètre que vous souhaitez ajuster.Selon l’état ou le mode du récepteur, certaines options peuvent ne pas être disponibles. Consultez le tableau ci-dessous pour en savoir plus à ce sujet.
3 Utilisez les touches / pour configurer le paramètre sélectionné.Consultez le tableau ci-dessous pour connaître les options disponibles pour chaque réglage.
4 Appuyez sur la touche RETURN pour valider la sélection et quitter le menu.
Remarque1 • Réglez sur ON indépendamment de ce réglage lors de la lecture de signaux DTS-HD.
• Peut être réglé automatiquement sur OFF, même lorsqu’il est réglé sur ON, selon le signal d’entrée et le mode d’écoute.
CSWL R
SL SR
SBL SBR SBL SBR
CSWL R
SL SR
UP MIX OFF UP MIX ON
BD DVD
INPUT SELECT
SOURCESLEEPTV
CONTROL
TV
INPUT
RECEIVER
RECEIVER ENTER
RETURN
AUDIOPARAMETER
TUNER EDITTOOLS
MASTERVOLUME
iPod CTRLBAND
MENU
HOMEMENUSETUP
TOPMENU
TUNE
TUNE
PRESETPRES
ET
RECEIVER
VSX-820_SYXCN_Fr.book 38 ページ 2010年4月12日 月曜日 午後6時59分
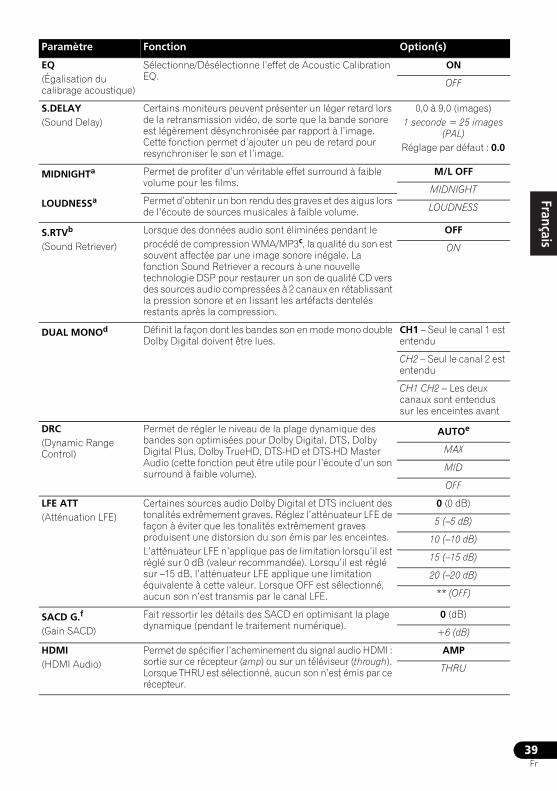
39Fr
EnglishFrançais
Deutsch
NederlandsItaliano
Español
Paramètre Fonction Option(s)
EQ(Égalisation du calibrage acoustique)
Sélectionne/Désélectionne l’effet de Acoustic Calibration EQ.
ON
OFF
S.DELAY(Sound Delay)
Certains moniteurs peuvent présenter un léger retard lors de la retransmission vidéo, de sorte que la bande sonore est légèrement désynchronisée par rapport à l’image. Cette fonction permet d’ajouter un peu de retard pour resynchroniser le son et l’image.
0,0 à 9,0 (images)1 seconde = 25 images
(PAL)Réglage par défaut : 0.0
MIDNIGHTa Permet de profiter d’un véritable effet surround à faible volume pour les films.
M/L OFF
MIDNIGHTLOUDNESSa Permet d’obtenir un bon rendu des graves et des aigus lors
de l’écoute de sources musicales à faible volume. LOUDNESS
S.RTVb (Sound Retriever)
Lorsque des données audio sont éliminées pendant le procédé de compression WMA/MP3c, la qualité du son est souvent affectée par une image sonore inégale. La fonction Sound Retriever a recours à une nouvelle technologie DSP pour restaurer un son de qualité CD vers des sources audio compressées à 2 canaux en rétablissant la pression sonore et en lissant les artéfacts dentelés restants après la compression.
OFF
ON
DUAL MONOd Définit la façon dont les bandes son en mode mono double Dolby Digital doivent être lues.
CH1 – Seul le canal 1 est entendu
CH2 – Seul le canal 2 est entendu
CH1 CH2 – Les deux canaux sont entendus sur les enceintes avant
DRC (Dynamic Range Control)
Permet de régler le niveau de la plage dynamique des bandes son optimisées pour Dolby Digital, DTS, Dolby Digital Plus, Dolby TrueHD, DTS-HD et DTS-HD Master Audio (cette fonction peut être utile pour l’écoute d’un son surround à faible volume).
AUTOe
MAX
MID
OFF
LFE ATT(Atténuation LFE)
Certaines sources audio Dolby Digital et DTS incluent des tonalités extrêmement graves. Réglez l’atténuateur LFE de façon à éviter que les tonalités extrêmement graves produisent une distorsion du son émis par les enceintes.L’atténuateur LFE n’applique pas de limitation lorsqu’il est réglé sur 0 dB (valeur recommandée). Lorsqu’il est réglé sur –15 dB, l’atténuateur LFE applique une limitation équivalente à cette valeur. Lorsque OFF est sélectionné, aucun son n’est transmis par le canal LFE.
0 (0 dB)
5 (–5 dB)
10 (–10 dB)
15 (–15 dB)
20 (–20 dB)
** (OFF)
SACD G.f (Gain SACD)
Fait ressortir les détails des SACD en optimisant la plage dynamique (pendant le traitement numérique).
0 (dB)
+6 (dB)
HDMI(HDMI Audio)
Permet de spécifier l’acheminement du signal audio HDMI : sortie sur ce récepteur (amp) ou sur un téléviseur (through). Lorsque THRU est sélectionné, aucun son n’est émis par ce récepteur.
AMP
THRU
VSX-820_SYXCN_Fr.book 39 ページ 2010年4月12日 月曜日 午後6時59分
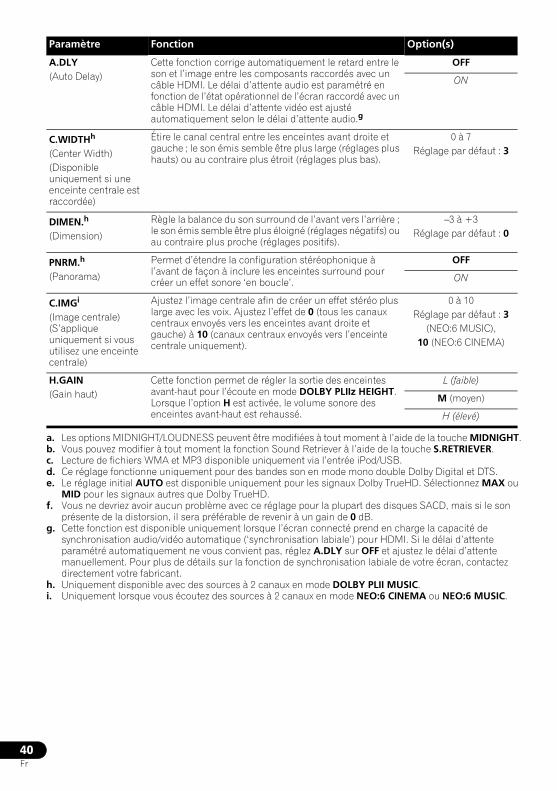
40Fr
a. Les options MIDNIGHT/LOUDNESS peuvent être modifiées à tout moment à l’aide de la touche MIDNIGHT.b. Vous pouvez modifier à tout moment la fonction Sound Retriever à l’aide de la touche S.RETRIEVER.c. Lecture de fichiers WMA et MP3 disponible uniquement via l’entrée iPod/USB.d. Ce réglage fonctionne uniquement pour des bandes son en mode mono double Dolby Digital et DTS.e. Le réglage initial AUTO est disponible uniquement pour les signaux Dolby TrueHD. Sélectionnez MAX ou
MID pour les signaux autres que Dolby TrueHD.f. Vous ne devriez avoir aucun problème avec ce réglage pour la plupart des disques SACD, mais si le son
présente de la distorsion, il sera préférable de revenir à un gain de 0 dB.g. Cette fonction est disponible uniquement lorsque l’écran connecté prend en charge la capacité de
synchronisation audio/vidéo automatique (‘synchronisation labiale’) pour HDMI. Si le délai d’attente paramétré automatiquement ne vous convient pas, réglez A.DLY sur OFF et ajustez le délai d’attente manuellement. Pour plus de détails sur la fonction de synchronisation labiale de votre écran, contactez directement votre fabricant.
h. Uniquement disponible avec des sources à 2 canaux en mode DOLBY PLII MUSIC.i. Uniquement lorsque vous écoutez des sources à 2 canaux en mode NEO:6 CINEMA ou NEO:6 MUSIC.
A.DLY(Auto Delay)
Cette fonction corrige automatiquement le retard entre le son et l’image entre les composants raccordés avec un câble HDMI. Le délai d’attente audio est paramétré en fonction de l’état opérationnel de l’écran raccordé avec un câble HDMI. Le délai d’attente vidéo est ajusté automatiquement selon le délai d’attente audio.g
OFF
ON
C.WIDTHh (Center Width)(Disponible uniquement si une enceinte centrale est raccordée)
Étire le canal central entre les enceintes avant droite et gauche ; le son émis semble être plus large (réglages plus hauts) ou au contraire plus étroit (réglages plus bas).
0 à 7Réglage par défaut : 3
DIMEN.h (Dimension)
Règle la balance du son surround de l’avant vers l’arrière ; le son émis semble être plus éloigné (réglages négatifs) ou au contraire plus proche (réglages positifs).
–3 à +3Réglage par défaut : 0
PNRM.h (Panorama)
Permet d’étendre la configuration stéréophonique à l’avant de façon à inclure les enceintes surround pour créer un effet sonore ‘en boucle’.
OFF
ON
C.IMGi (Image centrale) (S’applique uniquement si vous utilisez une enceinte centrale)
Ajustez l’image centrale afin de créer un effet stéréo plus large avec les voix. Ajustez l’effet de 0 (tous les canaux centraux envoyés vers les enceintes avant droite et gauche) à 10 (canaux centraux envoyés vers l’enceinte centrale uniquement).
0 à 10 Réglage par défaut : 3
(NEO:6 MUSIC),10 (NEO:6 CINEMA)
H.GAIN(Gain haut)
Cette fonction permet de régler la sortie des enceintes avant-haut pour l’écoute en mode DOLBY PLIIz HEIGHT. Lorsque l’option H est activée, le volume sonore des enceintes avant-haut est rehaussé.
L (faible)
M (moyen)
H (élevé)
Paramètre Fonction Option(s)
VSX-820_SYXCN_Fr.book 40 ページ 2010年4月12日 月曜日 午後6時59分
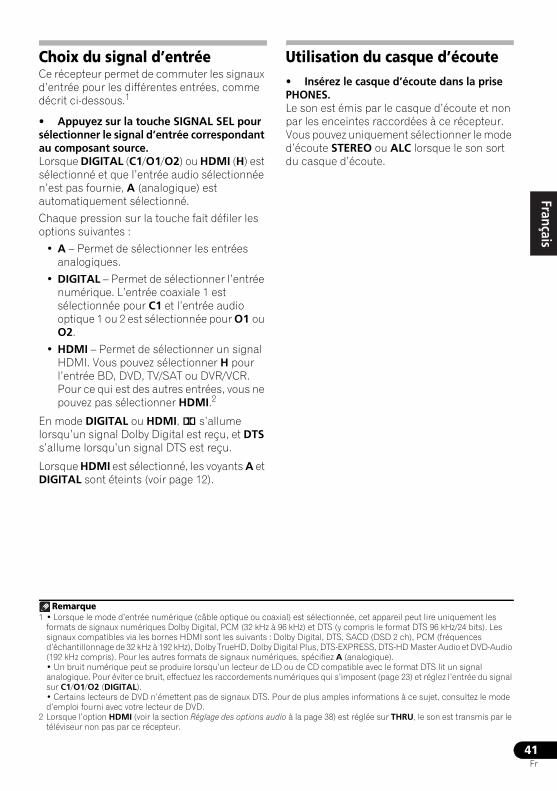
41Fr
EnglishFrançais
Deutsch
NederlandsItaliano
Español
Choix du signal d’entréeCe récepteur permet de commuter les signaux d’entrée pour les différentes entrées, comme décrit ci-dessous.1
• Appuyez sur la touche SIGNAL SEL pour sélectionner le signal d’entrée correspondant au composant source. Lorsque DIGITAL (C1/O1/O2) ou HDMI (H) est sélectionné et que l’entrée audio sélectionnée n’est pas fournie, A (analogique) est automatiquement sélectionné.
Chaque pression sur la touche fait défiler les options suivantes :
• A – Permet de sélectionner les entrées analogiques.
• DIGITAL – Permet de sélectionner l’entrée numérique. L’entrée coaxiale 1 est sélectionnée pour C1 et l’entrée audio optique 1 ou 2 est sélectionnée pour O1 ou O2.
• HDMI – Permet de sélectionner un signal HDMI. Vous pouvez sélectionner H pour l’entrée BD, DVD, TV/SAT ou DVR/VCR. Pour ce qui est des autres entrées, vous ne pouvez pas sélectionner HDMI.2
En mode DIGITAL ou HDMI, 2 s’allume lorsqu’un signal Dolby Digital est reçu, et DTS s’allume lorsqu’un signal DTS est reçu.
Lorsque HDMI est sélectionné, les voyants A et DIGITAL sont éteints (voir page 12).
Utilisation du casque d’écoute• Insérez le casque d’écoute dans la prise PHONES.Le son est émis par le casque d’écoute et non par les enceintes raccordées à ce récepteur. Vous pouvez uniquement sélectionner le mode d’écoute STEREO ou ALC lorsque le son sort du casque d’écoute.
Remarque1 • Lorsque le mode d’entrée numérique (câble optique ou coaxial) est sélectionnée, cet appareil peut lire uniquement les
formats de signaux numériques Dolby Digital, PCM (32 kHz à 96 kHz) et DTS (y compris le format DTS 96 kHz/24 bits). Les signaux compatibles via les bornes HDMI sont les suivants : Dolby Digital, DTS, SACD (DSD 2 ch), PCM (fréquences d’échantillonnage de 32 kHz à 192 kHz), Dolby TrueHD, Dolby Digital Plus, DTS-EXPRESS, DTS-HD Master Audio et DVD-Audio (192 kHz compris). Pour les autres formats de signaux numériques, spécifiez A (analogique).• Un bruit numérique peut se produire lorsqu’un lecteur de LD ou de CD compatible avec le format DTS lit un signal analogique. Pour éviter ce bruit, effectuez les raccordements numériques qui s’imposent (page 23) et réglez l’entrée du signal sur C1/O1/O2 (DIGITAL).• Certains lecteurs de DVD n’émettent pas de signaux DTS. Pour de plus amples informations à ce sujet, consultez le mode d’emploi fourni avec votre lecteur de DVD.
2 Lorsque l’option HDMI (voir la section Réglage des options audio à la page 38) est réglée sur THRU, le son est transmis par le téléviseur non pas par ce récepteur.
VSX-820_SYXCN_Fr.book 41 ページ 2010年4月12日 月曜日 午後6時59分 121
42Fr
Chapitre 6 :
Menu de configuration du système
Utilisation du menu de configuration du systèmeLa section suivante décrit de façon détaillée comment effectuer les réglages adaptés à votre propre utilisation du récepteur et comment régler chaque système d’enceintes séparément selon vos exigences.
Important
• L’affichage à l’écran n’apparaît pas si vous avez effectué la connexion au téléviseur via la sortie HDMI. Utilisez les connexions en composantes ou composite pour configurer le système.
1 Allumez le récepteur et votre téléviseur.Utilisez la touche RECEIVER pour ce faire.1
Réglez l’entrée TV de sorte que la connexion à l’appareil se fasse en mode analogique.
2 Appuyez sur la touche de la télécommande, puis sur la touche SETUP.2
Un affichage à l’écran apparaît sur votre téléviseur. Utilisez les touches /// et ENTER de la télécommande pour naviguer dans les écrans et sélectionner des options de menu. Appuyez sur RETURN pour confirmer et quitter le menu en cours.
3 Sélectionnez le réglage que vous voulez ajuster.
• Auto MCACC – Il s’agit d’une configuration surround automatique rapide et efficace (voir la section Configuration automatique du son surround (MCACC) à la page 29).
• Manual SP Setup – Définit la taille, le nombre, la distance et la balance générale des enceintes que vous avez raccordées (voir la section Réglage manuel des enceintes à la page 43).
• Input Assign – Vous permet de spécifier les composants raccordés aux entrées vidéo en composantes (voir la section Menu d’affectation d’entrée à la page 46).
• Pre Out Setting – Permet de spécifier l’utilisation des sorties PRE OUT (voir la section Configuration de l’option Pre Out à la page 47).
Remarque1 Si un casque est branché sur le récepteur, débranchez-le.2 • Vous ne pouvez pas utiliser le menu de configuration des enceintes lorsque l’entrée iPod/USB est sélectionnée.
• Appuyez sur la touche SETUP à tout moment pour sortir du menu de configuration du système.
BD DVD
INPUT SELECT
SOURCESLEEPTV
CONTROL
TV
INPUT
RECEIVER
RECEIVER ENTER
RETURN
AUDIOPARAMETER
TUNER EDITTOOLS
MASTERVOLUME
iPod CTRLBAND
MENU
HOMEMENUSETUP
TOPMENU
TUNE
TUNE
PRESETPRES
ET
RECEIVER
System Setup
1.Auto MCACC2.Manual SP Setup3.Input Assign4.Pre Out Setting
Return
VSX-820_SYXCN_Fr.book 42 ページ 2010年4月12日 月曜日 午後6時59分
43Fr
EnglishFrançais
Deutsch
NederlandsItaliano
Español
Réglage manuel des enceintesCe récepteur vous permet d’effectuer des réglages précis afin d’optimiser les performances de son surround. Les réglages ne seront faits qu’une seule fois (sauf si vous changez l’emplacement de vos enceintes ou si vous ajoutez de nouvelles enceintes).
Ces réglages sont destinés à optimiser les performances de votre système, mais si vous êtes satisfait des résultats obtenus avec la fonction de Configuration automatique du son surround (MCACC) à la page 29, il n’est pas nécessaire d’effectuer tous ces réglages.
ATTENTION
• Les tonalités de test utilisées dans la configuration du système sont générées à un volume élevé.
Important
• Selon la configuration Pre Out, les paramètres de réglage des enceintes diffèrent. L’affichage OSD de ce mode d’emploi est un cas où la configuration Pre Out est réglée sur Surr. Back.
1 Sélectionnez ‘Manual SP Setup’ puis appuyez sur la touche ENTER.
2 Sélectionnez le réglage que vous voulez ajuster.Si vous effectuez ces réglages pour la première fois, il est préférable de respecter l’ordre suivant :
• Speaker Setting – Permet d’indiquer la taille et le nombre des enceintes connectées (voir ci-dessous).
• Crossover Network – Définit les fréquences qui seront envoyées vers le subwoofer (page 45).
• Channel Level – Réglez l’équilibre global de votre système d’enceintes reportez-vous à la section (page 45).
• Speaker Distance – Définit la distance entre la position d’écoute et vos enceintes (page 46).
3 Effectuez les mises au point nécessaires pour chaque réglage en appuyant sur RETURN pour confirmer chaque écran.
Réglage des enceintesUtilisez ce réglage pour définir la configuration des enceintes (taille, nombre d’enceintes). Il est conseillé de vous assurer que les réglages obtenus avec la fonction de Configuration automatique du son surround (MCACC) à la page 29, sont corrects.
1 Sélectionnez ‘Speaker Setting’ dans le menu Manual SP Setup.
2 Choisissez l’ensemble d’enceintes à régler, puis sélectionnez une taille d’enceinte.Utilisez / pour sélectionner la taille (et le nombre) de chacune des enceintes suivantes :
• Front – Sélectionnez LARGE si vos enceintes avant reproduisent de façon fidèle les fréquences graves, ou si vous n’avez pas raccordé de subwoofer. Sélectionnez SMALL pour envoyer les fréquences graves vers le subwoofer.1
System Setup
1.Auto MCACC2.Manual SP Setup3.Input Assign4.Pre Out Setting
Return
2.Manual SP Setup
Return
a.Speaker Settingb.Crossover Networkc.Channel Leveld.Speaker Distance
Remarque1 Si vous sélectionnez SMALL pour les enceintes avant, le subwoofer passera automatiquement sur YES. En outre, les enceintes
centrale, surround, surround arrière et avant-haut ne peuvent pas être réglées sur LARGE lorsque les enceintes avant sont réglées sur SMALL. Dans ce cas, toutes les fréquences graves sont envoyées vers le subwoofer.
2.Manual SP Setup
Return
a.Speaker Settingb.Crossover Networkc.Channel Leveld.Speaker Distance
2a.Speaker Setting
Front CenterSurrSurr. BackSubwoofer:
Return
[ SMALL ][ SMALL ][ NO ] YES
SMALL
VSX-820_SYXCN_Fr.book 43 ページ 2010年4月12日 月曜日 午後6時59分
44Fr
• Center – Sélectionnez LARGE si votre enceinte centrale reproduit de façon fidèle les fréquences graves, ou sélectionnez SMALL pour envoyer les fréquences graves vers les autres enceintes ou vers le subwoofer. Si vous n’avez pas connecté d’enceinte centrale, choisissez NO (le canal central est envoyé vers les autres enceintes).
• Front Height1 – Sélectionnez LARGE si vos enceintes surround avant-haut reproduisent de façon fidèle les fréquences graves. Sélectionnez SMALL pour envoyer les fréquences graves vers les autres enceintes ou le subwoofer. Si vous n’avez pas raccordé d’enceintes avant-haut, choisissez NO.
• Surr – Sélectionnez LARGE si vos enceintes surround reproduisent de façon fidèle les fréquences graves. Sélectionnez SMALL pour envoyer les fréquences graves vers les autres enceintes ou le subwoofer. Si vous n’avez pas connecté d’enceintes surround, choisissez NO (le son des canaux surround est envoyé vers les autres enceintes).
• Surr. Back2 – Sélectionnez le nombre d’enceintes surround arrière que vous possédez (une, deux ou zéro).3 Sélectionnez LARGE si vos enceintes surround reproduisent de façon fidèle les fréquences graves. Sélectionnez SMALL pour envoyer les fréquences graves vers les autres enceintes ou le subwoofer. Si vous n’avez pas raccordé d’enceintes surround arrière, sélectionnez NO.
• Subwoofer – Les signaux LFE et les fréquences graves des canaux réglés sur SMALL sont émis par le subwoofer lorsque YES est sélectionné (voir les remarques ci-dessus). Choisissez le réglage PLUS si vous désirez que le subwoofer émette des sons graves de façon continue ou si vous souhaitez des graves plus profonds (les fréquences graves qui seraient normalement émises par les enceintes avant et centrale sont également dirigées vers le subwoofer). Si vous n’avez pas raccordé de subwoofer, sélectionnez NO (les fréquences graves seront émises par les autres enceintes).
3 Lorsque vous avez terminé, appuyez sur RETURN.Vous retournez au menu Manual SP Setup.
Astuce
• Si vous possédez un subwoofer et si vous désirez beaucoup de graves, il est tout à fait logique de sélectionner LARGE pour vos enceintes avant et PLUS pour le subwoofer. Cependant, cette sélection peut ne pas répondre parfaitement à vos attentes en matière de production des graves. En fonction de l’emplacement de vos enceintes dans la pièce, vous pouvez en fait remarquer une diminution de la quantité des graves en raison de l’annulation des basses fréquences. Dans ce cas, essayez de modifier la position ou la direction des enceintes. Si vous n’obtenez pas de bons résultats, écoutez la production des graves lorsque PLUS et YES sont sélectionnés ou lorsque les enceintes avant sont réglées sur LARGE et SMALL à tour de rôle et faites confiance à vos oreilles pour décider de la configuration idéale. En cas de problèmes, l’option la plus aisée est de diriger tous les sons graves vers le subwoofer en sélectionnant SMALL pour les enceintes avant.
Remarque1 • Le paramètre Front Height peut-être ajusté uniquement lorsque Pre Out Setting est réglé sur Height.
• Si les enceintes surround sont réglées sur NO, les enceintes avant-haut sont automatiquement réglées sur NO.2 Le paramètre Surr. Back peut-être ajusté uniquement lorsque Pre Out Setting est réglé sur Surr. Back.3 • Si les enceintes surround sont réglées sur NO, les enceintes surround arrière sont automatiquement réglées sur NO.
• Si vous ne sélectionnez qu’une seule enceinte surround arrière, assurez-vous que l’amplificateur supplémentaire est raccordé à la borne PRE OUT L (Single).
VSX-820_SYXCN_Fr.book 44 ページ 2010年4月12日 月曜日 午後6時59分
45Fr
EnglishFrançais
Deutsch
NederlandsItaliano
Español
Réseau de recouvrement• Réglage par défaut : 100Hz
Ce réglage établit une coupure entre les sons graves qui sont renvoyés des enceintes réglées sur LARGE, ou du subwoofer, et les sons graves qui sont renvoyés des enceintes réglées sur SMALL. Il établit également le moment précis de la coupure des sons graves du canal LFE.1
1 Sélectionnez ‘Crossover Network’ dans le menu Manual SP Setup.
2 Choisissez le point de coupure de fréquence.Les fréquences qui se trouvent en-dessous de ce point de coupure seront envoyées vers le subwoofer (ou les enceintes LARGE).
3 Lorsque vous avez terminé, appuyez sur RETURN.Vous retournez au menu Manual SP Setup.
Niveau des canauxÀ l’aide des réglages de niveau des canaux, vous pouvez régler la balance générale de votre système d’enceintes, un facteur important lors du réglage de votre système de cinéma à domicile.
1 Sélectionnez ‘Channel Level’ dans le menu Manual SP Setup.
2 Sélectionnez une option de configuration.
• Manual – Déplacez la tonalité d’essai manuellement d’une enceinte à l’autre et réglez chaque niveau de canal individuellement.
• Auto – Réglez les niveaux des canaux en suivant automatiquement la tonalité d’essai d’une enceinte à l’autre.
3 Confirmez l’option de configuration que vous avez sélectionnée.Les tonalités d’essai seront lancées lorsque vous aurez appuyé sur ENTER. Lorsque le volume aura atteint le niveau de référence, des tonalités de test seront émises.
4 Réglez le niveau de chaque canal à l’aide des touches /.Si vous avez sélectionné Manual, utilisez / pour passer d’une enceinte à l’autre. La configuration Auto génèrera des tonalités de test dans l’ordre affiché à l’écran :
Réglez le niveau de chaque enceinte pendant l’émission de la tonalité d’essai.2
5 Lorsque vous avez terminé, appuyez sur RETURN.Vous retournez au menu Manual SP Setup.
Remarque1 Pour plus d’informations sur la taille des enceintes et leur sélection, consultez la section Réglage des enceintes à la page 43.
2.Manual SP Setup
Return
a.Speaker Settingb.Crossover Networkc.Channel Leveld.Speaker Distance
2b.Crossover Network
Return
Frequency 100Hz
2.Manual SP Setup
Return
a.Speaker Settingb.Crossover Networkc.Channel Leveld.Speaker Distance
2c.Channel Level
Test Tone Manual
ENTER:NextReturn
2 • Si vous utilisez un indicateur Sound Pressure Level (SPL), effectuez les mesures depuis votre principale position d’écoute et ajustez le niveau de chaque enceinte à 75 dB SPL (C-coefficient/lecture lente).• La tonalité d’essai du subwoofer est émise à faible volume. Il se peut que vous deviez effectuer un nouveau réglage si l’essai a été réalisé avec une véritable bande son.
2c.Channel Level
Test Tone [ Manual ]
Please Wait . . .20 Caution Loud test tones will be output.
Return
2c.Channel Level
Front L CenterFront RSurround RSurr. Back RSurr. Back LSurround LSubwoofer
Return
[ 0dB][ 0dB][ 0dB][ ––– ][ ––– ][ 0dB][ 0dB]
0dB
VSX-820_SYXCN_Fr.book 45 ページ 2010年4月12日 月曜日 午後6時59分

46Fr
Astuce
• Vous pouvez modifier les niveaux des canaux à tout moment en appuyant sur
, puis sur CH SELECT et LEV +/– de la télécommande. Vous pouvez également appuyer sur CH SELECT et utiliser / pour sélectionner le canal, puis utiliser / pour ajuster les niveaux des canaux.
Distance des enceintesPour obtenir une profondeur sonore et un détachement parfaits de votre système, vous devez préciser la distance qu’il y a entre vos enceintes et la position d’écoute. Le récepteur pourra alors ajouter le délai nécessaire pour l’obtention d’un son surround optimal.
1 Sélectionnez ‘Speaker Distance’ dans le menu Manual SP Setup.
2 Réglez la distance de chaque enceinte à l’aide des touches /.Vous pouvez régler la distance de chaque enceinte par incrémentations de 0,1 m.
3 Lorsque vous avez terminé, appuyez sur la touche RETURN.Vous retournez au menu Manual SP Setup.
Menu d’affectation d’entréeIl vous suffit d’effectuer des réglages dans le menu Input Assign si vous n’avez pas raccordé votre équipement selon les réglages par défaut pour les entrées vidéo en composantes.
• Réglages par défaut :
Component 1 – BD
Component 2 – DVD
Important
• Si vous raccordez un composant source, quel qu’il soit, au récepteur via une entrée vidéo en composantes, votre téléviseur doit également être raccordé à la sortie COMPONENT VIDEO OUT de ce récepteur (il n’est pas possible de reconvertir la vidéo en composantes après avoir affecté une entrée).
Si vos raccordements vidéo en composantes ne respectent pas les raccordements par défaut ci-dessus, vous devrez affecter l’entrée numérotée à l’appareil que vous venez de raccorder (sinon, vous verrez apparaître le signal vidéo d’un autre appareil). Pour plus d’informations à ce sujet, consultez la section Utilisation des prises femelles vidéo en composantes à la page 26.
1 Appuyez sur la touche de la télécommande, puis sur la touche SETUP.Un affichage à l’écran apparaît sur votre téléviseur. Utilisez les touches /// et ENTER de la télécommande pour naviguer dans les écrans et sélectionner des options de menu. Appuyez sur RETURN pour confirmer et quitter le menu en cours.
RECEIVER
2.Manual SP Setup
Return
a.Speaker Settingb.Crossover Networkc.Channel Leveld.Speaker Distance
2d.Speaker Distance
Front L CenterFront RSurround RSurr. Back RSurr. Back LSurround LSubwoofer
Return
3.0 m [ 3.0 m ][ 3.0 m ][ 3.0 m ][ –––– ][ –––– ][ 3.0 m ][ 3.0 m ]
RECEIVER
System Setup
1.Auto MCACC2.Manual SP Setup3.Input Assign4.Pre Out Setting
Return
VSX-820_SYXCN_Fr.book 46 ページ 2010年4月12日 月曜日 午後6時59分
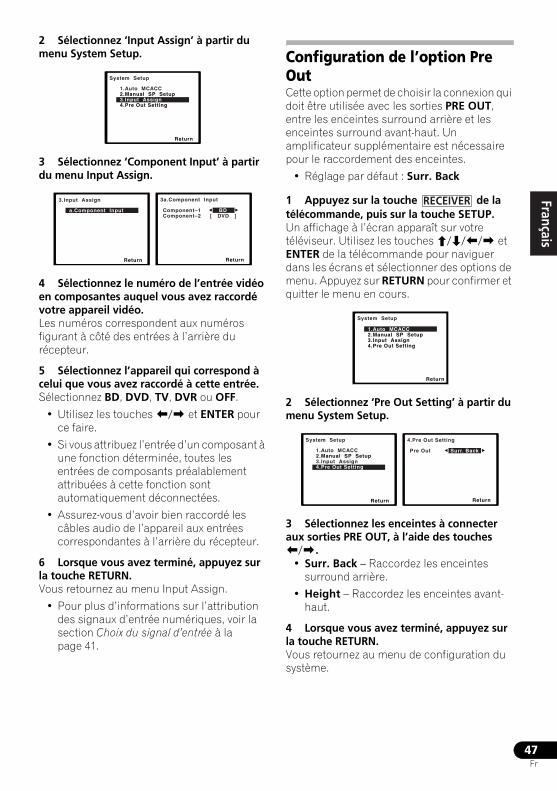
47Fr
EnglishFrançais
Deutsch
NederlandsItaliano
Español
2 Sélectionnez ‘Input Assign’ à partir du menu System Setup.
3 Sélectionnez ‘Component Input’ à partir du menu Input Assign.
4 Sélectionnez le numéro de l’entrée vidéo en composantes auquel vous avez raccordé votre appareil vidéo.Les numéros correspondent aux numéros figurant à côté des entrées à l’arrière du récepteur.
5 Sélectionnez l’appareil qui correspond à celui que vous avez raccordé à cette entrée.Sélectionnez BD, DVD, TV, DVR ou OFF.
• Utilisez les touches / et ENTER pour ce faire.
• Si vous attribuez l’entrée d’un composant à une fonction déterminée, toutes les entrées de composants préalablement attribuées à cette fonction sont automatiquement déconnectées.
• Assurez-vous d’avoir bien raccordé les câbles audio de l’appareil aux entrées correspondantes à l’arrière du récepteur.
6 Lorsque vous avez terminé, appuyez sur la touche RETURN.Vous retournez au menu Input Assign.
• Pour plus d’informations sur l’attribution des signaux d’entrée numériques, voir la section Choix du signal d’entrée à la page 41.
Configuration de l’option Pre OutCette option permet de choisir la connexion qui doit être utilisée avec les sorties PRE OUT, entre les enceintes surround arrière et les enceintes surround avant-haut. Un amplificateur supplémentaire est nécessaire pour le raccordement des enceintes.
• Réglage par défaut : Surr. Back
1 Appuyez sur la touche de la télécommande, puis sur la touche SETUP.Un affichage à l’écran apparaît sur votre téléviseur. Utilisez les touches /// et ENTER de la télécommande pour naviguer dans les écrans et sélectionner des options de menu. Appuyez sur RETURN pour confirmer et quitter le menu en cours.
2 Sélectionnez ‘Pre Out Setting’ à partir du menu System Setup.
3 Sélectionnez les enceintes à connecter aux sorties PRE OUT, à l’aide des touches /.
• Surr. Back – Raccordez les enceintes surround arrière.
• Height – Raccordez les enceintes avant-haut.
4 Lorsque vous avez terminé, appuyez sur la touche RETURN.Vous retournez au menu de configuration du système.
System Setup
1.Auto MCACC2.Manual SP Setup3.Input Assign4.Pre Out Setting
Return
3.Input Assign
Return
a.Component Input
3a.Component Input
Return
Component–1 BD Component–2 [ DVD ]
RECEIVER
System Setup
1.Auto MCACC2.Manual SP Setup3.Input Assign4.Pre Out Setting
Return
System Setup
1.Auto MCACC2.Manual SP Setup3.Input Assign4.Pre Out Setting
Return
4.Pre Out Setting
Return
Pre Out Surr. Back
VSX-820_SYXCN_Fr.book 47 ページ 2010年4月12日 月曜日 午後6時59分 127
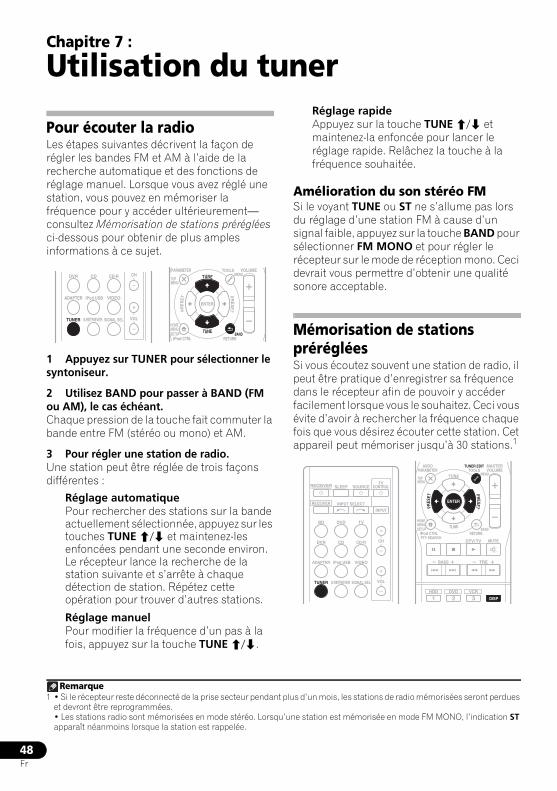
48Fr
Chapitre 7 :
Utilisation du tuner
Pour écouter la radioLes étapes suivantes décrivent la façon de régler les bandes FM et AM à l’aide de la recherche automatique et des fonctions de réglage manuel. Lorsque vous avez réglé une station, vous pouvez en mémoriser la fréquence pour y accéder ultérieurement—consultez Mémorisation de stations préréglées ci-dessous pour obtenir de plus amples informations à ce sujet.
1 Appuyez sur TUNER pour sélectionner le syntoniseur.
2 Utilisez BAND pour passer à BAND (FM ou AM), le cas échéant.Chaque pression de la touche fait commuter la bande entre FM (stéréo ou mono) et AM.
3 Pour régler une station de radio.Une station peut être réglée de trois façons différentes :
Réglage automatiquePour rechercher des stations sur la bande actuellement sélectionnée, appuyez sur les touches TUNE/ et maintenez-les enfoncées pendant une seconde environ. Le récepteur lance la recherche de la station suivante et s’arrête à chaque détection de station. Répétez cette opération pour trouver d’autres stations.
Réglage manuelPour modifier la fréquence d’un pas à la fois, appuyez sur la touche TUNE/.
Réglage rapideAppuyez sur la touche TUNE/ et maintenez-la enfoncée pour lancer le réglage rapide. Relâchez la touche à la fréquence souhaitée.
Amélioration du son stéréo FMSi le voyant TUNE ou ST ne s’allume pas lors du réglage d’une station FM à cause d’un signal faible, appuyez sur la touche BAND pour sélectionner FM MONO et pour régler le récepteur sur le mode de réception mono. Ceci devrait vous permettre d’obtenir une qualité sonore acceptable.
Mémorisation de stations prérégléesSi vous écoutez souvent une station de radio, il peut être pratique d’enregistrer sa fréquence dans le récepteur afin de pouvoir y accéder facilement lorsque vous le souhaitez. Ceci vous évite d’avoir à rechercher la fréquence chaque fois que vous désirez écouter cette station. Cet appareil peut mémoriser jusqu’à 30 stations.1
CHDVR CD CD-R
ADAPTER iPod USB VIDEO
TUNER S.RETRIEVER SIGNAL SEL VOL
ENTER
RETURN
PARAMETER TOOLS VOLUME
iPod CTRLBAND
MENU
HOMEMENUSETUP
TOPMENU
TUNE
TUNE
PRESETPR
ESET
Remarque1 • Si le récepteur reste déconnecté de la prise secteur pendant plus d’un mois, les stations de radio mémorisées seront perdues
et devront être reprogrammées.• Les stations radio sont mémorisées en mode stéréo. Lorsqu’une station est mémorisée en mode FM MONO, l’indication ST apparaît néanmoins lorsque la station est rappelée.
BD DVD
INPUT SELECT
SOURCESLEEPTV
CONTROL
TV
INPUT
CH
RECEIVER
DVR CD CD-R
ADAPTER iPod USB VIDEO
TUNER S.RETRIEVER SIGNAL SEL VOL
RECEIVER
1HDD
ENTER
2 DISP
DVD
3VCR
MUTE
RETURN
AUDIOPARAMETER
TUNER EDITTOOLS
MASTERVOLUME
iPod CTRLPTY SEARCH
BAND
MENU
HOMEMENUSETUP
DTV/ TV
TREBASS
TOPMENU
TUNE
TUNE
PRESETPRES
ET
VSX-820_SYXCN_Fr.book 48 ページ 2010年4月12日 月曜日 午後6時59分
49Fr
EnglishFrançais
Deutsch
NederlandsItaliano
Español
1 Pour régler une station de radio que vous désirez mémoriser.Pour plus d’informations à ce sujet, consultez la section Pour écouter la radio à la page 48.
2 Appuyez sur la touche TUNER EDIT.L’écran affiche PRESET, puis un MEM clignotant et une station préréglée.
3 Appuyez sur la touche PRESET / pour sélectionner la station préréglée que vous désirez.Pour cela, vous pouvez aussi utiliser les touches numériques.
4 Appuyez sur la touche ENTER.Après avoir appuyé sur la touche ENTER, le numéro préréglé cesse de clignoter et le récepteur mémorise la station.
Pour écouter les stations prérégléesVous devez mémoriser des stations préréglées pour avoir accès à cette fonction. Si vous n’avez pas encore mémorisé de stations préréglées, consultez la section Mémorisation de stations préréglées à la page 48.
• Appuyez sur la touche PRESET / pour sélectionner la station préréglée que vous désirez.
• Vous pouvez aussi utiliser les touches numériques sur la télécommande pour rappeler la station préréglée.
Attribution de noms aux stations prérégléesPour faciliter l’identification, vous pouvez attribuer un nom à toutes vos stations préréglées.
1 Choisissez la station préréglée que vous désirez nommer.Consultez la section Pour écouter les stations préréglées ci-dessus pour plus d’informations.
2 Appuyez deux fois sur TUNER EDIT.Le curseur se trouvant au premier caractère clignote sur l’écran.
3 Saisissez le nom que vous désirez donner à la station.Le nom peut comporter jusqu’à huit caractères.
• Utilisez les touches PRESET / pour sélectionner la position des caractères.
• Utilisez les touches TUNE / pour sélectionner les caractères.
• Le nom est mémorisé lorsque vous appuyez sur ENTER.
Astuce
• Pour effacer le nom d’une station, suivez les étapes 1 et 2, puis appuyez sur ENTER lorsque l’écran est vide. Appuyez sur TUNER EDIT lorsque l’écran est vide afin de conserver l’ancien nom.
• Une fois que vous avez attribué un nom à une station préréglée, appuyez sur DISP pour afficher le nom. Si vous voulez afficher de nouveau la fréquence, appuyez à plusieurs reprises sur DISP.
VSX-820_SYXCN_Fr.book 49 ページ 2010年4月12日 月曜日 午後6時59分
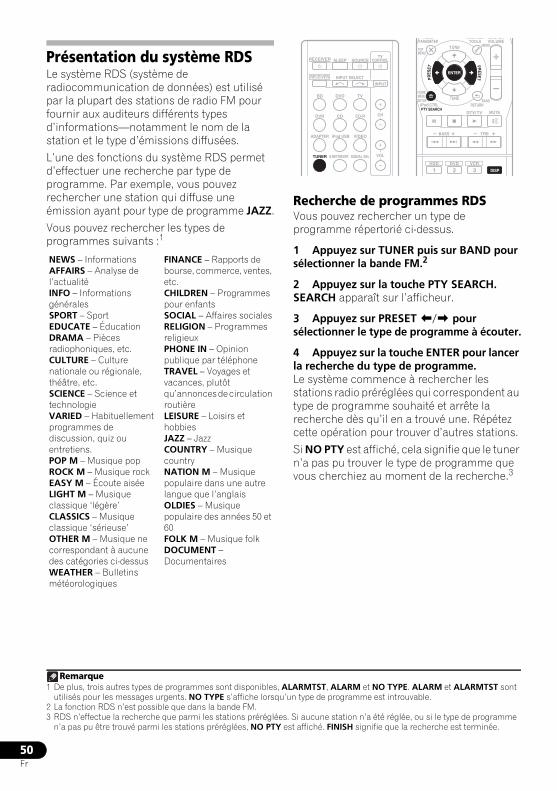
50Fr
Présentation du système RDSLe système RDS (système de radiocommunication de données) est utilisé par la plupart des stations de radio FM pour fournir aux auditeurs différents types d’informations—notamment le nom de la station et le type d’émissions diffusées.
L’une des fonctions du système RDS permet d’effectuer une recherche par type de programme. Par exemple, vous pouvez rechercher une station qui diffuse une émission ayant pour type de programme JAZZ.
Vous pouvez rechercher les types de programmes suivants :1
Recherche de programmes RDSVous pouvez rechercher un type de programme répertorié ci-dessus.
1 Appuyez sur TUNER puis sur BAND pour sélectionner la bande FM.2
2 Appuyez sur la touche PTY SEARCH.SEARCH apparaît sur l’afficheur.
3 Appuyez sur PRESET / pour sélectionner le type de programme à écouter.
4 Appuyez sur la touche ENTER pour lancer la recherche du type de programme.Le système commence à rechercher les stations radio préréglées qui correspondent au type de programme souhaité et arrête la recherche dès qu’il en a trouvé une. Répétez cette opération pour trouver d’autres stations.
Si NO PTY est affiché, cela signifie que le tuner n’a pas pu trouver le type de programme que vous cherchiez au moment de la recherche.3
NEWS – InformationsAFFAIRS – Analyse de l’actualitéINFO – Informations généralesSPORT – SportEDUCATE – ÉducationDRAMA – Pièces radiophoniques, etc.CULTURE – Culture nationale ou régionale, théâtre, etc.SCIENCE – Science et technologieVARIED – Habituellement programmes de discussion, quiz ou entretiens.POP M – Musique popROCK M – Musique rockEASY M – Écoute aisée LIGHT M – Musique classique ‘légère’CLASSICS – Musique classique ‘sérieuse’OTHER M – Musique ne correspondant à aucune des catégories ci-dessusWEATHER – Bulletins météorologiques
FINANCE – Rapports de bourse, commerce, ventes, etc.CHILDREN – Programmes pour enfantsSOCIAL – Affaires socialesRELIGION – Programmes religieuxPHONE IN – Opinion publique par téléphoneTRAVEL – Voyages et vacances, plutôt qu’annonces de circulation routièreLEISURE – Loisirs et hobbiesJAZZ – JazzCOUNTRY – Musique countryNATION M – Musique populaire dans une autre langue que l’anglaisOLDIES – Musique populaire des années 50 et 60FOLK M – Musique folkDOCUMENT – Documentaires
Remarque1 De plus, trois autres types de programmes sont disponibles, ALARMTST, ALARM et NO TYPE. ALARM et ALARMTST sont
utilisés pour les messages urgents. NO TYPE s’affiche lorsqu’un type de programme est introuvable.2 La fonction RDS n’est possible que dans la bande FM.3 RDS n’effectue la recherche que parmi les stations préréglées. Si aucune station n’a été réglée, ou si le type de programme
n’a pas pu être trouvé parmi les stations préréglées, NO PTY est affiché. FINISH signifie que la recherche est terminée.
BD DVD
INPUT SELECT
SOURCESLEEPTV
CONTROL
TV
INPUT
CH
RECEIVER
DVR CD CD-R
ADAPTER iPod USB VIDEO
TUNER S.RETRIEVER SIGNAL SEL VOL
RECEIVER
1HDD
ENTER
2 DISP
DVD
3VCR
MUTE
RETURN
AUDIOPARAMETER
TUNER EDITTOOLS
MASTERVOLUME
iPod CTRLPTY SEARCH
BAND
MENU
HOMEMENUSETUP
DTV/ TV
TREBASS
TOPMENU
TUNE
TUNE
PRESETPRES
ET
VSX-820_SYXCN_Fr.book 50 ページ 2010年4月12日 月曜日 午後6時59分

51Fr
EnglishFrançais
Deutsch
NederlandsItaliano
Español
Affichage d’informations RDSLa touche DISP permet d’afficher les différents types d’informations RDS disponibles.1
• Appuyez sur DISP pour plus d’informations sur le système RDS.Chaque pression fait changer l’affichage dans l’ordre suivant :
• Mode d’écoute
• Volume principal
• Texte radio (RT) – Messages transmis par la station de radio. Par exemple, une station de radio interactive propose un numéro de téléphone comme données RT.
• Nom de service du programme (PS) – Nom de la station de radio.
• Type de programme (PTY) – Indique le type de programme en cours d’émission.
• Fréquence actuelle du tuner (FREQ)
Remarque1 • Si des parasites sont captés pendant que RT défile sur l’affichage, certains caractères peuvent s’afficher de façon incorrecte.
• Si l’affichage RT indique NO TEXT, cela signifie qu’aucune donnée RT n’est diffusée par la station de radiodiffusion. L’affichage bascule automatiquement sur l’écran de données PS (si ces données ne sont pas disponibles, NO NAME s’affiche).• L’affichage PTY peut indiquer NO PTY.
VSX-820_SYXCN_Fr.book 51 ページ 2010年4月12日 月曜日 午後6時59分
52Fr
Chapitre 8 :
Enregistrement
Faire un enregistrement audio ou vidéoVous pouvez enregistrer un contenu audio ou vidéo à partir du syntoniseur intégré ou d’une source audio ou vidéo raccordée au récepteur (un lecteur de CD ou un téléviseur par ex.).
Gardez à l’esprit qu’il n’est pas possible d’effectuer un enregistrement numérique à partir d’une source analogique et vice-versa ; veillez donc à ce que les appareils à partir desquels/vers lesquels vous enregistrez soient raccordés de la même façon. (Pour plus d’informations sur les raccordements, voir la section Raccordement de votre équipement à la page 16).
Si vous voulez enregistrer une source vidéo, vous avez aussi besoin d’utiliser le même type de connexion pour la source et pour l’enregistreur. Par exemple, vous ne pourrez pas enregistrer une source raccordée à des prises vidéo composites avec un appareil enregistreur raccordé aux sorties vidéo en composantes (consultez page 26 pour de plus amples informations sur les raccordements vidéo).
1 Sélectionnez la source que vous désirez enregistrer.Utilisez les touches MULTI CONTROL (ou INPUT SELECT).
2 Sélectionnez le signal d’entrée (si nécessaire).
Appuyez sur la touche puis sur SIGNAL SEL pour sélectionner le signal d’entrée correspondant au composant source (pour plus d’informations à ce sujet à la voir page 41).
3 Préparez la source que vous désirez enregistrer.Réglez la station de radio, chargez le CD, la source vidéo, le DVD etc.
4 Préparez l’appareil enregistreur.Insérez une cassette, un MD, une cassette vidéo vierge, etc. dans l’appareil d’enregistrement et réglez les niveaux d’enregistrement.
Consultez le mode d’emploi de l’appareil enregistreur en cas de doute sur la fonction d’enregistrement. La plupart des enregistreurs vidéo règlent le niveau d’enregistrement audio automatiquement—consultez le mode d’emploi de l’appareil enregistreur en cas de doute sur la fonction d’enregistrement.
5 Lancez l’enregistrement, puis la lecture de l’appareil source.1
BD DVD
INPUT SELECT
SOURCESLEEPTV
CONTROL
TV
INPUT
CH
RECEIVER
DVR CD CD-R
ADAPTER iPod USB VIDEO
TUNER S.RETRIEVER SIGNAL SEL VOL
RECEIVER
Remarque1 • Le volume, la balance, la tonalité (graves, aigus, contour) du récepteur, et les effets surround n’ont aucune influence sur le
signal d’enregistrement.• Certaines sources numériques sont protégées contre la copie et ne peuvent être enregistrées qu’en analogique.• Certaines sources vidéo sont protégées contre la copie. Elles ne peuvent pas être enregistrées.
RECEIVER
VSX-820_SYXCN_Fr.book 52 ページ 2010年4月12日 月曜日 午後6時59分
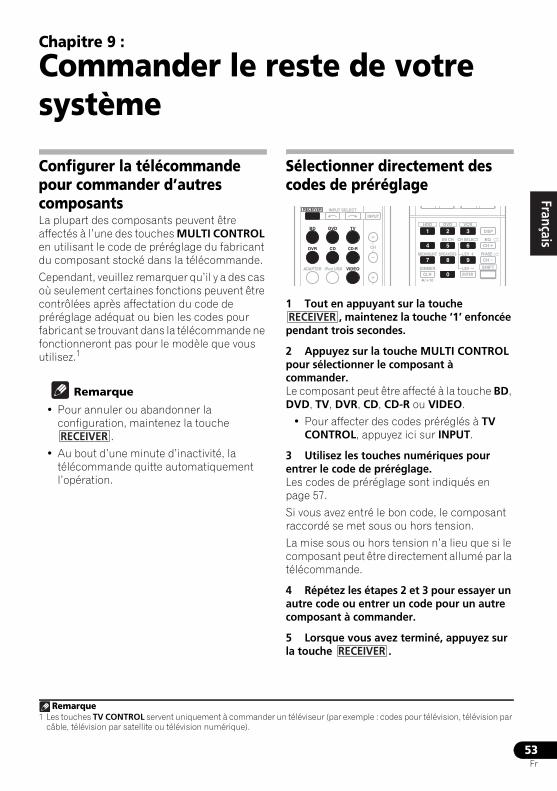
53Fr
EnglishFrançais
Deutsch
NederlandsItaliano
Español
Chapitre 9 :
Commander le reste de votre système
Configurer la télécommande pour commander d’autres composantsLa plupart des composants peuvent être affectés à l’une des touches MULTI CONTROL en utilisant le code de préréglage du fabricant du composant stocké dans la télécommande.
Cependant, veuillez remarquer qu’il y a des cas où seulement certaines fonctions peuvent être contrôlées après affectation du code de préréglage adéquat ou bien les codes pour fabricant se trouvant dans la télécommande ne fonctionneront pas pour le modèle que vous utilisez.1
Remarque
• Pour annuler ou abandonner la configuration, maintenez la touche
.
• Au bout d’une minute d’inactivité, la télécommande quitte automatiquement l’opération.
Sélectionner directement des codes de préréglage
1 Tout en appuyant sur la touche , maintenez la touche ‘1’ enfoncée
pendant trois secondes.
2 Appuyez sur la touche MULTI CONTROL pour sélectionner le composant à commander.Le composant peut être affecté à la touche BD, DVD, TV, DVR, CD, CD-R ou VIDEO.
• Pour affecter des codes préréglés à TV CONTROL, appuyez ici sur INPUT.
3 Utilisez les touches numériques pour entrer le code de préréglage.Les codes de préréglage sont indiqués en page 57.
Si vous avez entré le bon code, le composant raccordé se met sous ou hors tension.
La mise sous ou hors tension n’a lieu que si le composant peut être directement allumé par la télécommande.
4 Répétez les étapes 2 et 3 pour essayer un autre code ou entrer un code pour un autre composant à commander.
5 Lorsque vous avez terminé, appuyez sur la touche .
Remarque1 Les touches TV CONTROL servent uniquement à commander un téléviseur (par exemple : codes pour télévision, télévision par
câble, télévision par satellite ou télévision numérique).
RECEIVER
BD DVD
INPUT SELECT
TV
INPUT
CHDVR CD CD-R
ADAPTER iPod USB VIDEO
RECEIVER
DIMMER
1
4
7MIDNIGHT
HDD
+10
2
5
8SPEAKERS LEV
LEV
SB CH
DISP
CLR
EQ
PHASE
DVD
3
6
9
0 ENTER
CH
CH
CH SELECT
VCR
SHIFT
/
RECEIVER
RECEIVER
VSX-820_SYXCN_Fr.book 53 ページ 2010年4月12日 月曜日 午後6時59分
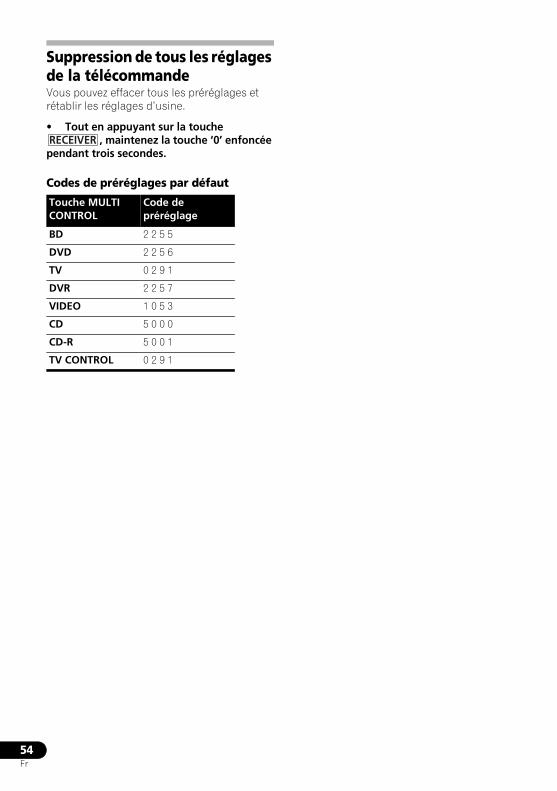
54Fr
Suppression de tous les réglages de la télécommandeVous pouvez effacer tous les préréglages et rétablir les réglages d’usine.
• Tout en appuyant sur la touche , maintenez la touche ‘0’ enfoncée
pendant trois secondes.
Codes de préréglages par défaut
Touche MULTI CONTROL
Code de préréglage
BD 2 2 5 5
DVD 2 2 5 6
TV 0 2 9 1
DVR 2 2 5 7
VIDEO 1 0 5 3
CD 5 0 0 0
CD-R 5 0 0 1
TV CONTROL 0 2 9 1
RECEIVER
VSX-820_SYXCN_Fr.book 54 ページ 2010年4月12日 月曜日 午後6時59分
55Fr
EnglishFrançais
Deutsch
NederlandsItaliano
Español
Commandes pour les téléviseursCette télécommande permet de commander d’autres équipements audiovisuels après avoir saisi les codes corrects, ou bien en utilisant la méthode d’apprentissage des commandes (pour plus d’informations, voir la section Commander le reste de votre système à la page 53). Utilisez les touches MULTI CONTROL pour sélectionner le composant.
• Les touches TV CONTROL de la télécommande sont destinées à commander le téléviseur affecté à la touche TV CONTROL INPUT.
Touche(s) Fonction Composants
TV CONTROL Allume ou éteint la télévision numérique. Télévision numérique
Met le téléviseur ou la télévision par câble en mode veille ou en marche.
Téléviseur câblé/Téléviseur Satellite/Téléviseur
TV CONTROL INPUT
Commute l’entrée téléviseur. (Pas possible avec tous les modèles.)
Téléviseur
TV CONTROL CH +/–
Sélectionne les chaînes. Téléviseur câblé/Téléviseur Satellite/Téléviseur/Télévision numérique
TV CONTROL VOL +/–
Ajuste le volume du téléviseur. Téléviseur câblé/Téléviseur Satellite/Téléviseur/Télévision numérique
SOURCE Appuyez pour allumer ou éteindre l’appareil affecté à la touche TV.
Téléviseur câblé/Téléviseur Satellite/Téléviseur/Télévision numérique
DTV/TV Permet de basculer entre les modes d’entrée Télévision numérique et TV analogique pour les téléviseurs Pioneer.
Téléviseur/Télévision numérique
TOP MENU Commutateurs TEXT ON/OFF pour téléviseurs. Téléviseur
HOME MENU Utilisez cette touche comme la touche GUIDE pour la navigation.
Téléviseur câblé/Téléviseur Satellite/Téléviseur/Télévision numérique
RETURN Permet de sélectionner le sous-titrage codé avec la télévision numérique.
Télévision numérique
Touches numériques
S’utilisent pour sélectionner un chaîne télévision spécifique.
Téléviseur câblé/Téléviseur Satellite/Téléviseur/Télévision numérique
ENTER Utilisez cette touche pour saisir une chaîne. Téléviseur câblé/Téléviseur Satellite/Téléviseur/Télévision numérique
MENU Appuyez pour afficher le menu de la télévision numérique.
Télévision numérique
Permet de sélectionner l’écran menu. Téléviseur câblé/Téléviseur Satellite/Téléviseur
& ENTER
Appuyez sur cette touche pour sélectionner ou ajuster et naviguer parmi les éléments de l’écran de menu.
Téléviseur câblé/Téléviseur Satellite/Téléviseur/Télévision numérique
CH +/– Sélectionne les chaînes. Téléviseur câblé/Téléviseur Satellite/Téléviseur/Télévision numérique
VSX-820_SYXCN_Fr.book 55 ページ 2010年4月12日 月曜日 午後6時59分
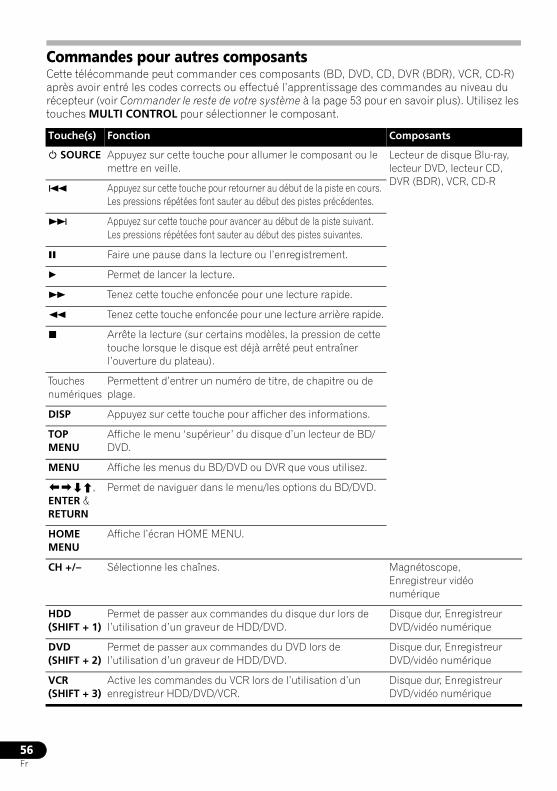
56Fr
Commandes pour autres composantsCette télécommande peut commander ces composants (BD, DVD, CD, DVR (BDR), VCR, CD-R) après avoir entré les codes corrects ou effectué l’apprentissage des commandes au niveau du récepteur (voir Commander le reste de votre système à la page 53 pour en savoir plus). Utilisez les touches MULTI CONTROL pour sélectionner le composant.
Touche(s) Fonction Composants
SOURCE Appuyez sur cette touche pour allumer le composant ou le mettre en veille.
Lecteur de disque Blu-ray, lecteur DVD, lecteur CD, DVR (BDR), VCR, CD-R
Appuyez sur cette touche pour retourner au début de la piste en cours. Les pressions répétées font sauter au début des pistes précédentes.
Appuyez sur cette touche pour avancer au début de la piste suivant. Les pressions répétées font sauter au début des pistes suivantes.
Faire une pause dans la lecture ou l’enregistrement.
Permet de lancer la lecture.
Tenez cette touche enfoncée pour une lecture rapide.
Tenez cette touche enfoncée pour une lecture arrière rapide.
Arrête la lecture (sur certains modèles, la pression de cette touche lorsque le disque est déjà arrêté peut entraîner l’ouverture du plateau).
Touches numériques
Permettent d’entrer un numéro de titre, de chapitre ou de plage.
DISP Appuyez sur cette touche pour afficher des informations.
TOP MENU
Affiche le menu ‘supérieur’ du disque d’un lecteur de BD/DVD.
MENU Affiche les menus du BD/DVD ou DVR que vous utilisez.
, ENTER & RETURN
Permet de naviguer dans le menu/les options du BD/DVD.
HOME MENU
Affiche l’écran HOME MENU.
CH +/– Sélectionne les chaînes. Magnétoscope, Enregistreur vidéo numérique
HDD (SHIFT + 1)
Permet de passer aux commandes du disque dur lors de l’utilisation d’un graveur de HDD/DVD.
Disque dur, Enregistreur DVD/vidéo numérique
DVD (SHIFT + 2)
Permet de passer aux commandes du DVD lors de l’utilisation d’un graveur de HDD/DVD.
Disque dur, Enregistreur DVD/vidéo numérique
VCR (SHIFT + 3)
Active les commandes du VCR lors de l’utilisation d’un enregistreur HDD/DVD/VCR.
Disque dur, Enregistreur DVD/vidéo numérique
VSX-820_SYXCN_Fr.book 56 ページ 2010年4月12日 月曜日 午後6時59分
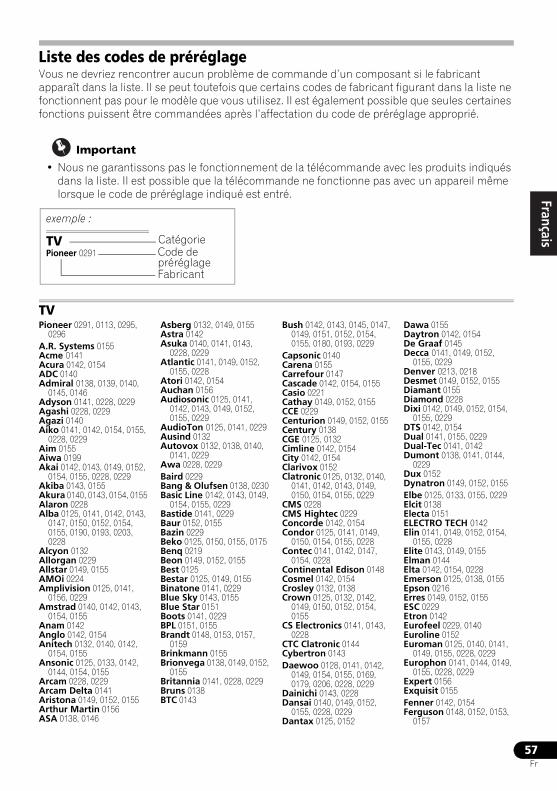
57Fr
EnglishFrançais
Deutsch
NederlandsItaliano
Español
Liste des codes de préréglageVous ne devriez rencontrer aucun problème de commande d’un composant si le fabricant apparaît dans la liste. Il se peut toutefois que certains codes de fabricant figurant dans la liste ne fonctionnent pas pour le modèle que vous utilisez. Il est également possible que seules certaines fonctions puissent être commandées après l’affectation du code de préréglage approprié.
Important
• Nous ne garantissons pas le fonctionnement de la télécommande avec les produits indiqués dans la liste. Il est possible que la télécommande ne fonctionne pas avec un appareil même lorsque le code de préréglage indiqué est entré.
TV Pioneer 0291, 0113, 0295,
0296A.R. Systems 0155 Acme 0141 Acura 0142, 0154 ADC 0140 Admiral 0138, 0139, 0140,
0145, 0146 Adyson 0141, 0228, 0229 Agashi 0228, 0229 Agazi 0140 Aiko 0141, 0142, 0154, 0155,
0228, 0229 Aim 0155 Aiwa 0199 Akai 0142, 0143, 0149, 0152,
0154, 0155, 0228, 0229 Akiba 0143, 0155 Akura 0140, 0143, 0154, 0155 Alaron 0228 Alba 0125, 0141, 0142, 0143,
0147, 0150, 0152, 0154, 0155, 0190, 0193, 0203, 0228
Alcyon 0132 Allorgan 0229 Allstar 0149, 0155 AMOi 0224 Amplivision 0125, 0141,
0156, 0229 Amstrad 0140, 0142, 0143,
0154, 0155 Anam 0142 Anglo 0142, 0154 Anitech 0132, 0140, 0142,
0154, 0155 Ansonic 0125, 0133, 0142,
0144, 0154, 0155 Arcam 0228, 0229 Arcam Delta 0141 Aristona 0149, 0152, 0155 Arthur Martin 0156 ASA 0138, 0146
Asberg 0132, 0149, 0155 Astra 0142 Asuka 0140, 0141, 0143,
0228, 0229 Atlantic 0141, 0149, 0152,
0155, 0228 Atori 0142, 0154 Auchan 0156 Audiosonic 0125, 0141,
0142, 0143, 0149, 0152, 0155, 0229
AudioTon 0125, 0141, 0229 Ausind 0132 Autovox 0132, 0138, 0140,
0141, 0229 Awa 0228, 0229 Baird 0229 Bang & Olufsen 0138, 0230 Basic Line 0142, 0143, 0149,
0154, 0155, 0229 Bastide 0141, 0229 Baur 0152, 0155 Bazin 0229 Beko 0125, 0150, 0155, 0175 Benq 0219 Beon 0149, 0152, 0155 Best 0125 Bestar 0125, 0149, 0155 Binatone 0141, 0229 Blue Sky 0143, 0155 Blue Star 0151 Boots 0141, 0229 BPL 0151, 0155 Brandt 0148, 0153, 0157,
0159 Brinkmann 0155 Brionvega 0138, 0149, 0152,
0155 Britannia 0141, 0228, 0229 Bruns 0138 BTC 0143
Bush 0142, 0143, 0145, 0147, 0149, 0151, 0152, 0154, 0155, 0180, 0193, 0229
Capsonic 0140 Carena 0155 Carrefour 0147 Cascade 0142, 0154, 0155 Casio 0221 Cathay 0149, 0152, 0155 CCE 0229 Centurion 0149, 0152, 0155 Century 0138 CGE 0125, 0132 Cimline 0142, 0154 City 0142, 0154 Clarivox 0152 Clatronic 0125, 0132, 0140,
0141, 0142, 0143, 0149, 0150, 0154, 0155, 0229
CMS 0228 CMS Hightec 0229 Concorde 0142, 0154 Condor 0125, 0141, 0149,
0150, 0154, 0155, 0228 Contec 0141, 0142, 0147,
0154, 0228 Continental Edison 0148 Cosmel 0142, 0154 Crosley 0132, 0138 Crown 0125, 0132, 0142,
0149, 0150, 0152, 0154, 0155
CS Electronics 0141, 0143, 0228
CTC Clatronic 0144 Cybertron 0143 Daewoo 0128, 0141, 0142,
0149, 0154, 0155, 0169, 0179, 0206, 0228, 0229
Dainichi 0143, 0228 Dansai 0140, 0149, 0152,
0155, 0228, 0229 Dantax 0125, 0152
Dawa 0155 Daytron 0142, 0154 De Graaf 0145 Decca 0141, 0149, 0152,
0155, 0229 Denver 0213, 0218 Desmet 0149, 0152, 0155 Diamant 0155 Diamond 0228 Dixi 0142, 0149, 0152, 0154,
0155, 0229 DTS 0142, 0154 Dual 0141, 0155, 0229 Dual-Tec 0141, 0142 Dumont 0138, 0141, 0144,
0229 Dux 0152 Dynatron 0149, 0152, 0155 Elbe 0125, 0133, 0155, 0229 Elcit 0138 Electa 0151 ELECTRO TECH 0142 Elin 0141, 0149, 0152, 0154,
0155, 0228 Elite 0143, 0149, 0155 Elman 0144 Elta 0142, 0154, 0228 Emerson 0125, 0138, 0155 Epson 0216 Erres 0149, 0152, 0155 ESC 0229 Etron 0142 Eurofeel 0229, 0140 Euroline 0152 Euroman 0125, 0140, 0141,
0149, 0155, 0228, 0229 Europhon 0141, 0144, 0149,
0155, 0228, 0229 Expert 0156 Exquisit 0155 Fenner 0142, 0154 Ferguson 0148, 0152, 0153,
0157
TVPioneer 0291
exemple :
CatégorieCode de préréglageFabricant
VSX-820_SYXCN_Fr.book 57 ページ 2010年4月12日 月曜日 午後6時59分
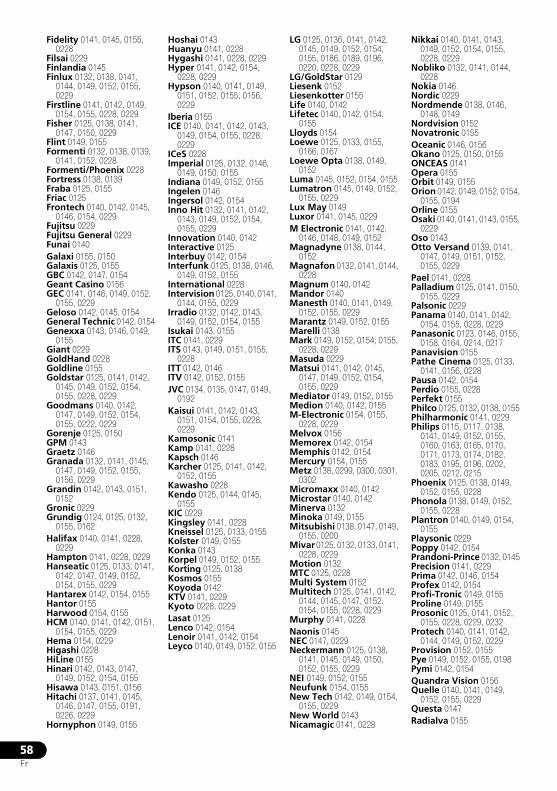
58Fr
Fidelity 0141, 0145, 0155, 0228
Filsai 0229 Finlandia 0145 Finlux 0132, 0138, 0141,
0144, 0149, 0152, 0155, 0229
Firstline 0141, 0142, 0149, 0154, 0155, 0228, 0229
Fisher 0125, 0138, 0141, 0147, 0150, 0229
Flint 0149, 0155 Formenti 0132, 0138, 0139,
0141, 0152, 0228 Formenti/Phoenix 0228 Fortress 0138, 0139 Fraba 0125, 0155 Friac 0125 Frontech 0140, 0142, 0145,
0146, 0154, 0229 Fujitsu 0229 Fujitsu General 0229 Funai 0140 Galaxi 0155, 0150 Galaxis 0125, 0155 GBC 0142, 0147, 0154 Geant Casino 0156 GEC 0141, 0146, 0149, 0152,
0155, 0229 Geloso 0142, 0145, 0154 General Technic 0142, 0154 Genexxa 0143, 0146, 0149,
0155 Giant 0229 GoldHand 0228 Goldline 0155 Goldstar 0125, 0141, 0142,
0145, 0149, 0152, 0154, 0155, 0228, 0229
Goodmans 0140, 0142, 0147, 0149, 0152, 0154, 0155, 0222, 0229
Gorenje 0125, 0150 GPM 0143 Graetz 0146 Granada 0132, 0141, 0145,
0147, 0149, 0152, 0155, 0156, 0229
Grandin 0142, 0143, 0151, 0152
Gronic 0229 Grundig 0124, 0125, 0132,
0155, 0162 Halifax 0140, 0141, 0228,
0229 Hampton 0141, 0228, 0229 Hanseatic 0125, 0133, 0141,
0142, 0147, 0149, 0152, 0154, 0155, 0229
Hantarex 0142, 0154, 0155 Hantor 0155 Harwood 0154, 0155 HCM 0140, 0141, 0142, 0151,
0154, 0155, 0229 Hema 0154, 0229 Higashi 0228 HiLine 0155 Hinari 0142, 0143, 0147,
0149, 0152, 0154, 0155 Hisawa 0143, 0151, 0156 Hitachi 0137, 0141, 0145,
0146, 0147, 0155, 0191, 0226, 0229
Hornyphon 0149, 0155
Hoshai 0143 Huanyu 0141, 0228 Hygashi 0141, 0228, 0229 Hyper 0141, 0142, 0154,
0228, 0229 Hypson 0140, 0141, 0149,
0151, 0152, 0155, 0156, 0229
Iberia 0155 ICE 0140, 0141, 0142, 0143,
0149, 0154, 0155, 0228, 0229
ICeS 0228 Imperial 0125, 0132, 0146,
0149, 0150, 0155 Indiana 0149, 0152, 0155 Ingelen 0146 Ingersol 0142, 0154 Inno Hit 0132, 0141, 0142,
0143, 0149, 0152, 0154, 0155, 0229
Innovation 0140, 0142 Interactive 0125 Interbuy 0142, 0154 Interfunk 0125, 0138, 0146,
0149, 0152, 0155 International 0228 Intervision 0125, 0140, 0141,
0144, 0155, 0229 Irradio 0132, 0142, 0143,
0149, 0152, 0154, 0155 Isukai 0143, 0155 ITC 0141, 0229 ITS 0143, 0149, 0151, 0155,
0228 ITT 0142, 0146 ITV 0142, 0152, 0155 JVC 0134, 0135, 0147, 0149,
0192 Kaisui 0141, 0142, 0143,
0151, 0154, 0155, 0228, 0229
Kamosonic 0141 Kamp 0141, 0228 Kapsch 0146 Karcher 0125, 0141, 0142,
0152, 0155 Kawasho 0228 Kendo 0125, 0144, 0145,
0155 KIC 0229 Kingsley 0141, 0228 Kneissel 0125, 0133, 0155 Kolster 0149, 0155 Konka 0143 Korpel 0149, 0152, 0155 Korting 0125, 0138 Kosmos 0155 Koyoda 0142 KTV 0141, 0229 Kyoto 0228, 0229 Lasat 0125 Lenco 0142, 0154 Lenoir 0141, 0142, 0154 Leyco 0140, 0149, 0152, 0155
LG 0125, 0136, 0141, 0142, 0145, 0149, 0152, 0154, 0155, 0186, 0189, 0196, 0220, 0228, 0229
LG/GoldStar 0129 Liesenk 0152 Liesenkotter 0155 Life 0140, 0142 Lifetec 0140, 0142, 0154,
0155 Lloyds 0154 Loewe 0125, 0133, 0155,
0166, 0167 Loewe Opta 0138, 0149,
0152 Luma 0145, 0152, 0154, 0155 Lumatron 0145, 0149, 0152,
0155, 0229 Lux May 0149 Luxor 0141, 0145, 0229 M Electronic 0141, 0142,
0146, 0148, 0149, 0152 Magnadyne 0138, 0144,
0152 Magnafon 0132, 0141, 0144,
0228 Magnum 0140, 0142 Mandor 0140 Manesth 0140, 0141, 0149,
0152, 0155, 0229 Marantz 0149, 0152, 0155 Marelli 0138 Mark 0149, 0152, 0154, 0155,
0228, 0229 Masuda 0229 Matsui 0141, 0142, 0145,
0147, 0149, 0152, 0154, 0155, 0229
Mediator 0149, 0152, 0155 Medion 0140, 0142, 0155 M-Electronic 0154, 0155,
0228, 0229 Melvox 0156 Memorex 0142, 0154 Memphis 0142, 0154 Mercury 0154, 0155 Metz 0138, 0299, 0300, 0301,
0302 Micromaxx 0140, 0142 Microstar 0140, 0142 Minerva 0132 Minoka 0149, 0155 Mitsubishi 0138, 0147, 0149,
0155, 0200 Mivar 0125, 0132, 0133, 0141,
0228, 0229 Motion 0132 MTC 0125, 0228 Multi System 0152 Multitech 0125, 0141, 0142,
0144, 0145, 0147, 0152, 0154, 0155, 0228, 0229
Murphy 0141, 0228 Naonis 0145 NEC 0147, 0229 Neckermann 0125, 0138,
0141, 0145, 0149, 0150, 0152, 0155, 0229
NEI 0149, 0152, 0155 Neufunk 0154, 0155 New Tech 0142, 0149, 0154,
0155, 0229 New World 0143 Nicamagic 0141, 0228
Nikkai 0140, 0141, 0143, 0149, 0152, 0154, 0155, 0228, 0229
Nobliko 0132, 0141, 0144, 0228
Nokia 0146 Nordic 0229 Nordmende 0138, 0146,
0148, 0149 Nordvision 0152 Novatronic 0155 Oceanic 0146, 0156 Okano 0125, 0150, 0155 ONCEAS 0141 Opera 0155 Orbit 0149, 0155 Orion 0142, 0149, 0152, 0154,
0155, 0194 Orline 0155 Osaki 0140, 0141, 0143, 0155,
0229 Oso 0143 Otto Versand 0139, 0141,
0147, 0149, 0151, 0152, 0155, 0229
Pael 0141, 0228 Palladium 0125, 0141, 0150,
0155, 0229 Palsonic 0229 Panama 0140, 0141, 0142,
0154, 0155, 0228, 0229 Panasonic 0123, 0146, 0155,
0158, 0164, 0214, 0217 Panavision 0155 Pathe Cinema 0125, 0133,
0141, 0156, 0228 Pausa 0142, 0154 Perdio 0155, 0228 Perfekt 0155 Philco 0125, 0132, 0138, 0155 Philharmonic 0141, 0229 Philips 0115, 0117, 0138,
0141, 0149, 0152, 0155, 0160, 0163, 0165, 0170, 0171, 0173, 0174, 0182, 0183, 0195, 0196, 0202, 0205, 0212, 0215
Phoenix 0125, 0138, 0149, 0152, 0155, 0228
Phonola 0138, 0149, 0152, 0155, 0228
Plantron 0140, 0149, 0154, 0155
Playsonic 0229 Poppy 0142, 0154 Prandoni-Prince 0132, 0145 Precision 0141, 0229 Prima 0142, 0146, 0154 Profex 0142, 0154 Profi-Tronic 0149, 0155 Proline 0149, 0155 Prosonic 0125, 0141, 0152,
0155, 0228, 0229, 0232 Protech 0140, 0141, 0142,
0144, 0149, 0152, 0229 Provision 0152, 0155 Pye 0149, 0152, 0155, 0198 Pymi 0142, 0154 Quandra Vision 0156 Quelle 0140, 0141, 0149,
0152, 0155, 0229 Questa 0147 Radialva 0155
VSX-820_SYXCN_Fr.book 58 ページ 2010年4月12日 月曜日 午後6時59分
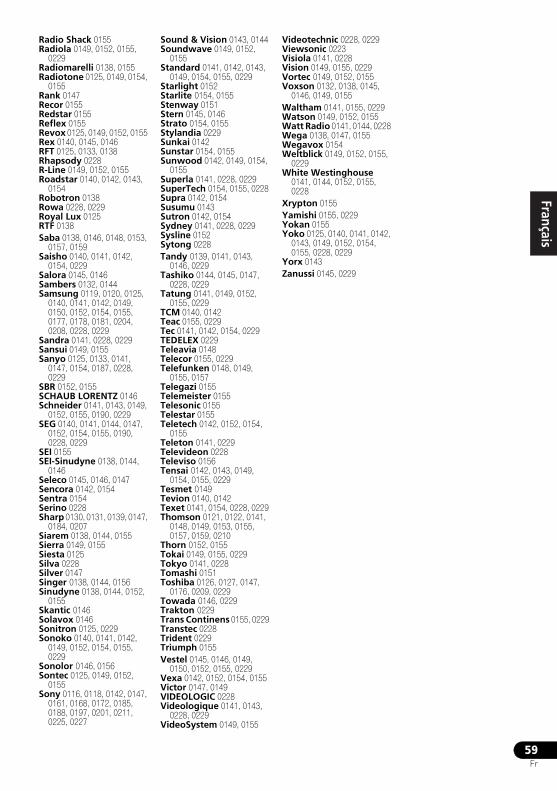
59Fr
EnglishFrançais
Deutsch
NederlandsItaliano
Español
Radio Shack 0155 Radiola 0149, 0152, 0155,
0229 Radiomarelli 0138, 0155 Radiotone 0125, 0149, 0154,
0155 Rank 0147 Recor 0155 Redstar 0155 Reflex 0155 Revox 0125, 0149, 0152, 0155 Rex 0140, 0145, 0146 RFT 0125, 0133, 0138 Rhapsody 0228 R-Line 0149, 0152, 0155 Roadstar 0140, 0142, 0143,
0154 Robotron 0138 Rowa 0228, 0229 Royal Lux 0125 RTF 0138 Saba 0138, 0146, 0148, 0153,
0157, 0159 Saisho 0140, 0141, 0142,
0154, 0229 Salora 0145, 0146 Sambers 0132, 0144 Samsung 0119, 0120, 0125,
0140, 0141, 0142, 0149, 0150, 0152, 0154, 0155, 0177, 0178, 0181, 0204, 0208, 0228, 0229
Sandra 0141, 0228, 0229 Sansui 0149, 0155 Sanyo 0125, 0133, 0141,
0147, 0154, 0187, 0228, 0229
SBR 0152, 0155 SCHAUB LORENTZ 0146 Schneider 0141, 0143, 0149,
0152, 0155, 0190, 0229 SEG 0140, 0141, 0144, 0147,
0152, 0154, 0155, 0190, 0228, 0229
SEI 0155 SEI-Sinudyne 0138, 0144,
0146 Seleco 0145, 0146, 0147 Sencora 0142, 0154 Sentra 0154 Serino 0228 Sharp 0130, 0131, 0139, 0147,
0184, 0207 Siarem 0138, 0144, 0155 Sierra 0149, 0155 Siesta 0125 Silva 0228 Silver 0147 Singer 0138, 0144, 0156 Sinudyne 0138, 0144, 0152,
0155 Skantic 0146 Solavox 0146 Sonitron 0125, 0229 Sonoko 0140, 0141, 0142,
0149, 0152, 0154, 0155, 0229
Sonolor 0146, 0156 Sontec 0125, 0149, 0152,
0155 Sony 0116, 0118, 0142, 0147,
0161, 0168, 0172, 0185, 0188, 0197, 0201, 0211, 0225, 0227
Sound & Vision 0143, 0144 Soundwave 0149, 0152,
0155 Standard 0141, 0142, 0143,
0149, 0154, 0155, 0229 Starlight 0152 Starlite 0154, 0155 Stenway 0151 Stern 0145, 0146 Strato 0154, 0155 Stylandia 0229 Sunkai 0142 Sunstar 0154, 0155 Sunwood 0142, 0149, 0154,
0155 Superla 0141, 0228, 0229 SuperTech 0154, 0155, 0228 Supra 0142, 0154 Susumu 0143 Sutron 0142, 0154 Sydney 0141, 0228, 0229 Sysline 0152 Sytong 0228 Tandy 0139, 0141, 0143,
0146, 0229 Tashiko 0144, 0145, 0147,
0228, 0229 Tatung 0141, 0149, 0152,
0155, 0229 TCM 0140, 0142 Teac 0155, 0229 Tec 0141, 0142, 0154, 0229 TEDELEX 0229 Teleavia 0148 Telecor 0155, 0229 Telefunken 0148, 0149,
0155, 0157 Telegazi 0155 Telemeister 0155 Telesonic 0155 Telestar 0155 Teletech 0142, 0152, 0154,
0155 Teleton 0141, 0229 Televideon 0228 Televiso 0156 Tensai 0142, 0143, 0149,
0154, 0155, 0229 Tesmet 0149 Tevion 0140, 0142 Texet 0141, 0154, 0228, 0229 Thomson 0121, 0122, 0141,
0148, 0149, 0153, 0155, 0157, 0159, 0210
Thorn 0152, 0155 Tokai 0149, 0155, 0229 Tokyo 0141, 0228 Tomashi 0151 Toshiba 0126, 0127, 0147,
0176, 0209, 0229 Towada 0146, 0229 Trakton 0229 Trans Continens 0155, 0229 Transtec 0228 Trident 0229 Triumph 0155 Vestel 0145, 0146, 0149,
0150, 0152, 0155, 0229 Vexa 0142, 0152, 0154, 0155 Victor 0147, 0149 VIDEOLOGIC 0228 Videologique 0141, 0143,
0228, 0229 VideoSystem 0149, 0155
Videotechnic 0228, 0229 Viewsonic 0223 Visiola 0141, 0228 Vision 0149, 0155, 0229 Vortec 0149, 0152, 0155 Voxson 0132, 0138, 0145,
0146, 0149, 0155 Waltham 0141, 0155, 0229 Watson 0149, 0152, 0155 Watt Radio 0141, 0144, 0228 Wega 0138, 0147, 0155 Wegavox 0154 Weltblick 0149, 0152, 0155,
0229 White Westinghouse
0141, 0144, 0152, 0155, 0228
Xrypton 0155 Yamishi 0155, 0229 Yokan 0155 Yoko 0125, 0140, 0141, 0142,
0143, 0149, 0152, 0154, 0155, 0228, 0229
Yorx 0143 Zanussi 0145, 0229
VSX-820_SYXCN_Fr.book 59 ページ 2010年4月12日 月曜日 午後6時59分
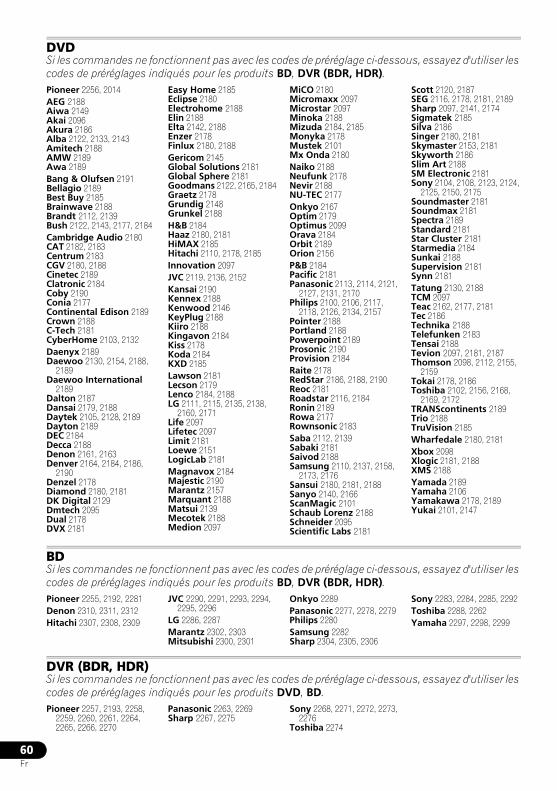
60Fr
DVDSi les commandes ne fonctionnent pas avec les codes de préréglage ci-dessous, essayez d'utiliser les codes de préréglages indiqués pour les produits BD, DVR (BDR, HDR).Pioneer 2256, 2014AEG 2188 Aiwa 2149 Akai 2096 Akura 2186 Alba 2122, 2133, 2143 Amitech 2188 AMW 2189 Awa 2189 Bang & Olufsen 2191 Bellagio 2189 Best Buy 2185 Brainwave 2188 Brandt 2112, 2139 Bush 2122, 2143, 2177, 2184 Cambridge Audio 2180 CAT 2182, 2183 Centrum 2183 CGV 2180, 2188 Cinetec 2189 Clatronic 2184 Coby 2190 Conia 2177 Continental Edison 2189 Crown 2188 C-Tech 2181 CyberHome 2103, 2132 Daenyx 2189 Daewoo 2130, 2154, 2188,
2189 Daewoo International
2189 Dalton 2187 Dansai 2179, 2188 Daytek 2105, 2128, 2189 Dayton 2189 DEC 2184 Decca 2188 Denon 2161, 2163 Denver 2164, 2184, 2186,
2190Denzel 2178 Diamond 2180, 2181 DK Digital 2129 Dmtech 2095 Dual 2178 DVX 2181
Easy Home 2185 Eclipse 2180 Electrohome 2188 Elin 2188 Elta 2142, 2188 Enzer 2178 Finlux 2180, 2188 Gericom 2145 Global Solutions 2181 Global Sphere 2181 Goodmans 2122, 2165, 2184 Graetz 2178 Grundig 2148 Grunkel 2188 H&B 2184 Haaz 2180, 2181 HiMAX 2185 Hitachi 2110, 2178, 2185 Innovation 2097 JVC 2119, 2136, 2152 Kansai 2190 Kennex 2188 Kenwood 2146 KeyPlug 2188 Kiiro 2188 Kingavon 2184 Kiss 2178 Koda 2184 KXD 2185 Lawson 2181 Lecson 2179 Lenco 2184, 2188 LG 2111, 2115, 2135, 2138,
2160, 2171 Life 2097 Lifetec 2097 Limit 2181 Loewe 2151 LogicLab 2181 Magnavox 2184 Majestic 2190 Marantz 2157 Marquant 2188 Matsui 2139 Mecotek 2188 Medion 2097
MiCO 2180 Micromaxx 2097 Microstar 2097 Minoka 2188 Mizuda 2184, 2185 Monyka 2178 Mustek 2101 Mx Onda 2180 Naiko 2188 Neufunk 2178 Nevir 2188 NU-TEC 2177 Onkyo 2167 Optim 2179 Optimus 2099 Orava 2184 Orbit 2189 Orion 2156 P&B 2184 Pacific 2181 Panasonic 2113, 2114, 2121,
2127, 2131, 2170 Philips 2100, 2106, 2117,
2118, 2126, 2134, 2157 Pointer 2188 Portland 2188 Powerpoint 2189 Prosonic 2190 Provision 2184 Raite 2178 RedStar 2186, 2188, 2190 Reoc 2181 Roadstar 2116, 2184 Ronin 2189 Rowa 2177 Rownsonic 2183 Saba 2112, 2139 Sabaki 2181 Saivod 2188 Samsung 2110, 2137, 2158,
2173, 2176 Sansui 2180, 2181, 2188 Sanyo 2140, 2166 ScanMagic 2101 Schaub Lorenz 2188 Schneider 2095 Scientific Labs 2181
Scott 2120, 2187 SEG 2116, 2178, 2181, 2189 Sharp 2097, 2141, 2174 Sigmatek 2185 Silva 2186 Singer 2180, 2181 Skymaster 2153, 2181 Skyworth 2186 Slim Art 2188 SM Electronic 2181 Sony 2104, 2108, 2123, 2124,
2125, 2150, 2175 Soundmaster 2181 Soundmax 2181 Spectra 2189 Standard 2181 Star Cluster 2181 Starmedia 2184 Sunkai 2188 Supervision 2181 Synn 2181 Tatung 2130, 2188 TCM 2097 Teac 2162, 2177, 2181 Tec 2186 Technika 2188 Telefunken 2183 Tensai 2188 Tevion 2097, 2181, 2187 Thomson 2098, 2112, 2155,
2159 Tokai 2178, 2186 Toshiba 2102, 2156, 2168,
2169, 2172 TRANScontinents 2189 Trio 2188 TruVision 2185 Wharfedale 2180, 2181 Xbox 2098 Xlogic 2181, 2188 XMS 2188 Yamada 2189 Yamaha 2106 Yamakawa 2178, 2189 Yukai 2101, 2147
BDSi les commandes ne fonctionnent pas avec les codes de préréglage ci-dessous, essayez d'utiliser les codes de préréglages indiqués pour les produits BD, DVR (BDR, HDR).Pioneer 2255, 2192, 2281Denon 2310, 2311, 2312 Hitachi 2307, 2308, 2309
JVC 2290, 2291, 2293, 2294, 2295, 2296
LG 2286, 2287 Marantz 2302, 2303 Mitsubishi 2300, 2301
Onkyo 2289 Panasonic 2277, 2278, 2279Philips 2280 Samsung 2282 Sharp 2304, 2305, 2306
Sony 2283, 2284, 2285, 2292 Toshiba 2288, 2262 Yamaha 2297, 2298, 2299
DVR (BDR, HDR)Si les commandes ne fonctionnent pas avec les codes de préréglage ci-dessous, essayez d'utiliser les codes de préréglages indiqués pour les produits DVD, BD.Pioneer 2257, 2193, 2258,
2259, 2260, 2261, 2264, 2265, 2266, 2270
Panasonic 2263, 2269 Sharp 2267, 2275
Sony 2268, 2271, 2272, 2273, 2276
Toshiba 2274
VSX-820_SYXCN_Fr.book 60 ページ 2010年4月12日 月曜日 午後6時59分

61Fr
EnglishFrançais
Deutsch
NederlandsItaliano
Español
Enregistreur vidéo numérique Pioneer 1053, 1108Adyson 1050 Aiwa 1033, 1034, 1035 Akai 1034 Akiba 1040, 1050 Akura 1034, 1040, 1050 Alba 1035, 1036, 1037, 1040,
1050, 1051 Ambassador 1037 Amstrad 1033, 1050, 1051 Anitech 1040, 1050 ASA 1038, 1039 Asuka 1033, 1038, 1039,
1040, 1050 Audiosonic 1051 Baird 1033, 1034, 1036, 1051 Bang & Olufsen 1052 Basic Line 1035, 1036, 1037,
1040, 1050, 1051 Baur 1039 Bestar 1036, 1037, 1051 Black Panther Line 1036,
1051 Blaupunkt 1039 Bondstec 1037, 1050 Bush 1035, 1036, 1040, 1050,
1051 Cathay 1051 Catron 1037 CGE 1033, 1034 Cimline 1035, 1040, 1050 Clatronic 1037, 1050 Condor 1036, 1037, 1051 Crown 1036, 1037, 1040,
1050, 1051 Daewoo 1036, 1037, 1051 Dansai 1040, 1050, 1051 Dantax 1035 Daytron 1036, 1051 De Graaf 1039 Decca 1033, 1034, 1039 Denko 1050 Dual 1034, 1051, 1060Dumont 1033, 1039 Elbe 1051 Elcatech 1050 Elsay 1050 Elta 1040, 1050, 1051 Emerson 1050 ESC 1036, 1051 Etzuko 1040, 1050 Ferguson 1034 Fidelity 1033, 1050 Finlandia 1039 Finlux 1033, 1034, 1039 Firstline 1035, 1038, 1040,
1050 Flint 1035 Formenti/Phoenix 1039 Frontech 1037 Fujitsu 1033 Funai 1033 Galaxy 1033 GBC 1037, 1040 GEC 1039 Geloso 1040 General 1037 General Technic 1035 GoldHand 1040, 1050 Goldstar 1033, 1048
Goodmans 1033, 1036, 1037, 1038, 1040, 1050, 1051
Graetz 1034 Granada 1039 Grandin 1033, 1036, 1037,
1038, 1040, 1050, 1051 Grundig 1039, 1040 Hanseatic 1038, 1039, 1051 Harwood 1050 HCM 1040, 1050 Hinari 1035, 1040, 1050, 1051 Hisawa 1035 Hitachi 1033, 1034, 1039,
1045Hypson 1035, 1040, 1050,
1051Impego 1037 Imperial 1033 Inno Hit 1036, 1037, 1039,
1040, 1050, 1051 Innovation 1035 Interbuy 1038, 1050 Interfunk 1039 Intervision 1033, 1051 Irradio 1038, 1040, 1050 ITT 1034 ITV 1036, 1038, 1051 JVC 1034, 1046 Kaisui 1040, 1050 Karcher 1039 Kendo 1035, 1036, 1037,
1050 Korpel 1040, 1050 Kyoto 1050 Lenco 1036 Leyco 1040, 1050 LG 1033, 1038, 1049 Lifetec 1035 Loewe Opta 1038, 1039 Logik 1040, 1050 Lumatron 1036, 1051 Luxor 1050 M Electronic 1033 Manesth 1040, 1050 Marantz 1039 Mark 1051 Matsui 1035, 1038 Matsushita 1033, 1039 Mediator 1039 Medion 1035 Memorex 1033, 1038 Memphis 1040, 1050 Micromaxx 1035 Microstar 1035 Migros 1033 Multitech 1033, 1037, 1039,
1040, 1050 Murphy 1033 NEC 1034 Neckermann 1034, 1039 NEI 1039 Nesco 1040, 1050 Nikkai 1037, 1050, 1051 Nokia 1034, 1051 Nordmende 1034 Oceanic 1033, 1034 Okano 1035, 1050, 1051 Orion 1035 Orson 1033
Osaki 1033, 1038, 1040, 1050 Otto Versand 1039 Palladium 1034, 1038, 1040,
1050 Panasonic 1043 Pathe Marconi 1034 Perdio 1033 Philco 1050 Philips 1039, 1045, 1052 Phonola 1039 Portland 1036, 1037, 1051 Prinz 1033 Profex 1040 Proline 1033 Prosonic 1035, 1051 Pye 1039 Quelle 1033, 1039 Radialva 1050 Radiola 1039 Rex 1034 RFT 1037, 1039, 1050 Roadstar 1036, 1038, 1040,
1050, 1051 Royal 1050 Saba 1034 Saisho 1035, 1040 Samsung 1041 Samurai 1037, 1050 Sansui 1034 Saville 1051 SBR 1039 Schaub Lorenz 1033, 1034 Schneider 1033, 1035, 1036,
1037, 1038, 1039, 1040, 1050, 1051
SEG 1040, 1050, 1051 SEI-Sinudyne 1039 Seleco 1034 Sentra 1037, 1050 Sentron 1040, 1050 Sharp 1042 Shintom 1040, 1050 Shivaki 1038 Siemens 1038 Silva 1038 Silver 1051 Sinudyne 1039 Solavox 1037 Sonneclair 1050 Sonoko 1036, 1051 Sontec 1038 Sony 1044 Standard 1036, 1051 Stern 1051 Sunkai 1035 Sunstar 1033 Suntronic 1033 Sunwood 1040, 1050 Symphonic 1050 Taisho 1035 Tandberg 1051 Tashiko 1033 Tatung 1033, 1034, 1039 TCM 1035 Teac 1051 Tec 1037, 1050, 1051 Teleavia 1034 Telefunken 1034 Teletech 1050, 1051 Tenosal 1040, 1050
Tensai 1033, 1038, 1040, 1050
Tevion 1035 Thomson 1034, 1048 Thorn 1034 Tokai 1038, 1040, 1050 Tonsai 1040 Toshiba 1034, 1039, 1047 Towada 1040, 1050 Towika 1040, 1050 TVA 1037 Uher 1038 Ultravox 1051 United Quick Star 1036,
1051Universum 1033, 1038, 1039 Videon 1035 Weltblick 1038 Yamishi 1040, 1050 Yokan 1040, 1050 Yoko 1037, 1038, 1040, 1050
VSX-820_SYXCN_Fr.book 61 ページ 2010年4月12日 月曜日 午後6時59分
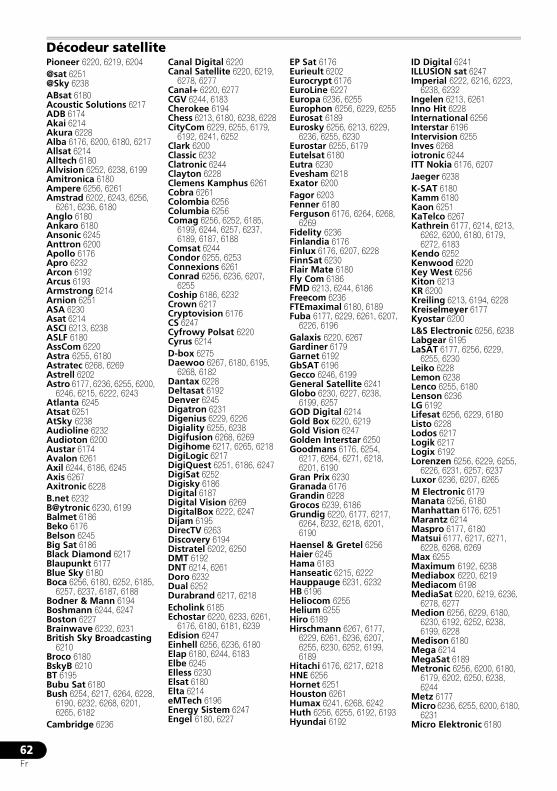
62Fr
Décodeur satellitePioneer 6220, 6219, 6204@sat 6251 @Sky 6238 ABsat 6180 Acoustic Solutions 6217 ADB 6174 Akai 6214 Akura 6228 Alba 6176, 6200, 6180, 6217 Allsat 6214 Alltech 6180 Allvision 6252, 6238, 6199 Amitronica 6180 Ampere 6256, 6261 Amstrad 6202, 6243, 6256,
6261, 6236, 6180 Anglo 6180 Ankaro 6180 Ansonic 6245 Anttron 6200 Apollo 6176 Apro 6232 Arcon 6192 Arcus 6193 Armstrong 6214 Arnion 6251 ASA 6230 Asat 6214 ASCI 6213, 6238 ASLF 6180 AssCom 6220 Astra 6255, 6180 Astratec 6268, 6269 Astrell 6202 Astro 6177, 6236, 6255, 6200,
6246, 6215, 6222, 6243 Atlanta 6245 Atsat 6251 AtSky 6238 Audioline 6232 Audioton 6200 Austar 6174 Avalon 6261 Axil 6244, 6186, 6245 Axis 6267 Axitronic 6228 B.net 6232 B@ytronic 6230, 6199 Balmet 6186 Beko 6176 Belson 6245 Big Sat 6186 Black Diamond 6217 Blaupunkt 6177 Blue Sky 6180 Boca 6256, 6180, 6252, 6185,
6257, 6237, 6187, 6188 Bodner & Mann 6194 Boshmann 6244, 6247 Boston 6227 Brainwave 6232, 6231 British Sky Broadcasting
6210 Broco 6180 BskyB 6210 BT 6195 Bubu Sat 6180 Bush 6254, 6217, 6264, 6228,
6190, 6232, 6268, 6201, 6265, 6182
Cambridge 6236
Canal Digital 6220 Canal Satellite 6220, 6219,
6278, 6277 Canal+ 6220, 6277 CGV 6244, 6183 Cherokee 6194 Chess 6213, 6180, 6238, 6228 CityCom 6229, 6255, 6179,
6192, 6241, 6252 Clark 6200 Classic 6232 Clatronic 6244 Clayton 6228 Clemens Kamphus 6261 Cobra 6261 Colombia 6256 Columbia 6256 Comag 6256, 6252, 6185,
6199, 6244, 6257, 6237, 6189, 6187, 6188
Comsat 6244 Condor 6255, 6253 Connexions 6261 Conrad 6256, 6236, 6207,
6255 Coship 6186, 6232 Crown 6217 Cryptovision 6176 CS 6247 Cyfrowy Polsat 6220 Cyrus 6214 D-box 6275 Daewoo 6267, 6180, 6195,
6268, 6182 Dantax 6228 Deltasat 6192 Denver 6245 Digatron 6231 Digenius 6229, 6226 Digiality 6255, 6238 Digifusion 6268, 6269 Digihome 6217, 6265, 6218 DigiLogic 6217 DigiQuest 6251, 6186, 6247 DigiSat 6252 Digisky 6186 Digital 6187 Digital Vision 6269 DigitalBox 6222, 6247 Dijam 6195 DirecTV 6263 Discovery 6194 Distratel 6202, 6250 DMT 6192 DNT 6214, 6261 Doro 6232 Dual 6252 Durabrand 6217, 6218 Echolink 6185 Echostar 6220, 6233, 6261,
6176, 6180, 6181, 6239 Edision 6247 Einhell 6256, 6236, 6180 Elap 6180, 6244, 6183 Elbe 6245 Elless 6230 Elsat 6180 Elta 6214 eMTech 6196 Energy Sistem 6247 Engel 6180, 6227
EP Sat 6176 Eurieult 6202 Eurocrypt 6176 EuroLine 6227 Europa 6236, 6255 Europhon 6256, 6229, 6255 Eurosat 6189 Eurosky 6256, 6213, 6229,
6236, 6255, 6230 Eurostar 6255, 6179 Eutelsat 6180 Eutra 6230 Evesham 6218 Exator 6200 Fagor 6203 Fenner 6180 Ferguson 6176, 6264, 6268,
6269 Fidelity 6236 Finlandia 6176 Finlux 6176, 6207, 6228 FinnSat 6230 Flair Mate 6180 Fly Com 6186 FMD 6213, 6244, 6186 Freecom 6236 FTEmaximal 6180, 6189 Fuba 6177, 6229, 6261, 6207,
6226, 6196 Galaxis 6220, 6267 Gardiner 6179 Garnet 6192 GbSAT 6196 Gecco 6246, 6199 General Satellite 6241 Globo 6230, 6227, 6238,
6199, 6257 GOD Digital 6214 Gold Box 6220, 6219 Gold Vision 6247 Golden Interstar 6250 Goodmans 6176, 6254,
6217, 6264, 6271, 6218, 6201, 6190
Gran Prix 6230 Granada 6176 Grandin 6228 Grocos 6239, 6186 Grundig 6220, 6177, 6217,
6264, 6232, 6218, 6201, 6190
Haensel & Gretel 6256 Haier 6245 Hama 6183 Hanseatic 6215, 6222 Hauppauge 6231, 6232 HB 6196 Heliocom 6255 Helium 6255 Hiro 6189 Hirschmann 6267, 6177,
6229, 6261, 6236, 6207, 6255, 6230, 6252, 6199, 6189
Hitachi 6176, 6217, 6218 HNE 6256 Hornet 6251 Houston 6261 Humax 6241, 6268, 6242 Huth 6256, 6255, 6192, 6193 Hyundai 6192
ID Digital 6241 ILLUSION sat 6247 Imperial 6222, 6216, 6223,
6238, 6232 Ingelen 6213, 6261 Inno Hit 6228 International 6256 Interstar 6196 Intervision 6255 Inves 6268 iotronic 6244 ITT Nokia 6176, 6207 Jaeger 6238 K-SAT 6180 Kamm 6180 Kaon 6251 KaTelco 6267 Kathrein 6177, 6214, 6213,
6262, 6200, 6180, 6179, 6272, 6183
Kendo 6252 Kenwood 6220 Key West 6256 Kiton 6213 KR 6200 Kreiling 6213, 6194, 6228 Kreiselmeyer 6177 Kyostar 6200 L&S Electronic 6256, 6238 Labgear 6195 LaSAT 6177, 6256, 6229,
6255, 6230 Leiko 6228 Lemon 6238 Lenco 6255, 6180 Lenson 6236 LG 6192 Lifesat 6256, 6229, 6180 Listo 6228 Lodos 6217 Logik 6217 Logix 6192 Lorenzen 6256, 6229, 6255,
6226, 6231, 6257, 6237 Luxor 6236, 6207, 6265 M Electronic 6179 Manata 6256, 6180 Manhattan 6176, 6251 Marantz 6214 Maspro 6177, 6180 Matsui 6177, 6217, 6271,
6228, 6268, 6269 Max 6255 Maximum 6192, 6238 Mediabox 6220, 6219 Mediacom 6198 MediaSat 6220, 6219, 6236,
6278, 6277 Medion 6256, 6229, 6180,
6230, 6192, 6252, 6238, 6199, 6228
Medison 6180 Mega 6214 MegaSat 6189 Metronic 6256, 6200, 6180,
6179, 6202, 6250, 6238, 6244
Metz 6177 Micro 6236, 6255, 6200, 6180,
6231 Micro Elektronic 6180
VSX-820_SYXCN_Fr.book 62 ページ 2010年4月12日 月曜日 午後6時59分
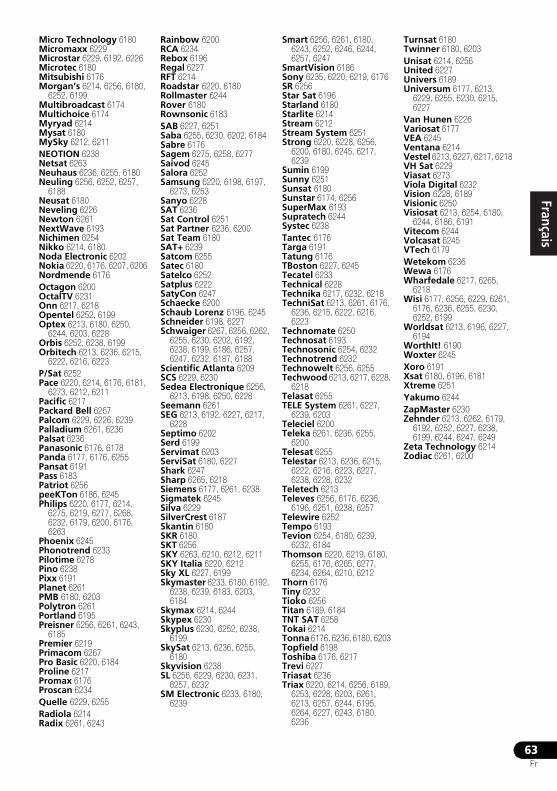
63Fr
EnglishFrançais
Deutsch
NederlandsItaliano
Español
Micro Technology 6180 Micromaxx 6229 Microstar 6229, 6192, 6226 Microtec 6180 Mitsubishi 6176 Morgan’s 6214, 6256, 6180,
6252, 6199 Multibroadcast 6174 Multichoice 6174 Myryad 6214 Mysat 6180 MySky 6212, 6211 NEOTION 6238 Netsat 6263 Neuhaus 6236, 6255, 6180 Neuling 6256, 6252, 6257,
6188 Neusat 6180 Neveling 6226 Newton 6261 NextWave 6193 Nichimen 6254 Nikko 6214, 6180 Noda Electronic 6202 Nokia 6220, 6176, 6207, 6206 Nordmende 6176 Octagon 6200 OctalTV 6231 Onn 6217, 6218 Opentel 6252, 6199 Optex 6213, 6180, 6250,
6244, 6203, 6228 Orbis 6252, 6238, 6199 Orbitech 6213, 6236, 6215,
6222, 6216, 6223 P/Sat 6252 Pace 6220, 6214, 6176, 6181,
6273, 6212, 6211 Pacific 6217 Packard Bell 6267 Palcom 6229, 6226, 6239 Palladium 6261, 6236 Palsat 6236 Panasonic 6176, 6178 Panda 6177, 6176, 6255 Pansat 6191 Pass 6183 Patriot 6256 peeKTon 6186, 6245 Philips 6220, 6177, 6214,
6275, 6219, 6277, 6268, 6232, 6179, 6200, 6176, 6263
Phoenix 6245 Phonotrend 6233 Pilotime 6278 Pino 6238 Pixx 6191 Planet 6261 PMB 6180, 6203 Polytron 6261 Portland 6195 Preisner 6256, 6261, 6243,
6185 Premier 6219 Primacom 6267 Pro Basic 6220, 6184 Proline 6217 Promax 6176 Proscan 6234 Quelle 6229, 6255 Radiola 6214 Radix 6261, 6243
Rainbow 6200 RCA 6234 Rebox 6196 Regal 6227 RFT 6214 Roadstar 6220, 6180 Rollmaster 6244 Rover 6180 Rownsonic 6183 SAB 6227, 6251 Saba 6255, 6230, 6202, 6184 Sabre 6176 Sagem 6275, 6258, 6277 Saivod 6245 Salora 6252 Samsung 6220, 6198, 6197,
6273, 6253 Sanyo 6228 SAT 6236 Sat Control 6251 Sat Partner 6236, 6200 Sat Team 6180 SAT+ 6239 Satcom 6255 Satec 6180 Satelco 6252 Satplus 6222 SatyCon 6247 Schaecke 6200 Schaub Lorenz 6196, 6245 Schneider 6198, 6227 Schwaiger 6267, 6256, 6262,
6255, 6230, 6202, 6192, 6238, 6199, 6186, 6257, 6247, 6232, 6187, 6188
Scientific Atlanta 6209 SCS 6229, 6230 Sedea Electronique 6256,
6213, 6198, 6250, 6228 Seemann 6261 SEG 6213, 6192, 6227, 6217,
6228 Septimo 6202 Serd 6199 Servimat 6203 ServiSat 6180, 6227 Shark 6247 Sharp 6265, 6218 Siemens 6177, 6261, 6238 Sigmatek 6245 Silva 6229 SilverCrest 6187 Skantin 6180 SKR 6180 SKT 6256 SKY 6263, 6210, 6212, 6211 SKY Italia 6220, 6212 Sky XL 6227, 6199 Skymaster 6233, 6180, 6192,
6238, 6239, 6183, 6203, 6184
Skymax 6214, 6244 Skypex 6230 Skyplus 6230, 6252, 6238,
6199 SkySat 6213, 6236, 6255,
6180 Skyvision 6238 SL 6256, 6229, 6230, 6231,
6257, 6232 SM Electronic 6233, 6180,
6239
Smart 6256, 6261, 6180, 6243, 6252, 6246, 6244, 6257, 6247
SmartVision 6186 Sony 6235, 6220, 6219, 6176 SR 6256 Star Sat 6196 Starland 6180 Starlite 6214 Stream 6212 Stream System 6251 Strong 6220, 6228, 6256,
6200, 6180, 6245, 6217, 6239
Sumin 6199 Sunny 6251 Sunsat 6180 Sunstar 6174, 6256 SuperMax 6193 Supratech 6244 Systec 6238 Tantec 6176 Targa 6191 Tatung 6176 TBoston 6227, 6245 Tecatel 6233 Technical 6228 Technika 6217, 6232, 6218 TechniSat 6213, 6261, 6176,
6236, 6215, 6222, 6216, 6223
Technomate 6250 Technosat 6193 Technosonic 6254, 6232 Technotrend 6232 Technowelt 6256, 6255 Techwood 6213, 6217, 6228,
6218 Telasat 6255 TELE System 6261, 6227,
6239, 6203 Teleciel 6200 Teleka 6261, 6236, 6255,
6200 Telesat 6255 Telestar 6213, 6236, 6215,
6222, 6216, 6223, 6227, 6238, 6228, 6232
Teletech 6213 Televes 6256, 6176, 6236,
6196, 6251, 6238, 6257 Telewire 6252 Tempo 6193 Tevion 6254, 6180, 6239,
6232, 6184 Thomson 6220, 6219, 6180,
6255, 6176, 6265, 6277, 6234, 6264, 6210, 6212
Thorn 6176 Tiny 6232 Tioko 6256 Titan 6189, 6184 TNT SAT 6258 Tokai 6214 Tonna 6176, 6236, 6180, 6203 Topfield 6198 Toshiba 6176, 6217 Trevi 6227 Triasat 6236 Triax 6220, 6214, 6256, 6189,
6253, 6228, 6203, 6261, 6213, 6257, 6244, 6195, 6264, 6227, 6243, 6180, 6236
Turnsat 6180 Twinner 6180, 6203 Unisat 6214, 6256 United 6227 Univers 6189 Universum 6177, 6213,
6229, 6255, 6230, 6215, 6227
Van Hunen 6226 Variosat 6177 VEA 6245 Ventana 6214 Vestel 6213, 6227, 6217, 6218 VH Sat 6229 Viasat 6273 Viola Digital 6232 Vision 6228, 6189 Visionic 6250 Visiosat 6213, 6254, 6180,
6244, 6186, 6191 Vitecom 6244 Volcasat 6245 VTech 6179 Wetekom 6236 Wewa 6176 Wharfedale 6217, 6265,
6218 Wisi 6177, 6256, 6229, 6261,
6176, 6236, 6255, 6230, 6252, 6199
Worldsat 6213, 6196, 6227, 6194
WorthIt! 6190 Woxter 6245 Xoro 6191 Xsat 6180, 6196, 6181 Xtreme 6251 Yakumo 6244 ZapMaster 6230 Zehnder 6213, 6262, 6179,
6192, 6252, 6227, 6238, 6199, 6244, 6247, 6249
Zeta Technology 6214 Zodiac 6261, 6200
VSX-820_SYXCN_Fr.book 63 ページ 2010年4月12日 月曜日 午後6時59分
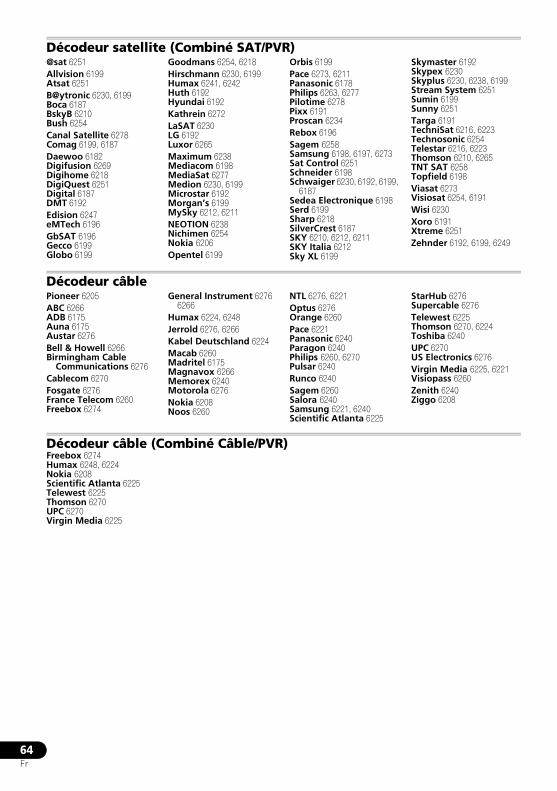
64Fr
Décodeur satellite (Combiné SAT/PVR)@sat 6251 Allvision 6199 Atsat 6251 B@ytronic 6230, 6199 Boca 6187 BskyB 6210 Bush 6254 Canal Satellite 6278 Comag 6199, 6187 Daewoo 6182 Digifusion 6269 Digihome 6218 DigiQuest 6251 Digital 6187 DMT 6192 Edision 6247 eMTech 6196 GbSAT 6196 Gecco 6199 Globo 6199
Goodmans 6254, 6218 Hirschmann 6230, 6199 Humax 6241, 6242 Huth 6192 Hyundai 6192 Kathrein 6272 LaSAT 6230 LG 6192 Luxor 6265 Maximum 6238 Mediacom 6198 MediaSat 6277 Medion 6230, 6199 Microstar 6192 Morgan’s 6199 MySky 6212, 6211 NEOTION 6238 Nichimen 6254 Nokia 6206 Opentel 6199
Orbis 6199 Pace 6273, 6211 Panasonic 6178 Philips 6263, 6277 Pilotime 6278 Pixx 6191 Proscan 6234 Rebox 6196 Sagem 6258 Samsung 6198, 6197, 6273 Sat Control 6251 Schneider 6198 Schwaiger 6230, 6192, 6199,
6187Sedea Electronique 6198 Serd 6199 Sharp 6218 SilverCrest 6187 SKY 6210, 6212, 6211SKY Italia 6212 Sky XL 6199
Skymaster 6192 Skypex 6230 Skyplus 6230, 6238, 6199 Stream System 6251 Sumin 6199 Sunny 6251 Targa 6191 TechniSat 6216, 6223 Technosonic 6254 Telestar 6216, 6223 Thomson 6210, 6265 TNT SAT 6258 Topfield 6198 Viasat 6273 Visiosat 6254, 6191 Wisi 6230 Xoro 6191 Xtreme 6251 Zehnder 6192, 6199, 6249
Décodeur câblePioneer 6205 ABC 6266 ADB 6175 Auna 6175 Austar 6276 Bell & Howell 6266 Birmingham Cable
Communications 6276 Cablecom 6270 Fosgate 6276 France Telecom 6260 Freebox 6274
General Instrument 6276 6266
Humax 6224, 6248 Jerrold 6276, 6266 Kabel Deutschland 6224 Macab 6260 Madritel 6175 Magnavox 6266 Memorex 6240 Motorola 6276 Nokia 6208 Noos 6260
NTL 6276, 6221 Optus 6276 Orange 6260 Pace 6221 Panasonic 6240 Paragon 6240 Philips 6260, 6270 Pulsar 6240 Runco 6240 Sagem 6260 Salora 6240 Samsung 6221, 6240 Scientific Atlanta 6225
StarHub 6276 Supercable 6276 Telewest 6225 Thomson 6270, 6224 Toshiba 6240 UPC 6270 US Electronics 6276 Virgin Media 6225, 6221 Visiopass 6260 Zenith 6240 Ziggo 6208
Décodeur câble (Combiné Câble/PVR) Freebox 6274 Humax 6248, 6224 Nokia 6208 Scientific Atlanta 6225 Telewest 6225 Thomson 6270 UPC 6270 Virgin Media 6225
VSX-820_SYXCN_Fr.book 64 ページ 2010年4月12日 月曜日 午後6時59分
65Fr
EnglishFrançais
Deutsch
NederlandsItaliano
Español
CDPioneer 5000, 5011 AKAI 5043 Asuka 5045 Denon 5019 Fisher 5048 Goldstar 5040 Hitachi 5042
Kenwood 5020, 5021, 5031 Luxman 5049 Marantz 5033 Onkyo 5017, 5018, 5030,
5050 Panasonic 5036 Philips 5022, 5032, 5044
RCA 5013, 5029 Roadstar 5052 Sharp 5051 Sony 5012, 5023, 5026, 5027,
5028, 5039TEAC 5015, 5016, 5034, 5035,
5037
Technics 5041 Victor 5014 Yamaha 5024, 5025, 5038,
5046, 5047
CD-RPioneer 5001, 5053Philips 5054Yamaha 5055
Lecteur de disque laserPioneer 5002, 5003
Platine à cassettePioneer 5058, 5059
Platine à cassette numériquePioneer 5057
MDPioneer 5056
VSX-820_SYXCN_Fr.book 65 ページ 2010年4月12日 月曜日 午後6時59分
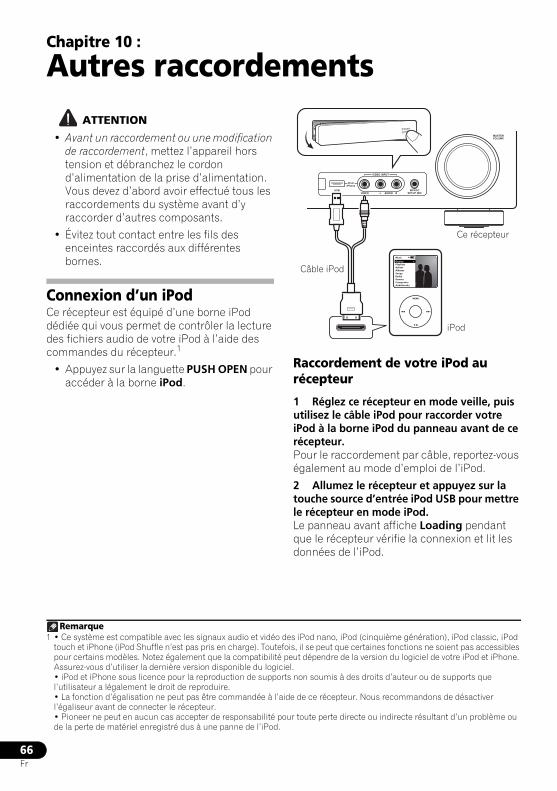
66Fr
Chapitre 10 :
Autres raccordements ATTENTION
• Avant un raccordement ou une modification de raccordement, mettez l’appareil hors tension et débranchez le cordon d’alimentation de la prise d’alimentation. Vous devez d’abord avoir effectué tous les raccordements du système avant d’y raccorder d’autres composants.
• Évitez tout contact entre les fils des enceintes raccordés aux différentes bornes.
Connexion d’un iPodCe récepteur est équipé d’une borne iPod dédiée qui vous permet de contrôler la lecture des fichiers audio de votre iPod à l’aide des commandes du récepteur.1
• Appuyez sur la languette PUSH OPEN pour accéder à la borne iPod.
Raccordement de votre iPod au récepteur
1 Réglez ce récepteur en mode veille, puis utilisez le câble iPod pour raccorder votre iPod à la borne iPod du panneau avant de ce récepteur.Pour le raccordement par câble, reportez-vous également au mode d’emploi de l’iPod.
2 Allumez le récepteur et appuyez sur la touche source d’entrée iPod USB pour mettre le récepteur en mode iPod. Le panneau avant affiche Loading pendant que le récepteur vérifie la connexion et lit les données de l’iPod.
Remarque1 • Ce système est compatible avec les signaux audio et vidéo des iPod nano, iPod (cinquième génération), iPod classic, iPod
touch et iPhone (iPod Shuffle n’est pas pris en charge). Toutefois, il se peut que certaines fonctions ne soient pas accessibles pour certains modèles. Notez également que la compatibilité peut dépendre de la version du logiciel de votre iPod et iPhone. Assurez-vous d’utiliser la dernière version disponible du logiciel.• iPod et iPhone sous licence pour la reproduction de supports non soumis à des droits d’auteur ou de supports que l’utilisateur a légalement le droit de reproduire.• La fonction d’égalisation ne peut pas être commandée à l’aide de ce récepteur. Nous recommandons de désactiver l’égaliseur avant de connecter le récepteur.• Pioneer ne peut en aucun cas accepter de responsabilité pour toute perte directe ou indirecte résultant d’un problème ou de la perte de matériel enregistré dus à une panne de l’iPod.
MASTERVOLUME
MCACCSETUP MIC
VIDEO INPUT
AUDIOL RVIDEO
iPodiPhone
USB
CONTROL ON / OFF
MENU
Music
Genius >PlaylistsArtistsAlbumsSongsRadioGenresComposersAudiobooks
Ce récepteur
iPod
Câble iPod
VSX-820_SYXCN_Fr.book 66 ページ 2010年4月12日 月曜日 午後6時59分
67Fr
EnglishFrançais
Deutsch
NederlandsItaliano
Español
3 Appuyez sur la touche TOP MENU pour afficher le menu principal de l’iPod.Dès que l’affichage indique Top Menu, vous pouvez commencer à écouter la musique de l’iPod.1
• Si, après que vous avez appuyé sur iPod, l’affichage indique NO DEVICE, essayez d’éteindre le récepteur et de reconnecter l’iPod au récepteur.
Lecture de l’iPodPour naviguer dans les morceaux de musique de votre iPod, vous pouvez utiliser la fonction d’affichage des messages à l’écran du téléviseur raccordé à ce récepteur.2 Vous pouvez également commander toutes les fonctions relatives à la musique à partir du panneau avant de ce récepteur.
Recherche des morceaux à écouterLorsque votre iPod est raccordé à ce récepteur, vous pouvez naviguer dans les morceaux de musique enregistrés sur votre iPod par listes de lecture, artistes, albums, morceaux, genres ou compositeurs, comme si vous utilisiez directement votre iPod.
1 Utilisez les touches / pour sélectionner une catégorie puis appuyez sur ENTER pour naviguer dans cette catégorie.
• Pour revenir au niveau précédent à tout moment, appuyez sur RETURN.
2 Utilisez les touches / pour naviguer dans la catégorie sélectionnée (par ex. albums).
• Utilisez / pour passer au niveau précédent/suivant.
3 Continuez à naviguer jusqu’à ce que vous arriviez au morceau à écouter, puis appuyez sur pour commencer la lecture.3
La navigation dans les catégories sur votre iPod se présente de la manière suivante :
Listes de lecture MorceauxArtistes Albums MorceauxAlbums MorceauxMorceauxPodcastsGenres Artistes Albums MorceauxCompositeurs Albums MorceauxLivres audioMix de morceaux
Astuce
• Vous pouvez lire tous les morceaux d’une catégorie particulière en sélectionnant l’option All figurant en haut de chaque liste de catégorie. Par exemple, vous pouvez lire tous les morceaux d’un artiste particulier.
Commandes de lecture de baseLe tableau suivant présente les commandes de lecture de base pour votre iPod :
Remarque1 Les commandes de votre iPod (excepté iPod touch et iPhone) seront désactivées tant que ce dernier sera raccordé au
récepteur (Pioneer s’affiche sur l’écran de l’iPod). 2 • Notez que les caractères non romains du titre s’affichent sous la forme *.
• Cette fonction n’est pas disponible pour les photos ou les clips vidéo enregistrés sur votre iPod.
iPod Top
[ Playlists ] [ Artists ] [ Albums ] [ Songs ] [ Podcasts ] [ Genres ] [ Composers ] [ Audiobooks ] [ Shuffle Songs ]
ENTER Return
3 Si vous êtes dans la catégorie Morceaux, vous pouvez aussi appuyer sur ENTER pour commencer la lecture.
Touche Fonction
Lance la lecture.Si vous lancez la lecture alors qu’un élément autre qu’un morceau est sélectionné, tous les morceaux de cette catégorie seront lus.
Interrompt la lecture, ou redémarre la lecture après une pause.
ENTER Appuyez pour régler les modes de lecture et de pause.
/ Lance un défilement rapide (maintenir enfoncé).
/ Passe à la piste précédente/suivante.
Permet de basculer entre Repeat One, Repeat All et Repeat Off (pression répétée).
Passe successivement à Shuffle Songs, Shuffle Albums et Shuffle Off (pression répétée).
VSX-820_SYXCN_Fr.book 67 ページ 2010年4月12日 月曜日 午後6時59分
68Fr
Visualisation de photos et de contenu vidéoPour visualiser des photos ou une vidéo sur votre iPod, comme ce récepteur ne permet pas la commande vidéo, vous devez utiliser les commandes principales de votre iPod.1
Important
• Pour lire des photos ou une vidéo sur votre iPod, vous devez raccorder la prise MONITOR OUT composite et le téléviseur.
1 Appuyez sur iPod CTRL pour sélectionner les commandes iPod permettant la lecture de photos et de vidéo.Les commandes du récepteur sont indisponibles pendant que vous regardez des vidéos sur votre iPod ou que vous parcourez une liste de photos.
2 Appuyez à nouveau sur iPod CTRL pour réactiver les commandes du récepteur lorsque vous avez terminé.
Astuce
• Il est possible de sélectionner d’un seul geste l’entrée iPod sur l’appareil, en appuyant sur la touche iPod iPhone DIRECT CONTROL sur le panneau avant, pour d’activer le contrôle des opérations à partir de l’iPod.
À propos d’iPod
Les accessoires électroniques portant la mention « Made for iPod » ont été conçus pour fonctionner avec un iPod et sont certifiés conformes aux exigences d’Apple par le fabricant.
Les accessoires électroniques portant la mention « Works with iPhone » ont été conçus pour fonctionner avec un iPhone et sont certifiés conformes aux exigences d’Apple par le fabricant.
Apple n’est pas responsable pour le fonctionnement de cet appareil ou de sa compatibilité avec les normes réglementaires et de sécurité.
iPod est une marque commerciale d’Apple Inc., enregistrées aux États-Unis et dans d’autres pays. iPhone est une marque commerciale d’Apple Inc.
DISP (DISPLAY)
Change les informations de lecture du morceau présentées sur l’affichage du panneau avant (pression répétée).
/ Pendant la navigation, permet de passer aux niveaux précédents/suivants.
/ Pendant la lecture d’un livre audio (Audiobook), permet de modifier la vitesse de lecture : Plus rapide Normale Plus lente
TOP MENU
Permet de revenir à l’affichage du menu iPod Top.
RETURN Permet de revenir au niveau précédent.
Remarque1 • Vous ne pouvez regarder les photos iPods et le contenu vidéo que lorsque l’iPod est raccordé à l’entrée iPod VIDEO sur le
panneau avant.• Cette fonction est disponible uniquement si votre iPod possède une sortie vidéo.
Touche Fonction
VSX-820_SYXCN_Fr.book 68 ページ 2010年4月12日 月曜日 午後6時59分

69Fr
EnglishFrançais
Deutsch
NederlandsItaliano
Español
Raccordement d’un appareil USBIl est possible d’obtenir un son à deux canaux1 en utilisant l’interface USB située à l’avant de ce récepteur. Raccordez un périphérique de stockage de masse USB2 en procédant comme indiqué ci-dessous.
• Appuyez sur la languette PUSH OPEN pour accéder à la borne USB.
Raccordement de votre périphérique USB au récepteur
1 Allumez le récepteur et votre téléviseur.
2 Appuyez sur iPod USB de la télécommande pour basculer le récepteur sur l’entrée iPod USB.NO DEVICE apparaît dans l’affichage à l’écran.
3 Raccordez votre périphérique USB.3
La borne USB est située sur le panneau avant.
Loading apparaît dans l’affichage à l’écran lorsque ce récepteur lance la reconnaissance du périphérique USB raccordé. Lorsque la reconnaissance est terminée, un écran de lecture apparaît dans l’affichage à l’écran et la lecture démarre automatiquement.4
Commandes de lecture de baseLe tableau suivant présente les commandes de base de la télécommande pour la lecture USB. Appuyez sur iPod USB pour basculer la télécommande en mode de fonctionnement iPod USB.
Remarque1 Cela inclut la lecture de fichiers WMA/MP3/MPEG-4 AAC (à l’exception des fichiers protégés en copie ou restreints en lecture).2 • Les périphériques USB compatibles sont : disques durs magnétiques externes, périphériques de mémoire Flash portables
(plus particulièrement des clés de mémoire) et lecteurs audio numériques (lecteurs MP3) de format FAT16/32. Il n’est pas possible de raccorder ce récepteur à un ordinateur personnel pour lancer une lecture USB.• Pioneer n’est pas en mesure de garantir la compatibilité (fonctionnement et/ou alimentation du bus) avec tous les périphériques de stockage de masse USB existants et n’endosse aucune responsabilité quant à la perte éventuelle de données susceptible de se produire en cas de raccordement de ces périphériques à ce récepteur.• Le récepteur a besoin de davantage de temps pour lire le contenu d’un périphérique USB lorsque celui-ci comporte un grand nombre de données.
3 Assurez-vous que le récepteur en mode veille lorsque vous déconnectez le périphérique USB.4 • S’il s’avère impossible de lire le fichier sélectionné, ce récepteur passe automatiquement au fichier lisible suivant.
• Lorsque le fichier en cours de lecture ne comporte pas de titre, le nom du fichier apparaît dans l’affichage à l’écran ; lorsque le nom de l’album et le nom de l’artiste ne sont pas mentionnés, la rangée reste vide.• Notez que les caractères non romains des listes d’écoute sont remplacés par *.
MASTERVOLUME
MCACCSETUP MIC
VIDEO INPUT
AUDIOL RVIDEO
iPodiPhone
USB
CONTROL ON / OFF
Ce récepteurPériphérique de stockage de masse USB
Touche Fonction
Permet de lancer la lecture en mode normal.
Permet de mettre la lecture en pause/de reprendre la lecture.
/ Passe à la piste précédente/suivante.
/ Lance un défilement rapide (maintenir enfoncé).
Permet de basculer entre Repeat Folder, Repeat One et Repeat All (pression répétée).
Permet de basculer entre Shuffle On et Shuffle Off (pression répétée).
DISP (DISPLAY)
Change les informations de lecture du morceau présentées sur l’affichage du panneau avant (pression répétée).
//
Pendant la lecture, appuyez sur ces touches pour passer à la piste précédente/suivante.
TOP MENU Appuyez sur cette touche pour revenir à l’écran des menus.
RETURN Permet de revenir au niveau précédent.
USB
R:Fld S:On
001/004PLAY
Return
R e l a x Yo u r B o dyKev i n J a ck s o nWe a r e a l l o n e
32kbps 0:01
MP3
Numéro de fichier/dossier
Format de fichierReprise ou Lecture aléatoireNom du morceauNom de l’artisteNom de l’album
Temps écoulé
Débits binaires
VSX-820_SYXCN_Fr.book 69 ページ 2010年4月12日 月曜日 午後6時59分
70Fr
Important
Si un message USB Error s’affiche, essayez les procédures suivantes :
• Éteignez le récepteur, puis rallumez-le.
• Raccordez le périphérique USB avec le récepteur éteint.
• Sélectionnez une autre source d’entrée (comme BD), puis revenez à iPod USB.
• Utilisez un adaptateur CA spécial (fourni avec le périphérique) pour l’alimentation USB.
Pour plus d’informations sur les messages d’erreur, consultez la section Messages USB à la page 79.
Si cela ne résout pas le problème, il est fort probable que votre périphérique USB soit incompatible.
Compatibilité des fichiers audio compressésNotez que bien que la plupart des combinaisons standard de débit binaire/taux d’échantillonnage pour les fichiers audio compressés soient compatibles, certains fichiers encodés irrégulièrement risquent de ne pas pouvoir être lus. La liste suivante indique les formats de fichiers audio compressés compatibles :
• MP3 (MPEG-1/2/2.5 Audio Layer 3) – Taux d’échantillonnage : 8 kHz à 48 kHz ; Débits binaires : 8 kbps à 320 kbps (128 kbps minimum recommandés) ; Extension de fichier : .mp3
• WMA (Windows Media Audio) – Taux d’échantillonnage : 32 kHz / 44,1 kHz ; Débits binaires : 32 kbps à 192 kbps (128 kbps minimum recommandés) ; Extension de fichier : .wma ; Encodage sans perte WMA9 Pro et WMA : Non
• AAC (MPEG-4 Advanced Audio Coding) – Taux d’échantillonnage : 11,025 kHz à 48 kHz ; Débits binaires : 16 kbps à 320 kbps (128 kbps minimum recommandés) ; Extension de fichier : .m4a ; Encodage sans perte Apple : Non
Autres informations sur la compatibilité• Lecture de fichiers MP3/WMA/MPEG-4
AAC VBR (Variable Bit Rate) : Oui1
• Compatibilité avec la protection DRM (Digital Rights Management) : Oui (les fichiers audio bénéficiant de la protection DRM ne pourront pas être lus par ce récepteur.)
À propos de la norme MPEG-4 AACAdvanced Audio Coding (AAC) est au cœur de la norme MPEG-4 AAC, qui intègre MPEG-2 AAC, formant ainsi la base de la technologie de compression audio MPEG-4. Le format et l’extension de fichier utilisés dépendent de l’application employée pour encoder le fichier AAC. Ce récepteur lit les fichiers AAC encodés par iTunes® et portant l’extension ‘.m4a’. Les fichiers bénéficiant de la protection DRM ne sont pas lus par cet appareil et il est possible que les fichiers encodés avec certaines versions de iTunes® ne puissent pas être lus.
Apple et iTunes sont des marques commerciales d’Apple Inc., déposées aux États-Unis et d’autres pays.
À propos de WMA
Le logo Windows Media imprimé sur le coffret indique que ce récepteur peut lire le contenu Windows Media Audio.
WMA est le sigle de Windows Media Audio, une technique de compression audio mise au point par Microsoft Corporation. Ce récepteur lit les fichiers WMA encodés par Windows Media® Player et portant l’extension ‘.wma’. Notez que les fichiers bénéficiant de la protection DRM ne sont pas lus par cet appareil et il est possible que les fichiers encodés avec certaines versions de Windows Media® Player ne puissent pas être lus.
Windows Media et le logo Windows sont des marques commerciales ou des marques déposées de Microsoft Corporation aux États-Unis et/ou dans d’autres pays.
Remarque1 Notez que dans certains cas, le temps de lecture ne sera pas affiché correctement.
VSX-820_SYXCN_Fr.book 70 ページ 2010年4月12日 月曜日 午後6時59分
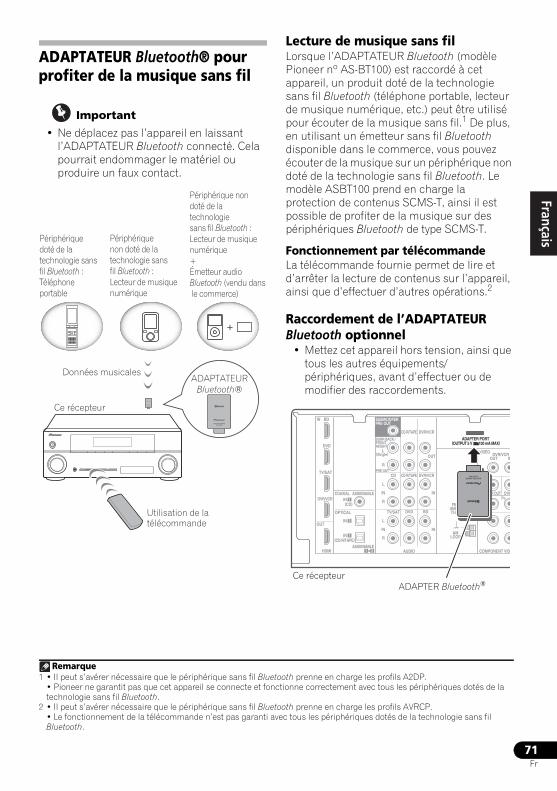
71Fr
EnglishFrançais
Deutsch
NederlandsItaliano
Español
ADAPTATEUR Bluetooth® pour profiter de la musique sans fil
Important
• Ne déplacez pas l’appareil en laissant l’ADAPTATEUR Bluetooth connecté. Cela pourrait endommager le matériel ou produire un faux contact.
Lecture de musique sans filLorsque l’ADAPTATEUR Bluetooth (modèle Pioneer nº AS-BT100) est raccordé à cet appareil, un produit doté de la technologie sans fil Bluetooth (téléphone portable, lecteur de musique numérique, etc.) peut être utilisé pour écouter de la musique sans fil.1 De plus, en utilisant un émetteur sans fil Bluetooth disponible dans le commerce, vous pouvez écouter de la musique sur un périphérique non doté de la technologie sans fil Bluetooth. Le modèle ASBT100 prend en charge la protection de contenus SCMS-T, ainsi il est possible de profiter de la musique sur des périphériques Bluetooth de type SCMS-T.
Fonctionnement par télécommandeLa télécommande fournie permet de lire et d’arrêter la lecture de contenus sur l’appareil, ainsi que d’effectuer d’autres opérations.2
Raccordement de l’ADAPTATEUR Bluetooth optionnel
• Mettez cet appareil hors tension, ainsi que tous les autres équipements/périphériques, avant d’effectuer ou de modifier des raccordements.
Ce récepteur
Utilisation de la télécommande
Données musicalesADAPTATEUR
Bluetooth®
Périphérique doté de la technologie sans fil Bluetooth :Téléphone portable
Périphérique non doté de la technologie sans fil Bluetooth : Lecteur de musique numérique
Périphérique non doté de la technologie sans fil Bluetooth :Lecteur de musique numérique + Émetteur audio Bluetooth (vendu dans le commerce)
Remarque1 • Il peut s’avérer nécessaire que le périphérique sans fil Bluetooth prenne en charge les profils A2DP.
• Pioneer ne garantit pas que cet appareil se connecte et fonctionne correctement avec tous les périphériques dotés de la technologie sans fil Bluetooth.
2 • Il peut s’avérer nécessaire que le périphérique sans fil Bluetooth prenne en charge les profils AVRCP.• Le fonctionnement de la télécommande n’est pas garanti avec tous les périphériques dotés de la technologie sans fil Bluetooth.
IN BD
SURR BACK /FRONTHEIGHT
L(Single)
R
R
L
IN
R
L
IN
IN
OUT
IN
CD
TV/SAT DVD BD
DVR/VCR
MONITOR OUTPR PB
DVD
COMPONENT VID
DVR/VCROUT IN
CD-R/TAPE
DVR/VCR CD-R/TAPE
PRE OUT
DVD
TV/SAT
COAXIAL
OPTICAL
(CD)IN
ASSIGNABLE
ASSIGNABLE
OUT
HDMI
DVR/VCR 1
(CD-R/TAPE)IN
AUDIO
ADAPTER PORT
VIDEO
(OUTPUT 5 V 100 mA MAX)
1
1 2
IN 2
SUBWOOFERPRE OUT
ANTENNAFM
UNBAL75
AMLOOP
ADAPTER Bluetooth®Ce récepteur
VSX-820_SYXCN_Fr.book 71 ページ 2010年4月12日 月曜日 午後6時59分
72Fr
1 Mettez l’appareil en mode veille et connectez la adaptateur Bluetooth à la borne ADAPTER PORT située sur le panneau arrière.
2 Mettez l’appareil sous tension.
3 Appuyez sur la touche ADAPTER de la télécommande pour sélectionner le mode d’entrée ADAPTER sur l’appareil.1
Appairage de l’ADAPTATEUR Bluetooth et du périphérique sans fil BluetoothIl est nécessaire d’associer les composants Bluetooth avant de commencer la lecture de contenu avec la technologie sans fil Bluetooth et l’ADAPTATEUR Bluetooth. Assurez-vous d’effectuer l’appairage la première fois que vous utilisez le système ou à chaque fois que les données d’appairage sont effacées. L’association est une étape nécessaire pour enregistrer les périphériques sans fil Bluetooth afin de permettre les communications Bluetooth.2 Pour plus d’informations, consultez aussi le mode d’emploi de votre périphérique Bluetooth.
1 Appuyez sur la touche TOP MENU.
2 Appuyez sur ENTER pour accéder à l’option PAIRING.
3 Sélectionnez le code PIN à utiliser parmi 0000/1234/8888 à l’aide de /, puis appuyez sur ENTER.PAIRING clignote.
Important
• Vous pouvez utiliser n’importe lequel des codes PIN 0000/1234/8888. Un périphérique sans fil Bluetooth utilisant un autre code PIN ne peut pas être utilisé avec ce système.
4 Mettez sous tension l’équipement sans fil Bluetooth que vous souhaitez associer à l’appareil, placez-le à proximité de l’appareil et mettez-le en mode association.
5 Vérifiez que l’ADAPTATEUR Bluetooth est détecté par le périphérique sans fil Bluetooth.
Lorsque le périphérique Bluetooth est raccordé :
Les noms des équipements et périphériques sans fil Bluetooth s’affichent sur l’écran de l’appareil.3
Si le périphérique sans fil Bluetooth n’est pas connecté :
L’indication NODEVICE s’affiche sur l’écran de l’appareil. Dans ce cas, effectuez la procédure de connexion depuis le périphérique sans fil Bluetooth.
6 Dans la liste des périphériques sans fil Bluetooth, sélectionnez l’ADAPTATEUR Bluetooth et entrez le code PIN choisi à l’étape 4.4
Remarque1 Si l’ADAPTATEUR Bluetooth n’est pas branché sur la borne ADAPTER PORT, l’indication NO ADAPTER s’affiche lorsque le
mode d’entrée ADAPTER est sélectionné.2 • L’appairage est requis la première fois que vous utilisez le périphérique sans fil Bluetooth et l’ADAPTATEUR Bluetooth.
• Pour permettre la communication Bluetooth, l’appairage doit être effectué avec votre système ainsi qu’avec le périphérique sans fil Bluetooth.
3 Le système peut afficher uniquement des caractères alphanumériques. Il se peut que les autres caractères ne s’affichent pas correctement.
4 Dans certains cas, le code PIN est appelé PASSKEY.
VSX-820_SYXCN_Fr.book 72 ページ 2010年4月12日 月曜日 午後6時59分
73Fr
EnglishFrançais
Deutsch
NederlandsItaliano
Español
Écoute de musique avec votre système à partir d’un équipement sans fil Bluetooth
1 Appuyez sur la touche ADAPTER de la télécommande pour sélectionner le mode d’entrée ADAPTER sur l’appareil.
2 Effectuez la procédure de connexion du périphérique sans fil Bluetooth vers la clé l’ADAPTATEUR Bluetooth.
3 Lancez la lecture des contenus musicaux stockés sur le périphérique sans fil Bluetooth.Les opérations suivantes sont désormais disponibles pour les périphériques/équipements sans fil Bluetooth, via la télécommande.1
La marque et les logos Bluetooth® sont des marques déposées appartenant à Bluetooth SIG, Inc. et Pioneer Corporation utilise ces marques sous licence. Les autres marques commerciales et noms commerciaux appartiennent à leurs propriétaires respectifs.
Touche Fonction
/ Démarre la lecture normale et active/désactive la mise en pause de la lecture.
Appuyez une fois pour revenir au début du fichier en cours de lecture, puis appuyez de nouveau pour accéder aux fichiers précédents. Appuyez et maintenez la touche enfoncée pour passer en lecture arrière rapide.
Appuyez une fois pour sauter au fichier suivant. Appuyez et maintenez la touche enfoncée pour passer en lecture rapide.
Remarque1 • Le périphérique Bluetooth doit être compatible avec le profil AVRCP.
• Selon le périphérique Bluetooth que vous utilisez, le fonctionnement peut être différent de ce qui est indiqué dans le tableau.
VSX-820_SYXCN_Fr.book 73 ページ 2010年4月12日 月曜日 午後6時59分
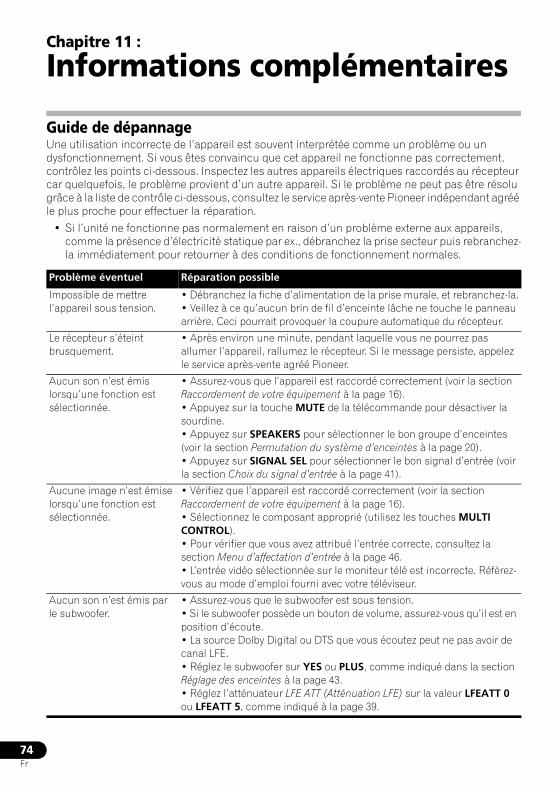
74Fr
Chapitre 11 :
Informations complémentaires
Guide de dépannageUne utilisation incorrecte de l’appareil est souvent interprétée comme un problème ou un dysfonctionnement. Si vous êtes convaincu que cet appareil ne fonctionne pas correctement, contrôlez les points ci-dessous. Inspectez les autres appareils électriques raccordés au récepteur car quelquefois, le problème provient d’un autre appareil. Si le problème ne peut pas être résolu grâce à la liste de contrôle ci-dessous, consultez le service après-vente Pioneer indépendant agréé le plus proche pour effectuer la réparation.
• Si l’unité ne fonctionne pas normalement en raison d’un problème externe aux appareils, comme la présence d’électricité statique par ex., débranchez la prise secteur puis rebranchez-la immédiatement pour retourner à des conditions de fonctionnement normales.
Problème éventuel Réparation possible
Impossible de mettre l’appareil sous tension.
• Débranchez la fiche d’alimentation de la prise murale, et rebranchez-la.• Veillez à ce qu’aucun brin de fil d’enceinte lâche ne touche le panneau arrière. Ceci pourrait provoquer la coupure automatique du récepteur.
Le récepteur s’éteint brusquement.
• Après environ une minute, pendant laquelle vous ne pourrez pas allumer l’appareil, rallumez le récepteur. Si le message persiste, appelez le service après-vente agréé Pioneer.
Aucun son n’est émis lorsqu’une fonction est sélectionnée.
• Assurez-vous que l’appareil est raccordé correctement (voir la section Raccordement de votre équipement à la page 16).• Appuyez sur la touche MUTE de la télécommande pour désactiver la sourdine.• Appuyez sur SPEAKERS pour sélectionner le bon groupe d’enceintes (voir la section Permutation du système d’enceintes à la page 20).• Appuyez sur SIGNAL SEL pour sélectionner le bon signal d’entrée (voir la section Choix du signal d’entrée à la page 41).
Aucune image n’est émise lorsqu’une fonction est sélectionnée.
• Vérifiez que l’appareil est raccordé correctement (voir la section Raccordement de votre équipement à la page 16).• Sélectionnez le composant approprié (utilisez les touches MULTI CONTROL).• Pour vérifier que vous avez attribué l’entrée correcte, consultez la section Menu d’affectation d’entrée à la page 46.• L’entrée vidéo sélectionnée sur le moniteur télé est incorrecte. Référez-vous au mode d’emploi fourni avec votre téléviseur.
Aucun son n’est émis par le subwoofer.
• Assurez-vous que le subwoofer est sous tension.• Si le subwoofer possède un bouton de volume, assurez-vous qu’il est en position d’écoute.• La source Dolby Digital ou DTS que vous écoutez peut ne pas avoir de canal LFE.• Réglez le subwoofer sur YES ou PLUS, comme indiqué dans la section Réglage des enceintes à la page 43.• Réglez l’atténuateur LFE ATT (Atténuation LFE) sur la valeur LFEATT 0 ou LFEATT 5, comme indiqué à la page 39.
VSX-820_SYXCN_Fr.book 74 ページ 2010年4月12日 月曜日 午後6時59分
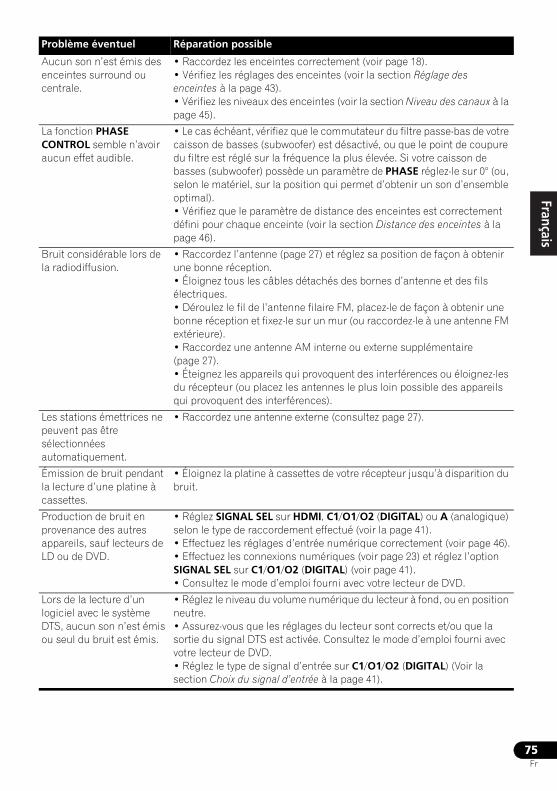
75Fr
EnglishFrançais
Deutsch
NederlandsItaliano
Español
Aucun son n’est émis des enceintes surround ou centrale.
• Raccordez les enceintes correctement (voir page 18).• Vérifiez les réglages des enceintes (voir la section Réglage des enceintes à la page 43).• Vérifiez les niveaux des enceintes (voir la section Niveau des canaux à la page 45).
La fonction PHASE CONTROL semble n’avoir aucun effet audible.
• Le cas échéant, vérifiez que le commutateur du filtre passe-bas de votre caisson de basses (subwoofer) est désactivé, ou que le point de coupure du filtre est réglé sur la fréquence la plus élevée. Si votre caisson de basses (subwoofer) possède un paramètre de PHASE réglez-le sur 0° (ou, selon le matériel, sur la position qui permet d’obtenir un son d’ensemble optimal).• Vérifiez que le paramètre de distance des enceintes est correctement défini pour chaque enceinte (voir la section Distance des enceintes à la page 46).
Bruit considérable lors de la radiodiffusion.
• Raccordez l’antenne (page 27) et réglez sa position de façon à obtenir une bonne réception.• Éloignez tous les câbles détachés des bornes d’antenne et des fils électriques.• Déroulez le fil de l’antenne filaire FM, placez-le de façon à obtenir une bonne réception et fixez-le sur un mur (ou raccordez-le à une antenne FM extérieure).• Raccordez une antenne AM interne ou externe supplémentaire (page 27).• Éteignez les appareils qui provoquent des interférences ou éloignez-les du récepteur (ou placez les antennes le plus loin possible des appareils qui provoquent des interférences).
Les stations émettrices ne peuvent pas être sélectionnées automatiquement.
• Raccordez une antenne externe (consultez page 27).
Émission de bruit pendant la lecture d’une platine à cassettes.
• Éloignez la platine à cassettes de votre récepteur jusqu’à disparition du bruit.
Production de bruit en provenance des autres appareils, sauf lecteurs de LD ou de DVD.
• Réglez SIGNAL SEL sur HDMI, C1/O1/O2 (DIGITAL) ou A (analogique) selon le type de raccordement effectué (voir la page 41).• Effectuez les réglages d’entrée numérique correctement (voir page 46).• Effectuez les connexions numériques (voir page 23) et réglez l’option SIGNAL SEL sur C1/O1/O2 (DIGITAL) (voir page 41).• Consultez le mode d’emploi fourni avec votre lecteur de DVD.
Lors de la lecture d’un logiciel avec le système DTS, aucun son n’est émis ou seul du bruit est émis.
• Réglez le niveau du volume numérique du lecteur à fond, ou en position neutre.• Assurez-vous que les réglages du lecteur sont corrects et/ou que la sortie du signal DTS est activée. Consultez le mode d’emploi fourni avec votre lecteur de DVD.• Réglez le type de signal d’entrée sur C1/O1/O2 (DIGITAL) (Voir la section Choix du signal d’entrée à la page 41).
Problème éventuel Réparation possible
VSX-820_SYXCN_Fr.book 75 ページ 2010年4月12日 月曜日 午後6時59分
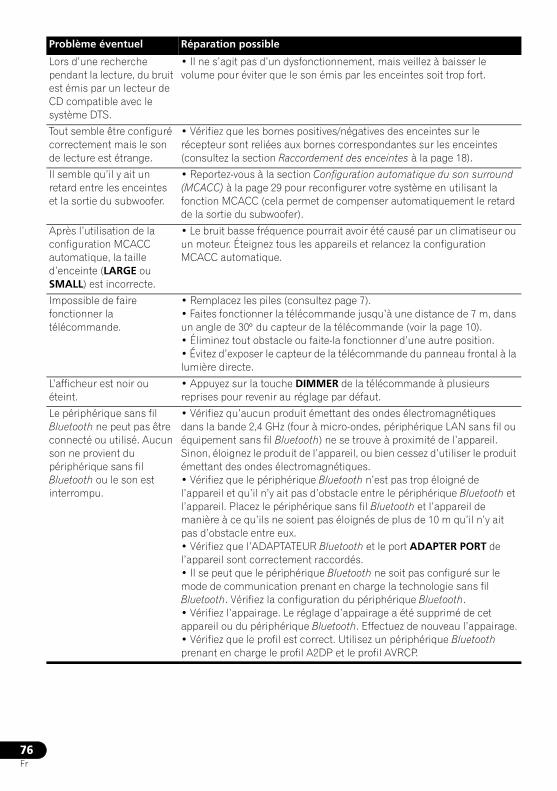
76Fr
Lors d’une recherche pendant la lecture, du bruit est émis par un lecteur de CD compatible avec le système DTS.
• Il ne s’agit pas d’un dysfonctionnement, mais veillez à baisser le volume pour éviter que le son émis par les enceintes soit trop fort.
Tout semble être configuré correctement mais le son de lecture est étrange.
• Vérifiez que les bornes positives/négatives des enceintes sur le récepteur sont reliées aux bornes correspondantes sur les enceintes (consultez la section Raccordement des enceintes à la page 18).
Il semble qu’il y ait un retard entre les enceintes et la sortie du subwoofer.
• Reportez-vous à la section Configuration automatique du son surround (MCACC) à la page 29 pour reconfigurer votre système en utilisant la fonction MCACC (cela permet de compenser automatiquement le retard de la sortie du subwoofer).
Après l’utilisation de la configuration MCACC automatique, la taille d’enceinte (LARGE ou SMALL) est incorrecte.
• Le bruit basse fréquence pourrait avoir été causé par un climatiseur ou un moteur. Éteignez tous les appareils et relancez la configuration MCACC automatique.
Impossible de faire fonctionner la télécommande.
• Remplacez les piles (consultez page 7).• Faites fonctionner la télécommande jusqu’à une distance de 7 m, dans un angle de 30° du capteur de la télécommande (voir la page 10).• Éliminez tout obstacle ou faite-la fonctionner d’une autre position.• Évitez d’exposer le capteur de la télécommande du panneau frontal à la lumière directe.
L’afficheur est noir ou éteint.
• Appuyez sur la touche DIMMER de la télécommande à plusieurs reprises pour revenir au réglage par défaut.
Le périphérique sans fil Bluetooth ne peut pas être connecté ou utilisé. Aucun son ne provient du périphérique sans fil Bluetooth ou le son est interrompu.
• Vérifiez qu’aucun produit émettant des ondes électromagnétiques dans la bande 2,4 GHz (four à micro-ondes, périphérique LAN sans fil ou équipement sans fil Bluetooth) ne se trouve à proximité de l’appareil. Sinon, éloignez le produit de l’appareil, ou bien cessez d’utiliser le produit émettant des ondes électromagnétiques.• Vérifiez que le périphérique Bluetooth n’est pas trop éloigné de l’appareil et qu’il n’y ait pas d’obstacle entre le périphérique Bluetooth et l’appareil. Placez le périphérique sans fil Bluetooth et l’appareil de manière à ce qu’ils ne soient pas éloignés de plus de 10 m qu’il n’y ait pas d’obstacle entre eux.• Vérifiez que l’ADAPTATEUR Bluetooth et le port ADAPTER PORT de l’appareil sont correctement raccordés.• Il se peut que le périphérique Bluetooth ne soit pas configuré sur le mode de communication prenant en charge la technologie sans fil Bluetooth. Vérifiez la configuration du périphérique Bluetooth.• Vérifiez l’appairage. Le réglage d’appairage a été supprimé de cet appareil ou du périphérique Bluetooth. Effectuez de nouveau l’appairage.• Vérifiez que le profil est correct. Utilisez un périphérique Bluetooth prenant en charge le profil A2DP et le profil AVRCP.
Problème éventuel Réparation possible
VSX-820_SYXCN_Fr.book 76 ページ 2010年4月12日 月曜日 午後6時59分
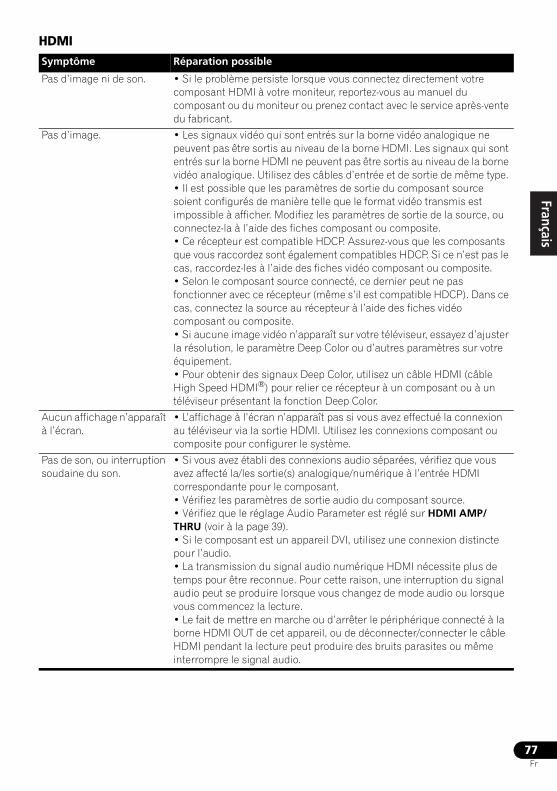
77Fr
EnglishFrançais
Deutsch
NederlandsItaliano
Español
HDMISymptôme Réparation possible
Pas d’image ni de son. • Si le problème persiste lorsque vous connectez directement votre composant HDMI à votre moniteur, reportez-vous au manuel du composant ou du moniteur ou prenez contact avec le service après-vente du fabricant.
Pas d’image. • Les signaux vidéo qui sont entrés sur la borne vidéo analogique ne peuvent pas être sortis au niveau de la borne HDMI. Les signaux qui sont entrés sur la borne HDMI ne peuvent pas être sortis au niveau de la borne vidéo analogique. Utilisez des câbles d’entrée et de sortie de même type.• Il est possible que les paramètres de sortie du composant source soient configurés de manière telle que le format vidéo transmis est impossible à afficher. Modifiez les paramètres de sortie de la source, ou connectez-la à l’aide des fiches composant ou composite.• Ce récepteur est compatible HDCP. Assurez-vous que les composants que vous raccordez sont également compatibles HDCP. Si ce n’est pas le cas, raccordez-les à l’aide des fiches vidéo composant ou composite.• Selon le composant source connecté, ce dernier peut ne pas fonctionner avec ce récepteur (même s’il est compatible HDCP). Dans ce cas, connectez la source au récepteur à l’aide des fiches vidéo composant ou composite.• Si aucune image vidéo n’apparaît sur votre téléviseur, essayez d’ajuster la résolution, le paramètre Deep Color ou d’autres paramètres sur votre équipement.• Pour obtenir des signaux Deep Color, utilisez un câble HDMI (câble High Speed HDMI®) pour relier ce récepteur à un composant ou à un téléviseur présentant la fonction Deep Color.
Aucun affichage n’apparaît à l’écran.
• L’affichage à l’écran n’apparaît pas si vous avez effectué la connexion au téléviseur via la sortie HDMI. Utilisez les connexions composant ou composite pour configurer le système.
Pas de son, ou interruption soudaine du son.
• Si vous avez établi des connexions audio séparées, vérifiez que vous avez affecté la/les sortie(s) analogique/numérique à l’entrée HDMI correspondante pour le composant. • Vérifiez les paramètres de sortie audio du composant source.• Vérifiez que le réglage Audio Parameter est réglé sur HDMI AMP/THRU (voir à la page 39).• Si le composant est un appareil DVI, utilisez une connexion distincte pour l’audio.• La transmission du signal audio numérique HDMI nécessite plus de temps pour être reconnue. Pour cette raison, une interruption du signal audio peut se produire lorsque vous changez de mode audio ou lorsque vous commencez la lecture.• Le fait de mettre en marche ou d’arrêter le périphérique connecté à la borne HDMI OUT de cet appareil, ou de déconnecter/connecter le câble HDMI pendant la lecture peut produire des bruits parasites ou même interrompre le signal audio.
VSX-820_SYXCN_Fr.book 77 ページ 2010年4月12日 月曜日 午後6時59分
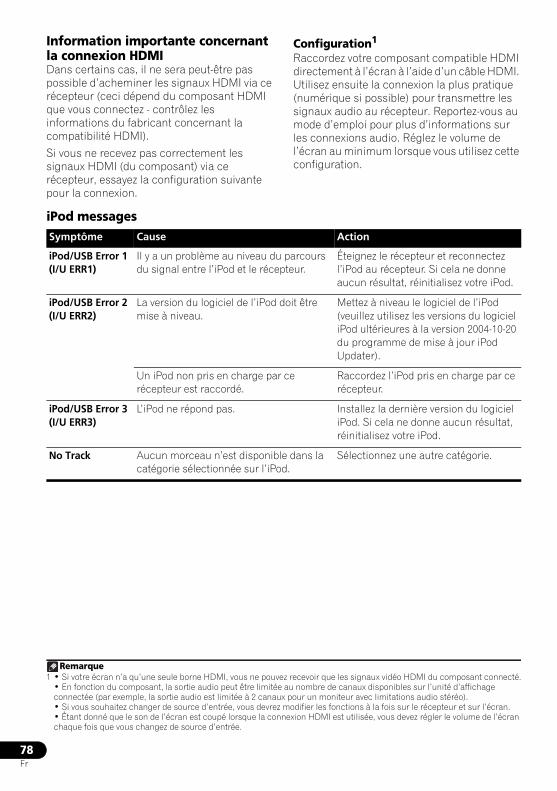
78Fr
Information importante concernant la connexion HDMIDans certains cas, il ne sera peut-être pas possible d’acheminer les signaux HDMI via ce récepteur (ceci dépend du composant HDMI que vous connectez - contrôlez les informations du fabricant concernant la compatibilité HDMI).
Si vous ne recevez pas correctement les signaux HDMI (du composant) via ce récepteur, essayez la configuration suivante pour la connexion.
Configuration1
Raccordez votre composant compatible HDMI directement à l’écran à l’aide d’un câble HDMI. Utilisez ensuite la connexion la plus pratique (numérique si possible) pour transmettre les signaux audio au récepteur. Reportez-vous au mode d’emploi pour plus d’informations sur les connexions audio. Réglez le volume de l’écran au minimum lorsque vous utilisez cette configuration.
iPod messages
Remarque1 • Si votre écran n’a qu’une seule borne HDMI, vous ne pouvez recevoir que les signaux vidéo HDMI du composant connecté.
• En fonction du composant, la sortie audio peut être limitée au nombre de canaux disponibles sur l’unité d’affichage connectée (par exemple, la sortie audio est limitée à 2 canaux pour un moniteur avec limitations audio stéréo).• Si vous souhaitez changer de source d’entrée, vous devrez modifier les fonctions à la fois sur le récepteur et sur l’écran.• Étant donné que le son de l’écran est coupé lorsque la connexion HDMI est utilisée, vous devez régler le volume de l’écran chaque fois que vous changez de source d’entrée.
Symptôme Cause Action
iPod/USB Error 1 (I/U ERR1)
Il y a un problème au niveau du parcours du signal entre l’iPod et le récepteur.
Éteignez le récepteur et reconnectez l’iPod au récepteur. Si cela ne donne aucun résultat, réinitialisez votre iPod.
iPod/USB Error 2 (I/U ERR2)
La version du logiciel de l’iPod doit être mise à niveau.
Mettez à niveau le logiciel de l’iPod (veuillez utilisez les versions du logiciel iPod ultérieures à la version 2004-10-20 du programme de mise à jour iPod Updater).
Un iPod non pris en charge par ce récepteur est raccordé.
Raccordez l’iPod pris en charge par ce récepteur.
iPod/USB Error 3 (I/U ERR3)
L’iPod ne répond pas. Installez la dernière version du logiciel iPod. Si cela ne donne aucun résultat, réinitialisez votre iPod.
No Track Aucun morceau n’est disponible dans la catégorie sélectionnée sur l’iPod.
Sélectionnez une autre catégorie.
VSX-820_SYXCN_Fr.book 78 ページ 2010年4月12日 月曜日 午後6時59分
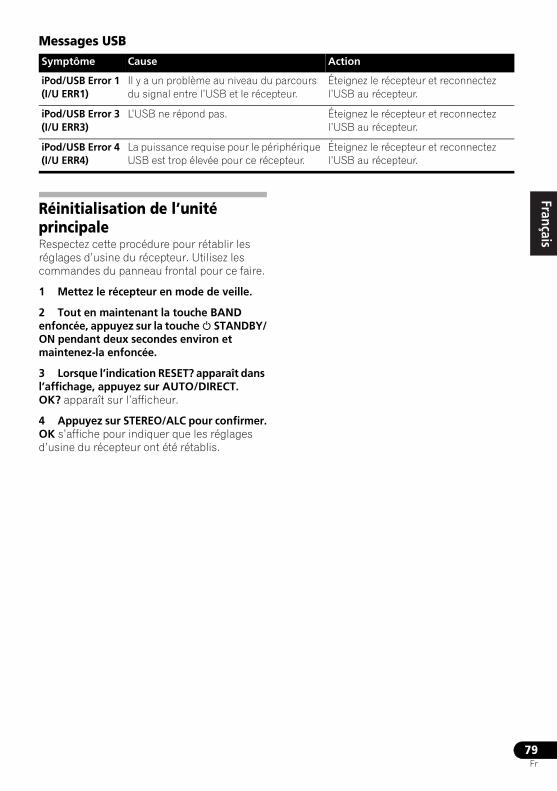
79Fr
EnglishFrançais
Deutsch
NederlandsItaliano
Español
Messages USB
Réinitialisation de l’unité principaleRespectez cette procédure pour rétablir les réglages d’usine du récepteur. Utilisez les commandes du panneau frontal pour ce faire.
1 Mettez le récepteur en mode de veille.
2 Tout en maintenant la touche BAND enfoncée, appuyez sur la touche STANDBY/ON pendant deux secondes environ et maintenez-la enfoncée.
3 Lorsque l’indication RESET? apparaît dans l’affichage, appuyez sur AUTO/DIRECT.OK? apparaît sur l’afficheur.
4 Appuyez sur STEREO/ALC pour confirmer.OK s’affiche pour indiquer que les réglages d’usine du récepteur ont été rétablis.
Symptôme Cause Action
iPod/USB Error 1 (I/U ERR1)
Il y a un problème au niveau du parcours du signal entre l’USB et le récepteur.
Éteignez le récepteur et reconnectez l’USB au récepteur.
iPod/USB Error 3 (I/U ERR3)
L’USB ne répond pas. Éteignez le récepteur et reconnectez l’USB au récepteur.
iPod/USB Error 4 (I/U ERR4)
La puissance requise pour le périphérique USB est trop élevée pour ce récepteur.
Éteignez le récepteur et reconnectez l’USB au récepteur.
VSX-820_SYXCN_Fr.book 79 ページ 2010年4月12日 月曜日 午後6時59分 159
80Fr
SpécificationsSection audioPuissance nominale de sortie
Avant, Centrale, Surround . . . . . . . . . . 130 W par canal (1 kHz, 6 Ω, 1 %) . . . . . . . . . . . . . . . . . . . . . . . . .100 W par canal
(20 Hz à 20 kHz, 8 Ω, 0,09 %)Distorsion harmonique totale
. . . . . . 0,06 % (20 Hz à 20 kHz, 8 Ω, 95 W/ch)Réponse en fréquence (mode LINE Pure Direct)
. . . . . . . . . . . . . . . . . . . . 5 Hz à 100 kHz dBImpédance garantie des enceintes
AVANT : A, B . . . . . . . . . . . . . . . . . . . 6 Ω à 16 ΩAVANT : A, B . . . . . . . . . . . . . . . . . . 12 Ω à 16 ΩSURROUND, CENTRALE . . . . . . . . . 6 Ω à 16 Ω
Entrée (Sensibilité de mesure/Impédance)LINE . . . . . . . . . . . . . . . . . . . . . . 200 mV/47 kΩ
Sortie (niveau/impédance)REC . . . . . . . . . . . . . . . . . . . . . 200 mV/2,2 kΩ
Rapport signal/bruit (IHF, court-circuité, réseau A)
LINE . . . . . . . . . . . . . . . . . . . . . . . . . . . . . 98 dB
Section vidéoNiveau de signal
Composite . . . . . . . . . . . . . . . . . . .1 Vp-p (75 Ω)Vidéo en composantes. . . . . Y : 1,0 Vp-p (75 Ω)
PB, PR : 0,7 Vp-p (75 Ω)Résolution maximum correspondante
Vidéo en composantes . . . . . . . . . . . . . . . . . .1080i (1125i)/720p (750p)
Section syntoniseurGamme de fréquence (FM) . . . . . . . . . . . . . . . . . . . . . . . 87,5 MHz à 108 MHzEntrée antenne (FM). . . . . . . 75 Ω dissymétriqueGamme de fréquence (AM) . . . . . . . . . . . . . . . . . . . . . . . . 531 kHz à 1602 kHzAntenne (AM) . . . . . . . . . . . . . . . . Antenne cadre
Section Entrée/Sortie numériquesBorne HDMI . . . . . . . . . . . . . Type A (19 broches)Type de sortir HDMI . . . . . . . . . . . . . .5 V, 100 mABorne USB. . . . . . . . Ultrarapide USB2.0 (Type A)Prise d’iPod . . . . . . . . .USB et Vidéo (Composite)
DiversAlimentation requise
. . . . . . . . . . . . . AC 220 V à 230 V, 50 Hz/60 HzConsommation électrique . . . . . . . . . . . . .245 W
En mode de veille. . . . . . . . . . . . . . . . . . 0,45 WDimensions. . . . . . .420 mm (L) x 158 mm (H) x 347,7 mm (P)Poids (sans emballage). . . . . . . . . . . . . . . . 9,1 kg
Pièces fourniesMicrophone (pour la configuration Auto MCACC). . . . . . . . . 1Télécommande . . . . . . . . . . . . . . . . . . . . . . . . . . 1Piles à anode sèche (AAA IEC R03) . . . . . . . . 2Antenne cadre AM. . . . . . . . . . . . . . . . . . . . . . . . 1Antenne filaire FM . . . . . . . . . . . . . . . . . . . . . . . . 1Câble iPod . . . . . . . . . . . . . . . . . . . . . . . . . . . . . . 1Cordon d’alimentation. . . . . . . . . . . . . . . . . . . . . 1Carte de garantie . . . . . . . . . . . . . . . . . . . . . . . . . 1Ce mode d’emploi
Remarque
• Les spécifications sont valables pour une alimentation de 230 V.
• Les caractéristiques et la conception sont soumises à de possibles modifications sans préavis, en raison d’améliorations apportées à l’appareil.
Nettoyage de l’appareil• Utilisez un chiffon à lustrer ou un chiffon
sec et doux pour éliminer toute trace de poussière et de saleté.
• Lorsque la surface de l’appareil est sale, essuyez-la en utilisant un tissu doux préalablement trempé dans une solution de nettoyage neutre diluée cinq à six fois et bien essoré, puis essuyez de nouveau l’appareil avec un chiffon sec et doux. N’utilisez pas de produits d’entretien pour mobilier tels que de la cire ou un détergent.
• N’utilisez jamais de diluants, de benzine, d’insecticides ou autres produits chimiques qui pourraient corroder la surface de l’appareil.
Publication de Pioneer Corporation.© 2010 Pioneer Corporation.Tous droits réservés.
VSX-820_SYXCN_Fr.book 80 ページ 2010年4月12日 月曜日 午後6時59分 160

81Fr
EnglishFrançais
Deutsch
NederlandsItaliano
Español
VSX-820_SYXCN_Fr.book 81 ページ 2010年4月12日 月曜日 午後6時59分

CAUTIONRISK OF ELECTRIC SHOCK
DO NOT OPEN
D3-4-2-1-1_A1_Ru
D3-4-2-1-3_A1_Ru
D3-4-2-1-4*_A1_Ru
D3-4-2-1-7a_A1_Ru
D3-4-2-1-7b*_A1_Ru
D3-4-2-1-7c*_A1_Ru K041_A1_Ru
VSX-820_SYXCN_Ru.book 2 ページ 2010年4月12日 月曜日 午後7時2分
K058a_A1_Ru
Pb
Информация для пользователей по сбору и утилизациибывшего в эксплуатации оборудования и отработавших элементов питания
Данные обозначения утверждены только для Европейского Союза.
Для стран, которые не входят в состав Европейского Союза:
D3-4-2-2-1a_A1_Ru
STANDBY/ON
D3-4-2-2-2a*_A1_Ru
VSX-820_SYXCN_Ru.book 3 ページ 2010年4月12日 月曜日 午後7時2分
4Ru
Благодарим вас за покупку этого изделия марки Pioneer.Полностью прочтите настоящие инструкции по эксплуатации, чтобы знать, как правильно обращаться с этой моделью. Прочитав инструкции, сохраните их в надежном месте для использования в будущем.
СодержаниеПорядок выполнения настроек на ресивере . . . . . . . . . . . . . . . . . . . . . 6
01 Перед началом работыПроверка комплекта поставки . . . . . . . . . . . . . 7Установка батареек . . . . . . . . . . . . . . . . . . . . . 7Установка ресивера . . . . . . . . . . . . . . . . . . . . . 7Вентиляция . . . . . . . . . . . . . . . . . . . . . . . . . 8
02 Органы управления и индикаторыПередняя панель . . . . . . . . . . . . . . . . . . . . . . . 9Дальность действия пульта дистанционного управления . . . . . . . . . . . . . . . . . . . . . . . . . 10
Дисплей . . . . . . . . . . . . . . . . . . . . . . . . . . . . 11Пульт дистанционного управления . . . . . . . . 13
03 Подключение оборудованияРазмещение громкоговорителей . . . . . . . . . . 16Советы по расположению громкоговорителей . . . . . . . . . . . . . . . . . . . 17
Подключение громкоговорителей . . . . . . . . . 18Подключение задних громкоговорителей объемного звучания или передних верхних громкоговорителей . . . . . . . . . . . . . . . . . . . 19Смена настройки акустической системы . . . . . . . . . . . . . . . . . . . . . . . . . . . 20
Подсоединение кабелей . . . . . . . . . . . . . . . . 20Кабели HDMI . . . . . . . . . . . . . . . . . . . . . . . 20О HDMI . . . . . . . . . . . . . . . . . . . . . . . . . . . 21Аналоговые аудиокабели . . . . . . . . . . . . . . 21Цифровые аудиокабели . . . . . . . . . . . . . . . 21Видеокабели. . . . . . . . . . . . . . . . . . . . . . . . 21
Подключение видеовыходов . . . . . . . . . . . . . 22Подключение телевизора и компонентов воспроизведения . . . . . . . . . . . . . . . . . . . . . . 23Подключение с помощью HDMI. . . . . . . . . 23Подключение компонента без разъема HDMI . . . . . . . . . . . . . . . . . . . . . . . . . . . . . 24
Подключение спутникового ресивера или другой цифровой приставки . . . . . . . . . . . . . 25Подключение HDD/DVD рекордера, видеомагнитофона и других источников видеосигнала. . . . . . . . . . . . . . . . . . . . . . . . . 25Использование разъемов компонентного видео. . . . . . . . . . . . . . . . . . . . . . . . . . . . . . . 26
Подключение других аудиокомпонентов . . . . 26Подключение антенн . . . . . . . . . . . . . . . . . . . 27Использование внешних антенн . . . . . . . . . 27
Подключение к видеоразъему на передней панели . . . . . . . . . . . . . . . . . . . . . . . . . . . . . . 28Подключение ресивера к электророзетке . . . . 28
04 Основная настройкаАвтоматическая настройка объемного звучания (MCACC) . . . . . . . . . . . . . . . . . . . . 29Другие проблемы при использовании автоматической настройки MCACC . . . . . . 31
05 Прослушивание системыОсновные операции воспроизведения . . . . . . 32Автоматическое воспроизведение . . . . . . . . . 33Прослушивание материала с использованием объемного звучания. . . . . . . . . . . . . . . . . . . . 33Использование эффектов дополнительного объемного звучания . . . . . . . . . . . . . . . . . . 34
Прослушивание в стереофоническом режиме . . . . . . . . . . . . . . . . . . . . . . . . . . . . . 35Использование функции фронтального расширенного объемного звучания . . . . . . . . 35Использование функции Stream Direct (Прямое воспроизведение). . . . . . . . . . . . . . . 35Использование функции Sound Retriever (Восстановление звучания) . . . . . . . . . . . . . . 36Улучшение качества звучания с помощью функции Phase Control (Корректировка фазы) . . . . . . . . . . . . . . . . . . 36Прослушивание с использованием эквалайзера акустической калибровки . . . . . . . . . . . . . . . 37Использование обработки заднего тылового канала . . . . . . . . . . . . . . . . . . . . . . . . . . . . . . 37Настройка функции Up Mix . . . . . . . . . . . . . . 38Задание параметров звука . . . . . . . . . . . . . . . 38Выбор входного сигнала . . . . . . . . . . . . . . . . 41Использование наушников . . . . . . . . . . . . . . 41
VSX-820_SYXCN_Ru.book 4 ページ 2010年4月12日 月曜日 午後7時2分
5Ru
EnglishFrançais
Deutsch
NederlandsItaliano
Español
06 Меню System Setup (Настройка системы)Использование меню System Setup (Настройка системы) . . . . . . . . . . . . . . . . . . . 42Ручная настройка громкоговорителей . . . . . . 43
Speaker Setting (Настройка громкоговорителей) . . . . . . . . . 43Crossover Network (Разделительный фильтр) . . . . . . . . . . . . . . 45Channel Level (Уровень канала). . . . . . . . . . 45Speaker Distance (Расстояние до громкоговорителей) . . . . . . . . . . . . . . . . . . 46
Меню назначения входов. . . . . . . . . . . . . . . . 46Настройка выхода предварительного усилителя . . . . . . . . . . . . . . . . . . . . . . . . . . . 47
07 Использование тюнераПрослушивание радиопередач . . . . . . . . . . . . 48Повышение качества стереозвука в диапазоне FM . . . . . . . . . . . . . . . . . . . . . . . 48
Сохранение запрограммированных радиостанций . . . . . . . . . . . . . . . . . . . . . . . . 48Прослушивание запрограммированных радиостанций . . . . . . . . . . . . . . . . . . . . . . . 49Присваивание названий запрограммированным радиостанциям . . . . 49
Знакомство с системой RDS . . . . . . . . . . . . . 50Поиск программ RDS . . . . . . . . . . . . . . . . . 50Отображение информации RDS . . . . . . . . . 51
08 Выполнение записи на внешний источникВыполнение аудио- или видеозаписи. . . . . . . 52
09 Управление остальными частями системыНастройка пульта дистанционного управления для работы с другими компонентами . . . . . . . 53Непосредственный ввод кодов компонентов . . . . . . . . . . . . . . . . . . . . . . . . . 53Сброс параметров пульта дистанционного управления . . . . . . . . . . . . . . . . . . . . . . . . . . 54Органы управления телевизорами . . . . . . . . . 55Органы управления другими компонентами . . . . . . . . . . . . . . . . . . . . . . . . 56Список предварительно заданных кодов . . . . 57
10 Другие подключенияПодключение iPod . . . . . . . . . . . . . . . . . . . . . 66Подключение iPod к ресиверу . . . . . . . . . . . 66Воспроизведение с iPod. . . . . . . . . . . . . . . . 67Просмотр фотографий и видеоконтента. . . . 68О формате iPod . . . . . . . . . . . . . . . . . . . . . . 68
Подключение устройства USB . . . . . . . . . . . . 69Подключите устройство USB к ресиверу . . . 69Основные органы управления воспроизведением . . . . . . . . . . . . . . . . . . . . 69Поддержка сжатых аудиосигналов . . . . . . . 70
АДАПТЕР Bluetooth® для прослушивания музыки без проводов . . . . . . . . . . . . . . . . . . . 71Воспроизведение музыки по беспроводной связи . . . . . . . . . . . . . . . . . . . . . . . . . . . . . . 71Подключение дополнительного АДАПТЕРА Bluetooth . . . . . . . . . . . . . . . . . . . . . . . . . . . 72Спаривание АДАПТЕРА Bluetooth и устройства с беспроводным интерфейсом Bluetooth . . . . . . . . . . . . . . . . . . . . . . . . . . . 72Прослушивание музыкального содержимого устройства с беспроводным интерфейсом Bluetooth . . . . . . . . . . . . . . . . . . . . . . . . . . . 73
11 Дополнительная информацияУстранение неисправностей. . . . . . . . . . . . . . 74
HDMI . . . . . . . . . . . . . . . . . . . . . . . . . . . . . 77Важные сведения о подключении HDMI . . . . . . . . . . . . . . . . . . . . . . . . . . . . . 78iPod сообщения . . . . . . . . . . . . . . . . . . . . . . 78Сообщения USB . . . . . . . . . . . . . . . . . . . . . 79
Сброс параметров ресивера (перезагрузка). . . 79Спецификации . . . . . . . . . . . . . . . . . . . . . . . . 80Чистка устройства . . . . . . . . . . . . . . . . . . . . . 80
VSX-820_SYXCN_Ru.book 5 ページ 2010年4月12日 月曜日 午後7時2分
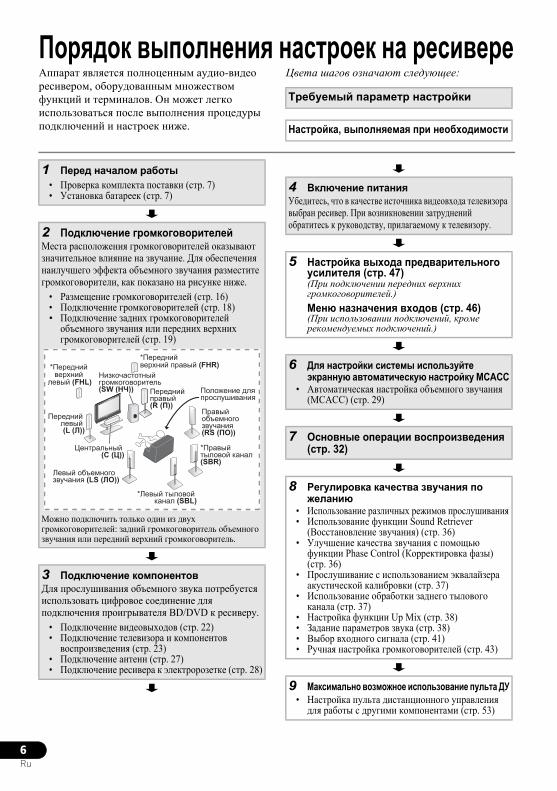
6Ru
Порядок выполнения настроек на ресивереАппарат является полноценным аудио-видео ресивером, оборудованным множеством функций и терминалов. Он может легко использоваться после выполнения процедуры подключений и настроек ниже.
Цвета шагов означают следующее:
Требуемый параметр настройки
Настройка, выполняемая при необходимости
1 Перед началом работы• Проверка комплекта поставки (стр. 7)• Установка батареек (стр. 7)
2 Подключение громкоговорителейМеста расположения громкоговорителей оказывают значительное влияние на звучание. Для обеспечения наилучшего эффекта объемного звучания разместите громкоговорители, как показано на рисунке ниже.
• Размещение громкоговорителей (стр. 16)• Подключение громкоговорителей (стр. 18)• Подключение задних громкоговорителей
объемного звучания или передних верхних громкоговорителей (стр. 19)
Можно подключить только один из двух громкоговорителей: задний громкоговоритель объемного звучания или передний верхний громкоговоритель.
3 Подключение компонентовДля прослушивания объемного звука потребуется использовать цифровое соединение для подключения проигрывателя BD/DVD к ресиверу.
• Подключение видеовыходов (стр. 22)• Подключение телевизора и компонентов
воспроизведения (стр. 23)• Подключение антенн (стр. 27)• Подключение ресивера к электророзетке (стр. 28)
Передний левый (L (Л))
*Передний верхний
левый (FHL)
*Передний верхний правый (FHR)
Левый объемного звучания (LS (ЛO))
*Левый тыловой канал (SBL)
*Правый тыловой канал (SBR)
Правый объемного звучания(RS (ПO))
Центральный (C (Ц))
Низкочастотный громкоговоритель (SW (НЧ)) Положение для
прослушиванияПередний правый (R (П))
4 Включение питанияУбедитесь, что в качестве источника видеовхода телевизора выбран ресивер. При возникновении затруднений обратитесь к руководству, прилагаемому к телевизору.
5 Настройка выхода предварительного усилителя (стр. 47)(При подключении передних верхних громкоговорителей.)Меню назначения входов (стр. 46)(При использовании подключений, кроме рекомендуемых подключений.)
6 Для настройки системы используйте экранную автоматическую настройку MCACC
• Автоматическая настройка объемного звучания (MCACC) (стр. 29)
7 Основные операции воспроизведения (стр. 32)
8 Регулировка качества звучания по желанию
• Использование различных режимов прослушивания• Использование функции Sound Retriever
(Восстановление звучания) (стр. 36)• Улучшение качества звучания с помощью
функции Phase Control (Корректировка фазы) (стр. 36)
• Прослушивание с использованием эквалайзера акустической калибровки (стр. 37)
• Использование обработки заднего тылового канала (стр. 37)
• Настройка функции Up Mix (стр. 38)• Задание параметров звука (стр. 38)• Выбор входного сигнала (стр. 41)• Ручная настройка громкоговорителей (стр. 43)
9 Максимально возможное использование пульта ДУ• Настройка пульта дистанционного управления
для работы с другими компонентами (стр. 53)
VSX-820_SYXCN_Ru.book 6 ページ 2010年4月12日 月曜日 午後7時2分
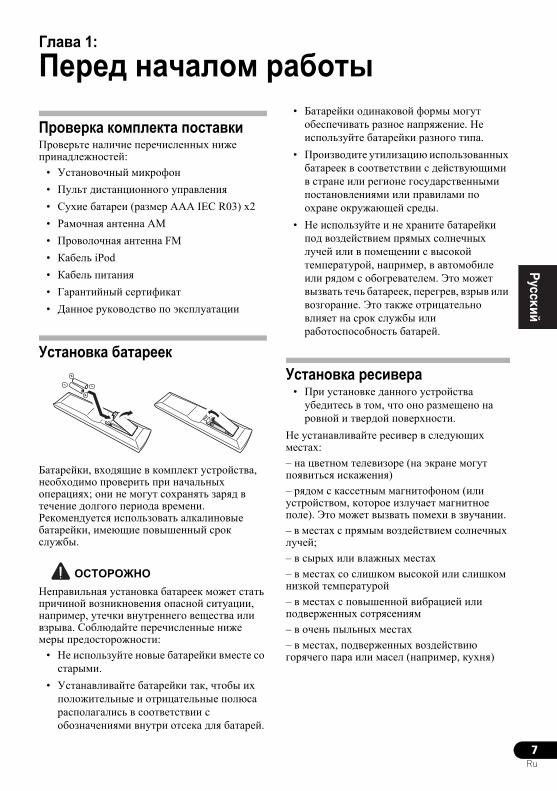
7Ru
EnglishFrançais
Deutsch
NederlandsItaliano
EspañolГлава 1:
Перед началом работы
Проверка комплекта поставкиПроверьте наличие перечисленных ниже принадлежностей:
• Установочный микрофон• Пульт дистанционного управления• Сухие батареи (размер AAA IEC R03) x2• Рамочная антенна АМ• Проволочная антенна FM• Кабель iPod• Кабель питания• Гарантийный сертификат• Данное руководство по эксплуатации
Установка батареек
Батарейки, входящие в комплект устройства, необходимо проверить при начальных операциях; они не могут сохранять заряд в течение долгого периода времени. Рекомендуется использовать алкалиновые батарейки, имеющие повышенный срок службы.
ОСТОРОЖНОНеправильная установка батареек может стать причиной возникновения опасной ситуации, например, утечки внутреннего вещества или взрыва. Соблюдайте перечисленные ниже меры предосторожности:
• Не используйте новые батарейки вместе со старыми.
• Устанавливайте батарейки так, чтобы их положительные и отрицательные полюса располагались в соответствии с обозначениями внутри отсека для батарей.
• Батарейки одинаковой формы могут обеспечивать разное напряжение. Не используйте батарейки разного типа.
• Производите утилизацию использованных батареек в соответствии с действующими в стране или регионе государственными постановлениями или правилами по охране окружающей среды.
• Не используйте и не храните батарейки под воздействием прямых солнечных лучей или в помещении с высокой температурой, например, в автомобиле или рядом с обогревателем. Это может вызвать течь батареек, перегрев, взрыв или возгорание. Это также отрицательно влияет на срок службы или работоспособность батарей.
Установка ресивера• При установке данного устройства убедитесь в том, что оно размещено на ровной и твердой поверхности.
Не устанавливайте ресивер в следующих местах:– на цветном телевизоре (на экране могут появиться искажения)– рядом с кассетным магнитофоном (или устройством, которое излучает магнитное поле). Это может вызвать помехи в звучании.– в местах с прямым воздействием солнечных лучей;– в сырых или влажных местах– в местах со слишком высокой или слишком низкой температурой– в местах с повышенной вибрацией или подверженных сотрясениям– в очень пыльных местах– в местах, подверженных воздействию горячего пара или масел (например, кухня)
VSX-820_SYXCN_Ru.book 7 ページ 2010年4月12日 月曜日 午後7時2分
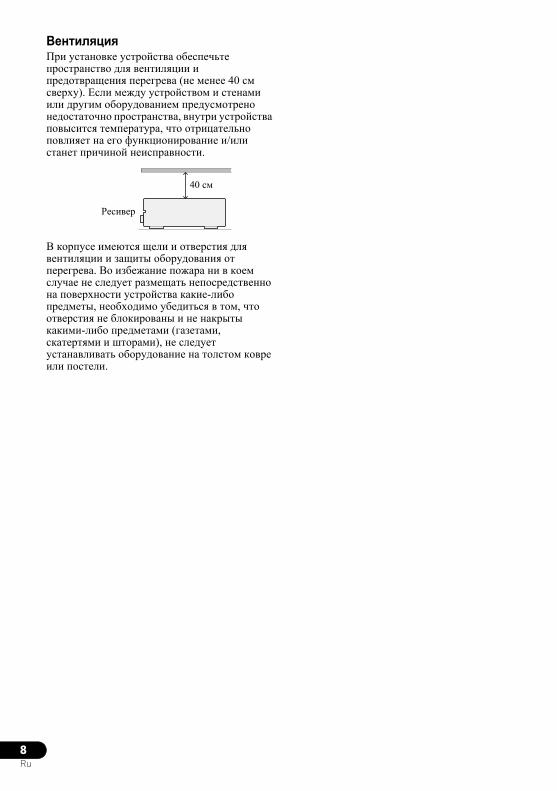
8Ru
ВентиляцияПри установке устройства обеспечьте пространство для вентиляции и предотвращения перегрева (не менее 40 см сверху). Если между устройством и стенами или другим оборудованием предусмотрено недостаточно пространства, внутри устройства повысится температура, что отрицательно повлияет на его функционирование и/или станет причиной неисправности.
В корпусе имеются щели и отверстия для вентиляции и защиты оборудования от перегрева. Во избежание пожара ни в коем случае не следует размещать непосредственно на поверхности устройства какие-либо предметы, необходимо убедиться в том, что отверстия не блокированы и не накрыты какими-либо предметами (газетами, скатертями и шторами), не следует устанавливать оборудование на толстом ковре или постели.
Pecивep
40 см
VSX-820_SYXCN_Ru.book 8 ページ 2010年4月12日 月曜日 午後7時2分
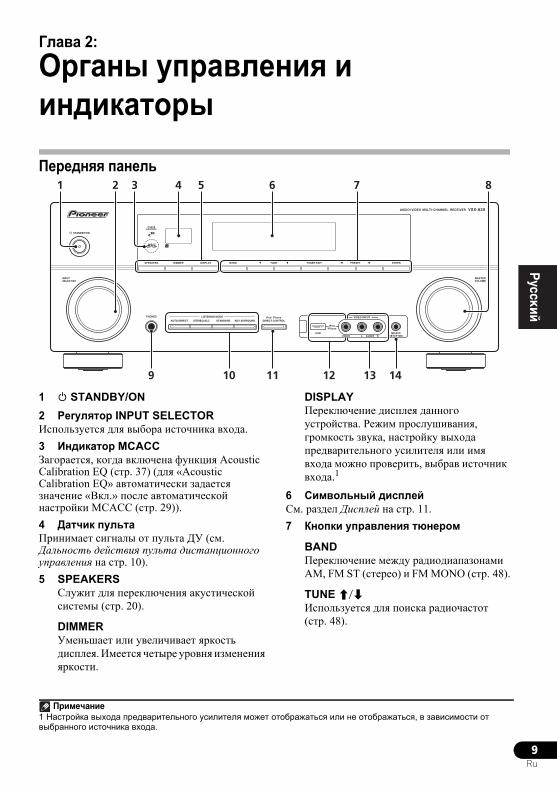
9Ru
EnglishFrançais
Deutsch
NederlandsItaliano
EspañolГлава 2:
Органы управления и индикаторы
Передняя панель
1 STANDBY/ON2 Peryлятор INPUT SELECTORИспользуется для выбора источника входа.3 Индикатор MCACCЗагорается, когда включена функция Acoustic Calibration EQ (стр. 37) (для «Acoustic Calibration EQ» автоматически задается значение «Вкл.» после автоматической настройки MCACC (стр. 29)).4 Датчик пультаПринимает сигналы от пульта ДУ (см. Дальность действия пульта дистанционного управления на стр. 10).5 SPEAKERS
Служит для переключения акустической системы (стр. 20).
DIMMERУменьшает или увеличивает яркость дисплея. Имеется четыре уровня изменения яркости.
DISPLAYПереключение дисплея данного устройства. Режим прослушивания, громкость звука, настройку выхода предварительного усилителя или имя входа можно проверить, выбрав источник входа.1
6 Символьный дисплейСм. раздел Дисплей на стр. 11.7 Кнопки управления тюнером
BANDПереключение между радиодиапазонами AM, FM ST (стерео) и FM MONO (стр. 48).
TUNE /Используется для поиска радиочастот (стр. 48).
SPEAKERS
AUTO/DIRECT STEREO/ALC STANDARD
LISTENING MODE
ADV SURROUND DIRECT CONTROLiPod iPhone
DIMMER DISPLAY BAND TUNE TUNER EDIT PRESET ENTER
PHONES
INPUTSELECTOR
STANDBY/ON
PHASECONTROL
MASTERVOLUME
MCACCSETUP MIC
AUDIO/ VIDEO MULTI- CHANNEL RECEIVER VSX-820
VIDEO INPUT
AUDIOL RVIDEO
iPodiPhone
USB
1 2 7 854 63
9 1110 141312
Примечание1 Настройка выхода предварительного усилителя может отображаться или не отображаться, в зависимости от выбранного источника входа.
VSX-820_SYXCN_Ru.book 9 ページ 2010年4月12日 月曜日 午後7時2分
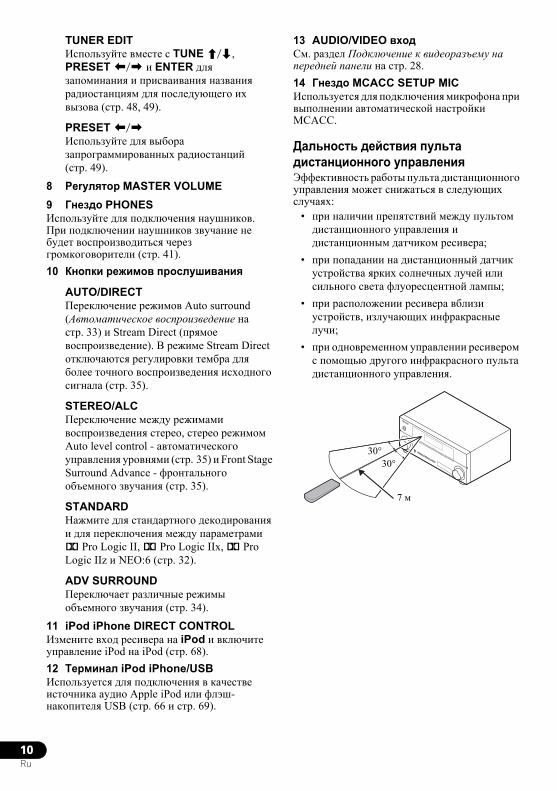
10Ru
TUNER EDITИспользуйте вместе с TUNE /, PRESET / и ENTER для запоминания и присваивания названия радиостанциям для последующего их вызова (стр. 48, 49).
PRESET /Используйте для выбора запрограммированных радиостанций (стр. 49).
8 Peryлятор MASTER VOLUME9 Гнездо PHONESИспользуйте для подключения наушников. При подключении наушников звучание не будет воспроизводиться через громкоговорители (стр. 41).10 Кнопки режимов прослушивания
AUTO/DIRECTПереключение режимов Auto surround (Автоматическое воспроизведение на стр. 33) и Stream Direct (прямое воспроизведение). В режиме Stream Direct отключаются регулировки тембра для более точного воспроизведения исходного сигнала (стр. 35).
STEREO/ALCПереключение между режимами воспроизведения стерео, стерео режимом Auto level control - автоматического управления уровнями (стр. 35) и Front Stage Surround Advance - фронтального объемного звучания (стр. 35).
STANDARDНажмите для стандартного декодирования и для переключения между параметрами 2 Pro Logic II, 2 Pro Logic IIx, 2 Pro Logic IIz и NEO:6 (стр. 32).
ADV SURROUNDПереключает различные режимы объемного звучания (стр. 34).
11 iPod iPhone DIRECT CONTROLИзмените вход ресивера на iPod и включите управление iPod на iPod (стр. 68).12 Терминал iPod iPhone/USBИспользуется для подключения в качестве источника аудио Apple iPod или флэш-накопителя USB (стр. 66 и стр. 69).
13 AUDIO/VIDEO входСм. раздел Подключение к видеоразъему на передней панели на стр. 28.14 Гнездо MCACC SETUP MICИспользуется для подключения микрофона при выполнении автоматической настройки MCACC.
Дальность действия пульта дистанционного управленияЭффективность работы пульта дистанционного управления может снижаться в следующих случаях:
• при наличии препятствий между пультом дистанционного управления и дистанционным датчиком ресивера;
• при попадании на дистанционный датчик устройства ярких солнечных лучей или сильного света флуоресцентной лампы;
• при расположении ресивера вблизи устройств, излучающих инфракрасные лучи;
• при одновременном управлении ресивером с помощью другого инфракрасного пульта дистанционного управления.
30°
7 м
30°
VSX-820_SYXCN_Ru.book 10 ページ 2010年4月12日 月曜日 午後7時2分
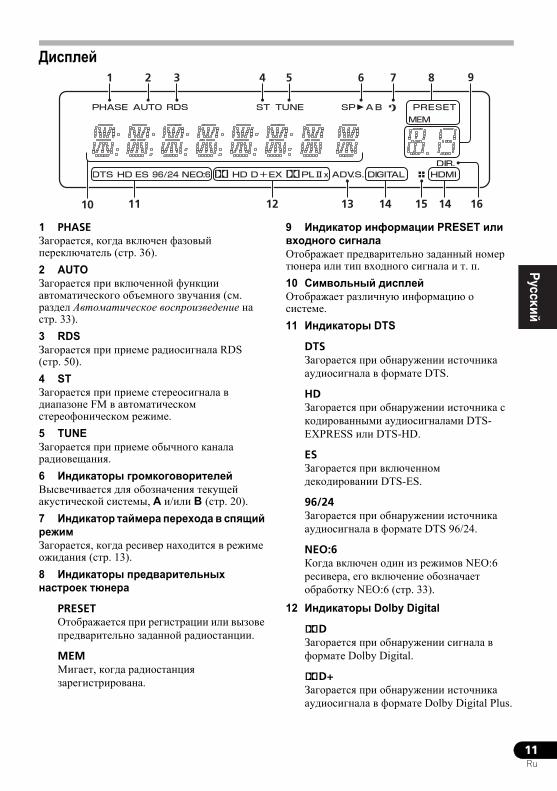
11Ru
EnglishFrançais
Deutsch
NederlandsItaliano
Español
Дисплей
1 PHASEЗагорается, когда включен фазовый переключатель (стр. 36).2 AUTOЗагорается при включенной функции автоматического объемного звучания (см. раздел Автоматическое воспроизведение на стр. 33).3 RDSЗагорается при приеме радиосигнала RDS (стр. 50).4 STЗагорается при приеме стереосигнала в диапазоне FM в автоматическом стереофоническом режиме.5 TUNEЗагорается при приеме обычного канала радиовещания.6 Индикаторы громкоговорителейВысвечивается для обозначения текущей акустической системы, A и/или B (стр. 20).7 Индикатор таймера перехода в спящий режимЗагорается, когда ресивер находится в режиме ожидания (стр. 13).8 Индикаторы предварительных настроек тюнера
PRESETОтображается при регистрации или вызове предварительно заданной радиостанции.
MEMМигает, когда радиостанция зарегистрирована.
9 Индикатор информации PRESET или входного сигналаОтображает предварительно заданный номер тюнера или тип входного сигнала и т. п.10 Символьный дисплей Отображает различную информацию о системе.11 Индикаторы DTS
DTSЗагорается при обнаружении источника аудиосигнала в формате DTS.
HDЗагорается при обнаружении источника с кодированными аудиосигналами DTS-EXPRESS или DTS-HD.
ESЗагорается при включенном декодировании DTS-ES.
96/24Загорается при обнаружении источника аудиосигнала в формате DTS 96/24.
NEO:6Когда включен один из режимов NEO:6 ресивера, его включение обозначает обработку NEO:6 (стр. 33).
12 Индикаторы Dolby Digital
2DЗагорается при обнаружении сигнала в формате Dolby Digital.
2D+Загорается при обнаружении источника аудиосигнала в формате Dolby Digital Plus.
1 2 3 4 5 6 7 8
11 12 13 14 14 1615
9
10
VSX-820_SYXCN_Ru.book 11 ページ 2010年4月12日 月曜日 午後7時2分

12Ru
2HDЗагорается при обнаружении источника аудиосигнала в формате Dolby TrueHD.
EXЗагорается при включенном декодировании Dolby Digital EX.
2PLll(x)Загорается при включенном декодировании 2 Pro Logic II / 2 Pro Logic IIx. Погаснет при декодировании 2 Pro Logic IIz (подробнее см. раздел Прослушивание материала с использованием объемного звучания на стр. 33).
13 ADV.S.Этот индикатор загорается при выборе одного из режимов дополнительного объемного звучания (подробнее см. раздел Использование эффектов дополнительного объемного звучания на стр. 34).14 Индикаторы SIGNAL SELECT
DIGITALЗагорается, когда выбран цифровой аудиосигнал.Мигает, когда выбран цифровой аудиосигнал, а выбранный аудиовход отсутствует.
HDMIЗагорается, когда выбран сигнал HDMI.Мигает, когда выбран сигнал HDMI, а выбранный вход HDMI отсутствует.
15 Индикатор Up Mix/DIMMERЗагорается, когда для функции Up Mix задано значение ON (см. стр. 38). Также загорается, когда режим DIMMER выключен.16 DIR.Загорается при включении режима DIRECT или PURE DIRECT (стр. 36).
VSX-820_SYXCN_Ru.book 12 ページ 2010年4月12日 月曜日 午後7時2分
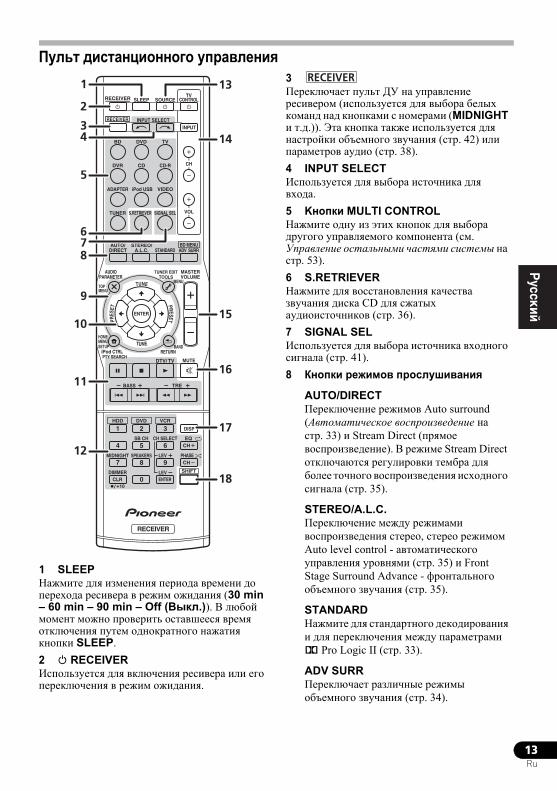
13Ru
EnglishFrançais
Deutsch
NederlandsItaliano
Español
Пульт дистанционного управления
1 SLEEPНажмите для изменения периода времени до перехода ресивера в режим ожидания (30 min – 60 min – 90 min – Off (Выкл.)). В любой момент можно проверить оставшееся время отключения путем однократного нажатия кнопки SLEEP.2 RECEIVER Используется для включения ресивера или его переключения в режим ожидания.
3Переключает пульт ДУ на управление ресивером (используется для выбора белых команд над кнопками с номерами (MIDNIGHT и т.д.)). Эта кнопка также используется для настройки объемного звучания (стр. 42) или параметров аудио (стр. 38).4 INPUT SELECTИспользуется для выбора источника для входа.5 Kнопки MULTI CONTROLНажмите одну из этих кнопок для выбора другого управляемого компонента (см. Управление остальными частями системы на стр. 53).6 S.RETRIEVERНажмите для восстановления качества звучания диска CD для сжатых аудиоисточников (стр. 36).7 SIGNAL SELИспользуется для выбора источника входного сигнала (стр. 41).8 Кнопки режимов прослушивания
AUTO/DIRECT Переключение режимов Auto surround (Автоматическое воспроизведение на стр. 33) и Stream Direct (прямое воспроизведение). В режиме Stream Direct отключаются регулировки тембра для более точного воспроизведения исходного сигнала (стр. 35).
STEREO/A.L.C.Переключение между режимами воспроизведения стерео, стерео режимом Auto level control - автоматического управления уровнями (стр. 35) и Front Stage Surround Advance - фронтального объемного звучания (стр. 35).
STANDARDНажмите для стандартного декодирования и для переключения между параметрами 2 Pro Logic II (стр. 33).
ADV SURRПереключает различные режимы объемного звучания (стр. 34).
BD DVD
INPUT SELECT
SOURCESLEEPTV
CONTROL
DIMMER
TV
INPUT
1
4
7MIDNIGHT
HDD
CH
RECEIVER
DVR CD CD-R
ADAPTER iPod USB VIDEO
TUNER S.RETRIEVER SIGNAL SEL
BD MENU
ENTER
STANDARD ADV SURRSTEREO/
A.L.C.AUTO/
DIRECT
VOL
+10
2
5
8SPEAKERS LEV
LEV
SB CH
DISP
CLR
EQ
PHASE
DVD
3
6
9
0 ENTER
CH
CH
CH SELECT
VCR
SHIFT
MUTE
RETURN
AUDIOPARAMETER
TUNER EDITTOOLS
MASTERVOLUME
iPod CTRLPTY SEARCH
BAND
MENU
HOMEMENUSETUP
DTV/ TV
/
TREBASS
TOPMENU
RECEIVER
TUNE
TUNE
PRESETPRES
ET
RECEIVER
1
2
13
14
15
16
17
34
5
678
9
10
11
12
18
RECEIVER
VSX-820_SYXCN_Ru.book 13 ページ 2010年4月12日 月曜日 午後7時2分
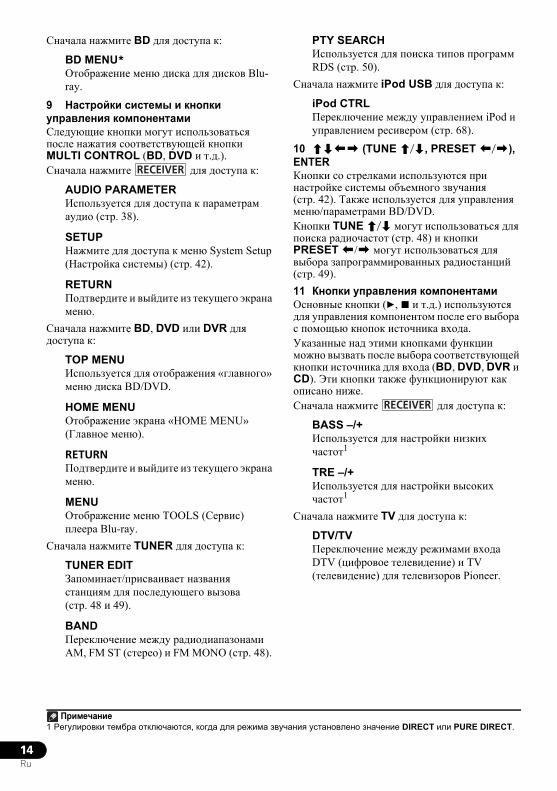
14Ru
Сначала нажмите BD для доступа к:
BD MENU*Отображение меню диска для дисков Blu-ray.
9 Настройки системы и кнопки управления компонентамиСледующие кнопки могут использоваться после нажатия соответствующей кнопки MULTI CONTROL (BD, DVD и т.д.). Сначала нажмите для доступа к:
AUDIO PARAMETERИспользуется для доступа к параметрам аудио (стр. 38).
SETUPНажмите для доступа к меню System Setup (Настройка системы) (стр. 42).
RETURNПодтвердите и выйдите из текущего экрана меню.
Сначала нажмите BD, DVD или DVR для доступа к:
TOP MENUИспользуется для отображения «главного» меню диска BD/DVD.
HOME MENUОтображение экрана «HOME MENU» (Главное меню).
RETURNПодтвердите и выйдите из текущего экрана меню.
MENUОтображение меню TOOLS (Сервис) плеера Blu-ray.
Сначала нажмите TUNER для доступа к:
TUNER EDITЗапоминает/присваивает названия станциям для последующего вызова (стр. 48 и 49).
BANDПереключение между радиодиапазонами AM, FM ST (стерео) и FM MONO (стр. 48).
PTY SEARCHИспользуется для поиска типов программ RDS (стр. 50).
Сначала нажмите iPod USB для доступа к:
iPod CTRLПереключение между управлением iPod и управлением ресивером (стр. 68).
10 (TUNE /, PRESET /), ENTERКнопки со стрелками используются при настройке системы объемного звучания (стр. 42). Также используется для управления меню/параметрами BD/DVD.Кнопки TUNE / могут использоваться для поиска радиочастот (стр. 48) и кнопки PRESET / могут использоваться для выбора запрограммированных радиостанций (стр. 49).11 Кнопки управления компонентамиОсновные кнопки (, и т.д.) используются для управления компонентом после его выбора с помощью кнопок источника входа.Указанные над этими кнопками функции можно вызвать после выбора соответствующей кнопки источника для входа (BD, DVD, DVR и CD). Эти кнопки также функционируют как описано ниже.Сначала нажмите для доступа к:
BASS –/+Используется для настройки низких частот1
TRE –/+Используется для настройки высоких частот1
Сначала нажмите TV для доступа к:
DTV/TVПереключение между режимами входа DTV (цифровое телевидение) и TV (телевидение) для телевизоров Pioneer.
RECEIVER
Примечание1 Регулировки тембра отключаются, когда для режима звучания установлено значение DIRECT или PURE DIRECT.
RECEIVER
VSX-820_SYXCN_Ru.book 14 ページ 2010年4月12日 月曜日 午後7時2分
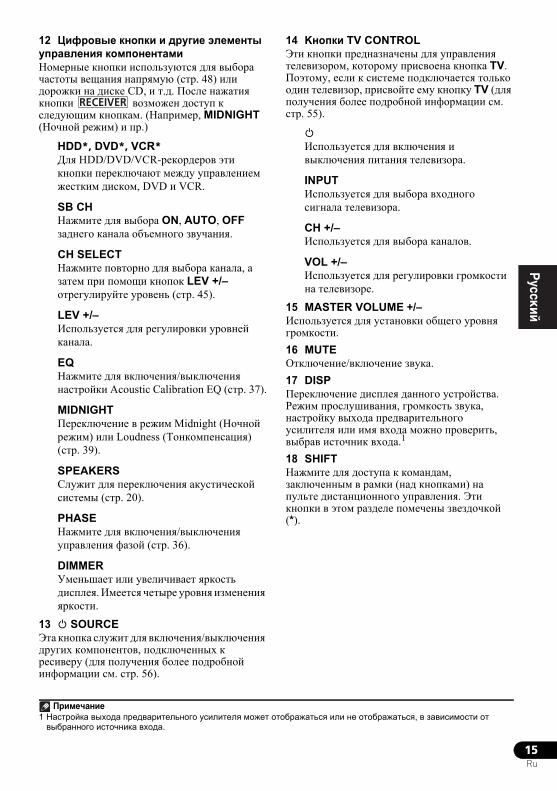
15Ru
EnglishFrançais
Deutsch
NederlandsItaliano
Español12 Цифровые кнопки и другие элементы управления компонентамиНомерные кнопки используются для выбора частоты вещания напрямую (стр. 48) или дорожки на диске CD, и т.д. После нажатия кнопки возможен доступ к следующим кнопкам. (Например, MIDNIGHT (Ночной режим) и пр.)
HDD*, DVD*, VCR*Для HDD/DVD/VCR-рекордеров эти кнопки переключают между управлением жестким диском, DVD и VCR.
SB CHНажмите для выбора ON, AUTO, OFF заднего канала объемного звучания.
CH SELECTНажмите повторно для выбора канала, а затем при помощи кнопок LEV +/– отрегулируйте уровень (стр. 45).
LEV +/–Используется для регулировки уровней канала.
EQНажмите для включения/выключения настройки Acoustic Calibration EQ (стр. 37).
MIDNIGHTПереключение в режим Midnight (Ночной режим) или Loudness (Тонкомпенсация) (стр. 39).
SPEAKERSСлужит для переключения акустической системы (стр. 20).
PHASEНажмите для включения/выключения управления фазой (стр. 36).
DIMMERУменьшает или увеличивает яркость дисплея. Имеется четыре уровня изменения яркости.
13 SOURCEЭта кнопка служит для включения/выключения других компонентов, подключенных к ресиверу (для получения более подробной информации см. стр. 56).
14 Kнопки TV CONTROLЭти кнопки предназначены для управления телевизором, которому присвоена кнопка TV. Поэтому, если к системе подключается только один телевизор, присвойте ему кнопку TV (для получения более подробной информации см. стр. 55).
Используется для включения и выключения питания телевизора.
INPUTИспользуется для выбора входного сигнала телевизора.
CH +/–Используется для выбора каналов.
VOL +/–Используется для регулировки громкости на телевизоре.
15 MASTER VOLUME +/–Используется для установки общего уровня громкости.16 MUTEОтключение/включение звука.17 DISPПереключение дисплея данного устройства. Режим прослушивания, громкость звука, настройку выхода предварительного усилителя или имя входа можно проверить, выбрав источник входа.1
18 SHIFTНажмите для доступа к командам, заключенным в рамки (над кнопками) на пульте дистанционного управления. Эти кнопки в этом разделе помечены звездочкой (*).
RECEIVER
Примечание1 Настройка выхода предварительного усилителя может отображаться или не отображаться, в зависимости от выбранного источника входа.
VSX-820_SYXCN_Ru.book 15 ページ 2010年4月12日 月曜日 午後7時2分
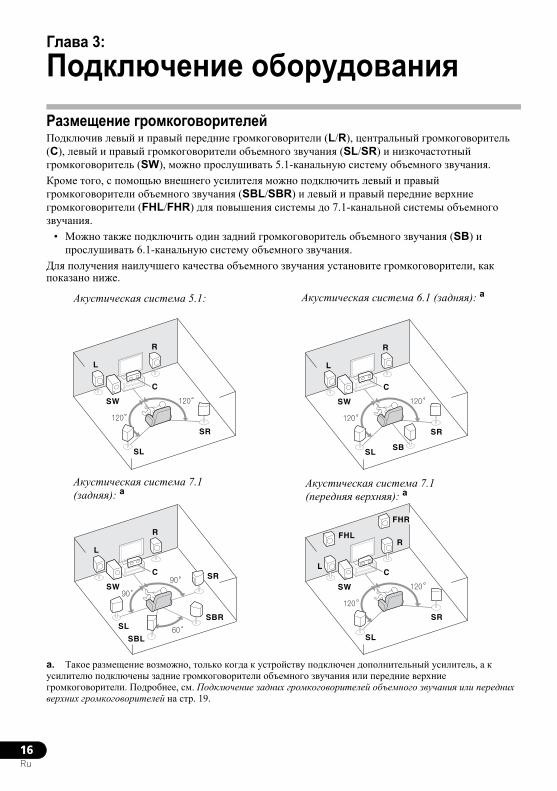
16Ru
Глава 3:
Подключение оборудованияРазмещение громкоговорителейПодключив левый и правый передние громкоговорители (L/R), центральный громкоговоритель (C), левый и правый громкоговорители объемного звучания (SL/SR) и низкочастотный громкоговоритель (SW), можно прослушивать 5.1-канальную систему объемного звучания.Кроме того, с помощью внешнего усилителя можно подключить левый и правый громкоговорители объемного звучания (SBL/SBR) и левый и правый передние верхние громкоговорители (FHL/FHR) для повышения системы до 7.1-канальной системы объемного звучания.
• Можно также подключить один задний громкоговоритель объемного звучания (SB) и прослушивать 6.1-канальную систему объемного звучания.
Для получения наилучшего качества объемного звучания установите громкоговорители, как показано ниже.
a. Такое размещение возможно, только когда к устройству подключен дополнительный усилитель, а к усилителю подключены задние громкоговорители объемного звучания или передние верхние громкоговорители. Подробнее, см. Подключение задних громкоговорителей объемного звучания или передних верхних громкоговорителей на стр. 19.
120
120
SL
L
SW
C
R
SR
120
120
SL
L
SW
C
R
SR
SB
120
120
SL
L
FHL
FHR
SW
C
R
SR
90
90
60SL
L
SW
C
R
SR
SBL
SBR
Акустическая система 5.1:
Акустическая система 7.1 (задняя): a
Акустическая система 7.1 (передняя верхняя): a
Акустическая система 6.1 (задняя): a
VSX-820_SYXCN_Ru.book 16 ページ 2010年4月12日 月曜日 午後7時2分
17Ru
EnglishFrançais
Deutsch
NederlandsItaliano
EspañolСоветы по расположению громкоговорителейPасположение громкоговорителей в комнате имеет большое влияние на качество звука. Следующие рекомендации помогут добиться оптимального звучания вашей системы.
• Сабвуфер можно поместить на полу. В идеальном случае другие громкоговорители во время прослушивания должны располагаться на уровне ушей. Расположение громкоговорителей на полу (кроме сабвуфера) или закрепление их высоко на стене не рекомендуется.
• Для получения оптимального стереоэффекта расположите фронтальные громкоговорители на расстоянии 2–3 метров друг от друга и на равном удалении от телевизора.
• В случае расположения громкоговорителей около ЭЛТ-телевизора, используйте громкоговорители магнитозащищенного типа или располагайте громкоговорители на достаточном расстоянии от ЭЛТ-телевизора.
• Если используется центральный громкоговоритель, разместите передние громкоговорители под большим углом. Если нет – под меньшим углом.
• Расположите центральный громкоговоритель под телевизором или над ним, чтобы звук центрального канала исходил от экрана телевизора. Кроме того, центральный громкоговоритель не должен пересекать линию, образованную передним краем правого и левого фронтальных громкоговорителей.
• Лучше всего поверните громкоговорители в направлении точки прослушивания. Угол зависит от размера помещения. Для более просторных помещений используйте меньший угол.
• Объемные и тыловые громкоговорители следует устанавливать на 60–90 см выше уровня ушей и слегка наклонить вниз. Убедитесь в том, что громкоговорители не направлены навстречу друг другу. Для формата DVD-Audio громкоговорители должны находиться более за слушателем.
• Если громкоговорители объемного звучания не могут устанавливаться прямо сбоку от места слушателя при использовании 7.1-
канальной системы, эффект объемного звучания можно усилить, отключив функцию Up Mix (см. Настройка функции Up Mix на стр. 38).
• Старайтесь не размещать громкоговорители объемного звучания дальше от слушателя, чем передние и центральные. В противном случае может произойти ослабление эффекта объемного звучания.
• Располагайте левый и правый передние верхние громоговорители непосредственно над левым и правым передними громкоговорителями на расстоянии минимум один метр.
ОСТОРОЖНО• Все громкоговорители должны быть надежно установлены. Это не только улучшает качество звука, но и уменьшает риск повреждения или травмы в результате падения или переворачивания громкоговорителей в случае внешнего толчка (например, при землетрясении).
Внимание• Для подключения задних громкоговорителей объемного звучания или передних верхних громкоговорителей, требуется дополнительный усилитель. Подключите дополнительный усилитель к выходам PRE OUT SURR BACK/FRONT HEIGHT этого устройства и подключите задние громкоговорители объемного звучания или передние верхние громкоговорители к дополнительному усилителю (см. Подключение задних громкоговорителей объемного звучания или передних верхних громкоговорителей на стр. 19).При выполнении вышеуказанных подключений, необходимо задать настройку выхода предварительного усилителя. Выберите SURR.BACK, если подключен задний громкоговоритель объемного звучания, и HEIGHT, если подключен передний верхний громкоговоритель (возможна любая настройка, если не подключен ни задний громкоговоритель объемного звучания, ни передний верхний громкоговоритель) (см. Настройка выхода предварительного усилителя на стр. 47).
VSX-820_SYXCN_Ru.book 17 ページ 2010年4月12日 月曜日 午後7時2分
18Ru
Подключение громкоговорителейРесивер может работать с двумя стерео громкоговорителями (передние громкоговорители на рисунке), тем не менее, рекомендуется использовать по крайней мере три, а полный комплект обеспечивает наилучшее объемное звучание. Убедитесь, что правый громкоговоритель подключен к правому (R) разъему, а левый (L) громкоговоритель – к левому. Также убедитесь, что положительный и отрицательный (+/–) разъемы ресивера совпадают с соответствующими разъемами громкоговорителей.
Можно использовать громкоговорители, подключенные к разъемам группы B для прослушивания в режиме стерео в другой комнате. Для прослушивания с такой настройкой ознакомьтесь с разделом Смена настройки акустической системы на стр. 20.Можно использовать громкоговорители с нормальным импедансом мощностью от 6 Ω до 16 Ω.Однако помните, что только для передних громкоговорителей задается значение между 12 Ω и 16 Ω, если выбрано SPAB в Смена настройки акустической системы на стр. 20.Подключайте устройство к сети переменного тока только после завершения всех соединений.
AC INSURR BACK /FRONTHEIGHT
L(Single)
R
R
L
IN
R
L
IN
IN
OUT
IN
CD
TV/SAT DVD BD
DVR/VCR
MONITOR OUTPR PB Y
R L
DVD IN BD IN
OUTMONITOR
COMPONENT VIDEO
TV/SATIN
DVR/VCROUT IN
FRONTR L
CD-R/TAPE
DVR/VCR CD-R/TAPE
PRE OUT
E
EAUDIO
ADAPTER PORT
VIDEO
(OUTPUT 5 V 100 mA MAX)
(BD)IN 1
(DVD)IN 2
ASSIGNABLE
SPEAKERS
1
B
SPEAKERS A
2
ANTENNAFM
UNBAL75
AMLOOP
VOLTAGE SELECTOR
110-127 V 220-240 V
SUBWOOFERPRE OUT
CENTERSURROUNDR L
SW
L
C
R SL SR
L R
Центральный громкоговоритель
Объемные громкоговорителиФронтальные громкоговорители
Активный низкочастотный громкоговоритель
Система громкоговорителей B
VSX-820_SYXCN_Ru.book 18 ページ 2010年4月12日 月曜日 午後7時2分
19Ru
EnglishFrançais
Deutsch
NederlandsItaliano
EspañolПодключение проводовРазъемы громкоговорителей группы A:
1 Скрутите оголенные жилы провода.
2 Ослабьте зажим контакта и вставьте оголенный провод.
3 Зажмите контакт.
Разъемы громкоговорителей группы B:
1 Скрутите оголенные жилы провода.
2 Откройте защитные выступы и вставьте оголенный провод.
3 Отпустите защитные выступы.
ОСТОРОЖНО• На контактах громкоговорителей имеется ОПАСНОЕ ДЛЯ ЖИЗНИ напряжение. Во избежание опасности поражения электрическим током при подключении или отключении кабелей громкоговорителей отсоединяйте кабель питания, прежде чем прикасаться к любым неизолированным деталям.
• Оголенные концы провода громкоговорителя должны быть обязательно скручены и вставлены в контакт громкоговорителя до конца. Если любой из неизолированных проводов громкоговорителя коснется задней панели, это может вызвать отключение питания в целях безопасности.
Подключение задних громкоговорителей объемного звучания или передних верхних громкоговорителейПодключите выходы PRE OUT на устройстве к дополнительному усилителю, чтобы добавить задний громкоговоритель объемного звучания или передний верхний громкоговоритель.
• Если подключен задний громкоговоритель объемного звучания или передний верхний громкоговоритель, задайте настройку выхода предварительного усилителя (см. Настройка выхода предварительного усилителя на стр. 47).
• Для одного громкоговорителя можно также подключать дополнительный усилитель к выходам PRE OUT заднего тылового канала. В этом случае подключайте усилитель только к левому (L (Single)) разъему.
1 2 3
10 мм
1 2 3
10 мм
IN BD
SURR BACK /FRONTHEIGHT
L(Single)
R
R
L
IN
R
L
IN
IN
OUT
IN
CD
TV/SAT DVD BD
DVR/VCR
M
CD-R/TAPE
DVR/VCR CD-R/TAPE
PRE OUT
DVD
TV/SAT
COAXIAL
OPTICAL
(CD)IN
ASSIGNABLE
ASSIGNABLE
OUT
HDMI
DVR/VCR 1
(CD-R/TAPE)IN
AUDIO
ADAPTER (OUTPUT 5 V 1
1
1 2
IN 2
SUBWOOFERPRE OUT
ANTENNAFM
UNBAL75
AMLOOP
INPUTL R
ANALOG
SBL/FHL SBR/FHR
Задние громкоговорители объемного звучания или
передние верхние громкоговорители
Усилитель заднего канала объемного звучания или переднего
верхнего канала
VSX-820_SYXCN_Ru.book 19 ページ 2010年4月12日 月曜日 午後7時2分
20Ru
Смена настройки акустической системыС помощью кнопки SPEAKERS можно выбрать три схемы расположения громкоговорителей.
• Используйте кнопку SPEAKERS на передней панели для выбора настроек системы громкоговорителей.1
Нажмите повторно для выбора настройки системы громкоговорителей:
• SPA – звук выводится из громкоговорителей, подключенных к контактам громкоговорителей A и PRE OUT SURR BACK/FRONT HEIGHT (возможно многоканальное воспроизведение).
• SPB – звук выводится из двух громкоговорителей, подключенных к акустической системе B (возможно только стереофоническое воспроизведение).
• SPAB – звук выходит из системы громкоговорителей A, двух громкоговорителей системы громкоговорителей B и сабвуфера. Для многоканальных источников понижающее микширование выполняется, только если выбран режим STEREO или ALC для стерео выхода от систем громкоговорителей A и B.2
• SP – звук через громкоговорители не выводится.
Подсоединение кабелейНе перегибайте кабели поверх устройства (как показано на рисунке). В противном случае магнитное поле, генерируемое трансформаторами этого устройства, может вызвать помехи в громкоговорителях.
Внимание• Перед выполнением или изменением схем подсоединения отключите кабель питания от розетки переменного тока.
• Перед отсоединением кабеля питания переключите питание в режим ожидания.
Кабели HDMIОдновременно по одному кабелю могут передаваться как видео-, так и звуковые сигналы. При подключении через этот ресивер проигрывателя и телевизора, используйте для обоих подключений кабели HDMI.3
Будьте внимательны и соблюдайте правильность направления при подключении разъема.
Примечание1 Воспроизведение звука низкочастотным громкоговорителем зависит от настроек, описанных в разделе Speaker
Setting (Настройка громкоговорителей) на стр. 43. Однако, если выше выбран пункт SPB, из низкочастотного громкоговорителя звук слышен не будет (канал низкочастотных эффектов не декодирован).
2 Можно использовать громкоговорители с нормальным импедансом мощностью от 6 Ω до 16 Ω. Однако помните, что только для фронтальных громкоговорителей задается значение между 12 Ω и 16 Ω, если выбрано SPAB.
SPEAKERS DIMMER DISPLAY
3 • Установите для параметра HDMI в Задание параметров звука на стр. 38 значение THRU (THROUGH) и задайте для входного сигнала в Выбор входного сигнала на стр. 41 значение HDMI, если вы хотите получить выход звука HDMI на телевизоре (не будет слышен звук от этого ресивера).• Если на телевизоре не появляется видеосигнал, попробуйте отрегулировать настройки разрешения используемого компонента или дисплея. Учтите, что некоторые компоненты (например, игровые видеоприставки) имеют разрешение, отображение которого невозможно. В этом случае используйте (аналоговое) композитное подключение.• Когда через HDMI поступает видеосигнал 480i, 480p, 576i или 576p, прием многоканального звука PCM и HD-звука невозможен.
Кабель HDMI
VSX-820_SYXCN_Ru.book 20 ページ 2010年4月12日 月曜日 午後7時2分

21Ru
EnglishFrançais
Deutsch
NederlandsItaliano
EspañolО HDMIПри помощи подключения HDMI передаются несжатые цифровые видеосигналы, а также практически любые виды цифрового звучания, с которыми совместим подключенный компонент, включая DVD-Video, DVD-Audio, SACD, Dolby Digital Plus, Dolby TrueHD, DTS-HD Master Audio (см. ниже информацию об ограничениях), Video CD/Super VCD и CD.Данный ресивер содержит технологию High-Definition Multimedia Interface (HDMI®).С помощью подключений HDMI данный ресивер поддерживает описанные ниже функции.1
• Цифровая передача несжатого видео (материала, защищенного по системе HDCP (1080p/24, 1080p/60, др.))
• Передача сигнала 3D2
• Передача сигнала Deep Color2
• Передача сигнала x.v.Color2
• Прием многоканальный линейных цифровых аудиосигналов PCM (192 кГц или менее) для макс. 8 каналов
• Прием следующих цифровых аудиоформатов:3
– Dolby Digital, Dolby Digital Plus, DTS, аудиосигналы с высокой битовой скоростью (Dolby TrueHD, DTS-HD Master Audio), DVD-Audio, CD, SACD (сигнал DSD), Video CD, Super VCD
HDMI, логотип HDMI и High-Definition Multimedia Interface являются торговыми марками или зарегистрированными торговыми марками HDMI Licensing, LLC в США и других странах.“x.v.Color” и x.v.Color являются торговыми марками Sony Corporation.
Аналоговые аудиокабелиДля подключения аналоговых аудиокомпонентов используйте стереофонические аудиокабели RCA. Эти кабели имеют стандартную красную и белую маркировку, и необходимо подключить красные штекеры к разъемам R (правый), а белые – к разъемам L (левый).
Цифровые аудиокабелиДля подключения к данному ресиверу цифровых компонентов следует использовать имеющиеся в продаже коаксиальные цифровые аудиокабели или оптические кабели.4
ВидеокабелиСтандартные видеокабели RCAЭти кабели являются наиболее распространенным типом видеокабелей и используются для подключения к разъемам композитного видео. Штекеры с желтой маркировкой отличают их от аудиокабелей.
Примечание1 • Используйте кабель High Speed HDMI®. Если используется кабель HDMI, а не кабель High Speed HDMI®, он может работать неправильно.• Если подключается кабель HDMI со встроенным эквалайзером, он может работать неправильно.
2 Передача сигнала возможна только при подключении к совместимому компоненту.3 • Передачи цифровых аудиосигналов в формате HDMI требуют большего времени для распознавания. В связи с этим, может возникать пропадание аудиосигнала при переключении между аудиоформатами или начале воспроизведения.• Включение/отключение устройства, подключенного к терминалу HDMI OUT этого устройства во время воспроизведения, или отсоединение/подсоединение кабеля HDMI во время воспроизведения, может вызвать помехи или прерывание звука.
4 • Аккуратно выполняйте подключение оптического кабеля, старайтесь не повредить защитную шторку оптического разъема.• Обеспечьте для оптического кабеля свободно свисающую петлю. Можно повредить кабель об острые углы.• Для коаксиального цифрового подключения также можно использовать стандартный видеокабель RCA.
VSX-820_SYXCN_Ru.book 21 ページ 2010年4月12日 月曜日 午後7時2分

22Ru
Кабели компонентного видеоНаивысшее качество воспроизведения цвета от источника видеосигнала обеспечивают кабели компонентного видео. По этим кабелям передается телевизионный цветовой сигнал, разделенный на сигнал яркости (Y) и сигналы цветности (PB и PR). Таким образом устраняются взаимные помехи между сигналами.
Подключение видеовыходовДанный ресивер не оборудован видеопреобразователем. Если для подключения к входному устройству используются видеокабели или кабели HDMI, такие же кабели должны использоваться для подключения к телевизору.Сигналы, поступающие с аналоговых (композитных и компонентных) видеовходов устройства, не будут передаваться с HDMI OUT.
VIDEO IN
PR PB Y
COMPONENT VIDEO INHDMI IN
MONITOR OUT
PR PB Y
HDMI OUT COMPONENT VIDEO MONITOR OUT
Терминал для подключения с исходным устройством
Терминал для подключения с телевизионным монитором
Компонент воспроизведения
Телевизор
Экранный дисплей не появится.
Возможность вывода видеосигналов.
VSX-820_SYXCN_Ru.book 22 ページ 2010年4月12日 月曜日 午後7時2分
23Ru
EnglishFrançais
Deutsch
NederlandsItaliano
Español
Подключение телевизора и компонентов воспроизведения
Подключение с помощью HDMIПри наличии компонента с интерфейсом HDMI или DVI (с HDCP) (проигрывателя Blu-ray дисков, др.), его можно подключить к данному ресиверу с помощью имеющегося в продаже кабеля HDMI.
• Если ресивер подключается к телевизору с помощью кабеля HDMI, экранный дисплей не будет отображаться. Убедитесь, что для подключения используется стандартный аналоговый видеокабель RCA.12
Примечание1 Если необходимо увидеть экран дисплея (для настройки и т.д.), переключитесь на аналоговый вход телевизора. (Со входом HDMI, экранный дисплей отображаться не будет.)
2 Если подключение выполнено с помощью оптического кабеля, нужно указать ресиверу, к какому цифровому входу подключен телевизор (см. Выбор входного сигнала на стр. 41).
IN BD
SURR BACK /FRONTHEIGHT
L(Single)
R
R
L
IN
R
L
IN
IN
OUT
IN
CD
TV/SAT DVD BD
DVR/VCR
MONITOR OUTPR PB Y
R L
DVD IN BD IN
OUTMONITOR
COMPONENT VIDEO
TV/SATIN
DVR/VCROUT IN
FRONTR L
CD-R/TAPE
DVR/VCR CD-R/TAPE
PRE OUT
DVD
TV/SAT
COAXIAL
OPTICAL
(CD)IN
ASSIGNABLE
ASSIGNABLE
OUT
HDMI
DVR/VCR 1
(CD-R/TAPE)IN
AUDIO
ADAPTER PORT
VIDEO
(OUTPUT 5 V 100 mA MAX)
1(BD)IN 1
(DVD)IN 2
1 2ASSIGNABLE
SPEAKERS
1
B
SPEAKERS A
2
IN 2
SUBWOOFERPRE OUT
ANTENNAFM
UNBAL75
AMLOOP
SURROUNR
VIDEO IN
HDMI OUT
HDMI IN
DIGITAL AUDIO OUTOPTICAL R L
ANALOG AUDIO OUT
MONITOROUT
Выберите один
Телевизор, совместимый с HDMI/DVIСовместимый с HDMI/DVI
проигрыватель Blu-ray дисков
Данное подключение требуется для прослушивания звучания телевизора через ресивер.
Это подключение необходимо, чтобы увидеть экранный дисплей устройства на телевизоре.
2
VSX-820_SYXCN_Ru.book 23 ページ 2010年4月12日 月曜日 午後7時2分
24Ru
Подключение компонента без разъема HDMIНа данном рисунке показаны подключения телевизора и проигрывателя DVD (или другого компонента воспроизведения) без разъема HDMI к ресиверу.123
Примечание1 Если подключение выполнено с помощью оптического кабеля, нужно указать ресиверу, к какому цифровому входу подключен телевизор (см. Выбор входного сигнала на стр. 41).
2 Если подключение выполнено с помощью оптического или коаксиального кабеля, нужно указать ресиверу, к какому цифровому входу подключен проигрыватель DVD (см. Выбор входного сигнала на стр. 41).
3 Если и телевизор, и проигрыватель имеют разъемы компонентного видео, их тоже можно подключить. Подробнее см. раздел Использование разъемов компонентного видео на стр. 26.
MONITOROUT
IN BD
SURR BACK /FRONTHEIGHT
L(Single)
R
R
L
IN
R
L
IN
IN
OUT
IN
CD
TV/SAT DVD BD
DVR/VCR
MONITOR OUTPR PB Y
R L
DVD IN BD IN
OUTMONITOR
COMPONENT VIDEO
TV/SATIN
DVR/VCROUT IN
FRONTR L
CD-R/TAPE
DVR/VCR CD-R/TAPE
PRE OUT
DVD
TV/SAT
COAXIAL
OPTICAL
(CD)IN
ASSIGNABLE
ASSIGNABLE
OUT
HDMI
DVR/VCR 1
(CD-R/TAPE)IN
AUDIO
ADAPTER PORT
VIDEO
(OUTPUT 5 V 100 mA MAX)
1(BD)IN 1
(DVD)IN 2
1 2ASSIGNABLE
SPEAKERS
1
B
SPEAKERS A
2
IN 2
SUBWOOFERPRE OUT
ANTENNAFM
UNBAL75
AMLOOP
SURROUNR
R LDIGITAL AUDIO OUTANALOG AUDIO OUT
COAXIAL
VIDEO OUT
OPTICAL
DIGITAL AUDIO OUTOPTICAL R L
ANALOG AUDIO OUT
VIDEO IN
Выберите один
Телевизор
Проигрыватель DVD
Данное подключение требуется для прослушивания звучания телевизора через ресивер.
Выберите один
1 2
3
VSX-820_SYXCN_Ru.book 24 ページ 2010年4月12日 月曜日 午後7時2分
25Ru
EnglishFrançais
Deutsch
NederlandsItaliano
Español
Подключение спутникового ресивера или другой цифровой приставкиСпутниковые и кабельные ресиверы, а также цифровые радио ресиверы являются примерами так называемых «приставок».12
Подключение HDD/DVD рекордера, видеомагнитофона и других источников видеосигналаДанный ресивер имеет аудио и видео входы и выходы, пригодные для подключения аналоговых или цифровых видео рекордеров, включая HDD/DVD-рекордеры и видеомагнитофоны.
• Только сигналы, которые подводятся к разъему VIDEO IN, могут выводиться с разъема VIDEO OUT.
• Аудиосигналы, которые подводятся через цифровой терминал, будут выводиться с аналогового терминала.
Примечание1 Если подключение выполнено с помощью оптического кабеля, нужно указать ресиверу, к какому цифровому входу подключена приставка или видеокомпонент (см. Выбор входного сигнала на стр. 41).
2 Если приставка или видеокомпонент также имеют выход HDMI или выход компонентного видео, его тоже можно подключить. Подробнее см. раздел Подключение с помощью HDMI на стр. 23 или Использование разъемов компонентного видео на стр. 26.
SURR BACK /FRONTHEIGHT
L(Single)
R
R
L
IN
R
L
IN
IN
OUT
IN
CD
TV/SAT DVD BD
DVR/VCR
MONITOR OUTPR PB Y
DVD IN BD INM
COMPONENT VIDEO
TV/SATIN
DVR/VCROUT IN
CD-R/TAPE
DVR/VCR CD-R/TAPE
PRE OUT
COAXIAL
OPTICAL
(CD)IN
ASSIGNABLE
ASSIGNABLE
1
(CD-R/TAPE)IN
AUDIO
ADAPTER PORT
VIDEO
(OUTPUT 5 V 100 mA MAX)
1
1 2ASSIGNA
IN 2
SUBWOOFERPRE OUT
ANTENNAFM
UNBAL75
AMLOOP
DIGITAL AUDIO OUT
OPTICAL R LANALOG AUDIO OUT
VIDEO OUTВыберите один
Приставка
2 1
MONITOROUT
SURR BACK /FRONTHEIGHT
L(Single)
R
R
L
IN
R
L
IN
IN
OUT
IN
CD
TV/SAT DVD BD
DVR/VCR
MONITOR OUTPR PB Y
DVD IN BD IN
OUTMONITOR
COMPONENT VIDEO
TV/SATIN
DVR/VCROUT IN
CD-R/TAPE
DVR/VCR CD-R/TAPE
PRE OUT
COAXIAL
OPTICAL
(CD)IN
ASSIGNABLE
ASSIGNABLE
1
(CD-R/TAPE)IN
AUDIO
ADAPTER PORT
VIDEO
(OUTPUT 5 V 100 mA MAX)
1(BD)IN 1
(DVD)IN 2
1 2ASSIGNABLE
1 2
IN 2
SUBWOOFERPRE OUT
ANTENNAFM
UNBAL75
AMLOOP
PLAYR LDIGITAL
AUDIO OUT ANALOG AUDIO OUTR L
ANALOG AUDIO IN
OPTICAL
VIDEO OUT
VIDEO IN
REC
Выберите один
DVR, VCR, проигрыватель LD, и т.д.
1
2
VSX-820_SYXCN_Ru.book 25 ページ 2010年4月12日 月曜日 午後7時2分
26Ru
Использование разъемов компонентного видеоПо сравнению с композитным видео компонентное видео обеспечивает значительно более высокое качество изображения. Еще большими преимуществами обладает видео с прогрессивной разверткой. При условии, что источник сигнала и телевизор поддерживают этот формат, обеспечивается очень устойчивое изображение без мерцания. Узнать, поддерживает ли ваше оборудование видео с прогрессивной разверткой (progressive-scan video), можно в документации к телевизору и компоненту-источнику видеосигнала.
• Если необходимо, назначьте входы компонентного видео для подключенного источника сигнала. Это необходимо сделать, только если подключение выполнено не в соответствии со следующими параметрами по умолчанию:
• COMPONENT VIDEO IN 1 – BD • COMPONENT VIDEO IN 2 – DVD
Подробнее см. раздел Меню назначения входов на стр. 46.
• По аудиоподключению см. Подключение компонента без разъема HDMI на стр. 24.
Внимание• Если любой компонент-источник подключен к ресиверу через вход компонентного видео, телевизор также следует подключить к ресиверу при помощи гнезд COMPONENT VIDEO OUT.
Подключение других аудиокомпонентовКоличество и тип соединений зависит от типа подключаемого компонента.1 Для подключения проигрывателей CD-R, MD, DAT, кассетного магнитофона или других аудиокомпонентов выполняйте действия, описанные ниже.2
R
R
L
IN
R
L
IN
IN
IN
CD
TV/SAT DVD BD
DVR/VCR
MONITOR OUTPR PB Y
DVD IN BD IN
OUTMONITOR
COMPONENT VIDEO
CD-R/TAPE PRE OUT
SSIGNABLE
SSIGNABLEAUDIO
(BD)IN 1
(DVD)IN 2
1 2ASSIGNABLE
SPE
1 2
ANTENNAFM
UNBAL75
AMLOOP
COMPONENT VIDEO INPR YPB
COMPONENT VIDEO OUTPR YPB
Проигрыватель BDТелевизор
Примечание1 Учтите, что необходимо подключить цифровые компоненты к гнездам аналогового аудио, если требуется выполнить запись с цифровых компонентов (например, минидиска) на аналоговые компоненты или наоборот.
2 Если подключение выполнено с помощью оптического или коаксиального кабеля, нужно указать ресиверу, к какому цифровому входу подключен компонент (см. Выбор входного сигнала на стр. 41).
SURR BACK /FRONTHEIGHT
L(Single)
R
R
L
IN
R
L
IN
IN
OUT
IN
CD
TV/SAT DVD BD
DVR/VCR
MONITOR OUTPR PB Y
DVD IN BD INM
COMPONENT VIDEO
TV/SATIN
DVR/VCROUT IN
CD-R/TAPE
DVR/VCR CD-R/TAPE
PRE OUT
COAXIAL
OPTICAL
(CD)IN
ASSIGNABLE
ASSIGNABLE
1
(CD-R/TAPE)IN
AUDIO
ADAPTER PORT
VIDEO
(OUTPUT 5 V 100 mA MAX)
1
1 2ASSIGN
IN 2
SUBWOOFERPRE OUT
ANTENNAFM
UNBAL75
AMLOOP
PLAYR L
DIGITAL AUDIO OUT ANALOG AUDIO OUT
COAXIAL R L
ANALOG AUDIO IN
RECOPTICAL
Выберите один
CD-R, MD, DAT, кассетный магнитофон, и т.д.
2
VSX-820_SYXCN_Ru.book 26 ページ 2010年4月12日 月曜日 午後7時2分
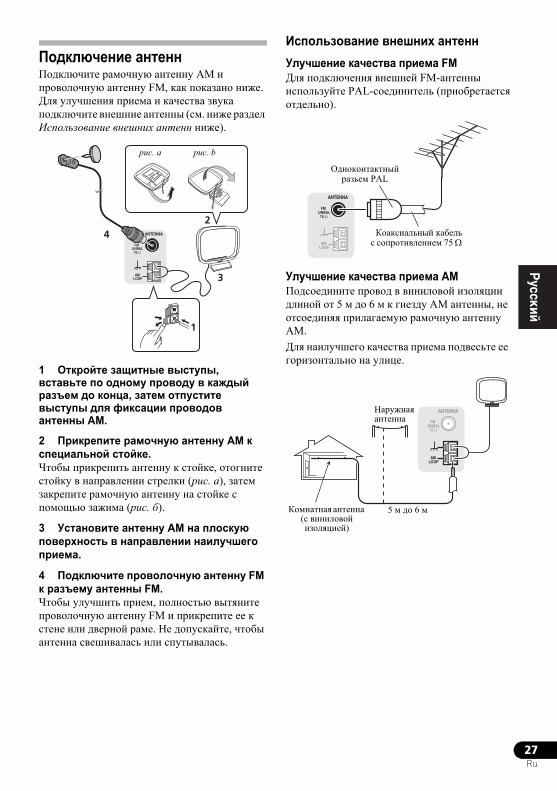
27Ru
EnglishFrançais
Deutsch
NederlandsItaliano
Español
Подключение антеннПодключите рамочную антенну АМ и проволочную антенну FM, как показано ниже. Для улучшения приема и качества звука подключите внешние антенны (см. ниже раздел Использование внешних антенн ниже).
1 Откройте защитные выступы, вставьте по одному проводу в каждый разъем до конца, затем отпустите выступы для фиксации проводов антенны AM.
2 Прикрепите рамочную антенну AM к специальной стойке.Чтобы прикрепить антенну к стойке, отогните стойку в направлении стрелки (рис. а), затем закрепите рамочную антенну на стойке с помощью зажима (рис. б).
3 Установите антенну AM на плоскую поверхность в направлении наилучшего приема.
4 Подключите проволочную антенну FM к разъему антенны FM.Чтобы улучшить прием, полностью вытяните проволочную антенну FM и прикрепите ее к стене или дверной раме. Не допускайте, чтобы антенна свешивалась или спутывалась.
Использование внешних антеннУлучшение качества приема FMДля подключения внешней FM-антенны используйте PAL-соединитель (приобретается отдельно).
Улучшение качества приема AMПодсоедините провод в виниловой изоляции длиной от 5 м дo 6 м к гнезду AM антенны, не отсоединяя прилагаемую рамочную антенну AM.Для наилучшего качества приема подвесьте ее горизонтально на улице.
ANTENNA
AM LOOP
2
1
3
4
рис. a рис. b
ANTENNA
FM UNBAL
75 Ω
AM LOOP
Одноконтактный разьем PAL
Коаксиальный кабельс сопротивлением 75 Ω
ANTENNA
FM UNBAL
75 Ω
AM LOOP
Наружная антенна
5 м до 6 мКомнатная антенна (с виниловой изоляцией)
VSX-820_SYXCN_Ru.book 27 ページ 2010年4月12日 月曜日 午後7時2分
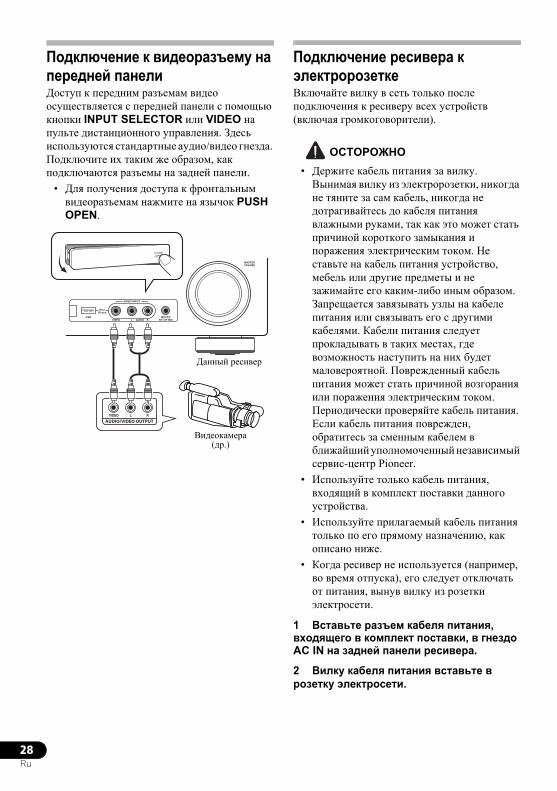
28Ru
Подключение к видеоразъему на передней панелиДоступ к передним разъемам видео осуществляется с передней панели с помощью кнопки INPUT SELECTOR или VIDEO на пульте дистанционного управления. Здесь используются стандартные аудио/видео гнезда. Подключите их таким же образом, как подключаются разъемы на задней панели.
• Для получения доступа к фронтальным видеоразъемам нажмите на язычок PUSH OPEN.
Подключение ресивера к электророзеткеВключайте вилку в сеть только после подключения к ресиверу всех устройств (включая громкоговорители).
ОСТОРОЖНО• Держите кабель питания за вилку. Вынимая вилку из электророзетки, никогда не тяните за сам кабель, никогда не дотрагивайтесь до кабеля питания влажными руками, так как это может стать причиной короткого замыкания и поражения электрическим током. Не ставьте на кабель питания устройство, мебель или другие предметы и не зажимайте его каким-либо иным образом. Запрещается завязывать узлы на кабеле питания или связывать его с другими кабелями. Кабели питания следует прокладывать в таких местах, где возможность наступить на них будет маловероятной. Поврежденный кабель питания может стать причиной возгорания или поражения электрическим током. Периодически проверяйте кабель питания. Если кабель питания поврежден, обратитесь за сменным кабелем в ближайший уполномоченный независимый сервис-центр Pioneer.
• Используйте только кабель питания, входящий в комплект поставки данного устройства.
• Используйте прилагаемый кабель питания только по его прямому назначению, как описано ниже.
• Когда ресивер не используется (например, во время отпуска), его следует отключать от питания, вынув вилку из розетки электросети.
1 Вставьте разъем кабеля питания, входящего в комплект поставки, в гнездо AC IN на задней панели ресивера.
2 Вилку кабеля питания вставьте в розетку электросети.
MASTERVOLUME
MCACCSETUP MIC
VIDEO INPUT
AUDIOL RVIDEO
iPodiPhone
USB
CONTROL ON / OFF
LVIDEO R
AUDIO/VIDEO OUTPUT
Данный ресивер
Видеокамера (др.)
VSX-820_SYXCN_Ru.book 28 ページ 2010年4月12日 月曜日 午後7時2分
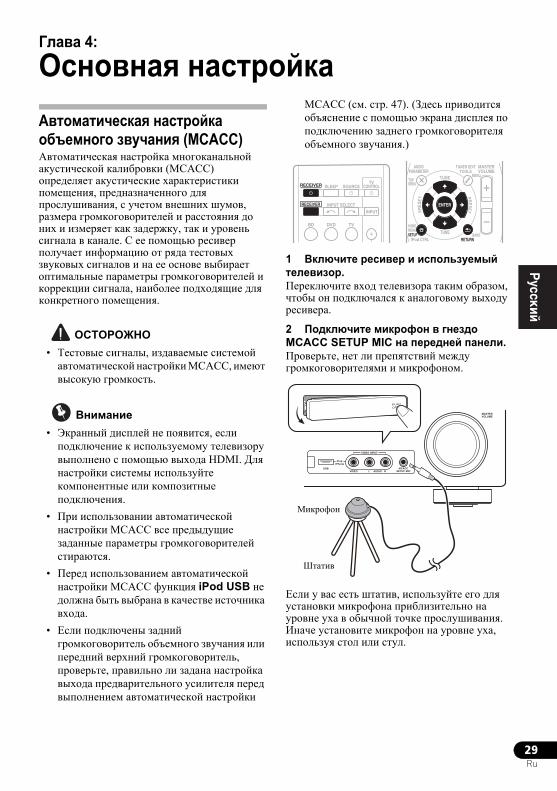
29Ru
EnglishFrançais
Deutsch
NederlandsItaliano
EspañolГлава 4:
Основная настройкаАвтоматическая настройка объемного звучания (MCACC)Автоматическая настройка многоканальной акустической калибровки (MCACC) определяет акустические характеристики помещения, предназначенного для прослушивания, с учетом внешних шумов, размера громкоговорителей и расстояния до них и измеряет как задержку, так и уровень сигнала в канале. С ее помощью ресивер получает информацию от ряда тестовых звуковых сигналов и на ее основе выбирает оптимальные параметры громкоговорителей и коррекции сигнала, наиболее подходящие для конкретного помещения.
ОСТОРОЖНО• Тестовые сигналы, издаваемые системой автоматической настройки MCACC, имеют высокую громкость.
Внимание• Экранный дисплей не появится, если подключение к используемому телевизору выполнено с помощью выхода HDMI. Для настройки системы используйте компонентные или композитные подключения.
• При использовании автоматической настройки MCACC все предыдущие заданные параметры громкоговорителей стираются.
• Перед использованием автоматической настройки MCACC функция iPod USB не должна быть выбрана в качестве источника входа.
• Если подключены задний громкоговоритель объемного звучания или передний верхний громкоговоритель, проверьте, правильно ли задана настройка выхода предварительного усилителя перед выполнением автоматической настройки
MCACC (см. стр. 47). (Здесь приводится объяснение с помощью экрана дисплея по подключению заднего громкоговорителя объемного звучания.)
1 Включите ресивер и используемый телевизор.Переключите вход телевизора таким образом, чтобы он подключался к аналоговому выходу ресивера.
2 Подключите микрофон в гнездо MCACC SETUP MIC на передней панели. Проверьте, нет ли препятствий между громкоговорителями и микрофоном.
Если у вас есть штатив, используйте его для установки микрофона приблизительно на уровне уха в обычной точке прослушивания. Иначе установите микрофон на уровне уха, используя стол или стул.
BD DVD
INPUT SELECT
SOURCESLEEPTV
CONTROL
TV
INPUT
RECEIVER
RECEIVER ENTER
RETURN
AUDIOPARAMETER
TUNER EDITTOOLS
MASTERVOLUME
iPod CTRLBAND
MENU
HOMEMENUSETUP
TOPMENU
TUNE
TUNE
PRESETPR
ESET
MASTERVOLUME
MCACCSETUP MIC
VIDEO INPUT
AUDIOL RVIDEO
iPodiPhone
USB
CONTROL ON / OFF
Штатив
Микрофон
VSX-820_SYXCN_Ru.book 29 ページ 2010年4月12日 月曜日 午後7時2分
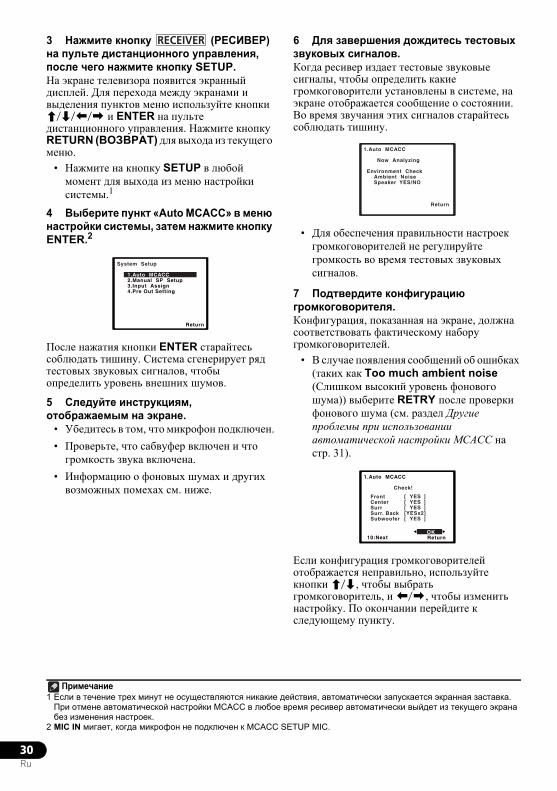
30Ru
3 Нажмите кнопку (РЕСИВЕР) на пульте дистанционного управления, после чего нажмите кнопку SETUP.На экране телевизора появится экранный дисплей. Для перехода между экранами и выделения пунктов меню используйте кнопки /// и ENTER на пульте дистанционного управления. Нажмите кнопку RETURN (ВОЗВРАТ) для выхода из текущего меню.
• Нажмите на кнопку SETUP в любой момент для выхода из меню настройки системы.1
4 Выберите пункт «Auto MCACC» в меню настройки системы, затем нажмите кнопку ENTER.2
После нажатия кнопки ENTER старайтесь соблюдать тишину. Система сгенерирует ряд тестовых звуковых сигналов, чтобы определить уровень внешних шумов.
5 Следуйте инструкциям, отображаемым на экране.
• Убедитесь в том, что микрофон подключен.• Проверьте, что сабвуфер включен и что громкость звука включена.
• Информацию о фоновых шумах и других возможных помехах см. ниже.
6 Для завершения дождитесь тестовых звуковых сигналов.Когда ресивер издает тестовые звуковые сигналы, чтобы определить какие громкоговорители установлены в системе, на экране отображается сообщение о состоянии. Во время звучания этих сигналов старайтесь соблюдать тишину.
• Для обеспечения правильности настроек громкоговорителей не регулируйте громкость во время тестовых звуковых сигналов.
7 Подтвердите конфигурацию громкоговорителя.Конфигурация, показанная на экране, должна соответствовать фактическому набору громкоговорителей.
• В случае появления сообщений об ошибках (таких как Too much ambient noise (Слишком высокий уровень фонового шума)) выберите RETRY после проверки фонового шума (см. раздел Другие проблемы при использовании автоматической настройки MCACC на стр. 31).
Если конфигурация громкоговорителей отображается неправильно, используйте кнопки /, чтобы выбрать громкоговоритель, и /, чтобы изменить настройку. По окончании перейдите к следующему пункту.
Примечание1 Если в течение трех минут не осуществляются никакие действия, автоматически запускается экранная заставка. При отмене автоматической настройки MCACC в любое время ресивер автоматически выйдет из текущего экрана без изменения настроек.
2 MIC IN мигает, когда микрофон не подключен к MCACC SETUP MIC.
RECEIVER
System Setup
1.Auto MCACC2.Manual SP Setup3.Input Assign4.Pre Out Setting
Return
1.Auto MCACC
Now Analyzing
Environment Check Ambient Noise Speaker YES/NO
Return
1.Auto MCACC
Check!
OK Return 10:Next
Front CenterSurrSurr. BackSubwoofer
[ YES ][ YES ][ YES ][YESx2][ YES ]
VSX-820_SYXCN_Ru.book 30 ページ 2010年4月12日 月曜日 午後7時2分
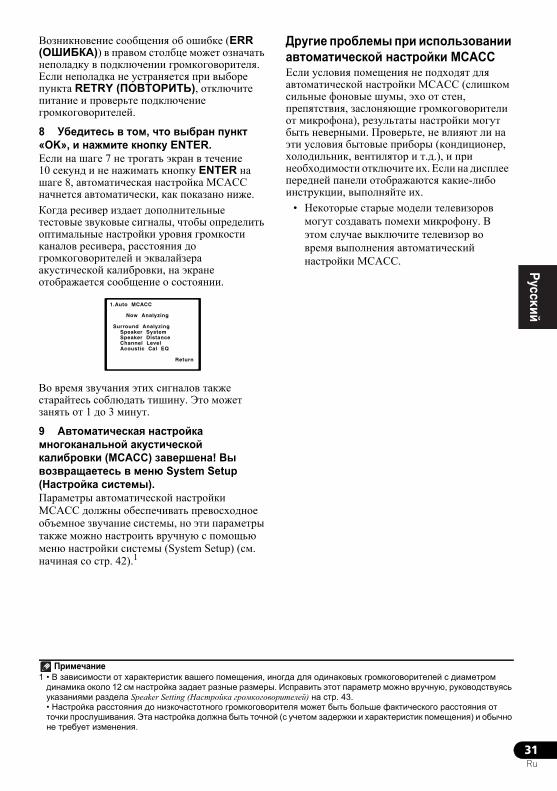
31Ru
EnglishFrançais
Deutsch
NederlandsItaliano
EspañolВозникновение сообщения об ошибке (ERR (ОШИБКА)) в правом столбце может означать неполадку в подключении громкоговорителя. Если неполадка не устраняется при выборе пункта RETRY (ПОВТОРИТЬ), отключите питание и проверьте подключение громкоговорителей.
8 Убедитесь в том, что выбран пункт «OK», и нажмите кнопку ENTER.Если на шаге 7 не трогать экран в течение 10 секунд и не нажимать кнопку ENTER на шаге 8, автоматическая настройка MCACC начнется автоматически, как показано ниже.Когда ресивер издает дополнительные тестовые звуковые сигналы, чтобы определить оптимальные настройки уровня громкости каналов ресивера, расстояния до громкоговорителей и эквалайзера акустической калибровки, на экране отображается сообщение о состоянии.
Во время звучания этих сигналов также старайтесь соблюдать тишину. Это может занять от 1 до 3 минут.
9 Автоматическая настройка многоканальной акустической калибровки (MCACC) завершена! Вы возвращаетесь в меню System Setup (Настройка системы).Параметры автоматической настройки MCACC должны обеспечивать превосходное объемное звучание системы, но эти параметры также можно настроить вручную с помощью меню настройки системы (System Setup) (см. начиная со стр. 42).1
Другие проблемы при использовании автоматической настройки MCACC Если условия помещения не подходят для автоматической настройки MCACC (слишком сильные фоновые шумы, эхо от стен, препятствия, заслоняющие громкоговорители от микрофона), результаты настройки могут быть неверными. Проверьте, не влияют ли на эти условия бытовые приборы (кондиционер, холодильник, вентилятор и т.д.), и при необходимости отключите их. Если на дисплее передней панели отображаются какие-либо инструкции, выполняйте их.
• Некоторые старые модели телевизоров могут создавать помехи микрофону. В этом случае выключите телевизор во время выполнения автоматический настройки MCACC.
Примечание1 • В зависимости от характеристик вашего помещения, иногда для одинаковых громкоговорителей с диаметром динамика около 12 см настройка задает разные размеры. Исправить этот параметр можно вручную, руководствуясь указаниями раздела Speaker Setting (Настройка громкоговорителей) на стр. 43.• Настройка расстояния до низкочастотного громкоговорителя может быть больше фактического расстояния от точки прослушивания. Эта настройка должна быть точной (с учетом задержки и характеристик помещения) и обычно не требует изменения.
1.Auto MCACC
Now Analyzing
Surround Analyzing Speaker System Speaker Distance Channel Level Acoustic Cal EQ
Return
VSX-820_SYXCN_Ru.book 31 ページ 2010年4月12日 月曜日 午後7時2分
32Ru
Глава 5:
Прослушивание системы Внимание
• Режимы звучания и многие функции, описанные в этом разделе, могут быть недоступны при некоторых значениях источника, настроек или статуса ресивера.
Основные операции воспроизведенияВ данном разделе приведены основные инструкции по воспроизведению источника (например, диска DVD) с помощью системы домашнего кинотеатра.1 Включите компоненты системы и ресивер.Сначала включите аппаратуру для воспроизведения (например, проигрыватель DVD), используемый телевизор1 и низкочастотный громкоговоритель (если имеется), затем - ресивер (нажмите RECEIVER).
• Убедитесь, что установочный микрофон отсоединен.
2 Выберите функцию входа, которую требуется воспроизвести.Можно использовать кнопки функций входа на пульте ДУ, INPUT SELECT, или регулятор INPUT SELECTOR на передней панели.2
3 Нажмите AUTO/DIRECT для выбора пункта «AUTO SURROUND» и начните воспроизведение источника.3Если воспроизводится диск DVD с объемным звучанием в формате Dolby Digital или DTS, звучание должно быть объемным. Если воспроизводится стереофонический источник, в режиме прослушивания по умолчанию звучание будет воспроизводиться через передние правый и левый громкоговорители.На дисплее передней панели можно проверить, правильно ли выполняется воспроизведение объемного звучания.При использовании заднего громкоговорителя объемного звучания, при воспроизведении сигналов Dolby Digital отображается 2D+PLIIx, и при воспроизведении 5.1-канальных сигналов DTS отображается DTS+NEO:6.Если задний громкоговоритель объемного звучания не используется, при воспроизведении сигналов Dolby Digital отображается 2D.Если информация на дисплее не соответствует входному сигналу и режиму прослушивания, проверьте подключения и настройки.
4 Установите уровень громкости при помощи регулятора громкости.Выключите звучание громкоговорителей телевизора, чтобы все звуковые сигналы выводились через громкоговорители, подключенные к данному ресиверу.
Примечание1 Убедитесь, что видеовход телевизора установлен на данный ресивер (например, при подключении данного ресивера к гнездам VIDEO на телевизоре, убедитесь, что выбран вход VIDEO).
2 Если необходимо вручную переключить тип входного сигнала, нажмите SIGNAL SEL (стр. 41).3 • Возможно, потребуется проверить настройки цифрового аудиовыхода на проигрывателе DVD или цифровом спутниковом ресивере. Он должен быть установлен на вывод аудиосигнала в формате Dolby Digital, DTS и 88,2 кГц/96 кГц PCM (2-канальный), а если имеется параметр MPEG audio, выберите конвертирование сигнала MPEG audio в формат PCM.• В зависимости от проигрывателя DVD или воспроизводимых дисков может выводиться только 2-канальное цифровое стереофоническое и аналоговое звучание. В этом случае, если требуется получить многоканальное объемное звучание, ресивер необходимо установить в режим многоканального прослушивания.
VSX-820_SYXCN_Ru.book 32 ページ 2010年4月12日 月曜日 午後7時2分
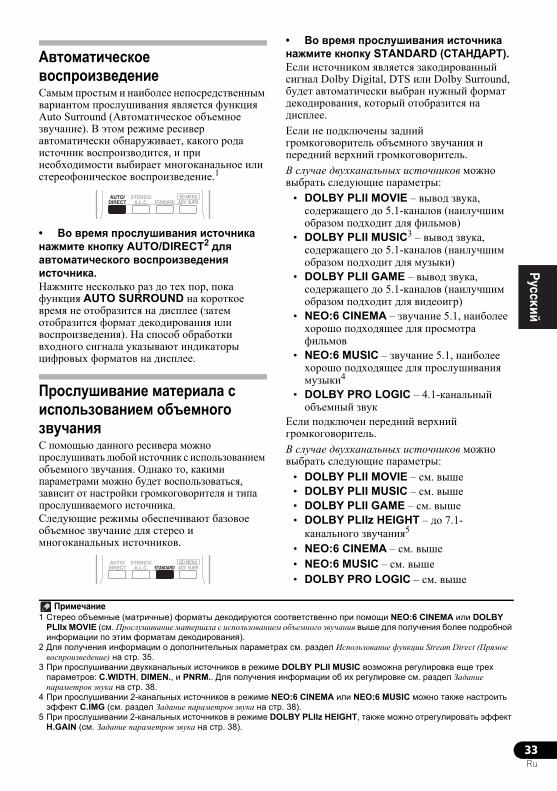
33Ru
EnglishFrançais
Deutsch
NederlandsItaliano
Español
Автоматическое воспроизведениеCамым простым и наиболее непосредственным вариантом прослушивания является функция Auto Surround (Автоматическое объемное звучание). В этом режиме ресивер автоматически обнаруживает, какого рода источник воспроизводится, и при необходимости выбирает многоканальное или стереофоническое воспроизведение.1
• Во время прослушивания источника нажмите кнопку AUTO/DIRECT2 для автоматического воспроизведения источника.Нажмите несколько раз до тех пор, пока функция AUTO SURROUND на короткое время не отобразится на дисплее (затем отобразится формат декодирования или воспроизведения). На способ обработки входного сигнала указывают индикаторы цифровых форматов на дисплее.
Прослушивание материала с использованием объемного звучанияС помощью данного ресивера можно прослушивать любой источник с использованием объемного звучания. Однако то, какими параметрами можно будет воспользоваться, зависит от настройки громкоговорителя и типа прослушиваемого источника.Следующие режимы обеспечивают базовое объемное звучание для стерео и многоканальных источников.
• Во время прослушивания источника нажмите кнопку STANDARD (СТАНДАРТ).Если источником является закодированный сигнал Dolby Digital, DTS или Dolby Surround, будет автоматически выбран нужный формат декодирования, который отобразится на дисплее.Если не подключены задний громкоговоритель объемного звучания и передний верхний громкоговоритель.В случае двухканальных источников можно выбрать следующие параметры:
• DOLBY PLII MOVIE – вывод звука, содержащего до 5.1-каналов (наилучшим образом подходит для фильмов)
• DOLBY PLII MUSIC3 – вывод звука, содержащего до 5.1-каналов (наилучшим образом подходит для музыки)
• DOLBY PLII GAME – вывод звука, содержащего до 5.1-каналов (наилучшим образом подходит для видеоигр)
• NEO:6 CINEMA – звучание 5.1, наиболее хорошо подходящее для просмотра фильмов
• NEO:6 MUSIC – звучание 5.1, наиболее хорошо подходящее для прослушивания музыки4
• DOLBY PRO LOGIC – 4.1-канальный объемный звук
Если подключен передний верхний громкоговоритель.В случае двухканальных источников можно выбрать следующие параметры:
• DOLBY PLII MOVIE – см. вышe• DOLBY PLII MUSIC – см. вышe• DOLBY PLII GAME – см. вышe• DOLBY PLIIz HEIGHT – до 7.1-канального звучания5
• NEO:6 CINEMA – см. вышe• NEO:6 MUSIC – см. вышe• DOLBY PRO LOGIC – см. вышe
Примечание1 Стерео объемные (матричные) форматы декодируются соответственно при помощи NEO:6 CINEMA или DOLBY
PLIIx MOVIE (см. Прослушивание материала с использованием объемного звучания вышe для получения более подробной информации по этим форматам декодирования).
2 Для получения информации о дополнительных параметрах см. раздел Использование функции Stream Direct (Прямое воспроизведение) на стр. 35.
BD MENUSTANDARD ADV SURR
STEREO/A.L.C.
AUTO/DIRECT
BD MENUSTANDARD ADV SURR
STEREO/A.L.C.
AUTO/DIRECT
3 При прослушивании двухканальных источников в режиме DOLBY PLII MUSIC возможна регулировка еще трех параметров: C.WIDTH, DIMEN., и PNRM.. Для получения информации об их регулировке см. раздел Задание параметров звука на стр. 38.
4 При прослушивании 2-канальных источников в режиме NEO:6 CINEMA или NEO:6 MUSIC можно также настроить эффект C.IMG (см. раздел Задание параметров звука на стр. 38).
5 При прослушивании 2-канальных источников в режиме DOLBY PLIIz HEIGHT, также можно отрегулировать эффект H.GAIN (см. Задание параметров звука на стр. 38).
VSX-820_SYXCN_Ru.book 33 ページ 2010年4月12日 月曜日 午後7時2分
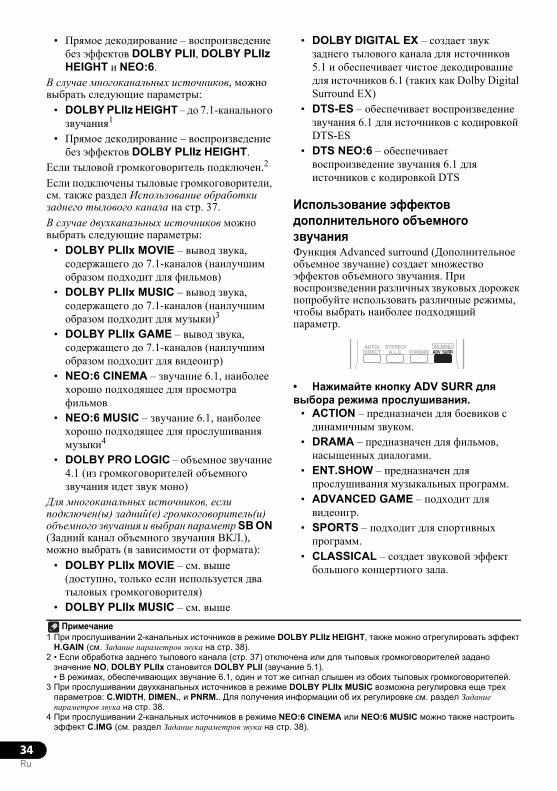
34Ru
• Прямое декодирование – воспроизведение без эффектов DOLBY PLII, DOLBY PLIIz HEIGHT и NEO:6.
В случае многоканальных источников, можно выбрать следующие параметры:
• DOLBY PLIIz HEIGHT – до 7.1-канального звучания1
• Прямое декодирование – воспроизведение без эффектов DOLBY PLIIz HEIGHT.
Если тыловой громкоговоритель подключен.2
Если подключены тыловые громкоговорители, см. также раздел Использование обработки заднего тылового канала на стр. 37.В случае двухканальных источников можно выбрать следующие параметры:
• DOLBY PLIIx MOVIE – вывод звука, содержащего до 7.1-каналов (наилучшим образом подходит для фильмов)
• DOLBY PLIIx MUSIC – вывод звука, содержащего до 7.1-каналов (наилучшим образом подходит для музыки)3
• DOLBY PLIIx GAME – вывод звука, содержащего до 7.1-каналов (наилучшим образом подходит для видеоигр)
• NEO:6 CINEMA – звучание 6.1, наиболее хорошо подходящее для просмотра фильмов
• NEO:6 MUSIC – звучание 6.1, наиболее хорошо подходящее для прослушивания музыки4
• DOLBY PRO LOGIC – объемное звучание 4.1 (из громкоговорителей объемного звучания идет звук моно)
Для многоканальных источников, если подключен(ы) задний(е) громкоговоритель(и) объемного звучания и выбран параметр SB ON (Задний канал объемного звучания ВКЛ.), можно выбрать (в зависимости от формата):
• DOLBY PLIIx MOVIE – см. выше (доступно, только если используется два тыловых громкоговорителя)
• DOLBY PLIIx MUSIC – см. вышe
• DOLBY DIGITAL EX – создает звук заднего тылового канала для источников 5.1 и обеспечивает чистое декодирование для источников 6.1 (таких как Dolby Digital Surround EX)
• DTS-ES – обеспечивает воспроизведение звучания 6.1 для источников с кодировкой DTS-ES
• DTS NEO:6 – обеспечивает воспроизведение звучания 6.1 для источников с кодировкой DTS
Использование эффектов дополнительного объемного звучанияФункция Advanced surround (Дополнительное объемное звучание) создает множество эффектов объемного звучания. При воспроизведении различных звуковых дорожек попробуйте использовать различные режимы, чтобы выбрать наиболее подходящий параметр.
• Нажимайте кнопку ADV SURR для выбора режима прослушивания.
• ACTION – предназначен для боевиков с динамичным звуком.
• DRAMA – предназначен для фильмов, насыщенных диалогами.
• ENT.SHOW – предназначен для прослушивания музыкальных программ.
• ADVANCED GAME – подходит для видеоигр.
• SPORTS – подходит для спортивных программ.
• CLASSICAL – создает звуковой эффект большого концертного зала.
Примечание1 При прослушивании 2-канальных источников в режиме DOLBY PLIIz HEIGHT, также можно отрегулировать эффект
H.GAIN (см. Задание параметров звука на стр. 38).2 • Если обработка заднего тылового канала (стр. 37) отключена или для тыловых громкоговорителей задано значение NO, DOLBY PLIIx становится DOLBY PLII (звучание 5.1).• В режимах, обеспечивающих звучание 6.1, один и тот же сигнал слышен из обоих тыловых громкоговорителей.
3 При прослушивании двухканальных источников в режиме DOLBY PLIIx MUSIC возможна регулировка еще трех параметров: C.WIDTH, DIMEN., и PNRM.. Для получения информации об их регулировке см. раздел Задание параметров звука на стр. 38.
4 При прослушивании 2-канальных источников в режиме NEO:6 CINEMA или NEO:6 MUSIC можно также настроить эффект C.IMG (см. раздел Задание параметров звука на стр. 38).
BD MENUSTANDARD ADV SURR
STEREO/A.L.C.
AUTO/DIRECT
VSX-820_SYXCN_Ru.book 34 ページ 2010年4月12日 月曜日 午後7時2分
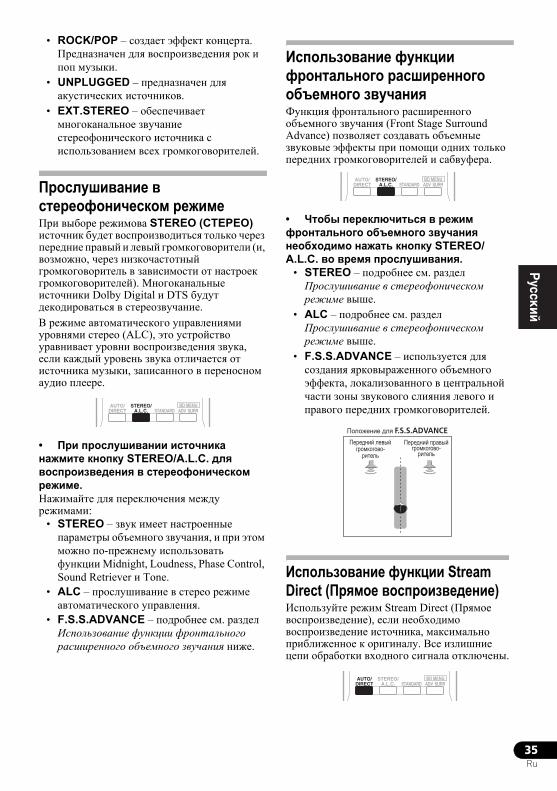
35Ru
EnglishFrançais
Deutsch
NederlandsItaliano
Español• ROCK/POP – создает эффект концерта. Предназначен для воспроизведения рок и поп музыки.
• UNPLUGGED – предназначен для акустических источников.
• EXT.STEREO – обеспечивает многоканальное звучание стереофонического источника с использованием всех громкоговорителей.
Прослушивание в стереофоническом режимеПри выборе режимовa STEREO (СТЕРЕО) источник будет воспроизводиться только через передние правый и левый громкоговорители (и, возможно, через низкочастотный громкоговоритель в зависимости от настроек громкоговорителей). Многоканальные источники Dolby Digital и DTS будут декодироваться в стереозвучание.В режиме автоматического управлениями уровнями стерео (ALC), это устройство уравнивает уровни воспроизведения звука, если каждый уровень звука отличается от источника музыки, записанного в переносном аудио плеере.
• При прослушивании источника нажмите кнопку STEREO/A.L.C. для воспроизведения в стереофоническом режиме.Нажимайте для переключения между режимами:
• STEREO – звук имеет настроенные параметры объемного звучания, и при этом можно по-прежнему использовать функции Midnight, Loudness, Phase Control, Sound Retriever и Tone.
• ALC – прослушивание в стерео режиме автоматического управления.
• F.S.S.ADVANCE – подробнее см. раздел Использование функции фронтального расширенного объемного звучания ниже.
Использование функции фронтального расширенного объемного звучанияФункция фронтального расширенного объемного звучания (Front Stage Surround Advance) позволяет создавать объемные звуковые эффекты при помощи одних только передних громкоговорителей и сабвуфера.
• Чтобы переключиться в режим фронтального объемного звучания необходимо нажать кнопку STEREO/A.L.C. во время прослушивания.
• STEREO – подробнее см. раздел Прослушивание в стереофоническом режиме вышe.
• ALC – подробнее см. раздел Прослушивание в стереофоническом режиме вышe.
• F.S.S.ADVANCE – используется для создания ярковыраженного объемного эффекта, локализованного в центральной части зоны звукового слияния левого и правого передних громкоговорителей.
Использование функции Stream Direct (Прямое воспроизведение)Используйте режим Stream Direct (Прямое воспроизведение), если необходимо воспроизведение источника, максимально приближенное к оригиналу. Все излишние цепи обработки входного сигнала отключены.
BD MENUSTANDARD ADV SURR
AUTO/DIRECT
STEREO/A.L.C.
BD MENUSTANDARD ADV SURR
AUTO/DIRECT
STEREO/A.L.C.
BD MENUSTANDARD ADV SURR
STEREO/A.L.C.
AUTO/DIRECT
VSX-820_SYXCN_Ru.book 35 ページ 2010年4月12日 月曜日 午後7時2分
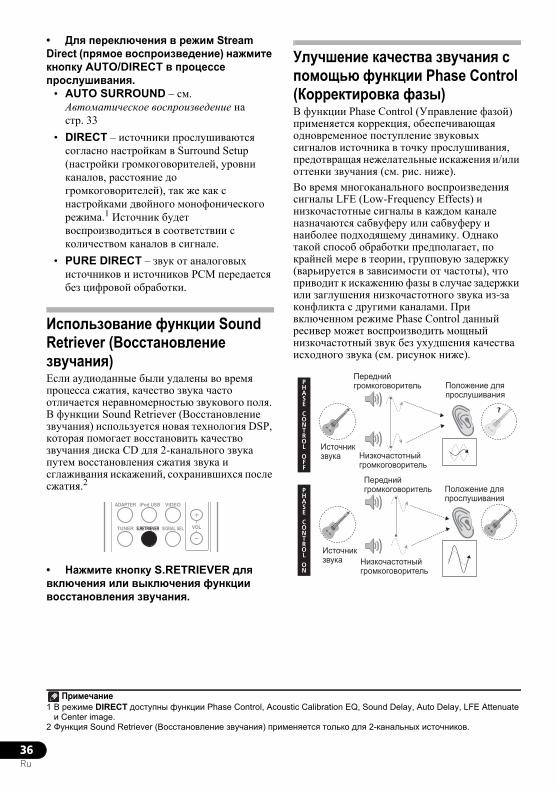
36Ru
• Для переключения в режим Stream Direct (прямое воспроизведение) нажмите кнопку AUTO/DIRECT в процессе прослушивания.
• AUTO SURROUND – см. Автоматическое воспроизведение на стр. 33
• DIRECT – источники прослушиваются согласно настройкам в Surround Setup (настройки громкоговорителей, уровни каналов, расстояние до громкоговорителей), так же как с настройками двойного монофонического режима.1 Источник будет воспроизводиться в соответствии с количеством каналов в сигнале.
• PURE DIRECT – звук от аналоговых источников и источников PCM передается без цифровой обработки.
Использование функции Sound Retriever (Восстановление звучания)Если аудиоданные были удалены во время процесса сжатия, качество звука часто отличается неравномерностью звукового поля. В функции Sound Retriever (Восстановление звучания) используется новая технология DSP, которая помогает восстановить качество звучания диска CD для 2-канального звука путем восстановления сжатия звука и сглаживания искажений, сохранившихся после сжатия.2
• Нажмите кнопку S.RETRIEVER для включения или выключения функции восстановления звучания.
Улучшение качества звучания с помощью функции Phase Control (Корректировка фазы)В функции Phase Control (Управление фазой) применяется коррекция, обеспечивающая одновременное поступление звуковых сигналов источника в точку прослушивания, предотвращая нежелательные искажения и/или оттенки звучания (см. рис. ниже).Во время многоканального воспроизведения сигналы LFE (Low-Frequency Effects) и низкочастотные сигналы в каждом канале назначаются сабвуферу или сабвуферу и наиболее подходящему динамику. Однако такой способ обработки предполагает, по крайней мере в теории, групповую задержку (варьируется в зависимости от частоты), что приводит к искажению фазы в случае задержки или заглушения низкочастотного звука из-за конфликта с другими каналами. При включенном режиме Phase Control данный ресивер может воспроизводить мощный низкочастотный звук без ухудшения качества исходного звука (см. рисунок ниже).
Примечание1 В режиме DIRECT доступны функции Phase Control, Acoustic Calibration EQ, Sound Delay, Auto Delay, LFE Attenuate и Center image.
2 Функция Sound Retriever (Восстановление звучания) применяется только для 2-канальных источников.
ADAPTER iPod USB VIDEO
TUNER S.RETRIEVER SIGNAL SEL VOL
?
PHASE
CONTROL
OFF
PHASE
CONTROL
ON
Передний громкоговоритель Положение для
прослушивания
Источник звука Низкочастотный
громкоговоритель
Положение для прослушивания
Передний громкоговоритель
Источник звука Низкочастотный
громкоговоритель
VSX-820_SYXCN_Ru.book 36 ページ 2010年4月12日 月曜日 午後7時2分
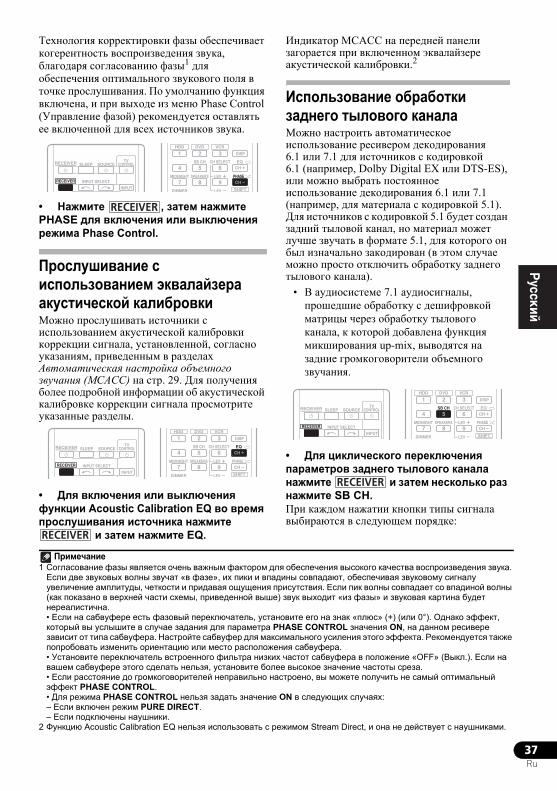
37Ru
EnglishFrançais
Deutsch
NederlandsItaliano
EspañolТехнология корректировки фазы обеспечивает когерентность воспроизведения звука, благодаря согласованию фазы1 для обеспечения оптимального звукового поля в точке прослушивания. По умолчанию функция включена, и при выходе из меню Phase Control (Управление фазой) рекомендуется оставлять ее включенной для всех источников звука.
• Нажмите , затем нажмите PHASE для включения или выключения режима Phase Control.
Прослушивание с использованием эквалайзера акустической калибровкиМожно прослушивать источники с использованием акустической калибровки коррекции сигнала, установленной, согласно указаниям, приведенным в разделах Автоматическая настройка объемного звучания (MCACC) на стр. 29. Для получения более подробной информации об акустической калибровке коррекции сигнала просмотрите указанные разделы.
• Для включения или выключения функции Acoustic Calibration EQ во время прослушивания источника нажмите
и затем нажмите EQ.
Индикатор MCACC на передней панели загорается при включенном эквалайзере акустической калибровки.2
Использование обработки заднего тылового каналаМожно настроить автоматическое использование ресивером декодирования 6.1 или 7.1 для источников с кодировкой 6.1 (например, Dolby Digital EX или DTS-ES), или можно выбрать постоянное использование декодирования 6.1 или 7.1 (например, для материала с кодировкой 5.1). Для источников с кодировкой 5.1 будет создан задний тыловой канал, но материал может лучше звучать в формате 5.1, для которого он был изначально закодирован (в этом случае можно просто отключить обработку заднего тылового канала).
• В аудиосистеме 7.1 аудиосигналы, прошедшие обработку с дешифровкой матрицы через обработку тылового канала, к которой добавлена функция микширования up-mix, выводятся на задние громкоговорители объемного звучания.
• Для циклического переключения параметров заднего тылового канала нажмите и затем несколько раз нажмите SB CH.При каждом нажатии кнопки типы сигнала выбираются в следующем порядке:
Примечание1 Согласование фазы является очень важным фактором для обеспечения высокого качества воспроизведения звука. Если две звуковых волны звучат «в фазе», их пики и впадины совпадают, обеспечивая звуковому сигналу увеличение амплитуды, четкости и придавая ощущения присутствия. Если пик волны совпадает со впадиной волны (как показано в верхней части схемы, приведенной выше) звук выходит «из фазы» и звуковая картина будет нереалистична.• Если на сабвуфере есть фазовый переключатель, установите его на знак «плюс» (+) (или 0°). Однако эффект, который вы услышите в случае задания для параметра PHASE CONTROL значения ON, на данном ресивере зависит от типа сабвуфера. Настройте сабвуфер для максимального усиления этого эффекта. Рекомендуется также попробовать изменить ориентацию или место расположения сабвуфера.• Установите переключатель встроенного фильтра низких частот сабвуфера в положение «OFF» (Выкл.). Если на вашем сабвуфере этого сделать нельзя, установите более высокое значение частоты среза.• Если расстояние до громкоговорителей неправильно настроено, вы можете получить не самый оптимальный эффект PHASE CONTROL.• Для режима PHASE CONTROL нельзя задать значение ON в следующих случаях:– Если включен режим PURE DIRECT.– Если подключены наушники.
INPUT SELECT
SOURCESLEEPTV
CONTROL
INPUT
RECEIVER
RECEIVER
DIMMER
1
4
7MIDNIGHT
HDD
2
5
8SPEAKERS LEV
LEV
SB CH
DISP
EQ
PHASE
DVD
3
6
9
CH
CH
CH SELECT
VCR
SHIFT
RECEIVER
INPUT SELECT
SOURCESLEEPTV
CONTROL
INPUT
RECEIVER
RECEIVER
DIMMER
1
4
7MIDNIGHT
HDD
2
5
8SPEAKERS LEV
LEV
SB CH
DISP
EQ
PHASE
DVD
3
6
9
CH
CH
CH SELECT
VCR
SHIFT
RECEIVER
2 Функцию Acoustic Calibration EQ нельзя использовать с режимом Stream Direct, и она не действует с наушниками.
INPUT SELECT
SOURCESLEEPTV
CONTROL
INPUT
RECEIVER
RECEIVER
DIMMER
1
4
7MIDNIGHT
HDD
2
5
8SPEAKERS LEV
LEV
SB CH
DISP
EQ
PHASE
DVD
3
6
9
CH
CH
CH SELECT
VCR
SHIFT
RECEIVER
VSX-820_SYXCN_Ru.book 37 ページ 2010年4月12日 月曜日 午後7時2分
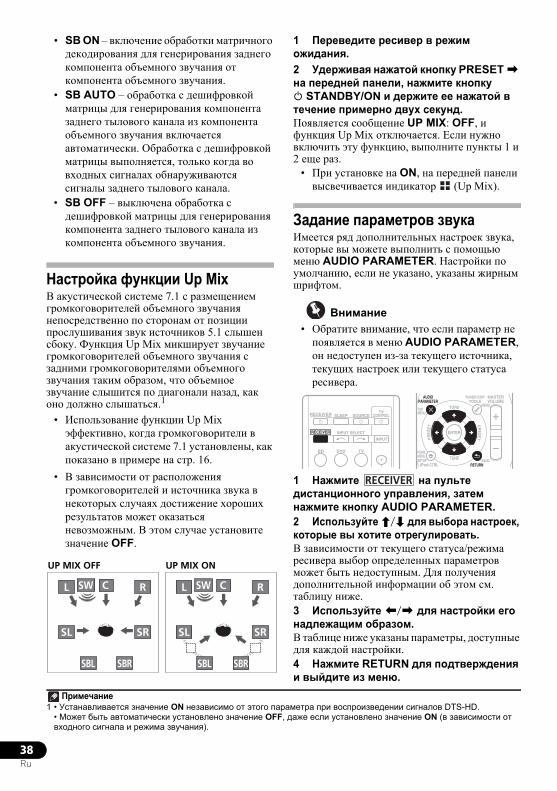
38Ru
• SB ON – включение обработки матричного декодирования для генерирования заднего компонента объемного звучания от компонента объемного звучания.
• SB AUTO – обработка с дешифровкой матрицы для генерирования компонента заднего тылового канала из компонента объемного звучания включается автоматически. Обработка с дешифровкой матрицы выполняется, только когда во входных сигналах обнаруживаются сигналы заднего тылового канала.
• SB OFF – выключена обработка с дешифровкой матрицы для генерирования компонента заднего тылового канала из компонента объемного звучания.
Настройка функции Up MixВ акустической системе 7.1 с размещением громкоговорителей объемного звучания непосредственно по сторонам от позиции прослушивания звук источников 5.1 слышен сбоку. Функция Up Mix микширует звучание громкоговорителей объемного звучания с задними громкоговорителями объемного звучания таким образом, что объемное звучание слышится по диагонали назад, как оно должно слышаться.1
• Использование функции Up Mix эффективно, когда громкоговорители в акустической системе 7.1 установлены, как показано в примере на стр. 16.
• В зависимости от расположения громкоговорителей и источника звука в некоторых случаях достижение хороших результатов может оказаться невозможным. В этом случае установите значение OFF.
1 Переведите ресивер в режим ожидания.2 Удерживая нажатой кнопку PRESET на передней панели, нажмите кнопку STANDBY/ON и держите ее нажатой в течение примерно двух секунд.Появляется сообщение UP MIX: OFF, и функция Up Mix отключается. Если нужно включить эту функцию, выполните пункты 1 и 2 еще раз.
• При установке на ON, на передней панели высвечивается индикатор (Up Mix).
Задание параметров звукаИмеется ряд дополнительных настроек звука, которые вы можете выполнить с помощью меню AUDIO PARAMETER. Настройки по умолчанию, если не указано, указаны жирным шрифтом.
Внимание• Обратите внимание, что если параметр не появляется в меню AUDIO PARAMETER, он недоступен из-за текущего источника, текущих настроек или текущего статуса ресивера.
1 Нажмите на пульте дистанционного управления, затем нажмите кнопку AUDIO PARAMETER.2 Используйте / для выбора настроек, которые вы хотите отрегулировать.В зависимости от текущего статуса/режима ресивера выбор определенных параметров может быть недоступным. Для получения дополнительной информации об этом см. таблицу ниже.3 Используйте / для настройки его надлежащим образом.В таблице ниже указаны параметры, доступные для каждой настройки.4 Нажмите RETURN для подтверждения и выйдите из меню.
Примечание1 • Устанавливается значение ON независимо от этого параметра при воспроизведении сигналов DTS-HD.
• Может быть автоматически установлено значение OFF, даже если установлено значение ON (в зависимости от входного сигнала и режима звучания).
CSWL R
SL SR
SBL SBR SBL SBR
CSWL R
SL SR
UP MIX OFF UP MIX ON
BD DVD
INPUT SELECT
SOURCESLEEPTV
CONTROL
TV
INPUT
RECEIVER
RECEIVER ENTER
RETURN
AUDIOPARAMETER
TUNER EDITTOOLS
MASTERVOLUME
iPod CTRLBAND
MENU
HOMEMENUSETUP
TOPMENU
TUNE
TUNE
PRESETPRES
ET
RECEIVER
VSX-820_SYXCN_Ru.book 38 ページ 2010年4月12日 月曜日 午後7時2分
39Ru
EnglishFrançais
Deutsch
NederlandsItaliano
Español
Настройка Назначение Параметр(ы)EQ(Эквалайзер акустической калибровки)
Включение/выключение эффекта функции Acoustic Calibration EQ.
ON
OFF
S.DELAY(Задержка звука)
Некоторые мониторы воспроизводят видео с небольшой задержкой, поэтому звук и изображение не будут совпадать в точности. Добавляя небольшое запаздывание, можно синхронизировать изображение и звук.
0,0 дo 9,0 (кадров)1 секунда = 25 кадров
(PAL)по умолчанию: 0.0
MIDNIGHTa Позволяет получить хорошее объемное звучание при прослушивании фильмов на низкой громкости.
M/L OFF
MIDNIGHTLOUDNESSa Используется для получения хорошего звучания низких и
высоких частот от источников музыки при низкой громкости.
LOUDNESS
S.RTVb (Восстановление звучания)
Когда аудиоданные удаляются во время процесса сжатия WMA/MP3c, качество звука часто страдает от неровного образа звука. В функции Sound Retriever (Восстановление звучания) используется новая технология DSP, которая помогает восстановить качество звучания диска CD для 2-канального звука путем восстановления сжатия звука и сглаживания искажений, сохранившихся после сжатия.
OFF
ON
DUAL MONOd Определяет воспроизведение звуковых дорожек, записанных в двухканальном монофоническом формате Dolby Digital.
CH1 (КАН1) – Слышен только канал 1
CH2 (КАН2) – Слышен только канал 2
CH1 CH2 (КАН1 КАН2 ) – Оба канала слышны от передних громкоговорителей
DRC (Управление динамическим диапазоном)
Регулирует уровень динамического диапазона для звуковых дорожек фильмов, оптимизированных для Dolby Digital, DTS, Dolby Digital Plus, Dolby TrueHD, DTS-HD и DTS Master Audio (вам может потребоваться использование этой функции при прослушивании объемного звука при низкой громкости).
AUTOe
MAX
MID
OFF
LFE ATT(Аттенюатор низкочастотных эффектов)
Некоторые аудиоисточники Dolby Digital и DTS содержат сверхнизкие частоты. Выполните соответствующую настройку аттенюатора низкочастотных эффектов для предотвращения появления помех при воспроизведении сверхнизких частот с помощью громкоговорителей.Низкочастотные эффекты не ограничены при установке на 0 дБ, что является рекомендуемым значением. При установке на –15 дБ низкочастотные эффекты ограничены в соответствующей степени. При выборе OFF, звучание от канала низкочастотных эффектов отсутствует.
0 (0 дБ)
5 (–5 дБ)
10 (–10 дБ)
15 (–15 дБ)
20 (–20 дБ)
** (OFF)
SACD G.f (Усиление SACD)
Выделяет детали для формата SACD, максимизируя динамический диапазон (во время цифровой обработки).
0 (дБ)
+6 (дБ)
HDMI(HDMI Аудио)
Определяет прохождение аудиосигнала HDMI из данного ресивера (amp) или через него на телевизор. Если выбрано значение «THRU» (Через), звук из ресивера не выходит.
AMP
THRU
VSX-820_SYXCN_Ru.book 39 ページ 2010年4月12日 月曜日 午後7時2分
40Ru
a. Параметры MIDNIGHT/LOUDNESS (Ночной режим/Тонкомпенсация) можно менять в любое время, используя кнопку MIDNIGHT.
b. Функцию Sound Retriever (Восстановление звучания) можно изменить в любой момент при помощи кнопки S.RETRIEVER.
c. Воспроизведение WMA и MP3 доступно только через вход iPod/USB.d. Этот параметр работает только для звуковых дорожек, записанных в двухканальном монофоническом
формате Dolby Digital и DTS.e. Изначально установленное значение AUTO доступно только для сигналов Dolby TrueHD. Для сигналов,
отличных от Dolby TrueHD, выбирайте значение MAX или MID.f. Не должно возникнуть никаких проблем при использовании с большинством SACD дисков, но при
искажении звучания, лучше всего переключить настройку амплитудно-частотной характеристки на 0 дБ.g. Эта функция доступна, только если подключенный дисплей поддерживает функцию автоматической
синхронизации аудио/видео («синхронизация звука и изображения») для HDMI. Если вы считаете, что автоматически заданное время задержки вам не подходит, задайте для параметра A.DLY значение OFF и настройте время задержки вручную. Подробную информацию о функции синхронизации звука и изображения на вашем дисплее можно получить непосредственно у производителя.
h. Доступны только при двухканальных источниках в режиме DOLBY PLII MUSIC.i. Только при прослушивании 2-канальных источников в режиме NEO:6 CINEMA и NEO:6 MUSIC.
A.DLY(Автоматическая задержка)
Эта функция автоматически корректирует задержку аудио/видео между компонентами, соединенными кабелем HDMI. Время задержки аудио устанавливается в зависимости от рабочего статуса дисплея, подключенного через кабель HDMI. Время задержки видео автоматически настраивается в соответствии со временем задержки аудио.g
OFF
ON
C.WIDTHh (Центр - ширина)(Эта функция доступна только при использовании центрального громкоговорителя)
Расширяет звучание центрального канала от переднего правого до левого громкоговорителя, делая звучание более широким (более высокие настройки) или более сфокусированным (более низкие настройки).
0 дo 7по умолчанию: 3
DIMEN.h (Размеры)
Регулирует баланс объемного звучания в направлении спереди назад, делая звук более удаленным (отрицательные значения) или более направленным вперед (положительные значения).
–3 дo +3по умолчанию: 0
PNRM.h (Панорама)
Расширяет стереоэффект передних громкоговорителей, заключая его вовнутрь объемного звучания для обеспечения «опоясывающего эффекта».
OFF
ON
C.IMGi (Центр - ширина) (Эта функция доступна только при использовании центрального громкоговорителя)
Настройте центральный образ для получения более широкого стереоэффекта с вокалом. Настройте эффект от 0 (весь центральный канал посылается на правый и левый фронтальные громкоговорители) до 10 (центральный канал посылается только на центральный громкоговоритель).
0 дo 10 по умолчанию: 3 (NEO:6 MUSIC),
10 (NEO:6 CINEMA)
H.GAIN(Усиление звука сверху)
Регулирует выход от переднего верхнего громкоговорителя при прослушивании в режиме DOLBY PLIIz HEIGHT. Если выбрана настройка H, звук сверху будет более сильным.
L (низкий)
M (средний)
H (высокий)
Настройка Назначение Параметр(ы)
VSX-820_SYXCN_Ru.book 40 ページ 2010年4月12日 月曜日 午後7時2分
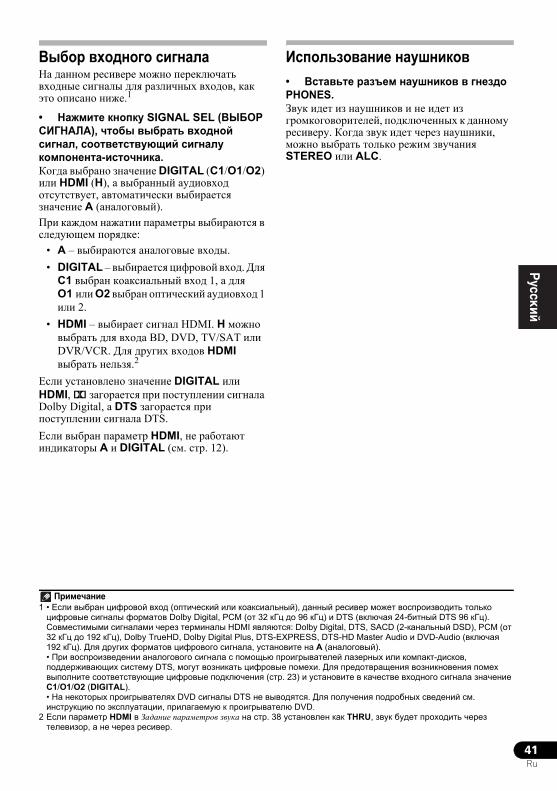
41Ru
EnglishFrançais
Deutsch
NederlandsItaliano
Español
Выбор входного сигналаНа данном ресивере можно переключать входные сигналы для различных входов, как это описано ниже.1
• Нажмите кнопку SIGNAL SEL (ВЫБОР СИГНАЛА), чтобы выбрать входной сигнал, соответствующий сигналу компонента-источника. Когда выбрано значение DIGITAL (C1/O1/O2) или HDMI (H), а выбранный аудиовход отсутствует, автоматически выбирается значение A (аналоговый).При каждом нажатии параметры выбираются в следующем порядке:
• A – выбираются аналоговые входы. • DIGITAL – выбирается цифровой вход. Для
C1 выбран коаксиальный вход 1, а для O1 или O2 выбран оптический аудиовход 1 или 2.
• HDMI – выбирает сигнал HDMI. H можно выбрать для входа BD, DVD, TV/SAT или DVR/VCR. Для других входов HDMI выбрать нельзя.2
Если установлено значение DIGITAL или HDMI, 2 загорается при поступлении сигнала Dolby Digital, а DTS загорается при поступлении сигнала DTS. Если выбран параметр HDMI, не работают индикаторы A и DIGITAL (см. стр. 12).
Использование наушников• Вставьте разъем наушников в гнездо PHONES.Звук идет из наушников и не идет из громкоговорителей, подключенных к данному ресиверу. Когда звук идет через наушники, можно выбрать только режим звучания STEREO или ALC.
Примечание1 • Если выбран цифровой вход (оптический или коаксиальный), данный ресивер может воспроизводить только цифровые сигналы форматов Dolby Digital, PCM (от 32 кГц до 96 кГц) и DTS (включая 24-битный DTS 96 кГц). Совместимыми сигналами через терминалы HDMI являются: Dolby Digital, DTS, SACD (2-канальный DSD), PCM (от 32 кГц до 192 кГц), Dolby TrueHD, Dolby Digital Plus, DTS-EXPRESS, DTS-HD Master Audio и DVD-Audio (включая 192 кГц). Для других форматов цифрового сигнала, установите на A (аналоговый).• При воспроизведении аналогового сигнала с помощью проигрывателей лазерных или компакт-дисков, поддерживающих систему DTS, могут возникать цифровые помехи. Для предотвращения возникновения помех выполните соответствующие цифровые подключения (стр. 23) и установите в качестве входного сигнала значение C1/O1/O2 (DIGITAL).• На некоторых проигрывателях DVD сигналы DTS не выводятся. Для получения подробных сведений см. инструкцию по эксплуатации, прилагаемую к проигрывателю DVD.
2 Если параметр HDMI в Задание параметров звука на стр. 38 установлен как THRU, звук будет проходить через телевизор, а не через ресивер.
VSX-820_SYXCN_Ru.book 41 ページ 2010年4月12日 月曜日 午後7時2分 201
42Ru
Глава 6:
Меню System Setup (Настройка системы)
Использование меню System Setup (Настройка системы)В следующем разделе описана подробная настройка ресивера при работе и тонкая настройка отдельных систем громкоговорителей в соответствии с личными предпочтениями.
Внимание• Экранный дисплей не появится, если подключение к используемому телевизору выполнено с помощью выхода HDMI. Для настройки системы используйте компонентные или композитные подключения.
1 Включите ресивер и используемый телевизор.Для включения используйте кнопку RECEIVER.1
Переключите вход телевизора таким образом, чтобы он подключался к аналоговому выходу ресивера.
2 Нажмите кнопку на пульте дистанционного управления, после чего нажмите кнопку SETUP.2На экране телевизора появится экранный дисплей. Для перехода между экранами и выделения пунктов меню используйте кнопки /// и ENTER на пульте дистанционного управления. Нажмите кнопку RETURN (ВОЗВРАТ) для подтверждения и выхода из текущего меню.
3 Выберите настройку, которую требуется отрегулировать.
• Auto MCACC – это быстрая и эффективная настройка объемного звучания (см. раздел Автоматическая настройка объемного звучания (MCACC) на стр. 29).
• Manual SP Setup – укажите размер, количество, расстояние и общий баланс подключенных громкоговорителей (см. раздел Ручная настройка громкоговорителей на стр. 43).
• Input Assign – укажите, что подключено к видеовходам компонента (см. раздел Меню назначения входов на стр. 46).
• Pre Out Setting – определите, как использовать выходы PRE OUT (см. Настройка выхода предварительного усилителя на стр. 47).
Примечание1 Если к ресиверу подключены наушники, отсоедините их.2 • Невозможно использовать меню System Setup (Настройка системы), если выбраны входы iPod/USB.
• Нажмите на кнопку SETUP в любой момент для выхода из меню настройки системы.
BD DVD
INPUT SELECT
SOURCESLEEPTV
CONTROL
TV
INPUT
RECEIVER
RECEIVER ENTER
RETURN
AUDIOPARAMETER
TUNER EDITTOOLS
MASTERVOLUME
iPod CTRLBAND
MENU
HOMEMENUSETUP
TOPMENU
TUNE
TUNE
PRESETPRES
ET
RECEIVER
System Setup
1.Auto MCACC2.Manual SP Setup3.Input Assign4.Pre Out Setting
Return
VSX-820_SYXCN_Ru.book 42 ページ 2010年4月12日 月曜日 午後7時2分

43Ru
EnglishFrançais
Deutsch
NederlandsItaliano
Español
Ручная настройка громкоговорителейДанный ресивер позволяет выполнять более точную настройку для оптимизации объемного звучания. Эти настройки необходимо выполнить только один раз (их повторное выполнение требуется после замены имеющейся акустической системы на новую или подключения новых громкоговорителей).Эти настройки предназначены для точной регулировки системы, но если вас устраивают характеристики системы, достигнутые в результате выполнения указаний раздела Автоматическая настройка объемного звучания (MCACC) на стр. 29, в регулировке всех этих настроек нет необходимости.
ОСТОРОЖНО• Тестовые сигналы, используемые при настройке системы, имеют значительную громкость.
Внимание• В зависимости от настройки Pre Out, будут различия в параметрах громкоговорителя, которые можно регулировать. Экранный дисплей для этих рабочих инструкций показывает пример, когда настройка Pre Out установлена на Surr. Back.
1 Выберите пункт «Manual SP Setup» (Ручная настройка громкоговорителей) и нажмите кнопку ENTER.
2 Выберите настройку, которую требуется отрегулировать.Если это делается впервые, то необходимо отрегулировать эти установки надлежащим образом:
• Speaker Setting (Настройка громкоговорителей) – определяет размер и число подключаемых громкоговорителей (см. ниже).
• Crossover Network (Разделительный фильтр) – укажите, какие частоты будут посылаться на низкочастотный громкоговоритель (см.стр. 45).
• Channel Level (Уровень канала) – отрегулируйте общий баланс используемой системы громкоговорителей (стр. 45).
• Speaker Distance (Расстояние до громкоговорителей) – укажите расстояние до громкоговорителей из точки прослушивания (стр. 46).
3 Внесите нужные изменения в каждый параметр и подтвердите каждый экран нажатием кнопки RETURN.
Speaker Setting (Настройка громкоговорителей)Этот параметр служит для указания конфигурации громкоговорителей (размера и количества). Рекомендуется проверить, правильны ли значения, установленные в соответствии с указаниями раздела Автоматическая настройка объемного звучания (MCACC) на стр. 29.1 Выберите пункт «Speaker Setting» (Настройка громкоговорителей) в меню Manual SP Setup (Ручная настройка громкоговорителей).
2 Выберите нужный набор громкоговорителей, а затем их размер.С помощью кнопок / выберите размер (и количество) каждого из следующих громкоговорителей:
• Front (Передние) – выберите размер LARGE (БОЛЬШОЙ), если передние громкоговорители эффективно воспроизводят низкие частоты или если не подключен низкочастотный громкоговоритель. Если выбрать SMALL (МАЛЫЙ), низкие частоты будут передаваться на низкочастотный громкоговоритель.1
System Setup
1.Auto MCACC2.Manual SP Setup3.Input Assign4.Pre Out Setting
Return
2.Manual SP Setup
Return
a.Speaker Settingb.Crossover Networkc.Channel Leveld.Speaker Distance
Примечание1 Если для передних громкоговорителей выбран размер SMALL, для низкочастотного громкоговорителя автоматически выбирается настройка YES. Кроме того, центральный громкоговоритель, громкоговорители объемного звучания, задние громкоговорители объемного звучания и передние верхние громкоговорители не могут быть установлены на LARGE, если передние громкоговорители установлены на SMALL. Все низкие частоты при этом передаются на низкочастотный громкоговоритель.
2.Manual SP Setup
Return
a.Speaker Settingb.Crossover Networkc.Channel Leveld.Speaker Distance
2a.Speaker Setting
Front CenterSurrSurr. BackSubwoofer:
Return
[ SMALL ][ SMALL ][ NO ] YES
SMALL
VSX-820_SYXCN_Ru.book 43 ページ 2010年4月12日 月曜日 午後7時2分
44Ru
• Center (Центральный) – выберите размер LARGE, если центральный громкоговоритель эффективно воспроизводит низкие частоты, или SMALL, чтобы низкие частоты передавались на громкоговоритель объемного звучания. Если громкоговорители объемного звучания не подключены, выберите пункт NO (сигналы этих каналов будут направляться на остальные громкоговорители).
• Front Height (Передний верхний)1 – выберите LARGE, если передние верхние громкоговорители эффективно воспроизводят низкие частоты. Если выбрать SMALL, низкие частоты будут передаваться на другие громкоговорители или низкочастотный громкоговоритель. Если передние верхние громкоговорители не подключены, выберите NO.
• Surr (Объемное звучание) – выберите размер LARGE, если громкоговорители объемного звучания эффективно воспроизводят низкие частоты. Если выбрать SMALL, низкие частоты будут передаваться на другие громкоговорители или низкочастотный громкоговоритель. Если громкоговорители объемного звучания не подключены, выберите пункт NO (сигналы этих каналов будут направляться на остальные громкоговорители).
• Surr. Back (Тыловой объемного звучания)2 – Выберите число имеющихся тыловых громкоговорителей (один, два или нет).3 Выберите LARGE, если ваши тыловые громкоговорители эффективно воспроизводят низкие частоты. Если выбрать SMALL, низкие частоты будут передаваться на другие громкоговорители или низкочастотный громкоговоритель. Если тыловые громкоговорители не подключены, выберите NO.
• Subwoofer (Низкочастотный громкоговоритель) – низкочастотные эффекты и низкие частоты каналов с выбранным размером SMALL выводятся на низкочастотный громкоговоритель, если выбран пункт YES (см. примечания ниже).
Выберите пункт PLUS, если низкочастотный громкоговоритель должен воспроизводить звук непрерывно или если нужно более глубокое басовое звучание (при этом низкие частоты, которые обычно поступают от передних и центрального громкоговорителя, также выводятся на низкочастотный громкоговоритель). Если низкочастотный громкоговоритель не подключен, выберите пункт NO (низкие частоты будут выводиться через другие громкоговорители).
3 После завершения нажмите кнопку RETURN.Вы вернетесь в меню «Manual SP Setup» (Ручная настройка громкоговорителей).
Совет• Если вам нравится звучание с мощными басами, и подключен низкочастотный громкоговоритель, целесообразно выбрать для передних громкоговорителей размер LARGE, а для низкочастотного громкоговорителя – параметр PLUS. Но это не гарантирует наилучшего воспроизведения низких частот. В зависимости от размещения громкоговорителей в помещении качество низких частот может даже ухудшиться. В этом случае попробуйте изменить расположение или направление громкоговорителей. Если не удается достичь хороших результатов, проверьте звучание низких частот при настройках PLUS и YES или же меняя для передних громкоговорителей размеры LARGE и SMALL, и определите, когда звук будет наивысшего качества. При затруднениях самое простое решение – направить все низкие частоты на низкочастотный громкоговоритель, выбрав для передних громкоговорителей размер SMALL.
Примечание1 • Можно только отрегулировать настройку Front Height, если настройка Pre Out Setting установлена на Height.
• Если для громкоговорителей объемного звучания установлено значение NO, для передних верхних громкоговорителей будет автоматически установлено значение NO.
2 Можно только отрегулировать настройку Surr. Back, если Pre Out Setting установлена на Surr. Back.3 • Если для громкоговорителей объемного звучания установлено значение NO, для тыловых громкоговорителей будет автоматически установлено значение NO.• Если вы выбрали только один тыловой громкоговоритель, убедитесь, что дополнительный усилитель подключен к разъему PRE OUT L (Single).
VSX-820_SYXCN_Ru.book 44 ページ 2010年4月12日 月曜日 午後7時2分
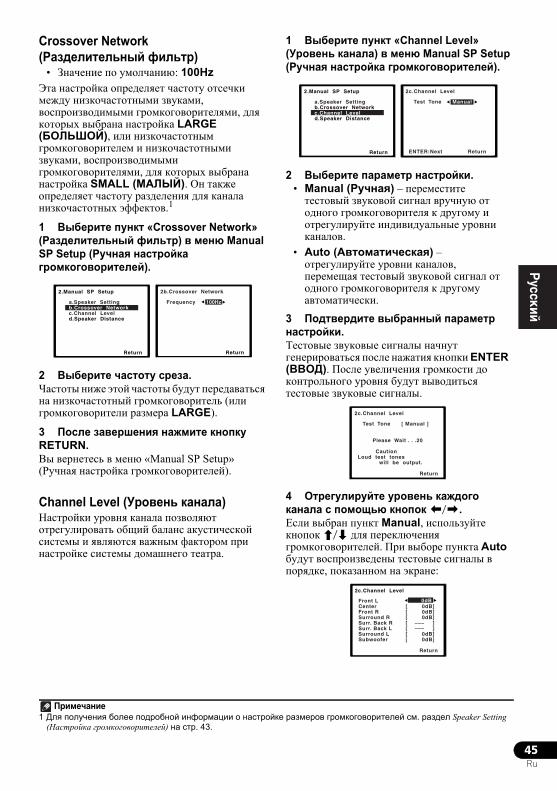
45Ru
EnglishFrançais
Deutsch
NederlandsItaliano
EspañolCrossover Network (Разделительный фильтр)
• Значение по умолчанию: 100Hz Эта настройка определяет частоту отсечки между низкочастотными звуками, воспроизводимыми громкоговорителями, для которых выбрана настройка LARGE (БОЛЬШОЙ), или низкочастотным громкоговорителем и низкочастотными звуками, воспроизводимыми громкоговорителями, для которых выбрана настройка SMALL (МАЛЫЙ). Он также определяет частоту разделения для канала низкочастотных эффектов.1
1 Выберите пункт «Crossover Network» (Разделительный фильтр) в меню Manual SP Setup (Ручная настройка громкоговорителей).
2 Выберите частоту среза.Частоты ниже этой частоты будут передаваться на низкочастотный громкоговоритель (или громкоговорители размера LARGE).
3 После завершения нажмите кнопку RETURN.Вы вернетесь в меню «Manual SP Setup» (Ручная настройка громкоговорителей).
Channel Level (Уровень канала)Настройки уровня канала позволяют отрегулировать общий баланс акустической системы и являются важным фактором при настройке системы домашнего театра.
1 Выберите пункт «Channel Level» (Уровень канала) в меню Manual SP Setup (Ручная настройка громкоговорителей).
2 Выберите параметр настройки.• Manual (Ручная) – переместите тестовый звуковой сигнал вручную от одного громкоговорителя к другому и отрегулируйте индивидуальные уровни каналов.
• Auto (Автоматическая) – отрегулируйте уровни каналов, перемещая тестовый звуковой сигнал от одного громкоговорителя к другому автоматически.
3 Подтвердите выбранный параметр настройки.Тестовые звуковые сигналы начнут генерироваться после нажатия кнопки ENTER (ВВОД). После увеличения громкости до контрольного уровня будут выводиться тестовые звуковые сигналы.
4 Отрегулируйте уровень каждого канала с помощью кнопок /.Если выбран пункт Manual, используйте кнопок / для переключения громкоговорителей. При выборе пункта Auto будут воспроизведены тестовые сигналы в порядке, показанном на экране:
Примечание1 Для получения более подробной информации о настройке размеров громкоговорителей см. раздел Speaker Setting
(Настройка громкоговорителей) на стр. 43.
2.Manual SP Setup
Return
a.Speaker Settingb.Crossover Networkc.Channel Leveld.Speaker Distance
2b.Crossover Network
Return
Frequency 100Hz
2.Manual SP Setup
Return
a.Speaker Settingb.Crossover Networkc.Channel Leveld.Speaker Distance
2c.Channel Level
Test Tone Manual
ENTER:NextReturn
2c.Channel Level
Test Tone [ Manual ]
Please Wait . . .20 Caution Loud test tones will be output.
Return
2c.Channel Level
Front L CenterFront RSurround RSurr. Back RSurr. Back LSurround LSubwoofer
Return
[ 0dB][ 0dB][ 0dB][ ––– ][ ––– ][ 0dB][ 0dB]
0dB
VSX-820_SYXCN_Ru.book 45 ページ 2010年4月12日 月曜日 午後7時2分
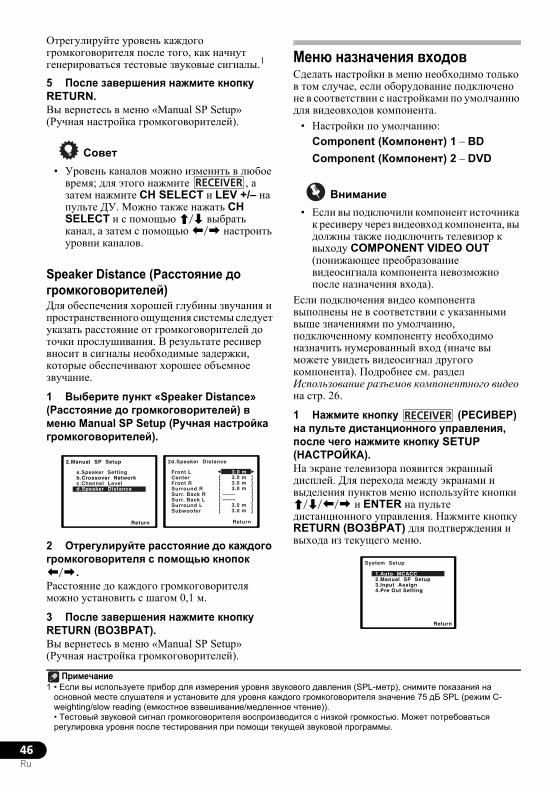
46Ru
Отрегулируйте уровень каждого громкоговорителя после того, как начнут генерироваться тестовые звуковые сигналы.1
5 После завершения нажмите кнопку RETURN.Вы вернетесь в меню «Manual SP Setup» (Ручная настройка громкоговорителей).
Совет• Уровень каналов можно изменить в любое время; для этого нажмите , а затем нажмите CH SELECT и LEV +/– на пульте ДУ. Можно также нажать CH SELECT и с помощью / выбрать канал, а затем с помощью / настроить уровни каналов.
Speaker Distance (Расстояние до громкоговорителей)Для обеспечения хорошей глубины звучания и пространственного ощущения системы следует указать расстояние от громкоговорителей до точки прослушивания. В результате ресивер вносит в сигналы необходимые задержки, которые обеспечивают хорошее объемное звучание.
1 Выберите пункт «Speaker Distance» (Расстояние до громкоговорителей) в меню Manual SP Setup (Ручная настройка громкоговорителей).
2 Отрегулируйте расстояние до каждого громкоговорителя с помощью кнопок /.Расстояние до каждого громкоговорителя можно установить с шагом 0,1 м.
3 После завершения нажмите кнопку RETURN (ВОЗВРАТ).Вы вернетесь в меню «Manual SP Setup» (Ручная настройка громкоговорителей).
Меню назначения входовСделать настройки в меню необходимо только в том случае, если оборудование подключено не в соответствии с настройками по умолчанию для видеовходов компонента.
• Настройки по умолчанию:Component (Компонент) 1 – BDComponent (Компонент) 2 – DVD
Внимание• Если вы подключили компонент источника к ресиверу через видеовход компонента, вы должны также подключить телевизор к выходу COMPONENT VIDEO OUT (понижающее преобразование видеосигнала компонента невозможно после назначения входа).
Если подключения видео компонента выполнены не в соответствии с указанными выше значениями по умолчанию, подключенному компоненту необходимо назначить нумерованный вход (иначе вы можете увидеть видеосигнал другого компонента). Подробнее см. раздел Использование разъемов компонентного видео на стр. 26.
1 Нажмите кнопку (РЕСИВЕР) на пульте дистанционного управления, после чего нажмите кнопку SETUP (НАСТРОЙКА).На экране телевизора появится экранный дисплей. Для перехода между экранами и выделения пунктов меню используйте кнопки /// и ENTER на пульте дистанционного управления. Нажмите кнопку RETURN (ВОЗВРАТ) для подтверждения и выхода из текущего меню.
Примечание1 • Если вы используете прибор для измерения уровня звукового давления (SPL-метр), снимите показания на основной месте слушателя и установите для уровня каждого громкоговорителя значение 75 дБ SPL (режим C-weighting/slow reading (емкостное взвешивание/медленное чтение)).• Тестовый звуковой сигнал громкоговорителя воспроизводится с низкой громкостью. Может потребоваться регулировка уровня после тестирования при помощи текущей звуковой программы.
RECEIVER
2.Manual SP Setup
Return
a.Speaker Settingb.Crossover Networkc.Channel Leveld.Speaker Distance
2d.Speaker Distance
Front L CenterFront RSurround RSurr. Back RSurr. Back LSurround LSubwoofer
Return
3.0 m [ 3.0 m ][ 3.0 m ][ 3.0 m ][ –––– ][ –––– ][ 3.0 m ][ 3.0 m ]
RECEIVER
System Setup
1.Auto MCACC2.Manual SP Setup3.Input Assign4.Pre Out Setting
Return
VSX-820_SYXCN_Ru.book 46 ページ 2010年4月12日 月曜日 午後7時2分

47Ru
EnglishFrançais
Deutsch
NederlandsItaliano
Español2 Выберите пункт «Input Assign» (Назначение входа) в меню System Setup (Настройка системы).
3 Выберите пункт «Component Input» (Вход компонента) в меню Input Assign (Назначение входа).
4 Выберите номер входа компонентного видео, к которому подключено видеооборудование.Цифры соответствуют цифрам рядом со входами на задней стороне ресивера.
5 Выберите тип компонента, подключенного к этому входу.Выберите BD, DVD, TV, DVR или OFF.
• Для этого используйте кнопки / и ENTER.
• Если компонентный вход предназначен для выполнения определенной функции, любые компонентные входы, ранее назначенные для этой функции, автоматически отключаются.
• Убедитесь в том, что аудиовыход компонента соединен с соответствующими входами, расположенными на задней панели ресивера.
6 После завершения нажмите кнопку RETURN (ВОЗВРАТ).Вы возвращаетесь в меню «Input Assign» (Назначение входа).
• Для назначения цифровых сигнальных входов, см. Выбор входного сигнала на стр. 41.
Настройка выхода предварительного усилителяОпределите, использовать ли подключение заднего громкоговорителя объемного звучания или переднего верхнего громкоговорителя к выходам PRE OUT. Для подключения громкоговорителя требуется дополнительный усилитель.
• Значение по умолчанию: Surr. Back
1 Нажмите кнопку (РЕСИВЕР) на пульте дистанционного управления, после чего нажмите кнопку SETUP.На экране телевизора появится экранный дисплей. Для перехода между экранами и выделения пунктов меню используйте кнопки /// и ENTER на пульте дистанционного управления. Нажмите кнопку RETURN (ВОЗВРАТ) для подтверждения и выхода из текущего меню.
2 Выберите пункт «Pre Out Setting» (Настройка выхода предварительного усилителя) в меню System Setup (Настройка системы).
3 Выберите, какой громкоговоритель подключать к выходам PRE OUT, с помощью /.
• Surr. Back – подключите задний громкоговоритель объемного звучания.
• Height – подключите передний верхний громкоговоритель.
4 После завершения нажмите кнопку RETURN (ВОЗВРАТ).Вы возвращаетесь в меню «System Setup» (Настройка системы).
System Setup
1.Auto MCACC2.Manual SP Setup3.Input Assign4.Pre Out Setting
Return
3.Input Assign
Return
a.Component Input
3a.Component Input
Return
Component–1 BD Component–2 [ DVD ]
RECEIVER
System Setup
1.Auto MCACC2.Manual SP Setup3.Input Assign4.Pre Out Setting
Return
System Setup
1.Auto MCACC2.Manual SP Setup3.Input Assign4.Pre Out Setting
Return
4.Pre Out Setting
Return
Pre Out Surr. Back
VSX-820_SYXCN_Ru.book 47 ページ 2010年4月12日 月曜日 午後7時2分 207
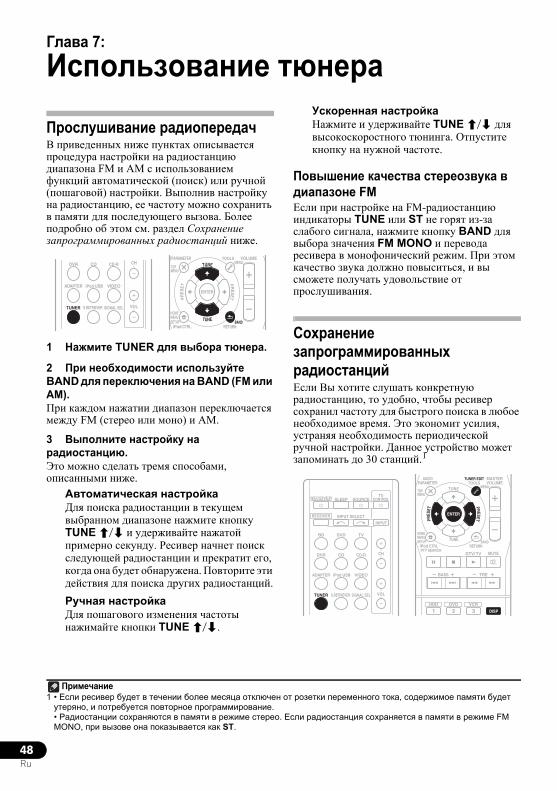
48Ru
Глава 7:
Использование тюнера
Прослушивание радиопередачВ приведенных ниже пунктах описывается процедура настройки на радиостанцию диапазона FM и AM с использованием функций автоматической (поиск) или ручной (пошаговой) настройки. Выполнив настройку на радиостанцию, ее частоту можно сохранить в памяти для последующего вызова. Более подробно об этом см. раздел Сохранение запрограммированных радиостанций ниже.
1 Нажмите TUNER для выбора тюнера.
2 При необходимости используйте BAND для переключения на BAND (FM или AM).При каждом нажатии диапазон переключается между FM (стерео или моно) и AM.
3 Выполните настройку на радиостанцию.Это можно сделать тремя способами, описанными ниже.
Автоматическая настройкаДля поиска радиостанции в текущем выбранном диапазоне нажмите кнопку TUNE / и удерживайте нажатой примерно секунду. Ресивер начнет поиск следующей радиостанции и прекратит его, когда она будет обнаружена. Повторите эти действия для поиска других радиостанций.Ручная настройкаДля пошагового изменения частоты нажимайте кнопки TUNE /.
Ускоренная настройкаНажмите и удерживайте TUNE / для высокоскоростного тюнинга. Отпустите кнопку на нужной частоте.
Повышение качества стереозвука в диапазоне FMЕсли при настройке на FM-радиостанцию индикаторы TUNE или ST не горят из-за слабого сигнала, нажмите кнопку BAND для выбора значения FM MONO и перевода ресивера в монофонический режим. При этом качество звука должно повыситься, и вы сможете получать удовольствие от прослушивания.
Сохранение запрограммированных радиостанцийЕсли Вы хотите слушать конкретную радиостанцию, то удобно, чтобы ресивер сохранил частоту для быстрого поиска в любое необходимое время. Это экономит усилия, устраняя необходимость периодической ручной настройки. Данное устройство может запоминать до 30 станций.1
CHDVR CD CD-R
ADAPTER iPod USB VIDEO
TUNER S.RETRIEVER SIGNAL SEL VOL
ENTER
RETURN
PARAMETER TOOLS VOLUME
iPod CTRLBAND
MENU
HOMEMENUSETUP
TOPMENU
TUNE
TUNE
PRESETPR
ESET
Примечание1 • Если ресивер будет в течении более месяца отключен от розетки переменного тока, содержимое памяти будет утеряно, и потребуется повторное программирование.• Радиостанции сохраняются в памяти в режиме стерео. Если радиостанция сохраняется в памяти в режиме FM MONO, при вызове она показывается как ST.
BD DVD
INPUT SELECT
SOURCESLEEPTV
CONTROL
TV
INPUT
CH
RECEIVER
DVR CD CD-R
ADAPTER iPod USB VIDEO
TUNER S.RETRIEVER SIGNAL SEL VOL
RECEIVER
1HDD
ENTER
2 DISP
DVD
3VCR
MUTE
RETURN
AUDIOPARAMETER
TUNER EDITTOOLS
MASTERVOLUME
iPod CTRLPTY SEARCH
BAND
MENU
HOMEMENUSETUP
DTV/ TV
TREBASS
TOPMENU
TUNE
TUNE
PRESETPRES
ET
VSX-820_SYXCN_Ru.book 48 ページ 2010年4月12日 月曜日 午後7時2分
49Ru
EnglishFrançais
Deutsch
NederlandsItaliano
Español1 Выполните настройку на радиостанцию, которую требуется занести в память.Подробнее см. раздел Прослушивание радиопередач на стр. 48.
2 Нажмите кнопку TUNER EDIT.На дисплее появится надпись PRESET, затем мигающая надпись MEM и запрограммированное значение для радиостанции.
3 Нажимайте кнопки PRESET / для выбора нужной запрограммированной радиостанции.Также можно использовать цифровые кнопки.
4 Нажмите кнопку ENTER.После нажатия ENTER запрограммированный номер перестает мигать, и ресивер сохраняет данные радиостанции.
Прослушивание запрограммированных радиостанцийДля этого в ресивере должно быть сохранено несколько запрограммированных станций. Если таких станций еще нет, обратитесь к разделу Сохранение запрограммированных радиостанций на стр. 48.
• Нажимайте кнопки PRESET / для выбора нужной запрограммированной радиостанции.
• Для вызова запрограммированной радиостанции можно также использовать номерные кнопки на пульте дистанционного управления.
Присваивание названий запрограммированным радиостанциямДля облегчения работы всем запрограммированным радиостанциям можно присвоить названия.
1 Выберите запрограммированную станцию, которой необходимо присвоить имя.Для этого см. указания раздела Прослушивание запрограммированных радиостанций выше.
2 Нажмите TUNER EDIT дважды.При этом на дисплее замигает курсор на позиции первого символа.
3 Введите нужное имя.Выберите название длиной до восьми символов.
• Используйте кнопки PRESET / для выбора позиции символа.
• Используйте кнопки TUNE / для выбора символов.
• Название сохраняется при нажатии кнопки ENTER.
Совет• Чтобы стереть название станции, выполните пункты 1 и 2, а затем нажмите ENTER при пустом дисплее. Чтобы сохранить предыдущее название, нажмите TUNER EDIT при пустом дисплее.
• Когда запрограммированной станции присвоено название, нажмите DISP для отображения названия. Если вы хотите вернуться к отображению частот, нажмите DISP несколько раз для отображения частоты.
VSX-820_SYXCN_Ru.book 49 ページ 2010年4月12日 月曜日 午後7時2分
50Ru
Знакомство с системой RDSСистема радиоданных (RDS) – это система, которая используется большинством радиостанций в диапазоне FM для предоставления слушателям различной информации – например, названия радиостанции или транслируемой программы.Одной из функций системы RDS является возможность поиска станции, транслирующей требуемый тип программы. Например, можно осуществлять поиск станции, которая транслирует программы в жанре JAZZ (джаз).Можно вести поиск программ следующих типов:1
Поиск программ RDSМожно осуществить поиск типов программ, перечисленных выше.
1 Нажмите TUNER, а затем нажмите BAND для выбора диапазона FM.2
2 Нажмите кнопку PTY SEARCH.На дисплее отобразится индикация SEARCH.
3 Нажмите PRESET / для выбора типа программы, которую хотите прослушать.
4 Нажмите кнопку ENTER для поиска программы заданного типа.Система начинает поиск запрограммированных станций с выбранным типом программы и прекратит его, когда она будет обнаружена. Повторите эти действия для поиска других радиостанций.Если отображается индикация NO PTY (НЕТ ТИПА), значит, тюнеру в процессе поиска не удалось обнаружить программы заданного типа.3
NEWS – новостиAFFAIRS – текущие событияINFO – информацияSPORT – спортEDUCATE – oбразовательная информациDRAMA – pадиоспектакли и т.д.CULTURE – национальная и местная культурная жизнь, театр и т.д.SCIENCE – наука и техникаVARIED – программы, построенные на беседе или общении, например викторины или интервью.POP M – поп-музыкаROCK M – рок-музыкаEASY M – легкая музыка LIGHT M – легкая классическая музыкаCLASSICS – cерьезная классическая музыкаOTHER M – музыка, не соответствующая перечисленным категориямWEATHER – сводки и прогнозы погоды
FINANCE – биржевые сводки, коммерческая, торговая информация и т.д.CHILDREN – программы для детейSOCIAL – общественная жизньRELIGION – программы о религииPHONE IN – программы, предусматривающие обсуждение какой-либо темы и общение со слушателями по телефонуTRAVEL – путешествия и отдыхLEISURE – свободное время, интересы и хоббиJAZZ – джазовая музыкаCOUNTRY – музыка «кантри»NATION M – популярная музыка не на английском языкеOLDIES – популярная музыка 1950-х и 1960-х годовFOLK M – народная музыкаDOCUMENT – публицистические программы
Примечание1 Существуют также три дополнительных типа программ: ALARMTST (TECT), ALARM (Внимание!) и NO TYPE (Нет).
ALARM и ALARMTST используются для передачи сообщений крайней важности. Индикация NO TYPE отображается в том случае, когда тип программы найти невозможно.
2 Система RDS доступна только в диапазоне FM.3 Поиск сигналов системы RDS выполняется только по запрограммированным станциям. Если не запрограммировано ни одной станции или среди них не удается найти тип программы, на дисплее появится надпись NO PTY. Индикация FINISH означает, что поиск закончен.
BD DVD
INPUT SELECT
SOURCESLEEPTV
CONTROL
TV
INPUT
CH
RECEIVER
DVR CD CD-R
ADAPTER iPod USB VIDEO
TUNER S.RETRIEVER SIGNAL SEL VOL
RECEIVER
1HDD
ENTER
2 DISP
DVD
3VCR
MUTE
RETURN
AUDIOPARAMETER
TUNER EDITTOOLS
MASTERVOLUME
iPod CTRLPTY SEARCH
BAND
MENU
HOMEMENUSETUP
DTV/ TV
TREBASS
TOPMENU
TUNE
TUNE
PRESETPRES
ET
VSX-820_SYXCN_Ru.book 50 ページ 2010年4月12日 月曜日 午後7時2分
51Ru
EnglishFrançais
Deutsch
NederlandsItaliano
EspañolОтображение информации RDSИспользуйте кнопку DISP для отображения разных типов информации RDS.1
• Нажмите кнопку DISP для получения информации RDS.При каждом нажатии кнопки дисплей изменяется следующим образом:
• Режим звучания• Регулирование громкости• Радиотекст (RT) – сообщения, передаваемые радиостанцией. Например, радиостанция, передающая ток-шоу, может передавать номер телефона в виде радиотекста.
• Сервисное имя программы (PS) – название радиостанции.
• Тип программы (PTY) – отображает вид программы, транслируемой в данный момент.
• Текущая частота тюнера (FREQ)
Примечание1 • При возникновении помех некоторые символы на дисплее RT могут отображаться неправильно.
• Если на дисплее RT отобразится сообщение NO TEXT, значит, радиостанция не передает данных радиотекста. Дисплей автоматически переключится на отображение данных запрограммированной станции (если нет данных запрограммированной станции, появится сообщение NO NAME).• На дисплее PTY (тип программы) может отобразиться надпись NO PTY.
VSX-820_SYXCN_Ru.book 51 ページ 2010年4月12日 月曜日 午後7時2分
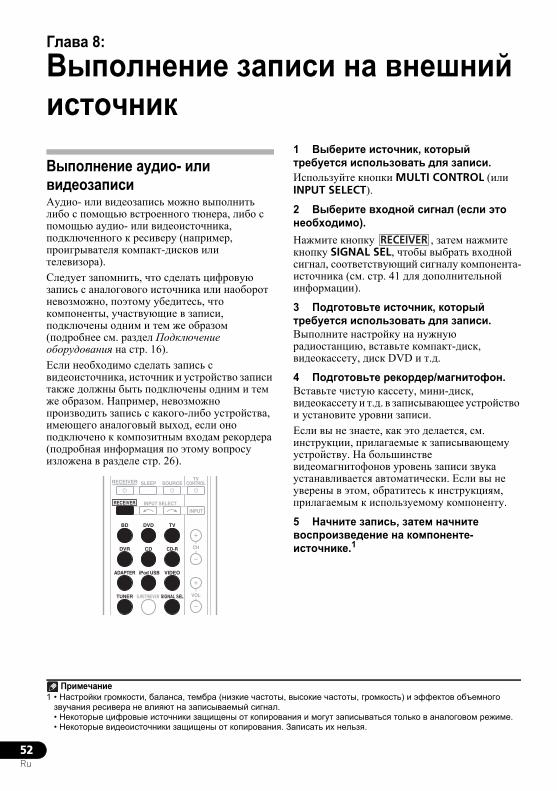
52Ru
Глава 8:
Выполнение записи на внешний источник
Выполнение аудио- или видеозаписиАудио- или видеозапись можно выполнить либо с помощью встроенного тюнера, либо с помощью аудио- или видеоисточника, подключенного к ресиверу (например, проигрывателя компакт-дисков или телевизора). Следует запомнить, что сделать цифровую запись с аналогового источника или наоборот невозможно, поэтому убедитесь, что компоненты, участвующие в записи, подключены одним и тем же образом (подробнее см. раздел Подключение оборудования на стр. 16). Если необходимо сделать запись с видеоисточника, источник и устройство записи также должны быть подключены одним и тем же образом. Например, невозможно производить запись с какого-либо устройства, имеющего аналоговый выход, если оно подключено к композитным входам рекордера (подробная информация по этому вопросу изложена в разделе стр. 26).
1 Выберите источник, который требуется использовать для записи.Используйте кнопки MULTI CONTROL (или INPUT SELECT).
2 Выберите входной сигнал (если это необходимо).Нажмите кнопку , затем нажмите кнопку SIGNAL SEL, чтобы выбрать входной сигнал, соответствующий сигналу компонента-источника (см. стр. 41 для дополнительной информации).
3 Подготовьте источник, который требуется использовать для записи.Выполните настройку на нужную радиостанцию, вставьте компакт-диск, видеокассету, диск DVD и т.д.
4 Подготовьте рекордер/магнитофон.Вставьте чистую кассету, мини-диск, видеокассету и т.д. в записывающее устройство и установите уровни записи.Если вы не знаете, как это делается, см. инструкции, прилагаемые к записывающему устройству. На большинстве видеомагнитофонов уровень записи звука устанавливается автоматически. Если вы не уверены в этом, обратитесь к инструкциям, прилагаемым к используемому компоненту.
5 Начните запись, затем начните воспроизведение на компоненте-источнике.1
BD DVD
INPUT SELECT
SOURCESLEEPTV
CONTROL
TV
INPUT
CH
RECEIVER
DVR CD CD-R
ADAPTER iPod USB VIDEO
TUNER S.RETRIEVER SIGNAL SEL VOL
RECEIVER
Примечание1 • Настройки громкости, баланса, тембра (низкие частоты, высокие частоты, громкость) и эффектов объемного звучания ресивера не влияют на записываемый сигнал.• Некоторые цифровые источники защищены от копирования и могут записываться только в аналоговом режиме.• Некоторые видеоисточники защищены от копирования. Записать их нельзя.
RECEIVER
VSX-820_SYXCN_Ru.book 52 ページ 2010年4月12日 月曜日 午後7時2分
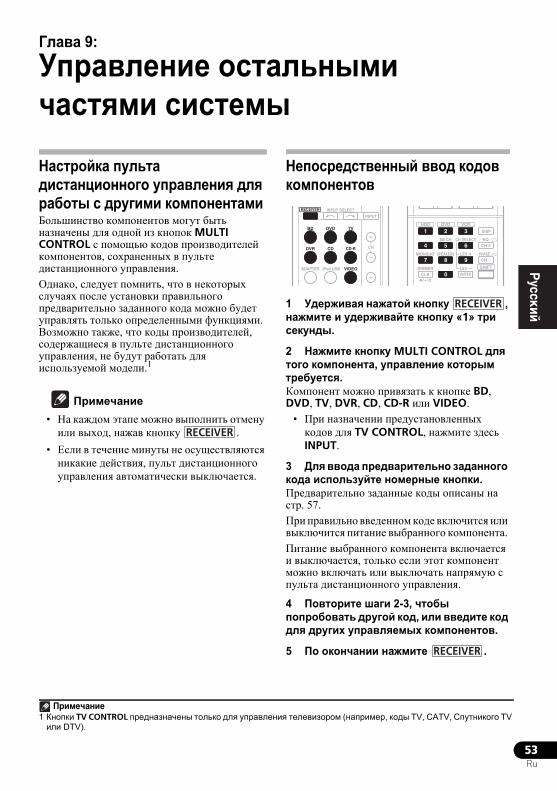
53Ru
EnglishFrançais
Deutsch
NederlandsItaliano
EspañolГлава 9:
Управление остальными частями системы
Настройка пульта дистанционного управления для работы с другими компонентамиБольшинство компонентов могут быть назначены для одной из кнопок MULTI CONTROL с помощью кодов производителей компонентов, сохраненных в пульте дистанционного управления.Однако, следует помнить, что в некоторых случаях после установки правильного предварительно заданного кода можно будет управлять только определенными функциями. Возможно также, что коды производителей, содержащиеся в пульте дистанционного управления, не будут работать для используемой модели.1
Примечание• На каждом этапе можно выполнить отмену или выход, нажав кнопку .
• Если в течение минуты не осуществляются никакие действия, пульт дистанционного управления автоматически выключается.
Непосредственный ввод кодов компонентов
1 Удерживая нажатой кнопку , нажмите и удерживайте кнопку «1» три секунды.
2 Нажмите кнопку MULTI CONTROL для того компонента, управление которым требуется.Компонент можно привязать к кнопке BD, DVD, TV, DVR, CD, CD-R или VIDEO.
• При назначении предустановленных кодов для TV CONTROL, нажмите здесь INPUT.
3 Для ввода предварительно заданного кода используйте номерные кнопки.Предварительно заданные коды описаны на стр. 57.При правильно введенном коде включится или выключится питание выбранного компонента. Питание выбранного компонента включается и выключается, только если этот компонент можно включать или выключать напрямую с пульта дистанционного управления.
4 Повторите шаги 2-3, чтобы попробовать другой код, или введите код для других управляемых компонентов.
5 По окончании нажмите .
Примечание1 Кнопки TV CONTROL предназначены только для управления телевизором (например, коды TV, CATV, Спутникого TV или DTV).
RECEIVER
BD DVD
INPUT SELECT
TV
INPUT
CHDVR CD CD-R
ADAPTER iPod USB VIDEO
RECEIVER
DIMMER
1
4
7MIDNIGHT
HDD
+10
2
5
8SPEAKERS LEV
LEV
SB CH
DISP
CLR
EQ
PHASE
DVD
3
6
9
0 ENTER
CH
CH
CH SELECT
VCR
SHIFT
/
RECEIVER
RECEIVER
VSX-820_SYXCN_Ru.book 53 ページ 2010年4月12日 月曜日 午後7時2分
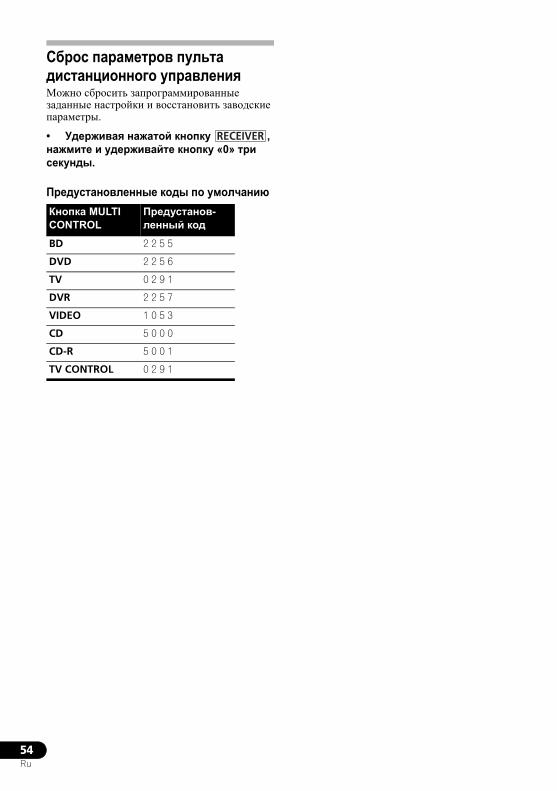
54Ru
Сброс параметров пульта дистанционного управленияМожно сбросить запрограммированные заданные настройки и восстановить заводские параметры.
• Удерживая нажатой кнопку , нажмите и удерживайте кнопку «0» три секунды.
Предустановленные коды по умолчаниюКнопка MULTI CONTROL
Предустанов-ленный код
BD 2 2 5 5
DVD 2 2 5 6
TV 0 2 9 1
DVR 2 2 5 7
VIDEO 1 0 5 3
CD 5 0 0 0
CD-R 5 0 0 1
TV CONTROL 0 2 9 1
RECEIVER
VSX-820_SYXCN_Ru.book 54 ページ 2010年4月12日 月曜日 午後7時2分
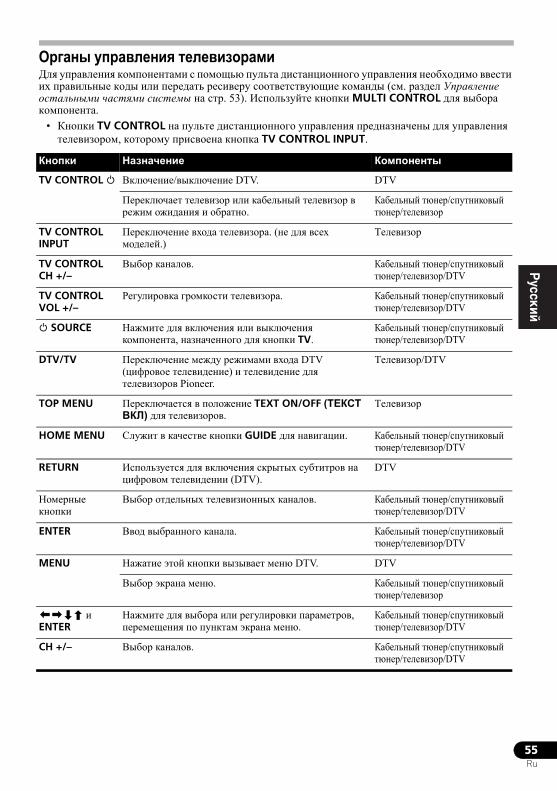
55Ru
EnglishFrançais
Deutsch
NederlandsItaliano
Español
Органы управления телевизорамиДля управления компонентами с помощью пульта дистанционного управления необходимо ввести их правильные коды или передать ресиверу соответствующие команды (см. раздел Управление остальными частями системы на стр. 53). Используйте кнопки MULTI CONTROL для выбора компонента.
• Кнопки TV CONTROL на пульте дистанционного управления предназначены для управления телевизором, которому присвоена кнопка TV CONTROL INPUT.
Кнопки Назначение Компоненты
TV CONTROL Включение/выключение DTV. DTV
Переключает телевизор или кабельный телевизор в режим ожидания и обратно.
Кабельный тюнер/спутниковый тюнер/телевизор
TV CONTROL INPUT
Переключение входа телевизора. (не для всех моделей.)
Tелевизор
TV CONTROL CH +/–
Выбор каналов. Кабельный тюнер/спутниковый тюнер/телевизор/DTV
TV CONTROL VOL +/–
Регулировка громкости телевизора. Кабельный тюнер/спутниковый тюнер/телевизор/DTV
SOURCE Нажмите для включения или выключения компонента, назначенного для кнопки TV.
Кабельный тюнер/спутниковый тюнер/телевизор/DTV
DTV/TV Переключение между режимами входа DTV (цифровое телевидение) и телевидение для телевизоров Pioneer.
Tелевизор/DTV
TOP MENU Переключается в положение TEXT ON/OFF (ТЕКСТ ВКЛ) для телевизоров.
Tелевизор
HOME MENU Служит в качестве кнопки GUIDE для навигации. Кабельный тюнер/спутниковый тюнер/телевизор/DTV
RETURN Используется для включения скрытых субтитров на цифровом телевидении (DTV).
DTV
Номерные кнопки
Выбор отдельных телевизионных каналов. Кабельный тюнер/спутниковый тюнер/телевизор/DTV
ENTER Ввод выбранного канала. Кабельный тюнер/спутниковый тюнер/телевизор/DTV
MENU Нажатие этой кнопки вызывает меню DTV. DTV
Выбор экрана меню. Кабельный тюнер/спутниковый тюнер/телевизор
и ENTER
Нажмите для выбора или регулировки параметров, перемещения по пунктам экрана меню.
Кабельный тюнер/спутниковый тюнер/телевизор/DTV
CH +/– Выбор каналов. Кабельный тюнер/спутниковый тюнер/телевизор/DTV
VSX-820_SYXCN_Ru.book 55 ページ 2010年4月12日 月曜日 午後7時2分
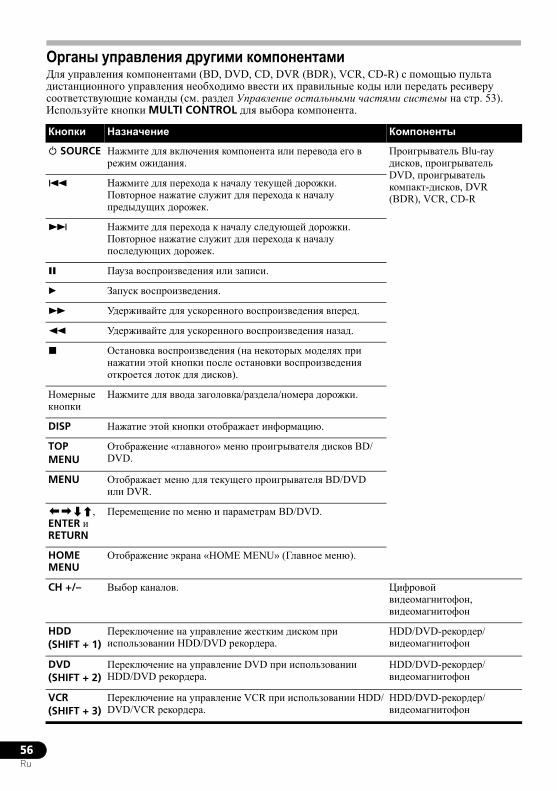
56Ru
Органы управления другими компонентамиДля управления компонентами (BD, DVD, CD, DVR (BDR), VCR, CD-R) с помощью пульта дистанционного управления необходимо ввести их правильные коды или передать ресиверу соответствующие команды (см. раздел Управление остальными частями системы на стр. 53). Используйте кнопки MULTI CONTROL для выбора компонента.
Кнопки Назначение Компоненты
SOURCE Нажмите для включения компонента или перевода его в режим ожидания.
Проигрыватель Blu-ray дисков, проигрыватель DVD, проигрыватель компакт-дисков, DVR (BDR), VCR, CD-R
Нажмите для перехода к началу текущей дорожки. Повторное нажатие служит для перехода к началу предыдущих дорожек.
Нажмите для перехода к началу следующей дорожки. Повторное нажатие служит для перехода к началу последующих дорожек.
Пауза воспроизведения или записи.
Запуск воспроизведения.
Удерживайте для ускоренного воспроизведения вперед.
Удерживайте для ускоренного воспроизведения назад.
Остановка воспроизведения (на некоторых моделях при нажатии этой кнопки после остановки воспроизведения откроется лоток для дисков).
Номерные кнопки
Нажмите для ввода заголовка/раздела/номера дорожки.
DISP Нажатие этой кнопки отображает информацию.
TOP MENU
Отображение «главного» меню проигрывателя дисков BD/DVD.
MENU Отображает меню для текущего проигрывателя BD/DVD или DVR.
, ENTER и RETURN
Перемещение по меню и параметрам BD/DVD.
HOME MENU
Отображение экрана «HOME MENU» (Главное меню).
CH +/– Выбор каналов. Цифровой видеомагнитофон, видеомагнитофон
HDD (SHIFT + 1)
Переключение на управление жестким диском при использовании HDD/DVD рекордера.
HDD/DVD-рекордер/видеомагнитофон
DVD (SHIFT + 2)
Переключение на управление DVD при использовании HDD/DVD рекордера.
HDD/DVD-рекордер/видеомагнитофон
VCR (SHIFT + 3)
Переключение на управление VCR при использовании HDD/DVD/VCR рекордера.
HDD/DVD-рекордер/видеомагнитофон
VSX-820_SYXCN_Ru.book 56 ページ 2010年4月12日 月曜日 午後7時2分

57Ru
EnglishFrançais
Deutsch
NederlandsItaliano
Español
Список предварительно заданных кодовНе должно возникать сложностей при управлении компонентами, если их производитель присутствует в списке, но учитывайте, что возможны ситуации, когда коды для производителя в списке не работают для данной модели. Также возможны ситуации, когда только некоторые функции могут управляться правильно установленными предварительно заданными кодами.
Внимание• Мы не гарантируем работу для всех перечисленных изготовителей и устройств. Работа может быть невозможна, даже если введен предустановленный код.
••••
TелевизорPioneer 0291, 0113, 0295,
0296A.R. Systems 0155 Acme 0141 Acura 0142, 0154 ADC 0140 Admiral 0138, 0139, 0140,
0145, 0146 Adyson 0141, 0228, 0229 Agashi 0228, 0229 Agazi 0140 Aiko 0141, 0142, 0154, 0155,
0228, 0229 Aim 0155 Aiwa 0199 Akai 0142, 0143, 0149, 0152,
0154, 0155, 0228, 0229 Akiba 0143, 0155 Akura 0140, 0143, 0154, 0155 Alaron 0228 Alba 0125, 0141, 0142, 0143,
0147, 0150, 0152, 0154, 0155, 0190, 0193, 0203, 0228
Alcyon 0132 Allorgan 0229 Allstar 0149, 0155 AMOi 0224 Amplivision 0125, 0141,
0156, 0229 Amstrad 0140, 0142, 0143,
0154, 0155 Anam 0142 Anglo 0142, 0154 Anitech 0132, 0140, 0142,
0154, 0155 Ansonic 0125, 0133, 0142,
0144, 0154, 0155 Arcam 0228, 0229 Arcam Delta 0141 Aristona 0149, 0152, 0155 Arthur Martin 0156 ASA 0138, 0146 Asberg 0132, 0149, 0155 Astra 0142
Asuka 0140, 0141, 0143, 0228, 0229
Atlantic 0141, 0149, 0152, 0155, 0228
Atori 0142, 0154 Auchan 0156 Audiosonic 0125, 0141,
0142, 0143, 0149, 0152, 0155, 0229
AudioTon 0125, 0141, 0229 Ausind 0132 Autovox 0132, 0138, 0140,
0141, 0229 Awa 0228, 0229 Baird 0229 Bang & Olufsen 0138, 0230 Basic Line 0142, 0143, 0149,
0154, 0155, 0229 Bastide 0141, 0229 Baur 0152, 0155 Bazin 0229 Beko 0125, 0150, 0155, 0175 Benq 0219 Beon 0149, 0152, 0155 Best 0125 Bestar 0125, 0149, 0155 Binatone 0141, 0229 Blue Sky 0143, 0155 Blue Star 0151 Boots 0141, 0229 BPL 0151, 0155 Brandt 0148, 0153, 0157,
0159 Brinkmann 0155 Brionvega 0138, 0149, 0152,
0155 Britannia 0141, 0228, 0229 Bruns 0138 BTC 0143 Bush 0142, 0143, 0145, 0147,
0149, 0151, 0152, 0154, 0155, 0180, 0193, 0229
Capsonic 0140 Carena 0155 Carrefour 0147 Cascade 0142, 0154, 0155
Casio 0221 Cathay 0149, 0152, 0155 CCE 0229 Centurion 0149, 0152, 0155 Century 0138 CGE 0125, 0132 Cimline 0142, 0154 City 0142, 0154 Clarivox 0152 Clatronic 0125, 0132, 0140,
0141, 0142, 0143, 0149, 0150, 0154, 0155, 0229
CMS 0228 CMS Hightec 0229 Concorde 0142, 0154 Condor 0125, 0141, 0149,
0150, 0154, 0155, 0228 Contec 0141, 0142, 0147,
0154, 0228 Continental Edison 0148 Cosmel 0142, 0154 Crosley 0132, 0138 Crown 0125, 0132, 0142,
0149, 0150, 0152, 0154, 0155
CS Electronics 0141, 0143, 0228
CTC Clatronic 0144 Cybertron 0143 Daewoo 0128, 0141, 0142,
0149, 0154, 0155, 0169, 0179, 0206, 0228, 0229
Dainichi 0143, 0228 Dansai 0140, 0149, 0152,
0155, 0228, 0229 Dantax 0125, 0152 Dawa 0155 Daytron 0142, 0154 De Graaf 0145 Decca 0141, 0149, 0152,
0155, 0229 Denver 0213, 0218 Desmet 0149, 0152, 0155 Diamant 0155 Diamond 0228
Dixi 0142, 0149, 0152, 0154, 0155, 0229
DTS 0142, 0154 Dual 0141, 0155, 0229 Dual-Tec 0141, 0142 Dumont 0138, 0141, 0144,
0229 Dux 0152 Dynatron 0149, 0152, 0155 Elbe 0125, 0133, 0155, 0229 Elcit 0138 Electa 0151 ELECTRO TECH 0142 Elin 0141, 0149, 0152, 0154,
0155, 0228 Elite 0143, 0149, 0155 Elman 0144 Elta 0142, 0154, 0228 Emerson 0125, 0138, 0155 Epson 0216 Erres 0149, 0152, 0155 ESC 0229 Etron 0142 Eurofeel 0229, 0140 Euroline 0152 Euroman 0125, 0140, 0141,
0149, 0155, 0228, 0229 Europhon 0141, 0144,
0149, 0155, 0228, 0229 Expert 0156 Exquisit 0155 Fenner 0142, 0154 Ferguson 0148, 0152, 0153,
0157 Fidelity 0141, 0145, 0155,
0228 Filsai 0229 Finlandia 0145 Finlux 0132, 0138, 0141,
0144, 0149, 0152, 0155, 0229
Firstline 0141, 0142, 0149, 0154, 0155, 0228, 0229
Fisher 0125, 0138, 0141, 0147, 0150, 0229
Flint 0149, 0155
TелевизорPioneer 0291
пример:
КатегорияПредустанов-ленный кодПроизводитель
VSX-820_SYXCN_Ru.book 57 ページ 2010年4月12日 月曜日 午後7時2分
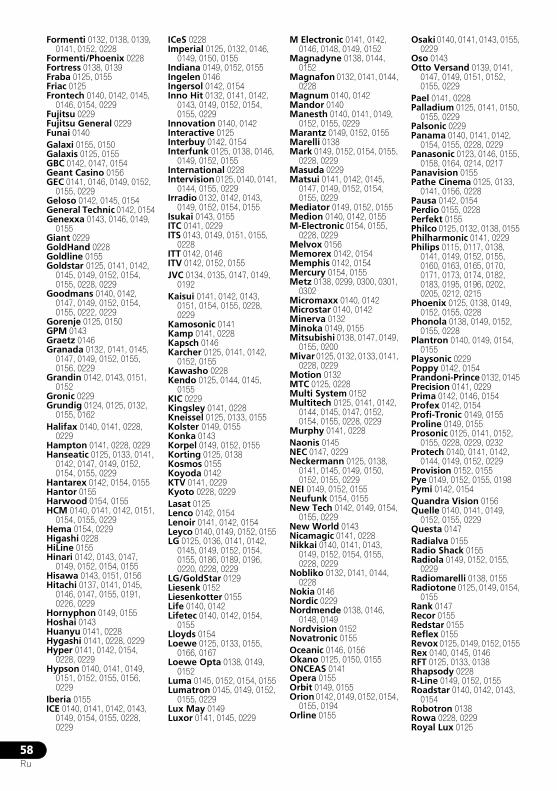
58Ru
Formenti 0132, 0138, 0139, 0141, 0152, 0228
Formenti/Phoenix 0228 Fortress 0138, 0139 Fraba 0125, 0155 Friac 0125 Frontech 0140, 0142, 0145,
0146, 0154, 0229 Fujitsu 0229 Fujitsu General 0229 Funai 0140 Galaxi 0155, 0150 Galaxis 0125, 0155 GBC 0142, 0147, 0154 Geant Casino 0156 GEC 0141, 0146, 0149, 0152,
0155, 0229 Geloso 0142, 0145, 0154 General Technic 0142, 0154 Genexxa 0143, 0146, 0149,
0155 Giant 0229 GoldHand 0228 Goldline 0155 Goldstar 0125, 0141, 0142,
0145, 0149, 0152, 0154, 0155, 0228, 0229
Goodmans 0140, 0142, 0147, 0149, 0152, 0154, 0155, 0222, 0229
Gorenje 0125, 0150 GPM 0143 Graetz 0146 Granada 0132, 0141, 0145,
0147, 0149, 0152, 0155, 0156, 0229
Grandin 0142, 0143, 0151, 0152
Gronic 0229 Grundig 0124, 0125, 0132,
0155, 0162 Halifax 0140, 0141, 0228,
0229 Hampton 0141, 0228, 0229 Hanseatic 0125, 0133, 0141,
0142, 0147, 0149, 0152, 0154, 0155, 0229
Hantarex 0142, 0154, 0155 Hantor 0155 Harwood 0154, 0155 HCM 0140, 0141, 0142, 0151,
0154, 0155, 0229 Hema 0154, 0229 Higashi 0228 HiLine 0155 Hinari 0142, 0143, 0147,
0149, 0152, 0154, 0155 Hisawa 0143, 0151, 0156 Hitachi 0137, 0141, 0145,
0146, 0147, 0155, 0191, 0226, 0229
Hornyphon 0149, 0155 Hoshai 0143 Huanyu 0141, 0228 Hygashi 0141, 0228, 0229 Hyper 0141, 0142, 0154,
0228, 0229 Hypson 0140, 0141, 0149,
0151, 0152, 0155, 0156, 0229
Iberia 0155 ICE 0140, 0141, 0142, 0143,
0149, 0154, 0155, 0228, 0229
ICeS 0228 Imperial 0125, 0132, 0146,
0149, 0150, 0155 Indiana 0149, 0152, 0155 Ingelen 0146 Ingersol 0142, 0154 Inno Hit 0132, 0141, 0142,
0143, 0149, 0152, 0154, 0155, 0229
Innovation 0140, 0142 Interactive 0125 Interbuy 0142, 0154 Interfunk 0125, 0138, 0146,
0149, 0152, 0155 International 0228 Intervision 0125, 0140, 0141,
0144, 0155, 0229 Irradio 0132, 0142, 0143,
0149, 0152, 0154, 0155 Isukai 0143, 0155 ITC 0141, 0229 ITS 0143, 0149, 0151, 0155,
0228 ITT 0142, 0146 ITV 0142, 0152, 0155 JVC 0134, 0135, 0147, 0149,
0192 Kaisui 0141, 0142, 0143,
0151, 0154, 0155, 0228, 0229
Kamosonic 0141 Kamp 0141, 0228 Kapsch 0146 Karcher 0125, 0141, 0142,
0152, 0155 Kawasho 0228 Kendo 0125, 0144, 0145,
0155 KIC 0229 Kingsley 0141, 0228 Kneissel 0125, 0133, 0155 Kolster 0149, 0155 Konka 0143 Korpel 0149, 0152, 0155 Korting 0125, 0138 Kosmos 0155 Koyoda 0142 KTV 0141, 0229 Kyoto 0228, 0229 Lasat 0125 Lenco 0142, 0154 Lenoir 0141, 0142, 0154 Leyco 0140, 0149, 0152, 0155 LG 0125, 0136, 0141, 0142,
0145, 0149, 0152, 0154, 0155, 0186, 0189, 0196, 0220, 0228, 0229
LG/GoldStar 0129 Liesenk 0152 Liesenkotter 0155 Life 0140, 0142 Lifetec 0140, 0142, 0154,
0155 Lloyds 0154 Loewe 0125, 0133, 0155,
0166, 0167 Loewe Opta 0138, 0149,
0152 Luma 0145, 0152, 0154, 0155 Lumatron 0145, 0149, 0152,
0155, 0229 Lux May 0149 Luxor 0141, 0145, 0229
M Electronic 0141, 0142, 0146, 0148, 0149, 0152
Magnadyne 0138, 0144, 0152
Magnafon 0132, 0141, 0144, 0228
Magnum 0140, 0142 Mandor 0140 Manesth 0140, 0141, 0149,
0152, 0155, 0229 Marantz 0149, 0152, 0155 Marelli 0138 Mark 0149, 0152, 0154, 0155,
0228, 0229 Masuda 0229 Matsui 0141, 0142, 0145,
0147, 0149, 0152, 0154, 0155, 0229
Mediator 0149, 0152, 0155 Medion 0140, 0142, 0155 M-Electronic 0154, 0155,
0228, 0229 Melvox 0156 Memorex 0142, 0154 Memphis 0142, 0154 Mercury 0154, 0155 Metz 0138, 0299, 0300, 0301,
0302 Micromaxx 0140, 0142 Microstar 0140, 0142 Minerva 0132 Minoka 0149, 0155 Mitsubishi 0138, 0147, 0149,
0155, 0200 Mivar 0125, 0132, 0133, 0141,
0228, 0229 Motion 0132 MTC 0125, 0228 Multi System 0152 Multitech 0125, 0141, 0142,
0144, 0145, 0147, 0152, 0154, 0155, 0228, 0229
Murphy 0141, 0228 Naonis 0145 NEC 0147, 0229 Neckermann 0125, 0138,
0141, 0145, 0149, 0150, 0152, 0155, 0229
NEI 0149, 0152, 0155 Neufunk 0154, 0155 New Tech 0142, 0149, 0154,
0155, 0229 New World 0143 Nicamagic 0141, 0228 Nikkai 0140, 0141, 0143,
0149, 0152, 0154, 0155, 0228, 0229
Nobliko 0132, 0141, 0144, 0228
Nokia 0146 Nordic 0229 Nordmende 0138, 0146,
0148, 0149 Nordvision 0152 Novatronic 0155 Oceanic 0146, 0156 Okano 0125, 0150, 0155 ONCEAS 0141 Opera 0155 Orbit 0149, 0155 Orion 0142, 0149, 0152, 0154,
0155, 0194 Orline 0155
Osaki 0140, 0141, 0143, 0155, 0229
Oso 0143 Otto Versand 0139, 0141,
0147, 0149, 0151, 0152, 0155, 0229
Pael 0141, 0228 Palladium 0125, 0141, 0150,
0155, 0229 Palsonic 0229 Panama 0140, 0141, 0142,
0154, 0155, 0228, 0229 Panasonic 0123, 0146, 0155,
0158, 0164, 0214, 0217 Panavision 0155 Pathe Cinema 0125, 0133,
0141, 0156, 0228 Pausa 0142, 0154 Perdio 0155, 0228 Perfekt 0155 Philco 0125, 0132, 0138, 0155 Philharmonic 0141, 0229 Philips 0115, 0117, 0138,
0141, 0149, 0152, 0155, 0160, 0163, 0165, 0170, 0171, 0173, 0174, 0182, 0183, 0195, 0196, 0202, 0205, 0212, 0215
Phoenix 0125, 0138, 0149, 0152, 0155, 0228
Phonola 0138, 0149, 0152, 0155, 0228
Plantron 0140, 0149, 0154, 0155
Playsonic 0229 Poppy 0142, 0154 Prandoni-Prince 0132, 0145 Precision 0141, 0229 Prima 0142, 0146, 0154 Profex 0142, 0154 Profi-Tronic 0149, 0155 Proline 0149, 0155 Prosonic 0125, 0141, 0152,
0155, 0228, 0229, 0232 Protech 0140, 0141, 0142,
0144, 0149, 0152, 0229 Provision 0152, 0155 Pye 0149, 0152, 0155, 0198 Pymi 0142, 0154 Quandra Vision 0156 Quelle 0140, 0141, 0149,
0152, 0155, 0229 Questa 0147 Radialva 0155 Radio Shack 0155 Radiola 0149, 0152, 0155,
0229 Radiomarelli 0138, 0155 Radiotone 0125, 0149, 0154,
0155 Rank 0147 Recor 0155 Redstar 0155 Reflex 0155 Revox 0125, 0149, 0152, 0155 Rex 0140, 0145, 0146 RFT 0125, 0133, 0138 Rhapsody 0228 R-Line 0149, 0152, 0155 Roadstar 0140, 0142, 0143,
0154 Robotron 0138 Rowa 0228, 0229 Royal Lux 0125
VSX-820_SYXCN_Ru.book 58 ページ 2010年4月12日 月曜日 午後7時2分
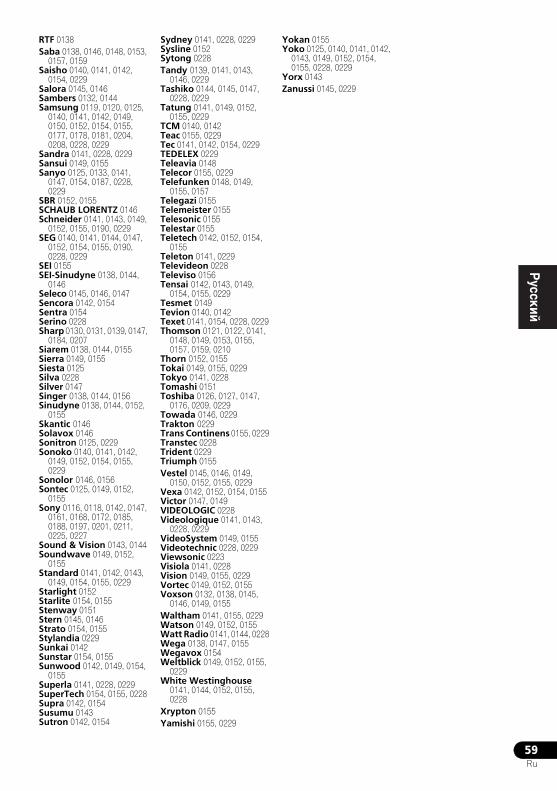
59Ru
EnglishFrançais
Deutsch
NederlandsItaliano
EspañolRTF 0138 Saba 0138, 0146, 0148, 0153,
0157, 0159 Saisho 0140, 0141, 0142,
0154, 0229 Salora 0145, 0146 Sambers 0132, 0144 Samsung 0119, 0120, 0125,
0140, 0141, 0142, 0149, 0150, 0152, 0154, 0155, 0177, 0178, 0181, 0204, 0208, 0228, 0229
Sandra 0141, 0228, 0229 Sansui 0149, 0155 Sanyo 0125, 0133, 0141,
0147, 0154, 0187, 0228, 0229
SBR 0152, 0155 SCHAUB LORENTZ 0146 Schneider 0141, 0143, 0149,
0152, 0155, 0190, 0229 SEG 0140, 0141, 0144, 0147,
0152, 0154, 0155, 0190, 0228, 0229
SEI 0155 SEI-Sinudyne 0138, 0144,
0146 Seleco 0145, 0146, 0147 Sencora 0142, 0154 Sentra 0154 Serino 0228 Sharp 0130, 0131, 0139, 0147,
0184, 0207 Siarem 0138, 0144, 0155 Sierra 0149, 0155 Siesta 0125 Silva 0228 Silver 0147 Singer 0138, 0144, 0156 Sinudyne 0138, 0144, 0152,
0155 Skantic 0146 Solavox 0146 Sonitron 0125, 0229 Sonoko 0140, 0141, 0142,
0149, 0152, 0154, 0155, 0229
Sonolor 0146, 0156 Sontec 0125, 0149, 0152,
0155 Sony 0116, 0118, 0142, 0147,
0161, 0168, 0172, 0185, 0188, 0197, 0201, 0211, 0225, 0227
Sound & Vision 0143, 0144 Soundwave 0149, 0152,
0155 Standard 0141, 0142, 0143,
0149, 0154, 0155, 0229 Starlight 0152 Starlite 0154, 0155 Stenway 0151 Stern 0145, 0146 Strato 0154, 0155 Stylandia 0229 Sunkai 0142 Sunstar 0154, 0155 Sunwood 0142, 0149, 0154,
0155 Superla 0141, 0228, 0229 SuperTech 0154, 0155, 0228 Supra 0142, 0154 Susumu 0143 Sutron 0142, 0154
Sydney 0141, 0228, 0229 Sysline 0152 Sytong 0228 Tandy 0139, 0141, 0143,
0146, 0229 Tashiko 0144, 0145, 0147,
0228, 0229 Tatung 0141, 0149, 0152,
0155, 0229 TCM 0140, 0142 Teac 0155, 0229 Tec 0141, 0142, 0154, 0229 TEDELEX 0229 Teleavia 0148 Telecor 0155, 0229 Telefunken 0148, 0149,
0155, 0157 Telegazi 0155 Telemeister 0155 Telesonic 0155 Telestar 0155 Teletech 0142, 0152, 0154,
0155 Teleton 0141, 0229 Televideon 0228 Televiso 0156 Tensai 0142, 0143, 0149,
0154, 0155, 0229 Tesmet 0149 Tevion 0140, 0142 Texet 0141, 0154, 0228, 0229 Thomson 0121, 0122, 0141,
0148, 0149, 0153, 0155, 0157, 0159, 0210
Thorn 0152, 0155 Tokai 0149, 0155, 0229 Tokyo 0141, 0228 Tomashi 0151 Toshiba 0126, 0127, 0147,
0176, 0209, 0229 Towada 0146, 0229 Trakton 0229 Trans Continens 0155, 0229 Transtec 0228 Trident 0229 Triumph 0155 Vestel 0145, 0146, 0149,
0150, 0152, 0155, 0229 Vexa 0142, 0152, 0154, 0155 Victor 0147, 0149 VIDEOLOGIC 0228 Videologique 0141, 0143,
0228, 0229 VideoSystem 0149, 0155 Videotechnic 0228, 0229 Viewsonic 0223 Visiola 0141, 0228 Vision 0149, 0155, 0229 Vortec 0149, 0152, 0155 Voxson 0132, 0138, 0145,
0146, 0149, 0155 Waltham 0141, 0155, 0229 Watson 0149, 0152, 0155 Watt Radio 0141, 0144, 0228 Wega 0138, 0147, 0155 Wegavox 0154 Weltblick 0149, 0152, 0155,
0229 White Westinghouse
0141, 0144, 0152, 0155, 0228
Xrypton 0155 Yamishi 0155, 0229
Yokan 0155 Yoko 0125, 0140, 0141, 0142,
0143, 0149, 0152, 0154, 0155, 0228, 0229
Yorx 0143 Zanussi 0145, 0229
VSX-820_SYXCN_Ru.book 59 ページ 2010年4月12日 月曜日 午後7時2分
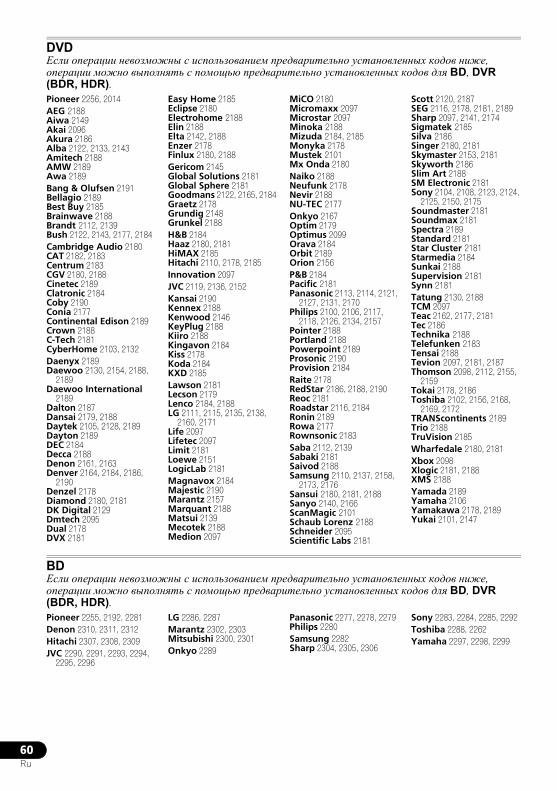
60Ru
DVDЕсли операции невозможны с использованием предварительно установленных кодов ниже, операции можно выполнять с помощью предварительно установленных кодов для BD, DVR (BDR, HDR).Pioneer 2256, 2014AEG 2188 Aiwa 2149 Akai 2096 Akura 2186 Alba 2122, 2133, 2143 Amitech 2188 AMW 2189 Awa 2189 Bang & Olufsen 2191 Bellagio 2189 Best Buy 2185 Brainwave 2188 Brandt 2112, 2139 Bush 2122, 2143, 2177, 2184 Cambridge Audio 2180 CAT 2182, 2183 Centrum 2183 CGV 2180, 2188 Cinetec 2189 Clatronic 2184 Coby 2190 Conia 2177 Continental Edison 2189 Crown 2188 C-Tech 2181 CyberHome 2103, 2132 Daenyx 2189 Daewoo 2130, 2154, 2188,
2189 Daewoo International
2189 Dalton 2187 Dansai 2179, 2188 Daytek 2105, 2128, 2189 Dayton 2189 DEC 2184 Decca 2188 Denon 2161, 2163 Denver 2164, 2184, 2186,
2190Denzel 2178 Diamond 2180, 2181 DK Digital 2129 Dmtech 2095 Dual 2178 DVX 2181
Easy Home 2185 Eclipse 2180 Electrohome 2188 Elin 2188 Elta 2142, 2188 Enzer 2178 Finlux 2180, 2188 Gericom 2145 Global Solutions 2181 Global Sphere 2181 Goodmans 2122, 2165, 2184 Graetz 2178 Grundig 2148 Grunkel 2188 H&B 2184 Haaz 2180, 2181 HiMAX 2185 Hitachi 2110, 2178, 2185 Innovation 2097 JVC 2119, 2136, 2152 Kansai 2190 Kennex 2188 Kenwood 2146 KeyPlug 2188 Kiiro 2188 Kingavon 2184 Kiss 2178 Koda 2184 KXD 2185 Lawson 2181 Lecson 2179 Lenco 2184, 2188 LG 2111, 2115, 2135, 2138,
2160, 2171 Life 2097 Lifetec 2097 Limit 2181 Loewe 2151 LogicLab 2181 Magnavox 2184 Majestic 2190 Marantz 2157 Marquant 2188 Matsui 2139 Mecotek 2188 Medion 2097
MiCO 2180 Micromaxx 2097 Microstar 2097 Minoka 2188 Mizuda 2184, 2185 Monyka 2178 Mustek 2101 Mx Onda 2180 Naiko 2188 Neufunk 2178 Nevir 2188 NU-TEC 2177 Onkyo 2167 Optim 2179 Optimus 2099 Orava 2184 Orbit 2189 Orion 2156 P&B 2184 Pacific 2181 Panasonic 2113, 2114, 2121,
2127, 2131, 2170 Philips 2100, 2106, 2117,
2118, 2126, 2134, 2157 Pointer 2188 Portland 2188 Powerpoint 2189 Prosonic 2190 Provision 2184 Raite 2178 RedStar 2186, 2188, 2190 Reoc 2181 Roadstar 2116, 2184 Ronin 2189 Rowa 2177 Rownsonic 2183 Saba 2112, 2139 Sabaki 2181 Saivod 2188 Samsung 2110, 2137, 2158,
2173, 2176 Sansui 2180, 2181, 2188 Sanyo 2140, 2166 ScanMagic 2101 Schaub Lorenz 2188 Schneider 2095 Scientific Labs 2181
Scott 2120, 2187 SEG 2116, 2178, 2181, 2189 Sharp 2097, 2141, 2174 Sigmatek 2185 Silva 2186 Singer 2180, 2181 Skymaster 2153, 2181 Skyworth 2186 Slim Art 2188 SM Electronic 2181 Sony 2104, 2108, 2123, 2124,
2125, 2150, 2175 Soundmaster 2181 Soundmax 2181 Spectra 2189 Standard 2181 Star Cluster 2181 Starmedia 2184 Sunkai 2188 Supervision 2181 Synn 2181 Tatung 2130, 2188 TCM 2097 Teac 2162, 2177, 2181 Tec 2186 Technika 2188 Telefunken 2183 Tensai 2188 Tevion 2097, 2181, 2187 Thomson 2098, 2112, 2155,
2159 Tokai 2178, 2186 Toshiba 2102, 2156, 2168,
2169, 2172 TRANScontinents 2189 Trio 2188 TruVision 2185 Wharfedale 2180, 2181 Xbox 2098 Xlogic 2181, 2188 XMS 2188 Yamada 2189 Yamaha 2106 Yamakawa 2178, 2189 Yukai 2101, 2147
BDЕсли операции невозможны с использованием предварительно установленных кодов ниже, операции можно выполнять с помощью предварительно установленных кодов для BD, DVR (BDR, HDR).Pioneer 2255, 2192, 2281Denon 2310, 2311, 2312 Hitachi 2307, 2308, 2309 JVC 2290, 2291, 2293, 2294,
2295, 2296
LG 2286, 2287 Marantz 2302, 2303 Mitsubishi 2300, 2301 Onkyo 2289
Panasonic 2277, 2278, 2279Philips 2280 Samsung 2282 Sharp 2304, 2305, 2306
Sony 2283, 2284, 2285, 2292 Toshiba 2288, 2262 Yamaha 2297, 2298, 2299
VSX-820_SYXCN_Ru.book 60 ページ 2010年4月12日 月曜日 午後7時2分
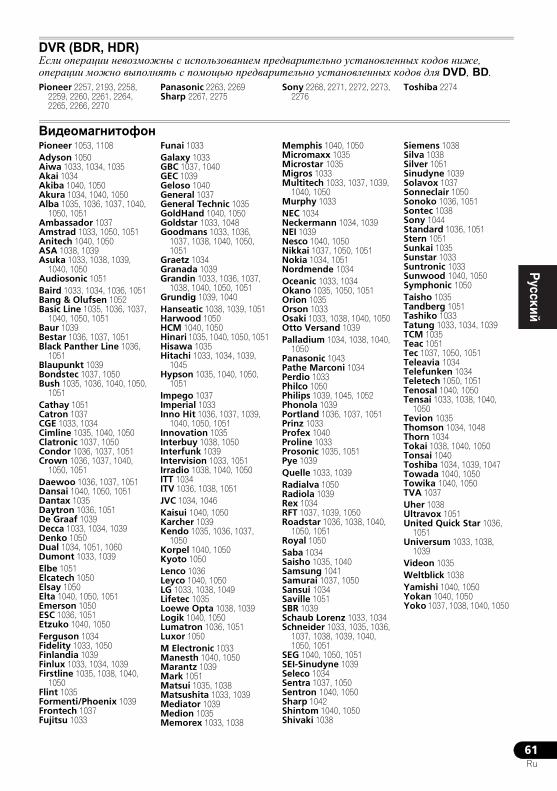
61Ru
EnglishFrançais
Deutsch
NederlandsItaliano
Español
DVR (BDR, HDR)Если операции невозможны с использованием предварительно установленных кодов ниже, операции можно выполнять с помощью предварительно установленных кодов для DVD, BD.Pioneer 2257, 2193, 2258,
2259, 2260, 2261, 2264, 2265, 2266, 2270
Panasonic 2263, 2269 Sharp 2267, 2275
Sony 2268, 2271, 2272, 2273, 2276
Toshiba 2274
Видеомагнитофон Pioneer 1053, 1108Adyson 1050 Aiwa 1033, 1034, 1035 Akai 1034 Akiba 1040, 1050 Akura 1034, 1040, 1050 Alba 1035, 1036, 1037, 1040,
1050, 1051 Ambassador 1037 Amstrad 1033, 1050, 1051 Anitech 1040, 1050 ASA 1038, 1039 Asuka 1033, 1038, 1039,
1040, 1050 Audiosonic 1051 Baird 1033, 1034, 1036, 1051 Bang & Olufsen 1052 Basic Line 1035, 1036, 1037,
1040, 1050, 1051 Baur 1039 Bestar 1036, 1037, 1051 Black Panther Line 1036,
1051 Blaupunkt 1039 Bondstec 1037, 1050 Bush 1035, 1036, 1040, 1050,
1051 Cathay 1051 Catron 1037 CGE 1033, 1034 Cimline 1035, 1040, 1050 Clatronic 1037, 1050 Condor 1036, 1037, 1051 Crown 1036, 1037, 1040,
1050, 1051 Daewoo 1036, 1037, 1051 Dansai 1040, 1050, 1051 Dantax 1035 Daytron 1036, 1051 De Graaf 1039 Decca 1033, 1034, 1039 Denko 1050 Dual 1034, 1051, 1060Dumont 1033, 1039 Elbe 1051 Elcatech 1050 Elsay 1050 Elta 1040, 1050, 1051 Emerson 1050 ESC 1036, 1051 Etzuko 1040, 1050 Ferguson 1034 Fidelity 1033, 1050 Finlandia 1039 Finlux 1033, 1034, 1039 Firstline 1035, 1038, 1040,
1050 Flint 1035 Formenti/Phoenix 1039 Frontech 1037 Fujitsu 1033
Funai 1033 Galaxy 1033 GBC 1037, 1040 GEC 1039 Geloso 1040 General 1037 General Technic 1035 GoldHand 1040, 1050 Goldstar 1033, 1048 Goodmans 1033, 1036,
1037, 1038, 1040, 1050, 1051
Graetz 1034 Granada 1039 Grandin 1033, 1036, 1037,
1038, 1040, 1050, 1051 Grundig 1039, 1040 Hanseatic 1038, 1039, 1051 Harwood 1050 HCM 1040, 1050 Hinari 1035, 1040, 1050, 1051 Hisawa 1035 Hitachi 1033, 1034, 1039,
1045Hypson 1035, 1040, 1050,
1051Impego 1037 Imperial 1033 Inno Hit 1036, 1037, 1039,
1040, 1050, 1051 Innovation 1035 Interbuy 1038, 1050 Interfunk 1039 Intervision 1033, 1051 Irradio 1038, 1040, 1050 ITT 1034 ITV 1036, 1038, 1051 JVC 1034, 1046 Kaisui 1040, 1050 Karcher 1039 Kendo 1035, 1036, 1037,
1050 Korpel 1040, 1050 Kyoto 1050 Lenco 1036 Leyco 1040, 1050 LG 1033, 1038, 1049 Lifetec 1035 Loewe Opta 1038, 1039 Logik 1040, 1050 Lumatron 1036, 1051 Luxor 1050 M Electronic 1033 Manesth 1040, 1050 Marantz 1039 Mark 1051 Matsui 1035, 1038 Matsushita 1033, 1039 Mediator 1039 Medion 1035 Memorex 1033, 1038
Memphis 1040, 1050 Micromaxx 1035 Microstar 1035 Migros 1033 Multitech 1033, 1037, 1039,
1040, 1050 Murphy 1033 NEC 1034 Neckermann 1034, 1039 NEI 1039 Nesco 1040, 1050 Nikkai 1037, 1050, 1051 Nokia 1034, 1051 Nordmende 1034 Oceanic 1033, 1034 Okano 1035, 1050, 1051 Orion 1035 Orson 1033 Osaki 1033, 1038, 1040, 1050 Otto Versand 1039 Palladium 1034, 1038, 1040,
1050 Panasonic 1043 Pathe Marconi 1034 Perdio 1033 Philco 1050 Philips 1039, 1045, 1052 Phonola 1039 Portland 1036, 1037, 1051 Prinz 1033 Profex 1040 Proline 1033 Prosonic 1035, 1051 Pye 1039 Quelle 1033, 1039 Radialva 1050 Radiola 1039 Rex 1034 RFT 1037, 1039, 1050 Roadstar 1036, 1038, 1040,
1050, 1051 Royal 1050 Saba 1034 Saisho 1035, 1040 Samsung 1041 Samurai 1037, 1050 Sansui 1034 Saville 1051 SBR 1039 Schaub Lorenz 1033, 1034 Schneider 1033, 1035, 1036,
1037, 1038, 1039, 1040, 1050, 1051
SEG 1040, 1050, 1051 SEI-Sinudyne 1039 Seleco 1034 Sentra 1037, 1050 Sentron 1040, 1050 Sharp 1042 Shintom 1040, 1050 Shivaki 1038
Siemens 1038 Silva 1038 Silver 1051 Sinudyne 1039 Solavox 1037 Sonneclair 1050 Sonoko 1036, 1051 Sontec 1038 Sony 1044 Standard 1036, 1051 Stern 1051 Sunkai 1035 Sunstar 1033 Suntronic 1033 Sunwood 1040, 1050 Symphonic 1050 Taisho 1035 Tandberg 1051 Tashiko 1033 Tatung 1033, 1034, 1039 TCM 1035 Teac 1051 Tec 1037, 1050, 1051 Teleavia 1034 Telefunken 1034 Teletech 1050, 1051 Tenosal 1040, 1050 Tensai 1033, 1038, 1040,
1050 Tevion 1035 Thomson 1034, 1048 Thorn 1034 Tokai 1038, 1040, 1050 Tonsai 1040 Toshiba 1034, 1039, 1047 Towada 1040, 1050 Towika 1040, 1050 TVA 1037 Uher 1038 Ultravox 1051 United Quick Star 1036,
1051Universum 1033, 1038,
1039 Videon 1035 Weltblick 1038 Yamishi 1040, 1050 Yokan 1040, 1050 Yoko 1037, 1038, 1040, 1050
VSX-820_SYXCN_Ru.book 61 ページ 2010年4月12日 月曜日 午後7時2分
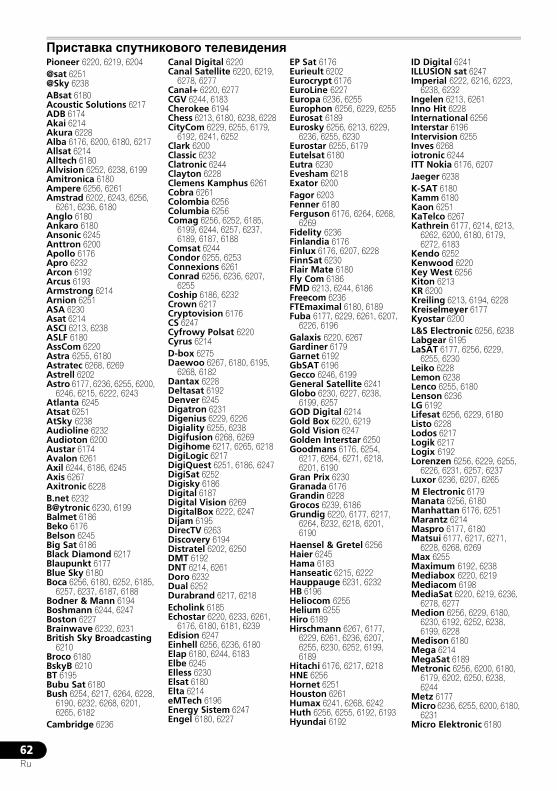
62Ru
Приставка спутникового телевиденияPioneer 6220, 6219, 6204@sat 6251 @Sky 6238 ABsat 6180 Acoustic Solutions 6217 ADB 6174 Akai 6214 Akura 6228 Alba 6176, 6200, 6180, 6217 Allsat 6214 Alltech 6180 Allvision 6252, 6238, 6199 Amitronica 6180 Ampere 6256, 6261 Amstrad 6202, 6243, 6256,
6261, 6236, 6180 Anglo 6180 Ankaro 6180 Ansonic 6245 Anttron 6200 Apollo 6176 Apro 6232 Arcon 6192 Arcus 6193 Armstrong 6214 Arnion 6251 ASA 6230 Asat 6214 ASCI 6213, 6238 ASLF 6180 AssCom 6220 Astra 6255, 6180 Astratec 6268, 6269 Astrell 6202 Astro 6177, 6236, 6255, 6200,
6246, 6215, 6222, 6243 Atlanta 6245 Atsat 6251 AtSky 6238 Audioline 6232 Audioton 6200 Austar 6174 Avalon 6261 Axil 6244, 6186, 6245 Axis 6267 Axitronic 6228 B.net 6232 B@ytronic 6230, 6199 Balmet 6186 Beko 6176 Belson 6245 Big Sat 6186 Black Diamond 6217 Blaupunkt 6177 Blue Sky 6180 Boca 6256, 6180, 6252, 6185,
6257, 6237, 6187, 6188 Bodner & Mann 6194 Boshmann 6244, 6247 Boston 6227 Brainwave 6232, 6231 British Sky Broadcasting
6210 Broco 6180 BskyB 6210 BT 6195 Bubu Sat 6180 Bush 6254, 6217, 6264, 6228,
6190, 6232, 6268, 6201, 6265, 6182
Cambridge 6236
Canal Digital 6220 Canal Satellite 6220, 6219,
6278, 6277 Canal+ 6220, 6277 CGV 6244, 6183 Cherokee 6194 Chess 6213, 6180, 6238, 6228 CityCom 6229, 6255, 6179,
6192, 6241, 6252 Clark 6200 Classic 6232 Clatronic 6244 Clayton 6228 Clemens Kamphus 6261 Cobra 6261 Colombia 6256 Columbia 6256 Comag 6256, 6252, 6185,
6199, 6244, 6257, 6237, 6189, 6187, 6188
Comsat 6244 Condor 6255, 6253 Connexions 6261 Conrad 6256, 6236, 6207,
6255 Coship 6186, 6232 Crown 6217 Cryptovision 6176 CS 6247 Cyfrowy Polsat 6220 Cyrus 6214 D-box 6275 Daewoo 6267, 6180, 6195,
6268, 6182 Dantax 6228 Deltasat 6192 Denver 6245 Digatron 6231 Digenius 6229, 6226 Digiality 6255, 6238 Digifusion 6268, 6269 Digihome 6217, 6265, 6218 DigiLogic 6217 DigiQuest 6251, 6186, 6247 DigiSat 6252 Digisky 6186 Digital 6187 Digital Vision 6269 DigitalBox 6222, 6247 Dijam 6195 DirecTV 6263 Discovery 6194 Distratel 6202, 6250 DMT 6192 DNT 6214, 6261 Doro 6232 Dual 6252 Durabrand 6217, 6218 Echolink 6185 Echostar 6220, 6233, 6261,
6176, 6180, 6181, 6239 Edision 6247 Einhell 6256, 6236, 6180 Elap 6180, 6244, 6183 Elbe 6245 Elless 6230 Elsat 6180 Elta 6214 eMTech 6196 Energy Sistem 6247 Engel 6180, 6227
EP Sat 6176 Eurieult 6202 Eurocrypt 6176 EuroLine 6227 Europa 6236, 6255 Europhon 6256, 6229, 6255 Eurosat 6189 Eurosky 6256, 6213, 6229,
6236, 6255, 6230 Eurostar 6255, 6179 Eutelsat 6180 Eutra 6230 Evesham 6218 Exator 6200 Fagor 6203 Fenner 6180 Ferguson 6176, 6264, 6268,
6269 Fidelity 6236 Finlandia 6176 Finlux 6176, 6207, 6228 FinnSat 6230 Flair Mate 6180 Fly Com 6186 FMD 6213, 6244, 6186 Freecom 6236 FTEmaximal 6180, 6189 Fuba 6177, 6229, 6261, 6207,
6226, 6196 Galaxis 6220, 6267 Gardiner 6179 Garnet 6192 GbSAT 6196 Gecco 6246, 6199 General Satellite 6241 Globo 6230, 6227, 6238,
6199, 6257 GOD Digital 6214 Gold Box 6220, 6219 Gold Vision 6247 Golden Interstar 6250 Goodmans 6176, 6254,
6217, 6264, 6271, 6218, 6201, 6190
Gran Prix 6230 Granada 6176 Grandin 6228 Grocos 6239, 6186 Grundig 6220, 6177, 6217,
6264, 6232, 6218, 6201, 6190
Haensel & Gretel 6256 Haier 6245 Hama 6183 Hanseatic 6215, 6222 Hauppauge 6231, 6232 HB 6196 Heliocom 6255 Helium 6255 Hiro 6189 Hirschmann 6267, 6177,
6229, 6261, 6236, 6207, 6255, 6230, 6252, 6199, 6189
Hitachi 6176, 6217, 6218 HNE 6256 Hornet 6251 Houston 6261 Humax 6241, 6268, 6242 Huth 6256, 6255, 6192, 6193 Hyundai 6192
ID Digital 6241 ILLUSION sat 6247 Imperial 6222, 6216, 6223,
6238, 6232 Ingelen 6213, 6261 Inno Hit 6228 International 6256 Interstar 6196 Intervision 6255 Inves 6268 iotronic 6244 ITT Nokia 6176, 6207 Jaeger 6238 K-SAT 6180 Kamm 6180 Kaon 6251 KaTelco 6267 Kathrein 6177, 6214, 6213,
6262, 6200, 6180, 6179, 6272, 6183
Kendo 6252 Kenwood 6220 Key West 6256 Kiton 6213 KR 6200 Kreiling 6213, 6194, 6228 Kreiselmeyer 6177 Kyostar 6200 L&S Electronic 6256, 6238 Labgear 6195 LaSAT 6177, 6256, 6229,
6255, 6230 Leiko 6228 Lemon 6238 Lenco 6255, 6180 Lenson 6236 LG 6192 Lifesat 6256, 6229, 6180 Listo 6228 Lodos 6217 Logik 6217 Logix 6192 Lorenzen 6256, 6229, 6255,
6226, 6231, 6257, 6237 Luxor 6236, 6207, 6265 M Electronic 6179 Manata 6256, 6180 Manhattan 6176, 6251 Marantz 6214 Maspro 6177, 6180 Matsui 6177, 6217, 6271,
6228, 6268, 6269 Max 6255 Maximum 6192, 6238 Mediabox 6220, 6219 Mediacom 6198 MediaSat 6220, 6219, 6236,
6278, 6277 Medion 6256, 6229, 6180,
6230, 6192, 6252, 6238, 6199, 6228
Medison 6180 Mega 6214 MegaSat 6189 Metronic 6256, 6200, 6180,
6179, 6202, 6250, 6238, 6244
Metz 6177 Micro 6236, 6255, 6200, 6180,
6231 Micro Elektronic 6180
VSX-820_SYXCN_Ru.book 62 ページ 2010年4月12日 月曜日 午後7時2分
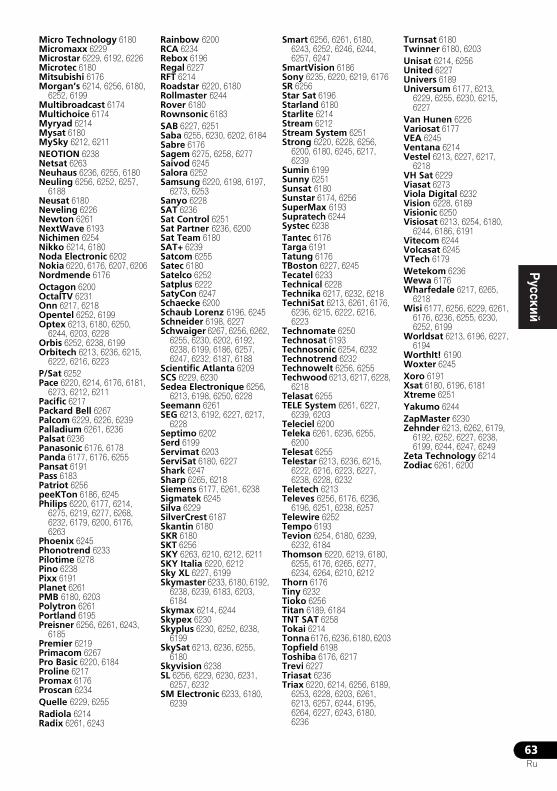
63Ru
EnglishFrançais
Deutsch
NederlandsItaliano
EspañolMicro Technology 6180 Micromaxx 6229 Microstar 6229, 6192, 6226 Microtec 6180 Mitsubishi 6176 Morgan’s 6214, 6256, 6180,
6252, 6199 Multibroadcast 6174 Multichoice 6174 Myryad 6214 Mysat 6180 MySky 6212, 6211 NEOTION 6238 Netsat 6263 Neuhaus 6236, 6255, 6180 Neuling 6256, 6252, 6257,
6188 Neusat 6180 Neveling 6226 Newton 6261 NextWave 6193 Nichimen 6254 Nikko 6214, 6180 Noda Electronic 6202 Nokia 6220, 6176, 6207, 6206 Nordmende 6176 Octagon 6200 OctalTV 6231 Onn 6217, 6218 Opentel 6252, 6199 Optex 6213, 6180, 6250,
6244, 6203, 6228 Orbis 6252, 6238, 6199 Orbitech 6213, 6236, 6215,
6222, 6216, 6223 P/Sat 6252 Pace 6220, 6214, 6176, 6181,
6273, 6212, 6211 Pacific 6217 Packard Bell 6267 Palcom 6229, 6226, 6239 Palladium 6261, 6236 Palsat 6236 Panasonic 6176, 6178 Panda 6177, 6176, 6255 Pansat 6191 Pass 6183 Patriot 6256 peeKTon 6186, 6245 Philips 6220, 6177, 6214,
6275, 6219, 6277, 6268, 6232, 6179, 6200, 6176, 6263
Phoenix 6245 Phonotrend 6233 Pilotime 6278 Pino 6238 Pixx 6191 Planet 6261 PMB 6180, 6203 Polytron 6261 Portland 6195 Preisner 6256, 6261, 6243,
6185 Premier 6219 Primacom 6267 Pro Basic 6220, 6184 Proline 6217 Promax 6176 Proscan 6234 Quelle 6229, 6255 Radiola 6214 Radix 6261, 6243
Rainbow 6200 RCA 6234 Rebox 6196 Regal 6227 RFT 6214 Roadstar 6220, 6180 Rollmaster 6244 Rover 6180 Rownsonic 6183 SAB 6227, 6251 Saba 6255, 6230, 6202, 6184 Sabre 6176 Sagem 6275, 6258, 6277 Saivod 6245 Salora 6252 Samsung 6220, 6198, 6197,
6273, 6253 Sanyo 6228 SAT 6236 Sat Control 6251 Sat Partner 6236, 6200 Sat Team 6180 SAT+ 6239 Satcom 6255 Satec 6180 Satelco 6252 Satplus 6222 SatyCon 6247 Schaecke 6200 Schaub Lorenz 6196, 6245 Schneider 6198, 6227 Schwaiger 6267, 6256, 6262,
6255, 6230, 6202, 6192, 6238, 6199, 6186, 6257, 6247, 6232, 6187, 6188
Scientific Atlanta 6209 SCS 6229, 6230 Sedea Electronique 6256,
6213, 6198, 6250, 6228 Seemann 6261 SEG 6213, 6192, 6227, 6217,
6228 Septimo 6202 Serd 6199 Servimat 6203 ServiSat 6180, 6227 Shark 6247 Sharp 6265, 6218 Siemens 6177, 6261, 6238 Sigmatek 6245 Silva 6229 SilverCrest 6187 Skantin 6180 SKR 6180 SKT 6256 SKY 6263, 6210, 6212, 6211 SKY Italia 6220, 6212 Sky XL 6227, 6199 Skymaster 6233, 6180, 6192,
6238, 6239, 6183, 6203, 6184
Skymax 6214, 6244 Skypex 6230 Skyplus 6230, 6252, 6238,
6199 SkySat 6213, 6236, 6255,
6180 Skyvision 6238 SL 6256, 6229, 6230, 6231,
6257, 6232 SM Electronic 6233, 6180,
6239
Smart 6256, 6261, 6180, 6243, 6252, 6246, 6244, 6257, 6247
SmartVision 6186 Sony 6235, 6220, 6219, 6176 SR 6256 Star Sat 6196 Starland 6180 Starlite 6214 Stream 6212 Stream System 6251 Strong 6220, 6228, 6256,
6200, 6180, 6245, 6217, 6239
Sumin 6199 Sunny 6251 Sunsat 6180 Sunstar 6174, 6256 SuperMax 6193 Supratech 6244 Systec 6238 Tantec 6176 Targa 6191 Tatung 6176 TBoston 6227, 6245 Tecatel 6233 Technical 6228 Technika 6217, 6232, 6218 TechniSat 6213, 6261, 6176,
6236, 6215, 6222, 6216, 6223
Technomate 6250 Technosat 6193 Technosonic 6254, 6232 Technotrend 6232 Technowelt 6256, 6255 Techwood 6213, 6217, 6228,
6218 Telasat 6255 TELE System 6261, 6227,
6239, 6203 Teleciel 6200 Teleka 6261, 6236, 6255,
6200 Telesat 6255 Telestar 6213, 6236, 6215,
6222, 6216, 6223, 6227, 6238, 6228, 6232
Teletech 6213 Televes 6256, 6176, 6236,
6196, 6251, 6238, 6257 Telewire 6252 Tempo 6193 Tevion 6254, 6180, 6239,
6232, 6184 Thomson 6220, 6219, 6180,
6255, 6176, 6265, 6277, 6234, 6264, 6210, 6212
Thorn 6176 Tiny 6232 Tioko 6256 Titan 6189, 6184 TNT SAT 6258 Tokai 6214 Tonna 6176, 6236, 6180, 6203 Topfield 6198 Toshiba 6176, 6217 Trevi 6227 Triasat 6236 Triax 6220, 6214, 6256, 6189,
6253, 6228, 6203, 6261, 6213, 6257, 6244, 6195, 6264, 6227, 6243, 6180, 6236
Turnsat 6180 Twinner 6180, 6203 Unisat 6214, 6256 United 6227 Univers 6189 Universum 6177, 6213,
6229, 6255, 6230, 6215, 6227
Van Hunen 6226 Variosat 6177 VEA 6245 Ventana 6214 Vestel 6213, 6227, 6217,
6218 VH Sat 6229 Viasat 6273 Viola Digital 6232 Vision 6228, 6189 Visionic 6250 Visiosat 6213, 6254, 6180,
6244, 6186, 6191 Vitecom 6244 Volcasat 6245 VTech 6179 Wetekom 6236 Wewa 6176 Wharfedale 6217, 6265,
6218 Wisi 6177, 6256, 6229, 6261,
6176, 6236, 6255, 6230, 6252, 6199
Worldsat 6213, 6196, 6227, 6194
WorthIt! 6190 Woxter 6245 Xoro 6191 Xsat 6180, 6196, 6181 Xtreme 6251 Yakumo 6244 ZapMaster 6230 Zehnder 6213, 6262, 6179,
6192, 6252, 6227, 6238, 6199, 6244, 6247, 6249
Zeta Technology 6214 Zodiac 6261, 6200
VSX-820_SYXCN_Ru.book 63 ページ 2010年4月12日 月曜日 午後7時2分
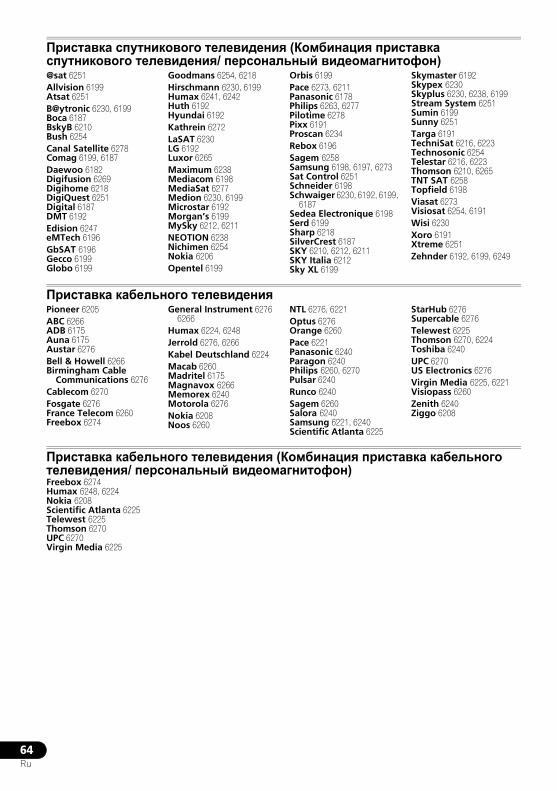
64Ru
Приставка спутникового телевидения (Комбинация приставка спутникового телевидения/ персональный видеомагнитофон)@sat 6251 Allvision 6199 Atsat 6251 B@ytronic 6230, 6199 Boca 6187 BskyB 6210 Bush 6254 Canal Satellite 6278 Comag 6199, 6187 Daewoo 6182 Digifusion 6269 Digihome 6218 DigiQuest 6251 Digital 6187 DMT 6192 Edision 6247 eMTech 6196 GbSAT 6196 Gecco 6199 Globo 6199
Goodmans 6254, 6218 Hirschmann 6230, 6199 Humax 6241, 6242 Huth 6192 Hyundai 6192 Kathrein 6272 LaSAT 6230 LG 6192 Luxor 6265 Maximum 6238 Mediacom 6198 MediaSat 6277 Medion 6230, 6199 Microstar 6192 Morgan’s 6199 MySky 6212, 6211 NEOTION 6238 Nichimen 6254 Nokia 6206 Opentel 6199
Orbis 6199 Pace 6273, 6211 Panasonic 6178 Philips 6263, 6277 Pilotime 6278 Pixx 6191 Proscan 6234 Rebox 6196 Sagem 6258 Samsung 6198, 6197, 6273 Sat Control 6251 Schneider 6198 Schwaiger 6230, 6192, 6199,
6187Sedea Electronique 6198 Serd 6199 Sharp 6218 SilverCrest 6187 SKY 6210, 6212, 6211SKY Italia 6212 Sky XL 6199
Skymaster 6192 Skypex 6230 Skyplus 6230, 6238, 6199 Stream System 6251 Sumin 6199 Sunny 6251 Targa 6191 TechniSat 6216, 6223 Technosonic 6254 Telestar 6216, 6223 Thomson 6210, 6265 TNT SAT 6258 Topfield 6198 Viasat 6273 Visiosat 6254, 6191 Wisi 6230 Xoro 6191 Xtreme 6251 Zehnder 6192, 6199, 6249
Приставка кабельного телевиденияPioneer 6205 ABC 6266 ADB 6175 Auna 6175 Austar 6276 Bell & Howell 6266 Birmingham Cable
Communications 6276 Cablecom 6270 Fosgate 6276 France Telecom 6260 Freebox 6274
General Instrument 6276 6266
Humax 6224, 6248 Jerrold 6276, 6266 Kabel Deutschland 6224 Macab 6260 Madritel 6175 Magnavox 6266 Memorex 6240 Motorola 6276 Nokia 6208 Noos 6260
NTL 6276, 6221 Optus 6276 Orange 6260 Pace 6221 Panasonic 6240 Paragon 6240 Philips 6260, 6270 Pulsar 6240 Runco 6240 Sagem 6260 Salora 6240 Samsung 6221, 6240 Scientific Atlanta 6225
StarHub 6276 Supercable 6276 Telewest 6225 Thomson 6270, 6224 Toshiba 6240 UPC 6270 US Electronics 6276 Virgin Media 6225, 6221 Visiopass 6260 Zenith 6240 Ziggo 6208
Приставка кабельного телевидения (Комбинация приставка кабельного телевидения/ персональный видеомагнитофон) Freebox 6274 Humax 6248, 6224 Nokia 6208 Scientific Atlanta 6225 Telewest 6225 Thomson 6270 UPC 6270 Virgin Media 6225
VSX-820_SYXCN_Ru.book 64 ページ 2010年4月12日 月曜日 午後7時2分
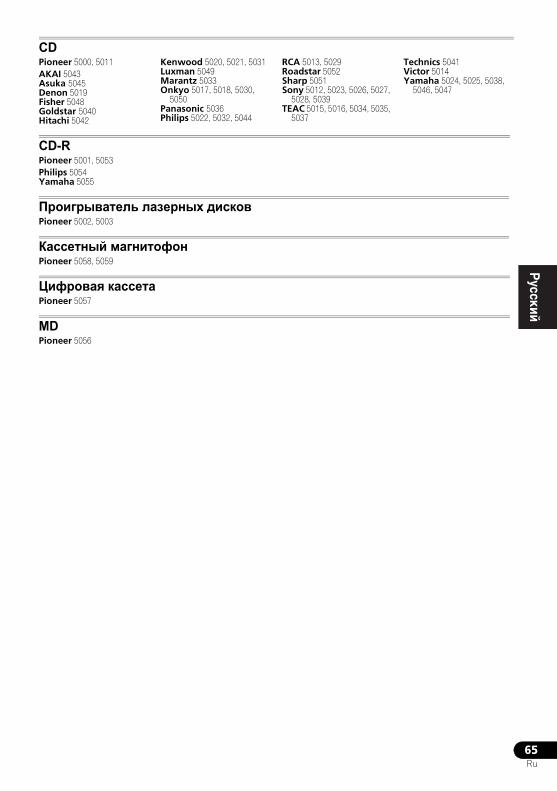
65Ru
EnglishFrançais
Deutsch
NederlandsItaliano
Español
CDPioneer 5000, 5011 AKAI 5043 Asuka 5045 Denon 5019 Fisher 5048 Goldstar 5040 Hitachi 5042
Kenwood 5020, 5021, 5031 Luxman 5049 Marantz 5033 Onkyo 5017, 5018, 5030,
5050 Panasonic 5036 Philips 5022, 5032, 5044
RCA 5013, 5029 Roadstar 5052 Sharp 5051 Sony 5012, 5023, 5026, 5027,
5028, 5039TEAC 5015, 5016, 5034, 5035,
5037
Technics 5041 Victor 5014 Yamaha 5024, 5025, 5038,
5046, 5047
CD-RPioneer 5001, 5053Philips 5054Yamaha 5055
Проигрыватель лазерных дисковPioneer 5002, 5003
Кассетный магнитофонPioneer 5058, 5059
Цифровая кассетаPioneer 5057
MDPioneer 5056
VSX-820_SYXCN_Ru.book 65 ページ 2010年4月12日 月曜日 午後7時2分
66Ru
Глава 10:
Другие подключения ОСТОРОЖНО
• Перед выполнением или изменением схем подсоединения отключите питание и отсоедините кабель питания от электророзетки. Подсоединение компонентов к электросети должно быть последней операцией по подключению, которая выполняется в системе.
• Не допускайте, чтобы контакты кабелей громкоговорителей были подключены к разным разъемам.
Подключение iPodЭтот ресивер снабжен разъемом, предназначенным для подключения iPod, позволяющим управлять воспроизведением аудиозаписей с iPod при помощи органов управления ресивера.1
• Нажмите выступ PUSH OPEN, чтобы открыть разъем iPod.
Подключение iPod к ресиверу1 Переключите этот ресивер в режим ожидания, а затем с помощью кабеля iPod подключите iPod к разъему iPod на передней панели этого ресивера.Также прочитайте о подключении кабелей в инструкции по эксплуатации iPod.2 Включите ресивер и нажмите кнопку iPod USB input source для переключения ресивера на связь с iPod. На дисплее передней панели появится надпись Loading, пока ресивер проверяет подключение и запрашивает данные iPod.3 Используйте кнопку TOP MENU для отображения главного меню iPod.Когда на дисплее появится надпись Top Menu, можно воспроизводить музыку с iPod.2
Примечание1 • Данная система поддерживает аудио и видео для iPod nano, iPod (пятого поколения), iPod classic, iPod touch и
iPhone (iPod shuffle не поддерживается). В то же время отдельные функции могут быть недоступны для некоторых моделей. Учтите, что совместимость может сильно меняться в зависимости от версии программного обеспечения iPod и iPhone. Убедитесь, что используется последняя версия программного обеспечения.• iPod и iPhone лицензированы для воспроизведения материалов, не защищенных авторским правом, или материалов, на воспроизведение которых пользователь имеет юридическое право.• Такие функции, как эквалайзер не могут управляться с ресивера, поэтому перед подключением рекомендуется отключать эквалайзер.• Pioneer при любых обстоятельствах не несет ответственности за прямые и косвенные убытки, возникшие вследствие неудобств и утраты записанного материала, возникшей из-за неисправности iPod.
2 При подключении к данному ресиверу элементы управления iPod (за исключением iPod touch или iPhone) не будут действовать (на дисплее iPod будет отображаться надпись Pioneer).
MASTERVOLUME
MCACCSETUP MIC
VIDEO INPUT
AUDIOL RVIDEO
iPodiPhone
USB
CONTROL ON / OFF
MENU
Music
Genius >PlaylistsArtistsAlbumsSongsRadioGenresComposersAudiobooks
Данный ресивер
iPod
Кабель iPod
VSX-820_SYXCN_Ru.book 66 ページ 2010年4月12日 月曜日 午後7時2分
67Ru
EnglishFrançais
Deutsch
NederlandsItaliano
Español• Если после нажатия iPod на дисплее появляется надпись NO DEVICE, попробуйте выключить ресивер и подключить к нему iPod заново.
Воспроизведение с iPodДля выбора песен на iPod можно воспользоваться преимуществами экранного меню телевизора, подключенного к ресиверу.1 Также можно управлять всеми операциями воспроизведения музыки с передней панели ресивера.
Поиск материала для воспроизведенияПри подключении iPod к ресиверу можно напрямую выбирать песни, хранящиеся в iPod, по спискам воспроизведения, исполнителю, названию альбома, песни, жанру или композитору, также, как и непосредственно на iPod.
1 С помощью кнопок / выберите категорию, затем нажмите кнопку ENTER для просмотра категории.
• Чтобы в любое время вернуться на предыдущий уровень меню, нажмите RETURN.
2 Используйте кнопки / для просмотра выбранной категории (например, альбомов).
• Используйте кнопки / для перехода на предыдущий или следующий уровень.
3 Продолжайте поиск, пока не будет найдена нужная композиция, затем нажмите чтобы начать воспроизведение.2Перемещение по категориям на iPod выглядит так:
Playlists (Списки воспроизведения) Songs (Песни)Artists (Исполнители) Albums (Альбомы) Songs (Песни)Albums (Альбомы) Songs (Песни)Songs (Песни)Podcasts (Подкасты)
Genres (Жанры) Artists (Исполнители) Albums (Альбомы) Songs (Песни)Composers (Композиторы) Albums (Альбомы) Songs (Песни)Audiobooks (Аудиокниги)Shuffle Songs (В случайном порядке)
Совет• Можно воспроизвести все песни определенной категории, выбрав пункт All (Все) в начале списка каждой категории. Например, можно воспроизвести все песни определенного исполнителя.
Основные органы управления воспроизведениемВ следующей таблице показаны основные органы управления воспроизведением iPod:
Примечание1 • Учтите, что нелатинские буквы в названиях будут отображаться как *.
• Эта функция недоступна для фотографий и видеороликов, записанных в iPod.2 Если вы находитесь в категории песен, для начала воспроизведения можно нажать кнопку ENTER.
iPod Top
[ Playlists ] [ Artists ] [ Albums ] [ Songs ] [ Podcasts ] [ Genres ] [ Composers ] [ Audiobooks ] [ Shuffle Songs ]
ENTER Return
Кнопка Назначение
Нажмите, чтобы начать воспроизведение.Если для воспроизведения выбраны не только песни, будут воспроизведены все песни, попавшие в эту категорию.
Приостанавливает и возобновляет воспроизведение.
ENTER Нажмите для задания режимов воспроизведения и паузы.
/ Нажмите и удерживайте во время воспроизведения для запуска сканирования.
/ Нажмите для пропуска предыдущей/следующей дорожки.
Повторно нажимайте для переключения между Repeat One (Повторить одну), Repeat All (Повторить все) и Repeat Off (Без повтора).При последовательном нажатии происходит переключение между режимами Shuffle Songs (Случайная песня), Shuffle Albums (Случайные альбомы) и Shuffle Off (Случайное воспроизведение отключено).
DISP (DISPLAY)
Повторно нажимайте для переключения информации воспроизведения песни, отображаемой на дисплее передней панели.
VSX-820_SYXCN_Ru.book 67 ページ 2010年4月12日 月曜日 午後7時2分
68Ru
Просмотр фотографий и видеоконтентаДля просмотра фотографий и видео на iPod необходимо использовать элементы управления iPod, поскольку управление видео с этого ресивера невозможно.1
Внимание• Для просмотра фотографий и воспроизведения видео на iPod необходимо подключить композитный разъем MONITOR OUT к телевизору.
1 Нажмите iPod CTRL для переключения на элементы управления iPod для просмотра фотографий и видео.Во время просмотра видео iPod или просмотра фотографий элементы управления ресивера действовать не будут.
2 После окончания просмотра еще раз нажмите iPod CTRL, чтобы переключиться обратно на элементы управления ресивера.
Совет• Измените вход ресивера на iPod с одной попытки, нажав кнопку iPod iPhone DIRECT CONTROL на передней панели, чтобы включить управление iPod на iPod.
О формате iPod
«Made for iPod» означает, что электронный прибор был разработан для подключения определенно к iPod и был сертифицирован разработчиком на соответствие стандарту технических характеристик Apple.
«Works with iPhone» означает, что электронный прибор был разработан для подключения определенно к iPhone и был сертифицирован разработчиком на соответствие стандарту технических характеристик Apple.
Apple не несет ответственности за работу данного устройства или его соответствие со стандартами по технике безопасности или регулятивными нормами.
iPod является торговым знаком компании Apple Inc., зарегистрированным в США и других странах. iPhone является торговым знаком компании Apple Inc.
/ При просмотре нажмите для перехода на предыдущий/следующий уровень.
/ При воспроизведении аудиокниги нажмите для изменения скорости воспроизведения: Faster (Быстрее) Normal (Обычный) Slower (Медленнее)
TOP MENU
Нажмите для возврата к экрану меню iPod Top.
RETURN Нажмите для возврата на предыдущий уровень.
Примечание1 • Фотографии и видеоконтент iPod можно просматривать, только когда iPod подключен к входу iPod VIDEO на передней панели.• Эту функцию можно использовать только на моделях iPod с видеовыходом.
Кнопка Назначение
VSX-820_SYXCN_Ru.book 68 ページ 2010年4月12日 月曜日 午後7時2分
69Ru
EnglishFrançais
Deutsch
NederlandsItaliano
Español
Подключение устройства USBС помощью интерфейса USB на передней панели этого ресивера можно прослушивать двухканальный звук1 с USB - устройств. Подключите запоминающее устройство2 с помощью интерфейса USB, как показано ниже.
• Нажмите выступ PUSH OPEN, чтобы открыть разъем USB.
Подключите устройство USB к ресиверу1 Включите ресивер и используемый телевизор.2 Нажмите iPod USB на пульте ДУ для переключения ресивера на iPod USB.На экранном дисплее отображается NO DEVICE.3 Подключите используемое устройство с интерфейсом USB.3Разъем USB расположен на передней панели.
На экранном дисплее отображается Loading, когда данный ресивер начинает распознавание подключенного устройства USB. После распознавания, на экранном дисплее отображается экран воспроизведения, и автоматически начинается воспроизведение.4
Основные органы управления воспроизведениемВ следующей таблице приведены основные кнопки управления воспроизведением устройств с интерфейсом USB на пульте дистанционного управления. Нажмите iPod USB для переключения пульта ДУ в рабочий режим iPod USB.
Примечание1 Это включает воспроизведение файлов WMA/MP3/MPEG-4 AAC (кроме файлов с защитой от копирования или ограниченным воспроизведением).
2 • К совместимым с USB устройствам относятся внешние магнитные жесткие диски, портативные элементы флэш-памяти (особенно мобильные накопители) и цифровые аудиопроигрыватели (проигрыватели MP3) формата FAT16/32. Невозможно подключить этот ресивер к ПК для воспроизведения USB.• Компания Pioneer не может гарантировать совместимость (управление и/или мощность шины) со всеми запоминающими устройствами USB и не несет ответственности за потерю данных, возможную при подключении к этому ресиверу.• При наличии больших объемов данных ресиверу может понадобиться больше времени для чтения содержимого устройства USB.
3 При отсоединении устройства с интерфейсом USB убедитесь в том, что ресивер находится в режиме ожидания.
MASTERVOLUME
MCACCSETUP MIC
VIDEO INPUT
AUDIOL RVIDEO
iPodiPhone
USB
CONTROL ON / OFF
Данный ресиверЗапоминающее устройство большой емкости USB
4 • Если невозможно воспроизвести выбранный файл, данный ресивер автоматически пропускает его и начинает воспроизведение следующего файла.• Если текущий воспроизводимый файл не имеет названия, вместо него на экранном дисплее отображается имя файла; при отсутствии названия альбома или имени исполнителя, отображается пустая строка.• Учтите, что нелатинские символы в списке воспроизведения отображаются как *.
Кнопка Назначение
Запуск обычного воспроизведения.
Останавливает/прекращает воспроизведение.
/ Нажмите для пропуска предыдущей/следующей дорожки.
/ Нажмите и удерживайте во время воспроизведения для запуска сканирования.
Повторно нажимайте для переключения между Repeat Folder, Repeat One и Repeat All.
USB
R:Fld S:On
001/004PLAY
Return
R e l a x Yo u r B o dyKev i n J a ck s o nWe a r e a l l o n e
32kbps 0:01
MP3
Номер файла/папкиФормат файловПовтор или случайный порядокНазвание песниИмя исполнителяНазвание альбома
Прошедшее время
Скорость цифрового потока
VSX-820_SYXCN_Ru.book 69 ページ 2010年4月12日 月曜日 午後7時2分
70Ru
ВниманиеЕсли на дисплее появляется сообщение об ошибке USB Error, попробуйте выполнить следующее:
• Выключите ресивер, затем включите снова.• Заново подсоедините устройство USB к выключенному ресиверу.
• Выберите другой источник входа (например, BD), затем снова переключите на iPod USB.
• Для питания устройства USB используйте специальный сетевой адаптер (прилагаемый к данному устройству).
Подробную информацию о сообщениях об ошибках см. в разделе Сообщения USB на стр. 79.Если это не является решением проблемы, скорее всего используемое устройство USB несовместимо.
Поддержка сжатых аудиосигналовУчтите, что хотя большинство стандартных комбинаций частоты дискретизации для сжатых аудиосигналов совместимо, некоторые файлы с нестандартной кодировкой могут не воспроизводиться. В списке, приведенном ниже, перечислены совместимые форматы сжатых аудиофайлов:
• MP3 (MPEG-1/2/2.5 Audio Layer 3) – частоты дискретизации: 8 кГц до 48 кГц; скорости передачи данных: 8 кбит/с до 320 кбит/с (рекомендуется 128 кбит/с или выше); расширение файла: .mp3
• WMA (Windows Media Audio) – частоты дискретизации: 32 кГц / 44,1 кГц; скорости передачи данных: 32 кбит/с до 192 кбит/с (рекомендуется 128 кбит/с или выше); расширение файла: .wma; WM9 Pro и WMA с кодированием без потерь: нет
• AAC (MPEG-4 Advanced Audio Coding) – частоты дискретизации: 11,025 кГц до 48 кГц; скорости передачи данных: 16 кбит/с до 320 кбит/с (рекомендуется 128 кбит/с или выше); расширение файла: .m4a; Apple с кодированием без потерь: нет
Дополнительная информация о совместимости
• VBR (изменяющаяся скорость передачи данных) MP3/WMA/MPEG-4 AAC: да1
• Совместимость с защитой DRM (Digital Rights Management (управления цифровыми правами)): да (аудиофайлы с защитой DRM не будут воспроизводиться на этом ресивере.)
О формате MPEG-4 AACВ основе Перспективного звукового кодирования (Advanced Audio Coding, AAC) лежит стандарт MPEG-4 AAC, в котором используется стандарт MPEG-2 AAC, являющийся основой технологии сжатия звука MPEG-4. Этот формат и расширение файлов используются в зависимости от приложения, применяемого для декодирования файла AAC. Данное устройство воспроизводит файлы формата AAC, закодированные с помощью iTunes®, с расширением «.m4a». Файлы с защитой DRM не воспроизводятся; также могут не воспроизводиться файлы с кодировкой некоторых версий iTunes®.
Apple и iTunes являются торговыми знаками компании Apple Inc., зарегистрированными в США и других странах.
Повторно нажимайте для переключения между Shuffle On и Shuffle Off.
DISP (DISPLAY)
Повторно нажимайте для переключения информации воспроизведения песни, отображаемой на дисплее передней панели.
//
Нажмите во время воспроизведения для перехода к предыдущей/следующей дорожке.
TOP MENU
Нажатие этой кнопки возвращает к экрану меню.
RETURN Нажмите для возврата на предыдущий уровень.
Кнопка Назначение
Примечание1 Учтите, что в некоторых случаях время воспроизведения отображается неправильно.
VSX-820_SYXCN_Ru.book 70 ページ 2010年4月12日 月曜日 午後7時2分
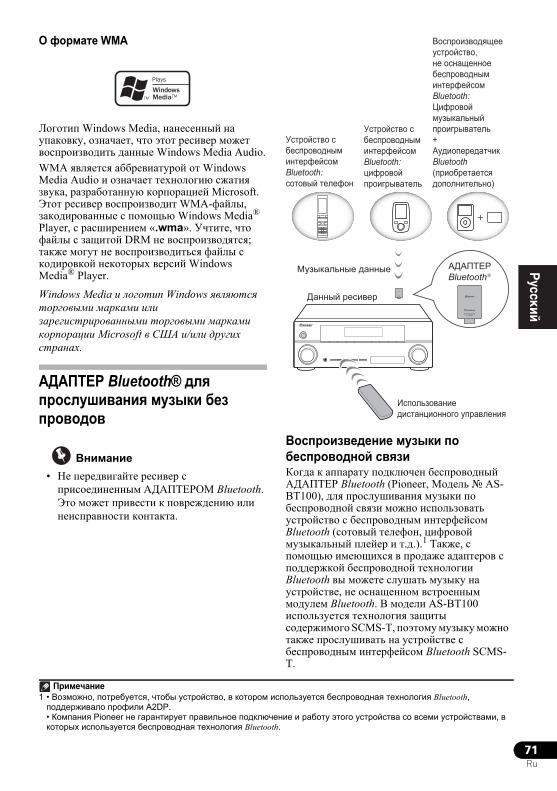
71Ru
EnglishFrançais
Deutsch
NederlandsItaliano
EspañolО формате WMA
Логотип Windows Media, нанесенный на упаковку, означает, что этот ресивер может воспроизводить данные Windows Media Audio.WMA является аббревиатурой от Windows Media Audio и означает технологию сжатия звука, разработанную корпорацией Microsoft. Этот ресивер воспроизводит WMA-файлы, закодированные с помощью Windows Media® Player, с расширением «.wma». Учтите, что файлы с защитой DRM не воспроизводятся; также могут не воспроизводиться файлы с кодировкой некоторых версий Windows Media® Player.
Windows Media и логотип Windows являются торговыми марками или зарегистрированными торговыми марками корпорации Microsoft в США и/или других странах.
АДАПТЕР Bluetooth® для прослушивания музыки без проводов
Внимание• Не передвигайте ресивер с присоединенным АДАПТЕРОМ Bluetooth. Это может привести к повреждению или неисправности контакта.
Воспроизведение музыки по беспроводной связиКогда к аппарату подключен беспроводный АДАПТЕР Bluetooth (Pioneer, Модель № AS-BT100), для прослушивания музыки по беспроводной связи можно использовать устройство с беспроводным интерфейсом Bluetooth (сотовый телефон, цифровой музыкальный плейер и т.д.).1 Также, с помощью имеющихся в продаже адаптеров с поддержкой беспроводной технологии Bluetooth вы можете слушать музыку на устройстве, не оснащенном встроенным модулем Bluetooth. В модели AS-BT100 используется технология защиты содержимого SCMS-T, поэтому музыку можно также прослушивать на устройстве с беспроводным интерфейсом Bluetooth SCMS-T.
Примечание1 • Возможно, потребуется, чтобы устройство, в котором используется беспроводная технология Bluetooth, поддерживало профили A2DP.• Компания Pioneer не гарантирует правильное подключение и работу этого устройства со всеми устройствами, в которых используется беспроводная технология Bluetooth.
Данный ресивер
Использование дистанционного управления
Устройство с беспроводным интерфейсом Bluetooth: сотовый телефон
Устройство с беспроводным интерфейсом Bluetooth: цифровой проигрыватель
Воспроизводящее устройство, не оснащенное беспроводным интерфейсом Bluetooth: Цифровой музыкальный проигрыватель + Аудиопередатчик Bluetooth (приобретается дополнительно)
Музыкальные данные АДАПТЕРBluetooth®
VSX-820_SYXCN_Ru.book 71 ページ 2010年4月12日 月曜日 午後7時2分
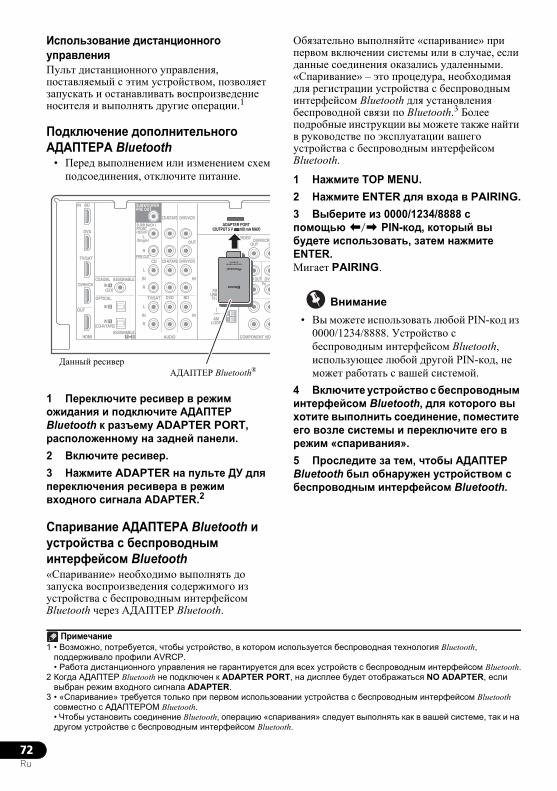
72Ru
Использование дистанционного управленияПульт дистанционного управления, поставляемый с этим устройством, позволяет запускать и останавливать воспроизведение носителя и выполнять другие операции.1
Подключение дополнительного АДАПТЕРА Bluetooth
• Перед выполнением или изменением схем подсоединения, отключите питание.
1 Переключите ресивер в режим ожидания и подключите АДАПТЕР Bluetooth к разъему ADAPTER PORT, расположенному на задней панели.2 Включите ресивер.3 Нажмите ADAPTER на пульте ДУ для переключения ресивера в режим входного сигнала ADAPTER.2
Спаривание АДАПТЕРА Bluetooth и устройства с беспроводным интерфейсом Bluetooth«Спаривание» необходимо выполнять до запуска воспроизведения содержимого из устройства с беспроводным интерфейсом Bluetooth через АДАПТЕР Bluetooth.
Обязательно выполняйте «спаривание» при первом включении системы или в случае, если данные соединения оказались удаленными. «Спаривание» – это процедура, необходимая для регистрации устройства с беспроводным интерфейсом Bluetooth для установления беспроводной связи по Bluetooth.3 Более подробные инструкции вы можете также найти в руководстве по эксплуатации вашего устройства с беспроводным интерфейсом Bluetooth.
1 Нажмите TOP MENU.2 Нажмите ENTER для входа в PAIRING.3 Выберите из 0000/1234/8888 с помощью / PIN-код, который вы будете использовать, затем нажмите ENTER.Мигает PAIRING.
Внимание• Вы можете использовать любой PIN-код из
0000/1234/8888. Устройство с беспроводным интерфейсом Bluetooth, использующее любой другой PIN-код, не может работать с вашей системой.
4 Включите устройство с беспроводным интерфейсом Bluetooth, для которого вы хотите выполнить соединение, поместите его возле системы и переключите его в режим «спаривания».5 Проследите за тем, чтобы АДАПТЕР Bluetooth был обнаружен устройством с беспроводным интерфейсом Bluetooth.
Примечание1 • Возможно, потребуется, чтобы устройство, в котором используется беспроводная технология Bluetooth, поддерживало профили AVRCP.• Работа дистанционного управления не гарантируется для всех устройств с беспроводным интерфейсом Bluetooth.
2 Когда АДАПТЕР Bluetooth не подключен к ADAPTER PORT, на дисплее будет отображаться NO ADAPTER, если выбран режим входного сигнала ADAPTER.
IN BD
SURR BACK /FRONTHEIGHT
L(Single)
R
R
L
IN
R
L
IN
IN
OUT
IN
CD
TV/SAT DVD BD
DVR/VCR
MONITOR OUTPR PB
DVD
COMPONENT VID
DVR/VCROUT IN
CD-R/TAPE
DVR/VCR CD-R/TAPE
PRE OUT
DVD
TV/SAT
COAXIAL
OPTICAL
(CD)IN
ASSIGNABLE
ASSIGNABLE
OUT
HDMI
DVR/VCR 1
(CD-R/TAPE)IN
AUDIO
ADAPTER PORT
VIDEO
(OUTPUT 5 V 100 mA MAX)
1
1 2
IN 2
SUBWOOFERPRE OUT
ANTENNAFM
UNBAL75
AMLOOP
АДАПТЕР Bluetooth®Данный ресивер
3 • «Спаривание» требуется только при первом использовании устройства с беспроводным интерфейсом Bluetooth совместно с АДАПТЕРОМ Bluetooth.• Чтобы установить соединение Bluetooth, операцию «спаривания» следует выполнять как в вашей системе, так и на другом устройстве с беспроводным интерфейсом Bluetooth.
VSX-820_SYXCN_Ru.book 72 ページ 2010年4月12日 月曜日 午後7時2分
73Ru
EnglishFrançais
Deutsch
NederlandsItaliano
EspañolКогда подключено устройство с беспроводным интерфейсом Bluetooth:На дисплее ресивера отображается имя устройства с беспроводным интерфейсом Bluetooth.1
Когда не подключено устройство с беспроводным интерфейсом Bluetooth:на дисплее ресивера отображается NODEVICE. В этом случае, выполните операцию подключения со стороны устройства с беспроводным интерфейсом Bluetooth.6 В списке устройств с беспроводным интерфейсом Bluetooth выберите АДАПТЕР Bluetooth и введите PIN-код, выбранный в шаге 4.2
Прослушивание музыкального содержимого устройства с беспроводным интерфейсом Bluetooth1 Нажмите ADAPTER на пульте ДУ для переключения ресивера в режим входного сигнала ADAPTER.2 Выполните операцию подключения со стороны устройства с беспроводным интерфейсом Bluetooth к АДАПТЕРУ Bluetooth.3 Запустите воспроизведение музыкального содержимого, хранящегося в устройстве с беспроводным интерфейсом Bluetooth.Теперь с устройством с беспроводным интерфейсом Bluetooth могут выполняться перечисленные ниже операции с использованием пульта дистанционного управления.3
Bluetooth® (слово и логотипы) является зарегистрированным товарным знаком и принадлежит компании Bluetooth SIG, Inc.; использование корпорацией Pioneer этих товарных знаков разрешено соответствующей лицензией. Прочие товарные знаки и торговые наименования принадлежат соответствующим владельцам.
Примечание1 Система может отображать только алфавитно-цифровые символы. Прочие символы могут отображаться некорректно.
2 В некоторых случаях PIN-код может обозначаться как PASSKEY (ключ доступа).3 • Устройство с беспроводным интерфейсом Bluetooth должно поддерживать профиль AVRCP.
• В зависимости от используемой в устройстве версии беспроводного интерфейса Bluetooth список доступных вам операций может отличаться от приведенного в таблице.
Кнопка Назначение
/ Запуск обычного воспроизведения и пауза/возобновление воспроизведения.
Нажмите для перехода к началу текущего файла, затем к предыдущим файлам. Нажмите и удерживайте для запуска быстрого сканирования в обратном направлении.
Нажмите для перехода к следующему файлу. Нажмите и удерживайте для запуска быстрого сканирования в обратном направлении.
VSX-820_SYXCN_Ru.book 73 ページ 2010年4月12日 月曜日 午後7時2分
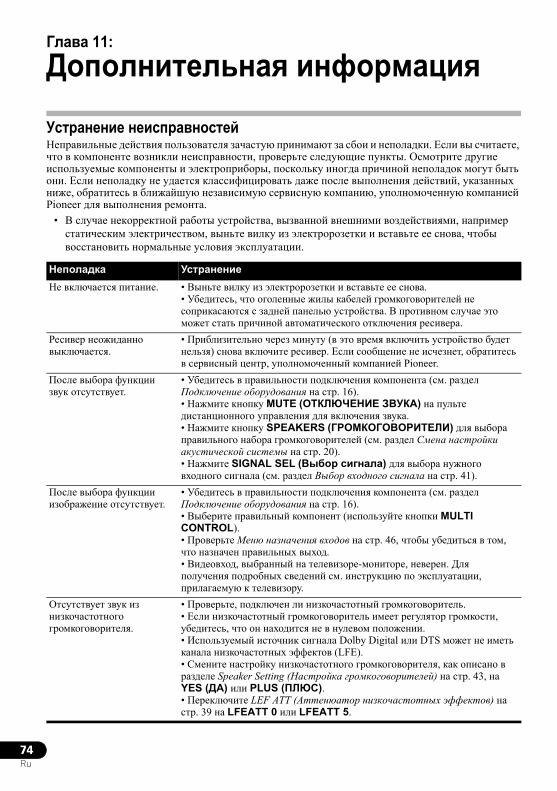
74Ru
Глава 11:
Дополнительная информация
Устранение неисправностейНеправильные действия пользователя зачастую принимают за сбои и неполадки. Если вы считаете, что в компоненте возникли неисправности, проверьте следующие пункты. Осмотрите другие используемые компоненты и электроприборы, поскольку иногда причиной неполадок могут быть они. Если неполадку не удается классифицировать даже после выполнения действий, указанных ниже, обратитесь в ближайшую независимую сервисную компанию, уполномоченную компанией Pioneer для выполнения ремонта.
• В случае некорректной работы устройства, вызванной внешними воздействиями, например статическим электричеством, выньте вилку из электророзетки и вставьте ее снова, чтобы восстановить нормальные условия эксплуатации.
Неполадка УстранениеНе включается питание. • Выньте вилку из электророзетки и вставьте ее снова.
• Убедитесь, что оголенные жилы кабелей громкоговорителей не соприкасаются с задней панелью устройства. В противном случае это может стать причиной автоматического отключения ресивера.
Ресивер неожиданно выключается.
• Приблизительно через минуту (в это время включить устройство будет нельзя) снова включите ресивер. Если сообщение не исчезнет, обратитесь в сервисный центр, уполномоченный компанией Pioneer.
После выбора функции звук отсутствует.
• Убедитесь в правильности подключения компонента (см. раздел Подключение оборудования на стр. 16).• Нажмите кнопку MUTE (ОТКЛЮЧЕНИЕ ЗВУКА) на пульте дистанционного управления для включения звука.• Нажмите кнопку SPEAKERS (ГРОМКОГОВОРИТЕЛИ) для выбора правильного набора громкоговорителей (см. раздел Смена настройки акустической системы на стр. 20).• Нажмите SIGNAL SEL (Выбор сигнала) для выбора нужного входного сигнала (см. раздел Выбор входного сигнала на стр. 41).
После выбора функции изображение отсутствует.
• Убедитесь в правильности подключения компонента (см. раздел Подключение оборудования на стр. 16).• Выберите правильный компонент (используйте кнопки MULTI CONTROL).• Проверьте Меню назначения входов на стр. 46, чтобы убедиться в том, что назначен правильных выход.• Видеовход, выбранный на телевизоре-мониторе, неверен. Для получения подробных сведений см. инструкцию по эксплуатации, прилагаемую к телевизору.
Отсутствует звук из низкочастотного громкоговорителя.
• Проверьте, подключен ли низкочастотный громкоговоритель.• Если низкочастотный громкоговоритель имеет регулятор громкости, убедитесь, что он находится не в нулевом положении.• Используемый источник сигнала Dolby Digital или DTS может не иметь канала низкочастотных эффектов (LFE).• Смените настройку низкочастотного громкоговорителя, как описано в разделе Speaker Setting (Настройка громкоговорителей) на стр. 43, на YES (ДА) или PLUS (ПЛЮС).• Переключите LEF ATT (Аттенюатор низкочастотных эффектов) на стр. 39 на LFEATT 0 или LFEATT 5.
VSX-820_SYXCN_Ru.book 74 ページ 2010年4月12日 月曜日 午後7時2分
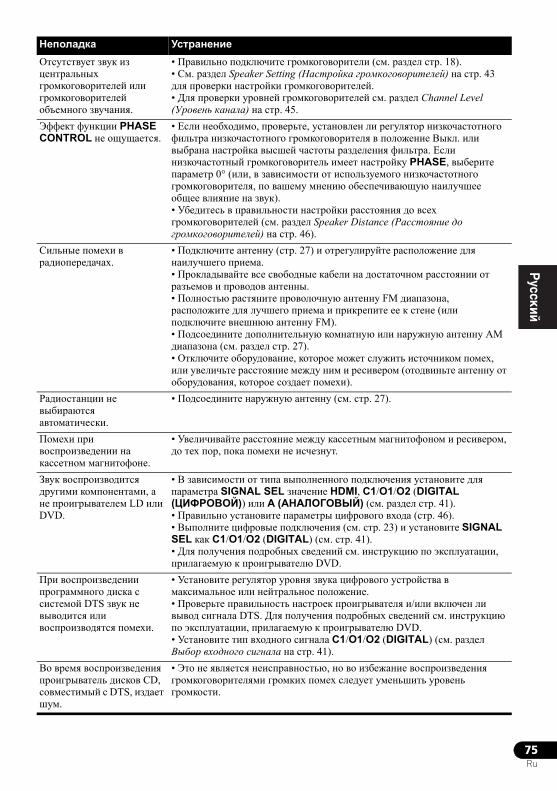
75Ru
EnglishFrançais
Deutsch
NederlandsItaliano
Español
Отсутствует звук из центральных громкоговорителей или громкоговорителей объемного звучания.
• Правильно подключите громкоговорители (см. раздел стр. 18).• См. раздел Speaker Setting (Настройка громкоговорителей) на стр. 43 для проверки настройки громкоговорителей.• Для проверки уровней громкоговорителей см. раздел Channel Level (Уровень канала) на стр. 45.
Эффект функции PHASE CONTROL не ощущается.
• Если необходимо, проверьте, установлен ли регулятор низкочастотного фильтра низкочастотного громкоговорителя в положение Выкл. или выбрана настройка высшей частоты разделения фильтра. Если низкочастотный громкоговоритель имеет настройку PHASE, выберите параметр 0° (или, в зависимости от используемого низкочастотного громкоговорителя, по вашему мнению обеспечивающую наилучшее общее влияние на звук).• Убедитесь в правильности настройки расстояния до всех громкоговорителей (см. раздел Speaker Distance (Расстояние до громкоговорителей) на стр. 46).
Сильные помехи в радиопередачах.
• Подключите антенну (стр. 27) и отрегулируйте расположение для наилучшего приема.• Прокладывайте все свободные кабели на достаточном расстоянии от разъемов и проводов антенны.• Полностью растяните проволочную антенну FM диапазона, расположите для лучшего приема и прикрепите ее к стене (или подключите внешнюю антенну FM).• Подсоедините дополнительную комнатную или наружную антенну AM диапазона (см. раздел стр. 27).• Отключите оборудование, которое может служить источником помех, или увеличьте расстояние между ним и ресивером (отодвиньте антенну от оборудования, которое создает помехи).
Радиостанции не выбираются автоматически.
• Подсоедините наружную антенну (см. стр. 27).
Помехи при воспроизведении на кассетном магнитофоне.
• Увеличивайте расстояние между кассетным магнитофоном и ресивером, до тех пор, пока помехи не исчезнут.
Звук воспроизводится другими компонентами, а не проигрывателем LD или DVD.
• В зависимости от типа выполненного подключения установите для параметра SIGNAL SEL значение HDMI, C1/O1/O2 (DIGITAL (ЦИФРОВОЙ)) или A (АНАЛОГОВЫЙ) (см. раздел стр. 41).• Правильно установите параметры цифрового входа (стр. 46).• Выполните цифровые подключения (см. стр. 23) и установите SIGNAL SEL как C1/O1/O2 (DIGITAL) (см. стр. 41).• Для получения подробных сведений см. инструкцию по эксплуатации, прилагаемую к проигрывателю DVD.
При воспроизведении программного диска с системой DTS звук не выводится или воспроизводятся помехи.
• Установите регулятор уровня звука цифрового устройства в максимальное или нейтральное положение.• Проверьте правильность настроек проигрывателя и/или включен ли вывод сигнала DTS. Для получения подробных сведений см. инструкцию по эксплуатации, прилагаемую к проигрывателю DVD.• Установите тип входного сигнала C1/O1/O2 (DIGITAL) (см. раздел Выбор входного сигнала на стр. 41).
Во время воспроизведения проигрыватель дисков CD, совместимый с DTS, издает шум.
• Это не является неисправностью, но во избежание воспроизведения громкоговорителями громких помех следует уменьшить уровень громкости.
Неполадка Устранение
VSX-820_SYXCN_Ru.book 75 ページ 2010年4月12日 月曜日 午後7時2分
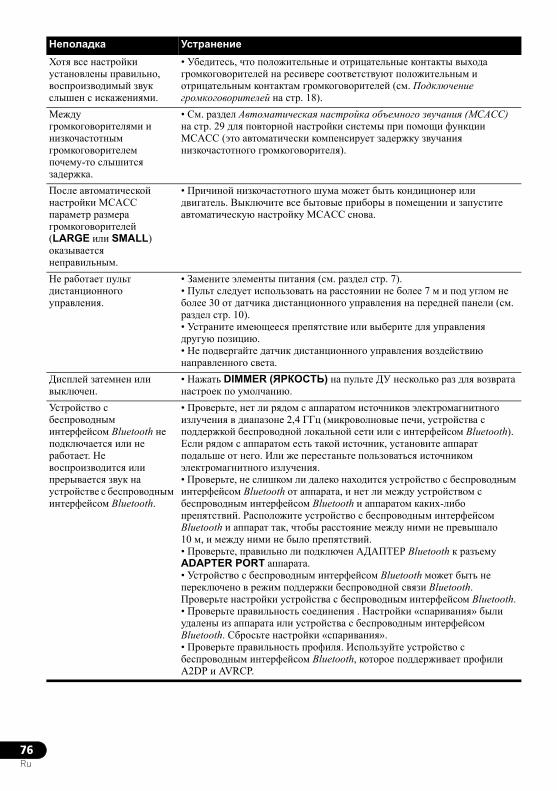
76Ru
Хотя все настройки установлены правильно, воспроизводимый звук слышен с искажениями.
• Убедитесь, что положительные и отрицательные контакты выхода громкоговорителей на ресивере соответствуют положительным и отрицательным контактам громкоговорителей (см. Подключение громкоговорителей на стр. 18).
Между громкоговорителями и низкочастотным громкоговорителем почему-то слышится задержка.
• См. раздел Автоматическая настройка объемного звучания (MCACC) на стр. 29 для повторной настройки системы при помощи функции MCACC (это автоматически компенсирует задержку звучания низкочастотного громкоговорителя).
После автоматической настройки MCACC параметр размера громкоговорителей (LARGE или SMALL) оказывается неправильным.
• Причиной низкочастотного шума может быть кондиционер или двигатель. Выключите все бытовые приборы в помещении и запустите автоматическую настройку MCACC снова.
Не работает пульт дистанционного управления.
• Замените элементы питания (см. раздел стр. 7).• Пульт следует использовать на расстоянии не более 7 м и под углом не более 30 от датчика дистанционного управления на передней панели (см. раздел стр. 10).• Устраните имеющееся препятствие или выберите для управления другую позицию.• Не подвергайте датчик дистанционного управления воздействию направленного света.
Дисплей затемнен или выключен.
• Нажать DIMMER (ЯРКОСТЬ) на пульте ДУ несколько раз для возврата настроек по умолчанию.
Устройство с беспроводным интерфейсом Bluetooth не подключается или не работает. Не воспроизводится или прерывается звук на устройстве с беспроводным интерфейсом Bluetooth.
• Проверьте, нет ли рядом с аппаратом источников электромагнитного излучения в диапазоне 2,4 ГГц (микроволновые печи, устройства с поддержкой беспроводной локальной сети или с интерфейсом Bluetooth). Если рядом с аппаратом есть такой источник, установите аппарат подальше от него. Или же перестаньте пользоваться источником электромагнитного излучения.• Проверьте, не слишком ли далеко находится устройство с беспроводным интерфейсом Bluetooth от аппарата, и нет ли между устройством с беспроводным интерфейсом Bluetooth и аппаратом каких-либо препятствий. Расположите устройство с беспроводным интерфейсом Bluetooth и аппарат так, чтобы расстояние между ними не превышало 10 м, и между ними не было препятствий. • Проверьте, правильно ли подключен АДАПТЕР Bluetooth к разъему ADAPTER PORT аппарата.• Устройство с беспроводным интерфейсом Bluetooth может быть не переключено в режим поддержки беспроводной связи Bluetooth. Проверьте настройки устройства с беспроводным интерфейсом Bluetooth. • Проверьте правильность соединения . Настройки «спаривания» были удалены из аппарата или устройства с беспроводным интерфейсом Bluetooth. Сбросьте настройки «спаривания».• Проверьте правильность профиля. Используйте устройство с беспроводным интерфейсом Bluetooth, которое поддерживает профили A2DP и AVRCP.
Неполадка Устранение
VSX-820_SYXCN_Ru.book 76 ページ 2010年4月12日 月曜日 午後7時2分
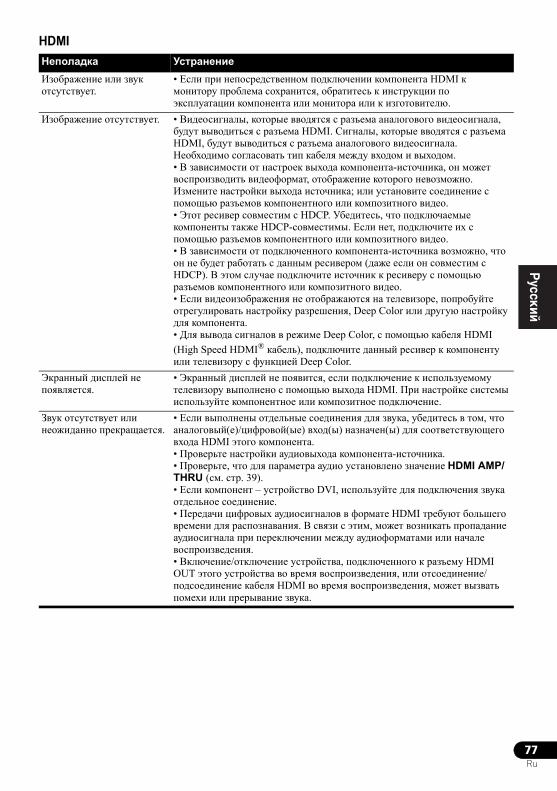
77Ru
EnglishFrançais
Deutsch
NederlandsItaliano
EspañolHDMIНеполадка УстранениеИзображение или звук отсутствует.
• Если при непосредственном подключении компонента HDMI к монитору проблема сохранится, обратитесь к инструкции по эксплуатации компонента или монитора или к изготовителю.
Изображение отсутствует. • Видеосигналы, которые вводятся с разъема аналогового видеосигнала, будут выводиться с разъема HDMI. Сигналы, которые вводятся с разъема HDMI, будут выводиться с разъема аналогового видеосигнала. Необходимо согласовать тип кабеля между входом и выходом.• В зависимости от настроек выхода компонента-источника, он может воспроизводить видеоформат, отображение которого невозможно. Измените настройки выхода источника; или установите соединение с помощью разъемов компонентного или композитного видео.• Этот ресивер совместим с HDCP. Убедитесь, что подключаемые компоненты также HDCP-совместимы. Если нет, подключите их с помощью разъемов компонентного или композитного видео.• В зависимости от подключенного компонента-источника возможно, что он не будет работать с данным ресивером (даже если он совместим с HDCP). В этом случае подключите источник к ресиверу с помощью разъемов компонентного или композитного видео.• Если видеоизображения не отображаются на телевизоре, попробуйте отрегулировать настройку разрешения, Deep Color или другую настройку для компонента.• Для вывода сигналов в режиме Deep Color, с помощью кабеля HDMI (High Speed HDMI® кабель), подключите данный ресивер к компоненту или телевизору с функцией Deep Color.
Экранный дисплей не появляется.
• Экранный дисплей не появится, если подключение к используемому телевизору выполнено с помощью выхода HDMI. При настройке системы используйте компонентное или композитное подключение.
Звук отсутствует или неожиданно прекращается.
• Если выполнены отдельные соединения для звука, убедитесь в том, что аналоговый(е)/цифровой(ые) вход(ы) назначен(ы) для соответствующего входа HDMI этого компонента. • Проверьте настройки аудиовыхода компонента-источника.• Проверьте, что для параметра аудио установлено значение HDMI AMP/THRU (см. стр. 39).• Если компонент – устройство DVI, используйте для подключения звука отдельное соединение.• Передачи цифровых аудиосигналов в формате HDMI требуют большего времени для распознавания. В связи с этим, может возникать пропадание аудиосигнала при переключении между аудиоформатами или начале воспроизведения.• Включение/отключение устройства, подключенного к разъему HDMI OUT этого устройства во время воспроизведения, или отсоединение/подсоединение кабеля HDMI во время воспроизведения, может вызвать помехи или прерывание звука.
VSX-820_SYXCN_Ru.book 77 ページ 2010年4月12日 月曜日 午後7時2分
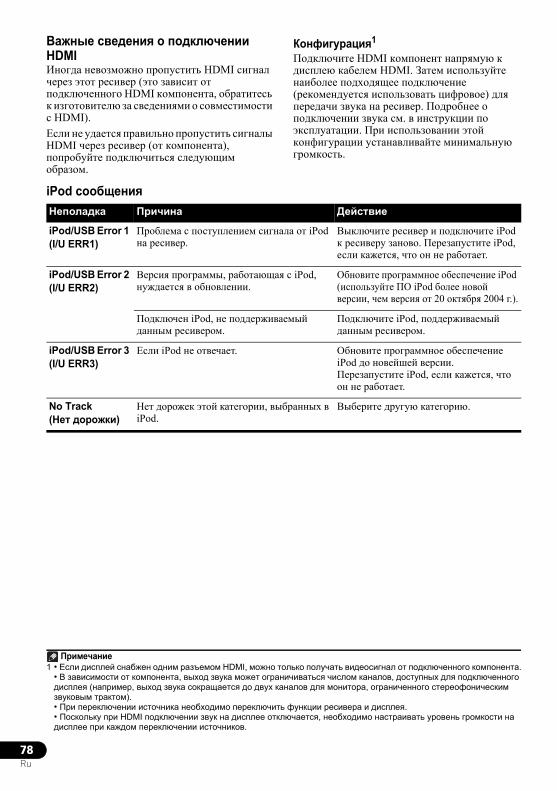
78Ru
Важные сведения о подключении HDMIИногда невозможно пропустить HDMI сигнал через этот ресивер (это зависит от подключенного HDMI компонента, обратитесь к изготовителю за сведениями о совместимости с HDMI).Если не удается правильно пропустить сигналы HDMI через ресивер (от компонента), попробуйте подключиться следующим образом.
Конфигурация1
Подключите HDMI компонент напрямую к дисплею кабелем HDMI. Затем используйте наиболее подходящее подключение (рекомендуется использовать цифровое) для передачи звука на ресивер. Подробнее о подключении звука см. в инструкции по эксплуатации. При использовании этой конфигурации устанавливайте минимальную громкость.
iPod сообщения
Примечание1 • Если дисплей снабжен одним разъемом HDMI, можно только получать видеосигнал от подключенного компонента.
• В зависимости от компонента, выход звука может ограничиваться числом каналов, доступных для подключенного дисплея (например, выход звука сокращается до двух каналов для монитора, ограниченного стереофоническим звуковым трактом).• При переключении источника необходимо переключить функции ресивера и дисплея.• Поскольку при HDMI подключении звук на дисплее отключается, необходимо настраивать уровень громкости на дисплее при каждом переключении источников.
Неполадка Причина Действие
iPod/USB Error 1 (I/U ERR1)
Проблема с поступлением сигнала от iPod на ресивер.
Выключите ресивер и подключите iPod к ресиверу заново. Перезапустите iPod, если кажется, что он не работает.
iPod/USB Error 2 (I/U ERR2)
Версия программы, работающая с iPod, нуждается в обновлении.
Обновите программное обеспечение iPod (используйте ПО iPod более новой версии, чем версия от 20 октября 2004 г.).
Подключен iPod, не поддерживаемый данным ресивером.
Подключите iPod, поддерживаемый данным ресивером.
iPod/USB Error 3 (I/U ERR3)
Если iPod не отвечает. Обновите программное обеспечение iPod до новейшей версии. Перезапустите iPod, если кажется, что он не работает.
No Track (Нет дорожки)
Нет дорожек этой категории, выбранных в iPod.
Выберите другую категорию.
VSX-820_SYXCN_Ru.book 78 ページ 2010年4月12日 月曜日 午後7時2分
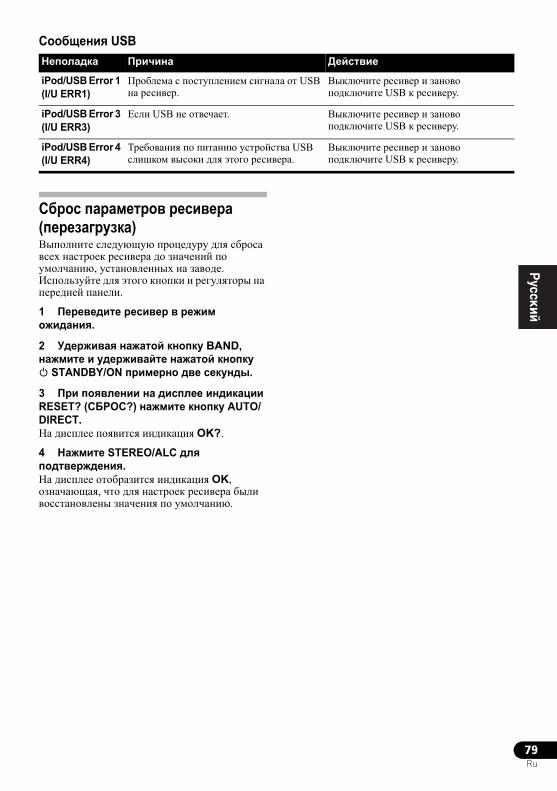
79Ru
EnglishFrançais
Deutsch
NederlandsItaliano
EspañolСообщения USB
Сброс параметров ресивера (перезагрузка)Выполните следующую процедуру для сброса всех настроек ресивера до значений по умолчанию, установленных на заводе. Используйте для этого кнопки и регуляторы на передней панели.
1 Переведите ресивер в режим ожидания.
2 Удерживая нажатой кнопку BAND, нажмите и удерживайте нажатой кнопку STANDBY/ON примерно две секунды.
3 При появлении на дисплее индикации RESET? (СБРОС?) нажмите кнопку AUTO/DIRECT.На дисплее появится индикация OK?.
4 Нажмите STEREO/ALC для подтверждения.На дисплее отобразится индикация OK, означающая, что для настроек ресивера были восстановлены значения по умолчанию.
Неполадка Причина Действие
iPod/USB Error 1 (I/U ERR1)
Проблема с поступлением сигнала от USB на ресивер.
Выключите ресивер и заново подключите USB к ресиверу.
iPod/USB Error 3 (I/U ERR3)
Если USB не отвечает. Выключите ресивер и заново подключите USB к ресиверу.
iPod/USB Error 4 (I/U ERR4)
Требования по питанию устройства USB слишком высоки для этого ресивера.
Выключите ресивер и заново подключите USB к ресиверу.
VSX-820_SYXCN_Ru.book 79 ページ 2010年4月12日 月曜日 午後7時2分 239
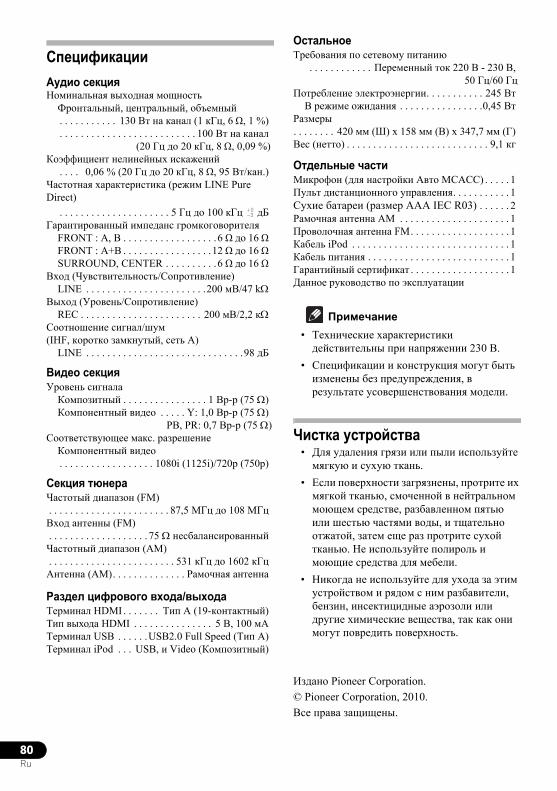
80Ru
СпецификацииАудио секцияНоминальная выходная мощностьФронтальный, центральный, объемный. . . . . . . . . . . 130 Вт на канал (1 кГц, 6 Ω, 1 %). . . . . . . . . . . . . . . . . . . . . . . . . . 100 Вт на канал
(20 Гц до 20 кГц, 8 Ω, 0,09 %)Коэффициент нелинейных искажений
. . . . 0,06 % (20 Гц до 20 кГц, 8 Ω, 95 Вт/кан.)Частотная характеристика (режим LINE Pure Direct)
. . . . . . . . . . . . . . . . . . . . . 5 Гц до 100 кГц дБГарантированный импеданс громкоговорителя
FRONT : A, B . . . . . . . . . . . . . . . . . .6 Ω до 16 ΩFRONT : A+B . . . . . . . . . . . . . . . . .12 Ω до 16 ΩSURROUND, CENTER . . . . . . . . . .6 Ω до 16 Ω
Вход (Чувствительность/Cопротивление)LINE . . . . . . . . . . . . . . . . . . . . . . .200 мВ/47 kΩ
Выход (Уровень/Cопротивление)REC . . . . . . . . . . . . . . . . . . . . . . . 200 мВ/2,2 кΩ
Соотношение сигнал/шум (IHF, коротко замкнутый, сеть A)
LINE . . . . . . . . . . . . . . . . . . . . . . . . . . . . . .98 дБ
Видео секцияУровень сигналаКомпозитный . . . . . . . . . . . . . . . . 1 Вp-p (75 Ω)Компонентный видео . . . . . Y: 1,0 Вp-p (75 Ω)
PB, PR: 0,7 Вp-p (75 Ω)Соответствующее макс. разрешениеКомпонентный видео. . . . . . . . . . . . . . . . . . 1080i (1125i)/720p (750p)
Секция тюнераЧастотый диапазон (FM). . . . . . . . . . . . . . . . . . . . . . . 87,5 МГц до 108 МГцВход антенны (FM). . . . . . . . . . . . . . . . . . . 75 Ω несбалансированныйЧастотный диапазон (AM). . . . . . . . . . . . . . . . . . . . . . . . 531 кГц до 1602 кГцАнтенна (AM). . . . . . . . . . . . . . Рамочная антенна
Раздел цифрового входа/выходаТерминал HDMI . . . . . . . Тип A (19-контактный)Тип выхода HDMI . . . . . . . . . . . . . . . 5 В, 100 мАТерминал USB . . . . . .USB2.0 Full Speed (Тип А)Терминал iPod . . . USB, и Video (Композитный)
ОстальноеТребования по сетевому питанию
. . . . . . . . . . . . Переменный ток 220 В - 230 В,50 Гц/60 Гц
Потребление электроэнергии. . . . . . . . . . . 245 ВтВ режиме ожидания . . . . . . . . . . . . . . . .0,45 Вт
Размеры. . . . . . . . 420 мм (Ш) x 158 мм (В) x 347,7 мм (Г)Вес (нетто) . . . . . . . . . . . . . . . . . . . . . . . . . . . 9,1 кг
Отдельные частиМикрофон (для настройки Авто МCACC) . . . . . 1Пульт дистанционного управления. . . . . . . . . . . 1Сухие батареи (размер AAA IEC R03) . . . . . . 2Рамочная антенна АМ . . . . . . . . . . . . . . . . . . . . . 1Проволочная антенна FM. . . . . . . . . . . . . . . . . . . 1Кабель iPod . . . . . . . . . . . . . . . . . . . . . . . . . . . . . . 1Кабель питания . . . . . . . . . . . . . . . . . . . . . . . . . . . 1Гарантийный сертификат . . . . . . . . . . . . . . . . . . . 1Данное руководство по эксплуатации
Примечание• Технические характеристики действительны при напряжении 230 В.
• Спецификации и конструкция могут быть изменены без предупреждения, в результате усовершенствования модели.
Чистка устройства• Для удаления грязи или пыли используйте мягкую и сухую ткань.
• Если поверхности загрязнены, протрите их мягкой тканью, смоченной в нейтральном моющем средстве, разбавленном пятью или шестью частями воды, и тщательно отжатой, затем еще раз протрите сухой тканью. Не используйте полироль и моющие средства для мебели.
• Никогда не используйте для ухода за этим устройством и рядом с ним разбавители, бензин, инсектицидные аэрозоли или другие химические вещества, так как они могут повредить поверхность.
Издано Pioneer Corporation.© Pioneer Corporation, 2010.Все права защищены.
VSX-820_SYXCN_Ru.book 80 ページ 2010年4月12日 月曜日 午後7時2分 240

81Ru
EnglishFrançais
Deutsch
NederlandsItaliano
Español
VSX-820_SYXCN_Ru.book 81 ページ 2010年4月12日 月曜日 午後7時2分

82Ru
VSX-820_SYXCN_Ru.book 82 ページ 2010年4月12日 月曜日 午後7時2分

83Ru
EnglishFrançais
Deutsch
NederlandsItaliano
Español
VSX-820_SYXCN_Ru.book 83 ページ 2010年4月12日 月曜日 午後7時2分

<5707-00000-317-1S>
Published by Pioneer Corporation.Copyright © 2010 Pioneer Corporation.
All rights reserved.Publication de Pioneer Corporation.
© 2010 Pioneer Corporation.Tous droits de reproduction et de traduction réservés.
Printed in China Imprimé en Chine
Примечание:В соответствии со статьей 5 Закона Российской Федерации “О защите прав потребителя” и Указанием Правительства Российской Федерации № 720 от 16 июня 1997 года корпорация Pioneer Europe NV устанавливает условие на следующую продолжительность срока службы официально поставляемых на Российский рынок товаров.
Аудио и видеооборудование: 7 лет Переносное аудиооборудование: 6 лет Другое оборудование (наушники, микрофон и т.д.): 5 лет Автомобильная электроника: 6 лет
D3-7-10-6_A1_Ru
http://www.pioneer.fr
http://www.pioneer-rus.ru
http://www.pioneer.co.uk
http://www.pioneer.eu
PIONEER CORPORATION1-1, Shin-ogura, Saiwai-ku, Kawasaki-shi, Kanagawa 212-0031, Japan
Корпорация Пайонир1-1, Син-Огура, Сайвай-ку, г. Кавасаки, префектура Канагава, 212-0031, ЯпонияИмпортер: ООО "ПИОНЕР РУС"125040, Россия, г. Москва, ул. Правды, д.26 Тел.: +7(495) 956-89-01PIONEER ELECTRONICS (USA) INC.P.O. BOX 1540, Long Beach, California 90801-1540, U.S.A. TEL: (800) 421-1404
PIONEER ELECTRONICS OF CANADA, INC.300 Allstate Parkway, Markham, Ontario L3R 0P2, Canada TEL: 1-877-283-5901, 905-479-4411
PIONEER EUROPE NVHaven 1087, Keetberglaan 1, B-9120 Melsele, Belgium TEL: 03/570.05.11
PIONEER ELECTRONICS ASIACENTRE PTE. LTD.253 Alexandra Road, #04-01, Singapore 159936 TEL: 65-6472-7555
PIONEER ELECTRONICS AUSTRALIA PTY. LTD.178-184 Boundary Road, Braeside, Victoria 3195, Australia, TEL: (03) 9586-6300
PIONEER ELECTRONICS DE MEXICO S.A. DE C.V.Blvd.Manuel Avila Camacho 138 10 piso Col.Lomas de Chapultepec, Mexico, D.F. 11000 TEL: 55-9178-4270K002_B2_Ru
VSX-820_SYXCN_En.book 82 ページ 2010年4月12日 月曜日 午後6時52分 244