veritas netbackup™ for vmware administrator's guide
TRANSCRIPT

Veritas NetBackup™ forVMware Administrator'sGuide
Release 8.3

Veritas NetBackup™ for VMware Administrator'sGuide
Last updated: 2020-09-13
Legal NoticeCopyright © 2020 Veritas Technologies LLC. All rights reserved.
Veritas, the Veritas Logo, and are trademarks or registered trademarks of Veritas TechnologiesLLC or its affiliates in the U.S. and other countries. Other names may be trademarks of theirrespective owners.
This product may contain third-party software for which Veritas is required to provide attributionto the third party (“Third-party Programs”). Some of the Third-party Programs are availableunder open source or free software licenses. The License Agreement accompanying theSoftware does not alter any rights or obligations you may have under those open source orfree software licenses. Refer to the Third-party Legal Notices document accompanying thisVeritas product or available at:
https://www.veritas.com/about/legal/license-agreements
The product described in this document is distributed under licenses restricting its use, copying,distribution, and decompilation/reverse engineering. No part of this document may bereproduced in any form by any means without prior written authorization of Veritas TechnologiesLLC and its licensors, if any.
THE DOCUMENTATION IS PROVIDED "AS IS" AND ALL EXPRESS OR IMPLIEDCONDITIONS, REPRESENTATIONS AND WARRANTIES, INCLUDING ANY IMPLIEDWARRANTY OF MERCHANTABILITY, FITNESS FOR A PARTICULAR PURPOSE ORNON-INFRINGEMENT, ARE DISCLAIMED, EXCEPT TO THE EXTENT THAT SUCHDISCLAIMERS ARE HELD TO BE LEGALLY INVALID. Veritas Technologies LLC SHALLNOT BE LIABLE FOR INCIDENTAL OR CONSEQUENTIAL DAMAGES IN CONNECTIONWITH THE FURNISHING, PERFORMANCE, OR USE OF THIS DOCUMENTATION. THEINFORMATION CONTAINED IN THIS DOCUMENTATION IS SUBJECT TO CHANGEWITHOUT NOTICE.
The Licensed Software and Documentation are deemed to be commercial computer softwareas defined in FAR 12.212 and subject to restricted rights as defined in FAR Section 52.227-19"Commercial Computer Software - Restricted Rights" and DFARS 227.7202, et seq."Commercial Computer Software and Commercial Computer Software Documentation," asapplicable, and any successor regulations, whether delivered by Veritas as on premises orhosted services. Any use, modification, reproduction release, performance, display or disclosureof the Licensed Software and Documentation by the U.S. Government shall be solely inaccordance with the terms of this Agreement.
Veritas Technologies LLC2625 Augustine DriveSanta Clara, CA 95054

http://www.veritas.com
Technical SupportTechnical Support maintains support centers globally. All support services will be deliveredin accordance with your support agreement and the then-current enterprise technical supportpolicies. For information about our support offerings and how to contact Technical Support,visit our website:
https://www.veritas.com/support
You can manage your Veritas account information at the following URL:
https://my.veritas.com
If you have questions regarding an existing support agreement, please email the supportagreement administration team for your region as follows:
[email protected] (except Japan)
DocumentationMake sure that you have the current version of the documentation. Each document displaysthe date of the last update on page 2. The latest documentation is available on the Veritaswebsite:
https://sort.veritas.com/documents
Documentation feedbackYour feedback is important to us. Suggest improvements or report errors or omissions to thedocumentation. Include the document title, document version, chapter title, and section titleof the text on which you are reporting. Send feedback to:
You can also see documentation information or ask a question on the Veritas community site:
http://www.veritas.com/community/
Veritas Services and Operations Readiness Tools (SORT)Veritas Services and Operations Readiness Tools (SORT) is a website that provides informationand tools to automate and simplify certain time-consuming administrative tasks. Dependingon the product, SORT helps you prepare for installations and upgrades, identify risks in yourdatacenters, and improve operational efficiency. To see what services and tools SORT providesfor your product, see the data sheet:
https://sort.veritas.com/data/support/SORT_Data_Sheet.pdf

Chapter 1 Introduction .......................................................................... 13
About NetBackup for VMware ......................................................... 13About the virtual machine backups that include database data ............... 14About the NetBackup appliance as a VMware backup host ................... 14NetBackup for VMware components ................................................. 15Appliance as backup host: component overview ................................. 18Media servers as backup or discovery hosts ...................................... 18Overview of the VMware backup process .......................................... 20NetBackup for VMware terminology ................................................. 20
Chapter 2 Required tasks: overview ................................................ 24
Overview of VMware tasks ............................................................. 24Overview of NetBackup tasks ......................................................... 25
Chapter 3 Notes and prerequisites .................................................. 26
NetBackup for VMware prerequisites ................................................ 26NetBackup for VMware: notes and restrictions .................................... 27Notes on VMware Virtual Volumes (VVols) ......................................... 33NetBackup IPv6 parameter required for backups in VMware IPv6
environments ........................................................................ 33NetBackup for VMware: notes on Linux virtual machines ...................... 34Notes on the NetBackup appliance as a VMware backup host ............... 35NetBackup for VMware support for SAN multi-pathing .......................... 35NetBackup for VMware support for fault tolerant VMs .......................... 37NetBackup character restrictions for the Primary VM identifier ............... 37In the policy Query Builder, display names, resource pool names, and
vApp names are case-sensitive ................................................. 39Notes on the hotadd transport mode ................................................. 40Notes and limitations for tag usage in VMware Intelligent Policy queries
........................................................................................... 41Notes and limitations for the backup and restore of VMware tag
associations .......................................................................... 42
Contents

Chapter 4 Configure NetBackup communication withVMware .......................................................................... 44
Adding the VMware backup host to NetBackup ................................... 44Adding NetBackup credentials for VMware ........................................ 45
Using the VMware Managed Object Browser to verify the servername ............................................................................. 50
Changing the host name of a VMware server in NetBackup .................. 50Setting privileges for posting events to vCenter ................................... 51Authentication token for the NetBackup vSphere plug-ins ..................... 51Setting global limits on the use of VMware resources ........................... 52Validating VMware virtualization server certificates in NetBackup ........... 54
ECA_TRUST_STORE_PATH for NetBackup servers and clients..................................................................................... 58
ECA_CRL_PATH for NetBackup servers and clients ...................... 59ECA_CRL_PATH_SYNC_HOURS for NetBackup servers and
clients ............................................................................ 60ECA_CRL_CHECK for NetBackup servers and clients ................... 61VIRTUALIZATION_HOSTS_CONNECT_TIMEOUT for servers
and clients ...................................................................... 62VIRTUALIZATION_HOSTS_SECURE_CONNECT_ENABLED
for servers and clients ....................................................... 63VIRTUALIZATION_CRL_CHECK for NetBackup servers and
clients ............................................................................ 64VMWARE_TLS_MINIMUM_V1_2 for NetBackup servers and
clients ............................................................................ 65
Chapter 5 Configure NetBackup policies for VMware ................ 67
Configuring a VMware policy from the Policy Wizard ........................... 68Configuring a VMware policy from the Policies utility ............................ 68Limit jobs per policy on the Attributes tab (for VMware) ........................ 72Backup options on the VMware tabVMware backup options .................. 73
VMware backup host ............................................................... 74Optimizations options (VMware) ................................................ 74Primary VM identifier options (VMware) ...................................... 76Existing snapshot handling options (VMware) ............................... 77Transport modes options (VMware) ............................................ 78Application protection options (VMware) ...................................... 79VMware - Advanced Attributes dialog ......................................... 81About the Post vCenter events option (VMware Advanced
Attributes) ....................................................................... 85Exclude Disks tab ......................................................................... 86
About the exclude disk options for virtual disk selection .................. 88
5Contents

Exclude disks from backups: an example to avoid ......................... 90Restoring data from the backups that excluded the boot disk or
data disks ....................................................................... 91Browse for VMware virtual machines ................................................ 91Limiting the VMware servers that NetBackup searches when browsing
for virtual machines ................................................................. 95Virtual machine host names and display names should be unique if
VMs are selected manually in the policy ...................................... 97Primary VM identifier option and manual selection of virtual machines
........................................................................................... 98About incremental backups of virtual machines ................................... 99Configuring incremental backups ................................................... 100Storage Foundation Volume Manager volumes in the virtual machine
.......................................................................................... 100
Chapter 6 Configure a VMware Intelligent Policy ....................... 101
About automatic virtual machine selection for NetBackup for VMware.......................................................................................... 102
Support and use of VMware tag associations ................................... 103The basics of a NetBackup query rule ............................................. 104Important notes on automatic virtual machine selection ...................... 105NetBackup requirements for automatic virtual machine selection .......... 108Automatic virtual machine selection: Task overview ........................... 108Options for selecting VMware virtual machines ................................. 109Configuring automatic virtual machine selection ................................ 112Editing an existing query in Basic Mode ........................................... 115Using the Query Builder in Advanced Mode ..................................... 116AND vs. OR in queries ................................................................. 117Examples for the NetBackup Query Builder ...................................... 118The IsSet operator in queries ........................................................ 120About selecting virtual machines by means of multiple policies ............. 121Order of operations in queries (precedence rules) ............................. 122Parentheses in compound queries ................................................. 124Query rules for resource pools ....................................................... 125Query rules for datacenter folders (host folder) ................................. 126Query rules for duplicate names .................................................... 127Query rules for tags ..................................................................... 128Query Builder field reference ......................................................... 129Test Query screen for VMware ...................................................... 139Test Query: Failed virtual machines ................................................ 140Effect of Primary VM identifier parameter on Selection column in Test
Query results ....................................................................... 142
6Contents

Effect of Primary VM identifier parameter on VM Name column in Testquery results ........................................................................ 144
Refreshing the display of virtual environment changes in the QueryBuilder ................................................................................ 144
Reducing the time required for VM discovery in a large VMwareenvironment ........................................................................ 146
Chapter 7 Reduce the size of backups ......................................... 147
About reducing the size of VMware backups .................................... 147Block-level backup (BLIB): full vs incremental ................................... 148Deleting a vSphere Client snapshot ................................................ 149
Chapter 8 Back up virtual machines .............................................. 151
Backing up virtual machines .......................................................... 151Using the Activity Monitor to monitor virtual machine backups .............. 153Restarting jobs individually in the Activity Monitor .............................. 155Viewing NetBackup activity in vSphere Web Client or vSphere Client
(HTML5) ............................................................................. 155Using OpsCenter to report on virtual machine backups ....................... 157
Chapter 9 Use Accelerator to back up virtual machines ......... 159
About the NetBackup Accelerator for virtual machines ........................ 159Accelerator: full vs. incremental schedules ....................................... 160How the NetBackup Accelerator works with virtual machines ............... 161Accelerator notes and requirements for virtual machines ..................... 161Accelerator forced rescan for virtual machines (schedule attribute)
.......................................................................................... 163Accelerator requires the OptimizedImage attribute ............................ 164Accelerator backups and the NetBackup catalog ............................... 164Accelerator messages in the backup job details log ........................... 165NetBackup logs for Accelerator with virtual machines ......................... 165About reporting the amount of Accelerator backup data that was
transferred over the network ................................................... 166Replacing the Accelerator image size with the network-transferred
data in NetBackup command output ......................................... 169
Chapter 10 Restore virtual machines ............................................... 173
Restore notes and restrictions ....................................................... 173Restore notes and restrictions on Linux ........................................... 177Restoring the full VMware virtual machine ........................................ 179
7Contents

Virtual Machine Recovery dialog boxes (restore to original location).................................................................................... 182
Virtual Machine Recovery dialogs boxes (restore to alternatelocation) ........................................................................ 188
About VMware virtual machine disk restore ...................................... 196Restoring VMware virtual machine disks by using Backup, Archive,
and Restore ........................................................................ 197Select Virtual Disks panel ....................................................... 199Recovery Destination panel .................................................... 200Virtual Disk Destination panel .................................................. 201Storage Destination panel ...................................................... 203Recovery Summary panel ...................................................... 204
Restoring VMware virtual machine disks by using NetBackupcommands .......................................................................... 204Determining the backup image ID from which to restore a VMware
virtual machine disk ......................................................... 205Creating the VMware virtual machine disk restore file ................... 207Modifying the virtual machine disk restore file ............................. 208Validating the virtual machine disk restore file ............................. 212Restoring the virtual machine disk or disks by using the
nbrestorevm command ................................................... 213VMware virtual machine disk restore file .................................... 214
About restore of individual filesAbout restoring individual VMware files.......................................................................................... 223
Restoring individual filesRestoring individual VMware virtual machinefiles .................................................................................... 224Setting up NetBackup Client Service for restore to a Windows
shared virtual machine driveSetting up NetBackup ClientService for VMware restores to a Windows shared virtualmachine drive ................................................................ 227
Restore Marked Files dialog for restore of VMware files ................ 228How NetBackup handles VMware tag associations at restore .............. 230Browse and search virtual machines for restore ................................ 232
Search Virtual Machines for Restore dialog ................................ 233Browse the vCloud or vSphere view for virtual machine clients
.................................................................................... 235Search results dialog ............................................................. 236
If the recovery host is not at the same NetBackup release level as thebackup host ......................................................................... 236
8Contents

Chapter 11 Restore virtual machines with Instant Recovery.......................................................................................... 237
About Instant Recovery for VMware ................................................ 237Task overview for Instant Recovery for VMware ................................ 239Performance recommendations for Instant Recovery for VMware ......... 240Requirements for Instant Recovery for VMware ................................ 241Notes on Instant Recovery for VMware ........................................... 242Restarting the Client for NFS service on a Windows restore host .......... 243Instant Recovery options on the nbrestorevm command ..................... 244Restoring a virtual machine with Instant Recovery for VMware ............. 249Restoring a virtual machine to a different location with Instant Recovery
for VMware .......................................................................... 253Restoring individual files with Instant Recovery for VMware while the
current virtual machine is running ............................................. 256Job types for Instant Recovery for VMware ...................................... 259Reactivating a restored virtual machine with Instant Recovery for
VMware .............................................................................. 260
Chapter 12 Use NetBackup for vCloud Director ........................... 262
About NetBackup for vCloud Director .............................................. 262Notes on creating a NetBackup policy for vCloud .............................. 263Notes on restoring virtual machines into vCloud Director ..................... 264Restoring virtual machines into vCloud Director ................................ 265Reducing the time required for VM discovery in a large vCloud
environment ........................................................................ 270Virtual machine recovery dialog boxes for vCloud Director .................. 275
Recovery Destination dialog boxRecovery Destination dialog box(vCloud Director) ............................................................ 275
Recovery Options dialog box (vCloud Director) ........................... 276Recovery vApp Options for vCloud Director dialog box (restore to
original location) ............................................................. 276Virtual Machine Options dialog box for vCloud Director ................. 277Perform Recovery dialog box for vCloud Director ........................ 277Recovery Options dialog box for vCloud Director (restore to
alternate location) ........................................................... 278Recovery vApp Options for vCloud Director dialog box (restore to
alternate location) ........................................................... 278Select a vApp dialog box ........................................................ 279Recovery Destination Options for vCloud Director dialog box
(restore to alternate location) ............................................. 280Virtual Machine Options (restore to alternate location) .................. 280Network connections (restore to alternate location) ...................... 280
9Contents

Perform Recovery dialog box for vCloud Director (restore toalternate location) ........................................................... 280
Chapter 13 Best practices and more information ......................... 282
NetBackup for VMware best practices ............................................. 282NetBackup for VMware with deduplication ................................. 283
Best practices for VMware tag usage .............................................. 284Further assistance with NetBackup for VMware ................................ 285
Chapter 14 Troubleshooting ................................................................ 286
Notes on troubleshooting NetBackup for VMware .............................. 287Beware of unsupported backup host ............................................... 288How to determine the ESX network that NetBackup used for the backup
or restore ............................................................................ 288NetBackup logging for VMware ...................................................... 290Configuring VxMS logging ............................................................ 291Format of the VxMS core.log and provider.log file names .................... 294Configuring the VDDK logging level ................................................ 295Preventing browsing delays caused by DNS problems ....................... 296Changing the browsing timeout for virtual machine discovery ............... 298Changing timeout and logging values for vSphere ............................. 299Credentials for VMware server are not valid ..................................... 301Snapshot error encountered (status code 156) ................................. 302The origin of the snapshot failure: NetBackup or VMware? .................. 305Conflict between NetBackup and VMware Storage vMotion with
vSphere 5.0 or later ............................................................... 306Incremental backups of the VM may fail if the NTFS file system in the
guest OS is corrupted and the backup uses MSDP storage ........... 307The restore fails when you restore individual files to a virtual machine
that has NetBackup client software ........................................... 308Backup or restore job hangs ......................................................... 308VMware SCSI requirements for application quiesce on Windows .......... 309Mount point missing on a restored Windows virtual machine ................ 310Mount points not available when restoring files from a Linux virtual
machine ............................................................................. 310Invalid client error when you restore files using NetBackup BAR
interface installed on the virtual machine ................................... 310VMware virtual machine does not restart after restore ........................ 311A restored VM may not start or its file system(s) may not be accessible
.......................................................................................... 311NetBackup job fails due to update tasks on the VMware server ............ 312
10Contents

The vSphere interface reports that virtual machine consolidation isneeded ............................................................................... 312
The Enable file recovery from VM backup option does not work if avolume disk set contains a mixture of disk types .......................... 313
Linux VMs and persistent device naming ......................................... 313For a VMware virtual machine with Windows dynamic disks, a restore
from incremental backup fails with a Windows restore host andthe hotadd transport mode ...................................................... 314
Simultaneous hotadd backups (from the same VMware backup host)fail with status 13 .................................................................. 316
Troubleshooting VMware tag usage ................................................ 317Ensuring that guest customizations can be restored in vCloud Director
.......................................................................................... 319Troubleshooting vmdk restore to existing VM .................................... 320Errors for backups of virtual machines on Virtual Volumes (VVols)
.......................................................................................... 322Issues with the CA certificate during installation of the NetBackup client
on VMware Cloud (VMC) ........................................................ 323
Appendix A NetBackup commands to back up and restorevirtual machines ......................................................... 325
Using NetBackup commands to create a VMware policy ..................... 325Notes on creating a VMware policy for vCloud Director ................. 329VMware policy: bpplinfo options and keywords ........................... 330bpplinclude options for modifying query rules in a VMware policy
.................................................................................... 332Using the nbdiscover command to search the virtual environment
.......................................................................................... 334Using the nbrestorevm command to restore virtual machines into
vSphere .............................................................................. 335Using the nbrestorevm command to restore virtual machines into
vCloud Director .................................................................... 340Using the nbrestorevm command to restore virtual machines with
Instant Recovery .................................................................. 345Using the nbrestorevm command to restore virtual machine disks
.......................................................................................... 345The nbrestorevm -R rename file for restoring virtual machines ........... 345Logs for troubleshooting the nbrestorevm command .......................... 349Query format and examples for searching virtual machine backups
.......................................................................................... 349Allowing other servers or clients to restore virtual machines ................. 352
11Contents

Appendix B Configuring services for NFS on Windows .............. 354
About installing and configuring Network File System (NFS) for GranularRecovery Technology (GRT) ................................................... 354
About configuring services for NFS on Windows 2012 or 2016(NetBackup for VMware) ........................................................ 355Enabling Services for Network File System (NFS) on a Windows
2012 or 2016 media server (NetBackup for VMware) ............. 355Enabling Services for Network File System (NFS) on a Windows
2012 or 2016 restore host (NetBackup for VMware) ............... 359Disabling the Server for NFS (NetBackup for VMware) ....................... 362Disabling the Client for NFS on the media server (NetBackup for
VMware) ............................................................................. 364Configuring a UNIX media server and Windows backup or restore host
for Granular Recovery Technology (NetBackup for VMware) .......... 366Configuring a different network port for NBFSD (NetBackup for
VMware) ............................................................................. 367
Appendix C The Reuse VM selection query results option.......................................................................................... 368
About the Reuse VM selection query results option ............................ 368The effect of virtual machine discovery on vCenter ............................ 369
Appendix D Backup of VMware raw devices (RDM) .................... 371
About VMware raw device mapping (RDM) ...................................... 371Configurations for backing up RDMs ............................................... 372About alternate client backup of RDMs ............................................ 372Requirements for alternate client backup of RDMs ............................ 373Configuring alternate client backup of RDMs .................................... 373
Index .................................................................................................................. 376
12Contents

IntroductionThis chapter includes the following topics:
■ About NetBackup for VMware
■ About the virtual machine backups that include database data
■ About the NetBackup appliance as a VMware backup host
■ NetBackup for VMware components
■ Appliance as backup host: component overview
■ Media servers as backup or discovery hosts
■ Overview of the VMware backup process
■ NetBackup for VMware terminology
About NetBackup for VMwareNetBackup for VMware provides backup and restore of the VMware virtual machinesthat run on VMware ESX servers. NetBackup for VMware takes advantage ofVMware vStorage APIs for data protection. The backup process is off-loaded fromthe ESX server to a VMware backup host.
NetBackup for VMware does the following:
■ Performs off-host backup of virtual machines (NetBackup client software is notrequired on the virtual machine). Off-host backup reduces the backup processingload on the VMware host.
■ Increases the backup speed as compared to standard file-order backup methods,if the virtual machine is heavily populated with small files.
1Chapter

■ Automatically creates quiesced snapshots using VSS (Windows only). Createsquiesced snapshots on Linux if snapshot quiesce is enabled in the Linux guestOS.
■ Uses snapshot technology to keep virtual machines 100% available to users.
■ Supports VMware vSphere and vCloud Director.
■ Performs full backups and incremental backups, including block-levelincrementals.
■ Backs up the full virtual machine.
■ Backs up the virtual machines even when they are turned off.
■ Can restore selected files from the backup.
About the virtual machine backups that includedatabase data
When NetBackup backs up a VMware virtual machine, database data in the virtualmachine is backed up with the rest of the virtual machine. NetBackup allows therecovery of individual database files from the backup. This feature supports MicrosoftExchange Server, SQL Server, and SharePoint Server.
Note the following:
■ To enable restore of individual database files, a NetBackup Windows client mustbe installed in the virtual machine during the backup.
■ NetBackup uses Windows Volume Shadow Copy Service (VSS) to quiesce thedatabase before it creates a snapshot of the virtual machine.
■ A full backup is performed of the database data with each backup job, even ifthe policy schedule is incremental.
See “Application protection options (VMware)” on page 79.
About the NetBackup appliance as a VMwarebackup host
The NetBackup appliance uses the VMware policy type to back up VMware virtualmachines.
The following topics contain notes on the appliance as the backup host:
■ For an overview of the appliance as backup host in a virtual environment:See “Appliance as backup host: component overview” on page 18.
14IntroductionAbout the virtual machine backups that include database data

■ For configuration tasks:See “Overview of VMware tasks” on page 24.See “Overview of NetBackup tasks” on page 25.
■ For a list of requirements and limitations:See “Notes on the NetBackup appliance as a VMware backup host” on page 35.
■ For log files:See “NetBackup logging for VMware” on page 290.
NetBackup for VMware componentsTable 1-1 describes the components that NetBackup for VMware uses.
Table 1-1 Components of NetBackup for VMware
DescriptionComponent
NetBackup for VMware uses a special host that is called a VMware backup host (formerly calledthe VMware backup proxy server). The backup host is a NetBackup client that performs backupson behalf of the virtual machines. The backup host must have access to the datastores of thevirtual machines.
The backup host is the only host on which NetBackup client software is installed. No NetBackupclient software is required on the VMware virtual machines.
Note that the backup host is referred to as the recovery host when it performs a restore.
The backup host can be configured in any of the following ways:
■ As a NetBackup client (Windows or Linux) with a connection to separate master and mediaservers. The master servers and media servers can be Windows, UNIX, or Linux.
■ As a NetBackup client that is installed on the media server (see Backup media server).■ The NetBackup client and master and media server can all reside on the same host (Windows
or Linux).For a list of supported platforms for the backup host, see the NetBackup Enterprise Serverand Server OS Software Compatibility List available from the following location:NetBackup Master Compatibility List
Backup host
Used for the automatic selection of virtual machines for backup. This host discovers virtualmachines and filters them by means of the selection rules in the policy Query Builder. Theresulting list determines which virtual machines are backed up.
The discovery host can be on any platform that NetBackup supports for master or media servers.It can also be the same host as the backup host.
You specify this host on the policy Clients tab: Click Select automatically through VMwareIntelligent Policy query, then NetBackup host to perform automatic virtual machineselection.
Discovery host
15IntroductionNetBackup for VMware components

Table 1-1 Components of NetBackup for VMware (continued)
DescriptionComponent
A media server that can operate as the backup host.
See “Media servers as backup or discovery hosts” on page 18.
Backup media server
Installed on the backup host.NetBackup client
Manages the backups of virtual machines, by means of the NetBackup client that is installedon the backup host.
NetBackup masterserver
Performs the backups to storage on behalf of the NetBackup client.NetBackup mediaserver
Virtual machines provide complete guest operating systems on virtualized hardware. In aNetBackup policy, a virtual machine is configured as a NetBackup client, even though NetBackupclient software is not installed on the virtual machine.
Virtual machine
The VMware ESX server presents a virtualized hardware environment to multiple virtualmachines; each virtual machine runs an independent operating system. Users can runapplications in the virtualized OS as if the OS was installed in its own physical computer.
ESX server
The VMware vCenter Server (or VirtualCenter server) coordinates multiple ESX servers andworkloads. It can migrate virtual machines from one ESX server to another. It also provides theability to back up the virtual machines that are turned off.
The vCenter Server is optional in the NetBackup for VMware environment.
vCenter Server
Figure 1-1 shows a NetBackup for VMware environment on a local network. Thebackup host accesses the VMware datastore through the ESX servers.
16IntroductionNetBackup for VMware components

Figure 1-1 NetBackup for VMware: components on local network
LAN / WAN
VMwaredatastore
vCenterserver
ESXservers
Virtual machinesVM VM VM
VM VM VM
NetBackup media serverUNIX, Linux, or Windows
NetBackup master serverUNIX, Linux, or Windows
Backup hostNetBackup Windows or Linuxclient. Can be combined with amaster or media server.
Figure 1-2 shows a NetBackup for VMware environment on a SAN. The backuphost accesses the VMware datastore directly over the SAN.
Figure 1-2 NetBackup for VMware: components on SAN
LAN / WAN
VMware datastore(Must be available toVMware backup host)
vCenterserver
ESXservers
Virtual machinesVM VM VM
VM VM VM
SAN
NetBackup media serverUNIX, Linux, or Windows
NetBackup master serverUNIX, Linux, or Windows
Backup hostNetBackup Windows or Linuxclient. Can be combined with amaster or media server.
17IntroductionNetBackup for VMware components

Appliance as backup host: component overviewAs Figure 1-3 shows, the appliance can operate as the VMware backup host. Aseparate Windows backup host is not required.
The appliance as backup host can also run the NetBackup media server and masterserver.
Figure 1-3 NetBackup for VMware with appliance as backup host
LAN / WAN
VMwaredatastore
vCenterserver
ESXservers
Virtual machinesVM VM VM
VM VM VM
NetBackupmaster server(if not onappliance)
Appliance as backuphost uses NetBackupclient software toback up VMs.
Client software andmedia server run onappliance. Masterserver can also runon appliance.
Note: Windows backuphost is not required.
NetBackup GUIworkstation
Mediaserverstorage
The NetBackup environment can also be on a SAN:
See Figure 1-2 on page 17.
Further information is available on the appliance as backup host:
See “Notes on the NetBackup appliance as a VMware backup host” on page 35.
Media servers as backup or discovery hostsNetBackup for VMware uses a special host that is called a VMware backup host.The backup host is a NetBackup client that performs off-host backups of the virtualmachines. The backup host must have access to the datastores of the virtualmachines. The backup host reads the data from the datastore and sends it overthe network to the media server. The media server backs up the data to storage.
NetBackup also uses a discovery host. For the policies that automatically selectvirtual machines, the discovery host filters virtual machines according to the rulesin the policy Query Builder. The discovery host returns a list of virtual machines tobe selected for backup.
18IntroductionAppliance as backup host: component overview
NetBackup can use media servers as backup hosts and as discovery hosts.
Media servers acting as backup or discovery hosts can provide the followingadvantages:
■ Host redundancy: If one media server goes down, another media server takesover.
■ Faster backup: The media server can read the data from the datastore and sendthe data straight to the storage device. Without media server access to storagedevices, an ordinary backup host must send the backup data over the localnetwork to the media server.
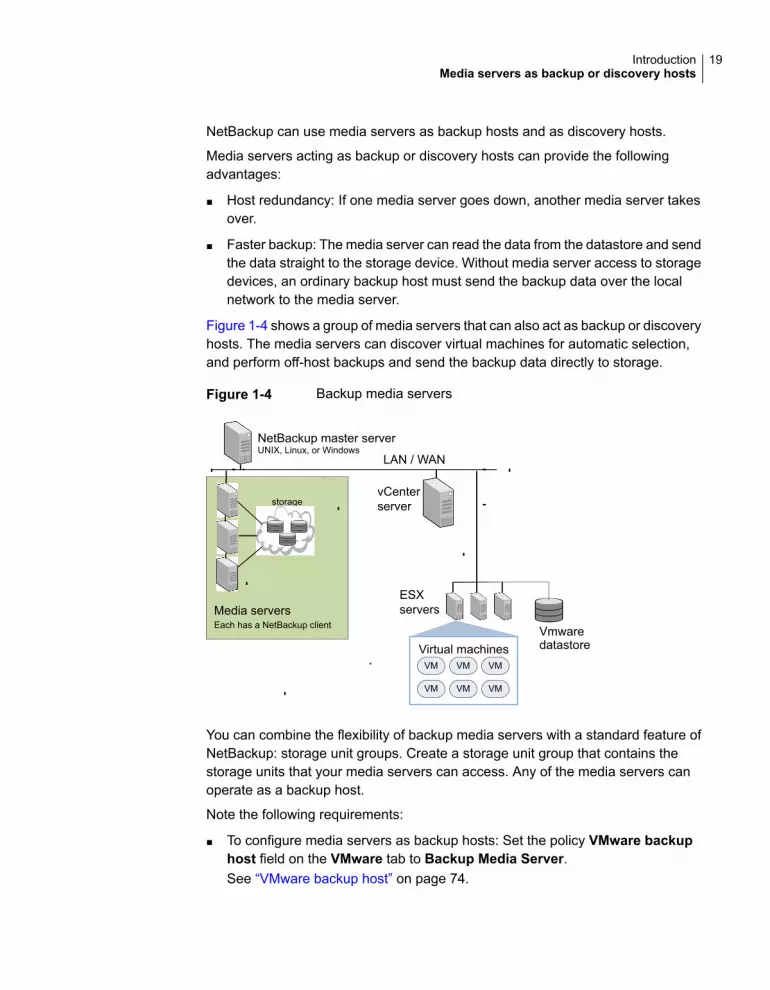
Figure 1-4 shows a group of media servers that can also act as backup or discoveryhosts. The media servers can discover virtual machines for automatic selection,and perform off-host backups and send the backup data directly to storage.
Figure 1-4 Backup media servers
LAN / WAN
Vmwaredatastore
vCenterserver
ESXservers
Virtual machinesVM VM VM
VM VM VM
NetBackup master serverUNIX, Linux, or Windows
Media serversEach has a NetBackup client
storage
You can combine the flexibility of backup media servers with a standard feature ofNetBackup: storage unit groups. Create a storage unit group that contains thestorage units that your media servers can access. Any of the media servers canoperate as a backup host.
Note the following requirements:
■ To configure media servers as backup hosts: Set the policy VMware backuphost field on the VMware tab to Backup Media Server.See “VMware backup host” on page 74.
19IntroductionMedia servers as backup or discovery hosts

■ To configure media servers as discovery hosts: Set the policy NetBackup hostto perform automatic virtual machine selection field on the Clients tab toBackup Media Server.See “Options for selecting VMware virtual machines” on page 109.
Overview of the VMware backup processThe following table describes the phases in the NetBackup backup process.
Table 1-2 NetBackup backup process
DescriptionPhase
The NetBackup master server initiates the backup.Phase 1
The NetBackup client on the VMware backup host initiates a VMwaresnapshot on the virtual machine.
Phase 2
Windows: VSS synchronizes the file system on the virtual machine.
Linux: If snapshot quiesce is enabled in the Linux guest OS, the file systemis synchronized on the virtual machine. (Contact your operating systemvendor and VMware for additional information on how to enable snapshotquiesce.)
Phase 3
The VMware server creates a snapshot on the virtual disk datastore.Phase 4
The NetBackup client reads the snapshot from the datastores and writesthe data to the NetBackup storage unit.
Phase 5
NetBackup for VMware terminologyTable 1-3 lists the terminology that is used in NetBackup for VMware.
For further explanations of VMware terminology, refer to your VMwaredocumentation.
20IntroductionOverview of the VMware backup process

Table 1-3 NetBackup for VMware terms
DefinitionTerm
The backup host is a NetBackup client that performs backups onbehalf of the virtual machines. (This host was formerly known asthe VMware backup proxy server.) The backup host is the only hoston which NetBackup client software is installed.
As an option, the backup host can also be configured as aNetBackup master server or media server.
The backup host is referred to as the recovery host when it performsa restore.
See “NetBackup for VMware components” on page 15.
backup host
A media server that operates as a backup host.backup media server
In NetBackup for VMware, the datastore is a disk that contains thevirtual machines files.
datastore
A collection of datastores that can be managed as a single unit.VMware Storage DRS manages the storage resources of thecluster.
datastore cluster
Discovers the virtual machines, filters them by the rules in the QueryBuilder, and returns a list of virtual machines to be selected forbackup. The discovery host is used only for automatic selection ofvirtual machines.
Can be the same host as the VMware backup host.
See “NetBackup for VMware components” on page 15.
discovery host
An operating system that runs on a virtual machine.guest OS
The backup or restore transport mode when the backup host isinstalled in a virtual machine.
hotadd
A software virtualization layer that lets different operating systemsrun simultaneously on the same physical computer. The VMwarehypervisor is vSphere, which runs on the ESX server host.
hypervisor
21IntroductionNetBackup for VMware terminology

Table 1-3 NetBackup for VMware terms (continued)
DefinitionTerm
A virtual disk that cannot be captured with a snapshot. Anindependent disk can be configured as either persistent ortemporary.
Note: NetBackup for VMware cannot back up the data on anindependent disk. The backup succeeds but the backup imagecontains no data for the independent disk. If you restore the diskfrom the backup, the independent disk is restored to its originalallocation size but contains no data. For example, the Windowsswap file can reside on an independent disk, and is consequentlynot included in the virtual machine backup.
To back up the data on an independent disk, install a NetBackupclient on the virtual machine.
See “NetBackup for VMware: notes and restrictions” on page 27.
independent disk
The combination of rules in the policy's Query Builder, by whichNetBackup selects virtual machines for backup. A query consistsof one or more rules.
query
For creating filtering rules for automatic selection of virtual machinesfor backup. The Query Builder is on the Clients tab of theNetBackup policy.
Query Builder
A single statement in a query, by which NetBackup selects virtualmachines for backup.
An example of a query rule is: Displayname Contains"finance"
query rule
Allows a virtual machine to directly access physical disks (on FibreChannel or iSCSI). RDM allows the OS and applications in thevirtual machine to have pass-thru access to raw devices.
NetBackup for VMware cannot back up an RDM disk. NetBackupclient software must be installed in the virtual machine.
See “About VMware raw device mapping (RDM)” on page 371.
Raw device mapping(RDM)
See backup host.recovery host
Determines how the snapshot data travels between the VMwaredatastore and the backup host.
See “Transport modes options (VMware)” on page 78.
transport mode
22IntroductionNetBackup for VMware terminology

Table 1-3 NetBackup for VMware terms (continued)
DefinitionTerm
An execution environment that the hypervisor creates for thecomputer hardware. The resulting virtualized environment allowsdifferent operating systems to run simultaneously on the samephysical computer.
virtual machine
A logical network that allows the exchange of data between virtualmachines. A virtual network uses a virtual switch (VMware vSwitch).A virtual network can be connected to a physical network.
virtual network
In a VMware ESX server, one or more vmdk files make up the diskimage or virtual drive in a virtual machine. The .vmdk files containthe operating system, applications, and data in the virtual machine.
vmdk file
Installed inside each VMware virtual machine. Enhances the virtualmachine performance and adds backup-related functionality.
VMware Tools
Sometimes called the vmx directory or configuration datastore.Contains the configuration files that describe the virtual machine,such as vmx files. During a backup of a virtual machine snapshot,vmdk writes are also cached on this datastore. Note that a separatevmx datastore is not a VMware requirement.
vmx datastore
VMware vStorage APIs enable data protection features for moreefficient use of storage capacity. NetBackup can use vStorage toback up the latest vSphere environments as well as to back upearlier VMware environments.
vStorage
23IntroductionNetBackup for VMware terminology

Required tasks: overviewThis chapter includes the following topics:
■ Overview of VMware tasks
■ Overview of NetBackup tasks
Overview of VMware tasksThe VMware components including ESX servers and virtual machines must be setup before you configure NetBackup.
Table 2-1 VMware tasks
TasksSequence
Ensure that the hardware and the SAN are configured properly. The VMwaredatastore where the target virtual machine files exist must be accessible tothe VMware backup host.
A SAN connection between the backup host and the datastore is optionalif you use the NBD transfer type or NBDSSL transfer type.
To use the SAN transport type, set up the datastore on Fibre Channel oriSCSI. In this configuration, the VMware backup host must be able to accessthe datastore over the SAN.
Phase 1
Install the VMware ESX server and virtual machines.Phase 2
Install VMware Tools on the virtual machines that you plan to back up.
VMware requires that ESX server names resolve to an IP address. It ishighly recommended that you use DNS for the naming resolution amongVMware servers.
Phase 3
Optional: install a vCenter (or VirtualCenter) server.Phase 4
2Chapter

Overview of NetBackup tasksTable 2-2 lists the NetBackup configuration tasks for VMware. These tasks aredescribed in other NetBackup topics and guides, as indicated.
Table 2-2 NetBackup tasks
TasksSequence
Install the NetBackup master server and media server.
See the NetBackup Installation Guide.
It is recommended that the NetBackup media server and the VMware backuphost be installed on the same host.
Phase 1
Install the NetBackup Enterprise Client license on the master server, andinstall NetBackup client software on the VMware backup host.
NetBackup for VMware requires an Enterprise Client license for each ESXServer. To protect an application or database, note: an additional licensefor the appropriate NetBackup package is needed for each ESX server thathosts the application or database.
Phase 2
Add the VMware backup host to your NetBackup configuration.
See “Adding the VMware backup host to NetBackup” on page 44.
Note: This step is not required on the appliance: the backup host is alreadyinstalled on the appliance.
Phase 3
Enter NetBackup access credentials as needed: for VMware vCenter, forvCloud Director, and for individual ESX servers.
See “Adding NetBackup credentials for VMware” on page 45.
Note: The NetBackup master server must have network access to theVMware servers that NetBackup has credentials for.
Phase 4
Create a NetBackup policy for VMware.
See “Configuring a VMware policy from the Policies utility” on page 68.
Phase 5
Perform a backup.
See “Backing up virtual machines” on page 151.
Phase 6
25Required tasks: overviewOverview of NetBackup tasks

Notes and prerequisitesThis chapter includes the following topics:
■ NetBackup for VMware prerequisites
■ NetBackup for VMware: notes and restrictions
■ Notes on VMware Virtual Volumes (VVols)
■ NetBackup IPv6 parameter required for backups in VMware IPv6 environments
■ NetBackup for VMware: notes on Linux virtual machines
■ Notes on the NetBackup appliance as a VMware backup host
■ NetBackup for VMware support for SAN multi-pathing
■ NetBackup for VMware support for fault tolerant VMs
■ NetBackup character restrictions for the Primary VM identifier
■ In the policy Query Builder, display names, resource pool names, and vAppnames are case-sensitive
■ Notes on the hotadd transport mode
■ Notes and limitations for tag usage in VMware Intelligent Policy queries
■ Notes and limitations for the backup and restore of VMware tag associations
NetBackup for VMware prerequisitesThe following prerequisites apply to NetBackup for VMware:
■ The VMware components including ESX servers and virtual machines must beset up before you configure NetBackup.See “Overview of VMware tasks” on page 24.
3Chapter

■ The NetBackup Java Runtime Environment (JRE) must be installed on thediscovery host and the recovery host. Install the NetBackup RemoteAdministration Console to install NetBackup Java.
■ The VMware backup host must run on Windows or Linux. The supportedhardware types are the same as for any NetBackup client. For the supportedplatforms for the backup host, see the NetBackup Enterprise Server and ServerOS Software Compatibility List available from the following location:NetBackup Master Compatibility List
■ To use the hotadd transfer type for backup or restore, the VMware backup orrestore host is installed in a virtual machine.See “Notes on the hotadd transport mode” on page 40.
NetBackup for VMware: notes and restrictionsNote the following about NetBackup for VMware:
■ For information on supported VMware versions and on supported platforms forthe backup host, see theNetBackup Enterprise Server and Server OS SoftwareCompatibility List available from the following location:NetBackup Master Compatibility ListFor additional support information on NetBackup for VMware, see Support forNetBackup in virtual environments:http://www.veritas.com/docs/000006177
■ NetBackup for VMware does not support the Retain snapshot for InstantRecovery or SLP ... option on the policy Attributes tab of the AdministrationConsole.
NetBackup supports these features as follows:
■ For Instant Recovery, use the nbrestorevm command.See “About Instant Recovery for VMware” on page 237.
■ For SLP management of snapshots, use Replication Director.For more information, see the NetBackup Replication Director SolutionsGuide.
■ NetBackup allows up to 31 snapshots per virtual machine. If the virtual machinehas more than 31 snapshots, the backup may fail with status 13. Messagessimilar to the following appear in the NetBackup job details:
10/18/2012 4:56:59 PM - Critical bpbrm(pid=4604)from client
Umesh_w2k3_hypervm33: FTL - vSphere_freeze: Unable to remove
existing snapshot, too many existing snapshots (91).
10/18/2012 4:56:59 PM - Critical bpbrm(pid=4604) from client
27Notes and prerequisitesNetBackup for VMware: notes and restrictions

Umesh_w2k3_hypervm33: FTL - VMware_freeze: VIXAPI freeze
(VMware snapshot) failed with 26: SYM_VMC_REMOVE_SNAPSHOT_FAILED
As a reminder to consolidate or delete snapshots, the NetBackup detailed statusprovides the following message when the number of snapshots exceeds 15:
Umesh_w2k3_hypervm33: WRN - vSphere_freeze: VM has 16 existing
snapshots. Snapshots may start failing if this number exceeds 32
To back up a virtual machine that has more than 31 snapshots, consolidate ordelete the existing snapshots. Then rerun the backup.
Note: Replication Director backups allow more than 31 snapshots per virtualmachine.
■ If the number of snapshot delta files for a VM's vmdk exceeds 32, snapshotcreation fails. A message similar to the following appears in the NetBackupdetailed status:
Umesh_w2k3_hypervm33: FTL - vSphere_freeze: Unable to
proceed with snapshot creation, too many existing delta files(50).
As a reminder to consolidate or delete snapshots, the NetBackup detailed statusprovides the following message when a vmdk's delta files exceed 16:
Umesh_23k3_hypervm33: WRN - vSphere_freeze: VM has 17 existing
delta files for vmdk Umesh_23k3_hypervm33.vmdk. Snapshots may start
failing if this number exceeds 31
Delta files can accumulate if the VM's snapshots are not deleted or consolidated.Consolidate or delete the existing snapshots, then rerun the backup.
■ NetBackup for VMware cannot back up the data on an independent disk, becausean independent disk cannot be captured with a snapshot. The backup succeedsbut the backup image contains no data for the independent disk.To back up the data on an independent disk, install a NetBackup client on thevirtual machine. You can configure NetBackup to back up the virtual machineand any independent disks as if the client was installed on a physical host. Youcan restore the virtual machine and then restore the independent disk as aseparate job.
■ NetBackup for VMware does not back up standard iSCSI LUNs that areconnected to the virtual machine. If the virtual machine has an iSCSI LUN, thebackup succeeds but the drive that represents the LUN is not backed up.Note: NetBackup for VMware supports datastores over iSCSI.
28Notes and prerequisitesNetBackup for VMware: notes and restrictions

■ Several notes and limitations apply to Linux virtual machines.See “NetBackup for VMware: notes on Linux virtual machines” on page 34.
■ If a Windows virtual machine includes Veritas Storage Foundation volumes, theEnable file recovery from VM backup option is not supported.See “Storage Foundation Volume Manager volumes in the virtual machine”on page 100.
■ During an incremental backup with the Enable file recovery from VM backupoption (with or without block-level incremental backup), any files that had beenmoved or renamed are not backed up. Those files are not available when youbrowse to restore individual files from that incremental backup.
Note: When you restore the entire VM from a block-level incremental backup,the file metadata is updated and the moved or renamed files reflect the updatedmetadata.
■ VMware virtual machine templates are for cloning virtual machines: They cannotbe turned on and used as functioning VMs. As a result, VMware has imposedthe following restrictions on backup and restore of virtual machine templates:
■ A virtual machine template cannot be captured in a snapshot. NetBackupbacks up the template to the designated storage unit.
■ Block level incremental backup (BLIB) cannot be used when backing up avirtual machine template.
Note: As a result of this restriction, NetBackup Accelerator cannot be usedto back up VMware virtual machine templates.
■ A virtual machine template cannot be backed up over a SAN. You mustconfigure the NetBackup policy to use a local network transfer type, suchas nbd. Likewise, the restore of a template must be conducted over a localnetwork.
Note: You can use the Query Builder in the NetBackup policy to create rulesfor automatic selection of virtual machine templates.
■ NetBackup supports non-ASCII characters in virtual machine objects, as follows:
■ The NetBackup master server, the backup host, and the restore host mustrun NetBackup 8.1 or later. The backup host and the restore host may bethe same computer.
29Notes and prerequisitesNetBackup for VMware: notes and restrictions

■ Windows operating systems on the NetBackup master server, the backuphost, and the restore host do not assume non-ASCII characters in VM displayname if the system locales of Windows hosts are not set to UTF-8. Even ifthe system locale is not set to UTF-8, a backup of the VMware virtual machinewhose display name contains non-ASCII character may work. However, arestore from the VMware virtual machine backup that has non-ASCIIcharacters in its display name needs a Linux or UNIX restore host whichuses UTF-8 character encoding.
■ The UNIX and Linux operating systems on the NetBackup master server,the backup host, and the restore host must use UTF-8 character encoding.The backup host and the restore host may be the same computer.
■ The name that NetBackup uses to select a VM for backups cannot containnon-ASCII characters. The Primary VM identifier field in the backup policyidentifies the name type that NetBackup uses to select VMs. For example,if you specify VM display name as the Primary VM identifier, the displayname of each VM that you back up cannot contain non-ASCII characters.See “Primary VM identifier options (VMware)” on page 76.VM BIOS UUID and VM instance UUID names never contain non-ASCIIcharacters.
■ For security purposes, VM names have some restrictions.See “NetBackup character restrictions for the Primary VM identifier”on page 37.
Examples of objects are file and folder names, annotations, floppy image name,parallel port or serial port file name, CD-ROM ISO name, and so on.
■ For dual-boot virtual machines, NetBackup does not support the following policyoptions:
■ Enable file recovery from VM backup
■ Exclude deleted blocks
■ Exclude swap and paging files
■ Exclude boot disk
■ Exclude all data disks
■ To support the following exclude disk options, the backup host must be at releaselevel 8.1 or later:
■ Perform custom attribute based exclusionCustom Attribute based disk exclusion requires that you enter in NetBackupthe credentials for the vCenter server or servers that host the VMs. ESXiserver credentials are not sufficient.
30Notes and prerequisitesNetBackup for VMware: notes and restrictions

See “Adding NetBackup credentials for VMware” on page 45.
■ Specific disk(s) to be excluded
■ NetBackup does not support the following exclude disks options for ReplicationDirector backups:
■ Exclude boot disk
■ Exclude all data disks
■ Perform custom attribute based exclusion
■ Specific disk(s) to be excluded
■ If you remove a disk from exclusion, the individual files that were last modifiedbefore the most recent backup cannot be restored. To restore those files, restorethe entire virtual disk or the virtual machine. After the next full backup, thosefiles are available to restore individually.
■ NetBackup fails the backups of virtual machines that are empty. A VM may beempty because all of its disks are empty or because disk exclusion excludes alldisks.
■ To back up a virtual machine while Storage vMotion migrates its files, NetBackupmust conduct the backup through the vCenter server.See “Conflict between NetBackup and VMware Storage vMotion with vSphere5.0 or later” on page 306.
■ Several notes and limitations apply to the automatic selection of virtual machinesfor backup (Virtual Machine Intelligent Policy).See “NetBackup requirements for automatic virtual machine selection”on page 108.
■ For hotadd backup or restore: The virtual machine to back up (or restore) andthe virtual machine that contains the hotadd backup host must reside in thesame VMware data center.See “Notes on the hotadd transport mode” on page 40.
■ NetBackup for VMware supports Windows NTFS file encryption and compression,for backup and restore. However, NetBackup for VMware does not supportNetBackup’s compression or encryption options (in the NetBackup policyattributes).For Windows, UNIX, or Linux guest operating systems: NetBackup for VMwaredoes not support any type of compression or encryption, whether they are setin NetBackup or in the guest OS (such as BitLocker).
31Notes and prerequisitesNetBackup for VMware: notes and restrictions

Note: The compressed Windows NTFS files are backed up and restored ascompressed files.
■ Storage optimization cannot be used if a snapshot exists on the virtual machinewhen VMware Changed Block Tracking is turned on.See “About reducing the size of VMware backups” on page 147.
■ If the policy's Primary VM identifier option is set to VM hostname, note:NetBackup cannot select a VMware virtual machine for backup if it cannot obtainan IP address for the virtual machine.
■ For Exchange, SharePoint, and SQL applications, NetBackup for VMwaresupports Granular Recovery Technology (GRT) restores from full backups only.
■ See “Restore notes and restrictions” on page 173.
■ If a policy is changed from manual selection to Intelligent policy (or vice versa),the next backup of the VM is a regular full backup, even if a backup alreadyexists for that VM.
For example:
■ In a new VMware policy, the Select manually option on the Clients tab isused to select a VM. The first backup from the policy runs.
■ In the policy, an Intelligent Policy query is used to select the same VM, andthe VM is backed up a second time. Because of the switch from manualselection to query-based selection, this second backup is a regular fullbackup. Note that for a policy that uses Enable block-level incrementalbackup (BLIB) or BLIB plus Accelerator, the backup processing is not limitedto changed blocks only.For the second backup, the Detailed status log includes a message similarto the following:
There is no complete backup image match, a regular full backup
will be performed.
The same backup behavior occurs if the policy’s VM selection is switched fromquery-based to manual selection: The second backup is a regular full backup.
■ For the virtual machines that vSphere 6.5 hosts, NetBackup fails the backup ifa snapshot exists while NetBackup tries to enable VMware Change BlockTracking. Because the VMware Change Block Tracking API behavior changedbeginning in vSphere 6.5, NetBackup fails the backup.NetBackup enables CBT on a VM if Block Level Incremental Backups isenabled in the backup policy and CBT is not enabled already on the VM.
32Notes and prerequisitesNetBackup for VMware: notes and restrictions

■ In vSphere, if your virtual environment has IPv6 addresses, use only fully qualifieddomain names (FQDNs) that are mapped to IPv6 addresses on the DNS server.
■ The Test query operation fails for a VMware policy in the following condition:There is no direct connectivity between the NetBackup master server and theESX server (for example, ESX server in NAT environment) where a virtualmachine is to be backed up and the NetBackup host to perform automaticvirtual machine selection option is set to Backup Media Server (for example,NAT media server).
Notes on VMware Virtual Volumes (VVols)NetBackup supports backup and restore of the virtual machines that are configuredon Virtual Volumes (VVols).
■ Ensure that you have the required snapshot license from the array vendor.
■ Consult the storage array documentation from the vendor for space requirements.
Configuring backup and restore of virtual machines with VVols is the same as forvirtual machines without VVols, with these exceptions:
■ To restore a virtual machine with the hotadd transport mode: VMware requiresthat the virtual machine and the restore host virtual machine reside on the sameVVol datastore. Otherwise, the restore must use a different transport mode (nothotadd).
■ For a restore to standard (non-VVol) datastores, the NetBackup job creates avSphere snapshot of the virtual machine while NetBackup restores the data.Note: For a restore to a VVol datastore, NetBackup restores the data to thevirtual machine without creating a vSphere snapshot.
NetBackup IPv6 parameter required for backupsin VMware IPv6 environments
For backups and restores of VMware virtual machines in an IPv6 environment, youmust configure the IPv6 support on the following NetBackup hosts:
■ The master server
■ The backup host
The Both IPv4 and IPv6 option of the IP Address Family Support host propertyconfigures IPv6 support. The IP Address Family Support host property is on theNetwork Settings host properties dialog box.
33Notes and prerequisitesNotes on VMware Virtual Volumes (VVols)

If the NetBackup master server and the backup host are the same host, configurethe support on that host only. If the NetBackup master server and the backup hostare separate hosts, configure the support on each host.
For more information about the IP Address Family Support host property, seethe NetBackup Administrator's Guide, Volume I:
http://www.veritas.com/docs/DOC5332
NetBackup for VMware: notes on Linux virtualmachines
The following notes apply to virtual machines with Linux guest operating systems:
■ NetBackup cannot exclude unused or deleted blocks from the backup if thevirtual machine is configured with software RAID volumes. The policy's Excludedeleted blocks option is not supported.
■ If snapshot quiesce is enabled in the Linux guest OS, NetBackup for VMwaresynchronizes the guest OS file system before it takes the snapshot. Contactyour operating system vendor and VMware for additional information on enablingsnapshot quiesce. Note: If snapshot quiesce is not enabled, NetBackup cannotguarantee that data in the file system is in a consistent state when the snapshotoccurs.
■ Unmounted LVM2 volumes must start with /devIf the path of an unmounted LVM2 volume does not start with /dev, the backupof the virtual machine fails. Note: The path of the volume is set with the dir
parameter on the LVM volume configuration file. An example of this configurationfile is /etc/lvm/lvm.conf.
■ For Linux files or directories, NetBackup for VMware has the same path namerestriction as NetBackup on a Linux physical host. Files or directories with pathnames longer than 1023 characters cannot be individually backed up or restored.Such files can be restored when you restore the entire virtual machine from afull virtual machine backup.
■ The Linux ext4 file system includes a persistent pre-allocation feature, toguarantee disk space for files without padding the allocated space with zeros.When NetBackup restores a pre-allocated file (to any supported ext file system),the file loses its preallocation and is restored as a sparse file. The restored fileis only as large as the last byte that was written to the original file. Subsequentwrites to the restored file may be non-contiguous.
Note: The restored file contains all of its original data.
34Notes and prerequisitesNetBackup for VMware: notes on Linux virtual machines

■ The NetBackup policy’s Enable file recovery from VM backup option is notsupported for the disks inside a Linux guest OS that are configured as follows:
■ The disks are divided into logical volumes by means of the Linux LogicalVolume Manager (LVM), and
■ The LVM volumes were created with thin-provisioning.
■ See “Restore notes and restrictions on Linux” on page 177.
Notes on the NetBackup appliance as a VMwarebackup host
Note the following requirements and limitations for the appliance as the backuphost:
■ The appliance must be version 2.5 or later.
■ You must use the VMware policy type.
■ The appliance supports iSCSI connections. Refer to the NetBackup ApplianceiSCSI Guide for more information.
NetBackup for VMware support for SANmulti-pathing
NetBackup for VMware on Windows supports dynamic multi-pathing (DMP) betweenthe vSphere ESXi storage and the NetBackup for VMware agent (Windows backuphost). Dynamic multi-pathing can provide SAN I/O high-availability and improvedbackup throughput.
For NetBackup for VMware on a Linux backup host, the following items describethe support for dynamic multi-pathing in a SAN environment:
The NetBackup appliance (beginning with the 2.6.0.2 release) supportsSAN dynamic multi-pathing for VMware backups. I/O is redirectedthrough the volume manager dynamic multi-pathing node.
For more information, see the NetBackup Appliance Administrator'sGuide for version 2.6.0.2 and later:
http://www.veritas.com/docs/DOC2792
NetBackupappliance
35Notes and prerequisitesNotes on the NetBackup appliance as a VMware backup host

NetBackup supports backups and restores for multi-pathing under thefollowing conditions:
■ The virtual disk SAN transport whitelist specifies the device nodepaths that you want to use for multipathing. The virtual diskvixDiskLib.transport.san.whitelist API function definesthe whitelist. For NetBackup purposes, Veritas recommends thatyou include the DMP nodes in the whitelist; the following is anexample:
vixDiskLib.transport.san.whitelist = /dev/vx/dmp/hitachi_usp-v0_00a0,/dev/vx/dmp/hitachi_usp-v0_00a0s1,/dev/vx/dmp/hitachi_usp-v0_00a0s2,/dev/vx/dmp/hitachi_usp-v0_00a0s3,/dev/vx/dmp/hitachi_usp-v0_00a0s4,/dev/vx/dmp/hitachi_usp-v0_00a0s5
■ The virtual disk SAN transport blacklist specifies the device nodepaths you want to exclude from multipathing. The virtual diskvixDiskLib.transport.san.blacklist API function definesthe blacklist. For NetBackup purposes, Veritas recommends thatyou set the blacklist to all; the following is an example:vixDiskLib.transport.san.blacklist = all
Specify the whitelist and the blacklist in the following file on the backuphost:
/usr/openv/lib/shared/vddk/lib64/vixDiskLib.ini
For more information about the whitelist and the blacklist, see theappropriate VMware documentation. For example, for Virtual DiskDevelopment Kit 6.0 the whitelist and the blacklist function descriptionsare in the VMware Virtual Disk Programming Guide.
Non-applianceLinux host
Note: This support or limitation does not affect NetBackup support for VMware’sNative Multipathing, which is multi-pathing between the ESXi host and storage.
This support or limitation does not affect NetBackup for VMware on Windows backuphosts. The Windows operating system has integrated multi-pathing support. Thefollowing Microsoft guide contains more information:
http://microsoft.com/mpio
36Notes and prerequisitesNetBackup for VMware support for SAN multi-pathing

NetBackup for VMware support for fault tolerantVMs
NetBackup supports backing up and restoring primary fault tolerant virtual machineson vSphere 6.0 and later. (NetBackup does not backup or restore the secondaryVMs.) If you choose to overwrite the VM during the restore, NetBackup deletesboth the primary and the secondary VMs during the restore process. NetBackupthen restores the primary VM.
Fault tolerance is not enabled on the restored VM. After the restore has completed,you can turn on fault tolerance.
For information about how to turn on fault tolerance, see the VMware documentationfor your version of vSphere.
NetBackup character restrictions for the PrimaryVM identifier
For VMware virtual machines in a NetBackup policy, certain characters are notallowed in their names. The backup policy Primary VM identifier field identifiesthe name type that NetBackup uses to select VMs.
See “Primary VM identifier options (VMware)” on page 76.
If the name contains disallowed characters, backups or restores may fail.
The following table describes the characters and strings that NetBackup does notallow for backup or restore in the Primary VM identifier, except where noted.
Table 3-1 Disallowed characters and strings in the primary VM identifier
NotesDescriptionCharacter/string
Quotation mark, unicode x22."
Dollar sign, unicode x24.$
Apostrophe, unicode x27.'
Asterisk, unicode x2A.*
Comma, unicode x2C.,
Colon, unicode x3A.:
Semi-colon, unicode x3B.;
37Notes and prerequisitesNetBackup for VMware support for fault tolerant VMs

Table 3-1 Disallowed characters and strings in the primary VM identifier(continued)
NotesDescriptionCharacter/string
Question mark, unicode x3F.?
At sign, unicode x40.@
Vertical line, unicode x7C.|
Grave accent, unicode x60.`
Acute accent, unicode xB4.´
Disallowed in the virtual machinedisplay name for application-awareVMware backups for SharePoint,allowed elsewhere.
In VIP query and VM searchresults, NetBackup converts % inthe display name of Included VMsto the literal string %25. When youspecify a display name in a query,replace the % character with %25.
Percent sign, unicode x25.%
Ampersand sign, unicode x26.&
Less than sign, unicode x3C.<
Greater than sign, unicode x3E.>
Disallowed in the first position only.Hyphen-minus, unicode x2D.-
Disallowed in VM display name,allowed in other objects.
Solidus, unicode x2F./
Disallowed in VM display name,allowed in other objects.
Reverse solidus, unicode x5C.\
Disallowed in VM display namewhen in the last position, allowedin other objects.
Full stop (period), unicode x2E..
38Notes and prerequisitesNetBackup character restrictions for the Primary VM identifier

Table 3-1 Disallowed characters and strings in the primary VM identifier(continued)
NotesDescriptionCharacter/string
In VIP query and VM searchresults, NetBackup converts aspace character in the displayname of IncludedVMs to the literalstring %20. When you specify adisplay name in a query, replacethe space character with %20.
Space, unicode x20.
Disallowed when the backup policyspecifies the VM display name asthe primary VM identifier.
Unicode charactersgreater than x7F(non-ASCII)
Disallowed in VM display name,allowed in other objects.
Literal string, not a unicodecharacter definition.
%2f
Disallowed in VM display name,allowed in other objects.
Literal string, not a unicodecharacter definition.
%5c
Additional character restrictions for VM names can be found in theNetBackup CloudAdministrator's Guide, available from this location:
http://www.veritas.com/docs/000003214
See “NetBackup for VMware: notes and restrictions” on page 27.
See “In the policy Query Builder, display names, resource pool names, and vAppnames are case-sensitive” on page 39.
In the policy Query Builder, display names,resource pool names, and vApp names arecase-sensitive
In VMware vSphere, virtual machine display names, resource pool names, andvApp names are case-sensitive. For example, a virtual machine with the name"vm1" is a different virtual machine from one that is named "VM1."
The VMware virtual machines with the name values that do not exactly match thequery string case are not returned in the result set. Backups for those virtualmachines are missed.
For example, for the following virtual machines:
39Notes and prerequisitesIn the policy Query Builder, display names, resource pool names, and vApp names are case-sensitive

vmware-ted
VMware-charles
VMWARE-john
vmWARE-jason
A query specifying Displayname Contains “vmware-” returns vmware-ted butnot the other virtual machines.
See “NetBackup for VMware: notes and restrictions” on page 27.
Notes on the hotadd transport modeNetBackup supports several transport modes for sending snapshot data betweenthe VMware datastore and the VMware backup host during a backup or restore.One of those transport modes (hotadd) is used when the VMware backup host isinstalled in a virtual machine.
Note the following about the hotadd transport mode:
■ The VMware backup host must be installed in a virtual machine.
■ The following is a VMware requirement: The virtual machine to back up and thevirtual machine that contains the hotadd backup host must reside in the sameVMware datacenter. The same VMware requirement applies to virtual machinerestore: The virtual machine to restore and the virtual machine that contains thehotadd restore host must reside in the same VMware datacenter.For hotadd backup, it is recommended at least one hotadd backup host for eachdatacenter.
■ NetBackup does not support IDE disks on the virtual machine.
■ On the virtual machine to back up, no two disks should have the same name.(Identical names can occur if the disks reside on different datastores.)
■ The ESX server (where the backup-host virtual machine resides) must haveaccess to the datastore of the virtual machines that you want to back up.
■ The datastore for the backup-host virtual machine must have some free spacebefore the hotadd backup begins. Otherwise, the backup may fail.
■ Restores that use the hotadd or SAN transport modes do not include the VM'smetadata changes in the restore. The status log of the NetBackup job containsmessages similar to the following:
07/25/2013 12:37:29 - Info tar (pid=16257) INF - Transport Type
= hotadd
07/25/2013 12:42:41 - Warning bpbrm (pid=20895) from client
40Notes and prerequisitesNotes on the hotadd transport mode

<client_address>: WRN - Cannot set metadata (key:geometry.
biosSectors, value:62) when using san or hotadd transport.
Retry the restore with a different transport mode (nbd or nbdssl).This problem is a known VMware issue..
■ Locking timeouts in the VMware VDDK may cause simultaneous hotadd backupsfrom the same VMware backup host to fail.See “Simultaneous hotadd backups (from the same VMware backup host) failwith status 13” on page 316.
■ For a list of VMware restrictions on the hotadd transport mode, refer to VMware’sdocumentation.
Notes and limitations for tag usage in VMwareIntelligent Policy queries
■ NetBackup does not support the selection of virtual machines based on thecategory.
■ NetBackup uses tags for virtual machine selection independent of the tag'scategory. The VMware vSphere Web Client can create tags in two differentcategories with the same tag name. In the example, both virtual machines areselected if the policy is configured to include virtual machines with the “HR” tag.Example:
■ Virtual_Machine_1 has a user-specified tag HR in the category Production
■ Virtual_Machine_2 has a user-specified tag HR in the category Test
■ NetBackup only recognizes the tags that are associated with virtual machines,not other vCenter objects such as Datastores.
■ vCenter Server 6.0 or later is required.
■ Any Windows host with only the NetBackup Client Software installed that is alsodefined in the VMware policy's Client tab as the NetBackup host to performautomatic virtual machine selection must have NetBackup Java installed.Install the NetBackup Remote Administration Console to install NetBackup Java.
■ Be aware of a known bug in vSphere 6.0 when the system time of the discoveryhost and the vCenter Server are not synchronized. This issue is known to causebackups to fail with a NetBackup Status Code 4263.VMware knowledge base article: http://kb.vmware.com/kb/2125193
■ In large VMware environments, consider increasing theMaximumbearer tokenlifetime from the default value. Veritas has observed issues with discovery jobs
41Notes and prerequisitesNotes and limitations for tag usage in VMware Intelligent Policy queries

timing out because the default value is too small. The Maximum bearer tokenlifetime is a vCenter Server setting. More information on this issue is available.See “Troubleshooting VMware tag usage” on page 317.
Notes and limitations for the backup and restoreof VMware tag associations
■ Tag associations are part of the metadata of the virtual machine. NetBackupconsiders virtual machine tag association protection a best effort backup. Anytag collection errors are shown in the Activity Monitor for the virtual machinesnapshot jobs.If for any reason NetBackup is unable to back up tag associations, the jobcompletes successfully with a NetBackup Status Code 0. Any failures to retrievetag associations in the backup are, however, reported in the job details in theActivity Monitor.
■ vCenter Server 6.0 or later is required.
■ VMware tag associations are only backed up when you use VMware IntelligentPolicies.
■ NetBackup backs up tag associations with virtual machines. NetBackup doesnot back up tag associations with other vCenter Server objects, such asdatastores or folders.
■ Tag associations for all virtual machines are retrieved during the discovery job.The tag associations are, however, stored in the backup image for each individualvirtual machine. Be aware there is a time difference between the discovery jobtime and the backup job. If tag associations are changed between these times,the changes are not backed up.
■ If tag associations of a virtual machine were successfully backed up, thenNetBackup attempts to recreate tag associations with the restored virtualmachine. If the recovery host version is incompatible, NetBackup completes therecovery of the virtual machine and sets the job status to 0. The recovery jobdetails, however, provide information on the failure to recreate the tagassociations.
■ If tag associations of a virtual machine were not backed up successfully, thenNetBackup does not attempt to recreate tag associations with the restored VirtualMachine. NetBackup completes the recovery of the virtual machine and setsthe job status to 0. The recovery job details provide information on the failureto collect the tag associations that occurred at the time of backup.
■ When Replication Director for VMware is used to protect your virtual machines,tag associations are backed up only when Application Consistent protection is
42Notes and prerequisitesNotes and limitations for the backup and restore of VMware tag associations

enabled. When Application Consistent protection is disabled, NetBackup doesnot protect tag associations.
43Notes and prerequisitesNotes and limitations for the backup and restore of VMware tag associations

Configure NetBackupcommunication withVMware
This chapter includes the following topics:
■ Adding the VMware backup host to NetBackup
■ Adding NetBackup credentials for VMware
■ Changing the host name of a VMware server in NetBackup
■ Setting privileges for posting events to vCenter
■ Authentication token for the NetBackup vSphere plug-ins
■ Setting global limits on the use of VMware resources
■ Validating VMware virtualization server certificates in NetBackup
Adding the VMware backup host to NetBackupUse this procedure to enable a NetBackup client as the backup host.
Note: This procedure is not needed for the media servers that operate as backuphosts with the policy Backup Media Server option. With that option, NetBackupautomatically enables media servers as backup hosts.
In the NetBackup Administration Console, do the following.
4Chapter

To add the VMware backup host
1 Click Host Properties > Master Servers, double click the NetBackup masterserver, and click VMware Access Hosts.
2 Click Add.
3 Enter the fully qualified domain name of the VMware backup host, and clickAdd.
4 When you are finished adding hosts, click Close.
5 Click Apply and then OK.
6 If the NetBackup master server is clustered in a failover environment: repeatthis procedure to add the backup host to each master server node in the cluster.
See “Adding NetBackup credentials for VMware” on page 45.
Adding NetBackup credentials for VMwareTo back up or restore virtual machines, NetBackup requires logon credentials tothe VMware ESX servers, the VMware vCenter servers, or the VMware vCloudservers. In the NetBackup Administration Console, do the following.
To add NetBackup credentials
1 Click Media and Device Management > Credentials > Virtual MachineServers.
2 Click Actions > New > New Virtual Machine Server.
3 On theNewVirtual Machine Server dialog, enter the name of a virtual machineserver (ESX server, vCenter server, or vCloud server).
Note: Enter the server name in the same format in which it is registered inDNS and in the VMware server (whether short or fully-qualified).
See “Using the VMware Managed Object Browser to verify the server name”on page 50.
45Configure NetBackup communication with VMwareAdding NetBackup credentials for VMware

Note: The vCenter name that you enter here must match the name that is seton the vCenter for VimApiUrl name and Runtime name. For assistance insetting those names on the vCenter, and for additional vCenter namingrequirements relating to the NetBackup plug-ins for vSphere: See the topic onconsistent vCenter naming in theNetBackup Plug-in for VMware vSphereWebClient Guide:
http://www.veritas.com/docs/000003214
Note: It is recommended the use of fully qualified names. The entire namemust be properly formed without empty or null elements. For example, afully-qualified name must include the domain name and not end in a period (.).
Note: The ESX server name is case-sensitive. Enter the ESX server nameexactly as it is in the VMware environment. If the case is wrong, the credentialvalidation fails and states "...expecting <correct_name_of_server>."
NetBackup needs access to this server for either of the following reasons:
■ To browse the server's virtual machines and back them up.
■ To use the server as a target for restoring virtual machines.Use the next dialog to identify the type of this server (vCenter, ESX, or ESXfor restore only).
4 In the Credentials pane of the New Virtual Machine Server dialog, enter thefollowing:
Virtual machine server type
Select the type of VMware server that NetBackup needs to access:
■ VMware Virtual Center serverDesignates a vCenter (or VirtualCenter) server that manages ESX servers.When you create a policy to back up this server's virtual machines,NetBackup can browse this server and list its virtual machines. If thecredentials provide full access privileges to the vCenter server, you canrestore virtual machines to this server.
Note: Do not enter logon credentials for the individual ESX servers that thisvCenter server manages. NetBackup needs credentials for the vCenteronly. If you enter credentials for both an ESXi server and a vCenter thatmanages it, problems such as the following may occur:
■ A VMware Intelligent Policy (VIP) may fail due to discovery of duplicateVMs.
46Configure NetBackup communication with VMwareAdding NetBackup credentials for VMware

■ For manual selection of VMs (not VIP): Tags and custom attributes(which require a vCenter) may cause intermittent problems if NetBackupattempts to back up the VM using the ESXi server.
■ VMware ESX ServerDesignates a standalone ESX server that a vCenter server does notmanage. NetBackup can browse the ESX server to present a list of its virtualmachines for backup. You can also restore virtual machines to this ESXserver. To use the server as a target for restores, enter the credentials thatprovide full access privileges to the ESX server.
■ VMware Restore ESX ServerDesignates an ESX server to which NetBackup can restore virtual machines.You must enter the credentials that provide full access privileges to theserver.
Note: NetBackup accesses this type of server for restores only, not forbackups.
The restore ESX server type has the following advantages:
■ For large environments with hundreds of hosts, NetBackup may notneed full access to the vCenter server. With the restore ESX servertype, you can give NetBackup full access to a single ESX server that isdedicated to restore.
■ SAN-based restores that go directly to a restore ESX server are fasterthan restores that go through the vCenter server.
■ Allows restoring to an ESX 5.x or later server that a vCenter 5.x or laterserver manages. NetBackup uses vCenter to create the virtual machine.NetBackup then writes the .vmdk files directly to the ESX server usingthe Restore ESX Server credentials to that server.
Note: VMware does not support the restore of virtual machines directly toan ESX 5.x or later server that vCenter manages. To restore the virtualmachine, select the vCenter server as the destination. As an alternative,you can set up an independent ESX server to be used for restores. Youmust add NetBackup restore credentials for that ESX server by means ofthe VMware Restore ESX Server type.
For further information on the restore ESX server, refer to the followingVeritas tech note:http://www.veritas.com/docs/000007351
47Configure NetBackup communication with VMwareAdding NetBackup credentials for VMware

■ VMware vCloud DirectorDesignates a vCloud Director server. NetBackup can browse the vCloudenvironment on this server to present a list of its virtual machines for backup.You can also restore virtual machines to this server.
Note: The credentials must be for a system administrator account.
Note: For backup and restore to vCloud Director, both vCloud and vCentercredentials are required (VMware Virtual Center server).
Note: If the vCloud environment uses a load-balancer to manage multiplecells (nodes), add credentials for the load balancer, not for the cells. IfvCloud Director has multiple cells but no load balancer, add credentials foronly one of the cells, not for all of them. Note also: If the Domain NameSystem (DNS) cannot resolve the name of the load balancer or cell, do thefollowing: Include a line in the hosts file on the VMware backup host thatspecifies the IP address of the load balancer or cell.
User name
Enter the user name for the virtual machine server. Note that spaces in usernames are not allowed.
To enter a domain name with a user name, separate them with a backslashas follows:
domain\username
Password
Enter the password for the virtual machine server.
For backup host
You can select a particular backup host for which to validate the credentials.Note that the hosts that appear in the pull-down list can be the following: mediaservers, or NetBackup clients that have been added under Host Properties,VMware Access Hosts.
For a list of supported backup host platforms, see the NetBackup SoftwareCompatibility List available from the following location:
NetBackup Master Compatibility List
See “Adding the VMware backup host to NetBackup” on page 44.
48Configure NetBackup communication with VMwareAdding NetBackup credentials for VMware

If For backup host is set to <Any> (the default), NetBackup attempts to validatethe credentials using each backup host in turn. NetBackup continues checkingonly until validation succeeds for a particular backup host or the list of backuphosts is exhausted.
During validation: An invalid user name or password is deleted if you haveentered it for the first time and you do not select a backup host. If validationfails for any reason, the entry is removed.
If your VMware backup host is running a version of NetBackup that is earlierthan 6.5.4, the credentials cannot be validated. An error message is displayed.You must verify that the credentials you entered are correct for the VMwareserver. If the credentials are correct, you can ignore the error message.
Connect using port number
If the default port number has not been changed on the VMware server, noport specification is required. In that case, make sure that the Connect usingport number box is not checked.
If the VMware server has been configured to use a different port, click theConnect using port number box and specify that port number.
5 Click OK.
6 If your site has multiple standalone ESX servers, use the Virtual MachineServer dialog to enter credentials for each ESX server.
7 If the NetBackup master server is clustered, do the following on the othermaster server nodes to verify the credentials for each backup host.
■ Fail over to the next master server node, to make it the active node.
■ On the active node, click onMedia andDeviceManagement > Credentials> Virtual Machine Servers and double-click on the virtual machine servercredential.
■ In the For backup host field, select a particular backup host (do not selectAny).If the backup host does not appear in the list, you must add the correctcredentials for the backup host. (Click Actions > New > New VirtualMachine Server.)
■ Click OK.NetBackup validates the credentials.
■ Double-click the same virtual machine server credential and validate thecredentials for another backup host (if any).
■ For other master server nodes, repeat step 7.
49Configure NetBackup communication with VMwareAdding NetBackup credentials for VMware

See “Setting global limits on the use of VMware resources” on page 52.
Using the VMware Managed Object Browser to verify the servername
When adding NetBackup credentials for a VMware server, enter the server nameexactly as configured in the VMware server (whether short or fully-qualified). If thename you enter for the credentials does not match the name as defined on theVMware server, the credential validation fails.
You can use the vSphere Managed Object Browser to verify the server's name.
To verify the server's name
1 In a web browser, open the Managed Object Browser (MOB) by entering thefully-qualified domain name of the VMware server and /mob.
For example: https://vcenter1.acmecorp.com/mob
2 Navigate to the ManagedObjectReference:HostSystem and find the namevalue for the server.
The object structure is site-dependent.
3 When you create NetBackup credentials for the server, enter the name valueexactly as it appears in the MOB.
See “Adding NetBackup credentials for VMware” on page 45.
For more information on the MOB, see your vSphere documentation.
Changing the host name of a VMware server inNetBackup
Use the following procedure if you need to change a VMware server's host nameas it is stored in NetBackup.
Example reasons for changing the VMware server name are the following:
■ You used a short host name for the server for its NetBackup credentials, andneed to replace that name with the fully qualified host name.
■ Two hosts currently resolve to the same IP address, and one of them must berenamed and assigned a new IP address.
To change the host name of a VMware host in NetBackup
1 Remove the current credentials that were entered for the VMware host.
Do the following:
50Configure NetBackup communication with VMwareChanging the host name of a VMware server in NetBackup

■ In the NetBackup Administration Console, click on Media and DeviceManagement > Credentials > Virtual Machine Servers.
■ Right-click on the credentials definition for the VMware server and selectDelete (or press the Delete key).
2 In the NetBackup Administration Console, re-enter NetBackup's credentialsfor the VMware server.
See “Adding NetBackup credentials for VMware” on page 45.
Make sure to enter the correct host name for the VMware server.
See “Setting global limits on the use of VMware resources” on page 52.
Setting privileges for posting events to vCenterWith the Post vCenter events option, NetBackup can send backup related eventsto the vCenter server, to view in vSphere Web Client. The NetBackup plug-in forvSphere Web Client or vSphere Client (HTML5) is not required.
Note the following requirements:
■ You must enter the credentials that give NetBackup access to the vCenterserver.See “Adding NetBackup credentials for VMware” on page 45.
■ Make sure that the Post vCenter events option is enabled in the policy.See “VMware - Advanced Attributes dialog” on page 81.
■ You must set the correct vCenter role privileges. Use the vSphere Web Clientto make sure that the following Global privileges are set in vCenter: Managecustom attributes and Set custom attribute.For assistance setting privileges, refer to the appropriate VMware vSphereDocumentation Center.
Authentication token for the NetBackup vSphereplug-ins
With the NetBackup vSphere Web Client plug-in and the vSphere Client (HTML5)plug-in, the VMware administrator can use the vSphere interface to recover virtualmachines. To allow the plug-in to communicate with the NetBackup master server,you must provide an authentication token to the VMware administrator.
To create an authentication token, see the Veritas NetBackup Plug-in for VMwarevSphere Web Client Guide or the Veritas NetBackup Plug-in for VMware vSphereClient (HTML5) Guide:
51Configure NetBackup communication with VMwareSetting privileges for posting events to vCenter

http://www.veritas.com/docs/DOC5332
See “Setting privileges for posting events to vCenter” on page 51.
Setting global limits on the use of VMwareresources
You can use the NetBackup Resource Limit dialog to control the number ofsimultaneous backups that can be performed on a VMware resource type. Thesettings apply to all NetBackup policies for the currently selected master server.
For example, to avoid overloading the ESX server, you can place a limit on thenumber of concurrent backup jobs per ESX server. To control I/O overhead on thedatastore's array, you can limit the number of concurrent backups per datastore.
The following limitations apply to setting global limits on the use of VMwareresources:
■ In NetBackup 8.3, you can set global limits for VMware resources only throughthe NetBackup Administration Console or the NetBackup Configuration API.You cannot set VMware resource limits with the NetBackup web UI. For moreinformation about the Configuration API, see the NetBackup API Reference onSORT.
■ New and changed resource limits may not take effect immediately. It can takea couple of jobs before the resource limit updates are in effect.
■ The Resource Limit screen applies only to policies that use automatic selectionof virtual machines (Query Builder). If virtual machines are selected manuallyon the Browse for Virtual Machines screen, the Resource Limit settings haveno effect.
■ To limit the number of simultaneous jobs per policy, use the Limit jobs perpolicy setting on the policy Attributes tab. The effect of this option dependson how the policy selects virtual machines.
See “Limit jobs per policy on the Attributes tab (for VMware)” on page 72.
To set limits on the use of VMware resources
1 In the NetBackup Administration Console, click Host Properties > MasterServers and double-click the NetBackup master server.
2 In the Properties screen, scroll down in the left pane and clickResource Limit.
52Configure NetBackup communication with VMwareSetting global limits on the use of VMware resources

3 Under Application, click VMware.
4 Click in the Resource Limit column to set the maximum NetBackup usage fora particular resource type. The settings apply to all policies.
For each resource type, the default is 0, (No Limit). A resource limit of 4 forDatastore means that NetBackup policies can perform no more than foursimultaneous backups on any particular datastore.
Table 4-1 describes the limits:
Table 4-1 Resource types and limits
Resource limitResource type
The maximum number of simultaneous backups per vCenterserver.
vCenter
The maximum number of simultaneous snapshot operations(create or delete) per vCenter.
snapshot
The maximum number of simultaneous backups per VMwarecluster.
Cluster
The maximum number of simultaneous backups per ESXserver.
ESXserver
53Configure NetBackup communication with VMwareSetting global limits on the use of VMware resources

Table 4-1 Resource types and limits (continued)
Resource limitResource type
Controls the maximum number of simultaneous backups perDatastore. The Datastore is defined as the location of the VMXfile that is associated with each VM. This resource type is usefulfor VMs that have VMDK files distributed across multipleDatastores. This setting is enforced globally within a NetBackupdomain.
See “NetBackup for VMware terminology” on page 20.
VMXDatastore
The maximum number of simultaneous backups per datastore.Datastore
The maximum number of simultaneous backups per datastorefolder.
DatastoreFolder
The maximum number of simultaneous backups per datastoretype.
DatastoreType
Controls the maximum number of simultaneous backups perDatastore at the NFS host level where the Datastore type isNFS. The VMXDatastoreNFSHost is an NFS server thatsources one or more NFS Datastores. For this resource typethe Datastore is defined as the location of the VMX file that isassociated with each VM. This resource type is useful for VMsthat have VMDK files that are distributed across multipleDatastores. This setting is enforced globally within a NetBackupdomain.
VMXDatastoreNFSHost
The maximum number of simultaneous backups per NFS hostof the datastore.
DatastoreNFSHost
The maximum number of simultaneous backups per datastorecluster.
DatastoreCluster
Other resource-related considerations may be of interest.
See “NetBackup for VMware best practices” on page 282.
See “Configuring a VMware policy from the Policies utility” on page 68.
Validating VMware virtualization server certificatesin NetBackup
NetBackup can now validate VMware virtualization server certificates using theirroot or intermediate certificate authority (CA) certificates.
54Configure NetBackup communication with VMwareValidating VMware virtualization server certificates in NetBackup

The following procedure is applicable for the NetBackup master server and allVMware access hosts.
55Configure NetBackup communication with VMwareValidating VMware virtualization server certificates in NetBackup

To configure secure communication between VMware virtualization serverand VMware access host
1 Configure an external CA trust store on the VMware access host.
2 Add CA certificates of the required VMware servers (VCenter, ESX, or ESXiserver) in the trust store on the access host.
In case of Windows certificate store, you need to add the CA certificate to theWindows Trusted Root Certification Authorities.
Use the following command:
certutil.exe -addstore -f "Root" certificate filename
56Configure NetBackup communication with VMwareValidating VMware virtualization server certificates in NetBackup

3 Use the nbsetconfig command to configure the following NetBackupconfiguration options on the access host:
Specifies the file path to the certificate bundle filethat contains all trusted root CA certificates.
ECA_TRUST_STORE_PATH
This option is specific to file-based certificates. Youshould not configure this option if Windows certificatestore is used.
If you have already configured this external CAoption, append the VMware CA certificates to theexisting external certificate trust store.
If you have not configured the option, add all therequired virtualization server CA certificates to thetrust store and set the option.
See “ECA_TRUST_STORE_PATH for NetBackupservers and clients” on page 58.
Specifies the path to the directory where thecertificate revocation lists (CRL) of the external CAare located.
ECA_CRL_PATH
If the configuration option is already configured,append the virtualization server CRLs to the CRLcache.
If the option is not configured, add all the requiredCRLs to the CRL cache and then set the option.
See “ECA_CRL_PATH for NetBackup servers andclients” on page 59.
Lets you enable the validation of a virtualizationserver's certificate.
VIRTUALIZATION_HOSTS_SECURE_CONNECT_ENABLED
See“VIRTUALIZATION_HOSTS_SECURE_CONNECT_ENABLEDfor servers and clients” on page 63.
Lets you validate the revocation status of thevirtualization server certificate against the CRLs.
VIRTUALIZATION_CRL_CHECK
By default, the option is disabled.
See “VIRTUALIZATION_CRL_CHECK forNetBackup servers and clients” on page 64.
57Configure NetBackup communication with VMwareValidating VMware virtualization server certificates in NetBackup

Lets you specify the duration (in seconds) after whichthe connection between NetBackup and vCloudDirector server ends.
See“VIRTUALIZATION_HOSTS_CONNECT_TIMEOUTfor servers and clients” on page 62.
VIRTUALIZATION_HOSTS_CONNECT_TIMEOUT
Lets you specify the Transport Layer Security (TLS)version to be used for communication betweenNetBackup and VMware servers.
See “VMWARE_TLS_MINIMUM_V1_2 forNetBackup servers and clients” on page 65.
VMWARE_TLS_MINIMUM_V1_2
For more information on external CA support in NetBackup, refer to theNetBackup Security and Encryption Guide.
ECA_TRUST_STORE_PATH for NetBackup servers and clientsThe ECA_TRUST_STORE_PATH option specifies the file path to the certificate bundlefile that contains all trusted root CA certificates.
This certificate file should have one or more certificates in PEM format.
Do not specify the ECA_TRUST_STORE_PATH option if you use the Windows certificatestore.
The trust store supports certificates in the following formats:
■ PKCS #7 or P7B file having certificates of the trusted root certificate authoritiesthat are bundled together. This file may either be PEM or DER encoded.
■ A file containing the PEM encoded certificates of the trusted root certificateauthorities that are concatenated together.
This option is mandatory for file-based certificates.
Table 4-2 ECA_TRUST_STORE_PATH information
DescriptionUsage
On NetBackup servers or clients.
If certificate validation is required for VMware, RHV servers, orNutanix AHV, this option must be set on the NetBackup masterserver and respective access hosts, irrespective of the certificateauthority that NetBackup uses for host communication(NetBackup CA or external CA).
Where to use
58Configure NetBackup communication with VMwareValidating VMware virtualization server certificates in NetBackup

Table 4-2 ECA_TRUST_STORE_PATH information (continued)
DescriptionUsage
Use the nbgetconfig and the nbsetconfig commands toview, add, or change the option.
For information about these commands, see the NetBackupCommands Reference Guide.
Use the following format:
ECA_TRUST_STORE_PATH = Path to the external CAcertificate
For example: c:\rootCA.pem
If you use this option on a Flex Appliance application instance,the path must be /mnt/nbdata/hostcert/.
How to use
No equivalent exists in theNetBackup Administration Consolehost properties.
Equivalent AdministrationConsole property
ECA_CRL_PATH for NetBackup servers and clientsThe ECA_CRL_PATH option specifies the path to the directory where the CertificateRevocation Lists (CRL) of the external certificate authority (CA) are located.
These CRLs are copied to NetBackup CRL cache. Revocation status of the externalcertificate is validated against the CRLs from the CRL cache.
CRLs in the CRL cache are periodically updated with the CRLs in the directory thatis specified for ECA_CRL_PATH based on the ECA_CRL_PATH_SYNC_HOURS option.
See “ECA_CRL_PATH_SYNC_HOURS for NetBackup servers and clients”on page 60.
If the ECA_CRL_CHECK or HADOOP_CRL_CHECK option is not set to DISABLE (or 0) andthe ECA_CRL_PATH option is not specified, NetBackup downloads the CRLs fromthe URLs that are specified in the CRL distribution point (CDP) and uses them toverify revocation status of the peer host's certificate.
See “ECA_CRL_CHECK for NetBackup servers and clients” on page 61.
59Configure NetBackup communication with VMwareValidating VMware virtualization server certificates in NetBackup

Note: For validating the revocation status of a virtualization server certificate, theVIRTUALIZATION_CRL_CHECK option is used.
See “VIRTUALIZATION_CRL_CHECK for NetBackup servers and clients”on page 64.
For validating the revocation status of a Hadoop server certificate, theHADOOP_CRL_CHECK option is used.
Table 4-3 ECA_CRL_PATH information
DescriptionUsage
On NetBackup servers or clients.
If certificate validation is required for VMware, RHV servers,Nutanix AHV, or Hadoop, this option must be set on theNetBackup master server and respective access or backuphosts, irrespective of the certificate authority that NetBackupuses for host communication (NetBackup CA or external CA).
Where to use
Use the nbgetconfig and the nbsetconfig commandsto view, add, or change the option.
For information about these commands, see the NetBackupCommands Reference Guide.
Use the following format to specify a path to the CRL directory:
ECA_CRL_PATH = Path to the CRL directory
If you use this option on a Flex Appliance application instance,the path must be /mnt/nbdata/hostcert/crl.
How to use
No equivalent exists in the NetBackup AdministrationConsole host properties.
Equivalent AdministrationConsole property
ECA_CRL_PATH_SYNC_HOURS for NetBackup servers and clientsThe ECA_CRL_PATH_SYNC_HOURS option specifies the time interval in hours to updatethe Certificate revocation lists (CRL) in the NetBackup CRL cache with the CRLsin the directory specified for the ECA_CRL_PATH configuration option.
See “ECA_CRL_PATH for NetBackup servers and clients” on page 59.
The ECA_CRL_PATH_SYNC_HOURS option is not applicable if CDP is used for CRLs.
By default, CRLs in the cache are updated every one hour.
During host communication, revocation status of the external certificate is validatedagainst the CRLs from the CRL cache.
60Configure NetBackup communication with VMwareValidating VMware virtualization server certificates in NetBackup

Table 4-4 ECA_CRL_PATH_SYNC_HOURS information
DescriptionUsage
On NetBackup servers or clients.Where to use
Use the nbgetconfig and the nbsetconfig commands toview, add, or change the option.
For information about these commands, see the NetBackupCommands Reference Guide.
Use the following format:
ECA_CRL_PATH_SYNC_HOURS = Number of hours
Minimum number of hours that you can specify - 1 hour
Maximum number of hours that you can specify - 720 hour
The default value is one hour.
How to use
No equivalent exists in theNetBackup Administration Consolehost properties.
Equivalent AdministrationConsole property
ECA_CRL_CHECK for NetBackup servers and clientsThe ECA_CRL_CHECK option lets you specify the revocation check level for externalcertificates of the host. It also lets you disable the revocation check for the externalcertificates. Based on the check, revocation status of the certificate is validatedagainst the Certificate Revocation List (CRL) during host communication.
You can choose to use the CRLs from the directory that is specified for theECA_CRL_PATH configuration option in the configuration file (bp.conf on UNIX orWindows registry) or the CRL Distribution Point (CDP).
See “ECA_CRL_PATH for NetBackup servers and clients” on page 59.
Table 4-5 ECA_CRL_CHECK information
DescriptionUsage
On NetBackup servers or clients.Where to use
61Configure NetBackup communication with VMwareValidating VMware virtualization server certificates in NetBackup

Table 4-5 ECA_CRL_CHECK information (continued)
DescriptionUsage
Use the nbgetconfig and the nbsetconfig commands toview, add, or change the option.
For information about these commands, see the NetBackupCommands Reference Guide.
Use the following format:
ECA_CRL_CHECK = CRL check
You can specify one of the following:
■ DISABLE (or 0) - Revocation check is disabled. Revocationstatus of the certificate is not validated against the CRL duringhost communication.
■ LEAF (or 1) - Revocation status of the leaf certificate isvalidated against the CRL. This is the default value.
■ CHAIN (or 2) - Revocation status of all certificates from thecertificate chain are validated against the CRL.
How to use
No equivalent exists in theNetBackup Administration Consolehost properties.
Equivalent AdministrationConsole property
VIRTUALIZATION_HOSTS_CONNECT_TIMEOUT for servers andclients
The VIRTUALIZATION_HOSTS_CONNECT_TIMEOUT option lets you specify the duration(in seconds) after which the connection between NetBackup and vCloud Directorserver ends.
Table 4-6
DescriptionUsage
On NetBackup master server or all access hosts.Where to use
62Configure NetBackup communication with VMwareValidating VMware virtualization server certificates in NetBackup

Table 4-6 (continued)
DescriptionUsage
Use the nbgetconfig and the nbsetconfig commands to view,add, or change the option.
For information about these commands, see the NetBackupCommands Reference Guide.
By default, theVIRTUALIZATION_HOSTS_CONNECT_TIMEOUT optionis set to 60 seconds.
Use the following format to specify the time-out value:
VIRTUALIZATION_HOSTS_CONNECT_TIMEOUT = Time-outvalue in seconds
How to use
No equivalent exists in the NetBackup Administration Consolehost properties
EquivalentAdministrationConsole property
VIRTUALIZATION_HOSTS_SECURE_CONNECT_ENABLED forservers and clients
The VIRTUALIZATION_HOSTS_SECURE_CONNECT_ENABLED option enables thevalidation of virtualization server certificates using its root or intermediate certificateauthority (CA) certificates.
Before you enable the option, review the steps from the 'Validating VMwarevirtualization server certificates in NetBackup ' section in the NetBackup for VMwareAdministrator's Guide.
Table 4-7 VIRTUALIZATION_HOSTS_SECURE_CONNECT_ENABLEDinformation
DescriptionUsage
On NetBackup master server or all access hosts.Where to use
63Configure NetBackup communication with VMwareValidating VMware virtualization server certificates in NetBackup

Table 4-7 VIRTUALIZATION_HOSTS_SECURE_CONNECT_ENABLEDinformation (continued)
DescriptionUsage
Use the nbgetconfig and the nbsetconfig commands to view,add, or change the option.
For information about these commands, see the NetBackupCommands Reference Guide.
By default, theVIRTUALIZATION_HOSTS_SECURE_CONNECT_ENABLED is set toUNDEFINED, but the security certificate validation is enabled for RHVand Nutanix AHV servers and disabled for VMware servers.
Use the following format to enable certificate validation for the RHV,VMware, or Nutanix AHV servers:
VIRTUALIZATION_HOSTS_SECURE_CONNECT_ENABLED = YES
How to use
No equivalent exists in the NetBackup Administration Consolehost properties.
EquivalentAdministrationConsole property
VIRTUALIZATION_CRL_CHECK for NetBackup servers and clientsThe VIRTUALIZATION_CRL_CHECK option lets you specify the revocation check levelfor external certificates of the virtualization server. Based on the check, revocationstatus of the virtualization server certificate is validated against the certificaterevocation list (CRL) during host communication.
By default, the VIRTUALIZATION_CRL_CHECK option is disabled. If you want to validatethe revocation status of the virtualization server certificate against certificaterevocation list (CRL), set the option to a different value.
You can choose to use the CRLs from the directory that is specified for theECA_CRL_PATH configuration option or the CRL distribution point (CDP).
See “ECA_CRL_PATH for NetBackup servers and clients” on page 59.
Table 4-8 VIRTUALIZATION_CRL_CHECK information
DescriptionUsage
On NetBackup master server or all access hosts.Where to use
64Configure NetBackup communication with VMwareValidating VMware virtualization server certificates in NetBackup

Table 4-8 VIRTUALIZATION_CRL_CHECK information (continued)
DescriptionUsage
Use the nbgetconfig and the nbsetconfig commands toview, add, or change the option.
For information about these commands, see the NetBackupCommands Reference Guide.
Use the following format:
VIRTUALIZATION_CRL_CHECK = CRL check
You can specify one of the following:
■ DISABLE (or 0) - Revocation check is disabled. Revocationstatus of the certificate is not validated against the CRL duringhost communication. This is the default value.
■ LEAF (or 1) - Revocation status of the leaf certificate isvalidated against the CRL.
■ CHAIN (or 2) - Revocation status of all certificates from thecertificate chain are validated against the CRL.
How to use
No equivalent exists in theNetBackup Administration Consolehost properties.
Equivalent AdministrationConsole property
VMWARE_TLS_MINIMUM_V1_2 for NetBackup servers and clientsThe VMWARE_TLS_MINIMUM_V1_2 option lets you specify the Transport Layer Security(TLS) version to be used for communication between NetBackup and VMwareservers.
Table 4-9
DescriptionUsage
On NetBackup master server or all access hosts.Where to use
65Configure NetBackup communication with VMwareValidating VMware virtualization server certificates in NetBackup

Table 4-9 (continued)
DescriptionUsage
Use the nbgetconfig and the nbsetconfig commands to view, add,or change the option.
For information about these commands, see the NetBackup CommandsReference Guide.
Use the following format:
VMWARE_TLS_MINIMUM_V1_2 = YES | NO
By default, the VMWARE_TLS_MINIMUM_V1_2 option is set to YES.
If the option is set to YES, TLS 1.2 version and the following cipher suitesare used for communication with VMware servers:
TLS_ECDHE_ECDSA_WITH_AES_256_GCM_SHA384,TLS_ECDHE_RSA_WITH_AES_256_GCM_SHA384,TLS_DHE_RSA_WITH_AES_256_GCM_SHA384,TLS_DHE_DSS_WITH_AES_256_GCM_SHA384,TLS_ECDHE_ECDSA_WITH_AES_128_GCM_SHA256,TLS_ECDHE_RSA_WITH_AES_128_GCM_SHA256,TLS_DHE_RSA_WITH_AES_128_GCM_SHA256,TLS_DHE_DSS_WITH_AES_128_GCM_SHA256,TLS_RSA_WITH_AES_256_GCM_SHA384,TLS_RSA_WITH_AES_128_GCM_SHA256
If the option is set to NO, the TLS 1.2 or earlier version with the defaultcipher suite is used for communication between NetBackup and VMwareserver. The cipher suite is used based on the TLS and cipher suiteconfiguration that are set on the respective VMware server.
How to use
No equivalent exists in the NetBackup Administration Console hostproperties.
EquivalentAdministrationConsole property
66Configure NetBackup communication with VMwareValidating VMware virtualization server certificates in NetBackup

Configure NetBackuppolicies for VMware
This chapter includes the following topics:
■ Configuring a VMware policy from the Policy Wizard
■ Configuring a VMware policy from the Policies utility
■ Limit jobs per policy on the Attributes tab (for VMware)
■ Backup options on the VMware tabVMware backup options
■ Exclude Disks tab
■ Browse for VMware virtual machines
■ Limiting the VMware servers that NetBackup searches when browsing for virtualmachines
■ Virtual machine host names and display names should be unique if VMs areselected manually in the policy
■ Primary VM identifier option and manual selection of virtual machines
■ About incremental backups of virtual machines
■ Configuring incremental backups
■ Storage Foundation Volume Manager volumes in the virtual machine
5Chapter

Configuring a VMware policy from the PolicyWizard
You can create a NetBackup for VMware policy by means of the Policy ConfigurationWizard.
Use the following procedure.
To create a backup policy by means of the Policy Configuration Wizard
1 In the NetBackup Administration Console (on the NetBackup master server),click on the name of the master server.
2 Click Create a Policy.
3 Under Create a backup policy for, click VMware and Hyper-V, and clickNext.
4 Enter a name for the policy.
5 Click VMware as the virtual machine type.
6 Click Next, and follow the remaining panels in the wizard.
The wizard creates the policy according to your selections.
See “Configuring a VMware policy from the Policies utility” on page 68.
Configuring a VMware policy from the Policiesutility
You can create a NetBackup policy (full or incremental) to back up the virtualmachine in either of two ways:
■ Use the Policies utility of the NetBackup Administration Console (described inthis topic).
■ Use the Policy Configuration Wizard.See “Configuring a VMware policy from the Policy Wizard ” on page 68.
Note: To configure a policy for Replication Director, see the NetBackup ReplicationDirector Solutions Guide.
68Configure NetBackup policies for VMwareConfiguring a VMware policy from the Policy Wizard

To configure a policy to back up the virtual machine
1 In the NetBackup Administration Console, click Policies and select Actions> New > Policy.
2 Enter a name for the policy.
3 For Policy type, select VMware.
VMware backup options are available on the VMware tab (described later inthis procedure).
4 Select a policy storage unit or storage unit group.
Storage unit groups are described in the NetBackup Administrator’s Guide,Volume I.
5 In most cases, you can leave the Disable client-side deduplication optionat the default (unchecked).
The Disable client-side deduplication option is described in the NetBackupAdministrator's Guide, Volume I.
6 To enable the Accelerator, click Use Accelerator.
When you clickUse Accelerator, theEnable block-level incremental backupoption on the VMware tab is selected and grayed out.
See “About the NetBackup Accelerator for virtual machines” on page 159.
69Configure NetBackup policies for VMwareConfiguring a VMware policy from the Policies utility

7 Click the VMware tab.
Use this dialog to set VMware-related options.
See “Backup options on the VMware tabVMware backup options” on page 73.
70Configure NetBackup policies for VMwareConfiguring a VMware policy from the Policies utility

8 Click the Exclude Disks tab.
Use this tab to exclude disks from the backups.
See “Exclude Disks tab” on page 86.
9 To define a schedule, click the Schedules tab and click New.
For assistance with the Accelerator forced rescan option:
See “Accelerator forced rescan for virtual machines (schedule attribute)”on page 163.
On the Schedules Attributes tab, you can select Full backup, DifferentialIncremental Backup, or Cumulative Incremental Backup.
Note that incremental backups require one of the following selections on thepolicy VMware tab:
■ Enable file recovery from VM backup, or
■ Enable block-level incremental backup.Enable block-level incremental backup requires an ESX server 4.0 anda virtual machine at vmx-07 or later.
71Configure NetBackup policies for VMwareConfiguring a VMware policy from the Policies utility

The following topic contains additional information.See “About incremental backups of virtual machines” on page 99.
10 Click the Clients tab to select the virtual machines to back up.
The options for selecting virtual machines are as follows:
The Browse for VMware Virtual Machines screen appears. You can type the host name inthe Enter the VMware hostname field, or click Browse and select virtual machine.
Note: The Backup Selections tab is set to ALL_LOCAL_DRIVES. Individual drives cannotbe specified.
See “Browse for VMware virtual machines” on page 91.
Select manually, andclick New.
With this option, NetBackup can automatically select virtual machines for backup based onthe filtering criteria that you enter. The following topics explain how to specify the criteria:
See “About automatic virtual machine selection for NetBackup for VMware” on page 102.
See “Configuring automatic virtual machine selection” on page 112.
Note: TheBackup Selections tab is filled in with the filtering rules from the query. NetBackupuses the ALL_LOCAL_DRIVES directive to back up the virtual machines.
Select automaticallythrough VMwareIntelligent Policyquery
Enables backup of the virtual machines that reside in a vCloud environment. Requires theautomatic selection of virtual machines.
With this option, the policy selects for backup only the virtual machines that vCloud manages:it skips the virtual machines that are not in vCloud.
See “About NetBackup for vCloud Director” on page 262.
Enable vCloudDirector integration
This option appears when you click Select automatically through VMware IntelligentPolicy query.
This host discovers virtual machines and automatically selects them for backup based onthe query rules.
See “About automatic virtual machine selection for NetBackup for VMware” on page 102.
NetBackup host toperform automaticvirtual machineselection
11 When you click OK, a validation process checks the policy and reports anyerrors. If you click Cancel, no validation is performed.
Limit jobs per policy on the Attributes tab (forVMware)
The Limit jobs per policy option operates as follows, depending on how the policyselects virtual machines.
72Configure NetBackup policies for VMwareLimit jobs per policy on the Attributes tab (for VMware)

For the policies that select virtual machines automatically(Query Builder)The Limit jobs per policy option controls the number of parent (discovery) jobsthat run simultaneously for the policy. This option does not limit the number ofsnapshot jobs and backup (bpbkar) jobs that the parent job launches. For example,if this option is set to 1 and you begin a backup of a policy that discovers 100 virtualmachines: all the snapshot jobs and backup jobs for each of the 100 virtual machinesare allowed to execute simultaneously. Only the initial discovery job counts againstLimit jobs per policy. If you begin a second backup of the policy, its discovery jobcannot start until all the child jobs from the first backup are complete.
For the policies that use manual selection of virtualmachinesLimit jobs per policy controls the number of virtual machines that the policy canback up simultaneously. Because no discovery job is needed, each virtual machinebackup begins with a snapshot job. Each snapshot counts against the Limit jobsper policy setting. If this option is set to 1: the backup of the next virtual machinethat is specified in the policy cannot begin until the first snapshot job and its backupare complete.
See “Setting global limits on the use of VMware resources” on page 52.
Backupoptionson theVMware tabVMware backupoptions
In the Administration Console, the VMware tab appears when you select VMwareas the policy type.
The following topics describe the VMware backup options.
See “VMware backup host” on page 74.
See “Optimizations options (VMware)” on page 74.
See “Primary VM identifier options (VMware)” on page 76.
See “Existing snapshot handling options (VMware)” on page 77.
See “Transport modes options (VMware)” on page 78.
See “Application protection options (VMware)” on page 79.
See “VMware - Advanced Attributes dialog” on page 81.
For more information, see the NetBackup for VMware Guide:
HTTP://www.veritas.com/docs/DOC5332
73Configure NetBackup policies for VMwareBackup options on the VMware tabVMware backup options

VMware backup hostThe VMware backup host is a NetBackup client that performs backups on behalfof the virtual machines.
Table 5-1 VMware backup host selection
DescriptionOption
This option allows a media server that is selected in the policy to operate as the backuphost. (The storage unit determines the selection of the media server.) To operate as thebackup host, the media server must contain NetBackup client software.
Note: The storage unit that is specified in the policy must be unique to the media serversthat NetBackup supports as VMware backup hosts. If the storage unit is available on amedia server that is not a supported VMware backup host, the snapshot may not succeed(status 20). For a list of supported platforms for the VMware backup host, see the NetBackupSoftware Compatibility List (SCL) available from the following location:
NetBackup Master Compatibility List
Note: When the Backup Media Server option is selected, NetBackup cannot determinea host to perform policy validation. To validate the policy, temporarily select one of thepossible media servers as the backup host (do not select Backup Media Server). Whenthe policy validates successfully, reset the backup host to Backup Media Server.
See “Media servers as backup or discovery hosts” on page 18.
Backup Media Server
Select a backup host to perform the backup.
The pull-down list contains any media servers that are supported as backup host. It alsocontains any NetBackup clients that have been added in the Administration Console underHost Properties, VMware Access Hosts.
For a list of supported platforms for the backup host, see the NetBackup SoftwareCompatibility List available from the following location:
NetBackup Master Compatibility List
See “Adding the VMware backup host to NetBackup” on page 44.
backup_host_name
See “Backup options on the VMware tabVMware backup options” on page 73.
Optimizations options (VMware)The following options set the type and scope of the VMware virtual machine backup.
74Configure NetBackup policies for VMwareBackup options on the VMware tabVMware backup options

Table 5-2 Optimizations
DescriptionOption
This option allows restore of individual files from the backup. With or without this option,you can restore the entire virtual machine.
You can also use this option for incremental backups: in the policy schedule, selectdifferential incremental backup or cumulative incremental backup.
To perform a VMware backup to a deduplication storage unit, select this option. This optionprovides the best deduplication rates.
To back up a virtual machine that contains Veritas Storage Foundation Volume Managervolumes, disable this option. Also make sure that the Exclude deleted blocks option isdisabled.
Note: For a Linux virtual machine, the name of an LVM volume can include any of thefollowing special characters: . (period), _ (underscore), - (hyphen). No other specialcharacters are supported. If other special characters are in the volume name, the Enablefile recovery from VM backup option does not work. As a result, you cannot restoreindividual files from that volume.
Note: During an incremental backup, any files that had been moved or renamed are notbacked up. Those files are not available when you browse to restore individual files fromthe incremental backup. However, when you restore the entire VM from a block-levelincremental backup, note: the file metadata is updated and the moved or renamed files inthe restored VM reflect the updated metadata.
Enable file recoveryfrom VM backup
For block-level backups of the virtual machine. This option reduces the size of the backupimage.
For the Exchange, SQL, and SharePoint Agents, this option is selected and grayed out ifyou enable Use Accelerator.
On theAttributes tab,Perform block level incremental backups is automatically selectedand grayed out.
See “Block-level backup (BLIB): full vs incremental” on page 148.
Enable block-levelincremental backup
Reduces the size of the backup image by excluding any unused or deleted blocks withinthe file system on the virtual machine. This option supports the following file systems:Windows NTFS, and Linux ext2, ext3, and ext4.
This option uses proprietary mapping technology to identify vacant sectors (allocated butempty) within the file system.
See “About reducing the size of VMware backups” on page 147.
To back up a virtual machine that contains Veritas Storage Foundation Volume Managervolumes, disable this option. Also make sure that the Enable file recovery from VMbackup option is disabled.
Exclude deleted blocks
75Configure NetBackup policies for VMwareBackup options on the VMware tabVMware backup options

Table 5-2 Optimizations (continued)
DescriptionOption
Reduces the size of the backup image by excluding the data in the guest OS system pagingfile (Windows) or the swap file (Linux).
Note: This option does not exclude the swapping and paging files from the backup: it onlyexcludes the data in those files. If the files are restored, they are restored as empty files.
Note: For a Linux virtual machine, this option disables the swap file when you restore thevirtual machine. You must reconfigure the swap file after the virtual machine is restored.To allow the virtual machine to be restored with its swap file enabled, do not select Excludeswap and paging files.
Exclude swap andpaging files
See “Backup options on the VMware tabVMware backup options” on page 73.
Primary VM identifier options (VMware)This setting specifies the type of name by which NetBackup recognizes virtualmachines when it selects them for backup.
The name you use for the Primary VM identifier may have restrictions.
See “NetBackup character restrictions for the Primary VM identifier” on page 37.
Table 5-3 Primary VM identifier
DescriptionOption
The network host name for the virtual machine. (This option is the default.) NetBackupobtains the host name by means of a reverse lookup on the virtual machine's IP address.
Note: For NetBackup to look up the IP address, the virtual machine must already beturned on.
If no host name can be found, the IPv4 address is used as the host name. In case ofan IPv6 address, the field remains blank.
See “Preventing browsing delays caused by DNS problems” on page 296.
VM hostname
76Configure NetBackup policies for VMwareBackup options on the VMware tabVMware backup options

Table 5-3 Primary VM identifier (continued)
DescriptionOption
The name of the virtual machine as displayed in the VMware interface. A display nameis assigned to the virtual machine when the virtual machine is created.
When virtual machines are included in a NetBackup policy, restrictions apply to thecharacters that are allowed in the virtual machine display name.
See “NetBackup character restrictions for the Primary VM identifier” on page 37.
Note: The restrictions also apply to other vSphere objects, such as floppy imagename, parallel port or serial port file name, and CD-ROM ISO name.
Each display name must be unique in your VMware environment.
See “NetBackup for VMware: notes and restrictions” on page 27.
See “Restoring individual filesRestoring individual VMware virtual machine files”on page 224.
VM display name
The ID assigned to the virtual machine when the virtual machine is created. This IDmay or may not be unique, depending on whether the virtual machine has beenduplicated. This option is included for compatibility with the policies that use the olderVM UUID identifier.
VM BIOS UUID
The VMware DNS Name of the virtual machine. In vSphere Client, this name appearson the virtual machine's Summary tab.
Note: This name may or may not be associated with the virtual machine’s IP address.VMware Tools obtains this name from the host name that is configured in the virtualmachine. For further information on this name, refer to the documentation for the guestoperating system.
VM DNS Name
The globally unique ID assigned to the virtual machine when the virtual machine iscreated. This ID uniquely identifies the virtual machine within a vCenter server. Evenif the virtual machine has been duplicated (such as within a vCloud), only the originalvirtual machine retains this instance ID. (The virtual machine duplicates are assigneddifferent instance UUIDs.)
This option is recommended instead of the VM BIOS UUID option.
VM instance UUID
See “Backup options on the VMware tabVMware backup options” on page 73.
Existing snapshot handling options (VMware)This option specifies the action that NetBackup takes when a snapshot is discoveredbefore NetBackup creates a new snapshot for the virtual machine backup. After itcreates a snapshot, NetBackup usually deletes the snapshot when the backup
77Configure NetBackup policies for VMwareBackup options on the VMware tabVMware backup options

completes. If snapshots are not automatically deleted (whether created byNetBackup or not), the performance of the virtual machine may eventually decline.
Undeleted snapshots can cause restore failures due to lack of disk space. If thevirtual machine was configured on multiple datastores and a leftover snapshotexisted on the virtual machine when it was backed up, note: NetBackup tries torestore all .vmdk files to the snapshot datastore. As a result, the datastore may nothave enough space for the .vmdk files, and the restore fails. (For a successfulrestore, you can restore the virtual machine to an alternate location. Use the StorageDestination dialog in the Virtual Machine Recovery dialogs to select a datastorefor the .vmdk files.)
Table 5-4 Existing snapshot handling: Options
DescriptionOption
NetBackup ignores any existing virtual machine snapshots (including snapshotspreviously created by NetBackup) and proceeds with snapshot creation and thebackup.
Continue backup
If any snapshot exists on the virtual machine, NetBackup aborts the job for thatvirtual machine only.
Abort if any snapshot(s) exist
If a virtual machine snapshot exists that a NetBackup backup previously created:NetBackup removes the old snapshot, creates an updated snapshot, and proceedswith the virtual machine backup.
RemoveNetBackup snapshot(s)and continue backup
If a virtual machine snapshot exists that a NetBackup backup previously created,NetBackup aborts the job for that virtual machine only.
(This option is the default.)
Abort if NetBackup snapshot(s)exist
See “Backup options on the VMware tabVMware backup options” on page 73.
Transport modes options (VMware)The transport modes determine how the snapshot data travels from the VMwaredatastore to the VMware backup host. The appropriate mode depends in part onthe type of network that connects the VMware datastore to the VMware backuphost.
By default, all modes are selected. NetBackup tries each transport mode in order,from top to bottom. It uses the first mode that succeeds for all disks in the virtualmachine.
78Configure NetBackup policies for VMwareBackup options on the VMware tabVMware backup options

Table 5-5 Transport Modes
DescriptionMode
For unencrypted transfer over Fibre Channel (SAN) or iSCSI.
Note: This mode is not supported for the virtual machines that use VMware VirtualVolumes (VVols).
See “Notes on VMware Virtual Volumes (VVols)” on page 33.
san
Lets you run the VMware backup host in a virtual machine.
See “Notes on the hotadd transport mode” on page 40.
Note: For the virtual machines that use VVols, the virtual machine and the backup host(hotadd) virtual machine must reside on same VVol datastore.
For instructions on this transport mode and on installing the backup host in a VMwarevirtual machine, refer to your VMware documentation.
hotadd
For unencrypted transfer over a local network that uses the Network Block Device (NBD)driver protocol. This mode of transfer is usually slower than Fibre Channel.
nbd
For encrypted transfer (SSL) over a local network that uses the Network Block Device(NBD) driver protocol. This mode of transfer is usually slower than Fibre Channel.
nbdssl
Use these options to change the order in which NetBackup tries each selected mode.Highlight a mode and click Move Up or Move Down.
For example: assume that all four transport modes are selected, and the order is SAN,hotadd, nbd, and nbdssl. If one of the virtual disks cannot be accessed using SAN, theSAN transport mode is not used for any of the virtual machine’s disks. NetBackup thentries to use the hotadd mode for all the disks. NetBackup continues to try each mode untilit finds one that succeeds for all the disks.
Move Up, Move Down
See “Backup options on the VMware tabVMware backup options” on page 73.
Application protection options (VMware)To enable file-level recovery of database data that resides in the virtual machine,select from the following options. These options apply to full backups of the virtualmachine; they do not apply to incremental backups.
79Configure NetBackup policies for VMwareBackup options on the VMware tabVMware backup options

Table 5-6 Application Protection options
DescriptionDatabase option
This option enables recovery of the Exchange databases or mailbox messages from thevirtual machine backups. If this option is disabled, you can recover the entire virtual machinefrom the backup, but you cannot recover the databases or mailbox messages individually.
To use the Enable Exchange Recovery option, you must enable the Enable file recoveryfrom VM backup option. If you choose to exclude disks on the Exclude disks tab, ensurethat the disks do not contain Exchange Server data.
For more information, refer to the NetBackup for Exchange Server Administrator's Guide.
Enable ExchangeRecovery
For Exchange, this option truncates the transaction logs when the snapshot of the virtualmachine is complete. Truncating the logs frees up disk space in the virtual machine.
Note: To use this option, install the Veritas VSS Provider on the virtual machine. Forinstructions on how to install this provider, refer to the NetBackup for Exchange ServerAdministrator's Guide.
If you do not select Truncate logs, the logs are not truncated.
Truncate logs
This option enables recovery of individual files from SQL Server data in the virtual machinebackup. If this option is disabled, you can recover the entire virtual machine from the backup,but you cannot recover the SQL Server files individually.
To use the Enable SQL Server Recovery option, you must enable the Enable file recoveryfrom VM backup option. If you choose to exclude disks on the Exclude disks tab, ensurethat the disks do not contain SQL Server data.
For more information, refer to the NetBackup for SQL Server Administrator's Guide.
Enable SQL ServerRecovery
For SQL Server, this option truncates the transaction logs when the backup occurs. Truncatingthe logs frees up disk space in the virtual machine.
Note: To use this option, install the Veritas VSS Provider on the virtual machine. Forinstructions on how to install this provider, refer to the NetBackup for SQL ServerAdministrator's Guide.
If you do not select Truncate logs, the logs are not truncated.
Truncate logs
This option enables recovery of SharePoint objects from the virtual machine backup. If thisoption is disabled, you can recover the entire virtual machine from the backup, but you cannotrecover the SharePoint objects individually.
To use the Enable SharePoint Recovery option, you must enable the Enable file recoveryfrom VM backup option. If you choose to exclude disks on the Exclude disks tab, ensurethat the disks do not contain SharePoint Server data.
For more information, refer to the NetBackup for SharePoint Server Administrator's Guide.
Enable SharePointRecovery
See “Backup options on the VMware tabVMware backup options” on page 73.
80Configure NetBackup policies for VMwareBackup options on the VMware tabVMware backup options

VMware - Advanced Attributes dialogThis dialog appears when you click Advanced... on the VMware policy tab.
You can use the VMware Advanced Attributes dialog to set the following additionalparameters for VMware backup. In most situations, the best settings are the defaults.
Table 5-7 VMware Advanced Attributes
DescriptionConfigurationparameter
This option is enabled by default. In the great majority of cases, you should accept the default.
I/O on the virtual machine is quiesced before NetBackup creates the snapshot. Without quiescingfile activity, data consistency in the snapshot cannot be guaranteed. If not consistent, thebacked-up data may be of little or no value.
If this option is disabled, the snapshot is created without quiescing I/O on the virtual machine. Inthis case, you must perform your own analysis for data consistency in the backup data.
Caution: Veritas does not recommend that you disable quiesce. In most cases, this option shouldbe enabled.
Note: To use this option, VMware Tools must be installed on the virtual machine.
Note: To use this option with Linux virtual machines, snapshot quiesce must be enabled in theLinux guest OS.
Virtual machinequiesce
If this option is enabled:
NetBackup does not back up a replicated (passive) VM in a vCenter Site Recovery Manager(SRM) environment if that VM has no vmdk files. NetBackup skips that VM and backs up thecorresponding active VM, which has vmdk files.
Note that virtual machines without vmdk files can occur in a vCenter SRM environment. If areplicated virtual machine has never been active, it is in passive mode and may have no vmdkfile(s).
Note: If this option is enabled and NetBackup does not have access to the vCenter where theactive virtual machine runs: the Query Builder policies run without error; no attempt is made toback up the virtual machine. For the policies that use manual selection of virtual machines,backups fail with status 156, because the virtual machine cannot be located.
If this option is disabled:
NetBackup attempts to back up a virtual machine regardless of whether it has vmdk files. If thevirtual machine has no vmdk files, the backup fails with status 156.
Ignore disklessVMs
81Configure NetBackup policies for VMwareBackup options on the VMware tabVMware backup options

Table 5-7 VMware Advanced Attributes (continued)
DescriptionConfigurationparameter
Enables NetBackup to send backup related events to the vCenter server. The events appear invSphere Client under Home > Inventory > Hosts and Clusters, Tasks & Events tab.
See “Viewing NetBackup activity in vSphere Web Client or vSphere Client (HTML5)” on page 155.
The following options are available:
■ All Events: NetBackup posts an event to the vCenter server on each backup success orfailure. This setting is the default.
■ No Events: Disables the Post vCenter events option. NetBackup does not post any eventsto the vCenter server.
■ Error Events: NetBackup posts an event to the vCenter server only for backup failures.
Further information on Post vCenter events is available:
See “About the Post vCenter events option (VMware Advanced Attributes)” on page 85.
Post vCenterevents
This option is disabled by default. If it is enabled, the query rules can select virtual machines fromdifferent vCloud Director organizations and back them up to the same storage unit.
If you do not want backups of virtual machines from different organizations to be stored on thesame drive, leave this option disabled.
Multipleorganizations perpolicy
If this option is enabled (the default): NetBackup skips any virtual machine that was restored withInstant Recovery for VMware if the virtual machine is running from a NetBackup NFS datastore.
When the virtual machine data files have been migrated to the production datastore, the virtualmachine can be backed up.
NetBackup identifies Instant Recovery virtual machines according to the following criteria:
■ The virtual machine has a snapshot that is named NBU_IR_SNAPSHOT,■ And the virtual machine is running from a datastore and the name of the datastore begins
with NBU_IR_.
If the virtual machine meets all these criteria, it is not backed up if this option is enabled.
If this option is disabled: NetBackup backs up the virtual machine even if it is running from theNetBackup NFS datastore.
Ignore InstantRecovery VMs
Sets the number of times the snapshot is retried. The default is 10. The range is 0 to 100.
This option and the snapshot time-out and snapshot creation interval provide flexibility in thecreation of snapshots. For most environments, the default values are usually best. In specialcircumstances, it may be helpful to adjust these settings. Example considerations are the sizeof the virtual machine and the processing load on the VMware server.
Snapshot retrycount
82Configure NetBackup policies for VMwareBackup options on the VMware tabVMware backup options

Table 5-7 VMware Advanced Attributes (continued)
DescriptionConfigurationparameter
Sets a time-out period (in minutes) for completion of the snapshot. The default is 0, which meansno time-out.
If snapshots do not complete, set this option to a specific period to force a time-out. Considerusing the snapshot creation interval to retry the snapshot at a later time.
Snapshot timeout(minutes)
Determines the wait time (in seconds) before the snapshot is retried. The default is 10 seconds.The range is 0 to 3600.
Snapshotcreation interval(seconds)
Specifies a colon-delimited list of virtual machine servers that NetBackup communicates with forthis policy. In large virtual environments, you can use this list to improve backup performance:NetBackup communicates only with the servers that are in this list. For example, exclude fromthe list any vCenter or vCloud servers that do not contain virtual machines to be backed up bythis policy. Also, if a duplicate of the virtual machine exists on a different server: the duplicate isnot backed up if it resides on a server that is not included in this list.
Important: IPv6 addresses are not supported in the VMware server list field. Use fully qualifieddomain names or host names.
Note: Each host name must match exactly the name as configured in the NetBackup credentials.
Note: Separate the names with a colon (:) not a comma (,).
This option does not affect either of the following: the list of all possible values in the Query Builderfor automatic selection of virtual machines, or browsing of virtual machines for manual selection.
If the list is blank (the default), NetBackup communicates with any servers in the virtualenvironment.
VMware serverlist
83Configure NetBackup policies for VMwareBackup options on the VMware tabVMware backup options

Table 5-7 VMware Advanced Attributes (continued)
DescriptionConfigurationparameter
Tags were introduced with VMware vCenter Version 5.1. The APIs to interface with the taggingservice were not released until VMware vCenter Version 6.0. NetBackup for VMware supportsthe tags that are assigned to virtual machine objects starting with VMware vCenter Version 6.0.
If you have a mixed vCenter environment, such as 5.1, 5.5, and 6.0: you can use this configurationparameter to modify how NetBackup treats tags for vCenter Version 5.1/5.5. This configurationparameter also applies to all versions of ESXi hosts whose credentials were added to the VirtualMachine Servers list.
This option is disabled by default. If you use the tag field in the VMware Intelligent Policy queryand your policy searches for virtual machines across a mixed vCenter environment, note:NetBackup reports the virtual machines that are discovered from vCenter Server 5.1/5.5 andESXi hosts as failed if it needs to evaluate the tag portion of the query to make an include orexclude decision.
When you enable this option NetBackup treats tags as unset. If you use the tag field in theVMware Intelligent Policy query and your policy searches for virtual machines across a mixedvCenter environment, note: NetBackup evaluates the tag part of the query as if no tags were seton the virtual machines that are discovered from vCenter Server 5.1, 5.5, and ESXi.
Treat Tags asunset if unable toevaluate
Note: This option applies to VMware Intelligent Policies (VIP) only.
When this option is set to Yes: For a VIP policy's discovery job, NetBackup ignores a failed logonto a vCenter and attempts to log on and discover VMs on other vCenters. On any vCenter thatNetBackup can log on to, the VMs that match the VIP policy's query are backed up.
When this option is set to No (the default): If the attempt to log on to a vCenter fails, the discoveryjob fails and no VMs are backed up for any vCenters.
More information is available on the types of NetBackup jobs for VMware:
See “Using the Activity Monitor to monitor virtual machine backups” on page 153.
Continue VIPdiscovery if onevSphere loginfails
This option is disabled by default. If it is enabled and a quiesced snapshot cannot be created,the snapshot is created without quiescing I/O on the virtual machine. The resulting snapshot isreferred to as crash consistent. In this case, you must perform your own analysis for dataconsistency in the backed-up data.
Warning: In most cases, Veritas does not recommend enabling this option. NetBackup cannotguarantee that all required data has been flushed to disk when the snapshot occurs. The datathat is captured in the snapshot may be incomplete.
If this option is disabled, the backup fails if a quiesced snapshot cannot be created.
Performsnapshotwithout quiescingif quiescedsnapshots fail
84Configure NetBackup policies for VMwareBackup options on the VMware tabVMware backup options

Table 5-7 VMware Advanced Attributes (continued)
DescriptionConfigurationparameter
Used to specify the VMDK compression method. When this option is set to none (default)compression is not used during the backup job.
NetBackup uses the preferred VMDK compression method when it opens VMDKs. Backup jobsautomatically set the compression method to none if NetBackup is unable to read the VMDKwith the preferred method.
VMDKCompression
See “About the exclude disk options for virtual disk selection” on page 88.
See “Backup options on the VMware tabVMware backup options” on page 73.
See “Configuring a VMware policy from the Policies utility” on page 68.
About the Post vCenter events option (VMware Advanced Attributes)ThePost vCenter events option is available on theVMware - AdvancedAttributesdialog of a NetBackup policy. (On the VMware tab of the policy, click Advanced....)
Post vCenter events enables NetBackup to send backup related events to thevCenter server.
Note: To post events to vCenter, NetBackup must perform the backup through avCenter server. If NetBackup accesses the ESX server directly, the backupinformation cannot be displayed in vSphere Client.
Note: You must set the required permissions in vCenter:
See “Setting privileges for posting events to vCenter” on page 51.
Note: If a vSphere administrator created an attribute named NB_LAST_BACKUPof type Global, NetBackup cannot post backup events to that attribute. You mustremove the NB_LAST_BACKUP attribute from vSphere. Make sure that PostvCenter events is set to All Events or Error Events. At the next backup, NetBackupcreates a NB_LAST_BACKUP attribute of type Virtual Machine and posts eventsto that attribute.
Post vCenter events also records the date and time of the last successful backupof the virtual machine:
85Configure NetBackup policies for VMwareBackup options on the VMware tabVMware backup options

■ The date and time appear in vSphere Client on the Summary tab as a customattribute under Annotations. The attribute is labeled NB_LAST_BACKUP.
■ The date and time appear in vSphere Web Client on the Virtual Machinesdisplay.
The events can also be viewed with the NetBackup vSphere Web Client plug-inand the NetBackup vSphere Client (HTML5) plug-in:
See “Viewing NetBackup activity in vSphere Web Client or vSphere Client (HTML5)”on page 155.
For instructions on installing and using the NetBackup plug-in, see the followingguides:
NetBackup Plug-in for VMware vSphere Web Client Guide
NetBackup Plug-in for VMware vSphere Client (HTML5) Guide
http://www.veritas.com/docs/DOC5332
Exclude Disks tabIn the Change Policy dialog box, the Exclude Disks tab appears for policies ofthe VMware policy type. These options determine the kind of disks on the virtualmachine that are excluded from the backup. These options can reduce the size ofthe backup, but should be used with care. These options are intended only for thevirtual machines that have multiple virtual disks.
The following options appear on the Exclude Disks tab.
Table 5-8 Options on the Exclude Disks tab of the policy
DescriptionOption
Backs up all virtual disks that are configured for the virtual machine.No disksexcluded
The virtual machine's boot disk (for example the C drive) is not includedin the backup. Any other disks (such as D) are backed up. Considerthis option if you have another means of recreating the boot disk, suchas a virtual machine template for boot drives.
See “About the exclude disk options for virtual disk selection”on page 88.
Note: A virtual machine that is restored from this backup cannot start.Data files are available in the restored data disks.
Exclude boot disk
86Configure NetBackup policies for VMwareExclude Disks tab

Table 5-8 Options on the Exclude Disks tab of the policy (continued)
DescriptionOption
The virtual machine's data disks (for example the D drive) are notincluded in the backup for this policy. Only the boot disk is backed up.Consider this option only if you have a different policy that backs upthe data disks.
See “About the exclude disk options for virtual disk selection”on page 88.
Note: When the virtual machine is restored from the backup, the virtualmachine data for the data disk may be missing or incomplete.
Exclude all datadisks
Exclude disks by a VMware Custom Attribute that is applied to a virtualmachine. The VMware Custom Attribute identifies the disks that youwant to exclude from backups. If you select this option, also enter thename of the Custom Attribute. NetBackup then excludes the disks thatare defined in that attribute. The attribute must have comma separatedvalues of device controllers for the disks to be excluded. For example:
scsi0-0,ide0-0,sata0-0,nvme0-0
The default value is NB_DISK_EXCLUDE_LIST. You can use this valueas the custom attribute or choose your own value.
Note: Custom Attribute based disk exclusion requires that you enterin NetBackup the credentials for the vCenter server or servers that hostthe VMs. ESXi server credentials are not sufficient.
See “Adding NetBackup credentials for VMware” on page 45.
Your VMware administrator must use a VMware interface to apply thecustom attribute to the disks that you want to exclude from the virtualserver. The Virtual Disk Exclusion wizard of the NetBackup plug-insfor vSphere provides a method to add a Custom Attribute to a virtualmachine or virtual machines.
Perform customattribute basedexclusion
Exclude a specific disk by selecting the disk controller type and devicenumbers that represent the virtual device node of the disk. Then clickAdd. NetBackup adds the controller ID to the list of nodes to beexcluded. Repeat for each disk that you want to exclude.
To delete a disk from the list of disks to exclude, select the disk controllertype and device numbers, and then click Delete. The list is acomma-separated collection of controller IDs.
Alternatively, you can add or delete specific disks by editing the contentsof the text box in which the excluded disks appear. Wildcard charactersare not supported.
Specific disks tobe excluded
87Configure NetBackup policies for VMwareExclude Disks tab

Note:NetBackup does not support the exclude disks options for Replication Directorbackups.
See “Exclude disks from backups: an example to avoid” on page 90.
See “Restoring data from the backups that excluded the boot disk or data disks”on page 91.
For more information about VMware, see the NetBackup for VMware Guide.
About the exclude disk options for virtual disk selectionThe backup policy Exclude Disks tab has options to exclude virtual disks from abackup. By default, no disks are excluded. You should use this setting in mostcases.
If you want to exclude disks from a backup, the other options are Exclude bootdisk and Exclude all data disks. These options are intended for the virtualmachines that have multiple virtual disks. You should use these options with care.
To exclude a boot disk or data disk, note the following requirements:
■ The virtual machine must have more than one disk.
■ NetBackup must be able to identify the boot disk.
■ The boot disk must not be part of a managed volume (Windows LDM or LinuxLVM). The boot disk must be fully contained on a single disk.
The boot disk must include the following:
■ The boot partition.
■ The system directory (Windows system directory or Linux boot directory).
Important! The exclude disk options are meant only for the following cases:
■ Exclude boot disk: Consider this option if you have another means of recreatingthe boot disk, such as a virtual machine template for boot drives. If Excludeboot disk is enabled, the policy does not back up the boot disk.
Note: When the virtual machine is restored from the backup, the virtual machinedata for the boot disk may be missing or incomplete.
Note the following about Exclude boot disk:
■ If the virtual machine has a boot disk but has no other disks, the boot diskis backed up. It is not excluded.
88Configure NetBackup policies for VMwareExclude Disks tab

■ If the virtual machine's boot disk is an independent disk, but the virtualmachine has no other disks, the boot drive is backed up. The restored bootdrive however contains no data, because NetBackup cannot back up thedata in an independent disk.
■ If the virtual machine has a boot drive and an independent drive, the bootdrive is not backed up. Only the independent drive is included in the backup.Since NetBackup cannot back up the data in an independent disk, therestored independent disk contains no data.Refer to the explanation on independent disks in the following topic:See “NetBackup for VMware terminology” on page 20.
■ Adding a virtual disk and changing this option before the next backup canhave unexpected results.See “Exclude disks from backups: an example to avoid” on page 90.
■ Exclude all data disks: Consider this option if you have a different policy orother backup program that backs up the data disks. If Exclude all data disksis enabled in a policy, that policy does not back up the data disks.
Note the following about excluding data disks:
■ If the virtual machine has only one disk (such as C:), that drive is backedup. It is not excluded.
■ If the virtual machine's boot disk is an independent disk, and the virtualmachine has a separate data disk, the boot disk is backed up. The restoredboot disk however contains no data, because NetBackup cannot back upthe data in an independent disk.
Note: When the virtual machine is restored from the backup, the virtual machinedata for the data disk may be missing or incomplete.
■ Perform customattribute based exclusion: If this option is enabled, NetBackupexcludes the disks that have a custom attribute from the backup. The defaultvalue for this attribute is NB_DISK_EXCLUDE_DISK. You can use this defaultattribute or change the attribute name on the Exclude Disks tab of the backuppolicy. Note that this option gives the VMware administrator control over whichdisks are excluded.
Note: When a virtual machine is restored from the backup, the virtual machinedata for the excluded disk may be missing or incomplete.
■ The attribute on the virtual machine must be populated with comma separatedvalues of controller IDs for the disks to be excluded.
89Configure NetBackup policies for VMwareExclude Disks tab

■ If the custom attribute is not populated or does not exist on the virtualmachine, none of the disks (except independent disks) is excluded.
■ If you remove disks from the custom attribute value between the differentialbackups, only those files that changed since the last backup are availableto restore individually. You can restore the entire virtual disk or the VM, inwhich case all files are restored including those you cannot restoreindividually. After the next full backup, you can restore any of the filesindividually.
■ If you add disks to the custom attribute value between the differentialbackups, those disks are excluded from the next backup.
■ Specific disk(s) to be excluded: If this option is enabled, NetBackup excludesthe disks that you specify. Note that this option gives the NetBackup administratorcontrol over which disks are excluded from backups.
Note: When a virtual machine is restored from the backup, the virtual machinedata for the excluded disk may be missing or incomplete.
■ You must include comma-separated values of controller IDs on the ExcludeDisks tab of the backup policy.
■ If the disks do not exist on the specified controller and device IDs, none ofthe disks (except independent disks) is excluded.
■ If you remove controllers from the exclusion list between the differentialbackups, only those files that changed since the last backup are availableto restore. All files are available to restore after the next full backup.
■ If you add controllers to the exclusion list between the differential backups,their disks are excluded from the next backup.
Caution: Use of the exclude disk options can have unintended consequences ifthese rules are not followed.
The following topics contain important guidance on the exclude disk options:
See “Restoring data from the backups that excluded the boot disk or data disks”on page 91.
Exclude disks from backups: an example to avoidYou should use the options on the Exclude Disks tab of the Change Policy dialogbox with care. For example, if you add a disk to the virtual machine and changethe settings that exclude disks, note: The next backup may not capture the virtual
90Configure NetBackup policies for VMwareExclude Disks tab

machine in the state that you intended. You should back up the entire virtual machine(that is, do not exclude any disks) before you exclude a disk from future backups.
See “VMware - Advanced Attributes dialog” on page 81.
Restoring data from the backups that excluded the boot disk or datadisks
If the policy's Excludes Disks option excluded the boot disk or data disks, you canrestore the backed-up data as follows:
■ If Enable file recovery from VM backup was enabled on the backup policy:You can restore individual files from those portions of the virtual machine thatthe Virtual disk selection option did not exclude.See “Restoring individual filesRestoring individual VMware virtual machine files”on page 224.
■ If the Excludes Disks option was set to Exclude boot disk: You can restorethe virtual machine and move the restored data disk(s) to another virtual machine.
Browse for VMware virtual machinesWhen you configure a NetBackup policy, you can use the Browse for VirtualMachines screen to select virtual machines for backup. You can enter the virtualmachine's host name manually or browse and select it from a list.
As an alternative, NetBackup can automatically select virtual machines based ona range of criteria.
See “About automatic virtual machine selection for NetBackup for VMware”on page 102.
91Configure NetBackup policies for VMwareBrowse for VMware virtual machines

■ Enter the VM display name (or VM hostname, VM BIOS UUID, VM DNSName, VM instance UUID)Click this option if you want to manually enter the name or other identifier of avirtual machine. The format of the name depends on your system. It may be thefully qualified name or another name, depending on your network configurationand how the name is defined in the guest OS. If NetBackup cannot find thename you enter, policy validation fails.
Note: The type of name to enter depends on the Primary VM identifier settingon the VMware tab of the policy.
To enter a name, make sure that Browse for Virtual Machines is not selected.
■ Browse for Virtual MachinesClick this option to discover vCenter servers, clusters, data centers, vApps, andESX servers (shown in the left pane). You can select virtual machines from alist (in the right pane).NetBackup uses the following icons for vSphere objects:
vCenter server
Datacenter
Cluster
vApp
ESX server
Virtual machine (powered off)
Virtual machine (powered on)
Virtual machine template
92Configure NetBackup policies for VMwareBrowse for VMware virtual machines

The virtual machines that are contained in a VMware vApp are displayed in theright pane along with other virtual machines.The virtual machine names that are listed may be derived from a cache file. Useof the cache file is faster than rediscovering the virtual machines on the networkif your site has a large number of virtual machines.If NetBackup cannot obtain the IP address of the virtual machine, the host nameand IP address are displayed as NONE.Note that virtual machine host names or display names must be unique withina master server's policies:See “Virtual machine host names and display names should be unique if VMsare selected manually in the policy” on page 97.
■ Last UpdateTo update the cache file and re-display virtual machines, click the refresh iconto the right of the Last Update field. This field shows the date and time of themost recent cache file that contains the names of virtual machines.
For NetBackup to access the virtual machines, note the following:
■ The NetBackup master server must have credentials for the VMware vCenteror ESX server(s).See “Adding NetBackup credentials for VMware” on page 45.
■ DNS problems may prevent or slow down discovery of the virtual machines.See “Preventing browsing delays caused by DNS problems” on page 296.
■ To limit the search to particular vCenter or ESX servers, you can create aBACKUP registry entry as an exclude list. Excluding unneeded servers candramatically speed up the search for virtual machines.See “Limiting the VMware servers that NetBackup searches when browsingfor virtual machines” on page 95.
■ The browsing time out value must not be set too low.See “Changing the browsing timeout for virtual machine discovery”on page 298.
■ VM hostname, Display Name, DNS Name, Instance UUID, etc.When you select an ESX server in the left pane, information about its virtualmachines appears in columns in the right pane.You can change the arrangement of these columns by right-clicking in the rightpane:
93Configure NetBackup policies for VMwareBrowse for VMware virtual machines

The columns are the following:
The host name of the virtual machine.VM hostname
The display name of the virtual machine.Display Name
The UUID of the virtual machine.Instance UUID
The BIOS UUID of the virtual machine.BIOS UUID
The VMware "DNS Name" of the virtual machine. InvSphere Client, this name appears on the virtual machine'sSummary tab.
See “Primary VM identifier options (VMware)” on page 76.
Dns Name
The IP address of the virtual machine.IP Address
The guest OS system as defined when the virtual machinewas created.
Operating System
The datastore where the virtual machine configuration filesare stored. If the datastore is in a datastore cluster,NetBackup displays the name of the datastore (not thename of the cluster).
DataStore
The power on/off status of the virtual machine when it waslast discovered.
Powered
Shows whether the virtual machine has a physical disk inraw device mapping mode (RDM) or has an independentdrive.
RDM Status
94Configure NetBackup policies for VMwareBrowse for VMware virtual machines

Shows whether the virtual machine supports the VMwareChanged Block Tracking feature (for BLIB). ChangedBlock Tracking requires ESX server 4.0 and a virtualmachine at vmx-07 or later.
Change Tracking Support
The vCenter server that manages the ESX server (alsoappears in the left pane).
Virtual Center Name
Shows whether the virtual machine is a template.Template
The virtual machines you selected are listed in the Clients tab.
Limiting the VMware servers that NetBackupsearches when browsing for virtual machines
As part of creating a NetBackup policy, you must specify which virtual machines toback up. One approach is to let NetBackup search the network and list all availablevirtual machines. However, if your VMware environment contains many VMwareservers and virtual machines, it may take too long to search and list all of them. Forexample, consider an environment with ten vCenter servers. To back up the virtualmachines on one of the ten vCenter servers, browsing virtual machines on all tenservers is unnecessary.
To speed up browsing, you can exclude particular VMware servers from the search.When it probes the network for virtual machines, NetBackup queries only theVMware servers that are not named in the exclude list for the backup-host.
Use one of the following procedures, depending on the platform of the backup host(Windows or Linux).
95Configure NetBackup policies for VMwareLimiting the VMware servers that NetBackup searches when browsing for virtual machines

To limit the VMware servers that NetBackup discovers, per Windows backuphost
1 On the Windows desktop of the backup host, click Start > Run and enterregedit.
2 To be on the safe side, make a backup of the current registry (File > Export).
3 Go to HKEY_LOCAL_MACHINE > SOFTWARE > Veritas > NetBackup >CurrentVersion > Config and create a key called BACKUP.
4 Right-click in the right pane and click New > String Value. EnterexcludeVMservers as the name.
5 Right-click the excludeVMservers name and click Modify.
6 In the Edit String dialog, enter a comma-delimited list of the VMware serversthat are NOT to be queried when NetBackup browses the network. Do notenter spaces. You can enter vCenter servers and individual ESX servers.
Note: The exclude list is used on the next backup. If any bpfis processes arerunning, the exclude list has no effect on them.
The exclude list applies only to this backup host. The servers are not queriedwhen NetBackup browses for virtual machines to list on the policy's Browsefor Virtual Machines dialog of the NetBackup Administration Console.
96Configure NetBackup policies for VMwareLimiting the VMware servers that NetBackup searches when browsing for virtual machines

To limit the VMware servers that NetBackup discovers, per Linux backup host
1 On the Linux backup host, create (or open) the following file:
/usr/openv/netbackup/virtualization.conf
2 Add the following to the file:
[BACKUP]
"excludeVMservers"="server1,server2,server3"
where server1,server2,server3 is a comma-delimited list of the VMware serversthat are NOT to be queried when NetBackup browses the network. Do notenter spaces. You can enter vCenter servers and individual ESX servers.
Note: If the file already contains a [BACKUP] line, do not add another [BACKUP]line. Any other lines that already exist under [BACKUP] should remain as theyare.
3 Save the file.
Note: The exclude list is used on the next backup. If any bpfis processes arerunning, the exclude list has no effect on them.
The exclude list applies only to this backup host. The servers are not queriedwhen NetBackup browses for virtual machines to list on the policy's Browsefor Virtual Machines dialog of the NetBackup Administration Console.
See “Browse for VMware virtual machines” on page 91.
As an alternative, NetBackup can automatically select virtual machines based ona range of criteria.
See “About automatic virtual machine selection for NetBackup for VMware”on page 102.
Virtual machine host names and display namesshould be unique if VMs are selected manually inthe policy
This topic applies to NetBackup for VMware.
Certain VMware environments do not require unique names for virtual machines.For instance, virtual machines within a vCenter server can have the same host ordisplay names as virtual machines in another vCenter server. The same is true ofdatacenters, which are logical groupings of virtual resources within a vCenter server.Virtual machine host names or display names must be unique within a datacenter.They do not need to be unique between two datacenters on the same vCenter. A
97Configure NetBackup policies for VMwareVirtual machine host names and display names should be unique if VMs are selected manually in the policy

virtual machine named VM1 can exist in datacenter A. Another virtual machine(also named VM1) can exist in datacenter B, on the same vCenter server.
Identically named virtual machines can present a problem for any policies that areconfigured as follows:
■ The master server's policies use the Select manually option on the Clients tabto select the VMs for backup.
■ The Primary VM identifier option on the VMware tab identifies VMs by theirhost names or display names.
These policies may back up a different but identically named VM, instead of theVM that you selected. In that case, the VM that you selected is not backed up. Forthese policies to work, the virtual machines' display names or host names must beunique.
Consider the following options:
■ For manual policies that identify VMs by display name or host name, changethe VM names so that each VM has a unique host name or display name.
■ As an alternative, configure the policies' Primary VM identifier option to identifythe VMs by their UUIDs instead of by host name or display name. Use the typeof UUID that is appropriate for your virtual machine environment.See “Primary VM identifier options (VMware)” on page 76.
■ Instead of policies with manual-selection, use VMware Intelligent policies toselect the VMs through a query. Even if the Primary VM identifier option is setto host name or display name, NetBackup identifies each VM by its UUID.
See “Browse for VMware virtual machines” on page 91.
Primary VM identifier option andmanual selectionof virtual machines
This topic applies to the manual selection of virtual machines on the NetBackupBrowse for Virtual Machines screen.
A change to the policy's Primary VM identifier value can affect backups. If youchange this option, you may have to delete the virtual machine selections on theClients tab and re-enter them. Otherwise, NetBackup may no longer be able toidentify the virtual machines to back up.
For example, the host names in the Clients tab cannot be used and the virtualmachines are not backed up in the following case:
■ If you change the Primary VM identifier from VM hostname to VM displayname, and
98Configure NetBackup policies for VMwarePrimary VM identifier option and manual selection of virtual machines

■ The display names of the virtual machines are different from the host names.
In this case, delete the host name entries on theClients tab and browse the networkto select the virtual machines by display name.
See “Browse for VMware virtual machines” on page 91.
Note: When creating virtual machines, use the same name for both host name anddisplay name. If the Primary VM identifier is changed, the existing entries on theClients tab still work.
If the policy selects virtual machines automatically, refer to the following topic:
See “Effect of Primary VM identifier parameter on Selection column in Test Queryresults” on page 142.
About incremental backups of virtual machinesNetBackup enables full virtual machine and file-level incrementals in the samebackup (the Enable file recovery from VM backup option).
Better support for incremental backup is available when you use BLIB (Enableblock-level incremental backup). BLIB requires ESX 4.x and virtual machines atvmx-07 or later.
Note: Individual file recovery is supported from full backups and from incrementalbackups, as long as the Enable file recovery from VM backup policy option isenabled.
Note: Make sure that the virtual machines to back up are time synchronized withthe backup host. Otherwise, some changed data may not be included in the backup,depending on the clock differential between the backup host and the virtual machine.
Note: For incremental backups, you do not have to configure the client on theVMware backup host for timestamps. The VMware policies automatically defaultto the use of timestamps.
See “Configuring incremental backups” on page 100.
99Configure NetBackup policies for VMwareAbout incremental backups of virtual machines

Configuring incremental backupsUse the following procedure for virtual machine backup.
More information is available on creating a policy.
See “Configuring a VMware policy from the Policies utility” on page 68.
To configure incremental backup of a virtual machine
1 In the NetBackup policy Attributes tab, select the VMware policy type.
2 On the VMware tab, select the VMware backup host.
3 Optional: for BLIB, select Enable block-level incremental backup.
4 Select Enable file recovery from VM backup.
More information is available on the VMware options.
See “Backup options on the VMware tabVMware backup options” on page 73.
5 Click OK.
6 On theSchedules tab, selectDifferential Incremental Backup orCumulativeIncremental Backup.
7 Fill in the Clients tab.
See “About incremental backups of virtual machines” on page 99.
Storage Foundation Volume Manager volumes inthe virtual machine
To back up a virtual machine that contains Veritas Storage Foundation VolumeManager volumes, make sure the following options on the policy's VMware tab aredisabled:
Enable file recovery from VM backup
Exclude deleted blocks.
Note: Restore of selected files from a backup of the full virtual machine is notsupported if the virtual machine contains Storage Foundation Volume Managervolumes.
See “NetBackup for VMware: notes and restrictions” on page 27.
See “Configuring a VMware policy from the Policies utility” on page 68.
100Configure NetBackup policies for VMwareConfiguring incremental backups

Configure a VMwareIntelligent Policy
This chapter includes the following topics:
■ About automatic virtual machine selection for NetBackup for VMware
■ Support and use of VMware tag associations
■ The basics of a NetBackup query rule
■ Important notes on automatic virtual machine selection
■ NetBackup requirements for automatic virtual machine selection
■ Automatic virtual machine selection: Task overview
■ Options for selecting VMware virtual machines
■ Configuring automatic virtual machine selection
■ Editing an existing query in Basic Mode
■ Using the Query Builder in Advanced Mode
■ AND vs. OR in queries
■ Examples for the NetBackup Query Builder
■ The IsSet operator in queries
■ About selecting virtual machines by means of multiple policies
■ Order of operations in queries (precedence rules)
■ Parentheses in compound queries
6Chapter

■ Query rules for resource pools
■ Query rules for datacenter folders (host folder)
■ Query rules for duplicate names
■ Query rules for tags
■ Query Builder field reference
■ Test Query screen for VMware
■ Test Query: Failed virtual machines
■ Effect of Primary VM identifier parameter on Selection column in Test Queryresults
■ Effect of Primary VM identifier parameter on VM Name column in Test queryresults
■ Refreshing the display of virtual environment changes in the Query Builder
■ Reducing the time required for VM discovery in a large VMware environment
About automatic virtual machine selection forNetBackup for VMware
Instead of manually selecting the virtual machines for backup, you can configureNetBackup to automatically select virtual machines based on a range of criteria.You specify the criteria (rules) in theQuery Builder on the NetBackup policyClientstab. NetBackup creates a list of the virtual machines that currently meet the rulesand adds those virtual machines to the backup.
This feature is called the VMware Intelligent Policy.
Automatic selection of virtual machines has the following advantages:
■ Simplifies the policy configuration for sites with large virtual environments.You do not need to manually select virtual machines from a long list of hosts:NetBackup selects all the virtual machines that meet the selection rules in thepolicy's Query Builder.
■ Allows the backup list to stay up-to-date with changes in the virtual environment.Eliminates the need to revise the backup list whenever a virtual machine isadded or removed.
■ Virtual machine selection takes place dynamically at the time of the backup.
Examples of automatic virtual machine selection are the following:
102Configure a VMware Intelligent PolicyAbout automatic virtual machine selection for NetBackup for VMware

Table 6-1 Examples for automatic virtual machine selection
DescriptionExample
At the next backup, the policy can automaticallydiscover the virtual machines that have recentlybeen added to the environment. If the virtualmachines match the query rules that you configurein the policy, they are automatically backed up.
Add new virtual machines
If some of your virtual machines are occasionallyturned off, NetBackup can be configured toautomatically exclude those from the backup list.Among the virtual machines it discovers,NetBackup backs up only the virtual machines thatare turned on.
Limit the backup list to the virtualmachines that are currently turned on
Examples of physical boundaries are vCenterservers, ESX servers, datastores, and clusters.For example, a query rule can select all the virtualmachines in a particular ESX server, so the policybacks up only those virtual machines.
Back up virtual machines based onphysical boundaries
Examples of logical boundaries are folders, vApps,templates, and resource pools. For example, aquery rule can select all the virtual machines in aparticular folder, so the policy backs up only thosevirtual machines.
Back up virtual machines based onlogical boundaries
NetBackup can include or exclude virtual machinesbased on the user assigned tags.
Back up virtual machines based onVMware tags
See “The basics of a NetBackup query rule” on page 104.
Support and use of VMware tag associationsNetBackup supports using VMware tags for virtual machine selection. You use thisfeature when you configure VMware Intelligent Policies to protect virtual machines.More information about this feature is available.
See “Notes and limitations for tag usage in VMware Intelligent Policy queries”on page 41.
See “Query rules for tags” on page 128.
NetBackup also supports the backup and restore of VMware tag associations withvirtual machines when you use VMware Intelligent Policies. The tag associationmetadata for all tags that are associated with a virtual machine are backed up with
103Configure a VMware Intelligent PolicySupport and use of VMware tag associations

that virtual machine. If those tags exist on the vCenter Server, they are recreatedwhen the virtual machine is restored. More information about this feature is available.
See “Notes and limitations for the backup and restore of VMware tag associations”on page 42.
See “How NetBackup handles VMware tag associations at restore” on page 230.
The basics of a NetBackup query ruleFor automatic virtual machine selection, NetBackup uses query rules to determinewhich VMware virtual machines to select for backup. You create the rules in theQuery Builder, on the Clients tab of the policy.
A query rule consists of the following:
■ A keyword, such asDisplayname orDatacenter (many keywords are available).For example: For automatic selection of the virtual machines with the displaynames that contain certain characters, you need the Displayname keyword inthe rule.
■ An operator, such as Contains, StartsWith, or Equal.The operator describes how NetBackup analyzes the keyword. For example:Displayname StartsWith tells NetBackup to look for the display names thatstart with particular characters.
■ Values for the keyword.For theDisplayname keyword, a value might be "prod". In that case, NetBackuplooks for the virtual machines that have the display names that include thecharacters prod.
■ An optional joining element (AND, AND NOT, OR, OR NOT) to refine or expandthe query.
The policy uses these elements to discover and select virtual machines for backup.
Table 6-2 contains the examples of rules.
Table 6-2 Examples of rules
DescriptionRule
NetBackup selects the virtual machines that have thecharacters vm anywhere in their display names.
Displayname Contains "vm"
NetBackup selects the virtual machines that have thecharacters vm at the end of their display names.
Displayname EndsWith "vm"
104Configure a VMware Intelligent PolicyThe basics of a NetBackup query rule

Table 6-2 Examples of rules (continued)
DescriptionRule
NetBackup selects the virtual machines that usedatacenter1 or datacenter2.
Datacenter AnyOf"datacenter1","datacenter2"
NetBackup selects only the virtual machines that arecurrently turned on.
Powerstate Equal poweredOn
NetBackup selects only virtual machines that arecurrently powered on with the "Production" tag.
Powerstate Equal poweredOnAND Tag Equal "Production"
Many topics are available on automatic selection of VMware virtual machines. Tobegin, consider the following topics.
See “Important notes on automatic virtual machine selection” on page 105.
See “Automatic virtual machine selection: Task overview” on page 108.
See “Configuring automatic virtual machine selection” on page 112.
See “AND vs. OR in queries” on page 117.
See “Query Builder field reference” on page 129.
Important notes on automatic virtual machineselection
The Virtual Machine Intelligent Policy feature in NetBackup is a different approachto VMware virtual machine selection in the policy. It represents a paradigm shift inthe way you select virtual machines for backup. As with all major changes, theeffective use of this feature requires forethought, preparation, and care.
105Configure a VMware Intelligent PolicyImportant notes on automatic virtual machine selection

Table 6-3 Important notes on automatic virtual machine selection!
ExplanationNote!
Instead of manually selecting virtual machines for backup, you create guidelines forautomatic selection of virtual machines. The guidelines are called rules; you enter therules in the policy's Query Builder.
You make the rules, and NetBackup follows them.
If the rules state: Back up all virtual machines with a host name that contains "prod",NetBackup does that. Any virtual machine that is added to the environment with a hostname containing "prod" is automatically selected and backed up when the policy runs.Virtual machines with the names that do not contain "prod" are not backed up. To haveother virtual machines automatically backed up, you must change the query rules (orcreate additional policies).
Create rules carefully....
If many virtual machines are temporarily added to your environment and happen to fallwithin the scope of the query rules, they are backed up. The backups can thereforerun much longer than expected.
Changes to the virtualenvironment can affectbackup times.
Test the query rules ahead of time. The policy includes a Test Query function for thatpurpose. It's important to verify that your query operates as expected. Otherwise, thequery may inadvertently select too many or too few virtual machines.
As an alternative, you can use the nbdiscover command to test a query. Refer tothe NetBackup Commands Reference Guide.
Note also: The policy's Primary VM identifier parameter can affect the automaticselection process.
See “Effect of Primary VM identifier parameter on Selection column in Test Queryresults” on page 142.
Test the query rules.
106Configure a VMware Intelligent PolicyImportant notes on automatic virtual machine selection

Table 6-3 Important notes on automatic virtual machine selection!(continued)
ExplanationNote!
The automatic selection process is dynamic. Changes in the virtual environment mayaffect which virtual machines the query rules choose when the backup runs.
Note: If virtual machine changes occur, the virtual machines that are selected forbackup may not be identical to those listed in your query test results.
A query test does not createthe backup list. NetBackupcreates the backup list whenthe backup runs.
Backuplist
Backuplist
Query test
Backupexecution
If you select virtual machines manually (with the Browse for Virtual machines screen),the selected virtual machines are listed on the policy Clients tab. But when you usethe Query Builder for automatic selection, the selected virtual machines are not listedon the Clients tab.
For a list of the backed up virtual machines, use the NetBackup Activity Monitor or theOpsCenter web interface.
See “Using the Activity Monitor to monitor virtual machine backups” on page 153.
See “Using OpsCenter to report on virtual machine backups” on page 157.
The policy does not display alist of the virtual machinesthat are to be backed up.
Use the Activity Monitor orOpsCenter.
107Configure a VMware Intelligent PolicyImportant notes on automatic virtual machine selection

Table 6-3 Important notes on automatic virtual machine selection!(continued)
ExplanationNote!
When you save a policy, policy validation does not consult the query rules and selectvirtual machines for backup. Because of the potential for changes in the virtualenvironment, virtual machine selection must wait until the backup runs. As a result,when you save the policy, NetBackup does not check the policy attributes against abackup list. If the query rules select the virtual machines that are incompatible with apolicy attribute, policy validation cannot flag that fact. The incompatibility becomesapparent when NetBackup determines the backup list at the time of the backup.
Take for example a policy that is configured for Enable block-level incrementalbackup (BLIB). BLIB works only with ESX 4.0 virtual machines at version vmx-07 orlater. If the query rules select a virtual machine at a version earlier than vmx-07, thepolicy cannot back up that virtual machine. The mismatch between the policy and thevirtual machine is revealed when the backup runs, not when the policy is validated.The Activity Monitor's job details log indicates which virtual machines can or cannotbe backed up.
When you save the policy, thequery rules are not validated.
Policy
Certain requirements apply.
See “NetBackup requirements for automatic virtual machine selection” on page 108.
See special requirements
NetBackup requirements for automatic virtualmachine selection
Note the following requirements for automatic selection of VMware virtual machines:
■ The system where the NetBackup Administration Console runs must have accessto the vCenter server.
■ Automatic virtual machine selection requires no additional license beyond theNetBackup Enterprise Client license.
■ Automatic virtual machine selection is required for backups in vCloud Directoror for Replication Director for VMware.
See “The basics of a NetBackup query rule” on page 104.
Automatic virtual machine selection: Taskoverview
This topic is a high-level overview of how to set up a NetBackup policy for automaticselection of VMware virtual machines. Follow the links in the table for more details.
108Configure a VMware Intelligent PolicyNetBackup requirements for automatic virtual machine selection

Table 6-4 Automatic selection of virtual machines: overview of the tasks
Description and notesSteps to configure automaticselection
Use the policy Attributes tab.
See “Configuring a VMware policy from the Policies utility” on page 68.
Configure a VMware policy
On the policy Clients tab, click Select automatically through VMwareIntelligent Policy query.
Choose a host for virtual machine selection (default is the VMware backuphost).
To add rules, use the Query Builder drop-down fields.
See “Configuring automatic virtual machine selection” on page 112.
See “Options for selecting VMware virtual machines” on page 109.
Set rules for virtual machine selectionin the policy Query Builder
Click Test Query in the Query Builder on the Clients tab. Virtual machinesare labeled as included or excluded, based on the rules.
Note: The list of virtual machines is not saved in the Clients tab.
Note: The query rules are also displayed in the Backup Selections tab. Thebackup selections are pre-set to All_LOCAL_DRIVES (not displayed).
As an alternative, you can use the nbdiscover command to test a query.Refer to the NetBackup Commands Reference Guide.
Test the rules
When the policy executes, NetBackup consults the rules in the Query Builder,creates a list of virtual machines, and backs them up.
Execute a backup
To see which virtual machines were backed up, use the Activity Monitor, orrun a Virtual Client Summary report in OpsCenter.
See “Using the Activity Monitor to monitor virtual machine backups” on page 153.
See “Using OpsCenter to report on virtual machine backups” on page 157.
Check the backup
Options for selecting VMware virtual machinesThis topic describes the options on the policy Clients tab, or in the Backup PolicyWizard.
You can use these options to manually select virtual machines, or to configureNetBackup to select virtual machines automatically. For automatic selection, youspecify the selection criteria (rules) in the policy's Query Builder. When the backupjob runs, NetBackup discovers the virtual machines that currently meet the criteriaand backs up those virtual machines.
109Configure a VMware Intelligent PolicyOptions for selecting VMware virtual machines

A procedure is available.
See “Configuring automatic virtual machine selection” on page 112.
Table 6-5 Virtual machine selection
DescriptionOption
Click this option and click New to manually enter virtual machines names, or to browse andselect them from a list.
See “Browse for VMware virtual machines” on page 91.
Note: The rest of the fields and options are for automatic selection of virtual machines.
Select manually
Click this option to allow NetBackup to automatically select virtual machines for backup basedon the rules that you enter in the Query Builder.
Select automaticallythrough VMwareIntelligent Policyquery
Enables backup of the virtual machines that reside in a vCloud environment. Requires theautomatic selection of virtual machines.
With this option, the policy selects for backup only the virtual machines that vCloud manages:it skips the virtual machines that are not in vCloud.
Enable vCloudDirector integration
This host discovers virtual machines and automatically selects them for backup based onyour query rules. The resulting list determines which virtual machines are backed up.
To designate your media servers as discovery hosts, select Backup Media Server from thepull-down.
NetBackup host toperform automaticvirtual machineselection
Table 6-6 Query Builder
DescriptionOption
Use these pull-down fields to define rules for automatic selection of virtual machines. Fromleft to right, each pull-down further defines the rule.
Click the plus sign to add the rule to the Query pane.
Click the reset icon (curved arrow) to blank out the pull-down fields.
See “Query Builder field reference” on page 129.
See “Examples for the NetBackup Query Builder” on page 118.
Query Builder (Join,Field, Operator,Values)
Places the Query Builder in Advanced Mode for manual entry of rules.
See “Using the Query Builder in Advanced Mode” on page 116.
See “Query Builder field reference” on page 129.
See “Examples for the NetBackup Query Builder” on page 118.
Advanced Mode
110Configure a VMware Intelligent PolicyOptions for selecting VMware virtual machines

Table 6-6 Query Builder (continued)
DescriptionOption
Returns the Query Builder from Advanced Mode to Basic Mode.
See “Query Builder field reference” on page 129.
Basic Mode
Use this option to change an existing query rule when in Basic Mode, as follows:
■ Click the rule and then click Edit.■ Make new selections in the Query Builder pull-down fields.■ Click the save option (diskette icon).
Edit
Deletes a query rule when in Basic Mode. Click on the rule and then click Remove.Remove
Click this option to test which virtual machines NetBackup selects based on the rules in theQuery Builder.
Note: This test option does not create the backup list for the policy. When the next backupruns from this policy, NetBackup re-discovers virtual machines and consults the query rules.At that time, NetBackup backs up the virtual machines that match the rules.
See “Test Query screen for VMware” on page 139.
As an alternative, you can use the nbdiscover command to test a query. Refer to theNetBackup Commands Reference Guide.
Test Query...
Sets the refresh rate of an internal cache of the query results. NetBackup uses the cache todetermine which virtual machines to select at the time of the backup. The cache speeds upthe selection of virtual machines without burdening the vCenter server at each scheduledbackup.
A faster cache refresh rate synchronizes the cache with the changes recorded in vCenter,such as the addition or removal of virtual machines. However, each cache refresh consumesvCenter resources.
With a slower refresh rate, new virtual machines may not be included immediately in the nextbackup. New or changed virtual machines are included when the cache is refreshed. Notethat fewer vCenter resources are consumed with a slower refresh rate.
The default is 8 hours. For 8 hours, NetBackup uses the cache and does not attempt torediscover virtual machines. Changes to the virtual environment do not affect the cacheduring that period. After 8 hours, the next execution of the policy causes NetBackup torediscover virtual machines. If any changes match a rule in the query, the list of selectedvirtual machines is modified accordingly.
Note: The cache is refreshed before the next scheduled backup whenever the policy ischanged and saved.
More information is available on the Reuse VM selection query results for: option:
See “About the Reuse VM selection query results option” on page 368.
Reuse VM selectionquery results for:
111Configure a VMware Intelligent PolicyOptions for selecting VMware virtual machines

Configuring automatic virtual machine selectionThis topic applies to policy configuration for NetBackup for VMware.
NetBackup can automatically select VMware virtual machines for backup based onthe criteria that you enter. You specify the criteria (rules) in the Query Builder onthe NetBackup policy Clients tab. You can set up rules to include certain virtualmachines for backup, or to exclude virtual machines.
When the backup job runs, NetBackup creates a list of the virtual machines thatcurrently meet the query rules and backs them up.
See “About automatic virtual machine selection for NetBackup for VMware”on page 102.
The following is the policy Clients tab with Select automatically through VMwareIntelligent Policy query selected.
Figure 6-1 Policy Clients tab for automatic selection of virtual machines
The Query Builder can operate in Basic Mode or in Advanced Mode.
112Configure a VMware Intelligent PolicyConfiguring automatic virtual machine selection

To configure automatic virtual machine selection in Basic Mode
1 On the policy Attributes tab, select VMware for the policy type.
2 On the policy VMware tab, select a VMware backup host.
Review the other options on the VMware tab.
See “Backup options on the VMware tabVMware backup options” on page 73.
3 Make other policy selections as needed (for example, create a Schedule).
4 Click the Clients tab, and click Select automatically through VMwareIntelligent Policy query.
If you selected virtual machines manually in the Browse for Virtual Machinesdialog, those virtual machines are removed from the policy.
5 To back up virtual machines in vCloud Director, click Enable vCloud Directorintegration.
More information is available on backups and restores into vCloud.
See “About NetBackup for vCloud Director” on page 262.
Note: Enable vCloud Director integration makes several vCloud Directorkeywords available in the policy Query Builder Field, for rule-based selectionof virtual machines. If this option is not selected, NetBackup cannot use thevCloud keywords to locate virtual machines in vCloud Director, and the backupfails.
113Configure a VMware Intelligent PolicyConfiguring automatic virtual machine selection

6 To create a rule, make selections from the pull-down menus.
For the first rule, you can start with the Field pull-down, depending on the typeof rule. (For the first rule, the only selections available for the Join field areblank (none), or NOT.)
Then make a selection for Operator:
For the Value(s) field: Click the folder icon to browse for values, enter the valuemanually, or in some cases use the Value(s) drop-down (as in this example).The characters you enter manually in the Values field must be enclosed insingle quotes or double quotes. Note that browsing for values may take sometime in large virtual environments.
See “Query Builder field reference” on page 129.
7 Click the plus sign to add the rule to the Query pane.
114Configure a VMware Intelligent PolicyConfiguring automatic virtual machine selection

8 Create more rules as needed.
See “Query Builder field reference” on page 129.
See “Examples for the NetBackup Query Builder” on page 118.
9 To see which virtual machines NetBackup currently selects based on yourquery, click Test Query.
On the Test Query screen, the Virtual machines in your current environmentthat match the rules for selection in the policy are labeled INCLUDED. Notehowever that the Test Query option does not create the backup list for thepolicy. When the next backup runs from this policy, NetBackup re-discoversvirtual machines and consults the query rules. At that time, NetBackup backsup the virtual machines that match the query rules.
The list of virtual machines is saved but the virtual machines are not displayedin the policy's Clients tab.
See “Test Query screen for VMware” on page 139.
10 You can specify how long NetBackup uses the latest query results as thebackup list for future executions of the policy. Set the time period in Reuse VMselection query results for.
The default is 8 hours.
More information is available on this setting:
See “About the Reuse VM selection query results option” on page 368.
11 To create queries manually instead of using the pull-down menus, clickAdvanced Mode.
See “Using the Query Builder in Advanced Mode” on page 116.
Editing an existing query in Basic ModeThis topic applies to policy configuration for NetBackup for VMware. You can usethe Query Builder to enter rules for the automatic selection of VMware virtualmachines for backup.
To edit an existing query in Basic Mode
1 Click on the query rule you want to change and click Edit.
2 Make selections in the pull-down menus.
3 Click the save option (diskette icon).
4 To delete a rule, click on it and click Remove.
See “Configuring automatic virtual machine selection” on page 112.
115Configure a VMware Intelligent PolicyEditing an existing query in Basic Mode

See “Using the Query Builder in Advanced Mode” on page 116.
Using the Query Builder in Advanced ModeThis topic applies to policy configuration for NetBackup for VMware. You can usethe Query Builder to enter rules for the automatic selection of VMware virtualmachines for backup.
The Query Builder's Advanced Mode provides more flexibility in crafting rules forvirtual machine selection, including the use of parentheses for grouping.
To use the Query Builder in Advanced Mode
1 Set up a VMware policy and specify a VMware backup host or backup mediaserver.
For assistance, you can refer to the first few steps of the following procedure:
See “Configuring automatic virtual machine selection” on page 112.
2 Click the Clients tab.
3 Click Select automatically through VMware Intelligent Policy query.
4 Beneath the Query Builder pane, click Advanced Mode.
5 You can use the Query Builder drop-down menus to add query rules. You canalso type in rules manually.
Here are a few example queries:
VMFolder Contains "mango"
Datastore StartsWith "Acc" OR Datastore StartsWith "Prod"
vCenter Contains "ROS" AND ESXserver Equal "VM_test1" AND
Powerstate Equal poweredOn
116Configure a VMware Intelligent PolicyUsing the Query Builder in Advanced Mode

6 To insert a rule between existing rules, place the cursor where you want thenew rule to start and type it in.
When you create a rule with the drown-down menus, it appears at the end ofthe query. You can cut and paste it into the proper location.
7 To establish the proper order of evaluation in compound queries, useparentheses to group rules as needed. Compound queries contain two or morerules, joined by AND, AND NOT, OR, or OR NOT.
More information is available on the use of parentheses and on the order ofprecedence.
See “AND vs. OR in queries” on page 117.
See “Order of operations in queries (precedence rules)” on page 122.
See “Parentheses in compound queries” on page 124.
AND vs. OR in queriesThis topic applies to policy configuration for NetBackup for VMware. You can usethe Query Builder to enter rules for the automatic selection of VMware virtualmachines for backup.
The Join field in the Query Builder provides connectors for joining rules (AND, ANDNOT, OR, OR NOT). The effect of AND versus OR in the Query Builder may notbe obvious at first glance.
In essence, AND and OR work in this way:
■ AND limits or restricts the scope of the query.
■ OR opens up the query to an additional possibility, expanding the scope of thequery.
Note: Do not use AND to join the rules that are intended to include additional virtualmachines in the backup list. For instance, AND cannot be used to mean "includevirtual machine X AND virtual machine Y."
For example: To include the virtual machines that have either "vm1" or "vm2" intheir names, use OR to join the rules:
Displayname Contains "vm1"
OR Displayname Contains "vm2"
If you use AND to join these rules:
Displayname Contains "vm1"
AND Displayname Contains "vm2"
117Configure a VMware Intelligent PolicyAND vs. OR in queries

the result is different: the backup list includes only the virtual machines that haveboth vm1 and vm2 in their names (such as "acmevm1vm2"). A virtual machine withthe name "acmevm1" is not included in the backup.
Table 6-7 provides the examples with AND and OR.
Table 6-7 Queries with AND, OR
DescriptionQuery
This query selects any virtual machine that has either vm1 or vm2 in itsdisplay name. For example, this query selects both "seabizvm1" and"seabizvm2" for backup.
Displayname Contains "vm1"
OR Displayname Contains "vm2"
This query is very specific. Virtual machines with the host names that contain"manu" are included in the backup only if: they reside in vCenter server"vCenterServer_1", datacenter "dc_A", and ESX server "prod".
The virtual machines that do not reside in that hierarchy are not included.For example: if a virtual machine resides in "vCenterServer_1" and datacenter"dc_A", but not in ESX server "prod", that virtual machine is not included.
vCenter Equal "vCenterServer_1"
AND Datacenter Equal "dc_A"
AND ESXserver Equal "prod"
AND VMHostName Contains "manu"
This query uses the same keywords and values, but combines them withOR. The result may be a much larger list of virtual machines.
A virtual machine that meets any of these rules is included:
■ Any virtual machines in vCenter "vCenterServer_1". Their host names,datacenter, or ESX server do not matter.
■ Any virtual machines in datacenter "dc_A". Their host names or serverdo not matter.
■ Any virtual machines in ESXserver "prod". Their host names, datacenter,or vCenter server do not matter.
■ Any virtual machines with a host name that contains "manu". Their serveror datacenter do not matter.
vCenter Equal "vCenterServer_1"
OR Datacenter Equal "dc_A"
OR ESXserver Equal "prod"
OR VMHostName Contains "manu"
See “Order of operations in queries (precedence rules)” on page 122.
See “Parentheses in compound queries” on page 124.
See “Examples for the NetBackup Query Builder” on page 118.
Examples for the NetBackup Query BuilderThis topic applies to policy configuration for NetBackup for VMware. You can usethe Query Builder to enter rules for the automatic selection of VMware virtualmachines for backup.
The following table provides example query rules.
118Configure a VMware Intelligent PolicyExamples for the NetBackup Query Builder

To use the Query Builder, you must click Select automatically through VMwareIntelligent Policy query on the Clients tab.
Another topic is available on the difference between AND and OR in a query.
See “AND vs. OR in queries” on page 117.
Table 6-8 Query Builder examples
Query result when backup job executesExample query
All virtual machines are added to the backup list. Exceptions arethose that do not have a host name, or that have invalid charactersin the display name.
See “Effect of Primary VM identifier parameter on Selection columnin Test Query results” on page 142.
No query rules specified (Query pane is empty)
All virtual machines with the display names that contain the string"prod" are added to the backup list.
See “Effect of Primary VM identifier parameter on Selection columnin Test Query results” on page 142.
Displayname Contains "prod"
Any virtual machine that is turned on is added to the backup list.powerstate Equal "poweredOn"
All virtual machines with a guest OS of Windows 7 are added to thebackup list.
VMGuestOS Equal "windows7Guest"
The virtual machines named "grayfox7”and "grayfox9" are added tothe backup list. (Note that each value must be enclosed in its ownquotes, with a comma in between.)
DisplayName AnyOf "grayfox7”,"grayfox9"
In datastore Storage_1: any virtual machine that is turned on andhas a guest OS of Red Hat Linux 4 is added to the backup list.
powerstate Equal "poweredOn"
AND Datastore Equal "Storage_1"
AND VMGuestOS Equal "rhel4Guest"
In the vCenter server vCenterServer_1, virtual machines that are inESX servers with names containing "prod" are added to the backuplist.
vCenter Equal "vCenterServer_1"
AND ESXserver Contains "prod"
In cluster VMcluster_1, all virtual machines with the host names thatcontain "Finance", in ESX servers ESX_1, ESX_2, ESX_3, are addedto the backup list.
Cluster Equal "VMcluster_1"
AND ESXserver AnyOf"ESX_1","ESX_2","ESX_3"
AND VMHostName Contains "Finance"
For any folder whose name starts with "Prod" or whose name is not"VM_test", add its virtual machines to the backup list.
VMFolder StartsWith "Prod"
OR VMFolder NotEqual "VM_test"
119Configure a VMware Intelligent PolicyExamples for the NetBackup Query Builder

Table 6-8 Query Builder examples (continued)
Query result when backup job executesExample query
See “The IsSet operator in queries” on page 120.Examples with IsSet
This query selects any virtual machine where the Datacenter contains"prod" and the user-specified tag is "Finance".
Datacenter Contains "prod" AND Tag Equal"Finance"
Selects virtual machines where Datacenter is "prod" but excludesany virtual machines that have the user-specified tag "Test".
Datacenter Equal "prod" AND NOT Tag Equal"Test"
Click Advanced to see the query rule in Advanced Mode. Only Advanced Modesupports the use of parentheses for grouping sets of rules.
See “Using the Query Builder in Advanced Mode” on page 116.
See “Configuring automatic virtual machine selection” on page 112.
The IsSet operator in queriesThis topic applies to policy configuration for NetBackup for VMware. You can usethe Query Builder to enter rules for the automatic selection of VMware virtualmachines for backup.
In a query, you can use the IsSet operator to ensure that certain virtual machinesare included or excluded from the backup.
For example: if the Primary VM identifier parameter is set to VM hostname,NetBackup is unable to identify virtual machines for backup that do not have a hostname. You can use IsSet to exclude such virtual machines from the backup list.
Table 6-9 Examples of queries with the IsSet operator
Effect of the query on virtual machine selectionQuery rules with IsSet operator
INCLUDED: Any virtual machine in a cluster that has a name that containsthe string "dev" if the virtual machine also has a VMware DNS name.
EXCLUDED: Any virtual machines that do not have a VMware DNS Name.
Without VMDNSName IsSet in this query, virtual machines without a DNSname cannot be excluded. They would be listed as FAILED.
Cluster Contains "dev"
AND VMDNSName IsSet
120Configure a VMware Intelligent PolicyThe IsSet operator in queries

Table 6-9 Examples of queries with the IsSet operator (continued)
Effect of the query on virtual machine selectionQuery rules with IsSet operator
INCLUDED: Any virtual machine with a display name that contains the string"prod" if the virtual machine also has a host name.
EXCLUDED: Any virtual machines that do not have host names.
Without VMHostName IsSet in this query, virtual machines without a hostname cannot be excluded. They would be listed as FAILED.
Displayname Contains "prod"
AND VMHostName IsSet
The policy's Primary VM identifier parameter has an important effect on whichvirtual machines NetBackup can back up. This parameter affects the test queryresults.
See “Effect of Primary VM identifier parameter on Selection column in Test Queryresults” on page 142.
About selecting virtual machines by means ofmultiple policies
This topic applies to policy configuration for NetBackup for VMware. You can usethe Query Builder to enter rules for the automatic selection of VMware virtualmachines for backup.
If your virtual environment has many virtual machines with inconsistent namingconventions, you may need multiple policies working in tandem. It may be difficultto create a single policy that automatically selects all the virtual machines that youwant to back up.
For this situation, configure several policies such that each policy backs up a portionof the environment. One policy backs up a particular set or group of virtual machines,such as those that have host names. A second policy backs up a different groupof virtual machines that were not backed up by the first policy, and so forth. Whenall the policies have run, all the virtual machines are backed up.
The following table describes the policies that are designed to back up the virtualenvironment in three phases. Note that each policy relies on a different setting forthe Primary VM identifier parameter.
121Configure a VMware Intelligent PolicyAbout selecting virtual machines by means of multiple policies

Table 6-10 Three policies that back up virtual machines in phases
Backup resultQuery Builder rulesPolicy
This policy backs up all virtual machines that have ahost name. Any virtual machines that do not have ahost name are excluded from the backup.
VMHostName IsSetFirst policy
Primary VM identifierparameter: VM hostname
This policy backs up all virtual machines that do nothave a host name but that do have a valid display name.Any virtual machines that do not have a host name ora valid display name are excluded from the backup.
See “NetBackup character restrictions for the PrimaryVM identifier” on page 37.
NOT VMHostName IsSet
AND VMHasVDSName Equal'TRUE'
Second policy
Primary VM identifierparameter: VM display name
This policy backs up the virtual machines that were notbacked up by the first two policies. This policy selectsthe virtual machines that do not have a host name or avalid display name, but that do have a UUID.
NOT VMHostName IsSet
AND NOT VMHasVDSNameEqual 'TRUE'
Third policy
Primary VM identifierparameter: VM UUID
More information is available on the Primary VM identifier parameter and its effecton virtual machine selection.
See “Effect of Primary VM identifier parameter on Selection column in Test Queryresults” on page 142.
See “The basics of a NetBackup query rule” on page 104.
Order of operations in queries (precedence rules)This topic applies to policy configuration for NetBackup for VMware. You can usethe Query Builder to enter rules for the automatic selection of VMware virtualmachines for backup.
The information in this topic is for advanced users who understand precedence inprogramming languages. In the Query Builder, the order in which operations occurcan determine which virtual machines are selected and backed up.
The following table lists the order of operations, or precedence, from highest tolowest (7 is the highest). For example, an operation with a precedence of 6 (suchas Contains) is evaluated before an operation with a precedence of 5 (such asGreater).
122Configure a VMware Intelligent PolicyOrder of operations in queries (precedence rules)

Table 6-11 Order of operations
PrecedenceDescriptionOperation
7Produces the value 0 if x is true (nonzero) andthe value 1 if x is false (0).
!x
6Does y exist somewhere in xx Contains y
6Does x start with yx StartsWith y
6Does x end with yx EndsWith y
6Does x appear in listx AnyOf list
5Is x greater than yx Greater y
5Is x greater than or equal to yx GreaterEqual y
5Is x less than yx Less y
5Is x less than or equal to yx LessEqual y
4Is x equal to yx Equal y
4Is x not equal to yx NotEqual y
3operator produces the value 0 if x is true(nonzero) and the value 1 if x is false (0).
Not x
2True if both x and y are truex And y
1True if either x or y are truex OR y
Note the following:
■ AND has a higher precedence than OR.In the Query Builder's Advanced Mode, you can use parentheses to change theorder of evaluation in the rules that use AND or OR.See “Parentheses in compound queries” on page 124.
■ In the Query Builder's Advanced Mode, you can combine two or more operationsin a single rule without AND or OR to join them. Precedence determines theorder in which the operations are evaluated within the rule.Example of a rule that includes three operations:
Displayname StartsWith “L” NotEqual Displayname contains “x”
This rule selects the following virtual machines:Virtual machines with the names that start with L but do not contain x.Virtual machines with the names that do not start with L but that do contain x.
123Configure a VMware Intelligent PolicyOrder of operations in queries (precedence rules)

Explanation: The StartsWith and Contains operations have a precedence of 6,whereas NotEqual has a lower precedence of 3. Starting on the left, theStartsWith operation is evaluated first and the Contains operation is evaluatednext. The last operation to be evaluated is Not Equal.
See “Using the Query Builder in Advanced Mode” on page 116.
See “The basics of a NetBackup query rule” on page 104.
Parentheses in compound queriesThis topic applies to policy configuration for NetBackup for VMware. You can usethe Query Builder to enter rules for the automatic selection of VMware virtualmachines for backup.
You can use the Query Builder to make precise queries containing as many rulesas necessary to identify the appropriate virtual machines. In a query such aspowerstate Equal "poweredOn", the result of the query is easy to predict: only thevirtual machines that are turned on are included in the backup. But if several rulesare combined with AND and OR, the result may not be obvious. This kind of queryis called a compound query. Compound queries contain two or more rules, joinedby AND, AND NOT, OR, or OR NOT.
The order in which the Query Builder evaluates compound rules affects the outcomeof the query. Grouping the rules with parentheses can change the order of evaluationand thus the outcome of the query.
The examples in the following table demonstrate how the Query Builder evaluatescompound queries with and without parentheses.
Note: Only the Query Builder's Advanced Mode supports the use of parentheses.
Table 6-12 Examples of compound queries with and without parentheses
The following virtual machines are selectedExample query
All virtual machines under ESX001 (regardless of power state), and virtualmachines under FolderEngA that are turned on
To select only the virtual machines that are turned on in the ESX server andin the folder, use parentheses (see next example).
ESXServer Equal "ESX001" OR FolderEqual "FolderEngA" AND powerstateEqual ON
All the virtual machines that are turned on in ESX001 and in FolderEngA.(ESXServer Equal "ESX001" OR FolderEqual "FolderEngA") AND powerstateEqual ON
See “AND vs. OR in queries” on page 117.
124Configure a VMware Intelligent PolicyParentheses in compound queries

See “Order of operations in queries (precedence rules)” on page 122.
Query rules for resource poolsThis topic applies to policy configuration for NetBackup for VMware. You can usethe Query Builder to enter rules for the automatic selection of VMware virtualmachines for backup.
If the resource pool that you query is nested, the choice of Operator determineswhich virtual machines in the resource pool hierarchy are discovered.
For example, assume the following hierarchy of resource pools that contain virtualmachines:
Res/ResourcePool_1
VM1
VM2
/ResourcePool_2
VM3
VM4
/ResourcePool_3
VM5
VM6
where ResourcePool_1 contains virtual machines VM1 and VM2, and so forth.
The following table shows the query results with the Contains, Equal, StartsWith,and EndsWith operators. (Other operators can be used.)
Note: If you want the query to include all virtual machines in a hierarchy of nestedresource pools, do not use Equal as the Operator.
Table 6-13 Example rules for nested resource pools
Included virtual machinesQuery rule
Includes all the virtual machines in the three resourcepools (VM1 through VM6).
Resourcepool Contains "Res/ResourcePool_1"
Includes only the virtual machines that are inResourcePool_1 (VM1, VM2). Virtual machines in thesub-pools are not included (VM3 through VM6).
Resourcepool Equal "Res/ResourcePool_1"
Includes only the virtual machines that are inResourcePool_2 (VM3, VM4).
Resourcepool Equal "Res/ResourcePool_1/ResourcePool_2"
125Configure a VMware Intelligent PolicyQuery rules for resource pools

Table 6-13 Example rules for nested resource pools (continued)
Included virtual machinesQuery rule
Includes all the virtual machines in the three resourcepools (VM1 through VM6).
Resourcepool StartsWith "Res/ResourcePool"
Includes only the virtual machines that are inResourcePool_2 and 3. Virtual machines inResourcePool_1 are not included.
Resourcepool StartsWith"Res/ResourcePool_1/ResourcePool_2"
Includes the virtual machines in ResourcePool_2 (VM3,VM4) but not in ResourcePool_1 or 3.
Resourcepool EndsWith "ResourcePool_2"
These examples also apply to host folders.
See “Query rules for datacenter folders (host folder)” on page 126.
See “Test Query screen for VMware” on page 139.
Query rules for datacenter folders (host folder)This topic applies to policy configuration for NetBackup for VMware. You can usethe Query Builder to enter rules for the automatic selection of VMware virtualmachines for backup.
In NetBackup terminology, a host folder is a folder that has been defined within aVMware datacenter. A host folder can contain ESX servers or clusters, as well asother folders. For example:
Folder_1
ESX1
ESX2
subfolder_A
ESX3
ESX4
subfolder_B
ESX_5
ESX_6
If you want NetBackup to select all the virtual machines within the top-level folderand any subfolders, use the Contains or StartsWith operator. For example:
HostFolder Contains "Folder_1"
126Configure a VMware Intelligent PolicyQuery rules for datacenter folders (host folder)

Note: If you want the query to include all virtual machines in the hierarchy of folders,do not use Equal as the Operator.
If you want NetBackup to select the virtual machines within a subfolder only (suchas subfolder_A), use the Contains or Equal operator. For example:
HostFolder Equal "Folder_1/subfolder_A"
In this case, NetBackup includes only the virtual machines that reside on serversESX3 and ESX4.
For host folders, these operators work the same as they do for resource pools. Forfurther query builder examples, refer to the following topic (substitute host folderfor resource pool in the examples):
See “Query rules for resource pools” on page 125.
Note: If an ESX cluster is not contained within a folder and you click the browsefor values button: The ESX cluster name appears in the Select From List dialog.
See “The basics of a NetBackup query rule” on page 104.
See “Configuring automatic virtual machine selection” on page 112.
Query rules for duplicate namesIf you have clusters, datastores, or virtual machine display names that haveduplicates elsewhere in your virtual environment, note: The query rules must specifythe parent datacenter or host folder to avoid conflicts during discovery. (A hostfolder is one that has been defined within a datacenter.)
Take the following example of duplicate virtual machine names:
Folder_1
ESXi_prod
VM_1
Folder_2
ESXi_mrkt
VM_1
To back up ESXi_prod/VM_1 but not ESXi_mrkt/VM_1, use the following query:
HostFolder Equal "Folder_1"
AND ESXserver Equal "ESXi_prod"
AND Displayname Equal "VM_1"
127Configure a VMware Intelligent PolicyQuery rules for duplicate names

To back up only ESXi_mrkt/VM_1, use the following query:
HostFolder Equal "Folder_2"
AND ESXserver Equal "ESXi_mrkt"
AND Displayname Equal "VM_1"
Note: To back up both of these virtual machines from the same policy, include bothof these rules in the policy, as follows:
Instead of Equal, you can use other field values, such as Contains.
See “Query rules for datacenter folders (host folder)” on page 126.
Query rules for tagsBe aware of the following rules when you use tags in your queries:
■ If you use VMware tags, you can base your backup selections on these tags.Be aware these tags are case-sensitive, so UNIX is different from unix.
■ When NetBackup uses tags to select virtual machines, the selection is basedonly on tag names. The selection is independent of the category.Example:
■ Virtual_machine_1 has a user-specified tag HR from the categoryproduction.
■ Virtual_machine_2 has a user-specified tag HR from the category test.Queries that select virtual machines with the tag HR select both virtual machines.
■ NetBackup uses a different VMware interface to access tag information fromvCenter Servers than is used for other query fields. Therefore, tag related callsto the vCenter Server execute only if they are required. Calls are skipped if thequery is satisfied without the tag information. NetBackup only collects thisinformation once per vCenter Server. NetBackup collects tag metadata as partof virtual machine backup, but it collects tag metadata only from those vCenterServers for which a virtual machine is selected. If no virtual machine is selected
128Configure a VMware Intelligent PolicyQuery rules for tags

from a vCenter Server and tags are not used in the query then tag metadata isnot collected from that vCenter Server.
■ Example 1: Tag Equal "Production" OR Powerstate Equal poweredOn
■ Example 2: Powerstate Equal poweredOn OR Tag Equal "Production"
In Example 1, NetBackup retrieves virtual machine data as well as tag data fromeach virtual server for which it has credentials.In Example 2, NetBackup retrieves virtual machine data for each virtual serverfor which it has credentials. But NetBackup only needs to retrieve tag data forvirtual machines where the Powerstate is not equal to poweredOn.
Query Builder field referenceThis topic applies to policy configuration for NetBackup for VMware. You can usethe Query Builder to enter rules for the automatic selection of VMware virtualmachines for backup.
Table 6-14 describes the drop-down fields and options for creating rules in theQuery Builder.
Table 6-14 Query Builder drop-down options: Join, Field, Operator, Value(s)
DescriptionQuery Builderdrop-downfields
Selects a connector to join rules.
For the first rule, choices are blank (none) or NOT. After you add a rule,the available connectors are AND, AND NOT, OR, OR NOT.
Join
Selects a parameter on which to build the rule. Select one from the list(scroll down for additional parameters).
You can type the first character to speed up selection. For example,on entering “d”, the list moves to first entry starting with "d". Anotherentry of "d" moves through the list to the next entry starting with "d".The selected entry is automatically filled in.
See Table 6-15 on page 130.
Field
Selects an operator. The available operators depend on the parameterthat is selected for Field.
See Table 6-16 on page 137.
Operator
129Configure a VMware Intelligent PolicyQuery Builder field reference

Table 6-14 Query Builder drop-down options: Join, Field, Operator, Value(s)(continued)
DescriptionQuery Builderdrop-downfields
Specifies a value for the Field parameter.
The Value field allows manual entry. It may also be a drop-down,depending on the selections that are made in the other fields.
For manual entry, you can specify multiple comma-separated values.
See Table 6-17 on page 138.
Value(s)
Allows browsing for specific values, depending on the selections thatare made in the other drop-down fields.
Adds the current drop-down selections to the Query pane as a newrule.
Blanks out the drop-down fields.
Field (keywords)
Table 6-15 describes the keywords available in the Field drop-down. The table alsoindicates whether the values for each keyword (in the Values field) arecase-sensitive.
Note that the inclusion or exclusion of virtual machines is not determined by theField keyword alone, but depends on the rule you construct: the combination ofJoin, Field, Operator, and Value(s).
Table 6-15 Keywords in the Field drop-down
DescriptionData typeField keyword
The text that is added to virtual machine annotations in vSphere Client.
Values are case-sensitive.
Alphanumericstring
Annotation
130Configure a VMware Intelligent PolicyQuery Builder field reference

Table 6-15 Keywords in the Field drop-down (continued)
DescriptionData typeField keyword
The name of the cluster (a group of ESX servers) that the virtualmachine is configured in.
Values are not case-sensitive.
Note: A virtual machine may be assigned to an ESX server that isnot in a cluster.
Note also that in VMware, a cluster name need only be unique withina datacenter path.
Alphanumericstring
Cluster
The name of the VMware datacenter.
Values are not case-sensitive.
Alphanumericstring
Datacenter
The folder structure that defines the path to a datacenter. Use thisoption if the datacenter name that you want to filter on is not uniquein your environment.
Values are case-sensitive.
Alphanumericstring
DatacenterPath
The name of the datastore.
Values are case-sensitive.
Note: Multiple ESX servers can share access to the same datastore.Also, a datastore name can be duplicated between multiple ESXservers. Use DatacenterPath or ESXserver to uniquely identify thedatacenter.
Alphanumericstring
Datastore
The name of the datastore cluster that contains the datastores.
Values are not case-sensitive.
Alphanumericstring
DatastoreCluster
The name of the folder that contains the datastores.
Values are not case-sensitive.
Alphanumericstring
DatastoreFolder
The name of the datastore's NFS host.
Values are not case-sensitive.
Alphanumericstring
DatastoreNFSHost
The folder structure that defines the path to an NFS datastore. Usethis option if the NFS host name of the datastore that you want to filteron is not unique in your environment.
Values are not case-sensitive.
Alphanumericstring
DatastoreNFSPath
131Configure a VMware Intelligent PolicyQuery Builder field reference

Table 6-15 Keywords in the Field drop-down (continued)
DescriptionData typeField keyword
The type of the datastore. Values are NFS, NFS41, VMFS, vsan, andVVOL.
Values are not case-sensitive.
Alphanumericstring
DatastoreType
The virtual machine's display name.
Values are case-sensitive.
Alphanumericstring
Displayname
The name of the ESX server.
Values are not case-sensitive.
The ESX host name must match the name as defined in the vCenterserver.
Alphanumericstring
ESXserver
The folder path between the datacenter level and a cluster, ESX hosts,or a subfolder.
If an ESX cluster is not contained within a folder and you click thebrowse for values button, note: The ESX cluster name appears in theSelect From List dialog.
Values are not case-sensitive.
See “Query rules for datacenter folders (host folder)” on page 126.
Alphanumericstring
HostFolder
The virtual machine's instance UUID.
Example query:
InstanceUUID Equal"501b13c3-52de-9a06-cd9a-ecb25aa975d1"
Values are not case-sensitive.
Alphanumericstring
InstanceUUID
The name of the network switch (on an ESX server) or distributedswitch.
Values are not case-sensitive.
Alphanumericstring
Network
The name of the folder that contains the network.
Values are not case-sensitive.
Alphanumericstring
NetworkFolder
The power state of the virtual machine.
Values are poweredOff, poweredOn, suspended.
AlphabeticPowerstate
132Configure a VMware Intelligent PolicyQuery Builder field reference

Table 6-15 Keywords in the Field drop-down (continued)
DescriptionData typeField keyword
The name of the resource pool. (A resource pool is similar to a vApp.)
Values are case-sensitive.
If a resource pool contains other resource pools (sub-pools), the choiceof Operator determines whether virtual machines in the sub-pools areincluded.
See “Query rules for resource pools” on page 125.
Alphanumericstring
Resourcepool
The name of the tag.
Values are case-sensitive.
When NetBackup uses tags to select virtual machines, the selectionis based only on tag names. The selection is independent of thecategory.
See “Query rules for tags” on page 128.
Alphanumericstring
Tag
TRUE if the virtual machine is a virtual machine template.BooleanTemplate
The name of the vApp.
Values are case-sensitive.
A vApp is a collection of virtual machines. vApps can also containresource pools and other vApps. vApps are components of standaloneESX servers or of clusters.
Like vSphere Client, NetBackup refers only to the top level of a vAppthat contains sub vApps.
For the following rule:
vApp Equal "vapp1"
if vapp1 has a sub vApp named "vapp2", any virtual machines in vapp1or vapp2 are included. You cannot make a rule that refers specificallyto vapp2.
Alphanumericstring
vApp
The name of the vCloud Director catalog.
Values are not case-sensitive.
Alphanumericstring
vCDCatalog
Expired if the vCloud Director vApp or vApp template is expired.
Possible values are Expired, Not Expired, and Unknown. Unknownindicates that an error occurred between vCloud Director and thevSphere environment. Examples are errors in provisioning or in adeletion operation.
AlphabeticvCDIsExpired
133Configure a VMware Intelligent PolicyQuery Builder field reference

Table 6-15 Keywords in the Field drop-down (continued)
DescriptionData typeField keyword
TRUE if the vCloud Director vApp is a template.BooleanvCDIsvAppTemplate
The name of the vCloud Director organization.
Values are not case-sensitive.
Alphanumericstring
vCDOrg
The name of the organization virtual datacenter in vCloud Director.
Values are not case-sensitive.
Alphanumericstring
vCDOrgvDC
The name of the vCloud Director server.
Values are not case-sensitive.
Alphanumericstring
vCDServer
The name of the vCloud Director vApp.
Values are not case-sensitive.
Alphanumericstring
vCDvApp
The name of the vCenter server.
Values are not case-sensitive.
The vCenter name that is specified in the Query Builder must matchthe name as entered in the Administration Console for NetBackupcredentials. (Media and DeviceManagement > Credentials > VirtualMachine Servers.)
Note that a fully qualified domain name is recommended.
Alphanumericstring
vCenter
The version of the vCenter Server. For example: 5.1.0, 5.5.0, 6.0.0
The possible values of this field are automatically updated andpopulated based on the environment. Only the versions of the vCenterservers that are registered with NetBackup are shown.
Alphanumericstring
vCenterVersion
The virtual machine DNS name in vSphere Client.
Values are not case-sensitive.
Alphanumericstring
VMDNSName
134Configure a VMware Intelligent PolicyQuery Builder field reference

Table 6-15 Keywords in the Field drop-down (continued)
DescriptionData typeField keyword
The name of the VM folder (within a datacenter), including the path tothe folder that contains the VMs.
Values are not case-sensitive.
For example, assume the following VM folders containing a total of 65VMs:
vm\VM_backup_prod1 (contains 5 VMs)vm\VM_backup_prod1\cluster1 (contains 10 VMs)vm\VM_backup_prod2 (contains 50 VMs)
To include the VMs in vm\VM_backup_prod1 but not the VMs incluster1 or in any other folder:
VMFolder Equal “vm\VM_backup_prod1”
To include the VMs in vm\VM_backup_prod1 and in its subfoldercluster1:
VMFolder Equal “vm\VM_backup_prod1”OR VMFolder StartsWith “vm\VM_backup_prod1\\”
Note: The first backslash is an escape character that causes thefollowing backslash to be interpreted as a literal character.
To include all 65 VMs:
VMFolder StartsWith “vm\VM_backup_prod”
Note: Any VM that is in a path that begins with vm\VM_backup_prodis included.
Alphanumericstring
VMFolder
The virtual machine guest OS type that is recorded in vSphere Client.
Values are case-sensitive.
Alphanumericstring
VMGuestOS
TRUE if the virtual machine has IDE drives.BooleanVMHasIDE
TRUE if the virtual machine has multiple datastores.
You can use this keyword to select any virtual machine that isconfigured to use more than one datastore.
BooleanVMHasMDS
TRUE if the virtual machine has NVMe drives.BooleanVMHasNVME
TRUE if the virtual machine uses Raw Device Mapping (RDM).BooleanVMHasRDM
TRUE if the virtual machine has SATA drives.BooleanVMHasSATA
135Configure a VMware Intelligent PolicyQuery Builder field reference

Table 6-15 Keywords in the Field drop-down (continued)
DescriptionData typeField keyword
TRUE if a VMware snapshot of the virtual machine is currently active.BooleanVMHasSnap
TRUE if the virtual machine has a display name that is valid for useas the host name.
BooleanVMHasVDSName
The virtual machine name that is derived from a reverse lookup of itsIP address.
Values are not case-sensitive.
Alphanumericstring
VMHostName
TRUE if the virtual machine is connected and available.
For example: If a virtual machine's ESX server is down, that virtualmachine is not connected.
BooleanVMIsConn
The VMware version of the virtual machine.
Values are case-sensitive.
For example: vmx-04, vmx-07, vmx-08.
Alphanumericstring
VMVersion
The name of the vmx datastore (sometimes called the vmx directoryor configuration datastore).
Values are case-sensitive.
More information on the vmx datastore is available.
See “NetBackup for VMware terminology” on page 20.
Alphanumericstring
VMXDatastore
The name of the folder that contains the vmx datastores.
Values are not case-sensitive.
Alphanumericstring
VMXDatastoreFolder
The name of the vmx datastore's NFS host.
Values are not case-sensitive.
Alphanumericstring
VMXDatastoreNFSHost
The folder structure that defines the path to a vmx NFS datastore. Usethis option if the NFS host name of the datastore that you want to filteron is not unique in your environment.
Values are not case-sensitive.
Alphanumericstring
VMXDatastoreNFSPath
The type of the vmx datastore. Values are NFS or VMFS.
Values are not case-sensitive.
Alphanumericstring
VMXDatastoreType
136Configure a VMware Intelligent PolicyQuery Builder field reference

Table 6-15 Keywords in the Field drop-down (continued)
DescriptionData typeField keyword
The value of a custom attribute that is set in vSphere Client for one ormore virtual machines.
Note: in vSphere Client, the attribute must have a value for at leastone virtual machine. The attribute type must be Virtual Machine.
The values are case-sensitive.
Custom Attribute based disk exclusion requires that you enter inNetBackup the credentials for the vCenter server or servers that hostthe VMs. ESXi server credentials are not sufficient.
See “Adding NetBackup credentials for VMware” on page 45.
Alphanumericstring
[vSphere custom attributes]
Operators
Table 6-16 describes the operators available in the Operator drop-down.
Table 6-16 Operators in the Operator drop-down
DescriptionOperator
Matches any of the specified values in the Value(s) field.
For example: If the ESX servers in the Value(s) field are "ESX01","ESX02,"ESX03", AnyOfmatches any ESX server that has one of those names. If the names of your servers are notidentical to any of the specified values, no match occurs. A server named ESX01A is not a match.
AnyOf
Matches the value in the Value(s) field wherever that value occurs in the string.
For example: If the Value(s) entry is "dev", Contains matches strings such as "01dev", "01dev99","devOP", and "Development_machine".
Contains
Matches the value in the Value(s) field when it occurs at the end of a string.
For example: If the Value(s) entry is "dev", EndsWith matches the string "01dev" but not "01dev99","devOP", or "Development_machine".
EndsWith
Matches only the value that is specified in the Value(s) field.
For example: If the display name to search for is "VMtest27", Equal matches virtual machinenames such as VMTest27 or vmtest27 or vmTEST27, and so forth. The name VMtest28 is notmatched.
Equal
Matches any value that is greater than the specified Value(s), according to the UTF-8 collatingsequence.
Greater
Matches any value that is greater than or equal to the specified Value(s), according to the UTF-8collating sequence.
GreaterEqual
137Configure a VMware Intelligent PolicyQuery Builder field reference

Table 6-16 Operators in the Operator drop-down (continued)
DescriptionOperator
Determines whether a value is returned for the Field keyword. Use IsSet with another rule as acondition, to ensure that the query selects the appropriate virtual machines.
Note that you do not make an entry under Value(s) for a rule that uses IsSet.
See “The IsSet operator in queries” on page 120.
See “Effect of Primary VM identifier parameter on Selection column in Test Query results”on page 142.
See “Test Query: Failed virtual machines” on page 140.
IsSet
Matches any value that is less than the specified Value(s), according to the UTF-8 collatingsequence.
Less
Matches any value that is less than or equal to the specified Value(s), according to the UTF-8collating sequence.
LessEqual
Matches any value that is not equal to the value in the Value(s) field.NotEqual
Matches the value in the Value(s) field when it occurs at the start of a string.
For example: If the Value(s) entry is "box", StartsWith matches the string "box_car" but not"flatbox".
StartsWith
Value(s)
Table 6-17 describes the characters that can be entered in the Value(s) field. TheField keyword determines case sensitivity.
Note: The character string you enter in the Value(s) field must be enclosed in singlequotes or double quotes.
Table 6-17 Characters you can enter for Value(s)
String characters allowedCharacter types
A to Z, a to z, 0 to 9, - (minus sign), and special characters.
Note: Decimal numbers only.
Alphanumerics
* (asterisk) matches everything.
For example: "*prod*" matches the string "prod" preceded or followed by any characters.
? (question mark) matches any single character.
For example: "prod??" matches the string "prod" followed by any two characters.
Wildcards
138Configure a VMware Intelligent PolicyQuery Builder field reference

Table 6-17 Characters you can enter for Value(s) (continued)
String characters allowedCharacter types
\ (backslash) escapes the wildcard or meta-character that follows it.
For example: To search for a string that contains an asterisk (such as test*), enter "test\*"
Escape character
Note: The characters you enter in Value(s) must be enclosed in single or double quotes.
To search for a string that contains quotation marks, either escape each quote (\") or enclosethe entire string in the opposite type of quotes.
For example: To search for a string that includes double quotes (such as "name"), enter'"name"' (enclosing it in single quotes) or "\"name\""
Quotation marks
See “The basics of a NetBackup query rule” on page 104.
Test Query screen for VMwareThis topic applies to policy configuration for NetBackup for VMware. You can usethe Query Builder to enter rules for the automatic selection of VMware virtualmachines for backup. Use the Test Query screen to test the rules.
This screen lists the virtual machines that NetBackup discovered in your virtualenvironment when you clicked Test Query. Later changes in the virtual environmentmay affect which virtual machines match the query rules. For example: if virtualmachines are added, the test results may not be identical to the virtual machinesthat are selected for backup when the backup runs.
When the next backup runs from this policy, the following occur: NetBackupre-discovers virtual machines, consults the query rules, and backs up the virtualmachines that match the rules.
The list of backed up virtual machines is saved but the virtual machines are notdisplayed in the policy's Clients tab. You can use the Activity Monitor to view thevirtual machine jobs, or you can run a Virtual Client Summary report in OpsCenter.
Note: An alternative to the Test Query screen is the nbdiscover command. Formore information, see the NetBackup Commands Reference Guide.
See “Using the Activity Monitor to monitor virtual machine backups” on page 153.
See “Using OpsCenter to report on virtual machine backups” on page 157.
The Test Query function runs in the background. You can continue to configurethe policy while the test runs. Any changes you make in the Query Builder however
139Configure a VMware Intelligent PolicyTest Query screen for VMware

are not included in the currently running test. You must re-initiate the test to seethe results of your Query Builder changes.
Table 6-18
DescriptionField
Lists the rules in the Query Builder that were used in this test. The rulesare specified in the Query Builder on the policy Clients tab.
Test query forpolicy
VM Name: Shows the display name of all discovered virtual machines.
Selection: Lists the virtual machines that were discovered, as follows:
■ INCLUDED: The virtual machine matches the rules in the query.■ EXCLUDED: The virtual machine does not match the rules in the
query.■ FAILED: The virtual machine cannot be selected for backup because
of a host name problem or other error. Also, the query cannot excludethe virtual machine. An explanation appears at the bottom of the TestQuery screen. For example:
VM does not have a host name to use as aclient name, display name =
See “Test Query: Failed virtual machines” on page 140.The operator IsSet can be used to filter out such virtual machines.More information is available on IsSet.See Table 6-16 on page 137.See “The IsSet operator in queries” on page 120.
Test QueryResults
Gives a tally of how many virtual machines were included, excluded, orfailed in the test.
Included:
Excluded:
Failed:
See “Using the Activity Monitor to monitor virtual machine backups” on page 153.
See “About automatic virtual machine selection for NetBackup for VMware”on page 102.
See “Configuring automatic virtual machine selection” on page 112.
Test Query: Failed virtual machinesThis topic applies to policy configuration for NetBackup for VMware. You can usethe Query Builder to enter rules for the automatic selection of VMware virtualmachines for backup. Use the Test Query screen to test the rules.
140Configure a VMware Intelligent PolicyTest Query: Failed virtual machines

If the query rules cannot exclude a virtual machine, and that virtual machine cannotbe selected for backup, it is marked as FAILED. The virtual machine is listed asnot run in the job details log.
For example: the virtual machine does not have the type of name specified by thePrimary VM identifier parameter (such as host name or display name). Or thevirtual machine name contains invalid characters. In any case, a virtual machinethat is listed as FAILED should be investigated: it may be one that you want to backup.
To see the reason for the failure, click on the virtual machine in the Test QueryResults. An explanation appears at the bottom of the screen.
For example:
Explanation: The virtual machine that is listed as Ubuntu-vS in the example doesnot have a VMware host name. In the NetBackup policy, on the VMware tab, thePrimary VM identifier parameter may be set to VM hostname. In that case,NetBackup cannot refer to the virtual machine by its host name and thus cannotback it up.
You can fix this problem in a couple of ways:
■ Use vSphere Client to configure a host name for the virtual machine.
■ To exclude the virtual machines that have no host name, construct a query withthe IsSet operator.
141Configure a VMware Intelligent PolicyTest Query: Failed virtual machines

See “The IsSet operator in queries” on page 120.
See “Effect of Primary VM identifier parameter on Selection column in Test Queryresults” on page 142.
See “Test Query screen for VMware” on page 139.
Effect of Primary VM identifier parameter onSelection column in Test Query results
This topic applies to policy configuration for NetBackup for VMware. You can usethe Query Builder to enter rules for the automatic selection of VMware virtualmachines for backup.
The NetBackup policy's Primary VM identifier parameter tells NetBackup how toidentify virtual machines. For example, if the parameter is set to VM hostname,NetBackup identifies virtual machines by their host names. If they do not have ahost name, the policy cannot back them up.
The Primary VM identifier parameter has a direct effect on the query test results.Note that for each virtual machine, the query test result is one of three possibilities:INCLUDED, EXCLUDED, or FAILED.
If NetBackup cannot identify a virtual machine according to the Primary VMidentifier parameter, one of two test results can occur:
■ If the virtual machine is filtered out by the query rules, it is listed as EXCLUDED.
■ If the virtual machine is not filtered out by the query rules, it is listed as FAILED.The following table gives the test query results from example combinations ofthe Primary VM identifier parameter and a query rule.
Table 6-19 Effect of Primary VM identifier parameter and query rules on testquery results
Test query resultQuery rule in QueryBuilder
Primary VMidentifier setting onVMware policy tab
INCLUDED: Any virtual machines with a host name thatcontains "VM". Since the Primary VM identifier parameter tellsNetBackup to select the virtual machine by host name, it canback up the virtual machines.
EXCLUDED: All other virtual machines.
VMHostName Contains "VM"VM hostname
142Configure a VMware Intelligent PolicyEffect of Primary VM identifier parameter on Selection column in Test Query results

Table 6-19 Effect of Primary VM identifier parameter and query rules on testquery results (continued)
Test query resultQuery rule in QueryBuilder
Primary VMidentifier setting onVMware policy tab
INCLUDED: Any virtual machines that have a host name andthat have a display name that contains "VM".
EXCLUDED: Any virtual machines that have a host name, butthat do not have a display name containing "VM".
FAILED: Any virtual machines that do not have a host name.Since the Primary VM identifier parameter is set to VMhostname, NetBackup cannot select the virtual machine forbackup.
Displayname Contains "VM"VM hostname
INCLUDED: Any virtual machines that have a host name andthat have a display name that contains "VM".
EXCLUDED: All other virtual machines. The IsSet rule meansthat if a virtual machine does not have a host name, it isexcluded.
Displayname Contains "VM"
AND VMHostName IsSet
VM hostname
INCLUDED:
■ Any virtual machines that have a host name and that havea display name that contains "VM".
■ Any virtual machines without a host name that have anannotation that contains "test".
EXCLUDED: All other virtual machines.
Displayname Contains "VM"
AND VMHostName IsSet
OR Annotation Contains "test"
AND NOT VMHostNameIsSet
VM hostname
INCLUDED: Any virtual machines with the display names thatcontain "VM". Since the Primary VM identifier parameter tellsNetBackup to select the virtual machine by display name, itcan back up the virtual machines.
EXCLUDED: All other virtual machines.
Displayname Contains "VM"VM display name
INCLUDED: Any virtual machines that have a display nameand that have a host name that contains "VM".
EXCLUDED: Any virtual machines that have a display name,but that do not have a host name containing "VM".
FAILED: Any virtual machines that do not have a display name.Since the Primary VM identifier parameter is set to VMdisplay name, NetBackup cannot select those virtual machinesfor backup.
VMHostName Contains "VM"VM display name
143Configure a VMware Intelligent PolicyEffect of Primary VM identifier parameter on Selection column in Test Query results

See “Test Query: Failed virtual machines” on page 140.
See “The IsSet operator in queries” on page 120.
See “Effect of Primary VM identifier parameter on VM Name column in Test queryresults” on page 144.
Effect of Primary VM identifier parameter on VMName column in Test query results
This topic applies to policy configuration for NetBackup for VMware. You can usethe Query Builder to enter rules for the automatic selection of VMware virtualmachines for backup. You can use the Test Query screen to test the rules.
The policy's Primary VM identifier parameter affects the type of virtual machinename that appears in the VM Name column of the Test Query screen, as follows:
■ If a virtual machine is EXCLUDED or FAILED, it is listed according to its virtualmachine display name. The Primary VM identifier parameter does not matter.
■ But if a virtual machine is listed as INCLUDED, note: The name that appearsunder VM Name is the type of name that is specified on the Primary VMidentifier parameter.For example: If the Primary VM identifier parameter is VM hostname, theincluded virtual machine is listed according to its host name. Even if the queryrule specified Display name (such as Displayname Equal "vm1"), the virtualmachine appears on the Test Query screen by its host name.
See “Primary VM identifier options (VMware)” on page 76.
See “Effect of Primary VM identifier parameter on Selection column in Test Queryresults” on page 142.
Refreshing the display of virtual environmentchanges in the Query Builder
By default, NetBackup waits one hour before the policy Query Builder detectschanges in the virtual environment. Until one hour has passed, the Query Builderdoes not detect the changes when you click the "Load values" folder icon next tothe Value(s) field. To make the changes immediately available to the Value(s) field,use the following procedure to refresh the display.
144Configure a VMware Intelligent PolicyEffect of Primary VM identifier parameter on VM Name column in Test query results

Note: The Query Builder's Reuse VM selection query results for option does notaffect the display of virtual environment changes in the Query Builder. The reuseoption determines how long NetBackup reuses the current backup list for futureexecutions of the policy.
To refresh the Query Builder's view of the virtual environment (Windows):
1 On the Windows desktop of the local host, click Start > Run and enter regedit.
2 To be on the safe side, make a backup of the current registry (File > Export).
3 Go to HKEY_LOCAL_MACHINE > SOFTWARE > Veritas > NetBackup >CurrentVersion > Config and create a key that is called BACKUP.
4 Under BACKUP, create a new DWORD that is called xmlCacheLimit.
5 Set this DWORD to the number of seconds for the refresh.
A value of 15 allows the Query Builder to be refreshed after 15 seconds.
6 If the policy editor is open in the NetBackup Administration Console, closeit and reopen it.
To refresh the Query Builder's view of the virtual environment (Linux):
1 On the Linux desktop of the local host, create (or open) the following file:
/usr/openv/netbackup/virtualization.conf
2 Enter a new dword line under [BACKUP] to set the number of seconds for therefresh. For example:
[BACKUP]
"xmlCacheLimit"=dword:15
This example allows the Query Builder to be refreshed after 15 seconds.
Note: If the file already contains a [BACKUP] line, do not add another [BACKUP]line. Any other lines that already exist under [BACKUP] should remain as theyare.
3 Save the file.
4 If the policy editor is open in the NetBackup Administration Console, close itand reopen it.
145Configure a VMware Intelligent PolicyRefreshing the display of virtual environment changes in the Query Builder

Reducing the time required for VM discovery in alarge VMware environment
NetBackup VMware Intelligent Policies use query rules to automatically search andfilter the vSphere environment. By default, the query rules search all the VMwareservers in your environment. If the environment contains many VMware serverswith many virtual machines, VM discovery may take a long time. You can speedup VM discovery by limiting the search to specific VMware servers or virtualmachines.
The following is an example of a policy Query Builder rule that searches all VMwareservers and all virtual machines:
vmware:/?filter=Displayname Contains "vm1"
To limit the search to particular servers or virtual machines, insert an additionalexpression in the Query Builder rule as explained in the following procedure.
To use the Administration Console to reduce the time required for VMdiscovery in a VMware environment
1 In the NetBackup Administration Console, open the VMware Intelligent Policy.
2 On the Clients tab of the policy, make sure Select automatically throughVMware Intelligent Policy query is selected.
3 In the Query Builder, click Advanced.
4 Under Query (Advanced Mode), create one or more rules to search for VMsin specific VMware servers or for specific virtual machines.
Be aware that to create two or more rules, you must be in Advanced Mode notBasic Mode. Additionally, each query rule must begin on its own line.
You can use the types of rules shown:
■ To search for VMs in a particular VMware servervmware://VMware_server?filter=filter
■ To search for a specific virtual machine on a particular VMware servervmware://VMware_server/vm/virtual_machine_instance_uuid
146Configure a VMware Intelligent PolicyReducing the time required for VM discovery in a large VMware environment

Reduce the size ofbackups
This chapter includes the following topics:
■ About reducing the size of VMware backups
■ Block-level backup (BLIB): full vs incremental
■ Deleting a vSphere Client snapshot
About reducing the size of VMware backupsThis topic applies to policy configuration for NetBackup for VMware.
NetBackup provides the following options for reducing the backup size for a VMwarevirtual machine:
7Chapter

Table 7-1 Options for reducing the virtual machine backup size
DescriptionOption
BLIB reduces the size of backups (full and incremental) by tracking block-level changes. Onlythe blocks that have changed since the last full or incremental are included in the backup. Forincremental backups, this option applies to cumulative and to differential backups.
BLIB works with VMware’s Changed Block Tracking in vSphere to track block-level changesin the virtual machine.
The Enable block-level incremental backup option is enabled by default on the NetBackuppolicy VMware tab. NetBackup uses BLIB for storage optimization when the backup runs.
Note: The first backup you run with BLIB must be a full backup.
See “Block-level backup (BLIB): full vs incremental” on page 148.
Note: BLIB works only with ESX 4.0 or later virtual machines at version vmx-07 or later.
Note: If you used vSphere Client to manually create a VM snapshot and that snapshot iscurrently active, you may have to delete the snapshot.
See “Deleting a vSphere Client snapshot” on page 149.
Block levelincremental backup(BLIB)
Reduces the size of virtual machine backups by excluding any deleted sectors in the file systemon the virtual machine.
To enable this option, click Exclude deleted blocks on the policy VMware tab.
Refer to Exclude deleted blocks in the following topic:
See “Optimizations options (VMware)” on page 74.
Exclusion of deletedblocks.
Block-level backup (BLIB): full vs incrementalThis topic applies to policy configuration for NetBackup for VMware.
When you use the Enable block-level incremental backup option in the policy,NetBackup uses VMware's Changed Block Tracking feature (CBT) to reduce thebackup size.
This option reduces the size of full backups as well as the size of incrementalbackups, as follows.
148Reduce the size of backupsBlock-level backup (BLIB): full vs incremental

Table 7-2 Block-level backup of the virtual machine: full vs incrementalschedule
Optimization that is used in backupType of backup
Backs up only the blocks that have changed since the .vmdk wascreated. Note that the blocks that are not initialized are excludedfrom the backup.
Backup of entire virtualmachine, with fullschedule
Backs up only the blocks that have changed since the last backup,as follows:
■ For cumulative incrementals, BLIB backs up only the blocksthat changed since the last full backup.
■ For differential incrementals, BLIB backs up only the blocksthat changed since the previous backup of any kind.
Note: On incremental backups, the Enable block-levelincremental backup option backs up the changed files as wellas their metadata.
Note: VMware CBT may occasionally reset tracking of filechanges in the virtual machine, such as after a power failure orhard shutdown. For the next backup, NetBackup reads all thedata from the vmdk files and the backup takes longer thanexpected. If deduplication is enabled, the deduplication rate islower than expected.
The following VMware article contains more information on CBT:
Changed Block Tracking (CBT) on virtual machines (1020128)
Backup of entire virtualmachine, withincremental schedule
See “About reducing the size of VMware backups” on page 147.
Deleting a vSphere Client snapshotThis topic applies to the use of BLIB (Perform block level incremental backup)with NetBackup for VMware.
To use BLIB with NetBackup for VMware, you must delete an existing vSphereClient snapshot if both of the following are true:
■ You used the vSphere Client interface to manually create a snapshot of thevirtual machine and that snapshot is currently active.
■ A NetBackup policy with the Enable block-level incremental backup featurehad never been used to back up the virtual machine before you started thevSphere Client snapshot.
149Reduce the size of backupsDeleting a vSphere Client snapshot

In this case, NetBackup cannot enable BLIB for the virtual machine. You mustdelete the vSphere Client snapshot. Then, when the NetBackup policy runs, BLIBis enabled.
More information is available on NetBackup block-level backups:
See “About reducing the size of VMware backups” on page 147.
See “Block-level backup (BLIB): full vs incremental” on page 148.
To delete a vSphere Client snapshot
1 In the vSphere Client interface, right-click on the virtual machine and selectSnapshot > Snapshot Manager.
2 Select the snapshot and click Delete.
3 To back up the virtual machine with BLIB, you can now run a NetBackup policythat uses Enable block-level incremental backup.
NetBackup backups from this policy continue to use storage optimization, evenif you manually create a snapshot of the virtual machine using vSphere Client.
See “Configuring a VMware policy from the Policies utility” on page 68.
150Reduce the size of backupsDeleting a vSphere Client snapshot

Back up virtual machinesThis chapter includes the following topics:
■ Backing up virtual machines
■ Using the Activity Monitor to monitor virtual machine backups
■ Restarting jobs individually in the Activity Monitor
■ Viewing NetBackup activity in vSphere Web Client or vSphere Client (HTML5)
■ Using OpsCenter to report on virtual machine backups
Backing up virtual machinesThis topic applies to NetBackup for VMware.
Virtual machine backups initiate from a NetBackup policy. You can start the backupmanually from a policy, or have it run automatically according to a schedule that isdefined in the policy.
To create the policy, you can use the Policies utility in the NetBackup AdministrationConsole, or the Policy Configuration Wizard.
See “Configuring a VMware policy from the Policies utility” on page 68.
See “Configuring a VMware policy from the Policy Wizard ” on page 68.
For further information on policies and backup schedules, see the "Creating backuppolicies" chapter of the NetBackup Administrator's Guide, Volume I.
8Chapter

To back up a virtual machine manually from an existing policy
1 Click on Policies in the NetBackup Administration Console, right-click on thepolicy, and click Manual Backup....
The Manual Backup dialog appears.
2 Select the type of schedule for the backup.
152Back up virtual machinesBacking up virtual machines

3 Select the clients (virtual machines) to back up.
If the policy was configured for automatic selection of virtual machines, theClients pane shows the VMware backup host rather than the virtual machines.
4 Click OK to start the backup.
5 To see the job progress, clickActivity Monitor in the NetBackup AdministrationConsole.
It may take a few moments for the job to appear in the Activity Monitor. Do notstart another backup if a job does not immediately appear. If the job does notshow up after a few moments, close and restart the NetBackup AdministrationConsole.
Note that your VMware backup request launches more than one job. The firstjob automatically creates and deletes snapshots. This job has a dash (-) in theSchedule column. The second job backs up the virtual machine files from thesnapshot.
Using the Activity Monitor to monitor virtualmachine backups
This topic applies to NetBackup for VMware.
You can use the NetBackup Activity Monitor to keep track of the VMware virtualmachines that a policy backs up.
To monitor virtual machine backups
1 Click Activity Monitor in the left pane of the Administration Console.
2 Note each job as it appears by row.
If the policy selects virtual machines automatically (based on a query), thebackup consists of three generations of jobs:
■ The first job discovers the virtual machines. This job is labeled Backup.(This job is unique to policies that use a query to select virtual machines.)
■ The discovery (Backup) job starts a child job to take a VMware snapshotof the virtual machine. A snapshot job is started for each virtual machine.Each of these jobs is labeled Snapshot.
■ Each snapshot job starts a child job to back up the virtual machine. A backupjob is started for each virtual machine. Each of these jobs is labeledBackup.The job flow is as follows:
discovery job --> snapshot job --> backup job
153Back up virtual machinesUsing the Activity Monitor to monitor virtual machine backups

3 To trace the discovery job to the virtual machine backup jobs, note the Job IDand the Parent Job ID columns.
In this example, the discovery job is 119. Job 119 started job 120 (Snapshot).Job 120 started job 121 (Backup).
4 Right-click on the job row and click Details.
On the Job Details screen, click the Detailed Status tab for more informationon the job.
5 If a column is not displayed in the Activity Monitor, or to re-arrange the columns,do the following:
■ Right-click anywhere in the Jobs pane and click Columns > Layout.
■ Click the row for the heading that you want to display, hide, or re-arrange(such as Parent Job ID).
■ Use Move Up, Move Down, Show, and Hide as needed.
■ Click OK. The columns should now be visible in the Activity Monitor.
See “Limit jobs per policy on the Attributes tab (for VMware)” on page 72.
See “Restarting jobs individually in the Activity Monitor” on page 155.
154Back up virtual machinesUsing the Activity Monitor to monitor virtual machine backups

See “Backing up virtual machines” on page 151.
See “Using OpsCenter to report on virtual machine backups” on page 157.
Restarting jobs individually in the Activity MonitorThis topic is about NetBackup policies that select virtual machines automatically (aVirtual Machine Intelligent Policy).
If the policy automatically selects virtual machines for backup, you can restart thevirtual machine jobs individually. This feature is handy if the policy backs up a largenumber of virtual machines: you can restart one or more of the jobs individuallyrather than re-running the entire policy.
To restart jobs individually in the Activity Monitor
◆ In the Activity Monitor, right-click on the job and select Restart Job.
In some cases, to restart a child job you may have to restart its parent job.
See “Using the Activity Monitor to monitor virtual machine backups” on page 153.
ViewingNetBackup activity in vSphereWebClientor vSphere Client (HTML5)
In VMware vCenter, NetBackup can record the backup activity for virtual machines.You can view the events in vSphere Web Client or vSphere Client (HTML5) at thelevel of any parent object (such as folder, datacenter, cluster, or host). You canalso view the events for the virtual machine.
Note: The NetBackup plug-in is not required.
Make sure that the policy's Post vCenter events option is enabled:
See “VMware - Advanced Attributes dialog” on page 81.
To view backup events and the last backup time in vSphere Web Client
1 Open vSphere Web Client or vSphere Client (HTML5).
2 Go to Home > Events.
155Back up virtual machinesRestarting jobs individually in the Activity Monitor

3 In the Event Console, enter NetBackup in the search field.
Each NetBackup event includes the following details:
Shows the NetBackup operation that succeeded or failed, andincludes policy details and duration. When you click on the rowof the event, the Event Details pane shows the sameinformation.
Description
The types are Information for a successful operation, and Errorfor a failed operation.
Type
The date and time of the event.Date Time
Not used.Task
The virtual machine that was backed up.
Click on the virtual machine link to see the Summary tab.
Note: On the Summary tab in vSphere 6.5, under CustomAttributes, the timestamp of the virtual machine's last backupis listed on the NB_LAST_BACKUP attribute.
Target
The user that ran the backup.User
4 To view backup events for a particular object (such as ESX host or VM), selectthe object and do the following:
■ Click the Monitor tab.
156Back up virtual machinesViewing NetBackup activity in vSphere Web Client or vSphere Client (HTML5)

■ Click Task & Events.
■ Click the Events view.
■ Enter NetBackup in the search field.
Using OpsCenter to report on virtual machinebackups
This topic applies to NetBackup for VMware.
To use OpsCenter to obtain a backup report on VMware virtual machines
1 Start the OpsCenter console in a web browser.
On a system that has a network connection to the OpsCenter server, enter thefollowing in a browser:
http://host.domain/opscenter
where host.domain is the fully qualified domain name or IP address of theOpsCenter server.
2 Click the Reports tab.
3 Click Client Reports > Virtual Client Summary.
The Virtual Client Summary report is described in the OpsCenter ReportingGuide.
157Back up virtual machinesUsing OpsCenter to report on virtual machine backups

See “Using the Activity Monitor to monitor virtual machine backups” on page 153.
See “Backing up virtual machines” on page 151.
158Back up virtual machinesUsing OpsCenter to report on virtual machine backups

Use Accelerator to backup virtual machines
This chapter includes the following topics:
■ About the NetBackup Accelerator for virtual machines
■ Accelerator: full vs. incremental schedules
■ How the NetBackup Accelerator works with virtual machines
■ Accelerator notes and requirements for virtual machines
■ Accelerator forced rescan for virtual machines (schedule attribute)
■ Accelerator requires the OptimizedImage attribute
■ Accelerator backups and the NetBackup catalog
■ Accelerator messages in the backup job details log
■ NetBackup logs for Accelerator with virtual machines
■ About reporting the amount of Accelerator backup data that was transferredover the network
■ Replacing the Accelerator image size with the network-transferred data inNetBackup command output
About the NetBackup Accelerator for virtualmachines
NetBackup Accelerator reduces the backup time for VMware backups. NetBackupuses VMware Changed Block Tracking (CBT) to identify the changes that were
9Chapter

made within a virtual machine. Only the changed data blocks are sent to theNetBackup media server, to significantly reduce the I/O and backup time. The mediaserver combines the new data with previous backup data and produces a traditionalfull NetBackup image that includes the complete virtual machine files.
Note: Accelerator is most appropriate for virtual machine data that does notexperience a high rate of change.
Accelerator has the following benefits:
■ Performs the full backups faster than traditional backup. Creates a compactbackup stream that uses less network bandwidth between the backup host andthe server.Accelerator sends only changed data blocks for the backup. NetBackup thencreates a full traditional NetBackup image that includes the changed block data.
■ Accelerator backups support Granular Recovery Technology (GRT) for restoringExchange, SQL, and SharePoint applications (using a full schedule only).
■ Accelerator backups (full and incremental) support instant recovery of virtualmachines.
■ If the Enable file recovery from VM backup option on the policy VMware tabis enabled, you can restore individual files from the backup (full or incremental).
■ Reduces the I/O on the backup host.
■ Reduces the CPU load on the backup host.
See “How the NetBackup Accelerator works with virtual machines” on page 161.
Accelerator: full vs. incremental schedulesNetBackup Accelerator supports full and incremental backups.
Note: After an initial full backup, Accelerator backups with a full schedule haveabout the same effect on I/O and performance as traditional incremental backups.The NetBackup catalog however includes all catalog references that would be madeif the backup was a traditional (non-Accelerator) full.
For virtual machine restore, note the following about full vs. incremental backupswith Accelerator:
■ For applications (Exchange, SQL, and SharePoint), NetBackup Acceleratorsupports Granular Recovery Technology (GRT) restores from full backups only.
■ For any other kind of virtual machine restore, the Accelerator supports fullbackups and incremental backups.
160Use Accelerator to back up virtual machinesAccelerator: full vs. incremental schedules

See “How the NetBackup Accelerator works with virtual machines” on page 161.
How the NetBackupAccelerator workswith virtualmachines
To enable acceleration of virtual machine backups, click Use Accelerator on thepolicy Attributes tab.
See “Configuring a VMware policy from the Policies utility” on page 68.
The NetBackup Accelerator creates the backup stream and backup image for eachvirtual machine as follows:
■ If the virtual machine has no previous backup, NetBackup performs a full backupand uses VMware Changed Block Tracking to track the data in use for eachVMDK.
■ At the next backup, NetBackup identifies data that has changed since theprevious backup. Only changed blocks and the header information are includedin the backup, to create a full virtual disk backup.
■ The backup host sends to the media server a tar backup stream that consistsof the following: The virtual machine's changed blocks, and the previous backupID and data extents (block offset and size) of the unchanged blocks.
■ The media server reads the virtual machine's changed blocks, the backup ID,and information about the data extents of the unchanged blocks. From thebackup ID and data extents, the media server locates the rest of the virtualmachine's data in existing backups.
■ The media server directs the storage server to create a new full image thatconsists of the following: The newly changed blocks, and the existing unchangedblocks that reside on the storage server. The storage server may not write theexisting blocks but rather link them to the image.
See “Accelerator notes and requirements for virtual machines” on page 161.
See “Accelerator forced rescan for virtual machines (schedule attribute)” on page 163.
Accelerator notes and requirements for virtualmachines
Note the following about Accelerator for virtual machines:
■ Accelerator for virtual machines uses VMware Changed Block Tracking (CBT)to identify the changes that were made within a virtual machine.
161Use Accelerator to back up virtual machinesHow the NetBackup Accelerator works with virtual machines

VMware CBT may occasionally reset tracking of file changes, such as after apower failure or hard shutdown. In that case, for the next backup NetBackupreads all the data from the vmdk files and the backup takes longer than expected.If deduplication is enabled, the deduplication rate is lower than expected.For more information on CBT, see the following VMware article:Changed Block Tracking (CBT) on virtual machines (1020128)
■ Supports the disk storage units that have the following storage destinations:
■ Cloud storage. Storage that a supported cloud storage vendor provides.
■ NetBackup Media Server Deduplication Pool. In addition to NetBackup mediaservers, NetBackup 5200 series appliances support Media ServerDeduplication Pool storage.
■ Qualified third-party OpenStorage devices.
To verify that your storage unit supports Accelerator, refer to the NetBackuphardware compatibility list for the currently supported OST vendors:NetBackup Master Compatibility List
■ It is recommended that you not enable Expire after copy retention for anystorage units that are used with storage lifecycle policies (SLP) in combinationwith Accelerator. The Expire after copy retention can cause images to expirewhile the backup runs. To synthesize a new full backup, the SLP backup needsthe previous backup image. If the previous image expires during the backup,the backup fails.
■ Update the NetBackup device mapping files if needed.The NetBackup device mapping files contain all storage device types thatNetBackup can use. To add support for the new devices or upgraded devicesthat support Accelerator, download the current device mapping files from thewebsite.See theNetBackup Administrator's Guide Volume I for information on the devicemapping files and how to download them.
■ Storage unit groups are supported only if the storage unit selection in the groupis Failover.
■ Supports the full backups and incremental backups. Every Accelerator backup(from a full schedule or incremental schedule) results in a complete image ofthe virtual machine.
■ You can use incremental backups (cumulative or differential) as follows: Toreduce the file-mapping overhead and to reduce the number of files that arerecorded in the NetBackup catalog. Cumulative backups may involve morefile-mapping because they do not use the random indexing method to determine
162Use Accelerator to back up virtual machinesAccelerator notes and requirements for virtual machines

which files have changed. In some cases, differential backups may be fasterthan cumulative backups.
■ If a backup of the virtual machine does not exist, NetBackup performs a fullbackup. On the backup host it also accesses the VMware CBT information. Thisinitial backup occurs at the speed of a normal (non-accelerated) full backup.Subsequent Accelerator backups of the virtual machine use VMware ChangedBlock Tracking to accelerate the backup.
Note:When you first enable a VMware policy to use Accelerator, the next backup(whether full or incremental) is in effect a full backup: It backs up all the virtualmachine files that are selected in the policy. If that backup is an incremental, itmay not complete within the backup window. When you upgrade policies toNetBackup 7.6 or later and enable Accelerator, make sure that the next fullbackup completes in the time that is required.
■ If the storage unit that is associated with the policy cannot be validated whenyou create the policy, note: The storage unit is validated later when the backupjob begins. If Accelerator does not support the storage unit, the backup fails. Inthe bpbrm log, a message appears that is similar to one of the following:
Storage server %s, type %s, doesn't support image include.
Storage server type %s, doesn't support accelerator backup.
■ Accelerator requires the storage to have the OptimizedImage attribute enabled.See “Accelerator requires the OptimizedImage attribute” on page 164.
■ Because of a VMware restriction, BLIB is not supported for VMware templates.As a result, NetBackup Accelerator cannot be used to back up VMware virtualmachine templates.
Accelerator forced rescan for virtual machines(schedule attribute)
Accelerator for virtual machines uses Changed Block Tracking (CBT) technologyfrom VMware to identify changed blocks. NetBackup requires the changed blockswhen it creates a full virtual machine (synthesized) image. NetBackup is thereforedependent on VMware CBT for correctly identifying changed blocks. To protectagainst any potential omissions by underlying VMware CBT using timestamps, theAccelerator forced rescan option conducts the backup by collecting all in-useblocks as reported by VMware CBT.
163Use Accelerator to back up virtual machinesAccelerator forced rescan for virtual machines (schedule attribute)

When Accelerator forced rescan is used, all the data on the virtual machine isbacked up. This backup is similar to the first Accelerator backup for a policy. Forthe forced rescan job, the optimization percentage for Accelerator is 0. The durationof the backup is similar to a non-Accelerator full backup.
Note: Under normal operations, an Accelerator forced rescan schedule is notnecessary for VMware backups. It can be used to enforce a new baseline backupin case VMware CBT issues are discovered. Engaging with Veritas support isrecommended in such situations.
Accelerator forced rescan is unavailable if the Use Accelerator option on theAttributes tab is not selected.
See “Accelerator messages in the backup job details log” on page 165.
Accelerator requires the OptimizedImage attributeAccelerator requires that the storage has the OptimizedImage attribute enabled.
To ensure that your storage is configured properly, see the documentation for yourstorage option:
■ NetBackup Media Server Deduplication Pool.The OptimizedImage attribute is enabled by default beginning with theNetBackup 7.1 release. If you created the storage servers and pools in an earlierrelease, you must configure them for OptimizedImage.See the NetBackup Deduplication Guide.
■ Backups to a third-party disk appliance.The storage device must support the OptimizedImage attribute.See the NetBackup OpenStorage Solutions Guide for Disk.
■ Cloud storage that NetBackup supports.See the NetBackup Cloud Administrator's Guide.
Accelerator backups and the NetBackup catalogUse of Accelerator does not affect the size of the NetBackup catalog. A full backupwith Accelerator generates the same catalog size as a full backup of the same datawithout Accelerator. The same is true of incremental backups: use of Acceleratordoes not require more catalog space than the same backup without Accelerator.
A potential catalog effect does exist, depending on how often you use Acceleratorwith full backups. A full backup with Accelerator completes faster than a normal
164Use Accelerator to back up virtual machinesAccelerator requires the OptimizedImage attribute

full. It may therefore be tempting to replace your incremental backups withAccelerator full backups. Note: Since a full backup requires more catalog spacethan an incremental, replacing incrementals with fulls increases the catalog size.When changing your incrementals to fulls, you must weigh the advantage ofAccelerator fulls against the greater catalog space that fulls require compared toincrementals.
Accelerator messages in the backup job detailslog
When a virtual machine is first backed up, Accelerator is not used for that backup.The following messages appear in the job details log:
7/25/2012 4:45:35 PM - Info bpbrm(pid=6192) There is no complete
backup image match with track journal, a regular full backup will
be performed
...
7/25/2012 4:53:22 PM - Info bpbkar32(pid=5624) accelerator sent
5844728320 bytes out of 5844726784 bytes to server, optimization 0.0%
When subsequent backups of the virtual machine use Accelerator, the followingmessages appear in the job details log:
7/27/2012 4:40:01 AM - Info bpbrm(pid=412) accelerator enabled
...
7/27/2012 4:43:07 AM - Info bpbkar32(pid=4636) accelerator sent
74764288 bytes out of 5953504256 bytes to server, optimization 98.7%
This message is a key trace for Accelerator. In this example Accelerator wassuccessful at reducing the backup data by 98.7%.
NetBackup logs for Accelerator with virtualmachines
Accelerator does not require its own log directory. For log messages aboutAccelerator, see the following standard NetBackup log directories.
165Use Accelerator to back up virtual machinesAccelerator messages in the backup job details log

Table 9-1 NetBackup logs that may contain Accelerator information
Resides onLog directory
NetBackup master or mediaserver
UNIX: /usr/openv/netbackup/logs/bpbrm
Windows: install_path\NetBackup\logs\bpbrm
NetBackup media serverUNIX: /usr/openv/netbackup/logs/bptm
Windows: install_path\NetBackup\logs\bptm
Backup host/usr/openv/netbackup/logs/bpbkar
Windows: install_path\NetBackup\logs\bpbkar
Backup host/usr/openv/netbackup/logs/bpfis
Windows: install_path\NetBackup\logs\bpfis
See “NetBackup logging forVMware” on page 290.
VxMS logs
To create the log directories, run the following command on the NetBackup serversand backup host:
On Windows:
install_path\NetBackup\logs\mklogdir.bat
On UNIX/Linux:
/usr/openv/netbackup/logs/mklogdir
About reporting the amount of Accelerator backupdata that was transferred over the network
For Accelerator backup reporting, several NetBackup commands can report theamount of data that is transferred over the network for each Accelerator backup.The amount of transferred data is often much less than the size of the Acceleratorbackup image.
For each Accelerator backup, NetBackup combines the client's (or VM's) changedblocks with the unchanged data from previous backups to synthesize a backupimage. However, NetBackup sends only the changed data over the network whenthe backup occurs. The resulting backup image may be much larger than the amountof backup data that travels the network. For backup reporting, it may be importantto distinguish between the backup image size and the amount of data that wastransferred over the network.
166Use Accelerator to back up virtual machinesAbout reporting the amount of Accelerator backup data that was transferred over the network

For Accelerator backups, the network-transferred data can appear in the output ofthe following NetBackup commands: bpdbjobs, bpimagelist, and bpclimagelist.
Table 9-2 lists the default location of these commands.
Table 9-2 Default location of bpdbjobs, bpimagelist, and bpclimagelist
Default locationCommand
Windows:
install_path\NetBackup\bin\admincmd\
UNIX, Linux
/usr/openv/netbackup/bin/admincmd/
bpdbjobs,bpimagelist
Windows:
install_path\NetBackup\bin\
UNIX, Linux
/usr/openv/netbackup/bin/
bpclimagelist
The following example uses the bpimagelist command to show the results of abackup of acmevm2:
bpimagelist -backupid acmevm2
Example output:
In this example, the backup image size in kilobytes is 7799632, and the amount ofdata that was transferred over the network is 225792.
You can use the following commands to show the amount of data that wastransferred over the network for an Accelerator backup.
167Use Accelerator to back up virtual machinesAbout reporting the amount of Accelerator backup data that was transferred over the network

bpimagelistbpimagelist -backupid backup_id [-l | -L | -json | -json_compact]
Brackets [ ] indicate optional elements, and the vertical bars | indicate that you canchoose only one of the options within the brackets.
Table 9-3 describes how the network-transferred data field appears in thebpimagelist output.
Table 9-3 The bpimagelist options that show the amount ofnetwork-transferred data for Accelerator backups
How the network-transferred data field appearsbpimagelistoption
The field is unlabeled. For example: 225792
See the bpimagelist example output earlier in this topic.
No option
The field is unlabeled (same as no option). For example: 225792-l
The field is labeled. For example:
Kilobytes Data Transferred: 225792
-L
The field is labeled. For example:
"kilobytes_data_transferred": 225792,
-json
The field is labeled. For example:
"kilobytes_data_transferred":225792,
-json_compact
bpdbjobsbpdbjobs –jobid job_id -report –most_columns
or
bpdbjobs –jobid job_id -report –all_columns
The network-transferred data field appears at the end of the output.
bpclimagelistbpclimagelist -client client_name
This command can only show the network-transferred data in the field that normallyshows the Accelerator backup image size. To show the network-transferred datawith this command, you must configure a NetBackup setting:
See “Replacing the Accelerator image size with the network-transferred data inNetBackup command output” on page 169.
168Use Accelerator to back up virtual machinesAbout reporting the amount of Accelerator backup data that was transferred over the network

Additional details on these commands are available in the NetBackup CommandsReference Guide or in the NetBackup man pages.
Replacing the Accelerator image size with thenetwork-transferred data in NetBackup commandoutput
You can configure the output of bpimagelist, bpdbjobs, and bpclimagelist toshow the amount of Accelerator backup data that was transferred over the networkinstead of the backup image size.
The following is the default bpimagelist output that shows the Accelerator imagesize (see the circled value 7799632). The amount of network-transferred dataappears farther down in the output (225792):
You can configure NetBackup command output to show the network-transferreddata in the image size field. In the output, the image size value is replaced with thenetwork-transferred data value (see the following example). A script that reads theimage size from the command output now reads the amount of network-transferreddata.
In the following bpimagelist output, the image size field shows thenetwork-transferred data (225792):
169Use Accelerator to back up virtual machinesReplacing the Accelerator image size with the network-transferred data in NetBackup command output

Note: The same change occurs in the labeled output of the commands (such aswith the -L option of bpimagelist). For example, the Kilobytes field shows thetransferred data value (225792 in the example) rather than the Accelerator backupimage size.
To enable the reporting of network-transferred data in the Accelerator imagesize field of bpimagelist, bpdbjobs, and bpclimagelist
◆ Use the bpsetconfig command to enable the output change.
To enable this change for the bpclimagelist command, enter the bpsetconfig
command on the master server. To enable this change for bpimagelist orbpdbjobs, enter the bpsetconfig command on the server where you intendto run bpimagelist or bpdbjobs.
Refer to Table 9-4 for the bpsetconfig command to use based on the type ofAccelerator backup that you want to report on.
170Use Accelerator to back up virtual machinesReplacing the Accelerator image size with the network-transferred data in NetBackup command output

Table 9-4 To enable the reporting of network-transferred data in theAccelerator image size field of bpimagelist, bpclimagelist, orbpdbjobs output
Enter this commandType of backupto report on
Windows
echo REPLACE_IMAGE_SIZE_WITH_DATA_TRANSFERRED = REPLACE_IMAGE_SIZE_FOR_ACCL_INC_VMWARE | install_path\NetBackup\bin\admincmd\bpsetconfig
UNIX, Linux
echo "REPLACE_IMAGE_SIZE_WITH_DATA_TRANSFERRED = REPLACE_IMAGE_SIZE_FOR_ACCL_INC_VMWARE" | /usr/openv/netbackup/bin/admincmd/bpsetconfig
IncrementalVMwareAcceleratorbackups
Windows
echo REPLACE_IMAGE_SIZE_WITH_DATA_TRANSFERRED = REPLACE_IMAGE_SIZE_FOR_ACCL_ALL_VMWARE | install_path\NetBackup\bin\admincmd\bpsetconfig
UNIX, Linux
echo "REPLACE_IMAGE_SIZE_WITH_DATA_TRANSFERRED = REPLACE_IMAGE_SIZE_FOR_ACCL_ALL_VMWARE" | /usr/openv/netbackup/bin/admincmd/bpsetconfig
All VMwareAcceleratorbackups (full andincremental)
Windows
echo REPLACE_IMAGE_SIZE_WITH_DATA_TRANSFERRED = REPLACE_IMAGE_SIZE_FOR_ACCL_INC_VIRTUAL | install_path\NetBackup\bin\admincmd\bpsetconfig
UNIX, Linux
echo "REPLACE_IMAGE_SIZE_WITH_DATA_TRANSFERRED = REPLACE_IMAGE_SIZE_FOR_ACCL_INC_VIRTUAL" | /usr/openv/netbackup/bin/admincmd/bpsetconfig
IncrementalAccelerator virtualmachine backups(VMware andHyper-V)
Windows
echo REPLACE_IMAGE_SIZE_WITH_DATA_TRANSFERRED = REPLACE_IMAGE_SIZE_FOR_ACCL_ALL_VIRTUAL | install_path\NetBackup\bin\admincmd\bpsetconfig
UNIX, Linux
echo "REPLACE_IMAGE_SIZE_WITH_DATA_TRANSFERRED = REPLACE_IMAGE_SIZE_FOR_ACCL_ALL_VIRTUAL" | /usr/openv/netbackup/bin/admincmd/bpsetconfig
All Acceleratorvirtual machinebackups (VMwareand Hyper-V, fulland incremental)
171Use Accelerator to back up virtual machinesReplacing the Accelerator image size with the network-transferred data in NetBackup command output

Table 9-4 To enable the reporting of network-transferred data in theAccelerator image size field of bpimagelist, bpclimagelist, orbpdbjobs output (continued)
Enter this commandType of backupto report on
Windows
echo REPLACE_IMAGE_SIZE_WITH_DATA_TRANSFERRED = REPLACE_IMAGE_SIZE_FOR_ACCL_INC_ALL | install_path\NetBackup\bin\admincmd\bpsetconfig
UNIX, Linux
echo "REPLACE_IMAGE_SIZE_WITH_DATA_TRANSFERRED = REPLACE_IMAGE_SIZE_FOR_ACCL_INC_ALL" | /usr/openv/netbackup/bin/admincmd/bpsetconfig
All incrementalAcceleratorbackups (physicalclients and virtualmachines)
Windows
echo REPLACE_IMAGE_SIZE_WITH_DATA_TRANSFERRED = REPLACE_IMAGE_SIZE_FOR_ACCL_ALL_ALL | install_path\NetBackup\bin\admincmd\bpsetconfig
UNIX, Linux
echo "REPLACE_IMAGE_SIZE_WITH_DATA_TRANSFERRED = REPLACE_IMAGE_SIZE_FOR_ACCL_ALL_ALL" | /usr/openv/netbackup/bin/admincmd/bpsetconfig
All Acceleratorbackups (full andincremental,physical clientsand virtualmachines)
To reset the command output to the default setting
◆ To disable the reporting of network-transferred data in the Accelerator imagesize field (return to default), enter the following:
Windows
echo REPLACE_IMAGE_SIZE_WITH_DATA_TRANSFERRED =
REPLACE_IMAGE_SIZE_DISABLED |
install_path\NetBackup\bin\admincmd\bpsetconfig
UNIX, Linux
echo "REPLACE_IMAGE_SIZE_WITH_DATA_TRANSFERRED =
REPLACE_IMAGE_SIZE_DISABLED" |
/usr/openv/netbackup/bin/admincmd/bpsetconfig
The following topic provides background on the Accelerator image size vs. theamount of data that was transferred over the network:
See “About reporting the amount of Accelerator backup data that was transferredover the network” on page 166.
172Use Accelerator to back up virtual machinesReplacing the Accelerator image size with the network-transferred data in NetBackup command output

Restore virtual machinesThis chapter includes the following topics:
■ Restore notes and restrictions
■ Restore notes and restrictions on Linux
■ Restoring the full VMware virtual machine
■ About VMware virtual machine disk restore
■ Restoring VMware virtual machine disks by using Backup, Archive, and Restore
■ Restoring VMware virtual machine disks by using NetBackup commands
■ About restore of individual filesAbout restoring individual VMware files
■ Restoring individual filesRestoring individual VMware virtual machine files
■ How NetBackup handles VMware tag associations at restore
■ Browse and search virtual machines for restore
■ If the recovery host is not at the same NetBackup release level as the backuphost
Restore notes and restrictionsThis topic is about restores from a NetBackup backup of a VMware virtual machine.
Before you begin the restore, note the following:
■ Cross-platform restore of individual files is not supported. You can restoreWindows files to Windows guest operating systems but not to Linux. You canrestore Linux files to supported Linux guest operating systems but not toWindows. In other words, the restore host must be the same platform as thefiles that you want to restore.
10Chapter

See “About restore of individual filesAbout restoring individual VMware files”on page 223.
■ Unless a NetBackup client is installed on the virtual machine, you must do therestore from the NetBackup master server.
■ To restore files to the original virtual machine location, the destination must bespecified as the virtual machine's host name (not display name or UUID).
■ To restore directly to an ESX server, the name that is specified for the restoremust match the ESX server’s official host name. The name must be in the sameformat in which it is registered in DNS and in the VMware server (whether shortor fully-qualified).See “Adding NetBackup credentials for VMware” on page 45.
■ If the VM’s display name was changed after the VM was backed up, thepre-recovery check may fail when you click Start Recovery:
VM exists overwrite -Failed. Vmxdir for VM exists
You can ignore the error and click Start Recovery, but note: The restore maysucceed but the folder that contains the vmx file for the newly restored VM hasa different name than the vmx folder of the existing VM. VMware does notrename this folder when the VM is renamed, but continues to use the existingfolder.As an alternative, restore the VM to a different location.
■ A virtual machine template cannot be restored to a standalone ESX server.Because templates are a feature of vCenter servers, you must restore thetemplate through vCenter. If you restore a template to a standalone ESX server,the template is converted to a normal virtual machine and is no longer a template.
■ NetBackup supports backup and recovery of VMware NVRAM files and thevTPM devices that are associated with virtual machines.
■ A NetBackup 8.3 or later backup or recovery host is required for NVRAMand vTPM protection. Supported recovery methods include Full VM recoveryand VMware Instant Recovery.
■ NetBackup does not support the backup or restore of NVRAM and vTPMfor the virtual machines whose display names begin with a period ('.'). Anexisting VMware limitation prevents downloading or uploading data storefiles beginning with a period ('.') to a virtual machine's working directory asthese appear as hidden files.
■ If the virtual machine was backed up by its display name or UUID, and thedisplay name differs from the host name, note: You must specify the correctdestination client for the restore. Use the Specify NetBackup Machines andPolicy Type dialog in the NetBackup Backup, Archive, and Restore interface.
174Restore virtual machinesRestore notes and restrictions

See “Invalid client error when you restore files using NetBackup BAR interfaceinstalled on the virtual machine” on page 310.
■ Restore of individual files from a backup of the full virtual machine is notsupported if the virtual machine contains Storage Foundation Volume Managervolumes.
■ To restore Windows NTFS-encrypted files individually, you must install aNetBackup client on the virtual machine.See “NetBackup for VMware best practices” on page 282.
■ If the attempt to restore a full virtual machine fails while using the SAN transporttype, try the NBD transport type instead.
■ Restoring a virtual machine with a transport mode of NBD or NBDSSL may beslow in the following cases:
■ The virtual machine had many small data extents due to heavy fragmentation.(A file system extent is a contiguous storage area defined by block offsetand size.)
■ The restore is from a block-level incremental backup and the changed blockson the disk were heavily fragmented when the incremental backup occurred.
For faster restores in either of these cases, use the hotadd transport modeinstead of NBD or NBDSSL.
■ VMware does not support the restore of virtual machines directly to an ESX 5.xserver that vCenter manages. To restore the virtual machine, select the vCenterserver as the destination.As an alternative, you can set up an independent ESX server to be used forrestores. You must add NetBackup restore credentials for that ESX server bymeans of the VMware restore ESX server server type.See “Adding NetBackup credentials for VMware” on page 45.
■ For the SAN transport mode, the job may be slow when you restore to a vCenterServer. For greater speed, designate a VMware restore ESX server as thedestination for the restore.See “Adding NetBackup credentials for VMware” on page 45.
■ For the SAN transport mode and a restore host on Windows 2008 R2 or later,the restore fails if the datastore’s LUN is offline. The detailed status log containsmessages similar to the following:
5/22/2013 4:10:12 AM - Info tar32(pid=5832) done. status: 24:
socket write failed
5/22/2013 4:10:12 AM - Error bpbrm(pid=5792) client restore EXIT
STATUS 24: socket write failed
175Restore virtual machinesRestore notes and restrictions

■ Make sure the status of the SAN disk on the restore host is online (not offline).Disk status can be checked or changed using the Windows diskpart.exeutility or the Disk Management utility (diskmgmt.msc). When the disk statusreads online, retry the restore.
■ If multipathing is enabled, make sure all the paths are online.
■ A restore by means of the SAN transport mode may be slow in othercircumstances. The following Veritas article provides details:VMware Transport Modes: Best practices and troubleshooting
■ The APIs in VMware's Virtual Disk Development Kit (VDDK) contain the followinglimitation: The maximum write speed during virtual machine restore is roughlyone third of the hardware's maximum speed. The following Veritas tech notecontains further information:Two causes of slow NetBackup for VMware restore performancehttp://www.veritas.com/docs/TECH169860
■ If a virtual machine had vmdk files in different directories in the same datastore,note: When the virtual machine is restored to the original location its vmdk filesare restored to a single directory, not to the original directories. (This behaviorfollows current VMware design.)As a workaround, do the following: Remove the vmdk files from the restoredvirtual machine, move the files to their respective directories, then re-attach themoved files to the virtual machine.
■ If the original VM contains encrypted vmdk files, after restoring the full VMwarevirtual machine to the original location or after an in-place disk restore, therestored disks may not be compliant to the VM encryption policy. Therefore, therestored VM must be reconfigured manually to comply with the policy. Otherwise,the virtual disks of the restored VM might be left in an unencrypted state.
■ When restoring large files, make sure that no snapshots are active on thedestination virtual machine. Otherwise, the files are restored to the VMwareconfiguration datastore, which may be too small to contain the files you want torestore. In that case, the restore fails.The configuration datastore (sometimes called the vmx directory) contains theconfiguration files that describe the virtual machine, such as *.vmx files. Notethat active snapshots of vmdk files are also stored on the configuration datastore.
■ If you cancel the virtual machine restore before it completes, the not-fully-restoredvirtual machine remains at the target location. NetBackup does not delete theincomplete virtual machine when the restore job is canceled. You must manuallyremove the incomplete virtual machine.
176Restore virtual machinesRestore notes and restrictions

■ If the virtual machine display name contains unsupported characters, the backupmay succeed but the restore fail. To restore the virtual machine, you must changethe display name to contain supported characters only and retry the restore.See “NetBackup character restrictions for the Primary VM identifier” on page 37.
■ NetBackup for VMware does not support individual file restore by means ofclient-direct restore.
■ On a restore, NetBackup recreates the linking between a hard link and its originalfile only in this case: The link file and its target file are restored in the same job.If each file is restored individually in separate restore jobs, they are restored asseparate files and the link is not re-established.
■ If you restore a VM in vCloud to an expired vApp, the vApp is automaticallyrenewed and added back into the vCloud organization. If the expired vAppcontained other VMs, all those VMs are also removed from the expired list andadded to the organization.Note that in vCloud Director, an expired vApp must be renewed before you canimport a VM into that vApp.
■ With a remote connection from a Windows Java GUI that uses the English locale,the restore of files that have non-ASCII characters may fail.See the following tech note for further information on how to restore the files:http://www.veritas.com/docs/TECH75745
■ In VMware vSphere 6.0 U1b and later, a full restore of a virtual machine maytrigger an alarm if the original VM was not deleted. The alarm is a VM MACaddress conflict alarm. This VMware alarm behavior is by design. If there is aMAC address conflict, VMware eventually changes the MAC address of the newVM. If you do not want to receive alarms, disable the VM MAC address conflictalarms in vCenter.
■ See “NetBackup for VMware: notes and restrictions” on page 27.
See “Restore notes and restrictions on Linux” on page 177.
See “If the recovery host is not at the same NetBackup release level as the backuphost” on page 236.
Restore notes and restrictions on LinuxThis topic relates to the restore of files from a NetBackup backup of a VMwarevirtual machine that runs Linux.
Before you begin the restore, note the following:
■ Cross-platform restore of individual files is not supported. You can restore Linuxfiles to supported Linux guest operating systems but not to Windows.
177Restore virtual machinesRestore notes and restrictions on Linux

■ To migrate an ext2 or ext3 file system to ext4, note: Make sure to follow theinstructions under "Converting an ext3 file system to ext4" on the following pageof the Ext4 wiki:https://ext4.wiki.kernel.org/index.php/UpgradeToExt4If you do not follow these instructions, data in a newly created ext4 file is notpromptly flushed from memory to disk. As a result, NetBackup cannot back upthe data of recently created files in the ext4 file system. (The NetBackup snapshotcaptures the file as zero length.)
As a workaround for the file systems that were not correctly migrated, do oneof the following:
■ Run the Linux sync command on the ext4 file system before starting eachbackup.
■ Make sure that snapshot quiesce is enabled in the Linux guest OS. Contactyour operating system vendor and VMware for additional information.
■ For Linux virtual machines, NetBackup cannot restore individual files fromsoftware RAID volumes. The files are restored when you restore the entire virtualmachine.
■ The Linux ext4 file system includes a persistent pre-allocation feature, toguarantee disk space for files without padding the allocated space with zeros.When NetBackup restores a pre-allocated file (to any supported ext file system),the file loses its preallocation and is restored as a sparse file. The restoredsparse file is only as large as the last byte that was written to the original file.Note also that subsequent writes to the sparse file may be non-contiguous.
■ NetBackup supports backup and restore of Linux LVM2 volumes, includingindividual file restore from an LVM2 volume. Note however that NetBackup doesnot support individual file restore from a snapshot that was created by meansof the snapshot feature in LVM2. If an LVM2 snapshot exists at the time of thebackup, the data in the snapshot is captured in the backup. The data can berestored along with the rest of the virtual machine data when you recover theentire virtual machine.
■ NetBackup supports backup of Linux FIFO files and socket files. NetBackupdoes not support restoring FIFO files and socket files individually. FIFO filesand socket files can be restored along with the rest of the virtual machine datawhen you recover the entire virtual machine.
■ For Linux virtual machines, the ext2, ext3, and ext4 file systems are supportedfor individual file restore. If a partition uses some other file system, the backupsucceeds but files in that partition cannot be individually restored. To allowNetBackup to present mount points for restore in the Backup, Archive, andRestore interface, note: The "/" (root) partition must be formatted with ext2, ext3,or ext4.
178Restore virtual machinesRestore notes and restrictions on Linux

See “Mount points not available when restoring files from a Linux virtual machine”on page 310.
■ When you restore Linux files individually to an NFS-shared device on a Linuxvirtual machine, NetBackup can only restore the file data and attributes. Theextended attributes cannot be restored to NFS-shared devices.
■ For a virtual machine that is running a Linux guest operating system: When yourestore a virtual machine, the ESX server may assign the virtual machine a new(virtual) MAC address. After you restart the virtual machine, you may have toconfigure its MAC address. For instance, the original MAC address of the virtualmachine may be in a configuration file that has to be updated.Refer to your VMware documentation for more details.
■ For Linux, additional notes apply.See “NetBackup for VMware: notes on Linux virtual machines” on page 34.
See “Restore notes and restrictions” on page 173.
See “Restoring the full VMware virtual machine” on page 179.
See “If the recovery host is not at the same NetBackup release level as the backuphost” on page 236.
Restoring the full VMware virtual machineThis topic describes how to r19546022estore the VMware virtual machines thatwere backed up with NetBackup for VMware.
To restore the full virtual machine
1 In the NetBackup Administration Console, clickBackup, Archive, andRestore.
2 Click Actions > Specify NetBackup Machines and Policy Type.
179Restore virtual machinesRestoring the full VMware virtual machine

3 Specify the following:
The NetBackup master server that directed the backupServer to use forbackup andrestores
The VMware virtual machine that was backed up.
Click Search VM Clients to search or browse for a virtualmachine. Use this option to locate a virtual machine in a large,multi-layered virtual environment.
See “Browse and search virtual machines for restore”on page 232.
Or enter the type of name that was selected for the Primary VMidentifier option on the policy VMware tab. For example, if thePrimary VM identifier option is set to VM host name, enter thevirtual machine's host name.
Source client forrestores
This field is ignored. The destination for the restore is specifiedin a different screen as explained in a later procedure.
Destination clientfor restores
The type of policy that made the backup (VMware).Policy type forrestores
4 Click OK.
5 For the Restore type, select Virtual Machine Backups.
6 You can use the Start date and End date icons to select the date range withinwhich the backup occurred.
180Restore virtual machinesRestoring the full VMware virtual machine

7 Under Directory Structure, click on the backup you want to restore.
8 Click Restore.
The type of dialog that appears depends on whether or not the backup wasenabled for vCloud.
See “Virtual Machine Recovery dialog boxes (restore to original location)” on page 182.
See “Virtual Machine Recovery dialogs boxes (restore to alternate location)” on page 188.
vSphere (not vCloud)
See “Virtual machine recovery dialog boxes for vCloud Director” on page 275.vCloud
See “About VMware virtual machine disk restore” on page 196.
See “About restore of individual filesAbout restoring individual VMware files”on page 223.
181Restore virtual machinesRestoring the full VMware virtual machine

Virtual Machine Recovery dialog boxes (restore to original location)This topic applies to NetBackup for VMware. It describes how to restore a VMwarevirtual machine to its original location.
The following topics describe the Backup, Archive, and Restore screens for restoringa virtual machine to the original location. These screens do not apply to vCloudDirector.
See “Virtual machine recovery dialog boxes for vCloud Director” on page 275.
See “Recovery Destination dialog box” on page 182.
See “Recovery Options dialog box” on page 182.
See “Virtual Machine Options dialog box” on page 184.
See “Perform Recovery dialog box” on page 187.
Recovery Destination dialog boxThis topic applies to NetBackup for VMware. It describes how to restore a VMwarevirtual machine.
You can select the type of destination for the virtual machine recovery: the originallocation or alternate location.
This dialog includes the following:
■ Original settings of the virtual machine at the backupShows the configuration of the virtual machine at the time of the backup.When you restore the virtual machine to its original location, these configurationsettings are used and cannot be changed.When you restore to an alternate location (not to the original location), you canchange these settings after you click Next.
■ Recover virtual machine toSelect Original Location or Alternate Location.
For restore to the original location:
See “Recovery Options dialog box” on page 182.
For restore to an alternate location:
See “Restoring the full VMware virtual machine” on page 179.
Recovery Options dialog boxThis topic applies to NetBackup for VMware. It describes how to restore a VMwarevirtual machine.
182Restore virtual machinesRestoring the full VMware virtual machine

Select the recovery host and transport mode, as follows:
■ Destination settingsShows the configuration of the virtual machine at the time of backup. Thesesettings are applied to the virtual machine when it is restored.
Note: This information is included for recovery to vSphere only (not for vCloud).
■ NetBackup Recovery HostThe host that performs the recovery. The default is the host that performed thebackup (the backup host).In most cases, you can use the host that performed the backup. Selecting adifferent host as the recovery host can result in a slow restore or a failed restore,depending on the transport mode.
For example, the restore fails if you select the SAN transport mode in thefollowing case:
■ The host that performed the backup used a SAN connection to access thedatastore.
■ The host you select as recovery host does not have SAN access to thedatastore.
■ Media ServerYou can use this option to select a media server that has access to the storageunit that contains the backup image. An example of such an environment is aMedia Server Deduplication Pool (MSDP) with multiple media servers.
Note: If the storage unit that contains the backup image is not shared withmultiple media servers, this option is grayed out.
■ Transport modesDetermines how the restore data is sent from the recovery host to the VMwaredatastore. The appropriate option depends in part on the type of network thatconnects the VMware datastore to the recovery host.The default is the type that the backup used.
For unencrypted transfer over Fibre Channel (SAN)or iSCSI.
san
183Restore virtual machinesRestoring the full VMware virtual machine

For unencrypted transfer over a local network thatuses the Network Block Device (NBD) driver protocol.This mode of transfer is usually slower than FibreChannel.
nbd
For encrypted transfer (SSL) over a local network thatuses the Network Block Device (NBD) driver protocol.This mode of transfer is usually slower than FibreChannel.
nbdssl
Requires the recovery host in a virtual machine.
For instructions on this transport mode and oninstalling the recovery host in a VMware virtualmachine, refer to your VMware documentation.
hotadd
Use these options to change the order in whichNetBackup tries each selected mode. Highlight a modeand click Move Up or Move Down.
For example: Assume that all four transport modesare selected, and the order is SAN, hotadd, nbd, andnbdssl. If one of the virtual disks cannot be accessedusing SAN, the SAN transport mode is not used forany of the virtual machine’s disks. NetBackup thentries to use the hotadd mode for all the disks.NetBackup continues to try each mode until it findsone that succeeds for all the disks.
Move Up, Move Down
See “Perform Recovery dialog box” on page 187.
Virtual Machine Options dialog boxVirtual Machine Options:
■ Restore BIOS UUID xxx instead of creating a new UUIDRetains the UUID of the original virtual machine (note that the UUID is a globallyunique identifier). The virtual machine is restored with the same UUID that ithad before the restore.
Note the following:
■ If a virtual machine with the same display name but with a different UUIDexists at the target restore location, the restore fails. You must either deletethe existing virtual machine and run the restore, or keep the existing virtualmachine and abandon the restore.
184Restore virtual machinesRestoring the full VMware virtual machine

■ If you do not want to keep the existing virtual machine, you can do one ofthe following: Remove the existing virtual machine, or log into the ESX serverand remove the directory where the virtual machine resides.
■ Restore Instance UUID xxx instead of creating a new UUIDRetains the Instance UUID of the original virtual machine (note that the InstanceUUID is a vCenter specific unique identifier of a virtual machine). The virtualmachine is restored with the same Instance UUID that it had when it was backedup.If the restore of the virtual machine is to a standalone ESXi host, this option isdisabled.If a virtual machine with the same Instance UUID exists at the target restorelocation, a message appears that the UUID is used already. In this case, theoriginal instance UUID is not restored and a new UUID is assigned for the virtualmachine.
■ Overwrite the existing virtual machineIf a virtual machine with the same display name exists at the destination, thatvirtual machine must be deleted before the restore begins. Otherwise, the restorefails. Select this option to have the virtual machine deleted.
■ Remove backing information for devices like DVD/CD-ROM drives, serialor parallel portsIf a virtual machine had an ISO file that was mounted on a CD when the virtualmachine was backed up, note: The ISO file must be available on the target ESXserver when you restore the virtual machine. If the ISO file is not available onthe ESX server, the restore fails.This option restores the virtual machine without restoring an ISO file that wasmounted when the virtual machine was backed up.
■ Remove network interfacesRemoves any network interfaces from the restored virtual machine.
Select this option if:
■ The network connections on the destination virtual machine have changedsince the backup was made.
■ Or if the original virtual machine still exists and a duplicate may causeconflicts.
■ Remove tag associationsWhen this option is selected, NetBackup does not attempt to restore tagassociations when it restores the virtual machine. If the box is not checked,NetBackup attempts to restore all tag associations from the backup. If NetBackupcannot restore one or more of the tag associations, the restore exits with aNetBackup Status Code 1.
185Restore virtual machinesRestoring the full VMware virtual machine

■ Power on virtual machine after recoverySelect this option to have the recovered virtual machine automatically turnedon when the recovery is complete.
■ Override default job priorityPlace a check mark in this box to override the default priority.
■ Job PriorityUse this field to set a higher priority.
■ Retain original hardware versionThis option restores the virtual machine with its original hardware version (suchas 4). It retains the original version even if the target ESX server by default usesa different hardware version (such as 7 or 8). If the target ESX server does notsupport the virtual machine’s hardware version, the restore may fail.If this option is disabled, the restored virtual machine is converted to the defaulthardware version that the ESX server uses.
Format of restored virtual disks:
■ Original provisioningRestores the virtual machine's virtual disks with their original provisioning.
Note: Regarding restore into vCloud Director: For Original provisioning,NetBackup restores the virtual machine's virtual disks with the format they hadwhen the virtual machine was backed up. That format may be different fromeither of the following: The default format of the vCloud organization when thevirtual machine was originally created, or the format for the destinationorganization.
■ Thick provisioning Lazy ZeroedConfigures the restored virtual disks in the thick format. The virtual disk spaceis allocated when the disk is created. This option restores the populated blocks,but initializes vacant blocks with zeros later, on demand.
■ Thick provisioning Eager ZeroedConfigures the restored virtual disks in the thick format. Restores the populatedblocks and immediately initializes vacant blocks with zeros (eager zeroed).Creation of the virtual disks may take more time with this option. However, ifthe restore occurs over a SAN, the eager zeroed feature may speed up therestore by reducing network communication with the vCenter server.
■ Thin provisioningConfigures the restored virtual disks in the thin format. Restores the populatedblocks but does not initialize vacant blocks or commit them.
186Restore virtual machinesRestoring the full VMware virtual machine

Thin provisioning saves disk space through dynamic growth of the vmdk file.The vmdk files are no larger than the space that the data on the virtual machinerequires. The virtual disks automatically increase in size as needed.
Note: If the vmdk is completely written, VMware automatically converts a thindisk to Thick provisioning Eager Zeroed.
For more information on virtual disk provisioning, refer to VMware'sdocumentation.
Perform Recovery dialog boxThis topic applies to NetBackup for VMware. It describes how to restore a VMwarevirtual machine.
Review the settings to be applied to the restored virtual machine.
■ Recovery settingsLists the settings that are used for the recovery.
■ Run Pre-Recovery CheckClick this option to verify the following: The credentials, the available space onthe datastore, and other important requirements. For a description of the checks,see Table 10-1.
■ Start RecoveryStarts the recovery of the virtual machine.
Table 10-1 Pre-recovery checks
DescriptionType of check
Verifies that NetBackup has the correct credentials to access the vSphere server for therestore.
Verify vSphere servercredential
Verifies that NetBackup can access the datacenter that is designated for the restore.Verify datacenter path
Verifies that NetBackup can access the VM folder that is designated for the restore.Verify folder path
Checks for unsupported characters in the VM display name, datastore name, or networkname.
Unsupported non-ASCIIcharacters
187Restore virtual machinesRestoring the full VMware virtual machine

Table 10-1 Pre-recovery checks (continued)
DescriptionType of check
If the original VM exists at the restore destination, verifies that the Overwrite the existingvirtual machine option is selected. If the VM exists and the overwrite option is selected,the VM is overwritten with the restored VM.
If the original VM does not exist at the restore destination, verifies that the original VM'svmx configuration file directory does not exist. If the original VM does not exist but the vmxdirectory exists, specify a different display name for the restored the VM.
VM exists overwrite
Verifies that the datastore (or datastore cluster) for the restore has enough space for therestored VM's vmx configuration file.
Adequate space ondatastore (or datastorecluster) for configurationfile
Verifies that the NetBackup restore host can communicate with the vCenter server.VMware connectivity test
Verifies that the datastore (or datastore cluster) for the restore has enough space for therestored VM files.
Datastore/DatastoreCluster space available
Verifies that the selected datastore has a compatible block size.
For example, this check fails if it detects the following problem: The VM’s vmdk files arenot a multiple of the VMFS block size. In that case, the last partial-block write may failduring the restore, and the restore job fails with status 2820. The NetBackup job detailslog contains messages similar to the following:
12/12/2011 3:12:28 AM - Critical bpbrm(pid=3560) from clientio.acme.com: FTL - Virtual machine restore: file write failed
In this case, use the NBD or the NBDSSL transport mode when you restore the VM.
SAN datastorecompatibility
If only the SAN transport mode is selected for the restore, determines if a VM with the sameBIOS UUID exists on the specified vCenter.
Verify unique BIOS UUID
See “Virtual Machine Recovery dialogs boxes (restore to alternate location)”on page 188.
Virtual Machine Recovery dialogs boxes (restore to alternate location)This topic applies to NetBackup for VMware. It describes how to restore a VMwarevirtual machine.
The following topics describe the Backup, Archive, and Restore screens for restoringa virtual machine to an alternate location. These screens do not apply to vCloudDirector.
See “Virtual machine recovery dialog boxes for vCloud Director” on page 275.
188Restore virtual machinesRestoring the full VMware virtual machine

See “Recovery Destination dialog box (restore to alternate location)” on page 189.
See “Recovery Options dialog box (restore to alternate location)” on page 189.
Recovery Destination dialog box (restore to alternatelocation)This topic applies to NetBackup for VMware. It describes how to restore a VMwarevirtual machine to an alternate location.
■ Original settings of the virtual machine when it was backed upShows the configuration of the virtual machine at the time of the backup. Whenrestoring to an alternate location (not to the original location), you can changethese settings after you click Next.
■ Recover virtual machine toSelect Alternate location.See “Recovery Options dialog box (restore to alternate location)” on page 189.
Recovery Options dialog box (restore to alternate location)This topic applies to NetBackup for VMware. It describes how to restore a VMwarevirtual machine to an alternate location.
The Recovery Options dialog initially displays the original virtual machine settingsthat were recorded in the NetBackup catalog when the virtual machine was backedup. Before accepting any default values, you may have to verify that the originalhosts or servers are still available.
The dialog contains the following fields:
■ NetBackup Recovery HostThe recovery host transfers the virtual machine files to the VMware destinationthat is specified in other fields on this dialog. The default for the recovery hostis the backup host that backed up the virtual machine.
Consider the following when selecting a recovery host:
■ To use the original VMware backup host for the recovery, verify that thebackup host still exists. The original backup host may have been removedor reconfigured after the backup occurred.
■ The current processing load on the host that you want to use may be a factor.The recovery host undergoes significant I/O activity when it restores a virtualmachine.
■ The network connection between the recovery host and the destinationdatastore may limit the type and speed of data transmission. For example,
189Restore virtual machinesRestoring the full VMware virtual machine

to use the SAN transport mode, the recovery host must have access to theappropriate LUNs in the datastore.
■ Media ServerYou can use this option to select a media server that has access to the storageunit that contains the backup image. An example of such an environment is aMedia Server Deduplication Pool (MSDP) with multiple media servers.
Note: If the storage unit that contains the backup image is not shared withmultiple media servers, this option is grayed out.
■ Transport modesDetermines how the data is sent from the recovery host to the VMware datastore.The appropriate mode depends on the type of connection between theNetBackup recovery host and the VMware datastore.More information is available about these options.See “Recovery Options dialog box” on page 182.
■ vCenter ServerSpecifies the vCenter server for the restored virtual machine. To use the originalvCenter Server (the default), verify that the original vCenter server still exists.To use a different vCenter Server, consider whether it is compatible with thevirtual machine you want to restore. If you attempt to restore to an earlier vSphereserver that does not support the virtual machine’s hardware version, note: TheVMware Tools component converts the virtual machine to an earlier hardwareversion. But the restore may fail if the virtual machine uses devices that onlythe later hardware version supports.In other cases, you can use the Retain original hardware version option onthe Virtual Machine Options dialog.The restore may finish faster if you use the SAN transport mode with a restoreESX server (bypassing any vCenter servers).
When choosing a target host for the restore, note the following:
■ If NetBackup has credentials to a vCenter server but does not havecredentials to a restore ESX server, you can perform the restore. NetBackupuses the vCenter credentials to access the ESX server but does not sendthe virtual machine data through the vCenter.
Note: If you use the SAN transport mode for the restore, the restore jobmay take longer than expected.
190Restore virtual machinesRestoring the full VMware virtual machine

The credentials must give NetBackup full access privileges to the vCenterserver.See “Adding NetBackup credentials for VMware” on page 45.
■ If NetBackup has credentials to a vCenter server as well as to a VMwarerestore ESX server, the restore may complete faster. In this case, by defaultNetBackup communicates with the restore ESX server during data transfer.You can select a vCenter folder in which to place the restored virtual machine.The credentials must give NetBackup full access privileges to the restoreESXi server.Select the vCenter Server, and click Change to select the VMware restoreESXi server.
Note: NetBackup uses the selected vCenter to create the virtual machine.NetBackup then writes the .vmdk files directly to the ESX server using theRestore ESX Server credentials to that server.
■ If NetBackup has credentials to an ESX server, you can designate that serveras the target for the restore. The credentials must give NetBackup full accessprivileges to the ESX server.Select None for the vCenter Server, and click Change to select the ESXserver.
Note: To restore to an ESX server, the ESX must be standalone, notmanaged by vCenter. To restore to an ESX under vCenter, NetBackup musthave VMware restore ESX server credentials for the ESX. Select the vCenter,and click Change to select the VMware restore ESX server.
■ ESX Server/ClusterSpecifies the ESX server or cluster on which the restored virtual machine is toreside. To use the original ESX server or cluster (the default), verify that theoriginal ESX server or cluster still exists.Click Change to browse for a different ESX server or cluster.See “Select ESX server dialog box (restore to alternate location)” on page 193.
■ DatacenterShows the VMware data center containing the selected ESX server.
■ FolderA folder is a logical entity within the vCenter that contains VMware objects, suchas datastores, networks, and virtual machines.
191Restore virtual machinesRestoring the full VMware virtual machine

By default, this field shows the VMware folder that contained the virtual machinewhen the virtual machine was backed up. If you select a different ESX serverto which to restore the virtual machine, this field changes to None. You mustthen click Change to select a folder within the data center for the restored virtualmachine.See “Select Folder dialog box (restore to alternate location)” on page 193.
■ Display NameSpecifies the VMware display name for the restored virtual machine. The defaultis the display name that the virtual machine had when it was backed up.The display name must be unique for the vCenter Server where the virtualmachine is restored.
Note: If a virtual machine with this display name already exists at this location(or at the original location), you are prompted to click Overwrite the existingvirtual machine. You cannot restore the virtual machine if the result is twovirtual machines with the same display name on the same vCenter server.
■ Resource Pool/vAppUse this option to have the restored virtual machine assigned to either a VMwareresource pool or to a vApp. Resource pools manage the host's CPU and memory.vApps are logical containers for virtual machines, and also share somefunctionality with virtual machines.
■ Datastore/Datastore ClusterSpecifies the VMware datastore or datastore cluster that contains the virtualmachine configuration files. Click Change to make a selection.This datastore (sometimes called the vmx directory) contains the configurationfiles that describe the virtual machine, such as *.vmx files. Active snapshots ofvmdk files are also stored on this datastore.
Note: The Datastore field shows the name of the datastore that contained thevirtual machine data when the virtual machine was backed up. Even if thedatastore was in a datastore cluster, the field shows the name of the datastore,not the datastore cluster. When the virtual machine is restored, NetBackupdetermines how the datastore is currently configured (in a cluster or not) andconfigures the virtual machine accordingly.
■ Use the same datastore/datastore cluster for all VMDKsThis option assigns all the restored virtual machines to the datastore or datastorecluster that is selected in the Datastore/Datastore Cluster field.
192Restore virtual machinesRestoring the full VMware virtual machine

If this option is not selected, you assign the VMDKs to specific datastores ordatastore clusters in a later dialog (the Storage Destination dialog).
See “Select ESX server dialog box (restore to alternate location)” on page 193.
See “Select Folder dialog box (restore to alternate location)” on page 193.
See “Storage Destination dialog box (restore to alternate location)” on page 194.
Select ESX server dialog box (restore to alternate location)Use this dialog to enter the name of the ESX server or cluster, or drill down in thelist to select the server or cluster.
■ Specify ESX serverEnter the name of the ESX server or cluster in this field. As you type a name,the list of available servers or clusters automatically expands and the nearestmatch is highlighted.
■ SearchIf necessary, click Search to locate the server name or cluster name that youtyped.
Note:Some older ESX servers may not support the version of the virtual machinethat you want to restore. Verify that the ESX server is compatible with the virtualmachine.
See “Select Folder dialog box (restore to alternate location)” on page 193.
See “Storage Destination dialog box (restore to alternate location)” on page 194.
Select Folder dialog box (restore to alternate location)This topic applies to NetBackup for VMware. It describes how to restore a VMwarevirtual machine to an alternate location.
The Select Folder dialog shows the vCenter folders that exist on the datacenterthat is shown in the Datacenter field.
Pick a folder from the list of available folders. The restored virtual machine is placedin this folder.
If two datacenters of the same name exist in the vCenter server, all folders for theidentically named datacenters are displayed. After you select a folder and click OK,verify that the folder on the Recovery Options dialog contains the destination ESXserver. If the selected folder is on the wrong datacenter, the restore fails.
See “Storage Destination dialog box (restore to alternate location)” on page 194.
193Restore virtual machinesRestoring the full VMware virtual machine

Select Datastore or Datastore Cluster dialog box (restoreto alternate location)Use this screen to select a datastore or datastore cluster for the restored virtualmachine. You can use the search field, or drill down manually into the list.
Note: Only datastores and clusters visible to the ESX server are displayed.
Specify Datastore
Type a name and click Search. The list of available datastores and datastoreclusters automatically expands and the nearest match is highlighted.
See “Recovery Options dialog box (restore to alternate location)” on page 189.
Virtual Machine Options dialog box (restore to alternatelocation)This dialog is described in a previous topic:
See “Virtual Machine Options dialog box” on page 184.
Storage Destination dialog box (restore to alternatelocation)This topic applies to NetBackup for VMware. It describes how to restore a VMwarevirtual machine to an alternate location.
Select the datastores where the .vmdk files are to be restored.
■ Source VMDK File NameShows the names of the .vmdk files that were backed up.
■ Datastore/Datastore ClusterShows the VMware datastore or datastore cluster where the .vmdk files are tobe restored. Click in this field to select another datastore.See “Select Datastore or Datastore Cluster dialog box (restore to alternatelocation)” on page 194.If the datastore is in a datastore cluster, NetBackup displays the name of thedatastore (not the name of the cluster).
■ Datastore/Datastore Cluster StatusIndicates whether the datastore or datastore cluster has enough space to containthe selected .vmdk file.
The datastore or datastore cluster has enough space tocontain the selected .vmdk file.
OK
194Restore virtual machinesRestoring the full VMware virtual machine

The datastore or datastore cluster does not have enoughspace to contain the selected .vmdk file.
Insufficient space
See “Network Connections and Other Recovery Options dialog box (restore toalternate location)” on page 195.
Network Connections and Other Recovery Options dialogbox (restore to alternate location)This topic applies to NetBackup for VMware. It describes how to restore a VMwarevirtual machine to an alternate location.
For restore into vSphere, this dialog displays all of the networks that the restoredvirtual machine can connect to.
For restore into vCloud Director, this dialog displays the networks that the virtualmachine was connected to (if any) at the time of the backup.
For vCloud Director: If the virtual machine was not connected to any networks duringbackup, or if none of those networks are currently available, the dialog states: "Nonetworks available for selected virtual machine." In that case, if a network connectionis required, create it after the restore completes.
■ Retain original network configurationIf possible, this option retains the original MAC address and other configurationsettings of the virtual machine. Note that vCenter assigns a new MAC addressif the original exists. This option configures the virtual machine with its originalnetwork labels, even if those networks are not available at the restore location.When you select this option, any network names that are shown in this dialogare ignored.If this option is unselected, the virtual machine's original network settings arediscarded. You can select available networks under Network Names.
■ Network NamesThe available virtual networks are displayed in addition to physical networks.Select the networks that you want the restored virtual machine to be connectedto. This option creates new network adaptors for the selected networks.
Note:On the restored virtual machine, the network adapters are not configured.
Note:Click theNetwork Names check box to select or unselect all the networksin the list.
195Restore virtual machinesRestoring the full VMware virtual machine

Use Move Up and Move Down to reorder the networks. The order in the listdetermines the order of the corresponding virtual network adapters (NIC cards)for the virtual machine.When the virtual machine is backed up, its network connections (physical orvirtual) are recorded in the NetBackup catalog.
For vSphere, NetBackup determines what networks currently exist at the restorelocation and lists the network names as follows:
■ If a network that was recorded in the backup catalog for the virtual machinestill exists, it is listed on this screen and automatically selected.
■ If a network is available that was not listed in the NetBackup catalog, it islisted on this screen but not selected.
■ If a network was recorded in the backup catalog but is not currently available,it is not listed.
See “Perform Recovery dialog box (restore to alternate location)” on page 196.
PerformRecovery dialog box (restore to alternate location)This topic applies to NetBackup for VMware. It describes how to restore a VMwarevirtual machine to an alternate location.
■ Recovery settingsLists the settings that are used for the recovery.
■ Run Pre-Recovery CheckVerifies the credentials and appropriate paths and connectivity, determineswhether the datastore or datastore cluster has available space, and reviewsother requirements. You must run this check at least once. You can proceedwith the restore even if the check fails. More details are available on thePre-Recovery Check.See “Perform Recovery dialog box” on page 187.
■ Start RecoveryStarts the recovery of the virtual machine.
See “Restoring the full VMware virtual machine” on page 179.
See “About restore of individual filesAbout restoring individual VMware files”on page 223.
About VMware virtual machine disk restoreNetBackup supports the restore of individual VMware virtual machine disks to thefollowing destinations:
196Restore virtual machinesAbout VMware virtual machine disk restore

You can restore the disks to the same VM from which the disks werebacked up. You can either overwrite the original disks or attach thevirtual disks without overwriting the original disks.
NetBackup creates a temporary VM to which it restores the virtual disks.Then, NetBackup attaches the virtual disks to the existing, target VM.Finally, NetBackup deletes the temporary VM after the disk or disksare attached successfully.
A special case, called in-place disk restore, replaces all disks of anexisting VM with the data in its backup. Raw devices (RDMs) andindependent disks are not replaced or deleted. For In-place DiskRestore, the disks are restored to the same disk controller configurationacquired at the time of backup.
To the original VM
You can restore the disks to a different VM.
NetBackup creates a temporary VM to which it restores the virtual disks.Then, NetBackup attaches the virtual disks to the existing, target VM.Finally, NetBackup deletes the temporary VM after the disk or disksare attached successfully.
You can also perform an in-place disk restore to a different VM.
To a different VM
NetBackup creates a new virtual machine and restores the specifieddisks to the new VM. The new VM is intended to be a container for therestored disks. It does not have enough resources to run most operatingsystems. After the restore, you should attach the restored virtual disksto a VM that can support them and then delete the restore VM.
To a new VM
The following are the general support requirements for virtual disk restore.
■ Sufficient storage must exist for the restore.
■ NetBackup does not support the following virtual machine disk restores:
■ From NetBackup Replication Director for VMware backups.
■ To templates. However, virtual disks from a backup of a VM template canbe restored to a virtual machine.
Restoring VMware virtual machine disks by usingBackup, Archive, and Restore
This restore method uses the Backup, Archive, and Restore interface to select theparameters for the restore and to restore the disks. NetBackup 8.1 or later isrequired.
See “About VMware virtual machine disk restore” on page 196.
197Restore virtual machinesRestoring VMware virtual machine disks by using Backup, Archive, and Restore

To restore virtual machine disks
1 In the NetBackup Administration Console, select Backup, Archive, andRestore.
Note: The NetBackup Administration Console does not support the in-placedisk restore option.
2 Select the Restore Files tab.
3 Click Actions > Specify NetBackup Machines and Policy Type.
4 Specify the following:
The NetBackup master server that directed the backupServer to use forbackup andrestores
The VMware virtual machine that was backed up.
Click Search VM Clients to search or browse for a virtualmachine. Use this option to locate a virtual machine in a large,multi-layered virtual environment.
See “Browse and search virtual machines for restore”on page 232.
Or enter the type of name that was selected for the Primary VMidentifier option on the policy VMware tab. For example, if thePrimary VM identifier option is set to VM host name, enter thevirtual machine's host name.
Source client forrestores
This field defaults to the same client selected in the Sourceclient for restores field.
You select the destination client in the wizard, so you do nothave to change this field.
Destination clientfor restores
Select VMware.Policy type forrestores
If any backups for the client are within the specified date range, NetBackuppopulates the Directory Structure pane and the Contents of... pane with theinformation about the most recent backup.
5 In the Restore type drop-down menu on the Restore Files tab, select VirtualDisk Restore.
The Directory Structure pane changes to show the client name.
198Restore virtual machinesRestoring VMware virtual machine disks by using Backup, Archive, and Restore

6 In the Directory Structure pane, select the client.
7 To restore disks from a backup other than the most recent:
On the Actions menu, select Set Date Range > Backup History.a.
In the Backup History dialog box, select the wanted backup and click OK.b.
8 Click Restore.
The Select Virtual Disks panel of the Restore Virtual Machine Disks wizardappears.
9 Complete the wizard panels to restore the virtual disks.
See “Select Virtual Disks panel” on page 199.
See “Recovery Destination panel” on page 200.
See “Virtual Disk Destination panel” on page 201.
See “Storage Destination panel” on page 203.
See “Recovery Summary panel” on page 204.
Select Virtual Disks panelThe Select Virtual Disks wizard panel shows all of the virtual disks that were inthe VM at back-up time, even those that were excluded from the backup. By default,the wizard displays the virtual disks. To select file systems, click File Systems.
199Restore virtual machinesRestoring VMware virtual machine disks by using Backup, Archive, and Restore

■ Virtual DisksSelect the disks that you want to restore.If you use the check box in the column header to select all, the wizard selectsonly those disks that were included in the backup.
■ File SystemsSelect the wanted file systems. When you select a file system, the wizard selectsthe virtual disks on which the file system resides.If you use the check box in the column header to select all, the wizard selectsonly those file systems that were included in the backup.
See “Restoring VMware virtual machine disks by using Backup, Archive, andRestore” on page 197.
Recovery Destination panelOn the Recovery Destination panel, you can configure the transport mode andthe recovery destination parameters.
■ NetBackup Recovery HostThe host that performs the restore. If not specified, NetBackup uses the backuphost value from the backup image.
■ Media ServerYou can use this option to select a media server that has access to the storageunit that contains the backup image. An example of such an environment is aMedia Server Deduplication Pool (MSDP) with multiple media servers. Note: Ifthe storage unit that contains the backup image is not shared with multiple mediaservers, this option is grayed out.
■ Transport modesThe transport modes to use for the restore. Select the wanted transport modesand move them so they are in the wanted order. If all methods fail, the restorefails.By default, the wizard displays the transport mode combination and the orderthat were used for the backup.
■ Recover virtual disks to
The destination VM for the restore, as follows:
■ Original Virtual Machine. NetBackup restores the selected disks to the VMfrom which they were backed up.You can select whether to overwrite the existing virtual disks on the StorageDestination panel.See “Storage Destination panel” on page 203.
200Restore virtual machinesRestoring VMware virtual machine disks by using Backup, Archive, and Restore

■ Alternate Virtual Machine. NetBackup restores the selected disks to adifferent VM than the original.
■ New (Temporary) Virtual Machine. NetBackup creates a new virtualmachine and restores the selected disks to the new VM. The new VM isintended to be a container for the restored disks. It does not have enoughresources to run most operating systems. After the restore, you should attachthe restored virtual disks to a VM that can support them and then delete thetemporary VM.
■ Advanced Restore Options
The following items describe the advanced restore options:
■ Delete restored staging VM on error. Whether to delete the temporary VMif the disk attach operation fails. If you select No and the disks are notsuccessfully attached to the target VM, you can access the data on thetemporary VM.
■ Wait time in seconds for VM shutdown. The restore process shuts downthe target virtual machine before it attaches the disk or disks. The durationof the shutdown operation depends on the VMware workload. Use thisparameter to specify how long the restore process should wait for shutdownbefore giving up on restore.
Virtual Disk Destination panelThe contents of the Virtual Disk Destination wizard panel depend on the recoverydestination, as follows:
■ Original Virtual MachineThe panel displays Destination details of the original VM.You can select the power state of the VM after the restore. You also can refreshVirtual Machine Server details.See Power on virtual machine after restore and Last update in Table 10-2.
■ Alternate Virtual MachineThe panel displays Destination details of the original VM.To select a destination VM:
Optionally, select a different Virtual Machine Server.a.
Optionally, enter a term in the Search box to find a VM on the Virtual MachineServer and click Search.
b.
201Restore virtual machinesRestoring VMware virtual machine disks by using Backup, Archive, and Restore

Select the destination VM for the restored virtual disks.
When you select a VM, the wizard populates the Destination details with thedetails of that VM.
c.
You can select the power state of the VM after the restore. You also can refreshVirtual Machine Server details.See Power on virtual machine after restore and Last update in Table 10-2.
■ New (Temporary) Virtual MachineYou must select the destination details.See the field descriptions in Table 10-2.
Table 10-2 Virtual disk destination field descriptions
DescriptionField
The name of the VMware host on which the destination VMresides or should be created.
Virtual Machine Server
Restore to a new VM only.
The name of the ESX host to which NetBackup should restorethe virtual machine disks. By default, NetBackup uses thevalue from the backup. To use a different host, click Browseto select or search for a host.
ESX Server
Restore to a new VM only.
The data center to which to restore the virtual disks.
Data Center
Restore to a new VM only.
The pathname of the VM folder to which NetBackup shouldrestore the virtual machine disks. By default, NetBackup usesthe value from the backup. Click Browse to select a differentfolder.
Folder
Restore to a new VM only.
The display name of the temporary virtual machine for therestored disk or disks. The wizard populates this field withthe name of the original VM client and appends a timestampto it. The timestamp is the decimal number of seconds sinceJanuary 1, 1970.
The name must be unique.
Virtual Machine
202Restore virtual machinesRestoring VMware virtual machine disks by using Backup, Archive, and Restore

Table 10-2 Virtual disk destination field descriptions (continued)
DescriptionField
Restore to a new VM only.
The resource pool or vApp to which NetBackup should restorethe virtual machine disks. By default, NetBackup uses thevalue from the backup.
Resource Pool/vApp
Restore to the original or to an alternate VM only.
Select to start the virtual machine after the restore completessuccessfully.
Power on virtual machineafter restore
Restore to the original or to an alternate VM only.
The date and time on which the Virtual Machine Serverprovided the information for this wizard panel. Click therefresh option to update the Virtual Machine Server details.
Last update
See “Restoring VMware virtual machine disks by using Backup, Archive, andRestore” on page 197.
Storage Destination panelThe Storage Destination wizard panel shows the virtual disks to restore. They areeither the disks you selected or the disks on which the file systems you selectedfor restore reside.
Settings for all virtual disks region
To change the values that apply to all of the virtual disks, use the fields in theSettings for all virtual disks region of the wizard panel, as follows:
■ Restored virtual disks provisioningThe default disk provisioning for all of the disks to be restored: Thin, Thick LazyZeroed, or Thick Eager Zeroed.
■ DatastoreThe name of the Datastore or the datastore cluster that is the destination forthe restore.Click Browse to select a different datastore or datastore cluster.
■ Overwrite all virtual disksWhether to overwrite the existing virtual disk or disks on the target VM. If Yes,overwrite the original virtual disk and retain the disk UUID. If No, restore thevirtual disk to the target VM as a new disk; VMware assigns a new UUID to thedisk.
203Restore virtual machinesRestoring VMware virtual machine disks by using Backup, Archive, and Restore

Original Virtual Disk list
To override the global settings, change the values for individual virtual disks in theOriginal Virtual Disk list.
See “Restoring VMware virtual machine disks by using Backup, Archive, andRestore” on page 197.
Recovery Summary panelThe Recovery Summary wizard panel displays the parameters of the recovery.
Verify the settings for the recovery. If they are correct, click Start Recovery.Otherwise, click Back to return and change the settings.
See “Restoring VMware virtual machine disks by using Backup, Archive, andRestore” on page 197.
Restoring VMware virtual machine disks by usingNetBackup commands
This restore method requires that you describe in a text file the parameters of therestore and then use a NetBackup command to restore the disks. The file in whichyou describe the restore includes the following information:
■ The backup image from which you want to restore.
■ The target VM if restoring to an existing VM.
■ The virtual machine disks to restore.
■ Other parameters that control aspects of the restore.
The NetBackup nbrestorevm command includes an option that you can use tocreate the required restore parameters file from a backup image. The NetBackupnbrestorevm command then reads that file to accomplish the restore.
The restore parameters file uses the JavaScript Object Notation (JSON) format todescribe the restore parameters.
The following table identifies the tasks in the process to restore an individual VMwarevirtual machine disk or disks. It also includes links to the individual task topics.
204Restore virtual machinesRestoring VMware virtual machine disks by using NetBackup commands

Table 10-3 Restore VMware virtual machine disk process
LinkDescriptionStep
See “Determining the backup image IDfrom which to restore a VMware virtualmachine disk” on page 205.
Optionally, determine the ID of thebackup image from which to create therestore parameters file. If you want to usea date range to specify the backup image,you do not have to perform this task.
Step 1
See “Creating the VMware virtualmachine disk restore file” on page 207.
Create the file that describes theparameters of the restore. You use thefile as input for the command thatrestores the virtual disks.
Step 2
See “Modifying the virtual machine diskrestore file” on page 208.
Modify the parameters of the virtualmachine disk restore file. You mustmodify the file to describe your specificrestore instance.
Step 3
See “Validating the virtual machine diskrestore file” on page 212.
Validate the virtual machine disk restorefile to ensure that the restore occurscorrectly.
Step 4
See “Restoring the virtual machine diskor disks by using the nbrestorevm
command” on page 213.
Restore the disk or disks.Step 5
See “Troubleshooting vmdk restore to existing VM” on page 320.
Determining the backup image ID from which to restore a VMwarevirtual machine disk
This topic describes how to determine the ID of the backup image from which torestore a VMware virtual machine disk. You then use the backup image ID to specifythe backup from which to create the restore parameters file. Two methods exist todetermine the backup ID, as follows:
See To determine the backup image ID by usingNetBackup Administration Console.
NetBackup AdministrationConsole
See To determine the backup image ID by using thebpclimagelist command.
bpclimagelist command
Note: If you want to use a date range to specify the backup from which to createthe restore parameters file, you can skip this task.
205Restore virtual machinesRestoring VMware virtual machine disks by using NetBackup commands

This task is part of a larger process that describes how to restore an individualVMware virtual machine disk or disks.
See “Restoring VMware virtual machine disks by using NetBackup commands”on page 204.
To determine the backup image ID by usingNetBackupAdministrationConsole
1 Use the NetBackup Administration Console Catalog utility to search for thebackup image of the client from which to restore. The Search Results paneof the Catalog utility shows the backup ID:
2 Continue to the next task in the individual virtual machine disk restore process.
See “Creating the VMware virtual machine disk restore file” on page 207.
To determine the backup image ID by using the bpclimagelist command
1 Invoke the NetBackup bpclimagelist command to display the backups forthe client, as follows:
On UNIX: /usr/openv/netbackup/bin/bpclimagelist -client client_name
-Likelydate -policy policy_name
On Windows: install_path\NetBackup\bin\bpclimagelist -client
client_name -Likelydate -policy policy_name
2 Construct the backup ID by combining the client name, an underscore character(_), and the backup time notation (the decimal number of seconds since January1, 1970). For the following example output, vm1.example.com_1454006694 isthe backup ID:
bpclimagelist -client vm1.example.com -Likelydate -policy backups
Client: vm1.example.com
Policy: backups
Keyword: NONE
Backup Time: Thu Jan 28 12:44:54 2016 (1454006694)
Schedule Type: FULL
3 Continue to the next task in the individual virtual machine disk restore process.
See “Creating the VMware virtual machine disk restore file” on page 207.
206Restore virtual machinesRestoring VMware virtual machine disks by using NetBackup commands

Creating the VMware virtual machine disk restore fileThis topic describes how to use the NetBackup nbrestorevm command to createthe text file that describes the virtual machine disk restore parameters. The file usesthe JavaScript Object Notation (JSON) format to describe the restore parameters.Two methods exist to specify the backup that is used to create the restoreparameters file, as follows:
See To create the VMware virtual machine disk restore file by specifyinga backup ID .
A separate procedure describes how to determine the backup ID.
See “Determining the backup image ID from which to restore a VMwarevirtual machine disk” on page 205.
Specify a backupimage ID
If you specify a date range, NetBackup uses the most recent backupin that date range.
See To create the VMware virtual machine disk restore file by specifyinga date range.
Specify a daterange
This task is part of a larger process that describes how to restore an individualVMware virtual machine disk or disks.
See “Restoring VMware virtual machine disks by using NetBackup commands”on page 204.
To create the VMware virtual machine disk restore file by specifying a backupID
1 Create the file that describes the virtual machine disk or disks that you wantto restore by specifying a backup ID, as follows:
On Windows: install_path\NetBackup\bin\nbrestorevm -vmw -C
vm_client -S master_server -backupid value -restorespecout
filename
On UNIX: /usr/openv/netbackup/bin/brestorevm -vmw -C vm_client -S
master_server -backupid value -restorespecout filename
■ The -backupid value option and argument specifies the backup imagefrom which to create the file.
■ The -restorespecout filename option and argument specifies the nameof the file.
207Restore virtual machinesRestoring VMware virtual machine disks by using NetBackup commands

By default, nbrestorevm creates the file in the current working directory.To create the file in a different directory, specify a pathname for thefilename.
2 Continue to the next task in the individual virtual machine disk restore process.
See “Modifying the virtual machine disk restore file” on page 208.
To create the VMware virtual machine disk restore file by specifying a daterange
1 Create the file that describes the virtual machine disk or disks that you wantto restore by specifying a date range, as follows:
On Windows: install_path\NetBackup\bin\nbrestorevm -vmw -C
vm_client -S master_server -s mm/dd/yyyy hh:mm:ss -e mm/dd/yyyy
hh:mm:ss -restorespecout filename
On UNIX: /usr/openv/netbackup/bin/nbrestorevm -vmw -C vm_client
-S master_server -s mm/dd/yyyy hh:mm:ss -e mm/dd/yyyy hh:mm:ss
-restorespecout filename
■ The hh:mm:ss for the start date and the end date are optional.
■ The -restorespecout filename option and argument specifies the nameof the file.By default, nbrestorevm creates the file in the current working directory.To create the file in a different directory, specify a pathname for thefilename.
2 Continue to the next task in the individual virtual machine disk restore process.
See “Modifying the virtual machine disk restore file” on page 208.
Modifying the virtual machine disk restore fileThis topic describes how to modify the file that describes the virtual machine diskrestore parameters. You must modify the file to describe your specific restoreinstance.
Two methods exist to modify the restore file, as follows:
With a text editor, you can modify any or all of the fields.
See To modify a VMware virtual machine disk restore file by using atext editor.
A text editor
208Restore virtual machinesRestoring VMware virtual machine disks by using NetBackup commands

With the restore_spec_utility.pl Perl script, you can performthe following operations:
■ –modify, to change the value of a field, one field at a time. Usethis option to modify the fields that do not describeVMWareVirtualDiskDestination parameters.
■ -keep_disks, to specify the disks to retain in the restoreparameters file. Any other disks are removed from the file.
■ -delete_disks, to specify the disks to delete from the restoreparameters file. The disks that remain are restored.
Examine the script for a description of the options and example usagestatements.
Perl must be installed on the host on which you modify the restoreparameters file. Examine the script to determine which modules arerequired; some may require separate installation.
See To modify a VMware virtual machine disk restore file by using therestore_spec_utility.pl script.
A Veritas providedPerl script
The following table describes some restore scenarios and the values of the fieldsthat are required to accommodate those scenarios.
Table 10-4 Restore parameters file items to edit
DescriptionItem
Edit the VMwareVirtualDiskDestination section of the file so thatit contains only the virtual machine disk or disks that you want to restore.To ensure data integrity, be aware of the following:
■ If a file system volume spans multiple virtual machine disks, restoreall of the virtual disks for that volume.
■ If a volume manager manages the volumes, restore all of the virtualdisks in that volume set.
Disks
For a restore of virtual disks to a datastore cluster, specify the name ofthe datastore cluster in the Datastore field of theVMwareVirtualDiskDestination section. Do not specify the clusterin the Path field.
Note: If the restore is to an existing VM, the VMDKs are not locatedin the existing datastore path for the VM. They reside in a datastorepath based on the name of the temporary VM used in the restore. Thename of the temporary VM is available in the details for the restore jobin NetBackup.
Restore to adatastore cluster
209Restore virtual machinesRestoring VMware virtual machine disks by using NetBackup commands

Table 10-4 Restore parameters file items to edit (continued)
DescriptionItem
By default, the restore parameters file that the nbrestorevm-restorespecout command creates is configured to restore to anew VM. To restore the virtual disks to an existing VM, do the following:
■ Specify the name of the VM in the VMName field. The VM must existin the target vCenter or ESXi serve; if it does not exist, the restorefails with status code 2820.
■ Change the value of the AttachDisksToExistingVM field fromNo to Yes or, in the case of in-place disk restores,DeleteAllDisksAndReplace.
■ If a virtual disk to restore exists on the target VM already, configurethe OverwriteExistingDisk field, as follows:■ To overwrite the original virtual disk and retain the disk UUID,
specify Yes.■ To restore the virtual disk to the target VM as a new disk, specify
No. VMware assigns a new UUID to the disk. The default is No.
Disk UUIDs are always preserved with in-place disk restores.■ The restore process shuts down the target virtual machine before
it attaches the disk or disks. By default, NetBackup does not turnon the target VM. To turn on the target VM, specify Yes for thePowerOn option.
The VMwareAdvancedRestoreOptions section of the restoreparameters file includes other parameters that are related to restoringto an existing VM.
The restore job details show the datastore path of the virtual disk whenit was backed up and after it is restored.
Restore to anexisting VM
To restore to a standalone ESXi hypervisor when the backup wasthrough a vCenter, edit the following fields so that their values are None,as follows:
■ "vCenterServer": "None"
■ "Folder": "None"
■ "Datacenter" : "None"
Standalone ESXihypervisor
The nbrestorevm -restorespecout command adds a timestampto the name of the original VM client when it populates the VMName fieldin the restore parameters file. The timestamp is the decimal number ofseconds since January 1, 1970.
Depending on the requirements of the restore instance, you may needto edit the VMName field.
The VM name
210Restore virtual machinesRestoring VMware virtual machine disks by using NetBackup commands

Table 10-4 Restore parameters file items to edit (continued)
DescriptionItem
Edit any of the other fields so that the values that describe the restoremeet your needs.
See “VMware virtual machine disk restore file” on page 214.
Other fields
This task is part of a larger process that describes how to restore an individualVMware virtual machine disk or disks.
See “Restoring VMware virtual machine disks by using NetBackup commands”on page 204.
To modify a VMware virtual machine disk restore file by using a text editor
1 Open the restore file in a text editor.
2 Modify the parameters as necessary, save the file, and then close the editor.
See “VMware virtual machine disk restore file” on page 214.
3 Continue to the next task in the individual virtual machine disk restore process.
See “Validating the virtual machine disk restore file” on page 212.
To modify a VMware virtual machine disk restore file by using therestore_spec_utility.pl script
1 Invoke the Perl script to modify the restore parameters file as necessary, onefield at a time. Examples of three supported -req_type operations follow:
■ The following is an example of a modify operation to change the VMName
field:Windows: perl.exeC:\Progra~1\Veritas\NetBackup\bin\goodies\restore_spec_utility.pl
-req_type modify -file_path restore_filename -field VMName
-value new_vm_name
UNIX: perl/usr/openv/netbackup/bin/goodies/restore_spec_utility.pl
-req_type modify -file_path restore_filename -field VMName
-value new_vm_name
■ The following is an example of a keep_disks operation to retain a subsetof the disks that are described in a restore parameters file. It retains thescsi0-1 and scsi0-2 virtual disks and deletes all of the other defined disksfrom the file:Windows: perl.exeC:\Progra~1\Veritas\NetBackup\bin\goodies\restore_spec_utility.pl
211Restore virtual machinesRestoring VMware virtual machine disks by using NetBackup commands

-req_type keep_disks -file_path restore_filename -controller
scsi0-1,scsi0-2
UNIX: perl/usr/openv/netbackup/bin/goodies/restore_spec_utility.pl
-req_type keep_disks -file_path restore_filename -controller
scsi0-1,scsi0-2
■ The following is an example of a delete_disks operation to delete a subsetof the disks that are described in a restore parameters file. It deletes thescsi0-1 and scsi0-2 virtual disks and retains the other defined disks inthe file:Windows: perl.exeC:\Progra~1\Veritas\NetBackup\bin\goodies\restore_spec_utility.pl
-req_type delete_disks -file_path restore_filename -controller
scsi0-0,scsi0-1
UNIX: perl/usr/openv/netbackup/bin/goodies/restore_spec_utility.pl
-req_type delete_disks -file_path restore_filename -controller
scsi0-0,scsi0-1
■ The following is an example of modifying a restore specification for In-placedisk restore:Windows: perl.exeC:\Progra~1\Veritas\NetBackup\bin\goodies\restore_spec_utility.pl
-req_type modify -file_path restore_filename -field
AttachDisksToExistingVM -value DeleteAllDisksAndReplace
UNIX: perl/usr/openv/netbackup/bin/goodies/restore_spec_utility.pl
-req_type modify -file_path restore_filename -field
AttachDisksToExistingVM -value DeleteAllDisksAndReplace
2 Repeat step 1 until you have finished modifying the file.
3 Continue to the next task in the individual virtual machine disk restore process.
See “Validating the virtual machine disk restore file” on page 212.
Validating the virtual machine disk restore fileThis topic describes how to use the NetBackup nbrestorevm command to validatethe file that describes the virtual machine disk restore parameters.
This task is part of a larger process that describes how to restore an individualVMware virtual machine disk or disks.
212Restore virtual machinesRestoring VMware virtual machine disks by using NetBackup commands

See “Restoring VMware virtual machine disks by using NetBackup commands”on page 204.
To validate the virtual machine disk restore file
1 Invoke the following NetBackup command:
On Windows: install_path\NetBackup\bin\nbrestorevm –validate
-restorespec filename
On UNIX: /usr/openv/netbackup/bin/nbrestorevm –validate
-restorespec filename
2 Examine the command output. If the output indicates problems, edit the file tofix the problems.
3 Repeat steps 1 and 2 until the file is valid.
4 Continue to the next task in the individual virtual machine disk restore process.
See “Restoring the virtual machine disk or disks by using the nbrestorevm
command” on page 213.
Restoring the virtual machine disk or disks by using the nbrestorevmcommand
This topic describes how to use the NetBackup nbrestorevm command to restoreone or more virtual machine disks to a new VMware virtual machine.
This task is part of a larger process that describes how to restore an individualVMware virtual machine disk or disks.
See “Restoring VMware virtual machine disks by using NetBackup commands”on page 204.
To restore a VMware virtual machine disk
1 If the file is valid, restore the virtual machine by invoking the followingNetBackup command:
On Windows: install_path\NetBackup\bin\nbrestorevm -restorespec
filename [-L progress_log] [-w [hh:mm:ss]]
On UNIX: /usr/openv/netbackup/bin/nbrestorevm -restorespec filename
[-L progress_log] [-w [hh:mm:ss]]
■ The -restorespec filename option specifies the name of the file thatcontains the parameters of the restore.
213Restore virtual machinesRestoring VMware virtual machine disks by using NetBackup commands

■ The -L progress_log option specifies the name of an existing file in whichto write progress information. Only default paths are allowed for this option;the following are the default paths:UNIX systems: /usr/openv/netbackup/logs/user_ops/proglogWindows systems: install_path\NetBackup\logs\user_ops\proglog
■ The -w [hh:mm:ss] option causes NetBackup to wait for a completionstatus from the server before it returns you to the system prompt.The required date and time values format in NetBackup commands variesaccording to your locale. The /usr/openv/msg/.conf file (UNIX) and theinstall_path\VERITAS\msg\LC.CONF file (Windows) contain informationsuch as the date-time format for each supported locale. The files containspecific instructions on how to add or modify the list of supported localesand formats.You can optionally specify a wait time in hours, minutes, and seconds. Themaximum wait time you can specify is 23:59:59. If the wait time expiresbefore the restore is complete, the command exits with a time-out status.The restore, however, still completes on the server.If you specify 0 or do not specify a time, the wait time is indefinite for thecompletion status.
2 Monitor the restore in the NetBackup Administration Console ActivityMonitor.
See “Troubleshooting vmdk restore to existing VM” on page 320.
3 After the restore completes, do the following as necessary:
■ For the virtual disks that are restored to a new VM, add the disks to a VMthat can support them after the restore succeeds. Optionally, delete the VMthat NetBackup created for the restore.
■ For the virtual disks that are restored to an existing VM, assign a drive letter(Windows) or mount the disk (Linux) so you can access the data.
How to add disks, delete virtual machines, and mount drives is beyond thescope of the NetBackup documentation. See your VMware documentation.
VMware virtual machine disk restore fileThis topic describes the parameters that NetBackup uses to restore a virtual machinedisk or disks. NetBackup requires that the parameters be described in a text filethat uses the JavaScript Object Notation (JSON) format. The NetBackupnbrestorevm command reads the file to obtain the necessary information aboutthe virtual machine disks. NetBackup has no requirements for the file name otherthan those imposed by the operating system.
214Restore virtual machinesRestoring VMware virtual machine disks by using NetBackup commands

You can use the nbrestorevm command to generate the file from an existing backup.How to do so is described in a different topic.
See “Creating the VMware virtual machine disk restore file” on page 207.
The following is an example template of the required file:
{
"ClientType": "VMware",
"ClientName": "VM-client-name",
"RestoreType": "SelectiveDiskRestore",
"BackupImageSelection": {
"MasterServer": "Master-server-name",
"StartDate": "mm/dd/yy hh:mm:ss",
"EndDate": "mm/dd/yy hh:mm:ss",
"BackupId": "clientname_timestamp"
},
"VMwareRestoreParameters": {
"vCenterServer": "vCenter-name-for-restore",
"VMwareRecoveryHost": "Recovery-host-name",
"DefaultDiskProvisioning": "thin",
"TransportMode": "san:hotadd:nbd",
"vmdk_compression": "none",
"VMwareVirtualMachineDestination": {
"VMName": "Restore-vm-name",
"AttachDisksToExistingVM": "No",
"PowerOn": "No",
"Datacenter": "Path-of-Datacenter-for-destination-vm",
"ESX": "Hostname-of-the-ESX-host",
"Folder": "Path-to-destination-VM-folder",
"ResourcePool/Vapp": "Path-of-vApp-or-resource-pool-destination",
"VmxDatastore": ""
},
"VMwareVirtualDiskDestination": [
{
"VirtualDisk" : "/DS1/BackedupVM/BackedupVM.vmdk",
"OverwriteExistingDisk": "No",
"Datastore": "[Datastore-name]",
"Path": "”,
"Provisioning": "thin"
"Controller": "scsi0-0"
},
{
"VirtualDisk": "/DS2/BackedupVM/BackedupVM_1.vmdk",
215Restore virtual machinesRestoring VMware virtual machine disks by using NetBackup commands

"OverwriteExistingDisk": "No",
"Datastore": "",
"Path": "[datastore_name] MyVm/MyVM_1.vmdk”,
"Provisioning": "eagerzeroed"
"Controller": "scsi0-1"
}
]
"VMwareAdvancedRestoreOptions": {
"DeleteRestoredVMOnError": "No",
"VMShutdownWaitSeconds": 900
}
}
}
The following is an example of the required file for In-place disk restore:
{
"BackupImageSelection": {
"StartDate": "mm/dd/yy hh:mm:ss",
"BackupId": "clientname_timestamp"
"EndDate": "mm/dd/yy hh:mm:ss",
"MasterServer": "Master-server-name",
},
"ClientName": "VM-client-name",
"VMwareRestoreParameters": {
"vmdk_compression": "none",
"VMwareAdvancedRestoreOptions": {
"VMShutdownWaitSeconds": 900,
"DeleteRestoredVMOnError": "No"
},
"VMwareRecoveryHost": "VM-recovery-host-name",
"VMwareVirtualMachineDestination": {
"ResourcePool/Vapp": "Path-of-vApp-or-resource-pool-destination",
"VmxDatastore": "Vmx-datastore-name",
"Datacenter": "Path-of-Datacenter-for-destination-vm",
"AttachDisksToExistingVM": "DeleteAllDisksAndReplace",
"ESX": "Hostname-of-the-ESX-host",
"VMName": "Restore-vm-name",
"Folder": "Path-to-destination-VM-folder",
"PowerOn": "Yes"
},
"DefaultDiskProvisioning": "unknown",
"TransportMode": "nbdssl",
"VMwareVirtualDiskDestination": [],
216Restore virtual machinesRestoring VMware virtual machine disks by using NetBackup commands

"vCenterServer": "vCenter-name-for-restore"
},
"ClientType": "VMware",
"RestoreType": "SelectiveDiskRestore"
}
The following subsections describe the parameters in the file. The optional sectionsor optional fields that you do not want to use must be omitted from the file.
See “About VMware virtual machine disk restore” on page 196.
Global fieldsThe first section of the file specifies the required information about the client thatcontains the disks that you want to restore. The following table describes the fieldsin the first, global section:
Table 10-5 Global fields (required)
Required?DescriptionField name
Required.The client type as configured in the backup policy. For Vmware virtual machinedisk restore, use VMware.
ClientType
Required.The client name as configured in the backup policy.ClientName
Required.The type of restore. For Vmware virtual machine disk restore, useSelectiveDiskRestore.
RestoreType
BackupImageSelectionThe BackupImageSelection section of the file specifies the information thatNetBackup requires to identify the backup image to restore. If this section is notspecified, NetBackup restores the most recent backup. The following table describesthe fields in the BackupImageSelection section:
Table 10-6 The BackupImageSelection section (optional)
Required?DescriptionField name
Optional.The fully-qualified domain name of the NetBackup master server to use to querythe VM details.
If not specified, NetBackup uses the master server that backs up the VM.
MasterServer
Optional.The start date to look for backup images, in mm/dd/yy hh:mm:ss format. If morethan one backup image exits in the date range, NetBackup selects the most recentbackup.
If not specified, the start date is 6 months earlier than the current date.
StartDate
217Restore virtual machinesRestoring VMware virtual machine disks by using NetBackup commands

Table 10-6 The BackupImageSelection section (optional) (continued)
Required?DescriptionField name
Optional.The end date to look for backup images, in mm/dd/yy hh:mm:ss format. If morethan one backup image exits in the date range, NetBackup selects the most recentbackup.
If not specified, NetBackup uses the current date.
EndDate
Optional.The ID of the backup image to use for the restore, in clientname_backuptimeformat. The backuptime is the decimal number of seconds since January 1,1970.
If not specified, NetBackup uses the most recent backup image. If you specify aStartDate, EndDate, and a valid BackupId, NetBackup restores from theBackupId image.
BackupId
VMwareRestoreParametersThe VMwareRestoreParameters section of the file contains the following:
■ The restore parameters of the VM. All of the fields in this section are optional;however, the section is required because it also contains two requiredsubsections. See Table 10-7.
■ A VMwareVirtualMachineDestination subsection, which specifies thedestination parameters for the restore.See the section called “VMwareVirtualMachineDestination” on page 219.
■ A VMwareVirtualDiskDestination subsection, which specifies the disks torestore and the restore parameters for those disks.See the section called “VMwareVirtualDiskDestination” on page 221.
■ A VMwareAdvancedRestoreOptions subsection, which specifies parameters torestore to an existing VM.See the section called “VMwareAdvancedRestoreOptions” on page 223.
Table 10-7 The VMwareRestoreParameters section (required)
Required?DescriptionField name
Optional.The host name of the destination vCenter for the restore, in the sameformat as specified in the NetBackup Virtual Server credentials.
To restore to a standalone ESXi hypervisor when the backup wasthrough a vCenter, the value of this field must be None.
vCenterServer
218Restore virtual machinesRestoring VMware virtual machine disks by using NetBackup commands

Table 10-7 The VMwareRestoreParameters section (required) (continued)
Required?DescriptionField name
Optional.The host that performs the restore.
If not specified, NetBackup uses the backup host value from thebackup image.
VMwareRecoveryHost
Optional.The default disk provisioning for all of the disks to be restored: thin,thick, eagerzeroed, or unknown.
For each disk, you can override this default by specifying a differentProvisioning value in the VMwareVirtualDiskDestinationsection of the file.
If neither DefaultDiskProvisioning or Provisioning arespecified, NetBackup uses the provisioning specified in the backup.
DefaultDiskProvisioning
Optional.The transport mode combination to use for the restore as specifiedin lowercase, colon separated values: hotadd:nbd:nbdssl:san.The order of the specification is significant; NetBackup attemptseach method in turn until the restore succeeds. If all methods fail,the restore fails.
If not specified, NetBackup uses the transport mode combinationthat was used for the backup.
TransportMode
Optional.The vmdk compression type to use for full and selective vmdkrestores. Vmdk compression types are: zlib, skipz, and fastlz.
If not specified, NetBackup uses none as the value.
vmdk_compression
VMwareVirtualMachineDestinationThe VMwareVirtualMachineDestination section of the file specifies the destinationparameters for the restore. The following table describes the fields in theVMwareVirtualMachineDestination section. This section is subordinate to theVMwareRestoreParameters section.
219Restore virtual machinesRestoring VMware virtual machine disks by using NetBackup commands

Table 10-8 The VMwareVirtualMachineDestination section (required)
Required?DescriptionField name
Required.The unique display name of the new virtual machine for therestored disk or disks. The nbrestorevm command adds atimestamp to the name of the original VM client when it populatesthis field. The timestamp is the decimal number of seconds sinceJanuary 1, 1970.
NetBackup restores the virtual machine disks to a new VM.Therefore, if this name conflicts with an existing display name, therestore fails.
VMName
Required.Whether to restore the selected VMDKs to an existing VM or to anew VM, as follows:
■ If the value is Yes, the VM specified in the VMName field mustexist in the target vCenter or ESX server. If it does not exist,the restore fails with status code 2820.
■ If the value is No, the VM specified in the VMName field mustnot exit in the target vCenter or ESX server. If it exists, therestore fails with status code 2820.
■ If the value is DeleteAllDisksAndReplace, the VMspecified in the VMName field must exist in the target vCenteror ESX server. If it does not exist, the restore fails with statuscode 2820.
The default value is No.
AttachDisksToExistingVM
Required.Whether to turn on the target VM after the restore, as follows:
■ If the value is Yes, the target VM is powered ON at the end ofa successful restore.
■ If the value is No, the target VM is not turned on after therestore.
If the restore is to an existing VM, the VM is turned off before thevirtual disks are attached to it during the restore.
The default value is No.
PowerOn
Optional.The name of the VMware Datacenter for the virtual disk, inpathname format.
To restore to a standalone ESXi hypervisor when the backup wasthrough a vCenter, the value of this field must be None.
If not specified, NetBackup uses the value from the backup.
Datacenter
220Restore virtual machinesRestoring VMware virtual machine disks by using NetBackup commands

Table 10-8 The VMwareVirtualMachineDestination section (required)(continued)
Required?DescriptionField name
Optional.The name of the ESX host to which NetBackup should restore thevirtual machine disks.
If not specified, NetBackup uses the value from the backup.
ESX
Optional.The pathname of the VM folder to which NetBackup should restorethe virtual machine disks.
To restore to a standalone ESXi hypervisor when the backup wasthrough a vCenter, the value of this field must be None.
If not specified, NetBackup uses the value from the backup.
Folder
Optional.The pathname of the resource pool to which NetBackup shouldrestore the virtual machine disks. If the restore is to a vApp, specifythe path of the vApp.
If not specified, NetBackup uses the value from the backup.
ResourcePool/Vapp
Optional.The name of the Datastore to which NetBackup should restorethe .vmx configuration file and other VM configuration files. Youmay enclose the name in square brackets but do not have to.
If not specified, NetBackup uses the value from the backup.
VmxDatastore
Optional.The name of the Datastore to which NetBackup should restoreall the virtual disks for in-place disk restore. If not specified,NetBackup uses the value from the backup. This option is onlyused for In-place disk restore and is ignored otherwise.
DefaultDiskDatastore
VMwareVirtualDiskDestinationThe VMwareVirtualDiskDestination section of the file is a JSON array thatspecifies the disks to restore and the restore parameters for those disks. It cancontain one or more sets of the fields that are described in the following table, oneset per virtual machine disk. A comma must separate fields in a set, and a commamust separate sets. This section is subordinate to the VMwareRestoreParameters
section.
Note: This section is not applicable for in-place disk restores.
221Restore virtual machinesRestoring VMware virtual machine disks by using NetBackup commands

Table 10-9 The VMwareVirtualDiskDestination section (required)
Required?DescriptionField name
Required.The full pathname of the virtual disk to restore. This path must matchexactly the path of the .vmdk file when it was backed up.
VirtualDisk
Required.Whether to overwrite the existing virtual disk or disks on the target VM,as follows:
■ If the value is Yes, overwrite the original virtual disk and retain thedisk UUID.
■ If the value is No, restore the virtual disk to the target VM as a newdisk. VMware assigns a new UUID to the disk.
The default value is No.
OverwriteExistingDisk
Optional.The name of the Datastore that is the destination for the restore. Youmay enclose the name in square brackets but do not have to. (VMwaregenerates the Datastore pathname using the naming conventionsfor the VM.)
For a restore of virtual disks to a datastore cluster, specify the nameof the datastore cluster in this field.
If not specified, NetBackup uses the value that is specified in the Pathfield. If neither Datastore or Path are specified, NetBackup uses theDatastore from the backup image.
Datastore
Optional.The full pathname to the restore destination for the virtual disk, in thefollowing format:
[datastore_name] MyVM/MyVM.vmdk
The nbrestorevm -restorespecout option does not populate thePath field.
If you specify a Path and it is not available or a disk already exists atthat path, the restore fails. If neither Datastore or Path are specified,NetBackup uses the Datastore from the backup image.
If a specific vmdk name is not required, Veritas recommends that youleave this field empty.
Path
Optional.The disk provisioning for this specific disk: thin, thick, eagerzeroed,or unknown.
If not specified, the NetBackup uses the DefaultDiskProvisioningvalue.
Provisioning
222Restore virtual machinesRestoring VMware virtual machine disks by using NetBackup commands

Table 10-9 The VMwareVirtualDiskDestination section (required)(continued)
Required?DescriptionField name
OptionalThe virtual disk controller to which the disk is attached in the originalVM.
This field is informational only to help you determine which virtual diskor disks to restore. The value is not used during a restore.
Controller
VMwareAdvancedRestoreOptionsThe VMwareAdvancedRestoreOptions section of the file specifies parameters torestore to an existing VM. This section is subordinate to theVMwareRestoreParameters section.
Table 10-10 The VMwareAdvancedRestoreOptions section (optional)
Required?DescriptionField name
Optional.NetBackup creates a temporary VM during the restore processand then attaches the virtual disks to the target VM. The value ofthis parameter determines whether NetBackup deletes thetemporary VM if the disk attach operation fails, as follows:
■ If the value is Yes, delete the temporary VM.■ If the value is No, do not delete the temporary VM. If the disks
are not successfully attached to the target VM, you can accessthe data on the temporary VM.
The default value is No.
DeleteRestoredVMOnError
Optional.For restores to an existing VM, the restore process shuts downthe target virtual machine before it attaches the disk or disks. Theduration of the shutdown operation depends on the VMwareworkload. Use this parameter to specify how long the restoreprocess should wait for shutdown before giving up on restore.
The default value is 900 seconds (15 minutes).
VMShutdownWaitSeconds
About restore of individual filesAbout restoringindividual VMware files
This topic applies to NetBackup for VMware.
You can use either of the following procedures to restore files individually.
223Restore virtual machinesAbout restore of individual filesAbout restoring individual VMware files

Restore individual files directly to a virtual machine in one of thefollowing ways:
■ Restore the files to a virtual machine on which NetBackup clientsoftware is installed.
■ Windows only: Restore the files to virtual machine drives thathave been mapped to a host on which NetBackup client softwareis installed.
See “Setting up NetBackup Client Service for restore to a Windowsshared virtual machine driveSetting up NetBackup Client Service forVMware restores to a Windows shared virtual machine drive”on page 227.
One-stage process
Restore individual files to a host on which the NetBackup clientsoftware is installed (not to the virtual machine). See the NetBackupBackup, Archive, and Restore Getting Started Guide on how torestore to different locations. Then manually copy the restored filesto the virtual machine. (NetBackup does not perform this step.)
Two-stage process
Note: Individual file recovery is supported from full backups and from incrementalbackups, as long as the Enable file recovery from VM backup policy option isenabled.
See “Restoring individual filesRestoring individual VMware virtual machine files”on page 224.
See “Restoring VMware virtual machine disks by using Backup, Archive, andRestore” on page 197.
See “Restoring the full VMware virtual machine” on page 179.
Restoring individual filesRestoring individualVMware virtual machine files
This topic describes how to restore files from a NetBackup backup of a VMwarevirtual machine.
If the VMware backup was made with the Enable file recovery from VM backupoption, you can restore individual files.
See “Optimizations options (VMware)” on page 74.
224Restore virtual machinesRestoring individual filesRestoring individual VMware virtual machine files

To restore individual files
1 In the NetBackup Administration Console, clickBackup, Archive, and Restore
2 Click Actions > Specify NetBackup Machines and Policy Type....
3 Enter the following:
The NetBackup master server that directed the backup.Server to use forbackup andrestores
The VMware virtual machine that was backed up.
Click Search VM Clients to search or browse for a virtualmachine. This option helps to locate a virtual machine in a large,multi-layered virtual environment.
See “Browse and search virtual machines for restore”on page 232.
Or, enter the type of name that was selected for the PrimaryVM identifier option on the policy VMware tab. For example, ifthe Primary VM identifier option is set to VM host name, enterthe virtual machine's host name.
Source client forrestores
Enter one of the following:
■ The host name of the VMware virtual machine that wasbacked up, if NetBackup client software has been installedon the virtual machine.Enter the host name even if the policy identified the virtualmachine by its VM display name, UUID, or DNS name. Donot enter the VM display name, UUID, or DNS name.
■ Any NetBackup client that has the same operating systemand file system of the VM that was backed up.
Note: The NetBackup Client Service must be logged on asAdministrator.
See “Setting up NetBackup Client Service for restore to aWindows shared virtual machine driveSetting up NetBackupClient Service for VMware restores to a Windows shared virtualmachine drive” on page 227.
Destination clientfor restores
The type of policy that made the backup (VMware).Policy type forrestores
The time period within which to search for backups.Date / time range
4 Click OK.
225Restore virtual machinesRestoring individual filesRestoring individual VMware virtual machine files

5 For the Restore type, select Normal Backups.
6 You can use the Start date and End date icons to select the date range withinwhich the backup occurred.
7 Under Directory Structure, drill into the folders and click the folders and filesyou want to restore.
8 Click Restore.
9 On the Restore Marked Files dialog: If NetBackup client software is notinstalled on the destination virtual machine, select one of the following:
■ Restore everything to its original location
■ Restore everything to a different location (maintaining existingstructure)
■ Restore individual directories and files to different locationsDestinations must be entered as UNC path names that refer to shareddrives on the virtual machine. For example, to restore the fileE:\folder1\file1 on virtual machine vm1, enter the following destination:
\\vm1\e$\folder1\file1
The NetBackup Client Service must be logged on under an account thathas Administrator privileges.
See “Setting up NetBackup Client Service for restore to a Windows sharedvirtual machine driveSetting up NetBackup Client Service for VMware restoresto a Windows shared virtual machine drive” on page 227.
226Restore virtual machinesRestoring individual filesRestoring individual VMware virtual machine files

See “About restore of individual filesAbout restoring individual VMware files”on page 223.
See “Restoring the full VMware virtual machine” on page 179.
See “About VMware virtual machine disk restore” on page 196.
See “Restore notes and restrictions” on page 173.
Setting up NetBackup Client Service for restore to a Windows sharedvirtual machine driveSetting up NetBackup Client Service for VMwarerestores to a Windows shared virtual machine drive
This topic relates to the restore of files from a NetBackup backup of a VMwarevirtual machine.
To restore individual files to a Windows virtual machine that has a shared drive,note: the NetBackup Client Service must be logged on under an account that hasAdministrator privileges (not as the Local System account). An account withAdministrator privileges lets NetBackup write to the directories on the virtual machineto which the data is restored.
If you try to restore files while the NetBackup Client Service is logged on as theLocal System account, the restore fails.
To log on the NetBackup Client Service as Administrator
1 In Windows Services on the VMware recovery host, double-click the NetBackupClient Service.
2 Check the Log On tab: if the service is not logged on under an account thathas Administrator privileges, stop the service.
3 Change the logon to the Administrator account, or to an account that hasAdministrator privileges.
The account must have Administrator privileges in the domain in which boththe virtual machine and the VMware backup host reside.
4 Restart the service.
5 Retry the restore.
See “Restoring individual filesRestoring individual VMware virtual machine files”on page 224.
See “Restore notes and restrictions” on page 173.
227Restore virtual machinesRestoring individual filesRestoring individual VMware virtual machine files

Restore Marked Files dialog for restore of VMware filesThis topic describes theRestore Marked Files dialog for restoring individual foldersand files from a VMware virtual machine backup.
Table 10-11 Options for individual file restore on the Restore Marked Filesdialog box
DescriptionOption
Select from the following options.Destination
228Restore virtual machinesRestoring individual filesRestoring individual VMware virtual machine files

Table 10-11 Options for individual file restore on the Restore Marked Filesdialog box (continued)
DescriptionOption
Restores the folders and files to the location where they residedwhen the backup occurred.
Restore everything toits original location
Restores the folders and files with their original hierarchy, but to adifferent location.
Use the Destination field to enter the restore location.
Click Browse to browse to the restore location.
Restore everything toa different location(maintaining existingstructure)
Restores the folders and files to individually designated locations.To designate a restore destination for each source folder, doubleclick on its row. Use the following dialog to enter or browse for thedestination:
To restore to a Windows mounted drive: Destinations must beentered as UNC path names that refer to shared drives on thevirtual machine. For example, to restore the fileE:\folder1\file1 on virtual machine vm1, enter the followingdestination:
\\vm1\e$\folder1\file1
See “Setting up NetBackup Client Service for restore to a Windowsshared virtual machine driveSetting up NetBackup Client Servicefor VMware restores to a Windows shared virtual machine drive”on page 227.
Restore individualdirectories and filesto different locations
This option is not implemented.Create and restore toa new virtual harddisk file
For a description of the restore options, see the NetBackup helpfor the Backup, Archive, and Restore interface.
Options
229Restore virtual machinesRestoring individual filesRestoring individual VMware virtual machine files

Table 10-11 Options for individual file restore on the Restore Marked Filesdialog box (continued)
DescriptionOption
You can use this option to select a media server that has accessto the storage unit that contains the backup image. An example ofsuch an environment is a Media Server Deduplication Pool (MSDP)with multiple media servers.
Note: If the storage unit that contains the backup image is notshared with multiple media servers, this option is grayed out.
Media Server
Determines the restore job's priority for restore resources. A higherpriority means that NetBackup assigns the first available drive tothe first restore job with the highest priority. Enter a number(maximum 99999). The default for all restore jobs is 0, the lowestpriority possible. Any restore job with a priority greater than zerohas priority over the default setting.
Override defaultpriority
See “Restoring the full VMware virtual machine” on page 179.
See “About restore of individual filesAbout restoring individual VMware files”on page 223.
See “If the recovery host is not at the same NetBackup release level as the backuphost” on page 236.
HowNetBackup handles VMware tag associationsat restore
To better understand the NetBackup restore behavior, it's important to understandsome of the internal mechanics of how VMware handles tag associations. For eachtag that is created in VMware, there is a corresponding internal identifier you cannotsee or edit. This feature allows VMware to function correctly without the need toaccount for variation in naming conventions. Tags are replicated throughout theenvironment through the Platform Services Controller (PSC).
NetBackup recognizes and uses tag names when they are part of the VIP query.Backups of the virtual machine store the tag name and VMware internal identifierfor all tags that are associated with that virtual machine. During the restore, however,NetBackup only creates the tag associations based on the VMware internal identifiersthat are defined on the target vCenter server.
230Restore virtual machinesHow NetBackup handles VMware tag associations at restore

Figure 10-1 Sample VMware environment
Platform ServicesController
vCenter2
vCenter3
Tag A (B)Identifier: 135
Tag A (B)Identifier: 135
VM1Tag A (B)Identifier: 135
VM2Tag AIdentifier: 246
Tag AIdentifier: 246
vCenter1
Figure 10-1 shows a sample VMware environment with multiple vCenter servers,virtual machines, and tags. Assume that a backup of all virtual machines completessuccessfully with a NetBackup status code 0.
231Restore virtual machinesHow NetBackup handles VMware tag associations at restore

■ If you restore VM1 to either vCenter1 or vCenter2, it is restored with tag A andthe restore exits with a NetBackup status code 0. This behavior is true both fora restore to the same name as well as an alternate client restore. This behavioris the result of VMware replicating tags across all vCenter servers that areattached to a single PSC.
■ If you restore VM1 to vCenter3, it is restored without any tags. The restore exitswith a NetBackup status code 1. This behavior is because VMware uses theinternal identifier. While there is a tag name A in vCenter3, the internal identifierfor tag A does not match the internal identifier that is restored. This behavior istrue both for a restore to the same name as well as an alternate client restore.
■ After the NetBackup backup, if tag A is renamed to B, when VM1 is restored toeither vCenter1 or vCenter2 it is restored with tag B. The restore exits with aNetBackup status code 0. This behavior is because VMware uses the internalidentifier, and now associates this identifier with the tag name B.
■ After the NetBackup backup, if tag A is deleted, when VM1 is restored to eithervCenter1 or vCenter2 it is restored without any tag associations. The restoreexits with a NetBackup status code 1.
If for any reason the backup of the virtual machines in Figure 10-1 did notsuccessfully capture the tag associations, the backup exits with NetBackup statuscode 0. The reasons for failing to capture tag associations appear in the ActivityMonitor. Any restores based on this backup exit with NetBackup status code 0, butno tag information is restored. Depending on the backup error, more informationregarding tag associations may appear in the Activity Monitor.
Browse and search virtual machines for restoreTo browse and search virtual machines for restore
1 In the Backup, Archive, and Restore interface, click Actions > SpecifyNetBackup Machines and Policy Type....
2 Under Policy type for restores, select VMware.
3 Click Search VM Clients.
The Browse and Search Virtual Machines for Restore dialog appears. Usethis dialog to find a virtual machine.
Note: This dialog finds the virtual machines that were backed up with the VMwarepolicy type. It does not search for other types of backups.
232Restore virtual machinesBrowse and search virtual machines for restore

Note: If the backup was made before NetBackup 7.6, the backup image must beimported and verified before it can be browsed or searched.
Table 10-12 Browse and Search Virtual Machines for Restore dialog box
DescriptionDialog box item
Search for virtual machines by name, IP address, UUID, or by othercriteria.
See “Search Virtual Machines for Restore dialog” on page 233.
Search virtualmachines
Browse for virtual machines by drilling down through the virtualobjects.
Select the type of view for browsing:
■ vCloud viewShows the virtual objects as they appear in vCloud Director.
■ vSphere viewShows the virtual objects as they appear in vSphere Client.
See “Browse the vCloud or vSphere view for virtual machine clients”on page 235.
Browse virtualmachines
Note: Although VMware allows up to 128 characters for an object name, theNetBackup database restricts searches to the first 126 characters only.
Search Virtual Machines for Restore dialogUse this screen to search for virtual machines by name or other identifier, or to useother filter criteria.
Enter Display Name, Host Name, IP Address, UUID, DNS Name or vApp tosearch for:
Enter the name or number of the virtual machine to search for and click Next. Anymatching virtual machines appear in the Search results dialog.
See “Search results dialog” on page 236.
Advanced Search:
Click to create a rule-based search query. See Table 10-13.
233Restore virtual machinesBrowse and search virtual machines for restore

Table 10-13 Advanced Search: filter parameters
DescriptionSearch item
Available when you click the plus sign to add a rule to thesearch.
AND: Limits or restricts the scope of the search.
OR: Opens the search to an additional possibility,expanding the scope of the search.
Select a parameter on which to search.
You can type the first character of the parameter to selectit.
Select an operator.
You can type the first character of the operator to select it.
The available operators depend on the parameter that wasselected.
Enter a value for the parameter. The search looks for thevirtual machines that match the value.
Choose a date and time.
Refine or expand the search (add another rule).
234Restore virtual machinesBrowse and search virtual machines for restore

Table 10-13 Advanced Search: filter parameters (continued)
DescriptionSearch item
Remove the rule from the search.
Search by display name, host name, IP address, UUID,DNS name, or vApp.
Basic Search
Run the search. The matching virtual machines appear inthe Search results dialog.
See “Search results dialog” on page 236.
Next
Note the following about the search behavior:
■ Although VMware allows up to 128 characters for an object name, the NetBackupdatabase restricts searches to the first 126 characters only.
■ To search for a vSphere vApp by name without specifying its path: Use thesearch operator Contains or EndsWith (do not use Equal). To use Equal, youmust specify the entire path of the vApp.
■ To search by IP address: If the virtual machine has two or more IP addresses(such as virtual addresses), use Contains as the search operator instead ofEqual.
■ You must include a leading forward slash (/) when searching for a data center,VM folder, or resource pool. If you use the Contains operator, a leading slashis not required.
■ Regarding wildcards: * and ? are not supported for Greater, GreaterEqual,Less, and LessEqual operators. The * and ? characters are treated as literals,not wildcards.For the rest of the operators, * matches everything, and ? matches any singlecharacter.Note: SQL has a limitation that wildcards * and ? (SQL equivalents are % and_) do not match null values. If a virtual machine does not have an IP address,the query “IPAddress Equal *” does not find the virtual machine.
Browse the vCloud or vSphere view for virtual machine clientsTheBrowse virtual machines using the vCloud (or vSphere) view dialog showsyour virtual environment starting with the vCenter server. The objects appearaccording to the view you chose (vCloud or vSphere).
235Restore virtual machinesBrowse and search virtual machines for restore

To select a virtual machine, click on an ESX server or vApp. Highlight the virtualmachine you want and then click Select.
To switch the view to vCloud or vSphere, click on the link in the upper right.
Note: Although VMware allows up to 128 characters for an object name, theNetBackup database restricts searches to the first 126 characters only.
See “Browse and search virtual machines for restore” on page 232.
Search results dialogThe virtual machines that match an advanced search (from the Search VirtualMachines for Restore dialog) are listed in the Search results dialog. The searchcriteria are listed at the top.
Click on the virtual machine that you want to restore and click Select. Click Refreshon the Specify NetBackup Machines and Policy Type screen.
If no virtual machines appear, click Back to revise your search criteria.
See “Browse and search virtual machines for restore” on page 232.
If the recovery host is not at the same NetBackuprelease level as the backup host
Note the following about mixed-level backups and restores:
■ To restore from a NetBackup 7.x backupTo restore a virtual machine from a backup that a NetBackup 7.x backup hostperformed, a NetBackup 7.x recovery host is required. You cannot use aNetBackup 6.5.x recovery host to restore a virtual machine that was backed upby a NetBackup 7.x backup host.
■ To restore from a NetBackup 6.5.x backupTo restore a virtual machine (or selected files) from a NetBackup 6.5.x backup,the VMware Converter must be installed on the NetBackup recovery host. Therecovery host can run NetBackup 6.5.x or 7.x. A staging area is required.
See “Restoring the full VMware virtual machine” on page 179.
See “Restoring individual filesRestoring individual VMware virtual machine files”on page 224.
236Restore virtual machinesIf the recovery host is not at the same NetBackup release level as the backup host

Restore virtual machineswith Instant Recovery
This chapter includes the following topics:
■ About Instant Recovery for VMware
■ Task overview for Instant Recovery for VMware
■ Performance recommendations for Instant Recovery for VMware
■ Requirements for Instant Recovery for VMware
■ Notes on Instant Recovery for VMware
■ Restarting the Client for NFS service on a Windows restore host
■ Instant Recovery options on the nbrestorevm command
■ Restoring a virtual machine with Instant Recovery for VMware
■ Restoring a virtual machine to a different location with Instant Recovery forVMware
■ Restoring individual files with Instant Recovery for VMware while the currentvirtual machine is running
■ Job types for Instant Recovery for VMware
■ Reactivating a restored virtual machine with Instant Recovery for VMware
About Instant Recovery for VMwareNetBackup can recover a virtual machine almost instantly, without waiting to transferthe virtual machine's data from the backup. NetBackup starts the virtual machine
11Chapter

directly from the backup image and makes it accessible to users on the target ESXhost immediately. You can copy files (including vmdk files) without restoring theentire virtual machine. To restore the virtual machine, use VMware Storage vMotionto migrate the virtual machine data files from the backup image to the ESX host.
Some example uses for instant recovery:
■ Access and restore individual files and folders from any type of OS and thendelete the virtual machine. (Note for Windows or Linux: Instead of instantrecovery, you can use the policy Enable file recovery from VM backup optionand restore individual files with the Backup, Archive, and Restore interface.)
■ Test a patch on a restored virtual machine before you apply the patch toproduction systems.
■ Troubleshoot a virtual machine or host, such as when the production ESX hostis down. You can start the virtual machine from its backup and use it until theproduction system is back online.
■ Permanently recover the virtual machine by means of Storage vMotion.
■ Verify the backup image.
■ Copy a vmdk file and then delete the virtual machine.
■ Verify an application.
In any case, the virtual machine is started directly from the backup image and isavailable in seconds or minutes. The startup time depends on the network speedand storage speed, not on the size of the virtual machine.
Table 11-1 describes the steps in a virtual machine instant recovery.
Table 11-1 How Instant Recovery for VMware works
ActionsSequence
Run the nbrestorevm command* to access the virtual machine from its backupimage. The NetBackup File System Service (NBFSD) on the media serveraccesses the backup image file system and mounts the image as an NFSdatastore. The datastore becomes accessible to the ESX host where thevirtual machine is to be restored.
On the same command, select a temporary datastore that is accessible tothe ESX host.
Step 1
NetBackup creates a virtual machine on the ESX host and configures thevirtual machine with write access to a temporary (local) datastore.
Step 2
NetBackup creates a snapshot of the virtual machine. Any new write requestsin the virtual machine use the temporary datastore. The virtual machine usesthe NFS datastore as read-only.
Step 3
238Restore virtual machines with Instant RecoveryAbout Instant Recovery for VMware

Table 11-1 How Instant Recovery for VMware works (continued)
ActionsSequence
NetBackup starts up the virtual machine on the ESX host.Step 4
To keep the restored VM: Use Storage vMotion to copy the virtual machinedata from the NFS datastore to the temporary datastore.
Step 5
When vMotion is complete, use nbrestorevm to unmount the NFS datastore.Step 6
*NetBackup provides a command-line interface for instant recovery of virtualmachines (nbrestorevm). A graphical user interface (the Instant Recovery Wizard)is available in the NetBackup vSphere Web Client plug-in and the NetBackupvSphere Client (HTML5) plug-in. For details, see theNetBackup Plug-in for VMwarevSphere Web Client Guide and the NetBackup Plug-in for VMware vSphere Client(HTML5) Guide, available from this location:
http://www.veritas.com/docs/000003214
For additional information on Instant Recovery for VMware:
See “Task overview for Instant Recovery for VMware” on page 239.
See “Notes on Instant Recovery for VMware” on page 242.
See “Instant Recovery options on the nbrestorevm command” on page 244.
See “Restoring a virtual machine with Instant Recovery for VMware” on page 249.
Task overview for Instant Recovery for VMwareTable 11-2 describes the tasks for Instant Recovery for VMware.
Table 11-2 Instant Recovery tasks
Reference topicDescriptionStep
See “Performance recommendationsfor Instant Recovery for VMware”on page 240.
Review the performancerecommendations
Step 1
See “Requirements for InstantRecovery for VMware” on page 241.
See “Notes on Instant Recovery forVMware” on page 242.
Review the notes and requirementsStep 2
239Restore virtual machines with Instant RecoveryTask overview for Instant Recovery for VMware

Table 11-2 Instant Recovery tasks (continued)
Reference topicDescriptionStep
See “Restarting the Client for NFSservice on a Windows restore host”on page 243.
Restart the Client for NFS service onthe restore host
Step 3
See “Instant Recovery options on thenbrestorevm command” on page 244.
Review the Instant Recovery optionson the nbrestorevm command
Step 4
See “Restoring a virtual machine withInstant Recovery for VMware”on page 249.
See “Restoring individual files withInstant Recovery for VMware whilethe current virtual machine is running”on page 256.
Use the nbrestorevm command toperform Instant Recovery
Step 5
Performance recommendations for InstantRecovery for VMware
After Instant Recovery, the virtual machine is on an NFS-attached datastore thatis presented by the NetBackup media server. The performance of the virtual machineand of Storage vMotion depends on the following: the network speed and latencybetween the ESXi host and the media server, and the speed of NetBackup storagethat the backup is recovered from.
It is recommended the following:
■ A SAN connection from the NetBackup media server to its disk storage unit.
■ For Fibre Channel SAN, a minimum speed of 4 gigabits per second.
■ For iSCSI SAN, a minimum speed of 1 gigabit per second.
■ When you use Storage vMotion to migrate a restored virtual machine, migrateone virtual machine at a time per media server. The migration may be slow ifyou simultaneously migrate multiple virtual machines per media server.
■ For disaster recovery testing, it is recommended that you restore no more thanthree or four virtual machines per media server. The number to restore dependson the I/O load on the media server. It is recommended restoring each VMone-by-one, not simultaneously.
240Restore virtual machines with Instant RecoveryPerformance recommendations for Instant Recovery for VMware

Note: For large-scale recovery of multiple virtual machines, use the virtual machinerestore feature in the Backup, Archive, and Restore interface. Do not use InstantRecovery for VMware.
Requirements for Instant Recovery for VMwareFor virtual machine instant recovery, your environment must meet the followingrequirements:
■ The virtual machine to restore must have been backed up from a VMware policy.
■ The target ESX server for the restore must be at vSphere 5.0 or later.
■ The restore host can be on Windows or Linux.
Note: For the VMware virtual machines that have non-ASCII characters in theirpaths, NetBackup does not support Instant Recovery using Windows restorehosts and media servers. You must use a Linux restore host and media serverfor Instant Recovery of such virtual machines.
The requirements and limitations for non-ASCII character support are describedin a different topic.
See “NetBackup for VMware: notes and restrictions” on page 27.
■ For a restore host that is separate from the NetBackup master server or mediaserver: You must add the restore host to the list of servers that can access themaster server.In the NetBackup Administration Console, click Host Properties > MasterServers, double-click the NetBackup master server, and click Servers. On theAdditional Servers tab, click Add to add the restore host.See “Allowing other servers or clients to restore virtual machines” on page 352.
■ The NFS Client service must be enabled on the ESXi host.
■ The Network File System (NFS) must be installed on the Linux media serverand restore host and the portmap service must be active.For information about how to install NFS, see the media server host operatingsystem documentation.
■ The Services for Network File System (NFS) must be installed on the Windowsmedia server and restore host.See “About configuring services for NFS on Windows 2012 or 2016 (NetBackupfor VMware)” on page 355.
241Restore virtual machines with Instant RecoveryRequirements for Instant Recovery for VMware

The NetBackup media server platform must support Granular RecoveryTechnology. See the NetBackup Enterprise Server and Server OS SoftwareCompatibility List:NetBackup Master Compatibility List
■ The Client for NFS service may have to be restarted on a NetBackup Windowsrestore host.See “Restarting the Client for NFS service on a Windows restore host”on page 243.
■ The media server must use IPv4 or have a dual stack configuration if the vCenterserver has a dual stack configuration.
■ NetBackup requires logon credentials for the vCenter server and the restorehost.See “Adding NetBackup credentials for VMware” on page 45.
Notes on Instant Recovery for VMwareNote the following about instant recovery of VMware virtual machines:
■ Supports the following storage unit types (disk only): BasicDisk, AdvancedDisk,Media Server Deduplication Pool (MSDP), and qualified third-party OpenStoragedevices.Note: Snapshot-only backups are not supported.
■ Does not support a virtual machine that had the disks that were excluded fromthe backup. The policy Virtual disk selection option must have been set toinclude all disks.
■ Does not support a virtual machine that has a disk in raw device mapping mode(RDM) or that has a disk in Persistent mode.
■ Supports the following policy schedule types: Full backups, and the incrementalbackups that include theUse Accelerator option with a disk-based storage unit.Incrementals without the Use Accelerator policy option are not supported.
■ Does not support virtual machine templates.
■ If the virtual machine contains an IDE drive, the restored virtual machine maynot start. This issue is not unique to instant recovery.See “VMware virtual machine does not restart after restore” on page 311.
■ To avoid host name or IP address conflicts between the current virtual machineand the virtual machine version you want to restore: Shut down the virtualmachine in your production environment before you start the recovery. Thenchange the display name of the current virtual machine, or use the -R option onnbrestorevm to rename the restored virtual machine.
242Restore virtual machines with Instant RecoveryNotes on Instant Recovery for VMware

■ For a virtual machine that is running under a high load, migration of the virtualmachine may take longer than expected. For this reason, NetBackup changesthe virtual machine's fsr.maxSwitchoverSeconds property to 900.For example, this increase may be necessary when the virtual machine isrestored from a deduplication storage unit.The following VMware Knowledge Base article contains more information onthe fsr.maxSwitchoverSeconds property:Using Storage vMotion to migrate a virtual machine with many disks timeout
■ Note the following about the virtual machine's datastore name:
■ If the name of the datastore includes spaces, the name should be enclosedin double quotes ("").
■ A virtual machine restore may fail if the name of the datastore (that was usedat the time of the backup) ended with a period.The following tech note contains additional information.http://www.veritas.com/docs/TECH199771
■ Instant recovery cannot restore a vCloud virtual machine into vCloud. The virtualmachine is restored into vSphere. You can copy or import the restored virtualmachine into vCloud by means of the Copy option in vCloud.Note that the vCloud Move option does not work with a virtual machine thatruns from a NetBackup datastore.
■ Storage lifecycle policies (SLPs) can use Auto Image Replication to replicate avirtual machine backup image to another NetBackup domain. To restore thevirtual machine from the replicated image, you must include the -vmproxy optionon the nbrestorevm command. Use the -vmproxy option to specify the backuphost (access host) that is in the domain where the virtual machine was replicated.Without the -vmproxy option, nbrestorevm defaults to the backup host in theoriginal domain and the restore fails.
■ Supports recovery of virtual machines containing independent disks. Theindependent disks that are associated with the virtual machine are recoveredto the virtual machine working directory on the temporary datastore. Thisfunctionality requires a NetBackup 8.3 or later recovery host.
Restarting the Client for NFS service on aWindows restore host
It may be necessary to stop and restart the NFS Client service. If you use theMicrosoft services snap-in (Services.msc) to restart it, the service does not startuntil you restart the server.
243Restore virtual machines with Instant RecoveryRestarting the Client for NFS service on a Windows restore host

To restart the Client for NFS service without a server restart
◆ From the Windows command prompt, run the following commands:
net stop nfsclnt
net stop nfsrdr
net start nfsrdr
net start nfsclnt
The Client for NFS service should restart without a restart of the server.
Instant Recovery options on the nbrestorevmcommand
NetBackup provides a command-line interface for instant recovery of virtualmachines: the nbrestorevm command.
The following is a list of the available nbrestorevm options for performing InstantRecovery of a VMware virtual machine. The options are listed in man page format.
Note: Although the nbrestorevm command has additional options, only the optionsthat are described in this topic apply to Instant Recovery.
To initiate Instant Recovery (activate the virtual machine)Options without brackets are required.
nbrestorevm -vmw -ir_activate -C vm_client
-temp_location temp_location_for_writes
[-S master_server] [-vmpo] [-vmInstanceId] [-vmsn] [-vmst]
[-vmserver vm_server] [-vmproxy vm_proxy] [-vmkeephv] [-vmid]
[-vmnewdiskuuid] [-s mm/dd/yyyy [HH:MM:SS]]
[-e mm/dd/yyyy [HH:MM:SS]]
[-R absolute_path_to_rename_file]
[-disk_media_server media_server]
Note: Only -vmw, -ir_activate, -C, and -temp_location are required. If the otheroptions are not specified, NetBackup automatically supplies values for those optionsfrom the backup. In most cases, if you do not restore the virtual machine to a differentlocation, you can omit the bracketed options.
See “To restore a virtual machine with instant recovery” on page 250.
244Restore virtual machines with Instant RecoveryInstant Recovery options on the nbrestorevm command

See “Restoring individual files with Instant Recovery for VMware while the currentvirtual machine is running” on page 256.
To list details about the activated virtual machinenbrestorevm -ir_listvm
To deactivate or delete the virtual machinenbrestorevm -ir_deactivate instant_recovery_identifier [-force]
To complete the VM instant recovery job after the data ismigratednbrestorevm -ir_done instant_recovery_identifier
To reactivate a virtual machine that was interrupted duringrecoverynbrestorevm -ir_reactivate instant_recovery_identifier [-force]
nbrestorevm -ir_reactivate_all -vmhost vm_host -media_server
media_server_activate_vm [-force]
See “Reactivating a restored virtual machine with Instant Recovery for VMware”on page 260.
Table 11-3 describes the nbrestorevm options for Instant Recovery of virtualmachines. These options are also described in the NetBackup Commands ReferenceGuide, and in the man page for nbrestorevm.
Table 11-3 Options on the nbrestorevm command for Instant Recovery
DescriptionOption
Indicates the type of virtual machine to restore (VMware).-vmw
The name of the virtual machine as identified in the backup. For example, if the policybacked up the virtual machine by its host name, specify that host name.
Note: If a virtual machine with the same name already exists on the target ESX host, thecommand fails. You can change the display name of the virtual machine in vCenter. As analternative, use the -R option on nbrestorevm to change the display name or location ofthe restored virtual machine.
-C virtual_machine
245Restore virtual machines with Instant RecoveryInstant Recovery options on the nbrestorevm command

Table 11-3 Options on the nbrestorevm command for Instant Recovery(continued)
DescriptionOption
Starts the restore by mounting the backup image of the virtual machine as an NFS datastore.The datastore becomes accessible to the ESX host where the virtual machine is to berestored.
The following procedure has further details:
See “To restore a virtual machine with instant recovery” on page 250.
-ir_activate
A temporary datastore on the ESX server where all writes occur until the virtual machineis restored. All writes occur on this datastore until Storage vMotion is complete or until youare finished with the virtual machine (such as for troubleshooting).
Note: This datastore must exist before you run nbrestorevm.
-temp_locationtemporary_datastore
Specifies a different master server, to restore a virtual machine from a backup that wasmade by that master.
-S master_server
The absolute path to a file that contains directives for restore to a different location.
The following are the entries that you can use in the file (each entry begins with change):
change esxhost to new_ESX_hostchange resourcepool to new_resource_poolchange vmname to new_virtual_machine_namechange network to new_network
Note: The change line should be entered exactly as it appears in this list, except for thevariable at the end (such as new_virtual_machine_name). Replace that variable with thenew name.
For example:
change esxhost to esx01.prod4.comchange resourcepool to /Tech1/esx01.prod4.com/Reschange vmname to T1vm5
Each change line must end with a carriage return.
Note: If the file contains only one change line, (such as change vmname to T1vm5),that line must end with a carriage return.
If you restore to a different ESX server, you may have to specify a different resource pool.(The original resource pool cannot be used to create a VM on a different ESX server.) Youmust specify a resource pool by including the following line in the rename file:
change resourcepool to path_to_new_resource_pool
-R rename_file_path
246Restore virtual machines with Instant RecoveryInstant Recovery options on the nbrestorevm command

Table 11-3 Options on the nbrestorevm command for Instant Recovery(continued)
DescriptionOption
Removes the virtual machine's tags.-vmst
The name of the vCenter server that manages the target ESX host for the restore. Torestore to the same vCenter where the virtual machine originally resided, omit this option.
-vmservervCenter_server
The host to perform the restore (a NetBackup client). The default is the host that performedthe backup.
-vmproxy restore_host
Specifies which media server performs the Instant Recovery.
This option is useful if NetBackup storage is configured over several media servers, suchas for load balancing. Without the -disk_media_server option, the Instant Recovery jobmay select any of the available media servers to do the restore. If only one of the mediaservers is configured for Instant Recovery, specify that server with the -disk_media_serveroption.
See “Notes on Instant Recovery for VMware” on page 242.
-disk_media_servermedia_server
Turns on the virtual machine after the restore.-vmpo
Retains the Instance UUID of the original virtual machine (note that the Instance UUID isa vCenter specific unique identifier of a virtual machine). The virtual machine is restoredwith the same Instance UUID that it had when it was backed up.
If the restore of the virtual machine is to a standalone ESXi host, this option is disabled.
If a virtual machine with the same Instance UUID exists at the target restore location, amessage appears that the UUID is used already. In this case, the original instance UUIDis not restored and a new UUID is assigned for the virtual machine.
-vmInstanceId
Removes the virtual machine's network interface.
See “Restoring individual files with Instant Recovery for VMware while the current virtualmachine is running” on page 256.
-vmsn
Retains the virtual machine's hardware version: the virtual machine is restored with thesame hardware version that it had when it was backed up.
Without this option, the virtual machine is restored with the default hardware version of thetarget ESX server or vCenter. The default is typically the latest supported hardware version.
-vmkeephv
Retains the BIOS UUID of the original virtual machine.-vmid
247Restore virtual machines with Instant RecoveryInstant Recovery options on the nbrestorevm command

Table 11-3 Options on the nbrestorevm command for Instant Recovery(continued)
DescriptionOption
Generate new virtual machine disk UUIDs during an instant recovery. Use this option withthe –ir_activate option.
The VMs that activate with this option do not retain the new vmdk UUID during a subsequent–ir_reactivate operation. In such a scenario, the VMDKs revert to their UUIDs at thetime of the backup.
-vmnewdiskuuid
Removes the virtual machine from the ESX host. If no other virtual machine uses theNetBackup NFS datastore, this option removes that datastore and releases its resourceson the NetBackup media server.
This option is for removing the virtual machine when you are finished copying its files anddo not intend to keep it.
Note: If the virtual machine has been migrated to a production datastore by means ofvMotion, -ir_deactivate is the same as ir_done.
Note: If vMotion is still in progress for this virtual machine, you should cancel the vMotionjob before you use –ir_deactivate.
See “To restore a virtual machine with instant recovery” on page 250.
-ir_deactivate instantrecovery ID
When vMotion migration of the virtual machine is finished, this option completes the virtualmachine instant recovery job. It also removes the NetBackup NFS datastore if no othervirtual machine uses it. When the datastore is removed, its resources are released on themedia server.
See “To restore a virtual machine with instant recovery” on page 250.
-ir_done instant recoveryID
Reactivates a restored virtual machine: remounts the NetBackup NFS datastore, and fromthe temporary datastore on the ESX host it registers the restored virtual machines on theESX host.
instant recovery ID is the virtual machine's numeric identifier from the -ir_listvm output.
If more than one virtual machine needs reactivation: -ir_reactivate_all remounts theNetBackup NFS datastores on the media server and reactivates the virtual machines. Forexample: If VM1, VM5, and VM6 were mounted on the specified ESX server (-vmhost),and their datastores were mounted on the specified media server (-media_server), thosethree VMs are reactivated.
-ir_reactivateinstant_recovery_identifier
-ir_reactivate_all
When you reactivate virtual machines, this option specifies the ESX host on which thevirtual machines were mounted.
-vmhost vm_host
When you reactivate virtual machines, this option specifies the media server on which theNFS datastores that contain the backup images were mounted.
-media_servermedia_server_activate_vm
248Restore virtual machines with Instant RecoveryInstant Recovery options on the nbrestorevm command

Table 11-3 Options on the nbrestorevm command for Instant Recovery(continued)
DescriptionOption
For the -ir_deactivate, –ir_reactivate, or –ir_reactivate_all option, -force suppressesconfirmation prompts.
-force
By default NetBackup selects the latest full backup plus Accelerator-enabled incrementalbackups (if any).
This option limits the selectable backup images to those with the timestamps that fall withinthe specified period. NetBackup selects the latest suitable backup image within the range.
-s start_time -e end_time
Restoring a virtual machine with Instant Recoveryfor VMware
You can use this procedure to do either of the following:
■ Copy files from a virtual machine backup.
■ Restore the full virtual machine.
In either case, you can restore the virtual machine to its original location or to analternate location.
Note: To avoid host name or IP address conflicts, shut down the current virtualmachine in your production environment before you start instant recovery.
To copy files while the current virtual machine is running, use a different procedure:
See “Restoring individual files with Instant Recovery for VMware while the currentvirtual machine is running” on page 256.
Table 11-4 Basic steps for VMware instant recovery
StepsType of recovery
Basic steps are these:
■ Restore the VM: Use nbrestorevm with the -ir_activate option.■ Copy files from the VM; or use the VM as a stand-in until the production host is back
online.■ Delete the VM and release the media server resources: Use nbrestorevm with the
-ir_deactivate option.
See the following procedure for command details.
Copy files ortroubleshoot an issue,then delete therestored virtualmachine
249Restore virtual machines with Instant RecoveryRestoring a virtual machine with Instant Recovery for VMware

Table 11-4 Basic steps for VMware instant recovery (continued)
StepsType of recovery
Basics steps are these:
■ Restore the VM: Use nbrestorevm with the ir_activate option.■ Transfer the virtual machine files to an ESX host: Use the Migrate option in vSphere
Client.
■ Release the media server resources: Use nbrestorevm with the ir_done option.
See the following procedure for command details.
Restore and keep thevirtual machine
See “Requirements for Instant Recovery for VMware” on page 241.
The detailed procedure follows.
To restore a virtual machine with instant recovery
1 On the master server, media server, or restore host, enter the nbrestorevmcommand.
This command is in the following location:
UNIX, Linux: /usr/openv/netbackup/bin/
Windows: install_path\NetBackup\bin\
Enter the command as follows.
To restore the VM to its original location:
nbrestorevm -vmw -ir_activate -C virtual_machine -temp_location
temporary_datastore [-vmproxy VMware_access_host] -vmpo
To restore the VM to a different location:
nbrestorevm -vmw -ir_activate -C virtual_machine -temp_location
temporary_datastore [-vmserver vCenter_server] -R rename_file_path
[-vmproxy VMware_access_host] -vmpo
-C virtual_machine identifies the virtual machine by the name or ID that wasset in the policy's Primary VM identifier attribute for the backup. On the -C
option, specify the same type of identifier that was used in the policy: VM hostname, VM display name, VM BIOS UUID, VM DNS name, or VM instanceUUID.
The -R option provides the path to a file that contains directives for restore toa different location.
See “Restoring a virtual machine to a different location with Instant Recoveryfor VMware” on page 253.
250Restore virtual machines with Instant RecoveryRestoring a virtual machine with Instant Recovery for VMware

See “Instant Recovery options on the nbrestorevm command” on page 244.
The nbrestorevm command mounts the virtual machine's backup image as anNFS datastore and makes the datastore accessible to the ESX host. It alsocreates the VM on the ESX host. It then creates a snapshot of the virtualmachine.
Note: Storage lifecycle policies (SLPs) can use Auto Image Replication toreplicate a virtual machine backup image to another NetBackup domain. Torestore the virtual machine from the replicated image, you must include the-vmproxy option on the command. Use the -vmproxy option to specify thebackup host (access host) that is in the domain where the virtual machine wasreplicated. Without the -vmproxy option, nbrestorevm defaults to the backuphost in the original domain and the restore fails.
The following tasks appear in the vSphere Client interface. In this example,dbl1vm5 is the virtual machine to be restored.
Note the following:
■ The nbrestorevm command creates a NetBackup job of type "VM InstantRecovery."See “Job types for Instant Recovery for VMware” on page 259.
■ If you cancel the instant recovery job or stop all NetBackup services, theNetBackup NFS datastore is unmounted and its media server resourcesare released.
Caution: The virtual machine is deleted from the ESX host.
2 In vSphere Client, turn on the virtual machine.
If you included the -vmpo option on the nbrestorevm command, the virtualmachine is already turned on.
251Restore virtual machines with Instant RecoveryRestoring a virtual machine with Instant Recovery for VMware

3 Browse and copy the virtual machine files as needed.
To copy files while the current virtual machine is running, use a differentprocedure.
See “Restoring individual files with Instant Recovery for VMware while thecurrent virtual machine is running” on page 256.
4 If you do not want to keep the restored virtual machine, enter the following:
nbrestorevm –ir_listvm
In the output, find the VM Instant Recovery ID for the restored VM.
To remove the VM from the ESX host:
nbrestorevm –ir_deactivate instant recovery ID [-force]
where instant recovery ID is the virtual machine's numeric identifier from the-ir_listvm output. -force is optional, to suppress confirmation prompts.
The VM is removed from the ESX host. If no other VM uses the NetBackupNFS datastore, NetBackup removes that datastore and releases its resourceson the media server.
The following tasks appear in the vSphere Client interface. In this example,dbl1vm5 is the virtual machine to be removed and datastore_V is the temporarydatastore that it used.
This step completes the VM Instant Recovery job. Skip the rest of thisprocedure.
Step 5 uses Storage vMotion to move the virtual machine to a productiondatastore. If vMotion is already in progress for this virtual machine, you shouldcancel the vMotion job before you enter –ir_deactivate. Otherwise, vMotionmoves the virtual machine to a production datastore where –ir_deactivate
cannot remove it.
252Restore virtual machines with Instant RecoveryRestoring a virtual machine with Instant Recovery for VMware

5 To keep the restored virtual machine:
In vSphere Client, right-click on the restored virtual machine and selectMigrate.Select the migration type and the destination.
Note: For the destination, select a permanent (production) location for thevirtual machine. Do not select the temporary datastore that was used for theinstant restore.
Storage vMotion transfers the virtual machine data files from the NetBackupNFS datastore to the datastore that you selected.
Note: You should migrate no more than one restored virtual machine at a timeper media server.
6 After the migration is complete, use vSphere Client to merge or consolidatethe virtual machine's redo log (or snapshot) files manually. See your VMwaredocumentation for details.
When the migration to the production datastore is complete, use the followingsteps to unmount the NFS datastore and release its resources.
7 Enter the following:
nbrestorevm –ir_listvm
In the -ir_listvm output, find the VM Instant Recovery ID for the restored VM.
8 When the data migration is complete, enter the following:
nbrestorevm –ir_done instant recovery ID
where instant recovery ID is the virtual machine's numeric identifier from the-ir_listvm output.
The -ir_done option completes the VM Instant Recovery job. It also removesthe NetBackup NFS datastore if no other VM uses it. When the datastore isremoved, its resources are released on the media server.
See “Restoring individual files with Instant Recovery for VMware while the currentvirtual machine is running” on page 256.
Restoring a virtual machine to a different locationwith Instant Recovery for VMware
This topic explains how to use the nbrestorevm command to restore a VM to adifferent location.
The overall instant recovery procedure is available in another topic:
See “Restoring a virtual machine with Instant Recovery for VMware” on page 249.
253Restore virtual machines with Instant RecoveryRestoring a virtual machine to a different location with Instant Recovery for VMware

To restore a VM to a different location
1 Find the path to a resource pool at the restore destination. (If you already knowthe full path, you can skip this step.)
Note: To restore to a different location, it is usually necessary to designate adifferent resource pool. Here is an example of a resource pool path:
/TechOffice/host/F2/pl9.acme.com/Resources
To find the path, enter the following on the master server, media server, orrestore host:
UNIX, Linux:
/usr/openv/netbackup/bin/bpVMreq <restore_host> 11 0 <ESXi_server>
<VMserver_or_vCenter_server>
Windows:
<install_path>\NetBackup\bin\bpVMreq.exe <restore_host> 11 0
<ESXi_server> <VMserver_or_vCenter_server>
Note: The numeric value 11 0 is required and must be entered as shown.
For example:
bpVMreq battleship.acme.com 11 0 ESXi_pl9.acme.com
vC_p9vm3.acme.com
Where battleship.acme.com is the restore host, ESXi_pl9.acme.com is thedestination ESXi server, and vC_p9vm3.acme.com is the destination vCenterserver.
This command generates a path to an XML file in a temporary location. TheXML file lists all the available resource pools.
Here is an example of an XML file that bpVMreq creates:
<?xml version="1.0" encoding="UTF-8" standalone="no" ?>
<ResourcePoolList><ResourcePool Name="Resources"
Path="/TechOffice/host/F2/pl9.acme.com/Resources"
Type="ResourcePool"><ResourcePoolList/>
</ResourcePool></ResourcePoolList>
In this example, the path to the resource pool is/TechOffice/host/F2/pl9.acme.com/Resources. Make a note of the pathfor use in the next step.
254Restore virtual machines with Instant RecoveryRestoring a virtual machine to a different location with Instant Recovery for VMware

2 Create a text file with the following change entries.
Note: Each change entry helps to define the location for the restore. Eachchange line must end with a carriage return.
(The change vmname entry is optional)change vmname to <new_virtual_machine_name>
change esxhost to <new_ESXi_host>
change resourcepool to <path_to_new_resouce_pool>
(The change networkname entry isoptional)
change networkname to <new_network>
Enter each change line exactly as it appears in this list, except for the variableat the end (such as new_virtual_machine_name). Replace the variable withthe new name. For example:
change esxhost to ESXi01.prod4.com
For the new_resouce_pool, use the path that was obtained in the first step ofthis procedure. For example:
change resourcepool to /TechOffice/host/F2/pl9.acme.com/Resources
This text file is called the -R rename file, and is used with the nbrestorevmcommand in the next step.
3 To restore the VM using the -R rename file, enter the nbrestorevm commandwith the -R option as follows.
Note: The -R option specifies the path to the text file (rename file).
■ To restore to the same vCenter server but to a different ESXi host, enterthe following:nbrestorevm –vmw –ir_activate –C <virtual_machine>
-temp_location <temporary_datastore> -R <rename_file_path>
■ To restore to a different vCenter server and a different ESXi host, enter thefollowing:nbrestorevm –vmw –ir_activate –C <virtual_machine>
-temp_location <temporary_datastore> -R <rename_file_path>
-vmserver <vCenter_server>
To restore a VM after Auto Image Replication (AIR) to a disaster recovery (DR)site: you must also include the -vmproxy option on the nbrestorevm commandto specify the restore host at the DR site.
255Restore virtual machines with Instant RecoveryRestoring a virtual machine to a different location with Instant Recovery for VMware

Restoring individual files with Instant Recoveryfor VMware while the current virtual machine isrunning
You can use instant recovery to restore files individually from a virtual machinebackup. You can restore the virtual machine from its backup image and mount iton a private network (such as a sandbox). This approach avoids the potential fornetwork conflicts with the virtual machine in your production environment. Anothervirtual machine on a public network can be used as an intermediary, to copy thefiles from the virtual machine on the private network.
Note: This procedure lets you restore files into a running VM. You do not need toshut down the current virtual machine in your production environment before youstart this procedure.
Before you start this procedure, you need an intermediary virtual machine that hasa network connection to the public network or production network. In this procedureyou connect the intermediary to the private network where the restored virtualmachine is to be mounted.
At the end of the procedure, you can copy files from the restored virtual machineto the intermediary virtual machine. Then the virtual machines on the public networkcan access the files on the intermediary.
To restore individual files using instant recovery
1 Use vSphere Client to log on to the vCenter server.
You must use a logon that allows access to the files that you want to recover.
2 Create a vSphere standard switch.
This switch is for access to the ESX host from the sandbox or private networkwhere the VM is to be activated from its backup.
Note: The switch is for internal communication within the ESX host only.
For example, in vSphere Client 5:
■ Select the ESX host for communication between the restored virtual machineand the intermediary virtual machine.
■ On the Configuration tab, in the Hardware pane, click Networking.
■ Click Add Networking.
256Restore virtual machines with Instant RecoveryRestoring individual files with Instant Recovery for VMware while the current virtual machine is running

■ Select Virtual Machine as the connection type.
■ Select Create a vSphere standard switch.
■ For Port Group Properties, Network Label, enter a name for the internalswitch (such as NB or NetBackup).
■ Click Finish.
3 On the intermediary virtual machine, add a network card (NIC) to be connectedto the vSphere standard switch.
Use this connection to retrieve files from the restored virtual machine that isto be mounted on the private network.
Note: This intermediary virtual machine must already have a network connectionto the public network or production network.
For example, in vSphere Client 5:
■ Select the intermediary virtual machine.
■ On the Summary tab, click Edit Settings.
■ Click Add.
■ Select Ethernet Adapter.
■ For the Network label, select the private network that is created in step 2.
■ Click Finish.
4 If the intermediary's guest OS does not automatically assign an IP address forthe private network after step 3, note: You must manually configure the IPaddress, default gateway, and subnet mask.
The intermediary should now be connected to both the public network and tothe private network where the virtual machine is to be restored.
257Restore virtual machines with Instant RecoveryRestoring individual files with Instant Recovery for VMware while the current virtual machine is running

5 Use the nbrestorevm command to restore the virtual machine.
nbrestorevm -vmw -ir_activate -C virtual_machine -temp_location
temporary_datastore -R rename_file_path -vmsn
-vmsn specifies that no network is enabled for the virtual machine when it isactivated from the backup image. Without the -vmsn option, network conflictswith the production virtual machine may occur.
The file that is designated by -R rename_file_path specifies a different displayname or location for the restored virtual machine. You must change the virtualmachine name or location to avoid conflicts with the current virtual machine inproduction. For example, to rename the virtual machine, the rename file canconsist of the following entry (ending with a carriage return):
change vmname to acme_vm5
Note: The words change vmname to are literals, followed by the actual nameto change to (such as acme_vm5).
See “Instant Recovery options on the nbrestorevm command” on page 244.
For other nbrestorevm options, see the man page or theNetBackup CommandsReference Guide.
6 Add a network card (NIC) to the restored virtual machine and connect the NICto the vSphere standard switch from step 2.
7 Turn on the restored virtual machine.
8 If the guest OS does not automatically assign an IP address for the privatenetwork, configure the IP address, default gateway, and subnet mask.
258Restore virtual machines with Instant RecoveryRestoring individual files with Instant Recovery for VMware while the current virtual machine is running

9 Set up file sharing (such as through FTP, NFS, or CIFS) between the restoredvirtual machine and the intermediary virtual machine.
Then copy the files from the restored virtual machine to the intermediary virtualmachine. The current virtual machine in production can access the files.
10 If you do not want to keep the restored virtual machine, enter the following:
nbrestorevm –ir_listvm
In the -ir_listvm output, find the VM Instant Recovery ID for the restored virtualmachine.
To remove the restored virtual machine:
nbrestorevm –ir_deactivate instant recovery ID
where instant recovery ID is the virtual machine's numeric identifier from the-ir_listvm output.
Job types for Instant Recovery for VMwareInstant Recovery jobs appear as the following job types in the NetBackup ActivityMonitor.
Table 11-5 VMware Instant Recovery job types in the Activity Monitor
DescriptionJob type
This job is the parent job for restoring a VM by means of InstantRecovery.
To complete this job, you must enter one of the following:
nbrestorevm -ir_done instant recovery ID
nbrestorevm -ir_deactivate instant recovery ID
For details on these commands:
See “Restoring a virtual machine with Instant Recovery forVMware” on page 249.
VM Instant Recovery
The parent VM Instant Recovery job starts an Activate InstantRecovery job to create the VM on the ESX host.
Activate Instant Recovery
This job runs when you use nbrestorevm -ir_done to removethe NetBackup NFS datastore and release its resources on themedia server.
Stop Instant Recovery
This job runs when you use nbrestorevm -ir_deactivateto delete the restored VM from the ESX host.
Deactivate InstantRecovery
259Restore virtual machines with Instant RecoveryJob types for Instant Recovery for VMware

Table 11-5 VMware Instant Recovery job types in the Activity Monitor(continued)
DescriptionJob type
This job runs when you use nbrestorevmwith the ir_reconfigureoption to restart an interrupted virtual machine recovery.
Reactivate InstantRecovery
Reactivating a restored virtual machine withInstant Recovery for VMware
If an interruption occurs during an instant recovery (such as a restart of the host ormedia server), the ESX connection to the media server may fail. In that case, it maybe possible to re-establish the connection and return the virtual machine to thestate it was in before the outage. Any transactions that occurred in the virtualmachine before the outage are retained.
260Restore virtual machines with Instant RecoveryReactivating a restored virtual machine with Instant Recovery for VMware

To reactivate a restored virtual machine
1 If only one VM had been restored to the ESX host, enter the following:
nbrestorevm –ir_listvm
Find the VM Instant Recovery ID for the restored VM in the -ir_listvm output.Then enter the following:
nbrestorevm –ir_reactivate Instant Recovery ID [-force]
where instant recovery ID is the virtual machine's numeric identifier from the-ir_listvm output. -force is an optional parameter to suppress confirmationprompts.
The ir_reactivate option remounts the NetBackup NFS datastore. From thetemporary datastore on the ESX host it registers the restored virtual machineson the ESX host.
2 If more than one VM had been restored to the ESX host:
nbrestorevm –ir_reactivate_all -vmhost vm_host –media_server
media_server [-force]
Note: For multiple virtual machines, do not use the –ir_reactivate option. Use–ir_reactivate_all.
The -vmhost option specifies the ESX host on which the virtual machines weremounted. The -media_server option specifies the media server on which theNFS datastores that contain the backup images were mounted. -force is anoptional parameter to suppress confirmation prompts.
The nbrestorevm -ir_reactivate_all command remounts the NetBackup NFSdatastores on the media server and reactivates the virtual machines.
3 When the virtual machine is reactivated, you can copy its files or migrate itsdata to the ESX host.
See “To restore a virtual machine with instant recovery” on page 250.
4 If Storage vMotion was migrating the virtual machine files when the outageoccurred, restart the migration.
In vSphere Client, right-click on the restored virtual machine and selectMigrate.
261Restore virtual machines with Instant RecoveryReactivating a restored virtual machine with Instant Recovery for VMware

Use NetBackup for vCloudDirector
This chapter includes the following topics:
■ About NetBackup for vCloud Director
■ Notes on creating a NetBackup policy for vCloud
■ Notes on restoring virtual machines into vCloud Director
■ Restoring virtual machines into vCloud Director
■ Reducing the time required for VM discovery in a large vCloud environment
■ Virtual machine recovery dialog boxes for vCloud Director
About NetBackup for vCloud DirectorNetBackup can back up VMware vCloud Director environments and restore virtualmachines into vCloud Director.
Table 12-1 describes the configuration requirements for backup of vCloud Director.
Table 12-1 Configuration for backup of vCloud Director virtual machines
Description (NetBackup Administration Console)Task
Media and Device Management > Credentials > Virtual Machine Servers.
See “Adding NetBackup credentials for VMware” on page 45.
Enter NetBackupcredentials for thevCloud Director serverand for its vCenterservers.
12Chapter

Table 12-1 Configuration for backup of vCloud Director virtual machines(continued)
Description (NetBackup Administration Console)Task
Select the following:
■ Select automatically through VMware Intelligent Policy query■ Enable vCloud Director integration
With the Enable vCloud Director option, the policy selects only vCloud-managed virtualmachines for backup: it skips the virtual machines that are not in vCloud.
NetBackup collects information on the vCloud environment, such as its organizations, virtualdatacenters, and vApps. NetBackup also retrieves information about a vApp for later restoreof the vApp and its virtual machines.
Note: Enable vCloud Director integration makes several vCloud keywords available inthe policy Query Builder Field, for rule-based selection of virtual machines. If Enable vCloudDirector integration is not selected, NetBackup cannot use the keywords to locate virtualmachines in vCloud Director and the backup fails.
Note: The browsing icon (next to the Query Builder drop-down fields) may list non-vCloudobjects. If you select an object that is not in vCloud Director, it is excluded from the backup.
See “Configuring a VMware policy from the Policies utility” on page 68.
See “Notes on creating a NetBackup policy for vCloud” on page 263.
Configure the policyClients tab
Note: The NetBackup for VMware restrictions also apply to vCloud Director objects.VMware restrictions also may apply; see your VMware documention.
See “NetBackup for VMware: notes and restrictions” on page 27.
Notes on creating a NetBackup policy for vCloudWhen you create a backup policy for vCloud virtual machines, note the following:
■ The configuration requirements are described in the following topic:See “About NetBackup for vCloud Director” on page 262.
■ To back up all the existing vApp templates, use the vCDIsvAppTemplatekeyword in the Query Builder (vCDIsvAppTemplate Equal TRUE).
■ To back up specific vApp templates, use the vCDvApp keyword in the QueryBuilder with appropriate operator and values to select the particular templates.
263Use NetBackup for vCloud DirectorNotes on creating a NetBackup policy for vCloud

■ To allow a policy to back up virtual machines from multiple vCloud Directororganizations: On the VMware tab of the policy, click Advanced, and enableMultiple organizations per policy.
Notes on restoring virtual machines into vCloudDirector
To restore a virtual machine into vCloud Director, note the following:
■ The Backup, Archive, and Restore interface allows the restore of one virtualmachine at a time.You can use the nbrestorevm command to restore multiple virtual machines.See “Using the nbrestorevm command to restore virtual machines into vCloudDirector” on page 340.
■ When you back up a virtual machine in vCloud Director, it is recommended theVMware display name setting for Primary VM identifier on the VMware tab.Use of the VM BIOS UUID setting is not recommended.
■ To restore a virtual machine into vCloud Director, the virtual machine must havebeen in vCloud Director when it was backed up.To restore a virtual machine into vCloud Director, the backup policy must havebeen configured as described in the following topic:See “About NetBackup for vCloud Director” on page 262.
■ When a vApp is restored, vCloud Director resets the vApp's expiration date. Forexample: Assume the original vApp was created on the first day of the monthand was set to expire in 30 days. If the vApp is restored 15 days before itsexpiration (on the 15th), vCloud resets the vApp to expire in 30 days from the15th.The VM administrator can reset the expiration date to its original date.
■ You cannot restore a virtual machine into an existing vApp template. VMwaresets this restriction.
■ After you restore a vApp template, the template cannot be changed and nofurther virtual machines can be added to it (a VMware restriction). To restore avApp template that is to contain multiple VMs, you must restore all but one ofthe VMs separately into a non-template vApp. Then restore the last virtualmachine by means of the Capture vApp as a template in catalog option.See “Restoring a vApp template that has multiple virtual machines” on page 269.
■ You can restore the vCloud Director virtual machine into vSphere instead ofvCloud Director. On theRecovery Destination screen, selectAlternate locationin vSphere.
264Use NetBackup for vCloud DirectorNotes on restoring virtual machines into vCloud Director

■ vCloud organization networks are not displayed on the Network Connectionsscreen for restore; only vSphere networks are displayed.
■ To restore into an existing vCloud Director vApp with the Capture vApp as atemplate in catalog option, the vApp must be turned off.
■ vCloud backup images cannot be restored by means of the NetBackup vSphereWeb Client plug-in or the NetBackup vSphere Client (HTML5) plug-in. This typeof restore can be performed by means of the Backup, Archive, and Restoreinterface.
■ vSphere 5 provides storage profiles for managing the datastores on which virtualmachines are created. When you restore into vCloud, the NetBackup restoreinterface lets you select a target datastore but not a storage profile. If the targetdatastore does not comply with the storage profile or if the datastore you selecthas been disabled, note: NetBackup automatically migrates the virtual machineto a compliant datastore if possible when you import to vCloud Director.
Note: At the end of a successful restore, NetBackup verifies that the virtualmachine is on compliant storage (on a datastore with the defined storage profile).
■ To ensure that any VM guest customizations are restored into vCloud Director,you must set a NetBackup parameter. The parameter value specifies a waitperiod in seconds so that the guest customizations can be restored successfully.(The VMware API requires that the VMware Tools are installed and running,but the state of the VMware Tools cannot be identified after the restore.Therefore, we wait the specified amount of time so that the VMware Tools arerunning in the initial restore environment.)See “Ensuring that guest customizations can be restored in vCloud Director”on page 319.
Restoring virtual machines into vCloud DirectorThis topic includes two procedures:
■ Restoring virtual machines into a vApp, or restoring a single virtual machine intoa vApp template.
■ Restoring a vApp template that has multiple virtual machines.
Note: You can also restore the virtual machine to an alternate location in vSphere.
See “Recovery Destination dialog boxRecovery Destination dialog box (vCloudDirector)” on page 275.
265Use NetBackup for vCloud DirectorRestoring virtual machines into vCloud Director

Restoring a single virtual machine into a vApp or vApp template
1 Begin with the steps in the following procedure:
See “Restoring the full VMware virtual machine” on page 179.
When you start the Restore, the Recovery Destination screen appears.
2 Select the recovery destination:
You can restore a virtual machine into an existing vApp or intoa new vApp that replaces the existing one. You can also restorea virtual machine that is in a vApp template.
Note: The restored vApp template can only contain one virtualmachine; no further virtual machines can be added.
Original location invCloud Director
You can restore a virtual machine into an existing vApp or intoa new vApp or vApp template.
To restore multiple virtual machines into a vApp template:
See “Restoring a vApp template that has multiple virtualmachines” on page 269.
Alternate locationin vCloud Director
3 On the Recovery Options screen, select the NetBackup recovery host andtransport mode for the restore.
See “Recovery Options dialog box” on page 182.
266Use NetBackup for vCloud DirectorRestoring virtual machines into vCloud Director

4 On the Recovery vApp Options for vCloud Director screen, set the vApprecovery options.
You can either restore the virtual machine into an existing vApp (if that vAppis not a template), or you can create a new vApp.
SelectRestore into existing vApp, orRemove existing vAppand recreate the vApp.
Caution: If you remove the existing vApp, all virtual machinesin the vApp are deleted. You must select the Delete option toacknowledge the deletion.
See “Recovery vApp Options for vCloud Director dialog box(restore to original location)” on page 276.
To restore a virtual machine in a vApp template, select Removeexisting vApp Template and recreate the vApp Template.The restored vApp template can only contain one virtualmachine; no further virtual machines can be added.
To restore multiple virtual machines into a vApp template:
See “Restoring a vApp template that has multiple virtualmachines” on page 269.
For restore to originallocation
Select Restore into existing vApp or Create new vApp.
You can enter details for the vApp to restore to.
See “Recovery vApp Options for vCloud Director dialog box(restore to alternate location)” on page 278.
Note: To restore the virtual machine into a vApp template thatis to contain this virtual machine only, select Create new vAppand Create vApp as a template in catalog.
To restore the virtual machine into a vApp template that is tocontain multiple virtual machines:
See “Restoring a vApp template that has multiple virtualmachines” on page 269.
For restore toalternate location
5 For restore to an alternate location: On the Recovery Destination Optionsfor vCloud Director screen, select the ESX server, the virtual machine thatyou want to restore, and a datastore.
See “Recovery Destination Options for vCloud Director dialog box (restore toalternate location)” on page 280.
267Use NetBackup for vCloud DirectorRestoring virtual machines into vCloud Director

6 On the Virtual Machine Options screen, select the appropriate options forthe virtual machine and its disk provisioning.
See “Virtual Machine Options dialog box” on page 184.
7 On the Network Connections screen, select the network for the restoredvirtual machine.
Note: If the virtual machine was not connected to any networks during backup,or if none of those networks are currently available, the dialog states: "Nonetworks available for selected virtual machine." If a network connection isrequired, create it in vCloud Director after the restore completes.
Note: For restore to an alternate location (a different organization or vCloudserver), no networks are displayed in the dialog. If a network connection isrequired, create it in vCloud Director after the restore completes.
See “Network Connections and Other Recovery Options dialog box (restoreto alternate location)” on page 195.
8 On the Perform Recovery screen, run a pre-recovery check.
To begin the restore click Start Recovery.
9 To restore additional virtual machines into the same vApp (not a vApp template),repeat this procedure.
Note: On the Recovery vApp Options for vCloud Director screen, selectRestore into existing vApp. Make sure to select the vApp into which youwant to restore the additional virtual machines.
268Use NetBackup for vCloud DirectorRestoring virtual machines into vCloud Director

Restoring a vApp template that has multiple virtual machines
1 Use the Backup, Archive, and Restore interface to restore all but one of thevirtual machines into a non-template vApp.
You can restore one virtual machine at a time. After you have restored the firstvirtual machine, restore the second virtual machine with Restore into existingvApp on the Recovery vApp Options for vCloud Director screen. Selectthe same vApp into which you restored the first virtual machine. Step throughthe restore screens to restore each virtual machine in this way, except for thelast virtual machine.
Note: Use the following steps to restore the last virtual machine and to copyall the restored virtual machines into a vApp template.
2 On the Recovery Destination screen, select Alternate location in vCloudDirector.
3 On theRecovery vAppOptions for vCloud Director screen, do the following:
■ Select Restore into existing vApp.
■ Select the vCloud server and the organization that includes the vApp intowhich you have restored the other virtual machines.
■ If necessary, browse for the vApp into which you have restored the othervirtual machines.
■ Select Capture vApp as a template in catalog.
■ Select the catalog to contain the template vApp.Note: The organization determines the available catalogs.
■ Enter a name for the vApp template.
■ Remove vApp after capture: Deletes the non-template vApp into whichyou restored the other virtual machines at the beginning of this procedure.Use this option to free up space on the datastore after the restore iscomplete.See “Recovery vApp Options for vCloud Director dialog box (restore toalternate location)” on page 278.
4 On the Recovery Destination Options for vCloud Director screen, selectthe last virtual machine that you want to restore into the template vApp.
See “Recovery Destination Options for vCloud Director dialog box (restore toalternate location)” on page 280.
269Use NetBackup for vCloud DirectorRestoring virtual machines into vCloud Director

5 On the Virtual Machine Options screen, select the appropriate options forthe virtual machine and its disk provisioning.
6 On the Network Connections screen, select the network for the restoredvirtual machine.
See “Network Connections and Other Recovery Options dialog box (restoreto alternate location)” on page 195.
7 On the Perform Recovery screen, run a pre-recovery check.
To begin the restore click Start Recovery.
NetBackup copies the current virtual machine and the previously restoredvirtual machines into a new vApp template. When the restore is complete, nofurther virtual machines can be added to the template vApp.
Reducing the time required for VM discovery in alarge vCloud environment
NetBackup backup policies for vCloud Director use query rules to automaticallysearch and filter the vCloud environment. By default, the query rules search all thevCloud Director (vCD) servers in your environment. If the environment containsmany vCloud servers with many vApps, VM discovery may take a long time. Youcan speed up VM discovery by limiting the search to specific vCloud servers orvApps.
The following is an example of a policy Query Builder rule that searches all vCloudservers and all vApps:
vmware:/?filter=vCDvApp Contains "vapp1"
To limit the search to particular servers or vApps, insert an additional vCloudexpression in the Query Builder rule as explained in the following procedure.
To use the Administration Console to reduce the time required for VMdiscovery in a vCloud environment
1 In the NetBackup Administration Console, open the vCloud Director policy.
2 On the Clients tab of the policy, make sure Select automatically throughVMware Intelligent Policy query and Enable vCloud Director integrationare selected.
3 In the Query Builder, click Advanced.
4 Under Query (Advanced Mode), create one or more rules to search for VMsin specific vCloud Director servers or vApps.
270Use NetBackup for vCloud DirectorReducing the time required for VM discovery in a large vCloud environment

To create two or more rules, you must be in Advanced Mode (not BasicMode).
Each query rule must begin on its own line.
You can use the following types of rules:
■ To search for VMs in a particular vCloud servervmware://<vCloud_server>?filter=<filter>
■ To search for VMs in a particular vApp or vApp templatevmware:/vApp/vapp-<vApp_id>?filter=<filter>
vmware:/vAppTemplate/vappTemplate-<vAppTemplate_id>?filter=<filter>
■ To search for VMs in a particular vApp or vApp template on a particularvCloud server
vmware://<vCloud_server>/vApp/vapp-<vApp_id>?filter=<filter>
vmware://<vCloud_server>/vAppTemplate/vappTemplate-
<vAppTemplate_id>?filter=<filter>
The following detail from a Query Builder screen (Advanced Mode) showstwo rules for narrowing the search within a vCloud environment. The first rulesearches a single vApp on vCloud server vCD1.acme.com. The second rulesearches a different vApp on vCloud server vCD2.acme.com. For help in findingthe vApp identifiers, see the following topic:
Example Query Builder rules for searching specific vCloud servers or vApps
271Use NetBackup for vCloud DirectorReducing the time required for VM discovery in a large vCloud environment

5 For two or more search rules, you must enable multiple organizations for thepolicy.
■ In the policy VMware tab, click Advanced.
■ In the VMware - Advanced Attributes dialog, enable Multipleorganizations per policy.
■ To use the nbdiscover command instead of the policy Query Builder, seethe following topic:Examples of the nbdiscover command for searching specific vCloud serversor vApps
Example Query Builder rules for searching specific vCloudservers or vAppsIn the NetBackup policy Query Builder, you can speed up discovery of vCloud VMsby using the following types of query rules:
■ To search for VMs in a particular vCloud server (note the double forward slash):vmware://<vCloud_server>?filter=<filter>
Example rule:vmware://vCD1.acme.com?filter=vCDvApp Contains "vapp1"
NetBackup searches for VMs only in the vCD1.acme.com server.
272Use NetBackup for vCloud DirectorReducing the time required for VM discovery in a large vCloud environment

■ To search for VMs in a particular vApp or vApp template (note the single forwardslash):vmware:/vApp/vapp-<vApp_id>?filter=<filter>
vmware:/vAppTemplate/vappTemplate-<vAppTemplate_id>?filter=<filter>
The vApp_id or vAppTemplate_id is the identifier on the end of the vCloud vApphref. You can use a vCloud Director REST API query to find the identifier.For example, the following is a REST API query for a vApp that is namedacmvappvm7:
https://acmvm5.acme.com/api/query?type=adminVApp&filter=
name==acmvappvm7
The following example is an excerpt from the API query Response:
href="https://acmvm5.acme.com/api/vApp/vapp-afaafb99
-228c-4838-ad07-5bf3aa649d42"
In this example, the vApp identifier for vApp acmvappvm7 isafaafb99-228c-4838-ad07-5bf3aa649d42. You can use this identifier in aNetBackup Query Builder rule as follows:
vmware:/vApp/vapp-afaafb99-228c-4838-ad07-5bf3aa649d42
?filter=Displayname Contains "prod"
Where Displayname Contains "prod" is an example filter for the rule.
■ To search for VMs in a particular vApp on a particular vCloud Director server:vmware://<vCloud_server>/vApp/vapp-<vApp_id>?filter=<filter>
Example rule:
vmware://vCD1.acme.com/vApp/vapp-4c0d9722-80a4-4f19-b636-72ebf48e4e71
?filter=Displayname Contains "prod"
■ To search additional vCloud Director servers or vApps from the same backuppolicy, include additional query rules in the Query Builder.
Note: To enter multiple rules in the Query Builder, you must be in AdvancedMode.
Note: Start each rule on its own line.
Example of two rules in the Query Builder:
273Use NetBackup for vCloud DirectorReducing the time required for VM discovery in a large vCloud environment

vmware://vCD1.acme.com/vApp/vapp-4c0d9722-80a4-4f19-b636-72ebf48e4e71
?filter=Displayname Contains "prod"
vmware://vCD2.acme.com/vApp/vapp-5c0c9833-80a4-4f19-b636-72ebf48e4e63
?filter=Displayname Contains "prod"
Examples of the nbdiscover command for searchingspecific vCloud servers or vAppsUse the following nbdiscover command format to search for VMs in specific vCloudservers or vCloud vApps:
nbdiscover “<vCloud_query>” –job_info “snaparg=enable_vCloud=1”
Example 1. Search for VMs in vCloud server vCD1.acme.com only:
nbdiscover -noxmloutput "vmware://vCD1.acme.com?filter=DisplayName
Contains 'prod1'" –job_info “snaparg=enable_vCloud=1”
The -noxmloutput option displays one VM per line.
Example 2. Search for VMs in a vCloud vApp that has the following vApp identifier:
4c0d9722-80a4-4f19-b636-72ebf48e4e71
nbdiscover -noxmloutput "vmware:/vApp/vapp-4c0d9722-80a4-4f19-b636
-72ebf48e4e71?filter=DisplayName Contains 'prod1'" –job_info
“snaparg=enable_vCloud=1”
The following topic provides assistance in finding the vApp identifier:
See the section called “Example Query Builder rules for searching specific vCloudservers or vApps” on page 272.
Example 3. Use two query rules to search for VMs prod1 and prod2 in a vCloudvApp:
nbdiscover -noxmloutput "vmware:/vApp/vapp-4c0d9722-80a4-4f19-b636
-72ebf48e4e71?filter=DisplayName Contains 'prod1'" "vmware:/vApp/
vapp-4c0d9722-80a4-4f19-b636-72ebf48e4e71?filter=DisplayName Contains
'prod2'" –job_info “snaparg=enable_vCloud=1,multi_org=1”
Note the two rules, each enclosed with double quotes and separated by a space,and the multi_org=1 option.
See “Notes on creating a VMware policy for vCloud Director” on page 329.
274Use NetBackup for vCloud DirectorReducing the time required for VM discovery in a large vCloud environment

Virtual machine recovery dialog boxes for vCloudDirector
The following topics describe the Backup, Archive, and Restore screens for restoringa virtual machine into vCloud Director.
You can restore a virtual machine into an existing vApp or into a new vApp.
See “Recovery Destination dialog boxRecovery Destination dialog box (vCloudDirector)” on page 275.
See “Recovery vApp Options for vCloud Director dialog box (restore to originallocation)” on page 276.
See “Virtual Machine Options dialog box for vCloud Director” on page 277.
See “Perform Recovery dialog box for vCloud Director” on page 277.
See “Recovery vApp Options for vCloud Director dialog box (restore to alternatelocation)” on page 278.
See “Recovery Destination Options for vCloud Director dialog box (restore toalternate location)” on page 280.
Recovery Destination dialog boxRecovery Destination dialog box(vCloud Director)
You can select the type of destination for the virtual machine recovery: the originallocation in vCloud, an alternate location in vCloud, or an alternate location invSphere.
■ Original settings of the virtual machine at backupShows the configuration of the virtual machine at the time of the backup.When you restore the virtual machine to its original location, these configurationsettings are used and cannot be changed.When you restore to an alternate location, you can change these settings afteryou click Next.
■ vApp detailsShows the information about the virtual machine's vApp at the time of the backup.
The name of the vApp that contained the virtual machine whenit was backed up.
vApp Name
The status of the vApp (active or expired) at the time of thebackup. When the virtual machine is restored, its vApp becomesactive even if the current vApp in the restore location is expired.
vApp Status
275Use NetBackup for vCloud DirectorVirtual machine recovery dialog boxes for vCloud Director

The name of the catalog that contains the vApp template. "..."means that the vApp is not a template.
vCloud Catalog
A link to the names of the other virtual machines in the vApp, ifany.
Other virtualmachines in vApp
■ Select Recovery DestinationYou can restore to the original location in vCloud, to an alternate location invCloud, or to an alternate location in vSphere (not in vCloud).
See “Recovery Options dialog box (vCloud Director)” on page 276.
Recovery Options dialog box (vCloud Director)Select the recovery host and transport mode. For a description of these options,refer to the following topic:
See “Recovery Options dialog box” on page 182.
See “Recovery vApp Options for vCloud Director dialog box (restore to originallocation)” on page 276.
Recovery vApp Options for vCloud Director dialog box (restore tooriginal location)
You can choose whether to restore the virtual machine into an existing vApp or toremove the vApp and recreate it.
To restore the virtual machine into an existing vApp, selectOverwrite the existing virtual machine.
If the existing virtual machine is already turned on, this option fails.
Note: If you restore a vApp template, this option is not available.
Restore into existingvApp
For a vApp template, this option is labeledRemove existing vAppTemplate and recreate the vApp Template
To remove the vApp (or vApp template) and recreate it, selectDelete all virtual machines to recreate this vApp.
Note: All virtual machines in the vApp are deleted.
Click on the numeric link to see the names of the virtual machinesthat exist in the vApp.
Remove existingvApp and recreate thevApp
276Use NetBackup for vCloud DirectorVirtual machine recovery dialog boxes for vCloud Director

Virtual Machine Options dialog box for vCloud DirectorThis dialog is described in a previous topic:
See “Virtual Machine Options dialog box” on page 184.
Perform Recovery dialog box for vCloud DirectorThis topic applies to NetBackup for VMware. It describes how to restore a VMwarevirtual machine.
Review the settings to be applied to the restored virtual machine.
■ Recovery settingsLists your recovery selections, including the vCloud Director and vSpheresettings.
■ Run Pre-Recovery CheckVerifies the credentials and appropriate paths and connectivity, determineswhether the datastore or datastore cluster has available space, and reviewsother important requirements. You must run this check at least once. You canproceed with the restore even if the check fails.Table 12-2 describes the pre-recovery checks that are unique to vCloud Director.The standard vSphere pre-recovery checks are described in another topic:See “Perform Recovery dialog box” on page 187.
■ Start RecoveryStarts the recovery of the virtual machine
Table 12-2 Pre-recovery checks for vCloud Director
DescriptionType of check
Validates the vCloud Director server credentials.vCloud server credentialfound
Verifies that the NetBackup restore host can log on to thevCloud Director server.
Verify login to vCloud Directorserver
Validates the selected vCloud Director organization to restoreto.
Verify vCloud Organization
Validates the selected organization virtual datacenter torestore to in vCloud Director.
Verify vCloud ORGvDC
If the option to capture the vApp as a template is selected,validates the selected vCloud Director catalog to restore to.
Verify template catalog
277Use NetBackup for vCloud DirectorVirtual machine recovery dialog boxes for vCloud Director

Table 12-2 Pre-recovery checks for vCloud Director (continued)
DescriptionType of check
If the options to restore into an existing vApp and the capturevApp as template are selected, verifies that the vApp ispowered off.
Verify vApp powered offbefore capturing to template
Recovery Options dialog box for vCloud Director (restore to alternatelocation)
Select the recovery host and transport mode. For a description of these options,refer to the following topic:
See “Recovery Options dialog box” on page 182.
Recovery vApp Options for vCloud Director dialog box (restore toalternate location)
You can restore the virtual machine into an existing vApp (Restore into existingvApp) or into a new vApp (Create a new vApp).
Table 12-3 describes the fields for specifying the vApp to restore to.
Note: The defaults are the server name, organization, and other details that wererecorded in the backup.
Table 12-3 Details for the vApp to be restored to
DescriptionField
Select the vCloud Director server for the restore.
The servers in the list are the ones for which NetBackup hascredentials of type VMware vCloud Director.
See “Adding NetBackup credentials for VMware” on page 45.
vCloud Server
Select the vCloud Director organization for the restore.Organization
Select the organization virtual datacenter.Org vDC
278Use NetBackup for vCloud DirectorVirtual machine recovery dialog boxes for vCloud Director

Table 12-3 Details for the vApp to be restored to (continued)
DescriptionField
Select or enter the name of the vApp for the restore.
If you restore into an existing vApp, click Browse to search fora vApp.
See “Select a vApp dialog box” on page 279.
This option defaults to the original vApp that was recorded in thebackup.
vApp name
This option is available when you restore to an existing vApp.
This option copies the vApp that is specified in the vApp Namefield into a new vApp template.
It also copies all of the vApp's virtual machines into the samevApp template. Note that this operation may take a lot of time.
By default, the source vApp for the copy is retained after the copy;you can have the source vApp removed after the copy. See theRemove vApp after capture option.
Capture vApp as atemplate in catalog
This option is available when you create a new vApp for therestore.
This option restores the virtual machine into a new vApp template.The name of the new template is the same as the vApp that wasspecified in the vApp Name field.
Create vApp as atemplate in catalog
Select the catalog in which to place the vApp template. Theorganization determines the available catalogs.
Catalog
When you restore into an existing vApp and capture the vApp asa template:
Enter the name for the new vApp template.
vApp template name
When you restore into an existing vApp and capture the vApp asa template:
Select this option to remove the source vApp after the vApp copyto the new vApp template completes. At the end of the copy, thenew template and its virtual machines are retained. The vAppthat was the source for the copy is deleted.
Remove vApp aftercapture
Select a vApp dialog boxUse this dialog to search the organization for a vApp.
279Use NetBackup for vCloud DirectorVirtual machine recovery dialog boxes for vCloud Director

Enter the vApp name. As you type, the organization is expanded andthe first name that contains the typed character(s) is highlighted.
Wildcards are not allowed.
Click Search to find further instances of the name.
Specify vAppname
You can drill into the organization and highlight a vApp.vApps inOrganization
Click OK to select the highlighted vApp.
Recovery Destination Options for vCloud Director dialog box (restoreto alternate location)
Specify details about the virtual machine to restore.
The vCloud options that you selected in the Recovery vApp Options for vCloudDirector dialog determine the vCenter server, resource pool, and datacenter.
Select the ESX server in which to restore the virtual machine.ESX server
Enter the name for the restored virtual machine.Virtual machine name
Specify manually: Select a datastore from the pull-down.
Or click Pick the datastore with the largest space available.
Datastore/ Datastorecluster
Virtual Machine Options (restore to alternate location)This dialog is described in a previous topic:
See “Virtual Machine Options dialog box” on page 184.
Network connections (restore to alternate location)The following topic describes the network information that appears on this dialog:
See “Network Connections and Other Recovery Options dialog box (restore toalternate location)” on page 195.
Perform Recovery dialog box for vCloud Director (restore to alternatelocation)
■ Recovery settingsLists your recovery selections, including the vCloud Director and vSpheresettings.
280Use NetBackup for vCloud DirectorVirtual machine recovery dialog boxes for vCloud Director

■ Run Pre-Recovery CheckVerifies the credentials and appropriate paths and connectivity, determineswhether the datastore or datastore cluster has available space, and reviewsother important requirements. You must run this check at least once. You canproceed with the restore even if the check fails. More details are available onthe Pre-Recovery Check:See “Perform Recovery dialog box for vCloud Director” on page 277.See “Perform Recovery dialog box” on page 187.
■ Start RecoveryStarts the recovery of the virtual machine.
281Use NetBackup for vCloud DirectorVirtual machine recovery dialog boxes for vCloud Director

Best practices and moreinformation
This chapter includes the following topics:
■ NetBackup for VMware best practices
■ Best practices for VMware tag usage
■ Further assistance with NetBackup for VMware
NetBackup for VMware best practicesThe following are best practices for NetBackup for VMware:
■ For a more efficient backup, the NetBackup media server and the VMwarebackup host should be installed on the same host.
■ When creating virtual machines, use the same name for both host name anddisplay name. If the policy'sPrimary VM identifier option is changed, the existingentries on the policy Clients tab still work.
■ VMware recommends that you run no more than four simultaneous backups ofvirtual machines that reside on the same datastore.
■ Successful VMware snapshots depend on the following:
■ The amount of I/O that occurs on the virtual machine datastore. Backupsshould be scheduled when relatively little I/O activity is expected. Reducingthe number of simultaneous backups can also help.Limit access to the datastore per policy: Use the Limit jobs per policyattribute in the NetBackup policy.Limit access to the datastore globally (across all policies): Use the HostProperties Resource Limit screen.
13Chapter

See “Setting global limits on the use of VMware resources” on page 52.
■ The design of the I/O substructure that is associated with each virtual machinedatastore. For correct I/O design and implementation, consult your VMwaredocumentation.
■ Make sure that the VMware backup host has enough memory to handle thenumber of simultaneous backups that occur.
■ Include in a single NetBackup policy those virtual machines that use the samedatastore. This practice lets you control the amount of backup-related I/O thatoccurs per datastore, to limit the backup effect on the target virtual machines.
■ NetBackup supports multiple backup hosts. When a single backup host issaturated with a backup process, another backup host can be added to increasebackup throughput.
■ If a VM's disks are accessible to multiple ESX hosts, the disks can be accessedfor backup or restore through any of the ESX hosts. The ESX host may or maynot be the ESX host where the virtual machine is running or registered. All ofthe following must be accessible to each other and should have DNS configured:
■ The vCenter server.
■ All ESX hosts under the vCenter that have access to the VM's vmdk files.
■ The backup host.
■ Upgrade to the latest version of VMware vSphere or Virtual Infrastructure.
See “NetBackup for VMware with deduplication” on page 283.
NetBackup for VMware with deduplicationFor a VMware backup to a deduplication storage unit, select the Enable filerecovery from VM backup option on the VMware policy tab. This option providesthe best deduplication rates. Without the Enable file recovery from VM backupoption, the result is a lower rate of deduplication.
More information is available on the VMware options.
See “Backup options on the VMware tabVMware backup options” on page 73.
See “Configuring a VMware policy from the Policies utility” on page 68.
See “NetBackup for VMware best practices” on page 282.
283Best practices and more informationNetBackup for VMware best practices

Best practices for VMware tag usageUse unique tag names whenever possibleThe combination of Category and Tag uniquely identifies a tag association to avirtual machine. Veritas, however, does not support selection of virtual machinesbased on Category. As such, avoid the creation of tags with identical names indifferent Categories.
When you create a VMware Intelligent Policy and select virtual machines based ontags, identical tag names in different categories may have unintended consequences.All virtual machines with the tag name are selected independent of the Category.Be aware of this behavior as you create your VMware Intelligent Policies.
Use a master server or a media server as a discovery hostfor VMware Intelligent Policies that use tagsBecause tag queries require Java, the discovery host used for VMware Intelligentpolicies must have Java installed. NetBackup master servers have Java installedby default. Java is an optional component for NetBackup media servers and forUNIX and Linux clients, and may or may not be installed in your environment.Windows clients that are used as a discovery host require a separate installationof the Remote Console.
Successful use of tags in a mixed vCenter ServerenvironmentNetBackup support for VMware tags begins at vCenter 6.0. In a mixed vCenterServer environment (e.g. 5.x and 6.0), a VMware Intelligent Policy query that usesthe Tag keyword can return some virtual machines as Failed if the configurationof the query requires tag evaluation on a 5.x vCenter. This behavior is observedwhen you select Test Query during policy configuration. This behavior is alsoobserved when you run the policy. The parent (discovery) job exits with a non-zerostatus and its details enumerate the virtual machines that Failed. The virtualmachines that the query has included are backed up normally.
You can use any of the options that are shown to create a query that uses tags butdoes not report virtual machines on 5.x servers as Failed.
■ Use another field to limit tag evaluation to the supported vCenter Server versions.Example: vCenterVersion GreaterEqual "6.0.0" AND Tag Equal
"Production"
Example: vCenter Equal "vcenter-123" AND tag Equal "Production"
■ Use the VMware Server List option under the Advanced Attributes on theVMware tab to restrict the policy to a supported list of vCenter Servers.See Table 5-7 on page 81.
284Best practices and more informationBest practices for VMware tag usage

■ Enable the Treat Tags as unset if unable to evaluate option under theAdvanced Attributes on the VMware tab.See Table 5-7 on page 81.
Place tag clause at the end of the VMware Intelligent PolicyqueryPlace the tag clause toward the end of the VMware Intelligent Policy query. Thisconfiguration allows NetBackup to eliminate as many virtual machines as possiblebefore it evaluates the tag portion of the query. This organization optimizes theperformance of discovery and selection of virtual machines.
Consider the query: Powerstate Equal poweredOn AND Tag Equal "Production"
In the example, the first clause automatically eliminates all virtual machines thatare poweredOff. The query does not need to evaluate the tag clause of the queryfor all of those virtual machines.
Tag backup and restore are best effortTag associations are part of the metadata of the virtual machine. NetBackupconsiders virtual machine tag association protection a best effort backup. Any tagcollection errors are shown in the Activity Monitor for the virtual machine snapshotjob.
Further assistance with NetBackup for VMwareTable 13-1 Sources of information on NetBackup for VMware
SourceTopic
NetBackup Snapshot Client Administrator's Guide.Snapshot Client configuration
NetBackupSnapshot Client Compatibility ListList of supported combinations ofplatforms and snapshot methods
NetBackup Software Compatibility ListSupport information on NetBackupfor VMware
285Best practices and more informationFurther assistance with NetBackup for VMware

TroubleshootingThis chapter includes the following topics:
■ Notes on troubleshooting NetBackup for VMware
■ Beware of unsupported backup host
■ How to determine the ESX network that NetBackup used for the backup orrestore
■ NetBackup logging for VMware
■ Configuring VxMS logging
■ Format of the VxMS core.log and provider.log file names
■ Configuring the VDDK logging level
■ Preventing browsing delays caused by DNS problems
■ Changing the browsing timeout for virtual machine discovery
■ Changing timeout and logging values for vSphere
■ Credentials for VMware server are not valid
■ Snapshot error encountered (status code 156)
■ The origin of the snapshot failure: NetBackup or VMware?
■ Conflict between NetBackup and VMware Storage vMotion with vSphere 5.0 orlater
■ Incremental backups of the VM may fail if the NTFS file system in the guest OSis corrupted and the backup uses MSDP storage
■ The restore fails when you restore individual files to a virtual machine that hasNetBackup client software
14Chapter

■ Backup or restore job hangs
■ VMware SCSI requirements for application quiesce on Windows
■ Mount point missing on a restored Windows virtual machine
■ Mount points not available when restoring files from a Linux virtual machine
■ Invalid client error when you restore files using NetBackup BAR interface installedon the virtual machine
■ VMware virtual machine does not restart after restore
■ A restored VM may not start or its file system(s) may not be accessible
■ NetBackup job fails due to update tasks on the VMware server
■ The vSphere interface reports that virtual machine consolidation is needed
■ The Enable file recovery from VM backup option does not work if a volume diskset contains a mixture of disk types
■ Linux VMs and persistent device naming
■ For a VMware virtual machine with Windows dynamic disks, a restore fromincremental backup fails with a Windows restore host and the hotadd transportmode
■ Simultaneous hotadd backups (from the same VMware backup host) fail withstatus 13
■ Troubleshooting VMware tag usage
■ Ensuring that guest customizations can be restored in vCloud Director
■ Troubleshooting vmdk restore to existing VM
■ Errors for backups of virtual machines on Virtual Volumes (VVols)
■ Issues with the CA certificate during installation of the NetBackup client onVMware Cloud (VMC)
Notes on troubleshooting NetBackup for VMwareNote the following:
■ Make sure that the VMware Tools are installed and up to date on each virtualmachine. Otherwise, communication problems and other issues can result. Forexample:
287TroubleshootingNotes on troubleshooting NetBackup for VMware

■ When you select virtual machines on the policy Clients tab, NetBackupcannot obtain the host name, IP address, or DNS name of the virtual machine.Policy validation may fail.
■ The virtual machine cannot be quiesced in preparation for the snapshot.
■ You cannot restore individual VMware files onto the virtual machine itself, exceptunder certain conditions.See “About restore of individual filesAbout restoring individual VMware files”on page 223.
See “Configuring a VMware policy from the Policies utility” on page 68.
Beware of unsupported backup hostThis topic applies to NetBackup for VMware.
Ensure that NetBackup supports your VMware backup host. For supported backuphost platforms, see the NetBackup Enterprise Server and Server OS SoftwareCompatibility List available from the following location:
NetBackup Master Compatibility List
For further VMware documentation on the backup host, see the information onbackup proxy in the following VMware article:
Best practices when using advanced transport for backup and restore
See “Notes on troubleshooting NetBackup for VMware” on page 287.
How to determine the ESXnetwork that NetBackupused for the backup or restore
If a virtual machine's disks are accessible to multiple ESX hosts, the disks can beaccessed through any of the ESX hosts. The ESX host that is used for the accessmay or may not be the ESX host where the virtual machine is running or registered.All of the following must be accessible to each other and should have DNSconfigured:
■ The vCenter server.
■ All ESX hosts under the vCenter that have access to the virtual machine's vmdkfiles.
■ The backup host.
288TroubleshootingBeware of unsupported backup host

If all hosts are not accessible to each other, the backup or restore may not succeed.In that case, you must determine which network NetBackup used for the backupor restore.
Note: For an NBD transport mode backup through vCenter, NetBackup uses theESX network over which the ESX host was added or registered to the vCenter. Foran NBD transport mode backup directly from the ESX host, NetBackup uses theESX host’s DNS/IP network.
The VxMS provider logs contain information on the network that NetBackup used.
See “Configuring VxMS logging” on page 291.
Check the VxMS provider logs for messages similar to those in this example:
10:49:21.0926 : g_vixInterfaceLogger:libvix.cpp:1811 <INFO> : Opening file
[MYDATASTORE] TestVM/TestVM-000001.vmdk (vpxa-nfc://[MYDATASTORE]
TestVM/[email protected]:902)
10:49:22.0301 : g_vixInterfaceLogger:libvix.cpp:1811 <INFO> : DISKLIB-LINK :
Opened 'vpxa-nfc://[MYDATASTORE]
TestVM/[email protected]:902' (0x1e): custom, 41943040
sectors / 20 GB.
10:49:22.0301 : g_vixInterfaceLogger:libvix.cpp:1811 <INFO> : DISKLIB-LIB :
Opened "vpxa-nfc://[MYDATASTORE]
TestVM/[email protected]:902" (flags 0x1e, type custom).
10:49:22.0301 : vdOpen:VixInterface.cpp:480 <DEBUG> : Done with
VixDiskLib_Open(): 200346144
10:49:22.0301 : openLeafSnapshotDisks:VixGuest.cpp:475 <DEBUG> : vdOpen()
succeess
10:49:22.0301 : openLeafSnapshotDisks:VixGuest.cpp:476 <INFO> : Transport
mode in effect = nbd
VMware logs the messages starting with g_vixInterfaceLogger. Such messagesin the example indicate that TestVM-000001.vmdk is opened over the ESX hostnetwork MyESX.xxx.xxx.com.
The following article contains related information:
■ Best practices when using advanced transport for backup and restorehttp://kb.vmware.com/kb/1035096
289TroubleshootingHow to determine the ESX network that NetBackup used for the backup or restore

NetBackup logging for VMwareFor log messages about VMware backup or VMware restore, see the followingNetBackup log directories.
Table 14-1 NetBackup logs that pertain to VMware backup and restore
Resides onContains themessages on
Log directory
NetBackup master or media serverBackup and restoreinstall_path\NetBackup\logs\bpbrm
NetBackup media serverBackup and restoreinstall_path\NetBackup\logs\bptm
VMware backup hostSnapshot creation andbackup
install_path\NetBackup\logs\bpfis
VMware backup hostSnapshot creation andbackup
install_path\NetBackup\logs\bpcd
VMware backup hostBackupinstall_path\NetBackup\logs\bpbkar
NetBackup master serverRestoreinstall_path\NetBackup\logs\bprd
NetBackup media server and VMwarebackup host
Instant recoveryinstall_path\NetBackup\logs\nbfsd
VMware backup or recovery hostPolicy configuration and onrestore
install_path\NetBackup\logs\bpVMutil
The client where the Backup, Archive,and Restore interface is running.
Restoreinstall_path\NetBackup\logs\bpVMreq
VMware backup hostPolicy configurationinstall_path\NetBackup\logs\nbproxy
VMware backup hostAutomatic virtual machineselection, and disabling andre-enabling VMwareStorage vMotion duringbackup or restore.
install_path\NetBackup\logs\ncfnbcs (originatorID 366)
ncfnbcs uses unified logging. See theNetBackupLogging Reference Guide for information on howto use unified logs.
VMware recovery hostRestoreinstall_path\NetBackup\logs\ncfnbrestore(originator ID 357)
ncfnbrestore uses unified logging. See theNetBackup Logging Reference Guide forinformation on how to use unified logs.
290TroubleshootingNetBackup logging for VMware

Table 14-1 NetBackup logs that pertain to VMware backup and restore(continued)
Resides onContains themessages on
Log directory
VMware backup host
See “Configuring VxMS logging”on page 291.
Note: The use of VxMS logging canreduce the performance of the backuphost.
File mapping during backupWindows:
install_path\NetBackup\logs\vxms
Linux:
/usr/openv/netbackup/logs/vxms
Note: Except for unified logging directories, these log directories must already existin order for logging to occur. If these directories do not exist, create them.
To create most of these log directories, run the following command on the NetBackupservers and backup host:
Windows:
install_path\NetBackup\logs\mklogdir.bat
UNIX (on master or media servers):
/opt/openv/netbackup/logs/mklogdir
See “Configuring VxMS logging” on page 291.
More detail is available on snapshot logs and logging levels. See the NetBackupSnapshot Client Administrator’s Guide.
A broader discussion of NetBackup logging is available. See theNetBackup LoggingReference Guide.
See “Notes on troubleshooting NetBackup for VMware” on page 287.
Configuring VxMS loggingThe following procedures describe how to configure VxMS logging for NetBackup.
Except as noted in this topic, you can also use the Logging Assistant (in the NetBackup Administration Console) to configure VxMS logging.
Note: VxMS logging may require significant resources on the VMware backup host.
291TroubleshootingConfiguring VxMS logging

VxMS logging on a Linux backup hostTo configure VxMS logging on a Linux backup host
1 Create the VxMS log directory:
/usr/openv/netbackup/logs/vxms
Note: For logging to occur, the VxMS directory must exist.
Note: If you have run the NetBackup mklogdir command, the VxMS logdirectory already exists.
See “NetBackup logging for VMware” on page 290.
2 Add the following to the /usr/openv/netbackup/bp.conf file:
VXMS_VERBOSE=<numeric value of 0 or greater>
See Table 14-2 for the available logging levels.
3 To change the log location, enter the following in the bp.conf file:
vxmslogdir=path to new log location
Note: If the VxMS log location is changed, the Logging Assistant does notcollect the logs.
292TroubleshootingConfiguring VxMS logging

VxMS logging on a Windows backup hostTo configure VxMS logging on a Windows backup host
1 Create the VxMS log directory:
install_path\NetBackup\logs\vxms
Note: For logging to occur, the VxMS folder must exist.
Note: If you have run the NetBackup mklogdir.bat command, the VxMS logdirectory already exists.
See “NetBackup logging for VMware” on page 290.
2 In the Windows registry, create the DWORD registry entry VXMS_VERBOSE inthe following location:
HKEY_LOCAL_MACHINE > SOFTWARE > Veritas > NetBackup >CurrentVersion > Config
3 To configure the logging level, set the numeric value of VXMS_VERBOSE to 0 orgreater. Larger numbers result in more verbose logs.
See Table 14-2 for the available logging levels.
4 To change the log location:
■ Open regedit and go to the following location:HKEY_LOCAL_MACHINE > SOFTWARE > Veritas > NetBackup >CurrentVersion
■ Create the registry entry vxmslogdir with a string value (REG_SZ). For thestring value, specify the full path to an existing folder.
Note: You can use NTFS compression on VxMS log folders to compress thelog size. The new logs are written in compressed form only.
Note: If the VxMS log location is changed, the Logging Assistant does notcollect the logs.
VxMS logging levelsTable 14-2 lists the VxMS logging levels.
293TroubleshootingConfiguring VxMS logging

Note: Logging levels higher than 5 cannot be set in the Logging Assistant.
Note: Logging levels higher than 5 should be used in very unusual cases only. Atthat level, the log files and metadata dumps may place significant demands on diskspace and host performance.
Table 14-2 VxMS logging levels
DescriptionLevel
No logging.0
Error logging.1
Level 1 + warning messages.2
Level 2 + informative messages.3
Same as level 3.4
Highly verbose (includes level 1) + auxiliary evidence files (.mmf, .dump, VDDKlogs, .xml, .rvpmem).
You can set the logging level for the VDDK messages.
5
VIX (VMware virtual machine metadata) dumps only.6
VHD (Hyper-V virtual machine metadata) dumps only.7
Full verbose + level 5 + level 6 + level 7.> 7
Format of the VxMS core.log and provider.log filenames
For the log files core.log and provider.log created by default during VxMSlogging, the NetBackup administrator's user name is inserted into the log file name.
Table 14-3 describes the format of the log file names.
294TroubleshootingFormat of the VxMS core.log and provider.log file names

Table 14-3 Format of VxMS core.log and provider.log file names
VxMS log-file-name formatPlatform
VxMS-thread_id-user_name.mmddyy_tag.log
For example:
VxMS-7456-ALL_ADMINS.070214_core.log
VxMS-7456-ALL_ADMINS.070214_provider.log
Windows
VxMS-thread_id-user_name.log.mmddyy_tag
For example:
VxMS-27658-root.log.081314_core
VxMS-27658-root.log.081314_provider
UNIX, Linux
See “Configuring VxMS logging” on page 291.
Configuring the VDDK logging levelThe following NetBackup processes capture VDDK log messages:
■ bpbkar, bpbkarv, nbrestore
These processes write VDDK messages in the VxMS logs if the VxMS logginglevel (VxMS_VERBOSE) is 5 or higher. By default, when VXMS_VERBOSE is5 or higher, the VDDK messages are generated at the highest verbosity.
■ ncfnbcs, bpVMutil
These processes write VDDK messages in their own log directories if theNetBackup global logging level is 5. By default, when the NetBackup globallogging level is 5, the VDDK messages in the ncfnbcs and bpVMutil logs aregenerated at minimum verbosity.
To change the logging level (verbosity) of the VDDK messages
1 Check the following on the backup host:
■ Make sure the VxMS log directory exists and that the VXMS_VERBOSEDWORD is set to 5 or higher.See “Configuring VxMS logging” on page 291.
■ Make sure the bpVMutil log directory exists and that the NetBackup globallogging level is set to 5.
295TroubleshootingConfiguring the VDDK logging level

Note: The ncfnbcs process uses unified logging: You do not have tomanually create a log directory for ncfnbcs. More information on unifiedlogging is available in the NetBackup Logging Reference Guide.
2 Enter the following on the backup host:
■ Windows:Create the DWORD registry entry VDDK_VERBOSE in the followinglocation:HKEY_LOCAL_MACHINE > SOFTWARE > Veritas > NetBackup >CurrentVersion > Config
■ Linux:Add the following to the /usr/openv/netbackup/bp.conf file:VDDK_VERBOSE=numeric value
3 Set the numeric value of VDDK_VERBOSE as follows:
Panic (failure messages only).0
Level 0 + error logging.1
Level 1 + warning messages.2
Level 2 + audit messages.3
Level 3 + informational messages.4
Highly verbose; level 4 + additional details.5
Most verbose; level 5 + debug messages.6
Preventing browsing delays caused by DNSproblems
This topic applies to NetBackup for VMware.
NetBackup may be unable to identify virtual machines when you use the Browsefor Virtual Machines dialog. Virtual machine host names may not be properlyconfigured in your Domain Name Server system (DNS), or the DNS system maybe slow. A timeout message may appear, or messages similar to the following mayappear in the NetBackup detailed status log:
296TroubleshootingPreventing browsing delays caused by DNS problems

17:25:37.319 [12452.10360] get_vSphere_VMs: Processing vm 002-wcms
17:25:37.319 [12452.10360] get_vSphere_VMs: uuid
421a8b46-063d-f4bd-e674-9ad3707ee036
17:25:37.319 [12452.10360] get_vSphere_VMs: vmxdir [san-05] 002-wcms/
17:25:37.319 [12452.10360] get_vSphere_VMs: datastore san-05
17:25:37.319 [12452.10360] get_vSphere_VMs: IpAddress 172.15.6.133
17:25:41.866 [12452.10360] get_vSphere_VMs: retry_gethostbyaddr for
172.15.6.133 failed with The requested name is valid, but no data of
the requested type was found.
Note:NetBackup may be unable to determine the host names of the virtual machinesfrom their IP addresses (reverse lookup may fail).
To prevent browsing delays caused by DNS problems (Windows)
1 On the Windows desktop of the backup host, click Start > Run and enterregedit.
2 To be on the safe side, make a backup of the current registry (File > Export).
3 Go to HKEY_LOCAL_MACHINE > SOFTWARE > Veritas > NetBackup >CurrentVersion > Config and create a key that is called BACKUP.
4 Create a new DWORD under BACKUP, called disableIPResolution.
This registry key causes NetBackup to use the virtual machine's IP addressas the virtual machine's host name.
5 Use the NetBackup Browse for Virtual Machines screen to rediscover thevirtual machines. The host names should now be the IP addresses.
See “Browse for VMware virtual machines” on page 91.
297TroubleshootingPreventing browsing delays caused by DNS problems

To prevent browsing delays caused by DNS problems (Linux)
1 On the Linux backup host, create (or open) the following file:
/usr/openv/netbackup/virtualization.conf
2 Add the following to the file:
[BACKUP]
"disableIPResolution"=dword:00000000
This entry causes NetBackup to use the virtual machine's IP address as thevirtual machine's host name.
Note: If the file already contains a [BACKUP] line, do not add another [BACKUP]line. Any other lines that already exist under [BACKUP] should remain as theyare.
3 Use the NetBackup Browse for Virtual Machines screen to rediscover thevirtual machines. The host names should now be the IP addresses.
See “Browse for VMware virtual machines” on page 91.
See “Notes on troubleshooting NetBackup for VMware” on page 287.
The following applies if: the Primary Identifier in VMware Intelligent Policies isselected as VM host name and Reverse name lookup is enabled in theconfiguration setting.
In a large VMware environment, reverse name lookups can be very slow dependingon the number of virtual machines being discovered. You can change theVNET_OPTIONS option to determine how many items NetBackup can cache. Thisvalue is in the bp.conf file on UNIX and Linux, and the registry on Windows.
The third value 200 is the default number of entries to be cached. Each entry takesabout 1 kilobyte in memory. Available memory needs to be taken into account whenyou change this value. The maximum number of allowed entries is 100000.
VNET_OPTIONS = 120 3600 200 40 3 1 30 10 1793 32 0 0
Use the nbgetconfig command to view the configuration settings. Use nbsetconfig
to change the settings.
Changing the browsing timeout for virtualmachine discovery
This topic applies to NetBackup for VMware.
When browsing for virtual machines in the Browse for Virtual Machines dialog,the browsing timeout value may need to be increased.
298TroubleshootingChanging the browsing timeout for virtual machine discovery

To change the browsing timeout value
1 On the host that runs the NetBackup Administration Console, open the followingfile:
/usr/openv/java/nbj.conf
2 Change the value of the NBJAVA_CORBA_DEFAULT_TIMEOUT parameter.
By default, this parameter is set to 60 seconds:
NBJAVA_CORBA_DEFAULT_TIMEOUT=60
Increase the value to a higher number.
For more information on the nbj.conf file, see the NetBackup Administrator'sGuide, Volume I:
Http://www.veritas.com/docs/DOC5332
See “Browse for VMware virtual machines” on page 91.
See “Changing timeout and logging values for vSphere” on page 299.
See “Notes on troubleshooting NetBackup for VMware” on page 287.
See “Configuring a VMware policy from the Policies utility” on page 68.
Changing timeout and logging values for vSphereThis topic applies to NetBackup for VMware.
Table 14-4 lists the vSphere keys and their default values for various timeouts.These values can be changed on the backup host (see the procedure in this topic).
Table 14-4 DWORD keys and defaults for vSphere timeouts
Default value (in seconds)DWORD key name
900jobtimeout
900poweroptimeout
900snapshottimeout
180registertimeout
180browsetimeout
300connecttimeout
The key and default for the vSphere API logging level are the following.
299TroubleshootingChanging timeout and logging values for vSphere

Table 14-5 DWORD key and default for vSphere API log level
Default valueDWORD key name
0 (no logging)vmcloglevel
Changes to the vSphere API logging level affect the following logs on the backuphost:
■ For backups (snapshot creation): bpfis log
■ For restores: bpVMutil log
■ For virtual machine discovery: ncfnbcs log (originator ID 366)
The logs are in the following location on the backup host:
Windows: install_path\NetBackup\logs\
Linux: /usr/openv/netbackup/logs
To change vSphere timeouts and logging values on Windows
1 On the Windows desktop of the backup host, click Start > Run and enterregedit.
2 To be on the safe side, make a backup of the current registry (File > Export).
3 Go to HKEY_LOCAL_MACHINE > SOFTWARE > Veritas > NetBackup >CurrentVersion > CONFIG and create a key that is called BACKUP.
4 To change a timeout value, create a new DWORD under BACKUP, using theappropriate registry name (such as jobtimeout or poweroptimeout).
Enter a value for the timeout.
5 To change the level of vSphere API logging, create a new DWORD calledvmcloglevel and enter the new logging value.
The allowed values are 0 through 6, where 0 is no logging and 6 is the highestlog level.
300TroubleshootingChanging timeout and logging values for vSphere

To change vSphere timeouts and logging values on Linux
1 On the Linux backup host, create (or open) the following file:
/usr/openv/netbackup/virtualization.conf
2 To change a timeout value, enter a new dword line under [BACKUP], using theappropriate name (such as jobtimeout or poweroptimeout). Include a valuefor the timeout.
For example:
[BACKUP]
"jobtimeout"=dword:60
This example sets the job timeout to 60 seconds.
Note: If the file already contains a [BACKUP] line, do not add another [BACKUP]line. Any other lines that already exist under [BACKUP] should remain as theyare.
3 To change the level of vSphere API logging, enter a dword line for vmcloglevelwith a logging value, under [BACKUP]. For example:
"vmcloglevel"=dword:6
The allowed values are 0 through 6, where 0 is no logging and 6 is the highestlog level.
See “Notes on troubleshooting NetBackup for VMware” on page 287.
Credentials for VMware server are not validThis topic applies to NetBackup for VMware.
A number of issues can prevent NetBackup from gaining access to the ESX serveror vCenter server. When you add credentials for a VMware server (Add VirtualMachine Server dialog), NetBackup validates the credentials when you click OK.If the credentials do not pass validation, a pop-up message appears.
Problems can result for a variety of reasons, including the following:
■ An incorrect virtual machine server name. Make sure that the server name isentered correctly.More information is available about changing the server name that is stored inNetBackup.See “Changing the host name of a VMware server in NetBackup” on page 50.
■ An invalid user name or password. Make sure that a valid user name andpassword were entered correctly.
301TroubleshootingCredentials for VMware server are not valid

■ An incorrect port number. Make sure that the port number is correct on theNetBackup Change Virtual Machine Server dialog. If the VMware server usesthe default port, no port specification is required. You can uncheck the Connectusing port number box.
■ You do not have enough privileges to perform backups or restores. (Notehowever that lack of sufficient privileges may not cause the credential validationto fail.)For the minimum permissions needed to back up and restore with vStorage,see the following:http://www.veritas.com/docs/TECH130493
See “Adding NetBackup credentials for VMware” on page 45.
See “Notes on troubleshooting NetBackup for VMware” on page 287.
Snapshot error encountered (status code 156)This topic applies to troubleshooting NetBackup for VMware.
The following table describes the VMware issues that relate to NetBackup statuscode 156.
Table 14-6 Possible causes of status code 156
Description and recommended actionCauses of statuscode 156
NetBackup may not be able to obtain the volume ID of a drive. In that case, none of thevirtual machine drives are backed up. The backup fails with NetBackup status code 156.
The drive may be down.
NetBackup cannot obtainthe volume ID of a drive
You cannot run more than one backup per virtual machine at a time. If you start a secondbackup of the virtual machine while the first backup is active, the second job fails with astatus 156.
Recommended action: Wait until the first job completes, then run the second one.
A backup of the virtualmachine is already active
302TroubleshootingSnapshot error encountered (status code 156)

Table 14-6 Possible causes of status code 156 (continued)
Description and recommended actionCauses of statuscode 156
NetBackup cannot find the host name or VM display name of a virtual machine that is listedin the backup policy. The detailed status log may include the following error message:
Critical bpbrm (pid=<pid number>) from client <client name>:FTL - snapshot creation failed, status 156.)
If the virtual machines do not have static IP addresses, you can configure NetBackup toidentify virtual machines by their VM display names or UUIDs. Examples of the environmentsthat do not use static IP addresses are clusters, and the networks that assign IP addressesdynamically.
Note that NetBackup may have been configured to identify virtual machines by their VMdisplay names. In that case, make sure that the display names are unique and that theydo not contain special characters.
See “Primary VM identifier options (VMware)” on page 76.
Cannot find virtualmachine name
Through a vCenter server, NetBackup can back up the virtual machines that are turnedoff. You must provide credentials for NetBackup to access the vCenter server.
See “Adding NetBackup credentials for VMware” on page 45.
If NetBackup uses credentials for an ESX server instead of vCenter, it may not be able toidentify a turned off virtual machine. Note the following:
■ If the policy uses VM host name or VM DNS name as the Primary VM identifier,NetBackup may not find the virtual machine. The backup fails.
■ If the policy uses VM display name or VM UUID as the Primary VM identifier, NetBackupcan identify the virtual machine. The backup succeeds.
The virtual machine ispowered off
If a virtual machine with independent disks is in a suspended state, snapshot jobs fail.Messages similar to the following appear in the job details log:
01/12/2015 17:11:37 - Critical bpbrm (pid=10144) from client<client name>: FTL - VMware error received: Cannot take amemory snapshot, since the virtual machine is configured withindependent disks.
This issue results from a VMware limitation (SR#15583458301). More information isavailable in the following VMware article:
http://kb.vmware.com/kb/1007532
As a workaround, change the state of the virtual machine to powered on or powered off,and rerun the backup.
Note: Data on independent disks cannot be captured with a snapshot. The rest of thevirtual machine data is backed up.
The virtual machine hasone or more independentdisks and is in asuspended state
303TroubleshootingSnapshot error encountered (status code 156)

Table 14-6 Possible causes of status code 156 (continued)
Description and recommended actionCauses of statuscode 156
The RDM is ignored (not backed up) and any independent disk is recreated but empty.
See “Configurations for backing up RDMs” on page 372.
The virtual machine's diskis in raw mode (RDM)
If the attempt to create a snapshot of the virtual machine exceeds the VMware timeout of10 seconds, the snapshot fails with NetBackup status 156. This timeout may occur if thevirtual machine is configured with a large number of volumes. Note that the timeout maybe encountered even if the Virtual machine quiesce option was disabled.
Do one of the following:
■ Reduce the number of volumes within the virtual machine.■ Install a NetBackup client on the virtual machine and select another backup method for
the policy (not the VMware snapshot method).
The attempt to create asnapshot exceeded theVMware timeout
The snapshot fails if the virtual machine has no vmdk file.
Virtual machines without vmdk files can occur in a vCenter Site Recovery Manager (SRM)environment. If a replicated virtual machine has never been active, it is in passive modeand may have no vmdk file(s).
You can enable the Ignore diskless VMs option on the VMware Advanced Attributestab of the policy. If this option is enabled: NetBackup does not back up a replicated (passive)virtual machine in an SRM environment if that virtual machine has no vmdk files.
More information is available on the Ignore diskless VMs option.
See “VMware - Advanced Attributes dialog” on page 81.
The virtual machine hasno vmdk file assigned
304TroubleshootingSnapshot error encountered (status code 156)

Table 14-6 Possible causes of status code 156 (continued)
Description and recommended actionCauses of statuscode 156
Whenever a VMware snapshot occurs, a delta.vmdk file is created for each vmdk. If 32 ormore such delta files exist for a single vmdk file, a NetBackup backup of that VM may fail(status 156). The NetBackup Activity Monitor job details contain messages similar to thefollowing:
02/06/2015 10:33:17 - Critical bpbrm (pid=15799) fromclient fl5vm1_2012: FTL - vSphere_freeze: Unable to proceed withsnapshot creation, too many existing delta files(44).02/06/2015 10:33:17 - Critical bpbrm (pid=15799) from clientfl5vm1_2012: FTL - VMware_freeze: VIXAPI freeze (VMware snapshot)failed with 25: SYM_VMC_FAILED_TO_CREATE_SNAPSHOT02/06/2015 10:33:17 - Critical bpbrm (pid=15799) from clientfl5vm1_2012: FTL - vfm_freeze: method: VMware_v2, type: FIM,function: VMware_v2_freeze
To back up the VM, do the following:
1 Consolidate the VM's snapshots.
In the VMware interface, right-click on the VM and select Snapshot > Consolidate.For more information, see your VMware documentation.
2 Verify that each of the VM’s vmdk files now has fewer than 32 delta files.
If the snapshot consolidation was not successful, see the following VMware articlefor further assistance:
Committing snapshosts in vSphere
3 Rerun the NetBackup backup.
The vmdk file has toomany delta files
If the NetBackup policy is enabled for virtual machine quiesce (the default), the VMwaresnapshot operation in vSphere initiates a quiesce of the virtual machine. If snapshot quiescefails, the NetBackup job fails with status 156.
VMware snapshotquiesce operation failed
See “Notes on troubleshooting NetBackup for VMware” on page 287.
See “Configuring a VMware policy from the Policies utility” on page 68.
The origin of the snapshot failure: NetBackup orVMware?
When a NetBackup snapshot job fails with status 156, the problem may originatein your VMware environment rather than in NetBackup. You can begin to isolate
305TroubleshootingThe origin of the snapshot failure: NetBackup or VMware?

the problem to one environment or the other by using vSphere Client to take asnapshot of the VM. NetBackup support often uses this approach to investigate asnapshot issue.
To identify the environment in which the snapshot error occurred
1 In the vSphere interface, right-click on the VM and click Snapshots > TakeSnapshot.
2 In the Take VM Snapshot for dialog, click Quiesce guest file system if theNetBackup policy was enabled for virtual machine quiesce (the default).
In the NetBackup policy, the Virtual machine quiesce option is in the VMware- Advanced Attributes dialog.
Note: In the Take VM Snapshot for dialog, make sure the Snapshot thevirtual machine's memory option is not selected. NetBackup does not usethat option.
3 Start the snapshot and check the Recent Tasks pane for snapshot status.
■ If the snapshot does not complete, the problem with the NetBackup snapshotmay be in the VMware environment. Consult your VMware documentation.
■ If the VMware snapshot is successful, the issue may be with NetBackup.For relevant error messages, consult the NetBackup bpfis logs.See “NetBackup logging for VMware” on page 290.The following topic summarizes some common causes of 156 errors:See “ Snapshot error encountered (status code 156)” on page 302.
Conflict betweenNetBackup and VMware StoragevMotion with vSphere 5.0 or later
To avoid conflicts with Storage vMotion in vSphere 5.0 or later, NetBackup shouldconduct backups through the vCenter server, not through the ESX host. A backupdirectly through the ESX server may fail if Storage vMotion simultaneously migratesthe virtual machine’s files. In addition, the virtual machine’s snapshot files may bestranded or other problems with the virtual machine may result. VMware hasacknowledged this issue.
If the backup fails, the NetBackup job details contain a message similar to thefollowing:
306TroubleshootingConflict between NetBackup and VMware Storage vMotion with vSphere 5.0 or later

Error opening the snapshot disks using given transport mode: Status 23.
To back up a virtual machine while its files are in the process of migration,NetBackup must conduct the backup through the vCenter server.
To back up a virtual machine while its files are in the process of migration
1 In the NetBackup Administration Console, under Media and DeviceManagement > Credentials > Virtual machine servers, add NetBackupcredentials for the vCenter server.
Select a server type of VMware VirtualCenter Server.
2 Delete the credentials that are currently defined under the server type VMwareESX server, and add those credentials as type VMware Restore ESX Server.
3 Rerun the backup.
Incremental backups of the VM may fail if theNTFS file system in the guest OS is corrupted andthe backup uses MSDP storage
This error may occur in the following case:
■ The VMware or Hyper-V backup policy specifies Media Server DeduplicationPool (MSDP) storage.
■ The backup schedule includes incrementals (differential or cumulative).
■ The NTFS file system in the VM’s guest OS is corrupted. For example, the filesystem contains orphaned file record segments. The bptm debug log containsmessages similar to the following:
16:24:04.604 [5720.7068] <16> 6:bptm:5720:win2012-2.hrous.sen.com:
[ERROR] PDSTS: fbu_fill_bitmap: (1945) stream_offset(610848768)
+ length(8192) > (1946) stream_offset(610848768)
16:24:04.604 [5720.7068] <16> 6:bptm:5720:win2012-2.hrous.sen.com:
[ERROR] PDSTS: fbu_scan_buf: fbu_fill_bitmap() failed
(2060022:software error)
The incremental backups fail with status 84, media write error.Use the chkdsk command to examine the file system in the guest OS and repairit as needed. Then restart the VM and rerun the backup.
See “Notes on troubleshooting NetBackup for VMware” on page 287.
307TroubleshootingIncremental backups of the VM may fail if the NTFS file system in the guest OS is corrupted and the backup
uses MSDP storage

The restore fails when you restore individual filesto a virtual machine that has NetBackup clientsoftware
This topic applies to NetBackup for VMware.
When you restore individual files to a virtual machine that has a NetBackup client,make sure that a firewall does not interfere with the restore. If a firewall stops therestore, turn off the firewall and retry the restore.
See “Restoring the full VMware virtual machine” on page 179.
See “Notes on troubleshooting NetBackup for VMware” on page 287.
See “Configuring a VMware policy from the Policies utility” on page 68.
Backup or restore job hangsThis topic applies to NetBackup for VMware.
NetBackup may have exceeded the maximum number of allowed VMware NFCconnections to the ESX server when it used the transport modes nbd or nbdssl.Note that NetBackup uses one NFC connection per virtual disk on the ESX or ESXiserver.
If NetBackup is configured to access the ESX server directly (not through a vCenteror VirtualCenter server), fewer connections are allowed. The following are themaximum connections as set by VMware:
Table 14-7 VMware NFC connection limits for nbd or nbdssl transfers
Maximum NFC connectionsallowed
Type of access to the ESXserver
ESX version
9Directly to ESX serverESX 4
27Through vCenterESX 4
11Directly to ESX serverESXi 4
23Through vCenterESXi 4
The maximum total for all NFCconnection buffers to an ESXi hostis 32 MB
Directly to ESX serverESXi 5
52Through vCenterESXi 5
308TroubleshootingThe restore fails when you restore individual files to a virtual machine that has NetBackup client software

Try a different transport type (such as SAN or hotadd). If a different transport typeis not available and NetBackup accesses the ESX servers directly, set up accessthrough a vCenter (or VirtualCenter) server. Use of a server increases the maximumnumber of allowed connections. For example: With 27 connections, NetBackup canaccess a virtual machine that has up to 27 disks, if the ESX 4 server is behind avCenter server.
Note that the connection limits are per-host (that is, per vCenter or ESX server).
For example, assume the following environment:
■ An ESX 4.0 server with three virtual machines.
■ Each virtual machine has ten virtual disks.
■ The virtual machines are behind a vCenter 4.0 server.
For a simultaneous backup of the three virtual machines, NetBackup requires 30NFC connections. With a limit of 27 NFC connections per vCenter server, any ofthe three backup jobs may hang.
These limits are described in the VMware Virtual Disk API Programming Guide:
VMware Virtual Disk API Programming Guide
See also the following section of the VMware vSphere 5 Documentation Center:
Virtual Disk Transport Methods
See “Restore notes and restrictions” on page 173.
See “Configuring a VMware policy from the Policies utility” on page 68.
VMwareSCSI requirements for application quiesceon Windows
For a snapshot that quiesces an application on a Windows VM, VMware imposesthe following disk requirements:
■ The VM's disks must be SCSI, not IDE.
■ The SCSI disks on the VM’s SCSI controller must not occupy more than half ofthe total number of slots in the controller. Since the controller has a total of 15slots, the number of disks in that controller must not exceed 7.If these conditions are not met and the NetBackup VMware policy enables theVirtual machine quiesce option, the backup may fail with status code 156.For more information on this VMware requirement, refer to the following articlein the VMware vSphere 6.0 Documentation Center:Windows Backup Implementations
309TroubleshootingVMware SCSI requirements for application quiesce on Windows

Mount point missing on a restored Windowsvirtual machine
This topic applies to NetBackup for VMware.
A Windows virtual machine may fail to write its mount point configuration to disk(the mount point configuration remains in RAM). In that case, the mount pointinformation cannot be backed up. When the virtual machine is restored, the datafrom the mounted volume is restored, but the mount point is absent from the restoredvirtual machine.
Reassign the mount point on the restored virtual machine. To make sure the mountpoint is correctly configured, restart the virtual machine.
See “Configuring a VMware policy from the Policies utility” on page 68.
See “Restore notes and restrictions” on page 173.
Mount points not available when restoring filesfrom a Linux virtual machine
This topic applies to NetBackup for VMware.
For Linux virtual machines, only the ext2, ext3, and ext4 file systems are supportedfor individual file restore. If a partition is formatted with some other file system, thebackup succeeds but NetBackup cannot map the file system addresses of the files.As a result, NetBackup cannot restore individual files from that partition. Only thefiles that were on ext2, ext3, or ext4 partitions can be individually restored.
Note also: To restore individual files from their original mount points, the "/" (root)partition must be formatted as ext2, ext3, or ext4. If the "/" (root) partition is formattedwith a different file system (such as ReiserFS), the mount points cannot be resolved.In that case, you can restore ext2, ext3, or ext4 files from the /dev level (such as/dev/sda1). You cannot restore the files from their original mount point level.
See “Restore notes and restrictions” on page 173.
See “Configuring a VMware policy from the Policies utility” on page 68.
Invalid client error when you restore files usingNetBackup BAR interface installed on the virtualmachine
This topic applies to NetBackup for VMware.
310TroubleshootingMount point missing on a restored Windows virtual machine

If the virtual machine was backed up by display name or UUID, and the displayname is not the same as the host name, note: You cannot restore individual filesby means of the Backup, Archive, and Restore (BAR) interface if the interface isinstalled on the virtual machine itself. The files can be restored if BAR is installedon the master server or media server. In this case, BAR must not be installed onthe virtual machine that you want to restore to.
To restore files, the Destination client for restores field in the BAR interface musthave a valid host name or IP address.
See “Restoring individual filesRestoring individual VMware virtual machine files”on page 224.
VMware virtual machine does not restart afterrestore
This topic applies to NetBackup for VMware.
The virtual machine may have been configured as follows:
■ At the time of the backup, the virtual machine had a combination of SATA andSCSI disks, or of SATA, SCSI, and IDE disks.
■ The guest OS resided on one of the SCSI disks.
The virtual machine when restored may attempt to boot from the SATA or the IDEdisk. The boot attempt fails with the message "Operating system not found."
VMware has identified this problem and will address it in a future release.
As a workaround, reconfigure the BIOS on the virtual machine to boot from thecorrect SCSI disk.
See “Restoring the full VMware virtual machine” on page 179.
See “Restore notes and restrictions” on page 173.
A restored VM may not start or its file system(s)may not be accessible
A restored VM may not boot up or its file system(s) may not be accessible in thefollowing case:
■ The VM's guest operating system is Windows 8,
■ The VM is restored from a block-level incremental backup image,
■ And the restore uses the hotadd transport mode.
311TroubleshootingVMware virtual machine does not restart after restore

As a result of a VMware issue in VDDK 5.5.x, the Windows NTFS Master File Tableon the restored VM may be corrupted. As a workaround, use a different transportmode to restore the VM (not hotadd).
See “Restore notes and restrictions” on page 173.
NetBackup job fails due to update tasks on theVMware server
Certain virtual machine update tasks on the VMware server may cause a NetBackupjob to fail. For example, a restore may fail when you use the nbrestorevm commandto restore multiple VMs at the same time. If the failed restore job creates the VM,the VM is deleted.
On the backup or restore host, the bpVMutil log may contain a message similarto the following:
Detail: <ManagedObjectNotFoundFault xmlns="urn:vim25"
xsi:type="ManagedObjectNotFound"><obj type="VirtualMachine">
vm-14355</obj>
</ManagedObjectNotFoundFault>
As a workaround, rerun the job for the operation that failed.
Note: If possible, avoid VMware maintenance activities during backup or restoreoperations.
See “NetBackup logging for VMware” on page 290.
The vSphere interface reports that virtual machineconsolidation is needed
When NetBackup begins a virtual machine backup, it requests a VMware snapshotof the virtual machine in vSphere. If the NetBackup policy is enabled for virtualmachine quiesce (the default), the VMware snapshot operation initiates a quiesceof the virtual machine. If snapshot quiesce fails, the NetBackup job fails with status156 and VMware snapshot delta files may be left behind in vSphere. Note: As aresult of leftover snapshot delta files, the vSphere status for the virtual machinemay warn that virtual machine consolidation is needed.
312TroubleshootingNetBackup job fails due to update tasks on the VMware server

VMware has acknowledged the problem of leftover delta files after a snapshotquiesce failure. VMware has fixed this issue in certain ESXi versions. See thefollowing VMware article for more information on this issue:
Delta disk files (REDO logs) are left uncommitted after a failed quiesced snapshotoperation (2045116)
For a workaround for leftover delta files, see the following VMware article:
Committing snapshots when there are no snapshot entries in the Snapshot Manager(1002310)
The Enable file recovery from VM backup optiondoes not work if a volume disk set contains amixture of disk types
If a VM is configured on a logical volume (LVM or LDM): Individual file recoverydoes not work if the volume disk set contains a mixture of disk types:
■ Some of the logical volume disks are regular virtual disks (normal VMDKs).
■ Some of the disks in the same volume are independent disks or are physicaldisks in raw device mapping mode (RDM).
The backup job succeeds but files cannot be individually restored from the filesystems that reside on the disk set (LVM or LDM). To be able to restore filesindividually, reconfigure the VM's logical volumes to reside on regular virtual disks(vmdk) only. Note that VMware does not make snapshots of independent disks orRDM disks.
Linux VMs and persistent device namingFor Linux VMs without persistent device naming, multiple disk controllers (such asIDE, SCSI, and SATA) may complicate the recovery of individual files. This issueoccurs because non-persistent device naming, such as /dev/sda and /dev/sdb,may cause unexpected mount point changes after a restart. If the VM has a SCSIdisk and SATA disk, the Backup, Archive, and Restore interface may show incorrectmount points for the VM's files. For example, the files originally under /vol_a mightappear under /vol_b when you browse to restore them. The restore is successful,but the restored files may not be in their original directories.
As a workaround, search for the files on the restored VM and move them to theproper locations.
313TroubleshootingThe Enable file recovery from VM backup option does not work if a volume disk set contains a mixture of disk
types

To prevent this issue on Linux VMs with multiple disk controllers, it is recommendeda persistent device-naming method for mounting the file systems. When persistentnaming is in place, device mounting is consistent and this issue does not occurwhen you restore files from future backups.
For persistent device naming, you can mount devices by UUIDs. The following isan example of the /etc/fstab file that contains the devices that are mounted byUUIDs:
UUID=93a21fe4-4c55-4e5a-8124-1e2e1460fece /boot ext4 defaults 1 2
UUID=55a24fe3-4c55-4e6a-8124-1e2e1460fadf /vola ext3 defaults 0 0
To find the device UUIDs, you can use either of the following commands:
blkid
ls -l /dev/disk/by-uuid/
Note:NetBackup also supports the by-LABEL method for persistent device naming.
For a VMware virtual machine with Windowsdynamic disks, a restore from incremental backupfails with a Windows restore host and the hotaddtransport mode
A restore of a Windows virtual machine by means of the hotadd transfer mode mayfail in the following case:
■ A backup is taken of a Windows virtual machine that has a dynamic disk group.
■ After the backup, another dynamic disk is added to the virtual machine's diskgroup.
■ After the dynamic disk is added, an incremental backup is taken of the virtualmachine.
■ A Windows restore host is used with the hotadd transport mode to restore thevirtual machine from the incremental backup.
The restore fails when the Windows restore host tries to mount the dynamic diskthat was added after the first backup. Depending on the data that has already beenrestored, Windows may detect the dynamic disk as Invalid or Foreign. Furtherwrites to an Invalid or Foreign disk are unsuccessful and the restore fails.
314TroubleshootingFor a VMware virtual machine with Windows dynamic disks, a restore from incremental backup fails with a
Windows restore host and the hotadd transport mode

The restore fails with status 1, "the requested operation was partially successful."Messages similar to the following may appear in the VxMS provider logs:
14:10:18.0854 : vdWrite:../VixInterface.cpp:760 <ERROR> : Error
24488361628532739 in write with vdhandle 48870608 startsector
128 numsectors 1 14:10:18.0854 : write:VixFile.h:333 <ERROR>
: Returned error 3, offset 0x0000000000010000, length
0x0000000000000200 14:10:18.0854 : write:VixFile.h:334
<ERROR> : Returning: 11
14:10:18.0854 : vixMapWrite:../VixCoordinator.cpp:1259 <ERROR>
: Returning: 11
14:10:18.0854 : vix_map_write:../libvix.cpp:1826 <ERROR>
: Returning: 11
When they are enabled, VxMS logs are written in the following directory:
Windows:
install_path\NetBackup\logs\vxms
Linux:
/usr/openv/netbackup/logs/vxms
See “Configuring VxMS logging” on page 291.
Note: For successful restores from future incremental backups, run backups withthe Use Accelerator option in the policy.
Try any of the following workarounds to restore from the current incremental backup:
■ Use a Linux restore host (not Windows).
■ Use a different transport mode, such as NBD, NBDSSL, or SAN (not hotadd).
■ When the dynamic disk (the one that was added after the first backup) is mountedfor restore, manually set the disk to offline. When the disk is offline, NetBackupcan write data to it and successfully complete the restore.See the remainder of this tech note for assistance with this workaround.
To determine when the dynamic disk is mounted for restore
◆ Use the Windows Disk Management utility (Control Panel > AdministrativeTools > Computer Management > Disk Management), or run diskpart inadministrator mode and enter the list disk option.
When Windows attempts to mount the disk, it labels the disk as Invalid orForeign.
315TroubleshootingFor a VMware virtual machine with Windows dynamic disks, a restore from incremental backup fails with a
Windows restore host and the hotadd transport mode

To use diskpart to take the dynamic disk offline
1 On the Windows restore host, run diskpart in administrator mode.
2 Enter list disk to list all disks and find the Invalid or Foreign disk.
3 Enter select disk disk ### to select the disk that is Invalid or Foreign.
4 Enter offline disk to offline the disk.
Example session:
DISKPART> list disk
Disk ### Status Size Free Dyn Gpt
-------- ------------- ------- ------- --- ---
Disk 0 Online 100 GB 1024 KB
Disk 1 Online 256 GB 56 GB *
Disk 2 Invalid 40 MB 40 MB * *
Disk 3 Offline 40 MB 40 MB
DISKPART> select disk 2
Disk 2 is now the selected disk.
DISKPART> offline disk
DiskPart successfully taken offline the selected disk.
Simultaneous hotadd backups (from the sameVMware backup host) fail with status 13
During simultaneous backups from the same VMware backup host, some of thebackups may fail with status 13, "file read failed." A hotadd backup of multiple disksmay take more time than the client-read timeout allows (the default is 300 seconds).The delay may be caused by locking timeouts in the VMware VDDK.
In the NetBackup Activity Monitor, the detailed status log may include messagessimilar to the following:
12/05/2014 06:43:53 - begin writing
12/05/2014 06:48:53 - Error bpbrm (pid=2605) socket read failed:
errno = 62 - Timer expired
12/05/2014 06:48:55 - Error bptm (pid=2654) media manager terminated
by parent process
316TroubleshootingSimultaneous hotadd backups (from the same VMware backup host) fail with status 13

The /NetBackup/logs/vxms log may include repeated instances of a VDDKmessage similar to the following:
12/08/2014 05:11:35 : g_vixInterfaceLogger:libvix.cpp:1844 <DEBUG> :
[VFM_ESINFO] 2014-12-08T05:11:35.146-06:00 [7F1B1163F700 info Libs']
FILE: FileLockWaitForPossession timeout on '/var/log/vmware/hotAddLock.
dat.lck/M34709.lck' due to a local process '15882-26732358(bpbkarv)'
To prevent this issue, do one of the following:
■ Reduce the number of hotadd backups that run simultaneously.
■ Increase the client-read timeout on the media server as appropriate (15 minutesor more):In the NetBackup Administration Console, click NetBackup Management >Host Properties > Double-click on media server > Timeouts > Client readtimeout.
Troubleshooting VMware tag usageTag associations are backed up and restored as part of the VMware backup process.Backup and restore of tag associations is a best effort. Any tag collection errorsare shown in the Activity Monitor for the virtual machine snapshot job.
Because of the best effort on backup and restore of tag associations, you mayreceive unexpected behavior. Please be aware of the following:
■ You can receive a NetBackup Status Code 0 even if the tag associations arenot captured during the backup. Because tag backup is best effort, this error isnot considered a failure that halts a backup. Any tag collection errors that occurin the backup are shown in the Activity Monitor for the virtual machine snapshotjob.
■ You can receive a NetBackup Status Code 0 on a restore even if tag associationsare not restored. Any tag collection errors that occur in the backup are shownin the Activity Monitor for the virtual machine snapshot job.
■ Restores receive a NetBackup Status Code 1 when:
■ The tag doesn't exist on the target vCenter Server. Be aware that NetBackuprestores tag associations to virtual machines by the tag identifier not tagname.
■ The virtual machine was restored to a pre-6.0 vCenter Server.
■ Other VMware failures.
317TroubleshootingTroubleshooting VMware tag usage

Query behavior with unsupported versions of VMwareTable 14-8 NetBackup query behavior for tag field keyword with unsupported
versions of VMware
Additional informationBehaviorVersion of VMware
N/AVirtual machines areevaluated as if tags are notset.
vCenter earlier than 5.1
If tag information is requiredto determine virtual machineselection, the virtual machineis marked as Failed withNetBackup Status Code4266.
Virtual machine selection ismarked as Failed.
vCenter 5.1 and 5.5
If tag information is requiredto determine virtual machineselection, the virtual machineis marked as Failed withNetBackup Status Code4265.
Virtual machine selection ismarked as Failed.
ESX server
List of possible Tag values not displayed in Query BuilderIf the list of possible values does not return any results when the Tag Field isselected in the Policy Query Builder, there are several causes of this problem.
■ Confirm that your version of vCenter Server is 6.0 or later.NetBackup support for tags starts with VMware vCenter Server 6.0.See “Notes and limitations for tag usage in VMware Intelligent Policy queries”on page 41.
■ Confirm there are tags defined using the vSphere Web Client.
■ Confirm that all tags and categories have descriptions.If one of the tags does not have a description, when you attempt to browse fortags in the VMware Intelligent Policy, no tags are displayed.Veritas has confirmed that this issue is resolved in vCenter Server 6.0 Update1.VMware Knowledge Base article: http://kb.vmware.com/kb/2124204
■ Confirm the system times of the discovery host and the vCenter Server aresynchronized.VMware Knowledge Base article: http://kb.vmware.com/kb/2125193
318TroubleshootingTroubleshooting VMware tag usage

Timeout issues in discovery jobIn large VMware environments, you may experience timeout issues during thediscovery job or the test query. Review the NetBackup Activity Monitor for thismessage:
09/21/2015 10:23:05 - Error nbpem (pid=13064) VMware vCloud Suite
SDK API Failed, msg = [This method requires authentication.], display
name = [display_name], server = [server_name]
This message indicates that the discovery job exceeded the bearer timeout. Youneed to increase this timeout for the job to complete successfully.
To adjust the timeout on the vCenter
1 Open the VMware vSphere Web Client.
2 SelectAdministration > Single Sign-On > Configuration > Policies > TokenPolicy.
3 Increase Maximum bearer token lifetime from the default 300 seconds.Because each environment is unique, Veritasdoes not have anyrecommendations on this value. Increase the value until the problem iseliminated.
Ensuring that guest customizations can berestored in vCloud Director
This topic applies to NetBackup for VMware.
NetBackup can back up VMware vCloud Director environments and restore virtualmachines into vCloud Director.
See “About NetBackup for vCloud Director” on page 262.
To ensure that any VM guest customizations are restored into vCloud Director, youmust set a NetBackup parameter, as follows:
■ On Windows, you must set a registry value.See “To ensure that guest customizations can be restored in vCloud Directoron Windows” on page 320.
■ On UNIX and Linux, you must edit a NetBackup configuration file.See “To ensure that guest customizations can be restored in vCloud Directoron Linux” on page 320.
The parameter value specifies a wait period in seconds so that the guestcustomizations can be restored successfully. (The VMware API requires that theVMware Tools are installed and running, but the state of the VMware Tools cannot
319TroubleshootingEnsuring that guest customizations can be restored in vCloud Director

be identified after the restore. Therefore, we wait the specified amount of time sothat the VMware Tools are running in the initial restore environment.)
To ensure that guest customizations can be restored in vCloud Director onWindows
1 On the Windows desktop of the backup host, click Start > Run and enterregedit.
2 To be on the safe side, make a backup of the current registry (File > Export).
3 Go to HKEY_LOCAL_MACHINE > SOFTWARE > Veritas > NetBackup >CurrentVersion > CONFIG and create a key that is called BACKUP.
4 Create a new DWORD under BACKUP and name it powerCycleInterval.
Enter a decimal value of 60 for the timeout.
5 Close the Windows Registry Editor.
To ensure that guest customizations can be restored in vCloud Director onLinux
1 On the Linux backup host, create (or open) the following file:
/usr/openv/netbackup/virtualization.conf
2 Create a line in the file named [BACKUP] and then on a separate line create apowerCycleInterval dword parameter with a value of 60, as follows:
For example:
[BACKUP]
"powerCycleInterval"=dword:60
Note: If the file already contains a [BACKUP] line, do not add another [BACKUP]line. Any other lines that already exist under [BACKUP] should remain as theyare.
3 Save the file and then close it from the text editor.
See “Notes on restoring virtual machines into vCloud Director” on page 264.
Troubleshooting vmdk restore to existing VMFor virtual disk restores and in-place restores to an existing VM, be aware of thefollowing:
■ If the VMDKs cannot be attached to the target VM, the restored VMDKs areretained on the temporary VM. The name of the temporary VM is available in
320TroubleshootingTroubleshooting vmdk restore to existing VM

the job details in NetBackup. In the following job details example, the temporaryVM name is vCenter60vm1_rhel6.4_1465584674:
06/10/2016 13:51:17 - Info bpVMutil (pid=3400) Restoring [datastore1]
vCenter60vm1_rhel6.4/vCenter60vm1_rhel6.4_4.vmdk to [datastore1]
vCenter60vm1_rhel6.4/vCenter60vm1_rhel6.4_4-1465584677.vmdk
06/10/2016 13:51:38 - Info bpVMutil (pid=3400) Successfully created
virtual machine vCenter60vm1_rhel6.4_1465584674 with specified disks.
06/10/2016 13:51:41 - requesting resource @aaaab
You can access the data on the temporary VM.If the temporary VM is retained after a restore failure, the restore job containsa message similar to the following:
06/14/2016 15:29:06 - Info bpVMutil (pid=5225) attachDisksToExistingVM:
Unable to attach restored disks to target VM vCenter60vm2_rhel6.4
06/14/2016 15:29:06 - Info bpVMutil (pid=5225) attachDisksToExistingVM:
Temporary VM with restored virtual disks was left in place, it can be
used to access restored data
By default, NetBackup retains the temporary VM if the disks are not attached.To change that behavior, set the DeleteRestoredVMOnError field to Yes in therestore parameters file.
■ After a restore to an existing VM, the next backup of the VM backs up therestored virtual disks. This backup may show a warning during collection of theChanged Block Tracking (CBT) information.
■ For an In-place disk restore, raw devices (RDMs) and independent disks arenot deleted or replaced during restore. If the controller for these disks conflictswith the disks being restored, the restore fails. The following example messagesare job details from a failed in-place restore:
May 07, 2020 10:26:21 AM - Warning bprd.sfr (pid=2425) Unable to
attach the restored disks to requested VM
May 07, 2020 10:26:21 AM - restored from image
InPlaceDiskRestoreDemo_1588837243; restore time: 0:00:50
May 07, 2020 10:26:21 AM - end Restore; elapsed time 0:00:50
May 07, 2020 10:26:21 AM - Info bpVMutil (pid=2673)
attachDisksToExistingVM: Controller scsi0-1 not available
to perform in-place disk restore. Aborting restore.
The requested operation was partially successful(1)
321TroubleshootingTroubleshooting vmdk restore to existing VM

Errors for backups of virtual machines on VirtualVolumes (VVols)
When troubleshooting backups of virtual machines on VVols, note the following:
■ Each snapshot job creates a vSphere snapshot of the virtual machine.
■ To investigate snapshot failures, check the storage array’s VASA provider logsas well as the vSphere error messages. (VASA is vSphere API for StorageAwareness.)
Table 14-9 Errors for backups of virtual machines on VVols
Explanation and recommended actionErrormessage orcause
Ensure that you have the required snapshot license from the array vendor. Licensing requirementsfor vSphere snapshots vary from one type of VVol storage to another, depending on the arrayvendor.
Each snapshot job creates a vSphere snapshot of the virtual machine.
vSpheresnapshotcreation fails fora backup of aVM on VVol.
There is insufficient space in VVol storage.
Space requirements vary from one array vendor to another. Consult the storage array documentation.
322TroubleshootingErrors for backups of virtual machines on Virtual Volumes (VVols)

Issues with the CA certificate during installationof the NetBackup client on VMware Cloud (VMC)
Failed to display CA certificate details
To fix this problem, do the following:
1 Click Cancel to cancel the installation.
2 Make sure the private DNS name was used to install the master server.
3 In the hosts file of the master server installed in AWS and of the backup hostinstalled in VMC, add the following:
■ The private IP and private DNS name of the NetBackup master server.
■ The IP and the DNS name of the backup host.The hosts file location on Windows:C:\Windows\System32\drivers\etc\hosts
The hosts file location on Linux:/etc/hosts
4 Begin the NetBackup client installation again.
323TroubleshootingIssues with the CA certificate during installation of the NetBackup client on VMware Cloud (VMC)

The target NetBackup server cannot be authenticated, orthe server name does not match any of the host namesthat are listed in the server's certificate
To fix this problem, do the following:
1 Click Cancel to cancel the installation.
2 Follow the previous steps under "Failed to display CA certificate details."
3 If the error persists, see the following article:
Host validation fails when a NetBackup client tries to connect to the masterserver
4 Begin the NetBackup client installation again.
324TroubleshootingIssues with the CA certificate during installation of the NetBackup client on VMware Cloud (VMC)

NetBackup commands toback up and restore virtualmachines
This appendix includes the following topics:
■ Using NetBackup commands to create a VMware policy
■ Using the nbdiscover command to search the virtual environment
■ Using the nbrestorevm command to restore virtual machines into vSphere
■ Using the nbrestorevm command to restore virtual machines into vCloud Director
■ Using the nbrestorevm command to restore virtual machines with InstantRecovery
■ Using the nbrestorevm command to restore virtual machine disks
■ The nbrestorevm -R rename file for restoring virtual machines
■ Logs for troubleshooting the nbrestorevm command
■ Query format and examples for searching virtual machine backups
■ Allowing other servers or clients to restore virtual machines
Using NetBackup commands to create a VMwarepolicy
This topic describes how to use NetBackup commands to create a policy to backup virtual machines.
AAppendix

The NetBackup commands for policy creation are in the following directory:
Windows:
install_path\Veritas\NetBackup\bin\admincmd
UNIX or Linux:
usr/openv/netbackup/bin/admincmd
Run these commands on the NetBackup master server.
To use NetBackup commands to create a VMware policy
1 Create a blank policy.
bppolicynew policyName -M masterServer
For example:
bppolicynew pol1 -M nbserver.acme.com
2 Configure the VMware policy type and set the VMware snapshot options.
This step requires running the initialize form of the bpplinfo command in twostages.
bpplinfo policyName -set -pt VMware
Example for the first stage of bpplinfo:
bpplinfo pol1 -set -active -pt VMware -residence stu1
Firststage:
326NetBackup commands to back up and restore virtual machinesUsing NetBackup commands to create a VMware policy

bpplinfo policyName -modify -use_virtual_machine 1-alt_client_name VMware_backup_host -snapshot_method"VMware_v2" -snapshot_method_argskeyword=value,keyword=value,...
The -alt_client_name specifies the VMware backup host (NetBackup accesshost). You can specify a particular backup host on this option, or specifyMEDIA_SERVER (a media server acts as the backup host).
The-use_virtual_machine,-alt_client_name,-snapshot_method"VMware_v2", and-snapshot_method_args must be specified with allparameters set. (Otherwise, the snapshot job fails.)
Note: -snapshot_method_args is a comma-delimited list of keywordsthat define the VMware snapshot and policy. The keywords are describedin a separate topic:
See “VMware policy: bpplinfo options and keywords” on page 330.
Example for the second stage of bpplinfo (for a policy for vCloud Director):
bpplinfo pol1 -modify -use_virtual_machine 1 -alt_client_namebackuphost1.acme.com -application_discovery 1 -snapshot_method"VMware_v2" -snapshot_method_args "file_system_optimization=1,snapact=2,drive_selection=0,Virtual_machine_backup=2,enable_vCloud=1,multi_org=0,disable_quiesce=0,nameuse=0,exclude_swap=1,skipnodisk=0,post_events=1,ignore_irvm=0,rLim=10,rTO=0,rHz=10,trantype=san:hotadd:nbd:nbdssl"
Secondstage:
To back up virtual machines in vCloud Director, the bpplinfo command mustinclude the following:
■ -application_discovery 1
■ The snapshotMethodArgs list must include enable_vCloud=1.
In addition, NetBackup credentials must be specified for a vCloud Directorserver.
3 Create a schedule for the policy.
bpplsched policyName -add scheduleLabel -st scheduleType
For example:
bpplsched pol1 -add Full -st FULL
327NetBackup commands to back up and restore virtual machinesUsing NetBackup commands to create a VMware policy

4 Modify the schedule attributes.
bpplschedrep policyName scheduleLabel -(0..6) start duration
For example:
bpplschedrep pol1 Full -0 0 604800
5 Select the virtual machines to back up.
This step requires two commands: bpplclients and bpplinclude.
bpplclients policyName -add VM_to_back_up hardware operating_System
bpplinclude policyName -add ALL_LOCAL_DRIVES | filter_to_select_VMs
■ To back up a virtual machine through manual selection (for example):
bpplclients pol1 -add prvm1.acme.com Windows-x64 Windows2008
bpplinclude example -add ALL_LOCAL_DRIVES
In this example, prvm1.acme.com is the virtual machine to back up, includingall of its local drives (-add ALL_LOCAL_DRIVES). ALL_LOCAL_DRIVES is theonly file list option available for the VMware policy type.
■ To automatically select virtual machines through a query rule (for example):
bpplclients pol1 -add MEDIA_SERVER VMware VMware
bpplinclude pol1 -add "vmware:/?filter= Displayname Contains
'prvm'"
MEDIA_SERVER allows NetBackup to use a media server to discover andselect the virtual machines. As an alternative, you can use -add to specifya particular discovery host.In the bpplinclude example, the query rule "vmware:/?filter=
Displayname Contains 'prvm'" selects the virtual machines with thedisplay names that contain prvm. (Other characters can also appear in thedisplay names.)
Note: To back up virtual machines in vCloud Director, the policy must use aquery rule on the bpplinclude command to select virtual machines automatically.For vCloud, do not specify a virtual machine on the bpplclients command.
bpplinclude has options for modifying the query rules in an existing policy.
See “bpplinclude options for modifying query rules in a VMware policy”on page 332.
328NetBackup commands to back up and restore virtual machinesUsing NetBackup commands to create a VMware policy

To test the bpplinclude query rule (vmware:/?filter) before you run thebackup
◆ Run the following:
Windows:
install_path\NetBackup\bin\nbdiscover -noxmloutput -policy
policyName -noreason
UNIX, Linux:
/usr/openv/netbackup/bin/nbdiscover -noxmloutput -policy
policyName -noreason
A + sign appears before the virtual machines that the query rule selects for thebackup: these virtual machines are included in the backup when the policyruns.
The virtual machines to be excluded from the backup appear with a - sign.
The -noreason option omits explanations as to why the query excluded a virtualmachine or why the query failed. For explanations, do not include -noreason.
For more details on most of the command options, see the man page or theNetBackup Commands Reference Guide.
See “Using the nbrestorevm command to restore virtual machines into vCloudDirector” on page 340.
Notes on creating a VMware policy for vCloud DirectorNote the following when you create a policy for vCloud Director:
■ NetBackup credentials must be specified for a vCloud Director server.
■ The bpplinfo command must include the following option and value, to enablethe policy for automatic selection of virtual machines: -application_discovery 1
■ On the bpplinfo command, the snapshotMethodArgs list must include thefollowing attribute: enable_vCloud=1.
■ The policy must use a query rule, on the bpplinclude command, to select virtualmachines automatically.
For the complete steps--including these points--use the following procedure:
See “Using NetBackup commands to create a VMware policy” on page 325.
329NetBackup commands to back up and restore virtual machinesUsing NetBackup commands to create a VMware policy

VMware policy: bpplinfo options and keywordsTable A-1 describes the options that are available on the bpplinfo command.These options are set to default values if not specified.
Table A-1 bpplinfo options
Keyword label in policy GUIValuesOption
The Attributes tab > Disableclient side deduplication
0 enables client deduplication, 1 disables clientdeduplication
-ignore_client_direct
Clients tab > Selectautomatically through VMwareIntelligent Policy query
0 disabled, 1 enabled-application_discovery
Clients tab > Reuse VMselection query results for
seconds-discovery_lifetime
Enables the file-level recovery ofdatabase data.
VMware tab > ApplicationProtection: Enable ExchangeRecovery, Enable SQL ServerRecovery, orEnable SharePointRecovery
exchange, mssql, sharepoint
truncatelogs=0 disabled, 1 enabled (for Exchange orSQL Server only)
To enable Exchange file recovery:
-ASC_apps_attr exchange:
To enable Exchange, SQL, and SharePoint file recovery:
-ASC_apps_attr exchange:,mssql:,sharepoint:
To enable exchange recovery with truncate logs:
-ASC_apps_attr exchange:;truncatelogs=1
To enable exchange without truncate logs and mssqlwith truncate logs:
-ASC_apps_attr exchange:,mssql:;truncatelogs=1
To enable exchange with truncate logs and mssqlwithout truncate logs (note the final colon):
-ASC_apps_attr exchange:;truncatelogs=1,mssql:
To enable both exchange and mssql with truncate logs:
-ASC_apps_attrexchange:;truncatelogs=1,mssql:;truncatelogs=1
-ASC_apps_attr
keyword=value,keyword=value, ...
See Table A-2 on page 331.
-snapshot_method_args
Table A-2 describes the keywords that must be included in -snapshot_method_args.
330NetBackup commands to back up and restore virtual machinesUsing NetBackup commands to create a VMware policy

Table A-2 Keywords and values for -snapshot_method_args
Name of keyword in policy GUIValueKeyword
VMware tab > Advanced > Virtualmachine quiesce
0 virtual machine quiesce is enabled, 1virtual machine quiesce is disabled
disable_quiesce=
Exclude Disks tab0 Include all disks, 1 Exclude boot disk,2 Exclude data disks
drive_selection=
Clients tab > Enable vCloud Directorintegration (only available with automaticselection of client)
0 disabled, 1 enabledenable_vCloud=
VMware tab > Exclude swap and pagingfiles
0 disabled, 1 enabledexclude_swap=
VMware tab > Exclude deleted blocks0 disabled, 1 enabledfile_system_optimization=
VMware tab > Advanced > Ignore InstantRecovery VMs
0 disabled, 1 enabledignore_irvm=
VMware tab > Advanced > Multipleorganizations per policy
0 disabled, 1 enabledmulti_org=
VMware tab > Primary VM identifier0 VM host name, 1 VM display name, 2VM BIOS UUID, 3 VM DNS Name, 4 VMinstance UUID
nameuse=
VMware tab > Advanced > Post vCenterevents
0 No Events, 1 All Events, 2 Error Eventspost_events=
VMware tab > Advanced > Snapshotcreation interval (seconds)
0 - 3600rHz=
VMware tab > Advanced > Snapshot retry0 - 100rLim=
VMware tab > Advanced > Snapshottimeout (minutes)
0 - 1440rTO=
VMware tab > Advanced > VMware serverlist
VMware server names. Use a colon toseparate the names. For example:
serverlist=vc1.acme.com:vc2.acme.com
To specify no server list, enterserverlist=
serverlist=
VMware tab > Advanced -> Ignorediskless VMs
0 disabled, 1 enabledskipnodisk=
331NetBackup commands to back up and restore virtual machinesUsing NetBackup commands to create a VMware policy

Table A-2 Keywords and values for -snapshot_method_args (continued)
Name of keyword in policy GUIValueKeyword
VMware tab > Existing snapshot handling0 Continue backup 1 Abort if anysnapshot(s) exist 2 Remove NetBackupsnapshot(s) and continue backup 3 Abortif NetBackup snapshot(s) exist
snapact=
VMware tab > Transport modessan, hotadd, nbd, or nbdssl
If more than one, separate each with acolon. Order of modes indicates priority.Example:
trantype=nbd:hotadd
This example selects these two modesand tries nbd first.
trantype=
VMware tab > Enable file recovery fromVM backup
1 disabled, 2 enabledVirtual_machine_backup=
Exclude Disks tab > Perform customattribute based selection
The name of the VMware custom attributethat specifies the disk(s) to exclude frombackups. For example,vmdk_ca=NB_DISK_EXCLUDE_LIST.
Set the value for the custom attribute oneach virtual machine or managed host,as appropriate.
The custom attribute must have commaseparated values of device controls forthe disks to be excluded. For example:scsi0-0,ide0-0,sata0-0.
vmdk_ca=
Exclude Disks tab > Specific disk(s) to beexcluded
Colon separated values of devicecontrollers for the disks to be excluded.For example:scsi0-0:ide0-0:sata0-0.
vmdk_list=
See “bpplinclude options for modifying query rules in a VMware policy” on page 332.
See “Using NetBackup commands to create a VMware policy” on page 325.
bpplinclude options for modifying query rules in a VMware policyThe bpplinclude command has options for modifying the query rules in an existingpolicy.
332NetBackup commands to back up and restore virtual machinesUsing NetBackup commands to create a VMware policy

Table A-3 bpplinclude options for modifying query rules
DescriptionOption
Adds the specified query string to the end of the policy query rules, or creates a queryif none exists.
Quotes (") must be escaped (\).
Examples:
To add vm17 to the list of values in the query rules of policy1:
bpplinclude policy1 -addtoquery ,\"vm17\"
To create a query in a policy that does not have a query:
bpplinclude policy1 -addtoquery vmware:/?filter=DisplaynameAnyOf \"grayfox7\",\"grayfox9\"
Note: Each quote (") is escaped with a backslash (\).
-addtoquery query_string ...
Adds the entries to the query rules from the specified file, or creates a query if noneexists.
In the file, quotes (") do not need to be escaped.
Example:
To create a query in a policy that does not have a query:
bpplinclude policy1 -addtoquery -f qfile1
where the contents of qfile1 are:
vmware:/?filter=vCenter Contains "ROS" AND ESXserver Equal"VM_test1" AND Powerstate Equal poweredOn
Note: The values "ROS" and "VM_test1" are not escaped.
Note: You can place entries on multiple lines in the file. All entries are added to theend of the query (if a query already exists).
-addtoquery -f file_name
333NetBackup commands to back up and restore virtual machinesUsing NetBackup commands to create a VMware policy

Table A-3 bpplinclude options for modifying query rules (continued)
DescriptionOption
Deletes the specified query string from the policy query rules.
Examples:
To delete vm27 from the list of values in the query rule of policy1:
bpplinclude policy1 -deletefromquery \"vm27\"
This example also deletes the comma preceding vm27 if such a comma exists in thequery rules.
Note: The -deletefromquery option deletes a comma if: the phrase in the query_stringdoes not begin or end with a comma and the character preceding the deleted stringis a comma.
To delete an entire query from the policy:
bpplinclude policy1 -deletefromquery vmware:/?filter=DisplaynameAnyOf "grayfox7","grayfox9"
-deletefromquery query_string...
Deletes the file entries from the query rules.
Example:
To delete a query from a policy:
bpplinclude policy1 -deletefromquery -f qfile1
where the contents of qfile1 are:
vmware:/?filter=vCenter Contains "ROS" AND ESXserver Equal"VM_test1" AND Powerstate Equal poweredOn
Note: The values "ROS" and "VM_test1" are not escaped.
-deletefromquery -f file_name
Note: paths that contain wildcards must be enclosed in quotes.
See “Using NetBackup commands to create a VMware policy” on page 325.
Using the nbdiscover command to search thevirtual environment
To search for VMs, run nbdiscover on the master server.
UNIX and Linux:
/usr/openv/netbackup/bin/nbdiscover -noxmloutput "query"
Windows:
334NetBackup commands to back up and restore virtual machinesUsing the nbdiscover command to search the virtual environment

install_path\NetBackup\bin\nbdiscover.exe -noxmloutput "query"
where -noxmloutput displays one VM per line. The query specifies either afilter-based search rule or a browse operation.
See “Query format and examples for searching virtual machine backups” on page 349.
For example, to search for the backups of virtual machines that have "prod1" intheir display names:
nbdiscover -noxmloutput
"vmsearch:/;reqType=search?filter=VMDisplayName Contains 'prod1'"
For further descriptions of the command options, see the command's man page orthe NetBackup Commands Reference Guide.
See “Using the nbrestorevm command to restore virtual machines into vSphere”on page 335.
See “Using the nbrestorevm command to restore virtual machines into vCloudDirector” on page 340.
Using the nbrestorevmcommand to restore virtualmachines into vSphere
To restore VMs, run the nbrestorevm command on the master server or recoveryhost. The command is located in the following directory:
UNIX and Linux:
/usr/openv/netbackup/bin/nbrestorevm
Windows:
install_path\NetBackup\bin\nbrestorevm.exe
The following nbrestorevm options are used in these examples:
■ –vmw
Required for all VMware virtual machine restores.
■ –C virtual_machine_to_restore
The VM name must match the type of name that was selected in the PrimaryVM identifier option of the backup policy. For example, if the VM was backedup by its VM display name, specify the display name on the -C option.
■ -R absolute_path_to_rename_file
Restores to a different location. The required entries in the rename file dependon the destination for the restore. See each example in this topic. Further notesare available on the rename file.
335NetBackup commands to back up and restore virtual machinesUsing the nbrestorevm command to restore virtual machines into vSphere

See “The nbrestorevm -R rename file for restoring virtual machines” on page 345.
■ -O
Overwrites the VMs and associated resources if they already exist.
■ –S master_server
Specifies the master server that made the backup (if different from the currentmaster).
■ -vmserver vCenter_server
Specifies a different vCenter server for the restore destination.
■ –vmproxy VMware_recovery_host
Specifies a different VMware recovery host (overrides the default backup hostthat backed up the VMs).
Note: Storage lifecycle policies (SLPs) can use Auto Image Replication toreplicate a virtual machine backup image to another NetBackup domain. Torestore the virtual machine from the replicated image, you must include the-vmproxy option. Use -vmproxy to specify the backup host (access host) thatis in the domain where the virtual machine was replicated.
■ -vmkeephv
Retains the hardware version upon recovery.
■ -vmid
Retains the BIOS UUID of the original virtual machine.
■ -vmInstanceId
Retains the Instance UUID of the original virtual machine (note that the InstanceUUID is a vCenter specific unique identifier of a virtual machine).
■ -vmsn
Removes the network from the restored VM.
■ -vmvmxd
Restores the .vmdk files to the vmx datastore (the configuration datastore).
■ -vmpo
Turns on the VM after the restore.
Following are examples of nbrestorevm, for various restore destinations and options.
A. Restore to the original location and overwrite the VM.nbrestorevm –vmw –C VM_to_restore –O
336NetBackup commands to back up and restore virtual machinesUsing the nbrestorevm command to restore virtual machines into vSphere

B. Restore to the original location, overwrite the VM, andretain the BIOS UUID.nbrestorevm –vmw –C VM_to_restore –O -vmid
C. Restore to the original location, overwrite the VM, andretain the instance UUID.nbrestorevm –vmw –C VM_to_restore –O -vmInstanceId
D. Restore to the original location, overwrite the VM, andremove the network.nbrestorevm –vmw –C VM_to_restore –O –vmsn
E: Restore to the original location from a VM backup thata different master server made, and overwrite the VM.nbrestorevm –vmw –C VM_to_restore –S master_server –O
F: Restore to the original vCenter and ESX, but to adifferent datastore that also contains the VM configurationfiles.nbrestorevm –vmw –C VM_to_restore –R absolute_path_to_rename_file
-vmvmxd
For the -R rename file, create a text file with the following entry:
change datastore to new_vmx_datastore
where new_vmx_datastore specifies the path to the vmx datastore (configurationdatastore) for the restored VM. After the restore, this datastore contains the .vmdkfiles of the restored VM.
Note: In the rename file, the change line must end with a carriage return.
G: Restore to a different vCenter server.nbrestorevm –vmw –C VM_to_restore –R absolute_path_to_rename_file
–vmserver vCenter_server
For the -R rename file, create a text file with the following entries. Replace theitalicized values with the actual name for the restored VM and for the other vSphereobjects in this list:
change vmname to new_display_name
change esxhost to new_ESX_host
change datacenter to /new_datacenter
337NetBackup commands to back up and restore virtual machinesUsing the nbrestorevm command to restore virtual machines into vSphere

change folder to /new_datacenter/new_folder
change resourcepool to new_datacenter/host/new_ESX_host/resources
/new_resource_pool
change datastore to new_vmx_datastore
change /original_vmdk_path to /new_datastore/
Note: In the rename file, each change line must end with a carriage return.
The last change entry in this list (change /original_vmdk_path to /new_datastore/)designates the following: the original path to the .vmdk file, and the new datastorefor the .vmdk file of the restored VM. This change entry is required when you restoreto a different datastore (unless you use the nbrestorevm –vmvmxd option).Depending on your VMware environment, this change entry may take the followingform:
change /original_datastore/original_VM_folder/original_vmdk.vmdk to
/new_datastore/
Note: If the change vmdk directive specifies a different path for some of the VM’svmdk files, the other vmdk files are restored to their original datastore.
See “The nbrestorevm -R rename file for restoring virtual machines” on page 345.
H: Restore to a different vCenter server that has multiplenetworks.nbrestorevm –vmw –C VM_to_restore –R absolute_path_to_rename_file
–vmserver vCenter_server
Create a rename file with the change entries listed for example G. Add the followingchange entry:
change network to new_network, new_network(n)
Note: In the rename file, each change line must end with a carriage return.
I: Restore by means of a different recovery host, to adifferent ESX server under the same vCenter Server. Afterrecovery, turn on the VM.nbrestorevm –vmw –C VM_to_restore –R absolute_path_to_rename_file
–vmproxy VMware_recovery_host –vmpo
The –vmpo option turns on the restored VM.
338NetBackup commands to back up and restore virtual machinesUsing the nbrestorevm command to restore virtual machines into vSphere

Include the following in the rename file:
change esxhost to new_ESX_host
To restore the .vmdk files to a different datastore, include the following entry in therename file:
change /original_vmdk_path to /new_datastore/
Note: In the rename file, each change line must end with a carriage return, even ifthe file contains only one line.
Note: The rename file may require other change entries, depending on your vSphereenvironment. See the available entries under example G.
Note: Configure the recovery host as a VMware Access Host on the master server.Communication between the master server and the backup host or recovery host(client) should be established before the restore.
J. Restore to a different location, to a standalone ESX servernbrestorevm –vmw –C VM_to_restore –R absolute_path_to_rename_file
Include the following in the rename file:
change esxhost to new_ESX_host
change datacenter to None
change folder to None
change resourcepool to /ha_datacenter/host/new_ESX_host/Resources
change datastore to new_datastore
change /original_vmdk_path to /new_datastore/
change network to new_network
Note: For restore to a standalone ESX server, the resource pool entry must includethe literal string ha-datacenter in the pool path.
Note: The rename file may require other change entries, depending on yourvSphere environment. See the available entries under example G.
339NetBackup commands to back up and restore virtual machinesUsing the nbrestorevm command to restore virtual machines into vSphere

K. Restore to a different location in a vSphere cluster,retaining the VM hardware versionnbrestorevm –vmw –C VM_to_restore –R absolute_path_to_rename_file
–vmkeephv
Include the following in the rename file:
change resourcepool to
/new_datacenter/host/cluster/resources/new_resource_pool
Note: The rename file may require other change entries, depending on your vSphereenvironment. See the available entries under example G.
For further descriptions of the nbrestorevm options, see the command's man pageor the NetBackup Commands Reference Guide.
The following topics contain additional information:
See “Logs for troubleshooting the nbrestorevm command” on page 349.
See “The nbrestorevm -R rename file for restoring virtual machines” on page 345.
See “Using the nbdiscover command to search the virtual environment” on page 334.
See “Using the nbrestorevm command to restore virtual machines into vCloudDirector” on page 340.
Using the nbrestorevmcommand to restore virtualmachines into vCloud Director
To search the virtual environment for VMs, use the nbdiscover command.
See “Using the nbdiscover command to search the virtual environment” on page 334.
To restore the virtual machines, run nbrestorevm on the master server or backuphost. The nbrestorevm command is located in the following directory:
UNIX and Linux:
/usr/openv/netbackup/bin/nbrestorevm
Windows:
install_path\NetBackup\bin\nbrestorevm.exe
The following command options are used in these examples:
■ –vmw
Required for all VMware virtual machine restores.
340NetBackup commands to back up and restore virtual machinesUsing the nbrestorevm command to restore virtual machines into vCloud Director

■ -vcd
Required for all virtual machine restores into vCloud.
■ –C virtual_machine_to_restore
The VM name must match the type of name that was selected in the PrimaryVM identifier option of the backup policy. For example, if the VM was backedup by its VM display name, specify the display name on the -C option.
■ -R absolute_path_to_rename_file
Restores to a different location. The entries that are required in the rename filedepend on the destination for the restore. See each example in this topic. Furthernotes are available on the rename file:See “The nbrestorevm -R rename file for restoring virtual machines” on page 345.
■ -vcdovw
Overwrites an existing vApp.
■ -vcdrte
Restores to an existing vApp. (If this option is set but the vApp does not exist,the restore fails.)
■ -vcdtemplate
Restores a vApp as a template.
■ -vcdlfree
Restores to the datastore that has the most free space.
■ -vcdremv
Removes a vApp after capture to a template.
■ -vmid
Retains the BIOS UUID of the original virtual machine.
■ -vmInstanceId
Retains the Instance UUID of the original virtual machine (note that the InstanceUUID is a vCenter specific unique identifier of a virtual machine).
A: Restore to the original vApp in vCloud and overwritethe VM.nbrestorevm -vmw -vcd -C VM_to_restore -vcdrte -O -vmInstanceId
The -O option overwrites the VM.
B: Restore to the original vApp in vCloud, overwrite theVM, and retain the BIOS UUID.nbrestorevm -vmw -vcd -C VM_to_restore -vcdrte -O -vmid
341NetBackup commands to back up and restore virtual machinesUsing the nbrestorevm command to restore virtual machines into vCloud Director

The -O option overwrites the VM, and the -vmid option retains the original InstanceUUID.
C: Restore to the original vApp in vCloud, overwrite theVM, and retain the instance UUID.nbrestorevm -vmw -vcd -C VM_to_restore -vcdrte -O -vmInstanceId
The -O option overwrites the VM, and the -vmInstanceId option retains the originalInstance UUID.
D: Restore to the original vCloud location to an existingvApp. Remove the existing vApp and create a new vApp.nbrestorevm –vmw –vcd –C VM_to_restore –vcdovw
The –vcdovw option deletes the vApp and the VMs inside it, and creates a newvApp.
Note: For restore to the original location, you must use either the –vcdovw optionor the –O option.
E: Restore to the original vCloud location in a vApptemplate.nbrestorevm –vmw –vcd –C VM_to_restore –vcdovw
Note: To restore a VM that resides in a vApp template to its original location, usethe –vcdovw option. If you use –O option, the restore fails with status 2820.
F: Restore to a different vCloud vApp but to the samevCloud organization.nbrestorevm –vmw –vcd –C VM_to_restore –R absolute_path_to_rename_file
–vcdrte
For the -R rename file, create a text file with the following entries. These entriesdescribe the restore location. Replace the italicized values with the actual values:
change vcdvapp to new_vcdvapp
change orgvdc to new_organization_VDC
Note: In the rename file, each change line must end with a carriage return.
342NetBackup commands to back up and restore virtual machinesUsing the nbrestorevm command to restore virtual machines into vCloud Director

Note: If you want to associate the restored VM with a different organization VDC,use the change orgvdc entry to specify the organization VDC.
G: Restore to a different vCloud organization.nbrestorevm –vmw –vcd –C VM_to_restore –R absolute_path_to_rename_file
–vcdrte
Include the following in the rename file:
change organization to new_organization
change orgvdc to new_organization_VDC
change vcdvapp to new_vcdvapp
change resourcepool to /new_datacenter/host/new_ESX_host/resources
/new_resource_pool
change datastore to new_vmx_datastore
Note: To create the organization on a different vCenter, include the –vmserver
vCenter_server option on the command. You must also include other changedirectives, such as for datacenter and ESX server.
See “The nbrestorevm -R rename file for restoring virtual machines” on page 345.
H: Restore to a different vCloud Director.nbrestorevm –vmw –vcd –C VM_to_restore –R absolute_path_to_rename_file
–vcdrte –vmserver vCenter_server
Include the following in the rename file:
change vcdserver to new_vcdserver
change organization to new_organization
change orgvdc to new_organization_VDC
change vcdvapp to new_vcdvapp
change vcdvmname to new_vcdvmname
change esxhost to new_ESX_host
change datacenter to /new_datacenter
change resourcepool to /new_datacenter/host/new_ESX_host/resources
/new_resource_pool
change datastore to new_vmx_datastore
343NetBackup commands to back up and restore virtual machinesUsing the nbrestorevm command to restore virtual machines into vCloud Director

I: Restore to a different vCloud vApp and capture it as atemplate in a catalog.nbrestorevm –vmw –vcd –C VM_to_restore –R absolute_path_to_rename_file
–vcdtemplate
Include the following in the rename file:
change vcdvapp to new_vcdvapp
change vcdcatalog to new_vcdcatalog
The vApp is restored to the original organization and organization VDC. To associatethe vApp with a different organization VDC, include this directive:
change orgvdc to new_organization_VDC
Note: After the template is created, no other VMs can be added to the template.
J: Restore to a different vCloud vApp, capture the vAppas a template, and remove the vApp.nbrestorevm –vmw –vcd –C VM_to_restore –R absolute_path_to_rename_file
–vcdtemplate –vcdremv
Include the following in the rename file:
change vcdvapp to new_vcdvapp
change vcdcatalog to new_vcdcatalog
The -vcdremv option removes the non-template vApp; the new vApp template isretained.
Note: After the template is created, no other VMs can be added to the template.
K: Restore a vCloud vApp template that hasmultiple virtualmachines.First, restore a virtual machine to a non-template vApp:
nbrestorevm -vmw -vcd -C VM_to_restore -vcdrte
Run this command for each VM but do not restore the last VM.
Next, restore the last VM, create a vApp template, and copy all the restored VMsinto that template:
nbrestorevm -vmw -vcd -C VM_to_restore -R absolute_path_to_rename_file
-vcdtemplate -vcdremv -vcdlfree
344NetBackup commands to back up and restore virtual machinesUsing the nbrestorevm command to restore virtual machines into vCloud Director

Include the following in the rename file:
change vcdvapp to vApp_template
The change directive provides the name for the new vApp template into which theVMs are to be restored.
The -vcdremv option removes the non-template vApp into which you initially restoredthe virtual machines. The -vcdlfree option selects the datastore that has the largestavailable space.
Note: After the template is created, no other VMs can be added to the template.
See “Allowing other servers or clients to restore virtual machines” on page 352.
Using the nbrestorevmcommand to restore virtualmachines with Instant Recovery
Instant Recovery for VMware is described in the "Restore virtual machines withInstant Recovery" chapter of this guide.
See “About Instant Recovery for VMware” on page 237.
See “Notes on Instant Recovery for VMware” on page 242.
See “Instant Recovery options on the nbrestorevm command” on page 244.
See “Restoring a virtual machine with Instant Recovery for VMware” on page 249.
Using the nbrestorevmcommand to restore virtualmachine disks
Virtual Machine Disk restore for VMware is described in other topics.
See “About VMware virtual machine disk restore” on page 196.
See “Restoring VMware virtual machine disks by using NetBackup commands”on page 204.
The nbrestorevm -R rename file for restoringvirtual machines
The -R option on the nbrestorevm command is for restoring a VM to a differentlocation. It identifies a text file that is called the rename file. This file describes the
345NetBackup commands to back up and restore virtual machinesUsing the nbrestorevm command to restore virtual machines with Instant Recovery

restore location by means of change directives. Each change directive providesinformation about a VMware attribute or object that defines the VM when it isrestored. For example: the change directives can set the display name for therestored VM, the name of the datastore, and the name of the ESX server.
Note the following about the -R rename file:
■ The -R option must specify the absolute path to the rename file.
■ The -R option and rename file are not required when you restore the VM to itsoriginal location with all its original settings.
■ Each change directive in the -R rename file must end with a carriage return. Ifthe file contains only one change directive, that line must end with a carriagereturn.
■ The change directives to include in the rename file depend on the VMwareenvironment.Unlike the Backup, Archive, and Restore interface, the nbrestorevm commanddoes not have its own validation checks. When you use the nbrestorevm -R
option, you must include all the change entries that the VMware environmentrequires. Otherwise, the restore does not succeed or the VM does not functioncorrectly.
■ The change directives can be placed in any order in the file.
■ The change directive should be entered exactly as shown in Table A-4, exceptfor the variable at the end (such as new_display_name). Replace that variablewith the new name.
■ If a vSphere object does not apply to the restore destination, enter None as itsvalue. For example: For restore to a standalone ESX, enter change datacenter
to None.
■ The rename file overrides the nbrestorevm -vmsn and -vmvmxd options:
■ If the rename file includes a change directive for a .vmdk path andnbrestorevm includes the –vmvmxd option, the –vmvmxd option is ignored.The change directive determines the .vmdk path of the restored VM.
■ If the rename file includes a change directive to designate a network for therestored VM and nbrestorevm includes the –vmsn option, –vmsn is ignored.
Table A-4 -R rename file change directives
Description and notes-R rename file directives
Sets the display name for the restored VM. If this entry is omitted,the original display name is used.
change vmname to new_display_name
346NetBackup commands to back up and restore virtual machinesThe nbrestorevm -R rename file for restoring virtual machines

Table A-4 -R rename file change directives (continued)
Description and notes-R rename file directives
Designates the ESX server to restore to. This entry is requiredwhen you restore to a different ESX server.
change esxhost to new_ESX_host
Designates the datacenter in which to restore the VM. If thedestination does not have a datacenter, enter None as the value:
change datacenter to None
change datacenter to /new_datacenter
Designates the folder in which to restore the VM. If the destinationdoes not have a folder, enter None as the value:
change folder to None
change folder to/new_datacenter/new_folder
For restore to a different ESX server, specify a different resource pool. (The original resource pool cannot be used to create a VM on a different ESX server.) You must specify a resource pool by including the following line in the rename file:
For restore to a standalone ESX server, the change resourcepool entry must include the literal stringha-datacenter in the path:
change resourcepool to/ha_datacenter/host/new_ESX_host/Resources
change resourcepool to/new_datacenter/host/new_ESX_host/resources/new_resource_pool
Designates the vmx datastore (configuration datastore) of therestored VM. The vmx datastore contains the configuration filesthat describe the virtual machine.
This change entry is required when you use the –vmvmxd optionon the nbrestorevm command. The -vmvmxd option allows thevmdk files to be restored to the same datastore where the vmxfile is specified.
Note: See the change /original_vmdk_path to /new_datastore/directive in this table.
change datastore to new_vmx_datastore
347NetBackup commands to back up and restore virtual machinesThe nbrestorevm -R rename file for restoring virtual machines

Table A-4 -R rename file change directives (continued)
Description and notes-R rename file directives
Designates the original path to the .vmdk file, and the newdatastore for the .vmdk file of the restored VM. As a rule, thischange entry is required when you restore to a different datastore.Depending on your VMware environment, this change entry maytake the following form:
change /original_datastore/original_VM_folder/original_vmdk.vmdkto /new_datastore/
Note: If you use the -vmvmxd option on nbrestorevm to restorethe .vmdk files to the vmx datastore, do not use this changedirective. By specifying the datastore for the vmdk files, this changedirective overrides the -vmvmxd option.
Note: If the change vmdk directive specifies a different path forsome of the VM’s vmdk files, the other vmdk files are restored totheir original datastore.
To restore more than one vmdk file to a specified datastore:
change /first_vmdk_path to /new_first_datastore/change /second_vmdk_path to /new_second_datastore/change /nth_vmdk_path to /new_nth_datastore
change /original_vmdk_path to/new_datastore/
Designates the new network for the restored VM. To designatemultiple networks, enter the following:
change network to new_network, new_network(n)
change network to new_network
Designates the vCloud Director organization to restore to.change organization tonew_organization
Designates the virtual datacenter in the vCloud Directororganization to restore to.
change orgvdc tonew_organization_virtual_datacenter
Designates the vCloud Director server to restore to.change vcdserver to new_vcdserver
Designates the vCloud Director vApp to restore to.change vcdvapp to new_vcdvapp
Designates the vCloud Director vApp template to restore to.change vcdvapptemplate tonew_vcdvapptemplate
Sets the display name for the restored VM in vCloud Director.change vcdvmname to new_vcdvmname
Designates the vCloud Director catalog to restore to.change vcdcatalog to new_vcdcatalog
See “Logs for troubleshooting the nbrestorevm command” on page 349.
348NetBackup commands to back up and restore virtual machinesThe nbrestorevm -R rename file for restoring virtual machines

Logs for troubleshooting the nbrestorevmcommand
The following logs may contain helpful messages on nbrestorevm.
Table A-5 Logs with messages on nbrestorevm
Resides onContains the messageson
Log directory
Master serverThe restore operation, suchas for status code 2820.
Windows
install_path\NetBackup\logs\bprd
Linux, UNIX
/usr/openv/netbackup/logs/bprd
Recovery hostThe restore operation, suchas for status code 2820.
Windows
install_path\NetBackup\logs\bpVMutil
Linux, UNIX
/usr/openv/netbackup/logs/bpVMutil
Host wherenbrestorevm is run
Incorrect usage of thenbrestorevm command, suchas omission of a requiredoption.
Windows
install_path\NetBackup\logs\nbrestorevm
Linux, UNIX
/usr/openv/netbackup/logs/nbrestorevm
If the restore job reaches the point of creating the virtual machine, the job's detailedstatus should contain a specific error message. vSphere Client shows an attemptto create the virtual machine and displays an associated failure message.
See “Restoring a virtual machine with Instant Recovery for VMware” on page 249.
Query format and examples for searching virtualmachine backups
From the master server, the nbdiscover command can search virtual machinebackups based on a query rule. Compose the query manually and enclose it indouble quotes.
For example: Search for backups of the virtual machines that have "vm1" as theirdisplay names:
349NetBackup commands to back up and restore virtual machinesLogs for troubleshooting the nbrestorevm command

nbdiscover "vmsearch:/;reqType=search?filter=VMDisplayName Equal
'vm1'"
Table A-6 Query format with examples
DescriptionElement
Specifies that the query searches virtual machine backups.vmsearch:/
The request type. The following request types are supported:
■ search
Specifies that the query is used for search. Requires a query rule■ browse
Displays the hierarchy of the virtual machines that were backed up. Requires theviewType.
■ listFields
Lists the supported field names and their attributes.■ listOps
Lists the operations that a field supports. Requires the fieldName option.
reqType
Specifies the type of hierarchical view (vcloud or vsphere). Used with the browse option.
Example - Show the hierarchy of vCloud:
nbdiscover "vmsearch:/;reqType=browse;viewType=vcloud"
Example - Show the hierarchy of vSphere:
nbdiscover "vmsearch:/;reqType=browse;viewType=vsphere"
viewType
Specifies the name of the field for which supported operators are to be listed. Used with thelistOps.
Example - List supported operators for VMDisplayName
nbdiscover "vmsearch:/;reqType=listOps;fieldName=VMDisplayName"
fieldName
The query rule. nbdiscover searches virtual machine backups based on the rule.
Example:
nbdiscover -noxmloutput "vmsearch:/;reqType=search?filter=ScheduleTypeEqual '0'"
filter
See the following examples with sample output.
Example 1: Search for the virtual machines that have full backups.
nbdiscover -noxmloutput "vmsearch:/;reqType=search?filter=ScheduleType
Equal '0'"
350NetBackup commands to back up and restore virtual machinesQuery format and examples for searching virtual machine backups

+ "demovm%20(8c879391-2917-4416-9373-bea7ec727717)"
+ "smallvm2%20(10a16222-8532-46ff-bd6a-9661240392f4)"
Example 2: Search backups of the virtual machines that have the display namesthat contain "vm".
nbdiscover -noxmloutput
"vmsearch:/;reqType=search?filter=VMDisplayName Contains 'vm'"
+ "demovm%20(8c879791-2917-4428-9373-bea7ec727717)"
+ "small_vm%20(33e85579-7279-411f-b2f9-9fb570583911)"
+ "small_vm_percent_%25%20(33e85579-7279-411f-b2f9-9fb570583911)"
Example 3: Search for backups of the vCloud virtual machines that have "test" intheir vApp names.
nbdiscover -noxmloutput "vmsearch:/;reqType=search?filter= vCDvApp
Contains 'test'"
+ "demovm%20(8c879791-2917-4428-8213-bea7ec727717)"
+ "small_vm%20(61e83479-7246-411f-b1f9-9fb570546755)"
+ "small_vm_percent_%25%20(61e83479-7246-411f-b1f9-9fb570546755)"
Example 4: Search the virtual machine backups that occurred before 08/24/201211:05:56 AM. Specify the backup time in UTC.
nbdiscover -noxmloutput "vmsearch:/;reqType=search?filter=BackupTime
Less '1345871512'"
+ "demovm%20(8c846791-2917-4428-9373-bea7ec727437)"
+ "small_vm%20(22e85813-7246-433f-b2f9-9fb570585387)"
+ "small_vm_percent_%25%20(22e85579-7246-433f-b2f9-9fb570585387)"
Example 5: Search backups for virtual machines where the vCloud organization isnamed "QA" and the vApp name contains "demo".
nbdiscover -noxmloutput "vmsearch:/;reqType=search?filter=vCDOrg
Equal 'QA' AND vCDvApp Contains 'demo'"
+ "demovm%20(8c879791-2917-4428-9373-bea7ec727717)"
Example 6: Show the hierarchy of a vCloud environment. The output is in XML.
nbdiscover "vmsearch:/;reqType=browse;viewType=vcloud"
<Start Iteration="vmsearch:/;reqType=browse;viewType=vcloud">
<VCDSERVER>
<NBU>
<NAME>hypervm1.acme.com</NAME>
351NetBackup commands to back up and restore virtual machinesQuery format and examples for searching virtual machine backups

</NBU>
<VCDORG>
<NBU>
<NAME>Test Cloud</NAME>
</NBU>
<VCDORGVDC>
<NBU>
<NAME>Test Org</NAME>
</NBU>
<VCDVAPP>
<NBU>
<NAME>TestvApp</NAME>
</NBU>
</VCDVAPP>
</VCDORGVDC>
</VCDORG>
</VCDSERVER>
<StatusMsg NBUStatus="0" Severity="0"></StatusMsg>
</START>
This search found the following:
■ A vCloud Director server: hypervm1.acme.com
■ An organization: Test Cloud
■ A virtual datacenter: Test Org
■ A vApp: TestvApp
See “Using the nbrestorevm command to restore virtual machines into vCloudDirector” on page 340.
Allowing other servers or clients to restore virtualmachines
You can configure NetBackup to allow nbrestorevm to run from another host (suchas another server, client, or virtual machine). The enabled host can use nbrestorevmto restore the virtual machine. The host must be configured as a peer of theNetBackup master server that performed the backup.
You can configure the peer in either of the following ways:
■ In the NetBackup Administration Console, click Host Properties > MasterServers > double click the master server > Servers. Add the peer on theAdditional servers tab.
352NetBackup commands to back up and restore virtual machinesAllowing other servers or clients to restore virtual machines

■ Add an empty peer_name file in the following location:UNIX, Linux/usr/openv/netbackup/db/altnames/peer_name
Windowsinstall_path\NetBackup\db\altnames\peer_name
The name of the file is the name of the server or client to be granted restoreprivileges.For instructions, see the topics on allowing clients to perform redirected restores,in the NetBackup Administrator's Guide, Vol I.
353NetBackup commands to back up and restore virtual machinesAllowing other servers or clients to restore virtual machines

Configuring services forNFS on Windows
This appendix includes the following topics:
■ About installing and configuring Network File System (NFS) for GranularRecovery Technology (GRT)
■ About configuring services for NFS on Windows 2012 or 2016 (NetBackup forVMware)
■ Disabling the Server for NFS (NetBackup for VMware)
■ Disabling the Client for NFS on the media server (NetBackup for VMware)
■ Configuring a UNIX media server and Windows backup or restore host forGranular Recovery Technology (NetBackup for VMware)
■ Configuring a different network port for NBFSD (NetBackup for VMware)
About installing and configuring Network FileSystem (NFS) for Granular Recovery Technology(GRT)
NetBackup Granular Recovery leverages Network File System, or NFS, to readindividual objects from a database backup image. Specifically, the NetBackup clientuses NFS to extract data from the backup image on the NetBackup media server.The NetBackup client uses “Client for NFS” to mount and access a mapped drivethat is connected to the NetBackup media server. The NetBackup media serverhandles the I/O requests from the client through NBFSD.
BAppendix

NBFSD is the NetBackup File System (NBFS) service that runs on the media server.NBFSD makes a NetBackup backup image appear as a file system folder to theNetBackup client over a secure connection.
About configuring services for NFS on Windows2012 or 2016 (NetBackup for VMware)
For instant recovery of virtual machines, the Services for Network File System (NFS)must be installed on Windows media servers.
Table B-1 Configuring NFS in a Windows 2012 or 2016 environment
DescriptionAction
On the media server do the following:
■ Stop and disable the ONC/RPC Portmapper service, if it exists.■ Enable NFS.
See “Enabling Services for Network File System (NFS) on a Windows 2012 or 2016 mediaserver (NetBackup for VMware)” on page 355.
■ Stop the Server for NFS service.See “Disabling the Server for NFS (NetBackup for VMware)” on page 362.
■ Configure the portmap service to start automatically at server restart.Issue the following from the command prompt:sc config portmap start= auto
This command should return the status [SC] ChangeServiceConfig SUCCESS.
Configure NFS on themedia server.
On the restore host, do the following:
■ Enable NFS.See “Enabling Services for Network File System (NFS) on a Windows 2012 or 2016restore host (NetBackup for VMware)” on page 359.
■ Stop the Server for NFS service.See “Disabling the Server for NFS (NetBackup for VMware)” on page 362.
Configure NFS on therestore host.
Enabling Services for Network File System (NFS) on a Windows2012 or 2016 media server (NetBackup for VMware)
To perform VM instant recovery with a Windows 2012 or 2016 media server, youmust enable Services for Network File System. When this configuration is completed,you can disable any unnecessary NFS services.
See “About configuring services for NFS on Windows 2012 or 2016 (NetBackupfor VMware)” on page 355.
355Configuring services for NFS on WindowsAbout configuring services for NFS on Windows 2012 or 2016 (NetBackup for VMware)

To enable Services for Network File System (NFS) on aWindows 2012 or 2016media server
1 Open the Server Manager.
2 From the Manage menu, click Add Roles and Features.
3 In the Add Roles and Features Wizard, on the Before You Begin page, clickNext.
356Configuring services for NFS on WindowsAbout configuring services for NFS on Windows 2012 or 2016 (NetBackup for VMware)

4 On the Select installation type page, select Role-based or feature-basedinstallation.
5 Click Next.
6 On the Server Selection page, click Select a server from the server pooland select the server. Click Next.
357Configuring services for NFS on WindowsAbout configuring services for NFS on Windows 2012 or 2016 (NetBackup for VMware)

7 On the Server Roles page, expand File and Storage Services and File andiSCSI Services.
8 Click File Server and Server for NFS. When you are prompted, click AddFeatures. Click Next.
358Configuring services for NFS on WindowsAbout configuring services for NFS on Windows 2012 or 2016 (NetBackup for VMware)

9 If the media server is also a restore host, on the Features page, click Clientfor NFS. Click Next.
10 On the Confirmation page, click Install.
11 Disable any unnecessary services, as follows:
■ If you have a single host that functions as both the media server and therestore host, you can disable the Server for NFS.
■ For a host that is only the NetBackup media server, you can disable theServer for NFS and the Client for NFS.
12 Make sure that the portmap service is started and that its startup mode is setto auto.
Enabling Services for Network File System (NFS) on a Windows2012 or 2016 restore host (NetBackup for VMware)
To perform VM instant recovery with a Windows restore host, you must enableServices for Network File System. When this configuration is complete, you candisable any unnecessary NFS services.
359Configuring services for NFS on WindowsAbout configuring services for NFS on Windows 2012 or 2016 (NetBackup for VMware)

To enable Services for Network File System (NFS) on aWindows 2012 or 2016restore host
1 Open the Server Manager.
2 From the Manage menu, click Add Roles and Features.
3 In the Add Roles and Features Wizard, on the Before You Begin page, clickNext.
360Configuring services for NFS on WindowsAbout configuring services for NFS on Windows 2012 or 2016 (NetBackup for VMware)

4 On the Select installation type page, select Role-based or feature-basedinstallation.
5 Click Next.
6 On the Server Selection page, click Select a server from the server pooland select the server. Click Next.
7 On the Server Roles page, click Next.
361Configuring services for NFS on WindowsAbout configuring services for NFS on Windows 2012 or 2016 (NetBackup for VMware)

8 On the Features page, click Client for NFS. Click Next.
9 On the Confirmation page, click Install.
Disabling the Server for NFS (NetBackup forVMware)
To disable the Server for NFS
1 Open the Server Manager.
2 In the left pane, expand Configuration.
362Configuring services for NFS on WindowsDisabling the Server for NFS (NetBackup for VMware)

3 Click Services.
4 In the right pane, right-click on Server for NFS and click Stop.
5 In the right pane, right-click on Server for NFS and click Properties.
363Configuring services for NFS on WindowsDisabling the Server for NFS (NetBackup for VMware)

6 From the Startup type list in the Server for NFS Properties dialog box, clickDisabled.
7 Click OK.
8 Do this procedure for each media server and for the restore host.
Disabling the Client for NFS on the media server(NetBackup for VMware)
After you enable Services for Network File System (NFS) on a host that is only aNetBackup media server, disable the Client for NFS.
To disable the Client for NFS on the NetBackup media server
1 Open the Server Manager.
2 In the left pane, expand Configuration.
364Configuring services for NFS on WindowsDisabling the Client for NFS on the media server (NetBackup for VMware)

3 Click Services.
4 In the right pane, right-click on Client for NFS and click Stop.
5 In the right pane, right-click on Client for NFS and click Properties.
365Configuring services for NFS on WindowsDisabling the Client for NFS on the media server (NetBackup for VMware)

6 From the Startup type list in the Client for NFS Properties dialog box, clickDisabled.
7 Click OK.
Configuring a UNIX media server and Windowsbackup or restore host for Granular RecoveryTechnology (NetBackup for VMware)
For backups and restores that use Granular Recovery Technology (GRT), performthe following configuration if you use a UNIX media server and Windows restorehost:
■ Confirm that your media server is installed on a platform that supports granularrecovery.For more information about supported platforms, see the NetBackup EnterpriseServer and Server - Software Compatibility List at the following URL:http://www.netbackup.com/compatibilityNo other configuration is required for the UNIX media server.
366Configuring services for NFS on WindowsConfiguring a UNIX media server and Windows backup or restore host for Granular Recovery Technology
(NetBackup for VMware)

■ Enable or install NFS on the restore host.See “Enabling Services for Network File System (NFS) on a Windows 2012 or2016 restore host (NetBackup for VMware)” on page 359.
■ You can configure a different network port for NBFSD.
Configuring a different network port for NBFSD(NetBackup for VMware)
NBFSD runs on port 7394. If another service uses the standard NBFSD port in yourorganization, you can configure the service on another port. The following proceduresdescribe how to configure a NetBackup server to use a network port other than thedefault.
To configure a different network port for NBFSD (Windows server)
1 Log on as administrator on the computer where NetBackup server is installed.
2 Open Regedit.
3 Open the following key:
HKEY_LOCAL_MACHINE\SOFTWARE\Veritas\NetBackup\CurrentVersion\Config
4 Create a new DWORD value named FSE_PORT.
5 Right-click on the new value and click Modify.
6 In the Value data box, provide a port number between 1 and 65535.
7 Click OK.
To configure a different network port for NBFSD (UNIX server)
1 Log on as root on the computer where NetBackup server is installed.
2 Open the bp.conf file.
3 Add the following entry, where XXXX is an integer and is a port number between1 and 65535.
FSE_PORT = XXXX
See “Configuring a UNIX media server and Windows backup or restore host forGranular Recovery Technology (NetBackup for VMware)” on page 366.
367Configuring services for NFS on WindowsConfiguring a different network port for NBFSD (NetBackup for VMware)

The Reuse VM selectionquery results option
This appendix includes the following topics:
■ About the Reuse VM selection query results option
■ The effect of virtual machine discovery on vCenter
About the Reuse VM selection query resultsoption
This topic applies to NetBackup for VMware.
The NetBackup Test Query screen lists the virtual machines that NetBackupdiscovered in your virtual environment. Because the automatic selection feature isdynamic, later changes in the environment may affect which virtual machines matchthe query rules. For example: if virtual machines are added later, the current testresults may not be identical to the virtual machines that are selected when thebackup runs.
During the period you specify onReuse VM selection query results for, NetBackupreuses the current list of virtual machines as the backup list. It does not consult theQuery Builder or rediscover virtual machines.
The less often your virtual machine environment undergoes changes, the moreadvantageous it may be to reuse the list of virtual machines for backups. In largeenvironments, discovery of virtual machines takes time and consumes resourceson the vCenter server.
Note the following about the Reuse VM selection query results option:
■ Determines how long the query results are reused (that is, how often the list ofdiscovered virtual machines is refreshed).
CAppendix

■ Controls how often NetBackup performs discovery on the vCenter server.For the environments that contain many virtual machines, the discovery processmay increase the load on the vCenter server.
■ Has no effect on the NetBackup policy execution schedule.
■ Is invalidated if the query rules are changed or if the policy attributes that affectdiscovery are changed. In that case, NetBackup rediscovers virtual machinesthe next time the policy runs.The following topic describes the policy attributes that affect discovery:See “Effect of Primary VM identifier parameter on Selection column in TestQuery results” on page 142.
For example: assume that the Reuse VM selection query results for option is setto 8 hours and your query selects turned-on virtual machines. If additional virtualmachines are turned on during the 8-hour period, they are not added to the policy'sbackup list. The policy backs up the virtual machines that were last added to thelist (such as when the policy was created). After 8 hours, at the next execution ofthe policy, the recently turned on virtual machines are discovered and added to thebackup list.
If the next backup occurs before the Reuse period expires, and a virtual machinewas renamed during the Reuse period, NetBackup backs up the renamed virtualmachine under its original name. Because the reuse period has not expired,NetBackup does not rediscover virtual machines and therefore cannot identify thevirtual machine by its new name. (NetBackup identifies the virtual machine by itsinstance UUID.) To have backed up the virtual machine with its new name, theReuse period should have been set to a shorter interval.
Note: The virtual machines that have been selected for backup are not displayedon the policy Clients tab. To see which virtual machines NetBackup has selectedand backed up, refer to the following topics.
See “The effect of virtual machine discovery on vCenter” on page 369.
See “Using the Activity Monitor to monitor virtual machine backups” on page 153.
See “Using OpsCenter to report on virtual machine backups” on page 157.
See “Options for selecting VMware virtual machines” on page 109.
See “Test Query screen for VMware” on page 139.
The effect of virtualmachine discovery on vCenterIn all but the largest environments, it may be advantageous to set the Reuse VMselection query results for option so that discovery occurs more often.
369The Reuse VM selection query results optionThe effect of virtual machine discovery on vCenter

If changes occur to virtual machine configuration (such as adding, deleting, ormoving vmdk files), it may be necessary to set Reuse VM selection query resultsfor to 0. With a setting of 0, NetBackup rediscovers the virtual machines and theirconfiguration each time the policy runs.
Note: If the vmdk files are reconfigured and the next backup runs withoutrediscovery, NetBackup is not aware of the vmdk changes. It attempts to back upthe virtual machines in their previous configuration. The result may be an incorrectbackup.
370The Reuse VM selection query results optionThe effect of virtual machine discovery on vCenter

Backup of VMware rawdevices (RDM)
This appendix includes the following topics:
■ About VMware raw device mapping (RDM)
■ Configurations for backing up RDMs
■ About alternate client backup of RDMs
■ Requirements for alternate client backup of RDMs
■ Configuring alternate client backup of RDMs
About VMware raw device mapping (RDM)This topic applies to NetBackup for VMware.
VMware raw device mapping mode (RDM) allows a virtual machine to directlyaccess physical disks. With raw device mapping, a VMware virtual machine canuse large storage devices such as disk arrays. Access to the data on an RDM diskis faster than to a fully virtualized disk (vmdk file). An RDM disk can be locallyattached to the ESX server or configured on a Fibre Channel SAN.
NetBackup supports the disk arrays that are configured on a virtual machine asRDMs.
Note: NetBackup cannot back up the RDM by means of a VMware backup host.
For notes and restrictions on NetBackup support for VMware RDM, see the followingVeritas tech note:
DAppendix

Support for NetBackup in virtual environments
http://www.veritas.com/docs/000006177
See “Configurations for backing up RDMs” on page 372.
See “About alternate client backup of RDMs” on page 372.
Configurations for backing up RDMsThis topic applies to NetBackup for VMware and VMware raw device mapping mode(RDM).
You can use either of the following NetBackup configurations to back up disk arraysas RDMs:
■ Without Snapshot Client: Install a NetBackup client on the virtual machine. Youcan configure NetBackup to back up the virtual machine and any RDMs as ifthe client was installed on a physical host. Without Snapshot Client software onthe virtual machine, the features of Snapshot Client are not available. (Thisconfiguration is not discussed in this NetBackup for VMware guide.)
■ With Snapshot Client: Install a NetBackup client and Snapshot Client softwareon the virtual machine. Configure an alternate client backup.
See “About alternate client backup of RDMs” on page 372.
About alternate client backup of RDMsThis topic applies to NetBackup for VMware and VMware raw device mapping mode(RDM).
Alternate client backup of an RDM consists of the following:
■ The RDM disk array contains the data to be backed up. Another host containingNetBackup client software and Snapshot Client software must have access tothe disk array. This host is the alternate client. In this configuration, the virtualmachine is called the primary client.
■ A snapshot of the data is created on the disk array and is mounted on thealternate client. The alternate client creates a backup image from the snapshot,using original path names, and streams the image to the NetBackup mediaserver.
■ The alternate client handles the backup I/O processing; the backup has little orno effect on the virtual machine. The media server reads the snapshot data fromthe alternate client and writes the data to storage.
372Backup of VMware raw devices (RDM)Configurations for backing up RDMs

■ The virtual machine and alternate client must be running the same operatingsystem, volume manager, and file system. For each of these I/O systemcomponents, the alternate client must be at the same level as the primary client,or higher level.For complete requirements on alternate client backup, refer to the Policyconfiguration chapter of the NetBackup Snapshot Client Administrator's Guide.
See “Requirements for alternate client backup of RDMs ” on page 373.
Requirements for alternate client backup of RDMsThis topic applies to NetBackup for VMware and VMware raw device mapping mode(RDM).
To use NetBackup Snapshot Client to back up an RDM, note the following:
■ RDM devices must be configured in physical compatibility mode. You select thismode when you create the RDM. Physical compatibility mode is not configuredin NetBackup.For an introduction to RDM, refer to your VMware documentation. For example,see the following VMware document:ESX Server 3 Configuration Guide
■ NetBackup may require certain OS and array configuration, depending on theguest OS and the array. For details, see the disk arrays chapter of theNetBackupSnapshot Client Administrator's Guide.
■ NetBackup client software must be installed on the virtual machine.
■ The requirements for the NetBackup for VMware feature (a backup host andthe VMware snapshot method) do not apply to backups of RDM disk arrays. Toback up RDM disk arrays, you must configure a Snapshot Client alternate clientbackup.
See “Configuring alternate client backup of RDMs” on page 373.
Configuring alternate client backup of RDMsThis topic applies to NetBackup for VMware and VMware raw device mapping mode(RDM).
This procedure highlights key points in creating a NetBackup alternate client backupof a disk array that is configured as an RDM. For broader details on disk arrayconfiguration, refer to the NetBackup Snapshot Client Administrator's Guide.
373Backup of VMware raw devices (RDM)Requirements for alternate client backup of RDMs

To create an alternate client policy for a disk array that is configured as anRDM
1 Select a policy type that is appropriate for the OS of the virtual machine andfor the type of data to back up.
Refer to the Policy configuration chapter of the NetBackup Snapshot ClientAdministrator's Guide.
2 On the policy Attributes tab in the Administration Console, click Performsnapshot backups and Perform off-host backup.
The following is a detail from the Attributes tab.
3 SelectAlternate Client from theUse pull-down. Do not select VMware backuphost.
In theMachine field, enter the name of the host that is configured as an off-hostbackup computer (the alternate client).
4 Click Options.
5 Select a snapshot method.
The VMware method does not apply to alternate client backup and is notavailable in the list.
374Backup of VMware raw devices (RDM)Configuring alternate client backup of RDMs

Select a snapshot method that is appropriate for the volume or array. Forexample:
■ The HP_EVA_Snapclone method or other EVA method for an HP EVAarray.
■ The EMC_CLARiiON_Snapview_Clone or other CLARiiON method for anEMC CLARiiON array.
■ FlashSnap.For FlashSnap, the following must be installed: VxVM 3.2 or later for UNIX,VxVM 4.0 or later for Linux and AIX, or VxVM 3.1 or later for Windows.Also, volumes must be configured over the primary host’s disks. The VxVMFlashSnap license must also be installed.
■ VSS (for Windows guest operating systems only).
The array may require additional OS and NetBackup configuration as describedin the disk arrays chapter of the NetBackup Snapshot Client Administrator'sGuide. The same guide contains more details on snapshot methods.
6 If required by an array snapshot method that you selected in the previous step,specify the Snapshot Resources.
7 In the policy’s Clients list, select the virtual machine on which the array isconfigured as an RDM.
8 In the policy’s Backup Selections tab, specify the disk that you want to backup, or the files or volumes that reside on the disk.
See “Requirements for alternate client backup of RDMs ” on page 373.
See “About VMware raw device mapping (RDM)” on page 371.
See “NetBackup for VMware: notes and restrictions” on page 27.
375Backup of VMware raw devices (RDM)Configuring alternate client backup of RDMs

Symbols156 (status code) 302
AAccelerator 160
and the NetBackup catalog 164logs for 165messages in the backup job details log 165policy attribute 161replacing image size with network-transferred
data in command output 169reporting network-transferred data in command
output 166Activity Monitor
to monitor VM backups 153Advanced Mode
Query Builder 116ALL_LOCAL_DRIVES 302alternate client backup
configure for RDM 373of RDM 372
alternate location for restore 188AND vs OR 122
Join field in Query Builder 117automatic selection of virtual machines 72
about 102Advanced Mode 116Basic Mode 112cache file for 368Clients tab 109examples 102, 118notes on 105Query Builder fields 129requirements 108task overview 108testing 139with multiple policies 121
Bbackup
fault tolerant VM 37host 15how to configure 68how to perform 151job hangs 308monitoring with Activity Monitor 153monitoring with OpsCenter 157process overview 20reduce size of 147
backup host 74adding to configuration 44check if supported 288
backup media server 16, 18, 74backups
replacing Accelerator image size withnetwork-transferred data in commandoutput 169
reporting network-transferred data forAccelerator 166
Basic Modeedit rule in Query Builder 115Query Builder 112
best practices 282BIOS
reconfigure for booting 311blacklist
for dynamic multipathing on Linux 35BLIB 75, 99, 148block-level incremental backup. See BLIBblocks
exclude deleted 75browse virtual machines 91browsing timeout 298
Ccache file
for browsing virtual machines 93catalog
and use of Accelerator 164
Index

change VMware hostname in NetBackup 50Changed Block Tracking 148Client Reports
using OpsCenter 157Clients tab
automatic selection of virtual machines 109description of fields for queries 129
code 156 error 302compound query rules 124configuration
of auto selection of virtual machines 109, 112overview for backup of VMs 24
configuration datastore 176credentials
adding for VMware 45troubleshooting 301
cross-platform restore 173Cumulative Incremental Backup 71
Ddatacenter
for restore 191datacenter folders
rules in Query Builder 126datastore
in a datastore cluster 192restore of 192
deduplication 283delete
vSphere Client snapshot 149Differential Incremental Backup 71disable virtual machine quiesce 81Discovered Timestamp 93disk array
configured as RDM 373display name 76, 93DNS name 76drives
and reboot failure 311dynamic multipathing
in a SAN environment 35
Eedit rules in Query Builder 115EMM database
remove VM host name from NetBackup 50Enable block-level incremental backup 75, 148encrypted drives 27
encryption of snapshot data transport 79, 184equipment 288escape character
use of in Query Builder 138ESX server 16, 45Exclude deleted blocks option 75exclude disks from backup 88exclude list
speed up discovery of virtual machines 93ext file systems, Linux 177extended attributes, restore of 177
Ffailed virtual machines
in test query 141fault tolerant VMs 37FIFO files, Linux 177file system
Linux, restore of 177firewall 308
Ggrouping rules in Query Builder 116, 124guest customizations
ensuring their restore 319
Hhost name 76, 93
changing in NetBackup 50host properties
for VMware 44hotadd transport mode 79, 184
notes on 40hypervisor 21
IIgnore diskless VMs 81, 304in-place disk restore 197–198, 212, 216, 220–221,
320–321incremental backup
about 99requirements 71setting up 100
independent disk 22, 94, 304how to back up 28
installing and configuring Network File System(NFS) 354
instant recovery 238
377Index

Intelligent Policy 102invalid client 311IsSet operator examples 120
Jjob hangs 308Join field in Query Builder 117
Kkeywords
in Query Builder 130
LLast Update 93Linux
notes on 34notes on restore 177quiesce 34
loggingAccelerator 165how to create folders for 291VMware 290vSphere 299VxMS 291
LVM2 volume 34, 177
MMAC address 177manual backup 151monitor backups
with Activity monitor 153with OpsCenter 157
mount pointmissing 310
multiple policiesfor auto selection of VMs 121
Nnbdiscover command 139
to test a query 106, 109, 111nbemmcmd 50nbfsd port 367NetBackup Accelerator. See AcceleratorNetwork Block Device (NBD) transport 79, 184Network Block Device (NBD) transport with SSL 79,
184Network Connections dialog 195
Network File System (NFS), described 354NFC connections 308NFS share, Linux 177NTFS file system
for USB drives 27
Ooperators
in Query Builder 137OpsCenter
to monitor VM backups 157optimized storage 147order of operations
Query Builder 122rules in Query Builder 116
overviewconfiguration steps 24of backup process 20restore procedure 223
overwrite virtual machine 185
Pparentheses
for grouping rules in Query Builder 116for rules in Query Builder 124
path lengthmaximum for Linux/UNIX files 34
Perform Recovery dialog 196policy
and cache file for auto selection of VMs 368configure for auto VM selection 112for full virtual machine backup 68multiple, for auto VM selection 121types 69wizard for creating 68
Policy Configuration wizard 68port number 49, 301precedence 122prerequisites 26Primary VM identifier
setting 76Primary VM identifier parameter
and IsSet operator 120and multiple policies 121and testing query rules 141–142and VM Name column in Test query 144
privileges 302
378Index

QQuery Builder
and Primary VM identifier parameter 142cache file for results 368configuration in Advanced Mode 116configuration in Basic Mode 112description of fields 129edit rule in 115enter rules manually 116escape character 138examples 118IsSet operator examples 120keywords 130operators 137order of operations 122quotation marks 138testing rules for 139, 141to select virtual machines for backup 102values 138wildcards 138with multiple policies 121
query builderto filter virtual machines for backup 72
quiesceLinux file system 177Linux, notes on 34
quiesce virtual machine 81quotation marks
use of in Query Builder 138
RRDM 22, 304
about 371alternate client backup of 372–373configurations supported 372
reboot failure 311Recovery Destination dialog 182recovery host 15, 183Recovery Options dialog 183, 189recovery wizard. See restore from backup. See
restore into vCloudreduce size of backup 147release level
using mixed levels 236remove VMware host name from NetBackup EMM
database 50reports on backups
using OpsCenter 157
resource poolfor virtual machine restore 192
resource poolsrules in Query Builder 125
restoreabout restoring individual virtual machines 204from backup 182, 188guest customizations 319how to 179, 198individual files 224into vCloud 275job hangs 308maximum path length for Linux/UNIX files 34notes on 173procedure overview 223virtual machine 179, 198vmdk 204
restore vmdkChanged Block Tracking warning during
subsequent backup 321create restore parameters file 207determine backup ID from which to restore 205restoring individual 213validate restore parameters file 212
reuse filefor Query Builder results 368
Reuse VM selection query results for 368rules in Query Builder
about 104configuring 112editing 115examples 104examples with parentheses 124for datacenter folders 126for resource pools 125IsSet operator examples 120manual entry of 116order of evaluation 116order of operations 122testing 139testing failued 141
run a backup 151
SSAN transport mode 79, 183SCSI drives
and reboot failure 311Select automatically through VMware Intelligent Policy
query 72, 102
379Index

Select ESX server dialog 193Select Folder dialog 193server name
changing in NetBackup 50size of backups
reducing 147snapshot
vSphere Clienthow to delete 149
socket files, Linux 177SRM environment and replication 81, 304SSL encryption of snapshot data 79, 184start a backup 151status code 156 302Storage Destination dialog 194storage optimization 27, 147
how to delete snapshot for 149Storage vMotion
backup conflict 306
Ttag associations
support 103use 103
template VM 27terminology 20Test Query screen 139
and Primary VM identifier parameter 142, 144failed virtual machines 141nbdiscover as alternative 106, 109, 111
thin provisioned disks 186timeout
browsing 298timeouts
vSphere 299transport modes
and hung job 308for restore 183hotadd 40
troubleshootingtips 287
UUSB drives
as the snapshot mount point 27UUID 76, 93
Vvalidate
credentials 45validate virtualization server's certificate 54values
in Query Builder 138vApp
browsing virtual machines within 93for virtual machine restore 192
vCenter server 16vCloud
alternate location for restore 275NetBackup credentials for 48
Virtual machine quiesce option 81Virtual Machine recovery wizard
restore to alternate location 188vCloud restore to alternate location 275
virtual machinesabout restoring individual 204auto selection from reuse file 368browsing 91configure backup policy for 68configure for auto selection of 112how to back up 151monitor backups of 153, 157notes on query builder 105requirements for auto selection 108Select automatically through VMware Intelligent
Policy query 72, 102testing auto selection of 139
virtual networkselect for restore 195
VirtualCenter server 16VM Name column in Test Query screen 144vmdk file 23
backup fails if none assigned 81, 304vmdk restore
about 196overwrite during restore 203, 222process 204restore parameters file 214troubleshooting 320–321
VMwarebackup environment 15backup host 44backup media server 18backups 151configuration overview 24credentials 45
380Index

VMware (continued)ESX server 16, 45Exclude Disk tab 86host properties 44introduction 13logging 290main features 13policy configuration 68required components 15restores 179, 198terminology 20troubleshooting 290
VMware Intelligent Policy 102VMware Intelligent Policy query 72VMware policy 69VMware policy tab 69VMware Tools 23VMX directory 176vmx-07 71vNetwork Distributed Switch 195Volume Manager volumes 100vSphere Client snapshot
how to delete 149vStorage 23
incrementals 100restore into vCloud 275
VxMS logging 291
Wwhitelist
for dynamic multipathing on Linux 35wildcards
use of in Query Builder 138wizard
to create backup policy 68to recover virtual machine 182, 275
381Index