user manual – en in 6938 treadmill insportline gilavar
TRANSCRIPT
USER MANUAL – EN
IN 6938 Treadmill inSPORTline Gilavar
2
CONTENTS
SAFETY INSTRUCTIONS ....................................................................................................................... 3
ADDITIONAL INFORMATION ............................................................................................................. 3
PACKING DETAILS ................................................................................................................................ 4
DIAGRAM ................................................................................................................................................ 5
LIST OF COMPONENTS ........................................................................................................................ 5
TREADMILL STRUCTURE ..................................................................................................................... 7
INSTALLATION SKETCH ....................................................................................................................... 7
USE ......................................................................................................................................................... 8
FOLDING & UNFOLDING ................................................................................................................... 8
INSTRUCTION FOR CONSOLE ............................................................................................................. 9
DISPLAY ................................................................................................................................................ 12
BLUETOOTH CONNECTION ............................................................................................................ 12
USE .................................................................................................................................................... 13
GENERAL TRAINING RECOMMENDATIONS ..................................................................................... 15
GETTING STARTED ............................................................................................................................. 16
SAFE EXERCISE .................................................................................................................................. 17
MAINTENANCE .................................................................................................................................... 17
THE ADJUSTMENT STEPS FOR POLY V-BELT ............................................................................. 17
ADJUSTMENT RUNNING BELT ....................................................................................................... 17
THE ADJUSTMENT STEPS FOR RUNNING BELT DEFLECTION ................................................. 18
LIBRICATION..................................................................................................................................... 18
CLEANING ......................................................................................................................................... 19
STORAGE.......................................................................................................................................... 19
GUIDES FOR MALFUNCTION ............................................................................................................. 19
PROGRAMS .......................................................................................................................................... 21
IMPORTANT NOTICE ........................................................................................................................... 22
ENVIRONMENT PROTECTION ........................................................................................................... 23
TERMS AND CONDITIONS OF WARRANTY, WARRANTY CLAIMS ................................................. 23
3
SAFETY INSTRUCTIONS
• According to your health condition, please exercise properly. Overload or
improper exercise will damage your health.
• While running, you should dress properly. Don’t dress too loosely in case your
clothes are entangled by the machine. And please wear sport shoes. Don’t let
your children or pet play near it to avoid unnecessary injury.
• This machine is not suitable for children. For patients or the disabled to use, they
have to follow the guides by their guardians or doctors.
• Don’t use this machine when in outdoor, high humidity condition or sun.
• Please pull the plug off from socket and keep the safe key, when the treadmill is
unused.
• This machine is for home use, not suitable for professional exercise or testing,
and also not suitable for medical purpose.
• The heart rate on this machine is not suitable for medical.
• If any damage for power wire, please ask manufacturer or professional service to
replace it in case of any danger.
• Please check all the parts before using. Make sure that all the nuts or screws are
fastened.
• Place your treadmill on the clean, flat and solid floor. Make sure that there is not
anything pointy, water or hot near to the machine. Use floor protection (not
included) and keep at least 0,6 m free space around device for security.
• Please stop exercising immediately and consult your doctor if you’re feel giddy,
surfeit, thorax ache or other symptoms.
• Make sure that hands are not near to running parts. Don’t put your hands or foots
under the running belt.
• When running this machine, it is only for one person to use it!
• Please use the spare parts from us, it is not acceptable if you use spare parts
from others.
• This machine is HC category, max user weight 150 kg.
• Please consult your doctor at first before running, if you have one of the following
diseases.
1. Cardiopathy, hypertension, sugar diabetes, respiratory disease, smoking, and other chronic diseases, complication disease.
2. If you are over 35 years old and heavier than common weight.
3. Women in pregnant or in breasting period.
ADDITIONAL INFORMATION
• Please use qualified socket. If the plug and the socket is not compatible, please
ask electrician to handle it and don’t do anything for the plug.
• The voltage for this machine is 220V-240V AC.
• Don’t let power wire touch roller, and also don’t put power wire on the running
belt. Don’t use damaged plug.
• Before cleaning, moving and maintaining the machine, please pull off the plug for
the socket.
Warning: If don’t pull off, it will cause injury or damage for the machine.
4
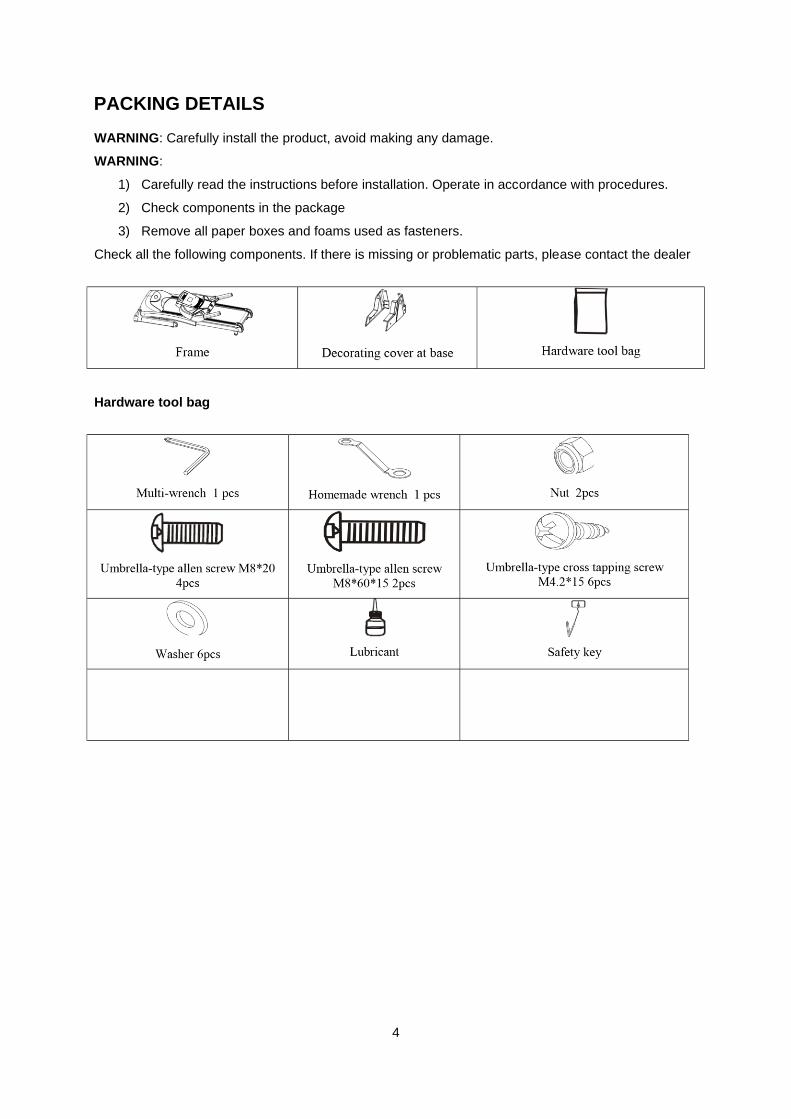
PACKING DETAILS
WARNING: Carefully install the product, avoid making any damage.
WARNING:
1) Carefully read the instructions before installation. Operate in accordance with procedures.
2) Check components in the package
3) Remove all paper boxes and foams used as fasteners.
Check all the following components. If there is missing or problematic parts, please contact the dealer
Hardware tool bag
5
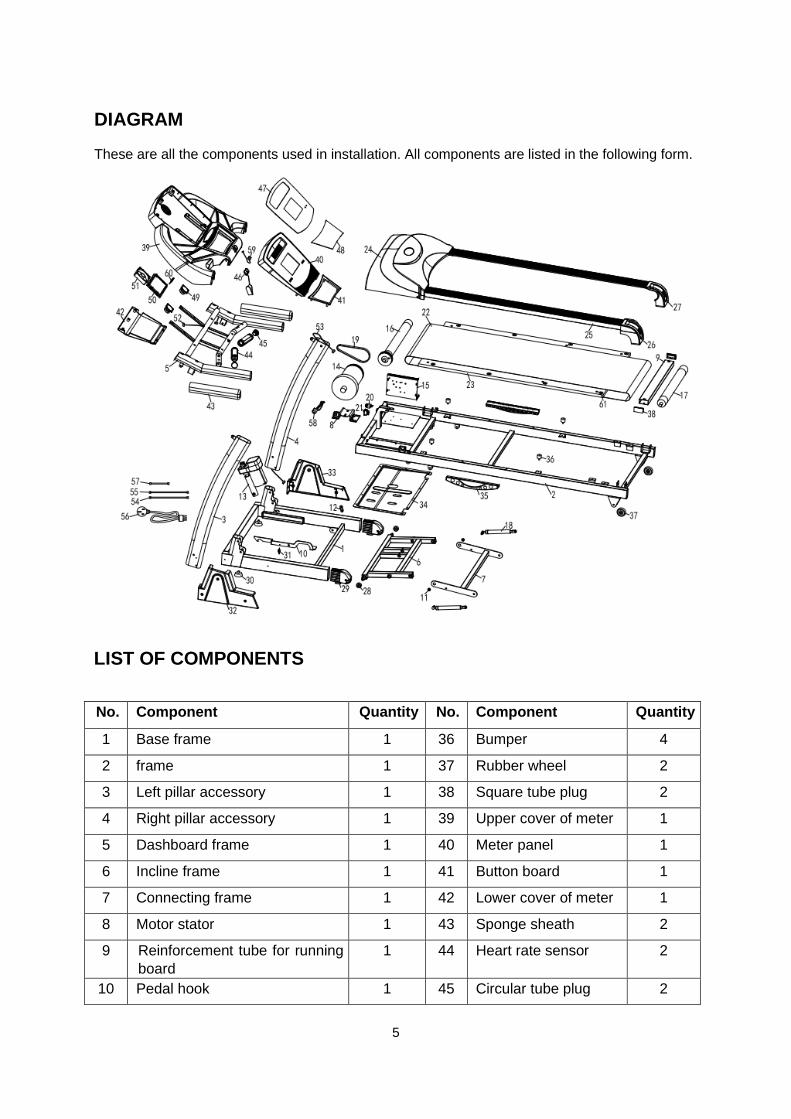
DIAGRAM
These are all the components used in installation. All components are listed in the following form.
LIST OF COMPONENTS
No. Component Quantity No. Component Quantity
1 Base frame 1 36 Bumper 4
2 frame 1 37 Rubber wheel 2
3 Left pillar accessory 1 38 Square tube plug 2
4 Right pillar accessory 1 39 Upper cover of meter 1
5 Dashboard frame 1 40 Meter panel 1
6 Incline frame 1 41 Button board 1
7 Connecting frame 1 42 Lower cover of meter 1
8 Motor stator 1 43 Sponge sheath 2
9 Reinforcement tube for running
board
1 44 Heart rate sensor 2
10 Pedal hook 1 45 Circular tube plug 2
6
11 Sleeve for shaft 2 46 Safety key 1
12 Safety brace for base frame
and frame
1 47 Surface paster 1
13 Incline motor 1 48 Button paster 1
14 Motor 1 49 Speaker 2
15 PCB 1 50 PCB for console 1
16 Front roller 1 51 Fan 1
17 Back roller 1 52 Upper communication
line
1
18 Pressure stick 2 53 Lower communication
line
1
19 Multislot belt 1 54 Green connecting line 1
20 Power switch 1 55 Red connecting line 1
21 Overload protector 1 56 Power wire 1
22 Running belt 1 57 Red connecting line 1
23 Running board 1 58 Sensor wire 1
24 Motor cover 1 59 Reed pipe for safety
key
1
25 Side rail 2
26 Left back cover 1 61 Locating pad for side
rail
8
27 Right back cover 1
28 Lifting transporting wheel 2
29 Base handling wheel set 2
30 Adjusting foot pad 2
31 Tension spring 1
32 Left decorative cover at base 1
33 Right decorative cover at base 1
34 Lower cover of motor 1
35 Shock absorption 2
7
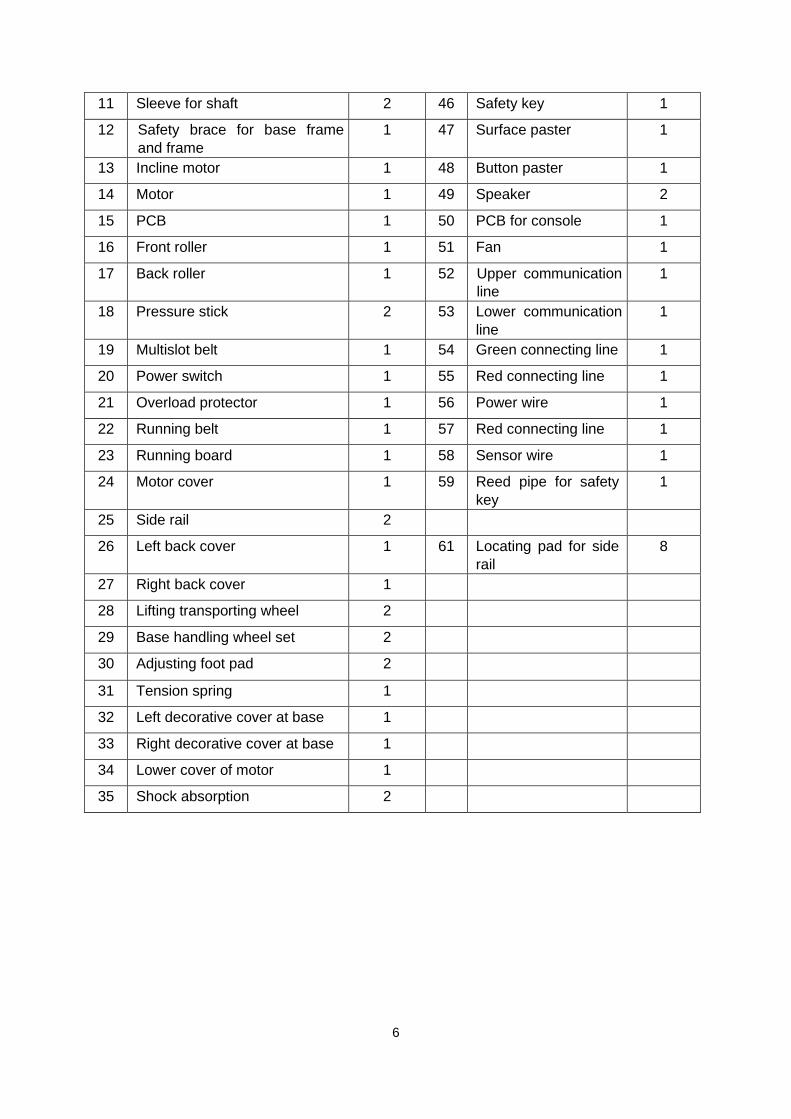
TREADMILL STRUCTURE
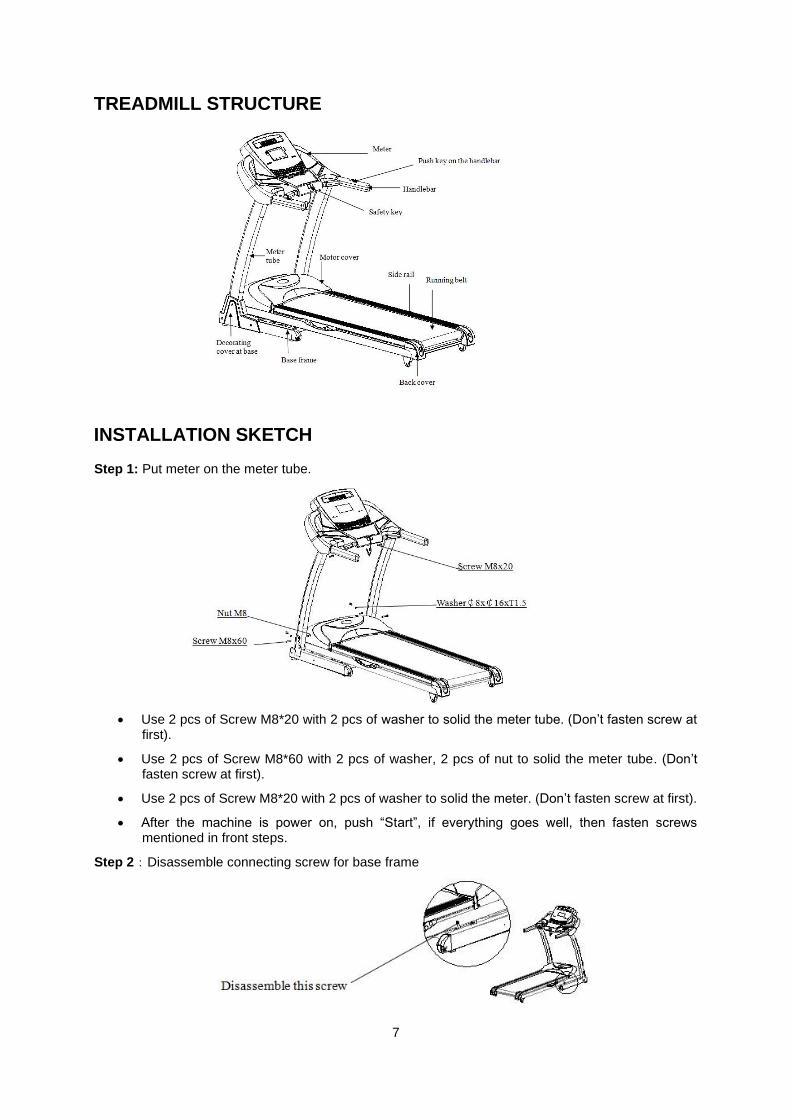
INSTALLATION SKETCH
Step 1: Put meter on the meter tube.
• Use 2 pcs of Screw M8*20 with 2 pcs of washer to solid the meter tube. (Don’t fasten screw at first).
• Use 2 pcs of Screw M8*60 with 2 pcs of washer, 2 pcs of nut to solid the meter tube. (Don’t fasten screw at first).
• Use 2 pcs of Screw M8*20 with 2 pcs of washer to solid the meter. (Don’t fasten screw at first).
• After the machine is power on, push “Start”, if everything goes well, then fasten screws mentioned in front steps.
Step 2:Disassemble connecting screw for base frame
8
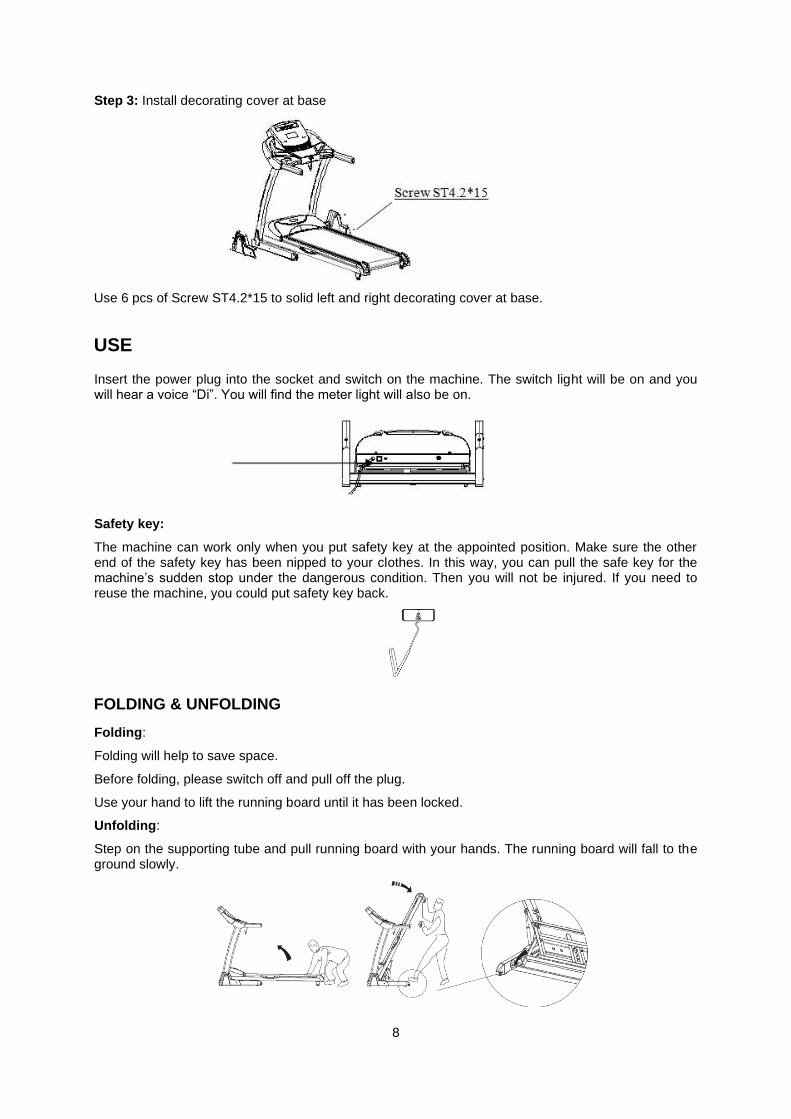
Step 3: Install decorating cover at base
Use 6 pcs of Screw ST4.2*15 to solid left and right decorating cover at base.
USE
Insert the power plug into the socket and switch on the machine. The switch light will be on and you will hear a voice “Di”. You will find the meter light will also be on.
Safety key:
The machine can work only when you put safety key at the appointed position. Make sure the other end of the safety key has been nipped to your clothes. In this way, you can pull the safe key for the machine’s sudden stop under the dangerous condition. Then you will not be injured. If you need to reuse the machine, you could put safety key back.
FOLDING & UNFOLDING
Folding:
Folding will help to save space.
Before folding, please switch off and pull off the plug.
Use your hand to lift the running board until it has been locked.
Unfolding:
Step on the supporting tube and pull running board with your hands. The running board will fall to the ground slowly.
9
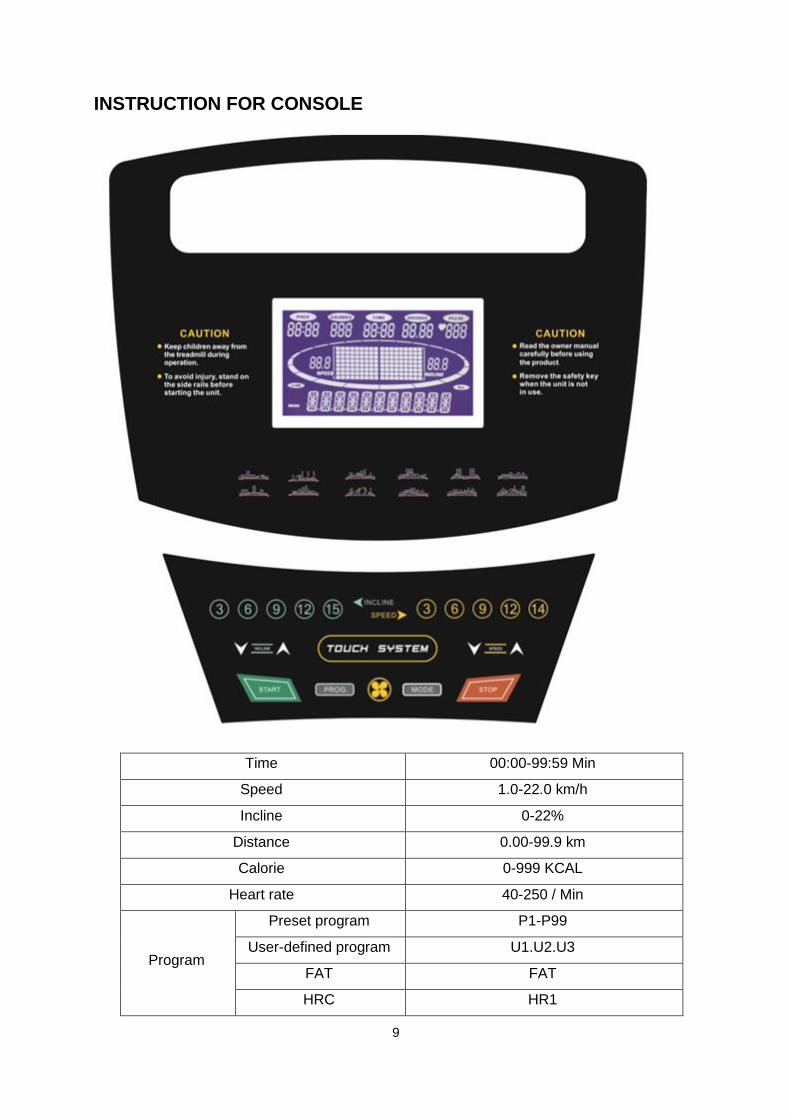
INSTRUCTION FOR CONSOLE
Time 00:00-99:59 Min
Speed 1.0-22.0 km/h
Incline 0-22%
Distance 0.00-99.9 km
Calorie 0-999 KCAL
Heart rate 40-250 / Min
Program
Preset program P1-P99
User-defined program U1.U2.U3
FAT FAT
HRC HR1

10
11
12
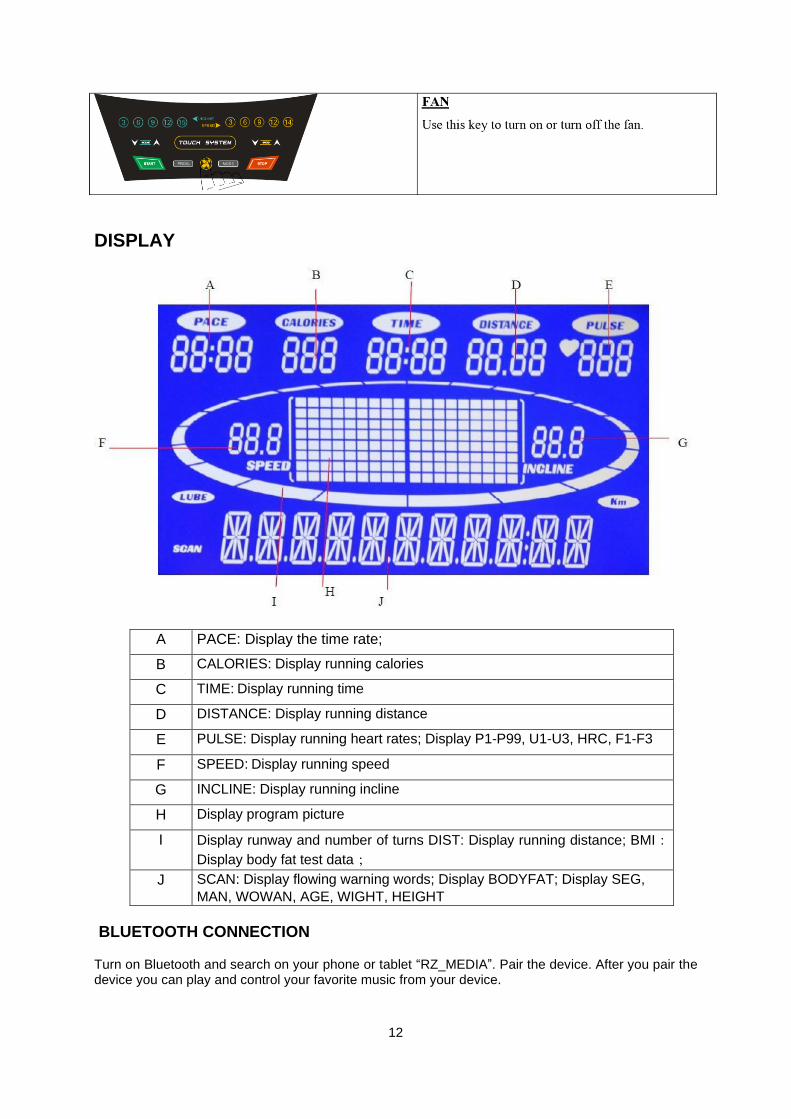
DISPLAY
A PACE: Display the time rate;
B CALORIES: Display running calories
C TIME: Display running time
D DISTANCE: Display running distance
E PULSE: Display running heart rates; Display P1-P99, U1-U3, HRC, F1-F3
F SPEED: Display running speed
G INCLINE: Display running incline
H Display program picture
I Display runway and number of turns DIST: Display running distance; BMI:
Display body fat test data;
J SCAN: Display flowing warning words; Display BODYFAT; Display SEG,
MAN, WOWAN, AGE, WIGHT, HEIGHT
BLUETOOTH CONNECTION
Turn on Bluetooth and search on your phone or tablet “RZ_MEDIA”. Pair the device. After you pair the device you can play and control your favorite music from your device.
13
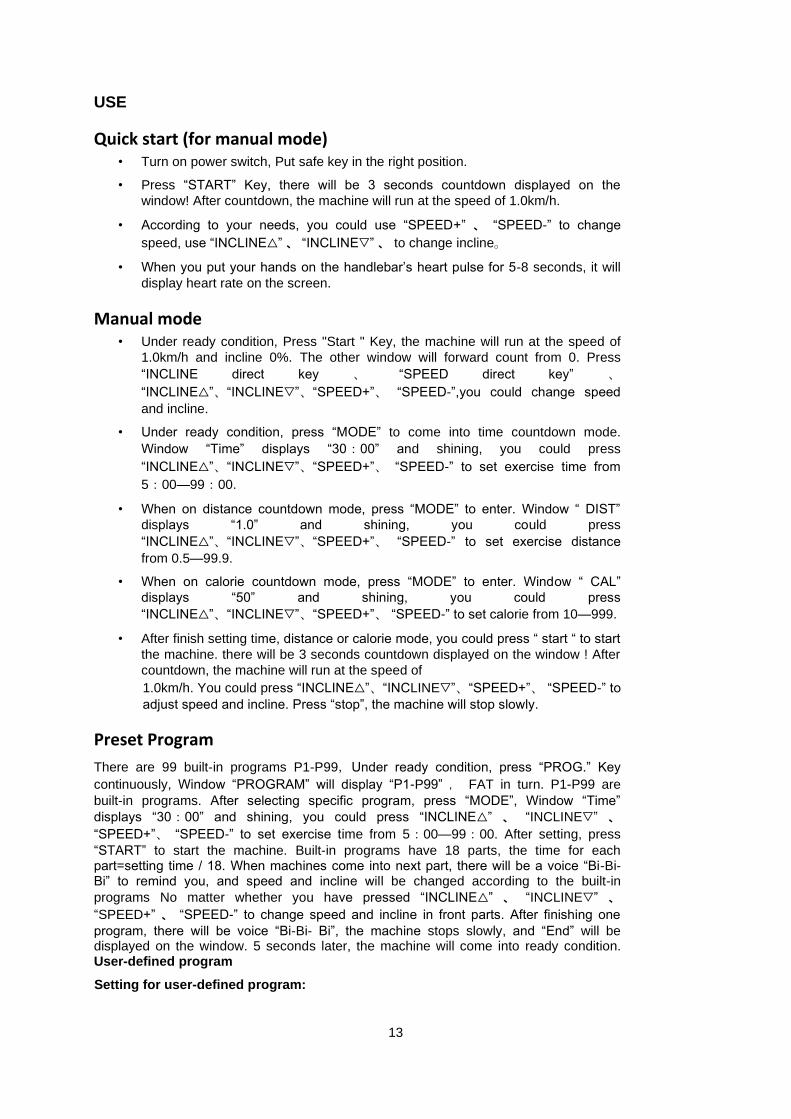
USE
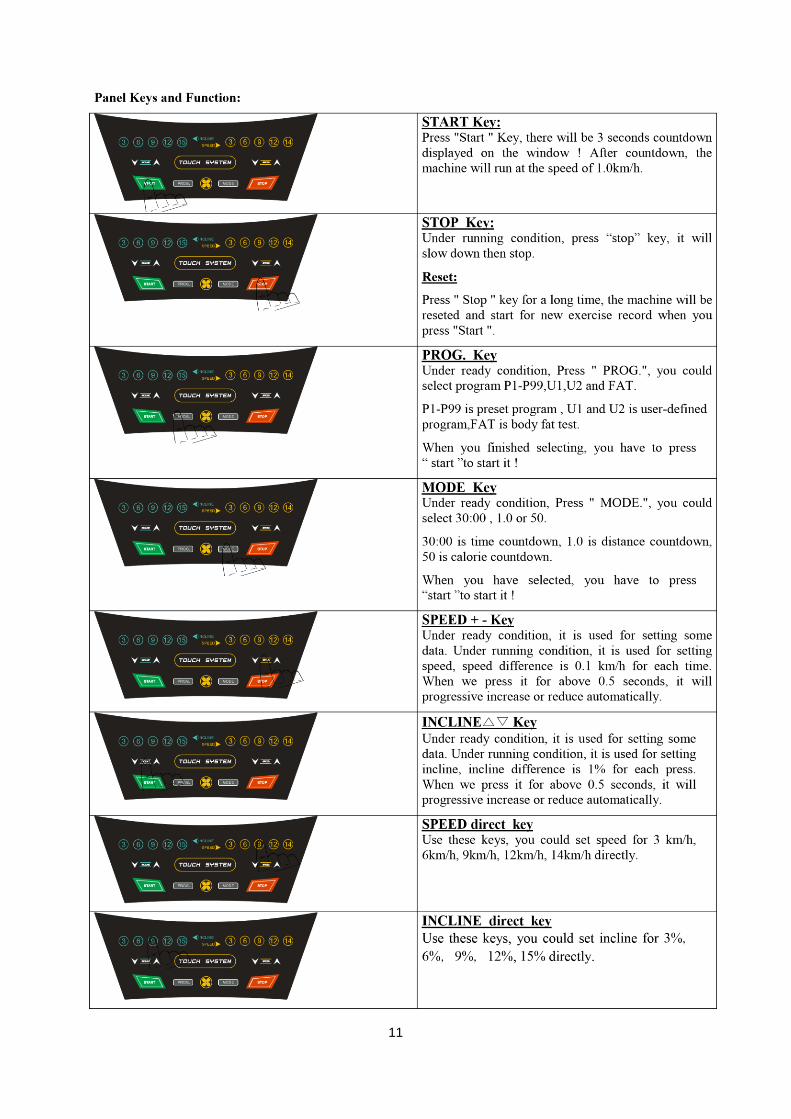
Quick start (for manual mode) • Turn on power switch, Put safe key in the right position.
• Press “START” Key, there will be 3 seconds countdown displayed on the
window! After countdown, the machine will run at the speed of 1.0km/h.
• According to your needs, you could use “SPEED+” 、 “SPEED-” to change
speed, use “INCLINE△” 、 “INCLINE▽” 、 to change incline。
• When you put your hands on the handlebar’s heart pulse for 5-8 seconds, it will
display heart rate on the screen.
Manual mode • Under ready condition, Press "Start " Key, the machine will run at the speed of
1.0km/h and incline 0%. The other window will forward count from 0. Press
“INCLINE direct key 、 “SPEED direct key” 、
“INCLINE△”、“INCLINE▽”、“SPEED+”、 “SPEED-”,you could change speed
and incline.
• Under ready condition, press “MODE” to come into time countdown mode.
Window “Time” displays “30:00” and shining, you could press
“INCLINE△”、“INCLINE▽”、“SPEED+”、 “SPEED-” to set exercise time from
5:00—99:00.
• When on distance countdown mode, press “MODE” to enter. Window “ DIST”
displays “1.0” and shining, you could press
“INCLINE△”、“INCLINE▽”、“SPEED+”、 “SPEED-” to set exercise distance
from 0.5—99.9.
• When on calorie countdown mode, press “MODE” to enter. Window “ CAL”
displays “50” and shining, you could press
“INCLINE△”、“INCLINE▽”、“SPEED+”、 “SPEED-” to set calorie from 10—999.
• After finish setting time, distance or calorie mode, you could press “ start “ to start
the machine. there will be 3 seconds countdown displayed on the window ! After
countdown, the machine will run at the speed of
1.0km/h. You could press “INCLINE△”、“INCLINE▽”、“SPEED+”、 “SPEED-” to
adjust speed and incline. Press “stop”, the machine will stop slowly.
Preset Program
There are 99 built-in programs P1-P99,Under ready condition, press “PROG.” Key
continuously, Window “PROGRAM” will display “P1-P99” , FAT in turn. P1-P99 are
built-in programs. After selecting specific program, press “MODE”, Window “Time”
displays “30:00” and shining, you could press “INCLINE△” 、 “INCLINE▽” 、
“SPEED+”、 “SPEED-” to set exercise time from 5:00—99:00. After setting, press
“START” to start the machine. Built-in programs have 18 parts, the time for each part=setting time / 18. When machines come into next part, there will be a voice “Bi-Bi- Bi” to remind you, and speed and incline will be changed according to the built-in
programs No matter whether you have pressed “INCLINE△” 、 “INCLINE▽” 、
“SPEED+” 、 “SPEED-” to change speed and incline in front parts. After finishing one
program, there will be voice “Bi-Bi- Bi”, the machine stops slowly, and “End” will be displayed on the window. 5 seconds later, the machine will come into ready condition. User-defined program
Setting for user-defined program:
14
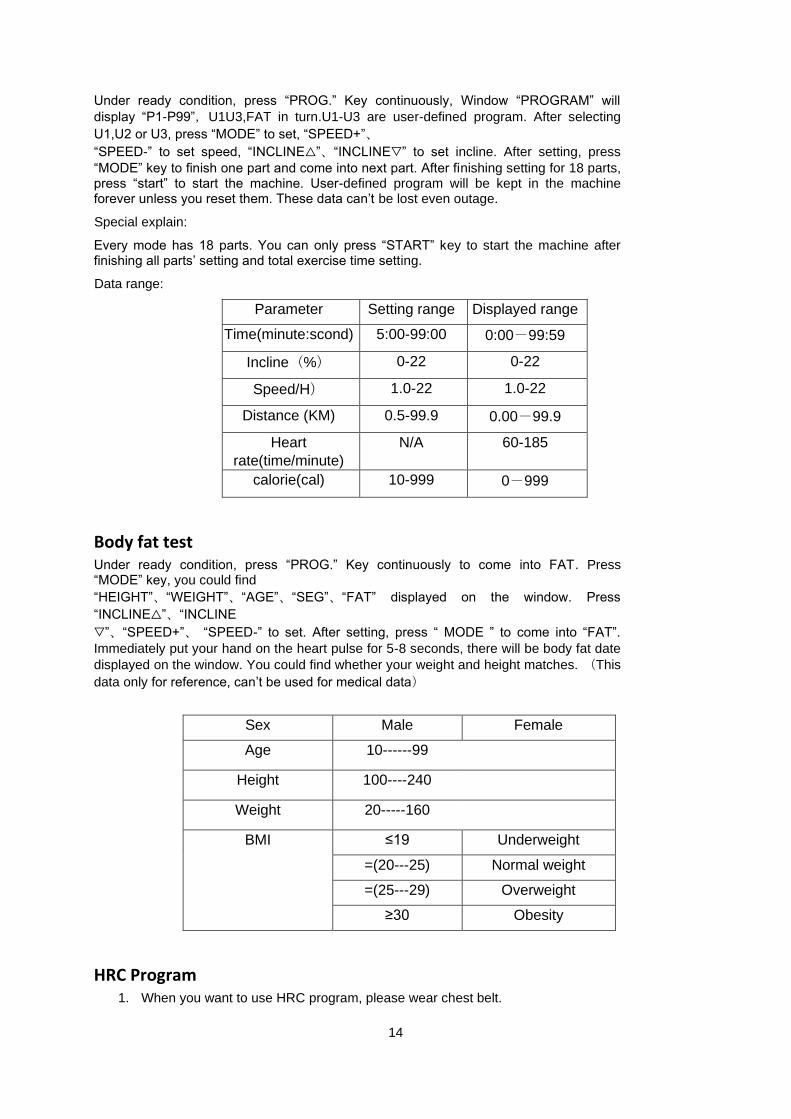
Under ready condition, press “PROG.” Key continuously, Window “PROGRAM” will
display “P1-P99”,U1U3,FAT in turn.U1-U3 are user-defined program. After selecting
U1,U2 or U3, press “MODE” to set, “SPEED+”、
“SPEED-” to set speed, “INCLINE△”、“INCLINE▽” to set incline. After setting, press
“MODE” key to finish one part and come into next part. After finishing setting for 18 parts, press “start” to start the machine. User-defined program will be kept in the machine forever unless you reset them. These data can’t be lost even outage.
Special explain:
Every mode has 18 parts. You can only press “START” key to start the machine after finishing all parts’ setting and total exercise time setting.
Data range:
Parameter Setting range Displayed range
Time(minute:scond) 5:00-99:00 0:00-99:59
Incline(%) 0-22 0-22
Speed/H) 1.0-22 1.0-22
Distance (KM) 0.5-99.9 0.00-99.9
Heart
rate(time/minute)
N/A 60-185
calorie(cal) 10-999 0-999
Body fat test Under ready condition, press “PROG.” Key continuously to come into FAT. Press “MODE” key, you could find
“HEIGHT”、“WEIGHT”、“AGE”、“SEG”、“FAT” displayed on the window. Press
“INCLINE△”、“INCLINE
▽”、“SPEED+”、 “SPEED-” to set. After setting, press “ MODE ” to come into “FAT”.
Immediately put your hand on the heart pulse for 5-8 seconds, there will be body fat date
displayed on the window. You could find whether your weight and height matches. (This
data only for reference, can’t be used for medical data)
Sex Male Female
Age 10------99
Height 100----240
Weight 20-----160
BMI ≤19 Underweight
=(20---25) Normal weight
=(25---29) Overweight
≥30 Obesity
HRC Program 1. When you want to use HRC program, please wear chest belt.
15
2. Under ready condition, press “PROG.” Key , window displays HRC. At this time, press “MODE” Key,there will be some displays as below:AGE:30.You could use “SPEED +-” key to set the age (From 15-80).After setting press”MODE”,there will be THR:specific heart rate displayed on the window and shining,you could use “SPEED +” key to set the heart rate(From 90-120).
3. After setting all of them, you could press “START” key to run the machine.
4. Now,you could use chest belt or heart rate sensor on the handlebar to test the heart rate.If you use both of them,our system will choose the chest belt.
5. Special Tips:From the safety side,we suggest the maximum speed to be 10 km/h when on HRC program.
6. Exercise time 22 minutes.
SAFETY WARNING: Do not use heart rate sensors in the handle at speeds above 14 km / h.
WARNING! The heart rate monitoring system may not be accurate. Overextending during training can cause serious injury or death. If you feel nauseous, stop the exercise immediately!
Power save mode
Our machine have power save function. When you turn on power switch for 10 minutes and don’t press any key, the machine will come into power save mode and there is no light on the screen. You could press any key into ready condition.
GENERAL TRAINING RECOMMENDATIONS
Be careful when starting your exercise program, exercise should not take too long, and you should not exercise more than once every two days. Extend the duration of exercise each week. Do not set unreachable goals. In addition to running on the treadmill, do other sports activities, such as swimming, dancing or cycling.
Always warm up before training. Stretch or perform gymnastic exercises to warm up for at least 5 minutes to reduce muscle tension and prevent pain.
During the exercise, breathe regularly and calmly.
Drink regularly during exercise. Remember that the recommended daily dose of fluids is 2-3 liters and this increases with physical activity. The fluids you drink should have room temperature.
Always wear comfortable and lightweight clothing as well as sports shoes while exercising on the device. Do not use too loose clothes that could get caught in the moving parts of the device during exercise.
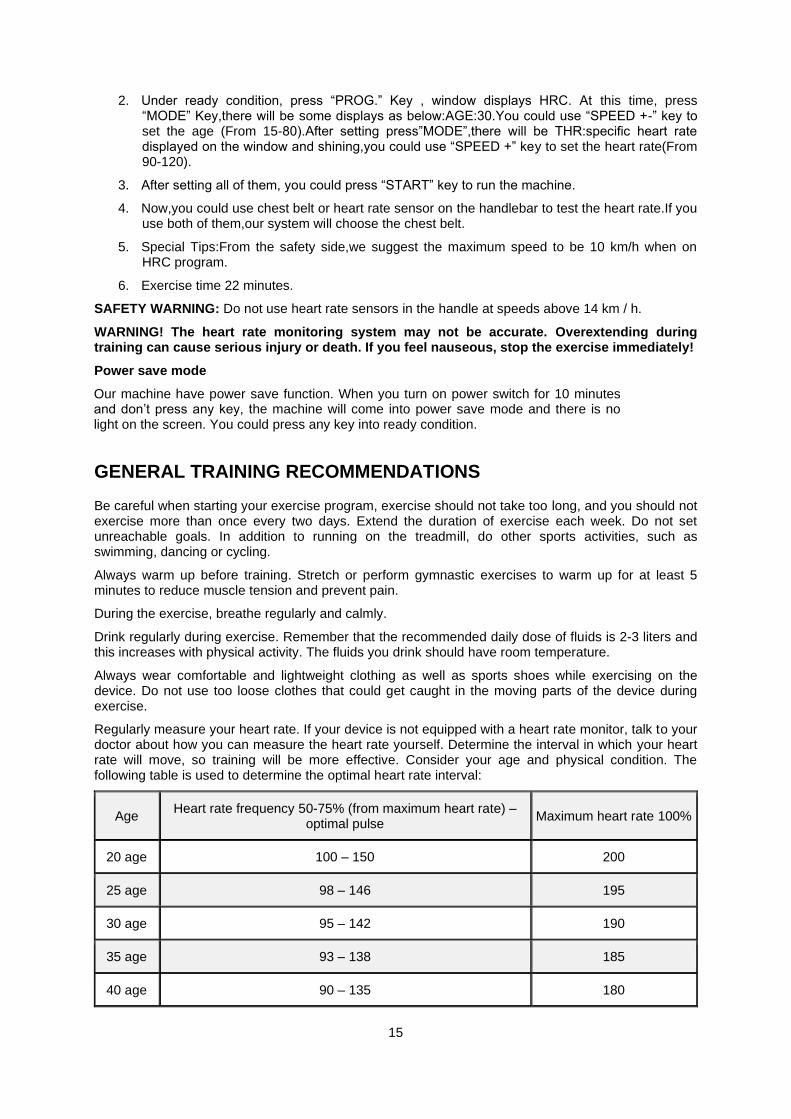
Regularly measure your heart rate. If your device is not equipped with a heart rate monitor, talk to your doctor about how you can measure the heart rate yourself. Determine the interval in which your heart rate will move, so training will be more effective. Consider your age and physical condition. The following table is used to determine the optimal heart rate interval:
Age Heart rate frequency 50-75% (from maximum heart rate) –
optimal pulse Maximum heart rate 100%
20 age 100 – 150 200
25 age 98 – 146 195
30 age 95 – 142 190
35 age 93 – 138 185
40 age 90 – 135 180
16
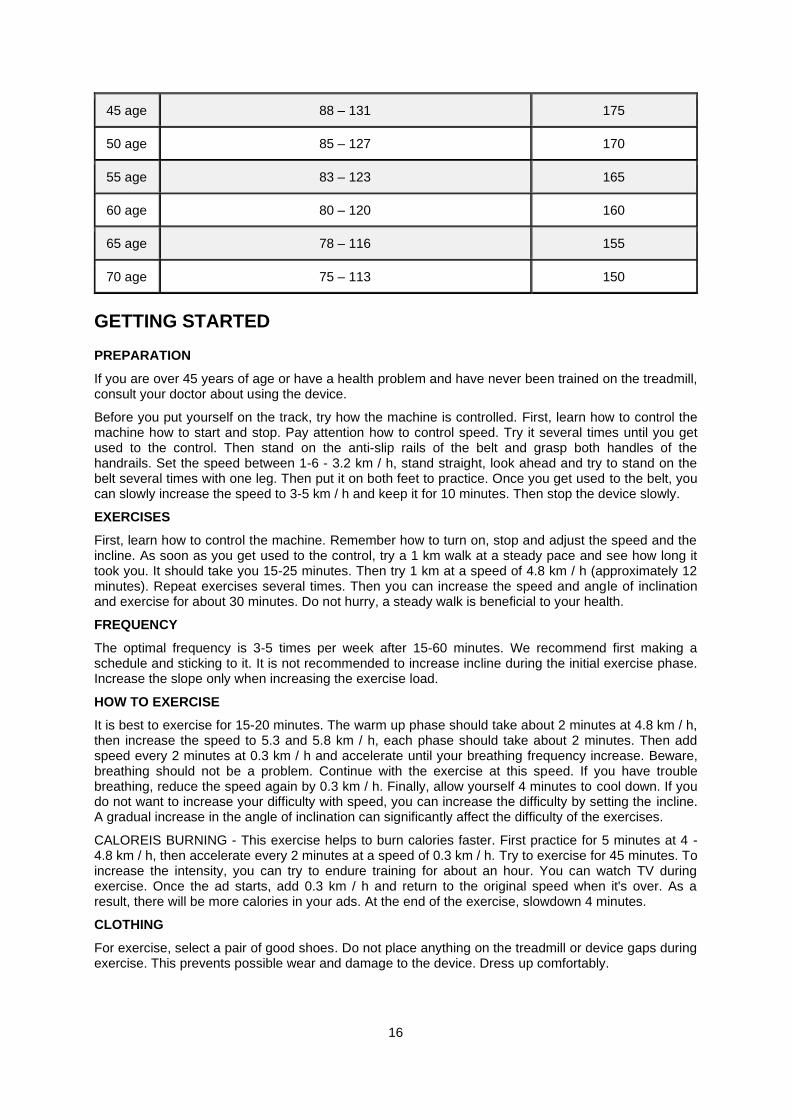
45 age 88 – 131 175
50 age 85 – 127 170
55 age 83 – 123 165
60 age 80 – 120 160
65 age 78 – 116 155
70 age 75 – 113 150
GETTING STARTED
PREPARATION
If you are over 45 years of age or have a health problem and have never been trained on the treadmill, consult your doctor about using the device.
Before you put yourself on the track, try how the machine is controlled. First, learn how to control the machine how to start and stop. Pay attention how to control speed. Try it several times until you get used to the control. Then stand on the anti-slip rails of the belt and grasp both handles of the handrails. Set the speed between 1-6 - 3.2 km / h, stand straight, look ahead and try to stand on the belt several times with one leg. Then put it on both feet to practice. Once you get used to the belt, you can slowly increase the speed to 3-5 km / h and keep it for 10 minutes. Then stop the device slowly.
EXERCISES
First, learn how to control the machine. Remember how to turn on, stop and adjust the speed and the incline. As soon as you get used to the control, try a 1 km walk at a steady pace and see how long it took you. It should take you 15-25 minutes. Then try 1 km at a speed of 4.8 km / h (approximately 12 minutes). Repeat exercises several times. Then you can increase the speed and angle of inclination and exercise for about 30 minutes. Do not hurry, a steady walk is beneficial to your health.
FREQUENCY
The optimal frequency is 3-5 times per week after 15-60 minutes. We recommend first making a schedule and sticking to it. It is not recommended to increase incline during the initial exercise phase. Increase the slope only when increasing the exercise load.
HOW TO EXERCISE
It is best to exercise for 15-20 minutes. The warm up phase should take about 2 minutes at 4.8 km / h, then increase the speed to 5.3 and 5.8 km / h, each phase should take about 2 minutes. Then add speed every 2 minutes at 0.3 km / h and accelerate until your breathing frequency increase. Beware, breathing should not be a problem. Continue with the exercise at this speed. If you have trouble breathing, reduce the speed again by 0.3 km / h. Finally, allow yourself 4 minutes to cool down. If you do not want to increase your difficulty with speed, you can increase the difficulty by setting the incline. A gradual increase in the angle of inclination can significantly affect the difficulty of the exercises.
CALOREIS BURNING - This exercise helps to burn calories faster. First practice for 5 minutes at 4 - 4.8 km / h, then accelerate every 2 minutes at a speed of 0.3 km / h. Try to exercise for 45 minutes. To increase the intensity, you can try to endure training for about an hour. You can watch TV during exercise. Once the ad starts, add 0.3 km / h and return to the original speed when it's over. As a result, there will be more calories in your ads. At the end of the exercise, slowdown 4 minutes.
CLOTHING
For exercise, select a pair of good shoes. Do not place anything on the treadmill or device gaps during exercise. This prevents possible wear and damage to the device. Dress up comfortably.
17
SAFE EXERCISE
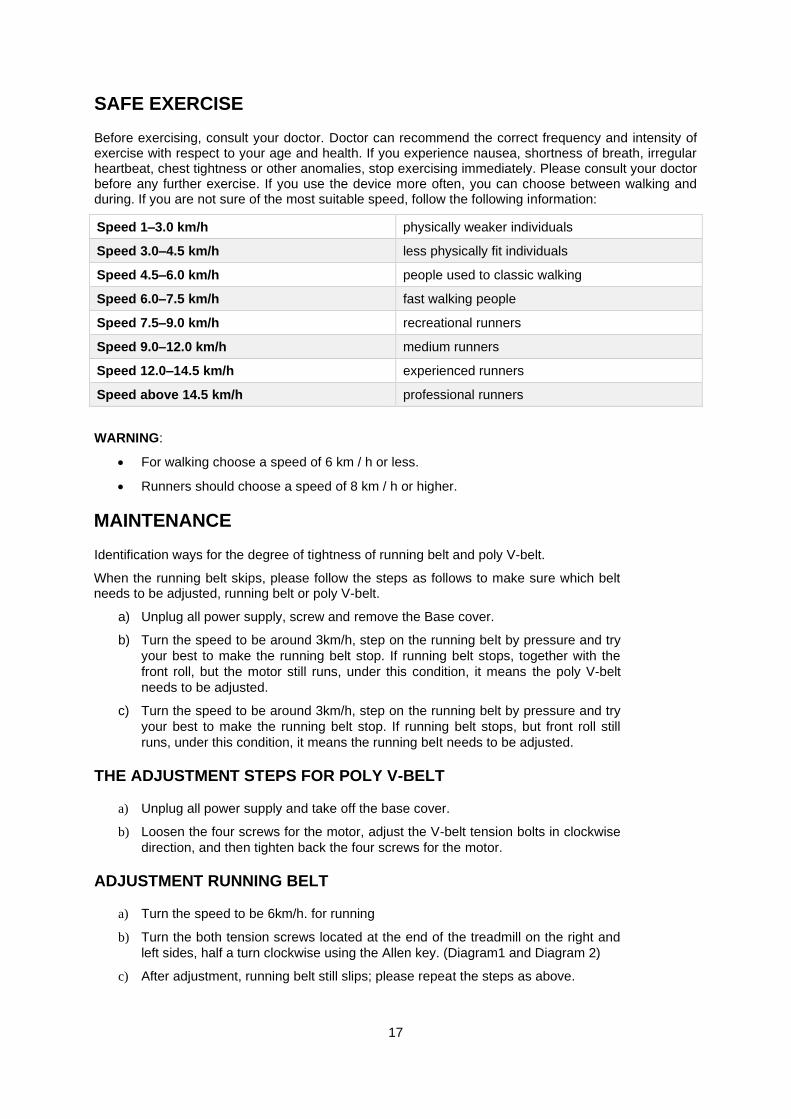
Before exercising, consult your doctor. Doctor can recommend the correct frequency and intensity of exercise with respect to your age and health. If you experience nausea, shortness of breath, irregular heartbeat, chest tightness or other anomalies, stop exercising immediately. Please consult your doctor before any further exercise. If you use the device more often, you can choose between walking and during. If you are not sure of the most suitable speed, follow the following information:
Speed 1–3.0 km/h physically weaker individuals
Speed 3.0–4.5 km/h less physically fit individuals
Speed 4.5–6.0 km/h people used to classic walking
Speed 6.0–7.5 km/h fast walking people
Speed 7.5–9.0 km/h recreational runners
Speed 9.0–12.0 km/h medium runners
Speed 12.0–14.5 km/h experienced runners
Speed above 14.5 km/h professional runners
WARNING:
• For walking choose a speed of 6 km / h or less.
• Runners should choose a speed of 8 km / h or higher.
MAINTENANCE
Identification ways for the degree of tightness of running belt and poly V-belt.
When the running belt skips, please follow the steps as follows to make sure which belt needs to be adjusted, running belt or poly V-belt.
a) Unplug all power supply, screw and remove the Base cover.
b) Turn the speed to be around 3km/h, step on the running belt by pressure and try
your best to make the running belt stop. If running belt stops, together with the
front roll, but the motor still runs, under this condition, it means the poly V-belt
needs to be adjusted.
c) Turn the speed to be around 3km/h, step on the running belt by pressure and try
your best to make the running belt stop. If running belt stops, but front roll still
runs, under this condition, it means the running belt needs to be adjusted.
THE ADJUSTMENT STEPS FOR POLY V-BELT
a) Unplug all power supply and take off the base cover.
b) Loosen the four screws for the motor, adjust the V-belt tension bolts in clockwise
direction, and then tighten back the four screws for the motor.
ADJUSTMENT RUNNING BELT
a) Turn the speed to be 6km/h. for running
b) Turn the both tension screws located at the end of the treadmill on the right and
left sides, half a turn clockwise using the Allen key. (Diagram1 and Diagram 2)
c) After adjustment, running belt still slips; please repeat the steps as above.
18
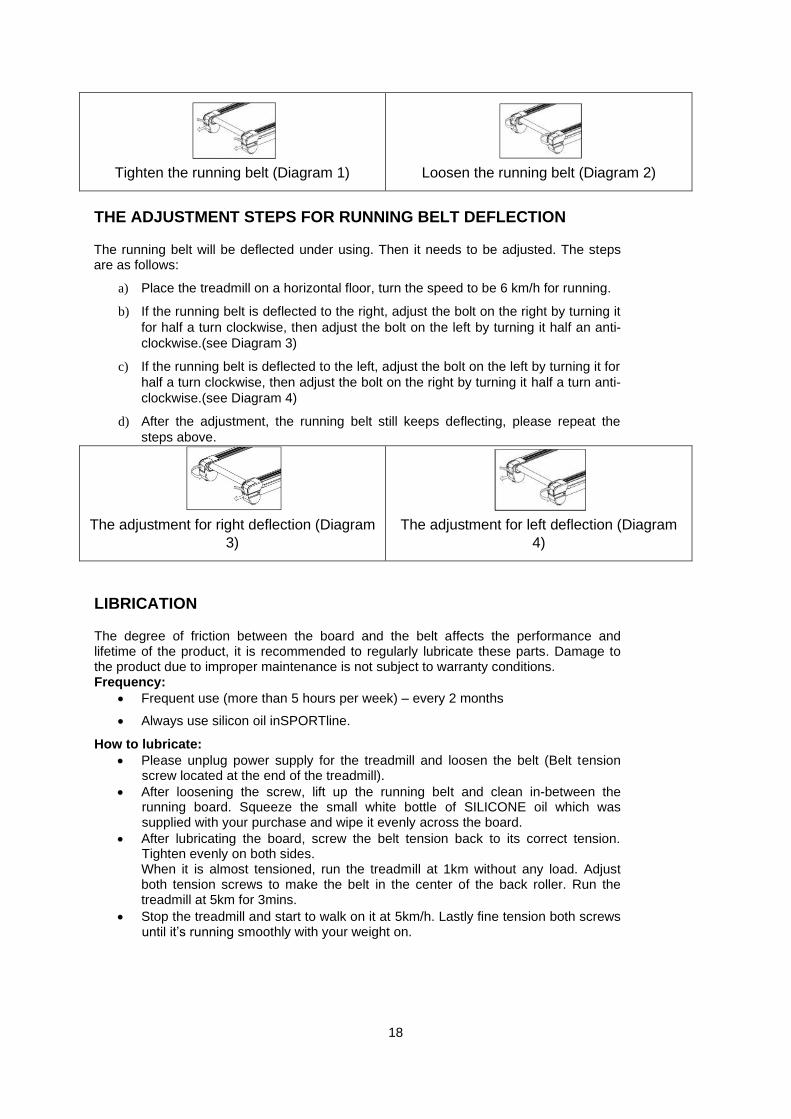
Tighten the running belt (Diagram 1)
Loosen the running belt (Diagram 2)
THE ADJUSTMENT STEPS FOR RUNNING BELT DEFLECTION
The running belt will be deflected under using. Then it needs to be adjusted. The steps are as follows:
a) Place the treadmill on a horizontal floor, turn the speed to be 6 km/h for running.
b) If the running belt is deflected to the right, adjust the bolt on the right by turning it
for half a turn clockwise, then adjust the bolt on the left by turning it half an anti-
clockwise.(see Diagram 3)
c) If the running belt is deflected to the left, adjust the bolt on the left by turning it for
half a turn clockwise, then adjust the bolt on the right by turning it half a turn anti-
clockwise.(see Diagram 4)
d) After the adjustment, the running belt still keeps deflecting, please repeat the
steps above.
The adjustment for right deflection (Diagram
3)
The adjustment for left deflection (Diagram
4)
LIBRICATION
The degree of friction between the board and the belt affects the performance and lifetime of the product, it is recommended to regularly lubricate these parts. Damage to the product due to improper maintenance is not subject to warranty conditions. Frequency:
• Frequent use (more than 5 hours per week) – every 2 months
• Always use silicon oil inSPORTline.
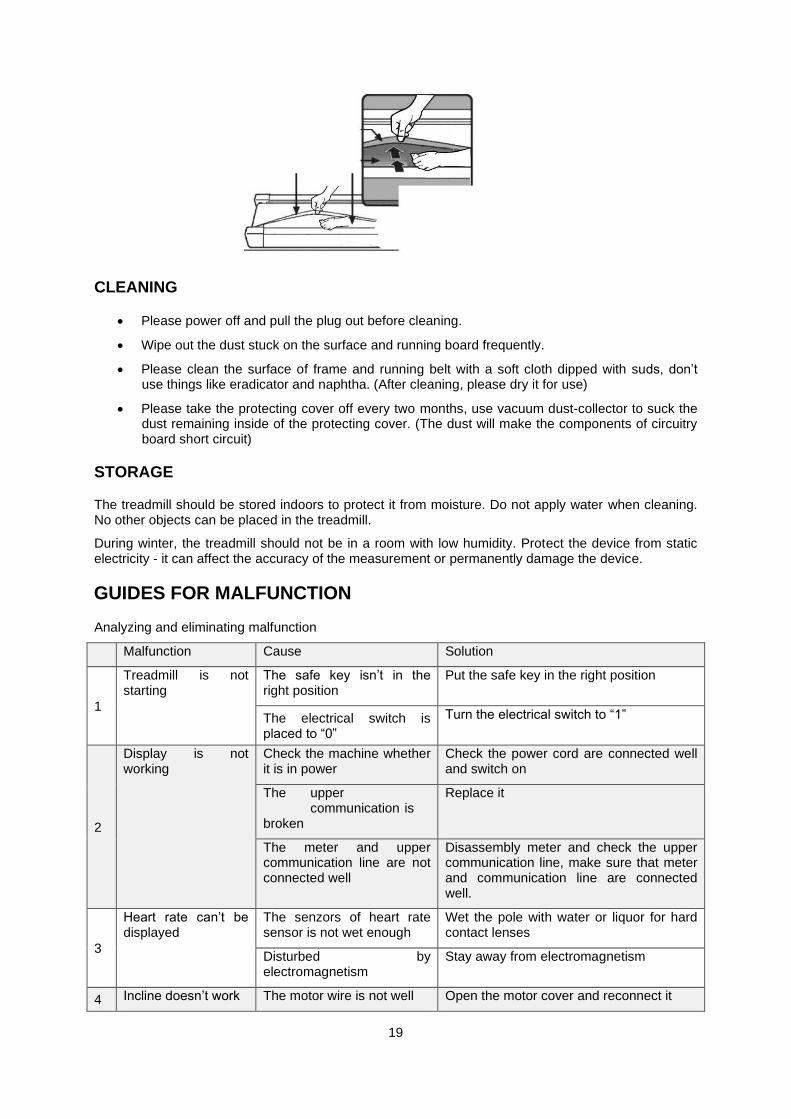
How to lubricate:
• Please unplug power supply for the treadmill and loosen the belt (Belt tension screw located at the end of the treadmill).
• After loosening the screw, lift up the running belt and clean in-between the running board. Squeeze the small white bottle of SILICONE oil which was supplied with your purchase and wipe it evenly across the board.
• After lubricating the board, screw the belt tension back to its correct tension. Tighten evenly on both sides. When it is almost tensioned, run the treadmill at 1km without any load. Adjust both tension screws to make the belt in the center of the back roller. Run the treadmill at 5km for 3mins.
• Stop the treadmill and start to walk on it at 5km/h. Lastly fine tension both screws until it’s running smoothly with your weight on.
19
CLEANING
• Please power off and pull the plug out before cleaning.
• Wipe out the dust stuck on the surface and running board frequently.
• Please clean the surface of frame and running belt with a soft cloth dipped with suds, don’t use things like eradicator and naphtha. (After cleaning, please dry it for use)
• Please take the protecting cover off every two months, use vacuum dust-collector to suck the dust remaining inside of the protecting cover. (The dust will make the components of circuitry board short circuit)
STORAGE
The treadmill should be stored indoors to protect it from moisture. Do not apply water when cleaning. No other objects can be placed in the treadmill.
During winter, the treadmill should not be in a room with low humidity. Protect the device from static electricity - it can affect the accuracy of the measurement or permanently damage the device.
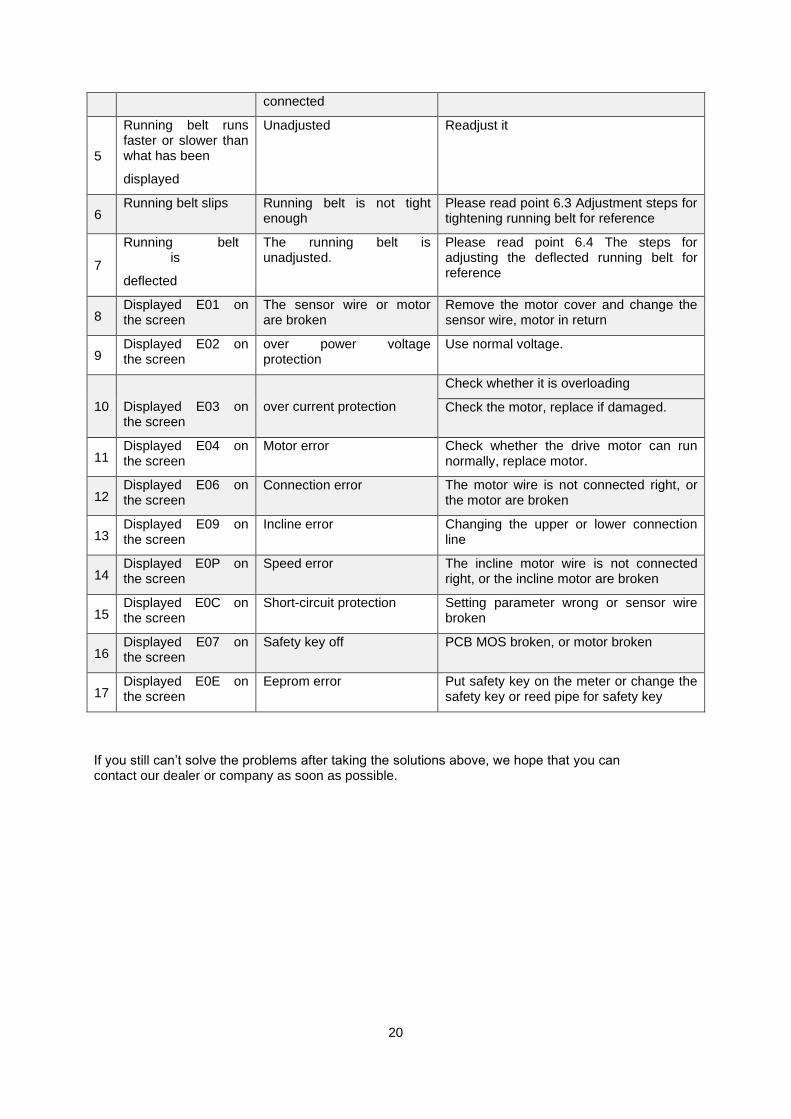
GUIDES FOR MALFUNCTION
Analyzing and eliminating malfunction
Malfunction Cause Solution
1
Treadmill is not starting
The safe key isn’t in the right position
Put the safe key in the right position
The electrical switch is placed to “0”
Turn the electrical switch to “1”
2
Display is not working
Check the machine whether it is in power
Check the power cord are connected well and switch on
The upper communication is broken
Replace it
The meter and upper communication line are not connected well
Disassembly meter and check the upper communication line, make sure that meter and communication line are connected well.
3
Heart rate can’t be displayed
The senzors of heart rate sensor is not wet enough
Wet the pole with water or liquor for hard contact lenses
Disturbed by electromagnetism
Stay away from electromagnetism
4 Incline doesn’t work The motor wire is not well Open the motor cover and reconnect it
20
connected
5
Running belt runs faster or slower than what has been
displayed
Unadjusted Readjust it
6 Running belt slips Running belt is not tight
enough Please read point 6.3 Adjustment steps for tightening running belt for reference
7
Running belt is
deflected
The running belt is unadjusted.
Please read point 6.4 The steps for adjusting the deflected running belt for reference
8 Displayed E01 on the screen
The sensor wire or motor are broken
Remove the motor cover and change the sensor wire, motor in return
9 Displayed E02 on the screen
over power voltage protection
Use normal voltage.
10
Displayed E03 on the screen
over current protection
Check whether it is overloading
Check the motor, replace if damaged.
11 Displayed E04 on the screen
Motor error Check whether the drive motor can run normally, replace motor.
12 Displayed E06 on the screen
Connection error The motor wire is not connected right, or the motor are broken
13 Displayed E09 on the screen
Incline error Changing the upper or lower connection line
14 Displayed E0P on the screen
Speed error The incline motor wire is not connected right, or the incline motor are broken
15 Displayed E0C on the screen
Short-circuit protection Setting parameter wrong or sensor wire broken
16 Displayed E07 on the screen
Safety key off PCB MOS broken, or motor broken
17 Displayed E0E on the screen
Eeprom error Put safety key on the meter or change the safety key or reed pipe for safety key
If you still can’t solve the problems after taking the solutions above, we hope that you can contact our dealer or company as soon as possible.
21
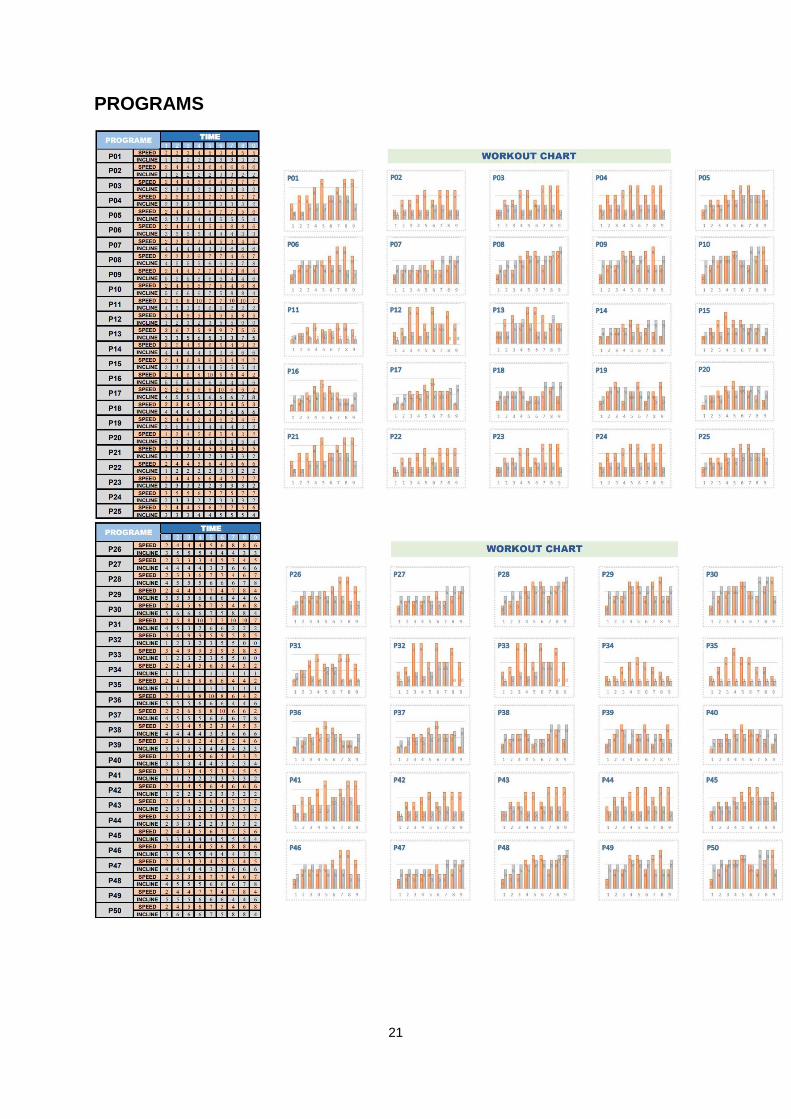
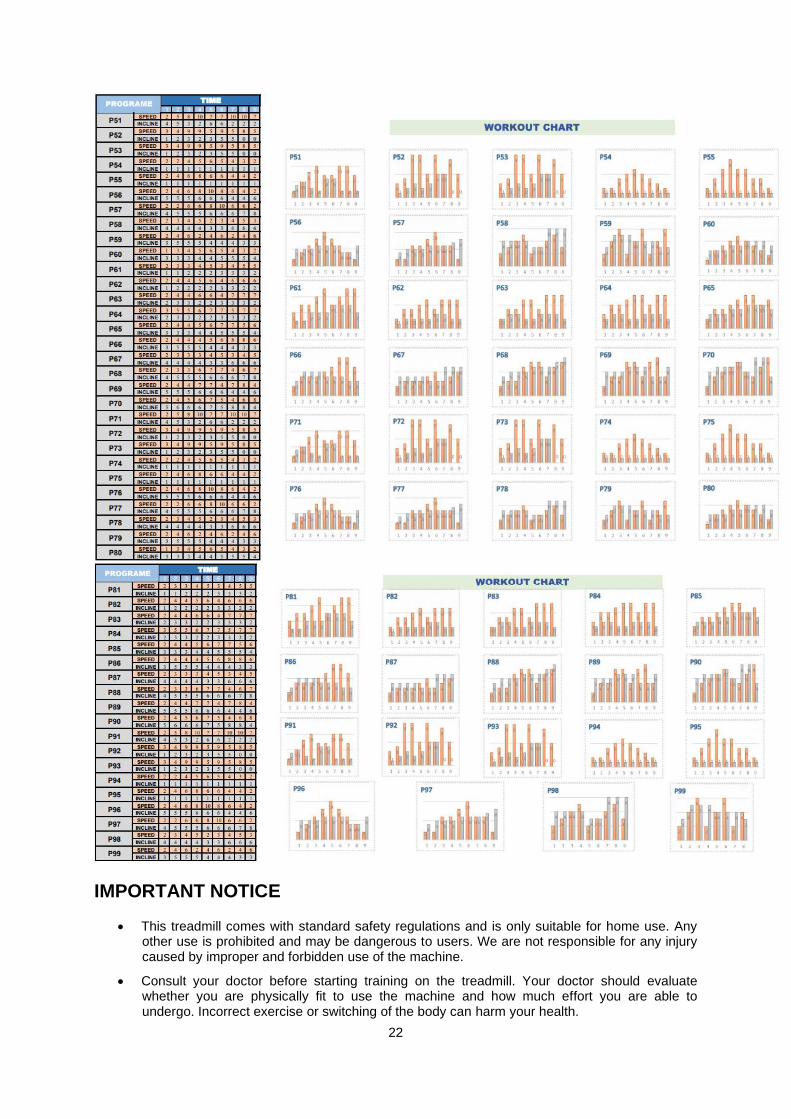
PROGRAMS
22
IMPORTANT NOTICE
• This treadmill comes with standard safety regulations and is only suitable for home use. Any other use is prohibited and may be dangerous to users. We are not responsible for any injury caused by improper and forbidden use of the machine.
• Consult your doctor before starting training on the treadmill. Your doctor should evaluate whether you are physically fit to use the machine and how much effort you are able to undergo. Incorrect exercise or switching of the body can harm your health.

23
• Carefully read the following tips and exercises. If you experience pain, nausea, breathing, or other health problems during exercise, immediately stop the exercise. If the pain persists, contact your doctor immediately.
• This treadmill is not suitable as a professional or medical purpose. It can also not be used for healing purposes.
• The heart rate monitor is not a medical device. It provides only approximate information about your average heart rate, and any suggested pulse rate is not medically binding. Accumulated data may not always be accurate regarding uncontrollable human and environmental factors.
ENVIRONMENT PROTECTION
After the product lifespan expired or if the possible repairing is uneconomic, dispose it according to the local laws and environmentally friendly in the nearest scrapyard.
By proper disposal you will protect the environment and natural sources. Moreover, you can help protect human health. If you are not sure in correct disposing, ask local authorities to avoid law violation or sanctions.
Don’t put the batteries among house waste but hand them in to the recycling place.
TERMS AND CONDITIONS OF WARRANTY, WARRANTY CLAIMS
General Conditions of Warranty and Definition of Terms
All Warranty Conditions stated here under determine Warranty Coverage and Warranty Claim Procedure. Conditions of Warranty and Warranty Claims are governed by Act No. 89/2012 Coll. Civil Code, and Act No. 634/1992 Coll., Consumer Protection, as amended, also in cases that are not specified by these Warranty rules.
The seller is SEVEN SPORT s.r.o. with its registered office in Strakonická street 1151/2c, Prague 150 00, Company Registration Number: 26847264, registered in the Trade Register at Regional Court in Prague, Section C, Insert No. 116888.
According to valid legal regulations it depends whether the Buyer is the End Customer or not.
“The Buyer who is the End Customer” or simply the “End Customer” is the legal entity that does not conclude and execute the Contract in order to run or promote his own trade or business activities.
“The Buyer who is not the End Customer” is a Businessman that buys Goods or uses services for the purpose of using the Goods or services for his own business activities. The Buyer conforms to the General Purchase Agreement and business conditions.
These Conditions of Warranty and Warranty Claims are an integral part of every Purchase Agreement made between the Seller and the Buyer. All Warranty Conditions are valid and binding, unless otherwise specified in the Purchase Agreement, in the Amendment to this Contract or in another written agreement.
Warranty Conditions
Warranty Period
The Seller provides the Buyer a 24 months Warranty for Goods Quality, unless otherwise specified in the Certificate of Warranty, Invoice, Bill of Delivery or other documents related to the Goods. The legal warranty period provided to the Consumer is not affected.
By the Warranty for Goods Quality, the Seller guarantees that the delivered Goods shall be, for a certain period of time, suitable for regular or contracted use, and that the Goods shall maintain its regular or contracted features.
The Warranty does not cover defects resulting from (if applicable):
• User’s fault, i.e. product damage caused by unqualified repair work, improper assembly, insufficient insertion of seat post into frame, insufficient tightening of pedals and cranks
• Improper maintenance

24
• Mechanical damages
• Regular use (e.g. wearing out of rubber and plastic parts, moving mechanisms, joints, wear of brake pads/blocks, chain, tires, cassette/multi wheel etc.)
• Unavoidable event, natural disaster
• Adjustments made by unqualified person
• Improper maintenance, improper placement, damages caused by low or high temperature, water, inappropriate pressure, shocks, intentional changes in design or construction etc.
Warranty Claim Procedure
The Buyer is obliged to check the Goods delivered by the Seller immediately after taking the responsibility for the Goods and its damages, i.e. immediately after its delivery. The Buyer must check the Goods so that he discovers all the defects that can be discovered by such check.
When making a Warranty Claim the Buyer is obliged, on request of the Seller, to prove the purchase and validity of the claim by the Invoice or Bill of Delivery that includes the product’s serial number, or eventually by the documents without the serial number. If the Buyer does not prove the validity of the Warranty Claim by these documents, the Seller has the right to reject the Warranty Claim.
If the Buyer gives notice of a defect that is not covered by the Warranty (e.g. in the case that the Warranty Conditions were not fulfilled or in the case of reporting the defect by mistake etc.), the Seller is eligible to require a compensation for all the costs arising from the repair. The cost shall be calculated according to the valid price list of services and transport costs.
If the Seller finds out (by testing) that the product is not damaged, the Warranty Claim is not accepted. The Seller reserves the right to claim a compensation for costs arising from the false Warranty Claim.
In case the Buyer makes a claim about the Goods that is legally covered by the Warranty provided by the Seller, the Seller shall fix the reported defects by means of repair or by the exchange of the damaged part or product for a new one. Based on the agreement of the Buyer, the Seller has the right to exchange the defected Goods for a fully compatible Goods of the same or better technical characteristics. The Seller is entitled to choose the form of the Warranty Claim Procedures described in this paragraph.
The Seller shall settle the Warranty Claim within 30 days after the delivery of the defective Goods, unless a longer period has been agreed upon. The day when the repaired or exchanged Goods is handed over to the Buyer is considered to be the day of the Warranty Claim settlement. When the Seller is not able to settle the Warranty Claim within the agreed period due to the specific nature of the Goods defect, he and the Buyer shall make an agreement about an alternative solution. In case such agreement is not made, the Seller is obliged to provide the Buyer with a financial compensation in the form of a refund.
CZ SEVEN SPORT s.r.o.
Registered Office: Strakonická 1151/2c, Praha 5, 150 00, ČR Headquaters: Dělnická 957, Vítkov, 749 01 Warranty & Service: Čermenská 486, Vítkov 749 01
CRN: 26847264 VAT ID: CZ26847264
Phone: +420 556 300 970 E-mail: [email protected] [email protected] [email protected]
Web: www.inSPORTline.cz
SK inSPORTline s.r.o.
Headquaters, warranty & service center: Električná 6471, Trenčín 911 01, SK
CRN: 36311723 VAT ID: SK2020177082

25
Phone: +421(0)326 526 701 E-mail: [email protected] [email protected] [email protected]
Web: www.inSPORTline.sk