the vista cervical collar inservice
TRANSCRIPT
The Vista Cervical Collar Inservice
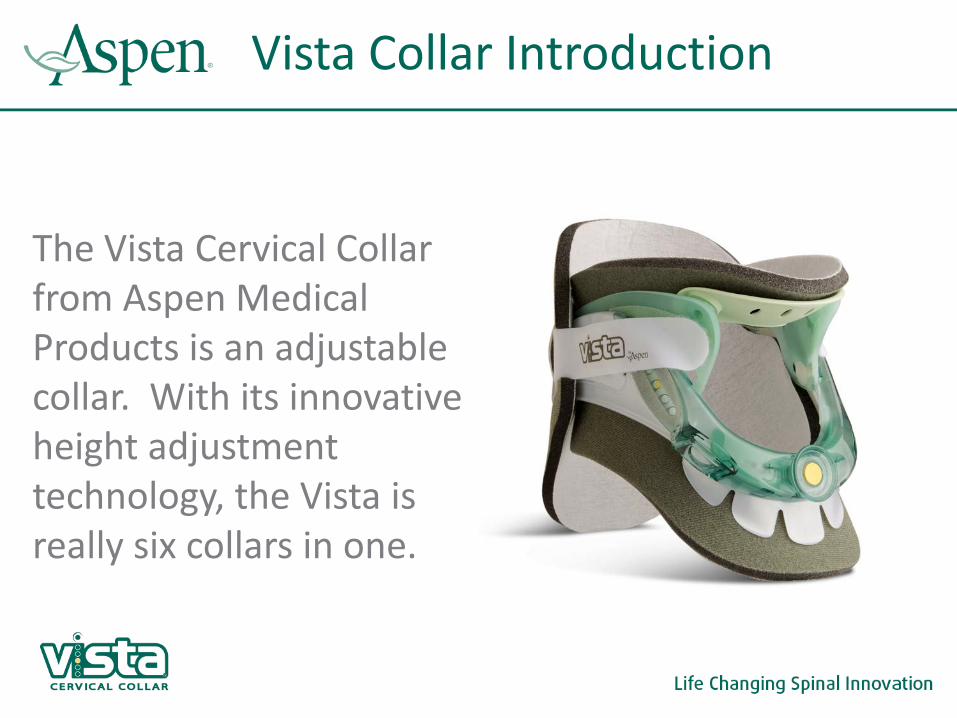
The Vista Cervical Collar from Aspen Medical Products is an adjustable collar. With its innovative height adjustment technology, the Vista is really six collars in one.
Vista Collar Introduction
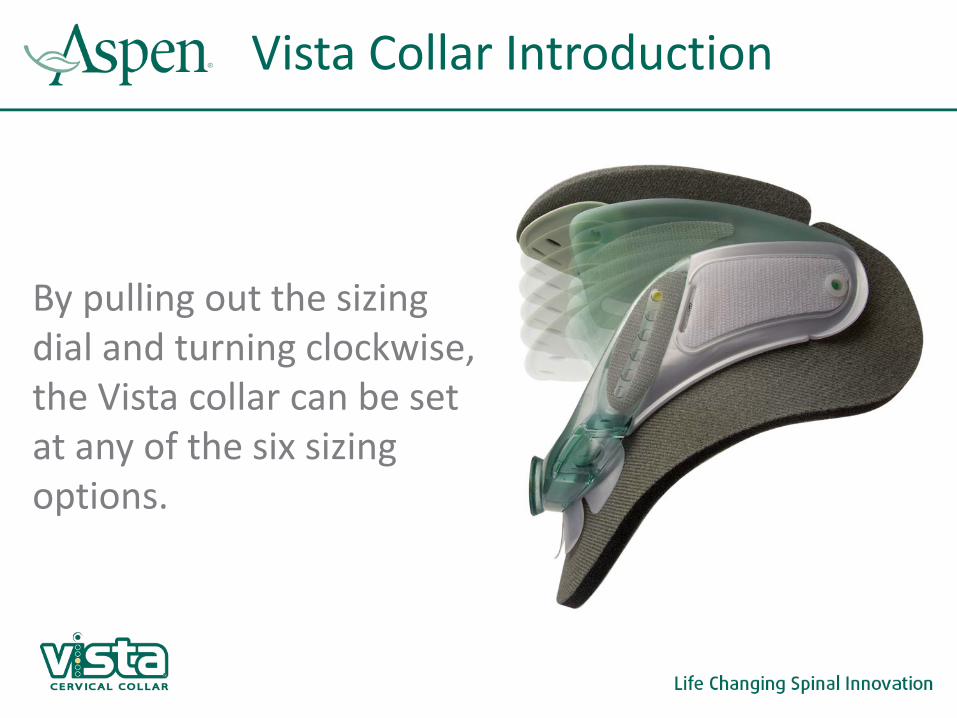
By pulling out the sizing dial and turning clockwise, the Vista collar can be set at any of the six sizing options.
Vista Collar Introduction
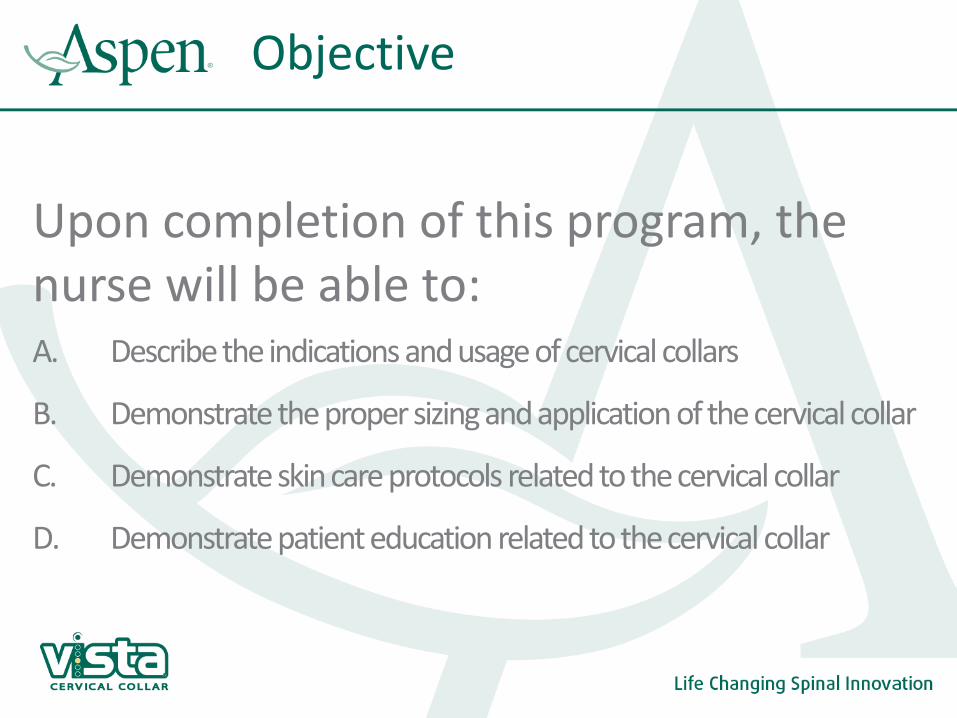
Objective
Upon completion of this program, the nurse will be able to: A. Describe the indications and usage of cervical collars
B. Demonstrate the proper sizing and application of the cervical collar
C. Demonstrate skin care protocols related to the cervical collar
D. Demonstrate patient education related to the cervical collar
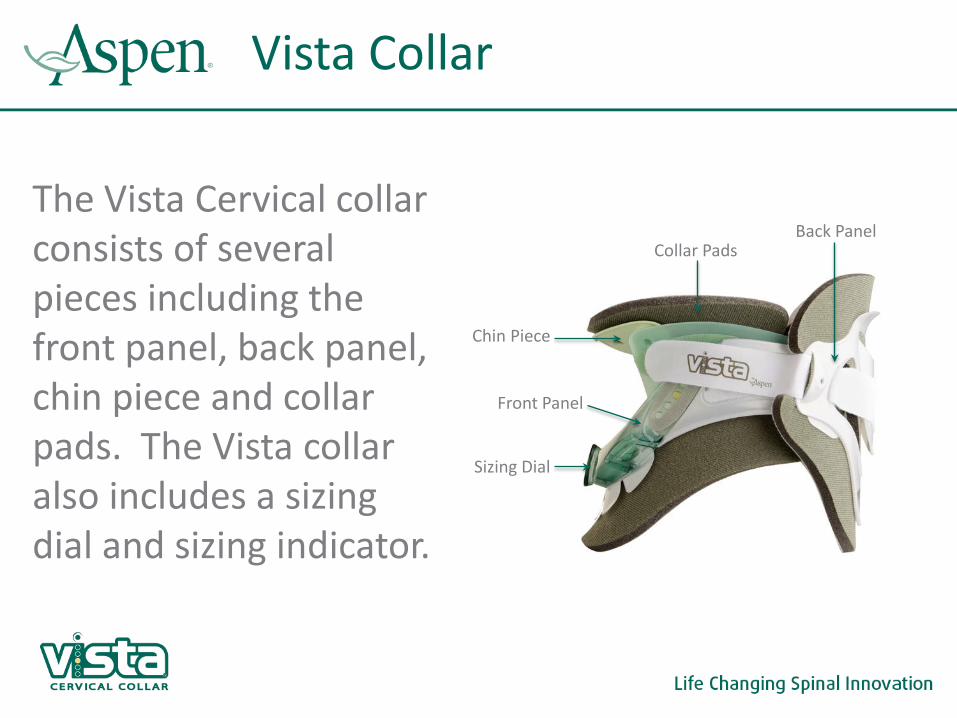
The Vista Cervical collar consists of several pieces including the front panel, back panel, chin piece and collar pads. The Vista collar also includes a sizing dial and sizing indicator.
Vista Collar
Front Panel
Back Panel
Chin Piece
Collar Pads
Sizing Dial
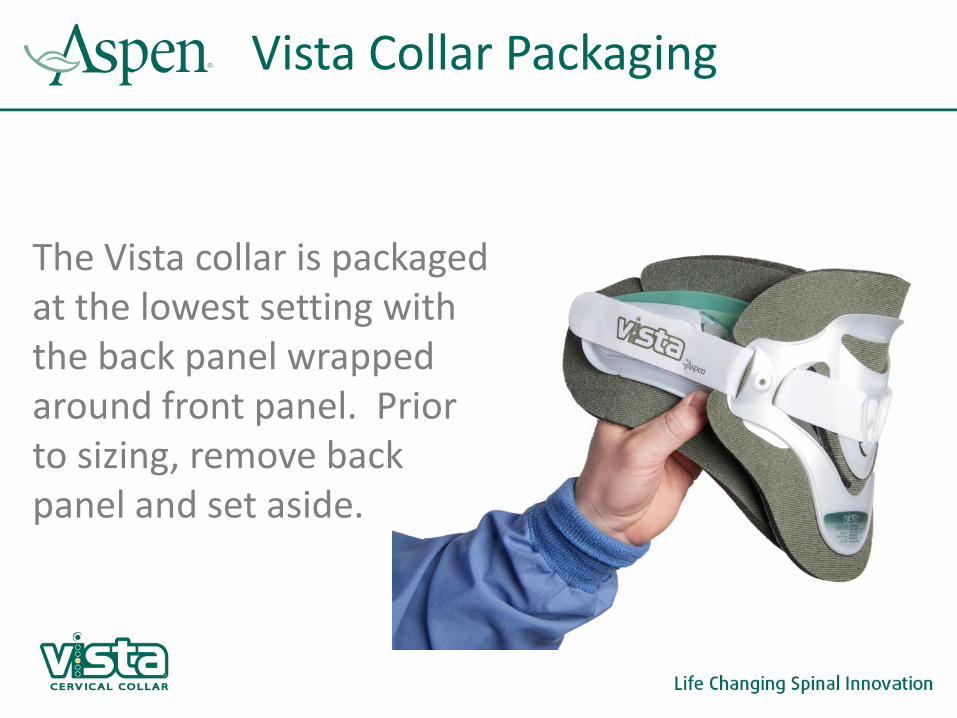
The Vista collar is packaged at the lowest setting with the back panel wrapped around front panel. Prior to sizing, remove back panel and set aside.
Vista Collar Packaging

Vista Collar Application
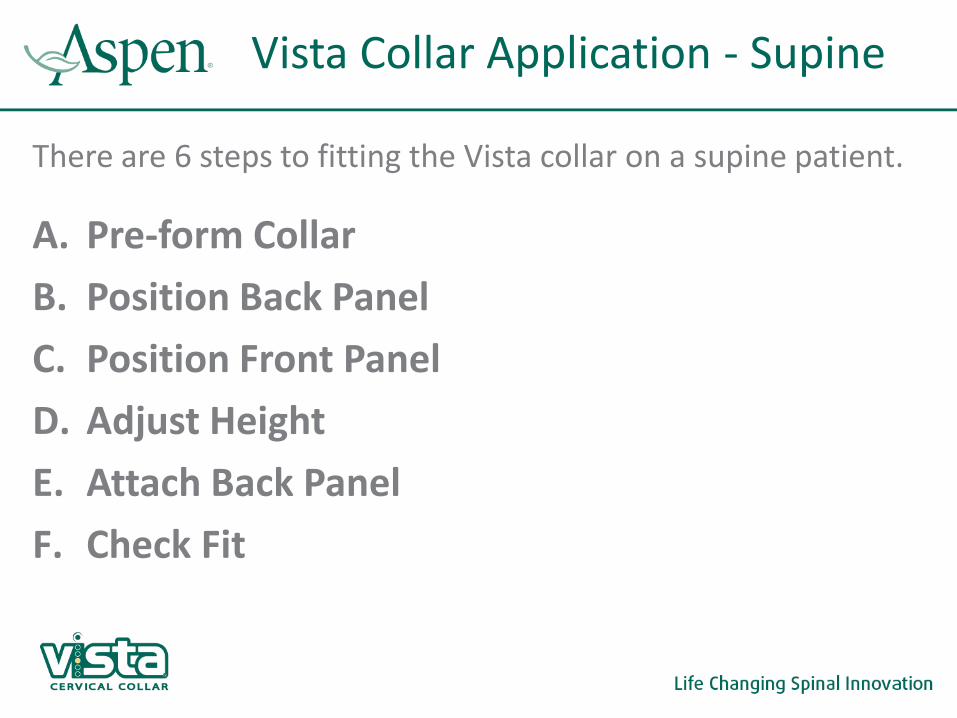
There are 6 steps to fitting the Vista collar on a supine patient. A. Pre-form Collar B. Position Back Panel C. Position Front Panel D. Adjust Height E. Attach Back Panel F. Check Fit
Vista Collar Application - Supine
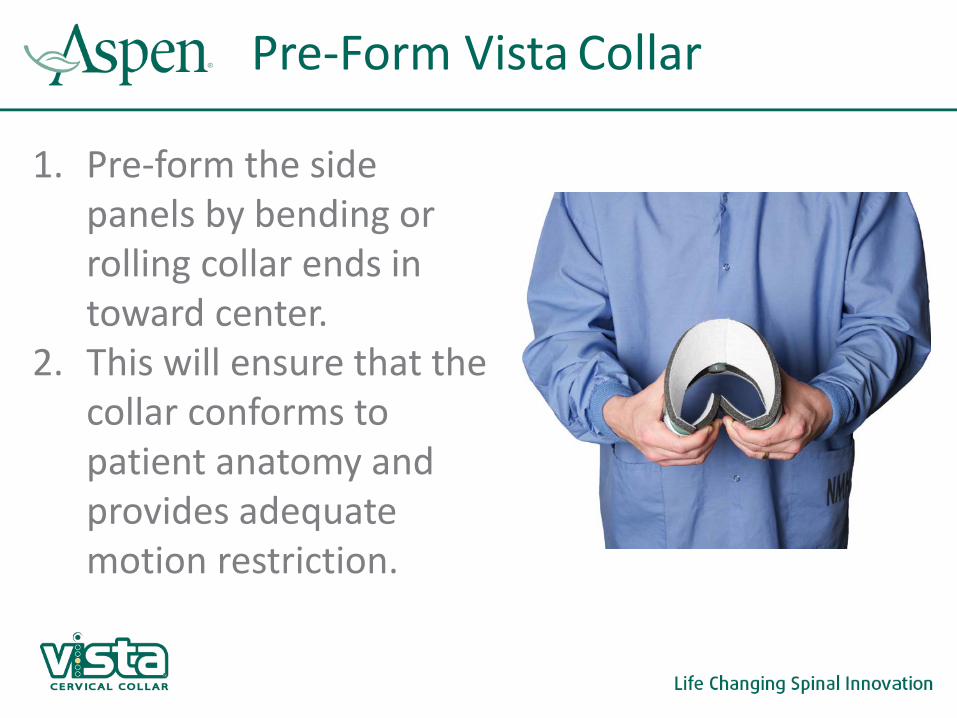
1. Pre-form the side panels by bending or rolling collar ends in toward center.
2. This will ensure that the collar conforms to patient anatomy and provides adequate motion restriction.
Pre-Form Vista Collar
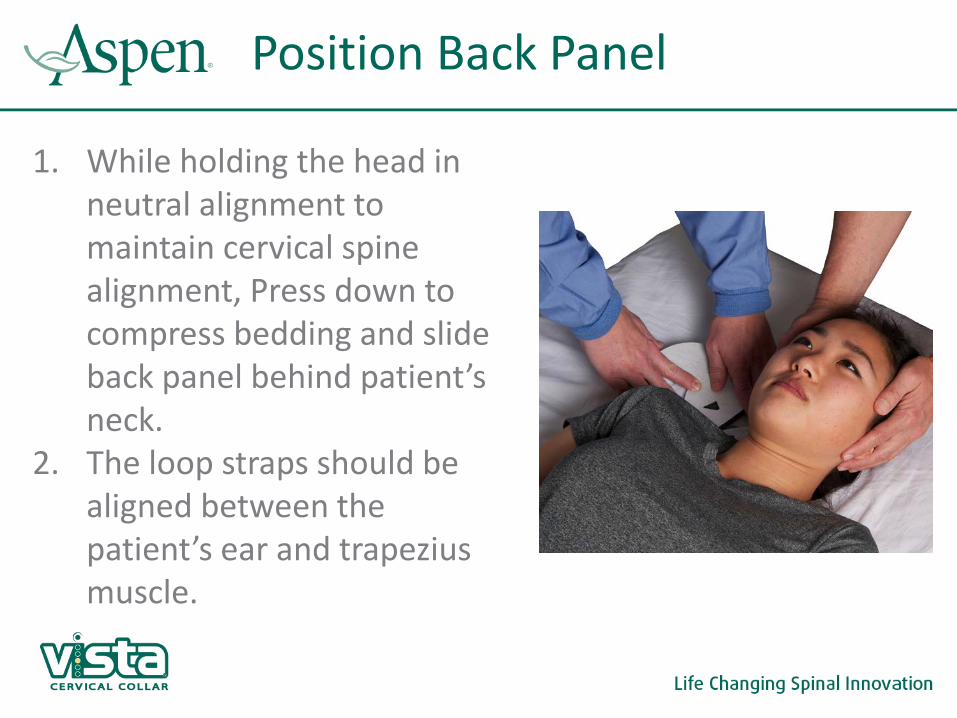
1. While holding the head in neutral alignment to maintain cervical spine alignment, Press down to compress bedding and slide back panel behind patient’s neck.
2. The loop straps should be aligned between the patient’s ear and trapezius muscle.
Position Back Panel
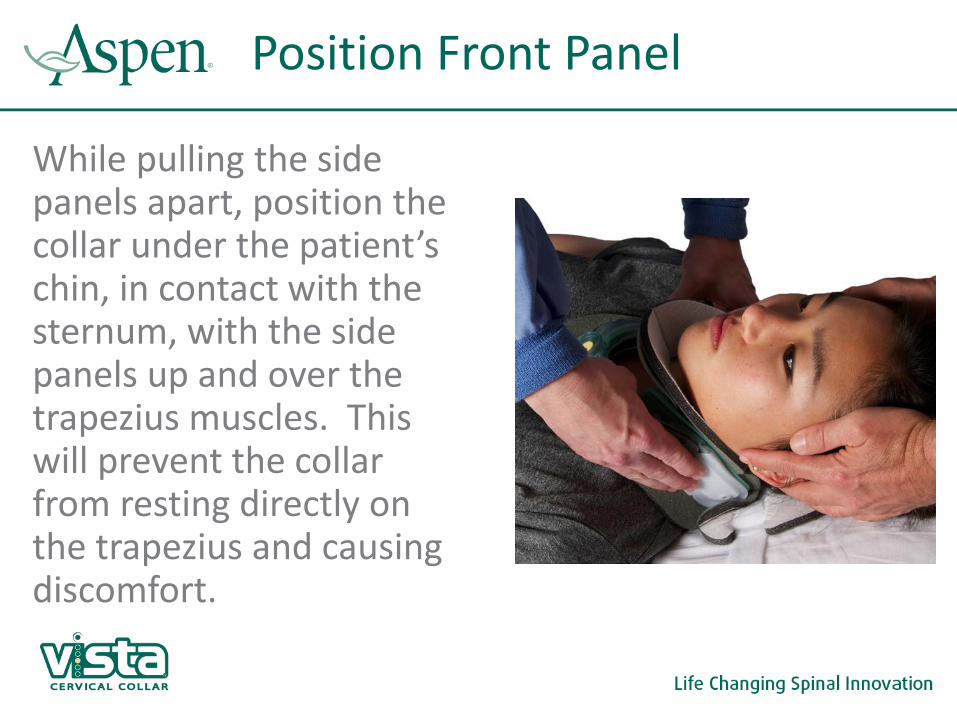
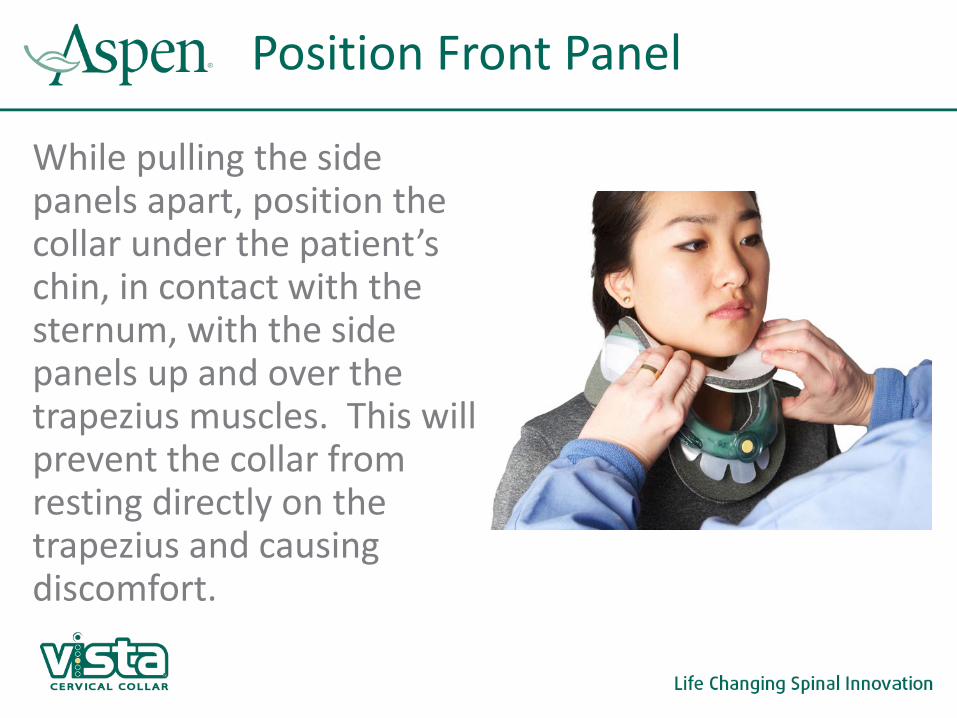
While pulling the side panels apart, position the collar under the patient’s chin, in contact with the sternum, with the side panels up and over the trapezius muscles. This will prevent the collar from resting directly on the trapezius and causing discomfort.
Position Front Panel
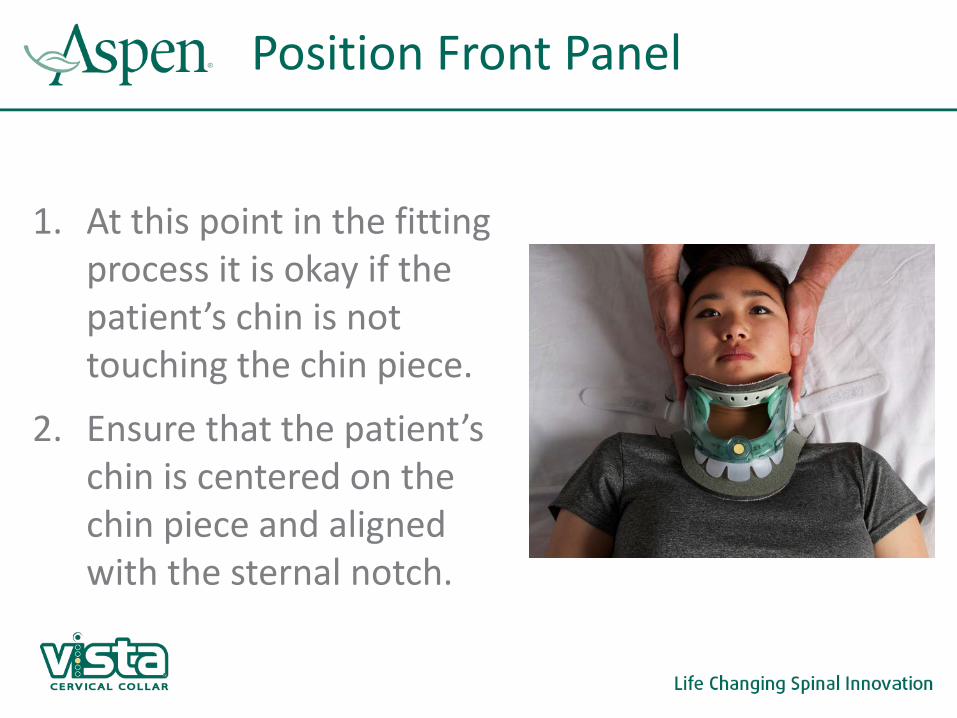
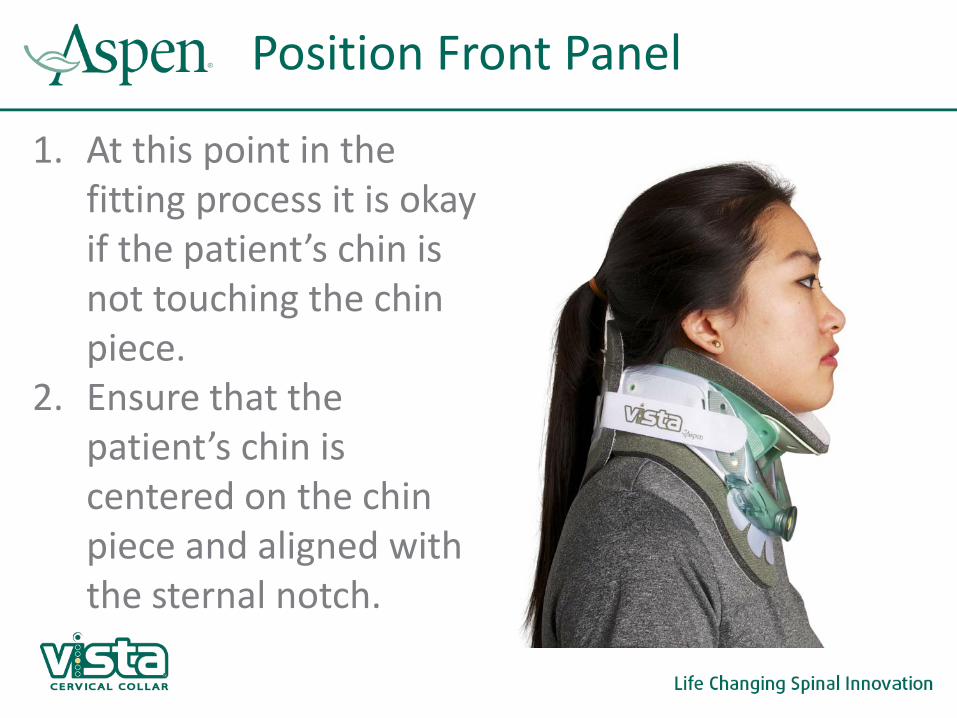
1. At this point in the fitting process it is okay if the patient’s chin is not touching the chin piece.
2. Ensure that the patient’s chin is centered on the chin piece and aligned with the sternal notch.
Position Front Panel
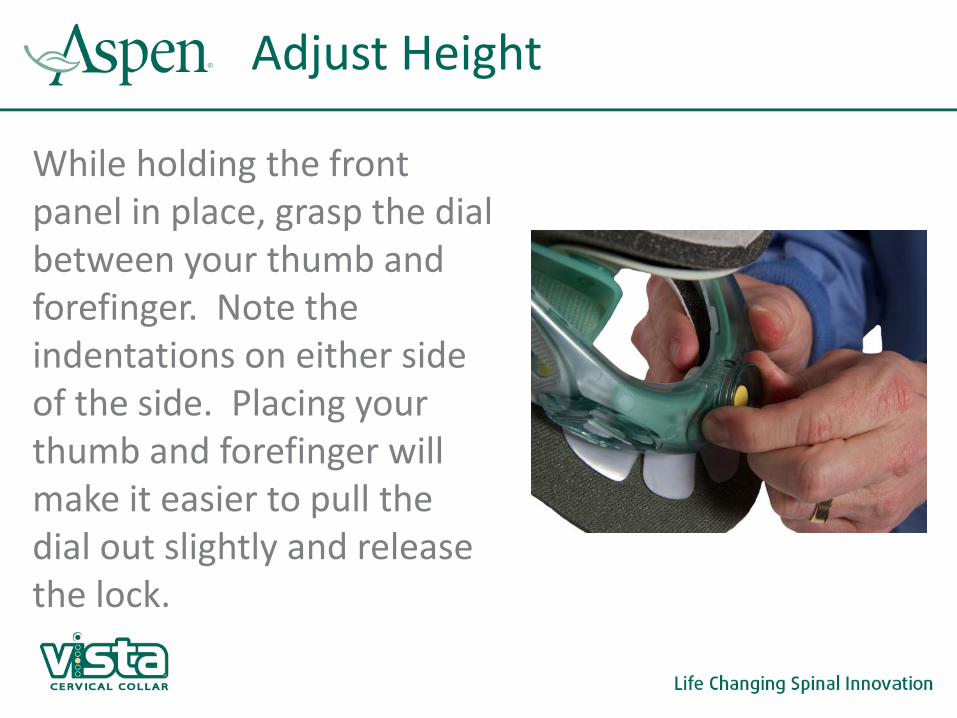
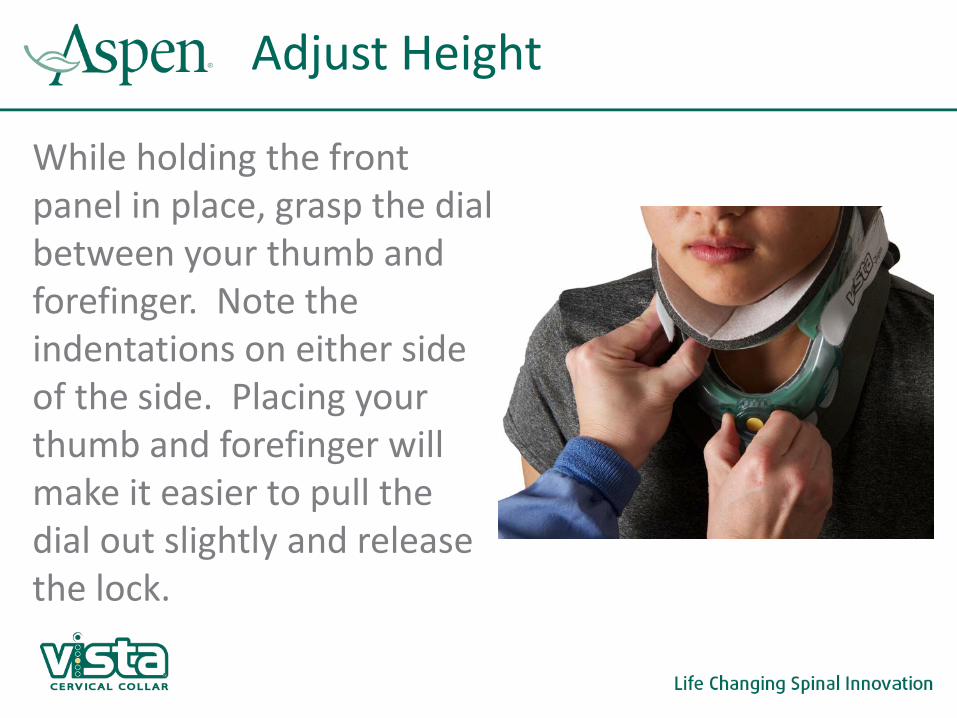
While holding the front panel in place, grasp the dial between your thumb and forefinger. Note the indentations on either side of the side. Placing your thumb and forefinger will make it easier to pull the dial out slightly and release the lock.
Adjust Height
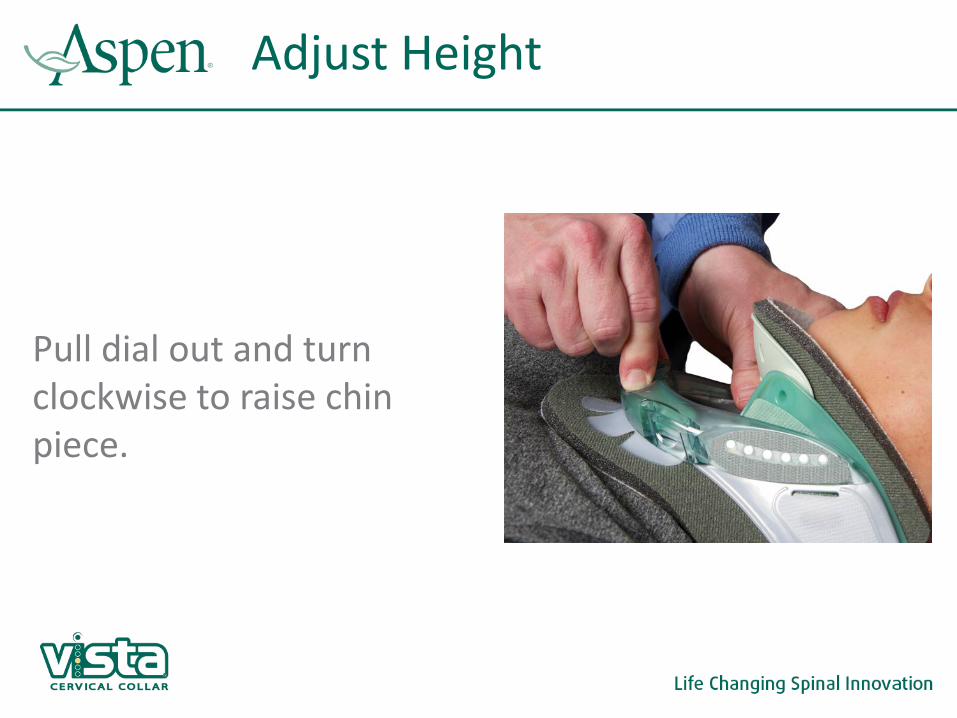
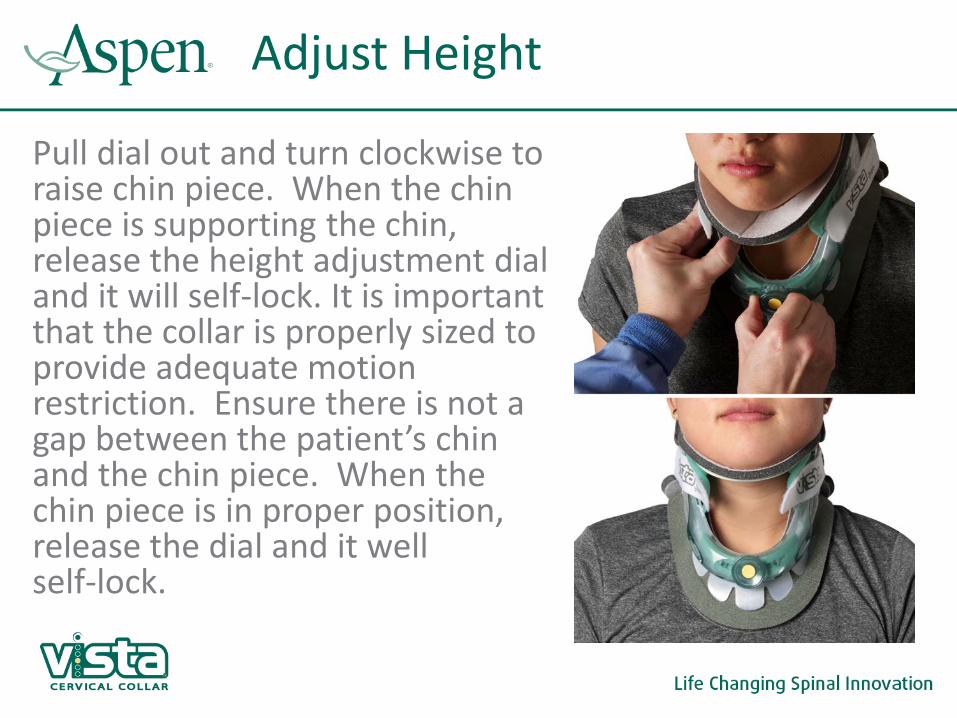
Pull dial out and turn clockwise to raise chin piece.
Adjust Height
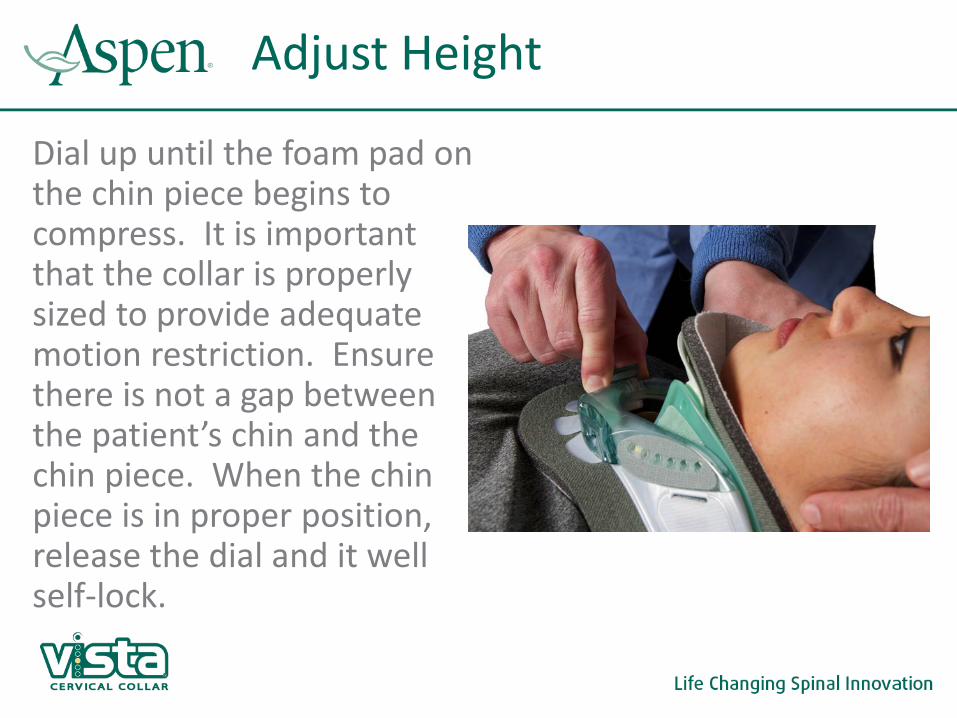
Dial up until the foam pad on the chin piece begins to compress. It is important that the collar is properly sized to provide adequate motion restriction. Ensure there is not a gap between the patient’s chin and the chin piece. When the chin piece is in proper position, release the dial and it well self-lock.
Adjust Height
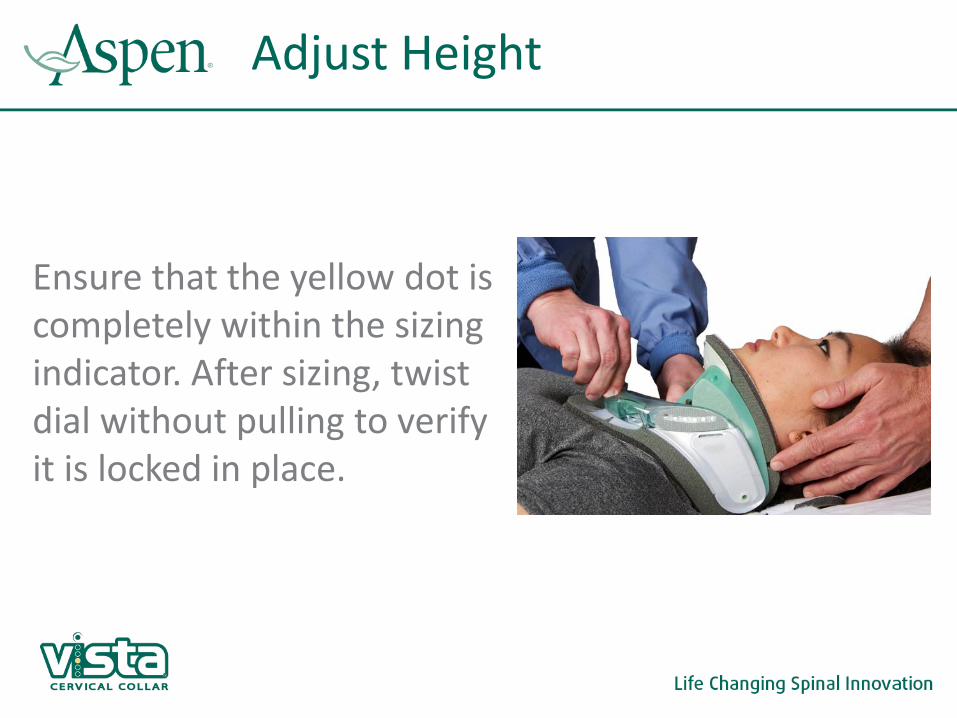
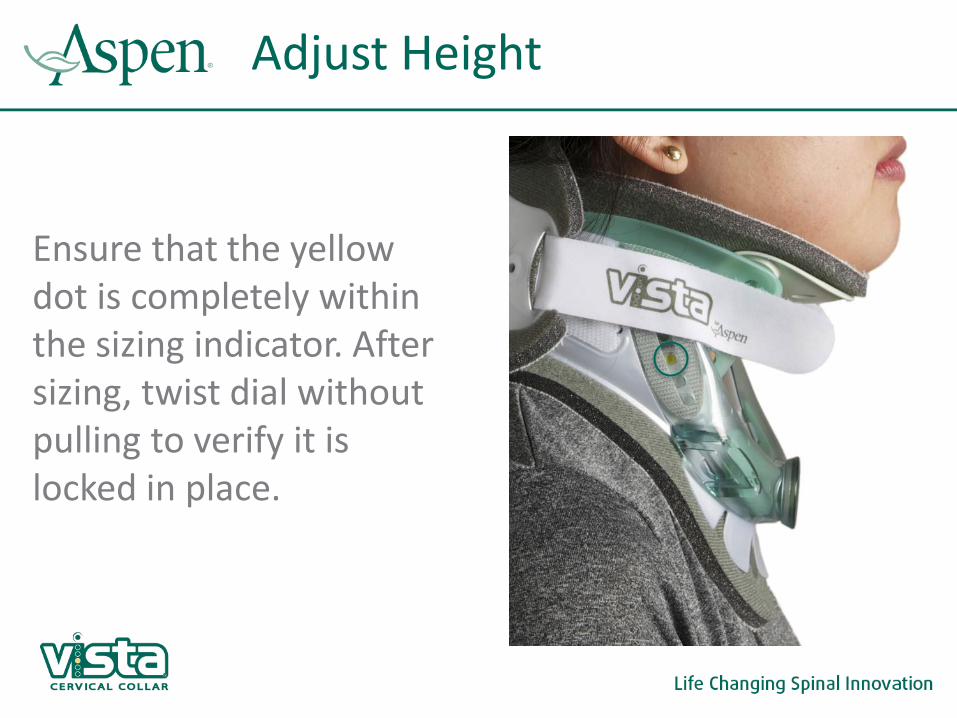
Ensure that the yellow dot is completely within the sizing indicator. After sizing, twist dial without pulling to verify it is locked in place.
Adjust Height
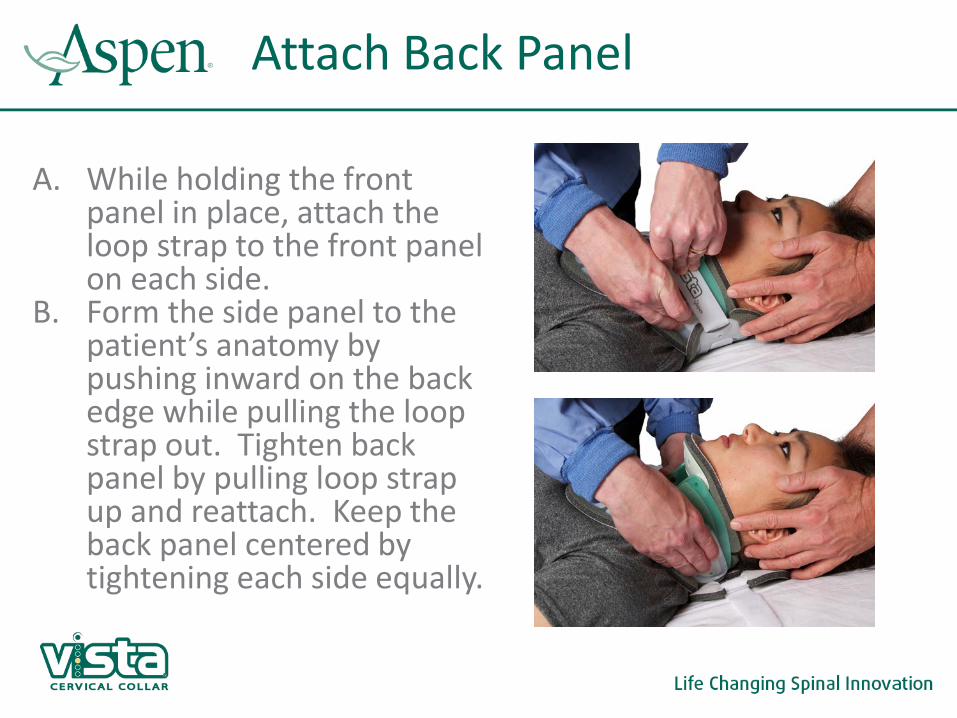
A. While holding the front panel in place, attach the loop strap to the front panel on each side.
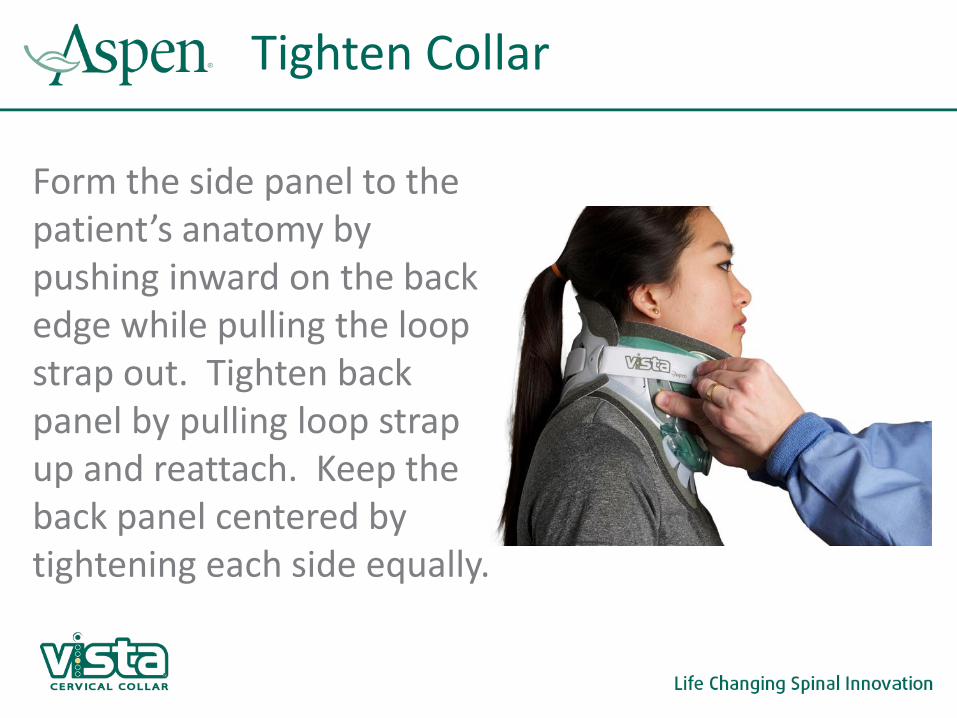
B. Form the side panel to the patient’s anatomy by pushing inward on the back edge while pulling the loop strap out. Tighten back panel by pulling loop strap up and reattach. Keep the back panel centered by tightening each side equally.
Attach Back Panel
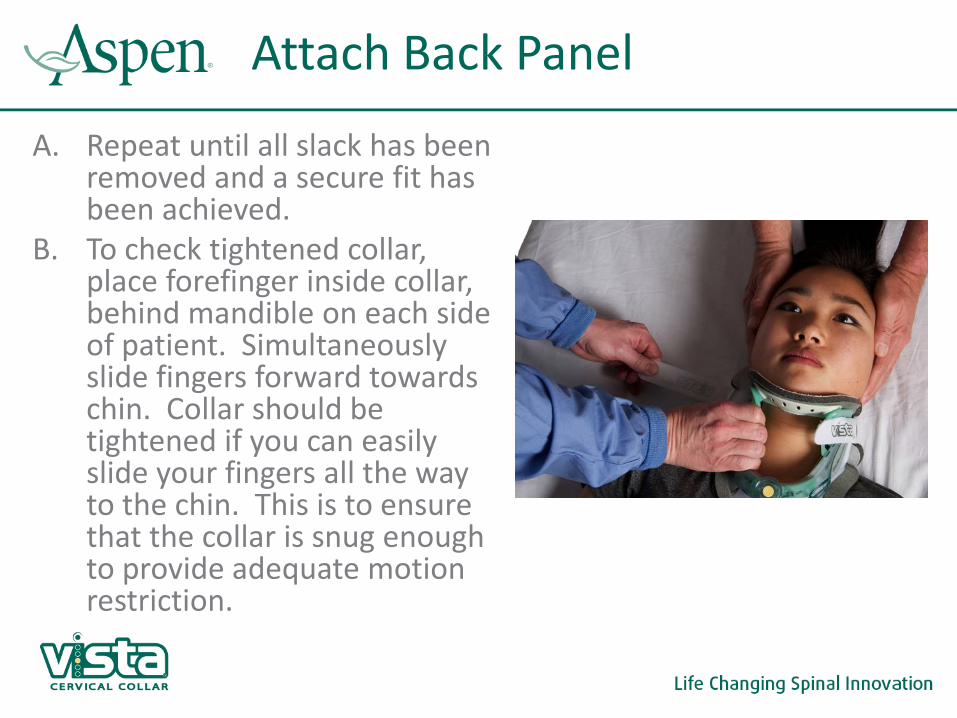
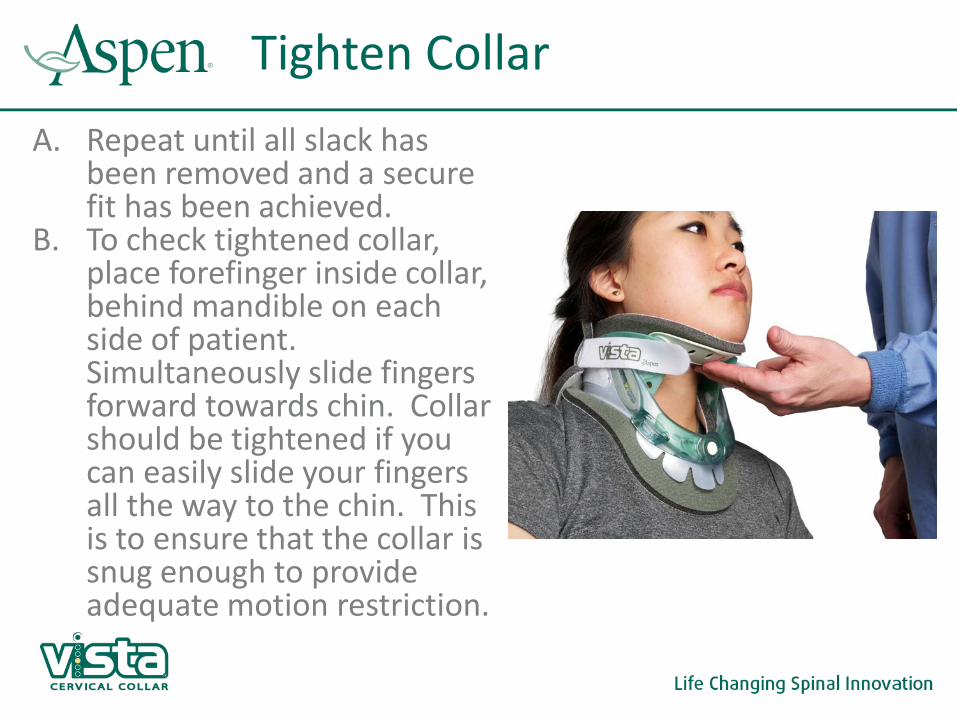
A. Repeat until all slack has been removed and a secure fit has been achieved.
B. To check tightened collar, place forefinger inside collar, behind mandible on each side of patient. Simultaneously slide fingers forward towards chin. Collar should be tightened if you can easily slide your fingers all the way to the chin. This is to ensure that the collar is snug enough to provide adequate motion restriction.
Attach Back Panel

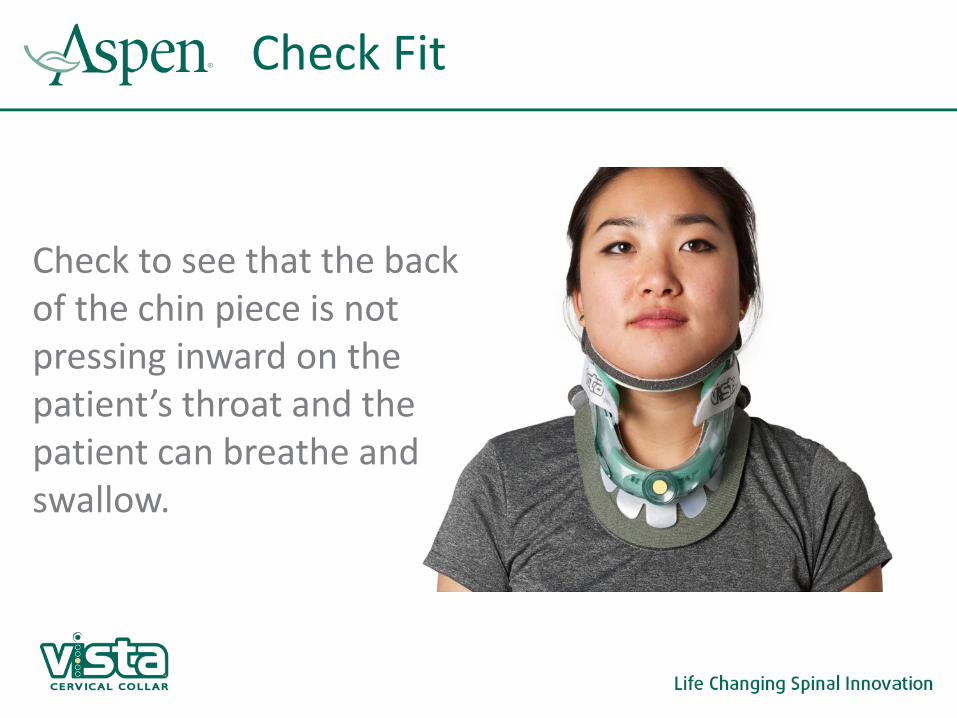
Check to see that the back of the chin piece is not pressing inward on the patient’s throat and the patient can breathe and swallow.
Check Fit
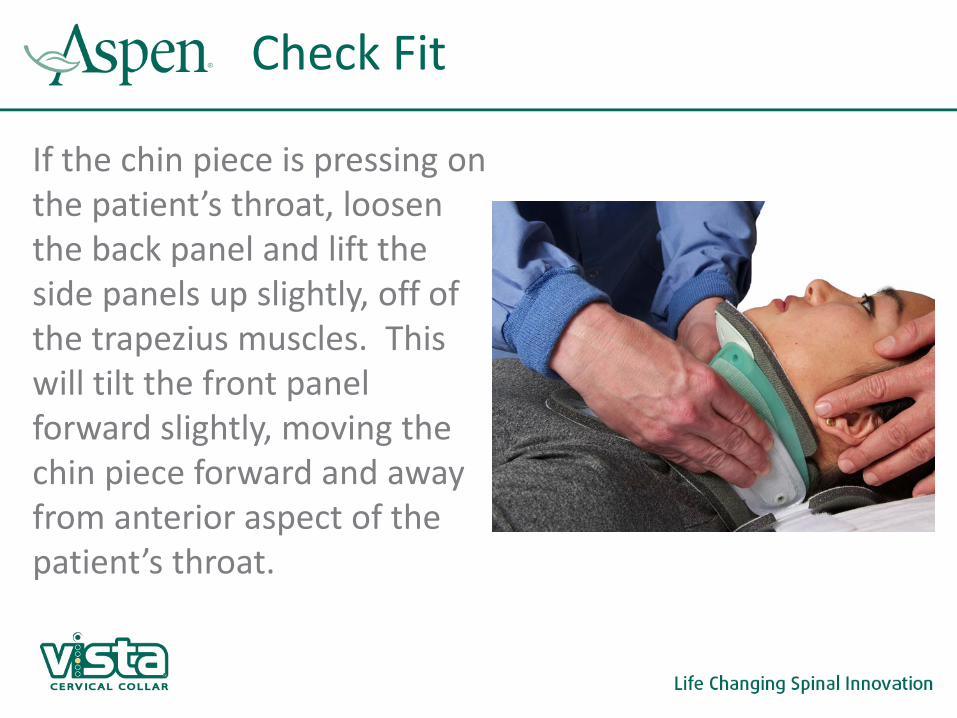
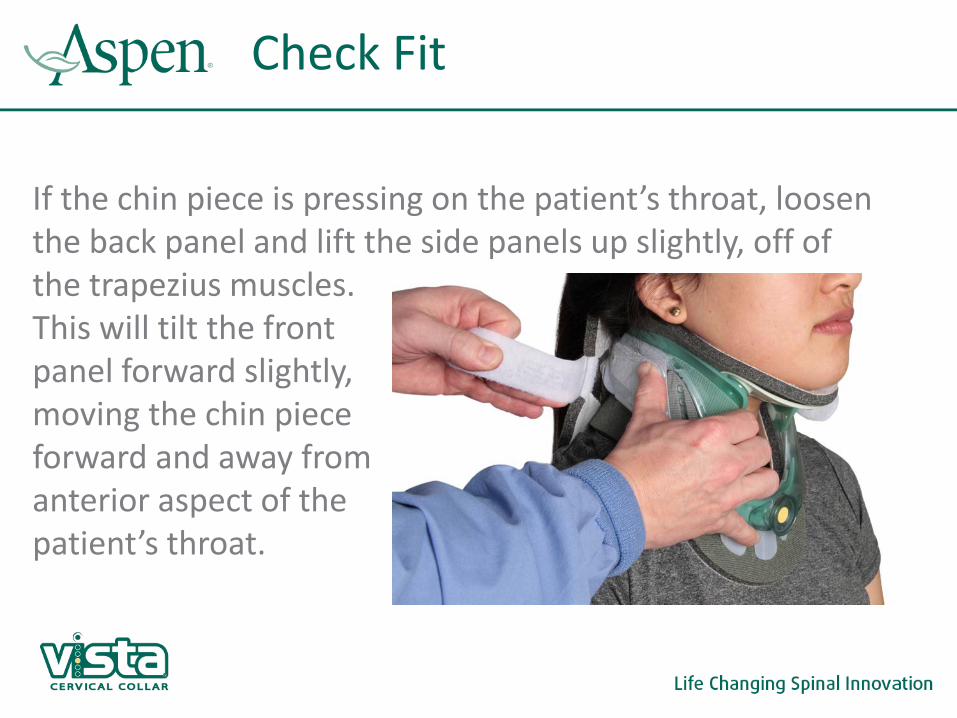
If the chin piece is pressing on the patient’s throat, loosen the back panel and lift the side panels up slightly, off of the trapezius muscles. This will tilt the front panel forward slightly, moving the chin piece forward and away from anterior aspect of the patient’s throat.
Check Fit
There are 6 steps to fitting the Vista collar on a supine patient. A. Pre-form Collar
B. Position Back Panel
C. Attach Front Panel
D. Adjust Height
E. Tighten Collar
F. Check Fit
Vista Collar Application - Upright

1. Pre-form the side panels by bending or rolling collar ends in toward center.
2. This will ensure that the collar conforms to patient anatomy and provides adequate motion restriction.
Pre-Form Vista® collar
Position Front Panel
While pulling the side panels apart, position the collar under the patient’s chin, in contact with the sternum, with the side panels up and over the trapezius muscles. This will prevent the collar from resting directly on the trapezius and causing discomfort.
1. At this point in the fitting process it is okay if the patient’s chin is not touching the chin piece.
2. Ensure that the patient’s chin is centered on the chin piece and aligned with the sternal notch.
Position Front Panel

1. Loosely attach back panel loop straps to white or gray areas to maintain front panel placement during sizing.
2. Do not attach loop strap to green area since this may interfere with the height adjustment of the front panel.
Attach Back Panel
Adjust Height
While holding the front panel in place, grasp the dial between your thumb and forefinger. Note the indentations on either side of the side. Placing your thumb and forefinger will make it easier to pull the dial out slightly and release the lock.
Adjust Height
Pull dial out and turn clockwise to raise chin piece. When the chin piece is supporting the chin, release the height adjustment dial and it will self-lock. It is important that the collar is properly sized to provide adequate motion restriction. Ensure there is not a gap between the patient’s chin and the chin piece. When the chin piece is in proper position, release the dial and it well self-lock.
Adjust Height
Ensure that the yellow dot is completely within the sizing indicator. After sizing, twist dial without pulling to verify it is locked in place.
Tighten Collar
Form the side panel to the patient’s anatomy by pushing inward on the back edge while pulling the loop strap out. Tighten back panel by pulling loop strap up and reattach. Keep the back panel centered by tightening each side equally.
Tighten Collar A. Repeat until all slack has
been removed and a secure fit has been achieved.
B. To check tightened collar, place forefinger inside collar, behind mandible on each side of patient. Simultaneously slide fingers forward towards chin. Collar should be tightened if you can easily slide your fingers all the way to the chin. This is to ensure that the collar is snug enough to provide adequate motion restriction.
Check Fit
Check to see that the back of the chin piece is not pressing inward on the patient’s throat and the patient can breathe and swallow.
Check Fit
If the chin piece is pressing on the patient’s throat, loosen the back panel and lift the side panels up slightly, off of the trapezius muscles. This will tilt the front panel forward slightly, moving the chin piece forward and away from anterior aspect of the patient’s throat.
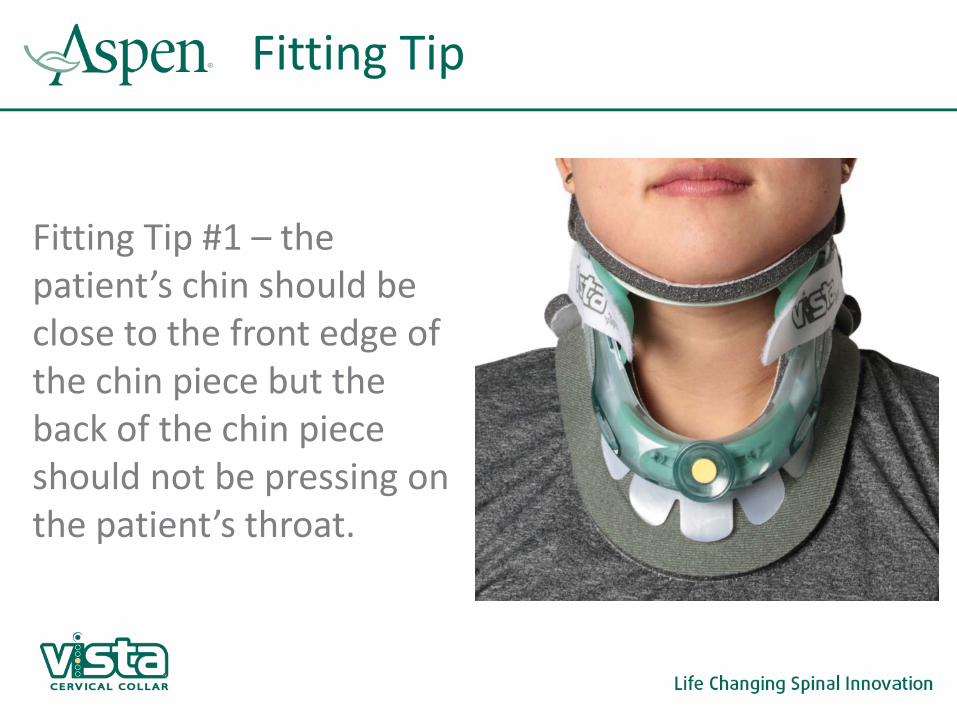
Fitting Tip
Fitting Tip #1 – the patient’s chin should be close to the front edge of the chin piece but the back of the chin piece should not be pressing on the patient’s throat.
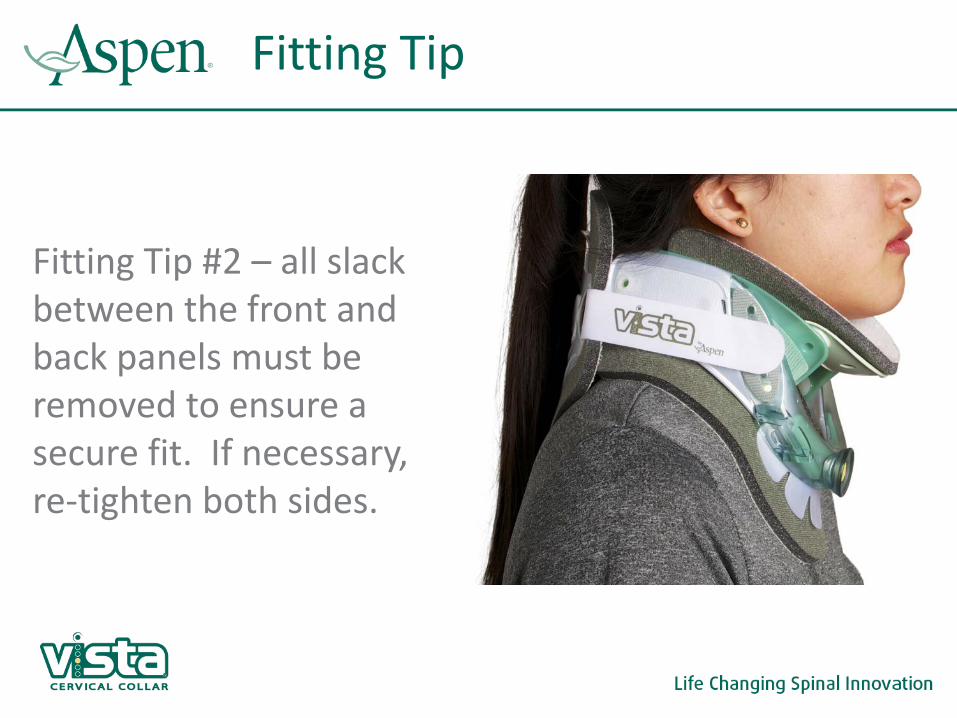
Fitting Tip
Fitting Tip #2 – all slack between the front and back panels must be removed to ensure a secure fit. If necessary, re-tighten both sides.
Fitting Tip
Fitting Tip #3 – patient’s often change position, it may be necessary to readjust the height and the re-tighten.
For example, when a supine patient becomes ambulatory and gravity pulls down on the shoulders, it
is often necessary to readjust the collar.
Fitting Tip
Fitting Tip #4 – if space is note beneath the chin piece, dial up the height. This will tighten the collar and may be all that is necessary for a proper fit. In some cases it may be necessary to tighten the loop straps evenly
to achieve a proper fit.
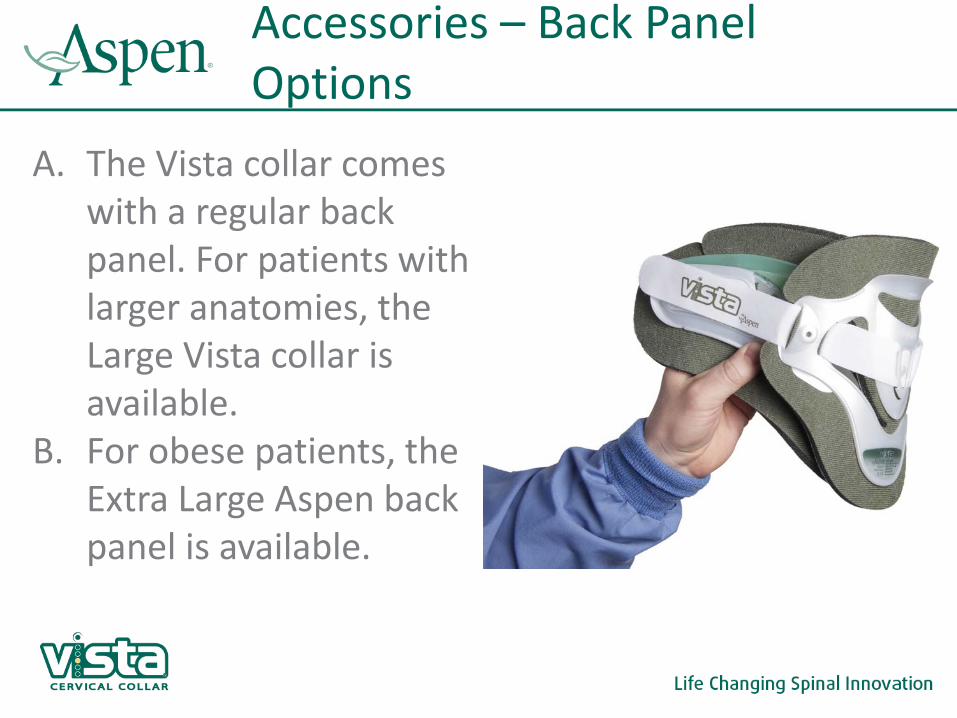
Accessories – Back Panel Options
A. The Vista collar comes with a regular back panel. For patients with larger anatomies, the Large Vista collar is available.
B. For obese patients, the Extra Large Aspen back panel is available.

Replacement Pads
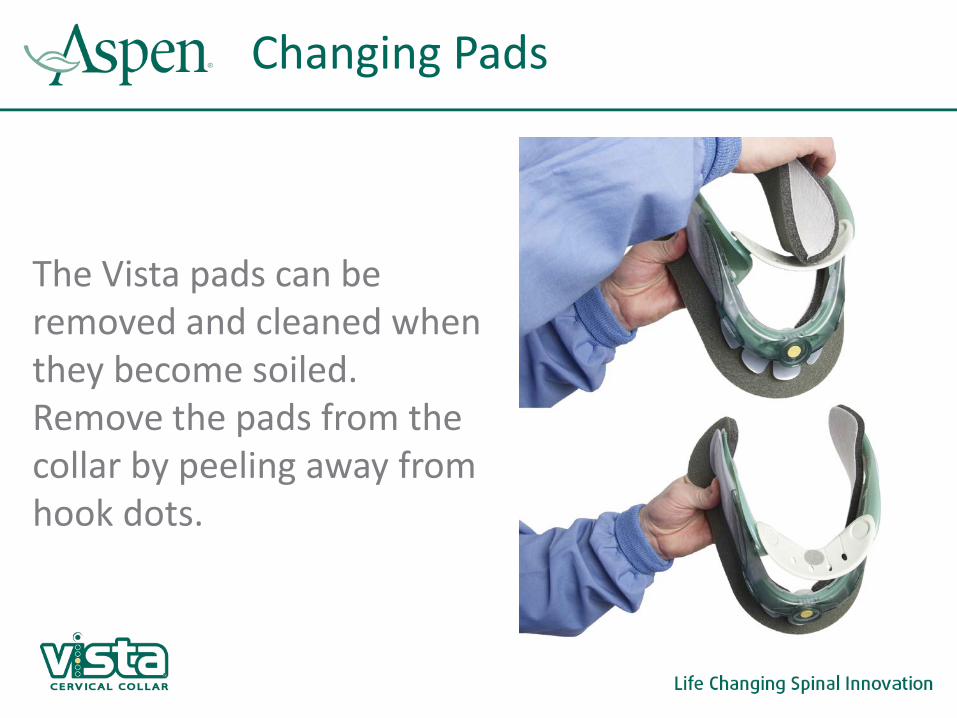
Changing Pads
The Vista pads can be removed and cleaned when they become soiled. Remove the pads from the collar by peeling away from hook dots.
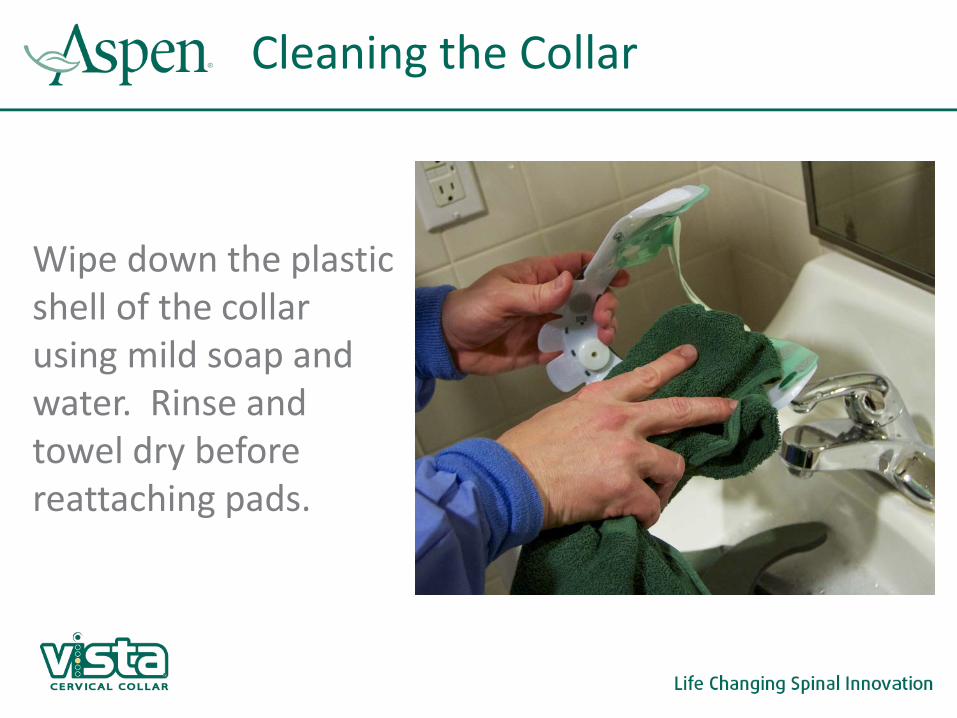
Cleaning the Collar
Wipe down the plastic shell of the collar using mild soap and water. Rinse and towel dry before reattaching pads.

Cleaning the Pads
Hands wash pads with a mild soap and warm water.

Cleaning the Pads
Rinse thoroughly to ensure no soap residue exists, this will prevent skin irritation.
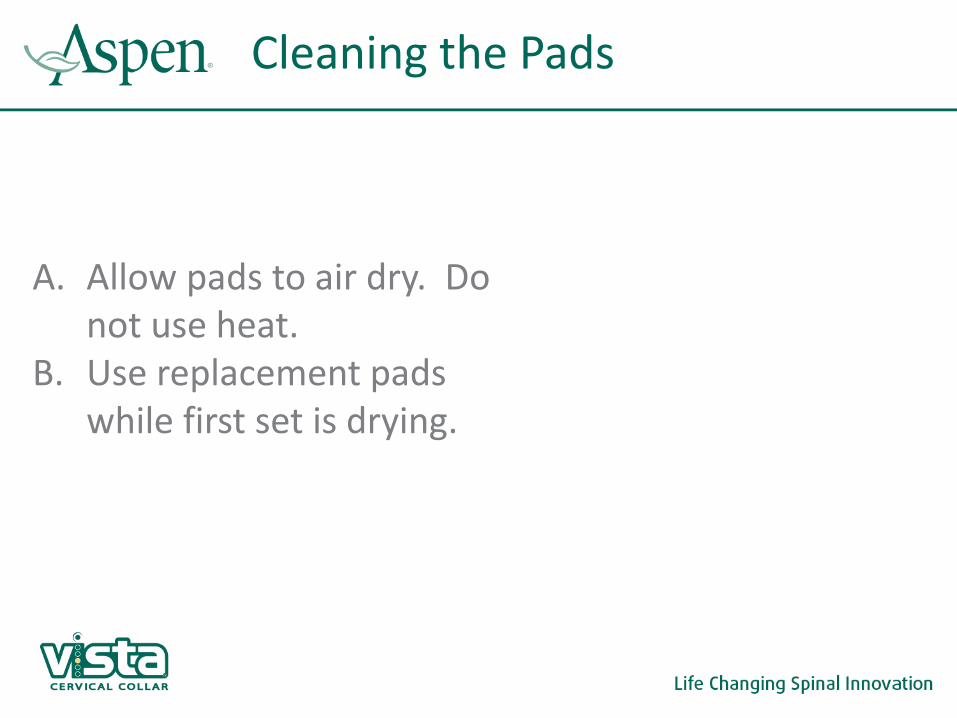
Cleaning the Pads
A. Allow pads to air dry. Do not use heat.
B. Use replacement pads while first set is drying.
Vista® Cervical Collar Padding
The white side of the Vista padding is made of hypoallergenic cotton. This prevents skin irritation and effectively wicks moisture away from the skin. There are pads for the front panel, chin piece, and back panel.
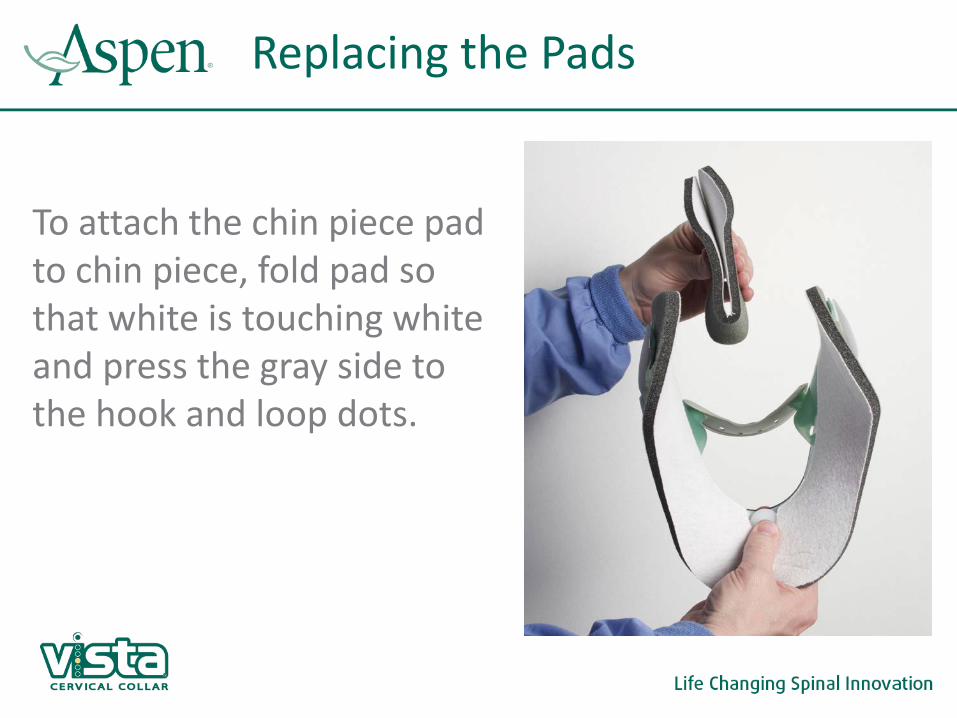
Replacing the Pads
To attach the chin piece pad to chin piece, fold pad so that white is touching white and press the gray side to the hook and loop dots.
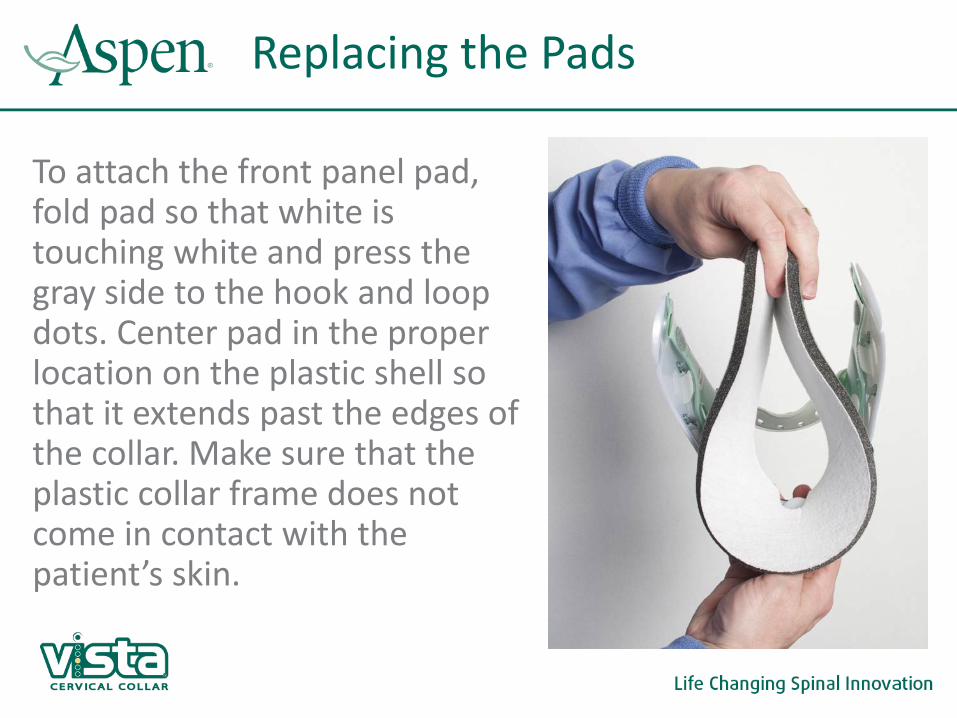
Replacing the Pads
To attach the front panel pad, fold pad so that white is touching white and press the gray side to the hook and loop dots. Center pad in the proper location on the plastic shell so that it extends past the edges of the collar. Make sure that the plastic collar frame does not come in contact with the patient’s skin.

Replacing the Pads
Place pad on back panel by pressing gray side to hook and loop dots. Thread loop strap through slots in pad.

Skin Care
Skin Care Protocol Recommendations
A. Remove device at least once per shift.
B. Make sure skin is clean and dry.
C. Check for signs of skin breakdown.
D. Palpate for skin changes within hairline.
E. Change pads as necessary to ensure they are clean and dry.

Vista Collar Competency Measurement

Vista Collar competency tool
Vista Collar competency tool
Measurement 1 – Indications of cervical collars

Vista Collar competency tool
Measurement 1 – Usage of cervical collars
Vista Collar competency tool
Measurement 1 – Usage of cervical collars
Vista Collar competency tool
Measurement 2 – Correct measuring of Vista collar
Vista Collar competency tool
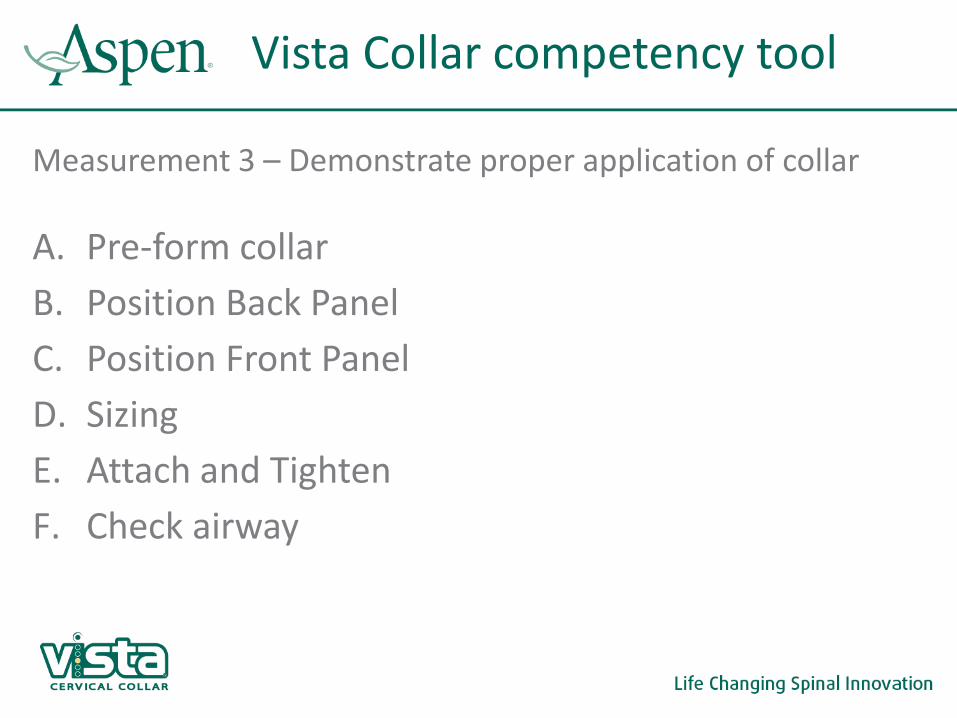
Measurement 3 – Demonstrate proper application of collar A. Pre-form collar B. Position Back Panel C. Position Front Panel D. Sizing E. Attach and Tighten F. Check airway
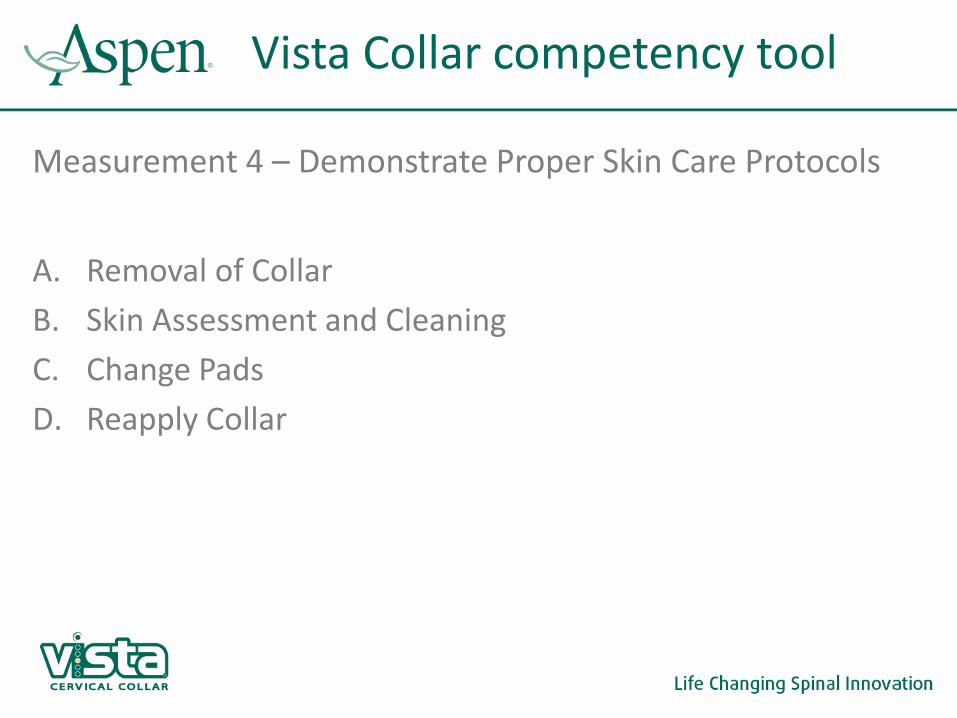
Vista Collar competency tool
Measurement 4 – Demonstrate Proper Skin Care Protocols A. Removal of Collar B. Skin Assessment and Cleaning C. Change Pads D. Reapply Collar
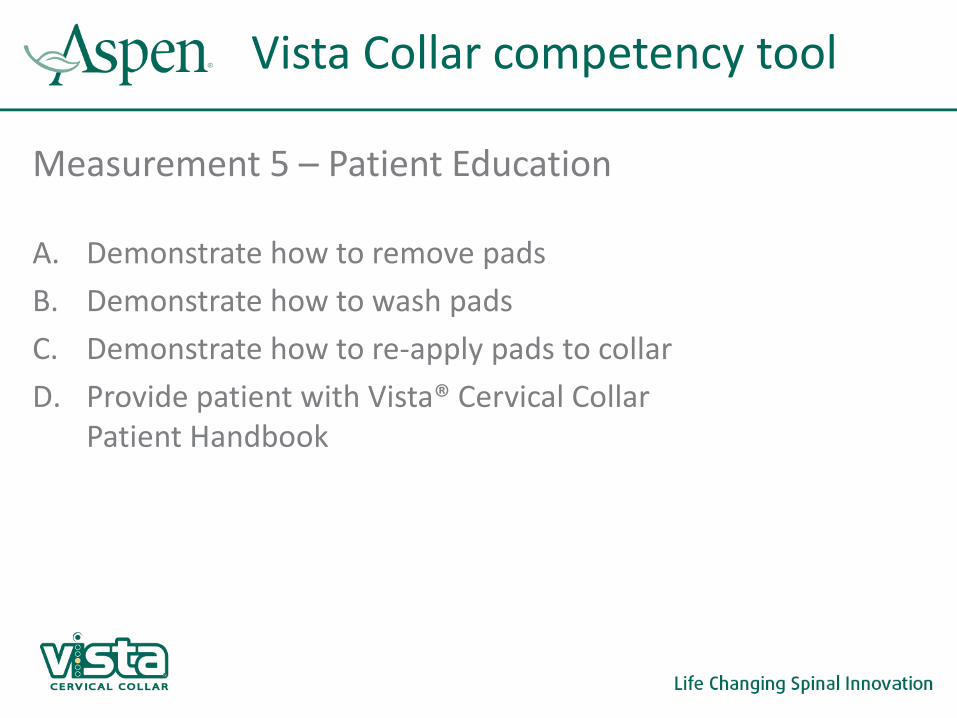
Vista Collar competency tool
Measurement 5 – Patient Education A. Demonstrate how to remove pads B. Demonstrate how to wash pads C. Demonstrate how to re-apply pads to collar D. Provide patient with Vista® Cervical Collar
Patient Handbook
Vista Collar competency tool
Links A. Clinical Research B. Technical Reports C. Tools

Video Links

Test

Test

Slide for Large Images