swiftwater rescue manual
TRANSCRIPT
Swiftwater Rescue Manual
Department of Interior National Park Service
Emergency Services

2 | P a g e
3 | P a g e
NATIONAL PARK SERVICE
SWIFTWATER RESCUE MANUAL
First Edition. September 2012
Published by the United States Department of the Interior, National Park Service. This text is intended to provide a comprehensive instruction manual for NPS personnel involved in swiftwater rescue training. As a publication of the federal government the text within this manual is not copyrighted under the copyright laws of the United States, however this manual does contain copyrighted images and illustrations. Such material is protected by United States Copyright Law and may not be reproduced without the express permission of the owner. Written by Ken Phillips, National Park Service Branch Chief of Search and Rescue Special thanks to Fred “Slim” Ray, author of Swiftwater Rescue for his contributions and input. All images, unless otherwise noted, are credited National Park Service The use of commercial products and trade names is for illustrative and educational purposes only and does not constitute an official endorsement by the National Park Service.
WARNING Swiftwater rescue involves unique hazards, which can be fatal. This manual contains information on specialized rescue techniques and intended for use as a part of a training course involving closely supervised field training with qualified instructors. A person cannot become proficient in swiftwater rescue by only reading this manual. Every swiftwater rescue situation is unique, requiring size-up and decision-making skills gained through personal experience.
4 | P a g e
Contents Introduction ..................................................................................................................... 8
Prevention ....................................................................................................................... 8
Swiftwater Rescue........................................................................................................... 8
INCIDENT REVIEW- Fatal Swiftwater Rescue Accident (West Virginia) ..................... 10
Swiftwater Hazards ....................................................................................................... 11
Powerful Force of Water ............................................................................................ 11
Cold Water ................................................................................................................. 11
Low-head dams ......................................................................................................... 12
Entrapments .............................................................................................................. 12
Strainers .................................................................................................................... 13
Culvert openings ........................................................................................................ 13
Flood Control Channel ............................................................................................... 14
Low-water Crossings ................................................................................................. 14
Flood debris ............................................................................................................... 15
Swiftwater Rescue Principles ........................................................................................ 15
Swiftwater Rescue Pre-Planning ................................................................................... 15
Rescuer Fitness ............................................................................................................ 16
Situational Awareness ................................................................................................... 16
Size-Up ......................................................................................................................... 17
Operational Risk Management ...................................................................................... 18
Risk assessment and management .............................................................................. 19
GAR Risk Assessment .............................................................................................. 20
Swiftwater Hydraulics/Hydrology and River Dynamics .................................................. 21
Classifications of River (Whitewater) Difficulty .............................................................. 25
Incident Management .................................................................................................... 25
Swiftwater Communications .......................................................................................... 27
Personal Swiftwater Rescue Equipment ....................................................................... 28
Personal Flotation Devices- USCG Ratings .............................................................. 28
Definitions Relating to PFD’s: ................................................................................ 30
Guidelines for Retiring A PFD .................................................................................... 31
Features of a Swiftwater Rescue PFD ....................................................................... 31
Sizing A PFD ............................................................................................................. 32
Helmets ..................................................................................................................... 33
5 | P a g e
Wetsuit or Dry Suit? ................................................................................................... 34
Wetsuits ..................................................................................................................... 34
Dry Suits (Drysuits) .................................................................................................... 36
Footwear .................................................................................................................... 37
Gloves ....................................................................................................................... 37
Swim Fins .................................................................................................................. 37
Eye Protection ........................................................................................................... 38
Whistle ....................................................................................................................... 38
Knife .......................................................................................................................... 38
Lights ......................................................................................................................... 38
Swiftwater Rescue Equipment- Team Gear .................................................................. 38
Throw Bags ............................................................................................................... 38
Riverboards ............................................................................................................... 40
Carlson Riverboard ................................................................................................ 40
RiverX Rescue Board by Extractor ......................................................................... 41
NRS Pro Rescue River Board ................................................................................ 41
Line Guns and Launchers .......................................................................................... 41
EZ Liner ................................................................................................................. 41
Bridger Line Gun .................................................................................................... 42
Sherrill Big Shot® ................................................................................................... 43
ResQmax™ ........................................................................................................... 43
Watercraft .................................................................................................................. 44
Hard Shell Kayaks .................................................................................................. 44
Inflatable Kayaks .................................................................................................... 45
Packraft .................................................................................................................. 45
Cataraft .................................................................................................................. 46
Paddle Rafts .......................................................................................................... 46
Hybrid Watercraft ....................................................................................................... 47
Inflatable Victim Retrieval Device ........................................................................... 47
Oceanid RDC ......................................................................................................... 47
Motorized Watercraft ................................................................................................. 48
Outboards .............................................................................................................. 48
Motorized Inflatables .............................................................................................. 49
Rigid-Hull Inflatables (RHIB) .................................................................................. 49
6 | P a g e
Personal Watercraft ............................................................................................... 50
Jon boats ............................................................................................................... 51
Swiftwater Rescue Techniques ..................................................................................... 51
Swiftwater Swimming ................................................................................................. 51
Defensive Swimming Technique ............................................................................... 52
Aggressive Swimming Technique .............................................................................. 52
Strainer ...................................................................................................................... 52
Entrapment ................................................................................................................ 53
Ferry Angle ................................................................................................................ 54
Rope Throw Bags ...................................................................................................... 54
Wading Rescue (Shallow Water Crossing) Techniques ............................................ 59
Single Rescuer ....................................................................................................... 59
Line Abreast ........................................................................................................... 59
Line Astern ............................................................................................................. 60
Tripod ..................................................................................................................... 60
Wedge ....................................................................................................................... 60
Contact Rescues ....................................................................................................... 60
Riverboard Rescues .................................................................................................. 62
Tethered Swimmer (Live Bait) ................................................................................... 63
Tensioned Diagonal ................................................................................................... 64
Continuous Loop System ........................................................................................... 64
Ferrying a Line ........................................................................................................... 64
Rope-Based Techniques ............................................................................................... 65
Boat Pins and Salvages ............................................................................................. 66
Stranded Vehicle Rescue Operations ........................................................................... 67
Helicopter Swiftwater Operations .................................................................................. 69
Medical Considerations ................................................................................................. 71
Submersion Injuries ................................................................................................... 71
Hypothermia .............................................................................................................. 72
Special Scenarios ......................................................................................................... 75
Large Volume Rivers ................................................................................................. 75
Recovery Operations ................................................................................................. 75
Night Operations ........................................................................................................ 76
Conclusion .................................................................................................................... 76

7 | P a g e
REFERENCES .............................................................................................................. 77
Appendix A- Glossary of Swiftwater Terminology ......................................................... 78
Appendix B- DOI All-Hazard SAR Position Qualifications ............................................. 80
Appendix C- Sample Swiftwater Rescue Preplan ......................................................... 81
Appendix D- Sample Swiftwater Rescue Training Class Agenda .................................. 86
8 | P a g e
Introduction This manual has been developed for use in conjunction with practical field exercises as part of a swiftwater training program. Becoming a trained swiftwater rescue technician involves developing formal knowledge in this discipline as well as an understanding of your personal physical limitations. A swiftwater rescue training program teaches tactile skills, but more importantly the exposure to the swiftwater environment develops confidence and knowledge to permit effective decision-making when the time comes. Rescuers have died attempting poorly conceived rescues. Success requires disciplined teamwork and knowing when a situation is beyond your abilities.
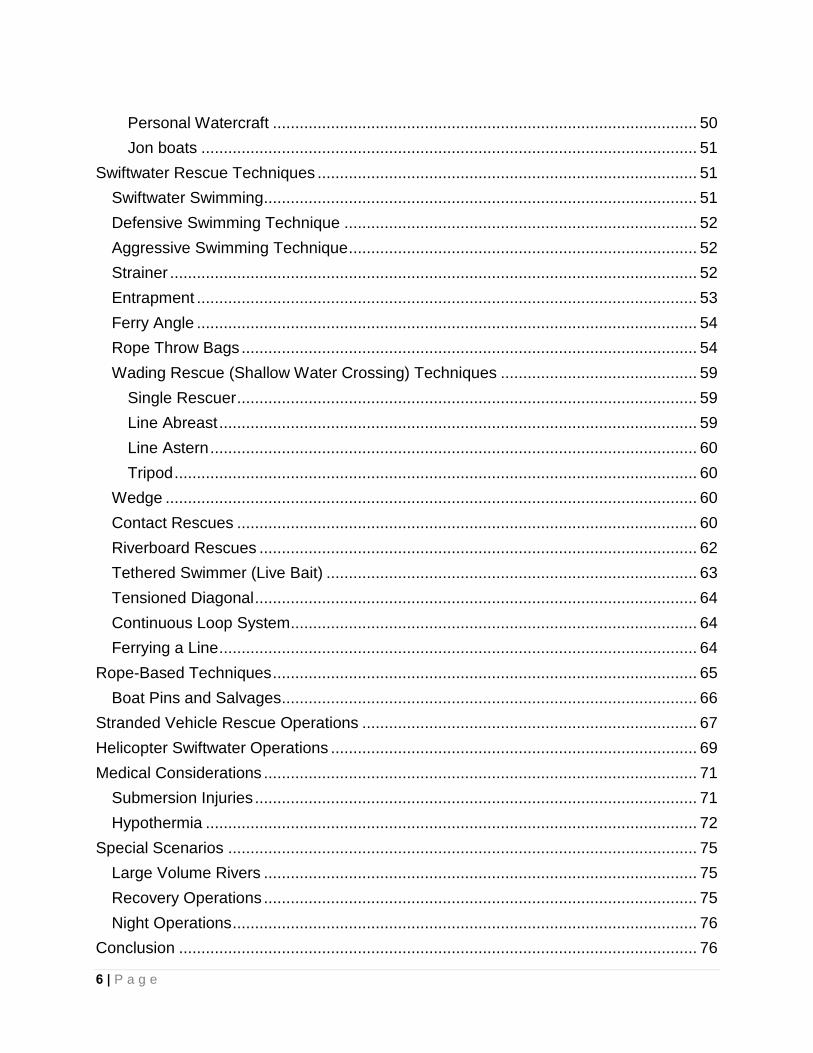
Prevention Numerous swiftwater rescue situations could be prevented by the parties involved through effective decision-making and appropriate equipment selection. Formal public education efforts, which target preventative search and rescue (PSAR) opportunities can reduce the need to have rescue personnel exposed to hazards because of unwarranted situations. PSAR efforts can include signage, printed messages, public education campaigns and targeted patrols at locations with histories of water-related accidents.
Swiftwater Rescue Swiftwater rescue is a specialized rescue discipline, which has principles and techniques that are employed in moving water. Although some personnel may refer to it as “whitewater rescue,” swiftwater is a more comprehensive term. There is not a single standardized definition of “swiftwater” within the rescue industry, however it is informally understood to refer to water over two feet deep that is flowing at a minimum of one knot (1.15 mph) and occurring in a natural watercourse, flood control channel, or a flood-related environment.
Swiftwater involves water over two feet deep that is flowing at a rate greater than one knot (1.15 mph) and occurring in a natural water course, flood control channel, or a flood-related environment.
FIGURE 1. Park visitors are seen ignoring the safety barriers and at the brink of Vernal Falls, Yosemite NP.
9 | P a g e
Whitewater refers to a stretch of water with a broken foamy surface. This occurs when a river's gradient increases enough to disturb its laminar flow and create turbulence, e.g., forms a bubbly, or aerated and unstable current; the frothy water appears white. Unlike the term whitewater, swiftwater refers to moving water in nearly any environment, including areas that are not ordinarily inundated by water. Swiftwater can include a remote backcountry drainage as well as a flooded urban area. The swiftwater rescue field has experienced several efforts to develop and standardize techniques and instruction within the United States. The initial effort started in 1979 when Rescue 3 was established as a commercial company in California providing formalized swiftwater rescue instruction classes. Jim Segerstrom, one of the initial founders, led the development of the “Swiftwater Rescue Technician” program, which has become a de facto standard nationwide. There are continuing efforts by several agencies and organizations to officially standardize national swiftwater rescue training and qualifications. ASTM International, formerly known as the American Society for Testing and Materials (ASTM), is an organization focused on the development of international voluntary consensus standards. The ASTM International F-32 Committee on Search and Rescue is the development of standards (classifications, guides, practices, specifications, terminology, and test methods) for search and rescue (SAR) activities. The National Park Service has initiated a standardized qualification system for SAR, which is reflected in the Department of Interior (DOI) All-Hazard Incident Qualification Guide (See Appendix B). Entry-level NPS SAR rescuers initially become qualified at the Search and Rescue Technician-Level 3 (SRT3) and following progression to Search and Rescue Technician-Level 2 (SRT2) may then obtain an endorsement for Swiftwater Rescue Technician- Level 2 (SWR2). The National Fire Protection Association has established guidelines for the fire service. Although NPS is not required to conform with NFPA guidelines during SAR operations it is important to have an understanding of these guidelines and how they may impact rescuers from other agencies which may be operating on the same swiftwater rescue incident. NFPA 1670- STANDARD FOR TECHNICAL RESCUE PROFESSIONAL QUALIFICATIONS delineates water rescue into several sub-disciplines, including surface water rescue (water moving less than one knot) and swiftwater rescue. This guideline describes the requisite knowledge and skills of a Level I Technical Rescuer (apply limited techniques) and Level II Technical Rescuer (apply advanced techniques). NFPA 1670- STANDARD ON OPERATIONS AND TRAINING FOR TECHNICAL SEARCH AND RESCUE INCIDENTS addresses three operational levels for rescue personnel, which include; • Awareness- capable of identifying incident hazards and the need for swiftwater rescue. • Operations- able to apply limited swiftwater rescue techniques. • Technician- proficient in applying and supervising advanced swiftwater rescue techniques. An awareness level qualification does not provide an individual with the requisite skills to be deployed, beyond scene control, at a swiftwater rescue incident.
10 | P a g e
Swiftwater rescue is low frequency-high risk endeavor. Rescues efforts that are ill-conceived, lack proper equipment, or involve improperly trained personnel can quickly turn tragic.
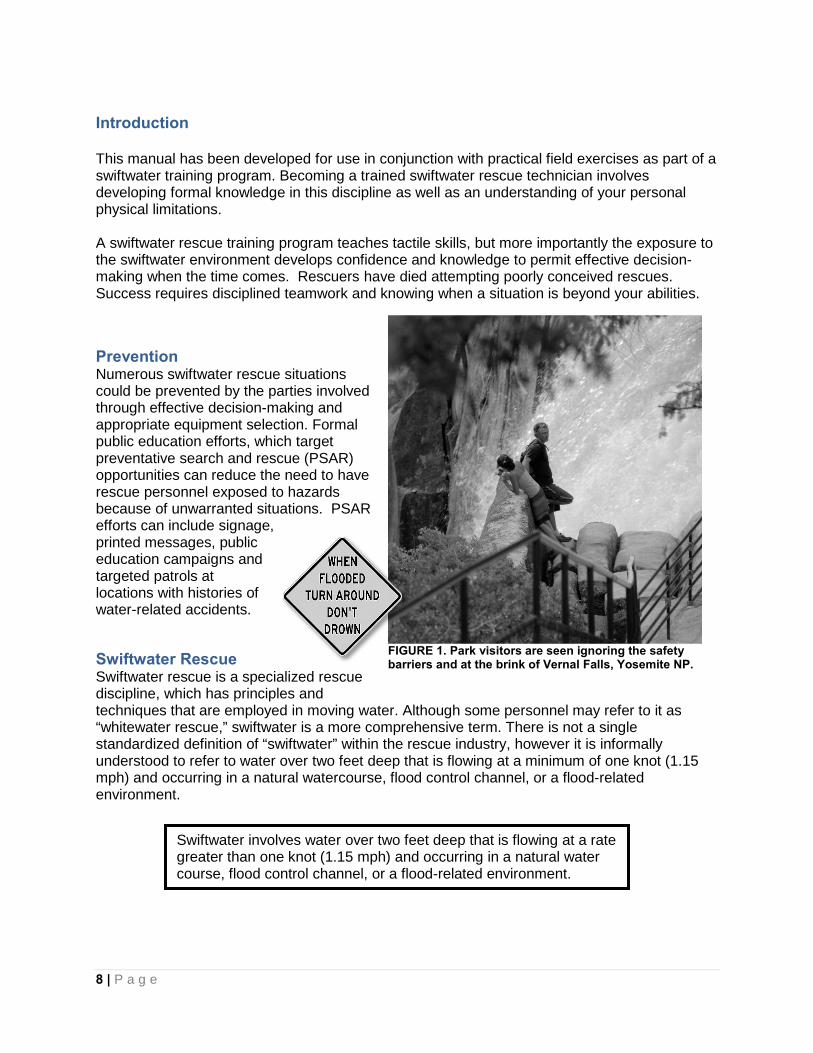
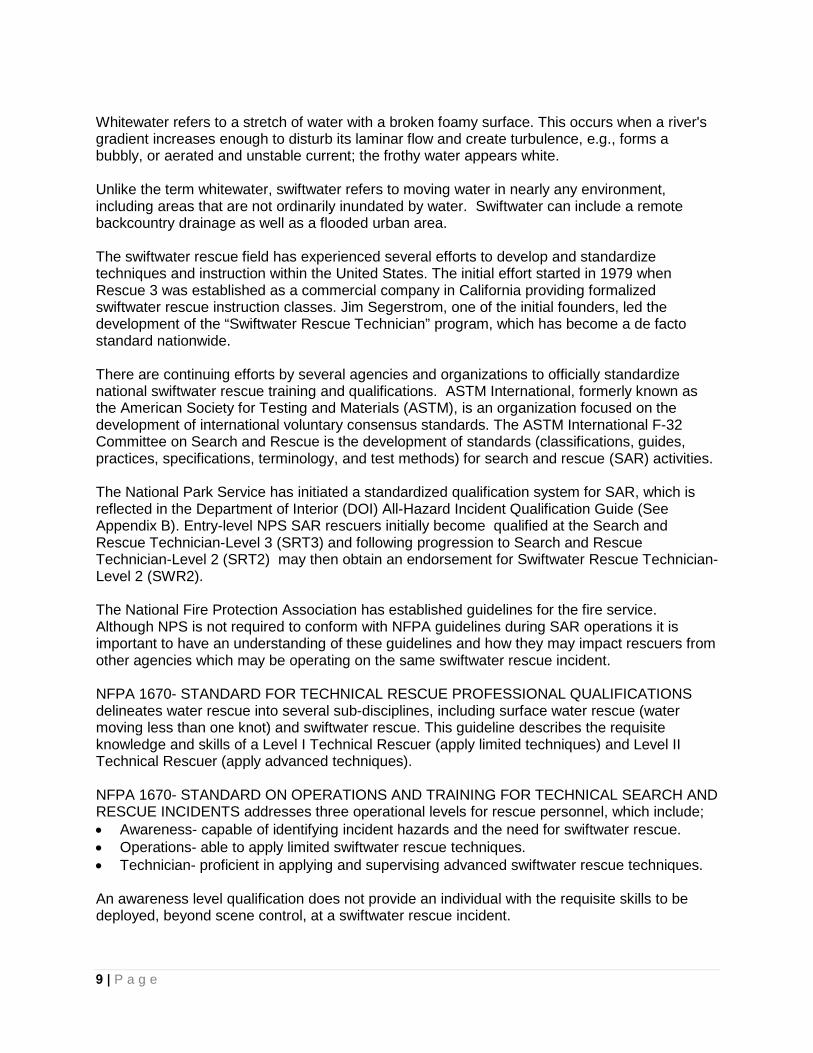
INCIDENT REVIEW- Fatal Swiftwater Rescue Accident (West Virginia) 1 On March 13, 2010, at approximately 0615 hours, a 32-year-old Kanawha County (WV) volunteer firefighter drowned after being thrown from a boat when it crashed into a bridge and capsized. The firefighter was part of a swiftwater rescue team, which included his captain and his chief. The chief was operating the boat as the crew attempted to make a fourth trip upstream to rescue civilians trapped by fast rising floodwaters. The crew was navigating up an eddy created from the water flooding a street when the motor struck something under the water and diverted them out into the main current. The chief could not steer the motor, nor did it react when he put it into reverse. The boat slammed into a concrete bridge. The back of the boat became submerged and the bow of the boat flipped up and over the stern throwing all three firefighters into the frigid water. Two of the firefighters were able to escape the hydraulics created from the floodwater rushing against the arched concrete stanchion on the side of the bridge. The victim was recovered six days later approximately four miles from where the boat had capsized. According to the accident fatality investigation conducted by the National Institute for Occupational Safety and Health (NIOSH) the victim, firefighter Adkins, was not wearing proper protective equipment at the time. NIOSH investigators concluded that insufficient risk assessment and the wrong type of equipment contributed to Adkins' death. Investigators said all three volunteer firefighters on the overturned rescue boat were wearing neoprene wetsuits at the time of the accident. Adkins was also wearing a cotton shirt under his wetsuit. But two of the firefighters were also wearing dry suits, which provide better protection from the cold. "Cotton holds moisture and does not provide any insulation when wet, unlike wool and some synthetic materials," investigators wrote. 1 Fire Fighter Fatality Investigation Report F2010-09| CDC/NIOSH. January 25, 2011. National Institute for Occupational Safety and Health (NIOSH)- Centers for Disease Control and Prevention (CDC), http://www.cdc.gov/niosh/fire/reports/face201009.html. Accessed 03-07-2011
FIGURE 2. Fire department rescue inflatable resting by bridge abutment at accident scene. NIOSH image.
FIGURE 3. Fire department rescue inflatable involved in the fatal accident. NIOSH image.
11 | P a g e
Only two of the three personnel aboard the boat, were trained to the Swiftwater Technician level. The victim, a 10-year firefighter, had only completed training that qualified him to the Awareness Level for swiftwater incidents with the following training courses:
• Swiftwater Boat Operations • Swiftwater Awareness
The official contributing factors identified in the final NIOSH Report included:
1. Insufficient risk assessment analysis conducted. 2. Personal protective ensemble was not appropriate for cold water or flood conditions.
Swiftwater Hazards
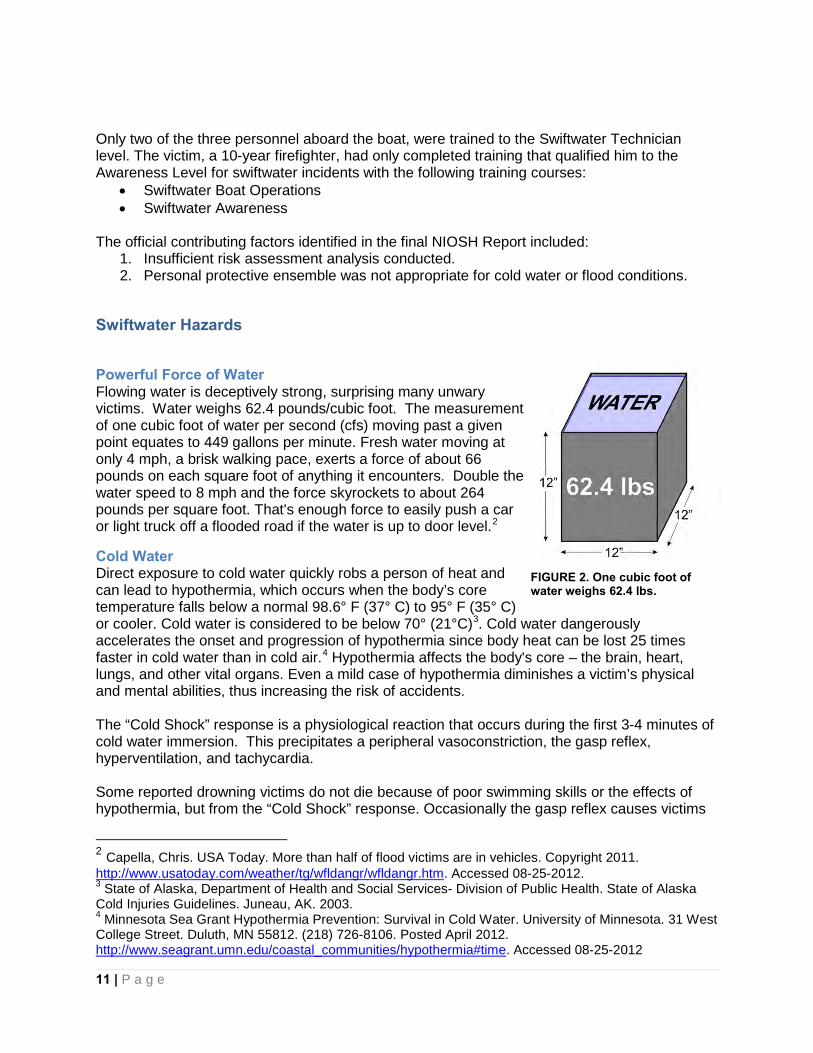
Powerful Force of Water Flowing water is deceptively strong, surprising many unwary victims. Water weighs 62.4 pounds/cubic foot. The measurement of one cubic foot of water per second (cfs) moving past a given point equates to 449 gallons per minute. Fresh water moving at only 4 mph, a brisk walking pace, exerts a force of about 66 pounds on each square foot of anything it encounters. Double the water speed to 8 mph and the force skyrockets to about 264 pounds per square foot. That's enough force to easily push a car or light truck off a flooded road if the water is up to door level.2
Cold Water Direct exposure to cold water quickly robs a person of heat and can lead to hypothermia, which occurs when the body’s core temperature falls below a normal 98.6° F (37° C) to 95° F (35° C) or cooler. Cold water is considered to be below 70° (21°C)3. Cold water dangerously accelerates the onset and progression of hypothermia since body heat can be lost 25 times faster in cold water than in cold air.4 Hypothermia affects the body's core – the brain, heart, lungs, and other vital organs. Even a mild case of hypothermia diminishes a victim’s physical and mental abilities, thus increasing the risk of accidents. The “Cold Shock” response is a physiological reaction that occurs during the first 3-4 minutes of cold water immersion. This precipitates a peripheral vasoconstriction, the gasp reflex, hyperventilation, and tachycardia. Some reported drowning victims do not die because of poor swimming skills or the effects of hypothermia, but from the “Cold Shock” response. Occasionally the gasp reflex causes victims
2 Capella, Chris. USA Today. More than half of flood victims are in vehicles. Copyright 2011. http://www.usatoday.com/weather/tg/wfldangr/wfldangr.htm. Accessed 08-25-2012. 3 State of Alaska, Department of Health and Social Services- Division of Public Health. State of Alaska Cold Injuries Guidelines. Juneau, AK. 2003. 4 Minnesota Sea Grant Hypothermia Prevention: Survival in Cold Water. University of Minnesota. 31 West College Street. Duluth, MN 55812. (218) 726-8106. Posted April 2012. http://www.seagrant.umn.edu/coastal_communities/hypothermia#time. Accessed 08-25-2012
FIGURE 2. One cubic foot of water weighs 62.4 lbs.
12 | P a g e
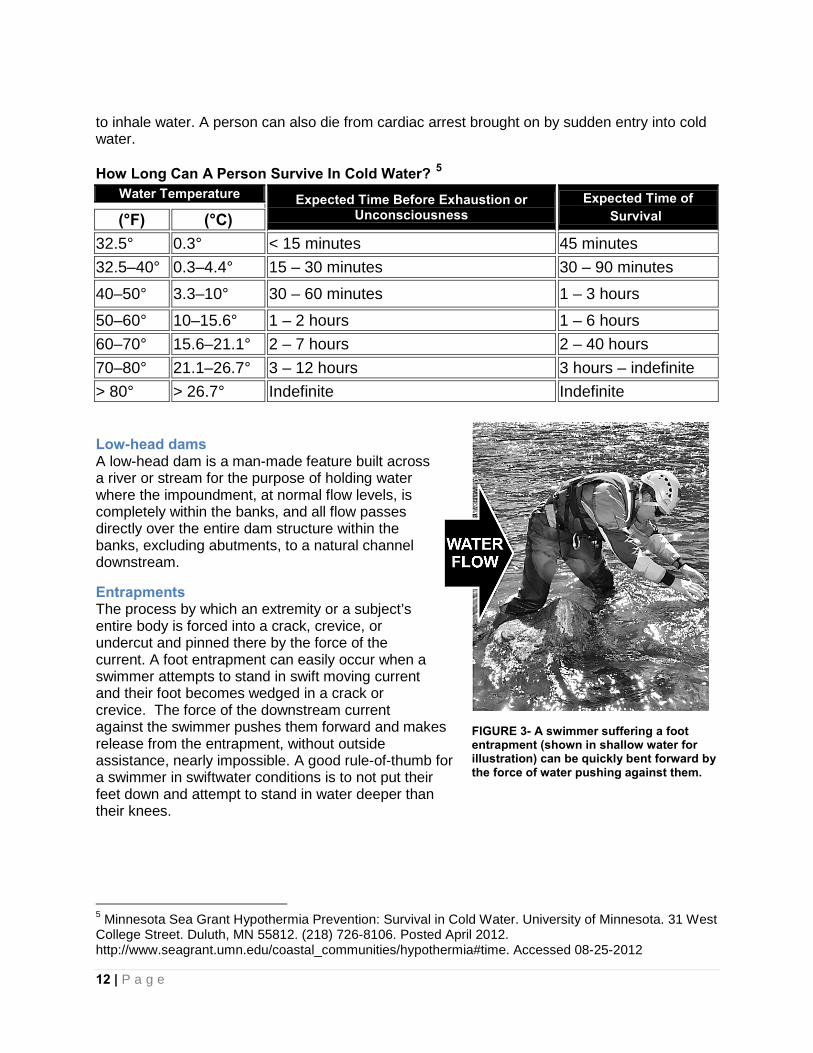
FIGURE 3- A swimmer suffering a foot entrapment (shown in shallow water for illustration) can be quickly bent forward by the force of water pushing against them.
to inhale water. A person can also die from cardiac arrest brought on by sudden entry into cold water. How Long Can A Person Survive In Cold Water? 5
Water Temperature Expected Time Before Exhaustion or Unconsciousness
Expected Time of Survival (°F) (°C)
32.5° 0.3° < 15 minutes 45 minutes 32.5–40° 0.3–4.4° 15 – 30 minutes 30 – 90 minutes
40–50° 3.3–10° 30 – 60 minutes 1 – 3 hours
50–60° 10–15.6° 1 – 2 hours 1 – 6 hours 60–70° 15.6–21.1° 2 – 7 hours 2 – 40 hours 70–80° 21.1–26.7° 3 – 12 hours 3 hours – indefinite > 80° > 26.7° Indefinite Indefinite
Low-head dams A low-head dam is a man-made feature built across a river or stream for the purpose of holding water where the impoundment, at normal flow levels, is completely within the banks, and all flow passes directly over the entire dam structure within the banks, excluding abutments, to a natural channel downstream.
Entrapments The process by which an extremity or a subject’s entire body is forced into a crack, crevice, or undercut and pinned there by the force of the current. A foot entrapment can easily occur when a swimmer attempts to stand in swift moving current and their foot becomes wedged in a crack or crevice. The force of the downstream current against the swimmer pushes them forward and makes release from the entrapment, without outside assistance, nearly impossible. A good rule-of-thumb for a swimmer in swiftwater conditions is to not put their feet down and attempt to stand in water deeper than their knees.
5 Minnesota Sea Grant Hypothermia Prevention: Survival in Cold Water. University of Minnesota. 31 West College Street. Duluth, MN 55812. (218) 726-8106. Posted April 2012. http://www.seagrant.umn.edu/coastal_communities/hypothermia#time. Accessed 08-25-2012
13 | P a g e
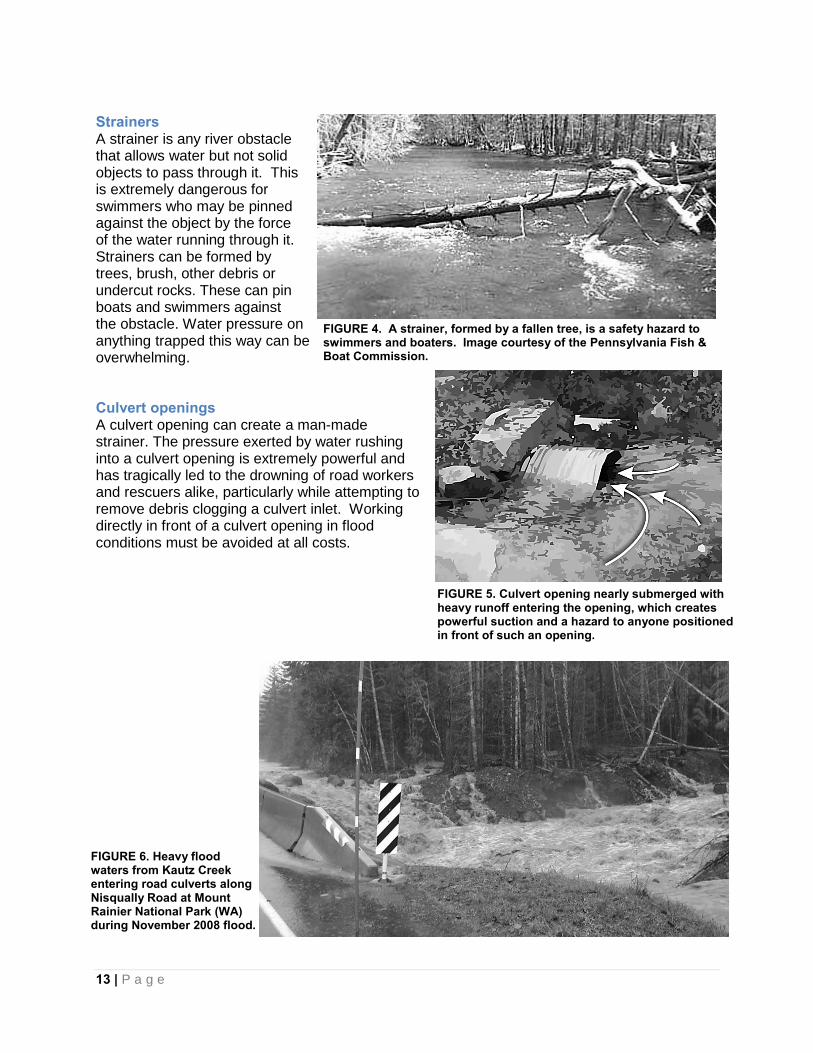
Strainers A strainer is any river obstacle that allows water but not solid objects to pass through it. This is extremely dangerous for swimmers who may be pinned against the object by the force of the water running through it. Strainers can be formed by trees, brush, other debris or undercut rocks. These can pin boats and swimmers against the obstacle. Water pressure on anything trapped this way can be overwhelming. Culvert openings A culvert opening can create a man-made strainer. The pressure exerted by water rushing into a culvert opening is extremely powerful and has tragically led to the drowning of road workers and rescuers alike, particularly while attempting to remove debris clogging a culvert inlet. Working directly in front of a culvert opening in flood conditions must be avoided at all costs.
FIGURE 6. Heavy flood waters from Kautz Creek entering road culverts along Nisqually Road at Mount Rainier National Park (WA) during November 2008 flood.
FIGURE 4. A strainer, formed by a fallen tree, is a safety hazard to swimmers and boaters. Image courtesy of the Pennsylvania Fish & Boat Commission.
FIGURE 5. Culvert opening nearly submerged with heavy runoff entering the opening, which creates powerful suction and a hazard to anyone positioned in front of such an opening.
14 | P a g e
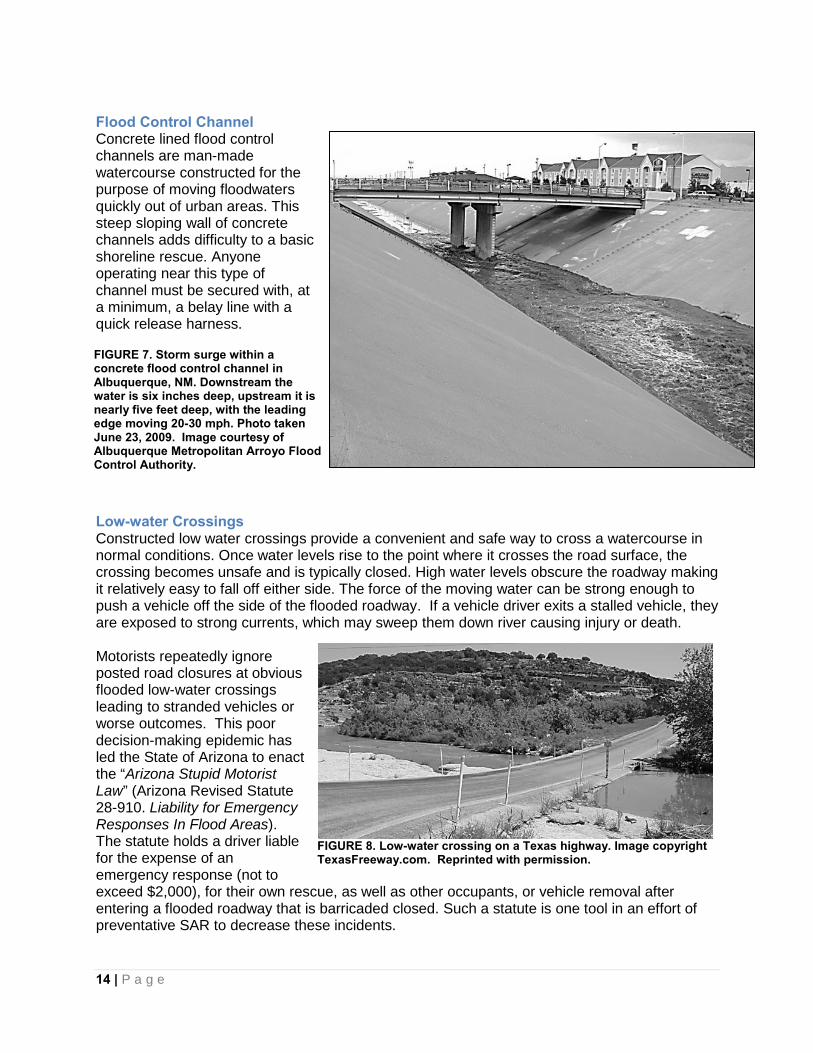
Flood Control Channel Concrete lined flood control channels are man-made watercourse constructed for the purpose of moving floodwaters quickly out of urban areas. This steep sloping wall of concrete channels adds difficulty to a basic shoreline rescue. Anyone operating near this type of channel must be secured with, at a minimum, a belay line with a quick release harness.
Low-water Crossings Constructed low water crossings provide a convenient and safe way to cross a watercourse in normal conditions. Once water levels rise to the point where it crosses the road surface, the crossing becomes unsafe and is typically closed. High water levels obscure the roadway making it relatively easy to fall off either side. The force of the moving water can be strong enough to push a vehicle off the side of the flooded roadway. If a vehicle driver exits a stalled vehicle, they are exposed to strong currents, which may sweep them down river causing injury or death. Motorists repeatedly ignore posted road closures at obvious flooded low-water crossings leading to stranded vehicles or worse outcomes. This poor decision-making epidemic has led the State of Arizona to enact the “Arizona Stupid Motorist Law” (Arizona Revised Statute 28-910. Liability for Emergency Responses In Flood Areas). The statute holds a driver liable for the expense of an emergency response (not to exceed $2,000), for their own rescue, as well as other occupants, or vehicle removal after entering a flooded roadway that is barricaded closed. Such a statute is one tool in an effort of preventative SAR to decrease these incidents.
FIGURE 7. Storm surge within a concrete flood control channel in Albuquerque, NM. Downstream the water is six inches deep, upstream it is nearly five feet deep, with the leading edge moving 20-30 mph. Photo taken June 23, 2009. Image courtesy of Albuquerque Metropolitan Arroyo Flood Control Authority.
FIGURE 8. Low-water crossing on a Texas highway. Image copyright TexasFreeway.com. Reprinted with permission.
15 | P a g e
Flood debris Debris which is picked up and moved along as part of the top load (things that float on the surface) or suspended load (subsurface), is a physical hazard to anyone swimming in a swiftwater environment. This can include trash, wood, logs, vehicles, etc. which could strike and injure a swiftwater rescuer. When working at rescue scene, deployment of an upstream spotter with an effective means of communication can drastically reduce this risk. Keep in mind that debris may not always be immediately visible on the surface and limiting exposure time of rescuers in the water will decrease the associated risk during a rescue operation.
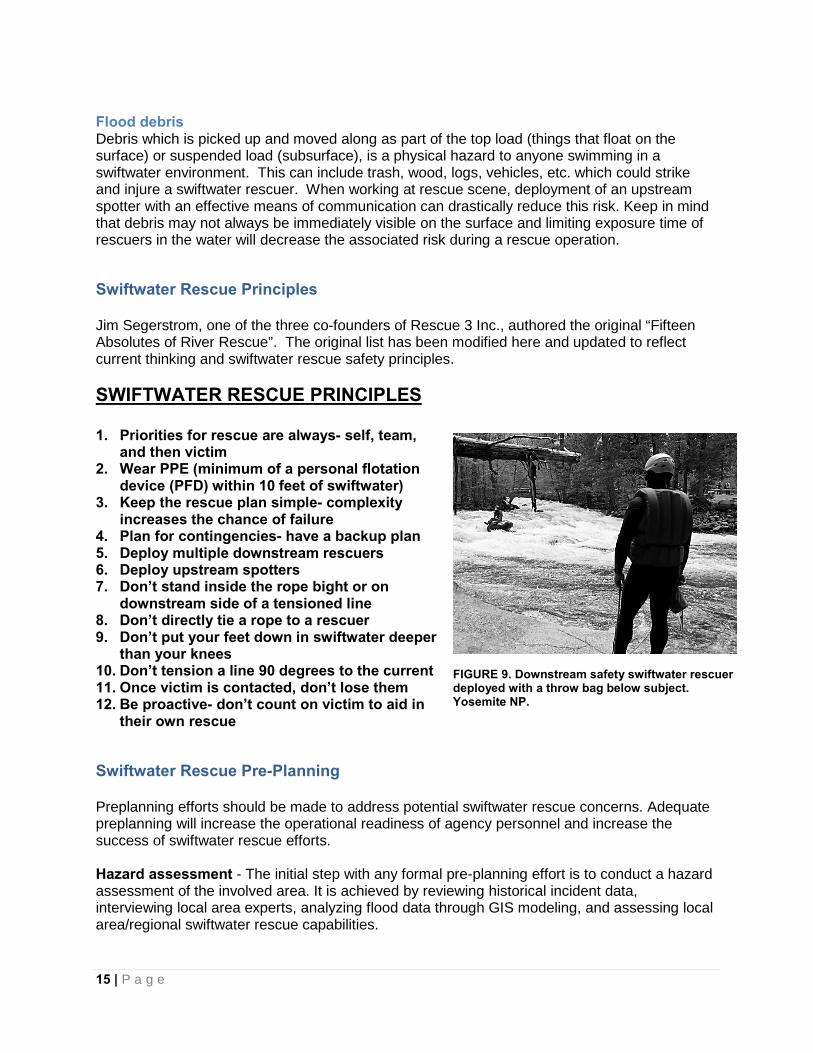
Swiftwater Rescue Principles Jim Segerstrom, one of the three co-founders of Rescue 3 Inc., authored the original “Fifteen Absolutes of River Rescue”. The original list has been modified here and updated to reflect current thinking and swiftwater rescue safety principles. SWIFTWATER RESCUE PRINCIPLES 1. Priorities for rescue are always- self, team,
and then victim 2. Wear PPE (minimum of a personal flotation
device (PFD) within 10 feet of swiftwater) 3. Keep the rescue plan simple- complexity
increases the chance of failure 4. Plan for contingencies- have a backup plan 5. Deploy multiple downstream rescuers 6. Deploy upstream spotters 7. Don’t stand inside the rope bight or on
downstream side of a tensioned line 8. Don’t directly tie a rope to a rescuer 9. Don’t put your feet down in swiftwater deeper
than your knees 10. Don’t tension a line 90 degrees to the current 11. Once victim is contacted, don’t lose them 12. Be proactive- don’t count on victim to aid in
their own rescue
Swiftwater Rescue Pre-Planning Preplanning efforts should be made to address potential swiftwater rescue concerns. Adequate preplanning will increase the operational readiness of agency personnel and increase the success of swiftwater rescue efforts. Hazard assessment - The initial step with any formal pre-planning effort is to conduct a hazard assessment of the involved area. It is achieved by reviewing historical incident data, interviewing local area experts, analyzing flood data through GIS modeling, and assessing local area/regional swiftwater rescue capabilities.
FIGURE 9. Downstream safety swiftwater rescuer deployed with a throw bag below subject. Yosemite NP.
16 | P a g e
Hazard Assessment Considerations Include:
• Physical Features • Specific Hazards • Pre-Determined Rescue Sites
• Egress Routes and Staging Areas • Anchor Points • Landing Zones
Equipment - Selecting and procuring suitable equipment for the area of responsibility. It needs to be appropriate to meet the type of calls and potential challenges encountered. For example, a watercraft needs to have features which match the capabilities required of a swiftwater response in the response area. Maintenance and replacement of equipment needs to be accomplished on a recurring basis. Training - Accomplishing an acceptable frequency of realistic training within a team, which truly generates suitable levels of individual proficiency, is much easier said than done. The reality is that conflicting administrative priorities and changes in personnel constantly put most teams in the position of being behind the power curve. That being said, it is the responsibility of all professionals in this field to constantly work to achieve this goal. Strive for regular training sessions that challenge participants. Work to provide training that reaches the greatest number of team members possible. These efforts will truly pay off down the road. Established procedures - A formal written plan needs to be completed that addresses swiftwater rescue operations. This can be part of a more comprehensive written SAR Plan. This type of document should address the framework on how operational swiftwater responses will occur. The plan will still leave plenty of discretion for decision-making by personnel at the scene of action. Team members need to know the plan and it should be exercised. A poorly written plan will gather dust on a shelf. Consider including checklist or job aids, which improve the understanding of the plan by agency personnel (Refer to Appendix C for a Sample Swiftwater Rescue Preplan). Finally the plan should be dynamic. Review the plan annually and make updates, which reflect lessons learned, best practices, and local area changes.
Rescuer Fitness Swiftwater rescue involves exposure to cold water and the forces of rapidly moving water. It requires a physically fit individual with a strong swimming ability. Not all emergency personnel fit this requirement. An overweight poorly conditioned swiftwater rescuer becomes a detriment to themselves and their fellow team members. If an unfit rescuer became incapacitated in the water, it could lead to an incident within an incident. This is preventable through a strong selection process for a rescue, which should select participants based upon who is most qualified to perform the rescue task.
Situational Awareness All involved emergency personnel need to practice effective situational awareness. This involves being aware of what is happening around you, as well as communicating and utilizing accurate available information in effective decision-making. Poor situational awareness has been identified as one of the primary factors in accidents attributed to human error. Emergency incidents are very dynamic and the flow of information-sharing is a key factor to successful and safe operations.

17 | P a g e
Size-Up As an initial rescuer approaches an emergency scene they begin the size-up process. The chaos of the incident can lead to a responder becoming overwhelmed and unable to make sound decisions. Factors for consideration in a swiftwater size-up include: • Stable situation (e.g., uninjured subject sitting on a rock in
the middle of a river) • Unstable situation (e.g., vehicle with occupants stranded
in rapidly rising flood waters) • Number of subjects and possible injuries • Location for immediate deployment of downstream safety
rescuers • Presence of debris coming downstream • Ability to deliver a PFD to a subject • Need to deploy rescuers for an in-water rescue Like a jet fighter pilot in a dogfight, employing the Observe-Orient-Decide-Act (OODA) Loop is an effective method to process the information received about a swiftwater rescue emergency and take the most appropriate action in an efficient manner. The OODA Loop consists of observing, orienting, deciding, and acting phases. Military pilots have come to relate situational awareness to the observe and orient phases of the famous OODA Loop or Boyd Cycle, as described by the USAF fighter ace and war theorist Col. John Boyd. • Observation: the collection of data by means of the
senses • Orientation: the analysis and synthesis of data to
form one's current mental perspective • Decision: the determination of a course of action
based on one's current mental perspective • Action: the physical playing-out of decisions Another important concept of good situational awareness involves having an accurate mental model. During an emergency incident, we all develop a personal mental understanding of what the mission involves and the game plan for the operation. Our personal mental model may be filled with inaccuracies or assumptions, which differ from our team members on the incident. Accurate mission briefings and communicating updated information among team members will lead to the development of a shared mental model, which is highly accurate and increases situational awareness.
FIGURE 11. OODA Loop.
FIGURE 10. Size-up at a swiftwater rescue incident. What would your initial actions be in a situation like this?
18 | P a g e
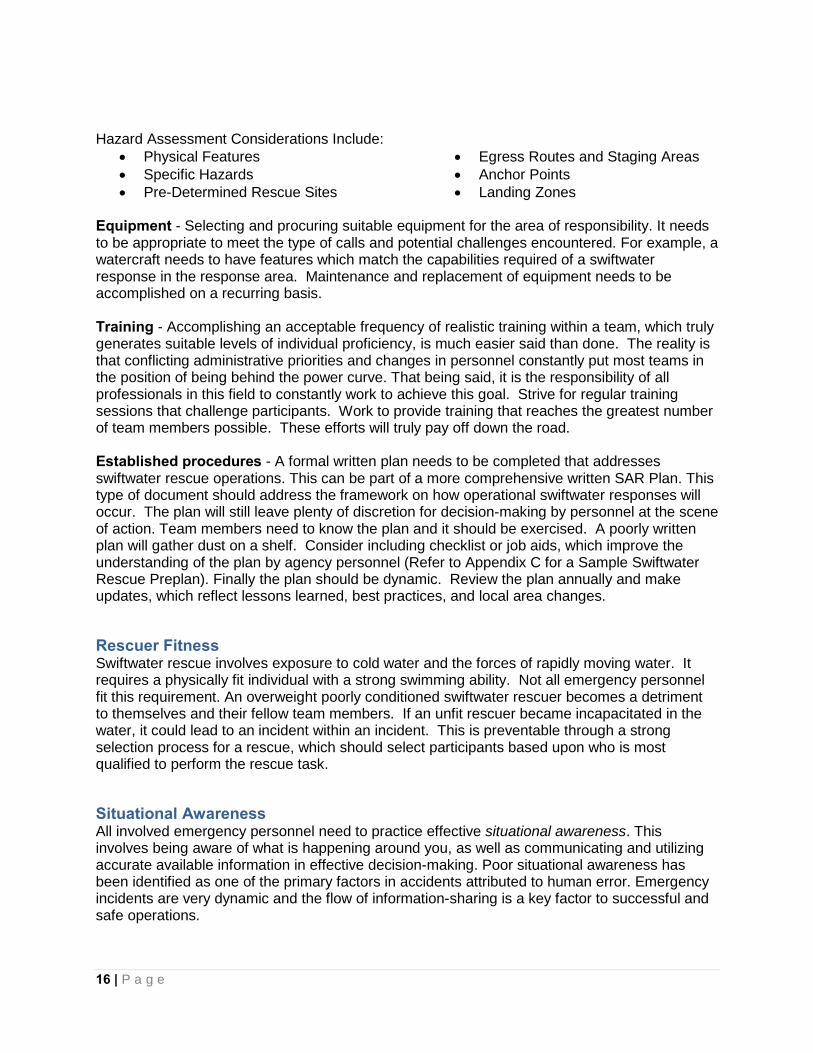
The checklist at right provides a suggested briefing format to be used for SAR personnel. The format encourages team member feedback and the sharing of important information. Being disciplined, in spite of the perceived urgency of the moment, will get all personnel on the same operational plan and enhance the likelihood of success. A team lacking such discipline will charge ahead without a clear plan and take operational shortcuts that could have tragic consequences.
Operational Risk Management Operational risk management (ORM) is a continuous, systematic process of identifying and controlling risks in all activities according to a set of pre-conceived factors by applying appropriate management policies and procedures. As an operation progresses and evolves, personnel should continuously employ the following operational risk management principles. Key ORM Principles 1. Accept No Unnecessary Risk: SAR operations entail risk. Unnecessary risk conveys no commensurate benefit to safety of a mission. The most logical courses of action for accomplishing a mission are those meeting all mission requirements while exposing personnel and resources to the lowest possible risk. If all hazards that could have been detected have not been detected, then unnecessary risks are being accepted. 2. Accept Necessary Risk When Benefits Outweigh Costs: Compare all identified benefits to all identified costs. The process of weighing risks against opportunities and benefits helps to maximize unit capability. Even high-risk endeavors may be undertaken when decision-makers clearly acknowledge the sum of the benefits exceeds the sum of the costs. Balancing costs and benefits may be a subjective process open to interpretation. Ultimately, the appropriate decision authority may have to determine the balance. 3. Make Risk Decisions at the Appropriate Level: Depending on the situation, anyone can make a risk decision. However, the appropriate level to make those decisions is that which most effectively allocates the resources to reduce the risk, eliminate the hazard, and implement controls. Incident personnel at all levels must ensure subordinates are aware of their own limitations and when to refer a decision to a higher level. 4. Integrate ORM into Operations and Planning at All Levels: While ORM is critically important in an operation’s planning stages; risk can change dramatically during an actual mission. Incident personnel should remain flexible and integrate ORM in executing tasks as much as in planning for them.
FIGURE 12. Briefing Format for Emergencies. Adapted From Dr. Karl Weicke, South Canyon Revisited: Lessons from High Reliability Organizations.
19 | P a g e
Operational Risk Management (ORM) includes the following seven steps: 1. Identify mission tasks 2. Identify hazards 3. Assess risks 4. Identify options 5. Evaluate risk versus gain (benefits outweigh potential costs) 6. Execute decision 7. Monitor situation
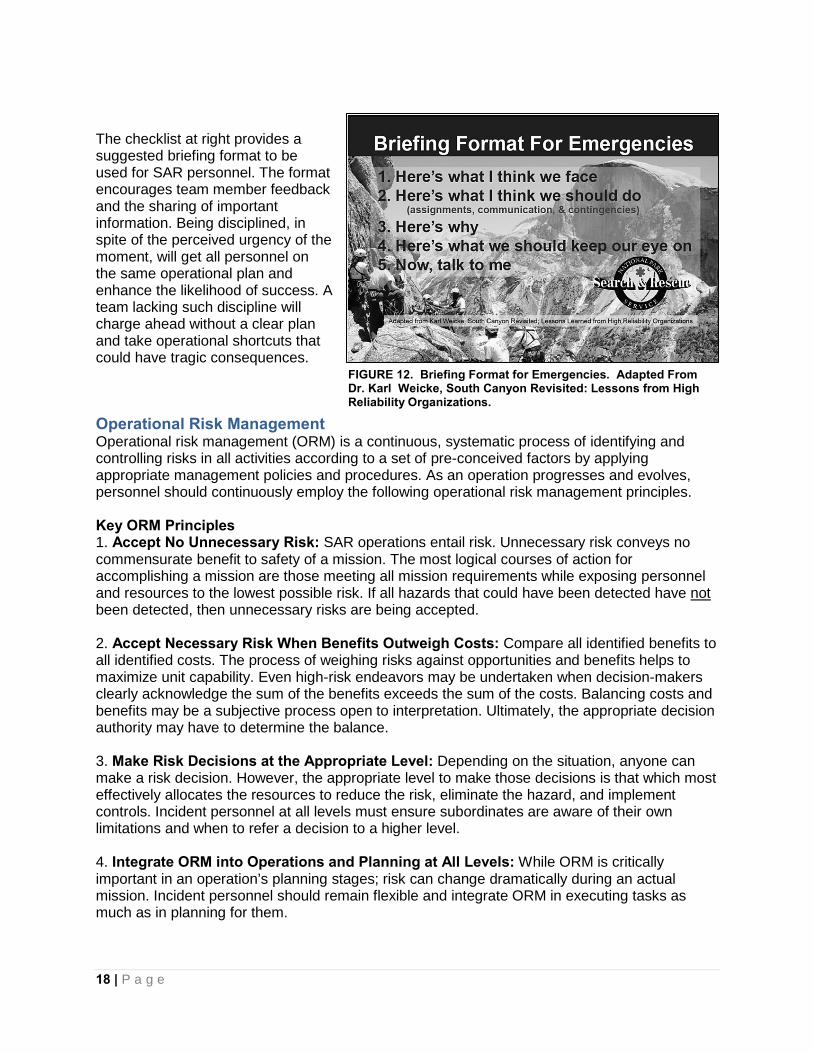
Risk assessment and management The low-to-high risk algorithm for swiftwater rescue reflects the increasing level of personal exposure to risk by rescuers based upon the method of rescue. Previously this read “reach-throw-row-go- helo”, however it has been updated to reflect the increased safety of helicopter operations and the increased deaths of rescuers in boats. Keep in mind that no algorithm reflects an absolute rigid means of how swiftwater rescue is to be performed. Every incident is unique and involves numerous factors that require an incident commander to decide, based upon totality of the circumstances, the best way to proceed. In some scenarios one tool, such as a boat makes the most sense, while in another it would be dangerously inappropriate. Finally, understand that while it is safest to talk a victim into performing a self-rescue, there truly is a substantial increase in danger once a rescuer enters the water. Talk refers to the dialogue that takes place between the rescuer and victim, and includes the rescuer directing the victim in methods of self-rescue, such as swimming to shore. Reaching is the first and easiest form of water rescue. If a subject can be saved by an outreached arm, an outreached leg, or an extended branch use this method. Remember to yell clear, simple, and distinct orders to grab the extended object as persons in danger of drowning are often experiencing an adrenalin rush and are very confused. An order such as "Grab the stick and hold on" is simple and useful. Remember in swiftwater applications, the current is very strong so be ready for a jolt when the current pulls on the subject in the water. It may not be possible for a single rescuer to actually remove an individual from the water after the subject has been grabbed. If so, hold the subject close to an edge, maintain an open airway, attempt to protect him from further injury, and wait for additional help to extract the subject. Throwing pertains to anything that is thrown to a subject to assist them. This type of rescue includes the use of throw lines, life rings, and floats. The three major types of rope throw assemblies are the throw bag, the coiled rope, and the life ring with rope. The use of rescue thro bag should be practiced to proficiency by every swiftwater rescuer. This type of rescue is only
FIGURE 13. Updated Low-to-High Risk Algorithm; TALK- REACH- THROW- HELO- ROW- GO.

20 | P a g e
useful if the subject is cooperative. Throwing should be accompanied with orders given loudly and clearly by a single person to prevent confusion. Throwing also includes throwing something that floats. Including a life ring, PFD, boogie board, cooler, etc. The objective is to provide the subject with an aid to keep him afloat until further help can be rendered. Helo rescue may be appropriate in specific situations, however there needs to be an understanding that this requires sound decision making that matches the capabilities of the involved personnel and aircraft. Helicopters can access a subject from overhead and potentially avoid hazards that rescuers on the water would be exposed to (e.g., strainers, flood debris, pour-overs, etc.). Extraction of a subject in the swiftwater environment can be efficiently accomplished with a hoist rescue or short-haul technique. Keep in mind that helicopter rescue accidents do repeatedly occur and they commonly involve poor decision-making. Rowing in the classical sense means rowing a watercraft to the subject. This can include paddling a kayak or raft, as well using powered watercraft such as a motorized inflatable of personal watercraft (PWC) to reach a subject. The intent is to either have the subject climb into the watercraft or to simply hold onto the craft until the subject can be dragged to safe water. Go is the deployment of an in-water swimming rescue. These are planned and practiced maneuvers that apply to the engagement of a drowning subject in open water. The technique includes the use of river boards for added flotation that delivers an extension to the subject so "subject to rescuer contact" is avoided. This can be combined with a “tethered swimmer” rope technique facilitating retrieval of the rescuer to shore upon contacting the subject. When one considers the dangers of open water swimming rescues, compounded with the dangers of swiftwater, swimming rescues are the least attractive option. Swimming rescues are more applicable once a subject has been carried to a wide watercourse or they move into slower moving water.
GAR Risk Assessment During extreme flood conditions, you are requested to affect a body recovery in the swiftwater environment with a highly inexperienced team. How would you go about quantifying the perceived risk of the mission? The GAR (Green-Amber-Red) Risk Assessment, creates a GO-NO GO decision tool. A strength of the GAR process is that it includes input directly from the involved personnel. Respondents independently assign a personal score of perceived risk (subjective estimate) to eight different elements associated with a mission. The risk score is 0 (No Risk) through 10 (Maximum Risk). The standard elements of the GAR risk assessment include; 1. SUPERVISION - Qualified, accessible and effective supervision on the incident. 2. PLANNING - Adequate incident information is available and clear. 3. CONTINGENCY RESOURCES - Backup resources that can assist if needed. 4. COMMUNICATION - How well personnel are briefed and communicating. 5. TEAM SELECTION - Qualifications and experience level of the individuals. 6. TEAM FITNESS - Consider physical and mental state of the crew. 7. ENVIRONMENT - Factors affecting performance of personnel and equipment such as time,
temperature, precipitation, topography and altitude. 8. INCIDENT COMPLEXITY - Severity, exposure time and probability of mishap.
21 | P a g e
If the total risk score falls in the green zone (1-35), then the risk is rated low and the mission is considered a “go.” A score in the yellow zone (36-60) indicates moderate risk and additional control efforts should be in place before proceeding with the mission. If the total score falls in the red zone (61-80), the risk is significant and this indicates a “no go.” The ability to assign numerical scores is not the most vital feature in the GAR process. Upon completion of the individual assessment, members discuss their results collectively. This generates valuable discussion toward understanding the mission risks and how the team will manage them.
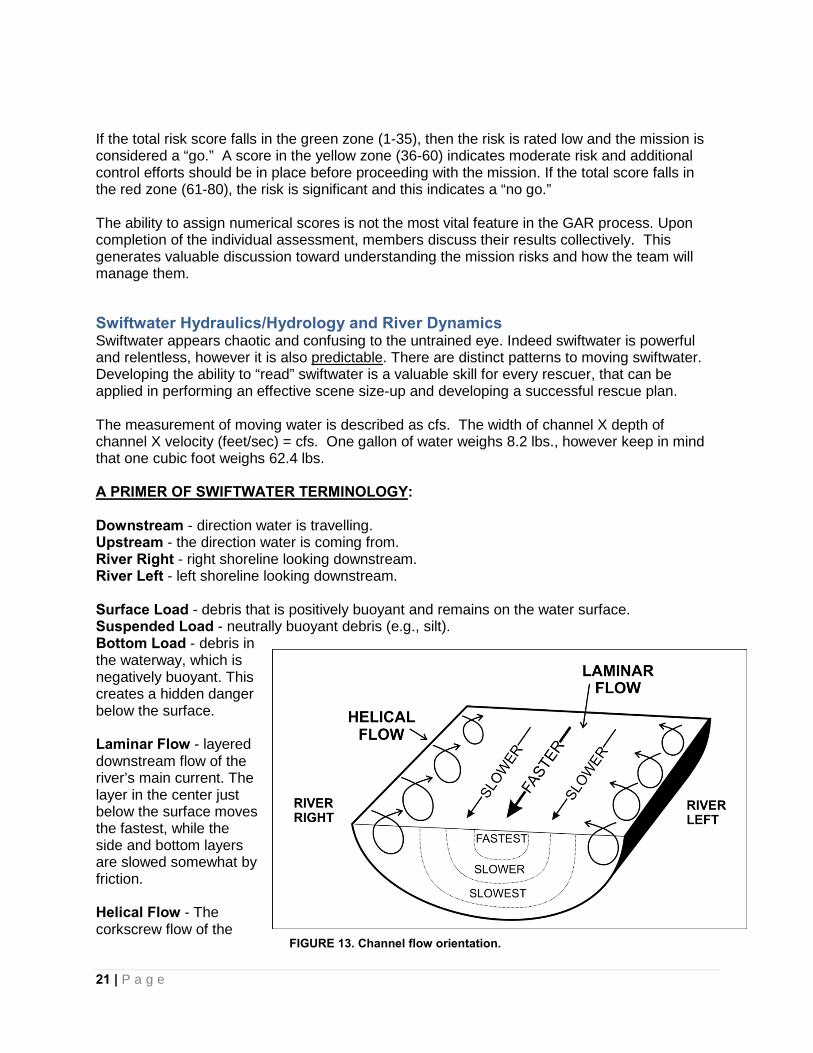
Swiftwater Hydraulics/Hydrology and River Dynamics Swiftwater appears chaotic and confusing to the untrained eye. Indeed swiftwater is powerful and relentless, however it is also predictable. There are distinct patterns to moving swiftwater. Developing the ability to “read” swiftwater is a valuable skill for every rescuer, that can be applied in performing an effective scene size-up and developing a successful rescue plan. The measurement of moving water is described as cfs. The width of channel X depth of channel X velocity (feet/sec) = cfs. One gallon of water weighs 8.2 lbs., however keep in mind that one cubic foot weighs 62.4 lbs. A PRIMER OF SWIFTWATER TERMINOLOGY: Downstream - direction water is travelling. Upstream - the direction water is coming from. River Right - right shoreline looking downstream. River Left - left shoreline looking downstream. Surface Load - debris that is positively buoyant and remains on the water surface. Suspended Load - neutrally buoyant debris (e.g., silt). Bottom Load - debris in the waterway, which is negatively buoyant. This creates a hidden danger below the surface. Laminar Flow - layered downstream flow of the river’s main current. The layer in the center just below the surface moves the fastest, while the side and bottom layers are slowed somewhat by friction. Helical Flow - The corkscrew flow of the
FIGURE 13. Channel flow orientation.
22 | P a g e
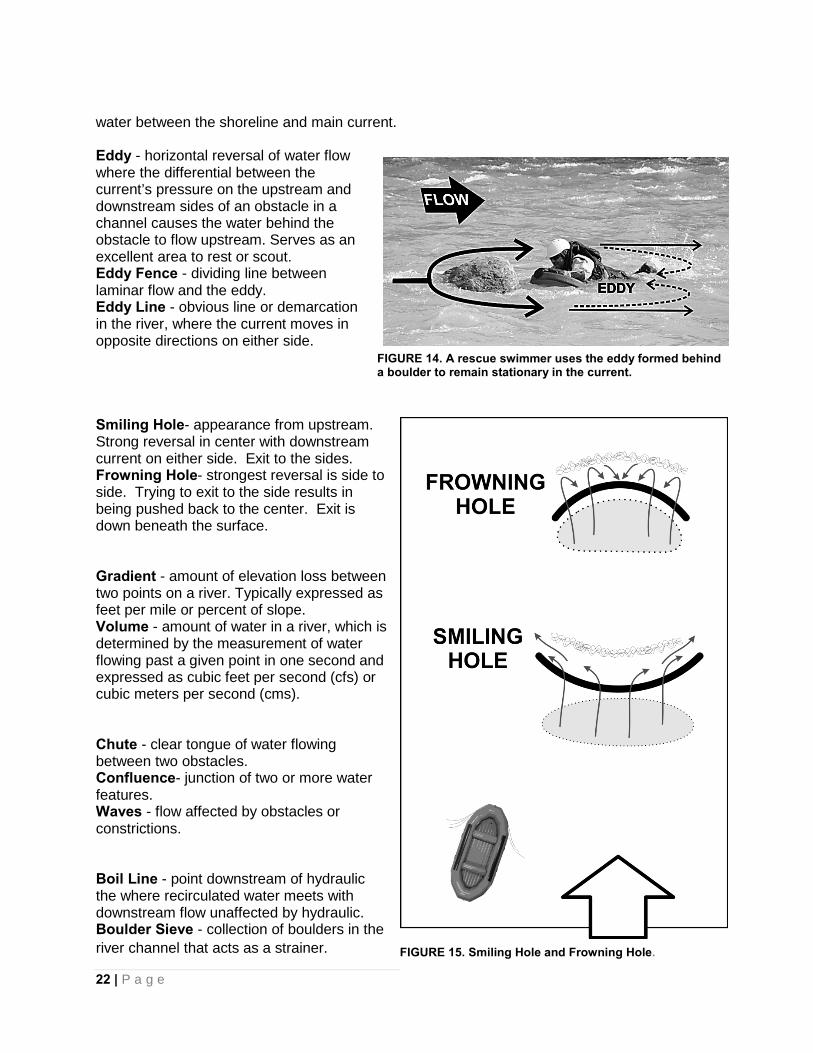
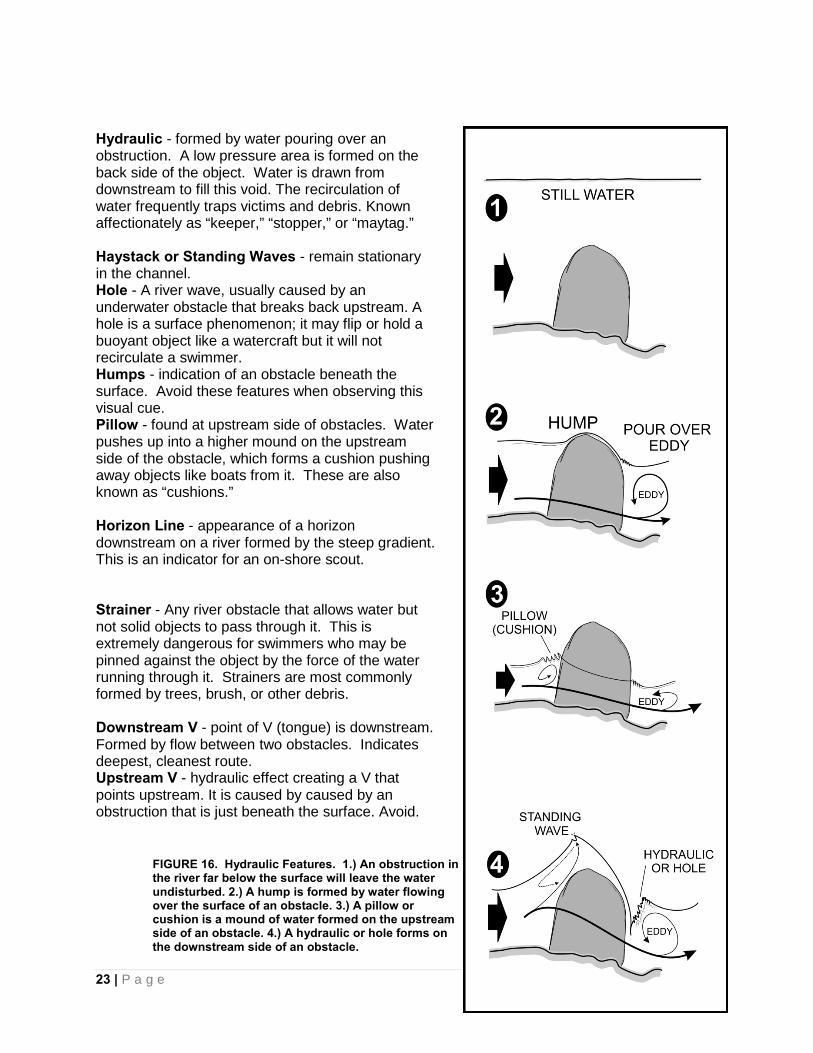
water between the shoreline and main current. Eddy - horizontal reversal of water flow where the differential between the current’s pressure on the upstream and downstream sides of an obstacle in a channel causes the water behind the obstacle to flow upstream. Serves as an excellent area to rest or scout. Eddy Fence - dividing line between laminar flow and the eddy. Eddy Line - obvious line or demarcation in the river, where the current moves in opposite directions on either side. Smiling Hole- appearance from upstream. Strong reversal in center with downstream current on either side. Exit to the sides. Frowning Hole- strongest reversal is side to side. Trying to exit to the side results in being pushed back to the center. Exit is down beneath the surface. Gradient - amount of elevation loss between two points on a river. Typically expressed as feet per mile or percent of slope. Volume - amount of water in a river, which is determined by the measurement of water flowing past a given point in one second and expressed as cubic feet per second (cfs) or cubic meters per second (cms). Chute - clear tongue of water flowing between two obstacles. Confluence- junction of two or more water features. Waves - flow affected by obstacles or constrictions. Boil Line - point downstream of hydraulic the where recirculated water meets with downstream flow unaffected by hydraulic. Boulder Sieve - collection of boulders in the river channel that acts as a strainer.
FIGURE 14. A rescue swimmer uses the eddy formed behind a boulder to remain stationary in the current.
FIGURE 15. Smiling Hole and Frowning Hole.
23 | P a g e
Hydraulic - formed by water pouring over an obstruction. A low pressure area is formed on the back side of the object. Water is drawn from downstream to fill this void. The recirculation of water frequently traps victims and debris. Known affectionately as “keeper,” “stopper,” or “maytag.” Haystack or Standing Waves - remain stationary in the channel. Hole - A river wave, usually caused by an underwater obstacle that breaks back upstream. A hole is a surface phenomenon; it may flip or hold a buoyant object like a watercraft but it will not recirculate a swimmer. Humps - indication of an obstacle beneath the surface. Avoid these features when observing this visual cue. Pillow - found at upstream side of obstacles. Water pushes up into a higher mound on the upstream side of the obstacle, which forms a cushion pushing away objects like boats from it. These are also known as “cushions.” Horizon Line - appearance of a horizon downstream on a river formed by the steep gradient. This is an indicator for an on-shore scout. Strainer - Any river obstacle that allows water but not solid objects to pass through it. This is extremely dangerous for swimmers who may be pinned against the object by the force of the water running through it. Strainers are most commonly formed by trees, brush, or other debris. Downstream V - point of V (tongue) is downstream. Formed by flow between two obstacles. Indicates deepest, cleanest route. Upstream V - hydraulic effect creating a V that points upstream. It is caused by caused by an obstruction that is just beneath the surface. Avoid.
FIGURE 16. Hydraulic Features. 1.) An obstruction in the river far below the surface will leave the water undisturbed. 2.) A hump is formed by water flowing over the surface of an obstacle. 3.) A pillow or cushion is a mound of water formed on the upstream side of an obstacle. 4.) A hydraulic or hole forms on the downstream side of an obstacle.
24 | P a g e
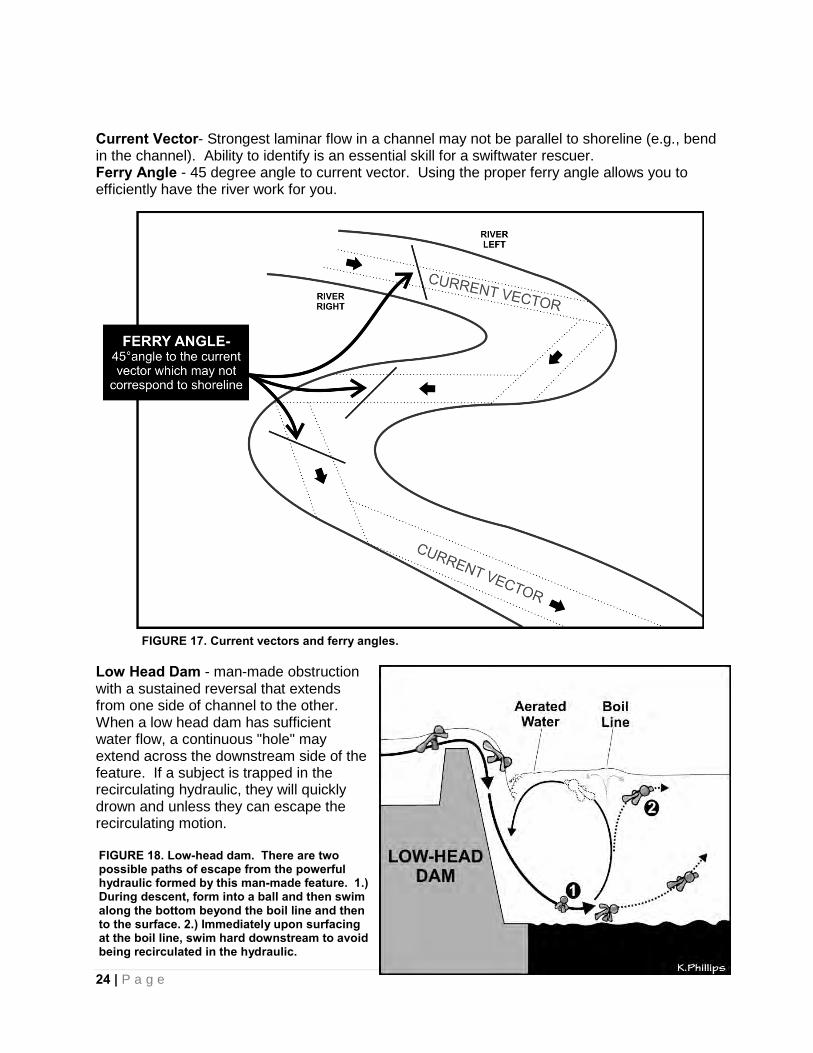
Current Vector- Strongest laminar flow in a channel may not be parallel to shoreline (e.g., bend in the channel). Ability to identify is an essential skill for a swiftwater rescuer. Ferry Angle - 45 degree angle to current vector. Using the proper ferry angle allows you to efficiently have the river work for you.
Low Head Dam - man-made obstruction with a sustained reversal that extends from one side of channel to the other. When a low head dam has sufficient water flow, a continuous "hole" may extend across the downstream side of the feature. If a subject is trapped in the recirculating hydraulic, they will quickly drown and unless they can escape the recirculating motion.
FIGURE 17. Current vectors and ferry angles.
FIGURE 18. Low-head dam. There are two possible paths of escape from the powerful hydraulic formed by this man-made feature. 1.) During descent, form into a ball and then swim along the bottom beyond the boil line and then to the surface. 2.) Immediately upon surfacing at the boil line, swim hard downstream to avoid being recirculated in the hydraulic.
25 | P a g e
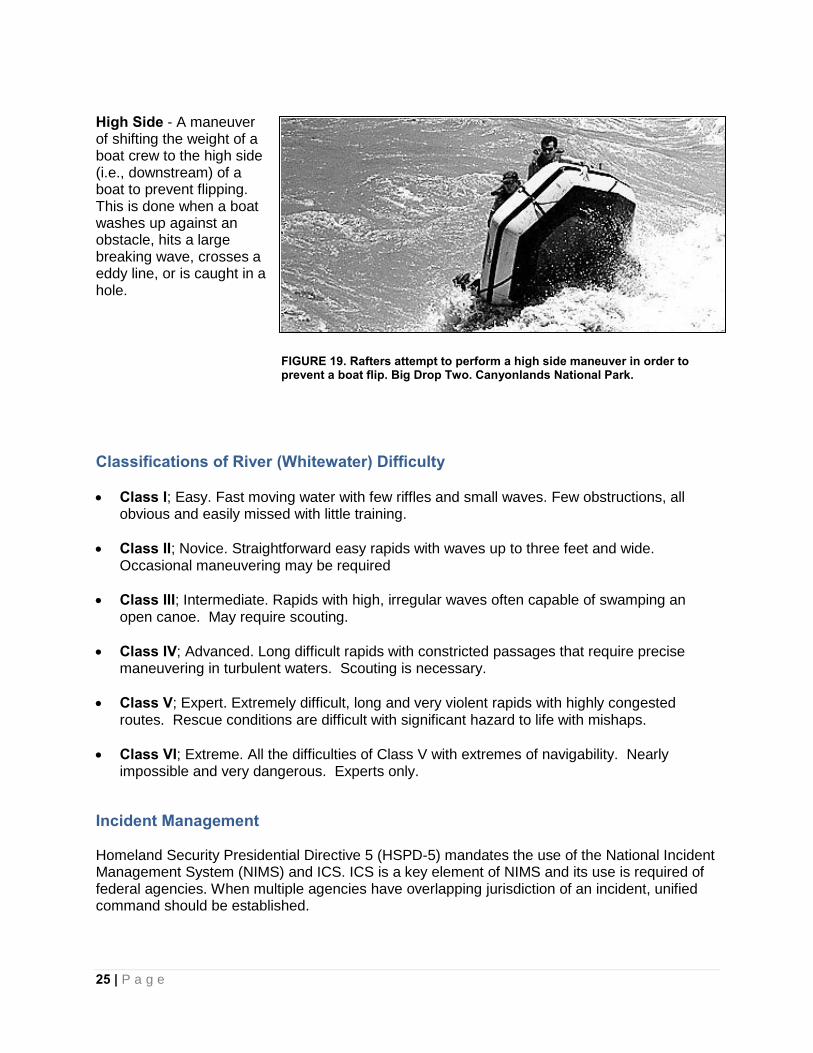
High Side - A maneuver of shifting the weight of a boat crew to the high side (i.e., downstream) of a boat to prevent flipping. This is done when a boat washes up against an obstacle, hits a large breaking wave, crosses a eddy line, or is caught in a hole.
Classifications of River (Whitewater) Difficulty • Class I; Easy. Fast moving water with few riffles and small waves. Few obstructions, all
obvious and easily missed with little training.
• Class II; Novice. Straightforward easy rapids with waves up to three feet and wide. Occasional maneuvering may be required
• Class III; Intermediate. Rapids with high, irregular waves often capable of swamping an
open canoe. May require scouting. • Class IV; Advanced. Long difficult rapids with constricted passages that require precise
maneuvering in turbulent waters. Scouting is necessary. • Class V; Expert. Extremely difficult, long and very violent rapids with highly congested
routes. Rescue conditions are difficult with significant hazard to life with mishaps. • Class VI; Extreme. All the difficulties of Class V with extremes of navigability. Nearly
impossible and very dangerous. Experts only.
Incident Management Homeland Security Presidential Directive 5 (HSPD-5) mandates the use of the National Incident Management System (NIMS) and ICS. ICS is a key element of NIMS and its use is required of federal agencies. When multiple agencies have overlapping jurisdiction of an incident, unified command should be established.
FIGURE 19. Rafters attempt to perform a high side maneuver in order to prevent a boat flip. Big Drop Two. Canyonlands National Park.
26 | P a g e
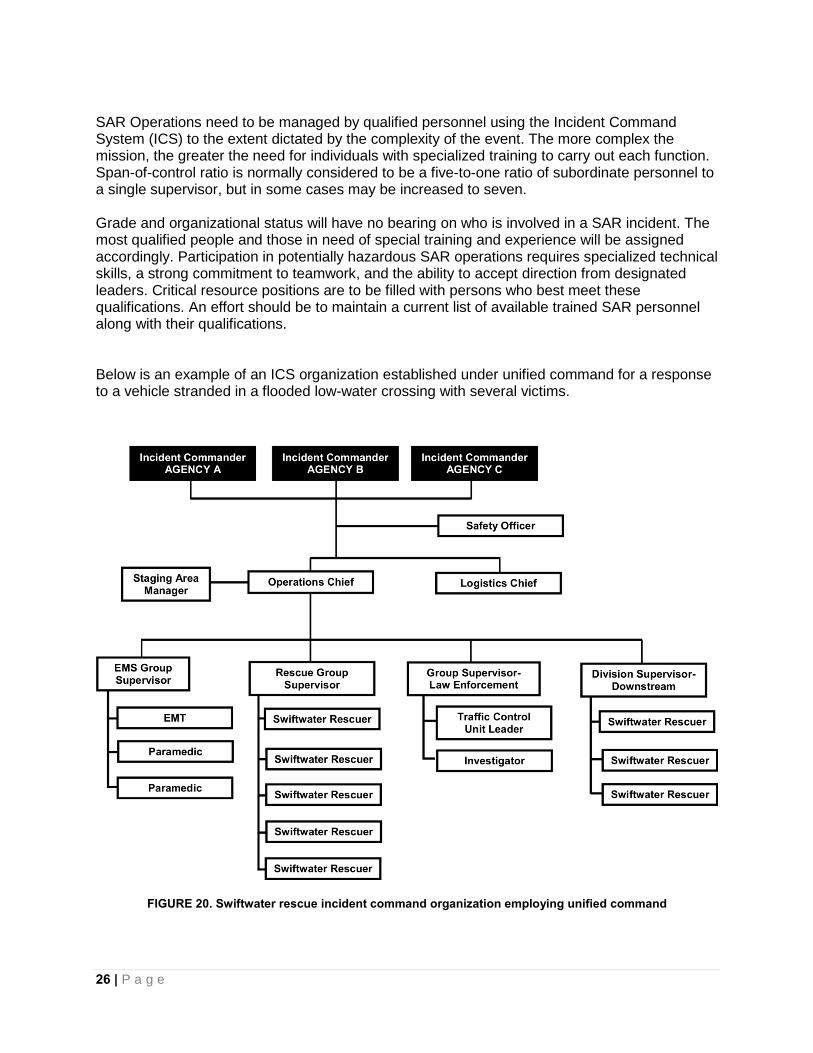
SAR Operations need to be managed by qualified personnel using the Incident Command System (ICS) to the extent dictated by the complexity of the event. The more complex the mission, the greater the need for individuals with specialized training to carry out each function. Span-of-control ratio is normally considered to be a five-to-one ratio of subordinate personnel to a single supervisor, but in some cases may be increased to seven. Grade and organizational status will have no bearing on who is involved in a SAR incident. The most qualified people and those in need of special training and experience will be assigned accordingly. Participation in potentially hazardous SAR operations requires specialized technical skills, a strong commitment to teamwork, and the ability to accept direction from designated leaders. Critical resource positions are to be filled with persons who best meet these qualifications. An effort should be to maintain a current list of available trained SAR personnel along with their qualifications. Below is an example of an ICS organization established under unified command for a response to a vehicle stranded in a flooded low-water crossing with several victims.
FIGURE 20. Swiftwater rescue incident command organization employing unified command
27 | P a g e
Swiftwater Communications The noise of moving swiftwater and possibly helicopters may prevent effective communications between rescuers. Radios may not always be practical for rescuers in the water. Hand and whistle signals provide a simple form of communications during swiftwater rescue operations. Not all team members may be in possession of waterproof radio communications and in addition, having a reliable backup of standardized whistle communications permits communication over the background white noise of the swiftwater environment. Standardized whistle signals using the “SUDOT” system are as follows:
• 1 blast- Stop, Look at me • 2 blasts- Up • 3 blasts- Down • 4 blasts- Okay, Off Rope • Sustained- Trouble
Standard swiftwater hand signals:
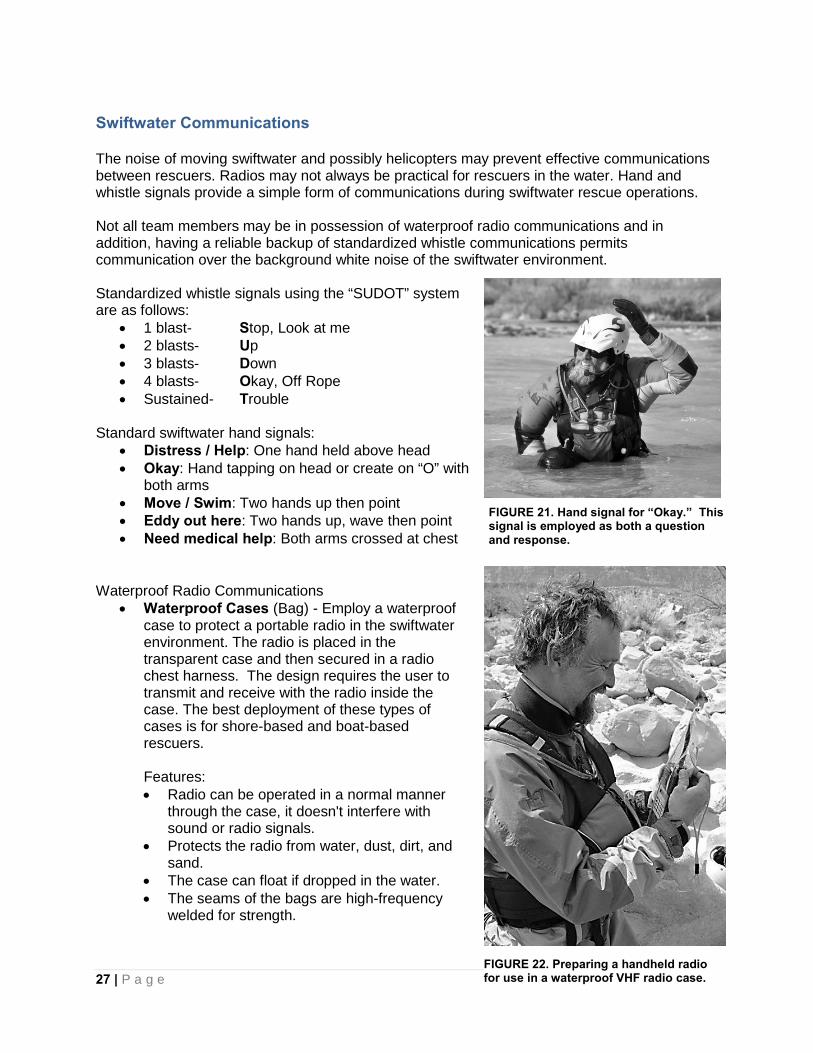
• Distress / Help: One hand held above head • Okay: Hand tapping on head or create on “O” with
both arms • Move / Swim: Two hands up then point • Eddy out here: Two hands up, wave then point • Need medical help: Both arms crossed at chest
Waterproof Radio Communications
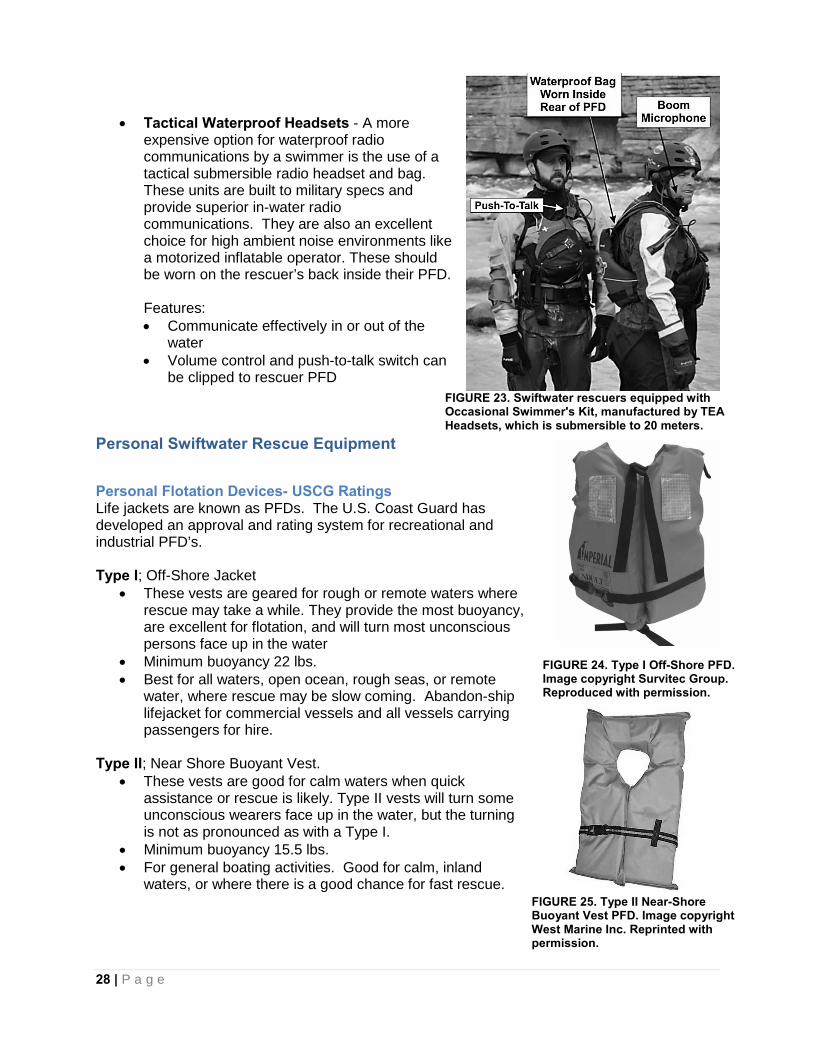
• Waterproof Cases (Bag) - Employ a waterproof case to protect a portable radio in the swiftwater environment. The radio is placed in the transparent case and then secured in a radio chest harness. The design requires the user to transmit and receive with the radio inside the case. The best deployment of these types of cases is for shore-based and boat-based rescuers.
Features: • Radio can be operated in a normal manner
through the case, it doesn't interfere with sound or radio signals.
• Protects the radio from water, dust, dirt, and sand.
• The case can float if dropped in the water. • The seams of the bags are high-frequency
welded for strength.
FIGURE 21. Hand signal for “Okay.” This signal is employed as both a question and response.
FIGURE 22. Preparing a handheld radio for use in a waterproof VHF radio case.
28 | P a g e
• Tactical Waterproof Headsets - A more expensive option for waterproof radio communications by a swimmer is the use of a tactical submersible radio headset and bag. These units are built to military specs and provide superior in-water radio communications. They are also an excellent choice for high ambient noise environments like a motorized inflatable operator. These should be worn on the rescuer’s back inside their PFD. Features: • Communicate effectively in or out of the
water • Volume control and push-to-talk switch can
be clipped to rescuer PFD
Personal Swiftwater Rescue Equipment
Personal Flotation Devices- USCG Ratings Life jackets are known as PFDs. The U.S. Coast Guard has developed an approval and rating system for recreational and industrial PFD’s. Type I; Off-Shore Jacket
• These vests are geared for rough or remote waters where rescue may take a while. They provide the most buoyancy, are excellent for flotation, and will turn most unconscious persons face up in the water
• Minimum buoyancy 22 lbs. • Best for all waters, open ocean, rough seas, or remote
water, where rescue may be slow coming. Abandon-ship lifejacket for commercial vessels and all vessels carrying passengers for hire.
Type II; Near Shore Buoyant Vest.
• These vests are good for calm waters when quick assistance or rescue is likely. Type II vests will turn some unconscious wearers face up in the water, but the turning is not as pronounced as with a Type I.
• Minimum buoyancy 15.5 lbs. • For general boating activities. Good for calm, inland
waters, or where there is a good chance for fast rescue.
FIGURE 24. Type I Off-Shore PFD. Image copyright Survitec Group. Reproduced with permission.
FIGURE 25. Type II Near-Shore Buoyant Vest PFD. Image copyright West Marine Inc. Reprinted with permission.
FIGURE 23. Swiftwater rescuers equipped with Occasional Swimmer's Kit, manufactured by TEA Headsets, which is submersible to 20 meters.
29 | P a g e
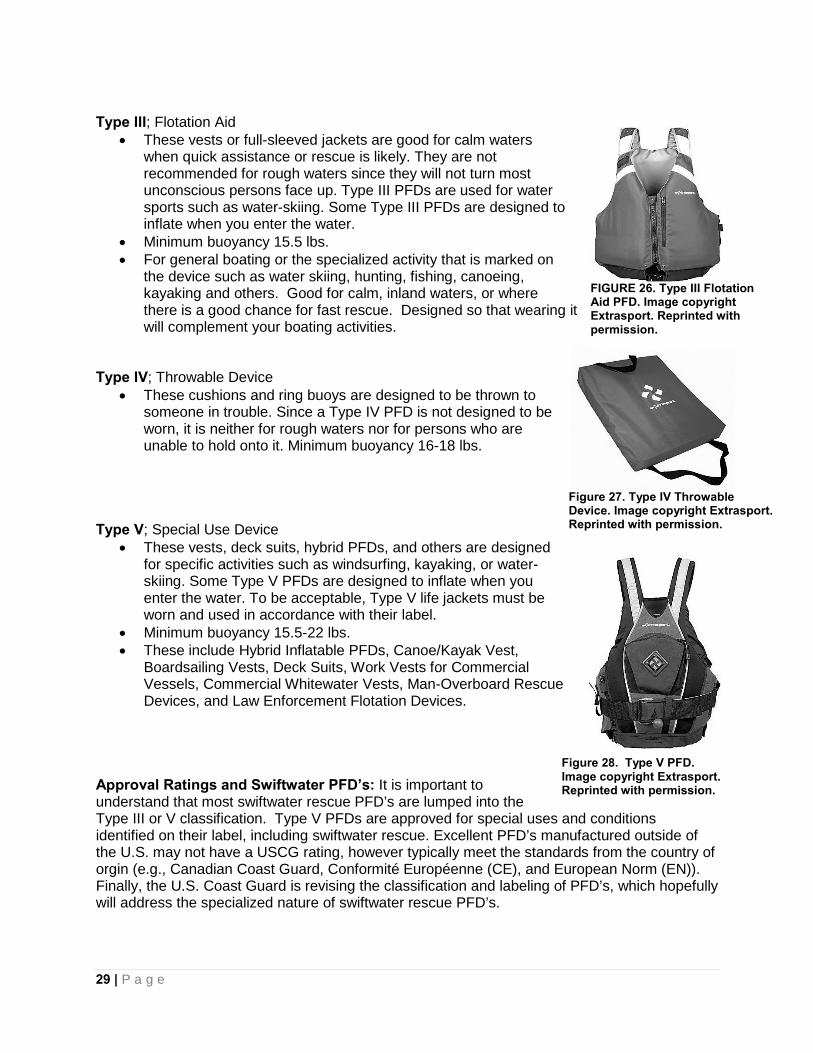
Type III; Flotation Aid • These vests or full-sleeved jackets are good for calm waters
when quick assistance or rescue is likely. They are not recommended for rough waters since they will not turn most unconscious persons face up. Type III PFDs are used for water sports such as water-skiing. Some Type III PFDs are designed to inflate when you enter the water.
• Minimum buoyancy 15.5 lbs. • For general boating or the specialized activity that is marked on
the device such as water skiing, hunting, fishing, canoeing, kayaking and others. Good for calm, inland waters, or where there is a good chance for fast rescue. Designed so that wearing it will complement your boating activities.
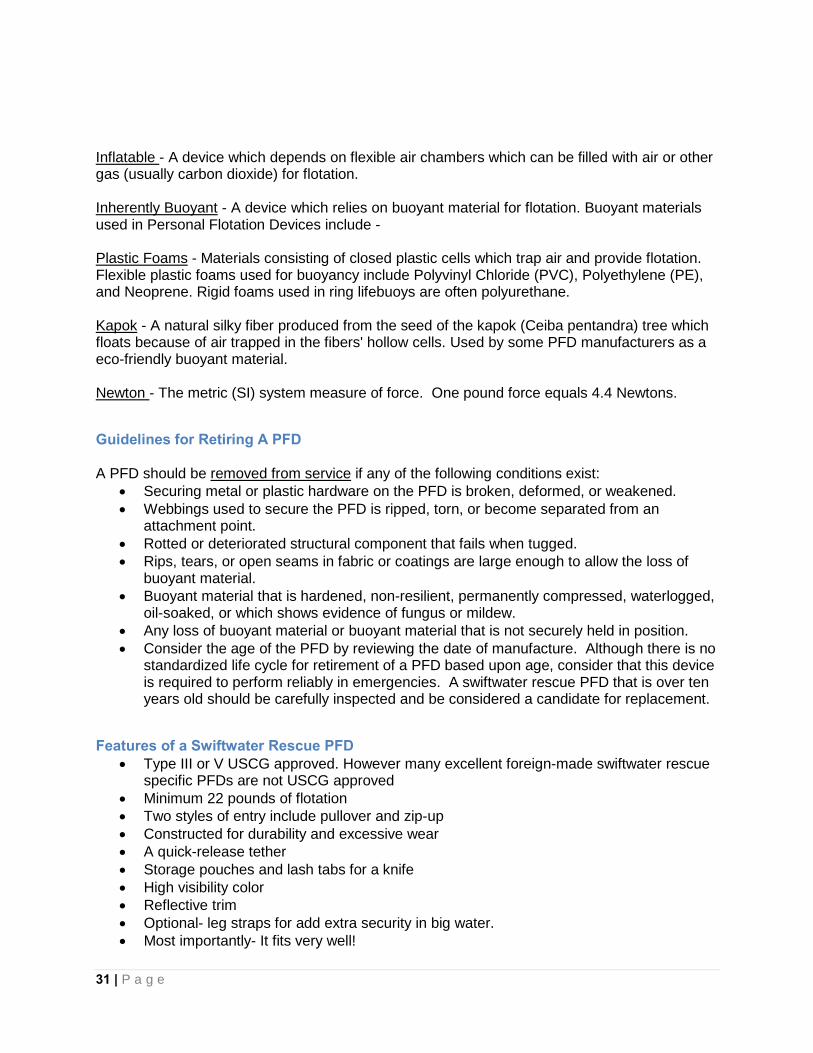
Type IV; Throwable Device
• These cushions and ring buoys are designed to be thrown to someone in trouble. Since a Type IV PFD is not designed to be worn, it is neither for rough waters nor for persons who are unable to hold onto it. Minimum buoyancy 16-18 lbs.
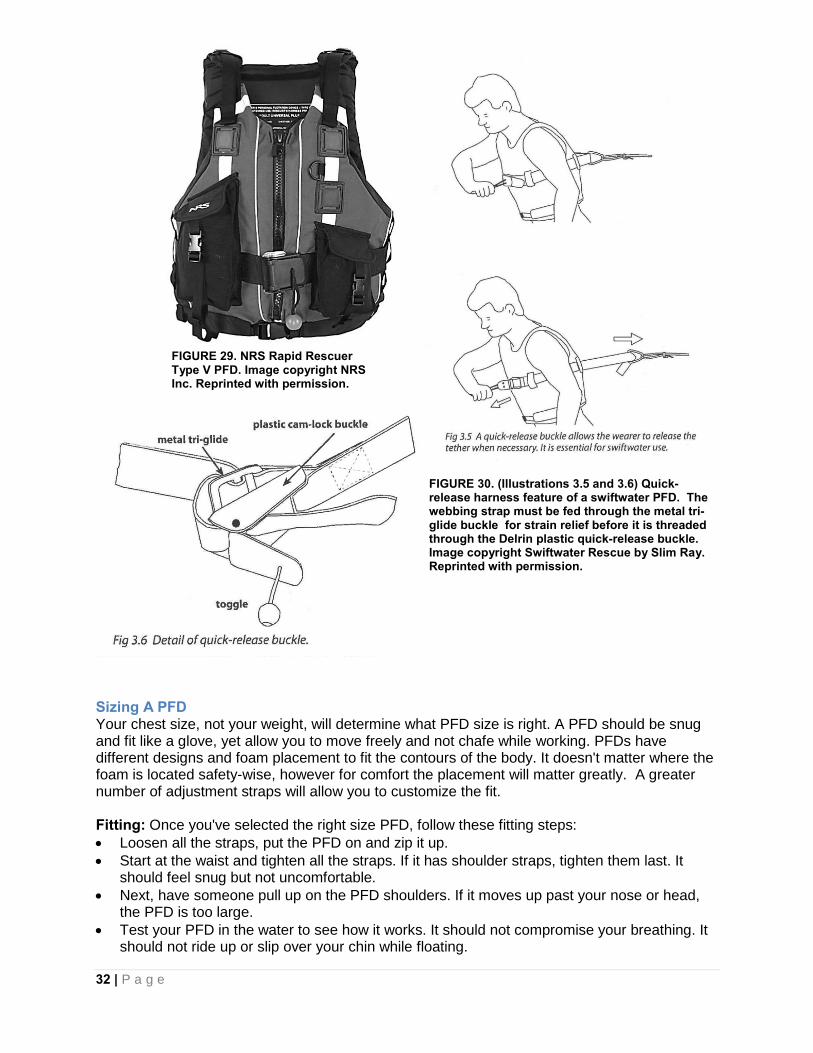
Type V; Special Use Device
• These vests, deck suits, hybrid PFDs, and others are designed for specific activities such as windsurfing, kayaking, or water-skiing. Some Type V PFDs are designed to inflate when you enter the water. To be acceptable, Type V life jackets must be worn and used in accordance with their label.
• Minimum buoyancy 15.5-22 lbs. • These include Hybrid Inflatable PFDs, Canoe/Kayak Vest,
Boardsailing Vests, Deck Suits, Work Vests for Commercial Vessels, Commercial Whitewater Vests, Man-Overboard Rescue Devices, and Law Enforcement Flotation Devices.
Approval Ratings and Swiftwater PFD’s: It is important to understand that most swiftwater rescue PFD’s are lumped into the Type III or V classification. Type V PFDs are approved for special uses and conditions identified on their label, including swiftwater rescue. Excellent PFD’s manufactured outside of the U.S. may not have a USCG rating, however typically meet the standards from the country of orgin (e.g., Canadian Coast Guard, Conformité Européenne (CE), and European Norm (EN)). Finally, the U.S. Coast Guard is revising the classification and labeling of PFD’s, which hopefully will address the specialized nature of swiftwater rescue PFD’s.
FIGURE 26. Type III Flotation Aid PFD. Image copyright Extrasport. Reprinted with permission.
Figure 27. Type IV Throwable Device. Image copyright Extrasport. Reprinted with permission.
Figure 28. Type V PFD. Image copyright Extrasport. Reprinted with permission.

30 | P a g e
Definitions Relating to PFD’s: Buoyancy - The tendency of a body to float or sink in water. Most people will naturally float in water, especially if they fill their lungs with air. Most require only about 11 pounds (50 Newtons) of extra buoyancy to keep their head out of water. That is why a PFD with just 15.5 pounds (70 Newtons) of buoyancy can provide adequate flotation for an adult -- even a very large person. PFDs with 22 to 34 pounds (100 to 155 Newtons) can provide superior performance. Buoyancy is determined by Archimedes' Principle: A body partially or completely submerged in a fluid is buoyed up by a force equal to the weight of the fluid displaced by the body. This means someone immersed in water is "buoyed" upward by a force equal to the weight of the volume of water that their body takes up (displaces). Gravity pulls a person's body downward by a force equal to their weight. The difference between these forces is a person's net buoyancy. A PFD is very lightweight, but displaces enough water to make the PFD and the person wearing it very buoyant. It also follows that the people hardest to float are those with compact, dense bodies. These tend to be people with athletic body builds, with a lot of bone and muscle mass, and not much fat. Fat is not as dense as muscle and bone, so people who are overweight can actually be easier to float than someone who is much smaller and leaner. Heavy people do not need a higher buoyancy PFD because of their weight.
HIGHER BUOYANCY MEANS HIGHER LIFT 6
6 USCG. http://www.uscg.mil/hq/cg5/cg5214/pfdselection.asp
Type PFDs Minimum Adult Buoyancy in Pounds (Newtons)
I - Inflatable 33.0 (150) I - Buoyant Foam or Kapok 22.0 (100) II - Inflatable 33.0 (150) II - Buoyant Foam or Kapok 15.5 (70) III - Inflatable 22.0 (100) III - Buoyant Foam 15.5 (70) IV - Ring Buoys 16.5 (75) IV - Boat Cushions 18.0 (82) V - Hybrid Inflatables 22.0 (Fully inflated) (100)
7.5 (Deflated) (34) V - Special Use Device - Inflatable 22.0 to 34.0 (100 to 155) V - Special Use Device - Buoyant Foam 15.5 to 22.0 (70 to 100)
31 | P a g e
Inflatable - A device which depends on flexible air chambers which can be filled with air or other gas (usually carbon dioxide) for flotation. Inherently Buoyant - A device which relies on buoyant material for flotation. Buoyant materials used in Personal Flotation Devices include - Plastic Foams - Materials consisting of closed plastic cells which trap air and provide flotation. Flexible plastic foams used for buoyancy include Polyvinyl Chloride (PVC), Polyethylene (PE), and Neoprene. Rigid foams used in ring lifebuoys are often polyurethane. Kapok - A natural silky fiber produced from the seed of the kapok (Ceiba pentandra) tree which floats because of air trapped in the fibers' hollow cells. Used by some PFD manufacturers as a eco-friendly buoyant material. Newton - The metric (SI) system measure of force. One pound force equals 4.4 Newtons.
Guidelines for Retiring A PFD A PFD should be removed from service if any of the following conditions exist:
• Securing metal or plastic hardware on the PFD is broken, deformed, or weakened. • Webbings used to secure the PFD is ripped, torn, or become separated from an
attachment point. • Rotted or deteriorated structural component that fails when tugged. • Rips, tears, or open seams in fabric or coatings are large enough to allow the loss of
buoyant material. • Buoyant material that is hardened, non-resilient, permanently compressed, waterlogged,
oil-soaked, or which shows evidence of fungus or mildew. • Any loss of buoyant material or buoyant material that is not securely held in position. • Consider the age of the PFD by reviewing the date of manufacture. Although there is no
standardized life cycle for retirement of a PFD based upon age, consider that this device is required to perform reliably in emergencies. A swiftwater rescue PFD that is over ten years old should be carefully inspected and be considered a candidate for replacement.
Features of a Swiftwater Rescue PFD • Type III or V USCG approved. However many excellent foreign-made swiftwater rescue
specific PFDs are not USCG approved • Minimum 22 pounds of flotation • Two styles of entry include pullover and zip-up • Constructed for durability and excessive wear • A quick-release tether • Storage pouches and lash tabs for a knife • High visibility color • Reflective trim • Optional- leg straps for add extra security in big water. • Most importantly- It fits very well!
32 | P a g e
Sizing A PFD Your chest size, not your weight, will determine what PFD size is right. A PFD should be snug and fit like a glove, yet allow you to move freely and not chafe while working. PFDs have different designs and foam placement to fit the contours of the body. It doesn't matter where the foam is located safety-wise, however for comfort the placement will matter greatly. A greater number of adjustment straps will allow you to customize the fit. Fitting: Once you've selected the right size PFD, follow these fitting steps: • Loosen all the straps, put the PFD on and zip it up. • Start at the waist and tighten all the straps. If it has shoulder straps, tighten them last. It
should feel snug but not uncomfortable. • Next, have someone pull up on the PFD shoulders. If it moves up past your nose or head,
the PFD is too large. • Test your PFD in the water to see how it works. It should not compromise your breathing. It
should not ride up or slip over your chin while floating.
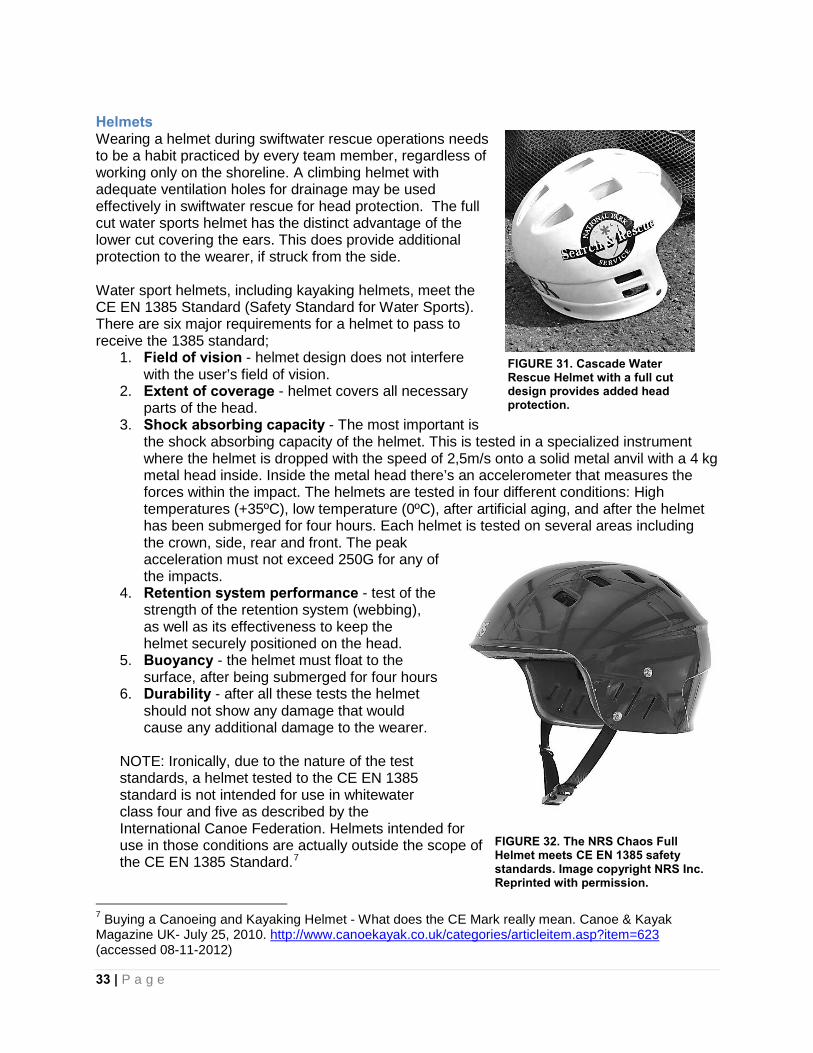
FIGURE 29. NRS Rapid Rescuer Type V PFD. Image copyright NRS Inc. Reprinted with permission.
FIGURE 30. (Illustrations 3.5 and 3.6) Quick-release harness feature of a swiftwater PFD. The webbing strap must be fed through the metal tri-glide buckle for strain relief before it is threaded through the Delrin plastic quick-release buckle. Image copyright Swiftwater Rescue by Slim Ray. Reprinted with permission.
33 | P a g e
Helmets Wearing a helmet during swiftwater rescue operations needs to be a habit practiced by every team member, regardless of working only on the shoreline. A climbing helmet with adequate ventilation holes for drainage may be used effectively in swiftwater rescue for head protection. The full cut water sports helmet has the distinct advantage of the lower cut covering the ears. This does provide additional protection to the wearer, if struck from the side. Water sport helmets, including kayaking helmets, meet the CE EN 1385 Standard (Safety Standard for Water Sports). There are six major requirements for a helmet to pass to receive the 1385 standard;
1. Field of vision - helmet design does not interfere with the user’s field of vision.
2. Extent of coverage - helmet covers all necessary parts of the head.
3. Shock absorbing capacity - The most important is the shock absorbing capacity of the helmet. This is tested in a specialized instrument where the helmet is dropped with the speed of 2,5m/s onto a solid metal anvil with a 4 kg metal head inside. Inside the metal head there’s an accelerometer that measures the forces within the impact. The helmets are tested in four different conditions: High temperatures (+35ºC), low temperature (0ºC), after artificial aging, and after the helmet has been submerged for four hours. Each helmet is tested on several areas including the crown, side, rear and front. The peak acceleration must not exceed 250G for any of the impacts.
4. Retention system performance - test of the strength of the retention system (webbing), as well as its effectiveness to keep the helmet securely positioned on the head.
5. Buoyancy - the helmet must float to the surface, after being submerged for four hours
6. Durability - after all these tests the helmet should not show any damage that would cause any additional damage to the wearer.
NOTE: Ironically, due to the nature of the test standards, a helmet tested to the CE EN 1385 standard is not intended for use in whitewater class four and five as described by the International Canoe Federation. Helmets intended for use in those conditions are actually outside the scope of the CE EN 1385 Standard.7
7 Buying a Canoeing and Kayaking Helmet - What does the CE Mark really mean. Canoe & Kayak Magazine UK- July 25, 2010. http://www.canoekayak.co.uk/categories/articleitem.asp?item=623 (accessed 08-11-2012)
FIGURE 31. Cascade Water Rescue Helmet with a full cut design provides added head protection.
FIGURE 32. The NRS Chaos Full Helmet meets CE EN 1385 safety standards. Image copyright NRS Inc. Reprinted with permission.
34 | P a g e
Helmet Features • Durable shell designed to dissipate impacts well. • A foam liner or suspension system that provides
comfort and protection. • Ventilation or drain holes depending upon design. • Meets CE EN 1385 standards for whitewater safety. • High visibility color for recognition in the water.
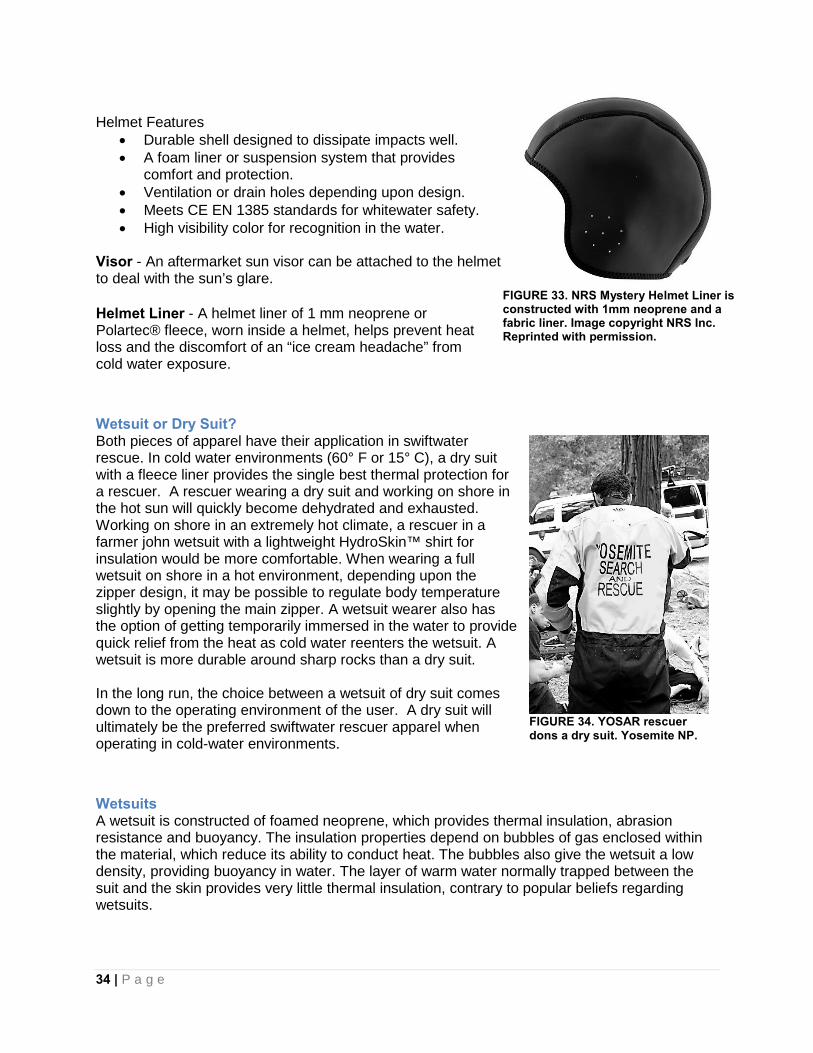
Visor - An aftermarket sun visor can be attached to the helmet to deal with the sun’s glare. Helmet Liner - A helmet liner of 1 mm neoprene or Polartec® fleece, worn inside a helmet, helps prevent heat loss and the discomfort of an “ice cream headache” from cold water exposure.
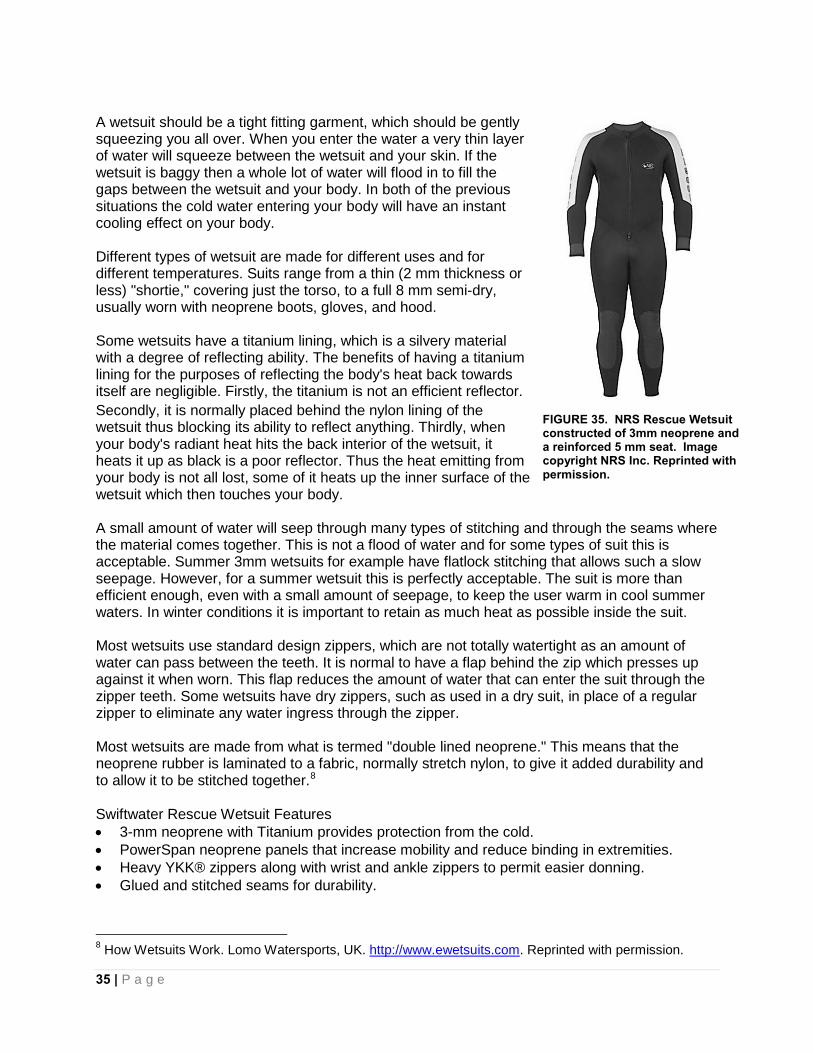
Wetsuit or Dry Suit? Both pieces of apparel have their application in swiftwater rescue. In cold water environments (60° F or 15° C), a dry suit with a fleece liner provides the single best thermal protection for a rescuer. A rescuer wearing a dry suit and working on shore in the hot sun will quickly become dehydrated and exhausted. Working on shore in an extremely hot climate, a rescuer in a farmer john wetsuit with a lightweight HydroSkin™ shirt for insulation would be more comfortable. When wearing a full wetsuit on shore in a hot environment, depending upon the zipper design, it may be possible to regulate body temperature slightly by opening the main zipper. A wetsuit wearer also has the option of getting temporarily immersed in the water to provide quick relief from the heat as cold water reenters the wetsuit. A wetsuit is more durable around sharp rocks than a dry suit. In the long run, the choice between a wetsuit of dry suit comes down to the operating environment of the user. A dry suit will ultimately be the preferred swiftwater rescuer apparel when operating in cold-water environments.
Wetsuits A wetsuit is constructed of foamed neoprene, which provides thermal insulation, abrasion resistance and buoyancy. The insulation properties depend on bubbles of gas enclosed within the material, which reduce its ability to conduct heat. The bubbles also give the wetsuit a low density, providing buoyancy in water. The layer of warm water normally trapped between the suit and the skin provides very little thermal insulation, contrary to popular beliefs regarding wetsuits.
FIGURE 33. NRS Mystery Helmet Liner is constructed with 1mm neoprene and a fabric liner. Image copyright NRS Inc. Reprinted with permission.
FIGURE 34. YOSAR rescuer dons a dry suit. Yosemite NP.
35 | P a g e
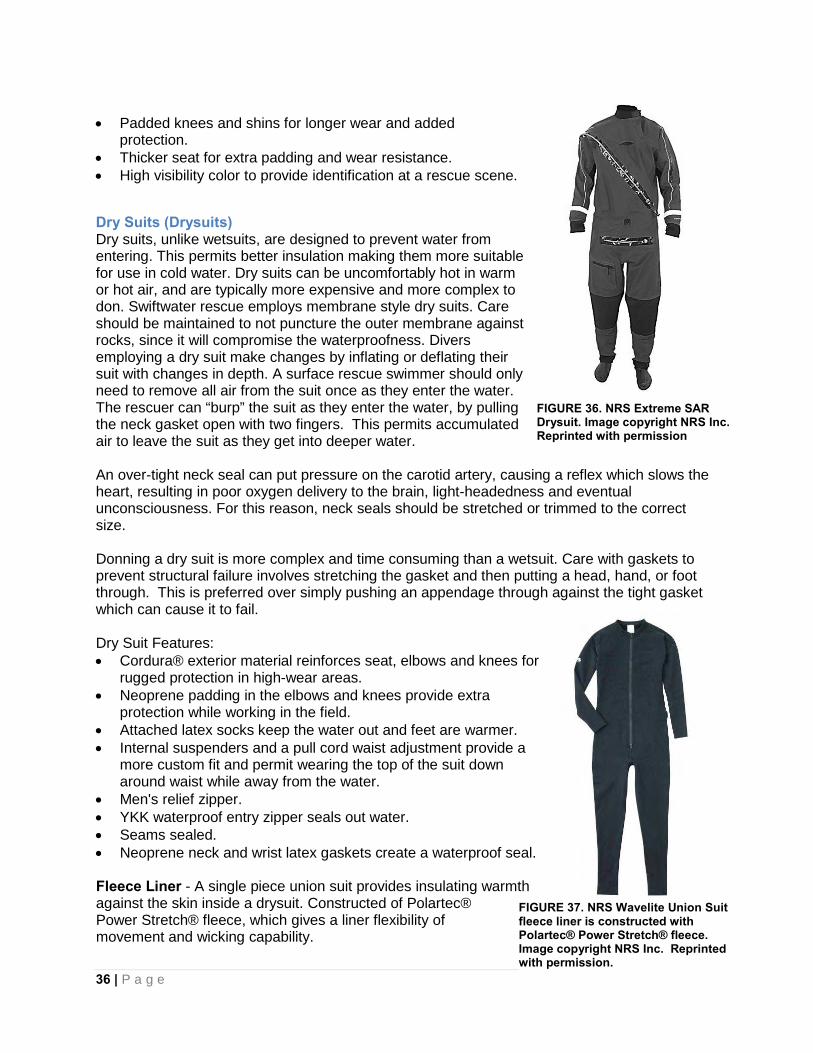
A wetsuit should be a tight fitting garment, which should be gently squeezing you all over. When you enter the water a very thin layer of water will squeeze between the wetsuit and your skin. If the wetsuit is baggy then a whole lot of water will flood in to fill the gaps between the wetsuit and your body. In both of the previous situations the cold water entering your body will have an instant cooling effect on your body. Different types of wetsuit are made for different uses and for different temperatures. Suits range from a thin (2 mm thickness or less) "shortie," covering just the torso, to a full 8 mm semi-dry, usually worn with neoprene boots, gloves, and hood. Some wetsuits have a titanium lining, which is a silvery material with a degree of reflecting ability. The benefits of having a titanium lining for the purposes of reflecting the body's heat back towards itself are negligible. Firstly, the titanium is not an efficient reflector. Secondly, it is normally placed behind the nylon lining of the wetsuit thus blocking its ability to reflect anything. Thirdly, when your body's radiant heat hits the back interior of the wetsuit, it heats it up as black is a poor reflector. Thus the heat emitting from your body is not all lost, some of it heats up the inner surface of the wetsuit which then touches your body. A small amount of water will seep through many types of stitching and through the seams where the material comes together. This is not a flood of water and for some types of suit this is acceptable. Summer 3mm wetsuits for example have flatlock stitching that allows such a slow seepage. However, for a summer wetsuit this is perfectly acceptable. The suit is more than efficient enough, even with a small amount of seepage, to keep the user warm in cool summer waters. In winter conditions it is important to retain as much heat as possible inside the suit. Most wetsuits use standard design zippers, which are not totally watertight as an amount of water can pass between the teeth. It is normal to have a flap behind the zip which presses up against it when worn. This flap reduces the amount of water that can enter the suit through the zipper teeth. Some wetsuits have dry zippers, such as used in a dry suit, in place of a regular zipper to eliminate any water ingress through the zipper. Most wetsuits are made from what is termed "double lined neoprene." This means that the neoprene rubber is laminated to a fabric, normally stretch nylon, to give it added durability and to allow it to be stitched together.8 Swiftwater Rescue Wetsuit Features • 3-mm neoprene with Titanium provides protection from the cold. • PowerSpan neoprene panels that increase mobility and reduce binding in extremities. • Heavy YKK® zippers along with wrist and ankle zippers to permit easier donning. • Glued and stitched seams for durability.
8 How Wetsuits Work. Lomo Watersports, UK. http://www.ewetsuits.com. Reprinted with permission.
FIGURE 35. NRS Rescue Wetsuit constructed of 3mm neoprene and a reinforced 5 mm seat. Image copyright NRS Inc. Reprinted with permission.
36 | P a g e
• Padded knees and shins for longer wear and added protection.
• Thicker seat for extra padding and wear resistance. • High visibility color to provide identification at a rescue scene.
Dry Suits (Drysuits) Dry suits, unlike wetsuits, are designed to prevent water from entering. This permits better insulation making them more suitable for use in cold water. Dry suits can be uncomfortably hot in warm or hot air, and are typically more expensive and more complex to don. Swiftwater rescue employs membrane style dry suits. Care should be maintained to not puncture the outer membrane against rocks, since it will compromise the waterproofness. Divers employing a dry suit make changes by inflating or deflating their suit with changes in depth. A surface rescue swimmer should only need to remove all air from the suit once as they enter the water. The rescuer can “burp” the suit as they enter the water, by pulling the neck gasket open with two fingers. This permits accumulated air to leave the suit as they get into deeper water. An over-tight neck seal can put pressure on the carotid artery, causing a reflex which slows the heart, resulting in poor oxygen delivery to the brain, light-headedness and eventual unconsciousness. For this reason, neck seals should be stretched or trimmed to the correct size. Donning a dry suit is more complex and time consuming than a wetsuit. Care with gaskets to prevent structural failure involves stretching the gasket and then putting a head, hand, or foot through. This is preferred over simply pushing an appendage through against the tight gasket which can cause it to fail. Dry Suit Features: • Cordura® exterior material reinforces seat, elbows and knees for
rugged protection in high-wear areas. • Neoprene padding in the elbows and knees provide extra
protection while working in the field. • Attached latex socks keep the water out and feet are warmer. • Internal suspenders and a pull cord waist adjustment provide a
more custom fit and permit wearing the top of the suit down around waist while away from the water.
• Men's relief zipper. • YKK waterproof entry zipper seals out water. • Seams sealed. • Neoprene neck and wrist latex gaskets create a waterproof seal. Fleece Liner - A single piece union suit provides insulating warmth against the skin inside a drysuit. Constructed of Polartec® Power Stretch® fleece, which gives a liner flexibility of movement and wicking capability.
FIGURE 36. NRS Extreme SAR Drysuit. Image copyright NRS Inc. Reprinted with permission
FIGURE 37. NRS Wavelite Union Suit fleece liner is constructed with Polartec® Power Stretch® fleece. Image copyright NRS Inc. Reprinted with permission.
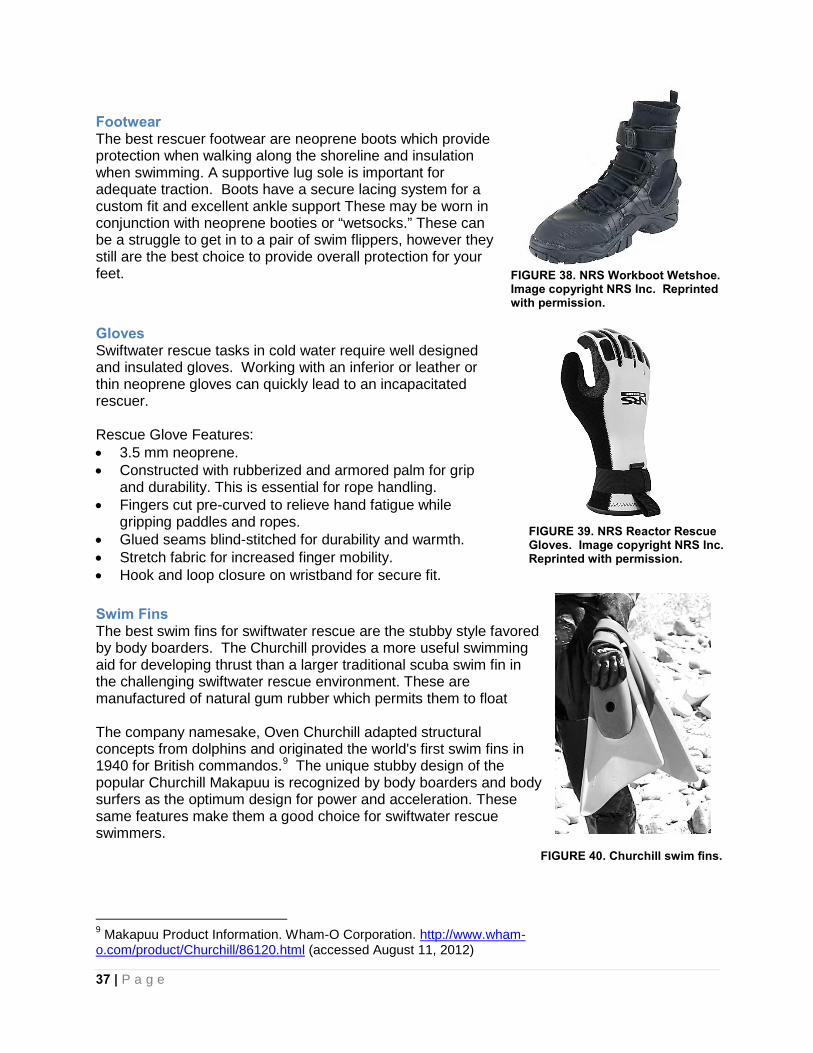
37 | P a g e
Footwear The best rescuer footwear are neoprene boots which provide protection when walking along the shoreline and insulation when swimming. A supportive lug sole is important for adequate traction. Boots have a secure lacing system for a custom fit and excellent ankle support These may be worn in conjunction with neoprene booties or “wetsocks.” These can be a struggle to get in to a pair of swim flippers, however they still are the best choice to provide overall protection for your feet.
Gloves Swiftwater rescue tasks in cold water require well designed and insulated gloves. Working with an inferior or leather or thin neoprene gloves can quickly lead to an incapacitated rescuer. Rescue Glove Features: • 3.5 mm neoprene. • Constructed with rubberized and armored palm for grip
and durability. This is essential for rope handling. • Fingers cut pre-curved to relieve hand fatigue while
gripping paddles and ropes. • Glued seams blind-stitched for durability and warmth. • Stretch fabric for increased finger mobility. • Hook and loop closure on wristband for secure fit.
Swim Fins The best swim fins for swiftwater rescue are the stubby style favored by body boarders. The Churchill provides a more useful swimming aid for developing thrust than a larger traditional scuba swim fin in the challenging swiftwater rescue environment. These are manufactured of natural gum rubber which permits them to float The company namesake, Oven Churchill adapted structural concepts from dolphins and originated the world's first swim fins in 1940 for British commandos.9 The unique stubby design of the popular Churchill Makapuu is recognized by body boarders and body surfers as the optimum design for power and acceleration. These same features make them a good choice for swiftwater rescue swimmers.
9 Makapuu Product Information. Wham-O Corporation. http://www.wham-o.com/product/Churchill/86120.html (accessed August 11, 2012)
FIGURE 38. NRS Workboot Wetshoe. Image copyright NRS Inc. Reprinted with permission.
FIGURE 39. NRS Reactor Rescue Gloves. Image copyright NRS Inc. Reprinted with permission.
FIGURE 40. Churchill swim fins.
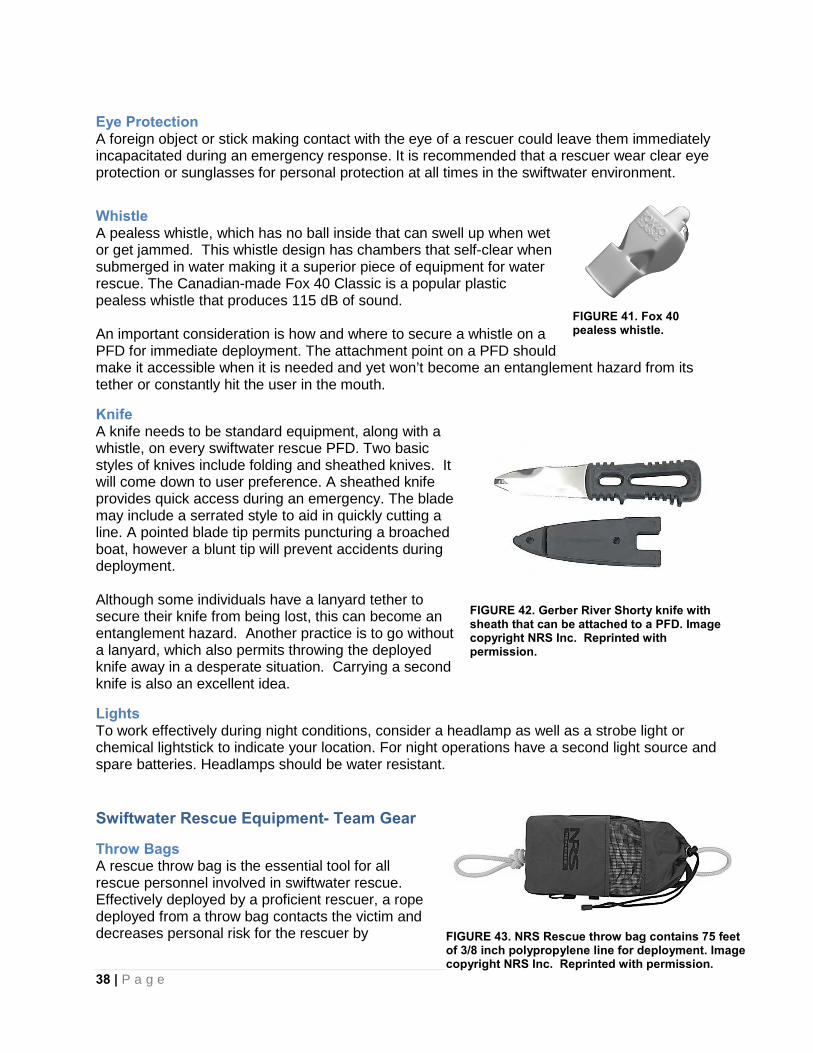
38 | P a g e
Eye Protection A foreign object or stick making contact with the eye of a rescuer could leave them immediately incapacitated during an emergency response. It is recommended that a rescuer wear clear eye protection or sunglasses for personal protection at all times in the swiftwater environment.
Whistle A pealess whistle, which has no ball inside that can swell up when wet or get jammed. This whistle design has chambers that self-clear when submerged in water making it a superior piece of equipment for water rescue. The Canadian-made Fox 40 Classic is a popular plastic pealess whistle that produces 115 dB of sound. An important consideration is how and where to secure a whistle on a PFD for immediate deployment. The attachment point on a PFD should make it accessible when it is needed and yet won’t become an entanglement hazard from its tether or constantly hit the user in the mouth.
Knife A knife needs to be standard equipment, along with a whistle, on every swiftwater rescue PFD. Two basic styles of knives include folding and sheathed knives. It will come down to user preference. A sheathed knife provides quick access during an emergency. The blade may include a serrated style to aid in quickly cutting a line. A pointed blade tip permits puncturing a broached boat, however a blunt tip will prevent accidents during deployment. Although some individuals have a lanyard tether to secure their knife from being lost, this can become an entanglement hazard. Another practice is to go without a lanyard, which also permits throwing the deployed knife away in a desperate situation. Carrying a second knife is also an excellent idea.
Lights To work effectively during night conditions, consider a headlamp as well as a strobe light or chemical lightstick to indicate your location. For night operations have a second light source and spare batteries. Headlamps should be water resistant.
Swiftwater Rescue Equipment- Team Gear
Throw Bags A rescue throw bag is the essential tool for all rescue personnel involved in swiftwater rescue. Effectively deployed by a proficient rescuer, a rope deployed from a throw bag contacts the victim and decreases personal risk for the rescuer by
FIGURE 41. Fox 40 pealess whistle.
FIGURE 42. Gerber River Shorty knife with sheath that can be attached to a PFD. Image copyright NRS Inc. Reprinted with permission.
FIGURE 43. NRS Rescue throw bag contains 75 feet of 3/8 inch polypropylene line for deployment. Image copyright NRS Inc. Reprinted with permission.
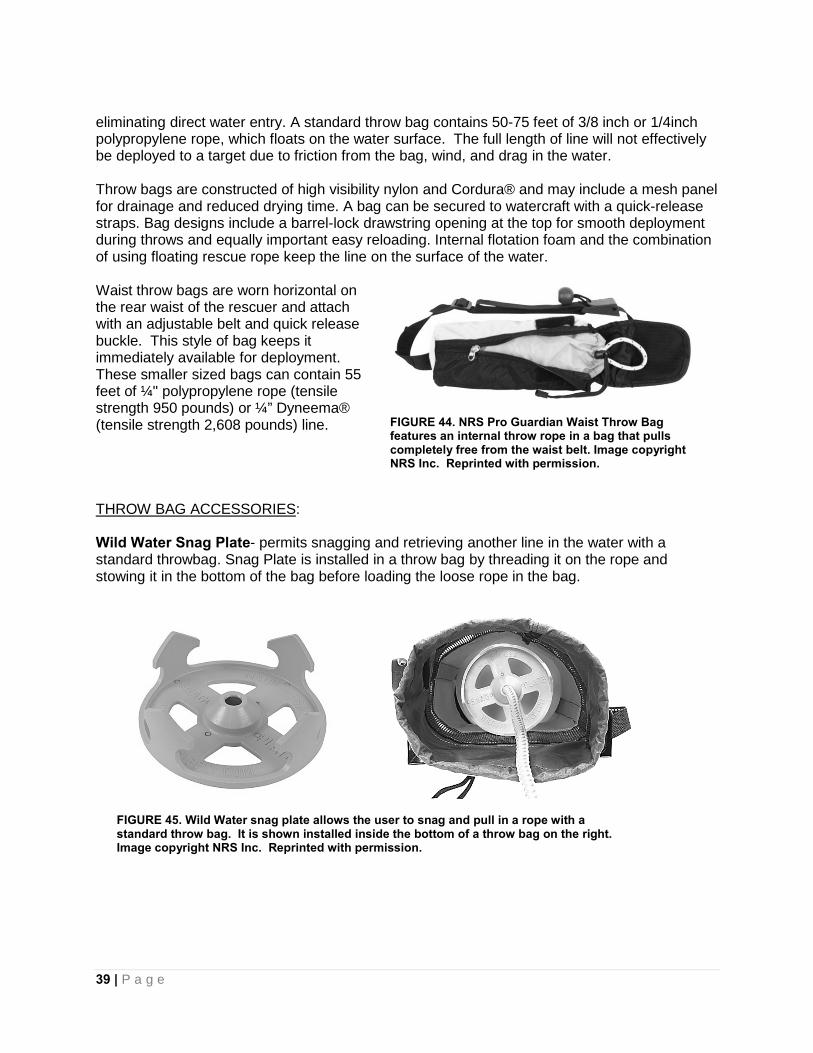
39 | P a g e
eliminating direct water entry. A standard throw bag contains 50-75 feet of 3/8 inch or 1/4inch polypropylene rope, which floats on the water surface. The full length of line will not effectively be deployed to a target due to friction from the bag, wind, and drag in the water. Throw bags are constructed of high visibility nylon and Cordura® and may include a mesh panel for drainage and reduced drying time. A bag can be secured to watercraft with a quick-release straps. Bag designs include a barrel-lock drawstring opening at the top for smooth deployment during throws and equally important easy reloading. Internal flotation foam and the combination of using floating rescue rope keep the line on the surface of the water. Waist throw bags are worn horizontal on the rear waist of the rescuer and attach with an adjustable belt and quick release buckle. This style of bag keeps it immediately available for deployment. These smaller sized bags can contain 55 feet of ¼" polypropylene rope (tensile strength 950 pounds) or ¼” Dyneema® (tensile strength 2,608 pounds) line. THROW BAG ACCESSORIES: Wild Water Snag Plate- permits snagging and retrieving another line in the water with a standard throwbag. Snag Plate is installed in a throw bag by threading it on the rope and stowing it in the bottom of the bag before loading the loose rope in the bag.
FIGURE 44. NRS Pro Guardian Waist Throw Bag features an internal throw rope in a bag that pulls completely free from the waist belt. Image copyright NRS Inc. Reprinted with permission.
FIGURE 45. Wild Water snag plate allows the user to snag and pull in a rope with a standard throw bag. It is shown installed inside the bottom of a throw bag on the right. Image copyright NRS Inc. Reprinted with permission.
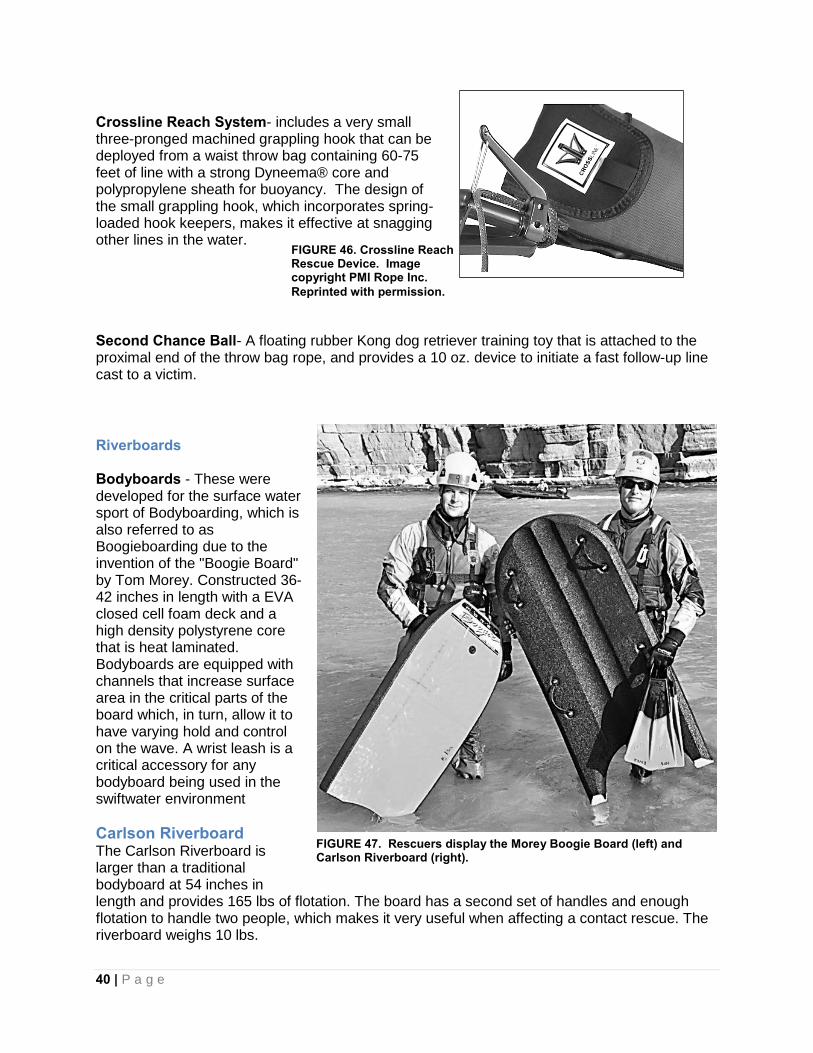
40 | P a g e
Crossline Reach System- includes a very small three-pronged machined grappling hook that can be deployed from a waist throw bag containing 60-75 feet of line with a strong Dyneema® core and polypropylene sheath for buoyancy. The design of the small grappling hook, which incorporates spring-loaded hook keepers, makes it effective at snagging other lines in the water. Second Chance Ball- A floating rubber Kong dog retriever training toy that is attached to the proximal end of the throw bag rope, and provides a 10 oz. device to initiate a fast follow-up line cast to a victim.
Riverboards Bodyboards - These were developed for the surface water sport of Bodyboarding, which is also referred to as Boogieboarding due to the invention of the "Boogie Board" by Tom Morey. Constructed 36-42 inches in length with a EVA closed cell foam deck and a high density polystyrene core that is heat laminated. Bodyboards are equipped with channels that increase surface area in the critical parts of the board which, in turn, allow it to have varying hold and control on the wave. A wrist leash is a critical accessory for any bodyboard being used in the swiftwater environment Carlson Riverboard The Carlson Riverboard is larger than a traditional bodyboard at 54 inches in length and provides 165 lbs of flotation. The board has a second set of handles and enough flotation to handle two people, which makes it very useful when affecting a contact rescue. The riverboard weighs 10 lbs.
FIGURE 47. Rescuers display the Morey Boogie Board (left) and Carlson Riverboard (right).
FIGURE 46. Crossline Reach Rescue Device. Image copyright PMI Rope Inc. Reprinted with permission.
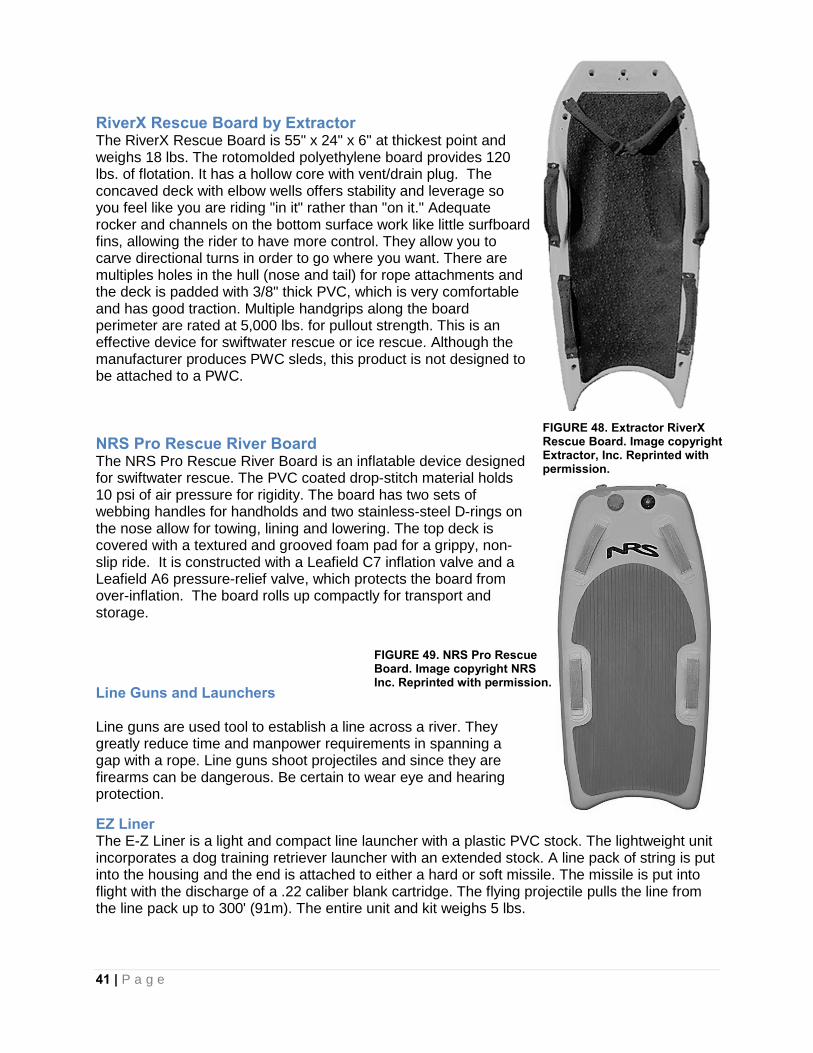
41 | P a g e
RiverX Rescue Board by Extractor The RiverX Rescue Board is 55" x 24" x 6" at thickest point and weighs 18 lbs. The rotomolded polyethylene board provides 120 lbs. of flotation. It has a hollow core with vent/drain plug. The concaved deck with elbow wells offers stability and leverage so you feel like you are riding "in it" rather than "on it." Adequate rocker and channels on the bottom surface work like little surfboard fins, allowing the rider to have more control. They allow you to carve directional turns in order to go where you want. There are multiples holes in the hull (nose and tail) for rope attachments and the deck is padded with 3/8" thick PVC, which is very comfortable and has good traction. Multiple handgrips along the board perimeter are rated at 5,000 lbs. for pullout strength. This is an effective device for swiftwater rescue or ice rescue. Although the manufacturer produces PWC sleds, this product is not designed to be attached to a PWC.
NRS Pro Rescue River Board The NRS Pro Rescue River Board is an inflatable device designed for swiftwater rescue. The PVC coated drop-stitch material holds 10 psi of air pressure for rigidity. The board has two sets of webbing handles for handholds and two stainless-steel D-rings on the nose allow for towing, lining and lowering. The top deck is covered with a textured and grooved foam pad for a grippy, non-slip ride. It is constructed with a Leafield C7 inflation valve and a Leafield A6 pressure-relief valve, which protects the board from over-inflation. The board rolls up compactly for transport and storage.
Line Guns and Launchers Line guns are used tool to establish a line across a river. They greatly reduce time and manpower requirements in spanning a gap with a rope. Line guns shoot projectiles and since they are firearms can be dangerous. Be certain to wear eye and hearing protection.
EZ Liner The E-Z Liner is a light and compact line launcher with a plastic PVC stock. The lightweight unit incorporates a dog training retriever launcher with an extended stock. A line pack of string is put into the housing and the end is attached to either a hard or soft missile. The missile is put into flight with the discharge of a .22 caliber blank cartridge. The flying projectile pulls the line from the line pack up to 300' (91m). The entire unit and kit weighs 5 lbs.
FIGURE 49. NRS Pro Rescue Board. Image copyright NRS Inc. Reprinted with permission.
FIGURE 48. Extractor RiverX Rescue Board. Image copyright Extractor, Inc. Reprinted with permission.
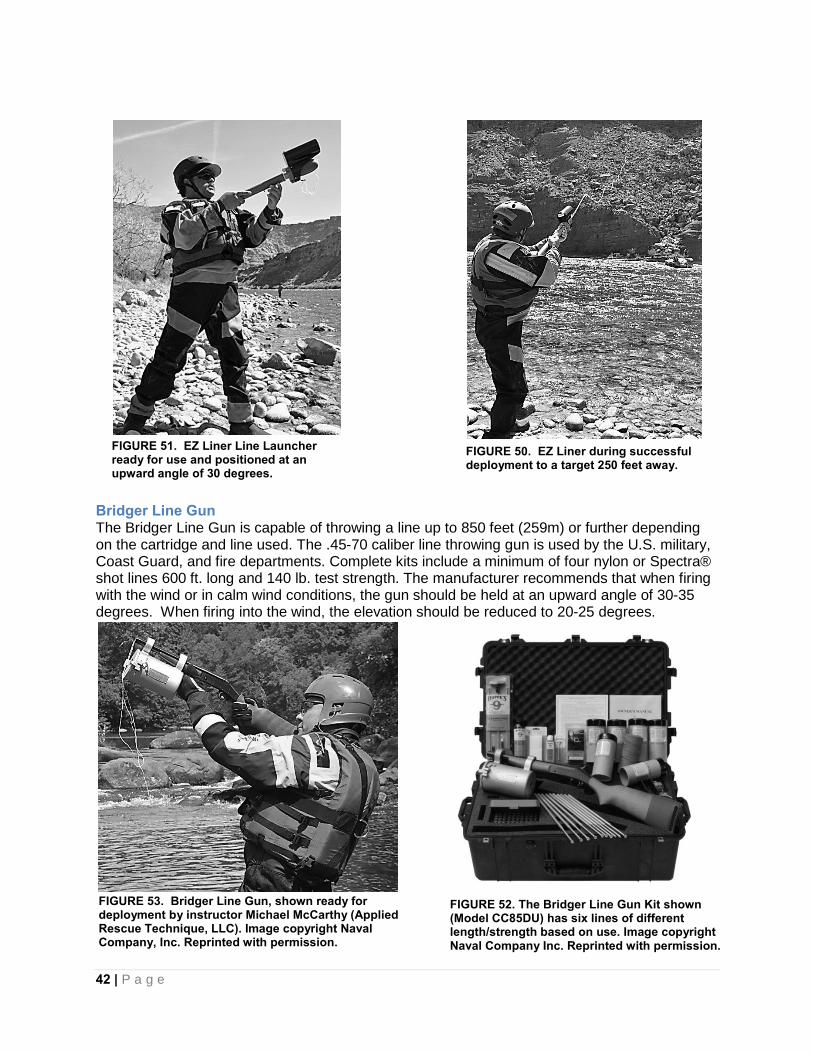
42 | P a g e
Bridger Line Gun The Bridger Line Gun is capable of throwing a line up to 850 feet (259m) or further depending on the cartridge and line used. The .45-70 caliber line throwing gun is used by the U.S. military, Coast Guard, and fire departments. Complete kits include a minimum of four nylon or Spectra® shot lines 600 ft. long and 140 lb. test strength. The manufacturer recommends that when firing with the wind or in calm wind conditions, the gun should be held at an upward angle of 30-35 degrees. When firing into the wind, the elevation should be reduced to 20-25 degrees.
FIGURE 51. EZ Liner Line Launcher ready for use and positioned at an upward angle of 30 degrees.
FIGURE 53. Bridger Line Gun, shown ready for deployment by instructor Michael McCarthy (Applied Rescue Technique, LLC). Image copyright Naval Company, Inc. Reprinted with permission.
FIGURE 52. The Bridger Line Gun Kit shown (Model CC85DU) has six lines of different length/strength based on use. Image copyright Naval Company Inc. Reprinted with permission.
FIGURE 50. EZ Liner during successful deployment to a target 250 feet away.
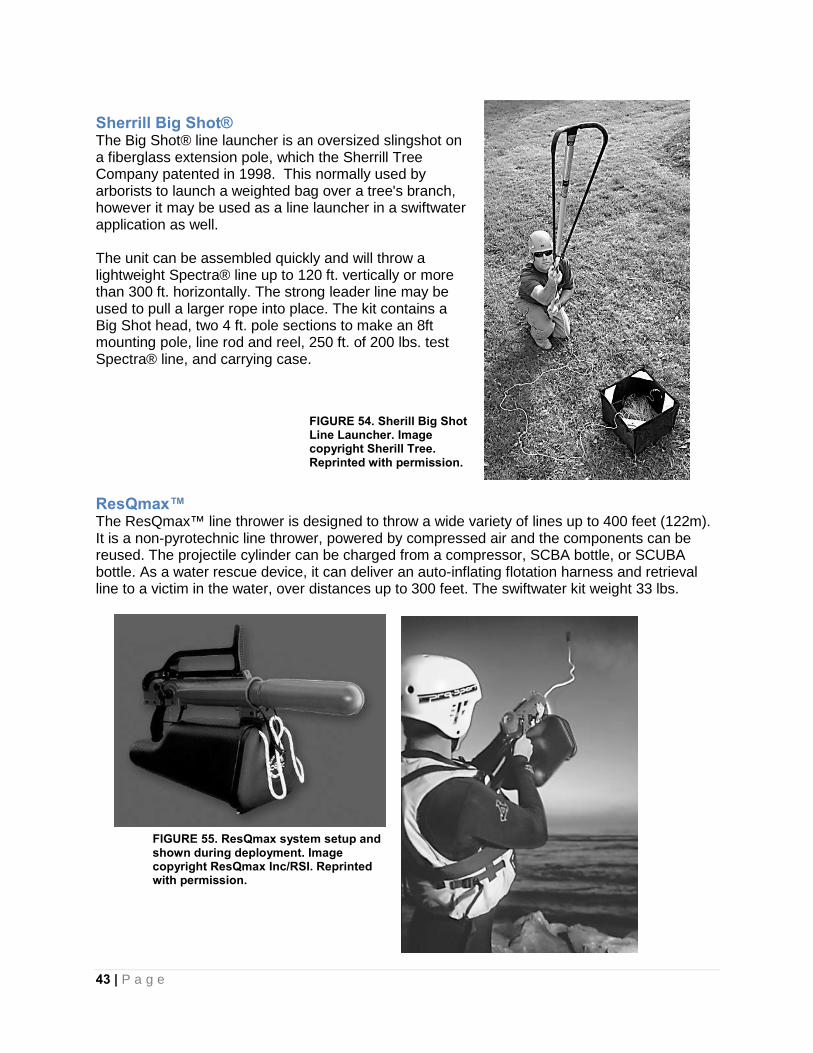
43 | P a g e
Sherrill Big Shot® The Big Shot® line launcher is an oversized slingshot on a fiberglass extension pole, which the Sherrill Tree Company patented in 1998. This normally used by arborists to launch a weighted bag over a tree's branch, however it may be used as a line launcher in a swiftwater application as well. The unit can be assembled quickly and will throw a lightweight Spectra® line up to 120 ft. vertically or more than 300 ft. horizontally. The strong leader line may be used to pull a larger rope into place. The kit contains a Big Shot head, two 4 ft. pole sections to make an 8ft mounting pole, line rod and reel, 250 ft. of 200 lbs. test Spectra® line, and carrying case.
ResQmax™ The ResQmax™ line thrower is designed to throw a wide variety of lines up to 400 feet (122m). It is a non-pyrotechnic line thrower, powered by compressed air and the components can be reused. The projectile cylinder can be charged from a compressor, SCBA bottle, or SCUBA bottle. As a water rescue device, it can deliver an auto-inflating flotation harness and retrieval line to a victim in the water, over distances up to 300 feet. The swiftwater kit weight 33 lbs.
FIGURE 55. ResQmax system setup and shown during deployment. Image copyright ResQmax Inc/RSI. Reprinted with permission.
FIGURE 54. Sherill Big Shot Line Launcher. Image copyright Sherill Tree. Reprinted with permission.
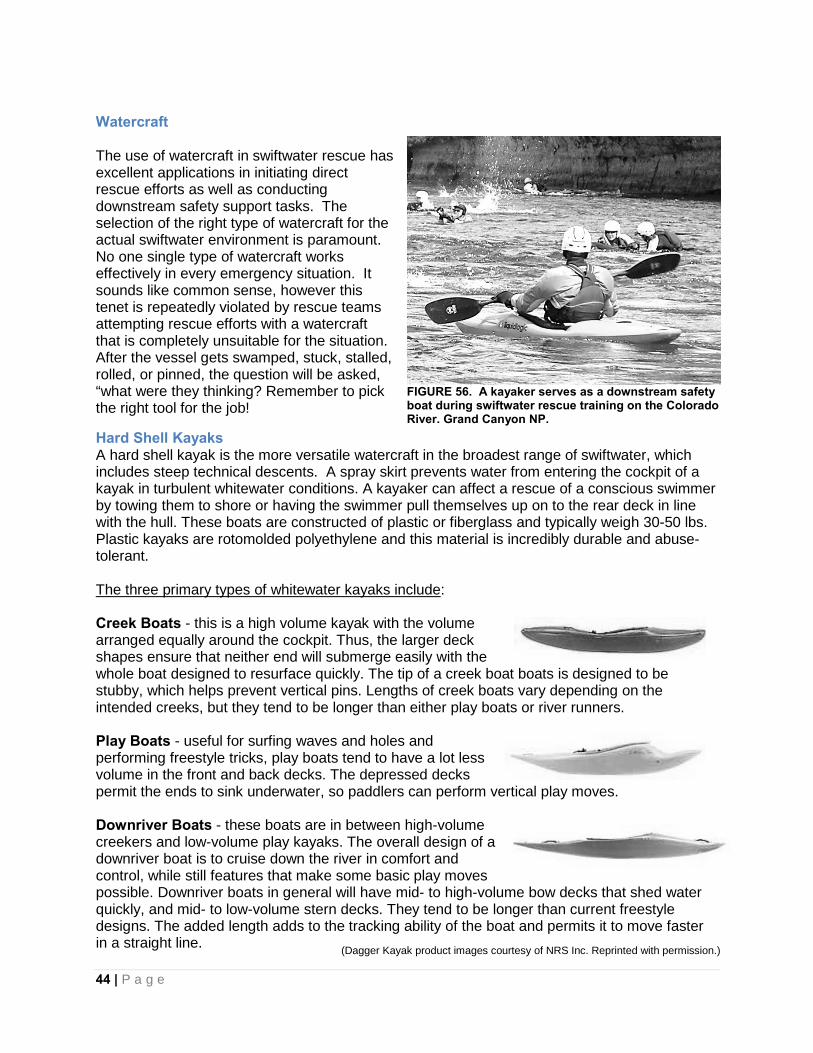
44 | P a g e
Watercraft The use of watercraft in swiftwater rescue has excellent applications in initiating direct rescue efforts as well as conducting downstream safety support tasks. The selection of the right type of watercraft for the actual swiftwater environment is paramount. No one single type of watercraft works effectively in every emergency situation. It sounds like common sense, however this tenet is repeatedly violated by rescue teams attempting rescue efforts with a watercraft that is completely unsuitable for the situation. After the vessel gets swamped, stuck, stalled, rolled, or pinned, the question will be asked, “what were they thinking? Remember to pick the right tool for the job!
Hard Shell Kayaks A hard shell kayak is the more versatile watercraft in the broadest range of swiftwater, which includes steep technical descents. A spray skirt prevents water from entering the cockpit of a kayak in turbulent whitewater conditions. A kayaker can affect a rescue of a conscious swimmer by towing them to shore or having the swimmer pull themselves up on to the rear deck in line with the hull. These boats are constructed of plastic or fiberglass and typically weigh 30-50 lbs. Plastic kayaks are rotomolded polyethylene and this material is incredibly durable and abuse-tolerant. The three primary types of whitewater kayaks include: Creek Boats - this is a high volume kayak with the volume arranged equally around the cockpit. Thus, the larger deck shapes ensure that neither end will submerge easily with the whole boat designed to resurface quickly. The tip of a creek boat boats is designed to be stubby, which helps prevent vertical pins. Lengths of creek boats vary depending on the intended creeks, but they tend to be longer than either play boats or river runners. Play Boats - useful for surfing waves and holes and performing freestyle tricks, play boats tend to have a lot less volume in the front and back decks. The depressed decks permit the ends to sink underwater, so paddlers can perform vertical play moves. Downriver Boats - these boats are in between high-volume creekers and low-volume play kayaks. The overall design of a downriver boat is to cruise down the river in comfort and control, while still features that make some basic play moves possible. Downriver boats in general will have mid- to high-volume bow decks that shed water quickly, and mid- to low-volume stern decks. They tend to be longer than current freestyle designs. The added length adds to the tracking ability of the boat and permits it to move faster in a straight line.
FIGURE 56. A kayaker serves as a downstream safety boat during swiftwater rescue training on the Colorado River. Grand Canyon NP.
(Dagger Kayak product images courtesy of NRS Inc. Reprinted with permission.)
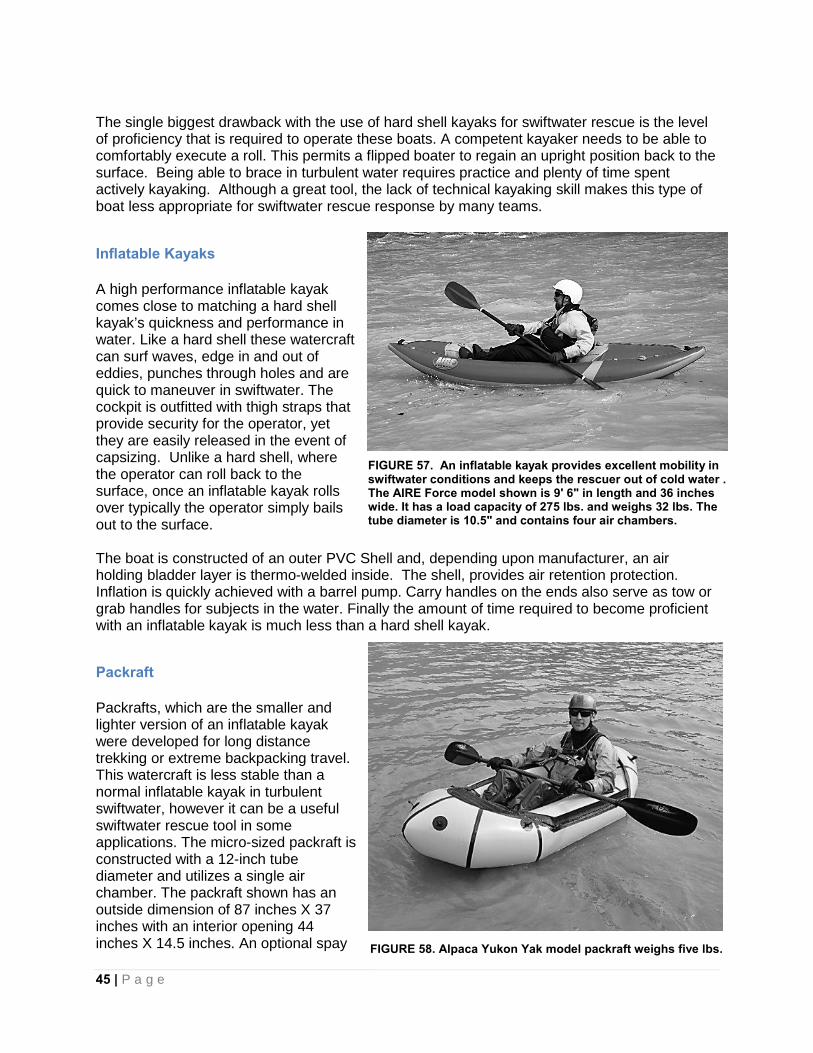
45 | P a g e
The single biggest drawback with the use of hard shell kayaks for swiftwater rescue is the level of proficiency that is required to operate these boats. A competent kayaker needs to be able to comfortably execute a roll. This permits a flipped boater to regain an upright position back to the surface. Being able to brace in turbulent water requires practice and plenty of time spent actively kayaking. Although a great tool, the lack of technical kayaking skill makes this type of boat less appropriate for swiftwater rescue response by many teams.
Inflatable Kayaks A high performance inflatable kayak comes close to matching a hard shell kayak’s quickness and performance in water. Like a hard shell these watercraft can surf waves, edge in and out of eddies, punches through holes and are quick to maneuver in swiftwater. The cockpit is outfitted with thigh straps that provide security for the operator, yet they are easily released in the event of capsizing. Unlike a hard shell, where the operator can roll back to the surface, once an inflatable kayak rolls over typically the operator simply bails out to the surface. The boat is constructed of an outer PVC Shell and, depending upon manufacturer, an air holding bladder layer is thermo-welded inside. The shell, provides air retention protection. Inflation is quickly achieved with a barrel pump. Carry handles on the ends also serve as tow or grab handles for subjects in the water. Finally the amount of time required to become proficient with an inflatable kayak is much less than a hard shell kayak.
Packraft Packrafts, which are the smaller and lighter version of an inflatable kayak were developed for long distance trekking or extreme backpacking travel. This watercraft is less stable than a normal inflatable kayak in turbulent swiftwater, however it can be a useful swiftwater rescue tool in some applications. The micro-sized packraft is constructed with a 12-inch tube diameter and utilizes a single air chamber. The packraft shown has an outside dimension of 87 inches X 37 inches with an interior opening 44 inches X 14.5 inches. An optional spay FIGURE 58. Alpaca Yukon Yak model packraft weighs five lbs.
FIGURE 57. An inflatable kayak provides excellent mobility in swiftwater conditions and keeps the rescuer out of cold water . The AIRE Force model shown is 9' 6" in length and 36 inches wide. It has a load capacity of 275 lbs. and weighs 32 lbs. The tube diameter is 10.5" and contains four air chambers.
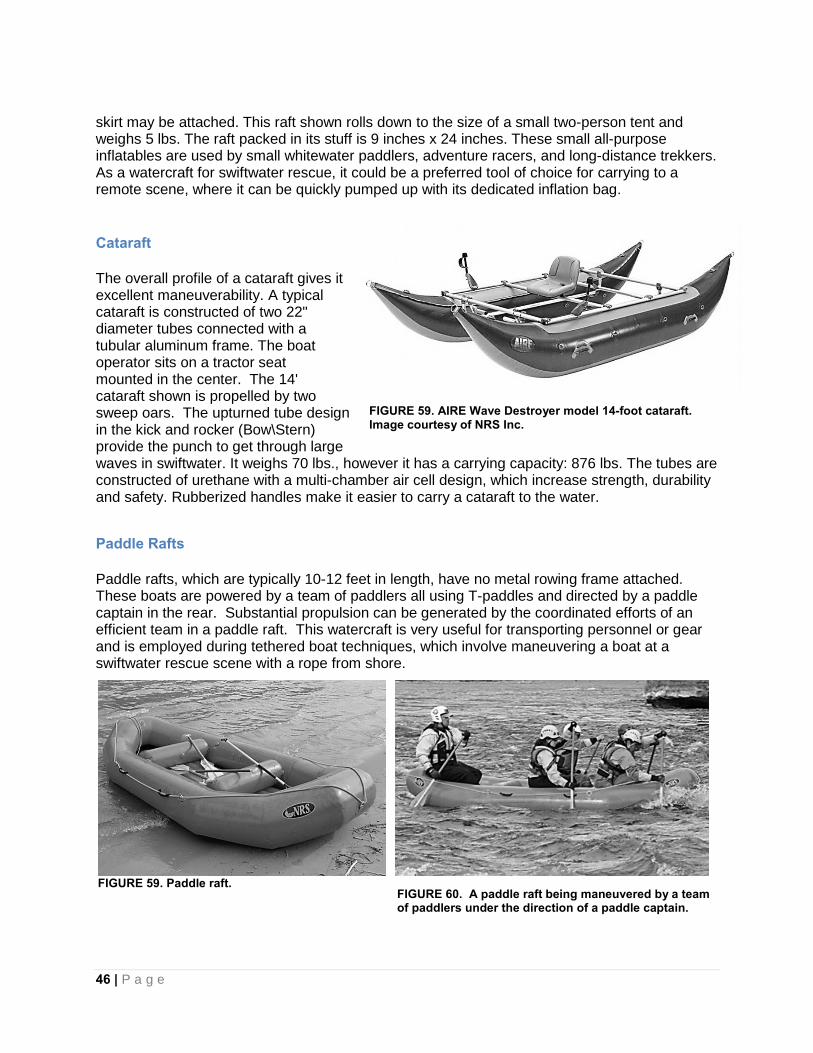
46 | P a g e
skirt may be attached. This raft shown rolls down to the size of a small two-person tent and weighs 5 lbs. The raft packed in its stuff is 9 inches x 24 inches. These small all-purpose inflatables are used by small whitewater paddlers, adventure racers, and long-distance trekkers. As a watercraft for swiftwater rescue, it could be a preferred tool of choice for carrying to a remote scene, where it can be quickly pumped up with its dedicated inflation bag.
Cataraft The overall profile of a cataraft gives it excellent maneuverability. A typical cataraft is constructed of two 22" diameter tubes connected with a tubular aluminum frame. The boat operator sits on a tractor seat mounted in the center. The 14' cataraft shown is propelled by two sweep oars. The upturned tube design in the kick and rocker (Bow\Stern) provide the punch to get through large waves in swiftwater. It weighs 70 lbs., however it has a carrying capacity: 876 lbs. The tubes are constructed of urethane with a multi-chamber air cell design, which increase strength, durability and safety. Rubberized handles make it easier to carry a cataraft to the water.
Paddle Rafts Paddle rafts, which are typically 10-12 feet in length, have no metal rowing frame attached. These boats are powered by a team of paddlers all using T-paddles and directed by a paddle captain in the rear. Substantial propulsion can be generated by the coordinated efforts of an efficient team in a paddle raft. This watercraft is very useful for transporting personnel or gear and is employed during tethered boat techniques, which involve maneuvering a boat at a swiftwater rescue scene with a rope from shore.
FIGURE 59. AIRE Wave Destroyer model 14-foot cataraft. Image courtesy of NRS Inc.
FIGURE 59. Paddle raft. FIGURE 60. A paddle raft being maneuvered by a team of paddlers under the direction of a paddle captain.
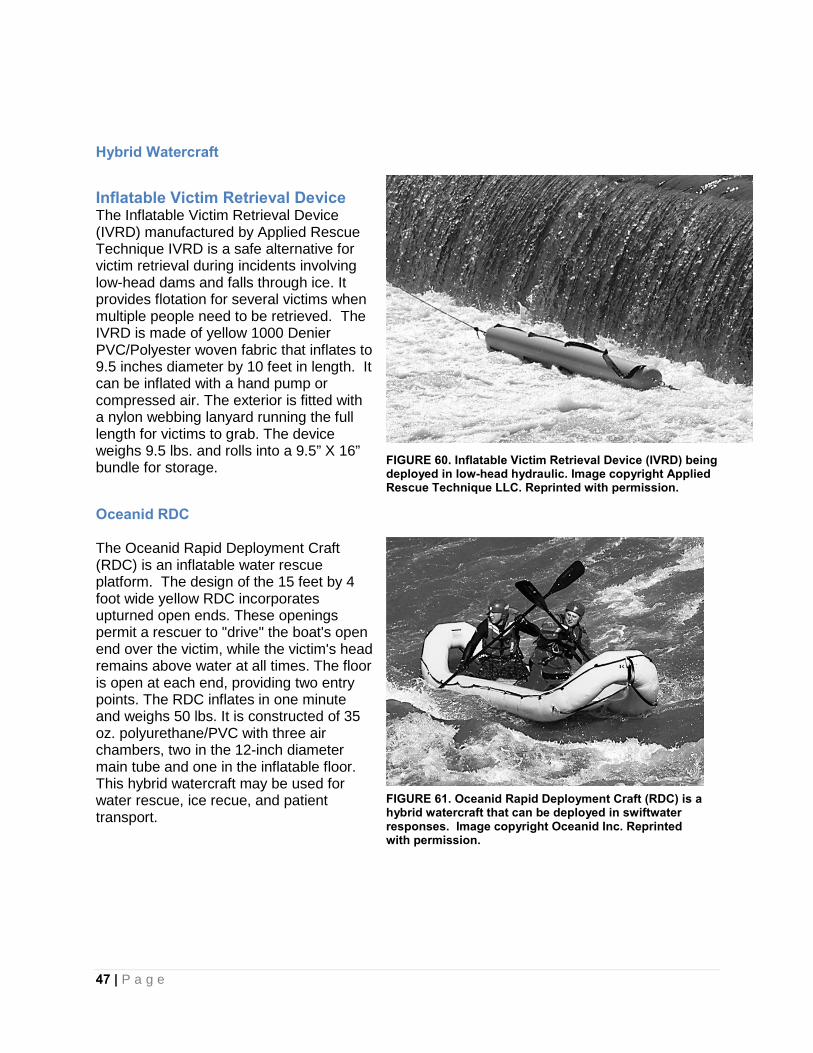
47 | P a g e
Hybrid Watercraft
Inflatable Victim Retrieval Device The Inflatable Victim Retrieval Device (IVRD) manufactured by Applied Rescue Technique IVRD is a safe alternative for victim retrieval during incidents involving low-head dams and falls through ice. It provides flotation for several victims when multiple people need to be retrieved. The IVRD is made of yellow 1000 Denier PVC/Polyester woven fabric that inflates to 9.5 inches diameter by 10 feet in length. It can be inflated with a hand pump or compressed air. The exterior is fitted with a nylon webbing lanyard running the full length for victims to grab. The device weighs 9.5 lbs. and rolls into a 9.5” X 16” bundle for storage.
Oceanid RDC The Oceanid Rapid Deployment Craft (RDC) is an inflatable water rescue platform. The design of the 15 feet by 4 foot wide yellow RDC incorporates upturned open ends. These openings permit a rescuer to "drive" the boat's open end over the victim, while the victim's head remains above water at all times. The floor is open at each end, providing two entry points. The RDC inflates in one minute and weighs 50 lbs. It is constructed of 35 oz. polyurethane/PVC with three air chambers, two in the 12-inch diameter main tube and one in the inflatable floor. This hybrid watercraft may be used for water rescue, ice recue, and patient transport.
FIGURE 61. Oceanid Rapid Deployment Craft (RDC) is a hybrid watercraft that can be deployed in swiftwater responses. Image copyright Oceanid Inc. Reprinted with permission.
FIGURE 60. Inflatable Victim Retrieval Device (IVRD) being deployed in low-head hydraulic. Image copyright Applied Rescue Technique LLC. Reprinted with permission.
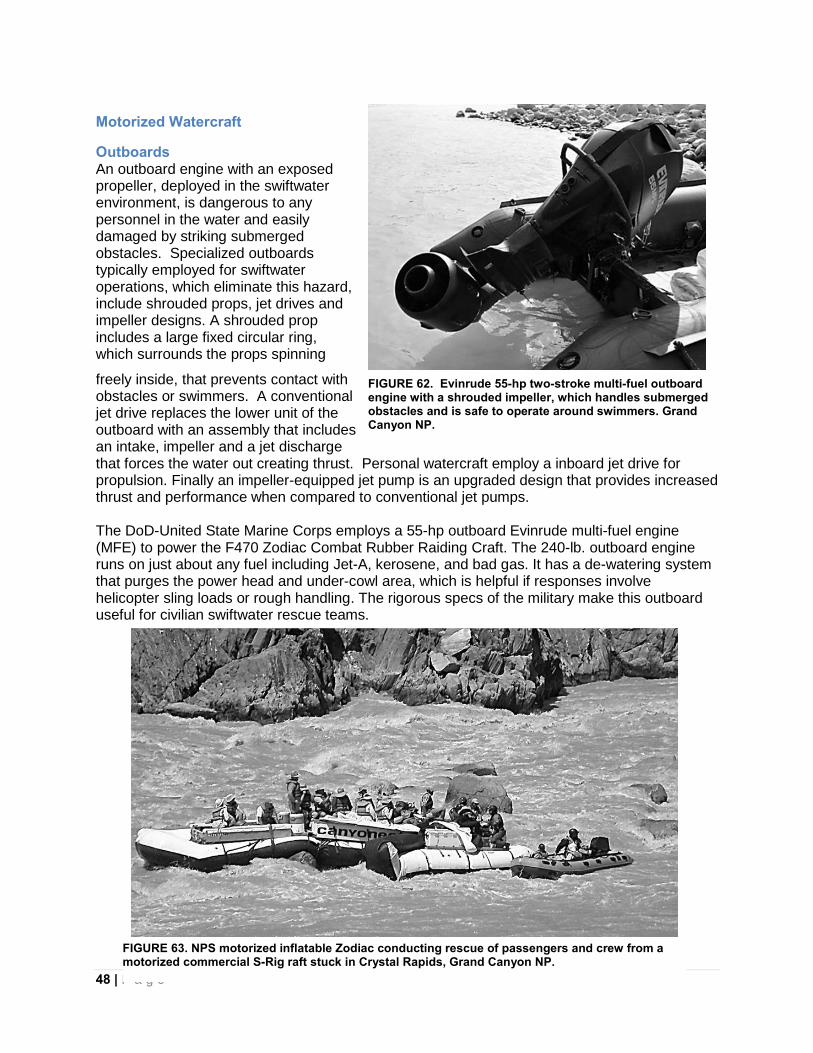
48 | P a g e
Motorized Watercraft
Outboards An outboard engine with an exposed propeller, deployed in the swiftwater environment, is dangerous to any personnel in the water and easily damaged by striking submerged obstacles. Specialized outboards typically employed for swiftwater operations, which eliminate this hazard, include shrouded props, jet drives and impeller designs. A shrouded prop includes a large fixed circular ring, which surrounds the props spinning
freely inside, that prevents contact with obstacles or swimmers. A conventional jet drive replaces the lower unit of the outboard with an assembly that includes an intake, impeller and a jet discharge that forces the water out creating thrust. Personal watercraft employ a inboard jet drive for propulsion. Finally an impeller-equipped jet pump is an upgraded design that provides increased thrust and performance when compared to conventional jet pumps. The DoD-United State Marine Corps employs a 55-hp outboard Evinrude multi-fuel engine (MFE) to power the F470 Zodiac Combat Rubber Raiding Craft. The 240-lb. outboard engine runs on just about any fuel including Jet-A, kerosene, and bad gas. It has a de-watering system that purges the power head and under-cowl area, which is helpful if responses involve helicopter sling loads or rough handling. The rigorous specs of the military make this outboard useful for civilian swiftwater rescue teams.
FIGURE 63. NPS motorized inflatable Zodiac conducting rescue of passengers and crew from a motorized commercial S-Rig raft stuck in Crystal Rapids, Grand Canyon NP.
FIGURE 62. Evinrude 55-hp two-stroke multi-fuel outboard engine with a shrouded impeller, which handles submerged obstacles and is safe to operate around swimmers. Grand Canyon NP.
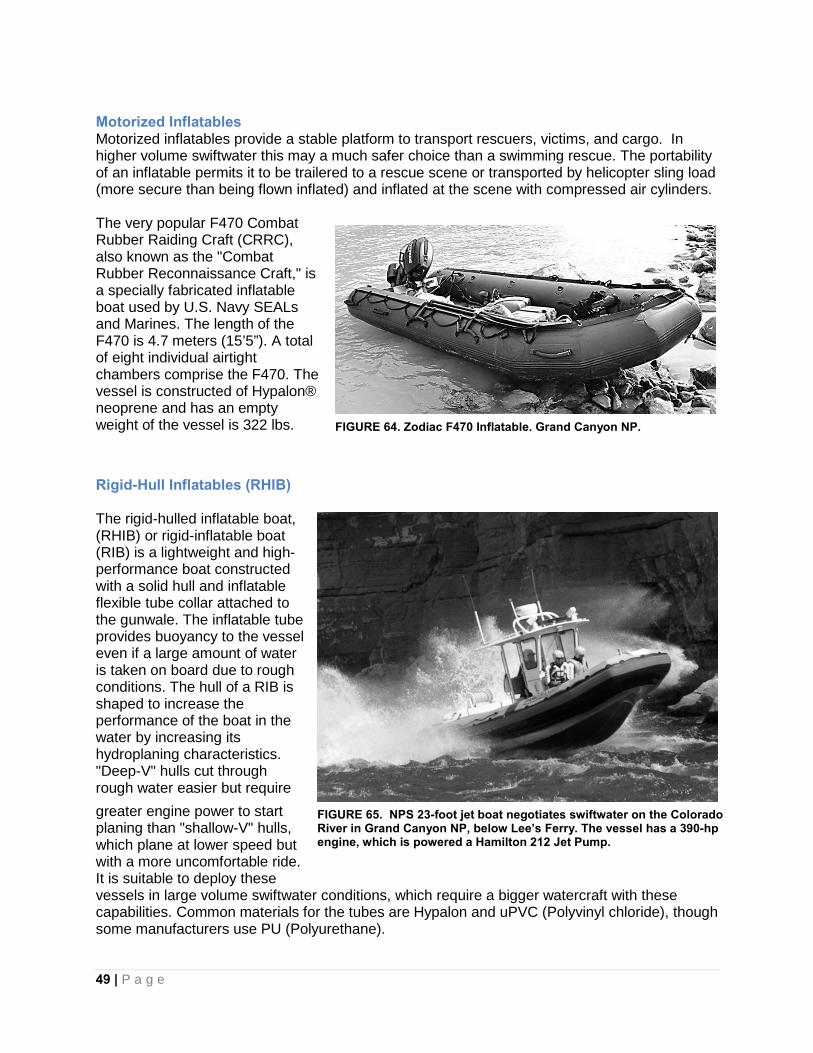
49 | P a g e
Motorized Inflatables Motorized inflatables provide a stable platform to transport rescuers, victims, and cargo. In higher volume swiftwater this may a much safer choice than a swimming rescue. The portability of an inflatable permits it to be trailered to a rescue scene or transported by helicopter sling load (more secure than being flown inflated) and inflated at the scene with compressed air cylinders. The very popular F470 Combat Rubber Raiding Craft (CRRC), also known as the "Combat Rubber Reconnaissance Craft," is a specially fabricated inflatable boat used by U.S. Navy SEALs and Marines. The length of the F470 is 4.7 meters (15’5”). A total of eight individual airtight chambers comprise the F470. The vessel is constructed of Hypalon® neoprene and has an empty weight of the vessel is 322 lbs.
Rigid-Hull Inflatables (RHIB) The rigid-hulled inflatable boat, (RHIB) or rigid-inflatable boat (RIB) is a lightweight and high-performance boat constructed with a solid hull and inflatable flexible tube collar attached to the gunwale. The inflatable tube provides buoyancy to the vessel even if a large amount of water is taken on board due to rough conditions. The hull of a RIB is shaped to increase the performance of the boat in the water by increasing its hydroplaning characteristics. "Deep-V" hulls cut through rough water easier but require greater engine power to start planing than "shallow-V" hulls, which plane at lower speed but with a more uncomfortable ride. It is suitable to deploy these vessels in large volume swiftwater conditions, which require a bigger watercraft with these capabilities. Common materials for the tubes are Hypalon and uPVC (Polyvinyl chloride), though some manufacturers use PU (Polyurethane).
FIGURE 65. NPS 23-foot jet boat negotiates swiftwater on the Colorado River in Grand Canyon NP, below Lee’s Ferry. The vessel has a 390-hp engine, which is powered a Hamilton 212 Jet Pump.
FIGURE 64. Zodiac F470 Inflatable. Grand Canyon NP.

50 | P a g e
The NPS utilizes RHIB boats for swiftwater operations on the Colorado River in Canyonlands NP and Grand Canyon NP. The Canyonlands jet boats, which were specifically constructed to handle rescue operations encountered in Cataract Canyon, are employed during the Spring high flow events, which have reached 70,000 cfs. Normal preferred flows for the area are 2,000-30,000 cfs.
Personal Watercraft Personal watercraft have an inboard engine driving a pump jet that has a screw-shaped impeller to create thrust for propulsion and steering. The U.S. Coast Guard defines a personal watercraft, as a jet drive boat less than 13' in length. Prior to 1990, many PWC, along with marine outboards, were powered by two-stroke cycle engines. These are smaller and lighter than newer four-stroke cycle engine designs but more polluting. The size, relative ease of use, and their propulsion system lacking an external propeller have made PWCs very popular for surf rescue. A PWC can be employed in the swiftwater environment, but a significant shortcoming is the fiberglass hull, which is easily damaged if it strikes a rock.
FIGURE 67. Personal Watercraft (PWC) equipped with a rescue sled. Image copyright Extractor, Inc. Reprinted with permission.
FIGURE 66. Canyonlands National Park jet boat in Cataract Canyon. A 450-hp diesel engine with a jet drive powers this 26-foot aluminum hulled vessel, which has a solid foam flotation collar.
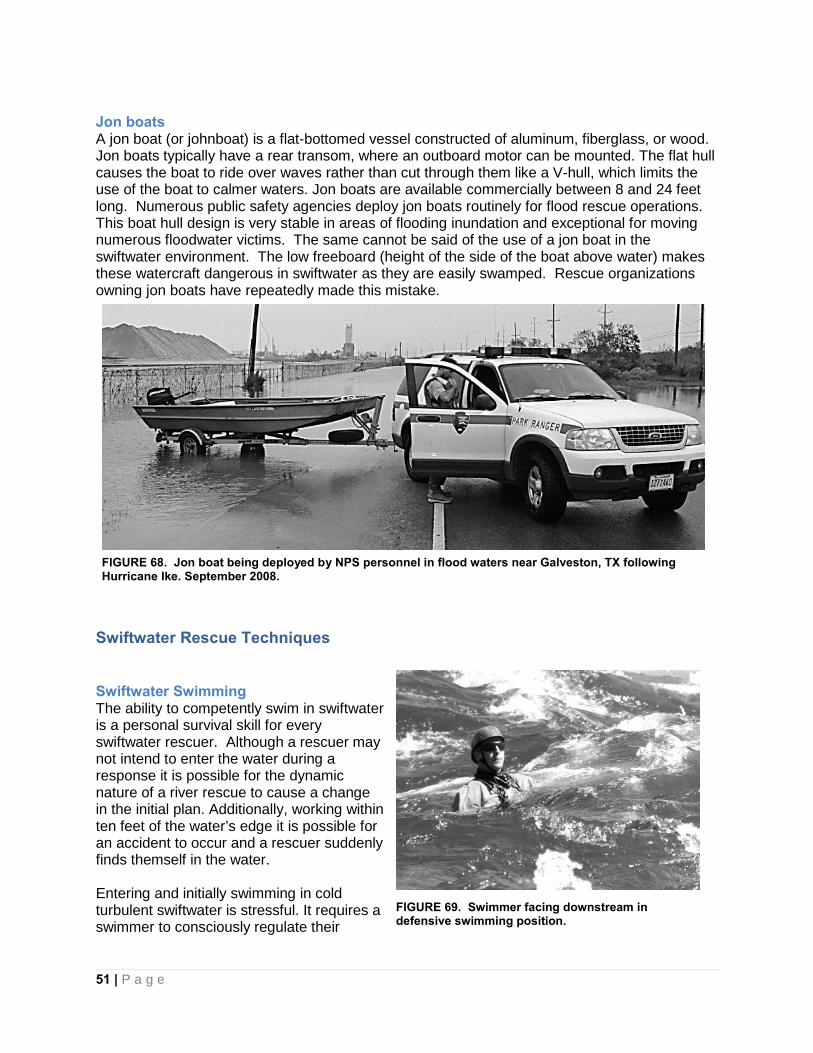
51 | P a g e
Jon boats A jon boat (or johnboat) is a flat-bottomed vessel constructed of aluminum, fiberglass, or wood. Jon boats typically have a rear transom, where an outboard motor can be mounted. The flat hull causes the boat to ride over waves rather than cut through them like a V-hull, which limits the use of the boat to calmer waters. Jon boats are available commercially between 8 and 24 feet long. Numerous public safety agencies deploy jon boats routinely for flood rescue operations. This boat hull design is very stable in areas of flooding inundation and exceptional for moving numerous floodwater victims. The same cannot be said of the use of a jon boat in the swiftwater environment. The low freeboard (height of the side of the boat above water) makes these watercraft dangerous in swiftwater as they are easily swamped. Rescue organizations owning jon boats have repeatedly made this mistake.
Swiftwater Rescue Techniques
Swiftwater Swimming The ability to competently swim in swiftwater is a personal survival skill for every swiftwater rescuer. Although a rescuer may not intend to enter the water during a response it is possible for the dynamic nature of a river rescue to cause a change in the initial plan. Additionally, working within ten feet of the water’s edge it is possible for an accident to occur and a rescuer suddenly finds themself in the water. Entering and initially swimming in cold turbulent swiftwater is stressful. It requires a swimmer to consciously regulate their
FIGURE 69. Swimmer facing downstream in defensive swimming position.
FIGURE 68. Jon boat being deployed by NPS personnel in flood waters near Galveston, TX following Hurricane Ike. September 2008.
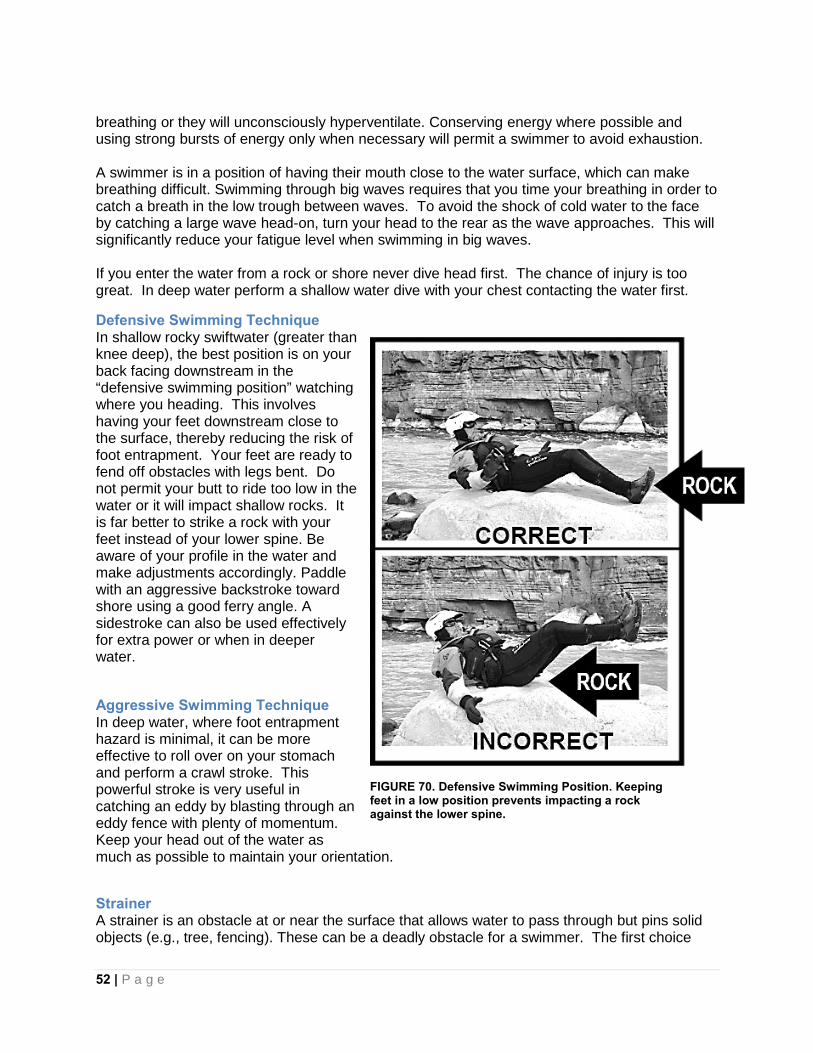
52 | P a g e
FIGURE 70. Defensive Swimming Position. Keeping feet in a low position prevents impacting a rock against the lower spine.
breathing or they will unconsciously hyperventilate. Conserving energy where possible and using strong bursts of energy only when necessary will permit a swimmer to avoid exhaustion. A swimmer is in a position of having their mouth close to the water surface, which can make breathing difficult. Swimming through big waves requires that you time your breathing in order to catch a breath in the low trough between waves. To avoid the shock of cold water to the face by catching a large wave head-on, turn your head to the rear as the wave approaches. This will significantly reduce your fatigue level when swimming in big waves. If you enter the water from a rock or shore never dive head first. The chance of injury is too great. In deep water perform a shallow water dive with your chest contacting the water first.
Defensive Swimming Technique In shallow rocky swiftwater (greater than knee deep), the best position is on your back facing downstream in the “defensive swimming position” watching where you heading. This involves having your feet downstream close to the surface, thereby reducing the risk of foot entrapment. Your feet are ready to fend off obstacles with legs bent. Do not permit your butt to ride too low in the water or it will impact shallow rocks. It is far better to strike a rock with your feet instead of your lower spine. Be aware of your profile in the water and make adjustments accordingly. Paddle with an aggressive backstroke toward shore using a good ferry angle. A sidestroke can also be used effectively for extra power or when in deeper water.
Aggressive Swimming Technique In deep water, where foot entrapment hazard is minimal, it can be more effective to roll over on your stomach and perform a crawl stroke. This powerful stroke is very useful in catching an eddy by blasting through an eddy fence with plenty of momentum. Keep your head out of the water as much as possible to maintain your orientation.
Strainer A strainer is an obstacle at or near the surface that allows water to pass through but pins solid objects (e.g., tree, fencing). These can be a deadly obstacle for a swimmer. The first choice
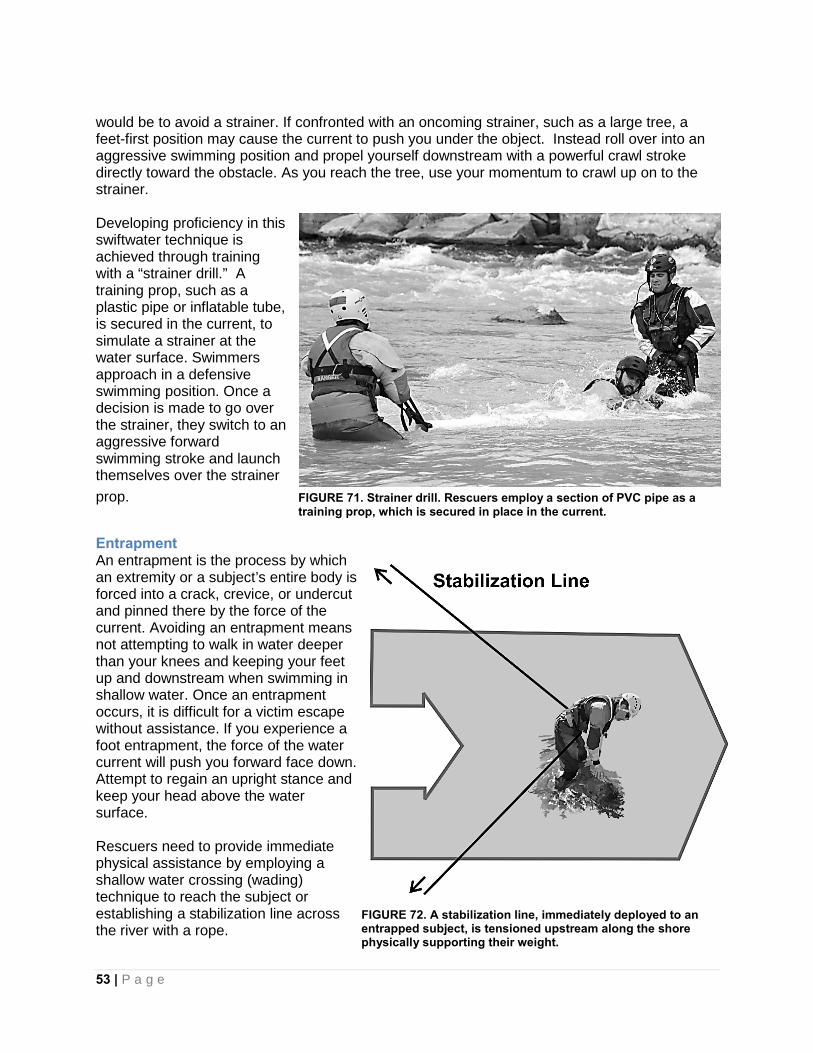
53 | P a g e
would be to avoid a strainer. If confronted with an oncoming strainer, such as a large tree, a feet-first position may cause the current to push you under the object. Instead roll over into an aggressive swimming position and propel yourself downstream with a powerful crawl stroke directly toward the obstacle. As you reach the tree, use your momentum to crawl up on to the strainer. Developing proficiency in this swiftwater technique is achieved through training with a “strainer drill.” A training prop, such as a plastic pipe or inflatable tube, is secured in the current, to simulate a strainer at the water surface. Swimmers approach in a defensive swimming position. Once a decision is made to go over the strainer, they switch to an aggressive forward swimming stroke and launch themselves over the strainer prop.
Entrapment An entrapment is the process by which an extremity or a subject’s entire body is forced into a crack, crevice, or undercut and pinned there by the force of the current. Avoiding an entrapment means not attempting to walk in water deeper than your knees and keeping your feet up and downstream when swimming in shallow water. Once an entrapment occurs, it is difficult for a victim escape without assistance. If you experience a foot entrapment, the force of the water current will push you forward face down. Attempt to regain an upright stance and keep your head above the water surface. Rescuers need to provide immediate physical assistance by employing a shallow water crossing (wading) technique to reach the subject or establishing a stabilization line across the river with a rope.
FIGURE 71. Strainer drill. Rescuers employ a section of PVC pipe as a training prop, which is secured in place in the current.
FIGURE 72. A stabilization line, immediately deployed to an entrapped subject, is tensioned upstream along the shore physically supporting their weight.
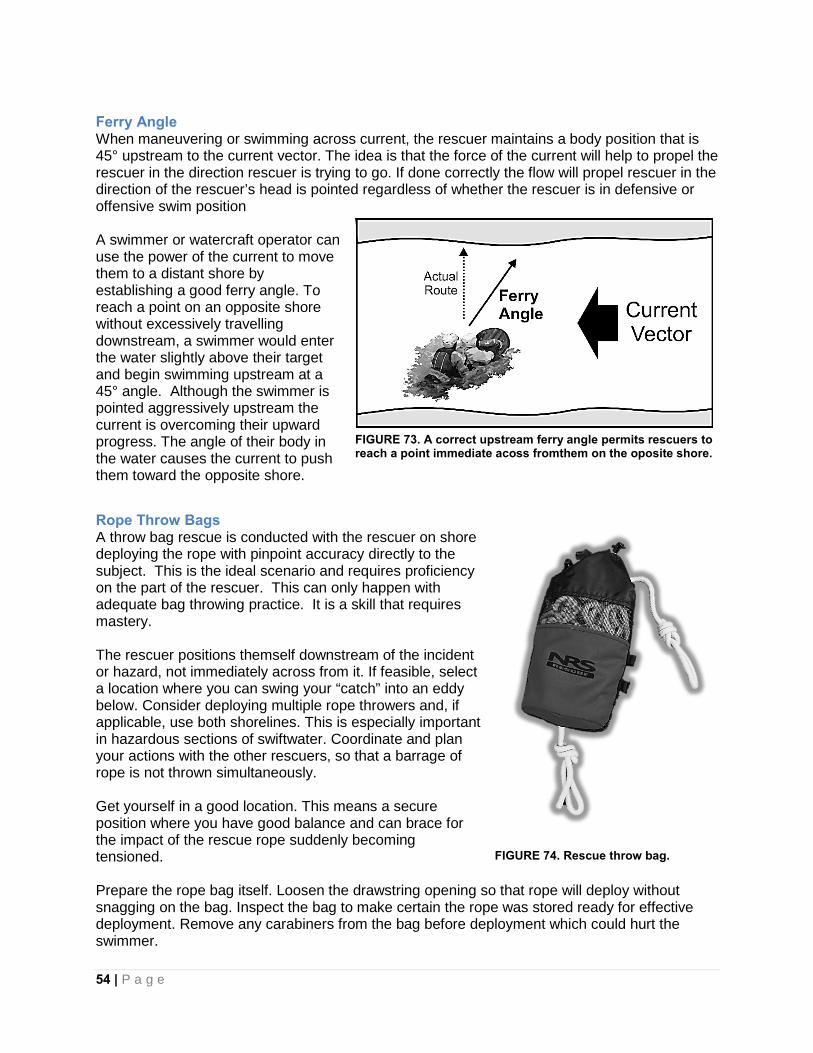
54 | P a g e
Ferry Angle When maneuvering or swimming across current, the rescuer maintains a body position that is 45° upstream to the current vector. The idea is that the force of the current will help to propel the rescuer in the direction rescuer is trying to go. If done correctly the flow will propel rescuer in the direction of the rescuer’s head is pointed regardless of whether the rescuer is in defensive or offensive swim position A swimmer or watercraft operator can use the power of the current to move them to a distant shore by establishing a good ferry angle. To reach a point on an opposite shore without excessively travelling downstream, a swimmer would enter the water slightly above their target and begin swimming upstream at a 45° angle. Although the swimmer is pointed aggressively upstream the current is overcoming their upward progress. The angle of their body in the water causes the current to push them toward the opposite shore.
Rope Throw Bags A throw bag rescue is conducted with the rescuer on shore deploying the rope with pinpoint accuracy directly to the subject. This is the ideal scenario and requires proficiency on the part of the rescuer. This can only happen with adequate bag throwing practice. It is a skill that requires mastery. The rescuer positions themself downstream of the incident or hazard, not immediately across from it. If feasible, select a location where you can swing your “catch” into an eddy below. Consider deploying multiple rope throwers and, if applicable, use both shorelines. This is especially important in hazardous sections of swiftwater. Coordinate and plan your actions with the other rescuers, so that a barrage of rope is not thrown simultaneously. Get yourself in a good location. This means a secure position where you have good balance and can brace for the impact of the rescue rope suddenly becoming tensioned. Prepare the rope bag itself. Loosen the drawstring opening so that rope will deploy without snagging on the bag. Inspect the bag to make certain the rope was stored ready for effective deployment. Remove any carabiners from the bag before deployment which could hurt the swimmer.
FIGURE 73. A correct upstream ferry angle permits rescuers to reach a point immediate acoss fromthem on the oposite shore.
FIGURE 74. Rescue throw bag.
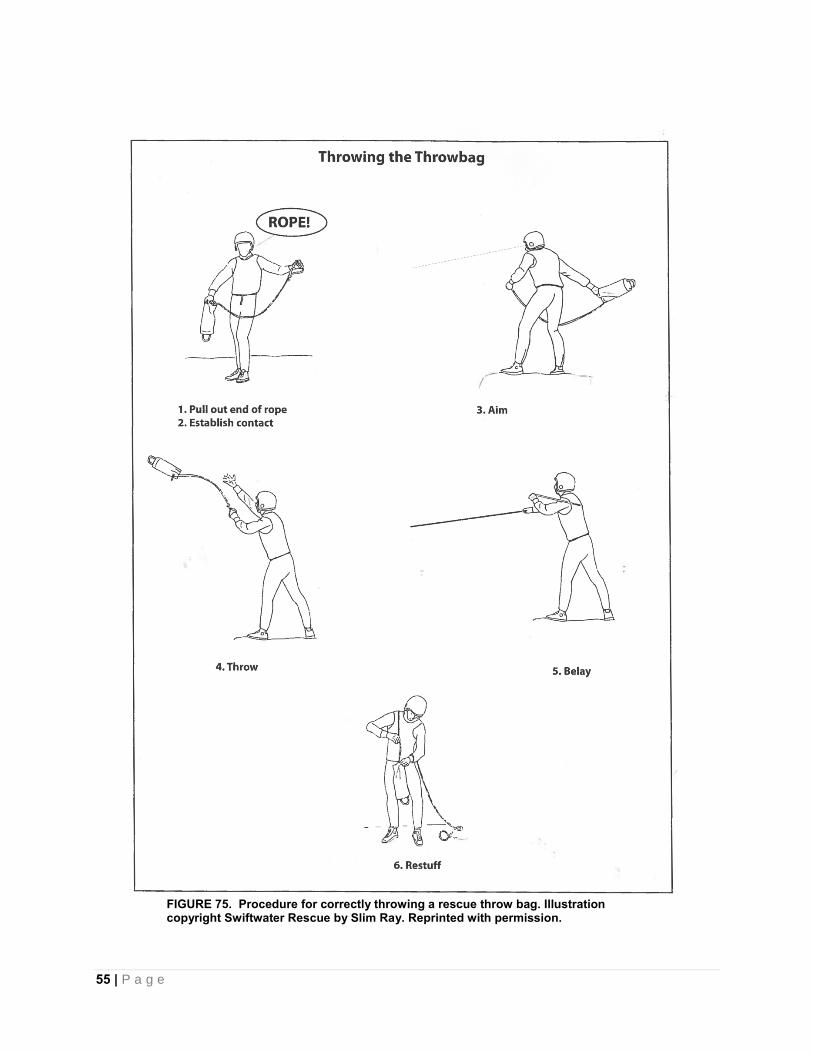
55 | P a g e
FIGURE 75. Procedure for correctly throwing a rescue throw bag. Illustration copyright Swiftwater Rescue by Slim Ray. Reprinted with permission.
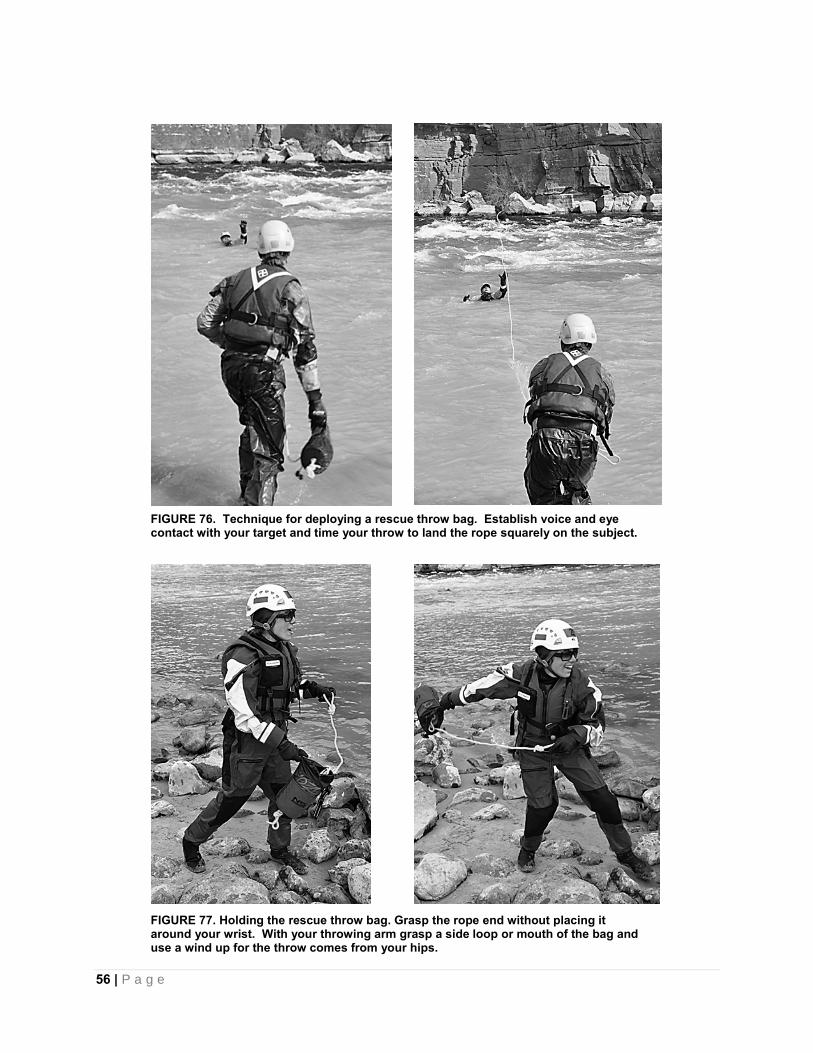
56 | P a g e
FIGURE 76. Technique for deploying a rescue throw bag. Establish voice and eye contact with your target and time your throw to land the rope squarely on the subject.
FIGURE 77. Holding the rescue throw bag. Grasp the rope end without placing it around your wrist. With your throwing arm grasp a side loop or mouth of the bag and use a wind up for the throw comes from your hips.
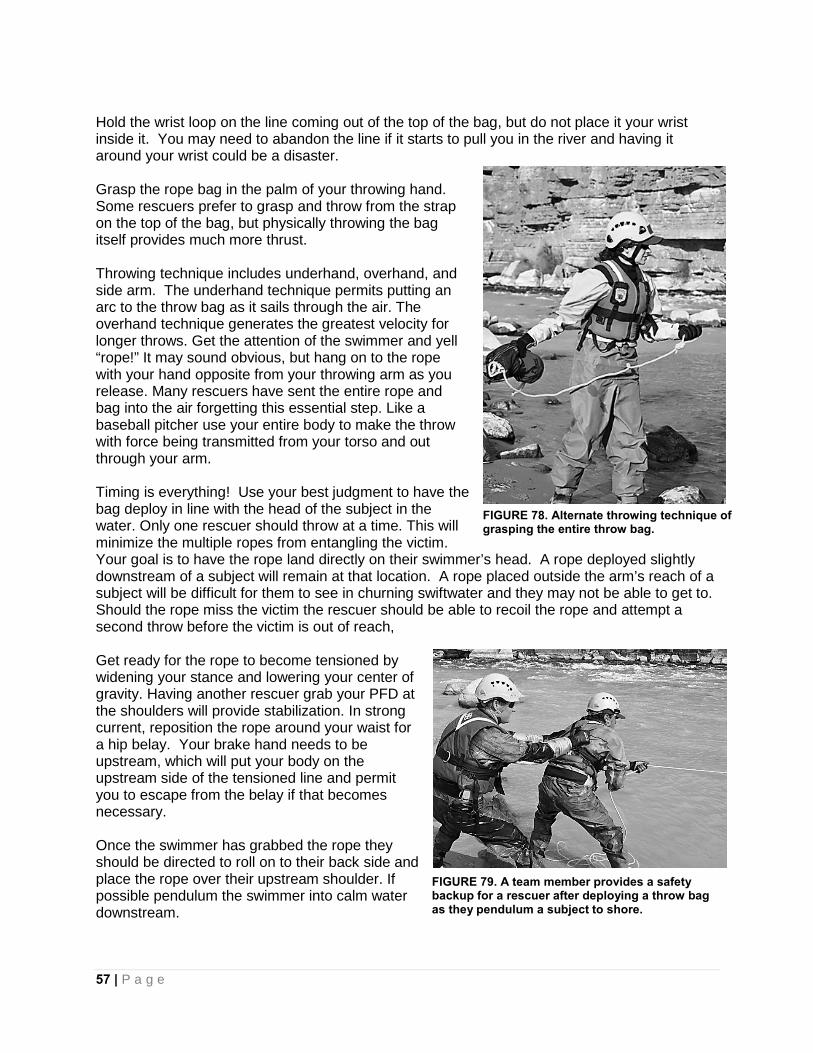
57 | P a g e
Hold the wrist loop on the line coming out of the top of the bag, but do not place it your wrist inside it. You may need to abandon the line if it starts to pull you in the river and having it around your wrist could be a disaster. Grasp the rope bag in the palm of your throwing hand. Some rescuers prefer to grasp and throw from the strap on the top of the bag, but physically throwing the bag itself provides much more thrust. Throwing technique includes underhand, overhand, and side arm. The underhand technique permits putting an arc to the throw bag as it sails through the air. The overhand technique generates the greatest velocity for longer throws. Get the attention of the swimmer and yell “rope!” It may sound obvious, but hang on to the rope with your hand opposite from your throwing arm as you release. Many rescuers have sent the entire rope and bag into the air forgetting this essential step. Like a baseball pitcher use your entire body to make the throw with force being transmitted from your torso and out through your arm. Timing is everything! Use your best judgment to have the bag deploy in line with the head of the subject in the water. Only one rescuer should throw at a time. This will minimize the multiple ropes from entangling the victim. Your goal is to have the rope land directly on their swimmer’s head. A rope deployed slightly downstream of a subject will remain at that location. A rope placed outside the arm’s reach of a subject will be difficult for them to see in churning swiftwater and they may not be able to get to. Should the rope miss the victim the rescuer should be able to recoil the rope and attempt a second throw before the victim is out of reach, Get ready for the rope to become tensioned by widening your stance and lowering your center of gravity. Having another rescuer grab your PFD at the shoulders will provide stabilization. In strong current, reposition the rope around your waist for a hip belay. Your brake hand needs to be upstream, which will put your body on the upstream side of the tensioned line and permit you to escape from the belay if that becomes necessary. Once the swimmer has grabbed the rope they should be directed to roll on to their back side and place the rope over their upstream shoulder. If possible pendulum the swimmer into calm water downstream.
FIGURE 78. Alternate throwing technique of grasping the entire throw bag.
FIGURE 79. A team member provides a safety backup for a rescuer after deploying a throw bag as they pendulum a subject to shore.
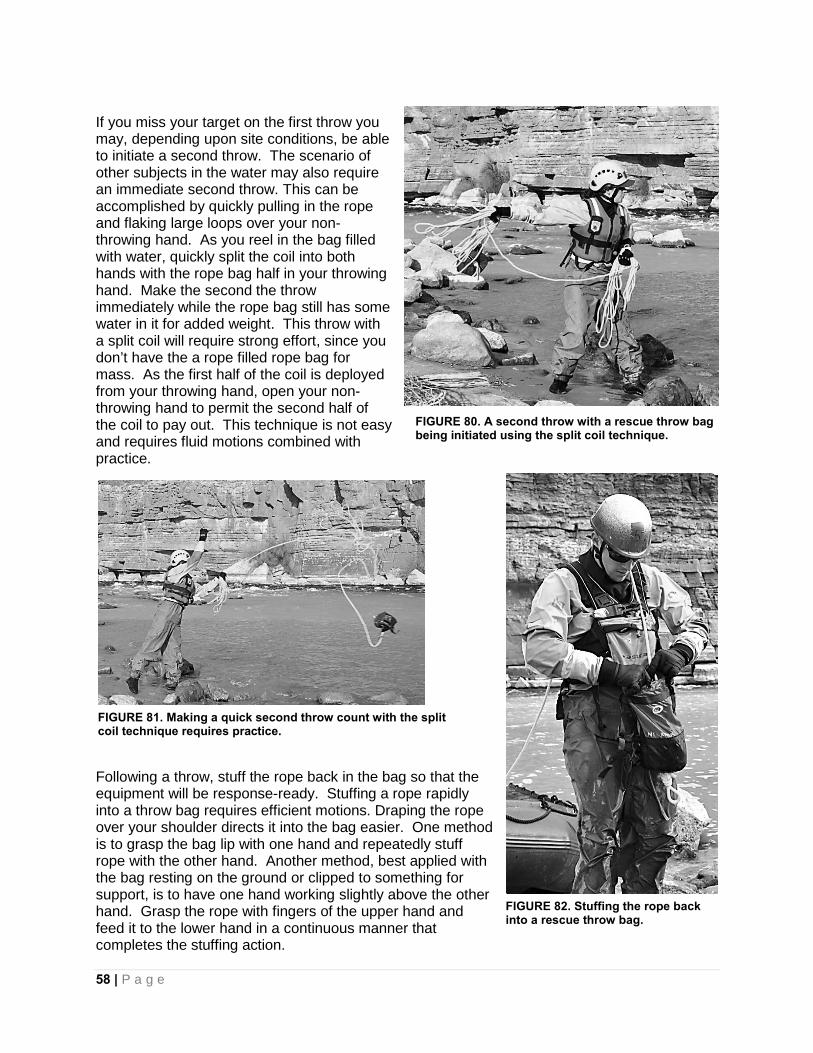
58 | P a g e
If you miss your target on the first throw you may, depending upon site conditions, be able to initiate a second throw. The scenario of other subjects in the water may also require an immediate second throw. This can be accomplished by quickly pulling in the rope and flaking large loops over your non-throwing hand. As you reel in the bag filled with water, quickly split the coil into both hands with the rope bag half in your throwing hand. Make the second the throw immediately while the rope bag still has some water in it for added weight. This throw with a split coil will require strong effort, since you don’t have the a rope filled rope bag for mass. As the first half of the coil is deployed from your throwing hand, open your non-throwing hand to permit the second half of the coil to pay out. This technique is not easy and requires fluid motions combined with practice.
Following a throw, stuff the rope back in the bag so that the equipment will be response-ready. Stuffing a rope rapidly into a throw bag requires efficient motions. Draping the rope over your shoulder directs it into the bag easier. One method is to grasp the bag lip with one hand and repeatedly stuff rope with the other hand. Another method, best applied with the bag resting on the ground or clipped to something for support, is to have one hand working slightly above the other hand. Grasp the rope with fingers of the upper hand and feed it to the lower hand in a continuous manner that completes the stuffing action.
FIGURE 80. A second throw with a rescue throw bag being initiated using the split coil technique.
FIGURE 82. Stuffing the rope back into a rescue throw bag.
FIGURE 81. Making a quick second throw count with the split coil technique requires practice.
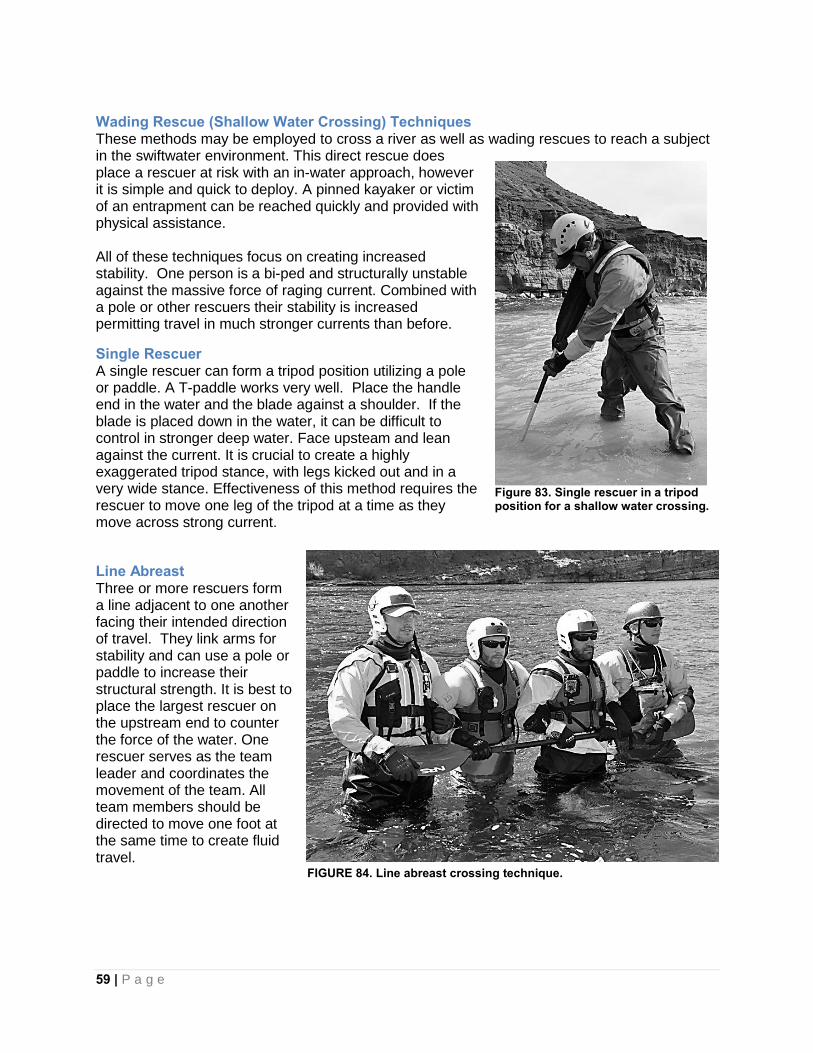
59 | P a g e
Wading Rescue (Shallow Water Crossing) Techniques These methods may be employed to cross a river as well as wading rescues to reach a subject in the swiftwater environment. This direct rescue does place a rescuer at risk with an in-water approach, however it is simple and quick to deploy. A pinned kayaker or victim of an entrapment can be reached quickly and provided with physical assistance. All of these techniques focus on creating increased stability. One person is a bi-ped and structurally unstable against the massive force of raging current. Combined with a pole or other rescuers their stability is increased permitting travel in much stronger currents than before.
Single Rescuer A single rescuer can form a tripod position utilizing a pole or paddle. A T-paddle works very well. Place the handle end in the water and the blade against a shoulder. If the blade is placed down in the water, it can be difficult to control in stronger deep water. Face upsteam and lean against the current. It is crucial to create a highly exaggerated tripod stance, with legs kicked out and in a very wide stance. Effectiveness of this method requires the rescuer to move one leg of the tripod at a time as they move across strong current.
Line Abreast Three or more rescuers form a line adjacent to one another facing their intended direction of travel. They link arms for stability and can use a pole or paddle to increase their structural strength. It is best to place the largest rescuer on the upstream end to counter the force of the water. One rescuer serves as the team leader and coordinates the movement of the team. All team members should be directed to move one foot at the same time to create fluid travel.
Figure 83. Single rescuer in a tripod position for a shallow water crossing.
FIGURE 84. Line abreast crossing technique.
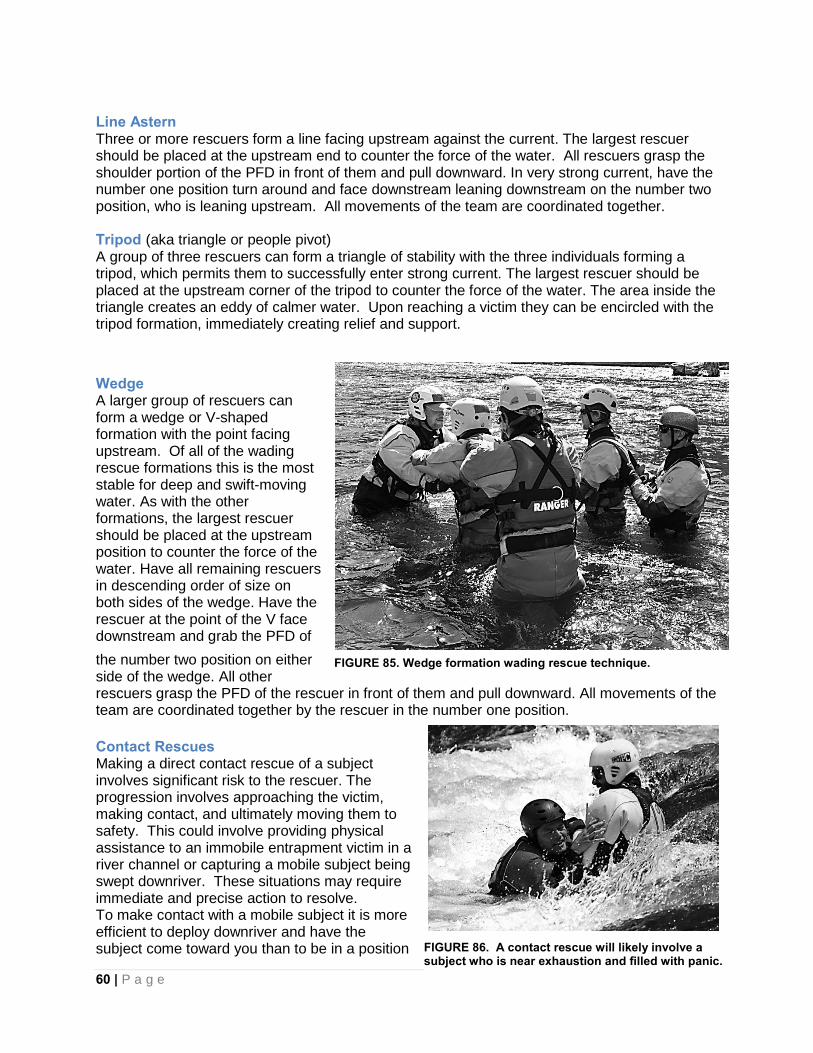
60 | P a g e
Line Astern Three or more rescuers form a line facing upstream against the current. The largest rescuer should be placed at the upstream end to counter the force of the water. All rescuers grasp the shoulder portion of the PFD in front of them and pull downward. In very strong current, have the number one position turn around and face downstream leaning downstream on the number two position, who is leaning upstream. All movements of the team are coordinated together. Tripod (aka triangle or people pivot) A group of three rescuers can form a triangle of stability with the three individuals forming a tripod, which permits them to successfully enter strong current. The largest rescuer should be placed at the upstream corner of the tripod to counter the force of the water. The area inside the triangle creates an eddy of calmer water. Upon reaching a victim they can be encircled with the tripod formation, immediately creating relief and support.
Wedge A larger group of rescuers can form a wedge or V-shaped formation with the point facing upstream. Of all of the wading rescue formations this is the most stable for deep and swift-moving water. As with the other formations, the largest rescuer should be placed at the upstream position to counter the force of the water. Have all remaining rescuers in descending order of size on both sides of the wedge. Have the rescuer at the point of the V face downstream and grab the PFD of the number two position on either side of the wedge. All other rescuers grasp the PFD of the rescuer in front of them and pull downward. All movements of the team are coordinated together by the rescuer in the number one position.
Contact Rescues Making a direct contact rescue of a subject involves significant risk to the rescuer. The progression involves approaching the victim, making contact, and ultimately moving them to safety. This could involve providing physical assistance to an immobile entrapment victim in a river channel or capturing a mobile subject being swept downriver. These situations may require immediate and precise action to resolve. To make contact with a mobile subject it is more efficient to deploy downriver and have the subject come toward you than to be in a position
FIGURE 85. Wedge formation wading rescue technique.
FIGURE 86. A contact rescue will likely involve a subject who is near exhaustion and filled with panic.
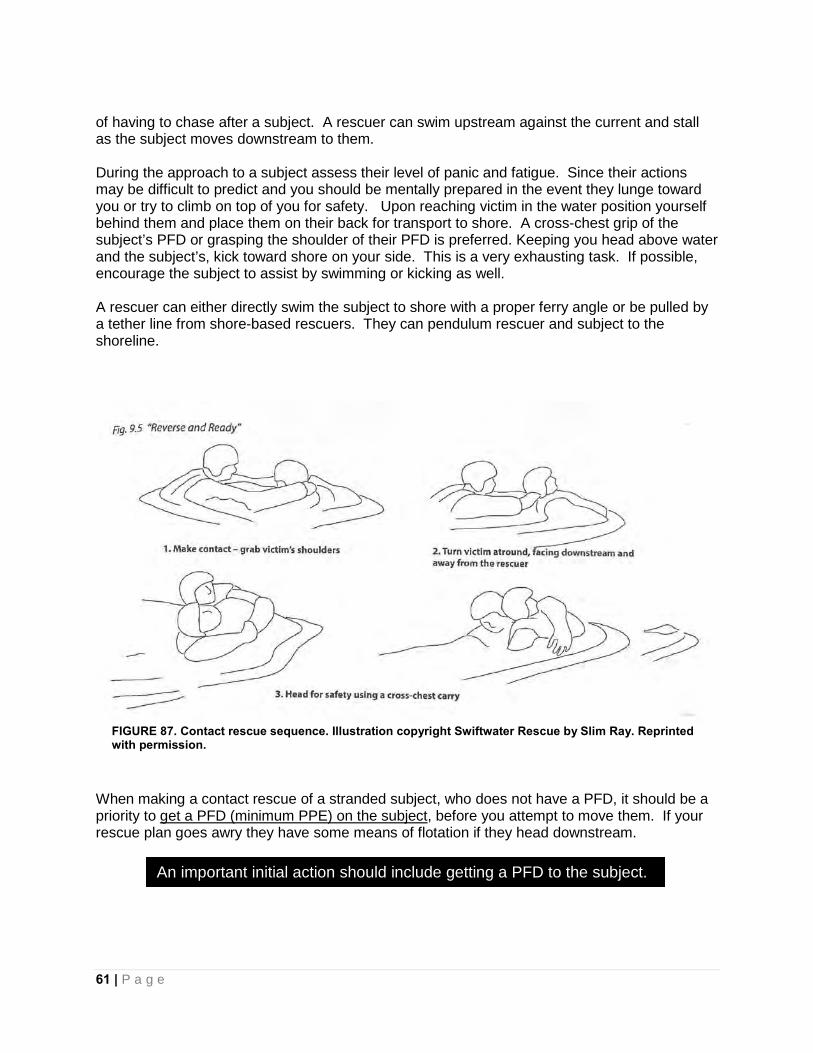
61 | P a g e
of having to chase after a subject. A rescuer can swim upstream against the current and stall as the subject moves downstream to them. During the approach to a subject assess their level of panic and fatigue. Since their actions may be difficult to predict and you should be mentally prepared in the event they lunge toward you or try to climb on top of you for safety. Upon reaching victim in the water position yourself behind them and place them on their back for transport to shore. A cross-chest grip of the subject’s PFD or grasping the shoulder of their PFD is preferred. Keeping you head above water and the subject’s, kick toward shore on your side. This is a very exhausting task. If possible, encourage the subject to assist by swimming or kicking as well. A rescuer can either directly swim the subject to shore with a proper ferry angle or be pulled by a tether line from shore-based rescuers. They can pendulum rescuer and subject to the shoreline.
When making a contact rescue of a stranded subject, who does not have a PFD, it should be a priority to get a PFD (minimum PPE) on the subject, before you attempt to move them. If your rescue plan goes awry they have some means of flotation if they head downstream.
FIGURE 87. Contact rescue sequence. Illustration copyright Swiftwater Rescue by Slim Ray. Reprinted with permission.
An important initial action should include getting a PFD to the subject.
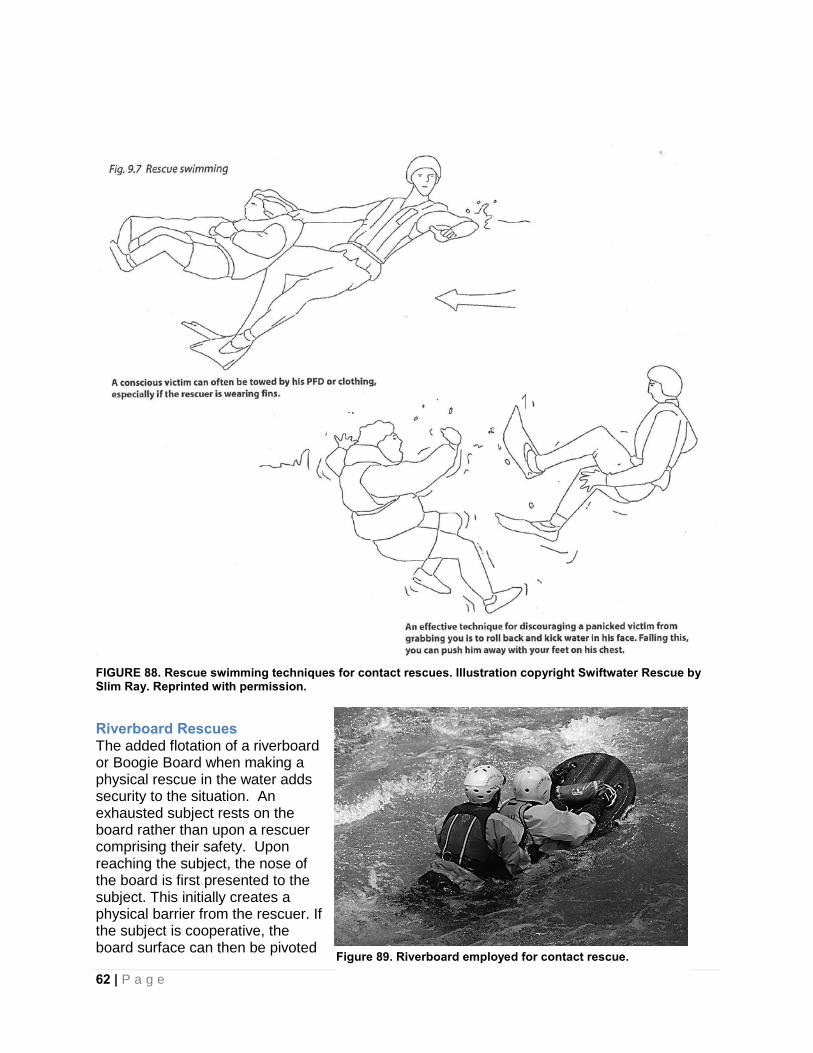
62 | P a g e
Riverboard Rescues The added flotation of a riverboard or Boogie Board when making a physical rescue in the water adds security to the situation. An exhausted subject rests on the board rather than upon a rescuer comprising their safety. Upon reaching the subject, the nose of the board is first presented to the subject. This initially creates a physical barrier from the rescuer. If the subject is cooperative, the board surface can then be pivoted
FIGURE 88. Rescue swimming techniques for contact rescues. Illustration copyright Swiftwater Rescue by Slim Ray. Reprinted with permission.
Figure 89. Riverboard employed for contact rescue.
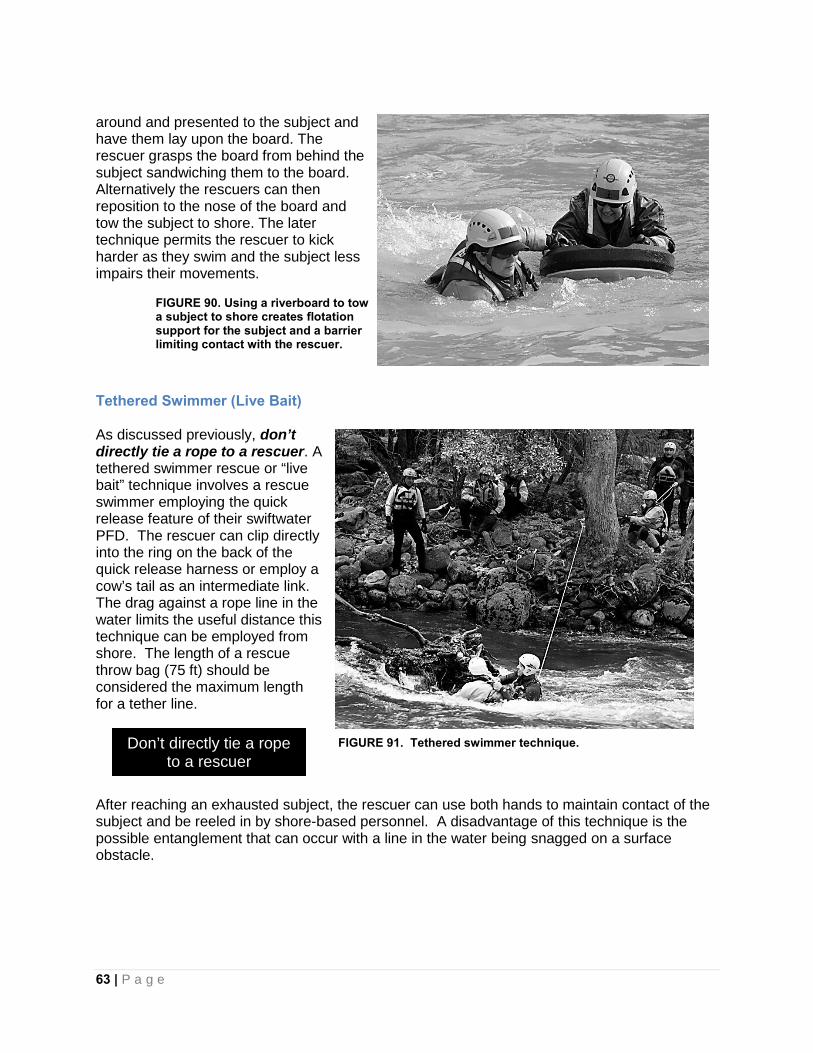
63 | P a g e
around and presented to the subject and have them lay upon the board. The rescuer grasps the board from behind the subject sandwiching them to the board. Alternatively the rescuers can then reposition to the nose of the board and tow the subject to shore. The later technique permits the rescuer to kick harder as they swim and the subject less impairs their movements.
Tethered Swimmer (Live Bait) As discussed previously, don’t directly tie a rope to a rescuer. A tethered swimmer rescue or “live bait” technique involves a rescue swimmer employing the quick release feature of their swiftwater PFD. The rescuer can clip directly into the ring on the back of the quick release harness or employ a cow’s tail as an intermediate link. The drag against a rope line in the water limits the useful distance this technique can be employed from shore. The length of a rescue throw bag (75 ft) should be considered the maximum length for a tether line. After reaching an exhausted subject, the rescuer can use both hands to maintain contact of the subject and be reeled in by shore-based personnel. A disadvantage of this technique is the possible entanglement that can occur with a line in the water being snagged on a surface obstacle.
FIGURE 90. Using a riverboard to tow a subject to shore creates flotation support for the subject and a barrier limiting contact with the rescuer.
FIGURE 91. Tethered swimmer technique. Don’t directly tie a rope to a rescuer
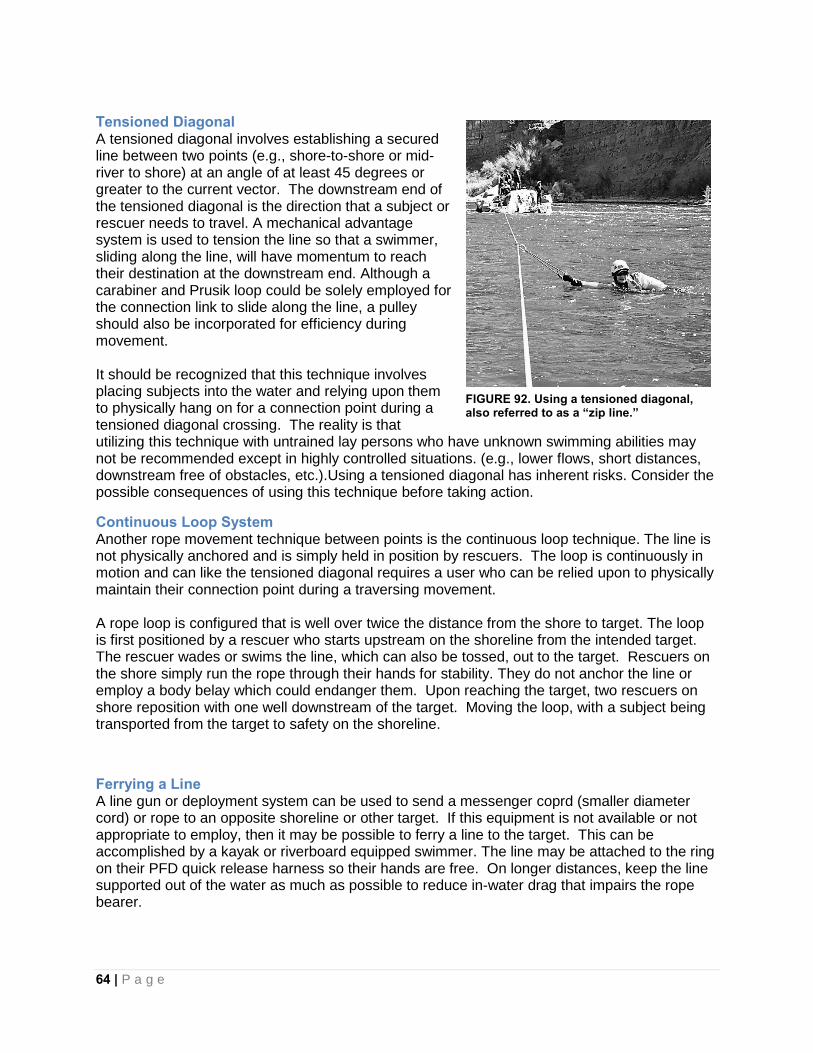
64 | P a g e
Tensioned Diagonal A tensioned diagonal involves establishing a secured line between two points (e.g., shore-to-shore or mid-river to shore) at an angle of at least 45 degrees or greater to the current vector. The downstream end of the tensioned diagonal is the direction that a subject or rescuer needs to travel. A mechanical advantage system is used to tension the line so that a swimmer, sliding along the line, will have momentum to reach their destination at the downstream end. Although a carabiner and Prusik loop could be solely employed for the connection link to slide along the line, a pulley should also be incorporated for efficiency during movement. It should be recognized that this technique involves placing subjects into the water and relying upon them to physically hang on for a connection point during a tensioned diagonal crossing. The reality is that utilizing this technique with untrained lay persons who have unknown swimming abilities may not be recommended except in highly controlled situations. (e.g., lower flows, short distances, downstream free of obstacles, etc.).Using a tensioned diagonal has inherent risks. Consider the possible consequences of using this technique before taking action.
Continuous Loop System Another rope movement technique between points is the continuous loop technique. The line is not physically anchored and is simply held in position by rescuers. The loop is continuously in motion and can like the tensioned diagonal requires a user who can be relied upon to physically maintain their connection point during a traversing movement. A rope loop is configured that is well over twice the distance from the shore to target. The loop is first positioned by a rescuer who starts upstream on the shoreline from the intended target. The rescuer wades or swims the line, which can also be tossed, out to the target. Rescuers on the shore simply run the rope through their hands for stability. They do not anchor the line or employ a body belay which could endanger them. Upon reaching the target, two rescuers on shore reposition with one well downstream of the target. Moving the loop, with a subject being transported from the target to safety on the shoreline.
Ferrying a Line A line gun or deployment system can be used to send a messenger coprd (smaller diameter cord) or rope to an opposite shoreline or other target. If this equipment is not available or not appropriate to employ, then it may be possible to ferry a line to the target. This can be accomplished by a kayak or riverboard equipped swimmer. The line may be attached to the ring on their PFD quick release harness so their hands are free. On longer distances, keep the line supported out of the water as much as possible to reduce in-water drag that impairs the rope bearer.
FIGURE 92. Using a tensioned diagonal, also referred to as a “zip line.”
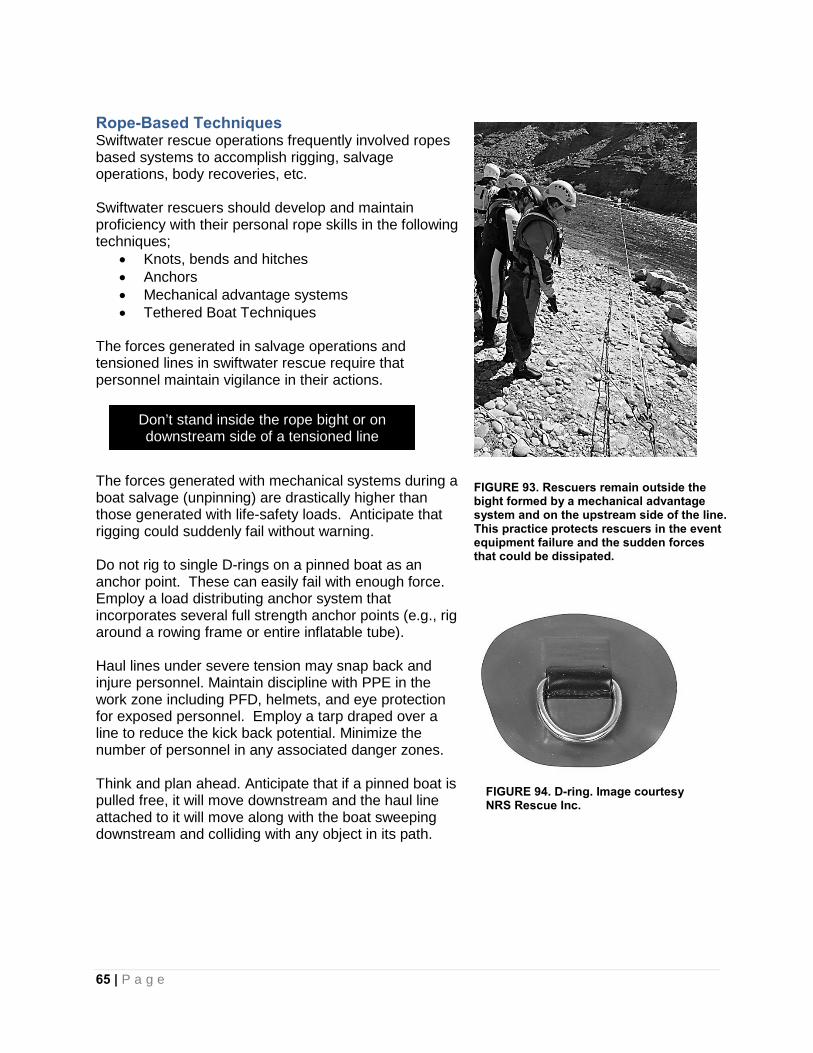
65 | P a g e
Rope-Based Techniques Swiftwater rescue operations frequently involved ropes based systems to accomplish rigging, salvage operations, body recoveries, etc. Swiftwater rescuers should develop and maintain proficiency with their personal rope skills in the following techniques;
• Knots, bends and hitches • Anchors • Mechanical advantage systems • Tethered Boat Techniques
The forces generated in salvage operations and tensioned lines in swiftwater rescue require that personnel maintain vigilance in their actions. The forces generated with mechanical systems during a boat salvage (unpinning) are drastically higher than those generated with life-safety loads. Anticipate that rigging could suddenly fail without warning. Do not rig to single D-rings on a pinned boat as an anchor point. These can easily fail with enough force. Employ a load distributing anchor system that incorporates several full strength anchor points (e.g., rig around a rowing frame or entire inflatable tube). Haul lines under severe tension may snap back and injure personnel. Maintain discipline with PPE in the work zone including PFD, helmets, and eye protection for exposed personnel. Employ a tarp draped over a line to reduce the kick back potential. Minimize the number of personnel in any associated danger zones. Think and plan ahead. Anticipate that if a pinned boat is pulled free, it will move downstream and the haul line attached to it will move along with the boat sweeping downstream and colliding with any object in its path.
FIGURE 93. Rescuers remain outside the bight formed by a mechanical advantage system and on the upstream side of the line. This practice protects rescuers in the event equipment failure and the sudden forces that could be dissipated.
Don’t stand inside the rope bight or on downstream side of a tensioned line
FIGURE 94. D-ring. Image courtesy NRS Rescue Inc.
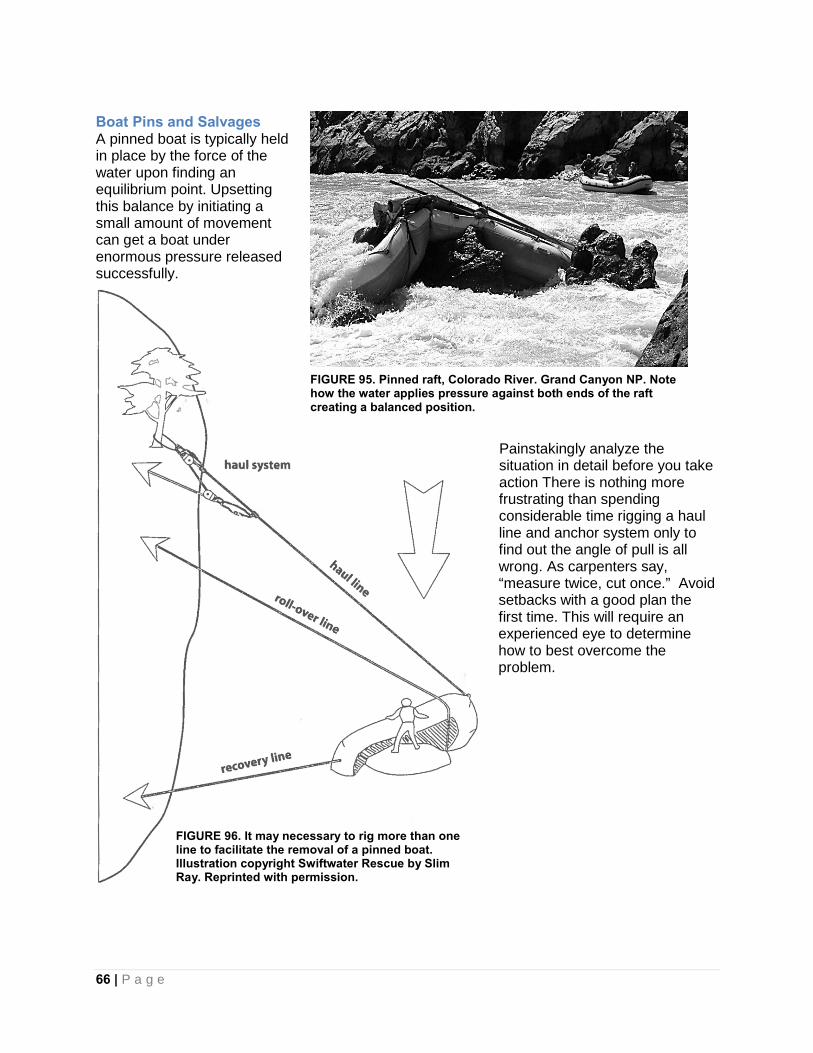
66 | P a g e
Boat Pins and Salvages A pinned boat is typically held in place by the force of the water upon finding an equilibrium point. Upsetting this balance by initiating a small amount of movement can get a boat under enormous pressure released successfully.
Painstakingly analyze the situation in detail before you take action There is nothing more frustrating than spending considerable time rigging a haul line and anchor system only to find out the angle of pull is all wrong. As carpenters say, “measure twice, cut once.” Avoid setbacks with a good plan the first time. This will require an experienced eye to determine how to best overcome the problem.
FIGURE 95. Pinned raft, Colorado River. Grand Canyon NP. Note how the water applies pressure against both ends of the raft creating a balanced position.
FIGURE 96. It may necessary to rig more than one line to facilitate the removal of a pinned boat. Illustration copyright Swiftwater Rescue by Slim Ray. Reprinted with permission.
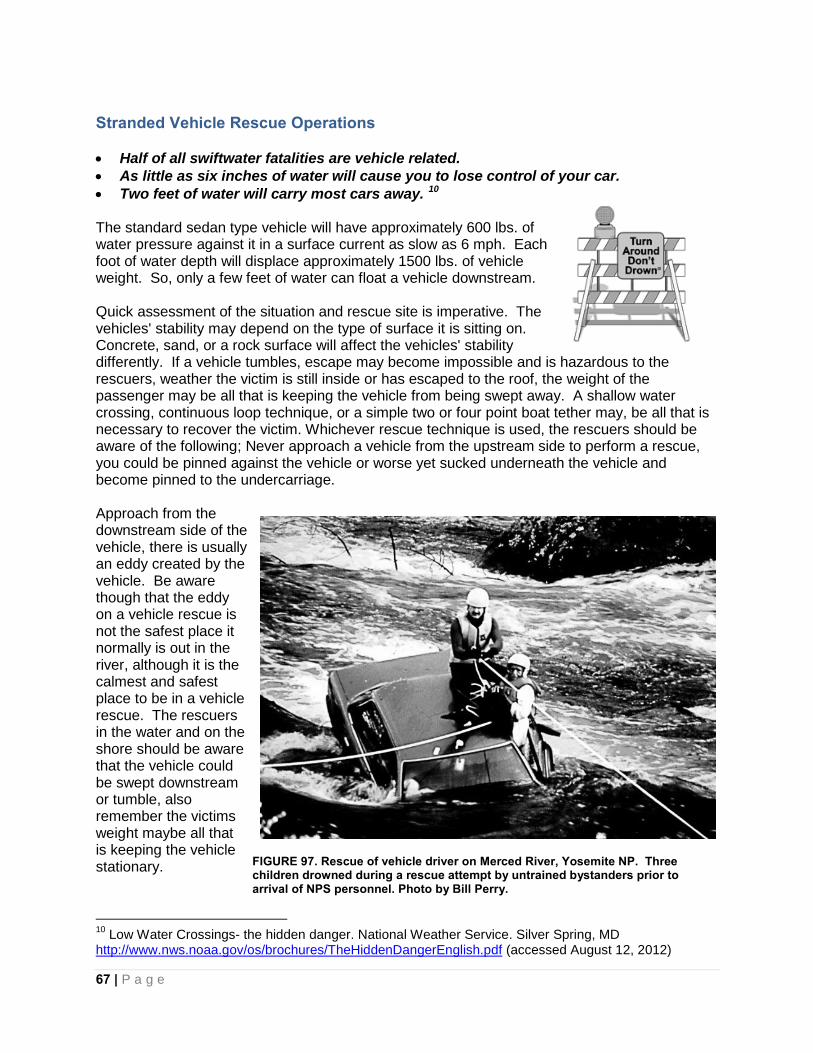
67 | P a g e
Stranded Vehicle Rescue Operations • Half of all swiftwater fatalities are vehicle related. • As little as six inches of water will cause you to lose control of your car. • Two feet of water will carry most cars away. 10 The standard sedan type vehicle will have approximately 600 lbs. of water pressure against it in a surface current as slow as 6 mph. Each foot of water depth will displace approximately 1500 lbs. of vehicle weight. So, only a few feet of water can float a vehicle downstream. Quick assessment of the situation and rescue site is imperative. The vehicles' stability may depend on the type of surface it is sitting on. Concrete, sand, or a rock surface will affect the vehicles' stability differently. If a vehicle tumbles, escape may become impossible and is hazardous to the rescuers, weather the victim is still inside or has escaped to the roof, the weight of the passenger may be all that is keeping the vehicle from being swept away. A shallow water crossing, continuous loop technique, or a simple two or four point boat tether may, be all that is necessary to recover the victim. Whichever rescue technique is used, the rescuers should be aware of the following; Never approach a vehicle from the upstream side to perform a rescue, you could be pinned against the vehicle or worse yet sucked underneath the vehicle and become pinned to the undercarriage. Approach from the downstream side of the vehicle, there is usually an eddy created by the vehicle. Be aware though that the eddy on a vehicle rescue is not the safest place it normally is out in the river, although it is the calmest and safest place to be in a vehicle rescue. The rescuers in the water and on the shore should be aware that the vehicle could be swept downstream or tumble, also remember the victims weight maybe all that is keeping the vehicle stationary.
10 Low Water Crossings- the hidden danger. National Weather Service. Silver Spring, MD http://www.nws.noaa.gov/os/brochures/TheHiddenDangerEnglish.pdf (accessed August 12, 2012)
FIGURE 97. Rescue of vehicle driver on Merced River, Yosemite NP. Three children drowned during a rescue attempt by untrained bystanders prior to arrival of NPS personnel. Photo by Bill Perry.
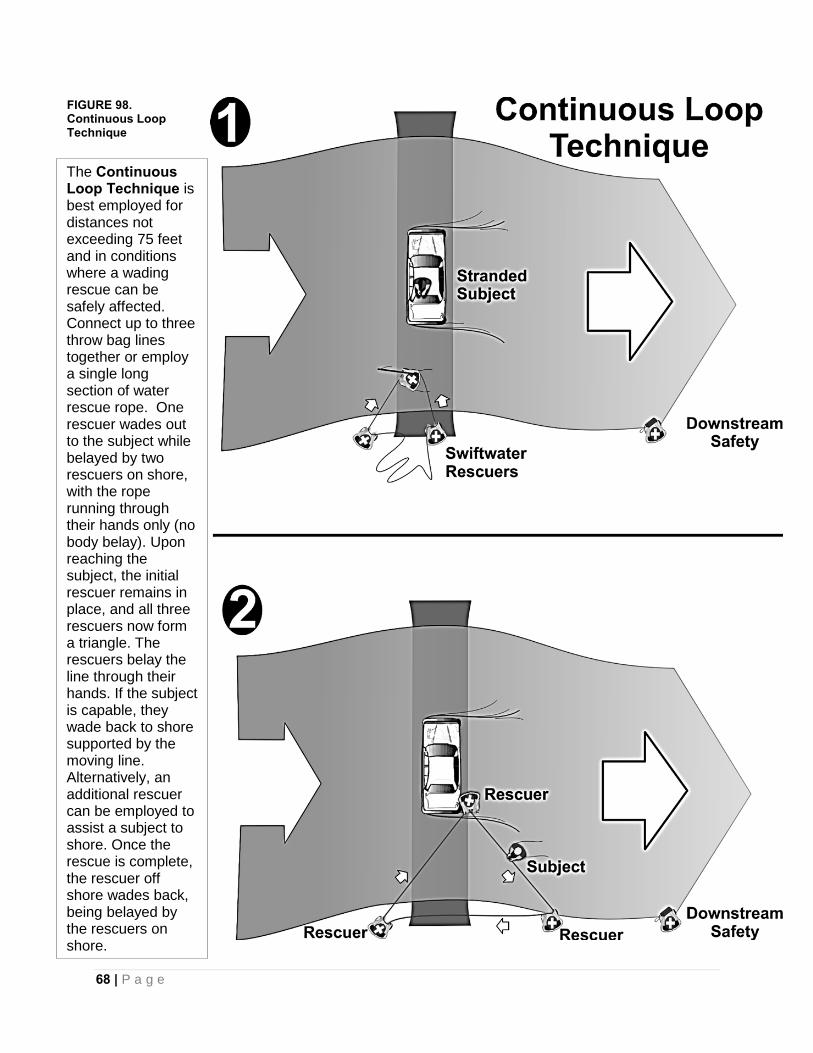
68 | P a g e
The Continuous Loop Technique is best employed for distances not exceeding 75 feet and in conditions where a wading rescue can be safely affected. Connect up to three throw bag lines together or employ a single long section of water rescue rope. One rescuer wades out to the subject while belayed by two rescuers on shore, with the rope running through their hands only (no body belay). Upon reaching the subject, the initial rescuer remains in place, and all three rescuers now form a triangle. The rescuers belay the line through their hands. If the subject is capable, they wade back to shore supported by the moving line. Alternatively, an additional rescuer can be employed to assist a subject to shore. Once the rescue is complete, the rescuer off shore wades back, being belayed by the rescuers on shore.
FIGURE 98. Continuous Loop Technique
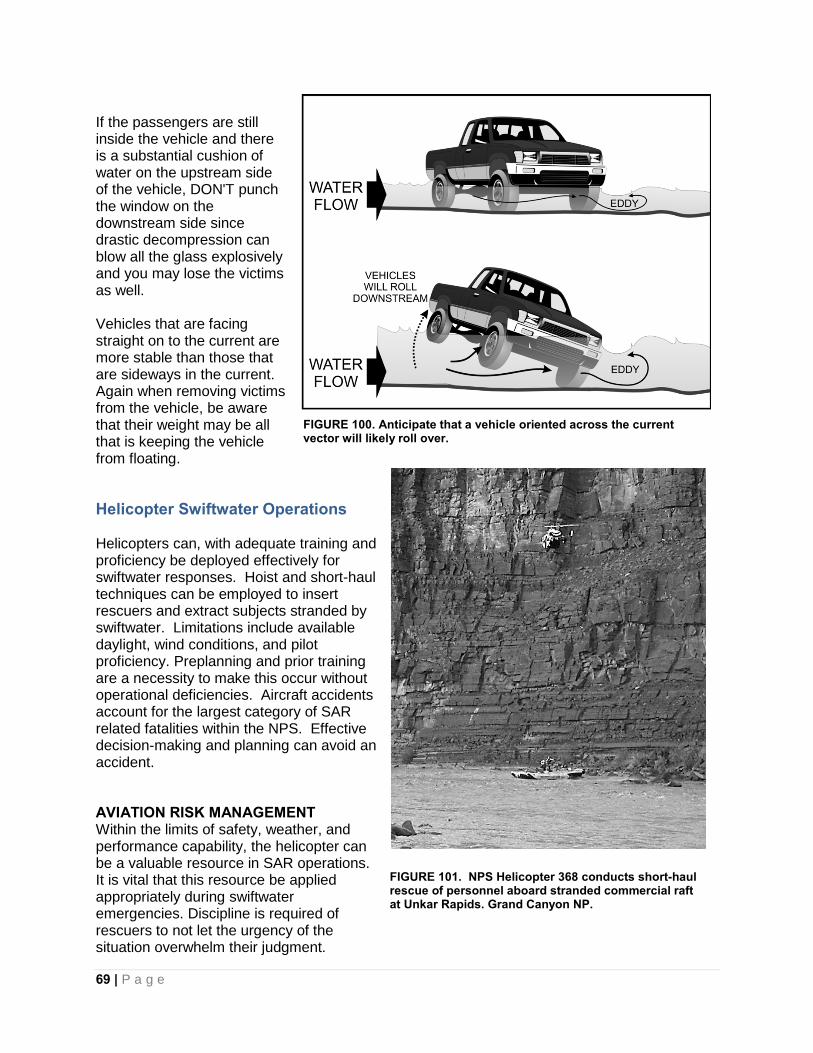
69 | P a g e
If the passengers are still inside the vehicle and there is a substantial cushion of water on the upstream side of the vehicle, DON'T punch the window on the downstream side since drastic decompression can blow all the glass explosively and you may lose the victims as well. Vehicles that are facing straight on to the current are more stable than those that are sideways in the current. Again when removing victims from the vehicle, be aware that their weight may be all that is keeping the vehicle from floating.
Helicopter Swiftwater Operations Helicopters can, with adequate training and proficiency be deployed effectively for swiftwater responses. Hoist and short-haul techniques can be employed to insert rescuers and extract subjects stranded by swiftwater. Limitations include available daylight, wind conditions, and pilot proficiency. Preplanning and prior training are a necessity to make this occur without operational deficiencies. Aircraft accidents account for the largest category of SAR related fatalities within the NPS. Effective decision-making and planning can avoid an accident. AVIATION RISK MANAGEMENT Within the limits of safety, weather, and performance capability, the helicopter can be a valuable resource in SAR operations. It is vital that this resource be applied appropriately during swiftwater emergencies. Discipline is required of rescuers to not let the urgency of the situation overwhelm their judgment.
FIGURE 101. NPS Helicopter 368 conducts short-haul rescue of personnel aboard stranded commercial raft at Unkar Rapids. Grand Canyon NP.
FIGURE 100. Anticipate that a vehicle oriented across the current vector will likely roll over.
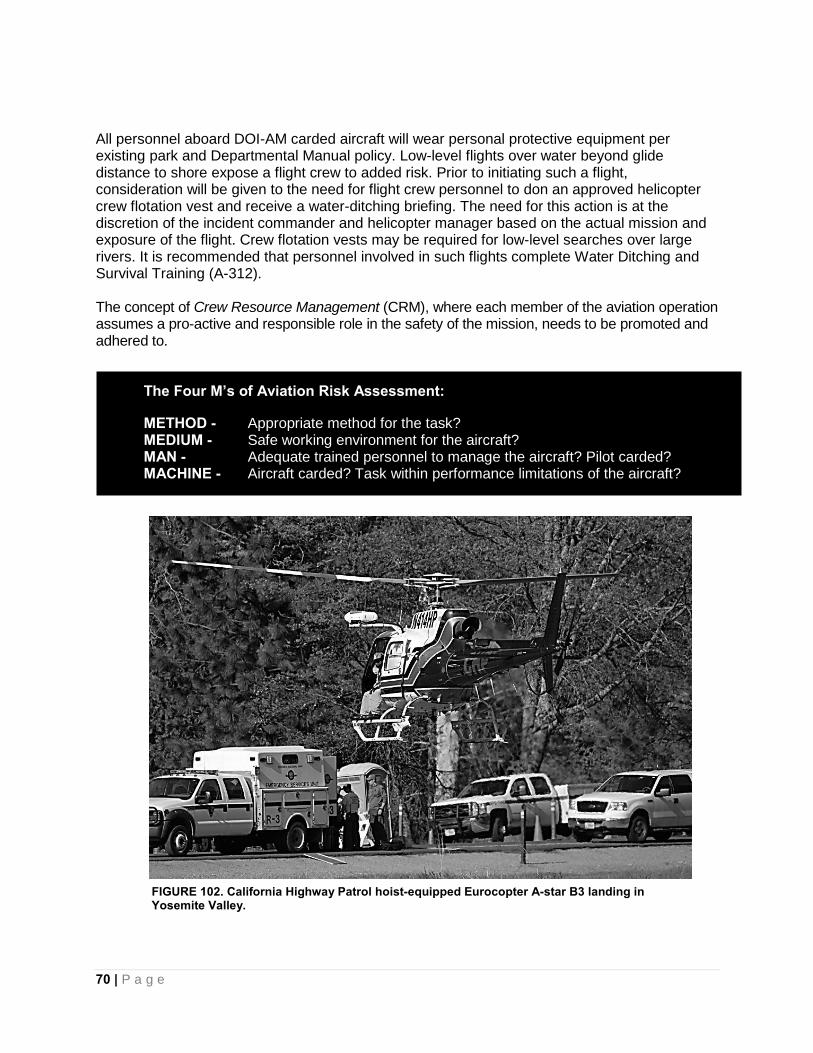
70 | P a g e
All personnel aboard DOI-AM carded aircraft will wear personal protective equipment per existing park and Departmental Manual policy. Low-level flights over water beyond glide distance to shore expose a flight crew to added risk. Prior to initiating such a flight, consideration will be given to the need for flight crew personnel to don an approved helicopter crew flotation vest and receive a water-ditching briefing. The need for this action is at the discretion of the incident commander and helicopter manager based on the actual mission and exposure of the flight. Crew flotation vests may be required for low-level searches over large rivers. It is recommended that personnel involved in such flights complete Water Ditching and Survival Training (A-312). The concept of Crew Resource Management (CRM), where each member of the aviation operation assumes a pro-active and responsible role in the safety of the mission, needs to be promoted and adhered to.
The Four M’s of Aviation Risk Assessment: METHOD - Appropriate method for the task? MEDIUM - Safe working environment for the aircraft? MAN - Adequate trained personnel to manage the aircraft? Pilot carded? MACHINE - Aircraft carded? Task within performance limitations of the aircraft?
FIGURE 102. California Highway Patrol hoist-equipped Eurocopter A-star B3 landing in Yosemite Valley.

71 | P a g e
Medical Considerations
Submersion Injuries Submersion refers to a patient’s head being underwater, as opposed to an immersion injury, where their head remains above the water surface.11 "Near drowning" means a person almost died from not being able to breathe (suffocating) under water. Once a subject is rescued from a near-drowning situation, immediate medical assistance is critical. A reduced concentration of oxygen in the blood (hypoxemia) is common to all near-drownings. Human life, of course, depends on a constant supply of oxygen-laden air reaching the blood by way of the lungs. When drowning begins, the larynx (vocal cords) closes involuntarily, preventing both air and water from entering the lungs. In 10-15% of cases, hypoxemia results because the larynx stays closed. This is called "dry drowning." Hypoxemia also occurs in "wet drowning," the 85-90% of cases where the larynx relaxes and water enters the lungs. Typically within three minutes of submersion most people are unconscious, and within five minutes the brain begins to suffer from lack of oxygen. Abnormal heart rhythms (cardiac dysrhythmias) often occur in near-drowning cases, and the heart may stop pumping (cardiac arrest). An increase in blood acidity (acidosis) is another consequence of near-drowning, and under some circumstances near-drowning can cause a substantial increase or decrease in the volume of circulating blood. Many victims experience a severe drop in body temperature (hypothermia). Treatment begins with removing the victim from the water and performing cardiopulmonary resuscitation (CPR). The victim is also checked for head, neck, and other injuries, and fluids are given intravenously. Hypothermia cases require careful handling to protect the heart. Patients can be discharged from the emergency department after four to six hours if their blood oxygen level is normal and no signs or symptoms of near-drowning are present. Because lung problems can arise 12 or more hours after submersion, the medical staff must first be satisfied that the patients are willing and able to seek further medical help if necessary. Admission to a hospital for at least 24 hours for further observation and treatment is a must for patients who do not appear to recover fully in the emergency department. Early rescue of near-drowning victims (within five minutes of submersion) and prompt CPR (within less than 10 minutes of submersion) appear to be the best guarantees of a complete recovery.12 If a person has been under water for LESS than one hour, full resuscitative efforts should be employed. If a person has been under water for MORE than one hour, resuscitation efforts are usually unsuccessful, and should not be started.13
11 State of Alaska, Department of Health and Social Services- Division of Public Health. State of Alaska Cold Injuries Guidelines. Juneau, AK. 2003. 12 Modell, Jerome H. "Drowning and Near-Drowning." In Harrison's Principles of Internal Medicine, edited by Anthony S. Fauci, et al. New York:McGraw-Hill, 1997. 13 State of Alaska, Department of Health and Social Services- Division of Public Health. State of Alaska Cold Injuries Guidelines. Juneau, AK. 2003.
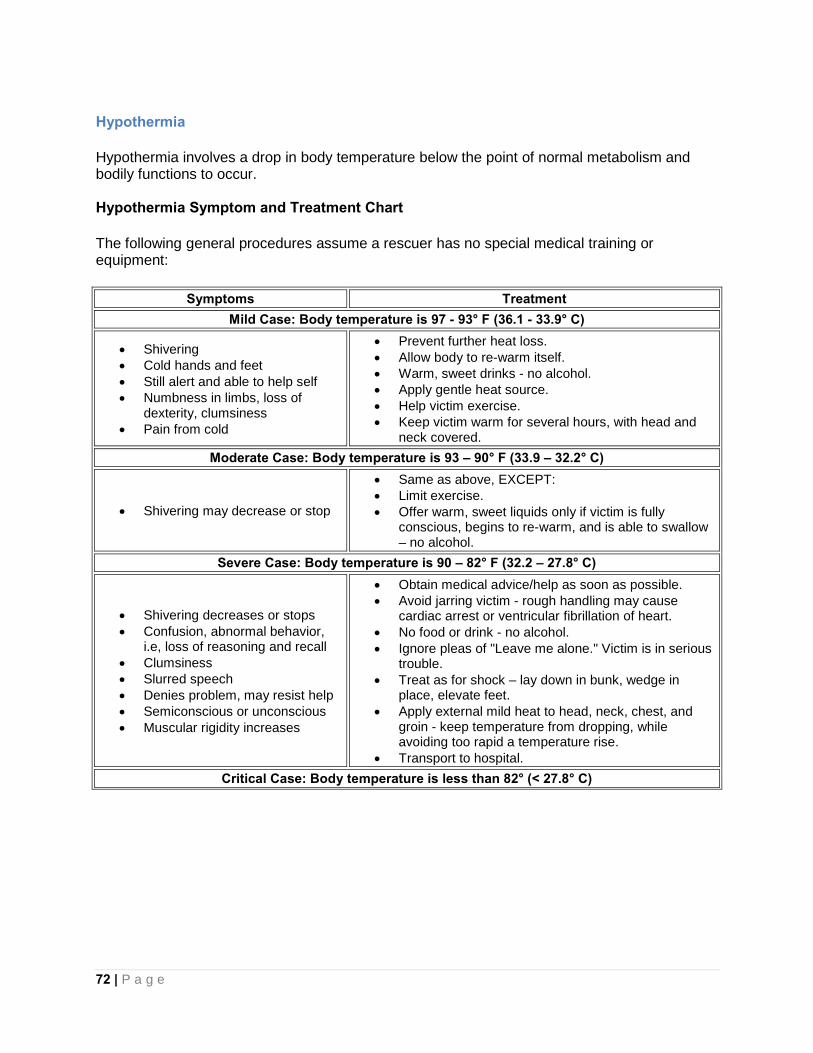
72 | P a g e
Hypothermia Hypothermia involves a drop in body temperature below the point of normal metabolism and bodily functions to occur. Hypothermia Symptom and Treatment Chart
The following general procedures assume a rescuer has no special medical training or equipment:
Symptoms Treatment Mild Case: Body temperature is 97 - 93° F (36.1 - 33.9° C)
• Shivering • Cold hands and feet • Still alert and able to help self • Numbness in limbs, loss of
dexterity, clumsiness • Pain from cold
• Prevent further heat loss. • Allow body to re-warm itself. • Warm, sweet drinks - no alcohol. • Apply gentle heat source. • Help victim exercise. • Keep victim warm for several hours, with head and
neck covered. Moderate Case: Body temperature is 93 – 90° F (33.9 – 32.2° C)
• Shivering may decrease or stop
• Same as above, EXCEPT: • Limit exercise. • Offer warm, sweet liquids only if victim is fully
conscious, begins to re-warm, and is able to swallow – no alcohol.
Severe Case: Body temperature is 90 – 82° F (32.2 – 27.8° C)
• Shivering decreases or stops • Confusion, abnormal behavior,
i.e, loss of reasoning and recall • Clumsiness • Slurred speech • Denies problem, may resist help • Semiconscious or unconscious • Muscular rigidity increases
• Obtain medical advice/help as soon as possible. • Avoid jarring victim - rough handling may cause
cardiac arrest or ventricular fibrillation of heart. • No food or drink - no alcohol. • Ignore pleas of "Leave me alone." Victim is in serious
trouble. • Treat as for shock – lay down in bunk, wedge in
place, elevate feet. • Apply external mild heat to head, neck, chest, and
groin - keep temperature from dropping, while avoiding too rapid a temperature rise.
• Transport to hospital. Critical Case: Body temperature is less than 82° (< 27.8° C)
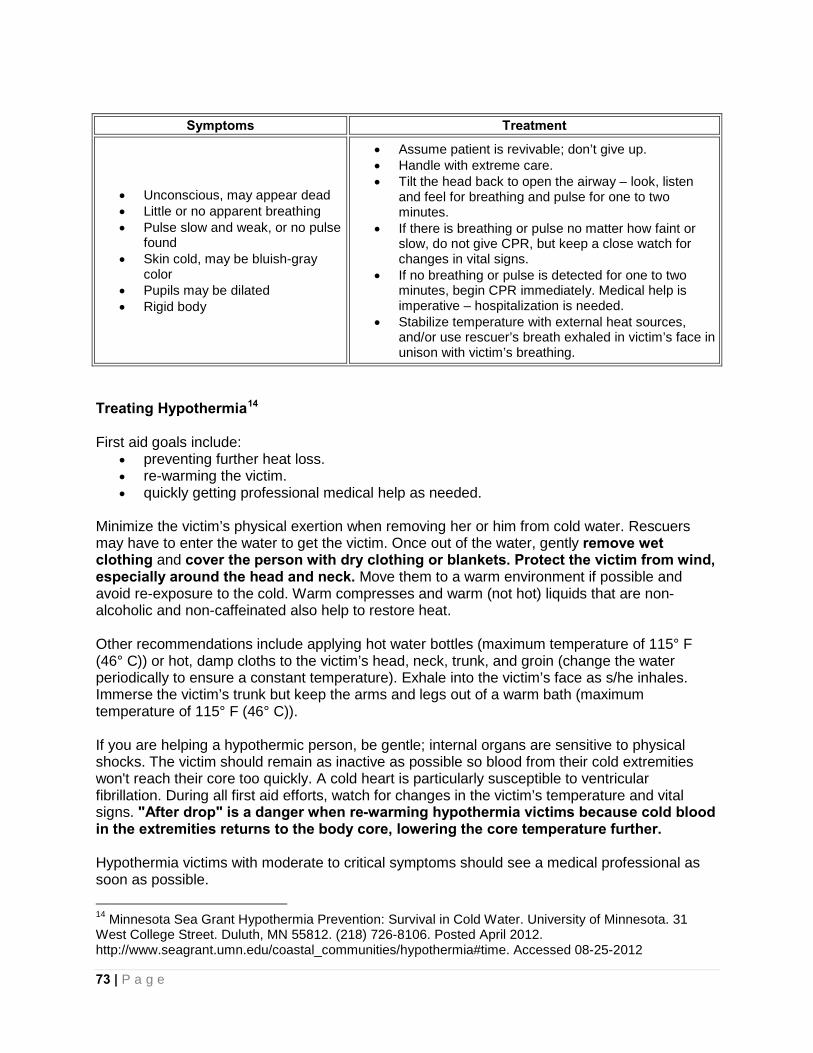
73 | P a g e
Symptoms Treatment
• Unconscious, may appear dead • Little or no apparent breathing • Pulse slow and weak, or no pulse
found • Skin cold, may be bluish-gray
color • Pupils may be dilated • Rigid body
• Assume patient is revivable; don’t give up. • Handle with extreme care. • Tilt the head back to open the airway – look, listen
and feel for breathing and pulse for one to two minutes.
• If there is breathing or pulse no matter how faint or slow, do not give CPR, but keep a close watch for changes in vital signs.
• If no breathing or pulse is detected for one to two minutes, begin CPR immediately. Medical help is imperative – hospitalization is needed.
• Stabilize temperature with external heat sources, and/or use rescuer’s breath exhaled in victim’s face in unison with victim’s breathing.
Treating Hypothermia14 First aid goals include:
• preventing further heat loss. • re-warming the victim. • quickly getting professional medical help as needed.
Minimize the victim’s physical exertion when removing her or him from cold water. Rescuers may have to enter the water to get the victim. Once out of the water, gently remove wet clothing and cover the person with dry clothing or blankets. Protect the victim from wind, especially around the head and neck. Move them to a warm environment if possible and avoid re-exposure to the cold. Warm compresses and warm (not hot) liquids that are non-alcoholic and non-caffeinated also help to restore heat. Other recommendations include applying hot water bottles (maximum temperature of 115° F (46° C)) or hot, damp cloths to the victim’s head, neck, trunk, and groin (change the water periodically to ensure a constant temperature). Exhale into the victim’s face as s/he inhales. Immerse the victim’s trunk but keep the arms and legs out of a warm bath (maximum temperature of 115° F (46° C)). If you are helping a hypothermic person, be gentle; internal organs are sensitive to physical shocks. The victim should remain as inactive as possible so blood from their cold extremities won't reach their core too quickly. A cold heart is particularly susceptible to ventricular fibrillation. During all first aid efforts, watch for changes in the victim’s temperature and vital signs. "After drop" is a danger when re-warming hypothermia victims because cold blood in the extremities returns to the body core, lowering the core temperature further. Hypothermia victims with moderate to critical symptoms should see a medical professional as soon as possible. 14 Minnesota Sea Grant Hypothermia Prevention: Survival in Cold Water. University of Minnesota. 31 West College Street. Duluth, MN 55812. (218) 726-8106. Posted April 2012. http://www.seagrant.umn.edu/coastal_communities/hypothermia#time. Accessed 08-25-2012
74 | P a g e
The body-to-body rewarming controversy
Some medical professionals and rescue personnel recommend rewarming mildly hypothermic victims in the field with body-to-body contact (in other words, by sharing body heat). However, research suggests that this technique may not be beneficial. The rationale comes from the fact that the person offering up their body heat is giving about as much heat as they are taking away by restricting the victim’s shivering response. And, the heat donor becomes colder in the process.
In a study15 evaluating whether body-to-body rewarming would enhance the recovery of a mildly hypothermic subject, researchers found that sharing body heat was approximately as effective as letting a person rewarm from their own shivering.
In a different study16, researchers simulated severe hypothermia by suppressing a victim’s shivering response. In cases where a person cannot shiver themselves back to normal, they report that body-to-body rewarming yields a faster recovery than letting a victim passively rewarm but it is significantly less effective than applying a heater and a rigid cover to the victim’s chest.
Alcohol consumption increases the odds of developing hypothermia
Alcohol consumption can speed the onset and progression of hypothermia. Alcohol impairs motor skills, magnifies the torso reflex, and affects clear thinking. As the alcohol level in a person's body increases, coordination abilities decrease. At high doses, alcohol damages thermoregulation, which lowers the body's resistance to cold water.
What is the mammalian diving reflex?
The mammalian diving reflex is an innate response to cold water exhibited by mammals – including humans. Cold water contacting the face triggers the reflex, which shunts blood and available oxygen to the heart and brain. It lowers the heart rate and limits blood circulation to all but the body’s core. Water warmer than 70° F does not cause the reflex, and neither does plunging non-facial body parts into cold water. Children younger than 3 years old exhibit the reflex more dramatically than adults. The diving reflex enables some children to survive for an unusually long time in frigid water.
Because of the diving reflex, near-drowning victims have been revived after as long as one hour under cold water. The chances for surviving depend on water temperature (colder is better), length of time under water, age of the person (younger is better), and rescue efforts.
15 Giesbrecht, G. G., D. I. Sessler, I. B. Mekjavic, M. Schroeder and G. K. Bristow. 1994. Treatment of mild immersion hypothermia by direct body-to-body contact. Journal of Applied Physiology 76(6) 2373-2379. 16 Hultzer, M.V., X. Xu, C. Marrao, G. Bristow, A. Chochinov, G. G. Giesbrecht. 2005. Pre-hospital torso-warming modalities for severe hypothermia: a comparative study using a human model. Canadian Journal of Emergency Medicine 7(6): 378-386.
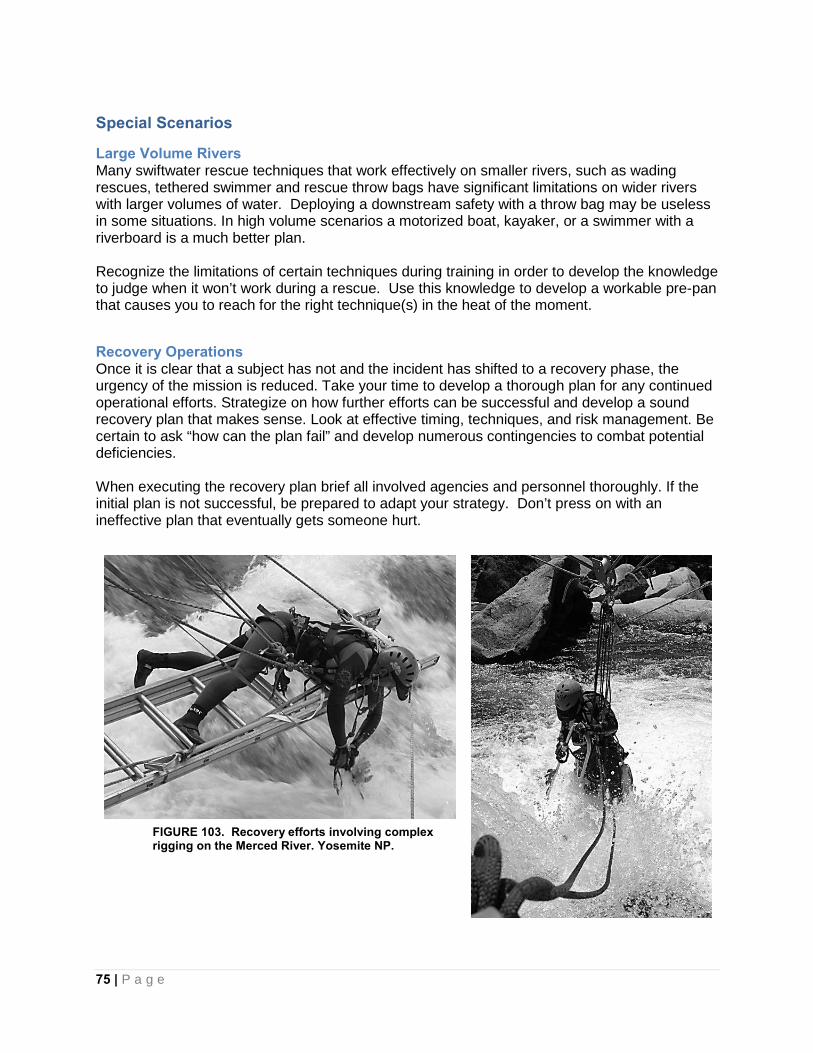
75 | P a g e
Special Scenarios
Large Volume Rivers Many swiftwater rescue techniques that work effectively on smaller rivers, such as wading rescues, tethered swimmer and rescue throw bags have significant limitations on wider rivers with larger volumes of water. Deploying a downstream safety with a throw bag may be useless in some situations. In high volume scenarios a motorized boat, kayaker, or a swimmer with a riverboard is a much better plan. Recognize the limitations of certain techniques during training in order to develop the knowledge to judge when it won’t work during a rescue. Use this knowledge to develop a workable pre-pan that causes you to reach for the right technique(s) in the heat of the moment.
Recovery Operations Once it is clear that a subject has not and the incident has shifted to a recovery phase, the urgency of the mission is reduced. Take your time to develop a thorough plan for any continued operational efforts. Strategize on how further efforts can be successful and develop a sound recovery plan that makes sense. Look at effective timing, techniques, and risk management. Be certain to ask “how can the plan fail” and develop numerous contingencies to combat potential deficiencies. When executing the recovery plan brief all involved agencies and personnel thoroughly. If the initial plan is not successful, be prepared to adapt your strategy. Don’t press on with an ineffective plan that eventually gets someone hurt.
FIGURE 103. Recovery efforts involving complex rigging on the Merced River. Yosemite NP.

76 | P a g e
Night Operations Swiftwater rescue operations conducted at night involve significantly increased risk due to the inability to see hazards and the difficulty with maintaining accountability of personnel. A mission may start during the day and progress into darkness. This is an important reminder of the need for all rescuers to be responsible for their own personal preparedness. Having personal lighting, strobes, gear with retro-reflective material, hydration fluids, snacks, etc., all enhance operational effectiveness. The increased hazard of working at night requires important considerations including: • Personal lights and strobes • Scene lighting • Communications • Identified or marked hazards • Personal accountability Scene lights illuminating the area should be deployed for rescuer safety. The sound of generators or emergency apparatus idling to power scene lights combined with the noise of the swiftwater will easily degrade scene communications. Consider the following: • Are you working toward a
viable subject? • Can the mission be
suspended and resumed in the morning?
• Does it make sense to
proceed in the dark?
Conclusion This text provides a foundation for your knowledge base as a swiftwater rescuer. Develop proficiency and then mastery in the field through repeated training sessions. Train in different environments and conditions. When you are called upon to perform a swiftwater rescue, you will be ready.
FIGURE 104. Yosemite NP SAR personnel respond to a car in the Merced River at night.

77 | P a g e
REFERENCES Bechdel, Les and Slim Ray. River Rescue, 4th Edition- A manual for whitewater safety.. CFS Press, Asheville, NC. 2009 Munger, Julie and Abigail Polsby Swiftwater Rescue Workbook. Sierra Rescue, Taylorsville, CA. Undated manuscript Ray, Slim. Swiftwater Rescue. CFS Press. Asheville, NC. 1997
• For additional information: http://www.cfspress.com
Segerstrom, Jim. Mike Croslin and Barry Edwards. Swiftwater Rescue Technician I.. Rescue 3, Inc. Elk Grove, CA. 1997 Segerstrom, Jim.Mike Croslin and Barry Edwards. Swiftwater Rescue Technician I Instructor Manual. 3rd edition. Rescue 3, Inc. Elk Grove, CA. 1997
78 | P a g e
Appendix A- Glossary of Swiftwater Terminology
• Boil Line- point downstream of hydraulic the where recirculated water meets with downstream flow unaffected by hydraulic.
• Bottom Load- debris in the waterway, which is negatively buoyant. This creates a hidden danger below the surface.
• Boulder Sieve- collection of boulders in the river channel that acts as a strainer. • Chute- clear tongue of water flowing between two obstacles. • Cold Reflex- (also known as the gasp reflex or inhalation response) is a physiological
reaction – an involuntarily gasp – that happens when a person suddenly enters cold water. The reflexive sucking in of air is a way for the body to rapidly increase oxygen intake into the lungs as a means of increasing survival.
• Confluence- junction of two or more water features. • Current Vector- Strongest laminar flow in a channel may not be parallel to shoreline (e.g.,
bend in the channel). Ability to identify is an essential skill for a swiftwater rescuer. • Cushion- see “pillow.” • Downstream- direction water is travelling. • Downstream V- point of V (tongue) is downstream. Formed by flow between two obstacles.
Indicates deepest, cleanest route. • Eddy- horizontal reversal of water flow where the differential between the current’s pressure
on the upstream and downstream sides of an obstacle in a channel causes the water behind the obstacle to flow upstream. Serves as an excellent area to rest or scout.
• Eddy Fence- dividing line between laminar flow and the eddy. • Eddy Line- obvious line or demarcation in the river, where the current moves in opposite
directions on either side. • Eddy Turn- Maneuver employed by a boat to leave the main current and enter an eddy. • Entrapment- The process by which an extremity or a subject’s entire body is forced into a
crack, crevice, or undercut and pinned there by the force of the current. • Ferry Angle- 45 degree angle to current vector. Using the proper ferry angle allows you to
efficiently have the river work for you. • Flood Control Channel- man-made watercourse constructed for the purpose of moving
floodwaters out of urban areas. This steep sloping wall of concrete channels adds difficulty to a basic shoreline rescue. Anyone operating near this type of channel must be secured with at minimum a belay line with a quick release harness.
• Frowning Hole- strongest reversal is side to side. Trying to exit to the side results in being pushed back to the center. Exit is down.
• Gradient- amount of elevation loss between two points on a river. Typically expressed as feet per mile or percent of slope.
• Haystack or Standing Waves- remain stationary in the channel. • Helical Flow- The corkscrew flow of the water between the shoreline and main current. • High Side- Shifting the weight of a boat crew to the high (i.e., downstream) side of a boat to
prevent flipping. This is done when a boat washes up against an obstacle, hits a large breaking wave, crosses a eddy line, or caught in a hole.
• Hole- A river wave, usually caused by an underwater obstacle that breaks back upstream. A hole is a surface phenomenon; it may flip or hold a buoyant object like a watercraft but it will not recirculate a swimmer.
• Horizon Line- appearance of a horizon downstream on a river formed by the steep gradient. This is an indicator for an on-shore scout.
79 | P a g e
• Humps- indication of an obstacle beneath the surface. Avoid these features when observing this visual cue.
• Hydraulic- formed by water pouring over an obstruction. A low pressure area is formed on the back side of the object. Water is drawn from downstream to fill this void. The recirculation of water frequently traps victims and debris. Known affectionately as “keeper,” “stopper,” or “maytag”.
• Laminar Flow- layered downstream flow of the river’s main current. The layer in the center just below the surface moves the fastest, while the side and bottom layers are slowed somewhat by friction.
• Low Head Dam- man-made obstruction with a sustained reversal that extends from one side of channel to the other. When a low head dam has sufficient water flow, a continuous "hole" may extend across the downstream side of the feature. If a subject is trapped in the recirculating hydraulic, they will quickly drown and unless they can escape the recirculating motion.
• Pillow- found at upstream side of obstacles. Water pushes up into a higher mound on the upstream side of the obstacle, which forms a cushion pushing away objects like boats from it. These are also known as “cushions.”
• River Right- right shoreline looking downstream. • River Left- left shoreline looking downstream. • Smiling Hole- appearance from upstream. Strong reversal in center with downstream
current on either side. Exit to the sides. • Strainer- Any river obstacle that allows water but not solid objects to pass through it. This is
extremely dangerous for swimmers who may be pinned against the object by the force of the water running through it. Strainers are most commonly formed by trees, brush, or other debris.
• Surface Load- debris that is positively buoyant. • Suspended Load- neutrally buoyant debris (e.g., silt). • Swiftwater- water over two feet deep that is flowing at a rate greater than one knot (1.15
mph) occurring in a natural water course, flood control channel, or flood-related incident. • Upstream- the direction water is coming from. • Upstream V- hydraulic effect creating a V, which points upstream. It is caused by caused by
an obstruction that is just beneath the surface. Avoid. • Volume- amount of water in a river, which is determined by the measurement of water
flowing past a given point in one second and expressed as cubic feet per second (cfs) of cubic meters per second (cms).
• Waves- flow affected by obstacles or constrictions. • Whitewater- collective term referring to “aerated water.”

80 | P a g e
Appendix B- DOI All-Hazard SAR Position Qualifications
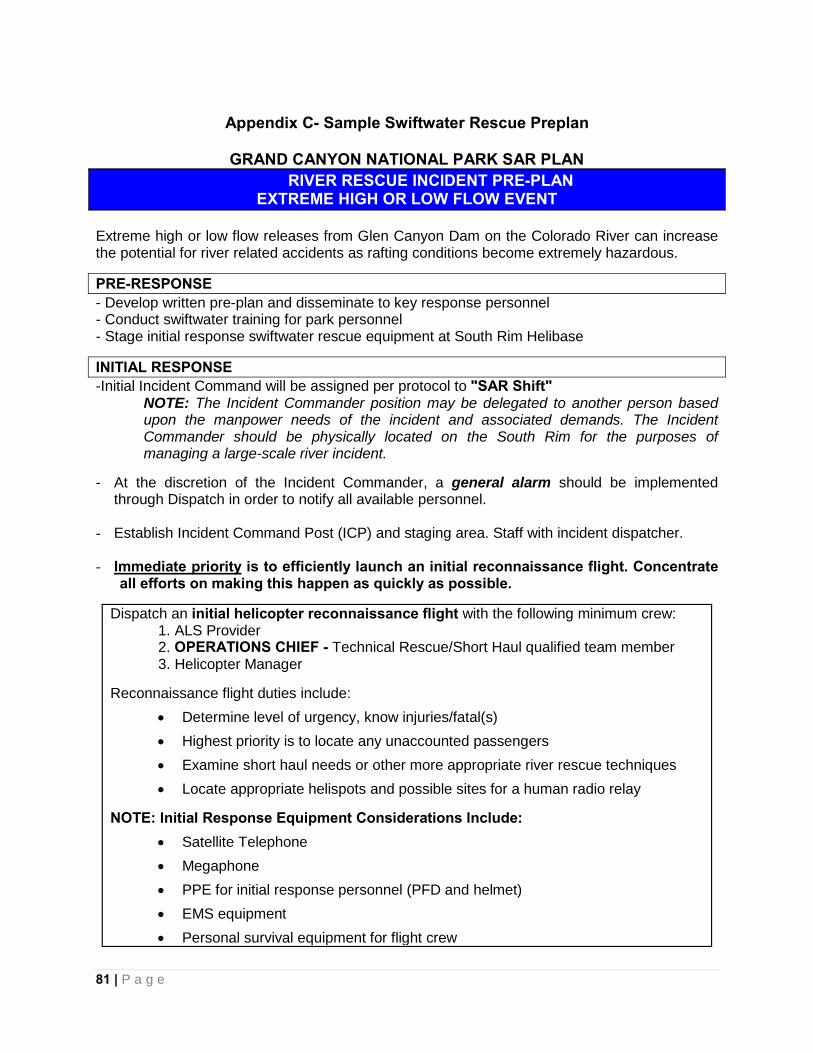
81 | P a g e
Appendix C- Sample Swiftwater Rescue Preplan
GRAND CANYON NATIONAL PARK SAR PLAN RIVER RESCUE INCIDENT PRE-PLAN
EXTREME HIGH OR LOW FLOW EVENT Extreme high or low flow releases from Glen Canyon Dam on the Colorado River can increase the potential for river related accidents as rafting conditions become extremely hazardous.
PRE-RESPONSE - Develop written pre-plan and disseminate to key response personnel - Conduct swiftwater training for park personnel - Stage initial response swiftwater rescue equipment at South Rim Helibase INITIAL RESPONSE -Initial Incident Command will be assigned per protocol to "SAR Shift"
NOTE: The Incident Commander position may be delegated to another person based upon the manpower needs of the incident and associated demands. The Incident Commander should be physically located on the South Rim for the purposes of managing a large-scale river incident.
- At the discretion of the Incident Commander, a general alarm should be implemented through Dispatch in order to notify all available personnel.
- Establish Incident Command Post (ICP) and staging area. Staff with incident dispatcher.
- Immediate priority is to efficiently launch an initial reconnaissance flight. Concentrate
all efforts on making this happen as quickly as possible.
Dispatch an initial helicopter reconnaissance flight with the following minimum crew: 1. ALS Provider 2. OPERATIONS CHIEF - Technical Rescue/Short Haul qualified team member 3. Helicopter Manager
Reconnaissance flight duties include:
• Determine level of urgency, know injuries/fatal(s) • Highest priority is to locate any unaccounted passengers • Examine short haul needs or other more appropriate river rescue techniques • Locate appropriate helispots and possible sites for a human radio relay
NOTE: Initial Response Equipment Considerations Include:
• Satellite Telephone • Megaphone • PPE for initial response personnel (PFD and helmet) • EMS equipment • Personal survival equipment for flight crew
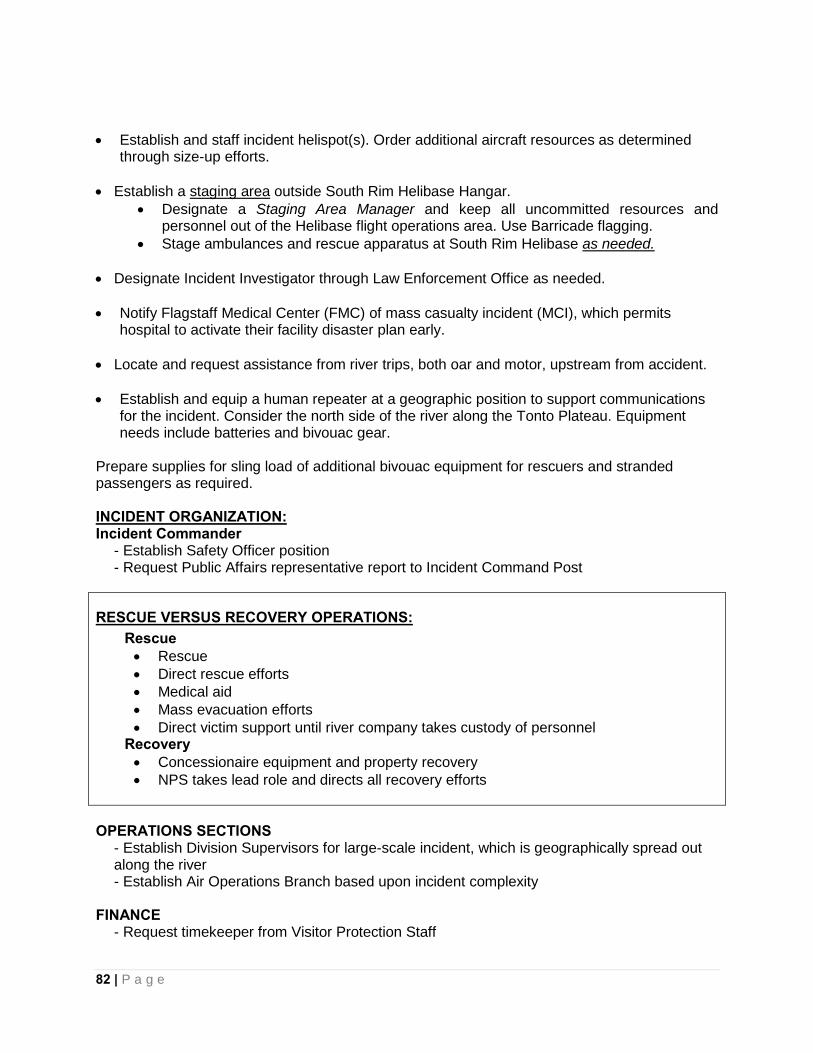
82 | P a g e
• Establish and staff incident helispot(s). Order additional aircraft resources as determined
through size-up efforts. • Establish a staging area outside South Rim Helibase Hangar.
• Designate a Staging Area Manager and keep all uncommitted resources and personnel out of the Helibase flight operations area. Use Barricade flagging.
• Stage ambulances and rescue apparatus at South Rim Helibase as needed. • Designate Incident Investigator through Law Enforcement Office as needed. • Notify Flagstaff Medical Center (FMC) of mass casualty incident (MCI), which permits
hospital to activate their facility disaster plan early. • Locate and request assistance from river trips, both oar and motor, upstream from accident. • Establish and equip a human repeater at a geographic position to support communications
for the incident. Consider the north side of the river along the Tonto Plateau. Equipment needs include batteries and bivouac gear.
Prepare supplies for sling load of additional bivouac equipment for rescuers and stranded passengers as required. INCIDENT ORGANIZATION: Incident Commander
- Establish Safety Officer position - Request Public Affairs representative report to Incident Command Post
RESCUE VERSUS RECOVERY OPERATIONS: Rescue • Rescue • Direct rescue efforts • Medical aid • Mass evacuation efforts • Direct victim support until river company takes custody of personnel
Recovery • Concessionaire equipment and property recovery • NPS takes lead role and directs all recovery efforts
OPERATIONS SECTIONS - Establish Division Supervisors for large-scale incident, which is geographically spread out along the river - Establish Air Operations Branch based upon incident complexity
FINANCE
- Request timekeeper from Visitor Protection Staff
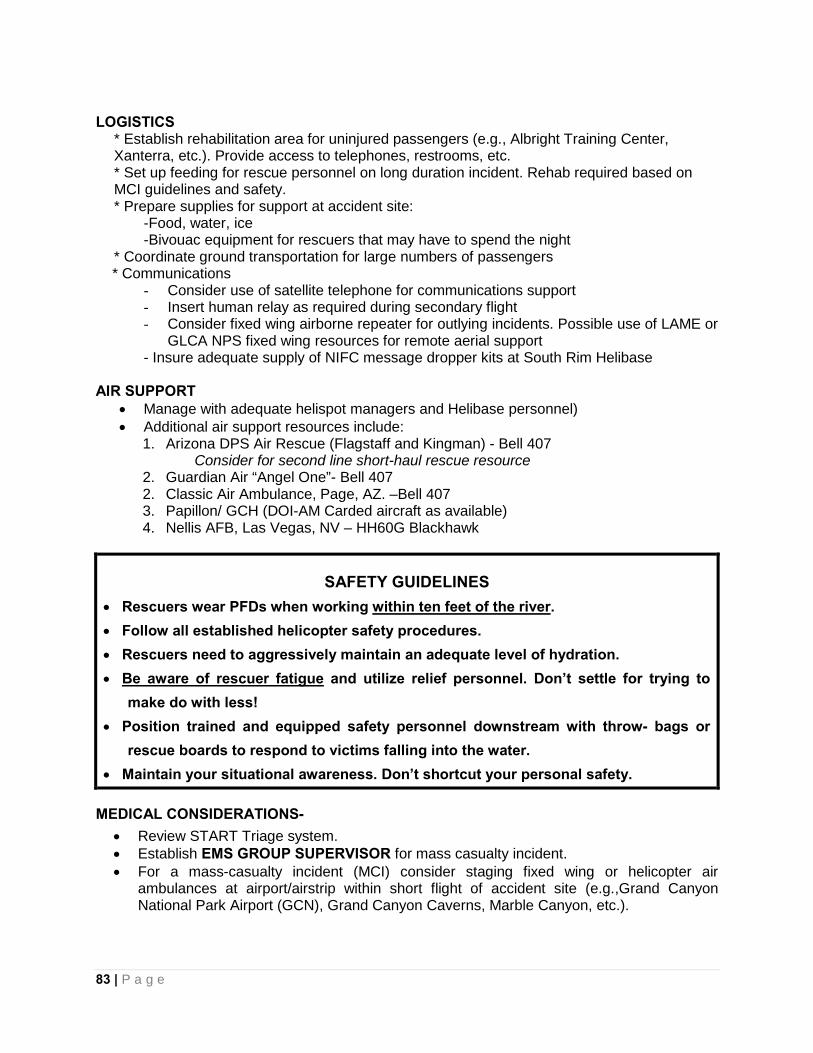
83 | P a g e
LOGISTICS * Establish rehabilitation area for uninjured passengers (e.g., Albright Training Center, Xanterra, etc.). Provide access to telephones, restrooms, etc. * Set up feeding for rescue personnel on long duration incident. Rehab required based on MCI guidelines and safety. * Prepare supplies for support at accident site:
-Food, water, ice -Bivouac equipment for rescuers that may have to spend the night
* Coordinate ground transportation for large numbers of passengers * Communications
- Consider use of satellite telephone for communications support - Insert human relay as required during secondary flight - Consider fixed wing airborne repeater for outlying incidents. Possible use of LAME or
GLCA NPS fixed wing resources for remote aerial support - Insure adequate supply of NIFC message dropper kits at South Rim Helibase
AIR SUPPORT
• Manage with adequate helispot managers and Helibase personnel) • Additional air support resources include:
1. Arizona DPS Air Rescue (Flagstaff and Kingman) - Bell 407 Consider for second line short-haul rescue resource
2. Guardian Air “Angel One”- Bell 407 2. Classic Air Ambulance, Page, AZ. –Bell 407 3. Papillon/ GCH (DOI-AM Carded aircraft as available) 4. Nellis AFB, Las Vegas, NV – HH60G Blackhawk
SAFETY GUIDELINES • Rescuers wear PFDs when working within ten feet of the river. • Follow all established helicopter safety procedures. • Rescuers need to aggressively maintain an adequate level of hydration. • Be aware of rescuer fatigue and utilize relief personnel. Don’t settle for trying to
make do with less! • Position trained and equipped safety personnel downstream with throw- bags or
rescue boards to respond to victims falling into the water. • Maintain your situational awareness. Don’t shortcut your personal safety.
MEDICAL CONSIDERATIONS- • Review START Triage system. • Establish EMS GROUP SUPERVISOR for mass casualty incident. • For a mass-casualty incident (MCI) consider staging fixed wing or helicopter air
ambulances at airport/airstrip within short flight of accident site (e.g.,Grand Canyon National Park Airport (GCN), Grand Canyon Caverns, Marble Canyon, etc.).

84 | P a g e
THINK HYPOTHERMIA! DROWNING CONSIDERATIONS - CPR should be started immediately. - Concentrate all efforts on performing effective CPR. - Intubate and administer high flow oxygen - Establish IV access. - Initiate passive re-warming as appropriate. - Spinal immobilization when associated with traumatic accidents.
START TRIAGE TAG
STANDARD WHISTLE COMMUNICATIONS- “SUDOT” S STOP!; Look At Me! One Short Blast U Up Two Short Blasts D Down Three Short Blasts O Okay; Off Rope Four Short Blasts T Trouble; Emergency Sustained Blast
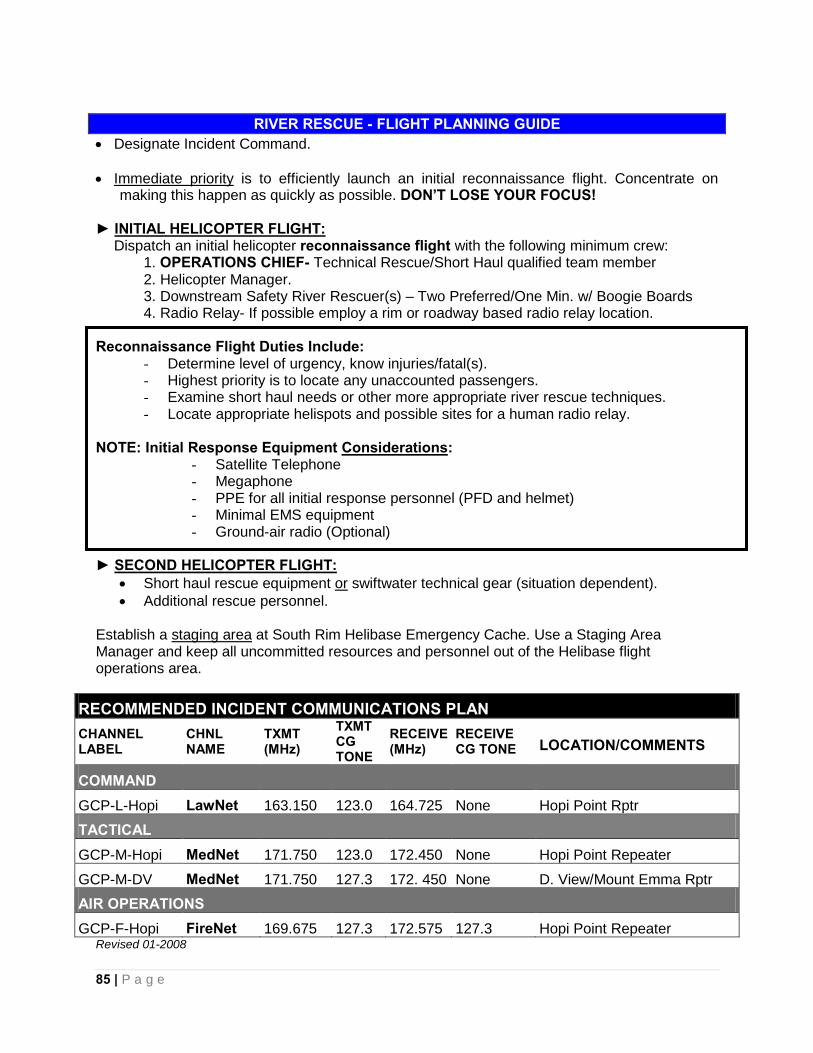
85 | P a g e
RIVER RESCUE - FLIGHT PLANNING GUIDE • Designate Incident Command. • Immediate priority is to efficiently launch an initial reconnaissance flight. Concentrate on
making this happen as quickly as possible. DON’T LOSE YOUR FOCUS! ► INITIAL HELICOPTER FLIGHT: Dispatch an initial helicopter reconnaissance flight with the following minimum crew:
1. OPERATIONS CHIEF- Technical Rescue/Short Haul qualified team member 2. Helicopter Manager. 3. Downstream Safety River Rescuer(s) – Two Preferred/One Min. w/ Boogie Boards
4. Radio Relay- If possible employ a rim or roadway based radio relay location.
Reconnaissance Flight Duties Include: - Determine level of urgency, know injuries/fatal(s). - Highest priority is to locate any unaccounted passengers. - Examine short haul needs or other more appropriate river rescue techniques. - Locate appropriate helispots and possible sites for a human radio relay.
NOTE: Initial Response Equipment Considerations:
- Satellite Telephone - Megaphone - PPE for all initial response personnel (PFD and helmet) - Minimal EMS equipment - Ground-air radio (Optional)
► SECOND HELICOPTER FLIGHT:
• Short haul rescue equipment or swiftwater technical gear (situation dependent). • Additional rescue personnel.
Establish a staging area at South Rim Helibase Emergency Cache. Use a Staging Area Manager and keep all uncommitted resources and personnel out of the Helibase flight operations area.
RECOMMENDED INCIDENT COMMUNICATIONS PLAN CHANNEL LABEL
CHNL NAME
TXMT (MHz)
TXMT CG TONE
RECEIVE (MHz)
RECEIVE CG TONE LOCATION/COMMENTS
COMMAND GCP-L-Hopi LawNet 163.150 123.0 164.725 None Hopi Point Rptr TACTICAL GCP-M-Hopi MedNet 171.750 123.0 172.450 None Hopi Point Repeater
GCP-M-DV MedNet 171.750 127.3 172. 450 None D. View/Mount Emma Rptr AIR OPERATIONS GCP-F-Hopi FireNet 169.675 127.3 172.575 127.3 Hopi Point Repeater
Revised 01-2008
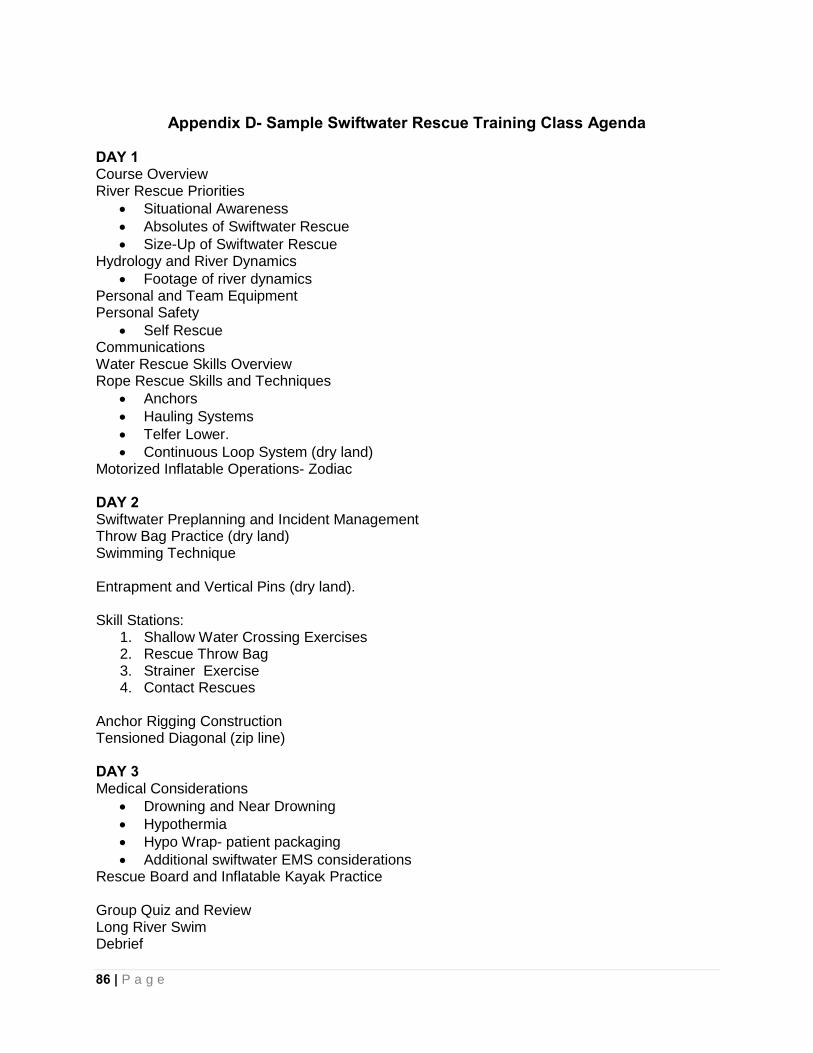
86 | P a g e
Appendix D- Sample Swiftwater Rescue Training Class Agenda DAY 1 Course Overview River Rescue Priorities
• Situational Awareness • Absolutes of Swiftwater Rescue • Size-Up of Swiftwater Rescue
Hydrology and River Dynamics • Footage of river dynamics
Personal and Team Equipment Personal Safety
• Self Rescue Communications Water Rescue Skills Overview Rope Rescue Skills and Techniques
• Anchors • Hauling Systems • Telfer Lower. • Continuous Loop System (dry land)
Motorized Inflatable Operations- Zodiac DAY 2 Swiftwater Preplanning and Incident Management Throw Bag Practice (dry land) Swimming Technique Entrapment and Vertical Pins (dry land). Skill Stations:
1. Shallow Water Crossing Exercises 2. Rescue Throw Bag 3. Strainer Exercise 4. Contact Rescues
Anchor Rigging Construction Tensioned Diagonal (zip line) DAY 3 Medical Considerations
• Drowning and Near Drowning • Hypothermia • Hypo Wrap- patient packaging • Additional swiftwater EMS considerations
Rescue Board and Inflatable Kayak Practice Group Quiz and Review Long River Swim Debrief