surginet intraoperative documentation
TRANSCRIPT

Quick Reference Guide
Presented by the IS Training Department
ofChildren’s
Hospital of The King’s Daughters
Presented by the IS Training Department,Children’s Hospital of The King’s
Daughters
SurgiNet® IntraOperative Documentation Training Guide


SurgiNet IntraOperativeDocumentation
SurgiNet IntraOperative Documentation........................................1Introduction...............................................................1Intended Audiences.........................................................1Objectives.................................................................1Accessing Citrix...........................................................2Accessing SurgiNet.........................................................2Securing your Workstation..................................................3System Access Considerations...............................................3Maintaining System Security................................................4Security Considerations....................................................5
SurgiNet Case Selection......................................................6Case Selection.............................................................7Select Case Toolbar.......................................................10Customize Column Display in Case Selection................................11Checking in a Patient.....................................................13Selecting an Encounter....................................................15Accessing IntraOperative Documentation....................................16
Completing Forms............................................................21Navigating Forms..........................................................22Sorting Segments..........................................................23Tips for Completing Forms.................................................24
Required Forms..............................................................25General Case Data Form (Page One).........................................25General Case Data Form (Page Two).........................................26Surgical Procedure Form (Page One)........................................27Surgical Procedure Form (Page Two)........................................28Surgical Procedure Form (Page Three)......................................29Case Attendance Form......................................................30Case Times Form...........................................................31Case Times Form (Page Two)................................................32Counts Verification (Page One)............................................33Counts Verification (Page Two)............................................34Counts Verification (Page Three)..........................................35Discharge from OR.........................................................36Case Time Out (Page One)..................................................37Case Time Out (Page Two)..................................................38Patient Positioning (Page One)............................................39Patient Positioning (Page Two)............................................40Patient Positioning (Page Three)..........................................41

PNDS (Page One)...........................................................42PNDS (Page Two)...........................................................43Surgical Sign Out.........................................................44
Supplemental Forms..........................................................45Catheters Drains Tubes Form (Page One)....................................45Catheters Drains Tubes Form (Page Two)....................................46Catheters Drains Tubes Form (Page Three)..................................47Cautery (Page One)........................................................48Cautery (Page Two)........................................................49Cautery (Page Three)......................................................50Cautery (Page Four).......................................................51Communication (Page One)..................................................52Communication (Page Two)..................................................53Dressing (Page One).......................................................54Dressing (PageTwo)........................................................55Medication Intake (Page One)..............................................56Medication Intake (Page Two)..............................................57Other Equipment...........................................................58Temperature Regulation Device (Page One)..................................59Temperature Regulation Device (Page Two)..................................60Peripheral / Invasive Lines...............................................61Skin Prep (Page One)......................................................62Skin Prep (Page Two)......................................................63Skin Prep (Page Three)....................................................64Specimens / Cultures (Page One)...........................................65Specimens / Cultures (Page Two)...........................................66Specimens / Cultures (Page Three).........................................67Delays - KD...............................................................68Laser Data (Page One).....................................................69Laser Data (Page Two).....................................................70Laser Data (Page Three)...................................................71Laser Safety..............................................................72Restraints................................................................73Implants / Explants (Page One)............................................74Implants / Explants (Page Two)............................................75Implants / Explants (Page Three)..........................................76Implants / Explants (Page Four)...........................................77Tourniquet (Page One).....................................................78Tourniquet (Page Two).....................................................79Tourniquet (Page Three)...................................................80Tubes - BMTT (Page One)...................................................81Tubes - BMTT (Page Two)...................................................82X-ray and Images..........................................................83
Pick List Documentation.....................................................84Pick List Tab Columns.....................................................86Pick List Menu............................................................88

Tips for Modifying Pick List Information..................................90Regenerating a Pick List....................................................91Regenerating Pick Lists from the Case Select Window.......................92System Messages when Generating Pick Lists................................92
Filling and Using Pick List Items...........................................93Adding Pick List Items....................................................95Removing a Pick List Item.................................................97Adding Free Text Information to the Pick List.............................98
Finalizing Documentation...................................................100Correcting Document Deficits.............................................101Viewing Finalized Documentation..........................................102Unfinalizing Documentation...............................................103Unfinalizing Documentation...............................................103
Miscellaneous Form Actions.................................................105Discontinuing a Segment..................................................105Inactivating Multiple Segments (Case Logging)............................106Activating a Segment.....................................................108Adding a Segment.........................................................109Entering Multiple Segment Entries........................................110Terminating Documentation – Unfinalized Document.........................111Terminating Documentation – Finalized Document...........................117Charting a Restrospective Document.......................................122Auditing Case Information................................................123Using Case Overview in SurgiNet..........................................125Printing a Document......................................................128Setting a Default Printer................................................129
Appendix...................................................................130Identifying Hardware.....................................................130Keyboard Shortcuts.......................................................132

Quick Reference Guide
Presented by the IS Training Department
ofChildren’s
Hospital of The King’s Daughters

SurgiNet IntraOperative Documentation Page 1
SurgiNet IntraOperative DocumentationIntroduction
SurgiNet IntraOperative Documentation allows OR Nurses and staff-members to quickly document details about surgical cases. IntraOperative Documentation allows users to populate forms, called segments, regarding surgical case information. At the conclusion of the documentation, the information becomes apart of the patient’s chart and is viewable from eKiDs PowerChart.
The benefits to using SurgiNet IntraOperative Documentation include:
Accurate Patient Charging Accurate Documentation No more lost forms Reports and statistics capability Elimination of poor handwriting All information will be in one place
Intended Audiences
All OR Nurses
Objectives
In this lesson, you will learn how to:
Select cases to document Navigate fields and forms within IntraOperative Documentation Complete segments in IntraOperative Documentation Add segments in IntraOperative Documentation Discontinue segments IntraOperative Documentation Correct documentation deficits Finalize documentation
SurgiNet IntraOperative Documentation Training Guide

SurgiNet IntraOperative Documentation Page 2
Accessing Citrix
To access SurgiNet, you must first log in to the Citrix Web Interface. You can access the Citrix Web Interface in three ways:
Select the Citrix Web Access icon on your Desktop.
On KDnet, under Popular Links, select Citrix Web Access.
Type “ekids” into your web browser.
Accessing SurgiNet
1. Click on the application icon todisplay the log on screen.
2. Enter your User Name in thedesignated field.
3. Enter your Password in thedesignated field.
4. Click OK or the <ENTER> key.
SurgiNet IntraOperative Documentation Training Guide
Sign in at the Citrix Login screen.Your Citrix User Name and Password will be the same as
your Network User Name and Password.

SurgiNet IntraOperative Documentation Page 3
Securing your Workstation
Suspend Application If you need to step away from the eKiDs PowerChart system for a short period oftime, you can choose to Suspend Application. By using this option, the patient’s record is still open but is secure. Sign back in using your password.
Change UserYou can also leave the patient record open so that another staff member can use the record by selecting the “Change User” option on the Task menu command toolbar. This process will remove your name from the system and the let the new user sign on and take responsibility for the patient record.
Exiting the System
When you have completed working within an application, it is imperative to log out. You can log out by selecting the Exit icon from the toolbar.
System Access Considerations
To gain security access SurgiNet, the following criteria must be met:
Employee must sign and return the Security Receipt form to the Information Services department.
The Employee Security Access Request form (ESAR) must be completed by the department manager and submitted to the Information Services department. This form can be accessed on KDnet.
SurgiNet IntraOperative Documentation Training Guide
Considerations: If you change your password in an eKiDs module (i.e. PowerChart,
FirstNet, SurgiNet), it will be changed in all other eKiDs modules.

SurgiNet IntraOperative Documentation Page 4
Employee must complete all required SurgiNet training as a result of their requested access level (indicated on the ESAR) with a score of 80%. The required training to gain access to IntraOperative Documentation is:
o Introduction to SurgiNet Tutorial and Testo PowerChart New User Tutorial and Testo PowerChart Basic Order Entry Instructor Led Classo IntraOperative Documentation Instructor Led Class or Departmental-
Based Training
Upon the completion of the above listed steps, security will be activated and access will be given to various features within the SurgiNet module, based on completed training and departmental role within CHKD.
SurgiNet IntraOperative Documentation Training Guide

SurgiNet IntraOperative Documentation Page 5
Maintaining System Security
To ensure system integrity and patient confidentiality, it is imperative that security considerations are given top priority when accessing confidential patient information.
To gain access to PowerChart you must first sign and return the Security Receipt form to the Information Services Department.
Upon the completion of this step, your security will be activated and you willbe given access to features based on the training that has been completed.
Multiple levels define system security. Using the information contained in your Security Receipt letter, you are given a Username and Password, which make up your Electronic Signature. Your Electronic Signature tracks your access activity in PowerChart. Your username is usually the first 6 letters of your last name and your first and middle initial (i.e., smithsab).
SurgiNet IntraOperative Documentation Training Guide

SurgiNet IntraOperative Documentation Page 6
Security Considerations
Passwords must be at least eight characters in length and contain one number.
Your User Name is assigned to you by the IS Department. User Names can be similar, but they are never the same. William R. Smith’s User Name may be SMITHWR, while Wilhmenia R. Smith’s username may be SMITHWR1.
No one should ever ask you for your Password for any reason; never share your Password with anyone. Watch out for persons attempting to get your Password or information through social engineering. Social engineering is a method by which a person impersonates or intimidates others to get sensitive information. Report any such cases to Information Services at 668-7075.
If you feel your Password has been compromised, change it immediately.
Don’t trust unexpected emails/files. Most computer viruses enter the network when an employee opens an e-mail attachment. If an attachment arrives unexpectedly, verify who sent it before you open it. Never open attachments from strangers.
Use strong p@ssw0rdZ. Hackers use tools that automatically try every word in the dictionary as your Password. Choose longer, hard-to-guess Passwords that contain a mix of letters, numbers, and punctuation. For easy-to-remember Passwords, use a line from a poem, song, or movie.
Destroy notes containing Passwords. More and more, thieves are stealing computer files or Passwords from their victims. Notes and post-it notes around your work area containing Passwords, account numbers, or other confidential information make it too easy.
Lock it up to lock them out. Never leave your computer/applications open when you step away from your computer. Locking your PC will help to stop snooping passers by when you leave your desk.
Stay in safe Web neighborhoods. You recognize the dangers of wandering to the tough part of town. Web surfing works the same way. Malicious software is installed on victims’ computers from a number of unsafe sites. Look before you click. Look carefully at links before you click them. Unless you intend to download software, no website/web address should have .exe in it. That indicates an
SurgiNet IntraOperative Documentation Training Guide

SurgiNet IntraOperative Documentation Page 7
executable program, which could be malicious. If a web site does not look right….it probably is not!
Just click "no." When you visit a Web site and a box asks, "Should I remember your Password?" do not enable it. The password is actually stored on your own computer. Anyone else using your computer can visit your Favorites and log in as you.
Report suspicious activity. Your computer is not performing as expected,there are more web pages popping up on your screen than clicked on or you notice a program installing and you did not start the installation. These are examples of what are considered suspicious activity on a computer and could indicate that spy ware, ad ware or remote control programs have been installed without your permission or knowledge. If you experience any of these or other suspicious activity, please call the help desk at 8-7075.
When in doubt, call Information Services. Information Services is here for you. If you ever have a question or need to notify us of a problem, give us a call at 8-7075. Only with your help can we maintainthe privacy and security of our systems.
SurgiNet IntraOperative Documentation Training Guide
SurgiNet CaseTrackingComponents

SurgiNet IntraOperative Documentation Page 8
SurgiNet Case SelectionSurgiNet Case Selection Window
SurgiNet IntraOperative Documentation Training Guide
OR Resources (Rooms)
Case Selection Select Case Toolbar
Total Number of Cases

SurgiNet IntraOperative Documentation Page 9
Case SelectionUse Select Case to select a specific patient case in all SurgiNet applications. Select Case provides a way to find the patient case whether fordocumentation or for other purposes. The search options you can use are listed below. You can select by date, person, case umber, provider, MRN.
To select acase by… Complete the following steps:
Date
1. In the Select Case window, select the Date option.
2. Define the date range to be included by entering the date from which to start the search in the From Date box by using the spin arrows.
3. Define the date range to be included by entering the date to which to end the search in the To Date field by using the spin arrows.
4. Click Retrieve to display a list of all surgery cases within the specified date range in the (Case) spreadsheet.
5. Select the correct patient case.
6. Click OK to save your selection and exit the dialog box.
Person 1. In the Select Case window, select the Person option.
2. Enter either the person's full name or partial name in the Person box. Click the ellipsis. Perform one of the
SurgiNet IntraOperative Documentation Training Guide

SurgiNet IntraOperative Documentation Page 10
following steps:
If you entered the full name, the Retrieve button is available. Click Retrieve. A list of persons that mostclosely match the name you entered is listed at the bottom of the window.
If you enter a partial name, click the binoculars icon to open the Person Search dialog box. The Person Searchdialog box opens with a list of persons that most closely match the name you entered. You also can enter patient data in the appropriate fields. The more information you enter, the closer the system can come toa direct match. Click Search to initiate the search.
3. Select a name from the list of patient records that are returned.
4. Click OK to save the selection and exit the dialog box. The selected name is displayed in the Person box.
5. Click Retrieve to display a list of cases scheduled for that patient.
6. Select the correct case and click OK.
Case Number 1. In the Select Case window, select the Case Number option.
2. Enter the first set of digits or letters of the case numberin the Case Number box.
3. Press TAB to advance to the next hyphenated space. Enter the next set of characters.
4. Press TAB to enter the last set of characters.
5. Click Retrieve. The Encounter Search dialog box opens withthe matching case displayed.
6. Select the case and click OK to save your selection and exit the dialog box.
SurgiNet IntraOperative Documentation Training Guide

SurgiNet IntraOperative Documentation Page 11
Provider
1. In the Select Case window, select the Provider option.
2. Enter the name or partial name of the surgeon in the Provider box. The system attempts to find a match for the name you entered.
If no matches can be found, <<No Matches>> is displayed. If multiple surgeon names are found, <<Multiple
Matches>> is displayed.
3. Click the binoculars icon to open the Provider Selection dialog box and perform a detailed search for a specific provider.
4. Enter the From Date for the start of the surgery date range.
5. Enter the To Date for the end of the surgery date range.
6. Click Retrieve. The system returns a list of matching cases in the bottom of the window.
7. Select the case and click OK.
MRN
1. In the Select Case window, select the MRN option.
2. Enter the patient's medical record number in the MRN box.
3. Click Retrieve. The Encounter Search dialog box opens withthe matching case displayed.
4. Select the case, and then click OK to save your selection and exit the dialog box.
SurgiNet IntraOperative Documentation Training Guide

SurgiNet IntraOperative Documentation Page 12
Note: Case retrieval in the Select Case window is determined by the anticipated Start date/time. If no anticipated start/stop data is provided, then the case Scheduled date/time is used. See Using Anticipated Start columnheaders
When you have located a patient case, you can use the Select Case toolbar to associate a patient with an encounter, check in a surgical case, or print patient documentation. Click here for a description of the toolbar commands.
SurgiNet IntraOperative Documentation Training Guide

SurgiNet IntraOperative Documentation Page 13
Select Case Toolbar
The toolbar contains the following elements:
Check In Opens the Check in dialog box, in which you can check the patient in as a surgical case. Right-click in the dialog boxto open context menus of commands from which you can select.
AssociateEncounter
Associate Encounter. Opens the Associate Encounter dialog box, in which you can associate the selected patient to an encounter if needed.
Change Add-OnStatus
Changes the add-on status of the selected case; this status is displayed in a column of the spreadsheet in the Case Selection window.
Print Opens the Print Setup dialog box, in which you can print the selected patient’s documents or pick list.
Preview Enables you to preview the selected patient's documents or pick list before printing.
Location Indicates the location you are currently using. Opens the Location Selection dialog box, in which you can select another location.
SurgiNet IntraOperative Documentation Training Guide

SurgiNet IntraOperative Documentation Page 14
SurgiNet IntraOperative Documentation Training Guide

SurgiNet IntraOperative Documentation Page 15
Customize Column Display in Case Selection
You have the ability to select which columns are displayed, modify the order in which the columns are displayed in the Case Selection tab, and view the total number of cases via Customize Column Display. This option allows you to quickly determine which pertinent pieces of information [columns] that you want displayed within your Case Selection window. In addition, it allows usersto determine the layout of the selected columns.
To begin Column Customization, complete the following steps:
1. Right-click in case selection screen.
2. Choose Customize Column Display.
The Customize Column window will appear.
SurgiNet IntraOperative Documentation Training Guide

SurgiNet IntraOperative Documentation Page 16
The options available in the To Available area are columns that can be displayed in the Case Select screen. The options available in the From Selected area are columns that are currently being displayed in the Case Select screen.
To add a column from within the Customize Columns window:1. Choose the column that you want displayed from the To Available
category. Select it by clicking on it.
2. Click to move the column to the From Selected category.
3. Click OK.
4. The selected column will display in the Case Select screen.
To remove a column from within the Customize Columns window:1. Choose the column that you want displayed from the From Selected
category. Select it by clicking on it.
2. Click to move the column to the To Available category.
3. Click OK.
4. The selected column will display in the Case Select screen.
To sort how columns are displayed from within the Customize Columns window:1. Choose the column that you want to move in the From Selected category.
Select it by clicking on it.
SurgiNet IntraOperative Documentation Training Guide

SurgiNet IntraOperative Documentation Page 17
2. Click the and arrows to position the column where you want it.
3. Click OK.
4. The selected column will display in the Case Select screen in the location that you have specified.
NOTE: Options that appear with a lock icon indicate that they are locked
and cannot be removed from the Case Select window.
You can choose the option to Select All to move all columns to the From Selected or to the To Available category.
SurgiNet IntraOperative Documentation Training Guide

SurgiNet IntraOperative Documentation Page 18
Checking in a Patient
To begin documentation, you must first check in your patient.
To check in a patient, complete the following steps:
1. Highlight the patients name in the Case Selection window by clicking on it.
2. Click the Check In Button.
The Check In window will open. The date and time are defaulted from the previous screen.
3. Optional: Enter comments in the Comments Field.
SurgiNet IntraOperative Documentation Training Guide

SurgiNet IntraOperative Documentation Page 19
4. Click the OK Button.
The encounter selection window will appear. In this window, confirm that the correct encounter is selected (if more than one encounter is present).
5. Click the OK Button.
You will be returned to the Case Selection screen. A checkmark beside the patient’s name indicates that they have been checked in.
SurgiNet IntraOperative Documentation Training Guide

SurgiNet IntraOperative Documentation Page 20
Selecting an Encounter
After checking in a patient, you have to associate an encounter when the patient is checked in (before documentation begins).
When the Encounter Selection screen appears, ensure that you are selecting thecorrect encounter by completing the following steps:
1. Select the appropriate encounter by clicking on it.
2. Click the OK button.
Tips and Tricks
Be sure to check the encounter! It will be a PreAdmit Testing prior to theday of surgery. On the day of surgery, look for SDC. Always look for yourlocation: HCPA, HCO…**
SurgiNet IntraOperative Documentation Training Guide

SurgiNet IntraOperative Documentation Page 21
Accessing IntraOperative Documentation
Once you have checked a patient in, you are able to begin IntraOperative Documentation. You can access IntraOperative documentation by:
Double clicking the patient’s name in Case Selection Selecting open from the bottom of the Case Selection window
Either method will trigger the IntraOperative Documentation form to open.
SurgiNet IntraOperative Documentation Training Guide

SurgiNet IntraOperative Documentation Page 22
Documentation Basics
Screen Element Description
DemographicsBar
Displays basic demographic information about the patient
Document TypesDrop-down box used to select between CHKD IntraOp, PACU I and PACU II document types.
Page DisplayDisplays the current page (page is highlighted in blue in the list of pages).
Patient ChartTabs
Displays the tabs of the patient’s chart within eKiDsPowerChart.
Auto-Hide ButtonMinimizes / maximizes the menu displaying the eKiDs PowerChart Tabs.
SurgiNet IntraOperative Documentation Training Guide
Demographics Bar
Patient Chart Tabs
Segments
Document Types
Page Display
Auto-Hide Button

SurgiNet IntraOperative Documentation Page 23
Documentation Form Basics
SurgiNet IntraOperative Documentation Training Guide
Exclamation Pointsindicate requiredsegments that haveto be completed tosign the document
Blue buttonsindicate forms thathave default fields
Gray buttonsindicate forms withoptional fields
A blue highlight ona segment is theform that you are
The number at thebottom left of theform indicates thenumber of pages in

SurgiNet IntraOperative Documentation Page 24
Form Basics (Continued)
ScreenElement Definition
Required FieldBox
Indicated by yellow highlight, this field must be completed. A checkmark will appear in the box once thefield is completed.
Drop DownArrow
Click on the drop-down arrow to reveal a list of choices from which to select. Select only one.
Add/RemoveArrows
Allows you to add or remove a choice from the previous field.
Prev/NextButton
Click on the buttons to return to the previous page of the form or go forward to the next page in the form.
SurgiNet IntraOperative Documentation Training Guide
Add/Remove Arrows
Required Field Box

SurgiNet IntraOperative Documentation Page 25
Form Basics (Continued)
SurgiNet IntraOperative Documentation Training Guide
ScreenElement Definition
Check BoxIndicated by a shadowed box, a field with this symbol must be completed. A checkmark will appear in the box once the field is completed.
CalendarDisplay
Click on the drop-down arrow to reveal a list of choicesfrom which to select. Select only one.
CommentsField
A free-text field where you can type comments. Click inthe field and begin typing.
Search FieldIndicated by a binoculars icon. Click on the binoculars two look up a person in SurgiNet.
Comments Field
Calendar Display
Check Box

SurgiNet IntraOperative Documentation Page 26
Completing FormsThe following section will show you how to complete several of the forms within the Intra-Op Documentation. All forms use the same functionality.
To access the Intra-Op Documentation, you must be on the Perioperative Doc Tab.
After selection of the document type the first time that you access IntraOperative documentation, the system will continue to default to that document type for your area. Do not change the document type unless necessary(for PACU staff), as the system will prompt you to finalize the document that you are leaving.
SurgiNet IntraOperative Documentation Training Guide

SurgiNet IntraOperative Documentation Page 27
Navigating FormsWhen a form is opened, the number of pages for the form is displayed at the bottom left. The page in yellow indicates the page that is currently being displayed.
SurgiNet IntraOperative Documentation Training Guide
To skip to acertain page withina form, click the
page number.
When you arefinished with allpages on a form andare ready to add it
If you want to display the next page within a form, click Next. The pages will display in the most logicalorder for documenting the surgical case.
Once an entry hasbeen added, you canModify or Removethe entry byclicking the
You can clear anentry before adding
it by clickingClear. All
information that

SurgiNet IntraOperative Documentation Page 28
Sorting SegmentsThe order that segments are displayed in IntraOperative Documentation was defined by OR management when SurgiNet was built. Based upon the 80/20 rule, they determined the execution sequence of the segments. However, the display order of the segments can be changed based on your preference.
To sort the segments that are displayed, complete the following steps:
1. Right-click on any available segment and select Sort from the context menu.
2. Choose the applicable sorting method that you want to use:
Ascending sorts the segments in alphabetical order, starting with A and ending with Z.
Descending sorts the segments in alphabetical order, starting with Z and ending with A.
Display Sequence sorts the segments in the original (default) order.
The segments will display in the manner that you have selected.
SurgiNet IntraOperative Documentation Training Guide
Segments sortedAscending A - Z
Segments sortedDescending Z - A

SurgiNet IntraOperative Documentation Page 29
Tips for Completing Forms It is highly recommended that you always use the Next Button when
completing pages; DO NOT click on each page title as you document. Using the Next Button will ensure that the pages appear in the most logical order.
Remember: You can only document on patients who have been checked in.
On a form with multiple entries possible, do not click on the Add Buttonuntil you are on the last page.
When filling out dates and times, you can use either the arrows or clickin the space and type the proper entry. In addition, you can also use T in a date field to input today’s date or an N in the time field to input the current time.
You can press TAB to navigate between the time / date boxes on any segment.
If you enter a slash (\) into a free-text box in Surgical PowerChart documentation, all text entered after the backslash is not displayed outside of Surgical PowerChart.
To generate entries into required fields (that were already completed from SurgiNet Scheduling), click on the entry in the list box. The fields within the form will populate with the information that you selected.
There are four SurgiNet-specific required segments for each case. Thesesegments are unable to be removed and therefore must be completed beforethe case can be finalized. These segments are:o Case Attendance o Case Timeso General Case Data o Surgical Procedures
There are six CHKD-specific required segments that must be completed, aswell. Although it is not suggested, these segments can be removed (discontinued) but will be monitored by OR Management. These segments are:
Counts Verification Discharge from OR Patient Positioning PNDSSurgical Time Out Surgical Sign Out
All other segments (forms) are supplemental, and can be added to the documentation record, as necessary. The supplemental forms are:
SurgiNet IntraOperative Documentation Training Guide

SurgiNet IntraOperative Documentation Page 30
o Catheters, Drains, Tubes o Cauteryo Communication o Dressingo Medication Intake o Other Equipmento Temperature Regulation
Deviceo Peripheral / Invasive
Lineso Skin Prep o Specimens / Cultureso Delays o Laser Datao Laser Safety o Tourniqueto Tubes – BMTT o X-Ray and Imageso Restraints o Implants / Explants
To save the IntraOp chart and finish charting in PACU: Close chart, say NO to finalize, and then reopen in PACU.
SurgiNet IntraOperative Documentation Training Guide

SurgiNet IntraOperative Documentation Page 31
Required Forms
General Case Data Form (Page One)The General Case Data form is used to document basic case information including the pre-operative and post-operative diagnoses, case level, and wound class.
Field Description OR This field is defaulted from SurgiNet Scheduling and displays
the OR for which the procedure is scheduled. Case Level This field is defaulted and displays the surgical case level (1
– 5). Wound Class This field is defaulted and displays the wound class (i.e. None,
Clean, Clean-Contaminated, Contaminated, Dirty-Infected). Specialty This field is defaulted from SurgiNet Scheduling and displays
the surgical specialty for the procedure. ASA Class Select the American Society of Anesthesiologists physical status
classification from the drop-down list. PreOp Diagnosis This field is defaulted from SurgiNet Scheduling and displays
the patient’s preop diagnosis.
Click the next button to go to the next page.
SurgiNet IntraOperative Documentation Training Guide

SurgiNet IntraOperative Documentation Page 32
General Case Data Form (Page Two)
The information on Page Two of the General Case Data form is a continuation ofdocumentation from Page One.
Field Description Diagnosis Post
Op Same asPreOp
Click the yes or no fields to indicate if the PostOp Diagnosis is the same as the PreOp Diagnosis. If yes is selected, this will automatically populate the PostOp Diagnosis field.
PostOp Diagnosis
This field is automatically populated if the yes option is selected in the PostOp Same as PreOp field is selected. If no isselected in the previous field, free-text the PostOp Diagnosis into this field.
Tips and Tricks:
Only Scheduling can enter the primary diagnosis. If there are multiple diagnoses for a case, the OR nurse will need to manually enter them in the General Case Data segment. Select Postop Same as Preop = NO, then type in the
SurgiNet IntraOperative Documentation Training Guide

SurgiNet IntraOperative Documentation Page 33
appropriate diagnosis. Also until the schedulers are receiving ICD-9 codes from the surgeon’s office staff, you may find generic diagnosis entered.
SurgiNet IntraOperative Documentation Training Guide

SurgiNet IntraOperative Documentation Page 34
Surgical Procedure Form (Page One)
The surgical procedure form is used to document case information including theprocedure, surgeon, anesthesia types and surgical service.
Field Description
Procedure Box /Procedure Field
The Procedure Box field is defaulted from SurgiNet Scheduling and displays the scheduled surgical procedure for the patient.
To add an additional procedure, click on the drop-down arrow in the Procedure field and make the appropriate selection. Do not free-text in the procedure name unless it is not in the procedure listing. This is a required field.
PrimaryProcedure
If the patient has one or more procedure scheduled for a case, indicate if the procedure listed is the primary procedure by selecting yes or no. This is a required field.
Primary SurgeonThe Primary Surgeon is defaulted from SurgiNet Scheduling. However, if necessary, you can indicate a different primary surgeon for the procedure by clicking on the binoculars.
SurgiNet IntraOperative Documentation Training Guide

SurgiNet IntraOperative Documentation Page 35
ModifiersThe Modifier is defaulted from SurgiNet Scheduling and displays the modifier for the case. Select the applicable procedure modifier from the drop-down list.
Click the next button to go to the next page. Surgical Procedure Form (Page Two)
Field Description Actual Procedure
PerformedFree-text the actual procedure performed, if different from the scheduled procedure.
Start / StopIndicate the start and stop times of the surgical procedure. If this information was already entered in the Case Times segment, it will default over to this field.
Surgical ServiceThis field is defaulted from SurgiNet Scheduling and displays the surgical service for the procedure. This is a required field.
Anesthesia Type
This field is defaulted from SurgiNet Scheduling and displays the selected anesthesia type for the procedure. This can be changed, if needed. This is a required field.
The information on Page Two of the Surgical Procedure form is a continuation of documentation from Page One.
SurgiNet IntraOperative Documentation Training Guide

SurgiNet IntraOperative Documentation Page 36
SurgiNet IntraOperative Documentation Training Guide

SurgiNet IntraOperative Documentation Page 37
Surgical Procedure Form (Page Three)
Field Description
Wound Class
The wound class from the procedure should automatically default from SurgiNet Scheduling. However, this can be changed by selecting the wound class from the drop-down box (i.e. None, Clean, Clean-Contaminated, Contaminated, Dirty-Infected). This is a required field.
The information on Page Two of the Surgical Procedure form is a continuation of documentation from Page One.
SurgiNet IntraOperative Documentation Training Guide

SurgiNet IntraOperative Documentation Page 38
Case Attendance Form
The Case Attendance Form is used to document all surgical case attendees. The case attendees entered on this form are accessible from other forms, so it is imperative to document all case attendees.
Field Description
Case AttendeeEnter the case attendees in this field. Use the patient look-up feature (binoculars) to open the search window. This is a required field.
Role Performed Enter the role performed of the selected case attendee. This is a required field.
Relief Indicate if the case attendee is a relief person for another attendee by checking / unchecking the Relief box.
Relief Reason Select the relief reason for the person listed as relief.
Time In / TimeOut Indicate the Time In / Time Out for the case attendee listed.
ProcedureCheckbox
If more than one procedure is listed for the patient, you can check / uncheck the procedure box(es) to indicate which procedure that the displayed Case Attendee was present for.
SurgiNet IntraOperative Documentation Training Guide

SurgiNet IntraOperative Documentation Page 39
Tip: All intraop role-type drop down choices will give you the choice of case personnel (by user name).Case Times Form
The Case Times form is used to document patient room, anesthesia, and surgerytime information.
Field Description
In Holding Time Enter the date and time that the patient arrived to holding.
In Room Via Indicate the mode of transportation.
Patient In Room Time /Out Room Time
Enter the date and time that the patient enters / exits the OR Room. Information entered in this field will display in SurgiNetCase Tracking.
Anesthesia Start Time / Stop
Time
Enter the date and time that the anesthesia was started and stopped.
SurgiNet IntraOperative Documentation Training Guide

SurgiNet IntraOperative Documentation Page 40
SurgiNet IntraOperative Documentation Training Guide

SurgiNet IntraOperative Documentation Page 41
Case Times Form (Page Two)
Page Two of the Case Times form a continuation of the information documented on Page One.
Surgery Times
Start Time / StopTime
Enter the date and time that the surgery began and ended. Information entered in this field will display in SurgiNet Case Tracking.
SurgiNet IntraOperative Documentation Training Guide

SurgiNet IntraOperative Documentation Page 42
Counts Verification (Page One)
The Counts Verification form is used to document the counts of all sharps / needles, sponges, and instruments at the beginning and end of a surgical case.
Field Description
Sequence Indicate the sequence via the drop-down box. Selection options are Final, First Closing, Opening, Relief Count, Second Closing, Shift Change, and Third Closing. This is a required field.
ByIndicate who completed the action selected from the sequence drop-down box. The only selectable persons in this field are those listed as Case Attendees. This is a required field.
Tips and Tricks:
For cases which do not need a “count”, you can either discontinue the segment OR put in a sequence of Opening, yourself as the person who performed the count, and then n/a for all counts.
SurgiNet IntraOperative Documentation Training Guide

SurgiNet IntraOperative Documentation Page 43
Counts Verification (Page Two)
Field Description
Sponges Indicate if all sponges used were accounted for. This is a required field.
Sponges ActionTaken
If all sponges were not accounted for, indicate the action taken. Selection options are Other / See Comments, Room Inspection, Wound Exploration, X-Ray Result.
Sharps / Needles Indicate if all sharps / needles that were set up for the case are accounted for. This is a required field.
Sharps ActionTaken
If all sharps / needles were not accounted for, indicate the action taken. Selection options are Other / See Comments, Room Inspection, Wound Exploration, X-Ray Result.
SurgiNet IntraOperative Documentation Training Guide

SurgiNet IntraOperative Documentation Page 44
Counts Verification (Page Three)
Instruments Indicate if all instruments that were set up for the case are accounted for. This is a required field.
InstrumentsAction Taken
If all instruments were not accounted for, indicate the action taken. Selection options are Other / See Comments, Room Inspection, Wound Exploration, X-Ray Result.
SurgiNet IntraOperative Documentation Training Guide

SurgiNet IntraOperative Documentation Page 45
Discharge from OR
The Discharge from OR form is used to document the patient’s status and destination after a surgical procedure has been completed.
Field Description
Patient Status Indicate the patient’s status upon discharge from the OR. Selection options are Admit, Admit – PICU, Inpatient, OP <= 2, OP 2 – 6, OP 6, OPEXO, and SNGH. This is a required field.
Via
Indicate the mode of transport for discharge from the OR. Selection options are Carried, Crib, Isolette, Other, Patient Bed, Stretcher, Toy Vehicle, Tricycle, Wagon, Walks, and Wheelchair. This is a required field.
Post-OpDestination
Indicate the patient’s post-operative destination. Selection options are Emergency Department, Floor, Lake Taylor, Morgue, PACU, PICU, and SNGH. This is a required field.
Report Given To: Identify who the post-operative report was given to (i.e. PACU nurse). This is a required field.
SurgiNet IntraOperative Documentation Training Guide

SurgiNet IntraOperative Documentation Page 46
SurgiNet IntraOperative Documentation Training Guide

SurgiNet IntraOperative Documentation Page 47
Case Time Out (Page One)
The Case Time Out form is used to document the confirmation that the correct surgical procedure was performed on the correct patient.
Field Description
Procedure Select the correct procedure by putting a check mark in the applicable box(es).
Weight Indicate the numeric weight and the measurement value.
Verify Indicate the staff members that are verifying the information.
All PresentParticipants
Agree
Indicate if all present participants agree. Selection options are yes and no.
SurgiNet IntraOperative Documentation Training Guide

SurgiNet IntraOperative Documentation Page 48
Case Time Out (Page Two)
Field Description Availability of necessary
supplies, equipmentand/or implants
Confirm if necessary supplies, equipment, and/or implants were available by selecting yes or no. This is a required field.
Followed safetyprecautions based on
patient history and / ormedication use:
Confirm if safety precautions were followed based on patient history and / or medication use. This is a required field.
Date / Time Indicate the date / time. This is a required field.
Documented By Indicate who documented the information.
SurgiNet IntraOperative Documentation Training Guide

SurgiNet IntraOperative Documentation Page 49
Patient Positioning (Page One)
The Patient Positioning Form is used to document the patient’s position duringthe surgical procedure. In addition, this form allows for the input of information regarding any comfort and safety devices.
Field Description
Procedure
If more than one procedure is listed for the patient, you can check / uncheck the procedure box(es) to indicate if the displayed information applies to both procedures or one procedure.
Press PointsChecked:
Confirm that pressure points were checked by selecting yes or no.
Body Position Indicate the patient’s body position.
Left Arm Position Indicate the patient’s left arm position.
Right ArmPosition Indicate the patient’s right arm position.
SurgiNet IntraOperative Documentation Training Guide

SurgiNet IntraOperative Documentation Page 50
Left Leg Position Indicate the patient’s left leg position.
SurgiNet IntraOperative Documentation Training Guide

SurgiNet IntraOperative Documentation Page 51
Patient Positioning (Page Two)
Field Description
Right Leg PositionIndicate the patient’s right leg position. Selection options are: Dangling, Elevated, Extended, Held on Field, Other / See Comments, Secured in Stirrup, and Traction.
Comfort and SafetyDevice:
Select the name of the comfort and safety device that was used. See Appendix 1.1 for instructions on looking up hardware in the system.
Position of Device: Free-text (type) in the position of the comfort and safety device.
SurgiNet IntraOperative Documentation Training Guide

SurgiNet IntraOperative Documentation Page 52
Patient Positioning (Page Three)
Field Description
Additional Information Free-text (type) any additional information regarding the comfort and safety device.
By:Enter the person’s name who is documenting the Patient Positioning form. The only selectable persons in this field are those listed as Case Attendees.
SurgiNet IntraOperative Documentation Training Guide

SurgiNet IntraOperative Documentation Page 53
PNDS (Page One)
The Perioperative Nursing Data Set [PNDS] form is used to document patient diagnoses, interventions, and outcomes.
Field Description
Diagnoses: Select the applicable patient diagnosis from the drop-down box.
Interventions:Indicate the intervention for the listed diagnoses by selecting it from the drop-down box and clicking the right arrow. Several interventions can be added at once.
Outcomes: List the applicable outcomes by selecting the appropriate optionfrom the drop-down box.
SurgiNet IntraOperative Documentation Training Guide

SurgiNet IntraOperative Documentation Page 54
PNDS (Page Two)
Field Description
All Patient Goals andOutcomes Met?
Indicate if all patient goals and outcomes are met by selecting yes or no.
SurgiNet IntraOperative Documentation Training Guide

SurgiNet IntraOperative Documentation Page 55
Surgical Sign Out
Surgical Sign Out is used to document adherence to policies and procedures.
Field Description
Procedure Indicate the procedure(s) by putting a checkmark next to the applicable procedure.
Postop Diagnosis The postop diagnosis should populate here. Verify that this is correct.
Final Counts Correct Indicate if the final counts for the case were correct.
Specimen Labelingand Handling:
Indicate that the correct procedures were followed for specimen labeling and handling.
Date / Time Indicate the Date / Time.
Documented By Indicate who documented the information.
SurgiNet IntraOperative Documentation Training Guide

SurgiNet IntraOperative Documentation Page 56
Supplemental FormsCatheters Drains Tubes Form (Page One)
The Catheters Drains Tubes form is used to document the usage of any catheters, drains, or tubes during the surgical procedure.
Field Description
Device Type Select the name of the device that was used. See Appendix 1.1 for instructions on looking up hardware in the system.
Size Free-text (type) the device size.
Location Free-text (type) the device location.
Dc’d at End ofCase?
Indicate if the device was discontinued at the end of the surgical case by selecting yes or no.
SurgiNet IntraOperative Documentation Training Guide

SurgiNet IntraOperative Documentation Page 57
Click the next button to go to the next page.
SurgiNet IntraOperative Documentation Training Guide

SurgiNet IntraOperative Documentation Page 58
Catheters Drains Tubes Form (Page Two)
Field Description
Inserted By
Indicate who inserted the device by selecting the correct name from the drop-down box and clicking the right arrow. More than one person can be selected. However, the only selectable persons in this field are those listed as Case Attendees.
Date / Time Enter the date and time that the device was inserted.
Dc’d by
Enter who discontinued the device by selecting the correct name from the drop-down box and clicking the right arrow. More than one person can be selected. However, the only selectable persons in this field are those listed as Case Attendees.
Click the next button to go to the next page.
SurgiNet IntraOperative Documentation Training Guide

SurgiNet IntraOperative Documentation Page 59
Catheters Drains Tubes Form (Page Three)
Field Description
Lot Number Enter the lot number for the device.
Expire Date Enter the expiration date for the device.
SurgiNet IntraOperative Documentation Training Guide

SurgiNet IntraOperative Documentation Page 60
Cautery (Page One)
The Cautery form is used to identify cauterization methods used during the surgical case.
Field Description
Hair Removal? Indicate if hair removal was completed for this procedure.
ESU Type Indicate the cautery unit used. See Appendix 1.1 for instructions on looking up a cautery device in the system.
Cautery SettingsCut Setting: Enter the cut setting for the cauterization instrument.
Cautery SettingsCoag Setting: Enter the coag setting for the cauterization instrument.
Click Next to go the next page.
SurgiNet IntraOperative Documentation Training Guide

SurgiNet IntraOperative Documentation Page 61
Cautery (Page Two)
Field Description
Cautery SettingsBlend Setting: Enter the blend setting for the cauterization instrument.
Cautery SettingsBipolar Setting: Enter the bipolar setting for the cauterization instrument.
Argon Gas Flow Indicate the level of the gas flow (Low, N/A, or Standard)
Gas Flow Setting Indicate the gas flow setting.
Click next to go the next page.
SurgiNet IntraOperative Documentation Training Guide

SurgiNet IntraOperative Documentation Page 62
Cautery (Page Three)
Field DescriptionGrounding PadGrounding Pad
Needed?Indicate if a grounding pad was needed be selecting yes or no.
Grounding PadGrounding Pad
SiteIf a grounding pad was used, identify the site.
Skin Cond Before: Indicate the skin condition before the grounding pad was placed.
Skin Cond After: Indicate the skin condition after the grounding pad was placed.
Click next to go the next page.
SurgiNet IntraOperative Documentation Training Guide

SurgiNet IntraOperative Documentation Page 63
Cautery (Page Four)
Field Description
By
Indicate who placed the grounding pad by selecting the correct name from the drop-down box and clicking the right arrow. More than one person can be selected. However, the only selectable persons in this field are those listed as Case Attendees.
Cautery safetystandards observed
per policy?
Indicate if cautery standards were observed per policy by selecting yes or no.
Click next to go the next page.
SurgiNet IntraOperative Documentation Training Guide

SurgiNet IntraOperative Documentation Page 64
Communication (Page One)
The Communication form is used to document communications regarding the patient’s status to involved parties.
Field Description
Communication Select the applicable communication type from the drop-down box (Patient Status).
CommunicationBy:
Select the person who initiated the communication from the drop-down list.
CommunicationTo:
Select the person who received the communication from the drop-down list and click the right arrow. More than one entry can be added to the selection box.
SurgiNet IntraOperative Documentation Training Guide

SurgiNet IntraOperative Documentation Page 65
Communication (Page Two)
Field Description
Date and Time Enter the date and time of the communication.
SurgiNet IntraOperative Documentation Training Guide

SurgiNet IntraOperative Documentation Page 66
Dressing (Page One)
The Dressing form is used to document dressings and packings that were used during the surgical case.
Field Description
Dressing Type: Indicate the dressing type by choosing the applicable option from the drop-down list and clicking the right arrow. More than one dressing type can be selected.
Packing Type:Indicate the packing type by choosing the applicable option fromthe drop-down list and clicking the right arrow. More than one dressing type can be selected.
Click next to go the next page.
SurgiNet IntraOperative Documentation Training Guide

SurgiNet IntraOperative Documentation Page 67
Dressing (PageTwo)
Field Description
Immobilization: Indicate the immobilization device that was used from the drop-down box and click the right-arrow. Multiple entries can be added in this field.
Location: Enter the location of the immobilization device from the drop down box.
Applied By:
Indicate who placed the immobilization device by selecting the correct name from the drop-down box and clicking the right arrow. More than one person can be selected. However, the onlyselectable persons in this field are those listed as Case Attendees.
SurgiNet IntraOperative Documentation Training Guide

SurgiNet IntraOperative Documentation Page 68
Medication Intake (Page One)
The Medication Intake form is used to document medication intake during the surgical case.
Field Description
Medication Indicate any medications administered to the patient from the drop-down box.
Dose Indicate the numeric value of the dose in the first field. In the drop down field, select the applicable dose measurement.
Route of Admin Indicate the route of administration from the drop-down box.
Diluent Click the applicable diluent option. Selection options are: IV Saline, Normal Saline, and Sterile Water.
Diluent Volume Indicate the numeric value of the volume in the first field. In the drop down field, select the applicable volume measurement.
Click next to go the next page.
SurgiNet IntraOperative Documentation Training Guide

SurgiNet IntraOperative Documentation Page 69
Medication Intake (Page Two)
Field Description
Antibiotic? Indicate if the medication contains an antibiotic by selecting the yes or no checkbox.
TimeAdministered Indicate the date and time that the medication was administered.
By
Indicate who administered the medication by selecting the correct name from the drop-down box and clicking the right arrow. The only selectable persons in this field are those listed as Case Attendees.
SurgiNet IntraOperative Documentation Training Guide

SurgiNet IntraOperative Documentation Page 70
Other Equipment The Other Equipment form is used to document other equipment that was used in the surgical case that has not been documented elsewhere.
Field Description
Equipment Type Select the name of the device that was used. See Appendix 1.1 for instructions on looking up hardware in the system.
Site Enter the body site on which the equipment was used.
SurgiNet IntraOperative Documentation Training Guide

SurgiNet IntraOperative Documentation Page 71
Temperature Regulation Device (Page One)The Temperature Regulation Device form is used to document any devices used during the surgical procedure for the purpose of regulating the patient’s temperature.
Field Description
Device Select the name of the device that was used. See Appendix 1.1 for instructions on looking up hardware in the system.
Serial Number Enter the asset number for the device.
Setting Enter the temperature setting for the device (numeric value).
TemperatureBefore
Enter the number value of the patient’s temperature before the use of the temperature regulation device in the first field. In the drop-down field, indicate the applicable unit of measurement.
TemperatureAfter
Enter the number value of the patient’s temperature after the use of the temperature regulation device in the first field. In the drop-down field, indicate the applicable unit of
SurgiNet IntraOperative Documentation Training Guide

SurgiNet IntraOperative Documentation Page 72
measurement.
Click next to go the next page.
SurgiNet IntraOperative Documentation Training Guide

SurgiNet IntraOperative Documentation Page 73
Temperature Regulation Device (Page Two)
Field Description
Site Indicate the site of where the temperature regulation device wasapplied by choosing the applicable option from the drop down box.
Applied By
Indicate who applied the temperature regulation device by selecting the correct name from the drop-down box. The only selectable persons in this field are those listed as Case Attendees.
Date / Time Indicate the date and time that the temperature regulation device was applied.
SurgiNet IntraOperative Documentation Training Guide

SurgiNet IntraOperative Documentation Page 74
Peripheral / Invasive Lines
The Peripheral / Invasive Line form is used to document any lines that were placed during the surgical procedure.
Field Description
Date / Time Enter the date and time that the peripheral / invasive line was placed.
Type Indicate the type of peripheral / invasive line by selecting theapplicable option from the drop down box.
Site / Location Indicate the site of the peripheral / invasive line. .
Gauge Indicate the gauge of the peripheral / invasive line (numeric value).
Site Condition Indicate the skin condition after placement of the peripheral / invasive line.
By:Indicate who placed the peripheral / invasive line by selecting the correct name from the drop-down box. The only selectable persons in this field are those listed as Case Attendees.
SurgiNet IntraOperative Documentation Training Guide

SurgiNet IntraOperative Documentation Page 75
Skin Prep (Page One)
The Skin Prep form is used to skin preparation procedures for the surgical case.
Field Description
Prep Agents
Indicate any prep agents that were used for the surgical procedure by choosing the applicable option from the drop-down box and clicking the right arrow. More than one prep agent can be selected. Selection options are: Alcohol, Betadine Gel, Betadine Scrub,Betadine Solution, Chloraprep, Duraprep, Hibiclens, None, Other / See Comments, Peridex, Peroxide, Phisohex, Saline, Sterile Water, Technicare, Ultradex, and Xephiran.
Prep Site Free-text (type) in the prep site on the patient where the prep agent was used.
Click next to go the next page.
SurgiNet IntraOperative Documentation Training Guide

SurgiNet IntraOperative Documentation Page 76
Skin Prep (Page Two)
Field Description
Prep By
Indicate who performed the skin prep by selecting the name from the drop-down box and clicking the right-arrow. More than one person can be selected. The only selectable persons in this field are those listed as Case Attendees.
Methods Select the method of Hair Removal from the drop-down box.
SurgiNet IntraOperative Documentation Training Guide

SurgiNet IntraOperative Documentation Page 77
Skin Prep (Page Three)
Field Description
Site: Indicate the site of the Hair Removal for the patient.
Removal By:Indicate who performed Hair Removal by selecting the correct name from the drop-down box. The only selectable persons in thisfield are those listed as Case Attendees.
SurgiNet IntraOperative Documentation Training Guide

SurgiNet IntraOperative Documentation Page 78
Specimens / Cultures (Page One)
Specimens / Cultures obtained during the surgical procedure can be documented using the Specimens / Cultures form.
Field Description
Specimen /Culture
Indicate if the collection was a specimen or a culture by selecting the applicable option from the drop down box.
Specimen TypeIndicate the specimen type.
On this form, if specimen is selected under the Specimen / Culture field, the fields for Specimen Type, Source, and Date / Time are required.
On this form, if culture is selected under the Specimen / Culture field, the fields for Specimen Type, Source, and Date / Time are required.
Click next to go the next page.
SurgiNet IntraOperative Documentation Training Guide

SurgiNet IntraOperative Documentation Page 79
Specimens / Cultures (Page Two)
Field Description
Culture Type
Indicate the specimen type by selecting the applicable option from the drop-down box. Selection options are: Aerobic, Aerobic and Anaerobic, Anaerobic, Chlamydial, Fresh, Fungal, Gram Stain, Gyn, None, Non-Gyn, Permanent Frozen, See Comments, and Viral.
Source Indicate the location where the specimen was obtained.
SurgiNet IntraOperative Documentation Training Guide

SurgiNet IntraOperative Documentation Page 80
Specimens / Cultures (Page Three)
Field Description
Frozen Section: Indicate if there is a frozen section of the specimen / culture by checking the applicable yes or no box.
Date / Time Indicate the date / time
SurgiNet IntraOperative Documentation Training Guide
SurgiNet IntraOperative Documentation Page 81
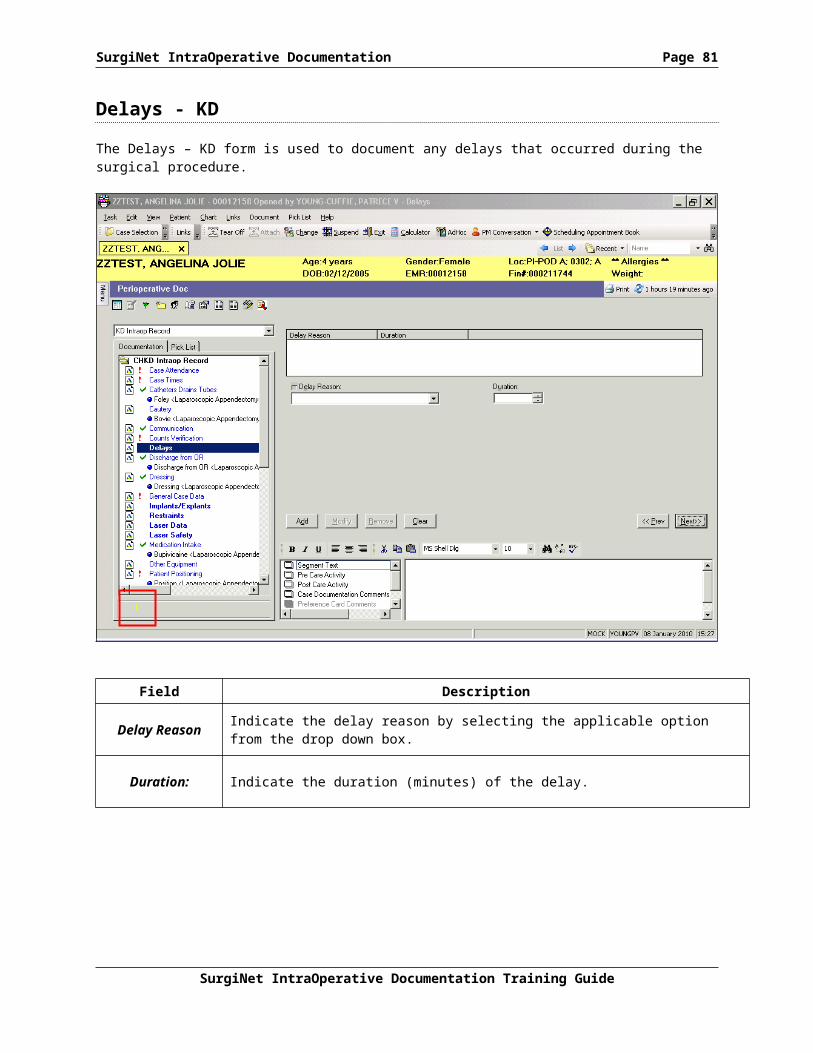
Delays - KD
The Delays – KD form is used to document any delays that occurred during the surgical procedure.
Field Description
Delay Reason Indicate the delay reason by selecting the applicable option from the drop down box.
Duration: Indicate the duration (minutes) of the delay.
SurgiNet IntraOperative Documentation Training Guide

SurgiNet IntraOperative Documentation Page 82
Laser Data (Page One)
The Laser Data form can be used to document surgical laser information.
Field Description
Laser Type Indicate the Laser Type by selecting the name of the device thatwas used. See Appendix 1.1 for instructions on looking up hardware in the system.
Site Indicate the body site on which the laser was used by choosing the applicable option from the drop down box.
Joules Free-text (type) the joules setting.
Pulses Free-text (type) the pulse setting.
SurgiNet IntraOperative Documentation Training Guide

SurgiNet IntraOperative Documentation Page 83
Laser Data (Page Two)
Field Description
Pulse Dur Free-text (type) the pulse duration setting.
Repeat Int Free-text (type) the repeat interval setting.
Watts Indicate the numeric value of the watts in the first field. In the drop down field, select the applicable dose measurement.
Laser Mode Indicate the mode of the laser. Selection options are continuous, pulse, and super pulse.
ByIndicate who utilized the laser by selecting the correct name from the drop-down box. The only selectable persons in this field are those listed as Case Attendees.
SurgiNet IntraOperative Documentation Training Guide

SurgiNet IntraOperative Documentation Page 84
Laser Data (Page Three)
Field Description
Start Time Indicate the start date and time for the laser usage.
Stop Time Indicate the stop date and time for the laser usage.
Laser safetystandards
observed perpolicy?
Indicate if laser safety standards were observed per policy by selecting yes or no.
SurgiNet IntraOperative Documentation Training Guide

SurgiNet IntraOperative Documentation Page 85
Laser Safety
The Laser Safety form is used to document the laser safety precautions that were performed during the usage of lasers in the surgical procedure.
Field Description
Laser safety Indicate which laser safety options were performed by checking the applicable boxes.
SurgiNet IntraOperative Documentation Training Guide

SurgiNet IntraOperative Documentation Page 86
Restraints
The Restraints form is used to document any restraints that were used for surgical cases.
Field Description
Date / Time Indicate the date and time that the restraint was used.
Action Select the applicable action from the drop-down box. Selection options are: Checked Restraint, Removed Restraint, and Restraint Applied.
Type / Location Indicate the type of restraint that was used.
Color, Motion,Sensation, Pulse
Checked
Select yes or no to indicate that the patient’s color, motion, sensation, and pulse were checked.
Skin Assessment Indicate the patient’s skin assessment. The information entered here is based on the action indicated in the Action field (i.e.
SurgiNet IntraOperative Documentation Training Guide

SurgiNet IntraOperative Documentation Page 87
if Checked Restraint is selected in the Action field, indicate the patient’s skin assessment at the time that the restraint was checked).
SurgiNet IntraOperative Documentation Training Guide

SurgiNet IntraOperative Documentation Page 88
Implants / Explants (Page One)
The Implants / Explants form is used to document any implants / explants that were used for surgical cases.
Field Description
Implant / Explant Indicate the type of implant / explant that was used for the surgical case.
Wasted? Indicate if the implant / explant was wasted by selecting yes orno.
Description Indicate the description / equipment information for the implant/ explant that was used in the surgical case.
Serial Number Free-text (type) the asset number of the implant / explant.
SurgiNet IntraOperative Documentation Training Guide

SurgiNet IntraOperative Documentation Page 89
Implants / Explants (Page Two)
Field Description
Lot Number Free-text (type) the lot number of the implant / explant.
Catalog # Free-text (type) the catalog number of the implant / explant.
Manufacturer Free-text (type) the manufacturer of the implant / explant.
Size Indicate the numeric value of the size in the first field. In the drop down field, select the applicable size measurement.
Expiration Date Indicate the expiration date, if any, of the implant / explant.
SurgiNet IntraOperative Documentation Training Guide

SurgiNet IntraOperative Documentation Page 90
Implants / Explants (Page Three)
Field Description
Site Indicate the placement site of the implant / explant.
Quantity Indicate the quantity of implants / explants used.
Description Free-text (type) the description of the explant.
SurgiNet IntraOperative Documentation Training Guide

SurgiNet IntraOperative Documentation Page 91
Implants / Explants (Page Four)
Page Four of Implants / Explants is a continuation of the information that waslisted in previous pages of the form.
Explant Reason Free-text (type) the reason for the explant.
SurgiNet IntraOperative Documentation Training Guide

SurgiNet IntraOperative Documentation Page 92
Tourniquet (Page One)
The Tourniquet form is used to document the usage of surgical tourniquets during the surgical case.
Field Description
Tourniquet Type Select the name of the tourniquet that was used. See Appendix 1.1 forinstructions on looking up hardware in the system.
Setting Free-text (type) the setting for the tourniquet. This is a numeric field.
Applied By
Indicate who applied the tourniquet by selecting the correct name from the drop-down box and clicking the right arrow. More than one person can be selected. However, the only selectable persons in this field are those listed as Case Attendees.
Body Location Indicate the body location of the tourniquet by selecting the applicable option from the drop-down box.
SurgiNet IntraOperative Documentation Training Guide

SurgiNet IntraOperative Documentation Page 93
Tourniquet (Page Two)
Field Description
Webril? Indicate if Webril was used by selecting yes or no.
Tourniquet TimesInflated /Deflated
Indcate the times that the tourniquet was inflated / deflated
SurgiNet IntraOperative Documentation Training Guide

SurgiNet IntraOperative Documentation Page 94
Tourniquet (Page Three)
Field Description
Total Time Indicate the total time that the tourniquet was in use.
Skin Cond Before Indicate the skin condition before the tourniquet placed.
Skin Cond After Indicate the skin condition after the tourniquet was placed.
Removed By Indicate who removed the tourniquet.
SurgiNet IntraOperative Documentation Training Guide
SurgiNet IntraOperative Documentation Page 95
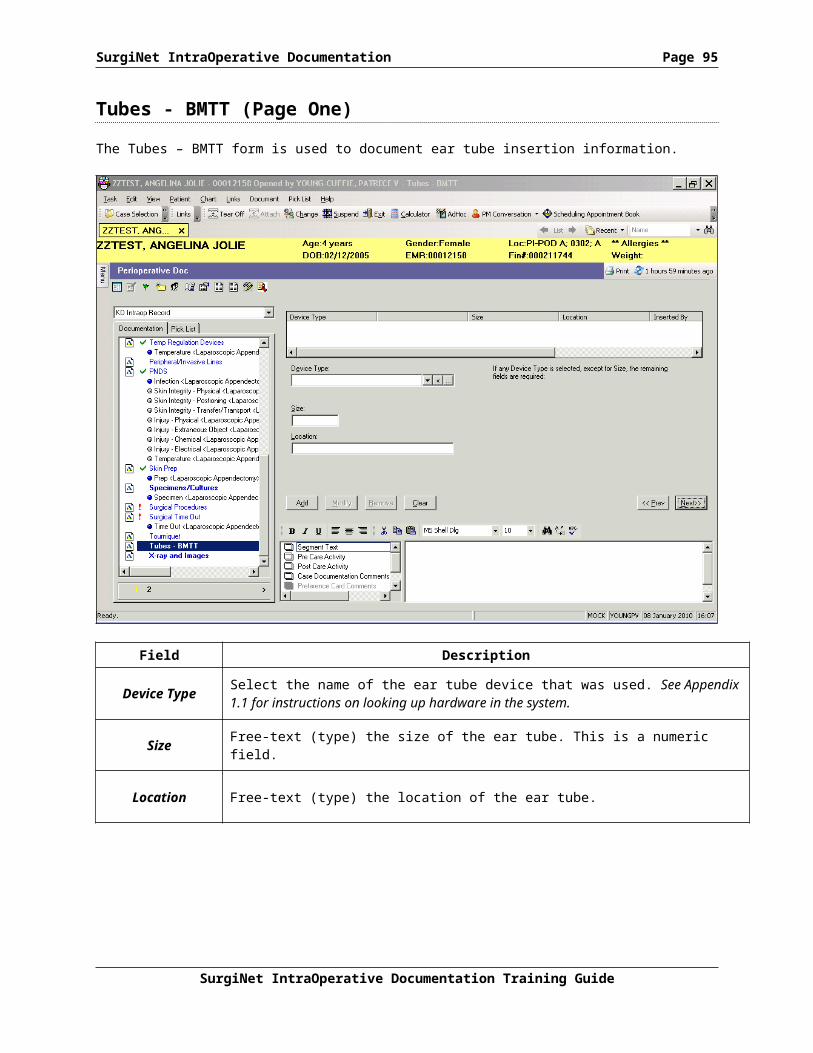
Tubes - BMTT (Page One)
The Tubes – BMTT form is used to document ear tube insertion information.
Field Description
Device Type Select the name of the ear tube device that was used. See Appendix1.1 for instructions on looking up hardware in the system.
Size Free-text (type) the size of the ear tube. This is a numeric field.
Location Free-text (type) the location of the ear tube.
SurgiNet IntraOperative Documentation Training Guide

SurgiNet IntraOperative Documentation Page 96
Tubes - BMTT (Page Two)
Field Description
Inserted By
Indicate who inserted the device by selecting the correct name from the drop-down box and clicking the right arrow. More than one person can be selected. However, the only selectable persons in this field are those listed as Case Attendees.
Lot Number Free-text (type) the lot number of the ear tube.
Expiration Date Enter the expiration date of the ear tube.
SurgiNet IntraOperative Documentation Training Guide

SurgiNet IntraOperative Documentation Page 97
X-ray and Images
The X-Ray and Images form is used to document information regarding radiology tests for the patient.
Field Description
Site Indicate the site of body the radiology test.
X-Ray Type Indicate the type of radiology test that was performed.
Tech Name Enter the radiology technician’s name who performed the test.
ProtectiveDevices Used
Indicate if protective devices were used for the radiology test by selecting yes, no, or N/A.
SurgiNet IntraOperative Documentation Training Guide

SurgiNet IntraOperative Documentation Page 98
Pick List Documentation The Pick List tab displays the pick list inventory, broken down by classification, for the selected patient case.
SurgiNet IntraOperative Documentation Training Guide

SurgiNet IntraOperative Documentation Page 99
Pick List Tab Components
Screen Element Description
Toolbar Allows you to perform Pick List functions such as Use,Fill, and Return Unused.
Pick List DialogBox
Displays the open, hold, fill, used, wasted, and return quantity for items on the pick list. This information can be edited at the end of the surgical case to document accurate quantities.
CommentsSection
Allows you to display preference card and case card comments.
SurgiNet IntraOperative Documentation Training GuideOnce an entry hasbeen added, you canModify or Removethe entry byclicking the
You can clear anentry before adding
it by clickingClear. All
information that
CommentsSection
Toolbar
Pick List itemsfor theselected

SurgiNet IntraOperative Documentation Page 100
Pick List Tab Columns
Column Description
The column represents the type of inventory item. The icons that could be displayed in this column are:
A consumable item. Reusable equipment that is schedulable. Sets or packs. Double-click the row to display the components.
Description Displays a description of the inventory item
Item Number Indicates the inventory item number.
SurgiNet IntraOperative Documentation Training Guide

SurgiNet IntraOperative Documentation Page 101
The column indicates that duplicate items exist.
Open QtyIndicates how many of the current item are opened andready to use. This value can be modified by clickingon the number, then entering the new value.
Hold Qty
The Hold Qty column indicates how many of a current item are on hand, but not opened. This value can be modified by clicking on the number, then entering thenew value.
Fill Qty
The fill qty is the sum of the open and hold qty’s. It is required that you Fill the case prior to using items. This field is only functional for clients that have implemented departmental materials management.
Used QtyThis is the qty that was actually used. This qty will default from the Open qty. It will feed into the charge quantity.
Wasted Qty The Wasted Qty column indicates how many items were wasted.
Return Qty The Return Qty column indicates how many items are tobe returned.
SurgiNet IntraOperative Documentation Training Guide

SurgiNet IntraOperative Documentation Page 102
Pick List Menu
The commands listed below are available from the pick list menu.
Command Description
FillIndicates the item quantity that was brought in for the procedure. This is usually the sum of the open and hold quantities.
UseIndicates the item quantity actually used during a procedure. Charges for used items are sent to the charge services department upon finalizing the form.
Return Opens a submenu from which you can select a quantity to return. If your inventory is set up as perpetual,this will increment the inventory amount and display the returned value in the Return column. Note: The Return action can be completed only after the Fill action has occurred.
Return Hold Increments the inventory for that item by the quantity displaying in the Hold column and displays that quantity in the Return column.
Return Unused Reduces the inventory for that item by the difference between the Fill and Used columns and
SurgiNet IntraOperative Documentation Training Guide

SurgiNet IntraOperative Documentation Page 103
displays that number in the Return column.
ClearOpens a submenu from which you can select a quantity to clear. Selection options are Open Qty., Hold Qty., Fill Qty., Used Qty., Wasted Qty., and Return Qty.
Regenerate Regenerates the pick list and discards all existing pick list items.
Email Pref CardUpdate…
Allows you to email a request to make specific changes on the preference card.
Open Pref Card(s)Opens the Find Preference Cards dialog box so you cansearch for and pull in additional preference cards toopen.
Save Saves changes made to the Pick List.
SurgiNet IntraOperative Documentation Training Guide

SurgiNet IntraOperative Documentation Page 104
Tips for Modifying Pick List Information Prior to the end of the case and before finalizing the document, the
nurse must update the pick list for the case. Updating the pick list not only impacts reordering of supplies but also impacts the ability to charge for these supplies.
If a Preference Card has not been built for a surgeon, the specialty nurse is accountable to ensure that it is created by either building oneor copying one from another surgeon’s preference card or from a generic procedure card at the time of scheduling a case.
If you make any numeric changes to pick list quantities, always hit the enter key after the change, then always save your changes!!!!
Ensure that all Open, Hold, and Wasted quantities are adjusted to reflect actual amounts used for the surgical case.
SurgiNet IntraOperative Documentation Training Guide

SurgiNet IntraOperative Documentation Page 105
Regenerating a Pick ListYou can regenerate a pick list as necessary from the Pick List tab in IntraOperative documentation as circumstances warrant. For example, at the beginning of the case, the circulator can regenerate the pick list and get themost updated preference card pick list (used if the card was updated yesterday, but the case was scheduled prior to that.) Or, you can regenerate if you accidentally select all items within the pick list window and then accidentally deleted.
To regenerate a Pick List, select Pick List Regenerate while on the Pick List tab.
A confirmation message will appear. Click the appropriate selection.
The Pick List will be regenerated.
SurgiNet IntraOperative Documentation Training Guide

SurgiNet IntraOperative Documentation Page 106
Regenerating Pick Lists from the Case Select Window
You can also regenerate a pick list from the Case Select window for a specificcase.
To regenerate a pick list for a case from the Case Select window, complete thefollowing steps:
1. Select the case you want from the Case Select window. Right-click the case in the Case Select window.
2. From the right-click menu select Generate Pick List.
The Generate Pick List dialog box displays.
3. Select a valid document type to generate the pick list for from the dropdown list of available document types.
4. Click OK.
System Messages when Generating Pick ListsYour ability to regenerate a pick list is determined by the document type. You may receive one of the following messages in the Generate Pick List dialogbox when attempting to regenerate a pick list:
Unable to regenerate pick list, the case has already be documented. You cannot regenerate a pick list because the case has been previously documented. The OK button is not available.
No pick list exists for this document type. You cannot regenerate a pick list for this document type because a pick list has not yet been generated. The OK button is not available.
All filled items are returned prior to regenerating the pick list.
SurgiNet IntraOperative Documentation Training Guide

SurgiNet IntraOperative Documentation Page 107
You can regenerate a pick list for this document type. The OK button is available.
Tips and Tricks:
Remember, if you have updated your usage on your pick list and then elect to regenerate your pick list, you will lose all your changes and have to re-update the actual usage.
SurgiNet IntraOperative Documentation Training Guide

SurgiNet IntraOperative Documentation Page 108
Filling and Using Pick List ItemsNOTE: This is a critical step in ensuring that charges from the case are posted correctly.
1. Click on the Pick List tab for your case to display the pick list.
2. Adjust Open and Hold quantities are to reflect actual amounts used or not used.
3. Adjust the amounts, as necessary by keying in the appropriate information in the fields.
Click on the item that you want to change and the field will turn blue.
Key in the correct amount and click enter.
SurgiNet IntraOperative Documentation Training Guide

SurgiNet IntraOperative Documentation Page 109
4. When finished modifying the amounts for the items, save all your Pick List changes by clicking the Save icon.
5. Select all of the pick list items by right-clicking in the white area ofthe pick list and
choose Select All.
6. Click the Fill icon on the icon bar to complete the fill quantity. This quantity adds the Open and Hold quantities together.
7. Click the Use icon on the icon bar to complete the used quantity. This column represents the charge items that will be posted.
8. Click the Save Icon to save your changes to the Pick List.
NOTE: Remember whenever you change a numeric value, always HIT THE ENTER KEY!!!!! THEN SAVE YOUR CHANGES!!!!
If you do not see the Fill Quantity,Used Quantity, Return Unused or WastedQuantity Columns, right click in thewhite area beside any Pick List item. From the pop-up menus, choose Options.This should open up a selection boxfrom which you can choose thesecolumns to be displayed.
SurgiNet IntraOperative Documentation Training Guide

SurgiNet IntraOperative Documentation Page 110
Tips and Tricks:
Always run the Return Pick list, even if there are no supplies to return.
SurgiNet IntraOperative Documentation Training Guide

SurgiNet IntraOperative Documentation Page 111
Adding Pick List Items
You can add items that were used in the surgical case but were not listed on the pick list.
To add items to the pick list, complete the following steps:
1. Click the Pick List Tab.
2. Select the Procedure in the Pick List window to which you wish to add anitem by clicking it.
3. Click the ellipsis button to the left of the Add button to open the Find:All Items window.
The Find: All Items window displays.
Use the Search On: box to search by description, item number, etc.
Use the Search For: box to qualify your search.
If you are uncertain of the exact naming convention of items that you wish toadd, select Includes in the Search For box.
4. Enter an item descriptor as your search key word to the right of the Search For: box.
SurgiNet IntraOperative Documentation Training Guide

SurgiNet IntraOperative Documentation Page 112
5. Click the Find Now button.
Remember: Only enter a key word. The more information you enter thenarrower your search will be and the item may not be located.
Items matching your search appear in a list below the search criteria.
6. Scroll through the list and select the item you wish to add.
7. Double Click on item to add to pick list.
The item will display in your pick list.
SurgiNet IntraOperative Documentation Training Guide

SurgiNet IntraOperative Documentation Page 113
8. Adjust the quantities accordingly.
9. Click the Save icon .
SurgiNet IntraOperative Documentation Training Guide

SurgiNet IntraOperative Documentation Page 114
Removing a Pick List Item
To remove a Pick List item, complete the following steps:
1. Right-click the inventory item you want to remove from the Pick List andselect Delete.
A warning message displays asking if you are sure you want to delete this item
2. Click the Yes button.
3. Click the Save icon .
The selected item will no longer be displayed on the pick list.
SurgiNet IntraOperative Documentation Training Guide

SurgiNet IntraOperative Documentation Page 115
Adding Free Text Information to the Pick List
Using the free text option to add an item to the pick list, will allow chargesto suspend when they are passed over to Charge Services.
To add a free text item to the pick list during post case documentation, complete the following steps:
1. From the Pick List tab, select the procedure name.
2. In the search box above the Description header, you can “free text” information about an item.
3. Click Add. DO NOT SEARCH FOR THE ITEM!!!!!
A Pick List Add message will display.
4. Click Yes on the message.
SurgiNet IntraOperative Documentation Training Guide

SurgiNet IntraOperative Documentation Page 116
The Free-Texted item will appear in the Pick List.
Tips and Tricks
Using the implant records and procedure records, enter as much information as possible, such as the name of the supply or implant, the size, the manufacture number, catalog number, price if available, and asset number if known.
If the information is not known, consult your department logistics personnel or the nurse circulator for the additional information needed to complete the documentation process
Remember, do not search for a free text item, click the add button to add the item to the picklist. Remember to always, always, always save your pick list changes.
SurgiNet IntraOperative Documentation Training Guide

SurgiNet IntraOperative Documentation Page 117
Finalizing DocumentationAfter all case-applicable forms have been completed, it is necessary to finalize the documentation so that it becomes part of the patient’s record.
To finalize the documentation, complete the following steps:
1. Click on the Finalize Icon from the Documentation Tab.
If there are no deficits in your documentation, you will see the following window:
2. Click Yes. The Print Document screen will appear, select yes or no to indicate if you want to print the document.
Tips and Tricks
When you finalize a case and have not updated / saved a pick list, the system will prompt you to save it.
SurgiNet IntraOperative Documentation Training Guide

SurgiNet IntraOperative Documentation Page 118
Correcting Document DeficitsIf the document that you are attempting to finalize has deficits, the Documentation Deficits window will appear when you click finalize, as shown below:
To address the deficits, perform the following steps:
1. Double-Click on each deficit item and complete the proper documentation.
On the screen shown above, the Report Given To: field has not been completed.
When all deficits have been corrected, click on the OK Button.
SurgiNet IntraOperative Documentation Training Guide

SurgiNet IntraOperative Documentation Page 119
Viewing Finalized DocumentationAfter documentation has been finalized, the final document appears in the All Documents tab of eKiDs PowerChart, shown below.
SurgiNet IntraOperative Documentation Training Guide

SurgiNet IntraOperative Documentation Page 120
Unfinalizing DocumentationIn the event that documentation has been finalized in error (or if you need tomake changes to a finalized document), you can Unfinalize the document.
To Unfinalize documentation, complete the following steps:
1. Select UnFinalize from the Documentation Form.
The Unfinalize window will appear.
2. Indicate the reason why you are Unfinalizing the document from the drop-down box.
3. If necessary, enter additional comments in the comments section.
4. Click OK.
SurgiNet IntraOperative Documentation Training Guide

SurgiNet IntraOperative Documentation Page 121
The documentation window will reopen.
5. Select the form that you want to modify and make your changes / corrections.
6. When finished, click Finalize to finalize the document that you modified.
The updated document will reflect the changes that you made to the system.
SurgiNet IntraOperative Documentation Training Guide

SurgiNet IntraOperative Documentation Page 122
Miscellaneous Form ActionsDiscontinuing a Segment
The forms (also called segments) that appear in SurgiNet IntraOperative Documentation are based on the case type that you select. At times, it may be necessary to discontinue a segment if that segment does not pertain to the case that you are documenting.
To discontinue a segment, complete the following steps:
1. Right-click on the segment you wish to discontinue and choose Discontinue (name of segment).
The segment will still appear, but will be “grayed out” and no longer active.
Tips and Tricks
Required forms, indicated by an exclamation point, cannot be discontinued and the option will not be displayed.
SurgiNet IntraOperative Documentation Training Guide

SurgiNet IntraOperative Documentation Page 123
SurgiNet IntraOperative Documentation Training Guide

SurgiNet IntraOperative Documentation Page 124
Inactivating Multiple Segments (Case Logging)
If there are several segments that you are discontinuing, you can elect to perform the action to all of them at once. Use the option of Case Logging whenyou want to discontinue several segments at once.
To inactivate multiple segments, complete the following steps:
1. Select Case Logging from the Document menu.
The Case Logging dialog box will open, displaying a list of the active segments for this case that can be inactivated. System-required segments (see pg. 24) will not appear in this window.
SurgiNet IntraOperative Documentation Training Guide

SurgiNet IntraOperative Documentation Page 125
2. Select the segment or segments that you want to inactivate by clicking on them. (You can select multiple segments by holding down the CTRL key and clicking on the multiple segments.)
3. Select from the list the reason for discontinuing a segment from the drop down list.
Note: You cannot discontinue required segments.
4. Click OK to save your entries and close the dialog box. The segment nowis unavailable for charting, as indicated by beside its name.
SurgiNet IntraOperative Documentation Training Guide

SurgiNet IntraOperative Documentation Page 126
SurgiNet IntraOperative Documentation Training Guide

SurgiNet IntraOperative Documentation Page 127
Activating a Segment
At times, it may be necessary to activate a segment that was previously deactivated.
To activate a segment, complete the following steps:
1. Right-click the deactivated form and choose Activate (name of segment).
2. The segment that you activated will appear active again.
SurgiNet IntraOperative Documentation Training Guide

SurgiNet IntraOperative Documentation Page 128
Adding a Segment
At times, it may be necessary to add segments that pertain to the case.
To add a segment, complete the following steps:
1. Click on the Add Segment Icon located on the Toolbar.
The Add Segment window will appear.
2. Under the Available Column, click on the segment you wish to add,
3. Click on the right-facing arrow to move the segment into the Selected Column.
4. Click OK.
The segment you have added will appear on the Listing of Forms.
SurgiNet IntraOperative Documentation Training Guide
The selected columnshows segments thatare currently in
The availablecolumn shows
segments that areavailable to be

SurgiNet IntraOperative Documentation Page 129
SurgiNet IntraOperative Documentation Training Guide

SurgiNet IntraOperative Documentation Page 130
Entering Multiple Segment Entries
As conditions warrant, it is necessary to add more than one entry into a segment. For example, if more than one case attendee needs to be documented, you have to enter a second entry into the segment. After the first entry has been added, it should display at the top of the screen.
To add a second segment entry, complete the following steps:
1. Click on the first page of the segment.
2. Document the information for the segment, as necessary. Remember to complete all required fields.
3. When finished, click Add. The additional entry that you added will display.
SurgiNet IntraOperative Documentation Training Guide

SurgiNet IntraOperative Documentation Page 131
Terminating Documentation – Unfinalized Document
It may be necessary to terminate documentation while in the middle of a case. You can terminate the documentation process if an event occurs that makes continuation of that document no longer needed. Any case that may have reachedthe OR room (intraop) or where intraop documentation had begun and is no longer needed should be terminated. You can also terminate cases checked in by accident, or cases that were checked in with the wrong encounter. Use the option to terminate documentation any time that you need to terminate a case record and not send charges.
Complete the following steps to terminate a document:
1. Open the case record that you are terminating.
2. Choose the document type that you are terminating. All document types for the selected case record must be terminated if a case is canceled.
3. Multi-select all segments from Case Logging to discontinue all non-required segments.
SurgiNet IntraOperative Documentation Training Guide

SurgiNet IntraOperative Documentation Page 132
4. Click OK.
5. Access the Case Times segment. Enter the same time for all of the times listed. (This will remove the case from the tracking board). However, if charges will be posted for the case, at least one minute of time must be documented.
6. Access the Case Attendees segment. Remove all entries except the PrimarySurgeon.
7. Access the General Case Data Segment. Ensure that an ASA class is selected on the first page. Then, select the option, “PostOp diagnosis same as Preop Diagnosis” on the second page.
SurgiNet IntraOperative Documentation Training Guide

SurgiNet IntraOperative Documentation Page 133
8. Access the Surgical Procedures segment. Leave the default procedure.
9. Click on the Document Menu and select Terminate.
SurgiNet IntraOperative Documentation Training Guide

SurgiNet IntraOperative Documentation Page 134
The Terminate Document dialog box will display.
SurgiNet IntraOperative Documentation Training Guide

SurgiNet IntraOperative Documentation Page 135
10. In the first section, choose a reason for terminating the document. The selection will be highlighted in blue.
11. In the Charge Options section, you have a choice of postponing charges or sending charges. Make your choice by clicking on the radio button in front of the proper selection. If a case was canceled after the room was opened, for example, you may want to send the charges even though the document was terminated. If you click to send the charges, the different charge types become un-dithered. You can select which charges you want to send. Or if the charges were already sent, you wouldwant to postpone them.
12. Click on OK to close the window.
The Confirm Termination window will appear. It reminds you that terminatinga document is a permanent function. The document cannot be retrieved or modified once it is terminated.
13. Choose “Yes” to terminate the current document.
SurgiNet IntraOperative Documentation Training Guide

SurgiNet IntraOperative Documentation Page 136
The title bar will show “terminated” beside the patient’s name.
SurgiNet IntraOperative Documentation Training Guide

SurgiNet IntraOperative Documentation Page 137
Terminating Documentation – Unfinalized DocumentSystem Steps
Steps Notes1. Open the case record that you are
terminating. 2. Choose the document type that you
are terminating. All document types for the selected case record must beterminated if a case is canceled.
3. Multi-select all segments from Case Logging to discontinue all non-required segments.
4. Access the Case Times segment. Enter the same time for all of thetimes listed.
This will remove the case from the tracking board. If charges will be posted for the case, at least one minute of time must be documented.
5. Access the Case Attendees segment.Remove all entries except the Primary Surgeon.
6. Access the General Case Data Segment. Ensure that an ASA class is selected on the first page. Then, select the option, “PostOp diagnosis same as Preop Diagnosis”on the second page.
7. Access the Surgical Procedures segment. Leave the default procedure.
8. Click on the Document Menu and select Terminate.
The Terminate Document dialog box will display.
9. In the first section, choose a reason for terminating the document.
The selection will be highlighted in blue.
10. In the Charge Options section, you have a choice of postponing charges or sending charges. Make your choice by clicking on the radio button in front of the proper selection.
11. Click on OK to close the window.
The Confirm Termination window will appear. It
SurgiNet IntraOperative Documentation Training Guide

SurgiNet IntraOperative Documentation Page 138
Steps Notesreminds you that terminatinga document is a permanent function. The document cannot be retrieved or modified once it is terminated.
12. Choose “Yes” to terminate the current document.
The title bar will show “terminated” beside the patient’s name.
SurgiNet IntraOperative Documentation Training Guide

SurgiNet IntraOperative Documentation Page 139
Terminating Documentation – Finalized Document
In a situation where the document has been finalized, there are additional steps necessary to terminate the document. The additional steps are necessary to modify the clinical notes associated with the case.
Complete the following steps to terminate a document:
1. Open the case record that you are terminating.
2. Choose the document type that you are terminating. All document types for the selected case record must be terminated if a case is canceled.
3. Un-finalize the case record by clicking the unfinalize icon.
4. Access the Case Times segment. Enter the same time for all of the times listed. (This will remove the case from the tracking board). However, if charges will be posted for the case, at least one minute of time must be documented.
SurgiNet IntraOperative Documentation Training Guide

SurgiNet IntraOperative Documentation Page 140
5. Access the Case Attendees segment. Remove all entries except the PrimarySurgeon.
6. Access the General Case Data Segment. Ensure that an ASA class is selected on the first page. Then, select the option, “PostOp diagnosis same as Preop Diagnosis” on the second page.
7. Access the Surgical Procedures segment. Leave the default procedure.
SurgiNet IntraOperative Documentation Training Guide

SurgiNet IntraOperative Documentation Page 141
8. Multi-select all segments from Case Logging to discontinue all non-required segments.
9. Re-finalize the case record. This will modify the clinical notes. It is the only way to make the clinical notes show it was changed / terminated.
10. Click on the Document Menu and select Terminate.
SurgiNet IntraOperative Documentation Training Guide

SurgiNet IntraOperative Documentation Page 142
The Terminate Document dialog box will display.
11. In the first section, choose a reason for terminating the document. The selection will be highlighted in blue.
12. In the Charge Options section, you have a choice of postponing charges or sending charges. Make your choice by clicking on the radio button in front of the proper selection. If a case was canceled after the room was opened, for example, you may want to send the charges even though the document was terminated. If you click to send the charges, the different charge types become un-dithered. You can select which charges you want to send. Or if the charges were already sent, you wouldwant to postpone them.
SurgiNet IntraOperative Documentation Training Guide

SurgiNet IntraOperative Documentation Page 143
13. Click on OK to close the window.
The Confirm Termination window will appear. It reminds you that terminatinga document is a permanent function. The document cannot be retrieved or modified once it is terminated.
14. Choose “Yes” to terminate the current document.The title bar will show “terminated” beside the patient’s name.
15. Go to Clinical Notes tab and verify the document reflects the changes.
SurgiNet IntraOperative Documentation Training Guide

SurgiNet IntraOperative Documentation Page 144
Terminating Documentation – Finalized DocumentSystem Steps
Steps Notes
1. Open the case record that you are terminating.
2. Choose the document type that you are terminating.
All document types for the selected case record must be terminated if a case is canceled.
3. Un-finalize the case record by clicking the Unfinalize icon.
4. Access the Case Times segment. Enter the same time for all of the times listed.
This will remove the case from the tracking board. If charges will be posted for the case, at least one minuteof time must be documented.
5. Access the Case Attendees segment. Removeall entries except the Primary Surgeon.
6. Access the General Case Data Segment. Ensure that an ASA class is selected on the first page. Then, select the option, “PostOp diagnosis same as Preop Diagnosis” on the second page.
7. Access the Surgical Procedures segment. Leave the default procedure.
8. Multi-select all segments from Case Logging to discontinue all non-required segments.
9. Re-finalize the case record. This will modify the clinical notes.
Refinalizing the case record is the only way to make the clinical notes show it was changed / terminated.
10. Click on the Document Menu and select Terminate.
The Terminate Document dialogbox will display.
11. In the first section, choose a reason for terminating the document.
The selection will be highlighted in blue.
12. In the Charge Options section, you have a choice of postponing charges or sending charges. Make your choice by clicking on the radio button in front of the proper selection.
13. Click on OK to close the window. The Confirm Termination window will appear. It
SurgiNet IntraOperative Documentation Training Guide

SurgiNet IntraOperative Documentation Page 145
Steps Notes
reminds you that terminating a document is a permanent function. The document cannot be retrieved or modified once it is terminated.
14. Choose “Yes” to terminate the current document.
The title bar will show “terminated” beside the patient’s name.
15. Go to Clinical Notes tab and verify the document reflects the changes.
SurgiNet IntraOperative Documentation Training Guide

SurgiNet IntraOperative Documentation Page 146
Charting a Restrospective Document
As conditions warrant, you can elect to document a patient case from a previous date (for example, if you are entering documentation after downtime).Retrospective documentation allows you to set the date for the date that the case was done and instead of defaulting to the current date, the date/time fields default to the date you set.
To chart a retrospective document, complete the following steps:
1. Select Retrospective Document from the Document menu to open the Retrospective Date dialog box.
2. Enter the date in the box provided.
3. Click OK to save your entry.
SurgiNet IntraOperative Documentation Training Guide

SurgiNet IntraOperative Documentation Page 147
Auditing Case Information You can audit completed documentation at the segment level.
Complete the following steps to audit the documentation for the selected segment:
1. Select Document Case Audit [Name of Segment].
The selected segment displays in the Segment Audit dialog box. You can also use the Segment drop-down box to display other available documentation audit segments.
SurgiNet IntraOperative Documentation Training Guide

SurgiNet IntraOperative Documentation Page 148
SurgiNet IntraOperative Documentation Training Guide

SurgiNet IntraOperative Documentation Page 149
You can also audit a documentation segment from the Documentation tab by right-clicking on the segment you would like to audit and then selecting Segment Audit [Name of Segmetn] from the menu that displays. The Segment Audit dialog box displays for the segment selected.
NOTE: If Segment Audit functionality is disabled the Segment Audit option willbe grayed out.
SurgiNet IntraOperative Documentation Training Guide

SurgiNet IntraOperative Documentation Page 150
Using Case Overview in SurgiNetThe Case Overview functionality affords you the opportunity to review information about a surgical case in an easy-to-access format. Case Overview is not a documentation tool. Instead, it is an overview of significant case information displayed in read-only mode.
Case Overview is accessible once a patient has been checked in for a scheduledcase and is accessible via the Case Overview icon on the toolbar or by selecting Case Overview from the Document menu within IntraOperative Documentation.
When the Case Overview option is selected, the system will prompt you to confirm if you want to finalize the case before viewing Case Overview. Choose the applicable option (yes or no) and the Case Overview window will open.
SurgiNet IntraOperative Documentation Training Guide

SurgiNet IntraOperative Documentation Page 151
Each frame in Case Overview is populated with the latest available informationbased on the status of the case and the documentation that has been completed.Each frame title provides a hypertext link to the actual documentation that has been entered.
In Case Overview mode, the following information frames are available:
Case Information – Displays information such as Case Number, Surgeon, Scheduled Start, Scheduled OR, and estimated duration. Selecting the hyperlinkwithin this frame links you to the General Case Data of IntraOperative Documentation.
Procedure Information – Displays scheduled procedures (primary and secondary) for the patient. Selecting the hyperlink within this frame links you to the Surgical Procedures of IntraOperative Documentation.
Case Times – Displays any case times that have been documented for the patient. Selecting the hyperlink within this frame links you to the Case Timesof IntraOperative Documentation.
Allergies – Displays allergies that have been documented for the patient. Selecting the hyperlink within this frame links you to the Allergies window for the patient.
SurgiNet IntraOperative Documentation Training Guide

SurgiNet IntraOperative Documentation Page 152
Problems/Diagnoses – Displays problems (i.e. Asthma) and diagnoses (i.e. Attention Deficit Hyperactivity Disorder) that have been entered for the patient. Selecting the hyperlink within this frame links you to the Problems /Diagnoses window for the patient.
Results for Encounter – Displays any charted results for the selected encounter / visit. Selecting the hyperlink within this frame links you to the Flowsheet window for the patient.
To exit Case Overview, select the Return to Documentation icon on the toolbar.
SurgiNet IntraOperative Documentation Training Guide

SurgiNet IntraOperative Documentation Page 153
Tips and Tricks for Using Case Overview:
In the Case Information frame the Post Operative Diagnosis may change if a different diagnosis is selected after the case.
The captions in the Case Details may change when viewing the Case Overview.For example, the actual OR room may be displayed as “OR Room” and the scheduled primary surgeon may be displayed as “Scheduled Surgeon.”
Only active allergies are visible in the Case Overview of SurgiNet. However, all allergies will appear when the hyperlink in the Allergies frame is selected from Case Overview.
SurgiNet IntraOperative Documentation Training Guide

SurgiNet IntraOperative Documentation Page 154
Printing a Document
To print a document, complete the following steps:
1. Select Print / Print Screen from the Task Menu.
2. In the Print dialog box, indicate the quantity, location, and print information.
3. Click OK.
Tips and Tricks
You will be given the option to print automatically when you finalize a document.
SurgiNet IntraOperative Documentation Training Guide

SurgiNet IntraOperative Documentation Page 155
Setting a Default Printer
In SurgiNet, you can set default printers by completing the following steps:
1. Select the item to be printed.
2. Select Task Print Setup.
The Print Setup dialog box will open.
3. Select the printer to which the information should be sent.
4. In the Copies box, enter the number of copies to be printed.
5. Under the Document Types tab, select the document types to be printed by
clicking the box next to the listed item.
6. Under the Pick List Parameters tab, select the pick list options to be
printed by clicking the next to the listed item.
NOTE: The Pick List Parameters tab is displayed only if printable pick
lists are associated with the item to be printed.
7. Select the Save Setup box if the information you entered should be used
as a default for printing in the future.
8. Click OK to print the selected information based on the parameters you
entered.
SurgiNet IntraOperative Documentation Training Guide

SurgiNet IntraOperative Documentation Page 156
SurgiNet IntraOperative Documentation Training Guide

SurgiNet IntraOperative Documentation Page 157
Appendix
Identifying Hardware
When the ellipsis is clicked on a field where hardware can be entered, the Find window will appear.
Complete the following steps to identify equipment within the system:
1. Select the search parameter that you will be using from the Search On drop- down list.
SurgiNet IntraOperative Documentation Training Guide

SurgiNet IntraOperative Documentation Page 158
2. Enter the search criteria in the applicable field.
3. Click OK.
4. Select the item that you want by clicking on it. 5. Click OK.
The selected item will be populated in the field.
SurgiNet IntraOperative Documentation Training Guide

SurgiNet IntraOperative Documentation Page 159
SurgiNet IntraOperative Documentation Training Guide

SurgiNet IntraOperative Documentation Page 160
Keyboard Shortcuts
The following shortcuts are available after a case has been selected:
Keystrokes ActionALT+T Displays the Task menuALT + E Displays the Edit menuALT + V Displays the View menuALT + D Displays the Document menuALT + H Displays the Help menu
For the options below,hold down the ALT key,
while pressing:T and then H Displays the Change User dialog boxT and then X Displays the Exit dialog boxT and then P Displays the Print dialog boxV and then D Displays the Demographics Bar dialog boxV and then B Displays the Tool Bar dialog boxV and then C Displays the Case Details dialog boxV and then T Displays the Sort dialog box
SurgiNet IntraOperative Documentation Training Guide