revision 1. 70 gifford computer systems san leandro, ca
TRANSCRIPT

Revision 1. 70
May 1985
Gifford Computer Systems
P.O. Box 1917 San Leandro, CA 94577
(415) 895-0798 TELEX: 704521


Preface
The Multiuser Concurrent DOS operating system will streamline your workload and i~rease your productivity. AnDng its most valuable and innovative features are sUmultaneous access to 8- and l6-bit programs, time accounting for users or projects, Virtual Terminals, an electronic mail facility, a multiuser appointment calendar, and true networking capability with DR Net networking software. (If your canputer is linked to a local area network, you should also read the DR NET USER'S MANUAL) • As you begin to use the system you will appreciate the many additional features engineered into MC-DOS ~ Gifford Computer Systems.
The information in this manual is intended for 1x>th the novice user and the seasoned canputer veteran. ,We include information to familiarize you with the system and to help you manage the system effectively. If this is your first experience with a canputer, we recomnend that you read BITS, BYTES ~ BUZ7HJRDS, ~ Mark Garetz, 1983, CaIplPro.
We urge you to practice patience and pay attention to details while you beoame familiar with Gifford's Me-DOS and the CmpuPro canputer. You will find that the time invested in learning how to use the system will payoff many times over.
i


Disc) ai1llpr
Gifford Ocmputer ~stems believes that the infor.mation presented in this manual is accurate and reliable, but takes no responsibility for any consequences arising out of the use of this manual. Gifford Ocmputer ~stems also reserves the right to revise the contents of this publication without obligation to notify any person of ,such revisions.
Questions or ccmnents regarding this manual should be directed to Gifford Ocmputer ~stems.
Trademarks
ARCnet is a trademark of Datapoint Corporation. CP/M and CP/M-86 are registered trademarks of Digital Research Inc. Concurrent CP/M, Concurrent lX>S, MP/M II, MP/M-86, and DR Net are trademarks of Digital Research Inc. dBASE II is a trademark of Ashton-Tate. r.mRIVE/H is a trademark of CoopuPro. MP/M 8-16 is a joint trademark of catpuPro and Digital Research Inc. catplPro is a registered trademark of CarpJPro Corporation. MS lX>S is a trademark of MicroSoft. Multiuser Concurrent lX>S is a joint trademark of Gifford Conplter Systems and Digital Research Inc. PC lX>S is a trademark of IBM. IBM is a trademark of International Business Machines Corporation. SuperCalc is a trademark of ~IM. Virtual Terminals is a trademark of Gifford Ocmputer ~stems, a subsidiary of Zitel Corporation. it:>rdStar is a registered trademark of the MicroPro International Corporation.
No part of this publication may be reproduced, transcribed, translated, or stored in any type of media retrieval system in any form without prior written permission of Gifford Computer Systems.
Copyright @ 1984 by Gifford Ocmputer ~stems. All rights reserved.
Printed in the United States of America.
ii

If you are about to set up a new system which you purchased from Gifford carputer Systems, it is essential that you read Qapter 1, Getting the SysteIl ~ am llJmirJJ, before you even unpack the boxes. Olapt:er 1 tells how to select a location, how to unpack and hook up the catpJter, and how to turn the power eN. If you are a new user of an established system, you should read the section Basics of Using the Systaa in a.apte.r 1.
Olapt:er 2 provides reference information on Using 1C-iXJ). '!he ccmnands available on the M:-IX>S operating system are described in alphabetical order, along with a Sn ... "ry of 1C-JX8 C'aIIaards am Piles and introductory cannents about operatiD3 systems. a.apte.r 2 also describes security features of M:-IX>S.
Olapt:er 3 provides. information on Managing the Syst:eL All systems should have at least one person designated as system manager, whose task should be to insure that the system is used efficiently. Olapt:er 3 provides information and exanples for the system manager, explaining such thiD3s as setting up the pasE¥>rd file, custanizing the system, backing up files, selectiD3 and installing system security features, and file maintenance.
a.apte.r ", Troublesbooting the System, is intended to get you out of trouble in the event that problems ar ise in usiD3 the catpJter. If you have problems with your canputer, please read 0Iapter " before you call Gifford Cooplter Systems. a.pt:er" will give you step-by-step instructions on how to locate a problem, and will tell you what information you will need to have available soould you need to call for assistance.
We have included a "Bug Report" at the end of 0Iapt:er " to give you the opportunity to inform us of any problems you discover and to suggest inprovements for the system or for the manual itself. Make photocopies of the "Bug Report" before filling it out. After you have filled out the "Bug Report, II send it to our CUstomer Support Department for review. We have also supplied several blank pages in AA?endix P for you to write down notes or questions while you are reading the manual. Use the Index if you cannot locate a topic in the 'l'able of Qmtents that follow.
iii

User' s Glide to 1bis Mamal
Gifford Cooputer Systems has written this user's manual to conform to certain stylistic conventions for your reading convenience. They are as follows:
1) System pronpts and any messages that appear on your screen are in boldfaced lettering, e.g. c.>.
2) The status of any toggle switch is in UPPER CASE lettering, e.g. nThe printer is OFF. n
3) System camands are in UPPER CASE lettering, e.g. nType SDIR * .DCX:!. n
4) Single keystroke ccmnands are encased in parentheses, e.g. nPress (Y)."
5) File names and file types appear in UPPER CASE lettering, e.g. YOORFlLE.OCX:.
6) References to any other sections of this manual appear in boldfaced lettering, e.g. "Refer to Cbapter 3."
7) ltlen a caret ( ..... ) appears before a character, you should fress down the Control key while typing the character. Thus, C means to press the crRL and C keys simultaneously.
8) References to any other manuals appear in upper case, urxler1ined lettering, e.g. "Refer to the ~ ~ OPERATING SYSTEM USER'S GUIDE."
9) Carriage returns are assumed unless imicated otherwise. The -word nRE1URN" always means to press the RElURN key, rather than typing the six characters.
10) Introduction of any new term will appear in boldface lettering, e.g. ''IbJems enable yoo to camunicate over pb)ne lines."
iv

Preface Introductim User's Qrlde to this Manual.
amPmR 1 GI5'l-YllG 'lBB S!S'Jl!iM UP All) lIJRUlI;
1. 0 Contents 1.1 'D1e Conponents of a CoIrpuPro Conputer 1.2 Selecting a Location 1.3 Unpacking the Parts 1.4 Installing the ~stem Hardware 1.5 Handling Diskettes 1.6 Starting QP the ~stem the First Time 1. 7 Basics of Using the ~stem 1.8 Slutting Ibwn the ~stem
CBAPl'BR 2 USDC 1IJ-Jn3
2.0 Contents 2.1 The Operating ~stem 2.2 The MUltiuser Concurrent DOS ~stem 2.3 MUltiuser CbnCurrent DOS Control Characters 2.4 Sumnary of be-DOS CoIllllarXis and Files 2.5 J):)Cunentation of M.l1tiuser CbnCurrent DOS Comnands 2.6 ~stem Security Overview of be-DOS 2.7 Security Features of be-DOS
CBAPD!'.R 3 MA1!W;]Jl; 'lBB S!S'Jl!iM
3.0 Contents 3.1 The ~stem Manager 3.2 creating a CUstomized MUltiuser Environment 3.3 Setting QP the ~stem Management Files 3.4 ~stem Security 3.5 Time10g Utilities 3.6"'D1e HI~ File 3.7 Creating and M:Xiifying HELP Files 3.8 File Maintenance Procedures 3.9 Automatic lW4 ~IIDry ~st 3.10 Upgrading and Updating be-DOS ~stems
v
i iii iv
1.0-1 1.0-1 1.1-1 1.2-1 1.3-1 1.4-1 1.5-1 1.6-1 1.7-1 1.8-1
2.0-1 2.0-1 2.1-1 2.2-1 2.3-1 2.4-1 2.5-1 2.6-1 2.7-1
3.0-1 3.0-1 3.1-1 3.2-1 3.3-1 3.4-1 3.5-1 3.6-1 3.7-1 3.8-1 ~.9-1 3.10-1

'!BE srB'IIJI 4.1 Startup Problems 4.2 ~roper Operation 4.3 Before You call Your Dealer 4.4 lC-DOS Bug ~port
APPJH)ICBS A. Hardware requirenents for lC-DOS B. Description of the Board Arrangement on
IEEE 696/5-100 Motherboard C. Documentation of Switch Settings and Jumpers D. Fbrmatting Hard Disks E. Programning Ser ia1 Ports in lC-DOS F. Using the Printer Port on l!eleVideo l!ermina1s G. Port Nmbers Used in lC-DOS H. M:>tes on Installing W:>rdStar and dBASE II I. Directory of System Files Supplied by
Gifford Computer Systems J. dBASE II Ehhanoements K. A Br ief Descr iption of lC-DOS L. cables and Cbnnections M. Map of logical Devices, cables, Ib:>ms,
Users, and Status N. ~b1e of ~xadecima1 N.mbers o. AS::II Olaracter Set P. M:>tes
GIDSSARY INDEX
vi
4.0-1 4.1-1 4.2-1 4.3-1 4.4-1
A-I
B-1 C-1 D-1 E-1 F-I G-1 H-1
I-I J-1 K-1 Ir1
M-1 N-1 0-1 P-1
GLOSSARY-1 INDEX-1

Chapter 1 provides essential information an setting up and using your CoopuPro cooputer and the ~-DOS operating system. We urge you to be patient and follow the instructions carefully, whether you are a novice or a seasoned catplter user.
1.1 '!he Cooponents of a CanpuPro Cooplter 1.2 Selecting a Location •••••••••••••••••••••••••••••••••• l.2-1 1.3 unpacking the Parts ••••••.•••••••••••••••••••••••••••• l.3-1
The Floppy Disk Drives •••••••••••••••••••••••••••••••• l.3-l The Hard Disk Drives •••••••••••••••••••••••••••••••••• l.3-2 5.25-inch ••••••••••••••••••••••••••••••••••••••••••••• l.3-2 a-inch •••••••••••••••••••••••••••••••••••••••••••••••• 1.3-2 14-inch ••••••••••••••••••••••••••••••••••••••••••••••• l.3-2
1.4 Installing the System Hardware •••••••••••••••••••••••• l.4-l Checking the Internal and External Oonnections •••••••• l.4-l Connecting the cables ••••••••••••••••••••••••••••••••• l.4-1 Connecting the Floppy Disk Drives ••••••••••••••••••••• l.4-2 Connecting the Hard Disk Drives ••••••••••••••••••••••• l.4-3 Final Connections ••••••••••••••••••••••••••••••••••••• l.4-3
1.5 Handling Diskettes •••••••••••••••••••••••••••••••••••• l.5-1 1.6 Starting up the System for the First Ttme ••••••••••••• l.6-l
TUrning ON the Power •••••••••••••••••••••••••••••••••• l.6-1 Backing up the Original System Diskettes •••••••••••••• l.6-3 Loading the Operating System •••••••••••••••••••••••••• l.6-3 User Areas and Drive Designations ••••••••••••••••••••• l.6-S Fbrmatting a Floppy Diskette with ~ •••••••••••••• 1.6-7 Copying the System Diskette With CPY •••••••••••••••••• 1.6-9
1.7 Basics of Using the System •••••••••••••••••••••••••••• l.7-l Changing User Areas and Logical Disk Drives ••••••••••• l.7-2 Invoking Programs ••••••••••••••••••••••••••••••••••••• l.7-3 Virtual Te~nals ••••••••••••••••••••••••••••••••••••• l.7-7
1.8 Shutting Down the System •••••••••••••••••••••••••••••• l.8-l
1.0-1

CBAPl'ER 1:
The ConplPro catplter is nOOular in design. The nOOular design simplifies future expansion, transportation, and maintenance.
The tendnal is the actual workstation of the computer. It catbines a keyboard with a video screen. Terminals can be located in renote work areas and are connected to the computer by cables. On a multiuser system, a number of terminals can be connected to the computer. One terminal is designated the as systeIIl console. The system console can perform the same tasks as the other terminals, and is the terminal used for starting up, shutting down, and operating the system in single-user nOOe.
The caIplter enclosure is a metal box with a red power switch and a buttoo labelled RESEn' on the front. The back of the enclosure has a number of sockets which accept the cables from various carponents. Inside this box are the actual "thinking" parts of the catplter. '!bese parts are contained on IOOdular circuit boards. '!be boards referred to as RAM boards hold the working mem:>ry. '!be CPU board holds the central processing unit. Additional boards include disk controllers and serial interface controllers.
The floppy disk drives are housed in a metal enclosure similar in size to the main enclosure. Doors on the front of the drive open to accept flexible magnetic disks (fl.qlpy diskettes) which store information. Your system may cane with either one or two flogJy disk drives. If you have only one flomr disk drive, you will have to follow special instructions to use sane of the conmand.s in the M:-[)(l; operating system. '!bese instructions are documented throughout this manual.
The bard disk drive is a mass storage device capable of storing many times the information available on a floppy diskette. Most multiuser computers have at least one hard disk.
Printers are the devices which will produce permanent "hard copy" records of your data. If the printer is to be placed in an office environment, you should consider placing it in a sound deadening enclosure. '
1.1-1

aJAPJm 1: GE'l-rlJ.lC '.IBB SYS'lBM UP AR) RHIDC
Addi tiona1 CCl'IpOnents may include JmClealS for conmunicating over phone lines, plotters for drawing graphs, charts and diagrams, magnetic tape drives for file storage, or aIrI nurrber of special devices suited to your specific needs.
Systems that are linked to other catplters in a DR Net local area. nebJork mst have a neblork controller board in the canputer enclosure and a coaxial cable connecting the catplter to the network. If llK>re than two canputers are in the network, (or if the distance between networked computers is greater than 2,000 feet) then coaxial cables are connected to active repeaters. If between two and four canputers are in the network, and if the distance between networked canputers is less than 200 feet then coaxial cables are connected to passive repeaters.
1.2 SelectiD) a Incatial
For efficient and secure operations you should locate the computer enclosure, the f10ppy disk drives, the system console, and the hard disk drive in a room that can be locked. Keep reference books about the canputer close to the system console.
'!he canputer enclosure and the floppy disk drives require a surface area of 2Ox30 inches. This is ample space for the floppy disk drives, and the main enclosure can sit on top of the disk drives. A space at table height will allow easy access to the floppy disk drives. These dimensions are deeper than the enclosures and allow for air circulation at the back panels. It is inp:>rtant not to obstruct the air circulation at the back of the system where the fans are or at the left side of the system where the air vents are located. Excessive heat will ~ir system performance and may damage the system. For the same reason, keep the catputer away from heaters, and keep the room temperature at a oamfortab1e level.
A terminal, preferably the system console, should be located within easy reach of the f10ppy disk drives. This will allow floppy disks to be changed easily by the system manager operating the system console. You should have this manual, the CCliICORRENl' ~ OPERATING SYSTEM USER'S GUIDE, and any additional reference materials close at hand.
1.2-1

CBAP.1'ER 1: GlHo!'ll'G TIlE S!9.lBI UP All) R:RtDt;
'!be hard disk drive, if you have one, should be located in a well ventilated spot. Wcate it where it will not be b\lllped or kicked.
Where you locate your printer is prtmari1y a function of who will use it and the mise it generates. It is handy, but not essential, to have a printer close to the system console.
1.3 tmpacking the Parts
Begin unpacking by locating the cover letter and the invoice or packing list. '!be cover letter gives your system number, which you will use should you need to call Gifford Cooputer Systems. On the back of the main enc1usure, there is a pressure sensitive label on which you will find your system number. Catp1ete a copy of the system map provided in Appenlix M.
Verify that all the items on the invoice or packing list are in the shipment, and file the cover letter and the invoice for future reference.
Open all boxes and carefully reIlDV'e each unit from the packing material. Place the units on a flat surface and inspect the cabinets for signs of shipping damage. Put aside all cables, cords, and diskettes. Save the packing materials, in the event that you have to return any of the units.
'1be PlDppy Disk Drives
'lb prevent shipping damage, Gifford catputer Systems ships the fLoppy disk drives with cardboard shipping inserts in the drive slots. It is extremely important to reDDVe the cardboard inserts before using the drives. 'lb open the drives, press the button below the drive door. Save the inserts with the packing materials in case you need to ship the drives again. You llllst put the inserts back in the drives even if your are transporting the drives a few miles by autaIDbi1e. Failure to do so risks damage to the drives.
1.3-1

'lhe Bard Disk Drives
Hard disk drive heads are locked in place for shipping. If you ordered hard disk drives, follow the directions below for the type of drive that you ordered.
S.25-inch. ~t drives supplied with Gifford catpUters have an autanatic locking mechanism. If you have one of the few drives without autanatic locking, a piece of tape will show across the front of the drive. Renove the cover of the drive, carefully reIlDVe the tape, and replace the cover.
8-inch. ReIlDVe the screws fran the underside of the cabinet, rem:we the front cover, and find the I..OCKID and UNIOCKED label on the drive. Unlock the drive by switching the lever underneath this label to the UNIOCKED position. '!bis lever is held in place in two notched areas. Hold the lever down, pulling it out of the first notched area marked I..OCKID, then slide it across and up to the second notched area marked tJNLCX:XED. Replace the cover.
14-inch. If you have a Control Data Corporation cartridge fttldule Drive refer to the ~L DATA CARrRIOOE KDJLE DRIVE HARaiARE AND MAINTENANCE MANUAL. '!be section on installation and checkout will describe the necessary procedures.
1.3-2

1.4 Instal]jng the SysteIIl Hardware
Your carputer was thoroughly tested at the Gifford Co1pJter Systems plant before it was shipped. You should have 00 problems getting it set up and running, but you should check that circuit boards in the main enclosure did not vibrate loose during shipping. You will need a Phillips head screwdr iver •
Before you check for loose boards, be sure that the 110 volt power cords are oot plugged in. Never \fK)rk on the inside of an enclosure when the enclosure is plugged in.
'lb check for loose boards, renove the screws on the sides of the enclosure and lift off the top. You will notice a nUI'l'ber of 5-inch by 10-inch circuit boards which plug into sockets in the bottom of the case. 'Ibis array of sockets is called the DDt:berboard. Rem:we the piece of foam packing fran between the top cover and the circuit boards.
Lift the boards out of the sockets by using the white plastic ears at the edge of each board as levers. Reseat the boards by pushing firmly down on the edge of the boards (00 not push dcMl <Xl the plastic ears) • Be sure that any cable connectors on the top of the boards are attached securely.
OxmectiDj the Cables
'!be connectors on the back panel are labeled to indicate which cables to attadh.
Connect the terminal and printer cables to the sockets on the back panel of the carputer enclosure. Begin with the system console, then terminal 1, terminal 2, and so on, until all terminals and printers are connected. Tag both ends of each external cable and record the cable name in Appendix II.
If special cables are needed for your devices, the ends of these cables should be marked.
1.4-1

On a multiuser system, do not attach terminal cables to the corrputer enclosure unless they are also attached to working terminals. Terminal cables not connected to a terminal, or connected to terminals that are not turned al, will degrade the performance of your system, sanetimes significantly. Refer to Section 4.0 of the manual entitled Cl.JS'!tKIz:m:; YOOR KlLTIUSER CXN:URRENT In) SYSTEM to determine the proper cable connections for your particular system configuration.
If you make your own RS-232 cables, or if you use cables supplied by other manufacturers, see Appendix L for ~rtant additional information on RS-232 cables and pin assignments.
0lnnect:i.0J the Floppy Disk Drives
The left (50-pin) connector (rear view), of the Disk 1 or Disk 1A controller board is connected to the back panel of the cooputer enclosure with a 50-pin cable inside the enclosure. Be sure that the board and cable connections are secure.
Connect the back panel of the enclosure to the fl<::g?y disk drives with the 50-lead flat ribbon cable marked "a:MPU'JER" and "DRIVES. II Both ends of the cable are marked with the word "UP" to indicate the proper orientation of the cable when it is installed. Take care not to bend the pins on the connectors, and be sure that the cable is plugged in securely. Check that yoo have ralDVed the cardboard sbiwing inserts frma the drives.
'lb check that the switches on your boards are set properly, refer to Appendix C or the one-page flyer labelled *****IMPO~**** that was pr~ided with your system.
1.4-2

Cmnect:i.IYJ the Bar:d Disk Drives
Two cable connections are made to the hard disk drives. '!he flat ribbon cables cane out the back panel of the system through the slots labeled "50-pin hard disk cable" and H20-pin hard disk cable." If you have ,8- or l4-inch hard disk drives, the cables are 20-lead and 50-leadi if you have 5.25-inch hard disk drives, the cables are 20-lead and 34-lead.
Connect the two cables to the back of the hard disk drive. '!he cables are marked with the word "UP" to indicate the proper orientation of the cable when it is installed in the connectors. Take care not to bend the pins, and be sure that the cable is plugged in securely.
Ik> not foaat your bard disk. It canes fran Gifford Catputer Systems catpletely tested. All of your system files are already installed on user area 0 of drive A:. If you ordered other software, and your terminal configuration was known at the time of your order, your other software is also installed on the hard disk.
Replace the cover on the canputer enclosure (Enclosure 2), making sure that the ventilation slots on the cover face the left of the machine (front view). loosely fasten all screws on the side of the COller before tightening any of theIn. If the slots do not line up with the slots on the conputer enclosure, the machine will have inadequate ventilation. '
Plug in all of the power cords. '!he main enclosure has three utility outlets on the back panel for plugging in disk drives, terminals, or printers. '!hese AC utility outlets are swi tched on by the main power button, and the sum total of current drawn on all three outlets must not exceed 5 anps.
Gifford CaIp.lter Systems recalilleilds that you plug the floppy and hard disk drives into the utility outlets on the enclosure. Plug printers directly into the wall sockets, since the enclosure outlets are rated lower than sane printers.
1.4-3

1.5 IIandliDJ Diskettes
The floppy diskette is a flat piece of round plastic with a magnetic coating. A protective jacket surrounds the magnetic disk. The jacket has slots for the heads of the disk drives to read and write. Handle the diskette by the jacket and avoid touching its inner magnetic disk. Tb protect diskettes from damage, avoid exposure to direct sunlight, magnetic fields, heat, and liquids. J:k) not use a pencil or ballpoint pen on the adhesive label after it has been affixed to a diskette.
Along one side of the diskette is a label. The opposite edge has two notches to position the diskette in the disk drive. A third and larger notch is found on IIDSt diskettes. This is a write protect notch. When this notch is exposed, the catplter cannot write information on the diskette. Adhesive "write-enable tabs" can be used to cover this notch, allOtTing information to be written on or erased from the diskette.
If you have experience with 5.25-inch diskettes, please note that an exposed notch on a-inch diskettes indicates write protected. On 5.25-inch diskettes, a covered notch indicates a protected diskette.
Floppy diskettes are available as either double-sided or single-sided. You can tell the difference by looking at the position of a small hole in the jacket near the large center hole. Position a diskette so the seams face away from you and the slot points down. If the hole a~ars at one 1:00, the diskette is double-sided. If the hole a~ars midway between 12:00 and 1:00, the diskette is single-sided. Your cooputer will accept the following diskettes:
llSDD Double-sided, double-density, SSDD Single-sided, double-density DSSD Double-sided, single-density, SSSD Single-sided, single-density
Gifford carputer Systems recomnends that you use doublesided, double-density diskettes. You can get twice as much information on a double-sided diskette for only a slightly higher cost, and you will spend less time changing diskettes in the drives. J:k) not use "hard sectored" diskettes (i.e., diskettes wi th two or J'lDre index holes).
1.5-1

1.6 StartiBJ ~ the SysteIIl for the First Time
Once your system is running, you must back up all master diskettes. Once a master diskette has been copied, it should be stored in a safe place and used only to create additional working diskettes, should the one in use fail. Backing up the system diskette involves several steps which are the responsibility of the system manager.
Starting up the system for the first time involves: Turning CN the power Ioading the operating system into the carputer (booting the system) FOrmatting new diskettes Making backup copies of the operating system Rebooting with your working system diskette
Check that all terminals and pr inters are connected to the oamputer. TUrn CN the power to the terminals and printer(s). All teminals and printers DJSt be turned (B before the system is turned (B.
Press the eject buttons under the drive door (s) to open the drives and eject any diskettes or inserts. '1be driws slndd be E!IIpty when you turn (B the pcM!r to prevent pcM!r surges fran affectiD) data <Xl the diskette.
1.6-1

!be carputer should be plugged into a 3-prong 110 volt power socket. Hold in the RESET button on the front of the system enclosure, and tum CN the power by pressil'l9 the top portion of the red pJWer switch on the front panel. Release the RESET button.
It is i11J?Ortant to hold in the RESF.:r button on the front of the main enclosure when you turn the power CN or OFF. !bis prevents incorrect data from being written to floppy and hard disks when the system is turned CN or OFF.
Now the system is CN and you should hear the hum of the various fans. The RESEr button should be lit and the red light on the left-hand disk drive should be blinking.
If you do not use the utility outlets on the back of the main enclosure to power the floppy and hard disks, you I1Ust turn CN the drives separately. Tum CN the power to the floppy disk drives by flipping the toggle switch on the rear panel. Turn CN power to the hard disk drives with the power switch on the front panel.
If the fans are not turning, or the RESET light is not CN, or the left floppy drive light is not blinkiDJ, hold in the RESm' button and turn OFF power to all components. Recheck the connections between the cooponents as well as the power plug connections before turning the power CN again. Refer to Qmpter 4 if you need further assistance.
1.6-2

Backing t4> tbe Original Syst:eIIl Diskettes
It is essential to make at least one copy of the original Me-DOS master diskette. This process of copying a diskette is called backing up. Yoo should back up all the original diskettes you receive frail software suppliers, as well as arl'f iJlp)rtant records you generate CD the oaapJter. ~t distribution diskettes are single-sided, 128 bytes per sector, and singledensity. The l-C-DOS system diskettes are double-sided, doubledensity diskettes.
A diskette which has the K:-DOS operating system on it is called a syst:eIIl diskette. To back up the system diskette you will need to load the operating system, format a blank diskette, and. COT!::l the information fran the system diskette onto the formatted diskette using the CPY program. If your system only has one floppy drive, you cannot use the CPY program. Me-DOS canes sug>lied as three diskettes: the Multiuser Concurrent DOS System diskette, the Multiuser Concurrent DOS XIOS diskette, and the Multiuser Concurrent DOS Utilities diskette. You will also be sug>lied with the DR Net Networking diskette if you ordered DR Net. You will need to have at least three blank double-sided, double-density diskettes to carry out the procedure outlined. You should have a couple of boxes of blank diskettes handy, since you will soon need to back up files that you create on the oatplter.
loading the ~ratiDg Systelll
When the power is turned 00, the fans and lights go 00, but the RAM (the canputer's menory) is enpty. The canputer is incapable of doing any real work until it receives instructions on how to operate. Since the canputer "loses" its RAM menory every time the pOwer is turned OFF, it must instruct itself on how to get instructions. This process is like pulling yourself up by your bootstraps. Catputer users call this process "bootstrapping" the system or "booting" the system. The oatplter has a small annmt of read-only "boot" menory which gives instructions on how to begin loading the operating system whenever power is first turned 00, or the RESET button is pushed. Once the information on the system diskette has been loaded, the OCIt'plter can proceed with any of its appointed tasks.
1.6-3

If the left drive light is blinking ON and OFF, you are ready to load the system. Press the RESEn' button to clear the canputer.
Locate the Gifford Computer System diskette with the Me-DOS operating system on it. Insert the diskette into the left floppy disk drive if you have two drives. '!he label should be on the top, and the side with the seams of the jacket showing should face down. '!he slot in the jacket should face the drive as you insert it. Push the diskette straight into the drive until it clicks into position. Now close the drive door.
Ioading the operating system takes a few nanents. The system startup messages displayed below appear on the system console stating memory size and copyright and trademark notices.
K:-(XJ; IDader Rev. 2.0A. Ioeding CX3LSYS. Please stard by •
'Jbt:al IIeaDry= 1 Megabyte
~atiDj systelD= 239K Available user = 784K
II:-(XJ; loader 2. OA
. .
versim 1.0 (07/30/84) version 1.1 (07/30/84) versim 1.2 (07/30/84)
II:-(XJ; copyright 1984, Gifford <bIpJter Systems Qlncurrent CP/M copyright 1984, Digital Research Inc.
OA>
The rnenory message will vary with the anount of RAM in your system. '!he o:::PMINIT message does not awear on systems that do not inplement Virtual Terminals. The Network I/O System and SE'INEl' messages do not awear on systems not linked to OR Net local area networks.
1.6-4

'!be last item on the screen, OA>, is the IC-IXJ3 prc:mpt. You are still in single-user lOOde. To enter IIUltiuser lOOde, type IOOOOT. '!be screen will I'lO'tI display:
Name:
This is called the login praipt or the name pralpt.
Here you nust enter a valid account name, and optionally a password. Your Gifford carputer is shipped with only one valid account name, "system." Initially, this account does oot require a password, although the system manager should use the N&ruSER program to place a password on this account during the customization procedure.
Type SYSTEM and the screen will display the ~-DOS prarpt: OA>. '!be ~-DOS prompt provides essential information on user areas and drive designations.
User Areas and Drive Designations
o A > \\ \ CUrrent drive \ CUrrent user area
The fe-DOS prompt (OA» tells you that you are currently logged into user area 0 of drive A:. Each drive has 16 user areas (0 through 15). If the prarpt is l4E>, you are in user area 14 of drive E:.
The user areas are not physically distinct portions of a drive, but are characteristics of the programs and data stored on a drive. All of the storage capacity of a drive could be occupied by files in a single user area, but it is convenient to keep in different user areas thefi1es used in different tasks or by different people. , Each unique catbination of user area and logical drive is called a directory area.
1.6-5

CHAP.rER 1: GlSl'l"nc; 'lBE SYSTDI UP MI> ~
The mmi:>er of drives on your ConpuPro canputer will depend on whether or not you have a hard disk on your system. '!he following table will tell you the drive designations of your system. If you have a system with only one floppy drive, ignore any references to the right-hand floppy drive, and assume your floppy drive to be the left-hand floppy drive.
Type of Systaa logical Drive Designatims
Hard disk Left-hand Right-hand logical Drives Floppy Drive Floppy Drive
Floppy-on1y none A: B: 5Mb hard A: B: C: 11M::> hard disk A:B: C: D: 16M::> hard disk A:B: C: D: 21M:> hard disk A:B:C: D: E: 37Mb hard disk A:B:C:D:E: F: G: 40Mb hard disk A:B:C:D:E: F: G: 56Mb hard disk A:B:C:D:E: F: G: 84Mb hard disk A:B:C:D:E:F: G: H:
Systems with two or ItDre hard disks add the same nl.lI'li:>er of logical drives as shown in the table above for each hard disk, wi th the tl«> floppy drives noved through the alphabet (towards liP") • The maximum nurrber of logical drives is sixteen (P:).
User areas and drive designations will be ~rtant when you call programs and assign tasks or personnel to specific work areas on the canputer. Two user areas deserve special attention. The canputer expects to find certain system programs and files in user area 0 of drive A:. You should keep frequently used programs in user area 0 of drive A:. The second special purpose area is user area 15, drive A: of your system, or user area 15, drive A: of the system ncx1e if your system is a part of a DR Net network. The canputer keeps appointment and mail files here. We will discuss user areas and drive designations again after we have discussed the basics of using the computer.
1.6-6

Fomatting a PlqJpy Diskette with POBIWr
Fbrmatting a diskette is an essential operation in preparing the diskette for use. Formatting puts information on the diskette to tell the computer how the diskette is arranged. Diskettes are organized into tracks am sectors. Each a-inch diskette has 77 tracks. You will specify the size of the sectors.
To begin formatting, select a blank diskette and CO'U'er the write protect notch with an adhesive write-enab1e tab.
Your screen will show:
Now type:
After a few nanents the screen will say:
0wplPr0 Disk Sd>-systan !(HWf Versim 3.1 For CP/M-86. IIP/il 8-16. and K:-aJ3 - lI:x1ified 7-10-84
Specify drive (A: - D:. E: - B:) :
The ~ program thinks that you have a f1oppy-on1y system and that your only drive designations are A: and B:. Note that this is an exception to the drive designation table on the preceding page. Disregard the A: - D: and E: - H: options for the time being. Refer to page 2.5-!aM\T-1 if you need information on these options.
If ~ have a system with a single floppy drive, the FORMAT pr03ram thinks that this is drive A:. When you are pratpted to sUW1y the drive that holds the diskette, type (A).
1.6-7

Fbr this example, insert the blank diskette in the righthand drive and as a safety precaution, remoYe anY diskette that you don't want to ~ormat fran the other drive.
Now press (B).
The screen adds your B to its message and then asks you:
Select Disk format DX1e (0,1,2,3):
o = 128 1 = 256
2 = 512 3 = 1024 >
In response, you should press (3).
You will make the mst efficient use of diskettes if you format them with 1024-byte sectors. The other options are available to you in the event that you will be formattiB3 diskettes for another oomputer. Commercial software distributors often supply siB31e sided diskettes formatted with 128-byte sectors (option 0).
Because formattiDj a diskette destroys inforEtial at the diskette, the system gives you a last chance to reconsider:
Confira ready for fcxmt at disk drive B (y).
If you are sure you are ready, press (Y).
When you press (Y) the screen displays syntx>1s of the 77 tracks of the diskette, nunbered fran 0 to 76, and indicates when each track is formatted (F) and verified (V):
1 2 3 4 567 0123456789012345678901234567890123456789012345678901234567890123456 E'E'FE'E'E'E'E'FE'E'E'E'E'E'E'E'E'E'E'E'E'FFFE'E'E'E'E'E'E'E'E'E'FFE'FE'E'E'E'FE'FFFE'FFE'E'FE'E'l!'E'E'E'E'E'E'FE'E'E'
1.6-8

If you get an E or an S in the rCM of Vs, sanething is wrong with a track. Try to format the disk one rore time, and if it still displays an E or an S, you should discard the diskette and try again with a fresh diskette. After the verify operation, the follCMing message appears:
IO:II\T <DIplete. Do you want to MHIPlr another disk?
R - request new parameters. or - duplicate last ~. N - exit back to sysa..
>
You now have a formatted diskette. Press (N) to exit back to the system.
Put the system diskette back in the left drive and leave the formatted diskette in the right drive.
Cov.iing the SysteID Diskette with CP!'
The CPY pro:Jram cannot be used with a Single-floppy drive system. The left-hand drive should have the original system diskette and the right-hand drive should have the formatted diskette.
The last line of the screen should sl'x.lw:
Now type:
and press RE'.lURN.
1.6-9

'Ibis ccmnand invokes the It£-OOS copy utility program. CPY creates an exact copy of a diskette. Since Gifford COmputer Systems supplies its system software on a double sided, double density l024-byte sector diskette, the CPY program expects to find a double sided, double density l024-~te sector diskette as the destination diskette. CPr' vill not lIDrk if the disk tor:.ats are different.
'!he program prarpts:
Gifford Qmplter Systaa Olpy utility V2.0 D> yaJ want to cq,JY:
$!S'llII tracks cmly? (type S) DAm tracks cmly? (type D) ALL of tbe disk? (type A)
Exit back to SysteID (type X)
Press (A) (with no REr(Jm. after it), since you want to copy the entire diskette. The program proopts:
Source drive? (A, B, • • .)
Enter the drive designation for your left-hand flqppy drive. Refer to page 1.6-6 if necessary. The program proopts:
Destinatial drive? (A, B, ••• )
Enter the drive designation for the right-hand floppy drive. '!be program proopts:
Put source disk <Xl • • • Put destinatim disk m • 1ben type Ml1JlW
• •
1.6-10

The two floppy drives should contain the designated diskettes. You should veri~ that the drives have the proper diskettes. It is extremely inportant that you have the source diskette in the drive that you designated, since you will erase this diskette if you reverse the two. To prevent inadvertent destruction of the source diskette, renove its write-enab1e tab.
Press REroRN and the program copies each track, typing the track mlJ'liler on the screen.
When all of the tracks are copied, the program prarpts you for the next copy operation. Press (X) to exit fran the program. Remove the system diskette fran the left-hand drive and put it in a safe place. ReIlDVe the copy fran the right-hand drive and put a label on it to identi~ it. This will be your working Cc:Jf1Y of the !C-In:) operating system. Put the new working system diskette into the left-hand drive and press the red RESET button.
The system shou1d boot with your copy. At this point you can use the ~T program to format blank diskettes and the CPY' program to copy any additional diskettes which need to be backed up.
Before you go on to Basics of Usin] the Systaa, you should be aware that the procedure presented above is one of several procedures you can use to make copies of programs. An alternative is the !C-IX>S PIP utility to copy data tracks, and then running the sYSGEN program to copy system tracks onto the diskette. PIP will not copy the system tracks. PIP is one of the nost frequently used programs in the ltC-In:) system. You mst use PIP if you want to copy software between diskettes with unlike formats or between double and single sided diskettes, or between a floppy diskette and a hard disk.
Q]pyin] Diskettes at Sin]le I'l.oppy Drive SystaE
You cannot directly copy diskettes to diskettes on systems that support only one floppy disk drive using the CPY' program. If you have a hard disk, you can copy all of the files on a diskette to an enpty directory area. Then give the DSKRFSEr ccmnand, replace the source diskette with a formatted destination diskette, and PIP (described in section 2.5-PIP) the files fran the hard disk to the destination diskette.
1.6-11

1.7 Basics of Usinj the System
Iojin Acoount NaIIes
You mst lag in to an acccxmt before you can use the system. An acoount is an entry that the system manager has made in the PASSWD file, a special file that tells Me-DOS who is allowed to use the system. One user can have many accounts, or one account name can have many users, provided that each user k~ the password for that account.
'!he account name may have a password associated with it. To leg in to an account, you mst be told by the sys~ manager both the account name and its password, if any. Gifford catplters are shipped with only one valid aocount name, "system," which should be reserved for the system manager. Before you leg in, your terminal will display the legin pronpt:
'RaIle:
To log in, you mst enter a valid account name. Suppose that your PAS&WJ) file included an account name called "guest." To log in to the "guest" account, enter:
Rame:GUFSl'
If the "guest" aooount requires a password, the screen will display:
PasaIord:
1.7-1

You DUSt now enter the password that the system manager has assigned to the account. If the account "guest" has the password "secret," you DUSt type:
'!be word "secret" will not actually awear on the screen. '!his prevents anyone who might be looking over your shoulder fran finding out the login password for that account.
You should now receive the M:-:OOS prarpt, indicating that you have successfully logged in to the system.
OIanginJ User Areas ani Io}ical Disk Drives
'!be lC-:oos pratpt (OA» tells you that you are currently logged in to user area 0 of drive A:. Each drive can have up to 16 user areas. If the pronpt is 6C>, you are in user area 6 of drive C:.
When you log in, the carputer will log you in to a default drive and user area, called your initial default directory ~.
To change drives, enter the drive you want to IIOY'e to . followed by a 001011. The ; following exanp1e will IIOY'e you fran user area 0, drive A: to user area 6, drive B:.
()A;>B:
'!be system pratpt returns with:
OB>
1.7-2

'lb change user areas, type the follO'lrling comnand:
08>6:
You can also use the USER conmand (USER 6) to change user areas. If you have been allocated access to that user area by the system manager in the PASSWD file, the system returns with the prompt:
6B>
Find out from the system manager what user areas you are allowed to access.
Invoking Progras
You have already called on three programs, FORMAT, CPY, and USER, to perform specific tasks for you. '!hese three programs are COllIIDnly referred to as ~-oos utilities I«rDOS comnands. You can display a directory of drive A: by entering the follO'lrling:
OA>DIR
You will see a, list of the files on drive A:. '!he computer identifies discrete sets of information as fil~ A file name has up to eight letters or numbers. It is separated by a per iod (.) from an optional file extension, or file type, of up to three letters or nunbers. A file can be a data file, a program file, a document file, or anyone of a number of different file types. CPY, FORMAT, and DIR have the file type .CMD, which indicates that they are 16-bit program files. Program files with the file type .COM are a-bit program files. I
'lb run a program, you simply type the file name. On some occasions, you will provide mre than just, the file name. '!he
1. 7-3

can:nand line that you enter after the OA> pratpt may contain the following:
OA>B:FILENAME options \ \ \ 123
. 1. '!be drive designation indicates the drive from which the file is to be executed. Program files on drive A: which have been given the system (SYS) and read-only (RO) attributes can be accessed fran all drives and user areas without specifying the drive designation. '!be drive designation can also be omitted if the file is on the logical drive sham in the ltC-IXS pratpt.
2. The FI1:aENAME is the name of the program that you intend to run. rrbe filetype (.<M> or .<nt) should not be typed.
3. A number of programs will require options which are specific to the file bei~ called. others like PIP, REN and som require file names and types. Files which are password protected will require the password here. (A IIOre detailed description of ltC-IXS ocmnand lines appears on page 2.5-1).
Now type:
OA>DSKRFSEl'
DSKRl!SE'l' tells the carputer that you are changing diskettes. If you change floppy, d~skettes without giving the DSKRFSEl' coomand, you will not be able to read or write information on the new diskette. (Users familiar with CP/M should note that the K:-IXS 1lSI<RESEI' ccmnand has the same function as "'c in CP/M. Under rc-r:x:s, hOwever,' "'c may abort a program, and will not execute a disk reset.)
Now type:
1.7-4

The SIDf utility will tell you how much space, in kilobytes, you have on the drives that users have accessed.
Type:
The HELP program can provide help on a number of K:-DOS features. For instance, type:
OA>BELP ltCDOS PIP
and you will see a display on how to use the PIP ocmnand.
'Ihe HELP program provides inportant documentation Ql
programs such as PIP. You can add information to the HELP files or create custom HELP files to provide information specific to your own system, as described in Olapter 3.
PIP is one of the most frequently used utilities. You will use PIP to copy the files from one drive or user area to another. PIP will not oop'f files fran user areas to which the system manager has not granted you access in the PASSWD file.
Program files on user area 0, drive A:, which have been assigned system status with the SEr cxmnand are accessible to all users on all drives. The SEr ocmnand is discussed in Qmpter 2.
As an exanple of copying and deleting files, create a test file called TFSl'.1XC on drive A:, oop'f it to d.rive B:, and then erase it. Type the follCMing ocmnands:
OA>MAKE TEST.1XC OA>PIP B:=A:TEST.1XC [Vlai] OA>DIR B:
1.7-5
You will see the file 'l'EST.IXX! on the drive B: directory. '!be PIP cxmnand can also be used with "wildcard syni:x>ls. II An asterisk designates any character, and a string of question (?) marks designates any character, or characters, up to the nl.Dlber of question marks. Type the following to experiment with wildcard synb::>ls:
OA>PIP B :=A: * • IXX! ['VlQi] OA>DIR B:
Now drive B: contains copies of all the .IXX! files. Before you go on, eliminate any unwanted files fran drive B:. Type:
OA>ERAQ B:*.IXX!
The system will list the files with a .IXX! file type on user area 0 of drive B:. Type (Y) after each file that you want to delete.
You can refer to 01apter 2 and also to the a:::NCURRENl' ~ OPE:RATDI; SYSTEM USER I S GUIDE for IlDre information on ~-1XlS cxmnands.
To calIon applications programs, you enter the file name for the program you want to use. To use SuperCalc enter:
OA>SC
'!bis loads SuperCalc. If you want to use ~rdStar, enter:
Ebr dBASE II, enter:
OA>DBASE
1.7-6
Q1ce you are in ~ applications programsucn as SuperCalc 86, you no lOl')ger .have direct access to tIle operating system. Each applications program has its am procedure for terminating the program and returning to lIC-IX>S. YOu must read the program documentation to learn the specific carmand that each program requires to send you back to the operating system.
SuperCalc, for exanple, uses:
lOY
while dBASE II uses:
QUIT
and WordStar uses "KX or X.
After you have invoked a program, you generally cannot talk to the operating system directly until you exit fran the program. See Al4.'lE!udix J for dBASE II exceptions.
Virtual Teminals
A DUltitaskiDj catpUter has the ability to perform several jobs at once fran each workstation. An inportant inprovement over ordinary catpUters is available with Gifford's VirtlJal Teminals. 'Ibis allows a physical terminal that has been specially equipped with extra pages of rnerIOry, such as the Freedan 200, the OC8-80, or the TeleVideo 950 or TeleVideo 925, to run several programs at once.
When application programs that are llOt currently attached to the physical terminal try to output data, this multitaskiD;J software automatically redirects their output to RAM or to disk buffers, so-called "Virtual Terminals." . When the user returns control of the actual screen to a detached program, all buffered output fran that program is then transferred to the physical screen.
l.7-7

Gifford's Virtual Terminals software allows up to four different programs to share the same physical screen and keyboard. The user can pick which program is attached to the actual screen and keyboard at arr:t given nanent, and can switch fran program to program si.np1y by touching specially progranmed function keys.
'Ibis resenb1es the way that an ordinary television set can select a specific channel to watch fran aIIDl'lCJ the varirus programs available fran the cable or antenna. Virtual Terminals software lets you select which program you want to see on screen by which function key that you press.
In giving each program the whole screen, the Virtual Terminals software also differs fran the "windowing" approach to I1U1titasking, which splits the screen anDl'l9 different programs. Although split screens are helpful in sane situations, JlDst people find it less confusing when they are multitasking to see the same screen display that they would see if only one process were ruming.
A special advantage of using Virtual Terminals software is that a sing1e-user can have a powerful array of programs and utilities running at all times, waiting for input. '!bough this can make heavy demands on system RAM, it does not affect system speed as long as the background processes are simply waiting for input.
'Ibe mlltiler of simultaneous programs that you can run with Virtual Terminals on a single physical terminal is limited by the nunber of extra pages of menory in your physical terminal. Just as in multiuser operations, the total RAM requirements of programs run on Virtual Terminals cannot exceed the RAM available in the system.
See the VIRTUAL 'l'ER4INAtS USER'S Ml-\NUAL for detailed information on the installation and use of Virtual Terminals software. Section 3.3, pages 3.3-7 and following outline the instal1ion of Virtual Terminals. A user may need to give a carmand like KEYS OCS80 to install a physical terminal for use with Virtual Terminals.
1.7-8

1.8 Slutting IDIn the SystaD
It is important that you follow these procedures each time you turn OFF your sysbem or RESEr (re-initia1ize by pressing the RESEr button), especially if you are running your system with a hard disk. These steps ensure that data is written from the hard disk cache. Failure to follow these instructi.oos EY result in lass of val.lilhle data.
All users (except the operator at the sysbem console) should' log out of the sysbem by entering:
After all the other users have logged out, the system manager at the system console enters:
OA'>WHO -A
'!he WHO caunand responds with a display of which users are on the system, and specifies which Virtual Terminals are currently attached by placing an asterisk next to that Virtual Terminal nunber. Only a single user, the system manager (at the system console) should be listed. It is important to look and see who is on the system before you shut down or RESEr. Users will lose their work unless they save their files before the system goes down.
Now type:
1.8-1

'Ibis disables all terminals except the system console. The following message is displayed on the system console:
'!be system is doNn.
Release the diskettes from the floppy disk drives. Hold in the red RESEr button on the front of the main enclosure, tum OFF power to the cooputer by pressing the bottom part of the power switch down, am release the RESEr button.
Place the diskettes in their paper sleeves and file them where they belong. You can tum OFF any terminals am printers if necessary. It is inp:>rtant to follow the procedure outlined above. 'nlese steps ensure that data is written fran the cache to the hard disk.
1.8-2

Chapter 2 describes the Me-DOS operating system, its control characters, oonmand lines, oonmand files, and system data files. Section 2.5 describes system oonmands and fil~s individually, with exanples of usage. The last part of the chapter outlines lC-OOS system secur i ty •
2.1 The Operating ~stem ••••••••••••••••••••••••••••••••••• 2.2-1 2.2 The MUltiuser Ooncurrent DOS Operating ~stem •••••••••• 2.2-l 2.3 MUltiuser Concurrent DOS Control Characters •••••••••••• 2.3-l
MC-DOS Program Control Characters •••••••••••••••••••••• 2.3-2 lC-DOS Command Line Editing COntrol Characters ••••••••• 2.3-3
2.4 Summary of MC-OOS Cbmmands and Files ••••••••••••••••••• 2.4-l Alphabetic SUmnary of lC-DOS Conmands and ~stem Files ••••••••••••••••••••••••••••••••••••••••• 2.4-2
2.5 Documentation of MUltiuser Concurrent DOS Oommands ••••• 2.5-l AOORT AP ASM86 A'rl'1\CH AD'lOST BUFFER OCPMINIT cmm CHSET CIOCK OONFIG.Nm' CON9JLE CPY DATE DAYFILE IDT86 om DOWN DOWN. SUB DSKRESET r.wN ED ERA ER1IO FILES
2.0-1

CHAPTER 2: USDG 1C-IXlS
FIXSTEP EORMAT GENCCPM GENCMD HELP HELPNDX HISTORY INITDIR KEYS rooIN rooIN.SUB IDGOUT WOOUT.SUB LPRS MAIL MAKE M:>TD NAMEOODE NAMSVR.DAT NET nane.NE1' NE'IMYID NETUSERS NEWUSER PASSWD PASSWORD PIP PRINT PRINTER PWASK.NET name.REM REN RES:m' SDIR sm' SETMEM SE"mET SOOW SPJl.CE SPOOL SUBMIT SW
2.0-2

&W86 SYtC S'YSGm SYSINIT SYSINIT.BAN SYSINIT.SUB SYSTAT TIME TIMELOG.CMD TIMELOG. SUB TrYS 'lYPE UPTIME USER USERINIT USERINIT.SUB U'IMP VCK)DE
VT950.KEY "V'R£S80 • KEY V'l'l'YS WID WRI'lE W'.lltP
2.6 ~stem Security OVerview of MC-DOS ••••••••••••••••••••• 2.6-l Login Security ..................... -: ................... 2.6-1 Min~ Level of Login Security •••••••••••••••••••••••• 2.6-2 Maximum Level of Login Security •••••••••••••••••••••••• 2.6-2 Special Internal System Security and MCn!toring •••••••• 2.6-3 Minimum Level of Special Security and MCnitoring ••••••• 2.6-3 Max~ Level of Special Security and Mbnitoring ••••••• 2.6-3 Standard COncurrent DOS Security Features •••••••••••••• 2.6-4 Minimum Level of Timestamping and Password Protection •• 2.6-4 Maximum Level of Timestamping and Passwork Protection •• 2.6-4 DR Net Local Area Network Security Features •••••••••••• 2.6-5 Minimum Level of DR Net Network Security •••••••••••••• 2.6-5 Maximum Level of DR Net Network Security •••••••••••••• 2.6-5
2.0-3

2.1 IJ.be ~rating Systaa
Like the central nervous System of a living organism, the operating systeDl inposes order on the activity of a catplter. When the corrputer starts up after power is turned CN or RE5ET, the RAM nenory is initially enpty. '!be canputer does not know how to use the terminals, the nenory, the disk drives, the printers, nor how to perform the various tasks that are required for practical work. Applications program such as Supercalc or WOrdStar can perform oanp1icated tasks, but they rely on the operating system to give them access to the different parts of your system. Although you probably acquired your canputer in order to use applications programs, they depend upon the operating system to be able to enter and store information, to create printed or screen output, and to locate data and program files.
'!be operating system is a collection of programs and files on the Gifford MC-OOS system diskette. It provides the information needed for the parts of your canputer to act coherently as a system. '!be operating system creates an envirorunent in which applications programs can carry out their intended functions.
2.2 IJ.be Illitiuser Qmcurrent In; ~atiDJ System
Multiuser Concurrent DOS is Gifford Computer Systems' proprietary enhancenent of COncurrent In) (3.1) by Digital Research Inc. MC-DOS is a powerful multitasking, multiuser, networkable operating system with many capabilities not available on IIOSt business canputers. Mvanced features of Multiuser Concurrent DOS include:
o Support for multitasking operations. Each physical terminal can support up to four concurrent "virtual terminals," each performing a different task, and accessible by a keystroke.
o Support for DIll tiuser operations. Users at different physical terminals can use the same canputer simultaneously and share programs, data, and hardware resources.
o Optional support for DR Net 1ooa1 area networks. A high speed I'letworkcan link many Me-In:; canputers, so that many users can share the data, programs, storage, and printers of the network.
2.2-1

o Advanced security features. '!he system manager can lI01itor usage am restrict file access on an individual basis, tailoring security procedures to match specific requirements.
o Camunicatioo and te leoamunications features. Messages and electronic mail can be exchanged anong users, reminders can be autanated: option to access other <::XJIpUters by roodem.
o Customization features. Utilities are provided so the System Manager can reconfigure and control the system to optimize the productivity of individual users, without use of asserrbly code ..
o Support for 8-bit and 16-bit operations. Multitasking and mltiuser operations by any user can simultaneously intermix programs written for both 8-bit and 16-bit microprocessors.
'!he last feature is inportant because IJDSt operating systems restrict users to a single processor, or can select one or another, but not use two at once in a true I1Illtiuser envir<XlJllEmt.. Using MC-OOS is like being able to speak two languages at the same time. MC-OOS gives you access to thousands of popular 8-bit programs as well as many new 16-bit programs. Gifford's MC-OOS can support languages and programs written for the CP/M-80, O'/M-86, MP/M II, MP/II-86, MP/M 8-~6, <lD::utrent 0'/11-86, and Concurrent DOS operating systems of Digital Research Inc., the largest selection of ccmnercially available software supported by any single operating system.
Besides these unusual features, Gifford's proprietary enhancements of MC-OOS provide a wide range of utilities to increase the ease and flexibility of using your catplter for business, engineering, and scientific work. By studying the cxmna.nds and files described in this chapter you can take full advantage of MC-OOS in automating your wor~.
Oamputers that support Gifford's MC-DOS can also utilize another operating system, called CP/M-86, a product of Digital Research Inc. '!he CP/M-86 operating system can only support one user (at the system console), and does not utilize the hard disk. '!he main use of CP/M-86 is as a diagnostic tool, in the event that you experience problems with your system. If the catpJter operates properly under CP/M-86, then the problems may lie in the
2.2-2

hard disk subsystem, which CP /M-86 ignores. For assistance in the diagnostic use of CP/M-86 or in other troubleshooting, read Olapter 4 of this manual and contact your dealer.
Another potential use of CP /M-86 with systems hav ing less than 5l2K of RAM is to support programs that can benefit fran large transient program areas. (A transient program area is the part of RAM where an applications program or language is located when it is running.) For exanple, a system with 320K of RAM supports larger spreadsheets if CP/M-86, rather than MC-IX>S were running, because Me-In) occupies IIDre RAM than CP /M-86, leaving less RAM free for applications programs.
Many l6-bit programs that are coopatible with Me-IX>S can also run under CP/M-86. If you plan to use CP/M-86 to operate your cooputer in single-user operation, you should be aware that there are inportant differences between Me-IX>S and CP/M-86. There are fewer ccmnands· in CP/M-86 and the versions of CP/M-86 that Gifford sells do not support hard disks. There are fewer conmands in CP/M-86, no virtual terminals, and the system console is the only workstaticn. Read the CP/M-86 OPERATIR; SYSTEM USER'S GUIDE for additional details on using CP/M-86.
2.3 Itlltiuser Qmcurrent ID) Caltrol Oaracters
MC-DOS control characters are used to control programs and to edit cannand lines typed at a terminal. A control character is produced by typing a character while pressing the crNrIDL key of your keyboard, just as you might type (A) by pressing (a) am the SHIFr key. The symbol ,. is used in this book to indicate that the next character is a control character. Thus, "'c means to press the crNrIDL and C keys. The Me-DOS operating system generally makes no distinction between upper case (A) and lower case (a) letters. Exceptions are noted in this manual. There are no differences between upper case and lower case control characters, but in this manual capital letters are always used to syntx>lize control characters.
Applications programs which have their own control characters, such as WOrdStar and SuperCalc, generally do not recognize the Me-DOS control characters.
2.3-1

1C-DC8 Prograa Qmtrol QJaracters
Although the control characters are intended to increase your control over the system, accidentally typing sane of the them can have effects that may make you think that your terminal or the system is acting inproper ly. You should read the following descriptions of program control characters so that you can use them deliberately where they are helpful, and can recognize the effects of unintended control characters.
AC Aborts the process running on your current virtual terminal. 'Ibis can be used to exit from roost programs.
AO Suppresses screen listing of output. unlike AS, which makes the process pause that was creating the listing, with AO the process continues, but its output is not displayed. If output was being echoed on the printer by "p, a AO stops the printer, but does not free it for other jobs. '!be screen resumes displaying your output after another AO is typed, or after the process is catpleted and you press the REroRN key.
Ap Sends all terminal output to the current printer. 'Ibis comnand acts as a toggle. '!be first Ap echoes the screen output on the printer1 the second Ap stops the echoing. A printer that is attached by a Ap cannot be used by other virtual terminals until you detach the printer with a seoorn Ap. In a DR Net network, Ap cannot activate a rel1Dte printer.
AQ Resumes the terminal listing if a AS cannand has been given to interrupt scrolling. Once AS has been entered, any character other than AQ will cause the terminal bell to sound. 'Ibe terminal will igoore all ocmnands except AQ or the function key to change virtual terminals. 'Ibe same virtual terminal that typed AS DUst give the matching AQ.
AS 'l.'errp:>rarily stops terminal listing. 'Ulis is useful to stop the scrolling initiated by caTI1Ial'1ds such as TYPE or SDIR. Users familiar with CP/M should note that typing AQ, not another AS, resumes the listing. If by mistake you type AS in a ocmnand line, the keyboard of your virtual terminal is disabled until you type AQ.
2.3-2

IC-Im OlglAnd Line aUtiDJ Qmtrol Olaracters
'!hese are used to create CODDaDd lines that tell the system what to do, or to correct typing errors in oonmand lines.
"E Acts like a ImruRN on your screen, but does not send anything to the catplter. The cursor advances to the beginning of the next line, but the carmand is not processed. '!his is helpful with very long oonmand lines.
AH Backspaces the cursor one space, deleting the previous character. Since the DELETE key repeats the previous (deleted) keystroke, "'H produces easier to read camrands.
AI Equi valent to TAB. The cursor roves to the next tab stop on the line, whose default spacing is every eight colUIlllS.
AJ Has the same effect as pressing RE1'IJRN. It produces a line feed and sends the ccmnand line to the catplter.
~ same as AJ or RETURN. The AJ or AM characters are helpful in prbgranming a keyboard function key to give ml tiple carmands that I1llst be separated by REl'URNs.
AR Retypes the carmand line on a clean line. '!his may be helpful if you have used the DELETE key to echo errors. If you then type AX, the original line remains displayed, but M:-OOS will ignore it, as if it had been erased.
Cancels the camnand line and roves the cursor down one line to begin a clean carmand line. '!he synOOl I is printed to acknowledge the AU, but can be ignored.
AX Cancels the carmand line and returns a blank line.
AZ Marks the end of a file, of a field, or of an operation.
Control characters not listed on these pages have no effect. Printable non-control characters from a keyboard are added to a ocmnand line. '!he BACKSPACE key deletes the last keystroke. See also the CXHlJRR!Nl' ~ OPERAT]N; SYSTEM USER'S GUIDE for additional information on MC-OOS control characters.
2.3-3

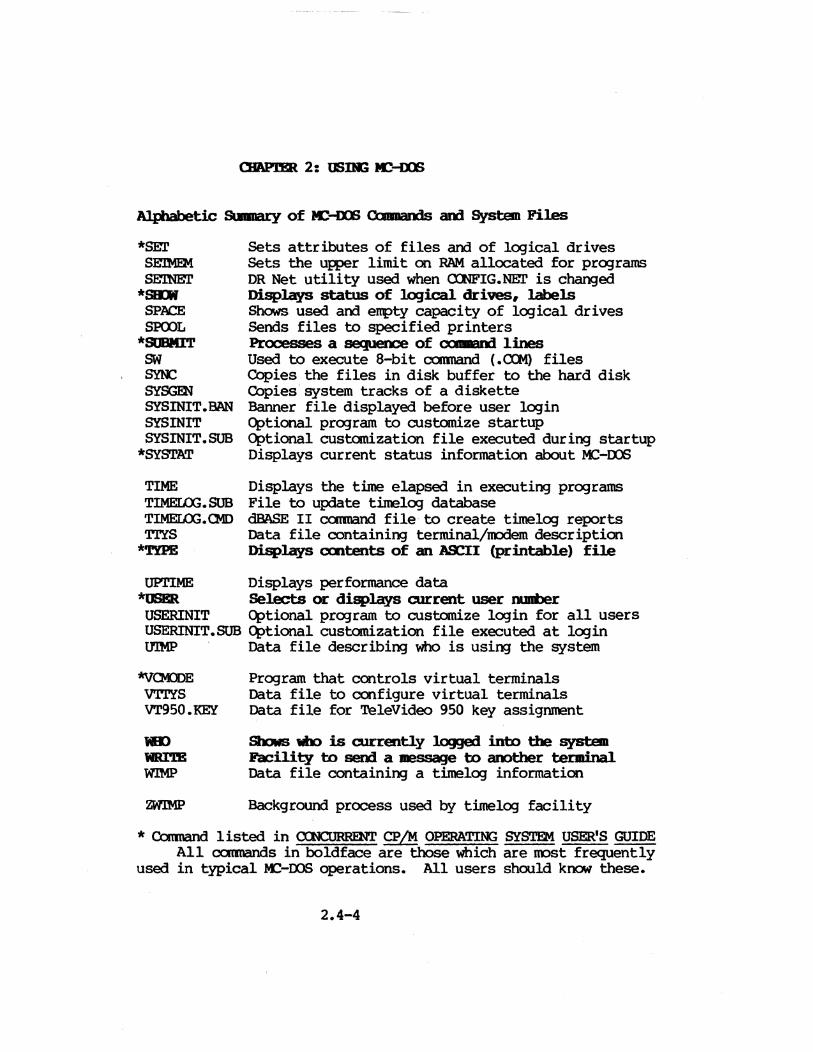
'!be following pages provide a quick reference to the system CODI1laI'Ids and files available on M:-DOS. Many of the comnands have powerful options, and you should refer to the IIDre couplete docunentation of Section 2.5 to use them effectively. Both an alphabetic listing is provided, and a listing of the comnands and files clasified into functionally related groups.
CbIrmands marked with an aster isk (*) are also descr ibed in the 00N:lJRRENT CP/M OPERATIR; SYSTEM USER'S GUIDE. ~te, however, that although IIDst of the Gifford enhancements take the form of supplementary CODI1laI'Ids and files, Gifford has roodified the DATE corrmand so that one Concurrent DOS option is not supported, and has roodified various comnands so that CONSOLE, GEN::CPM, HELP, NET, PRINT, PRINTER, SYSTAT, 'tYPE, USER, am VCMOOE have additional features, different displays, different defaul ts, or other discrepancies, sometimes only in small details, from the Digital Iesearch Inc. documentation. '!be HELP, NET, PRINTER, and 'lYPE CODI1laI'Ids, however, are so different in Gifford's M:-DOS that the Concurrent DOS documentation for those conmands is of limited use. 1tHSdix K of this manual outlines the differences between standard Concurrent DOS 3.1 and Gifford's MC-oos.· If your system is part of a DR Net local area net~rk, see Gifford's DR NET USER'S MANUAL for IIDre information on the NET, CONFIG.NET, "NAMsvR-DAT, NEnUSERS, and SETNET conmands and files used in net~rking.
Detailed documentation of Digital Iesearch Inc.'s utilities ASM86, IDT86, ED, GENXPM, GEN:MI), and SYSTAT is beyond the scope of this manual, which is intended for the non-technical reader. Sectim 2.5 provides a brief indication of what those routines do, but the interested reader should refer to the Digital Iesearch Inc. documentation prov ided with MC-DOS, name ly the 00N:lJRRENT ~ OPERATIR; SYSTEM USER'S GUIDE for ED, and the CON:URREm' CP/M OPERATING SYS'.I'.EN PRCX;RAMMER'S UTILITIES GUIDE for the other programmer's utilities and for an explanation of Concurrent DOS error messages
2.4-1

Al.{iJabetic Sa'llWlry of IC-OOS 0 ""ends and Systelll Files
*ABORT AP
*ASM86 A'rl'ACH AU'IDST
BUFFER
CCPMINIT *CHSET
CLOCK CDNFIG. NET
*CONSlLE CPY CHroN
*DATE DAYFILE *DDT86 *Dm
OOWN OOWN.SUB I8(RIiSB'I' ~
*ED *ERA *ERAQ
FILES FIXSTEP PMl'
*Bm:.P HELPNDX HIS'lORY
CUts short a process m another virtual terJliDal IIJl.tiuser appointllent cal.enc1ar utility for programners, a 16-bit assembler Attaches a background process to a terminal File for automatic multiuser start up
Controls a RAM drive buffer of the hard disk
Initialization program used with virtual terminals Changes certain attributes of .CMD files Sets and displays the system clock/calendar Data file used to configure DR Net Shows current virtual and physical terminal mmbers A utility for copying diskettes or logical drives Schedules a program to run in background at a given time
Displays clock/caleadar's current tiE, date Lists time of day after each conmand line Programing tool, directly manipulates RAM menory Displays the names of files in a logical drive Disables all terminals except the system console Optional file executed when shutting down the system Besets disk drives (used when changing diskettes) Optional program executed when shutting down
Line editor that can create or edit text files Deletes files from logical drives Deletes files, rut requires CXXlfirmtim
An advanced directory search utility Changes the step rate on floppy disk drives Formats a floppy diskette, erasing any files
Utility to create or modify Me-DOS operating system Utility that changes an .H86 file to a .CMD file
Displays infonatim to assist users Used when creating or modifying HELP files Optional data file which records system activities
* Ccmnand listed in ca:cuRRENT CP/M OPERATING SYSTEM USER'S GUIDE
2.4-2

AlJ;iIabetic Sewnary of IC-ID <bII&Jds and System Piles
*INITDIR
LOOIN LOOIN.SUB UXDJ.r IOOOOT.SUB LPRS
MIL I MAIL.HLP
MAIL.NDX MAKE ftCOOS.HLP ftCOOS.NDX K11'D
NAMn«)DE
NAMBVR.MT NE1' name.NET NF:lKY.ID NErUSERS N&lUSER
PASSWD PASSWORD
*PIP *PRINT *PRI:lfft2
PWASK.NE1'
name. RIll *REN
RESEr
*SDIR
Reformats drive directory for timestanping
Defines tbe prograDlllable keys of a terIIiDal
Optional program to individualize user login Optional custanization file executed at login logs an account off tbe systeDl Optional customization file executed at logout Data file containing printer/plotter descriptions
Electrarlc DBil systaD IIIeSSCWje fa:ility Electronic mail "help" data Electronic mail "help" index Creates an empty file lC-OOS operating system "help" data tC-DOS operating system "help" index Message of the day display
Autanatically maintains the NAMBVR.D1\T file Data file used in DR Net for system names Program to access DR Net resources Mapping. tenplate created by . the . NEl' -MAKE cxmnaoo Message of the day display for the network List of account names for DR Net Secur'ity utility to maintain the PASSWD file
Data file of passwords and user descr iptions Lets users m:xHfy their own login passwords ~ies filesJ tbe DDSt frequently used CCM1!dIId Prints a file on the current printer Displays and sets tbe printer nwber Requires a password to connect in DR Net network
Pile to display individual remiD1ers at lDgin Changes the name of a file Used if 'lTYS or LPRS files are m:xHfied
Displays extended disk directory
* Conma.nd listed in CCNCtlRREN1' ~ OPERATIOO SYSTEM USER'S GUIDE
2.4-3
Alpbabetic Sammary of IC-IXS 0 MMlD; am System Files
*SEn' SElMEM SE:'1NEn'
*SIDf SPACE SPOOL
*SOBMIT &W SYl'C SYSGEN SYSINIT • BAN SYSINIT SYSINIT. SUB
*SYSTAT
Sets attributes of files and of logical drives Sets the upper limit on RAM allocated for programs DR Net utility used when cx:m'IG.NEr is changed Displays status of logical drives, labels Shows used and enpty capacity of logical drives Sends files to specified printers Processes a sequeme of cawwnd lines Used to execute 8-bit cannand (.CXJot) files Copies the files in disk buffer to the hard disk Cbpies system tracks of a diskette Banner file displayed before user login Optional program to custanize startup Optional custanization file executed during startup Displays current status information about K:!-OCS
Displays the time elapsed in executing programs File to update timelog database dBASE II carmand file to create timelog reports Data file containing terminal/roodem description Displays cmtents of an A!C:I (printable) file
UPl'IME Displays performance data *OSBR Selects or displays current user IJlJIIber USERINIT Optional program to custanize login for all users USERINIT.SUB Optional custanization file executed at login U'IMP ' Data file describing who is using the system
*VCXDE VTrYS VT950.I<EY
Program that controls virtual terminals Data file to configure virtual terminals Data file for TeleVideo 950 key assignment
Shows wbo is currently logged into tbe systaD Facility to send a message to amtber terJIinal Data file containing a timelog information
Background process used by timelog facility
* Catmand listed in CXH.:.'URRENT ~ OPERATIR; SYS'l'EM USER'S GUIDE All ooomands in boldface are those which are nost frequently
used in typical K:!-OCS operations. All users should know these.
2.4-4

ABORT progr_ n
'Ibe ABORr cxmnand stops the executioo of a process. A process is an executable oc:mnarrl file that is ruming on any m:Xiem, terminal, or virtual terminal. In a valid ABORr ccmnand you mst correctly specify n, the virtual tenrinal n""" that invoked the process. You do not need to enter the .CMD (l6-bi t) or .COM (8-bit) file extension of the process that you want to stop. An exanple of an ABORl' e<mnand appears below:
OA>ABORl' WS 4
'Ibis tells Me-DOS to abort W5.CMD or W5.COM on virtual terminal 4. If the program name and virtual terminal nUJ1'ber that you sUWly do not match any currently active process, a message will appear to advise you that "Abort Failed.a You cannot use AOORT to stop a process whose physical terminal is connected to t'lK> different systems within a DR Net network.
Great care mst be exercised not to interfere with the 'lK>rk of other users, who may not wish to have their processes aborted. '!he WHO ccmnand (with the -A option) can be used to identify the virtual terminal nUJ1'ber of a foregrOUl'd or backgrOUl'd process that you want to terminate. '!be virtual terminal rn.mber appears in the cal field of a WID display.
Note that the SYSTAT e<mnand with options C or U displays virtual terminal nwrbers, but does so in hexadecimal (base 16) notation. You DUst supply ordinary decimal nunt>ers, mt hexadecimal nUJ1'bers, to designate the virtual terminal nwrber (for exanple, 13,. mt 00) in an ABORl' ccmnand line.
'Ibe ABORt' conmarx:l is helpful when a terminal loses control of a process. Since JOOSt programs have normal exit procedures, or can be stopped by the .... C control character, it is rarely necessary to invoke the AOORT coomand. See the c:x:HllRRENl' ~ OPERATDJ:; sYS'lUof USER'S GUIDE for additional informatim.
2.S-A'OORl'-l

2.5 1)lct1ll!ntatim. of M.1ltiuser Olncurrent 1100 0wnarv:1s
The following pages provide information on the ccmnand files and system files of MC-JX)S, presented in alphabetical order. For each cannand, the acceptable forms of carmand line syntax are presented at the begiming of the descripticn. A description of the ccmnand follows, and exanples of how to use each carmand are provided.
The most general form of an MC-JX)S oammand line is:
d: KImDI) [options] d:file [options] d:file [options] @node \ \ \ \ \ \ \ \ \ \ o 1 2 345 678 9
(Don't be alarmed- most camnand lines include only a few of the elements shown aboYe.) The possible elements are:
1. KEYWORD This is the name of the carmand, as it appears at the begiming of the description of each carmand in Section 2.5 (or as renamed by REN).
2,5,8. OPrICNS These are special synb:>ls or words that apply or OPTION LIST either to the entire command or to a file or a
list of files appearing in a comnand line. Sane oammands can have up to ten options in a sing Ie list. Several cxmnand.s require that square brackets, [ ], enclose a list of options.
0,3,6. DRIVE This is a letter, followed by a oolon (:), that DFSIGNATION indicates the logical drive affected by the
carmand, usually amnitted if same as the current drive. Sane oammands accept a list of drives.
4,7. FILE NAME The file or list of files affected by the or FILE LIST the ccmnand. M:>st commands require you to
specify the file extension, but sane do not.
9. N)DE NAME This shows the name of a DR Net node, prefixed by the @ synboll only a few oammands need this.
2.5-1

In addition to the standard notation used throughoo.t this book, the following calventions are used at the beginning of each ccmnand description, where examples of syntax are presented:
Boldface Boldface is used to irrlicate information which DJSt be supplied. Information not shoWn in boldface is optional.
UPPER <'ABE
lower case
file
@node
d:
c
n
... []"O<>1?
UPPER CASE characters represent information that BUst be typed exactly as shown, letter for letter.
WOrds in lower case irrlicate information which the user provides, substituting sane specific name, option, or 1IDdifier for the variable name given in the exanple.
'!be \«)rd file means file specification (the file name and extension), such as sc.CMD. A few cannands which can only be used with files of a single type do not require that the file extension be specified.
'!be syrcbol @ followed by the \«)rd node means that the name of a DR Net network node, prefixed by the @ syrcbol, mst be specified in the ccmnand.
'!be notation d: irrlicates a logical drive specification. '!be logical drive specification is an upper case or lower case letter ranging fran A to P, followed by a colon (:).
The letter c irrlicates a single-character ocmnand, such as those which the AP, DATE or MAIL programs accept.
The letter n specifies a number, such as a user area nUl'lber, printer nUl'lber, or nllJlber of a virtual terminal.
Irrlicates a continuing list of indefinite length, do not use this notation in a oonmand line.
All other special syrcbols like brackets, semicolons, ccmnas, etc. are used in oonmands lines exactly as they appear. Many ccmnands, for example, require brackets ([]) around a list of options (OJSET, DIR, ERA, ERAQ, PIP, PRINT, SOIR, SET, SHOW, SYSTAT, and TYP~.
2.5-2

AP
APc
'Ibe AP appointment calendar allows you to schedule agx>intments and reminders for yourself, and review your calendar. Each account nane listed in the PAS5WD file can have a calendar. AP files are kept in user area 15 of drive A: of the system node.
'Ibe information which can be retained for each appointment includes: the year, nonth, day of the nonth, day of the week, beginning time, ending time, the duration of the appointment, the nunber of days notice requested, as \\'ell as any message. N:>t all of this information is applicable to every agx>intment. For exanple, an annual agx>intment has no year specification. Also, the time of day does not always have to be specified. If it is not, then "anytime" is assumed. 'Ibis will become inportant during the "search for time" option.
Displays
Displays are always printed in chronological order, with the nost immdnent agx>intments at the top of the list. After every four agx>intments, the AP program pauses to give you time to read the current screen display, and then continues when you press RE'lURN.
BlteriBj time Jnformati<n
'lb specify time, in hours, on an AP comnand line you may enter numbers ranging for 100 to 2359, or you may enter a number in the range 1 to 12. '!he advantage of using the former is that the AP program is able to deduce the hour of the day, the minute of the hour, as well. as am or pm. In the latter case, however, the AP program will interpret the entry as the hour of the day then AP will prompt for further specification regarding am or pm.
2.5-AP-l

Operating Procedures
To use the AP program, type:
OA>AP MENJ
The fo11C711ing menu will be displayed on your screen:
Gifford <lJIplter Syst:eIIs Appointment ca:Lemar
Versial 4.0 of ap updated at Aug. 3, 1984 (bpyright (0) 1984 by Gifford <bIplter Systems, Inc.
Meru Optials
-login account D2III!-
A) Make an CIRJOinblent. B) 0IanJe an CIRJOintDEnt. C) Cancel an CIRJOintDEnt. D) Display today's reminders. B) Display every CJAX)int:llleDt. P) Finished. G) Schedn1e a periodic event. B) Display a I1Dlth' s calerdar. I) Display ymr week. J) Search for free tiIae. K) Search by ocntext. L) Sc MEale else' s calerdar.
Enter your selection am press RElURN. Upper and lower case letters are treated identically when you enter your menu option. Whenever you press lWI'URN, regardless of whether you are in the main menu or a sub-inenu, the AP program will assume that you intend to "default" to the current value. Your login account name will be displayed at the top of this menu.
2.S-AP-2

A. Make an 1!ppoinbEnt
This is the most frequently accessed option. Use this option to schedule a one-time specific event. You can schedule an a];p)intment up to one year in advance. If you attenpt to schedule an a];p)intment that would over lap an existing appointment, the program will display a message on your screen indicating that a conflict exists. You will have the option of overriding the conflict and scheduling a simultaneous appointment, or selecting another time.
'lb schedule an a];p)intment, type (A) and a usage exanple will be displayed on your screen. As indicated by this exanple, to enter a date you DUst type the date followed by the I1DI'lth followed by the time of your a];p)intment. After you have entered this information, the program will repeat that data on your screen and ask you to ver,ify your a];p)intment. '!he program will then prompt you to write a one line note to yourself.
This mandatory note should contain information pertinent to your appointment. You will also be asked how many days notice you want before the actual date of your appointment. '!be limit for this field is 28 days. Any time you eIlter anything over 28 days, you will get an error message. '!be next time that you press (D) from the main menu to display your appointment reminders, you will see your message irXIicating the nature and date of your appotntment.
B. Olange an Appointment
'lb change the time specification or the message for an existing a];p)intment entry, press (B). '!he program will list, the next appointment positioned at the top of the list, all of the appointments you have scheduled thus far. Fach appointment on this list will include the apPOintment nuni:ler, the date, time, anount of advance warning, and your note to yourself. '!be . program will display a submenu from which you should select what appointment, or which aspect of an appointment is to be altered.
2.5-AP-3

Make the appropriate choice fran this. s~nu. If you wish to make :nore than one change, press RElURN and the same sub-menu will reappear on your screen. 'lb return to the main menu, press (C) for "no :nore changes."
C. cancel an ARlOintlEnt
When yoo use this option, the appointment is eliminated fran the list. The actual change to the data file that contains the appointment information is not enacted until you choose F (Finished) or L (Saneone else's calendar) fran the list of menu options. AR?ointments whose date have already passed are autanatically re:nove:1 fran the system. Also, appointment entries with a blank message disappear autanatically when yoo 109 out of the system.
'1b cancel an appointment, press (C) and the AP prOgram will list all of yoor scheduled appointments with the :nost iIrminent appointment positioned at the tcp of the list. Designate which appoinbnent you intend to cancel by entering the mmber at the prarpt.
D. Display 'lbday's Demi.r&rs
Reminders that are appropriate for the current day are autanatically displayed when you choose this option.
Each appointment has associated with it a certain number of advarx::e notice days. Advarx::e notice takes weekends into account. For exanple, if you schedule an appointment for Monday with one (1) day advance notice, yoo will be notified on the preceding Friday. Also, yoo will be notified every day after the advance notice date and until the appointment has cane to pass. For exarcple, if you schedule an appointment for Wednesday with three (3) days advarx::e notice, you will be notified on the preceding Friday, Monday, and Tuesday.
2.S-AP-4

To display the current day's reminders, type (D) and a display similar to the one below will appear on your screen:
'lbday at l2:00 DOCD call the bank
"l'c:morrow frail l2:00 DOCD to 1: 00 po racquet ball
Friday frail 3:00 po to 4:00 po staff meeting
B. Display Every AppointlDent
When you choose this option, a list of every appointment, in chronological order, will be displayed on your screen. All pertinent information relating to the appointments, e.g. index nunber, date, time, advance notice, and the brief message, will be displayed on your screen.
F. Fini.sbed
When you press (F) fran the main menu, the appointment calendar file is updated, the program is terminated, and you are returned to the operating system. 'Ibis method of exiting the program is reccmnended over typing Control C (",C), as the latter ccmnand leaves the appointment file unchanged.
G. Sc:bEdde a Periodic Event
'!his option is ,very similar to option A (make an appointment), however, this option allows you to schedule indefinite or repeating events. Possibilities include annual, IIDnthly, weekly, and daily events. A birthday is an exanple of an annual event. Keep in mind that periodic events are not reIlDVed fran the agJOintment system until you cancel them with option C or until their logical longevity has expired.
2.S-AP-S

'1b schedule a per iodic event, type (G) ana the ~ progr~ will display the current day's date, and then prompt:
If you respond by typing (N) for ~n to the "every DDnth" proopt, a list of the 12 IlOnths will be displayed on your screen. Select the month in which you want to schedule the periodic event and the program will prompt:
weekly?
After you respond to this pronpt by typing (Y) for "yes" or (N) for "no," the program will display a list of the parameters that you have specified thus far. '!hen it will pronpt you to supply tl)e time of day that you wish to schedule the event, the estimated duration of the event, a note to YQUrself, and how mcmy days notice you request. After you hG!,ve entered all of this information, you will return to the main nenu.
B. Display a Hlnth' s cal..erI&lr
'!his choice simply displays a month's calendar. Whenthe program pronpts you to choose a oonth, a calendar for that lIDnth will be displayed on your screen. '!his option will only go eleven (11) lIDnths into the future.
I. Display Your week
When you press (I), you will see a tNeek's list of your scheduled engG!,gements. '!he program will first ask you to specify the appropriate lIDnth, and then a starting date for the week that you wish to see. You will see your appointments for the seven (7) days following the starting date. If no hour specification was made for that a£p)intment, no time is shown on the weekly 1 ist.
2.5-AP-6
J. Search for Free Time
'!his option searches through the calendar in ascending chronological order for a free space to match your specifications. '!he program will always find one, no matter hCM far into the future it needs to go. '!he valid time for each day is restricted to a certain user-specified time band. '!his means that you will be pratpted to suWly a block of time in which the AP program should search for free hours.
First you will be asked fran which month and date the program should start searching. '!he search will begin at midnight of the given date, and proceed forward into the future. You must also specify hCM large a time slot for which you are looking. 'Ibis specification cooforms to the rest of the AP program time entry format. EKample: 100 for one (1) hour, and (30) for a half hour, 115 for an hour and a quarter, and 300 for three (3) hours. It is assumed that 9 to 5 might be a conunon time band. 'lb convey these paramaters to AP, you nust type 900 to 1700. You are asked the earliest and latest times that you will consider. After you have entered your search specifications, the program will ask you if you want to include weekends too.
'lb begin searching for free time, type (J), the program will display the current day's date on your screen, and then prarpt you to select the awropriate Ila\th.
When you designate the tOOnth in which you want to search for free time, the program will display that l1DIlth for you on screen.
You must sUWly the date fran which the program should begin searching for free time. You will then be proopted to supply a series of specifications indicating the general time of day for which you wish to search for free time.
Free time slots will always begin on a multiple of fifteen minute intervals like 1:00, 1:15, 1:30, etc. Only time slots which fit entirely into the period specified will be reported. When a free time slot is found, it will be displayed on your
2.5-AP-7

screen, and you will be asked if you want the program to CQntinue searching fran that point qn, or break off the sear¢l.. If you want the search to continue, it will r~nc~inJnediately' after the available time slot that was just displayed on your screen.
For exanple, sugx>se that you are searching for a three hour time slot and the program fioos one, fran 9:00 to 12:00, but you are unhappy with this one. If you instruct the program to continue searching, the next possible slot \«)lIld be fran 12:00 to 3:00~ not from 9:15 to 12:15.
1:. Searcb by Cottext
All appointments whose message contains the same word or words can be found using this search <Jption. These appoin'l::n\ents will be displayed in chronological order, with the nost inminent appointment positioned at the top of the list. Upper ~ lower case are equivalent during this conte~t seqrch. This means that if you want to get a list of all of tll~ aax>inbnents you have had with a person with the last name ~Jone~'" you can enter jones or JCNES. The AP program will search for both.
'lb search for SCll\ething by context, pre~s (K) and the program will request which pattern it should search for.
In response to this pr,anpt, yoo should type a key word that you know occurs in a certain qategory of engagements that you have set up. For exanple, s~ that you meet regularly With Mr. Jooes, and you want to find out how many times this llDlth you have had appointments with him. 'lb do this, type JOOES after the pranpt, and the program will display for you all of the meetings that you have had with Mr. Jones.
L. Saneooe Else' s Cal.aK1ar
By default, the AP program operates on the calendar of the currently logged-in account. '!his aocount name is displayed just above the display box of the AP main menu. Option ''L" (saneone else's calendar) enables you to view or change the calendar of another account. If you choose the ''L" q>tion, a list appears on screen of all of the accounts for whom appointment calendars (files called name.AP) exist in user area 15 of drive A: in a
2.5-AP-S

non-networked ftC-IX>S system, or on the system node of a network. ('!his ability to access other accounts can be restricted by the system manager by setting a write-protect or read-protect file password on individual calendars. A protected calendar can ooly be JOOdified or accessed if the same password were the default terminal password. See thedescr iptioo of SEl' in Chapter 2 for details.)
When you press (L) fran the main menu, the AP program will ask you to supply the account name whose calendar file you intend to access. A file DaIIe.AP DUst already have been created by the account previoosly usiI'J3 AP to schedule an appointment. If AP has a record of that account, you can schedule appointments or display existing appointments, just as if you had logged in using that login account name and password.
In a DR Net network, every account name listed in the NETUSERS file can have a calendar. In an MC-IX>S system withoot networking, valid account names are listed in the PASSWD file.
2.S-AP-9

A9186 file
ASM86 is a progranmer's utility that is not required in ordinary operations. '!he ASM86 program asseIlbles asseIlbly language statements and produces an object file in hexadecimal format. Fbr example:
'!his will take the file B::HQ.A86 and produce a file ECID.H86.
See the CORlJRRENT ~ OPERATIR; SYSTEM PImRAMMER'S GUIDE for additional information.
2.5-ASM86-l

'Ibe A'rmCH ocmnand attaches a process to its console. 'Ibis ccmnand is used for multitasking. Processes can be initiated on a terminal arXl then detached with a system function call. Detached processes will run until they have coopleted execution, or require terminal input or output, in which case the process will wait to be attached. ATTACH allows the user to define which detached process is to be attached. Processes which are waiting for a terminal when a user gives the ux;a,)T oonmand will continue to wait until they are attached or aborted. For exanple:
attaches the background process GENLEDGR to the current virtual terminal. Programs can be detached fran any virtual terminal by Me-InS function calls. ~ndix J illustrates sane ~ II routines that could be used with function calls (page J-4) to detach a process. Attach is a progranmer's utility not required in ordinary Me-InS operations.
2.S-ATTACH-l

'!he AImlST file is used during system startup as a flag to jUJ'l'P autanatically into multiuser nOOe.AUTOST DUst be looated in user area 0 of drive A:. If the file does not exist, the system remains in singl&-user IOOde until the user at the system console gives the r.c:x:;a}T comnand. It is reccmnerXled that the system manager perform administrative functions such as setting passwords when the Me-DOS system is in ~ing Ie-user IOOde.
AUTOST is created by typing:
If AUTOST does not exist on user 0 of drive A:, the system console will not require its user to log in until after the execution of the logout catIDal'Xl. '!his means that without the use of AOroST there is initially no password protection for the system console.
During the system boot sequence, the operating system autanatically erases arrff UTMP files, then creates anenpty UTMP file and puts a special write password on the files UTMP am PASSWD. If AUTOST does not exist, this prooess takes place only after the execution of the logout catIDal'Xl. Maintenance of this file is under the jurisdiction of the system manager.
2.5-AlJ'11Cm'-1

'!he BUFFER conmand is run automatically when the system boots up. It allocates a cache buffer to your hard disk. If you type BUFFER, the following message will appear on your screen:
'!be buffering system is already lDaded.
'!he following files IIIlSt exist on user area 0 of drive A: in order for the BUFFER COIIIIIand to execute properly:
BUFO.CMD BUFl.<M> BUF2.CMD BOF3.am
'!hese files can be found on your MULTIUSER CCNlJRRENl' DOS SYSTEM AND UTILITIES DISKETJE.
2. 5-BUFFER-l
c:x:PMINIT is a program that sets up the characteristics for Virtual Terminals under the MC-IX>S operating system. You I1Ust have the c:x:PMINIT ccmnand file on user area 0 of drive A: in order for the Virtual Terminals feature to operate. If this file is not found during the boot process, then the Virtual Terminals feature will not work.
When the system is first booted, the c:x:PMINIT program reads the VT1'YS files am CCl'lfigures virtual terminal tables that are resident within the operating system.
2.5-<n:MINIT-l

CHR:N is a program which schedules a program to run on the system in the background at a given time. You can use CHRCH to run a job unattended at night when no one else is on the system. '!be CHR:N program runs detached fran the terminal. '!his means that if art';! program requires terminal input, that program cannot be executed with CHRCH.
'!be anm program requires three files: CHRCH.CMD, CHR:Nl'IM, am CBRCNl'AB. KKN.RBP invokes the CHR:N program. CHR:N creates am maintains the amcNl'IM file. Every time CHRCH is executed, ~ updates amcNl'IM. KKN.RSP runs every minute to check the date and timestanp on CHICRl'AB. If CHICRl'AB has been JOOdified, KRCN.RSP will run CHRCN. If there has been no change on the datestanp of CHICRl'AB, KBCN will check to see if there has been art';! change of .the datestanp on CHlOn'IM. If the current date and time is greater than or equal to the date in amcNl'IM, then ~.RSP will run the CHRCH program.
CHRCH.CMD am amcNl'IM JmIst reside in user area 0 of drive A: and should be SET to the SYS attribute.
'!be CHRCH program requires 96K of RAM plus the anount of RAM necessary for the scheduled catmand to be executed. For exanple, to execute a PIP COJ'II'IIalld you would need 96K for CHRCH and 121< for PIP.
'!be CHICRl'AB file cootains all of the useful information which CHRCH reads to execute a ccmnand or program at a given time and date. '!be CHR(NI'AB file must reside in user area 0 of drive A: and IIllst be SET to read-write (RW). CHICRl'AB can be edited while in non-document JOOde of WOrdStar. You are provided with a semple CHICRl'AB file called CBRCNl'AB.SAM.
2.5~-1

'!he CHRCN1'AB file contains the following fields:
JCOONl' MINUTE BOOR MCNrHI:ll\Y MCNlB WEEKDAYOUTPOT COM\ND
* * * * * * ccmnarXl
\ \ 1 2
\ 3
\ 4
\ 5
\ 6
\ 7
\ 8
\ 9
1. A semicolon at the beginning of a line signifies ccmnents. Each field should be separated by at least one space.
2. Count represents the nUl1ber of times that the cannand should be executed. 'Ibis annmt is decreased by one each time the ocmnand is executed until the coont is zero, at which time the entry is autanatically deleted fran the CHRCNl'AB file. A negative coont causes the cannand to be executed continually at the scheduled times until that entry is deleted fran the CHRCNl'AB file.
3. Mimte of the hour.
4. IbJr of the day (24 hour clock).
5. Iblthday (from 1 to 31 depeming upon the IOOI'lth).
6. Iblth (January = 1, February = 2, March = 3, etc.)
7. weekday (Sunday = 0, M:>nday = 1, Tuesday = 2, etc.)
8. Oltput is the standard output file. 'Ibis file is used for capturing output of the ocmnand that is executed. If the name of this file begins with a plus sign (+), then (]fl'Qq will appem the output to the em of that file. 'lb leave the ()]tput field blank, enter a hyphen in that field.
9. Ccwpand specifies the program or ocmnand which should be executed by the ~ program. Do not run prograJE that require inplt faa tbe temnal. If the ccmnand that you execute requires terminal input, that ocmnand will wait forever (until ABORt'ed) since CHRC6 cannot attach any cx:mnand
2.5-cHR::N-2

to a physical terminal. 'Ibis field can take a ccmnand am any arguments which you would normally enter at a oomnand line. 'Ibis field can take as a carmand, the name of a SUBMIT file as long as none of the ocmnands within the SUBMIT file require any terminal input. For exanp1e, in this field you can specify:
PIP A: [gO]=B:*.*[gSVIQq]
to PIP all files from user area 5 of drive B: to user area 0 of drive A:.
For each field which takes numbers for arguments (CCl.JNT, MINUTE, HOUR, MCNlBDAY, MCNm, and WEEKDAY), multiple arguments for a single field stnlld be separated by ocmnas. An asterisk in one of those fields tells CHRCN to always match the current date or time.
If the MINUTE field has a zero as its only entry, then the oomnand specified on that same line is executed once an tnlr on the hour. If the MINUTE field has the follow'ing entry:
0,5,10,15
then the ccmnand is executed on the hour, five minutes past the hour, ten minutes past the hour, and fifteen minutes past the hour.
; MINIJTE
0,5,10,15 * 1 3 1
'Ibis entry will execute the ccmnand four times every hour on every March 1 that falls on a Monday. If you entered a 3 in the hour field, then the ccmnand would be executed at 3:00 a.m., 3:05 a.m., 3:10 a.m., and 3:15 a.m. on every March 1 that falls on a M:>nda.y.
2.5--cHR»-3

A percentage sign (%) followed by a nUJ1'ber in one of the five fields which takes m.mbers for arguments tells CHR:N to execute the scheduled ccmnand on a periodic basis. '!hat is, if the minute field had an entry "%3," then the ccmnand would be executed every time that the current minute was a JIll 1 tiple of three.
An exanple of a CHR:Nl'AB entry follows:
To execute a tape backup to occur at 11:00 p.m. every night, edit the CHR:Nl'AB file in non-document JOOde of ~rdStar or a coopatible text editor and make the following entries:
1CXlJNT MINt1rE HOOR KNl'.BI:\\Y KNm WEEKDAY OUTPOT c::cJItWID -1 0 23 * * * +bO:tip.out ntip input. tip
Oltput is appended to the em of the file called TIP.OOT which is located in user area 0 of drive B:. At 11:00 p.m. every night, CHlOI executes the Nl'IP program which reads input fran the file called IN1:U1'.TIP. '!bis cxmnand will be executed every night until the entry is deleted from tRe CHR:Nl'AB file. If you only . wanted to execute this ccmnand for a period of five nights, place a "5" in the COUNT field instead of a "-1."
'!be ~ program requires an available physical console with an FF console nwrber to execute a cxmnand. cmm will look. for an available physical console with the FF console m.mber and if found will load the process. To see if the system has a physical console available with the FF console m.mber, run the SYS'l'AT program and specify (C) for calsoles. '!bis will display the physical consoles which are available for your system.
When generating your XIOS file, you mst have at least one mre virtual terminal nunber than you need. '!bese unassigned virtual terminals will have the calsole nunt>er of FF.
2.5~-4

CBSBT d:file [option=status, ••• , option=status]
The CHSET command modifies or displays special attributes of 16-bit oommand files. Any file named in a CHSm' carmand line is assumed to have the cxmnand file extensioo .CMD, and only files of type .CMD can be modified or described by CHSET. CHSET can show or modify three attributes of .CMD files:
(1) whether several users or terminals can share simultaneously the same copy of program code in RAM1
(2) whether the program uses an Intel 8087 or 80287 arithmetic coprocessor (device that speeds numerical calculations) 1
(3) whether execution is suspended when a user switches virtual terminals and the program becanes a background process.
The eight options available for CHSm' are:
CHSET d:file
CHSET d:file [SHAREI):=(l\l]
CHSET d:file [SHAREl)::()FF] (OEFAULT)
CHSET d:file [8087=CN] ,
CHSET d:file [8087=OFF] (DEFAULT)
CHSET d:file [8087=OP1']
= Displays the file's status on shared processing, 8087 usage, multitasking.
= Allows shared processing from a single image of the file in RAM.
= Prevents shared processing from a single image of the file in RAM.
= Prevents the program from running unless an 8087 or 80287 is available.
= Use this setting for programs that cannot use an 8087 or 80287.
= Allows the program to run with or without an available 8087 or 80287. If no coprocessor is available, the program mst enulate in software the functionality of an 8087 or 80287.
2.S-amET-l

CHSET d:file [SUSPEND=ON] = Prevents nultitasking: execution is suspended if the program is not the foreground screen.
aISET d:file [SUSPEND=OFF] = Allows a non-foreground process to (DEFAULT) output.
Ole, two, or three aISET attr ibutes can be specified in a single C'Ol1InaI1d line. For exanple, the following CHSET conmand:
OD>aISET A:IJC [SHARED=ON, 8087=OPT, SUSPE;ND=OFF]
specifies that the file DMCCMD on user ar~a 0 of drive A: is set for shared processing, use of an 8087 or 80287 if one is available, and with processing not suspended in background roode. If the program DMC is wr i tten in a way that supports these features, several users (or the sane user on several virtual terminals) could share use of an 8087 or 80287 (if a coprocessor were physically present).
Unless CHSET is used to set these special attr ibutes, all of them are OFF, the default status. For example:
'!he system responds with a display of the status of !If.am:
.(]I) settings are [8087::(ft' , SHARED=ON, SOSPJR)=tft')
R>t all oomnand files can actually take advantage of some of these attributes. '!he "header fields" controlled by aISET can interfere with a program's capability of being shared [SHARED=ON], of utilizing an 8087 or 80287 [8087=OFF], and of producing output as a background process [SUSPEND=OFF].
2. 5-CHSET-2

Note that a ccmnand of the form:
5B>CHSln' AJAX [SUS~]
will stop a program (here "AJAX.CMD") fran executing if it is subsequently detached fran the screen, regardless of whether the program is doing console I/O. '!be above ccmnand \\'QUId override a VCMODE BUFE'EREl) or VCMODE DYNAMIC cxmnand that otherwise 'NOUld allow all of the background processes of a given virtual terminal to create outpu~
Using CHSET to assign special attributes to a command file will not provide the file with new capabilities unless the program was originally written to support those features, just as awarding a diplana will not necessarily enable an illiterate recipient to read. CHSET only instructs the operating system to treat a program as if sane irdicated capability were presen~ If it is not, the program cannot take advantage of CHSET.
For exanple, using CHSET to set [SHARED = CN] will not allow DIll tiple users to share the same copy of a program that mixes code am data, nor will setting [8087=OPl'] allow a spelling checker program to use an 8087 or 80287 coprocessor if its code performs no arithmetic. You will have to experiment to see if CHSET is helpful for any specific applications program. See the CXHlJRRPNl' ~ OPERATING SYSTEM USER'S GUIDE am CXHlJRRPNl' ~ 0PERATI'tG SYSTEM PROGRAMMER'S GUIDE for additional information.
2.5-cHSEl'-3

aax HELP aax @node
'!be CLOCK ccmnand is used to set the system clock/calendar or to display the time aOO date. CLOCK can be used on an individual Me-DOS carp.lter, or within a DR Net network to display or set the clock/calendar on either the local node or arrt renote nodes. Many of the features in Me-DOS use the system clock to determine the current day aOO time. It is ~rtant that the system manager make certain that the system clock is always set accurately. Since the DATE ocmnand can read the clock, the system manager may decide to set a password on CLOCK to prevent unauthorized setting of the clock/calendar.
Me-DOS uses the real-time hardware clock to set the time. '!be DATE ocmnand can also be used to display the time of day. Unless the Nicad battery backup is disconnected fran your system, you should only have to set the time once. The NiCad battery lasts for about two years. When you type CLOCK, the program responds:
Optial:
GIHURD <XJII.lUlm SXS'll!!IE SysteIIl Cklck Maintenance Progr_ Rev. 1.3
OPTIOJ IIIRJ
s = Set time and date. T = Set time only. D = Set date only. P = Print date and tilDe emce. e = Print date and tilE ocntimously. X = Exit progr_.
Press (S) to set the time and date. Time is entered in a 24-hour clock format (such as 14:22 for 2:22 pn). '!be date is entered with the nunber of the IOOnth, day, and year between slashes: 6/21/84 for June 21, 1984.
2.S-cIOCK-1

You can set the "time only" by pressing (T), or you can set the "date only" by pressing (D). 'lb check the date and time, press (P). You will see a display similar to the one below:
CUrrent time: 09:52:54 CUrrent date: 06/21/84
Press (C) to C<X'ltinuously print the time and date on your terminal screen.
Use in DR Ret Ia::al Area RebJorks
In a DR Net local area network, the @node option of CLCCK can be used to set the time and date on any rerote nodes whose names follow the syntx>l (@) in the carmand line. A reJIDte node IIllst be up and running for you to set its clock/calendar. '1b.e CLOC:K program is helpful if you want to synchronize the times of all of the systems on a DR Net network. You can set the clock/calendars or display the current time and date of all the reJIDte nodes by typing:
or you can set the clock of the SALES system node by typing:
OA:>CL<X::K @SALES
2.S-cu:cK-2

'!be program displays the menu:
~:
Glft\H) aJIPO'mR St9J1H) Systelll Clock Maintenance Progr_ Rev. 1.3
o apud Menu Optims:
S = Set t:bae and date fraa this oode's settiDJ. P = Print date and t:bDe for the list of nodes. X = Exit program.
Press (S) to set the time and date for the nodes that are designated in the oarmand line. '!be time and date are set fran the time and date of the local node. Time is entered in a 24-hour clock format (such as 14:22 for 2:22pn). '!he date is entered with the nunber of the roonth, day, and year between slashes: 6/21/84 for June 21, 1984.
To check the date and time, press (P). You will see a display similar to the one below:
OJrrent date and tiE at oode:
sales 08/21/84 09:32:11
2.S-cIOCK-3

'!be ~IG.Nm' file is used only in DR Net local area networks. It provides the network input/output system (NIOS) with innormation about network configuration and default resource mapping. By changing the ~G.NEl' file the system manager can modify features of the network initialization process. If an operator would prefer to have a terminal attached to the network by a different resource mapping, the Nm' cxmnand can change ~G.NET default resource mapping assignments.
The a::NFIG.NFI.l' file is read by the SETNET program, invoked during network initialization, which uses that information to configure the network. A sample CONFIG.NET file is provided with the DR Net system diskette. If you want to change the sample file, use ED, WOrdStar (non-document mode), or a similar text editor. A sample ~IG.NET file is listed below:
passNOrd IUmIDIT DCC1e 1 default 0 servers 10 requester 6 buffers 4 timeoot 5 ret 9 private f: g: drive 1: = a: drive m: = b: drive printer queue queue queue noCIenaIIIe
n: = c: 5 = 1 3 MXSPL = MXSPL 02 SPLIR = SPLDt 02 SPUlJr = SPUUl' 02 MIU«Itl'm
,tble passwrd, also default passwrd ,Ia:al DCC1e nmber ,Default DCC1e IUIIber ,limber of server processes ,Rldler of requester processes ,limber of message buffers JSe.ocmds till timeout ,lbIber of lC".r's ,Private drives (no reuDte access) ,Maps a: drive of DCC1e 0 onto 1: ,Drive m: is b: drive of DCC1e 0 ,Drive n: is c: drive of DCC1e 0 JMap printer 1 of DCC1e 3 as printer 5 JMap the queue of DCC1e 2
JIccal node naDIe
For a nore detailed explanation of the ~G.NET file, r~ Chapter 3 of Gifford's DR NET USER'S MANUAL.
2.5-crNFIG.NET-l

'!he OONSOLE cxmnand displays the nunbeir of the user's terminal, as found in the 'rlYS file, as well as the nlmDer of the foreground virtual terminal screen.
ExaDple:
OA>coNSOLE
'!he system responds with a display of the form:
Ihysica1 tendnal is 2 Virtual terJDinal is 8
'!he virtual terminal nUDtler is needed by, the ABORT cxmnand.
2.S-CONSOLE-I

CPr -v
'!be CPY program enables you to copy an entire diskette or an entire logical drive of a hard disk. Rather than copy individual files like the PIP program, CPY transfers the entire image of one diskette or logical drive (the "source") onto another drive or diskette (the "destination"). '!be destination is usually a blank diskette or an enpty logical drive, since CPY erases whatever information may have been in the destination drive. Because it copies the exact image of the source, CPY does not "pack" files into contiguous tracks unless they were already arranged in this way on the source. '!bus, PIP is used rore often than CPY.
'!be CPY program is a convenient w8)j to back up diskettes. When used with hard disks, the program can copy one drive onto another, or in 84 megabyte systems, CPY can copy a drive onto the rerovable platter. When copying diskettes, CPY requires that both diskettes have the same nllJ'lber of bytes per sector (128, 256, 512, or 1024), and that both be either single or double sided. Typing the keyword CPY displays the main CPY menu:
OA.>CPY
Gifford Qmplter SysteE Qlpy utility V2.0
Ik> yaJ want to copy: S!S'.lBI tracks ally? (type S) IWrA tracks ally? (type D) ALL of the disk? (type A)
Exit back to the System. (type X)
Select the aQ?ropriate response (with no RETURN after it). '!be program proopts:
Source drive? (A, B, •• )
2.5-cPY-l

'lbesource drive is the drive which criltains the information you want to COpy. When you respond, the program pratpts:
Destinatim drive? (A, B,. • .)
'!he destination drive is the drive ontowbich you want the information to be copied. When you respond, the program pral'ptS:
Put source disk em ••• Put destiriatiaJ. diSk em ••• 'l11en type RBWH.t
Put the source am destination diskettes . in the proper drives. . It is extremely inportant that you have the souroe disk in the designated drive. You wi11 erase .inforinatibn ·6hthe SOUrce diskette if you reverse the two. If you have any dOubt about the identity of the SOUrce or destinatiOri drive, abort the program with "c, or type fran ano1::hE!r virtual tebldnal:
OA>SDIR d: [user=all]
where d is the drive designator that you 11ill use with theCP! program. Now press RErURNI if the diskettes have the same format, the program copies each track. ltlen all of the trackS are copied, the program pratpts you for the next 00py oPeratidtt If you type:
QA)Cpy -v
the CPY program will bypass the data verify pass oh the destination drive. If the CPY program gives ybu error statements, confirm that the diskettes in. the source arid destination drives ate physically identical (same Sector size, and both single or double sided).
2.5-cPY-2

(bpyi.DJ Diskettes CD SinJle Floppy Drive Systems
You cannot directly copy diskettes to diskettes on systems that support only one floppy disk drive using the CPY program. If you have a hard disk, you can PIP all of the files on a diskette to an enpty directory area. Then give the DSKRESEl' catmand, replace the source diskette with a formatted destination diskette, and PIP the files fran the hard disk to the destination diskette. See 2.5-PlP for a description of PIP.
If no enpty directory area is available on the hard disk, set (E the Archive attribute to all files in some directory area of the hard disk, and PIP the source diskette files to this directory area. Gi ve the DSKRESET catmand. Now you can use PIP with the [A] option to ropy the files to a destination diskette. If you do not need copies of the source files on the hard disk, use the EAAQ ocmnand to delete them.
In a DR Net network, a diskette can be copied to a destination diskette on a drive elswhere in the network, provided that the destination drive has been reset by a DSKRESET catmand and attached to your virtual terminal by a NEr ocmnand. You mst use PIP, however, rather than CPY, to transfer files between a 5.25" diskette and an 8" diskette.
2.S-cPY-3

DMBc
The DM'E cxmnand displays the current time and date at the terminal screen. To display the date, type:
The program respcn:ls with a display like thefolloong:
1falneac)ay Apt'il 18, 1984 9:08 pIl
For a c:xntinuous display that shows the time to the nearest seoorrl, type arr:I character after the keyword ''DA.m.'' An example follows, although this printed manual cannot imitate the oootinuous display of the advancing seoorrls:
OA>DM'E C wa'nrsClay April 18, 1984 9:08:12 pi
With arr:I character as an argument, the displayed time (and eventually the date) will advance as the clock/calendar records the passage of time. Pressing arr:I key stq>s the oootinuous display and returns you to the system. pratpt. The"'p toggle with DATE prints the date and time to your curent printer. (RemeJlt)er to free the printer with a matching "'P.)
Digital Research Inc.'s SEl' optiat of the DATE oomnam, to set the clock/calerXlar, is not implemented in Gifford's !C-DOS. Use instead the cux::K cxmnand to set the clock/ calerrlar •
See the a:Hl.JRRml' CP/M OPERATnG SYSTEM USER'S GUIDE for addi tiooal infonnatioo.
2.S-DATE-l

IlAYPII£ options
'!he DAYFILE ccmnand controls whether the screen lists after each ccmnand line the ti1De of day (hours/minutes/seconas for a 24-hour clock), am the logical drive am user area fran which the ocmna.nd file is loaded into RAM. You can toggle the DAYFILE feature by two options, CN (to enable the display) am OFF (to disable it). Any other characters display a usage message:
3A>DAYFILE ? Usage is "Dlm'IIB cr to enable the dayfile qltial or "Dlm'IIB (ftII to disable the dayfile qtim.
If you type the keyword DAYFILE with no argument, the screen displays the current status of the dayfile option, and indicates how to change it. After a DAYFILE ON ccmnand enables the dayfile option, a dayfile line follows any ccmnand. For exanple:
5B>MAKE AIm:l)T
14:32:52 A:MRIE.CMD (user 0)
If the canmand DAYFILE OFF were given, the same MAKE AIm:l)T ocmna.nd would not produce the second line of the display above.
'!he DAYFILE option of the GENC::a'M ocmnand also causes the current time to be displayed after each ccmnand, but usiBJ GENOCPM instead of the DAYFILE ccmnand to CQ'ltrol this feature is much less convenient. Ocmmands that are resident system processes or that are built into the Me-DOS shell (like T..JXI.'»'r, RESET, SYtC) are not affected by the DAYFILE ocmnand. Since a DAYFILE cxmnand affects every terminal on an Me-186 system, the system manager may elect to assume jurisdiction of the DAYFILE cc:mnand. All of the exanples of ccmnands lines in this manual (except the exanple above) represent the screen display as it would appear with the dayfile option OFF.
2.5-DAYFILE-I

IDl'86 filename
'!he DDT86 utility enables a programner to examine and nn:1ify programs and files, and to directly address the CPU or any location in randan access menory (RAM). Do not use DDT86 when other users are active, since an error in using DDT86 could disrupt their work or even disable the operating system. It is recannended that the system manager set a read-protect password on the DDT86 program, to prevent its unauthorized use.
Information that is loaded into RAM is stored in specific addresses within RAM, potentially ranging fran 0 (where Me-DOS itself begins) to the upper limit of meDDry in your system. DDT86 uses a bexadecblal notation to refer to locations in RAM. In hexadecimal nunbers, the first sixteen nunbers are written as single digits: the familiar 0, 1, 2, 3, ••• , but with "9" followed by the special hexadecimal numerals A (= 10), B (= 11), C (= 12), up to F (= 15). In the pre v ious sentence, ord inary "decimal" equivalents awear at the right of each equal sign. Use of hexadecimal notation allows DDT86 to write big nunt>ers nore carpactly. For exanple, hexadecimal "FFFF" = 65,535 in ordinary nunbers, but the hexadecimal versioo needs only four places, instead of the five figures required to write "65,535."
In DDT86 (and in other programmer's utilities like ~~, RAM addresses where files are stored are written as a pair of 4-digit hexadecimal nUIlbers, separated by a colon (:). '!he first part is called the "segment," and the seoc:xd part is called the "offset." '!he segment shows where to begin counting; the offset mst be added to the address. '!his may seem oooplex, but people use a similar notation in a date like "12/25/84" which we understand to mean the 25th day· (=offset) of the 12th nonth (=segment) of the 84th year. (Here "84" is really a second offset: the century "1900" is understood as added to the year.) Remenber that DDT86 interprets a number like AOOO:7850 as a specific RAM locatioo, namely AOOO (hexadecimal) "paragraphs" (16-byte units) plus 7850 (hexadecimal) 8-bit "bytes" above the lowest address (0000:0000) in RAM. In the description of DDT86 carmand options on the next page, "s:o" means "segment:offset." (See Appendix N).
2.5-DDT86-l

Typing its keyword invokes oor86, as illustrated below:
0A>1D'.l'86 JD1'86 1.2
At the DDT86 proopt (-) various letters (with RAM addresses) can be entered as o:mnand options. Several are listed below:
OP'lIat JIFANDI;
As:o Bs:ol,02,03
.... c Ds:o
Ds:ol,02
Efile Fs:ol,02,c Gs:o H,1,,2
Ls:ol,02 Msl:ol,02,03
OIn (or QOn) Rfile,s:o
Ss:o SRs:ol,s:02,x
Tn V Wfile,s:01,02 xr
Begin entering assent>ly language code at s:o Find any differences in two blocks of RAM, one fran s:ol to s:02, ~ the other extending to s:03 Exit fran ID1'86 Display cootents of the 192 bytes of RAM beginning at s:o, in both hexadecimal and AS:!II formats Similarly display everything fran s:ol to s:02 Any key stops the scrolling, returns the - pranpt IDa.d a specified executable caunand file into RAM Fill all the RAM fran s:ol to s:02 with character c Begin execution of e<mnand file, starting at s:o Calculate sum (II + 12), and difference (il - 12), for hexadecimal mmi>ers iI, 12 Display contents of s:ol to s:02 as assembly code Move contents of (sl:ol through sl.o2) to an area beginning at sl:03 (or at s2:03, if s2 specified) Read input fran port m or write output to port n Read a file fran a disk into RAM, starting at s:o If s:o not specified, IDT86 displays start address Display contents of s:o, replace with keyboard input Search for pattern x: fran s:ol to s:02, and display where x begins, if x is found Execute n program steps, displaying CPU states Show the location of a file manipulated by E or R Save on disk as "file" the cootents of s:ol to s:02. Display and m:xUfy register r of the CPU
Use the Me-IX)) control character .... C to exit fran oor86. '!he a:H:lJRRENT ~ OPERATING SYSTEM PlmRAMMER'S GUIDE provides additional detail on the use and capabilities of DDT86.
2.S-DDT86-2

om
om[S) d:file[Gn]
'!he OIR oonmand displays a list of files in a user area of a specified drive, or that resent>le the irrlicated files. '!he OIR camnand is used to determine what files are in a specified directory area. OIR accepts wildcard syntx>ls (* and ?) in file names.
In its s~lest form, OIRwithout any arguments or modifiers displays all of the files with the OIR attribute in your current directory area that have the OIR attribute. '!he oonmand:
4C>OIR
displays the names of all the files with the OIR attribute On user area 4 of drive C:, in a four-oolumn display. File names with fewer than eight characters before the extension are listed as if they had blanks preceding their file type. '!he above camand provides the same display as "OIR *.*," since the default value is "all names and all extensions." If a display has mre directories than will fit in a single screen, yoo mst use the .... S system oonmand to stop the scrolling ( .... Q restarts it), or request a mre restrictive listing. For exanple, to display only filenames starting with "M" in the same directory, type:
4C>OIR M*.*
To list only the OIR files with one-, two-, three-, four-, or five-letter names and with the extensioo .BAK in your current user area, type:
4C>OIR ?????BAK
2.S-0IR-I

To list files in a user area other than the one which you are in, use the [Gn] option with n the nunber of the user area. For exanple, to list the names of all the files that have the OIR attribute on user area 6 of drive B:, give the carmam:
OA>DIR B: [G6]
Fach account, however, has a unique entry in the PASSWD file which specifies its accessible user areas. The [Gn] OIR ocmnarXi cannot be used to display the names of files in directory areas where you are not allowed access in your login PASSWD file.
'!he [5] option causes the om COJ1IIlaIld to display the names of all files in a specified directory area, including both of OIR and SYS attributes. (See the SEr coomand for modifying the OIR or SYS attribute of a file.) For example, the carmam:
6C>OIR[5] A:*.CMD[GOi
will display all of the file names on user area 0 of drive A:, regardless of whether they have the OIR or SYS attributes. Unlike the SDIR conmand, however, the om conmand with the [S] option does not indicate which attribute a specific file has.
The Dm[5] conmand can be used, in conjunction with the "p control character, to print out the names of all of the files that are in a single user area on an archival diskette. This listing can be attached to the paper sleeve of the diskette, or kept in a bound catalogue, to assist in retrieving files fran diskette storage. Remenber to repeat the "p ocmnand when you no longer want the printer to echo the screen of your terminal.
See the CCNCURRENT ~ OPERATIOO sYSTEM USER'S GUIDE addi tional information.
2.S-0IR-2

'!he Inti ClOIlI11alXi disables all physiCal terminals except the system c:xxlSOle ani writes the contents of the cache buffer to the hard disk. '!he oonsole screen displays the message:
All other terminals become inoperative until the MC-OOS system is reloaded by pressin;J the RESEr rotten.
Exanple:
This caomand should cnly be given by the system manager. Before gi vin;J a JXl4lN <XJlI'IlaDi, type WH) -A to be sure that no other users are <Xl the system, since Inti will disable their terminals. If WfI) -A shows that other users are logged in, use the WRITE cxmnarxi to warn them that you plan to shut down the system.
2.S-00lti-l

IB<iCI!S£t d:
'1tIe DSKRESEl' 00I1I11a00 resets the floppy disk drive. Type the DSI<RESEl' cx:mnand before you change a floppy diskette. If you do not give an argument to DSKRESEl', all drives are reset. You can specify the individual drives that you want to reset.
Examples:
This resets all floppy disk drives.
~DSKRFSEl' B:
This resets floppy drive B:.
ClA>DSKRFSEl' D:, E:
This resets floppy drives D: and E:.
2.S-DSKRESEl'-1

IXiII.SOB
IXIII.SOB
IniN'.SUB is an optiOOal file oc:ntaining 00iIlIIarids which are to be eXecuted as part of the shutdown prOcedure. Read aboUt the SYSINIT.SUB and USERINIT.SUB for ideas at l1bw this file lIdght be used.
An ~le of a DONN.SUB file is:
iexample of a lnti.SUB file TIP
'lhe maintenance of this file falls Ul'der the juriSdictial of the system manager. It is discussed again in Cbapter 3.
2. 5-00N:q. SUB-l

DiN.CMD is an cptiooal program Which will nm after the J:X7fti o:mnarn is given. '!his program file can be used to custauize your system by executing a program Which you want to be part of your slultdc:.Nl procedure. It JlIlst be located 00 user area 0 of drive A:.
An exanple of a oc:mnand to create a DiN.CMD oc:mnand file is:
OJ\)PIP :DiN .CX>=DATE.CM>[vmi
'ltds cxmnaoo would cause the system to always display the date am time when you slult down the system.
'!be maintenance of this file falls urder the jurisdictioo of the system manager. It is discussed again in Qapter 3.
2.S-J:Hl-I

ED d:filel d:file2
ED is a text editing utility provided b¥ Digital Research, Inc. It can be used to create and modify various files used by Me-DOS, including LPRS, MO'ID, TlYS, VTlYS, and the .SUB files used b¥ the systen manager to customize MC-oos.
Unlike cbaracter-oriented text editors like WOrdStar that are cooloonly used in office work, ED is a line editor that operates b¥ creating lines of text in a metOry buffer. Although line editors like ED are widely used in programming, engineering, and sciEntific applications, readers who have experiSlce using character-oriented text editors may regard ED as not very easy to use. Gifford reconmSlds the use of other editors, such as WOrdStar,instead of ED for most business applications.
Readers who have no other text editor, however, can create or modify a file by typing the keyword ED followed by the name of the file that you wish to create or modify. FOr example:
2B>ED TEST. DOC
will create a new file TESTJX)C if the file does not already exist. If TEST.DOC already exists, ED will allow you to modify it, and will save the modified versioo as TEST.OOC and rename the original file TEST.BAK. If a drive nane (like "C:") had followed "TEST.OOC" in the comnand line above, the edited versioo would have been saved on that drive, rather than on your current drive.
You can also provide two file names in the ocmnand that invokes ED. The first file is the "input" file that you are modifying, and the second file is the "output" file that ED will create. If you type the ED keyword without any file names, the program will prompt you to identify the input and output files. An extensive description of ED and a tutorial on its use is provided in Section 4 of the COlCJRRENT ~ OPERATIR; SYSTEM USER'S GUIDE.
2.5-ED-l

All of the Me-DOS Editing control characters (page 2.3-3) can be used with ED, but .... C, .... p, and .... S (page 2.3-2) do not ~rk normally when ED is in ninsert m:::xlen (after I or i). Listed below are same command options that can be used with ED:
o 'pend
fA nA B, -B .... C nC, -nC no, -nD E Fstring .... Z fstring .... Z H I i Istring .... Z J, j nK, -nK nL, -nL, OL nMccmnand n, -n n: n:comnand Nstring .... Z o (YIN) nP, -nP Q (Y/N/ .... C) R Rfile .... Z S,s
Put entire input file into memory buffer Md lExt n lines fran input file to memory buffer fotlw pointer to begirming (B) or end (-B) of buffer Abort an ED macro COl1IIla.OO (option M below) Move pointer n characters forward (nC) or backward (-nC) Delete n characters before (-nD) or after (nD) pointer Exit from ED, save edited file, return to l£-DOS Find a string of characters, ignore upper/lower case Find exact character string ( .... Z marks end of string) Save file and reedit, using current output file as input Enter insert m:::xle, translating lower to upper case Enter exactly (upper/lower case) keystrokes to buffer Enter a string of characters at the pointer Used in commands to insert and delete strings Delete n lines before (-nK) or after (nK) pointer fotlve pointer n lines forward (-nK) or backward (nK) Execute st:ecifiEd comnand n times fotlve pointer n lines forward or -n lines backward fotlve to line n: Execute conmand (K/L/T) down to but not J:eyald line n: Search for a string in input file J:eyond memory buffer Abandon all changes, return to original input file fotlve pointer n pages (23 lines) forward or back (-nP) Exit from ED to K:-DOS witoout saving any ~rk Read into the buffer a block that you created with X Read into the buffer a file callEd file.LIB Used in string substitution commands
nT, -nT, U, -U
OT Display the previous (-nT) or next n lines
V, -V ov nW nXfile .... Z nZ .... Z or ESC
Translate lower case to upper case (-U = toggle off) 'lbggle line numbering on (V), off (-V) Display the anount of space ranaining in memory buffer Write first n lines of buffer to disk as output file Write n lines to the disk as temporary .LIB file Wai t n seconds J:e fore executing the next ccmnand End of string, separates file names in R conmands
2.5-ED-2

ERA d:file BRA d:file [XFCB]
'!he ERA ccmnand erases files that have the Hi ("read-write") attribute. ERA can be used to to make disk space or directory space available by deleting unwanted files. You can protect sensitive files fran unauthorized access by copying them to floppy diskettes, removing the diskettes to a secure location, and then using the ERA ocmnand to delete the files fran the hard disk. 'lb delete the file AMBRIAN in user area 8 of drive C:, type:
8B>ERA C:AMBRIAN
'!he SE:l' cxmnand can be used in several ways to protect files fran deletion by the ERA ccmnand. With the SEl' oarmand a file can be given the RO ("read only") attribute, or a password can be required to erase a file. For example:
2B>ERA D:FILEX,P~RD
'!his erases the file FILEX with the password P~ fran user area 2 of drive 0:. See the description of the SEl' ocmnand for DDre details on the Hi am RO attributes and file passwords.
'!he ERA ocmnand accepts wildcard specifications (*,1) in file names. (Great caution is adv ised in the use of the ERA command with wildcard specifications, since the wrong wildcard specification can destroy valuable files. '!he ER1!Q ocmnand is much safer to use than ERA.) If you oarmand the system to delete all of the files in a directory area with the *.* notation, the operating system will ask:
Confirlll delete all user files (Y/M)?
2.S-ERA-I

Type (y) or (y) to erase all unprotected files in the directory; any other key returns the system pranpt without erasing artI files. Additional examples of the use of wildcards with ERA are:
2C>ERA *.BAK
This erases all unprotected files of type .BAK in user area 2 of drive C:.
4A>ERA B:FL?? *
This erases all of the unprotected files with two, three, and four-letter names begiming with "FL" in user area 4 of drive B:.
If the [XFCB] option is specified, then only the extended file control blook is erased. An extended file control blook is created by the SEn' cxmnand, and contains supplementary information used for password protection of files.
4B>ERA REXDRDB.OLD [XFCB]
If protection has been SEn' to OFF, this erases the password of the file REXX>RDS.OLD, but not the file REXX>RDS.OLD itself. (If the label of drive E: has been SEn' with PROTECl' = eN, and the XFCB contains a file password, then the ERA program will request that you type the file password before it will erase the XFCB. The description of the SEn' ccmnand in this manual provides information on drive labels, file passwords, and passwordprotected labels.) See also the CCNCURRENl' ~ 0PE:RATIR2 SYSTEM USER'S GUIDE for DRI's dooumentation of the ERA and SEn' ccmnands.
The mst camDIl operator errors in MC-IX>S involve using ERA with wildcards and unintentionally erasing useful files. By using the safer ERAO carmand (see next page) this risk can be substantially reduced.
2.5-ERA-2

ElWl d:fUe ElWl d:file [XFCB]
The ERAO cx:mnarxl deletes files with the RW ("rea.d-write") attrirute. It can erase tmWallted files, thereby making directory space or file space available al your disk drives. It is normally used with wildcard (*,?) file specifications.
The ERAO ("erase with query") cx:mnarxl rese1libles the ERA c::x:xrIlIClOO, rut ERAO asks for ocnfirmatim before eaCh deletion. 'Ibis feature makes accidental deletial less likely, and lets you delete files selectively within the group of files matChing yoor wildcard specification. ERAO has the same syntax as ERA, but with dialogue. The following is a ERAO CX>lIIIIa.IXl am a praupt:
OB>ERAO *.* B: DOClIal'. 'm' ?
Since B:*.* means every RW file in user area 0 of drive B:~ ERAO will ask you for a respmse for eaCh of the files in this directory area. Type (Y) or (y) to delete 1XXlJMEll1T.'ln', or type arr:t other key to keep the file in your directory. ERAO may propose erasing a file with the RO attribute, but even if you affirm that it slx>uld be deleted, ERAO will print a message that the RO file was oot erased. The program will then go m to ask you about the next file, 1Dltil it has queried you m every file in the directory area that matches your wildcard specifications, or 1Dltil you exit with a ... c oontrol character.
'!he SEI' cx:mnarxl can be used to protect files fran deleletim by ERAO (or by ERA), by assigning to files either the RO ("read ally") attribute or a file password that prevents deletion. The label of a drive llIlst be set with PR:>TEX:'l'=(N for file passwords to be effective. (The ERA and ERAO o:mnands are disabled. al any logical drive that has 'been SET with the RO attrirute, but this last method is not depemable protectim, since a DSKRESEl' 0Cll1IDall1 or "'c restores all drives to RW status.)
2.5-ERAQ-l

The follCMing ocmnarrl would propose for deletioo. every file whose file extensioo. is .PAT 00. user area. 0 of drive C:.
0I\>ERl-\Q C: * . PAT
If you affirm that you want to delete a file that is protected by a file pa.ssword, and if the drive label is set with protectioo. (ti, the ERl-\Q program will ask for the file password, whiCh you must present to delete the file. If you cannot present the file password (which is oot echoed 00. the screen) I EMQ does not delete that file, blt queries you about the next file, if arry. If a group of files have the same password, you can inclOOe the password in the cx:mnarrl line, blt in this case the file password that you type will appear 00. your screen:
lOERAQ A: * . In:::; MYS'1ERY
The above <'XJIIIIMnd refers to all the files 00. user area I of drive A: whose extensioo. is .In::: and w'hose file pa.ssword is MYSTERY.
The EMQ ocmnand can delete file passwords, but tmless protectioo. is set OFF 00. the logical drive label, you must be able to provide MC-OOS with arry file passl«>rd that you want to delete. The following example with the [XFCB] optioo.:
2B>ERAQ DR??? * [XFCB]
causes ERAQ to ask you Whether to erase the passwords of all the files with tl«>, three, four, and five-letter names beginning with nOR" 00. user area 2 of drive B:. The files themselves will oot be deleted. If the label of drive B: is set with protectioo. (ti, the program will demarrl after each affirmative respcnse that you type the password that you want deleted. Only if you present the correct password will the exterxled file cxntrol block be erased.
See the c:x:ECURR!Nl' CP/M OPmATING SYS'l'EM USER'S GUIDE for addi tiooal informatioo. 00. the ERAQ oc:mmand.
2.S-EMO-2

FILBS
FILBS FILBS d:@node I'ILIS d:file[Ql) FILBS c •••
FILES is a program that lets you list your file directory using var ious formats. It lets you access extensive information about each of the files in any directory on a Gifford system or in a DR Net net\«)rk. FILES also recognizes rore. powerful wildcard synbols than other K:-OOS utilities. Displayed below is a list of the options that are available with the FILES program.
-1 Iong format: give additional information about each file -r Ieverse order: list in reverse alphabetical order -s Iecord size: give the size of the file in records (128 bytes) -t Tine order: list in order determined by tine stanps -u Usage tine: display last access and JOOdification time
I.alg J.ibrE.t:
'!he option lists additional information about each of the files in your directory. Below is a sanple ooJllllal'ld and output:
2C>FILES -L T.EST.IXX! rsa nil 1024 Q::t 18 12:33 po \ \ \ \ 123 4
test.doc \
5
'!he meaning of each of these fields follows:
l} "RSA" stands for "read only," "system," and "archive." Ieflects the current status of those respective attributes. If an attribute has not been set for a file, the display reflects this by showing a hyphen ("_") in the correspcnUng position. Pbr exanple, if this field shows " __ ," none of the three attributes have been set.
2.5-FILES-l

2) "RWD" stands for "reading," ''writing,'' and "deleting." Reflects the status of the file's password protection. A file may be protected with a password fran other users reading, writing, or deleting that file. For exanple, if this field shows "r-," the file has been protected fran being read. by other users.
3) This field indicates the size in bytes of the file in question. In our exanple, the file TEST.OOC is 1024 bytes. If the record size (-s) option had been specified, the mmber 8 would have been displayed instead of 1024, for that is the size in l28K records of the file TEST.roc.
4) '!his time and date is the last time that the file was ncdified. For instance, it would reflect the last usage time the file was edited by WOrdStar. If the -u option had been specified, the file's last access time would have been specified. For exanple, if you used the TYPE canna.nd to view the cootents of the file, the time that you issued this ccmnand would be recorded by the -u option. '!his field only can display date and timestanps if yOU have timestanping enabled for that drive. If you have not enabled timestamping for that drive, the time field is displayed as all blanks.
5) '!his field displays the name of the file. File names are . displayed in lower-case letter ing. If you are using the FILES program over the network, node names will be displayed . in upper-case lettering.
Sanetimes the name will be sinple, as in:
test. doc
If the file is in aoother directory, drive, or node, the name will be canplicated, as in:
l4b:test.doc@SALES
'!he second display is interpreted as the file named TEST.OOC on user area 14, drive B: on the node named SALES.
2.5-FILES-2

Wildcards
'!he FILES program is equipped to recognize a nuch rore extensive array of wildcard characters, than the DIR or SDIR conmands. A list of these wildcards and a short definition of each follows:
?
*
Any single character. (Note:? has a rore restrictive meaning here than the standard "?" wildcard synbol.) Any nunber of characters.
[ ] [" ]
Any of a classs of characters. Any but a class of characters.
'!hese characters may appear anywhere, any nunber of times on a command line. Here are same examples:
FILES ???
FILES A*
FILES *A
FILES A*B*C*
FILES ["A] *
FILES * [ABC] *
FILES [A-D] * [J-M]
FILES A?C
FILES [A-FP-RIZ]???
All files with three-character file names
All files that start with "A"
All files that end with "A"
All files that have an "A" ~ere, followed by a "B" sanewhere, followed by a "c" sanewhere
All files that don't start with "A"
All files that contain either an "A," "B," or a "C," anywhere in the name
All files that start with a letter in the range "A-D," and end with a letter in the the range "J-M"
All three-character files whose first character is "A" and whose last character is "C"
All four character files whose first character is in the range "A-F" or "P-R" or is "I" or "Z"
2.S-FILES-3

'Ibe matching patterns described above may be applied to the following three areas:
1) the user area and drive (before the colon) 2) the file name 3) the net\\1Ork ncx]e name (if you purchased DR Net)
'Ibis means that you could submit a conmand like the following:
2C>FILES [024-7] [Ae] :*'lER4*@*TIO*
'Ibis conmand is interpreted as all files on user areas 0, 2, or 4 through 7, on drives A: or C:, and whose file name contains the string "term" anywhere in the name, but only on network nodes whose ncx]e name contains the string TIO anywhere in the network node name.
When specifying user areas and multiple drives, as in the exanp1e above, sane rules must be adhered to.
1) If you are going to look in IlDre than one dr i ve, (for excmp1e, [ABC]:) you IIIlst specify user area nUllbers. For excmp1e, you could submit a conmand like this:
OA>FILES [024] [ACe]:*.DOC
but not like this:
OA>FILES [ACe] :*.DOC
2.5-FILES-4

You can also use wildcards to specify user area nUJl'bers. Ebr exanple:
?[ABC]: looks in user areas 0-9 of drives A, B, and C.
??[ABC]: looks in user areas 10-15 of drives A, B, and C.
* [ABC] : looks in user areas 0-15 of drives A, B, and C.
So if you want to look for a file or files in user areas 0 through 15, specify the asterisk wildcard and not [0-15]. The FILES program will interpret this to mean that you want to look in user areas 0, 1, and 5.
2. 5-FILES-5

Versions of Me-DOS for 5-100 systems with version numbers equal to or greater than 1.30 incorporate the FIXSTEP capability. '!he FIXSTEP program is used to change the step rate and head load time on floppy disk drives that are connected to a CoolpuPro Disk 1 or Disk 1A floppy disk controller. Your operating system has been configured with a default step rate of 4 milliseconds, and head load time of 40 milliseconds, to accolllllOdate llDSt floppy disk drives. If your disk drives can step at a faster rate than 4 milliseconds per track, or if they need a slower rate, you can run the FIXS'l'EP program to change the step rate. '!he FIXS'l'EP program patches your Me.OOS system fi Ie. You must reboot the computer after running FIXSTEP to implement the new step rate.
Before you invoke the FIXS'lEP program, make a new backup copy of the boot diskette. Suppose that your floppy disk drive is called drive F:. Insert the backup .£2.E:l. of your boot diskette into the floppy drive, and type:
OP>FIXSTEP
'!be FIXS'l'EP program will prompt you to supply the name of the system file that you want to patch:
Enter filfl!MW!!:
Press the Carr iage Return key for the de fau 1 t name: Me.OOS. If you have named your system file something other than Me.DOS, enter that name.
2. 5-FIXS'lEP-1

You will then be prompted to enter the disk step time in milliseconds:
Enter step time:
'!bis step time can range from 1 to 16 milliseconds. '!be default step tine is 4 milliseconds. '!be value that you enter here depends on the type of floIPi disk dt i ve that your system supports. For mst half-height drive$, this value should be set to 4. For full-height QuIne drives, this value may be shortened to ~, or in some cases, even 2 milliseconds. If you have Shugart SA 800 single-sided drives, set the. step rate to 8.
Next you will be prompted to enter the head load tine in milliseconds:
Enter bead load time:
'!bis number can range from Ito 254 milliseconds. '!be default head load tine is 40 milliseconds. '!be nl.lJlber that you enter here depends on the type of floIPi disk drive that your system supports. For mst dr i ves, this value should be set to 40.
'!be program gives you one final chance to make sure that you have designated the correct values. If you have no further changes to make, press the RETURN key. '!be FIXSTEP program will patch the operating system file on your floppy boot diskette to incorporate the new values. '!bese values will not be implenented until you reboot the system. Boot your ~stem with the new boot diskette that contains the patched version of the operating system.
Impaired performance of your floIPi disk drives such as verify errors in PIP, can indicate that the step rate has been set to too small a value.
'!be FIXS'IEP program should only be executed by the ~stem manager.
2.5-FIXSTEP-2

The FORMAT program is used to prepare new diskettes for use. FORMAT will work with 5.25-inch diskettes or 8-inch diskettes and automatically detects and formats single sided or double sided diskettes. A nUll'ber of formatting options are available for 8-inch diskettes. Gifford Computer Systems recommends that for 8-inch, you use double sided, double density diskettes formatted with l024-byte sectors. Fbr 5.25-inch diskettes, the FO~ program only formats in the single sided format of CP/M-86 for the IBM PC, and requires a 5.25-inch floppy disk drive.
When you run the FORMAT program for 8-inch diskettes, the left-hand floppy drive becomes drive A: and the right-hand floppy drive is always drive B:, regardless of whether those designations are normally used by logical drives of your hard disk. If your system has a single floppy drive, the FORMAT program thinks that drive is drive A:.
If you are running MC-OOS in multiuser Irode, make sure that no one else is using the diskette drive.
To begin formatting, put the diskette to be formatted in a right-hand floppy disk drive, with the write-protect notch covered by an adhesive tab, and enter:
This program pronpts:
lbnplPro Disk Sub-System ~ Versial 3.1 For CPjM-86, MP/M 8-16, am ~ - lbiified. 7-l.O-84
Specify Drive (A: - D:, B: - B:) :
2.5-FORMAT-l

'D1e options allow for up to eight (8) floI=PY disk drives on a system. 'D1e FORMAT program does not recognize hard disk logical drives. If you have two floppy drives, the left-hand drive is drive A: and the right-hand drive is drive B:. If you have four drives on one Disk 1 controller card, the third and fourth dr i ves become dr i ve C: and dr i ve D:. Dr i ves E: - H: refer to 5.25-inch drives on the Disk 1A controller card. ('D1e FORMAT program is the only program you will receive with MC-OOS that refers to physical rather than logical drives.) If your system has a single floppy drive, enter (A).
Ehter the dr i ve in which your diskette is to be formatted. ]» not type the oolon or a RE'lURN. '!he program responds:
Select Disk forat JIIX1e (0, 1, 2, 3):
0=128 1 = 256
2 = 512 3 = 1024
'D1is displays how many bytes (roughly equivalent to keystrokes) that each sector would hold under each format option. Gifford CDnputer Systems reconmends that you use 1024-byte sectors since this gives you the most data storage. Software from oommercial suppliers on 8-inch diskettes is usually distributed formatted with l28-bytesectors (option 0).
If you are formatting a diskette in the right-hand drive, the program responds:
QnfirID ready for forJIIat (Xl disk drive B (y).
Insert the diskette into the drive and press tr). ]» not press RETURN. 'lhe FORMAT program formats all tracks, and ver ifies that they were formatted oorrectly. 'lhe program shows its progress during the format and verification phases. '!he program displays an F for each track it formats and a V for each track it verifies. If S, C, or E appear instead of V, reformat the diskette. If it occurs again on the diskette, this indicates the diskette is bad and should be discarded.
2. 5-FORMAT-2

If the EORMAT program consistently gives S errors when formatting, it is likely that the disk drive needs repair, and you should contact your dealer. Similarly, if you have two floppy drives, and the same diskette shows errors when formatted on one drive, but not on another, or if one drive carmot read diskettes formatted by the other, you should call your dealer to discuss possible disk drive prob~ems. J):) not call your dealer if you cannot format diskettes with exposed write-protect notches, since your system is designed to respect that protection.
Upon oanpletion of formatting, the program prorrpts:
I(HfAT OCIIIplete. Jk) ym want to foaBt another disk? R - request new parameters. cr - duplicate last POlIM.'. R - exit back to systeID.
>
Type your response after the proopt.
If you se lect the R optioo, the program requests new parameters, allowing you to reformat your floppy diskette with new specifications. If you press REl'URN, the program will ask you to confirm that a fresh diskette is ready for formatting. After you type (y), EORMAT will format the diskette.
ReIneIrber that the EORMAT program obliterates any information that existed on a diskette prior to the ~ operatioo. If you make a mistake and format an ~rtant diskette, whatever files were on it carmot be recovered after FORMAT has run.
2.5-EORMAT-3

GIRX:PM GIHx:PM <inputfile >outpltfile
1be ~M conmand is used to generate the K:.OOS system file. It is very unlikely that you will ever need to run the GfN::CPM conmand to make a new version of the K:.OOS file.
'!be ~M conmand should be run on a disk with all of the files supplied on the system diskette, especially all that have file types of .CON and.RSP. We reoomnend that you use a copy of your original boot diskette.
GI!RX::PM Inplt and OUtplt Files
'!be CDiCCPM program will accept an input file which contains all of the parameters which llIlst be specified and changes which should occur in the new K:.OOS file. Input files can be created in the non-document mode of WbrdStar or any word processing progr~ Gifford supplies you with a series of input files on your MULTIUSER eotnJRRENT OOS XIOS DISK. You can send console output to an output file.
Each oomnand in an input file should appear in the same order in which you entered it in the GEN:CPM menu progr~ Every conmand should appear on a separate line followed by a RETURN. '!be last command in the input file should be:
GENSYS
'lb access the GEN:CPM menu program type:
and the program IS llEIlU will be displayed on your screen.
2.5-GENCnlM-I
The short summary below lists the steps in generating a new operating system. Refer to the manual entitled CUS'lOMIZING YOUR MULTIUSER 00t0JRRENT IX>S SYSTEM for a mre detailed explanation of this prcx:edure. -
1) Choose an XIOS file based on the number of I,flysical and virtual terminals, the number of printers, and the number and type of hard disk drive(s). ~ use the same XIOS file that is indicated on the label of your master system diskette (e.g. Xl070702.F2l). See pages 3-11 of the "CUS"roMIZATIONn manual.
2) Rename your new XIOS file to XIOS.OON. See page 12 of the nCUSTOMIZATION" manual.
3) Choose the correct inplt file for GENO:PM depending on the cache size and type, the number and size of the hard disk(s), Whether the floppy or the hard disk drive should be designated as dr i ve A: (e.g. HRD64K-l.F2l). See page 13 of the nCUSTOMIZATIONn manual.
3a) If you are adding an RSP into the operating system that was not previously included, you IlUst edit the inplt file chosen in step 13 and add the new RSP name (e.g. IN=KOON.@CRSP).
4) Run GENOCBM specifying the inplt file from step 13 (e.g. GENO:PM <HRD64K-l.F2l). Note the n<n symbol must be included in the comnand line. This generates a new system file called OCPM.SYS.
5) Rename the new CCPM. SYS file to M: .OOS.
Additional steps if the system will be connected via network controller to other systems:
6) Run AIDNEl' specifying the M:.OOS file to use (e.g. ADDNET lC.OOS). This creates a new system file called CCPM.SYS.
7) Rename the resulting OCPM.SYS file to M:.OOS.
2. 5-GENOCPM-2

If the boot loader needs to be changed because of a change in the hard disk size, or if the hard disk has been reformatted:
8) Run SYSGFE to put the boot loader on the hard or flOWY disk drive specifying the boot loader (e.g. BOO'lH.LDR), cud loader file nane (e.g. M:44.LDR), and the destinatioo drive nane (e.g. A:, F:, etc).
See Gifford's manual CUS'lOMIZIOO YOOR MULTIUSER ~ OOS SYS'lEM for additional information onusing this program.
2.~PM-3

GIRJI) file
'!be GENCMD creates a .CMD ocmnand file from a .H86 file (similar to files created with the ASM86 ccmnand). GENCMD is a programmer's utility not required in ordinary applications.
'!be GENCMD cannand converts hexadecimal format (.H86) files to executable (.CMD) files. Hexadecimal files are usually created b¥ the ASM86 assembler language translator. Fbr example:
takes the file EOI0.H86 and creates the file EOIO.CMD.
See the cnoJRRENr ~ OPERAT:IR; sYSTEM PR:X;RAMMER'S GUIDE for additional information.
2.5-GENCM>-1

BBLP
BBLP topic subtopic BBLP topic ALL
'!he HELP cc:mnand supplies information about the system, or about programs supported by the system. You can also make your own HELP files (files with extension .HLP that HELP can display), or modify the HELP files supplied by Gifford Computer S¥stems.
Gifford Cooputer S¥stems supplies a Me-DOS HELP file called MCDOS.HLP, describing cc:mnands am files in Me-DOS. Some other programs also have their own HELP files. To get help, type HELP, the name of a .HLP file subject (with 00 .HLP extensioo), and the subtopic of the subject on which you need help. For exanple, to fim out about the iYPE oarmand in Me-DOS, give the 0CIII1Ia1'¥3:
2C>HELP KlXJS TYPE
To get general information on a subject, type HELP and the HELP file name. '!he HELP program checks the .HLP file that you specify for the subject of GENERAL. For a list of the subtopics in a HELP file, enter "ALL" as the subtopic. '!he following exanple lists a HELP file called PASSWD.HLP, with three subtopics "GmERAL," ''NEJruSER," and "PASSWORD:"
?general ibe PASSIID file defines the encrypted login password,
initial default user 1UIb!r, drive, printer, optional awli.catial progr., teminal access, ana user area. access for evexy valid account name <Xl a Gifford Jt:-DJ3 systeIII. ?newuser
'!he NI!JUBl utility DJSt be used by the system &mager to create and maintain the PASSII> file. Qlly the ·systellf acccunt can use the NIISBk prograa. ?pasStlOrd
'lhe PASSiIR) progr_ permits users to c:bInje their 0NIl encrypted login passwrds in the PASSIID file.
2.S-HELP-I
Users can get he lp 00 PASSWD by typing any of the following ccmnands:
OA>HELP PASSWD
'!be PASSIiI) file defines the eoorypt:ed login password, initial default user nJdler, drive, printer, optimal applicatial program, terJDinal access, am user area access for every valid account raae CD a Gifford IC-IXE systaD.
In the exanple above, the HELP program displays the message under the subject "GENERAL." Alternatively, you can type:
OA>HELP PASSin ALL
general na;user
This displays a list of subtqpics in the PASSWD.HLP file. To get informatioo on a specific subtopic of the PAS9ND.HLP file, such as the subtopic NEHJSER, type the catmand:
OA>HELP PASSWD tm«JSER
'!be II!IDmR utility DUSt be used by the systaD Enager to create am lIBintain the PASSiI) file. Qlly the ~ account can use the J!IBIIIiBR progr-.
Users who take the trouble to learn how to ask the HELP ocmnand to display information fran .HLP files, and how to use the ALL option to list subtopics, will find that they can use llDre of the features of MC-DJS and of other software for which HELP files are available. HELP files are llDre convenient for llDSt users than printed dcnunentatioo as a source of informatioo, and can reduce the need. for users to refer questions directly to the system manager or to custaner service engineers.
2.5-HELP-2
Creating OlstDIized BBLP Piles
HELP files are files with extension .HLP that can be displayed by the HELP cannand. A HELP file can be created or mdified with a text editor like ED or ~rdStar in non-docurnent mde. To add a subtopic to a HELP file, you Illlst enter the name of the subtopic on a separate line as a single word preceded by a question (?) mark. The text to be displayed follows, begiming on the next line. If the text of a subtopic occupies rore than 23 lines, type .PAGE (begiming with the period in the first column) to indicate the botton of a screen of text. The HELP program will pralpt the user to press REl'URN for additiooal text. If you do not type ".PAGE" in this way, long texts will scroll off the top of the screen before users can read your advice.
To be accessible fran every user area and logical drive, all .HLP files IlllSt be SE1' with OIR and R) attributes, and IlllSt be kept in user area 0 or drive A:. If it is necessary to mdify or add text to a HELP file, the SE1' cxmnand IlllSt be used to terrp:>rarily assign the mi attribute to the .HLP file so that it can be mdified by a text editor.
Each HELP file should have the subject of ?GI!NERAL in it, so that users can get general information about the program by sinply typing "HELP" and the name of the subject.
Each HELP file has an index file associated with it, whose file type Imlst be.NDX. To create the index file, give the HELPNDX ccmnand with the file name. For exanple, if you had just created or mdified the exanple HELP file called PASSWD.HLP, you I1USt give the ccmnand:
OA>HELPNDX PASSWD
Unless you run HELPNDX to update the index every time you mdify a HELP file, the HELP cxmnand cannot access the mdified text. Maintenance of HELP files falls under the jurisdiction of the system manager. By suwlementiIJJ Gifford's MC-OOS HELP files with custon files reflecting the current needs of users, the system manager can autanate sane facets of <Xl-site sugx>rt.
2.5-HELP-3

BBLRIJK file file file ... '!he HELPNDX ccmnand updates the index to the HELP files
after a HELP file has been created or IOOdified. The HE:LPNDX program IlIlst be run if any .HLP file has been IOOdified or if a new .HLP file is created. If yoo do not run the HELPNDX program after changing your HELP files, the HELP ccmnand will not function.properly with the new or IOOdified .HLP file.
To use the HEr..PNDX program, yoor current directory area RUst be user area 0 of drive A:, and the .HLP files must be in the same directory area. Type the keyword "HELPNDX, n followed by the name (or list of names) of any HELP files that have been created or roodified since the last time HELPNDX was invoked, without typing the file extension .HLP of the new HELP file. For exanple, suppose that a HELP file called PASSWD.HLP had been roodified by aCHing new subtopics. '!he system manager mst type:
OA'>HELPNDX PASSWD
'!his creates a new index file called PASSWD.NDx. Once an index file is created or updated by the HELPNDX carmand, the HELPNDX oamand need not be used again until a .HLP file is created or IOOdified by ED or by WordStar (in non-document roode).
All HELP files RUst have the extension .HLP, and must be SEl' with the DIR and ro attributes in user area 0 of drive A:. A HELP file contains the text that the HELP comnand displays on screen, separated into subtopics. Each subtopic has a single word for a heading, followed by a text describing that subtopic. '!he heading mst begin with a question (?) mark. When a user invokes the HELP ccmnand, the HELP program uses the index files created by HELPNDX to find the specified subtopic within a HELP file and to display on screen the text for that subtopic. Use of the HELPNDX carmand falls within the jurisdiction of the system manager. It is discussed again in Olapter 3, Section 3.7.
2.S-HELPNOX-I

The HISl'ORY file records and timestanps all ocmnands given to the system. HISl'ORY is an optional file. If the file does not exist, then no histor ical records are maintained. If there is reason to think that unauthorized use of a system is being attenpted, the HISl'ORY feature of Me-OOS may assist the system manager in identifying and correcting the problem.
Because the operating system writes every coomand line to the HISl'ORY file (if it exists), inplementing HI9l'ORY sanewhat reduces the speed at which the system operates. The effect on system performance of a HI9l'ORY file varies with the Il1Jllber of users, and with how they are using the system. 'Ib inplement the HI9l'ORY feature, give the cxmnarrl:
This will create an enpty file in user area 0 of drive A: to which the system can add information as it is generated. Only ocmnands given by users who log in to the system after you give the cx.mnand above will be recorded. Once in use, the contents of HISl'ORY will resenble the exanple that follC7tlS:
tty6 Omary 14 23952l3239204O 7221984 l.364 pip a:==e:data.fy1[vn}
The first three fields (in this exanple ntty6 Omary") are the DaIle (fran 'rI'YS file) of the physical terminal or IOOdem, and the relative teradna1 , .. ,iler of the virtual terminal that issued the cx.mnand. In Me-OOS a physical terminal can sugx>rt up to four nscreens,n correspalding to virtual terminals, rnmbered 0, 1, 2, and 3. The next field is the aocotint DalE by which the operator logged in to the virtual terminal. The last field lists the actual u _1CiId line entered fran the keyboard.
2.5-HIsroRY-l

IJ.be Meaning of BIS'llm
In the same exanple of a line from HIsroRY (but with blanks inserted for greater clarity) the other numerical fields are:
14 \ 1
2395 \
2
21 \
3
32 \
4
39 \
5
1. Virtual 'l'eI1Iinal nwber
204 \
6
2. Days since January 1st, 1978
o \
7
3. Bcur of the day (24 hour clock) 4. .Mi.mte of the hour 5. Seccoi of the minute 6. Julian day of the year (1-366)
7 22 1984 \
8
1364 \
9
7. Day of the week (Sunday = 0, ~ay = 1, Tuesday = 2, etc.) 8. Date in I1Dlth-day-year format 9. Prcgr_ file link n1lliler, a serial nuni>er showing how many
cannands had been recorded in the HIsroRY file when this cannand was recorded. The link nuni>er of the last ~ is also written in the first line of the HIsroRY file.
The cauplete HISl'ORY line is reproduced belCM.
tty6 Oaary 14 23952132392040 7221984 l.364 pip a:=e:dat&fyl[vrw]
The meaniD3 of this entry in the HISl'ORY file is:
"From virtual terminal 14 (the first screen of physical terminal 6) saneone who logged in as "mary" gave a PIP ~ to COf?I and verify a file called DATA.FYL to drive A: fran drive E: at thirty-nine seconds after 9:32 pit on Sunday, July 22, 1984, the 1,364th ccmnand recorded since the beginning of HISTORY."
If you erase the HISl'ORY file, cxmnand lines are no longer recorded ~ the operatiD3 sys~ The creation and maintenance of HISl'ORY falls under the jurisdiction of the system manager.
2.5-HIsroRY-2

Dll"lUlk
IRrIDIR. d:
'!be INITDIR carmand mdifies the directory of a logical drive to suwort timestanping of files. The SEl' c::x:mnam, not INITDIR, activates date and timestanping, but SEl' cannot do so until an INITDIR CCIlIllaI'rl has reformatted the directory. The INITDIR procedure is necessary because time and datestanping occupy extra space in a directory. INITDIR only reformats the directory, oot the data area where files are stored on a disk. '!be INITDIR ccmnand can be i~ued either fran the drive whose directory you intend to reformat or fran a different drive. All the user areas of a logical drive are affected by INITDIR. No other users can be active on the system when INITDIR is invoked. 'lb reformat the directory of logical drive B:, for exanple, type:
OA>INITDIR B:
'!be program will ask you to oonfirm the carmand:
DI1'lDIR wm. 1tC'.rIVAm 'rIMB 9lMPS ~ Sl?Jl!Lt'IBD DnVE n> you want tn re-forat the directmy at drive B: (Y/l') ?
Type (Y) to mdify the drive B: directory, or any other key to exit without reformatting. If any files are in use on that drive, INITDIR will not work, and you will get an error message. 'lb avoid this p:>tential problem, the system manager mst run INITDIR before any other users have logged in to the system.
If the disk has already been reformatted for time and datestanping, the INITDIR program displays the message:
DirectoIy already refonattec1 n> you want tn recovec tiDe/date space (Y/l')?
2.5-INITDIR-l

Type (Y) to eliminate time and datestamping. If you type (N), timestanping remains active on your disk, but INITDIR will ask you if you want to reJlDVe the current time and date stamps:
Ib you want the existi.nj time/date staDps cleared (Y/R)?
Press (Y) to clear, or (N) to keep the existing stamps.
If the disk label is password protected, the INITDIR program will display the message:
Directxxy is pasaord protected PasSllOrd, please. >
If you do not enter the correct password, INITDIR will terminate without noUfying the directory.
A directory of files with date and timestamping requires mre space on the logical drive than a directory of files without date and timestamping, and fewer entries in the part of the logical drive that holds the directory of files. You IIIlst have at least 25% of the total directory space available to accxxllro:late the meIlDry requirements of date and timestamping. If there is not enough space on the disk directory when you type the INITDIR carmand, the INITDIR oarmand displays the error message:
J5klO(: Ibt emugb rcxB in directmy.
A logical drive whose directory has been IOOdified by INITDIR remains reformatted, even if the system is powered down or the RESEr button is pressed. 'Dlat is, INITDIR is a "one time" oc:mnand that need not be repeated unless you decide to eliminate timestanping or exterrl timestamping to another logical drive.
See the description of the SEn' cxmnand and the CXHlJRRENl' ~ C>PE:RATItG SYSTEM USER'S GUIDE for additional information.
2.5-INITDIR-2

KE!S file
The KEYS program makes it convenient to program the special function keys of the TeleVideo 950, the Freedan 200, the OC8-aO, the wy-sO, and any other terminal whose function keys use TeleVideo 950 protocols. '!he ~s program uses special terrplate files that you can create with any ASCII text editor, such as ED or WordStar (in non-docwnent m::x1e). You can create as many different template files as you wish, and so you can develop a whole library of function key definitions that are optimized to suit various projects. Tb assign a template file to the function keys of your physical terminal, you invoke the KEYS program by entering a ccmnand of the following form:
OA>KEYS terrplate
Here teJll)late is the name of a file whose file type is .~. All of the virtual terminals supported by your physical terminal will use the key definitions provided by the template file. For exanple, to use a tenplate file called SAMPLE.~ to program your terminal's function keys, you mst type:
OA>~S SAMPLE
Tenplate files have a simple structure. A terrplate file consists of a series of lines, each one dedicated to a specified function key. The first character in the line, called the key symbol, represents the key to be progranmed. The remaining characters, the text, represent the characters which the associated key will send whenever it is pressed. These teDplate files Il1lst have a file name of no I1Dre than eight (8) characters, and Il1lst have .~ as the file extension. For exanple, a file of key assignments for SuperCalc might be named sc.~, while a file of key assignments for dBASE II might be called DBASE.~.
2.S-KEYS-I

To assign the definitions contained in a file called DBASE.KEY to progranmable keys, type:
To reassign these keys according to a file called sc.KEY, type:
OA'>KEYS SC
If KEYS.CMD is assigned SYS and 00 status by the cxmnand:
0A>SEl' KEYS. CMD [SYS, 00]
then a copy of KEYS.CMD in user area 0 can be invoked by all user areas of a logical drive.
To create a tenplate file, use WJrdStar to create a file in the non-document IIDde (i.e., fran the "OPENn«2 MENU" enter (N) rather than (0)). Give your file any name that you wish, but make sure that it has the .KEY extension. For exanple, you could call a file 'lEST.KEY, but do not call it TEST.TRY.
Your file can have as many lines as you have function keys to program. For the TeleVideo 950 and the Freedan 200, a single key can seOO one message unshifted and a different message shifted, so in effect you have twice as many logical function keys as physical ones. '!be first character in each line must contain the syrix:>l for the key that you wish to program. '!be actual synrol used to spepify a function key is not dictated by the KEYS program, but is dependent on the terminal itself and should be defined in the user's manual for that terminal. '!be rest of the line can contain characters representing the data to be transmitted by the specified key.
2.5-KEYS-2

The characters which each functioo key is to send are not stored in the main menory of your oarplter, but in the internal menory of the terminal itself. Since this internal storage capacity is in all cases quite limited, you are restricted as to the nU11i:>er of characters you can assign to each functioo key and to each terminal. For exanple, the TeleVideo 950 allows up to 63 characters per functioo key and up to 256 characters total. See Chapter 3 of Gifford's VIRlUAL TERMINALS USER'S MANUAL for a list of these special functioo keys.
In counting progra:mned characters to determine whether they exceed the maximum nU11i:>er permitted on a given terminal, the following rule applies: A carriage return counts as a character, so any line in your definitioo file that does not terminate with a caret ("') should have no nore than twenty-six (26) data characters for a oc&-ao, 255 characters for a Freedan 200, and 63 for a TeleVideo 950. The caret ("') itself does not count as a character.
See Chapter 3 of Gifford's VIRIUAL TERMINAIS mER'S MANUAL for additional informatial.
2.5-KEYS-3

LOGIN.CMD is an optional program on an account's initial default drive aId user area, which will run before the login process is catp1eted. 'Ibis program file can be used to custanize your system by executing a program which you want to be part of an imividua1 account's login procedure. LOGIN.CMD has limited application on nost systems. 'Ibe LOGIN.SUB file will have greater value to nost users, since it can execute multiple oc.mnaOOs.
You can rename any cxmnand file ''IOOIN.CMD'' with a PIP c:xmnand. For exanp1e, sugx>se that you wanted a LOGIN.CMD that would autcmatica11y check the appointment calendar of any account whose initial default directory in the PASSWD file was user area 12 of drive B:. 'Ibis could be done by making AP the LOGIN.CMD, and creating a copy of the program in that directory area with the following o:mnand:
OA>PIP B: LOGIN. CM> [G12] =AP.OID[VIOl]
Note that this creates multiple copies of camtand files, since each initial default area requires its own LOGIN.CMD. If you wanted every account, to autcmatica11y check for appointments, the USERINIT.CMD feature is more efficient in the use of disk space. 'Ibe LOGIN.CMD and LOGIN.SUB files are ClR>ropriate where special initialization procedures are needed for same OJut not all) accounts, in CXXl.trast to USERINIT.CMD and USERINIT.SUB, which are designed to initialize all accounts in the same way.
'!be maintenarice of this file falls under the jurisdiction of the system manager. It is discussed again in Chapter 3.
2.S-LOGIN-1

LOOIN.SUB is an optiooal file on an a<X."OUlltls initial default drive and user area which contains ocmnands to be executed before the login process is catpleted. The follOlrling exanple shows you how you can use LOOIN.SUB to check your appointment calendar and electronic mailbox, reload the special function keys, and dis1pay a screen of advice before the login process is catp1eted. All of the files ment.ioned JIIlst exist:
J Salllple UlGIN.soo file to cbeck your AP scbeaIJ1e AP J Display allllAIL entries in your mi.1.lJa[ MIL J load functial keys for applicatial lCB!S IB200 J Display MIBJ 'IYPe AlRICB.API
The description of the SUBMIT ccmnand in this chapter provides detail on the creation and use of .SUB files for JIll 1 tiple ccmnands. Note that the LOOIN.SUS file affects only those accounts whan the PASSWD file assigns to an initial default directory where a LOOIN.SUB file exists, while USERINIT.SUS affects all accounts at login. For that reason, USERINIT.SOB should be used for initialization routines intended for everyooe, while LOOIN.SUB files should be created for irXiividual accounts that would benefit fran special treatment at login.
The maintenance of this file falls under the jurisdiction of the system manager. Since each LOOIN.SUS file only affects a single directory area, there is not nuch risk in allowing users to experiment with this feature if they understand how it works. The system manager should read about SYSINIT.SUB, USERINIT.SOB, and the remaining custamization files in this chapter for ideas on how to use the custanization features of Me-InS.
2.5-LOOIN.SUB-l

'!be uxnJ1' ccmnand is given to log an account and its current virtual terminal out of Me-oos. After the LOGOOT ccmnand is given, the canputer displays the bclnner and the RaIle: prompt. When a LOGOOT ccmnand is given, the system updates the tn'MP am W1'MP files. '!be uxnJ1' ccmnand is given by typing its keyword:
OA> LOOOOT
'!be system responds by logging out the account and by displaying the banner am the Name: proopt on the screen.
Failure to use the uxnJ1' cornnand will reduce the usefulness of the time accounting utilities am the WID ccmnand, am can OCIIPromise system security by allCMing unauthorized persons to access the system via an unattended but logged-in terminal. If you have a workstation that supports nultiple virtual terminals, be sure that you log out fran every virtual terminal when you are finished using the system. '!be keyboard of a terminal that is logged out can still switch screens to other virtual terminals.
'!be status line of IIDSt terminals can be progranmed to show if background terminals are still logged in, as illustrated in the sanple V'r1'YS file on page 3.3-9 of this manual. All should be logged out when you finish your work. To make it easier to give the LOGOOT cxmnand, the KEYS ccmnand can be used to program a function key to type nux:;a:rrn in a single keystroke.
If the AI.JTCSr file is not on user area 0 of drive A:, the system will not go into multius~r roode until the user at the system console gives the LOOOOT ccmnand.
'!be uxnJl' ccmnand does not detach a printer that has been attached to a virtual terminal by a Ap control character. LOOOOT is not an ordinary cxmnand file, but is part of the MC-OOS shell, so it cannot be erased nor assigned attributes by SET or CHSET.
2.5-LOOOOT-l

UXD1l'.SOB
I£XDJT.SUB is an optiooal file in an account's current drive am user area Which cxntains CXJIIItIalds to be executed before the logout process is ocmpleted. Read about IOOIN.SUB, SYSINIT.SUB, USERINIT.SUB am the rem.iniBl SUBMIT files for ideas en l'low to use the customizatioo features of loC-DOS.
'!he following example file shows how you can use IDG<X1l'.SUB to view your ag;x>intment calerr:3ar and your mailbox before you log out of the system:
: Sanple I£XDJT. SUB file to check AP and MAIL for messages. AP MAIL
To create or DDdify a su1:mdt file like this, use a text editor like ED or WordStar (in nm-document JOOde). If a user logs out fran a directory area in Which 00 u:xn:JT.SUB file exists, no IDGalT.SUB CXJIIItIalds will be executed.
'!he maintenance of this file falls Under the jurisdictioo of the system manager. It is discussed again in Qapter 3.
2.5-LOGOUT.~1

The LPRS file describes the characteristics of each printer attached to the system. It has the same format as the Tl'YS file.
An example of the file is:
O:8:1:82n:O,lprO:SysteIIl printer, Texas InstraDents 1:8:2:8ln:l,h-p:B-P gra{ilics plotter
The file has one entry for each printer or plotter on the system, and the fields are defined as follows:
DE.V i: BAUD RA'lE :HANOOHAKING: PROl'OCOL: LPR NJ.\ME:e<::M-!ENl' \ \ \ \ \ \
1 2 3 456
1. RUliber of the device, as printed on the back panel. Printer o is the default printer for users, unless the PASSWD file specifies another printer or plotter. If you have a parallel printer, there is no need to designate this is in the LPRS file, as this designation is hardware dependent.
2. Printer baud rate. The default is 9600. Baud rates codes are the following:
o = 9600 1 = 110 2 = 300 3 = 600 4 = 1200 5 = 1800 6 = 2400 7 = 4800 8 = 9600 9 = 19200
2.5-LPRS-l

3. Optimal 1&-232 bardlare hanIJshaking. The default is O. If handshaking is necessary, enter the number corresponding to the type of handshaking needed fran the following:
o = No handshaking 1 = Hardware handshaking (Dl'R) (RS-232 pin-20) 2 = Software handshaking (XCN/XOFF) 3 = Reserved for custom applicatien
4. Optimal CDIIUnicatims protocol. The default protocol is 8 data bits, 2 stop bits, and no parity, which is the setting for IlDSt printers. For example, if your printer requires a protocol of 7 data bits, 2 stop bits, even parity, enter 72E in field 4.
Data bits 8 7
Stop bits 2 1
Parity N (none) o (odd) E (even)
5. Printer name. The names given here are used in the lC-OOS PRINTER cxmnand, which changes the printer. In the example file en the preceding page, to access the printer en port 1, give either one of the following two cannands:
2B>PRINlER 1 2B>PRINTER H-P
6. ()pti.a1al. cc U'Mlt field.
This allows up to 100 characters to provide additicnal infor.matien about a printer or plotter.
2.5-LPRS-2

Check the printer manufacturer's manual for printer baud rate, hardware handshaking, and camu.nications protocol.
The LPRS file can be JOOdified while the system is rurming in mul tiuser m:xle. Once the file has been modified, type:
This will reset the system to the new specifications without the need to shut dam the system.
The number of printers and plotters that can be supported by an MC-IX>S system is specified in the XIOS (extended input/output system). If a system is reconfigured to support a greater number of printers and plotters than was known to Gifford when the system was ordered, it may be necessary to install a larger XIOS. Read the Gifford publication CUSTOMIZIOO YOOR MULTIUSER CXHl.JRRENl' IX>S SYSTEM for details on how to roodify the XIOS.
Please Note: If you have a parallel printer attached to your system, there is 00 need to designate this in the LPRS file, as this designation is hardware dependent.
The maintenance of this file falls urXler the jurisdiction of the system manager. It is discussed again in Chapter 3.
2.5-LPRS-3

MAIL naE .JiML userl user2 user3 MAIL AU. MAIL <file NAMELIST nanefile MAIL -C MAIL -R -A-V
'!be MAIL utility allows a user at a terminal to send nessages to other users attached to the netWork running Me-DOS. '!he nessage is sent to a "miHlbox" where the "addressee" reads ana deletes the nes8age. '!his mailbox resides in user area 15, drive A: of the system node. If the system node is down, mail service is unavailable for the entire network. Ebr the MAIL program to work, the NE'lUSERS and UTMP files trust be on the systeino
Mail nessages can be either a file created t>ya text ~itbr such. as WOrdStar or a nessage typed directly to a "mailbox" by the MAIL program.
'!he syntax that yoU rust use for SendiI19, receiving, a.ild checking fdr mail follows:
Sending mail: MAIL <file NAMELIST nanefile ALL user.;..
Ieceiving mail: MAIL -R -A
Checking mail: MAIL-C
A definition of each of the oommand arguments listed above follows:
<file '!his is the file nane of a file containing a nessage. '!he < synix>l 11l1st precede the file name. '!his file may be created wi th any text editor.
RAMBLIST '!his ~rd 11Ilst be typed (Xl the cortrna.nd line before you. type the name of the file that contains a list of account names to which you want to send your message.
2.5-MAIIrI

namefile '!his is the file that contains, on separate lines, the account names to which you want to send your message.
ALL Mail can be sent to all accounts by using this conmand argument.
-R (Ieverse messages) By typing MAIL -R, you will see a list of all of the messages in your mailbox in reverse order, where the IIDst recent message will be positioned at the top of the list. '!his enables you to read the IIDst recent message first if you scroll through the messages by pressing RETURN.
-A (All messages) By typing MAIL -A, you will see a list of all of the subject headers for the messages that you have been sent, plus all of your mail will be displayed without pronpting. 'Ibis list will have the oldest meS!sage positioned at the top of the list, unless you type MAIL -A -R, which will reverse the chronological order.
-C (Oleck for mail) ~ing MAIL -C enables you to check if you have any mail without having to log out and then log back in to the system. Users who frequently receive mail while they are logged in may want to include a "MAIIrC" line in their ux;ooT.SUB file to see if new messages have arrived.
-v (Display version ntlIlDer) ~ing MAIL -V displays the version number and copyright message of the MAIL program as well as a list of all of the subject headers for the messages that you have been sent.
'lb send a message to a user on your node or to a user on any other node that is currently attached to the network, type:
2»MAIL LINDA
where LINDA is the account to whom you want to send the message. '!he names used by the MAIL program DUst correspond exactly to the account entries in the PAS&WD file. In a DR Net network, the aocount to whan the mail is sent mst appear in the NE'lUSERS file.
2.5-MAIL-2

'!be MAIL utility naN pronpts you with:
Slbject:
You should respond to this pronpt by typing a brief descripti<Xl of the subject of the mail that you are about to send. 0lCe you have entered this information, the MAIL program will pronpt:
>
You can enter any text you want <Xl this line, and 00 subsequent lines. If you have WOrdStar on your system, you can enter directly into a WOrdStar file, thereby having the advantage of using WOrdStar text editing oonmands, by typing the following:
By typing the cxmnand above, you are oow wr iting your MAIL message fran inside WOrdStar. You can save your file and exit using the normal WOrdStar cc:mmand procedures, wich will take you back to the MAIL program prarpt. (If you are using a text editor other than WOrdStar and you want to use the -E option, renaue a ~ of your text editor program to WS.QID. Ebr exanple, if you are using Newword, make a copy of the file Mf.CMD and naue the copy W8.CMD, because the MAIL program will be looking for the WS.QID file. '!his will enable you to use the -E optioo to invoke a WOrdStar file into wich you can save your MAIL message.) You can naN exit from the MAIL program by typing a single period (.) 00 a blank line. MAIL then sends your message to the user (s) that you indicated on your 00IIIIIaIld line. If you want to cancel a message, type:
2.5-MAIL-3

If a portion of the text of your message exists in a preexisting file, you can read this file into the text of your message by typing:
>"'R [filename]
The file which you specified will be incorporated into the text of your message. The text of the file which was read into your message will not appear on your screen. lbwever, if you would like to read your message prior to sending it, type the following:
>"'P
and the text of your message will be displayed on your screen.
You can send the same message to rore than one account by adding the account nanes to the end of the conmand line. Ebr exanple, to send a message to acounts named "chr is" and "robin," type the conmand:
2A>MAIL CHRIS ROBIN
You can also create a file in ~rdStar, non~ocument IIOde, that contains a list of all of the people to whom you want to send a message. Suppose you want to send a message called ANNUAL.RPl' to everyone in the sales Department. Create a file
2.5-MAIt-4

called SALES.LST and list, 00 separate lines, the account nanes of everyone in the sales Department. R:)w type:
2A>MAIL <ANNUAL. RP1' NAMELIST SALES. LST
and your ANNUAL.RP1' file will be sent to everyooe in the sales Department who was listed in your file called ~LST. You JIIlst type the ~rd "NAMELIST" after your filenane for this feature to ~rk. 'lbe "<" in the conmand above tells the MAIL program that the attached ~rd is the nane of a MAIL message file.
a:.Jing Mail
'lb read nail, type :
If you have mail, you will be shown a nUllbered list of all of the MAIL message subjects headers that are in your mailbox, as well as a sum total of all of the message$ that you have been sent, from whan each message was sent, and the time and day that each message was sent. . 'Ibis list might look something like the following:
Olpyrigbt (C) 1984 Gifford Qmplter Syst:eIIIs Gifford mil versim 2.1 ~ '?' for help.
3 EssageS 1 john wed 2 eric '2bu 3 paula FJ:i
Jon 11, 1984 11:09 _ "new p;ice listJon 12, 1984 8: 55 po -racquet ball-Jon 13, 1984 12:34 pa "benefits DEeting-
Each of these messages may be read by typing the nl.lllber that corresponds to the awropr iate letter. SUppose that you want to read Eric's message first. '.lYPe (2). R:)w if you want to read Paula's message (3), press the R1mJRN key, and the MAIL program will take you from message #2 to message 13.
2.5-MAIL-5

After you read a message, you can tell the MAIL utility what to do with it (such as save it in a file, or forward it to another account, or simply delete it). Displayed below is a list of options that the MAIL program recognizes:
D ~ F B M
-p Q R
-afn 8fn o X
+
Delete current JDessage Blter 1tm3Star 1ibrwarc1 the current IEssage to SJIIf'aJe Print the headers of all pen:ling IEssages in lIBilbox Mail a IEssage to a:.e:me Prints your Essage so far Quit, remve deleted EssageS per_tently R!ply to sender of current Essage Reads a file into yow: current IEssage save current Essage to a file Displays a list of users attached to the nebJork Exit fran MAIL, bIt do not delete JllBrked 1Essage5 fran lIBilbox cancels the current Essage that you Ire writing Prints the lltil program's help IEIIU Display the current JEssage Display the next JEssage Display the previous lEsage
Listed below are definitions for same of the options listed above:
D '!his will delete the current message, and type the next message. '!he current message is only reIlOved fran your mailbox when you exit fran the MAIL utility by typing (0).
R '!his option is used to reply to a MAIL message after you have read it. By typing (R), you can instantly respond to the current message, and that response will automatically be sent to the sender of the original message. After you type (.) to end your response, the following message will be displayed on your screen:
Sending reply.
2.5-MAIL-6
F 'Ibis will forward a message to soneone. If you read a message am decide that it would be useful for soIiEone else on the net~rk to read that message, type (F) and then the name of the account or the namefile oontaining a list of account names to whom you want to forward that message.
Suppose that you logged in to your system as Gail, and you read a message with the subject header Ute stU that was sent from Kent and that you want to forward it to Nancy. '1b do this, type:
F NANCY
When Nancy logs in to her system and types MAIL, the following line will appear on her screen, irXlicating that Kent sent a message to Gail who has forwarded it to her.
1 gai1<-kent wed Jon 13, 1984 8:48 po -test-
M 'Ibis option is used to send mail to other users. It is the equi valent of typing MAIL.
B 'Ibis will print out a list of all of the subject headers of all peooing messages in a mailbOx. '1bese messages are listed with the oldest subject header positioned at the top of the list.
S fn 'Ibe "5" option, followed by a file name will save the designated message to a file. 'Ibis is useful if the message that you are reading oontains lengthy text that you want to save for future reference. 'Ibese files include the postmark, which indicates the sender, the time and date sent, and the account(s) to whom the message was sent. You can specify many files at once. If you do not give a file name, the message is written into the file MBOX.
+ 'Ibis will display the next message, and leave the current message in your mailbox.
'Ibis will display the pre v ious message and leave the current message in your mailbox.
2.5-MAIL-7

Q 'lhis option will exit you from your session with the MAIL program. MY nessages that you have not read, or ones which you did not delete, are left in your mailbox.
X Ehables you to exit without nDdifying the mailbox. With this option, any messages that you marked for deletion are left in your mailbox. All nessages that you have forwarded to other accounts, or saved in files, are sent and saved.
Mditimal lbtes (Xl Mail with NebJDrking
Every account that you list on the oonmand line DUst be listed in the NE'lUSERS file. If you give a nane of an account that is not listed in the NE'lUSERS file, MAIL gives you an error nessage, and puts the nessage that you sent into a file called DFADMAIL. If you gave both valid and invalid nanes, MAIL sends the nessage to the valid accounts.
When you send a nessage, the MAIL utility puts a postmark (the current time, date, and location from which you sent the mail) at the beginning of the nessage. If the system file UTMP does not exist, MAIL cannot determine who you are or from where you are sending the mail; your message is marked as being sent fran "UNKtIlm."
Mail is kept on user area 15 of drive A: of the system node. 'lhe "mailboxes" are files with the account's login nane for the file nane, and .MBX for the file type. Mail files continue to grow unless mail is deleted. '!he system manager should periodically check the files on user area 15 of drive A: to be sure that none are wasting disk space.
If the sane person·· tr ies to send mail from two different terminals simultaneously, the result is unpredictable. Also, if two users send mail to the sane account at the sane time, the result is unpredictable •
.lheMAIL utility allows you to send mail to and read mail fran user area 15 of dr i ve A: even if your account in the PASSWD file does not give you permission to access user area 15.
2.5-MAIL-8

11MB file
'!he MAKE coomand creates an enpty file on your disk. 'Ibis is useful if you need to make a file that does not contain any information such as AU'roST or a file such as W1'MP or HISTORY to which information will be added later. To make a file, give the MAKE ooomand and the file name at the system pranpt. For exanple:
OA>MAKE NTEST .FIL
In all of these exanples, an enpty file of the name specified after the keyword "MAKE" is created in the directory of dr i ve A:, in user area O.
2.S-MAKE-I

Mom is the message of the day file. When a user logs in, the message of the day is displayed. The file name for the message of the day is Mom and the file is kept on user 0 of drive A:. Use this file for messages that you want all users to see when they log into the system. This file can contain lm:Ything you wish, includill3 escape sequences to control the user's screen. Create and update the MOlD file with an editor such as ED or WordStar (in non-document nme). 'Ibis file is discussed again in Olapter 3.
2.S-K1l'D-l
lWIBID>E lWIBID>E R
'!he NAMEKDE program is used only in DR Net local area networks. '!he NAMENCDE program is used toIOOdify the list of node nanes that are attached to the network. 'Ibis list of node nanes is contained in a file called NAM~bAT which is located in user area 0, drive A: of the system node. '!he NAM~DAT file is autanatically updated each time the NAMESDE program is run. '!he NAMENDE program is part of the SYSINIT.SUB file, so as soon as your system starts up, your node nane will be added to the NAMSVR.DAT file. '!his file should only be IOOdified by the system manager.
'!he NAMEHDE program is run automatically by the local system when that system is booted. 'Ibis program logs in to the system node and wr i tes the node ID n\lIlt)er and node nane to a conmmication queue. '!be "receive" option is invoked by typing:
OA>NAMEmDE R
from the system node. '!he NAMEHDE program will detach and hang in the background to read the OOIII1Ilnication queue for the node ID number and node nane to update the NAMSVR.QAT file. '!he NAMEN)DE scanning option fran the system node scans the conmunication queue periodically to maintain the ~DAT file.
1b di~lay a list of the existing node nanes and their corresponding ID numbers that are attached to the network, use the NET NAMES oomnand.
See the DR NET USER'S MANUAL for additional information --atxxJt the NAMENDE program.
2.5-NAMENDE-l

'!he NAMSVR..DAT file is only used in MC-OOS systems connected to DR Net local area networks. NAMSVR.DAT is a binary data file which contains a list of the nanes of the nodes that exist on the network. '!he names of network nodes listed in NAMSVR..DAT can be used by the MAIL, NET, PRINTER, WHO, WRI'lE, and other MC-OOS conmands to identify nodes. '!he NAMSVR.DAT file will automatically be created when the SYSINIT.SUB file runs during system startup. '!he SYSINIT.SUB file runs the NAMENDE program which automatically adds to the NAMSVR.DAT file the narre of the node fran which the program was initiated. '!he NAMSVR.DAT file should always be located in user area 0 of logical drive A: of node 0 (the "system node").
'lb view the NAMSVR.DAT file, use the NET NAMES conmand or the NAMEHDE program. If you change the names of network nodes, or add mre MC-OOS systems to your network, you must JOOdify the NAMSVR..DAT file with the NAMEHDE conmand. See the DR NET USER'S MANUAL for additional information on the NET and NAMENDE COIII'IIands and on the NAMSVR.DAT file.
2. 5-NAMSVR. DAT-I

tEl' tEl' optia1 localdevice = renpted~ice @node tEl' MSPIAY file Nm' BBI:.P
'!he NEr program is only used if your MC-OOS carputer is part of a DR Net network. NEr is the only Special network (XIlI1Ialld that IIDSt users need to learn if their catpJter is linked to a DR Net local area network. '!he other special OR Net oannarrls arrl files (<nm'IG.NEr, NAMENJDE, NAMSVR.MT, and SElNET) are usually only of concern to the system manager.
'!he NEr program can operate in either of two ways:
o In a IlleDu-driven JOOde, requiring you to selept options fran menus that are displayed if you type the NEl' k~rd alone,
o In a 01 ... .11 JOOde, requiring you to provide information after the NEr keyword, to specify what you wal'lt NE1' to do.
'!he menu-driven lOOde is easier to use if you are unfamiliar with DR Net. '!he cannand JOOde. is quicker to use if you are an experienced DR Net user who needs to change the way in which your virtual terminal is connected to the resources of the network.
In either the 1l\enu-driven or ocmnand JJKXie, the NE1' program is powerful arrl versatile, giving you access to the drives, . programs, data, printers, plotters, arrl "queues" of the network. NE1' also provides information about the current status of the network, and allowing you to "map" network resources onto your terminal, so that ordinary MC-IXJS carrnands can activate devices that you have mapped with Nm'. Even lOOre remarkably, NET allows you to save your current mawing of resources as a file. If in the future you need to connect a virtual terminal to the same network drives, printers, arrl plotters of the network, NET allows you to recoo.figure your terminal to match a previously saved state in a single e<mnand line. '!his feature of Gifford's MC-DOS replaces the elaborate step-by-step mapping that is required to configure ordinary local area networks.
2.S-NEn'-l

If you type NEl', this menu appears:
-.at do ycu want to do?
0) OlaDje a printer, drive, or queue assignaent 1) Display the NImIork status 2) Display the IIBTtIork mde names 3) QlIJlllect to a NImIork mde 4) Disccmnect fran a IIBTtIork mde 5) Save the current NImIork configuration 6) Qmfigure the -.rtIork to a previoosly saved state 7) 0IaniJe the SP(DBR configuratial 8) Clear all printer, drive, queue, am mde assignDents 9) Disconn.ect cmpletely fran the NImIork
10) Display 0 ""end line belp infoI:Etial 11) BKit
Ycur ctnice:
By typing a nuni>er in the range 0 to 11 you select the correspoming optioo. Each menu option displays a suanenu, which requests additional information on what you want the program to do.
'!be meaning and use of each NEl' option and :nr:Xiifier, default values, and other uses of NEl' in cxmnand :nr:Xie are discussed in the DR NEl' USER'S MANUAL. Readers who have experience with other inplementations of Digital Research's DR Net should be aware that the NEl' program in MC-~ CC1li>ines the functions of several standard DR Net oaunands. Do not refer to the documentation of NEl' ~ other publishers as a guide to Gifford's NEl' oammand.
2.S-NEl'-2

name.NE1'
'Ibe na:me.NE1' file is only used in DR Net local area networks. 'Ibis file is created by th~ NE1' cxmnand, and is a mapping tenplate that stores an imcige of the current network mapping scheme of the virtual teQllinal fran which you give the NE1' ccmnand. 'Ibe scheme recorded in this tenplate is recreated autanatically when the acoount that matches DaIIle.llB'l' logs in to the system. Cooutonly used DR Net critmands can be stored in your name.NE1' tenplate.
To create a na:me.NE1' file, ~ NE1' MAKE. By typing NE1' MAKE, a mapping tenplate file wi],.l be created, using the current mapping scheme of the virtual terminal fran wbich you issued the cxmnand. 'Ibe name of this mapping tenplate file will default to your current login account name, plus .NB'l' as the file extension. For example, if you have loged in as "lucy" and have attacbed your terminal to network resources by various NE1' catl'Qallds, type:
3D>NET MAKE
'Ibis creates a mapping tenplate file called LUCY.NE1'. A message like the following will be displayed on your screen, irtiicating that the program is creating your teIli?late file:
CreatinJ file lucy. net
If a name.NE1' file exists in your initial default user area, DR Net will use name.NE1' to recreate the network mapping scheme saved in that file. Upon login, the system will respond:
Refer to the DR NE1' USER'S MANUAL for additional information about creating andChanging your mapping scheme.

NETMOTD is the message of the day file for all systems attached to the network. When a user logs in, the network message of the day is displayed as well as the message from the MO'lD file of the local node. The file name for the network message of the day is NETMOTD and the file is kept on user area 0 of drive A: of the system node. Use this file for messages that you want all users 00 the network to see when they log in to the system. '!his file can contain anything you wish, inclooing escape sequences to control the user's screen. Create and update the NETMO'ID file wih an editor such as ED or WordStar (in nondocument nme).
2. 5-NE'lK)'lD-l

'!he Nm'USERS file is only used if your MC-OOS oanputer is part of a DR Net network. The NE1'USERS file nust be located in user area 0 of drive A: on the system node. '!his file contains the names of the accounts on the network that are recognized by any program that needs to know if a user's account name is valid across the network.
To create the Nm'USERS file, the system manager mst create a file, with WOrdStar or any text editor in non-document lOOde, and enter each account name across the network on separate lines.
'!here should be no duplicate entries in this file. Otherwise, each time that someone uses the ALL option in the MAIL program to send a message to every account on the local system, the same message will be sent to that user twice.
2.5-NmUSERS-l

ibe NEJoruSER program is a security utility used by the system manager to maintain the PASSWD file. To use NlNJSER, the system manager DUst first have logged in as "system." If someone who has not logged in as "system" attenpts to invoke N&ruSER, the system responds:
Sorry but the 'newuser' progr_ can ally be run fa. the 'systaa' account. Please cbeck with the system EDager.
To invoke NEmJSER, typing the keyword NSiUSER causes the main NEliUSER menu to appear, as shown in the following dialogue:
~:
Gifford Omplter SysteE - newuser Maintenance Package
Qlpyright (C) 1984 by Gifford <bIputer SystaE, Inc. Versial 2.0 of :newuser: updated al Aug 3, 1.984
A) Add a user. B) Brief li.stiDJ of users. C) Quuje a user's parameters. D) Delete a user. E) List users in detail.
X) Exit. ~ Abort, JRake no change.
ibis program falls under the system manager's jurisdiction. For further information regarding this utility refer to Section 3.3.
2.5-NEliUSER-I

1.be PASmm file specifies account login names, encrypted login passwords, initial default user areas, initial default drive designations, optional terminal access restrictions, initial printer assignments, optional default prOgram assignments, a list of accessible user areas, and ccmnents on each acoount. A semple PASSWD file is listed below:
guest::c:l4:epson:l:submit deno:l4:run deno only michael:qJNrCSEby3Mn:c:l:ti::::all terminals and user areas JlDdem:yT5M:>9b34Axl:b:8: :7:message:8:J1Ddem bulletin board nancy:j9hPI92fzl9j:c:lO:0:2,3:ws:lO:eorrespondence only sales:7BoJqvNtCEpd:d:4:ti:4,5,6:dhase prospect:l2: steve:d.CTPcl24w9On:a:5:ti:2:dbase mail:5:mailiDJ list only ~stem:::diablo:::::no restrictions
Each entry in the file has nine fields. '!be fields have the followiD:J functions:
NAME:PAS~RD:DRIVE:USER:PRINTER:ACCESS:~:USER ARFAS:CXMtn!NrS \ \ \ \ \ \ \ \ \
1 2 345 678 9
1. Account login 1BIe. 1his can have up to eight characters.
2. Optional password field. If it exists; the password is encrypted.
3. Initial default drive. 1.bis will appear in the ~-OOS prarpt.
4. Initial default user area IUllber. '!bis will awear in the MC-OOS prarpt.
5. Initial default printer (default=printer 0). You can enter printer names or nunbers. '!be name or nunber mst be in the LPRS file.
2. 5-PASSWIr 1

6. Opt:i.c:mal selective tealinal access rn"hers. '!his is a list, separated by cannas, of the console nUJ'lt>ers (from TrYS, field 1) that this account is allowed to log in fran. If no assignment is made in this field, the user has access to any terminal.
7. Opt:i.c:mal default applicatial program. such as Supercalc 86. Accounts with an entry in this field are autanatically entered into the program specified. '!he system searches for the program exactly as if the user had typed it at the default pranpt. '!he account is autanatically logged out after exiting the program. '!he extension (file type) is not included with the program name.
8. Accessible User Areas. '!his is a list of nwnbers, separated by cxmnas or hyphens for a range, of the user areas that an account is allowed to access. If no assignment is made in this field, the account has access to any user area. If an account tries to access a restricted user area, the system will deny permission to access that particular user area. For exanple, if you have been allocated user areas 3, 4, and 14, and you try to neve into user area 6 fran user area 4, the system will respond with the following message:
You dcI.'l't have pemi.ssim to access user area 6. User JUdJer = 4.
9. ~imal CI .. GEilts field.
'!his contains any ccmnents that the system manager may wish to include regarding a PASSWD account.
2.S .... PASSWI>-2

'!be PASSWD file nust not be enpty. If the file is enpty or damaged, the system will lock up on startup am you will have to call your dealer. '!be PASSWD file should only be changed by the system manager, and the NEKJSER program should be used to used to inplement any changes in the file. Sirx::e m::xUfication of this ·file is restricted to the system manager, it is dOClUllented in nore detail in Chapter 3.
Do not use a text editor to create a PASSWD file, since you will not be able to encrypt any passwords that you put on account names. MC-OOS will not allow you to log in to an account with an unencrypted password. Use the PASS«>RD or NEKJSER carmands to put passwords on accounts in the PASSWD file.
MC-OOS will put a special write password on the PASSWD file during the boot process. If the label on drive A: has ~ set <:6, only the NEKJSER amPASSWOR> carmands can mdify the PASSWD file. Never put your own password on the PASSWD file.
In MC-OOS systems that inplement a high level of security, only the system manager's account ("system") should be allowed to access user areas 0 or 15. That is, field 8 of the PASSWD file should not be left blank, but "1-14" or some nore restrictive list of user areas should be entered for accounts other than the "system" account. In a secure system, every account should have a password in field 2, to prevent easy access to the system by unauthorized users.
2. 5-PASStID-3

PASSiDI) @node
'!be P~ program permits irrlividua1 users on the system to change their login password in the PASSm file of either the 1021 system or any designated reroote system. Because the PASSoID file is password protected, am because the login password field on PASSWD is encrypted, the PASSWD file cannot be edited by ordinary means such as ED, WordStar, or any other text editor. You can only use PASS\IORD to change the password of the account to which you are currently logged in. The PASSiORD program cannot be used to put passwords on files or devices.
To run the PASSWORD program, type:
OA>PASSWORD
For exanp1e, if you logged in as "I.ucy," the program will resporxi:
Gifford Omplter SysteE - Password - versial 2.0 OlangiDJ paSSllOrd for Wcy
If you already have a password, the program will prompt:
Old passllord:
If what you type does not match your old login password, the program will resporid:
Sor::ty. You did not type the correct pa:saIOrd.
2.5-P~l

At this point, if you did not correCtly enter your old password, you will automatically exit from PASSWORD. You will see the system prarpt, and you mst invoke the PASSWORD program again to make another attenpt to change your password. ('!be purpose of this feature is to prevent unauthorized users from changing your password.) If you have no current password, or if you typed it correctly in response to the ear lier prarpt, the system will ask:
Raf pasSlllOrd: Retype new password:
When you respald to this pronpt, your keystrokes will be echoed as blank spaces on the terminal screen. '!his is to insure that no one sees your password as you enter it into the PASSWJ) file.
Your password can be any string of up to eight ASCII characters, including control characters, followed by a carriage return. Unlike in file names, any characters, including periods, ccmnas, semicolons, and blanks (the spacebar) can be enbedded in a password. As before, the screen will sheM a blank space for each character that you type, rather than your actual keystrokes. Press the REl'URN key, and the screen will say:
'!We it again:
'1b successfully change your password, you IIl1st type exactly the same thing both times. If you do, you will have a new login password, and you will automatically exit to the system pronpt without further dialogue from the PASSWORD program. If your b«> versions of the new password are not identical, you will first get the error message:
2.5-PASSWORD-2

You will also autanatically ~it fran PASS-lORD, but withrut changing your password. '!be purpose of this feature is to make it unlikely that you will give yourself a new password that is different fran what you had meant to type. Be sure to remeJ:li)er your new password, since you cannot refresh your menory by displaying the PASSWD file as the password will always appear encrypted as twelve randan characters. If you ever forget yoor password, yoo mst contact the system manager for help.
If you want to change your password on a renote system for which you already have an account in the PAfBm file, you mst type PASStVRD, followed by @, and then the name of the renote system. SUQ?OSe that yoo have an account established on a system called SALES, and you want to change your password for that account. 'lb do this, type:
OA>PASStVRD @SALES
'!be PASSWORD program will display the same screen pranpts that it does if you were changing yoor password on the local system. It will ask you to enter your old password, and then enter your new password twice.
'!be next time that you connect to the SALES system, or login fran a terminal that is connected directly to the SALES system, you mst supply the new password. . You mst already have an account on the renote system aOO know the password for that account in order to change it. If you don't have an account on a renote system that you wish to access, an account mst be created on the renote system by the system manager for that system using the NEWUSER program. '!be NEWUSER program can only be used to create new accounts on the lcx::al system.
See the DR NET '(SER'S MANUAL for IIDre information.
2.5-P~3

PIP destination:=source device:, file(s) [options] PIP destination:=d:fUe [options] PIP d: [Gn] =d:file [options] PIP d:newfile[Gn] =d:file (s) [options]
'!he PIP ~ ("peripheral interchange program") is used to copy files to a destination device fran a source device. If you learn enough about PIP to be able to make copies of your files, you will reduce the likelihood of losing inportant data or programs. PIP typically uses logical drives (hard disks, floppy disks) as the destination and source devices, but PIP can also accept printers, plotters, and terminals as devices.
To use PIP to 00Pf file CAT.TXT fran drive A: to drive B: in your current ~ser area, type:
8C>PIP B:=A:CAT.TXT[VHf]
'!he [VRaf] options cause PIP to vet'ify [Vl that the COfJY matches the original,' to copy files regat'dless [R] of whether they have the om or the sYS attribute, and to replace with [W] source files arrJ files of ~ same names in the destinatioo area, even those set with the.RQ (read only), attribute. '!'hese options [VRf] shruld be routinely iDcluc1ed in file transfers, butanit [W] if you do not wish to update RO files on the destinatioo drive. An "archival n optioo [A] allows you to selectively COf!:I only updated files (see Section 3.8-8). All 21 PIP letter options are listed later in this descriptioo.
PIP can accept wildcards (*, ?) in the specifications of files on the source device, so that multiple files· can be copied with a single PIP corrmand. For exanple, to CXJpy all files of type .CMD with t~, three-, four-, and five-letter names that begin with the letters "FR" fran drive C: to drive A:, give the conrnarXl:
5B>PIP A:=C:FR???CMD [VHf]
2.5-PIP-l

To copy all the files in your user area fran A: to B:, type:
OC>PIP B:=A:*. * [VHq]
PIP can also copy files fran one user area to another. If the source or the destination is different fran your current user area, you must indicate the user area with the [Gn] ("go to user area nn) option. If you supply no logical drive or no [Gn] option in a source or in a destination, the PIP program supplies as default values your current logical drive am current ~ ~. Caipare, for exanple, the three e<mnands:
~PIP B: [G12] =C:lDi.lOi[G7VRW] 7B>PIP' 1Df.1Ol[G12] =C: [VHq]
]2>PIP B:=IDl.~[G7VH-1] /
All three lines accarplish exactly the same thing, transferring the file 1Dl.~ from user area 7 of drive C: to user area 12 of drive B:. 'Ibe last two lines are shorter, because they omit sane user area and drive specifications which match default values inplied in the system pratpts (respectively, user area 7 of drive B:, and user area 12 of drive C:). You are, of course, allowed to enter default values in PIP, as in all other MC-DOS ocmnands.
PIP can also give a new name to the copy of the file on the destination drive. 'Ibe following lines rename or.o.DCX: as NEW.DCX::
OA>PIP B: NJ!Itl. IXX>A :OLD. DCX: [VHq] OA>PIP NlM.IOC=OLD.DCX: [VHq]
In the second line above, the source and the destination are the same, namely drive A:. 'Ibis is not the same as using the MC-IX)S REN ccmnand to rename files, since after the last PIP comnand two copies (OLD.DCX: am NJ!Itl.DCX:) exist in the same directory area. If you copy a file to a destination where a file exists with the same name, PIP writes over the existing file, destroying it.
2.S-PIP-2

PIP can canbine many soorce files as one destination file:
6B>PIP C:BX>K=CBAPI [G2VRW] ,CHAP2 [G2VRW] ,A:CHAP3 [G2VlM]
'Ibe cannand line listed above will create in user area 6 of drive C: a file called BOOK that carbines files CHAPI am CHAP2 fran user area 2 in drive B:, am CHAP3 fran user area 2 of drive A:. Camlas (,) are used to separate the various soorce files. Option [0] allows .... Z only after the third file. Lt> not use wildcards (*,?) in PIP ccmnands to concatenate files.
(bpyiDJ Piles to Printers
Al though typical PIP cperations copy files between logical drives (hard disks or floppy disks), other devices can be used as a source or destination. For exanple, the PIP ccmnand accepts ISr: as a destination, allowing you to send files to the printer or plotter to which you are attached. 'Ibe command:
8C>PIP ISr: =A: TIYS [GO]
will print out file 'rfiS, if your printer is ready. 'Ibe ISl': option is sometimes helpful in sending to certain printers a file O(){ltaining special strings of characters to change how the printer operates- for exanple, switching the pitch to a different number of characters per inch. Another PIP destination option, PRN:, causes a printer to nurrber each line of your file, and to expand tabs to every eighth column. '1bese PIP options offer al ternati ves to the PRINl' ccmnand, or to the 'lYPE ccmnand with the .... p control character, or to an applications program, or text editor as a way to print files.
If you type PIP without an argument, the program signs on and gives you a prompt (*). You can then enter a valid PIP camnand line like those described on the following pages, specifying the desti-nation device am source device, but anitting the keyword "PIP. II 'Ibis interactive usage is called the "nultiple cammand" IlDde. 1b return to the operating system, press REroRN at the * prompt.
2.5-PIP-3

Selectively Qlpyi.nJ QU.y Updated Piles
Since JOOSt of the 21 letter options accepted by the PIP oammand are infrequently required, refer to the next two pages as the need arises, rather than menorize all the letter options. Five of the PIP options, hO'wever, are very inportant for everyday operatioos: Gn, V, R, W, and A. '!be first four have already been describech use of the [A] option is outlined belCM:
Me-DOS recognizes an "Archive" file attribute, whose "eN" or "OFF" value can be controlled by the SET or PIP oammand. If a file has this attribute set m, the operating system will reset the Archive attribute to OFF if the file is nrxUfied. For exanple, if you edit a text file, or add, delete, or edit records in a data file, or create a new file, the new or nrxiified file will have the Archive attribute set OFF. (The SDIR cxmnand lists "Arcv" after any file whose Archive attribute is set m.)
Using [A] as an option in a PIP oommand has two effects. First, it tells PIP not to copy source files that have the Archive attribute set m. Second, after transferring any file to the destination, PIP sets the source file's Archive attribute m. (If the transfer fails-- for example, because a diskette did not have enough space-- Archive is not set CN for the source file.) '!be Archive attribute is not copied by PIP, so all destination files transferred by PIP have Archive set OFF. '!be oammand:
OD>PIP D:=A:*. * [VHiA]
copies to drive D: all of the files on your directory area that have Archive set OFF, and sets Archive m for each source file.
'!be practical value of using the [A] option with PIP is in making backup ("archi val ") copies of files to renovable storage media, such as floppy diskettes. Always using the [A] option in making backup copies saves time and storage space, because it avoids repeatedly copying files that have not been nrxiified since the last backup operation. If you specify [A] in an "archival" PIP ocmnand, the Archive attribute is set m. Only files that have been nrxiified since the last backup will be copied.
2.5-PIP-4

[A] = Do not cq"y files with the Archive attribute set 00, and source files are set with Archive CN after copying. If [A] is not specified, all files that match the source are copied, and source files are not set with Archive 00.
[C] = You mst confirm (by typing (Y) or (N) each transfer after a PIP cannand that has wildcardsynbols in the source. Unless [C) is specified, all files are transferred.
[Dnl = Delete characters beyond colUllll n in each line. 'Ibis is useful when your destination is a ISl':, PRN:, or a:N: device that can print no more than n characters per line.
[E) = Echo each transfer on your terminal screen. Used only with character (printable) files, this displays the data that you are cq"ying as it is copied. 'Ibis option slows PIP.
[F] = Do not copy form feeds. If [F] is not specified, synbols to advance the printer to the beginning of the next page will remain in the destination copy of your file.
[Gn] = "Go to" user area n. Both the source and the destination files can have [Gn] options. 1'hi8 is the only option that can follow a destinatim specificatim. If [Gn] is not specified, PIP takes as its default your current user area. 'Ibe [Gn] option cannot be used to override any user area access restrictions inposed by the PASSWJ) file.
[H] = This should be used only in transfering hexadecimal files (with extension .H86 for l6-bit files, or .HEX for 8-bit).
[K] = Suppress terminal display during a wildcard file transfer. If [K] is not selected, the screen will list the names of each source file as it is transferred.
[L] == Change all upper case alphabet characters in the source to lower case letters in the destination1 OR;X>Site of [U].
[N] = Add line nUltbers, starting with one, and followed by a colon (:) in the destination file.
2.5-PIP-5

[N2] = Added line nUIlDers with single digits should be preceded by a zero (0) and a TAB should be inserted after the line mlIti:>er. If [T] is also specified, Tabs (",I) are expanded. 'Ibis option can be used when ISl': (not PRN:) is the destination device.
[0] = Cbject file transfers. 'Ibis causes end of file characters (",Z) to be ignored when copying to a character device such as CGl: or ISl':.
[Pn] = Sets the page length at n lines per page. If [Pn] is not specified or if [PI] is specified, page length beoanes 60. 'Ibis can be used in conjunction with [F) as source options.
[05"'Z] = ''Quit after SO option stops after copying a specified sequence of characters s. Type the control character "'z to indicate the end of sequence s. Like [Ss], this option only works in the interactive, I1l1ltiple ccmnand IOOde.
[R] = Read files that have the system (SYS) attribute set. Unless you specify [R], only DIR files will be cq;>ied.
[Ss"'Z] = "Start at sIt option begins copying at a specified sequence of characters s. Type the control character "'z to indicate the end of sequence s. 'Ibis option requires the interactive, I1l1ltiple ccmnand IOOde, where it can be used with option [05] to copy specified parts of files.
[Tn] = Expand TAB characters to n spaces. 'Ibis is used to list programs on printers (destination device LST: or PRN:).
[U] = Change all lower case alphabet characters in the source to upper case in the destination file1 the qposite of [L].
[V] = Verify that data was cq;>ied correctly after each record is written. 'Ibis option should only be used when a logical drive is the destination device (as in nost PIP cannands).
2.5-PIP-6

, .. ~ ....
[W] = Write over files that have the read only (ID) attribute. If you do not specify [W] and the destination file already exists with the read only (ID) attribute, then you will be proopted:
If you enter any character other than 00, then the original file remains. If you enter (y), then the source file is copied, overwriting the destination file.
[Z] = Used only with printable files, this sets the parity bit of every character in the destination file to zero.
0lpyi.nJ Piles IJ.b or FJ:aa Qmsoles
'!he CXN: option (for a terminal or lOOdem) can also be used in PIP oannands as a source device (usually the terminal keyboard, or a lOOdem) or as a destination device (usually the screen). '!he following example is of a PIP cannand to display on the terminal screen the file MEMO fran user area 4 of drive B:.
OA>PIP ~:=B:MfM)[G4]
'!his has the sane effect as the following TYPE cannand:
OA>TYPE 4B:MEMl
PIP can also create a file by directly entering data fran the keyboard or lOOdem. For exanple, the following cannand line will save any keystrokes that follow as TEXT.KBD, a file in your current user area. Type (",Z) to end the input and exit fran PIP. All characters, including backspaces will be en.tered in the file.
OA>PIP TEXT.KBD=aJN:
2.S-PIP-7

UsiDj PIP with PasaIord Protected Piles
rrbe PIP cxmnand can be used to copy files protected by file passwords, if you kJ'lOW the password. If the SE1' ccmnand has been used to make the source drive recognize file passwords, the correct password nust be presented in the PIP ccmnand line:
OA>PIP B: =A:~TA. TXT~ P&lQORD
rrbis form copies a password protected file with the name ~TA.TXT and the password PSWORD from the default user area 0, drive A: to default user area 0, drive B:. Note that when PIP copies a file, it does not cqJy aD¥ extended file control blocks (DCBs) to the destination. Since file passwords are in the XFCBs, they are not copied, so that if a protected file is copied with PIP, the copy is unprotected. If you want to password protect the COf!:{, you nust follow the procedures for file password protection that are descr ibed on page 2.S-SET-l.
UsiDj PIP at SysteE lfit:boot BaEd Disks
If your catplter has no hard disk, your system diskette will normally occupy drive A:. 'lb COf!:{ files that are not on the system diskette to another diskette, you must use PIP and the multitasking features of MC-oos. rrbe following procedure allows you to use PIP and the OOKRESET cxmnands, and different virtual terminals, to copy files from diskette to diskette. For this exanple, you are in user area 0 of drive A:, and drive B: is enpty. 'Ib invoke PIP in multiple ccmnand node, type:
OA>PIP
rrbe program responds with the PIP multiple comnand node pranpt:
*
2.5-PIP-8

Now switch virtual terminals in the normal way, and log in on a different virtual terminal. Suppose in this example that this is user area 1 of drive A:. When the system shows the praapt for your default directory area, you should reset the disk drives:
lA>DSKRESET
Now load the source diskette onto drive A:, and the destination diskette onto drive B:. Using the Virtual Terminals procedure for switching screens (usually a special function key), switch back to the virtual terminal where you left PIP running. In this exanple, let us suppose that all the files to be copied onto B: have the extension.J:lCX. Now to transfer your files:
*B: =A: * • OOC [\1Htl]
Notice that the first asterisk is the PIP praapt, not a wildcard. The screen will list each of your files being copied. If you change diskettes while at the * prompt, then use Virtual Terminals again to detach the PIP process. At the new virtual terminal pronpt, type once rore:
l.A:>DSKRESEl'
Mount the diskette in drive A:, and use the Virtual Terminals ccmnand again to switch back to the original virtual terminal where PIP was runn'ing. The ~reen will list the files copied, and will show the PIP multiple cannand prarpt:
*
Now the files *.OOC are on user area 0, drive B:. To exit fran PIP, reIOOUIlt your system diskette in drive A: and type "'C.
2.5-PIP-9

~iDJ Diskettes m SiDJle Flqlpy Drive Systellls
You cannot directly copy diskettes to diskettes on systems that support only one flOR?,Y disk drive. If you have a hard disk, yoo can copy all of the files on a diskette to an enpty directory area. Then give the 00KRESEr catIIlaI'd, replace the source diskette with a formatted destination diskette, and PIP the files from the hard disk to the destination diskette.
If no enpty directory area is available on the hard disk, set ~ the Archive attribute to all files in sane directory area of the hard disk, and PIP the source diskette files to this directory area. Gi ve the oSl<RE:sm' ccmnarxl. Now yoo can use PIP with the [A] option to cqJy the files to a destination diskette. If you do not need copies of the source files on the hard disk, use the ERAQ carmand to delete them.
Mlitimal. Notes m PIP
Besides the standard Me-DOS syrrOOls for logical drives (A:, B:, etc.) and the special syrrbols ISr: and PRN: for your current printer and CON: for your current console, PIP accepts two additional syrrbols for special nsource devices: n
EOF: = An imaginary device that always produces a ..... Z to mark the end of a file. 'Ibis can be concatenated to any file that for sane reason lacks an End Of File symbol.
NUL: = Another imaginary device used for paper tape readers, that always produces 40 null syrrbols (hexadecimal zeros).
If you are upgradiDJ yoor current oaIplter systeln frca MP/M 8-16 to JI::-D(J; it is ioperative that you use the new IC-D(J; versim of the PIP progr_ to oqJy ALL yoor new systeln files mto yoor hard disk. Make sure that you back up ALL of yoor files mto floppy diskettes (not just yoor systeln files), before you oqJy yoor new systeln files mto the hard disk.
See also the CXNCIJRRENl' ~ OPERATING SYSTEM USER'S GUIDE for additional information on the PIP ccmnand.
2.5-PIP-lO

PR1Rl' d:file [c:ption], d:file [c:ption], •••
'!be PRINl' ccmnand causes your current printer to print either text or data files directly fran the operating system prarpt, either locally or over a DR Net network, provided that the physical printer is available. The PRINT ccmnand. does not recognize formatting paramaters used by WOrdStar or by other text editors, resent>ling the TYPE ocmnand (with Ap). The PRINT ccmnand accepts the following c:ptions:
[Gn] : The [Gn] option specifies the user area nUI'l'ber of the file to be printed. This lets you print files located outside your current user areas, but this cannot be used to override any user area restrictions of the PASSWD file.
[S] : The [S] option is required if the file to be printed has the SYS attribute (like the [R] c:ptioo of PIP). Files with the DIR attribute do not require the [S] optioo.
[Tn] : The [Tn] c:ption exparrls tab characters (AI) so that the next character is printed in a col\Dlll exactly divisible by n. If n is 0, tabs are not expanded. If [Tn] is not specified, PRINT uses a default of n = 8 spaces.
A single PRINT command can print a list of files:
2B>PRINT * • OLD, C:NE.WS [S], EIAINE.REM[G4]
This exanple prints all files with extensioo .OLD in user area 2 of drive B:, then a system file NE.WS in user area 2 of drive C:, and finally the reminder file ~REM in user area 4 of drive B:. While each of the files specified 00 the ccmnand. line above is printing, the PRINT oammand will display the following messages on your screen:
Print.i.n:J file: fil.enalle. Press SPACE BAR to stop.
2.S-PRINl'-l

Pressing the space bar causes printing to be interrupted (after the printer's buffer is enpty), am the program asks:
Ik> you want to S(top printing), skip to the R(ext) file, or: R(ea.e printing this file) ?
If you type (S), you exit from PRINT. If you type (N), printing resumes on the next file. If you type (R) printing resumes where it stopped. If the printer is busy with another job, the following message is displayed on your screen:
Printer is beiDj used by amther amsole. Ik> you want to (II) ait or: (C) ancel?
If you type (W) the program waits until the printer is free, then prints your file(s). If you type (C), PRINl' terminates without printing, and returns the system pronpt. You must type RElURN after any letter response to a PRINl' pratpt. (Use the PRINTER carmand to select a printer other than your current printer before you 9i ve the PRINl' ccmnand, if you want to use a different printer, or if your current printer is not available.)
If the PRINl' ccmnand encounters any errors, it displays an error message on your terminal screen, and skips to the next file to be printed, if any, that was specified on your ccmnand line. When PRINl' finishes printing a file, the following message is displayed on your screen:
Pri.ntiD] is cmpleted. pic files printed.
Here p is the mmber of files that were successfully printed and c is the nuni>er of files that were specified on the ccmnand line. See also the a:Hl.JRRENr ~ OPERATING SYSTEM USER'S GUIlE for additional information.
2.S-PRINl'-2

PRllflER n P.RIIITBR. name @node PRDllBR name account @node PRDllBR ?
'lhe PRINrER oonmand with no argument displays the printer nUJTber assigned to your terminal. If you specify a name or a nuJ'li:)er, that printer (or plotter) is assigned to your current terminal. 'lhe name specified in the ooomand mst be in the LPRS file. Different virtual terminals supported by the same physical terminal can select different printers by the PRINTER o:mnand. If your system is part of a DR Net network, the PRINrER oonmand can access printers at other systems within the network.
Bxaaples:
'lhe follO'lling oonmand will show the correct format for using the PRINTER oonmand:
OA>PRINTER
'lhe follO'lling oonmand assigns a printer, called DRAFr in the LPRS file, to your current virtual terminal:
2D>PRINrER DRAFl'
'lhe ccmnand belO'll assigns the printer with the name LPRO (printer nUJTber 0) to your current virtual terminal:
4C>PRINTER LPRO
2.5-PRINTER-I

The following selects printer number 1 in the LP.RS file:
2D>PRINTER 1
If you type:
OA>PRINTER ?
'!HE PRINTER coIllllalld will display the printer numbers and nanes that exist in the LPRS file.
Accessing Printers <Xl Other Systems of a NebJork
The PRINTER coJRDaJXl also allows you to select a printer an a different system within a DR Net network. Fbr example:
10B>PRINTER DIABID· @MARKE:l'IN
This assigns a printer, called DIABID in the LPRS file of the system called MARKETIN, to your current terminal. Fbr this comnand to work, however, the account nane by which you logged in to your local system must also appear (with the same encrypted password) in the PASSWD file of the system called MARKETIN. The "at" symbol (@) DUst be prefixed to the system nane. If your account nane appears in the PASSWD file of the MARKETIN system, but with a different password, the operating system will ask for your password as it appears on the MARKEl'IN system. The screen will not echo the password that you type.
If you type the password correctly, you will be connected to the DIABID pr inter of the MARKETIN system. If you cannot present the correct encrypted password, you cannot connect to the printer of the networked system. If your account nane does not appear in the PASSWD file of MARKETIN, you will be asked for the password, but there is no correct answer- you cannot connect without matching the PASSWD file of MARKETIN.
2.5-PRINTER-2

If the account name by which you logged in does not awear on the password file of the ne'b«>rked system whose printer you want to use, yoo can instead give a PRINTER ccmnand that includes a valid account name that appears in the PASSWD file of the other system. '!be account name appears between the printer name/nunber and the system name in a PRINTER cau.nand like the following:
4B>PRINTER 2 ANN @SALES
'!bis attempts to assign printer 2 of the Sales Department system to your current virtual terminal. '!be account name "ANN" llIlst be in the PASSWD file of the system called SALES. If ANN is a ''public" account name (one with no encrypted password), or if the account name by which you logged in and ANN have the same encrypted password, the screen will print a message that you are rDII connected to that printer on the SALES system, and will display the SALES system's MOTD file, if one exists.
'!bus, if you need to connect to a printer on a system which does not list your account name in its PASSWD file, you can do so wi th the ccmnand line above by presenting another account name whose encrypted password on the other system either (I) does not exist, or (2) is the same as the password in your local PA%WD file by which you logged in to your local system.
Continuing the same exanple, if the nANN" account name that you use in a PRINrER cau.nand has an encrypted login password on the renote system's PASSWD file, and if this does not match the password of your current account name on your lcx::al system, then the operating system will ask you to present the password of ANN on the SALES system's PASSWD file. If you type it correctly, yoo will be connected to the SALES printerJ otherwise you will get a message that your password was not valid. Just as with local printers, connecting to a networked printer will only allow you to use the renote printer if it is available. If a printer is busy, yoo llIlst wait until work in progress is canpleted.
2.5-PRINTER-3

'!he r.cx;arr carmarrl or rebooting the system reassigns printers that have been selected by the PRINTER ccmnand, (but LOOOOT does not detach list devices attached by the "p control character) •
'!he MC-IX>S PRINl'ER coomand differs from the standard Concurrent IX>S PRIN11ER carmarrl in allowing account IlUJ1bers, am network ncXles, and printer names from the LPRS files to be used, as well as IlUJ1bers, as arguments of PRINTER. See the cx:NCURRENl' ~ 0PERATnI',; sYSTEM {SERfS GUIDE for additional information on the standard Digital Research Inc. PRINIER carmand.
2.S-PRINTER-4

'!be PWASK.NEl' file is a security feature used only by the system manager of a system in a DR Net local area network. A renote user who attenpts to connect to your node must present a login password that matches the entry for the current login account name in the PASSWD file of your node. If the password is incorrect, or if the PASS-ID file does not list the current login name, the renote user cannot connect to your node.
An exception to this rule, if the file PilASK.NEl'does not exist, is that a reJlDte user does not need to present a login password if his or her current login account name and login password exactly match corresponding entries in the PM3SWJ) file of your node. That is convenient in sane situations, but it means that an unauthorized person who finds an unattended loggedin terminal could use that terminal to access other network nodes to which the currently logged-in account name is allowed access.
If the PilASK.NEl' file exists on user area 0 of drive A: of a node, the exception described in the previous paragraph is eliminated: every attenpt to connect to a node requires that a login password for the current account riame be presented that matches the entry for that account in the PAS5WD file of the node being accessed. In the exanple of the unattended terminal, the person at the keyboard could not acce$S other nodes that has PWASK.NEl' files unless the correct password . were presented.
Like AU'lOST, the PWASK.NEl' file can be enpty, since it signals to the network inp.lt/output system (NICS) that a login password rust always be presented when saneone tries to comect to a node that has a PWASK.NEl' file. 'lb create PWASK.NEl', type:
Now' the operating system will ask anyone attenpting to connect to your node for a password. '!be PilASK.NEl' file affects only the local node, so that some nodes of a network can implement this protection, while those at other nodes can elect not to do so.
2.S-PWASK.NEl'-1

naoe.REM
The reminder file, name.REM, is an optional file which will be displayed when the user to whan the reminders are directed logs in. The file name "name" must match the login acoount name in the PASSWD file. The reminder files are kept in the default user area and dr i ve of each account.
Use the name.REM file to leave yourself a reminder to do sanething, since you will see the reminder message each time you log in to the system. '.lb make a reminder file, create the file wi th an editor such as ED or WOrdStar (in oon-document mde) fran the default drive and user area of your acoount. If you created a DiUDe.REM file fran a drive and user area other than the initial, you must oopy that file to the initial drive and user area which are specified in the login PA9SWD file. For example, if you have logged into the accx>unt "jane," and the default drive for the acoount "jane" is dr i ve D: and the de fau 1 t user area is 9, then fran a different drive and user area you would type:
3C>PIP D: [G9] =JANE-REM [VIOl]
Once the file is on user area 9 of drive D:, there is 00
need to leave it in user area 3 of drive c:. '.lb erase it fran user area 3, drive C:, area give the oonmand:
3C>ERA JANE.REM
You can, of course, leave reminder messages for other users using the above method, but it is more polite to send them mail with the MAlL utility.
2.5-name.REM-l

Ia d :newfile=oldfile
The Rm comnand renames files that have the RW (read-write) attr ibute. The new name must be al the left-hand side of the equal symbol (=), and the old name al the right-hand side.
In the example below, a BEN oonmand changes to "R:>SE.BUD" a file previously called "R)WS.BUD" in uset area 2 of drive A:
%:>REN A:IDSE.BUD=RJWS • BUD
If you rename a file with a new name that is the same as another file's in the same directory area, the f~le that first had the "new name" will be deleted. The Rm program warns you, and asks you to OQ'lfirm that you want to go through with this:
.BOD already exists, delete (Y/R)?
If you type (Y), the current file IDSE.BUD will be erased, aOO the file called R)WS.BUD will be renamed IDSE.BUD. If you press any other key, the program will terminate without doing anything.
Wildcard specificatioos (*,?) are permitted, but must oocur in the same parts of both the new and old names. The comnand:
9A>Rm * .OLD=*.NfM
changes every file extensial .NfM to .OLI;> in your directory. The BEN oonmand cannot rename files that have the :ro (read-ooly) attribute. The Rm 00llIlIaIld does oot and cannot change a file's attributes (such as Archive, SYS, DIR, or RW), password, user area, nor logical drive. See also the COtCURRENr ~ OPERATIN:; SYSTEM USER'S GUIDE for more examples of the BEN oonmand.
2.5-REN-I

'!he RESEl' ccmnand allows changes to be made in existing entries in the TTYS and LPRS files without having to shut down and start up the system. When the RESEl' ocmnand is given, the ca1p1ter executes a smc and reads the LPRS and TTYS files. The RESEr carmand cannot be used to add IIDre terminals or pr inters than are currently described in the files.
'lb use RESET, first make any changes to the TTYS or LPRS files, then type:
OB>RESEr
'!he system will make any necessary changes indicated in the files.
2.S-RESET-l

80IR
80IR dl: ,d2:, ••• ,dn: (option(s)] SDIR (option(s») d:file(s) SDIR d:file(s) [option(s)]
The SDIR comnand displays the names am the attributes of files in directory areas. SDIR is used to looate files, am to display information about files am logical drives. 80IR can accept wildcards (*,?) in file names. The SDIR cxmnand is helpful in systems with large hard disks, because it can help yoo search for a file when yoo are not entirely certain of the drive, the user area, or file name that were used to store the file.
The SDIR comnand resenbles the DIR(S] ccmnand, but has mre options, displays file size and attributes, sorts the files alphabetically am displays the date am time of the latest file update am accessing. '!he default (no options) form of 8DIR gives detailed information on every file in yoor directory area:
OA'>SDIR
This displays in alphabetical order the names am extensions of all the files in yoor current directory area, as well as:
o The logical drive letter of your current directory area o The user area nUlTber of yoor current directory area o The size (in l024-character "kilobytes") of each file o The nunber of l28-character "records" occupied by each file o The Dir/Sys, Hijro, Archive <E/OFF attributes of each file o The total nunber of l28-character records in yoor directory o '!he nUlTber of files in your directory o The total nunber of l024-characters blooks in yoor directory o '!he ratio of directory entries to the maxinum nunber allowed
On a logical drive with a label to sURX>rt extended file control blooks (XFCBs) for passwords, the same cannand also displays:
o The level of password protection assigned to each file, if any o Timestarrping information, if timestanping has been enabled
2.S-SDIR-l

The 80IR ccmnand accepts the following options and roodifiers that specify the files to be listed, or the format in which to display all files that match your catma.l'Xl line specifications:
SDIR [A'rrRII3UT&S]
SDIR [DIR]
- list the status of user-defined attributes
- files with directory attribute DIR
SDIR [DRIVE?d] - files from drive d: SDIR [DRIVE=ALL] - files from all cxxmected drives SDIR [DRIVE=(AB. • .d)] - files from drives A: B: ••• d:
SDIR [EXCLUDE]
SDIR [FF]
SDIR [FULL]
80IR [LENG'lH=n]
SDIR [MESSAGE]
SDIR [lOXFCB]
SDIR [lnSORl']
SDIR [K>]
80IR [~
SDIR [SIZE]
SDIR [SYS]
- list files that do not match wildcards (*,?) after the [EXCLUDE] option
- add form feed(s) to the beginning of any printed listing
- default display format (see previous page)
- repeat table headings after n lines
- identify each directory area searched
- files without extended file control blocks
- sequencEd as found, not alphabetically
- files with the read-only attribute K>
- files with the read-write attribute HW
- display only names and file size data
- files with system attribute SYS
SDIR [USER=n] - files in user area n SDIR [~-ALL] - files in all accessible user areas SDIR [USER=(O,l, ••• ,n)] - files in user areas 0, 1, ••• , n
SDIR [XFCB] - files that can have passwords
2.S-SDIR-2

Any option (or list of up to 10 options) RUst appear between a single pair of square brackets ([]) in an SOIR oc:mnaOO. line, with no IIDre than one option list per ccmnand. If' an option list carbines several options, these Illlst be separated by c:xmnas or by blanks. Any list of several user areas or logical drives used as IOOdifiers of a USER or DRIVE option IlllSt be enclosed in II ()"
(parentheses), with the items separated by carmas or spaces.
It is not necessary to type IIDre than the first ~ letters of an SDIR option. 1.be following arecanpletely equivalent SDIR carmand lines:
12B>SDIR *.eM> [ORIVE=B,USER=(2,4,6) ,SYS,MESSAGE] 12B>SDIR B:*.eM> [USER=(2,4,6), SYS, MESSAGE 12B>SOIR [USER=(2,4,6) SYS MESS] B:*.()![) 12B>SDIR B:*.<X> [U8=(2 4 6) SY ME
Fach tells the system to list in [FULL] format all of the files of type .CMD with the SYS attribute in user areas 2, 4, am 6 of logical drive B:, separately listing such files for each directory area. If any of the three has no file matching the specification, the [MESSAGE] option indicates this on the screen.
The SDIR oc:mnaOO. can search for a file whose directory area is unknown. 'lbe advantage of using SDIR rather than OIR to locate files is that SDIR can examine nultiple user areas am Illlitiple logical drives in a single catrnand line. For exanple:
9A>SDIR WST. In: [USER=ALL, DRIVE=ALL]
will display a directory of all the files called LOST.In: that are stored Qn your system, showing their directory areas, size, am attributes (if indeed arr:/ file of that name exists).
Every SDIRoption list awlies to all files that match the specification. If you do not indicate what files you want listed, SDIR will show all the files in the specified directory area(s), as if *.* were your file specification.
2.S-SDIR-3
~L - ~-____ ~ ______ ~ ---

Fbr example, the oammand line with no file specification:
6B>SDIR [ID, USER=ALL]
lists all files on drive B: that have the read-only attribute. Use ... s and "'Q to stop and to restart long SDIR screen displays.
The default display format is the option [FULL]. This displays one file per line (if the logical drive has a label) or two per line (if it has no label). The [SIZE] option uses a more canpact display format with three files per line. Fbr exanple:
4C>SDIR A:, B: [SIZE]
This exanple oammand would list the names of all files in user area 4 of drives A: and B: as separate directories, and would show how many I024-character blocks each file occupied. Unlike [FULL], the [SIZE] format does not show the nunber of records, file attributes, file password protection, nor timest:anps.
The [EXCLUDE] option is used to list files that do not match a wildcard specification. For exanple, the oammand:
4C>8OIR A:*.OI) [USER=O, DIR, EKe]
will list all files on user area 0 of drive A: that have the DIR attribute, except for files that have the .(1) extension.
80IR is helpful in cataloging files, because a 80IR display can be sent to your printer for outplt on paper. The [LENG'IH=n] and [FF] options can be used with the MC-DO.S control character "'p to print out in the [FULL] or [SIZE] formats a listing of the files in any directory areas, or of all the files on a disk.
See also the c:xH::URRPNI' ~ OPERATDG SYSTEM USER'S GUIDE for additional information on the 80IR oammand.
2.S-8OIR-4

SET
SET d: [qltim (s) ] SST d:file [qltim(s)]
'!he SET ccmnand is used to specify the attributes of files and logical drives. The SET ocmnand can be used to specify whether files can be freely read, copied, m::Xiified, renamed, or erased, and to iooicate the specific attributes of any files. Wildcard (*, ?) symbols can be used with SET to assign the same attributes to a group of files.
'!he SET ocmnand can assign to any logical drive a label that allows the drive to recognize file passwords on files. SET can then assign a password to any file, catinand, or label on that drive, so that only those who give the password are unrestricted in their access to the password-protected files.
SET can also assign a default password to a terminal or m::Xiem, so that it always presents that password. '!his security feature can be used with applications programs that have 00 provision for file passwords, but which must process sensitive data in a nultiuser environment, as described in Section 3.4. '!he SET ocmnand is so powerful that in SQne systems the system manager may decide to protect it with a file password. SET also controls the Archive attribute used in backup operations, and the process by which MC-IX>S puts date and timestanps on files.
SET can prevent files from being erased. For exanple, to give the read-only (00) attribute to logical drive B:, type:
2C>SET B: [00]
Now files on drive B: can be read, but cannot be created, deleted, IOOdified, renamed, or copied to B:. Substituting mi for 00 in the same ccmnand line assigns the read-write (RH) attribute to the drive, so that files on drive B: can be freely manipulated, unless restrictions are put Qn iooividual files of B:. Typing a "c or DSKRESET will clear the 00 status back to RW status.
2.S-8ET-I

Setting an entire logical drive to read-only (RO) is not recommended for most systems as a procedure for protecting files, since (1) no one can write on a 00 drive, and (2) another user might reset your drive to ~, unprotecting your files. It is listed here, however, as one capability of the SET ccmnand.
An individual file (or with wildcards, a group of files) can be SET with 00 or ~ attributes, and can be given the system attribute (SYS) or directory attribute (OIR). For exanple:
2B>SEr *.CMD [SYS,RO]
This gives SYS and RO attributes to every file of the type .CMD in user area 2 of drive B:. This differs from the ccmnand on the previous page (to make drive B: 00) in that:
1. Only files, not a drive, can have the SYS attribute.
2. A PIP ccmnand with the [W] option can override the RO status of a file, but not of a logical drive with the RO attribute.
3. Users can write on drive B: after the ccmnand on this page, but not after the previous ccmnand.
4. The first ccmnand affects all files on all user areas of B:; the second only affects files of type .CMD that were in user area 2 of drive B: when the ccmnand was given.
S. A .... C or DSKRESEr catmand gives drives the ~ (read-write) attribute, but does not change file attributes.
You can invoke ccmnand files with SYS and RO status in user area 0 of drive A:, regardless of your current drive and user area, and regardless of whether the PASSWD file allows you to access user area O. Certain files, such as sane .CNR (overlay) files, mst exist in user area 0 of your current logical drive, or in your current directory area, in order for programs that use them to execute proper lye To erase a RO file, you DUst first use SET to give the file the RW attribute.
2.S-SEl'-2

Attributes that the SEt' ooomand cootrols are specified by the options and nDdifiers listed below. '!bose in lower case letters are variable names that the user must supply.
AlOfIVE=OFF Fnables a PIP [A] caunand to copy a file AICHIVE=<:N Prevents PIP[A] fran copying a file DIR Non-system file attribute, O);.'pOsite of SYS R) Read-only status (ERA, ERAQ, REN disabled) Hi Read-write status (ERA, ERAQ, REN will work) tJPIlME Turns CN ~'lE timestanps on the default disk drive CRFATE Allows time ot file creation to be recorded ACCE5S Turns CN the ACCF.ss timestanps on a disk drive SYS System file attribute, O);.'pOsite of DIR DEFAULT=password Makes your terminal always present a password PASSWORD=password Requires a password to nDdify a label PASSWORD= (REIURN) Renoves password protection of a label NAME=label.typ Creates or renames a label on a logical drive ~ Enables a drive to recognize file passwords ~ Prevents a drive fran recognizing passwords PROTECr=DELETE Password required to erase or rename file PK7.l"ECl'=WRITE Password required to nDdify, erase, rename file PROTECr=READ Password required to do anything to file PlU1'.EC1'=lQE File has no password protection Fl,F2,F3,F4=ON Compatibility file attributesl not for ordinary use Fl,F2,F3,F4=OFF (See page 2.12 of ORI's COncurrent CP/M Programmer's
Guide)
"!be Archive Attriblte
SEt' accepts a file attribute option called archive, which can be displayed (as "Arcv") by the 80IR oc.mnand. The [AlCHIVE] option of SEt' can be useQ to control which files are copied by PIP (or by similar tape backup caunands) when files are backed up. '!he exanple ooomand line below sets the archive attribute CN for arrj file whose extension is .BAK in your current directory.
4B>SEt' *.BAt( [AIOnVE = CN]
2.S-SET-3

'!'his ccmnand would prevent a PIP cxmnand with the [A] option fran copying aI:rI .BAK file fran your current directory, since PIP's [A] option makes PIP copy only files whose archive attribute is OFF.
PIP also sets CN the archive attribute of aI:rI source files that are copied by a PIP [A] cxmnand. If your files of type .TXT had their archive attribute set CN, but you wanted them recopied,
3A>SET *. TXT [ARCHIVE = OFF]
would cause PIP with [A] to COfJ':l all files with extension .TXT fran your current directory.
Drive label s
A label can be placed on a logical drive or a diskette by the SET cxmnand, allowing files to be marked with tiJDestamps or set with file passwords. '!he label itself can be protected with a password, to prevent m::Xlification of the label. For exarrple, to put a protected label called "BELLA" on drive E: so that logical drive E: recognized file passwords, give the SET ocmnands:
2B>SET [NAME=BELLA] 2B>SET [~] 2B>SET [P~XYZZY]
After each of these three camna.ms, MC-JX)6 would irxUcate the status of the drive label with a screen display, as sh<:7tm in Section 3.4 but omitted here. '!be first cxmnand creates a label called "BELIA, n the second enables the drive to reoognize file passwords, and the third prevents the label fran being m::Xlified unless the password XYZZY is presented. '!he system manager cannot mcxUfy a drive label if its password is forgotten.
Files in all user areas of a logical drive are affected by the attributes of the drive label. Once a drive has a label, the only way to delete the label is to reformat the drive.
2.S-SET-4

F.I.le PasSllOEds
If a logical drive has a label that has the PRO.lK:T attribute eN, then the SEl' caunand can be used to put a paSfM)rd on any file on that drive. A pasfM)rd can be up to eight characters long. The SEl' ocmnand does not distinguish between upper case and l~r case letters in passwords.
PasfM)rds can specify various 1eve Is of protectioo: none (anyooe can do anything to the file), delete-protect (the file can be read or IOOdified without presenting the pasfM)rd, but cannot be erased), write-protect (the file can be read or copied, but not IOOdified or deleted), or read-protect (no one can do anything to the file without first presenting the password). If you do not specify any Pro'.l'ECl' IOOde when you set a file pasfM)rd, the operating system selects the READ IOOde, the highest level of protectioo. For exanp1e, to put the read-protect password "BIDDEN" on the file "FINANCE.J:XX::," type:
OA>SEl' FINANCE.J:XX:: [PASSiOR> = HIlDEN]
'!his prevents the file fran being read, copied, erased or IOOdified. To put a write-protect password on the file in the last exanple, you would type:
OA>SEl' FINANCE.J:XX:: [PASSiOR> = HI1DEN, ~ = WRITE]
If you decide to use file pasfM)rds, it may be efficient to assign the same password protection to groups of files that are used in the same way. A default password on a terminal can sinp1ify data processing prooedures when protected files have a cal.IOlI password. By defining groups of file names in the usual wildcard notation (*, ?) of the PIP, Om, and SDIR caunands, you
2.S-SEl'-S

can give a group of files the same protection level or a camon password with a single ccmnand. For exarrple, to protect fran erasure all .DBF files whose names begin with "an on drive A: (if A: 's label has the PK.Y.l'.&:T attribute Qij you could type:
OA>SET B*.DBF [PASa«>RD = INDELIBL, PRO.rEX:T = I>Er.BrE]
'!his will require the password nINDELIBLn to erase any of the .DBF files begiming with the letter B, such as:
OA>ERA BOXl917 .DBF1 INDELIBL
As an option, MC-JX)S can record the time and date when each file on a logical drive was created, accessed, or IOOdified. Only a logical drive that is SET with a label can support date and timestaDping of files (Section 3.8). The INITDIR oannand mst have previously been invoked, with no other prooess active, to format the directory of a logical drive to accept timestarrps.
4B>SET [ACCESS = ~]
'!he exarrple SET oatmand above causes a drive with a label to record in the directory the IlDSt recent time and date when each file was accessed. Alternatively, the time of creation can be recorded by the optioo [CRFATE = ~]. The [CRFATE] and [AOCFSS] options are nutually exclusive-- you cannot have both. '!he SDIR cxmnand displays the date and timestarrps.
2.S-SE:l'-6

A timestanp that shows the last time a file was m:x1ified is activated by the c:x:mnarn:
4B>SEr [UPDATE = CN]
Once yoo turn a timestanping attribute CN, it is in effect for any files that you access or add to that logical drive, unless amther SEr camtand is used to turn it OFF. If the drive label has a password, a user cannot change the timestamping options of a drive without giving the label pasS\oX)rd. Since time am date information occupy space in a file directory, you cannot have as many entries in the directory areas of a drive with timestanping attributes set CN as on a drive with timest:anping OFF.
See Section 3.4 for IIDre on file passwords. See the CXHlJRRI!NT CP/M 0PERA.TDt; SYSTEM USER'S GUIlE for additiaml exanples of using tlie'"SEr catmand.
2.S-BEr-7

S8'DIII hhhh
'!he ~ ccmnand sets an upper limit on the anDUllt of RAM allocated for pro:jrams. '!his is useful if you intem to create large spreadsheets with SuperCalc 86 and need to have JlDre RAM than the default value of 128 kilobytes (128K). '!be ocmnarxl is typed with a hexadecimal ("hex") nUI1iJer to specify the mmber of paragraphs of RAM that any pro:jram can use as a transient pro:jram area. A "paragraph" is 16 bytes (characters), written 10 in hex.
When usil¥J SEi'MEM, keep in mim the aIIDlUlt of RAM you have in your cooputer, the size of the operating system, the nUIlber of users on the system, am the types of pro:jrams users normally run. Pro:jrams which run on the 8-bit processor require just under 70K (the exact value in hex is 11OC). '!his includes RAM for the pro:jram am RAM for SW. Programs which run on the l6-bit processor require ~ere fram 16K to 1 megabyte of RAM, depending on the nature of the program.
'lb use Sm'MEM, type the cxmnand and the hex value for the annmt of RAM to allocate for programs. Use the following table as a guide:
Hex paragraphs
400 110C
2000 3000 4000 6000 8000
KildJytes (K = 1024 deciEl)
16K 69.5K (min~ allowable size
for 8-bit pro:jrams) l28K 192K 256K 484K 5l2K
If RAM space is limited on your carputer and you want to create large spread sheets, you might consider ruming SuperCalc 86 under single user CP/M-86, which requires less RAM than MC-IX&
2.5-SF:IMEM-l

Note that SEl'MEMaffects an entire MC-OOS cOnputer, oot just a drive or terminal. Each ncxie of a DR Net network can have a. different value for ~ An example of a ~ oammand is:
OA>SE'J!omM IIOC
'Ibis sets the menory allocation to 69.5K, the minimum size required to run 8-bit programs.
0A>SE'1MEM 4000
'!his sets the meI1bryallocati6n to 256K. 'Ibis is a practical size for large Supercalc spreadsheetS.
2.5-SE.llomM-2

SKI.,
'!he SElNE1' ccmnand is used by the system manager in a DR Net network to oanfigure the local system to the specifications that are designated in the ~IG.NEl' file. '!he SE'l'NEl' cxmnand is not used in MC-OOS systems that are not in local area networks. The ~G.NEl' file is supplied on your networking diskette. Same of the lines of the OONFIG.NEI' file are static, and can only be changed when the system is rebooted. '!hese are:
node nunber number of servers number of requesters number of message buffers nunber of requester oanfiguration tables
If you have changed any of these lines in the ~IG.Nm' file, you I1I1st reboot your system for the changes to be inplemented into the operating system.
'!he rest of the lines in the cmFIG.NEI' file can be changed dynamically using the SEINEr conmand. '!hese are:
default user password timeout list of private drives mappiBJ of: drives
printers queues
If you have changed any of these lines in the ~IG.Nm' file, you can implement these changes into the operatiBJ system by typing the followiBJ conmand:
OA>SEINEr
For a rore detailed discussion on the SElNE1' conmand, read Gifford's DR NET USER'S ~.
--=~~;;.;;==
2.S-SEmm'-1

SIDf d: option
'!he SB:)q ccmnand tells you about the logical drives of your system. SB:)q is used to see if enough space is available on your disk, to look at the label or physical format of your drives, and to list the directory areas that are being used to store files.
'!he SfQ' ccmnand accepts any one of four options. described bel<Y: SPACE, DRIVES, USERS, and IABEL. These describe any drive specified before the option. If no drive is specified, USERS and LABEL descr ibe yOur current logical drive, but SPACE and DRIVE describe all of the drives that users have accessed since your system was last rebooted (with exceptions, such as drives fran which users detached with "c or AOORl'). A fifth option, HELP, displays a brief S\Dll11ary of SIDf syntax.
SPACE
DRIVE
'!his displays how many I024-character blocks remain on a logical drive. '!his is also the default SIDl display, if no option is given. A typical d'isplay of SPACE is:
A: 1If, Space: B: 1If, Space: D: 1If, Space:
2,388K 4,336K
896K
Here drive C: is not shown, since no one has accessed it. If you specify a drive before SPACE, only the space remaining on that drive will be displayed.
Displays the disk format. A semple DRIVE ~isplay is:
A: Drive OIaracteristics 86,912: 128· Byte Records 10,864: Kik:lbyte Drive capacity 1,024: 32 Byte Direct::my Bltries
0: Olecked Directory Bltry 256: Beco. / Directory Entry 32: RecoD1s / Black 64: Sectors / Track 7: Reserved Tracks
2.S-SlDf-I

USERS This displays your current user area number, the user areas on the drive where files exist, and the number of files in each user area. A typical USERS display is:
B: Jcti. ve User : 10 B: Jctbe Files: 0 2 4 7 8 10 12 14 B: I of files : 42 13 26 34 lSl08 24 76
Here there are eight active user areas, with the largest number of files (108) in user area 10. This option is helpful in backing up files to diskette or tap!, to make sure that you copy all the files that are on a drive.
This option produces an error message if the logical drive has 00 label (see the SEl' carmand). If a label exists, the LABEL option displays the label (with any timestamps), and the OO/OFF status of the attributes PR:>T.EX:T, CRFATE or J.\CCESS, and UPDATE.
The following carmand would show the label (if any) of A:
llD>SHCfi A:LABEL
The next ccmnand shows how many kilobytes of lDlalloeated space remain on each of the logical drives currently active:
The directory areas of drive C: are sumnarized by:
3B>S1D'l C:USERS
The first letter of any SHOW option can be substituted for the oanplete option. See the C<HXJRRENr ~ OPERATIOO SYSTEM USER'S GUIDE for additional examples.
2.5-SIDl-2

~ dl: d2: ••• d:
The SPACE conmarXi is used to show how much space remains on logical drives. '!his ccmnand is helpful when you begin work on a long file, or before you use PIP or TYPE to copy a file or group of files to another drive, since insufficient available space on a destination drive causes a BIX>S error message. In estimating space requirements when using a text editor, remember that most make backups (files of type .BAK) that double storage requirements if (as reccmnended) you intenni ttently save work-in-progress. To use the SPACE cormand, type the keyword SPACE. For exanple:
U£>SPACE Drive Max Used , Free A: 8860 7672 86' 1188 B: 8860 3656 41' 5204 c: 8860 8072 91' 788 - -
35440 26220 739; 9220
This displays the storage capacity in kilobytes (Max), the space currently occupied (Used), the proportion of capacity occupied (%), am the unoccupied space in kilobytes (Free). The bottom line shows the aggregated figures for all the currently logged-in logical drives of your virtual terminal. You are logged in to the drive named in your MC-OOS prarpt, and to the system drive (A:). You are also logged in to any other drives that you have accessed, unless a .... C cqntrol character or an ABORl' or 00KRESEl' coomand has logged you off a dr i vee
With a drive name (or list of drives, separated by blank spaces) after the keyword SPACE, only the logical drives that you list will be displayed. You do not need to type the oolon (:) in a drive name. In a DR Net network, SPACE will identify with the @ syITbol and node name any drives on remote nodes to which you are logged in. '!he SfDq' carmand gives a less detailed display of the available space on logged-in logical drives.
2.5-SPACE-I

SI?CD. PRINT file file file ••• [option, option, ••• ] SPOOL BBLP SPOOL IJ'i!(BI'R n SPOOL S'.rARr n n n •••
'!he SPOOL cannand is used to send files to printers. If a system (or a network) has multiple printers, the SPOOL ccmnand can select from anong up to 16 different printers to print a file. Printers accessible ~ the SPOOL ccmnand can be attached to different systems within a DR Net network. Only ASCII (character) files can be printed out ~ the SPOOL ocmnand.
DSP and SPL are background processes that are run autanatically ~ the SPCX>L program. You rust have the DSP and SPL files ,on user area 0 of drive A: to run the print spooler system. Files with a .DSP filetype are created after the printer spooler system is started. '!hese files are created for internal program maintenance purposes. Never edit any files with the .DSP filetype, and do not erase them. Under no circumstances should you invoke these programs.
'!he SPOOL program sets up queues that list the files waiting to be printed ~ each printer. One advantage of using the SPCX>L cannand, rather than sending a file directly to a printer, is that your terminal is free after SPCX>L sends your file to a queue, regardless of how long the printer takes to c::onplete its output, or whether the printer is busy with other jobs.
Setting up the spooler system that supports the SPOOL carmand is the responsibility of the system manager, involving procedures outlined later in this description and in Chapber 3. Unless those steps are followed, the SPCX>L carmand cannot print files. '!he next page li~ts several cxmnands and options that are accepted ~ SPCX>L. A HELP ocmnand displays a sumnaryof the usage of SPOOL e<mnands and options:
9B>SPCX>L HELP
2.5-SPOOL-l

UsiDj the SPOOL o,.,iCiRl
'Ibe com:nand PRINl', followed by a file name, sends the file that you specify to the queue for your current printer:
OA>SPOOL PRIN!' MEDIA
'Ibis exanple com:nand line sends the file called MEDIA in user area 0 of drive A: to the printer attached to your terminal. Since the default canmand for SPOOL is PRINl', the line:
OA>SPOOL MEDIA
is completely equivalent. Nine different modifiers are accepted by the SPOOL PRINl' cannand. 'Ibese follC7il the file in square brackets ([]), and are listed belC7il. Underlined letters show the nl.11lber of characters required for MC-OOS to identify each name:
[COPIES=n]
[F<::mMAT]
[FCllMSIZE=n]
[MAOOIN--n]
[NOIi'Em]
[NUMBER]
Print n copies. If not specified, program will print one copy.
Divide into 55-line pages on 66-line forms. Used with text that lacks line and page breaks.
Formfeeds every n lines. Default is 66. Specify if 66 lines do not equal one page.
Starts printing n spaces from left-hand margin. Default = 8. Range: 0 to 50.
Prevents initial formfeedJ no effect on those in your text. Default: start on new page.
NuIrbers pages every 66 lines (or to match specified [FO~], [PAGE] ) • Default: no nl.11lbers. Specify if 66 lines do not equal one page.
2.5-SPOOL-2

[PAGESlZE=n]
[PRINl'ER=n]
Divide into n line page. Default = 55. Range of ([roRM] - [PAGE] ): 2 to 100.
Selects printer n from file LPRS. If not specified, current printer is used.
Replaces tab (AI) characters with spaces, so that next character is printed in a column exactly divisible by n. Default = 8.
Note that [PAGE=n] reseni>les the [Pn] option in the 'lYPE and PIP ccmnands, [PRINrER=n] resent>les the PRINlER cxmnand, and [TAB=n] reseni>les the [Tn] option of the PIP and PRINl' ccmnands.
A single SPCX>L PRINl' cxmnand line can sem several files to the printer, with blank spaces separating the various files in a list. Multiple IOOdifiers are also accepted, and are applied to all the files in the ccmnand line. All of the IOOdifiers mst be enclosed by a single pair of brackets ([]), and mst be separated by ccmnas. For exemple,
4C>SPCX>L TIC TOC 'IDE [MAR=10, PAGE=4l, NOM, PRINl'ER=l]
'Ibis ccmnand prints three files (TIC, TOC, 'IDE) from the current user area on printer 1, with page nuni:>ering, with 41 lines per page and setting a margin ten characters to the right of the left-hand margin of the text. Note that "PRINl'," the default SPOOL ccmnand, is omitted without anbiguity between SPCX>L and the list of files. Other default values are 66 lines per page [no FORM], tab expansion to the eighth column [no TAB], begin each file after a formfeed [no NOF), one copy of the printout [no COP], and follow the linefeeds and pagebreaks that are indicated in the text [no FOR]. If the files to be printed were prepared on a \\1Ord processor, these default format values are safe to use. If the height of your paper is different from 11 inches, or if your printer gets sanething other than six lines per inch vertically, you mst do sane calculating before you specify the [FORM] and [PAGE] values lof a SPOOL PRINT cxmnand.
2.5-SPCX>L-3

When SPCX)L e<mnands send several files to the printers, they are processed in the order that the queue for each printer received them. Another SPOOL ccmnand lets you look at the status of the spooler system:
6A>SPOOL STATUS
'!he screen will list the files being printed, jobs waiting to be printed, the file size, mmber of copies, am printer number.
'!he last SPOJL carmand that nost users need to kIX)W about can renove a file fran the queue before it is printed. The form of this SPOJL ccmnand is:
6A>SPOJL 0ErBrE 10
'!his deletes fran the queue of files oot yet printed the job that the SPOOL STATUS e<mnand refers to as 10.. If this job were being printed when you gave the SPOJL DELETE ocmnand, the printing would stop as soon as the printer buffer was empty. 'lb avoid deleting the wrong job, it is g<:x:ld practice to give the SPOJL STATUS ccmnand before attenpting to delete anything.
Two other carmands, TERMINATE and RESET, have the effect of disabling the SPOJL e<mnand, am should be reserved for use by the system manager. '!he TERMINATE ccmnand saves a record of what was in the queues, so the spooler system could be restored after some problem was resolved that had provoked a TERMINATE ooomand. '!he RESEr oarmand, however, obliterates the spooler system, so that any jobs waiting for printers are unrecoverably lost.
2.S-SPOOL-4

'nle system manager must follCM certain procedures after the conplter is rebooted for the SPCX>L <D1I'lIal'X1 to work proper lye The SP<X>L ccmnand is part of Digital Research Inc.'s spooler systeDl for Me-InS am DR Net that allCMS files to be sent to printer queues, rather than requiring that they be printed directly by other system <D1I'lIal'X1s (like PIP, . PRINl', or TYPE) or by applications programs. 'nle spooler system is normally configured at the time of system startup by CCIII'l1a1'rls within the SYSINIT.SUB file that the system manager creates. If the spooler system does not seem to be functiooing, the system manager should type:
OA>SDIR ???CMD OA>SDIR SPCX>L.CMD
to make sure that the files OOP.CMD, SPL.CMD, and SPCX>L.CMD are all present on user area ,0 of drive A:, am that these files have the SYS am :00 attributes. If these files are not present, copy them (with the PIP CCI1'ItIaD3) fran the system diskette, and if necessary SET them as SYS am :00 files. Do not invoke the OOP or SPL ocmnands, which are reserved for use by the spooler system. Do not erase any files with extension .DSP, which the spooler system creates and uses to manage the queues.
'nle SYSINIT.SUB file should include a conmand equivalent to:
OA>aISET DSP.CMD [S~]
to pass the [~] argument from the SUBMIT ccmnan.d line to a alSET line in the SYSINIT.SUB file, so that all users can access a single copy of the OOP.CMD file. otherwise the spooler system will use RAM nenory inefficiently.
2.5-SPCX>Ir-5

Initializing the spooler system requires a command like:
OA>SPOOL STAR!' 0 4 1
where after START is a list of the numbers {from the LPRS file) of the printers that will be accessible via the spooler sys~ Printer nUIlbers range from 0 to 15. '!be above cannand means that printers 0, 1, and 4 can be accessed by the SJ?(X)L cannand. These can include numbers corresponding to printers on other systems that will be accessible to users on your system via the network. A system must be configured for a number of printers within the range of nurrbers that follow your SPOOL STAR!' cxmnand. (Since the nurrbers start at zero, mte that a ItS-printer system" has printer nurrbers ranging from 0 to 4, not S). The system will indicate on the screen if the STAR!' carmand is successful.
In the exanple above, printers 2 and 3 will not be s~rted by the spooler system. If you later decided to add JIOre printers to the spooler system, you oust first give the oammand:
OA>SPOOL TERMINATE
You can then repeat the SPOOL STAR!' carmand with a corrected list of printers. The SPOOL TERMINATE cxmnand interrupts all jobs in the spooler queues. If you give a SPOOL STAR!' cannand after a SPOOL TERMINATE ccmnand, the spooler system reprints from the begiming any interrupted job, and restores to the queues any files that were waiting to be printed when the 'tERMINATE command was given. You should issue a SPOOL TERMINATE oammand before you shut down the system, otherwise you will lose all of the contents of the queue.
2.S-SJ?OOL-6

StDppiDj the Spooler System
If a printer is printing useless output, a SPOOL DELETE n cannand will stop print job n (after a SP<X>L STATUS ocmnand, to make sure that you specify n correctly). '!he SPOOL TERMINATE cannand shuts down the wOOle spooler system, but lets you restart it, with the queues intact, by a SP<X>L STARI' cxmnand and printer list. '!be SPOOL RESEr ocmnand is a drastic way to stop the spooler system. Since it also erases all the queues, use this ooly if you had sanehow lost control of a spooler system, and had no hope of successfully restarting it. Since any cxmnand that brings the spooler system to a halt terns to disrupt other users wOO are waiting for their jobs to print, users other than the system manager should probably restrict themselves to the SPOOL DELETE cxmnand, and should be very careful when using that.
UsiDj the SllOOL O ••• kItd with m Net
Like a logical drive or a printer, a spooler system can be a network resource that all of the systems linked in the network can share. A system in a network can also have a spcx>ler system that is not shared, but is accessible ooly to users 00 that system. Each system in a network can have only one spooler system, but if the system manager designates a spooler system as a network resource, users on other systems who connect to it can use SPOOL cxmnands to send their files to its printers.
Individual users can IOOdify the network by connecting or disconnecting spooler systems and their terminals. 'lb do this, use the NEr menu and select option 7 (to change spcx>ler coo.figuration). Fqui valently, the NEr SPCX>L ocmnand can be used to attach a reIlDte spooler system. After either procedure, SPOOL ocmnands fran your terminal to print files are executed by the reIlDte spooler system.
Besides connecting your terminal to a renDte spooler, DR Net also allows you to connect the printer of a reJlDte system to your local spooler. 'lb do this, use the NEl' menu and select option I (to change device assignment). Fqui valently, the NEr DE.VICE ccmnand can be used to attach a reJlDte printer. After either procedure, SPOOL carmands fran your terminal to print files are executed by the printer at the reIlDte node. '!be system manager
2.S-SPOOL-7

has the option of using the CX>NFIG.NET file or net\<o'Ork pass\<o'Ords to facilitate or to restrict the ability of net\<o'Ork users to access other spooler systems or other printers.
Fach virtual terminal in a DR Net net\<o'Ork can be connected to no IIDre than one spooler system. But different virtual terminals connected to different spooler systems can be supported by the sane physical terminal. Provided that the system manager permits access rights to rellDte net\<o'Ork resources, and provided that the operator can re:neJTber which virtual terminal is attached to which spooler system (the NET STAT display helps), a DR Net net\<o'Ork linking several systems that each have spooler systems can provide great flexibility and scope to an operator who needs to produce printed output.
'1he :nenu-dr i ven NET program is aJIDI'lg several Gifford enhancements to MC-OOS that sinplifies changing DR Net printers, queues, am spooler systems. See the DR NET USER'S MARJAL for details on the :nenu-driven NET program,-accessing rellDte queues, the Cl"JFIG.NET file, net\<o'Ork security, am spooler systems within DR Net.
2. S-SPOOL-8

SlIIIIT d:file parameters
'!be StJIIt1IT carmand puts forth a SUBaT file for batch prooessing of M:-IX); cxmnands and programs. A SUIMIT file DUst have .SUB as its file type. '!be.SUB extension of a SUBMIT file is not entered in a SUBMIT ocmnand line.
StJIIt1IT files are created with a text editor, such as ED or WordStar in non-docwnent IOOde. A SU'IMIT file contains one line for each Me-IX); ocmnand with its possible options. A SUBMIT file on user area 0 of the system drive can be called by any user.
Exanples:
3C>SUBMIT A:BILLING
'!his executes a SUBMIT file on user area 3, drive A: with the file name BILLING.SUB.
'!his executes a submit file on the current drive and user area with the file name WRKFILE.SUB. If a cxmnand line calls on an 8-bit program, then the SW (or swa6, on CPU 8086 systems) carmand 11Ust precede the 8-bit program file name. For exanple, if you want to run an 8-bit program called FBO on a file called BILLING.EOR, and then erase the file called BILLING.IS!', your SUBMIT file would have ~e following lines:
A:SW FBO BILLING.FOR ERA BILLING. IS!'
Up to ten (10) optional parameters can be included in a SUBMIT carmand line. '!bese are arCJlDllents that are substituted in the carmand lines of your SUBMIT file, where they DUst be written as:
$0 $1 $2 $3 $4 $5 $6 $7 $8 $9
2.S-smMIT-l

The symbol $0 is replaced by the name of the SUBMIT file itself. The syntx>ls $1 through $9 are replaced by the first through ninth parameters respectively. For exanple, suppose that you had a file called At1I'OPIP.SUB that consisted of the ocmnands:
DSKRESEl' PIP $1: [g$2] =*.$3 [vrow) ERA *.BAK
If you entered the stJmo1IT ocmnand:
OA>stJmo1IT AUTOPIP F 6 ~
then the first line of your stJmo1IT file would be interpreted as
PIP F: [g6]=*.~[vrow]
On execution of the SUBMIT ocmnand above, all files of type .~ would be copied to user area 6 of drive F: (provided that drive F: were ready, and that you had permission to access user area 6, am all of the files of type .BAK in your current user area would be erased. Similarly, the SUBMIT ccmnand:
l2C>SUBMIT AUTOPIP G 7 TXT
would ropy files of type .TXT to drive G: user area 7. The $ notation lets you supply parameters to a general-purpose SUBMIT file, so that routine tasks can be accatplished with less effort than if each cannand were manually entered fran the keyboard.
The Me-DOS control character "p cannot be used in a .SUB file to attach or to detach a printer, but in a .SUB file you can reassign your current user area, printer, and/or logical drive. You can specify whether a change in assignment persists
2.5-StBaT-2

after the SUBMIT file has executed, or reverts to your pre-SUBMIT values. To keep the new assigments, the .SUB file should include the special SUBMIT variable $GLOBAL, as a line prior to arrt ocmnands that change current values. For exanple, suppose that you call a SUBMIT file that includes the lines:
c: PRINTER 0
After this SUBMIT file has run, you will have C: as your current drive, and printer 0 as your list device, regardless of what your drive and printer were before the SUBMIT ocmnand. Arr:i changes in user area, logical drive, or list device will revert to previous values if ypu type $LOCAL in place of $GUEAL. unless you specify $GILBAL, $LOCAL is the default value of reassignment statements in a SUBMIT file.
A SOBMIT file can be "nestedn within another SUBMIT file, but the \<IJOrd "SUBMIT" cannot appear within a SUBMIT file comnand line. To call a .SUB file fran within a .SUB file, substitute the special ocmnand $:orr1lE for the \<IJOrd SUBMIT. For example, within a SUBMIT file the line:
$INCWDE MARINE. SUB
is equivalent to typing SUBMIT MARINE at the system prompt, and causes the system to execute the ocmna.n::is in file MARINE. SUB.
The following is an exanple of a SUBMIT file. This example selects printer 1, reads a KEYS file called OCS950.KEY to optimize the terminal for spreadSheet use, selects user area 4 of drive B: as the current directory area, and displays a file called SPRFAOSH.EET that provides the user with information on what to do next. For this SOBMI'l' routine to execute correctly, it is necessary that the KEYS.CMD and SC950.KEY fi les be on user area 0 or 4 of drive B:, that the text file SPRFADSH.EEr be in user area 4 of drive B:, and that the user's account be authorized in the PASSWD file to access user area 4. The lines begiming with semicolons are cooments that are not executed.
2.5-StJIKrT-3

1 EXample of a SUBM1T file: $GIDBAL USER 4 B: 1 User will see 4C> prarpt after SUBMIT is carpleted. PRINl'ER 1 1 This selects printer 1 as the current list device. KEYS SC950 1 This file loads the special function keys of the console. 'lYPE SPRE'ADSH. EET 1 This displays on the screen a file called SPRE'ADSH.EET
Ccmnands in a SUBMIT file are executed in the order in ~iCh they appear, "top to bottan." A conmand that cannot be executed will halt execution of the conmands in the SUBMIT file. No JlDre conmands will be read from the SUBMIT file.
In sane applications the user may wish to use the dollar sign ($) symbol as an actual ocmnand argument, rather than to syIrbolize a parameter sUWlied in the SUBMIT conmand line. To represent a "real" dollar sign in a .SUB file, type two dollar signs ($$). The SUBMIT program will interpret this as a sil'J1le dollar symbol, and as unrelated to any SUBMIT cxmnand parameters.
The SUBM1T file can include file passwords (see the SEl' conmand). Notice, however, that including file passwords. in a SUBMIT file would enable saneone who coold read the suaMrr file to learn the passwords. To maintain security in this situation, the SUBMIT file coold be kept in a protected user area, or a password coold be put on the submit file itself, or passwords coold be supplied as parameters in the SUBMIT conmand line, and symbolized only as $1, $2, etc. in the SUBMIT file.
2.5-SUf.MIT-4

Besides enabliD,;J the user to automate frequently used sequences of conmands by SUBMIT files, the Me-DOS operatiD,;J system recognizes the files SYSINIT.SUB, USERINIT.SUB, :u::GIN.SUB, uxnJr.SUB, and I:OQN.SUB as sequences of ccmnands to be automatically executed at certain ttmes, if files with those names exist. See the separate descriptions of these files for JlDre detail on when they are executed, aM in what directory areas they should be located. All of these are .SUB files that the system manager or the in:Ji vidual user DUst create, rather than files distributed with the Me-DOS operatiD,;J system.
2.S-StJIJaT-S

SW file
'Ibe SW ocmnand is used in SUBMIT files to process 8-bit programs. The SW program is the mst innovative part of Gifford carputer Systems' enhancements to Concurrent oos. 'Ibis program enables an MC-OOS catplter that has as its CPU (central processing unit) a Macrotech M[-286 or a CbmpuPro CPU 8085/88 dual processor to run 8- am 16-bit programs at the same time. The program SW.CMD must be on uset area a of drive A:.
When you type in an MC-iX>S ocmnand, the system first searches the directories for a Concurrent OOS (16-bit) program with a .CMD extension (see the aHXJRRENT ~ OPERA'l.nI; SYSTEM USER'S GUIDE for a discussion of the search order for files). If a .CMD file is not found, the shell autanatically runs SW, wich searches for a CP/M-80 (8-bit) program with the .OOM extension.
If the .<DM file is found, SW allocates a contigucus 64K block of menory. 'Ibis block is loaded with the switching code (about 3K), am the .CX'M program. The program is then run in this transient program area of RAM.
If the .c::n.t file is not found, SW gives the message:
If the system cannot find the SW.CMD file on user a of drive A:, it gives the message:
?Can't find a-Mnd
2.5-SW-I

When running CP/M-80 programs, SW processes all system calls in the 16-bit environment. It simulates CP/M-80 system calls so that programs run exactly as if they are in a CP/M-80 environment, except that the system calls are executed much faster. SW also handles MP 1M II queue calls.
The SW cannand has to be specified in a submit file if the file is to calIon 8-bit programs. If yoo want to run an 8-bit program called F80 on a file called BILLll'G.roR, your SUBMIT file would have the following line:
A:SW FaO BILLIOO.FOR
The SW program enables the system to support 8-bit carpatible CP/M programs, and also 8-bit MP/M II CXlIIpatible programs. SW enables MP/M II queue calls, which differ fran the queue calls of Concurrent IX>S.
2.S-&W-2

SII86 0Qi1wa:) argl.n1lents
'!he SW86 ccmnand is used in ccmnand lines and SUBMIT files to process 8-bit .CCM programs on systems having the CPU 8086/87. '!he SW86 program causes the 8086 to function as a Z80 eIIIllator. 'Ibis program enables the system to run both 8- am 16-bit programs at the same time with a 16-bit only processor. '!he program SW86.CMD rust be on user 0 9f drive A:.
In order to run 8-bi t programs on an 8086 processor system, you rust type SW86 followed by the name (bu~ not the .a:M extension) of an 8-bit caunand file. '!he shell searches for a CP/M-80 (8-bit) program with the .OOM extension. For exanple:
3B>SW86 WS
'!his allows an 8086 system to load am execute the 8-bit ccmnand fil~ WS.OOM, if this file is found in user area 0 of drive A: with the SYS and RO attributes. If the .OOM file is found, SW86 allocates a contiguous 64K block of meIlDry. '!his block is loaded with the switching code (about 3K), and the .OOM program. 'Ibe program is then run in this transient program area of RAM.
If the .c.:x:M file is not found, SW86 gives the message:
Program file cannot be opened
If the system cannot find the SW86.CMD file on user 0 of drive A:, it gives the message:
?Can't find 0: .-d
2.S-SW86-1

When ruming CP/M-80 programs, swa6 processes all system calls in the 16-bit environment. It sinulates CP/M-80 system calls so that programs run exactly as if they are in a CP/M-80 environment, except that the system calls are executed much faster.
'ltle swa6 ocmnand has to be specified in a submit file if the file is to call on 8-bit program. If you want to run an 8-bit program called Faa on a file called BILLING.FOR, yoor SUBMIT file would have the followiD3 line:
A:SW86 Faa BILLING.FOR
'ltle SW86 program enables the system to support 8-bit carpatible CP/M program, and also 8-bit MP/M II carpatible programs. swa6 enables MP/M II queue calls, which differ fran the queue calls of Concurrent InS.
2.5-SW86-2

1he SYNC cxmnand flushes the cache buffer ooto the hard disk. 'Ibis prevents loss of data in case of a power failure or a system reset. Me-DOS autanatically flushes the cache buffer every 30 seconds, so under normal circumstances it is unnecessary to run SYNC.
2.S-SYNC-l

The ~ program copies the system tracks fram one 8-inch floppy diskette (the "source) onto another diskette (the "destination"). unlike the CPY program, which must have physically identical source and destination diskettes, SYSGEN will accept different formats in the source and destination drives. Double-sided or single-sided diskettes can be used for source or destination, but both source and destination must be doub1e-density (1024 byte sectors).
Gifford's M:-OOS operating system requires a system diskette to be in the left-hand floppy disk drive (if your system has t\\1O floppy drives), when the system is powered up, like the ignition key of a car. To avoid potential problems if a system diskette is damaged, SYSGEN or CPY should be used to make backup copies of the system diskette.
If your M:-OOS software is IlnHfied (to accol'l'lOOdate changes in your hardware configuration, or to install updates of the operating system software) the SYSGEN utility can be used to create new system diskettes. A special portion of every diskette is reserved for the "system tracks," which cannot be read or IOOdified by any program or oonmand except SYSGEN, CPY, and the destructive FORMAT program. SYSGEN and CPY are able to write or co~ files on the reserved part of a diskette.
SYSGm can be used to co~ the system tracks from a system diskette to another diskette; or to co~ the system tracks to memory, so that a computer with only one floppy diskette can create a system diskette by oo~ing the system tracks back fran memory to a diskette. Readers with only one floppy disk drive cannot use the CPY program to create a system diskette.
To use SYSGm, place a system diskette that you intend to use as the source in the left-hand floppy drive, and put a newly formatted blank diskette in the right-hand floppy drive, if you have t\\1O floppy drives.
2.5-SYSGm-1

'!YPe:
and the program responds with the follCTt(ing:
Option
GDIOBD aKV1BR BrS'.I.'DIS SysteIII 'l'1:ack llaint:eDance Progr_ Rev 1.1
o ",.end -.u (lpti.~: c = Sysgen disk to disk. 0 = Single drive sysgen. F = Sysgen file to disk. X = Exit ·to the systeIl.
If you have a system with two floppy disk drives, type (C) (without RE'l'Um). If you have a system with ally one a-inch floppy drive, type (0) (with 00 RE'l'Um).
If you selected optial C, the program respcn:'is:
Blter source drive:
Type the logical drive designation for the source drive (without pressing RE'l'Um) and the program will respond:
Blter destination drive:
Type the logical drive designatial for the destinatial drive (without pressing RE'l'Um) and the program will respond.:
Press any key to 0CDti.nue ~. or <XlDtro1-C to abort.
2. S-SYSGEN-2

If you type any key (other than "C) to oontinue, the program then copies the system tracks onto the destination diskette. When the process is complete, the program responds:
Panctim caIIplete. Press any key to exmtinue.
Use option F to use the boot file and the loader file to generate system tracks. TYPe (m without pressing RETURN from the ooomand menu and the program responds:
Enter boot filenaae:
'lbe answer to this prompt should be Ia>T.LDR. 'lbe program then praopts:
Enter loader filenaae:
'!bere are two possible loader file names: DISKI.LDR and DISKlA.LDR. Your response to this praopt depeoos on the type of floppy disk controller that your system supports.
'!be program responds:
Enter destinatim drive:
TYPe the drive destination for the destination drive without pressing RETURN and the program will respond:
Press any key to ooontinue sysgen or Omtrol-C to abort.
2. S-SYSGEN-3

If you type any key to continue, the program then copies the system tracks onto the destination drive. When the process is aomplete, the program responds:
Ponctim awplete. Press any key to a:ntinoe.
If you select option 0 for a single drive SYSGEN, the program responds:
Enter souroe/destinatim drive:
TYPe the drive designation for the source/destination drive (without pressing ~ and the program will respond:
Press any key to exntiDue sysgen or ocntrol..c to abort.
If you type any key to continue, the program responds:
EKd1ange disks. press lCI.tI.'tHI to CXlIlti.nue or ocntrol..c to abort.
'!be program then copies the system tracks onto the destination diskette. When the process is complete, the program responds:
Functim cxwplete. Press any key to exntiDue.
'lbe system tracks have been copied, but the file IC.OOS must be on the diskette before it can be used to boot the system. Use PIP to copy !C.OOS and any additiooal files that you want to add to the new system diskettes.
2. S-SYSGEN-4

sYSINIT.CMD is an optiooal program file which will run when you start up the system. '!his program file can be used to custanize your system by executing a program which must be part of your startup procedure. sYSINIT.CMD has limited aR;>licatioo 00 nost systems. '!he file SYSINIT.SUB will have greater value to IlDst users. Refer to Sectim 2.5-S!SlI!Il"t.SOB.
'!he maintenance of this file falls umer the jurisdiction of the system manager. It is discussed again in 0Iapter 3.
\ ,
2.S-SYSINIT-I

S!SIRl'l' • BAH
SYSINIT.BAN is an optional banner file. '!be contents of the file are displayed above the Name: pratpt before a user logs in to the system. '!be banner appears again after the user logs out of the system. '1t1e SYSINIT.BAN file mst exist in user area 0 of drive A: for the banner message to be displayed.
You can create your own oanpany banner using ED or w:>rdStar in non-document roode. An exanple banner file might look like:
-[Y
GDI\H) aJIPUl'BR S!9lBIS 1DJID LID m 1IB£lXIm 10J m 'lBB 1IRD CR .!BE
IC-IXI) <I.'BMTllI; S!9lBI
The -[Y characters on the first line of the file are carmands to clear the video screen. '!bis allows the message to appear at the top of the screen. You should refer to the documentation on your terminals to see what escape sequence is used to clear the screen.
'!be maintenance of the SYSINIT.BAN file falls under the jurisdiction of the system manager. It is discussed again in Olapter 3.
Each computer within a network can have a different SYSINlT.BAN file. If a NErM01'D file exists on user area 0 of drive A: of the system nc::Xie, that banner is displayed above the SYSINIT.BAN message 00 all terminals on the network.
2.5-SYSINIT.BAN-l

S!SIR1T.Bm
SYSINIT.SUB is an optional file containing carmands which are to be executed as part of the startup procedure. '!his will be a useful file if you have initialization procedures you want to execute on startup. SYSINIT.SUB should be located on user area 0 of drive A:.
'!be following exanple shows how you might use SYSINIT.SUB to initialize the spooler system for printers 0 and L The contents of the file are as follows:
J Sanple S!SIHr.r.SOB file for initializiDj the spooler. SI!OOL 9mRr 0 1
It is not necessary to include CCPMINIT in the SYSINIT.SUB file to inplement virtual terminals. '!his is because OCPMINIT is run automatically if it exists on user area 0 of drive A: when an K!-IX>S system is powered up or reset.
'!be maintenance of SYSINIT.SUB falls under the jurisdiction of the system manager. It is discussed again in Chapter 3. See the description of the SUBMIT carmand for details on .SUB files in K!-IX>S.
2.5-SYSINIT.SUB-I

S!S'.lWr [Option] SYS'&'r (Optim C .t]
The SYSTAT ooomand displays information about the internal status of your MC-005 system. SYSTAT is used to identify what system and user processes are running, what physical terminals, virtual terminals, and printers are attached to them, their current state of activity, their size and lopation in mEIIDry, their foregrouOO or backgrouOO status, what queues exist, and other character istics of the system. ~ SYSTAT and ¥OU see:
1ihicb Optim ?
B Help M Memory o overview P Proc8Bses - All Q Queues U User Processes C Qmsoles X Exit
->
Like AP, CLOCK, NET, NEHJSER, and the TIMEIDG utility, SYSTAT can function as an interacti ve program whose menu pranpts you to indicate by a keystroke the type of information that you seek. Like NET it can also function in txmnand mode, so that the elq:erienced user can give mpranpted options and IOOdifiers in a single oommand line that produces the desired display.
The SYSTAT display provides a much JlX)re detailed description of the system than do the CONSOLE, PRIN'lER, or WHO utilities, but for JOOSt users the SYSTAT description is so volumimus and technical that it may not seem very informative. In fact, SYSTAT is mt an ordinary system cxmnand intended for mn-technical users, but a programRdng and diagnostic tool like the ASM86 and DDT86 routines. It is mt discussed in the CON:lJRREN1' ~ OPERATIK; SYST.EM USER'S GUIDE {where the system oommands are
2. S-SYSTAT-l

descr ibed), but in the CXH:l1RRENI' ~ PROGRAMMER'S REFE:REta GUIDE, which is not light reading. Why did Digital Research Inc. write a menu-interface for this c:x:mnam, so that novice users who are struggling to use PIP can easily use S'ff!1rAT?
In a word, diagnostics. The right SYSTAT c:x:mnam can sanetimes te very informati ve when sanething seems to te wrong. For example, sug;x>se that a printer suddenly won't work. If it is not out of ribbon or pa~r, try looking at the problem with SYf!1rAT. Type the "SYSTAT" keyword, and when the menu is displayed, select option C ("ConsolesU). Press RE:lURN when the program asks if you want a continuous display, since that will not te necessary. The screen will show a display that tegins:
PHYSICAL v.ua.UAL CXlID:.B CDID.B .. smm -
00 00 Shell BACK,BIJFF 00 01 lIS !ORB,BIJFF 00 02 IDgin BACK,BIJFF 00 03 lIS BIICK,BUP.F 01 04 Shell BACK,BUP.F, ~ 01 05 dM.. !ORB,BIJFF 01 06 IDgin BACK,BUP.F 01 07 Sbell BACK,BUP.F 02 08 S!S'mT !ORB,BUP.F 02 09 Shell JW:l(,BUP.F 02 OA IDgin JW:l(,BUP.F 02 OS Shell JW:l(,BUP.F 03 OC WS PORB,BUP.F 03 on Sbell JW:l(,BUP.F . . : . . . .
The mystery is solved: the number 4 virtual console has attached itself to a printer with a control character "'P (shown at the far right), and then switched to backgrouOO mode to allOlfi dBASE to rlDl fran the same physical console. To free the printer, the operator must switch virtual console 4 to the foreground and t~ "'P again to toggle it OFF. Now other users can access that printer.
2. 5-S'fSTAT-2
1:b use SYSTAT in ocmnand-dr i ven JOOde, supply the same letter pranpts that appear in the menu, but enclose them in a pair of square brackets ([]). Several optioos can also accept a He" argument, to refresh the display every .t seconds, for It sane hexadecimal n~r. SYSTAT in cxmnand JOOde seems to be the only MC-OOS catmand that cannot be executed if the user fails to supply a matching right bracket (]) as the last character in the ocmnand li~.
Besides the sJ;ecial uses of SYSTAT already described, SYSTAT . may be helpful if you ever experience troUble with your systen, since your dealer may ask you to select SYSTAT options and describe the display. Readers woo use their systen primarily for software deve lopnent soould stooy the cnoJRRENl' £UM OPERATIl<G SYSTEM PROGRAMMER'S RE:FERmCE GUIDE for more information on the SYSTAT ocmnand, whose features and applicatioos are t2yond the s<X>J;e of this manual.
2. S-SYSTAT-3

'l'DtB o.Mid TIME SW o •• wd
The TIME ccmnand measures how long it takes for a program to run. TIME can run with arrj program or SUBMIT file. For exanple, to time the file BILLING.CMD, give the ccmnand:
2B>TIME BILL:m;
The TIME program will display on your screen the elapsed time:
Elapsed time=00:04:29
'lb time an 8-bit program, you must precede it with an "SW" on systems based on the CPU 8085/88 or MI-286 dual processors), or with an "Si86" for systems based on the CPU 8086/87. Ask your system manager if you do not know what kirrl of CPU your cmp.1ter has. In a DR Net local area network that includes several types of catp.lters, the choice of SW or SW86 deperrls on whether your local node has an 8088. For exanple, suppose that you are working on a catplter with an 8085/88, am you want to firrl out how long it takes the 8-bit program DBASE.CDM to run the program FILER.CMD. You should enter the cc:mnand line:
2B>TIME SW DBASE FILER
The TIME utility is helpful in "benchmarking" programs. It can assist the system manager in determining how different Me-DOS configurations or different operating conditions affect the speed of the system.
2.s-TIME-l

The TIMELOG.CMD file allows you to use dBASE II to report the access of specific accounts am terminals. To use this program, you must be in user area 0 of drive A:. Give the ccmnarrl:
OA>DBASE TIMELOG
'!be screen displays a menu of reports that you can produce:
Here are yaJr optiaIs for t:iJleltJg reports:
1 = Report access by a specific accamt and specific c1erice 2 = Report access by a specific accoont, all derioes 3 = Report access by a specific derioe, all accounts 4 = Report access by all accounts & devices, subtotal by c1eri.oe 5 = Report access by all devices & CKXXlUDts, subtotal by acccunt 6 = Return to the qJerating systaD
Irplt yaJr choice : :
Account names are the login names that appear as the first entry in the pasS\«)rd file. To specify a device, 9i ve a device name that appears in the fifth field of the '1'1'YS file (usually o through 6). Enter a nunher (1 through 6) to select your option.
Each time you run a report, TIMELOG asks you for a file name for the report. Once the report is finished, you can TYPE the report on the screen, send it to the printer with the PRIN!' cxmnand, or edit it with ED or WordStar.
2.5-TIMELOO.CMD-1

'!he TIMELOO.SUB file is used to maintain the TIMELOOX.DBF database. TIMEUX;X.IJ3F is a dBASE II database used to prepare records based on the file WTMP. Use TIMELOO.SUB to create the database or to append the database if it already exists. Give the ccmnand:
OA>StJBMIT TIMELOG
'Ibis program copies all entries from the WTMP file, writes them to the database, erases the Wl'MP file, and restarts the W1'MP file. Berform this step when there are no other users on the system, so that your database is complete.
Use dBASE II to view the TIMELOOX.DBF file. You can use the utilities in the dBASE II ccmnand file called TIMELOO.cMD to prepare TIMELOO rep:>rts. 'lb use dBASE II on TIMELOGX.DBF you must be in user area O.
2.5-TIMELOG.SUB-I

'It1e T1'YS file describes characteristics of each terminal or JOOdem used on the system.
An exanple of the T1'YS file is:
0:9:0:82n:oonsole:Sysbem support 1:9:0:82n:ttyl,front:lnterfacer 3 port 0 2:9:0:82n:tty2,sales:lnterfacer 3 port 1
Entries in the file have the following format:
DE.V i:BAUD RATE: :HANI):;HAI(ItI;: PRJl'CXX)L: 'l'lY NNe:aJiMENTS \ \ \ \ \ \
1 2 345 6
1. I1umber of the device, corresponding to the connector label on the back panel. Nurrbers begin with O.
2. Terai.nal baud rate, the default is 9600. Baud rates correspoOO. to the followiDJ:
o = 9600 1 = 110 2 = 300 3 = 600 4 = 1200 5 = 1800 6 = 2400 7 = 4800 8 = 9600 9 = 19200 10 = automatic baud rate detection for modems.
The automatic baud rate detection for modems CJlly works for 300 and 1200 baud. TO use this feature, pin-20 on the RS-232 connector mst be wired to the speed detect pin on the IOOdem.
2.5-T'1YS-l

3. ~l BS-232 hardware bandshakiD]. Hardware handshaking is not required for IIK)st terminalsJ the default is O. If handshaking is necessary, enter the mlIlDer corresponding to the type of handshaking needed fran the following:
o = No handshaking 1 = Hardware handshaking (Dcr$Q (RS-232 pin-20) 2 = Software harrlshaking (XCE/XOFF) 3 = Reserved for custom application
4. ~l cammicatims protxx:ol. This is a three character entry. 'Ibe default protocol is 8 data bits, 2 stop bits, and no parity, which are the settings for IIK)st terminals. If you need to change this, select the configuration you need fran the table below and enter the three characters without any spaces. For exanple, if your terminal requires a protocol of 7 data bits, 2 stop bits, even parity, enter 72E in field 4.
Data bits
8 7
step bits
2 1
Parity
.. N (none) o (odd) E (even)
5. Terainal naDIe of up to 8 characters with no spaces. 'Ibe terminal name is often entered as "console" for the system console, "ttyl" for terminal 1, "tty2" for terminal 2, etc. This field is used to identify the location on the system of a user in IDa1'W Me-1m utilities. Many terminal names can be listed, separated by coomas with no spaces.
6. ~aal ceMents field. The carments field can give information of potential value to users, such as the location and RS-232 port.
In the exanple 'rl'YS file on the previous page, terminal 0 (the system console) ccmnunicates at 19200 baud, uses the standard camumications protocol (8 data bits, 2 stop bits and no parity), and has the terminal name "console." You could change the names to correspond with the physical location of the terminals. This is handy if you have to use the ABORl' process to free a "locked" terminal.
2.5-'rl'YS-2

The '1'l'YS file can be JOOdified while the system is running in mul tiuser JOOde. Once the file has been rocrlified, type:
OA>R&SET
This will reset the system to the new specifications without the need to shut down the system.
The nl.ll1ber of terminals and JOOdems that can be supported by an MC-OOS system is specified in the XIOS (extended input/output system). If a system is reconfigured to support a greater nl.ll1ber of terminals and JOOdems than was known to Gifford when the system was ordered, it may be necessary to install a larger XIOS. Read the Gifford publicatiat eu&.roMIZm:; YCXJR MULI'lUSa a::NCORRENT OOS SYSTEM for details at how to noUfy the XIOS.
The maintenarx:e of this file falls under the jurisdiction of the system manager. It is discussed again in atapter 3.
2. 5-'ITYS-3
T!PB d:file, d:file, ••• , d:file [PAGE] T!PB d: file(s) [Pn] T!PB d:file(s) >d:file TfllB d:file(s) @Doc1e >d:file
'!he T!{PE cxmnand displays ASCII (printable) files on your terminal screen. 'tYPE can be used to look at the contents of text files or data files, either locally or across a DR Net network. With the > option, 'tYPE c:arbines a list of files without displaying them, creating a file whose name follows the > syntx>l. Used in conjunction with the MC-OOS control character "P, it can send files to your current printer. For exanple, the CXJ1'I'l\aI'rl :
followed by the control character "p before pressing REl'URN, lists your V'I'I'YS file on the terminal screen and also causes your current printer to print the VT1'YS file. '!his procedure will not take advantage of special printer control CXJ1'I'l\aI'rls (such as pitch control or boldface) offered by word processing programs such as WOrdStar. '!he printer will continue to echo the screen of your terminal until you type another "p.
You can 'tYPE a file (or a list of files) that is on another logical drive. For example:
7B>TYPE A:PARl'1.TXT, A:PARl'2.TXT, C:PARl'3.TXT, PARl'4.TXT
'!his exanple will display (without pausing between files) the files PARl'l.TXT and PARl'2.TXT from user area 7 of drive A:, the file PARl'3.TXT fran user area 7 of drive C:, and the file PARl'4.TXT fran user area 7 of drive B:. '!he ccmnas in the exanple above are optional, but a blank space mst separate each file name in a T!{PE oammand to type a list of files.
2.S-TYPE-l

To display files in other user areas, specify the user n\lltt)er either before the oolon (:) or before the drive letter. Thus, "5C:" or "C5:" denotes "drive C:, user area 5." For exanple,
7B>'lYPE AO: PASSWf)
displays the PASSw.D file on user area 0 of drive A:.
TYPE with the > syntx>l can be used instead of PIP to COf!:i a file or list of files to a file whose name follows the > ~l. 'Ibis option does not display files on the screen. For exanple,
5C>TYPE n.t\SHER DANCER IXHmR BLITZEN >B:REINDEER.~
creates a file called REINDEER.~ in user area 5 of drive B: that camines four files fran the current user area in the order listed (DASHER first, BLITZEN last). 'Ibis has the effect of:
5C>PIP B:REINDEER.~=MSHER DANCER IXHmR BLITZEN
Wildcard characters (*, ?) can be used in the file specification of a TYPE coomand lil'le to display all the files that match the specification. Wildcards can also be used with the > option to camine files. To display all files of type .IXX! in user area 6 of drive B:, you can use the ccmnarrl line:
Q:>TypE B:*.~
Besides the > syrrbol, TYPE accepts two options, [PAGE] am [Pn]. If neither is specified in a TYPE oannand line, the display scrolls continuously. The scrolling can be stopped with "'s, continued with "'0, am abandoned with "'X or "'c.
2.5-TYPE-2

'!he [PAGE] option displays 24 lines, and then waits until any key is pressed to continue. The [Pn] option displays n lines at a time before pausing for a keystroke to continue. '!here must be a space between the option am the last file name. If a TYPE ccmnand to display a list of files ends with either option, the option applies to every file on the list. For exanple:
8C>TYPE DRAFl'.!XX: FINAL. !XX: [P48]
'Ibis displays DRAFl'.!XX: and FINAL.IX:X: fran the current user area, pausing every 48 lines for a keystroke to continue.
Di.sp1.ayioJ Files en Other Rodes of a DR Net RebIork
To use the TYPE ccmnand to display a file over a DR Net network, your terminal DUst be connected via the network to the reJ1Dte drive whose file you intend to display~ For exanple, suppose that you want to display a file called TEST.IX:X: which is located on user area 2 of drive C: on the SALES system. You mst first connect to drive C: on the SALES system by typing:
You can now use the TYPE carmand to display the file called TEST.I:XX: that is stored on user area 0 of drive C: of the SALES system by typing:
OA>TYPE TEST. I:XX:@SALES
Note that the TYPE ccmnand with MC-IX>S control character "'p cannot be used to display a file on a printer attached to a different system within a DR Net network.
'!he TYPE ccmnand descr ibed in the cn1CURRENl' ~ OPERATING SYSTEM USER'S GUIDE is different in several ways fran TYPE in Gifford's MC-OOS.
2.5-TYPE-3

OPrlME@node
'!be UPl'IME ocmna.nd displays the anount of time that a system has been up and running since last being rebooteCL The UPl'IME camnand can be run locally and across the network.
If you type:
fran the local system called nservice,n the system responds with:
Service bas been up for I + 02:10
'!bat is, none day, two hours, and ten minutes. II
To check the uptime for a particular node across the network, type UPTIME @, followed by the name of the renDte node. For exauple, if you type:
OAi>UPI'IME @SALES
'!be system might respond with the folla..ring display:
Hoc1e sales bas been up for 03:48
To get a listing for all of the systems attached to the network, type the folla..ring:
OA>UPrIME @
2.S-UPTIME-I

An exanple of a possible display from this oarmand is presented below:
Rode SM.BS-2 <bin Rode AaD:Bl'I doIIIl Rode MIS up Rode JDDTIO up Rode SBlI1ICB up Rode MMCltIttDI up Rode SM.BS up
2l:26 3-+07:22
02:47 10:15 12:24
2+02:07 03:50
'!be UPl'IME camand provides a tool with which the system manager can IIDnitor system operations.
2.S-UPTIME-2

USBR
USER n
'!he USER comnand will change the current, user nuni:>er to D, where D is an integer with value between 0 am 15. For example:
OA'>USER 6
'Ibis returns the prcmpt:
If you type the keyword USER without irxUcating a nUIllber, the system will pranpt:
'!be USER comnand cannot be used to access user areas that are not specified in your login account in the PASsWD file. For example, if you try to access restricted user area 6 from unrestricted user area 5, the screen will display:
You doD' t have perai.ssial to access user area 6. User Dl1IIIher = 5
'!be USER conmand can be avoided by typing the new user number followed by a colon. For exanple, to nove from user area 6 of drive A: to user area 5 of drive A:, type the following comnand:
6A>5: 51\>
2.5-USER-l

USERINIT.CMD is an optional program which will run when a user logs in to the system. 'nlis program file can be used to custanize your system by executing a program which must be part of the login prccedure. USERINIT.CMD has limited application on nost systems. 'nle USERINIT.SUB file will have greater value to IIDst users.
'nle maintenance of this file falls under the jurisdiction of the system manager. ' It is discussed again in Chapter 3.
2.5-USERINIT-l

USERINIT.SUB is an optional file containing camtands which are to be executed as part of the login procedure. A sanple file, USERINIT.SAM, is supplied with the system. '!be sanple file has the following entries:
J Sanple USERINIT.~ J This SUBMIT file runs autanatically each time a user logs in. J This file types out mail (if any), and lists the .BAK files J to remind users to delete them. MAIL -A DIR *.BAK
'!be maintenance of this file falls under the jurisdiction of the system manager. It is discussed again in Olapter 3.
2.5-USERINIT.SUB-I

The OTMP file is automatically created when you boot the system. Booting the system also autanatically puts a special password on the UTMP file. Only the operating system itself can use this password, which prevents any person or program but the operating system fran m:xlifying the OTMP file.
If you do not wish to restrict access to the UTMP file, simply use the SET camnand to turn PIDl'EC1' OFF on the label of drive A:. This will disable password protection on all of the files of drive A:. Once in use, the OTMP file has the format:
tty1 2david 12 16642132392034 7221982
The first three fields are the physical terminal name, the relative virtual terminal IlUIIDer, am the account name. The other fields are:
12 1664 21 32 39 203 4 7 22 1982 \\ \ \ \ \ \\ 1 2 3 4 5 6 7 8
1. Virtual terminal number.
2. ~ since January 1st, 1978.
3. IbJr of the day (24 lnlr clook).
4. Mimte of the hour.
5. Sec:xDl of the minute.
6. Julian day of the year (1-366)
7. Day of the week (Sunday = 0, Monday = 1, Tuesday = 2, etc.)
8. Date in nonth-day-year format.
The UTMP file is discussed in more detail in Chapter 3.
2.5-O'lMP-l

VOID VODB BBLP VODB JIJftl5RBl)
VODB SIZB=n VODB Dl'NNlIC VODEPUBI
'1l1e VCMOOE program allows you to change dynamically certain background operating characteristics of your virtual terminals. '1l1e VCMODE ccmnand only affects the virtual terminal that is in the foreground at the time when you give the, ocmnand, but it specifies how the operating system will treat output fran that virtual terminal if it is later switched to the background (that is, when it is not attached to your physical screen).
The VCMCDE program allows you to select the way that each of your virtual terminals will handle characters output by background processes (programs attached to. virtual terminals that you are not currently IIKlnitoring). '1l1e VCMOOE ccmnand allows you to specify that outplt fran a background virtual terminal is treated in any of three ways:
(1) BUFFERED, or saved in a disk bUffer for display when you reattach the virtual terminal to the physical screen1
(2) D'iNAMIC, or displayed on your screen as it is produced, while another process runs in the foregrOUl"d;
(3) FLUSH, or discarded.
'1l1e BUFFERED JOOde saves the first 0 kilcbytes (0 times 1024 characters) that any application program attenpts to outplt to a background screen, am stores those characters in a tenporary buffer area of your hard disk. You can specify the maxinum size of the buffer area with the SIZE=n option of the .VCMCDE program. To cause the current virtual terminal screen to operate in BUFFERED mode, type the catmand:
2.5-VO«DE-l

To set the maxinum size of the buffer to 16 kilobytes, type:
4B>VCMDE SIZE=16
If you invoke a program and then switch your screen to another virtual terminal, up to 16K of background output (in this exanp1e) could be sent to the disk buffer. If this buffer fills up, your background program will pause as soon as it tries to send an additional character to the buffer. When you switch back to a BUFFERED virtual terminal that has sent screen output to the disk, any characters stored in the disk buffer are inmediate1y sent to your screen, and the program resumes executioo. The temporary buffer files are automatically erased from the disk after BUFFERED output is displayed to the screen. '!he MC-IX>S control characters "'s and "'Q, described on page 2.3-2, can be used to control the scrolling of screen output, or the "'p control character can be used to list the output on your current printer.
You nust be in BOFli'ERED JOOde to use the SIZE option, and there RUst be enough space on logical drive A: for the buffer. (Note that the virtual terminal buffers controlled by the VCMOOE program are not directly related to the MC-DOS cache buffer.) The default nme for output from background virtual terminals is BUFFERED, the nme appropriate for rost business applications.
In sane programning and technical applications, however, it is helpful to see output in real time from a background process. ']he DYNAMIC option of VCMODE allows you JD'litor screen output as it is produced by a detached program, without concern that the background process will pause if your disk buffer bec.xJnes full. A background virtual terminal in DYNAMIC nme sends character output directly to the screen, rather than to a disk buffer. The following exanp1e shows how to select DYNAMIC JOOde for your current virtual terminal:
9A'>VCXDE DYNAMIC
Background Itxle for Virtual Terainal n set to Dynamic with Q1tput
2.5-VOO>E-2

If you invoke a program fran a virtual terminal whose VCMOOE status is "DYNAMIC Jrode with output," the character output will be displayed on screen, even if you switch to another virtual terminal. 'nlat is, even though your keyboard and screen are attached to a different foregrOlll'Xl virtual terminal, a program running in the background on a ,DYNAMIC virtual terminal can still write to your physical screen.
Since output fran two programs can be confusing if you are running a visually-oriented foreground program like a spreadsheet or word prdcessor, VCMCDE also provides a FLUSH option to suppress screen output from a background virtual terminal. For exanple:
5C>VCHDE FLUSH
Background Mode for Virtual Terllinal n set to DynaIII:ic with I'lusbing
'!his differs fran ~ SUSPEND option of the QJSET cxmnand (which makes a background process pause until reattached to the screen) in that FLUSH allows a background process to run to oarpletion.
With the FLUSH option, characters sent to the screen by a background process go neither to the screen nor to a disk buffer, but are discarded, and go nowhere. The FLUSH mode prevents a background virtual terminal fran ser~Ung characters to the screen, even when you bring that virtual terminal back to the foreground. When you return to a virtual terminal that is operating in FLUSH m.:Xie, the screen will not display any output, but will only show what was on the screen prior to switching to the background m:xle.
'!he HELP option of VCMOOE displays information about the VCMODE program. If you type:
6B>V0DlE HELP
your screen will display a general description of the VCMCDE carmand, including all of VCMCDE's primary cxmnand arguments.
2.S-VQmE-3

If you type the keyword VCMCDE without an argument, as in:
your screen will tell you the background IOOde of your current virtual terminal. If its status is BUFFERED, for exanple, the program will show' the size of the disk buffer:
Backgromd IbJe for Virtual 'l'erDIinal 0 is Buffered Maxhua file size = 10K
Because each virtual terminal is independent, a VCMOOE oarmand given from one virtual terminal cannot change the status of another virtual terminal, even if both are supported by the S2llll:! physical terminal.
When you use VCMOOE to select the background screen output noie of a virtual terminal, that IOOde persists until you change it with another VCMOOE ccmnand., or until the Me-DOS system is reset or powered down. Neither switching the electrical power of a physical terminal OFF nor entering a r..ocn:JT ccmnand will restore a DYNAMIC v irtual terminal to the default BUFEERED JOOde.
'!be VCMOOE ccmnand in Me-DOS has mNAMIC and FLUSH functions that are different from those of the standard Digital Research VCMOOE ccmnand. '!he description of the VCMOOE DYNAMIC option in the <DOJRRnfi' ~ OPERATING SYSTEM USER'S GUIDE does not apply to your MC-DOS system.
2.5-VCMCDE-4

VT950.KEY is a sample file incllKled on the Virtual Terminals Master Diskette that allows you to program function keys for use wi th the VT program. VT950.KE.Y is a function key template to switch VT screens for TeleVideo 950 or Freedan 200 terminals that have ~en upgraded with extra pages of internal RAM. The VT950~ file that is on your master diskette is written to program function keys one (1) through four (4) to switch directly to the first through fourth VT screens respectively.
The surrmary ~low descri~s the function keys that the VT950.KE.Y file programs to cause VT to switch screens.
VT950.KE.Y: KE.YS template for TeleVideo 950 and Freedan 200 Function Key
Fl F2 F3 F4
Character Sequence VT Function (" ) 0 SWitch to first VT SCreen (") 1 Switch to second VT Screen ("-) 2 SWi tch to third VT SCreen (" ) 3 Swi tch to fourth VT Screen
To program your TeleVideo 950 or Freedan 200 function keys using this template, type:
OA>KEYS VT950
After you enter the above line frail your terminal, pressing key Fl will switch you to the first VT screen, F2 to the second, F3 to the third,and F4 to the fourth. If for any reason your terminal is turned OFF, your Televideo function keys will be cleared and you must run the KE.YS program again. Rebooting the system does not by itself require you to run the Km!'S program again unless your terminal was turned OFF in the process.
See Section 3 of the VIR'lUAL TERMINALS USER'S MANUAL for additional information.
2.5-VT950.KEY-l

V'.lU:S80.KEf
VTOCSSO.KEY is a sample file included on the Virtual Terminals Master Diskette that allows you bo program function keys for use wi th the VT program. VTOCSSO.KEY is a function key template to switch VT screens for the OCS-SO (CIT-SO) terminal that has been upgraded with extra pages of internal RAM. The V'1n:SSO.KEY file that is on your master diskette is written bo program the bop four keys on the IS-key pad, left to right, to switch to virtual terminal screens one through four respecti vely.
The sUlllllary be low descr ibes the function keys that the V'lQ::SS.KEY file programs to cause VT to switch screens.
VTGCSSO.KEY: KEYS template for GCSSO terminal Function Key
(X)L lO:>E (X)PY BLOCK WRITE BIreK BLOCK DEL
Character Sequence VT Function (" ) 0 SWitch to first VT Screen ("-) I Switch to second VT Screen (,,-) 2 SWitch to third VT Screen (" _) 3 Switch to fourth VT Screen
'lb program your GCS-SO function keys using this template, type:
OA>KEYS VTGCSSO
After you enter the above line from your terminal, pressing the (X)L MooE key will switch you to the first VT screen, (X)PY SIreK to the second, WRITE SIreK to the third, and BlOCK DEL to the fourth. If for any reason your terminal is turned OFF, your function keys will be cleared and you must run the KEYS program again. ~booting the system does not by itself require you to rlDl the KEYS program again lDlless your terminal was turned OFF in the process.
See the VIRlUAL 'lERMlNALS USER'S MANUAL for additional information.
2.5-VTGCSSO.KEY-I


The V'l"lYS file is an ASCII file, much like the 'l'l'YS file, that tells the Virtual Terminals program what terminals 00 your system can support virtual terminals and describes sane technical characteristics of these terminals. The V'l"lYS file contains a series of lines, each of which describes one Iilysical terminal intended for use as virtual terminals. Every physical terminal with a4(litiooal screens must have an entry in the V'l"lYS file in order to be supported by virtual terminals. If the terminal does oot have an entry in the V'1'1'Y'S file, that terminal will be treated as a standard, single-page terminal. The V'l'l'YS file is read by the OCPMINIT.cMD program during the boot seqlJ3noe, and must reside on user area 0 of drive A: in order for Virtual Terminals to operate.
The V'l"lYS file must conform to the Iilysical terminals on your system. If you add or switch physical terminals, your V'l'l'YS file must be modified to reflect the change.
The master diskette contains a V'l'l'YS.SAM sample file which contains lines that can be used as a model in the initial creation of the V'l'l'YS file. See the VIR'IUAL TERMINALS USER'S MANUAL, Section 1, for additiooal information.
2.5-VTlYS-l

111) @node 111) accounts 111) -option ••• 111> "terminal 111) !program
'!be WHO camand lists the account names of users currently logged in to each system attached to the network. '!bis list of account names also includes the terminal name, the virtual terminal nunber ("coo"), the current prO,Jram, the time that each account logged in, the anDUllt of time that each user has been logged in to the system, am the annmt of time that has elapsed since the last keystroke was made on the foreground virtual terminal. For the WOO cxmnand to work, the UTMP file I11lst be on user area 0 of drive A:.
If you type WHO, a listing similar to the one below will be displayed on your screen for the accounts currently logged in to the local system:
Wed Jon 20, l.984 2:54 pa 'lbtal of 5 users logged in
name nancy tan trish
teadnal CDl progran OCX1SOle 00 * tty1 04 '*1IS tty2 09 .A1B)
time 9:22 aID 9:36 • 9:01.
period 5:31. 5:17 5:52
idle 0:02
Listed below is a definition of each of the co1lD11lS of information displayed above:
name: '!be account name used to log in to the system.
tenaina1: '!be physical terminal's name from the 'l'IYS file.
console: '!be virtual terminal nunber. '!bis nunber is required by the ABORl' program.
2.S-wHO-1

program: '!be program that the user is currently running. '!be asterisk that is displayed before the program name irrlicates that this is the foregrourrl terminal. If there is no program name next to this asterisk, this means that the user is currently not running any program. '!be terminal is 1IDSt likely at the MC-JX>S prarpt.
t~: The time of day that the user logged in to the system.
period: '!be aroount of time that the user has been logged in to the system. If this field is enpty, the WHO program was unable to calculate this time period.
idle: 'Ibe anount of time that has elapsed since the user last entered a keystroke on the terminal. 'Ibis is useful for checking to see if saneone is at their terminal before you use the WRITE program to send them a message. 'lb check for users currently running a program if you plan to shut down the system. If the idle field is enpty, this means that the user has been idle for less than one minute.
'!bere are five options that can be used in conjurction with the WHO program. 'Ibey are:
1. @ node 2. accounts 3. - option 4. - terminal 5. ! program
'Ibese ccmnands and the ~rguments that can be used in conjurction with them are described below.
1. @ role
The at-sign (@) can be used to display information about any system that you specify after you type (@) on the ocmnand line. For a listing of timelog information for all accounts currently logged in to all systems attached to the network, type WHO @ without specifying a system.
2.5-MlO-2

1b find out information about who is currently logged in to a particular system, type (@) followed by a system name. Make sure that you don't enter a space between the "@" and the system name that you intend to use. For exanple, to find out information about the Sales Department, type:
OA>WID @SALES
and you will get a listing of 'all aocounts currently logged in to the SALES system.
2. accounts:
You can also use the WHO program to display information abrut a parti~lar account by enteriBJ WID and the name of the account that you intend to roonitor. For exanple, if you type:
the screen will display a list of the various terminals, consoles, and programs which that account has accessed. 'Ibis display will also give the time these were accessed, as well as the duration of the access.
1b find out information about several accounts on several systems, you can use the @ option in a ccmnand line. For exanple, to find out information about dale, janet, and pat on the systems named DALE, SALES, and SERVICE, type:
OA>WHO DME JANErPAT @DALE @SALES @SERVICE
'!be WHO program will look for the account names that are listed on all the systems that ate listed. A listiBJ of all the catplter activity for those accounts will be displayed on your screen.
2.S-wID-3

3. - qJtions:
~tions are used to change the way that a program prooesses informatioo. For the WID program, single-character options can be used to change the display format. Program options will be read by the WHO program in the order that they were entered on the carmard line. Listed below are the various options that can be used to change the display format of the WHO program:
-a (for ALL virtual terminals) -d (for DATE of login time) -h (24-HOOR clook, instead of 12) -r (REVERSE the order of the listing) -s (for time in SEXXlIDS, as well as in minutes and hours) -v (VERSICN nunber of your WID program)
-a all:
By typing WHO -a, you will get a listing for every virtual terminal that each account is currently logged in to, instead of just the foreground prooess.
The foreground prooesses are marked by the asterisk that precedes the name of the program that each account is running. This option is useful in a DR Net net\«)rk if you are shutting down the system, and you want to make sure that all users on the system have logged out of each of their virtual terminals.
-d date:
This option will allow you to list the date when each account logged in to the system, as well as the time. This would be useful if saneone regularly forgets to log out of their system, and you want to determine the last day that they logged in. In order to display this information type:
OA>WHO -d
2.S-wHO-4

-b hours:
'!he WHO program allows you to list the login time for each account in a 24-hour clock format, instead of the l2-hour clock format (which uses am and IJIl) to which the WHO program defaults. To do this type, WHO -h, and this information will be displayed on your screen.
-r reverse:
'!he WHO program normally displays its information in alphabetical order, based on the account name. The -r option reverses the order of this display.
-s secxDJs:
By typing WHO -s, all of the timelogging categories (time, period, and idle) will list tbe seconds, as well as the hours am the minutes •
..." versiau
'!his option will print out the current version nurrber of your WHO program, along with the normal WHO information for the local system. .
Listed below are the various options that can be used in conj~tion with the WHO program to change the sorting format of the WHO program. '!he display is normally sorted by account name only. You can cause the display to be sorted by up to three categories by specifying one of the sort options below:
-@ (sort by system name) -i (sort by IDLE time) -1 (sort by lOOm time and date) -n (sort by system nurrber) -p (sort by P1U,;IWl name) -t (sort by TE1MINAL name) -u (sort by USER name)
2.S-wHO-S

-@ system name:
'!his option can be used to sort the WHO program display information alphabetically using the system "name" category.
-i idle:
'!his option can be used to sort the WHO program display information using the "idle" time category. '!his means that you will get a list of logged in accounts with the user whose keyboard has been the least idle at the top of the list, and the user whose keyboard has been idling the longest at the bottan of the list.
-llDjin:
You can sort WHO program information by the login time for each account attached to the network. The account that logged in first will be positioned at the top of this list, and the last account to log in will be positioned at the bottan of this list.
-n systelll:
'!he WHO program enables you to sort the timelog information by DR Net node nuItbers, in ascerrling order, that are attached to the network. By typing WHO -n @, this information will be displayed on your screen.
'!he "program" sorting function of the WHO program enables you to list the various accounts logged in to the network by sorting the programs that they are currently running in alphabetical order. By typiRJ WHO -p, the listing is sorted by program.
-t teminal.:
By typing WHO -t, you will see a list of the various accounts attached to the network, sorted by the nwrber of their foregrourx:i virtual terminal screen. 'Ibis list will position the "console" at the top of the list and then the virtual terminal screen nwrbers in ascerrling order.
2.S-w.HCr6

-u naae:
'!he "name" q>tion can be used in conjunction with the WHO program to list the accounts logged in to the network in alphabetical order. '!his is the sorting function that the WHO program will default to if no sorting q>tion is specified on the ccmnand line. By typing WHO -u, the listing is sorted by account.
Each of the sorting and format options 1 isted on the previous pages can be entered as a string on the e<mnand line. For exanple, suQ?ose that you want to list WHO information for all of the virtual terminals on the network (not just the foreground screens), you want to list the seconds as well as hours and minutes in the timelogging categories, am you want to sort the list by whose terminal has been idle the longest. To do this, you IlllSt type the following e<mnand:
0A>WfI) -R -I -A -S
'!he -r option is the first one that the WHO program uses to sort the information since this is the first q>tion that was entered" on the catmand line.
4 .... _:
'!he tilde C) is used to indicate that the following characters represent the name of a terminal attached to a system on the network. 'Ibis e<mnand can be used to search for a specific terminal nurrber across the network. For exanple, sUQ;X)se that you want to list all of the accounts on the network whose terminal nurrber is 1. To do this, type:
and a table of WHO program information listing all accounts currently logged in to a network systems whose terminal nu:nber is listed as 'r1'Y1 in the T1YS file will be displayed on your screen.
2.S-wHO-7

5. 1 program:
'!be ''program" sorting ~tion enables you to list WHO program information according to the program that each account is currently running. By typing (1), you are alerting the WHO program that the subsequent characters should be interpreted as the name of a program. Suppose that you want to find out who on the network is currently runniRJ WordStar. To do this, type:
OA:>WHO !WS @
to list all v«:>rdStar (WS) programs running in the network.
2.5-wm>-S

warm ALL warm name ttyt @node
'!he WRITE camnand is used to send a message to any account currently logged in to your system (or to any system in a DR Net Local area network). '!his means that you can instantly send a message to any foreground virtual terminal screen.
'!he WRITE oonmand must be followed by an account name, or you can send your message to all of the accounts logged into the local system using the ALL argument. '!he ALL argument, however, cannot be used across the network. The n@node" am "ttyi" arguments are optional. '!he @node argument can be used to send a message to an account by specifying the system name, after the account name on the conmand line. The tty# argument can be used if you intend to send a message to an account that is logged in to IIDre than one physical terminal. Here "tty#" is the name of the ~, as it appears in the fifth field of the TTYS file.
'!he message is typed by the person who invoked the WRITE program. '!he source of the message will be shown on all terminals receiving it. '!he receiver of the message will see one line of text appear on the terminal screen each time that the sender presses the REl'URN key. '!he WRITE program is terminated with a "'z or with a period (.) in column one of a blank line. Users can simultaneously send messages back and forth.
Messages that are sent with the WRITE ooomand do not affect a file being processed, but they do affect the screen display. WRITE messages will appear in the midst of text, spreadsheets, or programs which are being displayed on the receiving terminals. '!he WRITE program will first ask you if you want to interrupt the process that is running on the receiver's terminal. '!he WHO conmand will display the login account names am the terminal names of all currently logged-in operators and terminals.
2.5-wRITE-I
'!he name option can be used to send a message to a terminal whose operator is currently logged in as that account name, as it appears in the first field of the PASSWD file. Fbr example, sUJ,:POSe that an account called "rich" is logged in to your system, and you want to send him a message. 'lb do this, type:
OA>WRITE RICH
If "rich" is currently running a program, such as WOrdStar, the following proopt will be displayed on your screen:
WARIDC: User is runniD] program. "MSJk) you want to centime?
'tYPe (N) to interrupt the WRITE program, or (Y) to continue writing your message. If you type 00, the following message will be displayed on your screen:
Beady >
You can now begin typing your message to the screen of the operator logged in to the account called "rich."
'!he WRITE ALL utility can be used to send your message to all users currently logged in to the local system. Sugx>se that you want to send a message to everyone currently logged in to the system. 'lb do this, type:
OA>WRITE ALL
2.5-wRITE-2
After a WRITE ALL ccmnand, the WRITE program will interrupt all foreground programs currently running on the other terminals wi thout issuing any warning to you. If you logged in as ''mary," the following message will appear on all logged-in terminals:
Bro2I:1cast ESSi!Wje frc. JIIlI:y on tty2 •••
Now type the message to be sent. For exanple:
'DIe <DIPlter will be shut doIIJn in 5 minutes. Please save yOJr files an:) log alt.
'!he sender lIIlst enter .... Z, or a line with a period in COlUIm 1, followed by REroRN, to em the message.
The 'lTYt option IIllst be used if you want to send a message to an acoount that is logged in on mre than one physical terminal. Suppose that you use the WHO program to determine that there is an account called "john" that is logged in on terminals tty2 and tty3. You know that John is physically located at the tty3 terminal, and you want to send him a message right away. 'lb do this type:
If John is not running a program on the foreground virtual terminal screen for that console, you will be prarpted to begin typing your message.
2.5-tmITE-3
UsinJ WRl'fE in a IB Net JtebIork
'!be WRITE program can also be used to send a message to any designated account currently attached to a DR Net local area network. '!be NEl' STATUS NOOES and WHO @ cxmnands should be used first to learn which systems are currently attached to the network, which accounts are currently logged in to those systems, and which programs are currently being run by those accounts.
'!be renote system to which you send a message, however, I1l1st be up and running. You can use the NET STATUS NDES cx:mnarrl to determine the status of each of the systems in the network. For exanple, suppose that you want to send a message to the account called ''pat" on the system named SALES. You must type:
OA>WRITE PAT @SALES
Provided that the account called ''pat" is not currently running a program, you will be pratpted to begin typing your message.
'!be TrY argument can also be used across the network. For exanple, if you want to send a message to the account called "john" at tty2 on the system named SALES, type the following conrnand:
OA>WRITE JOON 'rI'Y2 @~
'!be WRITE facility is intended as a convenience to users of a Me-DOS system or DR Net network, since it allows real-time ccmmnication by users who might be separated by large distances, or whose telephones are busy. A reIlDte user can use WRITE over a lOOdeIII. Excessive or frivolous use of WRITE can be a distraction to users, however, and if the WRITE ccmnand is atused, the system manager should protect it with a password and limit its use to urgent messages for all users on the system.
2.5-wRITE-4

'!be wrMP file cOntains a list of entries corresponding to login and logout. '!be file is used by the TIMEr..CX; files for time accounting purposes. Entries in the file have the follCMihg form:
tt:y2 ldavid 12 l6()41Ol62l2034 122l.982 125 tt:y2 1 12 l664l326222034 7221982 126
In this exanple, "david" logged in at 10:16:21 and logged out at 13:26:22.
'!be first three fields are the PhY'sical terminal name, the relative virtual terminal nurrt>er, and the account name. The other fields are:
12 1664 21 32 39 203 4 7 22 1982 125 \\ \\\\ \\ \ 1 2 3 4 5 6 789
1. Virtual console nunbet.
2. Days since January 1st, 1978.
3. Iblr of the day (24 hOUr clock).
4. Miriute of the hour.
5. Seccmd of the minute.
6. Julian day of the year (1-365).
7. Day of the week (Sunday = 0, Monday = 1, Tuesday = 2, etc.).
8. Date in IOOnth--day-year format.
9. Program file link nUlllber. Each entry in the file contains the nunber of records in the file.
'!be WTMP file is covered again in Chipter 3.
2.5-wIMP-l

2.6 SysteID Security Overview of IC-Im
Your approach to system security depends on how the system will be used, and on the sensitivity of the programs and data stored in the system. This section will illustrate four areas of system security: login security, DD'litorinj ao:l special internal system security, standard Qmcurrent IXS security optiaIs, and DR Net security. Each facet of system and file security can be established independently at a level appropriate to the perceived risk, ranging fran a maximum level in which user activities are highly restricted, to a minimal level in which the security options are not used to oontrol access to system resources. The purpose of this section is to present the range of options available in MC-IX>S and DR Net security.
Because some security options globally affect all users, all files, all drives, or all systems in a network, while others selectively restrict only a few users, files, or devices, Me-DOS security options provide great flexibility to the system manager in matching security procedures to the current needs of the system or network. The system manager may choose, for exanple, to uphold the maximum level of login security but the minimum levels of internal system security, standard Concurrent IX>S security, and DR Net security. In some situations it is neither necessary nor desirable to maintain a high level of system security. In other situations it is imperative to maintain the highest level of system security possible.
1. IQgin Security
login security is oontrolled by the PASSWD file. The login PASSWD file contains descriptions of account login names, account login passwords, default user areas, default drive designations., optional terminal assigrnnents, optional printer assignments, optional default program assignments, and accessible user areas. The PASSWD file entries for a system with a minimum level of login security differs fran the PASSWD file entries for a system with a maximum level of login security. (Here "minimal login security" does not mean to delete the PASSWD file, since doing so would disable the appointment calendar, electronic MAIL, reminder files, WHO, WRITE, and other Me-DOS 9nd DR Net programs.)
2.6-1

A. MiniDua level of lIJgin Security
1. Account login names listed in PASSWD. 2. login passwords are not assigned to any accounts. 3. Default user drive is specified. 4. Default user nun'ber is specified. 5. Unrestr icted terminal access. 6. Unrestricted JOOdem access. 7. Unrestricted or restricted program access. (Accounts with an
entry in the optional default applicatioo program field of the PASSWD file are autanatica.lly entered into the program specified. It may be convenient to assign certain accounts to a default program if they always use the same program.)
8. Unrestricted user area access.
1. Account login names listed in PASSND. 2. login passwords for all accounts, to prevent unauthorized
access to the system. 3. Default user drive is specified. 4. Default user nun'ber is specified. 5. Restr icted terminal access for accounts. 6. ~ access restricted to accounts with default program. 7. Restricted program access (default programs) • 8. Restricted user area access. For practical reasoos, there are
exceptioos to user area restrictioos. Mail files stored in user area 15 of drive A: can be sent or received by all users, regardlesss of restrictioos from user area 15. Ccmnand files SEn' to system (SYS) and read ooly (K» status in user area 0 can be accessed by all users, even those restricted from user area O.
2.6-2

2. Special IC~ Syst:eII. Security am Iblitorin]
'lb enforce user area restrictions and other PASSWD file controls, and to ItDlitor system usage, MC-IX)S has special system security features which can be enabled by a system manager who desires a maximum level of special internal system security and ItDlitoring. '!be system manager satisfied with a minimum level of internal system security need not enable the special features.
A. Mi.niaJIIl level of Special Security and blitorin]
1. All users can IOOdify the PASSoID file with the NEW.JSER utility by logging in as "system." All users can IOOdify the PASSWD file with a word processor, but they should leave the password field enpty, since a word processor cannot enter an encrypted password.
2. '!be special internal system passwords are not enabled if there is not a label with P~ on drive A:.
3. Timelog reports are rarely, if ever, reviewed. 4. '!be optional HISl'ORY file is not created.
B. Max __ level of Special Security and blitorin]
1. '!be PAS&WD file can cnly be IOOdified with the NEl4USER utility by the system manager who logs in to the "system" account. Only the system manager should know the login password for th is account.
2. '!be special internal security feature of the operating system assigns secret passwords to the UTMP and PAS5WD files so that no one can tanper with these files. '!here rust be a label with P1U1E.:T set CE on drive A: to enable password protecticn. Put a password on the label to prevent unauthorized users from changing the protect attributes.
3. '!he optional HISTORY file is created. 4. Timelog reports are regularly reviewed by the system manager. 5. Supplementary file encryption hardware is installed to create
diskettes whose files cannot be read without similar equipnent and knowledge of the encryption code.
2.6-3

3. Standard Q:mcurrent In) Security Features
Standard security features devised by Digital Research Inc. as part of the Concurrent IX>S operating system include the option to restrict access to files by file passwords, and to mark each file's directory entry with the llDSt recent time and date when the file was accessed or roodified. '!he system manager has the option of implementing time and date stanping of files, and of setting passwords on selected files so that only users who can present the password can freely manipulate the files. Min~ and max~ levels of control are described.
A. Mi.niJun Ievel of ~inJ and PasSHOrd Protectim
1. If you do not have a label on a logical drive, then files on that drive cannot have password protection or timestarlping.
B. Maxi.- Level of TiEstaoping and PassIIord Protectim
1. Timest.anping requires that the INITDIR program be nm to reformat the directory of any logical drive whose files will have date and timestaIlps.
2. Give each logical drive that will oontain files protected by file passwords a label with PIOl'EX:T set 00 to enable file password protection.
3. Use the SET ccmnand to activate date and timestanping on labelled drives whose files are to be stanped.
4. Password protect each drive label with the SET ocmnand (refer to 2.5-SB'l'-l) so that the label cannot be mdified.
5. Use SET to assign a file password to files that should be protected with passwords, using as appropriate theDELEl'E, WRITE, or READ level of protection (see Section 3.4).
6. Password protect powerful cannands and prograns such as SET and DDT86, and other utilities and languages that can directly address RAM locations.
7. Do not assign passwords to the following files:
NENJSER PASSHD .MBX MJ1'D • REM t1lMP 'lTYS AUTOST
2.6-4

4. 1m Net Iccal Area RebJork Security Features
In addition be the Me-DOS security features described earlier, Me-DOS supports security options for DR Net networks. 'lhese features can be established be minimally restrict access be files across the network, or be reduce or eliminate the extent be which some users, terminals, and systems can access the programs, files, and devices within the DR Net network, according be the way in which the system manager configures the network. Just as the PASSWD file is the keystone of login security, the COOFIG.Nm' and ~ files control the access rights of network users.
A. Mi.niaJm Ieve.l of 1m Ret RebJork Security
1. Set up exNFIG.Nm' be support multiple "servers" and "requesters," so that several processes can access your system from other linked machines, or access other systems from yours.
2. Il:) not designate arrj drives as "private." 3. Il:) not use exNFIG.Nm' be set a node password on your system. 4. Have a PASSWD file on your system that lists all of the
account names in the network, with the same passwords that they have on their local systems, and· do not nm PWASK.Nm'.
A. Maxiaun Level of m Ret Reblork Security
1. Run the PWASK.NET routine, so that every user who accesses your system from another system in the network will have be present a login password matching your PASSWD file's . password for the account name that they present.
2. Use OEFIG.Nm' be set a password on your system. Only users who correctly present it can access your node's files or printers.
3. Have a PASSWD file on your system that does not list the account names of other network users, or that lists the account names with different login passwords than the passwords on their local PASSWO file.
4. Designate logical drives as "private," so that they will not be network resources.
5. Set up exNFIG.NET be support zero "servers" so that no users On rellDte systems can access your system from other linked machines via the network. Set "requesters" at zero if you want be keep the terminals of your system fran accessing other parts of the network.
2.6-5

0Iapter 3 is a guide for the system manager descr ibing how to install the M;::-OOS operating system as a customized software environment. Sections of this chapter discuss system security, m::nitoring system usage, file maintenance, and backing up files. The last part of the chapter describes how to install t-iC-IXl3, updates, or hardware upgrades. ~y of the procedures required for system management refer to coomands am files described in Sectial 2.5 or in the separa~ Gifford pub1icatials ClJSTOMIZn«; MULTIU5m 0l:CURRENl' IXl3 USER'S MANUAL, VIRlUAL TERMINALS USER'S MANUAL, or the DR NET USER'S GUIlE.
CDf.rENTS
3.1 The System Manager ••••••••••••••••••••••••••••••••••••• 3.1-1 On-Site ~upport •••••••••••••••••••••••••••••••••••••••• 3.1-1 Establishing Efficient User Habits ••••••••••••••••••••• 3.1-3
3.2 Creating a Customized Multiuser Environment •••••••••••• 3.2-1 Description of a System Startup •••••••••••••••••••••••• 3.2-1 Description of User Initia1ization •• ~ •••••••••••••••••• 3.2-3 Description of a LocJ()\lt •••••• " •••••••••••••••••••••••••• 3 .2-5 Description of a System Shutdown ••••••••••••••••••••••• 3.2-6 SUIlIllary of K:-OOS Customization Ccmnands and Fi1es ••••• 3 .2-7
3.3 Setting Up the System Management Fi1es ••••••••••••••••• 3.3-1 The LP.RS File •••••••••••••••••••••••••••••••••••••••••• 3.3-1 The TTYS File •••••••••••••••••••••••••••••••••••••••••• 3.3-4 The Multitasking VTTYS Fi1e •••••••••••••••••••••••••••• 3.3-7 The PASSWD File and NEWUSER Command •••••••••••••••••••• 3.3-12 The UTMP and WTMP Fi1es •••••••••••••••••••••••••••••••• 3.3-22 The OONFIG.NET File •••••••••••••••••••••••••••••••••••• 3.3-24 The SYSIN'IT.BAN File ••••••••••••••••••••••••••••••••••• 3 •. 3-26 The MOT.D File •••••••••••••••••••••••••••••••••••••••••• 3.3-26 The ~ File ••••••••••••••••••••••••••••••••••••••• 3.3-26 The ~.REM File •••••••••••••••••••••••••••••••••••••• 3.3~27 Additional Custamization Fi1es ••••••••••••••••••••••••• 3.3-28
3.0-1

3.4
3.5 3.6 3.7 3.S
3.9 3.10
SysOem Security •••••••••••••••••••••••••••••••••••••••• 3.4-1 Hardware Security •••••••••••••••••••••••••••••••••••••• 3.4-2 Pqysica1 Location •••••••••••••••••••••••••••••••••••••• 3.4-2 Restricting Access to Terminals •••••••••••••••••••••••• 3.4-3 ~ Security ••••••••••••••••••••••••••••••••••••••••• 3 .4-3 Software Security •••••••••••••••••••••••••••••••••••••• 3.4-4 The PASSWD File •••••••••••••••••••••••••••••••••••••••• 3.4-4 Putting a Label on a Logical Drive ••••••••••••••••••••• 3.4-5 Protecting Programs •••••••••••••••••••••••••••••••••••• 3.4-B File Security •••••• ~ ••••••••••••••••••••••••••••••••••• 3.4-9 Optional File Passwords •••••••••••••••••••••••••••••••• 3.4-12 Restricting Access to User Areas ••••••••••••••••••••••• 3.4-l4 DR Net 8ecurity ••••••••••••••••••••.••••••.••••••.••••• 3.4-15 Powering Down •••••••••••••••••••••••••••••••••••••••••• 3.4-17 Additional Notes on Security ••••••••••••••••••••••••••• 3.4-l7 Extraordinary Security Procedures •••••••••••••••••••••• 3.4-17 Contrasting Gifford's !C-OOS am COncurrent OOS
Security ••••••••••••••••••••••••••••••••••••••••••••• 3.4-18 LUnitations on System security ••••••••••••••••••••••••• 3.4-l9 TimeLog Utilities ••••••••.••••••••••••••••••••••••••••• 3.5-1 The HISTORY File ....................................... 3.6-1 Creating and Modifying HELP Files •••••••••••••••••••••• 3.7-l File Maintenance Procedures •••••••••••••••••••••••••••• 3.S-l Deleting Unnecessary Files ••••••••••••••••••••••••••••• 3.8-l Identifying Current Files •••••••••••••••••••••••••••••• 3.S-2 Packing the Hard Disk •••••••••••••••••••••••••••••••••• 3.8-3 Backing up Files •••••••••••••••••••••••••••.••••••••••• 3.8-4 Backing up Floppy Diskettes •••••••••••••••••••••••••••• 3.8-5 Backing up Hard Disks •••••••••••••••••••••••••••••••••• 3.8-5 The Daily Archive Backup ••••••••••••••••••••••••••••••• 3.8-6 The Weekly Full Backup ••••••••••••••••••••••••••••••••• 3.8-S Example of a weekly Full Backup •••••••••••••••••••••••• 3.8-9 Backing Up Read-Protected Files •••••••••••••••••••••••• 3.S-ll Restor ing Backup Data •••••••••••••••••••••••••••••••••• 3.S-l2 Automatic RAM Memory Test •••••••••••••••••••••••••••••• 3.9-l Upgrading and Updating MC-DOS Systems •••••••••••••••••• 3.l0-1 Keeping Your System Current •••••••••••••••••••••••••••• 3.l0-l Hardware Upgrades ...................................... 3.10-1 Preserving Old Operating System Software ••••••••••••••• 3.l0-2 upgrading MP/M 8-16 Systems to MC-DDS •••••••••••••••••• 3.10-2 Installing a !C-OOS upgrade •••••••••••••••••••••••••••• 3.lo-3 Upgrading Systems Without a Hard Disk •••••••••••••••••• 3.l0-4
3.0-2

3.1 '!be System Manager
It is essential that someone be available at all times to give oo-site system support. A system manager's responsibility is to insure efficient operatioo by monitoring the system and its use, and by encouraging users to cultivate good work habits.
Everycne using the canputer should be aware that a multiuser system is a shared resource. Unlike a personal catplter, a IIIlltiuser catplter (or a DR Net network) brings many people together in a CQIIIIOn work envirooment. How users manage their catplter time and catplter space affects other cooputer users. Every user should be considerate of others.
Ql-Site SuRxxt
To provide on-site support, the system manager should:
o Read this manual as well as the CXHlJRRENT ~ OPERATING SYSTEM USER'S GUIDE. ibese manuals provide the primary references for using the system. As the system manager, you should be familiar with the material in these manuals in order to know where to go for answers and where to direct users wb:> need docwnentatioo. Keep these mater ials in a lcx::atioo where they will be coovenient to users, together with the manuals of applications programs such as SuperCalc and ti>rdStar.
o Maintain a written record of all passwords. '!his is inportant in the event that saneone else has to take over responsibility for the system. To avoid being locked out of your own system, write down your passwords and keep them in a safe place. Keep track of account login passwords, drive label passwords, terminal passwords, and file passwords.
o Maintain a map of the system showing the locatioo and identity of terminals, printers, and cables, like the map in Appendix M-
o If you have terminals with progranmable functioo keys, these can be progranmed with the KEYS utility and specific .KEY files to match the needs of imi vidual users or tasks. The procedure is described in the description of the KEYS catmand in Sectial 2.5, and in Sectioo 3 of the VIRIUAL TERMINALS USER'S MANUAL.
3.1-1

o Be aware that many applications pro:Jrams such as WOrdStar can be custanized for individual needs. 'Ibis is often done with the assistance of an install pro:Jram. wi th WOrdStar, for exanple, you can set the default help level, margins, word wrap, hyphen help, or printer ccmnands to meet specific needs. You can create custan versions of l\brdStar and rename these for specific individuals, departments, or specific tasks. If you do this kind of custanization, you only need to rename the WS.COM file to distinguish one custan version fran another. 'lbus, the COf!:l of l\brdStar installed to drive a draft quality printer might be called WSDRAFl', while a letter quality version might be called WSLET. Do not change the names of the over lay files. (See also Appendix 8.)
o Be prepared to contact your dealer for support if your system seems to operate inproperly. 'Ibis manual provides a limited troubleshooting guide. Review Olapt:er 4 to understand what information to have ready if you need to call for support.
o Keep the system current. 'lbe GIft\H) <mSERVER newsletter announces new releases of MC-IX>S when they becane available. You can obtain new MC-IX>S releases and manuals at a nominal cost. Changes that Gifford makes in the system are custaner dr i ven. Gi ve us your suggestions for improv ing our product. we value your input and we are responsive to it.
o Make sure that all terminals and printers connected to the system are turned eN. If they are turned OFF, their cables should be disconnected fran the back panel of the catpJter enclosure (not just the device end).
o The system manager should oversee shutting down the system for servicing. Inproper shutdown may result in loss of data.
o Make sure that backups are done at regular intervals. It is extremely inportant to make backup copies of files. Backing up files is your ultimate protection against loss of valuable data.
o Maintain an adequate stock of materials, including spare printer elements, ribbons, paper, and blank diskettes, so that work will not be constrained by a lack of supplies.
3.1-2

Establishing Efficient User Habits
In addition to providirg the on-site support outlined above, the system manager should ootline am enforce efficient habits anong users. Recxmnended practices inClude:
o Use file names am file extensions that are self-documentirg. Make the habit of always usirg the file extension. Yoo might call a tenporary file sanethillJ like IXXlJMEN1'.TMP, or a laundry list LADNDRY.ISl'. Make the file names helpful in locatirg data in your directories, am make them document what you are doillJ. '!his will make managirg file directories an easy chore.
o Have users back up inportant files on their own, independent of the system backup procedures that you use. '!his is additional insurance against the loss of valuable files. Have the users do this durirg the workday, after lunch for exanple. If users wait until the end of the day, they may sanetimes neglect this task. Use procedures that do not copy over the last backup.
o Have users erase WordStar's .BAK files, or similar tenporary backup files. '!hese files tend to aocunulate and take up valuable space, am make directories harder to read. Keep work areas clean by eliminatirg non-essential files.
o Have users keep listillJs of pr03ram, data structure files, am dBASE II index keys. '!hese i terns are essential for documenting work or reconstructing files, should the need arise.
o Make sure that users 103 out when they are not usirg the system. '!his makes it easier to is:>late system problems am gives you the ability to maintain accurate timelog reports.
o If pr03rams (or the Ap control character) are used that do not release the printer after a print job, make sure that users release printers as soon as possible after printing. For exanple, people should not go to lunch while printirg docunelts on a letter quality printer. As an additional courtesy, have users set the paper in a tractorfeed printer at the start of a page when they renove their outp.lt. '!his W8!:/ the printer is always ready for the next user without requiring adjustment.
3.1-3
3.2 CreatiDj a OJstanized IIl1tiuser EnviralEllt
In order to understand how to customize the system for your specific needs, you need to know what files to I10Ufy and how to mXlify them. 'lhe following section docwnents the operations of starting up, logging in, logging out, and shutting down the system. 'lhe points at which these MC-IX>S operations can be custamized are imicated, and the files and CCl'IIIlalXls necessary to custamize them are identified.
Descriptial of a ~ Startup
When the RESEr button is pressed (or the computer is powered up), the operating system does not exist in RAM (menory) and I1llst be loaded from the system diskette. '!be computer starts up by going through the following operations:
1. A floppy diskette with the MC-IX>S system on it is placed in the left-hand floppy drive. The canp.1ter instructs the disk drive to go to the system tracks, read the file MC.IX>S from the left-hand floppy drive, and load the operating system into mencry. From this point, the computer only looks in user area 0, drive A: for the system files described here.
2. If the system has an MDRIVE/H RAM disk e1llllator it executes the file ~CMD to initialize the hard disk cache buffer.
3. 'lhe catplter runs the a:::PMINIT program, wich reads the VTTYS file. VTl'YS describes the virtual terminals on your system, and must be in user area ° of dr i ve A: for the system to stJR?Ort virtual terminals. (If V'l'l'YS is later IOOdified, the system mst be rebooted to read the new VTTYS file.)
4. If the system is in a DR Net local area network, the SE'1NEl' program loads and reads the a:NFIG.NEr file, initializing the internal tables of the network input/output system (NIOS).
5. 'lhe resident system processes called "shells" start up, and read the TrYS and LPRS file. Tl'YS describes the physical terminals and IOOdems on your system, LPRS the printers and plotters. Both files I1llst be in user area 0, drive A: for the system to support mltiple users and list devices. (If
3.2-1

your terminals or printers are later changed, the 'l'T!S or LPRS files that specify the baud rate, handshaking, etc., mst be IOOdified accordingly. Reboot the system or type RESEr so that the system reads the m:xUfied 'rl'YS or LPRS.)
6. The canputer runs an optional program, SYSINIT.CMD, which can be any program that yoo rename SYSINIT.CMD so that it will be part of the system startup process. Use REN or PIP to rename the chosen program SYSINIT.CMD, and place it on user area 0 of drive A: to be run autanatically at startup.
7. '!be canputer searches for an optional file SYSINIT.SUB, a SUBMIT file whose lines are a list of oaTItlal'ds and programs that yoo wish to run as part of the startup process. '!be SYSINIT.SUB file is optional for customizing the startup process. Section 2.S-SOBMIT describes SUBMIT files.
8. The canputer looks for a file called AU'IDST. If AU'IDST is present on user area 0 of drive A:, the initial user is autanatically logged oot, and all of the terminals will display the JIaJDe: pronpt. If AU'I09l' is not found, the catplter remains a single-user system, and cnly the system console can camunicate with the oarputer until the initial user types t.ooooT. If yoo want to inhibit the autanatic jump to DRlltiuser roode, yoo can erase AUTOST. AUTOST does not need to contain arwthing, and can be created by typi~:
9. When the system enters nultiuser roode, it autanatically erases the UTMP file, if it exists, and then creates a new, enpty UTMP file. 'Ibe system then puts a special write protect password on the UTMP and PAS.SWD files.
10. '!be system looks for the optional file SYSINIT.BAN. If this is not found, the default banner Giffard (Dplter SystaB Multiuser Concurrent DOS is displayed. If the file is found, its contents are displayed on all terminals in place of the default banner. Any terminal that is waiting for a user to log in will display the banner. '!his oarp1etes the startup.
3.2-2
/'
Once the system is up, an autanatic RAM test continually cycles through the RAM, and the system autanatically executes a snc ocmnand every 30 secords. If the optional HI9.rORY file exists, the system will record all the conmands entered, the terminals on which they were typed, am the account name givi~ the ocmnarrl.
Descriptial of User Initializatim
The following steps take place when a user logs in at a terminal. All the files used during user initialization are optional.
1. The system looks for a file called PASSWJ). (If P~ is not found, the user initialization process is oamplete, and the OA> prarpt is displayed, skipp~ all of the steps that follow.) Once PASbWI) is found, the catplter displays the name pronpt (Name:). The user responds by typi~ an account name.
2. Next the catplter looks for an optional password in the PASSWD file. If the login account name entered dur~ step 1 has an asSOciated password, the Password: prarpt is displayed. The user types a password, which the screen does not display. If the entry does not match the password in the PASSWD file, an error message is displayed and the name proopt is repeated.
3. If the password matches, the system checks whether the terminal bei~ used is contained in the selective terminal access field of the PASSWD file. If the terminal does not have access rights to the login account, an error message is displayed, and the name prarpt is repeated. If the terminal has access rights to the login account, the system reads fran the PASSWD file the default work area and printer.
4. If the files t.JTMP ami W1'MP exist, the system writes the account name, terminal, and login time in these files.
5. If the message of the day file (MOl'D) exists, its contents are displayed on the user's screen. If the network message of the day (NE'lM)l'O) exists in systems on a network, then its contents are displayed on the screen of each networked terminal.
3.2-3

CBAP.1'BR 3: JWIAGIlG '.I.BB S!9l'D1
6. The system checks to see if the acx:xxmt has arrj mail. 'lb check for mail, the system looks for the file name.MBX in user area 15, drive A: of the system (or in a DR Net network, on that directory area of the system node, where the MAIL facility resides). Here naae is the account name fran the PASSWO file (or in a network, fran the NE1'USERS file that lists the account names fran the PASSWD files of all the systems in the network). If name.MBX is found, the following is displayed:
YQ1 have mail.
7. The system checks the account's initial default directory area (specified in the PAS&WD file) for a reminder file with the file designation name.REM (matching the account name). If this file is fpund, its messages are displayed on the screen.
8. In a DR Net network, the system looks in the initial default directory area for an optional file name that is the same as the account name, and with .NET as the file extension. If the file is found, the system maps arxl connects the virtual terminal to the network, according to the specifications in the name.NEl' file, as if the user had typed the 0CJI'Il\al'rl:
7B>NEl' cnm"IG name
The file naae.NEl' can be created when a user who is already connected to the network gives the cx:mnand:
The effect is to oopy the current network mapping to a file called naDle.NEl'. (The system warns the user if a file of that name already exists in the same directory area, and asks for confirmation to overwrite the old naae.NEl' file. See the DR NEl' USER'S MANUAL for oore detail on the NEl' carmand.) If the file naDle.NEl' does not exist, the virtual terminal is not autanatically connected to the network.
3.2-4

9. The system looks for USERINIT.CMD on user area 0 of drive A:. If found, the program is run. USERINIT.CMD can be any program file which is to be included as part of the login routine for all users, and renamed USERINIT.CMD by the RFN or PIP ccmnarrl.
10. '!be system looks for the optional file USERINIT.SUB, and processes it if foum. The file USERINIT.SUB can contain any e<mnands which are to be run as part of the login routine for all users. Giffordcanputer Systems supplies a sanple file USERINIT.SAM which shows how a SUBMIT file can be set up to display mail autanatically and type a message.
11. '!be system looks for the optional program LOGIN.CMD 00 the drive and user area assigned to the account name by the PASSWD file and runs the program if it finds it. LOGIN.CMD can be any program file which is to be included as a part of the login process, renamed by the RFN or PIP ocmnand. A user might, for exa:nple, rename the appoinbnent calendar program (AP.am) as LOGIN.CMD, to check for any reminders.
12. The system looks for the optional file LOGIN.SUB 00 the drive and user area assigned to the account name by the PASSWD file. If found, the file is submitted for processing. LOGIN. SUB can be any SUBMIT file which is to be included as a part of an irXli vidual user's login rootine.
13. If the PASSWD file specifies a default applicatioos program, the program is run. When this program is exited, the user is autanatically logged out of the system. If no default pr99ram is specified in the PASSWD file, the MC-OOS prcnpt is displayed, indicating the default user number and drive designatioo.
Descriptial of a IDgout
1. When a user gives the LOGOOT ocmnand, the system looks for the optional file LOGOOT.SUB 00 the current drive and user area. If found, the file is submitted for processing. LOGOOT.SUB can be any SUBMIT file which 'is to be included as a part of an individual user's logout routine.
3.2-5

2. In a DR Net network, a r.cx:nrr cannand causes the system to disconnect the current virtual terminal fran the network.
3. The system looks for the UTMP file. If UTMP is found, the system renoves the account name, terminal nuni>er, and login time fran the file, and updates the Wl'MP file if it exists. The system then returns with the name pranpt, so that on systems with a PASSWD file, an account name and an optional password IIIlst be presented to access the system through any terminal.
Descriptim of a SysbB SlmtdoNn
When the system is intentionally shut down by a user at the system console, a nurrber of inportant processes occur. If the system is shut down either by interruption of the power supply, by typirg the IXliN cannand, or by pressirg the RESEr button without first givirg the proper sequence of cxmnands, files may be lost or damaged. The operations that should occur durirg an intentional shutdown include:
1. All users except the system console give the uxnrr cxmnand. This closes all files and displays the banner and name pratpt at all the other terminals.
2. The user at the system console should exit fran any programs am terminate or carplete any processes attached to the console. The system console will display the Me-DOS pranpt.
3. The user at the system console types WID -A am the system displays a list of the virtual terminals still on the system. If users are still on the system, each should give the L<:XXX1l' ccmnand fran each virtual terminal. '!be WRITE ocmnand can be used to advise users whose virtual terminals are marked by WHO with an asterisk (*) to exit fran any programs and log out of the system.
4. The user at the system console types SYtC. 'ibis ccmnand flushes the cache buffer onto the hard disk.
3.2-6

5. The user at the system console types OCMN. '!his turns OFF all other terminals, and puts the system into singleuser IIDde.
6. The system looks for a file called rMN.CMD, and runs the program if it is found. rMN.CMD can be any program that is meant to run as part of your system shutdown routine.
7. The system looks for miN.SUB, and if found, submits the file for processing. The file IXliN.SUB can be used as the counterpart to the startup ocmnand sYSINIT.SUB. Here is an exanple of the contents of a IXl4N.SUB file, whose canna.nd saves the contents of the spooler queue.
Like the other custanization SUBMIT files, IXliN.SUB can be created by a text editor like ED or by WordStar in non-docwnent IIDde.
8. After IXliN.SUB has been executed, the system can be shut down by pressing the RESE1' button while turning OFF the power switch.
Files and ocmnands that can be used to customize MC-IX>S at startup, login, logout, or shutdown include:
AP.CMD AIJlOO1' BUFFER.CMD OCPMINIT .CMD c::am'IG. NEt' IXliN.CMD IXliN.SUB rMN.CMD HISl'ORY KEYS.CMD LOOIN.CMD LOOIN.SUB :r.rocxJ1'
:r.rocxJ1' • SUB LPRS MAIL.CMD K:.IX>S MJl'D NElIDI'D name.MBX name.NEl' name. REM NEl'.CMD Nm'USERS PASSWD RESEr
3.2-7
SE'lNEr. CMD ~.CMD sYSINIT • BAN SYSINIT .CMD SYSINIT. SUB 'ITYS U'lMP VT1'YS USERINIT .CMD USERINIT • SUB WfD.CMD WRITE.CMD WIMP

CBAP.l'ER 3: IIN!mGllG TIlE S!9tIII
3.3 SettiDj Up the Systaa Manage E at Piles
The follOlling sectioo provides the informatioo to assist the system manager in modifying or creating system management files tailored to the needs of a specific system. This discussioo will begin with the LPRS, 'rfiS, VTl'YS, and PASfH) files. These files oonfigure the system's printers and plotters (LPRS), modems and terminals ('rl'YS), multitasking Virtual Terminals (VTl'YS), and the account names and access rights (PASSWD) of operators who can use a Gifford Multiuser Concurrent DOS system. Since these four files are ordinarily delivered with new Me-DOS system, the system manager does not need to create these files, unless they have been accidentally deleted.
The system manager should read this sectioo to understand how to change LPRS, 'rfiS, and VTl'YS, if these files were incorrectly installed, or if your dealer did rot koow what terminals and printers you planned to use with your system, or if in the future you add or substitute different inplt or output devices.
The PM)5WJ) file generally must be modified by the system manager at installatioo and fran time to time, siooe the versioo delivered with a new Me-DOS system ooly contains the "system" account of the system manager. By learning how the PASSWD file works and J:lo..I the NEHJSER utility maintains it, the system manager can specify the account names that operators will use to access the system, and install appropriate security restrictions.
The LPRS file describes the characteristics of each printer or plotter attached to the system. Each line of LPRS describes ale output device (a "list device") attached to your system, in data "fields" each separated by coloo (:) synix>ls. If your list dev ices were known pr ior to shipnent, you may not need to change the LPRS file. An example of an LPRS file is:
O:8~1:82n:O,lprO:System printer, Texas Instruments 1:8:2:8ln:l,h1P:H-P graphics plotter
3.3-1

The LPRS informatioo is in the following format:
DEV #:BlWD RATE :HANDSHAKING:P.RCmX))L: LPR NAMES:C<JrMENrS \ \ \ \ \ \ 12345 6
1. JI'llllher of the list device, corresporrling to the named oonnectioo 00 the back panel of the canputer enclosure. (This value is used by the RESEr coomand. Pr inter 0 is the default pr inter when any account logs in, unless the PASSWD file specifies another printer or plotter.)
2. Printer baud rate, defining the speed at which the printer or plotter coomunicates with the system. The same baud rate rust be set both 00 the physical list device and 00 the line in the LPRS file describing that device. The default is 9600 baud. The LPRS file uses the follafling codes to describe baud rates:
0 = 9600 5 = 1800 1 = 110 6 = 2400 2 = 300 7 = 4800 3 = 600 8 = 9600 4 = 1200 9 = 19200
3. Opticmal 1&-232 hardware handshaking. "Handshaking" refers to procedures by which the list device irrlicates that it is ready or not ready to receive data from the OOIlplter. The default is O. If your device requires handshaking, enter the type of handshaking needed, using the follo.tling codes:
o = No handshaking 1 = Hardware handshaking (Dl'R) (RS-232 pin-20) 2 = Software handshaking (XON/XOFF) 3 = Reserved for custom applicatioo
4. Opt:iaal CICBDlicaticns protxxx>l. This descr ibes the format in which informatioo is transmitted by yoor system to the printer or plotter. Leaving this field blank selects the default protocol of 8 data bits, 2 stop bits, and no parity, which are the settings for IlDSt pr inters.
3.3-2

<lIAPmR 3: ~ '!BE S!S'l'iII
The LPRS file uses the following camumications protoool codes:
Data bits 8 7
stop bits 2 1
Parity N (none) o (odd) E (even)
If you need to change the coomunicatons protoool, select the new values that you need from the table above and enter the three characters in the fourth LPRS field without any spaces. For example, if your printer requires a protocol of 7 data bits, 2 stop bits, even parity, enter 72E in field 4.
5. Printer names. In addition to the "list device number" (also called "printer number") fran the first field of LPRS, you should also assign a name or a list of names to each printer oc plotter. Same users find it easier to remember, for example, that a device is called "DlABID' than whatever its list device number may be. The printer names listed here are separated by cannas (,) and are used in the PASSWD file to assign an initial default list device, and by the PRINl'ER 00I'IIl\aI'rl to display or change the current printer.
Gifford reoommends that the first name listed here be the list device number from the first LPRS field. In the exanple LPRS file 00 page 3.3-1, which lists "l,h-p" in the fifth field as names of list dev ice number 1, users could make this plotter their current list device by either of the following cannands:
2B>PRINl'ER 1
2B>PRINl'ER H-P
6. Optional cc:maents field. This allafS you to make notes about each device, such as its location or IOOdel lllJIIi)er.
Read the manufacturer's manual to learn the baud rate, hardware handshaking, am coomunications protoools supported by your printers and plotters. The physical list devices must be set to match the codes in the LPRS file for these values.
3.3-3

The LPRS file can be modified while the system is ruming in l1Illtiuser mode, using a text editor like ED or WordStar in nondocument mode. After the LPRS file has been modified, type:
OA>RESEl'
This will reset the system to the new LPRS specificatiens. Ib not ccnfuse this ccmnand with press~ng the red RESEl' buttal on the oanplter, which aborts all of the processes running on the system, causing users to lose any work not saved to the disk.
The maximum number of list devices that your operating system can sURlQrt is specified in the extended inp.lt/outp.lt system (XIOS) of Me-ros. You cannot install printers or plotters beyond the XIOS limit merely by affiing lines to the LPRS file. Read the Gifford publicatioo aJSTCJUZIR; YCXJR MULTIUSER <nCJRRENl' J:)(l; SYSTEM for informatioo on how to modifY MC-J:)(l; to change the XIOS limit on the maximum number of list devices.
The 'lTYS file provides your Multiuser Calcurrent IX>S operating system with characteristics of each terminal or IOOdem attached to the system. A 'lTYS file is included en your system diskette. Each line in the 'l'l'YS file descr ibes one terminal device 00 the system, in the same format as the LPRS file, starting with device 0, the "system ccnsole." A 00100 (:)
separates each field of 'lTYS. Here is an example of a 'lTYS file:
O:9:0:82n:ccnsole:SysteID ~t 1:9:0:82n:ttyl,fDOnt:Interfacer 3 pact 0 2:9:0:82n:tty2,saies:Interfacer 3 port I 3:1O:0:8l.n:tty3,KdeIIIO:Interfacer 3 pact 2, Ven'.l'el 212
If your terminal arrangement was known when you p.lrchased your machine fran Gifford canputer Systems, you will not need to change this file, unless you later add or substitute terminals.
3.3-4

aJAPmR 3: ~ THE Si9l!HI
The format of TTYS closely resembles that of LPRS:
DBV' t:BlWD RATE :HANDSHAKING:PIO.OCCOL:T:rY NAMES:CCMt1ENl'S \ \ \ \ \ \ 12345 6
1. Device n ..... ..r of the teaIinal, corresponding to the named connector on the back panel. Numbers begin with O.
2. 'larainal baud rate, whose default is 9600. As with the LPRS file, the same baud rate rust be set both in the file and on the physical device, or else the device will not function correctly. The TTYS file uses these baud rate codes:
0 = 9600 6 = 2400 1 = 110 7 = 4800 2 = 300 8 = 9600 3 = 600 9 = 19200 4 = 1200 10 = autanatic baud rate 5 = 1800 detection for modems
The autanatic baud rate detection for nmems only works for 300 and 1200 baud. Tb use this feature, pin-20 on the RS-232 connector mst be wired to the speed detect pin on the lOOdem.
3. Optimal RS-232 hardware har1dshaIdnj. Hardware handshaking is not required for IIK>St terminals1 the default is O. If handshaking is necessary, enter the code number corresponding to the type of handshaking needed fran these codes:
o = No handshaking 1 = Hardware handshaking (Dl'R) (RS-232 pin-20) 2 = Software handshaking (XCN/XOFF) 3 = Reserved for custom awlication
4. 0ptiaIal. oamadcations protDool. This is a three-character entry that descr ibes the format of informatioo sent to or fran your terminal device. The default protocol is 8 data bits, 2 stop bits, and no parity bit, which are the settings for most terminals.
3.3-5

If you need to change this, use the following codes to select the configuratioo that you need:
Data bits 8 7
Stop bits 2 1
Parity N (none) o (odd) E (even)
The ccmnunications protocol is entered as three characters witOOut intervening spaces. For example, if your terminal requires a protocol of 7 data bits, 2 stop bits, even parity, enter 72£ in field 4 of TrYS.
5. Terainal naJDeS of up to 8 characters with no spaces. Many terminal names can be listed, separated by ocmnas (,) with no spaces. If you enter "console" as the first terminal name of the system console, "ttyl" for terminal 1, "tty2" for terminal 2, etc., then your notatioo will correspond to that used by Gifford in the examples that dcx:ument the HIS'rCEY, UTMP, TIMELOG, WID, WRITE, and other Me-DOS utilities that identify a physical terminal by the first name in this field.
6. Optional caaaents field. 'rhis allows you to make notes about each terminal device, such as its locatioo or nmel number.
In the first line of the example TTYS file 00 page 3~, terminal 0 (the system console) COfIIJlunicates at 19200 baud, uses no handshake, uses the standard ccmnunications protocol (8 data bits, 2 stop bits and no parity), and has the name "console."
The TTYS file can be nmified while the system is running in mul tiuser nme. After the TrYS file has been changed and the lOOdified file saved in user area 0 of drive A:, give a RESEr ocmnand. 'rhis will reset the system to the new specificatioos without the need to shut down the system. (n> not coofuse giving the RESEr ocmnand, which does not disrupt Me-DOS operatioos, with pressing the RESEr button, which aborts all current programs!)
Modifying TrYS cannot increase the number of terminals past the maximum number specified in the extended input/outplt system (XIOS) of MC-OOS. Read Gifford's ClJSTQt1IZ:n«; YOOR MULTIUSER CCHlJRRml' OOS SYSTEM manual 00 changing your XICl3.
3.3-6

CIIAPTER 3: 1i1M(AGDG. THE S!S'l!M.
The Multiuser Cmcurrent DOS operating system can support "multitasking" operations in which any properly equipped phy~ical terminal can support up to four simul tcmeous programs. Special buffer areas within the RAM memory, called "Virtual Terminals," keep track of these processes, so that the physical screen can resume the display when the operator wants to l1\Cl'litor a specific program.
This multitasking feature of Me-DOS is controlled by an AS:II file called V'rl'YS. Like LPRS or 'l"lYS, this file. must be located in user area 0 of drive A:, and can be m:xUfied by a text editor like ED or by WordStar in non-document nme. The VT1'YS file describes your virtual terminals to the operating system. For VT1'YS to work correctly, the physical terminals must be equipped with supplementary display rnenpry, and the OCPKINIT file must exist on user area 0 of dr i ve A:. The MC-IQ; carmarXl VCMOOE: specifies lxM programs running on virtual terminals that do oot control the physical screen (called "detached processes" or "background processes") produce output.
If canplete information on the virtual tel11linals configuration for your system was known to Gifford when yalr ~tem was ordered, then a VTl'YS file is included al your sys~ diskette. Otherwise a file called V'1'1'YS.8AM is included, slxMing examples of VTl'YS lines. Like the 'l"lYS file, each line of the VTl'YS file describes one physical terminal. A'l"lYS line has only only six (6) fields, while a V'1'1'YS line has sixteen (16) fields. Since the VTTYS file contains so much information, if yal need to create your own VTTYS file it may save.you time to make a copy of the sample file VTl'YS.sAM, and then edit and rename the copy.
An exanple of a VT1'YS file is shown below:
0::::: 4:4:/" :/"N/Eg: :/EK/0/0:/FJ/0/0:/Eg/Ef,tm4:jR: COOsole IV I /pOl/pll!p2I!p3Ipr=/L /e/s/o:Fr-200 TV-950 4 pages
1::::: 5:4:/" :/"N/Eg: :/EK/O/O:/FJ/O/O:/Eg/Efjm4:/R: COOsole IV I /pOl/pll/p2\/p3\pr=/L /e/s/o:0C8-aO CIT-ao 5 pages
2:::: :2:2:/"A:/"N/Eg: :/EK:/FJ:/Eg/EfjEX;4:/R: COOsole IV \ /pO\/pll!p21/p3Ipr=/L /Vr=/v:TeleVideo 925 2 pages
3.3-7

CBAP1'ER 3: IWQGlX; 'l'BE SYSTDI
Here each line is divided to accalloodate the page width of this manualJ in a real V'1'1'YS file the lines extend undivided to whatever width is required. In the example 00 the previous page, the first line describes a terminal like a Freedan 200 (or any other terminal that can emulate a TeleVideo 950 with four pages of display JIBlDry). The second line descr ibes a OCS-80 or C.Itoh CIT-80 terminal with five pages of display memory. The third line describes a TeleVideo 925, with two pages of display JIBlDry. Note that the caret symbol (") in this example represents an actual caret ( .... ) keystroke, which is the shifted numeral 6, in a V'1'1'YS file, rather than meaning that you should sanehow enter a control character in the file. (It happens that the sequence "I ...... in a V'1'1'YS file tells MC-IX>S that "the next character should be interpreted as a oontrol character.")
Using the first line of the example V'1'1'YS file as an illustratioo, the sixteen fields of a V'1'1'YS file are defined as shown below. (Fields 2 through 5 are reserved for future use.)
0:::: :4:4:1 .... :/"N/Eg: :/EK/O/O:/EJ/O/O:/Eg/Ef,IEG4:/R: Coo \ \ \ \- \ \ \ \ \ \ \
1 6 7 8 9 10 11 12 13 14 15
sole IV ! lpO!/pl!/p2!/p3!pr=/L le/s/o:Fr-200 TV-950 4 pages \
16
1. Physical terminal number, the same as the first TrYS field. ,
2-5. Reserved for future use by Gifford canputer Systems.
6. The number of pages of display JIBlDry in the terminal.
7. The number of virtual terminals supported by the device. This can be no greater than four oc the previous field.
8. The "leadin" character used to switch the screen. It is convenient to program functioo keys with the KEYS program to produce this sequence and the screen number, so that you can change virtual terminals with a single keystroke.
3.3-8

0::: ::4:4:/" :/"N/Eg: :/EK/O/O:/EJ/O/O:/Eg/Efjm4:jR:Con \ \ \ \- \ \ \ \ \ \ \
1 6 7 8 9 10 11 12 13 14 15
sole IV ! /pO!/pl!/p2!/p3!pr=/L /e/s/o:Fr-200 TV-950 4 pages \
16
9. The ini tia1izatioo sequence that MC-OOSsendsto the terminal when OCPMINIT installs virtual terminals at system .startup. In the example (which is repeated above) a line feed (/"N) enabling the IYm handshake, and an me g sequence to display the 25th (status) line, are sent at startup.
10. The sequence to directly switch to another screen. Since the TeleVideo 950 lacks this feature, the field is enpty, and screen switching is oontro11edbythenext two fields.
11. The sequence to switch to the next screen (forexaJll)le, fran screen #2 to screen 13), here me K, with two zeros (/0/0) to make sure that the status line is updated when you switch to a new virtual terminal screen.
12. The sequence to switch to the previous screen (for exanp1e, fran screen 12 to screen 11) ,here ESc J, with two zeros (/0/0) to make sure that the status line is updated when you switch to a new virtual terminal screen.
13. Escape sequences to turn the status line 00, enable load status line, and display the status line in reverse video.
14. The carriage return sequence to disable the load status line.
15. This field defines the informatioo displayed 00 the status line. The example specifies the word "Conso1en and the current nrelative termina111 (screen within display mE!I'lDry) , the names of processes running 00 each virtual terminal of this physical terminal, the symbols "pr::!1 followed by the printer number, and any "'p, "s, or "'0 control characters that currently affect the output of that virtual terminal.
16. A field for camtents or notes by the system manager.
3.3-9

The eight VTTYS fields 8 through 15 specify sequences of characters that MC-JX)S uses to control the terminal in multitasking operations. These control sequences and escape sequences are specific to each type of terminal, and are defined in the manufacturer's docunentation for each terminal. The following notation is used to define the special character sequences in fields 8 through 14 of the VTTYS file:
. . /
Begin a V'rlYS field Interpret what follows as a special code function, rather than as a printable ASCII character
// One printable ASCII slash (/) character /: One printable ASCII colon (:), rather than a field boundary /A Interpret the next character as a CONTROL character /0 Send a null character (DB) for a very short "padding" delay /0/0 Updates your status line to reflect new virtual terminal screen /C The logical terminal nUJIber (the same value that the CONSOLE
/D IE /1 IN /P /R IV
conmand displays as the "virtual terminal number") causes a longer delay (= 1/60 of a second) than /0 The ESC key (lBH), used to initiate escape sequences Display the current leadin character (for switching screens) Line feed (OAH) Physical terminal device number (the first field of TTYS) carriage ImlURN (Om) Relative virtual terminal number (the page of display menory in the physical terminal), whose value can be 0, 1, 2, or 3
The fifteenth field, which defines the display of the status line at the bottom of the screen, recognizes additional symbols:
/L Number of the current list device (the first field of LPRS) /e Display .... P if printer is toggled ON by a A p /m Display the VOeDDE program's background output option /n Display in right-hand corner the foreground program name /0 Display .... O if output is suppressed by a .... 0 /p' Display the name of the program running on relative virtual
terminal number t (you must substitute 0, 1, 2, or 3 for t) /s Display .... S if scrolling is interrupted by a AS /v SanE as (IV + 1); value can range from 1 up to 4
See also Gifford's VIRTUAL TERMINAlS USER'S MANUAL for mre detail on the VTTYS file and on the VCKDE and KEYS programs.
3.3-10

Each line in a VTl'YS file refers to the physical terminal wb:>se device number (the first 'rrYS field) matches the first field of VTl'YS. Only physical terminals that will sugx>rt virtual terminals need to be described in a VTl'YS file. The number of virtual terminals supported by a physical terminal (field 7 of VTl'YS) can be less than the available pages of additiooal screen menpry (field 6 of V'rlYS), rut should not be greater than the value of field 6 or 4. In systems with programnable function keys, the KEYS program sould be used to implement screen switching sequences.
Terminals without additional display memory can have their status line configured by V'rlYS, and can even specify screen switching sequences to detach a process fran the screen and attach the screen to a process that was in the background. Without additional display memory, however, the previous screen display of the backgrOUJ'd process cannot be instantly restored to the screen. Unless the operator asks the program to supply a new display (by scrolling forward in a word processor, for example, or by jumping to a distant cell in a spreadsheet) a terminal that has no extra memory presents an incomplete display :inlnediately after attaching a background process.
The XIOS (extended input/output system) of your Me-DOS must specify a number of physical and virtual terminals equal to or greater than what your Tl'YS (physical) and vrrYS (virtual) terminal canfiguraticn files specify. If you modify your VT1'YS file in a way that iooreases the total number of ];ilysical and virtual terminals, you may need to use the GNCCPM ccmnan::l to remake K:!-OOS with an XIOS of a larger capacity.
Note that the operating system can support virtual terminals becauSe it reserves space in RAM to keep track of what each virtual terminal is doing. When you replace your current XIOS with an XICS of larger capacity, you also increase the size of your operating system, and leave less space in RAM available for user programs. Select the smallest XIOS that can support the virtual terminals that you require. Similar ly, programs running on virtual terminals occupy RAM, so a large number of active virtual terminals can exhaust all the available RAM in your system. Heavy use of virtual terminals may require that you add IlDre RAM to your system, rut l024K (a megabyte) is the upper limit on the total RAM that Concurrent In; 3.1 can utilize.
3.3-11

'lhe PASSII> File aid the RI!IIJSBR o •• lrina
The PASSWD file lists the login account names that can be used to sign 00 to the system, and records an optional encrypted login password required to log in for each account. The PASSWD fil~ also defines for every account name an initial default drive, user area, printer, and optimal default applications program. The PASSWD file plays a central role in maintaining system secur i ty, since the system manager has the option of using PASSK> to specify optional restrictions on the user areas within a system or network in which the account is allOlf1ed access to files, and 00 terminals and roodems fran which the account can log in to the system. The PASSWD file also supplies each account with an initial directory area and printer, so that at login, each operator can 'be assigned to a part of the system where only the files and progranB necessary for that operator's work are stored. This speeds and simplifies use of the system.
The PASSWD file treats each account independently, so that a PASSWD file can simultaneously perform the folIO/ling functions:
o It can restrict login access to the system to operators who present a valid account name and the correspcnding password.
o If each operator (or at least each project team) uses a unique account name, the names can provide unique identifiers for sending electronic mail and reminders, maintaining appointment calendars, sending messages to terminal screens, mcnitoring system usage, individualizing network assignments, and maintaining timelog information for accounting purposes.
o It can assign each account at login to a unique directory area, so that files created by each operator tend to be in the same directory areas. 'This reduces the hazard of different operators simultaneously working in the same directory area.
o It can restrict login access of accounts to specific terminals and roodems, even if the correct password is given.
o It can restrict file access of accounts to specific user areas. In systems that implement a high level of file security, only the "system" account can access areas 0 or 15.
3.3-12

o It can restrict any aocount to a specific applications program, so that any operator logging in with that account name cannot access other programs or files, nor give Me-In:) ccmnands.
o It can assign any account to a specific hardware and software envirorment, so that any operator logging in with that aCOQUnt name is inmediate1y running a default program, witb:>ut needing to invoke the program, nor to log out after exiting.
The NEWUSER program is a security utility that must be used by the system manager to maintain the PASSWD file. To use NEWUSER, the system manager must first have logged in as "system." If saneone who has not logged in as "system" attempts to invoke NEHUSER., the system respoods:
Sorry bit tIE 'newuser' progr_ (31 ally be nm fEaa tIE 'system' account. Please check with tIE systaa EDager.
To invoke N&iUSER, typing the keyword NEWUSER causes the main NEWUSER menu to appear, as shown in the following dialogue:
Opt:i.al:
Giffcxd CcIIplter Systems - neNUSer Mainteoance Package
Copyright (C) 1984 by Giffcxd CcJIplter Systems, Inc. V'ersim 2.0 of newuser updated <Xl Aug 3, l.984
A) .Add a user. B) Brief l..i.st:ioJ of users. C) 0laDJe a user's parameters. D) Delete a user. B) List users in detaU.
X) Bxit. ~) Abort, Eke no change.
3.3-13

If you type (A) to add an account, the program respcnds:
Enter account name:
Type the account name with which a user will log in to the system. The name can have up to eight (8) letters. The name entered here will also be used by the AP, MAIL, WID, WRITE, and reminder (.REM) programs, by the wrMP, UTMP, and HISl"CRY files, and by the NEl' MAKE and NE1' ~IQJRE oomnands in DR Net. If you enter project names as account names, the wrMP and TIMEI:OO utilities will keep records on imividua1 projects, b.1t MAIL, HISl'OO.Y, and password encryptioo will have little value. Most system managers use real personal names as account login names.
Each account mst have a unique name. If you enter an CKXX>unt name that already exists Q1 the system, the program will resp::x1d with the following message:
'lIle name you have selected is already in use.
When a new account name is entered, the program responds:
Each account name should have a password. An account without a password will allow easy access to the system and defeat the purpose of the password security feature.
The next two pranpts request an initial default dr i ve, and an initial user area number (together specifying an initial directory area) where the new account will be after login:
select default drive:
3.3-14

Enter a valid drive letter, without a oolen (:), such as A, B, C, etc. After you enter the initial default drive specificatien, the program responds:
Enter defanlt user mJlllber:
Enter a default user number between 1 and 14. In selecting the initial default directory areas, J1k>St system managers give each account a unique oombinatioo of user area number and logical drive. In this way a OIR caunarxl shows ooly the files of that acc<>l.mt, and there is less risk of users interfering with one another by running in the same directory area programs that try to create intermediate files with the same name. Users can change directory areas by the d:, USER and PIP catI'lIal'lds to access all dr i ves and user areas from which they are not restr icted.
It is recoomended that you ..x. make ~ areas 0 nor 15 of drive A: default work areas. User area 0 of drive A: slDuld be reserved for system files, and user area 15 of drive A: should be reserved for MAIL and calendar (AP) files, rather than used as work areas. NEWUSER allows accounts to share the same default drive and user area, rut warns if this is the case.
The system next lists all the valid names of printers (and plotters, if any) from the LPRS file, and pranpts:
Select tile default prin~:
Enter a number or name (the first or fifth fields from lines of the LPRS file, as reproduced above the pranpt) to identify the initial default printer for the account. The program will not allow you to enter a printer number that has not already been designated in the LPRS file. If you press REruRNwitmut specifying a printer, printer 0 is the current printer when the account logs in to the system. Printer 0 is the printer attached to printer port 0 on the back of the main enclosure.
3.3-15

The program next pranpts you for a list of terminals:
Enter terminal access restri.ct:ials or return £ex 00 restrictialS:
This is an optional specification. If no terminals are specified, the account can log in fran all terminals and modems. Otherwise the account can only log in from };ilysica1 terminals specified here, identified ~ their device numbers or names (as they ar:pear in the first or fifth fields of the Tl'YS file).
Enter a single terminal name, a list of terminals separated by oonmas, or list of accessible terminal numbers with oomnas and hyphens. The following example allows the account to log in fran physical terminals 1, 2, 3, and 6 rut not from 0, 4, 5, or 7:
1-3, 6
The next pranpt requests user area restr ictions:
USer areas:
This optional specification can restrict CK:COUIlts to certain user areas. If you do not specify any user areas (by pressing RErURN at the pranpt), the account can access all user areas. To iDp:>se user area restrictions, list only those areas to which the account will have access. Separate the accessible user areas ~ cannas, or desigpate consecutive accessible user are~ with hyphens. For example, to restrict an account to user areas 3, 4, 5, 6, 7, and 14, respond by typing:
User areas: 3-7,14
3.3-16

If that account tried to access user area 8, an area not included in this example, the fo110rling message is displayed:
You &n't have perlli.ssim to aooess user area 8.
The next pranpt is:
Enter default progr_ to run:
This optimal entry can be used to restr ict an account to a specified program. This can simplify use of the system for saneone who always uses the same program. If you assign a default program to an account name, the account enters that program autanatica11y at login, and is autanatica11y logged out of Me-Da; when the program terminates. If you enter liS, the account will be restr icted to WOrdStar. SC restr icts an account to Superca1c, am dBASE restricts the user to dBASE II. Users with assigned default programs can also be restricted to specific data files. For example, to restrict an account to editing the WordStar file called EXAMPLE.Tn', type:
Enter defaul t progr_ to run: WS EXl-\MI?LE. ~
At login, EXAMPLE.TXT is autanatica11y loaded for editing. kcounts with default programs have no direct access to the operating system. To let an account access Me-DOS, press REroRN without entering a default program. NFHJSER will respond:
This is an optimal cxmnents field, where you can enter up to 100 characters to explain your entry in the PASSWD file.
3.3-17

If you selected (B) for a brief listing of account names, the screen will display an alphabetic list of the current account names. Here is a saq>le listing of account names in PASSWD:
betty dan barry james janet larry 1es l:inda mike nate pat txD trish
'l!1e -c" Optial
If you selected (e) to change an account's PASSWD file entry, the program requests an account name (as in optioo (A» • After you specify an account name, this menu of optioos appears:
a) name b) passwrd c) drive d) user e) pcinter f) terminal cu:ess g) user area access h) CQW.catim program i) O'.'Hlts
j) no ua:e changes for this user.
1blt to cbange?
Specify the letter corresponding to the optioo of your choice. The NEWUSER program will display the PASSWD listing for the account that you specify, so that you can nn'lify anything that should be changed. When you have finished making changes for this account, press (J) to return to the main menu.
3.3-18

If you choose (0) to delete an acCount, you will be pranpted to supply the account name that you wiSh to delete. If you supply an account name that has not already been created 00 the system, the NEWUSER program will display the following error message:
No such user
Suppose that you want to delete Iljames" from the PASSWD file. After you have supplied the account name, NEWUSER will ask you to oonfirm the deletioo:
Type nyu to ver ify that you want to delete this account name.
If you choose (E) for a detailed list of accounts that are allOlried access to your system, you will be supplied with a list of account names, their default drive and user area, and all of the restrictions, if any, that have been imposed 00 them. Here is a sample detailed list 'of account names:
HeIDe betty dan janet systaa
Dir Printer TeI:ainal Access cl4 0 3-7 b2 0 2,4-9 b7 0 Oa
3.3-19
AWlicat:ial o,·EDt ws sc

This option will write any IOOdifications that you have made back to the PASSWD file on user area 0 of drive A:.
If you want to abort NEHJSER witOOut saving any changes that you may have made to the PASSWD file, enter "'C.
If saneone happens to be running NEHJSER at another terminal of the same system, or if saneone is using PASSWORD to change a login password in the PASSWD file just as you run NEWUSER, the following error message will appear on your screen:
'!be passllDCd file is blsy, try again later.
This message wi 11 appear if NEWUSER finds that the PASSWD file is already open.
3.3-20

The PASSWD file has the follCMing format:
NAME.: PASfH)RD: DRIVE : USER: PRINl'ER:A£"X':ESS: PROGEWol:USER ARFM:a:HB'f.L'S \ \ \ \ \ \ \ \ \ 1 2 345 678 9
1. Account login name (maximum length is 8 characters).
2. Login password (maximum length is 8 characters).
3. Initial defaoltdrive (letter designatioo of logical drive).
4. Initial default user area (ranges from 1 to 14).
5. Initial default p£inter (printer name fran field 5 of the LPRS file1 REl'URN = pr inter 0).
6. Optional selective terwinal accaJS This is a list, separated by ocmnas, of the terminal names (fran TTYS, field 5) fran which the account can log in to the system. If this field is empty (RE:l'URN), the account can log in fran any terminal.
7. Opt:i.aal default app1icatim p:ograa. Acoounts with an entry in this field are automatically entered into the program specified. The system searches for the program as if the operator had typed it at the system pranpt. The acoolUlt is autanatically logged out after exiting fran the program. The extensioo (file type) is not included with the program name. If this field is empty (RE:l'URN), the acoount is unrestricted.
8. Optional user area access. This is a list of numbers, separated by caunas, or pairs of IlUItiJers separated by a hyphen to designate consecutive numbers, listing the user areas that an aocount is allOl.o.'ed to access. If 00 assignment is made in this field (RE:l'URN), the accotmt has access to all user areas. If an account tries to access a restricted user area, the system will deny permissioo to access that user area.
3.3-21

9. Optional cx.Dents field. Up to 100 characters can be entered, showing remarks of the system manager regarding an account.
As in the LPRS, 'rl'YS, and V'l'1'YS files, colons (:> are used to separate the fields of the PASSWD file. The PASSWD file must not be enpty. If the PASSWD file is empty or damaged, the system will lock up on startup, and you will have to contact your dealer for assistance. Your system is shipped with only one valid account name, "system," in the PASSWD file.
Here is an example of a PASSWD file:
guest: :c:14:epscn:l:subait deDD:14:rlD'l deDD.sub ally nancy:q;JHl:C8l'by3Mn:c: 1: ti: : ::110 ace ess restricticms DDiem:~b34Axl:b:8: :7:message:8:1IIldem bJl.letin board rbonda:j9bPI92fz19j:c:1O:O:2,3:ws:1O:oocrespandence only sales:7BoJ~tCBpd:d:4:ti:4,5,6:dbase ~ospect:12: steve:~:a:5:ti:2:dbase mail:5:mai1ing list syst.eIIl:f!h63Krl2g".l'c: :diablo:::::rn restrictims
Note that the "guest" account in the example above has no password, rut that anyone logging in by that account name is inmediately entered into a SUBMrr file called DEMO.suB. When this program is completed, the "guest" account is autanatically logged out of the system. Similarly, the ''modem" account is restricted to terminal device 7 and to a program called "message" that sUR;X>rts a bulletin board on user area 8 of drive B:. The characters that aQ?ear in the second field of the example are not actual login passwords, rut the encrypted forms created by NEHUSER. Entering the characters that awear in the encrypted form of a password would not result in a successful login. This feature protects a MC-OOS system from being accessed by an unauthorized person who has seen a listing of the P1\SSWD file.
'!'be Ul'MP and Wl'MP Files
The t1l'MP file keeps a record of which accounts are currently logged in to the system. It can be read by the WID utility. UTMP is created automatically when the system enters multiuser
3.3-22

JOOde. Wl'MP is used by the TIMELOG and HISl'mY accounting programs to maintain records of system use. For W1'MP to keep an active record, both the PA$WD and UTMP files must exist.
To create Wl'MP, use the MAKE cx:mnand by typing:
This will create empty files to which the system can add informatien as it is generated. Once in use, the contents of the W1'MP file will look like the follC7tling example, which records that "david" logged in fran virtual terminal #13 at 10:39 am en July 5th, 1984, and logged out at 12:18 pn the same day.
tty3 tty3
ldari.d 1
13 23781039 21874 7 5l.984 1124 13 2378l2l847l874 7 51984 1125
The first three W1'MP fields are the name of the physical ter:lllinal (fran the fifth field of 'l'rYS) ~ the relative virtual terDlinal number (equivalent to IV in the 15th field of the VT1'YS file, designating which page of display net'lOry controlled the screen at login); and the login account DalE. The other fields (with blanks inserted for clarity) are described belC7tl:
13 2378 \ \
1 2
10 39 \ \
3 4
2 187 \ \
5 6
4 7 5 1984 \ \
7 8
1124 \
9
1. Virtual terminal n1lllher (The value displayed by exNSOLE) 2. Days since January 1st, 1978 3. Boor of the day (24 hour clook) 4. Minute of the hour 5. SecxD) of the minute 6. Julian day of the year (1-366) 7. Day of the week (SUnday = 0, Malday = 1, Tuesday = 2, etc.) 8. Date in lOOIlth-day-year format 9. Program file link number (A serial number, slrMing the number
of records in the file after the login or logout recorded in the line.) As each new records is added to Wl'MP, this number in the first record is updated to show the new total number.
3.3-23
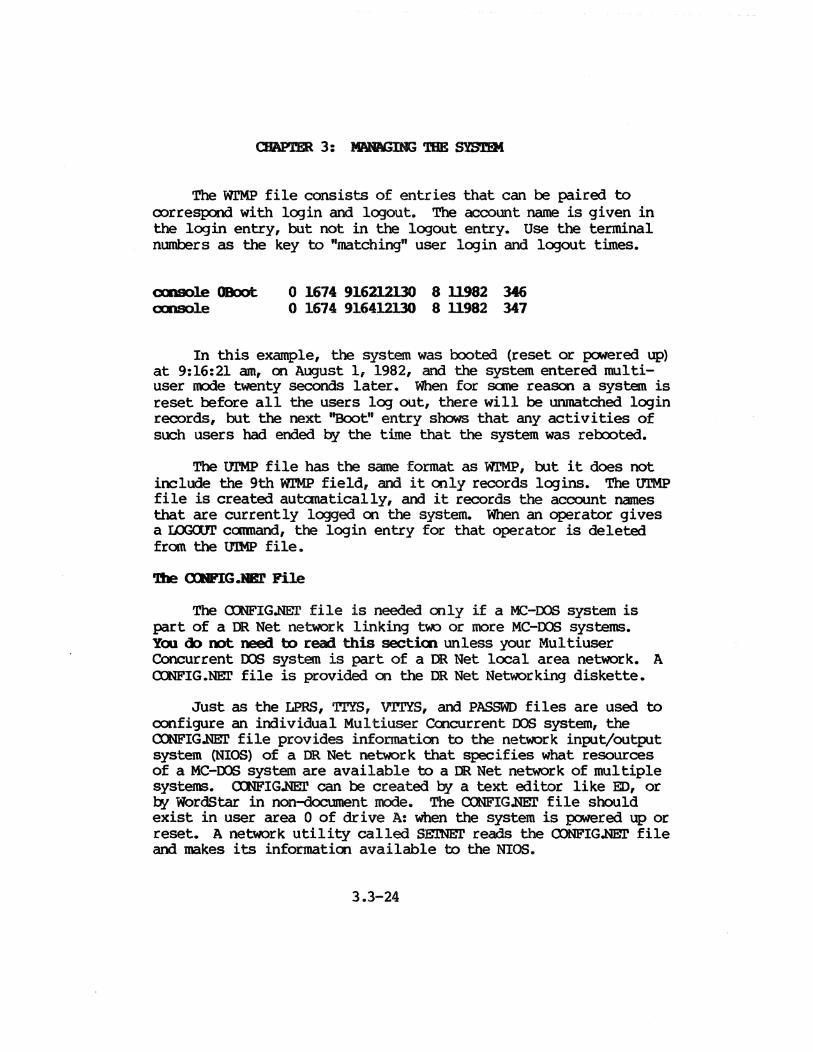
The Wl'MP file consists of entries that can be paired to correspond with login and logout. The account name is given in the login entry, but not in the logout entry. Use the terminal numbers as the key to "matching" user login and logout times.
ocnsol..e 0B00t ocnsole
o 1674 9162l213O 8 11982 3t6 o 1674 916412130 8 11982 347
In this example, the system was booted (reset or powered up) at 9:16:21 am, on August 1, 1982, and the system entered multiuser IOOde twenty seconds later. When for sane reason a system is reset before all the users log out, there will be unmatched login records, but the next ~t" entry shows that any activities of such users had ended by the time that the system was rebooted.
The t1l'MP file has the same format as Wl'MP, but it does not include the 9th Wl'MP field, and it only records logins. The tJ1'MP file is created automatically, and it records the account names that are currently logged on the system. When an operator gives a LOGOOT catmand, the login entry for that operator is deleted fran the U'lMP file.
The ~IG.NEI' file is needed only if a ~-IX>S system is part of a DR Net network linking two or more MC-DOS systems. Yoo do not need to read this sectim unless your Multiuser Concurrent DOS system is part of a DR Net lcx::al area network. A OONFIG.NET file is provided on the DR Net Networking diskette.
Just as the LPRS, TrYS, VTl'YS, and PASSWD files are used to configure an individual Multiuser Calcurrent IX>S system, the CONFtG~ file provides information to the network input/output system (NIOS) of a DR Net network that specifies what resources of a MC-IX>S system are available to a DR Net network of multiple systems. OONFIG~ can be created by a text editor like ED, or by WordStar in non-document mode. The CONFtG~ file should exist in user area 0 of dr i ve A: when the system is powered up or reset. A network utility called SEl'NEl' reads the CXJNFIG.NBl' file and makes its information available to the NIOS.
3.3-24

Although creating a:NFIG.NEI' requires the system manager to learn sane cdditiooal terms and concepts, it greatly speeds and s~lifies the tasks of creating or reoanfiguring a netwock.
The OONFIG.NEI' file is used to customize the relationship of a MC-IX>S system (called the "local node") to the other parts of a DR Net local area network. The system manager can use the a:NFIG.NEI' file to define a network configuration and to specify default resource mapping. The OONFIG.NEI' file can be used to modify certain features of the initialization process. A sample OONFIG.NEI' file is provided with the DR Net system diskette, that can be modified with a text editor.
Listed below is a sample OONFIG.NEr file:
puBIXd mae defanlt servers recp!Ster blffers tjM<Qt
ret private drive drive drive drive drive printer queue cp:!ue cpeue
PASSIIJ.I)
9 o 8 8 3 5 8 f: 9: 1: = a: a: = b: n: = c: 0: = d: p: = e: 5 = 0 0 MXSPL = MJSPL 02 SPLIN = SPLDt 02 SPUl1l :=II SPUl1l 02
JRode pasaIDCd, also defall] t pas8IIIOE'd JIa::al mae nlllher ,Defadt mae m .... r ,NuIItler of server processes ,)jIllllber of recp!Ster palOeasea ,!bIber of IIIeSSage bIffers ,Seoondstill tjJlE!Ol1t ,Nuailer of lCr's ,Private drives JMap a drive
,Map a printer ,Map a queue
Network parameters of the local node are listed 00 the left. Their values are assigned in the middle colunm. The right-hand column provides comnents describing the function of the data in the other two columns. For lOOre detailed information about the OONFIG.NEI', read Gifford's DR NET USER'S MANUAL. --
3.3-25

Message Files: SJS:Dll'T.BM1,!Om, NImOlD, nane.RIII
If a file called SYSINIT.BAN exists in user area 0 of dr i ve A:, MC-IX>S will display it above the name pranpt. This "banner" can be edited with ED or WOrdStar (in non-document IOOde). An example of the contents of a banner file appears below:
-[Y G1ftCHJ CDIIUl'ER SYS'lBIS 1DJID LIKE m
1IIUXJIB mJ m "l'BB 1I:RD (p "l'BB IC-IDJ ~ smrDI
The - [Y characters on the first line above clears the screen of a TeleVideo 950, so that the message appears at the top of the screen. The manufacturer's documentation of your terminals lists the escape or control sequences to clear the screen, make words blink, reverse video, and other effects. (WordStar can write sane control characters if you first type "p in the file.)
At every login, the system types the "message of the day," if a file called MOID exists on user area 0 of drive A:. This file can contain anything you wish, including escape sequences to oontrol the terminal's screen. The system manager can create and update the MC7ID file with an editor such as ED or WOrdStar (in non-dcx::ument mode).
If your MC-OOS system is part of a DR Net network, an additional message file called NEl'MOID is transmitted over the network when an operator logs in whose account name appears in the NEl'USERS file, prior to the display of the lcx::al MOl'D. For this to happen, the NEl'MOl'D file must exist in user area 0 of drive A: of the system node. The system manager can use a text editor like ED or WordStar (in non-document IOOde) to create and lOOdify a NJmDl'D file.
3.3-26

Eacn time an operator logs in, foK:-DOS looks in the account's default drive and user area for a file called DaJDe.REM, where name is the login account name. If the system finds the file, it types it 00 the user's screen at login. These reminders are not the responsibility of the system manager, rut the system manager should understand how to create them, so that others can be assisted in using this he lpful feature of foK:-DOS.
This is an easy way to leave yourself a reminder to do sanething, since you will see the remirrler message each time you log in to the system. To make a reminder file, create the file with an editor such as ED or ~rdStar, in non-doc.:wnent nn'ie, then rove it to the initial default drive and user area of your login account. For example, if you use account "jane" and your initial default directory area is user area 5 of drive C:, you could type:
3C>PIP C: [GS]=JANE.REM[V1Oij
Remember that if a remiroer file for your account already exists in that user area, the PIP coomand will replace the old remirrler file with the new, since in foK:-DOS two files with identical names cannot coexist in the same directory area. You can also use the ERAQ cxmnand to delete a remiroer file that is out of date. For example:
5C>ERAQ JANE.REM c: JANE .RIll?
By typing (Y) or (y) the file will be delet~, returning the system pranpt. You can, of course, leave reminder messages for others by using this feature (if you know their initial default directory areas), but it is rore polite to sero them mail with the MAIL utility.
3.3-27

Additimal CUst:ali.zaticm Piles
Additional files used to customize K!-DOS are AIl'.lOOT and various SUBMIT and renamed CCX1IIIal'Xi files that are executed at system startup, login, logout, and system shutdown.
The AlJTOST file is used dur ing system startup as a flag to jump autanatically into multiuser nme, if AIl'.lOOT exists in user area 0 of drive A:. Otherwise the system remains in single-user nme until the user at the system console gives the LCXDJT cxmnand. The system manager will find that many administrative flD'lCtiCl'ls, such as setting passwords, are easier to perform when MC-OOS is in single-user mode. The AlJTOST file does not need to oontain any informatiCl'l, and can be created by a MAKE cxmnand:
To inhibit the automatic entry into multiuser nme, you can erase the AtJTOST file:
OA>ERAQ AOl'OST A: AD'lO!r.1'. ?Y
The remaining customizatiCl'l files include SYSINIT.cMD and SYSINIT.suB for system startup, USERINIT.cMD and USERINIT.suB for login of all users, r..cx;IN.cMD and r..cx;IN.suB for initial login routines, and IDGa.JT.suB for logout of individual users, DWN.cMD and ~.suB for shutdown, all of which are described in Section 2.5. The system master diskette contains r..cx;IN.sAM, IDGa.JT.sAM, SYSINIT.sAM, and usERINIT.sAM as examples of 00w SUBMIT files can be used. The cannand files can be used for whatever program you might want to run. For example:
M'>PIP r..cx;IN.om = WS.CMD
The system would automatically load WS at login.
3.3-28

3.4 System Security
Your lC-lOOS system is a shared resource, in which a camunity of users has access to the conputer, the neJOOry, the disk drives, the ccmnands, the programs, the data files, the printers, and so forth. This ability to share data and equipuent is a major advantage of MC-OOS, since it offers both iooreased functionality and cost savings conpared with multiple personal computers.
In some situations, haoIever, it may be prudent or necessary to restrict sane or all users fran access to parts of the system. A hospital or clinic may have medical records whose confidentiality is mandated by state or federal statute. An educational institution may seek to avoid having the lOOdem used as an entry p:::>int by students exper imenting in teleconmunications. Most businesses have trade secrets, customer data, personnel files, or sensitive finaooial information on file that mst be protected from casual, curious, unskilled, or malicious intruders.
MC-OOS has built into it optional systaa security features which are designed to prevent unauthorized users from accessing, oopying, lOOdifying, or destroying information. Sane were devised by Digital Research Inc. as part of Concurrent 008, the operating system which is the nucleus of MC-Im. Others have been deve loped by Gifford catpl ter Systems as propr ietary enhancements to MC~. Together these security features provide the system manager with great flexibility in selecting whatever degree of security is ag;>ropriate to a given system. The system can be set up as a coopletely unrestricted resource, in which anyone can do anythingi or sane users can be given wide scope, while others are confined to specified parts of the system. At another extreme, every user can be permitted access only to part of the system, with IlDSt system resources restricted from use. This section outlines the security features and procedures available for Gifford MC-OOS systems.
3.4-1

C8APrER 3: MMQGDG '!BE Sf9.tlll
Additional security features of DR Net networks provide flexibility in specifying the access rights of rellDte users to files on your drives. The system manager can dispense with any or all security options, if an unrestricted operating environment is llDre appropriate for your system. section 2.6 contains an overview of the security options available to the system manager.
An optional mSl'ORY file IlDlitors all comnands received by the system. This file records the terminal, login name, date, time, and cannand, for every comnand that anyone gives. The m~Y utility makes it very difficult to probe system security without leaving evidence that may provide a basis for corrective or legal action.
Keep the OOI1p1ter in a room that can be securely locked. Never leave any system diskette in the floppy drives or accessible to unauthorized persons. Write down the passwords that protect drive labels, files, and ccmnands, to avoid locking everyone out of the system. Never leave a record of any password, or diskettes or other media with programs or sensitive data where an intruder can fim them. Never leave a terminal unattended without first exiting with the LOOOOT conmand.
Most t<C-OOS systems are left running all the time. A user at an inactive terminal should always type r..cn:lJT, so that an intruder cannot use the terminal. After the LOGaJT carmand is given, only a user who supplies a valid account name and the unique password for that name can talk to the operating system.
The list of valid account names is kept in a file called PASSWD which is maintained by the system manager. The password associated with each name is up to eight characters long. As a user, you can change your own password, but only the system manager can initially put your name on the PASSWD file. The pa~rds are encrypted, so that they cannot be read by
3.4-2

QfAPl'ER 3: ~ '!BE SYS'11!Jl
displaying the PASSWD file with any text editor, Tn'E, or PRINl' comnand. It 'WOUld be tedious for an intruder to attenpt to discover the password for any name by entering randan characters, because the number of different passwords available in Me-DOS is greater than 10,800,000,000,000,000 (ten quadrillion).
If the TIMELOO optioo is used, the system manager stnlld periodically review the TIMELOG records, to make sure that users log out, rather than carelessly leave terminals logged in overnight or over weekems. TIMELOG will also shCM any unusual after-tnlrs activity, or users who log in via IOOdem, which may reflect unauthorized attenpts to access files. The WHO conmarrl allows the system manager to IIa1itor system usage in real time.
Restricting Access to 'l'erIainal.s
An efficient line of defense against intruders is available by limiting access to physical devices. Gifford's Me-DOS offers the system manager the optioo of restr icting access to terminals by the login PASSWD file, which specifies the terminals that each account can use. The operating system will not allCM a user, even one with a valid password, to log in fran a terminal or IOOdem unless the PA8swD file specifies that the user's account name has access to that device. A user can be given access to many or all terminals, but ooly the system manager can IOOdify the terminal access authorization of any account name.
IbJem Security
If a IOOdem is permanently attached to the system, the login accounts authorized to log in via modem should be restricted to user areas where ooly lXXl-sensitive files are stored. Any "public" login name valid 00 a toodem has the least potential for trouble when a default program is also specified in the PASSWD file.
3.4-3

The login PASSWD file provides a number of options which relate to system security. These options include:
1. Login account names to restrict access to the canputer.
2. Encryption of login passwords to increase security.
3. Assignment of default drives and user areas to enforce the management practice of keeping users in separate work areas.
4. Assignment of default terminals, and restrictioo of accounts to specific terminals.
5. Assignment of default printers.
6. Assignment of default programs to restrict users to specific applicatioos programs.
7. Restrictioo of any account to specified user areas.
The system manager mst identify any groups who can share the same user areas, so that the PASSWD file can assign them ccmoon work areas.
The primary means of maintaining security in an Mo:-OOS system is through the login PASSWD file. Every account name IDUst have a password, which is automatically E;!l'lcrypted. The PASSWD file nust be kept on user area 0 of drive A:, which mst have a protected label that sets PROTOCT = CN. The system manager can assign to any login name a default program, to which a user is restr icted. The PASSWD file can restr ict the access of any account to specific terminals and user areas, and cart'restrict users who log in via IOOdem to a default program. The NEI'ruSER and pASS«JRD utilities are used to maintain the PASSWD file. Do not select passwords that can be easily guessed, oor leave written copies of passwords accessible.
3.4-4

Keep in mind that even these advanced features offer only limited security. They will keep honest users out of one another's files, but like physical security systems, they cannot offer absolute safety from the JOOSt so{ilisticated and determined intruder. The procedures in this section, however, will defeat JOOSt attenpts to violate security that would have succeeded against many other cauputers.
If login passwords are used for security reasons, every account should have an encrypted password. An account without an encrypted password oould easily becane a free key to the system, since the PASSWD file cannot be read protected. By following the procedures described on page 3.4-9, only the system manager can roodify the PASSHD file.
If you believe that system security is being attacked, use the HI~ file to see every carmand fran every terminal. This is a drastic procedure, which significantly slows system speed.
PUtting a Label <Xl a IDgical Drive
This section descr ibes a procedure that is Illi/DJatory for system security. The SEt' cannand of Digital Research's concurrent OOS permits a label to be put on any logical drive. The drive label is a directory entry, which like a file can be password protected. This label tells the operating system that a drive has special attributes. The attribute that is necessary for system security is the ~ option, which causes drive A: to reoognize passwords on files. (page 3-58 of the CXNCURRENl' CP/M OPERATIt«; SYSTEM USER'S GUIDE provides a detailed discussion of drive labels.)
The system manager must do the follCMing three things:
(1) Put a label on drive A:. (2) Put a password on the label. (3) Set password protection CN for drive A:.
3.4-5

Suppose that PRIVATE will be your password on a label called "TAG." Each step can be accomplished by SEl' cxxrmands:
OA>SEr [NAME=TAG]
Label for drive A:
Directory PassIIds Stallp StaDp StaDp Label Be<Jl Create Access Update
A:"; off off off off
0A>SEl' [~]
Label for drive A:
Directory PassIIds StaDp StaDp StaDp Label Be<Jl Create Access OpIate
A:ftG • (Xl off off off
The "~' option causes z,c-oos to look for file passwords that the system autanatically puts on the PASSWD and UTMP files on user area 0 of drive A: at startup. This enables drive A: to reoognize passwords on any file. A third SEl' cc:mnarrl is needed, however, to prevent the label fran being IOOdified:
0A>SEl' [PASSWORO=PRIVATE]
Label for drive A:
Directory Label
A:ftG
StaDp Create
off
3.4-6
StaDp Access
off
StaRp Update
off

.CBAP.r.BR 3: .MMWmC; TBB StS.f!M
Do not write this procedure into an SYSINIT.8OBfile, or anyooe who looks at SYSINIT.stJB can learn the password 00 your drive A: label. A label 00 a logical drive ofa hard disk or floppy diskette persists until the disk is reformatted.
A password must be set on the drive A: label to keep anyone I:xlt the system manager from setting the ~ attribute OFF. To rE!lOOve file protectioo (for example, to make an archival . backup) , type:
OA>Sm' [PIOl'.ECl'=OFF]
The system will pronpt:
Now type PRIVATE, the password of the dr ive label. Your keystrokes will not appear on the scree~, which shows:
Label for drive A:
Directxxy Label
A:Label off off
Stallp create
off off
Staup Upaate
off
This ccmnand does not erase the label. There is no reductioo in system speed if a logical drive has a label with all attril:xltes OFF. Neither ERA nor ERAQ can delete a label.
Note that "PRIVATE" would be an unwise choice of password for your actual label, since anyooe who finds this manual might read these pages, test PRIVATE as the password, and be able to access protected files 00 drive A: by setting protectioo OFF.
3.4-7

Protecting PrograllS
Most applicatioo programs that call 00 files do not koow how to use passwords. You might decide, for example, to protect with a file password parts of an accounting software package, or all of the programs, so that unauthor ized users cannot see or change informatioo. Suppose that processing your accounts requires you to invoke a program called AIXNr, which asks sane questions, and then runs other programs called INVOICE and PAYRJIL. When the sub-programs finish, they run ACXNl' again.
ACXNl'
~I--rI
INVOICE PAYRJIL
For this example, assume that INVOICE and PAYRJLL must be run by the AeOn' program, and cannot be run directly. To prevent sane users from running any of the programs, put a password 00 ACX::NT (such as LARK). To run ACXNl', then, you mst give the password 00 the cannand line:
3.4-8

'lb allow a user to run INVOICE but not PAYROLL,p.lt a password 00 the PAYROLL program that is different fran the ooe you put on the AO:NT program. The AO:NT program then cannot run PAYROLL unless you set your default password to match the password on the PAYROLL program. For exanple, if the password 00 PAYROLL is roBIN, and the password 00 AO:NT is still IARK, use the following two steps to run PAYROLL:
0A>SEl' [DEFAULT = roBIN] Defallt PaBSllOEd set to lQJDJ
When the ~ program calls the PAYROLL program, it matches the password 00 the program with the default password. If a user tries to run PAYROLL from AO:Nl' without the correct default password, the system gives a BJn3 error message aOO aborts the program. Defaul t passwords vanish when a system is reset, rut the file passwords remain as long as the ~ and the file label support them.
Pile Security
Files can be given any ale of three levels of protectioo by assigning a password. A read restr iction can be assigned where a password 11Ilst be given to read or write to a file. A write restriction can be assigned so a file has unlimited read status rut restricted write status. And a delete restriction can be assigned so that the file can be modified, rut the name cannot be changed and the file cannot be deleted.
Use file passwords to protect data or program files fran being read or updated by unaut:OOrized users. File password protectioo is discussed in Section 7.2 of the CXHlJRRPNl' ~ OPERATnG SYSTEM USER'S GUIlE and page 3.4-7 of this Chapter. Read also the SEl' CCiiiIialrl in Chapter 2.
3.4-9

Before you assign passwords to files, you should be aware that your system, as well as JOOSt applicatioos programs, does oot kno.f heM to use files with passwords on them. You cannot specify the password for a file when you run WordStar, unless you specify a default password for your terminal.
Applicatioos programs can read password protected files if you assign a default password to a terminal. For example, to edit the file called NXXXJNl'S.TXT with WordStar, if the password on the file is XACl'O, give the ccmnands:
0A>SEl' [DEFAULT = X1CI'O]
OA>WS NXXXJNl'S. TXT
Since you can have ooly ooe default password at a time, you shoUld use the same password 00 all of your data files. This eliminates the need to change your default password often.
Digital Research provides the option for limiting access to any mass storage device. The SEl' CX>11IIlaJ1d can assign temporary read-only (RO) status to any logical drive, so that its files· can be read but oot m:xUfied. The SEl' CX>11IIlaJ1d can also assign RO status to specific files, or to groups of files through the * and ? wildcard symbols. This feature is useful to keep files fran being accidentally erased, rather than to keep unauthorized users from reading or oopying files.
MC-OOS also allows any logical drive to be marked with a protected label, a directory entry that can cause the system to check for passwords on imividual files. C>I.1 a drive wtx>se label activates password protection, a file can be given a password that limits the access to the protected file, except by users who type the password. Progressively restrictive levels of file password protectioo are available, including protectioo against deletion or renaming, protection against overwriting or nmifying, am protection against reading or oopying. The higher
3.4-10

levels include all the restrictions of the lower levels. The "read protect" level is of importance in protecting the most sensitive files. How to create a protected drive label to sqpport file passwords is described earlier in this section.
Use of file passwords has sane drawbacks, however. Sinoe many ooomercially available programs do not provide for file passwords, processing password-protected data or invoking protected programs may be cumbersane and may require nrxe intervention by the operator. (File passwords can be useful in an MC-OOS or DR Net network environment where several users are working on the same programs or documents: Setting a file with a password means that saneone is currently revising a copy of the file, and that others should wait for the unprotected revision before adding their own improvements. This avoids creating different "latest versions" of the same file.)
The awroach to system security which Gifford recomnends, however, requires that the system manager set a protected label on logical drive A:. The operating system autanatically puts passwords on the systems files on drive A: that maintain system security.
To enforce user area restrictions, the system itself puts file pa$swords 00 the PASSWD and UTMP files, but you JIllst put a label 00 drive A:, using SEr with ~.
Repeat this step on any drive that has a 00fJ':l of the PASSWD file. Do not keep IDT86 or hard disk formatting utilitie$ 00
your hard disk. Put an encrypted password on every valid login name in the PASSWO file. Use SEr to assign SYS and RO status to programs on user area 0 of dr i ve A:.
You have the optioo of putting password-protected labels 00
other logical drives where sensitive data are stored or processed. These enable you to set pa$SWOrds on important files, on high level languages, and on powerful coomands such as IDT86 and SEr. Sensitive files on archival diskettes sOOuld be readprotected by file passwords, with a read-protect password set 00
the label of the diskette.
3.4-11

Even if sane files are individually protected, the system manager should not put file passwords 00 the PASSWD, NEHJSER, and UTMP files 00 drive A:. You can use file passwords to read protect the SEr 00IlI0aI1d and the DDT86 program1 and to write protect LPRS, ccmnand files, and data files that users do not need to IOOdifY1 and to de 1ete protect other system fi 1es. Do not put write-protect passwords 00 .MaX files. Do not put readprotect passwords C?I'1 the AI1l'CS1', MOl'D, TrYS, and .REM files.
If a logical drive has a label that has the ~ attr ibute eN, then the SEl' ccmnand can be used to put a password 00 any file 00 that drive. A password can be up to eight characters long. The SEl' ccmnand does not distinguish between upper case and lower case letters in passwords. For example, to put the password "HIlDEN' 00 the file "FINANCE.DOC!," type:
OA>SEr [~] OA>SEr FINANCE.ooc [PASSOID = mOOEN]
Now FINANCE.DOC! cannot be accessed without presenting the password mOOEN. If no label set with ~ has been SEr al
your current logical drive, you cannot put a password on a file or on a terminal.
The ~ option of the SEl' oomnand specifies the degree of protectioo that a password provides. Three levels of file protectioo ~, WRITE, and D:e:rzrE) are available, plus a fourth, IOm, that erases the file password. These IOOdes can be defined in terns of the file operatioos that can be performed without using the file password:
Value of PRJ'l'.EC1': RFAD WRITE DELEl'E tUm
Can you read the file? N:) YES YES YES Can you copy the file? 1'«) YES YES YES Can you wr i te on the file? 1'«) 1'«) YES YES Can you erase the file? 1'«) NO NO YES Can you rename the file? 1'«) 00 00 YES
3.4-12

If you do not specify any POO'r.ECl' JOOde when you set a file password, the operating system selects the RFAD roode, the highest level of protection. To put a write protect password on the file in the last example, you would type:
OA>SEr FINANCE.ocx:: [PAfB«)RD = HIDDEN, PRC:7l'ECI' = WRITE]
If you decide to use file passwords, it may be efficient to assign the same password protection to groups of files that are used in the same way. A default password on a terminal can simplify data processing procedures when protected files have a oorrmon password. By defining groups of file names in the usual wildcard notation (*, ?) of the PIP, DIR, and SDIR ccmnands, you can give a group of files the same protection level or a caIIllCIl password with a single ccmnand. For example, the following protects from erasure all of the dBASE data files wl'x>se names begin with the letter B.
M>SEr B*.DBF [PASStlRl = INDELIBL, PlOl.'.I!XJ.L' = mLErE]
This will require the password "INDELIBL" to erase any of the .DBF files begiming with the letter B, such as:
M>ERA OOXl9l7 .DBFI INDELIBL
The use of passwords on data files, on powerful oomnands and programs like 8m', IDl'86, or languages mst be guided by the perceived risk and potential CXXlSeqUences of accidental or deliberate erasure, modification, or copying. An alternative to password protection for a "dangerous". file like IDl'86 or any compiler is to erase it, keeping a copy on a fl~ disk that. is out of reach. Never put a password on the PASSWD or t1l'MP files on drive A:, since the operating system autanatically assigns those files a password. Drive A: mst have a label with ~ set 00.
3.4-13

If the security procedures recommended in this manual are fo11CMed, particularly the user area access restrictims of PASSWD, it is ordinarily not necessary to put passwords 00 files. There is no penalty, bowever, for putting a protected label and file passwords 00 archival diskettes that hold sensitive files, unless you forget the password; the oonsequences of forgetting a password can be ser ious.
BestrictiBj Access to User Areas
Although MC-OOS sUWOrts file passwords m irdividua1 program and data files, Gifford's recommended security procedures for MC-OOS systems are based m restr icting irdi vidual a::counts fran access to the directory areas where the files are stored. Access to the sixteen directory areas of an MC-OOS system is , controlled by the system manager through the login PASSWD file. The system manager specifies in the PASSWD file the user areas that will be accessible to each account name, grouping together in the same areas accounts wOO need to share files. The PASSWD file controls whether an account can access a directory area, but file passwords, and a password m the label of drive A:, prevent anyone but the system manager fran modifying PASSWD. Unless you need to keep saneone with whom you share a user area fran accessing a file, you do not need file passwords, because unauthorized users cannot access your directory areas to rename, erase, modify, copy, or read your files.
A unique Gifford MC-OOS system security feature that enforces this restrictim m directory areas is a modified ccmaand interpreter (the process that respalds to your keystrokes when the Me-1m system pranpt is displayed). Any attempt to override the PASSWD file restrictim of user areas (for example, by a PIP, USER, ERA, or ED ccmnard affecting user area 6, by saneone without a 6 in tne proper field of the PASSWD file) will fail, and the system will respond with the message:
Yoo den' t have permi.ssial to access user area 6.
3.4-14

Exceptions to this restriction are that any account can execute oaunand files in user area 0 that have SYS and RO attributes (am no password protection), am that all accounts can send or receive electronic mail. For MAIL files to be secure fran anyone but the addressee, ooly the system manager should" have access to user area 15 of the system node, where the .MBX am AP files keep the mail. As long as the label of drive A: has ~ set to 00, only the system manager can change the user area assignments of the PASSWD file.
m Net Security
The security options of a single MC-OOS computer are all extended to DR Net local area networks linking many MC-InS systems, arxl supplemented with additiooa1 network security features. DR Net allows users to access the drives arxl printers of other o::xtplters in the network, and the security optioos a11a-1 the system manager to specify the access rights of users.
Fran the user's perspective, the network is transparent: the same MC-InS ccmnands are used to rlm programs am manipulate and print files, but sane of the programs, data, and printers happen to be on other systems linked by the network. Each virtual terminal (typically four per physical terminal) can be mapped onto sixteen logical dr i ves, am the mapping of each virtual terminal is irXiependent of 1Dw other virtual terminals of the same workstation are mapped. A special cannand, NEl', a11a-1S users to change the mawing, so that different drives or printers can be accessed, except as restricted by security procedures. These are detailed in the DR NET USER'S MANUAL and include:
1. The number of server processes. A server process a11a-1S a user elsewhere in the network to access a system. If the system manager sets this at zero in the ~G.NE1' file, no renote users can access files on the system via the network.
2. The number of requester processes. A requester process accesses other systems. If the OONFIG.NEr file specifies zero requesters, no virtual terminal on the system can use the network.
3. Private drives. Files on logical drives that OONFIG.NEr designates as private cannot be accessed via the network.
3.4-15

4. Node passwords. If <nWIG.NEl' includes a password for a system, users who cannot present it cannot access the system.
S. Account passwords. Users elsewhere in the network can be required to present a login password matching the PASSWD file.
In addition to these specific DR Net security features, the ordinary MC-OOS user area restrictions and protectien of files by file passwords can be implemented in Gifford's DR Net networks.
This discussien of the secur i ty features has so far ooncerned a single MC-IXE canputer. In a DR Net network, many MC-OOS oanputers, both multiuser and single-user, are linked by ARCNIn' hardware and DR Net software, so that any terminal on any oode of the network can access any file on any logical drive of the network, unless restr icted by secur ity procedures. Local area networks add to the task of maintaining security the potential problem of files being accessed via the network.
Fortunately, all of the security procedures described above are in effect in Gifford's m Net networks of MC-IXE oanputers, including login names, encrypted login passwords, user area restr ictions, and passwords on files. For example, even if a user at another node of the network is authorized to access a drive and user area of your system, a 'file that is SEl' with a read-protect file password and is stored en a drive whose label supports password protectien cannot be accessed via the network, unless the file password is supplied.
In additioo to the standard MC-OOS security procedures of user area restrictims and file passIIOrds, Gifford's MC-IXE implementatioo of m Net provides the system manager with several methods to restrict network access by renote users to a system or to part of a system. For nore detailed informatien about DR Net security, refer to the DR NET USER'S MANUAL •
3.4-16

CBAPmR 3: ~ TIlE St9l1!M
A seemingly trivial security procedure, rut me which distinguishes a DR Net network fran a minicatplter or mainframe that uses other similar security features, is that individual nodes of a network can be powered OFF while others remain active. A system that held very sensitive files (for example, financial files) could be powered down overnight, while other nodes of the network remained productive- a procedure that is ooly practical in distriruted processing systems like DR Net. No one can access a hard disk that is powered OFF. The UPl'IME ocmnand m::nitors when each node of a DR Net network was reset by pressing the red RESEr rutton, or powered eN •
.At2litima1 Security Procednres
Two other security procedures are available that may be helpful as diagnostic aids if unauthorized access to files is suspected. If the system manager puts labels 00 the drives in question, and uses timestamp options 00 the labels, the directory will sh<::M when each file was last accessed or updatedJ see section 3.8 of this manual and Digital Research's CXH::tJRR.ENr ~ OPERATIN:; SYSTEM USER'S GUIlE 00 extended file control blocks (XFCBs). TimeStamp data can be used to see if unauthorized file access is occurring, and if so, when it occurred and by whan it was perpetrated. The HISl'mY utility moo.itors the fine structure of system usage, recording every oc:mnand line and the account, terminal, user area, date, and time of the ccmnand. Using HIS"J.'<RY reduces the speed of the system and is normal reccmnended as a normal security procedure.
3.4-17

Contrasting Gifford's 11::-1)(1; and Qmcurrent IXl3 Security
Controlling access to user areas represents a significant modification ~ Gifford of COncurrent DOS, which in its urm:xUfied form allows unrestr icted access to user areas. For example, Digital Research IIX:. provides a Concurrent DOS system comnand, USER, for the purpose of changing areas. The DIR [S] catmand, the PRINr carmand, and the PIP comnand, each with the [Gu] option, can respectively display the names, print the contents, or COT!.! to disk or printer all of the files in another user area, for u the number of any user area. Section 2.5 describes in detail the DIR, PIP, USER, and PRINl' cannands. Sane applications programs and languages are also capable of changing user areas. Thus, in ordinary Concurrent DOS and in most operating systems for business cx:mplters, a determined user who sanehow gets on your system can use system utilities to read your directory and get copies of your files. This may be of no ca'lsequeIX:e in a "friendly" environment, but features like this pose a serious challenge to maintaining system security.
The system manager has the option of configuring a Gifford Me-DOS system as in ordinary Concurrent DOS without user area restrictions, but the optional features of Me-DOS offer an unprecedented degree of system security. MC-DOS features that enhance the standard security options of Concurrent DOS include:
1. The login PASSWD file, which restricts access to the entire system and to direrctory areas, to terminals, and can restrict an account to a single applications program.
2. Encryption of login passwords within the PASSWD file.
3. The NMJSER utility to maintain PASSWD.
4. Autanatic assignment ~ the system of file passwords to the PASSWD and U'IMP files.
5. Modification of the comnand interpreter to enforce directory area restrictions.
6. WID, TIMELOO, and HISTCRY features to m::nitor system usage.
3.4-18

CBAPl'ER 3: IWiAGDG THE StSJlIII
LiaitatiaJs c:m Systaa Security
Although Gifford designed ~-OOSIS security opticns to provide the highest degree of system security available to date in any CP/M or MP/M system, the effectiveness of these security features is in the hands of the system manager • Passwords should be difficult to guess, system diskettes should not be accessible to strangers, physical access to the system should be limited, and written information describing the specific passwords that protect a system should be inaccessible to unauthorized persons. Passwords should be changed periodically. Archival files should be kept locked up in a secure location.' System managers should take care not to lock themselves (and everyone else) out of the system by forgetting passwords, and should review the TIMPLOG and the optiooal HIs.rcRY records periodically, to make sure that neither careless nor malicious use of the system is occurring.
A critical ingredient in maintaining system security is carm:n sense, and in its absence anything can happen. Many l'lDre problems are caused by failure to back up files (see Section 3.a) and by other errors by users than by malicious acts, but sane system may attract the attention of persons with unethical l'lDtivates. Gifford Computer System has made a determdned effort to provide MC-OOS system managers with a strategy to maintain a very high degree of system security, but the effectiveness of these measures in individual cases cannot be guaranteed. Their success will depend on the care with which you implement them, on the resources available to potential intruders, and the extent to which unfriendly or unwittingly destructive users penetrate your organization or arise within it, or gain access to information stored outside your MC-OOS system. Because these are imponderables, Gifford disclatms responsibility for breaches of system security, or consequential damages arising therefran. By following the security procedures recarmended in this section hcMever, the system manager can reduce to a very low level the risk that system security will be violated.
3.4-19

3.5 Timelag utilities
Gifford Cbmputer Systems provides dBASE II utilities to create and maintain login histories of accounts and of physical and virtual terminals on your Me-DOS system. 'Ibese utilities read fran the WTMP file, and write to dBASE II database files.
Use the TIMELOG.SUB file to create the TIMELOG database files, or to append it to the database if the files TIMELOGX.DBF, TIMEr.OOY.DBF, and TIMELOGZ.DBF already exist. Fran user area 0 of drive A: enter the command:
OA>stD1IT TIMELOO
'Ibis program copies all the entries fran the WIMP file, writes them to the data base, erases the WIMP file, and restarts the WIMP file with entries for the accounts that are still logged in to the system. It is best to perform this step when there are no other users on the system, so that your database is catplete.
You can l'lOW use aBASE II to view the TIMEI.DGX.DBF file, or you can use the utilities in the dBASE II cxmnand file called TIMEUlG.CMD. Fran user area 0 of drive A: enter the oommand:
After a sign-on message, the screen will display a menu:
1i:lUld you like to
1 = Add current lag to previous lag or
2 = Purge the previous lag aid keep ally the current lag
Please choose 1 or 2 (Default is 1) : :
3.5-1

Selecting 1 appends the latest timelog information to the database, while selecting 2 discards the previous data. Normally the first option is selected, unless the previous log has been saved to diskettes, or sl.Dll'Rarized in previous reports, or is no longer of interest. After either option is selected, the screen advises you to stand by. After the timelog information is processed, the following message is displayed:
You now have the ~ial of printing a report of the raw T:IMPlQ; datato a file. 'Ibis file may then be printed or edited at your ocmvenience. ibis step is not mandatory. Yoo my skip this step by inpltti.DJ ... or you may ocmtirue by inplttinj II!"
lnpJt Y or R here : :
If you type (Y) for a raw timelog data file, the screen pranpts:
lnpJt the name of the file to tibich the report will be written:
Type up to eight characters for the file name. '!he TIMELOG program supplies ".TXT" as the file extensioo. If, for exanple, you specify "AUGl" as the file name, the program acknowledges:
Raw TI.IIBU)G data is now being written to AmI. TXT
'!he screen next displays a menu of timelog report options:
Here are your cpti.ans for tilIelog reports I = Report aooess by a specific acoount and specific device 2 = Deport aooess by a specific accoont, all derices 3 = Report aooess by a specific device, all acoounts 4 = Deport aooess by all accounts Ii devices, amtotal by derice 5 = Report aooess by all devices Ii accounts; amtotal by accnmt 6 = Return to the qleratinj systeIIl
Inplt you: choice : :
3.5-2
. •

Here account means the login names that awear as the first entry in each line of the PAS&WD file, and device means the nmem or physical terminal at which a user logged in to the system. 'lb specify a terminal, give a terminal name that awears in the fifth field of the 'rIYS file (typically ranging fran 0 through 6).
1he program next asks you to chcx>se between detailed am aggregated timelog information, am to name the report:
1 = list all access tilDes 2 = list totals ally
Your c:boice : :
Input the name of the file to which the report will be written:
Each time that you request a report, TIMELOO wi 11 ask you for a file name for the report. Once the report is finished, you can use TYPE to display the report on your screen, or send it to a printer with the PIP, PRINT, or TYPE h p command, or edit it with ED, with WOrdStar, or with sane other text editor. Select option six (6) to exit from the DBASE TIMELOO program.
An exanple of a report produced by the timelog utility of MC-J.')OO is displayed below: I
. .
laveme lO/tty4 o 14 Aooesses Total elapsed tilDe = 27:40:13
'!he "totals only" report above was produced in response to option (2) in the report menu, showing all of the occasions that an account called "laverne" logged in from virtual terminal 10. 1he column headed Device/RaJDe lists "tty4 0" as the name of virtual terminal 10, indicating that this is the first screen (0 = first, 1 = 2nd, 2 = 3rd, 3 = 4th) of a physical terminal called "tty4" in the 'mS file.
3.5-3
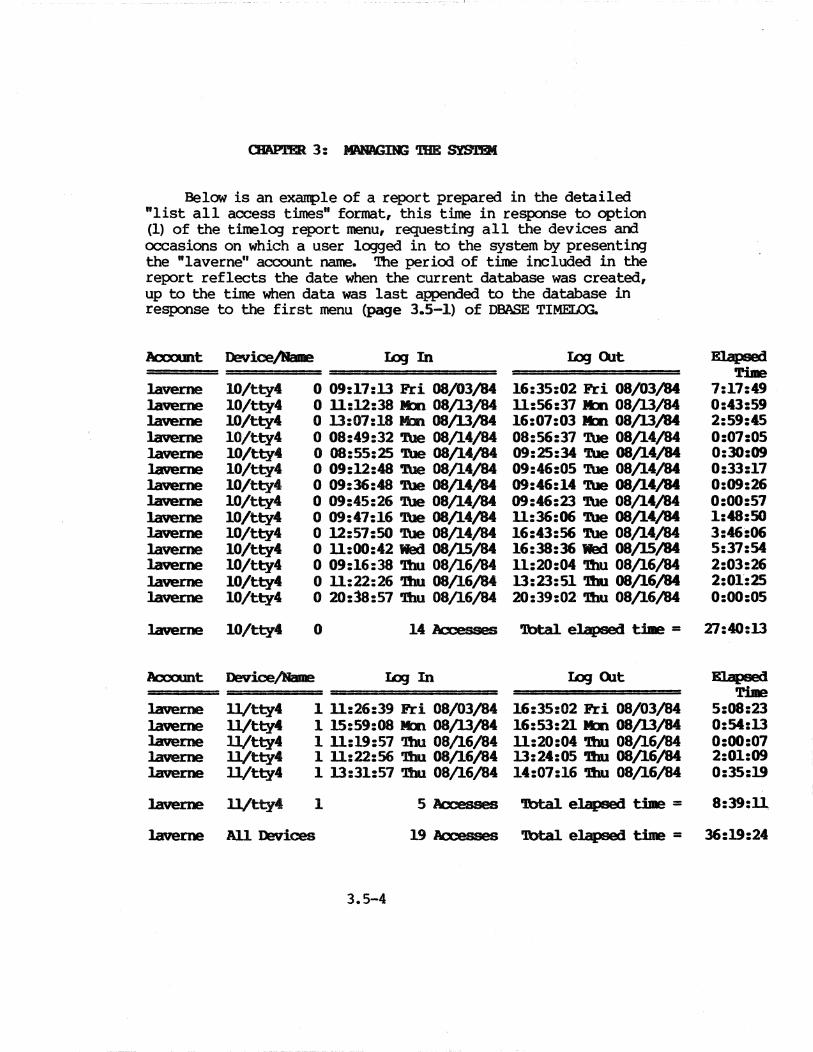
Below is an exanple of a report prepared in the detailed "list all aooess times" format, this time in response to option (1) of the timelog report menu, requesting all the devices am occasions on which a user logged in to the system by presenting the "laverne" account name. The period of time included in the report reflects the date when the current database was created, up to the time when data was last appended to the database in response to the first menu (page 3.5-1) of DBASE TlMELOG.
Accxult Ilerioe/NaIIe Iaj In Iaj Qlt
laverne 1O/tty4 o 09:17:13 Fri 08/03/84 16:35:02 Fri 08/03/84 laverne 10/tty4 o 11:12:38 Ibl 08/13/84 11:56:37 Ibl 08/13/84 laverne 1O/tty4 o 13:07:18 Ibl 08/13/84 16:07:03 Ibl 08/13/84 laverne 10/tty4 o 08:49:32 Tue 08/14/84 08:56:37 Tue 08/14/84 laverne 1O/tty4 o 08:55:25 Tue 08/14/84 09:25:34 Tue 08/14/84 laverne 10/tty4 o 09:12:48 Tue 08/14/84 09:46:05 Tue 08/14/84 laverne lO/tty4 o 09:36:48 Tue 08/14/84 09:46:14 Tue 08/14/84 laverne 10/tty4 o 09:45:26 Tue 08/14/84 09:46:23 Tue 08/14/84 laverne lO/tty4 o 09:47:16 Tue 08/14/84 11:36:06 Tue 08/14/84 laverne 10/tty4 o 12:57:50 Tue 08/14/84 16:43:56 Tue 08/14/84 laverne 10/tty4 o 11:00:42 Wed 08/15/84 16:38:36 Wed 08/15,184 laverne 1O/tty4 o 09:16:38 '1bu 08/16/84 11:20:04 '1bu 08/16/84 laverne lO/tty4 o 11:22:26 '1bu 08/16/84 13:23:51 '1bu 08/16/84 laverne 1O/tty4 o 20:18:57 '1bu 08/16/84 2O:39:02!bu 08/16/84
laverne 10/tty4 0 14 Accesses 'lbtal. elapsed tilE =
Accom1.t Device/Name IajIn Iaj QJt
laverne ll/tty4 1 11:26:39 Fri 08/03/84 16:35:02 Fri 08/03/84 laverne ll/tty4 1 15:59:08 Ibl 08/13/84 16:53:211bl 08/13/84 laverne ll/tty4 1 11:19:57 '1bu 08/16/84 11:20:04 '1bu 08/16/84 laverne ll/tty4 1 11:22:56 '1bu 08/16/84 13:24:05 '1bu 08/16/84 laverne ll/tty4 1 13:31:57 '1bu 08/16/84 14:07:16 '1bu 08/16/84
laverne ll/tty4 1 5 Accesses 'lbtal. elapsed tiDe =
laverne All Devices 19 Accesses 'lbtal. ,elapsed time =
3.5-4
Elapsed Tille
7:17:49 0:43:59 2:59:45 0:07:05 0:30:09 0:33:17 0:09:26 0:00:57 1:48:50 3:46':06 5:37:54 2:03:26 2:01:25 0:00:05
27:40:13
Elapsed TilDe
5:08:23 0:54:13 0:00:07 2:01:09 0:35:19
8:39:U
36:19:24

3.6 "1be BI9.l'(R Pile
'!he HIsroRY file maintains a historical record of all the ocmnands given to the system. HISTORY is an optional file. If the file does not exist, then no historical records are maintained. Use of the HISTORY option also requires that the PASSWD, 'l'l'YS, urMP, and Wl'MP files IlUlst also exist, and that the calendar/clock be functioning correctly.
'!he HIsroRY file can be used to JOOnitor system usage in m:>re detail than the TIMEUX; utility provides. By timestamping ocmnands, HIsroRY can document when events occurred on the system, and can help the system manager identify individuals who could benefit fran guidance in the use of the system.
Because the operating system writes every ClOI1II1and line to the HIsroRY file (if it exists), HISTORY sanewhat reduces the speed at which the system operates. The effect on system performance of a HISTORY file varies with the nUl'lber of users, and with how they are using the system. HISTORY only records ocmnand lines, such as ERl!Q or OIR, or ocmnands that invoke applications programs. It does not record user activity within an applications program, so that ~rdStar ccmnands and keystrokes, for exanple, are not recorded. Thus, the activities of a user who spent all day working on a spreadsheet might only be recorded in HISTORY as the line that invoked SuperCalc, while a SUBMIT file with 75 ocmnands would make HIsroRY write to the disk 75 times. '!he system manager can experimentally observe the extent to which HISTORY slows a particular system by canparing the speed of the system with and without this file.
To inplement the HIsroRY feature, give the ocmnand:
This will create an enpty' file on user area 0 of drive A: to which the system can add information as it is generated. Only cxmnands given by users who log in to the system after you give the ocmnand above will be recorded. If you erase the HISTORY file, ccmnand lines are no longer recorded by Me-DOS.
3.6-1

The format of HISl'ORY closely resenbles the format of the W1'MP file. An exanple of a line in a HISl'ORY file follows:
tty6 Oam:y 14 23952132392040 7221984 364 pip a:=e:data.fyl [vnr]
The first two fields (in this exanple "tty6 0") are the nail! (fran file TIYS) of the physical terminal or roodem, and the relative terminal IUlber of the virtual terminal that issued the carmand. In Me-In) a physical terminal can support up to four "screens," corresponding to virtual terminals, ntll'l'bered 0, 1, 2, and 3. The next field is the account nail! that is logged in to the virtual terminal. The last field lists the actual ca-and line. In the same exanple of a HISl'ORY line, but with blanks inserted for greater clarity, the other numerical fields are:
14 \
1
2395 \
2
21 \
3
32 \
4
39 \
5
1. Virtual Terllinal 111lIIber
204 \
6
2. ~ since January 1st, 1978
o \
7
3. IbJr of the day (24 hour clock) 4. Mimte of the hour 5. Seccmd of the minute 6. Julian day of the year (1-366)
7 22 1984 \
8
364 \
9
7. Diy of the week (Sunday = 0, M:>nday = 1, Tuesday = 2, etc.) 8. Date in JOOnth-day-year format 9. Progr_ file link mldler, a serial nunber showing how many
carmands had been recorded in the HISl'ORY file when this catmand was recorded. The link nunber of the last camnand is also written in the first line of the HISTORY file.
The meaning of the line in the carplete exanple is that fran virtual terminal 14 (the first screen of physical terminal 6) someone who logged in as "mary" gave a PIP comnand to CC1f!:l and verify a file called DATA.nL to drive A: fran drive E: at thirty-nine seconds after 9:32 pn on Sunday, July 22, 1984.,
3.6-2
\

CJIAP.l'ER 3: ~ THE sYS'lBI
3.7 Creating am lIJdifying HELP Files
You can modify existing HELP files or create new HELP files. HELP files IIllSt have the file type .HLP. The file name should be the subject. For exanp1e, the MC-DOO help file has the name MCIX>S.HLP. A WordStar HELP file could have the name WS.HLP.
HELP files can be created or modified with a text editor such as ED or WordStar in non-document mode. The HELP program expects Subtopics to be identified with a question (?) mark. Precede each subtopic (a single word) with a question mark. '!be following exanp1e HELP file (PASSWD.HLP) has the PASSWD file as its subject and has three subtopics: "GENERAL, II ''mliUSER,'' and "PASSWORD":
?general ibe PASSIID file defines the encrypted login pasaord,
initial default user rumer, drive, printer, optiam.1 awlicatiem program. terJdnal access, and user area access for every valid account rae em a Gifford 1C-IXlS systeID. ?newser
ibe NIKSBR utility DUSt be used by the systeul aanager to create am Eintain the PASSIID file. (hly the .syst:e!lf account can use the REIUmR program. ?pasaJord
ibe PASSIIR) program permits users to cbarvje their own encrypted login passwords in the PASSND file.
HELP lists all the subtopics if the option ALL follows a subject in a HELP carmand. For exanp1e:
OA>HELP PASSWD ALL
general
Each HELP file should have a subject of GENERAL in it, so that users can get general information abJut a given subject by typing ''HELP subject." For exanp1e,
3.7-1

'!his will display information fran the file PASSWD.HLP under the subtopic "general." '!he user will see the display:
'lbe PAS9ID file defines the encrypted lOgin password, initial default user m1lliler, drive, printer, opticmal applicatial prOgr., terminal ac:n!SS, am. user area access for every valid account name <Xl a Gifford II::-«E system.
'!he user can also request help on a specific topic:
X>HELP PASSWD NEWUSER
In this case the program will display information under the subtopic "NEHJSER," and the display will look like:
'lbe RIIIEBR utility DUSt be used by the syst.eBl EDager to create am. JBintain the PAS9ID file. <klly the .systeal" accDJIlt can use the NEIIImR prOgram.
Fach HELP file has an iooex file associated with it, whose file type is.NDX. 'lb create or maintain the iooex file, give the HELPNDX carmand with the file name whenever a HELP file is created or IOOdified. Every time you create or IOOdify a HELP file, you must run HELPNDX to update the iooex file. For exanple, if the above file is PASSWD.HLP, give the CCl1IDa1'¥!:
OA:>HELPNDX PASSWD
By making HELP files for the specific awlications programs used on a Me-DOS system, and by teaching users to use the HELP facility, the system manager can give users easy access to advice on how to use the system. Note that Gifford's HELP facility in Me-JX>S is somewhat different fran the system of HELP files descr ibed in the CCNCURRENT ~ OPERA.TlN3 SYSTEM USER'S GUIDE.
3.7-2

3.8 File Maintenance Procedures
Despite the versatility of cx:xnputers and the wide range of programs and accessories available today, the main functions of mst business oanputers are to create, IOOdify, store, retrieve, print, and transfer files. The system manager must ag;>reciate the importance and the requirements of file-related operations, so that work can be organiZEd in a way that uses the system efficiently, protects the integrity and security of data and program files, and minimizes the risk of losing valuable files. By establishing good file maintenance procedures, and by moti vating all users to cooperate in the ratiooal use of data and. programs, system performance can be maintained at a high level. COnversely, inefficient or careless file management can reduce the speed and productivity of the system, and. can waste time and resources in needless searches for lost or misharrlled files.
Deleting UJneceBBary Files
Inexperienced users often needlessly oop./ files fran other user areas to their own. '!his takes up valuable disk space, and causes all file accesses to take lenger, since mre directory entries must be read. The system manager should periodically c!heck the oontents of all user areas for files that exist in other places, suCh as copies of ag;>lications programs. 'lb do this easily, use the camnand:
~SDIR [USERS=AIL,DRIVES=AIL]
Sane applications programs (such as dBASE II and SUperCalc 86) require that the overlay and message files be en the current logical drive. 'Ihus, you may need copies of these files en user area 0 of eaCh drive. If they are in another user area, lOC)ve them to user area 0, so that eaCh drive has enly one COf1':I of these files. These overlay files should be set to system and read. ally status. This is done with the ac.mnand:
SEr * .OVR[SYS,R:>]
3.8-1

'!be system manager shc:uld also remird users to delete backup files (files with .BAK extensioos) When they are oot needed. sane users of word processing software habitually leave the backup files 00 the disk. Erasing these files (ooce the original file has been backed up) yields more disk space am faster file access. Files that are 00 looger used shc:uld be transferred to floppy diskettes am erasEd fran the hard disk. Use of the archive attriblte in file backup ma.y reveal directory areas where files 00 longer in use are sitting 00 the hard disk.
'!be system manager slnlld provide users with an adequate s'l.lfPly of floppy diskettes, so that files of marginal or archi val interest can be oopied ooto floppies with the PIP CXJ!JIJIand and erased fran the hard disk. The cost of diskettes is small oanpared to the potential degradatioo of system speed when mega1:¥tes of inactive files are left to clutter the hard disk.
Identifying Qu:reut Piles
As menticned in the oc:ntext of security in Section 3A, MC-OOS can put file paBlNOrds en files with the SEt' cxmoand. Even in environments where secrecy is oot an issue, passwords can be helpful in protecting informatioo fran accidental erasure.
Another use of file passwords not directly related to security is in situatioos where a group of users are developing a large document or program that has been divided into <Xl1lpCJ.'1ent files. Unless precautions are taken, it is not UIlCCImICn for a user (or a Whole group) to become oc:nfused over which is the most current versien of a file, particularly if changes in one file require correspa:lding revisioos in another. Fbw can the situatien be avoided in which two users are lOOdifying different copies of the same file simultaneously?
Qle procedure is to designate one directory area as the repository of "latest" versioos. Since two users should never work in the same directory area simultaneously, anyone IOOdifying a "latest" versioo slnlld PIP a copy to a work area, and set a password en the original in the repository. Even if the password is pUblicly known, it signals to others oot to revise the file until the current user returns an unprotected update.
3.8-2

Time an:i datestamping is controlled by the SEl' am INITDIR cxmnands. Marking files to s'OOw their time of crea.tiCXl or last update can assist users in reoog.nizing current files, an:i noticing when another user has accessed a file. The overhead imposed by timestamping an:i passwords in MC-OOS is not large, so that some system managers may elect to implement these MC-OOS features as file maintenance tools.
A third alternative to file passwords or to timestamps as a means of marking the latest versions of files is the use of a Its in files. In large projects where many prograumers or writers are working concurrently, ccmments help in clarifying wlx> was the last user to JOOdify a file. Most applications programs allow the user to insert conments into a file. In WordStar, for example, a line beginning with two periods ( •• ) appears Q'lScreen, rut is not printed. In a mu1 tiuser project, taking the time to provide cxmnents can assist in the final assembly of a large group of files, am can reduce the likelihood of inadvertently sUbstituting a non-current file for the latest revisiCXl.
An important procedure related to overall system performance is packing the hard disk. A file that is updated or extended will have its parts spread out CXl the disk. Accessing files that are spread out like this takes longer than accessing more CX>JDpaCt files, since the disk head must move further am more frequently to access the data. Copying all of the files to other media, erasing the original files, and then copying back to the disk again "repacks" the files into contiguous segments CXl the disk.
Repacking your hard disks every few months will increase the efficiency of file operations. 'lb do this, perform a full backup of each logical drive, format the disks, and restore the backup files. Be absolutely sure that the backup worked correctly before formattiD3 the disk. Remember that formatting a disk destroys all of the informatiCXl CXl it. The fastest way to repack a hard disk is to have enough space CXl cne logical drive to PIP CXlto it all the files of another logical drive, wlx>se files you then erase. You can restore the files copied by PIP, and repeat the process until all logical drives have been repacked.
3.8-3

Reformatting a hard disk erases drive labels, so yen must use the SET cxmnand to put password-protected labels en drive A:, and en arr.t other drive that must s'L1R?Ort file passwords or time and date stamps, if you reformat a labelled logical drive.
Since PIP does not 00'f!:I file passwords, after a drive has been repacked ya.l must also use the SET ccmnand to restore the passwords en arr.t files that have been assigned passwords, and the password en the dri ve label itself. (Excepticns to this are the PASSWD ani UlMP files, w'hose passwords are autanatically restored 1:¥ MC-OOS. D::> not set a file password en either PASSm or UlMP.)
Badd.ng ~ Files
~ £ran the speed advantages of repacking, data stored 00 diskettes or hard disks should be backed up (duplicated for later retrieval) at regular intervals. Although 'J:x)th flq:py and hard disk drives are very reliable, equipnent failures or accidental deleticns can cx:cur that may result in a loss of data. Potential causes of data loss are:
o Power loss o Hardware failure o Operator error o Disk media failure
'the J.'OC)re frequently ya.l back up your data, the less work you will lose if the diskette or disk fails. Gifford COmplter Systems reoamnends that you back up all data at least alCe a week. Marr.t canpanies back up their data daily.
'the time it takes to back up data should be thought of as insurance against loss of that data. The more critical the data, the DOre time may be justifiably spent. in backing up files.
The procedures to- select for backing up files will depend 00 what medium you intend to use as a backup. Most CXltiIIDlly used are flq:py diskettes, rut other options such as 4-track or 9-track magnetic tape are also available.
3.8-4

Diskettes can be oopied with a copf utility such as the !oC-oos CF.{ COIIIIDaIXi, the CP/M (J)F.{ cx:mmarrl (which ally works urrler the single-user CP/M system), or PIP. Both CPi and (J)P.{
ally work if both the original diskette and the interned backup diskette have the same PhYsical format. Select a standard format, such as 1024 l::¥tes per sector, for all diskettes.
Remember to put an adhesive label and date al oopies, so that you can identify your files· later if the need arises. It is good practice to give a DIR[S] or SDIR oc:mnand with "'P, so that the printer will create a hard oopy of the diskette directory that can be stored with the backup diskette. Backup diskettes sh:luld be stored in a safe place, according to the instructions of the manufacturer.
The 1lDSt CXJIIIlOOll method of backing up hard disks is to copf
the files onto floppy diskettes with the PIP o:mnand. Keep in mind, t:h<::ngh, that a l024-byte sectored double sided floppy will ally m1d 1190 kilo~ of information. Files larger than this will have to be broken down into smaller files or stored al another medium such as tape. Backing up to tape is much easier than backing up to diskettes. The backup can usually be nm with just a few conmands. Ebllow the directions in the TIP OPERA'lOR'S GUIDE to copf files if you have a tape drive.
If }Q1 are 1P.Jmding your syat.ea fraa MP/M 8-16 to M:-OOS, it is IMPERATIVE that }Q1 do a total badcup of jCOI' haxd disk befole }Q1 use the new MC-OOS versim of the PIP IEogLdIl to copy tbe new system files onto tbe haxd disk.
Regardless of the physical means used for file backup, two conceptually different backup procedures are available. The first procedure is called an archival backup. The archival backup uses the archive attribute to copf ally those files Which have been modified since the last archive backup. 'lhis saves time and storage space, since ally recently llDdified files are copied. The archive backup sh:luld be executed once a day.
3.8-5

'The secord backup is called a full backup. In a full backup, all files al the system are copied alto flOWY diskettes. 'lhis is a much slower process than tlle archive. The full backup should be executed cnce a week.
Keep in mind that While these two procedures are ally reoc:mnermtions, backing ~ data is an essential pmcess of systal manag&ient. Backing up files is the ally insurance you have against loss of valuable data, should sanething happen to your system. Regardless of What kind of cx:mputer you have, if you do not back up your files you are asking for trouble.
'lhe Ddly Ardli va Badrup
You should carry out all backup procedures when 00 other users are al the system am the system is in single-user mode. 'lhis prevents other users from lOOdifying files while you are executing backup procedures.
Keep five sets of diskettes for your daily backup. If it takes 10 floppy diskettes to mId all tlle files al your system, then you will need fifty floppies. Label each set of diskettes Monday, Tuesday, Wednesday, Thursday. en Friday, you will do a full backup Which will require an additiooal set of diskettes. The label should contain the date of the last backup, am tbe user area am drive designatial from ~ich the backup originated. By keeping several sets 6f backups, you have a "historical" oollectial of files. If for some reason your system were to go down, you would never lose more than one day's work.
Copy the files to your archive diskette with the PIP cxmnand using tlle archive optioo. You will have to give a PIP cx:moam for every backup of your drive and user area. (In a backup to tape, the DSKRESEl' ocmnarxls are not needed, am TIP or NTIP is substituted for the keyword PIP.) The form of the cxmnand is:
A>PIP x:=y:*.*[~] \ \
\ source drive of files to be copied (hard disk) \ destinatial where copy will be made (floppy drive)
3.8-6

You must replace the logical dri ve designations x: and y: above (x: for destinatial and y: for source) with drive designations that match ya.:rr system.
Note that for an archival backup the PIP oc:mnand line includes the A option, Which specifies copying enly those files which have been created or l'IOOified since the archive attribute was last set CN. The PIP c:x:mma.rrl with the archive optien turns CN the archive attribute for each file oopied. ArrI file JOOdified during the week will get its archive attrib1te set OFF. If this is the first tiae that you are doing a backup, set the archive attribute of all files OFF with the SEl' ccmna.nd, as in the example bela'/:
<a>SEl' *. * [ARCHI\1E=()FF]
The PIP oc:mnand will OOP./ as many files as the diskette can mId. If there are more files en the hard disk than the diskette can hold, the program will stop, with an error message such as:
FILEI2.BIL FILE39.BIL
ERRJR - DIS< WRITE - FILE39.$$$
All of the files al the source disk that were copied before the disk filled up have their archive attribute set to CN. Put in the next archive diskette, and give the DS<RESET c::xmoand:
Repeat the same PIP oc:mnand that you gave before. There will be a l<mg pause while the PIP ccmmarrl examines, but does rx>t copy, all of the files whose archive attribute has been set CN. Copying finally resumes with the the first file that was rx>t transferred by the previous PIP ocmnand. You must repeat the
3.8-7

previous steps for each user area number containing files al each of the logical dri ves. ('lbe sequence of PIP 0CIII1Ia1'lds al page 3.8-10 are typical of an archival backup, bltthe SET cxmnaros used in a full backup are not part of archival backup procedures.)
FUll backups are oopies of every user number al every logical drive al your hard disk. Un1 ike in an archival backup, which ally oopies new or lIOdified files, in a full backup the archive attriblte is set OFF al each file. The following steps must be fo11a-led to back up every user area and logical drive:
1. Type a SfDq' a:moard of the form:
<a>SfI::M A:USERS, B:USERS, C:USERS, •••
listing all of your logical drives. 'lbe screen will display a list of the user areas al each drive Where files exist.
2. For each occupied directory area identified above, set the archi ve attriblte OFF with a oc:mnand of the form:
7B>SEl' *. * [ARcHIVE = OFF]
3. Copy the files to a diskette with a ~ like,:
<a>PIP x:=y:*.*[~] \ \
\ source drive of files to be copied (hard disk) \ destinatial where copy will be made (f1qpy drive)
You must replace the logical drive designatialS, x: am y: above (x: for destinatial and y: for source) with the appropriate designatioos for your system. A PIP cx:mnarn can oopy up to as
3.8-8

many files as the diskette can m1d. If there are more files than the diskette can hold, the program will stop with an error message, such as:
FIIE12.BIL FIIE39.BIL
ERROR - DISK WRITE - FILE39.$$$
All files en the source drive that were copied before the diskette filled up l'X)W have their archive attribute set CN.
4. Put in the next backup diskette, a.rd type DSKRFSEl':
OA>DSKRESEI'
Repeat the same PIP cxmnand as before. The PIP oc:mnand will ignore files with the archive attributes set eN, a.rd begin with the first file that was not transferred. You must repeat steps 2 through 4 for each active directory area identified in step 1. Do the last step (DSKRESET, repeating PIP), en1y if the diskette runs out of available space during a PIP ccmnand.
£xaIf?le of a weekly Pull BCIdmp
Be sure that 00 other user is en the system, then log in so that user area 0 of drive A: is your current directory area. 'lhe backup diskettes go into the left-hand floppy drive, Which is designated "D:" in the example that follows. Remember to give a DSKRESET c:xmnand a.rd repeat any PIP cx:mnand that is interrupted because the diskette filled up, a.rd be sure to update the adhesi ve label en each diskette with a soft felt-tip marker.
For this example, assume that the system has a 21 megabyte hard disk (logical drives A:, B:, a.rd C:), and that by giving a SIUi A:USERS, B:USERS, C:USERS amnand, it has been determined that en1y the fo11CMing directory areas have files:
A: 0, 1, 2, 3, 6 B: 0, 1, 2 C: 0, 1, 3
3.8-9

'lbe listing below illustrates a series of~ for a full backup of the hard disk in this ex.amp;Le: '
~SEl' *. * [ARCHIVE=OFF] ~PIP D:~:*.*[~] ~DSI<RESEI' ~PIP D:~:*.*[~] ~SEl' B: * . * [ARCHIVE=OW] OR>PIP D:=8:*.* [VROWA] ~SEl' c: * . * [ARCHIVE=OFF] OR>PIP D:=C:*.*[VROW] OA>USER 1 lA>SET *. * [ARCHIVE=OFF] lA>PIP D:~:*.*[~J lA>SET B: * . * [ARCHIVE=OFF] lA>PIP D:=8:*.*[~] lA>DSI<RESEI' lA>PIP D:=8:*.*[VROWA] 1A>SEI' C: * • * [ARCHIVE=OFF] lA>PIP D:=C:*,*[~] 1A>DSKRFSEl' lA>PIP D:=C:*,*[~] lA>USER 2 '»SET *. * [ARCHIVE=OFF] ~PIP D:~:*.*[VBOw.A] ~SET B: * . * [ARCHIVE=OFF] ~PIP D:=8:*.*[~] '»DS<RESEI' '»PIP D:=B:*,*(VROWA] 2A>USER 3 3A>SET *. * [ARCHIVE=OFF] 3A>PIP D:~:*.*[VBOw.A] 3A>SET C: * . * [ARCHIVE=OFF] 3A>PIP D:=C:*.*[~] 3A>USER 6 6A>SEI' *. * (ARCHIVE=OFF] 6A>PIP D:~:*~*[~] 6A>DSI<RESEI' 6A>USER 0 c:a>
3.8-10

In this exaIlp1e four (4) floppies were filled up during PIP ocmnands, <XlCe 00 the A: drive, twice 00 the B:, and alee 00 the c: drive, so that a DS<RESET was needed, and the previous PIP ccmnand had to be repeated. The last D5KRESEl' (after oopying user area 6 of dri ve A:) was in preparatioo of renDving the fifth backup diskette. The frequency of D5KRESEl' ccmnands in a full backup depen3s 00 the size of the files being backed up. Fi ve floppies in all were sufficient to backup the hard disk in this exaIlp1e, suggesting that it was no more than 30% full.
You can back up files that have read-protect passwords by first JOOdifying their drive label so PR:>'l'8:T is set OFF. You must know the password of the drive label to IOOdify the label. Sug;xlse that "Sf.X:RE'I'1 were the password of the label of drive B:. 'lb back up protected fi 1es 00 B:, type:
<B>SEl' [~FF]
Now type SEnWr, the password 00 the label of dri ve B:. '!his causes dri ve B: to ignore file passwords. You can IlCW perform a backup, or you can erase the files fran drive B:, if they are no 100ger needa'! 00 the hard disk. After you PIP files to an archival diskette, the same cxmnand as above, but substituting lIeNl for "OFF, II will restore password protectioo to files 00 dri ve B:.
'lb password protect files 00 an archival diskette (for example, 00 dri ve E:) you must plt a label 00 the diskette. Below is a ocmnand to assign a label called IF1DPP-21" to the floppy disk:
OB>SEl' [NHm = FI.DPP-21]
3.8-11
The screen will display the label, in the f~t sb:::lW.n en page 3.4-5. Next you must make the label reoogntze file pasa«>rds by setting the PR:>'rECr optien of tbe l~l at:
'Ib prevent unauthorized persons fran lOOCiifying the label to disable the password protection, you must also put a password en the label. (You must also be sure that you do oot forget the passwords 1 ) In this exauple, "PADIDCK" is t~ label password:
OE>SET [PJ.\SS\ORD = PADlOCK]
Now the diskette can recognize file passwords that you may assign. The PIP cxmnan:.i does not copy passWOX'de. '!his means that a file that has a password 00. the SOurce will no longer have arr:t password en the destinatioo. area. If you use PIP to 00P.f files that require password protectioo., be sure to U$e the SET cxmnand to put file passwords 00. the archlval diskette files mediately after the PIP operatien is dale. Wil~ symbols can be used to put the same password 00. each ftle. For. exanple:
OB>SET *.*[PASSWORD = IDCKPAD]
This puts the password "IDCKPAO" 00. every file in user area O. If files were stored in other user areas of the diskette (fo;example, user areas 2 am 9) additiooal CX11IIDa,r¥is would be required to protect the other user areas that had files:
OB>USER 2 2E>SET *. * [PASSWORD = IDCKPAD]
2E>USER 9 9E>SET *. * [PASSWORD = IDCKPAD]
3.a-.12

Note that the cnmna.rrl to plt a label al the diskette did not have to be repeated, because a single label can support file passwords or timestamps at all of the user areas of a logical drive. '1l1e SEl' oatmand to assign file passwords to the files, however, has to be repeated for each user area that has files.
Restoring Badmp Data
If you need to restore data from a backup tape or diskette, you can either restore all of the data at once, or restore specific files selectively. For example, if you accidentally erase a file at yc:AJr hard disk, you can cop:! the most recent versiat of the file from a backup diskette or tape. To restore files or disks from floppy diskettes, use the PIP oonmuXL To restore files from tape, use the TIP program.
3.9.Autx:8atic RIM I' BY Test
Me-OOS incltrles an autanatic RAM test Which runs at the lowest priori ty ~ does not decrease the efficiency of the system. '1l1e RAM test performs oon-destructi ve tests al each byte of rneJOOrY, am reports bad memory, if it is found, al the system CXXlSOle.
It is very unlikely that you will ever receive arrf messages fran the menory test program. If you want to test all your RAM memory, leave your system CN with no active users. The meDDry test will be oanpleted in an hour or less if there is IX>
activity. The memory test starts over as soon as it finishes.
If bad meDK>ry is fOlltrl, the following message appears at the system CXXlSOle screen:
lte.xy failure at 'hbbb:1tiIl data was hb data sbould have been hb
'!he hhhh:hhhh am hhs are hexadecimal numbers, described al page 2.5-DDT86-1. Write dotm all of the informatial, am call your Gifford canputer Systems representati vee
3.9-1

KeepiDJ Your Sys1aa Oltrent
As your canputing needs expand, you may wish to expand your system am your software to meet those needs. Gifford OEplter Systems supplies hardware, software, and technical assistance to meet the growing needs of MC-OOS custaners.
Gifford o::mputer Systems is oootinually updating the MC-OOS operating system with new features. You will be notified Qf new developuents of the Me-OOS system in our newsletter, the GIftORD OBSERVER, am you will have the opportunity to plI'c::lha.se updates of our operating software for a reasonable fee.
Fran time to time Digital Research Inc., publisher of the OX1current OOS operating system upcn Which Gifford's MC-OOS is based, releases new versions of Concurrent OOS that may offer new capabilities important to your canputer applioatiCXlS. Gifford's policy has been to make new releases of Digital Research Inc. operating systems software products available to custaners in a timely mamer, When Gifford engineers are satisfied that the new software is adequately integrated with the tilysioal equipnent.
Gifford canputer Systems peric:rlically updates the MC-OOS manuals, and you my want to plI'chase new documentatien when it beoanes avai lable. Please contact your Gifford representative if you are interested in expanding the hardware or software capabilities of your K:!-OOS system.
Hu:'dware ~ades
If you have purchased additiooa.l IEEE 696/8-100 hardware c::atpXlents, or if you have had Gifford upgrade old o::II
Preservi.nj Old ~rati.nj Systems
Before you install an updated version of Me-DOS, be sure that you have a ropy of ALL of your files on floppy diskettes (oot just the system files), so that you can go back to the old software in the event that anything is wrong with your cx>py of the new version of Me-DOS. Label the diskette that holds the old version am keep it in a secure place offsite. It is good practice to keep in your archives a labelled ropy of any operating system that ever worked on your system. Follow the procedures in Section 1.6 to back up the new system diskette. Keep all copies of system diskettes inaccessible to intruders.
lPJradi.nj MP/M 8-16 Systems to I«:-rn:;
If you are upgrading a computer to Me-DOS that formerly supported an MP/M 8-16 operating system, read the letter that accc::mpanied your upgrade regarding any differences in switch settings or jl.Dlpers on your 5-100 boards. Detailed information is provided in Appendix C of this manual. Make sure that you back up ALL of your files alto flqlpy diskettes (not just your system files), before yo1 cqJy your new system files alto the hard disk. Also, it is iaperative that yo1 use the new ID-Im versim of the PIP program to cqJy ALL ycur new system files alto your hard disk. Otherwise, the new system files will mt be copied correctly. If your catpUter is a Gifford MP/M 8-16 operating software release earlier than 2.1F, or CbmpuPro's version of the MP/M 8-16 operating system, you will need to run the special FIXPASS upgrade utility to nmify your unencrypted PASSWD file. Read the description of FIXPASS in Chapter 2 of this manual. You do not need FIXPASS to upgrade systems that already have Gifford's Me-DOS or releases 2.1F or 2.lG of Gifford's MP/M 8-16.
If you have a version of the MP/M 8-16 operating system from 1983 or ear lier, read the section near the end of CbJpt:er 2 on system security to decide what level of system security you need to establish. With encrypted login passwords am restrictions on who can access various user areas, you RUst decide which user areas will be . open to which accounts. Before you upgrade, you RUst put an account called system in your PASSWD. file. '!be procedures for installing an upgrade are described in the next section. Read about NBiUSER in Section 3.3 to learn how to add account names to the PASSWD file.
3.10-2

Installbvj a IC-Im Upgrade
Below are procedures to install an upgrade. Keep a copy of your older operating system handy, until you are sure that the upgraded version is installed proper lye Follow these nine steps:
L Boot the system with the older operating system.
2. COpy PASSWD, LPRS, Tl'YS, and VTrYS files to a diskette and store nearby. If the .HLP files have been custanized, copy them too. If you have a hard disk, the custanized files fran your old MC-IX)S that do not appear on the new system diskette will be on your hard disk. Review this chapter, particularly Sections 3.3 through 3.7, to be sure that the system management files are as they should be. If you have files on your old system that for sane reason are superior to the corresponding new files (for exanple, HELP files that you have augmented with messages tailored to your users am. applications, or .MBX and .REM files), these can be copied to dri ve A: from your archival diskette, using the PIP cx:mnard
3. Type SYNC to flush .the cache buffer to the hard disk.
4. Boot the system with the newest version of M:-JX)S.
5. log in as "system" on the system console.
6. Copy the new operating system floppy diskette to user area o of drive A: with the new Me-DOS version of the PIP ocmnand (to determine which PIP program you're usiIY:J type PIP am then REl'URN) like the followiIY:J, but substituting your floppy drive source designation for ''y:n
PIP A:=y:*.* [VlOO']
If you have SET a label on drive A: with protection 00', rement>er to set protecticn OFF so that you can overwr i te old system files that are protected by file passwords. RemelIber to put a label with a password, with protection set 00', on drive A: so that your new system will be secure. Read Section 3.4 of this chapter for informatioo on the use of drive labels and on establishing system security.
3.10-3

7. Restore old files (like LPRS, PASS'ID, TIY5 am VTIYS, etc. that you set aside in Step 2 above) to user area 0 of drive A: of the hard disk. Do not cop.! the old PASSiD file if you were required to use FIXPASS. If you have a new PASS'ID file that has been mcxiified by FlXPASS, this must be used en the new system. An old MP/M 8-16 PAS.9ID file may lock you out of the system, if it OCI'ltains \D'leIlCI"ypted passwords.
8. Run SYN: to copy to drive A: all the new files stored in the bJffer. .
9. Reboot with the new M;:-OOS system diskette in your leftham floppy drive.
Renv:mIber to keep labelled copies of yaIr old operating system diskette in a safe place.
tJ.pgrading Syst.eIIIB Without a Bml Disk
The reduced speed am reduced storage capacity of a system without a hard disk generally nake it impractical to install all of the features of Gifford's MC-OOS en a floppy-cnly system. You must choose selectively am:ng the options. If this is an unsatisfactory si tuatien, you should consider upgrading to a hard disk.
If you are adding a hard disk to a system that formerly lacked one, or if you are upgrading a CP/M system to MC-OOS, read OJapter 1 of this manual and proceed as if you were installing a new system.
3.10-4

aIAP.l'ER 4:
'lbese charts will assist you in getting out of trouble should your system fail to operate proper 1y. If you find that you need to call Gifford Catputer Systems, read 1Ibat You Will lteed to J.{ncJw to Call Gifford <bIpJter: SystaIB at the end of this chapter. For systems with only one floppy drive, assl1l11E! that the left-hand floppy drive is the equivalent of your single floppy drive.
Warni.D;J: Rever work <Xl the inside of the enclosures 1iIben the paller is (Ii. 'l'brn (R' the paller am mwplog the pcJIIIK ccxds before opening an erx:losure.
4.1 S!S'lBI WILL lOr 9mRl UP
(bJplt:er lb:l.osure
Rxal c:pratial is indicated by the SCUJd of the fans am the RBSBr blttal shruld be lit.
Problem
RF.Sm' button not lit and fan not at.
Probable Cause
No electrical power to the catplter.
4.1-1
Plug power cord into wall socket.
Plug power cord into catplter enclosure.
Check wall outlet for power.
Check circuit breaker to outlet.

Pmbl.elll
RESET button not lit and fan not (lq.
Fan (lq, RESEr button not lit.
Prdlable Cause
Circuit breaker has tripped the main power switch.
IDose camection or bad light.
RESET button lit, Fan discamected fan not (lq. or broken.
Ploppy Disk Drives
Check system for shorts 1 turn breaker OFF, then (lq.
Call Gifford.
Call Gifford.
Koral operatial is indicated by a blinking light on the left floppy drive ttben the drive door is qaI.
Prmlan
Drive light fails to light.
Drive light glows dimly.
Probable cause
Floppy dr ives do not have power.
Weak connection between drives and controlling cables.
4.1-2
Turn back panel power switch (lq.
Plug power cord into power socket on main enclosure or into a wall socket.
Check circuit breaker on rear panel.
Check that the cables are securely connected between drives and Disk 1 or Disk 1A board~ Check that Disk 1 or Disk 1A board is seated in the mtherboard.

Both drive lights gl<:M brightly.
OCive light c0ntinues to blink when the dr ive door is closed.
Drive light blinks, dr ive heads click, but system will not load.
Probl.
System begins to load, but stops in mid process.
System souOOs as if it booted, but no message on console.
cable is installed upside down.
The dr ive belt has detached.
Damaged system diskette or the wrong diskette.
PrdJable 0UIe
Bad [email protected] board.
No power to terminal.
RS-232 cable not connected properly.
Terminal incorrectly set.
4.1-3
Disconnect, turn over the connector, ana. reconnect.
call Gifford.
Try another system diskette.
call Gifford.
Plug in terminal am turn 00 power
Check cable connections •
Check baud rate and word size settings.

Bard Disk Drives
ProblaD
Dr ive does not initialize.
Probable cause
Dr ive does not have power.
Dr ive heads not unlocked.
Data or control cables not secure.
Check :p<:Mer switch. Check power cord.
Unlock heads.
Check that cables are connected properly and are secure.
4.2 smmM 9mRrS UP, lUI' IXB:J lOr QlI!BI.Wm J.lI.O.»ERLY
Buns slowly or loses data sporadically.
System runs slowly.
Sane terminals or printers are not CN or not connected.
RS-232 cables are using pin-4.
The hard disk needs reformatting.
The catTflUter Bad RAM board. occasiooally loses data or files.
4.2-1
Reconnect any disconnected terminals and printers and turn CN poiI1er to all terminals and printers.
Disconnect any wires from pin-4.
call Gifford.
call Gifford.

CIIAPIJlR 4:
CPY does not work.
Applications programs such as wat:dStar or SuperCalc do not work correctly.
Programs work on all but a few terminals.
SourOi! and de.stination diskette formats are not identical.
The program is not insta,Ued properly for your system.
'rrYS file Me been damaged.
Use t.pe ~fPropr;ate diskette or use PIP to cop] files.
~ad the manuals.
Try running the progrcun under a single-user operating system.
If you pllrcilased the sof~e with your ~s~, ~ Gifford.
Check TTYS file.
For 008-80 tePlatnals, check that 1:landshaking is set and scroll is at.
4.3 1IINr mJ WILL NBBD IJD IlOf !IJ.O CAll. G1I1fQI) (DiJ?(tl'Bk SiS'1'!HS at lQJR IBAt.ER
Gifford canp.tter Systems fully s~ts all of the hardware and software we sell. Call the Olstat\er Service Department between 9:00 A.M. and, 5:00 P.M. (pacific t~) for help. Please have the following items ~ when you call:
Your system number. This number is listed on the invoice you received with your system.
The version of your operating system. This is listed at the label of your master diskette. .
4.3-1

0IAPlER 4: "'1,; h:" I
An exact description of what is not working. Also list whether the product was working before, and what has changed between the time that it did and did not work. Have this manual wi th you when you phone us, in case we need to refer you to specific pages in the manual.
We will attempt to rectify the problem with you on the phone. If we are unable to solve your problem inmediately, we will take your name and number and get back to you as soon as we can.
If it is necessary to repack your system, make sure that it is packed as it was originally shipped. Take special care in repacking the hard and flOfPY disk drives. It is important that the disk drives be secured before IlDving or shipping. Install the cardboard inserts in the floppy dr i ves, and secure the heads on hard disk drives.
4.3-2
This form s1x>uld be used toreIX>rt problens withMC-DOS or with the manual itself to Gifford Coo'plterSystems. EvelY report will be reviewed by our CUstomer SUpport Department.
Name:
CcIIpany:
Address:
City, State, Zip Code:
Telephone:
K:-DOS System Number:
K:-ta; Version:
State the exa::t problem and symptalS that you encountered with MC-DOS below:
4.4-1

CBAP1'ER 4: 'liO IBflStD)l1JG THE smJ.W(
4.4-2

APPJH>ICBS
A~ Hardware RequirE!nents for !C-1)()S ••••••••••••• ~ ••• ~ •••••••• A-1 B. Deser iption of the Board Arrangement on the 1_
696/S-l00 M:)tberboard •••••••••••••••••• ~ •••••••• ~ ••••••••• g.;.l C. ~ntation of SWitch settings and Junpers ••••••••••••• • C-l
OOnpu~o CPO 8085/~8 •••••••••••••••••• ~ ••••••••••••••••••• C-l CoJtpu1?ro "Cl?tJ 808'6/87 ....................................... C-l ~rotech MI-286 •.•••••••.••.•••••••••••••••••••••••••••• ~'C-2 OampuPro S¥stemSupPort 1 ••••••••••••••••••••••••••••••••• C-3 Macrotech 256K-5l2l< Static RAM Mamry Board ••••••••••••••• C-4 .R»I 16 ~:nory I3c:>a.rds •••••••••••••••••••••••••••••• ~ ••••••• C-5 RAM 21 Memory Boards .••••••••••••••••••••••••••••••••••••• C-6 RAM 22 Mamory Boards •••••••••.•••••••••••••••••••••••••••• C-6 HDC/OMA Hard Disk Cbntro1ler •••••••••••••••••••••••••••••• c-7 HDCA Hard Disk COntroller •••••••••••••••••••• ~ •••••••••••• c-1 ~ DGC-100 Bard Disk Cbntroller •••••••••••••••••••••••• C-8 Disk 2 Hard Disk ContrOller ••••••••••••••••••••••••••••••• C-8 Disk 3 Bard Disk Ccintroller ••••••••••••••••••••••••••••••• c-9 Disk 1 Floppy Disk COntroller ••••••••••••••••••••••••••••• C-10 Disk 1A Floppy Disk Cbntroller •••••••••••••••• ~ ••••••••••• C-ll Interfacer 3 ••••••••••••••• ~ ••••••••••••••••••• ~ •••••••••• C-12 Interfaoer 4 •••••••••••••••••••••••••••••••••• ~ ••••••••••• C-13 f.tt)R.I'V:E:/IJ. • • • • • • ~ • • • • • • • • • • • • • • • • • • • • • • ~ • • • ~ ~ • • • • • • • • • • • • •• C-l"6 AICS100 Switch Settings ••••••••••••••••••••••••••••••••••• C-16 AICSlOO Junper COnfi9uration ••••••••••••••••••••••••••• ~ •• C-17 LANSlOO Jumper OOnfiguratiori •••••••••••••••••••• ~ ••••••••• C-18
D. Ebrmatting Bard Disks ••••••••••••••••••• ;. •••••••••••• ~ •••• D-l Ebrmatting 8-Inch with the Disk 2 Cbritroller •••••••••••••• D-2 5.25-Inch with the Konan Cbntroller •••••••• ~~ •• ~ •••••••••• D-3 5.25-InCh with the Disk 3 Cbntrolier •••••••••••••••••••••• 0-5 8-Inch with the HDCA cbntroller ••••••••••••••••••••••••••• D-7 ~stin9 the ~ive •••••• ~ •••••••••••••••••••••••••••••••••• 0-9 Installing the ~rating System 00 Your Hard Disk ••••••••• 0-12
E. Programning Serial Ports inK::-OOS •••••••••••••••••••••••• E-l F. using the Printer ~rt On 'D!leVideo
'It!tminals •••••.• ••••• ~ ••••••••••••••••••••••••••••••••• ;. •• • F-l G. ~rt N.urbers used -in ~-nos ............................... G-l
APPENDIX-l

H. Notes on Installing WOrdS tar and dBASE II ••••••••••••••••• H-l WOrdStar Installatian ••••••••••••••••••••••••••••••••••••• H-l J:lelay's •••••••••••••••••••••••••••••••••••••••••••••••••••• B-1 Printer Release ••••••••••••••••••••••••••••••••••••••••••• H-2 l6-bit WOrdStar, Version 3.3 •••••••••••••••••••••••••••••• H-2 a-bit WOrdStar, Version 3.3 ••••••••••••••••••••••••••••••• H-4 a-bit WOrdStar, Version 3.0 ••••••••••••••••••••••••••••••• H-5 RerlaIning WOrdStar ••••••••••••••••••••••••••••••••••••••••• H-S Troubleshooting a Reinstallation •••••••••••••••••••••••••• H-5 Installation of dBASE II, Version 2.4 ••••••••••••••••••••• H-6
I. Directory of System Files Supplied by Gifford Canputer SysteIl'S ••••••••••••••••••••••••••••••••••••••••••••••••••• 1-1
J. dBASE II Enhancements ••••••••••••••••••••••••••••••••••••• J-l CAI.i[, • ()IJ». • • • • • • • • • • • • • • • • • • • • • • • • • • •.• • • • • • • • • • • • • • • • • • • • • .J - 3 SY~.()IJ» ••••••••••• ~ •••••••••••••••••••••••••••••••••••• J-5 GErDA.m .00> ••••••••••••••••••••••••••••••••••••••••••••••• J-6 GE:I'r·!J.'tIE.OO> ••••••••••••••••••••••••••••• ~ ••••••••••••••••• J-8 ER'EE:J?RNIr .00> • • • • • • • • • • • • • • • • • • • • • • • • • • • • • • • • • • • • • • • • • • .• • • • J-8 QtJI'rIO.QD) •••••••••••••••••••••••••••••••••••••••••••••••• J-9 'WIIM.<>1[) •••••••••••••••••••••••••••••••••••••••••••••••••• J-IO CAI.J:,.~ •••••••••••••••••••••••••••••••••••••••••••••••••• J-ll ~.~ •••••••••••••••••••••••••••••.•••••••••••••••• J-~2 GE:IDAiE.~ ••••••••••••••••••••••••••••••••••••••••••••••• J-12 SY'SC)r1[) .~ •••••••••••••••••••••••••••••••••••••••••••••••• J-15
K. A Brief Description of MC-DOS ••••••••••••••••••••••••••••• K-l Me-DOS and Ocncurrent DOS ••••••••••••••••••••••••••••••••• K-l Features unique to MC-DOS ••••••••••••••••••••••••••••••••• K-2 Additional Notes on Me-DDS •••••••••••••••••••••••••••••••• K-3 Me-DOS and MP/M 8-16 •••••••••••••••••••••••••••••••••••••• K-4
L. cables and Oonnectians •••••••••••••••••••••••••••••••••••• L-l M. Map of Logical Devices, cables, Rooms, Users,
and Status •••••••••••••••••••••••••••••••••••••••••••••••• M-I N. Table of Hexadecllnal Numbers •••••••••••••••••••••••••••••• N-l O. ASCII Character Set ••••••••••••••••••••••••••••••••••••••• ~l P. Notes ••••••••••••••••••••••••••••••••••••••••••••••••••••• P-l
APPENDIX-2

APPEtIlIX A
The following OompuPro products are necessary nor a basic !C-OOS system:
Mainframe: An IEEE 696/S-l00 motherboard and power supply.
Processor: Macrotech MI-286 (dual CPU with 8-bit Z80H and l6-bit 80286); or alternatively, CbmpuPro CPU 8085/88 (dual CPU with 8-bit 8085 and l6-bit 8088); or Q)mpuPro CPU 8086/87 (lG-bit).
SUpport: System SUpport 1 (one serial port for system console, two interrupt controllers, a real-time calendar and clock, three interval timers, RAM and EPROM).
RAM Memory: RAM 16, 21, 22, or 23 (high speed static RAM). 192 kilobytes of RAM is required for the operating system. 64 kilobytes is needed nor each user running 8-bit programs. Users running l6-bit programs require somewhere between 16 kilobytes and 1 megabyte depending on the nature of the program. The K:-OOS operating system allocates up to 128 kilobytes per l6-bit user as a default value. This value can be changed with the SE'lMEM conmand or by generating a new system file with the GENOCPM menu-driven program. Systems with hard disks can utilize an additional OK, 32K, or 64K of RAM for a hard disk cache buffer.
I/O Control: Interfacer 3-8 board (terminal, printer, and modem support).
Mass Storage: Disk 1 or Disk 1A floppy disk controller (with one or two 8-inch double sided, double density floppy disk dr i ves). From one to four hard disk dr i ves, each holding at least 20 megabytes, is recoJ1lllended for systems which support three or more users.
~rminals: cne for each logged-in user. Extra display RAM will support multitasking virtual terminals.
A-I

APPEtI)IX A
Each user on the system requires a serial interface port to connect a terminal or IOOdem. Mditional serial ports can be added to the system using CoopuPro's inter facer boards.
Systems with tape backup units (4-track or 9-track) require a tape controller on the bus, such as the AllO¥ controllers.
DR ~t local area net\'JOrks require a net\'JOrk controller on each computer within the net\'JOrk, to support Datapoint's ARCNET network hardware protocols. Networks with more than t\'JO nodes will require active or passive repeaters to link the coaxial cables that connect the net\'JOrk controllers.
Cbmputers like the IBM PC or IBM PC/XTmust have 256K or more of RAM, and must include a net\'JOrk controller that supports ARCNET protocols to be in DR Net net\'JOrk.
A-2

APPJR)IX B
B. Descriptial of the Board ArrangeJEllt OIl IBBB 696/S-100 Jbtherboard
'.lbe tables in .Appendix C docUI1Ent the switch and junper settings for the MC-OOS operating system. U1less you install a different CPU, it is unlikely that you will ever have to change any of the switches or junpers. lJ.his information is provided in the event that switch settings are accidentally changed.
The switches referred to are located an the circuit boards inside the main enclosure. You will need to turn the ~stem OFF and unplug the computer from its power socket before you remove the cover of the enclosure. Olce the cover is renoved, you will find the circuit boards plugged into a series of sockets an the motherboard. Each socket has 100 contacts (which is the origin of the IEEE 696/S-l00 bus designation).
All of the boards rust be inserted so that the oooponent side of the board faces the front of the computer. The boards can be placed in any order. Gifford Computer S¥stems installs them in the following order, counting from the front:
Slot I
1 2 3 4 5 6 7 8 9 10 11 12 13 14
Board descriptiOll
CPU
RAM RAM RAM RAM RAM RAM MDRIVE/H MDRIVE/H DR NEl' NElWORK BOARD
HARD DISK CONTROLLER
B-1

Slot I
15 16 17 18 19 20
APPBIIlIX B
Jbrrd descriptioo
DISK 1 or DISK lA
SYSTEM SUPPORT 1
IN'IERFACER 3-8
(CkmpuPro introduced notherboards during 1984 that have 21, rather than 20 bus sockets.)
Each board has its descr iption on it. '!be switches are likely to be the blue conponents with tiny white switch levers on them. '!be switch can be identified by looking on the board near the switch for the oamponent description. The component descriptions are printed in yellow on the ConpuPro boards. If you have trouble locating a board or the switches, you can refer to the user manuals for each board. 'lhese are thin blue books with photographs of the boards on the covers (for CbmpuPro boards), similar books for Macrotech or Alloy boards, and a small-format booklet for the Konan controller. '!be user manuals include catpOllent layouts that indicate the position of the switches and jUDpers.
B-2

c. J)x:IJaltatial of Switch Settings and J\JIIPr8
unless otherwise noted, the settings descr ibed below are valid for the current versions of K;:-OOS (VLOO and later).
Switch 1 0f!P (B
1 == 2 == 3 == 4 == 5 == 6 == 7 == 8 ==
CQIplPro CPU 8086/87
Switch 2 OJ"!' (B
1== 2 == 3'· ----4' ----5 ==
, 6 == 7 == 8=
SWitch 3 QII'!' caJ
1 == 2 3= 4 == 5 == 6 == 7 == 8 ==
==
SWitch 1 and switch 2: all paddles (subswitches) are OFF.
Switch 3 011' (B
1 == 2= 3 == 4 == 5 == 6 == 7 == 8=
Switch 4 OPF (B.
1 == 2= 3 == 4 == 5 == 6 == 7 == 8 == 9 ==
10 == J8-junpred.
C-l
Switch 5 0f'P c.:
1 == 2= 3 == 4= 5 == 6 == 7 == 8= 9 ==
10 -==

APPBRlIX C
IIilcrotech MI-286 (Z80/80286 DJal. Processor)
N:>te that there is an eighth, unlabeled junper in the upper left set of junpers, below J7, and that the location labelled J24 has no junper. '!he following junper settings should be used:
Jl-J7 J25 - J32 J33 0-00 00-0 0
I 00-0 00-0 0
0-00 00-0 0
00-0 0-00
0-00 ·00-0
00-0 0-00
00-0 00-0
0-00 (no label) 0-00 J17 - J23 0-00
J8 J9 JlO Jll Jl2 00-0 0 0 0 0 0
I I I 00-0 0 0 0 0 0
I I 00-0 0 0 0 0 0
00-0
Jl3 Jl4 Jl5 Jl6 0 0 0 0 00-0
I I 0 0 0 0 00-0
I I 0 0 0 0
C-2

APPlR>IX C
FOe OompuPro 8086 CPU or Macrotech MI-286 cpu, remove pin-4 of IC U28 an the System Support 1 from its socket. Ebr an MI-286, 8085/88, or 8086, rove slide junper J17 on the Disk 1 from position A-B to B-C:
<bIpJPro Disk 1, J17
A
B I C
OlIplPro System S:gu:t 1
Srritdl 1 OP.F (»I
1= *2 *3
4 15 = 6 == 7 8 ==
== <See note == <below * ==
==
1 2 3 4 5 == 6 == 7 == 8 ==
== ==
Slritdl 3 CJI!P (»I
1 == 2= 3 ,= 4 == 5 6 == 7 8=
==
==
* If the cpu is a Macrotech MI-286, subswitches 12 and 13 of Switch 1 on the System Support 1 board must be OFF, rather than ON. ('!he position illustrated above is required for the Q:mpuPro cpu 8085/88 and cpu 8086/87).
, Ebr systems with one negabyte of RAM, subswitch 15 of Switch 1 should be set ON.
Junpered Settings: Jl cable connector on upper card edge: Serial port connection. J2 Dip socket near upper edge: Insert a dip shunt. J3 Battery connection on upper edge: Plug auxiliary battery cable
into this connector, noting the "+" de'signation on the board. J8 Dip socket in 10\liler row of ICs: Insert a dip shunt.
J13 'lbree-pin junper : Insert a slide junper onto prongs 8 and C. All remaining jumpers are left unconnected.
C-3

APPJRlIX C
.Macrotech 256K-5l2K Static RAM II!DDry Jbard
'!he jumper settings for the jumper marked J3 on the 256K-512K Macrotech memory board should be as follows:
1st 256K 2nd 2561{ 300 2S6K 4th 256K
0 1 0 1 0 1 0 1
00-0 0-00 0-00 00-0
00-0 0-00 00-0 0-00
00-0 00-0 00-0 00-0 00-0 00-0 00-0 00-0
00-0 0-00 0-00 0-00
00-0 0-00 0-00 0-00
00-0 0-00 0-00 0-00
00-0 0-00 0-00 0-00
lefer to the Macrotech technical Addressing Addendum 1.1 for documentation on alternate memory value jumper settings.
C-4

APPBlIllX C
RAM 16 II9Dry lbards
Switch Settings for 51:
1st 64lt 2nd 64K 3rd 64K 4th 64K
Oft' (It Oft' (II Oft' "em OPP em
1 == 1 == 1 == 1 == 2 == 2 == 2 == 2 == 3 == 3 -- 3 == 3 == 4 -- 4 == 4 -- 4 == S == S == S == S == 6 == 6 == 6 == 6 == 7 == 7 == 7 == 7 == 8 == 8 == 8 == 8 ==
o-FFFF 10000-1FFFF 20000-2FFFF 30000-3FFFF
5th 64K 6th 64K 7th 64K 8th 64K
CPr (II CPr (If OP.P (It OPP em
1 == 1 == 1 == 1 == 2 == 2 == 2 == 2 ==;
3 == 3 == 3 == 3 == 4 == 4 == 4 == 4 == S == S == S == S == 6 == 6 == 6 == 6 == 7 == 7 == 7 == 7 == 8 == 8 == 8 == 8 == 4000o-4FFFF SOOOo-SFFFF 6000o-6FFFF 7000o-7FFFF

APPJR)IX C
Swi tch Settings for Sl:
1st 1281(
Oft" (B
1 == 2 == 3 == 4 == S == 6 == 7 == 8 == O-IFFFE'
Switch Settings
1st 256lt
OP!" (B
1 == 2 == 3 == 4 == S == 6 --7 == 8 == 0-3FFFF
2nd 1281(
Oft" (B
1 == 2 == 3 == 4 --S --6 == 7 == 8 == 20000-3FFFE'
for Sl:
2nd 256K
OFF af
I --2 == 3 == 4 == S == 6 == 7 == 8 --40000-7FFFF
C-6
3rd 1281(
I 2 3 4 S 6 == 7 8 ==
== == == ==
40000-SFFFF
3rd 256lt
Oft" (B
I == 2 == 3 --4 == S == 6 == 7 == 8 == 80000-BFFFF
4th 1281(
I 2 3 4 S 6 == 7 == 8 ==
== == ==
60000-7FFFF
4th 256'((
OFF af
I --2 = 3 == 4 = S == 6 == 7 == 8 --COOOO-FFFFF

Versions Vl.OO or later of M>-DOS:
Jumper Settings:
J5 to 0, J3 shorted.
BOCA Bard Disk Olntrol1er
Sritcb 8
CIlF (II
1 == 2 == 3 == 4 == 5 --6 === 7 == 8 ==
Jumpered Settings:
versions 1.00 or later:
Interrupt jumper: A to B to o.
C-7

APPJR>IX C
IC'man JU:-IOO Bard Disk Qmtroller
Junper Settings:
Near R41: leftnDst junper camected, others unconnected.
Above RP3: secom and fifth from left connected, others unconnected •
Junper "IIrfA": middle and bottom connected.
Junper "eBA": middle and bottom connected.
Disk 2 Bard Disk Qmtroller
Version Vl.OO or later of l>C-DOS:
SIIlitcb 1
ow
1 == 2 == 3 4 == 5 6 == 7 8 == 9 ==
10 ==
== ==
==
SIIlitch 2
ow
1= 2 == 3 4 5 == 6 7 8
== ==
== ==
'!he interrupt junper should be IlDVed to position 1 of jumper area J7-J15.
C-8

Selector 0Ianne1
Sldtcb 1
an"
1 == 2 3= 4== 5= 6 == 7 8 9
10
== == == ==
~IXC
Disk 3 Bard Disk Oxltroller
Sritdl 1
1 == 2 3 4 == 5 6 7 8
(B
== == == == ==
Sritdl 2
(J.II' at
1 == 2 == 3 == 4= 5 == 6 == 7 == 8 ==
RP1 Dip scx:ke~: Insert a dip shunt ..
J1-J4 'lbp edge of card: cable connection to drives.
J5 'lbp edge of card: cable connection to dr i ves.
J7 'three jwrper pins: Insert a jwrper slide between C and B.
J8 'lhree junper pins: Insert a jWlper slide between A and C.
C-9

J9
J10
APPJR)U C
I I I I I I I
III1111
012 3 4 5 6 7 8
J\lnper should be set in top position.
Disk 1 F.IDppy Disk Qmtrol1er
Blfitcb 1
(ft (B.
1 == 2 == 3== 4 == 5 == 6 == 7 == 8 ==
Siritcb 2
CI!"F (B
1 == 2 == 3 == 4 == 5 == 6 == 7 == 8 ==
en switch 2, subswitch 1 controls the baud rate of the terminal attached to the System SUgx>rt 1 board. SUbswitch 2 of switch 2 controls the number of stop bits used by the console attached to the System SUgx>rt 1 board. 'lhis is not the way that standard CbIIpuPro software uses these switches.
Sldtdl 2
Subswitch 1 Subswitch 2
9600 baud 19200 baud 2 stop bits 1 stop bits
C-10

Interrupt junperJ4: installed.
With either an 8085/88, an 808.6 cpu, ora MI~286, slide jwrper Jl7 should be llDVed toposition"B,· ~ecting the lower two posts of J17.
Disk 1A Floppy Disk Qmtroller
'!he switch settings docwmnted .below are for the Disk lA floppy disk controller. '!be Disk lAwill control both 8-inch am 5 1/4-inch floppy disk drives.
Srritdl 1 _itch 3
(ft CB alP ·aIP Of
1 == 1 == 1 == 2 == 2 == 2 == 3 == 3 == 3 == 4 == 4 == 4 == 5 == 5 == 5 .== 6 == 6 == 6 == 7 == 7 == 7 == 8 == 8 == 8 ==
SUbswitch 4 should be set~. SUbswitch 5 on Switch 1 controls the batrl rate of the terminal attached totheSys~ Support 1 board (called Cblsole 0). &!bswitch 6 on Sw.itch 1 controls the nunber of stop bits used by the terminalattacbe4 to the System Support 1 board.
SWitch 1 SUbswitch 5 &!bswitch 6
(II 9600 batrl 2 stop bits
C-ll
(ft 19200 batrl 1 stop bit

JUDper Q)sitim
Jl J2 J3 J4 ,J5 J6 J7 J8 J9 JlO Jll Jl2 Jl3
lnterfacer 3
Switch 1
1 == 2 3 4 5== 6 7 8
==
== == ==
APPM>IX C
9nmt Q)sitim
5 5 8 8
OPllN AC Be AC AC
4 Shunt Installed
OPEN OPEN
For a second Interfacer 3 board, subswitch 7 of switch 1 should be set OFF.
JUmpered Settings:
J1 Upper left dip socket: Insert a dip shunt. Q)nsult the Interfacer 3 manual for hardware handshaking.
J2 Dip socket to right of J2: Insert a dip shunt.
C-l2

J3-J8
1==1 I 1 J9-14
1=1 1 1
J15· Dip socket one row up from bottom edge: Cc.Ilnect pins 5, 9, 10, 11, 12, 13, 14, 15, and 16. '!his is an interrupt jumper.
J16 Dip socket below J15: Connect pins 1, 2, 3, 4, 5, 6, 7, 8 am 11. ':Ibis is an interrupt junper.
J17 '!hree-pin junper between U30 am u31: Junper the top tW() pins.
'!he remaining junpers are unoonnected.
lnterfacer 4
Versions Vl.OO or later of ltC-DOS:
Switch 1: all paddles (subswitches) are OFF.
Sritch 2
OW (B
1 == 2 == 3 == 4 == 5 == 6 == 7 == 8 == 9 ==
10 ==
Slritcb 3
c:ft' (B
1= 2 == 3 == 4 == 5 6 7 8
C-13
==. == ==

J26 Pbr PRINTER=O
\ / \/
APPlRlIX C
--------Jumper Blocks
J26 Pbr PRI~l
HB\ __ >---Jumper Blocks C D
If the Interfacer 4 is used with an Inter facer ,3, paddle 1 of switch 2 should be set OFF.
Jumpers:
Jl
Q Q P P
J2-J5
IIII == II == II ==
II
C-l4

J6-J8
J6 II J7 == J8 II J26
A 1==1 B C == D
All remaining junpers are unconnected.
JSl-JS3 Dip sockets near uwer edge of card: Insert dip shunts in these three sockets.
JS4 N::>t connected.
JS5 Pins 5,9,10,11,12,13,14,15 and 16 connected together.
JS6 Pins 6,9,10;11,12,13,14,15 and 1600nnected together.

alF
1= 2 == 3 4 5 6 == 7 == 8 9
10
== == ==
APPJR)IX C
lbard 2
1 == 2== 3 4 5 6 == 7 == 8 9
10 ==
== == =
== ==
You can have one or t~ MDRIVE/H boards, for a total size of either 512K or one megabyte, as a hard disk cache buffer.
AESlOO Network Qxltroller (DR Net net~rks only)
A1CD.OO SWitch Settings
SWitch 1 Slfitch 2 Slfitch 3 SWitdl 4
Off at Off at Off at Off at
1 == 1 -- I == 1 == 2 == 2 == 2 == 2 == 3 == 3 == 3 == 3 == 4 == 4 == 4 == 4 == 5 == 5 == 5 == 5 == 6 == 6 == 6 == 6 --7 == 7 == 7 == 7 == 8 == 8 == 8 == 8 ==
C-16

'!he AlCS100 switch cm,figuration for Switch 5 will vary from system to system.
SyStem 0 ,SldtcbS
Off Ql
1 == 2= 3 == 4 == 5 == 6= 7 == 8 ==
.System 1 Siri.tcb 5
Off 01
1 2 == 3 == 4 == 5 == 6 == 7 == 8 ==
==
s,stea 2 aritdi 5
Off 'OJ.
1 == 2 3 == 4 == 5 == 6 == 7= 8 ==
Off Gl
1 == .~ == 3 = 4 == $ = :6 == ., == '8 ==
'!bese are binary nUI1bers that identify ·~ne.tworknocae. ~fer to page 0-18 to determine the proper .item settings for each node on the DR Net network.
AIC'S1IO .JtlDp!r Omfiguratians
Pbrthe AlCS100 junperconfigur$tion,thelollow'lrlg slide junpers are the onlyooes that Sbou1dbe installed:
J(JRR
JP14 JP22 JP23 JP26
~
C(M 9026IN'.l'R = SlOOVectoree Irlt line '6 SlOO POC = AICSlOO PC(: AOC:SlO() MRE:l =S100 .~ ADCS100 WAIT = Sl00 ~
C-17

APPBmIX C
InterocDtinental llicrosystems LANSlOO (DR Net networks only)
LAIISlOO JuDper ODfiguratims
10 PORT *LANC 1D ADDR
------1 0 0 2 0=0 3 0 0 4 0 0
ENABLE 5 0=0
EK'lND 6 0=0
PIJAN'1a.f ADDR 7 0=0
----- 81 0=0
11 0=0 12 1 0 ------------ I
2 0
VI ~T EK'lND ADDR
------ --------1 0 1 0 0
2 0 0 2 0 3 0 0
I 4 0 0 3 0 5 0 0
6 0 0 7 0=0
8 0 0
1 0=0 2 0=0
3 0=0
4 0=0
5 0 0 6 0 0 7 0 0
8 0 0
11 0 = 0 12
S1X'lN PO
-----0 0
ON BOARD 0 0
ADDR 0 0 ------ 0 0
1 0 0 0 0 2 0 0 0 0
3 0 0 0 0 4 0=0 0 0
5 0 0 -----------
* '!he node m on the IANC 1D jlll1per will change for each board. B:!fer to the following page to determine the proper jlll1per configuration for each node.
C-18

'!he table below displays the $Witch settings for the AlCS100 network controller board and the junper configurations for the LANSI00 network controller board. 'Ibis information has been provided for up to 64 nodes attached to the DR Net network.
AIanOO Board
o = switch should be on 'the left (OPEN) 1 = switch should be on the right (CIDSED)
RightrlDst character corresponds to position 1 of switch 5. IeftrlDst character corresp0rx3s to position 8 of switch 5.
LARSlOO Board
o = junper should be not be installed 1 = junper should be be installed
RightrlDst character corresponds to bottom prong on IAtC 10 junper. IeftrlDst character corresporXis to top prong on I..AR: m junper.
N::rle : 0 00000000 !b3e: 19 00010011 N::rle: 1 00000001 NXie: 20 00010100 Rxle: 2 00000010 !b3e: 21 00010101 N:Xie: 3 00000011 NXie: 22 00010110 !b3e: 4 00000100 !b3e: 23 00010111 N:Xie: 5 00000101 NXie: 24 00011000 !b3e: 6 00000110 RXle: 25 OOOllOOl N::rle: 7 00000111 RXJe: 26 00011010 N::rle : 8 00001000 R:Jqe: 27 00011011 N::rle: 9 00001001 N:Xie. . . 28 00011100 N::rle : 10 00001010 !b3e: 29 00011101 N:Xie: 11 000010U NXie: 30 00011110 !b3e: 12 00001100 !b3e: 31 00011111 N:lde: 13 00001101 N:Xie: 32 00100000 N::rle: 14 00001110 RXie: 33 00100001 N:lde: 15 000011ll tb3e: 34 00100010 !b3e: 16 00010000 !b3e: 35 00100011 N::rle : 17 00010001 N:lde: 36 00100100 N:Xle: 18 00010010 !b3e: 37 00100101
C-19

APPBIIlIX C
lbie: 38 00100110 lbie: 51 00110011 lbie: 39 00100111 lbie: 52 00110100 lbie: 40 00101000 lbie: 53 00110101 lbie: 41 00101001 lbie: 54 00110110 lbie: 42 00101010 lbie: 55 00110111 lbie: 43 00101011 lbie: 56 00111000 lbie: 44 00101100 lbie: 57 00111001 lbie: 45 00101101 lbie: 58 00111010 N:xie: 46 00101110 lbie: 59 00111011 lbie: 47 00101111 lbie: 60 00111100 N:xie: 48 00110000 lbie: 61 00111101 lbie: 49 00110001 lbie: 62 00111110 N:xie: 50 00110010 lbie: 63 00111111
BDIIPLB:
Suppose that you have six nodes attached to the DR Net net\«)rk. Pbr node nllIlber 4, refer to the table on the preceding page, and you'll notice that the nllIlber to the right of node nt.Dnber 4 is 00000100. 'Ibis means that if you have an AOCS100 or IANSlOO network CXXltro11er board, your switch settings or junper settings should look like one of these CXXlfigurations:
A1CSlOO Sldtdl 5
Off 01
1 == 2 == 3 == 4 --5 --6 == 7 --8 --ON = 1 OFF= 0 High bit = subswitch 8
C-20
o 0
o 0 o 0 o 0 o 0
o == 0 o 0 o 0
Junpered = 1 U'ljunpered = 0 Highbit = top

APPlR>IX D
n. Formatting Bard Disks
Fbrmatting a disk erases all of the information on it, and it is not recomnended that you format a disk durin·~ normal use. It is also not recoJ1lRended that you run the destructive disk test, sinee this also destroys the information on your disk.
FOrmatting a disk is useful, however, when you repack the disk. See Repacking the Disk in Section 3.8 for a description of packing the disk.
If you format or destructively test your hard disk, you mst reinstall the operating system on the hard disk. See Installing the cp!rating System on Your Bard Disk on page 0..12.
Do not put any of the hard disk formatting programs on your hard disk, since a user may accident~lly run them and destroy the information on the hard disk.
Begin the formatting process bi ba(;king up all files that you want to save onto floppy diskettes. This should be done in single-user Irode. R:!nember to use the WHO coomand before you use IXliN to put the system into MC-OOS single-user mde. ~fer to Chapter 3 for information on how to back up disks.
Qlee all the files on the hard disk have been oopied onto floppy diskettes, press the RESET button and load the CP/M system diskette with the label "CP/M-86 Diagnostic Diskette." If, however, your system incorporates the Kanan Controller, press the RESET button and load the MC-OOS diskette with the label ftMC-OOS Diagnostic Diskette." ONhi1e either diskette can be used, Gifford Computer Sysbems r:-ecom.rnands using the MC-ro~ 11 iskette on the Konan.) In not run any hard disk format programs in nultiuser. nnde.
According to your hard disk subsystem, go to the appropriate section in the following pages. N:> matter what type of hard disk you are formatting, the last t\O,lO steps that the FM'lHARD program performs are to run the INI'lDIR program to initialize the directory and the SET program to enable date and tinestanping.
)')-1

APPJR)IX D
FomattiDj 8-Incb with the Disk 2 Qlntroller
Format MorrOH MlO, M20, or M26 drives running on the catplPro Disk 2 disk controller with the DISK2 program. Give the ocmnand:
A>DISK2 [drivetype] [arguments]
The "drivetype" is either MIO or M20, depending upon the capacity of your hard disk. The argwnents are:
DRIVE m Specify a physical drive (0-3) to be formatted. The default is drive O.
SKEW m Specify the skewing f~tor to be used. The suggested value is 2.
FCmfAT Format ooly the headers.
DATA Set all the data bytes to E5 hex.
TEST Perform a destructive test 00 the data fields.
SEEK Perform a non-destructive seek test.
ALL Perform the format, data test, and seek test.
To format the disk, use the ALL argument. The formatting takes two hours to oanplete. The program displays:
PoDDatting Track 0: D Bard 0 Soft 0
The track number is given before the 00100, and the number of hard and soft sector errors (if any are found) is displayed to the right of each entry. If many errors are reported, consult your DISK ! TEx:::HNICAL MANUAL and contact your dealer.
0-2

APPBtI>IX D
After the disk is formatted, the system qisplays:
ver ifying T.r:ack
Data '!'est T.r:ack
Seek 'D!st
'!bere are twe 1 ve passes in the last test. When it is finished, bad sectors are listed. Bad sectors that are found are magled out and blocked from use.
5.25-Incb with the KcJnan CDltro11er
Format Gifford ~ter SystellS 5.25-inch hard disk dr i yes running on the Konan controller with the tn::FMT progrf31il.
Gi ve the comnand:
0A>D0CFMr 'lYPE OPTIONS
''!be "type" is either F5-5, F5-11, F5-l6, F5-2l, F5-32 (Quantum), F5-37 , F5-40, F5-4l,or F5-5~, where the second nUIIber matches the size of your hard disk in roogabytes. '!bat is, if you have a 21 roogabyte hard disk, give the "type" as F5-2l.
'!be options are:
BAD Maps out the bad sectors 00 the hard disk • aefore you type this COll'Il\al'Xi, y~Im1st type:
0-3

APP!JI)IX D
to find out which sectors are bad. Write these nunbers down. SUR,JOse that you have a 37 ~abyte hard disk drive, and the IXX:nrr MAP conmand has indicated that cylinder 1200 and head 13 are bad. 'lb map the bad cylinder and head to a bad map list, type the following conmand:
OA>DOCEMr F5-37 BAD 200 3
'!be IXX:EMl' program will display a message irxUcating that it has mapped cylinder 1200 and head 13 to a bad map list.
DRIVE n Specify a physical drive, either 0 or 1. '!bis is used only if you have two hard disks attached to your hard disk controller. '!be first drive, (0) is connected on the right of the board, and the second drive (1) is connected on the left.
d: Give the letter of the logical drive, such as A:, B:, etc. If you have two hard disks connected to one controller, the letters for both drives are as if the disk was the first disk (that is, A: and B: instead of D: and E:).
SKmV n
Creates a list showing bad sectors on the hard disk drive.
Change the skewing factor from the default of 2. '!bis option is rarely used.
Formats the drive. Formatting the drive will erase all information on the drive. The TEST option then tests the drive and clears out all bad sectors by remapping them. AI though this takes longer than sinply formatting the disk, it will give you better performance from your hard disk. Keep in mind that aborting the TEST procedure is dangerous as it destroys the bad map.
0-4

FORMAT
.AllP.IB>IX D
Test the disk for ~ sectorswithoqt erasing them.
Clear the disk without affecting the ~ secbors.
Format the disk and clear out bad sectors with()ut testing it first. All information on the disk iEi lost.
If you specify a dr i ve mmber but no dr i ve letter, the entire hard disk is formatted. If you give a drive letter but no dr i ve nunber, dr i ve 0 is assumed. '!he dr i ve munber and dr i v~ letter mst be specified before 'lEST or FORMAT.
For e~anple, to test and format only drive :e; of a 21 11I:'!gabyte dr i ve, give the comnand:
OA>OOCEMT F5-2l B: TEST
'lb test and format the second drive if you ~ve tWQ 11 megabyte drives, give the conmand:
OA>In:FMT F5-1l DRIVE 1 TEST
0-5

APPJR)IX D
S.25-I:ncb with the Disk 3 QDtroller
Fbrmat Gifford Computer ~stems S.2S-inch hard disk drives running on the Disk 3 controller with the DISK3 program.
Give the COl1II1alld:
OA>DISK3 'r.lPE OPTIONS
'!he "type" is either F5-S, F5-ll, F5-l6, F5-21, F5-37, F5-40, or F5-S6, where the second number matches the size of your hard disk in negabytes. '!hat is, if you have a 21 negabyte hard disk, give the "type" as F5-2L
'!he options are:
DRIVE n
d:
SKEW n
Specify a physical drive, either 0 or 1. '!his is used ooly if you have tw:> hard disks attached to your hard disk controller. '!he first drive, (0) is connected on the right of the board, and the second drive (1) is connected on the left.
Give the letter of the logical drive, such as A:, B:, etc. If you have tw:> hard disks connected to one oontroller, the letters for both drives are as if the disk was the first disk (that is, A: and B: instead of D: and E:).
Change the skewing factor from the default of 2. '!his option is rarely used.
'lest the disk for bad sectors, erase them and then format the disk. All information on the disk is lost. Al though this takes longer. than siq>ly formatting the disk, it will give you better performance from your hard disk.

FORMAT
CLFAR
RETEST
APPJR)IX D
Ebrmat the disk and clear out bad sectors without testing it first. All information on the disk is lost.
Clear the disk without affecting the bad sectors.
'lest the disk for bad sectors without erasing them.
If you specify a drive nUI1ber but no drive letter, the entire hard disk is formatted. If you give a drive letter but no dr ive n\lllber, dr i ve 0 is assuned. '!he dr i ve nUIlber and dr i ve letter DUst be specified before TEST or FORMAT.
Ebr exanplet to test and format just dr ive B: of a 21 megabyte drive, give the coll111a1'¥3:
OA>DISK3 F5-2l B: TEST
'lb test am format the second dr i ve if you have two 11 megabyte drives, give the coll111a1'¥3:
OA>DISK3 F5-ll DRIVE 1 TEST
0-7

APPJR>IX D
8-Inch with the BIX2\ Olntroiler
Boot the system with the CP/M-86 diagnostic diskette, and give the command:
'!be program responds:
Discus MLO, 1120 am 1126 hard disk forDBt program, B:N. 2.1. QIoose the desired functial:
L = J.ibrE.t a IDgical dr ive. F = J.ibrE.t an entire p.ysical drive. C = Olntinue an interrupt:ec1 test. D = am a Diagmstic test.
Ehter (F) to format the drive:
I\Jnctial (RB1UR!I to exit) :F
'nle program pronpts:
ltlter {ilysica1 n1Jpt~r to be tested or forDBtted (1-4, lCIfiURN to exit):
Ehter the dr i ve nll11ber and press RETURN. '!be dr i ve number is 1 for the first drive, 2 for the second, etc.
I>-8

APPJ!B)IX J)
'!he program prompts:
Select the drive type:
A = Discus H26, 26 IIII!gabyte drive. B = Discus MiO, 10 IIII!gabyte drive. C = Discus H2O, 20 JDeCjabyte drive.
Ikive type (RE'l.\JII!I to exit) :
Ehter the letter corresponding to your disk drive type and press RE'IURN. If you have an MIO, the system asks:
Select drive type:
F = Il1jitsu M = lI!DDrex
~ (RE'.I.\JM to exit) :
Ehter the 1 tter (F) am press Rlm1RN. For all dr i ve types, the program prompts:
Blter aDDUIlt of forDBtting desired:
B = forDBt ll!aders ally (data reaains intact) D = erase Data fields also
Format the headers and data:
!\D:ticm:D
The program prompts:
l!brE.tting the entire PJysical drive will take about four Ddnutes ••••••••••••••••••••••••••••••
All finished, returning to cPIM Press RImJHN to return to CP/M: [RE'lURNl

APPJRlIX D
~ the Drive
You only need to test the hard disk if you receive disk errors after the disk has been formatted. Do not run this test witbcut first CDltacting your dealer.
'Ibis test destroys any information on your disk, am you must reformat the disk after the test is conp1ete. 'Ibe test takes six to fourteen hours to conp1ete, depemill9 on the size of your disk.
~st Morrow MIO, H2O, or M26 drives running on the .HJX:A disk controller with the FM'IHD program. Fb110w the instructions in the Shutting Down Your System (section 1.8-1) of this manual. Boot the system with the CP/M-86 diagnostic diskette, am give the COIlIIIaOO :
If you have just turned ON the hard disk, allow time for it to stabilize (about tl«> minutes) before beginning the test. 'Ibe program pronpts:
Discus MlO, H2O aDd M26 hard disk for-.t program, ReV. 2.1. 0uJse the desired· function:
L = IbrDBt a logical drive. F = IbrDBt an entire PJysical drive. C = OJDtinue an interrupted test. D = am a Diagnostic test.
PUnction (RE'lUiCl!l to exit) :
Enter (D) to begin the diagnostic test:
PUnction (RISIURJ to exit):D
0-10

APPDIllX D·
The program prompts:
Jbf -.JCb of a diagnostic do you want to tun:
1 = sector header field test only. 2 = Sector data field test only. 4 = Seek mechanism test only.
Oioose the diagmstic by adding together the desired 6ptiaus.
Clltions (RB'ltJlCN to exit) :
If the suggested option sum is seven (7), all diagnostics are run.
qJtions (RImmR to exit) :7
~ program prompts:
l!hterp:.ysica1 drive I11DIiJer to bet:ested or formatted (1-4, RkltJlCN to exit):
Enter the number and press REmURN. The number corresponds to the order in which the dr i ve is COnnected to MC-IX>S. 'lbe program pronpts:
Select the drive type:
A = Discus 1126, 26 megabyte drive. B = Discus MlO, 10 megabyte drive. C = Discus 1120, 20 megabyte drive.
!kive type (RB'.l1JBN to exit) :
Enter the letter corresponding to your hard disk type and press RETURN.
rrll

.APPJR)IX D
The first areas tested are the sector headers:
'.D!stirlg SIeCtor beiMJers ••••• _._ •••••••••••••
FOr the next six to fourteen hours, information about the tests is displayed on the terminal. As each test completes, new descriptions are displayed such as "Seek test" or "'D!sting sector data." Error information is also displayed if any are found. FOr exanp1e:
SIClQR ERR,"l1W]{ 233, BEAD 0, SlCIUR 2, CDlRl' 189
If this test reveals bad sectors or other errors, contact your dealer. ~rreJd:)er that you must formt the ,disk after you run the destructive test.
D-12

'APP1B>lX D
Installing the <Prating System on Your Bard Disk
If you have reformatted your hard disk, follow the instructions below to replace the MC-OOS oPerating sy.stem on your hard disk. You only need to do this if you have reformatted your hard disk, since Gifford Chnputer Systems includes all necessary files on your bard disk before shipping it·to you.
Use the PIP utility to copy files from the flOP.P.l diskette back onto drive A:. '!he format of the conmand is as follows·:
OA>PIP A:=d:*.*[VRDW]
where d: is the drive designation for the floppy drive whiCh will be the source drive.
R>te that the small letter d: should 'be replaced with your appropriate drive designation. You can refer to the following chart for the drive designations appropriate for yoursyste~ If you have a single floppy drive system, assi.Jrle that your floppy drive is the equivalent of the left-hand flOM drive in the . table below.
~ of Systea
Floppy-only 5MB hard disk lJJ.b hard disk 16M:> hard disk 2lJ.t> hard disk 37M:> hard disk 40M:> hard disk 56MJ hard disk 84M:> hard disk
logical Dr:ive Designations
Hard disk !eft-hand Right-hard Iogical Drives Floppy Drive FloPpY Drive
none A: B: A: B: C:
A:B: C: D: A:B: C: D:
A:B:C: D: E: A:B:C:D:E: F: G: A:B:C:D:E: F: G: A:B:C:D:E: F: G:
A:B:C:D:E:F: G: H:
Systems with two or more hard disks add the same number of logical drives as shown in the table above for each hard disk, with one or two floppy drives ftDvedup in the alphabet '(towards IIPII).
0-13

AWEHlIX E
E. ProgrClllllling Serial Ports in K!-I)(l)
Advanced programners may want to interface non-standard RS-232 devices with MC-OOS. You can control the console port fran either the 8085 or the 8088 using BOOS call number fifty (50) • A few precautions must be taken before connecting the device to the system.
In the following calls, be sure to use a valid terminal number, since invalid terminal numbers may stop the system. Terminal numbers are the same as those marked 00 the back panel (0, 1, etc.).
For every physical terminal 00 your system, there is an MC-Del) "Physical Input Prcx::ess" (PIN) which is responsible for switching virtual terminal screens and for control characters "'s, "'P, AC, "'0, and "'0. Since you cannot have two prcx::esses inputting fran the same port, you must stop PIN fran inputting before you can begin to program a serial port.
Each physical terminal has its own queue called MXoonsn, where n is the physical terminal number. MC-Del) mutual exclusioo queues enable you to open a queue with 0 OPEN, and read a queue with 0 RFAD so that your prcx::ess can have-sole control of the queue which is assigned to the physical terminal number.
This prevents other prcx::esses fran cx::cupying that queue. You must set a flag to alert the PIN prcx::ess to call the same queue.
This alerts the PIN prcx::ess to await the queue which you are currently holding. This prevents the PIN prcx::ess fran inputting to the serial port which you are trying to program until you release the queue with O_WRITE. You are now able to program the serial port.
Set up a 5-byt.e area of memory for the BIOS descr iptor •
8-bit prograns load the C register with 32H, and DE with the address of the BIOS descr iptor.
E-l

16-bit programs load the CL register with 32H, OX with the offset of the BIOS descr iptor, and OS with the segment of the BIOS descriptor.
The structure of the BIOS descr iptor is:
FUNC arg1 TYPE arg2 arg3
6
The first byte, FUNC, is always 6. The third byte, 'fiPE, is either 1, 2, 3, 4, 7, or 8: these represent setup, output, input, input status, extended status, and extended setup, respectively. The three arguments depend 00 the value of TYPE.
Setup TYPE = 1 arg1 = :tilysical terminal number (console number) arg2 = bits 0 - 3: select baud rate
o = 9600 1 = 110 2 = 300 3 = 600 4 = 1200 5 = 1800 6 = 2400 7 = 4800 8 = 9600 9 = 19200
bits 4 - 5: select parity o = no parity 1 = odd parity 2 = even parity
bit 6: select number of stop bits o = 1 stop bit . 1 = 2 stop bits
bit 7: select number of data bits o = 7 data bits 1 = 8 data bits
arg = handshaking o = no handshaking 1 = D1'R handshaking 2 = XCN/XOFF
E-2

OUtput TYPE = 2 argl = character to output arg2 = console number No value returned.
Input TYPE = 3
APP!H>IX E
argl = physical terminal nwnber (console nwnber) Returns byte in A register (8085) or AL register (8088).
Status TYPE = 4 argl = physical terminal nwnber (console nwnber) Returns input status, (0 = not ready, FF = ready) in A register, (8085) or AL register (8088).
Extended status TYPE = 7 argl = physical terminal nwnber (console nwnber) Returns extended hardware information in A register (8085) or At, register (8088). The hardware status is indicated by the following bits:
Bit f 0 1 0 Il3R high DSR low 1 OCD high OCD low 4 ok parity error 5 ok overrun error 6 ok framing error
Normally, DSR is line btlenty (20) and OCD is line eight (8) of the RS-232 connector.
Extended setup TYPE = 8 argl = physical terminal nwnber (console nwnber) arg2 = set parameters
Bit I o 1 2 7
o set I1l'R high set RI'S high
no break no reset
1 set I1l'R low set RI'S low send break
reset all errors
Normally, orR is line six (6) and RTS is line five (5) of the RS-232 connector.
E-3

APP.BttlIX E
The following example is a C program that uses the calls described 00 the previous page:
/* * Logical port we will be talking through */
#define 5
/* * M:-DOS operating system ftmctioo calls used in this program */
#define ide fine #define 'define #define
/*
S BIOS oEV FIAGSEr Q OPEN Q:RF.AD P DELAY
.50 133 135 137 141
* Functioo 6 extended XIOS call oomnands */
#define tdefine #define tdefine
/*
S'rrY oorPOT INPUT INPUT STATUS
1 2 3 4
* M:-DOS Queue Parameter Block defintioo */
struct r int int int char * char } qpbi
qpb fillOi qpb -queueidi qpbfillii qpb -buffer i qpb name[8]i
E-4
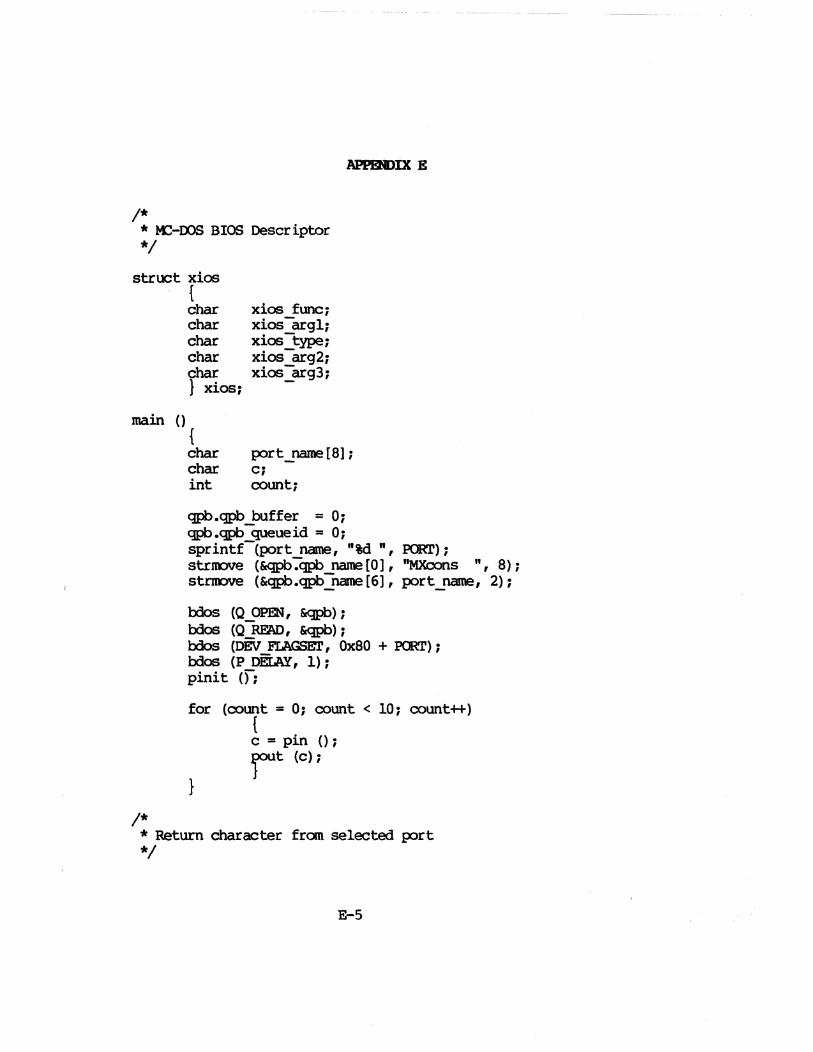
APPJR>IX E
1* * Me-DOS BIOS Descriptor *1
stroot xios
main 0
1*
{ char char char char
~OS1
{ char char int
xios func1 xios-arg11 xios-type1 xios-arg~1 xios_arg31
port_name [8] ; C1 count;
qpb.qpb buffer = 0; qpb.qpb -queueid = 0; sprintf-(port name, "id n, :J?ORr) 1 strIOOVe (&qpb7qpbname[O], "MXcons ",8); strIoove (&qpb.qpb name [6] , port_name, 2);
bdos (O_OPEN, &qpb) 1 bdos (0 RFAD, &qpb) 1 bdos (DEV FLAGSET, Ox80 + PORl') 1 bdos (P DELAY, 1) 1 pinit (fj
for
}
(count = 0; count < 10; count+l-) { c = pin 0; jt (c);
* Return character from selected port *1
E-S

pin 0
1*
{ xios.xios func = 6, xios.xios-argl = PORr; xios .xios -type = INPIJ'l'J return bda; (8 BIOS, &xios) 1 } -
* Output a character to selected port *1
pout (e)
1*
char e7 { xios.xios func = 6, xios.xios-arg2 = PaRr, xios .xios -type = CX1.l'PUTl xios.xios-argl = e, bdos (8 BIOS, &xios) 1 } -
* Set up the selected port *1
pinit {l xios.xios func = 6; xios.xios-type = STTY; xios.xios-argl = PORT; xios.xios-arg2 = OxcO;
1* 8 databits, 2-stopbits, 00 pa+ity, 9600 baud *1 xios .xios arg3 = 0; 1* No handshaking "'1 bdos (S BIOS, &xios); . } -
E-6

APPJR)IX F
F. Using the Printer Port CD '1'eleVideo 'l'eDIinals
The printer port Q'l the TeleVideo 925 or the TeleVideo 950 has limited use. All informatiQ'l which goes to the printer port must pass through the terminal and must be displayed Q'l the video screen. Since the terminal is not a printer, it may not recognize printer control characters or special characters imbedded in ASCII files. The printer port can be used with the C1'RL P ("p) printer toggle, and with oonmands such as TYPE, which are intended to send informatiQ'l to a video screen.
If you are going to attach a printer to your TeleVideo terminal, be sure that the cable between the terminal and oanputer, or between the terminal and roodem, has pin-20 of each eoo connected, so that the canputer and terminal can use JJl'R handshaking. The terminal, oomputer, and printer must operate at the same baud rate, and the terminal must be attached to an Interfacer board, not the System Support board.
The cable between the terminal and printer must also be able to handle [7l'R handshaking. Be sure that pin-20 on the terminal end of the cable is connected to the [7l'R pin 00 the printer erXl. For example, Q'l Diablo printers, this is pin-201 on Okidata 82A and 93A printers, this is pin-II.
This terminal-to-printer cable can be tested by using it to connect the printer directly to the oomputer's printer port. Send a few pages of text to the printer, and check the output for lost characters.
If the terminal is a TeleVideo 925, set the internal switch S3-l0 down. This connects the 0l'R line (pin-20) to the oanputer.
The cxmnunicatioos protocol between oanputers and terminals is different fran that between canputers and IOOdems. When oomnunicating with terminals, XOO/XOFF must be disabled1 when ccmnunicating with modems, XCl't/XOFF must be enabled.
F-l

You must enable or disable X(ti/XOFF in the ms file 0I'l the oanp.lter. Send a character fran the cOO1puter to the terminal (or type the character in local mode 00 the terminal} to enable or disable it in the terminal. Enable XCIiJ/XOtF in the terminal by sending a C1'RL 0 ("O) (ASCII value 15 decimal, OF hex) ~ disable XCIiJ/XOFF with a CTRL N ("N) (ASCII value 14 decimal, OE hex).
While the terminal is running, turn the printer ~ by sending the terminal an ESCAPE@ (ASCII values 27 and 64 decimal, 1B and 40 hex). All data received by the terminal are trananitted to the printer.
Turn OFF the printer by sending the terminal an EscAPE A (ASCII values 27 and 65 decimal, lB and 41 hex).
F-2

APPBI!I)IX G
If you add IEEE 696/S-100 boards to your foC-DOS system, you must be sure that they do not coof1ict with the I/O ports already assigned. The following chart lists all of the ports used by the sys~ You may use devices that do not coof1ict with any of the ports listed. You can also use devices that conflict with the ports listed with an asterisk (*), as long as you do not have the device listed for those ports. For example, you can a3d a device that uses port 64. You can also add a device that uses port E5, as long as you do not have a PMMI 1OOd.em attached to the system.
Port I in Hex 00-01 02-03 04-05 06-07 08-09 OA-OB OC-OD OE-OF 10-17 18-lF 20-2F
*30-3F * 40-41 42-4F SO-SF
*80-83 * *90 * *B0-B1 * CO-C3
*C6-c7 * *C8-c9 * *00-03 * *D7-D7 * *EO-E3 * *E4-E7 * *FO-FO * *FD-FE * *FD-FF * *FE-FF *
Derioe Interfacer 1 or 2 t 1 Interfacer 1 or 2 i 2 Interfacer 1 or 2 t 3 Interfacer 1 or 2 t 4 Interfacer 1 or 2 t 5 Interfacer 1 or 2 t 6 Interfacer 1 or 2 t 7 Interfacer 1 or 2 t 8 Interfacer 3 or 4 i 1 Interfacer 3 or 4 t 2 Reserved by Gifford canputer Systems AllO¥ Engineering tape controller Futurex data encryption board Reserved by Gifford canputer Systems System Support 1 Morrow m:x::A disk controller Disk 3 hard disk controller DR Net network controller Disk 1 or Disk 1A floppy disk controller MDRIVE/H Disk 2 hard disk controller SemiDisk Kanan hard disk controller IX: Hayes modem PN4I 1OOd.em Selector channel (part of Disk 2) CPU 8085/88 or CPU 8086/87 Macrotech MI-286 (80287 uses F8, FA, FC) CPU-Z
G-l

B. Hote.s at ~ ~tar .a ~ II
The follaiing will help you run the W,ordS~ t:e~tprOCElssing program lOOre efficiently cp your MC-JD) system. If you pur~ WordStar fran Gifford Ccnp.lter Systems cmd your printers and terminals were known, it is already installed Q'l your catplter.
lIbrdStar Installatioo
If you reinstall WordStar, you do not need. to reset any of the flags listed Q'l pages 8-5 or 8-6 of the lQDSTAR INSTA.T.lATI~ MANUAL. Since MC-OOS treats a-bit programs differently fran MP/M II, JOOSt of the timing considerations that are discussed Q'l
these pages are not valid for your system.
If you reinstall your COf!.{ of WOrdStar, the follOtling labels should be set with the INSTALL program:
Label
DELCUS: DEJ:lt1IS: DELl: DEL2: DEL3: DEL4: DELS:
Hew setting
1 1 o o o o o
These labels refer to values u~ in timing loops for certain delays in WordStar. They take valuable Cl?U time and slai down WordStar and your system.
These values work for TeleVideo terminals. If you have other terminals, and the aOOve settings prevent you fran running WordStar, set the values higher.
H-l

APPJRlIX 8
Printer Release
There are other locatioos in It:>rdStar that should be patched with the DDT86 program. There is a bug in WordStar that does not release the printer when you finish printing a file. The following are terminal sessions with DDT86 to free the printer in 8- and l6-bit W:>rdStar, Versioo 3.3 and 8-bit WordStar, Versioo 3.0. The boldfaced characters are values that you should enter.
16-bit lixdStar, Versial 3.3:
0A>1Dl'86 DDT86 1.1 -IE.OIl
STARl' END 4400:0000 4400:54FF -s324 4400:0324 90 e9 4400:0325 90 39 4400:0326 C3 00 4400:0327 90 • -s846 4400:0846 90 e9 4400:0847 90 2b 4400:0848 C3 fb 4400:0849 00 • -s33d 4400:0330 00 e9 4400:033E 90 39 4400:033F C3 00 4400:0340 00 • -s33a, 4400:033A 00 e9 4400:0338 90 41 4400: 033C C3 00 4400: 0330 E9 • -s36O 4400:0360 00 bl 4400:0361 00 Oc 4400:0362 00 cd 4400:0363 00 eO
B-2

4400:0364 00 80 4400:0365 00 ff 4400:0366 00 11 4400:0367 00 75 4400:0368 00 Oa 4400:0369 00 c6 4400:036A 00 06 4400:036B 00 ba 4400:036C 00 02 4400:0360 00 e9 4400: 036E 00 c6 4400:036F 00 06 4400:0370 00 bel 4400:0371 00 02 4400:0372 00 e9 4400:0373 00 c3 4400:0374 00 bl 4400:0375 00 9f 4400:0376 00 cd 4400:0377 00 eO 4400:0378 00 c3 4400:0379 00 bl 4400:037A 00 03 4400:037B 00 cd 4400:037C 00 eO 4400:0370 00 c3 4400:037E 00 bl 4400:037F 00 06 4400:0380 00 b2 4400:0381 00 fe 4400:0382 00 cd 4400:0383 00 eO 4400:0384 00 c3 4400: 0385 00 • -1RIl'B9:I!' .01> -"c W\>
APPlRlIX H
B-3

A1'PIRlIX H
This Control C ("'c) will return you to the system pranpt, OA>, or whatever your current drive really is. Test the patched version, to make sure that you made IX> keystroke errors, before replacing your old oopies with this enhanced version of WOrdStar. Then type the cannands:
RDl16.~.QI)
SKr ~.QI)[sys,rol
8-bit WordStar, versial 3.3
0A>1I7l86 JDr86 1.1 -HIS.ax STARr END 2800:0000 2800:3DFF -8614 2800:0614 00 C3 2800:0615 00 CD 2800:0616 C9 02 2800:0617 00 -6lCB 2800:0lCB 00 OE 2800:0lCC 00 9J! 2800:0lCD 00 C3 2800:01CE 00 05 2800: OlCF 00 00 2800:0100 00 -M6..IlSSr .<DI -~ OA>
This Caltro1 C ( .... C) will return you to the system prompt M:>, or whatever your current drive really is. Test the patched version, to make sure that you made IX> keystroke errors, before replacing your old oopies with this enhanced version of WOrdStar. Then type the oarmands:
RBN 118 .all liBl'i!S't.ax SBr 16.ax[sys,ro]
H-4

&-bit WocdStar:, Versial 3.0
OA> m.r86 -RIIS.<XII
START END 2800:0000 2800:3DF.F -S610 2800: 0610 00 C3 2800:0611 00 m 2800:0612 C9 02 2800: 0613 00 • -SlEO 28oo:0lEO 00 OE 2800:0lEl 00 gp 2800:0lE2 00 C3 2800:01E3 00 OS 2800:0lE4 00 00 2800: OlES 00 • -tIIB.<XII -~ OA>
Benaming WordStar
When you reinstall WOrdStar, the tNsTALL program asks what you want to name the new cop. The INSTAIL program will write that name in the program, and you cannot rename it later and still have the RUN suJ::x::almand of WordStar work.
Before you reinstall WOrdStar i write down the printer coofiguration, carm:unications protocol, and output device, which are displayed when you start rmming WOrdStar oj Be sure to keep these settings when you go through the reinstallatiort, sa that. your printer works correctly. Almost every printer will work with the settings ''Teletype-like printer," "No Comiunicat1ons Protocol," and "CP 1M ISl': device."
H-5

APPlR)IX B
Installatial of daME II, versim 2.4
our ing the installatioo. process, when the screen displays:
0Jange 1&%0, date, etc (Y/H)?
Answer yes by typing (Y), and the screen will display:
Enter a character to be used foe indicating macros or a BBl'UBI!I foe a default character of Clllp!rsand (&)
Specify an ampersand (&) by pressing RErllRN. The screen will display:
Type a RIftOiCN if the error oorrectim dialogue is to be used, QC any otber key if DO diaJogue is wanted:
Press RETURN and the screen will display:
A - CP/M 2.2 B - MP/M II system
Specify that you are using an MP/M II by typing (B).
Only this part of the prooedure is specific to ~-IXl3.
H-6

APPBIlIX I
I. Directory of System Files SUpplied by Gifford C'aIplter Systems
The only file which is essential in loading the operating system is MC.005. All other files are optional. This does not mean that all the remaining files can be deleted. You should keep as many of the files in user area 0, drive A: as you can. You must have enough system programs, (such as PIP.CMD and ERA.CMD) to operate the system effectively. If you run any a-bit programs, SW.CMD must be on user area 0, drive A:.
There is no reason to delete any of the files unless you are running a floppy-only system and space on dr i ve A: is cr i tical.
Your MC-OOS system is distr ibuted on up to four physical diskettes: the MULTIUSER CONCURRENT OOS SYSTEM DISK, the MULTIUSER CONCURRENT 005 XI05 DISK, the DR NET NE'lJ«)RKING DISK, and the MULTIUSER OOOCURRENI' 005 UTILITIES diskette. Systems that are not linked to DR Net nett«>rks do not include the DR Net diskette. A listing for all of the files contained on these diskettes is provided on the following pages.
Files with the extension .OON and .RSP are required by GEN::CPM. Files with the extension .CMD are conmand files, which may include system comnands and a-bit dBASE II comnands related to system functions1 those with .SAM are sample files1 and those with .DBF are dBASE II database files. Application programs which are widely used on your system should be located on user area 0, drive A:. This makes them accessible to all user areas. Use the SEl' conmand to set COllIlX)I1ly used applications programs to system and read-only status.
Data files (files with no extension, and files that have the extensions .HLP, .KEY, .NDX, and .DBF) can have the DIR attributes. HELP files (.HLP) must be set with the ro and DIR attributes to be accessible from all directory areas.
I-I

APPEtI>IX I
JlJLTIOSER aRDRRI!Jll' OOS S!S'.lBI and UTIL.1'rIES DISl<BTl2S
ABORT.CMD AP.CMD ASM86.CMD ATl'JICH. eM)
BUFFER.CMD BUFO.CMD BUFl.CMD BUF2.CMD BUF3.CMD CCPMINIT • eM:> ClOON.CMD CHSET.CID CIOCK.CMD CONOOLE.CID CPY.CMD DATE.CMD DAYFILE.CMD DDT86.0I) DIR.CMD OOWN.CMD DSKRESET .CMD DSP.CMD ED.CMD ERA.CMD ERAQ.CMD FILES.CMD FORMAT.CMD GENCM:>.CMD HELP.CMD HELPNDX.CMD INITDIR.CMD KEYS.CMD lOOIN.SAM I£XDJT.SAM LPRS MAIL. eM)
MAIL. HLP MAIL.NDX MAKE.CMD
tCOOS.HLP lCOOS.NDX NaiUSER.CMD PASSWD PASSWD.HLP PASSWD.NDX PASm«)RD.CMD PIP.CMD PRINT.CMD PRINTER.CMD Rm.CMD SDIR.CMD SET.CMD SEIMEM.CMD SOOW.CMD SPACE.CMD SPL.CMD SPOOL.eM:> SUBMIT.CMD SW.CID SW86.CMD ~.CMD SYSDISK.CMD SYSGEN.CMD SYSINIT.SAM SYSTAT.CMD TIME.CMD TIMEOOG.CMD TIMEIDG.DBF TIMEIDG. SUB TIMEIDGI. CMD TIMEIDG2.CMD TIMEIDG3.CMD TIMEOOG4.CMD TIMEIDG5.CMD TIMEOOGX.CMD TIMEIDGX.DBF TIMEUJGY .CID TIMEIDGZ .CMD
I-2
'I'lYS 'lYPE.CMD UPTIME.CMD USER.CMD USERINIT.SAM VCM)DE.CMD VT950.KEY V'lOCS80 • KEY VTlYS.SAM WHO.CMD WHYBCX)T .CMD WRITE. eM)
WMl.DBF ZW'lM?CMD

DR NBT NE'.MlRKIlC DISK
ADDNJn' .CMD . CONFIG. NET DRNET.CMD NAMENDDE.eM:>
APPJR)IX I
NAMSVR.DAT NET.CMD NE1KY.ID SmNET.CM:>
This diskette is supplied only for systems that are part of DR Net local area networks.
KJL"rIOSBR CXRDRRBNT OOS XIOS DISK
BOOS.CON BOOT. LOR BUFFER a:PMINIT .CK> CIO.CON CPY.eM:> ~fMl'.CMD DIR.eM:> DISKl.LDR DISKlA.LOR DISK2.CMD DISK3.CMD ERA.CMD
Xl030702 Xl03l502 Xl050704 Xl05l504 Xl060703 Xl06l503 Xl070702
FIXSTEP .CMD FLOPPY FMlHD.CMD FORMAT .CM:> OCS.RSP GENCCPM.eM:> HRD32K-l HRD64K-l KroN.RSP M::.OOS MEM.CON MEM>RY.RSP PASSWD
Xl071502 Xl090704 Xl090708 XI091504 Xl09l508 Xll00703
PIN.RSP PIP.CMD Rm.CMD R'lM.COO SHELL.RSP SM:FMl' .CMD STA'lUS. RSP SUP. CON SYSDAT.OON SYSGEN.CMD TYPE.CMD VOUT.RSP
XllOl503 Xll10706 Xllll506 Xll30704 Xll3l504 XFLQFPY
The file extensions of the XIOS files will irxUcate the hard disk configuration. The XIOS diskette is used to customize or reconfigure lC-OOS.
I-3

A'P'PBImIX J
J. dBASE II Bnbancements
Gifford CcJnplter Systems has developed several dBASE II cannand files which will be useful to dBASE II programners. These oc:mnand files include:
CALL.OI) Executes lC-OOS functioo calls fran a dBASE II program.
S!SCJI).OIl Executes an M:-OOS oonmand fran a dBASE II program.
GI.mlA.'m.OIl Stores the lC-OOS system date to the dBASE II date functioo. Also prints date and day of the week.
Displays the time of day.
!RI5I5PBlft'.QI) Detaches the list device, enabling other users to pr int to that device.
1HM.QI>
AllOlflS a dBASE II user to use the OOIT TO functioo.
Displays the dBASE II user' s terminal number.
The m::>St powerful of these oonmands are the CALL.CMD and the SYSC>ID.CMD •
In additioo to the dBASE II ocmnand files developed for a-bit processors, listed above, Gifford CcJnplter Systems has developed several dBASE II ocmnand files for l6-bit processors.
Executes K:!-OOS function calls fran dBASE II prograns.
!RI5I5PBlft'.PSG Detaches the list device, enabling other users to pr int to that device.
GeI.'IlM.'B.PSG Stores the lC-OOS system data to the dBASE II date functioo. Also prints date and day of the week, as well as the time of the day.
SBlI).PSG Executes an K:!-OOS conmand fran a dBASE program.
J-I

APPJltI)IX J
1IIJI am WI·rID were not converted for the l6-bit processor.
The documentaticn and listings for the oomnands listed above follows.
Purchasers of Gifford systems are hereby given permission to reproduce or m:xUfy the listings provi<ied here.
Copyright 1984 Gifford Computer Systems
J-2

CALL.QI>
CalCurrent rns functioo calls allow a dBASE II routine to change printers, read the system clock/calendar, access a file that is located in another user area, or carry out a number of functions which are valuable in a multiuser environment.
The CALL.cMD file enables the dBASE II user to make system functioo calls. This is done by storing the number (in decimal) of the call to be made to a numeric variable called FUNCl'ICN. A numeric value must als:> be stored to a variable called ARG. This is the argument of the functioo call and may be zero for tb:>se functions which require 00 argument. The 00 CALL coomand will execute the routine, and the result can be found beginning in locatioo 48 decimal. The value of the first byte of the result is stored in a numeric variable called RESULT.
Here is the dBASE II code for any functioo call:
SlOm • • m BIB Pam 29,POCrIC»I SlOm Dlf(AR;/256) m ABG2 ~ ABG- (256*AR;2) m AIm. PaCE 3O,ARa Pam 31,AR;2 POKE 32,58,29,0,79,42,30,0,235,205,5,0,34,48,0,201 ser CALL m 32 CALL BIB S'UmE PEBK(48) m R8SOLT RBLBASE ROR,ARll,ARG2 RJmlRN
J-3

APPJH)IX J
CALL.CM:> is equivalent to thE! fo11011ing c;lssembly code:
29 IB FtI.C.f 30 1M .AR; 32~ 29 35 JOT C,A 36 IJI[J) 30 39 JDK; 40 CALL 5 43 Sl.'A 48 46 RKr 47 48 IB RBS{m
The follOiling functioo calls can be execu~ fran dBASE II. Programners should refer to Digital Research Inc.'s ~ CP/M OPERATm; SYSTEM PRCX;RAMMER'S REFEREta GUIDE for dI£iooal Iiiro"rmatioo. .
o .System reset 11 Get console status 14 Select disk 25 Return current disk 24 Return login vector 28 write protect disk 29 Get RIO vector 32 Set/get user code 37 Reset dr ive 141 Delay 143 Terminate process 145 Set priority 146 Attach console 147 Detach console 148 Set console 153 Get console number 155 Get a date and time 158 Attach list 159 Detach list 160 Set list 161 Conditional attach list 162 Condi tional attach console 164 Get list number
J-4

APPEtI>IX J
The set/get user code cannot be used to access restricted user areas that are not specified in your login PASSWD file.
The SYSCMD.cMD file is a dBASE II oonmand file which allC7llS execution of an MC-IXlS carmarrl fran within a dBASE II program. Store the ooomand that you want to execute into a character variable called CMD. Then give the oorrmand 00 SYSCMD. If the catmand that you intend to execute is an 8-bit program, include the sw catmand in the variable string.
For example, suppose that you want to execute DSKRESEl' fran within dBASE II:
Or if you want to PIP a file to another user area and drive:
mom 'PIP B:fi.l.emlDe.typ(G3]=A:fi.l.emlDe.typ(Gl]' ro am DO S!SCII)
If you want to run an 8-bit program, then include the sw carmand as follC7llS:
S'lam • SW PRlG8O' ro am IX> S!SJI)
Note: With dBASE II releases earlier than 2.4, avoid carmands which return messages to the screen such as OIR. These messages tend to hang up the computer. Version 2.4 or later can
J-5

AWJI!I)IX J
execute cannands which serxl messages to the terminal fllld ean even execute programs such as WordStar.
The dBASE II listing for SYSCMD.<>J) is as follows;
lOCE 49408,229,1.4,1.45,1.7,1.96,0,205,5,0,225,126,35,50,50 lOCE 49422,193,79,17,51,193,126,35,18,19,13,194,19,193 POlE 49435,1.75,18,1.4,1.50,17,50,193,205,5,0 POlE 49445,14,146,205,5,0,14,145,1.7,200,0,195,5,0,0,0 SIft CALL m 49408 . CALL QI)
The PIP comnand cannot be used to CIJf!i files to or from restr icted user areas.
'rilis cannand file will ch a system functiql call to fird the date. It will store the date to the aBAsE II system date am print the date. It does a calculaticn to firxl the day of the week am displays the day of the week and the date.
oom; In order to store the system date to dBASE II, the dBASE II macro rust be defined as an ampersand (&).
Here is the dBASE II listing for GEI'Di\TE .CMD:
SltmB SlR(PBBK(1.6)-6*llf.r(PBBK(1.6)/l.6) ,2) m DB S'.Lam SlR(PBBK(17)-6*llf.r(PBBK(1.7)/16) ,2) m &l S'.Lam SlR(PBBK(18)-6*llf.r(PBBK(18)/l.6) ,2) m yy SIft twr£ m &DID &del &yy S'.Lam VAL(DIa) m IIDltb S'.Lam VAL(&l) m day S'.lam VAL (yy) TO year S'.Lam 708926.000 m BasEQly S'ltlRB year + l.9OO m year S'.Lam IRr(30.57*Daath)+llf.r(365.25*year-l95.25)-Iday m X IF 1Dlth>2
IF IRr(year/4)=year/4 SltmB X-1. m X
J-6

ElSE S'l'am X-2 TO X
JR)IF IRlIF S'l'am year - 1900 TO year
APPJRlIX J
mom (X - BaseDay)/7.000 TO interval STCBE interval - IRr(interval) TO fraction SlUm :orr «frac:ti<D* 7 .000) + 0 .5) TO DayIbD IX) CASE CASE Day'IIta = 0
S'BBE 'SUnday' TO wekday CASE DayRa = 1
S'BBE 'Ma1day' TO wekday CASE Daytba = 2
S'BBE 'Tuesday' TO wekday CASE DayRa = 3
S'.l'(BB 'wednesday' TO wekday CASE Daytla = 4
S'.l'(BB '~sday' TO wekday CASE Daylla = 5
S'.l'(BB 'Friday' TO wekday CASE Daylla = 6
STCBE 'Saturday' TO weekday EIIlCASB ERASE ? 'Today is ' + wekday + " , + DATE () BBLBASB interval, frac:ti<D, BaseDay, 1IIeekday, 1liIyNla, X BiHOkN
J-7

APPlR>IX J
This short ocmnand file pokes a routine to execute the functioo call which returns the time of day. That time is then peeked and displayed for the user.
Here is the dBASE II listing for GE'rl'IME.(M):
S'lmE • • 'lO KIf POlE 32,14,155,17,48,0,195,5,0 ser CALl. 'lO 32 CALL 101 S'lmE PEBK(SO)-6*INT(PEBK(SO)/16) 'lO IDlR S'lmE P.BBK(51)-6*INT(P.BBK(51)/l6) 'lO MIN S'lmE PBBK(52)-6*INT(PEBK(52)/16) 'lO S!C ? SJR(IDlR,2)+': '-t9lR(MIR,2)+' : '-t9lR(SII:,2) RBLBASE IDJR,MIN,S!C,lUI RISJ.'U9H
I1<I5I5PHI!l.r .(1)
This short ocmnand file will poke a routine which will detach the list device, enabling other users to print to that device.
Here is the dBASE II listing for FREEPRNl' .CM:>:
9.LOm • • 'lO RlR POKE 32,14,159,205,5,0,201 ser CALL 'lO 32 CALL lUf RBI:2ASB lUI mmJRN
J-8

APPJR>IX J
This cxmnand file effectively allows a user to utilize the 'OJrr TO fn' caunand in dBASE II. The calling convention is as follows:
STam I udSW oc:JII"tnd I '10 aid IX) quitto
In the preceding example, u is the user area number where you would like to execute the conmand, and d is the drive name on which you would like the oonmand to execute. u and d are upper case, single alphabetic characters with A=user 0, B=user 1, etc.
For example:
9lXmE IJC SlIMH' G[ft(H)1 '10 (]I)
IX) UJl~l'O
Or:
S'.lOm IJCSOBa'r G:IFI'QCIJ' '10 QI) for Hi-bit 0CJIIIIaI1ds
This will quit dBASE II and change the user area to user 11 (J), drive C: and then subnit the file GIFE'CH>.stJB. You can return to dBASE II by invoking dBASE as the last line of the subnit •
• S'.lOm IX SOBnT GI:RQCDI '10 (]I)
18> OSBR 11 llB> C: llC> StIKlT G:IFI'QCIJ
llC> USBR 1 lC> B: lB>
J-9

APPlH)IX J
Here is the dBASE II listing for o:;rITl'O.QeD.'):
~ 49408,70,4,17,90,193,126,18,35,19,5,194,5,193,62 pam 49422,195,33,25,193,50,0,0,34,1,0,201,17,128,0,14 pam 49437,26,205,5,0,58,91,193,14,32,205,81,193,58,92,193 Pam 49452,14,14,205,81,193,58,90,193,33,93,193,214,2,71 pam 49466,17,128,0,126,18,35,19,5,194,61,1.93,175,18,1. Pam 49480,47,205,5,0,14,0,205,5,0,254,32,200,214,65,95 PCIm 49495,195,5,0,0,0,0,0,0,0,0,0,0,0,0,0,0,0,0,0,0,0,0 pam 49517,0,0,0,0,0,0,0,0,0,0,0,0,0,0,0,0
ser CALL 'lO 49408 CALL (]I) (JJl'.r
The USER ocmnand cannot be used to access restr icted user areas.
1HJI.QI>
This short ocmnand file will poke a routine which returns the user's terminal number. That number is then peeked and displayed for the user.
Here is the dBASE II listing for WIDf.Qm:
SBr TALK (ft S'RmB ' , 'lO Rmf PCIm 32,14,153,205,5,0,50,48,0,201 SET CALL 'lO 32 CALL 1Uf smm PERK (48) 'lO <DI:D.E ? '<XIBLB = '-t9lR(<DI:D.E,2) SBr TALK at ~ aHD:.B,Rmf lCISJ:ORN
J-lO

APPJR>IX J
This routine allows 16-bit dBASE users to make loC-IX>S functioo. calls. It can be used to find the time or your terminal number, to find or change your printer device, to find or change your user area, to detach your list device so others can print after you finish, to set your priority, and much IlDre.
The MC-IX>S functioo. calls are implemented by storing the number (in decimal) of the call to be made to a numeric variable called FUNCrlCE. A numeric value must also be stored to a variable called ARG. This is the argwnent of the functioo. call and should be zero for those functions which require 00 argument. The 00 CALL ocmnand will execute the routine, and the result can be found beginning in location 48 decimal. The value of the first byte of the result is stored in a numeric-variable called RESULT.
The follC7lling is the source code for CALL.PRG:
9L'(B • • "B) lUI J:I(D 65297,J.DCrI<B 9L'(B IRr(JR;j256) "B) AR;2 91mB AlG- (256*AR;2) "B) AR;l. J:I(D 65298,ARa,AR;2 J:I(D 65280,46,138,14,17,255,46,139,22,18 J:I(D 65289,255,205,224,46,163,20,255,195 SBr CALL "B) 65280 CAlL lUI 9L'(B PBI!K(65300) "B) RESOLT RII:BASB 1IJN,ABGl.,AR;2 RId\JlGi
This file must be in your current directory area, or on user area 0 of your current logical drive (SEl' to sm and R) status) for it to be accessible when you run dBASE.
Refer to CXHlJRREN1' CP/M PROORAMMER'S REr'.ERENCe: GUIDE for furthe~ informatioo.. ----
J-II

APPIR)IX J
This cxmnand is the l6-bi t analog to the a-bit FREEPRtfr.cMD routine which releases the printer while in the dBASE program. FREEPRNl'.PRG will ''poke" a routine to detach the list device (functioo 159), thus enabling other users to print to that device when your dBASE II program finishes with the printer.
The code is as follows:
SBr TAUt (ft
SJDm • • 'to BIll p(J(E 65280,46,138,14,17,255,46 10m 65286,l39,22,18,255 p(J(E 65290,205,224,46,163,20,255 POlE 65296,195,159,0,0 ser CALL 'to 65280 CALL 101 SBr TALK (lIJ
BBLBASB 101 RElUCN
dBASE programs that continue after printing should include the carmand:
CALL FREEPRNr
in order to free the printer.
GI!I.'IllaB .PIG
This cxmnand is the l6-bit versioo of GEl'DM'E.cMD with ale major IOOdification: GEl'OATE.PRG returns the system date and time with a single lC-OOS functial call (functial 155).
J-l2

APPJR>IX J
The GEIDATE.PRG code is listed below:
SBr 'mLK CPP sram 11m 11M POKE 65280,46,138,14,17,255 POKE 65285,46,139,22,18,255 POKE 65290,205,224,46,163,20 POlE 65295,255,195,155,22,255 SBr CAU.. m 65280 CAU.. RB
The following section oanputes the time:
sram 9.rR(PBBK(65304)--6*IN'r(PBBK(65304)/16,2) m IDJR 9.l{BB 9.rR(PEBK(65305)--6*IN'r(PEBK(65305)/16) ,2) m MIR sram 9.rR(PBBK (65306) --6*IN'r(PEBK (65306) /16) ,2) m S8! IF $(IDJR,1,1)=1 ,
ff.ltmB '0'+$ (IDJR,2,1) m IDJR. 1RlIF IF $(MIR,1,1)=1 1 sram '0'+$(MIR,2,1) m MIN
1RlIF IF $(S8!,1,1)=1 1 sram '0' +$ (S8!,2,1) m S8!
1RlIF
To oanpute the date:
9.l{BB PBBK(65302) + 256*PBBK(65303) m DA1S S'.lam (JlJm;+ 13173.000) /7.000 m DIlERVAL sram IRl'BRAL - lRr(IRrBRVAL) m mACl'lQi 9lOm IN'r {(I'JmCrI<B * 7.000) + 0.5) m DADDI 9.LOIB 'SUltb4'UelfecJlhlFriSat 1 m DImIAMB 9.l{BB mIM($(DADWIB, 3*DADD1 +1,3» m 1D\Y RBLBASB Drl'ERVAL,mACl'lQi RBLEASB DADDI,DURAME 9.LOIB 78 m D'AR 9.l{BB 1 m JDmI DO 1IIILE (DA1S>366) .CR. (DA1S = 366 .Ali). D:AR/4 <> IN'r(D:A1V4» IF DM/4=lRr(DABI4) 9.l{BB DA1S-366 m M1S
KSB
J-13

mom DA1S-365 m DDS BRDIF S'latE YEAR+ 1 m YEAR
JRJX)
IF D'AR/4+IRr (YEAB/4) SIam T 'to LEAP
BlSB S'latE p m LEAP
JR)IF S'.lam T m UIDmASB DO 1IIILE DEDmASB
DO CASE
APPJR)IX J
CASE STR(JIlmI,2) $ , 1 3 5 7 8 10' JR). DDS>31 SIam JDlJ.B+ 1 m IDI'lB S'lam DA1S-3l m DA'!S
CASE STR(IDmI,2)$'4 6 9 11' JR). DDS>30 S'.lam IDlJ.B+ 1 m IDft'8 SIam DA1S-30 'to DDS
CASE 1DlJB=:2 .AR>. DDS>29 JR). IBN» mum 3 m IDlIB S'.lam DA1S-29 'to DA'!S
CASE 1Df.IB=2 JR). DAYS>28 .JR). .lOr. ~ S'.lam 3 m IDlIB mam DA1S-28 'to DDS
01'BBRNISE S'lam p m DEDmASB
BtIIX)
Rm:.BASB LEAP ,UIDmASB SIam STR(YBAR,2) m m SIam STR(IDmI,2) 'to lIB SIam STR(DUS ,2) m mY IF $(IIIt,l,l)·' • S'lam 'O'+$(IDf,2,l) 'to Dl\Y
JH)IF IF $ (DAY,l,l)·' , SIam 'O'+$(mY,2,l) m Dl\Y
SRr IW.l'E m 6iIDI &mY &m ? 'Today is --ItIlI\Y+' , ?? 1D!1+' /'+DAY+'/'+m+' , ??BOOR+':'~':'+SBC RBLEASB IDJR,MIR,sa::,mY RBLEASB lIB,m,~,RIf
J-14

APPDI)IX J
This routine can be used to date documents or records. The code may be instructive to readers interested in perpetual calendars.
SYSCMD.PRG is a routine which allows l6-bit dBASE users to execute MC-lXS cannands fran within dBASE. This lets you execute ocmnands like PIP, WS (WordStar), OOKRESEr, or SC (Supercalc) fran dBASE. When the coomand or program is done, you are returned to the next line in your dBASE oomnand file. You can maintain program control over every aspect of your application, even if software other than dBASE is required.
The code to create the l6-bit dBASE II program SYSCMD.PRG is listed below:
POKE 65280,83,177,145,186,196,0,205 POlE 65287,224,91,138,7,67,46,162,53 POKE 65295,193,138,200,181,0,191,54 POlE 65302,193,138,7,67,136,5,71,226 POKE 65310,248,198,5,0,177,150,186 POlE 65317,53,193,205,224,177,146 POlE 65323,205,224,177,145,186,200,0 POlE 65330,205,224,195,0,0 SBr CALL TO 65280 CAll. (]I)
RaURR
J-15

APPDI>IX K
L A Brief Descriptial of MC-IlQ;
This appendix gives a brief description of Gifford's Me-DOS and its relationship to Digital Research Inc.'s Conc:urrent DOS. This will be of value to those wJ:x> have worked with Ccxlcurrent DOS and need to knCM what features are unique to MC-DOS. A list of features unique to !oC-DOS is provided. Documentation of these features is presented in the previous chapters of this manual. Note that under !oC-oos the DATE, HELP, PRINTER, TYPE, and VCMOOE ccmnands have been modified. DR Net, the networking extension of catcurrent DOS, has been rewritten, so that a m:mu-driven NEr ccmnand and a cx:.tiFIG.NE1' file integrate most of the user carmand$ of DR Net. The NEr program can operate in a conmand IOOde with the names of the Digital Research DR Net conma.nds as arguments.
IC-IlQ; and Cmcurrent 1m
Concurrent DOS 3.1 can be viewed as having three parts: the user interface which processes your cannands, the internal catcurrent DOS system function calls, and the hardware interface.
Under Me-DOS, the basic structure of the operating system designed by Digital Research Inc. remains unchanged. In systenB equipped with the canpupro M.DRIVE/H, MC-IXS can utilize up to I024K of solid state memory as a cache buffer for the hard disk, in place of the Concurrent IXS buffer in RAM. All of the system enhancements by Gifford catplter Systems are in areas designed to be modified, such as the user interface. These e$ancements do not interfere with the normal operation of Cancurrent DOS.
Gifford Cootputer Systems has modified MC-IXS's Terminal Message Process, and named it the system shell. The shell's main functions are:
1. Default terminal, printer, user number, and drive assignment for each acoount. These are stored in a file that can be modified to add or delete accounts, or to change their default assignments.
2. Printer and terminal I/O parameters. You can change these by modifying files that are provided with your system, so that no assembly language I/O progranming is needed. This makes your system much more flexible and easy to modify.
K-l

APPIR>IX K
3. User login am password functions. You can prevent unauthor ized users from logging into your system, put restrictions on what prograns can be executed by users, am specify the terminals that individuals can use.
The following list includes features which have been implemented by Gifford Canputer Systems. Included in the list are only those features of which the user needs to be aware. Features which are essentially invisible have not been listed. (See also Olapter 2, sectial 2.4. The list includes:
SW, (Allow simultaneous processing of 8- am 16-bit swa6 programs by 8085/88 and 8086 CPOs respectively).
VT1'YS (ASCII file to coofigures Virtual Terminals for concurrent processing)
Autanatic RAM. meroory test (see Chapter 3)
User custamization files and utilities (see Chapter 3):
1XMN.SUB tMN.am KEYS.om, LOGIN.om LOGIN.SUB IDnlT.SUB MAIL.HLP KD:>S.HLP
name.NE'l' (DR Net only) Nl\MENl)E.am (DR Net only) name.REM SYSINIT .BAN SYSINrt.CX> SYSINrt .SUB USERINrt .om USERINIT .SUB
System security files am utilities (see Chapter 3):
PASSWD HISl.'ffiY IDnlT NEWUSER.QoID
K-2
PASSQm .eM PWASK.NE'l' (DR Net only) TIMELOG.om TIMELOG .SUB UTMP

~ications utilities (see Olapter 3)
AP.<M> MAIL.<M> M:Jl'[)
other utilities (see Chapter 3)
ATl'ACH .<M> Bt1FFER.QtID cx::=PMINIT .<M> ~G.NEr (DR Net only) CPY.<M> Infi.<M> DSKRFSEr FOOMAT.<M> LCXnJT MAKE.om NEr .CMD (DR Net only)
NElMJl'D (DR Net ally) NErUSERS (DR Net only) WRITE.C>m
RESEr.CMD SElMEM.OI> SErNE:r.C>m (DR Net enly) SYNC.OI> SYSGEN.om TIME.om TYPE.CMD UPl'IME .01> VQ.O)E.<M> WID.CMO
SIO Caltrol (progra:mnable serial ports for interrupt driven input am output. See AR;lerrlix E ).
Additicmal Notes (Xl K:-[XI;
Users should note that under Me-DOS several c:xmnands no lenger perform as specified by Digital Research. The follOlrling notes describe the IOOre important changes, and SCI1le supplementary Gifford commands.
In Me-DOS the DATE 0CX'II'IIarrl does not set the system clock. see the CLOCK command. DATE still returns the correct time.
A DSKRFSEr 0CX'II'IIarrl is wilt into Me-DOS and also is supplied as a separate file DSKRESEl'.cMD. This allows you to have two diskettes on a floppy-based system .with no DSKRP.:sEr command en either diskette.
The HELP ocmnand is sanewhat different in its syntax and structure, am MAIL uses a separate help facility.
K-3

APPJR>IX K
The NE.WUSER utility can be used to restrict accounts to the user areas, terminals, and optimal default program assigned in the PASSWD file.
The PRINl'ER oomnand in ftC-DOS can take printer names, as well as printer numbers, as arguments, and can attach the user to printers at other nodes of a DR Net network. Wi th the "1n
optioo it displays all of the list device numbers and names.
The SW program enables Gifford's Me-DOS with 80286/Z80 or 8088/85 dual processors to support programs written f~ MP/M II, despite different queue calls in Calcurrent DOS and MP/M II. The SW86 program enables an 8086-based Gifford MC-DOS system to support applicatioos programs written for an 8080 or Z80.
The TYPE carmarrl in Gifford's MC-JX)S can accept wildcards, list multiple files, change user areas, ooncatenate files, pause in its scrolling after an arbitrary number of lines, and access other DR Net nodes.
The USER oonmand prompts the user to select a user number, rather than displays the current user number. The system pranpt always displays the current user number, even f~ user area O.
The VCMCDE carmarrl in DYNAMIC mode allows a background process to wr i te to the screen, rather than wr i te to a buffer. The FLUSH optioo in ftC-JX)S discards detached screen outp.1t.
In Me-DOS, the Calcurrent DOS oomnand interpreter has been modified to enforce any user area access restrictions of the login PASSN:> file, so that comnands like USER, PIP, PRINl', DIR, or applications programs cannot access unauthorized areas.
E-DOS and MPIM 8-16
Me-DOS incorporates many external features of MP/M 8-16, Gifford's enhancement of Digital Research's MP/M-86 multitasking, multiuser operating system. This similarity in the user interface is superficial, in that most MC-DOS command files are not identical to their MP/M 8-16 counterparts. The following pages identify differences between fIC-ra; and MP/M 8-16.
K-4

AP.P.BII)IX K
Me-In) has several features not available in MP/M 8-16. The roost important is support for networking, since the DR Net network I/O system (NIOS) and utilities allow MC-D,)S sy~terps to be linked by Datapoint's ARmEl' hardware. Gifford cauputer Systems has enhanced DR Net to allow networks to be copfigure.d witb:>ut assembly code. The maximum number of workstatioos in a DR Net network of MC-In) systems slJI'passes by ~re than an order of magnitude the practical limit 00 the number of terminals attached to a single MP/M 8-16 system.
The MC-OOS operating system allows users to share an 80287 coprocessor, with a CPU like the Macrotech MI-286 dual processor (80286/Z80). In aw1icatioos requiring intensive numerical processing, suWOrt for this device in a multiuser environment offers important advantages over MP/M 8-16, which dpes not allow a coprocessor to be shared. The same CHSEl' utility of Me-In) that enables use of a coprocessor also a110111S certain programs that separate logical code fran data to be shared by multiple users. This featlJI'e can oonserve RAM, rut the operator must determine by experiment which programs can be shared in this way.
MC-OOS accesses files faster than MP/M 8-16, through a npre efficient, "hashedn directory search. Unlike MP/M 8-16, which uses XFCBs for both file passwords and time stamping,MC-IlOS uses XFCBs only for passwords. MC-In) systems that implement file passwords and timestamping show much lesS degradatioo in speed than MP /M 8-16 systems that implement these feature~. Repacking the hard disk is less important in MC-J:Xl3 than in MP 1M 8-16.
Apart fran the DR Net ccmnands, several other MC-In) files have no counterparts in MP/M 8-16: CHSEr, INITDIR, LC)(DJTSUB, PRINl', SW86, and UPl'IME. The functions of eleven MP/M 8-16 files are perfocmed by Me-DOS files that have different names:
MPIM 8-16
BUFFER.<H> SWAP .<H> CClMINIT.CMD vr.eM:> DATE.<H> TOO .CMD GENCCFM.eM:> GENSYS .eM:> K!X)S .HLP MPH.HLP MCIn3 .NDX MEM.NDX
K-5
IC:-IXB
SYSINIT .BAN SYSINIT.OO SYSINIT .SUB SysrAT .Q.1D VCMX>E.<H>
MPIM 8-16 . .: .
~IT.BAN Ml?MINI'l' .001> MPMINIT .SUB MPMSl'AT .SUB VMDE.CMD

APPlR)IX K
Var ious MC-lm cannands, including CLOCK, COOSOLE, MAIL, PRlNl'ER, TYPE, and Wfi), have supplementary features that are not in their MPIM 8-16 oounterparts.
VersialS of the MCDEM 8-16 telecomnunicatialS language written for MP/M 8-16 will not run under MC-lm. A version of MCDEM 8-16 is available from Gifford that runs under MC-lm, and that occupies less than half the space in RAM that the MP /M 8-16 version required.
Both MC-OOS and MP/M 8-16 support a 200-character type-ahead buffer, to accept rapid character input.
Gifford's initial release of Me-lm (versioo 1.00) did not include several coomands fran MP 1M 8-16:
SCHED.om SETWARP.om SErPASSW .om
SEl'U'lMP .om STAT.om
The SErPASSW and SErt11'MP security utilities are not used in MC-IX>S, because the MC-lm shell autanatically restores a special password to the PASSWD or ti.rMP files if they are copied to the system drive. Readers wOO have MP/M 8-16 will find that STAT works in MC-OOS, rut STAT is an MP/M-86 utility that Di9ital Research does not include with a Concurrent IX>S license. Releases of MC-OOS later than 1.00 provide the CBRON.cMD utility to schedule recurring processes linked to the clock/calendar.
SErWARP is not in the MC-OOS oc.mnand set, because neither disk emulatioo hardware nor system RAM can be used as a logical drive in MC-OOS. Systems tl}at incorporate up to a megabyte of semiconductor disk like catplPro's MDRIVE/H can use it as a cache buffer in MC-OOS, rather than as a volatile logical drive. This restr icts to 1024K the cuoount of MDRIVE/H that MC-IX>S can utilize, rather than the limit of 4096K in MP/M 8-16.
In MC-OOS, the control character "D cannot detach a foreground process, nor attach a back9round process, as it can in MP/M 8-16. In MC-lm a .... C unconditionally aborts the current foregrOlD'ld process, while MP/M 8-16 asks the operator to confirm (YIN) that a process interrupted by .... C should be terminated.
K-6

APPJRlIX L
L. cables and cauectioos
The recoomended length for RS-232 cables is anything under fifty feet. This is the maximum length specified by the IEEE standard. If you must use cables over fifty feet, use twisted pair, unshielded cables. Belden #9745 cable, 22 gauge has been used in runs over 500 feet, although we cannot guarantee that your devices will operate at such a distarice. Shielded cables cannot be used for 1al9 runs. If you need to make your own cables, the following connections are what the catp.JPro canputer needs at the back panel. Be sure that line 4 does not have any connections. If it does, you should clip the wire to this pin before, installing the cable to your computer. Use of this line can cause your system to freeze.
Pin Number Coonection - I Ground V"2 Devioe td computer v3 _,~F.er to de,Y,i:~
4 CLeave aIs-'~~'''''' ted '--_ ...... _ .. "--'" ~ ...... ~ 6 " Terminal Input Handshake
~7 Ground v20 0l'R. Data terminal ready.
-12V for logic I +12V for logic 0
The RS-232 ports perform bidirectional hardware handshaking for all terminals that interfaoe with the canputer. If a terminal sends characters too fast to the canputer, MC-IlCS will signal to. that devioe by lowering the RS-232 pin-six (6)., This tells the transmitting devioe to stop sending characters to the canputer. If more characters are sent to the canputer after pin six (6) is lowered, the canputer will send a crRL S (AS) to the terminal. When the canputer is ready to receive more characters, pin-6 is raised and becomes clear to send more characters. The 'r1'YS and LPRS files allCM you to set the canputer to roonitor D1'R pin-20 with both terminals and printers in order not to output characters faster than the terminal or printer can receive them. Hardware handshaking is not enabled for remote terminals which carmunicate with the canputer via modem.
L-I

APPIR)IX L
In a IE Net local area network, the network controller boards must be linked by RG62 coaxial cable (93 ohms). Networks of only two nodes can be directly connected at distances of up to 2,000 feet.
Networks of lOOre than two nodes must have each node connected to a repeater. A passive repeater can connect up to four cables (attached to a network controller or to an active repeater) over distances of up to 200 feet. An active repeater can connect up to eight cables (attached to a network controller or to another active repeater) over distances of up to 2,000 feet. The total distance separating two nodes of a network linked by active repeaters can be no lOOre than 20,000 feet. The total number of nodes (single user or multiuser MC-IXl3 canputers) linked in a single IE Net network can be no greater than 255.
L-2

APPJR)IX M
M. Map of Logical Devices, cables, ax.s, users, and Status
Copy this page and fill in the informatioo pertinent to your system. Update the map whenever you make changes, and post copies of the map at the system console and other strategic locatioos.
Calsole
Tl'Yl
Sys. Calsole
Terminal 1
~l
Operator status
Coonected
Connected

APPBlI>IX It
It. Table of Bexadeciml Mllllhers
This Appendix and the next respectively describe hexadecblal (hase-sixteen) numbers, and the ASCII (American Standard Code for Information Interchange) representation of keyboard characters.
Ordinary numbers are based on powers of ten. When we wr i te a number like "1985" for the name of a year, we mean the value of the sum:
1 times ten to the 3rd power (1,000 x 1 = 1000), plus 9 times ten to the 2nd power (100 x 9 = 900), plus 8 times ten to the first power (10 x 8 = 80), plus 5 times ten to the zeroeth power (1 x 5 = . 5).
We do not need to wr i te this as a sum, because the position of each numeral indicates the IXJWer of ten by which it should be 1IDl1tiplied. The way that we write numbers in daily life (as opposed, for example, to Ranan numerals or bar codes) is called a "base-ten" or "decimal" system of numbers, because it is based upon powers of ten.
A 16-bit Me-DOS machine ,sometimes represents numbers on a base of sixteen, rather than ten. In numbers written in basesixteen notation, the smallest two-digit number ("10") represents the quantity sixteeni the smallest three-digit number ("100") represents the quantity sixteen squaredi the smallest four-digit number ("1000") represents sixteen cubed, and so forth. To be able to oount past nine with single-digit numbers, six new numerals must be used: A (= decimal ten), B (= decimal eleven), C, 0, E, and F (= decimal fifteen). Numbers in base-sixteen notation are called hexadecimal numbers, or "hex" for short.
In base-sixteen the hexadecimal number "1985" ~ld represent the decimal number 6,533, or 1 times 16 cubed (4,096), plus 9 times 16 squared (256), plus 8 times 16, plus 5 times 1. The quantity 1,985 in decimal notation would be written "7Cl" in hex, because it is the sum of 7 times 16 squared (= 1,792 decimal) plus C (twelve) times 16 (= 192 decimal), plus one, or "7Cl" hex. The next page displays a table of the decimal (hase-ten) equivalents of same hexadecimal (hase-sixteen) numbers.
N-l

Bex=DeciIal 1 1 2 2 3 3 4 4 5 5 6 6 7 7 8 8 9 9 A 10 Bll C 12 013 E 14 F 15
IIelc.=DeciJal 10 16 20 32 30 48 40 64 50 80 60 96 70 112 80 128 90 144 AO 160 BO 176 CO 192 00 208 EO 224 FO 240
APPJR)IX R
Bex=DeciJDal 100 256 200 512 300 768 400 1024 SOO 1280 600 1536 700 1792 800 2048 900 2304 AOO 2560 BOO 2816 COO 3072 000 3328 EOO 3584 FOO 3840
Bex=DeciJDal 1000 4096 2000 8192 3000 12288 4000 16384 5000 20480 6000 24576 7000 28672 8000 32768 9000 36864 AOOO 40960 BOOO 45056 COOO 49152 0000 53248 EOOO 57344 FOOO 61440
Bex=DeciJDal 10000 65536 20000 131072 30000 196608 40000 262144 50000 327680 60000 393216 70000 458752 80000 524288 90000 589824 AOOOO 655360 BOOOO 720896 COOOO 786432 00000 851968 EOOOO 917504 FOOOO 983040
Use the table above to calculate the decimal equivalent of any hex m.unber of 5 or fewer digits, by adding the decimal value of each hexadecimal place. For example, FFFF hex equals the SI.Dll:
FOOO (= 61,440 decimal) FOO (= 3,840 decimal)
FO (= 240 decimal) + F (= 15 decimal)
FFFF = 65,535 decimal.
Sane Me-In) catmands am utilities use paragraphs, a unit equal to 10 hex (= 16 decimal) bytes. To convert a hex number of paragraphs to bytes, append "0" on the right to multiply by 10 hex. Thus, se hex paragraphs equal seo hex bytes (= 1472 decimal). To convert bytes to paragraphs, divide by 10 hex (by dropping the last digit). For example, 4040 hex bytes = 404 hex paragraphs.
Specific RAM locations in MC-In) progranming utilities like IDT86 or SYSTAT are written in the form s:o, for sando hexadecimal numbers of 00 JOC)re than four digits. (Here s is the segaent of RAM, showing the hex number of a paragraph, counting fran zero, the beginning RAM address). The value of 0 is the offset of the RAM address, the hex number of bytes above the beginning of s. For example, the RAM address AOOO:7850 denotes a RAM location AOOO paragraphs + 7850 bytes (= A7850 hex bytes, or A785 paragraphs) above the beginning address (0000:0000) of RAM.
N-2

APPJRlIX 0
o. ASCII aaracter Set
The follOlll1ing is a chart of the ASCII character set as JOOdified for printing, including Meta characters.
Dec. Hex Grcqjlic Name (MeaniDJ)
O. 00 ""@ NUL (used for padding) 1. 01 ""A S<E (start of header) 2. 02 "B srx (start of text) 3. 03 "c El'X (end of text) 4. 04 ""0 ror (end of transmission) 5. OS "E ENQ (enquiry) 6. 06 "F ACK (acknowledge) 7. 07 "G BEL (bell or alarm) 8. 08 "Ii BS (backspace) 9. 09 "I Rr (horizontal tab)
10. OA "J LF (line feed) 11. OB 1< vr (vertical tab) 12. OC "L FE' (form feed, new page) 13. 00 "M CR (carr iage return) 14. OE "N SO (shift out) 15. OF "0 SI (shift in) 16. 10 ""p OLE (data link escape) 17. 11 "0 OC1 (device control 1, XCE) 18. 12 "R OC2 (device control 2) 19. 13 "s OC3 (device control 3, XOFF) 20. 14 "T OC4 (device control 4) 21. 15 "u NAK (negative acknowledge) 22. 16 "V sm (synchronous idle) 23. 17 "W El'B (end transmission block) 24. 18 "X CAN (cancel) 25. 19 "y EM (end of medium) 26. lA "z SUB (substitute) 27. 1B "[ ESC (escape, alter fOOde, .SEL) 28. 1C "\ FS (file separator) 29. 10 "] GS (group separator) 30. IE "" RS (record separator) 31. 1F " US (unit separator)
0-1

APPlRlIX 0
Dec. Rex Grapdc RaIDe (Mearrl.Dj)
32. 20 space or blank 33. 21 ! exclamatien mark 34. 22 " double quote 35. 23 i number sign (hash mark) 36. 24 $ dollar sign 37. 25 % percent sign 38. 26 & ampersand sign 39. 27 single quote (apostrop,e) 40. 28 ( left parenthesis 4l. 29 ) right parenthesis 42. 2A * asterisk (star) 43. 2B + plus sign 44. 2C , canna 45. 2D minus sign (hyphen) 46. 2E · period (decimal point, dot) 47. 2F / (right) slash 48. 30 0 numeral zero 49. 31 1 numeral one 50. 32 2 numeral two 5l. 33 3 numeral three 52. 34 4 numeral four 53. 35 5 muneral five 54. 36 6 numeral six 55. 37 7 numeral seven 56. 38 8 numeral eight 57. 39 9 numeral nine 58. JA · oolen · 59. 3B ; semi-ooloo 60. 3C < less-than sign 6l. 3D = equal sign 62. 3E > greater-than sign 63. 3F ? questien mark
0-2

APPBlI>IX 0
Dec. Hex Grapdc HallIe (Meaning)
64. 40 @ at-sign 65. 41 A upper-case letter ALPHA 66. 42 B upper-case letter BRAVO 67. 43 C upper-case letter CHARLIE 68. 44 D upper-case letter DELTA 69. 45 E upper-case letter EOD 70. 46 F upper-case letter FO~ 71. 47 G upper-case letter OOLF 72. 48 H upper-case letter IDTEL 73. 49 I upper-case letter INDIA 74. 4A J upper-case letter JERICEI) 75. 4B K upper-case letter KAPPA 76. 4C L upper-case letter LIMA 77. 4D M upper-case letter MIKE 78. 4E N upper-case letter NCJV.EMBER 79. 4F 0 upper-case letter OSCAR 80. 50 P upper-case letter PAPPA 81. 51 Q upper-case letter ~ 82. 52 R upper-case letter RCMEO 83. 53 S upper-case letter SIERRA 84. 54 T upper-case letter ~ 85. 55 U upper-case letter UNICORN 86. 56 V upper-case letter VIcroR 87. 57 W upper-case letter WHISKEY 88. 58 X upper-case letter XRAY 89. 59 Y upper-case letter YANKEE 90. 5A Z upper-case letter ZEBRA 91. 5B [ left square bracket 92. 5C \ left slash (backslash) 93. 50 ] right square bracket 94. 5E " up-arrow (caret) 95. SF underscore
0-3

APPJH)IX 0
Dec. Hex Grapdc 'RaIle (MeaniDJ)
96. 60 .. (single) back quote (grave accent) 97. 61 a lower-case letter alpha 98. 62 b lower-case letter beta 99. 63 c lower-case letter char lie
100. 64 d lower-case letter delta 101. 65 e lower-case letter echo 102. 66 f lower-case letter foxtrot 103. 67 g lower-case letter golf 104. 68 h lower-case letter hotel 105. 69 i lower-case letter india 106. 6A j lawer-case letter jericho 107. GB k lower-case letter kappa 108. 6C 1 lawer-case letter lima 109. 6D m lower-case letter mike 110. 6E n lawer-case letter november Ill. 6F 0 lower-case letter oscar 112. 70 P lawer-case letter pappa ill. 71 q lower-case letter quebec 114. 72 r lawer-case letter raneo 115. 73 s lower-case letter sierra 116. 74 t lawer-case letter tango 117. 75 u lower-case letter unicorn 118. 76 v 1awer-case letter victor 119. 77 w lower-case letter whiskey 120. 78 x 1awer-case letter xray l2l. 79 Y lower-case letter yankee 122. 7A z lower-case letter zebra 123. 7B I left brace 124. 7C vertical bar 125. 7D right brace 126. 7E - tilde 121. 7F "'1 DEL (delete, rub out)
0-4

APPJR>IX P
P. Rates
P-l

APPElI>IX P
P-2

P-3

account: A name that can be presented at the lCXJin pranpt to access the system. MC-IX>S can require that an encrypted password be presented with a valid account name before an operator can access a system. Account names are also used by the AP, MAIL, HISl'CRY, TIMEOOG, WB:>, arr3. WRITE utilities, and by the reminder file utility.
appli.catia:l program: A prCXJram that performs a rosiness or scientific function such as word prooessing or structural analysis. As opposed to a system utility, like PIP, or a language, like FORrRAN.
archive attribute: File attrirote that irrlicates whether a file has been IOOdified since last being backed up (archived). It is used with PIP to avoid backing up files needlessly.
ARCNBT: A networking hardware standard (baseband, token-passing) developed by Datapoint Corporation.
argtIEIlt: A symbol that is entered after the prCXJram name in a cannand line to give the prCXJram specific instructions.
ASCII: American Standard Code for Information Interchange. It is a widely accepted standard for the digital representation of numbers, letters, arr3. symbols. "ASCII" terminals and printers can convert data between ASCII format and human readable text. In contrast, binary or hexadecimal data has meaning only in the context of the specific hardware or software which uses it.
attriblte: A file flag that can be set 00 or OFF to determine how that file will be treated by the operating system. For example, an attribute can be set 00 to prevent a file from being IOOdified.
background: Processing that occurs without affecting a terminal screen is said to be in the background. With Virtual Terminal software, screens other than the current, visible (foreground) screen are backgroum screens.
backup: A COf!l of a file or files that are created to insure against irrecoverable loss of data. .
GI.Q;SARY-l

baud rate: The speed at which serial data is transferred, as with a IOOdem or an RS-232 device. Usually baud rate divided by 10 equals bytes per second, so that, for example, 19.2 kilobaud equals about 1.92 kilobytes per second.
binary data: In the nost general sense, any digital representatioo of data. Since no formal standard exists to define binary data, the term is often used to mean non-ASCII data.
bit: The smallest unit of data that a oanputer can manipulate. Eight bits make a byte, 1,024 bytes make a kilobyte.
bJS: A physical path for electrical signals.
boot: The process of loading an operating system into meIlDry, usually by physically resetting the system. Most systems when powered up will automatically attenpt to read the "tx:x:>t tracks" of the system disk into meIlDry and then execute that ccx1e, which in turn instructs the caoputer to read into rnenory the remainder of the operating system. By canpleting this process, the computer "pulls itself up by its tx:x:>tstraps."
bJffer: A t:enporary data storage area, typically used to canpensate for the cxnparative slowness of another COI'IlpCXlent.
cache: A type of bIffer used to enhance disk performance.
ooaaand file: A program file which can be run by typing its file name (anitting its file type) follCMed by a carriage return. l6-bit c:xmnand files have the file type .om, and 8-bit c:xmnand files have the file type .<D1.
ocncatenate: To oanbine two or IOOre files into a single file. This can be dale by the PIP ccmnand or the TYPE ccmnand.
OCDfiguratial: The installatioo of hardware or software so that it is catpatible with other hardware and software in a system. Oonfiguratioo also refers to the specific hardware and software that make up a system.
GLOOSARY-2

CD1SOle: A terminal. This manual will use the word console enly to refer to the system. CCDSOle, that is, the terminal which Multiuser Calcurrent OOS first talks to during the J:xx>t sequence.
CPU: Central processing unit. The microprocessor which runs the operating system and programs.
dBASB II: An awlicatien program by AShton-Tate deSigned for database management.
default: The node, disk drive, user number, password, program, options, terminal, or list device that will be assumed by the operating system when the user gives a cannand without specifying this information.
diagnostics: Programs used to identify system problems.
directory: A listing of files. The directory can be evoked with the Dm. or 8Dm. oonmands. Directory also refers to the CiI"ea 00 a
. disk that tells the operating system where files are stored en that disk. If this latter type of directory is damaged, the files to which it refers may be irrecoverably lost.
DR Ret: The networking IOOdule of the Multiuser Calcurrent Jn3 operating system, providing software protocols to link catplters.
encryptim: A scheme used to encode informatiooso that it is unintelligible without the encryptien algorithm and "key." It is analogous to a canbinatien lock. for data.
executable code: Code that is machine readable and ready to be run by the catplter without translatioo. Source code, by contrast, is human readable and 11l1st be canpiled or assembled into executable object code before it can be run by the CPU.
Bxt:erIded Pile Ocntrol Block: Part of a directory listing that allows the opticnal use of file password protecticn.
GLQ3SARY-3

BKteIJded Inplt/QItp1t Systelll (XIaJ): The software interface between the Multiuser Ccncurrent IX>S operating system and the specific physical hardware which makes up your CCIIplter. In a DR Net network, the Network Input/Output System (NIOS) is the software that talks to the network controller hardware.
file: A collection of data, characters, or instructions stored on disk.
Pile CcDtrol Block (PCB): A structure used by the operating system to describe attributes of files.
file name: The name given to a file. Technically, file name refers to the first part of a file's name and precedes the optional file type. The file name cannot exceed 8 characters. In the file WS.cMD, the file name is WS.
file type: The optional second part of a file'S name, separated from the file naDIe by a per iod. The file type cannot exceed 3 characters. In the file WS.CMD, the file type is CMD.
floppy diskette: A flexible disk made of mylar that is coated with magnetic oxide and encased in square cardboard. It is used for storing data. Flq:py diskettes are inexpensive and highly portable.
function keys: A special set of preprogranmed or programnable keys on a keyboard. They are typically used to condense rultiple character strings into a single keystroke.
bandsbaking: The means by which the flC7trl of data between peripheral devices is controlled so as to prevent data overrun. The facility for handshaking rust be built in to the devices being used and nust be mutually oanpatible. The JlDSt popular hardware handshake protocol is Dl'R, and the Il'OSt popular software handshake is XOO/XOFF.
hardware: The physical elements of a canputer system, in contrast to software.
hard disk: A rigid disk that is coated with magnetic oxide and used for storing data. Generally, hard disks store much more data and operate much faster than floppy diskettes.
GLa3SARY-4

hexadecial notatim: Notatioo for the base-16 number system'that uses 16 different characters, 0 through 9 and A throUgh F. This is a "natural" nwnber system for microcanputers because there is a one-to-one relationship between the 256 possible ca1Ibinations of two-digit hexadecimal characters and the 256 poSsible bytes.
input: Data sent to a program by an I/O (inpUt/output) device such as a keyboard, disk, or tape drive.
interface: A device or program that allows devices and/or progra.ms to conmunicate.
I/O: Abbreviatioo for input/output.
kil.obyt:e: 1024 bytes, OOIlIOOIlly written as iK.
local device: A device that is physically attached to your local network node. '
local node: The ccmputer to which your terminal is physicaliy attached, as opposed to "remote nodes" (other ba1IpUters in a III Net network) •
logical drive: Allor part of a physical drive, represented by a letter (A: through P:). under DR Net, you can arbitrarily assi<jrt a logical drive letter to rei1Dte physical drives on the network.
-=-IXl3: Mul tiu~ Concurrent JX)6, Gifford's enhanced versim of Digital Research's Concurrent JX)6 operating system.
-=-IXlS prc:mpt: See" system praapl. II
megabyte: 1024 kilobytes.
JIIldem: A device that allows comnunicatioo over phone lines between two ccmputers or between a canputer am a terminal.
mltiuser system: A computer that allows two or mre physical terminals to be used simultaneously for running programs.
GLOSSARY-5

1IIJltitasking: SynonynDUS with concurrent. The ability to run two or IlDre programs simultaneously fran a single physical terminal, as in Multiuser Ca1current OOS with Virtual Terminals software.
neblcr:k: A oollectioo of single-user and/or multiuser canp.1ters so integrated as to permit the sharing of I/O devices such as logical drives, tape drives, plotters, printers, and spooler systens.
node: A single-user or multiuser canp.1ter attached to a network. A node can functioo as a self-sufficient canp.1ter, when not attached to the network.
object code: Machine readable code that can be executed by the CPU. See executable code.
operating system: Software such as Multiuser Coo.current DOS that provides a canoon, productive envirorunent for applicatioo programs, utility software, languages, and I/O devices.
option: A value supplied by a user usually fran a list of special symbols, that specifies what a oomnand should do.
outplt: Data produced by a program and sent to an I/O device such as a terminal, printer, plotter, disk, or tape drive.
pasmaord: A string of symbols used to maintain security, serving as a kim of software padlock. Passwords can be put 00 nodes, files, and accounts to restrict unauthorized users fran accessing sensi ti ve data.
peripheral device: Input/Output hardware such as a terminal, disk drive, tape drive, printer, plotter, etc., as o{:POsed to the CPU or RAM meRDry which are part of the main computer system.
prograa: Software that contains instructions for the CPU to execute.
queue: A data structure used by Multiuser Coocurrent DOS to allC7ll processes to carmunicate in an order ly manner with the operating system am with one another.
GLCSSARY-6

1WI.: Randan Access Meoory. A program must be loaded into RAM before it can be executed by the CPU. The expressioo "randan access" refers to the fact that any randan1yse1ected RAM address takes exactly the same anount of time for the CPU to access as any other RAM address, unlike disk or tape records which require variable anounts of mechanica1l1Dtioo to access. The implicatial is that RAM is extremely fast since it has no mechanical oonstraints. RAM also implies read-write IDe!IIOry, as opposed to D1 (read-al1y) nenory.
read-mly: Able to be read but not IOOdified.
read-write: Able to be read and/or IOOdified.
record: In terms of a disk file, a 128-byte segment of data.
Requester: Cmfiguratial Table .(lCl): These tables specify which virtual terminals are currently mapped over the network.
source code: Human readable code that must be oanpi1edor assembled into executable object code before it can be run by the CPU.
remote device: A device that is not physically attached to your local network node; for example, a logical drive al another node.
requester: A network node that can receive files or other network services fran another node.
Resident System Process (RSP): Programs that are incorporated in the operating system so as to be permanently resident in mem:>ry.
resource map: The current oonfiguraticn of a terminal's network resources such as disk dr i ves and printers. The resource map can be easily changed or "remapped." Each virtual terminal screen has an independent resource map.
sector: A secticn of a disk track. Sector size is determined by the software that is used to format the disk. Typical sector sizes range fran 128 bytes to 2 kilobytes.
server: A network node that can sem files to another node.
GIa3SARY-7

sofbere: Programs or data. Anything that can be stored at a disk, at tape, or in RAM or ROM meIlDry. This is as opposed to hardware, which includes the physical devices that actually store and manipulate software.
spooler: A system of programs that buffers output intended for a printer so that in case the printer is busy, the output data is stored automatically in a temporary disk file until the printer becanes free. This allCMS the terminal to go at to other tasks while waiting for a printer to become free.
string: A sequence of ASCII characters.
SuperCalc 86: An applicatioo program by SCRCIM for creating and maintaining electrooic spread sheets.
syntax: The formal order or granmar of a computer ccmnand.
system console: The terminal to which Mul tiuser Concurrent rn:; signs 00 during the initial boot sequence.
system~: The persoo responsible for seeing that a oomputer installatioo is used efficiently.
system prograa: A utility program such as DIR or PIP that is of general use regardless of the specific applicatioo for which the oomputer is being used. This is as o~ to an applicatiat program such as an accounting package.
system praapt: A three-character string displayed by Multiuser Coocurrent rn:; to indicate that the operating system is waiting for you to type a conmand. The system pranpt characters consist of the current user number, the current logical drive, and the "greater than" (» character.
'1'erIIIinal Messaqe Processx: The part of Coocurrent Multiuser rn:; that CXX1trols the user interface. Gifford's revised Terminal Message Processor, or TMP, is called the "she I 1."
text editor: Any applicatioo program designed to help in the creatioo or roodificatioo of ASCII, human readable text, or source files.
GLOSSARY-a
..

tiE stamp: A feature of a file's directory listing that can keep track of when that file was created, last accessed, or last JOOdified. The SEl' and INrrDIR cxmnands control time and datestamping in lC-OOS.
track: On a flOfPY diskette or a hard disk, concentr ic magnetic rings that can contain data, programs, directory information, or the operating systenL
upward oaIpltible: A highly desirable feature that allows new software or hardware . to accoliloodate products designed to run with older versioos of that same software or hardware.
upgrade: Hardware or software additions or enhancements to increase or improve the capabilities of an existing system.
user area: Any of sixteen logical attr ibutes of files on logical drives, wtx>se value must be a whole number fran 0 to 15. In MC-t::m, the basis of file security is that ac::coounts can be restricted in their access to user areas.
virtual teI1llinal: A feature of MC-t::m that allows up to four programs to share the screen and keyboard of a proper ly equipped serial terminal.
wildcard characters: The? and * characters that can be used to substitute for literal characters when specifying file names. The ? stands for any ooe or fewer characters, and the * stands for any string of characters.
1Ixcl;tar: An applicatioo program by MicroPro International designed for word processing, an alternative to the ED text editor.
write-protect: A file attribute that prevents a file fran being JOOdified, but allows it to be read or oopied without presenting a password.
DC3: See Extended Pile Centrol Block.
GIOOSARY-9
Please Rote: kly reference to other manuals in the text of this manual does not denote that the referenced manual has been included with your Gifford MC-DOS system. If you wish to purchase the referenced manual, please call our Sales Department.
AOCSlOO USER'S GUIDE. Standard Microsystems COrporation, 1983.
BITS, BYTES AND BUZZWORDS. Mark Garetz. COnpuPro, a Division of Godbout Electronics, 1983.
COICJRRENT QtM OPERATIl'G SYSTEM PKX;RAMMER' S REFE:REN::E GUIDE. Digital aesearch Inc., 1984. (While this publication does not cone with your system, it can be purchased from Gifford.
C<H:lJRRENl' CP/M OPERATIl'G SYSTEM USER'S GUIDE. Digital aesearch Inc., 1984.
c::aoJRRENT CP/M OPERATlt'G SYSTEM USER'S GUIDE SUPPLEMENT FOR '!HE PRINT SFOOLER SYSTEM. Digital Research Inc., 1984.
CONTROL MTA CARTRIDGE MODULE DRIVE HARIl'VARE AND MAINTENAN::E MANUJU:" COntrol Data COrporation, 1981.-
CP/M-86 OPERATIt'G SYSTEM USER'S GUIDE. Digital Research Inc., 1981.
CUS'lOMIZlt'G yam MULTWSER c::aoJRRENT DOS SYSTEM, Rev ision 4.0. Gifford COIrputer Systems, a Division of Zitel COrporation, 1984.
DISK .! 'lmlNICAL MANUAL. COnpuPro, a Division of Q:x]bout Electronics, 1982.
DR NET USER'S MANUAL, aev ision 3.0. Gifford COnputer Systems, a - Division of Zitel COrporation, 1984.
GCS-80 USER'S MANUAL, aevision 2. O. Gifford COnputer Systems, a Division of Zitel COrporation, 1984.
~l

IANSlOO USER'S GUIDE, Rev ision 1. Intercontinental Micro Systems Corporation, 1984.
MULTIUSER a::HlJRRENT JX)S USER'S MANUAL, Revision 1.50. Gifford Conputer Systems;a Division of Zitel O:>rporation, 1984.
TIP OPERA 'lOR'S GUIDE, Version 4.xx. Alloy CoIrp.lter Products, a Division of Alloy Engineering Conpany, Inc., 198L
VIRIUAL 'lERMINALS USER'S MANUAL, Rev ision 6. O. Gifford Cooputer Systems, a Division of Zitel O:>rporation, 1984.
WORDSTAR INSTALIATION MANUAL, Version 3.0. MicroPro International, 1981.

KJLTlOSBR Ol!DJRRIWl' DOS USER'S MN!IJAL DIlEX
A (carmand options), 1.8-1, 2.5-AP-2, 2.5-CPY-2, 2.5-DDT86-2, 2.5-ED-2, 2.5-NEWUSER-2, 2.5-WHO-1, 3.2-7, J-9
A (Archive attribute), 2.5-PIP-4, 2.5-SDIR-1, 2.5-SET-4, 3.8-7 ABORT, 2.4-2, 2.5-~1, 2.5-MPMSTAT-1, 2.5-TlYS-3, 2.5-WHO-1 Abort, 1.7-4, 2.3-2, H-3 Ia:ESS, 2.5-SE'.l'-4, 2. 5-SHCM-2, 3. 8-3 Access to:
network resoorces, 2.5-NBT-l, 2.6-5, 3.3-21, 3.4-11 password pcotected files, 2.5-SET-3, 2.6-3, 3.4-3, 3.4-7, 3.8-11 restricted DR Net nodes, 2.7-7, 3.3-22, 3.4-12 restricted user areas, 2.5-PASSND-2, 2.6-4, 2.7-4, 3.3-15, 3.4-10, J-9 system, 2.5-PASSWD-1, 2.6-2, 2.7-2, 3.3-12, 3.4-1, 3.4-9, 3.10-2 terminals and modems, 2.5-PAS&WD-2, 2.6-1, 2.7-2, 3.3-16, 3.4-1 user areas, 2.5-PASSWD-2, 2.7-4, 3.3-11, 3.4-1, 3.4-16, J-9, K-2
Account nat'Ie, 1. 7-1, 3.3-14 1cgin, 2.5-AP-1, 2.5-HISTORY-1, 2.5-MAIL-1, 2.5-name.REM-1,
2.5-NEr-4, 2.5-NEl'USERS-1, 2.5-NEWUSER-1, 2.5-PASSWD-1, 2.5-PASSWORD-1, 2.5-PRINTER-3, 2. 5-TI MELCX;.CMD-1 , 2.5-'lYPE-3, 2.5-U'IMP-1, 2.5-WHo-1, 2.5-WRI'l'E-1, 2.5-WTMP-1, 2.6-1, 3.3-12, 3.4-1, 3.4-9, 3.6-1, 3.7-1, K-2
"system," 1. 6-5, 1.7-1, 2.5-FIXPASS-1, 2.5-NEWUSER-1, 3.3-15, 3.10-3 AID, 2. 5-N2-\MESK)D-1 lIildress, 2.5-D7J.'86-1, 2.5-GEXX:PM-4, 3.9-1, H-2, N-2 Air circulation, 1.2-1 ALL, 2.5-SDIR-3, 2.5-HELP-2, 2.5-MAIL-2, 2.5-NEr-4, 2.5-WRI'l'E-1 Alloy Canplter Products tape controller, A:-2, G-1 Alphaootic order, 2.5-FIXPASS-1, 2.5-SDIR-1, 2.5-WHO-3, 2.5-WHO-7 ALPHABETICALLY, 2. 5-NEr-4 AP, 2.4-2, 2.5-AP-l, 3.3-14 Applications programs, 1.7-6, 2~2-1, 2.3-1, 2.5-SET-1, 3.3-17, 4.3-1 Appointment calendar, 2.5-AP-l, 3.2-5 Archival backup, 2.5-PIP-4, 2.5-SET-4, 2.7-8, 3.8-5, 3.8-7 Archival diskettes, 3.4-10, 3.8-5, 3.8-11, 3.10-1 AICHIVE, 2.5-SET-3, 3.8-7, 3.8-10 AlCNET, 3.4-11, A:-2, K-5 AlCS100, C-15 AICV (=Archive attribute set ON), 2.5-PIP-4, 2.5-SOIR-l, 2.5-SET-4 ASCII, 2.4-4, 2.5-KEYS-1, 2.5-SPOOL-1, 2.5-'lYPE-1, 2.5-VTIYS-1,
3.3-7, 3.3-10, 3.3-14, F-2, K-2, 0-1 Arithmetic coprocessor (8087 or 80287), 2.5-CBSB'l'-1, K-5 ASM86, 2.4-1, 2.5-ASM86-1, 2.5-GEtnID-1, 2.5-SUBMIT-4 Assembly code, 2.2-2, 2.5-AS-186-1, 2.5-1DT86-2, E-4, J-4, K-5 Asterisk (*) symbol, 1.7-6, 2.4-2, 2.~6, 2.5-PIP-8, 2.5-WHO-l At (@) symbol, 2.5-2, 2.5-NElUSERS-1, 2.5-PASSWORD-3, 2.5-PRIN'lER-2,
2. 5-'1YPE-3, 2. 5-UPTIME-1, 2. 5-WHO-3, 2. 5-WRITE-1, F-2 ATmCH, 2.4-2, 2.5-A'.l'DOI-l Attaching programs, 1.7-8, 2.5-ATl'ACH-1, 2.5-PIP-9, 2.5-VTIYS-1, 3.3-7 A'ITRIBU'l'E, 2.5-SDIR-2 Attributes, 2.5-CHSET-1, 2.5-PIP-5, 2.5-REN-1, 2.5-SDIR-2, 2.5-SB'.l'-1,
3.4-5, 3.8-1 Autanatic baud rate detectim, 2.5-'l"ftS-l, 3.3-5 Automatic logout, 2.5-PASSND-2, 3.2-4, 3.3-17 Autanatic RAM test, 2.5-{;ENSyS-4, 3.2-3, 3.9-1, K-2 AV'roST, 2.4-2. 2.5-AD'.lOS'l'-l, 2.5-LOOOOT-l, 3.2-2, 3.3-27, K-2

B, 2.5-AP-2, 2.5-IDT86-2, 2.5-ED-2, 2.5-NEWUSER-1, 3.3-18, J-9 'Background processes, 1.7-8, 2.5-ATrACH-1, 2.5-aISET-2, 2.5-sysrAT-2,
2.5-\On)E-1, 3.3-7, Backing Up, 1.6-3, 3.1-2, 3.8-6
diskettes, 1.6-10, 3.8-5 files, 2.5-PIP-l, 3.1-3, 3.8-4 hard disks, 2.5-CI¥-1, 3.8-5, 3.8-8 password protected files, 2.5-PIP-8, 3.4-6, 3.8-11
BACKSPACE key, 2.3-3 Backups, 3.8-5, 3.8-7, 3.8-8 IW< (file extension), 2.5-ED-1, 3.1-3, 3.8-2 Banner file, 2.5-S!SDIrr.~1, 3.2-3, 3.3-25 Bam rate, of printer, 2.5-LPRS-l, 3.3-2, E-2, F-1 Bam rate, of terminal, 2.5-'rlY8-l, 3.3-5, C-7, C-8, B-2 BIX>S (basic disk operating system), 3.4-4, B-1, 1-4 BidirectiCllal hardware handshake, C-ll, F-1, Ir1 BIOS (basic input/output system), E-1 !bard arrangement, B-1 Eboting, 1.6-3, 2.S-AInOsr-1, 3.2-1, 3.3-24, 3.10-3, 4.1-2 Ebotstrapping, 1.6-3 Bracket ([ ]) symbols, 2.5-2, 2.S-sysrAT-3 WFFER, 2.4-2, 2.5-lIJftER-l, 3.2-2, K-1 Buffer, 1.7-7, 2.S-ED-1, 2.5-PRINT-2 BJFFERED, 2. S-\OD)E-2 Bug report, vi, 4.3-3 Byte, N-2
.... C, 1.7-4, 2.3-2, 2.S-AP-6, 2.S-ED-2, 2.S-DDT86-2, 2.5-SYS;EN-2, B-3 C (options), 2.5-AP-1, 2.5-ED-2, 2.5-MAlL-1, 2.5-NEJroSER-1, 2.5-PIP-5,
2.S-PRINT-2, 2.5-SYS;EN-2, 2.5-sysrAT-1, 3.3-10 C (oontinuous display) 2.5-CI.£Xl<-1, 2.5-DATE-1, 2.5-SYSTAT-1 cables, 1.1-1, 1.4-2, 3.1-2, 4.1-2, ~l cache buffer of the hard disk, 1.8-1, 2.3-1, 2.4-6, 2.5-BJFFER-1,
2.5-G!RX!IM-5, 2.5-SYN:-1, 3.2-2, 3.10-3, C-15, K-6 CAIL.CMD, J-2 caret ( .... ) symbol, v, 2.3-2, 2.S-~S-3, 2.S-VT950.~-1, 3.3-8 <X!J:MINIT, 2.4-2, 2.~1, 2.S-Vl'lYS-1. 3.2-2, 3.3-7 <X!PM'syS, 2.5-GENCCPII-1, 2.5-GENCCPM-8, 2.S-SYS;EN-3, 3.2-2, I-I coc cartridge M:Jdule Drive (9448 Phoenix), 1.3-2, 1.6-6, 2.5-CPY'-1 Changing:
appointments, 2. S-AP-4 attributes of files, 2.5-CHSET-1, 2.S-SDIa-l, 2.5-SET-1 diskettes, 1.7-4, 2.S-DSKRESET-1, 3.8-7 logical drives, 1.7-2, 3.8-10, J-3 login passwords, 2.5-NEWUSER-1, 2.5-PASSIfORD-l, 2.7-8, 3.3-8, 3.4-10 LP.RS file, 2.5-~1, 3.2-1, 3.3-4 network cxnfiguration, 2.5-COOFIGNEl'-1, 2.S-NEr-l, 2.~1, 3.3-24 network node names, 2.5-IImMI!9ID-1, 2.5-NNtlSVR.DAT-1 operating system parameters, 2.5-GENCCPM-3, 2.5-GJH:X::J?M-8, 3.3-11 PAS9lD file, 2.5-lilBl«JSER-1, 2.S-P~ORD-1, 3.3-7, 3.4-2, 3.10-2 printers, 2.S-NEr-2, 2.S-PRDI'J.'BR-l, 2.5-'lYPE-4, K~3 RSP list, 2.5-GEN<X!P.M-7 TTYS file, 2.5-~1, 3.2-1, 3.3-7 user areas, 1.7-3, 2.5-USER-1, 2.7-6, 3.3-15, 3.4-10, 3.8-10, J-4, K-3 virtual terminals, 1.7-8, 2.5-VlOCSSO.KE..Y-1, 3.3-8, 3.3-11
foe-roS INDEK-2

eISEl', 2.4-2, 2.5-aISm'-1, 2.5-SRX>L-5, 2. 5-VCMODE-3 , K-5 CLFAR, 2. 5-N!:.l'-1, 0-6, 0-8 crro<, 2.4-2, 2.5-CUXK-1, 2.5-DATE-1, K-3 crro<.RSP, 2. 5-GEN<:X:I:M-7 Clock/calendar, 2.4-2, 2.5-a.OCK-1, 2.5-DM.'Fr1, 3.6-1, C-3, J-3, K-6 Coaxial cables, 1.1-3, A-2, L-1 Coloo (:) symbol, 1.7-2, 2.5-1, 2.5-AP-1, 2.5-DDT86-1, 3.3-1, 3.3-10, 0-3 COtman:1 (=program) file, 1.7-3, 2.5-AOORT-1, 2.5-BJFFER-1, 2.5-<lISm'-1,
2.5-SEr-2, 2.5-&JIMIT-1, 2.5-S"l-1, 2.5-S"l86-1, 3.3-21 COtman:1 interpreter, 2.7-4, 3.4-10, K-3 Command line, 1.7-4, 2.3-3, 2.5-1, 2.5-SUBMIT-1, 2.5-S"l-1, 3.6-1 Conments, 2.5-&JIMIT-3, 3.3-2, 3.3-5, 3.3-9, 3.3-22, 3.3-25, 3.&-3 COmal user areas, 2.7-4, 3.4-9 canpupro, ii, 1.1-1, A-1, B-2, C-1, C-7 canputer enclosure, 1.1-1, 1.2-1, 3.10-1, 4.1-1, B-1 (XN, 2.5-PIP-7, 2.~1 COncurrent CP/M-86, 2.2-2 Ccncurrent OOS (3.1), 2.2-1, 2.6-4, 2.7-1, 2.7-6, K-1 CONFIG, 3.3-14 CONFIG.NEr, 2.4-2, 2.5-CONFIG.NEr-l, 2.5-SE'1NEI'-1, 2.6-5, 3.3-24, 3.4-12 Connectioos, 1.4-1, 3.1-2, 4.1-3 ~, 2.5-'lYPE-3 CCNs)LE, 2.4-2, 2.5-CDiISlUi-1, 3.3-10 COnsole (system), 1.1-2, 1.2-1, 1.8-1, 2.3-1, 2.5-DOWN-l, 3.2-2,
3.3-4, 3.3-24, 3.9-1, 3.10-3, 4.1-3, A-1, C-7, C-8, 1-4 CXNrR>L key, v, 2.3-1, 3.3-10 COntrol characters, v, 2.3-1, 2.5-ID-2, 3.3-8, 3.3-10, 3.3-14 (l)PIES, 2.5-SRX>L-2 Coprocessor (Intel 8087 or 80287 NPX), 2.5-CBSBT-1 , K-5 (l)F.{ (in CP/M 2.2), 1.6-11, 3.8-5 Copying files, 1.6-3, 1.6-10, 2.5-CP.f-1, 2.5-PIP-1, 3.8-5 Cover letter, 1.3-1 CP/M 2.2, 1.6-12, 2.2-2, 2.5-Sf-1, H-6 CP/M-86, 2.2-2, 2.5-PASS"lD-2, 2.5-lroRMAT-1, 0-1 CPU (central processing unit), 1.1-1, 2.5-DDT86-1, A-1, B-1
S0286/ZSO dual processor, 2.5-Sf-1, 2.5-TIME-1, A-1, C-2, C-3, C-8, K-5 8085/88 dual processor, 2.4-6, 2.5-Sf-1, A-1, C-1, C-8, E-2, G-2, K-2 8086/87, 2.4-6, 2.~1, 2.5-TIME-1, A-1, C-1, C-8
CP.{, 1.6-11, 2.4-2, 2.5-CPr-1, 3.8-5, 4.3-1 CRFATE, 2.5-SET-4, 2.5-SID'l-2 Current files, 2.7-3, 3.8-2 CUstaner service, 2.3-1, 3.1-2, 3.9-1, 4.3-1 CUstomizing M:-OOS, 3.2-7, 3.3-11
applications programs, 3.1-2, H-1 customizatioo files, 2.4-9, 3.2-7, 3.3-1, 3.3-28, K-2 default programs, 2.5-NEWUSER-1, 2.5-PASS"lD-2, 3.3-17, 3.4-1 HFLP files, 2.5-HELP-1, 2.5-HELRIDK-1, 3.7-1 message files, 2.5-naJlle.REM-1, 3.2-2, 3.3-25 network oc:nfiguratioo, 2.5-CONFIG.NEl'-1, 2.6-5, 3.2-4, 3.3-25, 3.4-12 progra.u:mab1e keys, 2.5-KB.YS-1, 3.1-1 system security, 2.5-NEWUSER-1, 2.6-1, 3.3-12, 3.4-12 system shutdown, 1.8-1, 2.5-~.SUB-1, 2.5-Ilti-1, 3.2-6, 3.3-27, 3.8-5 system startup, 1.6-1, 2.5-SlSINIT.&JB-1, 3.2-1, 3.3-17 user startup, 1.6-5, 2. 5-IOOIN.&JB-1, 2.5-USERINIT.&JB-1, 3.2-3, 3.3-28 Virtual 'lerminals, 2.5-vrIYS-1, 3.3-7, 3.3-11
~-nos TNDEX-3

D, 2.5-AP-2, 2.5-c:UX::K-1, 2.~-1, 2.5-JDT86-2, 2.5-EJ)-2, 2.5-KE~'S-2, 2.5-MAIL-5, 2.5-NEWUSER-1, 2.5-PIP-5, 2.~6, 3.3-10
Data bits, 3.3-2, 3.3-5, B-2 Da.ta encryptioo, 2.7-5, G-1 DATE, 2.4-1, 2.5-IlI\TB-l, 2.5-SEr-4, K-1 Da.y-Fi1e, 2.5-G~J:M-3 dB1\SE II, 1.7-7, 2.5-TIMEI:.OO.a-ID-1, 2.5-TIMEI:OO.SUB-1, J-1, .J-7 IDl'86, 2.4-1, 2.5-JJ:7.l'8&-1, 2.5-SY'STAT-4, 2.6-4, 3.4-10, H-2, N-2 DFAIMAIL, 2.5-MAIL-7 DEFAULT, 2. 5-SEl'-4 Default:
applicatioos program, 3.3-10, 3.3-17, 3.4-10 balmer, 2.5-SY'SINIT.BAN-1, 3.2-2 baud rate, 3.3-1, 3.3-4 directory area, 2.5-PAS9D-1, 3.3-9 drive, 1.7-2, 2.5-PAS&ID-1, 3.3-9, 3.3-13, 3.8-3 file name, 2.~7, 2.5-naae.NET-1 m::xle of protectioo, 2.5-SB'l"-3, 3.4-7 node number, 2.5-O:JIFIG.Nel'-1, 2. 5-SE'lNEl'-1, 3.3-25 node password, 2.5-<DIF.IG.Nel'-1, 3.3-25 . password of a terminal, 2.5-AP-11, 2.5-Sm'-4, 3.4-3, 3.4-8 printer, 2.5-P.AS9lD-I, 3.3-9, 3.3-12 program, 2.5-PAS9lD-2, 2.6-2, 2.7-6, 3.3-10,.3.3-12, 3.4-10 transient program area size, 2.5-G~J:M-3, 2.5-SB'JIEM-l, A-I user area, 1.7-2, 3.2-4, 3.3-12, 3.4-1, 3.8-3
DELEl'E key, 2.3-3 DELEI'E (optioos), 2.5-N1-\MEEHD-3, 2.5-SEr-3, 2.5-SPOOL-4, 3.4-8 Delete-protect password, 2.5-SB1'-3, 2.6-4, 2.7-3, 3.4-7, 3.4-12 Deleting files, 2.5-ERA-1, 2.5-ERKr1, 2.7-4, 3.1-3, 3.3-27, 3.4-8, 3.8-2 Detache1 processes, 1.7-8, 2.5-ATl'J\CH-l, 2.5-alSEr-2, 2.5-PI~9, 2.5-1IODJB-l,
2.5-WID-5, 3.3-7, 3.3-11, J-4, K-5 . Device mawing, 2.5-OONFIG.NEl'-I, 2.5-NEl'-1, 3.3-25 Diagnostic diskette, 2.2-2, 0...1, I-I Digital Research Inc., ii, 2.2-1, 2.7-4, 3.10-1, K-l DIR, 2.4-2, 2.5-DIR-l, 3.3-15, 3.8-5 DIR (attribute), 2.5-DIR-1, 2.5-HELP-3, 2.5-SDIR-2, 2.5-SBl'-2, 3.8-3 Directory area, 1.7-2, 2.7-4, 3.3-12, 3.4-11 DI~, 2.5-NEl'-2 Disk I, 2.5-EORMAT-2, B-2, C-3, C-7, G-l Disk ]A, 2.5-EORMAT-2, B-2, C-8 Disk 2 switches, C-9, 0...2, G-l Disk 3 switches, C-I0, G-1 Disk emulatioo hardware, 2.3-1, 2.5-a:JHl5lt-l, 3.2-1, B-1, C-15, K-1 Diskettes:
diagnostic, 2.3-1, 0...1, I-I directories, 2.5-Dm-2, 2.5-SDIR-l, 3.8-5 system master, 1.6-3, 2.5-G~J:M-1, 2.6-2, 3.10-2
DISPIAY, 2.5-NAME9tDD-l, 2.5-NEl'-1 Distributioo diskette, 1.6-3, I-I D:>11ar ($) sign, 2. 5-SUEMIT-3 IXIiN, 1.8-1, 2.4-2, 2.5-IXMN-l, 3.2-6 IXIiN.SJB, 2.4-2, 2.~.SUB-l, 3.2-7, 3.3-28 DRIVE, 2.5-SDIR-2, 2.5-SfDW-1, 0...5 Drive designation, 1.6-6, 1.7-3, 0...12 Drive label, 2.5-SE'IL-4, 2.5-SR:M-l, 2.6-2, 3.4-5, 3.4-12, 3.8-2, 3.9-1

DR Net, iii, 1.1-3, 1.7-9, 2.2-1, 2.4-1, 2.5-AP-11, 2.5-CONFIG.NET-1, 2.5-MAIL-8, 2. 5-NAMESO>-l, 2. 5-NJ.\MSRV .DAT-1, 2.5-lmJ.'-1, 2. 5-NElM)']])-1, 2.5-NElUSERS-1, 2.5-PRINTER-2, 2.5-SE'lNEl'-1, 2.5-'lYPE-3, 2.5-UPl'IME-1, 2.5-WID-2, 2.5-WRITE-1, 2.6-1, 2.6-5, 2.7-7, 3.2-2, 3.3-21, 3.4-11, K-1
DS<RESEl', 1.7-4, 2.4-2, 2.5-SEl'-1, 2.5-DEI<RES£l'-l, 3.8-7, K-3 DSP, 2.5-SmOL-5, I-2 DTR (data terminal ready handshake», 3.3-2, 3.3-5, 3.3-9, E-3, F-1, L-1 l:liN, 2.4-2, 2.~1, 3.2-6, 3.3-28 DYNPMIC, 2.5-VOrDDE-3
"'E, 2.3-3 NE, 2.5-MAIL-3 E, 1.6-8, 2.5-AP-2, 2.5-DDT86-2, 2.5-ED-2, 2.5-EORMAT-2, 2.5-LPRS-1,
2.5-NDruSER-1, 2.5-PIP-5, 2.5-SYSTAT-1, 2.5-T'lYS-1, 3.3-10 ED, 2.4-1, 2.5-ED-1, 2.7-3, 3.3-7, 3.5-3, 3.7-1 Eject rutton, 1.6-1 E'llcrypted login passwords, 2.5-FIXPASS-1, 2.5-NEWUSER-l, 2.6-2,
2.7-2, 3.3-12, 3.3-19, 3.4-1, 3.10-2 E'llcryption of files, 2.7-5, 3.4-2, G-1 IDF (em of file), 2.5-PIP-10 Fqua1 (=) sign, 2.5-CHSEr-1, 2.5-PIP-1, 2.5-REN-1, 2.5-SDIR-1, 2.5-SEr-1, 3.3-24 ERA, 2.4-2, 2.5-ElUtr-l, 3.4-7 ERP(l, 2.4-2, 2.5-ERAQ-l, 3.3-7 Exclamation p:>int (1), 2.5-WfD-14 EXCWDE, 2.5-SDIR-2 . Expansion, 1.1-1, 3.3-11, 3.10-1, G-1 Extended file cx:ntrol blocks (XR:Bs), 2.5-ERA-1, 2.5-ERPO-1,
2.5-PIP-8, 2.5-SDIR-1, 2.5-SET-4, 2.5-SIDW-1, 3.4-5, K-5 Extended input/output system (XIOS), 2.5-GENCClM-4, 3.3-11, E-5, I-3
F, 1.6-8, 2.5-AP-2, 2.5-1DT86-2, 2.5-ID-2, 2.5-MAIL-5, 2.5-PIP-5 Fans, 1.6-2, 4.1-1 FF, 2.5-SDIR-2 File maintenance, 3.4-1 File name, 1.7-4, 3.1-3 File passwords, 2.5-PIP-8, 2.~, 2.6-4, 2.7-3, 3.4-7, 3.9-1 File type (=extension), 1.7-4, 2.5-2, 2.5-Si-1, 3.1-3, I-1 FIXPASS, 2.5-P.IXlW&-1, 3.10-2 Floppy disk drives:
buffer, 2.5-GENCClM-6 connecting, 1.4-3, 4.1-2 oCntroller, Pr-2, C-3, C-7, C-8 description, 1.1-1 precautions in noving, 1.3-1, 4.3-2 unpacking, 1.3-1, 1.6-1
Floppy diskettes: changing, 1.7-5, 2.5-D:il<RBSt:1'-1, 3.8-11 description, 1.5-1 formatting, 1.6-7, 2.5-FORMAT-1 ha:rXUing, 1.5-1, 2.7-8, 3.4-9, 3.10-2 labeling, 1.5-1, 1.6-11, 3.10-4 loading, 1.6-4 password-protected, 3.4-10, 3.9-1
FUJSH, 2. 5-VOD:>E-3 FMllID, 0-5
~-DOS INDEX-5

ForegrourXi process, 2.5-vtHDE-3, 2.~S, 3 .. 3-11 FORMAT, 1. 6-7, 2.4-2, 2. 5-:RlIIIM.'-I, 2. 5-SRX>L-1 Formatting hard disks, 1.4-3, D-l FORMSlZE, 2.5-SR:X>L-1 Freedom 200 terminals, 1. 7-7, 2.S-I(EfS..l, 2. 5-'1V950-1 , 3.3-8 EREEPRINI'.CMD, J-7 EUIL, 2.5-SOIR-2 F1, F2, F3, F4 (user-defined attributes), 2.5-SDIR-2, 2.s.-s8.l'-3
G ("go to user area. nil), 2.5-0IR-1, 2.5-PIP-S, 2.5-PRINT-1 G (optioos) 2.5-AP-2, 2.5-IDT86-2 . GC8-ao terminals, 1.7-1, 2.5-KEm-l, 2.5-vrocss-1, 3.3-8, 4.3-1 Gmc:lM, 2.4-2, 2.5-GIBX:lM-l, 3.3-11 GENCMD, 2.4-2, 2.5-GDnI>-1 GENERAL, 2.0~2, 3.7-1 GElDA'lE.CMD, J-S GEl'rIME.CMD, J-6 Giffard enhancements, 2.2-1, 2.4-1, 2.7-S, 2.5-SJ?CX>L-8; J-1, K~2 GlftOlCD OBSERVER, 3.1-2, 3.10-1 GIDPAL, 2. 5-SJJ:MIT-2 Greater than (» symbol, 1.6-6, 2.5-GENCX:lM-1, 2.5-~2, 2.5-WRJ:TE-2
11, 2.3-3 H, 2.5-AP-2, 2.5-IDT86-2, 2.5-m-2, 2.5-MAIL-6, 2.5-PIP-S,
2. 5-SYSl'AT-1, 2.~6 Handshaking, 2.5-LPRS-2, 2.5-TlYS-2, 3.3-2, 3.3-S, C-Il, E-2, F-1, Ir-1 Hard disk drive, 1.1-2
cxxmecting, 1.3-2 oontroller, C-S, C-8, G-1 description, 1.1-1 formatting, D-1 headers, D-2 packing, 3.8-4, K-S systems without, 2.05-~, 3.10-4, I-1 troubleshooting, 2.3-1, 4.1-3 unpacking, 1. 2-1
Hardware encryption boards, 2.6-3, 2.7-5, 3.4-2, G-l Hardware requirements of M:-OOS, A-I HIX!A (Mxrow Designs), C-S, D-8, G-1 HELP, 2.4-1, 2.5-III!U'-1, 3.7-1, 3.10-3, K-1 HELP (option), 2.S-CHSET-1, 2.S-GEN:X:FM-1, 2.5-MAIL-1, 2.5-NEl'-1, 2.5-SDIR-l,
2.5-SEr-1, 2.5-SlDi-1, 2.5-SOOOL-1, 2.S-VCMOOE-l HFLP (.HLP) files, 2.5-ImU'-1, 3.7-1, 3.10-3 HELPNDX, 2.4-2, 2.5-BBURlIC-l, 3.7-2, K-2 Hexadecimal numbers, 2.5-IDT86-1, 2.5-m-2, 2.5-G~lM-3, 2.5-~1,
3.9-1, C-4, F-l, G-1, H-2, 11-1, 0-1 HISl'ORY, 2.4-2, 2.5-BIS.l'tm'-1, 2.6-2, 2.7-S, 3.2-3, 3.3-8, 3.4-12, 3.6-1 Hyphen (-), 2.5-BJFFER-2, 2.5-CP.!-3, 2.S-SYSTAT-4, 2.5-MAI~6, 3.3-7
""I, 2.3-3, 2.5-PRINT-1, 2.5-sro>L-2, 0-3 I, 2.5-AP-1, 2.5-ED-2, 2.5-PIP-S, 2.5-WHO-9 Idle field, 2.~2 IEEE 696/S-1oo, 1.4-1, 2.7-5, 3.10-1, A-1, ~1, G-1 IN:UIDE, 2. 5-SJIMIT-3 INITDIR, 2.4-2, 2.5-llB'JDlR-l, 2.5-SET-S, 3.4-8, 3.8-3

Initial default: directory area, 2.5-name.net-1, 2.5-WGIN-1, 2. 5-I.D3<X.JT-1 , 3.3-15 node, 2.s.<DIF.IG.Nel'-1, 3.3-25 printer, 2.5-PASSllD-l, 3.3-15
Ini tia1izaticn: directory, 2.5-INI'lDIR-1
. spooler, 2.5-SRXJL-5, 2.5-SYSINIT.SUB-1 system, 2. 5-SYSINIT. SUB-1 , 3.2-1, 3.3-28 user, 2. 5-WGIN. SUB-1, 2. 5-USERINIT. SUS-1 , 3.2-3, 3.3-15, 3.3-28
Installing Ie-OOS, 3.10-3, D-14 Interfacer 3, C-11, C-13, G-1 Interfacer 4, C-12, G-1 Internal system security, 2.6-3 Interrupts, A-1, C-9, C-12, K-3 Interterminal conmunication, 2.5-MAIL-1, 2.S-WarJ.'B-1 Invoice, 1.3-1, 4.3-1 Invoking programs, 1.7-3, 2.5-1, 2. 5-SUEMIT-1 , 2.5-&1-1, 2.5-&186-1
"J, 2.3-3 J, 2.5-AP-2, 2.5-ED-2, 3.3-18 Jacket of diskette, 1.5-1, 1.6-4, 2.5-DIR-2 Julian date, 2.5-BISB:m"-1, 2.5-U'IMP-1, 3.3-23, 3.6-2 jumper settings, 3.10-1, C-l
"K, 1.7-7 K, 2.5-AP-2, 2.5-ED-2, 2.5-PIP-5 Keeping Olrrent, 3.1-1, 3.10-1 ~S, 2.4-3, 2.~1, 3.1-1, 3.3-8 KEY files, 2.5-KJm;-1, 2.5-vrocSSO.KEY'-1, 2.5-vr950.KEY-1, 3.1-1 Kalan hard disk ocntro11er, C-7, D-1, D-4, G-1
L, 2.5-AP-2, 2.5-IDT86-2, 2.5-ED-2, 2.5-PIP-5, 2.5-WHO-10, 3.3-10 lABEL, 2.5-SIDel-1 label (adhesive, for diskettes), 1.5-1, 1.6-11, 3.8-9, 3.10-2 label (of logical drive), 2.5-INITDIR-2, 2.5-SIJ1'-4, 2.5-SlDV-1,
2.6-2, 2.7-2, 3.4-5, 3.8-2 U\NS100, C-16 I.eadin character to switch screens, 3.3-8 LEN:;'lH, 2.5-SDIR-2 Less than «) symbol, 2. 5-GENO:IM-1, 2. 5-MAIL-4 L<X!AL, 2.5-SUEMIT-3 Local area network, 1.1-3, 2.2-1, 2.5-<X>NFIG.NEr-1, 2.5-NEr-1, 3.3-24, K-1 Local device, 2.5-NEr-2, 3.3-25 Local node, 2.~.Nel'-1, 3.3-24 IDgging out, 1.8-1, 2.5-ImDl'-1, 2.5-WIMP-1, 2.7-5, 3.1-3, 3.4-9, 3.4-11 IDgical drives, 1.6-6, 1.7-3, 3.3-15, 3.4-5, 3.9-1, D-12 WGIN.<M> , 2.4-3, 2.5-IOGDT.CH>-I, 3.2-4, 3.3-28 WGIN.&JB, 2.4-3, 2.5-IOGIN.SJB-l, 3.2-4, 3.3-28 IDgin name, 2.5-PAS9Il-l, 2.5-name.REM-1, 2.6-1, 3.3-14, 3.4-1, K-2 IDgin password, 1.7-1, 2.5-PAS&lORD-1, 2.5-PRINIER-3, 2.6-1, 3.4-1, 3.4-12 I.OCDJT, 2.4-3, 2.5-A'I'rACH-1, 2.5-AU'roSI'-1, 2.5-ImDl'-1, 2.7-2, 3.2-6, 3.4-9 IDGa1I'.&JB, 2.4-3, 2.5-UXDJ'l'.SJB-l, 3.2-6, 3.3-28 Loose boards, reseating, 1.4-1, 4.1-2 LPRS, 2.4-3, 2.5-LPRS-l, 2.5-PRIN'IER-1, 2.5-RESEr-1, 3.2-1, 3.3-1, 3.10-3 rsr, 2.5-NEr-1, 2.5-PIP-3, H-4

"M, 2.3-3 M'; 2.5-IDT86-2, 2.5-ED-2, -2.5-MAIL-6, 2.5-sysrA'l'-1 Macrot.ech MI-286, 2.5-SN-l, A-I, C-2, c-3, C-8, K-5 Magnetic tape, 1.1-2, 3.8-4, 3.9-1, A-2 MAIL, 2.4-3, 2.s-.n,...1, 2.5-naIIe.REM-13.2-3, 3.3-28, 3.4-9, 3.10-3, K-2 MAIL.HLP, 2.4-3, 2.~1, 3.7-1 MAIL.NDX, 2.4-3, 2.5-MAIL-1, 2.5-BBa:aIlIC-l, 3.7-2 MAKE, 1.7:"'5, 2.4-3, 2.5-tPKE-l, 3.2-2, 3.3-23, 3.3-28, 3.4-5, 3.6-1 MAKE (option), 2.5-a:me~1, 3.3-14 Managing the system, 2.7-7, 3.1-1, 3.3-1, 3.4-9 Mallua1s, 1.2-1, 3.1-1, 3.4-5, 4.3-1 MAP, 2.5-NEl'-1 Map of the system, 1.4-2, 3.1-1, M-l Mag;>ing DR Net resources, 2.5-a:>NFIG.NE1'-I, 2.5-DDle..NEr-l, 2.5-NBT-l,
2.5-SJmml'-1, 2.7-7, 3.2-4, 3.3-25, 3.4-12 MAmIN, 2.5-SPCX>L-2 Mass storage, 1.1-2, 2.5-sa:M-l, 3.10-4, A-1, D-l MBK files, 2.5-MIL-3, 2.6-4, 3.2-4, 3.10-2 ~-OOS, 2.2-1, 2.4-3, 2.4-5, 2.7-6, 1-1, K-l fC-OOS pranpt, 1.6-5, 1.7-2, 2.7-4 MJX>S.HLP, 2.4-3, 2.5-Bl!LP-1, 3.7-1, K-2 !CIX>S.NDX, 2.4-3, 2.5-III!l.aIlK-l, 3.7-2, K-2 MDRIVE/H, 2.3-1, 2.5-GENCX!EM-5, B-1, K-l, K-6
port number, G-1 switch settings, C-15
MEM:>RY, 2.~, 3.9-1, 1-4 Menory test, 3.9-1, K-2 MENU, 2.5-AP-l ~E, 2.5-SDIR-2 Message buffers, 2.5-a&'IG.NIn'-I, 2.5-SE'1NEr-l, 3.3-25 Minus (-) sign, 2.5-BJFEER-2, 2.5-CF.l-3, 2.5-DDT86-2, 2. 5-MAIL-6 ,
2.5-SYSTAT-4, 2.5-WHO-2, 3.3-7, 3 .. 3-16 Modem, 1.1-2, 2.5-TftS-l, 2.7-2, 3.3-5, 3.4-9, F-l, G-l, L-l MY.ID (message of the day), 2.4-3, 2.5-M:m>-1, 3.2-3, 3.3-26, K-3 ~board, 1.4-1, A-l, B-1 MP/M II, 2.2-2, 2.5-GENCClM-4, 2.5-91-2, 2.5-Stl86-1, B-1, 8-6, K-3 MP/M 8-16, 2.2-2, 2.5-FIXPASS-l, 3.8-5, 3.10-2, K-4 MP/M-86, 2.2-2, K-S Multitasking, 1.7-7, 2.2-1, 2.5-ATrACH-l, 2.5-CCPMINIT-l, 2.5-VTMOOE-l,
2.5-Vl'lYS-l, 2.S-WlD-5, 3.3-7, K-2 Multiuser IOOde, 1.6-5, 2.2-1, 2.5-Al1.IOSl'-l, 2.5-UXDJT-l, 2.7 .... 1, 3.2-2,
3.3-3, 3.3-6, 3.3-22, 3.3-28, D-l
"N, F-2 N, 1.6-9, 2.S-AP-7, 2.S-ED-2, 2.5-FORMAT-2, 2.5-INX'lDIR-2,,2~S-Kl1X'S-2,
2.5-LPRS-2, 2.5-MAIL-l, 2.5-PIP-S, 2.5-TTYS-2, 2.5-'wao-lO N])ME, 2.5-SB'l'-3, 3.4-6 Name (=login) prompt, 1.6-5, 2.5-LOCnJT-l, 3.2-6 name.AP, 2.5-AP-ll nIIIIM!.MBX, 2.5-MIL-7, 3.2-3, 3.10-3 name.NEl', 2.5-DEllDie.NE1'-1,3.2-6, 3.3-14 name.R!M, 2.5-mIIe.tall-l, 3.2-4, 3.3-14, 3.3-27, 3.10-3 lWmLIsr, 2. 5-MAIL-l NAMES, 2.~3, 2.5-NEl'-1 ~, 2.4-3, 2.~1, 2.5-tif1:'\MSVR.DAT .... l

NN-iSVR.DAT, 2.4-3, 2.5-twm:MOD-1, 2.5-NlMSVR.MT-1 NET, 2.4-1, 2.5-B1'-1, 2.5-'IYPE-3, 3.2-4, 3.3-14, K-1 NETMDTD, 2.~1, 3.2-4, 3.3-26 NElUSERS, 2.4-3, ,2.5-AP-ll, 2.5-+1AIL-2, 2.5-NEl'USImS-1, 3.2-4 Network ccntro11er, 1.1-3, A-2, C-16, G-1 NEWUSER, 2.4-3, 2.5-NEWUSER-1, 2.7-6, 3.3-13, 3.4-9, 3.10-2, K-3 Nicad battery, 2.5-CI.OCK-1 NIOS (net~rk input/output system), 1.6-4, 3.2-1, 3.3-24, K-5 Node, 2.5-<DIF.IG.~1, 2.5-NEr-2, 3.3-25 Node In, 2.5-CONPIG.NE'l'-1, 2.5-PASSWORD-3, 2.5-PRINTER-2,
2.5-'lYPE-3, 2.5-UPTIME-1, 2.5-WHO-3, 2.5-WRlTE-1, 3.3-25 Node pass~ds, 2.5-<DSIF.IG.NET-1, 2.6-5, 2.7-7, 3.3-25, 3.4-12 :t'O)ES, 2. 5-NEl'-1, 2. 5-WRITE-1 N:>FEED, 2. 5-SPCX>L-2 N::NE, 2.5-Sf:1\-3, 3.4-7 ~B, 2.5-SDIR-2 N:>SORr, 2. 5-SDIR-2 Notes by users, P-1 NUL, 2.5-PIP-10 NlMBER, 2.5-SPCX>L-2
"'0, 2.3-2, F-2 0, 2.5-ED-2, 2.5-LPRS-2, 2.5-PIP-)., 2.5-SY$EN-2, 2.5-sysrAT-1, 2.5-TlYS-2 OFF, 2.5-aISEl'-1, 2.5-NEl'-1, 2.5-SEr-1 Offset, 2.5-mr86-1, N-2 CN, 2. 5-CHSEl'-1, 2. 5-SEI'-1 Operating system, 1.6-3, 2.2-1, 3.2-1, 3.10-3, 4.3-1, K-1 Operator error, 2.7-8, 3.8-5, 4.3-1 OPr, 2. 5-CHSE:r-1 OVerlays, 2.5-SEr-2, 3.1-2, 3.8-1
"'P, 2.3-2, 2.5-DIR-2, 2.5-LO<DJT-1, 2.5-PRINT-1, 2.5-PRINTER-3, 2.5-SDIR-5, 2.5-SUIMIT-2, 2.5-SYSTAT-2, 2.5-'lYPE-1, 3.1-3, 3.3-26, 3.8-5, F-1
P, 2.5-a.OCK-1, 2.5-ED-2, 2.5-MAIL-1, 2.5-sysrAT-1, 2.5-WH>-1l, 3.3-10 Pn, 2.5-PIP-6, 2.5-'lYPE-1 Pl'GE, 2. 5-HELP-3, 2. 5-'lYPE-1 P.AGESlZE, 2. 5-SPCX>L-2 Pages (=screens) of display roem:>ry, 1.7-7, 2.5-fnSl'ORY-1, 3.3-8, 3.3-11, 3.6-2 Paragraph (=16 bytes), 2.5-mr86-1, 2.5-G:ENOCEM-3, 2.5-SEIMEM-1, N-2 Parentheses (), v, 2.5-SDIR-3 Parity, 2.5-LPBS-2, 2.5-PIP-7, 2.5-TlYS-2, 3.3-2, 3.3-5, E-2 PASS-ID, 1.7-1, 2.4-3, 2.5-AP-11, 2.5-MAIL-2, 2.5-NDruSER-1, 2.5-PASSWD-1,
2.5-PASSWORD-1, 2.5-PRINTER-2, 2.6-1, 2.7-2, 3.2-3, 3.3-12, 3.4-1, 3.10-2 PASSolORD, 2.4-3, 2.5-PASSID-2, 2.5-PASSWORD-l, 3.4-10 PASSiORD (optien), 2.5-CONFIG.NET-1, 2.5-SET-3, 3.3-25, 3.4-5 Passwords:
default, 2.5-AP-11, 2.5-SEr-1, 3.4-3 delete-protect, 2.5-SEl'-3, 3.4-8 encrypted login, 1. 7-1, 2.5-~1, 2.7-2, 3.3-6, 3.4-1, 3.10-4 an diskettes, 3.4-11, 3.8-11 an drive labels, 2.S-Ser-4, 2.6-4, 2.7-3, 3.4-5, 3.9-1 an files, 2.~3, 2.7-3, 3.4-7, 3.8-2, 3.8-11 en net~k nodes, 2.5-<DIF.IG.NB'l'-1, 2.6-5, 2.7-7, 3.3-25, 3.4-13 read-protect, 2.5-SEl'-3, 3.4-8, 3.8-11 write-protect, 2.5-SEl'-3, 3.4-8

Period (.), 1.7-3, 2.5-1, 2.5-MAIL-3, 2.5-WRITE-l, 3.3-7, 3.8-3 Physical terminal number, 2.5-0l!I9lIB-l, 2.5-&YsrAT-l, 3.3-5, 3.3-8, B-1 PIP, 2.4-3, 2.5-PIP-l, 2.5-SEl'-3, 2.7-4, 3.8-5, 3.8-6, 3.10-3, J-5, K-3 Plotters, 1.'1-2, 2. 5-LPRS-l , 3.3-4 Plus (+) symbol, 2.5-MAIL-6, C-3 Ibrt numbers, 2.5-DDT86-2, 2.5-LPRS-1, 2.5-TIYS-l, B-2, E-5, G-l ~:
c::ords, 1.4-4, 4.1-1 outlets, 1.4-4, 1.6-2 switch, 1.6-2, 3.2-6 turning OFF, 1.6-2, 1.8-2, 3.2-7, 3.4-13 turning CN, 1.6-1, 3.1-2, 3.2-1
PRINT, 2.4-3, 2.5-PBD1'l'-1 PRINl' (option), 2.5-Srollrl PRINTER, 2.4-1, 2.5-PRD1'l'ER-l, 3.3-5, K-3 Printer name, 2.5-LPRS-l, 2. 5-PRIN1'ER-1 , 3.3-5, 3.3-9, K-3 Printer number, 2.5-LPRS-l, 2.5-PASSWD-1, 2.5-5roOlr5, 3.3-5, 3.3-9 Printer ports, F-l Printer release, 2.5-PAS.SWI>-3, 2.5-&YsrAT-2, 3.1-3
dBASE, J-8 (8-bit), J-12 (16-bit) ~dStar V3.0 (8-bit), H-4 WordStar V3.3, H-3 (8-bit), H-2 (16-bit)
Printers, 1.1-2, 2.5-G:ENCX:IM-2, 2.4-7, 2.5-LPRS-l, 3.3-1, 3.3-15, 3.3-24 Private drives, 2.5-<X>NFIG.NEl'-1, 2.5-SEINEl'-1, 2.6-5, 2.7-7, 3.3-25, 3.4-12 Pm, 2.5-PIP-2 Process, 2.3-2, 2. 5-A1IR1'-1 , 2. 5-ATrACH-1, 2. 5-I.DGaJT-1 Programmable keys, 1.7-10, 2.~1, 3.1-1 Progranming serial ports, E-l PR>TECT, 2.5-S!:1'-2, 2.5-SfDi-2, 2.6-3, 3.4-5, 3.8-11, 3.10-3 iWASK.NEl', 2.6-5
"0, 2.3-3, 2.5-DIR-1, 2.5-1YPE-2 0, 2.5-ED-2, 2.5-MAIL-6, 2.5-PIP-1, 2.5-&YSTAT-l Queue, 2.5-OJ!IPIG.~I, 2.5-NEl'-1, 2.5-PRINTER-l, 2.5-SEINEr-l, 2.5-SFOOlrl,
2. 5-&YSTAT-1, 3.3-25 Queue calls, 2.5-Sf-2, K-3 Questicn (?) mark, 1.7-6, 2.5-ER1!Q-l, 2.5-HELP-2, 2.5-PRINTER-l OIn am (X)n, 2.5-IDl'86-2 Quit, 1.7-7 QUITl'O.CH>, J-7
"R, 2.3-3 R, 1.6-9, 2.5-DDT86-2, 2.5-ED-2, 2.5-EORMAT-2, 2.5-MAIlr5, 2.5-PIP-l,
2.5-WHO-7, 3.3-10, H-2 RAM, 1.1-1, 1.7-8, 2.3-1, 2.5-AEDRl'-1, 2.5-CHSE1'-1 , 2.5-IDT86-1, 2.5-SErMEM-l,
2.5-&YSTAT-3, 2.5-vamE-2, 3.2-1, 3.2-3, 3.3-11, 3.9-1, 4.1-3, 4.2-1, B-1 MM memory boards, C-3, C-4 OCT (requester ocnfiguration table), 2.5-<D1PIG.NBl'-1, 3.3-25, 3.4-12 RFAD, 2.5-SB.r-3, 3.4-8 Read-protect password, 2.5-SIa'-3, 2.5-1YPE-3, 2.6-4, 3.4-5, 3.8-11 Relati ve virtual terminal (=screen) number, 2.5-mSl'ORY-l, 2.5-U'IMP-l,
2.5-WIMP-l, 3.3-10, 3.5-3, 3.6-2 Reminder files, 2.6-4, 2.5-naJIe.RlM-I, 2.6-1, 3.2-4, 3.3-14, 3.10-3 ReDDte device, 2.5-<XlNFIG.NEl'-I, 2.5-NB'l'-1, 3.3-24 REN, 2.4-3, 2.5-Rllf-l, 3.2-3, B-3
tC-OOS mbJ!X-10

Renaming files, 2.5-1, 2.5-PIP-2, 2.5-1YPE-2, 2.5-RBII-l, 3.1-2,,3.4-7, H-4 Requester coofiguration table (RCT), 2.5-aJ.ilFIG.Dr-I, 2. 5-SEINEr-1 , 3.3-25 Requester processes in DR Net, 2.5-SE'INEI'-1, 2.7-7, 3.3-25, 3.4-13 RESET, 2.4-3" 2.5-mSB'1'-l, 3.3-4, 3.3-6 RESEl' (optioo), 2.5-SPOOI.r-4 RESET buttoo, 1.6-2, 1.8-1, 2.5-lXNll-l, 2.5-UPrIME-l, 3.2-1, 3,2-6, D-l Resident system process (RSP), 2.5-GDiIX:lH-7, 3.2-1, I-1 Resource map in DR Net, 2.5-CONFIG.NEr-1, 2.5-NE'.r-2, 3.2-6, 3.3-25 Restoring backup files, 3.8-3, 3.9-1 Restricting access to:
DR Net nodes, 2.5-<X>NFIG.NEl'-1, 2.6-5, 2.7-7, 3.3-25, 3.4-12 files, 2.5-SEl'-l, 2.7-3, 3.4-3, 3.4-7 nOOems, 2.6-2, 2.7-2, 3.4-11 network drives, 2.5-<X>NFIG.NEr-l, 2.6-5, 2.7-7, 3.3-25, 3.4-12 programs, 2.7-3, 3.4-11 system, 2.7-2, 3.3-12, 3~4-9 termdna1s, 2.7-2, 3.3-16, 3.4-1 user areas, 2.7-4, 3.3-16, 3.4-10, K-l
RErURN key, v, 1.6-10, 2.3-3 R> (read-only attribute), 2.5-ERA-1, 2.5-~1, 2.5-SDIR-2, 2.S-Sft-l,
3.4-10, 3.8-3, H-4, I-I RS-232 cables, 1.4-2, E-l, Irl RSP (resident system process), 2.5-GDiIX:lH-7, 3.2-1, I-1 ~ (read-write attribute), 2.5-ERA-1, 2.5-~1, 2.5-HJ.!I.,P-3, 2.5-SDIR-l,
2.5-5&'1'-1, 3.8-3, I-I
"'5, 2.3-3, 2.5-DIR-l, 2.5-ED-2, 2.5-'lYPE-2, 3.3-9, L-l 5, 1.6-8, 2.5-CLCXl<-l, 2.5-CFY-l, 2.5-DDT86-2, 2.5-DIR-l, 2.5-ED-2,
2.5-PORMAT-2, 2.5-MAIL-6, 2.5-PRINT-1, 2.5-WfD-7, H-2 Screws, 1.4-4 SDIR, 2.4-4, 2.5-PIP-4, 2.5-SDm-l, 2.5-SEI'-6, 3.8-5 Sectors, 1.6-7, 2.5-CP.{-l, 2.5-FORMAT-l, 2.5-SYS3EN-1, 3.8-8, D-3 Security, 2.6-1, 2.7-1, 3.4-1
files, 2.4-8, 2.7-3, 3.4-2, 3.4-9 login passwords, 2.7-2, 3.3-14, 3.4-9 IOOdem, 2.6-2, 2.7-2, 3.4-11 network, 2.6-5, 2.7-8, 3.4-12 IhYsical, 2.7-2, 3.4-9 procedures, 2.6-1, 2.7-7, 3.4-9 user areas, 2.7-4, 3.3-16, 3.4-10' utilities, 2.5-N&lUSER-l, 2.5-PASSWD-l, 2.5-PASS«>RD-1, 3.4-1
Segment, 2.5-JDr86-1, N-2 Selector channel (of Q:xnpuPro Disk 2), C-I0, G-2 Serial ports, 2.5-LPRS-1, 2.5-T'lYS-l, A-2, B-1, F-l, G-l, L-1 Server processes in DR Net, 2.5-aJ.iIFIG.NE1'-I, 2.5-SEINEl'-l, 2.7-7, 3.3-25, 3.4-13 SEr, 2.4-4, 2.5-ERA-l, 2.5-INI'IDIR-l, 2.5-PIP-4, 2.5-SIfJ.\-1, 2.6-2, 2.7-6,
3.4-5, 3.4-9, 3.4-10, 3.4-12, 3.8-1, 3.8-3, 3.9-1, ~4, I-1 SEl' (optioo), 2.5-DATE-1 SEIMEM, 2.4-4, 2.5-SlmBl-1 SE'I.NEl', 2,4-4, 2. 5-00NFIG .NEl'-l, 2.5-SE'.IBe1'-1, 3.3-21 SETUP, 2.5-~1 SHARED, 2. 5-aISEI'-1 filell, 1.7-9, 2.5-GENXIM-7, 2.5-Si-1, 2.5-SlsrAT-2, 3.2-1, I-4, K-l, K-6 Shell ClOlIIIIaD:is, 2.5-IOGOOT-l, 2.5-RESEl'-1, 2.5-USER-1 9lie1ded cables, their unsuitability, L-l
lC-OOS INDEK-ll

ShiWing insert, 1.3-1, 4.3-2 SEDf, 1.7-4, 2.4-4, 2.5-SDf-1, 3.8-8 Smtting dam, 1.&-1, 2.S-lDlN.SJB-1, 3.2-5, 3.4-13 Sign-al ~ge, 1.6-4, 2.5-GENOCIM-6 Sing1e-user operation, 2.3-1, 3.2-2, 3.3-28, D-1 SIO control, E-1, K-3 SIZE, 2.5-SDIR-2, 2.5-SEDf-1, 2.5-vtMDE-2 SPACE, 2.5-SfDtl-2 ' Speed detect pin, 3.3-5 SPL, 2.5-SI1aL-1, I-2 SRX>L, 2.4-4, 2.5-SI1aL-l, 2.S-SY'SINIT.SUB-1 SRX>L (option), 2.5-NEl'-1 Spooler system, 2.5-NEr-2, 2.5-SI1aL-l, 3.3-24 SR (search), 2.5-JDI'86-2 srARI', 2. 5-SRX>L-5, 2. 5-SY'SINIT • SUB-I Starting up, 1.6-1, 3.2-1, 4.1-1 srATUS, 2. 5-NEl'-2, 2. 5-SPCX>L-2 Status display, 2.4-6, I-I, M-1 Status (25th) line of a terminal, 3.3-9, 3.3-11 srA'lUS.RSP, 2.s..G!RX!tM-7, I-4 Stop bits, 2.5-LPBS-2, 2.5-'lTYS-2, 3.3-2, 3.3-5, C-6, E-2 SUIMIT, 2.4-4, 2.5-SJIMr.l'-1, 2.5-9'1-1, 3.2-5, 3.3-28 SuperCa1c, 1.7-5, 2.3-1, 2.5-GmccFM-3, 2.5-SElMI!M-1, 3.3-17 SUfport, iv, 3.1-1, 3.1-2, 3.9-1, 4.3-1 SUSPEND, 2.5-aIB.l'-1, 2.5-VCMa>E-3 Sf, 2.4-4, 2.5-SEIMEM-1, 2.5-SUIMIT-1, 2.5-Slf-l, 2.5-TIME-1, J-4, K-2 SWitch settings, C-1 Sffl6, 2.4-4, 2.5-SI86-1, K-2 SYlC, 1.8-1, 2.4-4, 2.5-RESm'-1, 2.5-SD1::-1, 3.2-3, 3.10-3 sys, 1.7-6, 2.S-DIR-1, 2.5-PIP-6, 2.5-PRINT-1, 2.5-SBJ.'-2, B-3, I-1 SY'&:MD.CMD, J-5 SYSGEN, 2.4-4, 2.5-S!92Ii-1, N-2 SYSINIT.m\N, 2.4-4, 2.5-SfSDIlT.BMl-l, 3.2-2, 3.3-26 SY'SINIT.CMD, 2.4-4, 2.5-S!SD1IT.aI>-l, 3.2-2, 3.3-28 SYSINIT.SUB, 2.4-4, 2.5-SfSDIIT.9JB-1, 3.2-2, 3.2-6, 3.3-28, 3.4-6 sysrAT, 2.4-4, 2.5-AB:>RT-1, 2.5-S!S'.rM.\-1, 4.2-1 system:
aCOO\mt, 1.6-5, 1.7-1, 2.5-FIXPASS-1, 2.5-NlHJSER-1, 3.3-13, 3.10-3 attriblte, 1. 7-6, 2.5-alSEl'-1, 2.5-DIR-2, 2.5-SOIR-1, 2.5-SBJ.'-2, 3.8-3 console, 1.1-1, 1.2-1, 1.8-1, 2.3-1, 2.5-~-1, 3.2-2, 3.3-21, 3.9-1 diskette, 1.6-3, 1.6-10, 2.5-SY'SGEN-1, 2.6-2, 3.10-1, 4.1-3 drive (=A:), 2.5-BJFFER-1 files, I-I manager, iv, 3.1-1 map, 1.3-1, 3.1-1, M-1 node, 2. 5-AP-11 , 2.5-MAIL-1 number, 1.3-1, 4.3-1 pranpt, 1.6-5, 1. 7-2, 2.7-4 queues, 2.~G.NEl'-1, 2.5-fiIBI\-1, 3.3-24 security, 2.6-1, 2.7-1, 3.4-1, 3.4-9, K-2 shell, 1.7-9, 2.5-GENSY'S-4, 2.5-SYSTAT-'2, 3.2-1, K-1 tracks, 1.6-10, 2.5-CP.i'-1, 2.5-SY'SGEN-1 usage, 2.5-TIMELOG.sub-1, 2.5-WHO-1, 3.1-1, 3.4-11, 3.5-1, 3.6-1
SYStem SUpport 1 board, 2.5-CIOCK-1, A-1, B-1, C-2, C-7, F-l
M:-OOS INDFX-12

T, 2.~-1, 2.~11 Tn, 2.5-IDT86-2, 2.5-m>-2, 2.5-PIP-2, 2.5-PRINT-1 TABS, 2.5-SPOOL-1 Tagging cables, 1.4-2, M-1 Tape controller, A-2, G-1 Tape drives, 1.1-2, 3.8-8, 3.9-1, A-1, G-1 Te1eVideo 925/950, 1. 7-7, 2.5-I(EfS-1, 2.5-TV950.KF.Y-1, F-1, H-1 Template, 2. 5-~S-1, 2. 5-name.NEl'-1 Terminal, 1.1-1, 3.3-1 Terminal access, 2.5-PASSllD-2, 2.6-1, 2.7-2, 3.3-16, 3.4-1 Terminal name, 2.5-HISl'ORY-1, 2.5-MAIL-1, 2.5-"ftYS-2, 2.5-U'lMP-1, 2.54ifD-1,
2.5-WRITE-1, 2.5-WTMP-1, 3.3-6, 3.5-2, 3.6-2 Terminal munber, 2.5-CXXiSOLE-1, 2.5-SYSTAT-1, 2.5-'lTfS-1, 3.3-5, E-1, J-3, J-9 ~, 2.5-SPOOL-6 Tilde ("') symOO1, 2.5-MAIL-1, 2.5-WHO-13 TIME, 2.4-4, 2.5-TIME-1 Time accounting, 2.5-TJMEU)G.CH>-1, 2.5-TIMEI:.OO.SUB-1, 3.5-1 TIMEUJG utilities, 2.7-5, 3.4-11, 3.5-1 TIMEI:OO.Q.ID, 2.4-4, .5-'rDB:m.CH>-1, 3.5-1 TIME£.DGX.DBF, 2.4-4, .5-TIMIUlG.CH>-1, 3.5-1. TIMEI:OO. SUB, 2.4-4, .5-TIMl!UlG.stJB-l, 3.5-1 Timeout in DR Net, .s-a.FIG.I!El"-I, 2.5-SE1NEI'-1, 3.3-25 Timestamping, 2.5-INIIDIR-1, 2.5-SE'l'-4, 2.6-3, 3.4-11, 3.8-3, J-12 TIP, 3.8-5, 3.9-1 'lbgg1e, 2.3-2, F-1 Transient program area (TPA), 2.3-1, 2.5-ABJRT-1, 2.5-SE'lMEM-1, 2.5-~BrAT-4 Troub1eshcx>ting, 2.3-1, 4.1-1, H-4 TlYS, 2.4-4, 2.5-RESET-1, 2.5-T'lYS-1, 3.3-4, 4.3-1, F-2 'lYPE, 2.4-4, 2.5-PIP-7, 2.5-PRINl'-1, 2.5--WPB-1
. Type-ahead (20O-character), K-6
"tI, 2.3-3 U, 2.5-IDT86-2, 2.5-m>-2, 2.5-PIP-6, 2.5-SYBrAT-1, 2.5-WlD-13 Unauthorized users, 2.6-1, 2.7-1 UNKtUiN, 2. 5-MAIL-7 Unshielded cable, L-1 UPDATE, 2.5-SE'1'-4, 2.5-SDW-2 qpdates, 2.1-2, 3.1-2, 3.10-1 Upgrade, 3.8-5, 3.10-1 UPrIME, 2.4-4, 2.5-UPrlMB-l, 3.4-13 USER, 2.4-4, 2.5-USBR-l, 1.7-3, 2.7-4, 3.4-8, K-3 User areas, 1.6-6, 1.7-3, 2.5-USER-1, 2.6-2, 2.7-4, 2.3-6, 3.3-12,
3.4-1, 3.4-10, 3.8-8, J-5, J-9, K-4 User habits, 2.7-5, 3.1-3, 3.3-15 USERINIT.CMD, 2.4-4, 2.5-OSBRINIT.CH>-1, 3.2-4, 3.3-28 USERINIT.SUB, 2.4-4, 2.5-OSBRINIT.SJB-1, 3.2-4, 3.3-28 USERS, 2.5-SDIR-2, 2.5-SfD'l-2, 3.8-8 User I s guide to this manual, v U'lMP, 2.4-4, 2.5-U'IMP-1, 2.5-WlD-1, 3.2-6, 3.3-22, 3.4-5, 3.6-1, 3.8-4
V, 1.6-8, 2.5-CP.{-1, 2.5-IDT86-2, 2.5-ED-2, 2.5-FQR.1AT-2, 2.5-PIP-8., 2.5-WlD-8, 3.3-10
VOMODE, 2.4-4, 2.5-VCMODB-l, 3.3-8, 3.3-10 Ventilation slots, 1.4-4 Verbose, 2. 5-GENCCIM-2

Verify, 1.6-9, 2.5-CP.l-l, 2.5-~-1, 2.5-P1P-2 Versioos of M:-OOS, 3.1-2, 3.10-1, 3.10-4, 4.3-1, C-l, K-6 Virtual terminal number, 2.5-AOORI'-l, 2. 5-aJNSOLB-l , 2.5-HIsroRY-l,
2.s-SYSTAT-2,· 2.s-WHO-1, 2.s-WTMP-l, 3.3-10, 3.3-20, 3.5-3, 3.6-2 Virtual Terminals, 1.7-7, 2.2-1, 2.3-2, 2.5-AOORT-l, 2.5-ElJFFER-l,
2.s--a=tMINIT-1, 2.5-CQils)LE-1, 2.5-NEn'-1, 2.5-PRINTER-1, 2. 5-VQO)E-1 , 2.5-vrIYS-l, 2.5-WfD-11, 2.7-7, 3.2-1, 3.2-4, 3.3-7, K-2
vrocsao.Krl, 2.5-vrocsao.J<g{-1 vrIYS, 2.4-3, 2.5-<CtMINIT-1, 2.5-vrIYS-1, 3.2-1, 3.3-7, K-2 vr9s0.KE.Y, 2.4-4, 2.5-VT950.KEY'-1
W, 2.5-IDT86-2, 2.5-ED-2, 2.s-MAlL-1, 2.5-P1P-1, 2.5-PRINT-2, 2.5-sysrAT-s, B-3 Weekly backup, 3.1-2, 3.8-5, 3.8-9 WED, 1.&-1, ,2.4-3, 2.5-AOORT-1, 2.5-WD-l, 3.2-7, 3.3-22, 0-1 WlIM.CMD, J-9 Wildcard symbols (*, ?): 1.7-6, 2.5-CHSEr-1, 2.5-DIR-1, 2.5-ERA-1, 2.5-ERllO-1,
2.5-P1P-l, 2.5-PRINT-1, 2.5-REN-l, 2.5-SD1R-1, 2.5-SEl'-1, 2.5-'lYPE-1, 3.4-8 WirXiowing, 1. 7-8 WordStar:
exiting from, 1.7-8 invoking, 1.7-7 installing, 3.1-2, B-1 ncn~ JOOde, 2.5-KBYS-2, 2.5-LPRS-l, 2.5-MAIL-3, 2.5-SYSINIT.BAN-l,
2.5-a.e.R&f-l, 2.5-TlYS-1, 2.5-vrIYS-l, 3.3-27 printer release, H-2 renaming, 3.1-2, H-2
WRI'IE, 2.4-4, 2.S-miN-1, 2.s..:NRrl'E-l, 3.2-6, 3.3-14 write enable tab, 1.5-1, 2.5-FORMAT-l write-protect:
attribute (ro), 2.5-ERA-1, 2.5-HELP-3, 2.5-SET-2, 3.&-1 functim call, J-3 notch, 1.5-1, 2.5-PORMAT-1 password, 2.5-SeJ.'-3, 3.2-2, 3.3-17, 3.4-8, 3.&-12
WIMP, 2.4-4, 2.5-WlMP-1, 3.2-5, 3.3-22, 3.4-1, 3.5-1, 3.6-1 ~-5O, 2.5-KEYS-1
'X, 2.3-3, 2.5-T'.lPE-2 "'X, 2.s-MAIL-3 X (=exit), 2.5-CIOCK-1, 2.5-CPf-1, 2.5-MAlL-7, 2.5-NEWUSER-1, 2.5-SY$EN-1 X (=other optioos), 2.5-ror86-2, 2.5-ED-2 XFCBs, 2.5-BU\:-2, 2.5-ERllO-1, 2.s-PIP-8, 2.5-SDIR-1, 2.5-SET-4, 2.5-SDf-1,
3.4-5, K-S XIoS, 1.6-3, 2.5-GENOCIM-4, 2.5-LPRS-3, 3.3-4, 3.3-6, 3.3-11, E-s, 1-3 X1OS.S!iS, 1-3 XfJil/XOFF handshake, 2.5-IRRS-2, 2.5-TlYS-2, 3.3-2, 3.3-5, E-2, F-l
-[y (clears screen of Te1eVideo 950), 3.3-26 y (=yes), 1.6-9, 2.s-AP-l, 2.5-ED-1, 2.5-ERA-2, 2.5-ERAQ-l t 2.5-EORMAT-2,
2.5-{;ENc::aM-2, 2.5-INI'lDIR-1, 2.5-NAMFS«>D-2, 2.5-P1P-S, 2.5-REB-1
""z, 2.3-3, 2.5-ED-2, 2.5-P1P-6, 2.5-WRITE-l, 3.3-10 Z, 2.5-ED-2, 2.5-P1P-7 Zero (0), 2.5-ED-l, 3.3-10 2WlMP.CMD, 2.4-4, 1-3 Z80 (microprocessor by Zilog), 2.5-Slf-l, 2. 5-Stl86-1 , C-2,K-4
M:-OOS INDEK-14