retain 4.9.2: archiving guide - novell is now part of micro focus
TRANSCRIPT
Retain 4.9.2Archiving Guide
May 2021

Legal Notice
For information about legal notices, trademarks, disclaimers, warranties, export and other use restrictions, U.S. Government rights, patent policy, and FIPS compliance, see https://www.microfocus.com/about/legal/.
Copyright © 2017–2021 Micro Focus or one of its affiliates.
Contents
Preface 5About Retain . . . . . . . . . . . . . . . . . . . . . . . . . . . . . . . . . . . . . . . . . . . . . . . . . . . . . . . . . . . . . . . . . . . . 5About This Guide . . . . . . . . . . . . . . . . . . . . . . . . . . . . . . . . . . . . . . . . . . . . . . . . . . . . . . . . . . . . . . . . . 5For Documentation Feedback . . . . . . . . . . . . . . . . . . . . . . . . . . . . . . . . . . . . . . . . . . . . . . . . . . . . . . . 5To Join the Retain Idea Exchange . . . . . . . . . . . . . . . . . . . . . . . . . . . . . . . . . . . . . . . . . . . . . . . . . . . . 5For Additional Documentation . . . . . . . . . . . . . . . . . . . . . . . . . . . . . . . . . . . . . . . . . . . . . . . . . . . . . . . 5To Contact Technical Support. . . . . . . . . . . . . . . . . . . . . . . . . . . . . . . . . . . . . . . . . . . . . . . . . . . . . . . . 5For Sales . . . . . . . . . . . . . . . . . . . . . . . . . . . . . . . . . . . . . . . . . . . . . . . . . . . . . . . . . . . . . . . . . . . . . . . 5For Professional Services . . . . . . . . . . . . . . . . . . . . . . . . . . . . . . . . . . . . . . . . . . . . . . . . . . . . . . . . . . 5
1 Getting Started with Retain Archiving 7First, Plan Your Retain Archiving System . . . . . . . . . . . . . . . . . . . . . . . . . . . . . . . . . . . . . . . . . . . . . . . . . . . . 7Next, Match Your Messaging Systems to Retain’s Archiving methods . . . . . . . . . . . . . . . . . . . . . . . . . . . . . . 7Where to Go from Here. . . . . . . . . . . . . . . . . . . . . . . . . . . . . . . . . . . . . . . . . . . . . . . . . . . . . . . . . . . . . . . . . . 9
2 Setting Up Pull-Based Archiving 11Understanding Retain Jobs. . . . . . . . . . . . . . . . . . . . . . . . . . . . . . . . . . . . . . . . . . . . . . . . . . . . . . . . . . . . . . 11Creating Modules . . . . . . . . . . . . . . . . . . . . . . . . . . . . . . . . . . . . . . . . . . . . . . . . . . . . . . . . . . . . . . . . . . . . . 13Schedules . . . . . . . . . . . . . . . . . . . . . . . . . . . . . . . . . . . . . . . . . . . . . . . . . . . . . . . . . . . . . . . . . . . . . . . . . . . 15
Creating Schedules . . . . . . . . . . . . . . . . . . . . . . . . . . . . . . . . . . . . . . . . . . . . . . . . . . . . . . . . . . . . . . 15Creating Workers . . . . . . . . . . . . . . . . . . . . . . . . . . . . . . . . . . . . . . . . . . . . . . . . . . . . . . . . . . . . . . . . . . . . . 17
Workers Overview . . . . . . . . . . . . . . . . . . . . . . . . . . . . . . . . . . . . . . . . . . . . . . . . . . . . . . . . . . . . . . . 17Deciding Where to Install Your Workers. . . . . . . . . . . . . . . . . . . . . . . . . . . . . . . . . . . . . . . . . . . . . . . 17Installing and Configuring a Worker . . . . . . . . . . . . . . . . . . . . . . . . . . . . . . . . . . . . . . . . . . . . . . . . . . 18Uploading a Worker Bootstrap to the Worker Console . . . . . . . . . . . . . . . . . . . . . . . . . . . . . . . . . . . 23
Worker Servers . . . . . . . . . . . . . . . . . . . . . . . . . . . . . . . . . . . . . . . . . . . . . . . . . . . . . . . . . . . . . . . . . . . . . . . 25Configuration Tab . . . . . . . . . . . . . . . . . . . . . . . . . . . . . . . . . . . . . . . . . . . . . . . . . . . . . . . . . . . . . . . . 26Server Connection Tab. . . . . . . . . . . . . . . . . . . . . . . . . . . . . . . . . . . . . . . . . . . . . . . . . . . . . . . . . . . . 26Status Tab . . . . . . . . . . . . . . . . . . . . . . . . . . . . . . . . . . . . . . . . . . . . . . . . . . . . . . . . . . . . . . . . . . . . . 27Scheduler Tab . . . . . . . . . . . . . . . . . . . . . . . . . . . . . . . . . . . . . . . . . . . . . . . . . . . . . . . . . . . . . . . . . . 28
Archiving Blackberry Server Data . . . . . . . . . . . . . . . . . . . . . . . . . . . . . . . . . . . . . . . . . . . . . . . . . . . . . . . . . 31Blackberry Prerequisites . . . . . . . . . . . . . . . . . . . . . . . . . . . . . . . . . . . . . . . . . . . . . . . . . . . . . . . . . . 31Creating a Blackberry Module . . . . . . . . . . . . . . . . . . . . . . . . . . . . . . . . . . . . . . . . . . . . . . . . . . . . . . 31Setting a Blackberry Schedule . . . . . . . . . . . . . . . . . . . . . . . . . . . . . . . . . . . . . . . . . . . . . . . . . . . . . . 37Specifying a Blackberry Profile . . . . . . . . . . . . . . . . . . . . . . . . . . . . . . . . . . . . . . . . . . . . . . . . . . . . . 37Setting Up a Blackberry Worker . . . . . . . . . . . . . . . . . . . . . . . . . . . . . . . . . . . . . . . . . . . . . . . . . . . . . 41Creating a Blackberry Job . . . . . . . . . . . . . . . . . . . . . . . . . . . . . . . . . . . . . . . . . . . . . . . . . . . . . . . . . 41
Archiving Bloomberg. . . . . . . . . . . . . . . . . . . . . . . . . . . . . . . . . . . . . . . . . . . . . . . . . . . . . . . . . . . . . . . . . . . 47Creating a Bloomberg Module . . . . . . . . . . . . . . . . . . . . . . . . . . . . . . . . . . . . . . . . . . . . . . . . . . . . . . 47Setting a Bloomberg Schedule. . . . . . . . . . . . . . . . . . . . . . . . . . . . . . . . . . . . . . . . . . . . . . . . . . . . . . 49Specifying a Bloomberg Profile . . . . . . . . . . . . . . . . . . . . . . . . . . . . . . . . . . . . . . . . . . . . . . . . . . . . . 49Setting Up a Bloomberg Worker. . . . . . . . . . . . . . . . . . . . . . . . . . . . . . . . . . . . . . . . . . . . . . . . . . . . . 52Creating a Bloomberg Job . . . . . . . . . . . . . . . . . . . . . . . . . . . . . . . . . . . . . . . . . . . . . . . . . . . . . . . . . 52
Archiving Exchange and Office 365 . . . . . . . . . . . . . . . . . . . . . . . . . . . . . . . . . . . . . . . . . . . . . . . . . . . . . . . 55Prerequisites for Archiving Exchange Data . . . . . . . . . . . . . . . . . . . . . . . . . . . . . . . . . . . . . . . . . . . . 55Creating an Exchange Module. . . . . . . . . . . . . . . . . . . . . . . . . . . . . . . . . . . . . . . . . . . . . . . . . . . . . . 65Setting an Exchange Schedule . . . . . . . . . . . . . . . . . . . . . . . . . . . . . . . . . . . . . . . . . . . . . . . . . . . . 109Specifying an Exchange Profile . . . . . . . . . . . . . . . . . . . . . . . . . . . . . . . . . . . . . . . . . . . . . . . . . . . . 110Setting Up an Exchange Worker . . . . . . . . . . . . . . . . . . . . . . . . . . . . . . . . . . . . . . . . . . . . . . . . . . . 117Creating an Exchange Job. . . . . . . . . . . . . . . . . . . . . . . . . . . . . . . . . . . . . . . . . . . . . . . . . . . . . . . . 117
Contents 3
4 Con
Archiving Google Apps ( GSuite) . . . . . . . . . . . . . . . . . . . . . . . . . . . . . . . . . . . . . . . . . . . . . . . . . . . . . . . . 120Preparing Google Apps to Work with Retain . . . . . . . . . . . . . . . . . . . . . . . . . . . . . . . . . . . . . . . . . . 120Creating a Google Apps Module . . . . . . . . . . . . . . . . . . . . . . . . . . . . . . . . . . . . . . . . . . . . . . . . . . . 131Setting a Google Apps Schedule . . . . . . . . . . . . . . . . . . . . . . . . . . . . . . . . . . . . . . . . . . . . . . . . . . . 134Specifying a Google Apps Profile . . . . . . . . . . . . . . . . . . . . . . . . . . . . . . . . . . . . . . . . . . . . . . . . . . . 134Setting Up a Google Apps Worker . . . . . . . . . . . . . . . . . . . . . . . . . . . . . . . . . . . . . . . . . . . . . . . . . . 138Creating a Google Apps Job . . . . . . . . . . . . . . . . . . . . . . . . . . . . . . . . . . . . . . . . . . . . . . . . . . . . . . 138
Archiving GroupWise . . . . . . . . . . . . . . . . . . . . . . . . . . . . . . . . . . . . . . . . . . . . . . . . . . . . . . . . . . . . . . . . . 142Creating a GroupWise Module. . . . . . . . . . . . . . . . . . . . . . . . . . . . . . . . . . . . . . . . . . . . . . . . . . . . . 142Setting a GroupWise Schedule . . . . . . . . . . . . . . . . . . . . . . . . . . . . . . . . . . . . . . . . . . . . . . . . . . . . 149Specifying a GroupWise Profile . . . . . . . . . . . . . . . . . . . . . . . . . . . . . . . . . . . . . . . . . . . . . . . . . . . . 149Setting Up a GroupWise Worker . . . . . . . . . . . . . . . . . . . . . . . . . . . . . . . . . . . . . . . . . . . . . . . . . . . 159Creating a GroupWise Job. . . . . . . . . . . . . . . . . . . . . . . . . . . . . . . . . . . . . . . . . . . . . . . . . . . . . . . . 159
Archiving Social Media Governance (Deprecated) . . . . . . . . . . . . . . . . . . . . . . . . . . . . . . . . . . . . . . . . . . . 163
3 Setting Up Push-Based Archiving 165First, Configure the Retain Server or Router Connection . . . . . . . . . . . . . . . . . . . . . . . . . . . . . . . . . . . . . . 165Archiving Android Messages and Call Information . . . . . . . . . . . . . . . . . . . . . . . . . . . . . . . . . . . . . . . . . . . 166
Creating a Mobile (Android) Module . . . . . . . . . . . . . . . . . . . . . . . . . . . . . . . . . . . . . . . . . . . . . . . . 166Creating a Mobile (Android) Profile . . . . . . . . . . . . . . . . . . . . . . . . . . . . . . . . . . . . . . . . . . . . . . . . . 169Mobile Router Page . . . . . . . . . . . . . . . . . . . . . . . . . . . . . . . . . . . . . . . . . . . . . . . . . . . . . . . . . . . . . 171Customizing the Mobile Registration Email Template . . . . . . . . . . . . . . . . . . . . . . . . . . . . . . . . . . . 172
Archiving AT&T Messages . . . . . . . . . . . . . . . . . . . . . . . . . . . . . . . . . . . . . . . . . . . . . . . . . . . . . . . . . . . . . 173Creating a Wireless AT&T Module . . . . . . . . . . . . . . . . . . . . . . . . . . . . . . . . . . . . . . . . . . . . . . . . . . 173
Archiving Blackberry Messenger Enterprise . . . . . . . . . . . . . . . . . . . . . . . . . . . . . . . . . . . . . . . . . . . . . . . . 176Messenger Enterprise (BBME) Tab (Blackberry) . . . . . . . . . . . . . . . . . . . . . . . . . . . . . . . . . . . . . . . 176Setting Up Blackberry Auditing and Archiving Services (BAAS) for BBM . . . . . . . . . . . . . . . . . . . . 177
Archiving CellTrust Generation 2 . . . . . . . . . . . . . . . . . . . . . . . . . . . . . . . . . . . . . . . . . . . . . . . . . . . . . . . . 182Prerequisites . . . . . . . . . . . . . . . . . . . . . . . . . . . . . . . . . . . . . . . . . . . . . . . . . . . . . . . . . . . . . . . . . . 183Configure the Retain Push-based Archiving Connection . . . . . . . . . . . . . . . . . . . . . . . . . . . . . . . . . 183Create a REST Collector . . . . . . . . . . . . . . . . . . . . . . . . . . . . . . . . . . . . . . . . . . . . . . . . . . . . . . . . . 183Configure the CellTrust Module . . . . . . . . . . . . . . . . . . . . . . . . . . . . . . . . . . . . . . . . . . . . . . . . . . . . 183
Archiving GBS Notes . . . . . . . . . . . . . . . . . . . . . . . . . . . . . . . . . . . . . . . . . . . . . . . . . . . . . . . . . . . . . . . . . 184Prerequisites—GBS Notes. . . . . . . . . . . . . . . . . . . . . . . . . . . . . . . . . . . . . . . . . . . . . . . . . . . . . . . . 185Configure the Retain Push-based Archiving Connection . . . . . . . . . . . . . . . . . . . . . . . . . . . . . . . . . 185Create REST Collector for GBS Notes. . . . . . . . . . . . . . . . . . . . . . . . . . . . . . . . . . . . . . . . . . . . . . . 185Configure the GBS Notes Module . . . . . . . . . . . . . . . . . . . . . . . . . . . . . . . . . . . . . . . . . . . . . . . . . . 185Configuring GBS Notes to Work with Retain . . . . . . . . . . . . . . . . . . . . . . . . . . . . . . . . . . . . . . . . . . 186
Archiving GroupWise Messenger . . . . . . . . . . . . . . . . . . . . . . . . . . . . . . . . . . . . . . . . . . . . . . . . . . . . . . . . 186Prerequisites . . . . . . . . . . . . . . . . . . . . . . . . . . . . . . . . . . . . . . . . . . . . . . . . . . . . . . . . . . . . . . . . . . 186Configure the Push-based Archiving Connection. . . . . . . . . . . . . . . . . . . . . . . . . . . . . . . . . . . . . . . 186Create a REST Collector for GW Messenger. . . . . . . . . . . . . . . . . . . . . . . . . . . . . . . . . . . . . . . . . . 186Configure the GW Messenger Module. . . . . . . . . . . . . . . . . . . . . . . . . . . . . . . . . . . . . . . . . . . . . . . 186
Archiving Ionlake MyRepChat. . . . . . . . . . . . . . . . . . . . . . . . . . . . . . . . . . . . . . . . . . . . . . . . . . . . . . . . . . . 187Creating an Ionlake Module . . . . . . . . . . . . . . . . . . . . . . . . . . . . . . . . . . . . . . . . . . . . . . . . . . . . . . . 187
Archiving TeleMessage Messages . . . . . . . . . . . . . . . . . . . . . . . . . . . . . . . . . . . . . . . . . . . . . . . . . . . . . . . 190Creating a TeleMessage Module . . . . . . . . . . . . . . . . . . . . . . . . . . . . . . . . . . . . . . . . . . . . . . . . . . . 190
Archiving UM Labs Messages . . . . . . . . . . . . . . . . . . . . . . . . . . . . . . . . . . . . . . . . . . . . . . . . . . . . . . . . . . 191Creating a UM Labs Module . . . . . . . . . . . . . . . . . . . . . . . . . . . . . . . . . . . . . . . . . . . . . . . . . . . . . . 191
tents
Preface
About RetainRetain Unified Archiving
Archives email and text messages. Catalogs them for search and retrieval.
Retain is not a backup/restore system.
About This GuideThis is the archiving documentation for Retain Unified Archiving version 4.9.2.
For Documentation FeedbackScroll to the bottom of the online page and enter a User Comment.
To Join the Retain Idea ExchangeGot an idea for a new Retain feature or enhancement? Log in to Microfocus.com and join the conversations happening inside the Retain Idea Exchange.
For Additional DocumentationSee the Micro Focus Knowledge Base website.
To Contact Technical SupportBrowse to the Micro Focus Support Page (https://www.microfocus.com/support-and-services/) and begin typing Retain Unified Archiving in the Search for a Product field.
For SalesGo to the Micro Focus Contact page (https://www.microfocus.com/en-us/contact).
For Professional ServicesContact Micro Focus Professional Services by sending an email to [email protected] or calling (877) 772-4450.
Preface 5

6 Preface
1 1Getting Started with Retain Archiving
First, Plan Your Retain Archiving SystemAs a best practice, we recommend that you start by creating a written plan. Obviously, this plan will evolve and expand over time, but beginning with a plan is the most effective and efficient way to ensure a successful Retain deployment.
Do the following:
1. Identify stakeholders in your organization who have a vested interest in a successful Retain deployment.
2. With the stakeholders, decide on a convenient and accessible way to propose, review, and finalize your Retain deployment plan.
3. Create your plan by doing at least the following:a. Identify the messaging systems that Retain will service.b. Record each system’s DNS and IP address information, physical location, administrator
information, and any other information relative to the system’s future interaction with Retain.c. Save a space to record details identified during the deployment, such as system
credentials, licenses, and other information that Retain and third-party systems will require as you connect them together.
d. Determine the times when systems and network traffic are slow and best suited for archiving operations to take place. This will feed into schedule creation as proposed in “Creating Schedules” on page 15.
e. Articulate the scope of what needs to be archived for each system: users, groups, message types, date ranges, attachments, and so on.
f. Avoid redundant data collection.
Next, Match Your Messaging Systems to Retain’s Archiving methods
Retain’s archiving methods are designed to match the messaging systems being archived.
Find your messaging platforms in Figure 1-1 to determine which of Retain’s archiving models your organization requires.
Getting Started with Retain Archiving 7
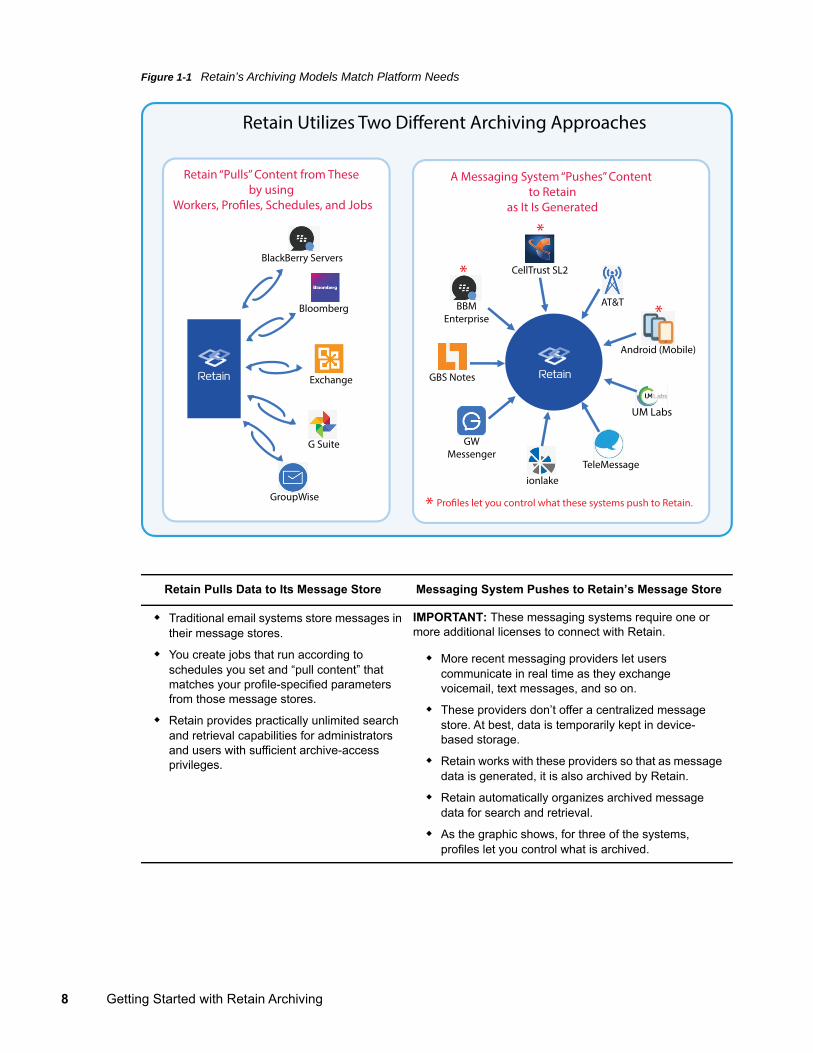
Figure 1-1 Retain’s Archiving Models Match Platform Needs
Retain Pulls Data to Its Message Store Messaging System Pushes to Retain’s Message Store
Traditional email systems store messages in their message stores.
You create jobs that run according to schedules you set and “pull content” that matches your profile-specified parameters from those message stores.
Retain provides practically unlimited search and retrieval capabilities for administrators and users with sufficient archive-access privileges.
IMPORTANT: These messaging systems require one or more additional licenses to connect with Retain.
More recent messaging providers let users communicate in real time as they exchange voicemail, text messages, and so on.
These providers don’t offer a centralized message store. At best, data is temporarily kept in device-based storage.
Retain works with these providers so that as message data is generated, it is also archived by Retain.
Retain automatically organizes archived message data for search and retrieval.
As the graphic shows, for three of the systems, profiles let you control what is archived.
Retain Utilizes Two Different Archiving Approaches
BlackBerry Servers
Bloomberg
Exchange GBS Notes
G Suite
GroupWise
GWMessenger
TeleMessage
UM Labs
Retain “Pulls” Content from These by using
Workers, Profiles, Schedules, and Jobs
A Messaging System “Pushes” Content to Retain
as It Is Generated
Android (Mobile)
*BBMEnterprise
*
* Profiles let you control what these systems push to Retain.
ionlake
AT&T
CellTrust SL2
*
8 Getting Started with Retain Archiving
Where to Go from Here Pull-based: For your messaging platforms that require Retain-initiated archiving, continue with
“Understanding Retain Jobs.” Push-based: For your messaging platforms that support push-based archiving, skip to
Chapter 3, “Setting Up Push-Based Archiving,” on page 165.
Getting Started with Retain Archiving 9

10 Getting Started with Retain Archiving
2 2Setting Up Pull-Based Archiving
After your Retain system is installed and running properly and you have planned for the components needed for your target platforms, use the instructions in the following sections to set up Pull-based archiving for your organization.
“Understanding Retain Jobs” on page 11 “Creating Modules” on page 13 “Schedules” on page 15 “Creating Workers” on page 17 “Worker Servers” on page 25 “Archiving Blackberry Server Data” on page 31 “Archiving Bloomberg” on page 47 “Archiving Exchange and Office 365” on page 55 “Archiving Google Apps ( GSuite)” on page 120 “Archiving GroupWise” on page 142 “Archiving Social Media Governance (Deprecated)” on page 163
Understanding Retain JobsIf your messaging platforms require pull-based archiving, you need a basic understanding of Retain Jobs and their components: modules, schedules, profiles, and workers, as illustrated in Figure 2-1 and explained in Table 2-1 on page 12.
Setting Up Pull-Based Archiving 11
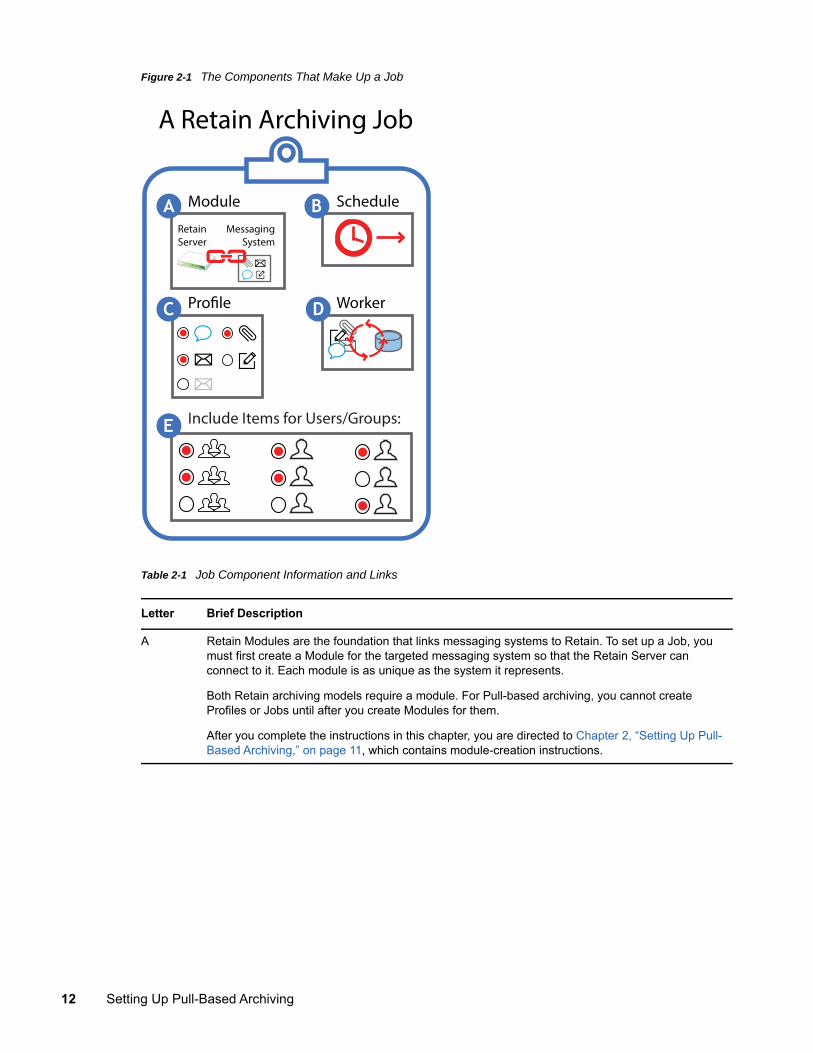
Figure 2-1 The Components That Make Up a Job
Table 2-1 Job Component Information and Links
Letter Brief Description
A Retain Modules are the foundation that links messaging systems to Retain. To set up a Job, you must first create a Module for the targeted messaging system so that the Retain Server can connect to it. Each module is as unique as the system it represents.
Both Retain archiving models require a module. For Pull-based archiving, you cannot create Profiles or Jobs until after you create Modules for them.
After you complete the instructions in this chapter, you are directed to Chapter 2, “Setting Up Pull-Based Archiving,” on page 11, which contains module-creation instructions.
A Retain Archiving Job
ScheduleBRetainServer
MessagingSystem
ModuleA
ProfileC WorkerD
Include Items for Users/Groups:E
12 Setting Up Pull-Based Archiving
Creating ModulesRetain Modules are the foundation that links your messaging systems to Retain. Each module type is as unique as the system it connects.
Both Retain archiving models (Push-based and Pull-based) require messaging-system-specific modules. For Pull-based archiving, you cannot create Profiles or Jobs until after you create Modules for their respective systems.
Path: Retain Server Manager > Configuration > Module Configuration
B Schedules define the time framework that jobs run within.
They can set up a single time for a job to run or they can specify recurring times.
Schedules are not module- or job-specific. You can use a schedule with as many jobs as makes sense.
TIP: The order implied by the letters in Figure 2-1, reflects the process of creating jobs, beginning with module creation.
However, as a best practice, you might want to start by planning the best times for your jobs to run, and then create schedules that reflect your plans.
For instructions on creating schedules, see “Schedules” on page 15.
C Profiles define what Retain retrieves from the message system. You can archive everything or filter by time periods, folders, subjects, and how the data is stored.
Profiles are module-specific and module-dependent.
Profiles perform duplicate checking, which keeps the Retain system from storing multiple instances of the same message.
Instructions for creating profiles are contained in their relevant platform sections.
D Workers pull data from message-system servers.
They track their associated jobs, when to start them (the schedule), and which items to retrieve (the profile).
Workers can only run one job at a time.
They are not module-specific, but they might require module-specific settings in the module-specific tab.
Each Worker has two parts:
Worker Agent: Retrieves and initially processes message data.
Worker Web Object: Connects (bootstraps) the Worker Agent and the Retain Server.
Instructions for creating and setting up Workers are found in “Creating Workers” on page 17.
E Jobs tie all the other components together.
Jobs specify which mailboxes (users and groups) Retain archives on the targeted systems.
Jobs and Modules tie directly to each other. You select one or more modules by name before creating the Job.
Instructions for creating jobs are contained in their relevant platform sections.
Letter Brief Description
Setting Up Pull-Based Archiving 13
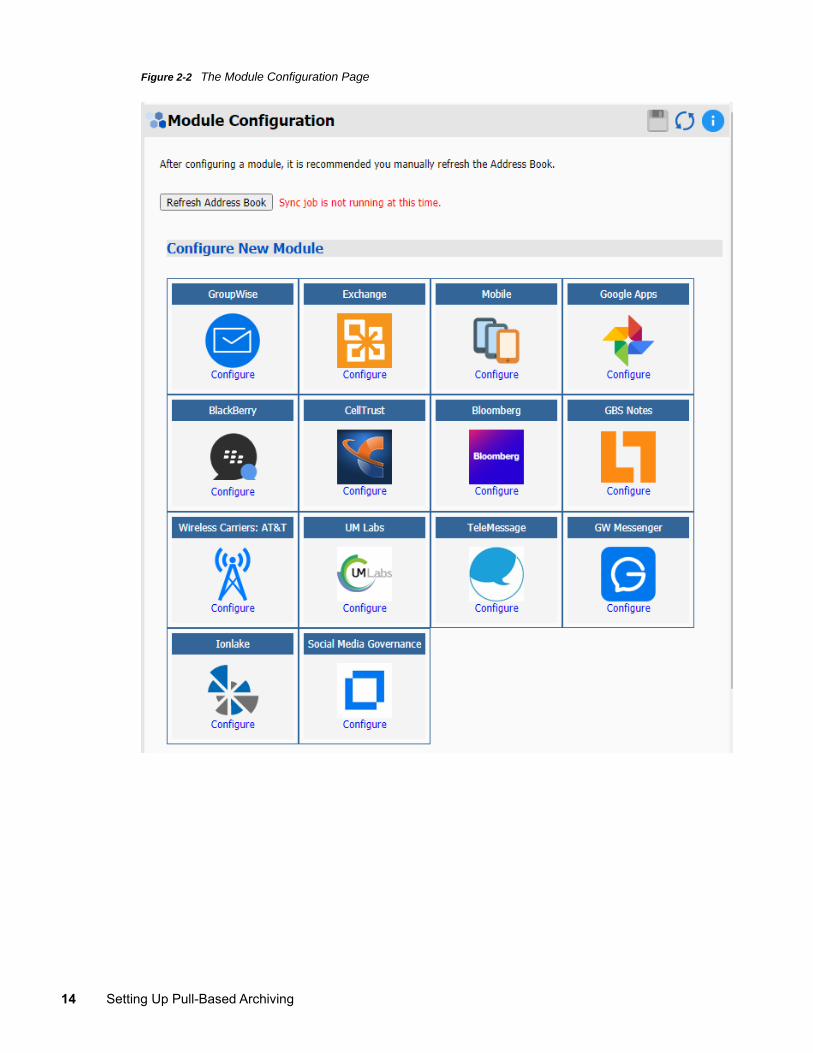
Figure 2-2 The Module Configuration Page
14 Setting Up Pull-Based Archiving

Table 2-2 Using the Module Configuration Page
SchedulesSchedules tell jobs when to start.
They are only required for Pull-based archiving, not Push-based archiving.
Their creation and usage is completely flexible, as follows:
They can recur at regular intervals or be for one-time use only. The total number of schedules is not restricted. You can use each schedule with as many or as few jobs as needed.
Creating SchedulesIf your messaging system uses push-based archiving, you must create at least one schedule.
Path: Retain Server Manager > Data Collection > Schedules
1 Referring to the deployment plan that you began in “First, Plan Your Retain Archiving System” on page 7, use the Add Schedule button to create one or more schedules that you can assign during Job creation.For example, you might create a recurring schedule named Daily at 12 a.m. to start your archiving jobs each day at midnight.
2 Record the names and basic information about the schedules that you create, including the Jobs and/or messaging systems that they will be associated with.
3 Refer to the sections below for more information on Retain schedules.
Field, Option, or Button Information and/or Action
Configure New Module 1. Click the icon for the module you are configuring.
2. Follow the instructions in the section for your messaging platform.
Pull-based Modules are documented in this chapter, beginning with “Archiving Blackberry Server Data” on page 31.
Push-based Modules are documented in “Setting Up Push-Based Archiving” on page 165, beginning with “Archiving Android Messages and Call Information” on page 166.
Setting Up Pull-Based Archiving 15
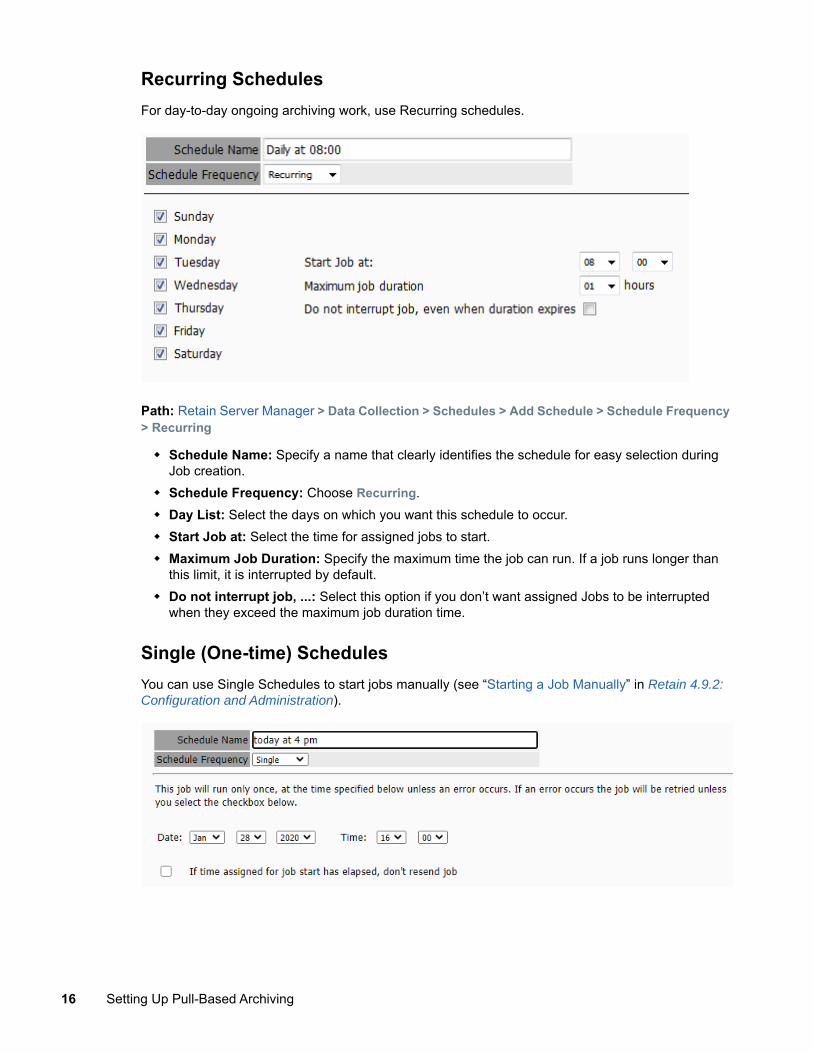
Recurring SchedulesFor day-to-day ongoing archiving work, use Recurring schedules.
Path: Retain Server Manager > Data Collection > Schedules > Add Schedule > Schedule Frequency > Recurring
Schedule Name: Specify a name that clearly identifies the schedule for easy selection during Job creation.
Schedule Frequency: Choose Recurring. Day List: Select the days on which you want this schedule to occur. Start Job at: Select the time for assigned jobs to start. Maximum Job Duration: Specify the maximum time the job can run. If a job runs longer than
this limit, it is interrupted by default. Do not interrupt job, ...: Select this option if you don’t want assigned Jobs to be interrupted
when they exceed the maximum job duration time.
Single (One-time) SchedulesYou can use Single Schedules to start jobs manually (see “Starting a Job Manually” in Retain 4.9.2: Configuration and Administration).
16 Setting Up Pull-Based Archiving

Path: Retain Server Manager > Data Collection > Schedules > Add Schedule > Schedule Frequency > Single
Schedule Name: Specify a name that clearly identifies the schedule. Schedule Frequency: Choose Single. Date: Specify the date when the assigned jobs will start. Time: Specify the time when the assigned jobs will start. If time assigned for job start has elapsed, ... : As a general best practice, you should enable
this option. This prevents Jobs from queuing up after their start time has passed. Otherwise, errors or schedule configuration adjustments can cause the system to redundantly resend jobs even though a schedule has technically expired.
Creating Workers “Workers Overview” on page 17 “Deciding Where to Install Your Workers” on page 17 “Installing and Configuring a Worker” on page 18 “Uploading a Worker Bootstrap to the Worker Console” on page 23
Workers dredge data from messaging systems that are archived through Retain-initiated archiving. They have no role in Push-based archiving.
Workers Overview
Deciding Where to Install Your WorkersFor Pull-based archiving, you must set up at least one Retain Worker to collect (dredge) the data from each messaging system and deliver that data to the Retain Server.
Best practice is to install a Worker on each messaging server from which Retain collects data.
Setting Up Pull-Based Archiving 17
A Worker can also be installed on the Retain Server itself, but this is not a best practice and is only sufficient for very small (100 or fewer users) systems or for evaluation purposes.
Worker traffic consumes network bandwidth and the archiving process is much slower than when the worker runs locally.
Retain lets you create as many workers as you need on Linux and/or Windows servers.
Installing and Configuring a Worker “Installing a Worker” on page 18 “Polling Tab” on page 18 “Logging tab” on page 19 “Connection Tab” on page 20 “Module Specific Tab” on page 20 “Status Tab” on page 22 “Bootstrap Tab” on page 22
Installing a Worker1. Install a Worker on each server identified in “Deciding Where to Install Your Workers” on
page 17. Refer to the instructions specific to each server’s platform: Linux: “Deploying Production-Use Worker Agents on Linux” in Retain 4.9.2: Installation and
Upgrade
Windows: “Installing Additional Retain Workers on Windows” in Retain 4.9.2: Installation and Upgrade
2. On the Retain home page in the left menu bar, click Workers.3. Click Add Worker.4. Click the Worker text field, then type a name for the worker, for example: Local Worker 0.
IMPORTANT: If you are creating multiple workers on different servers, assign them unique names that identify where they are installed.
5. Click Save Changes to begin the creation process and continue with each of the tabs as documented in the following sections.
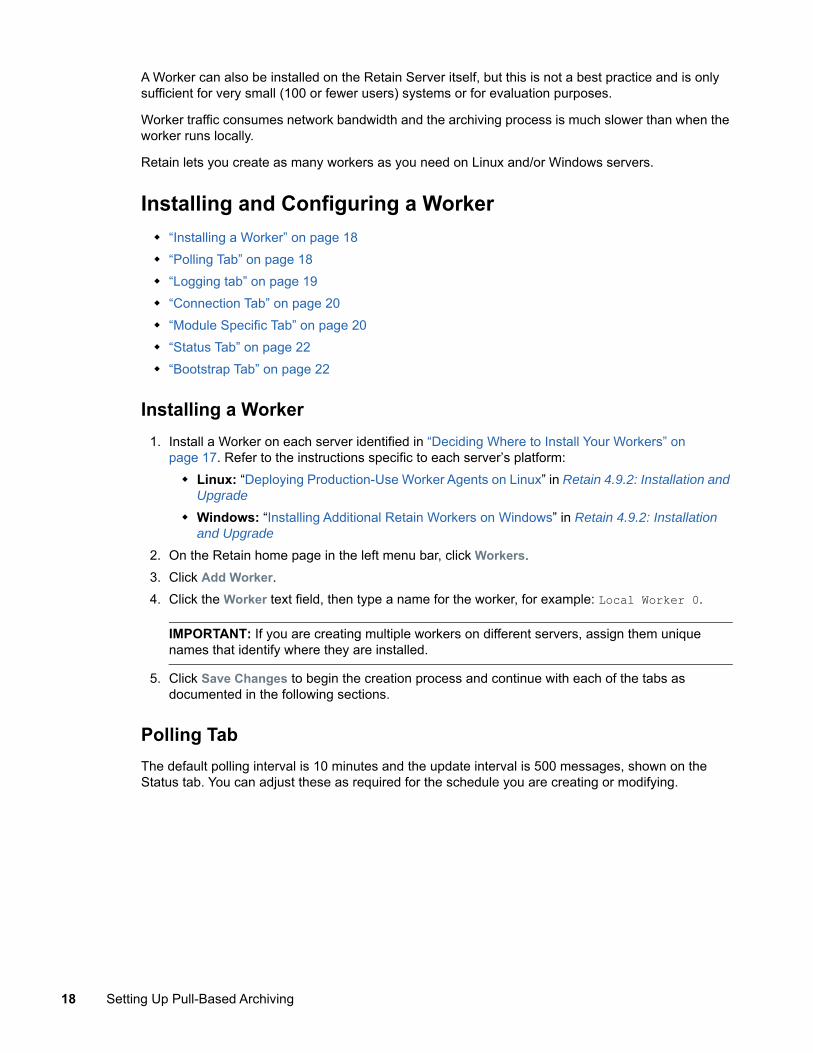
Polling TabThe default polling interval is 10 minutes and the update interval is 500 messages, shown on the Status tab. You can adjust these as required for the schedule you are creating or modifying.
18 Setting Up Pull-Based Archiving
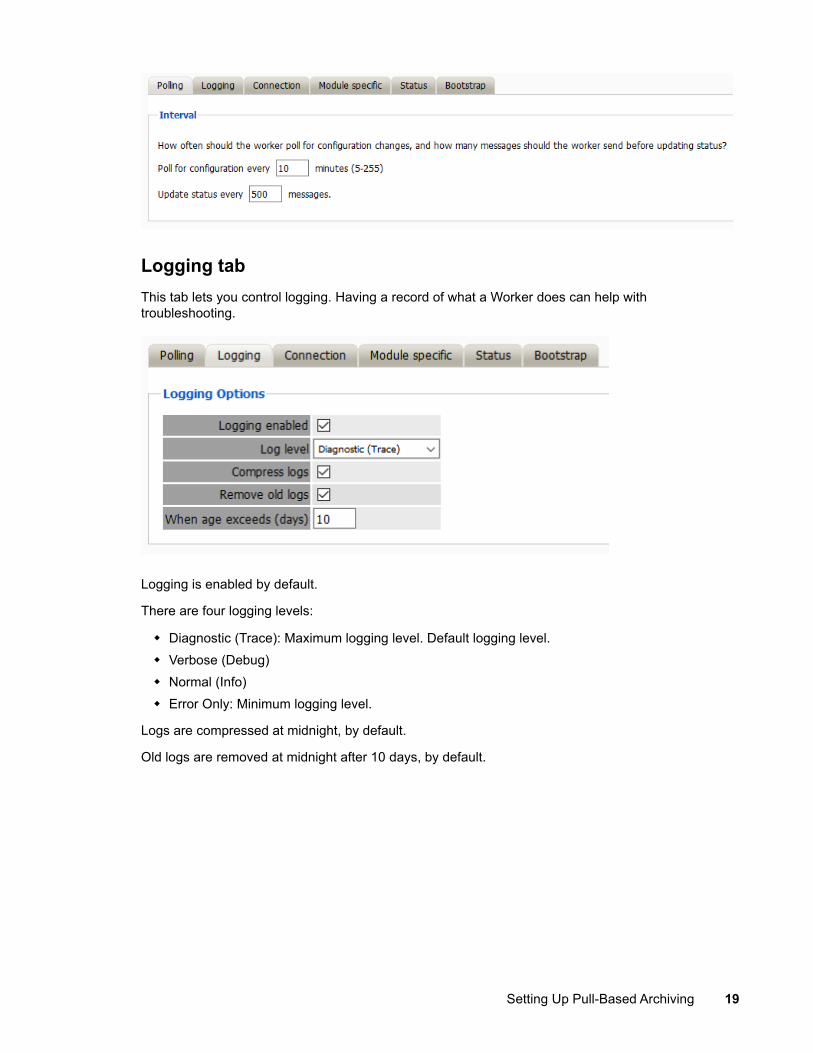
Logging tabThis tab lets you control logging. Having a record of what a Worker does can help with troubleshooting.
Logging is enabled by default.
There are four logging levels:
Diagnostic (Trace): Maximum logging level. Default logging level. Verbose (Debug) Normal (Info) Error Only: Minimum logging level.
Logs are compressed at midnight, by default.
Old logs are removed at midnight after 10 days, by default.
Setting Up Pull-Based Archiving 19
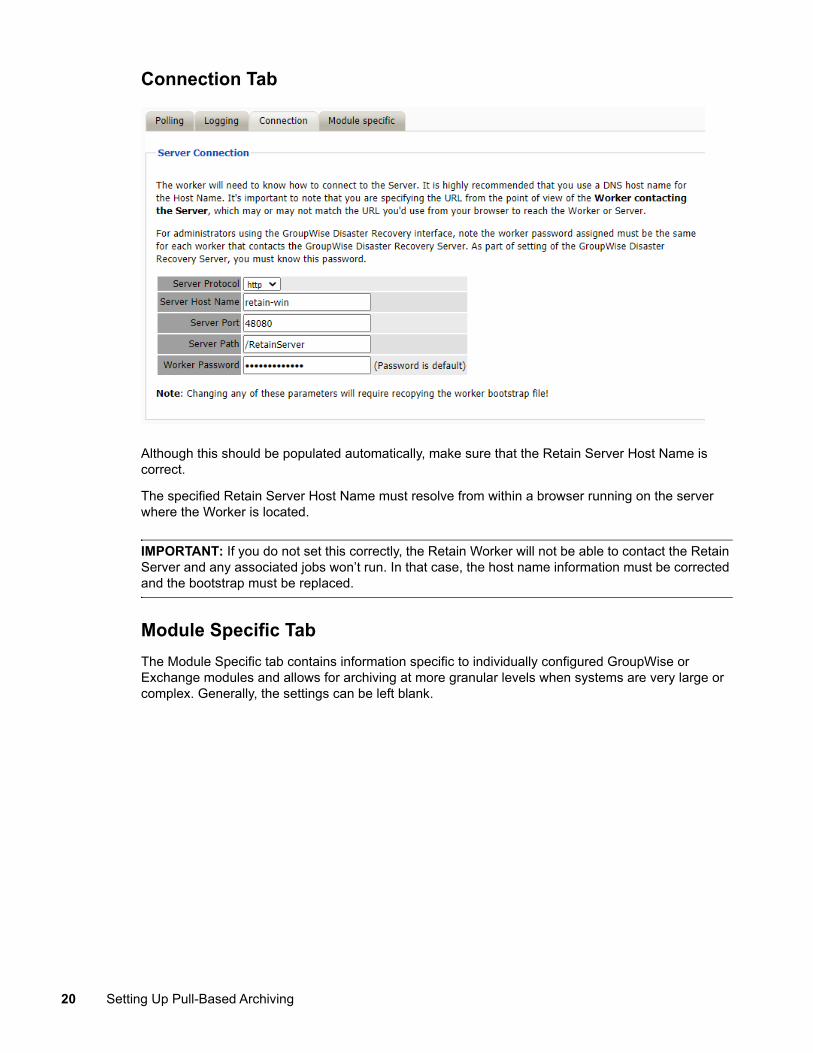
Connection Tab
Although this should be populated automatically, make sure that the Retain Server Host Name is correct.
The specified Retain Server Host Name must resolve from within a browser running on the server where the Worker is located.
IMPORTANT: If you do not set this correctly, the Retain Worker will not be able to contact the Retain Server and any associated jobs won’t run. In that case, the host name information must be corrected and the bootstrap must be replaced.
Module Specific TabThe Module Specific tab contains information specific to individually configured GroupWise or Exchange modules and allows for archiving at more granular levels when systems are very large or complex. Generally, the settings can be left blank.
20 Setting Up Pull-Based Archiving
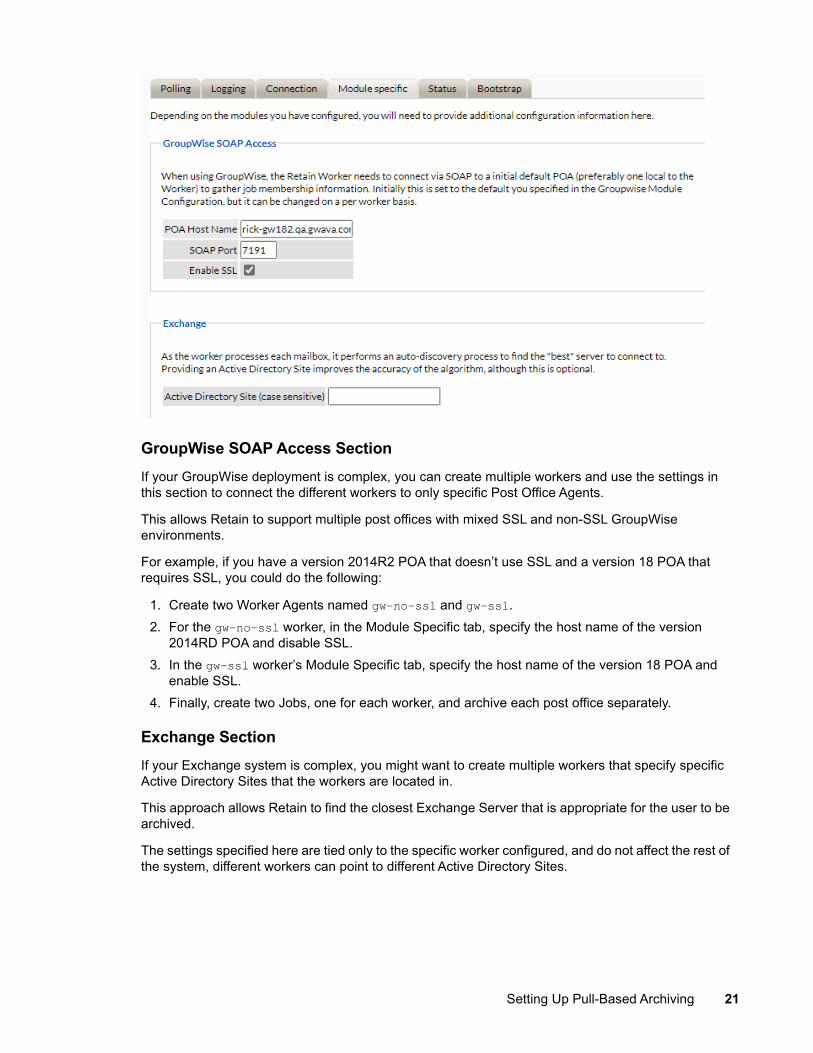
GroupWise SOAP Access SectionIf your GroupWise deployment is complex, you can create multiple workers and use the settings in this section to connect the different workers to only specific Post Office Agents.
This allows Retain to support multiple post offices with mixed SSL and non-SSL GroupWise environments.
For example, if you have a version 2014R2 POA that doesn’t use SSL and a version 18 POA that requires SSL, you could do the following:
1. Create two Worker Agents named gw-no-ssl and gw-ssl.2. For the gw-no-ssl worker, in the Module Specific tab, specify the host name of the version
2014RD POA and disable SSL.3. In the gw-ssl worker’s Module Specific tab, specify the host name of the version 18 POA and
enable SSL.4. Finally, create two Jobs, one for each worker, and archive each post office separately.
Exchange SectionIf your Exchange system is complex, you might want to create multiple workers that specify specific Active Directory Sites that the workers are located in.
This approach allows Retain to find the closest Exchange Server that is appropriate for the user to be archived.
The settings specified here are tied only to the specific worker configured, and do not affect the rest of the system, different workers can point to different Active Directory Sites.
Setting Up Pull-Based Archiving 21
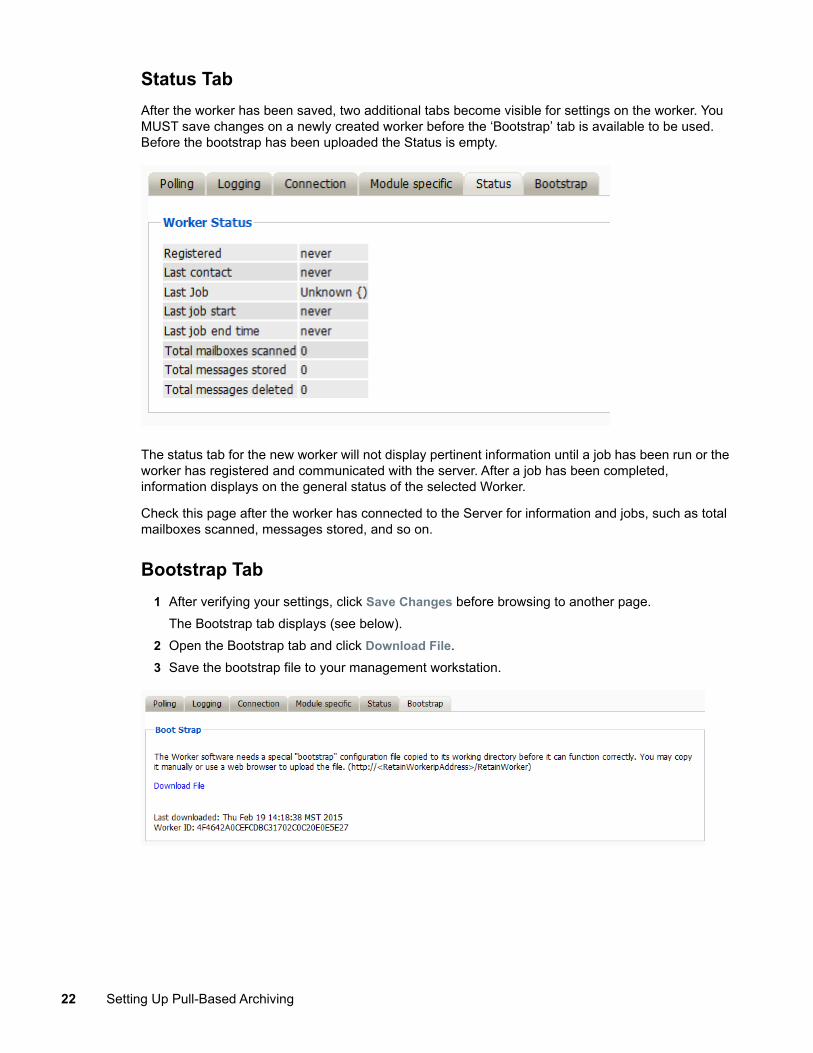
Status TabAfter the worker has been saved, two additional tabs become visible for settings on the worker. You MUST save changes on a newly created worker before the ‘Bootstrap’ tab is available to be used. Before the bootstrap has been uploaded the Status is empty.
The status tab for the new worker will not display pertinent information until a job has been run or the worker has registered and communicated with the server. After a job has been completed, information displays on the general status of the selected Worker.
Check this page after the worker has connected to the Server for information and jobs, such as total mailboxes scanned, messages stored, and so on.
Bootstrap Tab1 After verifying your settings, click Save Changes before browsing to another page.
The Bootstrap tab displays (see below). 2 Open the Bootstrap tab and click Download File.3 Save the bootstrap file to your management workstation.
22 Setting Up Pull-Based Archiving
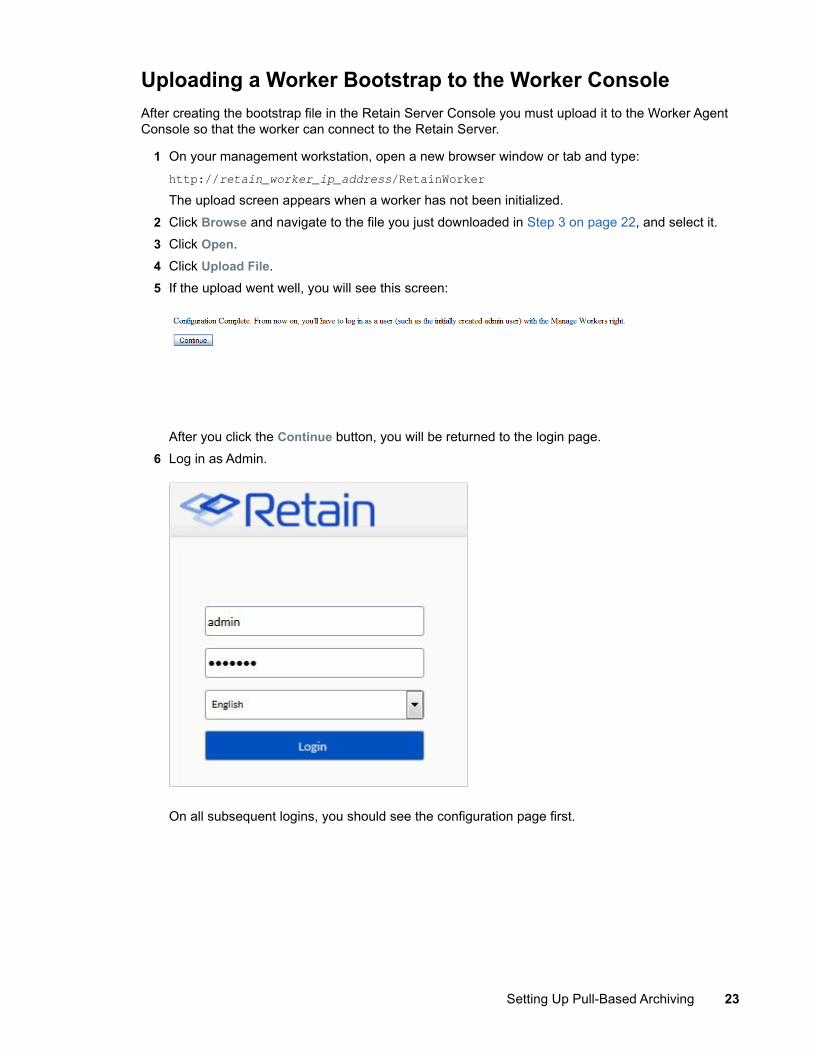
Uploading a Worker Bootstrap to the Worker ConsoleAfter creating the bootstrap file in the Retain Server Console you must upload it to the Worker Agent Console so that the worker can connect to the Retain Server.
1 On your management workstation, open a new browser window or tab and type:http://retain_worker_ip_address/RetainWorkerThe upload screen appears when a worker has not been initialized.
2 Click Browse and navigate to the file you just downloaded in Step 3 on page 22, and select it.3 Click Open.4 Click Upload File.5 If the upload went well, you will see this screen:
After you click the Continue button, you will be returned to the login page.6 Log in as Admin.
On all subsequent logins, you should see the configuration page first.
Setting Up Pull-Based Archiving 23
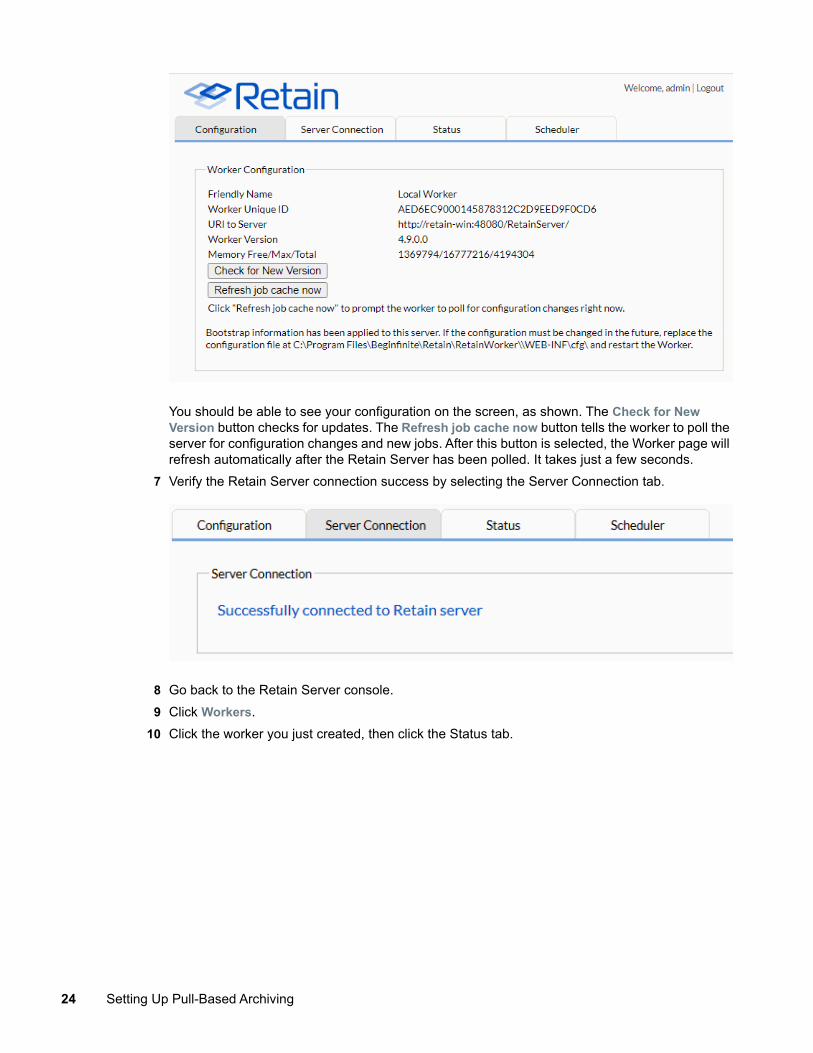
You should be able to see your configuration on the screen, as shown. The Check for New Version button checks for updates. The Refresh job cache now button tells the worker to poll the server for configuration changes and new jobs. After this button is selected, the Worker page will refresh automatically after the Retain Server has been polled. It takes just a few seconds.
7 Verify the Retain Server connection success by selecting the Server Connection tab.
8 Go back to the Retain Server console.9 Click Workers.
10 Click the worker you just created, then click the Status tab.
24 Setting Up Pull-Based Archiving
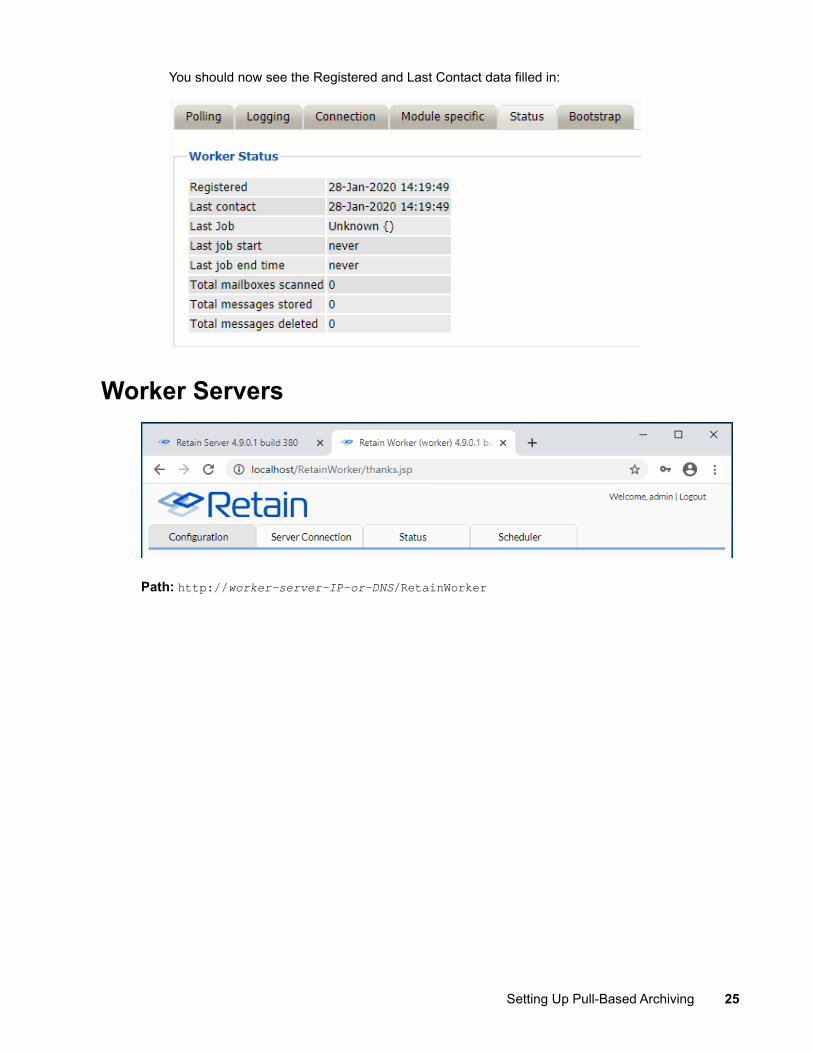
You should now see the Registered and Last Contact data filled in:
Worker Servers
Path: http://worker-server-IP-or-DNS/RetainWorker
Setting Up Pull-Based Archiving 25
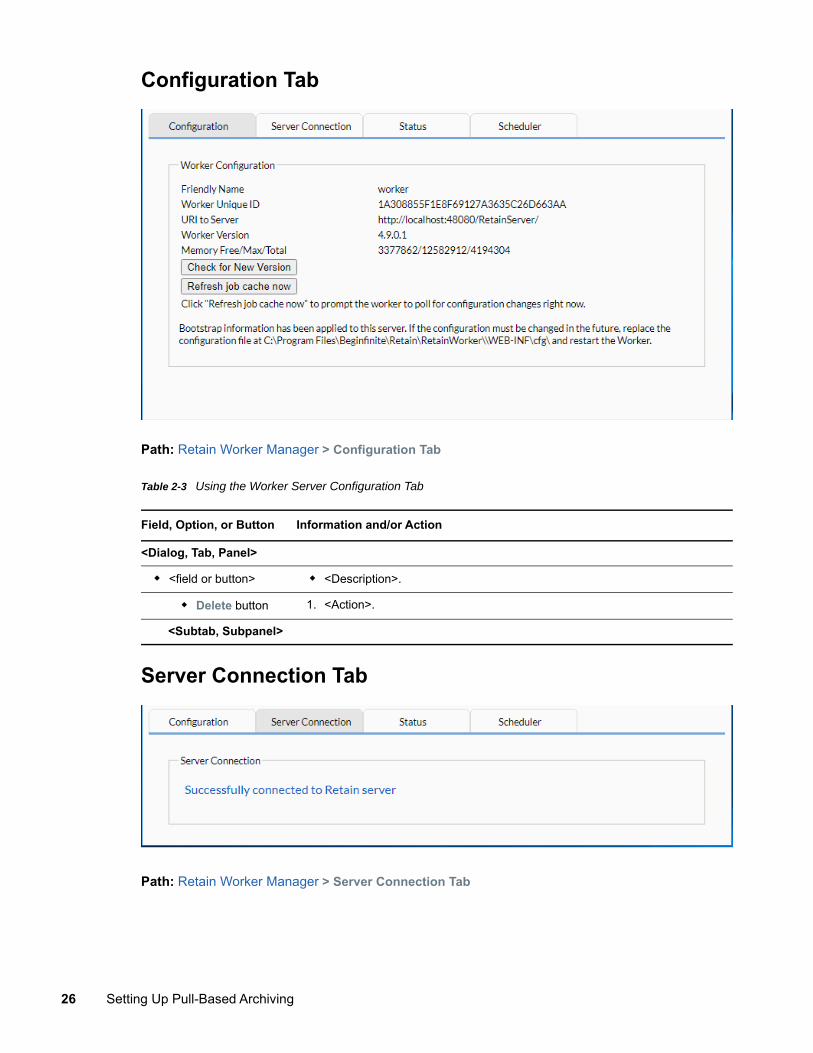
Configuration Tab
Path: Retain Worker Manager > Configuration Tab
Table 2-3 Using the Worker Server Configuration Tab
Server Connection Tab
Path: Retain Worker Manager > Server Connection Tab
Field, Option, or Button Information and/or Action
<Dialog, Tab, Panel>
<field or button> <Description>.
Delete button 1. <Action>.
<Subtab, Subpanel>
26 Setting Up Pull-Based Archiving
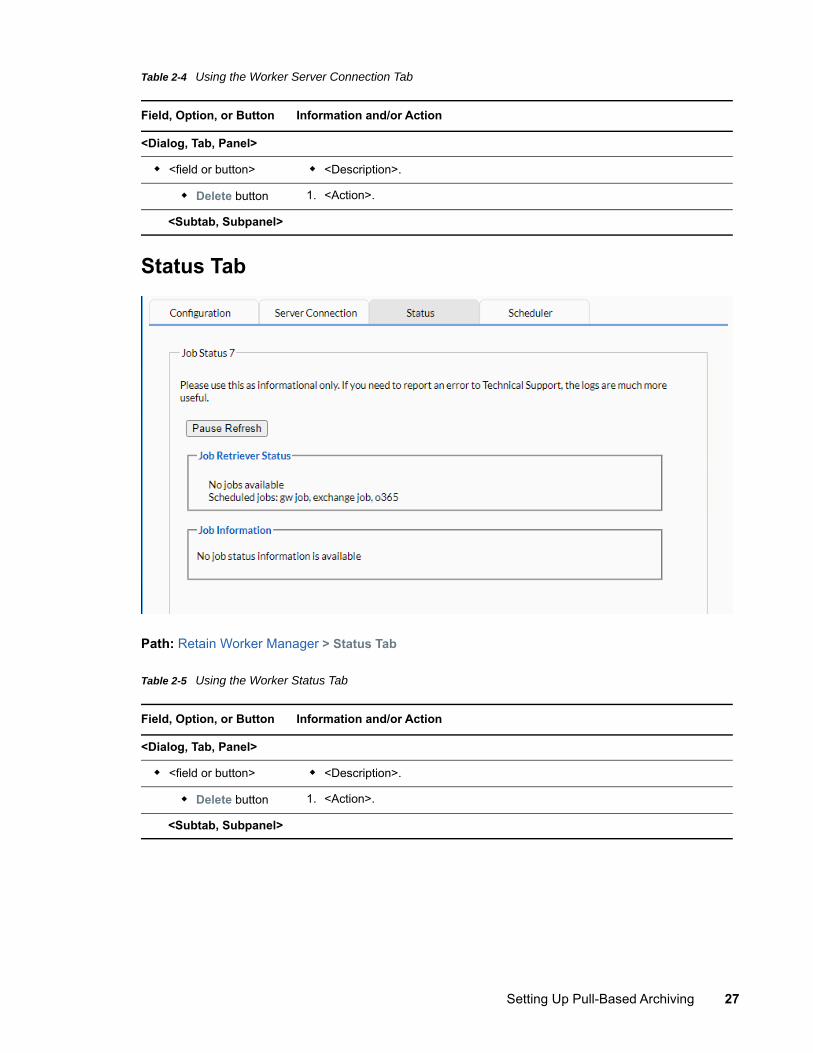
Table 2-4 Using the Worker Server Connection Tab
Status Tab
Path: Retain Worker Manager > Status Tab
Table 2-5 Using the Worker Status Tab
Field, Option, or Button Information and/or Action
<Dialog, Tab, Panel>
<field or button> <Description>.
Delete button 1. <Action>.
<Subtab, Subpanel>
Field, Option, or Button Information and/or Action
<Dialog, Tab, Panel>
<field or button> <Description>.
Delete button 1. <Action>.
<Subtab, Subpanel>
Setting Up Pull-Based Archiving 27
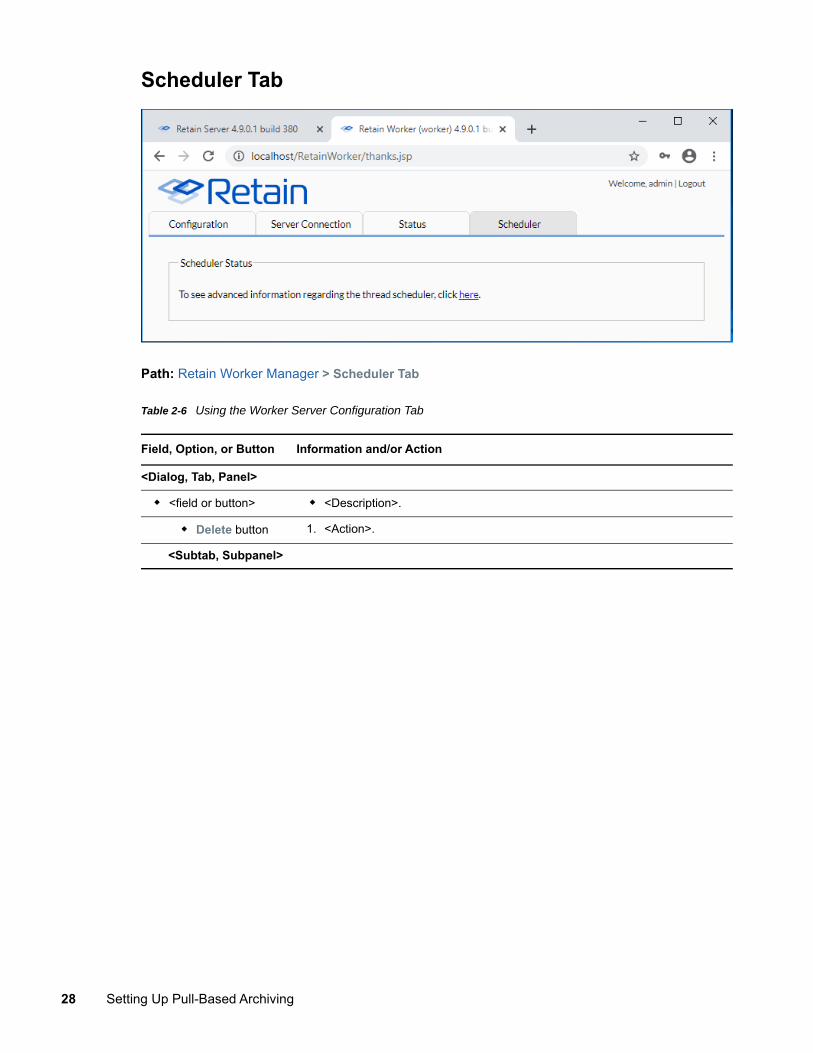
Scheduler Tab
Path: Retain Worker Manager > Scheduler Tab
Table 2-6 Using the Worker Server Configuration Tab
Field, Option, or Button Information and/or Action
<Dialog, Tab, Panel>
<field or button> <Description>.
Delete button 1. <Action>.
<Subtab, Subpanel>
28 Setting Up Pull-Based Archiving
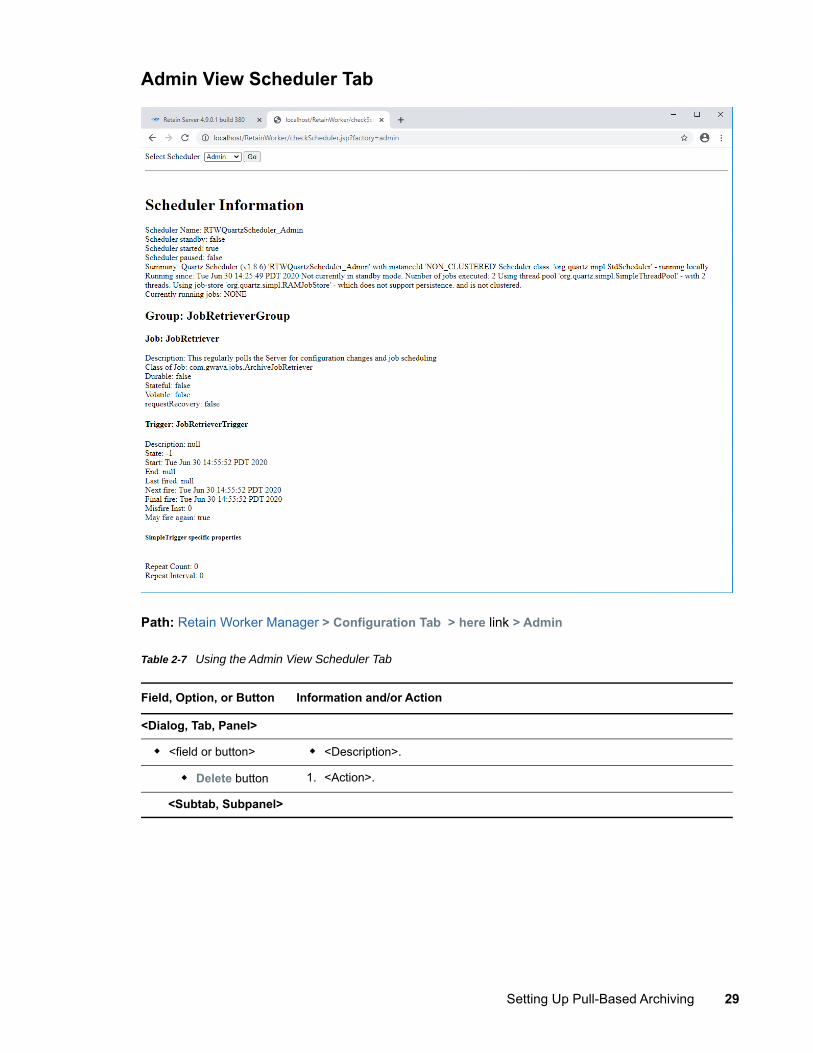
Admin View Scheduler Tab
Path: Retain Worker Manager > Configuration Tab > here link > Admin
Table 2-7 Using the Admin View Scheduler Tab
Field, Option, or Button Information and/or Action
<Dialog, Tab, Panel>
<field or button> <Description>.
Delete button 1. <Action>.
<Subtab, Subpanel>
Setting Up Pull-Based Archiving 29

Archiver View Scheduler Tab
Path: Retain Worker Manager > Configuration Tab > here link > Archiver
30 Setting Up Pull-Based Archiving
Table 2-8 Using the Archiver View Scheduler Tab
Archiving Blackberry Server Data “Blackberry Prerequisites” on page 31 “Creating a Blackberry Module” on page 31 “Setting a Blackberry Schedule” on page 37 “Specifying a Blackberry Profile” on page 37 “Setting Up a Blackberry Worker” on page 41 “Creating a Blackberry Job” on page 41
Blackberry Prerequisites Retain uses Blackberry server log files to collect the information about phone activity. System
phones require no changes. Make sure that the Blackberry server is configured to log the data. Otherwise, Retain cannot
archive the information. Make sure that SOAP is enabled on every Blackberry Enterprise and Unified Endpoint
Management server that Retain will archive from. To archive the Blackberry information, Blackberry servers must be configured to log phone calls,
PIN, BBM and SMS data. For BES 5.x, instructions to modify the logging in the Blackberry Enterprise Server can be found
in the Blackberry Enterprise Server help file. (Found under Start | Programs | Blackberry Enterprise Server | Help | Blackberry Manager Help)
For BES 10.x and 12.x, users must be set on EMM – Regulated mode and have the logging set to ‘yes’ for all types desired. Balanced mode users will not have logs created for them in the BES system and as a result will not be archived.
Creating a Blackberry Module1 To begin configuring the Blackberry Module, open Retain Server Manager > Configuration >
Module Configuration > Blackberry-Configure > Core Settings.2 Use the information and options in the sections that follow to configure the Blackberry Module.
Field, Option, or Button Information and/or Action
<Dialog, Tab, Panel>
<field or button> <Description>.
Delete button 1. <Action>.
<Subtab, Subpanel>
Setting Up Pull-Based Archiving 31
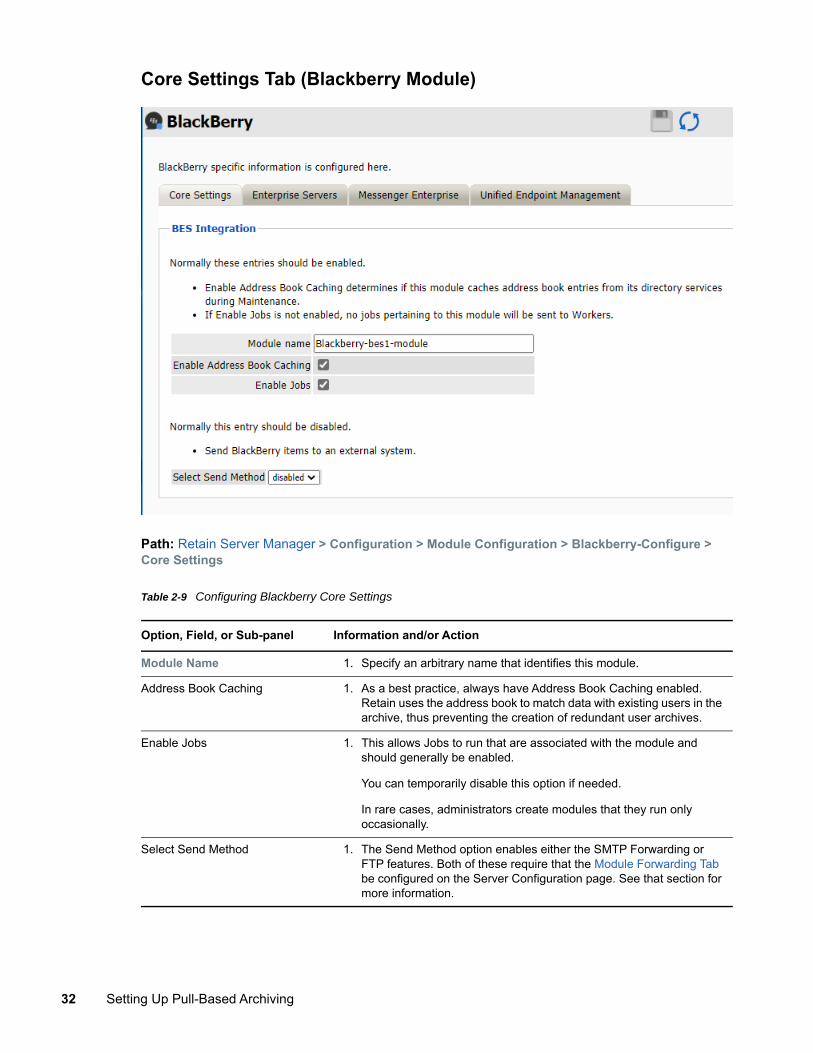
Core Settings Tab (Blackberry Module)
Path: Retain Server Manager > Configuration > Module Configuration > Blackberry-Configure > Core Settings
Table 2-9 Configuring Blackberry Core Settings
Option, Field, or Sub-panel Information and/or Action
Module Name 1. Specify an arbitrary name that identifies this module.
Address Book Caching 1. As a best practice, always have Address Book Caching enabled. Retain uses the address book to match data with existing users in the archive, thus preventing the creation of redundant user archives.
Enable Jobs 1. This allows Jobs to run that are associated with the module and should generally be enabled.
You can temporarily disable this option if needed.
In rare cases, administrators create modules that they run only occasionally.
Select Send Method 1. The Send Method option enables either the SMTP Forwarding or FTP features. Both of these require that the Module Forwarding Tab be configured on the Server Configuration page. See that section for more information.
32 Setting Up Pull-Based Archiving
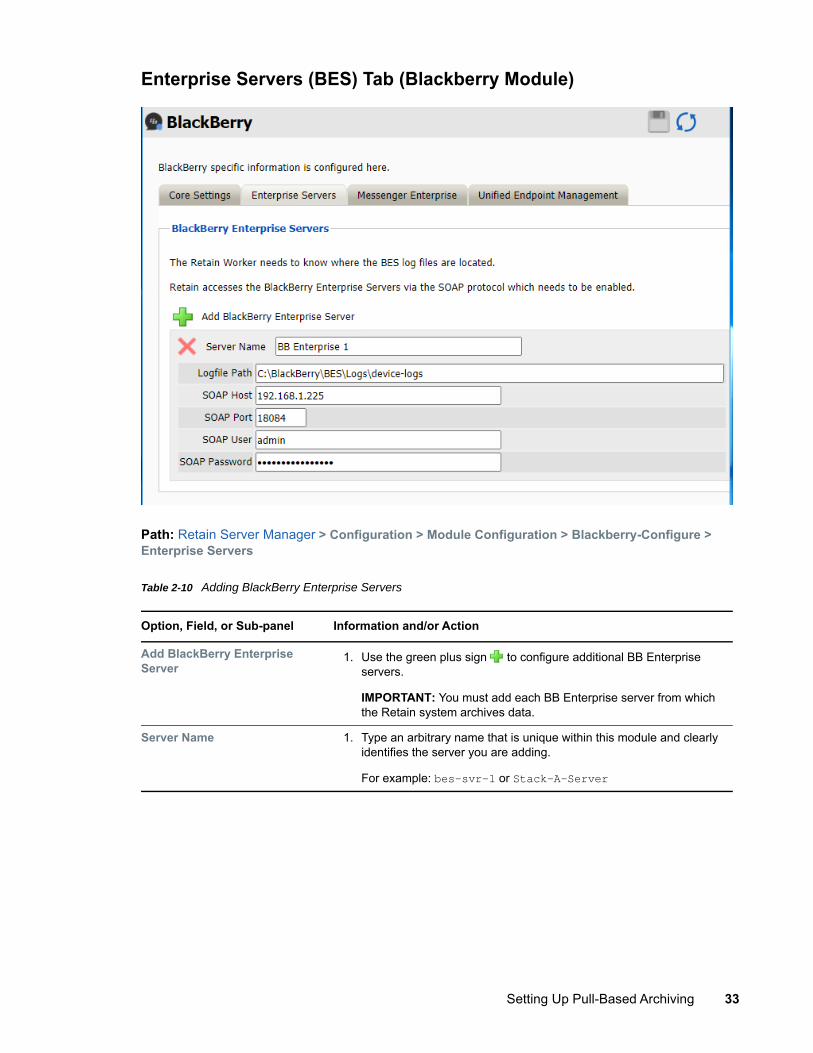
Enterprise Servers (BES) Tab (Blackberry Module)
Path: Retain Server Manager > Configuration > Module Configuration > Blackberry-Configure > Enterprise Servers
Table 2-10 Adding BlackBerry Enterprise Servers
Option, Field, or Sub-panel Information and/or Action
Add BlackBerry Enterprise Server
1. Use the green plus sign to configure additional BB Enterprise servers.
IMPORTANT: You must add each BB Enterprise server from which the Retain system archives data.
Server Name 1. Type an arbitrary name that is unique within this module and clearly identifies the server you are adding.
For example: bes-svr-1 or Stack-A-Server
Setting Up Pull-Based Archiving 33
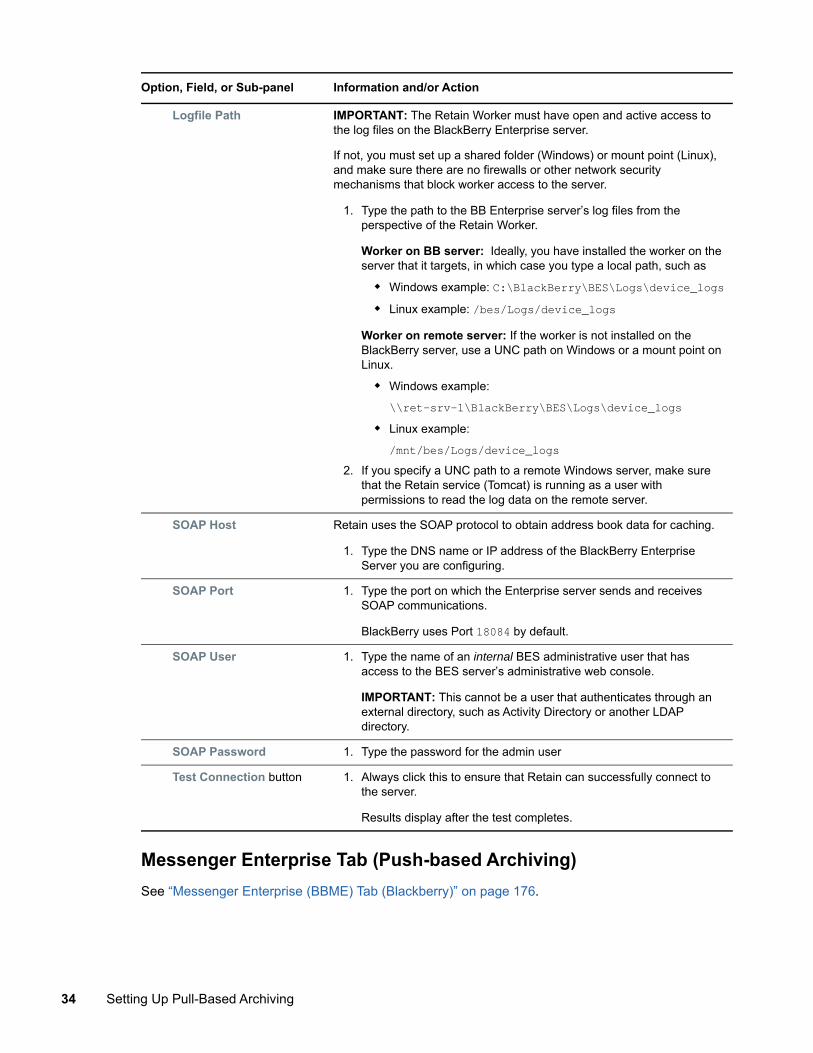
Messenger Enterprise Tab (Push-based Archiving)See “Messenger Enterprise (BBME) Tab (Blackberry)” on page 176.
Logfile Path IMPORTANT: The Retain Worker must have open and active access to the log files on the BlackBerry Enterprise server.
If not, you must set up a shared folder (Windows) or mount point (Linux), and make sure there are no firewalls or other network security mechanisms that block worker access to the server.
1. Type the path to the BB Enterprise server’s log files from the perspective of the Retain Worker.
Worker on BB server: Ideally, you have installed the worker on the server that it targets, in which case you type a local path, such as
Windows example: C:\BlackBerry\BES\Logs\device_logs Linux example: /bes/Logs/device_logs
Worker on remote server: If the worker is not installed on the BlackBerry server, use a UNC path on Windows or a mount point on Linux.
Windows example:
\\ret-srv-1\BlackBerry\BES\Logs\device_logs Linux example:
/mnt/bes/Logs/device_logs2. If you specify a UNC path to a remote Windows server, make sure
that the Retain service (Tomcat) is running as a user with permissions to read the log data on the remote server.
SOAP Host Retain uses the SOAP protocol to obtain address book data for caching.
1. Type the DNS name or IP address of the BlackBerry Enterprise Server you are configuring.
SOAP Port 1. Type the port on which the Enterprise server sends and receives SOAP communications.
BlackBerry uses Port 18084 by default.
SOAP User 1. Type the name of an internal BES administrative user that has access to the BES server’s administrative web console.
IMPORTANT: This cannot be a user that authenticates through an external directory, such as Activity Directory or another LDAP directory.
SOAP Password 1. Type the password for the admin user
Test Connection button 1. Always click this to ensure that Retain can successfully connect to the server.
Results display after the test completes.
Option, Field, or Sub-panel Information and/or Action
34 Setting Up Pull-Based Archiving
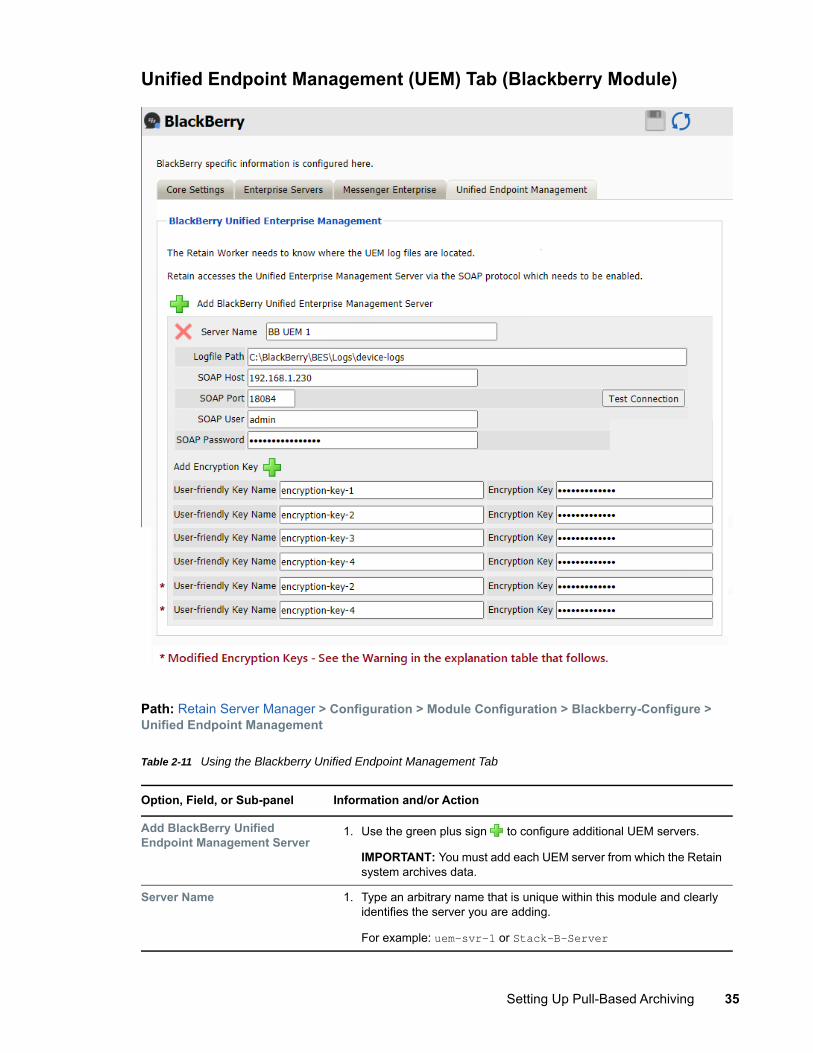
Unified Endpoint Management (UEM) Tab (Blackberry Module)
Path: Retain Server Manager > Configuration > Module Configuration > Blackberry-Configure > Unified Endpoint Management
Table 2-11 Using the Blackberry Unified Endpoint Management Tab
Option, Field, or Sub-panel Information and/or Action
Add BlackBerry Unified Endpoint Management Server
1. Use the green plus sign to configure additional UEM servers.
IMPORTANT: You must add each UEM server from which the Retain system archives data.
Server Name 1. Type an arbitrary name that is unique within this module and clearly identifies the server you are adding.
For example: uem-svr-1 or Stack-B-Server
Setting Up Pull-Based Archiving 35
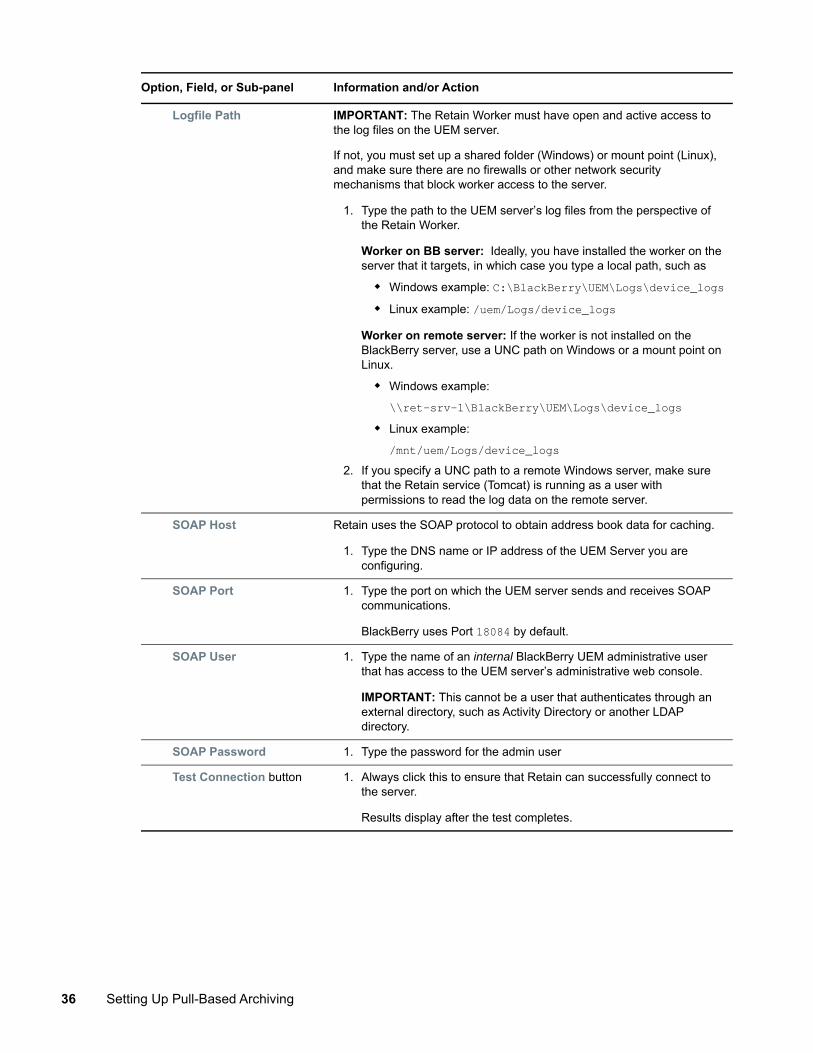
Logfile Path IMPORTANT: The Retain Worker must have open and active access to the log files on the UEM server.
If not, you must set up a shared folder (Windows) or mount point (Linux), and make sure there are no firewalls or other network security mechanisms that block worker access to the server.
1. Type the path to the UEM server’s log files from the perspective of the Retain Worker.
Worker on BB server: Ideally, you have installed the worker on the server that it targets, in which case you type a local path, such as
Windows example: C:\BlackBerry\UEM\Logs\device_logs Linux example: /uem/Logs/device_logs
Worker on remote server: If the worker is not installed on the BlackBerry server, use a UNC path on Windows or a mount point on Linux.
Windows example:
\\ret-srv-1\BlackBerry\UEM\Logs\device_logs Linux example:
/mnt/uem/Logs/device_logs2. If you specify a UNC path to a remote Windows server, make sure
that the Retain service (Tomcat) is running as a user with permissions to read the log data on the remote server.
SOAP Host Retain uses the SOAP protocol to obtain address book data for caching.
1. Type the DNS name or IP address of the UEM Server you are configuring.
SOAP Port 1. Type the port on which the UEM server sends and receives SOAP communications.
BlackBerry uses Port 18084 by default.
SOAP User 1. Type the name of an internal BlackBerry UEM administrative user that has access to the UEM server’s administrative web console.
IMPORTANT: This cannot be a user that authenticates through an external directory, such as Activity Directory or another LDAP directory.
SOAP Password 1. Type the password for the admin user
Test Connection button 1. Always click this to ensure that Retain can successfully connect to the server.
Results display after the test completes.
Option, Field, or Sub-panel Information and/or Action
36 Setting Up Pull-Based Archiving
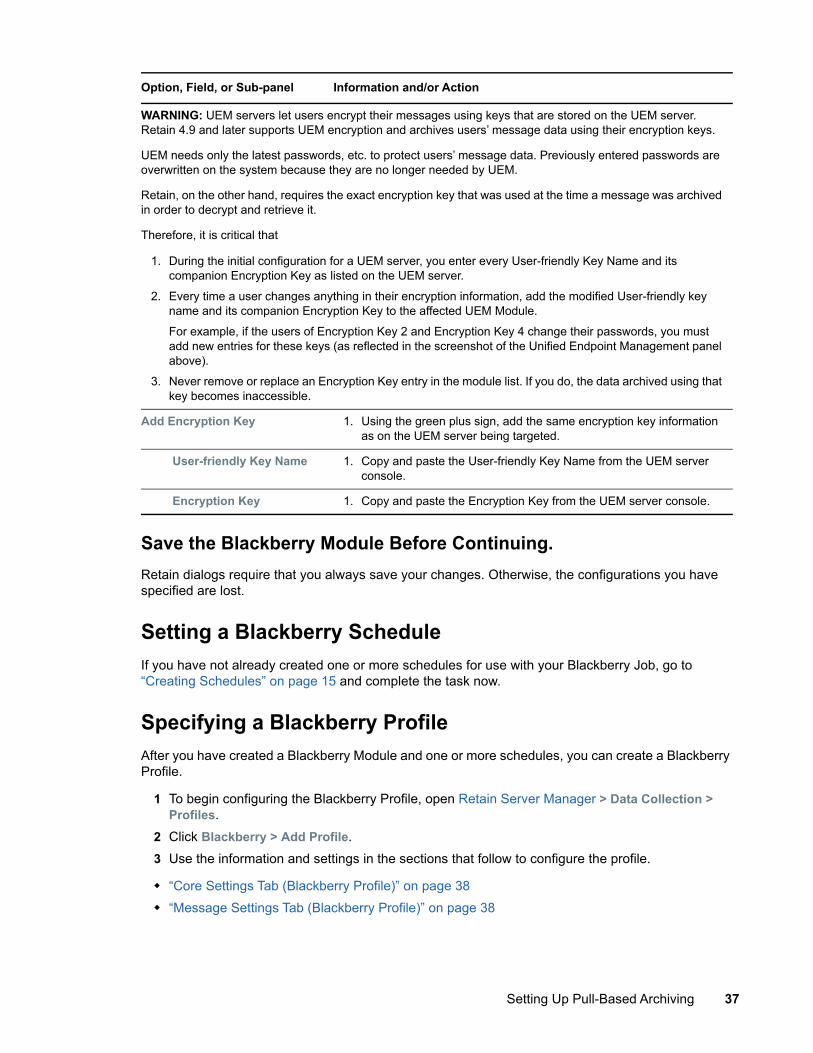
Save the Blackberry Module Before Continuing.Retain dialogs require that you always save your changes. Otherwise, the configurations you have specified are lost.
Setting a Blackberry ScheduleIf you have not already created one or more schedules for use with your Blackberry Job, go to “Creating Schedules” on page 15 and complete the task now.
Specifying a Blackberry ProfileAfter you have created a Blackberry Module and one or more schedules, you can create a Blackberry Profile.
1 To begin configuring the Blackberry Profile, open Retain Server Manager > Data Collection > Profiles.
2 Click Blackberry > Add Profile.3 Use the information and settings in the sections that follow to configure the profile.
“Core Settings Tab (Blackberry Profile)” on page 38 “Message Settings Tab (Blackberry Profile)” on page 38
WARNING: UEM servers let users encrypt their messages using keys that are stored on the UEM server. Retain 4.9 and later supports UEM encryption and archives users’ message data using their encryption keys.
UEM needs only the latest passwords, etc. to protect users’ message data. Previously entered passwords are overwritten on the system because they are no longer needed by UEM.
Retain, on the other hand, requires the exact encryption key that was used at the time a message was archived in order to decrypt and retrieve it.
Therefore, it is critical that
1. During the initial configuration for a UEM server, you enter every User-friendly Key Name and its companion Encryption Key as listed on the UEM server.
2. Every time a user changes anything in their encryption information, add the modified User-friendly key name and its companion Encryption Key to the affected UEM Module.
For example, if the users of Encryption Key 2 and Encryption Key 4 change their passwords, you must add new entries for these keys (as reflected in the screenshot of the Unified Endpoint Management panel above).
3. Never remove or replace an Encryption Key entry in the module list. If you do, the data archived using that key becomes inaccessible.
Add Encryption Key 1. Using the green plus sign, add the same encryption key information as on the UEM server being targeted.
User-friendly Key Name 1. Copy and paste the User-friendly Key Name from the UEM server console.
Encryption Key 1. Copy and paste the Encryption Key from the UEM server console.
Option, Field, or Sub-panel Information and/or Action
Setting Up Pull-Based Archiving 37
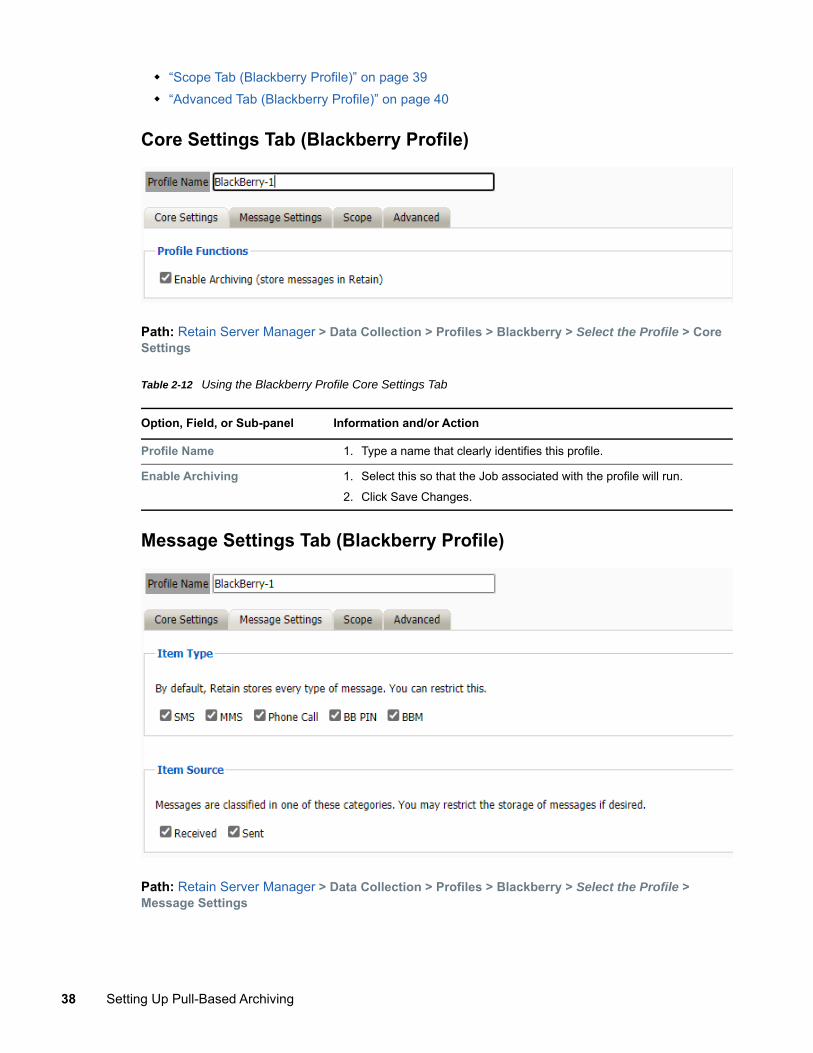
“Scope Tab (Blackberry Profile)” on page 39 “Advanced Tab (Blackberry Profile)” on page 40
Core Settings Tab (Blackberry Profile)
Path: Retain Server Manager > Data Collection > Profiles > Blackberry > Select the Profile > Core Settings
Table 2-12 Using the Blackberry Profile Core Settings Tab
Message Settings Tab (Blackberry Profile)
Path: Retain Server Manager > Data Collection > Profiles > Blackberry > Select the Profile > Message Settings
Option, Field, or Sub-panel Information and/or Action
Profile Name 1. Type a name that clearly identifies this profile.
Enable Archiving 1. Select this so that the Job associated with the profile will run.
2. Click Save Changes.
38 Setting Up Pull-Based Archiving
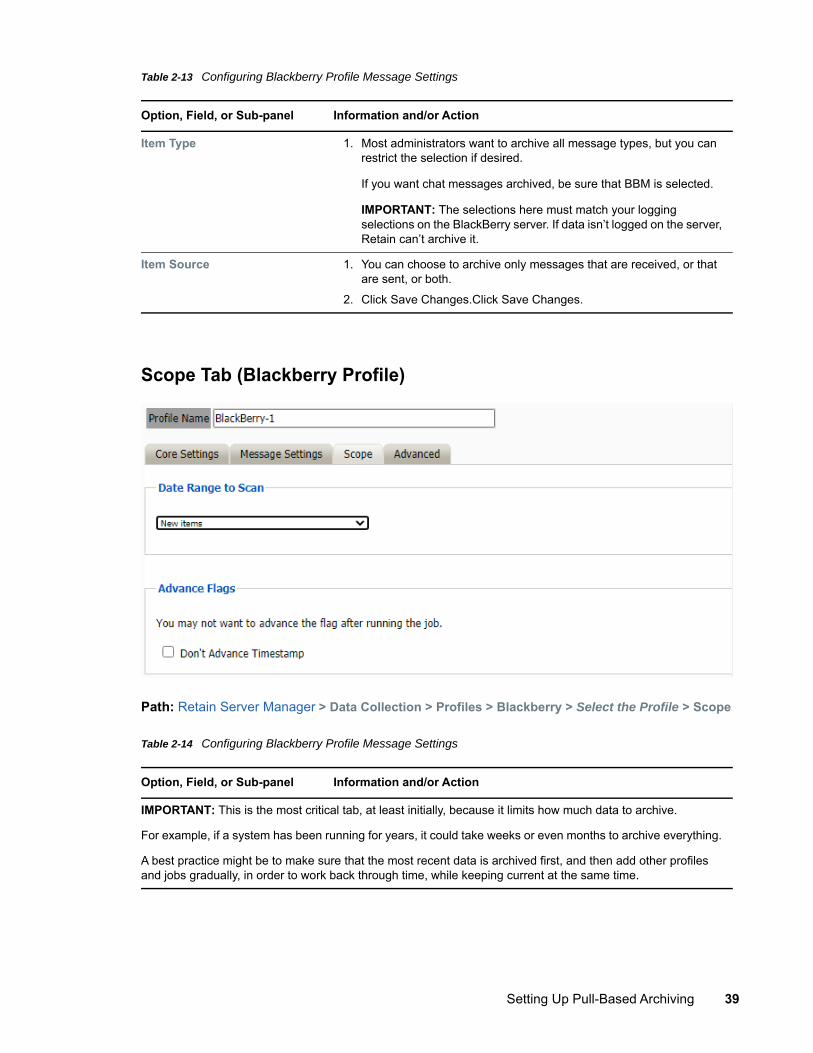
Table 2-13 Configuring Blackberry Profile Message Settings
Scope Tab (Blackberry Profile)
Path: Retain Server Manager > Data Collection > Profiles > Blackberry > Select the Profile > Scope
Table 2-14 Configuring Blackberry Profile Message Settings
Option, Field, or Sub-panel Information and/or Action
Item Type 1. Most administrators want to archive all message types, but you can restrict the selection if desired.
If you want chat messages archived, be sure that BBM is selected.
IMPORTANT: The selections here must match your logging selections on the BlackBerry server. If data isn’t logged on the server, Retain can’t archive it.
Item Source 1. You can choose to archive only messages that are received, or that are sent, or both.
2. Click Save Changes.Click Save Changes.
Option, Field, or Sub-panel Information and/or Action
IMPORTANT: This is the most critical tab, at least initially, because it limits how much data to archive.
For example, if a system has been running for years, it could take weeks or even months to archive everything.
A best practice might be to make sure that the most recent data is archived first, and then add other profiles and jobs gradually, in order to work back through time, while keeping current at the same time.
Setting Up Pull-Based Archiving 39
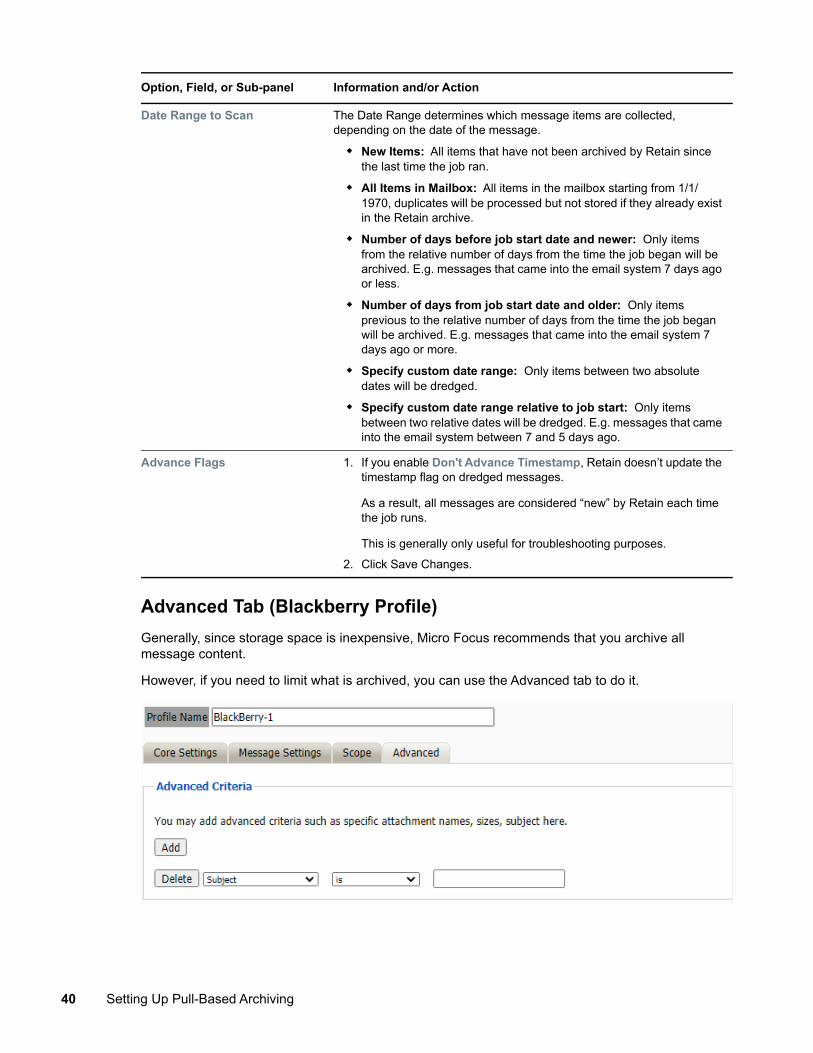
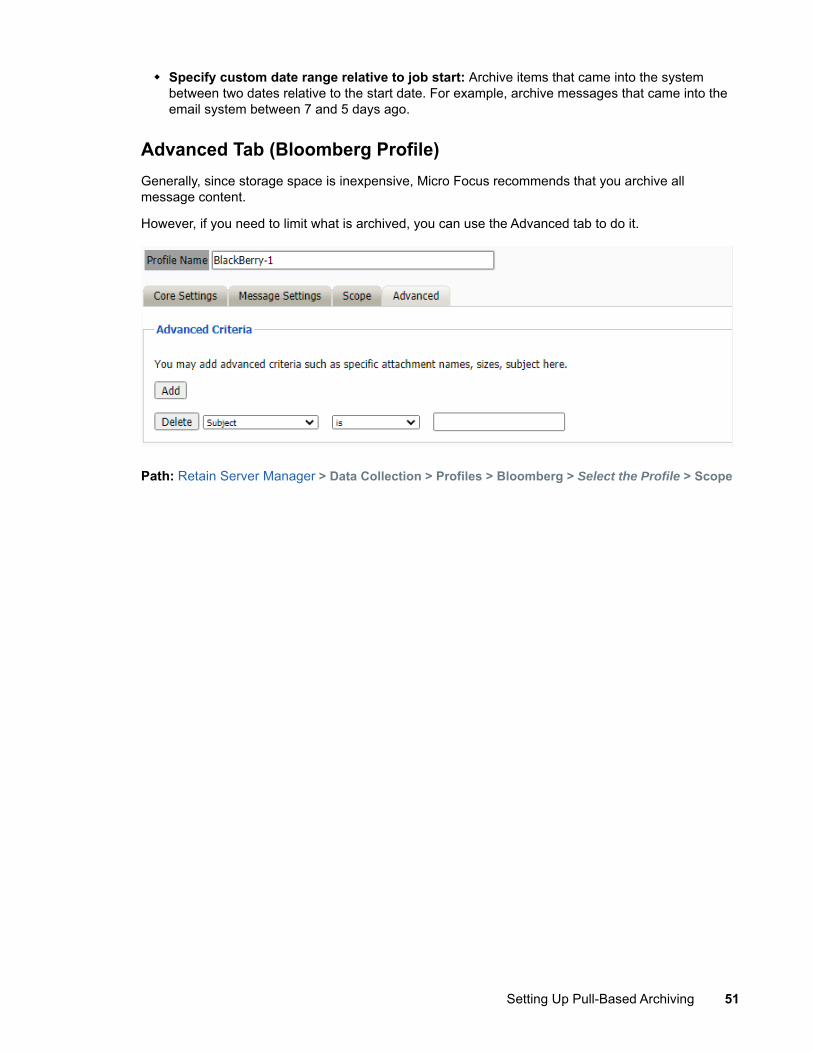
Advanced Tab (Blackberry Profile)Generally, since storage space is inexpensive, Micro Focus recommends that you archive all message content.
However, if you need to limit what is archived, you can use the Advanced tab to do it.
Date Range to Scan The Date Range determines which message items are collected, depending on the date of the message.
New Items: All items that have not been archived by Retain since the last time the job ran.
All Items in Mailbox: All items in the mailbox starting from 1/1/1970, duplicates will be processed but not stored if they already exist in the Retain archive.
Number of days before job start date and newer: Only items from the relative number of days from the time the job began will be archived. E.g. messages that came into the email system 7 days ago or less.
Number of days from job start date and older: Only items previous to the relative number of days from the time the job began will be archived. E.g. messages that came into the email system 7 days ago or more.
Specify custom date range: Only items between two absolute dates will be dredged.
Specify custom date range relative to job start: Only items between two relative dates will be dredged. E.g. messages that came into the email system between 7 and 5 days ago.
Advance Flags 1. If you enable Don't Advance Timestamp, Retain doesn’t update the timestamp flag on dredged messages.
As a result, all messages are considered “new” by Retain each time the job runs.
This is generally only useful for troubleshooting purposes.
2. Click Save Changes.
Option, Field, or Sub-panel Information and/or Action
40 Setting Up Pull-Based Archiving
Path: Retain Server Manager > Data Collection > Profiles > Blackberry > Select the Profile > Advanced Settings
Table 2-15 Configuring Blackberry Profile Advanced Settings
Setting Up a Blackberry WorkerIf you have not already created one or more Workers for use with your Blackberry Job, go to “Creating Workers” on page 17 and complete the tasks there.
Creating a Blackberry JobAfter completing the instructions in the preceding sections, you can create a Blackberry Job.
1 To begin creating a Blackberry Job, open Retain Server Manager > Data Collection > Jobs.2 Click Blackberry > Add Job.3 Use the information in the sections that follow to configure each tab.
Option, Field, or Sub-panel Information and/or Action
Advanced Criteria Use this dialog to define the conditions Retain uses to determine what to archive.
Each line sets a specific parameter and the lines are all added together (AND-ed). To check how Retain will interpret your settings, read through the lines in turn, inserting AND between each one.
1. For the first field, select from among the following items:
Subject
Sender
Recipient
Size
Attachment Name
2. For the second field, specify the relationship of the first field to the (third field):
is
is not
contains
does not contain
3. Type a string for the third field.
4. Click Add to enter another statement
5. When the conditions are defined, click Save Changes.
Setting Up Pull-Based Archiving 41
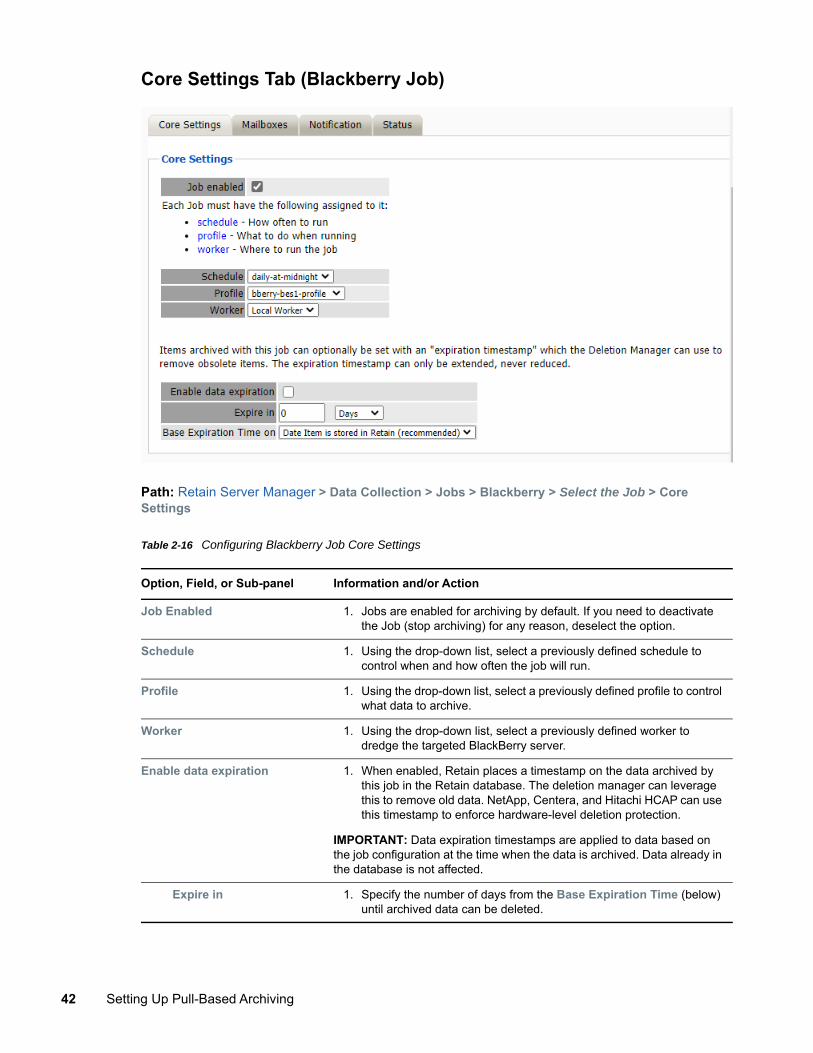
Core Settings Tab (Blackberry Job)
Path: Retain Server Manager > Data Collection > Jobs > Blackberry > Select the Job > Core Settings
Table 2-16 Configuring Blackberry Job Core Settings
Option, Field, or Sub-panel Information and/or Action
Job Enabled 1. Jobs are enabled for archiving by default. If you need to deactivate the Job (stop archiving) for any reason, deselect the option.
Schedule 1. Using the drop-down list, select a previously defined schedule to control when and how often the job will run.
Profile 1. Using the drop-down list, select a previously defined profile to control what data to archive.
Worker 1. Using the drop-down list, select a previously defined worker to dredge the targeted BlackBerry server.
Enable data expiration 1. When enabled, Retain places a timestamp on the data archived by this job in the Retain database. The deletion manager can leverage this to remove old data. NetApp, Centera, and Hitachi HCAP can use this timestamp to enforce hardware-level deletion protection.
IMPORTANT: Data expiration timestamps are applied to data based on the job configuration at the time when the data is archived. Data already in the database is not affected.
Expire in 1. Specify the number of days from the Base Expiration Time (below) until archived data can be deleted.
42 Setting Up Pull-Based Archiving
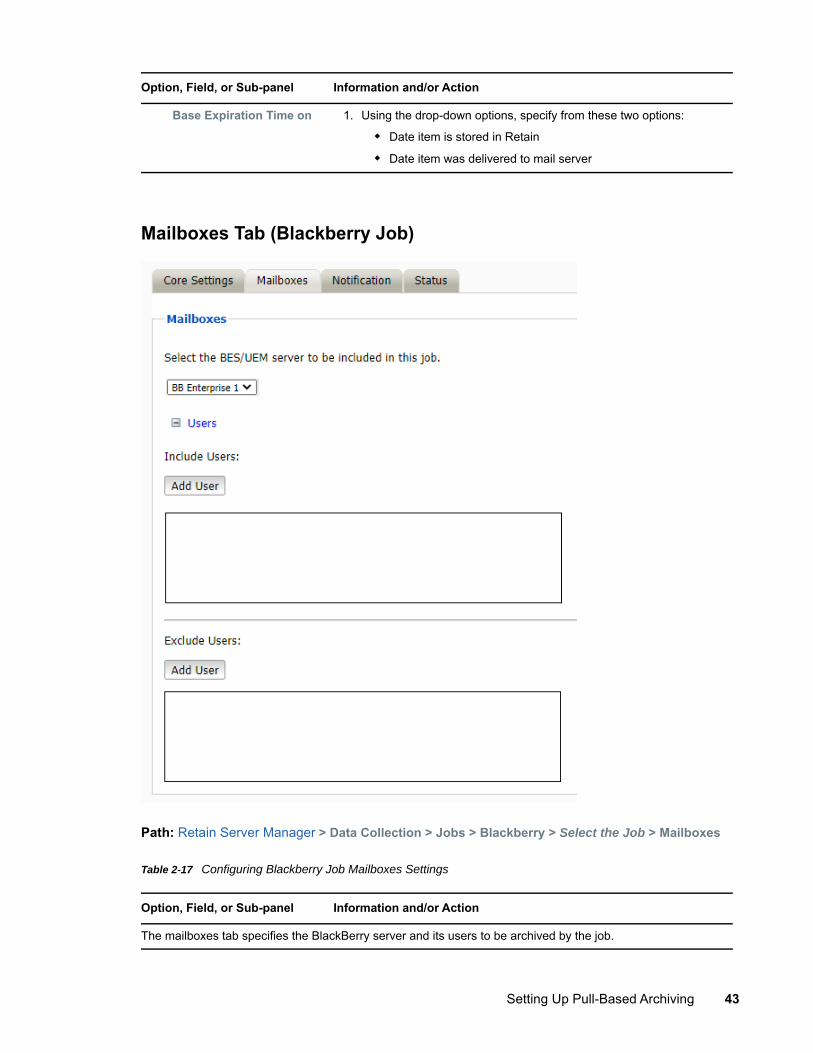
Mailboxes Tab (Blackberry Job)
Path: Retain Server Manager > Data Collection > Jobs > Blackberry > Select the Job > Mailboxes
Table 2-17 Configuring Blackberry Job Mailboxes Settings
Base Expiration Time on 1. Using the drop-down options, specify from these two options:
Date item is stored in Retain
Date item was delivered to mail server
Option, Field, or Sub-panel Information and/or Action
The mailboxes tab specifies the BlackBerry server and its users to be archived by the job.
Option, Field, or Sub-panel Information and/or Action
Setting Up Pull-Based Archiving 43
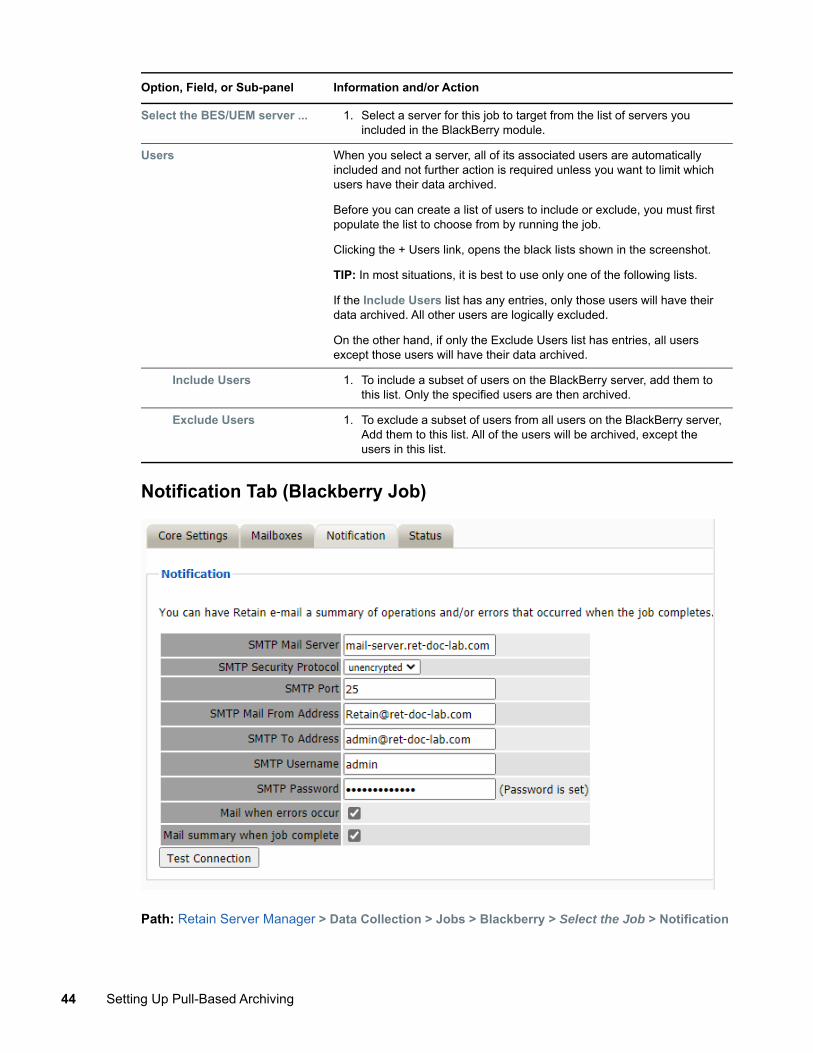
Notification Tab (Blackberry Job)
Path: Retain Server Manager > Data Collection > Jobs > Blackberry > Select the Job > Notification
Select the BES/UEM server ... 1. Select a server for this job to target from the list of servers you included in the BlackBerry module.
Users When you select a server, all of its associated users are automatically included and not further action is required unless you want to limit which users have their data archived.
Before you can create a list of users to include or exclude, you must first populate the list to choose from by running the job.
Clicking the + Users link, opens the black lists shown in the screenshot.
TIP: In most situations, it is best to use only one of the following lists.
If the Include Users list has any entries, only those users will have their data archived. All other users are logically excluded.
On the other hand, if only the Exclude Users list has entries, all users except those users will have their data archived.
Include Users 1. To include a subset of users on the BlackBerry server, add them to this list. Only the specified users are then archived.
Exclude Users 1. To exclude a subset of users from all users on the BlackBerry server, Add them to this list. All of the users will be archived, except the users in this list.
Option, Field, or Sub-panel Information and/or Action
44 Setting Up Pull-Based Archiving
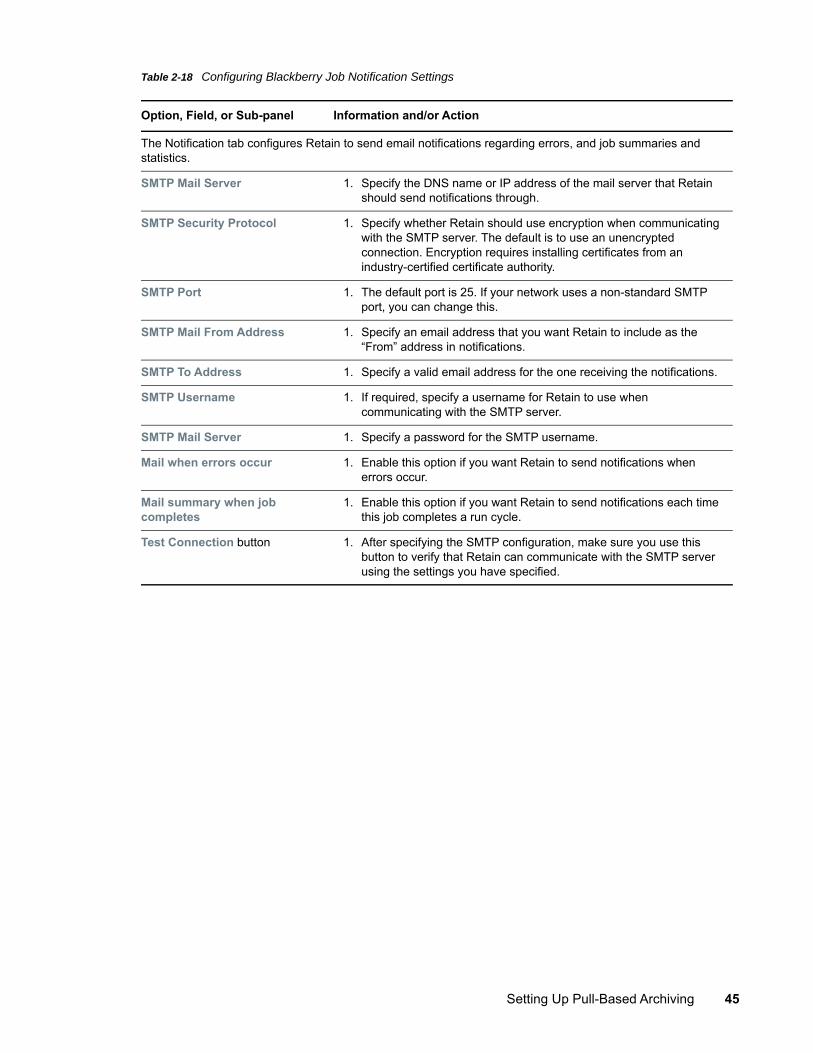
Table 2-18 Configuring Blackberry Job Notification Settings
Option, Field, or Sub-panel Information and/or Action
The Notification tab configures Retain to send email notifications regarding errors, and job summaries and statistics.
SMTP Mail Server 1. Specify the DNS name or IP address of the mail server that Retain should send notifications through.
SMTP Security Protocol 1. Specify whether Retain should use encryption when communicating with the SMTP server. The default is to use an unencrypted connection. Encryption requires installing certificates from an industry-certified certificate authority.
SMTP Port 1. The default port is 25. If your network uses a non-standard SMTP port, you can change this.
SMTP Mail From Address 1. Specify an email address that you want Retain to include as the “From” address in notifications.
SMTP To Address 1. Specify a valid email address for the one receiving the notifications.
SMTP Username 1. If required, specify a username for Retain to use when communicating with the SMTP server.
SMTP Mail Server 1. Specify a password for the SMTP username.
Mail when errors occur 1. Enable this option if you want Retain to send notifications when errors occur.
Mail summary when job completes
1. Enable this option if you want Retain to send notifications each time this job completes a run cycle.
Test Connection button 1. After specifying the SMTP configuration, make sure you use this button to verify that Retain can communicate with the SMTP server using the settings you have specified.
Setting Up Pull-Based Archiving 45
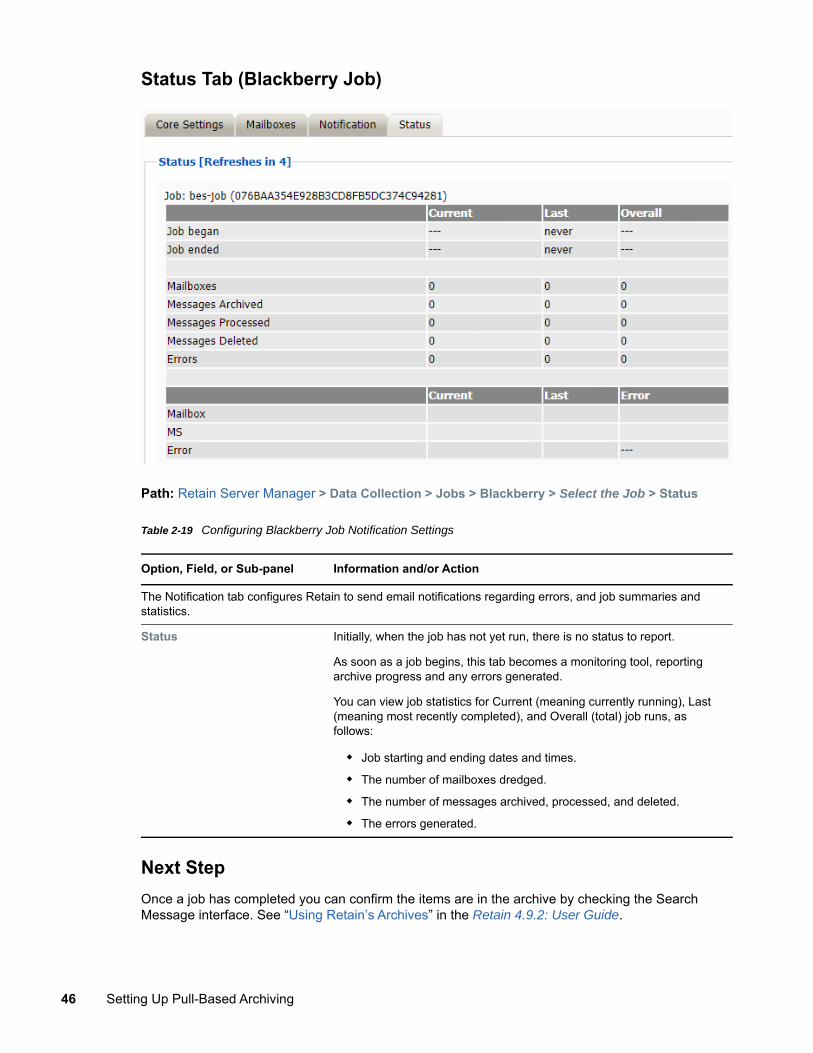
Status Tab (Blackberry Job)
Path: Retain Server Manager > Data Collection > Jobs > Blackberry > Select the Job > Status
Table 2-19 Configuring Blackberry Job Notification Settings
Next StepOnce a job has completed you can confirm the items are in the archive by checking the Search Message interface. See “Using Retain’s Archives” in the Retain 4.9.2: User Guide.
Option, Field, or Sub-panel Information and/or Action
The Notification tab configures Retain to send email notifications regarding errors, and job summaries and statistics.
Status Initially, when the job has not yet run, there is no status to report.
As soon as a job begins, this tab becomes a monitoring tool, reporting archive progress and any errors generated.
You can view job statistics for Current (meaning currently running), Last (meaning most recently completed), and Overall (total) job runs, as follows:
Job starting and ending dates and times.
The number of mailboxes dredged.
The number of messages archived, processed, and deleted.
The errors generated.
46 Setting Up Pull-Based Archiving
Archiving Bloomberg “Creating a Bloomberg Module” on page 47 “Setting a Bloomberg Schedule” on page 49 “Specifying a Bloomberg Profile” on page 49 “Setting Up a Bloomberg Worker” on page 52 “Creating a Bloomberg Job” on page 52
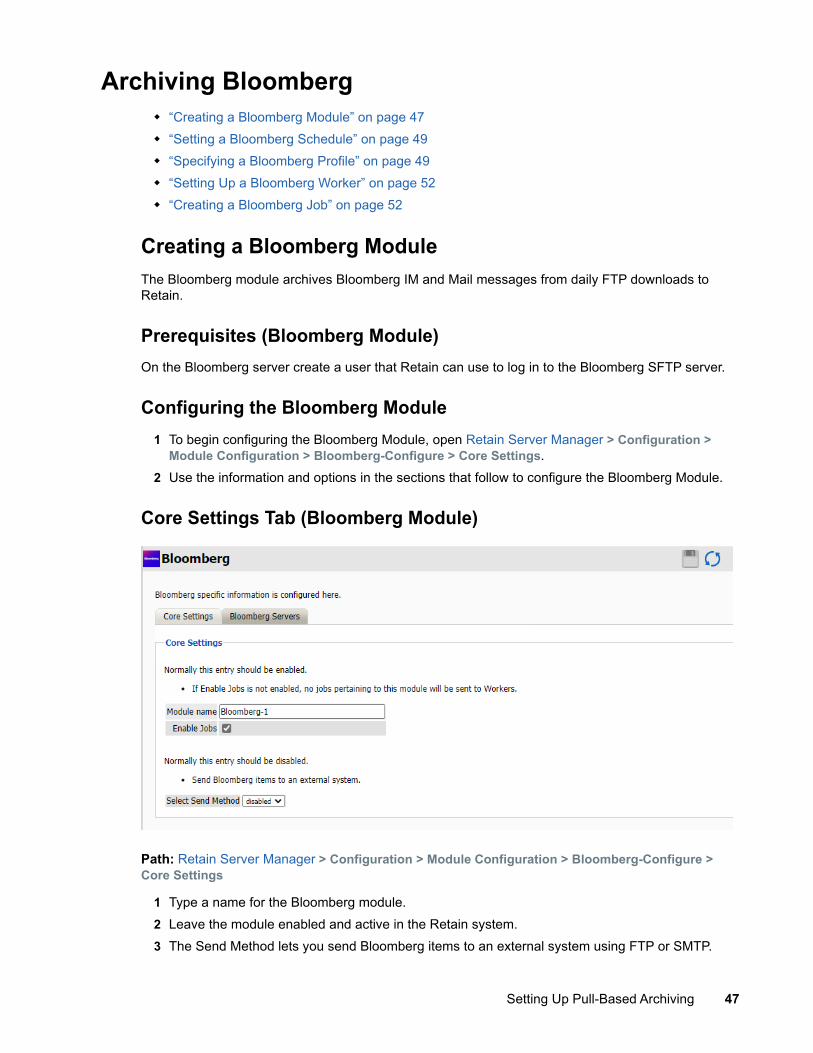
Creating a Bloomberg ModuleThe Bloomberg module archives Bloomberg IM and Mail messages from daily FTP downloads to Retain.
Prerequisites (Bloomberg Module)On the Bloomberg server create a user that Retain can use to log in to the Bloomberg SFTP server.
Configuring the Bloomberg Module1 To begin configuring the Bloomberg Module, open Retain Server Manager > Configuration >
Module Configuration > Bloomberg-Configure > Core Settings.2 Use the information and options in the sections that follow to configure the Bloomberg Module.
Core Settings Tab (Bloomberg Module)
Path: Retain Server Manager > Configuration > Module Configuration > Bloomberg-Configure > Core Settings
1 Type a name for the Bloomberg module.2 Leave the module enabled and active in the Retain system.3 The Send Method lets you send Bloomberg items to an external system using FTP or SMTP.
Setting Up Pull-Based Archiving 47
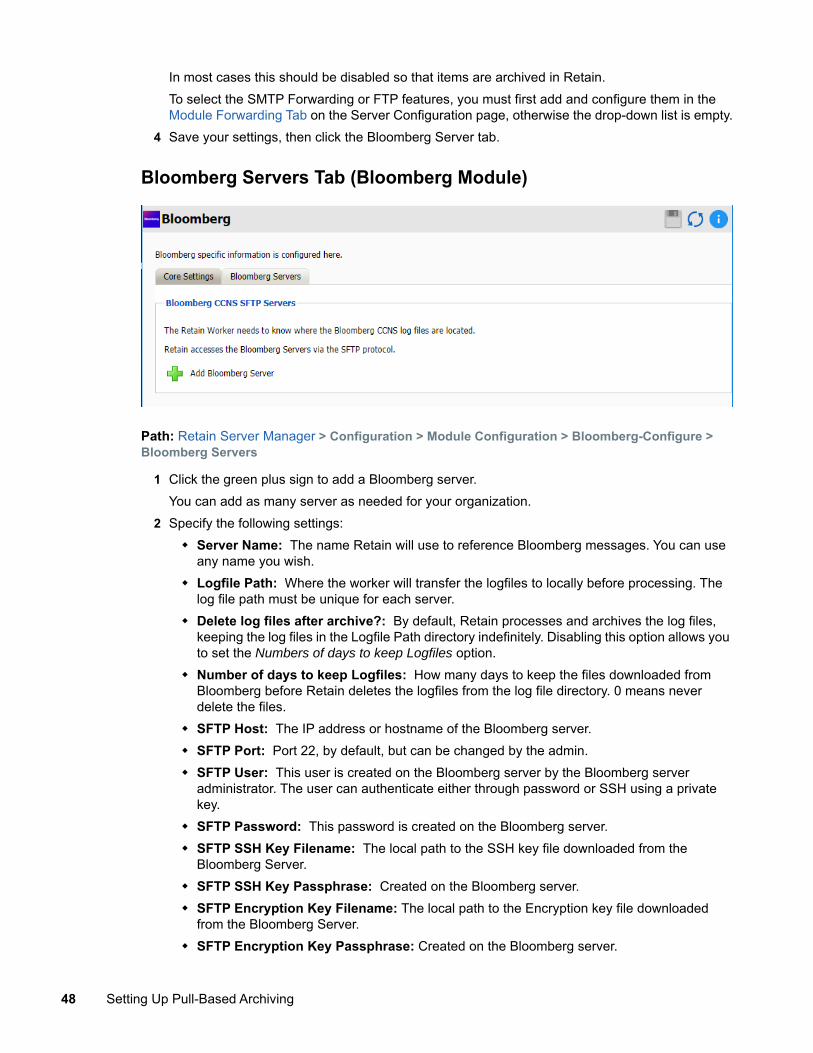
In most cases this should be disabled so that items are archived in Retain.To select the SMTP Forwarding or FTP features, you must first add and configure them in the Module Forwarding Tab on the Server Configuration page, otherwise the drop-down list is empty.
4 Save your settings, then click the Bloomberg Server tab.
Bloomberg Servers Tab (Bloomberg Module)
Path: Retain Server Manager > Configuration > Module Configuration > Bloomberg-Configure > Bloomberg Servers
1 Click the green plus sign to add a Bloomberg server. You can add as many server as needed for your organization.
2 Specify the following settings: Server Name: The name Retain will use to reference Bloomberg messages. You can use
any name you wish. Logfile Path: Where the worker will transfer the logfiles to locally before processing. The
log file path must be unique for each server. Delete log files after archive?: By default, Retain processes and archives the log files,
keeping the log files in the Logfile Path directory indefinitely. Disabling this option allows you to set the Numbers of days to keep Logfiles option.
Number of days to keep Logfiles: How many days to keep the files downloaded from Bloomberg before Retain deletes the logfiles from the log file directory. 0 means never delete the files.
SFTP Host: The IP address or hostname of the Bloomberg server. SFTP Port: Port 22, by default, but can be changed by the admin. SFTP User: This user is created on the Bloomberg server by the Bloomberg server
administrator. The user can authenticate either through password or SSH using a private key.
SFTP Password: This password is created on the Bloomberg server. SFTP SSH Key Filename: The local path to the SSH key file downloaded from the
Bloomberg Server. SFTP SSH Key Passphrase: Created on the Bloomberg server. SFTP Encryption Key Filename: The local path to the Encryption key file downloaded
from the Bloomberg Server. SFTP Encryption Key Passphrase: Created on the Bloomberg server.
48 Setting Up Pull-Based Archiving
Save the Bloomberg Module Before ContinuingRetain dialogs require that you always save your changes. Otherwise, the configurations you have specified are lost.
Setting a Bloomberg ScheduleIf you have not already created one or more schedules for use with your Bloomberg Job, go to “Creating Schedules” on page 15 and complete the task now.
Specifying a Bloomberg Profile1 To begin configuring the Blackberry Profile, open Retain Server Manager > Data Collection >
Profiles.2 Click Bloomberg > Add Profile.3 Use the information and settings in the sections that follow to configure the profile.
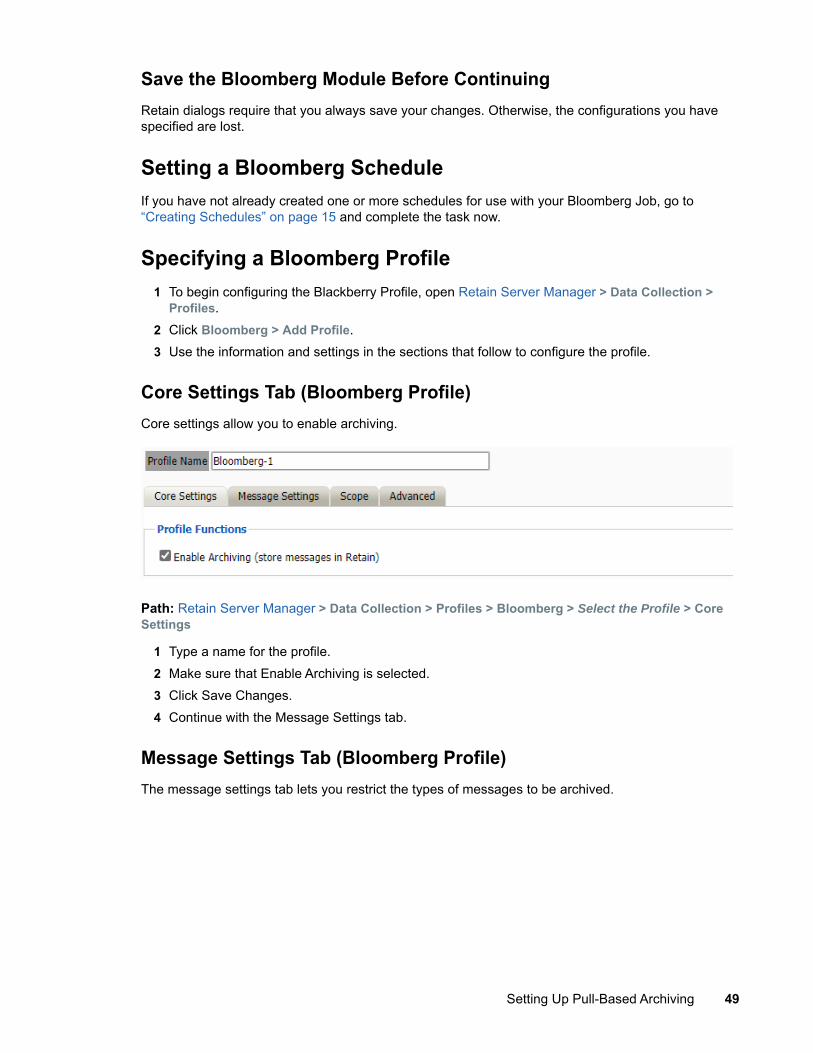
Core Settings Tab (Bloomberg Profile)Core settings allow you to enable archiving.
Path: Retain Server Manager > Data Collection > Profiles > Bloomberg > Select the Profile > Core Settings
1 Type a name for the profile.2 Make sure that Enable Archiving is selected.3 Click Save Changes.4 Continue with the Message Settings tab.
Message Settings Tab (Bloomberg Profile)The message settings tab lets you restrict the types of messages to be archived.
Setting Up Pull-Based Archiving 49
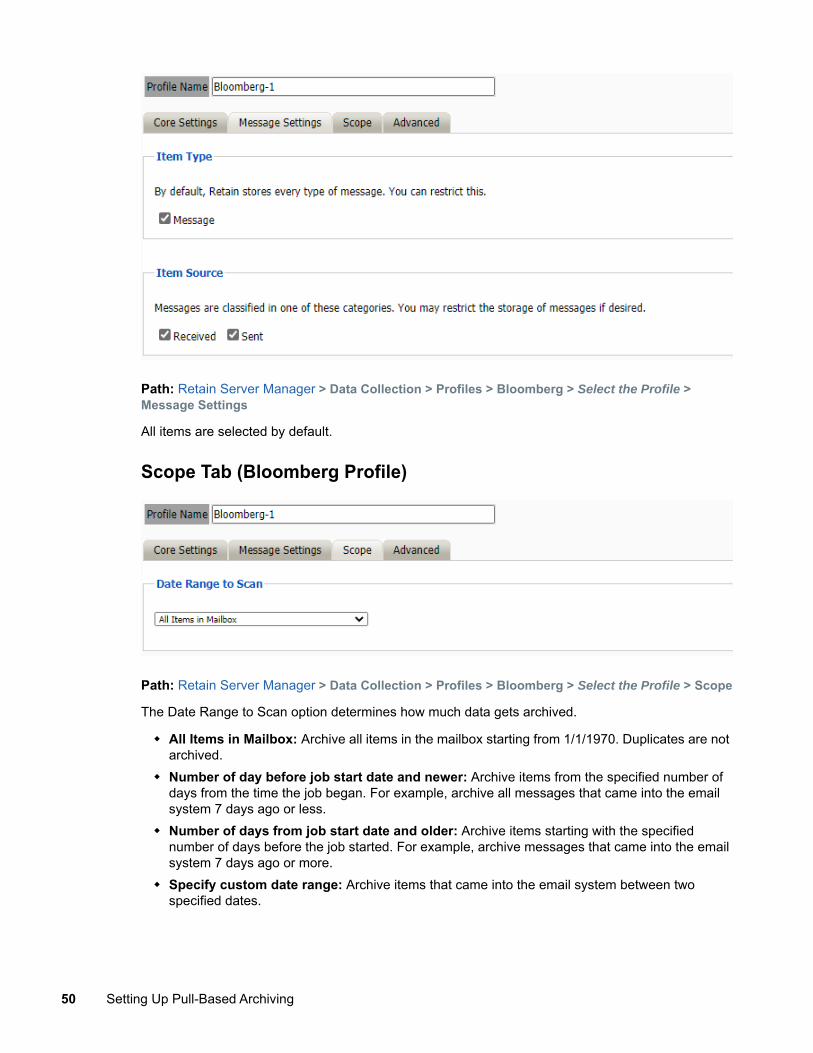
Path: Retain Server Manager > Data Collection > Profiles > Bloomberg > Select the Profile > Message Settings
All items are selected by default.
Scope Tab (Bloomberg Profile)
Path: Retain Server Manager > Data Collection > Profiles > Bloomberg > Select the Profile > Scope
The Date Range to Scan option determines how much data gets archived.
All Items in Mailbox: Archive all items in the mailbox starting from 1/1/1970. Duplicates are not archived.
Number of day before job start date and newer: Archive items from the specified number of days from the time the job began. For example, archive all messages that came into the email system 7 days ago or less.
Number of days from job start date and older: Archive items starting with the specified number of days before the job started. For example, archive messages that came into the email system 7 days ago or more.
Specify custom date range: Archive items that came into the email system between two specified dates.
50 Setting Up Pull-Based Archiving
Specify custom date range relative to job start: Archive items that came into the system between two dates relative to the start date. For example, archive messages that came into the email system between 7 and 5 days ago.
Advanced Tab (Bloomberg Profile)Generally, since storage space is inexpensive, Micro Focus recommends that you archive all message content.
However, if you need to limit what is archived, you can use the Advanced tab to do it.
Path: Retain Server Manager > Data Collection > Profiles > Bloomberg > Select the Profile > Scope
Setting Up Pull-Based Archiving 51
Table 2-20 Configuring Bloomberg Profile Advanced Settings
Setting Up a Bloomberg WorkerIf you have not already created one or more Workers for use with your Bloomberg Job, go to “Creating Workers” on page 17 and complete the tasks there.
Creating a Bloomberg JobAfter completing the instructions in the preceding sections, you can create a Blackberry Job.
1 To begin creating a Bloomberg Job, open Retain Server Manager > Data Collection > Jobs.2 Click Bloomberg > Add Job.3 Use the information in the sections that follow to configure each tab.4 Make sure that you save your changes before leaving the dialogs.
Option, Field, or Sub-panel Information and/or Action
Advanced Criteria Use this dialog to define the conditions Retain uses to determine what to archive.
Each line sets a specific parameter and the lines are all added together (AND-ed). To check how Retain will interpret your settings, read through the lines in turn, inserting AND between each one.
1. For the first field, select from among the following items:
Subject
Sender
Recipient
Size
Attachment Name
2. For the second field, specify the relationship of the first field to the (third field):
is
is not
contains
does not contain
3. Type a string for the third field.
4. Click Add to enter another statement
5. When the conditions are defined, click Save Changes.
52 Setting Up Pull-Based Archiving
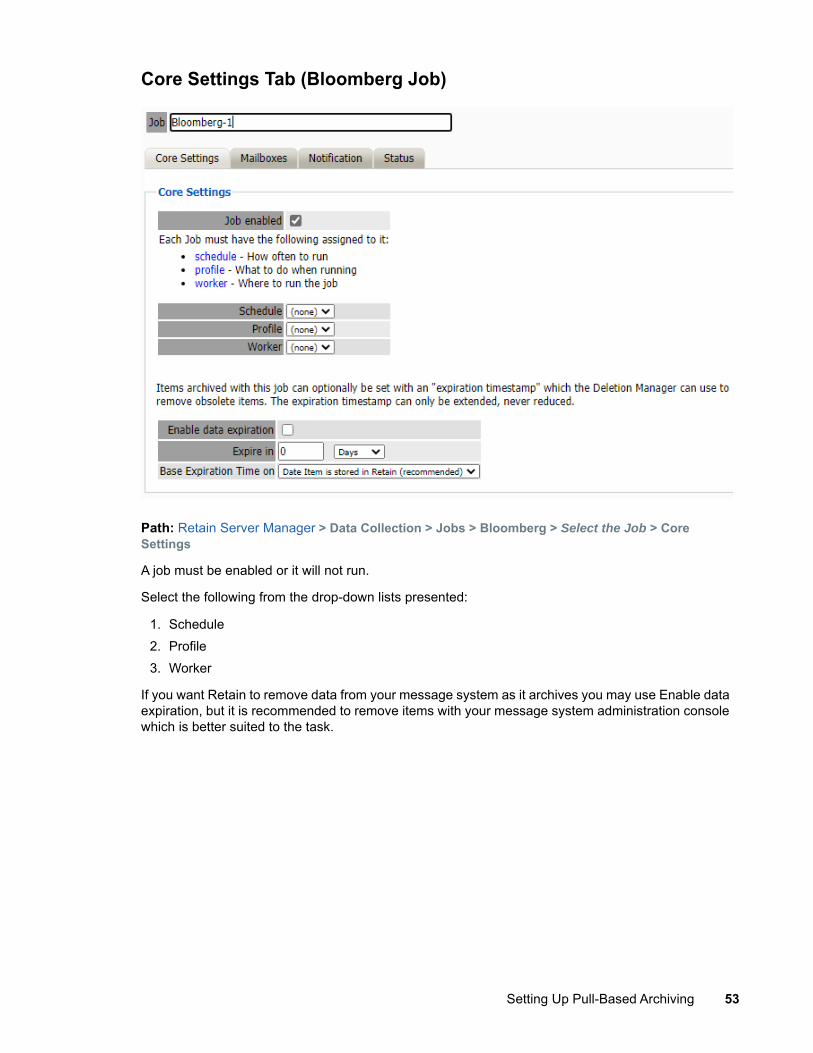
Core Settings Tab (Bloomberg Job)
Path: Retain Server Manager > Data Collection > Jobs > Bloomberg > Select the Job > Core Settings
A job must be enabled or it will not run.
Select the following from the drop-down lists presented:
1. Schedule2. Profile3. Worker
If you want Retain to remove data from your message system as it archives you may use Enable data expiration, but it is recommended to remove items with your message system administration console which is better suited to the task.
Setting Up Pull-Based Archiving 53
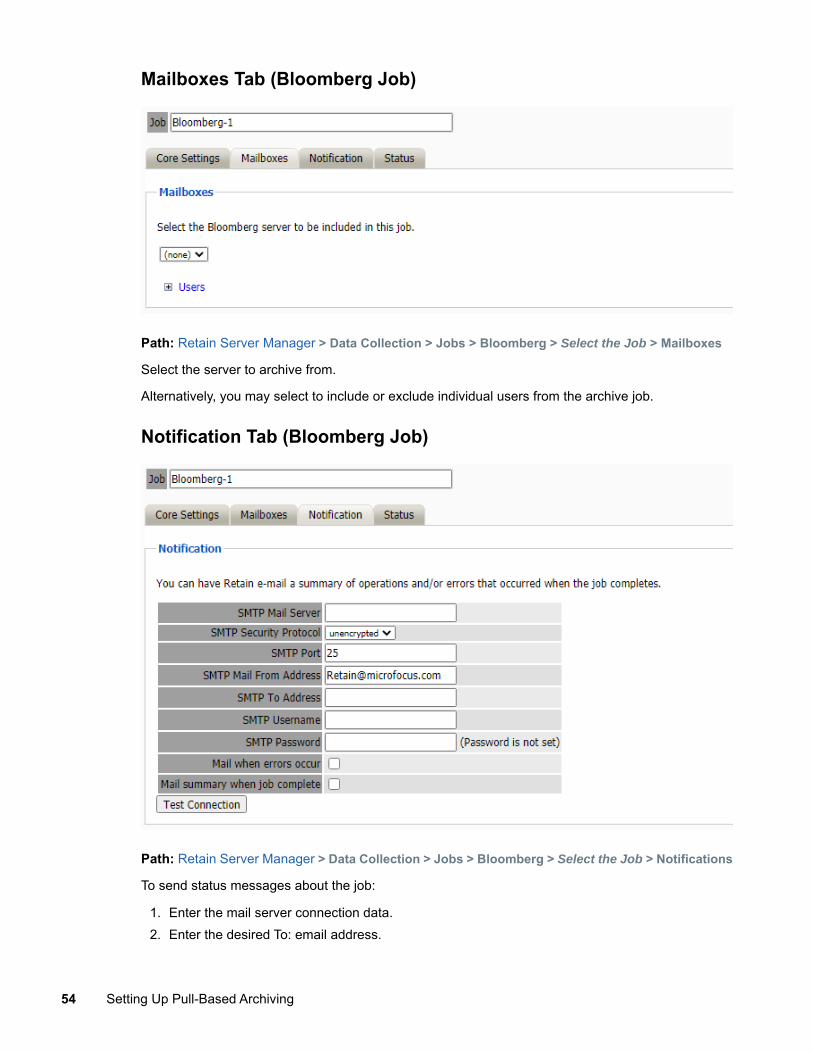
Mailboxes Tab (Bloomberg Job)
Path: Retain Server Manager > Data Collection > Jobs > Bloomberg > Select the Job > Mailboxes
Select the server to archive from.
Alternatively, you may select to include or exclude individual users from the archive job.
Notification Tab (Bloomberg Job)
Path: Retain Server Manager > Data Collection > Jobs > Bloomberg > Select the Job > Notifications
To send status messages about the job:
1. Enter the mail server connection data.2. Enter the desired To: email address.
54 Setting Up Pull-Based Archiving
3. Enable “Mail when errors occur”, if desired.4. Enable “Mail summary when job is complete”, if desired.
After entering the data use the “Test Connection” button to send a test message from Retain.
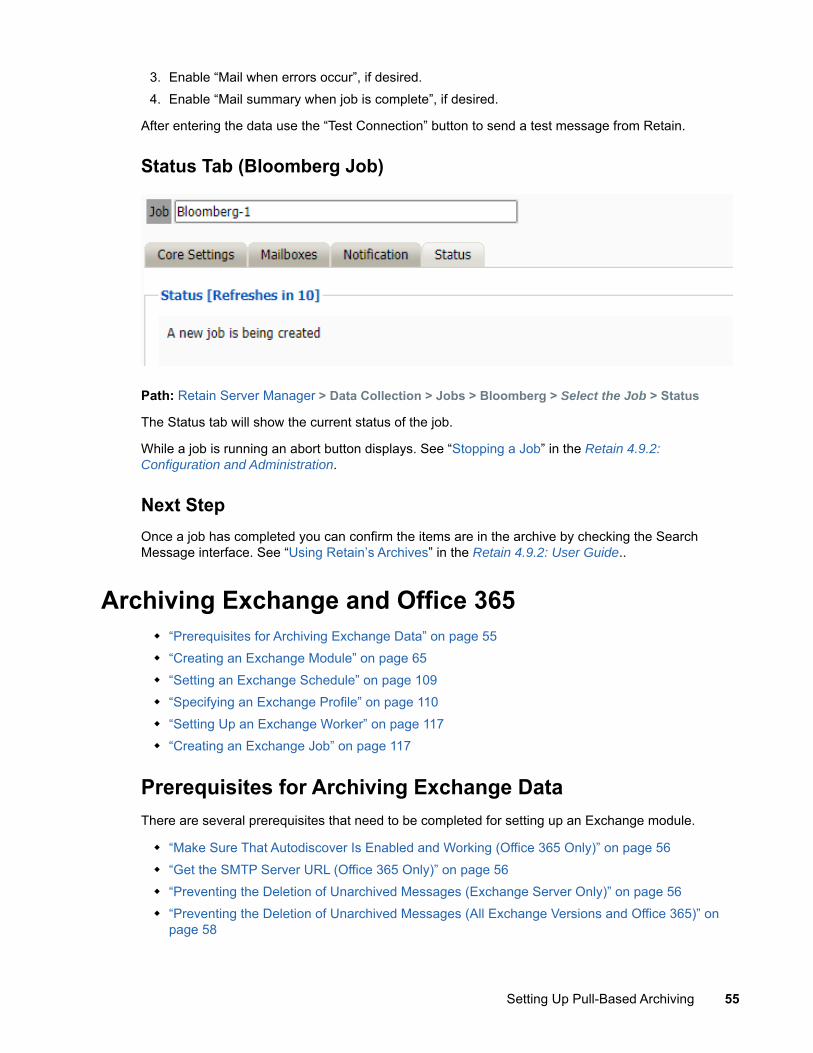
Status Tab (Bloomberg Job)
Path: Retain Server Manager > Data Collection > Jobs > Bloomberg > Select the Job > Status
The Status tab will show the current status of the job.
While a job is running an abort button displays. See “Stopping a Job” in the Retain 4.9.2: Configuration and Administration.
Next StepOnce a job has completed you can confirm the items are in the archive by checking the Search Message interface. See “Using Retain’s Archives” in the Retain 4.9.2: User Guide..
Archiving Exchange and Office 365 “Prerequisites for Archiving Exchange Data” on page 55 “Creating an Exchange Module” on page 65 “Setting an Exchange Schedule” on page 109 “Specifying an Exchange Profile” on page 110 “Setting Up an Exchange Worker” on page 117 “Creating an Exchange Job” on page 117
Prerequisites for Archiving Exchange DataThere are several prerequisites that need to be completed for setting up an Exchange module.
“Make Sure That Autodiscover Is Enabled and Working (Office 365 Only)” on page 56 “Get the SMTP Server URL (Office 365 Only)” on page 56 “Preventing the Deletion of Unarchived Messages (Exchange Server Only)” on page 56 “Preventing the Deletion of Unarchived Messages (All Exchange Versions and Office 365)” on
page 58
Setting Up Pull-Based Archiving 55
“Setting Up Users with a PowerShell Script” on page 58 “Synchronizing the Exchange Address Book with Retain” on page 59 “Configuring Retain for Archiving Site-Collection Document Links” on page 65
Make Sure That Autodiscover Is Enabled and Working (Office 365 Only)
IMPORTANT: Autodiscover is essential:
It lets you skip users or immediately abort a job. If Autodiscover isn’t working, serious errors occur when Retain attempts to archive users’
messages.
1 Test that Autodiscover is enabled and working for the domain by doing the following:1a Browse to the Microsoft Remote Connectivity Analyzer (https://
testconnectivity.microsoft.com/).1b On the Office 365 tab, under Microsoft Office Outlook Connectivity Tests, select Outlook
Autodiscover.1c Enter your credentials and run the test.
2 If the test succeeds, continue with the next section, Get the SMTP Server URL (Office 365 Only)3 If the test fails, contact Microsoft and have them turn autodiscover on, then rerun the test until it
succeeds.
Get the SMTP Server URL (Office 365 Only)Retain requires an SMTP server for sending notifications.
1. In the Microsoft Remote Connectivity Analyzer (https://testconnectivity.microsoft.com/ (https://testconnectivity.microsoft.com/) > the Office 365 tab, under Microsoft Office Outlook Connectivity Tests, select Inbound SMTP Email.
2. Enter your credentials and run the test.3. Record the SMTP server URL .
Preventing the Deletion of Unarchived Messages (Exchange Server Only)
NOTE: Prior to Retain 4.9.1, Micro Focus recommended using Microsoft in-place holds to prevent the deletion of unarchived data.
Starting October 1, 2020, management of in-place holds is no longer possible in Exchange Online/Office365.
For now, the information in this section still applies to Exchange Server deployments. However, as a best practice, Micro Focus recommends that you begin replacing in-place holds with Microsoft’s Retention Policies and Retention Labels. For more information, see this article on Microsoft.com.
56 Setting Up Pull-Based Archiving
If you use Exchange Online/Office 365, you must skip to “Preventing the Deletion of Unarchived Messages (All Exchange Versions and Office 365)” on page 58.
“How Message Deletion Works in Exchange” on page 57 “Set Retain Profile/Miscellaneous to Include Recoverable Items” on page 57 “Setting Up a Distribution List” on page 57 “Placing the Distribution List under a 90-day Hold” on page 57 “Finding How Many Mailboxes Were Placed Under Hold” on page 57
To prevent data loss, you must keep users from removing items before Retain has a chance to archive them.
How Message Deletion Works in ExchangeWhen users delete messages in Outlook, the messages are moved, by default, to the trash.
When users empty their trash, deleted items are moved to the mostly hidden Recoverable Items folder, where they are kept for 14 day before being removed from the disk.
In the interim, users can right-click the Trash to recover items, but they can also purge the items, which immediately deletes them.
If a hold is in place, purged items are moved to a Purged folder that is not user-accessible and kept there until the hold is lifted.
Set Retain Profile/Miscellaneous to Include Recoverable ItemsIn Retain, set Profile/Miscellaneous to Include user's recoverable items.
Setting Up a Distribution List1 Access the Exchange Admin Console. 2 Set up a distribution list.
For example, create a list named All_Mailboxes that contains all mailboxes. 3 Create a policy that adds new users to this distribution list by default.
Placing the Distribution List under a 90-day Hold1 Access the Exchange Management Shell.2 Enter the following command, replacing All_Mailboxes with the name of the distribution list
mailbox that you created in “Setting Up a Distribution List” above.New-MailboxSearch "Retain90DayHold" -ItemHoldPeriod 90 -InPlaceHoldEnabled $true -SourceMailboxes All_Mailboxes
It takes time for the hold to take effect.
Finding How Many Mailboxes Were Placed Under HoldYou can determine how many mailboxes were placed under hold with the following script:
((Get-Mailbox).InPlaceHolds).Count
Setting Up Pull-Based Archiving 57
Preventing the Deletion of Unarchived Messages (All Exchange Versions and Office 365)
IMPORTANT: Starting October 1, 2020, management of in-place holds is no longer allowed in Exchange Online/Office 365. Existing in-place hold mechanisms are still enforced, but they cannot be modified, only removed.
To prevent your users from deleting Exchange message data before Retain can archive it, you should implement Microsoft Retention Policies within your organization’s Exchange or Office 365 infrastructure.
Organization requirements differ widely. Therefore, we recommend that you begin with this informative article on Microsoft.com.
The article contains numerous links to additional information that you can use to identify and create policies that fit your organization’s needs.
Setting Up Users with a PowerShell Script
NOTE: Retain uses PowerShell to connect to Office 365 .
PowerShell does not allow the following special characters in names or passwords: # $ ( ) * + . [ ] ? \ / ^ { } |
Create a Retain Impersonation User In the O365 Exchange Admin Center, create a Retain Impersonation user with a mailbox, making sure to give it a license.
Give the Impersonation user the proper rights. Under Permissions, create a new Admin Role (e.g. Retain Impersonation Management), add the ApplicationImpersonation right and the Retain Impersonation user as a member .
Create a Retain Administrator UserRetain needs a user with Administrator rights to download the address book from Office 365 every day with the Office 365 Address Book Synchronization Script. This can be an existing administrator account or you can create a separate one. It needs to have sufficient rights to see all the users in the address book.
Setting Up Access to Shared Mailboxes for the Impersonation UserImpersonation rights allow the Retain user to enter other mailboxes but those rights do not extend to shared mailboxes. To access a shared mailbox, the Retain user needs rights to each shared mailbox that is to be archived. These rights can be granted through the Exchange Management Shell.
For example, If the shared mailbox is owned by John Doe and your Retain impersonation account is Retain, you would issue the following command in an Exchange Management Shell (EMC):
Add-MailboxPermission -Identity "John Doe" -User Retain -AccessRights FullAccess -InheritanceType All -AutoMapping $false
58 Setting Up Pull-Based Archiving
Synchronizing the Exchange Address Book with RetainFor Retain to authenticate users and access mailboxes for archiving, it needs to know what mailboxes are in Office 365. There are two ways to do this:
“Synchronizing the Address Book Using Office 365 (Microsoft GraphAPI)” on page 59 “Synchronizing the Address Book Using PowerShell Scripts” on page 60
Synchronizing the Address Book Using Office 365 (Microsoft GraphAPI)To enable Retain for access to the Office 365 Address Book through the GraphAPI, you must:
“Register the Retain Server on the Microsoft Azure Portal” on page 59 “Add the Azure Portal Information to the Office 365 Module” on page 59
Register the Retain Server on the Microsoft Azure Portal
1 Enter the following URL in your administrative browser:
https://portal.azure.com/#blade/Microsoft_AAD_RegisteredApps/applicationsListBlade
2 Create a new app registration pointing it to your Retain Server URL. For example:
https://retain.gwava.com/RetainServer3 After creating the app registration, click API permissions for the app > Add a permission >
Microsoft Graph > Application permissions.
NOTE: Adding the following permissions requires Admin credentials, for which you are prompted the next time you log in.
4 Select the following permissions: User.Read.All Directory.Read.All
5 Click API permissions for the app > Add a permission > Exchange > Application permissions.6 Select the following permission:
full_access_as_app (Only needed for archiving data, not address book synchronization)7 Go to Certificates & secrets and select New client secret to create a secret for Retain.
IMPORTANT: Make a record of the Client secret value because it is only visible now.
8 Add the following information to the record you just made: Application (client) id (found on the Overview page) Directory (tenant) id (found on the Overview page)
Add the Azure Portal Information to the Office 365 Module
1 Access the Office 365 module.2 In the Service Connection Details tab, configure the module to populate the address book using
Office 365.
Setting Up Pull-Based Archiving 59
Synchronizing the Address Book Using PowerShell ScriptsRetain includes two PowerShell scripts (under the Tools menu) for extracting address book information from Office 365.
Both scripts download the Office 365 address book and save it in two .csv files.
PowerShell Sync Script 1.0 saves the username and password in plaintext in the script.
PowerShell Sync Script 4.0 encrypts the password to a separate file.
Retain cannot archive members of the distribution lists if theHiddenFromAddressListsEnabled field: is set to True.
If using multiple modules, you must create separate folders for the script and the resulting .csv files. The folder location that Retain should pull the .csv file data from is set in the module as detailed below. You must also create a scheduled task for each script.
“PowerShell Sync Script 1.0 (sync365.ps1)” on page 60 “Settin Up the PowerShell Scripts” on page 60 “PowerShell Sync Script 4.0 (sourcesync365.ps1)” on page 62 “Troubleshooting the PowerShell Export Process” on page 63 “Using PowerShell when Retain Is Linux-based” on page 64 “Create a Batch File to Transfer the Files” on page 64 “Automate the Script” on page 64
PowerShell Sync Script 1.0 (sync365.ps1)
IMPORTANT: This script requires that you enter an Office 365 administrative password in cleartext. if this is a concern, use the “PowerShell Sync Script 4.0 (sourcesync365.ps1)” on page 62 instead.
The script requires PowerShell 2.0 . This script connects to the target system and downloads the address book and distribution group lists into two address book .csv files, exchangeuser.csv and exchangegroup.csv.
Settin Up the PowerShell Scripts
1 Install PowerShell 2.0 or higher. (Windows 7 and Server 2008 R2 already come with PowerShell 2.0)
2 Enable Microsoft .NET Framework 3.5.1.3 Install the Office 365 PowerShell cmdlets. Two packages are needed which can be downloaded
from the Microsoft Azure Active Directory PowerShell Module Version Release History, currently found at: Where Can I Find the Latest Version of AAD PowerShell. Microsoft Online Services Sign-In Assistant for IT Professional RTW (this is the prerequisite
to the Azure AD Module) Azure Active Directory Module for Windows PowerShell (64-bit version)
4 You might need to change the execution policy to allow these scripts to function: Allow PowerShell script execution
The Default Execution Policy is set to restricted, it can be viewed by entering this command in PowerShell:Get-ExecutionPolicy
60 Setting Up Pull-Based Archiving

The script provided by Micro Focus must be run as an Administrator in PowerShell:Set-ExecutionPolicy RemoteSigned
5 In the Retain Management Console, download the script by clicking Tools > O365 Archiving > PowerShell Sync Script 1.0.The downloaded script filename is sync365.ps1.
6 If you plan to run the script on the Retain server itself, move the sync365.ps1 script to the ~\Program Files\Beginifinite\Retain\RetainServer\WEB-INF\cfg folder. Otherwise, if you run it on the management workstation, be sure to copy the resulting exchangeuser.csv and excahngegroup.csv files to that directory on the Retain server.
7 Edit the sync365.ps1 script with the Microsoft Integrated Scripting Environment (ISE) editor.1. At the top are 3 settings:
$User Set this to the UPN of an administrator account in Office 365. $PlainPassword Set this to the plain text password of the administrator account. $ExportBasePath Set this to a directory where the two resulting .csv files are saved.
If the path does not yet exist, you must create it manually, making sure to escape the backslashes (\\). For example: $ExportBasePath="C:\\Program Files\\Beginifinite\\Retain\\RetainServer\\WEB-INF\\cfg"
2. Execute the script by clicking the play button. This process can take a while if there are many users. When the script finishes, a message displays in the bottom status bar.
3. Make sure that the exchangeuser.csv and exchangegroup.csv files are in ~\Program Files\Beginifinite\Retain\RetainServer\WEB-INF\cfg for Retain to use for the address book.
8 Set the Task Scheduler to run the script automatically once per day by doing the following. If you create it at the Task Scheduler (Local) level, you can find it after it is created in the Task Scheduler Library folder, center pane.8a Create a New Task.8b On the General tab, give it a name description.8c Under Security options, choose: Run whether user is logged in or not.8d In the Triggers tab, click New....8e Under Settings, choose Daily and set the Start Time to an hour before the Exchange
archive job is set to begin to guarantee that the script finishes in time.8f Choose Do not expire.
8g Enable the task.8h Under the Actions tab: Create a New action.
8h1 Set the Action to “Start a program”8h2 Program/script: powershell8h3 Add arguments: -NoProfile -ExecutionPolicy Bypass -file "[drive]:\Program
Files\Beginfinite\Retain\RetainServer\WEB_INF\cfg\sync365.ps1" -Verb RunAs8h4 Start In: (leave blank)
Setting Up Pull-Based Archiving 61
PowerShell Sync Script 4.0 (sourcesync365.ps1)
Use this script if exposing the administrator password in plain text is not acceptable under your organization’s security policy.
Requirements The script must be run on the same machine as it was downloaded to because the password
encryption is specific to the machine it runs on. This script requires PowerShell 4.0 or higher or it aborts .
You can determine the installed PowerShell version by running the cmdlet:
$PSVersionTable.PSVersion If using Windows Server 2008R2 or earlier, the script generates errors because the Task
Scheduler cmdlets are not supported and the Scheduled Task must be created manually.
Running the Script1 In the Retain Management Console, download the script by clicking Tools > O365 Archiving >
PowerShell Sync Script 4.0.2 After downloading and extracting the script, open PowerShell and change to the directory the
script is in.3 enter .\Save-CredentialsEncrypted.ps1
If you haven't run a PowerShell script before, you might have to change the Execution Policy to get a script to run using the following command:Set-ExecutionPolicy -ExecutionPolicy Bypass -Scope Process.
4 A dialog box displays5 Enter the user name (example: [email protected]) and password of an
administrator user with sufficient rights to download the address book from Office 365.6 Specify the destination folder of the address book files.
Provide it with a name for the Scheduled task.You can specify any arbitrary destination folder you want. However, the resulting address book files, exchangeuser.csv and exchangegroup.csv must be in the ~\Program Files\Beginfinite\Retain\RetainServer\WEB_INF\cfg folder on the Retain Server when Retain refreshes the address book.If you are using a Linux-based Retain Server, you must set up a process to move the address book files to the Linux-based Retain Server's opt/beginfinite/retain/RetainServer/WEB-INF/cfg folder, as outlined in “Using PowerShell when Retain Is Linux-based” on page 64.
7 Specify a separate task and destination folder for each Exchange module that you create.
62 Setting Up Pull-Based Archiving

8 The script then sets up a recurring task (SyncO365) in Task Scheduler to download the address book every day at 12:30am.The script requests your logon credentials as it sets up the task. The script starts the task before exiting. If you are using Windows Server 2008, multiple errors appear because the Task Scheduler cmdlets do not exist, this is expected and the task can be created manually in Task Scheduler.
9 It takes a moment to download the address book files: exchangeuser.csv and exchangegroup.csv. For a small system (<100 users) it might take a few minutes, for a large system (>10k users) it can take more than half an hour. After the script completes, make sure that the address book files are in the same folder as your PowerShell script. If there are no files, it may be an execution policy issue. See Troubleshooting the PowerShell Export Process.
Troubleshooting the PowerShell Export Process
Task Scheduler Reliability: Because the scheduler has been known to stop working at times, we recommend monitoring the .csv files to ensure that they are being updated every day.
Blank .csv files: Office 365 requires regular password changes. If the wrong credentials are entered or the password has expired, two blank .csv files are created. You must run the script again, entering the Administrator logon name, the new password, and the destination folder. The script starts the task to update the address book files.
Red Text Displays and Window Closes: If you see red text and the window closes immediately, there was an error of some kind.
1. Open a PowerShell window, change to the script folder2. Run the following command in a PowerShell window to allow execution for the current
process:
Set-ExecutionPolicy -ExecutionPolicy Bypass -Scope Process3. Run the script from the same process window using the following command.
.\Save-CredentialsEncrypted.ps1
Setting Up Pull-Based Archiving 63
Using PowerShell when Retain Is Linux-based
PowerShell scripts don’t run on Linux.
Instead, run the script on a Windows computer with the required version of PowerShell installed, then copy the resulting .csv files to the Retain server.
Create a Batch File to Transfer the Files
You can create a small Windows VM that only runs the Powershell script and then copy the exchangeuser.csv and exchangegroup.csv files to the Retain server.
You can use the free program WinSCP (http://winscp.net/eng/index.php) to copy from a Windows computer to a Linux server.
You can use windscp.com as the basis of a batch file to copy the resulting .csv files to the Retain server.
For example:
retain.bat"C:\Program Files (x86)\WinSCP\winscp.com" /command ^ "option batch abort" ^ "option confirm off" ^ "open scp://[user]:[password]@[retain server address]" ^ "cd /opt/beginfinite/retain/RetainServer/WEB-INF/cfg" ^ "option transfer binary" ^ "put [file location on windows]*.csv" ^ "close" ^ "exit"Explanation of what each line does:
#Specify that all commands are run on the command line, while using ^ to split long lines for readability. "C:\Program Files (x86)\WinSCP\winscp.com" /command ^# Automatically abort script on errors "option batch abort" ^# Disable overwrite confirmations that conflict with the previous "option confirm off" ^# Connect replacing your own username, password and retain server address "open scp://[user]:[password]@[retain server address]" ^# Change remote directory "cd /opt/beginfinite/retain/RetainServer/WEB-INF/cfg" ^# Force binary mode transfer "option transfer binary" ^# Upload the file to current working directory "put [file location on windows]*.csv" ^# Disconnect "close" ^# Exit WinSCP "exit"
Automate the Script
You can now automate the running of this batch file in Task Scheduler (https://technet.microsoft.com/en-us/library/cc721871.aspx) as a simple task to run before the Retain archive job. Set the run time of the task so that it completes before the Retain job begins.
64 Setting Up Pull-Based Archiving
Configuring Retain for Archiving Site-Collection Document LinksOnline Exchange in Office 365 lets you attach documents that are stored in Site Collections in SharePoint Online/OneDrive. However, Exchange only contains links to the documents, not actual copies of them. The documents still reside only in the Site Collections themselves.
The ApplicationImpersonation right only provides Retain with access to what is stored in Exchange. Therefore, when Retain attempts to archive an attached document, it generates an error similar to the following:
11:04:16, 704[Thread-4920] [ERROR] ExchangeAttachment: error while creating attachment. java.io.IOException: SharePointError - Impersonation has no access to: https://gwava-my.sharepoint.com/personal/user08_gwava_onmicrosoft_com1/Documents/Email attachments/office 365 users(1) (1).txt
Granting Access to a Site CollectionFor Retain to archive an attached document in Exchange, the Retain user must be added as a Site Collection Administrator in SharePoint/OneDrive.
1 Browse to the Office 365 Admin page.2 Select SharePoint, then click Site Collections and select the collection that contains the
attachment.3 Click the Owners tab and choose Manage Administrators.4 Add the Retain user as a Site Collection Administrator.
The Retain user now has rights to access the documents for archiving.
Granting Access to Multiple Site CollectionsIf you need to provide site collection administration access to multiple collections, consider a soluction, such as the SharePoint Online Management Shell script (http://sharepointjack.com/2015/add-a-person-as-a-site-collection-administrator-to-every-office-365-site-sharepoint-online-site-collection/).
Creating an Exchange Module “Office 365” on page 66 “Exchange without Access to Active Directory” on page 74 “Exchange with Access to Active Directory” on page 81 “Core Settings Tab (Exchange)” on page 105 “Impersonation Tab (Exchange)” on page 105 “Hosted Services Tab - Office 365 Settings” on page 106 “Hosted Services Tab - Non-LDAP Exchange Settings” on page 107 “Exchange Forest Tab (Exchange)” on page 108 “User Forests Tab (Exchange)” on page 109 “Delegates Tab (Exchange)” on page 109
Setting Up Pull-Based Archiving 65
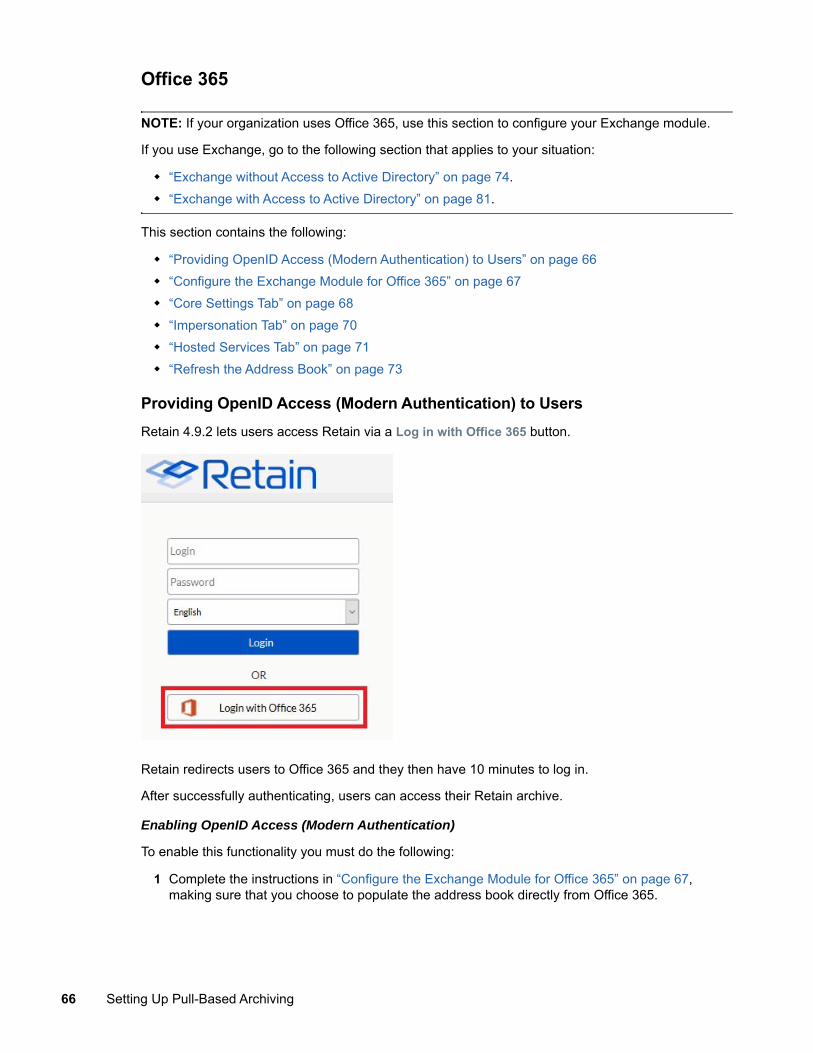
Office 365
NOTE: If your organization uses Office 365, use this section to configure your Exchange module.
If you use Exchange, go to the following section that applies to your situation:
“Exchange without Access to Active Directory” on page 74. “Exchange with Access to Active Directory” on page 81.
This section contains the following:
“Providing OpenID Access (Modern Authentication) to Users” on page 66 “Configure the Exchange Module for Office 365” on page 67 “Core Settings Tab” on page 68 “Impersonation Tab” on page 70 “Hosted Services Tab” on page 71 “Refresh the Address Book” on page 73
Providing OpenID Access (Modern Authentication) to UsersRetain 4.9.2 lets users access Retain via a Log in with Office 365 button.
Retain redirects users to Office 365 and they then have 10 minutes to log in.
After successfully authenticating, users can access their Retain archive.
Enabling OpenID Access (Modern Authentication)
To enable this functionality you must do the following:
1 Complete the instructions in “Configure the Exchange Module for Office 365” on page 67, making sure that you choose to populate the address book directly from Office 365.
66 Setting Up Pull-Based Archiving
IMPORTANT: Using a .csv file to populate the address book is not compatible with this functionality.
2 After you have created the module and verified (tested) the Office 365 connection, open the Retain Server Manager.
3 Click Server Configuration > Accounts tab and go to the Office 365 End User Authentication panel.
4 Copy and paste the same Tenant ID and Client ID as you used in the “Credentials Sub-panel” on page 73.
5 In Microsoft Azure, on the Registered Apps page in the Authentication menu, do the following:5a Under Web > Redirect URIs, add the URL of the openIdConnect.jsp file on the Retain
Server that you are configuring.For example, https://your-Retain-server/RetainServer/Server/openIdConnect.jsp
5b Under Implicit grant, enable the ID tokens option.5c Under Supported account types, enable the Accounts in any organizational directory (Any
Azure AD directory - Multitenant option.
Enabling Multiple Retain Servers for OpenID Support
If you have multiple Retain servers archiving from the same Office 365 system, you must do the following on each of those Retain servers.
1 Edit the /opt/beginfinite/retain/RetainServer/WEB-INF/classes/config/misc.properties file.
2 Add the following line:msopenid.redirecturi=https://your-Retain-server/RetainServer/Server/openIdConnect.jsp
3 Restart Tomcat.
Configure the Exchange Module for Office 365The Exchange module must be configured in the Retain Server before any communication between Retain and an existing Exchange message system can occur. Open the Retain management page on the Retain Server, and select Module Configuration.
Setting Up Pull-Based Archiving 67
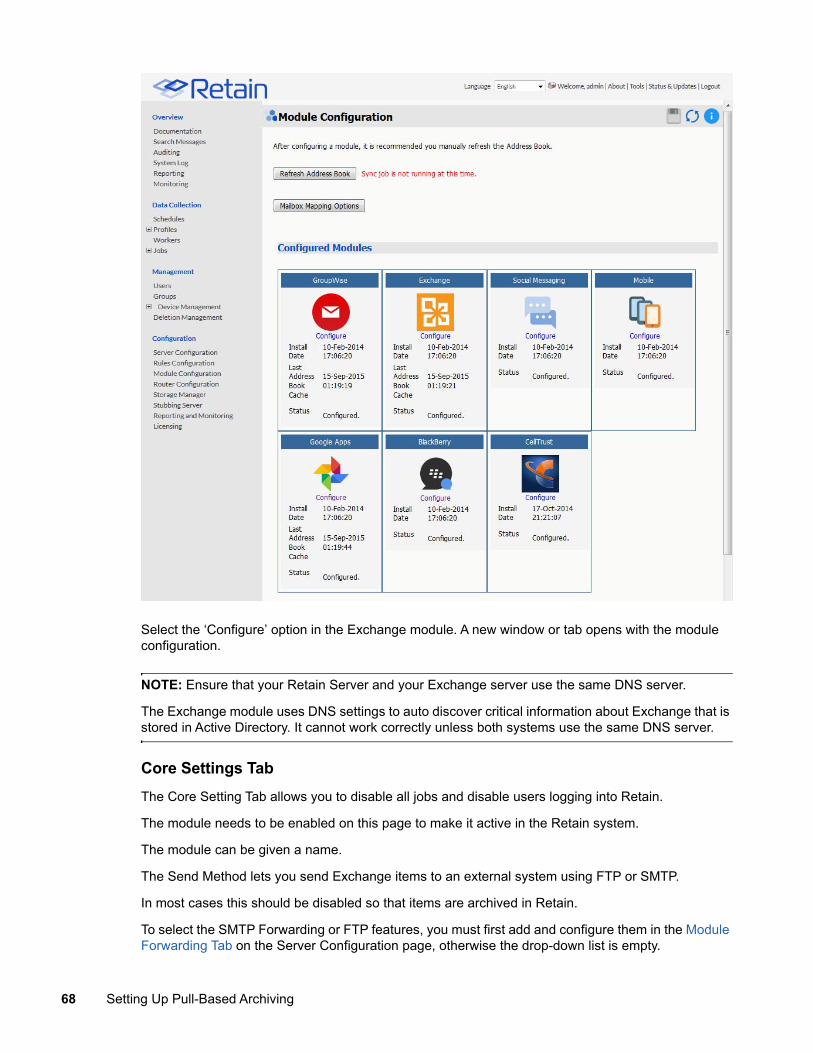
Select the ‘Configure’ option in the Exchange module. A new window or tab opens with the module configuration.
NOTE: Ensure that your Retain Server and your Exchange server use the same DNS server.
The Exchange module uses DNS settings to auto discover critical information about Exchange that is stored in Active Directory. It cannot work correctly unless both systems use the same DNS server.
Core Settings TabThe Core Setting Tab allows you to disable all jobs and disable users logging into Retain.
The module needs to be enabled on this page to make it active in the Retain system.
The module can be given a name.
The Send Method lets you send Exchange items to an external system using FTP or SMTP.
In most cases this should be disabled so that items are archived in Retain.
To select the SMTP Forwarding or FTP features, you must first add and configure them in the Module Forwarding Tab on the Server Configuration page, otherwise the drop-down list is empty.
68 Setting Up Pull-Based Archiving
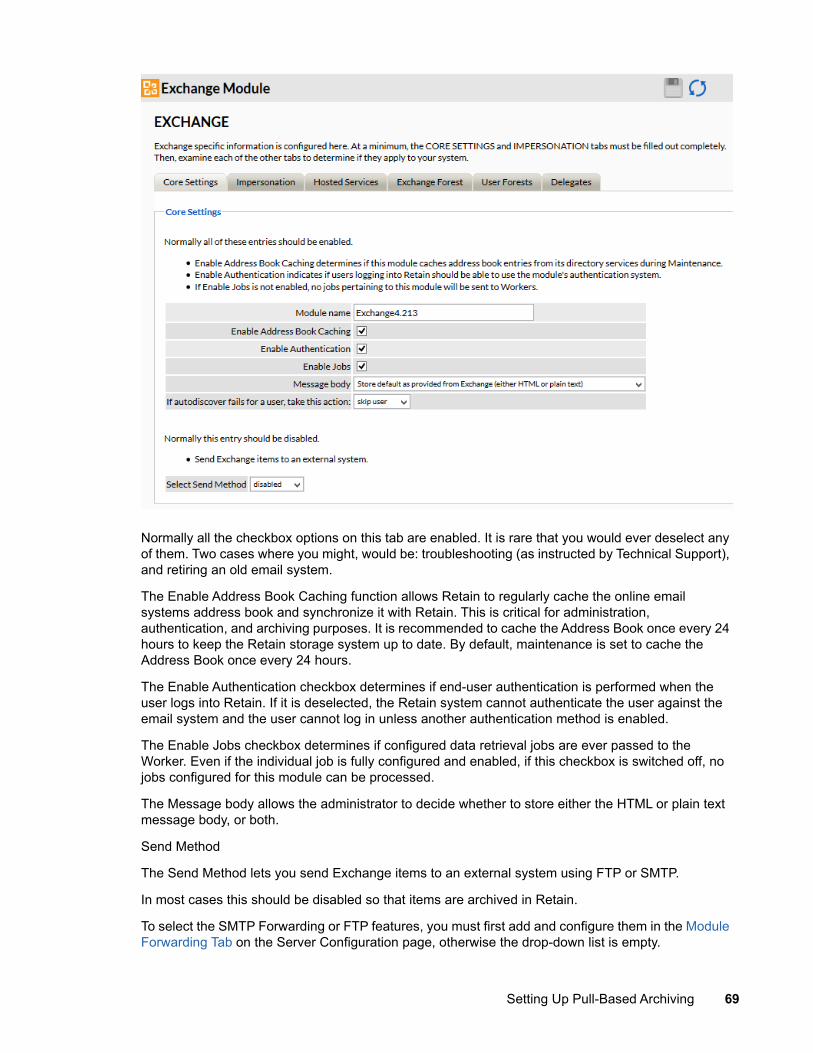
Normally all the checkbox options on this tab are enabled. It is rare that you would ever deselect any of them. Two cases where you might, would be: troubleshooting (as instructed by Technical Support), and retiring an old email system.
The Enable Address Book Caching function allows Retain to regularly cache the online email systems address book and synchronize it with Retain. This is critical for administration, authentication, and archiving purposes. It is recommended to cache the Address Book once every 24 hours to keep the Retain storage system up to date. By default, maintenance is set to cache the Address Book once every 24 hours.
The Enable Authentication checkbox determines if end-user authentication is performed when the user logs into Retain. If it is deselected, the Retain system cannot authenticate the user against the email system and the user cannot log in unless another authentication method is enabled.
The Enable Jobs checkbox determines if configured data retrieval jobs are ever passed to the Worker. Even if the individual job is fully configured and enabled, if this checkbox is switched off, no jobs configured for this module can be processed.
The Message body allows the administrator to decide whether to store either the HTML or plain text message body, or both.
Send Method
The Send Method lets you send Exchange items to an external system using FTP or SMTP.
In most cases this should be disabled so that items are archived in Retain.
To select the SMTP Forwarding or FTP features, you must first add and configure them in the Module Forwarding Tab on the Server Configuration page, otherwise the drop-down list is empty.
Setting Up Pull-Based Archiving 69
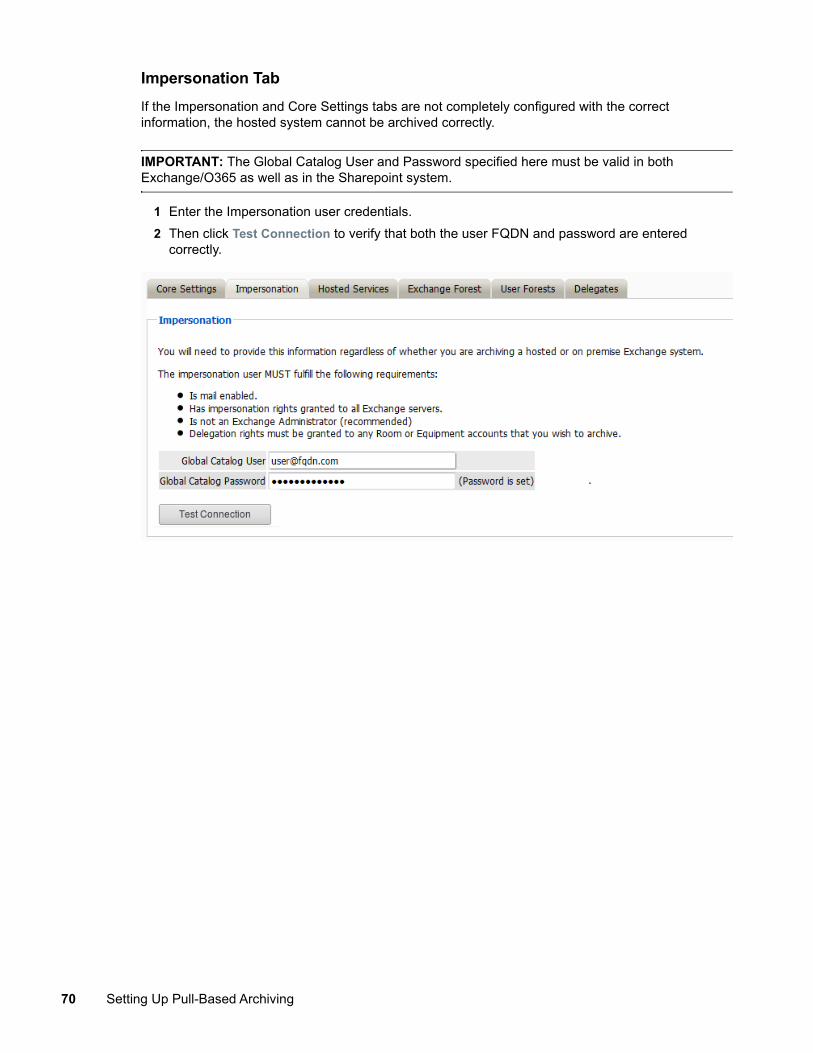
Impersonation TabIf the Impersonation and Core Settings tabs are not completely configured with the correct information, the hosted system cannot be archived correctly.
IMPORTANT: The Global Catalog User and Password specified here must be valid in both Exchange/O365 as well as in the Sharepoint system.
1 Enter the Impersonation user credentials.2 Then click Test Connection to verify that both the user FQDN and password are entered
correctly.
70 Setting Up Pull-Based Archiving
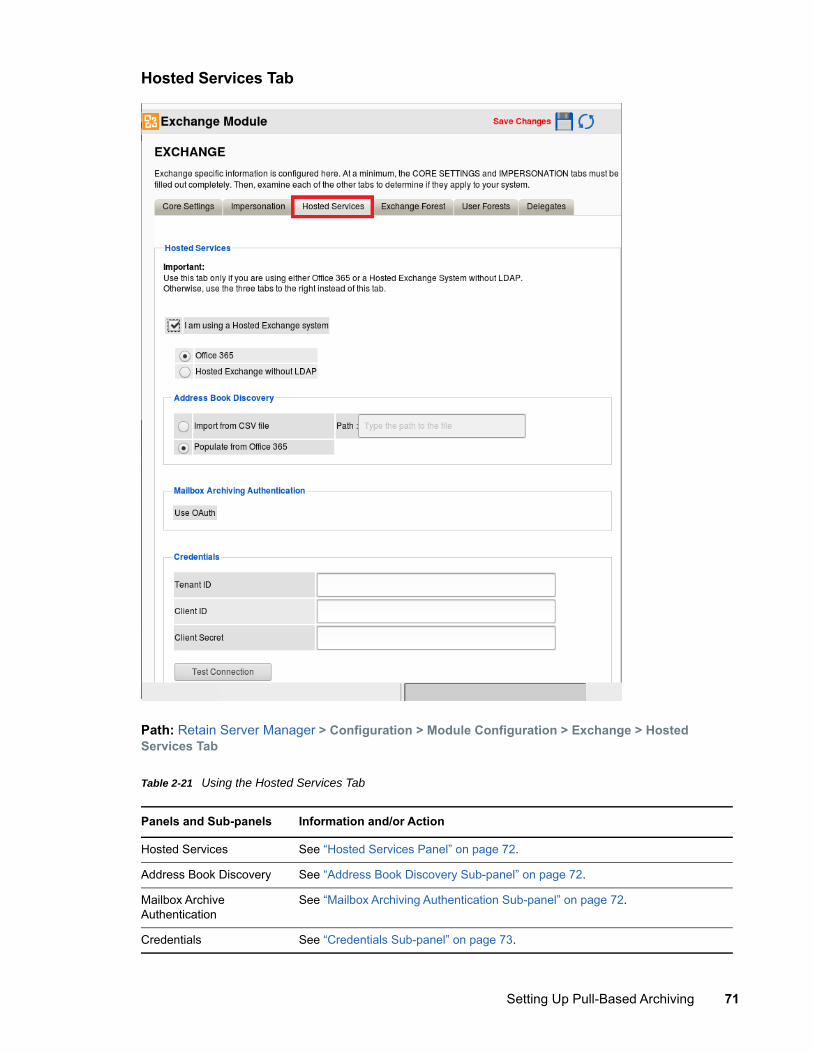
Hosted Services Tab
Path: Retain Server Manager > Configuration > Module Configuration > Exchange > Hosted Services Tab
Table 2-21 Using the Hosted Services Tab
Panels and Sub-panels Information and/or Action
Hosted Services See “Hosted Services Panel” on page 72.
Address Book Discovery See “Address Book Discovery Sub-panel” on page 72.
Mailbox Archive Authentication
See “Mailbox Archiving Authentication Sub-panel” on page 72.
Credentials See “Credentials Sub-panel” on page 73.
Setting Up Pull-Based Archiving 71
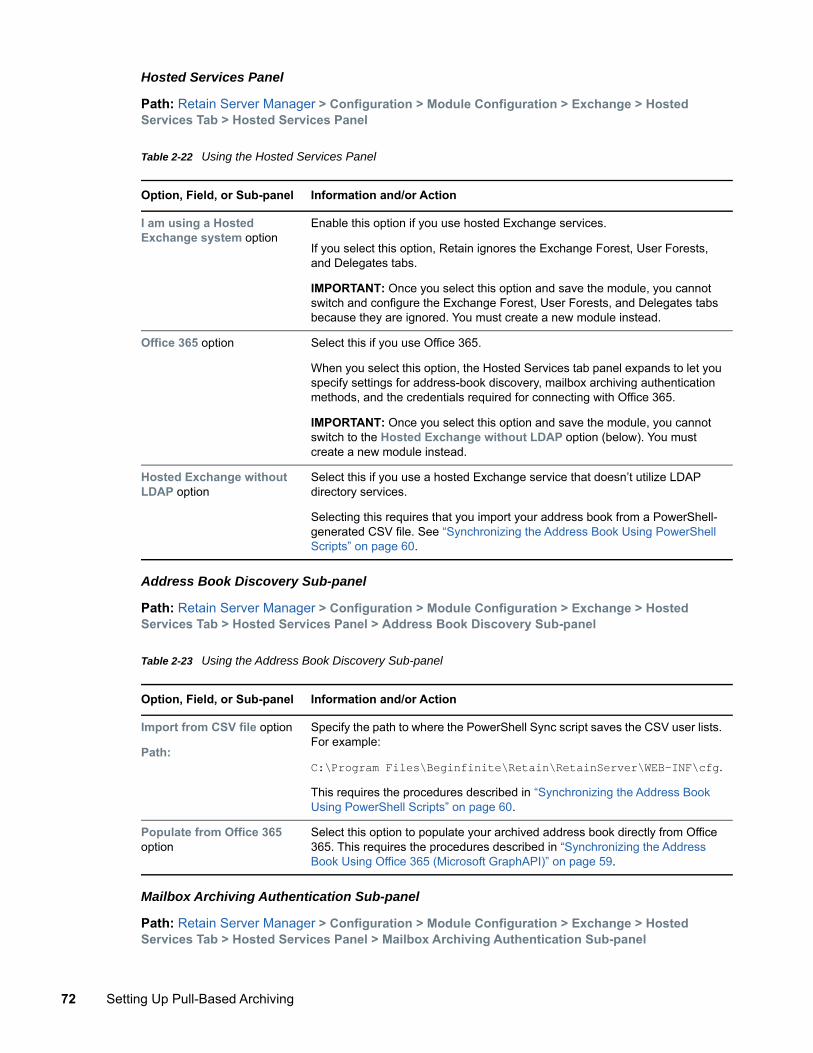
Hosted Services Panel
Path: Retain Server Manager > Configuration > Module Configuration > Exchange > Hosted Services Tab > Hosted Services Panel
Table 2-22 Using the Hosted Services Panel
Address Book Discovery Sub-panel
Path: Retain Server Manager > Configuration > Module Configuration > Exchange > Hosted Services Tab > Hosted Services Panel > Address Book Discovery Sub-panel
Table 2-23 Using the Address Book Discovery Sub-panel
Mailbox Archiving Authentication Sub-panel
Path: Retain Server Manager > Configuration > Module Configuration > Exchange > Hosted Services Tab > Hosted Services Panel > Mailbox Archiving Authentication Sub-panel
Option, Field, or Sub-panel Information and/or Action
I am using a Hosted Exchange system option
Enable this option if you use hosted Exchange services.
If you select this option, Retain ignores the Exchange Forest, User Forests, and Delegates tabs.
IMPORTANT: Once you select this option and save the module, you cannot switch and configure the Exchange Forest, User Forests, and Delegates tabs because they are ignored. You must create a new module instead.
Office 365 option Select this if you use Office 365.
When you select this option, the Hosted Services tab panel expands to let you specify settings for address-book discovery, mailbox archiving authentication methods, and the credentials required for connecting with Office 365.
IMPORTANT: Once you select this option and save the module, you cannot switch to the Hosted Exchange without LDAP option (below). You must create a new module instead.
Hosted Exchange without LDAP option
Select this if you use a hosted Exchange service that doesn’t utilize LDAP directory services.
Selecting this requires that you import your address book from a PowerShell-generated CSV file. See “Synchronizing the Address Book Using PowerShell Scripts” on page 60.
Option, Field, or Sub-panel Information and/or Action
Import from CSV file option
Path:
Specify the path to where the PowerShell Sync script saves the CSV user lists. For example:
C:\Program Files\Beginfinite\Retain\RetainServer\WEB-INF\cfg.
This requires the procedures described in “Synchronizing the Address Book Using PowerShell Scripts” on page 60.
Populate from Office 365 option
Select this option to populate your archived address book directly from Office 365. This requires the procedures described in “Synchronizing the Address Book Using Office 365 (Microsoft GraphAPI)” on page 59.
72 Setting Up Pull-Based Archiving
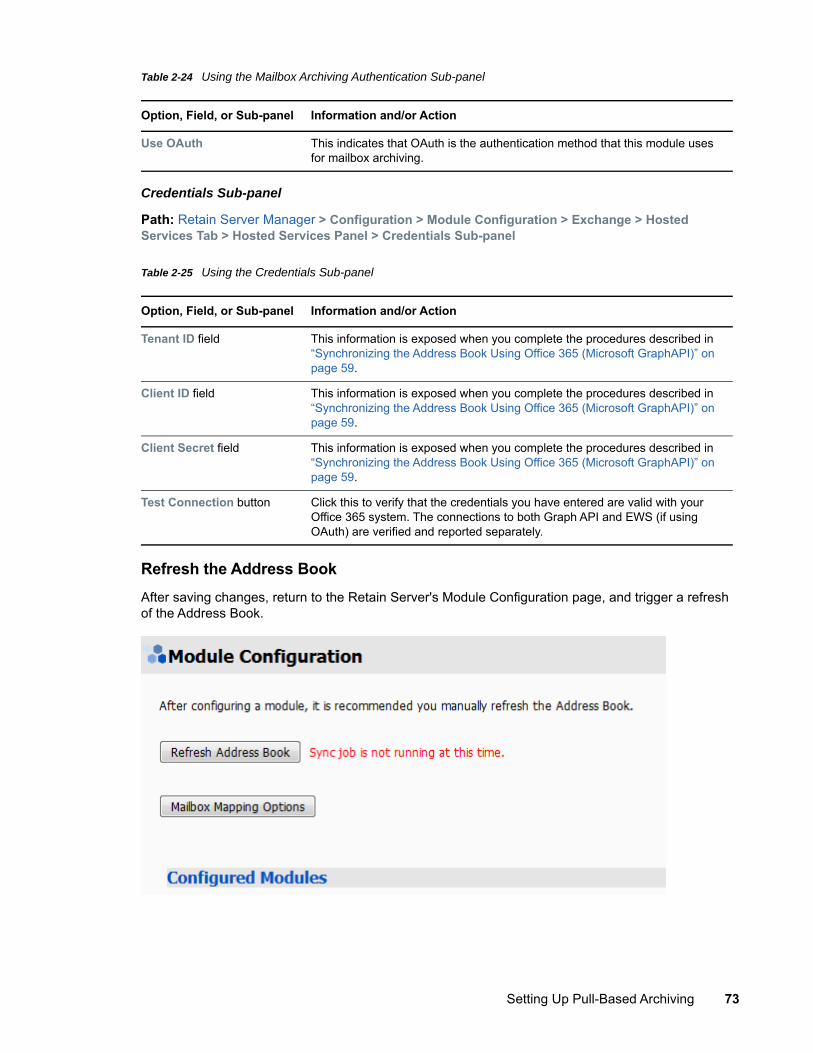
Table 2-24 Using the Mailbox Archiving Authentication Sub-panel
Credentials Sub-panel
Path: Retain Server Manager > Configuration > Module Configuration > Exchange > Hosted Services Tab > Hosted Services Panel > Credentials Sub-panel
Table 2-25 Using the Credentials Sub-panel
Refresh the Address BookAfter saving changes, return to the Retain Server's Module Configuration page, and trigger a refresh of the Address Book.
Option, Field, or Sub-panel Information and/or Action
Use OAuth This indicates that OAuth is the authentication method that this module uses for mailbox archiving.
Option, Field, or Sub-panel Information and/or Action
Tenant ID field This information is exposed when you complete the procedures described in “Synchronizing the Address Book Using Office 365 (Microsoft GraphAPI)” on page 59.
Client ID field This information is exposed when you complete the procedures described in “Synchronizing the Address Book Using Office 365 (Microsoft GraphAPI)” on page 59.
Client Secret field This information is exposed when you complete the procedures described in “Synchronizing the Address Book Using Office 365 (Microsoft GraphAPI)” on page 59.
Test Connection button Click this to verify that the credentials you have entered are valid with your Office 365 system. The connections to both Graph API and EWS (if using OAuth) are verified and reported separately.
Setting Up Pull-Based Archiving 73
Depending on the size of the address book, it may take several minutes to return with information, but a successful configuration returns a correct address book cache date and no errors. The date should reflect the date when the address book refresh was triggered.
The Status may show “Address Book Cache Never Run” or may list commonly mis-configured or missed items if the Refresh job fails.
Once the status is configured and the Address Book has been cached, Retain can connect to and archive messages from the Exchange server. The system is ready to have workers, schedules, profiles, and jobs configured, and those options now appear on the main administrative interface.
The Address Book is refreshed whenever the button is pressed, during the nightly maintenance cycle, and before each job.
Exchange without Access to Active DirectoryUse this section to configure a module for a hosted Exchange system where you don’t have administrative access to its associated Active Directory services.
This section contains the following:
“Configure the Exchange Module for Exchange without Access to Active Directory” on page 74 “Core Settings Tab” on page 75 “Impersonation Tab” on page 77 “Hosted Services Tab” on page 78 “Refresh Address Book” on page 80
Configure the Exchange Module for Exchange without Access to Active DirectoryThe Exchange module must be configured in the Retain Server before any communication between Retain and an existing Exchange message system can occur. Open the Retain management page on the Retain Server, and select Module Configuration.
74 Setting Up Pull-Based Archiving
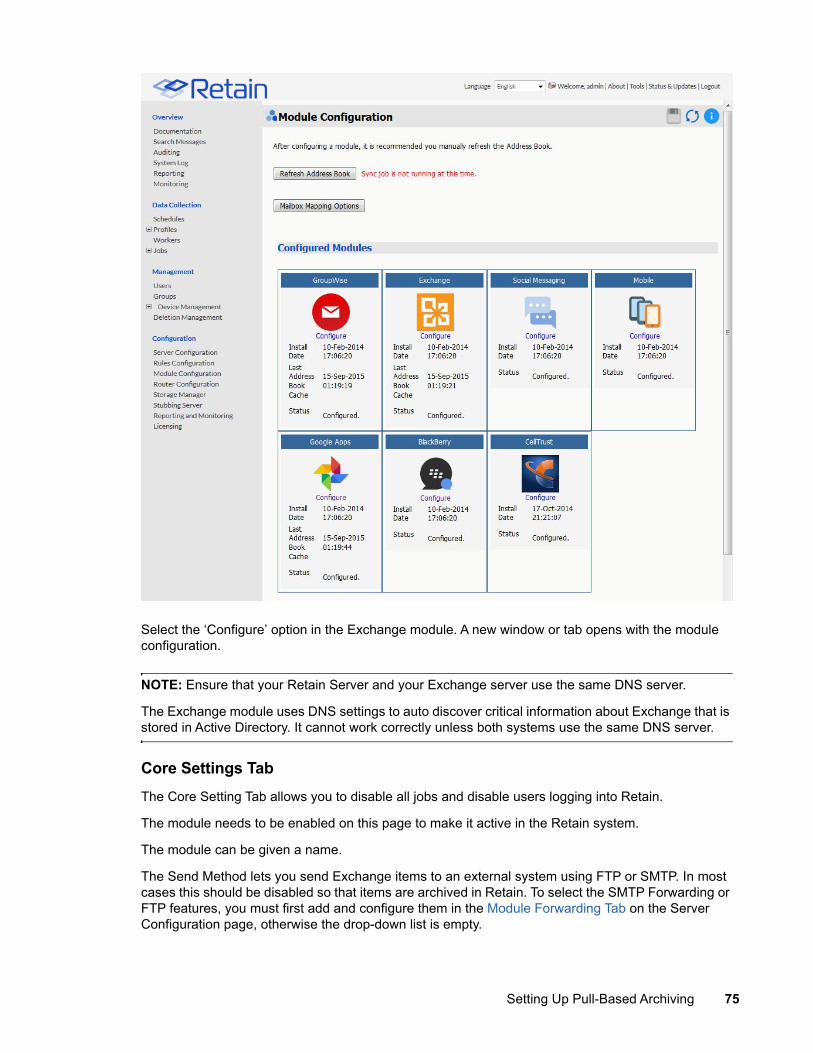
Select the ‘Configure’ option in the Exchange module. A new window or tab opens with the module configuration.
NOTE: Ensure that your Retain Server and your Exchange server use the same DNS server.
The Exchange module uses DNS settings to auto discover critical information about Exchange that is stored in Active Directory. It cannot work correctly unless both systems use the same DNS server.
Core Settings TabThe Core Setting Tab allows you to disable all jobs and disable users logging into Retain.
The module needs to be enabled on this page to make it active in the Retain system.
The module can be given a name.
The Send Method lets you send Exchange items to an external system using FTP or SMTP. In most cases this should be disabled so that items are archived in Retain. To select the SMTP Forwarding or FTP features, you must first add and configure them in the Module Forwarding Tab on the Server Configuration page, otherwise the drop-down list is empty.
Setting Up Pull-Based Archiving 75
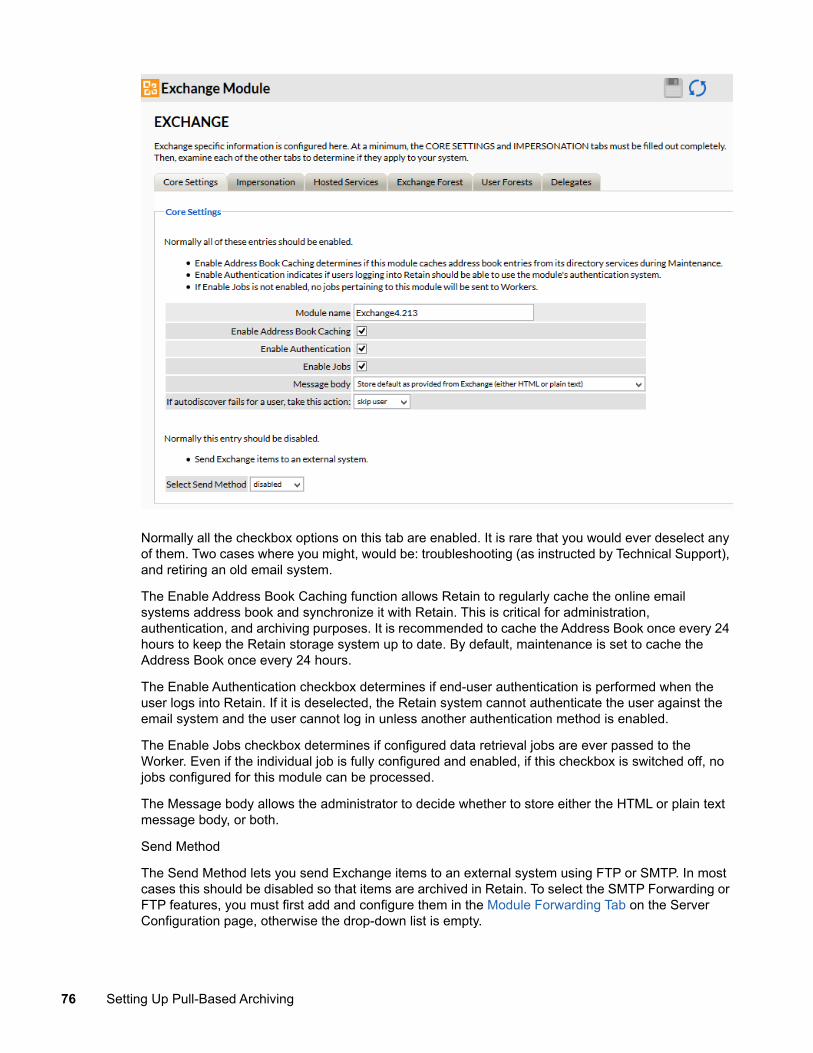
Normally all the checkbox options on this tab are enabled. It is rare that you would ever deselect any of them. Two cases where you might, would be: troubleshooting (as instructed by Technical Support), and retiring an old email system.
The Enable Address Book Caching function allows Retain to regularly cache the online email systems address book and synchronize it with Retain. This is critical for administration, authentication, and archiving purposes. It is recommended to cache the Address Book once every 24 hours to keep the Retain storage system up to date. By default, maintenance is set to cache the Address Book once every 24 hours.
The Enable Authentication checkbox determines if end-user authentication is performed when the user logs into Retain. If it is deselected, the Retain system cannot authenticate the user against the email system and the user cannot log in unless another authentication method is enabled.
The Enable Jobs checkbox determines if configured data retrieval jobs are ever passed to the Worker. Even if the individual job is fully configured and enabled, if this checkbox is switched off, no jobs configured for this module can be processed.
The Message body allows the administrator to decide whether to store either the HTML or plain text message body, or both.
Send Method
The Send Method lets you send Exchange items to an external system using FTP or SMTP. In most cases this should be disabled so that items are archived in Retain. To select the SMTP Forwarding or FTP features, you must first add and configure them in the Module Forwarding Tab on the Server Configuration page, otherwise the drop-down list is empty.
76 Setting Up Pull-Based Archiving
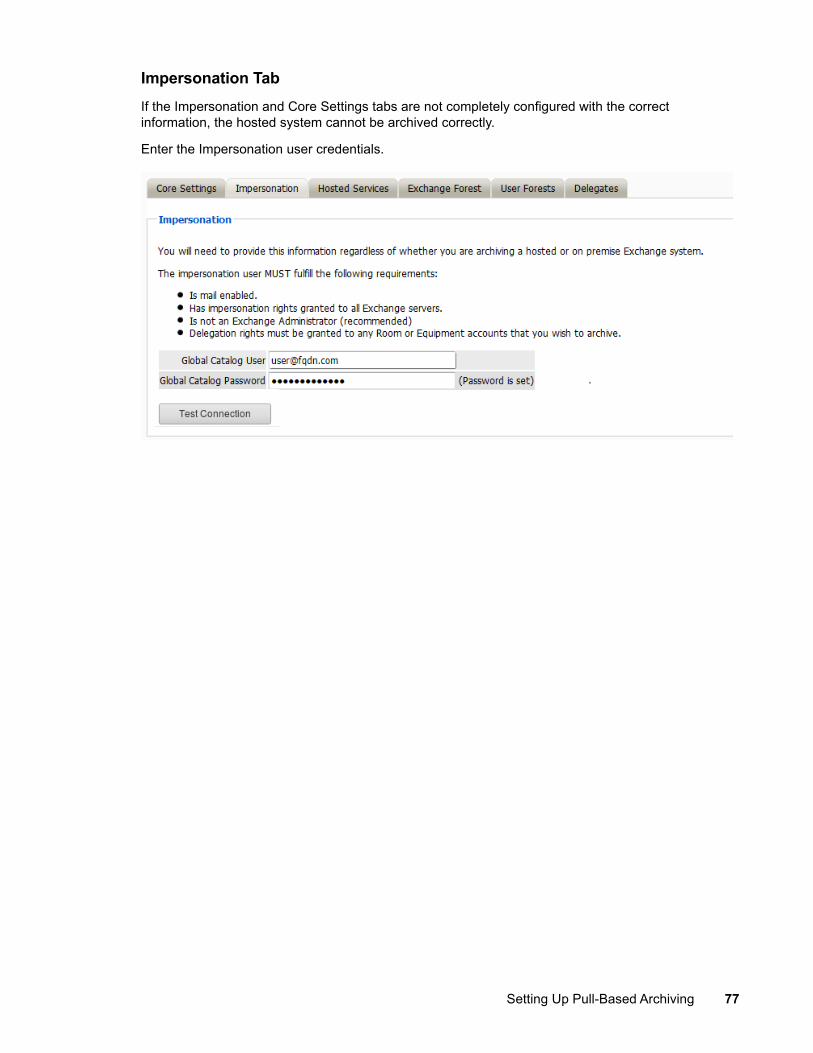
Impersonation TabIf the Impersonation and Core Settings tabs are not completely configured with the correct information, the hosted system cannot be archived correctly.
Enter the Impersonation user credentials.
Setting Up Pull-Based Archiving 77
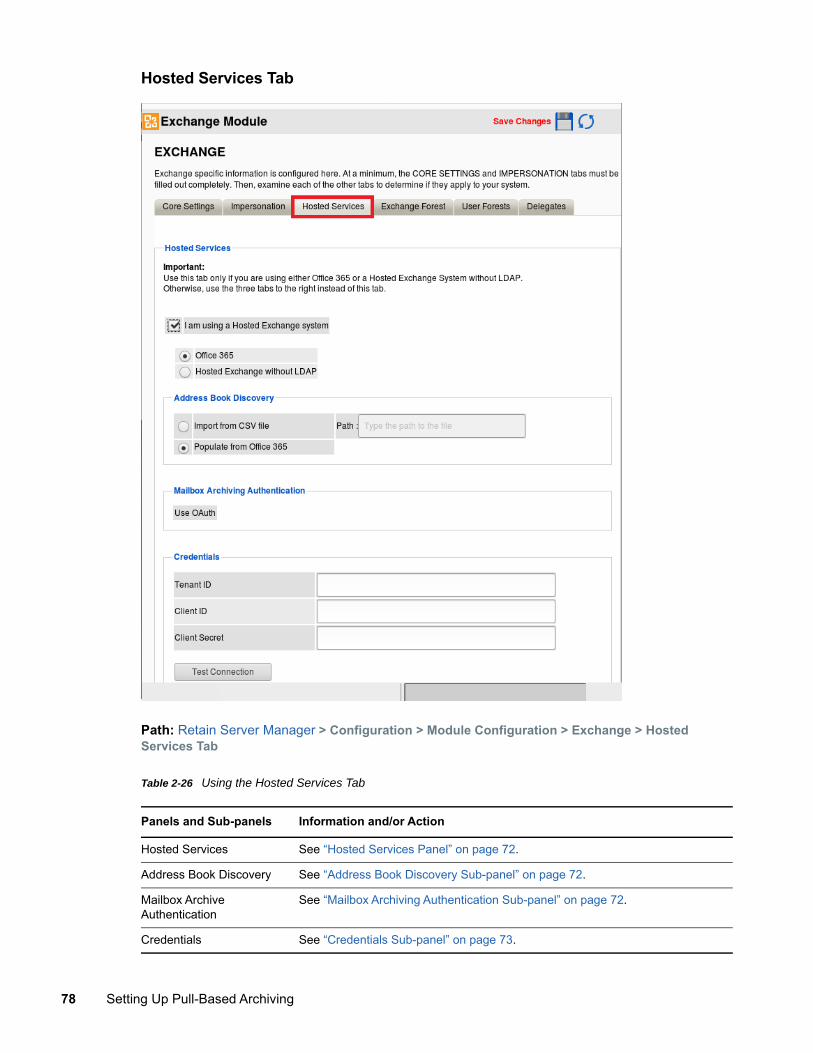
Hosted Services Tab
Path: Retain Server Manager > Configuration > Module Configuration > Exchange > Hosted Services Tab
Table 2-26 Using the Hosted Services Tab
Panels and Sub-panels Information and/or Action
Hosted Services See “Hosted Services Panel” on page 72.
Address Book Discovery See “Address Book Discovery Sub-panel” on page 72.
Mailbox Archive Authentication
See “Mailbox Archiving Authentication Sub-panel” on page 72.
Credentials See “Credentials Sub-panel” on page 73.
78 Setting Up Pull-Based Archiving
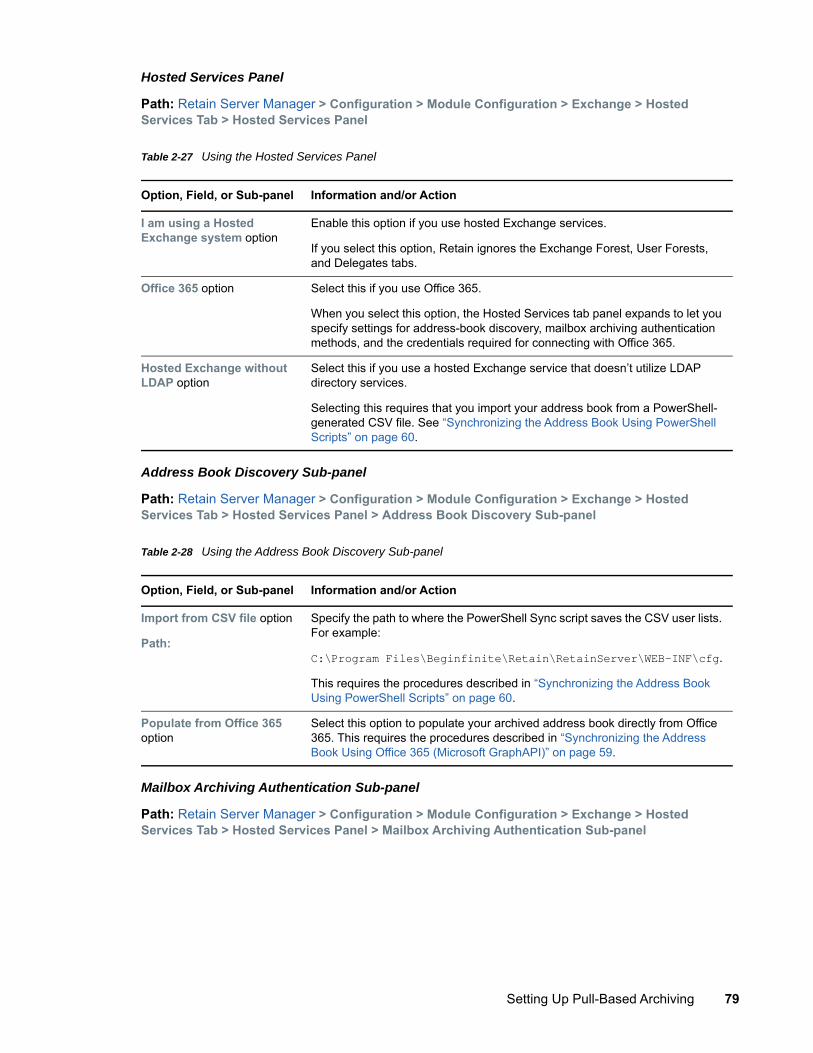
Hosted Services Panel
Path: Retain Server Manager > Configuration > Module Configuration > Exchange > Hosted Services Tab > Hosted Services Panel
Table 2-27 Using the Hosted Services Panel
Address Book Discovery Sub-panel
Path: Retain Server Manager > Configuration > Module Configuration > Exchange > Hosted Services Tab > Hosted Services Panel > Address Book Discovery Sub-panel
Table 2-28 Using the Address Book Discovery Sub-panel
Mailbox Archiving Authentication Sub-panel
Path: Retain Server Manager > Configuration > Module Configuration > Exchange > Hosted Services Tab > Hosted Services Panel > Mailbox Archiving Authentication Sub-panel
Option, Field, or Sub-panel Information and/or Action
I am using a Hosted Exchange system option
Enable this option if you use hosted Exchange services.
If you select this option, Retain ignores the Exchange Forest, User Forests, and Delegates tabs.
Office 365 option Select this if you use Office 365.
When you select this option, the Hosted Services tab panel expands to let you specify settings for address-book discovery, mailbox archiving authentication methods, and the credentials required for connecting with Office 365.
Hosted Exchange without LDAP option
Select this if you use a hosted Exchange service that doesn’t utilize LDAP directory services.
Selecting this requires that you import your address book from a PowerShell-generated CSV file. See “Synchronizing the Address Book Using PowerShell Scripts” on page 60.
Option, Field, or Sub-panel Information and/or Action
Import from CSV file option
Path:
Specify the path to where the PowerShell Sync script saves the CSV user lists. For example:
C:\Program Files\Beginfinite\Retain\RetainServer\WEB-INF\cfg.
This requires the procedures described in “Synchronizing the Address Book Using PowerShell Scripts” on page 60.
Populate from Office 365 option
Select this option to populate your archived address book directly from Office 365. This requires the procedures described in “Synchronizing the Address Book Using Office 365 (Microsoft GraphAPI)” on page 59.
Setting Up Pull-Based Archiving 79
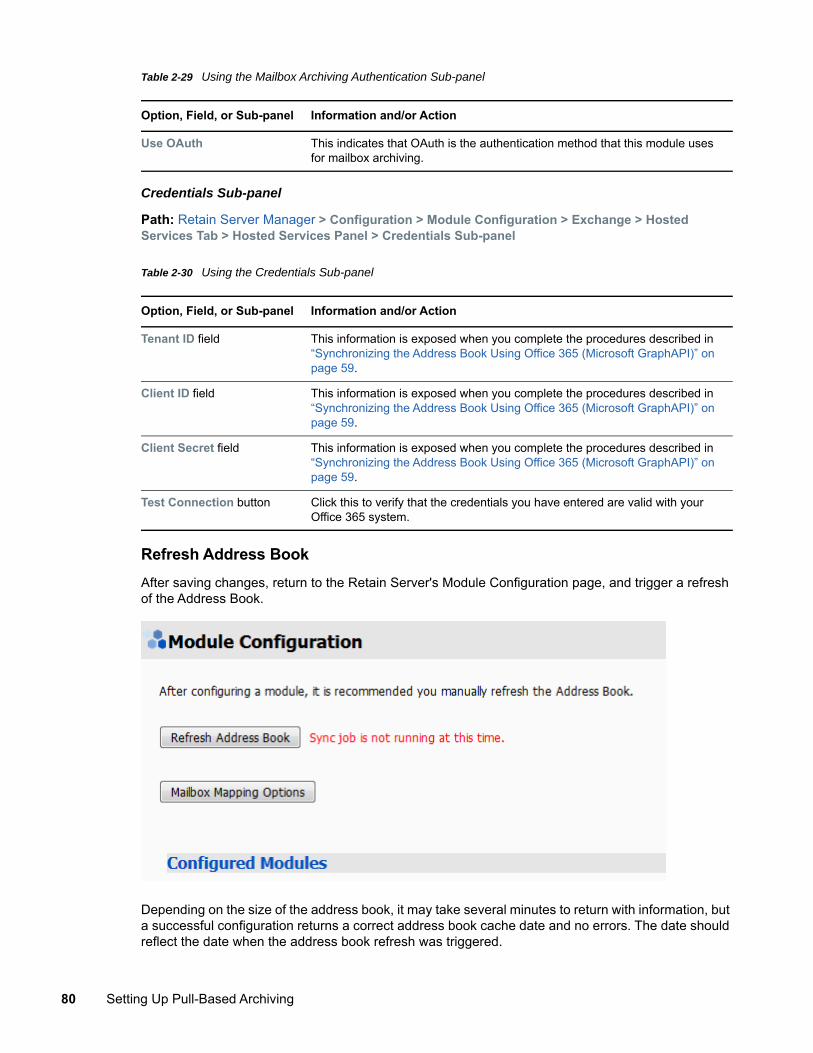
Table 2-29 Using the Mailbox Archiving Authentication Sub-panel
Credentials Sub-panel
Path: Retain Server Manager > Configuration > Module Configuration > Exchange > Hosted Services Tab > Hosted Services Panel > Credentials Sub-panel
Table 2-30 Using the Credentials Sub-panel
Refresh Address BookAfter saving changes, return to the Retain Server's Module Configuration page, and trigger a refresh of the Address Book.
Depending on the size of the address book, it may take several minutes to return with information, but a successful configuration returns a correct address book cache date and no errors. The date should reflect the date when the address book refresh was triggered.
Option, Field, or Sub-panel Information and/or Action
Use OAuth This indicates that OAuth is the authentication method that this module uses for mailbox archiving.
Option, Field, or Sub-panel Information and/or Action
Tenant ID field This information is exposed when you complete the procedures described in “Synchronizing the Address Book Using Office 365 (Microsoft GraphAPI)” on page 59.
Client ID field This information is exposed when you complete the procedures described in “Synchronizing the Address Book Using Office 365 (Microsoft GraphAPI)” on page 59.
Client Secret field This information is exposed when you complete the procedures described in “Synchronizing the Address Book Using Office 365 (Microsoft GraphAPI)” on page 59.
Test Connection button Click this to verify that the credentials you have entered are valid with your Office 365 system.
80 Setting Up Pull-Based Archiving
The Status may show “Address Book Cache Never Run” or may list commonly mis-configured or missed items if the Refresh job fails.
Once the status is configured and the Address Book has been cached, Retain can connect to and archive messages from the Exchange server. The system is ready to have workers, schedules, profiles, and jobs configured, and those options now appear on the main administrative interface.
The Address Book is refreshed whenever the button is pressed, during the nightly maintenance cycle, and before each job.
Exchange with Access to Active DirectoryThe Exchange module can connect to On-Premise Exchange servers.
Supported Exchange Forest ConfigurationsRetain supports:
A single forest Active Directory system, (Exchange and standard users) An Exchange Resource Forest, (One Exchange Forest linked to one or multiple User Forests)
Retain does NOT support multiple linked Exchange Forests. Ensure that the Exchange Settings have been configured correctly before continuing the Exchange module setup.
Exchange Prerequisites required for RetainThere are several prerequisites that need to be done in Exchange for Retain to successfully archive the mailbox databases:
A mailbox user with ApplicationImpersonation rights Basic Authentication enabled for Autodiscover and EWS on all Client Access Servers A DNS SRV record Set the DNS used by the Retain server to be the same as used by Exchange. Set a Rolling In-Place Hold to retain data until Retain can archive it. If "Configure email forwarding for a mailbox" is in use, enable "Deliver messages to both
forwarding address and mailbox", otherwise no messages can stored in Exchange and Retain cannot archive any messages.
Create the Retain Global Catalog UserTo connect with Exchange, Retain needs a user with appropriate rights. This can be accomplished by using an existing user, or by creating a new one. It is recommended to create a new user for Retain archiving. If creating a new user, ensure that the user is an active user account and that the password does not change to ensure Retain can access mail without changing settings. This user is sometimes called a ‘service account’. Retain calls this user the ‘global catalog user’.
The user created or used for Retain must be a “mailbox-enabled user” with read access to see all other users, groups, resources, and Exchange Servers in the Exchange Forest. The user is utilized by both the Retain Server and the Worker for LDAP lookups in Active Directory. The Retain user also must have Exchange impersonation rights to every mailbox user on every server in the organization to be archived. The Retain user MUST NOT be a member of any Exchange Administrator group, as Exchange denies impersonation rights for all administrator accounts.
Additional permissions need to be added to the user created for Retain. The quickest way to add these rights is through the Exchange Management Shell.
Setting Up Pull-Based Archiving 81
After creating the new user in Active Directory, open the Exchange Management Shell.
Grant Impersonation Permissions to the Retain user.In Exchange 2013 and 2016 Impersonation permissions can be granted in the Exchange Admin Center under Permissions.
Under Admin Roles create a new role (e.g. Retain Impersonation Management). Add the role "ApplicationImpersonation" and add the Retain User as a member.
You can also accomplish this via PowerShell commands using the Exchange Management Shell.
The commands required are different depending on the version of the Exchange Server. Exchange 2010, and 2013 require only one command per Exchange system to be issued, whereas Exchange 2007 requires the commands to be run on every Exchange server in the Exchange system to grant required permissions. If the Exchange system contains mixed 2007, 2010, and 2013 servers, the different commands must be completed on one server of each type.
Exchange 2010, 2013, and 2016 commands
For Exchange 2010, 2013, and 2016 the only command necessary for impersonation permissions is:
New-ManagementRoleAssignment –name ImpersonationAssignmentName –Role ApplicationImpersonation –User ServiceAccount
Where the ‘Name’ is a name chosen by the administrator and the ‘ServiceAccount’ is the name of the Retain user.
For Example:
New-ManagementRoleAssignment –Name impersonation-retain -Role ApplicationImpersonation -UserRetain
If additional Exchange servers are added to the system after running this command to grant rights to the ‘retain’ user, the command must be run again to grant rights to the new server.
Room and Equipment ResourcesTo archive Room and Equipment Resources, or to restore them, the Retain user, or Service Account, must also have delegation rights. These commands must be issued manually for each Room and Equipment or resource mailbox on every relevant server. This is required for 2013 and 2016.
These commands must be issued:
(‘Retain’ is used here as the name of the Service Account, or Retain user, and the ‘Mailbox Database’ should be changed to the appropriate name.)
(NOTE: every time a new Room and Equipment or resource mailbox is added, the first command must be re-run. )
Exchange 2013 and 2016 Powershell commands
Get-Mailbox –ResultSize Unlimited –Database “Mailbox Database” | Add-MailboxPermission –User “Retain” –AccessRights FullAccess
Add-ADPermission –Identity “Mailbox Database” –User “Retain” –ExtendedRights Receive-As
Add-ADPermission –Identity “Mailbox Database” –User “Retain” –ExtendedRights Send-As
82 Setting Up Pull-Based Archiving
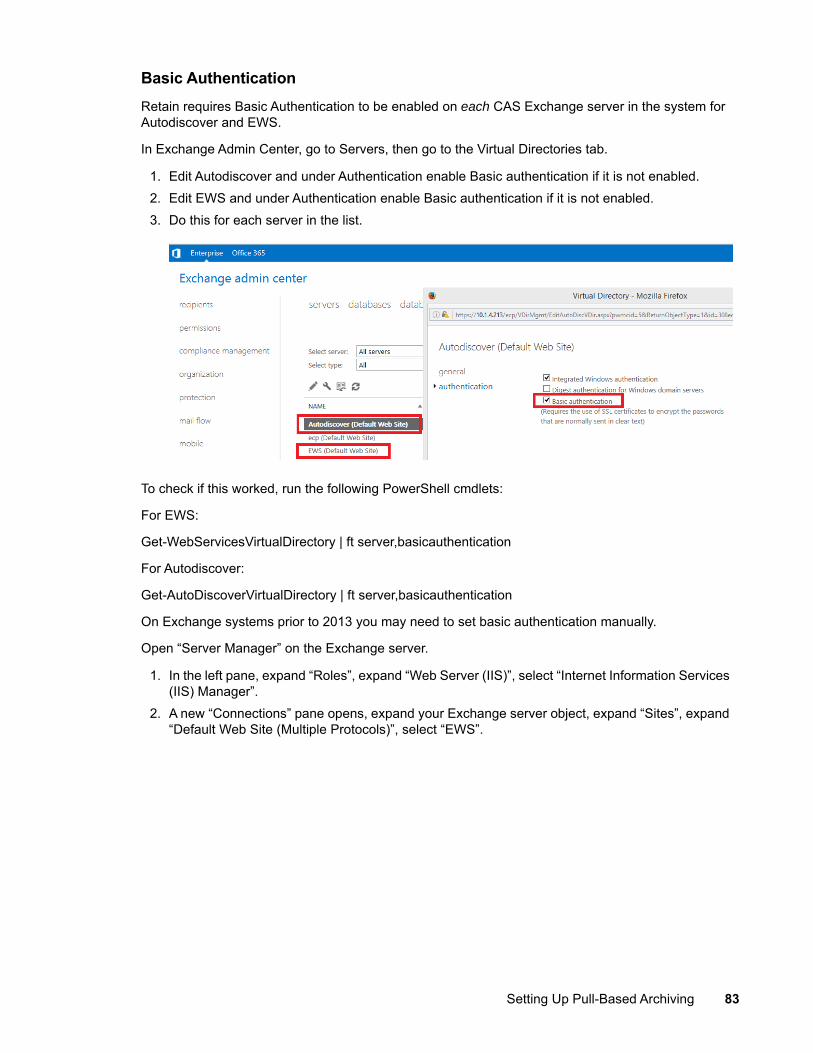
Basic AuthenticationRetain requires Basic Authentication to be enabled on each CAS Exchange server in the system for Autodiscover and EWS.
In Exchange Admin Center, go to Servers, then go to the Virtual Directories tab.
1. Edit Autodiscover and under Authentication enable Basic authentication if it is not enabled.2. Edit EWS and under Authentication enable Basic authentication if it is not enabled.3. Do this for each server in the list.
To check if this worked, run the following PowerShell cmdlets:
For EWS:
Get-WebServicesVirtualDirectory | ft server,basicauthentication
For Autodiscover:
Get-AutoDiscoverVirtualDirectory | ft server,basicauthentication
On Exchange systems prior to 2013 you may need to set basic authentication manually.
Open “Server Manager” on the Exchange server.
1. In the left pane, expand “Roles”, expand “Web Server (IIS)”, select “Internet Information Services (IIS) Manager”.
2. A new “Connections” pane opens, expand your Exchange server object, expand “Sites”, expand “Default Web Site (Multiple Protocols)”, select “EWS”.
Setting Up Pull-Based Archiving 83
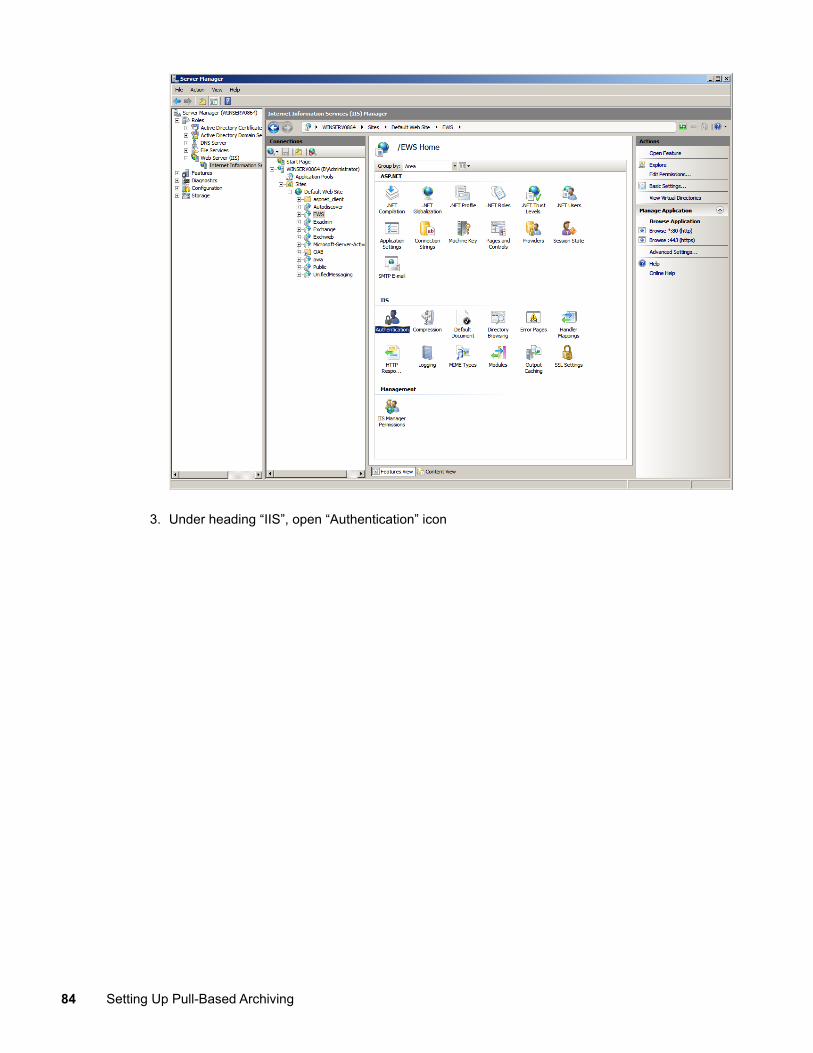
3. Under heading “IIS”, open “Authentication” icon
84 Setting Up Pull-Based Archiving
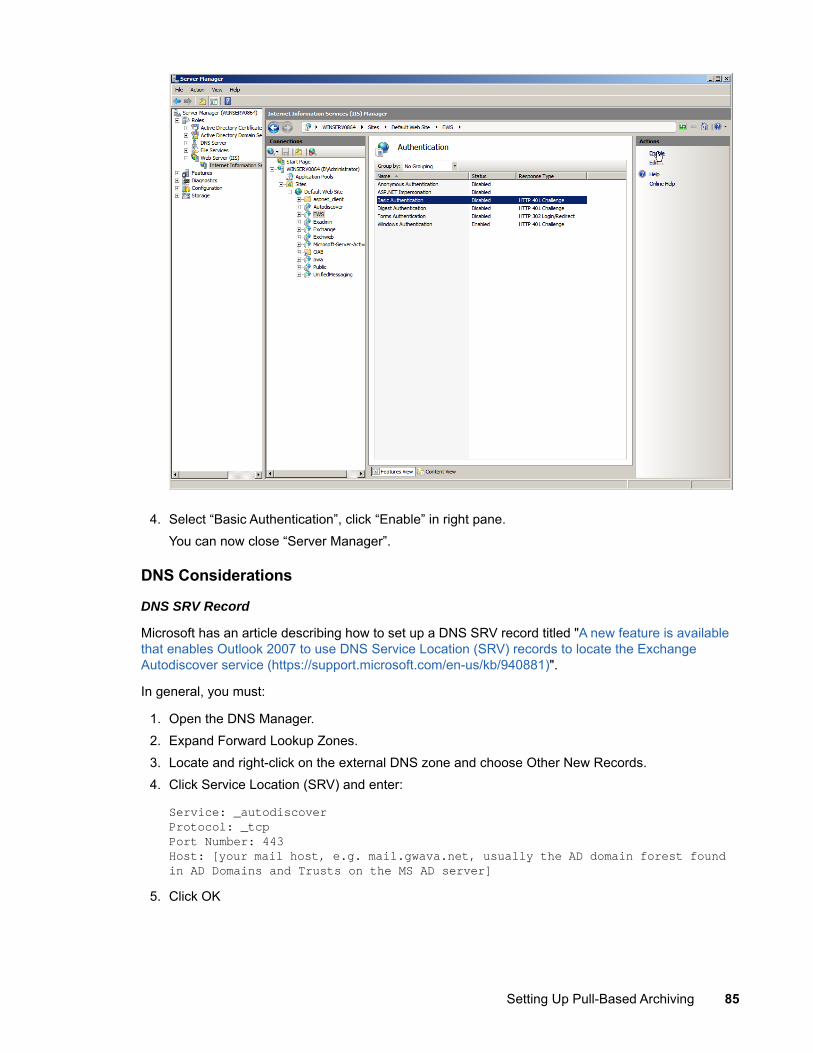
4. Select “Basic Authentication”, click “Enable” in right pane.You can now close “Server Manager”.
DNS Considerations
DNS SRV Record
Microsoft has an article describing how to set up a DNS SRV record titled "A new feature is available that enables Outlook 2007 to use DNS Service Location (SRV) records to locate the Exchange Autodiscover service (https://support.microsoft.com/en-us/kb/940881)".
In general, you must:
1. Open the DNS Manager.2. Expand Forward Lookup Zones.3. Locate and right-click on the external DNS zone and choose Other New Records.4. Click Service Location (SRV) and enter:
Service: _autodiscoverProtocol: _tcpPort Number: 443Host: [your mail host, e.g. mail.gwava.net, usually the AD domain forest found in AD Domains and Trusts on the MS AD server]
5. Click OK
Setting Up Pull-Based Archiving 85
The Microsoft autodiscover library in Retain expects a URL along the lines of https://autodiscover.[your domain]/Autodiscover/Autodiscover.xml (e.g., https://autodiscover.xyzcompany.com/Autodiscover/Autodiscover.xml), which can be found in the worker log as it attempts to log in by searching for "Discovered endpoint:" or "AutoDiscover".
Server DNS Setting
Retain performs best when the server's network setting is using the same DNS as the Exchange servers.
If Retain and Exchange must use different DNS, on the DNS that Retain uses, create a Conditional Forwarder that resolves to the Exchange server.
Placing Exchange Items on Hold to Prevent Data LossTo prevent data loss, you must ensure that users are not able to remove items before Retain has a chance to archive them.
How Outlook Handles Item Deletion
By default, when a user deletes a message from Outlook it is moved to the Trash folder.
When the user empties the trash, the item is moved to the mostly hidden Recoverable Items folder, where it is kept for 14 days before being removed from disk.
During the 14-day period, the user can right-click the Trash to either
Recover the item,
Or Purge it, which actually moves the item to a Purged folder that is not user accessible.
Configuring Exchange Item Retention Policies
To ensure that items are available for archiving, it is vital that you understand the information in the following documents and that you then configure your system so that Items aren’t removed from disk before Retain Archives them.
Learn about retention for Exchange (https://docs.microsoft.com/en-us/microsoft-365/compliance/retention-policies-exchange?view=o365-worldwide)
Create a Litigation Hold (https://docs.microsoft.com/en-us/microsoft-365/compliance/create-a-litigation-hold?view=o365-worldwide)
Configure an Exchange Module for On-Premise ExchangeThe Exchange module must be configured in the Retain Server before any communication between Retain and an existing Exchange message system can occur. Open the Retain management page on the Retain Server, and select Module Configuration.
86 Setting Up Pull-Based Archiving
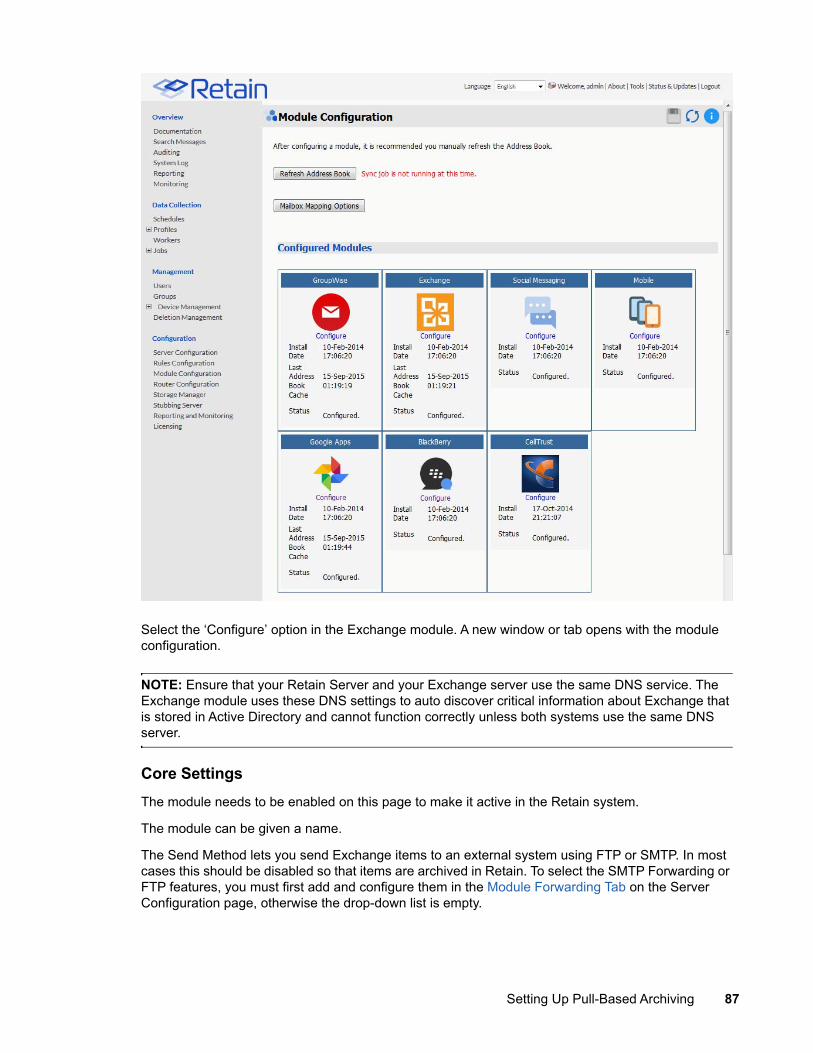
Select the ‘Configure’ option in the Exchange module. A new window or tab opens with the module configuration.
NOTE: Ensure that your Retain Server and your Exchange server use the same DNS service. The Exchange module uses these DNS settings to auto discover critical information about Exchange that is stored in Active Directory and cannot function correctly unless both systems use the same DNS server.
Core SettingsThe module needs to be enabled on this page to make it active in the Retain system.
The module can be given a name.
The Send Method lets you send Exchange items to an external system using FTP or SMTP. In most cases this should be disabled so that items are archived in Retain. To select the SMTP Forwarding or FTP features, you must first add and configure them in the Module Forwarding Tab on the Server Configuration page, otherwise the drop-down list is empty.
Setting Up Pull-Based Archiving 87
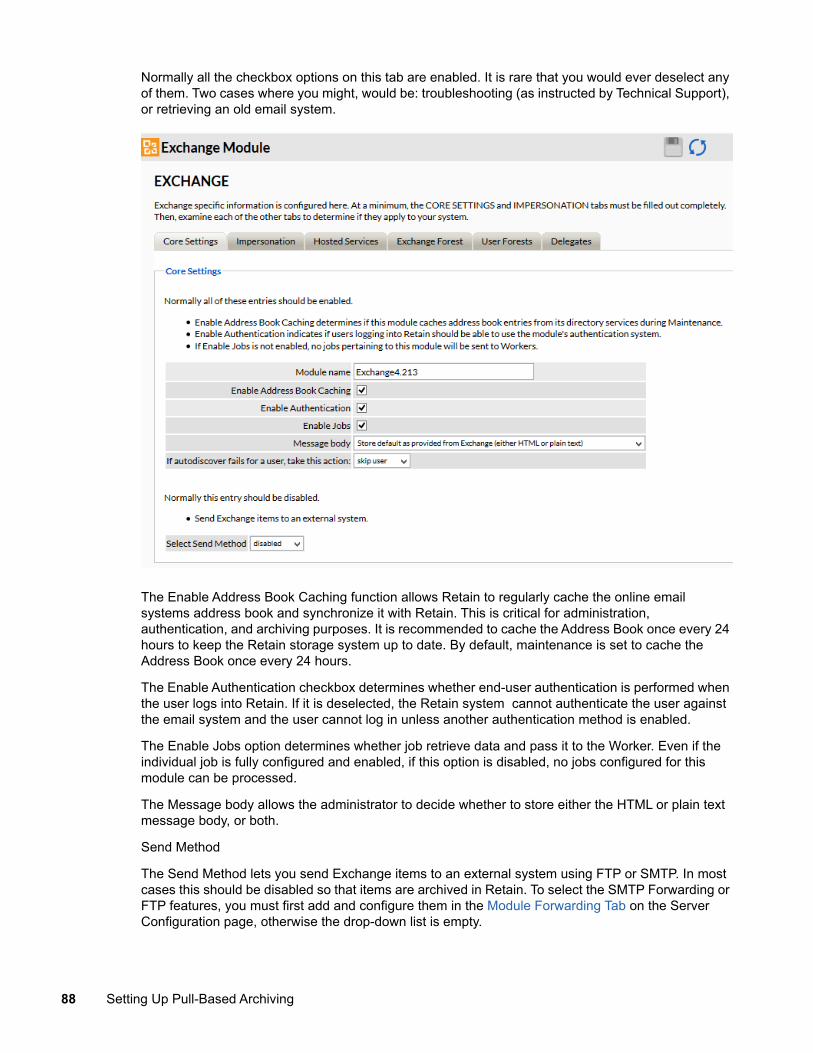
Normally all the checkbox options on this tab are enabled. It is rare that you would ever deselect any of them. Two cases where you might, would be: troubleshooting (as instructed by Technical Support), or retrieving an old email system.
The Enable Address Book Caching function allows Retain to regularly cache the online email systems address book and synchronize it with Retain. This is critical for administration, authentication, and archiving purposes. It is recommended to cache the Address Book once every 24 hours to keep the Retain storage system up to date. By default, maintenance is set to cache the Address Book once every 24 hours.
The Enable Authentication checkbox determines whether end-user authentication is performed when the user logs into Retain. If it is deselected, the Retain system cannot authenticate the user against the email system and the user cannot log in unless another authentication method is enabled.
The Enable Jobs option determines whether job retrieve data and pass it to the Worker. Even if the individual job is fully configured and enabled, if this option is disabled, no jobs configured for this module can be processed.
The Message body allows the administrator to decide whether to store either the HTML or plain text message body, or both.
Send Method
The Send Method lets you send Exchange items to an external system using FTP or SMTP. In most cases this should be disabled so that items are archived in Retain. To select the SMTP Forwarding or FTP features, you must first add and configure them in the Module Forwarding Tab on the Server Configuration page, otherwise the drop-down list is empty.
88 Setting Up Pull-Based Archiving
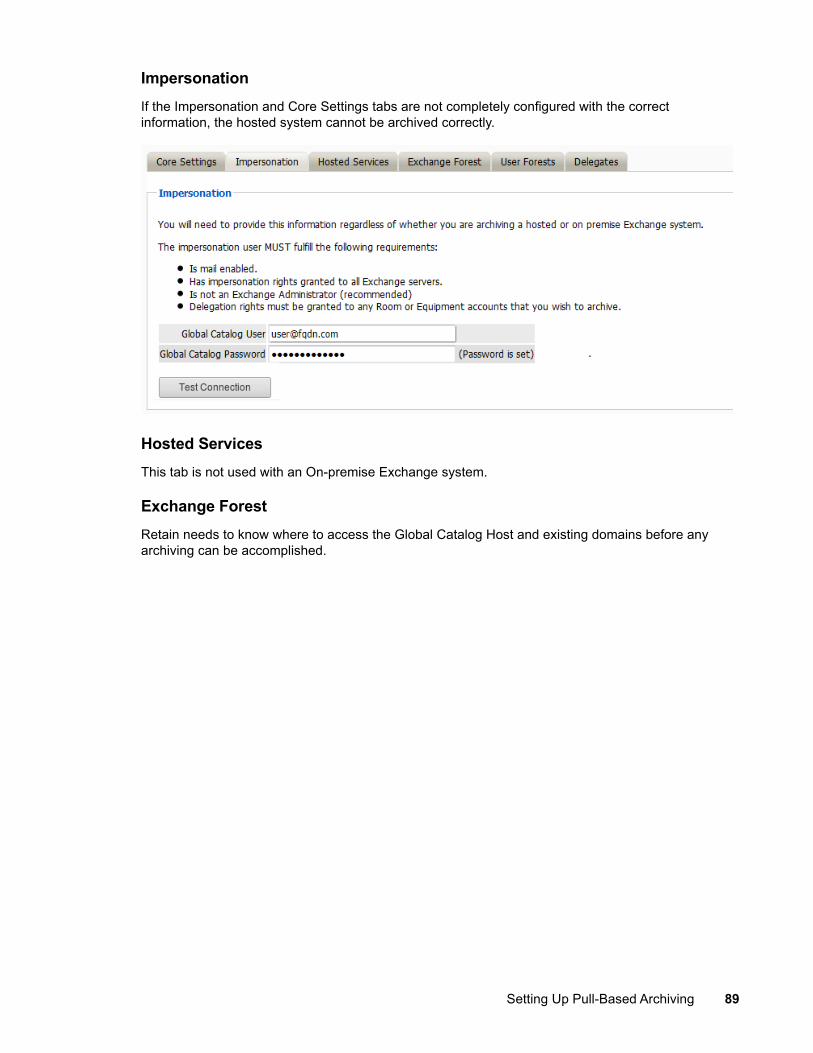
ImpersonationIf the Impersonation and Core Settings tabs are not completely configured with the correct information, the hosted system cannot be archived correctly.
Hosted ServicesThis tab is not used with an On-premise Exchange system.
Exchange ForestRetain needs to know where to access the Global Catalog Host and existing domains before any archiving can be accomplished.
Setting Up Pull-Based Archiving 89
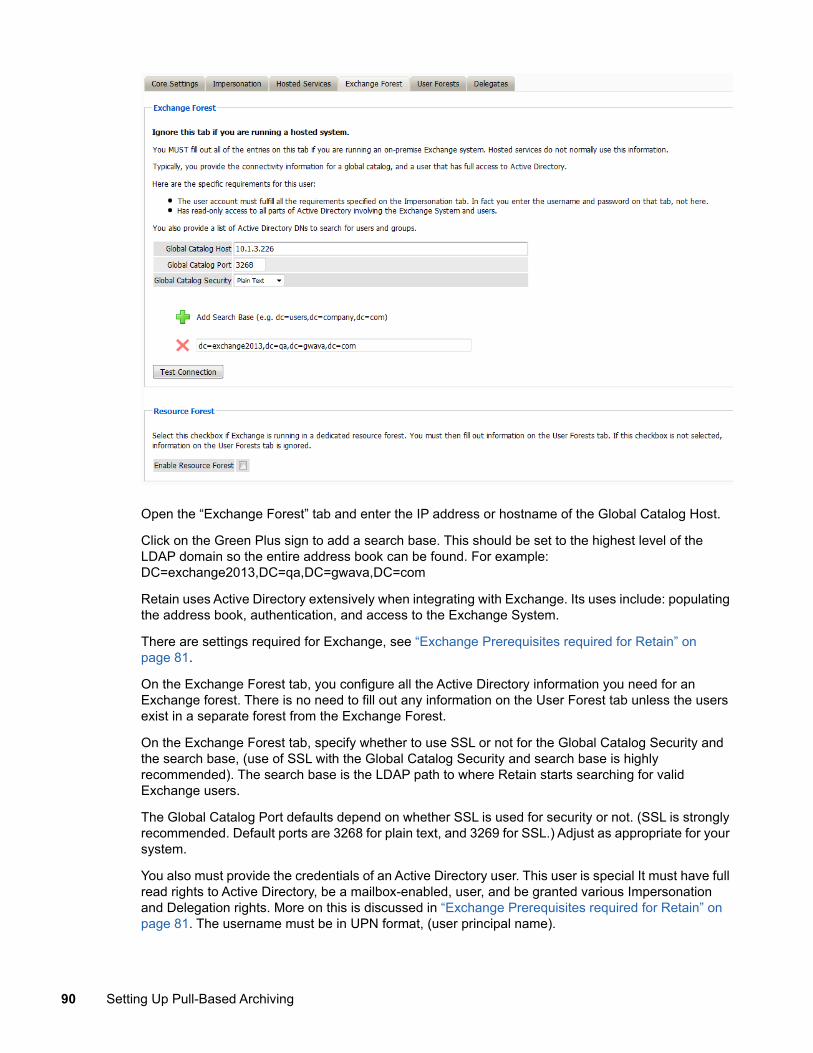
Open the “Exchange Forest” tab and enter the IP address or hostname of the Global Catalog Host.
Click on the Green Plus sign to add a search base. This should be set to the highest level of the LDAP domain so the entire address book can be found. For example: DC=exchange2013,DC=qa,DC=gwava,DC=com
Retain uses Active Directory extensively when integrating with Exchange. Its uses include: populating the address book, authentication, and access to the Exchange System.
There are settings required for Exchange, see “Exchange Prerequisites required for Retain” on page 81.
On the Exchange Forest tab, you configure all the Active Directory information you need for an Exchange forest. There is no need to fill out any information on the User Forest tab unless the users exist in a separate forest from the Exchange Forest.
On the Exchange Forest tab, specify whether to use SSL or not for the Global Catalog Security and the search base, (use of SSL with the Global Catalog Security and search base is highly recommended). The search base is the LDAP path to where Retain starts searching for valid Exchange users.
The Global Catalog Port defaults depend on whether SSL is used for security or not. (SSL is strongly recommended. Default ports are 3268 for plain text, and 3269 for SSL.) Adjust as appropriate for your system.
You also must provide the credentials of an Active Directory user. This user is special It must have full read rights to Active Directory, be a mailbox-enabled, user, and be granted various Impersonation and Delegation rights. More on this is discussed in “Exchange Prerequisites required for Retain” on page 81. The username must be in UPN format, (user principal name).
90 Setting Up Pull-Based Archiving
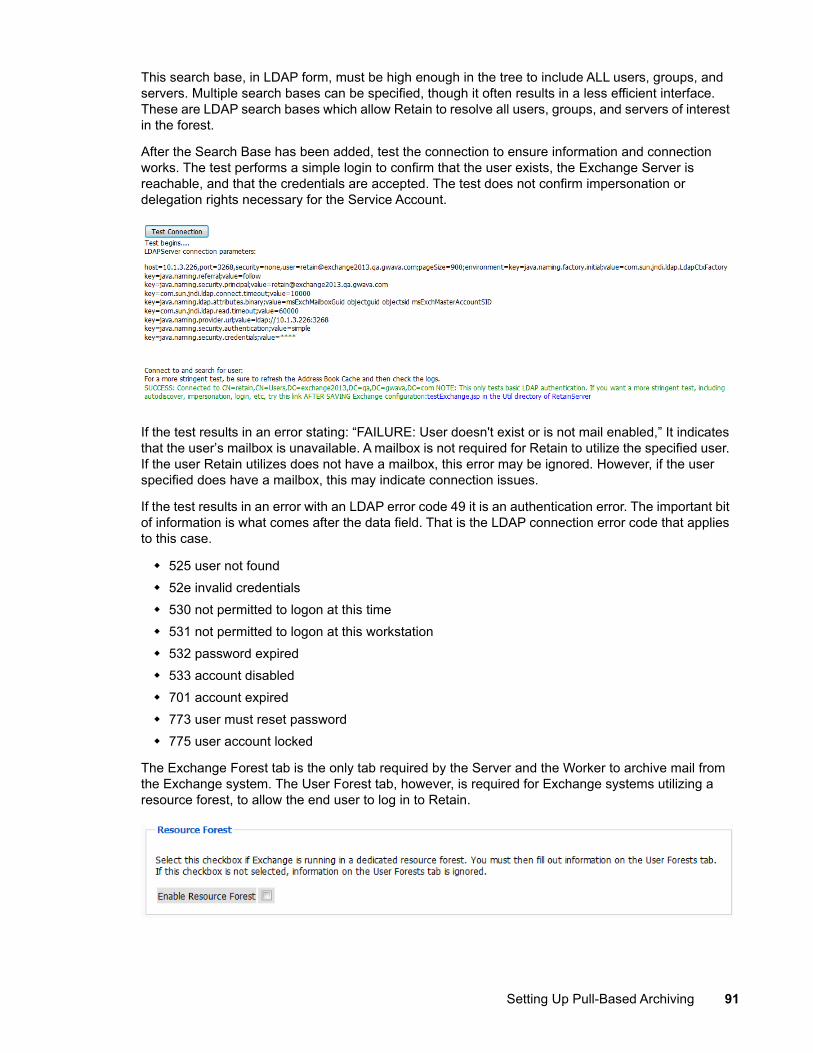
This search base, in LDAP form, must be high enough in the tree to include ALL users, groups, and servers. Multiple search bases can be specified, though it often results in a less efficient interface. These are LDAP search bases which allow Retain to resolve all users, groups, and servers of interest in the forest.
After the Search Base has been added, test the connection to ensure information and connection works. The test performs a simple login to confirm that the user exists, the Exchange Server is reachable, and that the credentials are accepted. The test does not confirm impersonation or delegation rights necessary for the Service Account.
If the test results in an error stating: “FAILURE: User doesn't exist or is not mail enabled,” It indicates that the user’s mailbox is unavailable. A mailbox is not required for Retain to utilize the specified user. If the user Retain utilizes does not have a mailbox, this error may be ignored. However, if the user specified does have a mailbox, this may indicate connection issues.
If the test results in an error with an LDAP error code 49 it is an authentication error. The important bit of information is what comes after the data field. That is the LDAP connection error code that applies to this case.
525 user not found 52e invalid credentials 530 not permitted to logon at this time 531 not permitted to logon at this workstation 532 password expired 533 account disabled 701 account expired 773 user must reset password 775 user account locked
The Exchange Forest tab is the only tab required by the Server and the Worker to archive mail from the Exchange system. The User Forest tab, however, is required for Exchange systems utilizing a resource forest, to allow the end user to log in to Retain.
Setting Up Pull-Based Archiving 91
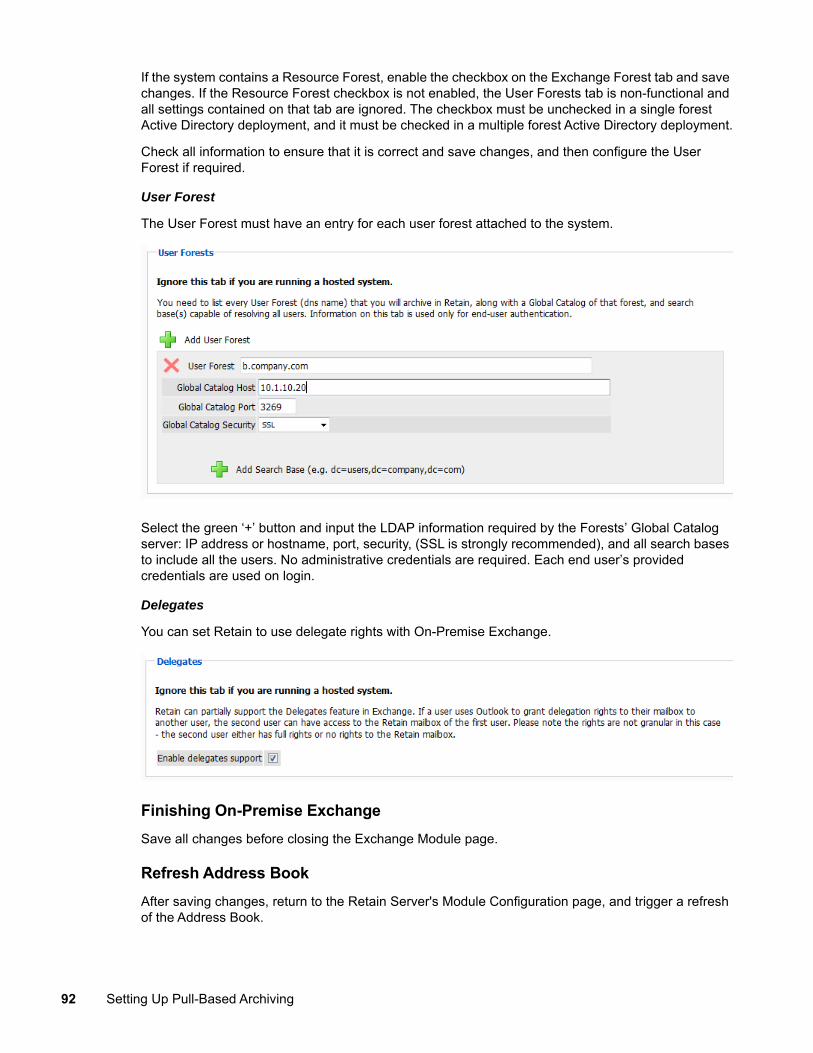
If the system contains a Resource Forest, enable the checkbox on the Exchange Forest tab and save changes. If the Resource Forest checkbox is not enabled, the User Forests tab is non-functional and all settings contained on that tab are ignored. The checkbox must be unchecked in a single forest Active Directory deployment, and it must be checked in a multiple forest Active Directory deployment.
Check all information to ensure that it is correct and save changes, and then configure the User Forest if required.
User Forest
The User Forest must have an entry for each user forest attached to the system.
Select the green ‘+’ button and input the LDAP information required by the Forests’ Global Catalog server: IP address or hostname, port, security, (SSL is strongly recommended), and all search bases to include all the users. No administrative credentials are required. Each end user’s provided credentials are used on login.
Delegates
You can set Retain to use delegate rights with On-Premise Exchange.
Finishing On-Premise ExchangeSave all changes before closing the Exchange Module page.
Refresh Address BookAfter saving changes, return to the Retain Server's Module Configuration page, and trigger a refresh of the Address Book.
92 Setting Up Pull-Based Archiving
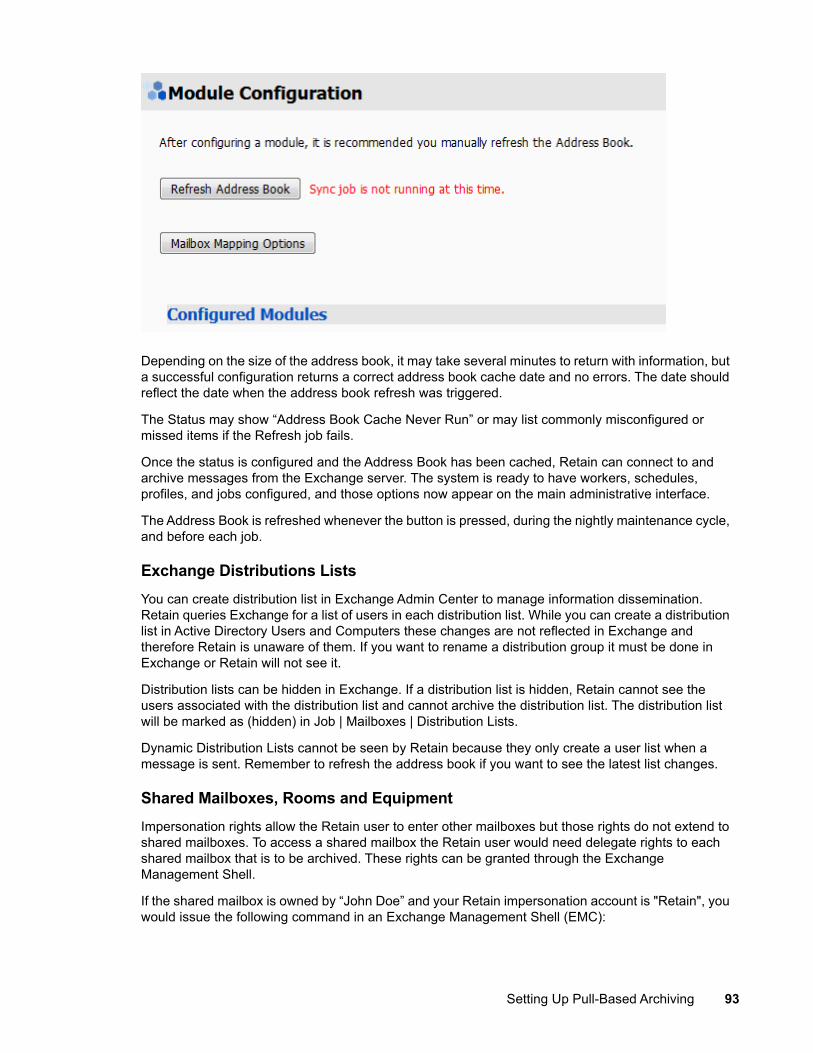
Depending on the size of the address book, it may take several minutes to return with information, but a successful configuration returns a correct address book cache date and no errors. The date should reflect the date when the address book refresh was triggered.
The Status may show “Address Book Cache Never Run” or may list commonly misconfigured or missed items if the Refresh job fails.
Once the status is configured and the Address Book has been cached, Retain can connect to and archive messages from the Exchange server. The system is ready to have workers, schedules, profiles, and jobs configured, and those options now appear on the main administrative interface.
The Address Book is refreshed whenever the button is pressed, during the nightly maintenance cycle, and before each job.
Exchange Distributions ListsYou can create distribution list in Exchange Admin Center to manage information dissemination. Retain queries Exchange for a list of users in each distribution list. While you can create a distribution list in Active Directory Users and Computers these changes are not reflected in Exchange and therefore Retain is unaware of them. If you want to rename a distribution group it must be done in Exchange or Retain will not see it.
Distribution lists can be hidden in Exchange. If a distribution list is hidden, Retain cannot see the users associated with the distribution list and cannot archive the distribution list. The distribution list will be marked as (hidden) in Job | Mailboxes | Distribution Lists.
Dynamic Distribution Lists cannot be seen by Retain because they only create a user list when a message is sent. Remember to refresh the address book if you want to see the latest list changes.
Shared Mailboxes, Rooms and EquipmentImpersonation rights allow the Retain user to enter other mailboxes but those rights do not extend to shared mailboxes. To access a shared mailbox the Retain user would need delegate rights to each shared mailbox that is to be archived. These rights can be granted through the Exchange Management Shell.
If the shared mailbox is owned by “John Doe” and your Retain impersonation account is "Retain", you would issue the following command in an Exchange Management Shell (EMC):
Setting Up Pull-Based Archiving 93
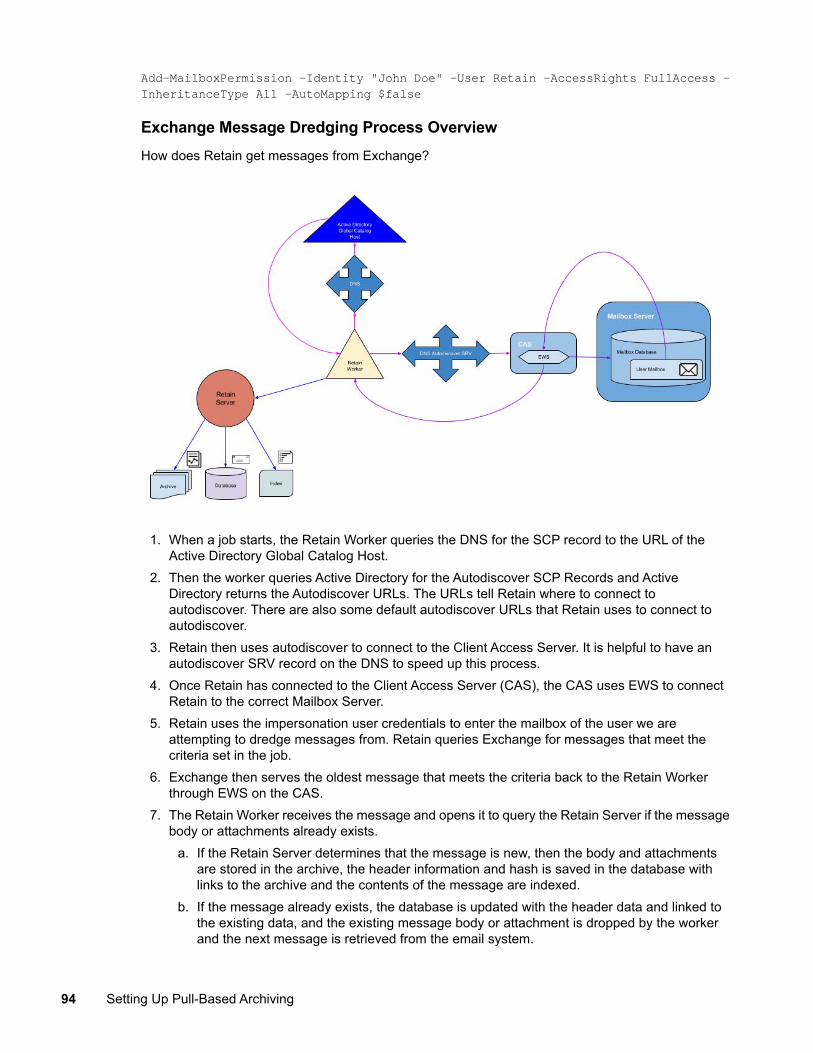
Add-MailboxPermission -Identity "John Doe" -User Retain -AccessRights FullAccess -InheritanceType All -AutoMapping $false
Exchange Message Dredging Process OverviewHow does Retain get messages from Exchange?
1. When a job starts, the Retain Worker queries the DNS for the SCP record to the URL of the Active Directory Global Catalog Host.
2. Then the worker queries Active Directory for the Autodiscover SCP Records and Active Directory returns the Autodiscover URLs. The URLs tell Retain where to connect to autodiscover. There are also some default autodiscover URLs that Retain uses to connect to autodiscover.
3. Retain then uses autodiscover to connect to the Client Access Server. It is helpful to have an autodiscover SRV record on the DNS to speed up this process.
4. Once Retain has connected to the Client Access Server (CAS), the CAS uses EWS to connect Retain to the correct Mailbox Server.
5. Retain uses the impersonation user credentials to enter the mailbox of the user we are attempting to dredge messages from. Retain queries Exchange for messages that meet the criteria set in the job.
6. Exchange then serves the oldest message that meets the criteria back to the Retain Worker through EWS on the CAS.
7. The Retain Worker receives the message and opens it to query the Retain Server if the message body or attachments already exists.
a. If the Retain Server determines that the message is new, then the body and attachments are stored in the archive, the header information and hash is saved in the database with links to the archive and the contents of the message are indexed.
b. If the message already exists, the database is updated with the header data and linked to the existing data, and the existing message body or attachment is dropped by the worker and the next message is retrieved from the email system.
94 Setting Up Pull-Based Archiving
Troubleshooting Exchange Performance
In general, we have found that acceptable throughput is in the 3-5 messages per second range. In well designed systems with sufficient hardware resources we have seen throughput above 10 m/s. There is definitely an issue if the throughput is less than 3, and we have seen instances of less than 0.1. The first place to look is the worker log.
Mailbox DelaysWe are looking for how long it takes Retain to log in to each mailbox and when it finds the endpoint which tells us it entered the mailbox.
Search the log for lines containing:
enterMailboxDiscovered endpointNow you want to compare the difference in times between these two lines. It should be less than 2 seconds. If it is significantly longer than 2 seconds it is most likely an issue with the DNS not properly serving autodiscover.
2015-09-25 12:00:07,256 TRACE [RTWQuartzScheduler_Archive_Worker-1] com.gwava.caapi.MailboxArchivingStats: enterMailbox: [email protected] 12:02:14,177 DEBUG [RTWQuartzScheduler_Archive_Worker-1] com.gwava.ews.archiveimpl.process.ExchangeUser: Discovered endpoint: https://ad.test.sys/ews/exchange.asmxscreenThis indicates that there is an issue with how autodiscover is configured in the DNS. It may need an SCP or SRV record.
Message DelaysAnother thing to search for are connection failures and retries, which increase each time it fails which can add up to 4 minutes:
search for items
Software caused connection abort: recv failed
EWS request failed: null. Will retry after
Setting Up Pull-Based Archiving 95
2015-07-22 00:25:25,056 TRACE [Thread-1341102] com.gwava.ews.RetainExchangeWebserviceFactory: retry, exception :javax.xml.ws.WebServiceException: java.net.SocketException: Software caused connection abort: recv failedat com.sun.xml.ws.transport.http.client.HttpClientTransport.readResponseCodeAndMessage(Unknown Source)...at com.gwava.ews.archiveimpl.process.CursorFetchThread.run(CursorFetchThread.java:1334)Caused by: java.net.SocketException: Software caused connection abort: recv failedat java.net.SocketInputStream.socketRead0(Native Method)...at sun.net.www.protocol.https.HttpsURLConnectionImpl.getResponseCode(HttpsURLConnectionImpl.java:318)... 27 more2015-07-22 00:25:25,056 DEBUG [Thread-1341102] com.gwava.ews.RetainExchangeWebserviceFactory: EWS request failed: null. Will retry after 2 secondsThis retries a few times with longer delays untl it aborts. Here we are losing connection to the Exchange server while already in a mailbox. This can indicate that there are issues with either a message attachment or the webserver on the Exchange or CAS servers is unable to serve the item at this time. Go to the message in Outlook or OWA and see if it can be accessed.
If the message can be accessed successfully export it as a .pst and use the PST Importer to bring it into Retain.
If the message cannot be accessed successfully then it must be deleted.
Exchange HealthYou may also want to check the health of the Exchange server itself.
Performance Monitor
The first thing to check is the performance of the server by going into Performance Monitor to see it is above 80% utilization of CPU, Memory, Disk and/or Network. If they are consistently high you should use the various Server health, monitoring, and performance cmdlets to pinpoint the issue
Queues
Another thing to check are the Queues. The mail queues are how Exchange handles mail. You can see they by going into Exchange Tookbox/Queue Viewer. The number of messages in the queues should be low, if there is a queue with hundred or thousands of messages and they are not being cleared then that queue may have a stuck message, which would need to be cleared.
You can also use the Exchange Managment Shell (EMS) to check the status of the queues.
Get-Queues
Mailboxes
Another thing to check are the mailboxes. Performance can degrade if a mailbox has too many messages (~100k). The number of messages is more important then the size of the messages. For large systems you should pipe to a file since this command can exceed the EMS buffer.
Get-Mailbox | Get-MailboxStatistics > c:\mailboxstat.txt
96 Setting Up Pull-Based Archiving
If there is a specific mailbox with issues you may need to repair the mailbox.
Server Health
You can get a quick overview of an Exchange server's health by running this EMS cmdlet:
Get-ServerHealth -Identity server1 | Sort-Object AlertValue | ft Name, AlertValue
Exchange Throttling Policy and Bandwidth/Performance (2013)Microsoft Exchange 2013 uses client throttling policies by default to track bandwidth for each Microsoft Exchange user and enforce bandwidth limits as necessary. Throttling policies should be turned off for the Retain Service Account, because they can affect the performance of Retain for Exchange when accessing mailboxes with a large number of folders and mail items.
1. On a computer that hosts the Microsoft Exchange Management Shell, open the Microsoft Exchange Management Shell.
2. Type these commands:a. New-ThrottlingPolicy [give it a policy name of your choosing]b. Set-ThrottlingPolicy [policy name from step "a"] -RCAMaxConcurrency Unlimited -
EWSMaxConcurrency Unlimited -EWSMaxSubscriptions Unlimited -CPAMaxConcurrency Unlimited -EwsCutoffBalance Unlimited -EwsMaxBurst Unlimited -EwsRechargeRate Unlimited
c. Set-Mailbox [Retain impersonation user account] -ThrottlingPolicy [policy name from step "a"]
3. To check the policy run the command: Get-ThrottlingPolicy -Identity [policy name from step "a"] | Format-List
Exchange Throttling Policy and Bandwidth/Performance (2010)
The error indicates that either you have a throttling policy applied or the Exchange server is busy. Microsoft Exchange 2010 uses client throttling policies by default to track bandwidth for each Microsoft Exchange user and enforce bandwidth limits as necessary. Throttling policies should be turned off for the Retain Service Account, because they can affect the performance of Retain for Exchange when accessing mailboxes with a large number of folders and mail items.
1. On a computer that hosts the Microsoft Exchange Management Shell, open the Microsoft Exchange Management Shell. Find out the default Throttling Policy: Get-ThrottlingPolicy
2. Type these commands:a. New-ThrottlingPolicy [give it a policy name of your choosing] -RCAMaxConcurrency $null -
RCAPercentTimeInAD $null -RCAPercentTimeInCAS $null -RCAPercentTimeInMailboxRPC $null -EWSMaxConcurrency $null -EWSPercentTimeInAD $null -EWSPercentTimeInCAS $null -EWSPercentTimeInMailboxRPC $null -EWSMaxSubscriptions $null -EWSFastSearchTimeoutInSeconds $null -EWSFindCountLimit $null
b. Set-Mailbox [Retain impersonation user account] -ThrottlingPolicy [policy name from step "a"]
3. Check the Throttling Policy for the "retain" impersonation user: Get-ThrottlingPolicy -Identity [policy name from step "a"] | Format-List
Setting Up Pull-Based Archiving 97
Exchange Journaling MailboxUsing Exchange Journaling Mailbox is not recommended, but there are some situations where it is a viable option.
According to a Microsoft technician, they recommend at least 1 journaling mailbox per mail server. Exchange can only effectively support mailboxes under 5 - 10G. Exchange experiences performance issues when the Inbox exceeds 2500-5000 messages. http://blogs.technet.com/b/exchange/archive/2005/03/14/395229.aspx
This means that, once you enable a journaling mailbox, you should begin archiving its contents and using the Retain option to delete the items from the mailbox once archived. However, if there are delays in getting those journaling mailboxes archived, you should watch the size. If it gets to 5G, turn it off and re-route email to another journaling mailbox until you get all of them archived and emptied out.
1. Set up a journal mailbox for each mailbox database.2. Journaling jobs should have their own Profile with the Scope set to "All messages (ignore date)"
and Duplicate Check set to "Try to publish all message (SLOW)" to gather all messages from the beginning of the mailbox. This profile can be used for all journaling mailbox jobs.
3. Under Job, "Enable Journaling" and "Delete archived items from journal" must be enabled (checked) so that the journaling mailbox is cleared during the job, and choose the journaling mailbox you want archived. Create a separate job for each journaling mailbox.
Important note: As Retain archives the journal mailbox it creates a list of messages to be deleted but only sends the delete request when it exits the mailbox. If the job fails before it exits then the messages won't be deleted. Limiting the scope of the job to allow Retain to finish the job successfully ensures that the messages are deleted.
Transitioning from Journaling to Rolling In-Place Hold for Exchange Archiving
There are changes you must make in Exchange and Retain for this transition to go as smoothly as possible.
Mandatory Exchange Tasks:
1. Enable Rolling In-Place Hold. You can test that the hold is properly enabled by going into Outlook or OWA and deleting an item, going into the recoverable items dialog and attempting to purge the item. It should end up in the Purges folder which the user cannot see but Retain can. So you should run an archive job against it to see it within Search Messages in Retain. In Exchange 2010 you should enable Single Item Recovery, which allows you to set a rolling duration for holding deleted items.
Get-Mailbox | Set-Mailbox -SingleItemRecoveryEnabled $true -RetainDeletedItemsFor 902. Disable Journal Rule in Exchange. Once the rolling in-place hold is enabled, you can disable the
journal rule in Exchange. https://technet.microsoft.com/en-us/library/bb124264%28v=exchg.141%29.aspx
Mandatory Retain Tasks:
1. Keep the existing Retain journaling job and allow that to run until the journal mailbox is empty. If you are currently unable to archive your existing journal mailbox(es) because they have become too large for Exchange to manage, there are powershell scripts for transfering mail to another mailbox.
98 Setting Up Pull-Based Archiving
2. Create New Profile. The primary option to enable is Profile/Miscellaneous/"Include user's recoverable items". With this option enabled Retain will dredge each users recoverable items folder and all items and folders inside it, except the logs found in the Audits subfolder.
3. Create a New Job(s) If you have multiple Exchange databases we recommend one job per mailbox database and one worker per job so they can run in parallel. (Retain Technical Support has a PowerShell 4.0 script to make this easier)
Large Attachments and/or Messages Cannot Be Archived From ExchangeSymptoms you may notice when experiencing problems with default IIS limitations:
Retention is turned on in GroupWise and messages up to a certain date can't be deleted. Errors on retrieving attachments show in the Worker log. Can see messages that don't have all the attachments in Retain. You may also have difficulty getting larger exports through the web interface (exports larger than
28.6 MB). When logging is set to diagnostic for the Worker you can see errors like this:
15:15:15,668 RetainServerCommunication - Attempt to connect, but Server returned HTTP status (404): Not found (this line is typically repeated several times over the course of 5 minutes) 15:15:15,668 RetainServerCommunication - Giving up...too many retries! 15:15:15,668 ArchiveAttachment - Send a nice healthy blob:Archive: ERROR: Fatal Error Result=AddedEMails: 0, emailID=null, parentID=null 15:15:15,691 JobUtilities - HandleArchivingException
*Note: IIS is not supported by GWAVA. These are suggested methods for allowing Retain to archive large emails through IIS. For further information visit the MicroSoft support pages: http://www.iis.net/configreference/system.webserver/security/requestfiltering/requestlimits (http://www.iis.net/configreference/system.webserver/security/requestfiltering/requestlimits) Some other useful information can also be found on the IIS forums: http://forums.iis.net/t/1066272.aspx (http://forums.iis.net/t/1066272.aspx)
This may not be as much of an issue in Retain installations that were created with 3.x and later. The RetainWorker will now communicate, by default, directly to the RetainServer on port 48080 thereby bypassing IIS. If you'd like to change this for an older installation, change the connection address of the worker. See the manual (look up "Worker Configuration") for your particular installation for more information. You may still have this be an issue on your Exchange server when Retain tries to collect from it if there are message attachments or messages that are larger than whatever IIS is set to allow through. This would be a setting on the Exchange side that would need to be changed. Default is 30000000 bytes.
For getting exports out of Retain you can also choose to bypass IIS and use http://(RetainIP):48080/RetainServer. IIS integration is more of a convenience to point users at Retain so that you don't have to deal with port information in a URL and other advantages that this can provide.
IIS, by default, limits the amount of data that can be imported by Retain. You can remove, or at least mitigate, this limitation by changing 4 settings. This example will be assuming you'd like to archive files up to 931 MB.
1. 1. You'll need to increase the limit on how much data the RetainWorker and RetainServer can push/pull through IIS. You can do that using the following command*:
a. ** %windir%\system32\inetsrv\appcmd set config "Default Web Site/RetainWorker" -section:requestFiltering -requestLimits.maxAllowedContentLength:1000000000
b. %windir%\system32\inetsrv\appcmd set config "Default Web Site/RetainServer" -section:requestFiltering -requestLimits.maxAllowedContentLength:1000000000
Setting Up Pull-Based Archiving 99
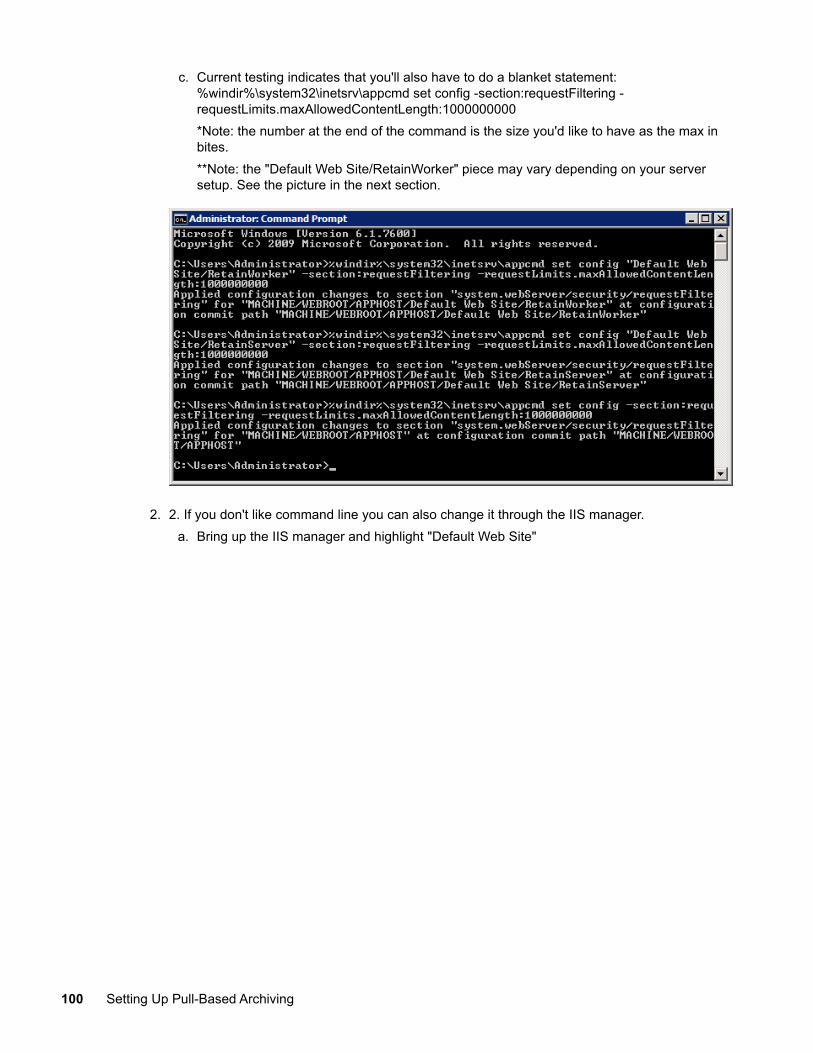
c. Current testing indicates that you'll also have to do a blanket statement: %windir%\system32\inetsrv\appcmd set config -section:requestFiltering -requestLimits.maxAllowedContentLength:1000000000*Note: the number at the end of the command is the size you'd like to have as the max in bites.**Note: the "Default Web Site/RetainWorker" piece may vary depending on your server setup. See the picture in the next section.
2. 2. If you don't like command line you can also change it through the IIS manager.a. Bring up the IIS manager and highlight "Default Web Site"
100 Setting Up Pull-Based Archiving
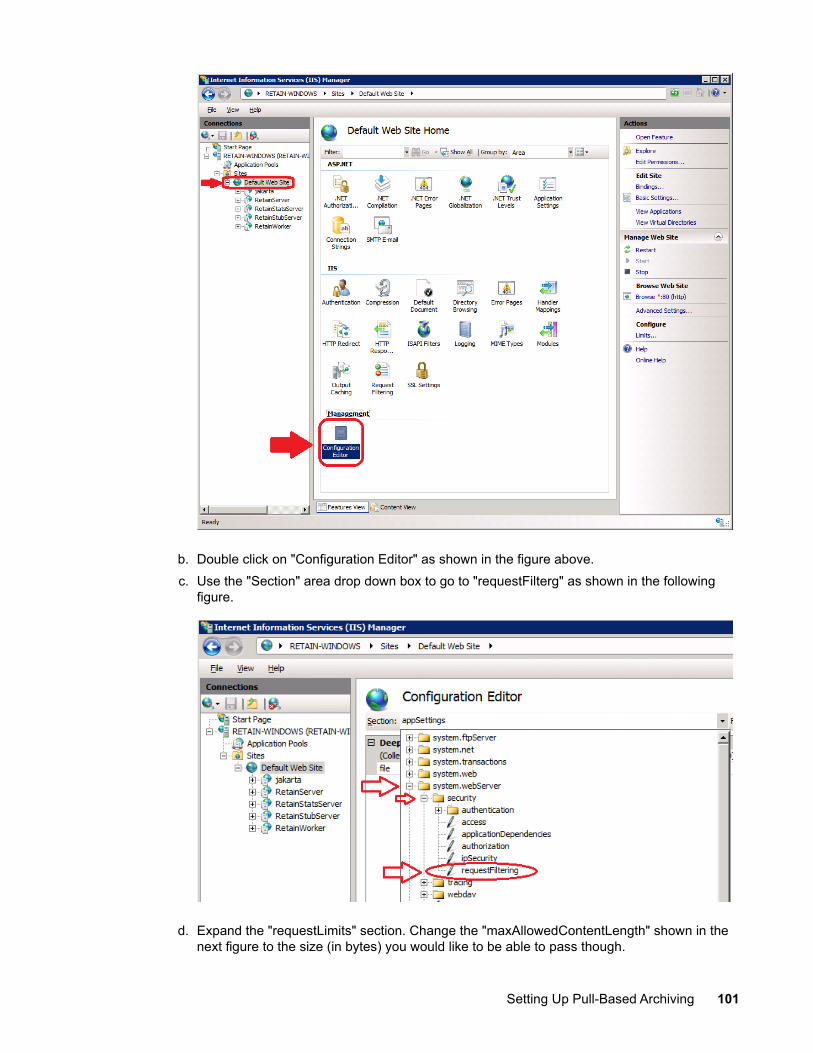
b. Double click on "Configuration Editor" as shown in the figure above.c. Use the "Section" area drop down box to go to "requestFilterg" as shown in the following
figure.
d. Expand the "requestLimits" section. Change the "maxAllowedContentLength" shown in the next figure to the size (in bytes) you would like to be able to pass though.
Setting Up Pull-Based Archiving 101
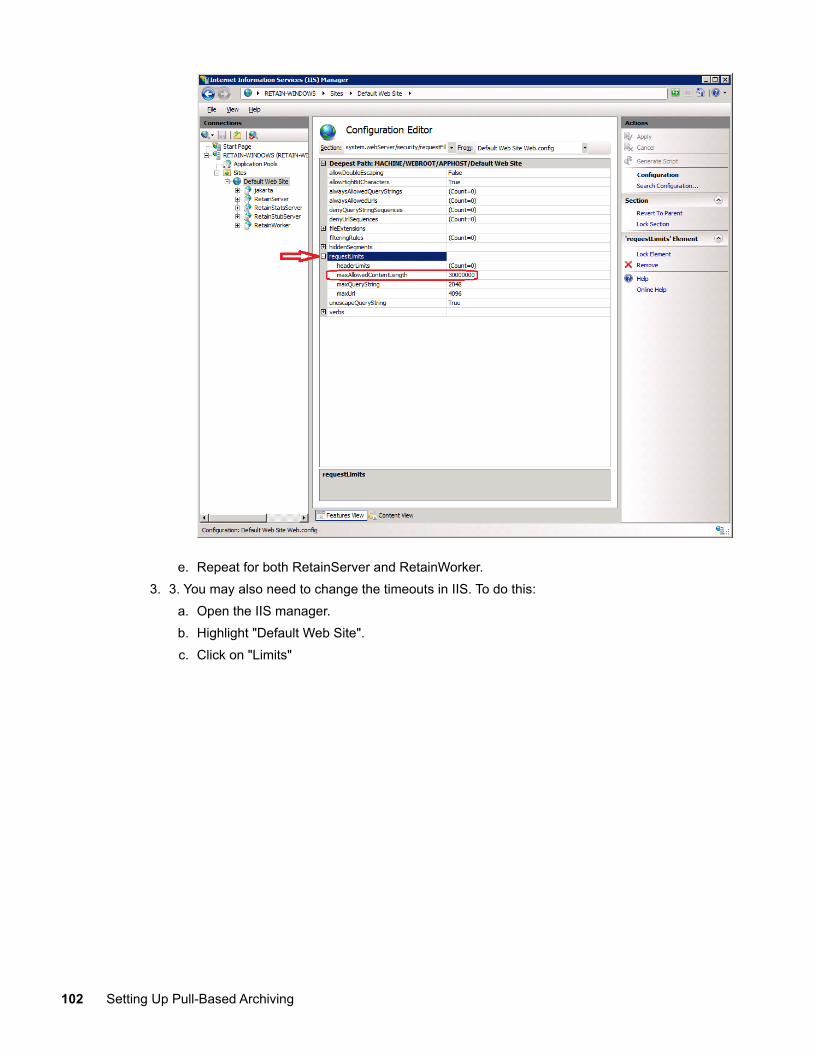
e. Repeat for both RetainServer and RetainWorker.3. 3. You may also need to change the timeouts in IIS. To do this:
a. Open the IIS manager.b. Highlight "Default Web Site".c. Click on "Limits"
102 Setting Up Pull-Based Archiving
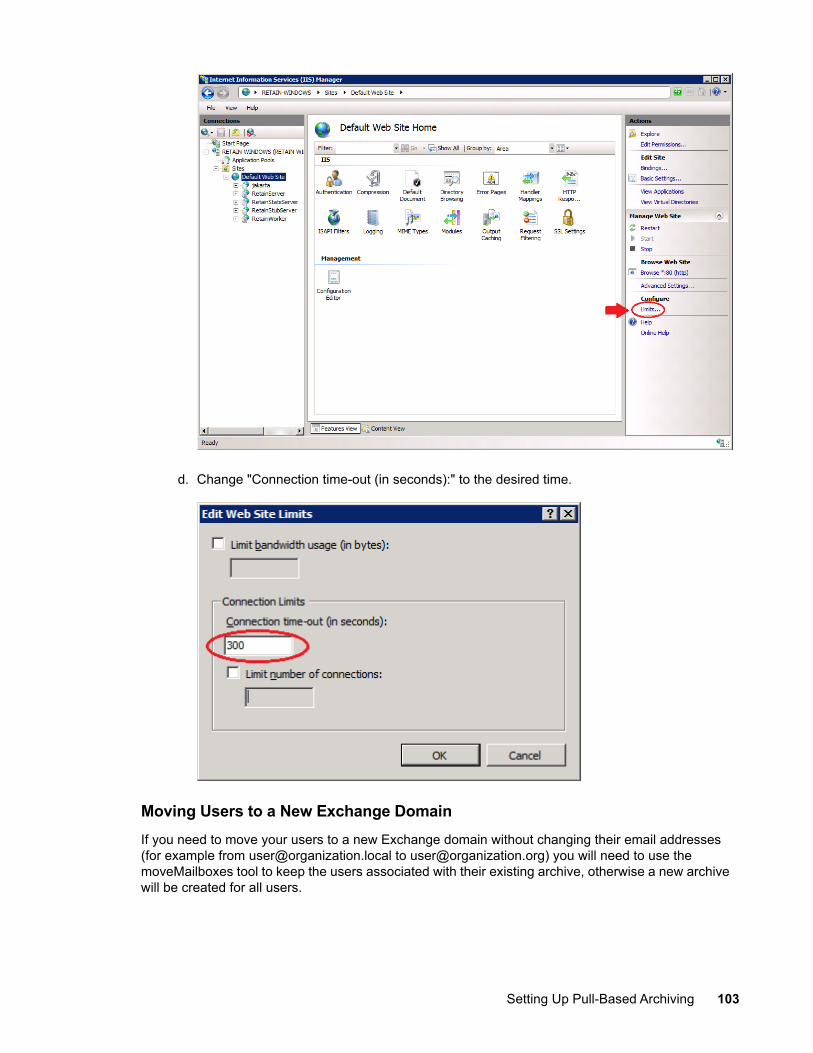
d. Change "Connection time-out (in seconds):" to the desired time.
Moving Users to a New Exchange DomainIf you need to move your users to a new Exchange domain without changing their email addresses (for example from [email protected] to [email protected]) you will need to use the moveMailboxes tool to keep the users associated with their existing archive, otherwise a new archive will be created for all users.
Setting Up Pull-Based Archiving 103
Prerequisites
The new on-premise Exchange system can not have been archived by Retain before. The users continue to use the same email address, though the UPN may be different.
Procedure
1. In the Retain Web Console, go to the Exchange module and select configure.2. Under the Impersonation tab, enter the new impersonation user credentials.3. Under the Exchange Forest tab, reconfigure the settings to the new Exchange system.4. Click the Test Connection button to confirm the connection can be made.5. Save your changes.6. Return to the Module Configuration page and Refresh the Address Book by clicking the Refresh
Address Book button. Wait for the refresh to complete.7. Open the RetainServer log and tail the log to watch progress of the tool. On Windows a utility
program like baretail is useful for this.8. Open a new tab and enter the URL: http://<your Retain Server Address>/RetainServer/
Util/moveMailboxes.jsp. The page will be blank.9. In the RetainServer log when the migration is complete, you will see the message
"MoveMailboxes: mailboxes moved: [amount of mailboxes]. Process Complete." 10. Re-index all messages. In the Retain Web Console, go to Server Configuration | Index and press
the Re-index All Messages button. This may take significant time in larger systems and search will be limited as the re-index is going on.
11. Once re-indexing is complete, archiving can resume normally.
When the users log in to Retain they will see two folders one with the mails from the original Exchange system and the other with mail from the new system. They have different system IDs so cannot be combined seamlessly
Exchange Concurrent Connection LimitsIf jobs fail with the error: 421 4.3.2 The maximum number of concurrent connections has exceeded a limit, closing transmission channel.It may be because we are hitting the maximum inbound connections per source limit connecting to Exchange. You will need to increase the MaxInboundConnectionPerSource parameter. See “Understanding message rate limits and throttling” (https://technet.microsoft.com/en-us/library/bb232205(v=exchg.160).aspx) for details.
104 Setting Up Pull-Based Archiving
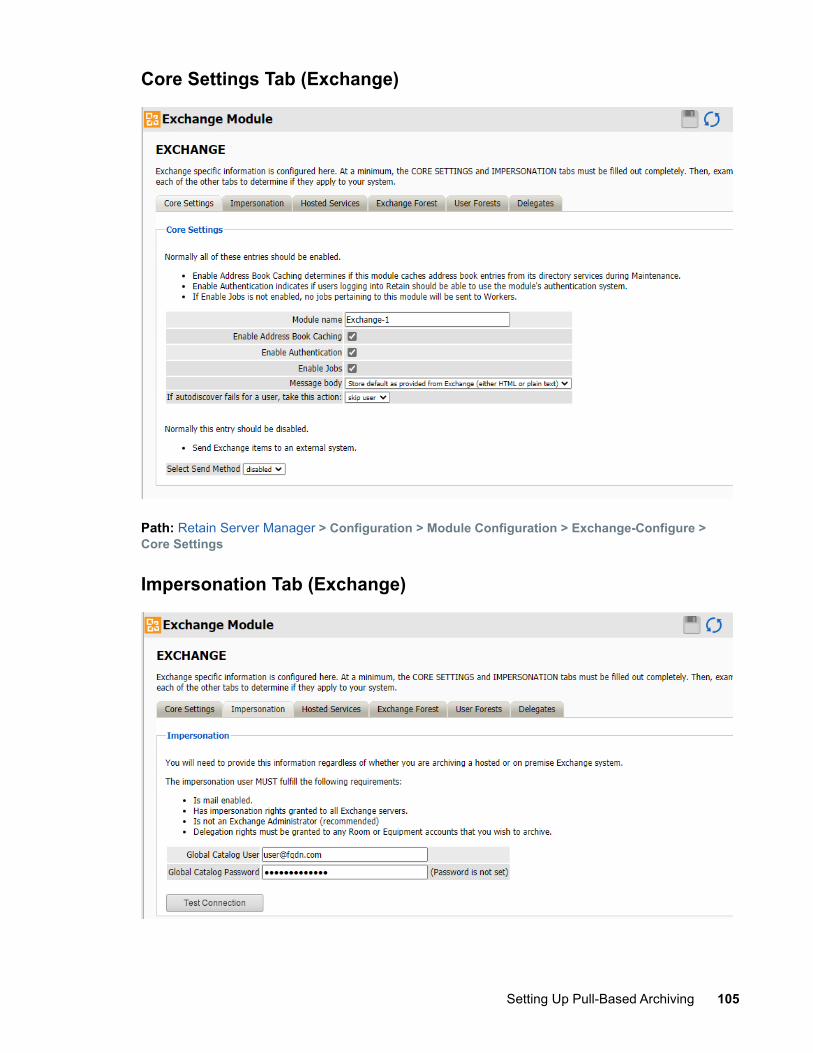
Core Settings Tab (Exchange)
Path: Retain Server Manager > Configuration > Module Configuration > Exchange-Configure > Core Settings
Impersonation Tab (Exchange)
Setting Up Pull-Based Archiving 105
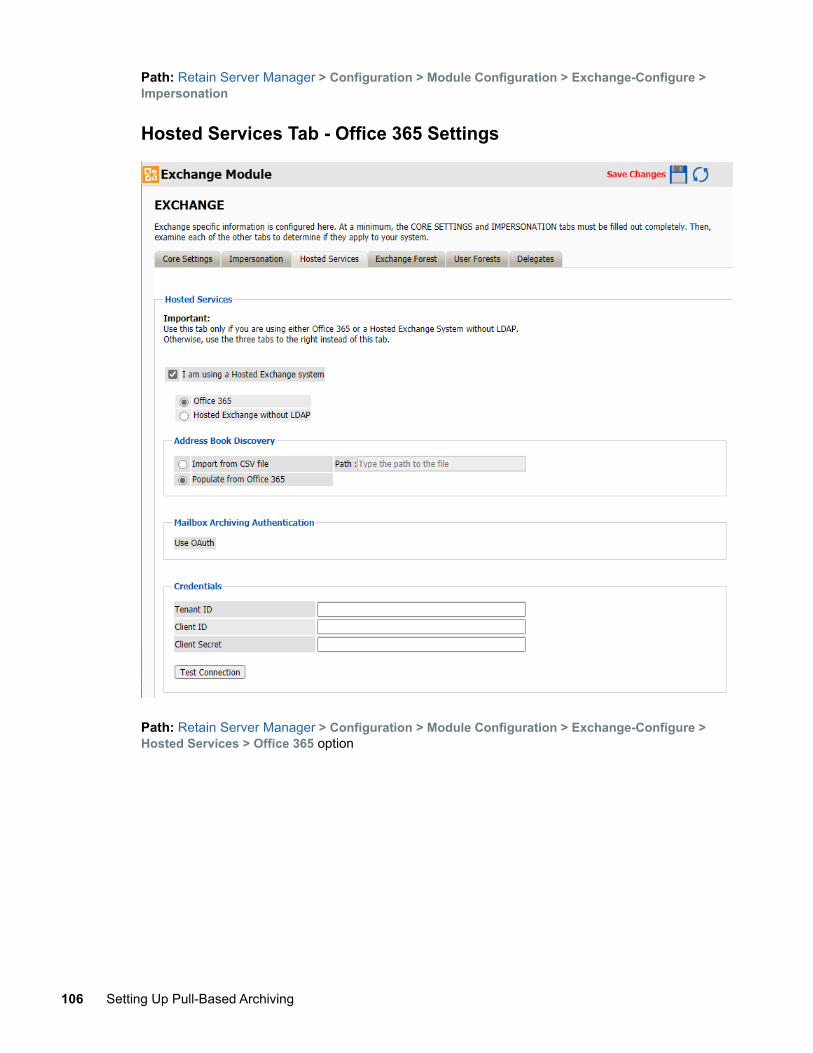
Path: Retain Server Manager > Configuration > Module Configuration > Exchange-Configure > Impersonation
Hosted Services Tab - Office 365 Settings
Path: Retain Server Manager > Configuration > Module Configuration > Exchange-Configure > Hosted Services > Office 365 option
106 Setting Up Pull-Based Archiving
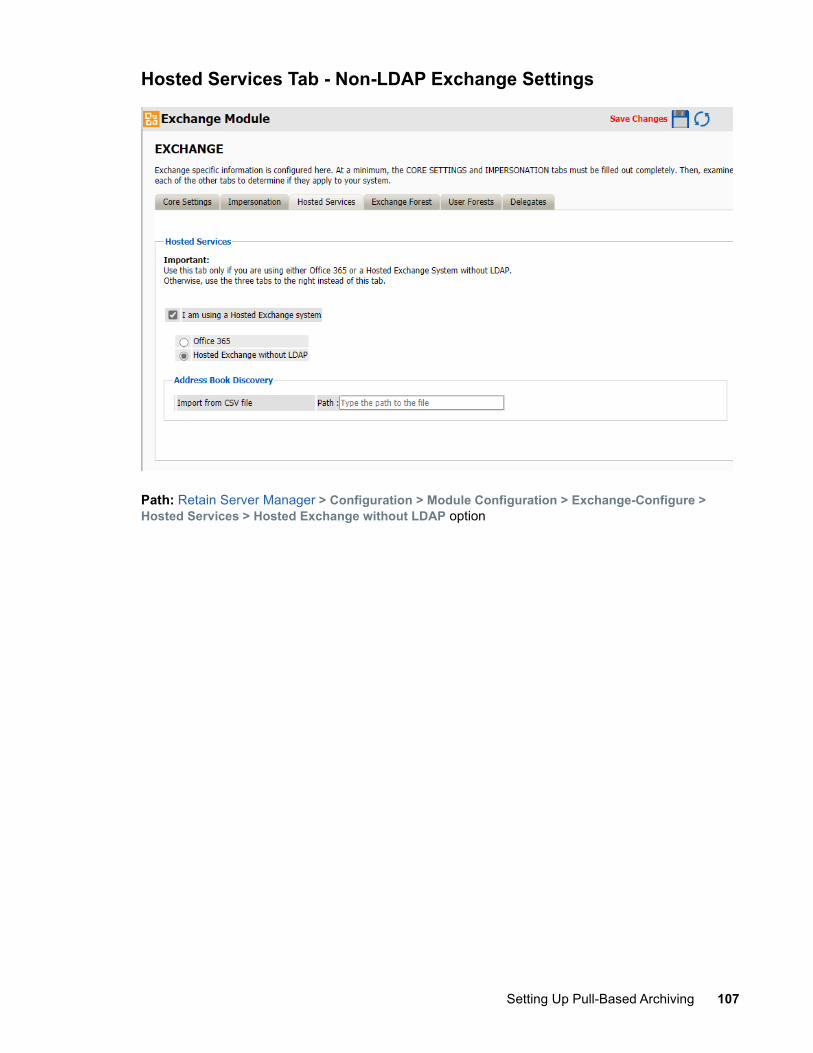
Hosted Services Tab - Non-LDAP Exchange Settings
Path: Retain Server Manager > Configuration > Module Configuration > Exchange-Configure > Hosted Services > Hosted Exchange without LDAP option
Setting Up Pull-Based Archiving 107
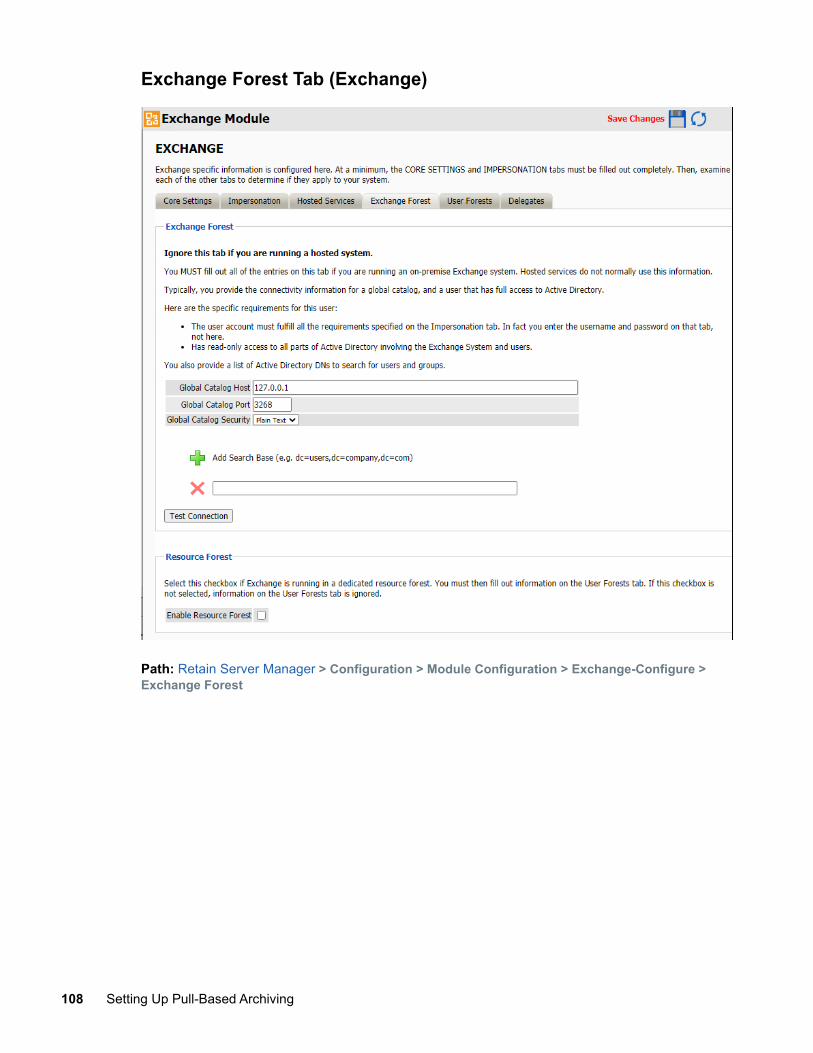
Exchange Forest Tab (Exchange)
Path: Retain Server Manager > Configuration > Module Configuration > Exchange-Configure > Exchange Forest
108 Setting Up Pull-Based Archiving
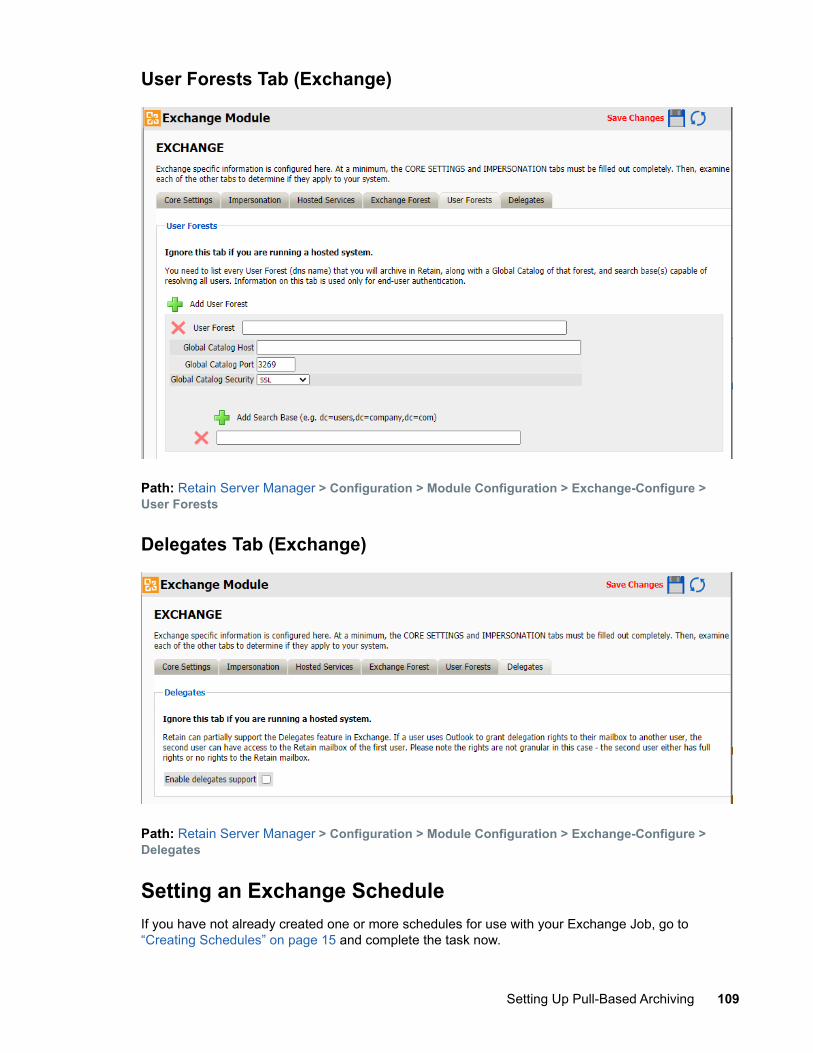
User Forests Tab (Exchange)
Path: Retain Server Manager > Configuration > Module Configuration > Exchange-Configure > User Forests
Delegates Tab (Exchange)
Path: Retain Server Manager > Configuration > Module Configuration > Exchange-Configure > Delegates
Setting an Exchange ScheduleIf you have not already created one or more schedules for use with your Exchange Job, go to “Creating Schedules” on page 15 and complete the task now.
Setting Up Pull-Based Archiving 109
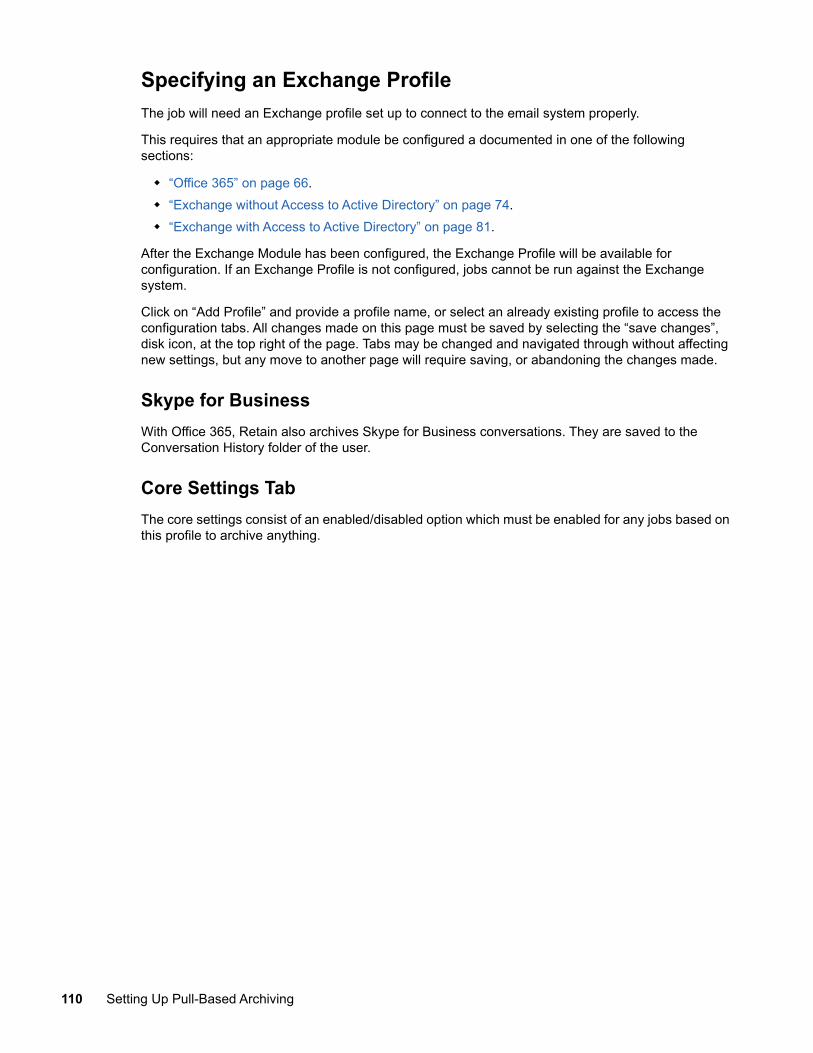
Specifying an Exchange ProfileThe job will need an Exchange profile set up to connect to the email system properly.
This requires that an appropriate module be configured a documented in one of the following sections:
“Office 365” on page 66. “Exchange without Access to Active Directory” on page 74. “Exchange with Access to Active Directory” on page 81.
After the Exchange Module has been configured, the Exchange Profile will be available for configuration. If an Exchange Profile is not configured, jobs cannot be run against the Exchange system.
Click on “Add Profile” and provide a profile name, or select an already existing profile to access the configuration tabs. All changes made on this page must be saved by selecting the “save changes”, disk icon, at the top right of the page. Tabs may be changed and navigated through without affecting new settings, but any move to another page will require saving, or abandoning the changes made.
Skype for BusinessWith Office 365, Retain also archives Skype for Business conversations. They are saved to the Conversation History folder of the user.
Core Settings TabThe core settings consist of an enabled/disabled option which must be enabled for any jobs based on this profile to archive anything.
110 Setting Up Pull-Based Archiving
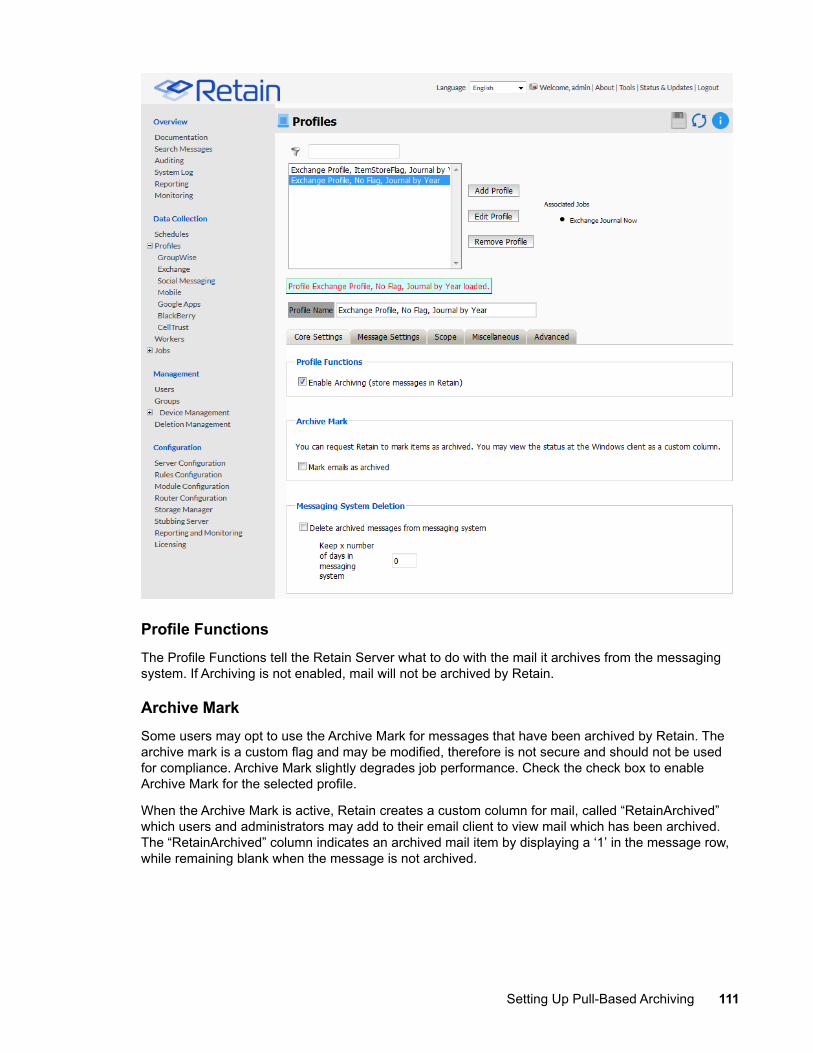
Profile FunctionsThe Profile Functions tell the Retain Server what to do with the mail it archives from the messaging system. If Archiving is not enabled, mail will not be archived by Retain.
Archive MarkSome users may opt to use the Archive Mark for messages that have been archived by Retain. The archive mark is a custom flag and may be modified, therefore is not secure and should not be used for compliance. Archive Mark slightly degrades job performance. Check the check box to enable Archive Mark for the selected profile.
When the Archive Mark is active, Retain creates a custom column for mail, called “RetainArchived” which users and administrators may add to their email client to view mail which has been archived. The “RetainArchived” column indicates an archived mail item by displaying a ‘1’ in the message row, while remaining blank when the message is not archived.
Setting Up Pull-Based Archiving 111
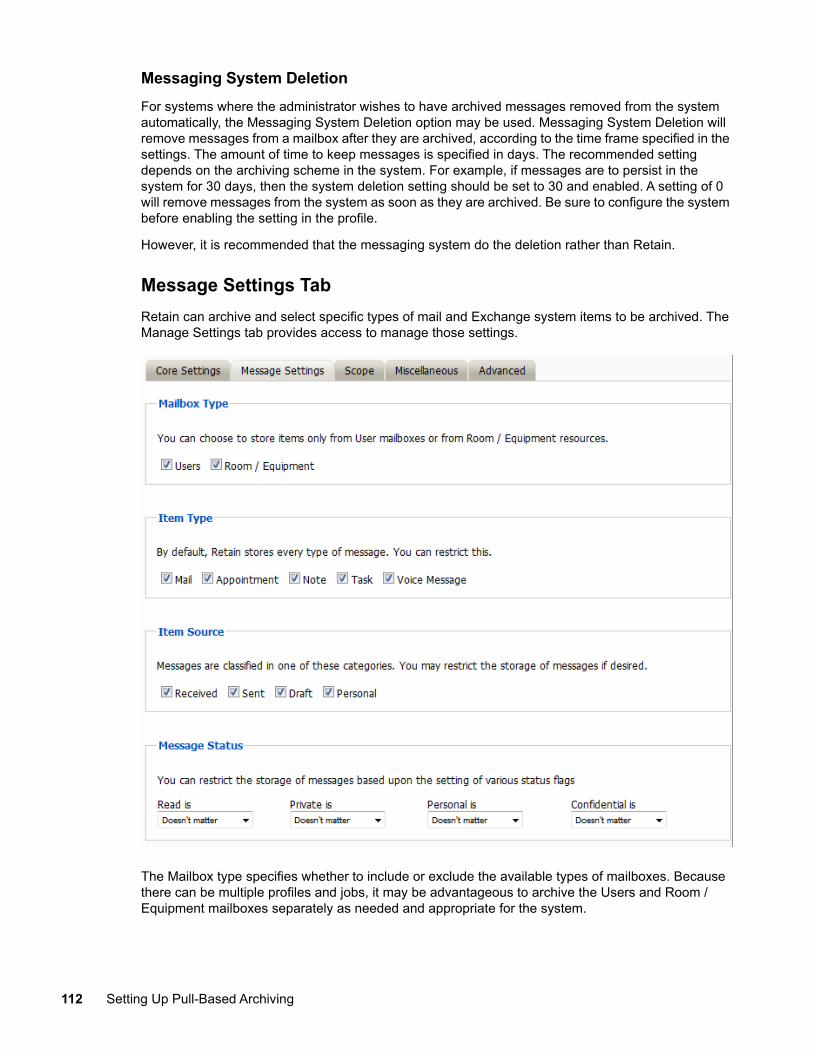
Messaging System DeletionFor systems where the administrator wishes to have archived messages removed from the system automatically, the Messaging System Deletion option may be used. Messaging System Deletion will remove messages from a mailbox after they are archived, according to the time frame specified in the settings. The amount of time to keep messages is specified in days. The recommended setting depends on the archiving scheme in the system. For example, if messages are to persist in the system for 30 days, then the system deletion setting should be set to 30 and enabled. A setting of 0 will remove messages from the system as soon as they are archived. Be sure to configure the system before enabling the setting in the profile.
However, it is recommended that the messaging system do the deletion rather than Retain.
Message Settings TabRetain can archive and select specific types of mail and Exchange system items to be archived. The Manage Settings tab provides access to manage those settings.
The Mailbox type specifies whether to include or exclude the available types of mailboxes. Because there can be multiple profiles and jobs, it may be advantageous to archive the Users and Room / Equipment mailboxes separately as needed and appropriate for the system.
112 Setting Up Pull-Based Archiving
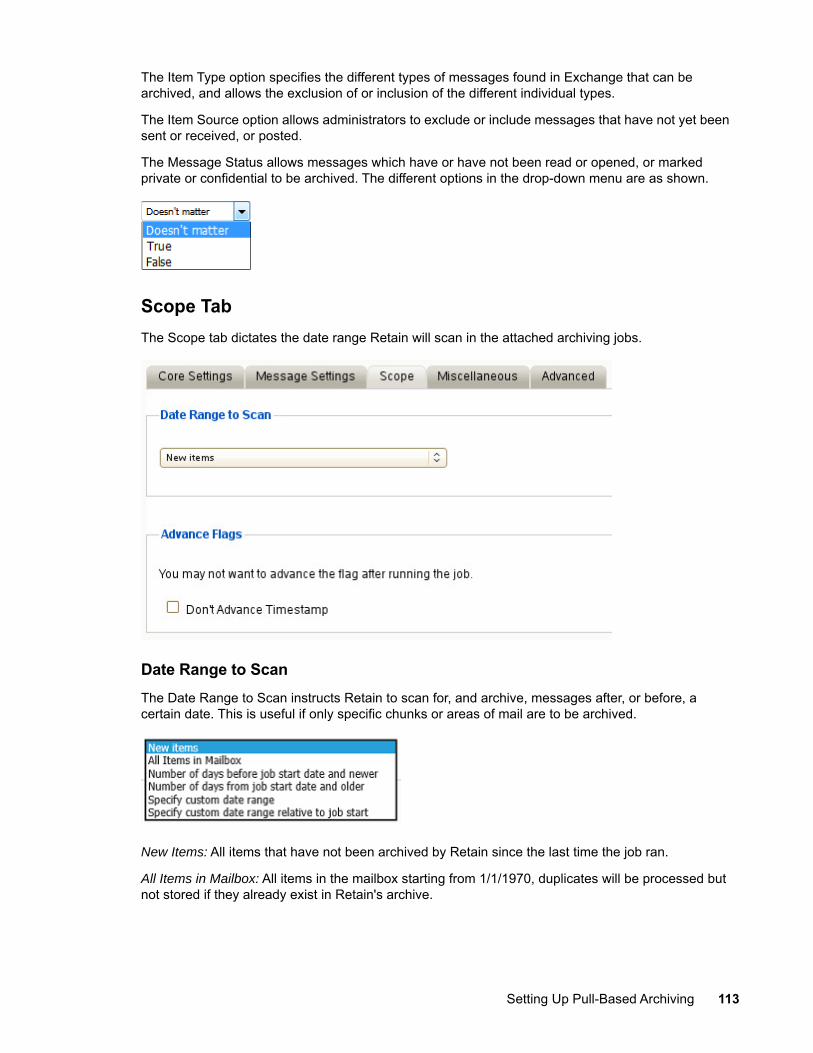
The Item Type option specifies the different types of messages found in Exchange that can be archived, and allows the exclusion of or inclusion of the different individual types.
The Item Source option allows administrators to exclude or include messages that have not yet been sent or received, or posted.
The Message Status allows messages which have or have not been read or opened, or marked private or confidential to be archived. The different options in the drop-down menu are as shown.
Scope TabThe Scope tab dictates the date range Retain will scan in the attached archiving jobs.
Date Range to ScanThe Date Range to Scan instructs Retain to scan for, and archive, messages after, or before, a certain date. This is useful if only specific chunks or areas of mail are to be archived.
New Items: All items that have not been archived by Retain since the last time the job ran.
All Items in Mailbox: All items in the mailbox starting from 1/1/1970, duplicates will be processed but not stored if they already exist in Retain's archive.
Setting Up Pull-Based Archiving 113
Number of days before job start date and newer: Only items from the relative number of days from the time the job began will be archived. E.g. messages that came into the email system less than 7 days ago.
Number of days from job start date and older: Only items previous to the relative number of days from the time the job began will be archived. E.g. messages that came into the email system more than 7 days ago.
Specify custom date range: Only items between two absolute dates will be dredged.
Specify custom date range relative to job start: Only items between two relative dates will be dredged. E.g. messages that came into the email system between 7 and 5 days ago.
It is recommended to archive all New items.
Advance FlagsEnabling "Don't Advance Timestamp" will not update the timestamp flag. Items that are dredged will still be considered new by Retain the next time the job runs.
This is useful when troubleshooting, but is generally not used for normal jobs.
NOTE: Unlike GroupWise, Exchange does not ensure any compliance when scanning end user mailboxes; users may freely delete their email. The Item store flag does not prevent mail deletion. Only setting a rolling hold on all mailboxes guarantees all items have been archived.
Miscellaneous TabThe Miscellaneous tab allows access to settings detailing how messages are stored and what is archived. Attachments, message information such as the Internet headers, and how the data is stored and named, (by folders, year, or year and month), dictate not only the message store structure, but affect the storage size.
Miscellaneous options also allow for the archiving of the ‘recoverable items’. To enable checking and archiving of the ‘Recoverable Items’ for compliance reasons, select the checkbox next to the option.
114 Setting Up Pull-Based Archiving
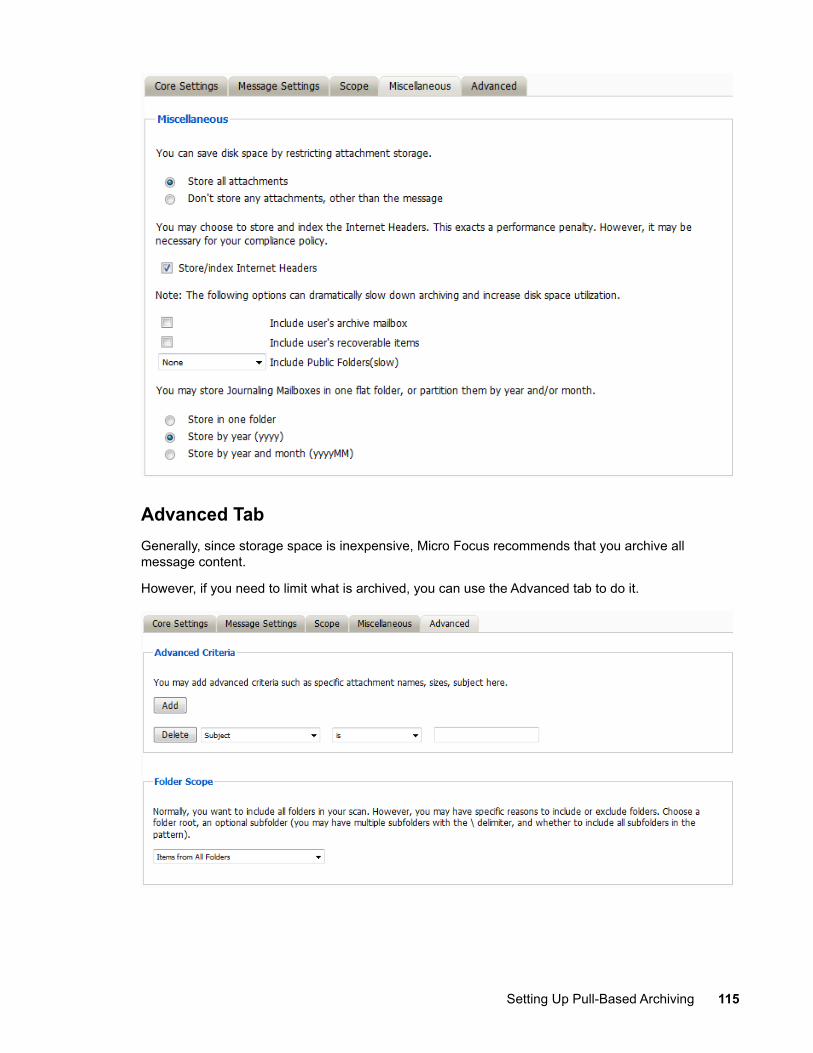
Advanced TabGenerally, since storage space is inexpensive, Micro Focus recommends that you archive all message content.
However, if you need to limit what is archived, you can use the Advanced tab to do it.
Setting Up Pull-Based Archiving 115

Table 2-31 Configuring Exchange Profile Advanced Settings
Option, Field, or Sub-panel Information and/or Action
Use this dialog to define the conditions Retain uses to determine what to archive.
Advanced Criteria Each line sets a specific parameter and the lines are all added together (AND-ed). To check how Retain will interpret your settings, read through the lines in turn, inserting AND between each one.
1. For the first field, select from among the following items:
Subject
Sender
Recipient
Size
Attachment Name
2. For the second field, specify the relationship of the first field to the (third field):
is
is not
contains
does not contain
3. Type a string for the third field.
4. Click Add to enter another statement
5. When the conditions are defined, click Save Changes.
Folder Scope By default, Retain archives the items from all folders.
Using this panel, you can restrict which folders are archived, by either:
Specifying the folders to include (the Only items from folders listed below option)
or
Specifying the folders to exclude (the All folders except those listed below option)
To specify the folders to include or exclude, do the following:
1. Specify a System Folder (mandatory).
Example: Calendar.
2. Optionally, specify a subfolder within that folder.
Example: entering old would mean the folder old under Calendar.
3. Use the / delimiter to specify multiple hierarchies under that.
Example: old/mail would mean the subfolder mail under old under Calendar.
4. Specify whether the option includes subfolder.
Example: If you specify old and deselect includes subfolder, then Calendar/old is archived.
If you specify old and select includes subfolder, Calendar/old/mail is archived.
116 Setting Up Pull-Based Archiving
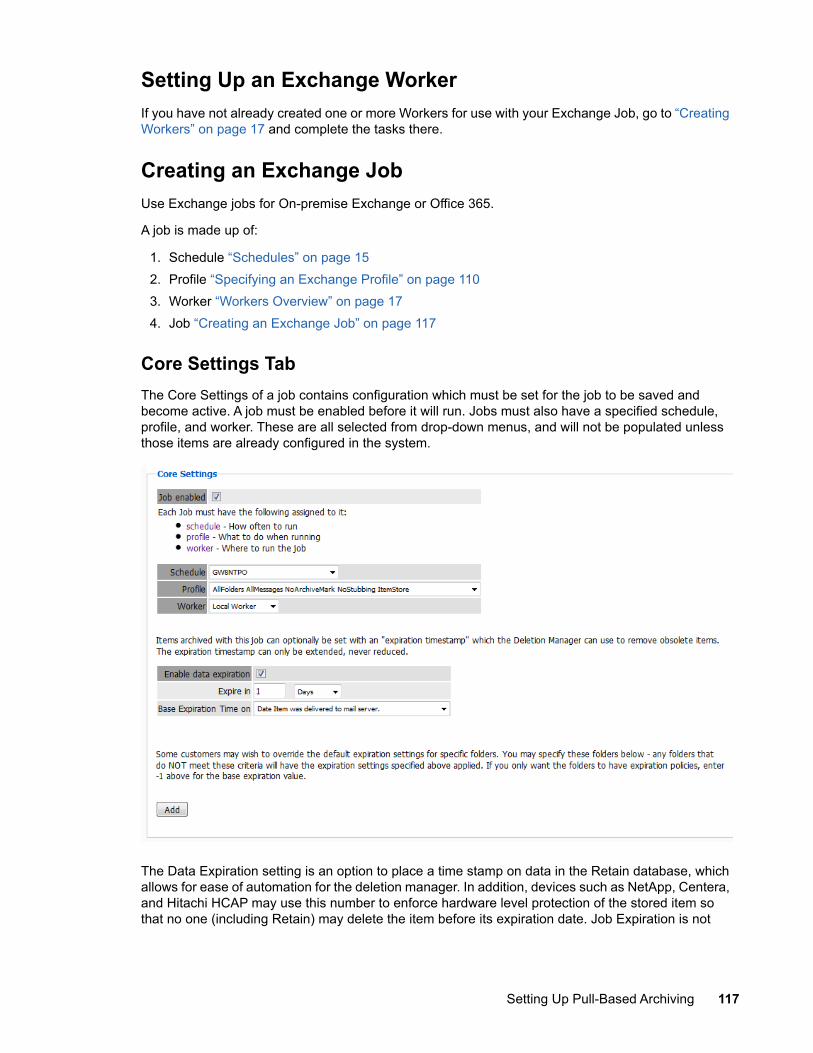
Setting Up an Exchange WorkerIf you have not already created one or more Workers for use with your Exchange Job, go to “Creating Workers” on page 17 and complete the tasks there.
Creating an Exchange JobUse Exchange jobs for On-premise Exchange or Office 365.
A job is made up of:
1. Schedule “Schedules” on page 152. Profile “Specifying an Exchange Profile” on page 1103. Worker “Workers Overview” on page 174. Job “Creating an Exchange Job” on page 117
Core Settings TabThe Core Settings of a job contains configuration which must be set for the job to be saved and become active. A job must be enabled before it will run. Jobs must also have a specified schedule, profile, and worker. These are all selected from drop-down menus, and will not be populated unless those items are already configured in the system.
The Data Expiration setting is an option to place a time stamp on data in the Retain database, which allows for ease of automation for the deletion manager. In addition, devices such as NetApp, Centera, and Hitachi HCAP may use this number to enforce hardware level protection of the stored item so that no one (including Retain) may delete the item before its expiration date. Job Expiration is not
Setting Up Pull-Based Archiving 117
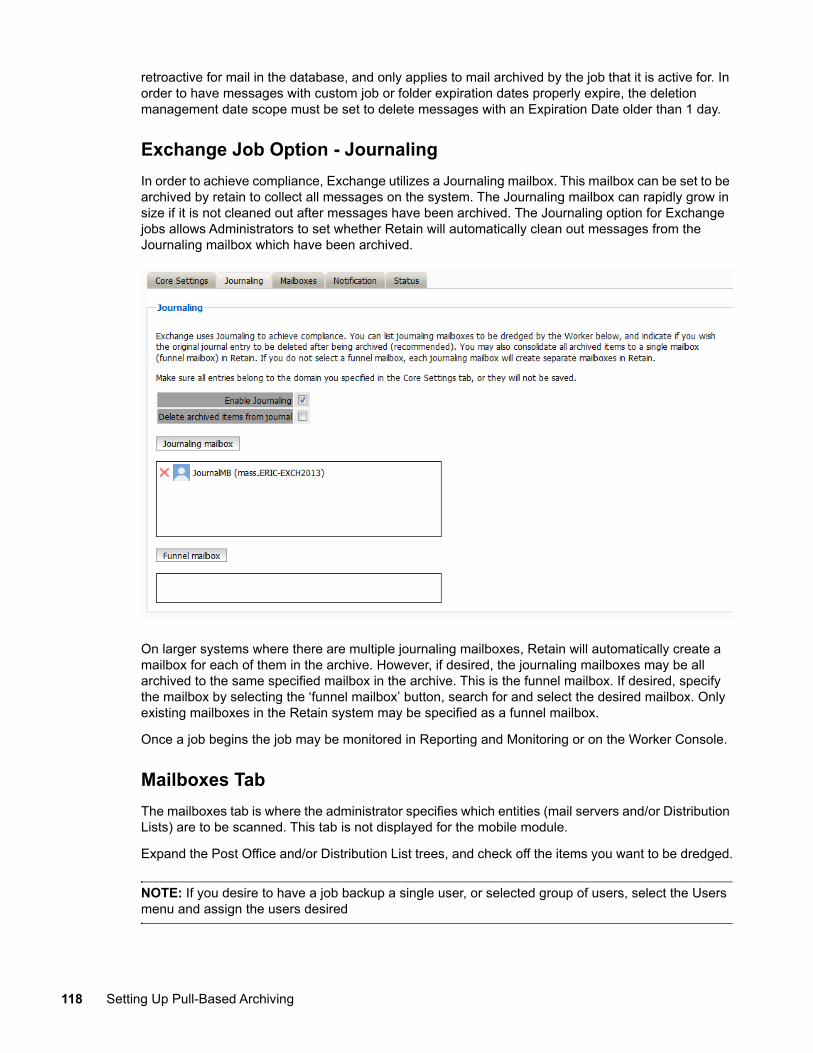
retroactive for mail in the database, and only applies to mail archived by the job that it is active for. In order to have messages with custom job or folder expiration dates properly expire, the deletion management date scope must be set to delete messages with an Expiration Date older than 1 day.
Exchange Job Option - JournalingIn order to achieve compliance, Exchange utilizes a Journaling mailbox. This mailbox can be set to be archived by retain to collect all messages on the system. The Journaling mailbox can rapidly grow in size if it is not cleaned out after messages have been archived. The Journaling option for Exchange jobs allows Administrators to set whether Retain will automatically clean out messages from the Journaling mailbox which have been archived.
On larger systems where there are multiple journaling mailboxes, Retain will automatically create a mailbox for each of them in the archive. However, if desired, the journaling mailboxes may be all archived to the same specified mailbox in the archive. This is the funnel mailbox. If desired, specify the mailbox by selecting the ‘funnel mailbox’ button, search for and select the desired mailbox. Only existing mailboxes in the Retain system may be specified as a funnel mailbox.
Once a job begins the job may be monitored in Reporting and Monitoring or on the Worker Console.
Mailboxes TabThe mailboxes tab is where the administrator specifies which entities (mail servers and/or Distribution Lists) are to be scanned. This tab is not displayed for the mobile module.
Expand the Post Office and/or Distribution List trees, and check off the items you want to be dredged.
NOTE: If you desire to have a job backup a single user, or selected group of users, select the Users menu and assign the users desired
118 Setting Up Pull-Based Archiving
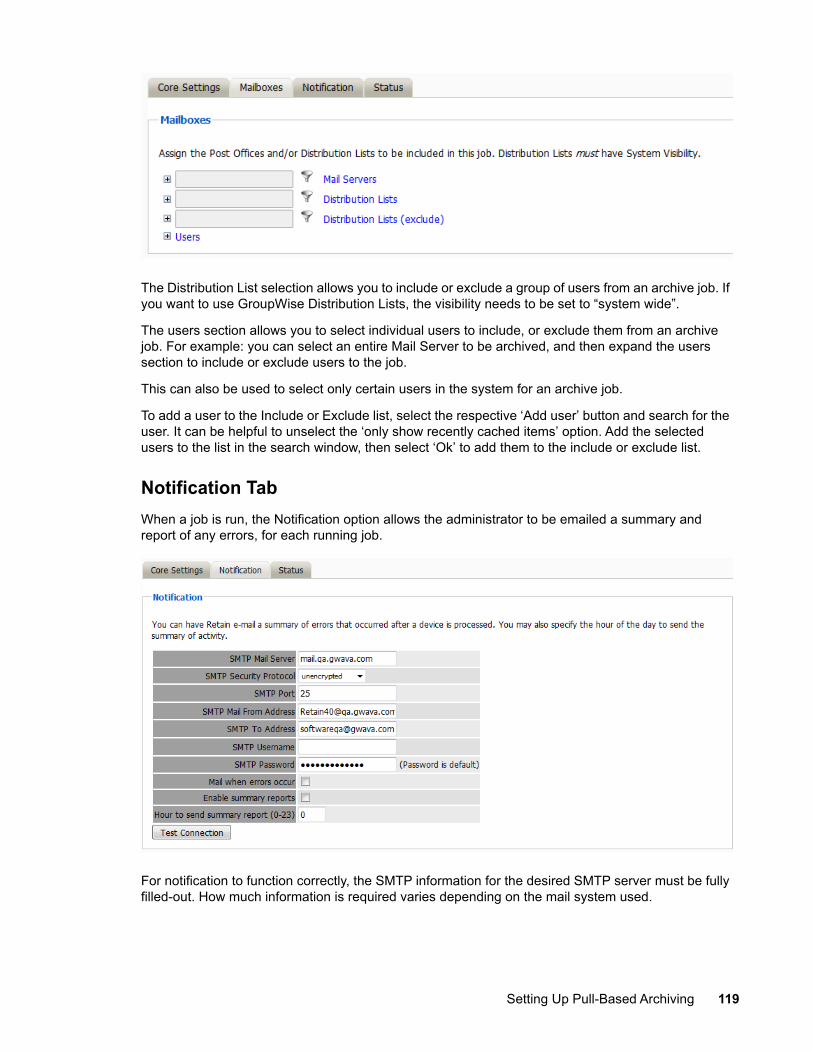
The Distribution List selection allows you to include or exclude a group of users from an archive job. If you want to use GroupWise Distribution Lists, the visibility needs to be set to “system wide”.
The users section allows you to select individual users to include, or exclude them from an archive job. For example: you can select an entire Mail Server to be archived, and then expand the users section to include or exclude users to the job.
This can also be used to select only certain users in the system for an archive job.
To add a user to the Include or Exclude list, select the respective ‘Add user’ button and search for the user. It can be helpful to unselect the ‘only show recently cached items’ option. Add the selected users to the list in the search window, then select ‘Ok’ to add them to the include or exclude list.
Notification TabWhen a job is run, the Notification option allows the administrator to be emailed a summary and report of any errors, for each running job.
For notification to function correctly, the SMTP information for the desired SMTP server must be fully filled-out. How much information is required varies depending on the mail system used.
Setting Up Pull-Based Archiving 119
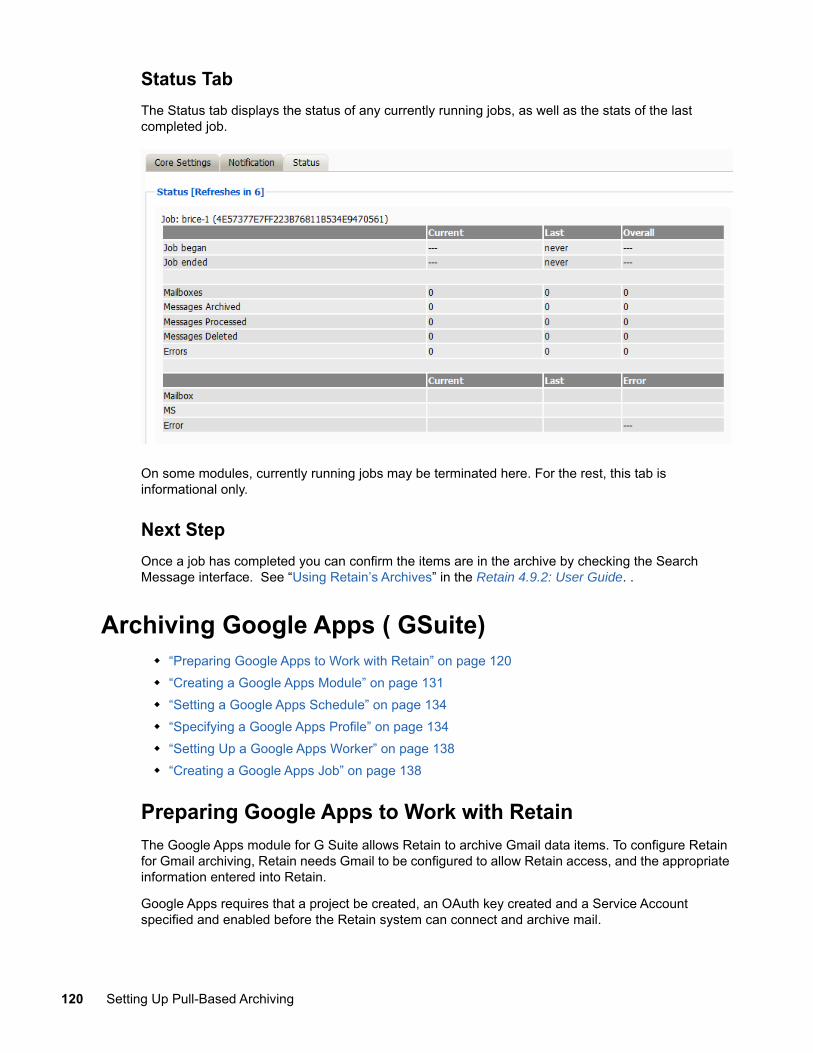
Status TabThe Status tab displays the status of any currently running jobs, as well as the stats of the last completed job.
On some modules, currently running jobs may be terminated here. For the rest, this tab is informational only.
Next StepOnce a job has completed you can confirm the items are in the archive by checking the Search Message interface. See “Using Retain’s Archives” in the Retain 4.9.2: User Guide. .
Archiving Google Apps ( GSuite) “Preparing Google Apps to Work with Retain” on page 120 “Creating a Google Apps Module” on page 131 “Setting a Google Apps Schedule” on page 134 “Specifying a Google Apps Profile” on page 134 “Setting Up a Google Apps Worker” on page 138 “Creating a Google Apps Job” on page 138
Preparing Google Apps to Work with RetainThe Google Apps module for G Suite allows Retain to archive Gmail data items. To configure Retain for Gmail archiving, Retain needs Gmail to be configured to allow Retain access, and the appropriate information entered into Retain.
Google Apps requires that a project be created, an OAuth key created and a Service Account specified and enabled before the Retain system can connect and archive mail.
120 Setting Up Pull-Based Archiving
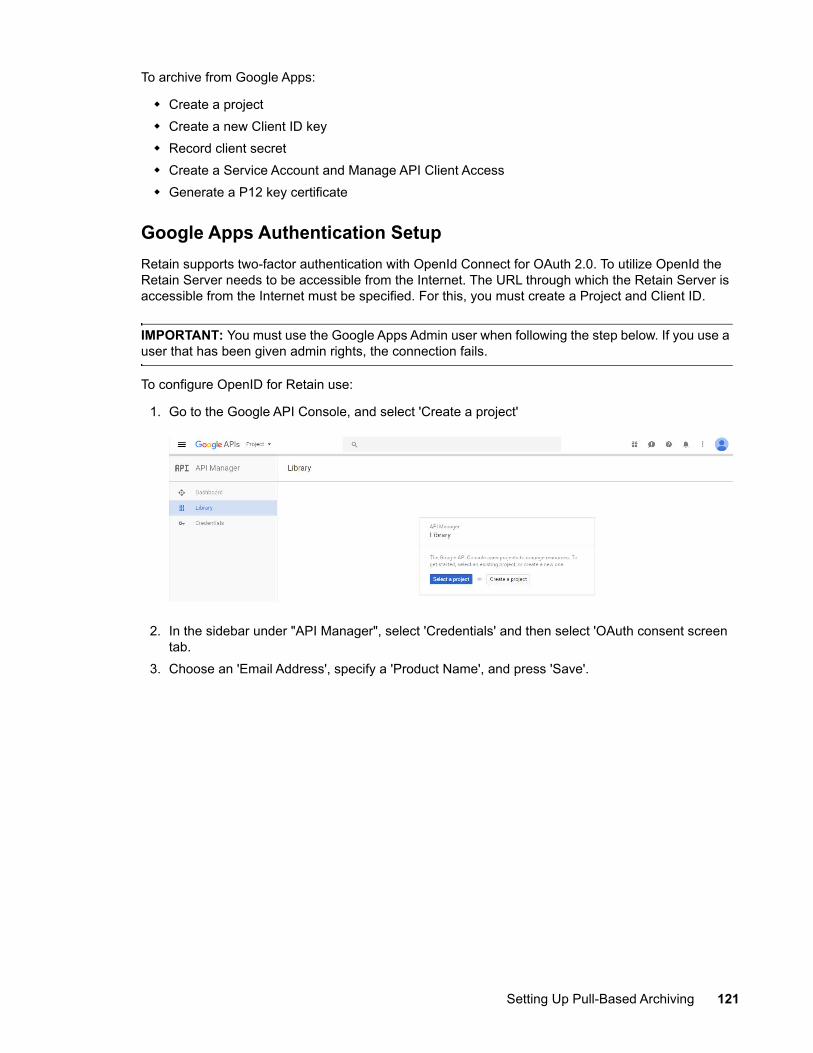
To archive from Google Apps:
Create a project Create a new Client ID key Record client secret Create a Service Account and Manage API Client Access Generate a P12 key certificate
Google Apps Authentication Setup Retain supports two-factor authentication with OpenId Connect for OAuth 2.0. To utilize OpenId the Retain Server needs to be accessible from the Internet. The URL through which the Retain Server is accessible from the Internet must be specified. For this, you must create a Project and Client ID.
IMPORTANT: You must use the Google Apps Admin user when following the step below. If you use a user that has been given admin rights, the connection fails.
To configure OpenID for Retain use:
1. Go to the Google API Console, and select 'Create a project'
2. In the sidebar under "API Manager", select 'Credentials' and then select 'OAuth consent screen tab.
3. Choose an 'Email Address', specify a 'Product Name', and press 'Save'.
Setting Up Pull-Based Archiving 121
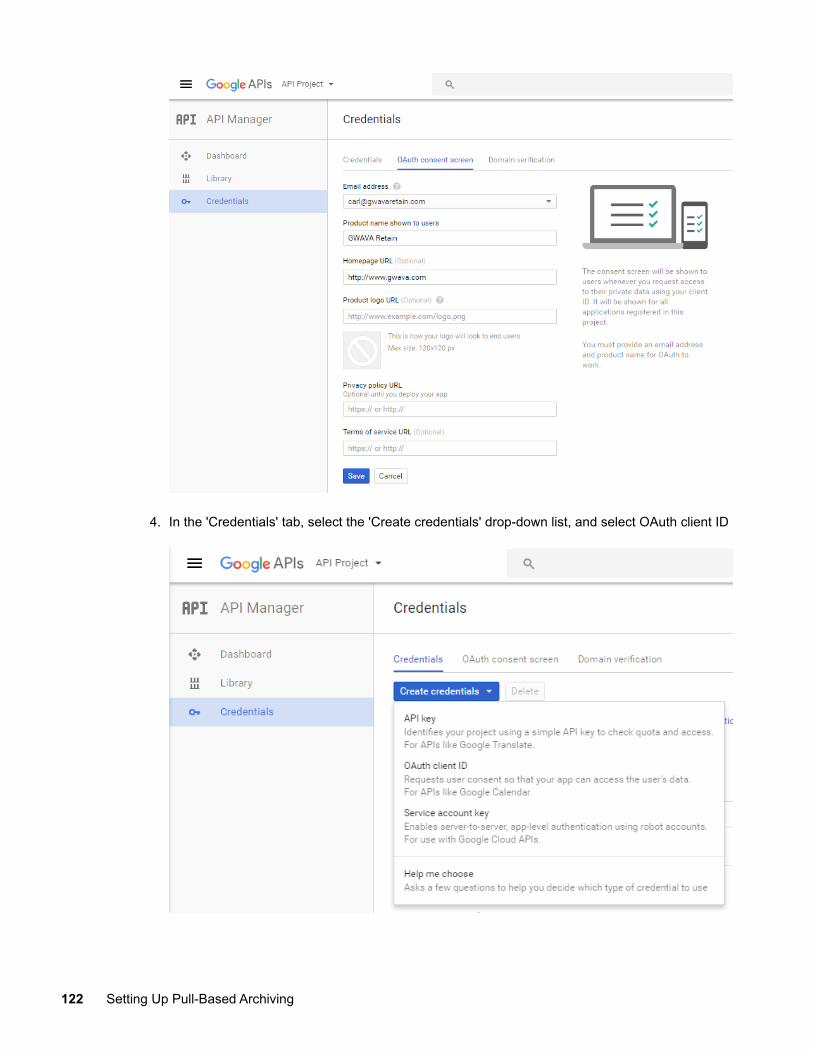
4. In the 'Credentials' tab, select the 'Create credentials' drop-down list, and select OAuth client ID
122 Setting Up Pull-Based Archiving
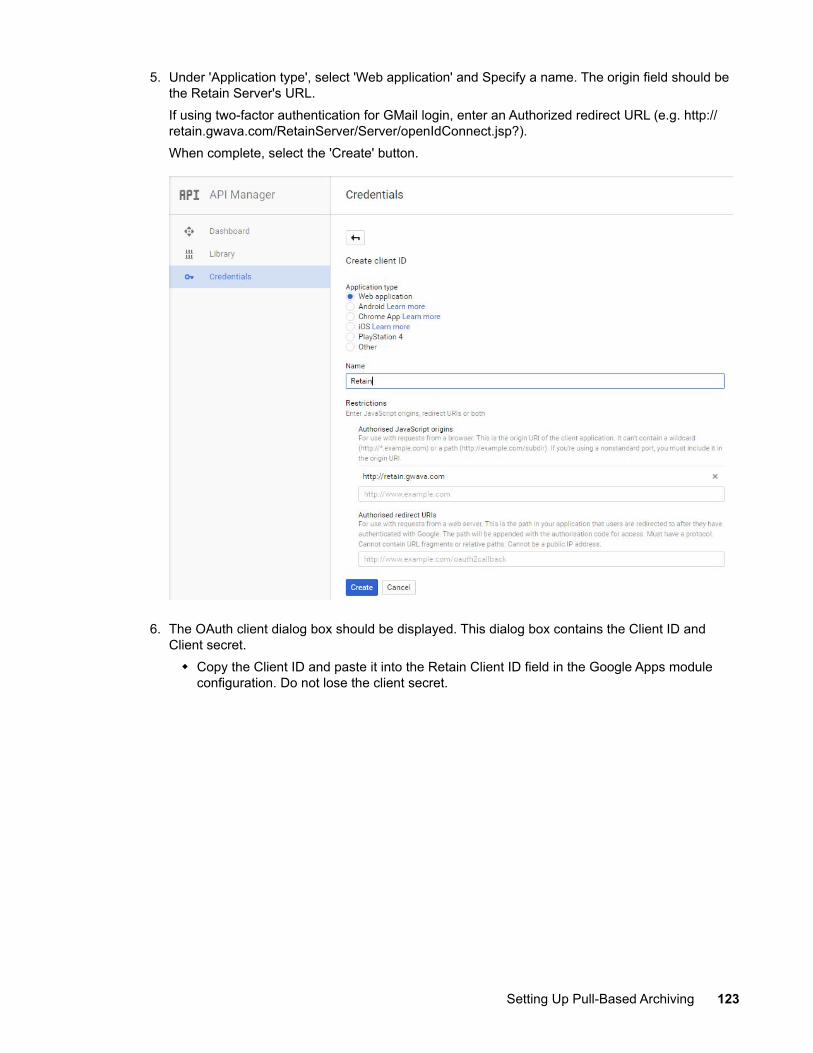
5. Under 'Application type', select 'Web application' and Specify a name. The origin field should be the Retain Server's URL.If using two-factor authentication for GMail login, enter an Authorized redirect URL (e.g. http://retain.gwava.com/RetainServer/Server/openIdConnect.jsp?).When complete, select the 'Create' button.
6. The OAuth client dialog box should be displayed. This dialog box contains the Client ID and Client secret. Copy the Client ID and paste it into the Retain Client ID field in the Google Apps module
configuration. Do not lose the client secret.
Setting Up Pull-Based Archiving 123
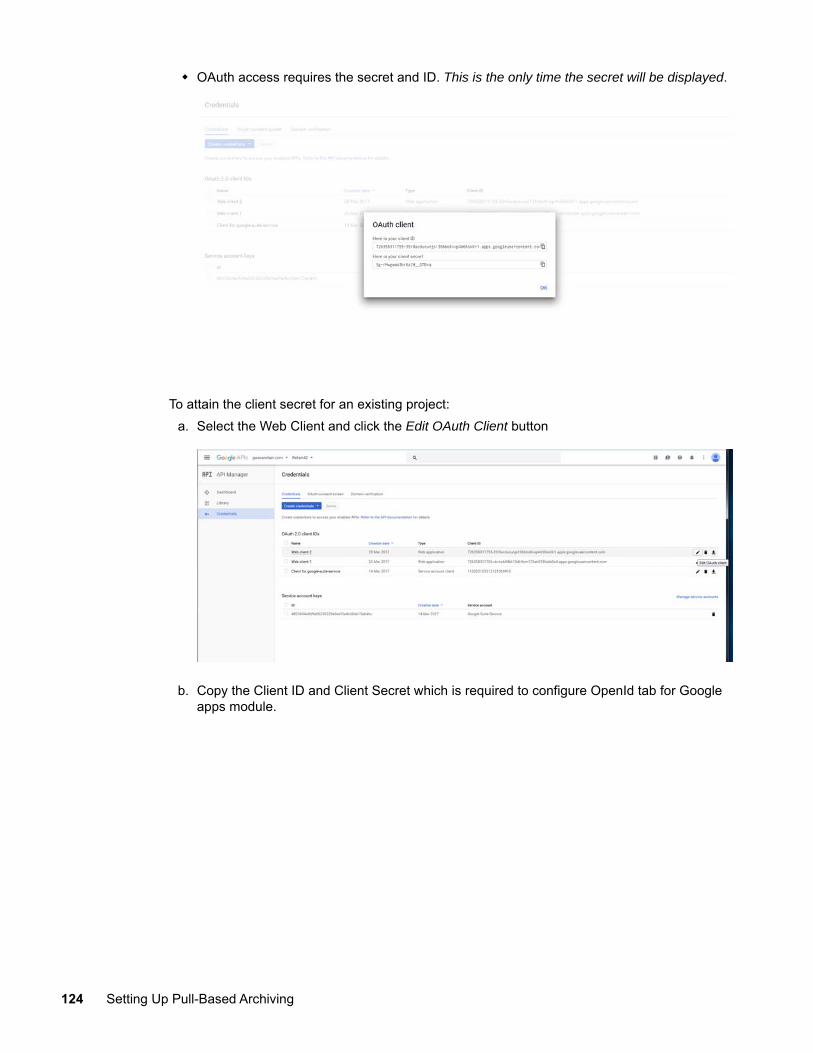
OAuth access requires the secret and ID. This is the only time the secret will be displayed.
To attain the client secret for an existing project:a. Select the Web Client and click the Edit OAuth Client button
b. Copy the Client ID and Client Secret which is required to configure OpenId tab for Google apps module.
124 Setting Up Pull-Based Archiving
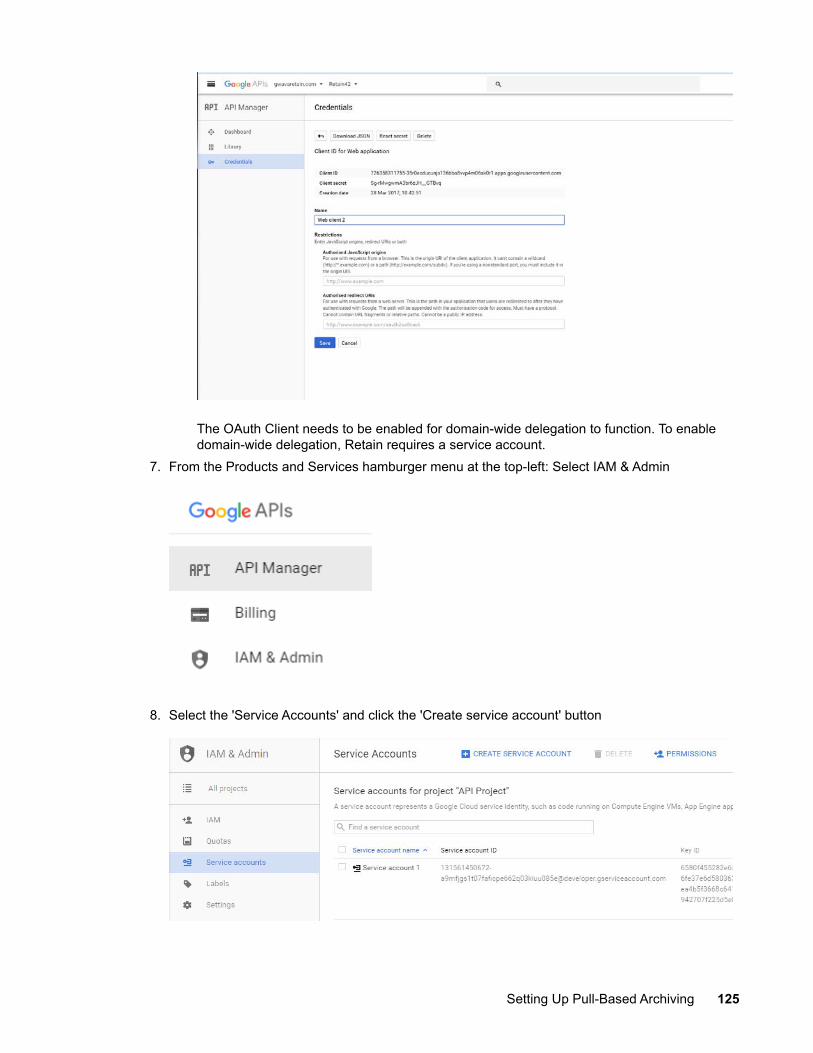
The OAuth Client needs to be enabled for domain-wide delegation to function. To enable domain-wide delegation, Retain requires a service account.
7. From the Products and Services hamburger menu at the top-left: Select IAM & Admin
8. Select the 'Service Accounts' and click the 'Create service account' button
Setting Up Pull-Based Archiving 125
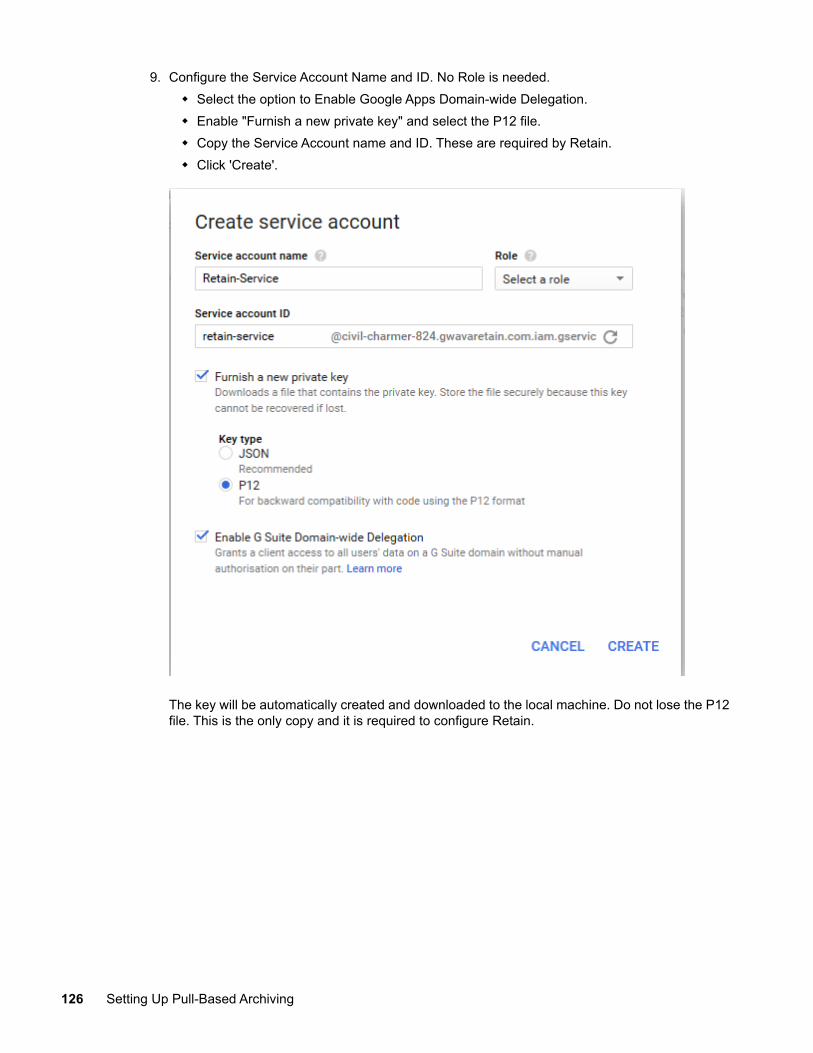
9. Configure the Service Account Name and ID. No Role is needed. Select the option to Enable Google Apps Domain-wide Delegation. Enable "Furnish a new private key" and select the P12 file. Copy the Service Account name and ID. These are required by Retain. Click 'Create'.
The key will be automatically created and downloaded to the local machine. Do not lose the P12 file. This is the only copy and it is required to configure Retain.
126 Setting Up Pull-Based Archiving
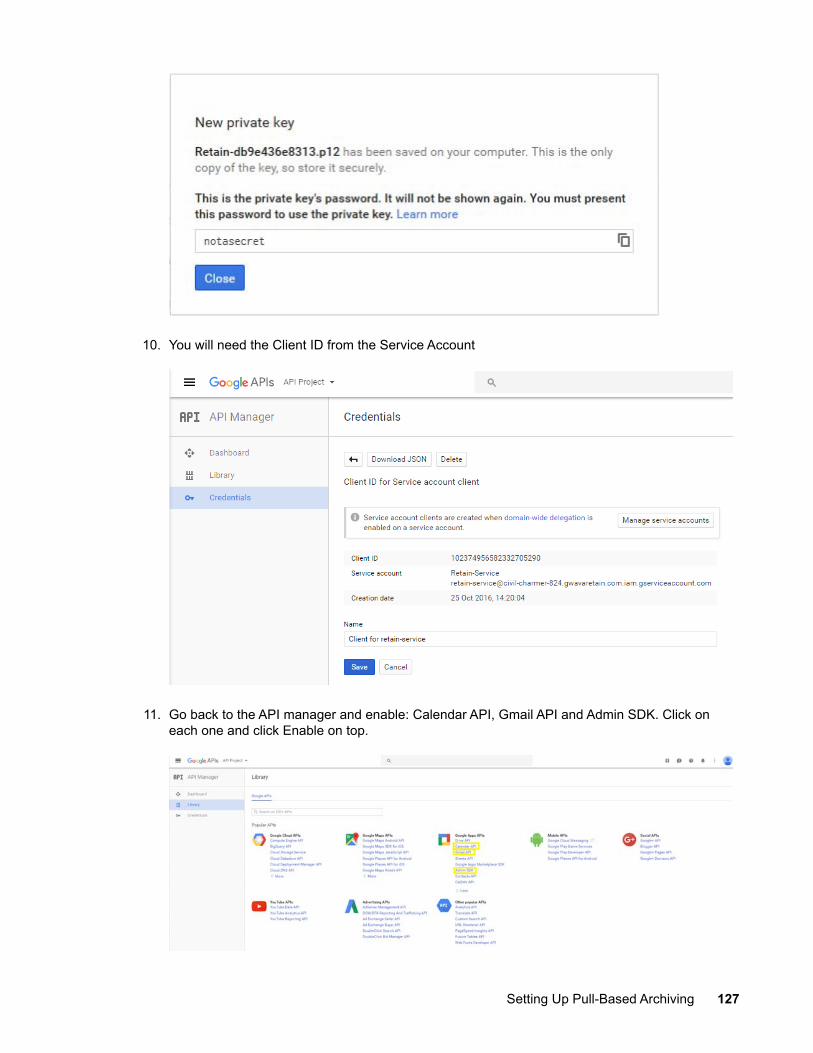
10. You will need the Client ID from the Service Account
11. Go back to the API manager and enable: Calendar API, Gmail API and Admin SDK. Click on each one and click Enable on top.
Setting Up Pull-Based Archiving 127

12. The last step is to authorize the domain. Browse to the Google home page and select 'Admin' from the drop down menu at the top right.
13. Select 'Security' from the administration menu.
128 Setting Up Pull-Based Archiving
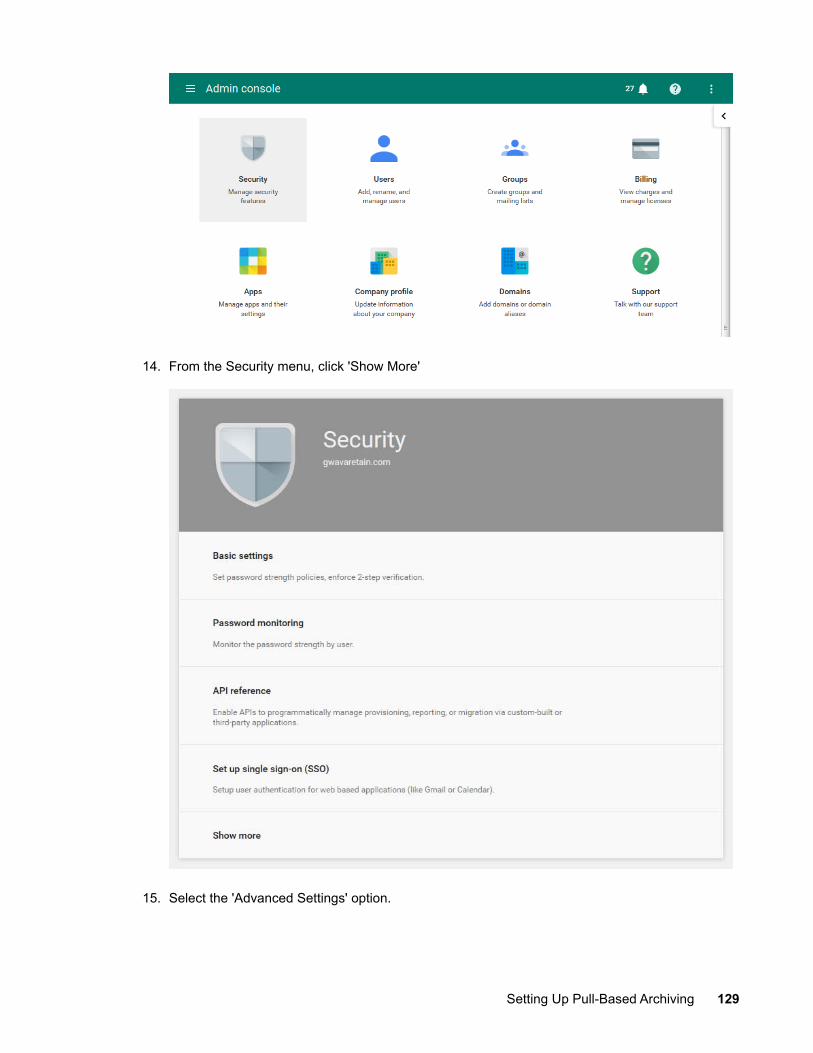
14. From the Security menu, click 'Show More'
15. Select the 'Advanced Settings' option.
Setting Up Pull-Based Archiving 129
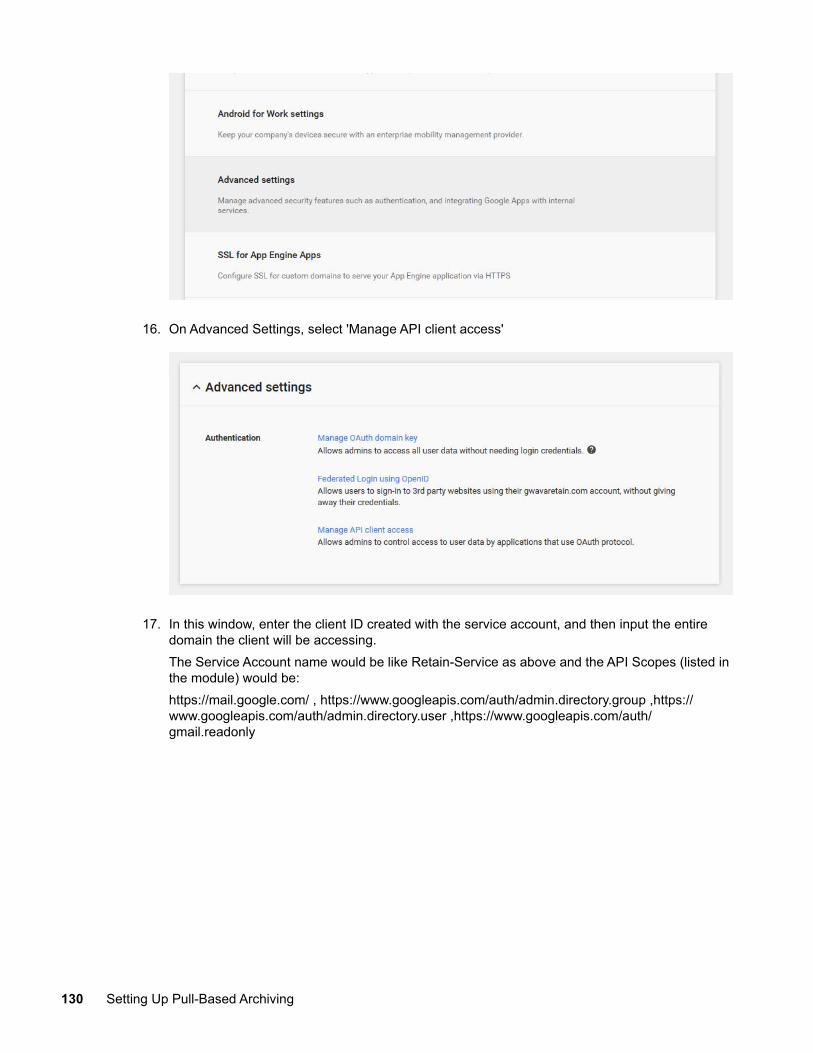
16. On Advanced Settings, select 'Manage API client access'
17. In this window, enter the client ID created with the service account, and then input the entire domain the client will be accessing.The Service Account name would be like Retain-Service as above and the API Scopes (listed in the module) would be:https://mail.google.com/ , https://www.googleapis.com/auth/admin.directory.group ,https://www.googleapis.com/auth/admin.directory.user ,https://www.googleapis.com/auth/gmail.readonly
130 Setting Up Pull-Based Archiving

18. Once entered, click 'Authorize'.All configuration required is now complete in Google Apps, and the information and files keys are available for configuration of Retain.
Creating a Google Apps Module
IMPORTANT: To create a Google Apps Module, you must first complete the instructions in “Preparing Google Apps to Work with Retain” on page 120.
“Core Settings Tab (Google Apps Module)” on page 131 “Settings Tab (Google Apps)” on page 132 “Open ID Tab (Google Apps module)” on page 133
Core Settings Tab (Google Apps Module)
Setting Up Pull-Based Archiving 131
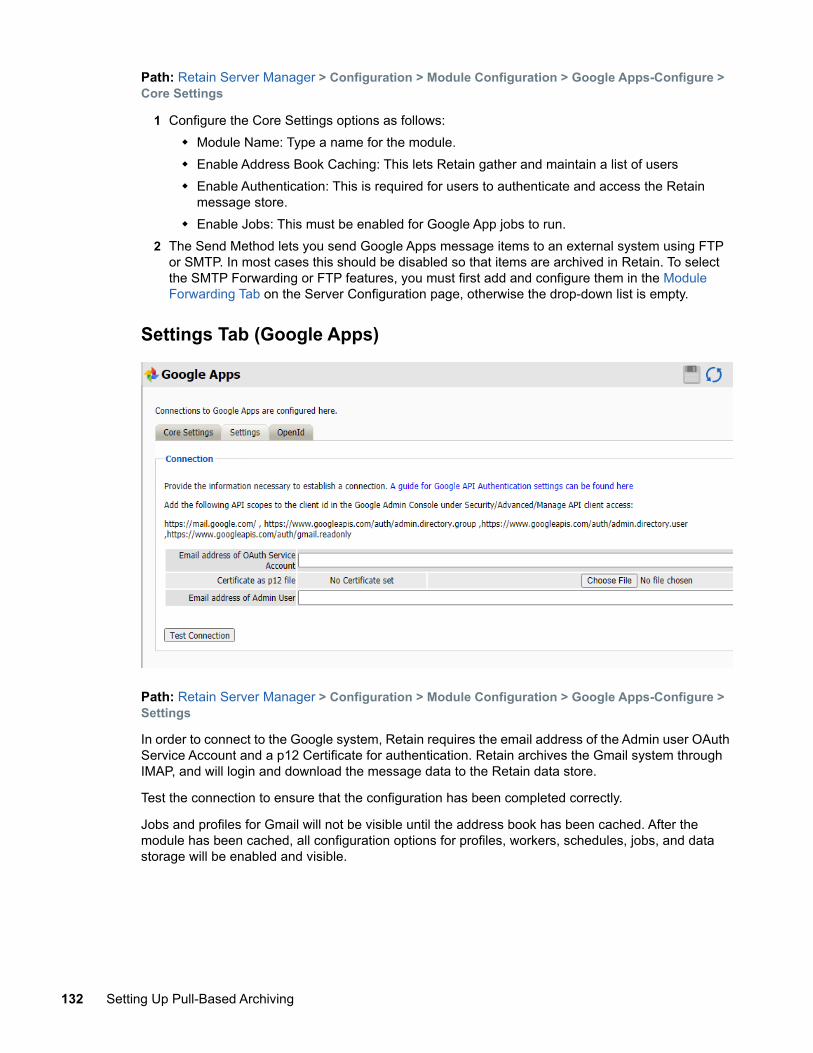
Path: Retain Server Manager > Configuration > Module Configuration > Google Apps-Configure > Core Settings
1 Configure the Core Settings options as follows: Module Name: Type a name for the module. Enable Address Book Caching: This lets Retain gather and maintain a list of users Enable Authentication: This is required for users to authenticate and access the Retain
message store. Enable Jobs: This must be enabled for Google App jobs to run.
2 The Send Method lets you send Google Apps message items to an external system using FTP or SMTP. In most cases this should be disabled so that items are archived in Retain. To select the SMTP Forwarding or FTP features, you must first add and configure them in the Module Forwarding Tab on the Server Configuration page, otherwise the drop-down list is empty.
Settings Tab (Google Apps)
Path: Retain Server Manager > Configuration > Module Configuration > Google Apps-Configure > Settings
In order to connect to the Google system, Retain requires the email address of the Admin user OAuth Service Account and a p12 Certificate for authentication. Retain archives the Gmail system through IMAP, and will login and download the message data to the Retain data store.
Test the connection to ensure that the configuration has been completed correctly.
Jobs and profiles for Gmail will not be visible until the address book has been cached. After the module has been cached, all configuration options for profiles, workers, schedules, jobs, and data storage will be enabled and visible.
132 Setting Up Pull-Based Archiving
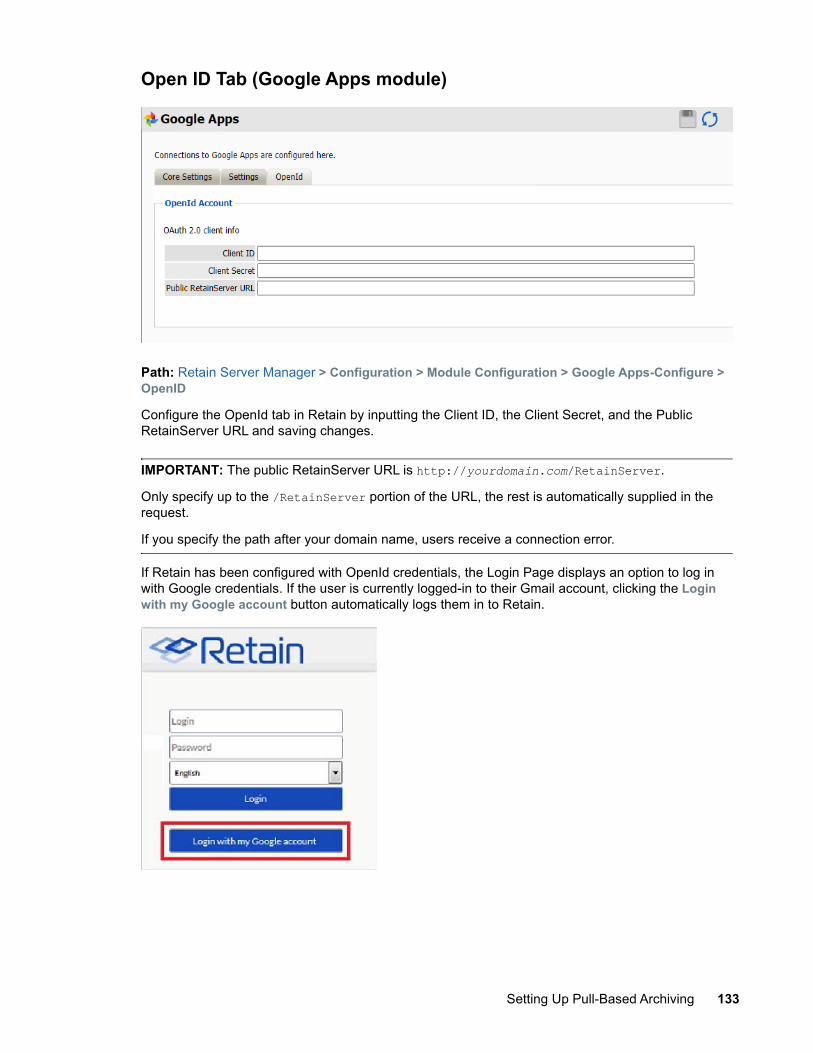
Open ID Tab (Google Apps module)
Path: Retain Server Manager > Configuration > Module Configuration > Google Apps-Configure > OpenID
Configure the OpenId tab in Retain by inputting the Client ID, the Client Secret, and the Public RetainServer URL and saving changes.
IMPORTANT: The public RetainServer URL is http://yourdomain.com/RetainServer.
Only specify up to the /RetainServer portion of the URL, the rest is automatically supplied in the request.
If you specify the path after your domain name, users receive a connection error.
If Retain has been configured with OpenId credentials, the Login Page displays an option to log in with Google credentials. If the user is currently logged-in to their Gmail account, clicking the Login with my Google account button automatically logs them in to Retain.
Setting Up Pull-Based Archiving 133
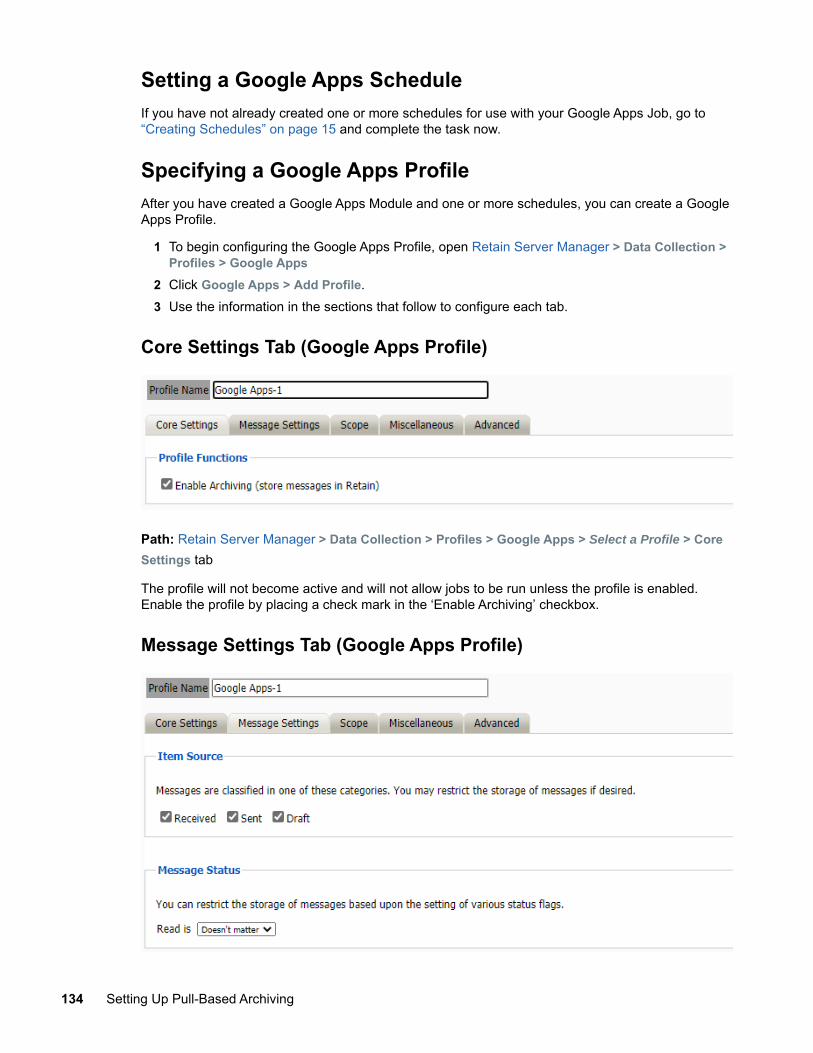
Setting a Google Apps ScheduleIf you have not already created one or more schedules for use with your Google Apps Job, go to “Creating Schedules” on page 15 and complete the task now.
Specifying a Google Apps ProfileAfter you have created a Google Apps Module and one or more schedules, you can create a Google Apps Profile.
1 To begin configuring the Google Apps Profile, open Retain Server Manager > Data Collection > Profiles > Google Apps
2 Click Google Apps > Add Profile.3 Use the information in the sections that follow to configure each tab.
Core Settings Tab (Google Apps Profile)
Path: Retain Server Manager > Data Collection > Profiles > Google Apps > Select a Profile > Core Settings tab
The profile will not become active and will not allow jobs to be run unless the profile is enabled. Enable the profile by placing a check mark in the ‘Enable Archiving’ checkbox.
Message Settings Tab (Google Apps Profile)
134 Setting Up Pull-Based Archiving
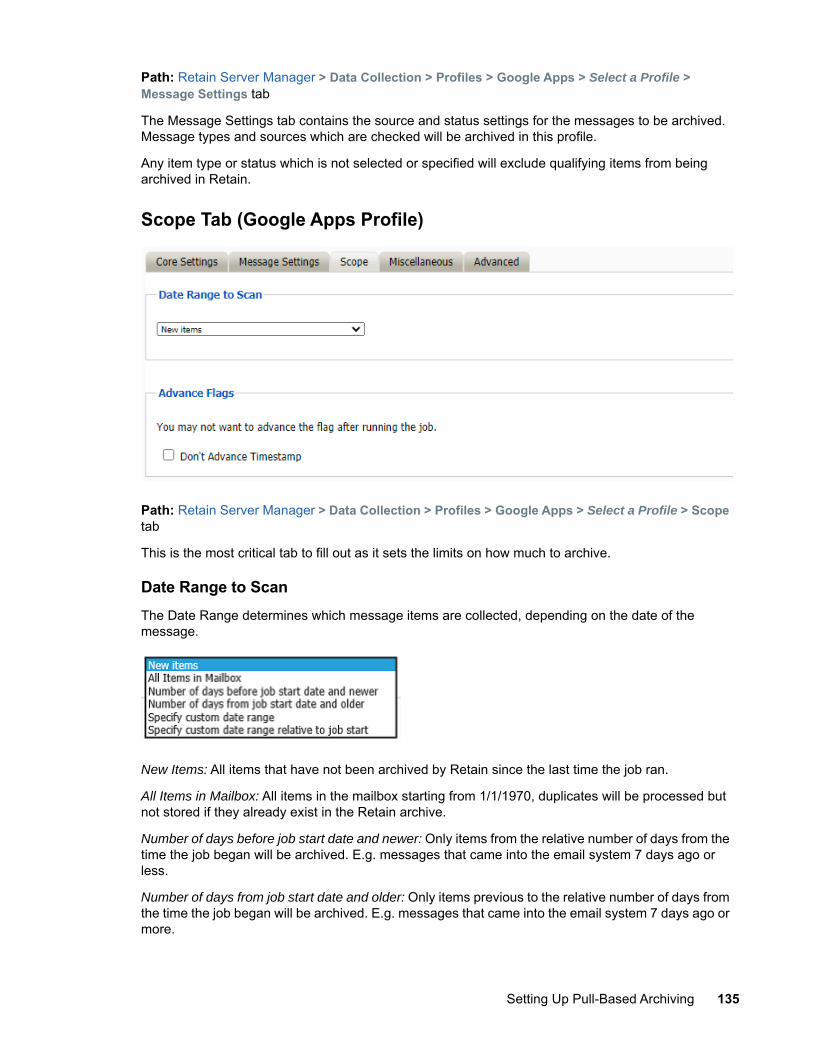
Path: Retain Server Manager > Data Collection > Profiles > Google Apps > Select a Profile > Message Settings tab
The Message Settings tab contains the source and status settings for the messages to be archived. Message types and sources which are checked will be archived in this profile.
Any item type or status which is not selected or specified will exclude qualifying items from being archived in Retain.
Scope Tab (Google Apps Profile)
Path: Retain Server Manager > Data Collection > Profiles > Google Apps > Select a Profile > Scope tab
This is the most critical tab to fill out as it sets the limits on how much to archive.
Date Range to ScanThe Date Range determines which message items are collected, depending on the date of the message.
New Items: All items that have not been archived by Retain since the last time the job ran.
All Items in Mailbox: All items in the mailbox starting from 1/1/1970, duplicates will be processed but not stored if they already exist in the Retain archive.
Number of days before job start date and newer: Only items from the relative number of days from the time the job began will be archived. E.g. messages that came into the email system 7 days ago or less.
Number of days from job start date and older: Only items previous to the relative number of days from the time the job began will be archived. E.g. messages that came into the email system 7 days ago or more.
Setting Up Pull-Based Archiving 135
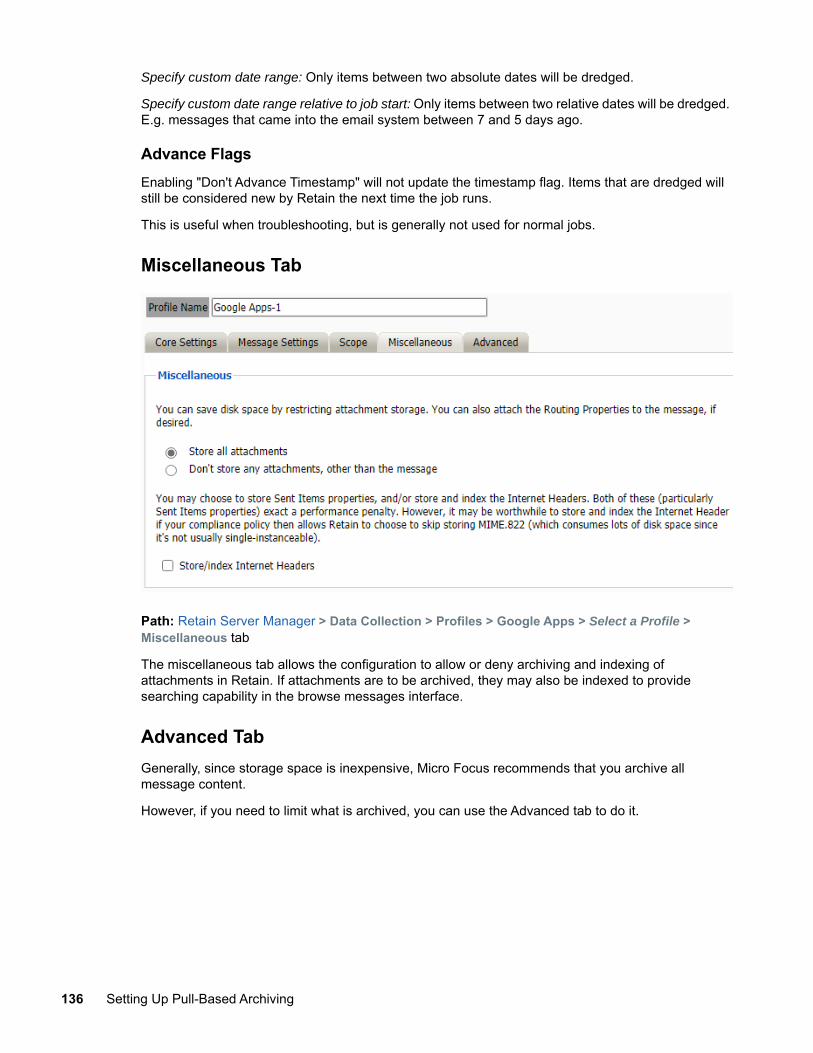
Specify custom date range: Only items between two absolute dates will be dredged.
Specify custom date range relative to job start: Only items between two relative dates will be dredged. E.g. messages that came into the email system between 7 and 5 days ago.
Advance FlagsEnabling "Don't Advance Timestamp" will not update the timestamp flag. Items that are dredged will still be considered new by Retain the next time the job runs.
This is useful when troubleshooting, but is generally not used for normal jobs.
Miscellaneous Tab
Path: Retain Server Manager > Data Collection > Profiles > Google Apps > Select a Profile > Miscellaneous tab
The miscellaneous tab allows the configuration to allow or deny archiving and indexing of attachments in Retain. If attachments are to be archived, they may also be indexed to provide searching capability in the browse messages interface.
Advanced TabGenerally, since storage space is inexpensive, Micro Focus recommends that you archive all message content.
However, if you need to limit what is archived, you can use the Advanced tab to do it.
136 Setting Up Pull-Based Archiving
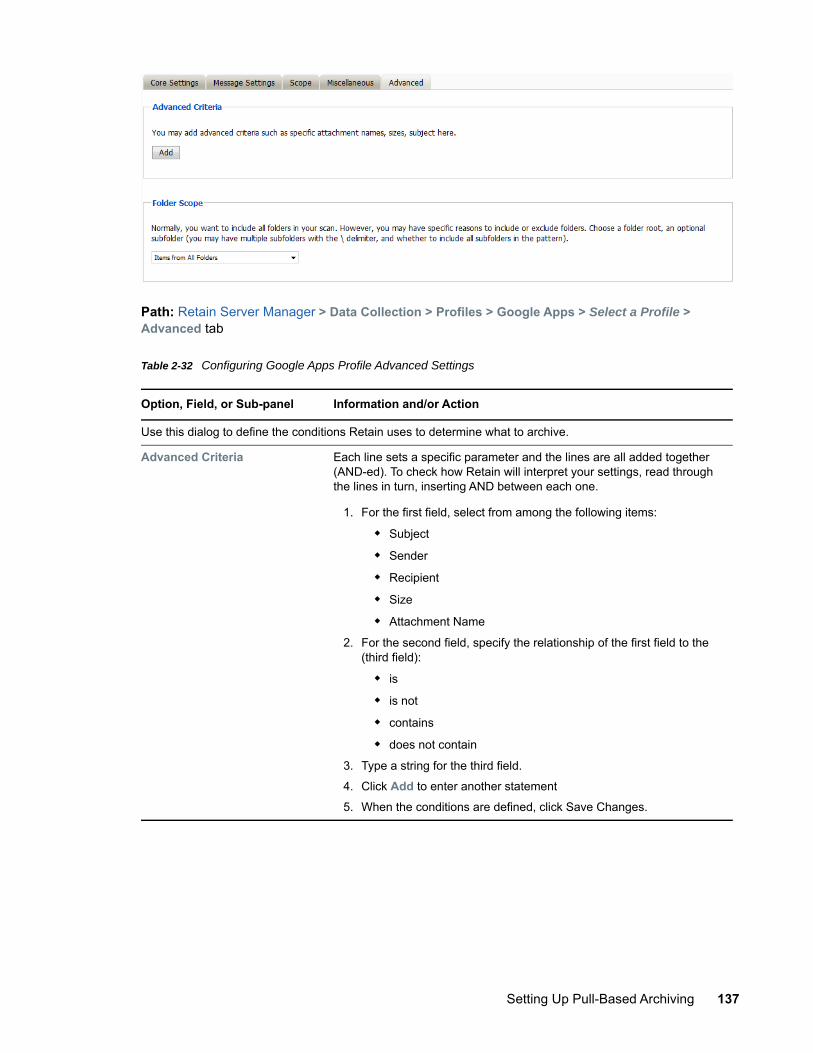
Path: Retain Server Manager > Data Collection > Profiles > Google Apps > Select a Profile > Advanced tab
Table 2-32 Configuring Google Apps Profile Advanced Settings
Option, Field, or Sub-panel Information and/or Action
Use this dialog to define the conditions Retain uses to determine what to archive.
Advanced Criteria Each line sets a specific parameter and the lines are all added together (AND-ed). To check how Retain will interpret your settings, read through the lines in turn, inserting AND between each one.
1. For the first field, select from among the following items:
Subject
Sender
Recipient
Size
Attachment Name
2. For the second field, specify the relationship of the first field to the (third field):
is
is not
contains
does not contain
3. Type a string for the third field.
4. Click Add to enter another statement
5. When the conditions are defined, click Save Changes.
Setting Up Pull-Based Archiving 137

Setting Up a Google Apps WorkerIf you have not already created one or more Workers for use with your Google Apps Job, go to “Creating Workers” on page 17 and complete the tasks there.
Creating a Google Apps JobAll data collection for Google Apps is configured through the Google Apps job interface. The jobs here combine the Profile, the Schedule, and a Worker together to archive a specified mailbox, distribution list, or domain. A Job must have a Profile, Schedule, Worker, and a target, mailbox, list, or domain, before it can be saved or run.
The Schedule, Profile, and Worker selected here will determine what is archived, when it is archived, and what worker does the actual archival work. The Job MUST be enabled to run. Only previously configured Schedules, Profiles, and Workers can be selected.
Core Settings Tab (Google Apps Job)Core settings allows you to enable the job and set the Schedule, Profile and Worker needed to run the job.
Folder Scope By default, Retain archives the items from all folders.
Using this panel, you can restrict which folders are archived, by either:
Specifying the folders to include (the Only items from folders listed below option)
or
Specifying the folders to exclude (the All folders except those listed below option)
To specify the folders to include or exclude, do the following:
1. Specify a System Folder (mandatory).
Example: Calendar.
2. Optionally, specify a subfolder within that folder.
Example: entering old would mean the folder old under Calendar.
3. Use the / delimiter to specify multiple hierarchies under that.
Example: old/mail would mean the subfolder mail under old under Calendar.
4. Specify whether the option includes subfolder.
Example: If you specify old and deselect includes subfolder, then Calendar/old is archived.
If you specify old and select includes subfolder, Calendar/old/mail is archived.
Option, Field, or Sub-panel Information and/or Action
138 Setting Up Pull-Based Archiving
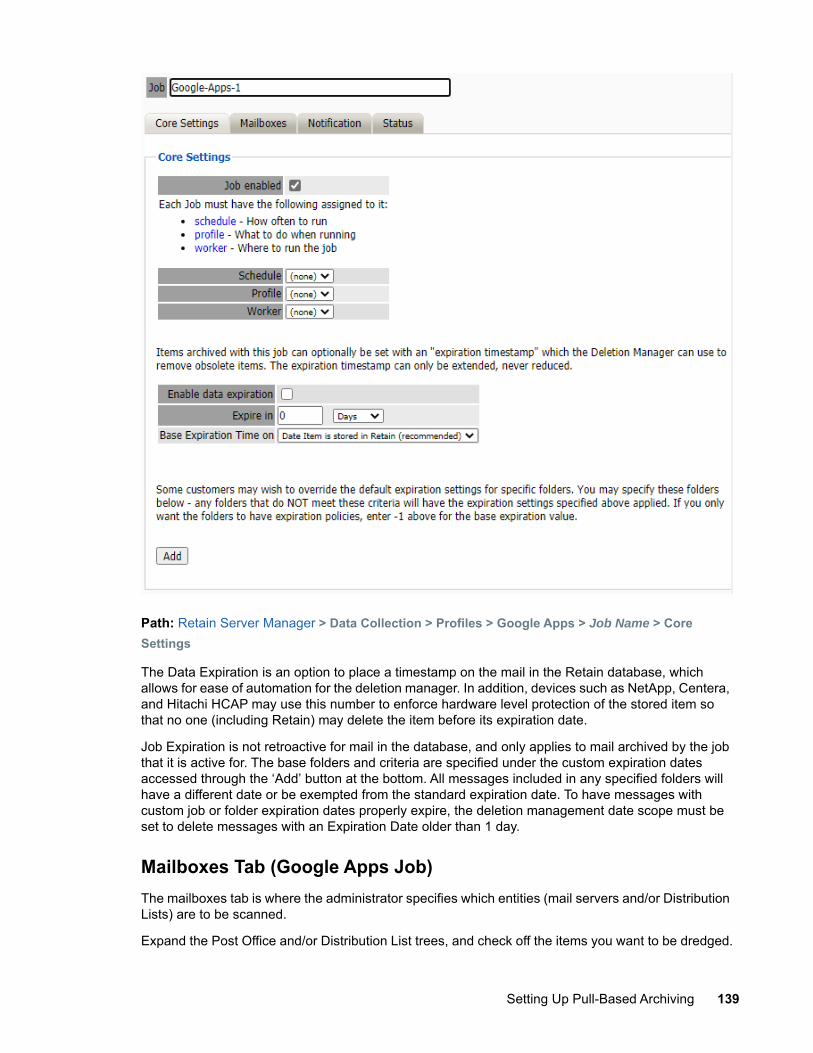
Path: Retain Server Manager > Data Collection > Profiles > Google Apps > Job Name > Core Settings
The Data Expiration is an option to place a timestamp on the mail in the Retain database, which allows for ease of automation for the deletion manager. In addition, devices such as NetApp, Centera, and Hitachi HCAP may use this number to enforce hardware level protection of the stored item so that no one (including Retain) may delete the item before its expiration date.
Job Expiration is not retroactive for mail in the database, and only applies to mail archived by the job that it is active for. The base folders and criteria are specified under the custom expiration dates accessed through the ‘Add’ button at the bottom. All messages included in any specified folders will have a different date or be exempted from the standard expiration date. To have messages with custom job or folder expiration dates properly expire, the deletion management date scope must be set to delete messages with an Expiration Date older than 1 day.
Mailboxes Tab (Google Apps Job)The mailboxes tab is where the administrator specifies which entities (mail servers and/or Distribution Lists) are to be scanned.
Expand the Post Office and/or Distribution List trees, and check off the items you want to be dredged.
Setting Up Pull-Based Archiving 139
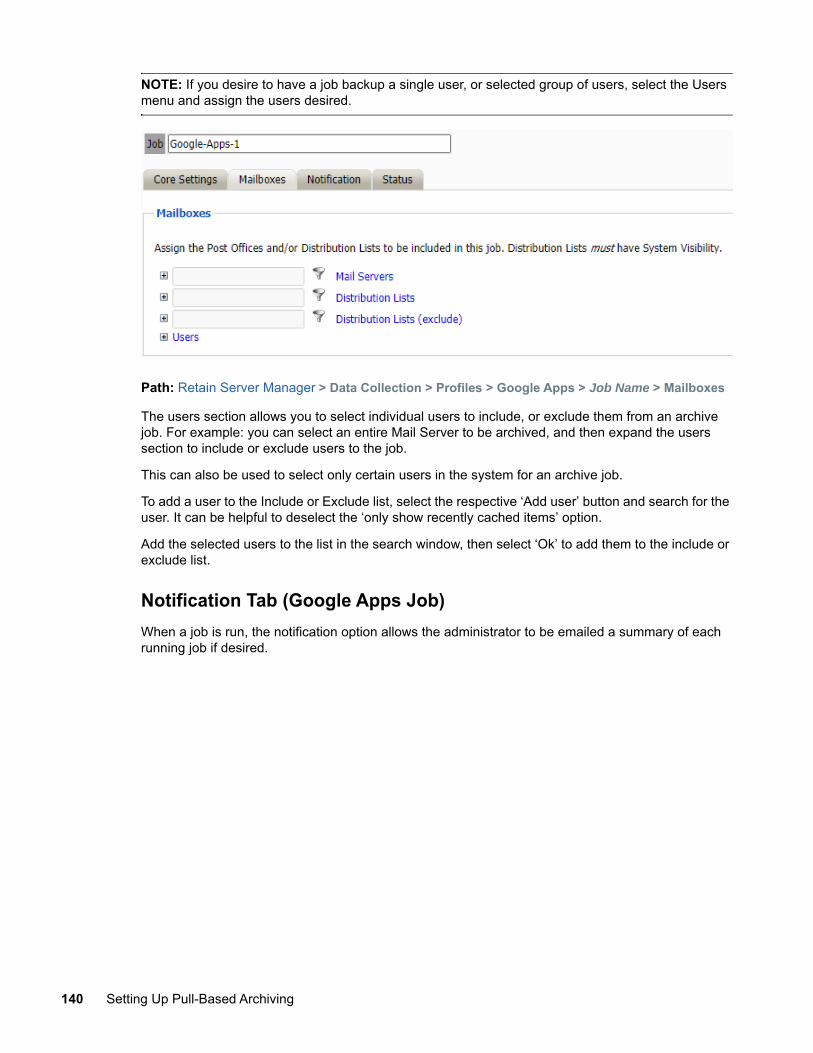
NOTE: If you desire to have a job backup a single user, or selected group of users, select the Users menu and assign the users desired.
Path: Retain Server Manager > Data Collection > Profiles > Google Apps > Job Name > Mailboxes
The users section allows you to select individual users to include, or exclude them from an archive job. For example: you can select an entire Mail Server to be archived, and then expand the users section to include or exclude users to the job.
This can also be used to select only certain users in the system for an archive job.
To add a user to the Include or Exclude list, select the respective ‘Add user’ button and search for the user. It can be helpful to deselect the ‘only show recently cached items’ option.
Add the selected users to the list in the search window, then select ‘Ok’ to add them to the include or exclude list.
Notification Tab (Google Apps Job)When a job is run, the notification option allows the administrator to be emailed a summary of each running job if desired.
140 Setting Up Pull-Based Archiving

Path: Retain Server Manager > Data Collection > Profiles > Google Apps > Job Name > Notification
For notification to function correctly, the SMTP information for the desired SMTP server must be fully filled-out. How much information is required varied depending on the mail system used.
Status Tab (Google Apps Job)The Status tab displays the status of any currently running jobs, as well as the stats of the last completed job.
Path: Retain Server Manager > Data Collection > Profiles > Google Apps > Job Name > Status
This tab is informational only unless a job is currently running. If the selected job is running, an option to abort the job is displayed.
This window will refresh every ten seconds to keep you up to date as to the status of the selected job. The completed line is displayed during an active job. The completed status is a display of how many mailboxes have been completed, the job mailbox total, and gives an incrementing percentage for the
Setting Up Pull-Based Archiving 141
amount completed. This amount is based entirely on the number of mailboxes, not the amount of mail. Because the last mailbox could be larger than the rest of the system, this percentage may not be accurate according to time.
You may now configure Schedules, Workers and Jobs.
Next StepOnce a job has completed you can confirm the items are in the archive by checking the Search Message interface. See “Using Retain’s Archives” in the Retain 4.9.2: User Guide. .
Archiving GroupWise “Creating a GroupWise Module” on page 142 “Setting a GroupWise Schedule” on page 149 “Specifying a GroupWise Profile” on page 149 “Setting Up a GroupWise Worker” on page 159 “Creating a GroupWise Job” on page 159
Creating a GroupWise Module “Prerequisites of the GroupWise Module” on page 142 “Core Settings Tab” on page 144 “SOAP Tab” on page 145 “LDAP Tab” on page 146 “GroupWise Proxy Accounts” on page 148 “Next Step” on page 148
The GroupWise module enables Retain to archive messages from GroupWise. The GroupWise module must be fully configured before Retain can archive or communicate with the GroupWise mail system.
Other tools that work with the GroupWise Module:
GroupWise Client Plugin GroupWise WebAccess Plugin A Stubbing Server can be installed which allows users to search the Retain archive from their
GroupWise client. (See “Performing Retain Searches Within The GroupWise Client” in Retain 4.9.2: Configuration and Administration.)
GroupWise Archive Migration Tool
Prerequisites of the GroupWise ModuleBefore beginning you should gather the following information:
IP Address and SOAP port of a Post Office Agent (POA) A Trusted Key Name and Trusted Application Key
142 Setting Up Pull-Based Archiving
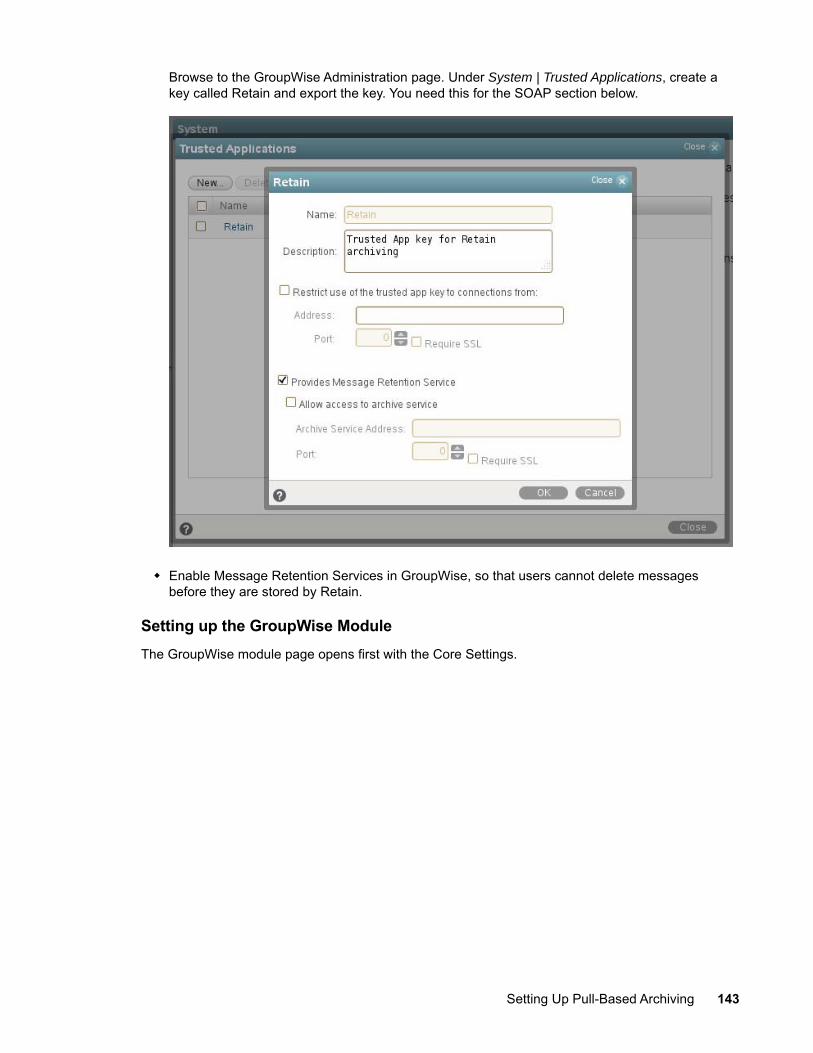
Browse to the GroupWise Administration page. Under System | Trusted Applications, create a key called Retain and export the key. You need this for the SOAP section below.
Enable Message Retention Services in GroupWise, so that users cannot delete messages before they are stored by Retain.
Setting up the GroupWise ModuleThe GroupWise module page opens first with the Core Settings.
Setting Up Pull-Based Archiving 143
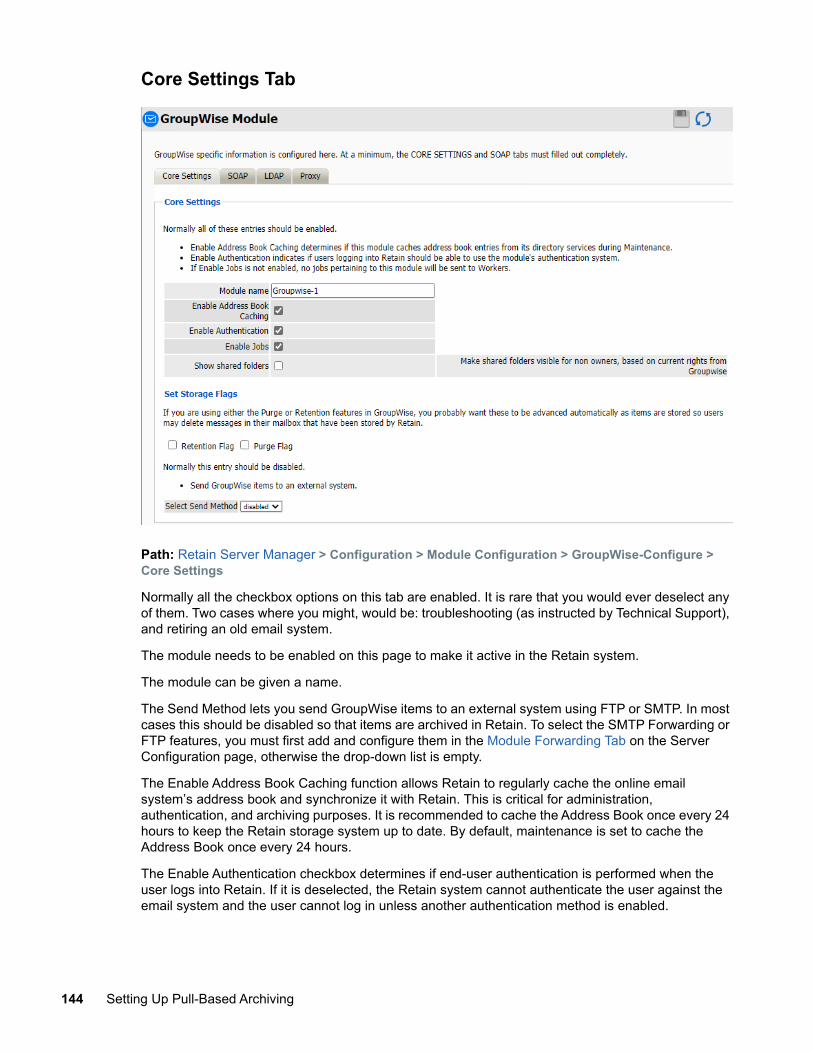
Core Settings Tab
Path: Retain Server Manager > Configuration > Module Configuration > GroupWise-Configure > Core Settings
Normally all the checkbox options on this tab are enabled. It is rare that you would ever deselect any of them. Two cases where you might, would be: troubleshooting (as instructed by Technical Support), and retiring an old email system.
The module needs to be enabled on this page to make it active in the Retain system.
The module can be given a name.
The Send Method lets you send GroupWise items to an external system using FTP or SMTP. In most cases this should be disabled so that items are archived in Retain. To select the SMTP Forwarding or FTP features, you must first add and configure them in the Module Forwarding Tab on the Server Configuration page, otherwise the drop-down list is empty.
The Enable Address Book Caching function allows Retain to regularly cache the online email system’s address book and synchronize it with Retain. This is critical for administration, authentication, and archiving purposes. It is recommended to cache the Address Book once every 24 hours to keep the Retain storage system up to date. By default, maintenance is set to cache the Address Book once every 24 hours.
The Enable Authentication checkbox determines if end-user authentication is performed when the user logs into Retain. If it is deselected, the Retain system cannot authenticate the user against the email system and the user cannot log in unless another authentication method is enabled.
144 Setting Up Pull-Based Archiving
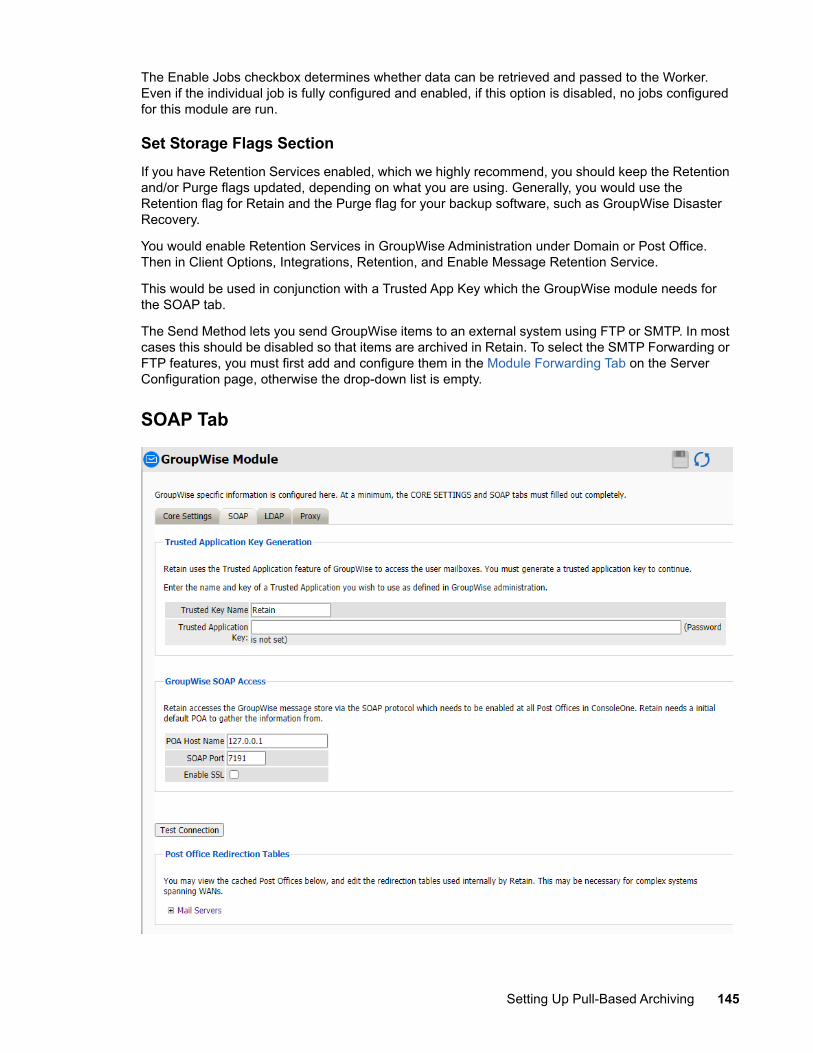
The Enable Jobs checkbox determines whether data can be retrieved and passed to the Worker. Even if the individual job is fully configured and enabled, if this option is disabled, no jobs configured for this module are run.
Set Storage Flags SectionIf you have Retention Services enabled, which we highly recommend, you should keep the Retention and/or Purge flags updated, depending on what you are using. Generally, you would use the Retention flag for Retain and the Purge flag for your backup software, such as GroupWise Disaster Recovery.
You would enable Retention Services in GroupWise Administration under Domain or Post Office. Then in Client Options, Integrations, Retention, and Enable Message Retention Service.
This would be used in conjunction with a Trusted App Key which the GroupWise module needs for the SOAP tab.
The Send Method lets you send GroupWise items to an external system using FTP or SMTP. In most cases this should be disabled so that items are archived in Retain. To select the SMTP Forwarding or FTP features, you must first add and configure them in the Module Forwarding Tab on the Server Configuration page, otherwise the drop-down list is empty.
SOAP Tab
Setting Up Pull-Based Archiving 145
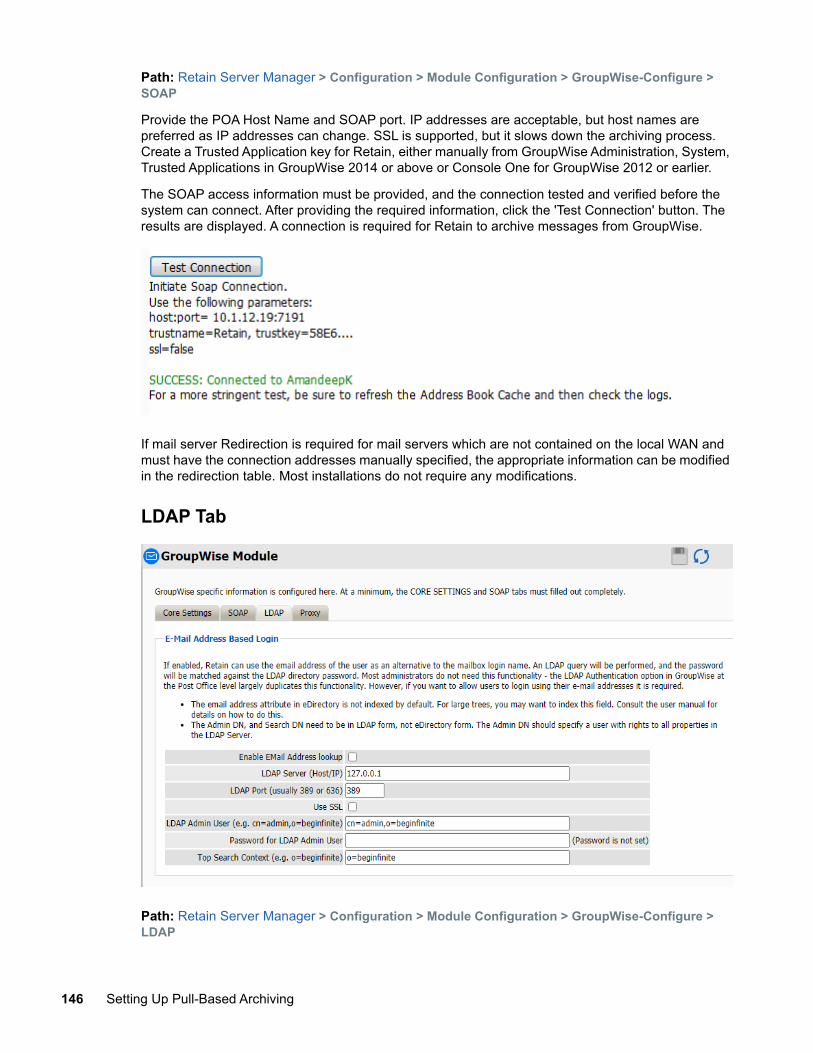
Path: Retain Server Manager > Configuration > Module Configuration > GroupWise-Configure > SOAP
Provide the POA Host Name and SOAP port. IP addresses are acceptable, but host names are preferred as IP addresses can change. SSL is supported, but it slows down the archiving process. Create a Trusted Application key for Retain, either manually from GroupWise Administration, System, Trusted Applications in GroupWise 2014 or above or Console One for GroupWise 2012 or earlier.
The SOAP access information must be provided, and the connection tested and verified before the system can connect. After providing the required information, click the 'Test Connection' button. The results are displayed. A connection is required for Retain to archive messages from GroupWise.
If mail server Redirection is required for mail servers which are not contained on the local WAN and must have the connection addresses manually specified, the appropriate information can be modified in the redirection table. Most installations do not require any modifications.
LDAP Tab
Path: Retain Server Manager > Configuration > Module Configuration > GroupWise-Configure > LDAP
146 Setting Up Pull-Based Archiving
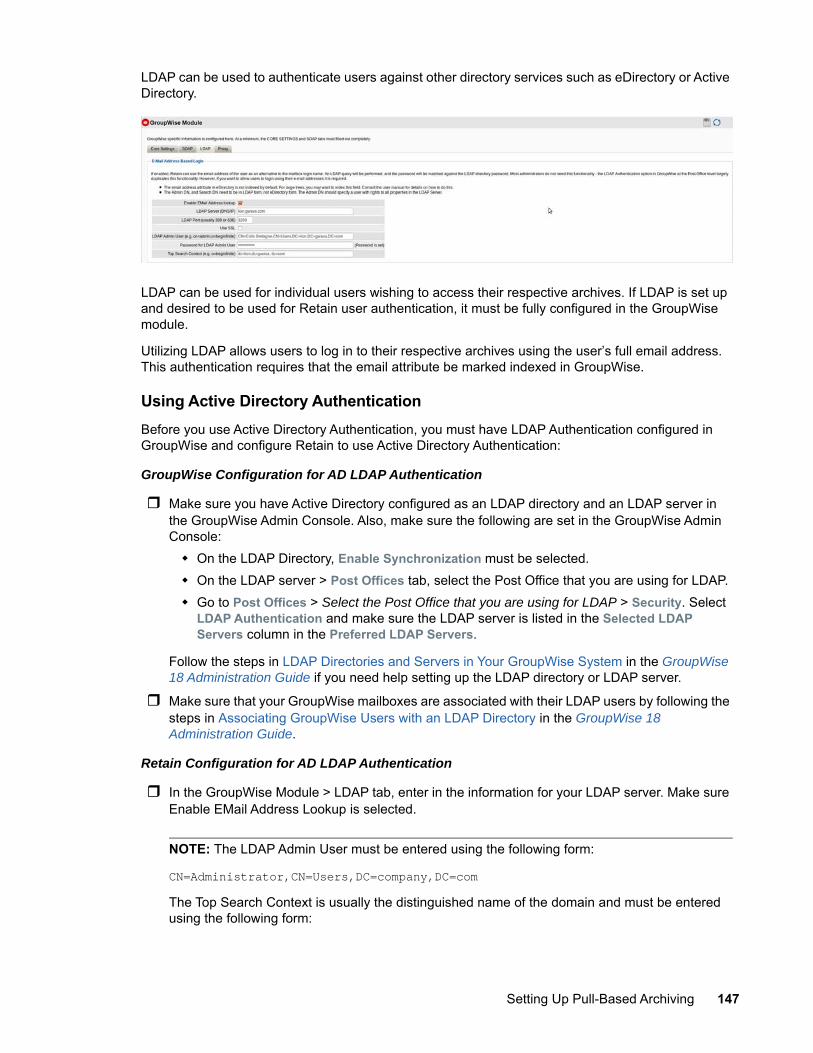
LDAP can be used to authenticate users against other directory services such as eDirectory or Active Directory.
LDAP can be used for individual users wishing to access their respective archives. If LDAP is set up and desired to be used for Retain user authentication, it must be fully configured in the GroupWise module.
Utilizing LDAP allows users to log in to their respective archives using the user’s full email address. This authentication requires that the email attribute be marked indexed in GroupWise.
Using Active Directory AuthenticationBefore you use Active Directory Authentication, you must have LDAP Authentication configured in GroupWise and configure Retain to use Active Directory Authentication:
GroupWise Configuration for AD LDAP Authentication
Make sure you have Active Directory configured as an LDAP directory and an LDAP server in the GroupWise Admin Console. Also, make sure the following are set in the GroupWise Admin Console: On the LDAP Directory, Enable Synchronization must be selected. On the LDAP server > Post Offices tab, select the Post Office that you are using for LDAP. Go to Post Offices > Select the Post Office that you are using for LDAP > Security. Select
LDAP Authentication and make sure the LDAP server is listed in the Selected LDAP Servers column in the Preferred LDAP Servers.
Follow the steps in LDAP Directories and Servers in Your GroupWise System in the GroupWise 18 Administration Guide if you need help setting up the LDAP directory or LDAP server.
Make sure that your GroupWise mailboxes are associated with their LDAP users by following the steps in Associating GroupWise Users with an LDAP Directory in the GroupWise 18 Administration Guide.
Retain Configuration for AD LDAP Authentication
In the GroupWise Module > LDAP tab, enter in the information for your LDAP server. Make sure Enable EMail Address Lookup is selected.
NOTE: The LDAP Admin User must be entered using the following form:
CN=Administrator,CN=Users,DC=company,DC=comThe Top Search Context is usually the distinguished name of the domain and must be entered using the following form:
Setting Up Pull-Based Archiving 147
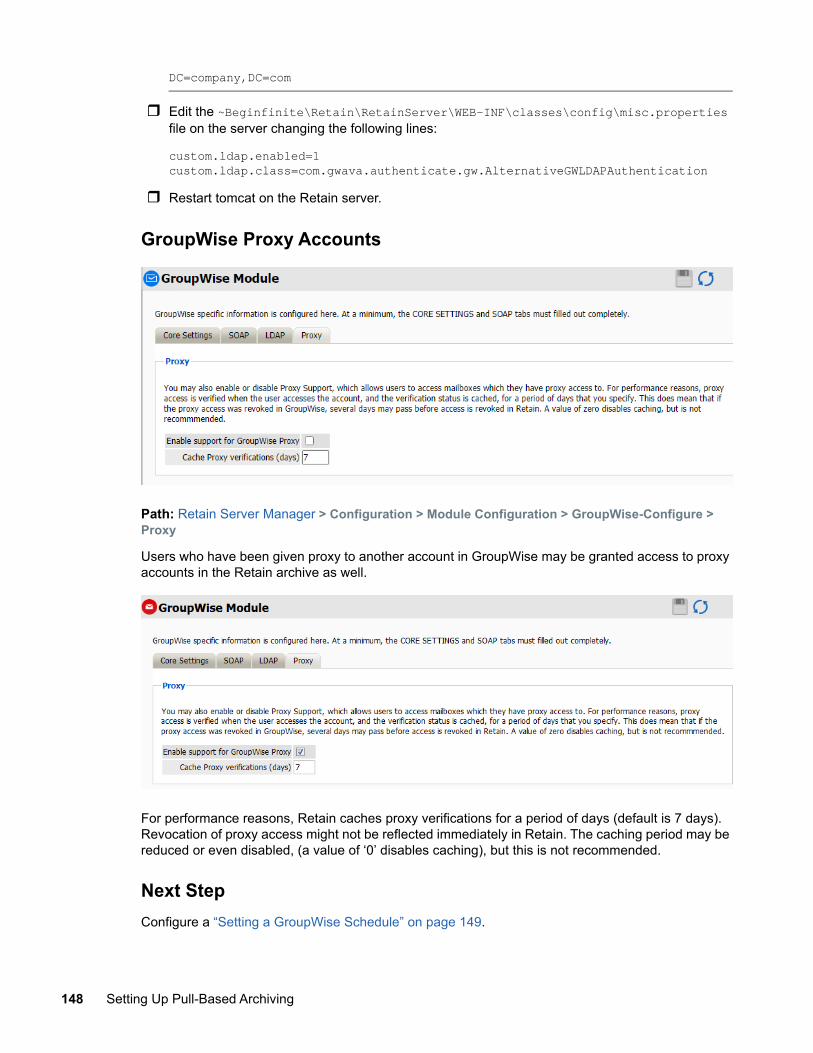
DC=company,DC=com
Edit the ~Beginfinite\Retain\RetainServer\WEB-INF\classes\config\misc.properties file on the server changing the following lines:
custom.ldap.enabled=1custom.ldap.class=com.gwava.authenticate.gw.AlternativeGWLDAPAuthentication
Restart tomcat on the Retain server.
GroupWise Proxy Accounts
Path: Retain Server Manager > Configuration > Module Configuration > GroupWise-Configure > Proxy
Users who have been given proxy to another account in GroupWise may be granted access to proxy accounts in the Retain archive as well.
For performance reasons, Retain caches proxy verifications for a period of days (default is 7 days). Revocation of proxy access might not be reflected immediately in Retain. The caching period may be reduced or even disabled, (a value of ‘0’ disables caching), but this is not recommended.
Next StepConfigure a “Setting a GroupWise Schedule” on page 149.
148 Setting Up Pull-Based Archiving
Setting a GroupWise ScheduleIf you have not already created one or more schedules for use with your Blackberry Job, go to “Creating Schedules” on page 15 and complete the task now.
Specifying a GroupWise Profile “Core Settings Tab” on page 150 “Message Settings Tab” on page 152 “Scope Tab” on page 153 “Miscellaneous Tab” on page 156 “Advanced Tab” on page 157
The Profile lets you set what is to be dredged from your GroupWise system.
This requires that the module be configured “Creating a GroupWise Module” on page 142.
Click on “Add Profile” and provide a profile name, or select an already existing profile to access the configuration tabs. All changes made on this page must be saved by selecting the “save changes”, disk icon, at the top right of the page. Tabs may be changed and navigated through without affecting new settings, but any move to another page will require saving, or abandoning the changes made.
Setting Up Pull-Based Archiving 149
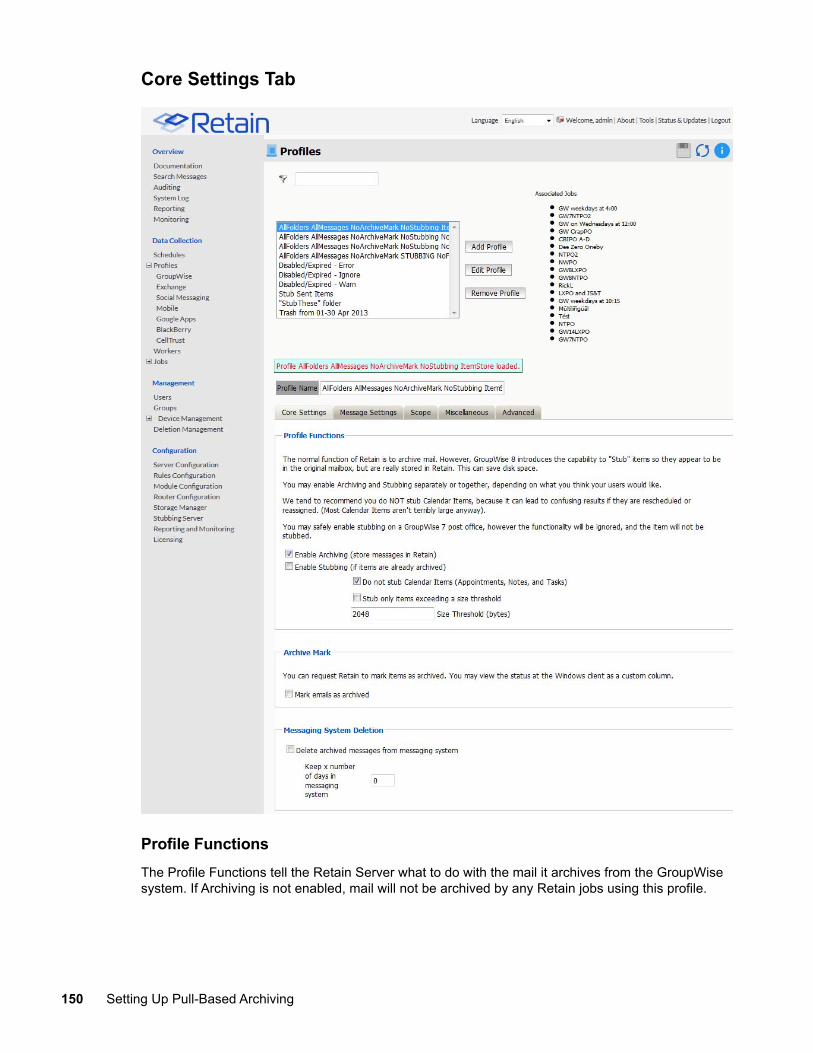
Core Settings Tab
Profile FunctionsThe Profile Functions tell the Retain Server what to do with the mail it archives from the GroupWise system. If Archiving is not enabled, mail will not be archived by any Retain jobs using this profile.
150 Setting Up Pull-Based Archiving
StubbingBefore enabling stubbing, make sure you understand the way stubbing works and how that will work in your system, because, once enabled, the stubbing process cannot be reversed. Stubbing, which requires GroupWise 8.02HP1 or above, allows Retain to replace archived messages and items in the GroupWise Post office with ‘stubs’ that link back to the full message or item in the Retain Archive. End users should not notice a difference as they have transparent access to the stubbed item through the GroupWise Post office, if they only use the client. The stub behaves much like the native item is still in the GroupWise system.
Stubbing cannot be reversed.
Plan your system and understand the positive and negative sides to Stubbing before you continue. To use stubbing, it is strongly recommended that the GroupWise system be at least 8.02HP1. Previous versions of GroupWise do not contain critical stability fixes.
Why you might want to implement stubbing (Pros):
Save Disk space. Mail can be removed from the system without being ‘deleted’. Users have easy access to items stored in Retain Transparent access, no need to log in to Retain for common tasks.
Why stubbing may not work for your system (Cons):
Mobile, Web, IMAP, and POP3 clients will only see posted empty items, not actual contents. Stubbing cannot be reversed. (Once a message is stubbed, it cannot be returned to the same
position in the system) User training for stubbed items may be necessary due to decreased access speed No method for protecting stubs from deletion in the GroupWise client. (Recreation is difficult and
complicated.) Non-mail items should not be stubbed. (Calendar and appointment items behave erratically
when rescheduled). Stub items are not compatible with third party API’s. These applications view the stubs as posted
items only, with no text or attachments.
Determine the correct option for your system. If you wish to enable Stubbing, you need to install and configure the Stubbing Server as well. Refer to the install guide for your specific OS and the Stubbing Server sections. Stubbing can only be active for items which have been archived by Retain.
Calendar Items should not be stubbed unless necessary, as this can cause erratic behavior if archived items are rescheduled. If you wish to only stub large items in your Post Office, you may set a size threshold. Any item larger than the specified size will be stubbed. If this option is not set, all messages will be stubbed, regardless of size.
Archive MarkSome users may opt to use the Archive Mark in GroupWise for messages that have been archived by Retain. The archive mark is a custom flag and may be modified, therefore is not secure and should not be used for compliance. Archive Mark slightly degrades job performance. Check the check box to enable Archive Mark for the selected profile.
When the Archive Mark is active, Retain creates a custom column for mail, called “RetainArchived” which users and administrators may add to their GroupWise clients to view mail which has been archived. The “RetainArchived” column indicates an archived mail item by displaying a ‘1’ in the message row, while remaining blank when the message is not archived.
Setting Up Pull-Based Archiving 151
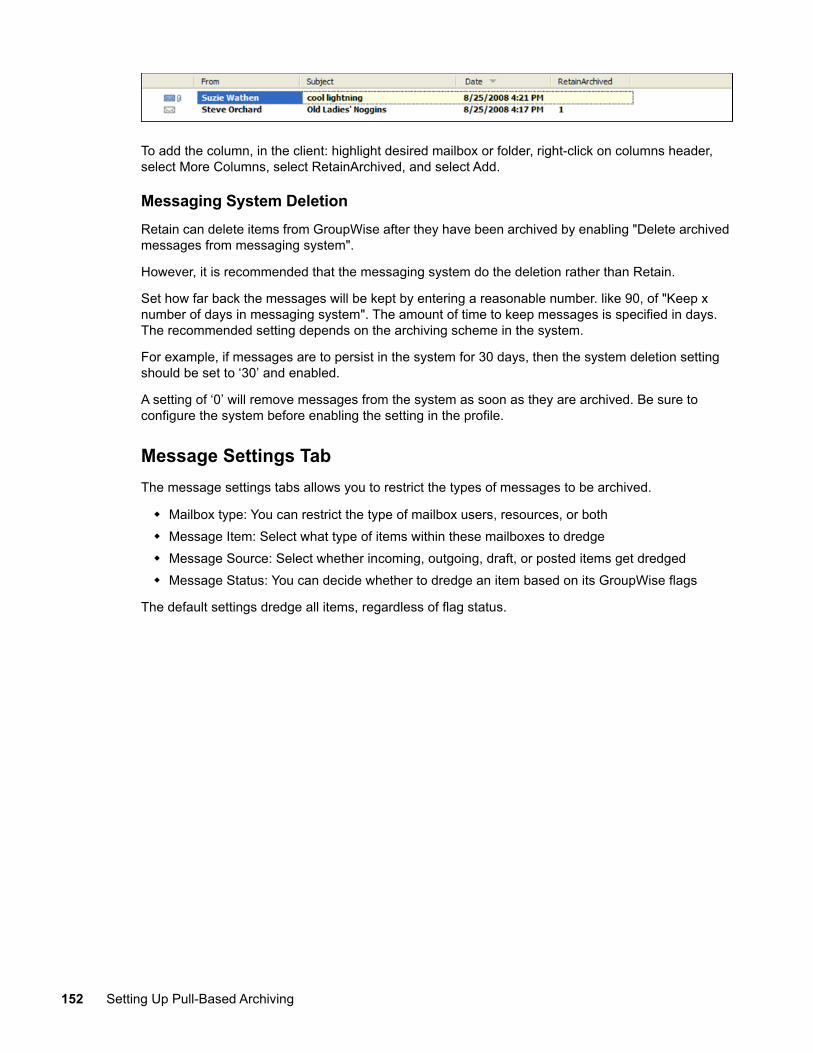
To add the column, in the client: highlight desired mailbox or folder, right-click on columns header, select More Columns, select RetainArchived, and select Add.
Messaging System DeletionRetain can delete items from GroupWise after they have been archived by enabling "Delete archived messages from messaging system".
However, it is recommended that the messaging system do the deletion rather than Retain.
Set how far back the messages will be kept by entering a reasonable number. like 90, of "Keep x number of days in messaging system". The amount of time to keep messages is specified in days. The recommended setting depends on the archiving scheme in the system.
For example, if messages are to persist in the system for 30 days, then the system deletion setting should be set to ‘30’ and enabled.
A setting of ‘0’ will remove messages from the system as soon as they are archived. Be sure to configure the system before enabling the setting in the profile.
Message Settings TabThe message settings tabs allows you to restrict the types of messages to be archived.
Mailbox type: You can restrict the type of mailbox users, resources, or both Message Item: Select what type of items within these mailboxes to dredge Message Source: Select whether incoming, outgoing, draft, or posted items get dredged Message Status: You can decide whether to dredge an item based on its GroupWise flags
The default settings dredge all items, regardless of flag status.
152 Setting Up Pull-Based Archiving
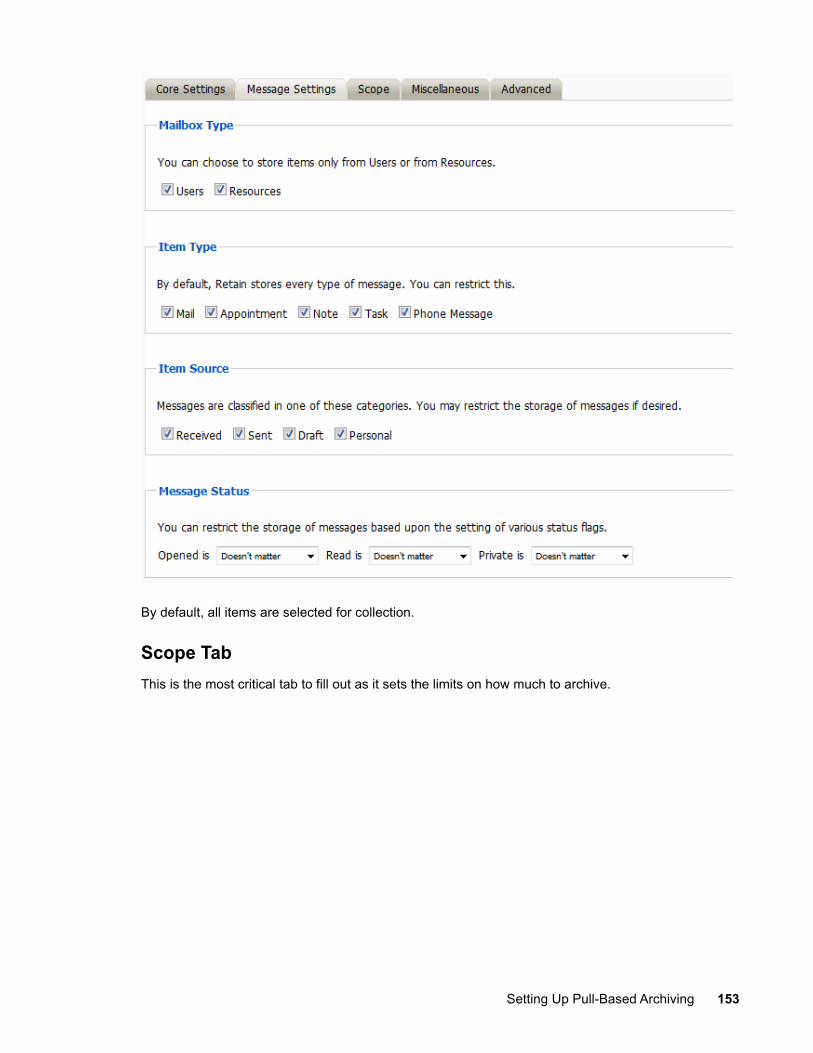
By default, all items are selected for collection.
Scope TabThis is the most critical tab to fill out as it sets the limits on how much to archive.
Setting Up Pull-Based Archiving 153
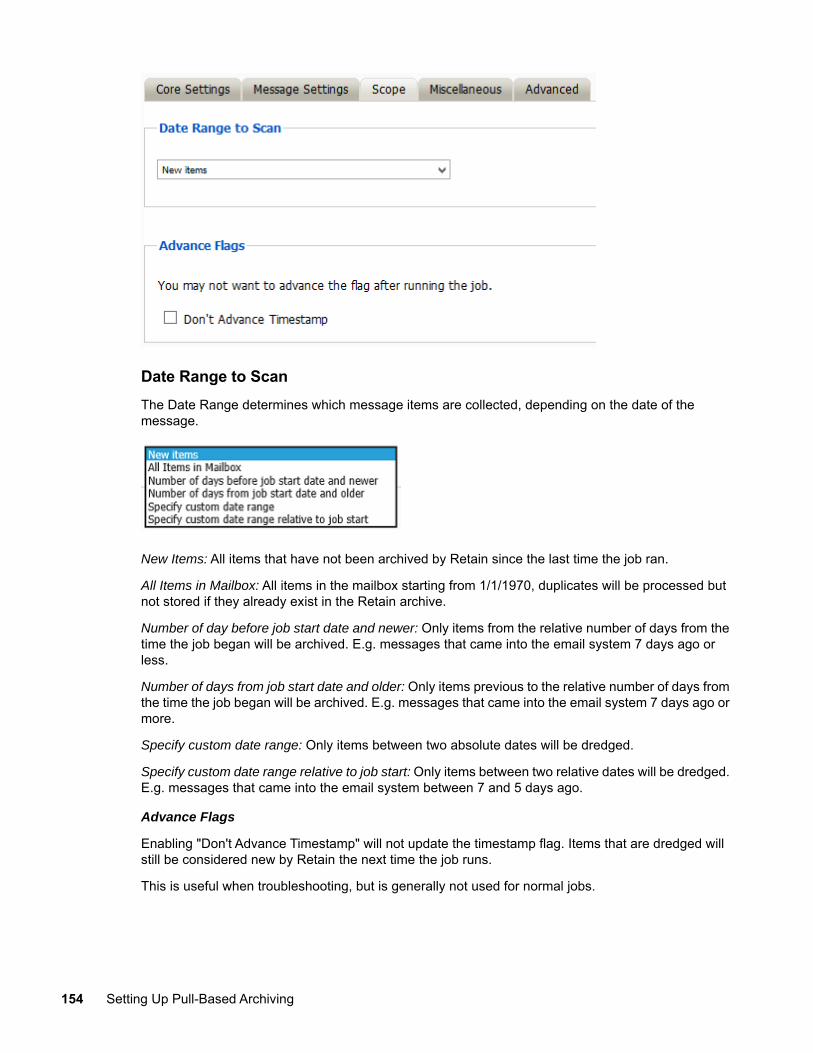
Date Range to ScanThe Date Range determines which message items are collected, depending on the date of the message.
New Items: All items that have not been archived by Retain since the last time the job ran.
All Items in Mailbox: All items in the mailbox starting from 1/1/1970, duplicates will be processed but not stored if they already exist in the Retain archive.
Number of day before job start date and newer: Only items from the relative number of days from the time the job began will be archived. E.g. messages that came into the email system 7 days ago or less.
Number of days from job start date and older: Only items previous to the relative number of days from the time the job began will be archived. E.g. messages that came into the email system 7 days ago or more.
Specify custom date range: Only items between two absolute dates will be dredged.
Specify custom date range relative to job start: Only items between two relative dates will be dredged. E.g. messages that came into the email system between 7 and 5 days ago.
Advance Flags
Enabling "Don't Advance Timestamp" will not update the timestamp flag. Items that are dredged will still be considered new by Retain the next time the job runs.
This is useful when troubleshooting, but is generally not used for normal jobs.
154 Setting Up Pull-Based Archiving
About GroupWise’s Purge and Retention FlagsThe Purge, and Retention flags perform similar functions. The Purge and Retention flags are stored internally in the GroupWise post office on a per-mailbox basis. The Retain Server also keeps its own timestamp flag internally in the Retain configuration database.
Each can be thought of as simply a “time stamp” indicating the last time data was retrieved by a third-party application. There are a few subtle differences between the three flags, which are discussed below.
The Purge flag was introduced by Novell in GroupWise version 6.0.
With Purge enabled in GroupWise:
The flag is a time stamp, stored in the user's mailbox. Items older than the time stamp can be deleted freely. Items newer than the time stamp cannot be deleted. A 3rd party application, such as backup software can retrieve and/or set this time stamp value.
GroupWise never changes the time stamp value. The initial purpose of this was for backup software. Backup software can either manually or
automatically, (via the SMS TSAGW component of GroupWise), advance this time stamp once all items are backed up. The backup software can also use this time stamp to “know” that all items older than this time stamp have already been backed up, and can be skipped.
Retain can use this flag to skip archived items, and automatically advance it as well. However, in practice, you'll rarely want to do this, because backup software, including Micro Focus GroupWise Disaster Recovery, already uses this flag. There's no way to “share” the flag.
Because makers of retention and compliance software wanted a flag of their own, one that wasn't shared with the backup software Purge flag, the Retention flag was introduced by Novell in GroupWise 6.5.1.
In almost all respects, the Retention flag is identical in purpose and function to the Purge flag. Like the Purge flag, it is stored internally, and is primarily used to prevent premature deletion, and to skip previously stored messages. In fact, these are so identical in purpose, in theory virtually all backup software could switch to using the Retention flag, and all Retention software to the Purge flag, and you'd notice almost no difference. The primary difference is simply it's a different value, used by different vendors.
There are some small distinctions:
It's enabled and configured in a different location in ConsoleOne. It cannot be enabled or configured until a Trusted Application (like Retain) is installed and
specifically requests it be made available. The Purge flag is turned on/off globally. The Retention flag can be configured at the Domain, PO,
or user level.
Most customers using Retain will want to use the Retention flag. It's logical and consistent to do so, and avoids conflict with backup software. It is recommended that you use this flag unless there is a compelling reason not to. A few possibilities are discussed below.
Retain can use the Purge and Retention flags.
Setting up Purge and Retention flags in GroupWiseIt is highly recommended that Message Retention Service is enabled, so users cannot delete items before the item is archived.
Setting Up Pull-Based Archiving 155
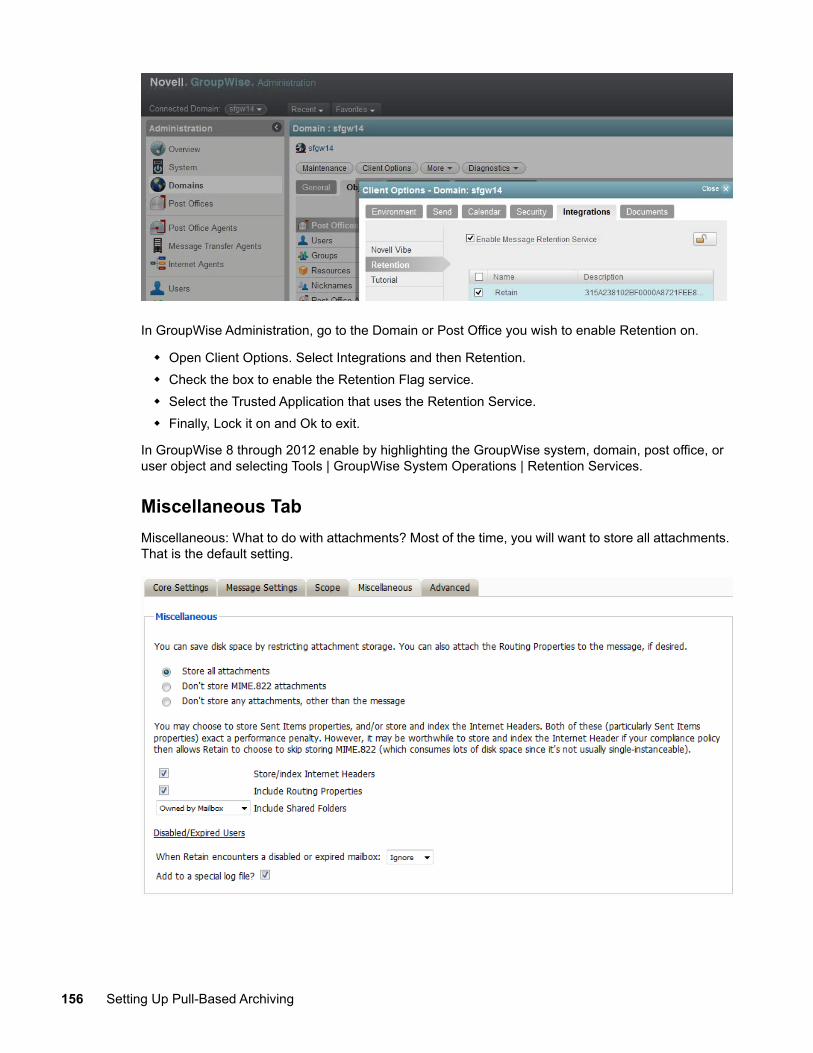
In GroupWise Administration, go to the Domain or Post Office you wish to enable Retention on.
Open Client Options. Select Integrations and then Retention. Check the box to enable the Retention Flag service. Select the Trusted Application that uses the Retention Service. Finally, Lock it on and Ok to exit.
In GroupWise 8 through 2012 enable by highlighting the GroupWise system, domain, post office, or user object and selecting Tools | GroupWise System Operations | Retention Services.
Miscellaneous TabMiscellaneous: What to do with attachments? Most of the time, you will want to store all attachments. That is the default setting.
156 Setting Up Pull-Based Archiving
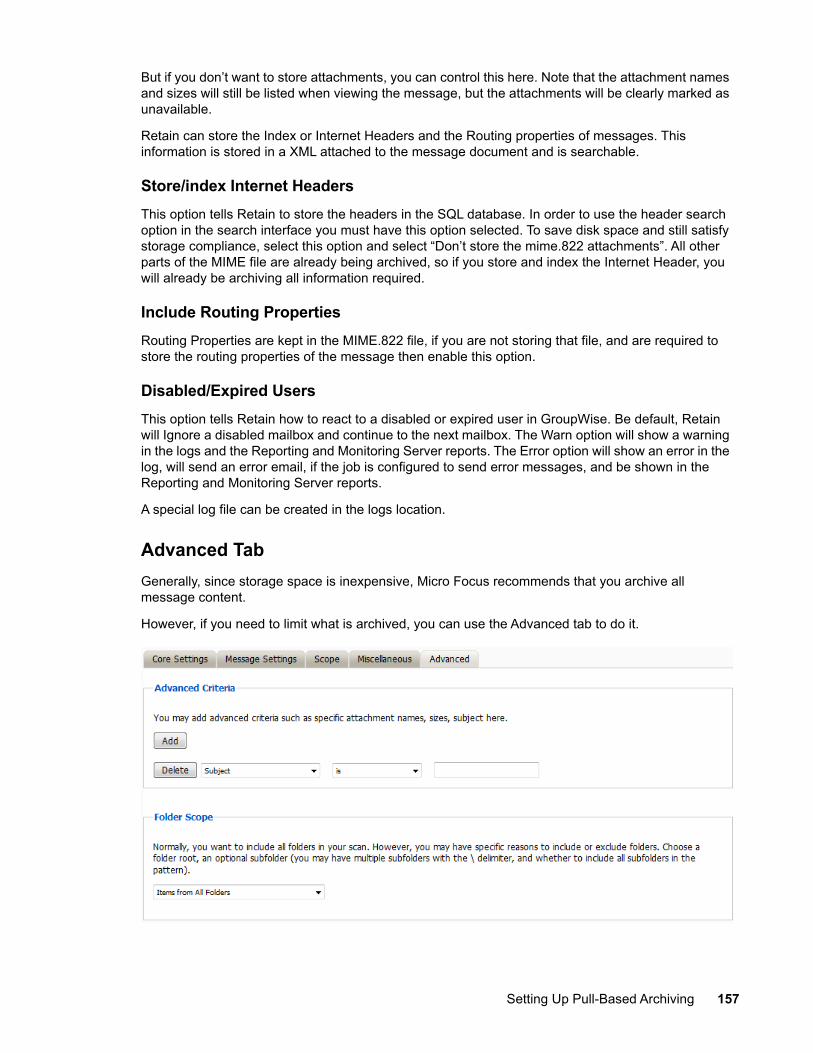
But if you don’t want to store attachments, you can control this here. Note that the attachment names and sizes will still be listed when viewing the message, but the attachments will be clearly marked as unavailable.
Retain can store the Index or Internet Headers and the Routing properties of messages. This information is stored in a XML attached to the message document and is searchable.
Store/index Internet HeadersThis option tells Retain to store the headers in the SQL database. In order to use the header search option in the search interface you must have this option selected. To save disk space and still satisfy storage compliance, select this option and select “Don’t store the mime.822 attachments”. All other parts of the MIME file are already being archived, so if you store and index the Internet Header, you will already be archiving all information required.
Include Routing PropertiesRouting Properties are kept in the MIME.822 file, if you are not storing that file, and are required to store the routing properties of the message then enable this option.
Disabled/Expired UsersThis option tells Retain how to react to a disabled or expired user in GroupWise. Be default, Retain will Ignore a disabled mailbox and continue to the next mailbox. The Warn option will show a warning in the logs and the Reporting and Monitoring Server reports. The Error option will show an error in the log, will send an error email, if the job is configured to send error messages, and be shown in the Reporting and Monitoring Server reports.
A special log file can be created in the logs location.
Advanced TabGenerally, since storage space is inexpensive, Micro Focus recommends that you archive all message content.
However, if you need to limit what is archived, you can use the Advanced tab to do it.
Setting Up Pull-Based Archiving 157
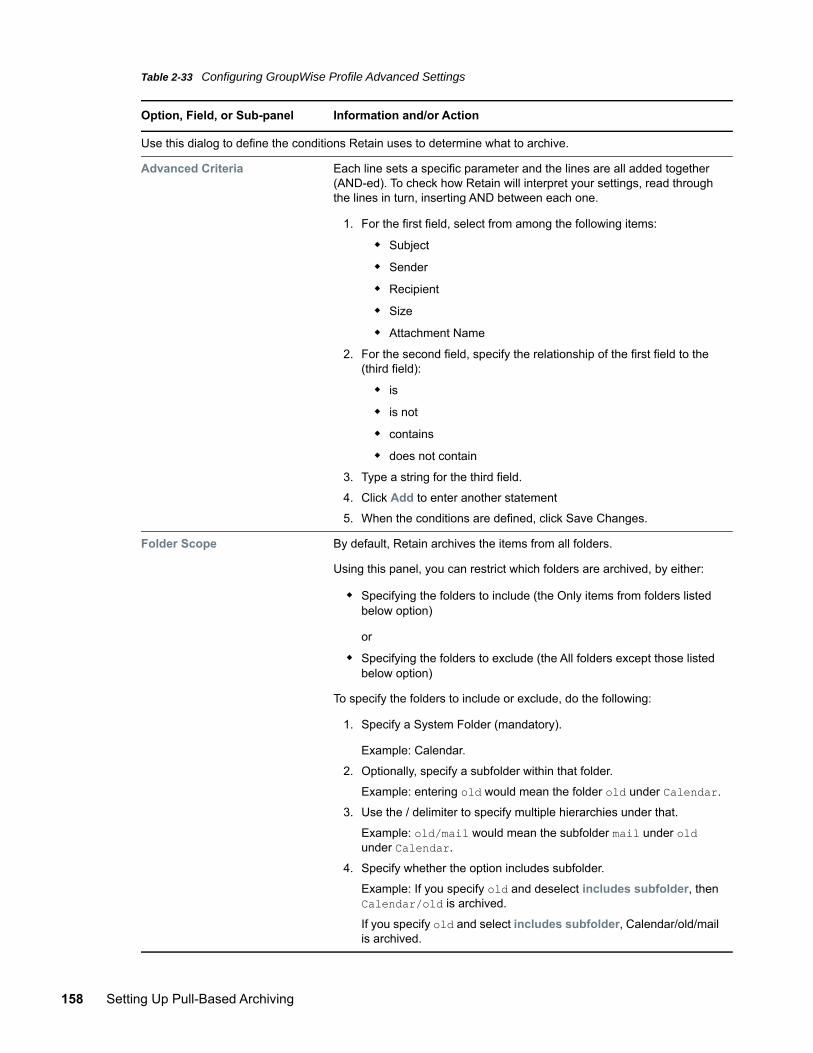
Table 2-33 Configuring GroupWise Profile Advanced Settings
Option, Field, or Sub-panel Information and/or Action
Use this dialog to define the conditions Retain uses to determine what to archive.
Advanced Criteria Each line sets a specific parameter and the lines are all added together (AND-ed). To check how Retain will interpret your settings, read through the lines in turn, inserting AND between each one.
1. For the first field, select from among the following items:
Subject
Sender
Recipient
Size
Attachment Name
2. For the second field, specify the relationship of the first field to the (third field):
is
is not
contains
does not contain
3. Type a string for the third field.
4. Click Add to enter another statement
5. When the conditions are defined, click Save Changes.
Folder Scope By default, Retain archives the items from all folders.
Using this panel, you can restrict which folders are archived, by either:
Specifying the folders to include (the Only items from folders listed below option)
or
Specifying the folders to exclude (the All folders except those listed below option)
To specify the folders to include or exclude, do the following:
1. Specify a System Folder (mandatory).
Example: Calendar.
2. Optionally, specify a subfolder within that folder.
Example: entering old would mean the folder old under Calendar.
3. Use the / delimiter to specify multiple hierarchies under that.
Example: old/mail would mean the subfolder mail under old under Calendar.
4. Specify whether the option includes subfolder.
Example: If you specify old and deselect includes subfolder, then Calendar/old is archived.
If you specify old and select includes subfolder, Calendar/old/mail is archived.
158 Setting Up Pull-Based Archiving

Setting Up a GroupWise WorkerIf you have not already created one or more Workers for use with your GroupWise Job, go to “Creating Workers” on page 17 and complete the tasks there.
Creating a GroupWise JobAfter completing the instructions in the preceding sections, you can create a GroupWise Job.
1 To begin creating a GroupWise Job, open Retain Server Manager > Data Collection > Jobs.2 Click GroupWise > Add Job.3 Use the information in the sections that follow to configure each tab.4 Make sure that you save your changes before leaving the dialogs.
Core Settings Tab (GroupWise Job)The Core Settings of a job contains configuration which must be set for the job to be saved and become active. A job must be enabled before it will run. Jobs must also have a specified schedule, profile, and worker. These are all selected from drop-down menus, and will not be populated unless those items are already configured in the system.
Setting Up Pull-Based Archiving 159
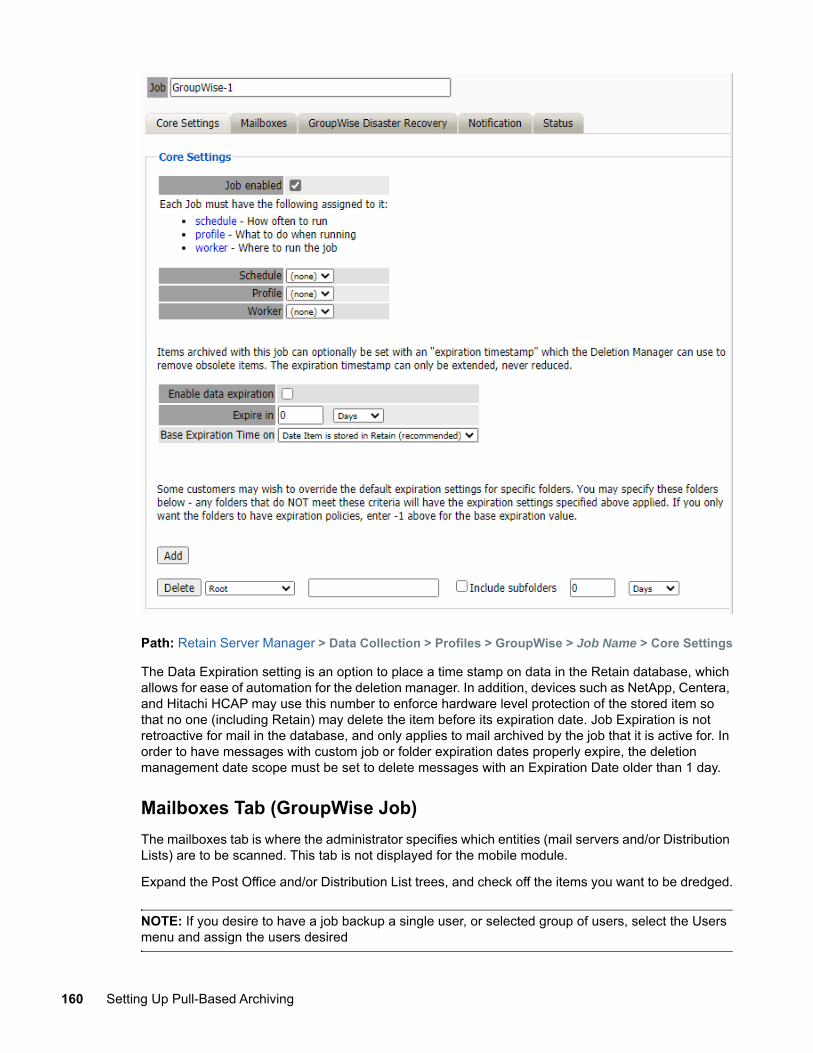
Path: Retain Server Manager > Data Collection > Profiles > GroupWise > Job Name > Core Settings
The Data Expiration setting is an option to place a time stamp on data in the Retain database, which allows for ease of automation for the deletion manager. In addition, devices such as NetApp, Centera, and Hitachi HCAP may use this number to enforce hardware level protection of the stored item so that no one (including Retain) may delete the item before its expiration date. Job Expiration is not retroactive for mail in the database, and only applies to mail archived by the job that it is active for. In order to have messages with custom job or folder expiration dates properly expire, the deletion management date scope must be set to delete messages with an Expiration Date older than 1 day.
Mailboxes Tab (GroupWise Job)The mailboxes tab is where the administrator specifies which entities (mail servers and/or Distribution Lists) are to be scanned. This tab is not displayed for the mobile module.
Expand the Post Office and/or Distribution List trees, and check off the items you want to be dredged.
NOTE: If you desire to have a job backup a single user, or selected group of users, select the Users menu and assign the users desired
160 Setting Up Pull-Based Archiving
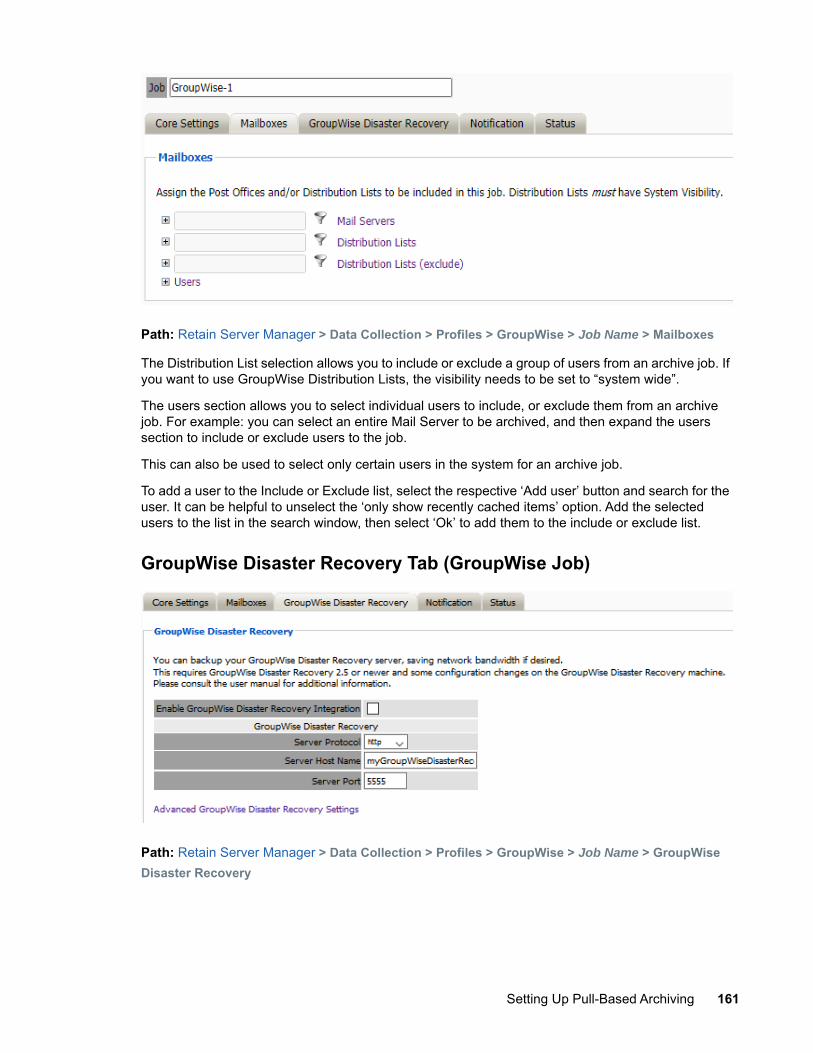
Path: Retain Server Manager > Data Collection > Profiles > GroupWise > Job Name > Mailboxes
The Distribution List selection allows you to include or exclude a group of users from an archive job. If you want to use GroupWise Distribution Lists, the visibility needs to be set to “system wide”.
The users section allows you to select individual users to include, or exclude them from an archive job. For example: you can select an entire Mail Server to be archived, and then expand the users section to include or exclude users to the job.
This can also be used to select only certain users in the system for an archive job.
To add a user to the Include or Exclude list, select the respective ‘Add user’ button and search for the user. It can be helpful to unselect the ‘only show recently cached items’ option. Add the selected users to the list in the search window, then select ‘Ok’ to add them to the include or exclude list.
GroupWise Disaster Recovery Tab (GroupWise Job)
Path: Retain Server Manager > Data Collection > Profiles > GroupWise > Job Name > GroupWise Disaster Recovery
Setting Up Pull-Based Archiving 161
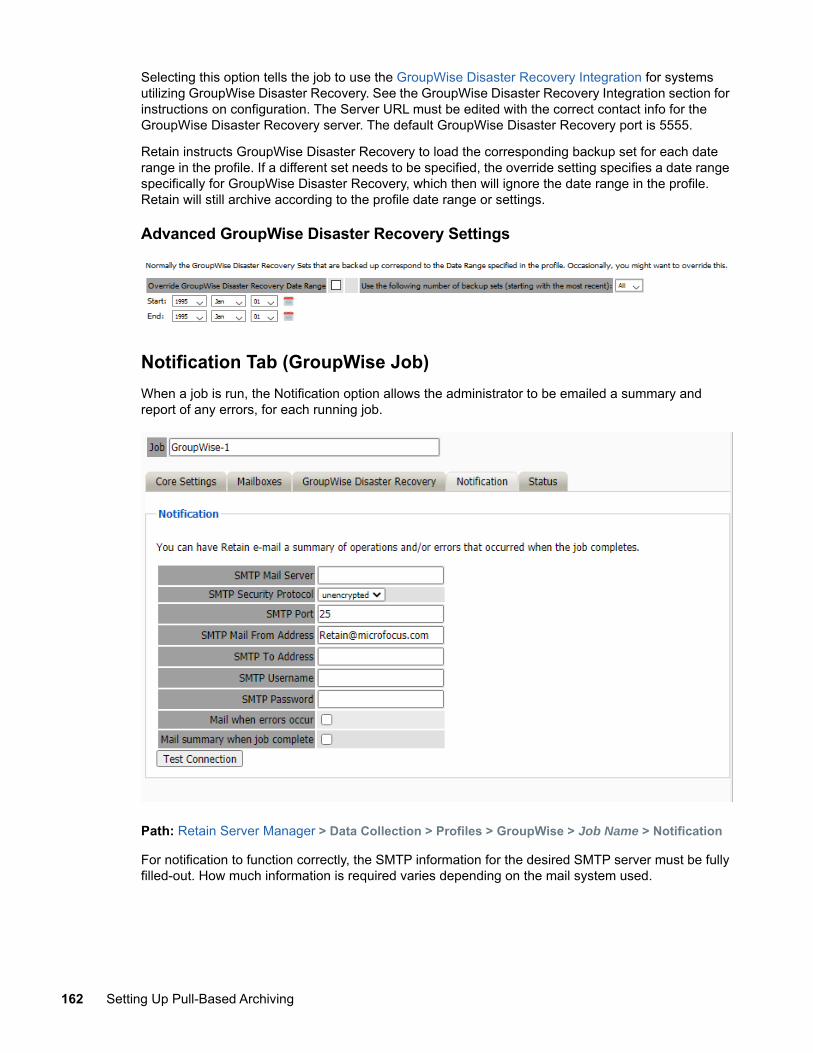
Selecting this option tells the job to use the GroupWise Disaster Recovery Integration for systems utilizing GroupWise Disaster Recovery. See the GroupWise Disaster Recovery Integration section for instructions on configuration. The Server URL must be edited with the correct contact info for the GroupWise Disaster Recovery server. The default GroupWise Disaster Recovery port is 5555.
Retain instructs GroupWise Disaster Recovery to load the corresponding backup set for each date range in the profile. If a different set needs to be specified, the override setting specifies a date range specifically for GroupWise Disaster Recovery, which then will ignore the date range in the profile. Retain will still archive according to the profile date range or settings.
Advanced GroupWise Disaster Recovery Settings
Notification Tab (GroupWise Job)When a job is run, the Notification option allows the administrator to be emailed a summary and report of any errors, for each running job.
Path: Retain Server Manager > Data Collection > Profiles > GroupWise > Job Name > Notification
For notification to function correctly, the SMTP information for the desired SMTP server must be fully filled-out. How much information is required varies depending on the mail system used.
162 Setting Up Pull-Based Archiving
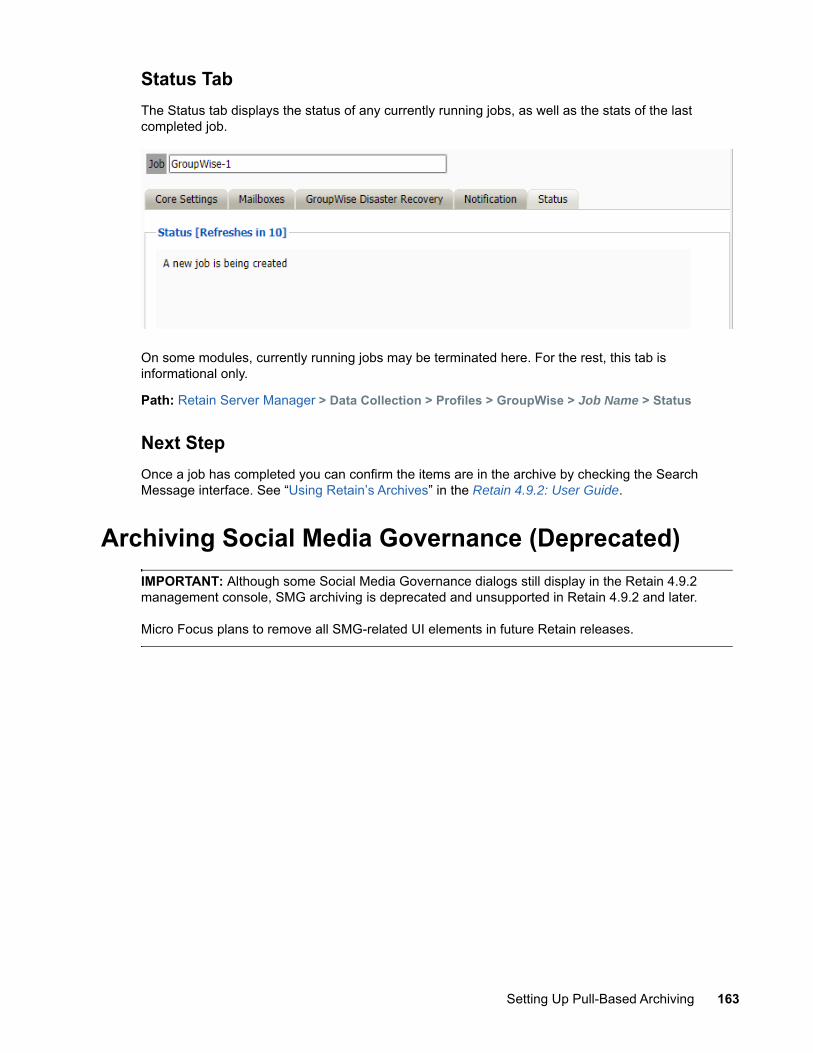
Status TabThe Status tab displays the status of any currently running jobs, as well as the stats of the last completed job.
On some modules, currently running jobs may be terminated here. For the rest, this tab is informational only.
Path: Retain Server Manager > Data Collection > Profiles > GroupWise > Job Name > Status
Next StepOnce a job has completed you can confirm the items are in the archive by checking the Search Message interface. See “Using Retain’s Archives” in the Retain 4.9.2: User Guide.
Archiving Social Media Governance (Deprecated)IMPORTANT: Although some Social Media Governance dialogs still display in the Retain 4.9.2 management console, SMG archiving is deprecated and unsupported in Retain 4.9.2 and later.
Micro Focus plans to remove all SMG-related UI elements in future Retain releases.
Setting Up Pull-Based Archiving 163

164 Setting Up Pull-Based Archiving
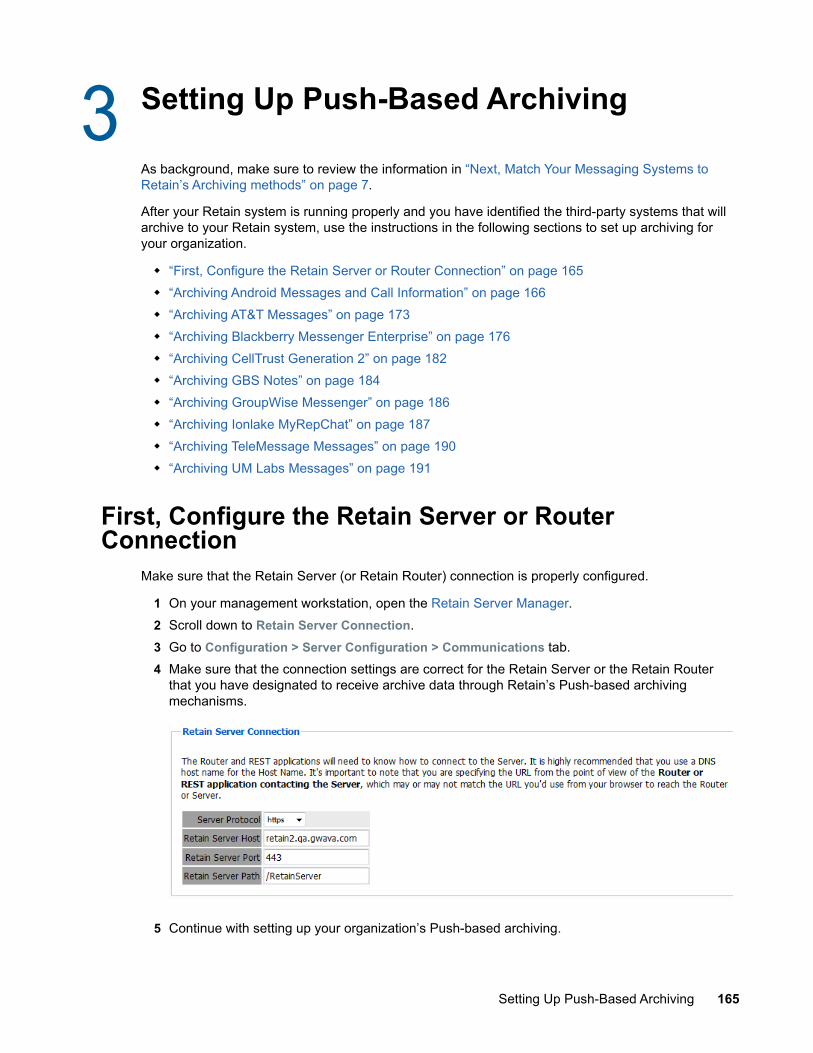
3 3Setting Up Push-Based Archiving
As background, make sure to review the information in “Next, Match Your Messaging Systems to Retain’s Archiving methods” on page 7.
After your Retain system is running properly and you have identified the third-party systems that will archive to your Retain system, use the instructions in the following sections to set up archiving for your organization.
“First, Configure the Retain Server or Router Connection” on page 165 “Archiving Android Messages and Call Information” on page 166 “Archiving AT&T Messages” on page 173 “Archiving Blackberry Messenger Enterprise” on page 176 “Archiving CellTrust Generation 2” on page 182 “Archiving GBS Notes” on page 184 “Archiving GroupWise Messenger” on page 186 “Archiving Ionlake MyRepChat” on page 187 “Archiving TeleMessage Messages” on page 190 “Archiving UM Labs Messages” on page 191
First, Configure the Retain Server or Router Connection
Make sure that the Retain Server (or Retain Router) connection is properly configured.
1 On your management workstation, open the Retain Server Manager.2 Scroll down to Retain Server Connection. 3 Go to Configuration > Server Configuration > Communications tab. 4 Make sure that the connection settings are correct for the Retain Server or the Retain Router
that you have designated to receive archive data through Retain’s Push-based archiving mechanisms.
5 Continue with setting up your organization’s Push-based archiving.
Setting Up Push-Based Archiving 165
Archiving Android Messages and Call InformationIMPORTANT: If you need instructions for the deprecated Pull-based Mobile solution, refer to the documentation for earlier Retain releases on the Micro Focus Documentation Site. (https://www.microfocus.com/documentation/retain-unified-archiving/)
“Creating a Mobile (Android) Module” on page 166 “Creating a Mobile (Android) Profile” on page 169 “Mobile Router Page” on page 171 “Customizing the Mobile Registration Email Template” on page 172
Creating a Mobile (Android) ModuleThe Retain for Mobile module captures and archives MMS, SMS, and phone call information from Android smart phones. The mobile application, Retain Service, supports Android 4.4+ and utilizes the REST API in Retain. The Retain Service APK can be accessed on the 'tools' page. The Tools page is accessed by selecting 'Tools' from the top right of the Retain Administration interface.
You will also need to set up the RetainService Android App for archiving the device, and the Retain App for accessing archived data.
Requirements—Mobile ModuleTo enable mobile data archiving, the following tasks must be completed in order:
1. Install the Retain Message Router on Linux or Windows and be available in the DMZ outside the host network.
2. Install a third-party TLS certificate on the Router.3. Configure the Mobile Module.4. Use a Mobile Device Management (MDM) system to install the Retain Android application (4.4+)
on users’ phones.5. Register the mobile devices under Device Management.6. Have users use the registration email to verify device registration with the Retain server.7. Manually create the Storage path folders.8. For users that travel internationally, have them set their devices to connect trough port 80. Port
48080 is blocked by telecom companies across borders.
Use a Mobile Device Management (MDM) system to distribute Retain Service to devices. When using an MDM to distribute the Retain app, the system can be set to not allow app removal. The MDM will need the package name for Retain Service, which should be set to com.gwava.retain.mobile. Consult the MDM’s documentation for instructions.
MDMs that have been tested with Retain include:
ACE Airwatch BES Citrix XenMobile Good Dynamics
166 Setting Up Push-Based Archiving
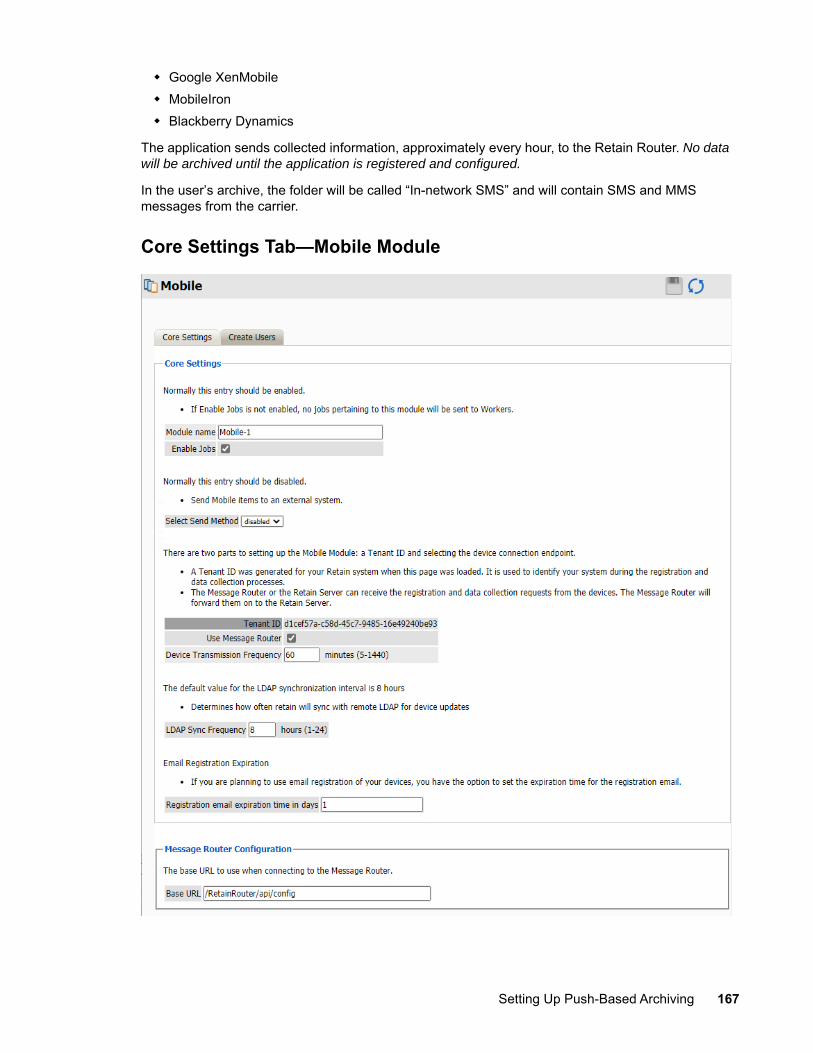
Google XenMobile MobileIron Blackberry Dynamics
The application sends collected information, approximately every hour, to the Retain Router. No data will be archived until the application is registered and configured.
In the user’s archive, the folder will be called “In-network SMS” and will contain SMS and MMS messages from the carrier.
Core Settings Tab—Mobile Module
Setting Up Push-Based Archiving 167
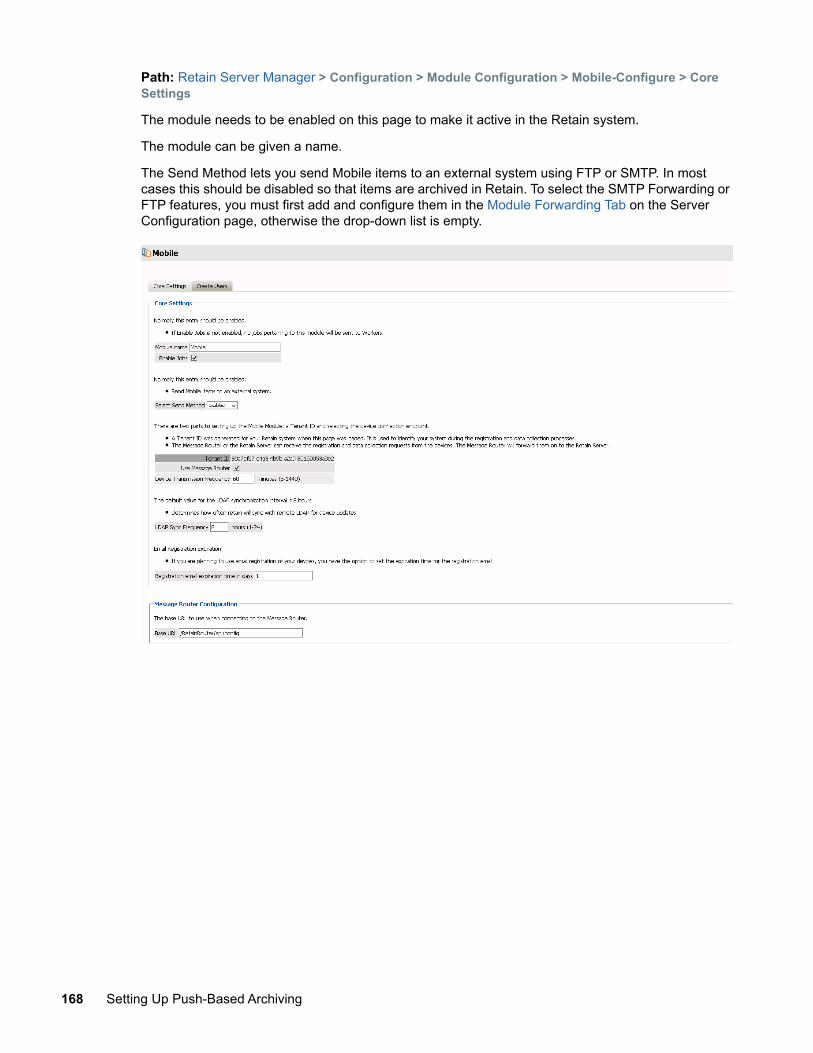
Path: Retain Server Manager > Configuration > Module Configuration > Mobile-Configure > Core Settings
The module needs to be enabled on this page to make it active in the Retain system.
The module can be given a name.
The Send Method lets you send Mobile items to an external system using FTP or SMTP. In most cases this should be disabled so that items are archived in Retain. To select the SMTP Forwarding or FTP features, you must first add and configure them in the Module Forwarding Tab on the Server Configuration page, otherwise the drop-down list is empty.
168 Setting Up Push-Based Archiving
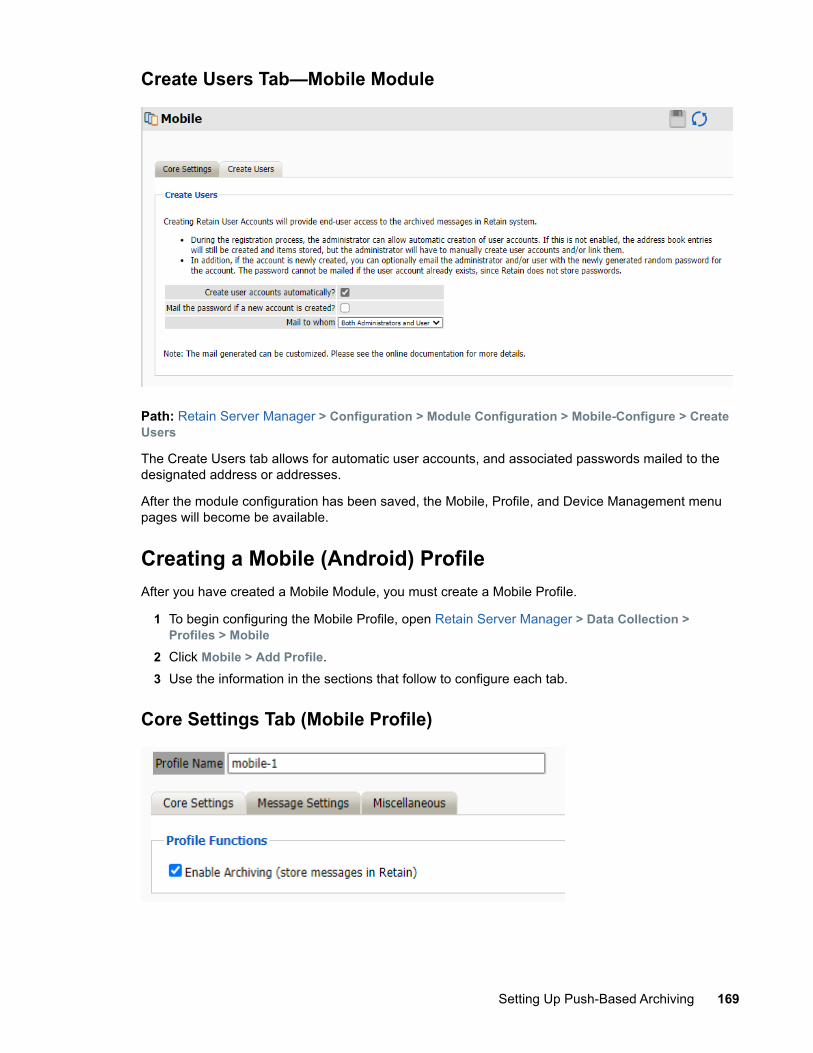
Create Users Tab—Mobile Module
Path: Retain Server Manager > Configuration > Module Configuration > Mobile-Configure > Create Users
The Create Users tab allows for automatic user accounts, and associated passwords mailed to the designated address or addresses.
After the module configuration has been saved, the Mobile, Profile, and Device Management menu pages will become be available.
Creating a Mobile (Android) ProfileAfter you have created a Mobile Module, you must create a Mobile Profile.
1 To begin configuring the Mobile Profile, open Retain Server Manager > Data Collection > Profiles > Mobile
2 Click Mobile > Add Profile.3 Use the information in the sections that follow to configure each tab.
Core Settings Tab (Mobile Profile)
Setting Up Push-Based Archiving 169
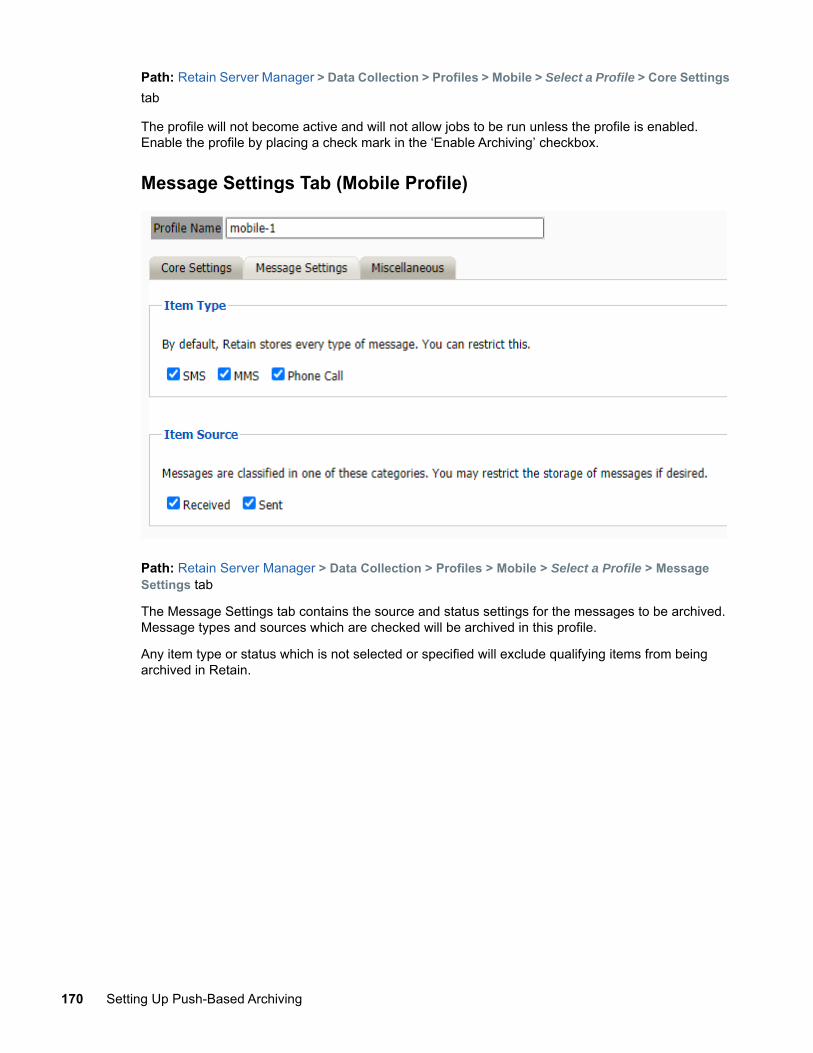
Path: Retain Server Manager > Data Collection > Profiles > Mobile > Select a Profile > Core Settings tab
The profile will not become active and will not allow jobs to be run unless the profile is enabled. Enable the profile by placing a check mark in the ‘Enable Archiving’ checkbox.
Message Settings Tab (Mobile Profile)
Path: Retain Server Manager > Data Collection > Profiles > Mobile > Select a Profile > Message Settings tab
The Message Settings tab contains the source and status settings for the messages to be archived. Message types and sources which are checked will be archived in this profile.
Any item type or status which is not selected or specified will exclude qualifying items from being archived in Retain.
170 Setting Up Push-Based Archiving
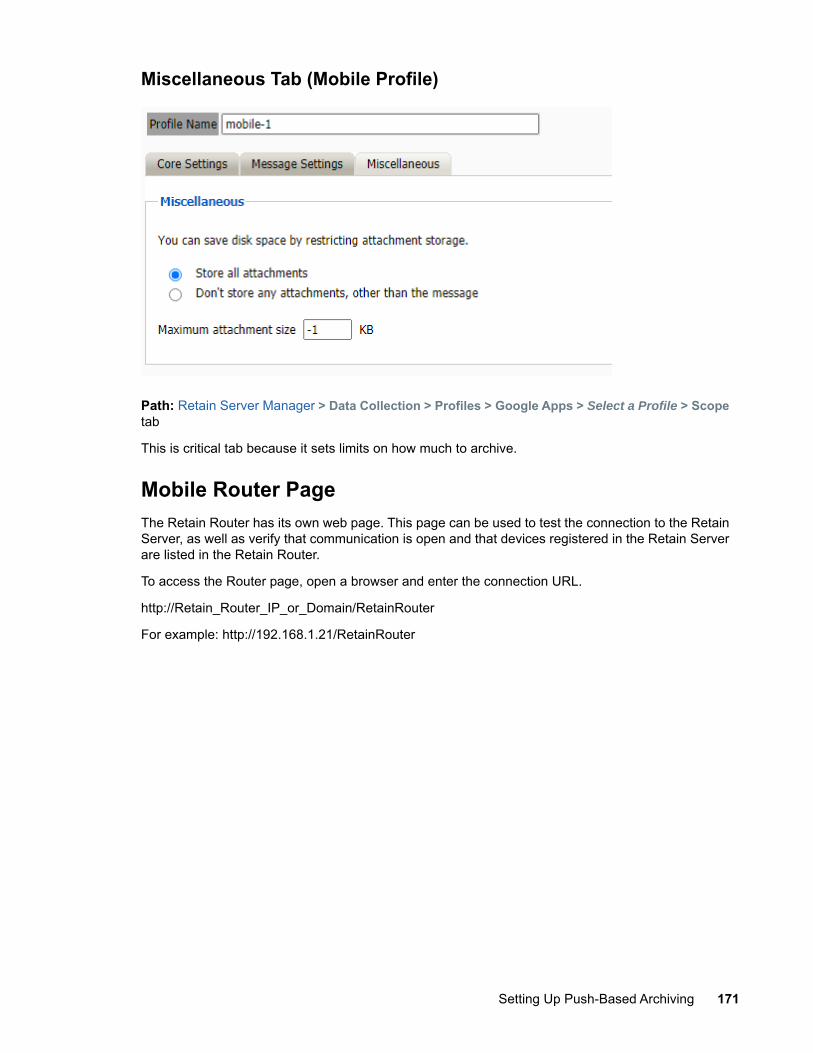
Miscellaneous Tab (Mobile Profile)
Path: Retain Server Manager > Data Collection > Profiles > Google Apps > Select a Profile > Scope tab
This is critical tab because it sets limits on how much to archive.
Mobile Router PageThe Retain Router has its own web page. This page can be used to test the connection to the Retain Server, as well as verify that communication is open and that devices registered in the Retain Server are listed in the Retain Router.
To access the Router page, open a browser and enter the connection URL.
http://Retain_Router_IP_or_Domain/RetainRouter
For example: http://192.168.1.21/RetainRouter
Setting Up Push-Based Archiving 171
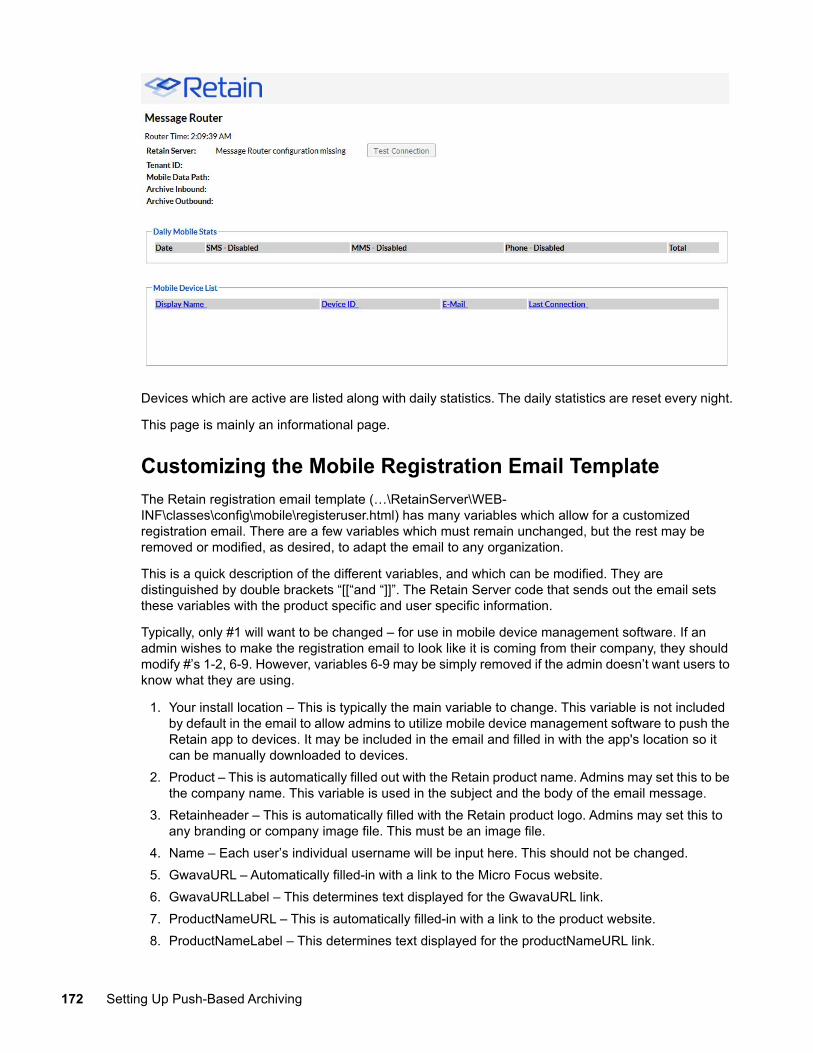
Devices which are active are listed along with daily statistics. The daily statistics are reset every night.
This page is mainly an informational page.
Customizing the Mobile Registration Email TemplateThe Retain registration email template (…\RetainServer\WEB-INF\classes\config\mobile\registeruser.html) has many variables which allow for a customized registration email. There are a few variables which must remain unchanged, but the rest may be removed or modified, as desired, to adapt the email to any organization.
This is a quick description of the different variables, and which can be modified. They are distinguished by double brackets “[[“and “]]”. The Retain Server code that sends out the email sets these variables with the product specific and user specific information.
Typically, only #1 will want to be changed – for use in mobile device management software. If an admin wishes to make the registration email to look like it is coming from their company, they should modify #’s 1-2, 6-9. However, variables 6-9 may be simply removed if the admin doesn’t want users to know what they are using.
1. Your install location – This is typically the main variable to change. This variable is not included by default in the email to allow admins to utilize mobile device management software to push the Retain app to devices. It may be included in the email and filled in with the app's location so it can be manually downloaded to devices.
2. Product – This is automatically filled out with the Retain product name. Admins may set this to be the company name. This variable is used in the subject and the body of the email message.
3. Retainheader – This is automatically filled with the Retain product logo. Admins may set this to any branding or company image file. This must be an image file.
4. Name – Each user’s individual username will be input here. This should not be changed.5. GwavaURL – Automatically filled-in with a link to the Micro Focus website.6. GwavaURLLabel – This determines text displayed for the GwavaURL link.7. ProductNameURL – This is automatically filled-in with a link to the product website.8. ProductNameLabel – This determines text displayed for the productNameURL link.
172 Setting Up Push-Based Archiving
The registration code and information in that variable must not change. This information is generated by the device management page when the device is added.
The following variables must not change.
Do not modify the following:
enrollmentCode: This is generated when the device is created on the device management page. tenantid: This is static number for retain. Displayed on the mobile page from Module
Configuration. email: This is from the Device Management page. name: This is from the Device Management page. endpoint: This is the address of the Retain Server routerURL: This is pulled from the mobile page of Module Configuration. activateHREF: This is an identification string, a link specific to the user and installation.
Archiving AT&T Messages “Creating a Wireless AT&T Module” on page 173
Creating a Wireless AT&T ModuleRetain can archive user SMS and MMS data from wireless carriers that have Message Archiving enabled.
For more detail see the AT&T site http://serviceguidenew.att.com/sg_flashPlayerPage/AMA
NOTE: Stored messages are pushed in near real-time to a company provided URL via HTTP POST and one-way SSL encryption. After a successful push, stored messages are deleted on the carrier side. If the push fails, retries will occur for an additional 5 days until items are deleted by the carrier. Messages are stored even when the user is roaming from the home network. All pushed messages are then encrypted, stored and viewed on the customer premise; no further end user action is required for message storage.
REST data flow can be monitored trough the Archive User by Module Report. See “Archive Summary by Module” in the Retain 4.9.2: Configuration and Administration.
Prerequisites You will need to open the firewall, configure the module and create a REST collector, and send
connection details to your carrier. Install the Module License. See Submitting a PEM License in Retain 4.9.2: Installation and
Upgrade. Install the REST License. See Installing a REST License in Retain 4.9.2: Installation and
Upgrade.
Setting Up Push-Based Archiving 173
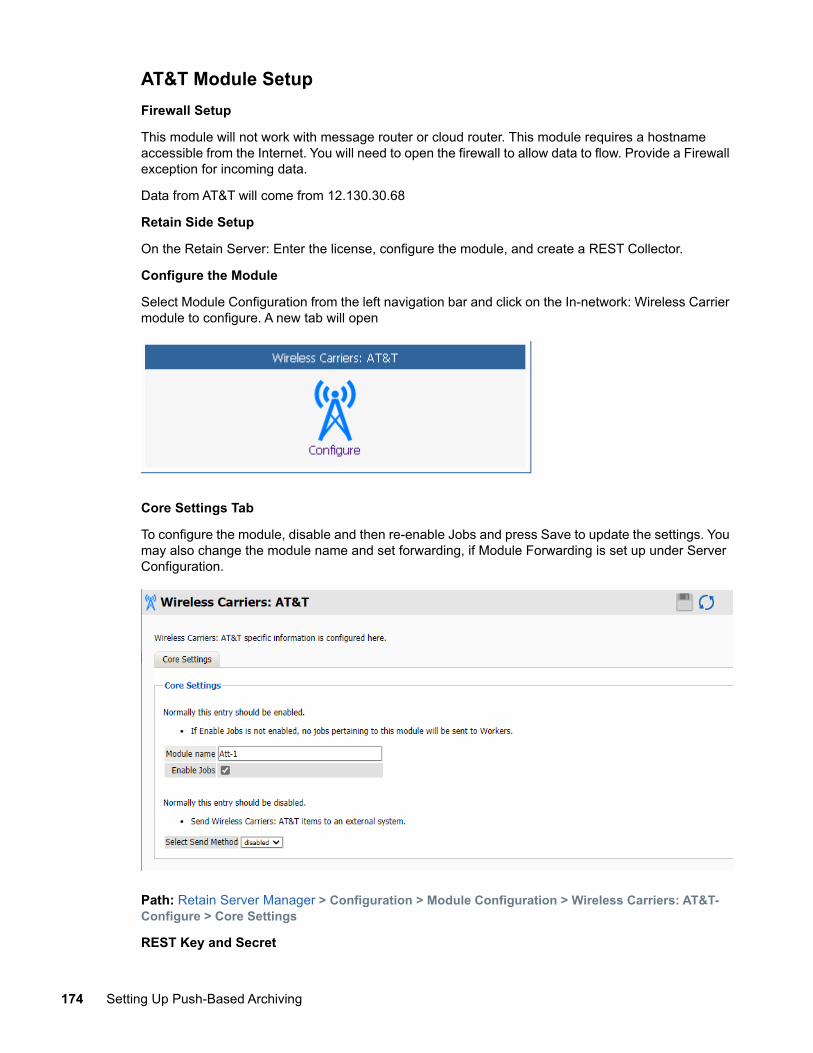
AT&T Module SetupFirewall Setup
This module will not work with message router or cloud router. This module requires a hostname accessible from the Internet. You will need to open the firewall to allow data to flow. Provide a Firewall exception for incoming data.
Data from AT&T will come from 12.130.30.68
Retain Side Setup
On the Retain Server: Enter the license, configure the module, and create a REST Collector.
Configure the Module
Select Module Configuration from the left navigation bar and click on the In-network: Wireless Carrier module to configure. A new tab will open
Core Settings Tab
To configure the module, disable and then re-enable Jobs and press Save to update the settings. You may also change the module name and set forwarding, if Module Forwarding is set up under Server Configuration.
Path: Retain Server Manager > Configuration > Module Configuration > Wireless Carriers: AT&T-Configure > Core Settings
REST Key and Secret
174 Setting Up Push-Based Archiving
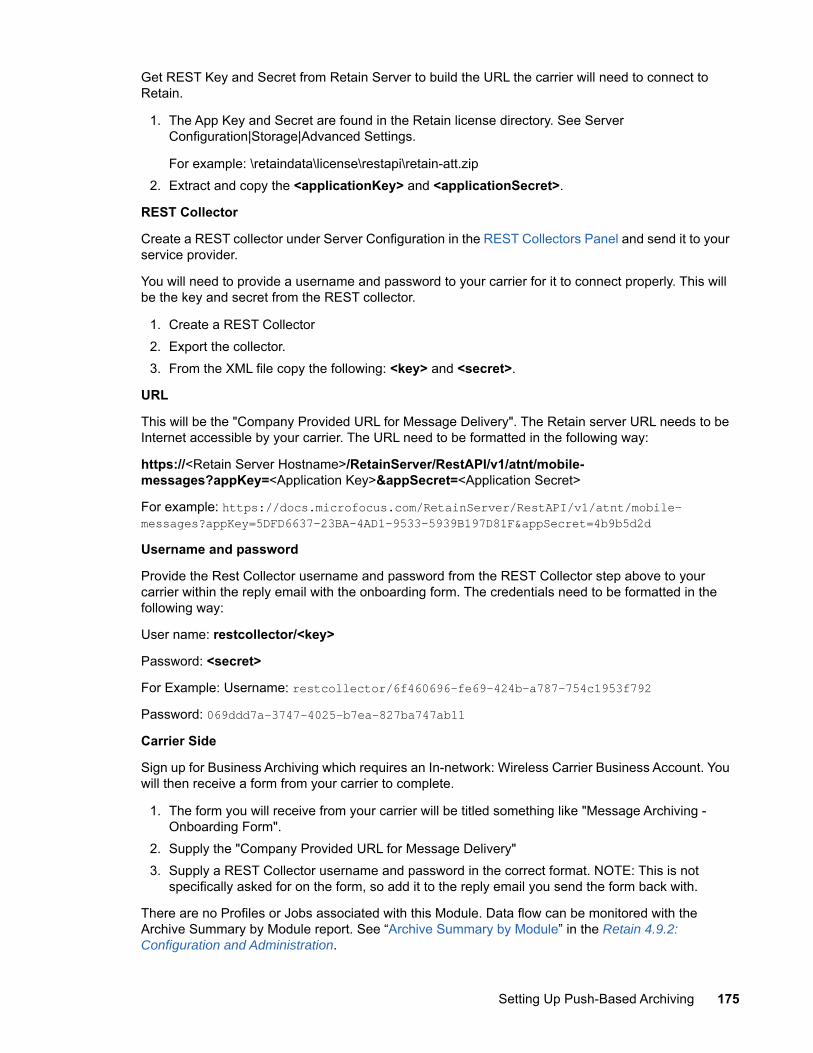
Get REST Key and Secret from Retain Server to build the URL the carrier will need to connect to Retain.
1. The App Key and Secret are found in the Retain license directory. See Server Configuration|Storage|Advanced Settings.
For example: \retaindata\license\restapi\retain-att.zip2. Extract and copy the <applicationKey> and <applicationSecret>.
REST Collector
Create a REST collector under Server Configuration in the REST Collectors Panel and send it to your service provider.
You will need to provide a username and password to your carrier for it to connect properly. This will be the key and secret from the REST collector.
1. Create a REST Collector2. Export the collector.3. From the XML file copy the following: <key> and <secret>.
URL
This will be the "Company Provided URL for Message Delivery". The Retain server URL needs to be Internet accessible by your carrier. The URL need to be formatted in the following way:
https://<Retain Server Hostname>/RetainServer/RestAPI/v1/atnt/mobile-messages?appKey=<Application Key>&appSecret=<Application Secret>
For example: https://docs.microfocus.com/RetainServer/RestAPI/v1/atnt/mobile-messages?appKey=5DFD6637-23BA-4AD1-9533-5939B197D81F&appSecret=4b9b5d2dUsername and password
Provide the Rest Collector username and password from the REST Collector step above to your carrier within the reply email with the onboarding form. The credentials need to be formatted in the following way:
User name: restcollector/<key>
Password: <secret>
For Example: Username: restcollector/6f460696-fe69-424b-a787-754c1953f792Password: 069ddd7a-3747-4025-b7ea-827ba747ab11Carrier Side
Sign up for Business Archiving which requires an In-network: Wireless Carrier Business Account. You will then receive a form from your carrier to complete.
1. The form you will receive from your carrier will be titled something like "Message Archiving - Onboarding Form".
2. Supply the "Company Provided URL for Message Delivery"3. Supply a REST Collector username and password in the correct format. NOTE: This is not
specifically asked for on the form, so add it to the reply email you send the form back with.
There are no Profiles or Jobs associated with this Module. Data flow can be monitored with the Archive Summary by Module report. See “Archive Summary by Module” in the Retain 4.9.2: Configuration and Administration.
Setting Up Push-Based Archiving 175

Archiving Blackberry Messenger Enterprise “Messenger Enterprise (BBME) Tab (Blackberry)” on page 176 “Setting Up Blackberry Auditing and Archiving Services (BAAS) for BBM” on page 177
Messenger Enterprise (BBME) Tab (Blackberry)
Path: Retain Server Manager > Configuration > Module Configuration > Blackberry-Configure > Messenger Enterprise
The Blackberry module lets Blackberry servers archive BBM Enterprise data into the Retain system using the Retain REST API. The Blackberry servers must be configured to log phone calls, PIN, BBM and SMS data.
The web server on the Retain Server and the Retain Router, and all other areas in Retain that require TLS must support TLS 1.2 or TLS 1.3. Earlier TLS versions are not sufficient.For configuration instructions, see the appropriate link: IIS (https://msdn.microsoft.com/en-us/library/windows/desktop/aa374757(v=vs.85).aspx) Apache (https://httpd.apache.org/docs/2.4/ssl/ssl_howto.html)
BBMe Supported Ciphers are:
ECDHE-ECDSA-AES256-GCM-SHA384ECDHE-RSA-AES256-GCM-SHA384ECDHE-ECDSA-AES128-GCM-SHA256ECDHE-RSA-AES128-GCM-SHA256DHE-RSA-AES256-GCM-SHA384DHE-DSS-AES256-GCM-SHA384DHE-RSA-AES128-GCM-SHA256DHE-DSS-AES128-GCM-SHA256ECDHE-ECDSA-AES128-SHA256ECDHE-ECDSA-AES256-SHA384
176 Setting Up Push-Based Archiving
ECDHE-RSA-AES256-SHAECDHE-ECDSA-AES256-SHA
Setting Up Blackberry Auditing and Archiving Services (BAAS) for BBM
IMPORTANT: For questions about BAAS licensing, setup, and so on, contact your Blackberry representative.
The following information is provided for your benefit.
Setting up Retain Blackberry Auditing and Archiving Service for BBM Enterprise (BAAS) is quite simple, as the BBM Enterprise application directly inputs data to Retain
The BBM Enterprise app can forward data to either the Retain Router or the Retain Server, but it will only forward to one or the other.
Because the BBM Enterprise app communicates directly to the Retain BAAS system, Retain needs to have an open connection to the Internet.
Whichever will be used, Router or Server, the configuration and a security certificate must be obtained before setup can be completed.
This supports the BBM App for Desktop (Windows and macOS).
IMPORTANT: Due to the Internet-open-connection requirement, the desired connection should be placed in the network’s DMZ. To protect the Retain Server, the Retain Router has been designed to be placed in the DMZ. When the Router cannot be installed in the system, the Retain Server can handle all communication, but will need to be installed in the DMZ.
Blackberry Environment Requirements Enterprise ID (From Blackberry) Base API license (In licensing tab) Blackberry license (In Licensing tab) REST API base License (In REST API tab) BBM REST API license (In REST API tab) SSL security certificate obtained from a trusted third party certificate authority for either Server or
Router (whichever is to be used).
Pre-setup Tasks1. Create a Network structure plan (Where to place the Retain Server, and whether to use the
Router.)2. Set up and configure a Retain Server, or a Server and router.3. Make sure the Router or Server is connected to and accessible in your DMZ.
Setting Up Push-Based Archiving 177
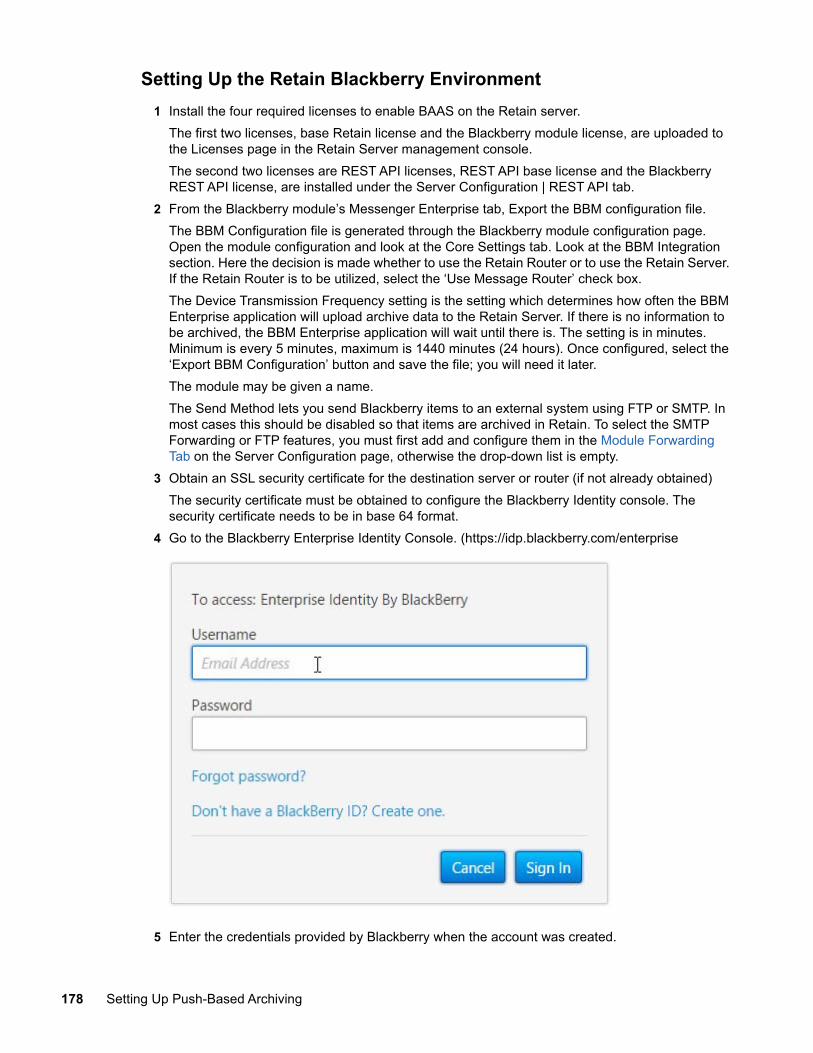
Setting Up the Retain Blackberry Environment1 Install the four required licenses to enable BAAS on the Retain server.
The first two licenses, base Retain license and the Blackberry module license, are uploaded to the Licenses page in the Retain Server management console. The second two licenses are REST API licenses, REST API base license and the Blackberry REST API license, are installed under the Server Configuration | REST API tab.
2 From the Blackberry module’s Messenger Enterprise tab, Export the BBM configuration file.The BBM Configuration file is generated through the Blackberry module configuration page. Open the module configuration and look at the Core Settings tab. Look at the BBM Integration section. Here the decision is made whether to use the Retain Router or to use the Retain Server. If the Retain Router is to be utilized, select the ‘Use Message Router’ check box.The Device Transmission Frequency setting is the setting which determines how often the BBM Enterprise application will upload archive data to the Retain Server. If there is no information to be archived, the BBM Enterprise application will wait until there is. The setting is in minutes. Minimum is every 5 minutes, maximum is 1440 minutes (24 hours). Once configured, select the ‘Export BBM Configuration’ button and save the file; you will need it later.The module may be given a name. The Send Method lets you send Blackberry items to an external system using FTP or SMTP. In most cases this should be disabled so that items are archived in Retain. To select the SMTP Forwarding or FTP features, you must first add and configure them in the Module Forwarding Tab on the Server Configuration page, otherwise the drop-down list is empty.
3 Obtain an SSL security certificate for the destination server or router (if not already obtained)The security certificate must be obtained to configure the Blackberry Identity console. The security certificate needs to be in base 64 format.
4 Go to the Blackberry Enterprise Identity Console. (https://idp.blackberry.com/enterprise
5 Enter the credentials provided by Blackberry when the account was created.
178 Setting Up Push-Based Archiving
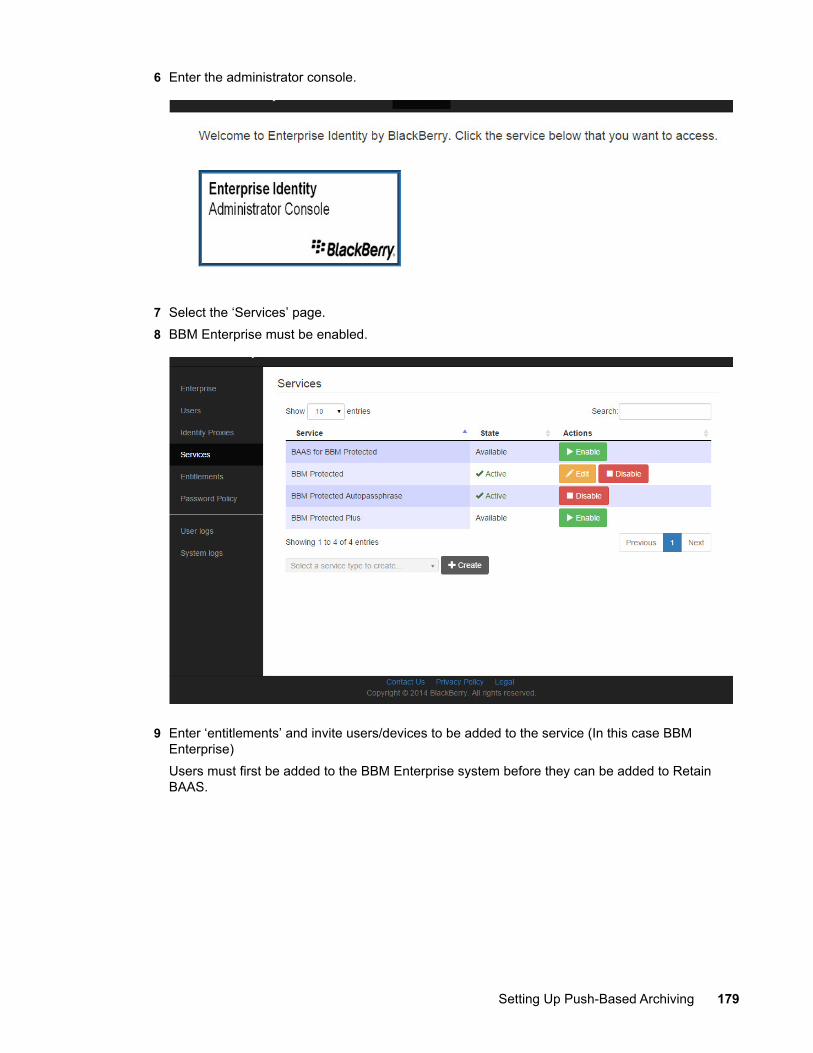
6 Enter the administrator console.
7 Select the ‘Services’ page.8 BBM Enterprise must be enabled.
9 Enter ‘entitlements’ and invite users/devices to be added to the service (In this case BBM Enterprise)Users must first be added to the BBM Enterprise system before they can be added to Retain BAAS.
Setting Up Push-Based Archiving 179
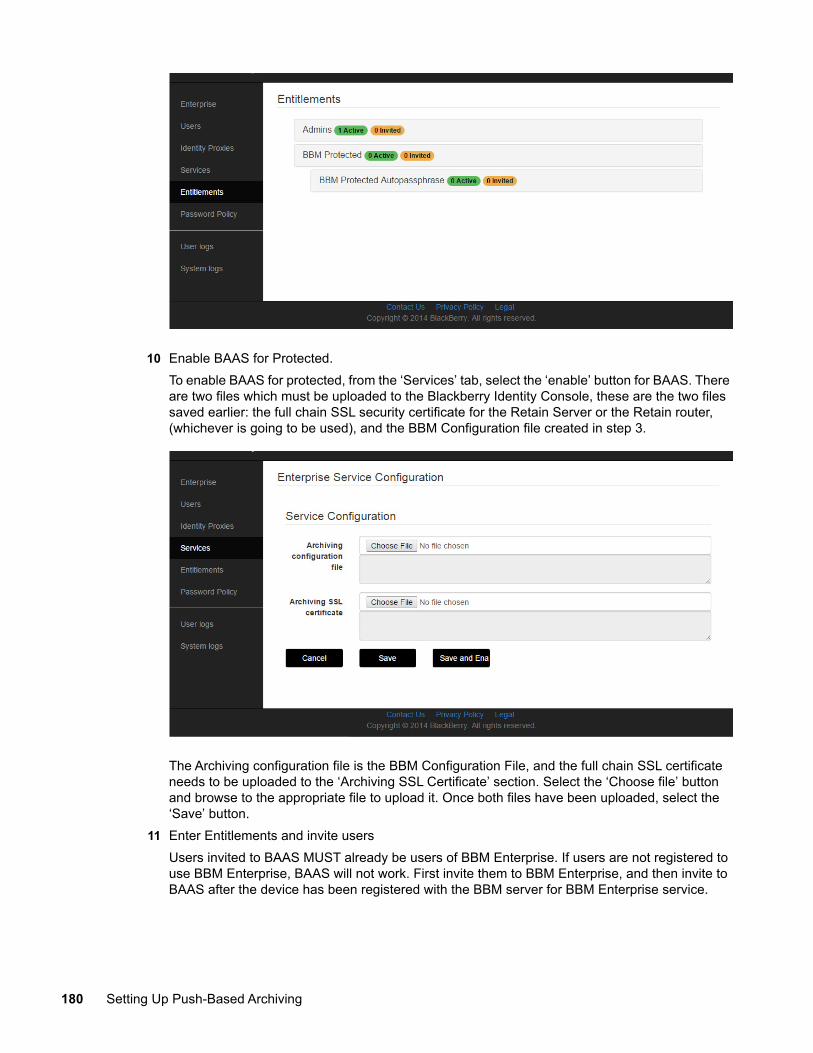
10 Enable BAAS for Protected.To enable BAAS for protected, from the ‘Services’ tab, select the ‘enable’ button for BAAS. There are two files which must be uploaded to the Blackberry Identity Console, these are the two files saved earlier: the full chain SSL security certificate for the Retain Server or the Retain router, (whichever is going to be used), and the BBM Configuration file created in step 3.
The Archiving configuration file is the BBM Configuration File, and the full chain SSL certificate needs to be uploaded to the ‘Archiving SSL Certificate’ section. Select the ‘Choose file’ button and browse to the appropriate file to upload it. Once both files have been uploaded, select the ‘Save’ button.
11 Enter Entitlements and invite usersUsers invited to BAAS MUST already be users of BBM Enterprise. If users are not registered to use BBM Enterprise, BAAS will not work. First invite them to BBM Enterprise, and then invite to BAAS after the device has been registered with the BBM server for BBM Enterprise service.
180 Setting Up Push-Based Archiving
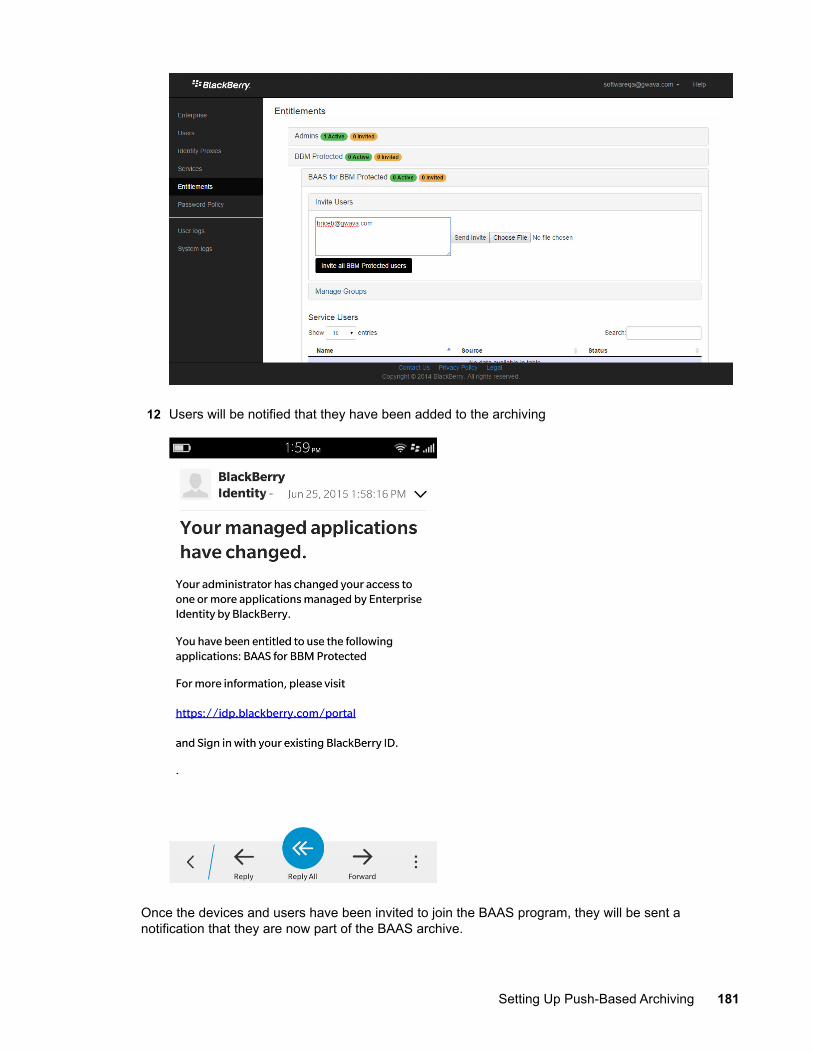
12 Users will be notified that they have been added to the archiving
Once the devices and users have been invited to join the BAAS program, they will be sent a notification that they are now part of the BAAS archive.
Setting Up Push-Based Archiving 181
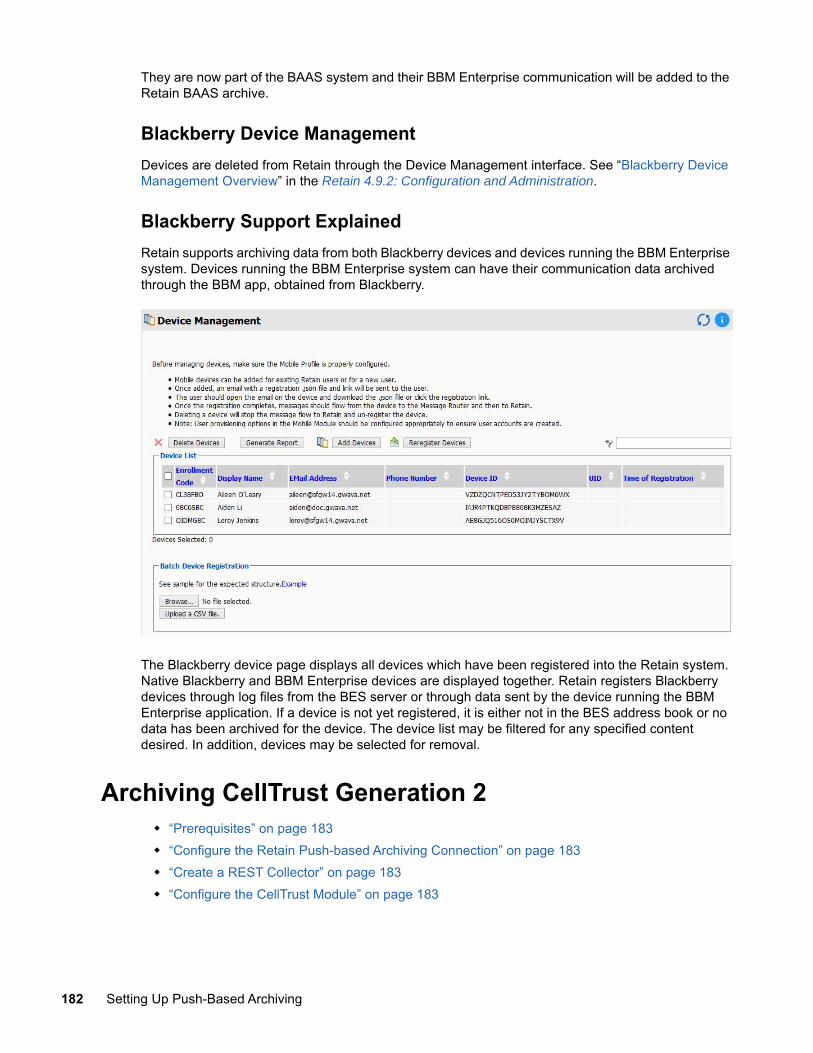
They are now part of the BAAS system and their BBM Enterprise communication will be added to the Retain BAAS archive.
Blackberry Device ManagementDevices are deleted from Retain through the Device Management interface. See “Blackberry Device Management Overview” in the Retain 4.9.2: Configuration and Administration.
Blackberry Support ExplainedRetain supports archiving data from both Blackberry devices and devices running the BBM Enterprise system. Devices running the BBM Enterprise system can have their communication data archived through the BBM app, obtained from Blackberry.
The Blackberry device page displays all devices which have been registered into the Retain system. Native Blackberry and BBM Enterprise devices are displayed together. Retain registers Blackberry devices through log files from the BES server or through data sent by the device running the BBM Enterprise application. If a device is not yet registered, it is either not in the BES address book or no data has been archived for the device. The device list may be filtered for any specified content desired. In addition, devices may be selected for removal.
Archiving CellTrust Generation 2 “Prerequisites” on page 183 “Configure the Retain Push-based Archiving Connection” on page 183 “Create a REST Collector” on page 183 “Configure the CellTrust Module” on page 183
182 Setting Up Push-Based Archiving

Prerequisites Install the Module License. See Submitting a PEM License in Retain 4.9.2: Installation and
Upgrade. Install the REST License. See Installing a REST License in Retain 4.9.2: Installation and
Upgrade.
Configure the Retain Push-based Archiving ConnectionMake sure you have completed the instructions in “First, Configure the Retain Server or Router Connection” on page 165.
Create a REST CollectorCreate a REST collector under Server Configuration in the REST Collectors Panel and send it to your service provider.
Configure the CellTrust ModuleTo configure the CellTrust module, all that is required is to enable the Jobs in the module and Save Changes.
Path: Retain Server Manager > Configuration > Module Configuration > CellTrust SecureLine-Configure > Core Settings
The “Enable Jobs” box must be checked to have data archiving functionality.
The Send Method lets you send CellTrust items to an external system using FTP or SMTP. In most cases this should be disabled so that items are archived in Retain. To select the SMTP Forwarding or FTP features, you must first add and configure them in the Module Forwarding Tab on the Server Configuration page, otherwise the drop-down list is empty.
Save changes and the module is configured. You may need to disable and re-enable "Enable Job" before it will allow you to Save Changes.
Setting Up Push-Based Archiving 183
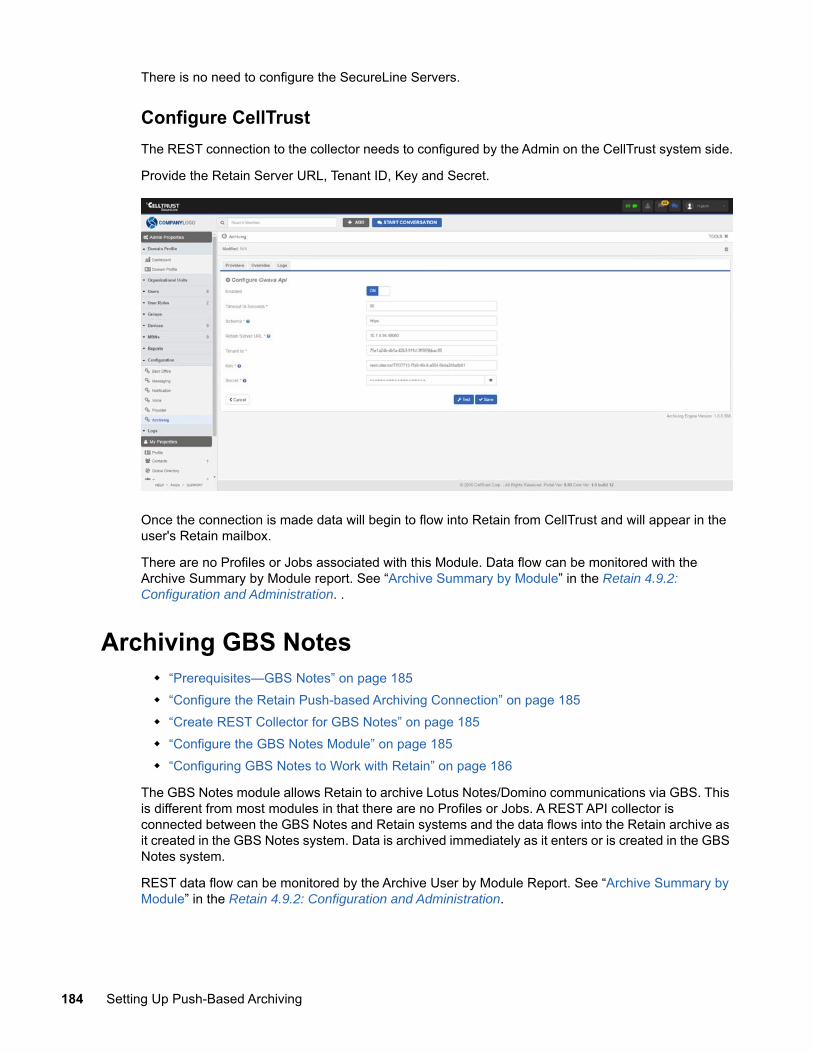
There is no need to configure the SecureLine Servers.
Configure CellTrustThe REST connection to the collector needs to configured by the Admin on the CellTrust system side.
Provide the Retain Server URL, Tenant ID, Key and Secret.
Once the connection is made data will begin to flow into Retain from CellTrust and will appear in the user's Retain mailbox.
There are no Profiles or Jobs associated with this Module. Data flow can be monitored with the Archive Summary by Module report. See “Archive Summary by Module” in the Retain 4.9.2: Configuration and Administration. .
Archiving GBS Notes “Prerequisites—GBS Notes” on page 185 “Configure the Retain Push-based Archiving Connection” on page 185 “Create REST Collector for GBS Notes” on page 185 “Configure the GBS Notes Module” on page 185 “Configuring GBS Notes to Work with Retain” on page 186
The GBS Notes module allows Retain to archive Lotus Notes/Domino communications via GBS. This is different from most modules in that there are no Profiles or Jobs. A REST API collector is connected between the GBS Notes and Retain systems and the data flows into the Retain archive as it created in the GBS Notes system. Data is archived immediately as it enters or is created in the GBS Notes system.
REST data flow can be monitored by the Archive User by Module Report. See “Archive Summary by Module” in the Retain 4.9.2: Configuration and Administration.
184 Setting Up Push-Based Archiving
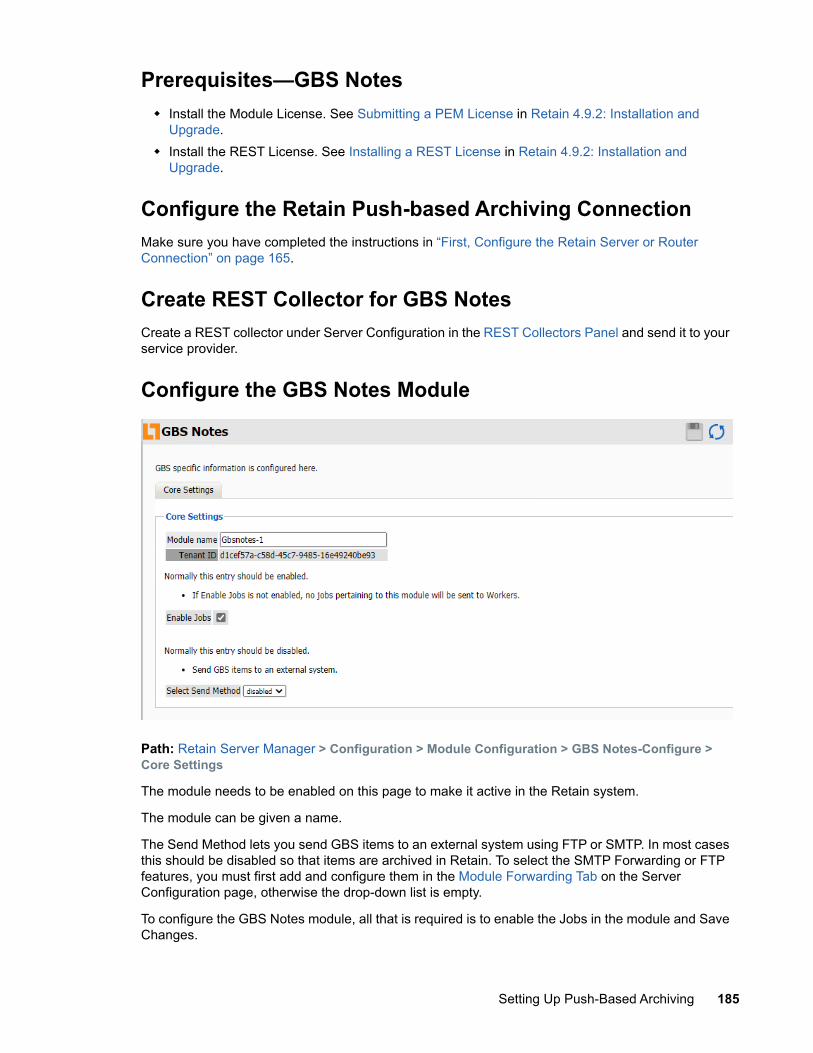
Prerequisites—GBS Notes Install the Module License. See Submitting a PEM License in Retain 4.9.2: Installation and
Upgrade. Install the REST License. See Installing a REST License in Retain 4.9.2: Installation and
Upgrade.
Configure the Retain Push-based Archiving ConnectionMake sure you have completed the instructions in “First, Configure the Retain Server or Router Connection” on page 165.
Create REST Collector for GBS NotesCreate a REST collector under Server Configuration in the REST Collectors Panel and send it to your service provider.
Configure the GBS Notes Module
Path: Retain Server Manager > Configuration > Module Configuration > GBS Notes-Configure > Core Settings
The module needs to be enabled on this page to make it active in the Retain system.
The module can be given a name.
The Send Method lets you send GBS items to an external system using FTP or SMTP. In most cases this should be disabled so that items are archived in Retain. To select the SMTP Forwarding or FTP features, you must first add and configure them in the Module Forwarding Tab on the Server Configuration page, otherwise the drop-down list is empty.
To configure the GBS Notes module, all that is required is to enable the Jobs in the module and Save Changes.
Setting Up Push-Based Archiving 185
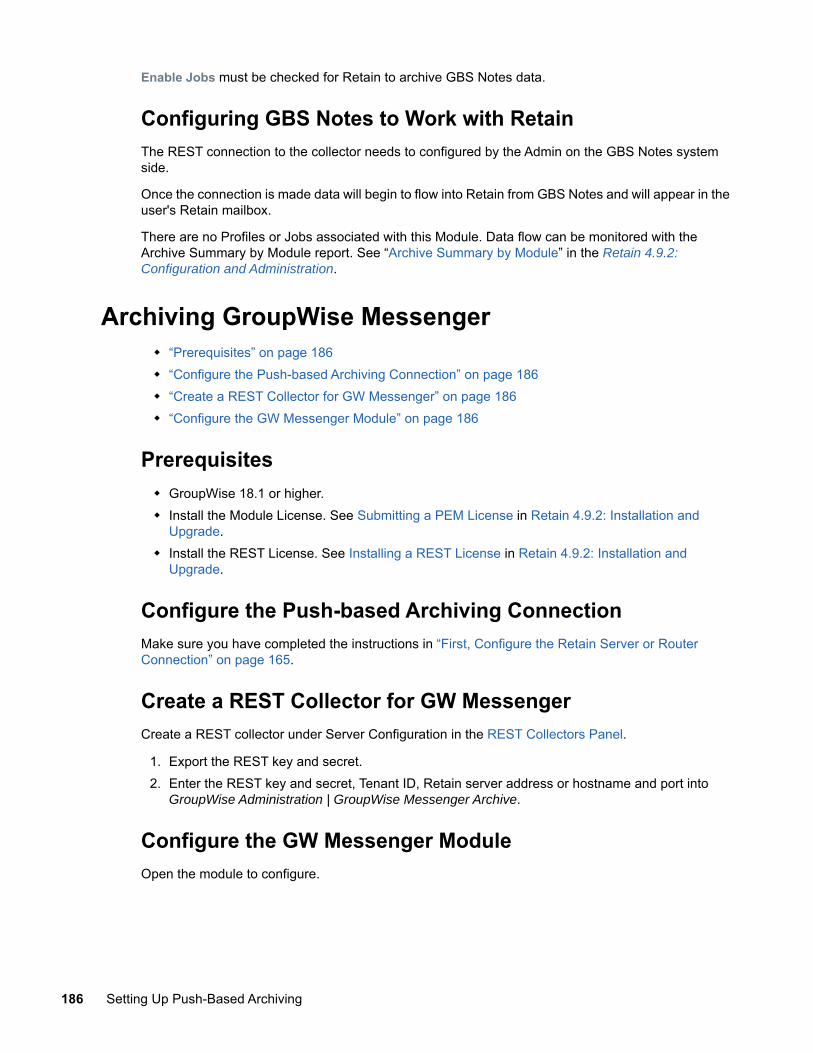
Enable Jobs must be checked for Retain to archive GBS Notes data.
Configuring GBS Notes to Work with RetainThe REST connection to the collector needs to configured by the Admin on the GBS Notes system side.
Once the connection is made data will begin to flow into Retain from GBS Notes and will appear in the user's Retain mailbox.
There are no Profiles or Jobs associated with this Module. Data flow can be monitored with the Archive Summary by Module report. See “Archive Summary by Module” in the Retain 4.9.2: Configuration and Administration.
Archiving GroupWise Messenger “Prerequisites” on page 186 “Configure the Push-based Archiving Connection” on page 186 “Create a REST Collector for GW Messenger” on page 186 “Configure the GW Messenger Module” on page 186
Prerequisites GroupWise 18.1 or higher. Install the Module License. See Submitting a PEM License in Retain 4.9.2: Installation and
Upgrade. Install the REST License. See Installing a REST License in Retain 4.9.2: Installation and
Upgrade.
Configure the Push-based Archiving ConnectionMake sure you have completed the instructions in “First, Configure the Retain Server or Router Connection” on page 165.
Create a REST Collector for GW MessengerCreate a REST collector under Server Configuration in the REST Collectors Panel.
1. Export the REST key and secret.2. Enter the REST key and secret, Tenant ID, Retain server address or hostname and port into
GroupWise Administration | GroupWise Messenger Archive.
Configure the GW Messenger ModuleOpen the module to configure.
186 Setting Up Push-Based Archiving
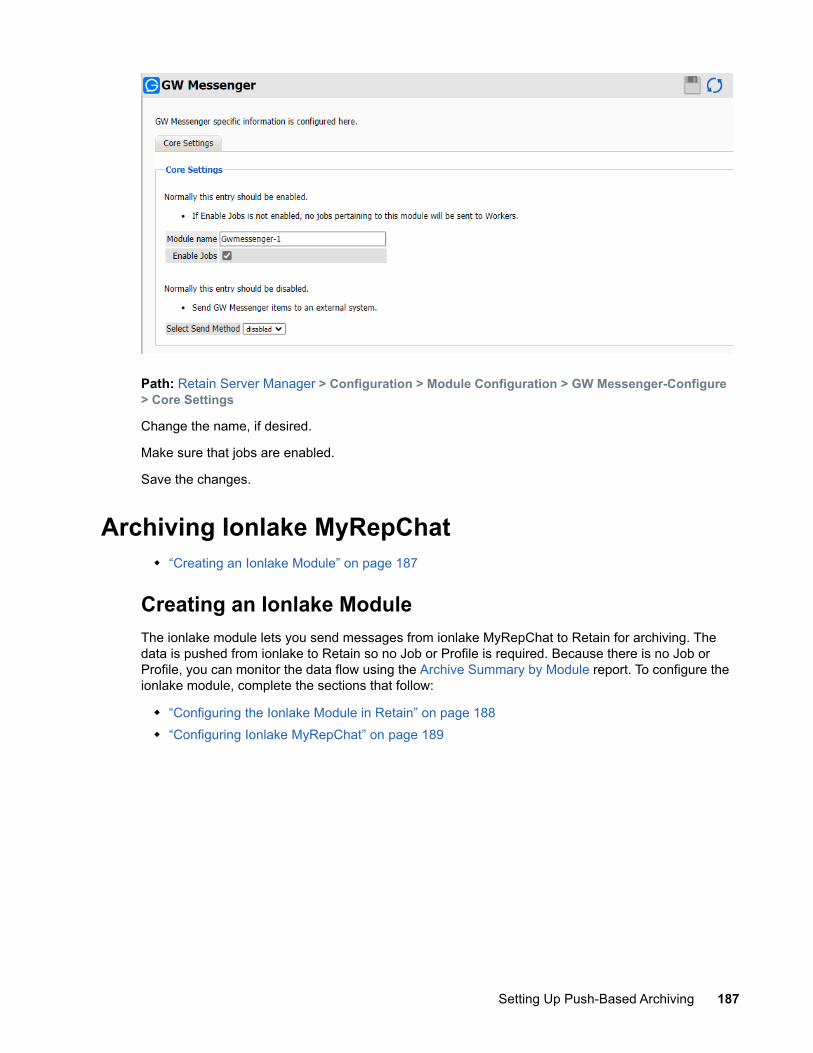
Path: Retain Server Manager > Configuration > Module Configuration > GW Messenger-Configure > Core Settings
Change the name, if desired.
Make sure that jobs are enabled.
Save the changes.
Archiving Ionlake MyRepChat “Creating an Ionlake Module” on page 187
Creating an Ionlake ModuleThe ionlake module lets you send messages from ionlake MyRepChat to Retain for archiving. The data is pushed from ionlake to Retain so no Job or Profile is required. Because there is no Job or Profile, you can monitor the data flow using the Archive Summary by Module report. To configure the ionlake module, complete the sections that follow:
“Configuring the Ionlake Module in Retain” on page 188 “Configuring Ionlake MyRepChat” on page 189
Setting Up Push-Based Archiving 187
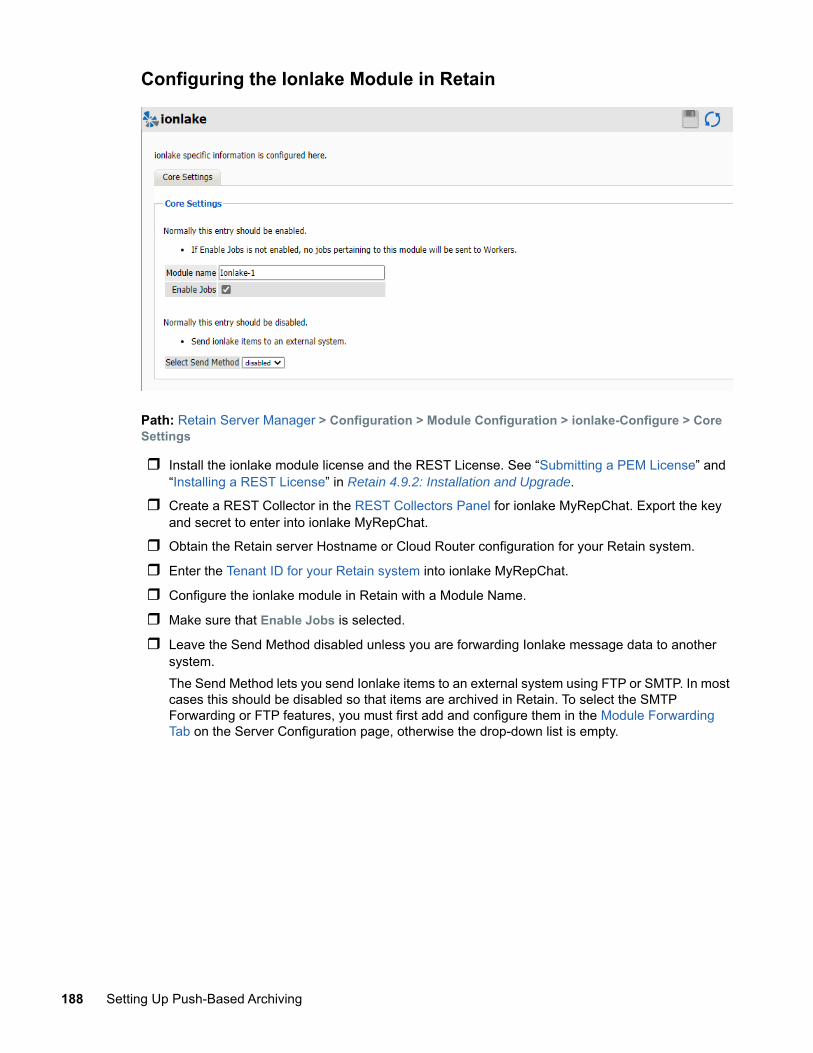
Configuring the Ionlake Module in Retain
Path: Retain Server Manager > Configuration > Module Configuration > ionlake-Configure > Core Settings
Install the ionlake module license and the REST License. See “Submitting a PEM License” and “Installing a REST License” in Retain 4.9.2: Installation and Upgrade.
Create a REST Collector in the REST Collectors Panel for ionlake MyRepChat. Export the key and secret to enter into ionlake MyRepChat.
Obtain the Retain server Hostname or Cloud Router configuration for your Retain system.
Enter the Tenant ID for your Retain system into ionlake MyRepChat.
Configure the ionlake module in Retain with a Module Name.
Make sure that Enable Jobs is selected.
Leave the Send Method disabled unless you are forwarding Ionlake message data to another system.The Send Method lets you send Ionlake items to an external system using FTP or SMTP. In most cases this should be disabled so that items are archived in Retain. To select the SMTP Forwarding or FTP features, you must first add and configure them in the Module Forwarding Tab on the Server Configuration page, otherwise the drop-down list is empty.
188 Setting Up Push-Based Archiving
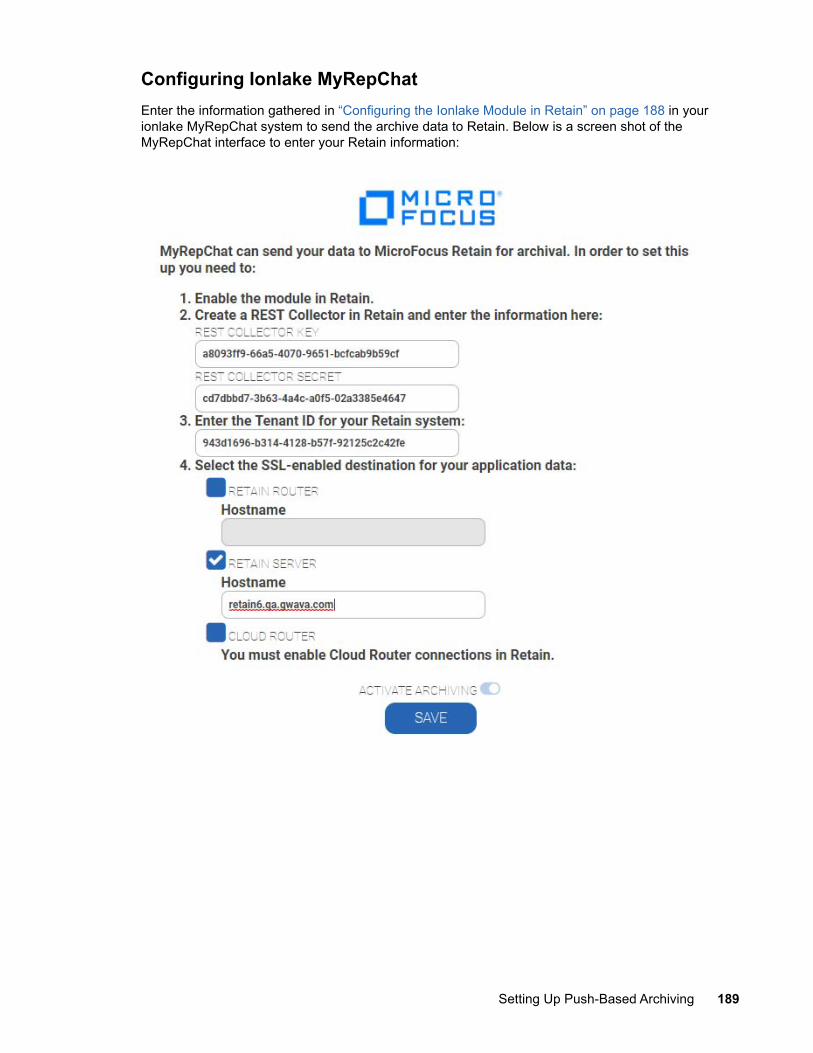
Configuring Ionlake MyRepChatEnter the information gathered in “Configuring the Ionlake Module in Retain” on page 188 in your ionlake MyRepChat system to send the archive data to Retain. Below is a screen shot of the MyRepChat interface to enter your Retain information:
Setting Up Push-Based Archiving 189
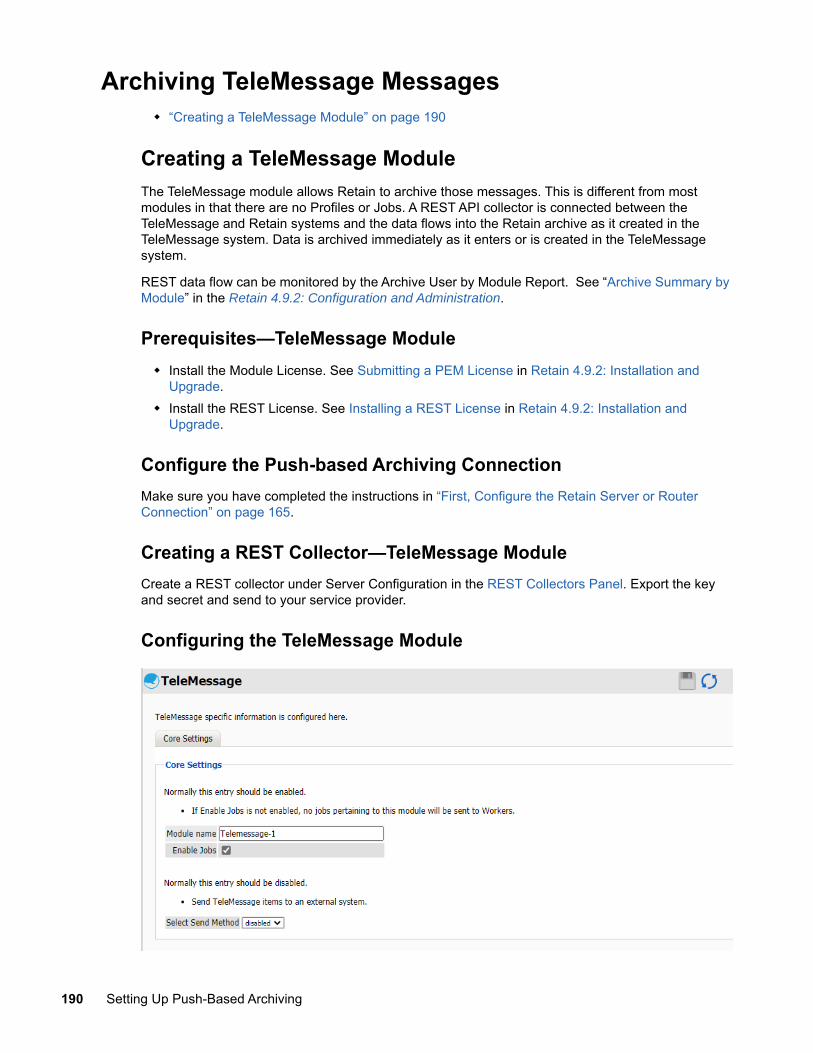
Archiving TeleMessage Messages “Creating a TeleMessage Module” on page 190
Creating a TeleMessage ModuleThe TeleMessage module allows Retain to archive those messages. This is different from most modules in that there are no Profiles or Jobs. A REST API collector is connected between the TeleMessage and Retain systems and the data flows into the Retain archive as it created in the TeleMessage system. Data is archived immediately as it enters or is created in the TeleMessage system.
REST data flow can be monitored by the Archive User by Module Report. See “Archive Summary by Module” in the Retain 4.9.2: Configuration and Administration.
Prerequisites—TeleMessage Module Install the Module License. See Submitting a PEM License in Retain 4.9.2: Installation and
Upgrade. Install the REST License. See Installing a REST License in Retain 4.9.2: Installation and
Upgrade.
Configure the Push-based Archiving ConnectionMake sure you have completed the instructions in “First, Configure the Retain Server or Router Connection” on page 165.
Creating a REST Collector—TeleMessage ModuleCreate a REST collector under Server Configuration in the REST Collectors Panel. Export the key and secret and send to your service provider.
Configuring the TeleMessage Module
190 Setting Up Push-Based Archiving
Path: Retain Server Manager > Configuration > Module Configuration > TeleMessage-Configure > Core Settings
The module needs to be enabled on this page to make it active in the Retain system.
The module can be given a name.
The Send Method lets you send TeleMessage items to an external system using FTP or SMTP. In most cases this should be disabled so that items are archived in Retain. To select the SMTP Forwarding or FTP features, you must first add and configure them in the Module Forwarding Tab on the Server Configuration page, otherwise the drop-down list is empty.
To configure the module, all that is required is to enable the Jobs in the module and Save Changes.
The “Enable Jobs” box must be checked to have data archiving functionality.
Save changes and the module is configured. You may need to disable and re-enable "Enable Job" before it will allow you to Save Changes.
Configuring TeleMessage to Work with RetainThe REST connection to the collector needs to configured by the Admin on the TeleMessage system side.
Once the connection is made data will begin to flow into Retain from TeleMessage and will appear in the user's Retain mailbox.
There are no Profiles or actual Jobs associated with this Module. Data flow can be monitored with the Archive Summary by Module report. See “Archive Summary by Module” in the Retain 4.9.2: Configuration and Administration.
Archiving UM Labs Messages “Creating a UM Labs Module” on page 191
Creating a UM Labs ModuleThe UM Labs module allows Retain to archive those messages. This is different from most modules in that there are no Profiles or Jobs. A REST API collector is connected between the UM Labs and Retain systems and the data flows into the Retain archive as it created in the UM Labs system. Data is archived immediately as it enters or is created in the UM Labs system.
REST data flow can be monitored by the Archive User by Module Report. See “Archive Summary by Module” in the Retain 4.9.2: Configuration and Administration.
Prerequisites Install the Module License. See Submitting a PEM License in Retain 4.9.2: Installation and
Upgrade. Install the REST License. See Installing a REST License in Retain 4.9.2: Installation and
Upgrade.
Setting Up Push-Based Archiving 191
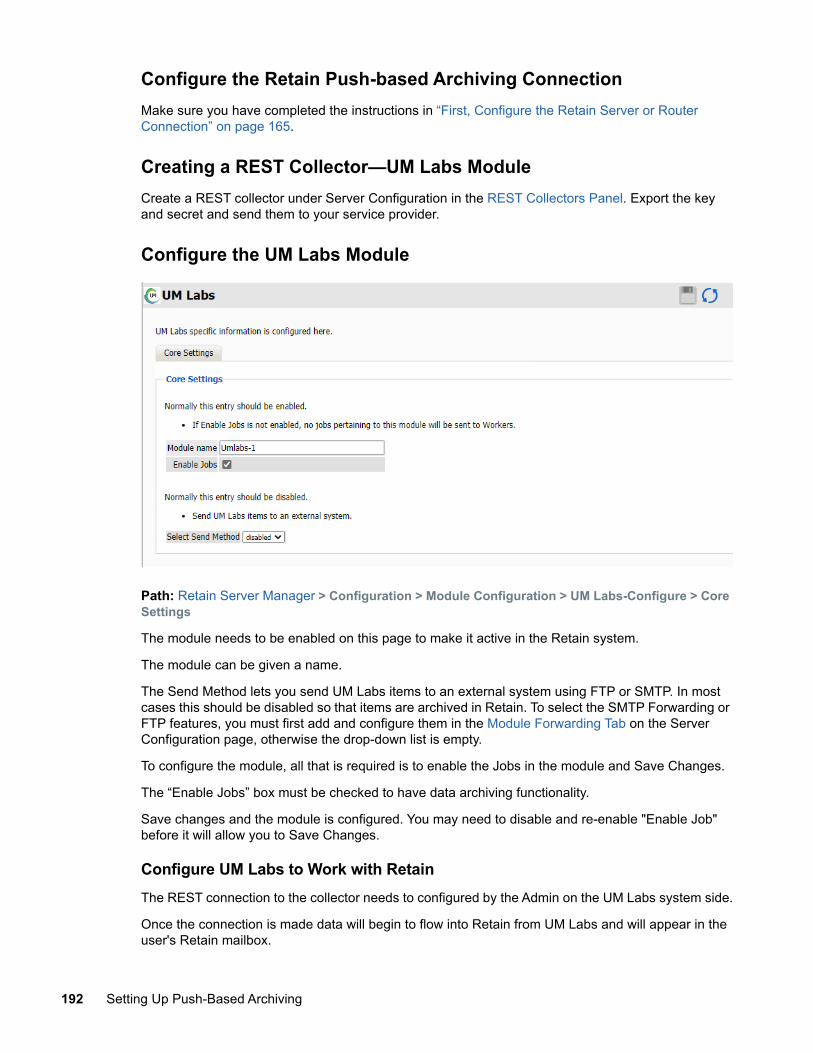
Configure the Retain Push-based Archiving ConnectionMake sure you have completed the instructions in “First, Configure the Retain Server or Router Connection” on page 165.
Creating a REST Collector—UM Labs ModuleCreate a REST collector under Server Configuration in the REST Collectors Panel. Export the key and secret and send them to your service provider.
Configure the UM Labs Module
Path: Retain Server Manager > Configuration > Module Configuration > UM Labs-Configure > Core Settings
The module needs to be enabled on this page to make it active in the Retain system.
The module can be given a name.
The Send Method lets you send UM Labs items to an external system using FTP or SMTP. In most cases this should be disabled so that items are archived in Retain. To select the SMTP Forwarding or FTP features, you must first add and configure them in the Module Forwarding Tab on the Server Configuration page, otherwise the drop-down list is empty.
To configure the module, all that is required is to enable the Jobs in the module and Save Changes.
The “Enable Jobs” box must be checked to have data archiving functionality.
Save changes and the module is configured. You may need to disable and re-enable "Enable Job" before it will allow you to Save Changes.
Configure UM Labs to Work with RetainThe REST connection to the collector needs to configured by the Admin on the UM Labs system side.
Once the connection is made data will begin to flow into Retain from UM Labs and will appear in the user's Retain mailbox.
192 Setting Up Push-Based Archiving
There are no Profiles or Jobs associated with this Module. Data flow can be monitored with the Archive Summary by Module report. See “Archive Summary by Module” in the Retain 4.9.2: Configuration and Administration.
Setting Up Push-Based Archiving 193

194 Setting Up Push-Based Archiving