relativityone integration points guide
TRANSCRIPT

RelativityOne IntegrationPoints GuideFebruary 11, 2022
For the most recent version of this document, visit our documentation website.
RelativityOne Integration Points Guide 2
Table of Contents1 Integration Points 4
1.1 Using Integration Points scenarios 4
2 Installing Integration Points 6
2.1 Installing Integration Points 6
2.2 Adding Integration Points agents 6
2.3 Security permissions 7
3 Integration Points profiles 12
3.1 Copying Integration Point profiles 14
3.1.1 Configuring an Integration Point Profile for copying 15
3.1.2 Setup 15
3.1.3 Connect to Source 15
4 Importing data through Integration Points 17
4.1 Importing a CSV file 17
4.2 Importing LDAP 23
4.3 Importing a document load file 30
4.4 Importing an image load file 36
4.5 Importing from Microsoft Azure AD 41
4.5.1 Reporting 44
4.6 Importing a production load file 44
4.7 Running the import job 48
4.7.1 Downloading the error file 49
4.8 Disabling an Integration Point sync 50
4.8.1 Scheduler date format considerations 51
5 Exporting data through Integration Points 53
5.1 Exporting a folder to load file 53
5.2 Exporting a folder and subfolders to a load file 62
5.3 Exporting a production to a load file 71
5.4 Exporting a saved search to a load file 80
5.5 Exporting to a Relativity workspace 89
5.6 Running the export job 89

RelativityOne Integration Points Guide 3
5.6.1 Stopping an export job 91
5.7 Disabling an Integration Point sync 92
5.7.1 Scheduler date format considerations 92
6 Sync with Integration Points 94
6.1 Special considerations for large sync workflows 94
6.2 Exporting to a Relativity workspace 94
6.2.1 Setup 95
6.2.2 Connect to Source 96
6.2.3 Map Fields 97
6.3 Mapping saved searches 100
6.4 Working with promoted documents 100
6.4.1 Reusing coding decisions 100
6.5 Performance baselines 101
7 Monitoring job history and errors 103
7.1 Job History 103
7.1.1 Viewing job history details 104
7.2 Job History Errors 105
7.2.1 Item-level versus job-level errors 107
7.3 Troubleshooting job history errors 107
8 Viewing destination workspaces 110
9 Microsoft Azure AD provider 112
9.1 Registering an Azure application and credentials 112
9.2 Finding Azure credentials 113
9.3 Removing application access 113
RelativityOne Integration Points Guide 4
1 Integration PointsIntegration Points offers a solution to configure integrations from third party systems to Relativity objectsand from Relativity instance-to-instance with Integration Points Sync. For more information, see Sync withIntegration Points on page 94.
Interested developers can create a separate ADS application to pull data from a third party system sourceprovider. Integration Points ingests that application to handle the scheduling, setup, field mapping, andactual import into Relativity. By using the Integration Points platform, developers can reduce the amount oftime needed to create these custom integrations while end users receive a consistent and easy setupapproach.
In addition to supporting developer-built custom integrations, Integration Points also provides a built-inintegration to Lightweight Directory Access Protocol (LDAP) enabled HR servers such as Microsoft ActiveDirectory. Built on the Integration Points platform, the LDAP integration can filter and schedule imports fromActive Directory data into a Relativity workspace. For example, the workstations, employee names, datashares, etc.
Since the Integration Points doesn't offer Full Name field calculation for Custodian/Entity object, the field isnot available as an option for mapping. If you need to update the Entity object, please use the LDAPprovider, which allows new records to be added with a field other than Full Name as the identifier.Alternatively, you may consider using Relativity Desktop Client for Custodians/Entities updates.\
Note: You can locate an application's version number by navigating to Applications & Scripts >Application Library tab. You must be a system admin to access this tab.
1.1 Using Integration Points scenarios
Using Integration Points as a developerYou’re the lead developer of an organization responsible for building Relativity customizations.One of your clients started tracking all of their litigation-related information outside of Relativity ina new product called Whazootie. They mention to you that they would love to have this sameinformation available in their Relativity workspaces to tie their document review to specific caseinformation.
You useWhazootie's APIs to build a simple Relativity application to connect to a Whazootiewebsite without building any import or setup steps. You give the application to your client alongwith Integration Points for them to install in a workspace. They can use all the security,scheduling, setup, and import options available in Integration Points along with the Whazootieconnection to set up multiple imports that bring Whazootie data into their Relativity workspace.
Using Integration Points as an end userYou’re the litigation support professional responsible for setting up workflows and templates tohelp manage your company’s legal hold procedure using Relativity Legal Hold. You want toensure that all custodian information is kept up-to-date so that holds always go to the correctemail address and that the litigation team is aware of custodians who have changed departments

RelativityOne Integration Points Guide 5
or left the company. Unfortunately, all of the custodian information is scattered across multiplecompany HR servers containing unnecessary computer and network data.
To solve this problem, you use the Integration Points setup wizard to configure new integrations toeach HR server, mapping items to specific Relativity fields. You work with your team to configurea filter in each setup so that only the appropriate employees are brought in as Custodians andschedule the import to occur automatically each night during off-hours. As a result, your custodianaddress book is always up-to-date, ensuring that proper litigation workflows are followed withevery custodian.
RelativityOne Integration Points Guide 6
2 Installing Integration PointsTo successfully use Integration Points, you need to install the Integration Points application to at least oneworkspace.
Note: If you are a current RelativityOne user, and you want to install or upgrade this application, you mustcontact the Client Services team.
Use the following procedures to install Integration Points:
1. Install Integration Points from either the Application Library or an external file. See Installing Integ-ration Points below.
2. Add the Integration Points agent. See Adding Integration Points agents below.
3. Access Integration Points. See Installing Integration Points above.
2.1 Installing Integration PointsSince Integration Points uses the ADS framework, you have the following options available for installingIntegration Points in your environment. See Relativity Applications in the Admin guide.
n Install Integration Points from the Application Library - If you add the Integration Points applic-ation to the Application Library, you can install it to the current workspace, or to multiple workspacesat once, from the Application Library.
n Install Integration Points from an external file - You can import the Integration Points applicationinto your workspace from an external file if it hasn't been added to the Application Library.
2.2 Adding Integration Points agentsAfter you install Integration Points, add the Integration Points Agent and Integration Points Manager Agentthrough the following steps.
Note:We recommend using only the Integration Points Agent.
Add one of each of these agents per Resource Pool. See Application-specific agents in the Agents guide formore information.
1. Navigate to the Agents tab.
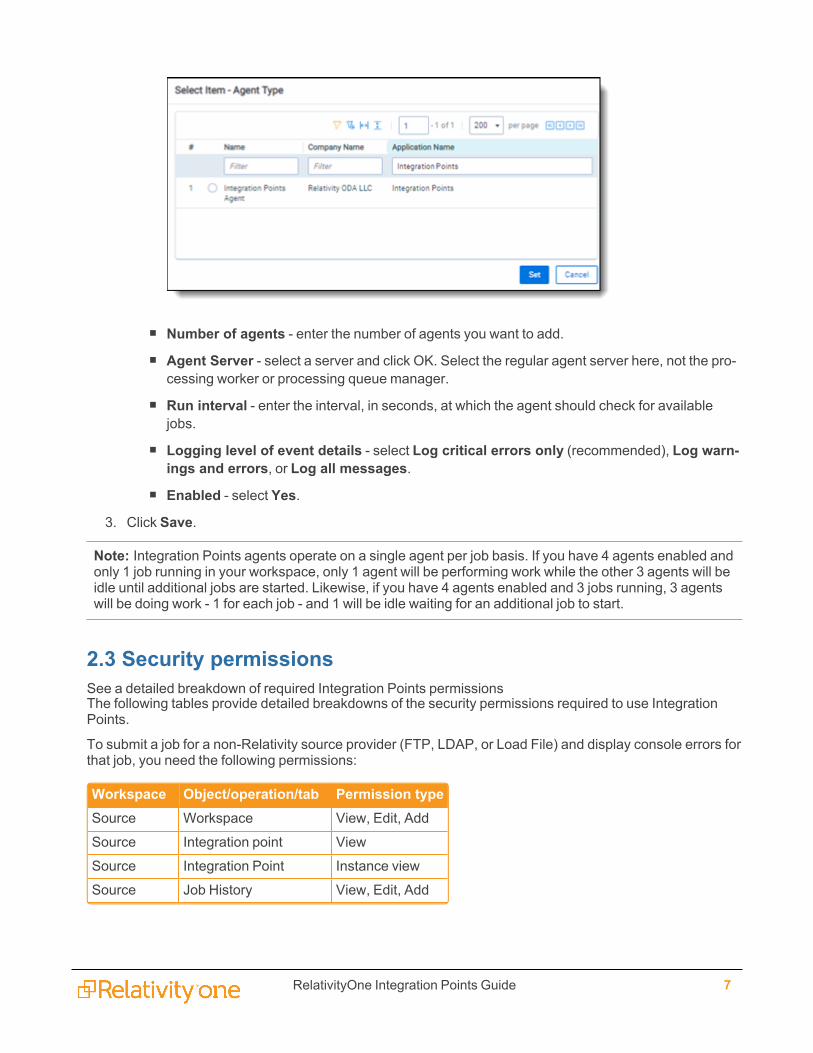
2. Click New Agent and complete the following required fields:n Agent Type - access the list of agents, filter for one of the Integration Points agents, select
the agent, and clickOK.
RelativityOne Integration Points Guide 7
n Number of agents - enter the number of agents you want to add.n Agent Server - select a server and click OK. Select the regular agent server here, not the pro-
cessing worker or processing queue manager.
n Run interval - enter the interval, in seconds, at which the agent should check for availablejobs.
n Logging level of event details - select Log critical errors only (recommended), Log warn-ings and errors, or Log all messages.
n Enabled - select Yes.
3. Click Save.
Note: Integration Points agents operate on a single agent per job basis. If you have 4 agents enabled andonly 1 job running in your workspace, only 1 agent will be performing work while the other 3 agents will beidle until additional jobs are started. Likewise, if you have 4 agents enabled and 3 jobs running, 3 agentswill be doing work - 1 for each job - and 1 will be idle waiting for an additional job to start.
2.3 Security permissionsSee a detailed breakdown of required Integration Points permissionsThe following tables provide detailed breakdowns of the security permissions required to use IntegrationPoints.
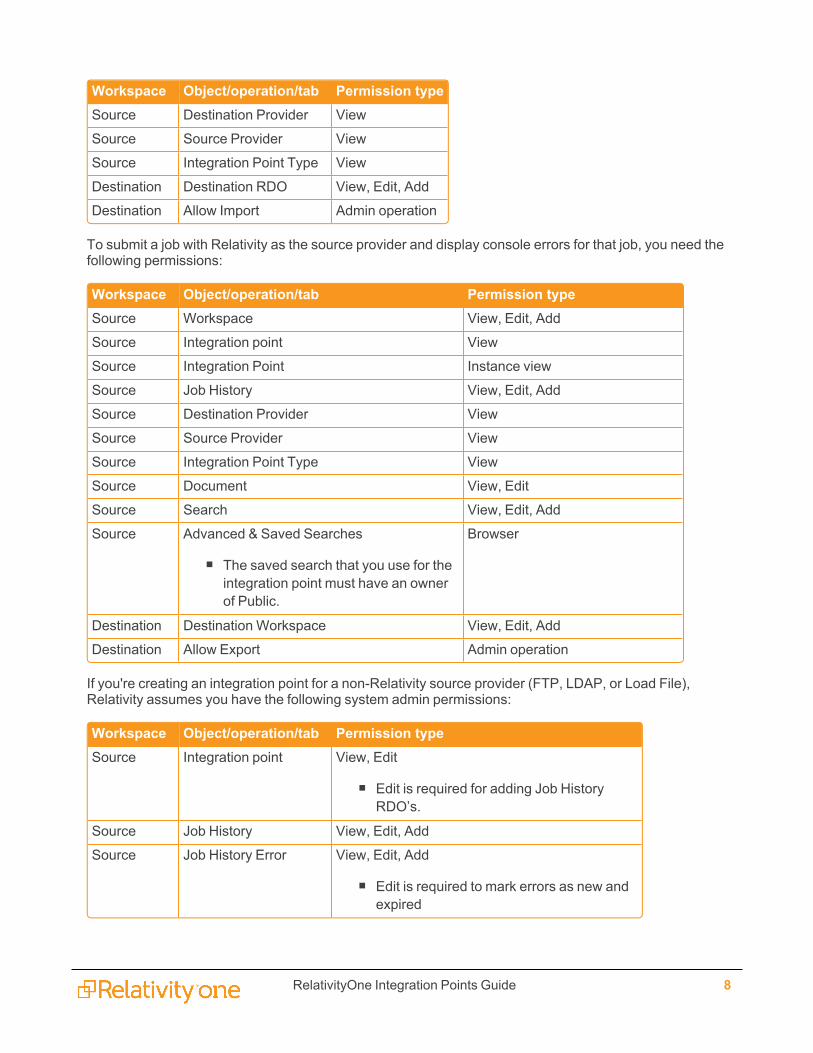
To submit a job for a non-Relativity source provider (FTP, LDAP, or Load File) and display console errors forthat job, you need the following permissions:
Workspace Object/operation/tab Permission typeSource Workspace View, Edit, Add
Source Integration point View
Source Integration Point Instance view
Source Job History View, Edit, Add
RelativityOne Integration Points Guide 8
Workspace Object/operation/tab Permission typeSource Destination Provider View
Source Source Provider View
Source Integration Point Type View
Destination Destination RDO View, Edit, Add
Destination Allow Import Admin operation
To submit a job with Relativity as the source provider and display console errors for that job, you need thefollowing permissions:
Workspace Object/operation/tab Permission typeSource Workspace View, Edit, Add
Source Integration point View
Source Integration Point Instance view
Source Job History View, Edit, Add
Source Destination Provider View
Source Source Provider View
Source Integration Point Type View
Source Document View, Edit
Source Search View, Edit, Add
Source Advanced & Saved Searches
n The saved search that you use for theintegration point must have an ownerof Public.
Browser
Destination Destination Workspace View, Edit, Add
Destination Allow Export Admin operation
If you're creating an integration point for a non-Relativity source provider (FTP, LDAP, or Load File),Relativity assumes you have the following system admin permissions:
Workspace Object/operation/tab Permission typeSource Integration point View, Edit
n Edit is required for adding Job HistoryRDO’s.
Source Job History View, Edit, Add
Source Job History Error View, Edit, Add
n Edit is required to mark errors as new andexpired
RelativityOne Integration Points Guide 9
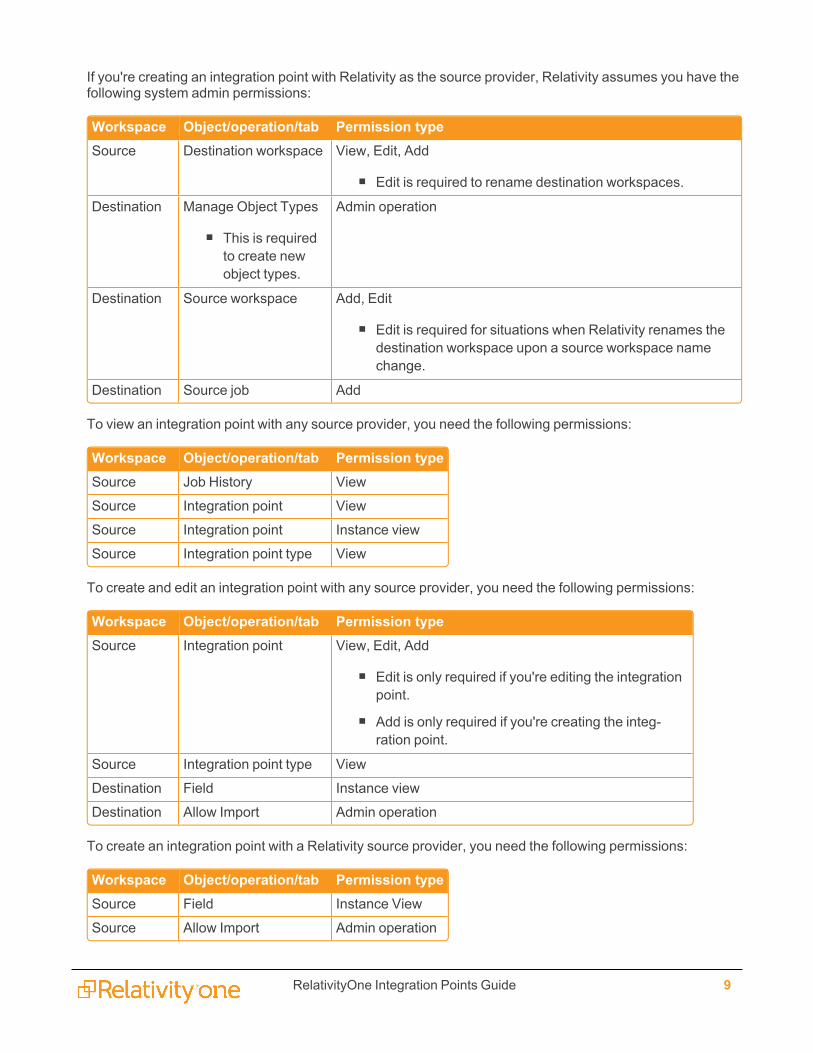
If you're creating an integration point with Relativity as the source provider, Relativity assumes you have thefollowing system admin permissions:
Workspace Object/operation/tab Permission typeSource Destination workspace View, Edit, Add
n Edit is required to rename destination workspaces.
Destination Manage Object Types
n This is requiredto create newobject types.
Admin operation
Destination Source workspace Add, Edit
n Edit is required for situations when Relativity renames thedestination workspace upon a source workspace namechange.
Destination Source job Add
To view an integration point with any source provider, you need the following permissions:
Workspace Object/operation/tab Permission typeSource Job History View
Source Integration point View
Source Integration point Instance view
Source Integration point type View
To create and edit an integration point with any source provider, you need the following permissions:
Workspace Object/operation/tab Permission typeSource Integration point View, Edit, Add
n Edit is only required if you're editing the integrationpoint.
n Add is only required if you're creating the integ-ration point.
Source Integration point type View
Destination Field Instance view
Destination Allow Import Admin operation
To create an integration point with a Relativity source provider, you need the following permissions:
Workspace Object/operation/tab Permission typeSource Field Instance View
Source Allow Import Admin operation
RelativityOne Integration Points Guide 10
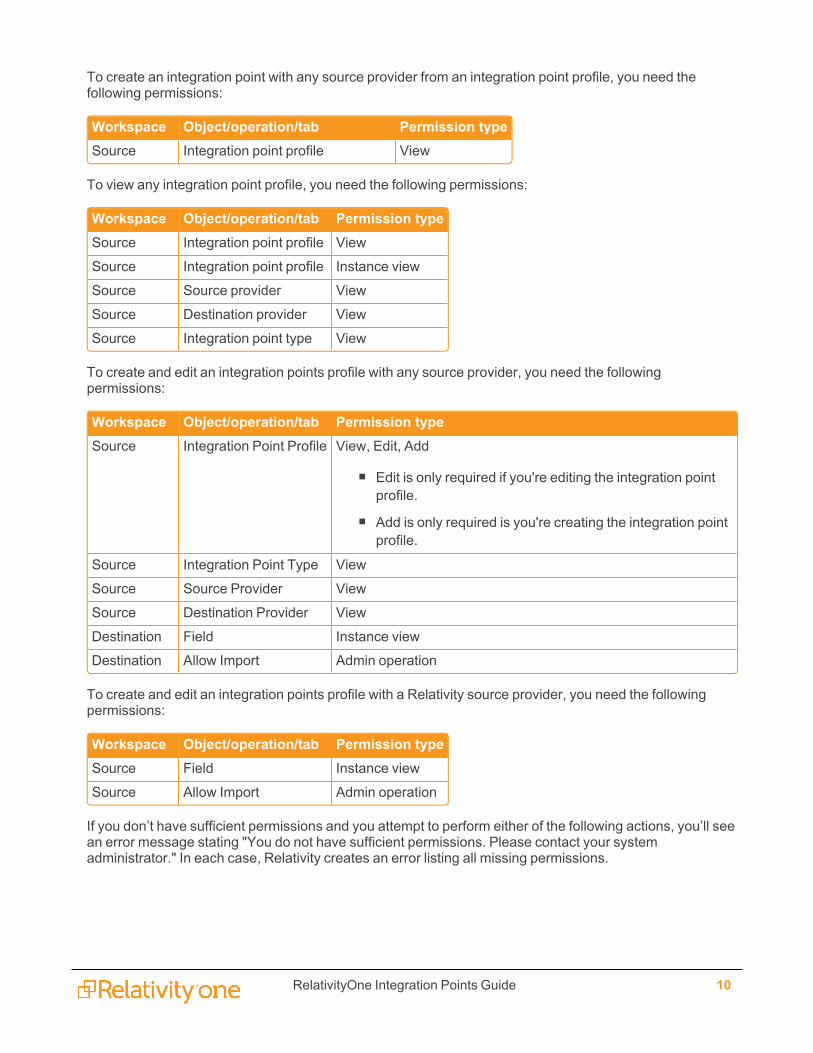
To create an integration point with any source provider from an integration point profile, you need thefollowing permissions:
Workspace Object/operation/tab Permission typeSource Integration point profile View
To view any integration point profile, you need the following permissions:
Workspace Object/operation/tab Permission typeSource Integration point profile View
Source Integration point profile Instance view
Source Source provider View
Source Destination provider View
Source Integration point type View
To create and edit an integration points profile with any source provider, you need the followingpermissions:
Workspace Object/operation/tab Permission typeSource Integration Point Profile View, Edit, Add
n Edit is only required if you're editing the integration pointprofile.
n Add is only required is you're creating the integration pointprofile.
Source Integration Point Type View
Source Source Provider View
Source Destination Provider View
Destination Field Instance view
Destination Allow Import Admin operation
To create and edit an integration points profile with a Relativity source provider, you need the followingpermissions:
Workspace Object/operation/tab Permission typeSource Field Instance view
Source Allow Import Admin operation
If you don’t have sufficient permissions and you attempt to perform either of the following actions, you’ll seean error message stating "You do not have sufficient permissions. Please contact your systemadministrator." In each case, Relativity creates an error listing all missing permissions.

RelativityOne Integration Points Guide 11
n Loading the integration points console or clicking Run Now or Retry:o If the error occurs after a button click, the message is prefixed with, "Failed to submit integ-ration job."
o If the job is a retry job, the prefix reads, "Failed to submit the retry job."
n Saving an integration point after creating a new one or editing an existing one.
Note: Integration points is tenant-aware. This means that workspace admins within a tenancy receive anerror if they attempt to push to a workspace they don't have permissions to. This error occurs when theyclick Run Now on the integration point they create to push documents to review.
RelativityOne Integration Points Guide 12
3 Integration Points profilesYou have the option of creating and saving profiles, which you can use to run future import or export jobsthrough Integration Points.
You can make your profiles specific to each data source provider so that you can then reuse those settingsand avoid having to remap fields multiple times.
You can save a profile through the Transfer Options console on an integration point that you're currentlycreating or editing, or you can create one through the Integration Point Profile tab.
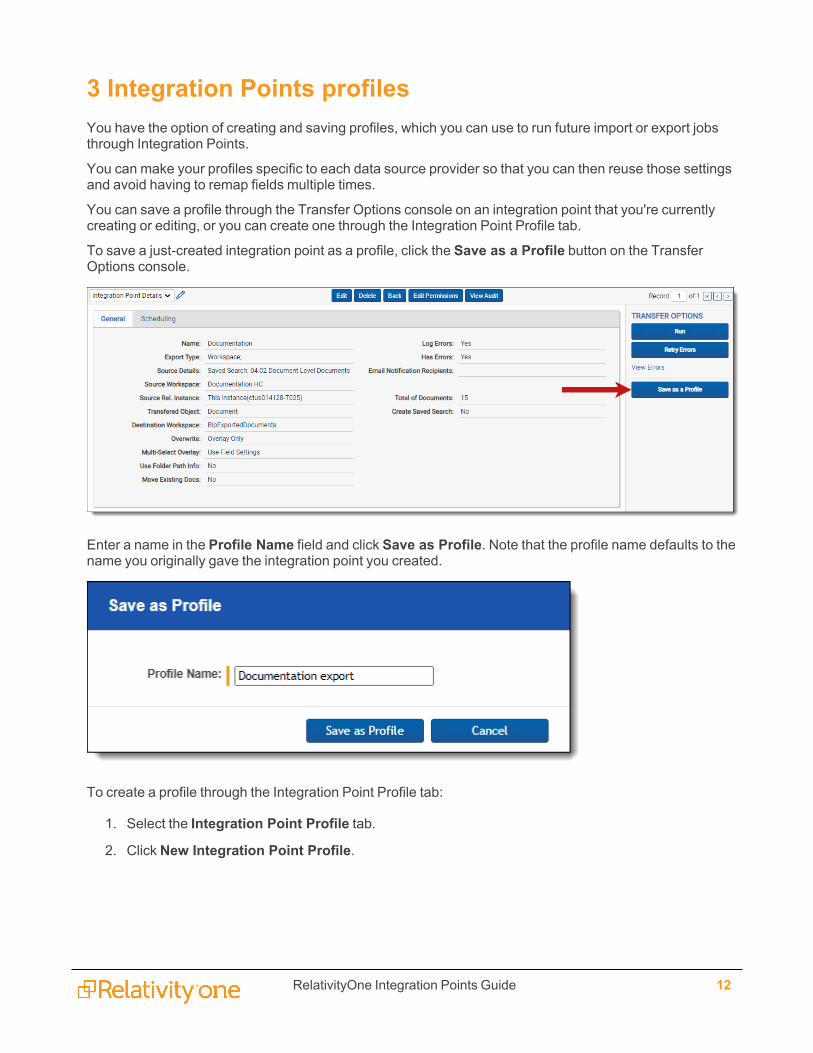
To save a just-created integration point as a profile, click the Save as a Profile button on the TransferOptions console.
Enter a name in the Profile Name field and click Save as Profile. Note that the profile name defaults to thename you originally gave the integration point you created.
To create a profile through the Integration Point Profile tab:
1. Select the Integration Point Profile tab.
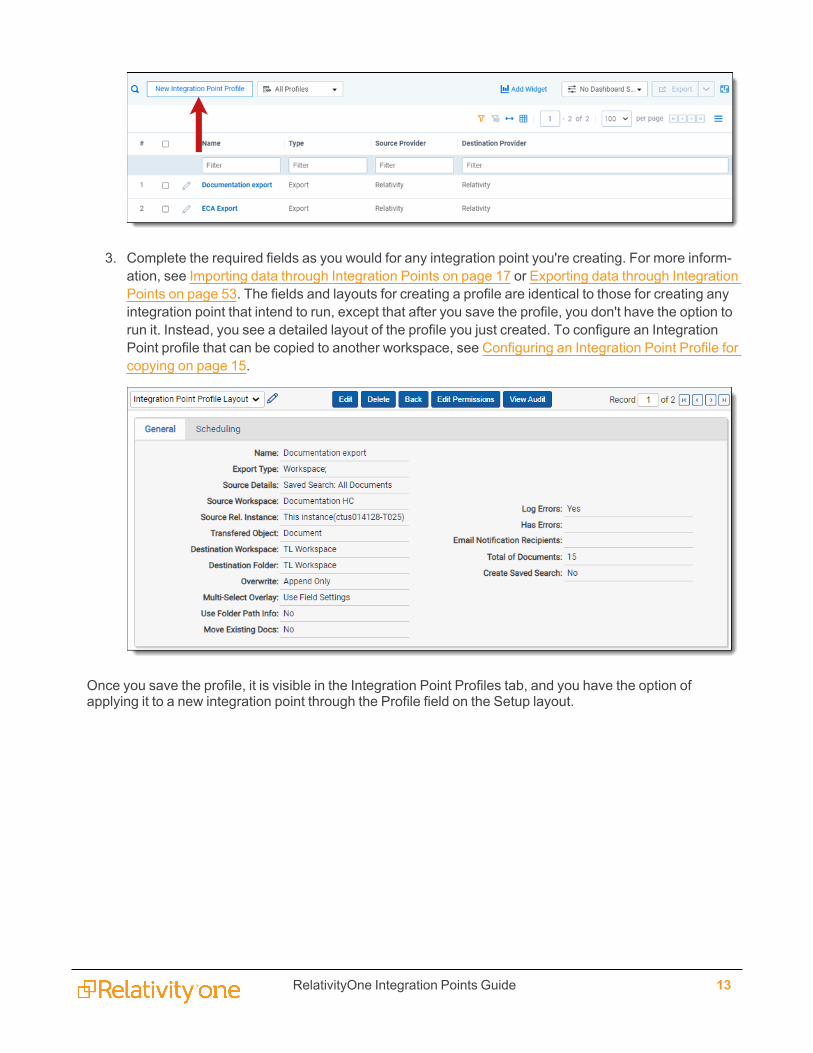
2. Click New Integration Point Profile.
RelativityOne Integration Points Guide 13
3. Complete the required fields as you would for any integration point you're creating. For more inform-ation, see Importing data through Integration Points on page 17 or Exporting data through IntegrationPoints on page 53. The fields and layouts for creating a profile are identical to those for creating anyintegration point that intend to run, except that after you save the profile, you don't have the option torun it. Instead, you see a detailed layout of the profile you just created. To configure an IntegrationPoint profile that can be copied to another workspace, see Configuring an Integration Point Profile forcopying on page 15.
Once you save the profile, it is visible in the Integration Point Profiles tab, and you have the option ofapplying it to a new integration point through the Profile field on the Setup layout.
RelativityOne Integration Points Guide 14
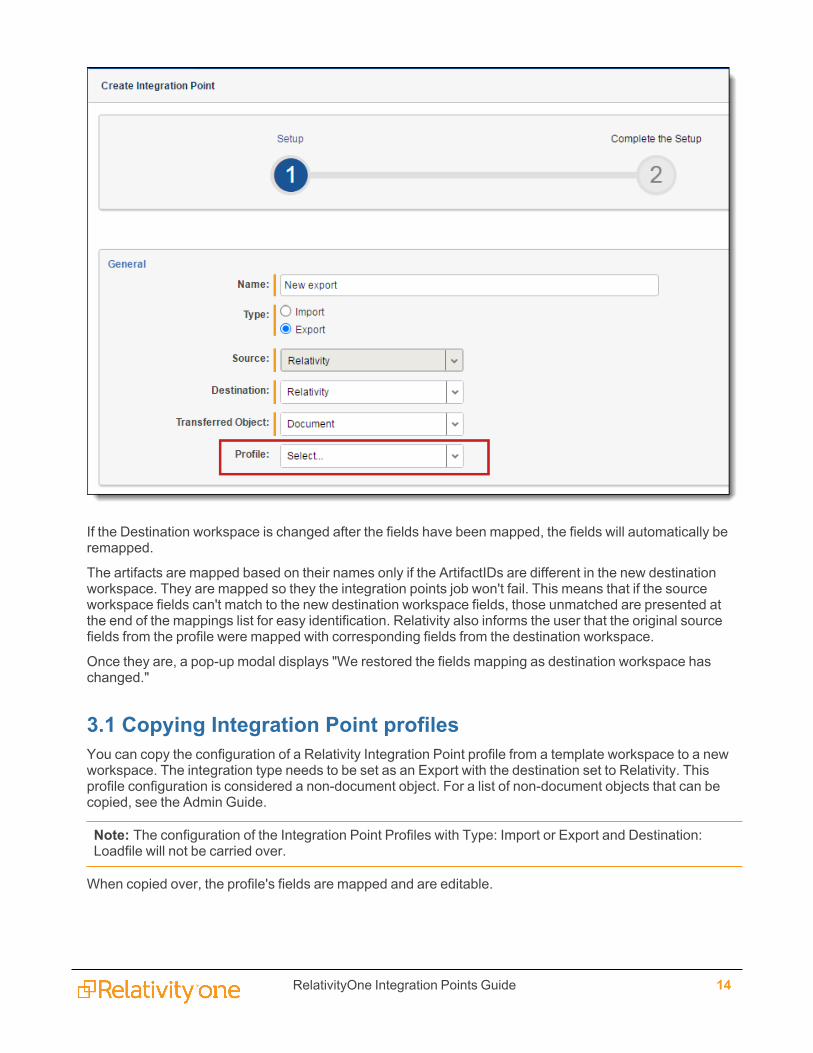
If the Destination workspace is changed after the fields have been mapped, the fields will automatically beremapped.
The artifacts are mapped based on their names only if the ArtifactIDs are different in the new destinationworkspace. They are mapped so they the integration points job won't fail. This means that if the sourceworkspace fields can't match to the new destination workspace fields, those unmatched are presented atthe end of the mappings list for easy identification. Relativity also informs the user that the original sourcefields from the profile were mapped with corresponding fields from the destination workspace.
Once they are, a pop-up modal displays "We restored the fields mapping as destination workspace haschanged."
3.1 Copying Integration Point profilesYou can copy the configuration of a Relativity Integration Point profile from a template workspace to a newworkspace. The integration type needs to be set as an Export with the destination set to Relativity. Thisprofile configuration is considered a non-document object. For a list of non-document objects that can becopied, see the Admin Guide.
Note: The configuration of the Integration Point Profiles with Type: Import or Export and Destination:Loadfile will not be carried over.
When copied over, the profile's fields are mapped and are editable.
RelativityOne Integration Points Guide 15
3.1.1 Configuring an Integration Point Profile for copyingTo create an Integration Point profile that can be copied to another Relativity workspace, follow theconfigurations below.
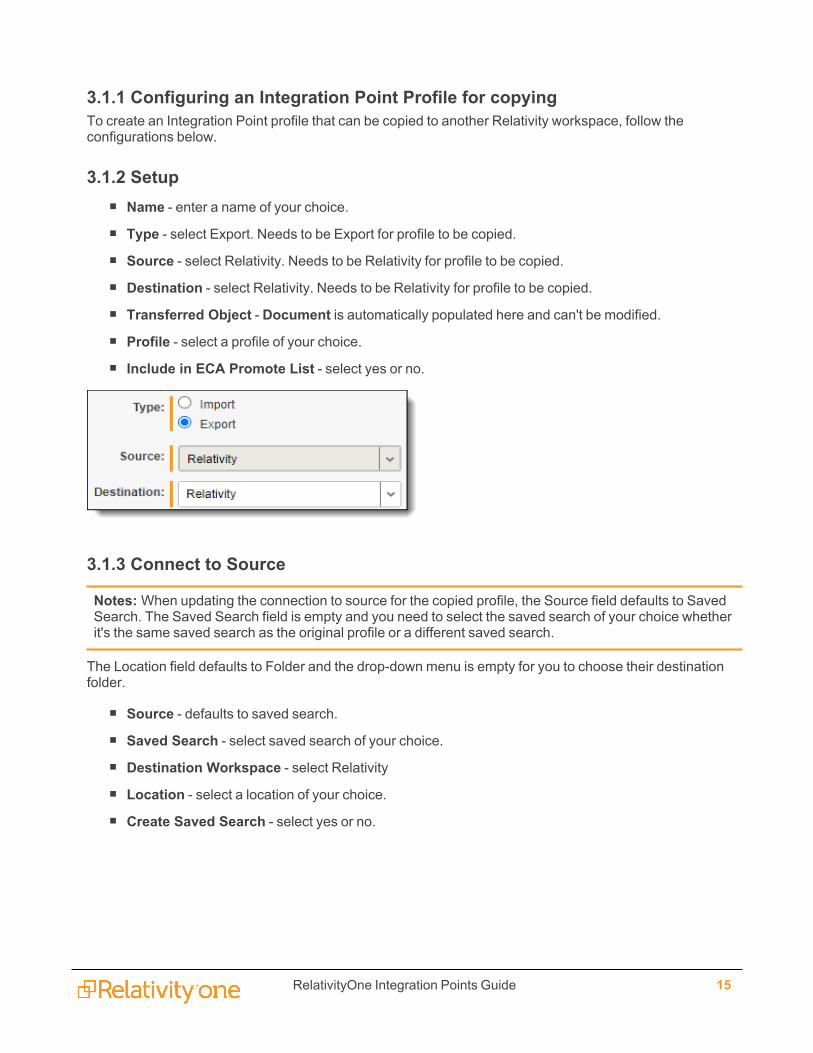
3.1.2 Setupn Name - enter a name of your choice.n Type - select Export. Needs to be Export for profile to be copied.n Source - select Relativity. Needs to be Relativity for profile to be copied.n Destination - select Relativity. Needs to be Relativity for profile to be copied.n Transferred Object - Document is automatically populated here and can't be modified.n Profile - select a profile of your choice.n Include in ECA Promote List - select yes or no.
3.1.3 Connect to Source
Notes:When updating the connection to source for the copied profile, the Source field defaults to SavedSearch. The Saved Search field is empty and you need to select the saved search of your choice whetherit's the same saved search as the original profile or a different saved search.
The Location field defaults to Folder and the drop-down menu is empty for you to choose their destinationfolder.
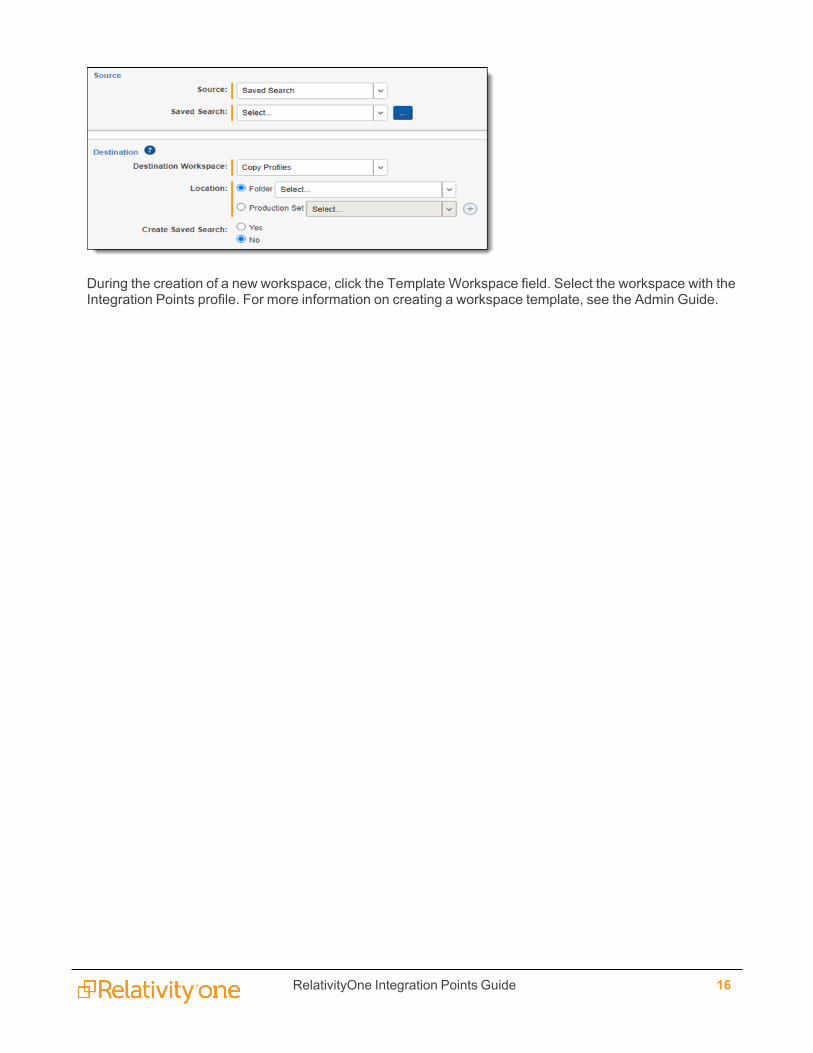
n Source - defaults to saved search.n Saved Search - select saved search of your choice.n Destination Workspace - select Relativityn Location - select a location of your choice.n Create Saved Search - select yes or no.
RelativityOne Integration Points Guide 16
During the creation of a new workspace, click the Template Workspace field. Select the workspace with theIntegration Points profile. For more information on creating a workspace template, see the Admin Guide.
RelativityOne Integration Points Guide 17
4 Importing data through Integration PointsIntegration Points provides you with the ability to import a CSV file, LDAP, or load file directly into yourworkspace, and scheduling future or recurrent import jobs.
Although importing and exporting a load file is possible in Integration Points, the Relativity Desktop Client isthe main application recommended for a stable and efficient load file import and export. For moreinformation, see the Desktop Client Guide.
All Integration Points jobs are fully editable after run.
Note: Changing root folder permissions during import is not a supported workflow.
4.1 Importing a CSV file
Note: Opening a new port for your RelativityOne instance will require a Security assessment.
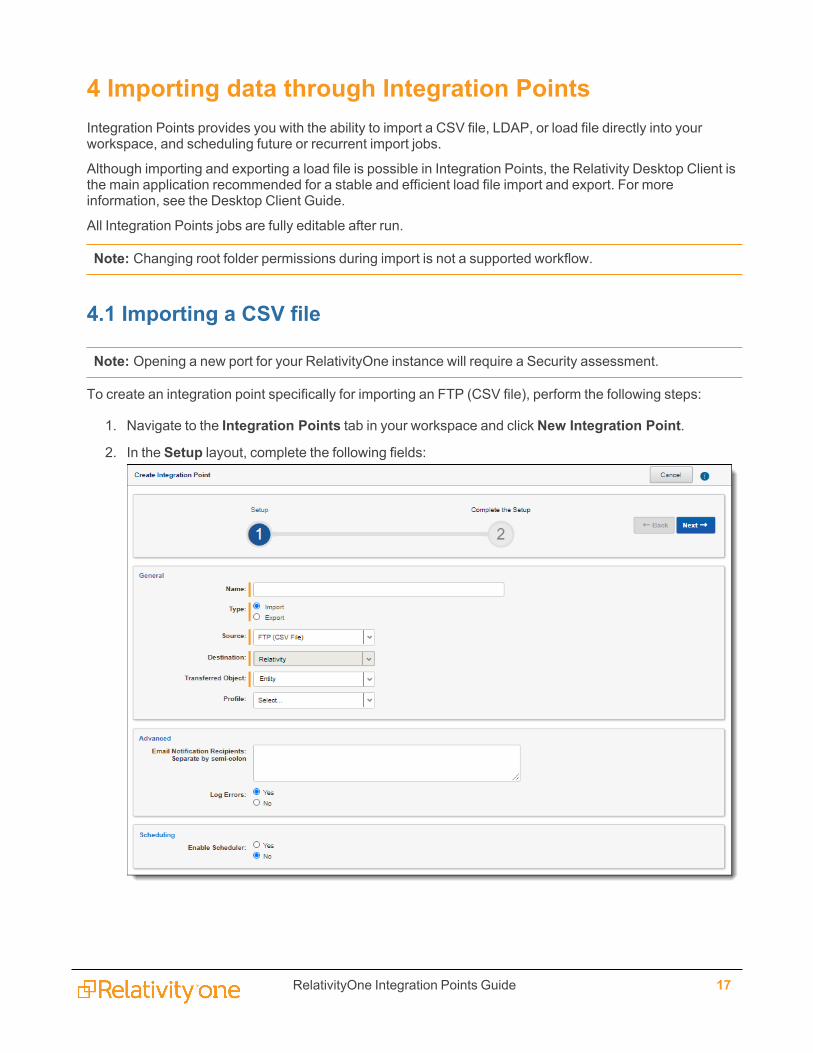
To create an integration point specifically for importing an FTP (CSV file), perform the following steps:
1. Navigate to the Integration Points tab in your workspace and click New Integration Point.
2. In the Setup layout, complete the following fields:
RelativityOne Integration Points Guide 18
n Name - the name of your integration for reference purposes.n Type - select Import to designate the job as a data import. Selecting Import makes all of the
possible import sources available for selection in the Source field below.n Source - select FTP (CSV File) to sync to a Custodian list on an FTP Server to automatically
update custodian information in your workspace. We strongly recommend using a securedFTP server and not using anonymous authentication.
n Destination - by default, this is set to Relativity and is uneditable when you select Import asthe type, since you've already designated that you want to import into a Relativity workspace.You'll select the specific workspace on a subsequent layout.
n Transferred Object - select the specific Relativity Dynamic Object to which you want to importthe data. If you're importing the entity object, select Entity here.
n Profile - complete the remaining Integration Points settings based on the settings of a savedprofile. This includes all of the fields in the Connect to Source layout, as well as field mappings.If no profiles exist in the workspace, you don't have the option of selecting them. To apply aprofile that you've already created, select it from the drop-down list. For more information onprofiles, see Integration Points profiles on page 12.
n Email Notification Recipients - enter the email addresses of those who should receivenotifications of whether the integration point export succeeded or failed. Use semi colonsbetween addresses.
n Log Errors - select Yes or No to denote whether Relativity tracks item level errors.o If you select Yes, each job also logs any item level errors.o If you select No, Relativity doesn't log these item level errors.o Regardless of your selection, job-level errors are always recorded in Relativity.
n Enable Scheduler - gives you the option of scheduling additional imports. Selecting Yesmakes the following fields available:
o Frequency - the interval at which Relativity syncs this integration point.l Daily - select this option to sync once every day.l Weekly - select this option to sync on a weekly basis. You can specify how oftenin the Reoccur field, in which you'll provide a number value in the Every # week(s) choice. You can then specify on which day of the week the sync will take placeby checking any of the days of the week listed.
l Monthly - select the day of the month that you want this integration point to synconce every month.
l Reoccur - enter the number of month(s) in which this integration point recurrentlysyncs.
l Send Onl Day _ the month - select the day of the month that you want thisintegration point to sync.
l The _ _ of the Month - select this option for this integration point to syncon the chosen day of every month. For example, "The Second Friday ofthe month."
o Start Date - the date that you want Integration Points to start syncing the data.
RelativityOne Integration Points Guide 19
o End Date - (Optional) the date that you want Integration Points to stop syncing the data.Leaving the End Date blank causes the Integration Point to run indefinitely at thescheduled interval.
o Scheduled Time - the time at which this integration point syncs. This time is local toyour PC, not to the server.
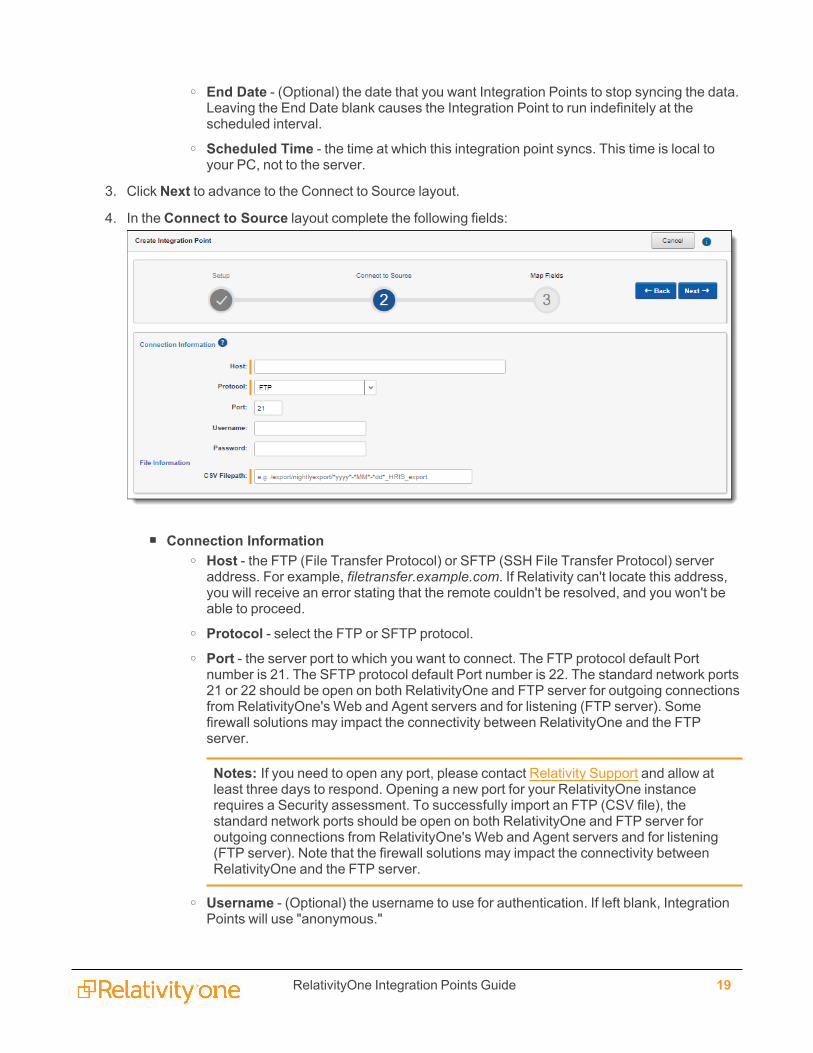
3. Click Next to advance to the Connect to Source layout.
4. In the Connect to Source layout complete the following fields:
n Connection Informationo Host - the FTP (File Transfer Protocol) or SFTP (SSH File Transfer Protocol) serveraddress. For example, filetransfer.example.com. If Relativity can't locate this address,you will receive an error stating that the remote couldn't be resolved, and you won't beable to proceed.
o Protocol - select the FTP or SFTP protocol.o Port - the server port to which you want to connect. The FTP protocol default Portnumber is 21. The SFTP protocol default Port number is 22. The standard network ports21 or 22 should be open on both RelativityOne and FTP server for outgoing connectionsfrom RelativityOne's Web and Agent servers and for listening (FTP server). Somefirewall solutions may impact the connectivity between RelativityOne and the FTPserver.
Notes: If you need to open any port, please contact Relativity Support and allow atleast three days to respond. Opening a new port for your RelativityOne instancerequires a Security assessment. To successfully import an FTP (CSV file), thestandard network ports should be open on both RelativityOne and FTP server foroutgoing connections from RelativityOne's Web and Agent servers and for listening(FTP server). Note that the firewall solutions may impact the connectivity betweenRelativityOne and the FTP server.
o Username - (Optional) the username to use for authentication. If left blank, IntegrationPoints will use "anonymous."
RelativityOne Integration Points Guide 20
o Password - (Optional) the associated password to use for authentication. If left blank,Integration Points will use "anonymous."
n File Informationo CSV Filepath - the location of the CSV file that Integration Points imports from theFTP/SFTP server. If you set the generated CSV file to always include the date, you canspecify this file path value to use date wildcards so that Integration Points alwaysimports the latest file. For example, the following file path will import the most recentlydated file:/export/nightlyexport/*yyyy*-*MM*-*dd*_HRIS_export.csv
l Wildcards are case sensitive.
l The wildcard feature only pulls data from a file name with the current date.
l You can also use hh:MM:ss for hours, minutes, and seconds, with capital M's forminutes. When using times, only file names within the last hour are found.
5. Click Next to advance to the Map Fields layout, which contains a list of Relativity fields from their des-tination RDO as well as attributes that the source provider pulled back.
6. In theMap Fields wizard, Map the attributes or fields so that Integration Points imports the targeteddata into specific Relativity fields. You have the following options for mapping fields:
n Use the Shift + click and Ctrl + click method to select multiple fields at a time, similar to fieldmapping in the Relativity Desktop Client.
n Use the single and double arrows or double-click a field to move selected fields betweencolumns.
n The field names in the Destination column include the type of each field listed.
n Click theMap Fields button between the Source and Destination columns to automaticallymap all fields with matching names. If you have Destination fields that are mapped to Fields inthe Field Catalog, Relativity tries to find name matches between these Catalog Fields, as well.
When mapping fields there are items to note:
n If the WebAPIPath instance setting in the kCura.IntegrationPoints section isn't configuredcorrectly after upgrade or installation, the Source field list is empty because it can't return anyattributes, and you aren't able to map fields.
n You don’t need to map all attributes or fields. Only the Unique Identifier and Object Identifierare required. The Unique Identifier should contain a value that no other item in the workspacecontains. For example, use the GUID or Unique Name. The Object Identifier is the specific fieldon the object that holds the displayed identifier, which might not be unique. For example, theFull Name field is the Object Identifier of the Entity RDO but it might not be unique. These twoidentifier values can be the same.
n The Full Name field is not available as an option for mapping. If you need to update the entityobject, please use the LDAP provider. The LDAP provider allows the addition of new recordswith a field other than Full Name as the identifier. Alternatively, you may consider usingRelativity Desktop Client for entity updates.
RelativityOne Integration Points Guide 21
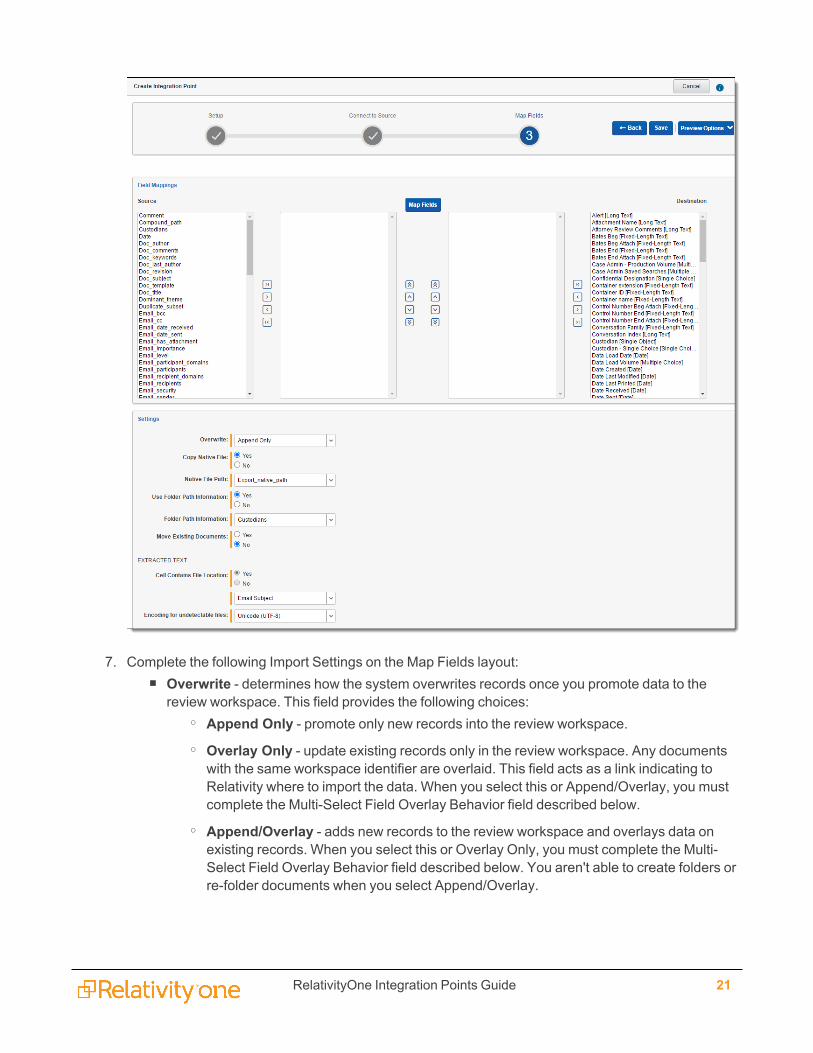
7. Complete the following Import Settings on the Map Fields layout:n Overwrite - determines how the system overwrites records once you promote data to the
review workspace. This field provides the following choices:o Append Only - promote only new records into the review workspace.o Overlay Only - update existing records only in the review workspace. Any documentswith the same workspace identifier are overlaid. This field acts as a link indicating toRelativity where to import the data. When you select this or Append/Overlay, you mustcomplete the Multi-Select Field Overlay Behavior field described below.
o Append/Overlay - adds new records to the review workspace and overlays data onexisting records. When you select this or Overlay Only, you must complete the Multi-Select Field Overlay Behavior field described below. You aren't able to create folders orre-folder documents when you select Append/Overlay.
RelativityOne Integration Points Guide 22
n Multi-Select Field Overlay Behavior - determines how the system overlays records whenyou promote documents to the review workspace. This field is only available if you've selectedeither Overlay Only or Append/Overlay above. This field provides the following choices:
o Merge Values - merges all values for multi-choice and multi-object fields in the sourcedata with corresponding multi-choice and multi-option fields in the workspace, regard-less of the overlay behavior settings in the environment.
o Replace Values - replaces all values for multi-choice and multi-object fields in thesource data with corresponding multi-choice and multi-option fields in the workspace,regardless of the overlay behavior settings in the environment.
o Use Field Settings - merges or replaces all values for multi-choice and multi-objectfields in the source data with corresponding multi-choice and multi-option fields in theworkspace according to the overlay behavior settings in the environment.
n Copy Native File - indicate whether Integration Points copies any native files while syncingdata between the source and destination workspaces.
o Select No to not create additional copies of your natives. Doing this maintains a singlecopy of that data file no matter how many times you use the document in your work-space.
o You have the option of selecting No for an initial run of an integration point and then Yesfor a subsequent run. Doing this saves you time on the initial job while then retaining cop-ies of the native files on the final job.
o The benefit of selecting No for this field is that you save on storage and speed, as it tellsthe system to look for a file path in the source workspace.
o If you delete the ECA source workspace, you also delete your source files. If you need toeventually delete the ECA source workspace, then select Yes for this field.
Note:When you copy natives, Relativity makes a copy of all the files in the source folder onthe hard drive or network share, adds those copies to the EDDS repository, sets theInRepository column on the File database table to 1(true) to indicate that a copy exists, andupdates the Location column on the File table to list the new copied location. Relativity thenrefers to the new location when facilitating integration points or processing jobs.
n Use Folder Path Information - use a metadata field to build the folder structure for the doc-uments that you promote to the review workspace.
o Select Yes to use a metadata field to build the folder structure for the documents thatyou promote to the review workspace. Selecting Yes makes the Folder Path Informationfield required below.
o Select No if you don't want to build a folder structure based on metadata. In this case,Relativity loads all documents directly into the folder indicated by the promote des-tination, and you create no new folders in the destination workspace.
n Folder Path Information - specify a metadata field to build the folder structure for the doc-uments that you promote to the review workspace. For the purposes of ECA and Investigation,select the Processing Folder Path option.

RelativityOne Integration Points Guide 23
n Unique Identifier - for every import, you must select a field that contains the unique identifier,a field with a primary key such as a Control Number or an ArtifactID, for the specific import. Ifyou select an Overlay or Append/Overlay to run, Integration Points uses this field as the key todetermine which records already exist in the Relativity workspace.
n Use Folder Path Information - select a source field in the drop down that contains a folderpath structure that you want to be created in the workspace for your documents to be placedinto.
n Extracted Text - select the destination field that is mapped to a path to Extracted Text files.The content of these files will be read into the selected field. Note that only Long Text des-tination fields that are mapped will show up as options in the Extracted Text dropdown. Youcan select an encoding type for the extracted text files as well.
n Import Native Files - this Yes/No field is only visible when you select the Documents RDO,and lets you indicate whether Integration Points should import any native files in the sync.
o Native File Path - this field appears if you select Yes to import the native files. From thedrop-down menu, select the source provider attribute containing the file path links to thenatives that you want to import.
n Custodian Manager Contains Link - this Yes/No field is only visible when you select theEntity RDO from the LDAP source provider, and lets you indicate if Legal Hold should expect alinked value in the manager field from LDAP.
8. Click Save to save the Integration Point.
Once you save the Integration Point, you can run the import job. For more information, see Running theimport job on page 48.
4.2 Importing LDAPBefore importing LDAP, the Integration Points LDAP Provider needs to be connected to the LDAP server.To connect successfully, open the standard network ports for both RelativityOne and the LDAP Server foroutgoing connections from RelativityOne's Web and Agent servers and for listening (LDAP Server). Toconnect these ports, contact Relativity Support.
Notes: To successfully connect Integration Points LDAP Provider to the LDAP server, the standardnetwork ports should be open on both RelativityOne and the LDAP Server for outgoing connections fromRelativityOne's Web and Agent servers and for listening (LDAP Server). Depending on the selectedauthentication method, we highly recommend using 636 (Secure Socket Layer) or 389 (Anonymus,FastBind) network ports for LDAP connection. Custom ports are not supported and may not workcorrectly. Please be aware that firewall solutions may impact the connectivity between RelativityOne andLDAP server.
To create an integration point specifically for importing LDAP, perform the following steps:
1. Navigate to the Integration Points tab in your workspace and click New Integration Point.
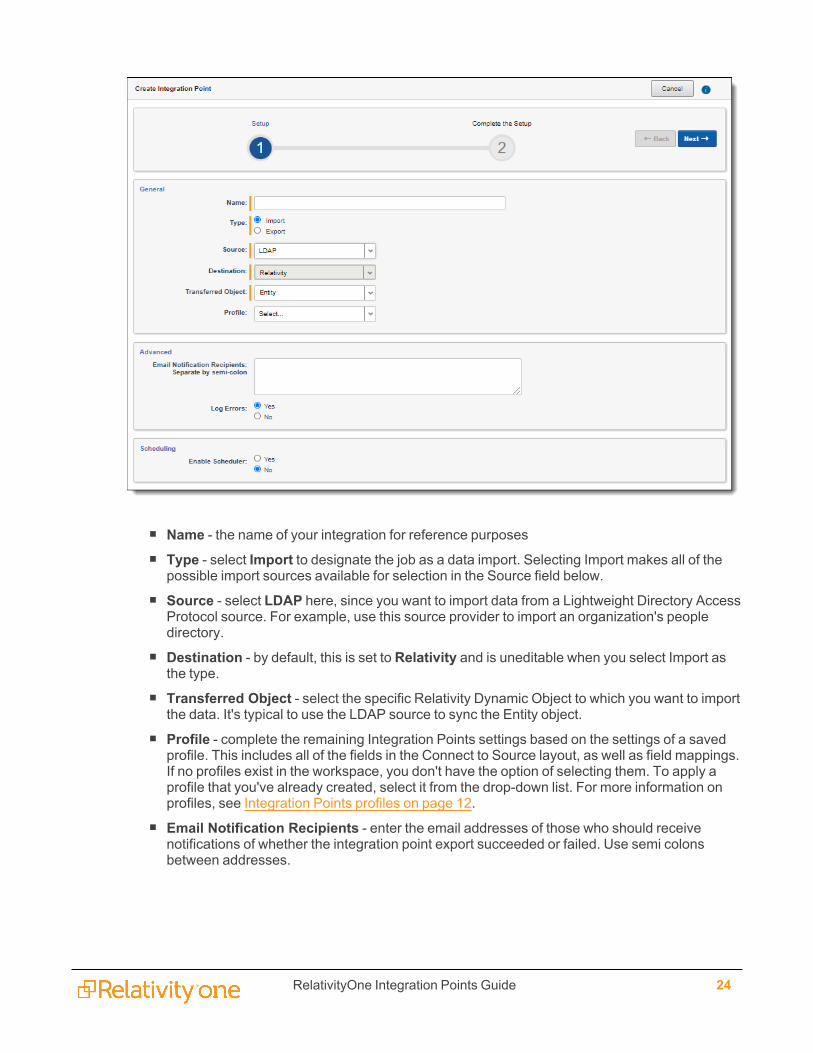
2. In the Setup layout, complete the following fields:
RelativityOne Integration Points Guide 24
n Name - the name of your integration for reference purposesn Type - select Import to designate the job as a data import. Selecting Import makes all of the
possible import sources available for selection in the Source field below.n Source - select LDAP here, since you want to import data from a Lightweight Directory Access
Protocol source. For example, use this source provider to import an organization's peopledirectory.
n Destination - by default, this is set to Relativity and is uneditable when you select Import asthe type.
n Transferred Object - select the specific Relativity Dynamic Object to which you want to importthe data. It's typical to use the LDAP source to sync the Entity object.
n Profile - complete the remaining Integration Points settings based on the settings of a savedprofile. This includes all of the fields in the Connect to Source layout, as well as field mappings.If no profiles exist in the workspace, you don't have the option of selecting them. To apply aprofile that you've already created, select it from the drop-down list. For more information onprofiles, see Integration Points profiles on page 12.
n Email Notification Recipients - enter the email addresses of those who should receivenotifications of whether the integration point export succeeded or failed. Use semi colonsbetween addresses.
RelativityOne Integration Points Guide 25
n Log Errors - select Yes or No to denote whether Relativity tracks item level errors.o If you select Yes, each job also logs any item level errors.o If you select No, Relativity doesn't log these item level errors.o Regardless of your selection, job-level errors are always recorded in Relativity.
n Enable Scheduler - gives you the option of scheduling additional imports. Selecting Yesmakes the following fields available:
o Frequency - the interval at which Relativity syncs this integration point.l Daily - select this option to sync once every day.l Weekly - select this option to sync on a weekly basis. You can specify how oftenin the Reoccur field, in which you'll provide a number value in the Every # week(s) choice. You can then specify on which day of the week the sync will take placeby checking any of the days of the week listed.
l Monthly - select the day of the month that you want this integration point to synconce every month.
l Reoccur - enter the number of month(s) in which this integration point recurrentlysyncs.
l Send Onl Day _ the month - select the day of the month that you want thisintegration point to sync.
l The _ _ of the Month - select this option for this integration point to syncon the chosen day of every month. For example, "The Second Friday ofthe month."
o Start Date - the date that you want Integration Points to start syncing the data.o End Date - (Optional) the date that you want Integration Points to stop syncing the data.Leaving the End Date blank causes the Integration Point to run indefinitely at thescheduled interval.
o Scheduled Time - the time at which this integration point syncs. This time is local toyour PC, not to the server.
RelativityOne Integration Points Guide 26
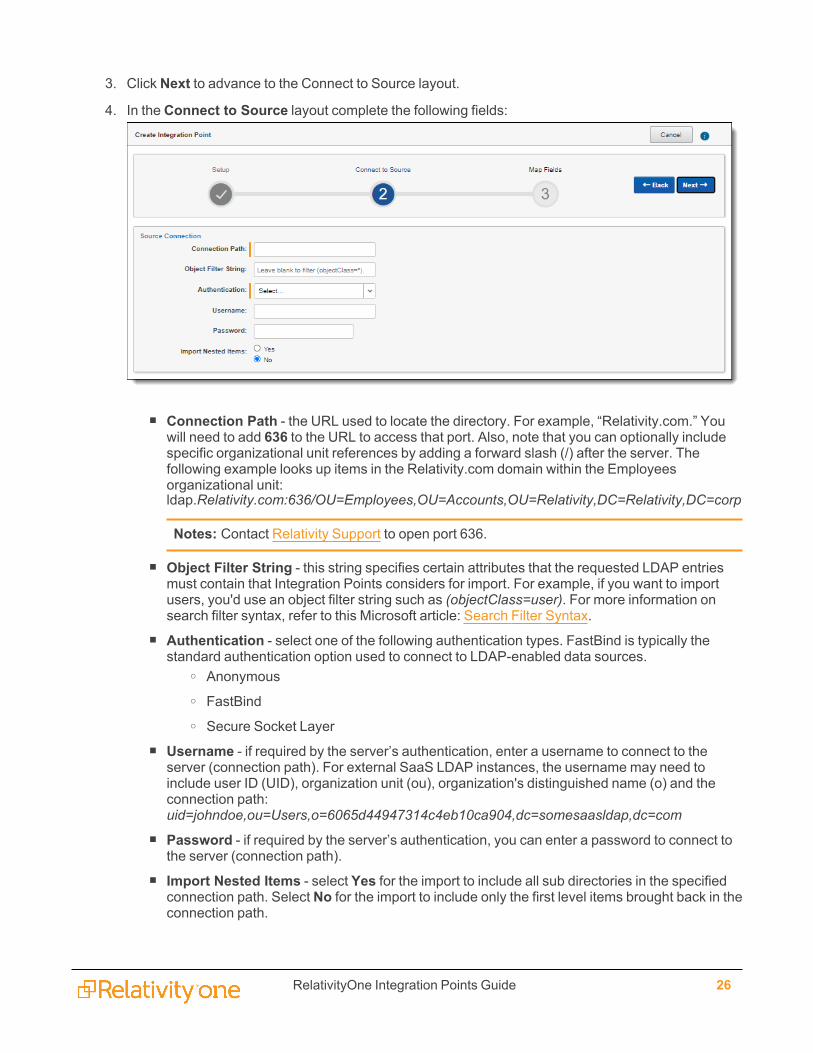
3. Click Next to advance to the Connect to Source layout.
4. In the Connect to Source layout complete the following fields:
n Connection Path - the URL used to locate the directory. For example, “Relativity.com.” Youwill need to add 636 to the URL to access that port. Also, note that you can optionally includespecific organizational unit references by adding a forward slash (/) after the server. Thefollowing example looks up items in the Relativity.com domain within the Employeesorganizational unit:ldap.Relativity.com:636/OU=Employees,OU=Accounts,OU=Relativity,DC=Relativity,DC=corp
Notes: Contact Relativity Support to open port 636.
n Object Filter String - this string specifies certain attributes that the requested LDAP entriesmust contain that Integration Points considers for import. For example, if you want to importusers, you'd use an object filter string such as (objectClass=user). For more information onsearch filter syntax, refer to this Microsoft article: Search Filter Syntax.
n Authentication - select one of the following authentication types. FastBind is typically thestandard authentication option used to connect to LDAP-enabled data sources.
o Anonymouso FastBindo Secure Socket Layer
n Username - if required by the server’s authentication, enter a username to connect to theserver (connection path). For external SaaS LDAP instances, the username may need toinclude user ID (UID), organization unit (ou), organization's distinguished name (o) and theconnection path:uid=johndoe,ou=Users,o=6065d44947314c4eb10ca904,dc=somesaasldap,dc=com
n Password - if required by the server’s authentication, you can enter a password to connect tothe server (connection path).
n Import Nested Items - select Yes for the import to include all sub directories in the specifiedconnection path. Select No for the import to include only the first level items brought back in theconnection path.

RelativityOne Integration Points Guide 27
5. Click Next to advance to the Map Fields layout, which contains a list of Relativity fields from their des-tination RDO as well as attributes that the source provider pulled back.
6. In theMap Fields wizard, Map the attributes or fields so that Integration Points imports the targeteddata into specific Relativity fields. You have the following options for mapping fields:
n Use the Shift + click and Ctrl + click method to select multiple fields at a time, similar to fieldmapping in the Relativity Desktop Client.
n Use the single and double arrows or double-click a field to move selected fields betweencolumns.
n The field names in the Destination column include the type of each field listed.
n Click theMap Fields button between the Source and Destination columns to automaticallymap all fields with matching names. If you have Destination fields that are mapped to Fields inthe Field Catalog, Relativity tries to find name matches between these Catalog Fields, as well.
Note: If the WebAPIPath instance setting in the kCura.IntegrationPoints section isn't configuredcorrectly after upgrade or installation, the Source field list is empty because it can't return anyattributes, and you aren't able to map fields.
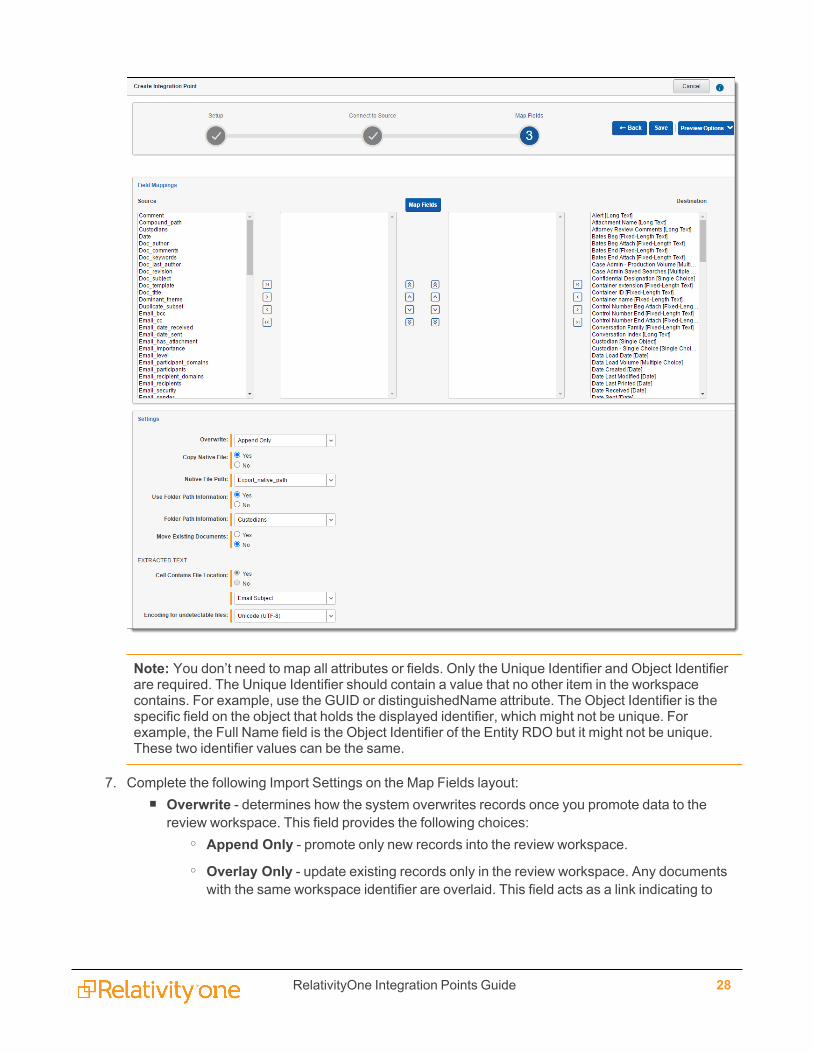
RelativityOne Integration Points Guide 28
Note: You don’t need to map all attributes or fields. Only the Unique Identifier and Object Identifierare required. The Unique Identifier should contain a value that no other item in the workspacecontains. For example, use the GUID or distinguishedName attribute. The Object Identifier is thespecific field on the object that holds the displayed identifier, which might not be unique. Forexample, the Full Name field is the Object Identifier of the Entity RDO but it might not be unique.These two identifier values can be the same.
7. Complete the following Import Settings on the Map Fields layout:n Overwrite - determines how the system overwrites records once you promote data to the
review workspace. This field provides the following choices:o Append Only - promote only new records into the review workspace.o Overlay Only - update existing records only in the review workspace. Any documentswith the same workspace identifier are overlaid. This field acts as a link indicating to
RelativityOne Integration Points Guide 29
Relativity where to import the data. When you select this or Append/Overlay, you mustcomplete the Multi-Select Field Overlay Behavior field described below.
o Append/Overlay - adds new records to the review workspace and overlays data onexisting records. When you select this or Overlay Only, you must complete the Multi-Select Field Overlay Behavior field described below. You aren't able to create folders orre-folder documents when you select Append/Overlay.
n Multi-Select Field Overlay Behavior - determines how the system will overlay records whenyou push documents to the review workspace. This field is only available if you've selectedeither Overlay Only or Append/Overlay above. This field provides the following choices:
o Merge Values - merges all values for multi-choice and multi-object fields in the sourcedata with corresponding multi-choice and multi-option fields in the workspace, regard-less of the overlay behavior settings in the environment.
o Replace Values - replaces all values for multi-choice and multi-object fields in thesource data with corresponding multi-choice and multi-option fields in the workspace,regardless of the overlay behavior settings in the environment.
o Use Field Settings - merges or replaces all values for multi-choice and multi-objectfields in the source data with corresponding multi-choice and multi-option fields in theworkspace according to the overlay behavior settings in the environment.
n Unique Identifier - for every import, you must select a field that contains the unique identifier,a field with a primary key such as a Control Number or an ArtifactID, for the specific import. Ifyou select an Overlay or Append/Overlay to run, Integration Points uses this field as the key todetermine which records already exist in the Relativity workspace.
n Use Folder Path Information - use a metadata field to build the folder structure for the doc-uments that you promote to the review workspace.
o Select Yes to use a metadata field to build the folder structure for the documents thatyou promote to the review workspace. Selecting Yes makes the Folder Path Informationfield required below.
o Select No if you don't want to build a folder structure based on metadata. In this case,Relativity loads all documents directly into the folder indicated by the promote des-tination, and you create no new folders in the destination workspace.
n Extracted Text - select the destination field that is mapped to a path to Extracted Text files.The content of these files will be read into the selected field. Note that only Long Text des-tination fields that are mapped will show up as options in the Extracted Text dropdown. Youcan select an encoding type for the extracted text files as well.
n Import Native Files - this Yes/No field is only visible when you select the Documents RDO,and lets you indicate whether Integration Points should import any native files in the sync.
o Native File Path - this field appears if you select Yes to import the native files. From thedrop-down menu, select the source provider attribute containing the file path links to thenatives that you want to import.
RelativityOne Integration Points Guide 30
n Custodian Manager Contains Link - this Yes/No field is only visible when you select theEntity RDO from the LDAP source provider, and lets you indicate if Legal Hold should expect alinked value in the manager field from LDAP.
8. Click Save to save the Integration Point.
Once you save the Integration Point, you can run the import job. For more information, see Running theimport job on page 48.
4.3 Importing a document load file
Note: Before creating an integration point to import a load file, note that you must first place the load datain the \\files\<TenantNumber>\Files\EDDS<WorkspaceArtifactID>\DataTransfer\Import folder, oryou won't be able to select that data for the Import Source field.
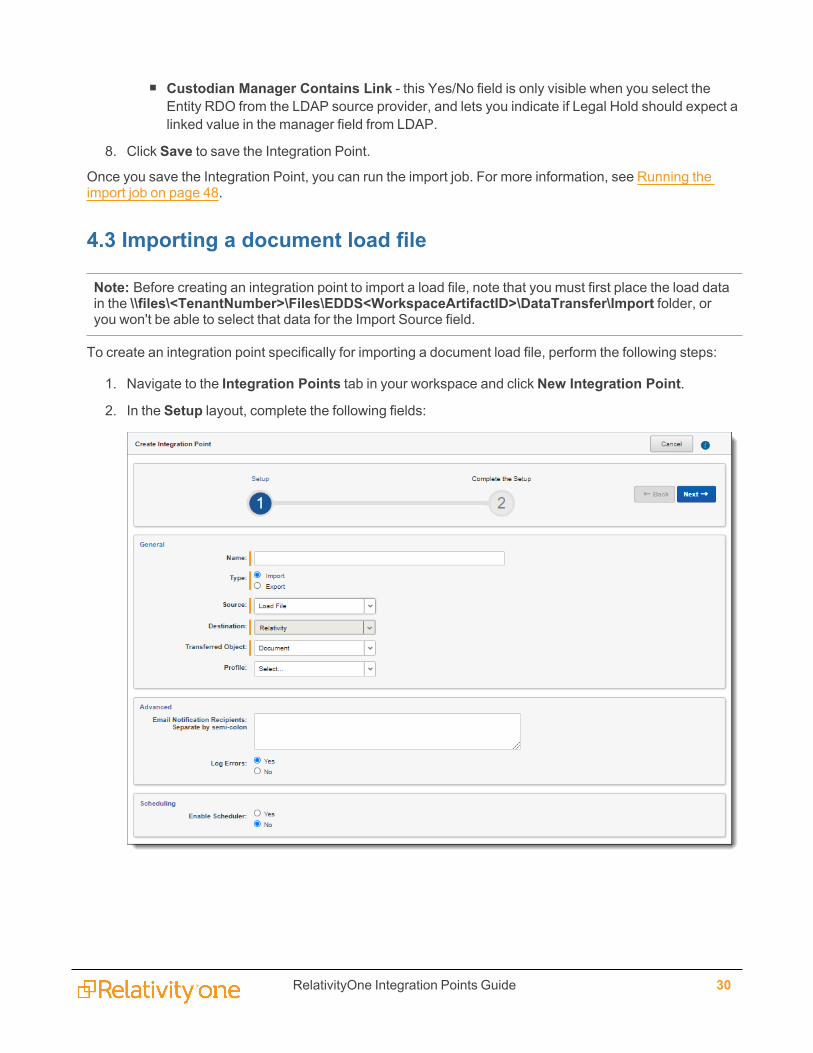
To create an integration point specifically for importing a document load file, perform the following steps:
1. Navigate to the Integration Points tab in your workspace and click New Integration Point.
2. In the Setup layout, complete the following fields:

RelativityOne Integration Points Guide 31
n Name - the name of your integration for reference purposesn Type - select Import to designate the job as a data import. Selecting Import makes all of the
possible import sources available for selection in the Source field below.n Source - select Load File here, since you want to import a load file into a workspace. On the
Connect to Source layout, you'll have the option of specifying whether your importing adocument, image, or production load file.
n Destination - by default, this is set to Relativity and is uneditable when you select Import asthe type, since you've already designated that you want to import into a Relativity workspace.You'll select the specific workspace on a subsequent layout.
n Transferred Object - select the specific Relativity Dynamic Object to which you want to importthe data. Since you're importing the document object, select Document here.
n Profile - complete the remaining Integration Points settings based on the settings of a savedprofile. This includes all of the fields in the Connect to Source layout, as well as field mappings.If no profiles exist in the workspace, you don't have the option of selecting them. To apply aprofile that you've already created, select it from the drop-down list. For more information onprofiles, see Integration Points profiles on page 12.
n Email Notification Recipients - enter the email addresses of those who should receivenotifications of whether the integration point export succeeded or failed. Use semi colonsbetween addresses.
n Log Errors - select Yes or No to denote whether Relativity tracks item level errors.o If you select Yes, each job also logs any item level errors.o If you select No, Relativity doesn't log these item level errors.o Regardless of your selection, job-level errors are always recorded in Relativity.
n Enable Scheduler - gives you the option of scheduling additional imports. Selecting Yesmakes the following fields available:
o Frequency - the interval at which Relativity syncs this integration point.l Daily - select this option to sync once every day.l Weekly - select this option to sync on a weekly basis. You can specify how oftenin the Reoccur field, in which you'll provide a number value in the Every # week(s) choice. You can then specify on which day of the week the sync will take placeby checking any of the days of the week listed.
l Monthly - select the day of the month that you want this integration point to synconce every month.
l Reoccur - enter the number of month(s) in which this integration point recurrentlysyncs.
l Send On -l Day _ the month - select the day of the month that you want thisintegration point to sync.
l The _ _ of the Month - select this option for this integration point to syncon the chosen day of every month. For example, "The Second Friday ofthe month."
o Start Date - the date that you want Integration Points to start syncing the data.
RelativityOne Integration Points Guide 32
o End Date - (Optional) the date that you want Integration Points to stop syncing the data.Leaving the End Date blank causes the Integration Point to run indefinitely at thescheduled interval.
o Scheduled Time - the time at which this integration point syncs. This time is local toyour PC, not to the server.
1. Click Next to advance to the Connect to Source layout.
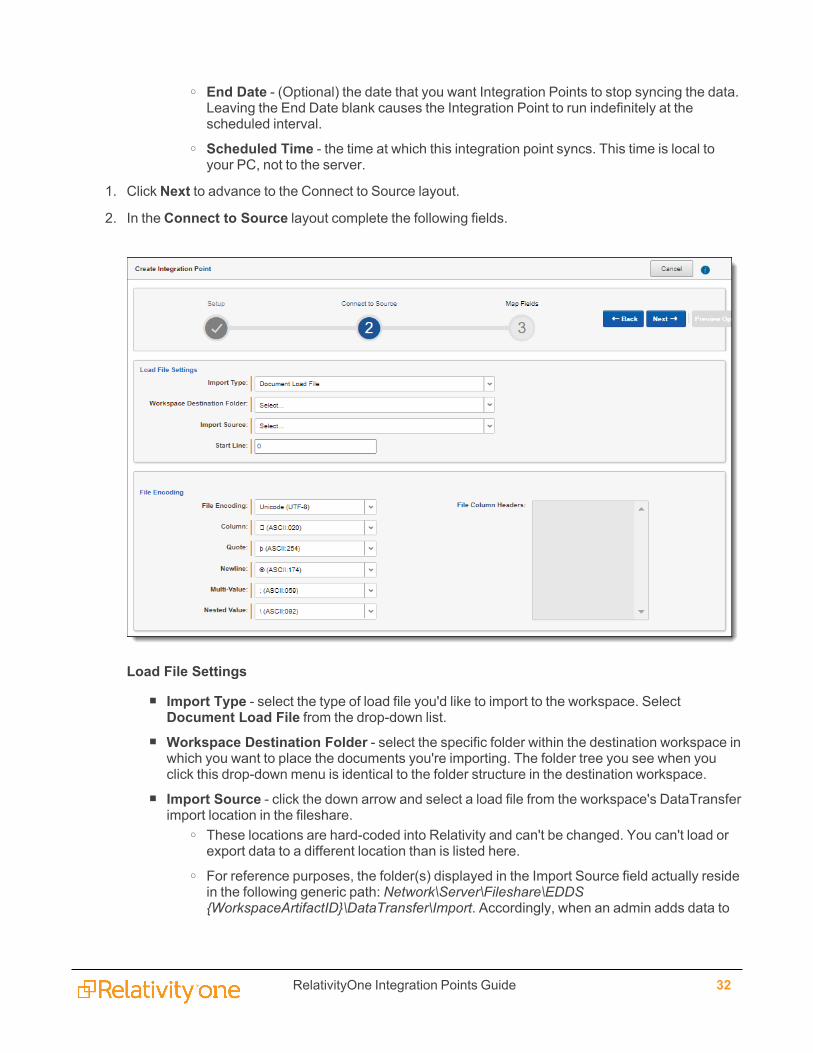
2. In the Connect to Source layout complete the following fields.
Load File Settings
n Import Type - select the type of load file you'd like to import to the workspace. SelectDocument Load File from the drop-down list.
n Workspace Destination Folder - select the specific folder within the destination workspace inwhich you want to place the documents you're importing. The folder tree you see when youclick this drop-down menu is identical to the folder structure in the destination workspace.
n Import Source - click the down arrow and select a load file from the workspace's DataTransferimport location in the fileshare.
o These locations are hard-coded into Relativity and can't be changed. You can't load orexport data to a different location than is listed here.
o For reference purposes, the folder(s) displayed in the Import Source field actually residein the following generic path: Network\Server\Fileshare\EDDS{WorkspaceArtifactID}\DataTransfer\Import. Accordingly, when an admin adds data to

RelativityOne Integration Points Guide 33
the Import folder inside the DataTransfer folder inside the folder displaying theworkspace's artifact ID, that data then becomes available for selection in the ImportSource field.
n Start Line - select the line number in the load file where you want the import process to begin.The default value is 1, which results in loading the entire file.
File Encoding - the following fields are only available if you selected Document Load File for theImport Type field above.
n File Encoding - select an encoding for the document load file. (Consult your processingvendor or department to determine the correct encoding option, if necessary.) If your filecontains a language other than English, choose a Unicode option. Note the following detailsabout encoding:
o Relativity immediately applies any changes that you make to the encoding of a load file,and displays these changes in the column header preview.
o Relativity provides you with the ability to audit the encoding of a load file.n Column - select the character used to separate columns.n Quote - select the character used as the text qualifier.n Newline - select the character used to indicate the end of a line in any extracted text or long
text field.n Multi-Value - select the character used to separate choices within a field.n Nested Value - select the character used to separate the different levels of a multi-choice
hierarchy. For example, you might import a field with following values: “Hot\Really Hot\SuperHot; Look at Later”. Using a semi-colon (;) as a multi-value delimiter, and a backslash (\) as anested value delimiter, Relativity displays the choices
n File Column Headers - displays the load file's column headers. Relativity automaticallyupdates this section of the Load File tab when you select the file encoding. Note the followingdetails about file column headers:
o After you select an encoding, this section displays the fields in the load file. The columnheaders in the file display as vertical list. The fields display in alphanumeric order. Thenumeric value in parentheses indicates the position of the field within the file.
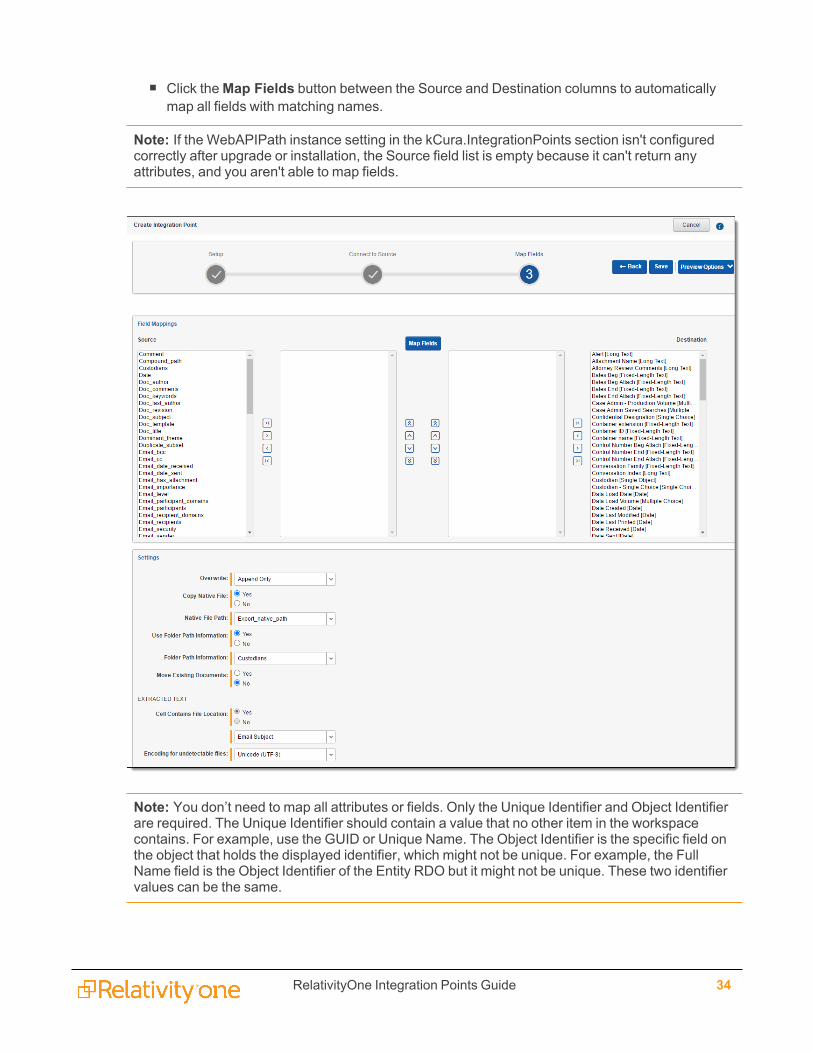
3. Click Next to advance to the Map Fields layout, which contains a list of Relativity fields from their des-tination RDO as well as attributes that the source provider pulled back.
4. In theMap Fields wizard, Map the attributes or fields so that Integration Points imports the targeteddata into specific Relativity fields. You have the following options for mapping fields:
n Use the Shift + click and Ctrl + click method to select multiple fields at a time, similar to fieldmapping in the Relativity Desktop Client.
n Use the single and double arrows or double-click a field to move selected fields betweencolumns.
n If you have Destination fields that are mapped to Fields in the Field Catalog, Relativity tries tofind name matches between these Catalog Fields, as well.
n The field names in the Destination column include the type of each field listed.
RelativityOne Integration Points Guide 34
n Click theMap Fields button between the Source and Destination columns to automaticallymap all fields with matching names.
Note: If the WebAPIPath instance setting in the kCura.IntegrationPoints section isn't configuredcorrectly after upgrade or installation, the Source field list is empty because it can't return anyattributes, and you aren't able to map fields.
Note: You don’t need to map all attributes or fields. Only the Unique Identifier and Object Identifierare required. The Unique Identifier should contain a value that no other item in the workspacecontains. For example, use the GUID or Unique Name. The Object Identifier is the specific field onthe object that holds the displayed identifier, which might not be unique. For example, the FullName field is the Object Identifier of the Entity RDO but it might not be unique. These two identifiervalues can be the same.
RelativityOne Integration Points Guide 35
5. Complete the following Import Settings on the Map Fields layout:n Overwrite - determines how the system overwrites records once you promote data to the
review workspace. This field provides the following choices:o Append Only - promote only new records into the review workspace.o Overlay Only - update existing records only in the review workspace. Any documentswith the same workspace identifier are overlaid. This field acts as a link indicating toRelativity where to import the data. When you select this or Append/Overlay, you mustcomplete the Multi-Select Field Overlay Behavior field described below.
o Append/Overlay - adds new records to the review workspace and overlays data onexisting records. When you select this or Overlay Only, you must complete the Multi-Select Field Overlay Behavior field described below. You aren't able to create folders orre-folder documents when you select Append/Overlay.
n Multi-Select Field Overlay Behavior - determines how the system will overlay records whenyou push documents to the review workspace. This field is only available if you've selectedeither Overlay Only or Append/Overlay above. This field provides the following choices:
o Merge Values - merges all values for multi-choice and multi-object fields in the sourcedata with corresponding multi-choice and multi-option fields in the workspace, regard-less of the overlay behavior settings in the environment.
o Replace Values - replaces all values for multi-choice and multi-object fields in thesource data with corresponding multi-choice and multi-option fields in the workspace,regardless of the overlay behavior settings in the environment.
o Use Field Settings - merges or replaces all values for multi-choice and multi-objectfields in the source data with corresponding multi-choice and multi-option fields in theworkspace according to the overlay behavior settings in the environment.
n Unique Identifier - for every import, you must select a field that contains the unique identifier,a field with a primary key such as a Control Number or an ArtifactID, for the specific import. Ifyou select an Overlay or Append/Overlay to run, Integration Points uses this field as the key todetermine which records already exist in the Relativity workspace.
n Use Folder Path Information - use a metadata field to build the folder structure for the doc-uments that you promote to the review workspace.
o Select Yes to use a metadata field to build the folder structure for the documents thatyou promote to the review workspace. Selecting Yes makes the Folder Path Informationfield required below.
o Select No if you don't want to build a folder structure based on metadata. In this case,Relativity loads all documents directly into the folder indicated by the promote des-tination, and you create no new folders in the destination workspace.
o You have the option of creating folders or re-foldering documents when you selectAppend/Overlay for the Overwrite field.
o You have the option of re-foldering documents for the Overwrite field through the MoveExisting Documents field below.
RelativityOne Integration Points Guide 36
n Folder Path Information - specify a metadata field to build the folder structure for the doc-uments that you promote to the review workspace. For the purposes of ECA and Investigation,select the Processing Folder Path option.
n Move Existing Documents - re-folder documents that were previously imported into the des-tination workspace, but were only placed in the root case folder and not to any subfolders. Thisfield is useful for situations in which you want to add new data to the destination workspacewhile overlaying existing data.
o Select Yes to move existing documents into the folders provided in the Folder PathInformation field. For example, you previously imported custodian Sally Smith's files intothe destination workspace's root folder; now, in addition to placing the documents fromthe saved search specified in this integration point in their subfolder, you also want tomove those previously migrated documents into Sally Smith's subfolder, you'd selectYes.
o Select No if you don’t want to re-folder existing documents.n Extracted Text - select the destination field that is mapped to a path to Extracted Text files.
The content of these files will be read into the selected field. Note that only Long Text des-tination fields that are mapped will show up as options in the Extracted Text dropdown. Youcan select an encoding type for the extracted text files as well.
n Import Native Files - this Yes/No field is only visible when you select the Documents RDO,and lets you indicate whether Integration Points should import any native files in the sync.
o Native File Path - this field appears if you select Yes to import the native files. From thedrop-down menu, select the source provider attribute containing the file path links to thenatives that you want to import.
n Cell contains file location - select this option if your extracted text is in document-level textfiles, and your load file contains a path to those text files.
n Encoding for undetectable files - select an encoding for the text file.
6. Click Save to save the Integration Point.
Once you save the Integration Point, you can run the import job. For more information, see Running theimport job on page 48.
4.4 Importing an image load file
Note: Before creating an integration point to import a load file, note that you must first place the load datain the \\files\<TenantNumber>\Files\EDDS<WorkspaceArtifactID>\DataTransfer\Import folder, oryou won't be able to select that data for the Import Source field.
To create an integration point specifically for importing an image load file, perform the following steps:
1. Navigate to the Integration Points tab in your workspace and click New Integration Point.
2. In the Setup layout, complete the following fields:

RelativityOne Integration Points Guide 37
n Name - the name of your integration for reference purposesn Type - select Import to designate the job as a data import. Selecting Import makes all of the
possible import sources available for selection in the Source field below.n Source - select Load File here, since you want to import a load file into a workspace. On the
Connect to Source layout, you'll have the option of specifying whether your importing adocument, image, or production load file.
n Destination - by default, this is set to Relativity and is uneditable when you select Import asthe type, since you've already designated that you want to import into a Relativity workspace.You'll select the specific workspace on a subsequent layout.
n Transferred Object - select the specific Relativity Dynamic Object to which you want to importthe data. Since you're importing the document object, select Document here.
n Profile - complete the remaining Integration Points settings based on the settings of a savedprofile. This includes all of the fields in the Connect to Source layout, as well as field mappings.If no profiles exist in the workspace, you don't have the option of selecting them. To apply aprofile that you've already created, select it from the drop-down list. For more information onprofiles, see Integration Points profiles on page 12.
n Email Notification Recipients - enter the email addresses of those who should receivenotifications of whether the integration point export succeeded or failed. Use semi colonsbetween addresses.
RelativityOne Integration Points Guide 38
n Log Errors - select Yes or No to denote whether Relativity tracks item level errors.o If you select Yes, each job also logs any item level errors.o If you select No, Relativity doesn't log these item level errors.o Regardless of your selection, job-level errors are always recorded in Relativity.
n Enable Scheduler - gives you the option of scheduling additional imports. Selecting Yesmakes the following fields available:
o Frequency - the interval at which Relativity syncs this integration point.l Daily - select this option to sync once every day.l Weekly - select this option to sync on a weekly basis. You can specify how oftenin the Reoccur field, in which you'll provide a number value in the Every # week(s) choice. You can then specify on which day of the week the sync will take placeby checking any of the days of the week listed.
l Monthly - select the day of the month that you want this integration point to synconce every month.
l Reoccur - enter the number of month(s) in which this integration point recurrentlysyncs.
l Send On -l Day _ the month - select the day of the month that you want thisintegration point to sync.
l The _ _ of the Month - select this option for this integration point to syncon the chosen day of every month. For example, "The Second Friday ofthe month."
o Start Date - the date that you want Integration Points to start syncing the data.o End Date - (Optional) the date that you want Integration Points to stop syncing the data.Leaving the End Date blank causes the Integration Point to run indefinitely at thescheduled interval.
o Scheduled Time - the time at which this integration point syncs. This time is local toyour PC, not to the server.
3. Click Next to advance to the Connect to Source layout.
4. In the Source Information layout complete the following fields.
RelativityOne Integration Points Guide 39
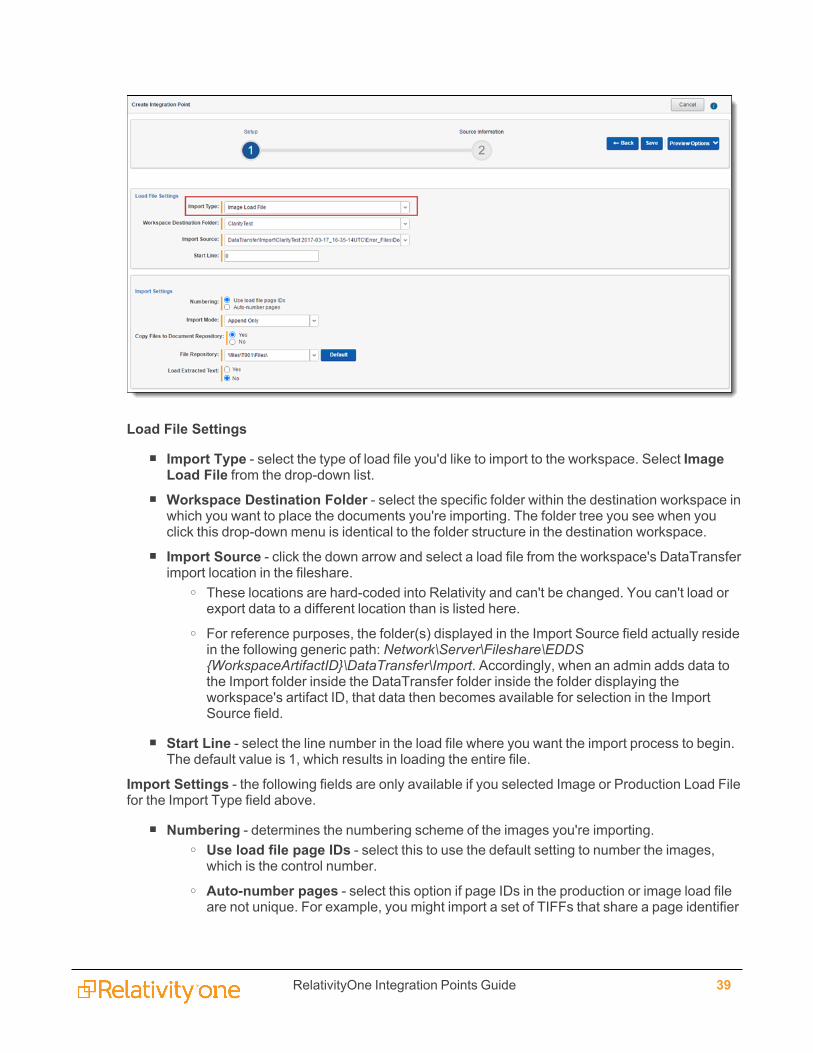
Load File Settings
n Import Type - select the type of load file you'd like to import to the workspace. Select ImageLoad File from the drop-down list.
n Workspace Destination Folder - select the specific folder within the destination workspace inwhich you want to place the documents you're importing. The folder tree you see when youclick this drop-down menu is identical to the folder structure in the destination workspace.
n Import Source - click the down arrow and select a load file from the workspace's DataTransferimport location in the fileshare.
o These locations are hard-coded into Relativity and can't be changed. You can't load orexport data to a different location than is listed here.
o For reference purposes, the folder(s) displayed in the Import Source field actually residein the following generic path: Network\Server\Fileshare\EDDS{WorkspaceArtifactID}\DataTransfer\Import. Accordingly, when an admin adds data tothe Import folder inside the DataTransfer folder inside the folder displaying theworkspace's artifact ID, that data then becomes available for selection in the ImportSource field.
n Start Line - select the line number in the load file where you want the import process to begin.The default value is 1, which results in loading the entire file.
Import Settings - the following fields are only available if you selected Image or Production Load Filefor the Import Type field above.
n Numbering - determines the numbering scheme of the images you're importing.o Use load file page IDs - select this to use the default setting to number the images,which is the control number.
o Auto-number pages - select this option if page IDs in the production or image load fileare not unique. For example, you might import a set of TIFFs that share a page identifier
RelativityOne Integration Points Guide 40
for each record. The page identifiers are shared per document and are not unique. TheAuto-number pages option appends the 01, .02, and so on to the page-level identifier,creating a unique number per page.
Note: Auto-numbering pages is useful if you are importing productions or image loadfiles that use document-level numbering without page numbers, and includedocuments that contain multiple pages.
n Import Modeo Append Only - select this to load only new records.o Overlay Only - select this to update existing records only. When you select this, therequired Overlay Identifier field appears below This field acts as a link indicating toRelativity where to import the data.
o Append/Overlay - select this to add new records and overlay data on existing records.
Note: Select append to import the extracted text and natives from a .dat file. Selectoverlay when overlaying production images onto the existing documents.
n Overlay Idenitifier - select a field that stores overlaid document-level Bates information on thedocument. This is only available if you selected Overlay Only for the import mode.
Note: The fields in the drop-down menu are fixed-length fields with a manually-applied SQLindex. Note that this is NOT the same as adding the field to the full-text index. Contact yourSQL database administrator to apply an index to a field.
n Copy Files to Document Repository - determines whether or not Relativity will copy filesfrom the location in the image load file field to a selected document repository.
o Yes - select this to copy files to a document repository that you select in the FileRepository field below.
o No - select this if the native files already reside in their final location, which is accessibleby Relativity.
Notes: The No option isn't available for selection in RelativityOne because all filesmust be copied to a selected File Repository.
n File Repository - select the file repository to which you want to copy the files in the image loadfile. This field is only visible if you selected Yes for the Copy Files to Document Repository fieldabove. Click Default to switch this value to the default file repository used by the workspace.
n Load Extracted Text - determines whether or not Relativity will load new text for Productiondocuments that may be revised based on redactions.
o The text files must have .txt extensions, be stored in the same directory as the TIFF files,and be named in the same as the TIFF files.
o This field is only available for image load files.o When you select this, the required Encoding for undetectable files field appears below.
n Encoding for undetectable files - select an encoding for the new text file that Relativityloads, per your enabling of the Load Extracted Text field above.
5. Click Save to save the Integration Point.
RelativityOne Integration Points Guide 41
Once you save the Integration Point, you can run the import job. For more information, see Running theimport job on page 48.
4.5 Importing from Microsoft Azure ADSee information on importing from Microsoft Azure ADThe Integration Points Azure AD Provider is a separate and standalone application that is not in theRelativity Application Library. For assistance in getting the Azure AD Provider installed into your workspace,contact Relativity Support. For more information, see Azure AD provider.
You will need the following to complete the setup in Integration Points:
n Application ID fromMicrosoft Azure
n Application Secret from Microsoft Azure
n Domain address of Microsoft Azure instance
n Any filtering requirements that will be used to filter imported data
n Field Mappings to map fields between Relativity and Microsoft Azure AD
When creating an integration point, follow the steps below:
1. Navigate to the Integration Points tab.
2. Click New Integration Point.
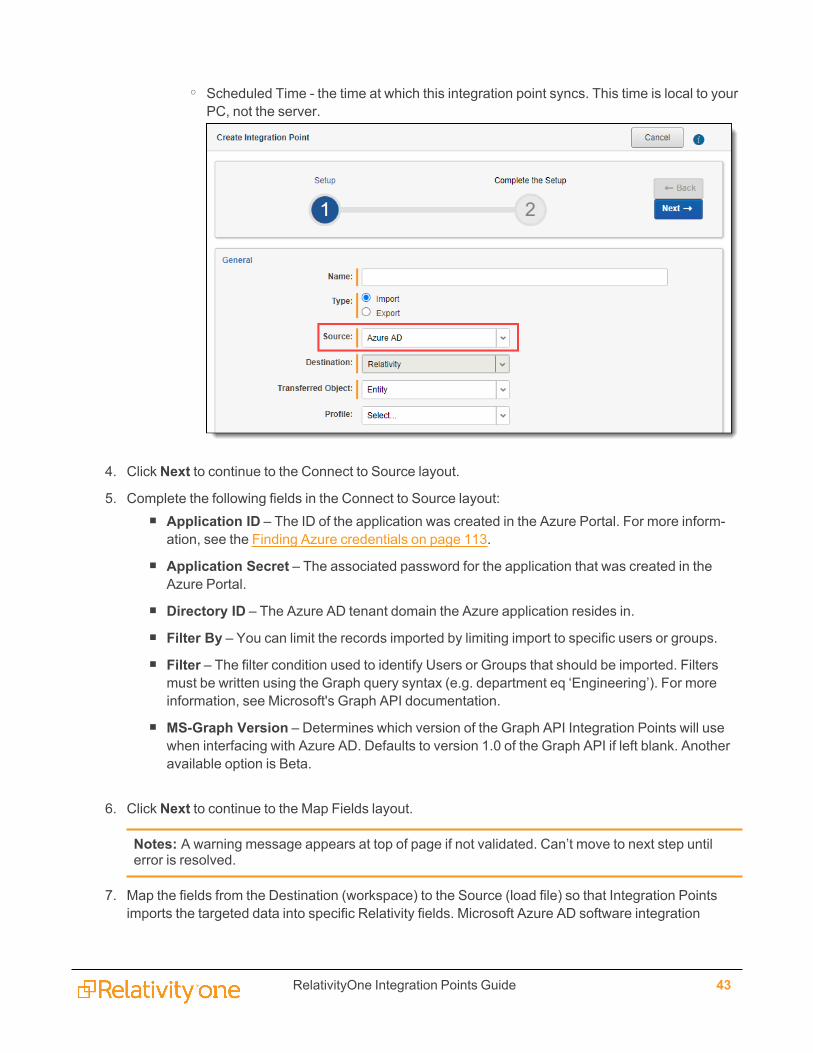
3. Complete the following fields in the Set Integration Details layout:n Name - the name of your integration for reference purposes.
Notes: Name the application in Integration Points the same as you did in Azure AD for easylocation of application when needing to make updates.
n Type - select Import to designate the job as a data import. Selecting Import makes all the pos-sible import sources available for selection in the Source field below.
n Source - all possible third-party systems that you can import data from. Select Azure AD.n Destination - by default, this is set to Relativity and isn't editable when you select Import as the
type, since you've already designated that you want to import into a Relativity workspace.You'll select the specific workspace on a subsequent layout.
n Transferred Object - the Relativity Dynamic Object (RDO) to which you want to import thedata. Select the Entity object.
n Profile - complete the remaining Integration Points settings based on the settings of a savedprofile. This includes all of the fields in the Connect to Source layout, as well as field mappings.If no profiles exist in the workspace, you don't have the option of selecting them. To apply a pro-file that you've already created, select it from the drop-down list.
n Email notifications - the email address(es) to which Integration Points sends a notificationdetailing whether the sync succeeded or failed. Use semicolons between addresses.

RelativityOne Integration Points Guide 42
n Log errors - select Yes or No to denote whether Integration Points tracks item level errors.o If you select Yes, each job also logs any item level errors. For example, a fixed lengthtext field not being large enough to contain an imported value.
o If you select No, Integration Points doesn't log item level errors.o Regardless of your selection, job-level errors are always recorded in Relativity.
n Enable Scheduler - gives you the option of scheduling additional imports. Selecting Yesmakes the following fields available:
o Frequency - the interval at which Relativity syncs once every day.l Daily - select this option to sync once every day.
l Weekly - select this option to sync on a weekly basis. You can specify how oftenin the Reoccur field, in which you'll provide a number value in Every # week(s)choice. You can then specify on which day of the week the sync will take place bychecking any of the days of the week listed.
l Monthly - select the day of the month that you want this integration point to synconce every month.
l Reoccur - enter the number of months in which this integration point recurrentlysyncs.
l Send onl Day _ the month - select the day of the month that you want this integrationpoint to sync.
l The __ of the Month - select this option for this integration point to sync onthe chosen day of every month. For example, The Second Friday of themonth."
o Start Date - the date you want Integration Points to start syncing the data.o End Date - (Optional) the date you want Integration Points to stop syncing the data.Leaving teh End Date blank causes the integration point to run indefinitely at the sched-uled interval.
RelativityOne Integration Points Guide 43
o Scheduled Time - the time at which this integration point syncs. This time is local to yourPC, not the server.
4. Click Next to continue to the Connect to Source layout.
5. Complete the following fields in the Connect to Source layout:n Application ID – The ID of the application was created in the Azure Portal. For more inform-
ation, see the Finding Azure credentials on page 113.
n Application Secret – The associated password for the application that was created in theAzure Portal.
n Directory ID – The Azure AD tenant domain the Azure application resides in.
n Filter By – You can limit the records imported by limiting import to specific users or groups.n Filter – The filter condition used to identify Users or Groups that should be imported. Filters
must be written using the Graph query syntax (e.g. department eq ‘Engineering’). For moreinformation, see Microsoft's Graph API documentation.
n MS-Graph Version – Determines which version of the Graph API Integration Points will usewhen interfacing with Azure AD. Defaults to version 1.0 of the Graph API if left blank. Anotheravailable option is Beta.
6. Click Next to continue to the Map Fields layout.
Notes: A warning message appears at top of page if not validated. Can’t move to next step untilerror is resolved.
7. Map the fields from the Destination (workspace) to the Source (load file) so that Integration Pointsimports the targeted data into specific Relativity fields. Microsoft Azure AD software integration
RelativityOne Integration Points Guide 44
contains the following default Source mapped fields. The Destination fields are dependent on whatfields currently exist in your workspace.
Notes: If Relativity can't locate fields in your workspace for the default mapping, Relativity movesthese fields to the bottom of the Source list. You can either map these fields to other workspacefields, or remove them from the list.
8. (Optional) Add or remove any fields from the field mapping based on your preferences. Click MapFields to map default selections.
Notes: Rename Relativity fields to match Microsoft to increase the number of auto-mapped fields.You still may have to manually update fields after auto-mapping.
9. Complete the following fields in the Settings card:n Overwrite - includes options to Append Only, Overlay Only, or Append/Overlay. By default,
the application selects Append Only.
n Multi-Select Field Overlay Behavior - only available if Overlay Only or Append/Overlay areselected in the Overwrite field. This field determines how the system will overlay records whenyou push documents to the review workspace. This field provides the following choices:
o Merge Values - merges all values for multi-choice and multi-object fields in the sourcedata with corresponding multi-choice and multi-option fields in the workspace,regardless of the overlay behavior settings in the environment.
o Replace Values - replaces all values for multi-choice and multi-object fields in thesource data with corresponding multi-choice and multi-option fields in the workspace,regardless of the overlay behavior settings in the environment.
o Use Field Settings - merges or replaces all values for multi-choice and multi-objectfields in the source data with corresponding multi-choice and multi-option fields in theworkspace according to the overlay behavior settings in the environment.
n Unique Identifier – includes the options from the mapped fields. Use the default UniqueIDoption. In Azure AD, map the UniqueID to the ID field to guarantee future custodian updates.
n Entity Manager Contains Link – this Yes/No field is only visible when you select the EntityRDO from the LDAP source provider, and lets you indicate if Legal Hold should expect a linkedvalue in the manager field from LDAP.
10. Click Save.
Once all of the settings have been entered the Integration Points job will run according to the schedule thatwas set. If you would like to run the job ahead of that time. Please follow the instructions at this link.
4.5.1 ReportingReporting on Azure AD imports can be done in Integration Points. For more information, see Monitoring jobhistory and errors on page 103.
4.6 Importing a production load file
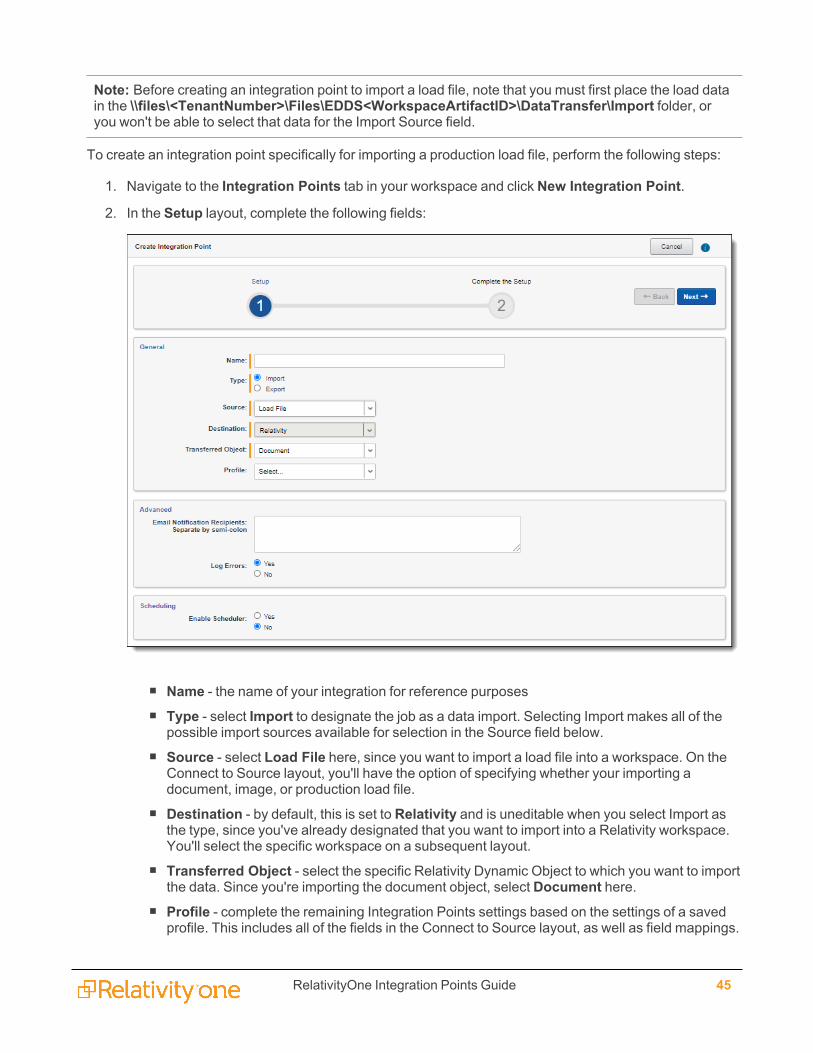
RelativityOne Integration Points Guide 45
Note: Before creating an integration point to import a load file, note that you must first place the load datain the \\files\<TenantNumber>\Files\EDDS<WorkspaceArtifactID>\DataTransfer\Import folder, oryou won't be able to select that data for the Import Source field.
To create an integration point specifically for importing a production load file, perform the following steps:
1. Navigate to the Integration Points tab in your workspace and click New Integration Point.
2. In the Setup layout, complete the following fields:
n Name - the name of your integration for reference purposesn Type - select Import to designate the job as a data import. Selecting Import makes all of the
possible import sources available for selection in the Source field below.n Source - select Load File here, since you want to import a load file into a workspace. On the
Connect to Source layout, you'll have the option of specifying whether your importing adocument, image, or production load file.
n Destination - by default, this is set to Relativity and is uneditable when you select Import asthe type, since you've already designated that you want to import into a Relativity workspace.You'll select the specific workspace on a subsequent layout.
n Transferred Object - select the specific Relativity Dynamic Object to which you want to importthe data. Since you're importing the document object, select Document here.
n Profile - complete the remaining Integration Points settings based on the settings of a savedprofile. This includes all of the fields in the Connect to Source layout, as well as field mappings.
RelativityOne Integration Points Guide 46
If no profiles exist in the workspace, you don't have the option of selecting them. To apply aprofile that you've already created, select it from the drop-down list. For more information onprofiles, see Integration Points profiles on page 12.
n Email Notification Recipients - enter the email addresses of those who should receivenotifications of whether the integration point export succeeded or failed. Use semi colonsbetween addresses.
n Log Errors - select Yes or No to denote whether Relativity tracks item level errors.o If you select Yes, each job also logs any item level errors.o If you select No, Relativity doesn't log these item level errors.o Regardless of your selection, job-level errors are always recorded in Relativity.
n Enable Scheduler - gives you the option of scheduling additional imports. Selecting Yesmakes the following fields available:
o Frequency - the interval at which Relativity syncs this integration point.l Daily - select this option to sync once every day.l Weekly - select this option to sync on a weekly basis. You can specify how oftenin the Reoccur field, in which you'll provide a number value in the Every # week(s) choice. You can then specify on which day of the week the sync will take placeby checking any of the days of the week listed.
l Monthly - select the day of the month that you want this integration point to synconce every month.
l Reoccur - enter the number of month(s) in which this integration point recurrentlysyncs.
l Send On -l Day _ the month - select the day of the month that you want thisintegration point to sync.
l The _ _ of the Month - select this option for this integration point to syncon the chosen day of every month. For example, "The Second Friday ofthe month."
o Start Date - the date that you want Integration Points to start syncing the data.o End Date - (Optional) the date that you want Integration Points to stop syncing the data.Leaving the End Date blank causes the Integration Point to run indefinitely at thescheduled interval.
o Scheduled Time - the time at which this integration point syncs. This time is local toyour PC, not to the server.
3. Click Next to advance to the Connect to Source layout.
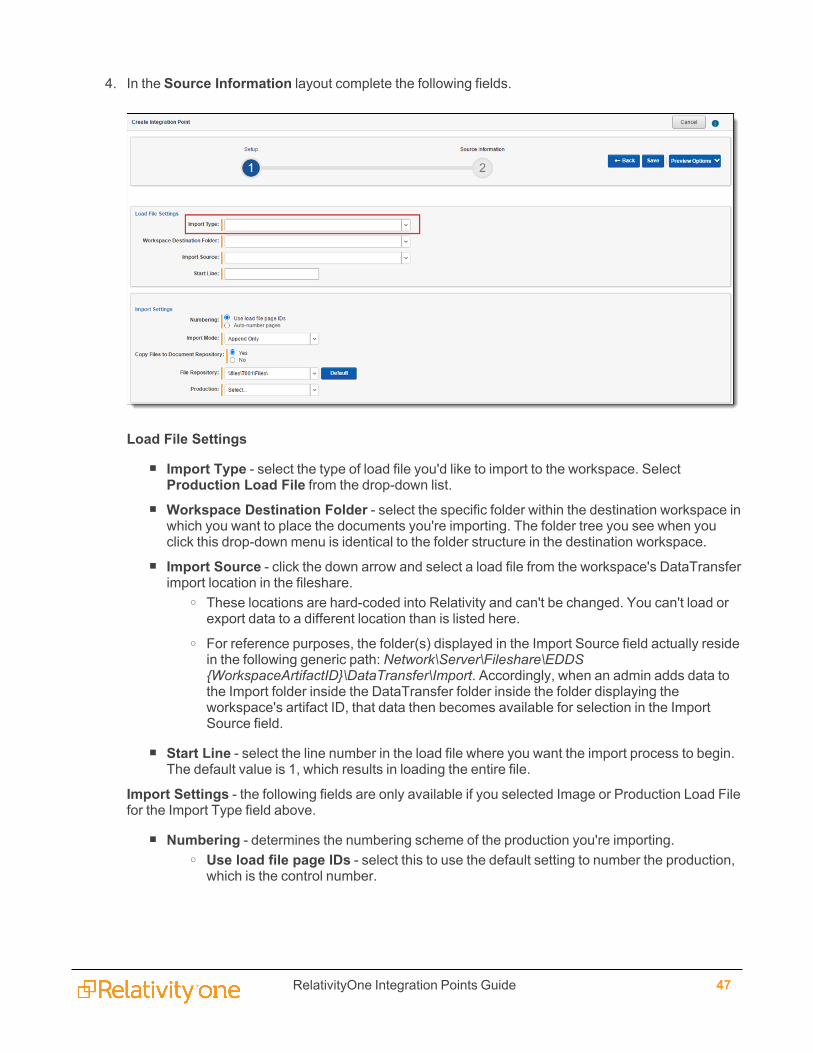
RelativityOne Integration Points Guide 47
4. In the Source Information layout complete the following fields.
Load File Settings
n Import Type - select the type of load file you'd like to import to the workspace. SelectProduction Load File from the drop-down list.
n Workspace Destination Folder - select the specific folder within the destination workspace inwhich you want to place the documents you're importing. The folder tree you see when youclick this drop-down menu is identical to the folder structure in the destination workspace.
n Import Source - click the down arrow and select a load file from the workspace's DataTransferimport location in the fileshare.
o These locations are hard-coded into Relativity and can't be changed. You can't load orexport data to a different location than is listed here.
o For reference purposes, the folder(s) displayed in the Import Source field actually residein the following generic path: Network\Server\Fileshare\EDDS{WorkspaceArtifactID}\DataTransfer\Import. Accordingly, when an admin adds data tothe Import folder inside the DataTransfer folder inside the folder displaying theworkspace's artifact ID, that data then becomes available for selection in the ImportSource field.
n Start Line - select the line number in the load file where you want the import process to begin.The default value is 1, which results in loading the entire file.
Import Settings - the following fields are only available if you selected Image or Production Load Filefor the Import Type field above.
n Numbering - determines the numbering scheme of the production you're importing.o Use load file page IDs - select this to use the default setting to number the production,which is the control number.
RelativityOne Integration Points Guide 48
o Auto-number pages - select this option if page IDs in the production or image load fileare not unique. For example, you might import a set of TIFFs that share a page identifierfor each record. The page identifiers are shared per document and are not unique. TheAuto-number pages option appends the 01, .02, and so on to the page-level identifier,creating a unique number per page.
Note: Auto-numbering pages is useful if you are importing productions or image loadfiles that use document-level numbering without page numbers, and includedocuments that contain multiple pages.
n Import Modeo Append Only - select this to load only new records.o Overlay Only - select this to update existing records only. When you select this, therequired Overlay Identifier field appears below This field acts as a link indicating toRelativity where to import the data.
o Append/Overlay - select this to add new records and overlay data on existing records.
Note: Select append to import the extracted text and natives from a .dat file. Selectoverlay when overlaying production images onto the existing documents.
n Overlay Idenitifier - select a field that stores overlaid document-level Bates information on thedocument. This is only available if you selected Overlay Only for the import mode.
Note: The fields in the drop-down menu are fixed-length fields with a manually-applied SQLindex. Note that this is NOT the same as adding the field to the full-text index. Contact yourSQL database administrator to apply an index to a field.
n Copy Files to Document Repository - determines whether or not Relativity will copy filesfrom the location in the image load file field to a selected document repository.
o Yes - select this to copy files to a document repository that you select in the FileRepository field below.
o No - select this if the native files already reside in their final location, which is accessibleby Relativity.
n File Repository - select the file repository to which you want to copy the files in the image loadfile. This field is only visible if you selected Yes for the Copy Files to Document Repository fieldabove. Click Default to switch this value to the default file repository used by the workspace.
n Production - select a Relativity production that you want to upload images to. Only newproduction sets without a production source appear in this list.
5. Click Save to save the Integration Point.
Once you save the Integration Point, you can run the import job. For more information, see Running theimport job below.
4.7 Running the import jobOnce you've created an Integration Point, you can manually run an integration point by selecting theIntegration Point, and clicking Run from the console. This lets you run an integration point instantly, as
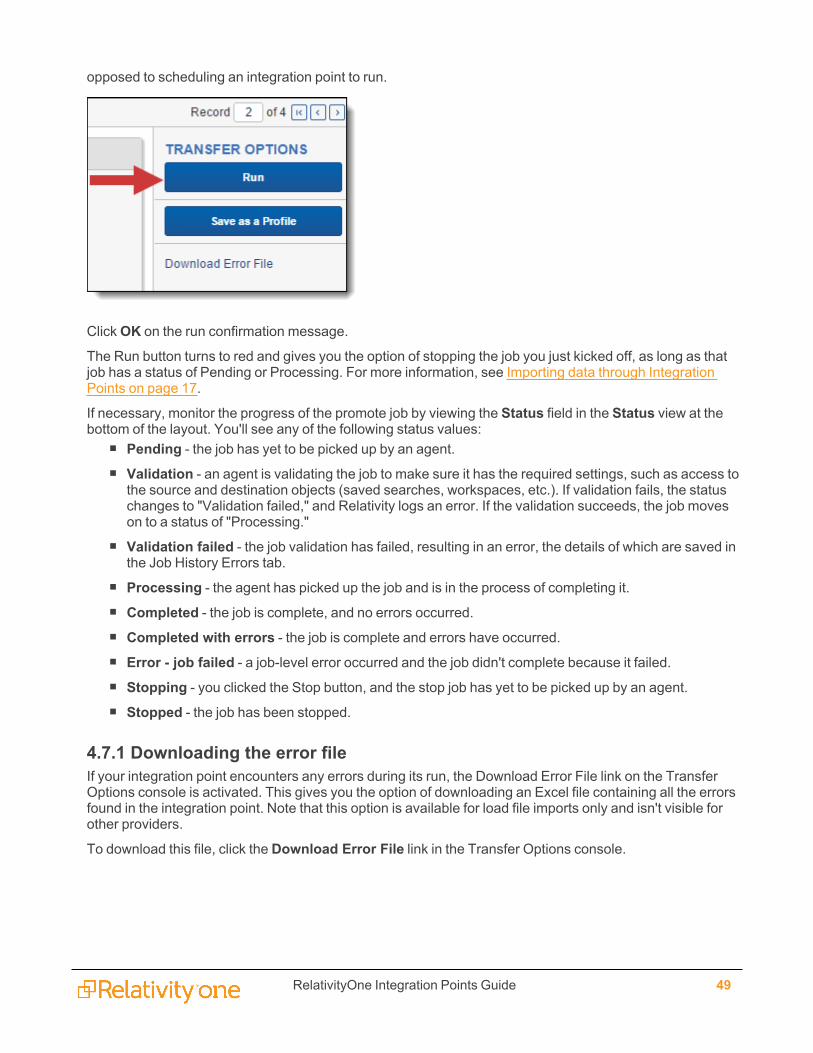
RelativityOne Integration Points Guide 49
opposed to scheduling an integration point to run.
ClickOK on the run confirmation message.
The Run button turns to red and gives you the option of stopping the job you just kicked off, as long as thatjob has a status of Pending or Processing. For more information, see Importing data through IntegrationPoints on page 17.
If necessary, monitor the progress of the promote job by viewing the Status field in the Status view at thebottom of the layout. You'll see any of the following status values:
n Pending - the job has yet to be picked up by an agent.n Validation - an agent is validating the job to make sure it has the required settings, such as access to
the source and destination objects (saved searches, workspaces, etc.). If validation fails, the statuschanges to "Validation failed," and Relativity logs an error. If the validation succeeds, the job moveson to a status of "Processing."
n Validation failed - the job validation has failed, resulting in an error, the details of which are saved inthe Job History Errors tab.
n Processing - the agent has picked up the job and is in the process of completing it.n Completed - the job is complete, and no errors occurred.n Completed with errors - the job is complete and errors have occurred.n Error - job failed - a job-level error occurred and the job didn't complete because it failed.n Stopping - you clicked the Stop button, and the stop job has yet to be picked up by an agent.n Stopped - the job has been stopped.
4.7.1 Downloading the error fileIf your integration point encounters any errors during its run, the Download Error File link on the TransferOptions console is activated. This gives you the option of downloading an Excel file containing all the errorsfound in the integration point. Note that this option is available for load file imports only and isn't visible forother providers.
To download this file, click the Download Error File link in the Transfer Options console.
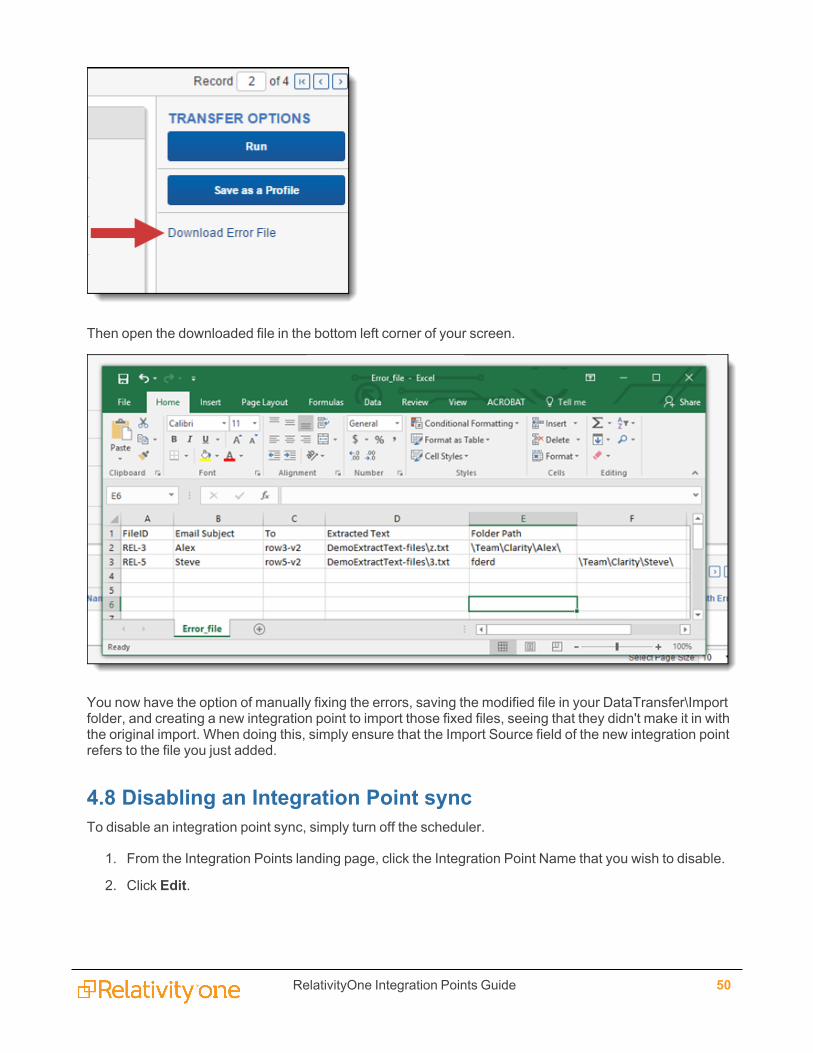
RelativityOne Integration Points Guide 50
Then open the downloaded file in the bottom left corner of your screen.
You now have the option of manually fixing the errors, saving the modified file in your DataTransfer\Importfolder, and creating a new integration point to import those fixed files, seeing that they didn't make it in withthe original import. When doing this, simply ensure that the Import Source field of the new integration pointrefers to the file you just added.
4.8 Disabling an Integration Point syncTo disable an integration point sync, simply turn off the scheduler.
1. From the Integration Points landing page, click the Integration Point Name that you wish to disable.
2. Click Edit.
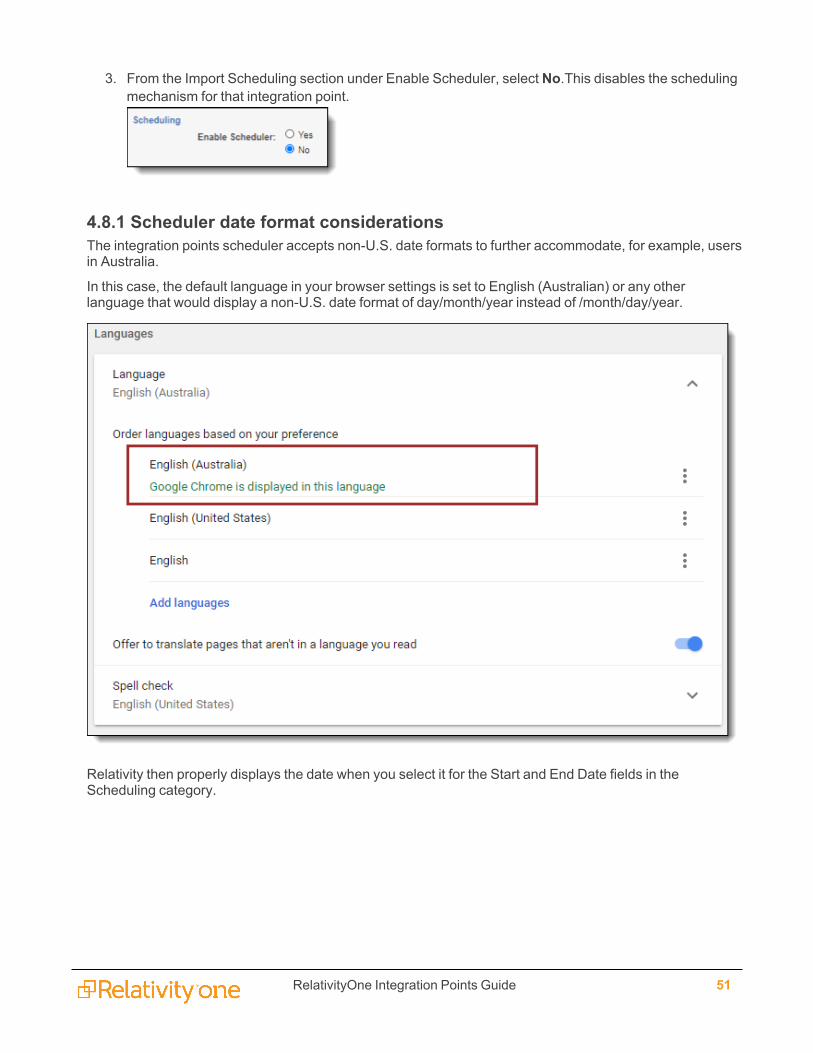
RelativityOne Integration Points Guide 51
3. From the Import Scheduling section under Enable Scheduler, select No.This disables the schedulingmechanism for that integration point.
4.8.1 Scheduler date format considerationsThe integration points scheduler accepts non-U.S. date formats to further accommodate, for example, usersin Australia.
In this case, the default language in your browser settings is set to English (Australian) or any otherlanguage that would display a non-U.S. date format of day/month/year instead of /month/day/year.
Relativity then properly displays the date when you select it for the Start and End Date fields in theScheduling category.
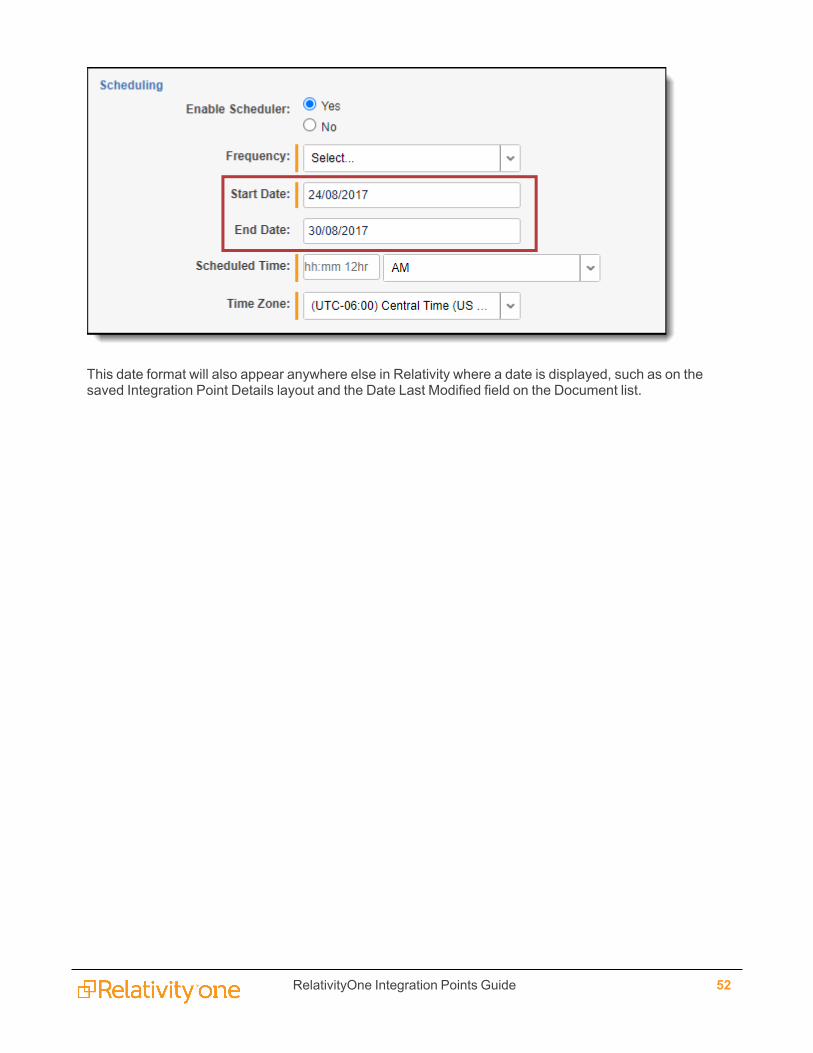
RelativityOne Integration Points Guide 52
This date format will also appear anywhere else in Relativity where a date is displayed, such as on thesaved Integration Point Details layout and the Date Last Modified field on the Document list.
RelativityOne Integration Points Guide 53
5 Exporting data through Integration PointsIntegration Points provides you with the ability to export data directly from your workspace through the samefunctionality that the Relativity Desktop Client (RDC) provides for exporting the document object. Thisincludes exporting saved searches, case folders, and productions directly from your workspace, andscheduling future or recurrent export jobs.
Note:When you export data to a load file through Integration Points, your files get saved to a file share.To access this file share, look at the AppID in the URL of your Relativity environment and locate theEDDS folder on the file share that has the same number.
5.1 Exporting a folder to load fileTo create an integration point specifically for exporting a folder, perform the following steps:
1. Navigate to the Integration Points tab.
2. Click New Integration Point.

RelativityOne Integration Points Guide 54
3. Complete the following fields in the Setup category of the Create Integration Point layout:
n Name - the name of your integration for reference purposes.n Type - select Export to designate this as an export job. Selecting this sets the Source field to
be Relativity.n Source - this is automatically set to Relativity since you're exporting data out of a Relativity
workspace.n Destination - select Load File. This is because you don't want to export directly to another
Relativity workspace, but instead want to leverage the RDC export functionality, which isavailable on a subsequent layout only if you select Load File here.
n Transferred Object - select Document.
n Profile - use this to complete the remaining Integration Points settings based on the settings ofa saved profile. This includes all of the fields in the Connect to Source layout, as well as fieldmappings. If no profiles exist in the workspace, you don't have the option of selecting them. Toapply a profile that you've already created, select it from the drop-down list. For moreinformation on profiles, see Integration Points profiles on page 12.
RelativityOne Integration Points Guide 55
n Email Notification Recipients - enter the email addresses of those who should receivenotifications of whether the integration point export succeeded or failed. Use semi colonsbetween addresses.
n Log Errors - select Yes or No to denote whether Relativity tracks item level errors.o If you select Yes, each job also logs any item level errors.o If you select No, Relativity doesn't log these item level errors.o Regardless of your selection, job-level errors are always recorded in Relativity.
n Enable Scheduler - gives you the option of scheduling additional exports. Selecting Yesmakes the following fields available:
o Frequency - the interval at which Relativity syncs this integration point.l Daily - select this option to sync once every day.l Weekly - select this option to sync on a weekly basis. You can specify how oftenin the Reoccur field, in which you'll provide a number value in the Every # week(s) choice. You can then specify on which day of the week the sync will take placeby checking any of the days of the week listed.
l Monthly - select the day of the month that you want this integration point to synconce every month.
l Reoccur - enter the number of month(s) in which this integration point recurrentlysyncs.
l Send Onl Day _ the month - select the day of the month that you want thisintegration point to sync.
l The _ _ of the Month - select this option for this integration point to syncon the chosen day of every month. For example, "The Second Friday ofthe month."
o Start Date - the date that you want Integration Points to start syncing the data.o End Date - (Optional) the date that you want Integration Points to stop syncing the data.Leaving the End Date blank causes the Integration Point to run indefinitely at thescheduled interval.
o Scheduled Time - the time at which this integration point syncs. This time is local toyour PC, not to the server.
4. Click Next to advance to the Source Information layout.
4. Complete the following fields on the Source Information layout:
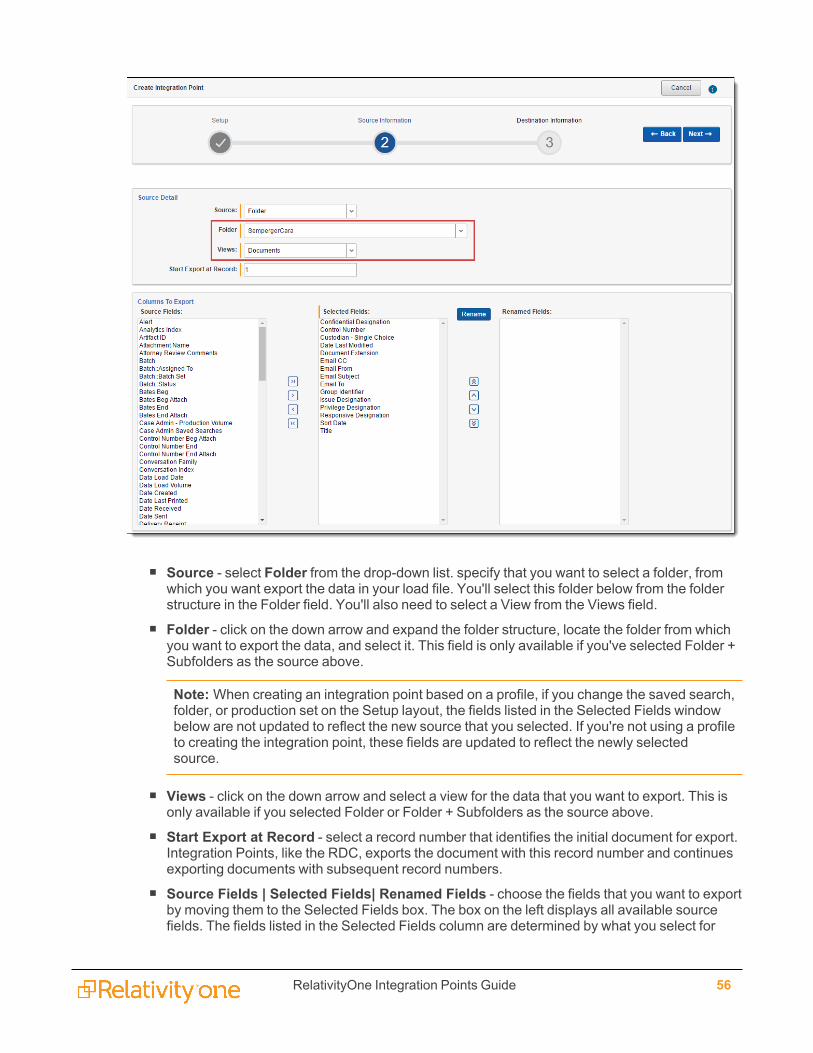
RelativityOne Integration Points Guide 56
n Source - select Folder from the drop-down list. specify that you want to select a folder, fromwhich you want export the data in your load file. You'll select this folder below from the folderstructure in the Folder field. You'll also need to select a View from the Views field.
n Folder - click on the down arrow and expand the folder structure, locate the folder from whichyou want to export the data, and select it. This field is only available if you've selected Folder +Subfolders as the source above.
Note:When creating an integration point based on a profile, if you change the saved search,folder, or production set on the Setup layout, the fields listed in the Selected Fields windowbelow are not updated to reflect the new source that you selected. If you're not using a profileto creating the integration point, these fields are updated to reflect the newly selectedsource.
n Views - click on the down arrow and select a view for the data that you want to export. This isonly available if you selected Folder or Folder + Subfolders as the source above.
n Start Export at Record - select a record number that identifies the initial document for export.Integration Points, like the RDC, exports the document with this record number and continuesexporting documents with subsequent record numbers.
n Source Fields | Selected Fields| Renamed Fields - choose the fields that you want to exportby moving them to the Selected Fields box. The box on the left displays all available sourcefields. The fields listed in the Selected Fields column are determined by what you select for
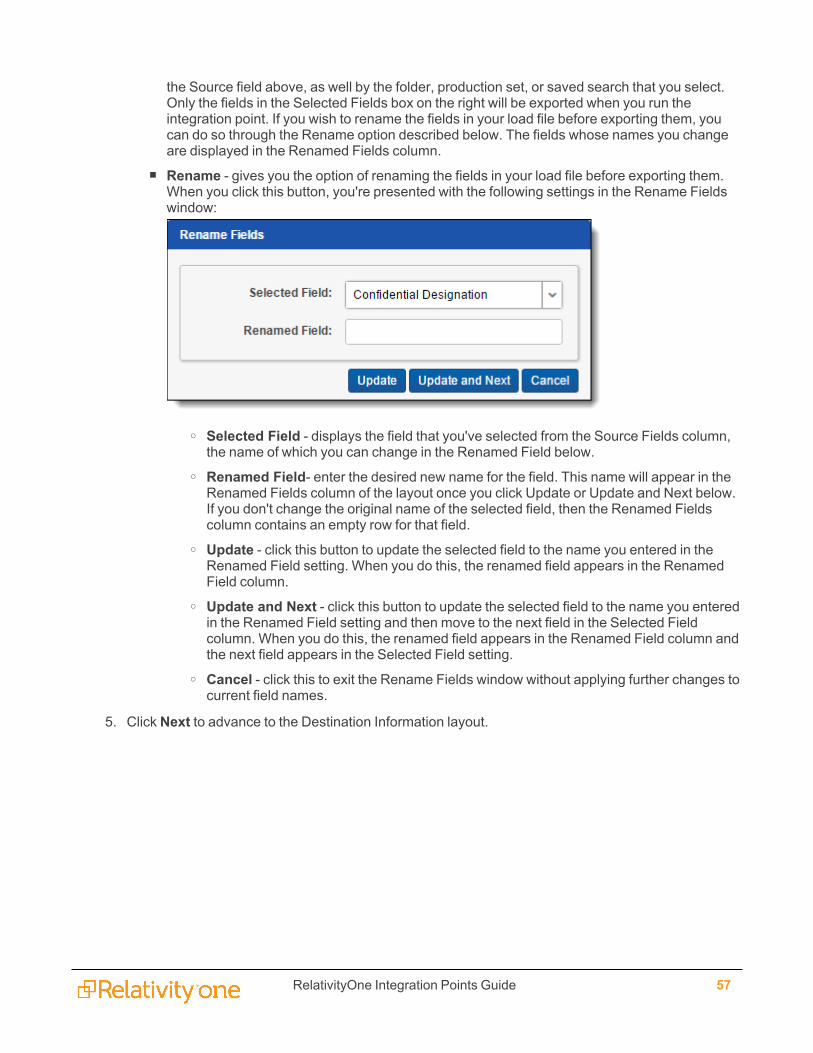
RelativityOne Integration Points Guide 57
the Source field above, as well by the folder, production set, or saved search that you select.Only the fields in the Selected Fields box on the right will be exported when you run theintegration point. If you wish to rename the fields in your load file before exporting them, youcan do so through the Rename option described below. The fields whose names you changeare displayed in the Renamed Fields column.
n Rename - gives you the option of renaming the fields in your load file before exporting them.When you click this button, you're presented with the following settings in the Rename Fieldswindow:
o Selected Field - displays the field that you've selected from the Source Fields column,the name of which you can change in the Renamed Field below.
o Renamed Field- enter the desired new name for the field. This name will appear in theRenamed Fields column of the layout once you click Update or Update and Next below.If you don't change the original name of the selected field, then the Renamed Fieldscolumn contains an empty row for that field.
o Update - click this button to update the selected field to the name you entered in theRenamed Field setting. When you do this, the renamed field appears in the RenamedField column.
o Update and Next - click this button to update the selected field to the name you enteredin the Renamed Field setting and then move to the next field in the Selected Fieldcolumn. When you do this, the renamed field appears in the Renamed Field column andthe next field appears in the Selected Field setting.
o Cancel - click this to exit the Rename Fields window without applying further changes tocurrent field names.
5. Click Next to advance to the Destination Information layout.

RelativityOne Integration Points Guide 58
6. Complete the following fields on the Destination Information layout:
Load File Options

RelativityOne Integration Points Guide 59
n Export Type - this field reflects the type of export job you're running, which you specified onthe Setup layout. By default, Load File is selected as the base configuration for your export job.You also have the option of enhancing the load file by selecting Images, Natives, and TextFields as Files, depending on the makeup of your data. Selecting any of these makesadditional corresponding output settings available, which are described below.
o The Text Fields as Files option determines the export of the extracted text or OCR.Select this option if you want to export files as individual document-level text files, withone file per document. Integration Points includes text as part of your load file if youdeselect this option and if a long text field is included in the selected fields that youmapped in the Source Information layout.
n Destination Folder - specify the folder into which you want to export the data from the loadfile. This reads the Default File Repository and lets you select a subfolder of that location.
n Create Export Folder - check this box to create an export folder named after the existingRelativity Integration Point job and the timestamp in your export folder. This will prevent theoverwriting of any previous Relativity Integration Point exports to your export folder. When youcheck this box, the value displayed in the Destination Folder field is updated to reflect the[JobName]_[RunTimeStampUTC] information.
n Image File Format - select one of these formats for image-level load file:o Opticono IPROo IPRO (Full Text)
n Data File Format - select a the format for the document-level load file you're exporting:o Relativity (.dat) - load file exports with the standard Concordance delimiters.o HTML (.html) - load file is in HTML and contains hyperlinks to launch any exported files.o Comma-separated (.csv)o Custom (.txt) - load file exports with the custom delimiters that you select.
n Data File Encoding - select an encoding for the document-level load file from the drop-downbox.
n File Path - controls how the export path for the files is referenced. Select one of the followingoptions:
o Use absolute paths - paths to exported files are represented as absolute paths. Forexample, C:\ Desktop\VOL001\NATIVE001\AS000001.msg
o Use relative paths - paths to exported files are represented as relative paths. Forexample, .\VOL001\NATIVE001\AS000001.msg
o Use prefix - a prefix is added to the relative path, such as a CD drive letter. Forexample, D:\VOL001\NATIVE001\AS000001.msg
n Include Native Files Path - check this box if you want to include the native file path in yourdata once you export it. Note that in the load file, for example a Relativity.dat file, there will befile path information added for every record you're exporting.
n Export Multiple Choice Fields as Nested - select this option to maintain the hierarchy ofRelativity multiple-choice lists, when applicable. The nested value delimiter, a backslash,separates child choices.

RelativityOne Integration Points Guide 60
n Name Output Files After - select one of the following naming convention for exported files:o Identifier - select this option to name the files after the identifier for your workspace.o Begin production number - select this option to name the files after the productionnumber. (This number may be the Bates number for a production.) Relativity names filesafter the production number only if you select select Produced Images as the ProductionPrecedence below.
n Append Original File Name - select this option to append the original name of the file to theend of the exported file name.
Image - the following fields are only available if you selected Images for the Export Type field above.
n File Type - select one of these file types:o Single-page TIF/JPGo Multi-page TIFo PDF
n Production Precedence - select one of the following groups of produced documents forexport instead of the original images:
o Original Images - exports only the original, non-produced images.o Produced Images - exports a produced version of the images. When you select this,the following fields become available:
l Image Productions - select the produced images that you want to act as theprecedence.
l Include Original Images If Not Produced - exports only the original images inthe event that they haven't been produced.
n Subdirectory Prefix - enter the alpha prefix for the subdirectory that stores exported images.By default, this is set to IMG.
Native
n Subdirectory Prefix - enter the alpha prefix for the subdirectory that stores exported nativefiles. By default, this is set to NATIVE. This field is only available if you selected Natives for theExport Type field above.

RelativityOne Integration Points Guide 61
Text- the following fields are only available if you selected text Fields As Files for the Export Typefield above.
n Text File Encoding - select the encoding for the document-level text filesn Text Precedence - select and assign an order to long text fields that Relativity checks for text
when performing an export. You must select one or more long text fields to use thisfunctionality. Click the ellipsis to display the Pick Text Precedence pop-up. To move fieldsbetween columns, highlight them and click the Right or Left single or double arrows. Use theUp and Down arrows to order the precedence of the fields.
n Subdirectory Prefix - enter the alpha prefix for the subdirectory that stores exported text files.By default, this is set to TEXT.
Volume
n Prefix - enter the alpha prefix for the volume identifier. By default, this is set to VOL.n Start Number - select the first number used for the numeric section of the volume identifier.
Multiple volumes increment numbers during export creating unique volume identifiers.n Number of Digits - select the number of digits attached to the prefix. (For example, if you
RelativityOne Integration Points Guide 62
select 3, the output is VOL001, VOL002, and so on.)n Max Size (MB) - select the maximum size allowed for each volume in MBs.
Subdirectory
n Start Number - select the starting number for the subdirectories.n Number of Digits - select the number of digits of the subdirectory prefix (For example, if you
select 3, the output is IMG001, IMG002, and so on.)n Max Files - select the number of files to store in each subdirectory.
7. Click Save to save this integration point with these export settings.
Once Relativity saves the integration point, you'll be able to run it and export the data based on the settingsyou specified. See Running the export job on page 89 for details.
5.2 Exporting a folder and subfolders to a load fileTo create an integration point specifically for exporting a folder and subfolders, perform the following steps:
1. Navigate to the Integration Points tab.
2. Click New Integration Point.
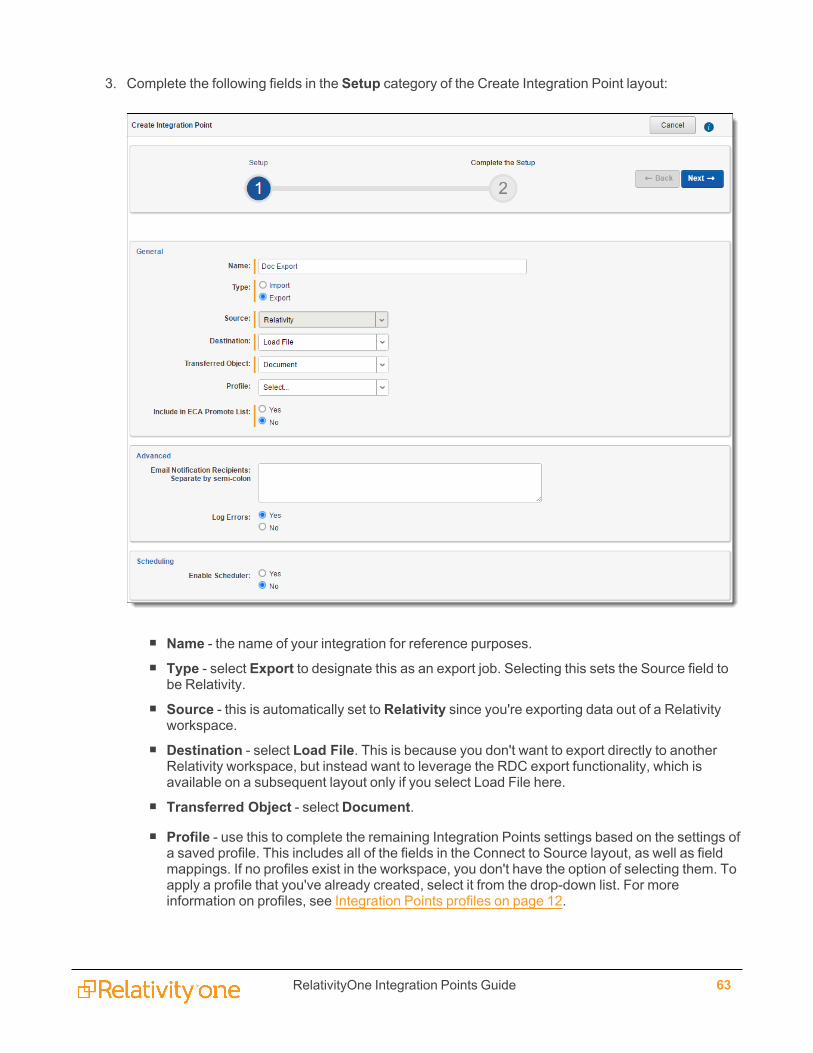
RelativityOne Integration Points Guide 63
3. Complete the following fields in the Setup category of the Create Integration Point layout:
n Name - the name of your integration for reference purposes.n Type - select Export to designate this as an export job. Selecting this sets the Source field to
be Relativity.n Source - this is automatically set to Relativity since you're exporting data out of a Relativity
workspace.n Destination - select Load File. This is because you don't want to export directly to another
Relativity workspace, but instead want to leverage the RDC export functionality, which isavailable on a subsequent layout only if you select Load File here.
n Transferred Object - select Document.
n Profile - use this to complete the remaining Integration Points settings based on the settings ofa saved profile. This includes all of the fields in the Connect to Source layout, as well as fieldmappings. If no profiles exist in the workspace, you don't have the option of selecting them. Toapply a profile that you've already created, select it from the drop-down list. For moreinformation on profiles, see Integration Points profiles on page 12.
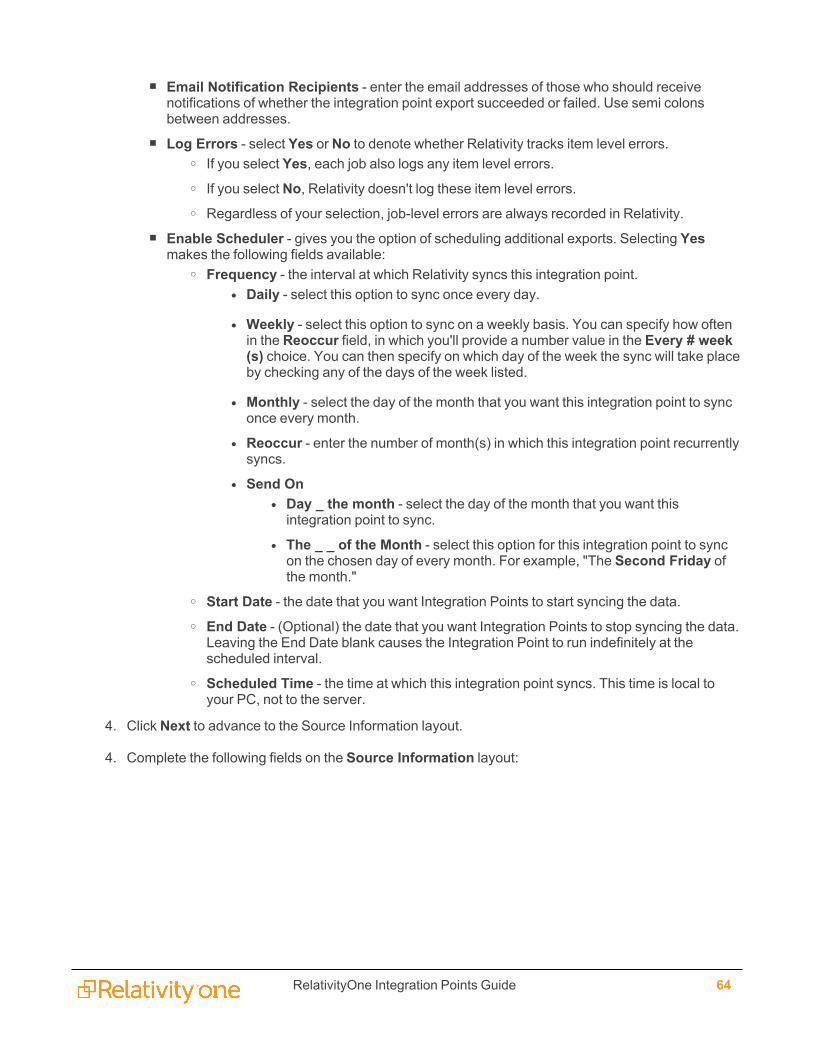
RelativityOne Integration Points Guide 64
n Email Notification Recipients - enter the email addresses of those who should receivenotifications of whether the integration point export succeeded or failed. Use semi colonsbetween addresses.
n Log Errors - select Yes or No to denote whether Relativity tracks item level errors.o If you select Yes, each job also logs any item level errors.o If you select No, Relativity doesn't log these item level errors.o Regardless of your selection, job-level errors are always recorded in Relativity.
n Enable Scheduler - gives you the option of scheduling additional exports. Selecting Yesmakes the following fields available:
o Frequency - the interval at which Relativity syncs this integration point.l Daily - select this option to sync once every day.
l Weekly - select this option to sync on a weekly basis. You can specify how oftenin the Reoccur field, in which you'll provide a number value in the Every # week(s) choice. You can then specify on which day of the week the sync will take placeby checking any of the days of the week listed.
l Monthly - select the day of the month that you want this integration point to synconce every month.
l Reoccur - enter the number of month(s) in which this integration point recurrentlysyncs.
l Send Onl Day _ the month - select the day of the month that you want thisintegration point to sync.
l The _ _ of the Month - select this option for this integration point to syncon the chosen day of every month. For example, "The Second Friday ofthe month."
o Start Date - the date that you want Integration Points to start syncing the data.o End Date - (Optional) the date that you want Integration Points to stop syncing the data.Leaving the End Date blank causes the Integration Point to run indefinitely at thescheduled interval.
o Scheduled Time - the time at which this integration point syncs. This time is local toyour PC, not to the server.
4. Click Next to advance to the Source Information layout.
4. Complete the following fields on the Source Information layout:

RelativityOne Integration Points Guide 65
n Source - select Folder + Subfolders from the drop-down list and specify that you want toselect a folder and subfolders, from which you want export the data in your load file. You'llselect this folder below from the folder structure in the Folder + Subfolders field. You'll alsoneed to select a View from the Views field.
n Folder + Subfolders - click on the down arrow and expand the folder structure, locate thefolder and subfolders from which you want to export the data, and select it. This field is onlyavailable if you've selected Folder + Subfolders as the source above.
Note:When creating an integration point based on a profile, if you change the saved search,folder, or production set on the Setup layout, the fields listed in the Selected Fields windowbelow are not updated to reflect the new source that you selected. If you're not using a profileto creating the integration point, these fields are updated to reflect the newly selectedsource.
n Views - click on the down arrow and select a view for the data that you want to export. This isonly available if you selected Folder or Folder + Subfolders as the source above.
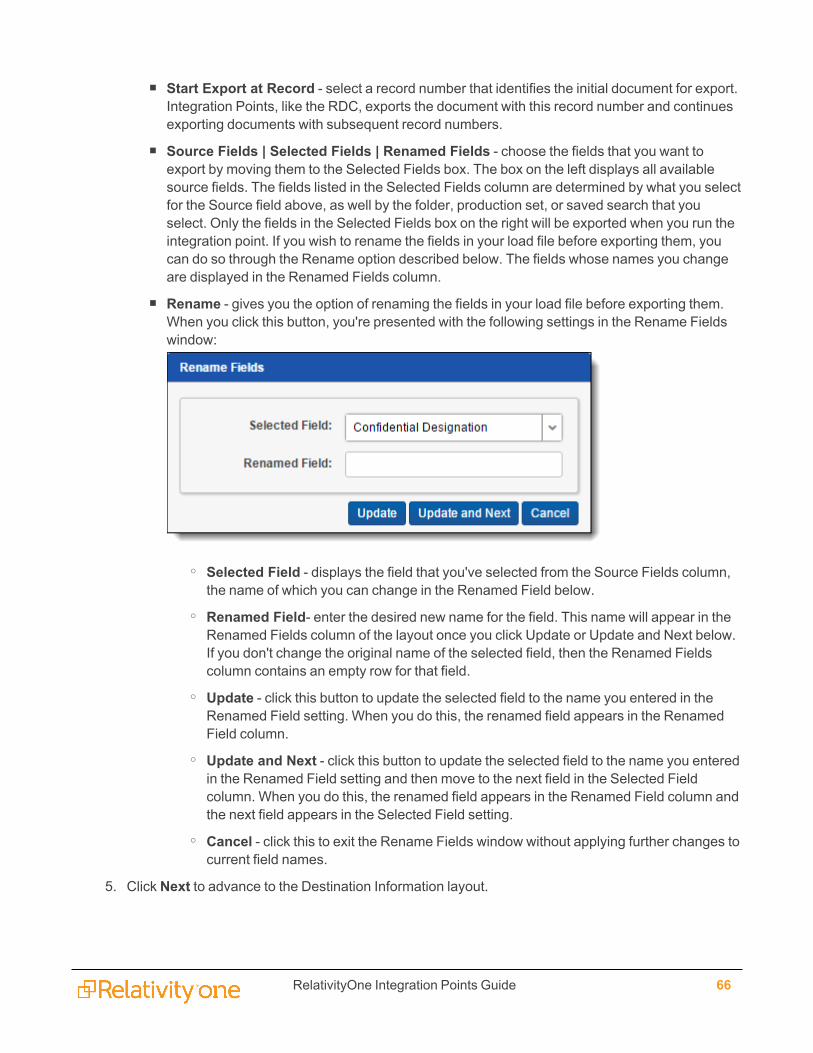
RelativityOne Integration Points Guide 66
n Start Export at Record - select a record number that identifies the initial document for export.Integration Points, like the RDC, exports the document with this record number and continuesexporting documents with subsequent record numbers.
n Source Fields | Selected Fields | Renamed Fields - choose the fields that you want toexport by moving them to the Selected Fields box. The box on the left displays all availablesource fields. The fields listed in the Selected Fields column are determined by what you selectfor the Source field above, as well by the folder, production set, or saved search that youselect. Only the fields in the Selected Fields box on the right will be exported when you run theintegration point. If you wish to rename the fields in your load file before exporting them, youcan do so through the Rename option described below. The fields whose names you changeare displayed in the Renamed Fields column.
n Rename - gives you the option of renaming the fields in your load file before exporting them.When you click this button, you're presented with the following settings in the Rename Fieldswindow:
o Selected Field - displays the field that you've selected from the Source Fields column,the name of which you can change in the Renamed Field below.
o Renamed Field- enter the desired new name for the field. This name will appear in theRenamed Fields column of the layout once you click Update or Update and Next below.If you don't change the original name of the selected field, then the Renamed Fieldscolumn contains an empty row for that field.
o Update - click this button to update the selected field to the name you entered in theRenamed Field setting. When you do this, the renamed field appears in the RenamedField column.
o Update and Next - click this button to update the selected field to the name you enteredin the Renamed Field setting and then move to the next field in the Selected Fieldcolumn. When you do this, the renamed field appears in the Renamed Field column andthe next field appears in the Selected Field setting.
o Cancel - click this to exit the Rename Fields window without applying further changes tocurrent field names.
5. Click Next to advance to the Destination Information layout.

RelativityOne Integration Points Guide 67
6. Complete the following fields on the Destination Information layout:
Load File Options

RelativityOne Integration Points Guide 68
n Export Type - this field reflects the type of export job you're running, which you specified onthe Setup layout. By default, Load File is selected as the base configuration for your export job.You also have the option of enhancing the load file by selecting Images, Natives, and TextFields as Files, depending on the makeup of your data. Selecting any of these makesadditional corresponding output settings available, which are described below.
o The Text Fields as Files option determines the export of the extracted text or OCR.Select this option if you want to export files as individual document-level text files, withone file per document. Integration Points includes text as part of your load file if youdeselect this option and if a long text field is included in the selected fields that youmapped in the Source Information layout.
n Destination Folder - specify the folder into which you want to export the data from the loadfile. This reads the Default File Repository and lets you select a subfolder of that location.
n Create Export Folder - check this box to create an export folder named after the existingRelativity Integration Point job and the timestamp in your export folder. This will prevent theoverwriting of any previous Relativity Integration Point exports to your export folder. When youcheck this box, the value displayed in the Destination Folder field is updated to reflect the[JobName]_[RunTimeStampUTC] information.
n Image File Format - select one of these formats for image-level load file:o Opticono IPROo IPRO (Full Text)
n Data File Format - select a the format for the document-level load file you're exporting:o Relativity (.dat) - load file exports with the standard Concordance delimiters.o HTML (.html) - load file is in HTML and contains hyperlinks to launch any exported files.o Comma-separated (.csv)o Custom (.txt) - load file exports with the custom delimiters that you select.
n Data File Encoding - select an encoding for the document-level load file from the drop-downbox.
n File Path - controls how the export path for the files is referenced. Select one of the followingoptions:
o Use absolute paths - paths to exported files are represented as absolute paths. Forexample, C:\ Desktop\VOL001\NATIVE001\AS000001.msg
o Use relative paths - paths to exported files are represented as relative paths. Forexample, .\VOL001\NATIVE001\AS000001.msg
o Use prefix - a prefix is added to the relative path, such as a CD drive letter. Forexample, D:\VOL001\NATIVE001\AS000001.msg
n Include Native Files Path - check this box if you want to include the native file path in yourdata once you export it. Note that in the load file, for example a Relativity.dat file, there will befile path information added for every record you're exporting.
n Export Multiple Choice Fields as Nested - select this option to maintain the hierarchy ofRelativity multiple-choice lists, when applicable. The nested value delimiter, a backslash,separates child choices.

RelativityOne Integration Points Guide 69
n Name Output Files After - select one of the following naming convention for exported files:o Identifier - select this option to name the files after the identifier for your workspace.o Begin production number - select this option to name the files after the productionnumber. (This number may be the Bates number for a production.) Relativity names filesafter the production number only if you select select Produced Images as the ProductionPrecedence below.
n Append Original File Name - select this option to append the original name of the file to theend of the exported file name.
Image - the following fields are only available if you selected Images for the Export Type field above.
n File Type - select one of these file types:o Single-page TIF/JPGo Multi-page TIFo PDF
n Production Precedence - select one of the following groups of produced documents forexport instead of the original images:
o Original Images - exports only the original, non-produced images.o Produced Images - exports a produced version of the images. When you select this,the following fields become available:
l Image Productions - select the produced images that you want to act as theprecedence.
l Include Original Images If Not Produced - exports only the original images inthe event that they haven't been produced.
n Subdirectory Prefix - enter the alpha prefix for the subdirectory that stores exported images.By default, this is set to IMG.
Native
n Subdirectory Prefix - enter the alpha prefix for the subdirectory that stores exported nativefiles. By default, this is set to NATIVE. This field is only available if you selected Natives for theExport Type field above.

RelativityOne Integration Points Guide 70
Text- the following fields are only available if you selected text Fields As Files for the Export Typefield above.
n Text File Encoding - select the encoding for the document-level text filesn Text Precedence - select and assign an order to long text fields that Relativity checks for text
when performing an export. You must select one or more long text fields to use thisfunctionality. Click the ellipsis to display the Pick Text Precedence pop-up. To move fieldsbetween columns, highlight them and click the Right or Left single or double arrows. Use theUp and Down arrows to order the precedence of the fields.
n Subdirectory Prefix - enter the alpha prefix for the subdirectory that stores exported text files.By default, this is set to TEXT.
Volume
n Prefix - enter the alpha prefix for the volume identifier. By default, this is set to VOL.n Start Number - select the first number used for the numeric section of the volume identifier.
Multiple volumes increment numbers during export creating unique volume identifiers.n Number of Digits - select the number of digits attached to the prefix. (For example, if you
RelativityOne Integration Points Guide 71
select 2, the output is VOL001, VOL002, and so on.)n Max Size (MB) - select the maximum size allowed for each volume in MBs.
Subdirectory
n Start Number - select the starting number for the subdirectories.n Number of Digits - select the number of digits of the subdirectory prefix (For example, if you
select 3, the output is IMG001, IMG002, and so on.)n Max Files - select the number of files to store in each subdirectory.
7. Click Save to save this integration point with these export settings.
Once Relativity saves the integration point, you'll be able to run it and export the data based on the settingsyou specified. See Running the export job on page 89 for details.
5.3 Exporting a production to a load fileTo create an integration point specifically for exporting a production set, perform the following steps:
1. Navigate to the Integration Points tab.
2. Click New Integration Point.
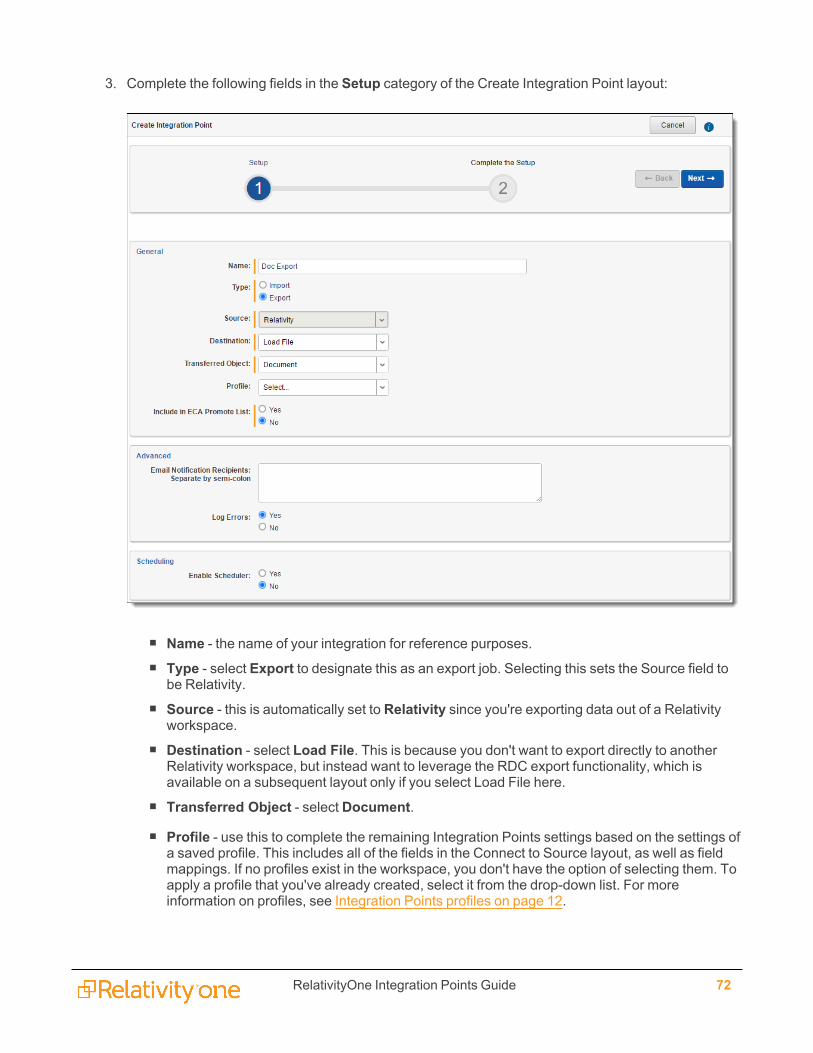
RelativityOne Integration Points Guide 72
3. Complete the following fields in the Setup category of the Create Integration Point layout:
n Name - the name of your integration for reference purposes.n Type - select Export to designate this as an export job. Selecting this sets the Source field to
be Relativity.n Source - this is automatically set to Relativity since you're exporting data out of a Relativity
workspace.n Destination - select Load File. This is because you don't want to export directly to another
Relativity workspace, but instead want to leverage the RDC export functionality, which isavailable on a subsequent layout only if you select Load File here.
n Transferred Object - select Document.
n Profile - use this to complete the remaining Integration Points settings based on the settings ofa saved profile. This includes all of the fields in the Connect to Source layout, as well as fieldmappings. If no profiles exist in the workspace, you don't have the option of selecting them. Toapply a profile that you've already created, select it from the drop-down list. For moreinformation on profiles, see Integration Points profiles on page 12.

RelativityOne Integration Points Guide 73
n Email Notification Recipients - enter the email addresses of those who should receivenotifications of whether the integration point export succeeded or failed. Use semi colonsbetween addresses.
n Log Errors - select Yes or No to denote whether Relativity tracks item level errors.o If you select Yes, each job also logs any item level errors.o If you select No, Relativity doesn't log these item level errors.o Regardless of your selection, job-level errors are always recorded in Relativity.
n Enable Scheduler - gives you the option of scheduling additional exports. Selecting Yesmakes the following fields available:
o Frequency - the interval at which Relativity syncs this integration point.l Daily - select this option to sync once every day.
l Weekly - select this option to sync on a weekly basis. You can specify how oftenin the Reoccur field, in which you'll provide a number value in the Every # week(s) choice. You can then specify on which day of the week the sync will take placeby checking any of the days of the week listed.
l Monthly - select the day of the month that you want this integration point to synconce every month.
l Reoccur - enter the number of month(s) in which this integration point recurrentlysyncs.
l Send Onl Day _ the month - select the day of the month that you want thisintegration point to sync.
l The _ _ of the Month - select this option for this integration point to syncon the chosen day of every month. For example, "The Second Friday ofthe month."
o Start Date - the date that you want Integration Points to start syncing the data.o End Date - (Optional) the date that you want Integration Points to stop syncing the data.Leaving the End Date blank causes the Integration Point to run indefinitely at thescheduled interval.
o Scheduled Time - the time at which this integration point syncs. This time is local toyour PC, not to the server.
4. Click Next to advance to the Source Information layout.
4. Complete the following fields on the Source Information layout:
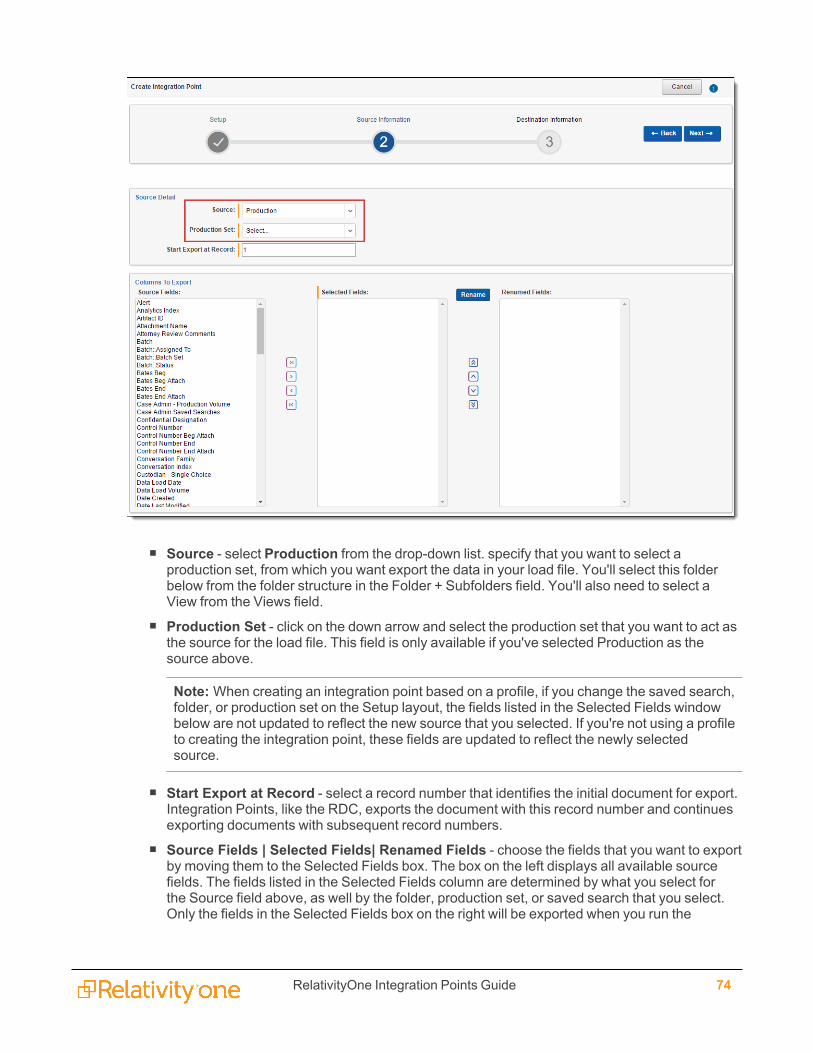
RelativityOne Integration Points Guide 74
n Source - select Production from the drop-down list. specify that you want to select aproduction set, from which you want export the data in your load file. You'll select this folderbelow from the folder structure in the Folder + Subfolders field. You'll also need to select aView from the Views field.
n Production Set - click on the down arrow and select the production set that you want to act asthe source for the load file. This field is only available if you've selected Production as thesource above.
Note:When creating an integration point based on a profile, if you change the saved search,folder, or production set on the Setup layout, the fields listed in the Selected Fields windowbelow are not updated to reflect the new source that you selected. If you're not using a profileto creating the integration point, these fields are updated to reflect the newly selectedsource.
n Start Export at Record - select a record number that identifies the initial document for export.Integration Points, like the RDC, exports the document with this record number and continuesexporting documents with subsequent record numbers.
n Source Fields | Selected Fields| Renamed Fields - choose the fields that you want to exportby moving them to the Selected Fields box. The box on the left displays all available sourcefields. The fields listed in the Selected Fields column are determined by what you select forthe Source field above, as well by the folder, production set, or saved search that you select.Only the fields in the Selected Fields box on the right will be exported when you run the
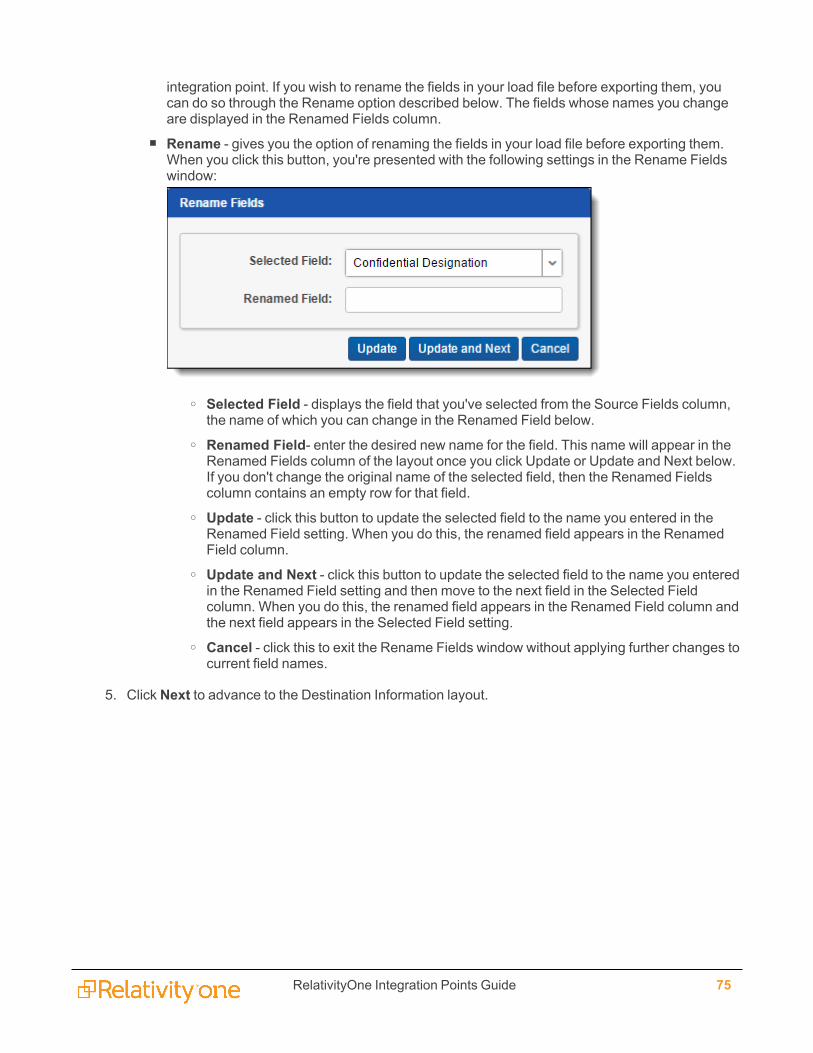
RelativityOne Integration Points Guide 75
integration point. If you wish to rename the fields in your load file before exporting them, youcan do so through the Rename option described below. The fields whose names you changeare displayed in the Renamed Fields column.
n Rename - gives you the option of renaming the fields in your load file before exporting them.When you click this button, you're presented with the following settings in the Rename Fieldswindow:
o Selected Field - displays the field that you've selected from the Source Fields column,the name of which you can change in the Renamed Field below.
o Renamed Field- enter the desired new name for the field. This name will appear in theRenamed Fields column of the layout once you click Update or Update and Next below.If you don't change the original name of the selected field, then the Renamed Fieldscolumn contains an empty row for that field.
o Update - click this button to update the selected field to the name you entered in theRenamed Field setting. When you do this, the renamed field appears in the RenamedField column.
o Update and Next - click this button to update the selected field to the name you enteredin the Renamed Field setting and then move to the next field in the Selected Fieldcolumn. When you do this, the renamed field appears in the Renamed Field column andthe next field appears in the Selected Field setting.
o Cancel - click this to exit the Rename Fields window without applying further changes tocurrent field names.
5. Click Next to advance to the Destination Information layout.

RelativityOne Integration Points Guide 76
6. Complete the following fields on the Destination Information layout:
Load File Options
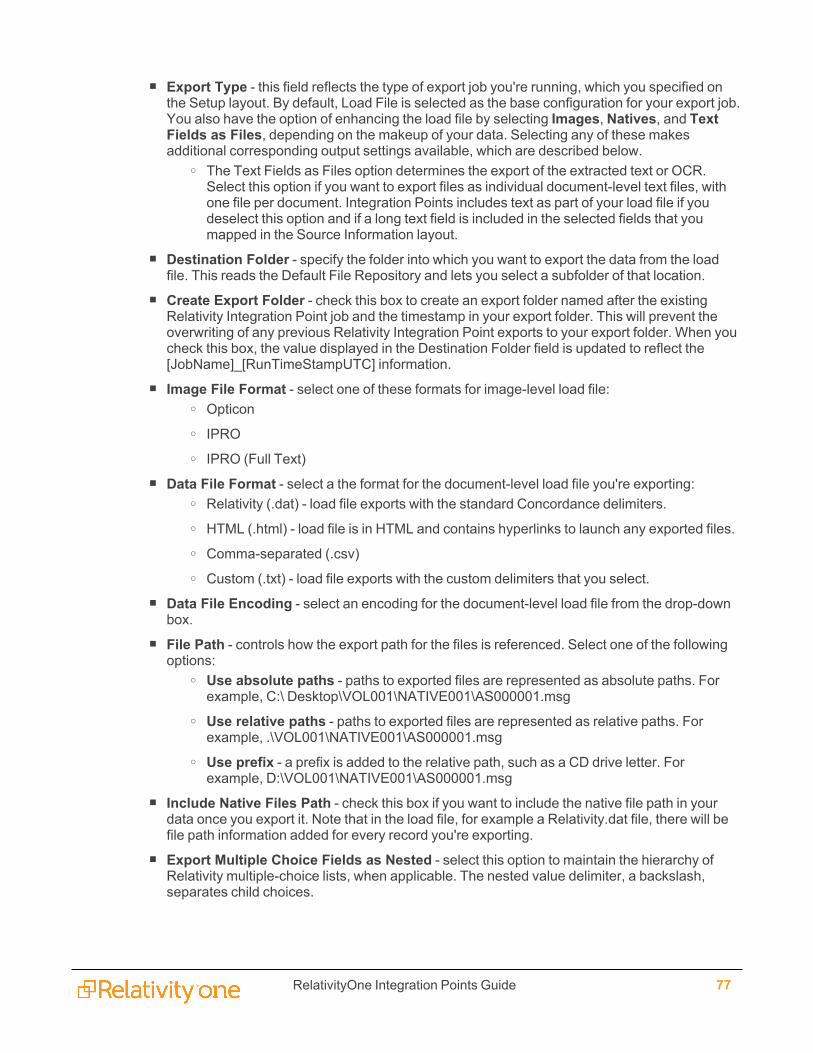
RelativityOne Integration Points Guide 77
n Export Type - this field reflects the type of export job you're running, which you specified onthe Setup layout. By default, Load File is selected as the base configuration for your export job.You also have the option of enhancing the load file by selecting Images, Natives, and TextFields as Files, depending on the makeup of your data. Selecting any of these makesadditional corresponding output settings available, which are described below.
o The Text Fields as Files option determines the export of the extracted text or OCR.Select this option if you want to export files as individual document-level text files, withone file per document. Integration Points includes text as part of your load file if youdeselect this option and if a long text field is included in the selected fields that youmapped in the Source Information layout.
n Destination Folder - specify the folder into which you want to export the data from the loadfile. This reads the Default File Repository and lets you select a subfolder of that location.
n Create Export Folder - check this box to create an export folder named after the existingRelativity Integration Point job and the timestamp in your export folder. This will prevent theoverwriting of any previous Relativity Integration Point exports to your export folder. When youcheck this box, the value displayed in the Destination Folder field is updated to reflect the[JobName]_[RunTimeStampUTC] information.
n Image File Format - select one of these formats for image-level load file:o Opticono IPROo IPRO (Full Text)
n Data File Format - select a the format for the document-level load file you're exporting:o Relativity (.dat) - load file exports with the standard Concordance delimiters.o HTML (.html) - load file is in HTML and contains hyperlinks to launch any exported files.o Comma-separated (.csv)o Custom (.txt) - load file exports with the custom delimiters that you select.
n Data File Encoding - select an encoding for the document-level load file from the drop-downbox.
n File Path - controls how the export path for the files is referenced. Select one of the followingoptions:
o Use absolute paths - paths to exported files are represented as absolute paths. Forexample, C:\ Desktop\VOL001\NATIVE001\AS000001.msg
o Use relative paths - paths to exported files are represented as relative paths. Forexample, .\VOL001\NATIVE001\AS000001.msg
o Use prefix - a prefix is added to the relative path, such as a CD drive letter. Forexample, D:\VOL001\NATIVE001\AS000001.msg
n Include Native Files Path - check this box if you want to include the native file path in yourdata once you export it. Note that in the load file, for example a Relativity.dat file, there will befile path information added for every record you're exporting.
n Export Multiple Choice Fields as Nested - select this option to maintain the hierarchy ofRelativity multiple-choice lists, when applicable. The nested value delimiter, a backslash,separates child choices.
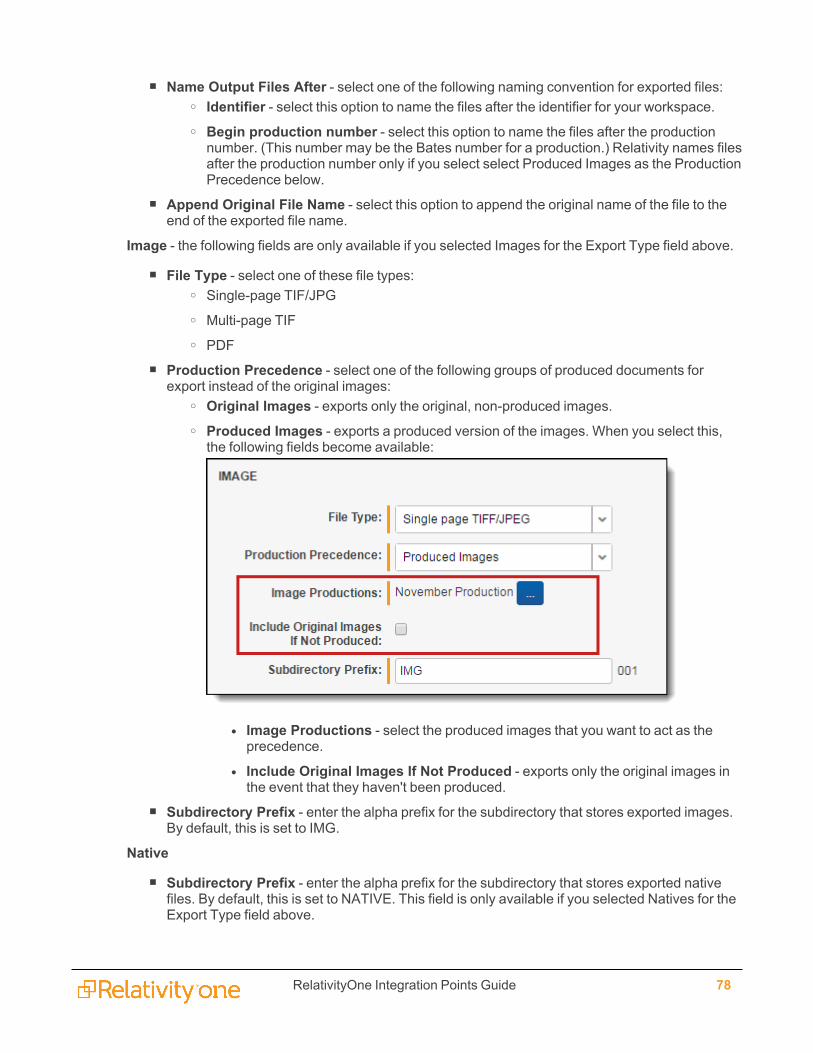
RelativityOne Integration Points Guide 78
n Name Output Files After - select one of the following naming convention for exported files:o Identifier - select this option to name the files after the identifier for your workspace.o Begin production number - select this option to name the files after the productionnumber. (This number may be the Bates number for a production.) Relativity names filesafter the production number only if you select select Produced Images as the ProductionPrecedence below.
n Append Original File Name - select this option to append the original name of the file to theend of the exported file name.
Image - the following fields are only available if you selected Images for the Export Type field above.
n File Type - select one of these file types:o Single-page TIF/JPGo Multi-page TIFo PDF
n Production Precedence - select one of the following groups of produced documents forexport instead of the original images:
o Original Images - exports only the original, non-produced images.o Produced Images - exports a produced version of the images. When you select this,the following fields become available:
l Image Productions - select the produced images that you want to act as theprecedence.
l Include Original Images If Not Produced - exports only the original images inthe event that they haven't been produced.
n Subdirectory Prefix - enter the alpha prefix for the subdirectory that stores exported images.By default, this is set to IMG.
Native
n Subdirectory Prefix - enter the alpha prefix for the subdirectory that stores exported nativefiles. By default, this is set to NATIVE. This field is only available if you selected Natives for theExport Type field above.

RelativityOne Integration Points Guide 79
Text- the following fields are only available if you selected text Fields As Files for the Export Typefield above.
n Text File Encoding - select the encoding for the document-level text filesn Text Precedence - select and assign an order to long text fields that Relativity checks for text
when performing an export. You must select one or more long text fields to use thisfunctionality. Click the ellipsis to display the Pick Text Precedence pop-up. To move fieldsbetween columns, highlight them and click the Right or Left single or double arrows. Use theUp and Down arrows to order the precedence of the fields.
n Subdirectory Prefix - enter the alpha prefix for the subdirectory that stores exported text files.By default, this is set to TEXT.
Volume
n Prefix - enter the alpha prefix for the volume identifier. By default, this is set to VOL.n Start Number - select the first number used for the numeric section of the volume identifier.
Multiple volumes increment numbers during export creating unique volume identifiers.n Number of Digits - select the number of digits attached to the prefix. (For example, if you
RelativityOne Integration Points Guide 80
select 2, the output is VOL001, VOL002, and so on.)n Max Size (MB) - select the maximum size allowed for each volume in MBs.
Subdirectory
n Start Number - select the starting number for the subdirectories.n Number of Digits - select the number of digits of the subdirectory prefix (For example, if you
select 3, the output is IMG001, IMG002, and so on.)n Max Files - select the number of files to store in each subdirectory.
7. Click Save to save this integration point with these export settings.
Once Relativity saves the integration point, you'll be able to run it and export the data based on the settingsyou specified. See Running the export job on page 89 for details.
5.4 Exporting a saved search to a load fileTo create an integration point specifically for exporting a saved search, perform the following steps:
1. Navigate to the Integration Points tab.
2. Click New Integration Point.

RelativityOne Integration Points Guide 81
3. Complete the following fields in the Setup category of the Create Integration Point layout:
n Name - the name of your integration for reference purposes.n Type - select Export to designate this as an export job. Selecting this sets the Source field to
be Relativity.n Source - this is automatically set to Relativity since you're exporting data out of a Relativity
workspace.n Destination - select Load File. This is because you don't want to export directly to another
Relativity workspace, but instead want to leverage the RDC export functionality, which isavailable on a subsequent layout only if you select Load File here.
n Transferred Object - select Document.
n Profile - use this to complete the remaining Integration Points settings based on the settings ofa saved profile. This includes all of the fields in the Connect to Source layout, as well as fieldmappings. If no profiles exist in the workspace, you don't have the option of selecting them. Toapply a profile that you've already created, select it from the drop-down list. For moreinformation on profiles, see Integration Points profiles on page 12.
RelativityOne Integration Points Guide 82
n Email Notification Recipients - enter the email addresses of those who should receivenotifications of whether the integration point export succeeded or failed. Use semi colonsbetween addresses.
n Log Errors - select Yes or No to denote whether Relativity tracks item level errors.o If you select Yes, each job also logs any item level errors.o If you select No, Relativity doesn't log these item level errors.o Regardless of your selection, job-level errors are always recorded in Relativity.
n Enable Scheduler - gives you the option of scheduling additional exports. Selecting Yesmakes the following fields available:
o Frequency - the interval at which Relativity syncs this integration point.l Daily - select this option to sync once every day.
l Weekly - select this option to sync on a weekly basis. You can specify how oftenin the Reoccur field, in which you'll provide a number value in the Every # week(s) choice. You can then specify on which day of the week the sync will take placeby checking any of the days of the week listed.
l Monthly - select the day of the month that you want this integration point to synconce every month.
l Reoccur - enter the number of month(s) in which this integration point recurrentlysyncs.
l Send Onl Day _ the month - select the day of the month that you want thisintegration point to sync.
l The _ _ of the Month - select this option for this integration point to syncon the chosen day of every month. For example, "The Second Friday ofthe month."
o Start Date - the date that you want Integration Points to start syncing the data.o End Date - (Optional) the date that you want Integration Points to stop syncing the data.Leaving the End Date blank causes the Integration Point to run indefinitely at thescheduled interval.
o Scheduled Time - the time at which this integration point syncs. This time is local toyour PC, not to the server.
4. Click Next to advance to the Source Information layout.

RelativityOne Integration Points Guide 83
4. Complete the following fields on the Source Information layout:
n Source - select Saved Search from the drop-down list. specify that you want to select a savedsearch, from which you want export the data in your load file. You'll select this folder belowfrom the folder structure in the Folder + Subfolders field. You'll also need to select a View fromthe Views field.
n Saved Search - click on the down arrow and select the saved search that you want to act asthe source for the load file. This field is only available if you've selected Saved Search as thesource above.
Note:When creating an integration point based on a profile, if you change the saved search,folder, or production set on the Setup layout, the fields listed in the Selected Fields windowbelow are not updated to reflect the new source that you selected. If you're not using a profileto creating the integration point, these fields are updated to reflect the newly selectedsource.
n Start Export at Record - select a record number that identifies the initial document for export.Integration Points, like the RDC, exports the document with this record number and continuesexporting documents with subsequent record numbers.
n Source Fields | Selected Fields| Renamed Fields - choose the fields that you want to exportby moving them to the Selected Fields box. The box on the left displays all available sourcefields. The fields listed in the Selected Fields column are determined by what you select forthe Source field above, as well by the folder, production set, or saved search that you select.
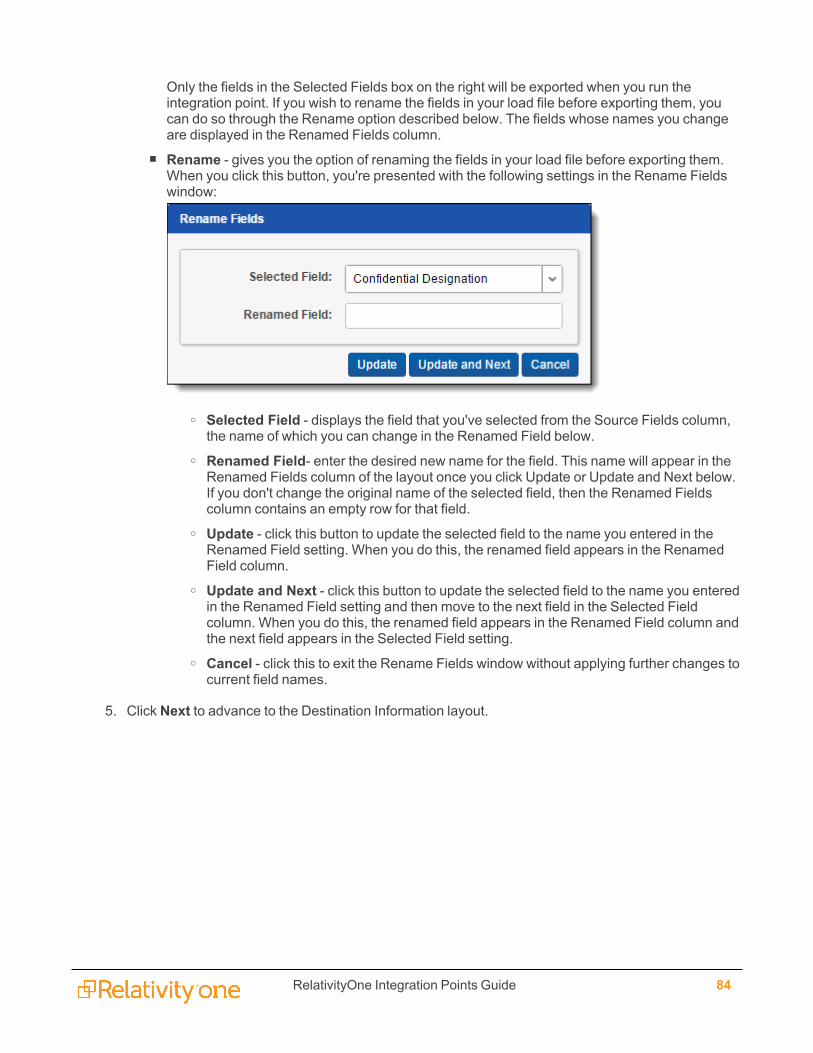
RelativityOne Integration Points Guide 84
Only the fields in the Selected Fields box on the right will be exported when you run theintegration point. If you wish to rename the fields in your load file before exporting them, youcan do so through the Rename option described below. The fields whose names you changeare displayed in the Renamed Fields column.
n Rename - gives you the option of renaming the fields in your load file before exporting them.When you click this button, you're presented with the following settings in the Rename Fieldswindow:
o Selected Field - displays the field that you've selected from the Source Fields column,the name of which you can change in the Renamed Field below.
o Renamed Field- enter the desired new name for the field. This name will appear in theRenamed Fields column of the layout once you click Update or Update and Next below.If you don't change the original name of the selected field, then the Renamed Fieldscolumn contains an empty row for that field.
o Update - click this button to update the selected field to the name you entered in theRenamed Field setting. When you do this, the renamed field appears in the RenamedField column.
o Update and Next - click this button to update the selected field to the name you enteredin the Renamed Field setting and then move to the next field in the Selected Fieldcolumn. When you do this, the renamed field appears in the Renamed Field column andthe next field appears in the Selected Field setting.
o Cancel - click this to exit the Rename Fields window without applying further changes tocurrent field names.
5. Click Next to advance to the Destination Information layout.

RelativityOne Integration Points Guide 85
6. Complete the following fields on the Destination Information layout:
Load File Options
RelativityOne Integration Points Guide 86
n Export Type - this field reflects the type of export job you're running, which you specified onthe Setup layout. By default, Load File is selected as the base configuration for your export job.You also have the option of enhancing the load file by selecting Images, Natives, and TextFields as Files, depending on the makeup of your data. Selecting any of these makesadditional corresponding output settings available, which are described below.
o The Text Fields as Files option determines the export of the extracted text or OCR.Select this option if you want to export files as individual document-level text files, withone file per document. Integration Points includes text as part of your load file if youdeselect this option and if a long text field is included in the selected fields that youmapped in the Source Information layout.
n Destination Folder - specify the folder into which you want to export the data from the loadfile. This reads the Default File Repository and lets you select a subfolder of that location.
n Create Export Folder - check this box to create an export folder named after the existingRelativity Integration Point job and the timestamp in your export folder. This will prevent theoverwriting of any previous Relativity Integration Point exports to your export folder. When youcheck this box, the value displayed in the Destination Folder field is updated to reflect the[JobName]_[RunTimeStampUTC] information.
n Image File Format - select one of these formats for image-level load file:o Opticono IPROo IPRO (Full Text)
n Data File Format - select a the format for the document-level load file you're exporting:o Relativity (.dat) - load file exports with the standard Concordance delimiters.o HTML (.html) - load file is in HTML and contains hyperlinks to launch any exported files.o Comma-separated (.csv)o Custom (.txt) - load file exports with the custom delimiters that you select.
n Data File Encoding - select an encoding for the document-level load file from the drop-downbox.
n File Path - controls how the export path for the files is referenced. Select one of the followingoptions:
o Use absolute paths - paths to exported files are represented as absolute paths. Forexample, C:\ Desktop\VOL001\NATIVE001\AS000001.msg
o Use relative paths - paths to exported files are represented as relative paths. Forexample, .\VOL001\NATIVE001\AS000001.msg
o Use prefix - a prefix is added to the relative path, such as a CD drive letter. Forexample, D:\VOL001\NATIVE001\AS000001.msg
n Include Native Files Path - check this box if you want to include the native file path in yourdata once you export it. Note that in the load file, for example a Relativity.dat file, there will befile path information added for every record you're exporting.
n Export Multiple Choice Fields as Nested - select this option to maintain the hierarchy ofRelativity multiple-choice lists, when applicable. The nested value delimiter, a backslash,separates child choices.

RelativityOne Integration Points Guide 87
n Name Output Files After - select one of the following naming convention for exported files:o Identifier - select this option to name the files after the identifier for your workspace.o Begin production number - select this option to name the files after the productionnumber. (This number may be the Bates number for a production.) Relativity names filesafter the production number only if you select select Produced Images as the ProductionPrecedence below.
n Append Original File Name - select this option to append the original name of the file to theend of the exported file name.
Image - the following fields are only available if you selected Images for the Export Type field above.
n File Type - select one of these file types:o Single-page TIF/JPGo Multi-page TIFo PDF
n Production Precedence - select one of the following groups of produced documents forexport instead of the original images:
o Original Images - exports only the original, non-produced images.o Produced Images - exports a produced version of the images. When you select this,the following fields become available:
l Image Productions - select the produced images that you want to act as theprecedence.
l Include Original Images If Not Produced - exports only the original images inthe event that they haven't been produced.
n Subdirectory Prefix - enter the alpha prefix for the subdirectory that stores exported images.By default, this is set to IMG.
Native
n Subdirectory Prefix - enter the alpha prefix for the subdirectory that stores exported nativefiles. By default, this is set to NATIVE. This field is only available if you selected Natives for theExport Type field above.
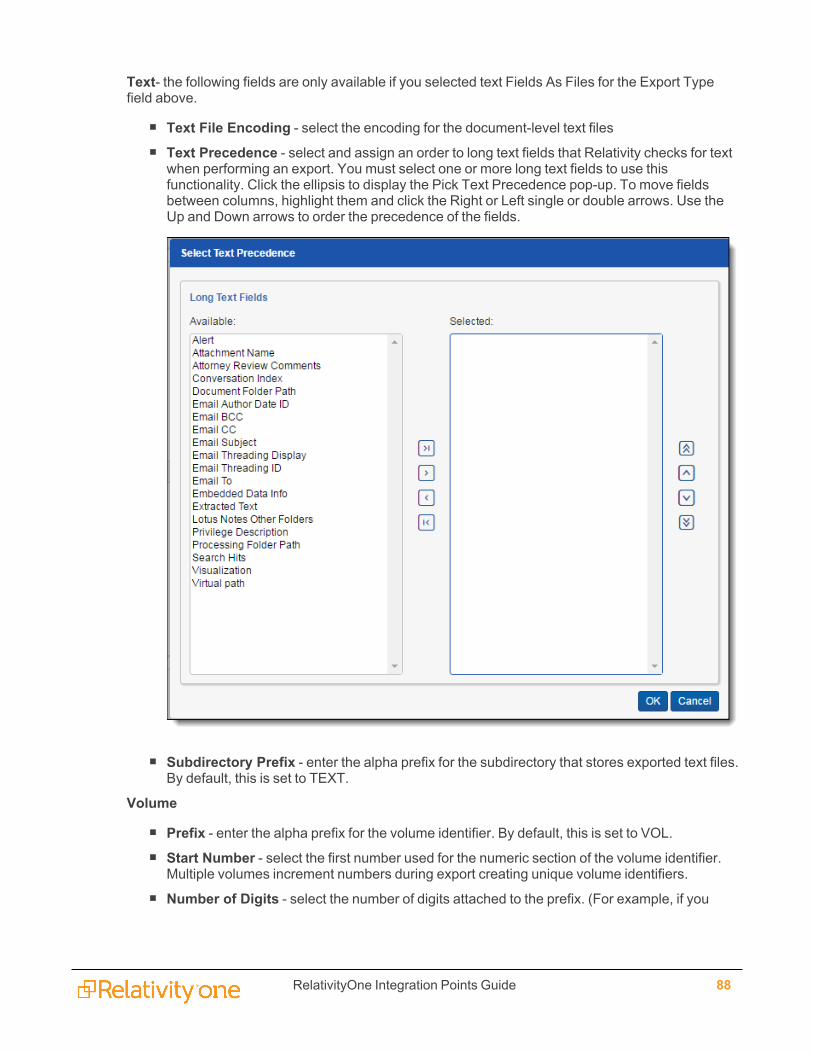
RelativityOne Integration Points Guide 88
Text- the following fields are only available if you selected text Fields As Files for the Export Typefield above.
n Text File Encoding - select the encoding for the document-level text filesn Text Precedence - select and assign an order to long text fields that Relativity checks for text
when performing an export. You must select one or more long text fields to use thisfunctionality. Click the ellipsis to display the Pick Text Precedence pop-up. To move fieldsbetween columns, highlight them and click the Right or Left single or double arrows. Use theUp and Down arrows to order the precedence of the fields.
n Subdirectory Prefix - enter the alpha prefix for the subdirectory that stores exported text files.By default, this is set to TEXT.
Volume
n Prefix - enter the alpha prefix for the volume identifier. By default, this is set to VOL.n Start Number - select the first number used for the numeric section of the volume identifier.
Multiple volumes increment numbers during export creating unique volume identifiers.n Number of Digits - select the number of digits attached to the prefix. (For example, if you
RelativityOne Integration Points Guide 89
select 2, the output is VOL001, VOL002, and so on.)n Max Size (MB) - select the maximum size allowed for each volume in MBs.
Subdirectory
n Start Number - select the starting number for the subdirectories.n Number of Digits - select the number of digits of the subdirectory prefix (For example, if you
select 3, the output is IMG001, IMG002, and so on.)n Max Files - select the number of files to store in each subdirectory.
7. Click Save to save this integration point with these export settings.
Once Relativity saves the integration point, you'll be able to run it and export the data based on the settingsyou specified. See Running the export job below for details.
5.5 Exporting to a Relativity workspaceSee the steps for exporting a source workspace to a destination workspaceIn addition to exporting to a CSV and load file, you have the option of exporting data from a sourceworkspace to a destination workspace in Relativity. You can do this by selecting Relativity as thedestination for the data that you intend to transfer and then selecting a specific workspace where you wantthat data to go. This is the most efficient way to move documents from one workspace to another, since it's aone-step process and it doesn't require you to export and re-import your data.
Note the following details about exporting to a workspace:
n For workspace-to-workspace integration points, Relativity supports transfers across the Documentobject only and not other RDO's.
n When using integration points to transfer data between workspaces, you can move original imagesand natives and/or metadata. You aren't required to have Integration Points installed on the des-tination workspace.
n When transferring images to a destination workspace, the field mapping section is disabled becauseonly the control number is required and available in this scenario. If you want to transfer other fieldmetadata, you must create a new integration point without choosing to copy images.
n Integration points uses the following delimiters to configure the Import API for the destinationworkspace. Other delimiters typically configured with the Import API, for example via the RDC, arenot utilized:
o Multi-value delimiter: ASCII 029
o Nested-value delimiter: ASCII 030
5.6 Running the export jobTo export your load file based on the export settings you specified above, click Run on the Transfer Optionsconsole on the saved integration point.
Note: All Integration Points jobs are fully editable after run.

RelativityOne Integration Points Guide 90
Note that you also have the option of saving this integration point as a profile through the Save as Profilebutton on the Transfer Options console. For more information on profiles, see Integration Points profiles onpage 12.
ClickOK on the run confirmation message, which informs you of where your documents will be placed.
The Run button turns to red and gives you the option of stopping the job you just kicked off, as long as thatjob has a status of Pending or Processing.
If necessary, monitor the progress of the promote job by viewing the Status field in the Status view at thebottom of the layout. You'll see any of the following status values:
n Pending - the job has yet to be picked up by an agent.n Validation - an agent is validating the job to make sure it has the required settings, such as access to
the source and destination objects (saved searches, workspaces, etc.). If validation fails, the statuschanges to "Validation failed," and Relativity logs an error. If the validation succeeds, the job moveson to a status of "Processing."
n Validation failed - the job validation has failed, resulting in an error, the details of which are saved inthe Job History Errors tab.
n Processing - the agent has picked up the job and is in the process of completing it.n Completed - the job is complete, and no errors occurred.n Completed with errors - the job is complete and errors have occurred. You can view error details in
the Job History Errors tab. See Monitoring job history and errors on page 103 for details.n Error - job failed - a job-level error occurred and the job didn't complete because it failed. You can
view error details in the Job History Errors tab. See Monitoring job history and errors on page 103 fordetails.
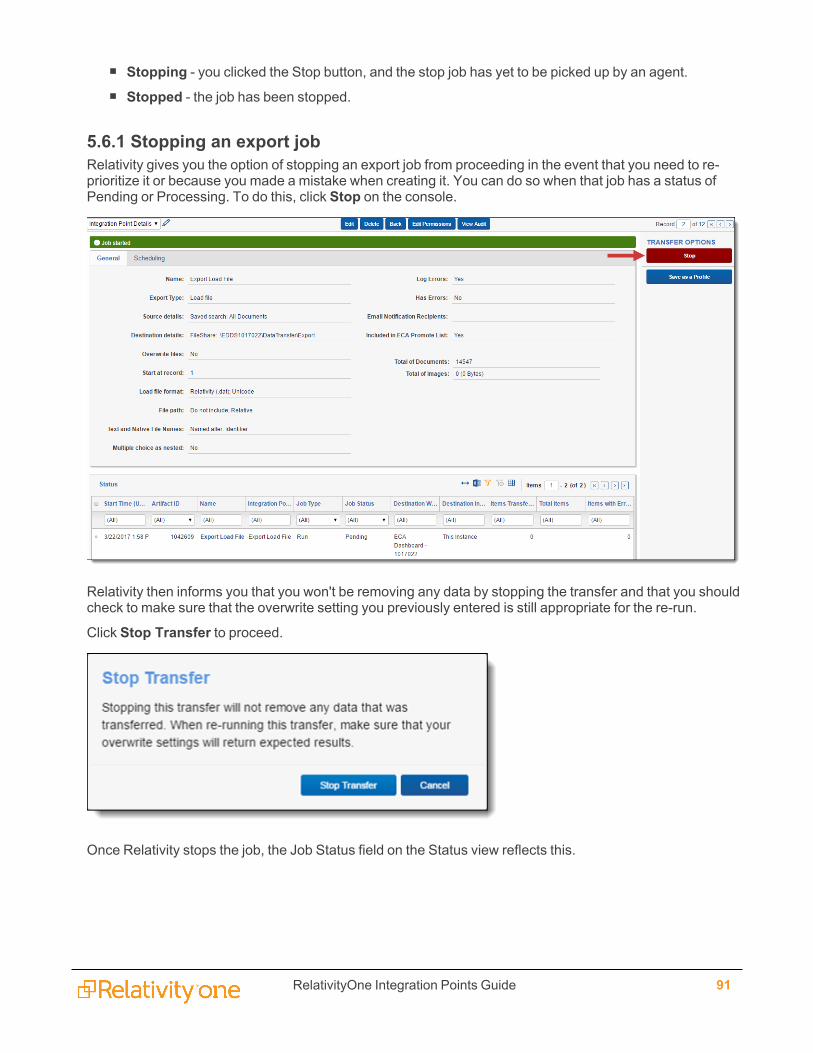
RelativityOne Integration Points Guide 91
n Stopping - you clicked the Stop button, and the stop job has yet to be picked up by an agent.n Stopped - the job has been stopped.
5.6.1 Stopping an export jobRelativity gives you the option of stopping an export job from proceeding in the event that you need to re-prioritize it or because you made a mistake when creating it. You can do so when that job has a status ofPending or Processing. To do this, click Stop on the console.
Relativity then informs you that you won't be removing any data by stopping the transfer and that you shouldcheck to make sure that the overwrite setting you previously entered is still appropriate for the re-run.
Click Stop Transfer to proceed.
Once Relativity stops the job, the Job Status field on the Status view reflects this.
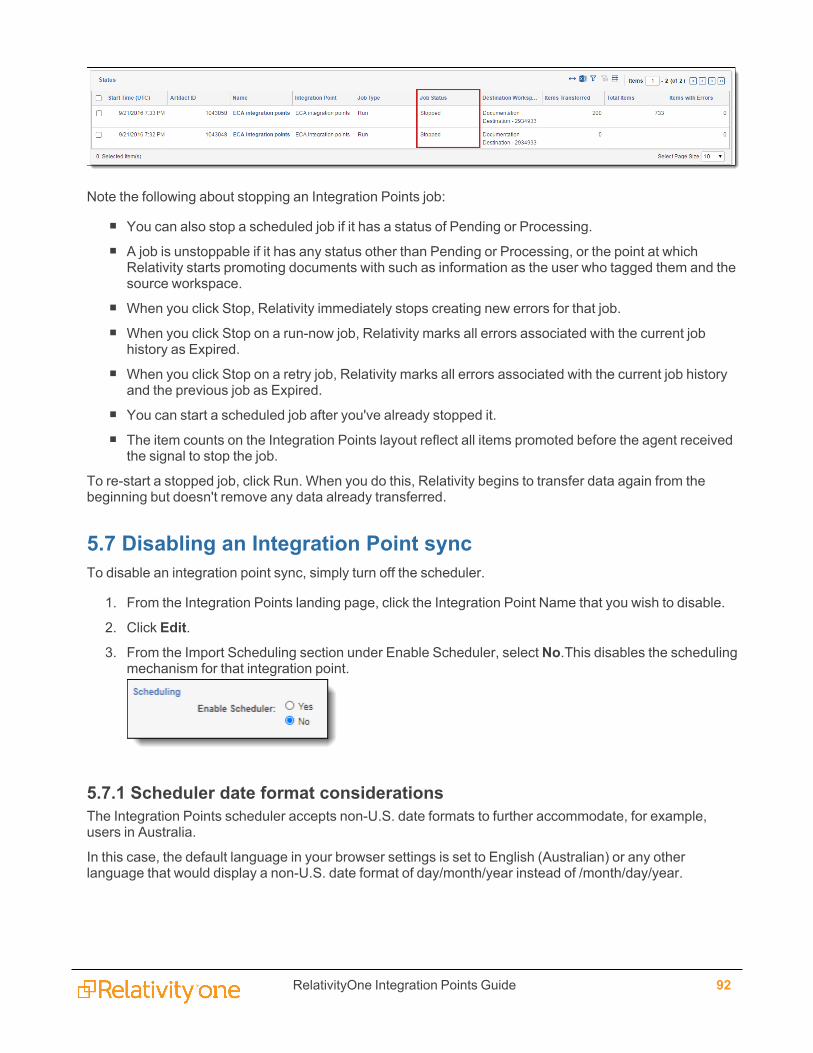
RelativityOne Integration Points Guide 92
Note the following about stopping an Integration Points job:
n You can also stop a scheduled job if it has a status of Pending or Processing.n A job is unstoppable if it has any status other than Pending or Processing, or the point at which
Relativity starts promoting documents with such as information as the user who tagged them and thesource workspace.
n When you click Stop, Relativity immediately stops creating new errors for that job.n When you click Stop on a run-now job, Relativity marks all errors associated with the current job
history as Expired.n When you click Stop on a retry job, Relativity marks all errors associated with the current job history
and the previous job as Expired.n You can start a scheduled job after you've already stopped it.n The item counts on the Integration Points layout reflect all items promoted before the agent received
the signal to stop the job.
To re-start a stopped job, click Run. When you do this, Relativity begins to transfer data again from thebeginning but doesn't remove any data already transferred.
5.7 Disabling an Integration Point syncTo disable an integration point sync, simply turn off the scheduler.
1. From the Integration Points landing page, click the Integration Point Name that you wish to disable.
2. Click Edit.3. From the Import Scheduling section under Enable Scheduler, select No.This disables the scheduling
mechanism for that integration point.
5.7.1 Scheduler date format considerationsThe Integration Points scheduler accepts non-U.S. date formats to further accommodate, for example,users in Australia.
In this case, the default language in your browser settings is set to English (Australian) or any otherlanguage that would display a non-U.S. date format of day/month/year instead of /month/day/year.
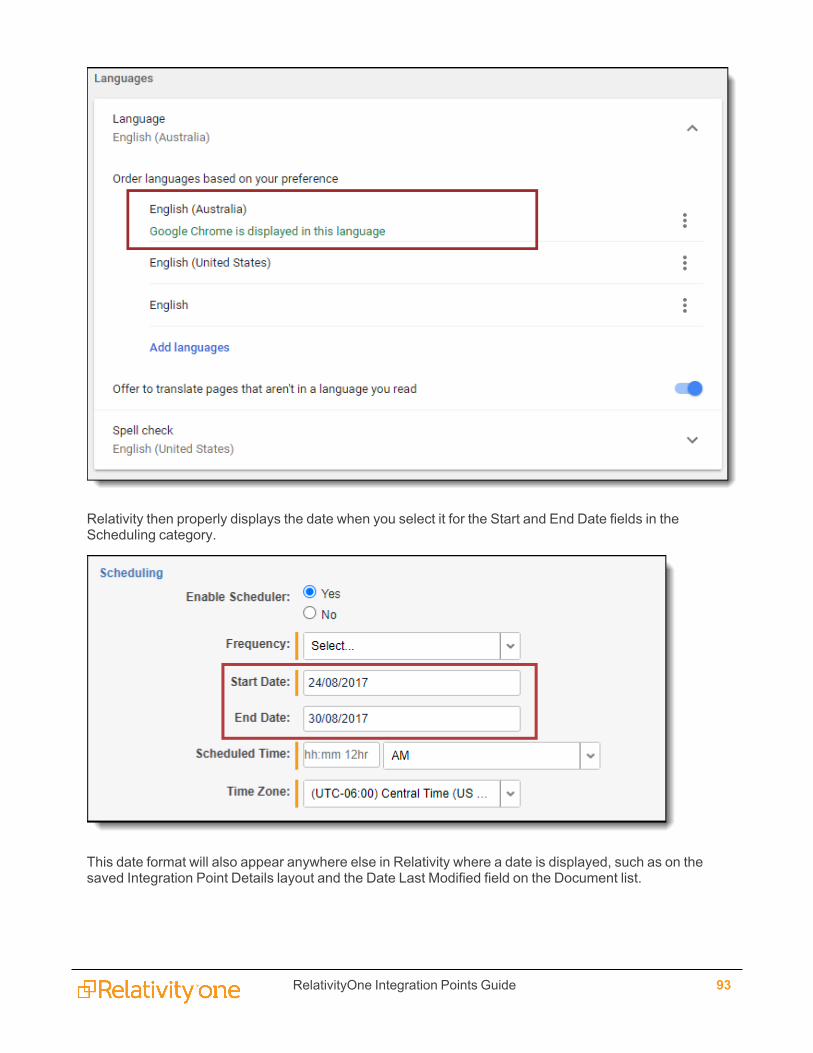
RelativityOne Integration Points Guide 93
Relativity then properly displays the date when you select it for the Start and End Date fields in theScheduling category.
This date format will also appear anywhere else in Relativity where a date is displayed, such as on thesaved Integration Point Details layout and the Date Last Modified field on the Document list.
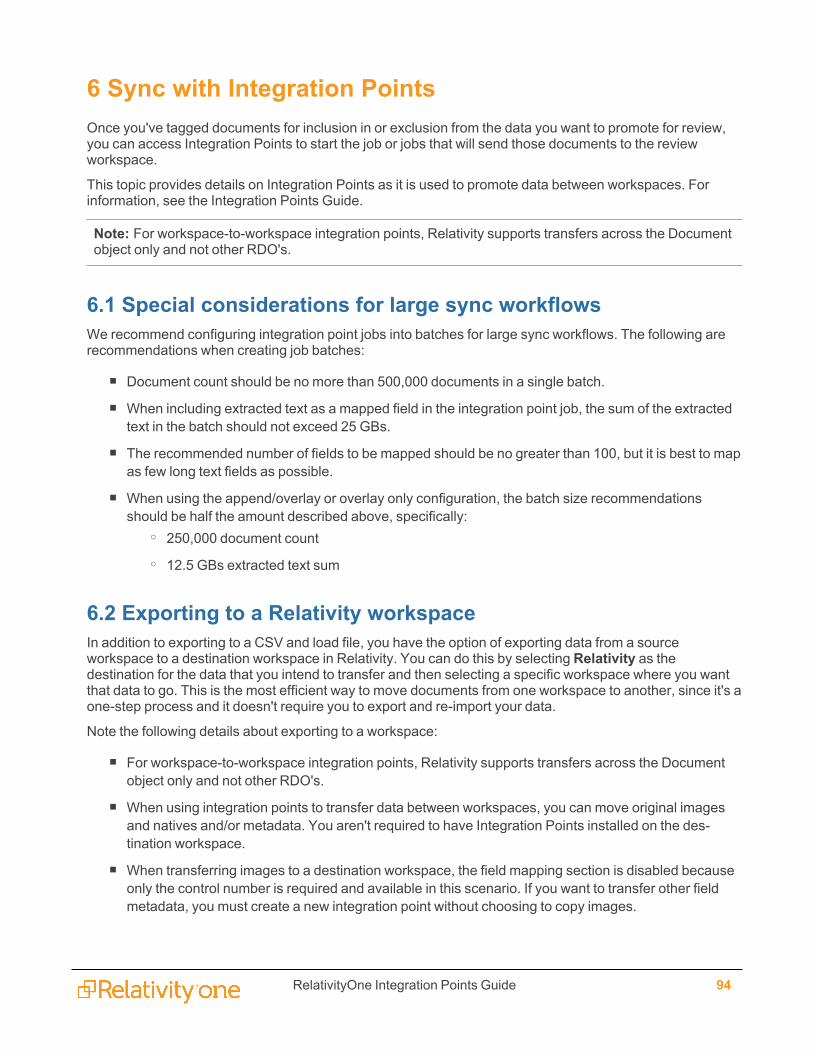
RelativityOne Integration Points Guide 94
6 Sync with Integration PointsOnce you've tagged documents for inclusion in or exclusion from the data you want to promote for review,you can access Integration Points to start the job or jobs that will send those documents to the reviewworkspace.
This topic provides details on Integration Points as it is used to promote data between workspaces. Forinformation, see the Integration Points Guide.
Note: For workspace-to-workspace integration points, Relativity supports transfers across the Documentobject only and not other RDO's.
6.1 Special considerations for large sync workflowsWe recommend configuring integration point jobs into batches for large sync workflows. The following arerecommendations when creating job batches:
n Document count should be no more than 500,000 documents in a single batch.
n When including extracted text as a mapped field in the integration point job, the sum of the extractedtext in the batch should not exceed 25 GBs.
n The recommended number of fields to be mapped should be no greater than 100, but it is best to mapas few long text fields as possible.
n When using the append/overlay or overlay only configuration, the batch size recommendationsshould be half the amount described above, specifically:
o 250,000 document counto 12.5 GBs extracted text sum
6.2 Exporting to a Relativity workspaceIn addition to exporting to a CSV and load file, you have the option of exporting data from a sourceworkspace to a destination workspace in Relativity. You can do this by selecting Relativity as thedestination for the data that you intend to transfer and then selecting a specific workspace where you wantthat data to go. This is the most efficient way to move documents from one workspace to another, since it's aone-step process and it doesn't require you to export and re-import your data.
Note the following details about exporting to a workspace:
n For workspace-to-workspace integration points, Relativity supports transfers across the Documentobject only and not other RDO's.
n When using integration points to transfer data between workspaces, you can move original imagesand natives and/or metadata. You aren't required to have Integration Points installed on the des-tination workspace.
n When transferring images to a destination workspace, the field mapping section is disabled becauseonly the control number is required and available in this scenario. If you want to transfer other fieldmetadata, you must create a new integration point without choosing to copy images.
RelativityOne Integration Points Guide 95
n Integration points uses the following delimiters to configure the Import API for the destinationworkspace. Other delimiters typically configured with the Import API, for example via the RDC, arenot utilized:
o Multi-value delimiter: ASCII 029
o Nested-value delimiter: ASCII 030
6.2.1 SetupTo create an integration point specifically for exporting a workspace, perform the following steps:
1. Navigate to the Integration Points tab.
2. Click New Integration Point.
3. Complete the following fields in the Setup category of the Create Integration Point layout:
n Name - the name of your integration for reference purposes.n Type - select Export to designate this as an export job. Selecting this sets the Source field to
be Relativity.n Source - this is automatically set to Relativity since you're exporting data out of a Relativity
workspace.n Destination - select Relativity. This is because you don't want to export directly to another
Relativity workspace, but instead want to leverage the RDC export functionality, which isavailable on a subsequent layout only if you select Load File here.
n Transferred Object - select Document.
n Profile - use this to complete the remaining Integration Points settings based on the settings ofa saved profile. This includes all of the fields in the Connect to Source layout, as well as fieldmappings. If no profiles exist in the workspace, you don't have the option of selecting them. Toapply a profile that you've already created, select it from the drop-down list. For moreinformation on profiles, see Integration Points profiles on page 12.
n Email Notification Recipients - enter the email addresses of those who should receivenotifications of whether the integration point export succeeded or failed. Use semi colons toseparate email addresses.
n Log Errors - select Yes or No to denote whether Relativity tracks item level errors.o If you select Yes, each job also logs any item level errors.o If you select No, Relativity doesn't log these item level errors.o Regardless of your selection, job-level errors are always recorded in Relativity.
n Enable Scheduler - gives you the option of scheduling additional exports. Selecting Yesmakes the following fields available:
o Frequency - the interval at which Relativity syncs this integration point.l Daily - select this option to sync once every day.l Weekly - select this option to sync on a weekly basis. You can specify how oftenin the Reoccur field, in which you'll provide a number value in the Every # week(s) choice. You can then specify on which day of the week the sync will take placeby checking any of the days of the week listed.
RelativityOne Integration Points Guide 96
l Monthly - select the day of the month that you want this integration point to synconce every month.
l Reoccur - enter the number of month(s) in which this integration point recurrentlysyncs.
l Send Onl Day _ the month - select the day of the month that you want thisintegration point to sync.
l The _ _ of the Month - select this option for this integration point to syncon the chosen day of every month. For example, "The Second Friday ofthe month."
o Start Date - the date that you want Integration Points to start syncing the data.o End Date - (Optional) the date that you want Integration Points to stop syncing the data.Leaving the End Date blank causes the Integration Point to run indefinitely at thescheduled interval.
o Scheduled Time - the time at which this integration point syncs. This time is local toyour PC, not to the server.
4. Click Next to advance to the Source Information layout.
6.2.2 Connect to SourceContinue create your import integration point by connecting Relativity to the data source. Follow the stepsbelow.
1. In the Connect to Source layout complete the following fields:
n Source - select a saved search or production from the drop-down list. specify that you want toselect a folder, from which you want export the data in your load file. You'll select this folderbelow from the folder structure in the Folder field. You'll also need to select a View from theViews field.
n Saved Search/Production - select an existing saved search or production set. If your sourceis a saved search, click the ellipsis button for an alternative way to select a saved search.
n Destination Workspace - select an existing workspace to export your saved search orproduction to.
n Location - select a folder or production set as the destination location.o Folder - select the drop-down menu to expand the folder structure, locate the folderfrom which you want to export the data, and select it. This field is only available if you'veselected Folder.
Note:When creating an integration point based on a profile, if you change the savedsearch, folder, or production set on the Setup layout, the fields listed in the SelectedFields window below are not updated to reflect the new source that you selected. Ifyou're not using a profile to creating the integration point, these fields are updated toreflect the newly selected source.
o Production Set - select a production set to export the data to. Click the plus sign tocreate a new production set.
RelativityOne Integration Points Guide 97
n Create Saved Search - select Yes to create a saved search in the destination workspace.This saved search's name will take the name given to the integration point.
2. Click Next to advance to the Destination Information layout.
6.2.3 Map FieldsMap the attributes or fields so that Integration Points imports the targeted data into specific Relativity fields.
1. In theMap Fields wizard, you have the following options for mapping fields:n Use the Shift + click and Ctrl + click method to select multiple fields at a time, similar to field
mapping in the Relativity Desktop Client.
n Use the single and double arrows or double-click a field to move selected fields betweencolumns.
n The field names in the Destination column include the type of each field listed.
n Click theMap Fields button between the Source and Destination columns to automaticallymap all fields with matching names. If you have Destination fields that are mapped to Fields inthe Field Catalog, Relativity tries to find name matches between these Catalog Fields, as well.
Notes: If the WebAPIPath instance setting in the kCura.IntegrationPoints section isn't con-figured correctly after upgrade or installation, the Source field list is empty because it can'treturn any attributes, and you aren't able to map fields.
Note: You don’t need to map all attributes or fields. Only the Unique Identifier and ObjectIdentifier are required. The Unique Identifier should contain a value that no other item in theworkspace contains. For example, use the GUID or distinguishedName attribute. The ObjectIdentifier is the specific field on the object that holds the displayed identifier, which might notbe unique. For example, the Full Name field is the Object Identifier of the Entity RDO but itmight not be unique. These two identifier values can be the same.
2. Complete the following Import Settings on the Map Fields layout:n Overwrite - determines how the system overwrites records once you promote data to the
review workspace. This field provides the following choices:o Append Only - promote only new records into the review workspace.o Overlay Only - update existing records only in the review workspace. Any documentswith the same workspace identifier are overlaid. This field acts as a link indicating toRelativity where to import the data. When you select this or Append/Overlay, you mustcomplete the Multi-Select Field Overlay Behavior field described below.
o Append/Overlay - adds new records to the review workspace and overlays data onexisting records. When you select this or Overlay Only, you must complete the Multi-Select Field Overlay Behavior field described below. You aren't able to create folders orre-folder documents when you select Append/Overlay.
n Copy Images - choose to copy, or not copy, images to the destination workspace. SelectingYes will copy images to your destination workspace. When yes is selected, an Image Pre-cedence field needs to be completed. Selecting No won't copy images to your destination work-space. When no is selected, a Copy Native Files needs to be completed.
RelativityOne Integration Points Guide 98
o Image Precedence - selectOriginal Images or Produced Images too Copy Native Files - select Physical Files, Links Only, or No to copy any native files,links to the native files, or nothing while syncing data between the source and des-tination workspaces.
l Select No to not create additional copies of your natives. Doing this maintains asingle copy of that data file no matter how many times you use the document inyour workspace.
l You have the option of selecting No for an initial run of an integration point andthen Yes for a subsequent run. Doing this saves you time on the initial job whilethen retaining copies of the native files on the final job.
l The benefit of selecting No for this field is that you save on storage and speed, asit tells the system to look for a file path in the source workspace.When you copy natives, Relativity makes a copy of all the files in the source folderon the hard drive or network share, adds those copies to the EDDS repository,sets the InRepository column on the File database table to 1(true) to indicate thata copy exists, and updates the Location column on the File table to list the newcopied location. Relativity then refers to the new location when facilitating integ-ration points or processing jobs.
o Use Folder Path Information - use a metadata field to build the folder structure for thedocuments that you promote to the review workspace.
l Select Read From Field or Read From Folder Tree to use a metadata field tobuild the folder structure for the documents that you promote to the review work-space. Selecting either makes the Folder Path Information field required below.
l Select No if you don't want to build a folder structure based on metadata. In thiscase, Relativity loads all documents directly into the folder indicated by the pro-mote destination, and you create no new folders in the destination workspace.
l You have the option of creating folders or re-foldering documents when youselect Append/Overlay for the Overwrite field.
l You have the option of re-foldering documents for the Overwrite field through theMove Existing Documents field below.
o Folder Path Information - specify a metadata field to build the folder structure for thedocuments that you promote to the review workspace.
o Move Existing Documents - re-folder documents that were previously imported intothe destination workspace, but were only placed in the root case folder and not to anysubfolders. This field is useful for situations in which you want to add new data to the des-tination workspace while overlaying existing data.
l Select Yes to move existing documents into the folders provided in the FolderPath Information field. For example, you previously imported custodian SallySmith's files into the destination workspace's root folder; now, in addition to pla-cing the documents from the saved search specified in this integration point intheir subfolder, you also want to move those previously migrated documents into
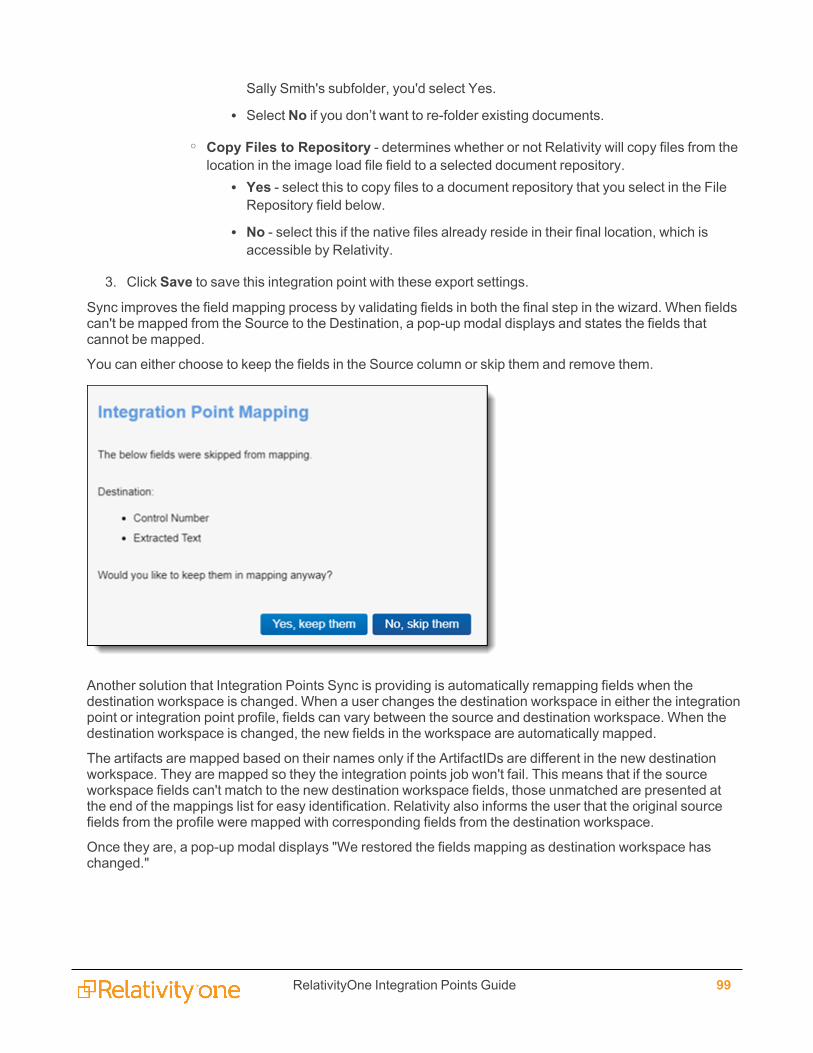
RelativityOne Integration Points Guide 99
Sally Smith's subfolder, you'd select Yes.
l Select No if you don’t want to re-folder existing documents.
o Copy Files to Repository - determines whether or not Relativity will copy files from thelocation in the image load file field to a selected document repository.
l Yes - select this to copy files to a document repository that you select in the FileRepository field below.
l No - select this if the native files already reside in their final location, which isaccessible by Relativity.
3. Click Save to save this integration point with these export settings.
Sync improves the field mapping process by validating fields in both the final step in the wizard. When fieldscan't be mapped from the Source to the Destination, a pop-up modal displays and states the fields thatcannot be mapped.
You can either choose to keep the fields in the Source column or skip them and remove them.
Another solution that Integration Points Sync is providing is automatically remapping fields when thedestination workspace is changed. When a user changes the destination workspace in either the integrationpoint or integration point profile, fields can vary between the source and destination workspace. When thedestination workspace is changed, the new fields in the workspace are automatically mapped.
The artifacts are mapped based on their names only if the ArtifactIDs are different in the new destinationworkspace. They are mapped so they the integration points job won't fail. This means that if the sourceworkspace fields can't match to the new destination workspace fields, those unmatched are presented atthe end of the mappings list for easy identification. Relativity also informs the user that the original sourcefields from the profile were mapped with corresponding fields from the destination workspace.
Once they are, a pop-up modal displays "We restored the fields mapping as destination workspace haschanged."
RelativityOne Integration Points Guide 100
6.3 Mapping saved searchesThe Map Saved Searches button automatically maps the fields from the saved search. It also maps theobject identifier fields, even when such field isn't selected in the saved search. If any unsupported fields aremanually mapped, clicking the Save button displays a pop-up modal stating that the job might fail.
Once Relativity saves the integration point, you'll be able to run it and export the data based on the settingsyou specified. See Sync with Integration Points on page 94 for details.
6.4 Working with promoted documentsTo view the documents you promoted to the review workspace, perform the following steps:
1. Navigate to the destination workspace.
2. Select the Saved Search browser and select the search you created to bring back documents thatwere promoted from the source workspace.
3. Note the following fields on the saved search view:n Relativity Source Case - the name of the workspace in which you tagged documents for inclu-
sion and exclusion and from which you promoted your tagged documents to the review work-space.
n Relativity Source Job - the name of the Integration Point that you used to promote taggeddocuments to the review workspace.
You can now review these documents and apply coding decisions for responsiveness and/or issuesdesignation.
6.4.1 Reusing coding decisionsYou can re-use the coding decisions you made on reviewed documents and promote them back into thesource workspace through another Integration Point. For example, you could run another promote job toconduct a privilege overlay on documents in the source workspace.
To do this, perform the following steps:
1. Select the saved search you created to promote documents back to the source workspace.
2. Navigate to the Integration Points tab.
3. Create a new integration point that specifies the following values, which differ from those you enteredfor the promote job you ran previously:
a. Destination Workspace - select the original source workspace, specifically the workspacefrom which you previously promoted documents to the review workspace.
b. Saved Search - select the saved search you created to promote documents back to the ECA(source) workspace.
c. Field Mappings - map only Control Number (Object Identifier) and Privilege Designation.
d. Overwrite - selectOverlay Only.
4. Click Run.
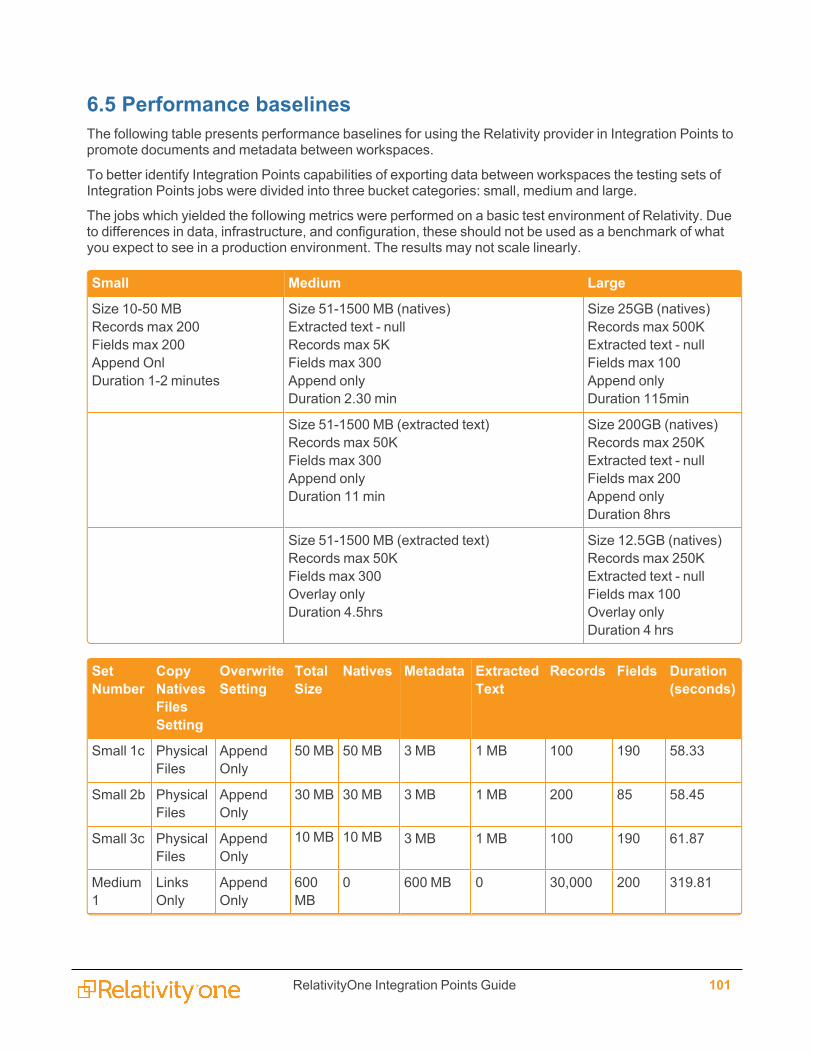
RelativityOne Integration Points Guide 101
6.5 Performance baselinesThe following table presents performance baselines for using the Relativity provider in Integration Points topromote documents and metadata between workspaces.
To better identify Integration Points capabilities of exporting data between workspaces the testing sets ofIntegration Points jobs were divided into three bucket categories: small, medium and large.
The jobs which yielded the following metrics were performed on a basic test environment of Relativity. Dueto differences in data, infrastructure, and configuration, these should not be used as a benchmark of whatyou expect to see in a production environment. The results may not scale linearly.
Small Medium Large
Size 10-50 MBRecords max 200Fields max 200Append OnlDuration 1-2 minutes
Size 51-1500 MB (natives)Extracted text - nullRecords max 5KFields max 300Append onlyDuration 2.30 min
Size 25GB (natives)Records max 500KExtracted text - nullFields max 100Append onlyDuration 115min
Size 51-1500 MB (extracted text)Records max 50KFields max 300Append onlyDuration 11 min
Size 200GB (natives)Records max 250KExtracted text - nullFields max 200Append onlyDuration 8hrs
Size 51-1500 MB (extracted text)Records max 50KFields max 300Overlay onlyDuration 4.5hrs
Size 12.5GB (natives)Records max 250KExtracted text - nullFields max 100Overlay onlyDuration 4 hrs
SetNumber
CopyNativesFilesSetting
OverwriteSetting
TotalSize
Natives Metadata ExtractedText
Records Fields Duration(seconds)
Small 1c PhysicalFiles
AppendOnly
50 MB 50 MB 3 MB 1 MB 100 190 58.33
Small 2b PhysicalFiles
AppendOnly
30 MB 30 MB 3 MB 1 MB 200 85 58.45
Small 3c PhysicalFiles
AppendOnly
10 MB 10 MB 3 MB 1 MB 100 190 61.87
Medium1
LinksOnly
AppendOnly
600MB
0 600 MB 0 30,000 200 319.81
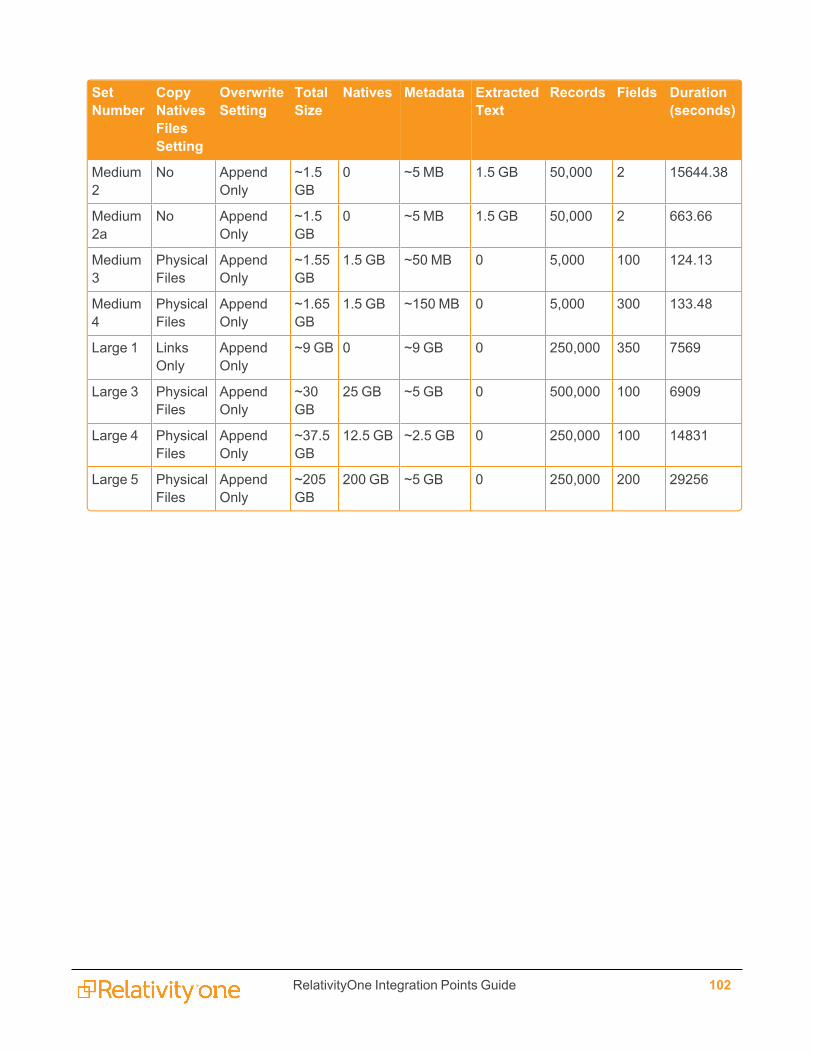
RelativityOne Integration Points Guide 102
SetNumber
CopyNativesFilesSetting
OverwriteSetting
TotalSize
Natives Metadata ExtractedText
Records Fields Duration(seconds)
Medium2
No AppendOnly
~1.5GB
0 ~5 MB 1.5 GB 50,000 2 15644.38
Medium2a
No AppendOnly
~1.5GB
0 ~5 MB 1.5 GB 50,000 2 663.66
Medium3
PhysicalFiles
AppendOnly
~1.55GB
1.5 GB ~50 MB 0 5,000 100 124.13
Medium4
PhysicalFiles
AppendOnly
~1.65GB
1.5 GB ~150 MB 0 5,000 300 133.48
Large 1 LinksOnly
AppendOnly
~9 GB 0 ~9 GB 0 250,000 350 7569
Large 3 PhysicalFiles
AppendOnly
~30GB
25 GB ~5 GB 0 500,000 100 6909
Large 4 PhysicalFiles
AppendOnly
~37.5GB
12.5 GB ~2.5 GB 0 250,000 100 14831
Large 5 PhysicalFiles
AppendOnly
~205GB
200 GB ~5 GB 0 250,000 200 29256
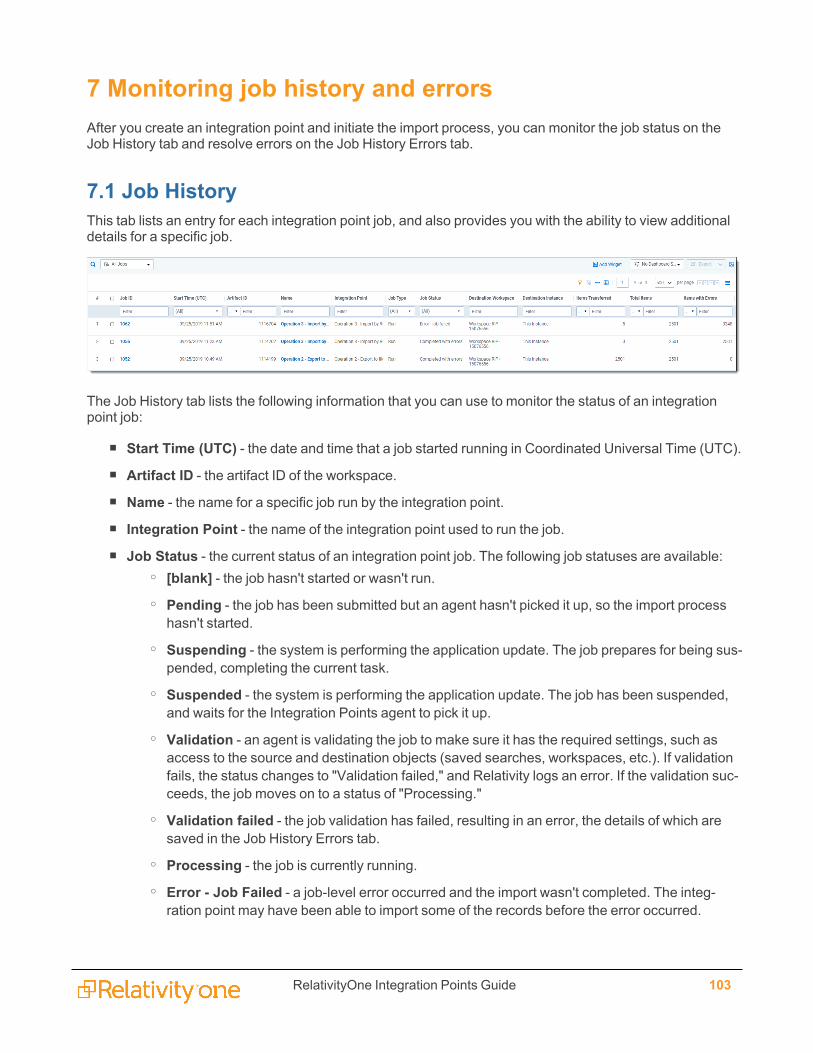
RelativityOne Integration Points Guide 103
7 Monitoring job history and errorsAfter you create an integration point and initiate the import process, you can monitor the job status on theJob History tab and resolve errors on the Job History Errors tab.
7.1 Job HistoryThis tab lists an entry for each integration point job, and also provides you with the ability to view additionaldetails for a specific job.
The Job History tab lists the following information that you can use to monitor the status of an integrationpoint job:
n Start Time (UTC) - the date and time that a job started running in Coordinated Universal Time (UTC).n Artifact ID - the artifact ID of the workspace.
n Name - the name for a specific job run by the integration point.n Integration Point - the name of the integration point used to run the job.n Job Status - the current status of an integration point job. The following job statuses are available:
o [blank] - the job hasn't started or wasn't run.o Pending - the job has been submitted but an agent hasn't picked it up, so the import processhasn't started.
o Suspending - the system is performing the application update. The job prepares for being sus-pended, completing the current task.
o Suspended - the system is performing the application update. The job has been suspended,and waits for the Integration Points agent to pick it up.
o Validation - an agent is validating the job to make sure it has the required settings, such asaccess to the source and destination objects (saved searches, workspaces, etc.). If validationfails, the status changes to "Validation failed," and Relativity logs an error. If the validation suc-ceeds, the job moves on to a status of "Processing."
o Validation failed - the job validation has failed, resulting in an error, the details of which aresaved in the Job History Errors tab.
o Processing - the job is currently running.o Error - Job Failed - a job-level error occurred and the import wasn't completed. The integ-ration point may have been able to import some of the records before the error occurred.
RelativityOne Integration Points Guide 104
o Completed with Errors - the import job completed but at least one item-level error occurred. Ifyou set the Log Errors field to Yes for the integration point, you can view the item-level errors inthe section called Job History Errors on the Job Details layout. See Viewing job history detailsbelow.
o Completed - the import job completed without any item-level errors.n Destination Workspace - the workspace specified as the destination for the transferred files.n Items Transferred - the number of records successfully transferred when the job ran.n Total Items - the total number of items originally designated to be transferred, including those that
ended up having errors.
n Items with Errors - the number of records that the integration point failed to import due to item-levelerrors.
7.1.1 Viewing job history detailsTo view additional history information, click the name of a specific job listed on the Job History tab. The JobDetails layout displays basic job information, import statistics, and a detailed list of errors.
The Job History Error section always logs job-level errors. If you set the Log Errors field to Yes, then it alsologs item-level errors.
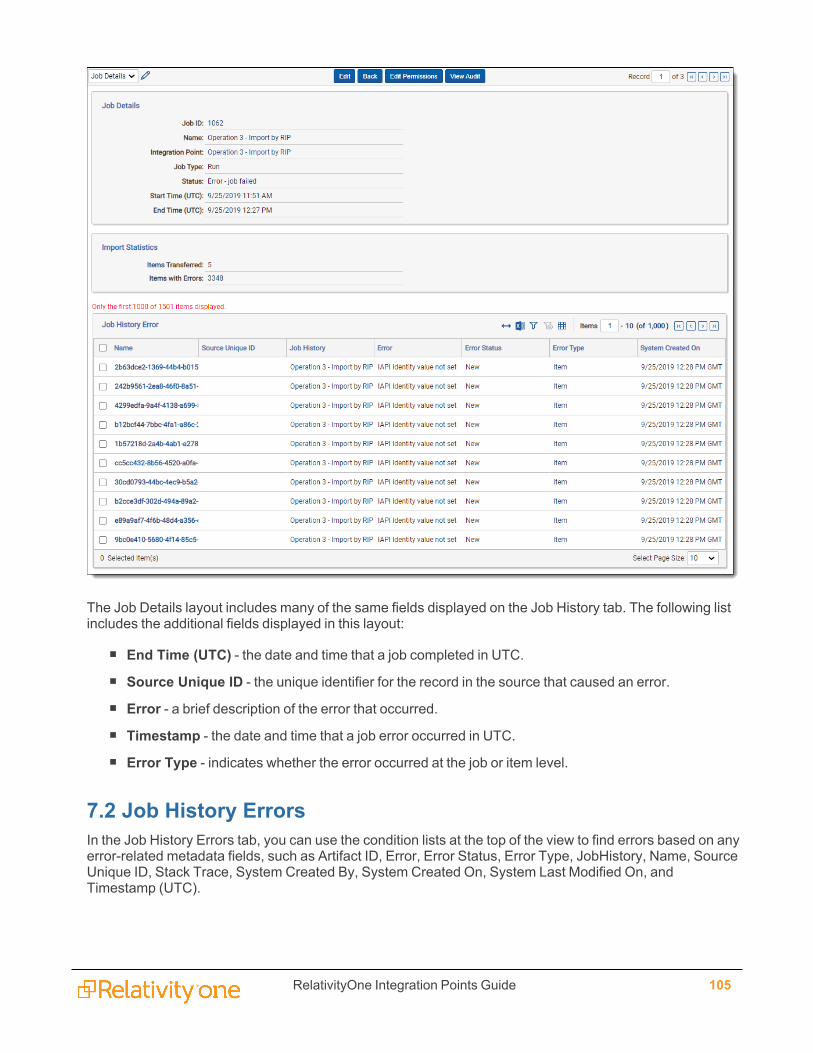
RelativityOne Integration Points Guide 105
The Job Details layout includes many of the same fields displayed on the Job History tab. The following listincludes the additional fields displayed in this layout:
n End Time (UTC) - the date and time that a job completed in UTC.n Source Unique ID - the unique identifier for the record in the source that caused an error.
n Error - a brief description of the error that occurred.n Timestamp - the date and time that a job error occurred in UTC.n Error Type - indicates whether the error occurred at the job or item level.
7.2 Job History ErrorsIn the Job History Errors tab, you can use the condition lists at the top of the view to find errors based on anyerror-related metadata fields, such as Artifact ID, Error, Error Status, Error Type, JobHistory, Name, SourceUnique ID, Stack Trace, System Created By, System Created On, System Last Modified On, andTimestamp (UTC).
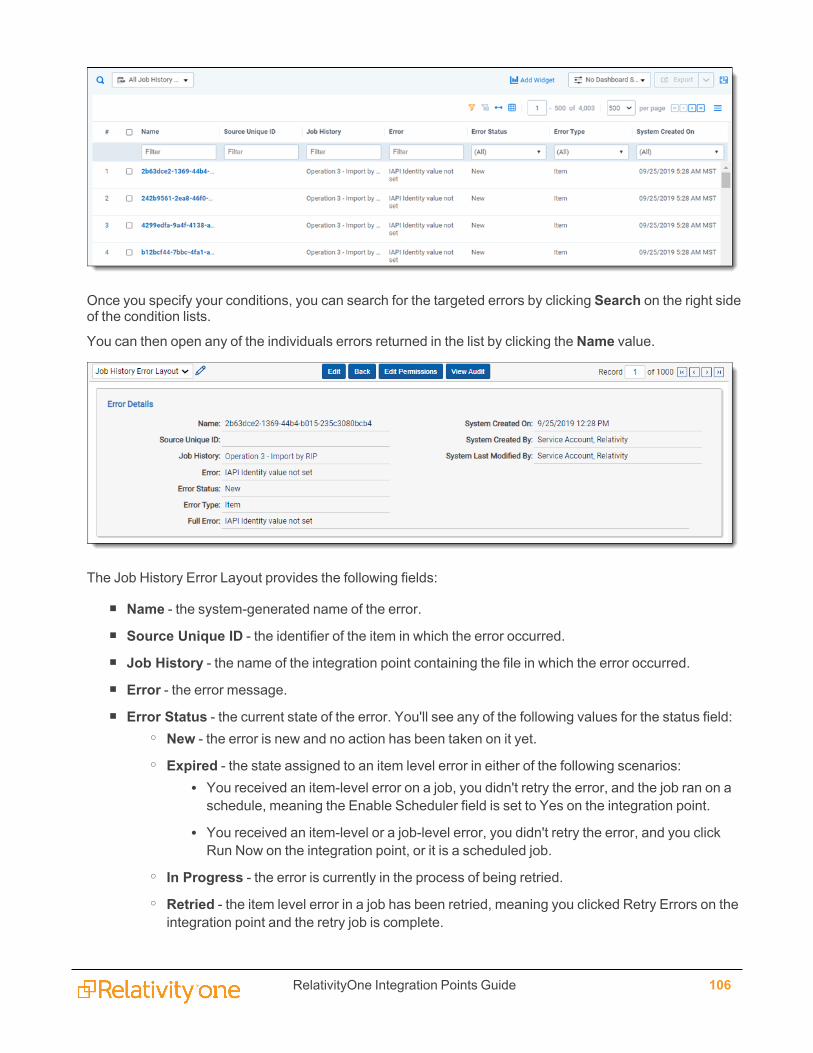
RelativityOne Integration Points Guide 106
Once you specify your conditions, you can search for the targeted errors by clicking Search on the right sideof the condition lists.
You can then open any of the individuals errors returned in the list by clicking the Name value.
The Job History Error Layout provides the following fields:
n Name - the system-generated name of the error.n Source Unique ID - the identifier of the item in which the error occurred.
n Job History - the name of the integration point containing the file in which the error occurred.n Error - the error message.n Error Status - the current state of the error. You'll see any of the following values for the status field:
o New - the error is new and no action has been taken on it yet.o Expired - the state assigned to an item level error in either of the following scenarios:
l You received an item-level error on a job, you didn't retry the error, and the job ran on aschedule, meaning the Enable Scheduler field is set to Yes on the integration point.
l You received an item-level or a job-level error, you didn't retry the error, and you clickRun Now on the integration point, or it is a scheduled job.
o In Progress - the error is currently in the process of being retried.o Retried - the item level error in a job has been retried, meaning you clicked Retry Errors on theintegration point and the retry job is complete.
RelativityOne Integration Points Guide 107
n Error Type - an indicator of whether the error is item or job-level.
n Full Error- the error message with details, including a stack trace of the error, when available.n System Created On - the date and time at which the error was created by the agent during the integ-
ration point job.
n System Created By - the agent that created the error during the integration point job.n System Last Modified By - the agent that last updated the status value of the error.
With the information provided in the Job History Errors Layout, you can identify those files on which errorsoccurred. You can then access those files to manually address the causes of those errors. From there, youcan return to the integration points console and retry the errors.
7.2.1 Item-level versus job-level errorsNote the following differences in the way Relativity handles item-level and job-level errors.
Relativity handles a mix of item-level and job-level errors in the following way:
n When you click Run Now on an integration point that contains item and job-level errors, the entire jobis re-run and all errors are marked as Expired.
n When you click Retry Errors on an integration point that contains item and job-level errors, the entirejob is rerun and Relativity assigns a value of Expired to the item-level errors while job-level errors aremarked as In Progress and then Retried.
Relativity handles item-level errors in the following way:
n When you click Run Now, the entire job is re-run, and Relativity assigns a value of Expired to theitem-level errors.
n When you click Retry Errors, Relativity assigns a value of Retried to the item-level errors and starts aretry job containing only those error documents.
Relativity handles job-level errors in the following way:
n It registers only one job-level error for the integration point.
n When you click Run Now, the entire job is re-run and Relativity assigns a value of Expired to the job-level error.
n The Retry Errors and Run Now buttons are both available.
n The Retry Error button re-runs the whole job, but the job-level error is marked as In progress and thenretried.
n The Run Now button re-runs the whole job, but the job-level error is marked as Expired.
Scheduled job is not inserted and an error is thrown that shows up in the errors tab in Admin mode that ascheduled job did not run for this integration because the job was already running.
7.3 Troubleshooting job history errorsRelativity provides informative and actionable error messages when you attempt to save and run anintegration point in any of the following situations:
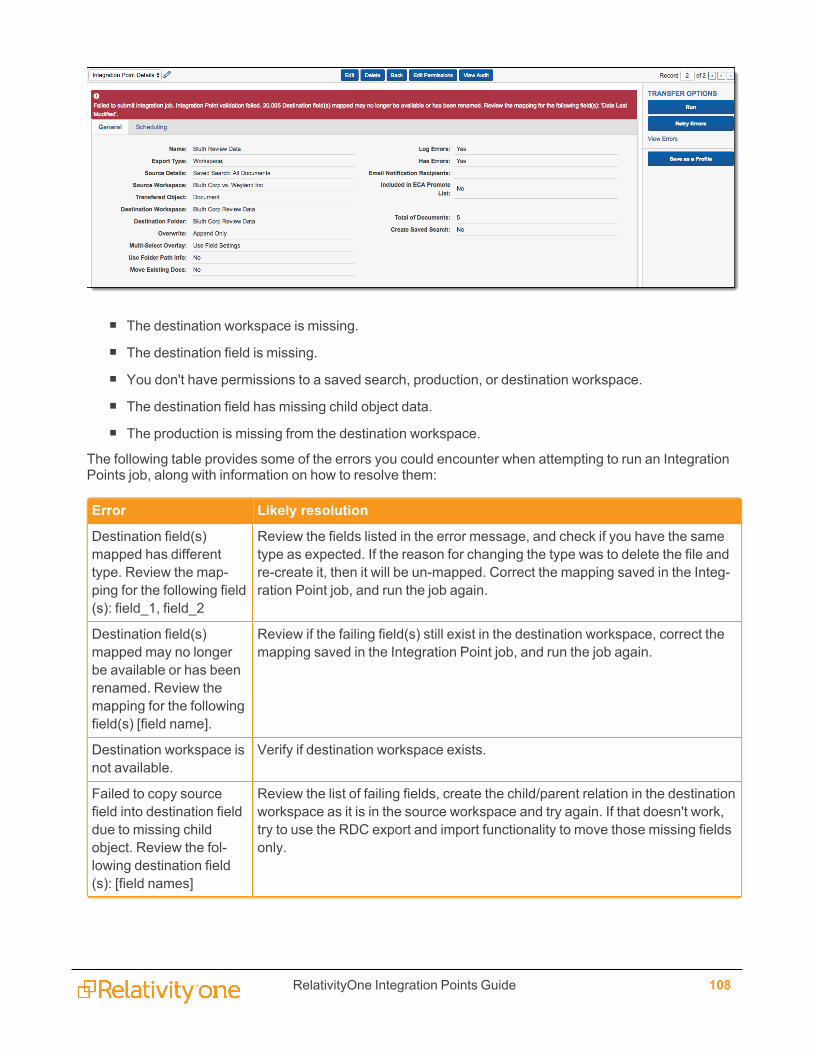
RelativityOne Integration Points Guide 108
n The destination workspace is missing.
n The destination field is missing.
n You don't have permissions to a saved search, production, or destination workspace.
n The destination field has missing child object data.
n The production is missing from the destination workspace.
The following table provides some of the errors you could encounter when attempting to run an IntegrationPoints job, along with information on how to resolve them:
Error Likely resolution
Destination field(s)mapped has differenttype. Review the map-ping for the following field(s): field_1, field_2
Review the fields listed in the error message, and check if you have the sametype as expected. If the reason for changing the type was to delete the file andre-create it, then it will be un-mapped. Correct the mapping saved in the Integ-ration Point job, and run the job again.
Destination field(s)mapped may no longerbe available or has beenrenamed. Review themapping for the followingfield(s) [field name].
Review if the failing field(s) still exist in the destination workspace, correct themapping saved in the Integration Point job, and run the job again.
Destination workspace isnot available.
Verify if destination workspace exists.
Failed to copy sourcefield into destination fielddue to missing childobject. Review the fol-lowing destination field(s): [field names]
Review the list of failing fields, create the child/parent relation in the destinationworkspace as it is in the source workspace and try again. If that doesn't work,try to use the RDC export and import functionality to move those missing fieldsonly.
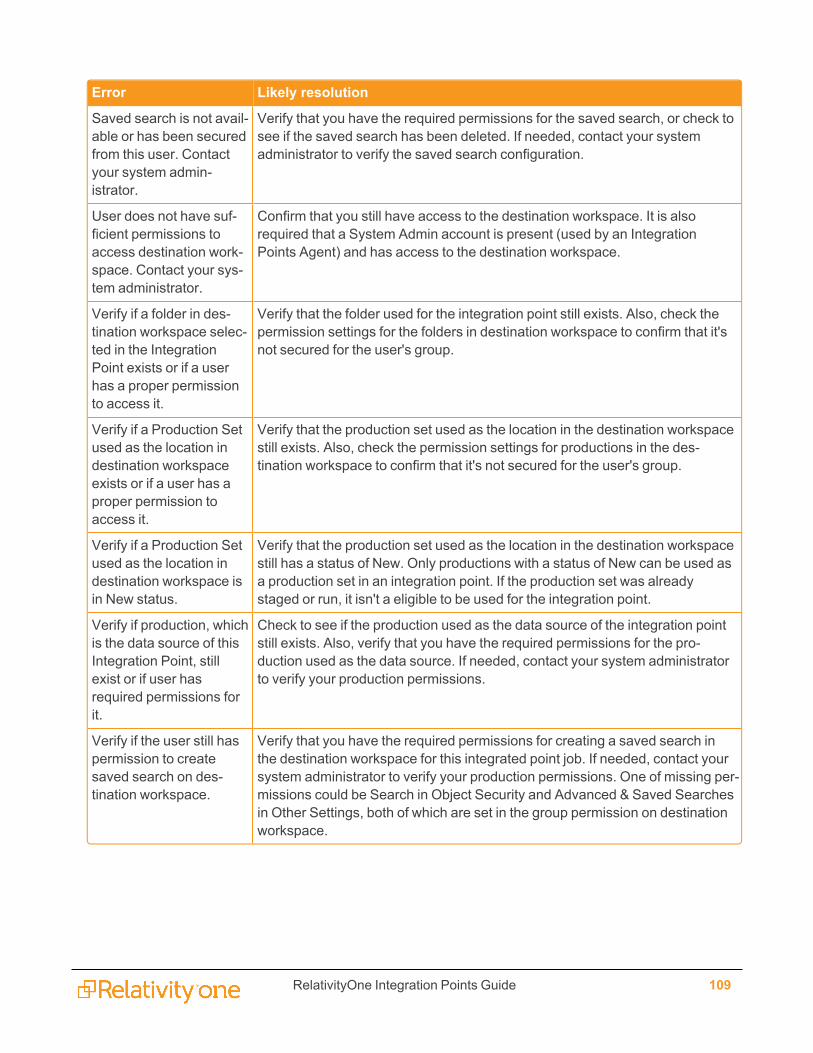
RelativityOne Integration Points Guide 109
Error Likely resolution
Saved search is not avail-able or has been securedfrom this user. Contactyour system admin-istrator.
Verify that you have the required permissions for the saved search, or check tosee if the saved search has been deleted. If needed, contact your systemadministrator to verify the saved search configuration.
User does not have suf-ficient permissions toaccess destination work-space. Contact your sys-tem administrator.
Confirm that you still have access to the destination workspace. It is alsorequired that a System Admin account is present (used by an IntegrationPoints Agent) and has access to the destination workspace.
Verify if a folder in des-tination workspace selec-ted in the IntegrationPoint exists or if a userhas a proper permissionto access it.
Verify that the folder used for the integration point still exists. Also, check thepermission settings for the folders in destination workspace to confirm that it'snot secured for the user's group.
Verify if a Production Setused as the location indestination workspaceexists or if a user has aproper permission toaccess it.
Verify that the production set used as the location in the destination workspacestill exists. Also, check the permission settings for productions in the des-tination workspace to confirm that it's not secured for the user's group.
Verify if a Production Setused as the location indestination workspace isin New status.
Verify that the production set used as the location in the destination workspacestill has a status of New. Only productions with a status of New can be used asa production set in an integration point. If the production set was alreadystaged or run, it isn't a eligible to be used for the integration point.
Verify if production, whichis the data source of thisIntegration Point, stillexist or if user hasrequired permissions forit.
Check to see if the production used as the data source of the integration pointstill exists. Also, verify that you have the required permissions for the pro-duction used as the data source. If needed, contact your system administratorto verify your production permissions.
Verify if the user still haspermission to createsaved search on des-tination workspace.
Verify that you have the required permissions for creating a saved search inthe destination workspace for this integrated point job. If needed, contact yoursystem administrator to verify your production permissions. One of missing per-missions could be Search in Object Security and Advanced & Saved Searchesin Other Settings, both of which are set in the group permission on destinationworkspace.
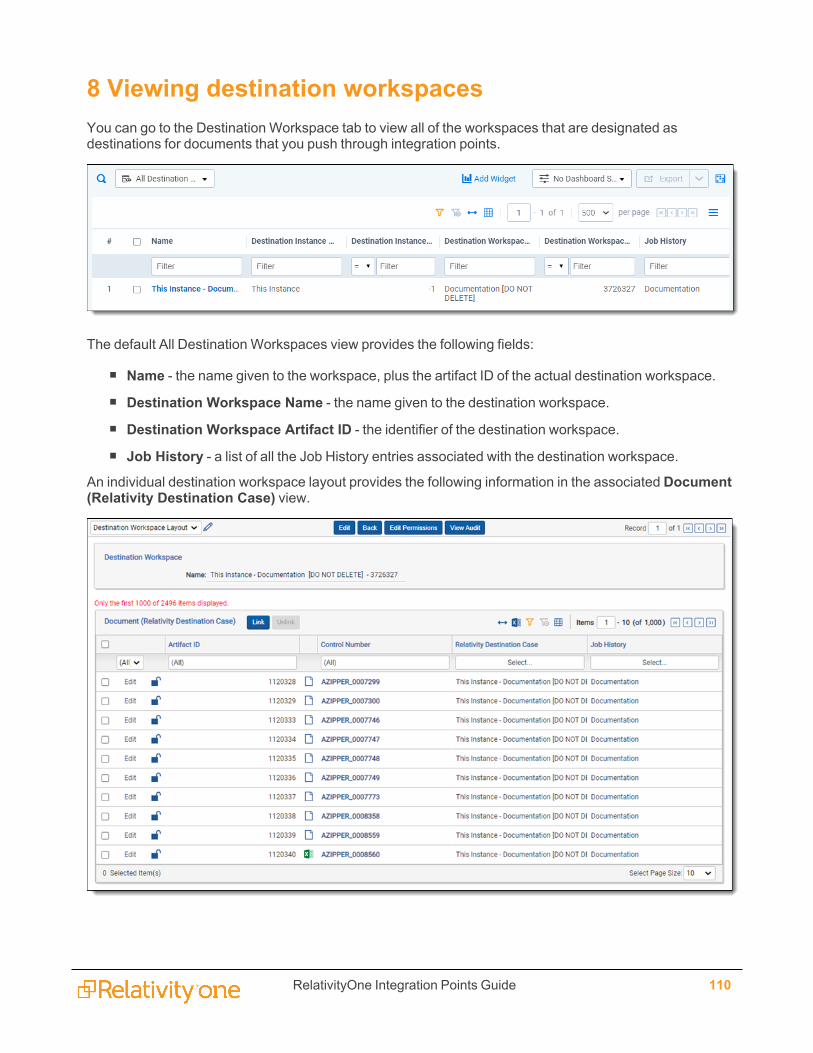
RelativityOne Integration Points Guide 110
8 Viewing destination workspacesYou can go to the Destination Workspace tab to view all of the workspaces that are designated asdestinations for documents that you push through integration points.
The default All Destination Workspaces view provides the following fields:
n Name - the name given to the workspace, plus the artifact ID of the actual destination workspace.
n Destination Workspace Name - the name given to the destination workspace.n Destination Workspace Artifact ID - the identifier of the destination workspace.
n Job History - a list of all the Job History entries associated with the destination workspace.
An individual destination workspace layout provides the following information in the associated Document(Relativity Destination Case) view.

RelativityOne Integration Points Guide 111
n ArtifactID - the identifier of the document.
n Control Number - the control number of the document.n Relativity Destination Case - a list of all the destination workspaces in which the document can be
found.
n Job History - a list of audited actions associated with the document.
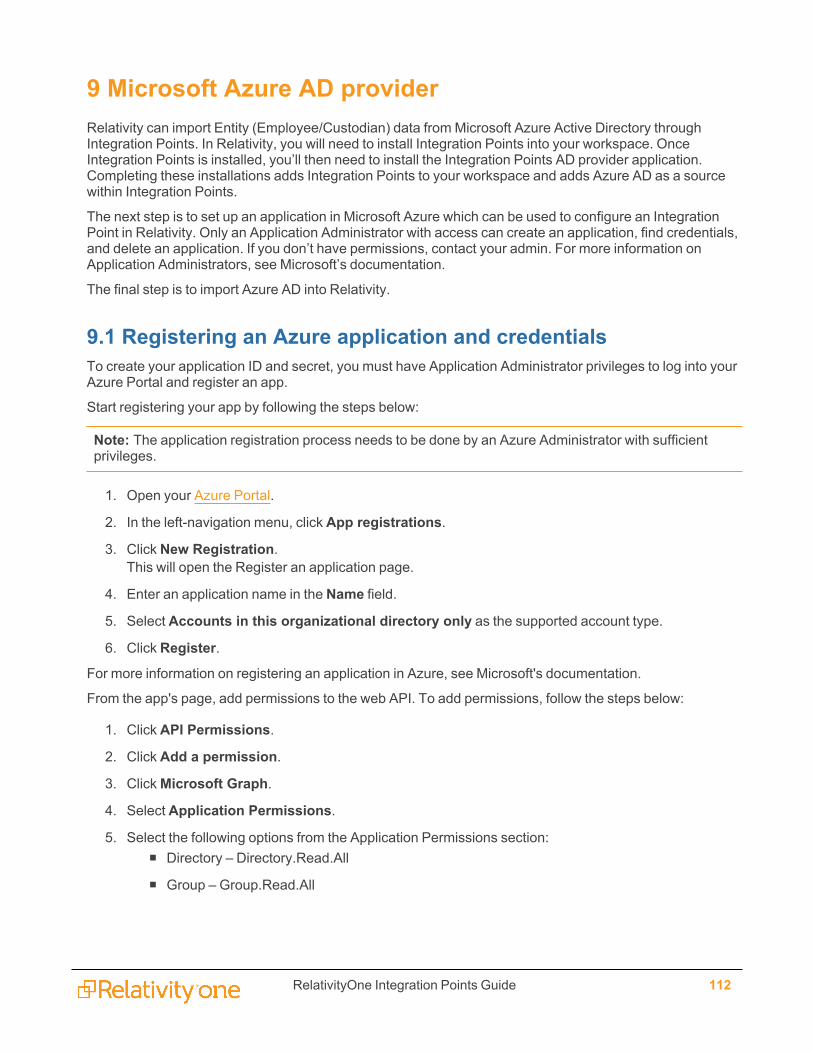
RelativityOne Integration Points Guide 112
9 Microsoft Azure AD providerRelativity can import Entity (Employee/Custodian) data from Microsoft Azure Active Directory throughIntegration Points. In Relativity, you will need to install Integration Points into your workspace. OnceIntegration Points is installed, you’ll then need to install the Integration Points AD provider application.Completing these installations adds Integration Points to your workspace and adds Azure AD as a sourcewithin Integration Points.
The next step is to set up an application in Microsoft Azure which can be used to configure an IntegrationPoint in Relativity. Only an Application Administrator with access can create an application, find credentials,and delete an application. If you don’t have permissions, contact your admin. For more information onApplication Administrators, see Microsoft’s documentation.
The final step is to import Azure AD into Relativity.
9.1 Registering an Azure application and credentialsTo create your application ID and secret, you must have Application Administrator privileges to log into yourAzure Portal and register an app.
Start registering your app by following the steps below:
Note: The application registration process needs to be done by an Azure Administrator with sufficientprivileges.
1. Open your Azure Portal.
2. In the left-navigation menu, click App registrations.
3. Click New Registration.This will open the Register an application page.
4. Enter an application name in the Name field.
5. Select Accounts in this organizational directory only as the supported account type.
6. Click Register.
For more information on registering an application in Azure, see Microsoft's documentation.
From the app's page, add permissions to the web API. To add permissions, follow the steps below:
1. Click API Permissions.
2. Click Add a permission.
3. ClickMicrosoft Graph.
4. Select Application Permissions.
5. Select the following options from the Application Permissions section:n Directory – Directory.Read.All
n Group – Group.Read.All
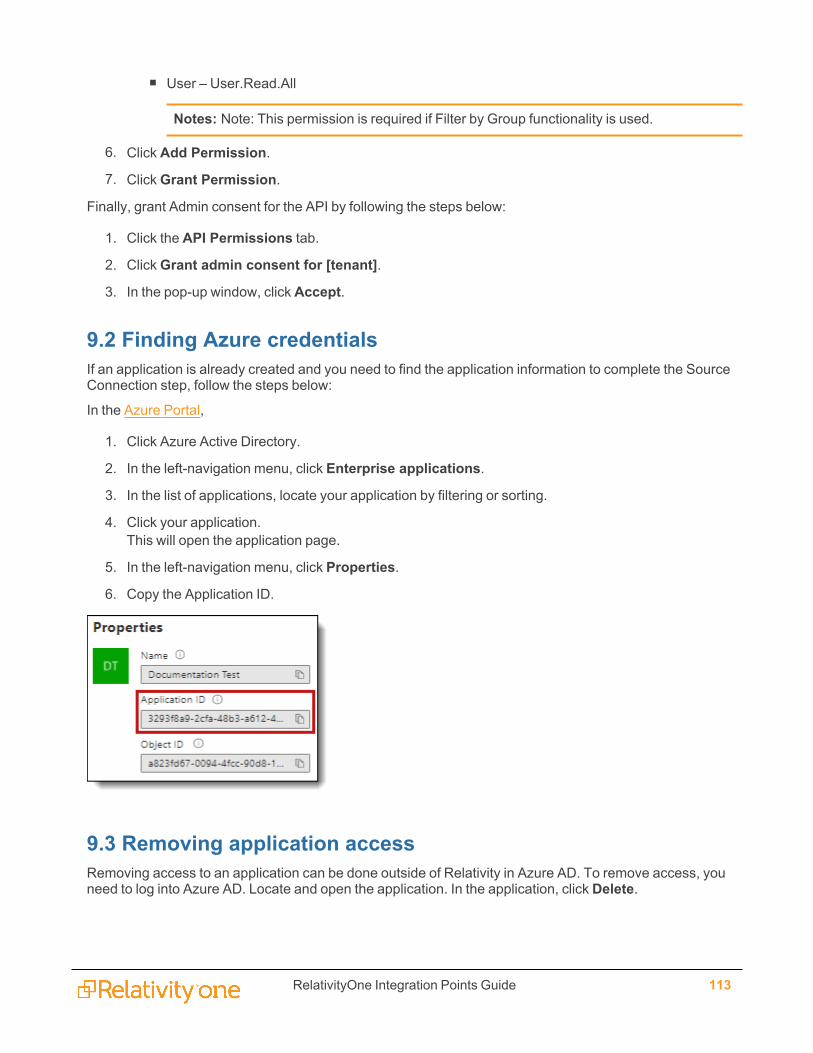
RelativityOne Integration Points Guide 113
n User – User.Read.All
Notes: Note: This permission is required if Filter by Group functionality is used.
6. Click Add Permission.
7. ClickGrant Permission.
Finally, grant Admin consent for the API by following the steps below:
1. Click the API Permissions tab.
2. ClickGrant admin consent for [tenant].
3. In the pop-up window, click Accept.
9.2 Finding Azure credentialsIf an application is already created and you need to find the application information to complete the SourceConnection step, follow the steps below:
In the Azure Portal,
1. Click Azure Active Directory.
2. In the left-navigation menu, click Enterprise applications.
3. In the list of applications, locate your application by filtering or sorting.
4. Click your application.This will open the application page.
5. In the left-navigation menu, click Properties.
6. Copy the Application ID.
9.3 Removing application accessRemoving access to an application can be done outside of Relativity in Azure AD. To remove access, youneed to log into Azure AD. Locate and open the application. In the application, click Delete.
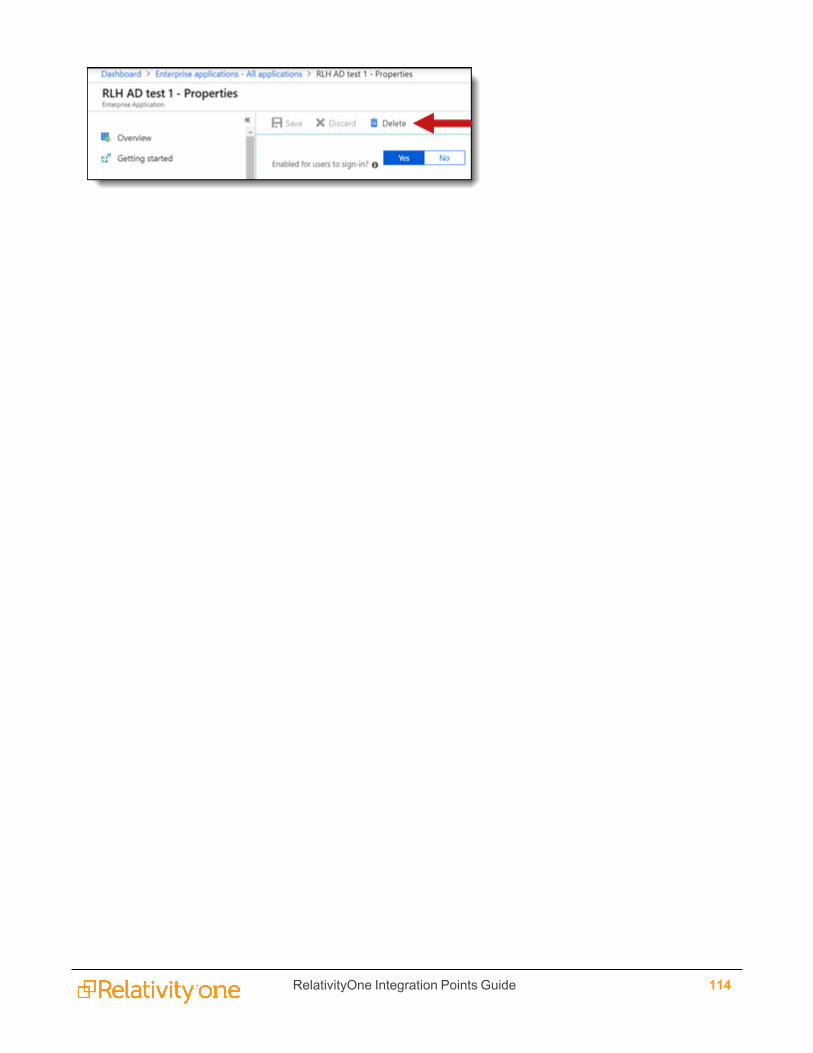
RelativityOne Integration Points Guide 114
RelativityOne Integration Points Guide 115
Proprietary RightsThis documentation (“Documentation”) and the software to which it relates (“Software”) belongs toRelativity ODA LLC and/or Relativity’s third party software vendors. Relativity grants written licenseagreements which contain restrictions. All parties accessing the Documentation or Software must: respectproprietary rights of Relativity and third parties; comply with your organization’s license agreement,including but not limited to license restrictions on use, copying, modifications, reverse engineering, andderivative products; and refrain from any misuse or misappropriation of this Documentation or Software inwhole or in part. The Software and Documentation is protected by the Copyright Act of 1976, as amended,and the Software code is protected by the Illinois Trade Secrets Act. Violations can involve substantialcivil liabilities, exemplary damages, and criminal penalties, including fines and possible imprisonment.
©2022. Relativity ODA LLC. All rights reserved. Relativity® is a registered trademark of RelativityODA LLC.