rebuilding a cast iron k-jetronic fuel distributor - k-jet
TRANSCRIPT
Rebuilding a Cast Iron K-Jetronic Fuel Distributor
It makes very little difference whether it is a 4, 6 or 8 cylinder fuel distributor. The importantdifference is whether it is an adjustable or non-adjustable type, and it just adds a few steps.
Find somewhere clean, with a bit of room, to disassemble, clean and rebuild your fuel distributor.
The photo's I am using are a 5cylinder Audi, but it makes no difference, it's just an example of what to do.
What do you need? Tools to pull the FD apart, Wire BrushSpanner for the bottom nut, T27 torx bit for the screws or a flat blade screw driver for very early FDs, Spanner for the system pressure valve, 10mm or 14mm for very early ones, 16mm for later ones, Seal pick, 1,000 grit wet & Dry paper, Loctite 515 or similar, Petroleum Jelly / Vaseline, Copper greaseBrake CleanerAnd a rebuild Kit (hopefully you bought one from me)
Start by giving the outside a bit of a clean off of loose dirt, paint... better to do it away form your 'clean rebuild area'.
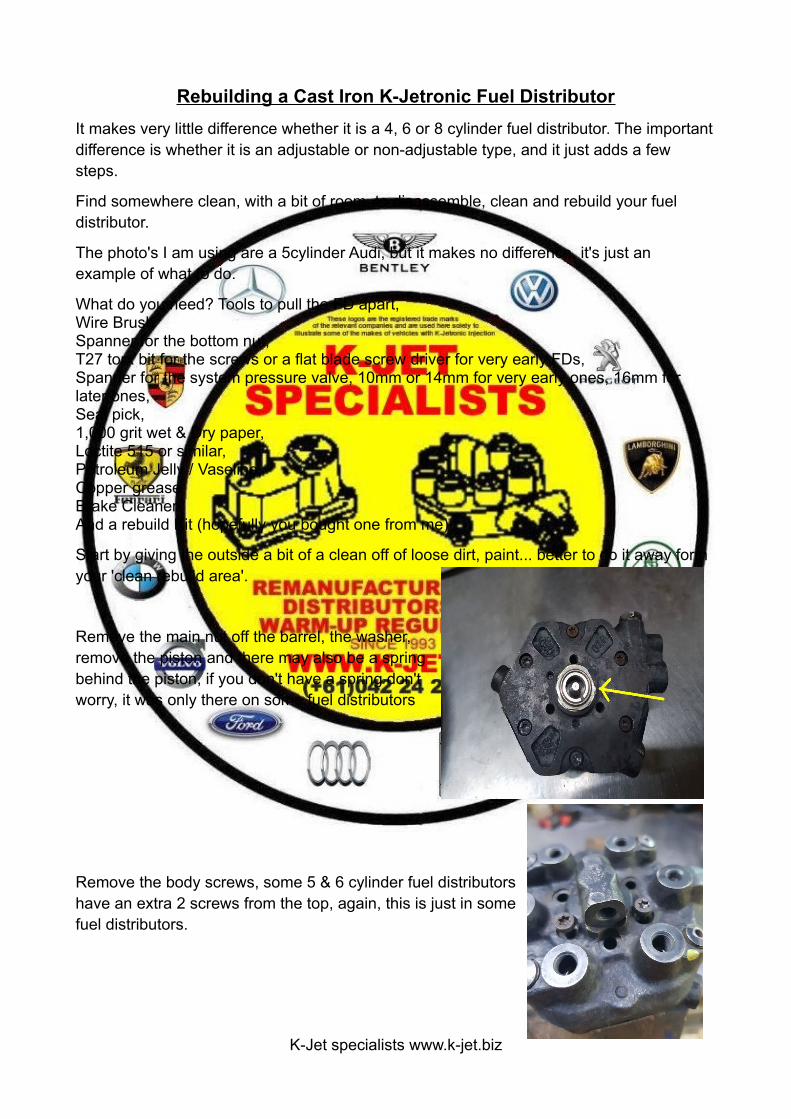
Remove the main nut off the barrel, the washer,remove the piston and there may also be a springbehind the piston, if you don't have a spring don'tworry, it was only there on some fuel distributors
Remove the body screws, some 5 & 6 cylinder fuel distributorshave an extra 2 screws from the top, again, this is just in somefuel distributors.
K-Jet specialists www.k-jet.biz
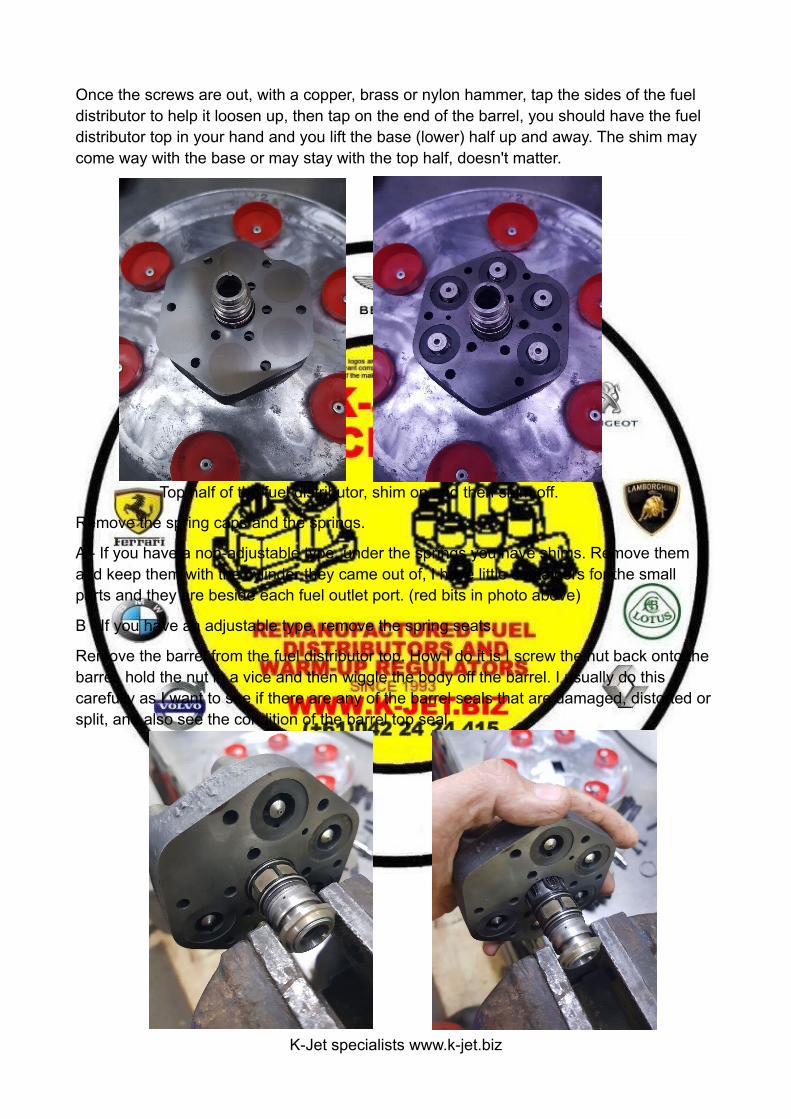
Once the screws are out, with a copper, brass or nylon hammer, tap the sides of the fuel distributor to help it loosen up, then tap on the end of the barrel, you should have the fuel distributor top in your hand and you lift the base (lower) half up and away. The shim may come way with the base or may stay with the top half, doesn't matter.
Top half of the fuel distributor, shim on and then shim off.
Remove the spring caps and the springs.
A - If you have a non-adjustable type, under the springs you have shims. Remove them and keep them with the cylinder they came out of, I have little containers for the small parts and they are beside each fuel outlet port. (red bits in photo above)
B - If you have an adjustable type, remove the spring seats.
Remove the barrel from the fuel distributor top. How I do it is I screw the nut back onto the barrel, hold the nut in a vice and then wiggle the body off the barrel. I usually do this carefully as I want to see if there are any of the barrel seals that are damaged, distorted or split, and also see the condition of the barrel top seal.
K-Jet specialists www.k-jet.biz
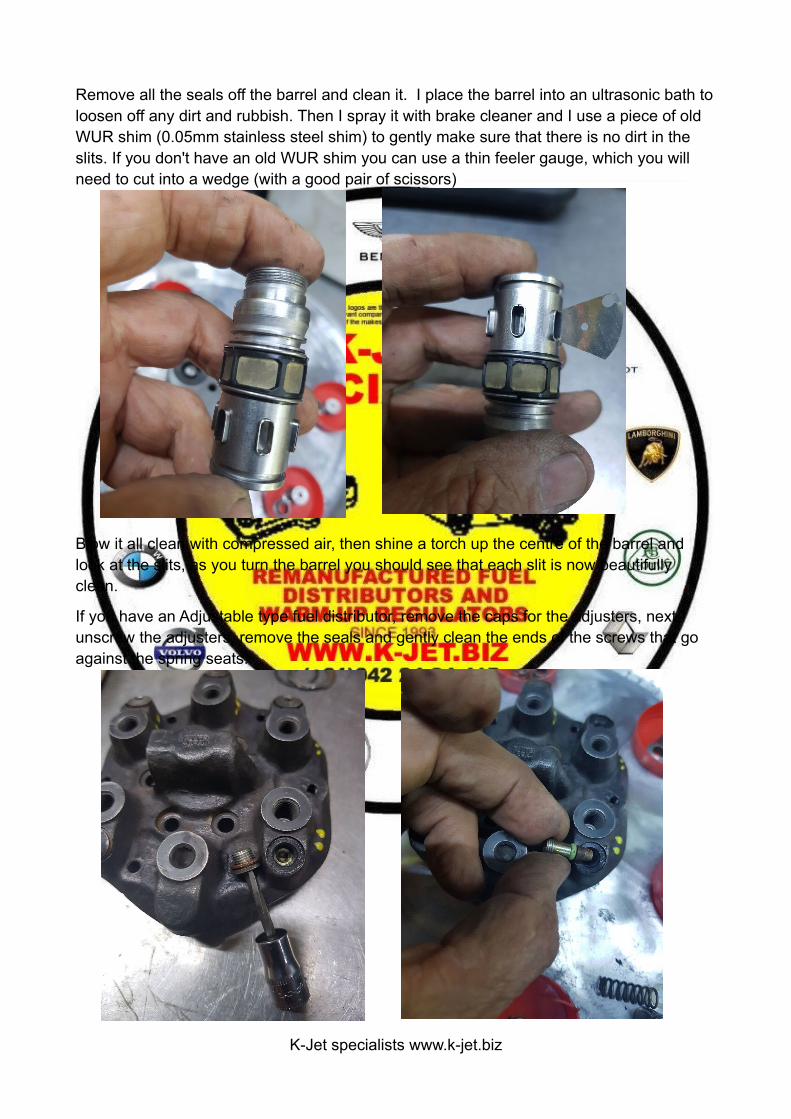
Remove all the seals off the barrel and clean it. I place the barrel into an ultrasonic bath toloosen off any dirt and rubbish. Then I spray it with brake cleaner and I use a piece of old WUR shim (0.05mm stainless steel shim) to gently make sure that there is no dirt in the slits. If you don't have an old WUR shim you can use a thin feeler gauge, which you will need to cut into a wedge (with a good pair of scissors)
Blow it all clean with compressed air, then shine a torch up the centre of the barrel and look at the slits, as you turn the barrel you should see that each slit is now beautifully clean.
If you have an Adjustable type fuel distributor, remove the caps for the adjusters, next unscrew the adjusters, remove the seals and gently clean the ends of the screws that go against the spring seats.
K-Jet specialists www.k-jet.biz
Remove the old outlet filters. I use a simple self tapping screw. Carefully screw it into the filter a few turns and then pull it out.
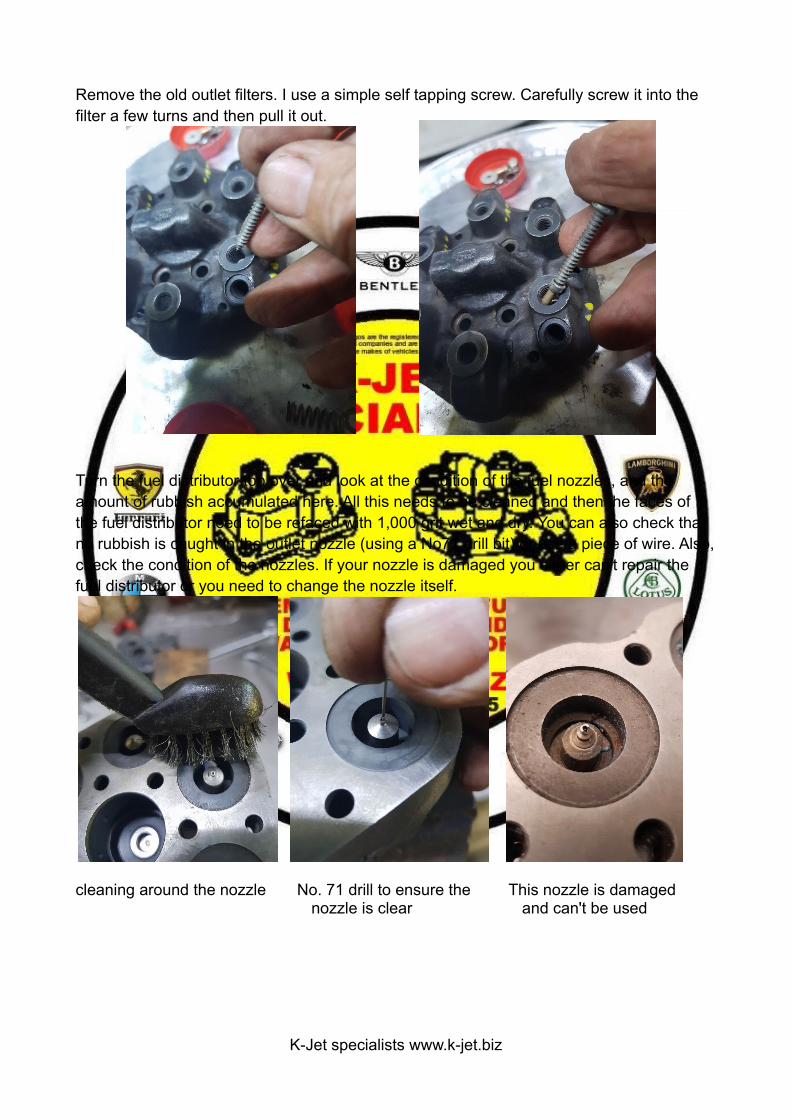
Turn the fuel distributor top over and look at the condition of the fuel nozzles, and the amount of rubbish accumulated here. All this needs to be cleaned and then the faces of the fuel distributor need to be refaced with 1,000 grit wet and dry. You can also check that no rubbish is caught in the outlet nozzle (using a No71 drill bit) or use a piece of wire. Also,check the condition of the nozzles. If your nozzle is damaged you either can't repair the fuel distributor or you need to change the nozzle itself.
cleaning around the nozzle No. 71 drill to ensure the This nozzle is damagednozzle is clear and can't be used
K-Jet specialists www.k-jet.biz
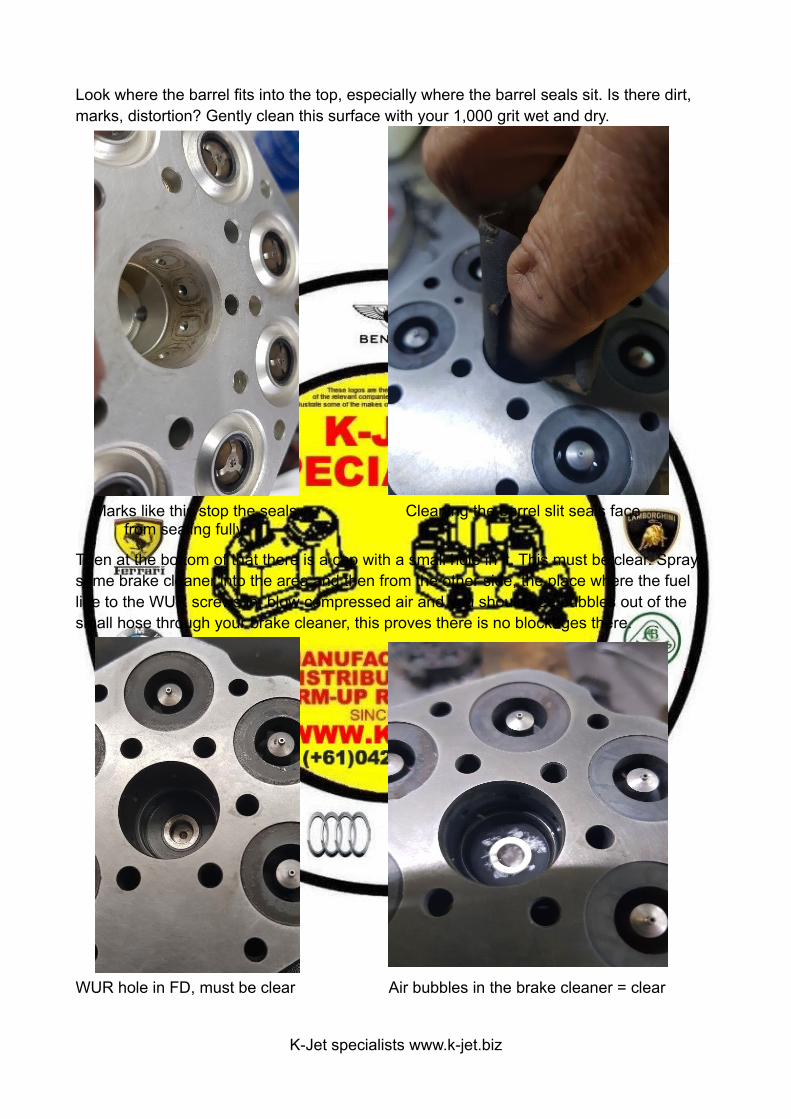
Look where the barrel fits into the top, especially where the barrel seals sit. Is there dirt, marks, distortion? Gently clean this surface with your 1,000 grit wet and dry.
Marks like this stop the seals Cleaning the barrel slit seals face from sealing fully.
Then at the bottom of that there is a cap with a small hole in it. This must be clear. Spray some brake cleaner into the area and then from the other side, the place where the fuel line to the WUR screws in, blow compressed air and you should see bubbles out of the small hose through your brake cleaner, this proves there is no blockages there.
WUR hole in FD, must be clear Air bubbles in the brake cleaner = clear
K-Jet specialists www.k-jet.biz
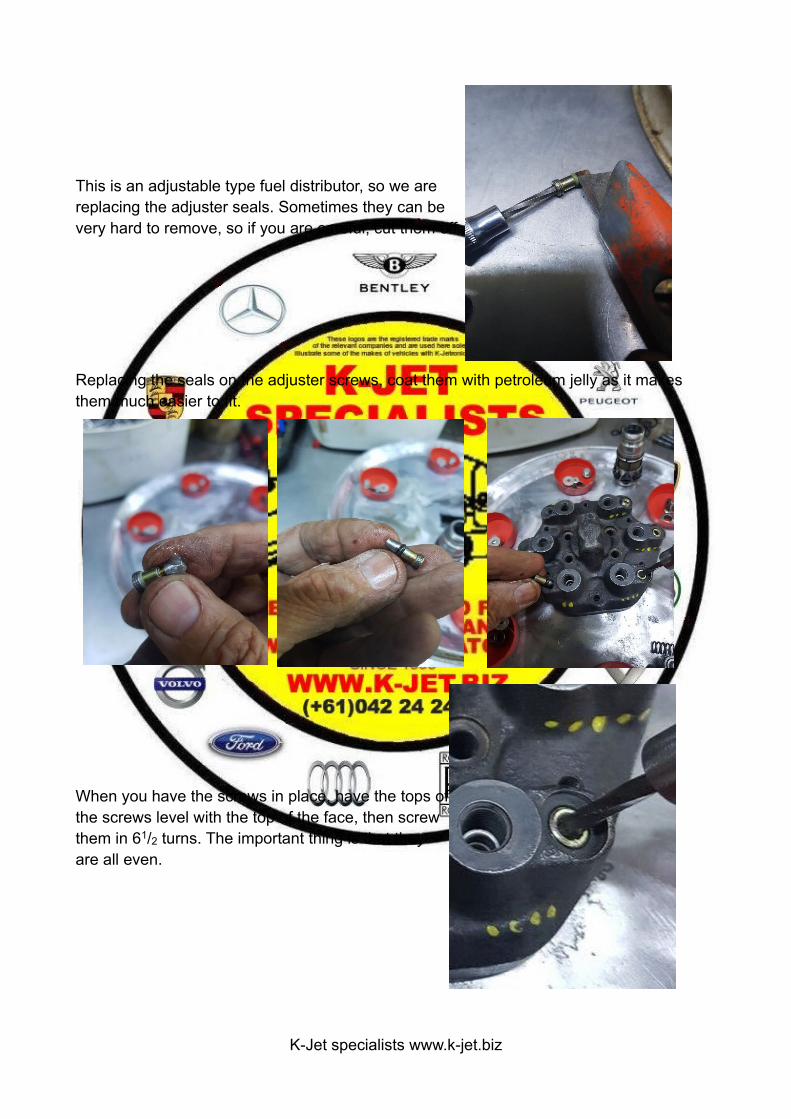
This is an adjustable type fuel distributor, so we arereplacing the adjuster seals. Sometimes they can bevery hard to remove, so if you are careful, cut them off.
Replacing the seals on the adjuster screws, coat them with petroleum jelly as it makes them much easier to fit.
When you have the screws in place, have the tops ofthe screws level with the top of the face, then screwthem in 61/2 turns. The important thing is that theyare all even.
K-Jet specialists www.k-jet.biz
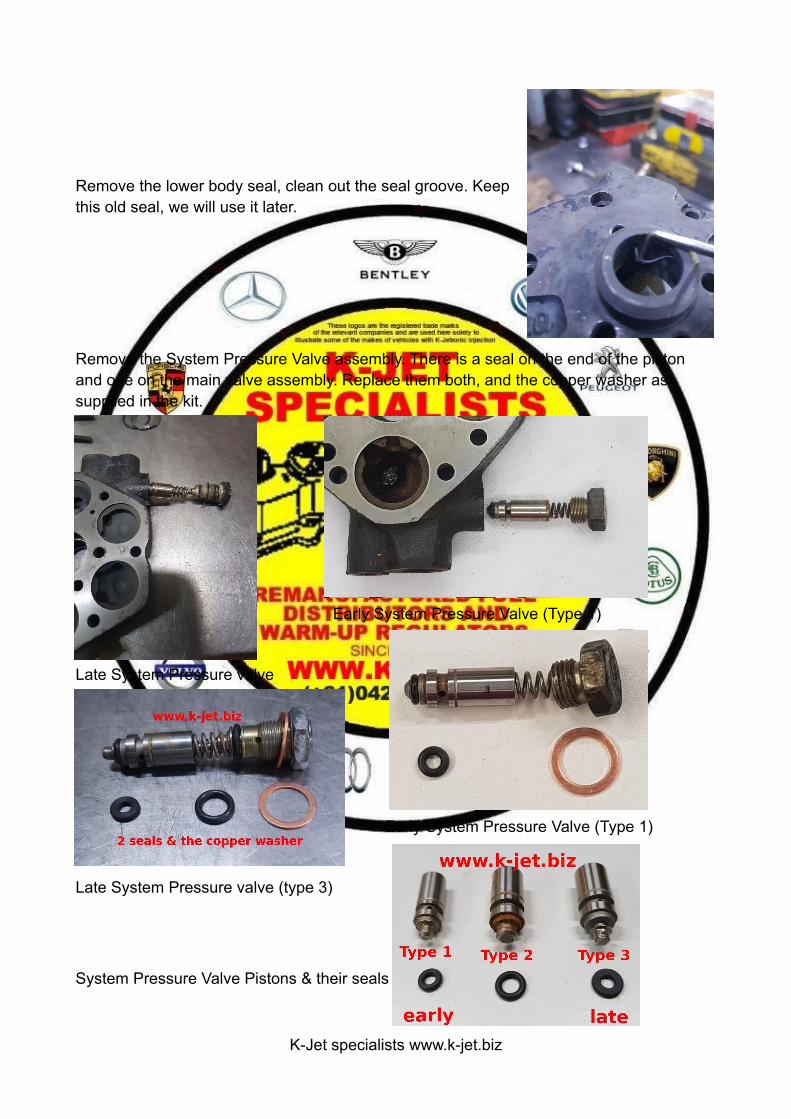
Remove the lower body seal, clean out the seal groove. Keepthis old seal, we will use it later.
Remove the System Pressure Valve assembly. There is a seal on the end of the piston and one on the main valve assembly. Replace them both, and the copper washer as supplied in the kit.
Early System Pressure Valve (Type 1)
Late System Pressure valve
Early System Pressure Valve (Type 1)
Late System Pressure valve (type 3)
System Pressure Valve Pistons & their seals
K-Jet specialists www.k-jet.biz
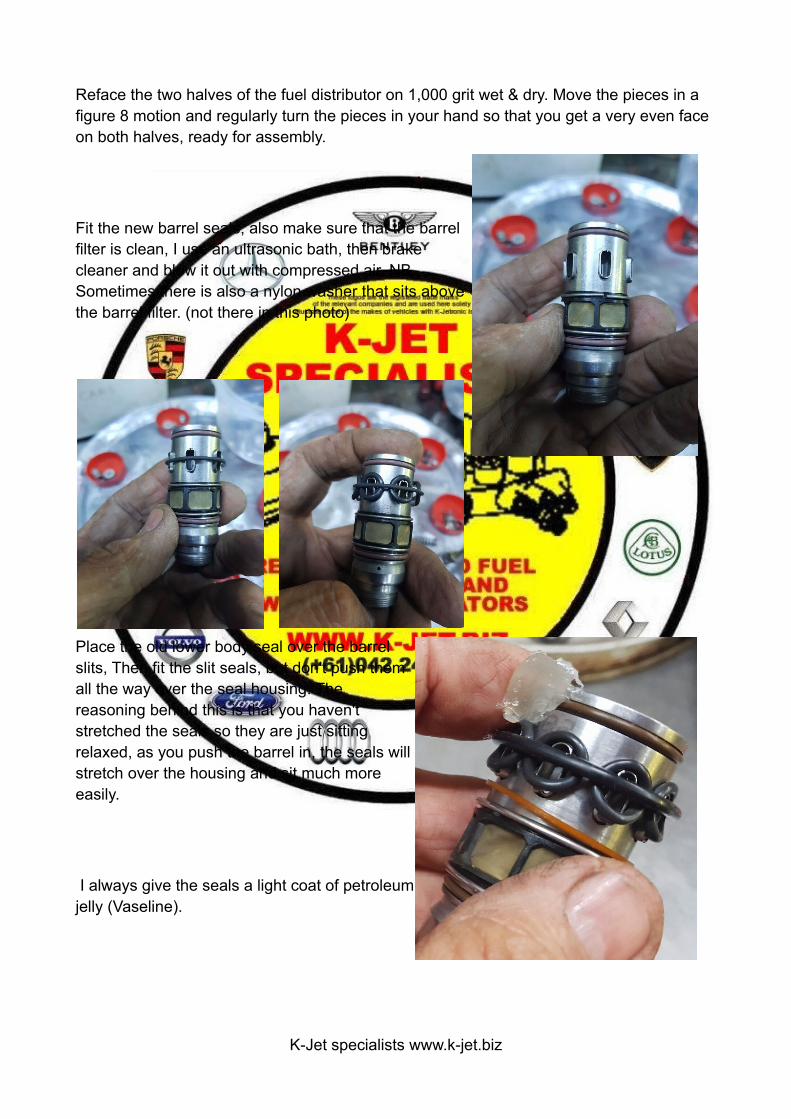
Reface the two halves of the fuel distributor on 1,000 grit wet & dry. Move the pieces in a figure 8 motion and regularly turn the pieces in your hand so that you get a very even face on both halves, ready for assembly.
Fit the new barrel seals, also make sure that the barrelfilter is clean, I use an ultrasonic bath, then brakecleaner and blow it out with compressed air. NB.Sometimes there is also a nylon washer that sits abovethe barrel filter. (not there in this photo)
Place the old lower body seal over the barrelslits, Then fit the slit seals, but don't push themall the way over the seal housing. Thereasoning behind this is that you haven'tstretched the seals so they are just sittingrelaxed, as you push the barrel in, the seals willstretch over the housing and sit much moreeasily.
I always give the seals a light coat of petroleumjelly (Vaseline).
K-Jet specialists www.k-jet.biz
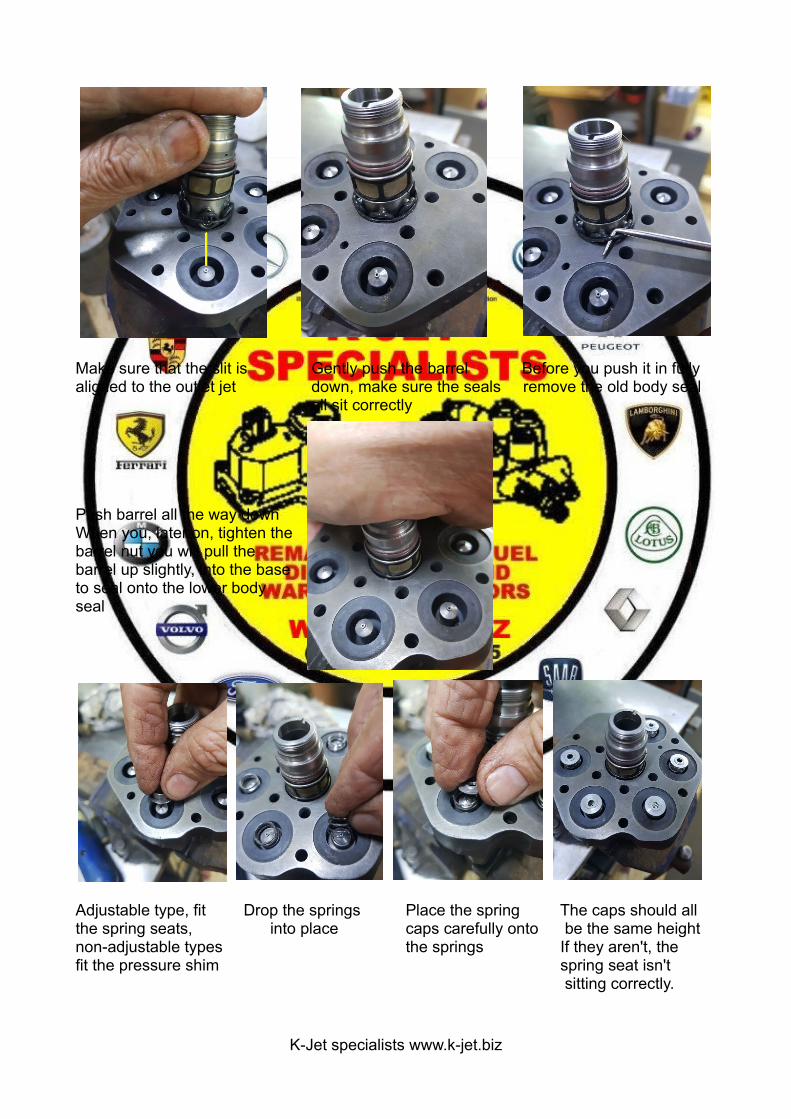
Make sure that the slit is Gently push the barrel Before you push it in fullyaligned to the outlet jet down, make sure the seals remove the old body seal
all sit correctly
Push barrel all the way downWhen you, later on, tighten thebarrel nut you will pull the barrel up slightly, into the baseto seal onto the lower bodyseal
Adjustable type, fit Drop the springs Place the spring The caps should allthe spring seats, into place caps carefully onto be the same heightnon-adjustable types the springs If they aren't, the fit the pressure shim spring seat isn't
sitting correctly.
K-Jet specialists www.k-jet.biz

The next stage is a bit more tricky for you. I have amachine which places Loctite 515 on the surfaces of thefuel distributor and shim, perfectly evenly. You will needto do this as best you can. The most important thing isnot to put too much sealant on the surfaces as, whenyour screw the halves together any excess will squishinto the fuel chambers and may cause you problems.
Smear the Loctite 515 on both the bottom and top halves of the fuel distributor. An alternative sealant id Permatex Anaerobic Flange Sealant #51531.
Look very carefully at the main shim. Hold it up to the lightand you will see a tiny hole. This must be placed in thecorrect position on the fuel distributor base for the fueldistributor and Warm-Up Regulator (WUR) to functioncorrectly.
Sealant on the shim, if this is too hard, place the sealant onthe top half of the fuel distributor.
K-Jet specialists www.k-jet.biz
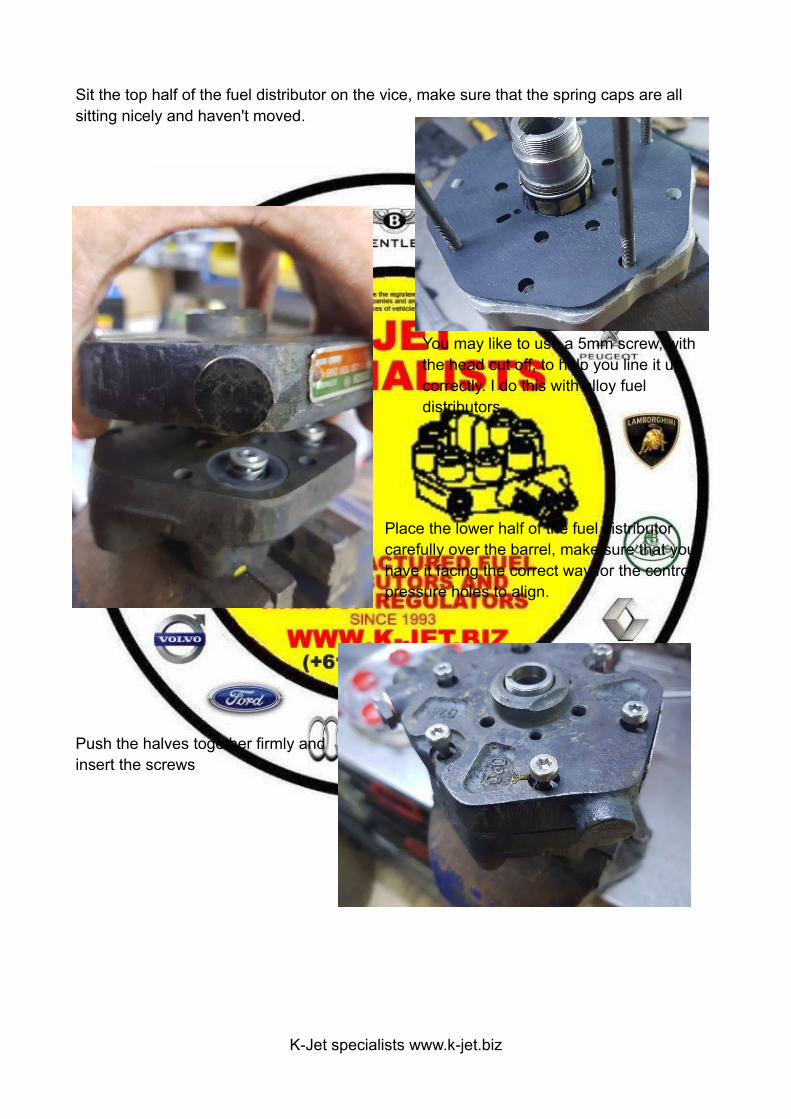
Sit the top half of the fuel distributor on the vice, make sure that the spring caps are all sitting nicely and haven't moved.
You may like to use a 5mm screw, with the head cut off, to help you line it up correctly. I do this with alloy fuel distributors.
Place the lower half of the fuel distributor carefully over the barrel, make sure that you have it facing the correct way for the control pressure holes to align.
Push the halves together firmly andinsert the screws
K-Jet specialists www.k-jet.biz
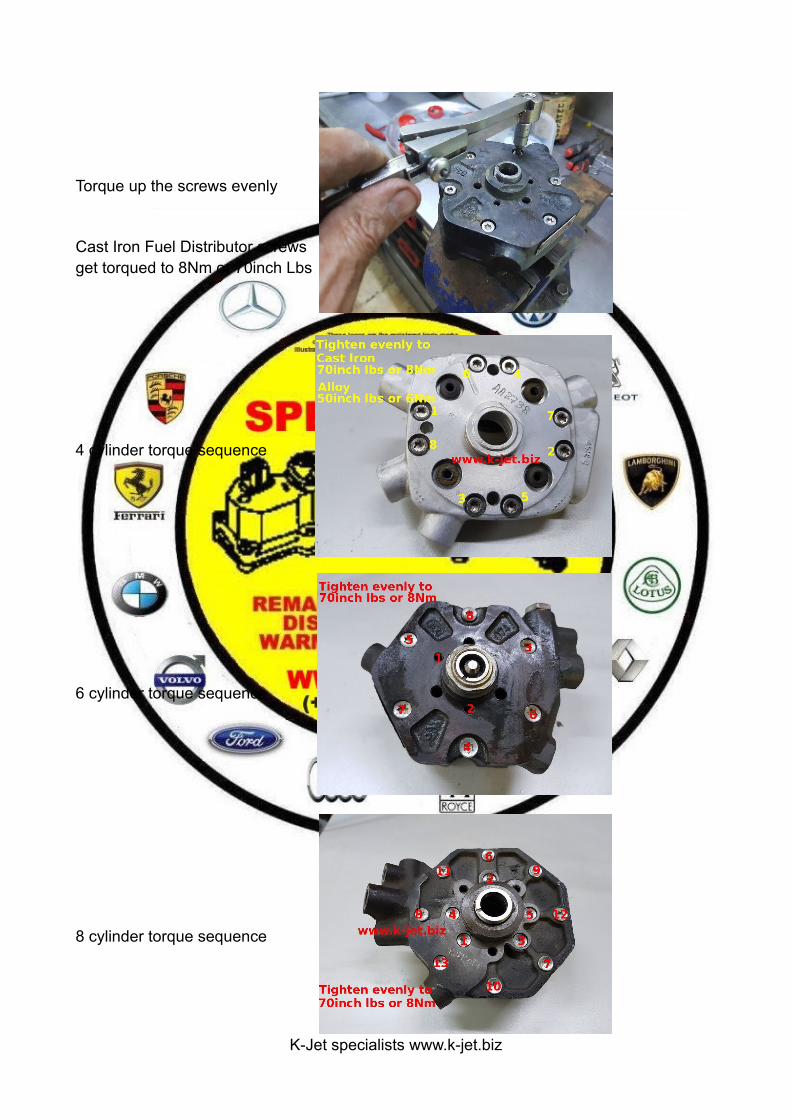
Torque up the screws evenly
Cast Iron Fuel Distributor screwsget torqued to 8Nm or 70inch Lbs
4 cylinder torque sequence
6 cylinder torque sequence
8 cylinder torque sequence
K-Jet specialists www.k-jet.biz
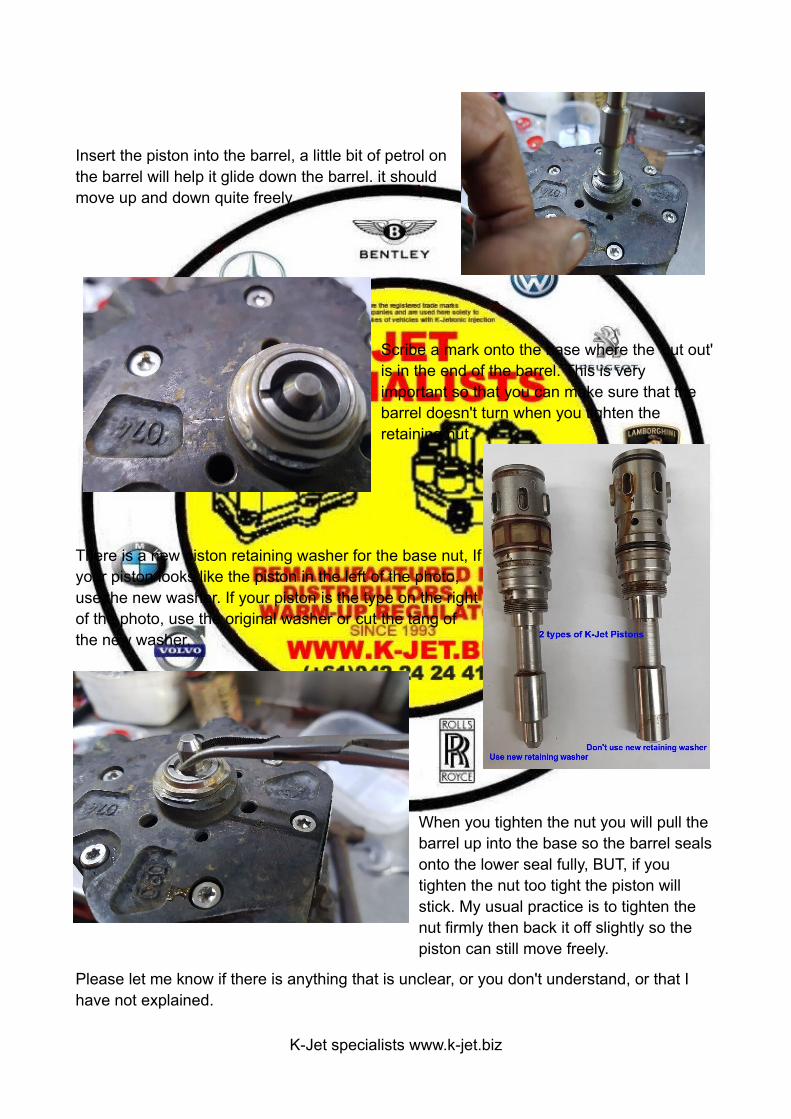
Insert the piston into the barrel, a little bit of petrol onthe barrel will help it glide down the barrel. it shouldmove up and down quite freely.
Scribe a mark onto the base where the 'cut out'is in the end of the barrel. This is very important so that you can make sure that the barrel doesn't turn when you tighten the retaining nut.
There is a new piston retaining washer for the base nut, Ifyour piston looks like the piston in the left of the photo,use the new washer. If your piston is the type on the rightof the photo, use the original washer or cut the tang ofthe new washer.
When you tighten the nut you will pull the barrel up into the base so the barrel sealsonto the lower seal fully, BUT, if you tighten the nut too tight the piston will stick. My usual practice is to tighten the nut firmly then back it off slightly so the piston can still move freely.
Please let me know if there is anything that is unclear, or you don't understand, or that I have not explained.
K-Jet specialists www.k-jet.biz