pointsec protector release 4.81 - check point software
TRANSCRIPT
Pointsec Protector Release 4.81
Administrator’s Guide
Version B
August, 2007

© 2003-2007 Check Point Software Technologies Ltd. All rights reserved. This product and related documentation are protected by copyright and distributed under licensing restricting their use, copying, distribution, and decompilation. No part of this product or related documentation may be reproduced in any form or by any means without prior written authorization of Check Point. While every precaution has been taken in the preparation of this book, Check Point assumes no responsibility for errors or omissions. This publication and features described herein are subject to change without notice. RESTRICTED RIGHTS LEGEND: Use, duplication, or disclosure by the government is subject to restrictions as set forth in subparagraph (c)(1)(ii) of the Rights in Technical Data and Computer Software clause at DFARS 252.227-7013 and FAR 52.227-19. TRADEMARKS: ©2003–2007 Check Point Software Technologies Ltd. All rights reserved. Check Point, AlertAdvisor, Application Intelligence, Check Point Express, Check Point Express CI, the Check Point logo, ClusterXL, Confidence Indexing, ConnectControl, Connectra, Connectra Accelerator Card, Cooperative Enforcement, Cooperative Security Alliance, CoreXL, CoSa, DefenseNet, Dynamic Shielding Architecture, Eventia, Eventia Analyzer, Eventia Reporter, Eventia Suite, FireWall-1, FireWall-1 GX, FireWall-1 SecureServer, FloodGate-1, Hacker ID, Hybrid Detection Engine, IMsecure, INSPECT, INSPECT XL, Integrity, Integrity Clientless Security, Integrity SecureClient, InterSpect, IPS-1, IQ Engine, MailSafe, NG, NGX, Open Security Extension, OPSEC, OSFirewall, Pointsec, Pointsec Mobile, Pointsec PC, Pointsec Protector, Policy Lifecycle Management, Provider-1, Safe@Home, Safe@Office, SecureClient, SecureClient Mobile, SecureKnowledge, SecurePlatform, SecurePlatform Pro, SecuRemote, SecureServer, SecureUpdate, SecureXL, SecureXL Turbocard, Sentivist, SiteManager-1, SmartCenter, SmartCenter Express, SmartCenter Power, SmartCenter Pro, SmartCenter UTM, SmartConsole, SmartDashboard, SmartDefense, SmartDefense Advisor, Smarter Security, SmartLSM, SmartMap, SmartPortal, SmartUpdate, SmartView, SmartView Monitor, SmartView Reporter, SmartView Status, SmartViewTracker, SofaWare, SSL Network Extender, Stateful Clustering, TrueVector, Turbocard, UAM, UserAuthority, User-to-Address Mapping, UTM-1, VPN-1, VPN-1 Accelerator Card, VPN-1 Edge, VPN-1 Express, VPN-1 Express CI, VPN-1 Power, VPN-1 Power VSX, VPN-1 Pro, VPN-1 SecureClient, VPN-1 SecuRemote, VPN-1 SecureServer, VPN-1 UTM, VPN-1 UTM Edge, VPN-1 VSX, Web Intelligence, ZoneAlarm, ZoneAlarm Anti-Spyware, ZoneAlarm Antivirus, ZoneAlarm Internet Security Suite, ZoneAlarm Pro, ZoneAlarm Secure Wireless Router, Zone Labs, and the Zone Labs logo are trademarks or registered trademarks of Check Point Software Technologies Ltd. or its affiliates. ZoneAlarm is a Check Point Software Technologies, Inc. Company. All other product names mentioned herein are trademarks or registered trademarks of their respective owners. The products described in this document are protected by U.S. Patent No. 5,606,668, 5,835,726, 5,987,611, 6,496,935, 6,873,988, 6,850,943, and 7,165,076 and may be protected by other U.S. Patents, foreign patents, or pending applications. For third party notices, see “THIRD PARTY TRADEMARKS AND COPYRIGHTS”.
Contents
About Pointsec Protector v4....................................................................7 Welcome ..............................................................................................8
Removable media/IO device manager ..................................................8 Unauthorised software/file protection...................................................8 Device Management ...........................................................................9 Centralised management ....................................................................9 Centralised auditing & alerts................................................................9 Detailed Reporting..............................................................................9 Content Management .........................................................................9 Anti-Virus scanner integration............................................................10 Remote/home user support...............................................................10 Removable Media Encryption.............................................................10
System Requirements ..........................................................................11 Pointsec Protector Enterprise Server ..................................................11 Pointsec Protector Enterprise Client ...................................................11
Additional Information .........................................................................13 Using the Pointsec Protector Administration Console...............................13
Getting Started ................................................................................13 Administrator Utilities .......................................................................14 System Utilities ................................................................................17 Profile templates ..............................................................................45 Users/Groups...................................................................................88 Computers - Dynamic Client Configuration........................................ 109 Alerts ............................................................................................ 115 Logs.............................................................................................. 118 Removable Media Log..................................................................... 123 Reports ......................................................................................... 131
Installing a remote Pointsec Protector Administration Console ............... 137 Installation Instructions .................................................................. 137 Connecting to the Remote Server .................................................... 141
Installing Pointsec Protector Client ......................................................... 141 Manual Installation ............................................................................ 141 Silent Network Installation.................................................................. 147
Creating a template installation for silent deployment........................ 147 Configuring a Config.ini................................................................... 148 Editing the Setup.iss configuration file.............................................. 150
Installing Protector Client using Deployment Server.............................. 151 Check Point Deployment Server Features & Benefits.......................... 151 Creating an installation package ...................................................... 151 Distributing a package .................................................................... 154
Upgrading Pointsec Protector.............................................................. 155 Installing Enterprise Client with Active Directory using Group Policy Objects........................................................................................................ 155
Publish vs. Assign........................................................................... 156 Publishing Pointsec Protector Enterprise Client to Computers ............. 156
Installing Protector Client/Disknet Pro using MS SMS v2.0/2003 ............ 160 Creating an installation package ...................................................... 161 Distributing a package .................................................................... 168
Upgrading Protector Enterprise Server 4.50 to 4.52+ and migrating database from MySQL to MS SQL Database Server ................................................ 173
Section 1: MS SQL Database Engine installed as part of Protector Enterprise Server setup ..................................................................................... 173 Section 2: MS SQL Database Server installed separately on same computer where Protector Enterprise Server is being upgraded............................ 175 Section 3: MS SQL Database Server installed separately on remote computer .......................................................................................... 178
Encryption Policy Manager Explorer ........................................................ 180 Introduction ...................................................................................... 180 The Requirement............................................................................... 181 Installation........................................................................................ 181 Using the Encryption Policy Manager Explorer ...................................... 184
Extracting files to the local hard disk................................................ 184 Double Click Secure File Extraction .................................................. 186 Drag & Drop/Copy & Paste of files ................................................... 187
Pointsec DataScan ................................................................................ 188 About Pointsec DataScan.................................................................... 188
Introduction................................................................................... 189 What is new in version 3................................................................. 189
Installing Pointsec DataScan............................................................... 190 Functionality .................................................................................. 190 Understanding the XML script.......................................................... 191 Pointsec DataScan’s installed files .................................................... 194 Pointsec DataScan’s Command Line Parameters................................ 194
FAQs ................................................................................................... 197 Frequently asked Questions................................................................ 197
Where can I read about up to date support issues and solutions?....... 197 How can I integrate Pointsec Protector Client with my Anti-Virus scanner?.................................................................................................... 197 Do Check Point offer training on Pointsec Protector? ......................... 197 How can I configure my client workstations to only authorise media containing data only?...................................................................... 197 How can I change the file types that Pointsec DataScan? .................. 197 How can I authorise media that contains executable code?................ 198 How can I disable Pointsec Protector Client if my Operating System becomes corrupt?........................................................................... 198 I cannot install software with my software distribution package any more because PSG blocks it? ................................................................... 198 How can I allow my software distribution package to install software when PSG is enabled?..................................................................... 198 How can I silently install Pointsec Protector Client across my Window NT Domain?........................................................................................ 198 Profile changes I make on the server are not being updated on the client workstations?................................................................................. 199

How can I view the profile of the current user?................................. 199 How can I assign a special profile to a user without creating a new group? .......................................................................................... 200 Where can I get an up to date list of exempt applications? ................ 200 How can I setup RMM to only display an unauthorised media message and not authorise, thus forcing the user to visit a sheep dip workstation?.................................................................................................... 201 How can I setup a standalone ‘Sheep-dip’ machine?.......................... 201 I cannot authorise media with Sophos Anti-Virus when logged in as a user?............................................................................................. 201 How can I stop users downloading MP3 files from the internet and e-mail attachments? ................................................................................. 201 How can I specify 2 or more server names in Pointsec Protector Client?.................................................................................................... 201 Is it possible to change the style of the Pointsec Protector Client message boxes? .......................................................................................... 201 Is it possible to enforce users to only have write access to encrypted removable media? .......................................................................... 202 Is there a key recovery mechanisms implemented into the Encryption Policy Manager? ............................................................................. 202 How can I allow users to access encrypted media external to my organisation without converting the device back to clear text? ........... 202 How can I stop a particular user from accessing previously authorised encrypted media?........................................................................... 202 How can I stop users with local admin rights from disabling the Pointsec Protector Service? .......................................................................... 203 How can I setup multiple Pointsec Protector Servers?........................ 203 How can I assign machine specific settings? ..................................... 203 How can I pre-encrypt a device for a user? ...................................... 203 How can I assign devices to individual users only? ............................ 205 Is it possible to hide the Pointsec Protector system tray icon? ............ 205 How can I configure it so that certain devices are enabled independent of who logs on? ................................................................................. 206 How can I add my own specific devices? .......................................... 206 Does Pointsec Protector still protect in safe mode?............................ 206 Can I prevent users with local admin rights from deinstalling the Pointsec Protector Client software? ............................................................... 206 Is it possible to configure different profile settings for when a mobile user is and on and off the network? ........................................................ 206 Can Pointsec Protector Server be installed onto an existing MS SQL Server database? ........................................................................... 206 If I already have MSDE installed on my server can I install Pointsec Protector Server onto the same machine? ........................................ 207 Can I install Pointsec Protector in an audit only mode? ...................... 207
Glossary of Terms................................................................................. 208 Terms............................................................................................... 208
AES Encryption .............................................................................. 208 Anti-Virus ...................................................................................... 208
Anti-Virus Definition Files (DEF Files) ............................................... 208 Authentication................................................................................ 208 Com Port ....................................................................................... 208 .csv............................................................................................... 208 Default Profile ................................................................................ 208 Digital signature............................................................................. 209 Drivers .......................................................................................... 209 Enumeration .................................................................................. 209 Exempt Applications ....................................................................... 209 Filter ............................................................................................. 209 Graphical User Interface (GUI) ........................................................ 209 Groups Synchronisation .................................................................. 209 Hostname...................................................................................... 209 ID ................................................................................................. 209 IP address ..................................................................................... 209 .iss................................................................................................ 210 LPT Port ........................................................................................ 210 Master Boot Record (MBR) .............................................................. 210 Media authorisation ........................................................................ 210 Media ID ....................................................................................... 210 MMC ............................................................................................. 210 Profile Template............................................................................. 211 Program Security Guard (PSG) ........................................................ 211 RDS .............................................................................................. 211 Removable Media ........................................................................... 211 Service .......................................................................................... 211 SMS .............................................................................................. 211 Simple Mail Transfer Protocol (SMTP)............................................... 212 TCP/IP .......................................................................................... 212 Unique ID...................................................................................... 212 Universal Naming Convention (UNC) ................................................ 212 USB - universal serial bus................................................................ 212 User ID ......................................................................................... 212 VPN .............................................................................................. 213
THIRD PARTY TRADEMARKS AND COPYRIGHTS...................................... 214
Pointsec Protector Administrator Guide
About Pointsec Protector v4
Pointsec Protector v4.81 Copyright © Check Point Software Technologies Ltd 1996 – 2007 Online Help 3.0 Operating Systems: Microsoft Windows 2000/2003/XP Published: June 2007 All rights reserved. This software is sold subject to license. All use of this software is subject to the terms & conditions of Check Point Software Technologies Ltd. Copyright infringement may give rise to civil and/or criminal liability. Check Point welcomes your questions, comments and suggestions. Check Point Software Technologies Ltd Support: United Kingdom Tel: +44 (0)20 7372 6666 USA Tel +972-444 6600 Elsewhere Tel +972 -3-6115100 Email: [email protected] http://www.checkpoint.com/services/contact/ [email protected] Web: www.Check Point.com – www.pointsec.com Support: https://supportcenter.Check Point.com/SupportCenter/ Other Offices: USA, Sweden, Finland, The Netherlands, Germany, France, Norway, Australia, Luxembourg, Hong Kong, India, Italy, Japan, Singapore, Hong Kong, UAE, Saudi Arabia.
Online help written by: Check Point Software Technologies Ltd Trademarks Pointsec Protector is a trademark of Check Point Software Technologies Ltd All other trademarks recognised.
Welcome
Pointsec Protector is a unique corporate solution that provides a policy driven mechanism of securing an organisation’s information and ensures data integrity across all end points. The following features are optional and can be selected during installation allowing the administrator to match the organisation’s security policies.
Removable media/IO device manager By centrally controlling access to removable media/IO devices, the system administrator can control user access to floppy disks, memory sticks, PDAs, flash memory, Zip/Jazz drives, digital cameras etc. (CDs, CDRs, DVDs can be protected by integrating Check Point Optimum or using Device Manager). Removable Media Manager controls device access on all available ports including USB and Firewire. All removable media/IO devices must be authorised before use is granted. Authorisation can be centrally managed or users can authorise their own devices providing certain rules are met (see data authorisation & Anti-Virus scanner integration below). A digital signature is written to a device to mark it as authorised. The digital signature is automatically updated during file transfers within the protected environment. If changes to the media are permitted outside of the organisation, the device will require re-authorisation before it can be used again within the protected environment. The system enforces that all devices are virus free, prevents illegal importing of data and more importantly can prevent the unauthorised exporting of data. This system will also stop users gaining access to any unauthorised hot-swap & plug-and-play devices.
Unauthorised software/file protection Pointsec Protector provides profile based file management. Users can be prevented from creating defined file types on the local workstation and network drives. File types are specified by extension and can be used to prevent the introduction of unlicensed software (.EXE .COM, DLL etc), malicious file types (.VBS .SCR etc), or simply unwanted file types (MPG, MP3, JPG etc). Protection is provided from any external source including e-mail
attachments and web downloads. This component also provides unrivalled protection against new and unknown virus attacks. For example both W32/MSBlast & W32/SoBig would be automatically blocked from infecting the machine simply by preventing the creation of unauthorised executable files.
Device Management Pointsec Protector allows the administrator to control user access to devices accessed through all PC ports. Access to IrDA, Com, USB, Firewire and LPT ports can be controlled. By applying security permissions to devices it is also possible to manage access to all removable media, CD/DVD drives, PDAs, WiFi, Blackberries, Bluetooth and unauthorised hard disks. This feature prevents users from connecting unauthorised devices to the PC ports including hardware such as a modem and provides On/Off/read only protection as opposed to the more granular approach offered by Removable Media Manager detailed above.
Centralised management Pointsec Protector is centrally administered. A familiar MS MMC interface is provided to control user profiles, real-time monitoring and extensive auditing. User profile management and configuration is all stored within an SQL database.
Centralised auditing & alerts Pointsec Protector provides detailed auditing of attempted security breaches. All events are centrally logged in an SQL database with the ability to create structured queries and detailed reports. Pointsec Protector enables the administrator to centrally audit all file operations on all removable storage including CDs/DVDs. The administrator can configure the auditing of certain events to produce e-mail alerts to defined addresses.
Detailed Reporting The Pointsec Protector auditing provides extensive tracking of user behaviour and system security. To simplify audit analysis fully configurable html reports can be generated from within the administration console detailing summary information across all audit events.
Content Management Pointsec Protector is supplied with a data authorisation module, which is integrated within the media authorisation process. Employing this module, users can be given the right to authorise their own media providing the device contains only permitted file types. The Pointsec DataScan module can be configured to only allow the authorisation of data only files. Any
executable/unapproved code will be rejected even if renamed or hidden. This provides an additional layer of generic active code protection. Using the Pointsec DataScan configuration utility it is possible to specify which file types are permitted.
Anti-Virus scanner integration Pointsec Protector automatically detects and integrates with compatible Anti-Virus scanners. Anti-Virus scanners can be used to enforce that all removable media is virus free before access is granted as part of the authorisation process.
Remote/home user support Pointsec Protector supports remote and standalone workstations. Remote workstations (laptops and desktops) often pose a greater security risk as conventional anti-virus & security techniques are often hard to enforce. Pointsec Protector provides valuable generic protection against malicious code and can be fully managed just like networked workstations. A remote worker can be dynamically controlled if connected by the Internet via a VPN or RAS connection. Pointsec Protector empowers businesses to manage and secure their data across both networked and standalone workstations. Being user based and centrally managed, it presents the minimum of administrator overhead whilst affording the maximum level of security aimed at your internal threats.
Removable Media Encryption Pointsec Protector can be supplied with the optional Encryption Policy Manager (EPM). The greatest threat when granting access to removable media storage devices is the loss of sensitive or proprietary information. The encryption policy manager can ensure that data can only be accessed by authorised staff on authorised systems. The Pointsec Protector Encryption Policy Manager provides transparent encryption of removable media storage devices. Unlike any other solution on the market, offline access can be granted to trusted users. Users will be able to access secure devices without the need to install any software onto third party systems using secure password authentication. This component will allow access on third party systems even with just basic user rights. To activate this component you will require an additional license. For further information please contact your authorised Check Point Software Technologies Ltd partner. For a list of authorised partners please visit http://partners.us.Check Point.com/partnerlocator/
System Requirements
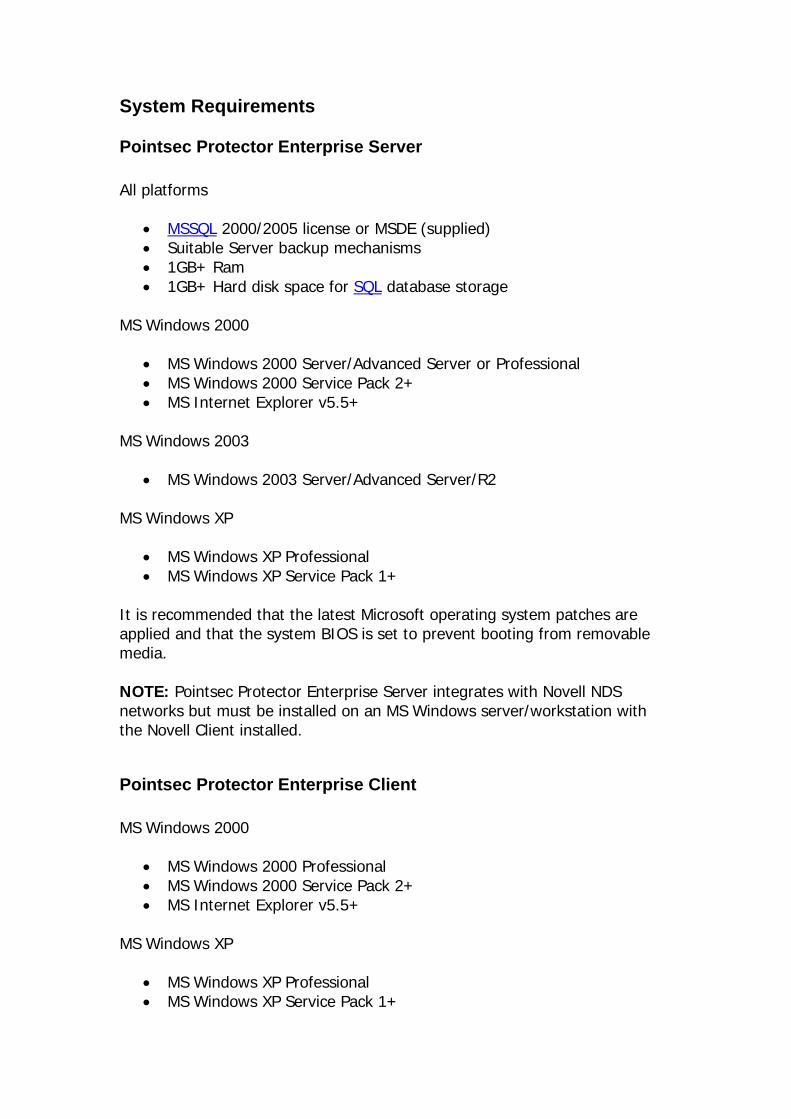
Pointsec Protector Enterprise Server All platforms
• MSSQL 2000/2005 license or MSDE (supplied) • Suitable Server backup mechanisms • 1GB+ Ram • 1GB+ Hard disk space for SQL database storage
MS Windows 2000
• MS Windows 2000 Server/Advanced Server or Professional • MS Windows 2000 Service Pack 2+ • MS Internet Explorer v5.5+
MS Windows 2003
• MS Windows 2003 Server/Advanced Server/R2 MS Windows XP
• MS Windows XP Professional • MS Windows XP Service Pack 1+
It is recommended that the latest Microsoft operating system patches are applied and that the system BIOS is set to prevent booting from removable media. NOTE: Pointsec Protector Enterprise Server integrates with Novell NDS networks but must be installed on an MS Windows server/workstation with the Novell Client installed.
Pointsec Protector Enterprise Client MS Windows 2000
• MS Windows 2000 Professional • MS Windows 2000 Service Pack 2+ • MS Internet Explorer v5.5+
MS Windows XP
• MS Windows XP Professional • MS Windows XP Service Pack 1+
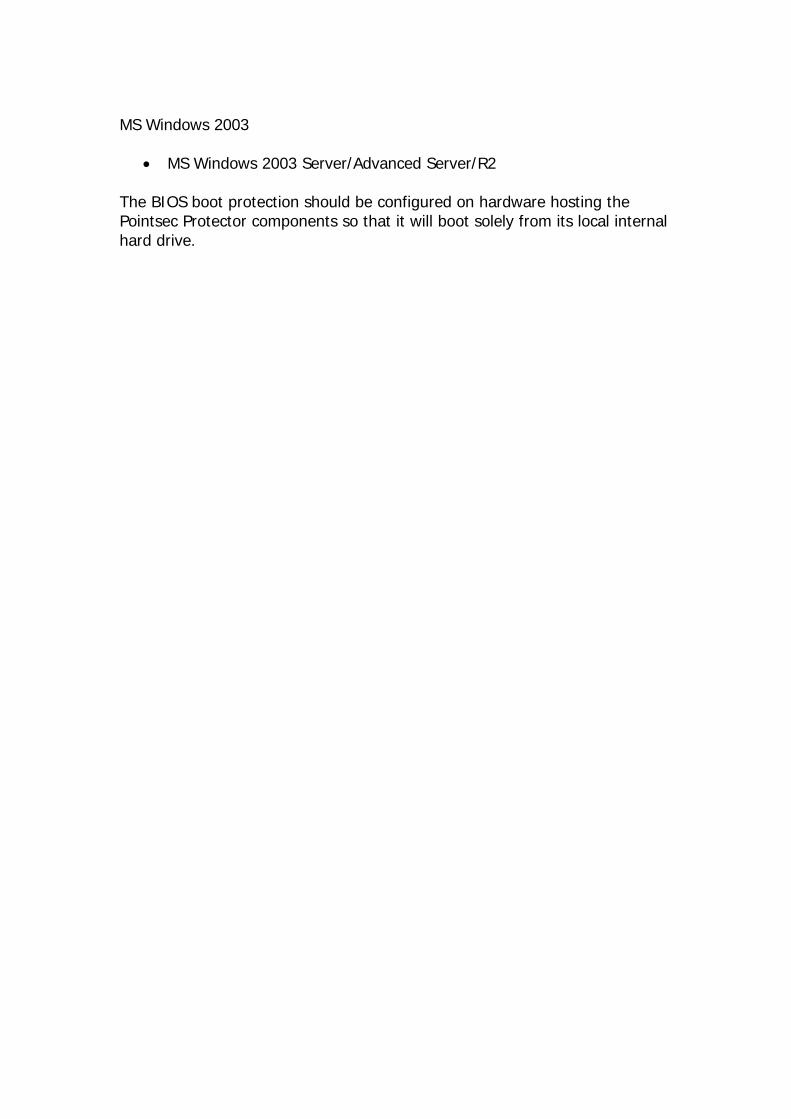
MS Windows 2003
• MS Windows 2003 Server/Advanced Server/R2 The BIOS boot protection should be configured on hardware hosting the Pointsec Protector components so that it will boot solely from its local internal hard drive.
Additional Information Pointsec Protector is supplied with fully indexed administrator and user online help. In addition to these resources further information is available from the Check Point Software Technologies Ltd website: http://www.checkpoint.com – www.pointsec.com The website provides:
• A fully searchable support knowledge base that provides up to date information on the latest support problems and frequently asked questions: https://secureknowledge.CheckPoint.com/
• The product updates area provides the ability to download the latest software updates and patches for licensed customers. https://supportcenter.Check Point.com/SupportCenter/
• The latest product documentation https://supportcenter.Check Point.com/SupportCenter/
Using the Pointsec Protector Administration Console The Pointsec Protector Administration console allows system administrators to centrally manage Pointsec Protector Client software. The Pointsec Protector Administration console is a Microsoft Management Console (MMC) snapin. Using this management console it is possible to perform the following tasks:
• Create and manage user/group based policy profiles for the control of Removable Media Manager, Program Security Guard, Device Manager, and Encryption Policy Manager.
• Perform dynamic management of Pointsec Protector Client workstations.
• View and process audit events • Management of automated alerts • Management of Pointsec Protector Security infrastructure • Management of removable media encryption settings (EPM)
Getting Started This section details the stages that should be followed when installing Pointsec Protector for the first time. It is advisable to complete the following steps in order to complete a successful deployment: 1. Edit the default profile. This profile is used as the default global profile
and contains the default organisational policies. For example, if a global messaging standard is required across the organisation it should be configured within the default profile. The default profile is also used if the
client user is unknown or if the server connection fails and should be used as a failsafe mechanism.
2. Create new profile templates from within the ‘Profile Templates’ node. These profiles should include a standard user profile and an administrator profile plus any other special profiles required.
3. Create new groups using the ‘Create New Group Wizard’ and assign the required profile templates. It is often advisable to create new NT/2K/Novell domain groups for use with the Pointsec Protector Enterprise Server.
4. Specify the required e-mail alerts from the ‘Alerts’ node. 5. Configure the Pointsec Protector security settings as required. If using the
Encryption Policy Manager please pay careful attention when specifying the EPM Key Recovery option.
6. Backup the media ID using the Export Media ID wizard. A prompt to backup the media ID would also be received the first time the administration console is opened.
7. Export the default profile to Pointsec Protector Client installation folder. 8. Manually install at least two Pointsec Protector Client workstations for
testing. 9. Setup and configure a silent Pointsec Protector Client installation.
Administrator Utilities A number of administrator utilities are provided for managing the Pointsec Protector Enterprise. This section details the following features:
• Managing Pointsec Protector Enterprise Server/Client security • Performing a local/remote server connection using MMC • Generating a Pointsec Protector Emergency Access diskette • Managing Removable Media signature IDs • Configuring device types covered under the management of Device
Manager • Managing Removable Media Encryption (EPM)
Connect to - Server Connection The Pointsec Protector Administration Console uses the industry standard Microsoft Management Console (MMC) to manage the Pointsec Protector Server. MMC provides a great deal of flexibility and allows for remote server connections. It is possible to install multiple administration consoles across an organisation to manage a Pointsec Protector Server (see Installing a remote Pointsec Protector Administration Console). To connect to a remote or local server machine that is within the same LAN select ‘connect to’ from the Check Point Protector Server node as displayed below:

Select either to connect to the local machine if the Pointsec Protector Server is running locally, or select a remote machine by entering the server machine name or IP address in the host field. The TCP/IP port number of the server machine should be entered (default 9738). Click ‘Finish’ to complete the connection.
The following connection process will be displayed:
The current connection status is displayed. Please note; security access must be granted within the security permissions tab before a remote server connection can be performed.

Domain Server Enumeration Override (MS Windows NT Only) Pointsec Protector Enterprise Server automatically retrieves user information from the NT Domain on opening of the Administration Console. On large networks this can take some time as automatic checks are performed for the closest Domain Controller. On Domain networks where the Primary Domain controller maybe at a remote location it is often desirable to specify a local backup Domain controller manually. To specify a domain server please complete the following steps:
1) Open regedit.exe on the Pointsec Protector Enterprise Server machine
2) Create a new key HKEY_LOCAL_MACHINE\SOFTWARE\Reflex\DisknetServer\Domains
3) Create a string value for the domain name and server name as below. The string value should contain a comma or semicolon separated list of the domain controllers for a specified Domain The server name should all start with \\:
Example: * = Automatic server resolution HKEY_LOCAL_MACHINE\SOFTWARE\Reflex\DisknetServer\domains DOMAIN1="\\Server1" DOMAIN2="\\Server2;*" DOMAIN3="*;\\Server3" DOMAIN4="" DOMAIN5="*" \\Server1 is always used as domain controller for DOMAIN1. For DOMAIN2 the Pointsec Protector server will try to contact \\Server2 first, and, if it is not available, use automatic domain controller resolution mechanism (because of '*'). For DOMAIN3 automatic domain controller resolution mechanism is used first, and then \\Server3 if the automatic one fails.
DOMAIN4 users and groups are never enumerated.
nly automatic domain controller resolution mechanism used for DOMAIN5.
System Utilities
emovable Media Manager
uring installation the Pointsec Protector Enterprise Server generates a
O"DOMAIN5" value can be deleted from registry to the same effect, because "*" is a default value.
R Dunique signature media ID. This unique ID is used during media authorisation and ensures that media authorised within other PoinProtector protected environments are not valid within this protected zonvice versa. On occasions it can be desirable to use the same media signature ID on multiple sites/servers. This means that devices authorised within one protected environment can also be recognised as authorised in other environments. This can be achieved using the Import/Export
tsec e and
Media ID
nhanced Mode
emovable Media Manager operates in Enhanced Mode by default as
feature.
E
Rdetermined by the ‘EM’ field in the ‘config.ini’ when deploying the PoinProtector Client software. This mode of operation will detect every single change made to the removable media on a non-Pointsec Protector machineHowever, this system would be slow for all media directory levels and is therefore only applied to seven directory levels (i.e. including the root levDoing the check any deeper could result in a noticeable system slow down and we cannot compromise this trade-off, having to maintain system securiand speed. Therefore, files/folders beyond this scope are treated as read-only with no access to the binary files therein. Files cannot be executed orcopied to the Pointsec Protector client machine’s hard drive.
tsec
.
el).
ty
the Enhanced Mode flag is manually changed in the ‘config.ini’ pre-rollout
mport/Export Media ID
he Import/Export Media ID
Ifby a System Administrator and is not operational on their Pointsec Protector client-base, only significant media changes will be detected when reintroduced media has been amended on these client machines.
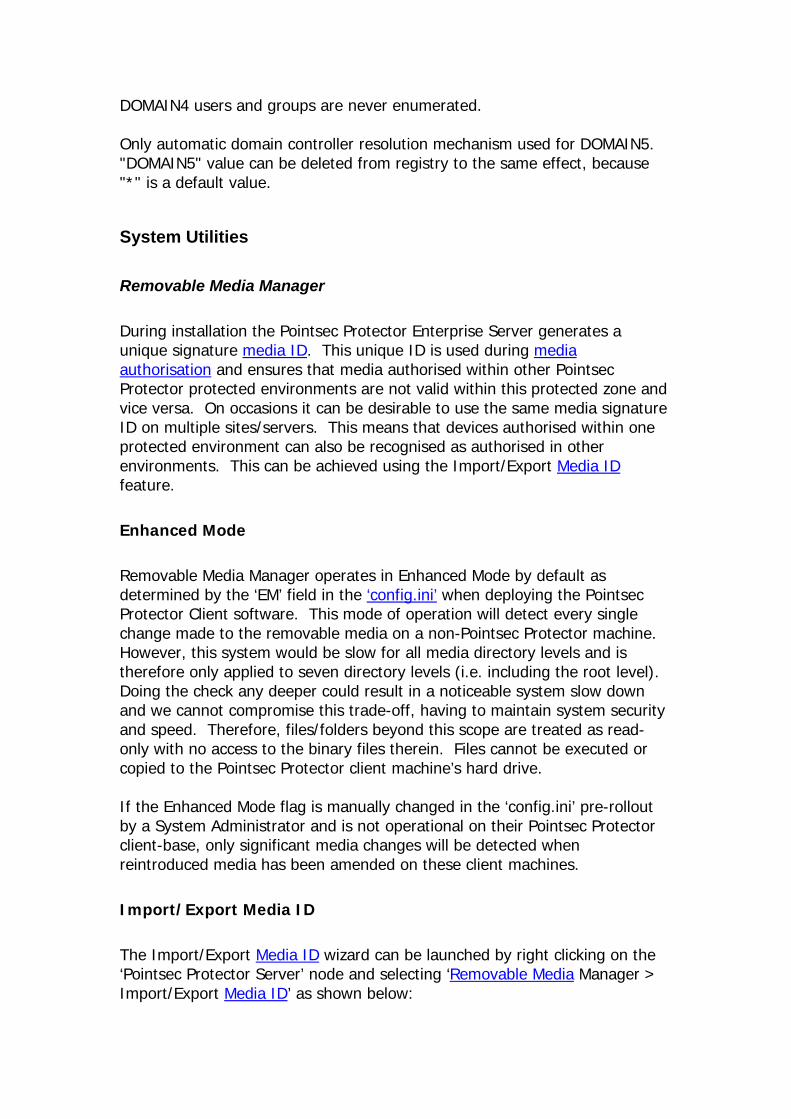
I
T wizard can be launched by right clicking on the ‘Pointsec Protector Server’ node and selecting ‘Removable Media Manager > Import/Export Media ID’ as shown below:
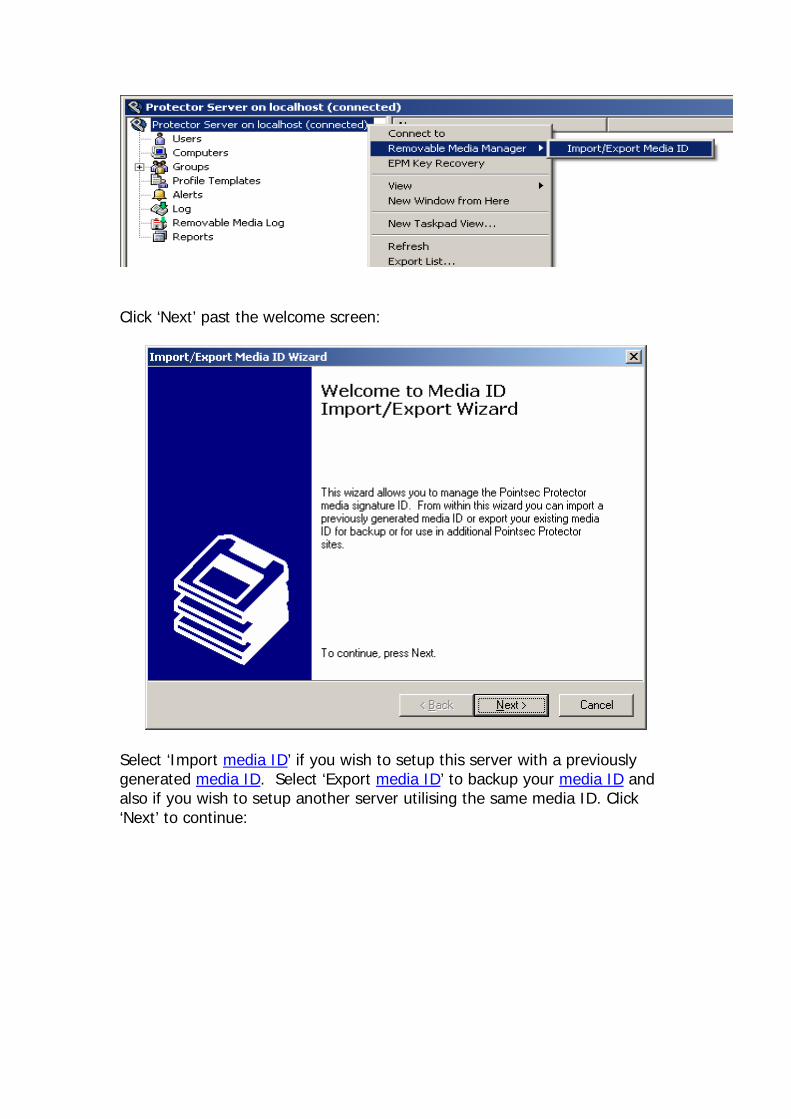
Click ‘Next’ past the welcome screen:
elect ‘Import media IDS ’ if you wish to setup this server with a previously
generated media ID. Select ‘Export media ID’ to backup your media ID analso if you wish to setup another server utilising the same media ID. Click ‘Next’ to continue:
d
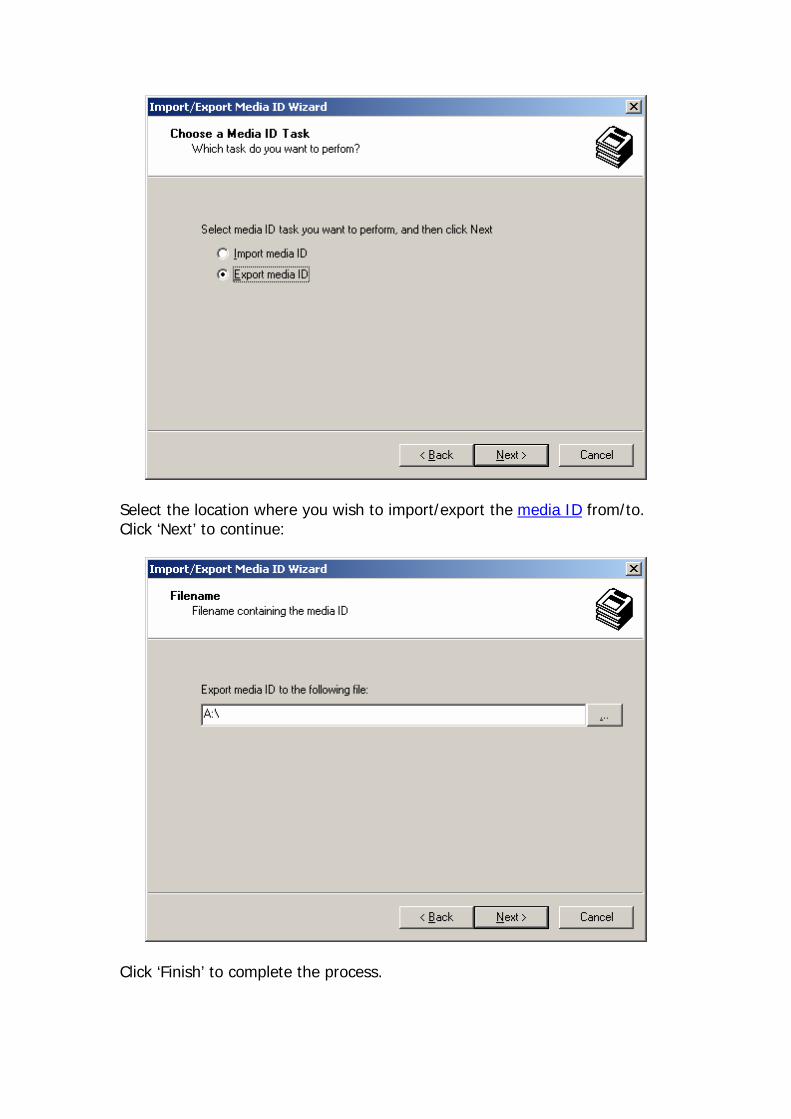
Select the location where you wish to import/export the media ID from/to. Click ‘Next’ to continue:
Click ‘Finish’ to complete the process.
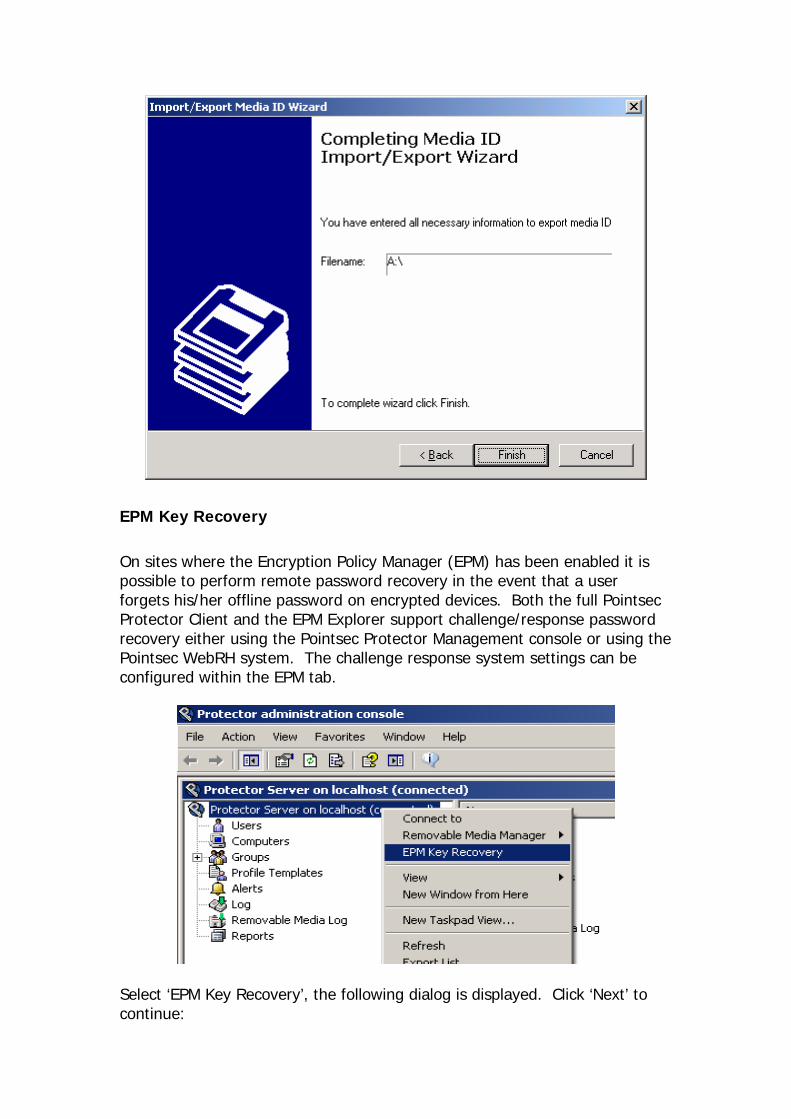
EPM Key Recovery
On sites where the Encryption Policy Manager (EPM) has been enabled it is possible to perform remote password recovery in the event that a user forgets his/her offline password on encrypted devices. Both the full Pointsec Protector Client and the EPM Explorer support challenge/response password recovery either using the Pointsec Protector Management console or using the Pointsec WebRH system. The challenge response system settings can be configured within the EPM tab.
Select ‘EPM Key Recovery’, the following dialog is displayed. Click ‘Next’ to continue:
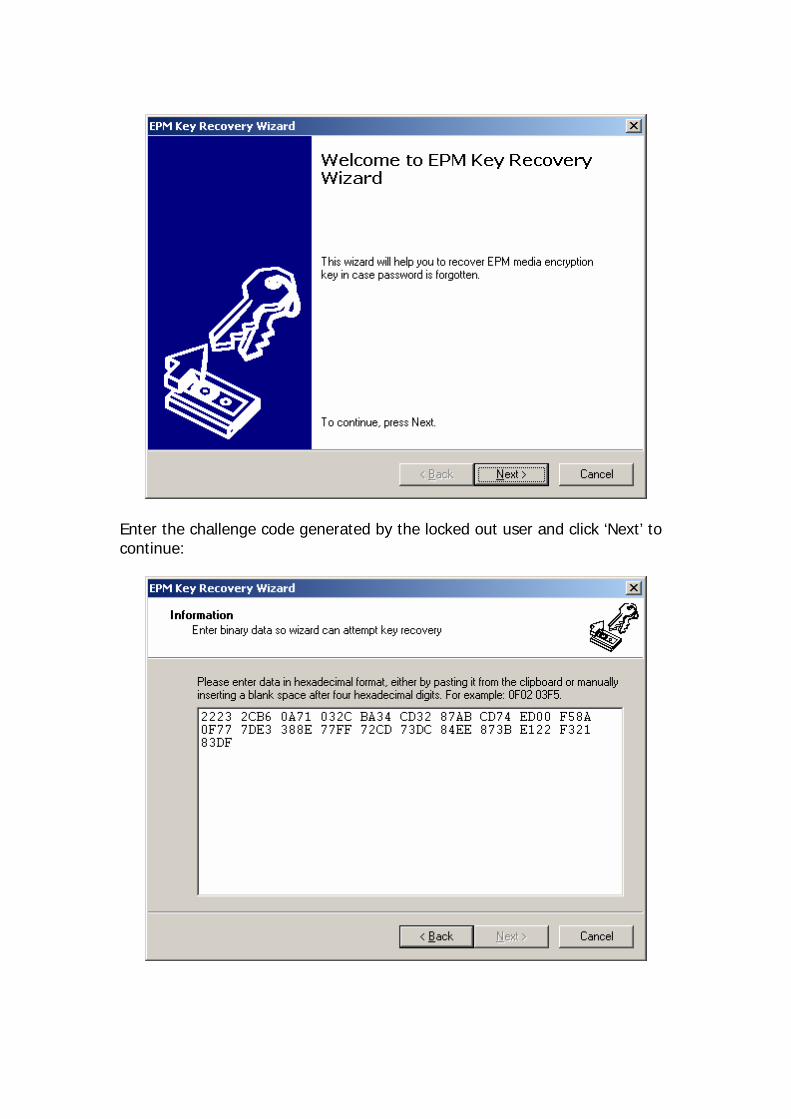
Enter the challenge code generated by the locked out user and click ‘Next’ to continue:
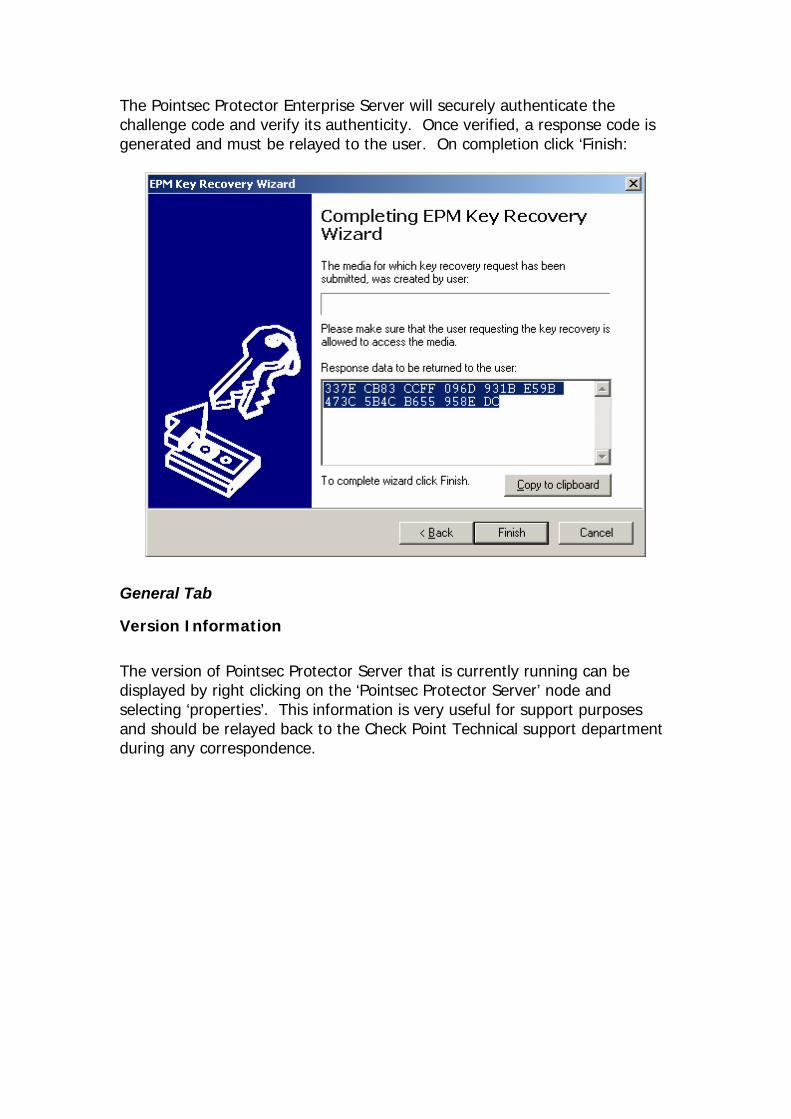
The Pointsec Protector Enterprise Server will securely authenticate the challenge code and verify its authenticity. Once verified, a response code is generated and must be relayed to the user. On completion click ‘Finish:
General Tab
Version Information
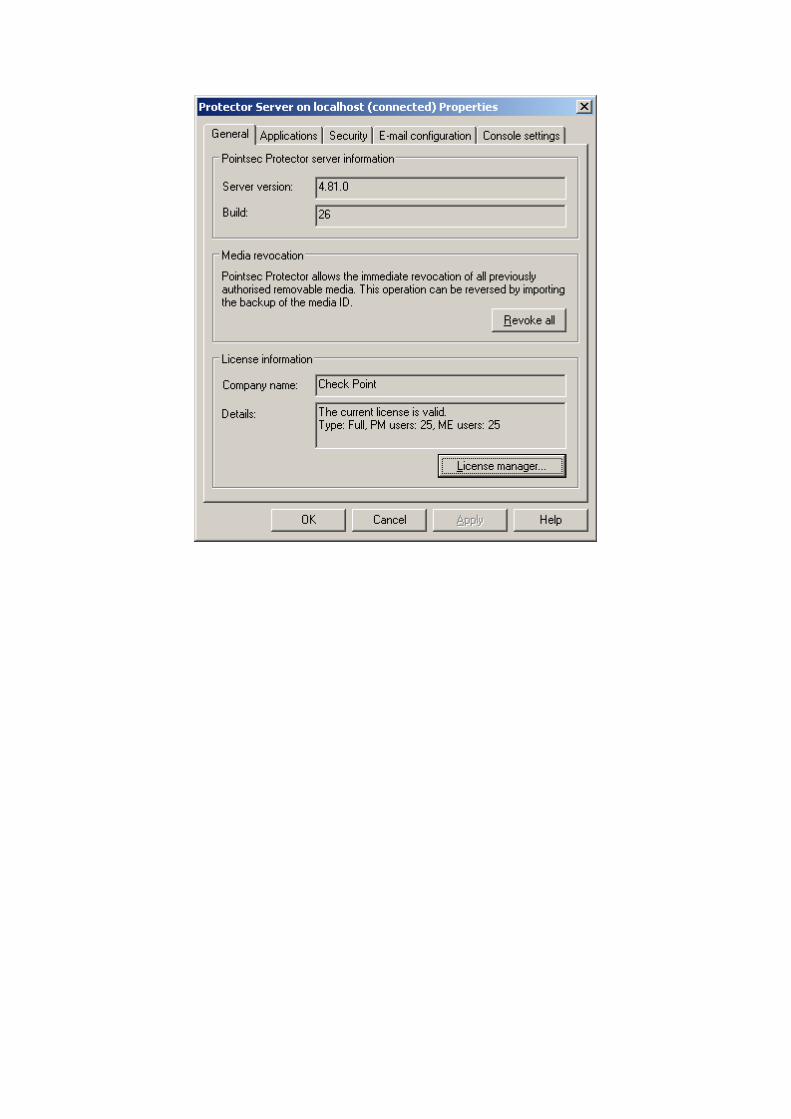
The version of Pointsec Protector Server that is currently running can be displayed by right clicking on the ‘Pointsec Protector Server’ node and selecting ‘properties’. This information is very useful for support purposes and should be relayed back to the Check Point Technical support department during any correspondence.
Media Revocation
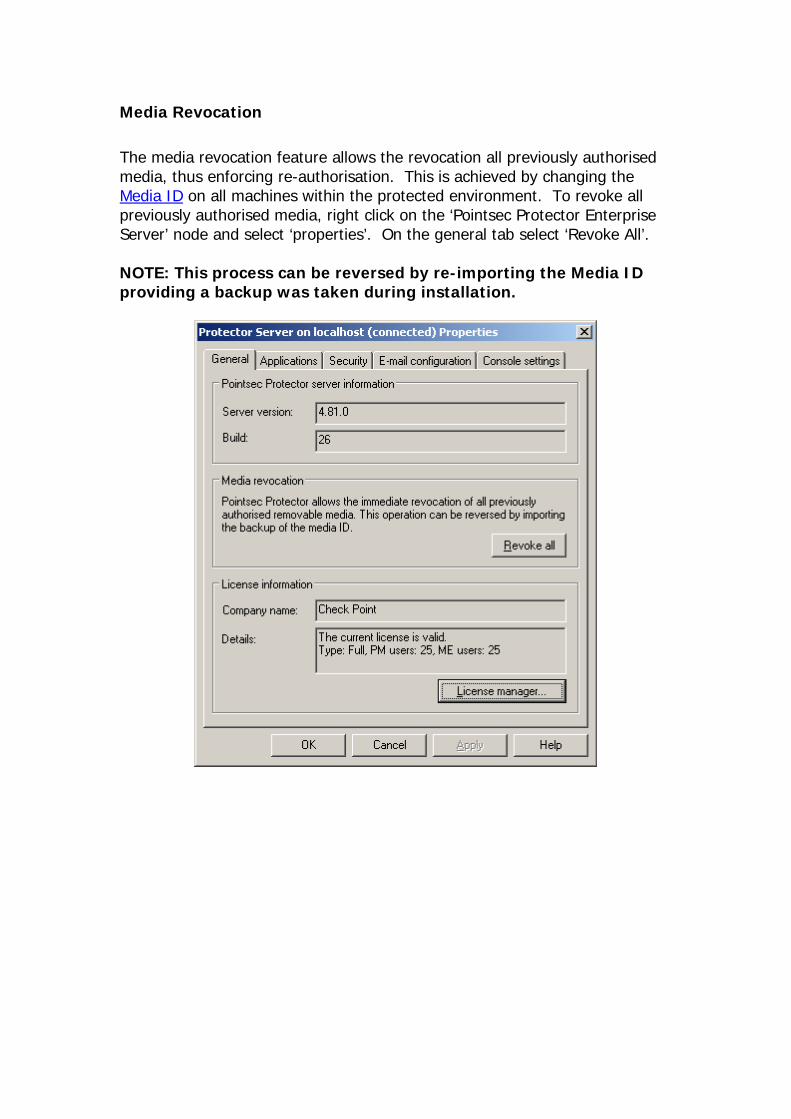
The media revocation feature allows the revocation all previously authorised media, thus enforcing re-authorisation. This is achieved by changing the Media ID on all machines within the protected environment. To revoke all previously authorised media, right click on the ‘Pointsec Protector Enterprise Server’ node and select ‘properties’. On the general tab select ‘Revoke All’. NOTE: This process can be reversed by re-importing the Media ID providing a backup was taken during installation.
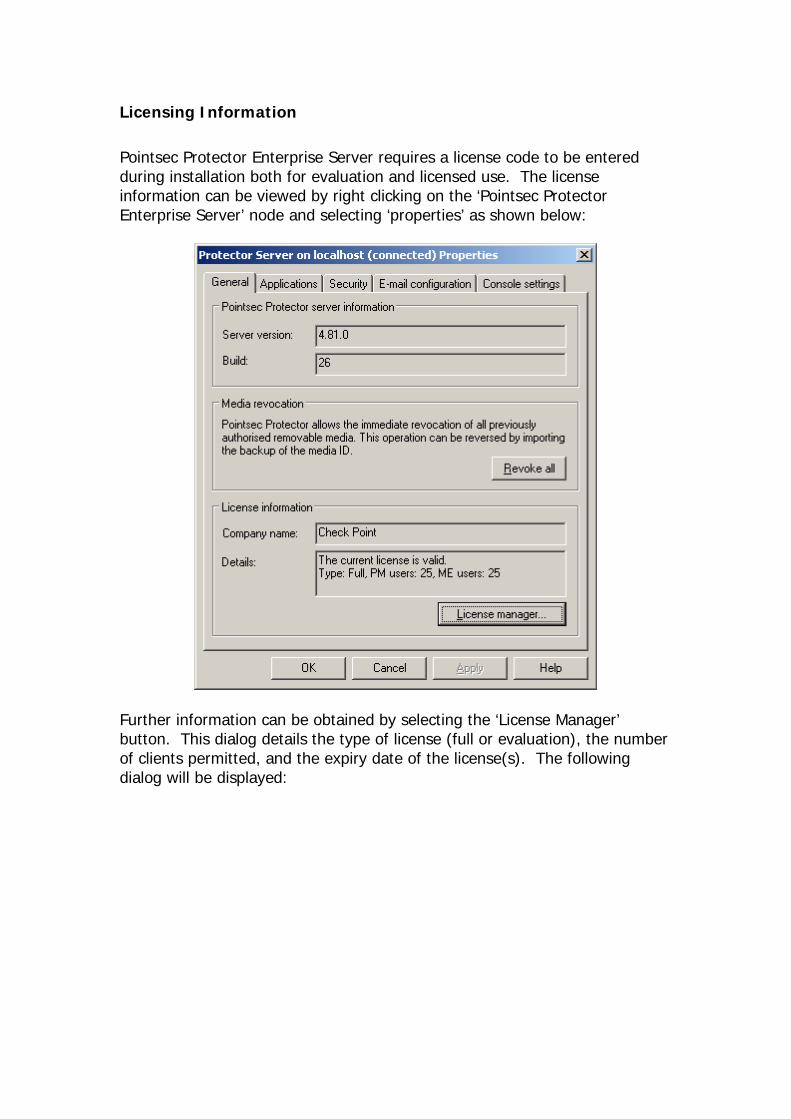
Licensing Information
Pointsec Protector Enterprise Server requires a license code to be entered during installation both for evaluation and licensed use. The license information can be viewed by right clicking on the ‘Pointsec Protector Enterprise Server’ node and selecting ‘properties’ as shown below:
Further information can be obtained by selecting the ‘License Manager’ button. This dialog details the type of license (full or evaluation), the number of clients permitted, and the expiry date of the license(s). The following dialog will be displayed:
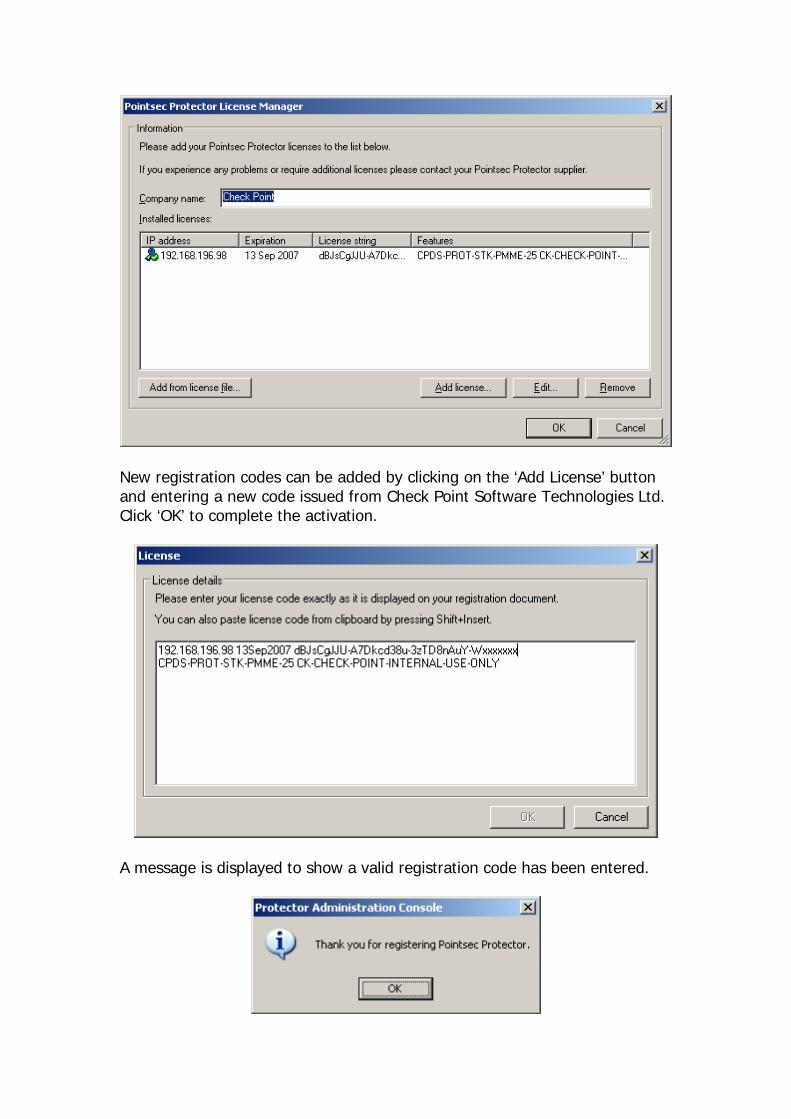
New registration codes can be added by clicking on the ‘Add License’ button and entering a new code issued from Check Point Software Technologies Ltd. Click ‘OK’ to complete the activation.
A message is displayed to show a valid registration code has been entered.
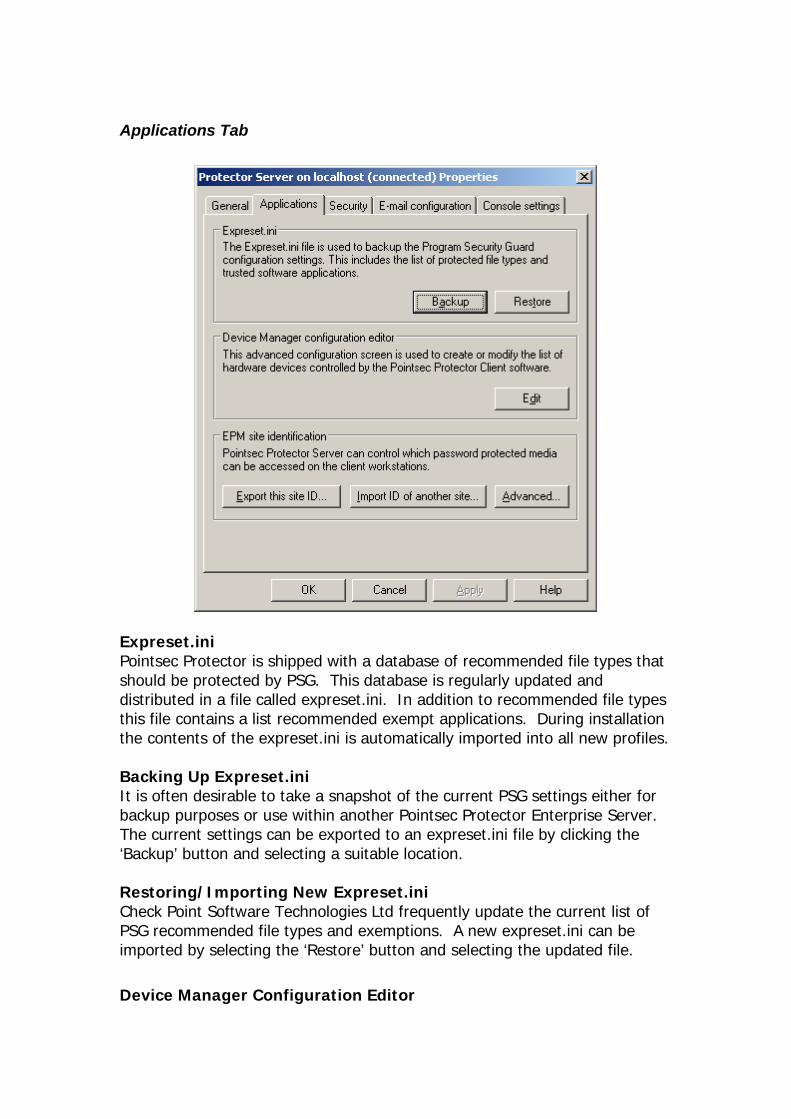
Applications Tab
Expreset.ini Pointsec Protector is shipped with a database of recommended file types that should be protected by PSG. This database is regularly updated and distributed in a file called expreset.ini. In addition to recommended file types this file contains a list recommended exempt applications. During installation the contents of the expreset.ini is automatically imported into all new profiles. Backing Up Expreset.ini It is often desirable to take a snapshot of the current PSG settings either for backup purposes or use within another Pointsec Protector Enterprise Server. The current settings can be exported to an expreset.ini file by clicking the ‘Backup’ button and selecting a suitable location. Restoring/Importing New Expreset.ini Check Point Software Technologies Ltd frequently update the current list of PSG recommended file types and exemptions. A new expreset.ini can be imported by selecting the ‘Restore’ button and selecting the updated file.
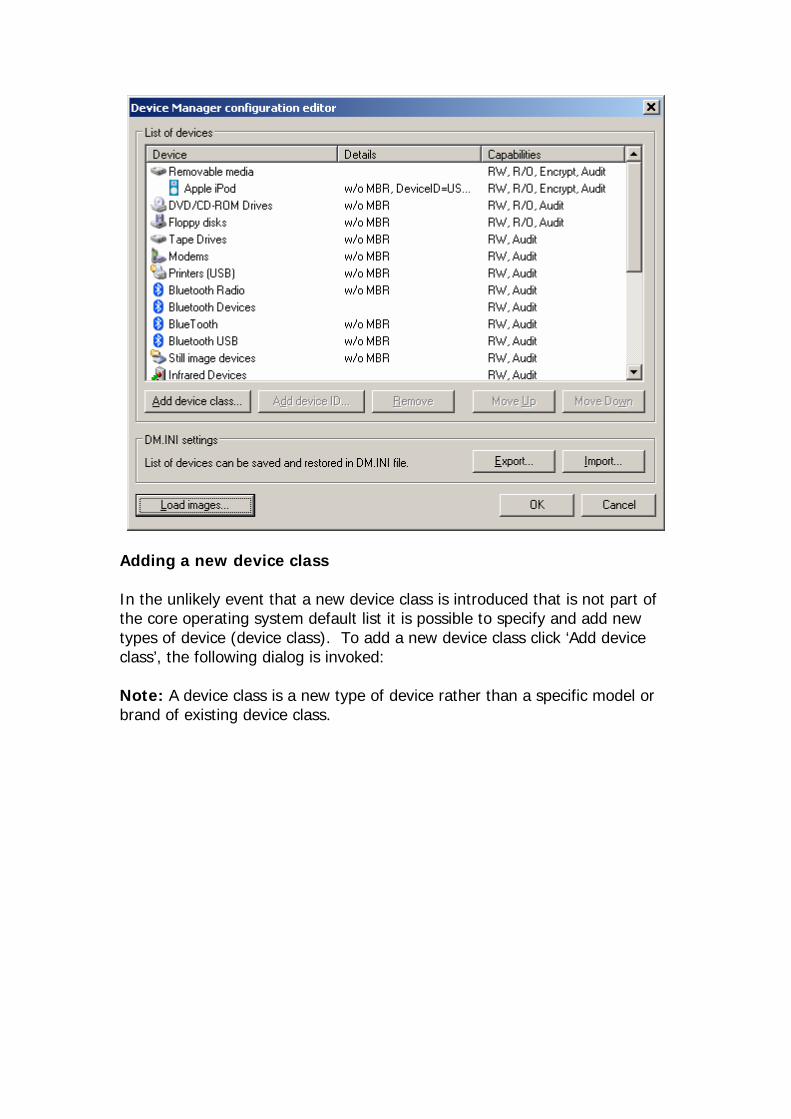
Device Manager Configuration Editor
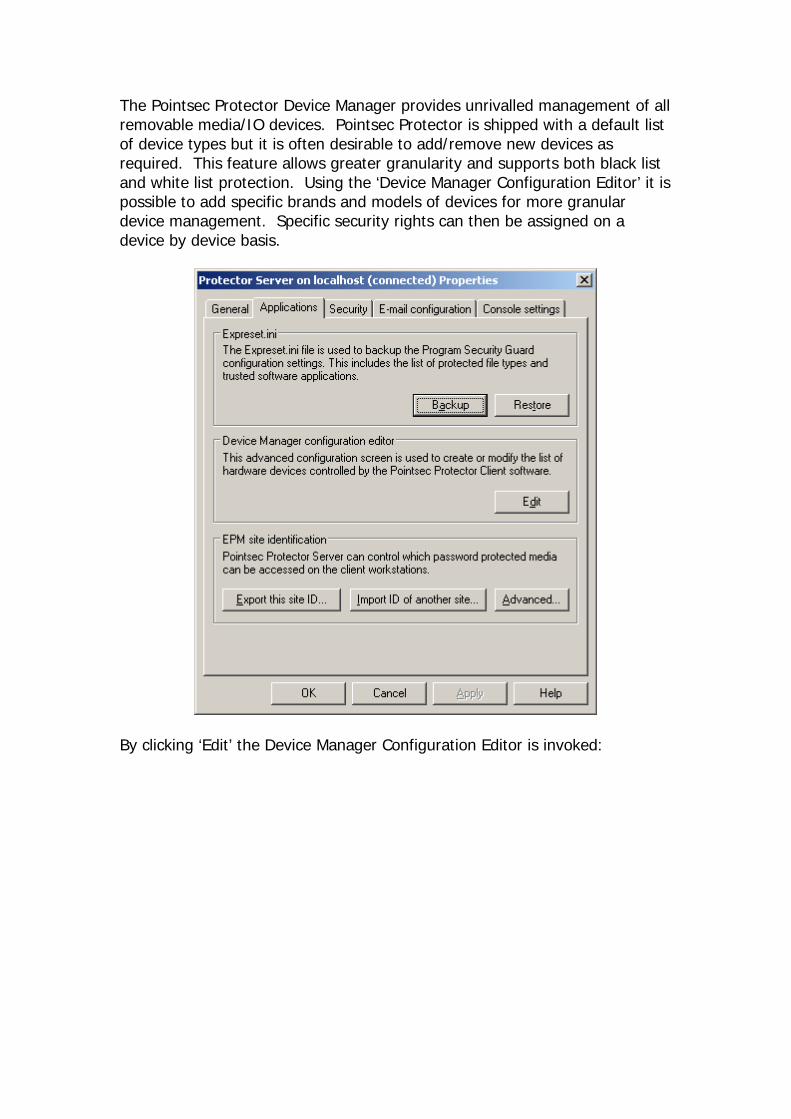
The Pointsec Protector Device Manager provides unrivalled management of all removable media/IO devices. Pointsec Protector is shipped with a default list of device types but it is often desirable to add/remove new devices as required. This feature allows greater granularity and supports both black list and white list protection. Using the ‘Device Manager Configuration Editor’ it is possible to add specific brands and models of devices for more granular device management. Specific security rights can then be assigned on a device by device basis.
By clicking ‘Edit’ the Device Manager Configuration Editor is invoked:
Adding a new device class In the unlikely event that a new device class is introduced that is not part of the core operating system default list it is possible to specify and add new types of device (device class). To add a new device class click ‘Add device class’, the following dialog is invoked: Note: A device class is a new type of device rather than a specific model or brand of existing device class.
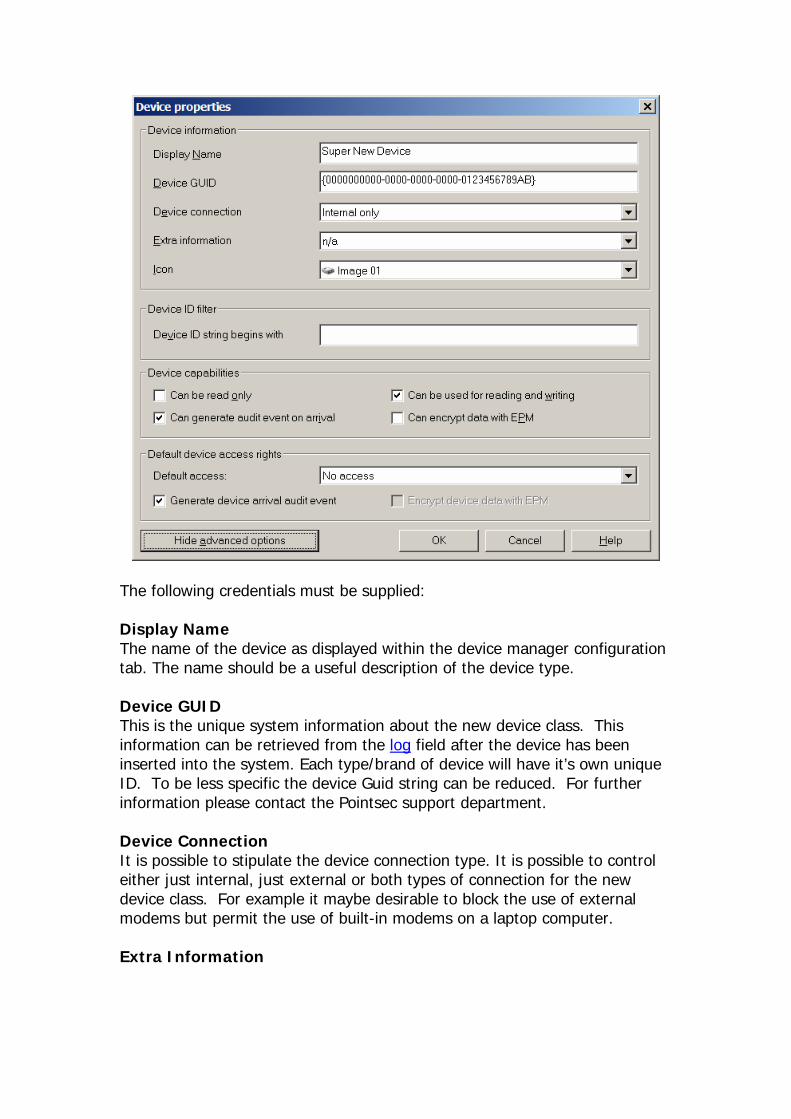
The following credentials must be supplied: Display Name The name of the device as displayed within the device manager configuration tab. The name should be a useful description of the device type. Device GUID This is the unique system information about the new device class. This information can be retrieved from the log field after the device has been inserted into the system. Each type/brand of device will have it’s own unique ID. To be less specific the device Guid string can be reduced. For further information please contact the Pointsec support department. Device Connection It is possible to stipulate the device connection type. It is possible to control either just internal, just external or both types of connection for the new device class. For example it maybe desirable to block the use of external modems but permit the use of built-in modems on a laptop computer. Extra Information
For removable media storage devices it is desirable to stipulate whether the device appears to MS Windows as a fixed disk device (Hard Disk with Master boot record) or as removable media (Media without master boot record). Icon A custom icon can be used for graphical representation in the device manager configuration tab. Select the required icon from the drop down menu or alternatively new icons can be added using the ‘Load Images’ button on the parent dialog. Device can be read only For storage devices it is possible to provide read only management. By ticking this dialog the read only functionality will be available during device configuration. Device can be used for read and writing If the new device class provides removable media storage that can be read from and written to this option should be selected. Data on the device can be EPM encrypted For digital storage devices the Encryption Policy Manager (EPM) can be enabled to provide transparent removable media encryption. Device arrival audit event can be generated The arrival of new devices can be audited under the ‘audit tab’. This event records the type of device with full details of the device usage. Default device access rights This setting configures the default device access for new profiles. Select the required configuration from the drop down menu. Adding a new device ID It is often desirable to provide greater granularity over the types/brands/model of device that can be can be managed within the Pointsec Protector Device Manager. For example, the system administrator may wish to specify additional security rights on defined corporate brands and models of device. This component offers both white list and blacklist protection across all device types. For example the system administrator can specify that any device except for the XXXX Brand(s)/Model(s) can be used or alternatively that only the XXXXX Brand(s)/Model(s) of device can be used. Under each specific device it is possible to assign individual security rights. To add a new device ID, click on the device class under which the new device is to be added (i.e. removable media) and click ‘Add device ID’, the following dialog is invoked:
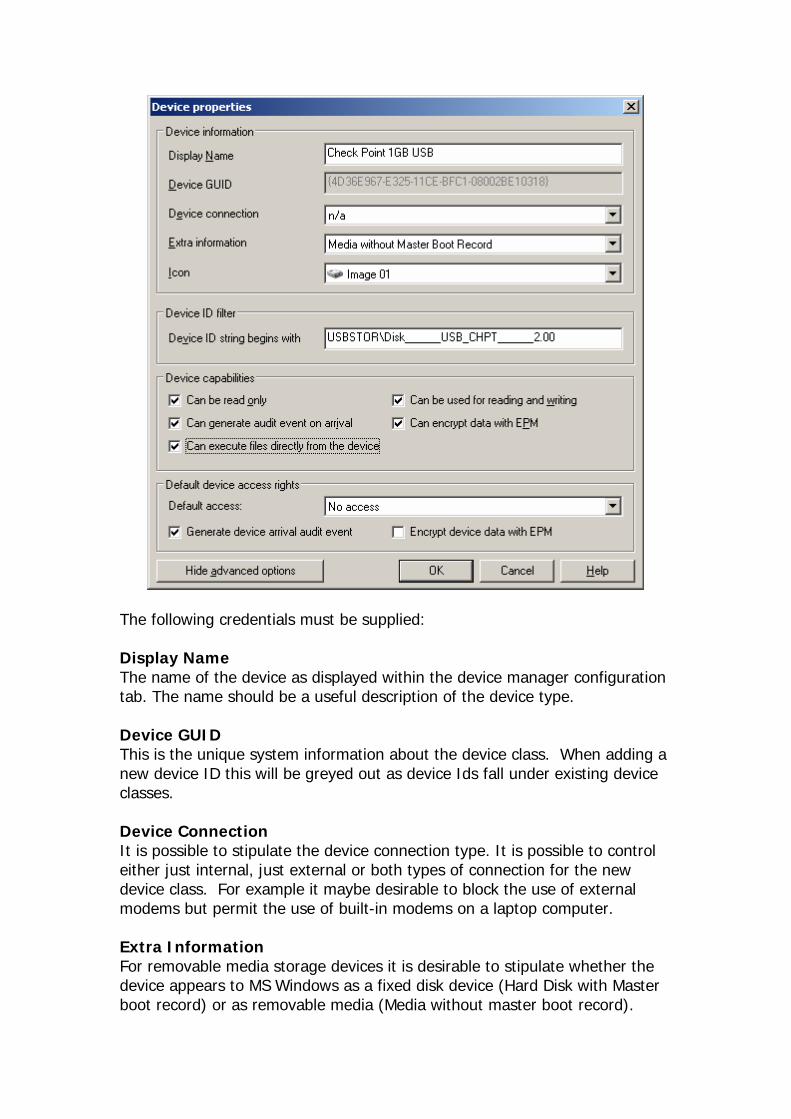
The following credentials must be supplied: Display Name The name of the device as displayed within the device manager configuration tab. The name should be a useful description of the device type. Device GUID This is the unique system information about the device class. When adding a new device ID this will be greyed out as device Ids fall under existing device classes. Device Connection It is possible to stipulate the device connection type. It is possible to control either just internal, just external or both types of connection for the new device class. For example it maybe desirable to block the use of external modems but permit the use of built-in modems on a laptop computer. Extra Information For removable media storage devices it is desirable to stipulate whether the device appears to MS Windows as a fixed disk device (Hard Disk with Master boot record) or as removable media (Media without master boot record).

Icon A custom icon can be used for graphical representation in the device manager configuration tab. Select the required icon from the drop down menu or alternatively new icons can be added using the ‘Load Images’ button on the parent dialog. Device ID String begins with Each specific model of device has a device specific ID. This information can be automatically imported from the unauthorised device manager alert within the logs node. Device Manager can be configured to be very specific by including the entire Device ID string or less specific by including just the start of the ID string. Please see the FAQ section for examples. Device can be read only For storage devices it is possible to provide read only management. By ticking this dialog the read only functionality will be available during device configuration. Read only will prevent users copying data from the local drive/network to the removable storage device. Device can be used for read and writing If the new device class provides removable media storage that can be read from and written to this option should be selected. Data on the device can be EPM encrypted For digital storage devices the Encryption Policy Manager (EPM) can be enabled to provide transparent removable media encryption. Device arrival audit event can be generated The arrival of new devices can be audited under the event tab. This event records the type of device with full details of the device usage. Default device access rights This setting configures the default device access for new profiles. Select the required configuration from the drop down menu.
EPM Site identification
The Encryption Policy Manager enables transparent encryption of removable media. Within large organisations it is often desirable to enable the transfer of data between trusted organisations via removable media devices such as USB flash media. With EPM it is possible to setup trust relationships between different Pointsec Protector sites that are not physically linked. This trust relationship enables controls over which 3rd party encrypted devices can be accessed. This section provides the ability to add trusted sites, the access control rights are however configured within the individual profiles.
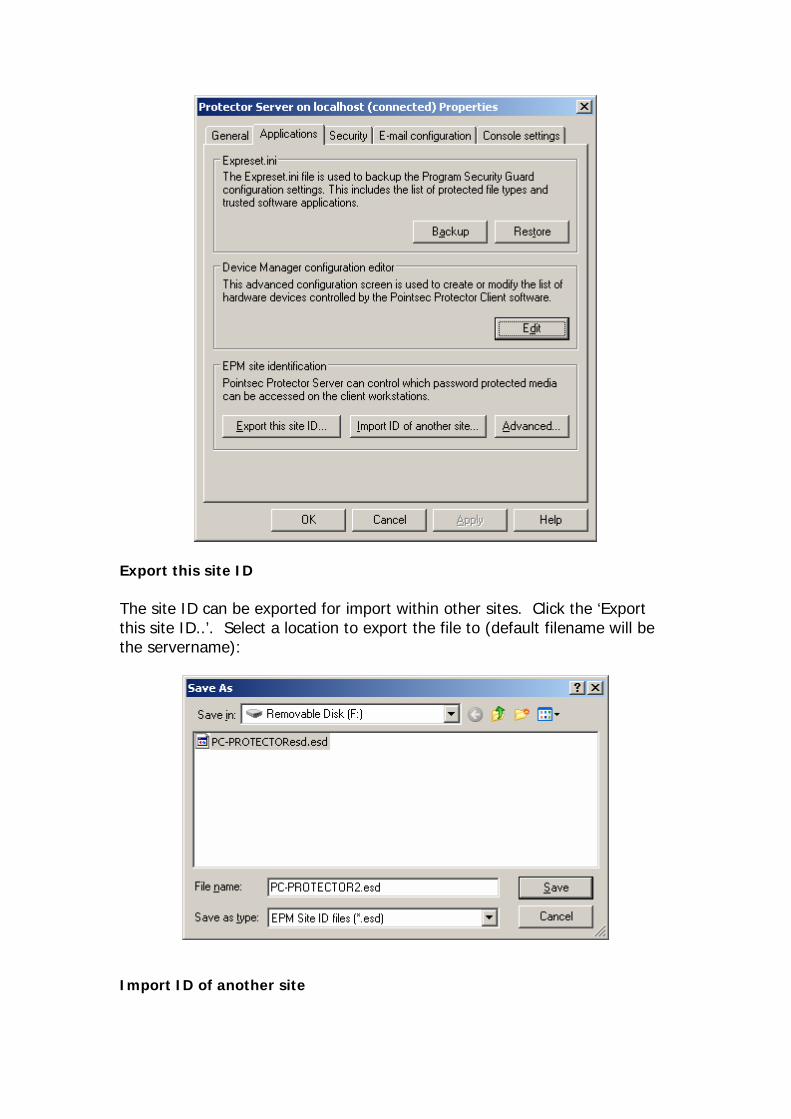
Export this site ID The site ID can be exported for import within other sites. Click the ‘Export this site ID..’. Select a location to export the file to (default filename will be the servername):
Import ID of another site
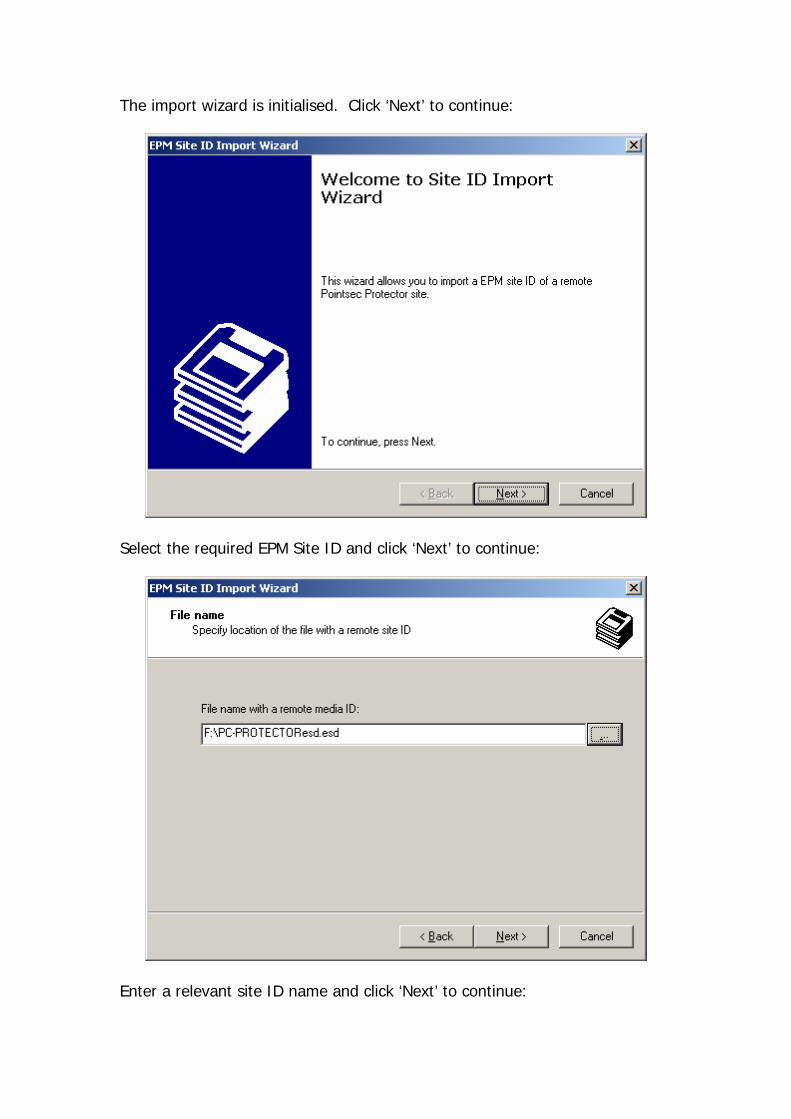
The import wizard is initialised. Click ‘Next’ to continue:
Select the required EPM Site ID and click ‘Next’ to continue:
Enter a relevant site ID name and click ‘Next’ to continue:

Click ‘Finish’ to complete the import process:
Advanced
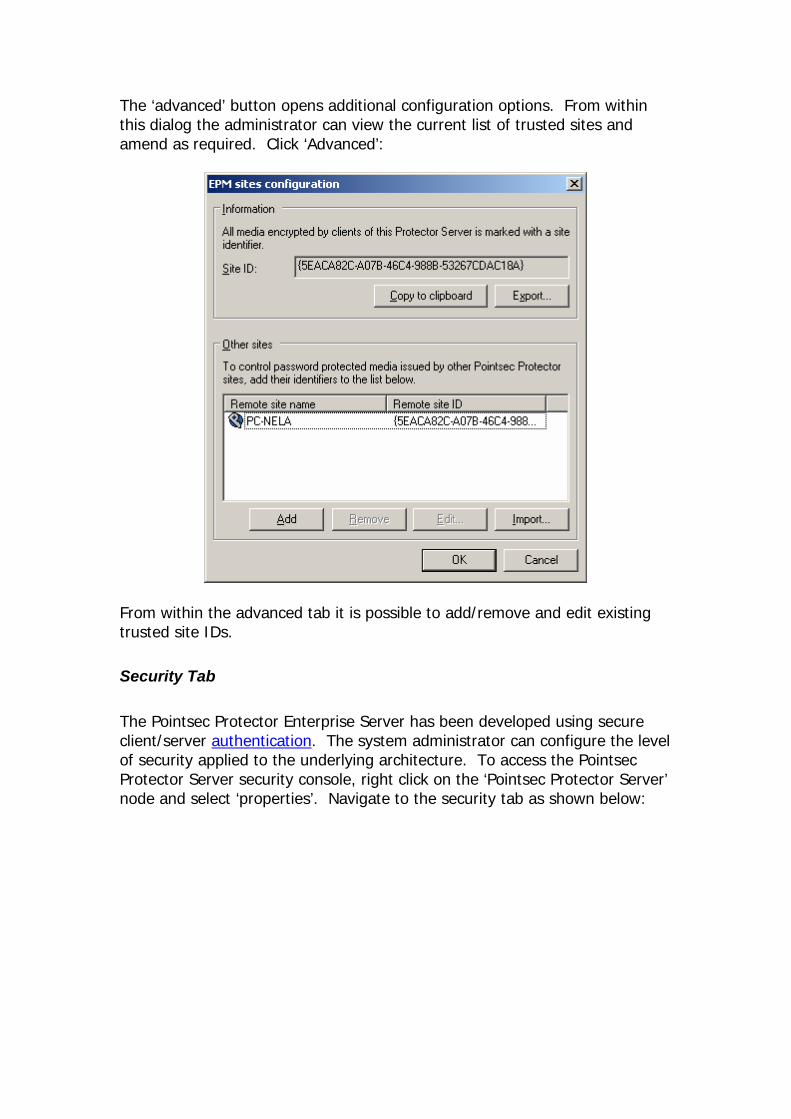
The ‘advanced’ button opens additional configuration options. From within this dialog the administrator can view the current list of trusted sites and amend as required. Click ‘Advanced’:
From within the advanced tab it is possible to add/remove and edit existing trusted site IDs.
Security Tab The Pointsec Protector Enterprise Server has been developed using secure client/server authentication. The system administrator can configure the level of security applied to the underlying architecture. To access the Pointsec Protector Server security console, right click on the ‘Pointsec Protector Server’ node and select ‘properties’. Navigate to the security tab as shown below:

During installation, Pointsec Protector Enterprise Server sets up default security permissions. Anyone within the NT/2K Administrator group will have full rights to the Pointsec Protector Server. Authenticated users will be granted client access only by default. You can Add and Remove users/groups using the ‘Add’ and ‘Remove’ buttons and select the desired security permissions by choosing to allow or deny each feature.
Basic Permissions Tab

The following options can be configured with the ‘basic permissions’ security tab: Administrate This option grants access to administer the Pointsec Protector Enterprise server. The ability to change the media ID and delete log files is unavailable. Manage Reports This option grants access to manage and generate reports within the Pointsec Protector Administration Console. Special Permissions Special permissions will grant access to recover encryption keys and change the media ID. This option should only be selected for security administrators.
Advanced Permissions Tab
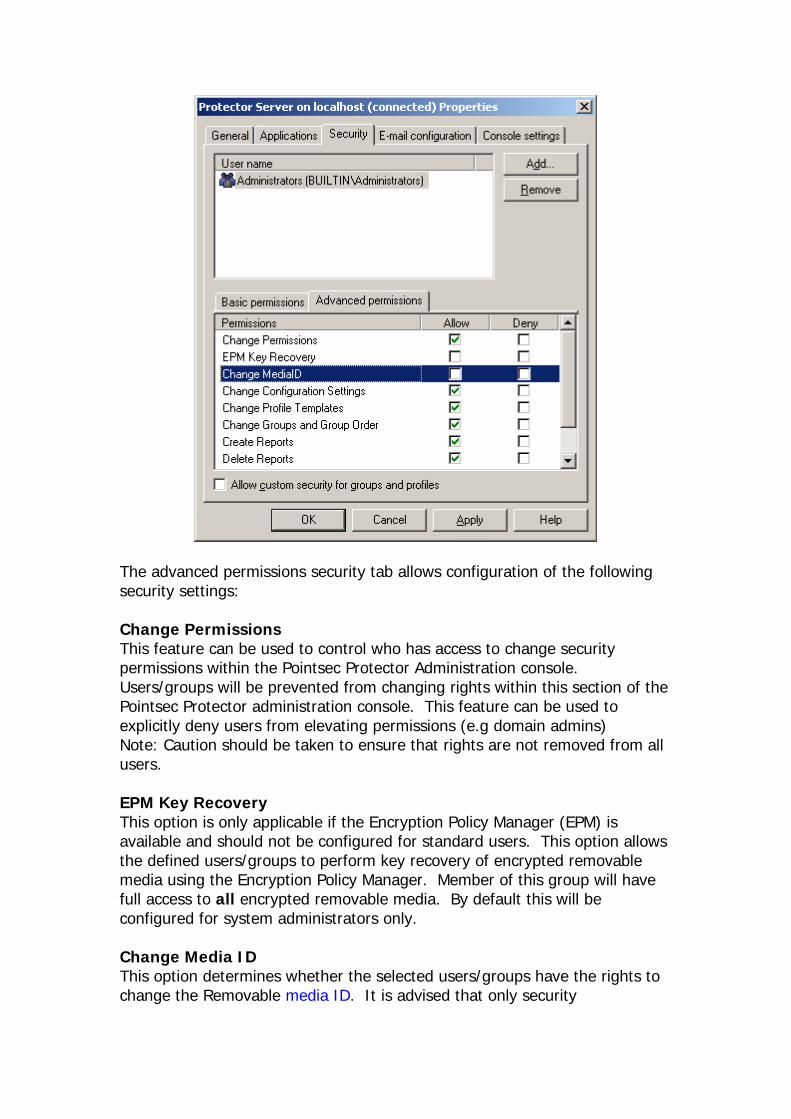
The advanced permissions security tab allows configuration of the following security settings: Change Permissions This feature can be used to control who has access to change security permissions within the Pointsec Protector Administration console. Users/groups will be prevented from changing rights within this section of the Pointsec Protector administration console. This feature can be used to explicitly deny users from elevating permissions (e.g domain admins) Note: Caution should be taken to ensure that rights are not removed from all users. EPM Key Recovery This option is only applicable if the Encryption Policy Manager (EPM) is available and should not be configured for standard users. This option allows the defined users/groups to perform key recovery of encrypted removable media using the Encryption Policy Manager. Member of this group will have full access to all encrypted removable media. By default this will be configured for system administrators only. Change Media ID This option determines whether the selected users/groups have the rights to change the Removable media ID. It is advised that only security
administrators are granted the rights to change the Media ID as this process is irreversible and will impact Pointsec Protector Client users. Change Configuration Settings This feature can be used to control which users/groups have access to change configuration options (excluding profiles and groups) within the Pointsec Protector Administration console. Change Profile Templates Permissions can be assigned regarding the capability of changing global profile templates. Please note that specific profile security will override the global setting. Change Groups and Group Order Permissions can be assigned regarding the capability of creating, deleting and modifying user groups. Group ordering can also be restricted. Create Reports The create reports security can be used to define which users/groups are permitted to create new html reports from within the administration console. Delete Reports By configuring access to this option it is possible to specify users/groups that are permitted to delete reports from within the administration console. View Configuration This option will grant/revoke access for the selected users/groups to view the users/groups and profile section within the Pointsec Protector administration console. Without access being granted to view the configuration, no access will be given to the Pointsec Protector Administration Console View Logs This option will allow the selected users/groups the ability to view the Pointsec Protector audit logs within the Pointsec Protector Administration console. IMPORTANT NOTE: The anonymous network connection must be supported by the Protector server in order to account for requests from the clients where there is no interactive user logged in. In such scenarios a connection between the client and server is still established according to the security protocol (sspi), i.e. authenticated. Anonymous logon accounts must be given client access permissions only as by default. This must not be deleted under any circumstances.
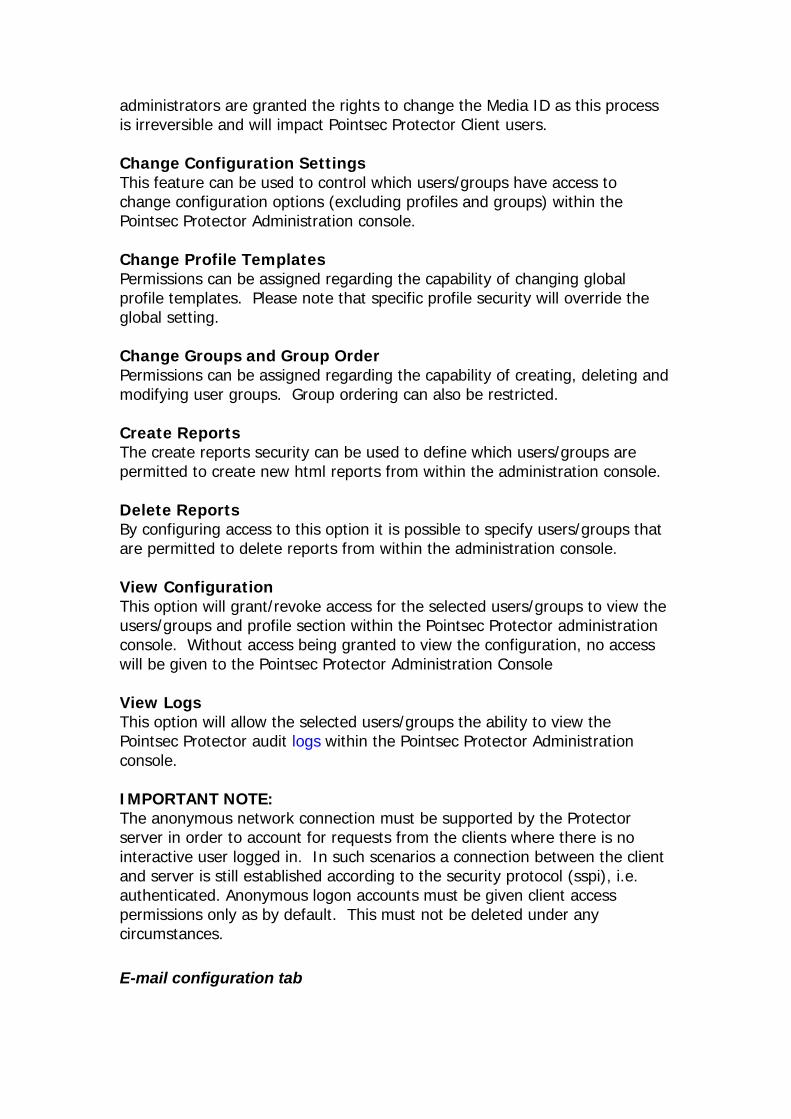
E-mail configuration tab
The Pointsec Protector Enterprise Server can be configured to send e-mail alerts on defined events to the e-mail addresses specified under the events node. During installation it is possible to configure the SMTP server used for sending alerts and the specified accounts and security credentials. This tab enables the administrator to specify or reconfigure these settings:
The following information must be specified: SMTP server name The name of the server where SMTP is enabled for internal connections. Port Port number on which the SMTP server can be connected to (default 25) SMTP user name Specify a user account that has permission to connect to and send e-mail alerts via SMTP. Password The user account password. Confirm Password As above.
Server e-mail address The e-mail address used to send Pointsec Protector alerts via the SMTP server Alert message subject This text will appear in the message subject for all alert messages generated by the Pointsec Protector Enterprise Server. Send a test alert to Enables the system administrator to test the SMTP configuration settings. On pressing this button a test message should be received immediately in the specified test e-mail inbox.
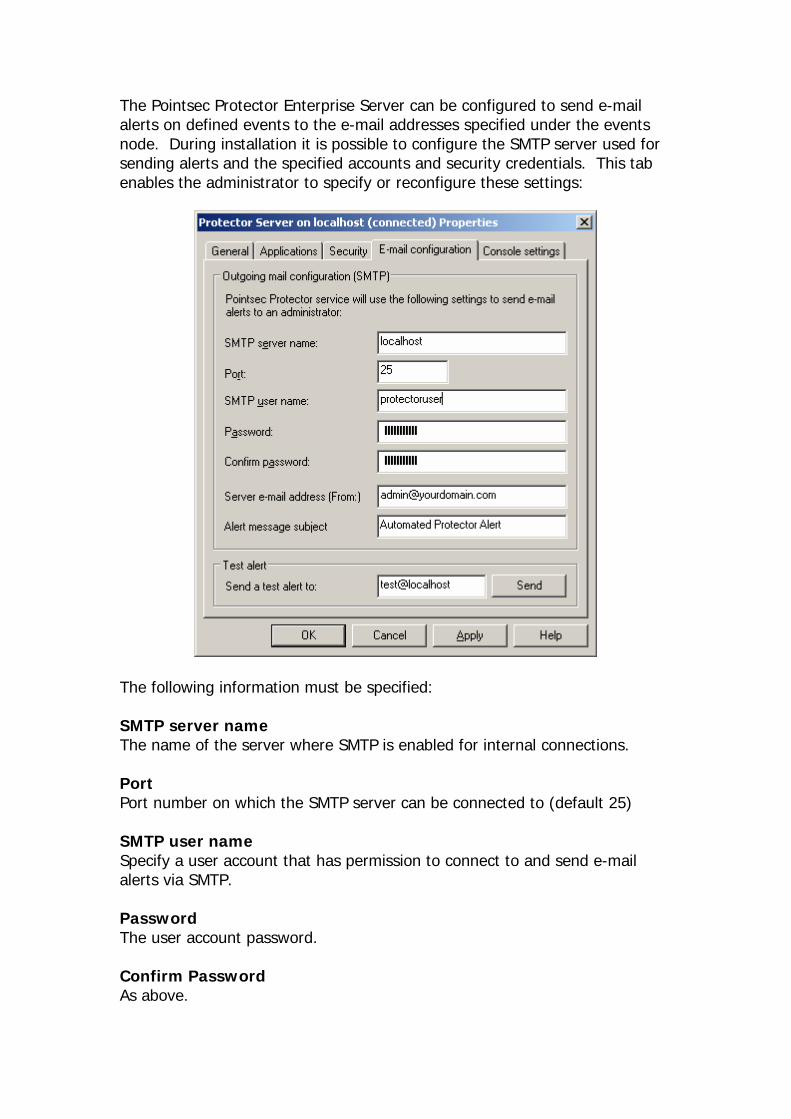
Console Settings tab Pointsec Protector is designed to be used on global infrastructures with many thousands of machines and workstations. To improve performance it is possible to restrict the number of viewed users and workstations. Select the required numbers and click ‘OK’ to continue:
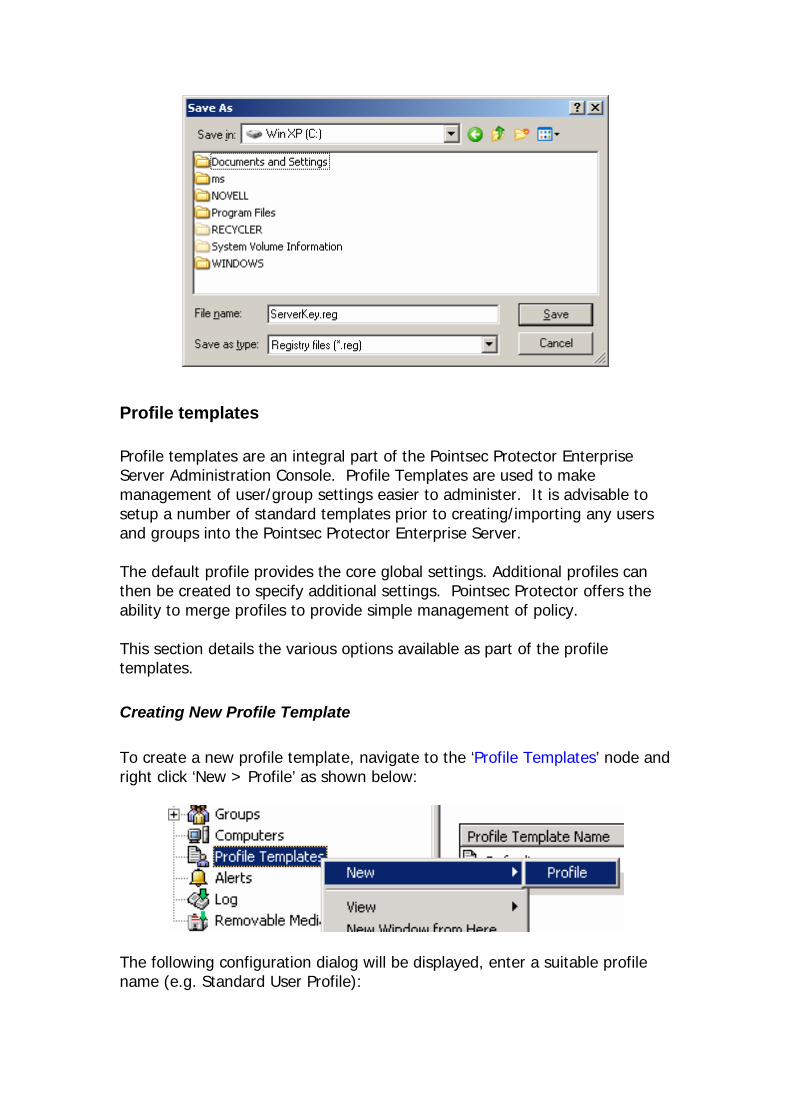
Server Key tab
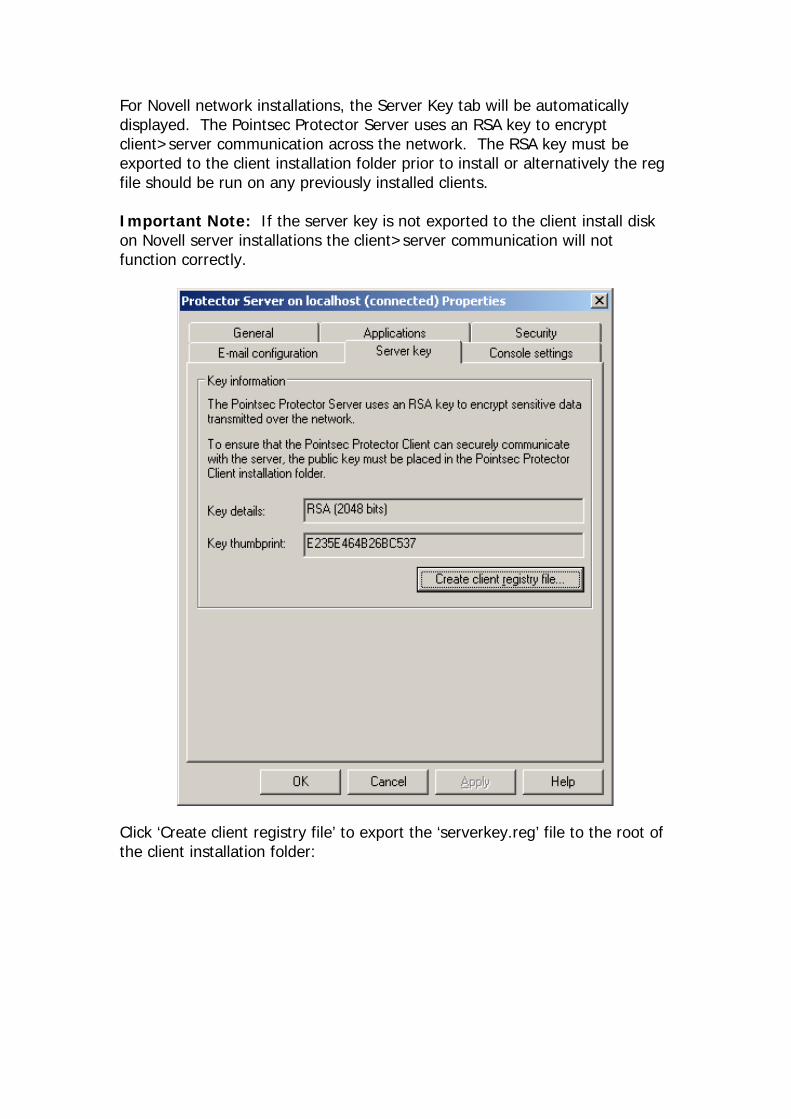
For Novell network installations, the Server Key tab will be automatically displayed. The Pointsec Protector Server uses an RSA key to encrypt client>server communication across the network. The RSA key must be exported to the client installation folder prior to install or alternatively the reg file should be run on any previously installed clients. Important Note: If the server key is not exported to the client install disk on Novell server installations the client>server communication will not function correctly.
Click ‘Create client registry file’ to export the ‘serverkey.reg’ file to the root of the client installation folder:
Profile templates Profile templates are an integral part of the Pointsec Protector Enterprise Server Administration Console. Profile Templates are used to make management of user/group settings easier to administer. It is advisable to setup a number of standard templates prior to creating/importing any users and groups into the Pointsec Protector Enterprise Server. The default profile provides the core global settings. Additional profiles can then be created to specify additional settings. Pointsec Protector offers the ability to merge profiles to provide simple management of policy. This section details the various options available as part of the profile templates.
Creating New Profile Template To create a new profile template, navigate to the ‘Profile Templates’ node and right click ‘New > Profile’ as shown below:
The following configuration dialog will be displayed, enter a suitable profile name (e.g. Standard User Profile):
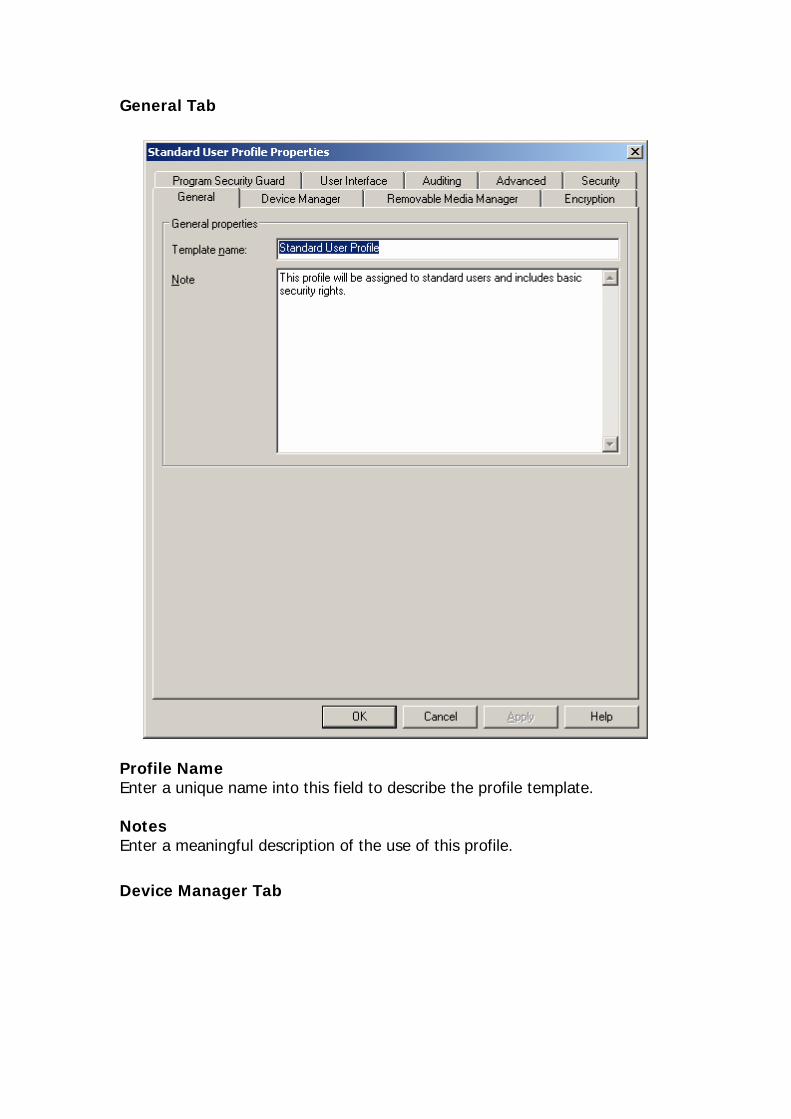
General Tab
Profile Name Enter a unique name into this field to describe the profile template. Notes Enter a meaningful description of the use of this profile.
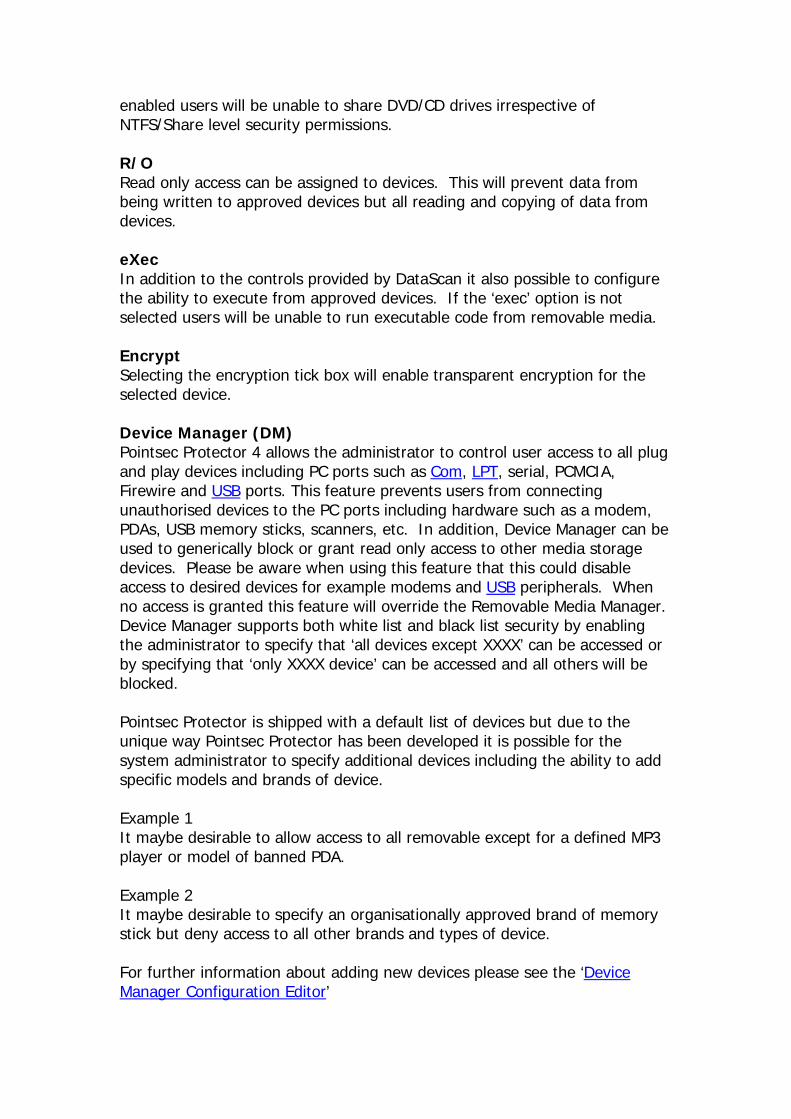
Device Manager Tab

Denotes that the settings are defined in this profile
Denotes that the settings are not defined in this profile and are inherited from the profile below. Audit: This tick box will enable the ability for the specified device type to be audited if auditing is enabled within the auditing tab. Please note this does not turn auditing on it just enables the capability Access This tick box will enable access for the specified device/device type.
The DVD/CD Drives option has an additional capability where it is possible to restrict shared access to a DVD/CD drive across the network. With this option
enabled users will be unable to share DVD/CD drives irrespective of NTFS/Share level security permissions. R/O Read only access can be assigned to devices. This will prevent data from being written to approved devices but all reading and copying of data from devices. eXec In addition to the controls provided by DataScan it also possible to configure the ability to execute from approved devices. If the ‘exec’ option is not selected users will be unable to run executable code from removable media. Encrypt Selecting the encryption tick box will enable transparent encryption for the selected device. Device Manager (DM) Pointsec Protector 4 allows the administrator to control user access to all plug and play devices including PC ports such as Com, LPT, serial, PCMCIA, Firewire and USB ports. This feature prevents users from connecting unauthorised devices to the PC ports including hardware such as a modem, PDAs, USB memory sticks, scanners, etc. In addition, Device Manager can be used to generically block or grant read only access to other media storage devices. Please be aware when using this feature that this could disable access to desired devices for example modems and USB peripherals. When no access is granted this feature will override the Removable Media Manager. Device Manager supports both white list and black list security by enabling the administrator to specify that ‘all devices except XXXX’ can be accessed or by specifying that ‘only XXXX device’ can be accessed and all others will be blocked. Pointsec Protector is shipped with a default list of devices but due to the unique way Pointsec Protector has been developed it is possible for the system administrator to specify additional devices including the ability to add specific models and brands of device. Example 1 It maybe desirable to allow access to all removable except for a defined MP3 player or model of banned PDA. Example 2 It maybe desirable to specify an organisationally approved brand of memory stick but deny access to all other brands and types of device. For further information about adding new devices please see the ‘Device Manager Configuration Editor’
Detailed Below are the default list of devices shipped with Pointsec Protector Device Manager: Floppy drives: It is possible to block or grant read only access to any floppy disk drive if authorised access using Removable Media Manager is not desired. Removable Media Devices (USB drives, etc): All removable media device access can be managed including the ability assign no access, read only access, or full access. Additional more granular control can also be achieved using Removable Media Manager, this component will ensure that only digitally signed authorised devices can be accessed. This option will manage the use of removable media devices plugged into any port including USB & Firewire. Removable storage devices can also be encrypted if the optional Encryption Policy Manager has been purchased. Please note there is an automatic exemption on EPM encrypted drives and full access is granted. External hard drives: If this option is selected, access to any unauthorised new hard disks including USB/Firewire drives can be blocked or read only access granted. External hard drives can also be encrypted if the optional Encryption Policy Manager has been purchased. Please note there is an automatic exemption on EPM encrypted drives and full access is granted. Optical devices (CD/DVD): CD & DVD drives can be either disabled or read only access granted. This provides management over the use of CDR/DVDR and CDRW/DVDRW drives. Pointsec Protector can control the use of native XP CD burning and other 3rd party CD/DVD authoring software. If authorised CD access is required Check Point Optimum can be purchased as an additional component. Check Point Optimum allows the system administrator to build a database of approved CDs/DVDs. For further information please contact the Check Point sales department [email protected]. Tape Drives: Device Manager can be used to manage access to tape drives. Modems: Device Manager can be used to manage access to modems both internal and external. Printers (LPT/USB): Device Manager can be used to manage access to LPT/USB ports thus preventing access to unauthorised printers. Bluetooth: Device Manager can be used to manage access to Bluetooth devices including USB dongles. Still image devices: Device Manager can be used to manage access to still image devices including scanners and digital cameras.
Serial ports (COM): Device Manager can be configured to manage access to COM ports and hence block the introduction of unapproved serial port devices including modems. Infrared ports (IrDA): Infra-red ports pose a potentially large security vulnerability particularly for laptop users. Device Manager can be used to disable IrDA ports. Smart card readers: Device Manager can be used to manage access to smart card readers both internal and external devices. PCMCIA Memory: Device Manager can be used to manage access to PCMCIA memory including Compact Flash and removable hard disks. Blackberry RIM devices: Blackberry (RIM) device access can be managed by Device Manager. Windows CE Portable Devices: MS Windows CE PDA device access can be managed using Device Manager. This includes all devices that connect to MS Windows using MS Active Sync. Windows Portable Devices: Devices like MP3 players and personal video players can be managed by Device Manager under this category. Ports (COM/LPT): Device Manager can be configured to manage access to COM/LPT ports and hence block the introduction of unapproved serial port devices including modems and printers. Wireless Network Adapters (WiFi): Device Manager can be configured to manage access to all WiFi adapter including internal Centrino and USB dongle devices. When Device Manager is enabled users will receive bubble alerts from the system tray when an unapproved device is connected. IMPORTANT NOTE: The no access option within Device Manager will override all Removable Media Manager settings. An exclusion is automatically built into Device Manager to allow peripheral devices such as mice and keyboards to operate without problem. Caution should be exercised when enabling this feature as improper use could make some peripheral devices inoperable. The default operation for Device Manager is to enable access to all ports. To protect ports simply select the desired tick boxes from the dialog displayed above and click ‘OK’.
User Interface Tab
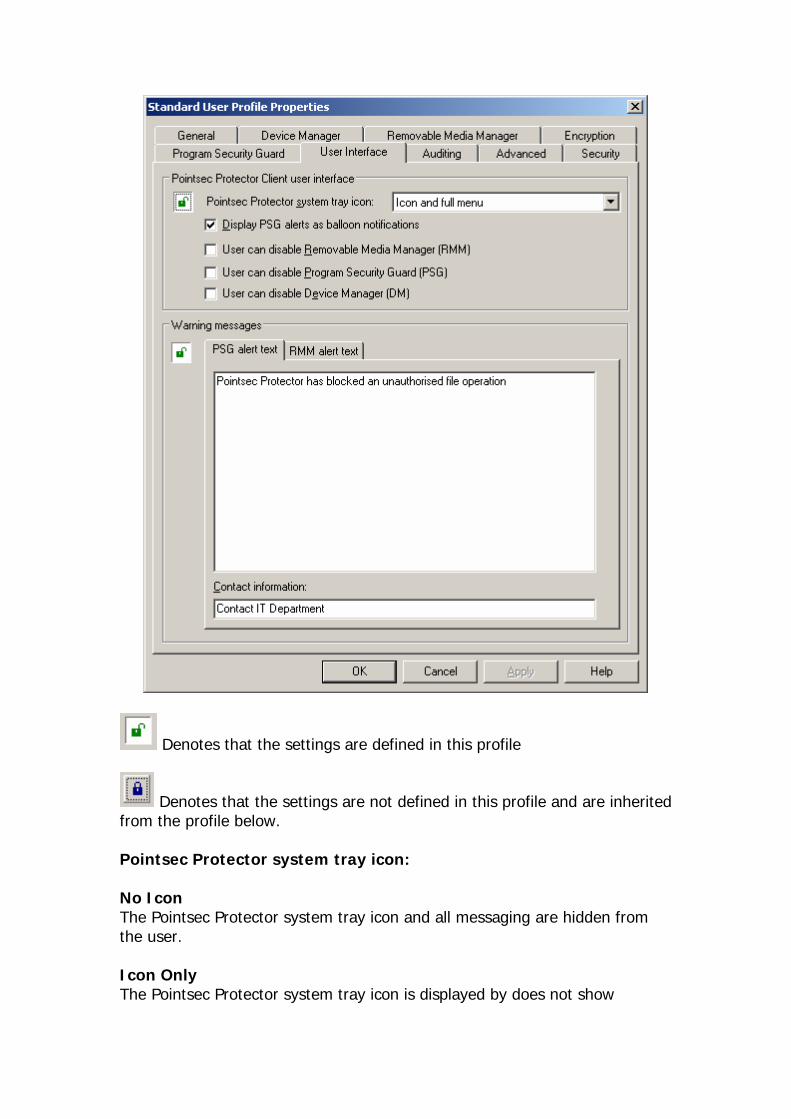
Denotes that the settings are defined in this profile
Denotes that the settings are not defined in this profile and are inherited from the profile below. Pointsec Protector system tray icon: No Icon The Pointsec Protector system tray icon and all messaging are hidden from the user. Icon Only The Pointsec Protector system tray icon is displayed by does not show
messaging or the client menu system. Please note the system tray icon must be visible to provide balloon messaging. Icon and short menu The Pointsec Protector system tray icon is displayed as well as the short menu which includes client help, manual profile download options, and an about box. Icon and full menu The Pointsec Protector system tray icon is displayed together with a full context sensitive menu system. The full menu provides the ability for users to access the Device Manager, Removable Media Manager, Program Security Guard and Encryption Policy Manager menu systems. Display PSG alerts as balloon notifications PSG standard messaging can often be quite intrusive to the user. If this option is selected users will receive all messaging from the system tray as balloon messages that automatically close after 10 seconds and require no user interaction. User can access the Pointsec Protector system tray menu With this option selected, users with this profile will have access to the Pointsec Protector client system tray. User can disable Removable Media Manager (RMM) By selecting this option users with this profile will have the rights to disable RMM from the Pointsec Protector system tray. Caution should be exercised when enabling this option as a user will have the ability to bypass the removable media manager security. User can disable Program Security Guard (PSG) By selecting this option users with this profile will have the rights to disable PSG from the Pointsec Protector system tray. Caution should be exercised when enabling this option as a user running this profile can disable PSG completely thus bypassing all security. User can disable Device Manager (DM) By selecting this option users with this profile will have the rights to disable DM from the Pointsec Protector system tray. Caution should be exercised when enabling this feature as user will be able to bypass all security provided by Device Manager. PSG alert text Message: This message will be displayed on the Pointsec Protector Client software when a user from the selected profile attempts to create or modify a file type defined in the PSG protected file types list.
Contact Information: Additional support contact information can be specified. RMM alert text Message: This message will be displayed on the Pointsec Protector Client software when a user from the selected profile inserts an unauthorised media device (e.g. Floppy disk, flash memory, Zip drive etc). Please note this message will not be displayed if the Removable Media Manager has been set to automatic authorisation. Contact Information: Additional support contact information can be specified.
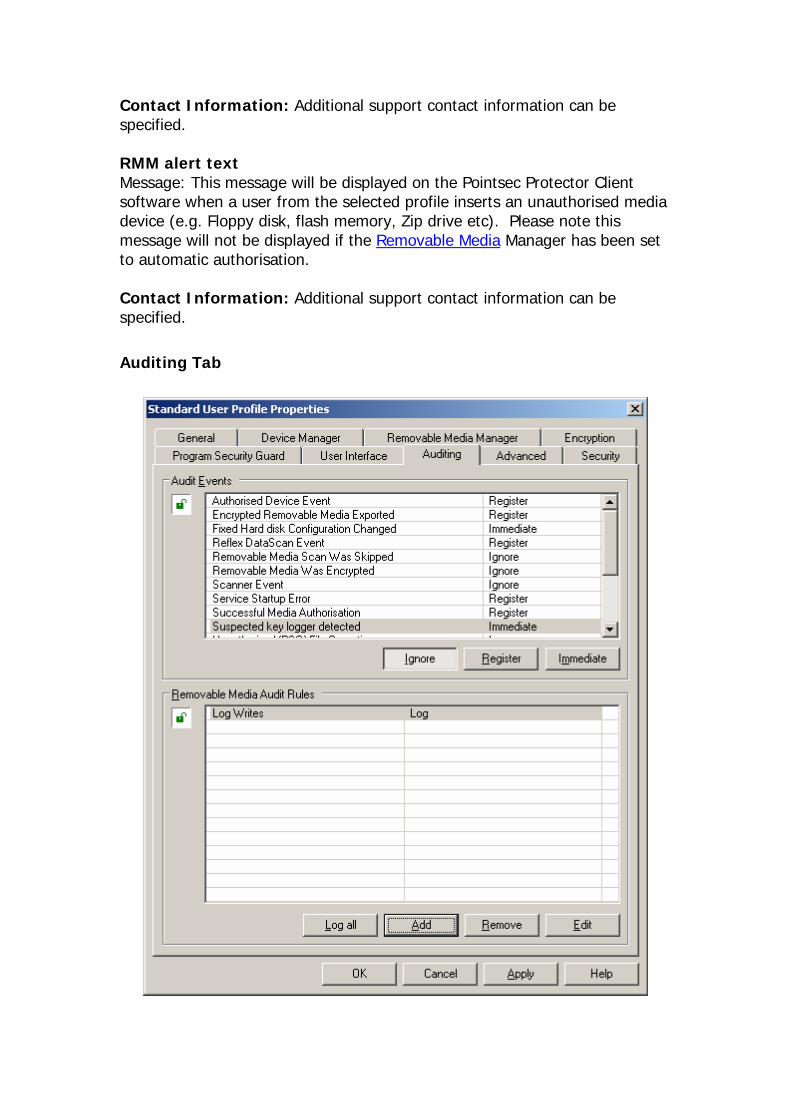
Auditing Tab
Denotes that the settings are defined in this profile
Denotes that the settings are not defined in this profile and are inherited from the profile below. The Auditing tab allows the system administrator to decide which security breaches/events require auditing and how the events should be processed. The following information is audited for all events: ID: The log ID number is an incremental number and is used to make searching events easier. Unique ID: The unique ID is assigned to each audit event. Time: Records information about the time and date at which the audit event occurred. Event: The name of the event (e.g. Unauthorised (PSG) File operation) Alert: Details whether there is an alert configured for the selected event (Yes/No) User ID: The User ID within the Pointsec Protector user database. User Name: The MS Windows user name of the user who was logged on when the event occurred. Hostname: The machine name on which the event occurred. Source: The source of the audited event (e.g. PSG, RMM, DM etc). Message: Contains other relevant information about the event. (e.g. virus infection details, unauthorised file audits etc). Authorised Device Event This audit event records all access to approved devices. This information can be used to add new specific devices to the Device Manager configuration direct from the audit event. Encrypted Removable Media Exported This event audits when an EPM encrypted device is exported back to clear text. Fixed Hard Disk Configuration Changed This event audits when there has been a physical change in hard disk configuration. This could be either the unauthorised addition of a new hard disk or the unauthorised removal of a hard disk. The addition of such devices can be blocked using Device Manager. Pointsec DataScan The Pointsec DataScan provides a detailed audit of media scan results including detailed analysis of file types and unsuccessful authorisation of media.
Pointsec Protector Client Service Was Shutdown Where local administration rights are present on a client workstation and the Pointsec Protector service is not locked, the shutdown of the Pointsec Protector client service can be audited. Removable Media Scan Was Skipped During the media authorisation process if permission to skip a virus or DataScan scan is permitted this event can be audited. Removable Media Was Encrypted If the Encryption Policy Manager (EPM) component is enabled, and permission to import new devices is granted the import of all new devices can be audited. Scanner Event Pointsec Protector can audit the results of Anti-Virus scans (provided supported within the AV scanner). Please contact Check Point Software Technologies Ltd for further information about supported scanners http://www.checkpoint.com/services/contact/. Service Startup Error The core of Pointsec Protector client messaging is an MS Windows NT service. It is possible to audit the service startup and whether it has succeeded or failed. The Pointsec Protector Client service is started during boot up. If the service is not started Pointsec Protector Client will not operate correctly and all devices will be secured and the default profile selected. Audit of this event will only be received the next time the service is successfully started. Successful Media Authorisation During media authorisation it is possible to audit when media is successfully authorised. Suspected key logger detected This event is generated if a suspected USB key logger is detected. The Pointsec Protector client software can detect any suspicious keyboard configuration changes. Unauthorised (PSG) File Operation Unauthorised PSG file operations can be recorded. As well as recording unauthorised user file access, this feature can also be useful for tracing new applications that require PSG exemption. A detailed log also contains information about the process that triggered PSG. This information can be used to create new exempt applications. Unauthorised Device Event All unauthorised device access attempts can be recorded. This information can be used to add new specific devices to the Device Manager configuration direct from the audit event.
Unauthorised Execution Attempt Program Security Guard automatically blocks the execution of files without defined executable extensions. Only programs with a .exe .com .sys .vbs file extension are allowed to be executed. Unauthorised Removable Media Found Unauthorised Removable Media detection can be recorded. In addition to the standard audit information it is also possible to view the capacity and type of the unauthorised media. Unsuccessful Media Authorisation If authorisation of a media device fails the event is audited as well as the reason for failure. User has disabled a system component Disabling of the core Pointsec Protector client components RMM, PSG and DM can be audited when available in the client software. User has enabled a system component Enabling of the core Pointsec Protector client components RMM, PSG and DM can be audited when available in the client software. Ignore: If the propagation of an audit event is set to ‘Ignore’ the selected event will not be logged locally or centrally. Register: If the propagation of an audit event is set to ‘register’, the event audit will be stored locally on the client machine until the next schedule client/server synchronisation takes place. Immediate: If the propagation of an audit event is set to ‘Immediate’, as soon the event occurs the client will immediately connect to the Pointsec Protector Enterprise Server (if available) and upload the audit information. This mode overrides the settings in the ‘Client log synchronisation’ section below. This mode can be used in conjunction with the ‘Alerts’ section. Removable Media Audit rules Removable Media Manager is a very powerful component for controlling the use of removable media storage devices. The Removable Media Audit tab provides the ability to audit all file operations performed on removable media devices and CD/DVD drives. From the RMM Audit tab it is possible to configure a profile to either audit every file operation performed or to build a complex set of rules based on certain defined criteria. Removable Media Audit can record the following information: ID: The log ID number is an incremental number and is used to make searching events easier.
Date & Time: Records information about the time and date at which the audit event occurred. Host Name: The machine name on which the event occurred. Operation Type: The type of operation that was performed on the removable media device: Create: Audits the creation of new files Open for Write: Audits any files that are opened for write access. Move/Rename: Audits file moves and renames Delete: Audits file deletions Filename1: Records the file name & extension Filename2: Records the new filename if a file rename is performed Process: Records the process name that performed the file operation (e.g Winword.exe, Explorer.exe etc) User Name: Records the Domain and User Name of the current user Alert: Details whether there is an alert configured for the selected event (Yes/No) Reset Disables all removable media auditing from the current profile. Log all By selecting this option all removable media file operations will be audited within the current profile. IMPORTANT NOTE: This option can generate large amounts of audit information and should be used with caution. Add It is possible to build a set of defined rules to control which removable media events are audited. To build a removable media audit rule select ‘Add’:
Media Audit Rule Tab
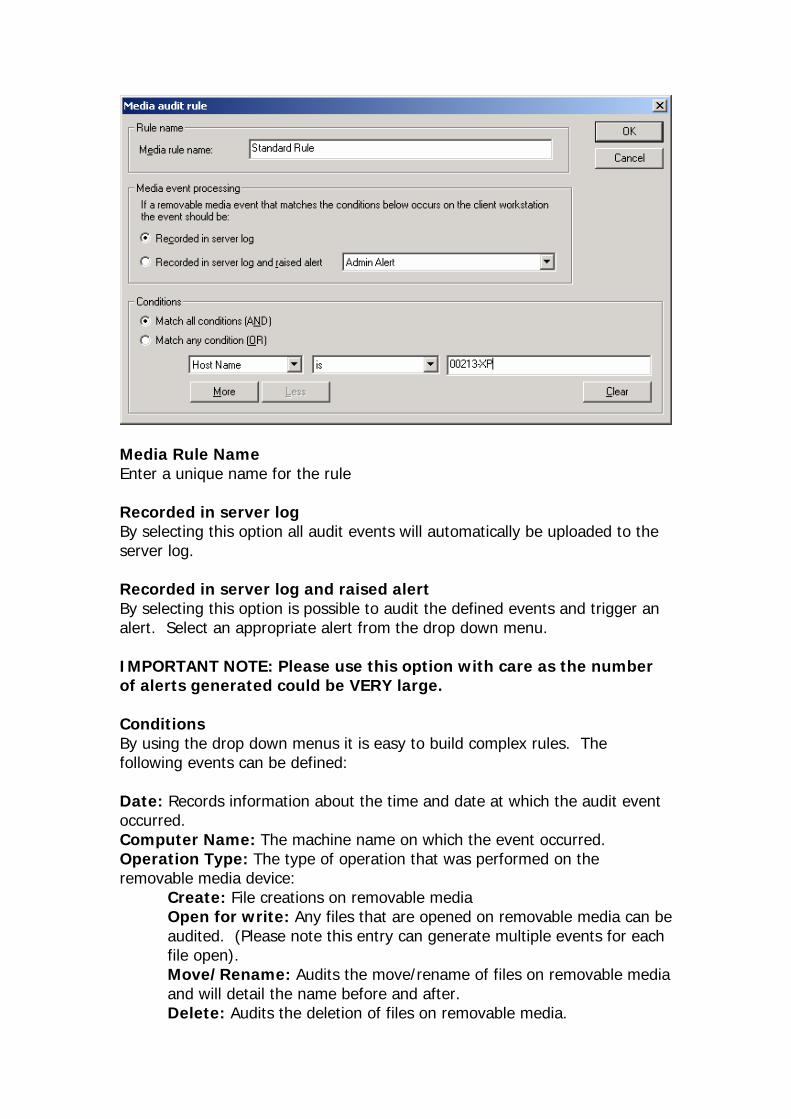
Media Rule Name Enter a unique name for the rule Recorded in server log By selecting this option all audit events will automatically be uploaded to the server log. Recorded in server log and raised alert By selecting this option is possible to audit the defined events and trigger an alert. Select an appropriate alert from the drop down menu. IMPORTANT NOTE: Please use this option with care as the number of alerts generated could be VERY large. Conditions By using the drop down menus it is easy to build complex rules. The following events can be defined: Date: Records information about the time and date at which the audit event occurred. Computer Name: The machine name on which the event occurred. Operation Type: The type of operation that was performed on the removable media device: Create: File creations on removable media
Open for write: Any files that are opened on removable media can be audited. (Please note this entry can generate multiple events for each file open). Move/Rename: Audits the move/rename of files on removable media and will detail the name before and after. Delete: Audits the deletion of files on removable media.
CD/DVD audit: Audits the creation of files burnt to CD/DVD using CD authoring applications. EE Copy Out: Audits the exporting of files from EPM explorer to 3rd party systems. EE Copy in: Audit the importing of files using EPM explorer on 3rd party systems. EE Read File: Audits the opening of files using EPM explorer on 3rd party systems EE Rename: Audits the renaming of files using EPM explorer. EE Delete: Audit the deletion of files using EPM explorer. EE Create: Audit the creation of new files using EPM explorer. EE Audit Log was tampered with: Audits the attempted tampering of the EPM explorer audit log
Filename1: Records the file name & extension Filename2: Records the new filename if a file rename is performed Process: Records the process name that performed the file operation (e.g. Winword.exe, Explorer.exe etc) User ID: Records the user logon ID User Name: Records the Domain and User Name of the current user In addition the following expressions can be used: Is: equal to (e.g. Filename is Mydata.doc) Is not: is not equal to (e.g. Process is not test.exe) Please Note * can be used as wild card entry for IS and IS NOT expressions. Example 1 To audit the creation of all files on removable media devices the following rule would be used:
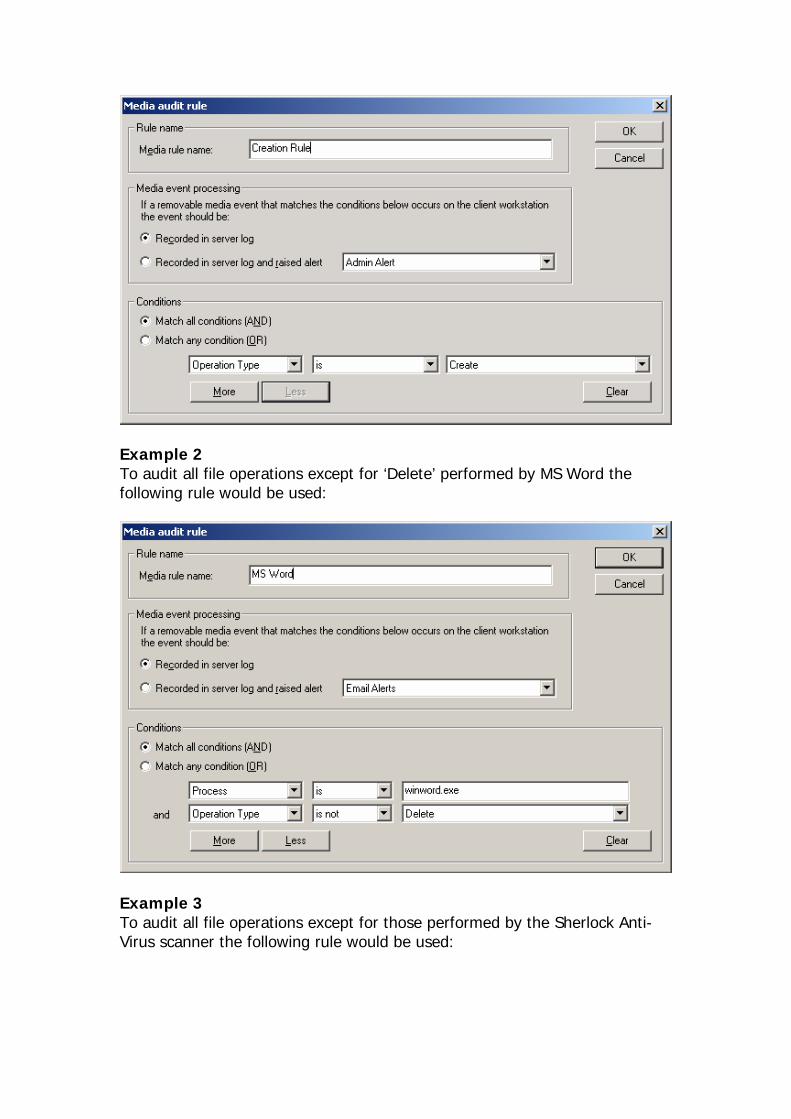
Example 2 To audit all file operations except for ‘Delete’ performed by MS Word the following rule would be used:
Example 3 To audit all file operations except for those performed by the Sherlock Anti-Virus scanner the following rule would be used:
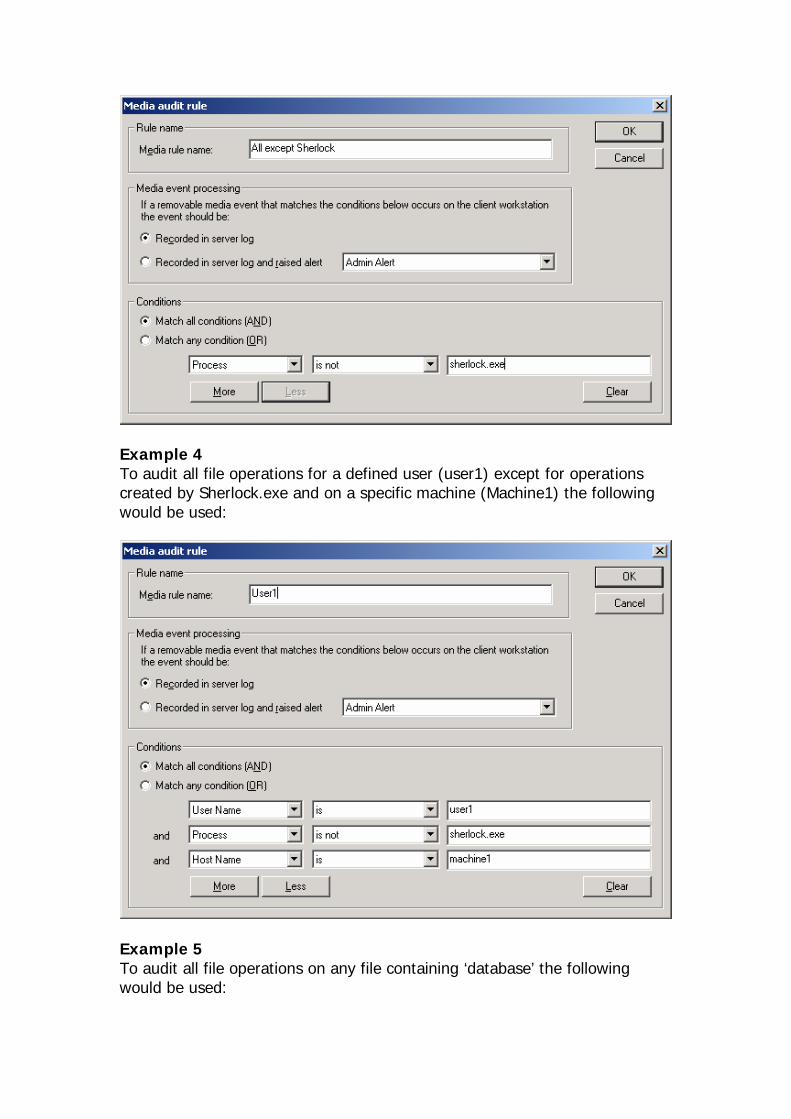
Example 4 To audit all file operations for a defined user (user1) except for operations created by Sherlock.exe and on a specific machine (Machine1) the following would be used:
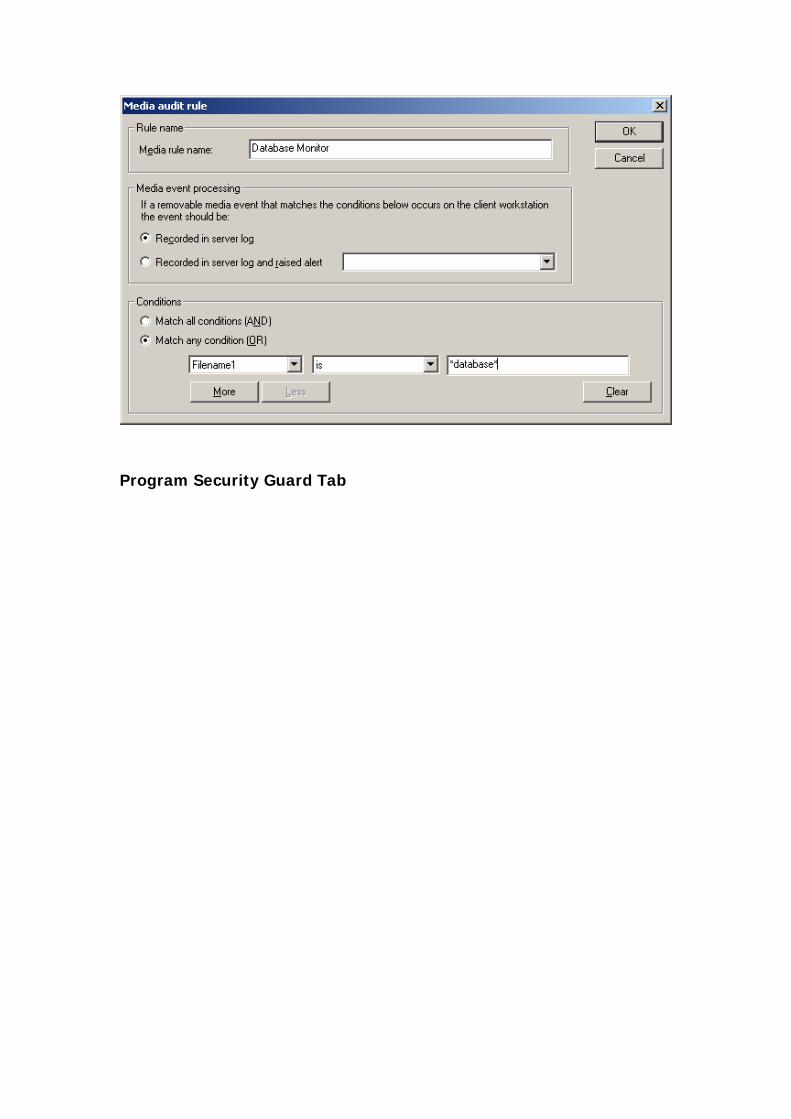
Example 5 To audit all file operations on any file containing ‘database’ the following would be used:
Program Security Guard Tab
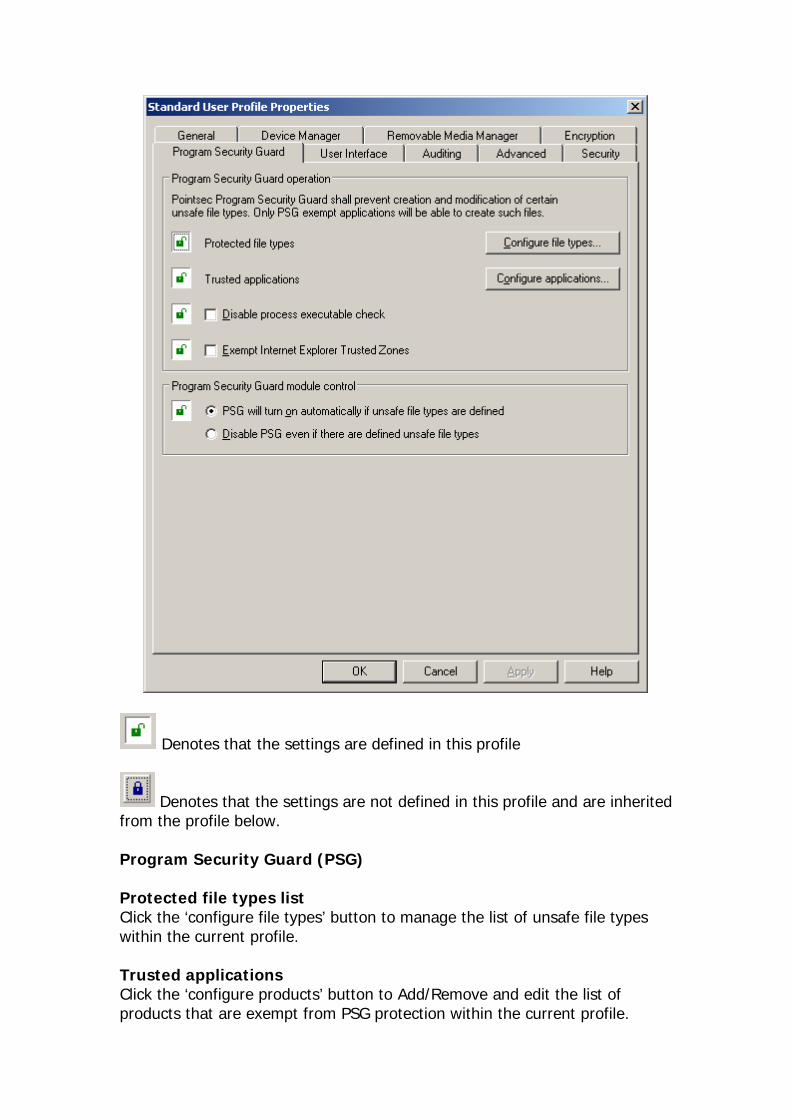
Denotes that the settings are defined in this profile
Denotes that the settings are not defined in this profile and are inherited from the profile below.
Program Security Guard (PSG) Protected file types list Click the ‘configure file types’ button to manage the list of unsafe file types within the current profile. Trusted applications Click the ‘configure products’ button to Add/Remove and edit the list of products that are exempt from PSG protection within the current profile.
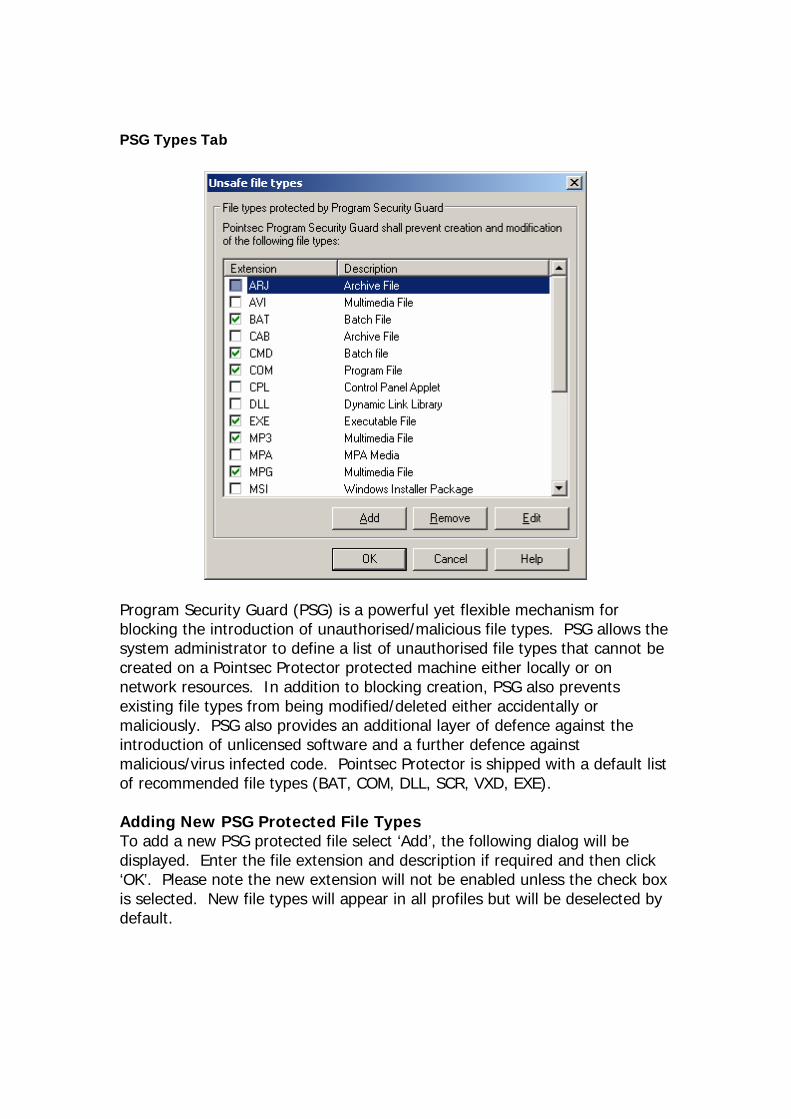
PSG Types Tab
Program Security Guard (PSG) is a powerful yet flexible mechanism for blocking the introduction of unauthorised/malicious file types. PSG allows the system administrator to define a list of unauthorised file types that cannot be created on a Pointsec Protector protected machine either locally or on network resources. In addition to blocking creation, PSG also prevents existing file types from being modified/deleted either accidentally or maliciously. PSG also provides an additional layer of defence against the introduction of unlicensed software and a further defence against malicious/virus infected code. Pointsec Protector is shipped with a default list of recommended file types (BAT, COM, DLL, SCR, VXD, EXE). Adding New PSG Protected File Types To add a new PSG protected file select ‘Add’, the following dialog will be displayed. Enter the file extension and description if required and then click ‘OK’. Please note the new extension will not be enabled unless the check box is selected. New file types will appear in all profiles but will be deselected by default.
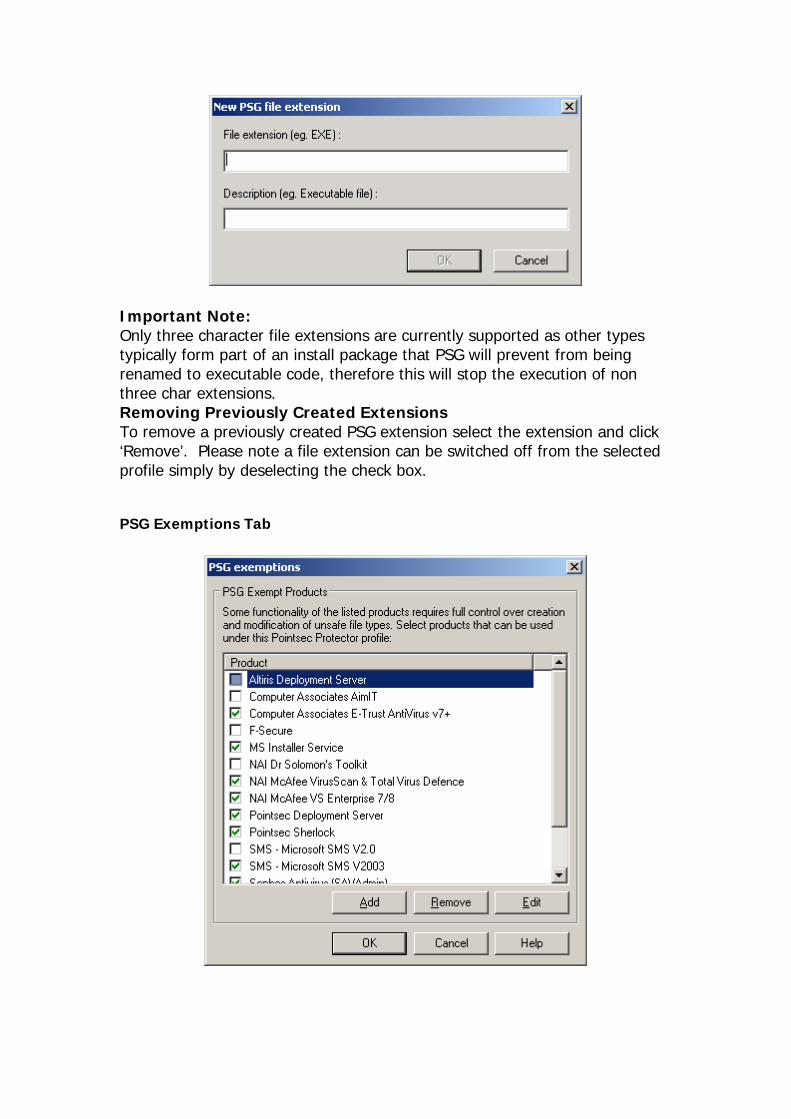
Important Note: Only three character file extensions are currently supported as other types typically form part of an install package that PSG will prevent from being renamed to executable code, therefore this will stop the execution of non three char extensions. Removing Previously Created Extensions To remove a previously created PSG extension select the extension and click ‘Remove’. Please note a file extension can be switched off from the selected profile simply by deselecting the check box.
PSG Exemptions Tab
Pointsec Protector client can be configured to prevent the introduction of, and unauthorised modification of defined file types (defined in the PSG file types tab). Due to the nature of PSG it is often desirable to allow certain defined programs to be exempt from PSG protection. Anti-Virus scanners and software deployment utilities generally require full access to modify and create new programs/files. Rather than disabling PSG during file modifications, a PSG exempt process is authorised to run leaving the machine secured against unauthorised processes. Pointsec Protector Server is supplied with a default list of exempt processes. Regular updates to this list are posted on the Check Point Software Technologies Ltd website www.Check Point.com/support in a file called expreset.ini. The current list of default applications is shown below:
• Reflex Deployment Server • Pointsec Protector Encryption Policy Manager (EPM) • NAI McAfee VirusScan & Total Virus Defence • NAI Dr Solomon's Toolkit • Sophos (SAVAdmin) • F-Secure • Microsoft SMS v2.0 • Microsoft SMS v2003 • Symantec Norton Anti-Virus • Computer Associates AimIT • Vet - Cyber Pty Ltd • Panda Anti-Virus • MS Applications • Trend Micro OfficeScan • NAI McAfee VS Enterprise 7x • Norman Anti-Virus • EZ E-Trust Anti-Virus v7+
Selecting Exempt Processes To select an existing PSG exempt application tick the relevant tick box and click ‘OK’. Adding a New Exempt Process If a particular application requires PSG exemption it is possible to add new program(s) to the selected profile. This can be achieved by completing the following tasks: Click the ‘Add’ button to open the ‘Add New Program’ dialog. Enter a product name as shown below:
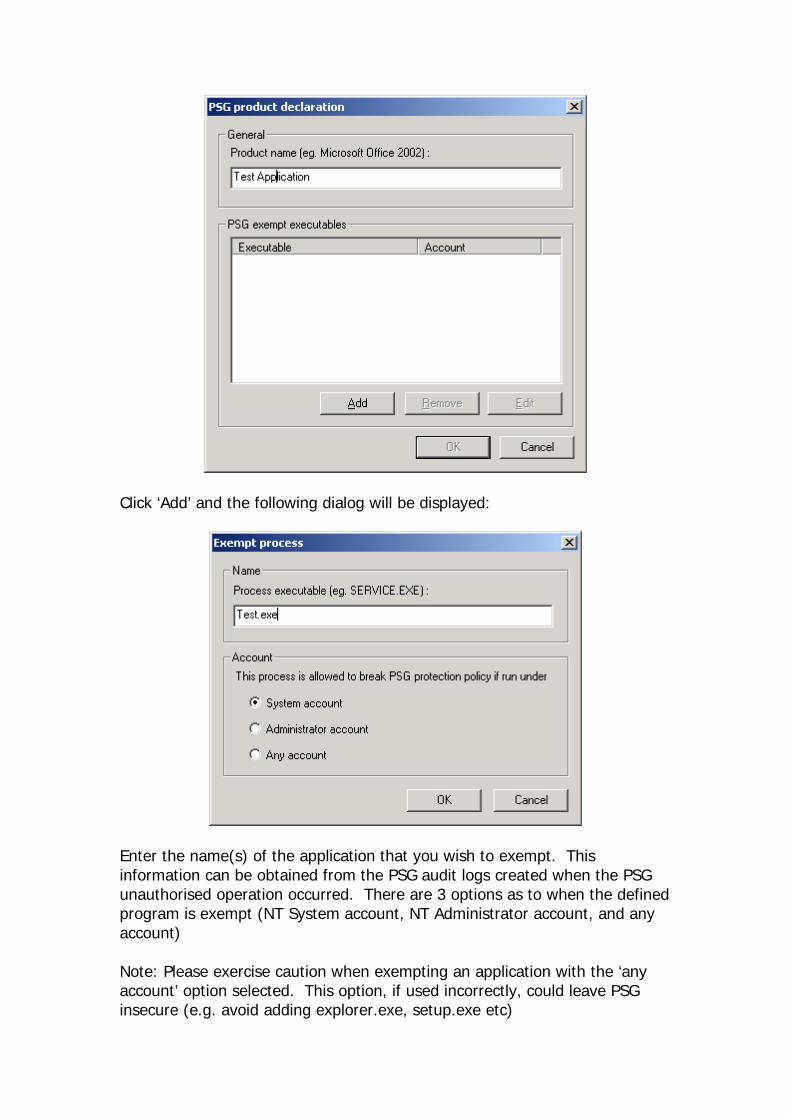
Click ‘Add’ and the following dialog will be displayed:
Enter the name(s) of the application that you wish to exempt. This information can be obtained from the PSG audit logs created when the PSG unauthorised operation occurred. There are 3 options as to when the defined program is exempt (NT System account, NT Administrator account, and any account) Note: Please exercise caution when exempting an application with the ‘any account’ option selected. This option, if used incorrectly, could leave PSG insecure (e.g. avoid adding explorer.exe, setup.exe etc)
Disable Process Executable Check To enhance security, PSG can also be configured to block the execution of non executable file extensions. By default PSG will only allow the execution of .EXE .COM and .SYS file types. Exempt Internet Explorer Trusted Zones By selecting the this option all Internet Explorer trusted zones will be exempt from PSG file protection. This provides security against attacks from spyware, trojans and viruses spread by the internet but will enable trusted sites to create/install software as required. This is particularly useful for setting up trusts with internal intranets and web based applications. Program Security Guard Module Control PSG will turn on automatically if unsafe file types are defined If protected files types are configured within the PSG protected files list Program Security Guard is automatically enabled. Disable PSG even if there are defined unsafe file types If this option is selected Program Security Guard is disabled even if unsafe file types are defined.
Removable Media Manager Tab
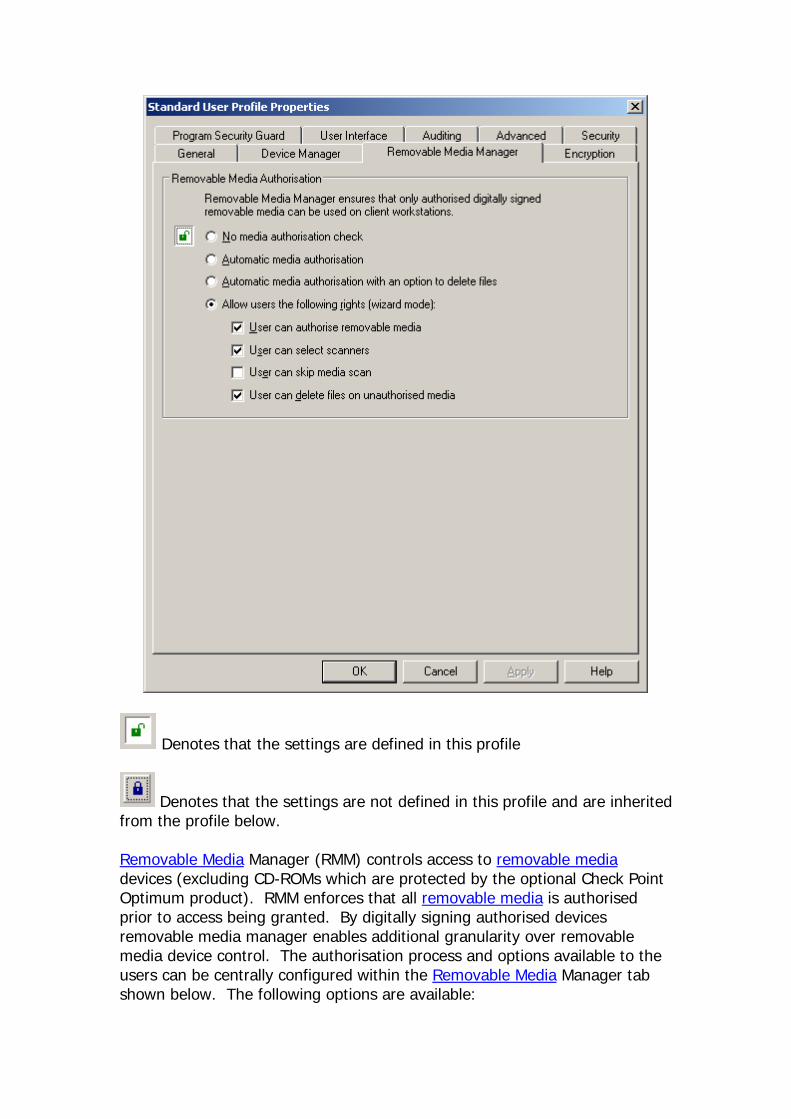
Denotes that the settings are defined in this profile
Denotes that the settings are not defined in this profile and are inherited from the profile below.
Removable Media Manager (RMM) controls access to removable media devices (excluding CD-ROMs which are protected by the optional Check Point Optimum product). RMM enforces that all removable media is authorised prior to access being granted. By digitally signing authorised devices removable media manager enables additional granularity over removable media device control. The authorisation process and options available to the users can be centrally configured within the Removable Media Manager tab shown below. The following options are available:
No media authorisation check By selecting this option Removable Media Manager will not be active in the current profile. Users will be able to access any devices permitted within the Device Manager configuration tab. Automatic media authorisation If the ’Automatic Media Authorisation’ radio button is selected within a profile, whenever a user inserts a removable media device and attempts to access it through MS Windows Explorer/My Computer, access will be blocked. The authorisation process will automatically execute and attempt to authorise the media. During automatic authorisation, Pointsec Protector client will automatically detect compatible Anti-Virus scanners installed on the machine. Note: If no Anti-Virus scanner or Pointsec DataScan is detected on the client machine then automatic authorisation will not be possible and access will not be granted. Automatic media authorisation with an option to delete files If the ’Automatic Media Authorisation with an option to delete files’ radio button is selected within a profile, whenever a user inserts a removable media device and attempts to access it through MS Windows Explorer/My Computer, access will be blocked. The authorisation process will automatically execute and attempt to authorise the media. During automatic authorisation, Pointsec Protector client will automatically detect compatible Anti-Virus scanners installed on the machine. Note: If no Anti-Virus scanner or Pointsec DataScan is detected on the client machine then automatic authorisation will not be possible and access will not be granted. In this mode the user will be prompted with an option to delete any unauthorised files detected by Pointsec DataScan to enable authorisation. Allow users the following rights (wizard mode) The media authorisation process can either be invoked automatically (as discussed above) or the user can be presented with a simple authorisation wizard. This mode requires user interaction to authorise media. User can authorise removable media This option allows users within the selected profile to authorise removable media with any installed and compatible Anti-Virus/Data Authorisation scanner detected. If this option is not selected users will be presented with a message only and no rights to authorise the media. User can select scanners If this option is selected users within the defined profile will be able to select which scanner to use during authorisation of removable media devices. The user must select at least 1 scanner to continue the authorisation process. It is not advisable to select this option when using the Pointsec DataScan as users maybe able to import unauthorised file types by deselecting and choosing just to invoke an Anti-Virus scan.
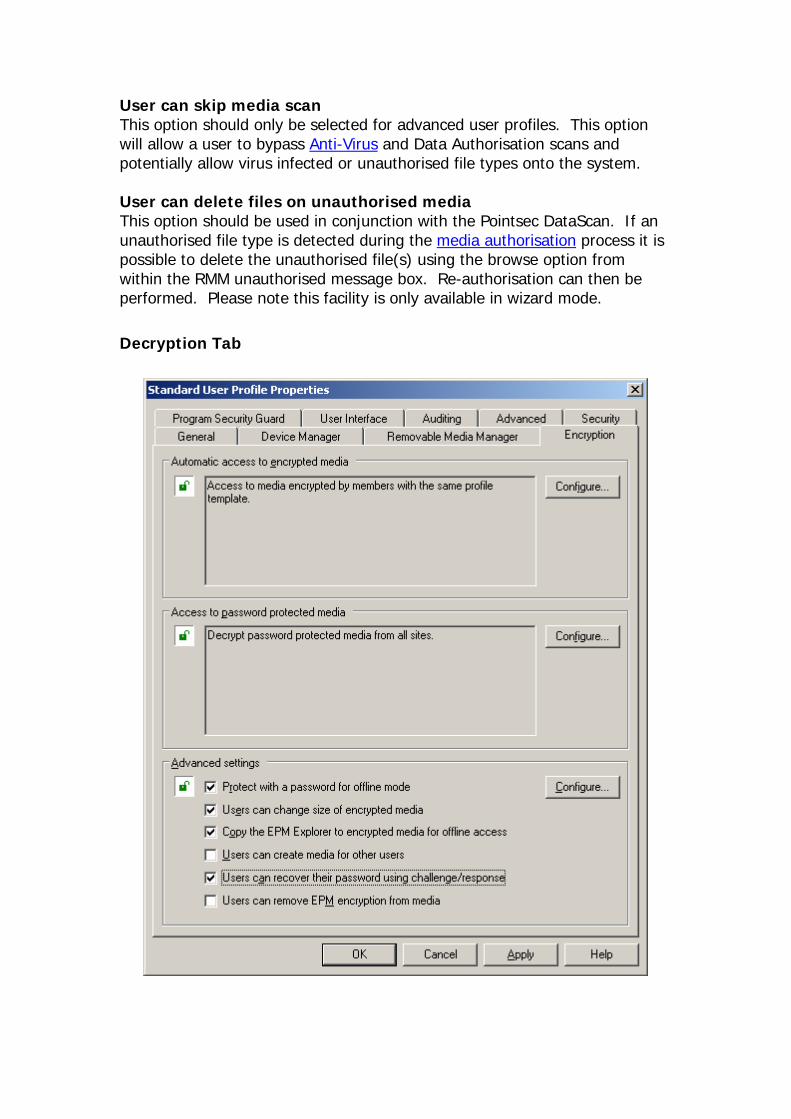
User can skip media scan This option should only be selected for advanced user profiles. This option will allow a user to bypass Anti-Virus and Data Authorisation scans and potentially allow virus infected or unauthorised file types onto the system. User can delete files on unauthorised media This option should be used in conjunction with the Pointsec DataScan. If an unauthorised file type is detected during the media authorisation process it is possible to delete the unauthorised file(s) using the browse option from within the RMM unauthorised message box. Re-authorisation can then be performed. Please note this facility is only available in wizard mode.
Decryption Tab

Denotes that the settings are defined in this profile
Denotes that the settings are not defined in this profile and are inherited from the profile below.
The EPM encryption tab will only be visible if the Encryption Policy Manager (EPM) has been installed. The Pointsec Protector Encryption Policy Manager provides strong encryption using the AES algorithm for all selected removable media devices. From within this component it is possible to enforce that all removable media storage devices must be encrypted before access is granted. By enforcing encryption of all devices organisations can ensure that all sensitive information is transparently secured from external breaches. Please Note: The following options permit users to encrypt new devices during the authorisation process. The Encryption Policy Manager is always active in the background irrespective of these options. This means users can access previously created encrypted devices providing they are correctly authenticated and are approved for access. Automatic access to encrypted media
By selecting the ‘Configure’ button it is possible to configure the encrypted media access rights for the current profile. The following options are available: No access to any EPM protected media
By selecting this option any users running the selected profile will have no access to any encrypted media. The only exception to this rule will be users that are part of the EPM Key Recovery group. This option should be selected to revoke all access to encrypted media. Decrypt media written by any Protector user This option will permit the access to any encrypted media that has been created within the current organisation irrespective of the user group that imported the device. Decrypt only media written by the same Protector user This option will permit access to encrypted media only by the user that initially performed the encryption media import. Please note that only EPM key recovery officers will have access to all encrypted media. This feature enables the system administrator to enforce individual media assignment. Decrypt media written by Protector users using the same profile template By selecting this option users of the current profile will only be able access devices imported by other users using the same profile. For example, if a user is using the ‘standard users profile’ he or she will only be able to access devices imported by other users who are also running the ‘Standard users profile’. Decrypt all media except written by members of the following groups By selecting this option is it is possible to specify that users running the selected profile can access devices imported by all groups except for defined groups. For example it maybe desirable to allow full access to all devices except for those imported by members of the accounts group. Access to password protected media
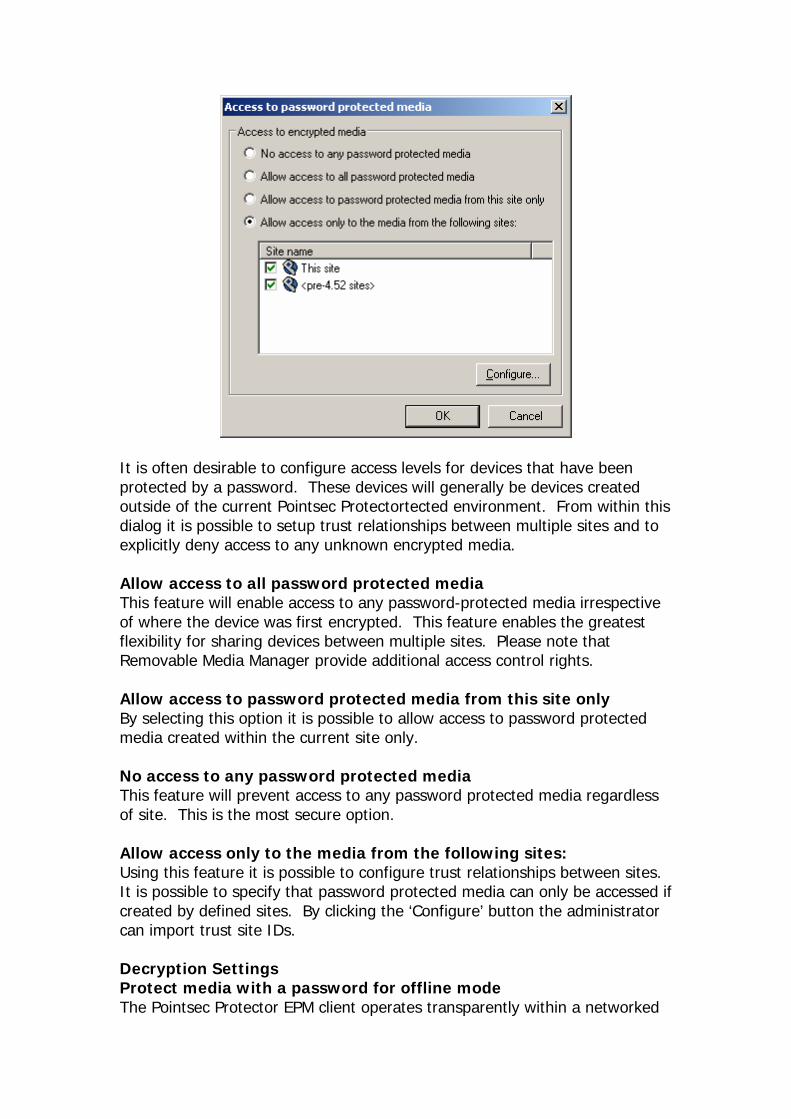
It is often desirable to configure access levels for devices that have been protected by a password. These devices will generally be devices created outside of the current Pointsec Protectortected environment. From within this dialog it is possible to setup trust relationships between multiple sites and to explicitly deny access to any unknown encrypted media. Allow access to all password protected media This feature will enable access to any password-protected media irrespective of where the device was first encrypted. This feature enables the greatest flexibility for sharing devices between multiple sites. Please note that Removable Media Manager provide additional access control rights. Allow access to password protected media from this site only By selecting this option it is possible to allow access to password protected media created within the current site only. No access to any password protected media This feature will prevent access to any password protected media regardless of site. This is the most secure option. Allow access only to the media from the following sites: Using this feature it is possible to configure trust relationships between sites. It is possible to specify that password protected media can only be accessed if created by defined sites. By clicking the ‘Configure’ button the administrator can import trust site IDs. Decryption Settings Protect media with a password for offline mode The Pointsec Protector EPM client operates transparently within a networked
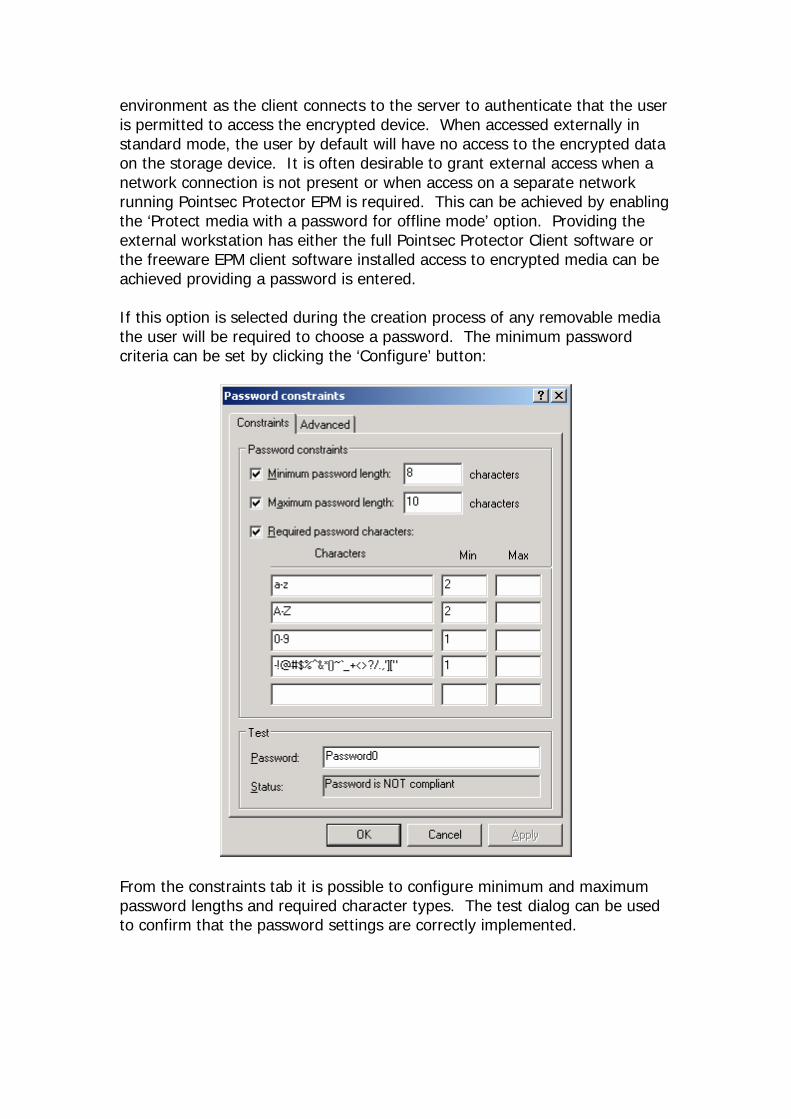
environment as the client connects to the server to authenticate that the user is permitted to access the encrypted device. When accessed externally in standard mode, the user by default will have no access to the encrypted data on the storage device. It is often desirable to grant external access when a network connection is not present or when access on a separate network running Pointsec Protector EPM is required. This can be achieved by enabling the ‘Protect media with a password for offline mode’ option. Providing the external workstation has either the full Pointsec Protector Client software or the freeware EPM client software installed access to encrypted media can be achieved providing a password is entered. If this option is selected during the creation process of any removable media the user will be required to choose a password. The minimum password criteria can be set by clicking the ‘Configure’ button:
From the constraints tab it is possible to configure minimum and maximum password lengths and required character types. The test dialog can be used to confirm that the password settings are correctly implemented.

Users can be given policy notes detailing password constraints by entering the relevant information into the text box. Password attempts The number of password attempts permitted to access encrypted removable media can be specified. (0=infinate password attempts) Block access for (minutes): When the maximum number of password attempts has been exceeded it is possible to block access to encrypted media for XX minutes. Lock drive completely after (attempts): To enhance security it is possible to configure that encrypted removable media devices can be locked out completely after XX password attempts. Access to the device can be re-enabled by either returning the device to the home network and securely authenticating it or by recovering via secure challenge/response. Users can change size of encrypted media If this option is enabled users are permitted to change the percentage of removable media that is encrypted during EPM import wizard.
Copy the EPM Explorer to encrypted media (enables offline access) By enabling this option the EPM Explorer is automatically copied to encrypted removable media. The EPM Explorer enables offline access to encrypted data on third party machines without the need to install any software. Even if the third party machine does not have either Pointsec Protector or the EPM Freeware client installed, access can be granted to encrypted removable media via a password. For further information about using the EPM Explorer please see the EPM Explorer section. Users can create media for other users This option is generally selected for administrator profiles. Using this option the administrator can import devices and assign to different users. There is also the ability to import a device in a ‘limbo’ state. This means the device can be issued to a user and the first time they insert the device it will be assigned to the current user. Users can recover their password using challenge/response In the event that a user forgets his/her password for encrypted removable media when remote from the home site it is possible to perform remote password recovery using challenge/response. Users can remove EPM encryption from media If this option is enabled users are permitted to decrypt encrypted removable media devices. This can be achieved by the clicking on the ‘Export’ button from within the EPM Client console. Removing encryption will back up the contents of the device, decrypt the information and then copy the data back in clear text. This option should only be given to the administrator or trusted users.
Advanced Tab
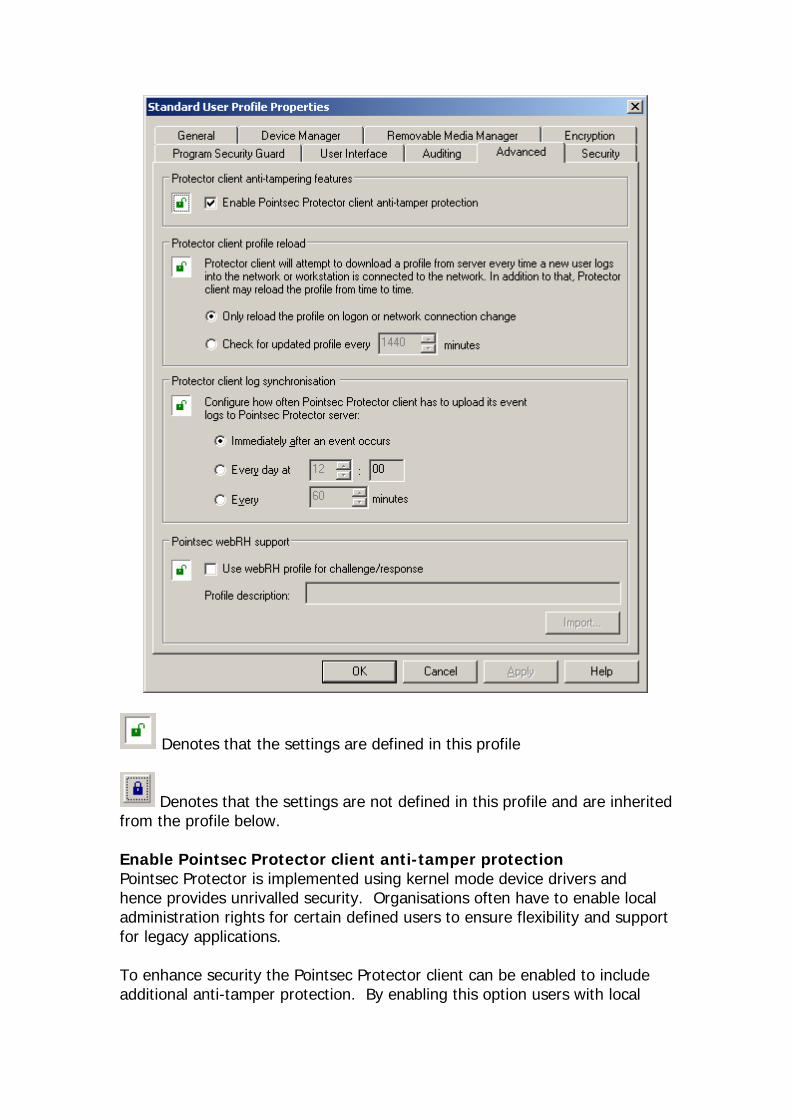
Denotes that the settings are defined in this profile
Denotes that the settings are not defined in this profile and are inherited from the profile below. Enable Pointsec Protector client anti-tamper protection Pointsec Protector is implemented using kernel mode device drivers and hence provides unrivalled security. Organisations often have to enable local administration rights for certain defined users to ensure flexibility and support for legacy applications. To enhance security the Pointsec Protector client can be enabled to include additional anti-tamper protection. By enabling this option users with local
administration rights will be unable to modify/delete key Pointsec Protector registry keys or system files. Note: It is advisable to disable this feature for system administrators as this feature will prevent any debug of the Pointsec Protector client software. Protector client profile reload By default the Pointsec Protector client only connects to the Pointsec Protector server at logon or when a manual profile reload is instigated from the client or the server. Additional options can be configured to ensure that the profile applied is always current and based on location and status: Only reload the profile on logon or network connection change A profile reload will automatically be performed on logon and if the network connection status is changed, for example when changing from a wired network to wireless. Check for updated profile every XXX minutes An automatic profile reload can be performed at scheduled intervals to ensure that the Pointsec Protector policy is always up to date. This feature is particularly applicable where users do not log off of workstations/laptops regularly. Protector Client Log Synchronisation Immediately after an event occurs: With this option selected the client workstation will perform an immediate connection to the Pointsec Protector Enterprise Server (if available) and upload the latest audit log information. Ever day at _____ The client workstation can be configured to upload the latest log information every day at a defined time. Every ____ mins The client workstation can be configured to upload the latest log information at defined intervals. Manually With this option selected log information will only be uploaded at logon or when a user selects the update profile button from the Pointsec Protector Client ‘Options>Update’ tab. Pointsec webRH Support Use webRH profile for challenge/response By selecting this option it is possible to use the Pointsec webRH challenge/response service for remote password reset/recovery of EPM encrypted devices. Click the ‘Use WebRH profile for challenge/respons tick
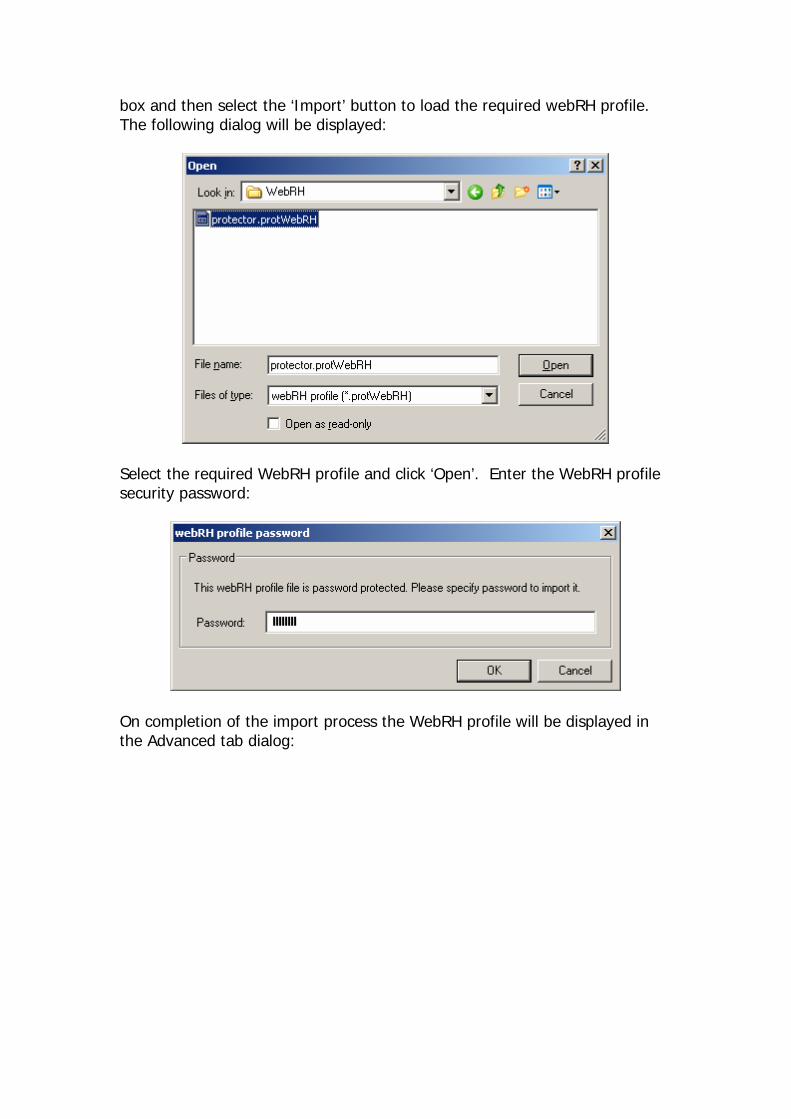
box and then select the ‘Import’ button to load the required webRH profile. The following dialog will be displayed:
Select the required WebRH profile and click ‘Open’. Enter the WebRH profile security password:
On completion of the import process the WebRH profile will be displayed in the Advanced tab dialog:
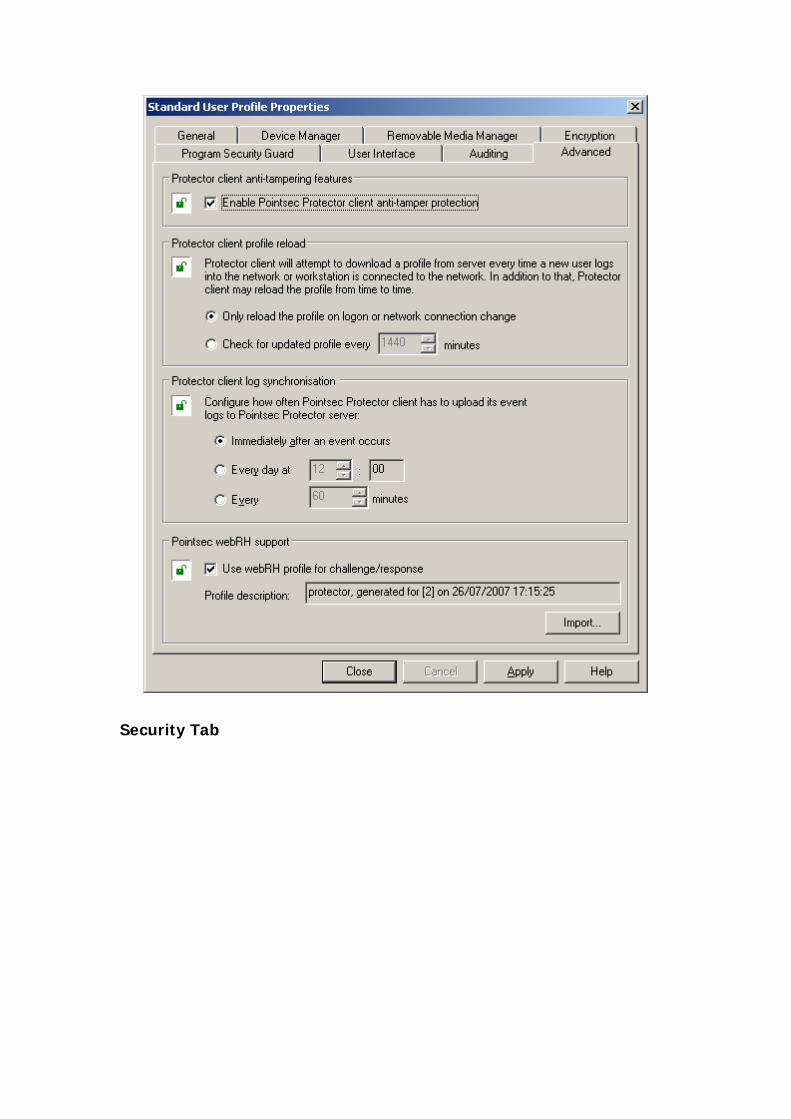
Security Tab
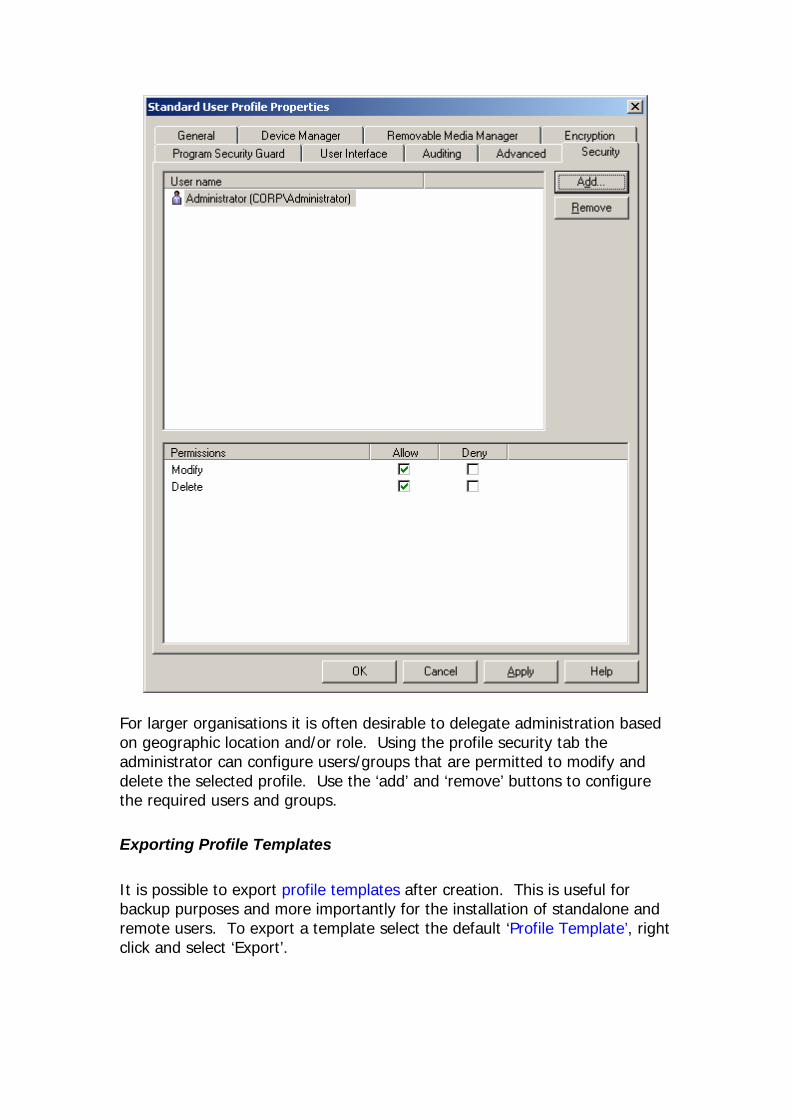
For larger organisations it is often desirable to delegate administration based on geographic location and/or role. Using the profile security tab the administrator can configure users/groups that are permitted to modify and delete the selected profile. Use the ‘add’ and ‘remove’ buttons to configure the required users and groups.
Exporting Profile Templates It is possible to export profile templates after creation. This is useful for backup purposes and more importantly for the installation of standalone and remote users. To export a template select the default ‘Profile Template’, right click and select ‘Export’.
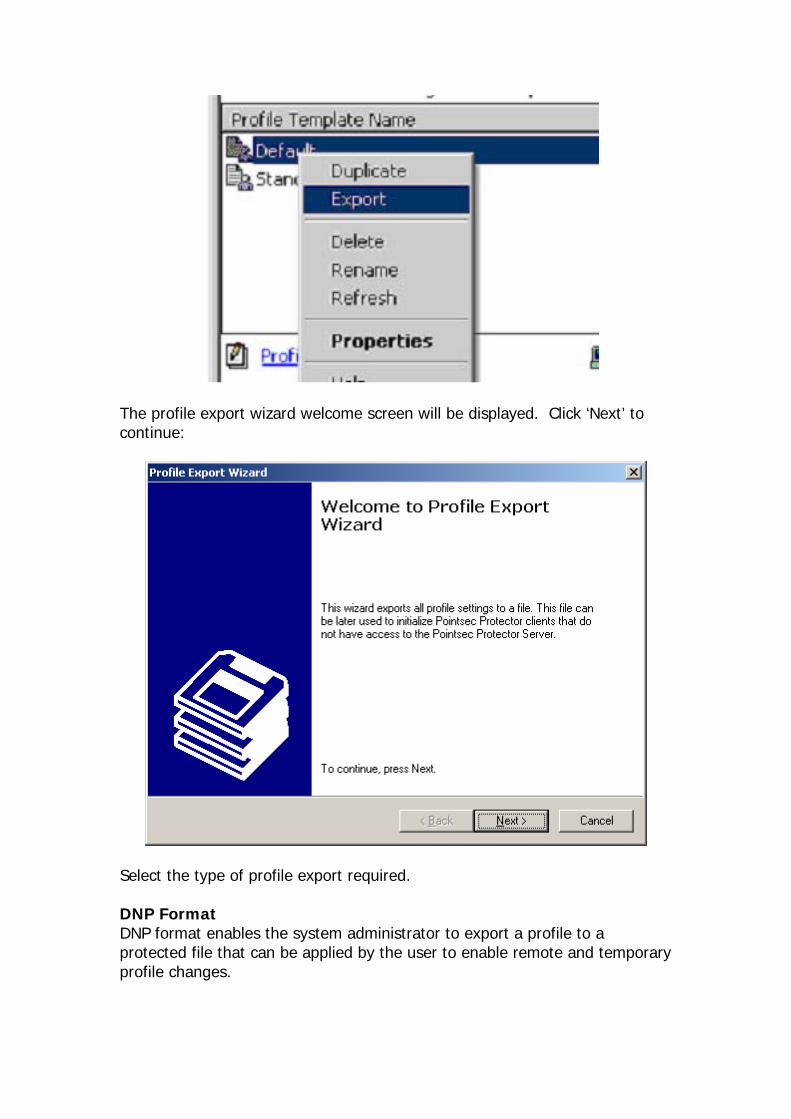
The profile export wizard welcome screen will be displayed. Click ‘Next’ to continue:
Select the type of profile export required. DNP Format DNP format enables the system administrator to export a profile to a protected file that can be applied by the user to enable remote and temporary profile changes.
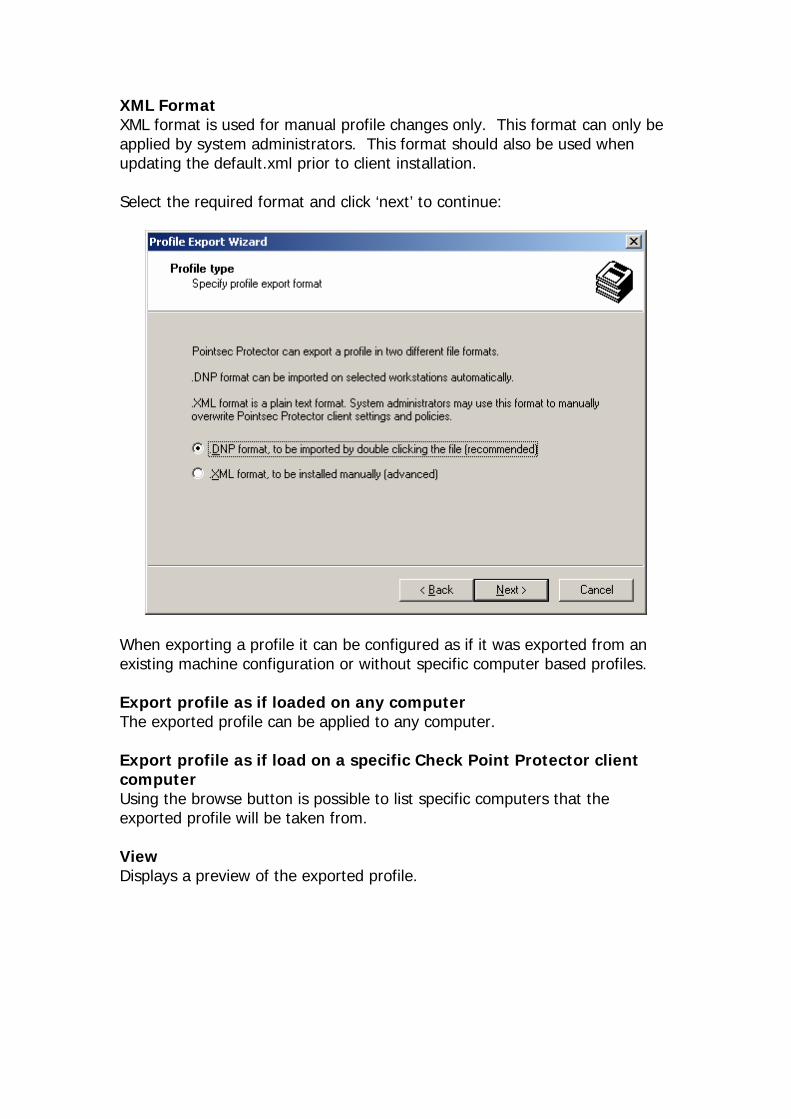
XML Format XML format is used for manual profile changes only. This format can only be applied by system administrators. This format should also be used when updating the default.xml prior to client installation. Select the required format and click ‘next’ to continue:
When exporting a profile it can be configured as if it was exported from an existing machine configuration or without specific computer based profiles. Export profile as if loaded on any computer The exported profile can be applied to any computer. Export profile as if load on a specific Check Point Protector client computer Using the browse button is possible to list specific computers that the exported profile will be taken from. View Displays a preview of the exported profile.
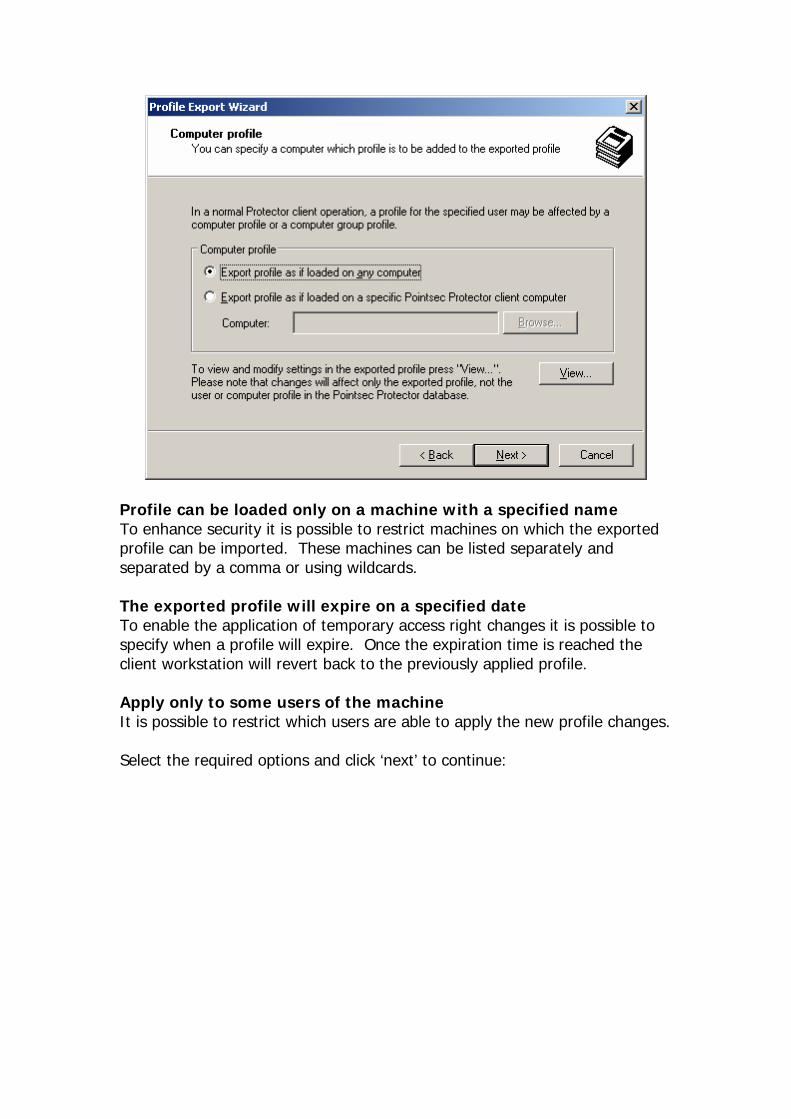
Profile can be loaded only on a machine with a specified name To enhance security it is possible to restrict machines on which the exported profile can be imported. These machines can be listed separately and separated by a comma or using wildcards. The exported profile will expire on a specified date To enable the application of temporary access right changes it is possible to specify when a profile will expire. Once the expiration time is reached the client workstation will revert back to the previously applied profile. Apply only to some users of the machine It is possible to restrict which users are able to apply the new profile changes. Select the required options and click ‘next’ to continue:
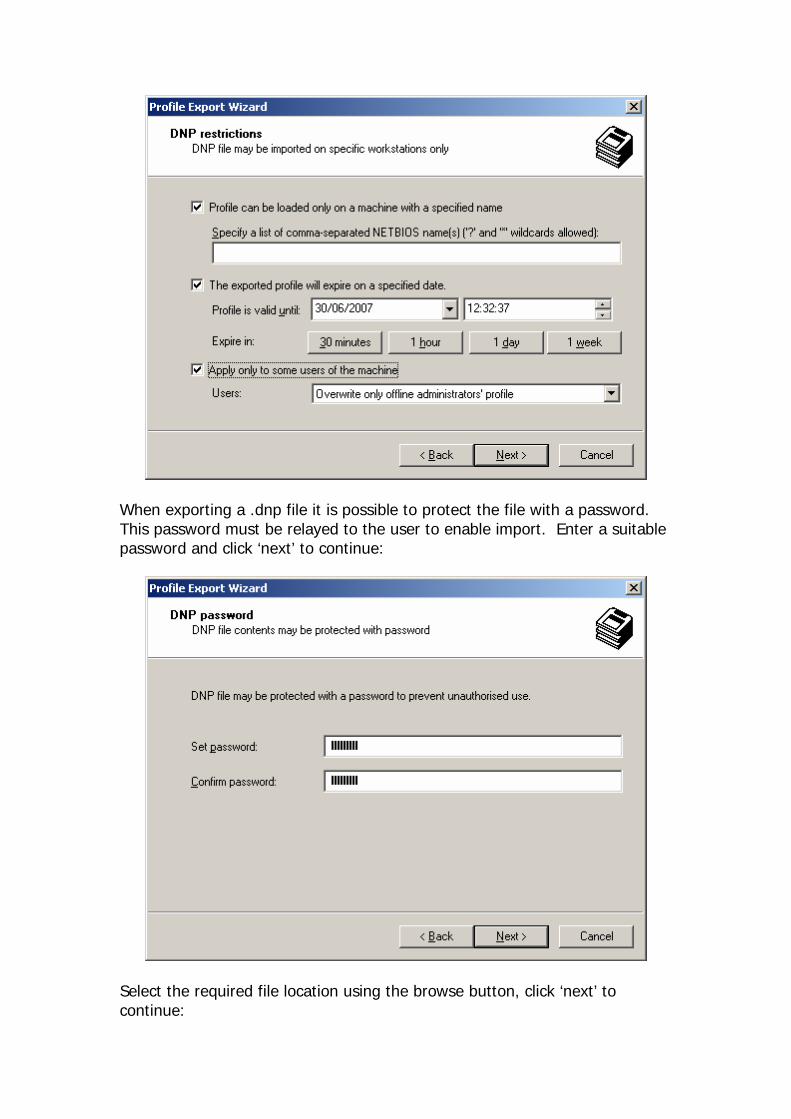
When exporting a .dnp file it is possible to protect the file with a password. This password must be relayed to the user to enable import. Enter a suitable password and click ‘next’ to continue:
Select the required file location using the browse button, click ‘next’ to continue:
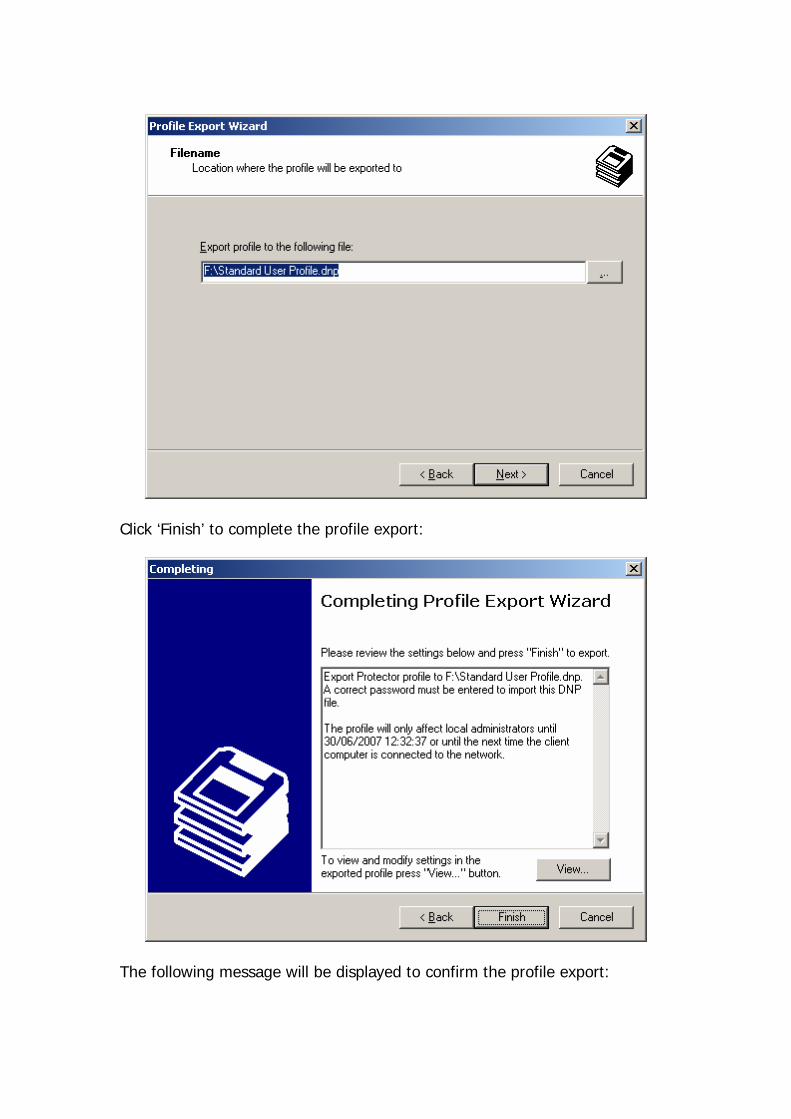
Click ‘Finish’ to complete the profile export:
The following message will be displayed to confirm the profile export:
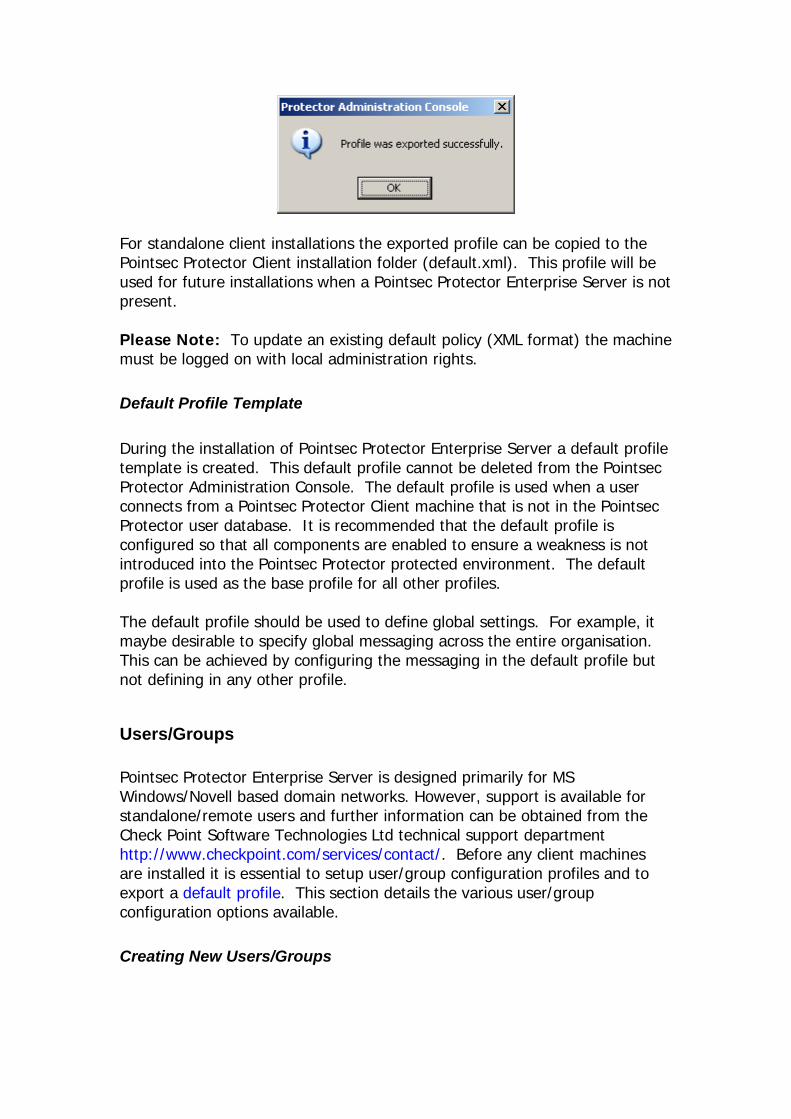
For standalone client installations the exported profile can be copied to the Pointsec Protector Client installation folder (default.xml). This profile will be used for future installations when a Pointsec Protector Enterprise Server is not present. Please Note: To update an existing default policy (XML format) the machine must be logged on with local administration rights.
Default Profile Template During the installation of Pointsec Protector Enterprise Server a default profile template is created. This default profile cannot be deleted from the Pointsec Protector Administration Console. The default profile is used when a user connects from a Pointsec Protector Client machine that is not in the Pointsec Protector user database. It is recommended that the default profile is configured so that all components are enabled to ensure a weakness is not introduced into the Pointsec Protector protected environment. The default profile is used as the base profile for all other profiles. The default profile should be used to define global settings. For example, it maybe desirable to specify global messaging across the entire organisation. This can be achieved by configuring the messaging in the default profile but not defining in any other profile.
Users/Groups Pointsec Protector Enterprise Server is designed primarily for MS Windows/Novell based domain networks. However, support is available for standalone/remote users and further information can be obtained from the Check Point Software Technologies Ltd technical support department http://www.checkpoint.com/services/contact/. Before any client machines are installed it is essential to setup user/group configuration profiles and to export a default profile. This section details the various user/group configuration options available.
Creating New Users/Groups
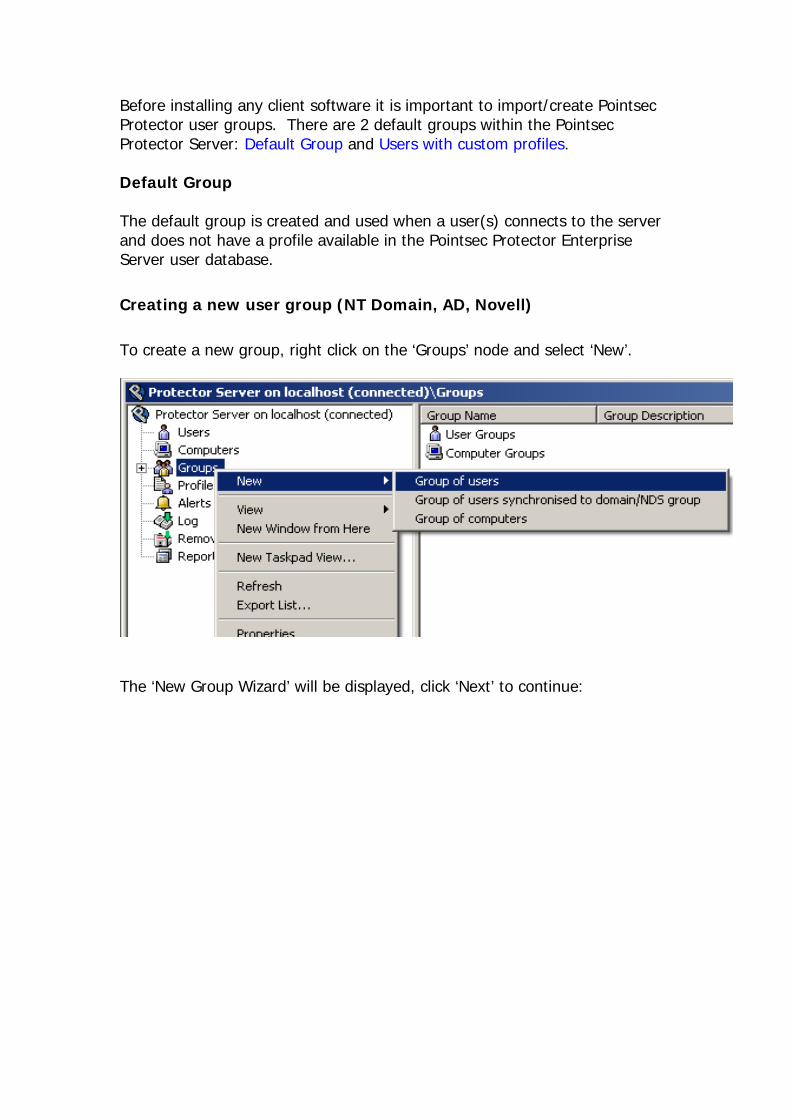
Before installing any client software it is important to import/create Pointsec Protector user groups. There are 2 default groups within the Pointsec Protector Server: Default Group and Users with custom profiles. Default Group The default group is created and used when a user(s) connects to the server and does not have a profile available in the Pointsec Protector Enterprise Server user database.
Creating a new user group (NT Domain, AD, Novell)
To create a new group, right click on the ‘Groups’ node and select ‘New’.
The ‘New Group Wizard’ will be displayed, click ‘Next’ to continue:
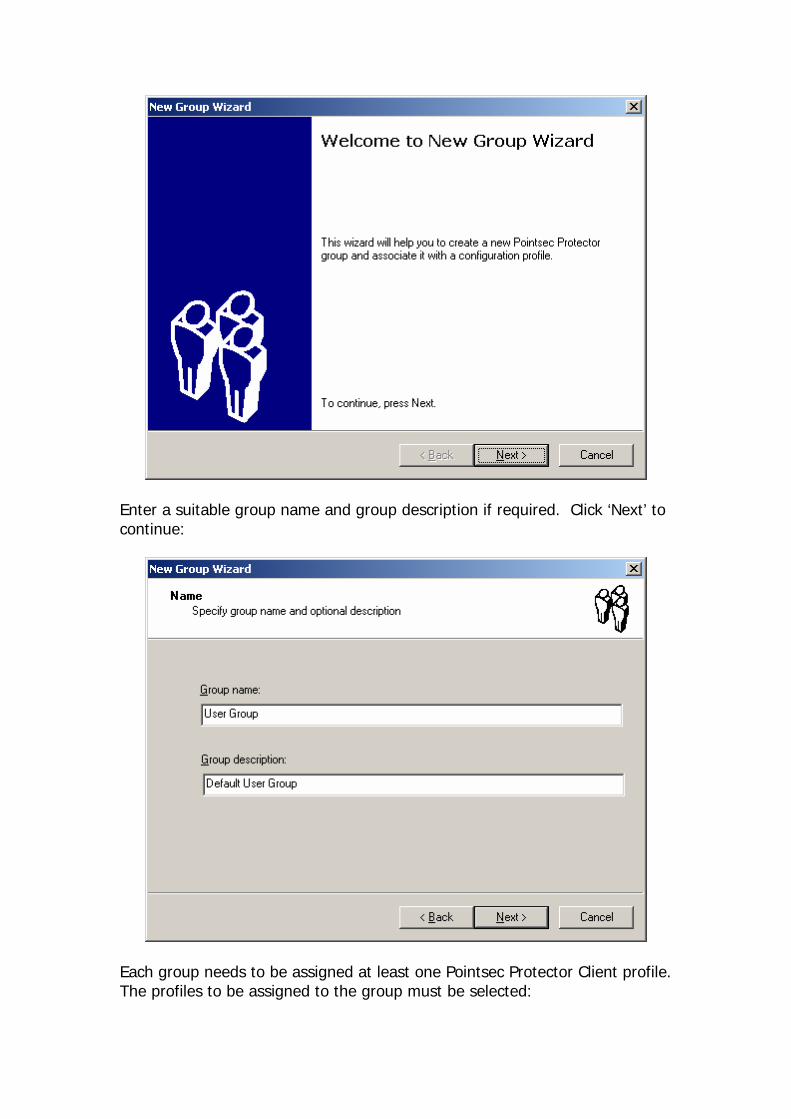
Enter a suitable group name and group description if required. Click ‘Next’ to continue:
Each group needs to be assigned at least one Pointsec Protector Client profile. The profiles to be assigned to the group must be selected:
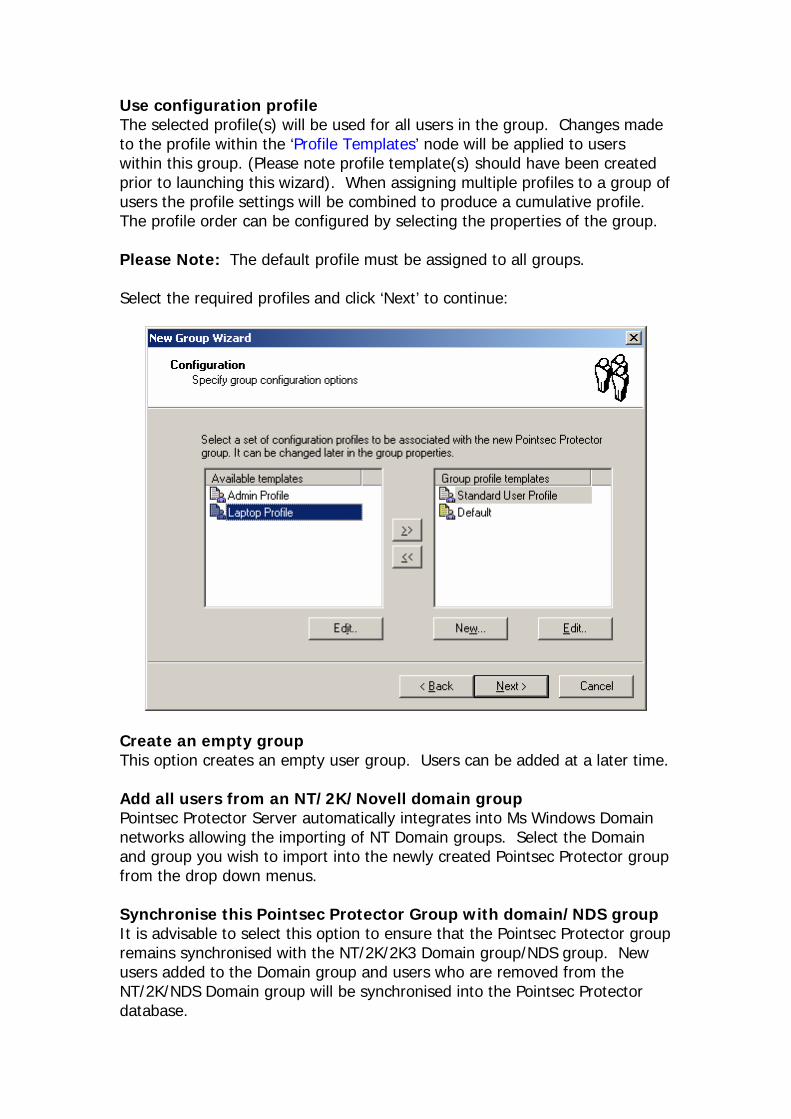
Use configuration profile The selected profile(s) will be used for all users in the group. Changes made to the profile within the ‘Profile Templates’ node will be applied to users within this group. (Please note profile template(s) should have been created prior to launching this wizard). When assigning multiple profiles to a group of users the profile settings will be combined to produce a cumulative profile. The profile order can be configured by selecting the properties of the group. Please Note: The default profile must be assigned to all groups. Select the required profiles and click ‘Next’ to continue:
Create an empty group This option creates an empty user group. Users can be added at a later time. Add all users from an NT/2K/Novell domain group Pointsec Protector Server automatically integrates into Ms Windows Domain networks allowing the importing of NT Domain groups. Select the Domain and group you wish to import into the newly created Pointsec Protector group from the drop down menus. Synchronise this Pointsec Protector Group with domain/NDS group It is advisable to select this option to ensure that the Pointsec Protector group remains synchronised with the NT/2K/2K3 Domain group/NDS group. New users added to the Domain group and users who are removed from the NT/2K/NDS Domain group will be synchronised into the Pointsec Protector database.
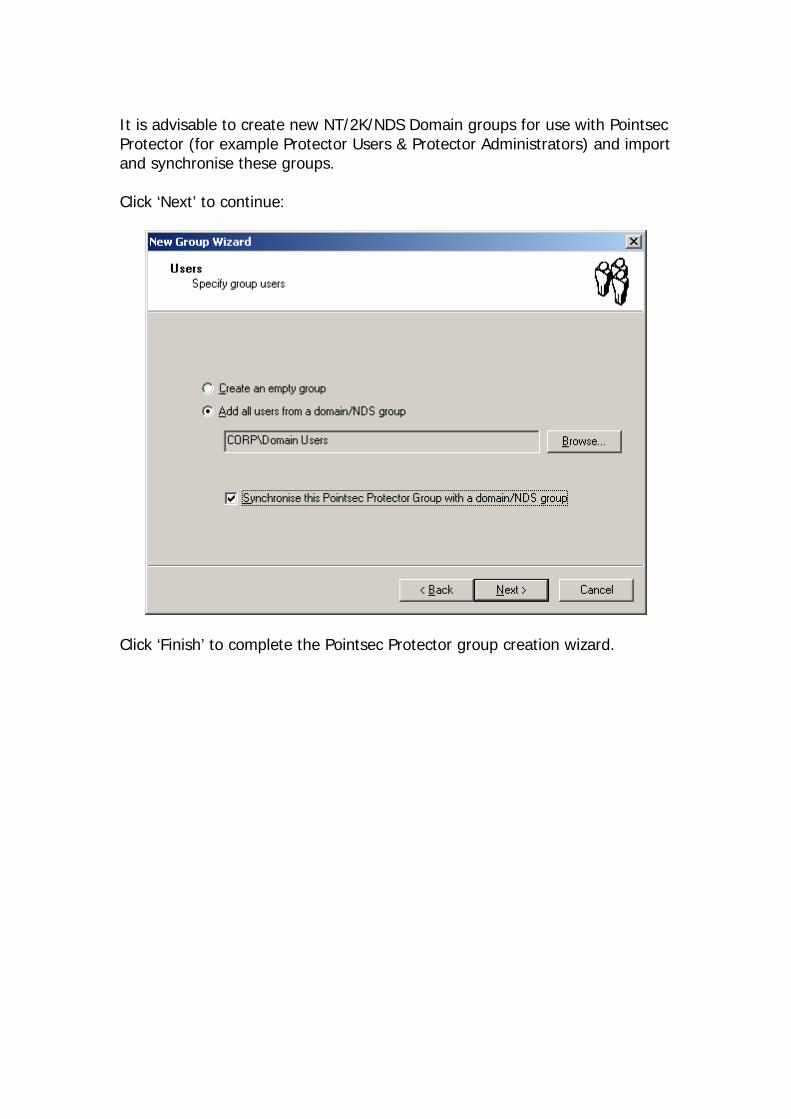
It is advisable to create new NT/2K/NDS Domain groups for use with Pointsec Protector (for example Protector Users & Protector Administrators) and import and synchronise these groups. Click ‘Next’ to continue:
Click ‘Finish’ to complete the Pointsec Protector group creation wizard.
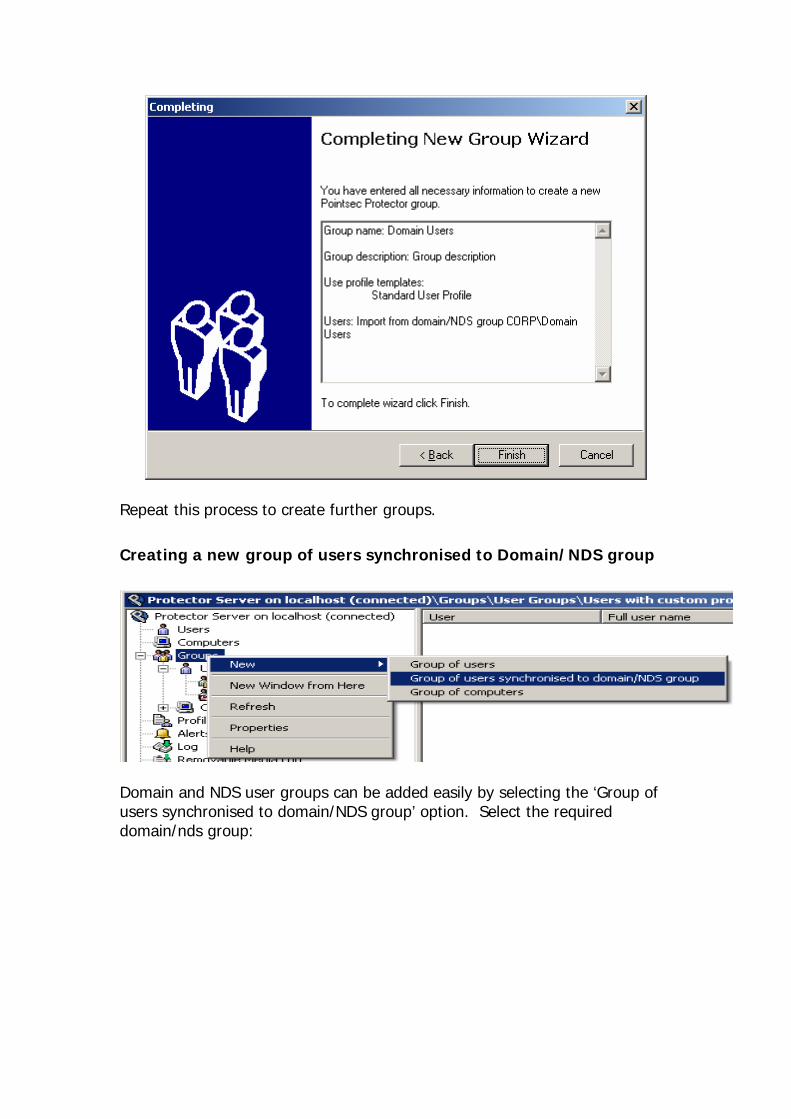
Repeat this process to create further groups.
Creating a new group of users synchronised to Domain/NDS group
Domain and NDS user groups can be added easily by selecting the ‘Group of users synchronised to domain/NDS group’ option. Select the required domain/nds group:

Select the required group options including automated synchronisation.
The relevant profiles can be selected using the add/remove buttons as required. If an existing profile is not available it is possible to define custom profile settings that will be applied to this group only.
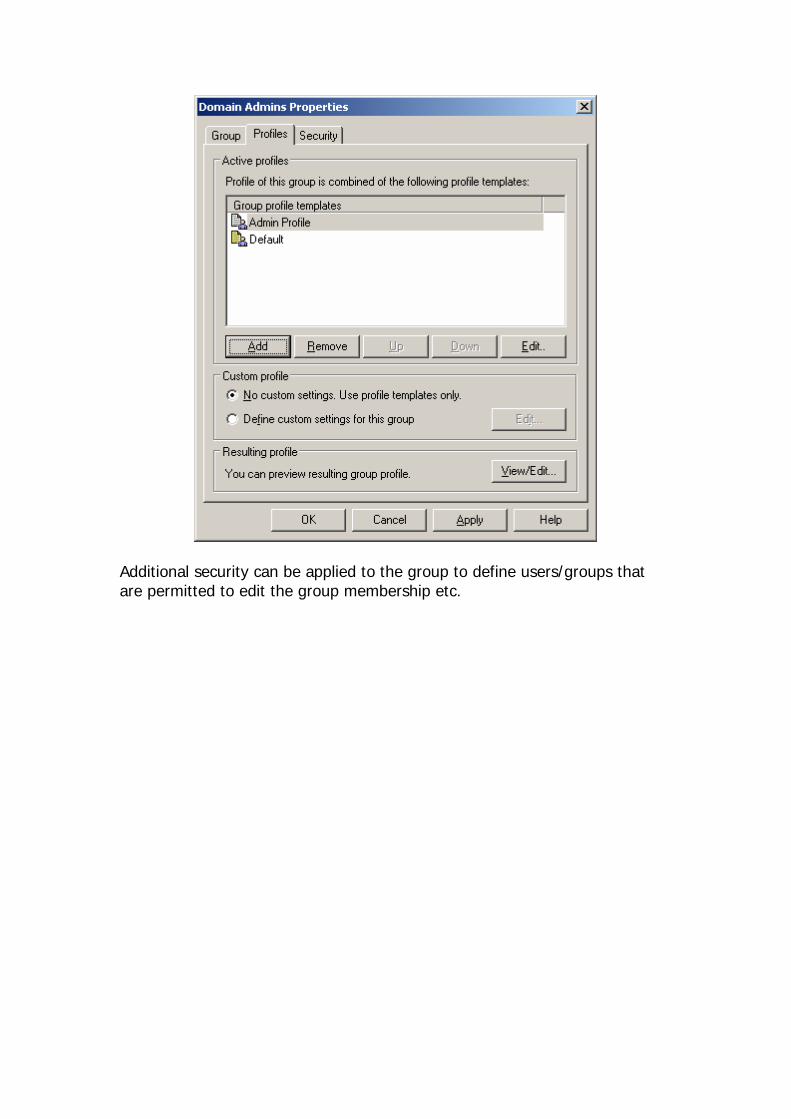
Additional security can be applied to the group to define users/groups that are permitted to edit the group membership etc.
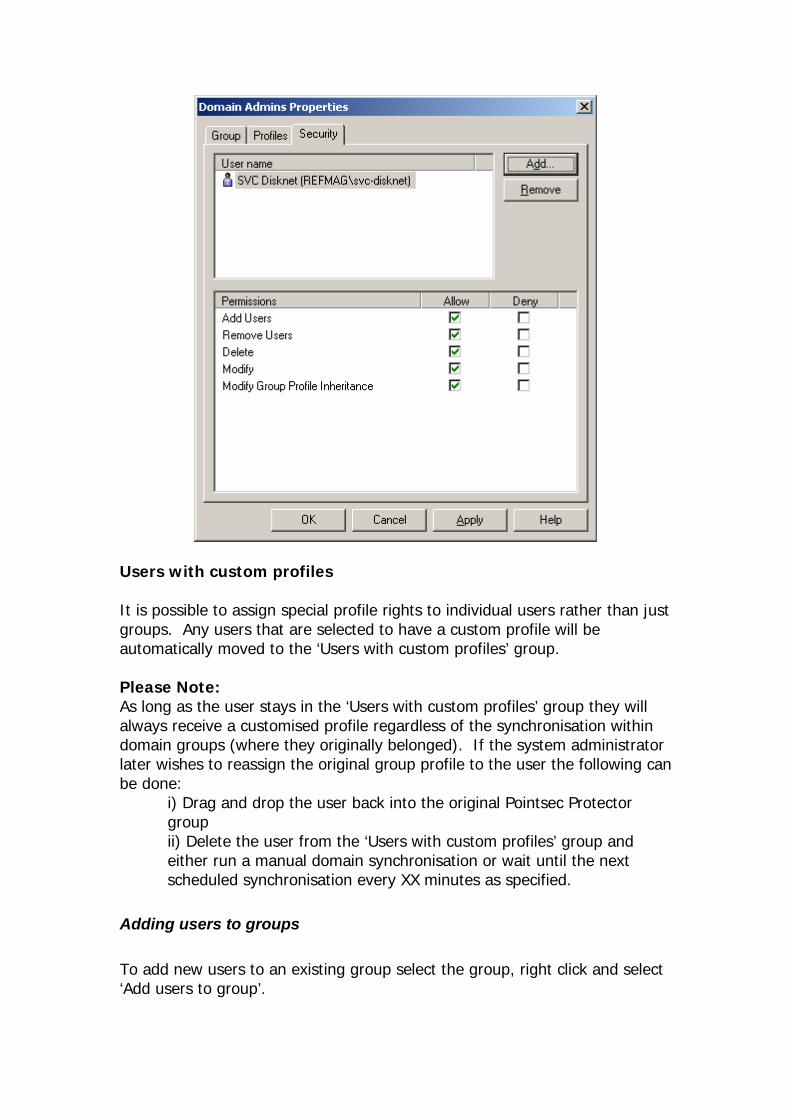
Users with custom profiles It is possible to assign special profile rights to individual users rather than just groups. Any users that are selected to have a custom profile will be automatically moved to the ‘Users with custom profiles’ group. Please Note: As long as the user stays in the ‘Users with custom profiles’ group they will always receive a customised profile regardless of the synchronisation within domain groups (where they originally belonged). If the system administrator later wishes to reassign the original group profile to the user the following can be done:
i) Drag and drop the user back into the original Pointsec Protector group ii) Delete the user from the ‘Users with custom profiles’ group and either run a manual domain synchronisation or wait until the next scheduled synchronisation every XX minutes as specified.
Adding users to groups To add new users to an existing group select the group, right click and select ‘Add users to group’.
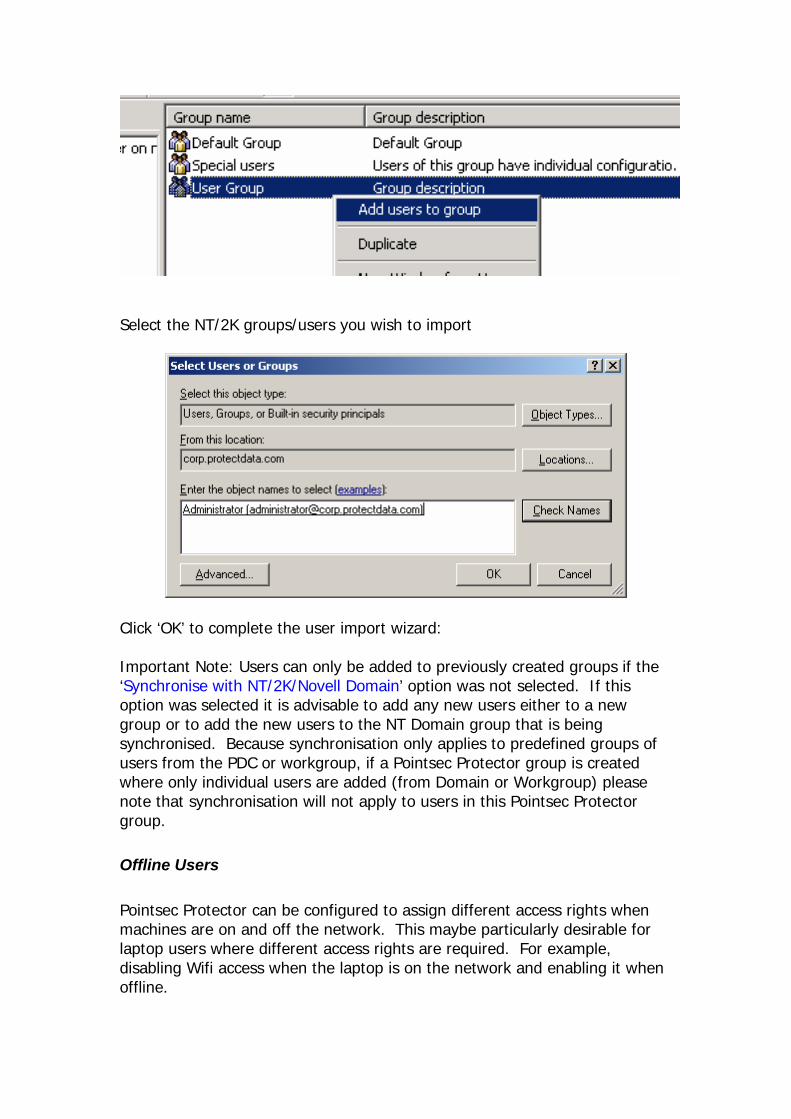
Select the NT/2K groups/users you wish to import
Click ‘OK’ to complete the user import wizard:
Important Note: Users can only be added to previously created groups if the ‘Synchronise with NT/2K/Novell Domain’ option was not selected. If this option was selected it is advisable to add any new users either to a new group or to add the new users to the NT Domain group that is being synchronised. Because synchronisation only applies to predefined groups of users from the PDC or workgroup, if a Pointsec Protector group is created where only individual users are added (from Domain or Workgroup) please note that synchronisation will not apply to users in this Pointsec Protector group.
Offline Users Pointsec Protector can be configured to assign different access rights when machines are on and off the network. This maybe particularly desirable for laptop users where different access rights are required. For example, disabling Wifi access when the laptop is on the network and enabling it when offline.
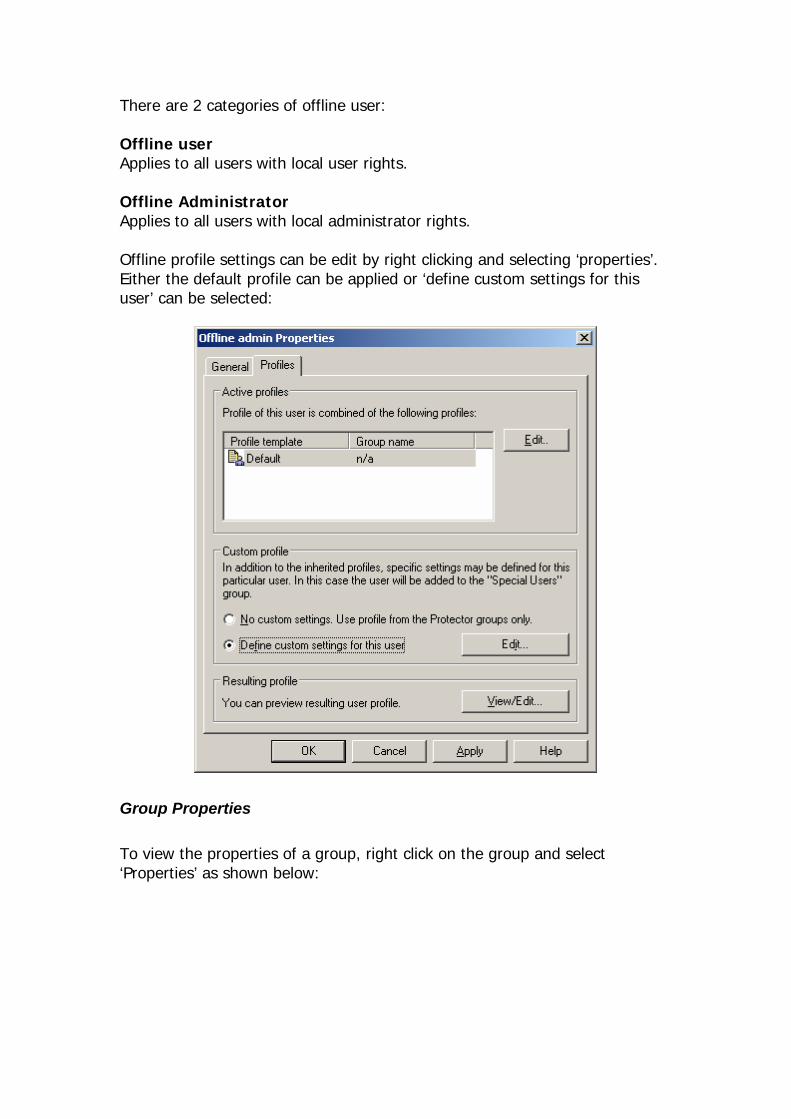
There are 2 categories of offline user: Offline user Applies to all users with local user rights. Offline Administrator Applies to all users with local administrator rights. Offline profile settings can be edit by right clicking and selecting ‘properties’. Either the default profile can be applied or ‘define custom settings for this user’ can be selected:
Group Properties To view the properties of a group, right click on the group and select ‘Properties’ as shown below:
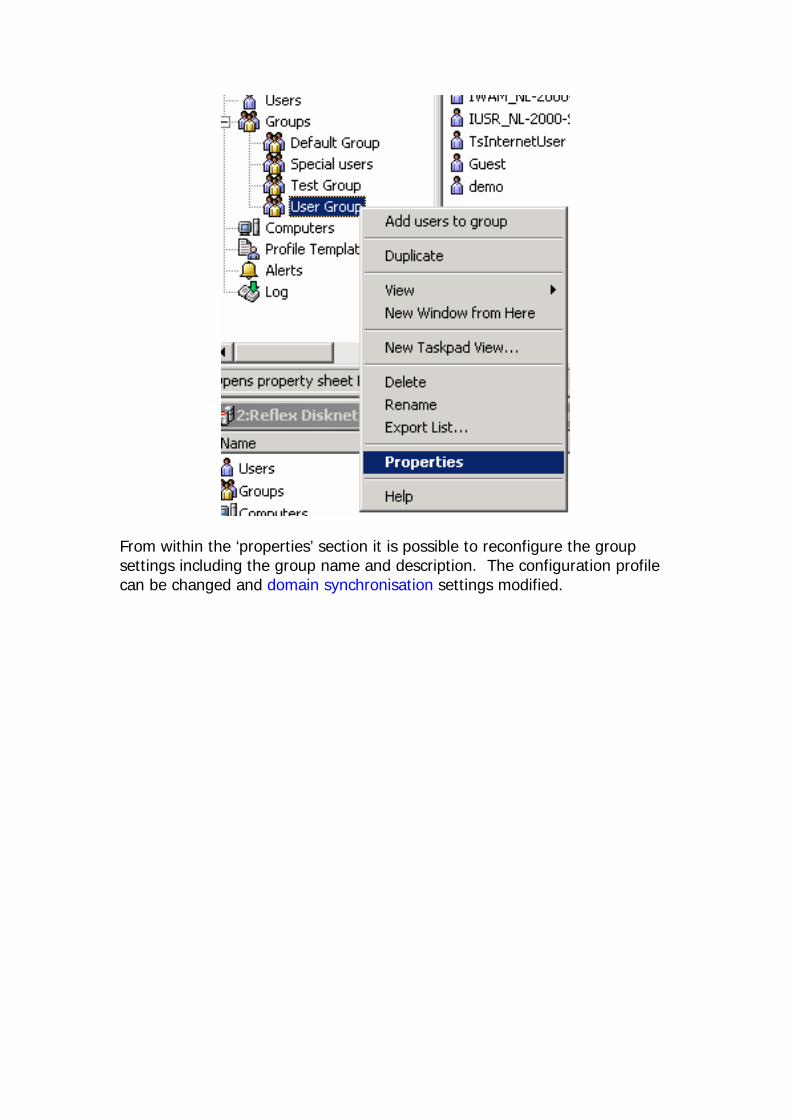
From within the ‘properties’ section it is possible to reconfigure the group settings including the group name and description. The configuration profile can be changed and domain synchronisation settings modified.
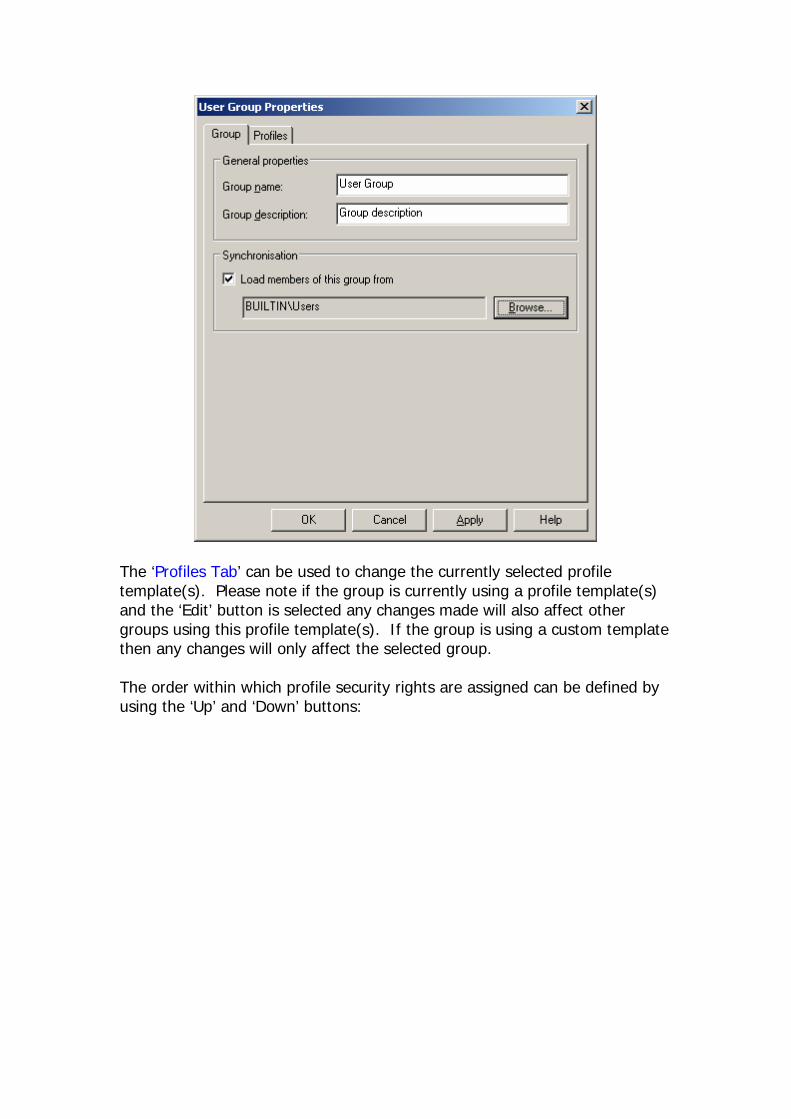
The ‘Profiles Tab’ can be used to change the currently selected profile template(s). Please note if the group is currently using a profile template(s) and the ‘Edit’ button is selected any changes made will also affect other groups using this profile template(s). If the group is using a custom template then any changes will only affect the selected group. The order within which profile security rights are assigned can be defined by using the ‘Up’ and ‘Down’ buttons:
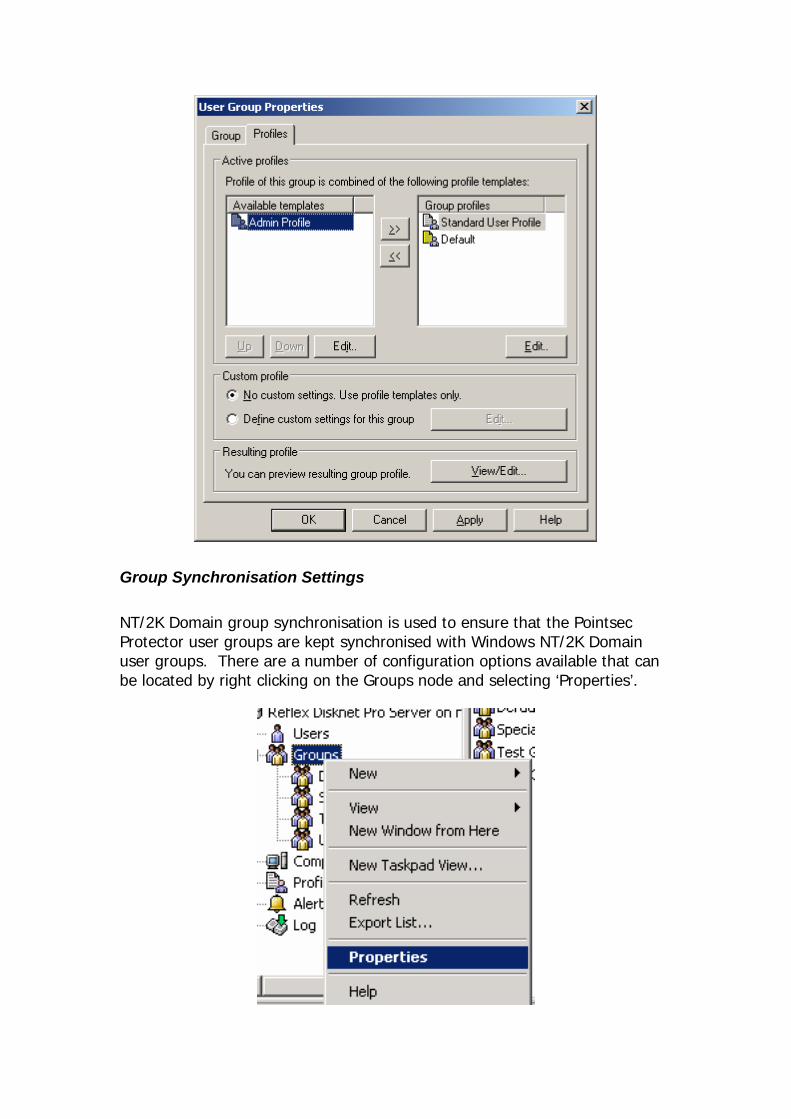
Group Synchronisation Settings NT/2K Domain group synchronisation is used to ensure that the Pointsec Protector user groups are kept synchronised with Windows NT/2K Domain user groups. There are a number of configuration options available that can be located by right clicking on the Groups node and selecting ‘Properties’.
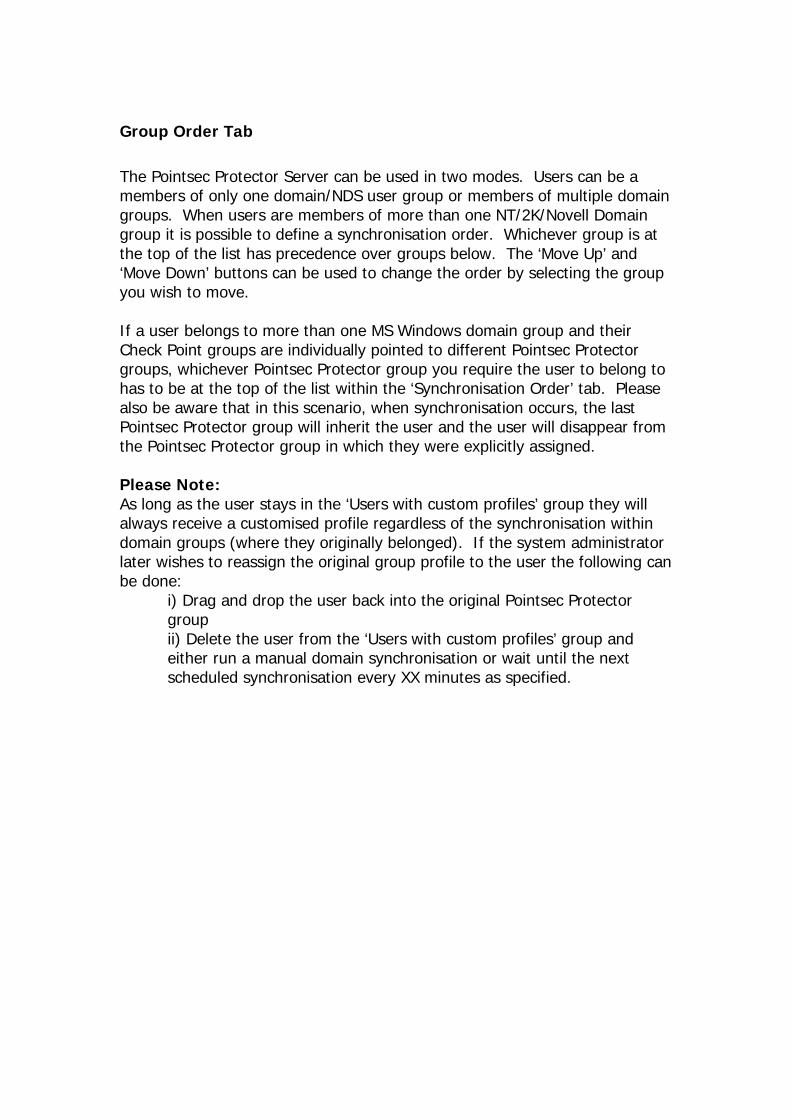
Group Order Tab
The Pointsec Protector Server can be used in two modes. Users can be a members of only one domain/NDS user group or members of multiple domain groups. When users are members of more than one NT/2K/Novell Domain group it is possible to define a synchronisation order. Whichever group is at the top of the list has precedence over groups below. The ‘Move Up’ and ‘Move Down’ buttons can be used to change the order by selecting the group you wish to move. If a user belongs to more than one MS Windows domain group and their Check Point groups are individually pointed to different Pointsec Protector groups, whichever Pointsec Protector group you require the user to belong to has to be at the top of the list within the ‘Synchronisation Order’ tab. Please also be aware that in this scenario, when synchronisation occurs, the last Pointsec Protector group will inherit the user and the user will disappear from the Pointsec Protector group in which they were explicitly assigned. Please Note: As long as the user stays in the ‘Users with custom profiles’ group they will always receive a customised profile regardless of the synchronisation within domain groups (where they originally belonged). If the system administrator later wishes to reassign the original group profile to the user the following can be done:
i) Drag and drop the user back into the original Pointsec Protector group ii) Delete the user from the ‘Users with custom profiles’ group and either run a manual domain synchronisation or wait until the next scheduled synchronisation every XX minutes as specified.

Synchronisation Period Tab
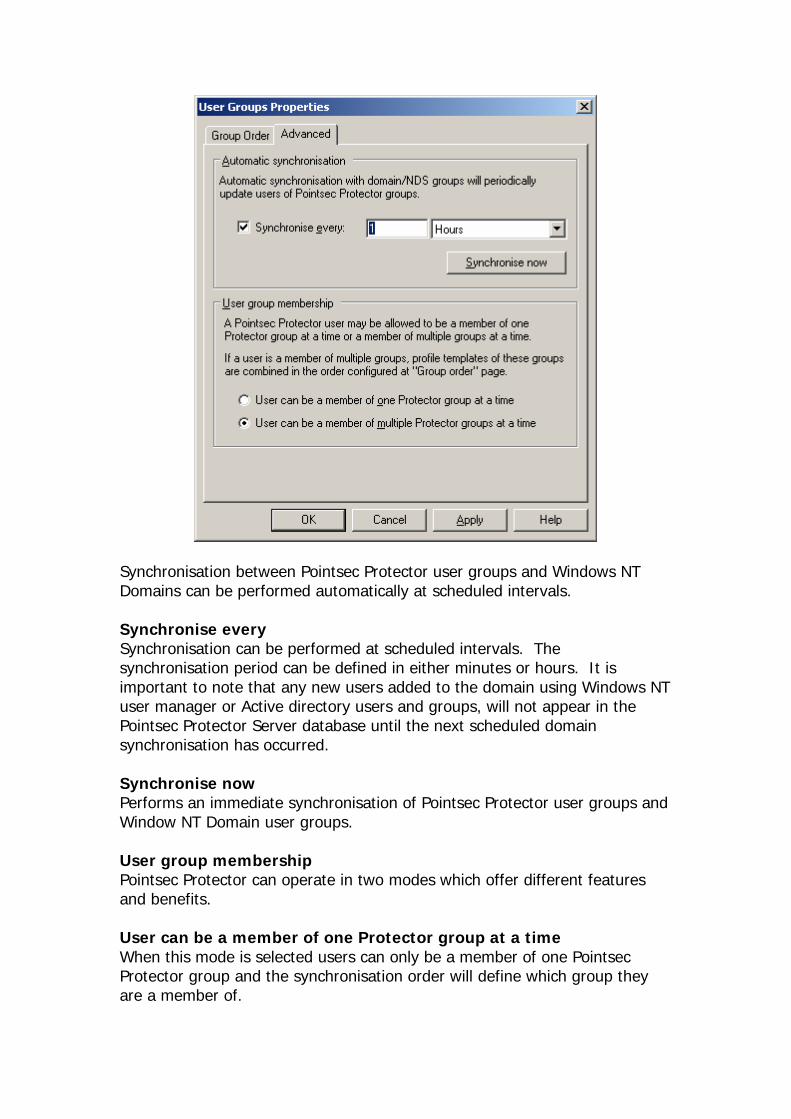
Synchronisation between Pointsec Protector user groups and Windows NT Domains can be performed automatically at scheduled intervals. Synchronise every Synchronisation can be performed at scheduled intervals. The synchronisation period can be defined in either minutes or hours. It is important to note that any new users added to the domain using Windows NT user manager or Active directory users and groups, will not appear in the Pointsec Protector Server database until the next scheduled domain synchronisation has occurred. Synchronise now Performs an immediate synchronisation of Pointsec Protector user groups and Window NT Domain user groups. User group membership Pointsec Protector can operate in two modes which offer different features and benefits. User can be a member of one Protector group at a time When this mode is selected users can only be a member of one Pointsec Protector group and the synchronisation order will define which group they are a member of.
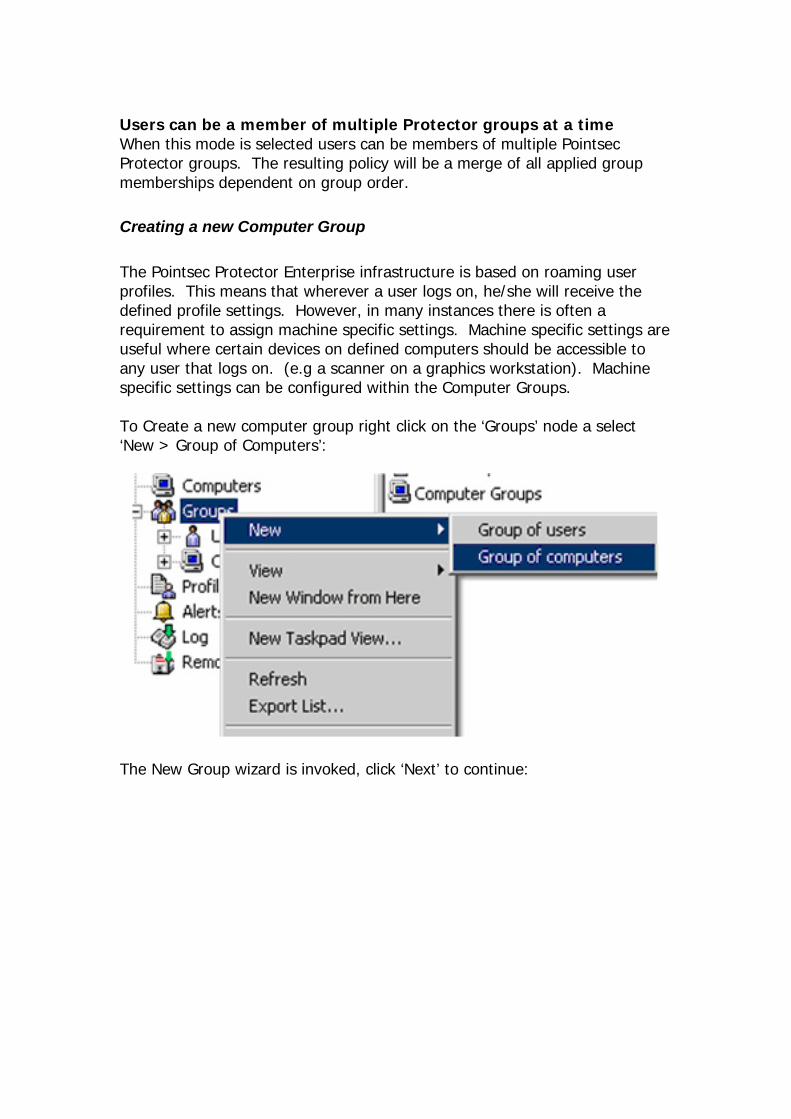
Users can be a member of multiple Protector groups at a time When this mode is selected users can be members of multiple Pointsec Protector groups. The resulting policy will be a merge of all applied group memberships dependent on group order.
Creating a new Computer Group The Pointsec Protector Enterprise infrastructure is based on roaming user profiles. This means that wherever a user logs on, he/she will receive the defined profile settings. However, in many instances there is often a requirement to assign machine specific settings. Machine specific settings are useful where certain devices on defined computers should be accessible to any user that logs on. (e.g a scanner on a graphics workstation). Machine specific settings can be configured within the Computer Groups. To Create a new computer group right click on the ‘Groups’ node a select ‘New > Group of Computers’:
The New Group wizard is invoked, click ‘Next’ to continue:

Enter a suitable group name and description and click ‘Next’ to continue:
Select the required machine based profile, the profile order can be configured after creation. Click ‘Next’ to continue:
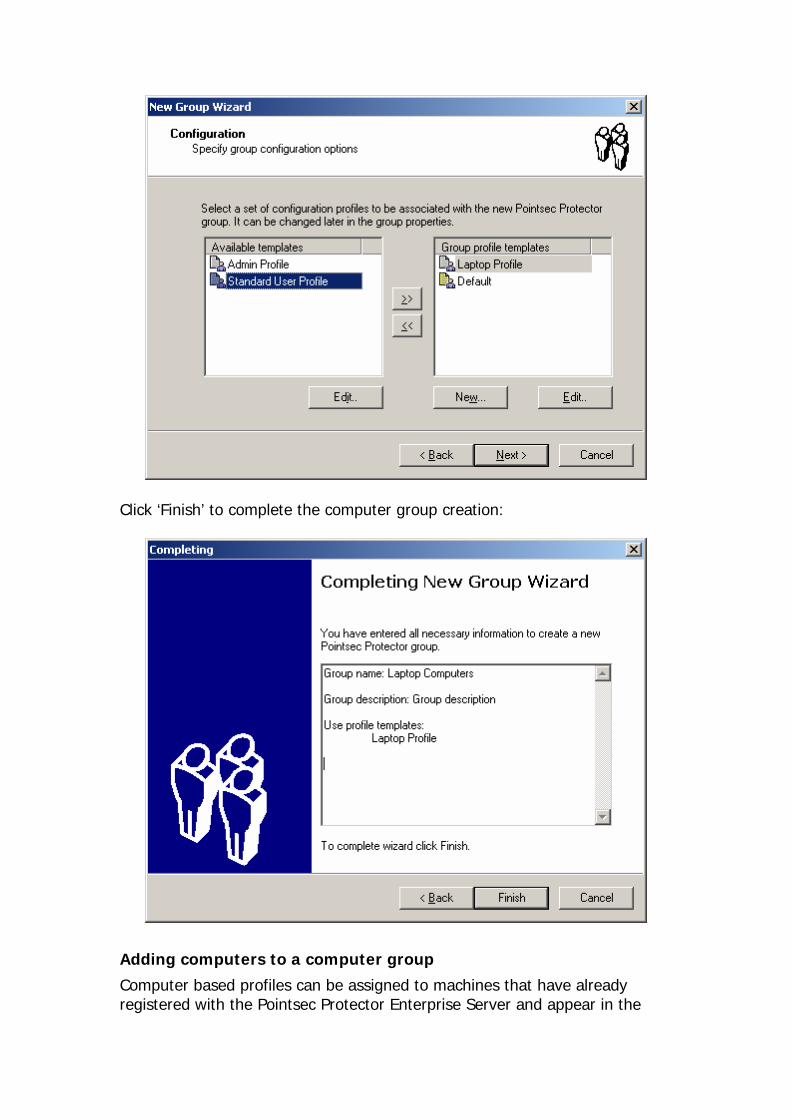
Click ‘Finish’ to complete the computer group creation:
Adding computers to a computer group
Computer based profiles can be assigned to machines that have already registered with the Pointsec Protector Enterprise Server and appear in the
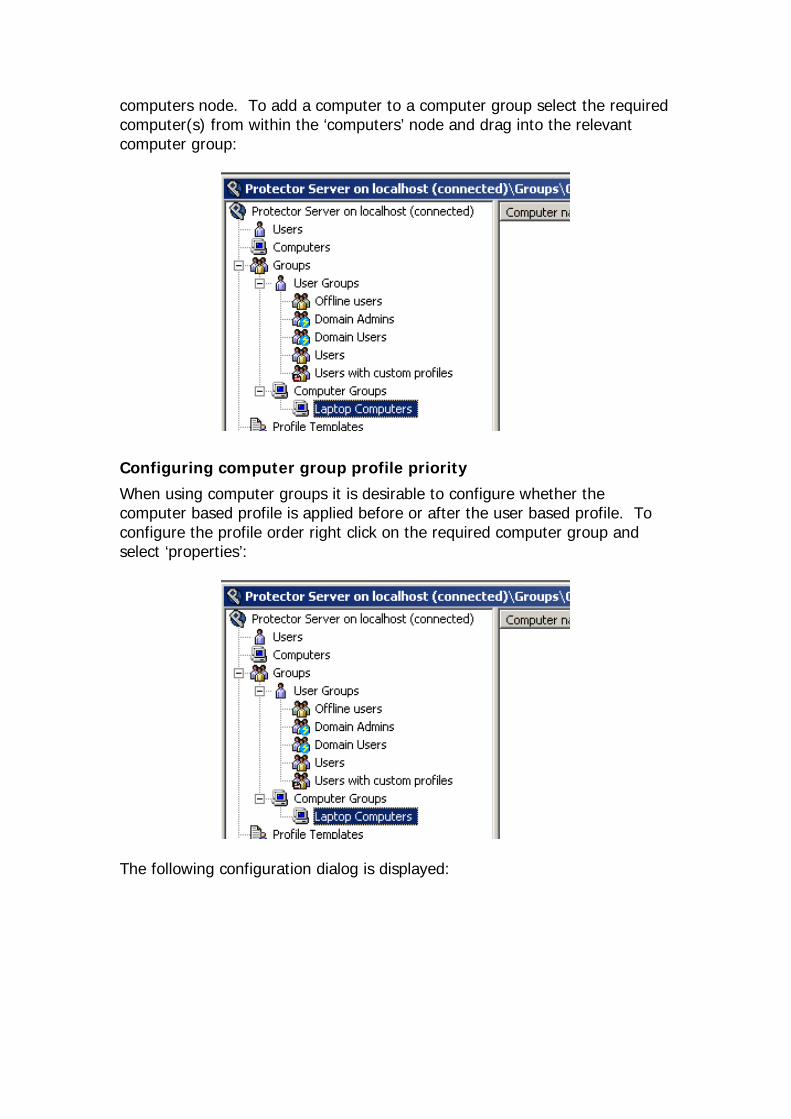
computers node. To add a computer to a computer group select the required computer(s) from within the ‘computers’ node and drag into the relevant computer group:
Configuring computer group profile priority
When using computer groups it is desirable to configure whether the computer based profile is applied before or after the user based profile. To configure the profile order right click on the required computer group and select ‘properties’:
The following configuration dialog is displayed:
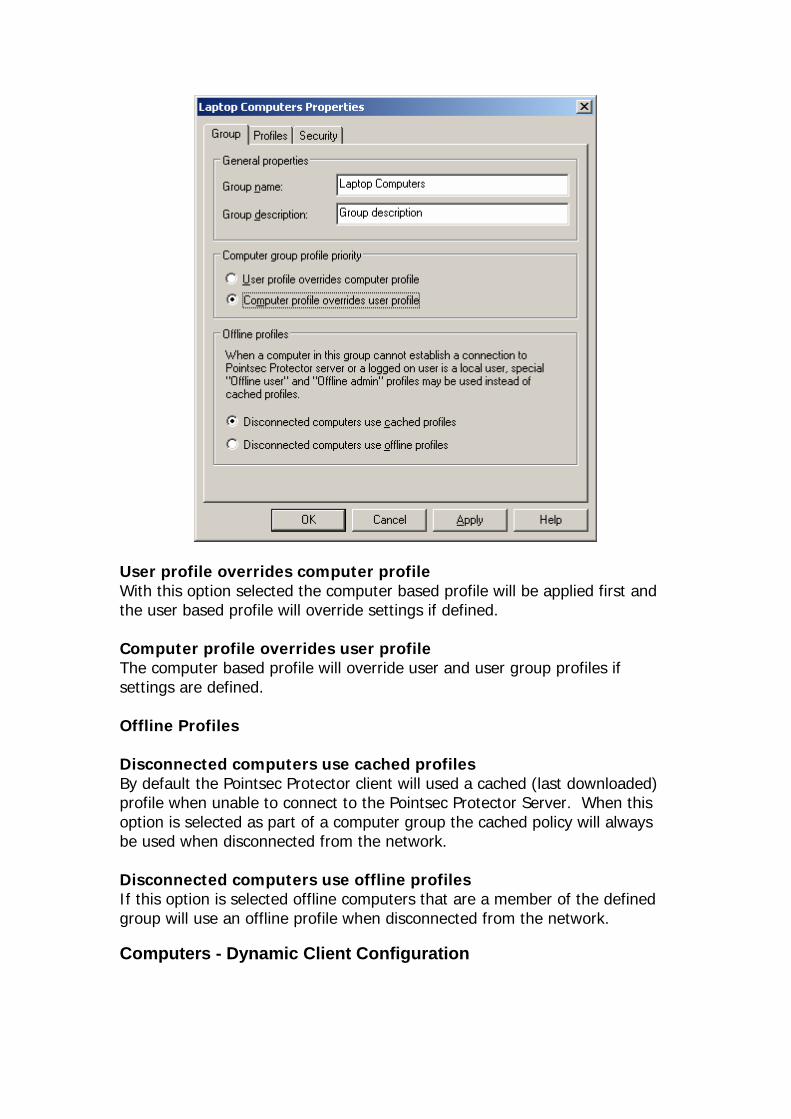
User profile overrides computer profile With this option selected the computer based profile will be applied first and the user based profile will override settings if defined. Computer profile overrides user profile The computer based profile will override user and user group profiles if settings are defined. Offline Profiles Disconnected computers use cached profiles By default the Pointsec Protector client will used a cached (last downloaded) profile when unable to connect to the Pointsec Protector Server. When this option is selected as part of a computer group the cached policy will always be used when disconnected from the network. Disconnected computers use offline profiles If this option is selected offline computers that are a member of the defined group will use an offline profile when disconnected from the network.
Computers - Dynamic Client Configuration
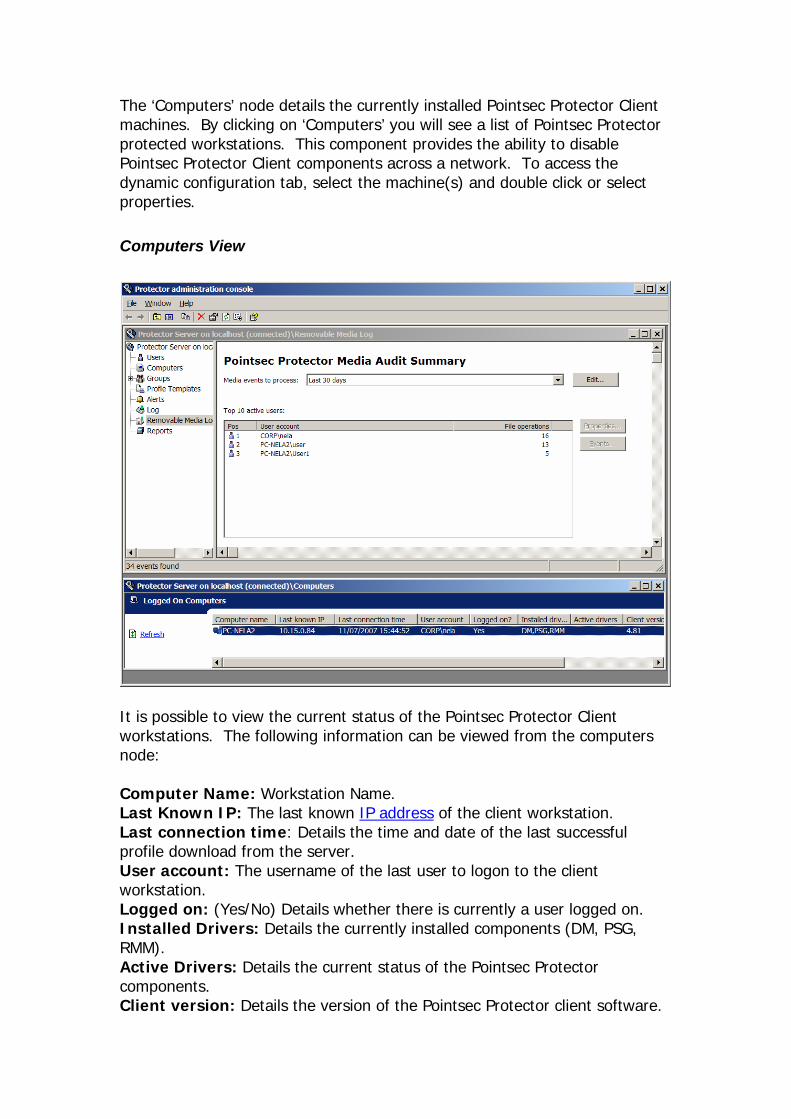
The ‘Computers’ node details the currently installed Pointsec Protector Client machines. By clicking on ‘Computers’ you will see a list of Pointsec Protector protected workstations. This component provides the ability to disable Pointsec Protector Client components across a network. To access the dynamic configuration tab, select the machine(s) and double click or select properties.
Computers View
It is possible to view the current status of the Pointsec Protector Client workstations. The following information can be viewed from the computers node: Computer Name: Workstation Name. Last Known IP: The last known IP address of the client workstation. Last connection time: Details the time and date of the last successful profile download from the server. User account: The username of the last user to logon to the client workstation. Logged on: (Yes/No) Details whether there is currently a user logged on. Installed Drivers: Details the currently installed components (DM, PSG, RMM). Active Drivers: Details the current status of the Pointsec Protector components. Client version: Details the version of the Pointsec Protector client software.
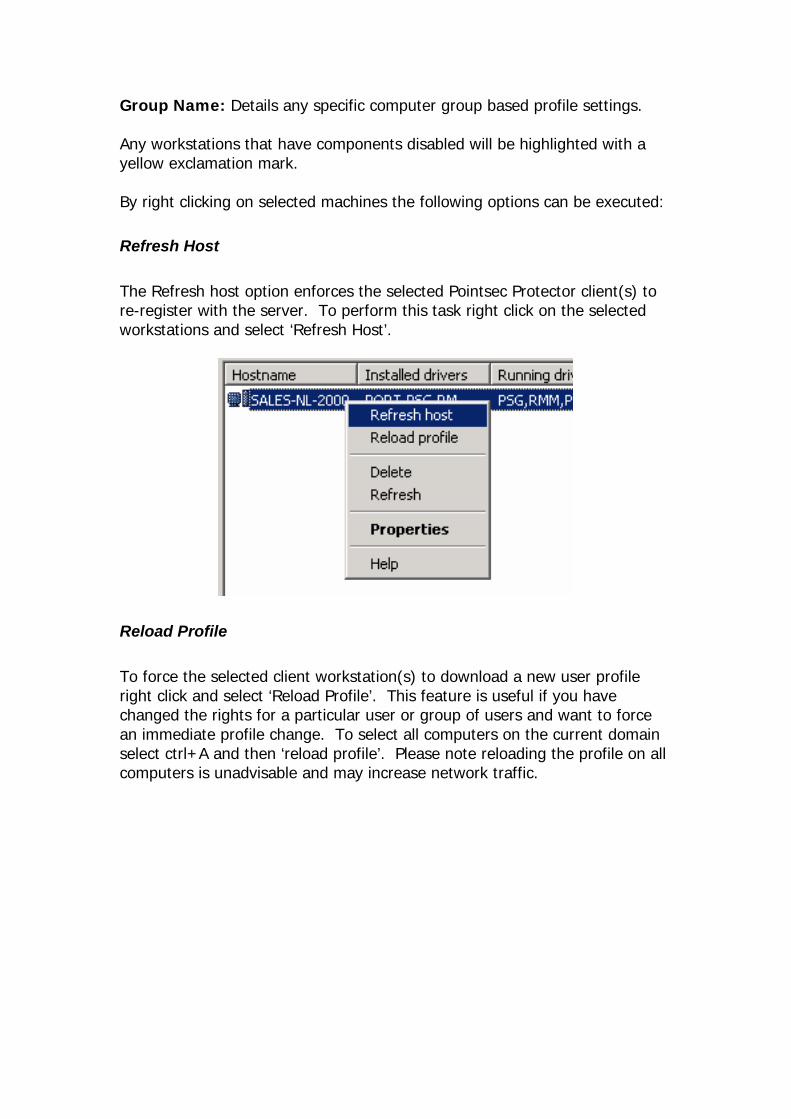
Group Name: Details any specific computer group based profile settings. Any workstations that have components disabled will be highlighted with a yellow exclamation mark. By right clicking on selected machines the following options can be executed:
Refresh Host The Refresh host option enforces the selected Pointsec Protector client(s) to re-register with the server. To perform this task right click on the selected workstations and select ‘Refresh Host’.
Reload Profile To force the selected client workstation(s) to download a new user profile right click and select ‘Reload Profile’. This feature is useful if you have changed the rights for a particular user or group of users and want to force an immediate profile change. To select all computers on the current domain select ctrl+A and then ‘reload profile’. Please note reloading the profile on all computers is unadvisable and may increase network traffic.
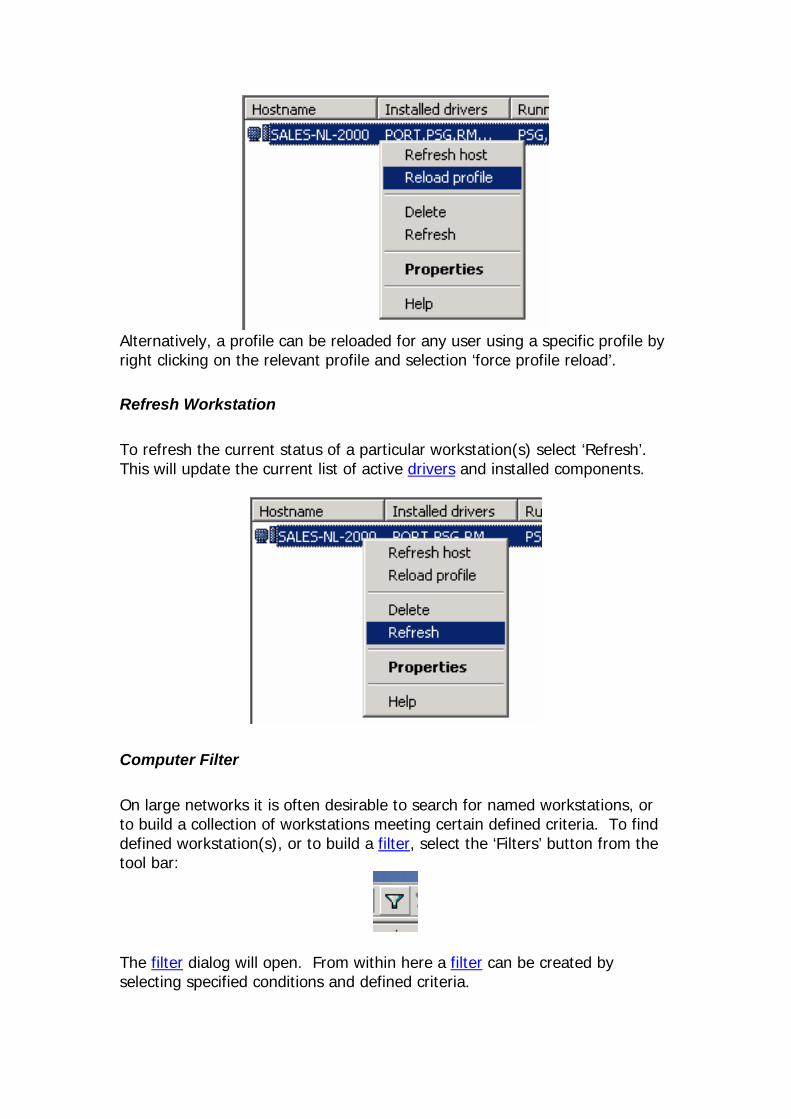
Alternatively, a profile can be reloaded for any user using a specific profile by right clicking on the relevant profile and selection ‘force profile reload’.
Refresh Workstation To refresh the current status of a particular workstation(s) select ‘Refresh’. This will update the current list of active drivers and installed components.
Computer Filter On large networks it is often desirable to search for named workstations, or to build a collection of workstations meeting certain defined criteria. To find defined workstation(s), or to build a filter, select the ‘Filters’ button from the tool bar:
The filter dialog will open. From within here a filter can be created by selecting specified conditions and defined criteria.
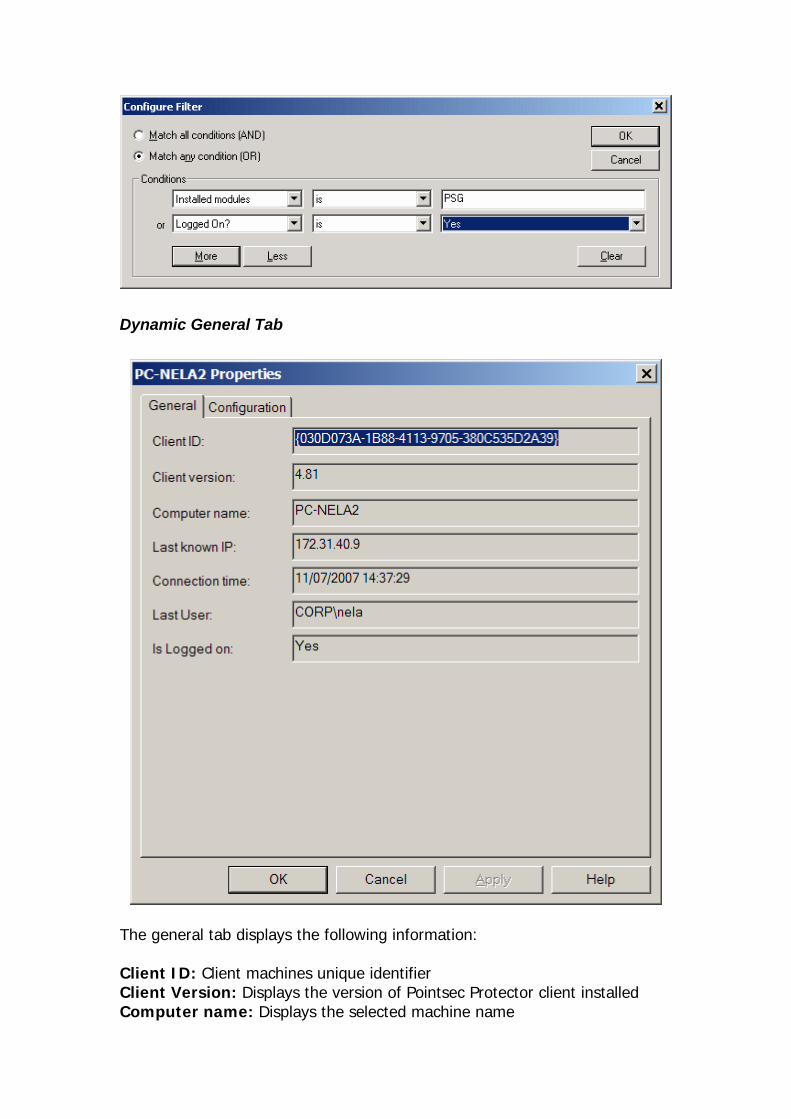
Dynamic General Tab
The general tab displays the following information: Client ID: Client machines unique identifier Client Version: Displays the version of Pointsec Protector client installed Computer name: Displays the selected machine name
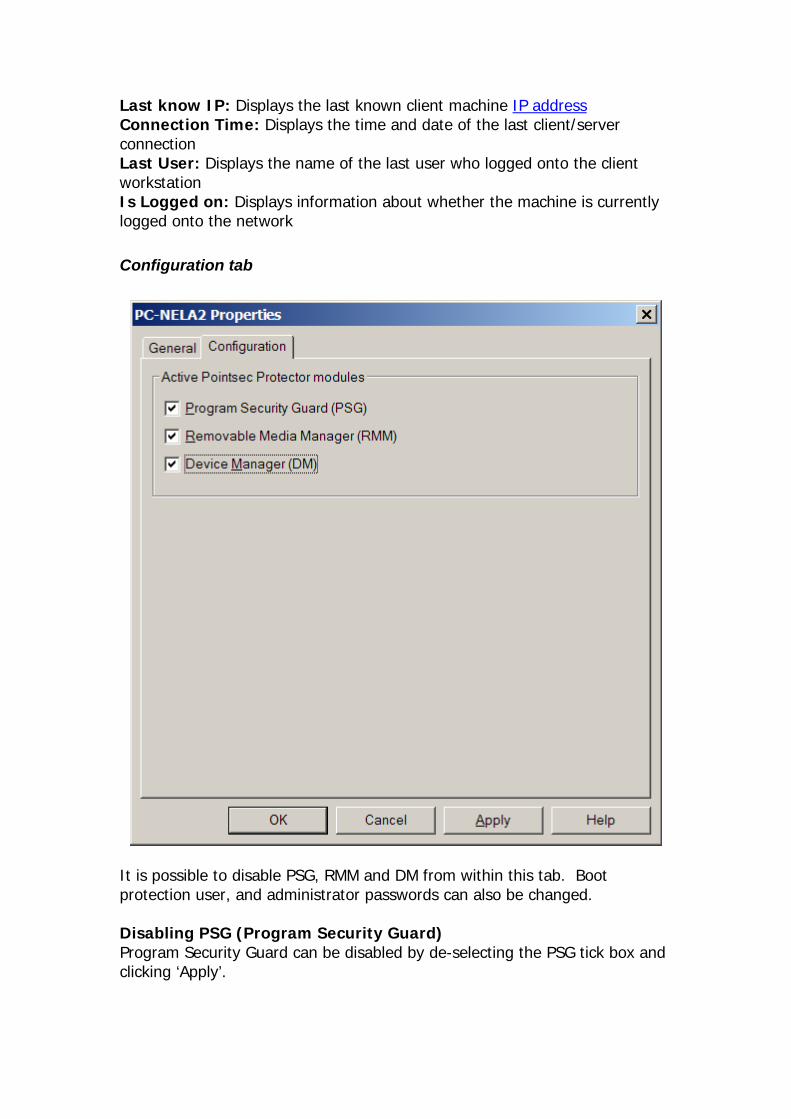
Last know IP: Displays the last known client machine IP address Connection Time: Displays the time and date of the last client/server connection Last User: Displays the name of the last user who logged onto the client workstation Is Logged on: Displays information about whether the machine is currently logged onto the network
Configuration tab
It is possible to disable PSG, RMM and DM from within this tab. Boot protection user, and administrator passwords can also be changed. Disabling PSG (Program Security Guard) Program Security Guard can be disabled by de-selecting the PSG tick box and clicking ‘Apply’.
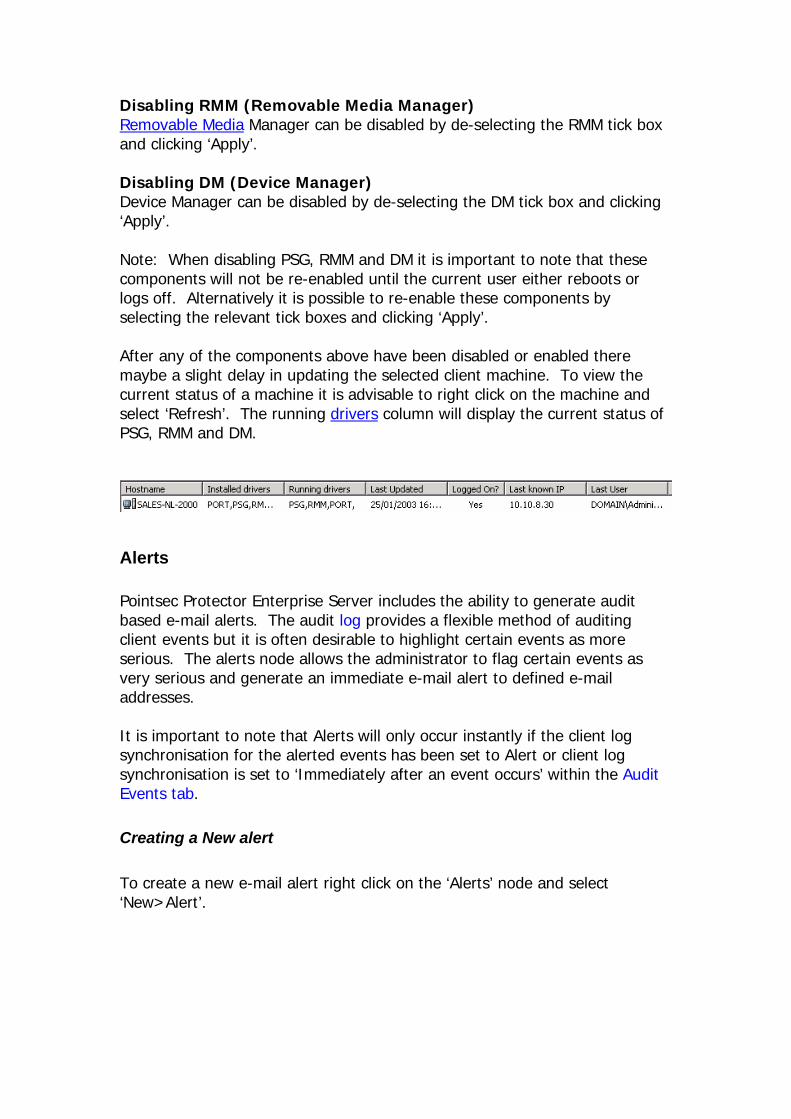
Disabling RMM (Removable Media Manager) Removable Media Manager can be disabled by de-selecting the RMM tick box and clicking ‘Apply’. Disabling DM (Device Manager) Device Manager can be disabled by de-selecting the DM tick box and clicking ‘Apply’. Note: When disabling PSG, RMM and DM it is important to note that these components will not be re-enabled until the current user either reboots or logs off. Alternatively it is possible to re-enable these components by selecting the relevant tick boxes and clicking ‘Apply’. After any of the components above have been disabled or enabled there maybe a slight delay in updating the selected client machine. To view the current status of a machine it is advisable to right click on the machine and select ‘Refresh’. The running drivers column will display the current status of PSG, RMM and DM.
Alerts Pointsec Protector Enterprise Server includes the ability to generate audit based e-mail alerts. The audit log provides a flexible method of auditing client events but it is often desirable to highlight certain events as more serious. The alerts node allows the administrator to flag certain events as very serious and generate an immediate e-mail alert to defined e-mail addresses. It is important to note that Alerts will only occur instantly if the client log synchronisation for the alerted events has been set to Alert or client log synchronisation is set to ‘Immediately after an event occurs’ within the Audit Events tab.
Creating a New alert To create a new e-mail alert right click on the ‘Alerts’ node and select ‘New>Alert’.
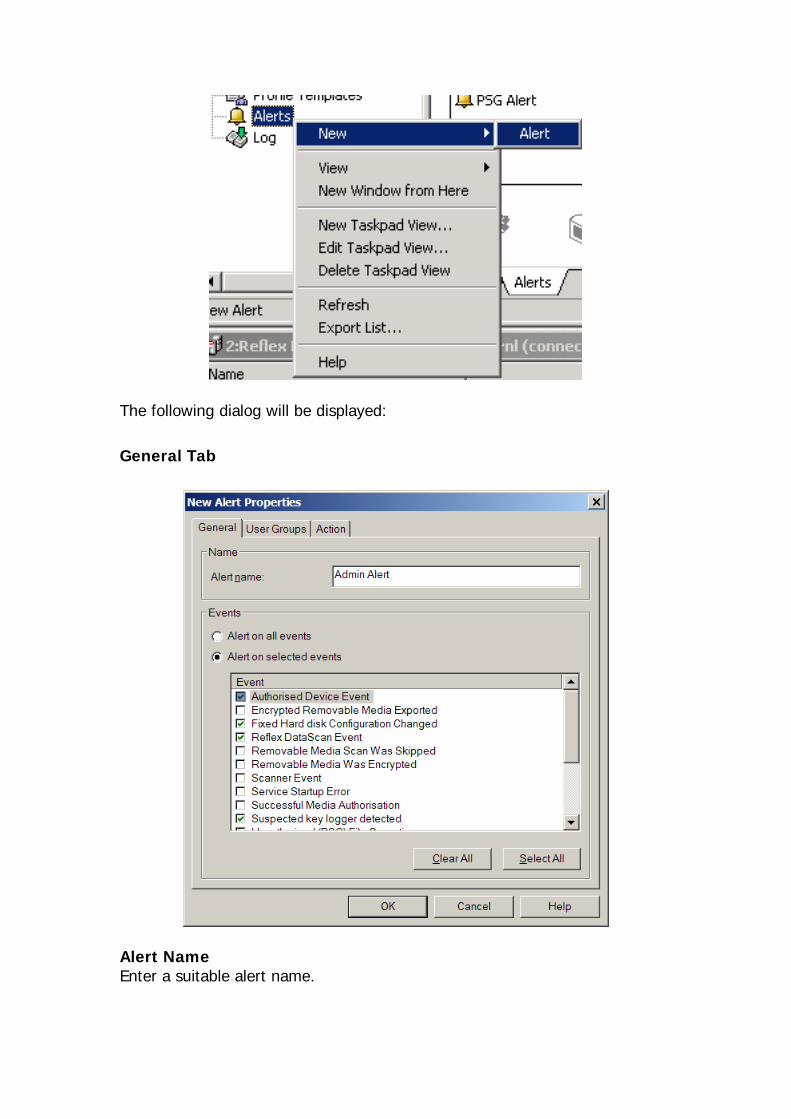
The following dialog will be displayed:
General Tab
Alert Name Enter a suitable alert name.
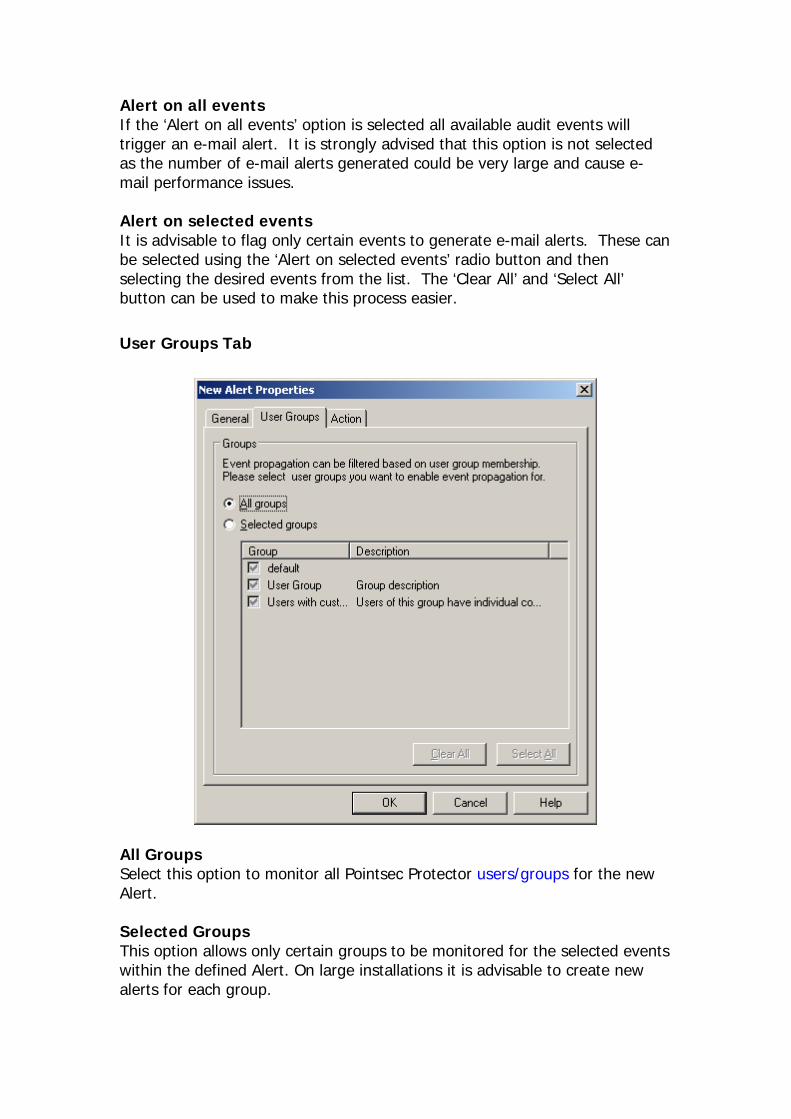
Alert on all events If the ‘Alert on all events’ option is selected all available audit events will trigger an e-mail alert. It is strongly advised that this option is not selected as the number of e-mail alerts generated could be very large and cause e-mail performance issues. Alert on selected events It is advisable to flag only certain events to generate e-mail alerts. These can be selected using the ‘Alert on selected events’ radio button and then selecting the desired events from the list. The ‘Clear All’ and ‘Select All’ button can be used to make this process easier.
User Groups Tab
All Groups Select this option to monitor all Pointsec Protector users/groups for the new Alert. Selected Groups This option allows only certain groups to be monitored for the selected events within the defined Alert. On large installations it is advisable to create new alerts for each group.
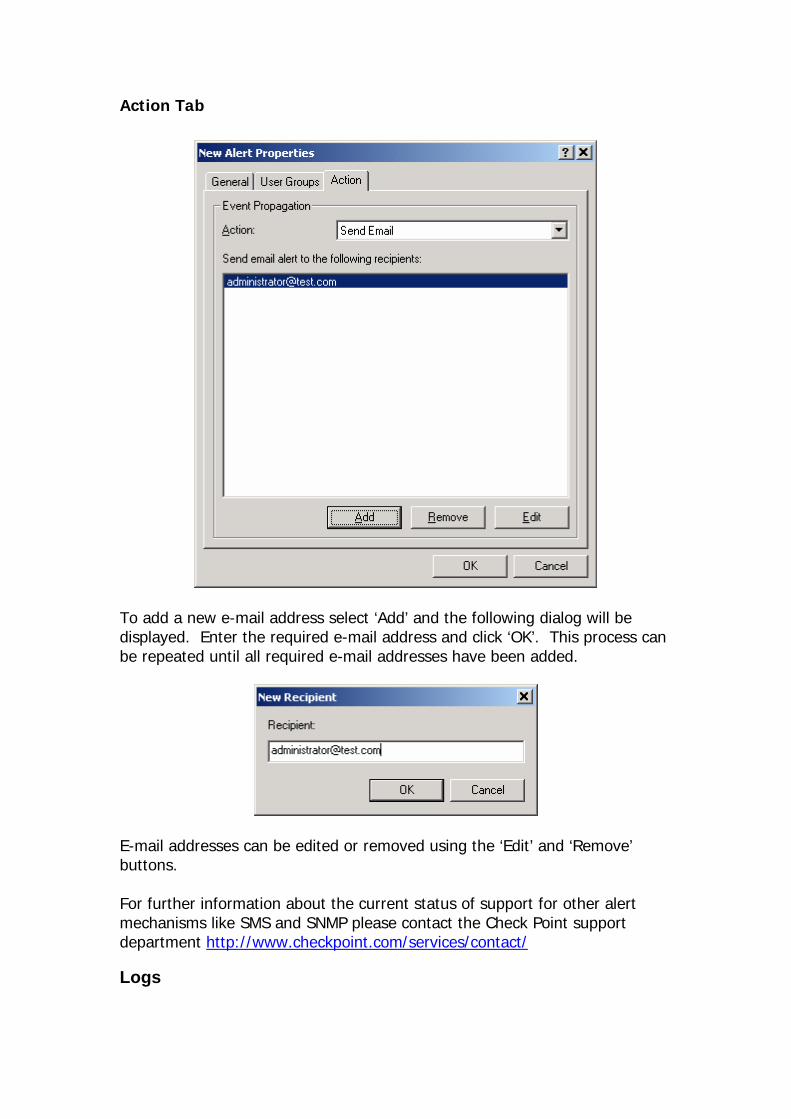
Action Tab
To add a new e-mail address select ‘Add’ and the following dialog will be displayed. Enter the required e-mail address and click ‘OK’. This process can be repeated until all required e-mail addresses have been added.
E-mail addresses can be edited or removed using the ‘Edit’ and ‘Remove’ buttons. For further information about the current status of support for other alert mechanisms like SMS and SNMP please contact the Check Point support department http://www.checkpoint.com/services/contact/
Logs
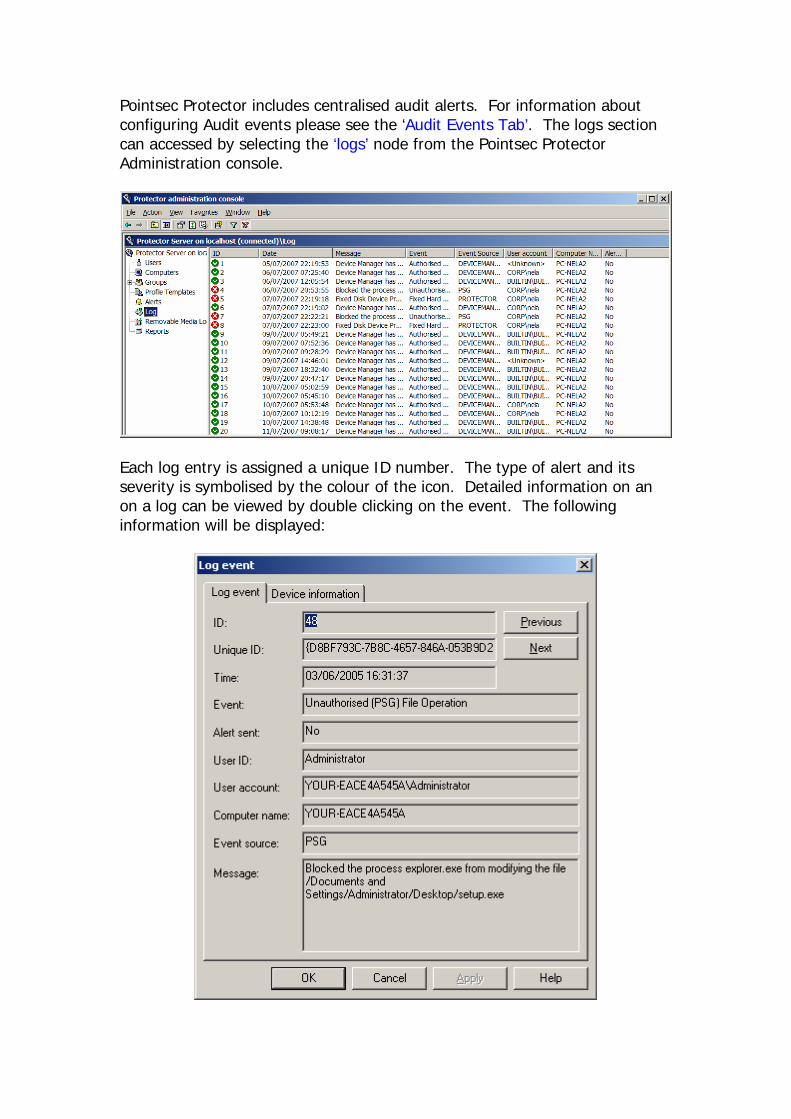
Pointsec Protector includes centralised audit alerts. For information about configuring Audit events please see the ‘Audit Events Tab’. The logs section can accessed by selecting the ‘logs’ node from the Pointsec Protector Administration console.
Each log entry is assigned a unique ID number. The type of alert and its severity is symbolised by the colour of the icon. Detailed information on an on a log can be viewed by double clicking on the event. The following information will be displayed:
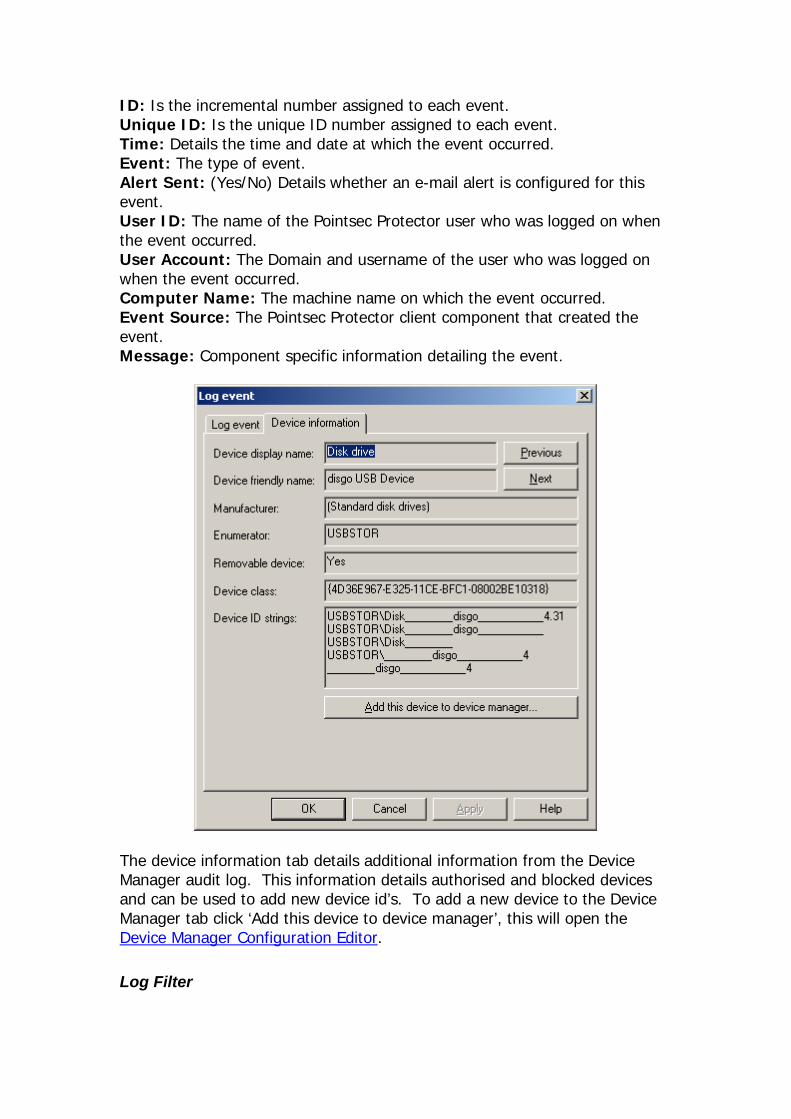
ID: Is the incremental number assigned to each event. Unique ID: Is the unique ID number assigned to each event. Time: Details the time and date at which the event occurred. Event: The type of event. Alert Sent: (Yes/No) Details whether an e-mail alert is configured for this event. User ID: The name of the Pointsec Protector user who was logged on when the event occurred. User Account: The Domain and username of the user who was logged on when the event occurred. Computer Name: The machine name on which the event occurred. Event Source: The Pointsec Protector client component that created the event. Message: Component specific information detailing the event.
The device information tab details additional information from the Device Manager audit log. This information details authorised and blocked devices and can be used to add new device id’s. To add a new device to the Device Manager tab click ‘Add this device to device manager’, this will open the Device Manager Configuration Editor.
Log Filter
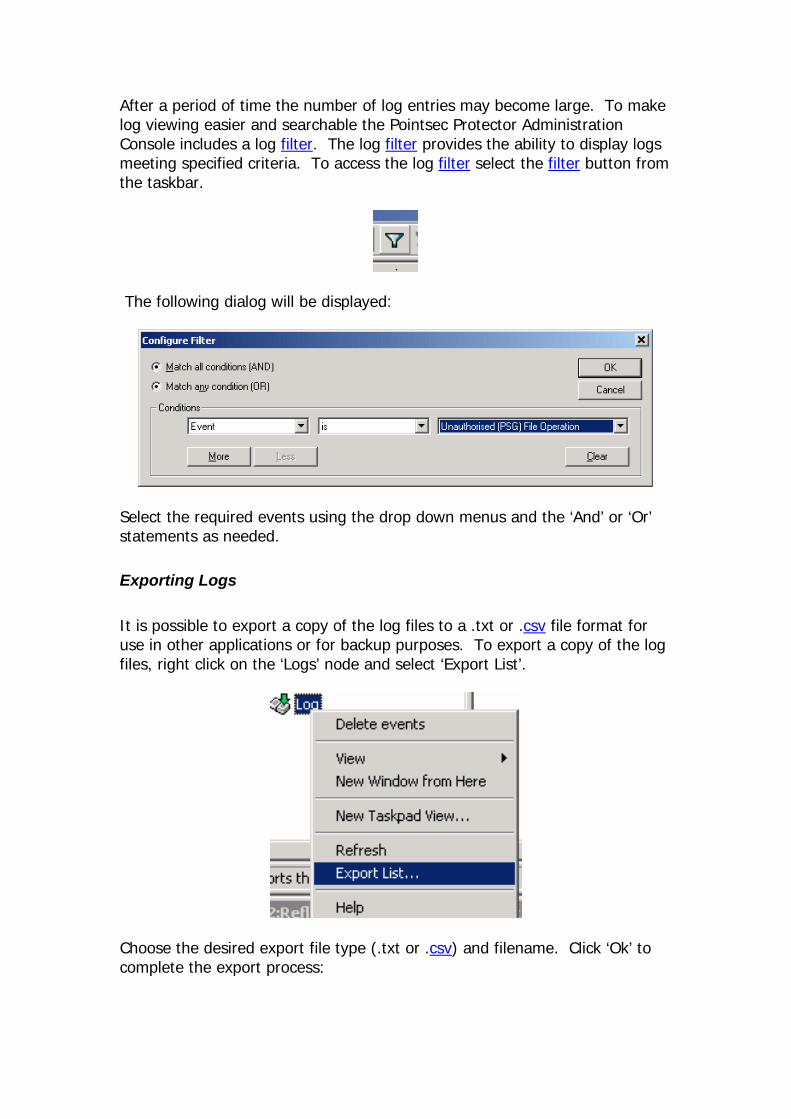
After a period of time the number of log entries may become large. To make log viewing easier and searchable the Pointsec Protector Administration Console includes a log filter. The log filter provides the ability to display logs meeting specified criteria. To access the log filter select the filter button from the taskbar.
The following dialog will be displayed:
Select the required events using the drop down menus and the ‘And’ or ‘Or’ statements as needed.
Exporting Logs It is possible to export a copy of the log files to a .txt or .csv file format for use in other applications or for backup purposes. To export a copy of the log files, right click on the ‘Logs’ node and select ‘Export List’.
Choose the desired export file type (.txt or .csv) and filename. Click ‘Ok’ to complete the export process:
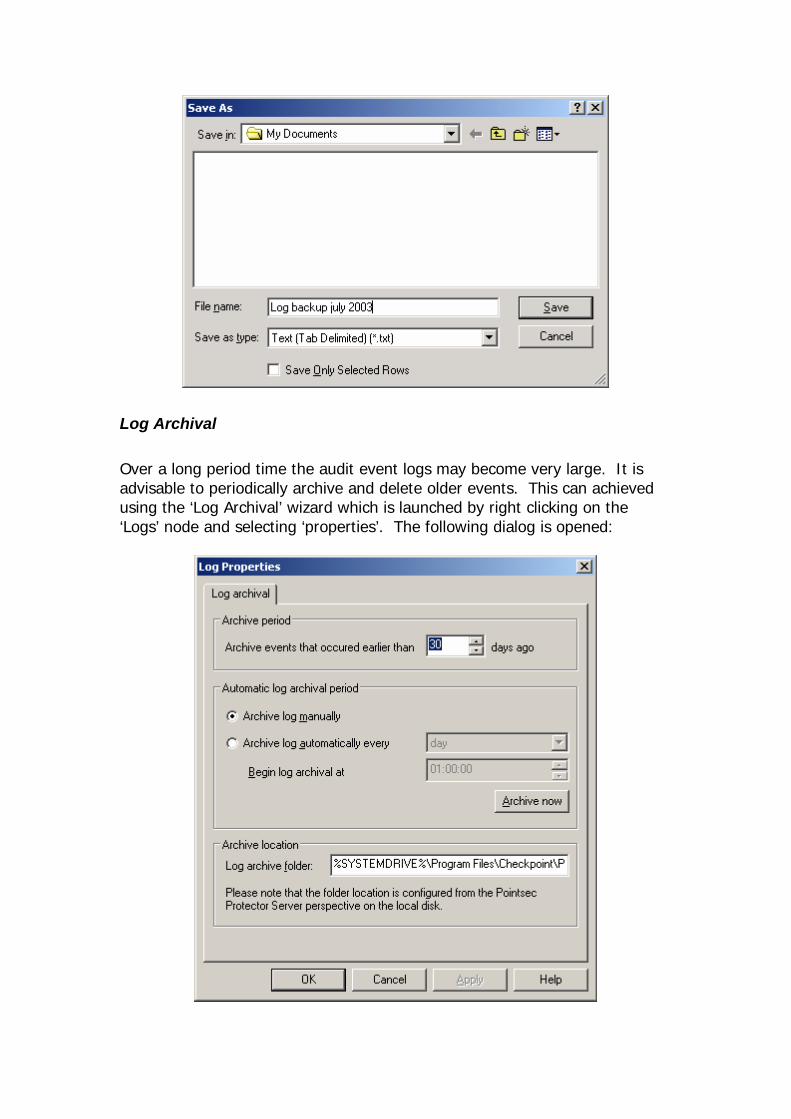
Log Archival Over a long period time the audit event logs may become very large. It is advisable to periodically archive and delete older events. This can achieved using the ‘Log Archival’ wizard which is launched by right clicking on the ‘Logs’ node and selecting ‘properties’. The following dialog is opened:
Archive events that occurred earlier than Specifies the time period within which events will be archived. Archive log manually Audit logs will only be archived by selecting the ‘Archive now’ button. Archive log automatically every Configures the automatic archiving of audit logs to the specified location. This can be configured periodically by selecting a preferred day and time. Archive Now Will perform a manual archive of the audit logs within the specified time constraints. Log Archive Folder Specifies the location where the archives will be stored in delimited text format. The archive will be created using a filename denoting the date of the archive creation.
Removable Media Log Pointsec Protector includes the ability to audit defined file operations on removable media and CDs/DVDs including the creation, deletion, move/rename, and open for read and write of files. For further information about configuring removable media audit events please see the Removable Media Manager Audit tab. The Removable Media Logs can be accessed by selecting the ‘Removable Media Log’ node from the Pointsec Protector Administration console. The default view shows a summary of the top ten active users and hosts as shown below:
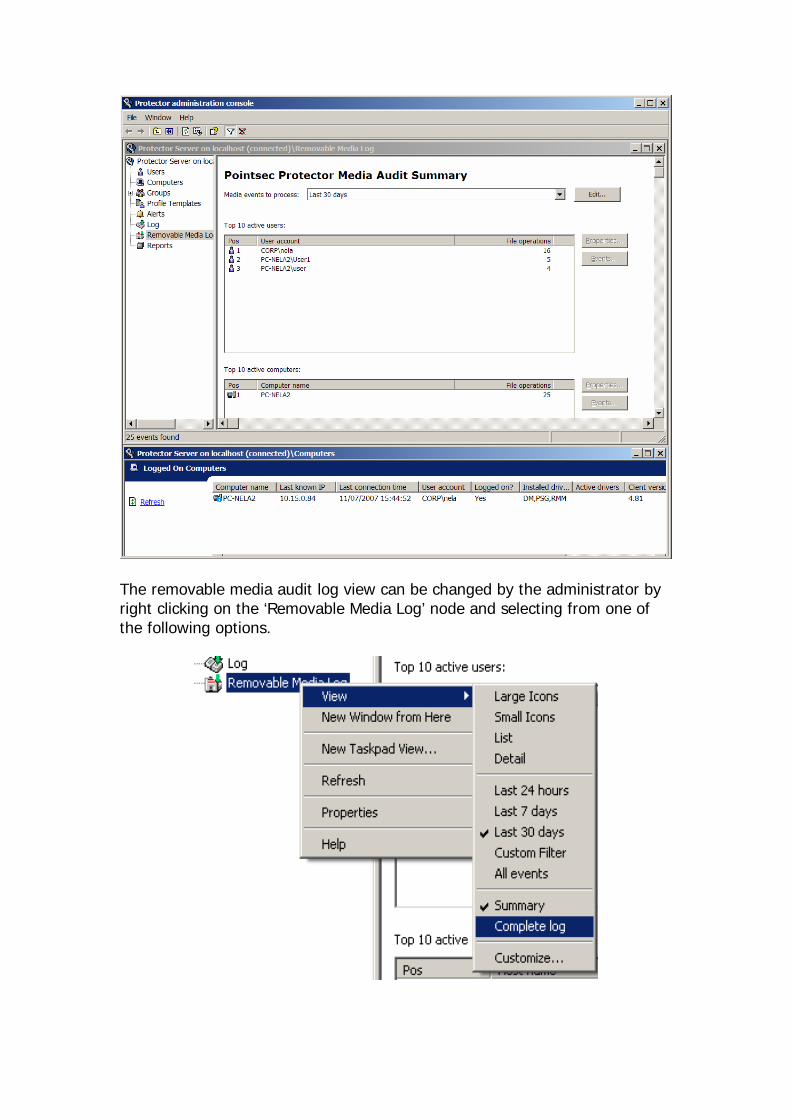
The removable media audit log view can be changed by the administrator by right clicking on the ‘Removable Media Log’ node and selecting from one of the following options.
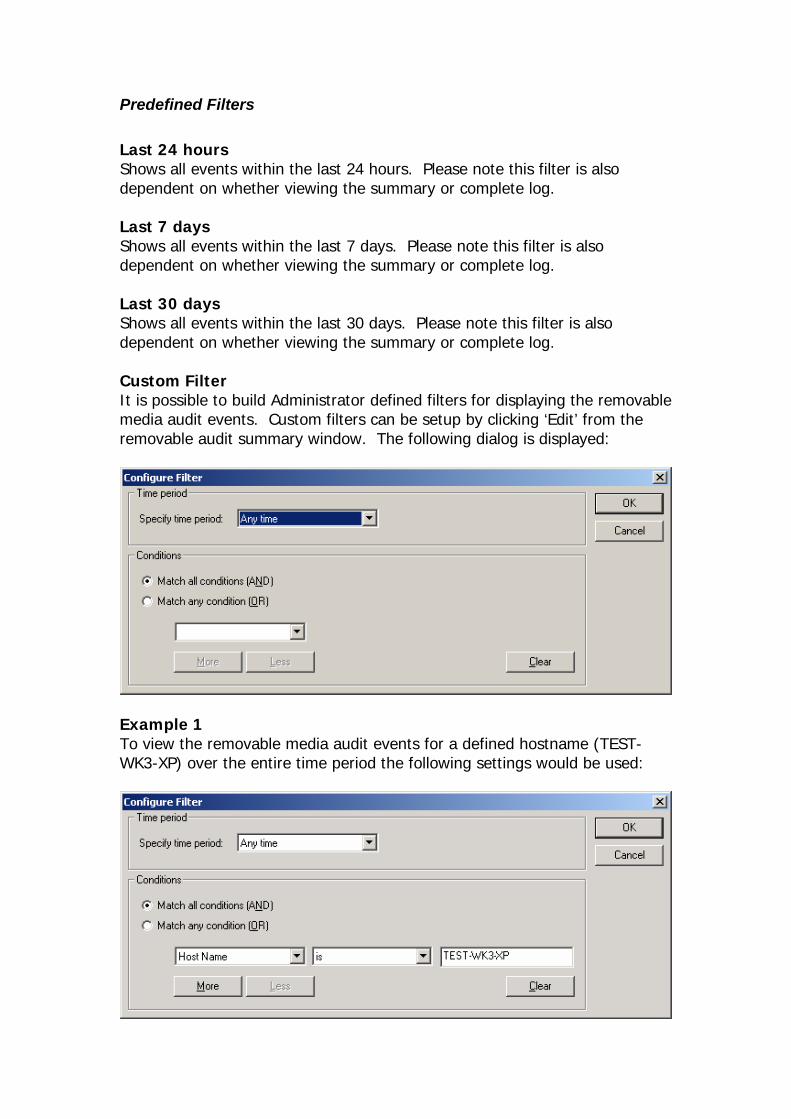
Predefined Filters Last 24 hours Shows all events within the last 24 hours. Please note this filter is also dependent on whether viewing the summary or complete log. Last 7 days Shows all events within the last 7 days. Please note this filter is also dependent on whether viewing the summary or complete log. Last 30 days Shows all events within the last 30 days. Please note this filter is also dependent on whether viewing the summary or complete log. Custom Filter It is possible to build Administrator defined filters for displaying the removable media audit events. Custom filters can be setup by clicking ‘Edit’ from the removable audit summary window. The following dialog is displayed:
Example 1 To view the removable media audit events for a defined hostname (TEST-WK3-XP) over the entire time period the following settings would be used:
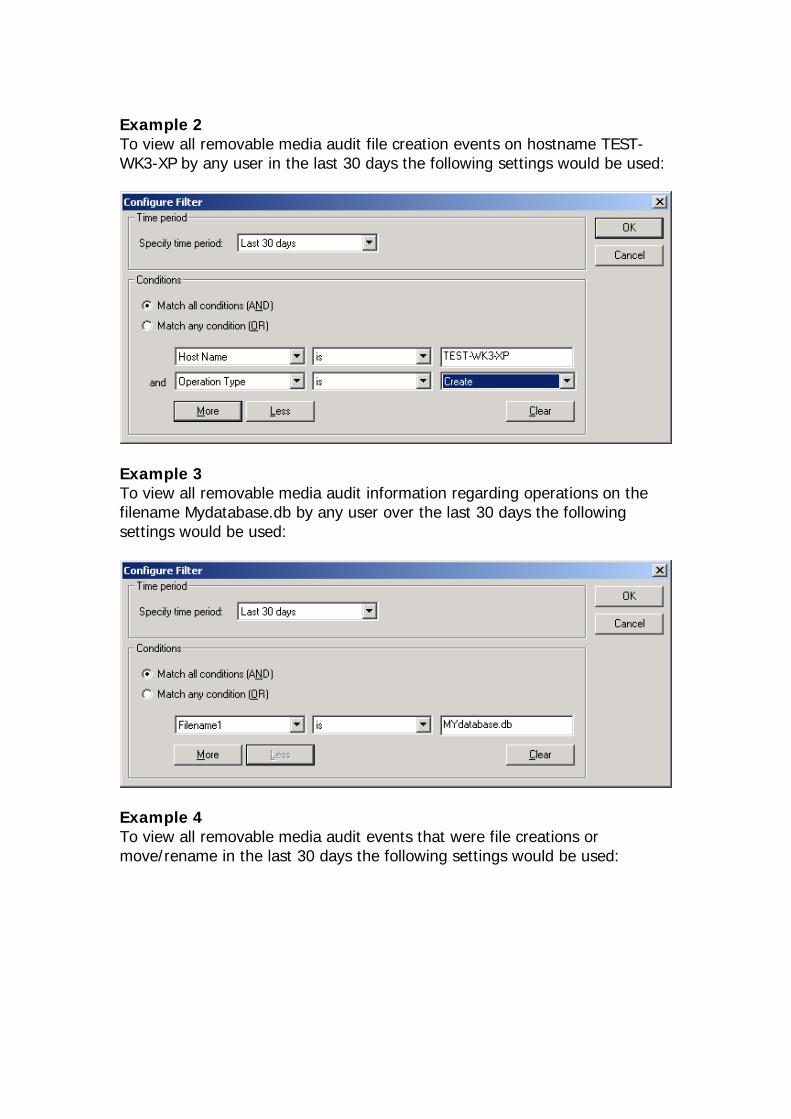
Example 2 To view all removable media audit file creation events on hostname TEST-WK3-XP by any user in the last 30 days the following settings would be used:
Example 3 To view all removable media audit information regarding operations on the filename Mydatabase.db by any user over the last 30 days the following settings would be used:
Example 4 To view all removable media audit events that were file creations or move/rename in the last 30 days the following settings would be used:
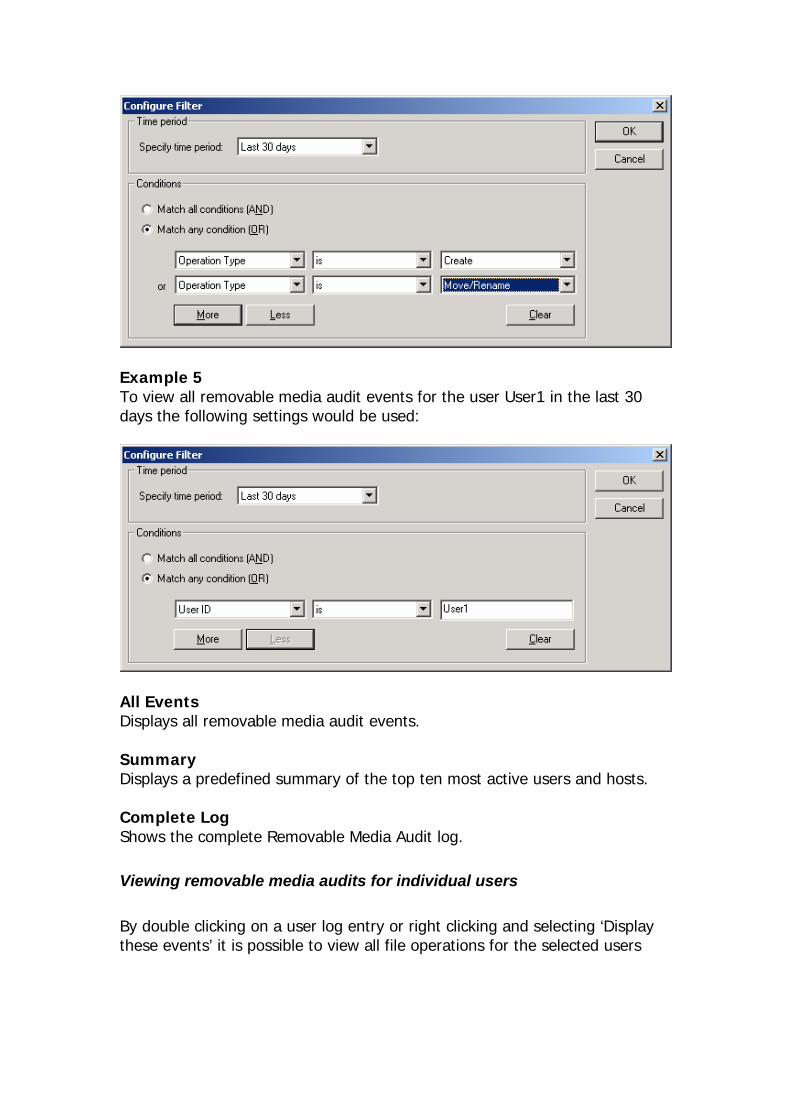
Example 5 To view all removable media audit events for the user User1 in the last 30 days the following settings would be used:
All Events Displays all removable media audit events. Summary Displays a predefined summary of the top ten most active users and hosts. Complete Log Shows the complete Removable Media Audit log.
Viewing removable media audits for individual users By double clicking on a user log entry or right clicking and selecting ‘Display these events’ it is possible to view all file operations for the selected users
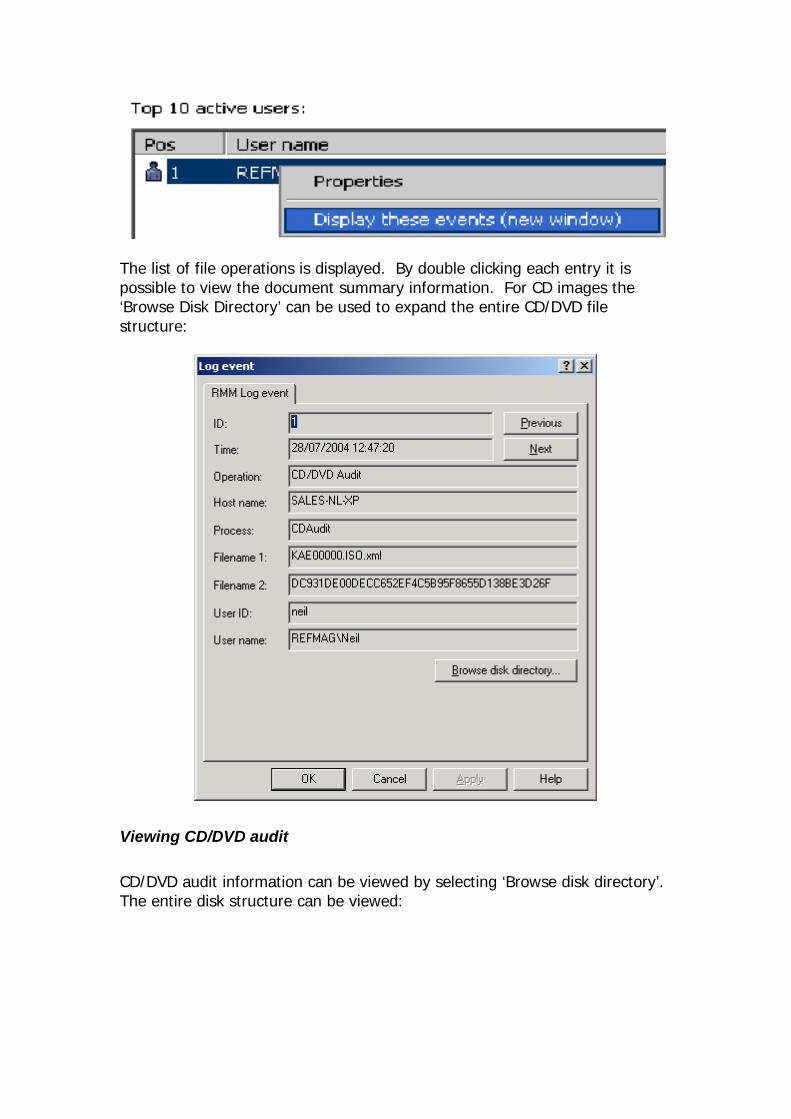
The list of file operations is displayed. By double clicking each entry it is possible to view the document summary information. For CD images the ‘Browse Disk Directory’ can be used to expand the entire CD/DVD file structure:
Viewing CD/DVD audit CD/DVD audit information can be viewed by selecting ‘Browse disk directory’. The entire disk structure can be viewed:
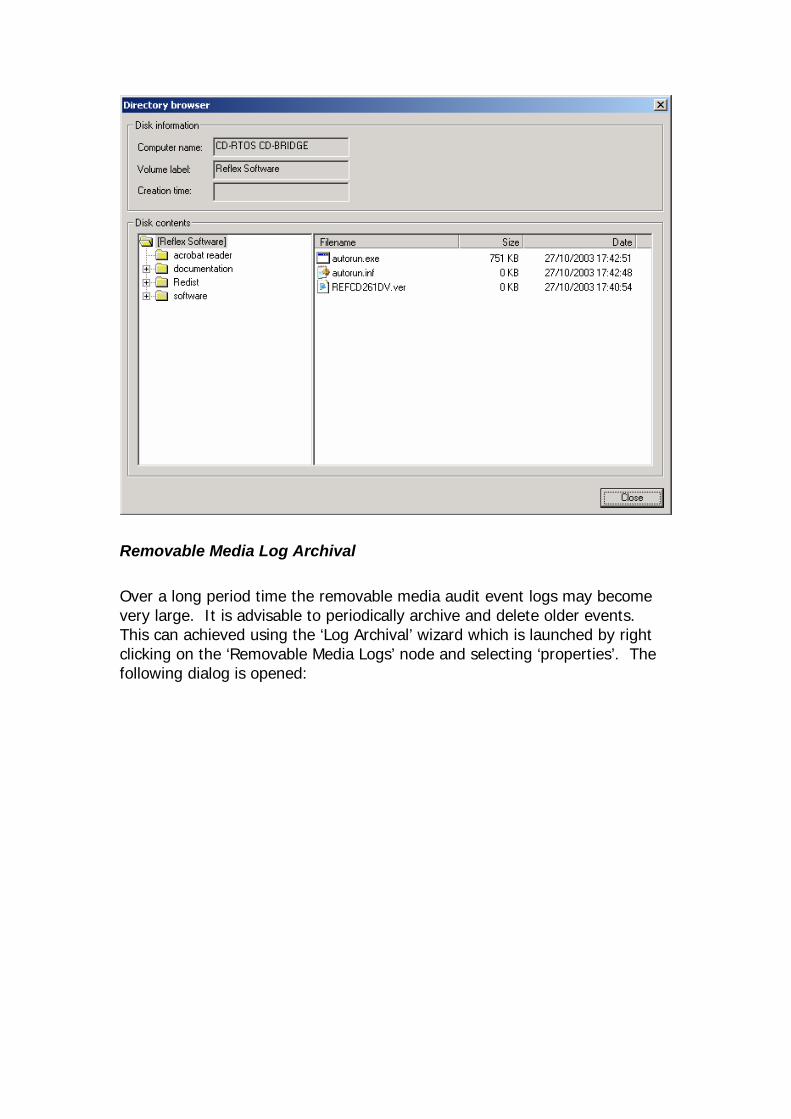
Removable Media Log Archival Over a long period time the removable media audit event logs may become very large. It is advisable to periodically archive and delete older events. This can achieved using the ‘Log Archival’ wizard which is launched by right clicking on the ‘Removable Media Logs’ node and selecting ‘properties’. The following dialog is opened:
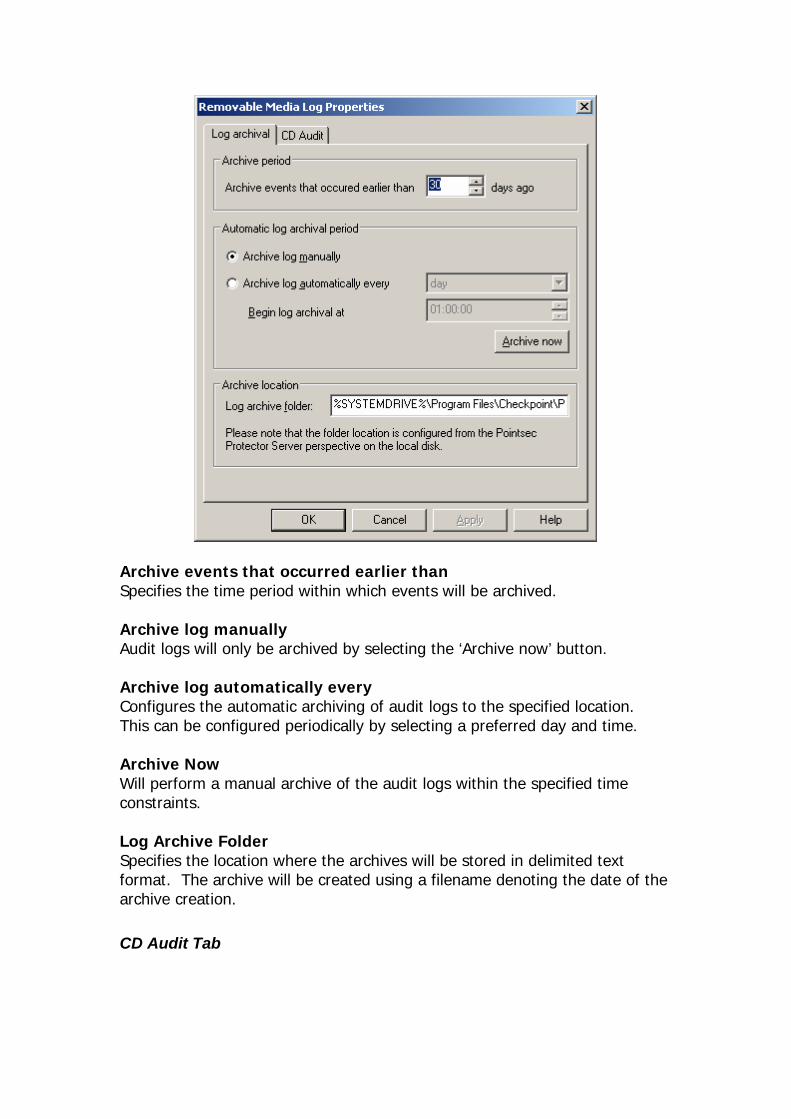
Archive events that occurred earlier than Specifies the time period within which events will be archived. Archive log manually Audit logs will only be archived by selecting the ‘Archive now’ button. Archive log automatically every Configures the automatic archiving of audit logs to the specified location. This can be configured periodically by selecting a preferred day and time. Archive Now Will perform a manual archive of the audit logs within the specified time constraints. Log Archive Folder Specifies the location where the archives will be stored in delimited text format. The archive will be created using a filename denoting the date of the archive creation.
CD Audit Tab
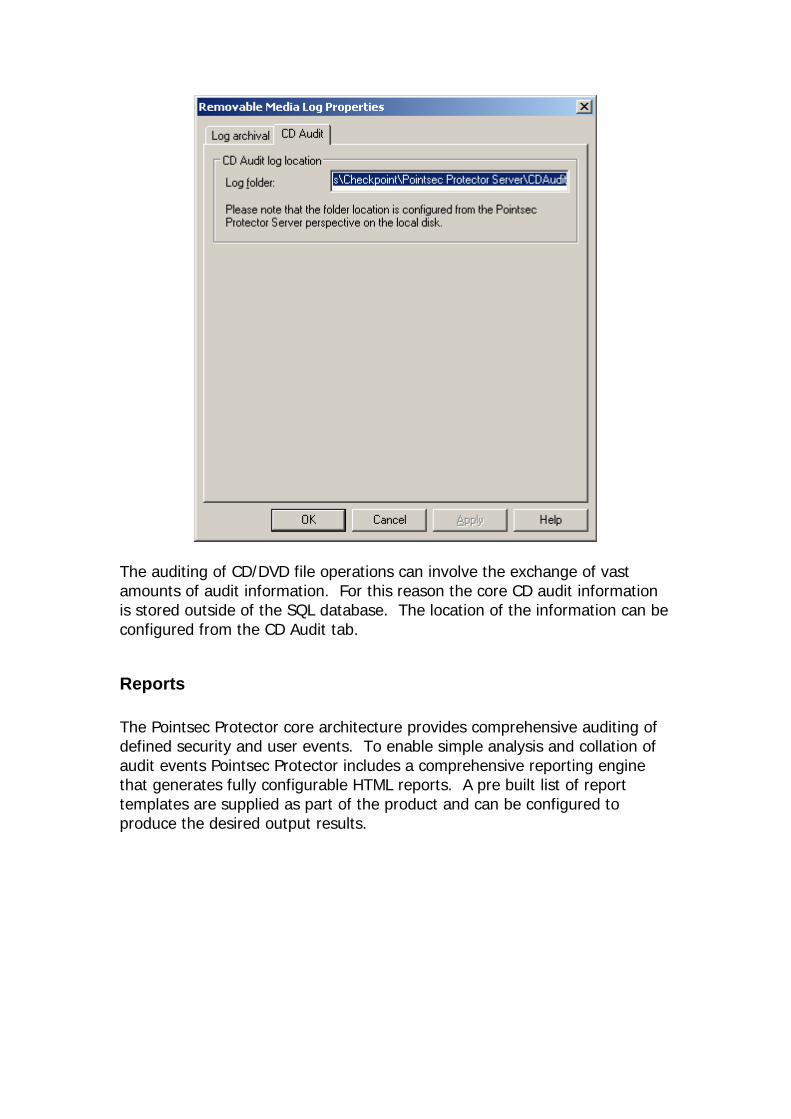
The auditing of CD/DVD file operations can involve the exchange of vast amounts of audit information. For this reason the core CD audit information is stored outside of the SQL database. The location of the information can be configured from the CD Audit tab.
Reports The Pointsec Protector core architecture provides comprehensive auditing of defined security and user events. To enable simple analysis and collation of audit events Pointsec Protector includes a comprehensive reporting engine that generates fully configurable HTML reports. A pre built list of report templates are supplied as part of the product and can be configured to produce the desired output results.
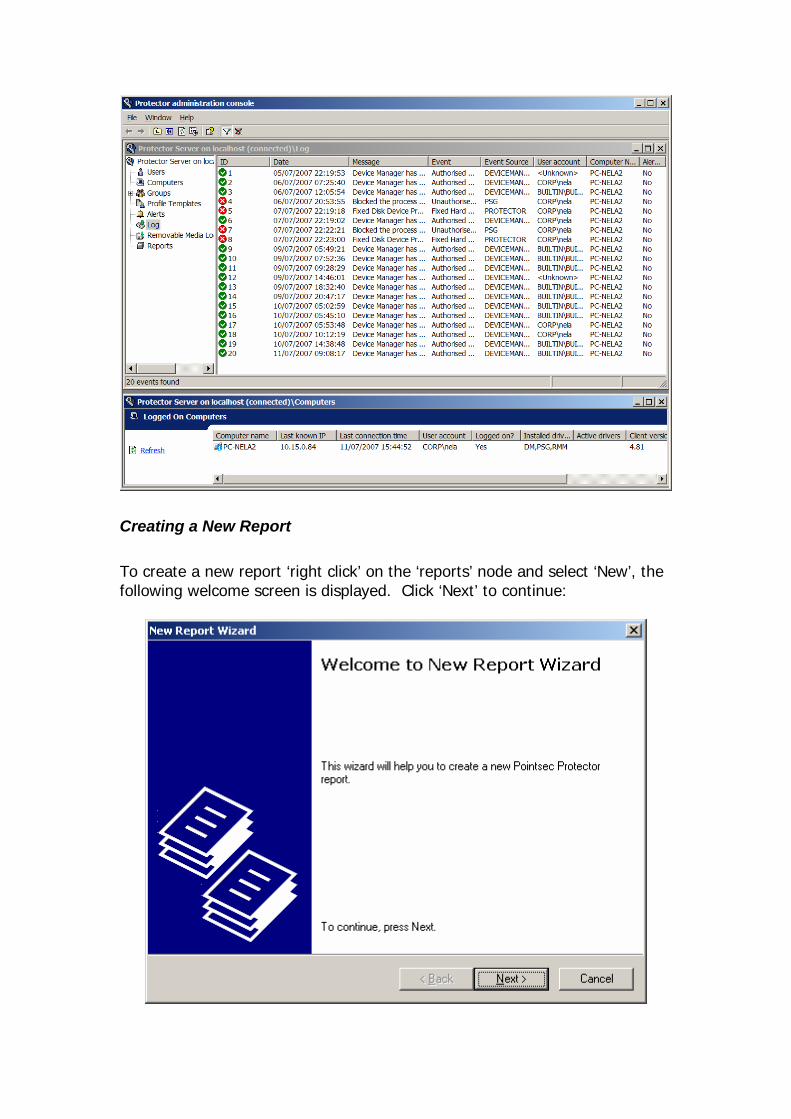
Creating a New Report To create a new report ‘right click’ on the ‘reports’ node and select ‘New’, the following welcome screen is displayed. Click ‘Next’ to continue:
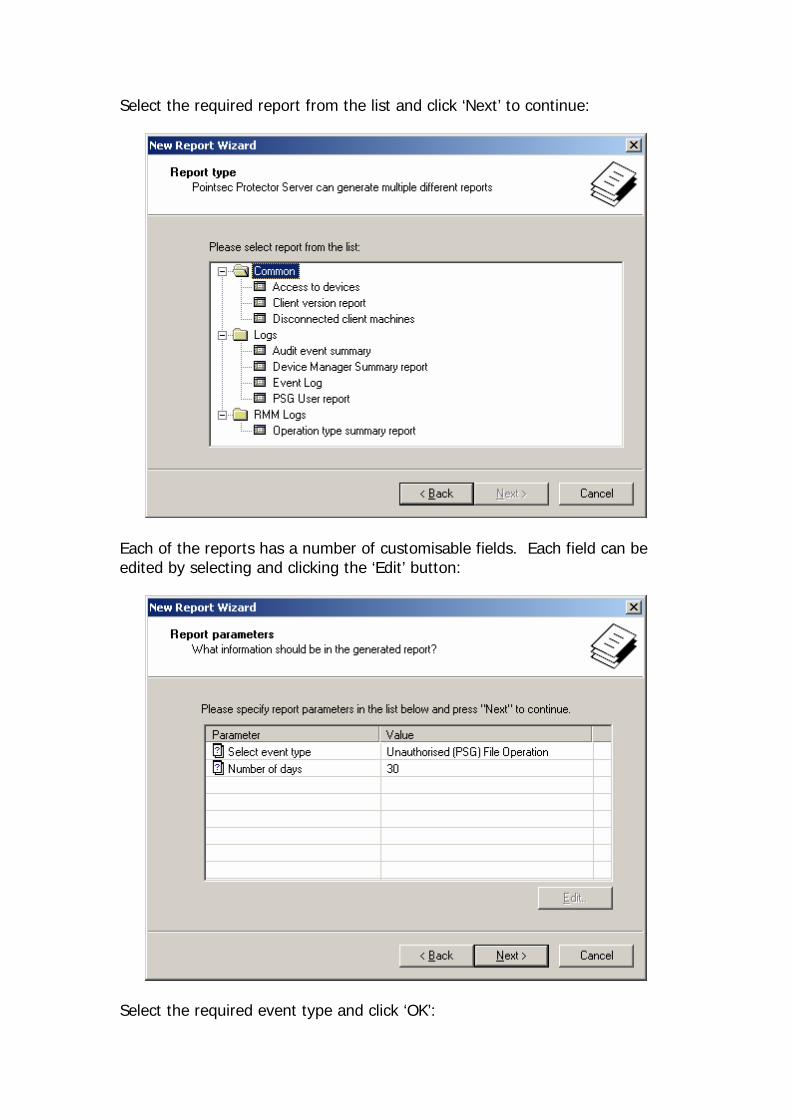
Select the required report from the list and click ‘Next’ to continue:
Each of the reports has a number of customisable fields. Each field can be edited by selecting and clicking the ‘Edit’ button:
Select the required event type and click ‘OK’:
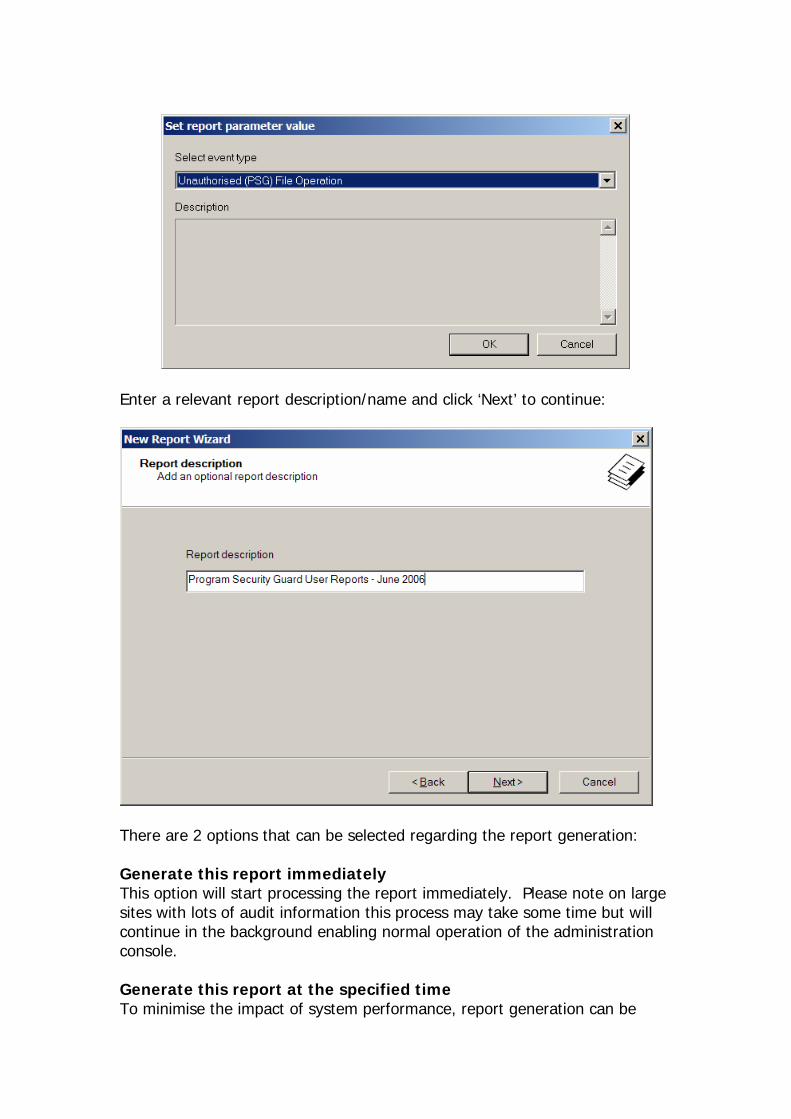
Enter a relevant report description/name and click ‘Next’ to continue:
There are 2 options that can be selected regarding the report generation: Generate this report immediately This option will start processing the report immediately. Please note on large sites with lots of audit information this process may take some time but will continue in the background enabling normal operation of the administration console. Generate this report at the specified time To minimise the impact of system performance, report generation can be
configured to take place at a defined date and time. For example, it maybe desirable to schedule report generation overnight when there is little or no network activity. Select the required option and click ‘Next’ to continue:
A report summary is displayed. Providing the details are correct click ‘Next’ to create the report:
If ‘generate this report immediately’ was selected the report creation will begin immediately. The progress bar shows the current report generation progress. Clicking ‘Next’ will close the dialog, report generation will continue in the background:
Click ‘Finish’ to close the report generation wizard:
Report generation is complete when the newly created report is displayed with a green tick.
Installing a remote Pointsec Protector Administration Console
Installation Instructions It is often desirable to setup a number of remote administration consoles for the Pointsec Protector Enterprise Server. To install a remote administration console the following steps need to be completed: 1) Logon to a MS Windows NT/2000 or XP workstation with local administration rights. 2) From the installation CD-ROM run the Check Point Protector Enterprise Server installation setup.exe. Click ‘Next’ through the welcome screen:
3) The server license agreement is displayed. Providing you agree with the terms and conditions of the license select ‘I accept the agreement’ and click ‘Next’ to continue:
4) Enter a valid registration code, and select ‘Anyone who uses this computer’. Click ‘Next’ to continue:
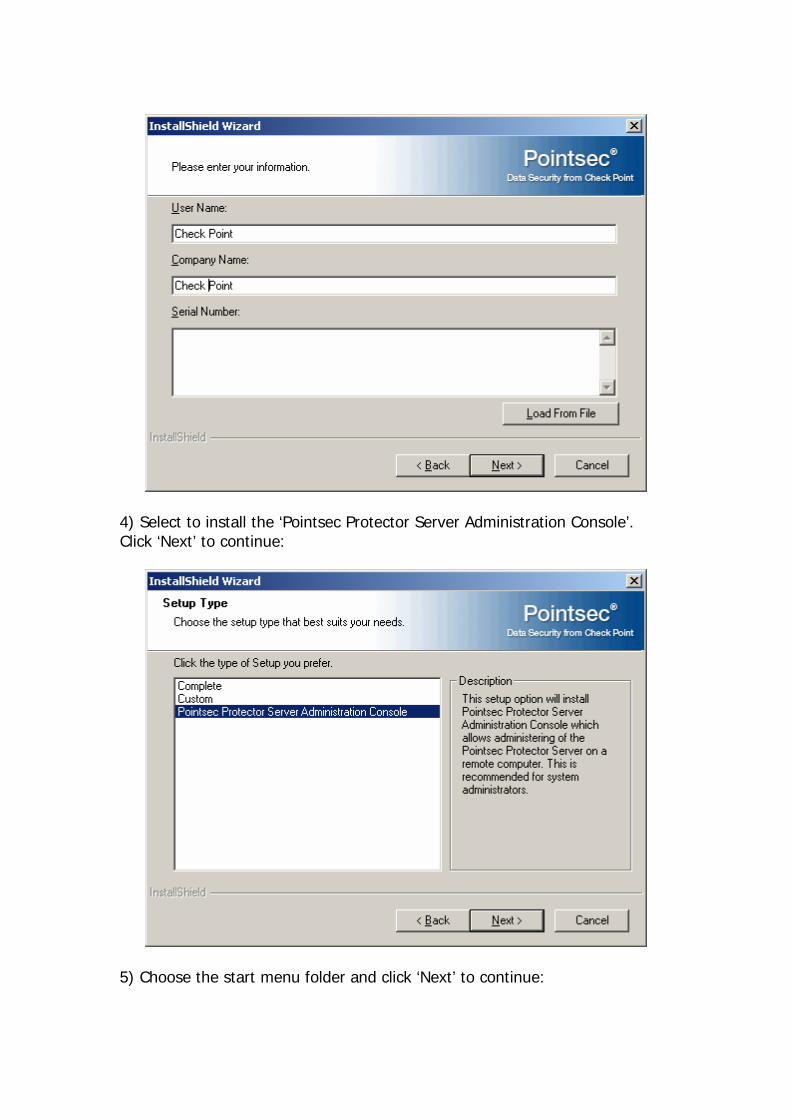
4) Select to install the ‘Pointsec Protector Server Administration Console’. Click ‘Next’ to continue:
5) Choose the start menu folder and click ‘Next’ to continue:
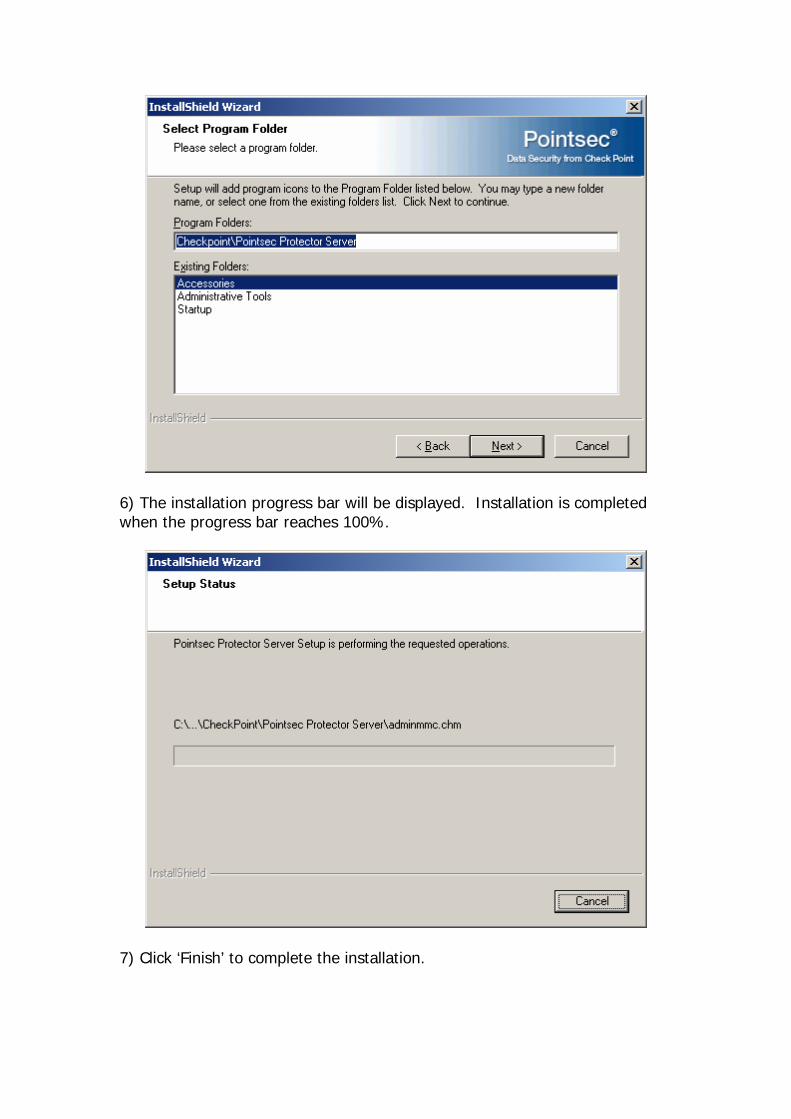
6) The installation progress bar will be displayed. Installation is completed when the progress bar reaches 100%.
7) Click ‘Finish’ to complete the installation.
Connecting to the Remote Server After installing Pointsec Protector Administration console you need to complete the following steps to connect to the remote Enterprise Server. 1) Open Pointsec Protector Administration Console Start>Programs>Check Point>Pointsec Protector>Administration Console and the Management Console will open. 2) Ensure the user wishing to connect to the remote Enterprise Server has sufficient security rights granted to allow access. 3) To Connect to the remote server right click and select ‘Connect to’. Select the remote server name or IP address and Port Number and click ‘Finish’.
Installing Pointsec Protector Client
Manual Installation This section details the installation of Pointsec Protector client software to Windows 2000 and XP client workstations. The preferred mechanism for client deployment is using the Check Point Deployment Server. To install Pointsec Protector client manually complete the following steps:

1) Locate the Pointsec Protector client software and run ‘setup.exe’. The following welcome screen will be displayed. Click ‘Next’ to continue:
2) The client license agreement is displayed. Providing you agree with the terms and conditions of the license select ‘I accept the agreement’ and click ‘Next’ to continue:
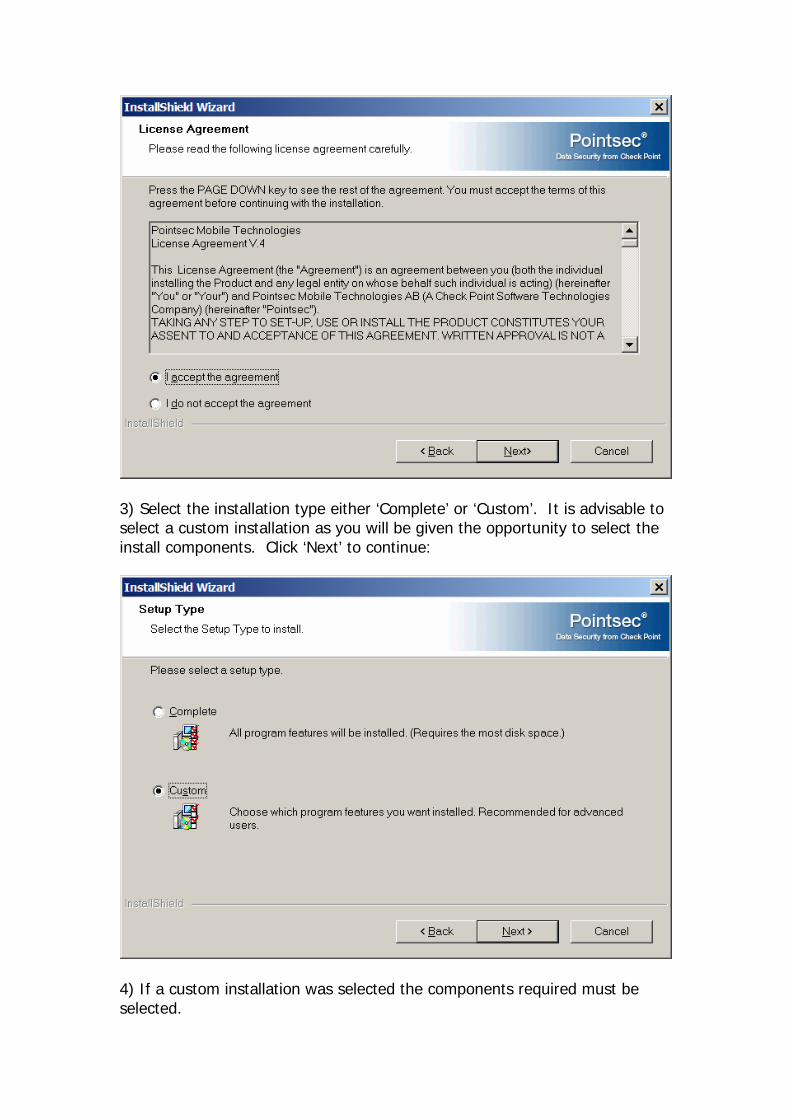
3) Select the installation type either ‘Complete’ or ‘Custom’. It is advisable to select a custom installation as you will be given the opportunity to select the install components. Click ‘Next’ to continue:
4) If a custom installation was selected the components required must be selected.
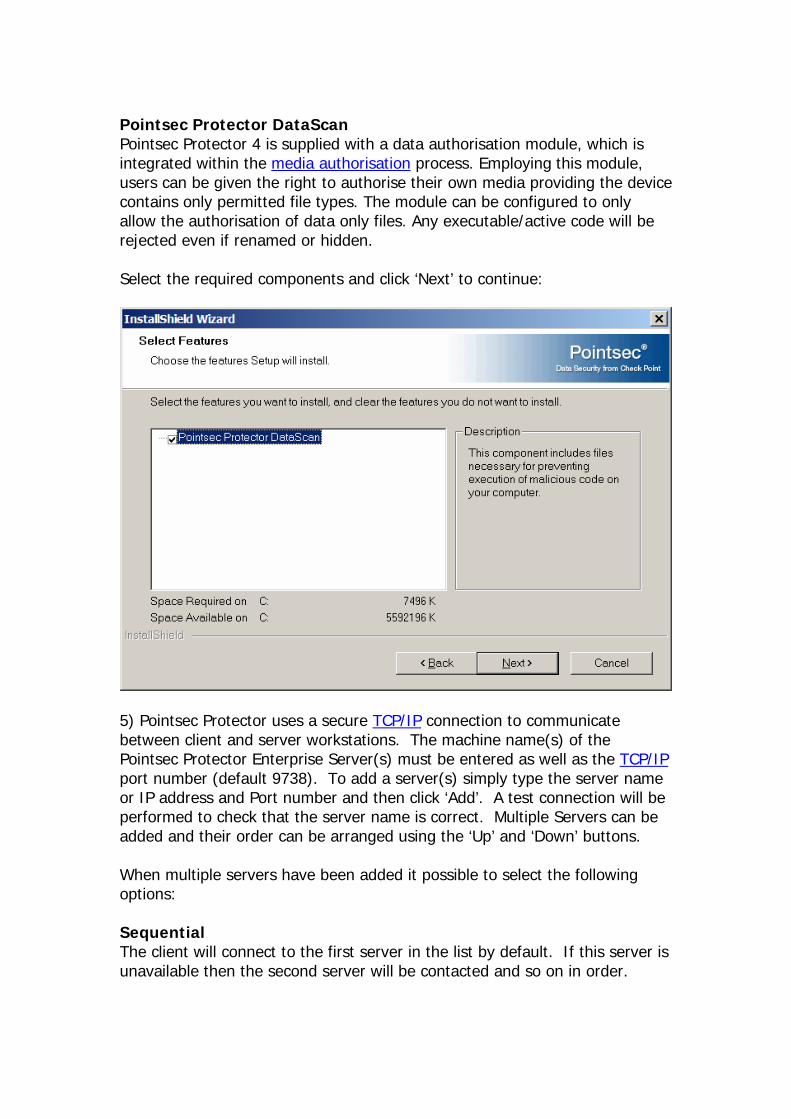
Pointsec Protector DataScan Pointsec Protector 4 is supplied with a data authorisation module, which is integrated within the media authorisation process. Employing this module, users can be given the right to authorise their own media providing the device contains only permitted file types. The module can be configured to only allow the authorisation of data only files. Any executable/active code will be rejected even if renamed or hidden. Select the required components and click ‘Next’ to continue:
5) Pointsec Protector uses a secure TCP/IP connection to communicate between client and server workstations. The machine name(s) of the Pointsec Protector Enterprise Server(s) must be entered as well as the TCP/IP port number (default 9738). To add a server(s) simply type the server name or IP address and Port number and then click ‘Add’. A test connection will be performed to check that the server name is correct. Multiple Servers can be added and their order can be arranged using the ‘Up’ and ‘Down’ buttons. When multiple servers have been added it possible to select the following options: Sequential The client will connect to the first server in the list by default. If this server is unavailable then the second server will be contacted and so on in order.
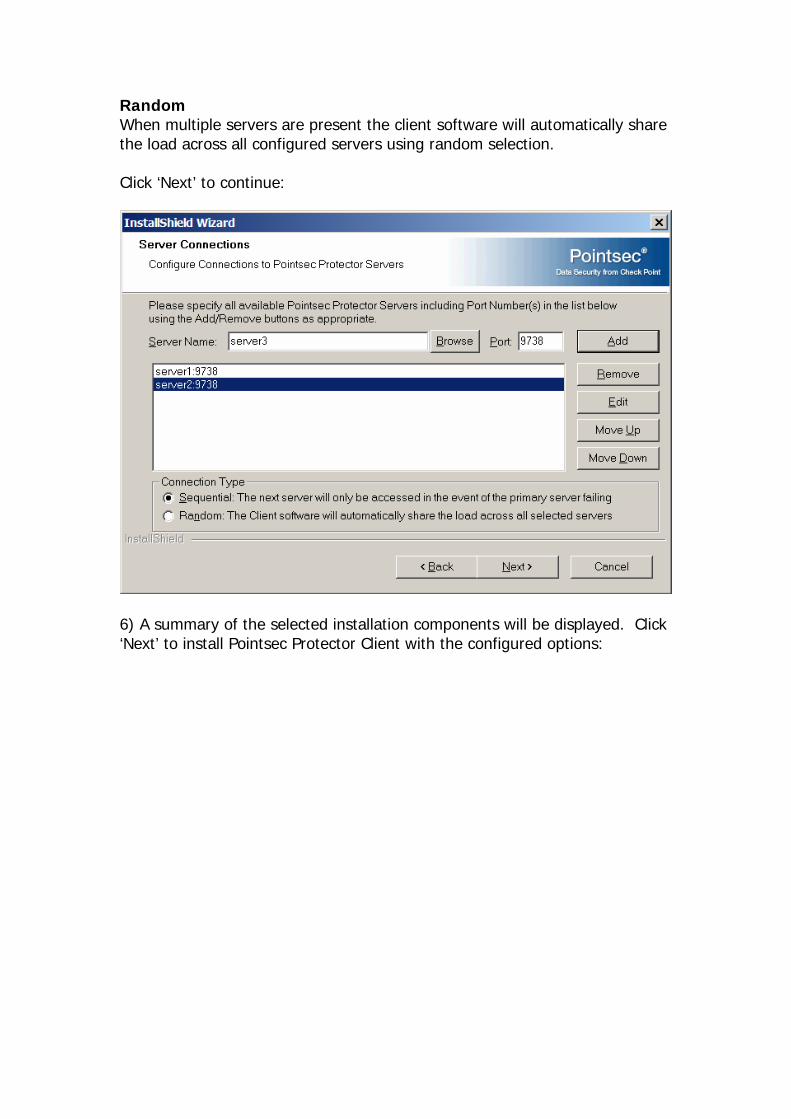
Random When multiple servers are present the client software will automatically share the load across all configured servers using random selection. Click ‘Next’ to continue:
6) A summary of the selected installation components will be displayed. Click ‘Next’ to install Pointsec Protector Client with the configured options:
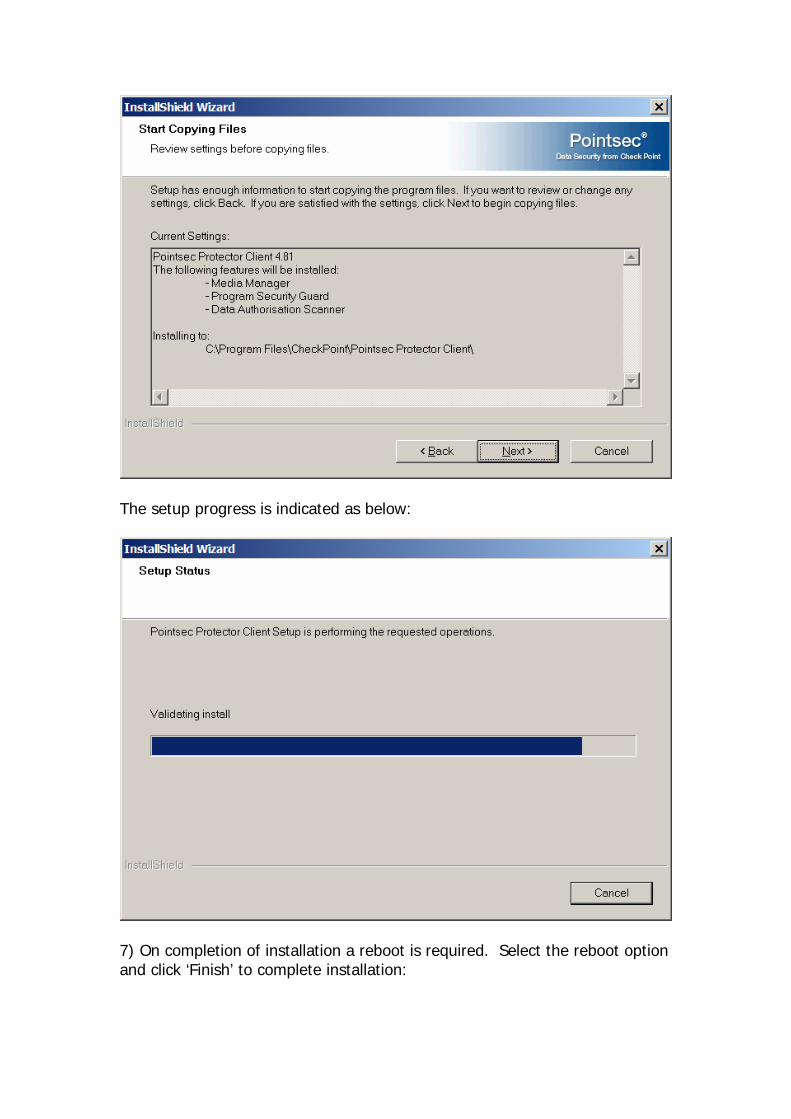
The setup progress is indicated as below:
7) On completion of installation a reboot is required. Select the reboot option and click ‘Finish’ to complete installation:

Silent Network Installation The preferred method for installing Pointsec Protector Client is a silent network deployment. Because Pointsec Protector Client requires local administration rights to install, you will need to use a software deployment mechanism to install. Pointsec Protector Enterprise Server is supplied with the Check Point Deployment Server – a flexible network software deployment utility. To install Pointsec Protector Client silently using any mechanism an install template file must be created. This can be created by recording a standard install.
Creating a template installation for silent deployment To create a standard template installation for silent network deployment the following steps need to be completed: 1) Create a shared folder on the server and copy the contents of the Pointsec Protector folder on the Pointsec Protector installation CD-ROM to this location. 2) Logon to a Windows 2000 or XP client workstation that currently does not have Pointsec Protector Client installed with local administration rights. 3) Navigate to ‘Start>Run’ and browse to the location of setup.exe within the Pointsec Protector client folder. Run ‘Setup.exe –r’ to invoke a recorded install as shown below:

4) Complete the installation as detailed in the Manual installation section. Please note all options and configuration will be recorded and used for future silent installations. 5) A file named setup.iss will have been created in the Windows directory (e.g. ‘C:\winnt’). Copy this file to the software installation network share location. 6) It is now possible to execute the Pointsec Protector Client installation in silent mode using ‘setup.exe –s’.
Configuring a Config.ini Additional installation options can be configured within the config.ini file which is located on the root folder of the client installation. From the config.ini it is possible to specify the Pointsec Protector Server names and default port number, boot protection passwords, and permission of who is allowed to deinstall the client software. The config.ini can be opened and edited using any text editor or notepad.exe. The following information is stored (The default settings are shown): [Server] Servers= DefaultPort=9738 ServerOrder=1 [Client] UsersCanAdmin=0 EM=1 (Removable Media Manager) EMUPGRADE=0 [Uninstall] AllowedUsers=%COMPUTER%\Administrator,%DOMAIN%\Administrator AllowedGroups=%DOMAIN%\Administrators,%DOMAIN%\domain admins,CHECK POINT\administrators Syntax [Server] - (Server configuration section) Servers=Server1:9738;Server2:9738 - (Specify the servernames & Port number)
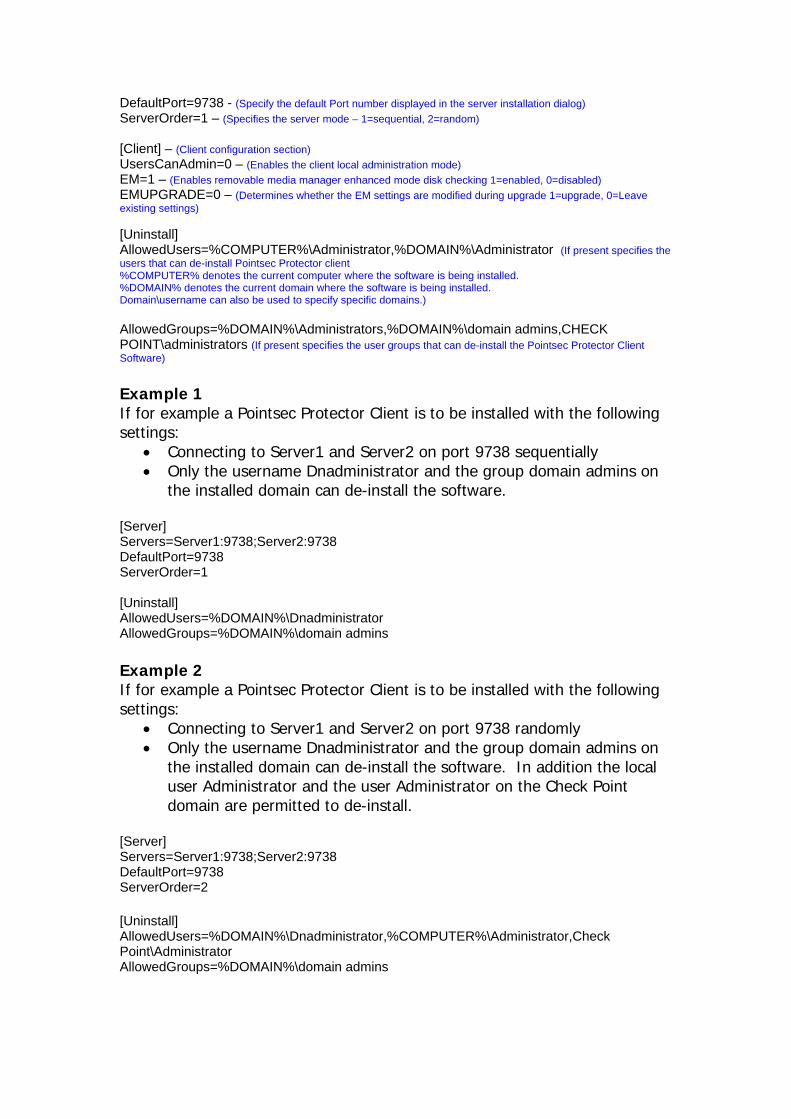
DefaultPort=9738 - (Specify the default Port number displayed in the server installation dialog) ServerOrder=1 – (Specifies the server mode – 1=sequential, 2=random) [Client] – (Client configuration section) UsersCanAdmin=0 – (Enables the client local administration mode) EM=1 – (Enables removable media manager enhanced mode disk checking 1=enabled, 0=disabled) EMUPGRADE=0 – (Determines whether the EM settings are modified during upgrade 1=upgrade, 0=Leave existing settings) [Uninstall] AllowedUsers=%COMPUTER%\Administrator,%DOMAIN%\Administrator (If present specifies the users that can de-install Pointsec Protector client %COMPUTER% denotes the current computer where the software is being installed. %DOMAIN% denotes the current domain where the software is being installed. Domain\username can also be used to specify specific domains.) AllowedGroups=%DOMAIN%\Administrators,%DOMAIN%\domain admins,CHECK POINT\administrators (If present specifies the user groups that can de-install the Pointsec Protector Client Software) Example 1 If for example a Pointsec Protector Client is to be installed with the following settings:
• Connecting to Server1 and Server2 on port 9738 sequentially • Only the username Dnadministrator and the group domain admins on
the installed domain can de-install the software. [Server] Servers=Server1:9738;Server2:9738 DefaultPort=9738 ServerOrder=1 [Uninstall] AllowedUsers=%DOMAIN%\Dnadministrator AllowedGroups=%DOMAIN%\domain admins Example 2 If for example a Pointsec Protector Client is to be installed with the following settings:
• Connecting to Server1 and Server2 on port 9738 randomly • Only the username Dnadministrator and the group domain admins on
the installed domain can de-install the software. In addition the local user Administrator and the user Administrator on the Check Point domain are permitted to de-install.
[Server] Servers=Server1:9738;Server2:9738 DefaultPort=9738 ServerOrder=2 [Uninstall] AllowedUsers=%DOMAIN%\Dnadministrator,%COMPUTER%\Administrator,Check Point\Administrator AllowedGroups=%DOMAIN%\domain admins
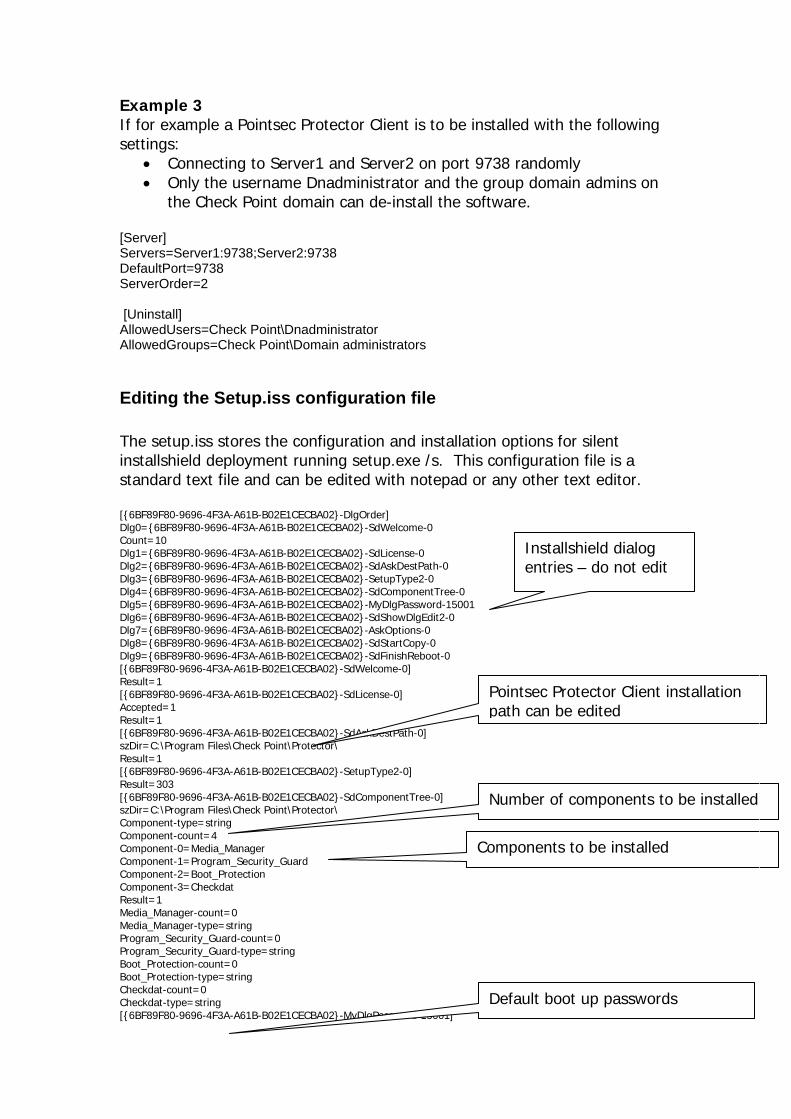
Example 3 If for example a Pointsec Protector Client is to be installed with the following settings:
• Connecting to Server1 and Server2 on port 9738 randomly • Only the username Dnadministrator and the group domain admins on
the Check Point domain can de-install the software. [Server] Servers=Server1:9738;Server2:9738 DefaultPort=9738 ServerOrder=2 [Uninstall] AllowedUsers=Check Point\Dnadministrator AllowedGroups=Check Point\Domain administrators
Editing the Setup.iss configuration file The setup.iss stores the configuration and installation options for silent installshield deployment running setup.exe /s. This configuration file is a standard text file and can be edited with notepad or any other text editor. [{6BF89F80-9696-4F3A-A61B-B02E1CECBA02}-DlgOrder] Dlg0={6BF89F80-9696-4F3A-A61B-B02E1CECBA02}-SdWelcome-0 Count=10 Dlg1={6BF89F80-9696-4F3A-A61B-B02E1CECBA02}-SdLicense-0 Dlg2={6BF89F80-9696-4F3A-A61B-B02E1CECBA02}-SdAskDestPath-0 Dlg3={6BF89F80-9696-4F3A-A61B-B02E1CECBA02}-SetupType2-0 Dlg4={6BF89F80-9696-4F3A-A61B-B02E1CECBA02}-SdComponentTree-0 Dlg5={6BF89F80-9696-4F3A-A61B-B02E1CECBA02}-MyDlgPassword-15001 Dlg6={6BF89F80-9696-4F3A-A61B-B02E1CECBA02}-SdShowDlgEdit2-0 Dlg7={6BF89F80-9696-4F3A-A61B-B02E1CECBA02}-AskOptions-0 Dlg8={6BF89F80-9696-4F3A-A61B-B02E1CECBA02}-SdStartCopy-0 Dlg9={6BF89F80-9696-4F3A-A61B-B02E1CECBA02}-SdFinishReboot-0 [{6BF89F80-9696-4F3A-A61B-B02E1CECBA02}-SdWelcome-0] Result=1 [{6BF89F80-9696-4F3A-A61B-B02E1CECBA02}-SdLicense-0] Accepted=1 Result=1 [{6BF89F80-9696-4F3A-A61B-B02E1CECBA02}-SdAskDestPath-0] szDir=C:\Program Files\Check Point\Protector\ Result=1 [{6BF89F80-9696-4F3A-A61B-B02E1CECBA02}-SetupType2-0] Result=303 [{6BF89F80-9696-4F3A-A61B-B02E1CECBA02}-SdComponentTree-0] szDir=C:\Program Files\Check Point\Protector\ Component-type=string Component-count=4 Component-0=Media_Manager Component-1=Program_Security_Guard Component-2=Boot_Protection Component-3=Checkdat Result=1 Media_Manager-count=0 Media_Manager-type=string Program_Security_Guard-count=0 Program_Security_Guard-type=string Boot_Protection-count=0 Boot_Protection-type=string Checkdat-count=0 Checkdat-type=string [{6BF89F80-9696-4F3A-A61B-B02E1CECBA02}-MyDlgPassword-15001]
Installshield dialog entries – do not edit
Pointsec Protector Client installation path can be edited
Number of components to be installed
Components to be installed
Default boot up passwords
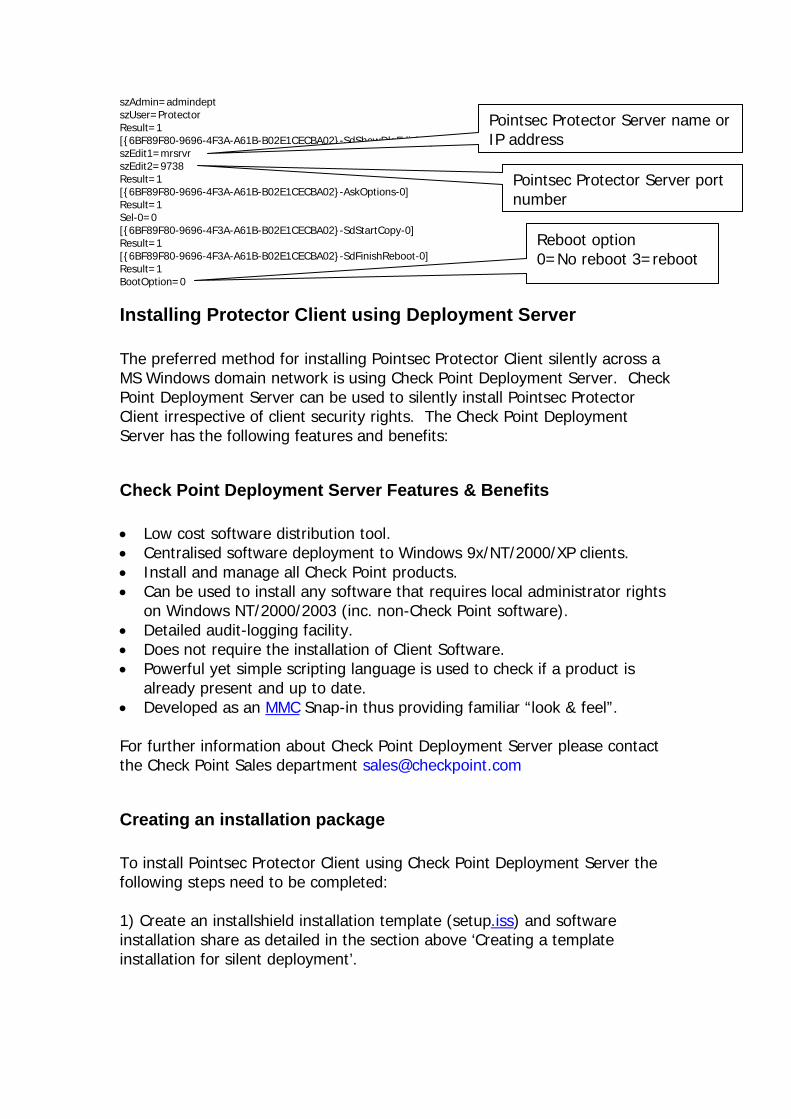
szAdmin=admindept szUser=Protector Result=1 [{6BF89F80-9696-4F3A-A61B-B02E1CECBA02}-SdShowDlgEdit2-0] szEdit1=mrsrvr szEdit2=9738 Result=1 [{6BF89F80-9696-4F3A-A61B-B02E1CECBA02}-AskOptions-0] Result=1 Sel-0=0 [{6BF89F80-9696-4F3A-A61B-B02E1CECBA02}-SdStartCopy-0] Result=1 [{6BF89F80-9696-4F3A-A61B-B02E1CECBA02}-SdFinishReboot-0] Result=1 BootOption=0
Installing Protector Client using Deployment Server The preferred method for installing Pointsec Protector Client silently across a MS Windows domain network is using Check Point Deployment Server. Check Point Deployment Server can be used to silently install Pointsec Protector Client irrespective of client security rights. The Check Point Deployment Server has the following features and benefits:
Check Point Deployment Server Features & Benefits • Low cost software distribution tool. • Centralised software deployment to Windows 9x/NT/2000/XP clients. • Install and manage all Check Point products. • Can be used to install any software that requires local administrator rights
on Windows NT/2000/2003 (inc. non-Check Point software). • Detailed audit-logging facility. • Does not require the installation of Client Software. • Powerful yet simple scripting language is used to check if a product is
already present and up to date. • Developed as an MMC Snap-in thus providing familiar “look & feel”. For further information about Check Point Deployment Server please contact the Check Point Sales department [email protected]
Creating an installation package To install Pointsec Protector Client using Check Point Deployment Server the following steps need to be completed: 1) Create an installshield installation template (setup.iss) and software installation share as detailed in the section above ‘Creating a template installation for silent deployment’.
Pointsec Protector Server name or IP address
Pointsec Protector Server port number
Reboot option 0=No reboot 3=reboot
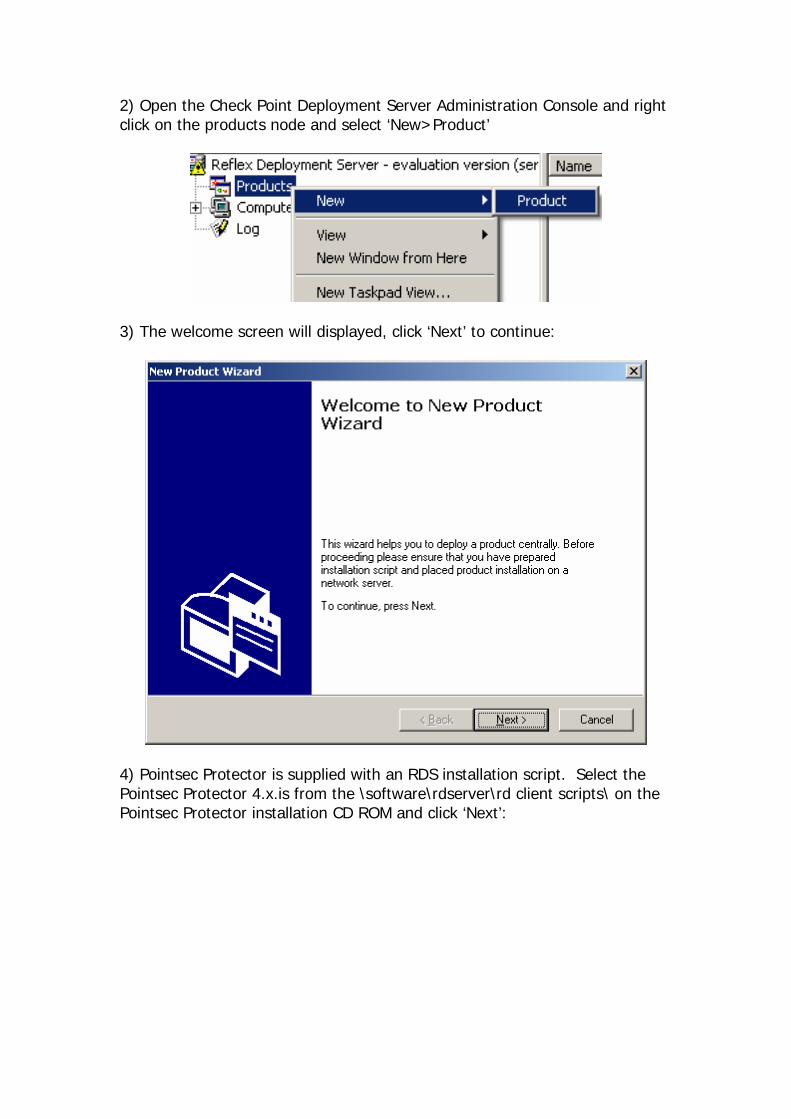
2) Open the Check Point Deployment Server Administration Console and right click on the products node and select ‘New>Product’
3) The welcome screen will displayed, click ‘Next’ to continue:
4) Pointsec Protector is supplied with an RDS installation script. Select the Pointsec Protector 4.x.is from the \software\rdserver\rd client scripts\ on the Pointsec Protector installation CD ROM and click ‘Next’:
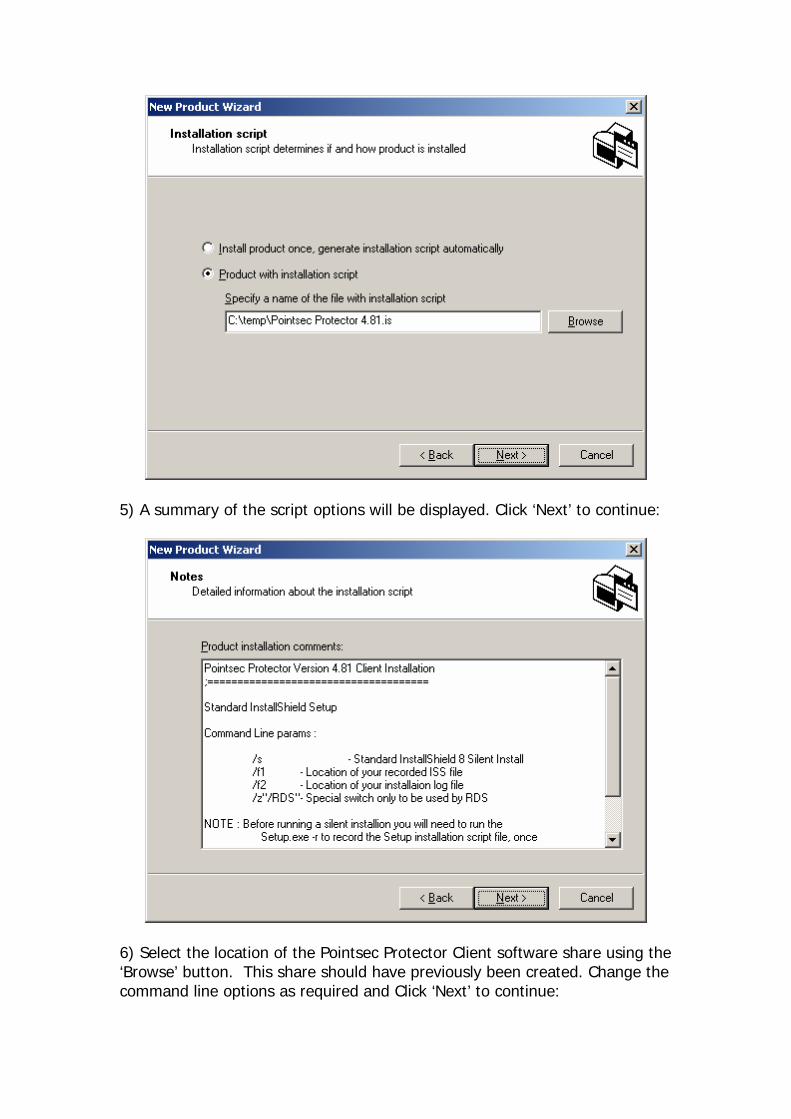
5) A summary of the script options will be displayed. Click ‘Next’ to continue:
6) Select the location of the Pointsec Protector Client software share using the ‘Browse’ button. This share should have previously been created. Change the command line options as required and Click ‘Next’ to continue:
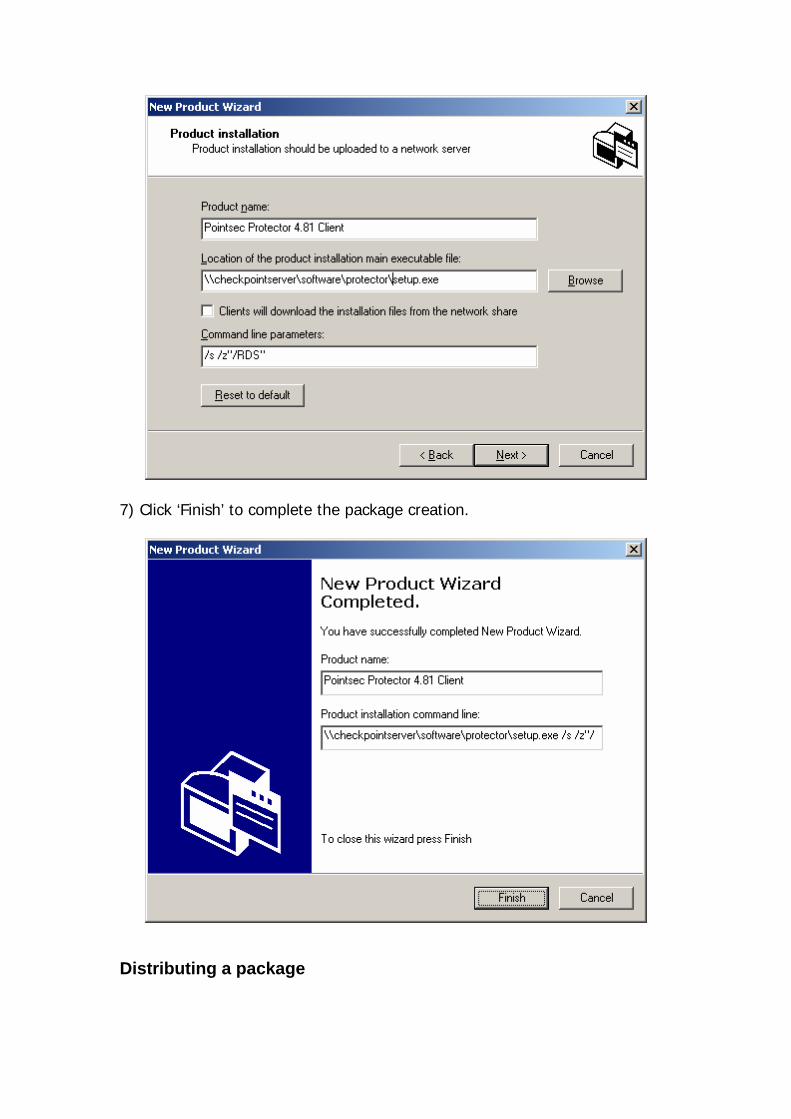
7) Click ‘Finish’ to complete the package creation.
Distributing a package
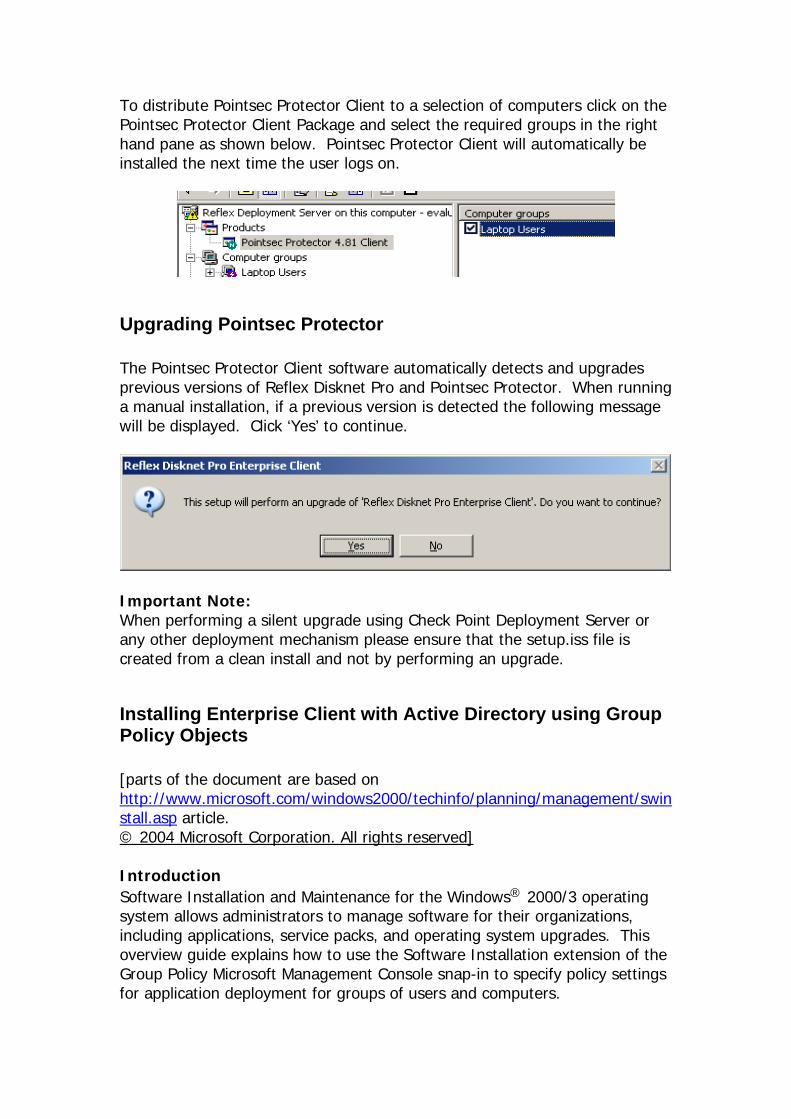
To distribute Pointsec Protector Client to a selection of computers click on the Pointsec Protector Client Package and select the required groups in the right hand pane as shown below. Pointsec Protector Client will automatically be installed the next time the user logs on.
Upgrading Pointsec Protector The Pointsec Protector Client software automatically detects and upgrades previous versions of Reflex Disknet Pro and Pointsec Protector. When running a manual installation, if a previous version is detected the following message will be displayed. Click ‘Yes’ to continue.
Important Note: When performing a silent upgrade using Check Point Deployment Server or any other deployment mechanism please ensure that the setup.iss file is created from a clean install and not by performing an upgrade.
Installing Enterprise Client with Active Directory using Group Policy Objects [parts of the document are based on http://www.microsoft.com/windows2000/techinfo/planning/management/swinstall.asp article. © 2004 Microsoft Corporation. All rights reserved] Introduction Software Installation and Maintenance for the Windows® 2000/3 operating system allows administrators to manage software for their organizations, including applications, service packs, and operating system upgrades. This overview guide explains how to use the Software Installation extension of the Group Policy Microsoft Management Console snap-in to specify policy settings for application deployment for groups of users and computers.
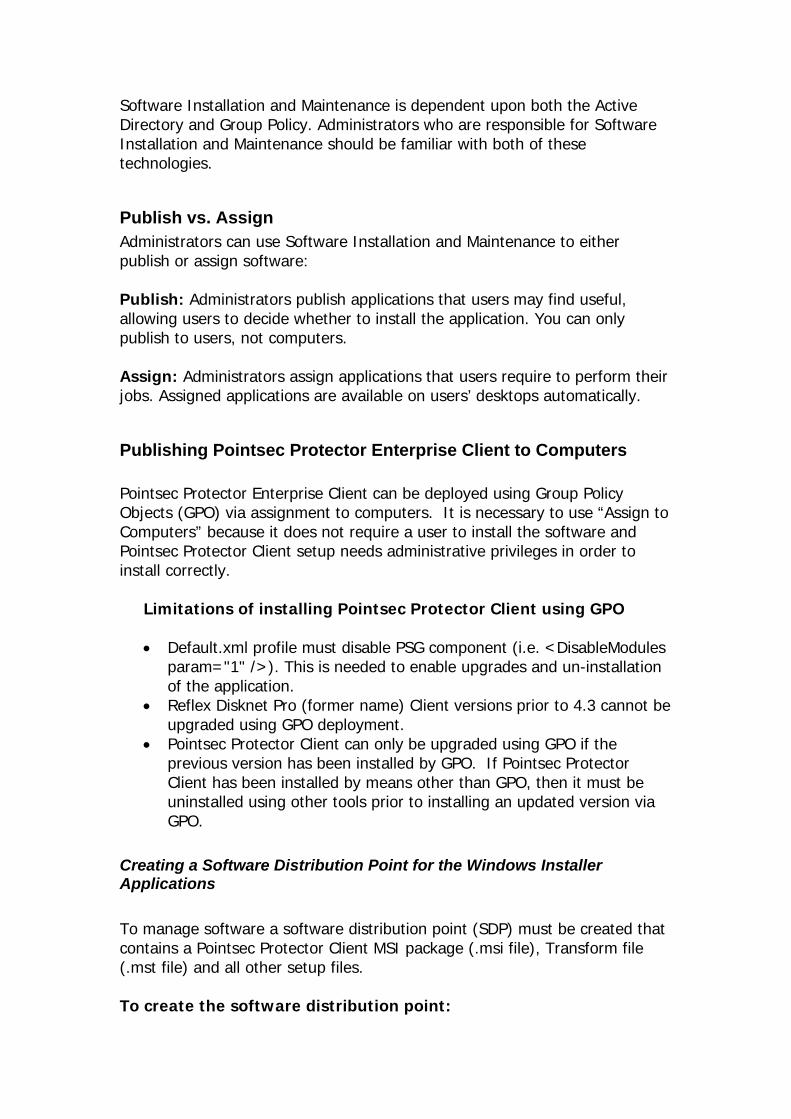
Software Installation and Maintenance is dependent upon both the Active Directory and Group Policy. Administrators who are responsible for Software Installation and Maintenance should be familiar with both of these technologies.
Publish vs. Assign Administrators can use Software Installation and Maintenance to either publish or assign software: Publish: Administrators publish applications that users may find useful, allowing users to decide whether to install the application. You can only publish to users, not computers. Assign: Administrators assign applications that users require to perform their jobs. Assigned applications are available on users’ desktops automatically.
Publishing Pointsec Protector Enterprise Client to Computers Pointsec Protector Enterprise Client can be deployed using Group Policy Objects (GPO) via assignment to computers. It is necessary to use “Assign to Computers” because it does not require a user to install the software and Pointsec Protector Client setup needs administrative privileges in order to install correctly.
Limitations of installing Pointsec Protector Client using GPO • Default.xml profile must disable PSG component (i.e. <DisableModules
param="1" />). This is needed to enable upgrades and un-installation of the application.
• Reflex Disknet Pro (former name) Client versions prior to 4.3 cannot be upgraded using GPO deployment.
• Pointsec Protector Client can only be upgraded using GPO if the previous version has been installed by GPO. If Pointsec Protector Client has been installed by means other than GPO, then it must be uninstalled using other tools prior to installing an updated version via GPO.
Creating a Software Distribution Point for the Windows Installer Applications To manage software a software distribution point (SDP) must be created that contains a Pointsec Protector Client MSI package (.msi file), Transform file (.mst file) and all other setup files. To create the software distribution point:
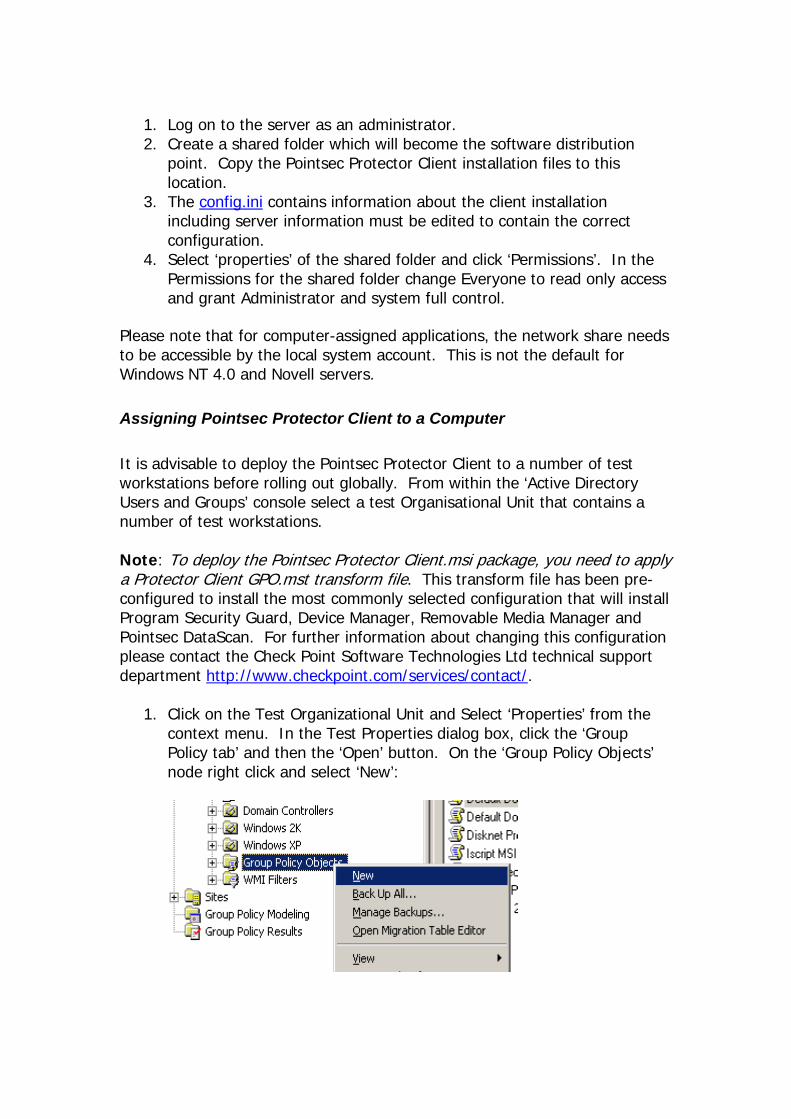
1. Log on to the server as an administrator. 2. Create a shared folder which will become the software distribution
point. Copy the Pointsec Protector Client installation files to this location.
3. The config.ini contains information about the client installation including server information must be edited to contain the correct configuration.
4. Select ‘properties’ of the shared folder and click ‘Permissions’. In the Permissions for the shared folder change Everyone to read only access and grant Administrator and system full control.
Please note that for computer-assigned applications, the network share needs to be accessible by the local system account. This is not the default for Windows NT 4.0 and Novell servers.
Assigning Pointsec Protector Client to a Computer It is advisable to deploy the Pointsec Protector Client to a number of test workstations before rolling out globally. From within the ‘Active Directory Users and Groups’ console select a test Organisational Unit that contains a number of test workstations. Note: To deploy the Pointsec Protector Client.msi package, you need to apply a Protector Client GPO.mst transform file. This transform file has been pre-configured to install the most commonly selected configuration that will install Program Security Guard, Device Manager, Removable Media Manager and Pointsec DataScan. For further information about changing this configuration please contact the Check Point Software Technologies Ltd technical support department http://www.checkpoint.com/services/contact/.
1. Click on the Test Organizational Unit and Select ‘Properties’ from the context menu. In the Test Properties dialog box, click the ‘Group Policy tab’ and then the ‘Open’ button. On the ‘Group Policy Objects’ node right click and select ‘New’:
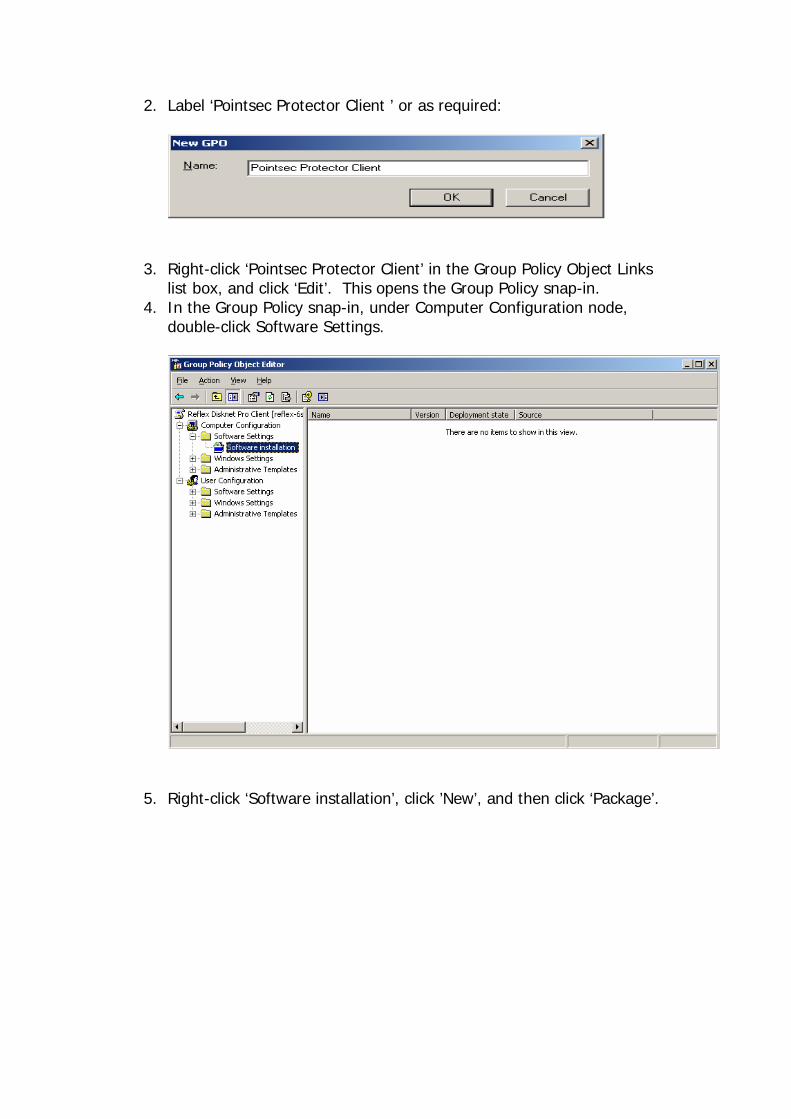
2. Label ‘Pointsec Protector Client ’ or as required:
3. Right-click ‘Pointsec Protector Client’ in the Group Policy Object Links list box, and click ‘Edit’. This opens the Group Policy snap-in.
4. In the Group Policy snap-in, under Computer Configuration node, double-click Software Settings.
5. Right-click ‘Software installation’, click ’New’, and then click ‘Package’.
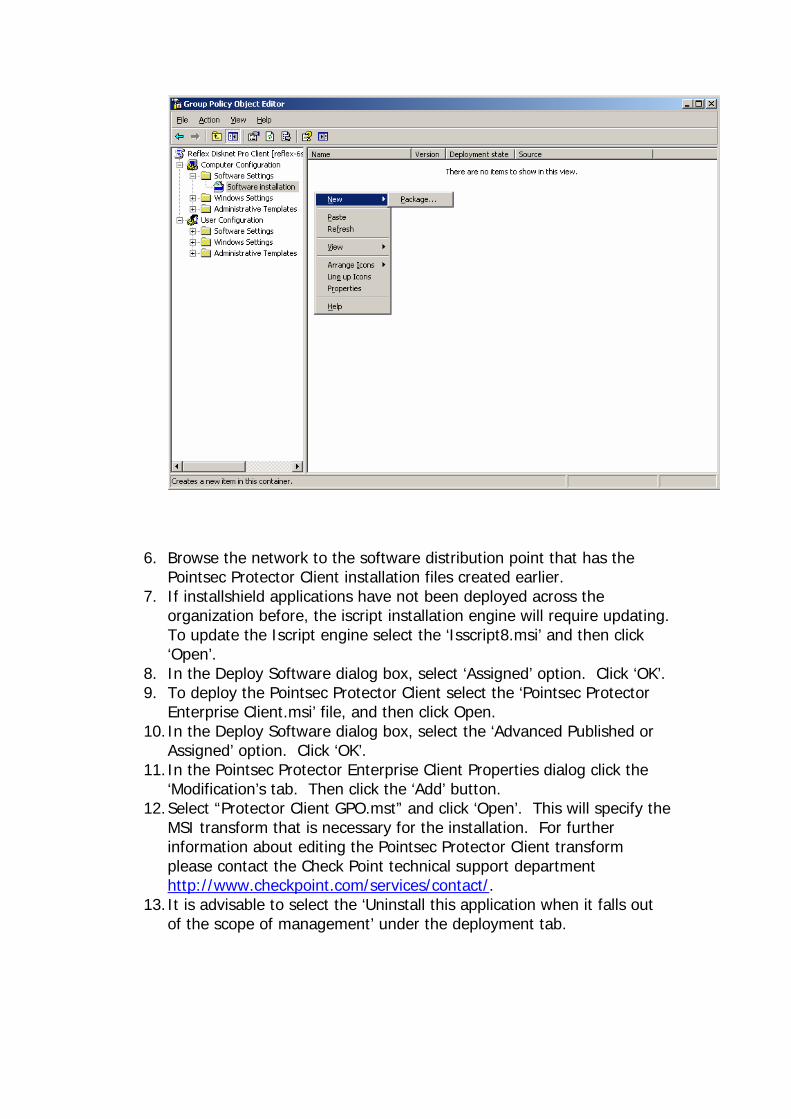
6. Browse the network to the software distribution point that has the Pointsec Protector Client installation files created earlier.
7. If installshield applications have not been deployed across the organization before, the iscript installation engine will require updating. To update the Iscript engine select the ‘Isscript8.msi’ and then click ‘Open’.
8. In the Deploy Software dialog box, select ‘Assigned’ option. Click ‘OK’. 9. To deploy the Pointsec Protector Client select the ‘Pointsec Protector
Enterprise Client.msi’ file, and then click Open. 10. In the Deploy Software dialog box, select the ‘Advanced Published or
Assigned’ option. Click ‘OK’. 11. In the Pointsec Protector Enterprise Client Properties dialog click the
‘Modification’s tab. Then click the ‘Add’ button. 12. Select “Protector Client GPO.mst” and click ‘Open’. This will specify the
MSI transform that is necessary for the installation. For further information about editing the Pointsec Protector Client transform please contact the Check Point technical support department http://www.checkpoint.com/services/contact/.
13. It is advisable to select the ‘Uninstall this application when it falls out of the scope of management’ under the deployment tab.
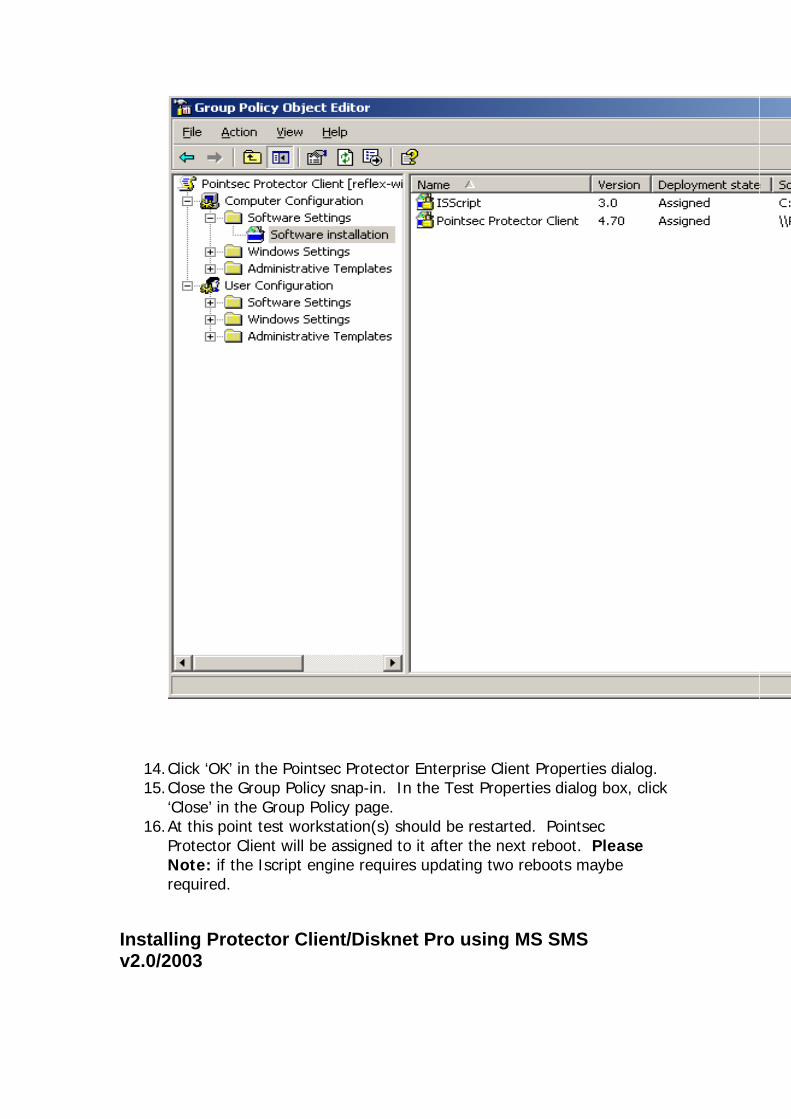
14. Click ‘OK’ in the Pointsec Protector Enterprise Client Properties dialog. 15. Close the Group Policy snap-in. In the Test Properties dialog box, click
‘Close’ in the Group Policy page. 16. At this point test workstation(s) should be restarted. Pointsec
Protector Client will be assigned to it after the next reboot. Please Note: if the Iscript engine requires updating two reboots maybe required.
Installing Protector Client/Disknet Pro using MS SMS v2.0/2003
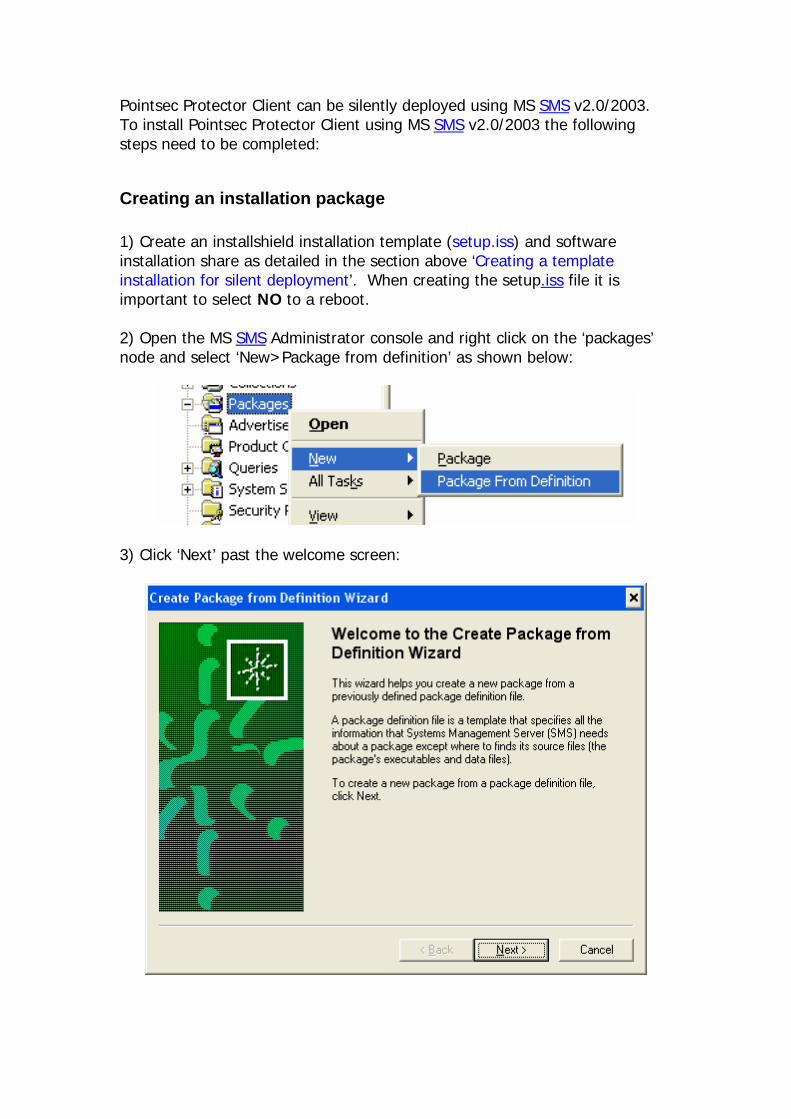
Pointsec Protector Client can be silently deployed using MS SMS v2.0/2003. To install Pointsec Protector Client using MS SMS v2.0/2003 the following steps need to be completed:
Creating an installation package 1) Create an installshield installation template (setup.iss) and software installation share as detailed in the section above ‘Creating a template installation for silent deployment’. When creating the setup.iss file it is important to select NO to a reboot. 2) Open the MS SMS Administrator console and right click on the ‘packages’ node and select ‘New>Package from definition’ as shown below:
3) Click ‘Next’ past the welcome screen:
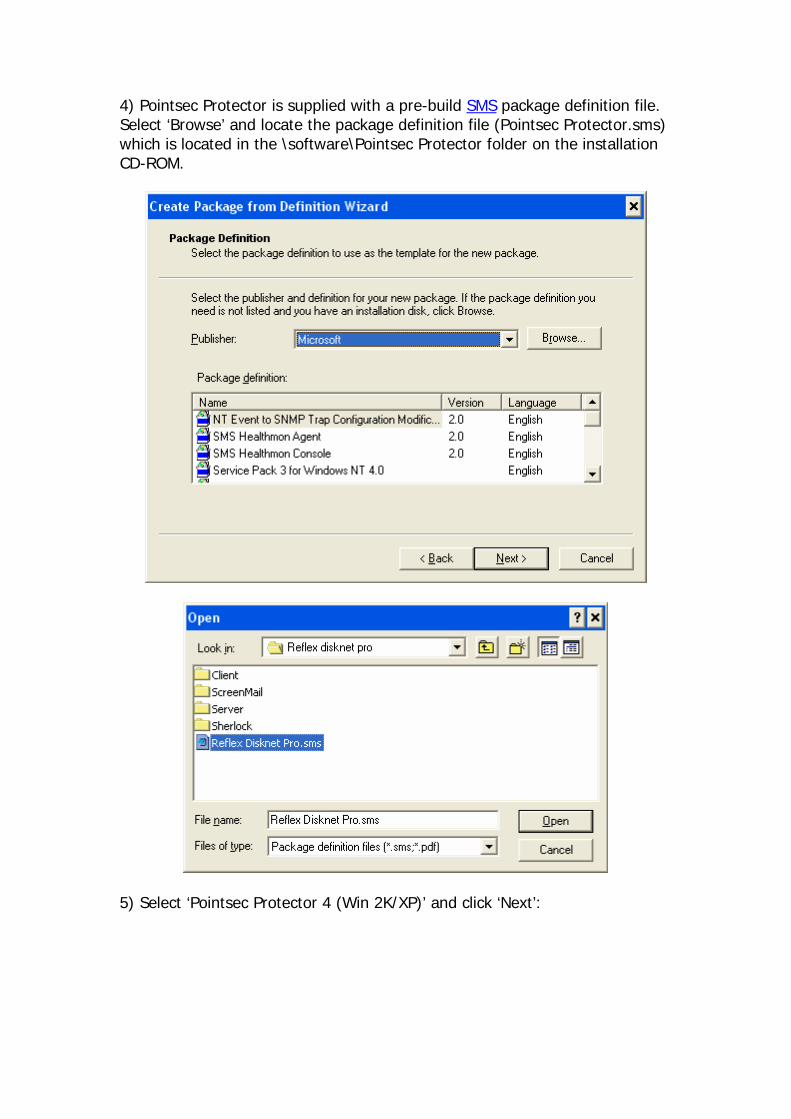
4) Pointsec Protector is supplied with a pre-build SMS package definition file. Select ‘Browse’ and locate the package definition file (Pointsec Protector.sms) which is located in the \software\Pointsec Protector folder on the installation CD-ROM.
5) Select ‘Pointsec Protector 4 (Win 2K/XP)’ and click ‘Next’:
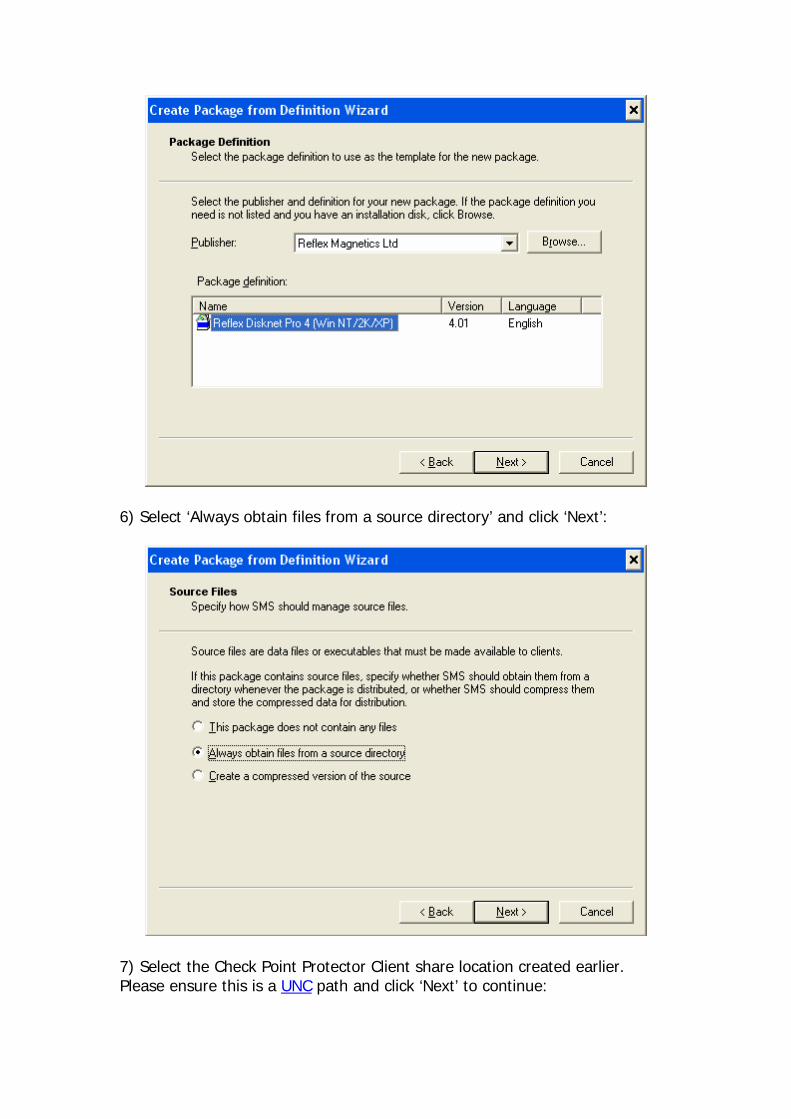
6) Select ‘Always obtain files from a source directory’ and click ‘Next’:
7) Select the Check Point Protector Client share location created earlier. Please ensure this is a UNC path and click ‘Next’ to continue:
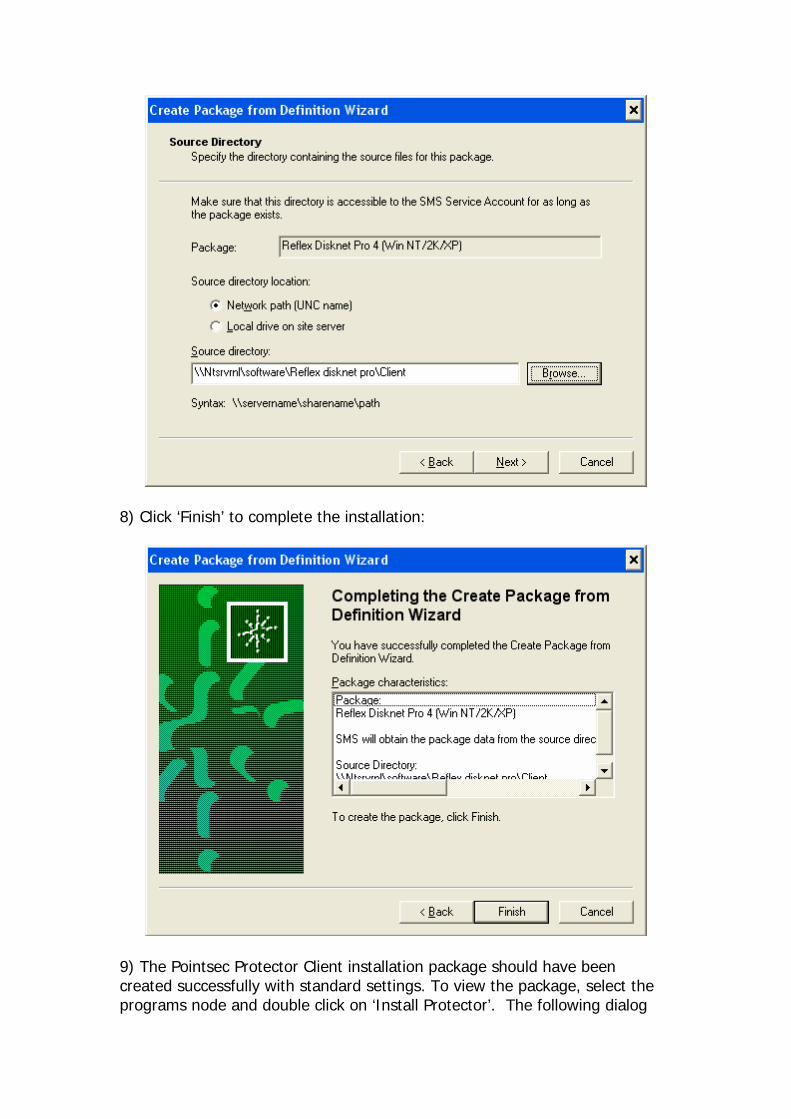
8) Click ‘Finish’ to complete the installation:
9) The Pointsec Protector Client installation package should have been created successfully with standard settings. To view the package, select the programs node and double click on ‘Install Protector’. The following dialog

will be displayed. From within this dialog it is possible to change the name of the package and command line options if required.
10) Within the requirements tab it is possible to specify the minimum spec of machine with which Pointsec Protector Client can be installed. Please configure this as required.
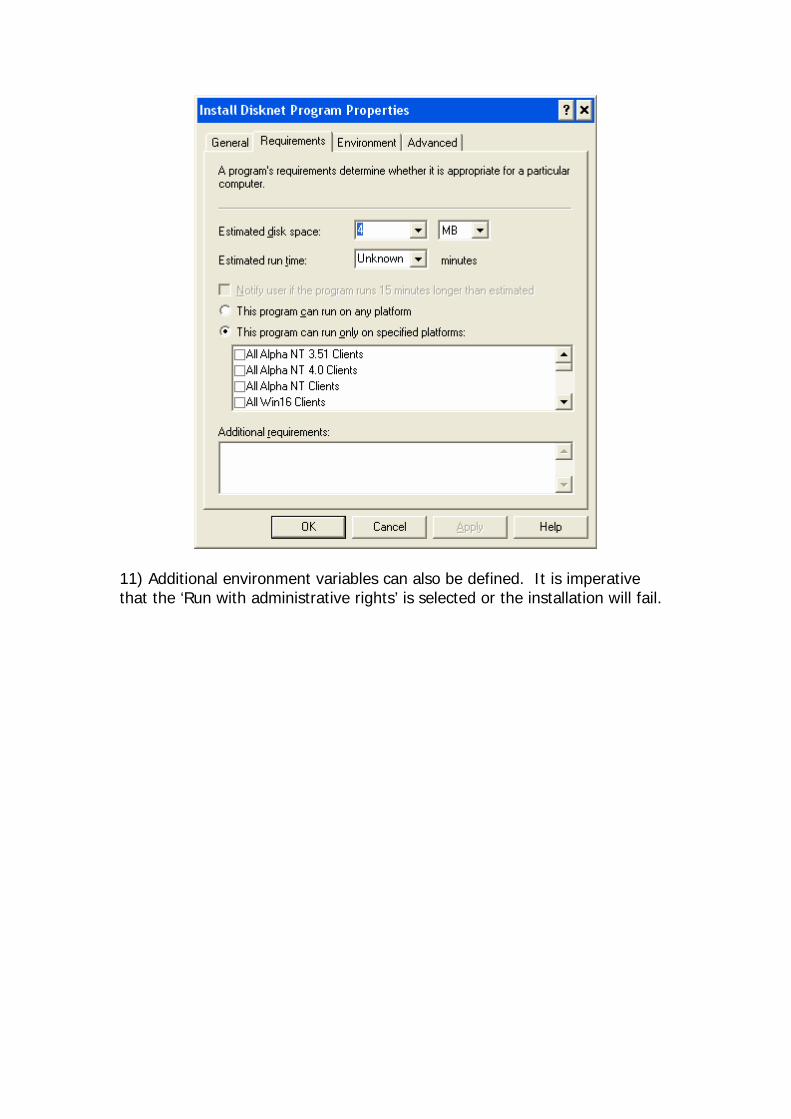
11) Additional environment variables can also be defined. It is imperative that the ‘Run with administrative rights’ is selected or the installation will fail.
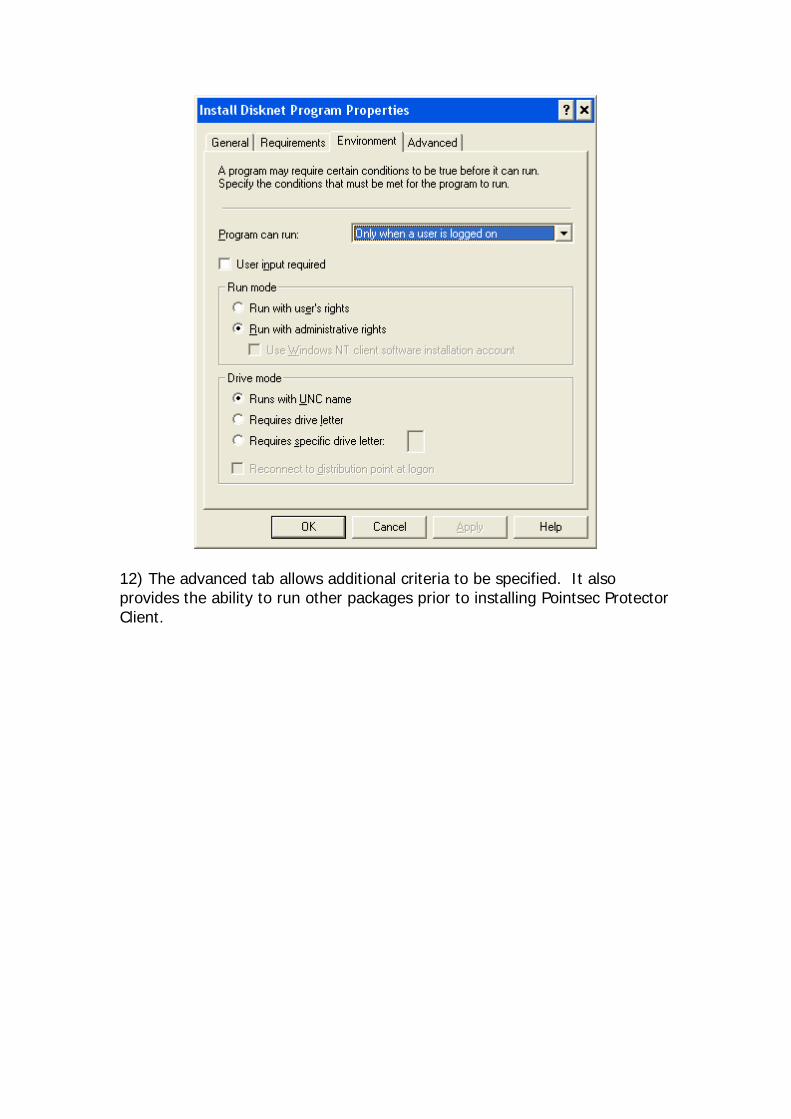
12) The advanced tab allows additional criteria to be specified. It also provides the ability to run other packages prior to installing Pointsec Protector Client.
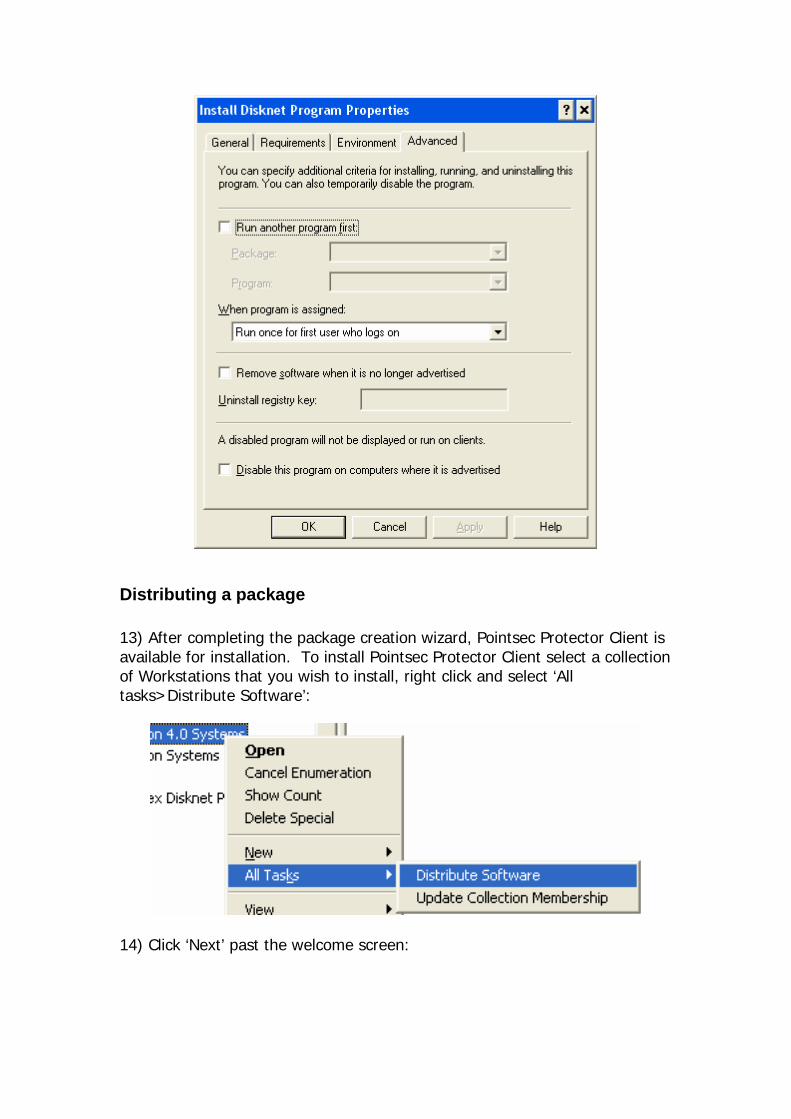
Distributing a package 13) After completing the package creation wizard, Pointsec Protector Client is available for installation. To install Pointsec Protector Client select a collection of Workstations that you wish to install, right click and select ‘All tasks>Distribute Software’:
14) Click ‘Next’ past the welcome screen:
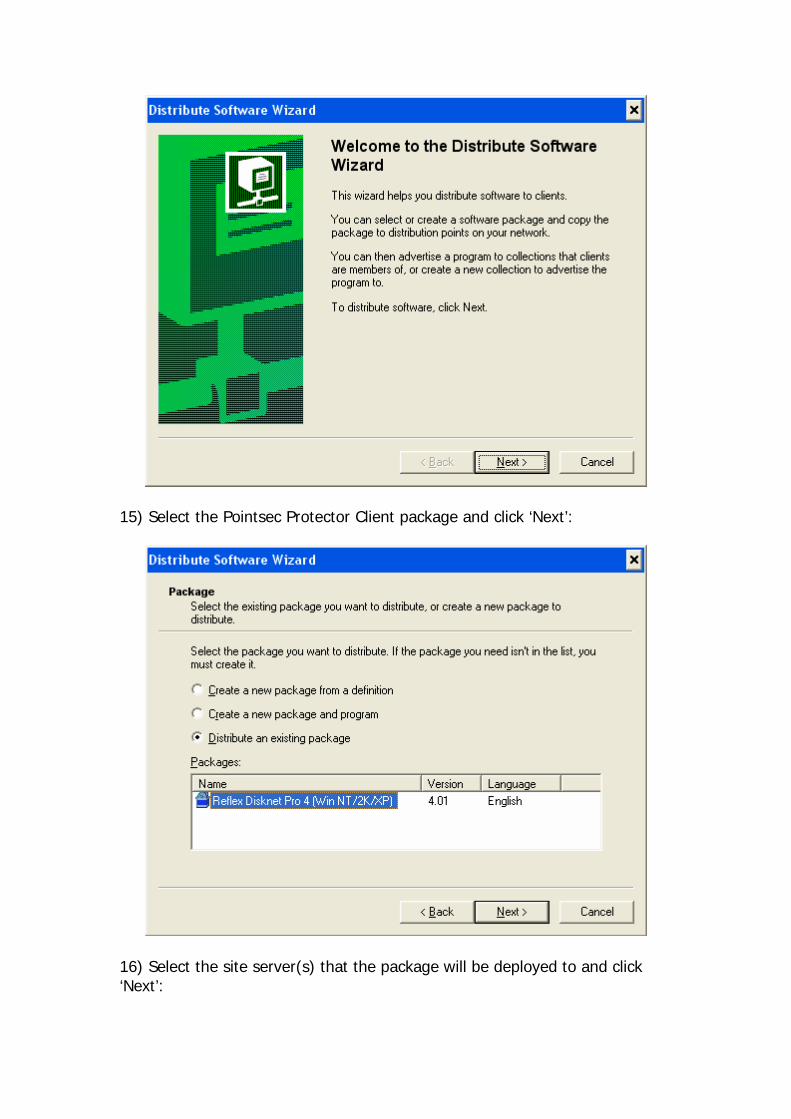
15) Select the Pointsec Protector Client package and click ‘Next’:
16) Select the site server(s) that the package will be deployed to and click ‘Next’:
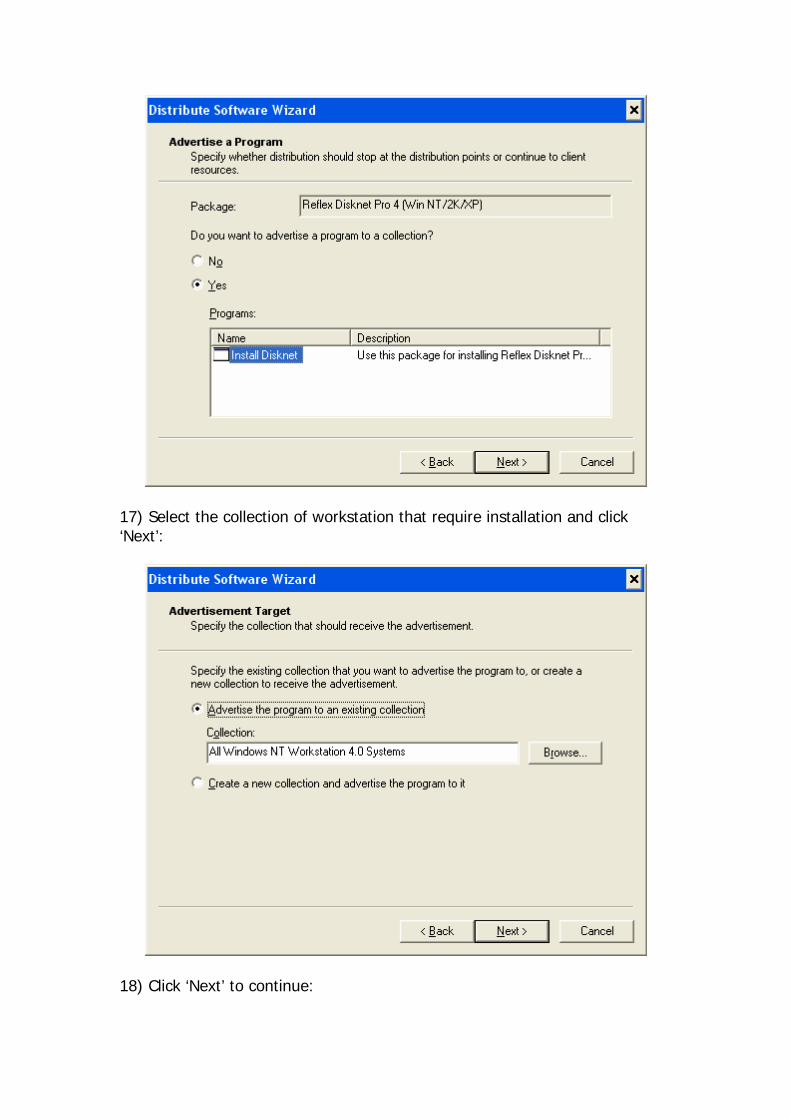
17) Select the collection of workstation that require installation and click ‘Next’:
18) Click ‘Next’ to continue:

19) Select the desired advertisement settings and click ‘Next’:
20) Select an expiry date for the advertisement and click ‘Next’:
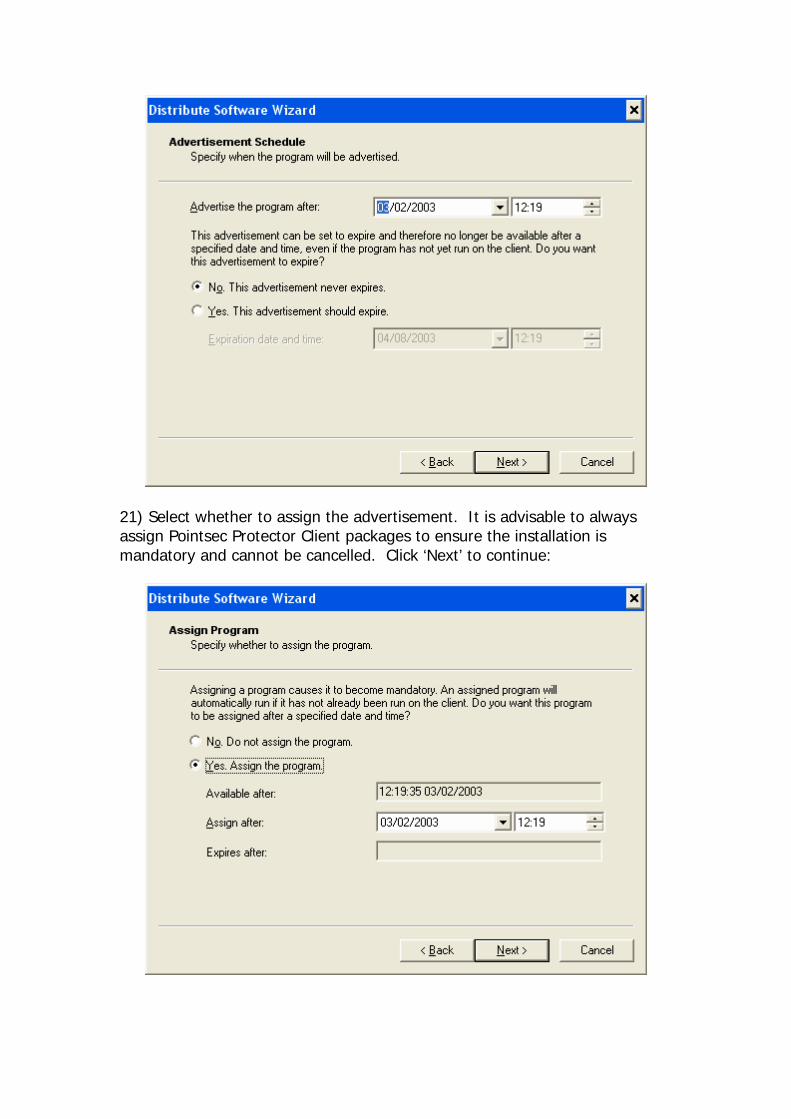
21) Select whether to assign the advertisement. It is advisable to always assign Pointsec Protector Client packages to ensure the installation is mandatory and cannot be cancelled. Click ‘Next’ to continue:
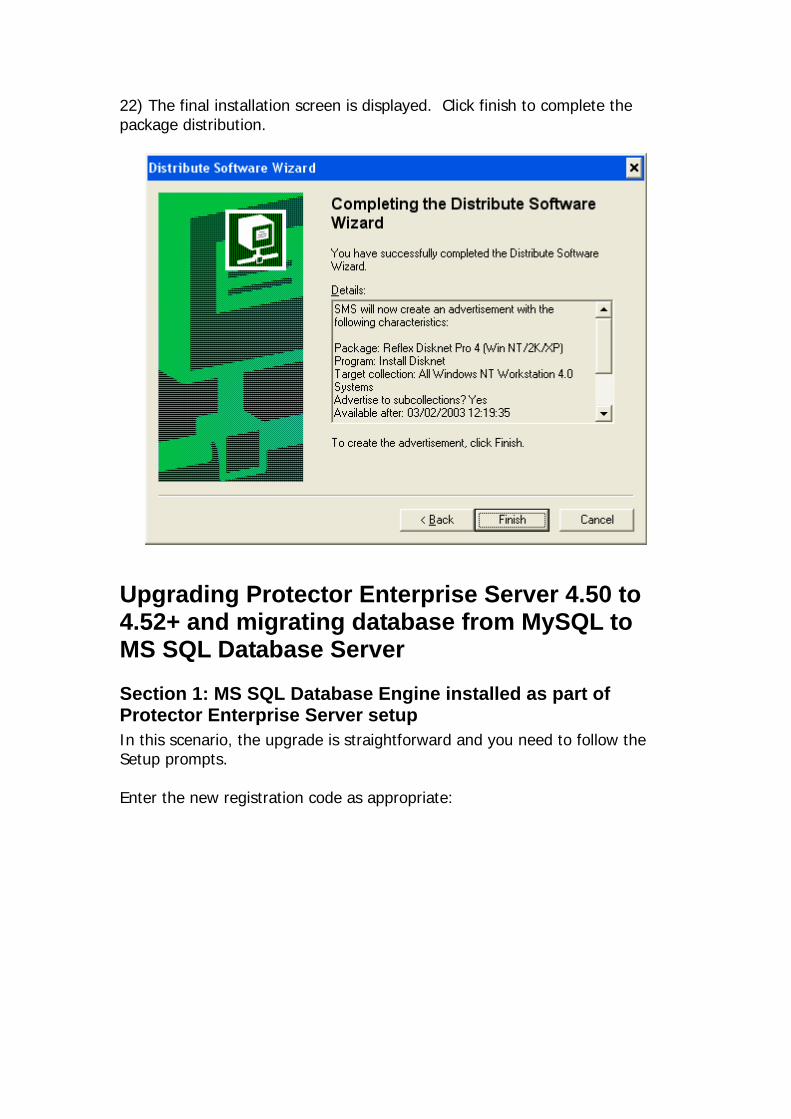
22) The final installation screen is displayed. Click finish to complete the package distribution.
Upgrading Protector Enterprise Server 4.50 to 4.52+ and migrating database from MySQL to MS SQL Database Server
Section 1: MS SQL Database Engine installed as part of Protector Enterprise Server setup In this scenario, the upgrade is straightforward and you need to follow the Setup prompts. Enter the new registration code as appropriate:
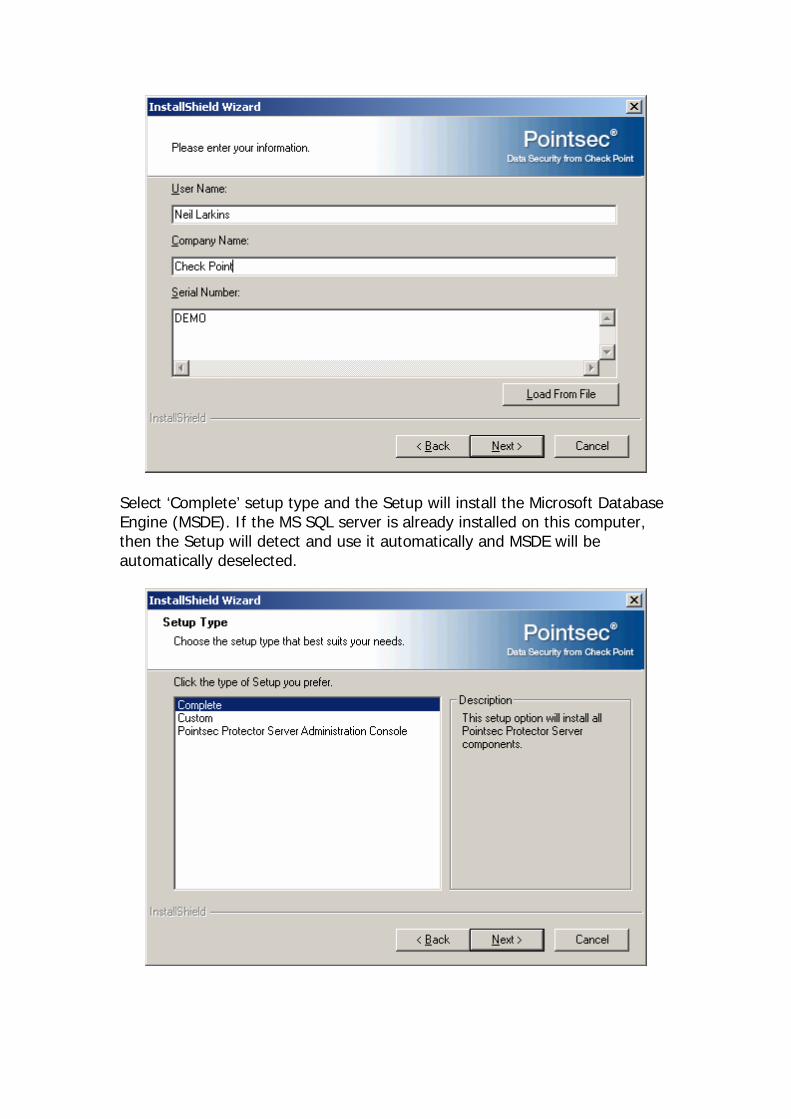
Select ‘Complete’ setup type and the Setup will install the Microsoft Database Engine (MSDE). If the MS SQL server is already installed on this computer, then the Setup will detect and use it automatically and MSDE will be automatically deselected.
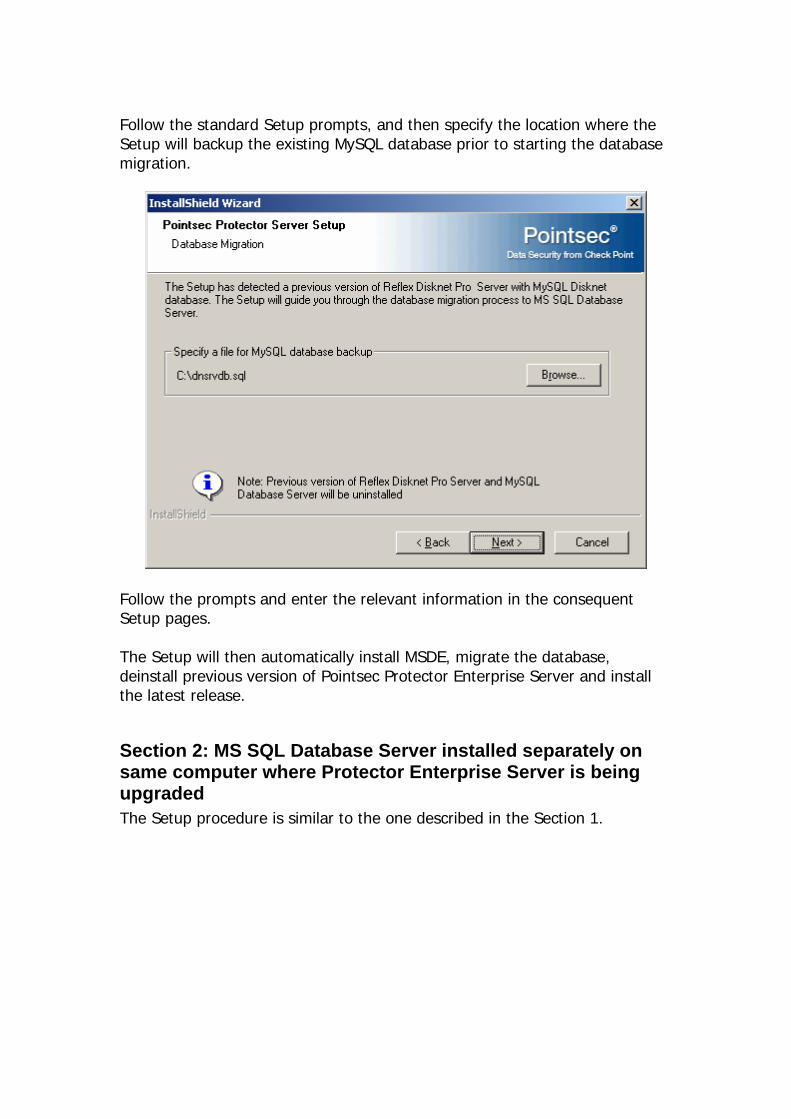
Follow the standard Setup prompts, and then specify the location where the Setup will backup the existing MySQL database prior to starting the database migration.
Follow the prompts and enter the relevant information in the consequent Setup pages. The Setup will then automatically install MSDE, migrate the database, deinstall previous version of Pointsec Protector Enterprise Server and install the latest release.
Section 2: MS SQL Database Server installed separately on same computer where Protector Enterprise Server is being upgraded The Setup procedure is similar to the one described in the Section 1.
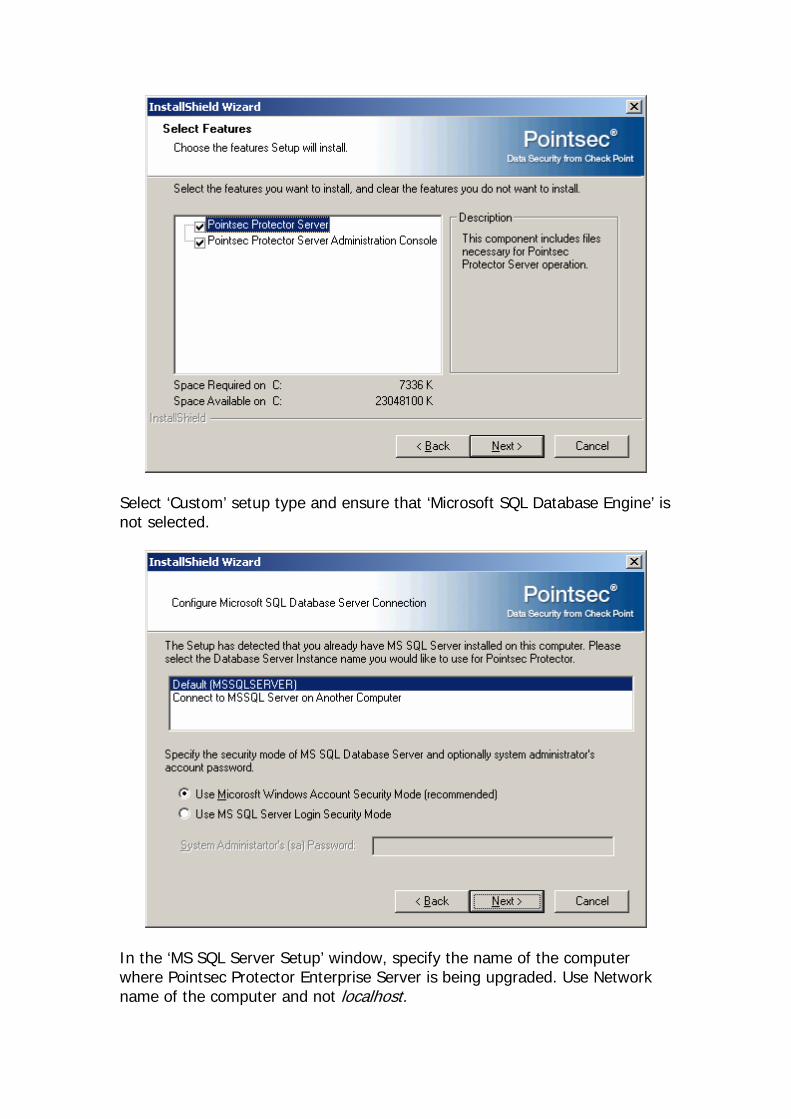
Select ‘Custom’ setup type and ensure that ‘Microsoft SQL Database Engine’ is not selected.
In the ‘MS SQL Server Setup’ window, specify the name of the computer where Pointsec Protector Enterprise Server is being upgraded. Use Network name of the computer and not localhost.
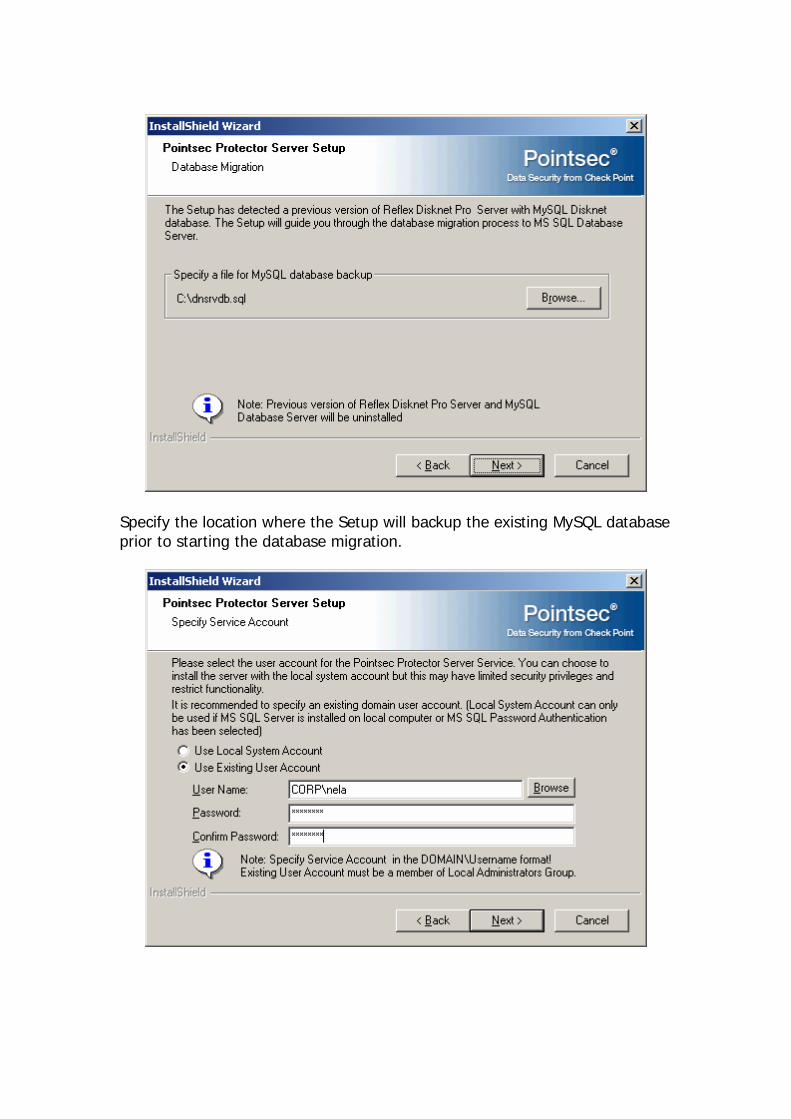
Specify the location where the Setup will backup the existing MySQL database prior to starting the database migration.
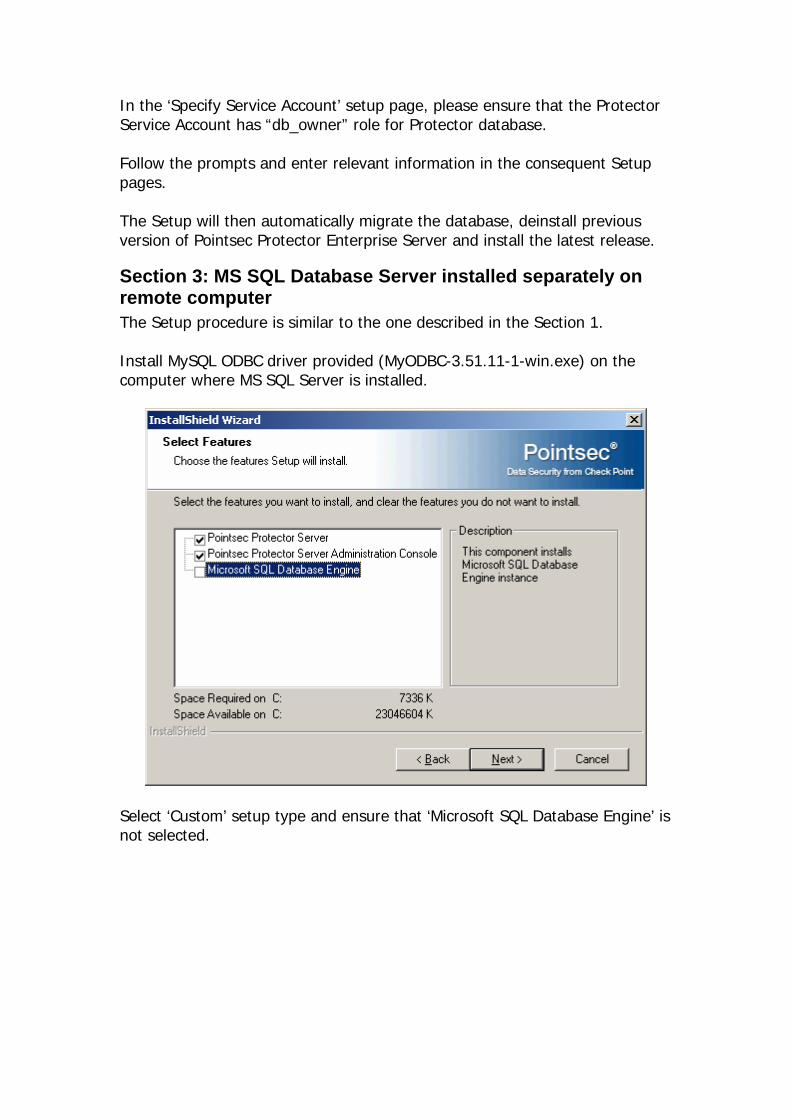
In the ‘Specify Service Account’ setup page, please ensure that the Protector Service Account has “db_owner” role for Protector database. Follow the prompts and enter relevant information in the consequent Setup pages. The Setup will then automatically migrate the database, deinstall previous version of Pointsec Protector Enterprise Server and install the latest release.
Section 3: MS SQL Database Server installed separately on remote computer The Setup procedure is similar to the one described in the Section 1. Install MySQL ODBC driver provided (MyODBC-3.51.11-1-win.exe) on the computer where MS SQL Server is installed.
Select ‘Custom’ setup type and ensure that ‘Microsoft SQL Database Engine’ is not selected.
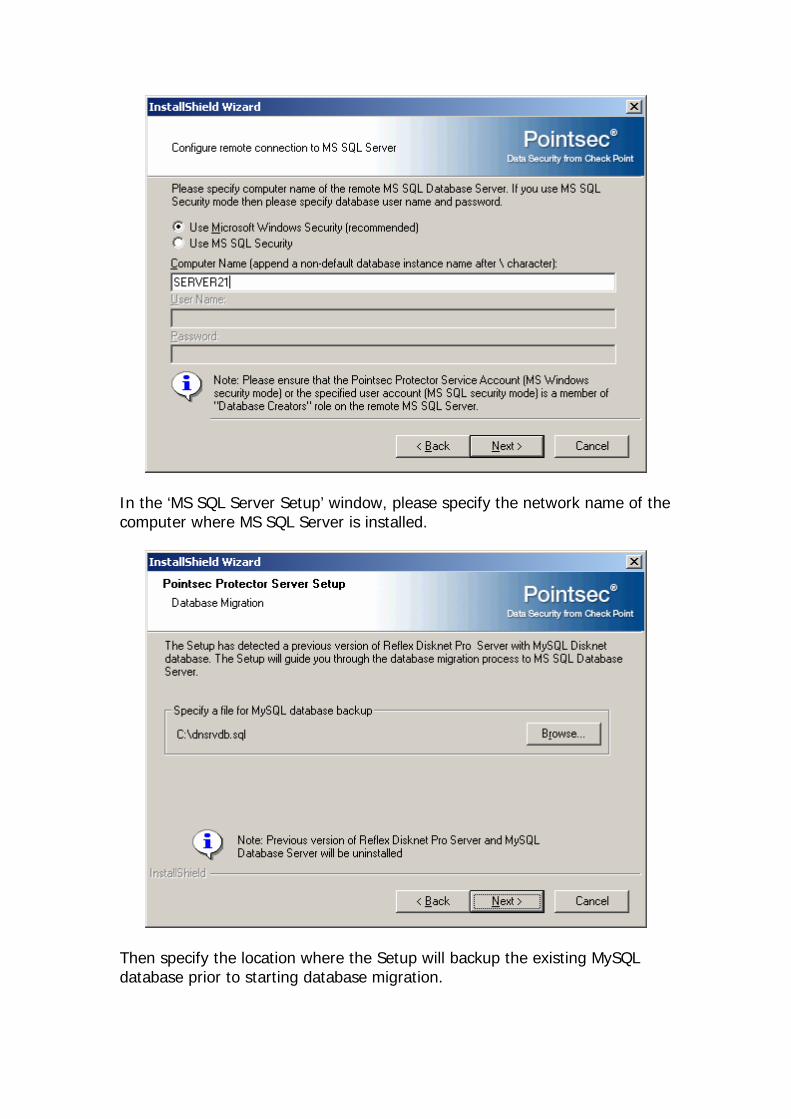
In the ‘MS SQL Server Setup’ window, please specify the network name of the computer where MS SQL Server is installed.
Then specify the location where the Setup will backup the existing MySQL database prior to starting database migration.

In the ‘Specify Service Account’ setup page, please ensure that the Protector Service Account has “db_owner” role for Protector database.
Follow the prompts and enter relevant information in the consequent Setup pages. The Setup will then automatically install onto the existing MSSQL server, migrate the database, deinstall previous versions of Pointsec Protector Enterprise Server and install the latest release.
Encryption Policy Manager Explorer
Introduction The Pointsec Protector Encryption Policy Manager (EPM) provides unrivalled security on the use of removable media storage devices. Built using industry standard AES (FIPS approved) encryption the Encryption Policy Manager is secure and transparent to the user. Pointsec Protector offers the ability to grant trusted users the facility to access encrypted removable media offline via password authentication. Previous versions of Pointsec Protector have allowed off line access providing either the complete Pointsec Protector Client or the freeware version of the Encryption Policy Manager plug-in is installed on the target machine.
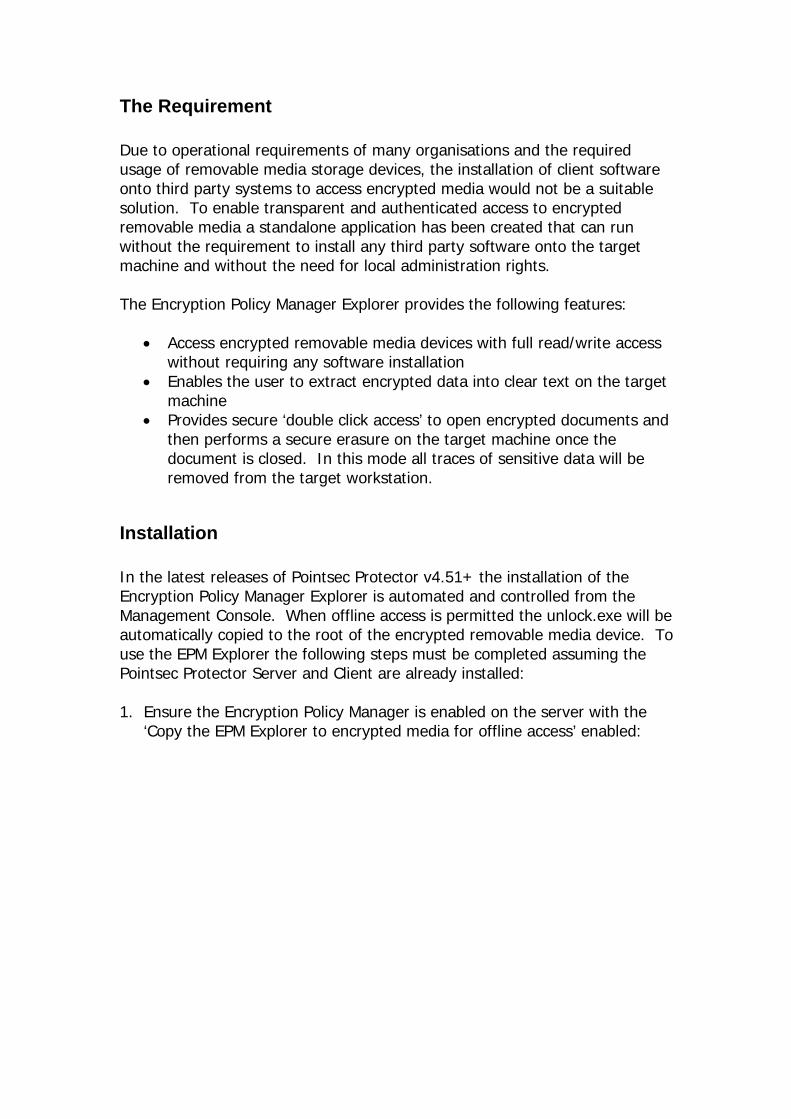
The Requirement Due to operational requirements of many organisations and the required usage of removable media storage devices, the installation of client software onto third party systems to access encrypted media would not be a suitable solution. To enable transparent and authenticated access to encrypted removable media a standalone application has been created that can run without the requirement to install any third party software onto the target machine and without the need for local administration rights. The Encryption Policy Manager Explorer provides the following features:
• Access encrypted removable media devices with full read/write access without requiring any software installation
• Enables the user to extract encrypted data into clear text on the target machine
• Provides secure ‘double click access’ to open encrypted documents and then performs a secure erasure on the target machine once the document is closed. In this mode all traces of sensitive data will be removed from the target workstation.
Installation In the latest releases of Pointsec Protector v4.51+ the installation of the Encryption Policy Manager Explorer is automated and controlled from the Management Console. When offline access is permitted the unlock.exe will be automatically copied to the root of the encrypted removable media device. To use the EPM Explorer the following steps must be completed assuming the Pointsec Protector Server and Client are already installed: 1. Ensure the Encryption Policy Manager is enabled on the server with the
‘Copy the EPM Explorer to encrypted media for offline access’ enabled:

2. On the Pointsec Protector client workstation insert a clear text memory stick and complete the encryption import wizard ensuring a password is selected:

The memory stick is now encrypted and secured ready for use. 3. On inserting the encrypted memory into a machine not running Pointsec
Protector the following files will be displayed. The unlock.exe is automatically copied to the root of the memory stick as shown below:
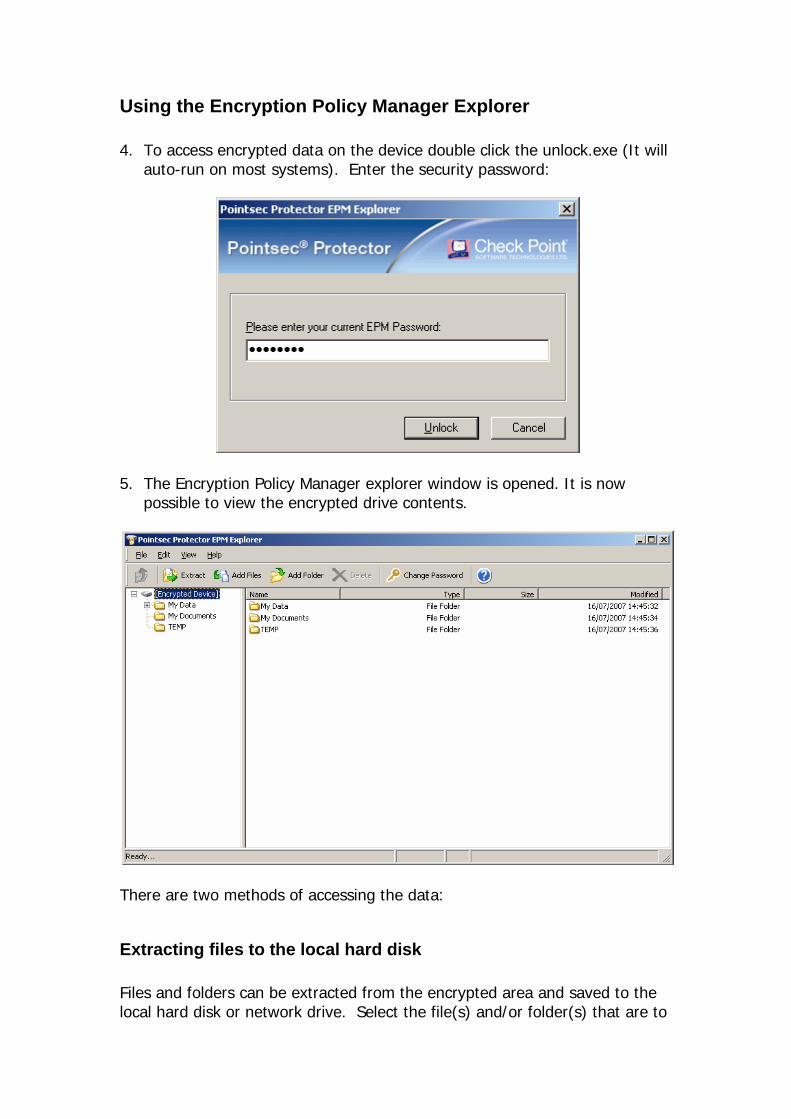
Using the Encryption Policy Manager Explorer 4. To access encrypted data on the device double click the unlock.exe (It will
auto-run on most systems). Enter the security password:
5. The Encryption Policy Manager explorer window is opened. It is now possible to view the encrypted drive contents.
There are two methods of accessing the data:
Extracting files to the local hard disk Files and folders can be extracted from the encrypted area and saved to the local hard disk or network drive. Select the file(s) and/or folder(s) that are to
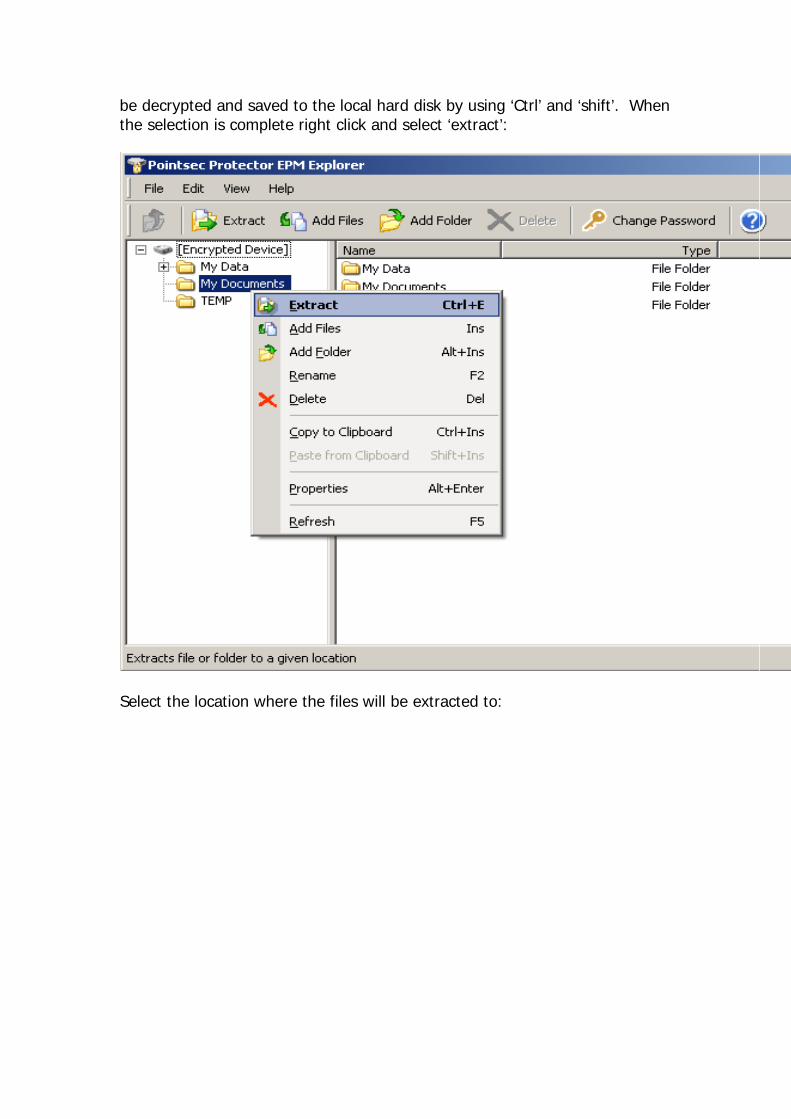
be decrypted and saved to the local hard disk by using ‘Ctrl’ and ‘shift’. When the selection is complete right click and select ‘extract’:
Select the location where the files will be extracted to:

The files are now decrypted and saved in clear text on the local workstation. On closing the EPM Explorer the user will be asked if they wish to securely delete all of the extracted files. By Clicking ‘Yes’ all of the newly extracted files will be securely deleted thus leaving no traces of sensitive information:
Double Click Secure File Extraction By double clicking on a selected file within the drive explorer, the EPM Explorer transparently decrypts the file to a temporary location and then automatically opens the file with the associated application. To view a file in secure mode simply double click on the required file:

If any changes are made to the decrypted file, the following prompt will be displayed asking whether the encrypted file within the device should be updated. Click ‘Yes’ as required.
Drag & Drop/Copy & Paste of files Once the EPM Explorer Window is unlocked it is possible to drag & drop or copy & paste files in and out of the encrypted device.
Note: For further information and an example user guide please see the ‘Pointsec Protector User Guide.pdf’ located on the Pointsec Protector installation CD.
Pointsec DataScan
About Pointsec DataScan
Pointsec DataScan v3.13 Copyright © Check Point Software Technologies Ltd 1996 – 2007 Online Help v1.2 Operating Systems: Microsoft Windows 2000/XP Published: July 2007 All rights reserved. This software is sold subject to license. All use of this software is subject to the terms & conditions of Check Point Software Technologies Ltd. Copyright infringement may give rise to civil and/or criminal liability. Check Point welcomes your questions, comments and suggestions. Check Point Software Technologies Ltd. 31-33 Priory Park Road London NW6 7HP United Kingdom Tel: +44 (0)20 7372 6666 Fax: +44 (0)20 7372 2507 Email: [email protected]
Web: www.CheckPoint.com Other Offices: Australia, Benelux, Canada, Italy, Middle East, South Africa, USA.
Online help written by: Check Point Software Technologies Ltd
Introduction ‘Pointsec DataScan’ (herein referred to as DataScan) is the new name for Check Point’ data scanner previously known as ‘Check Point CheckDat’. It differs from a virus scanner in that it won’t ‘pass’ any files with executable code; whereas a virus scanner will ‘pass’ executable files only if they are not infected with a virus. Pointsec Protector Administrators can therefore install DataScan on their users’ machines, safe in the knowledge that any media being signatured when scanned by DataScan is not only virus-free, but are also free of any executable binary files or software such as games.
What is new in version 3 XML Data File DataScan has a new XML data file containing the file definitions (XML is a mark-up language for documents containing structured information). The previous store for file binary information was a raw hex data file. However, by now using XML the source is open and easy to understand for all who use and may need to amend this file to better suit their requirements. Please refer to ‘Understanding the XML script’ in the DataScan help guide to acquire further information. Pointsec Protector Server logging DataScan has always had its own log file options, but the new Pointsec Protector Server module will not only generically log the results of all third party scans of media with virus scanners, it will further log the exact file(s) preventing media from being authorised when scanned. DataScan is one of these products and is provided as part of the Pointsec Protector suite.
Installing Pointsec DataScan Pointsec DataScan cannot be installed as a standalone Check Point product, it is only offered as a sub option of the Pointsec Protector suite. Using Pointsec DataScan If installed as part of the Pointsec Protector suite, the ‘Pointsec DataScan’ will be offered as one of the scanners by which a user can authorise media, though it will fail all executable files, not just infected ones. There are several DataScan command line options to refine your level of detection as detailed in the command line parameter section. This gives exact details of how to call DataScan to operate as desired. A general overview of its functionality is detailed in the next section named ‘Functionality’.
Functionality Unzipping ZIP files ZIP files are automatically expanded and their contents examined for executable/unauthorised code. If not specified, any ZIP files will automatically fail a DataScan scan as their content is obviously unknown. If they are investigated and found to be free of executables, they will pass the scanning process and a disk that might otherwise have failed a DataScan scan will be authorised.
MS Office Macros DataScan can be configured to fail all macros, (by default) or just viral macros when performing a scan.
MS Outlook files Any MS Outlook messages that are saved to a media device can be scanned for attachments with executable code. No matter how deep the executable code is buried, DataScan will find it. For example, if someone were to attach an executable to an email, send it to themselves, save this message to their hard disk, place this message in a zip file, which they then sent to themselves again and saved once again to hard disk, then DataScan would fail the resulting file if scanned. No matter how complicated the paper trail, DataScan will unearth the executable code.
Log file If specified, a log file will be produced from the DataScan scan. If this scan then results in a failure, the offending file(s) can be identified and appropriate action taken in order for the media to be signatured and therefore authorised access past the DataScan security wall. This saves any guesswork on the part of the user as to what files are preventing the disk being authorised. i.e. assumed file deletions and unnecessary aggravation.
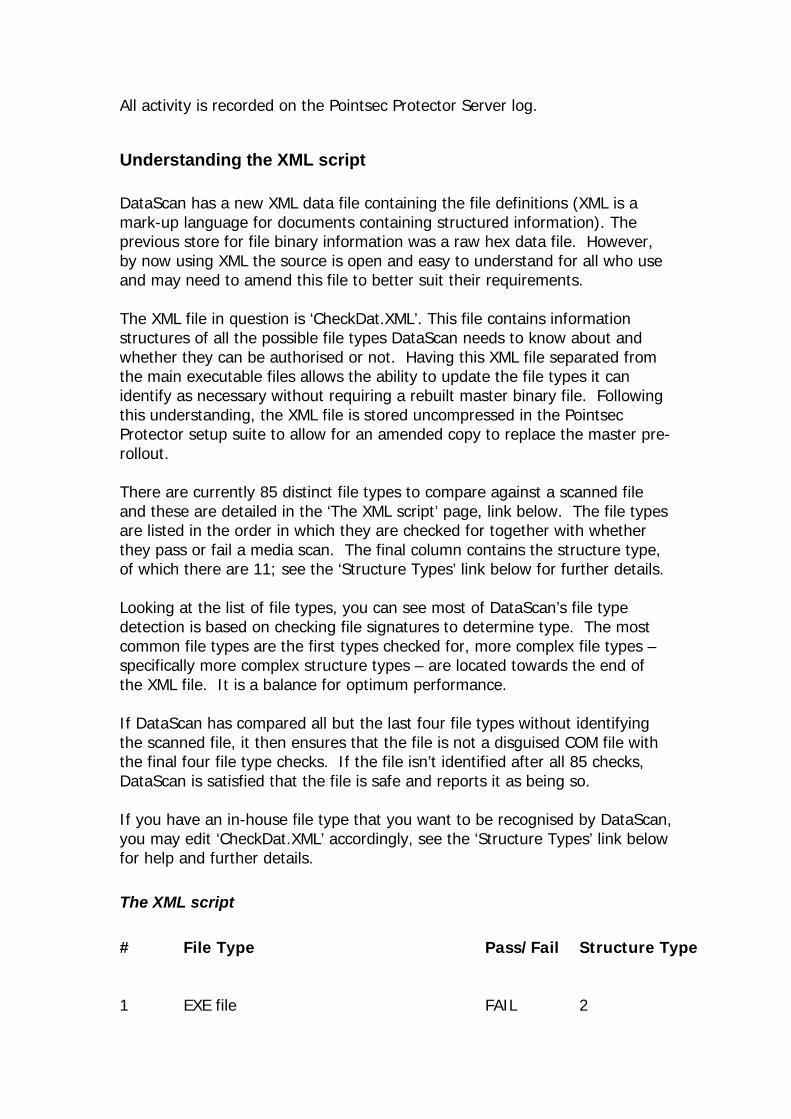
All activity is recorded on the Pointsec Protector Server log.
Understanding the XML script DataScan has a new XML data file containing the file definitions (XML is a mark-up language for documents containing structured information). The previous store for file binary information was a raw hex data file. However, by now using XML the source is open and easy to understand for all who use and may need to amend this file to better suit their requirements. The XML file in question is ‘CheckDat.XML’. This file contains information structures of all the possible file types DataScan needs to know about and whether they can be authorised or not. Having this XML file separated from the main executable files allows the ability to update the file types it can identify as necessary without requiring a rebuilt master binary file. Following this understanding, the XML file is stored uncompressed in the Pointsec Protector setup suite to allow for an amended copy to replace the master pre-rollout. There are currently 85 distinct file types to compare against a scanned file and these are detailed in the ‘The XML script’ page, link below. The file types are listed in the order in which they are checked for together with whether they pass or fail a media scan. The final column contains the structure type, of which there are 11; see the ‘Structure Types’ link below for further details. Looking at the list of file types, you can see most of DataScan’s file type detection is based on checking file signatures to determine type. The most common file types are the first types checked for, more complex file types – specifically more complex structure types – are located towards the end of the XML file. It is a balance for optimum performance. If DataScan has compared all but the last four file types without identifying the scanned file, it then ensures that the file is not a disguised COM file with the final four file type checks. If the file isn’t identified after all 85 checks, DataScan is satisfied that the file is safe and reports it as being so. If you have an in-house file type that you want to be recognised by DataScan, you may edit ‘CheckDat.XML’ accordingly, see the ‘Structure Types’ link below for help and further details.
The XML script # File Type Pass/Fail Structure Type 1 EXE file FAIL 2
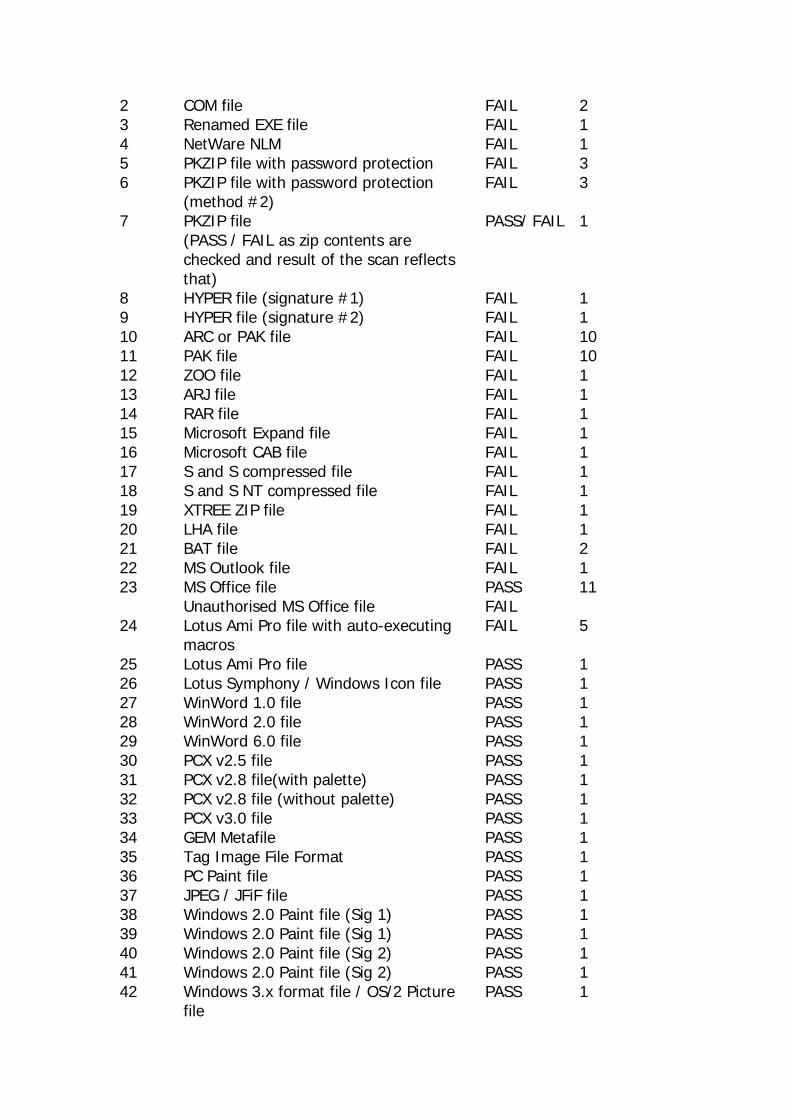
2 COM file FAIL 2 3 Renamed EXE file FAIL 1 4 NetWare NLM FAIL 1 5 PKZIP file with password protection FAIL 3 6 PKZIP file with password protection
(method #2) FAIL 3
7 PKZIP file (PASS / FAIL as zip contents are checked and result of the scan reflects that)
PASS/ FAIL 1
8 HYPER file (signature #1) FAIL 1 9 HYPER file (signature #2) FAIL 1 10 ARC or PAK file FAIL 10 11 PAK file FAIL 10 12 ZOO file FAIL 1 13 ARJ file FAIL 1 14 RAR file FAIL 1 15 Microsoft Expand file FAIL 1 16 Microsoft CAB file FAIL 1 17 S and S compressed file FAIL 1 18 S and S NT compressed file FAIL 1 19 XTREE ZIP file FAIL 1 20 LHA file FAIL 1 21 BAT file FAIL 2 22 MS Outlook file FAIL 1 23 MS Office file
Unauthorised MS Office file PASS FAIL
11
24 Lotus Ami Pro file with auto-executing macros
FAIL 5
25 Lotus Ami Pro file PASS 1 26 Lotus Symphony / Windows Icon file PASS 1 27 WinWord 1.0 file PASS 1 28 WinWord 2.0 file PASS 1 29 WinWord 6.0 file PASS 1 30 PCX v2.5 file PASS 1 31 PCX v2.8 file(with palette) PASS 1 32 PCX v2.8 file (without palette) PASS 1 33 PCX v3.0 file PASS 1 34 GEM Metafile PASS 1 35 Tag Image File Format PASS 1 36 PC Paint file PASS 1 37 JPEG / JFiF file PASS 1 38 Windows 2.0 Paint file (Sig 1) PASS 1 39 Windows 2.0 Paint file (Sig 1) PASS 1 40 Windows 2.0 Paint file (Sig 2) PASS 1 41 Windows 2.0 Paint file (Sig 2) PASS 1 42 Windows 3.x format file / OS/2 Picture
file PASS 1
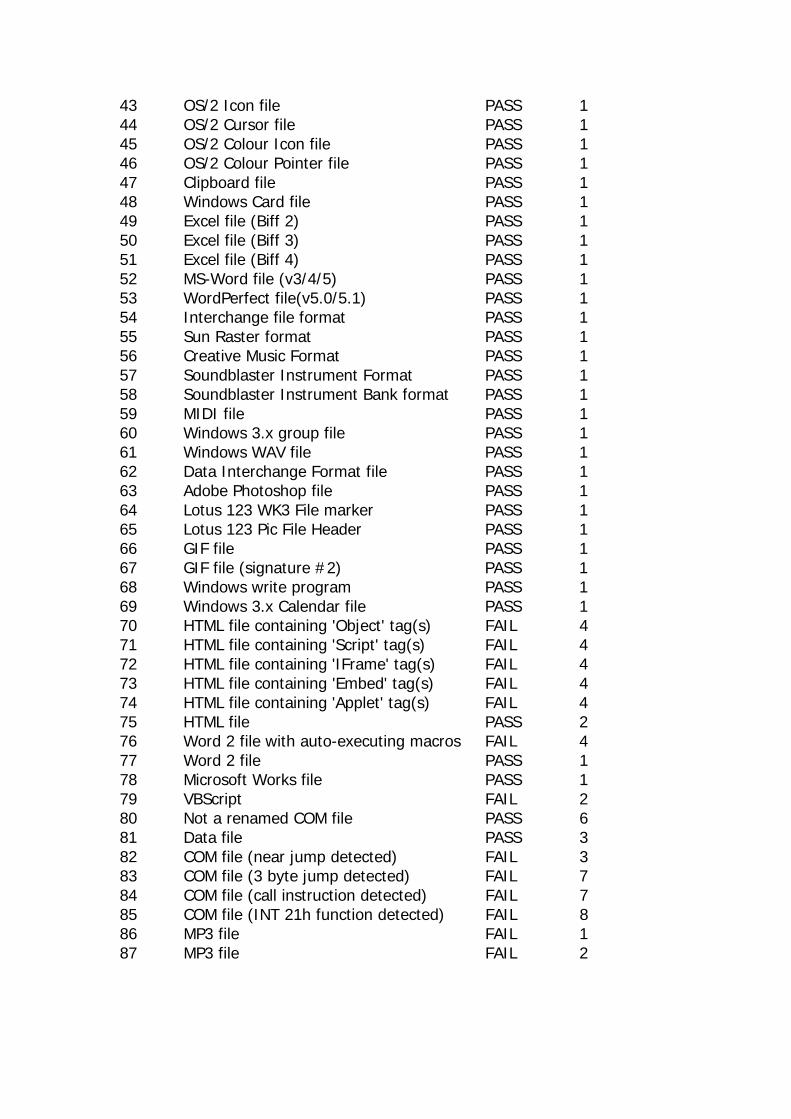
43 OS/2 Icon file PASS 1 44 OS/2 Cursor file PASS 1 45 OS/2 Colour Icon file PASS 1 46 OS/2 Colour Pointer file PASS 1 47 Clipboard file PASS 1 48 Windows Card file PASS 1 49 Excel file (Biff 2) PASS 1 50 Excel file (Biff 3) PASS 1 51 Excel file (Biff 4) PASS 1 52 MS-Word file (v3/4/5) PASS 1 53 WordPerfect file(v5.0/5.1) PASS 1 54 Interchange file format PASS 1 55 Sun Raster format PASS 1 56 Creative Music Format PASS 1 57 Soundblaster Instrument Format PASS 1 58 Soundblaster Instrument Bank format PASS 1 59 MIDI file PASS 1 60 Windows 3.x group file PASS 1 61 Windows WAV file PASS 1 62 Data Interchange Format file PASS 1 63 Adobe Photoshop file PASS 1 64 Lotus 123 WK3 File marker PASS 1 65 Lotus 123 Pic File Header PASS 1 66 GIF file PASS 1 67 GIF file (signature #2) PASS 1 68 Windows write program PASS 1 69 Windows 3.x Calendar file PASS 1 70 HTML file containing 'Object' tag(s) FAIL 4 71 HTML file containing 'Script' tag(s) FAIL 4 72 HTML file containing 'IFrame' tag(s) FAIL 4 73 HTML file containing 'Embed' tag(s) FAIL 4 74 HTML file containing 'Applet' tag(s) FAIL 4 75 HTML file PASS 2 76 Word 2 file with auto-executing macros FAIL 4 77 Word 2 file PASS 1 78 Microsoft Works file PASS 1 79 VBScript FAIL 2 80 Not a renamed COM file PASS 6 81 Data file PASS 3 82 COM file (near jump detected) FAIL 3 83 COM file (3 byte jump detected) FAIL 7 84 COM file (call instruction detected) FAIL 7 85 COM file (INT 21h function detected) FAIL 8 86 MP3 file FAIL 1 87 MP3 file FAIL 2
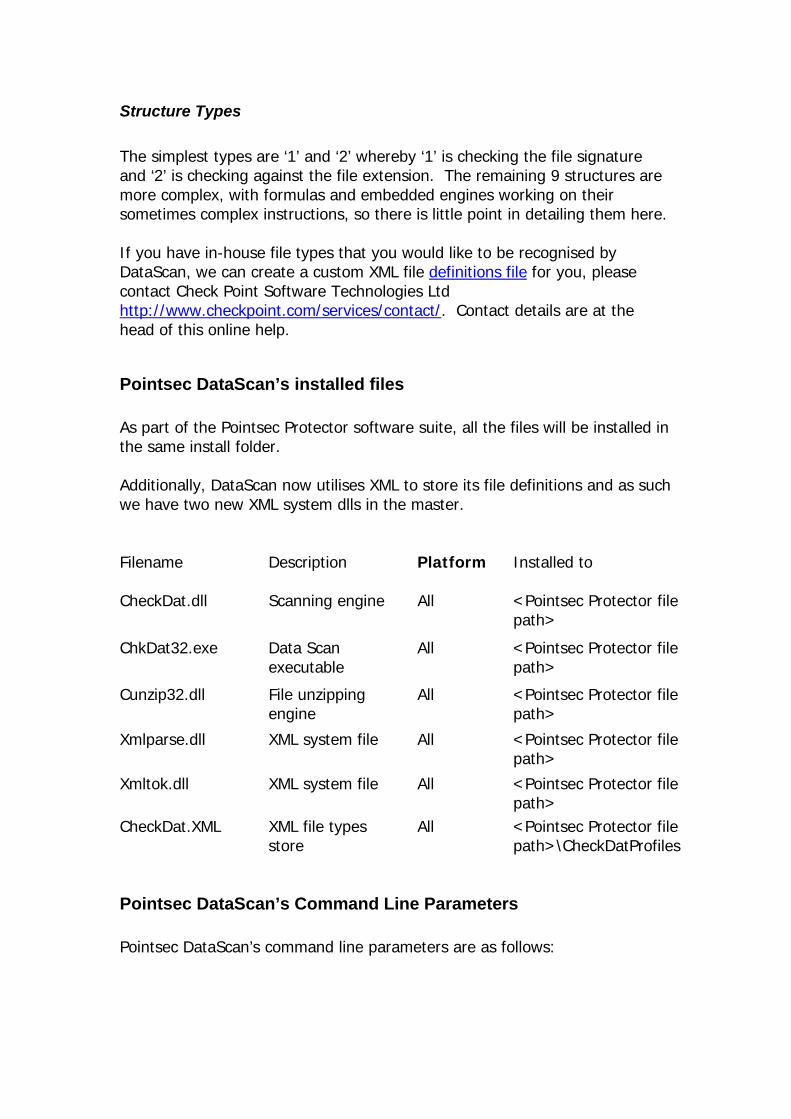
Structure Types The simplest types are ‘1’ and ‘2’ whereby ‘1’ is checking the file signature and ‘2’ is checking against the file extension. The remaining 9 structures are more complex, with formulas and embedded engines working on their sometimes complex instructions, so there is little point in detailing them here. If you have in-house file types that you would like to be recognised by DataScan, we can create a custom XML file definitions file for you, please contact Check Point Software Technologies Ltd http://www.checkpoint.com/services/contact/. Contact details are at the head of this online help.
Pointsec DataScan’s installed files As part of the Pointsec Protector software suite, all the files will be installed in the same install folder. Additionally, DataScan now utilises XML to store its file definitions and as such we have two new XML system dlls in the master. Filename Description Platform Installed to CheckDat.dll Scanning engine All <Pointsec Protector file
path>
ChkDat32.exe Data Scan executable
All <Pointsec Protector file path>
Cunzip32.dll File unzipping engine
All <Pointsec Protector file path>
Xmlparse.dll XML system file All <Pointsec Protector file path>
Xmltok.dll XML system file All <Pointsec Protector file path>
CheckDat.XML XML file types store
All <Pointsec Protector file path>\CheckDatProfiles
Pointsec DataScan’s Command Line Parameters Pointsec DataScan’s command line parameters are as follows:
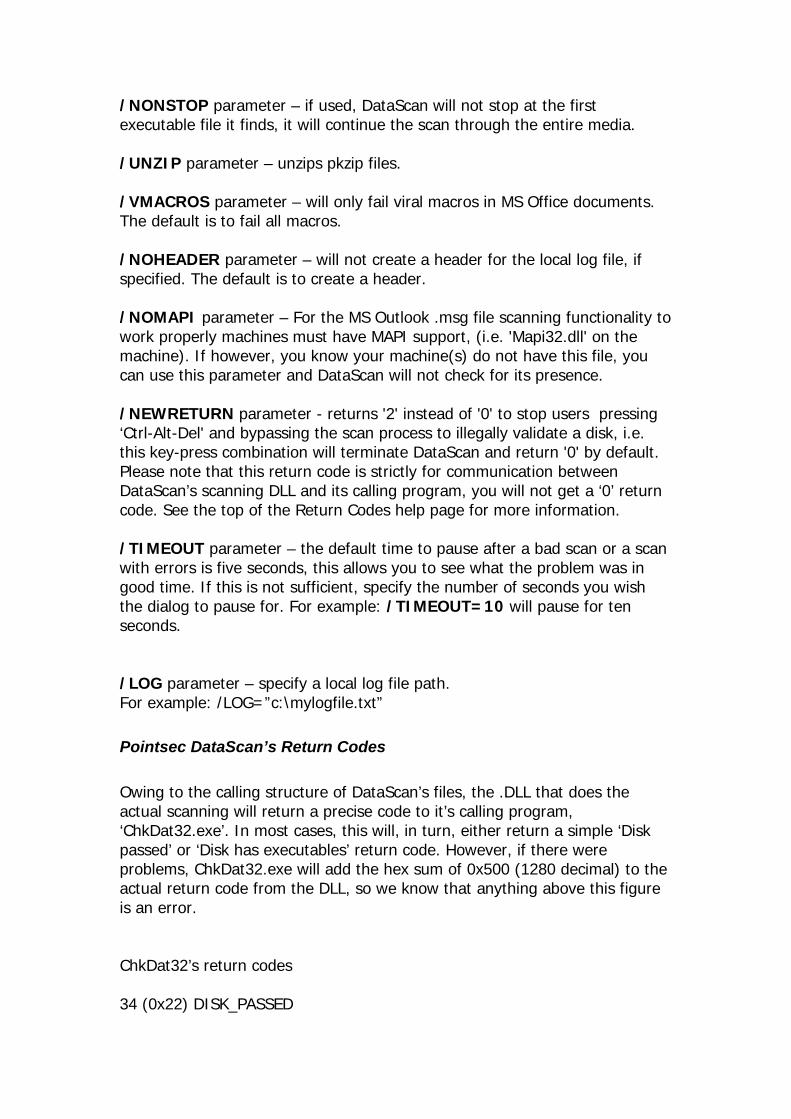
/NONSTOP parameter – if used, DataScan will not stop at the first executable file it finds, it will continue the scan through the entire media. /UNZIP parameter – unzips pkzip files. /VMACROS parameter – will only fail viral macros in MS Office documents. The default is to fail all macros. /NOHEADER parameter – will not create a header for the local log file, if specified. The default is to create a header. /NOMAPI parameter – For the MS Outlook .msg file scanning functionality to work properly machines must have MAPI support, (i.e. 'Mapi32.dll' on the machine). If however, you know your machine(s) do not have this file, you can use this parameter and DataScan will not check for its presence. /NEWRETURN parameter - returns '2' instead of '0' to stop users pressing ‘Ctrl-Alt-Del' and bypassing the scan process to illegally validate a disk, i.e. this key-press combination will terminate DataScan and return '0' by default. Please note that this return code is strictly for communication between DataScan’s scanning DLL and its calling program, you will not get a ‘0’ return code. See the top of the Return Codes help page for more information. /TIMEOUT parameter – the default time to pause after a bad scan or a scan with errors is five seconds, this allows you to see what the problem was in good time. If this is not sufficient, specify the number of seconds you wish the dialog to pause for. For example: /TIMEOUT=10 will pause for ten seconds. /LOG parameter – specify a local log file path. For example: /LOG=”c:\mylogfile.txt”
Pointsec DataScan’s Return Codes Owing to the calling structure of DataScan’s files, the .DLL that does the actual scanning will return a precise code to it’s calling program, ‘ChkDat32.exe’. In most cases, this will, in turn, either return a simple ‘Disk passed’ or ‘Disk has executables’ return code. However, if there were problems, ChkDat32.exe will add the hex sum of 0x500 (1280 decimal) to the actual return code from the DLL, so we know that anything above this figure is an error. ChkDat32’s return codes 34 (0x22) DISK_PASSED
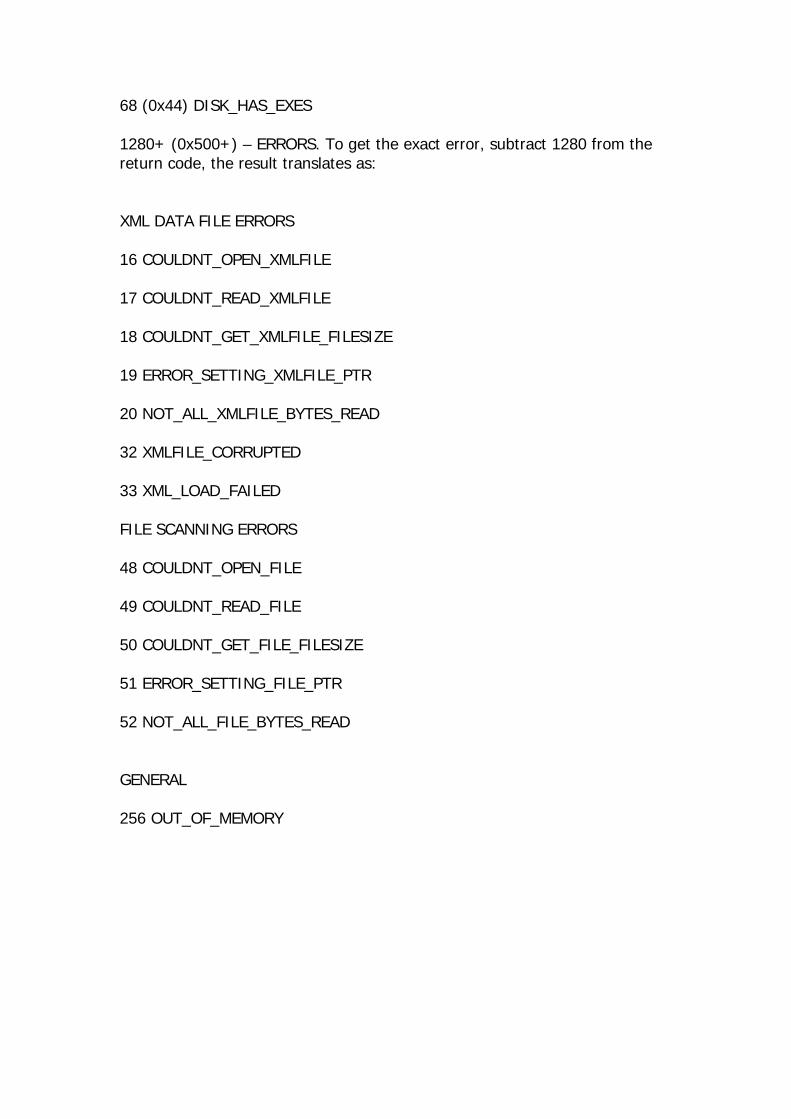
68 (0x44) DISK_HAS_EXES 1280+ (0x500+) – ERRORS. To get the exact error, subtract 1280 from the return code, the result translates as: XML DATA FILE ERRORS 16 COULDNT_OPEN_XMLFILE 17 COULDNT_READ_XMLFILE 18 COULDNT_GET_XMLFILE_FILESIZE 19 ERROR_SETTING_XMLFILE_PTR 20 NOT_ALL_XMLFILE_BYTES_READ 32 XMLFILE_CORRUPTED 33 XML_LOAD_FAILED FILE SCANNING ERRORS 48 COULDNT_OPEN_FILE 49 COULDNT_READ_FILE 50 COULDNT_GET_FILE_FILESIZE 51 ERROR_SETTING_FILE_PTR 52 NOT_ALL_FILE_BYTES_READ GENERAL 256 OUT_OF_MEMORY
FAQs
Frequently asked Questions
Where can I read about up to date support issues and solutions? The Check Point Software Technologies Ltd knowledgebase offers tried and tested solutions to the most common support queries. http:/www.CheckPoint.com
How can I integrate Pointsec Protector Client with my Anti-Virus scanner? Pointsec Protector Client automatically detects and integrates with compatible anti-virus scanners. A database of compatible anti-virus scanners is stored in a file ‘avirdef.cab’ located in ‘system drive\program files\common files\Check Point’. Check Point Software Technologies Ltd offer frequent updates to the Avirdef.cab when new compatible AV scanners become available. If there is a particular scanner that is requires integration please contact the Check Point support department for up to date information http://www.checkpoint.com/services/contact/.
Do Check Point offer training on Pointsec Protector? Check Point Software Technologies Ltd provide a full training and installation service. For further information please contact Check Point [email protected]
How can I configure my client workstations to only authorise media containing data only? Pointsec Protector client is supplied with the Pointsec DataScan. During installation of the client software there is an option to install this component. The Pointsec DataScan will only authorise data only files, any files containing executable or active code will be blocked. For further information please see installing Pointsec DataScan.
How can I change the file types that Pointsec DataScan? The settings for DataScan are stored in a configuration file called checkdat.xml. For further information about changing the contents of this file please contact the Check Point Software Technologies Ltd support department on http://www.checkpoint.com/services/contact/.
How can I authorise media that contains executable code? If the Pointsec DataScan was installed on Pointsec Protector Client workstations during installation then by default users are unable to authorise media containing executable code. There are two methods of allowing authorisation of executable code. 1) The user can be permitted to select an AV scanner to authorise media
thus enforcing only virus free file types can be authorised irrespective of their executable content.
2) The user can bring all media containing executable to dedicated IT personnel who can verify the media contents before authorising.
How can I disable Pointsec Protector Client if my Operating System becomes corrupt? It is possible to create a Pointsec Protector ‘emergency access disk’ which allows the system administrator to disable all Pointsec Protector Client drivers.
I cannot install software with my software distribution package any more because PSG blocks it? Pointsec Protector includes an advanced PSG exemption mechanism. The software distribution package needs to be added to the exempt applications list.
How can I allow my software distribution package to install software when PSG is enabled? Pointsec Protector supports many of the leading software distribution packages by default. The software is shipped with a default list of exempt applications which can be amended to include new applications. Please see the PSG Exemptions Tab for further information.
How can I silently install Pointsec Protector Client across my Window NT Domain? Pointsec Protector Client can be silently deployed using any software distribution tool including MS SMS 2.0/2003, Altiris, Novell Zenworks and is fully MSI compatible enabling deployment direct from Active Directory via
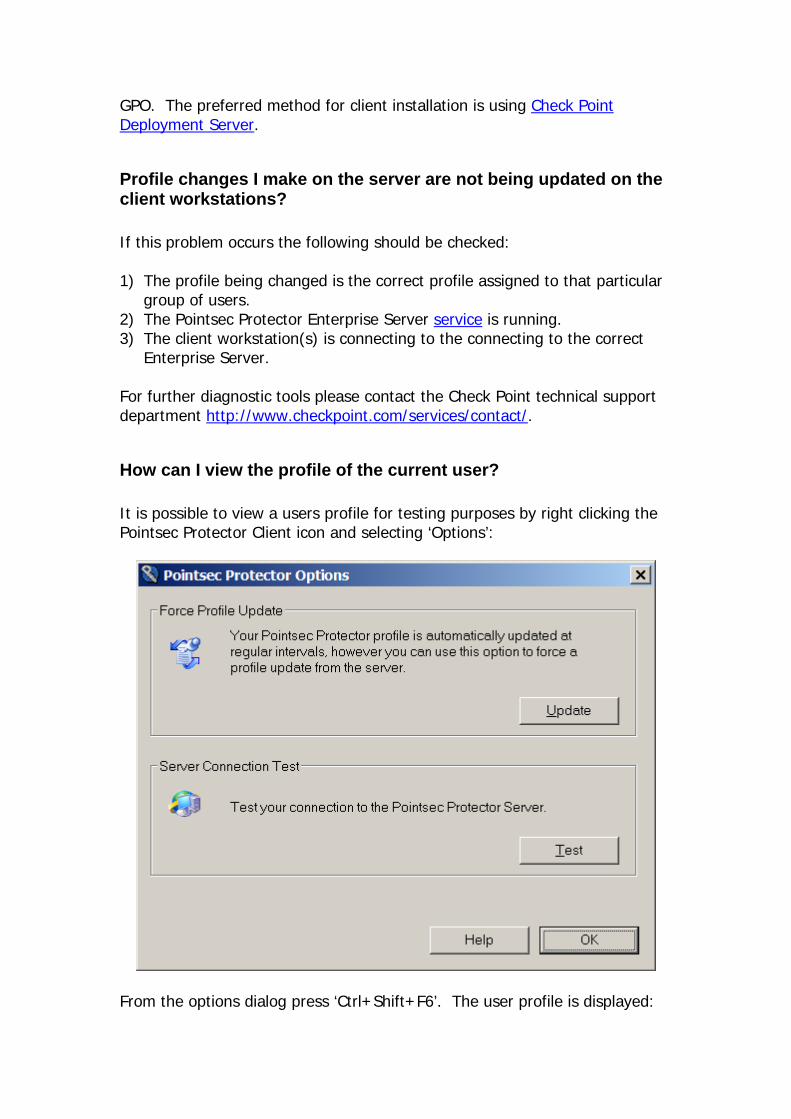
GPO. The preferred method for client installation is using Check Point Deployment Server.
Profile changes I make on the server are not being updated on the client workstations? If this problem occurs the following should be checked: 1) The profile being changed is the correct profile assigned to that particular
group of users. 2) The Pointsec Protector Enterprise Server service is running. 3) The client workstation(s) is connecting to the connecting to the correct
Enterprise Server. For further diagnostic tools please contact the Check Point technical support department http://www.checkpoint.com/services/contact/.
How can I view the profile of the current user? It is possible to view a users profile for testing purposes by right clicking the Pointsec Protector Client icon and selecting ‘Options’:
From the options dialog press ‘Ctrl+Shift+F6’. The user profile is displayed:
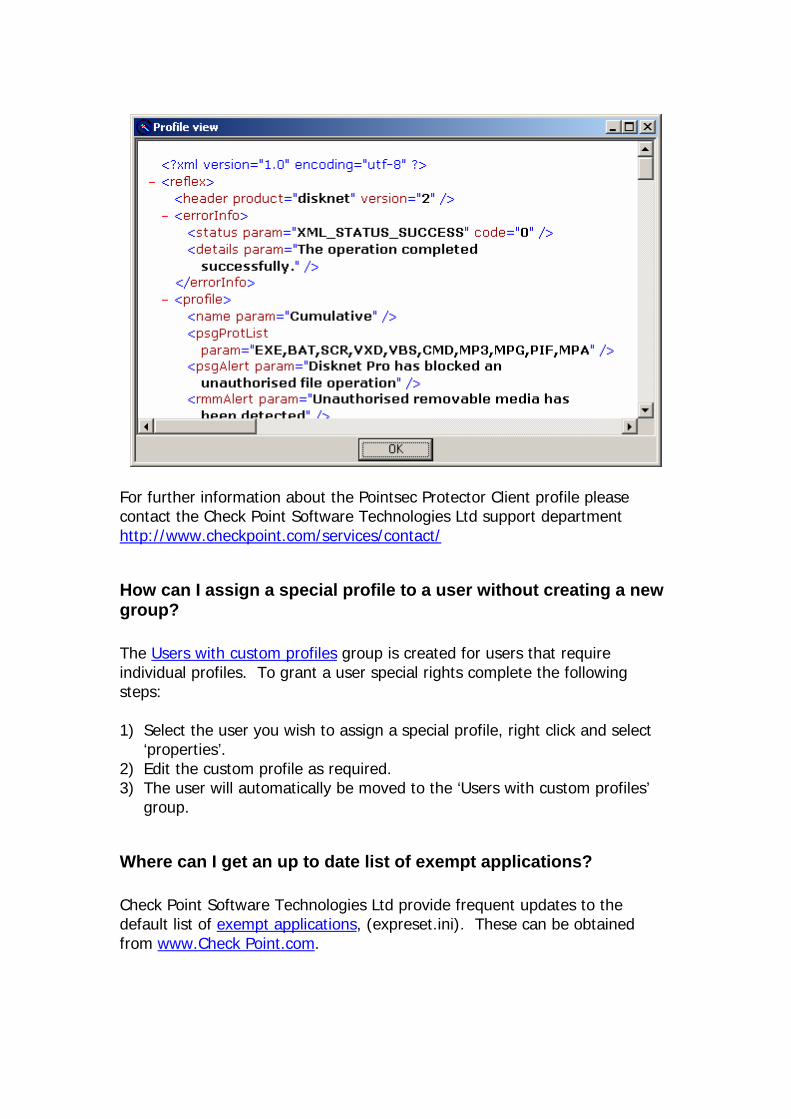
For further information about the Pointsec Protector Client profile please contact the Check Point Software Technologies Ltd support department http://www.checkpoint.com/services/contact/
How can I assign a special profile to a user without creating a new group? The Users with custom profiles group is created for users that require individual profiles. To grant a user special rights complete the following steps: 1) Select the user you wish to assign a special profile, right click and select
‘properties’. 2) Edit the custom profile as required. 3) The user will automatically be moved to the ‘Users with custom profiles’
group.
Where can I get an up to date list of exempt applications? Check Point Software Technologies Ltd provide frequent updates to the default list of exempt applications, (expreset.ini). These can be obtained from www.Check Point.com.
How can I setup RMM to only display an unauthorised media message and not authorise, thus forcing the user to visit a sheep dip workstation? To setup a Pointsec Protector Client profile without the ability to authorise media the ‘Allow users the following rights (wizard mode)’ option should be selected with none of the sub options selected.
How can I setup a standalone ‘Sheep-dip’ machine? To setup a standalone sheep dip machine a new profile should be created on the Enterprise Server. The ‘export profile template’ option should then be used to create an installation template. The client software can then be installed using the template profile settings.
I cannot authorise media with Sophos Anti-Virus when logged in as a user? For further information about setting up Pointsec Protector Client software using Sophos Anti-Virus please contact the Check Point support department http://www.checkpoint.com/services/contact/.
How can I stop users downloading MP3 files from the internet and e-mail attachments? Program Security Guard can be used to block the introduction of unwanted file types from any source. To add a new file type select the ‘PSG types tab’ in the required profile and add the new extension.
How can I specify 2 or more server names in Pointsec Protector Client? During installation of Pointsec Protector Client it is possible to specify 2 or more server names for backup and load balancing purposes. The servers can either be contact randomly or sequentially. The Dnver utility is also available to perform real-time server location changes after installation
Is it possible to change the style of the Pointsec Protector Client message boxes? It is possible to customise the Pointsec Protector Client message alert boxes to a corporate image. By placing 400x250 pixel copies of the following files in
the Pointsec Protector Client installation folder it is possible to customise the Removable Media Manager and Program Security Guard message boxes: Program Security Guard – psgbmp.bmp Removable Media Manager – rmmbmp.bmp
Is it possible to enforce users to only have write access to encrypted removable media? Yes this can be achieved by granting read only access to the devices in Device Manager, this will enforce encryption. Device Manager has an automatic exclusion for encrypted media and will not apply read only to encrypted devices.
Is there a key recovery mechanisms implemented into the Encryption Policy Manager? From the Pointsec Protector Enterprise Server security tab it is possible to specify users/groups that have EPM key recovery rights. Users who have EPM key recovery rights will have full access to all encrypted removable media within the current network.
How can I allow users to access encrypted media external to my organisation without converting the device back to clear text? By enabling the ‘Protect media with a password for offline mode’ the device can be accessed externally via a password. For this option to operate either a full copy of Pointsec Protector Client or the freeware version of EPM must be installed on the external workstation. Alternatively the EPM Explorer can be used to grant secure read/write access without the need to install any software.
How can I stop a particular user from accessing previously authorised encrypted media? It is often desirable to revoke user access to encrypted media. This can be achieved by removing the user from the current group and dragging to the Users with custom profiles group. The user will then have no access to encrypted media as they no longer belong to the user group.
How can I stop users with local admin rights from disabling the Pointsec Protector Service? Pointsec Protector is implemented using kernel mode filter drivers to ensure the highest level of security. In addition, the Pointsec Protector service provides customized messaging and user alerts. By default, standard users are prevented from disabling or de-installing the Pointsec Protector client service. Even if a user with local admin rights is permitted to stop the service security is still enforced by the kernel mode filter drivers. It is possible to audit when a user disables the Pointsec Protector client service. In addition the ‘Pointsec Protector Client Anti-Tamper protection can be enabled within the user interface tab on each profile. The anti-tamper protection will block users with local administration rights from being able to tamper with registry keys and client system files. All attempted breaches are audited.
How can I setup multiple Pointsec Protector Servers? For further information about configuring multiple Pointsec Protector Servers including server replication please contact the Check Point Software Technologies Ltd technical support department http://www.checkpoint.com/services/contact/.
How can I assign machine specific settings? It is often useful to assign computer specific permissions onto defined machines where global access rights are required. This can be achieved using a computer groups.
How can I pre-encrypt a device for a user? Many organisations have a requirement to ensure that only corporate devices are issued from a central location and that users are unable to introduce any new devices without administrator approval. In addition it is required that defined administrators can pre-configure encrypted devices for users. Pointsec Protector enables the unique facility of pre-encrypting and assigning devices for users. To setup this scenario the following should be completed:
1) A user profile is configured as required to block all unauthorised access.
2) An administrator profile is configured with the ‘Users can create media for other users’ under the decryption tab.
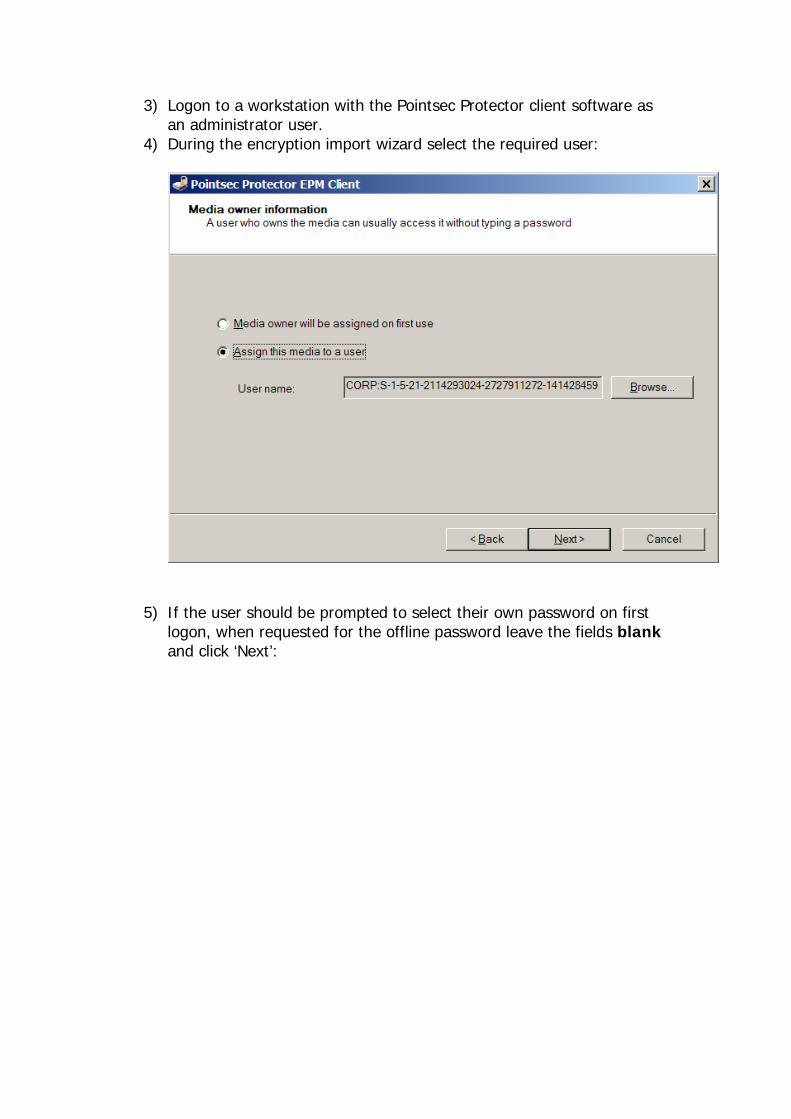
3) Logon to a workstation with the Pointsec Protector client software as an administrator user.
4) During the encryption import wizard select the required user:
5) If the user should be prompted to select their own password on first logon, when requested for the offline password leave the fields blank and click ‘Next’:
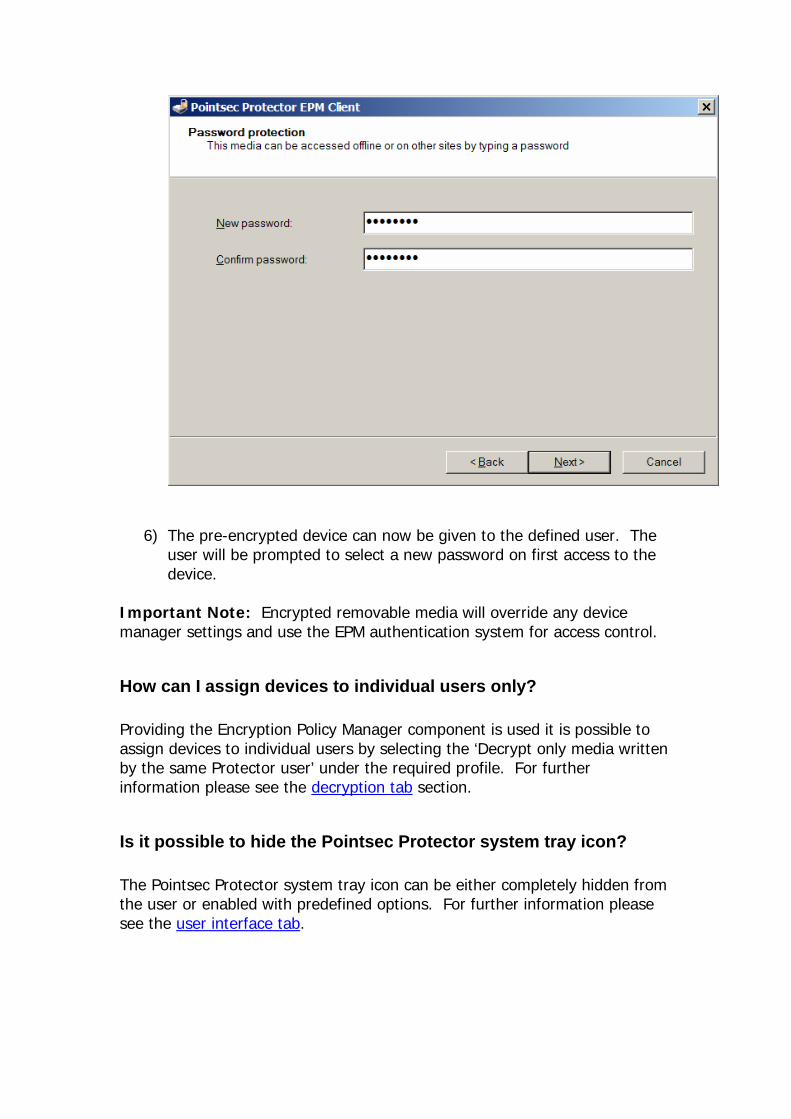
6) The pre-encrypted device can now be given to the defined user. The user will be prompted to select a new password on first access to the device.
Important Note: Encrypted removable media will override any device manager settings and use the EPM authentication system for access control.
How can I assign devices to individual users only? Providing the Encryption Policy Manager component is used it is possible to assign devices to individual users by selecting the ‘Decrypt only media written by the same Protector user’ under the required profile. For further information please see the decryption tab section.
Is it possible to hide the Pointsec Protector system tray icon? The Pointsec Protector system tray icon can be either completely hidden from the user or enabled with predefined options. For further information please see the user interface tab.
How can I configure it so that certain devices are enabled independent of who logs on? Computer groups provide the ability to assign machine based permissions.
How can I add my own specific devices? Pointsec Protector Enterprise Server is supplied with a list of predefined device types. However, to enhance white list security it is often required that only specific brands and models of device are permitted. Pointsec Protector enables the system administrator to add new devices via a simple import wizard. To add a new specific device type from a device manager log see the Logs and Device Manager Configuration Editor section.
Does Pointsec Protector still protect in safe mode? As Pointsec Protector Client utilises kernel mode device drivers all security is still maintained even when a workstation is booted into MS Windows Safemode.
Can I prevent users with local admin rights from deinstalling the Pointsec Protector Client software? Prior to installation of the Pointsec Protector Client software it is possible to configure within the config.ini users/groups that are permitted to deinstall the software. When deploying via Group Policy the Add/Remove programs entry is automatically removed.
Is it possible to configure different profile settings for when a mobile user is and on and off the network? The offline user/admin function enables the system administrator to define a different set of user rights for when mobile workstation(s) are disconnected from the network. This feature can be particularly useful where wireless connection is not permitted inside of the organisation but is permitted externally.
Can Pointsec Protector Server be installed onto an existing MS SQL Server database? The Pointsec Protector Server can be installed onto an existing MS SQL database server. Please contact the Check Point Technical Support
department for further information http://www.checkpoint.com/services/contact/.
If I already have MSDE installed on my server can I install Pointsec Protector Server onto the same machine? The Pointsec Protector Server can be installed on an existing MSDE database using a new database instance. Please contact the Check Point Technical Support department for further information http://www.checkpoint.com/services/contact/.
Can I install Pointsec Protector in an audit only mode? Most organisations that implement Pointsec Protector have no true picture of how prevalent device usage is within the organisation. For this reason it is recommended that Pointsec Protector is initially rolled out in an audit only mode to ascertain details about devices currently in use. This list can then be filtered to distinguish between the required devices and the unwanted devices. To enable audit only mode the relevant profiles should be configured to allow access to all devices. The ‘Authorised Device Event’ under the auditing tab should be enabled for all profiles. This will record all device access back to the Pointsec Protector Server.
Glossary of Terms
Terms
AES Encryption Advanced Encryption Standard using Rijndael block cipher. The industry standard for strong encryption.
Anti-Virus Refers to software used for detecting computer virus infected code
Anti-Virus Definition Files (DEF Files) These type of files contain the latest virus information for use with the Sherlock Anti-Virus Scanner.
Authentication The process for verifying that an entity or object is who or what it claims to be. Examples include confirming the source and integrity of information, such as verifying a digital signature or verifying the identity of a user or computer.
Com Port An interface on the computer that allows asynchronous transmission of data characters one bit at a time. Also called a communication port or COM port., also called the COM port.
.csv The CSV (Comma delimited) file format saves only the text and values as they are displayed in columns of the active log. All rows and all characters in each entry are saved. Columns of data are separated by commas, and each row of data ends in a carriage return. If a cell contains a comma, the cell contents are enclosed in double quotation marks.
Default Profile The default profile is the profile that will be used by any users which logon to a Pointsec Protector Client machine that are not listed within the Pointsec Protector Enterprise Server users/groups.
Digital signature A string of code that is written to removable media devices to mark as authorised. The digital signature includes a checksum or the information stored on the device encoded with a customer ID.
Drivers Refers to the Pointsec Protector Enterprise Client device drivers that provide the backbone to the security infrastructure.
Enumeration Refers the process of importing and validating new users from a Windows NT Domain.
Exempt Applications Program Security Guard (PSG) prevents the introduction and authorised modification of defined file types. It is possible to build a list of applications that are exempt from PSG protection.
Filter For Indexing Service, software that extracts content and property values from the Pointsec Protector database in order to index them.
Graphical User Interface (GUI) Refers to the Pointsec Protector user interface on the client software.
Groups Synchronisation The ability to synchronise Pointsec Protector Enterprise Server user groups with groups within an NT Domain network.
Hostname Details the workstation name on which an event was created.
ID Is a unique identifier assigned to each log entry sequentially generated.
IP address A 32-bit address used to identify a node on an IP internetwork. Each node on the IP internetwork must be assigned a unique IP address, which is made up

of the network ID, plus a unique host ID. This address is typically represented with the decimal value of each octet separated by a period (for example, 192.168.7.27). In this version of Windows, you can configure the IP address statically or dynamically through DHCP.
.iss Is a InstallShield Silent response file used for storing silent installation configuration data.
LPT Port The input/output connector for a parallel interface device. Printers are generally plugged into a parallel port.
Master Boot Record (MBR) The first sector on a hard disk, which starts the process of booting the computer. The MBR contains the partition table for the disk and a small amount of executable code called the master boot code.
Media authorisation Media authorisation defines the ability to grant access to a removable media device. Media authorisation will often require certain criteria to be met before a digital signature is written to the device.
Media ID During authorisation of removable media a unique digital signature is written to the device. This digital signature is made up of a check sum of the information and a unique Media ID generated during installation of the server software.
MMC You can use Microsoft Management Console (MMC) to create, save, and open administrative tools (called MMC consoles) that manage the hardware, MMC software, and network components of your Windows system. MMC can be run on the various Windows 9x and Windows NT operating systems. MMC does not perform administrative functions, but hosts tools that do. The primary type of tool you can add to a console is called a snap-in. Other items that you can add include ActiveX controls, links to Web pages, folders, taskpad views, and tasks. There are two general ways that you can use MMC: in user mode, working with existing MMC consoles to administer a system, or in author mode, creating new consoles or modifying existing MMC consoles. For more information about the differences between user and author mode
Profile Template A profile template is a collection of Pointsec Protector Client settings that can be applied to users/groups.
Program Security Guard (PSG) Program Security Guard provides a fully scalable method for preventing the introduction or new, and the modification of existing defined file types. The administrator can define the list of file types from the Pointsec Protector Enterprise Server.
RDS Check Point Deployment Server is a low cost software deployment tool.
Removable Media The term removable media describes any removable device that can be used to store and transport data/files. These devices include floppy disks, zip drives, memory sticks, USB flash memory, digital cameras.
Service A program, routine, or process that performs a specific system function to support other programs, particularly at a low (close to the hardware) level. When services are provided over a network, they can be published in Active Directory, facilitating service-centric administration and usage. Some examples of services are the Security Accounts Manager service, File Replication service, and Routing and Remote Access service.
SMS Microsoft® Systems Management Server 2.0 includes detailed hardware inventory, software inventory and metering, software distribution and installation, and remote troubleshooting tools. These integrated features make Systems Management Server 2.0 the most scalable way to reduce the cost of change and configuration management for Windows® based desktop and server systems. Systems Management Server 2.0 is built on industry-standard management protocols, ensuring compatibility with complementary management tools. Systems Management Server 2.0 is tightly integrated with Microsoft SQL Server™ and Microsoft Windows NT® Server operating system, making it easier than ever to install, configure, and maintain Systems Management Server in any size network.
Simple Mail Transfer Protocol (SMTP) When you're exchanging electronic mail on the Internet, SMTP is what keeps the process orderly. It is a protocol that regulates what goes on between the mail servers.
TCP/IP Transmission Control Protocol/Internet Protocol (TCP/IP) is the most popular network protocol, and the basis for the Internet. Its routing capabilities provide maximum flexibility in an enterprise-wide network. In Windows XP TCP/IP is automatically installed. On a TCP/IP network, you must provide IP addresses to clients. Clients may also require a naming service or a method for name resolution. This section explains IP addressing and name resolution for Network Connections on TCP/IP networks. It also describes the FTP and Telnet tools that are provided by TCP/IP.
Unique ID Is the unique ID number assigned to each event.
Universal Naming Convention (UNC) A convention for naming files and other resources beginning with two backslashes (\), indicating that the resource exists on a network computer. UNC names conform to the \\SERVERNAME\SHARENAME syntax, where SERVERNAME is the server's name and SHARENAME is the name of the shared resource. The UNC name of a directory or file can also include the directory path after the share name, with the following syntax: \\SERVERNAME\SHARENAME\DIRECTORY\FILENAME
USB - universal serial bus An external bus that supports Plug and Play installation. Using USB, you can connect and disconnect devices without shutting down or restarting your computer. You can use a single USB port to connect up to 127 peripheral devices, including speakers, telephones, CD-ROM drives, joysticks, tape drives, keyboards, scanners, and cameras. A USB port is usually located on the back of your computer near the serial port or parallel port.
User ID Details the username of the user who was logged on when an alert was generated.
VPN A VPN is an extension of a private network that encompasses links across shared or public networks such as the Internet. VPN connections leverage the IP connectivity of the Internet and use a combination of tunnelling and data encryption to securely connect remote clients and remote offices.

THIRD PARTY TRADEMARKS AND COPYRIGHTS Entrust is a registered trademark of Entrust Technologies, Inc. in the United States and other countries. Entrust’s logos and Entrust product and service names are also trademarks of Entrust Technologies, Inc. Entrust Technologies Limited is a wholly owned subsidiary of Entrust Technologies, Inc. FireWall-1 and SecuRemote incorporate certificate management technology from Entrust. Verisign is a trademark of Verisign Inc. The following statements refer to those portions of the software copyrighted by University of Michigan. Portions of the software copyright © 1992-1996 Regents of the University of Michigan. All rights reserved. Redistribution and use in source and binary forms are permitted provided that this notice is preserved and that due credit is given to the University of Michigan at Ann Arbor. The name of the University may not be used to endorse or promote products derived from this software without specific prior written permission. This software is provided “as is” without express or implied warranty. Copyright © Sax Software (terminal emulation only). The following statements refer to those portions of the software copyrighted by Carnegie Mellon University. Copyright 1997 by Carnegie Mellon University. All Rights Reserved. Permission to use, copy, modify, and distribute this software and its documentation for any purpose and without fee is hereby granted, provided that the above copyright notice appear in all copies and that both that copyright notice and this permission notice appear in supporting documentation, and that the name of CMU not be used in advertising or publicity pertaining to distribution of the software without specific, written prior permission. CMU DISCLAIMS ALL WARRANTIES WITH REGARD TO THIS SOFTWARE, INCLUDING ALL IMPLIED WARRANTIES OF MERCHANTABILITY AND FITNESS, IN NO EVENT SHALL CMU BE LIABLE FOR ANY SPECIAL, INDIRECT OR CONSEQUENTIAL DAMAGES OR ANY DAMAGES WHATSOEVER RESULTING FROM LOSS OF USE, DATA OR PROFITS, WHETHER IN AN ACTION OF CONTRACT, NEGLIGENCE OR OTHER TORTIOUS ACTION, ARISING OUT OF OR IN CONNECTION WITH THE USE OR PERFORMANCE OF THIS SOFTWARE. The following statements refer to those portions of the software copyrighted by The Open Group. THE SOFTWARE IS PROVIDED "AS IS", WITHOUT WARRANTY OF ANY KIND, EXPRESS OR IMPLIED, INCLUDING BUT NOT LIMITED TO THE WARRANTIES OF MERCHANTABILITY, FITNESS FOR A PARTICULAR PURPOSE AND NONINFRINGEMENT. IN NO EVENT SHALL THE OPEN GROUP BE LIABLE FOR ANY CLAIM, DAMAGES OR OTHER LIABILITY, WHETHER IN AN ACTION OF CONTRACT, TORT OR OTHERWISE, ARISING FROM, OUT OF OR IN CONNECTION WITH THE SOFTWARE OR THE USE OR OTHER DEALINGS IN THE SOFTWARE. The following statements refer to those portions of the software copyrighted by The OpenSSL Project. This product includes software developed by the OpenSSL Project for use in the OpenSSL Toolkit (http://www.openssl.org/). THIS SOFTWARE IS PROVIDED BY THE OpenSSL PROJECT ``AS IS'' AND ANY * EXPRESSED OR IMPLIED WARRANTIES, INCLUDING, BUT NOT LIMITED TO, THE IMPLIED WARRANTIES OF MERCHANTABILITY AND FITNESS FOR A PARTICULAR PURPOSE ARE DISCLAIMED. IN NO EVENT SHALL THE OpenSSL PROJECT OR ITS CONTRIBUTORS BE LIABLE FOR ANY DIRECT, INDIRECT, INCIDENTAL, SPECIAL, EXEMPLARY, OR CONSEQUENTIAL DAMAGES (INCLUDING, BUT NOT LIMITED TO, PROCUREMENT OF SUBSTITUTE GOODS OR SERVICES; LOSS OF USE, DATA, OR PROFITS; OR BUSINESS INTERRUPTION) HOWEVER CAUSED AND ON ANY THEORY OF LIABILITY, WHETHER IN CONTRACT, STRICT LIABILITY, OR TORT (INCLUDING NEGLIGENCE OR OTHERWISE) ARISING IN ANY WAY OUT OF THE USE OF THIS SOFTWARE, EVEN IF ADVISED OF THE POSSIBILITY OF SUCH DAMAGE. The following statements refer to those portions of the software copyrighted by Eric Young. THIS SOFTWARE IS PROVIDED BY ERIC YOUNG ``AS IS'' AND ANY EXPRESS OR IMPLIED WARRANTIES, INCLUDING, BUT NOT LIMITED TO, THE IMPLIED WARRANTIES OF MERCHANTABILITY AND FITNESS FOR A PARTICULAR PURPOSE ARE DISCLAIMED. IN NO EVENT SHALL THE AUTHOR OR CONTRIBUTORS BE LIABLE FOR ANY DIRECT, INDIRECT, INCIDENTAL, SPECIAL, EXEMPLARY, OR CONSEQUENTIAL DAMAGES (INCLUDING, BUT NOT LIMITED TO, PROCUREMENT OF SUBSTITUTE GOODS OR SERVICES; LOSS OF USE, DATA, OR PROFITS; OR BUSINESS INTERRUPTION) HOWEVER CAUSED AND ON ANY THEORY OF LIABILITY, WHETHER IN CONTRACT, STRICT LIABILITY, OR TORT (INCLUDING NEGLIGENCE OR OTHERWISE) ARISING IN ANY WAY OUT OF THE USE OF THIS SOFTWARE, EVEN IF ADVISED OF THE POSSIBILITY OF SUCH DAMAGE. Copyright © 1998 The Open Group. The following statements refer to those portions of the software copyrighted by Jean-loup Gailly and Mark Adler Copyright (C) 1995-2002 Jean-loup Gailly and Mark Adler. This software is provided 'as-is', without any express or implied warranty. In no event will the authors be held liable for any damages arising from the use of this software. Permission is granted to anyone to use this software for any purpose, including commercial applications, and to alter it and redistribute it freely, subject to the following restrictions: 1. The origin of this software must not be misrepresented; you must not claim that you wrote the original software. If you use this software in a product, an acknowledgment in the product documentation would be appreciated but is not required. 2. Altered source versions must be plainly marked as such, and must not be misrepresented as being the original software. 3. This notice may not be removed or altered from any source distribution.

The following statements refer to those portions of the software copyrighted by the Gnu Public License. This program is free software; you can redistribute it and/or modify it under the terms of the GNU General Public License as published by the Free Software Foundation; either version 2 of the License, or (at your option) any later version. This program is distributed in the hope that it will be useful, but WITHOUT ANY WARRANTY; without even the implied warranty of MERCHANTABILITY or FITNESS FOR A PARTICULAR PURPOSE. See the GNU General Public License for more details.You should have received a copy of the GNU General Public License along with this program; if not, write to the Free Software Foundation, Inc., 675 Mass Ave, Cambridge, MA 02139, USA. The following statements refer to those portions of the software copyrighted by Thai Open Source Software Center Ltd and Clark Cooper Copyright (c) 2001, 2002 Expat maintainers. Permission is hereby granted, free of charge, to any person obtaining a copy of this software and associated documentation files (the "Software"), to deal in the Software without restriction, including without limitation the rights to use, copy, modify, merge, publish, distribute, sublicense, and/or sell copies of the Software, and to permit persons to whom the Software is furnished to do so, subject to the following conditions: The above copyright notice and this permission notice shall be included in all copies or substantial portions of the Software. THE SOFTWARE IS PROVIDED "AS IS", WITHOUT WARRANTY OF ANY KIND, EXPRESS OR IMPLIED, INCLUDING BUT NOT LIMITED TO THE WARRANTIES OF MERCHANTABILITY, FITNESS FOR A PARTICULAR PURPOSE AND NONINFRINGEMENT. IN NO EVENT SHALL THE AUTHORS OR COPYRIGHT HOLDERS BE LIABLE FOR ANY CLAIM, DAMAGES OR OTHER LIABILITY, WHETHER IN AN ACTION OF CONTRACT, TORT OR OTHERWISE, ARISING FROM, OUT OF OR IN CONNECTION WITH THE SOFTWARE OR THE USE OR OTHER DEALINGS IN THE SOFTWARE. GDChart is free for use in your applications and for chart generation. YOU MAY NOT re-distribute or represent the code as your own. Any re-distributions of the code MUST reference the author, and include any and all original documentation. Copyright. Bruce Verderaime. 1998, 1999, 2000, 2001. Portions copyright 1994, 1995, 1996, 1997, 1998, 1999, 2000, 2001, 2002 by Cold Spring Harbor Laboratory. Funded under Grant P41-RR02188 by the National Institutes of Health. Portions copyright 1996, 1997, 1998, 1999, 2000, 2001, 2002 by Boutell.Com, Inc. Portions relating to GD2 format copyright 1999, 2000, 2001, 2002 Philip Warner. Portions relating to PNG copyright 1999, 2000, 2001, 2002 Greg Roelofs. Portions relating to gdttf.c copyright 1999, 2000, 2001, 2002 John Ellson ([email protected]). Portions relating to gdft.c copyright 2001, 2002 John Ellson ([email protected]). Portions relating to JPEG and to color quantization copyright 2000, 2001, 2002, Doug Becker and copyright (C) 1994, 1995, 1996, 1997, 1998, 1999, 2000, 2001, 2002, Thomas G. Lane. This software is based in part on the work of the Independent JPEG Group. See the file README-JPEG.TXT for more information. Portions relating to WBMP copyright 2000, 2001, 2002 Maurice Szmurlo and Johan Van den Brande. Permission has been granted to copy, distribute and modify gd in any context without fee, including a commercial application, provided that this notice is present in user-accessible supporting documentation. This does not affect your ownership of the derived work itself, and the intent is to assure proper credit for the authors of gd, not to interfere with your productive use of gd. If you have questions, ask. "Derived works" includes all programs that utilize the library. Credit must be given in user-accessible documentation. This software is provided "AS IS." The copyright holders disclaim all warranties, either express or implied, including but not limited to implied warranties of merchantability and fitness for a particular purpose, with respect to this code and accompanying documentation. Although their code does not appear in gd 2.0.4, the authors wish to thank David Koblas, David Rowley, and Hutchison Avenue Software Corporation for their prior contributions. Licensed under the Apache License, Version 2.0 (the "License"); you may not use this file except in compliance with the License. You may obtain a copy of the License at http://www.apache.org/licenses/LICENSE-2.0. The curl license COPYRIGHT AND PERMISSION NOTICE Copyright (c) 1996 - 2004, Daniel Stenberg, <[email protected]>.All rights reserved. Permission to use, copy, modify, and distribute this software for any purpose with or without fee is hereby granted, provided that the above copyright notice and this permission notice appear in all copies. THE SOFTWARE IS PROVIDED "AS IS", WITHOUT WARRANTY OF ANY KIND, EXPRESS OR IMPLIED, INCLUDING BUT NOT LIMITED TO THE WARRANTIES OF MERCHANTABILITY, FITNESS FOR A PARTICULAR PURPOSE AND NONINFRINGEMENT OF THIRD PARTY RIGHTS. IN NO EVENT SHALL THE AUTHORS OR COPYRIGHT HOLDERS BE LIABLE FOR ANY CLAIM, DAMAGES OR OTHER LIABILITY, WHETHER IN AN ACTION OF CONTRACT, TORT OR OTHERWISE, ARISING FROM, OUT OF OR IN CONNECTION WITH THE SOFTWARE OR THE USE OR OTHER DEALINGS IN THE SOFTWARE. Except as contained in this notice, the name of a copyright holder shall not be used in advertising or otherwise to promote the sale, use or other dealings in this Software without prior written authorization of the copyright holder. The PHP License, version 3.0 Copyright (c) 1999 - 2004 The PHP Group. All rights reserved. Redistribution and use in source and binary forms, with or without modification, is permitted provided that the following conditions are met: 1. Redistributions of source code must retain the above copyright notice, this list of conditions and the following disclaimer. 2. Redistributions in binary form must reproduce the above copyright notice, this list of conditions and the following disclaimer in the documentation and/or other materials provided with the distribution. 3. The name "PHP" must not be used to endorse or promote products derived from this software without prior written permission. For written permission, please contact [email protected].

4. Products derived from this software may not be called "PHP", nor may "PHP" appear in their name, without prior written permission from [email protected]. You may indicate that your software works in conjunction with PHP by saying "Foo for PHP" instead of calling it "PHP Foo" or "phpfoo". 5. The PHP Group may publish revised and/or new versions of the license from time to time. Each version will be given a distinguishing version number. Once covered code has been published under a particular version of the license, you may always continue to use it under the terms of that version. You may also choose to use such covered code under the terms of any subsequent version of the license published by the PHP Group. No one other than the PHP Group has the right to modify the terms applicable to covered code created under this License. 6. Redistributions of any form whatsoever must retain the following acknowledgment: "This product includes PHP, freely available from <http://www.php.net/>". THIS SOFTWARE IS PROVIDED BY THE PHP DEVELOPMENT TEAM ``AS IS'' AND ANY EXPRESSED OR IMPLIED WARRANTIES, INCLUDING, BUT NOT LIMITED TO, THE IMPLIED WARRANTIES OF MERCHANTABILITY AND FITNESS FOR A PARTICULAR PURPOSE ARE DISCLAIMED. IN NO EVENT SHALL THE PHP DEVELOPMENT TEAM OR ITS CONTRIBUTORS BE LIABLE FOR ANY DIRECT, INDIRECT, INCIDENTAL, SPECIAL, EXEMPLARY, OR CONSEQUENTIAL DAMAGES (INCLUDING, BUT NOT LIMITED TO, PROCUREMENT OF SUBSTITUTE GOODS OR SERVICES; LOSS OF USE, DATA, OR PROFITS; OR BUSINESS INTERRUPTION) HOWEVER CAUSED AND ON ANY THEORY OF LIABILITY, WHETHER IN CONTRACT, STRICT LIABILITY, OR TORT (INCLUDING NEGLIGENCE OR OTHERWISE) ARISING IN ANY WAY OUT OF THE USE OF THIS SOFTWARE, EVEN IF ADVISED OF THE POSSIBILITY OF SUCH DAMAGE. This software consists of voluntary contributions made by many individuals on behalf of the PHP Group. The PHP Group can be contacted via Email at [email protected]. For more information on the PHP Group and the PHP project, please see <http://www.php.net>. This product includes the Zend Engine, freely available at <http://www.zend.com>. This product includes software written by Tim Hudson ([email protected]). Copyright (c) 2003, Itai Tzur <[email protected]> All rights reserved. Redistribution and use in source and binary forms, with or without modification, are permitted provided that the following conditions are met: Redistribution of source code must retain the above copyright notice, this list of conditions and the following disclaimer. Neither the name of Itai Tzur nor the names of other contributors may be used to endorse or promote products derived from this software without specific prior written permission. THIS SOFTWARE IS PROVIDED BY THE COPYRIGHT HOLDERS AND CONTRIBUTORS "AS IS" AND ANY EXPRESS OR IMPLIED WARRANTIES, INCLUDING, BUT NOT LIMITED TO, THE IMPLIED WARRANTIES OF MERCHANTABILITY AND FITNESS FOR A PARTICULAR PURPOSE ARE DISCLAIMED. IN NO EVENT SHALL THE COPYRIGHT OWNER OR CONTRIBUTORS BE LIABLE FOR ANY DIRECT, INDIRECT, INCIDENTAL, SPECIAL, EXEMPLARY, OR CONSEQUENTIAL DAMAGES (INCLUDING, BUT NOT LIMITED TO, PROCUREMENT OF SUBSTITUTE GOODS OR SERVICES; LOSS OF USE, DATA, OR PROFITS; OR BUSINESS INTERRUPTION) HOWEVER CAUSED AND ON ANY THEORY OF LIABILITY, WHETHER IN CONTRACT, STRICT LIABILITY, OR TORT (INCLUDING NEGLIGENCE OR OTHERWISE) ARISING IN ANY WAY OUT OF THE USE OF THIS SOFTWARE, EVEN IF ADVISED OF THE POSSIBILITY OF SUCH DAMAGE. Copyright (c) 1998, 1999, 2000 Thai Open Source Software Center Ltd Permission is hereby granted, free of charge, to any person obtaining a copy of this software and associated documentation files (the "Software"), to deal in the Software without restriction, including without limitation the rights to use, copy, modify, merge, publish, distribute, sublicense, and/or sell copies of the Software, and to permit persons to whom the Software is furnished to do so, subject to the following conditions: The above copyright notice and this permission notice shall be included in all copies or substantial portions of the Software. THE SOFTWARE IS PROVIDED "AS IS", WITHOUT WARRANTY OF ANY KIND, EXPRESS OR IMPLIED, INCLUDING BUT NOT LIMITED TO THE WARRANTIES OF MERCHANTABILITY, FITNESS FOR A PARTICULAR PURPOSE AND NONINFRINGEMENT. IN NO EVENT SHALL THE AUTHORS OR COPYRIGHT HOLDERS BE LIABLE FOR ANY CLAIM, DAMAGES OR OTHER LIABILITY, WHETHER IN AN ACTION OF CONTRACT, TORT OR OTHERWISE, ARISING FROM, OUT OF OR IN CONNECTION WITH THE SOFTWARE OR THE USE OR OTHER DEALINGS IN THE SOFTWARE. Copyright © 2003, 2004 NextHop Technologies, Inc. All rights reserved. Confidential Copyright Notice Except as stated herein, none of the material provided as a part of this document may be copied, reproduced, distributed, republished, downloaded, displayed, posted or transmitted in any form or by any means, including, but not limited to, electronic, mechanical, photocopying, recording, or otherwise, without the prior written permission of NextHop Technologies, Inc. Permission is granted to display, copy, distribute and download the materials in this document for personal, non-commercial use only, provided you do not modify the materials and that you retain all copy-right and other proprietary notices contained in the materials unless otherwise stated. No material contained in this document may be

"mirrored" on any server without written permission of NextHop. Any unauthorized use of any material contained in this document may violate copyright laws, trademark laws, the laws of privacy and publicity, and communications regulations and statutes. Permission terminates automatically if any of these terms or conditions are breached. Upon termination, any downloaded and printed materials must be immediately destroyed. Trademark Notice The trademarks, service marks, and logos (the "Trademarks") used and displayed in this document are registered and unregistered Trademarks of NextHop in the US and/or other countries. The names of actual companies and products mentioned herein may be Trademarks of their respective owners. Nothing in this document should be construed as granting, by implication, estoppel, or otherwise, any license or right to use any Trademark displayed in the document. The owners aggressively enforce their intellectual property rights to the fullest extent of the law. The Trademarks may not be used in any way, including in advertising or publicity pertaining to distribution of, or access to, materials in this document, including use, without prior, written permission. Use of Trademarks as a "hot" link to any website is prohibited unless establishment of such a link is approved in advance in writing. Any questions concerning the use of these Trademarks should be referred to NextHop at U.S. +1 734 222 1600. U.S. Government Restricted Rights The material in document is provided with "RESTRICTED RIGHTS." Software and accompanying documentation are provided to the U.S. government ("Government") in a transaction subject to the Federal Acquisition Regulations with Restricted Rights. The Government's rights to use, modify, reproduce, release, perform, display or disclose are restricted by paragraph (b)(3) of the Rights in Noncommercial Computer Software and Noncommercial Computer Software Documentation clause at DFAR 252.227-7014 (Jun 1995), and the other restrictions and terms in paragraph (g)(3)(i) of Rights in Data-General clause at FAR 52.227-14, Alternative III (Jun 87) and paragraph (c)(2) of the Commercial Computer Software-Restricted Rights clause at FAR 52.227-19 (Jun 1987). Use of the material in this document by the Government constitutes acknowledgment of NextHop's proprietary rights in them, or that of the original creator. The Contractor/Licensor is NextHop located at 1911 Landings Drive, Mountain View, California 94043. Use, duplication, or disclosure by the Government is subject to restrictions as set forth in applicable laws and regulations. Disclaimer Warranty Disclaimer Warranty Disclaimer Warranty Disclaimer Warranty THE MATERIAL IN THIS DOCUMENT IS PROVIDED "AS IS" WITHOUT WARRANTIES OF ANY KIND EITHER EXPRESS OR IMPLIED. TO THE FULLEST EXTENT POSSIBLE PURSUANT TO THE APPLICABLE LAW, NEXTHOP DISCLAIMS ALL WARRANTIES, EXPRESSED OR IMPLIED, INCLUDING, BUT NOT LIMITED TO, IMPLIED WARRANTIES OF MERCHANTABILITY, FITNESS FOR A PARTICULAR PURPOSE, NON INFRINGEMENT OR OTHER VIOLATION OF RIGHTS. NEITHER NEXTHOP NOR ANY OTHER PROVIDER OR DEVELOPER OF MATERIAL CONTAINED IN THIS DOCUMENT WARRANTS OR MAKES ANY REPRESEN-TATIONS REGARDING THE USE, VALIDITY, ACCURACY, OR RELIABILITY OF, OR THE RESULTS OF THE USE OF, OR OTHERWISE RESPECTING, THE MATERIAL IN THIS DOCUMENT. Limitation of Liability UNDER NO CIRCUMSTANCES SHALL NEXTHOP BE LIABLE FOR ANY DIRECT, INDIRECT, SPECIAL, INCIDENTAL OR CONSEQUENTIAL DAMAGES, INCLUDING, BUT NOT LIMITED TO, LOSS OF DATA OR PROFIT, ARISING OUT OF THE USE, OR THE INABILITY TO USE, THE MATERIAL IN THIS DOCUMENT, EVEN IF NEXTHOP OR A NEXTHOP AUTHORIZED REPRESENTATIVE HAS ADVISED OF THE POSSIBILITY OF SUCH DAMAGES. IF YOUR USE OF MATERIAL FROM THIS DOCUMENT RESULTS IN THE NEED FOR SERVICING, REPAIR OR CORRECTION OF EQUIPMENT OR DATA, YOU ASSUME ANY COSTS THEREOF. SOME STATES DO NOT ALLOW THE EXCLUSION OR LIMITATION OF INCIDENTAL OR CONSEQUENTIAL DAMAGES, SO THE ABOVE LIMITATION OR EXCLUSION MAY NOT FULLY APPLY TO YOU. Copyright © ComponentOne, LLC 1991-2002. All Rights Reserved. BIND: ISC Bind (Copyright (c) 2004 by Internet Systems Consortium, Inc. ("ISC")) Copyright 1997-2001, Theo de Raadt: the OpenBSD 2.9 Release PCRE LICENCE PCRE is a library of functions to support regular expressions whose syntax and semantics are as close as possible to those of the Perl 5 language. Release 5 of PCRE is distributed under the terms of the "BSD" licence, as specified below. The documentation for PCRE, supplied in the "doc" directory, is distributed under the same terms as the software itself. Written by: Philip Hazel <[email protected]> University of Cambridge Computing Service, Cambridge, England. Phone: +44 1223 334714. Copyright (c) 1997-2004 University of Cambridge All rights reserved. Redistribution and use in source and binary forms, with or without modification, are permitted provided that the following conditions are met: * Redistributions of source code must retain the above copyright notice, this list of conditions and the following disclaimer.

* Redistributions in binary form must reproduce the above copyright notice, this list of conditions and the following disclaimer in the documentation and/or other materials provided with the distribution. * Neither the name of the University of Cambridge nor the names of its contributors may be used to endorse or promote products derived from this software without specific prior written permission. THIS SOFTWARE IS PROVIDED BY THE COPYRIGHT HOLDERS AND CONTRIBUTORS "AS IS" AND ANY EXPRESS OR IMPLIED WARRANTIES, INCLUDING, BUT NOT LIMITED TO, THE IMPLIED WARRANTIES OF MERCHANTABILITY AND FITNESS FOR A PARTICULAR PURPOSE ARE DISCLAIMED. IN NO EVENT SHALL THE COPYRIGHT OWNER OR CONTRIBUTORS BE LIABLE FOR ANY DIRECT, INDIRECT, INCIDENTAL, SPECIAL, EXEMPLARY, OR CONSEQUENTIAL DAMAGES (INCLUDING, BUT NOT LIMITED TO, PROCUREMENT OF SUBSTITUTE GOODS OR SERVICES; LOSS OF USE, DATA, OR PROFITS; OR BUSINESS INTERRUPTION) HOWEVER CAUSED AND ON ANY THEORY OF LIABILITY, WHETHER IN CONTRACT, STRICT LIABILITY, OR TORT (INCLUDING NEGLIGENCE OR OTHERWISE) ARISING IN ANY WAY OUT OF THE USE OF THIS SOFTWARE, EVEN IF ADVISED OF THE POSSIBILITY OF SUCH DAMAGE.