picture collage & time-lapse web application
TRANSCRIPT

Picture Collage & Time-LapseWeb Application
by
Esti Sojati
Bachelor Thesis in Computer Science
Submission: December 4, 2020 Supervisors:Prof. Francesco Maurelli & Conrad Zeidler
Jacobs University Bremen | Department of Computer Science and Electrical Engineering

Statutory Declaration
Family Name, Given / First Name Sojati, EstiMatriculation number 30000548What kind of thesis are you submitting: Bachelor-, Master-, PhD-Thesis Bachelor-Thesis
English: Declaration of Authorship
I hereby declare that the thesis submitted was created and written solely by myself withoutany external support. Any sources, direct or indirect, are marked as such. I am awareof the fact that the contents of the thesis in digital form may be revised with regard tousage of unauthorized aid as well as whether the whole or parts of it may be identified asplagiarism. I do agree my work to be entered into a database for it to be compared withexisting sources, where it will remain in order to enable further comparisons with futuretheses. This does not grant any rights of reproduction and usage, however.
This document was neither presented to any other examination board nor has it beenpublished.
German: Erklarung der Autorenschaft (Urheberschaft)
Ich erklare hiermit, dass die vorliegende Arbeit ohne fremde Hilfe ausschließlich vonmir erstellt und geschrieben worden ist. Jedwede verwendeten Quellen, direkter oderindirekter Art, sind als solche kenntlich gemacht worden. Mir ist die Tatsache bewusst,dass der Inhalt der Thesis in digitaler Form gepruft werden kann im Hinblick darauf, ob essich ganz oder in Teilen um ein Plagiat handelt. Ich bin damit einverstanden, dass meineArbeit in einer Datenbank eingegeben werden kann, um mit bereits bestehenden Quellenverglichen zu werden und dort auch verbleibt, um mit zukunftigen Arbeiten verglichenwerden zu konnen. Dies berechtigt jedoch nicht zur Verwendung oder Vervielfaltigung.
Diese Arbeit wurde noch keiner anderen Prufungsbehorde vorgelegt noch wurde siebisher veroffentlicht.
December 4, 2020
Abstract
Growing fresh food in space or other extra-terrestrial environments is hard thing to do, butreally essential. Fresh food provides essential vitamins, minerals and other useful macro-molecules such as bio-active compounds to support crew health, and thereby functionsas a countermeasure for the stresses associated with deep space exploration. Consid-ering the symbiotic relationship between humans (carbon dioxide emitters) and plants(carbon dioxide absorbers), plant growth modules will also provide valuable oxygen tothe crew and remove harmful carbon dioxide. EDEN ISS of DLR Bremen is an initiativethat has been running since 2011, focused on Bio-regenerative Life Support Systems,especially greenhouse modules, and how these technologies can be integrated in futurespace habitats. The EDEN research group operates an experimental greenhouse facilitynear the polar research station Neumayer III of the Alfred Wegener Institute in Antarcticaas part of the EDEN ISS project. In a semi-enclosed greenhouse system, innovative tech-nologies and processes for the long-term stay of humans in space are tested in so-calledanalogue missions under Martian/Moon-like conditions regarding harsh environments, lo-gistics and crew situations.[17] The container-sized greenhouse of the EDEN ISS projectwill provide year-round fresh food supplementation for the Neumayer Station III crew.[18]There are numerous cameras placed inside the greenhouse, whose main purpose iswatching over the plant growth, but also other compartments that are within their frame.This thesis is about the making of an application that provides the DLR EDEN ISS teamwith a better observation solution of the plants and their changes through these cameras.
iii

Contents
1 Introduction 1
2 Requirements 1
3 Website Design 23.1 Top Bar Menu . . . . . . . . . . . . . . . . . . . . . . . . . . . . . . . . . . . 23.2 Time-Lapse . . . . . . . . . . . . . . . . . . . . . . . . . . . . . . . . . . . . 33.3 Image Slideshow . . . . . . . . . . . . . . . . . . . . . . . . . . . . . . . . . 4
4 Implementation 64.1 Image Retrieval . . . . . . . . . . . . . . . . . . . . . . . . . . . . . . . . . . 74.2 Layout Custom Components . . . . . . . . . . . . . . . . . . . . . . . . . . 8
4.2.1 Container . . . . . . . . . . . . . . . . . . . . . . . . . . . . . . . . . 84.2.2 Column . . . . . . . . . . . . . . . . . . . . . . . . . . . . . . . . . . 94.2.3 Row . . . . . . . . . . . . . . . . . . . . . . . . . . . . . . . . . . . . 94.2.4 Cell . . . . . . . . . . . . . . . . . . . . . . . . . . . . . . . . . . . . 9
4.3 Layout Creation . . . . . . . . . . . . . . . . . . . . . . . . . . . . . . . . . . 104.4 Image Movement . . . . . . . . . . . . . . . . . . . . . . . . . . . . . . . . . 124.5 Image Slideshow . . . . . . . . . . . . . . . . . . . . . . . . . . . . . . . . . 13
4.5.1 What Was Removed . . . . . . . . . . . . . . . . . . . . . . . . . . . 144.5.2 What Was Added . . . . . . . . . . . . . . . . . . . . . . . . . . . . . 15
4.6 Top Bar Menu . . . . . . . . . . . . . . . . . . . . . . . . . . . . . . . . . . . 164.6.1 HOME . . . . . . . . . . . . . . . . . . . . . . . . . . . . . . . . . . . 164.6.2 Layout Menu . . . . . . . . . . . . . . . . . . . . . . . . . . . . . . . 174.6.3 Timer Text-Field . . . . . . . . . . . . . . . . . . . . . . . . . . . . . 174.6.4 Filters Menu . . . . . . . . . . . . . . . . . . . . . . . . . . . . . . . 184.6.5 TIMELAPSE . . . . . . . . . . . . . . . . . . . . . . . . . . . . . . . 19
4.7 Time-Lapse . . . . . . . . . . . . . . . . . . . . . . . . . . . . . . . . . . . . 204.8 Control File . . . . . . . . . . . . . . . . . . . . . . . . . . . . . . . . . . . . 214.9 Automation . . . . . . . . . . . . . . . . . . . . . . . . . . . . . . . . . . . . 23
4.9.1 React Client Windows Application . . . . . . . . . . . . . . . . . . . 234.9.2 HTTP Server Windows Application . . . . . . . . . . . . . . . . . . . 244.9.3 Python Automation Script . . . . . . . . . . . . . . . . . . . . . . . . 25
5 All Layouts 255.1 Layout: 4x4 . . . . . . . . . . . . . . . . . . . . . . . . . . . . . . . . . . . . 255.2 Layout: 3x3 . . . . . . . . . . . . . . . . . . . . . . . . . . . . . . . . . . . . 265.3 Layout: 2x2 . . . . . . . . . . . . . . . . . . . . . . . . . . . . . . . . . . . . 265.4 Layout: 1x1 . . . . . . . . . . . . . . . . . . . . . . . . . . . . . . . . . . . . 275.5 Layout: 1+12 . . . . . . . . . . . . . . . . . . . . . . . . . . . . . . . . . . . 275.6 Layout: 2+8 . . . . . . . . . . . . . . . . . . . . . . . . . . . . . . . . . . . . 285.7 Layout: 1+7 . . . . . . . . . . . . . . . . . . . . . . . . . . . . . . . . . . . . 285.8 Layout: 1+11 . . . . . . . . . . . . . . . . . . . . . . . . . . . . . . . . . . . 295.9 Layout: 18+1 . . . . . . . . . . . . . . . . . . . . . . . . . . . . . . . . . . . 29
6 JavaScript + React.JS + Node.JS 306.1 What is JavaScript and its Uses . . . . . . . . . . . . . . . . . . . . . . . . . 306.2 Reasons to Use JavaScript for Modern Web App Development in 2020 . . . 31
iv
6.2.1 Minimize the Complexity of Web App Development Process . . . . . 316.2.2 Ease of Writing Server-side Code in JavaScript . . . . . . . . . . . . 316.2.3 MEAN Stack: 4 Major Components in a Single Pack . . . . . . . . . 326.2.4 Hassle-Free Integration of Multiple Transpilers . . . . . . . . . . . . 326.2.5 Ability To Develop Responsive Web Pages With JavaScript . . . . . 326.2.6 A Broad Access of Libraries and Frameworks . . . . . . . . . . . . . 32
6.3 Popular JS Frameworks That You Can Use For Web App Development . . . 336.4 What makes React so fast . . . . . . . . . . . . . . . . . . . . . . . . . . . . 33
6.4.1 Virtual DOM . . . . . . . . . . . . . . . . . . . . . . . . . . . . . . . 336.4.2 Diffing Algorithm . . . . . . . . . . . . . . . . . . . . . . . . . . . . . 346.4.3 Single-way Data Flow . . . . . . . . . . . . . . . . . . . . . . . . . . 35
6.5 What makes Node so great . . . . . . . . . . . . . . . . . . . . . . . . . . . 356.5.1 Single programming language . . . . . . . . . . . . . . . . . . . . . 366.5.2 Large Community . . . . . . . . . . . . . . . . . . . . . . . . . . . . 366.5.3 API . . . . . . . . . . . . . . . . . . . . . . . . . . . . . . . . . . . . 366.5.4 Scalability . . . . . . . . . . . . . . . . . . . . . . . . . . . . . . . . . 376.5.5 Real-time web applications . . . . . . . . . . . . . . . . . . . . . . . 37
6.6 Conclusion . . . . . . . . . . . . . . . . . . . . . . . . . . . . . . . . . . . . 37
7 Material-UI vs Bootstrap 377.1 Bootstrap . . . . . . . . . . . . . . . . . . . . . . . . . . . . . . . . . . . . . 37
7.1.1 Pros . . . . . . . . . . . . . . . . . . . . . . . . . . . . . . . . . . . . 387.1.2 Cons . . . . . . . . . . . . . . . . . . . . . . . . . . . . . . . . . . . . 38
7.2 Material Design . . . . . . . . . . . . . . . . . . . . . . . . . . . . . . . . . . 397.2.1 Pros . . . . . . . . . . . . . . . . . . . . . . . . . . . . . . . . . . . . 397.2.2 Cons . . . . . . . . . . . . . . . . . . . . . . . . . . . . . . . . . . . . 39
7.3 Conclusion . . . . . . . . . . . . . . . . . . . . . . . . . . . . . . . . . . . . 40
8 FTP Server vs HTTP Server 408.1 FTP . . . . . . . . . . . . . . . . . . . . . . . . . . . . . . . . . . . . . . . . 41
8.1.1 Pros . . . . . . . . . . . . . . . . . . . . . . . . . . . . . . . . . . . . 418.1.2 Cons . . . . . . . . . . . . . . . . . . . . . . . . . . . . . . . . . . . . 42
8.2 HTTP . . . . . . . . . . . . . . . . . . . . . . . . . . . . . . . . . . . . . . . 448.2.1 Pros . . . . . . . . . . . . . . . . . . . . . . . . . . . . . . . . . . . . 448.2.2 Cons . . . . . . . . . . . . . . . . . . . . . . . . . . . . . . . . . . . . 46
8.3 Conclusion . . . . . . . . . . . . . . . . . . . . . . . . . . . . . . . . . . . . 478.4 Is There a Better Solution that Outperforms Both? . . . . . . . . . . . . . . 47
9 Problems during Development 479.1 Grid Component . . . . . . . . . . . . . . . . . . . . . . . . . . . . . . . . . 479.2 Python Application . . . . . . . . . . . . . . . . . . . . . . . . . . . . . . . . 47
10 Conclusions 48
v

1 Introduction
With a huge amount of pictures to look into and analyze on a daily basis, it is sure thatit would be a challenge for German Aerospace Center (DLR or Deutsches Zentrum furLuft- unde Raumfahrt) EDEN ISS project to browse through every single one of them.An ideal image summary should contain as many informative regions as possible on agiven space[19]. To make this process easier, more efficient, less painful and to makethe pictures more observable, we needed to address this problem. Picture collage makertools provide with one simple layout using direct code compilation[3] or a ready-to-useapplication that saves a picture created out of a collage of pictures[88]. However, thepurpose of the application we will talk about is solely for observation, so we do not save,create, or add anything to the pictures as the information is already attached to each ofthem by default. We also need different layouts for an easier and versatile observation.
The application is web-based, which itself allows for a more versatile observation, not-dependent on the location of the person using it. There is no log-in authentication re-quired and nor does one have to work at DLR to have access to it, so it is a picture-observation solution made simple for everyone who wants to use it.
DLR has a dedicated server containing information and data regarding the EDEN ISSproject. The server provided by DLR is a File Transfer Protocol (FTP) server. Locatedinside it, is a complex folder structure, containing data related and not related to ourpicture observation application. The server has been there since the EDEN ISS teamwas founded and it is full of data, but we only need to access those relevant to us, i.e.images.
However, the FTP server was not fully compatible with our project programming lan-guages and the nature of the server itself did not allow for a good solution of gettingthe pictures[2], so how could we access them and later server them to display in theGraphical User Interface (GUI)? Usually, all the data that can be served in a web-basedapplication is provided from an HyperText Transfer Protocol (HTTP) server[67]. But howcould we connect two servers (FTP and HTTP) with each other and get the useful infor-mation while also maintaining a good performance? Since our application is to be usedby everyone, we do not need to create a authentication screen, which FTP requires[67]and for HTTP it is not mandatory[67]. How should we also handle this issue? Further-more, when using an image from the FTP server, there exists no meta-data[9], just theraw binary, but HTTP server provides meta-data[9], which is useful to us when trying toretrieve the latest picture.
2 Requirements
DLR EDEN ISS team provided the project with a list of requirements with the followingstructure:
1. General Requirements:
• Size of visualisation adaptable to screen size
• Should be possible to put on website, i.e. web-application
• Programming language up to me
2. Picture visualization task requirements:
1

• Take pictures from DLR FTP server
• Visualize pictures from last day as default
• X various layouts to choose (”button” to switch layouts)
• Picture should stay X seconds (would be good to set number in GUI) andmove afterwards on screen to different location like slideshow or disappear incase not all pictures displayed
• Create automated timelapse with the last X pictures (choose picture + dedi-cated menu)
• If you click on picture in layouts, this picture should pop up as new layer overthe whole screen and in background everything stays the same
Everything part of the thesis that is not mentioned in the requirements, is an extra part ofthis application.
3 Website Design
Coming up with a perfect design for your website is always difficult, all the more when onedoes not come from a design-related background. This section of the thesis thoroughlyexplains the design aspect of the web-application and how it came to be. Before startingthe project, there was already a thought prototype of what it would look like. The mostimportant design principle followed was minimalism. Ever since the beginning, minimal-ism is what shaped the way of thinking and the design of the web-page. The reason whyminimalism was the main focus is because the website was meant to be simple, easy tofollow, and not make the user tired when looking at it for a long time.
3.1 Top Bar Menu
During the first phase of the design prototype, it was thought to use a navigation menu.There are limitless options to display a bar menu these days, but it all comes down tothe context of use. Since we wanted our application to be simple and intuitive, it wasdecided that a modal[37] component that could be shown and hidden with the use of abutton or hovering feature was a no go. So, after deciding to be an always shown com-ponent, the question arises: Where should it be located on the screen? The two obviousoptions available are on the top or on the side of the screen. After further evaluation andinvestigation on the entire application design, it was best thought to be displayed on top.If it would be located on the side, then we would need a way to hide it so to not obstructthe observation and it would go back to just being a modal component again. On the topof the screen we could ”hide” it by just scrolling down. One would say that you can alsoscroll horizontally with various ways, but scrolling vertically is always going to be easier,intuitive, and have less steps to do so.
It was also thought as best to use a simple, one-colored navigation bar component takingthe entire width of the web-page in order for the design to be uniform. The color was de-cided to be a blue menu with white text to have a colorful look, but with a good contrast soit does not hurt the eye, e.x. when using yellow background and red text. All the buttonslocated inside the navigation bar that can change the view of the page in any way wouldhave a white outlined border, whereas the buttons that would not do such thing would not
2

have the border. This was done to distinguish different types of buttons used and try tocreate an artificial intuition of the bar menu. Using this logic HOME, {folders selected /total nr. of folders}, TIMELAPSE buttons are outlined, and Layout : {layout name}are not.
Figure 1: Top Application Bar
3.2 Time-Lapse
It was decided that the TIMELAPSE button would be part of the top menu and not opena new website tab, because opening a completely new tab would increase the complexityof the project and require more effort connecting components, attributes, and states inthe background. Furthermore, it is also required to open an additional server endpoint forthe new page. But more importantly, our way is easier both in terms of accessibility andquickness. It would take too much time for the user to switch to different tabs and if thereare many tabs opened, it is hard to keep count of what the actual web-page tabs contain.This way, it allows the user to have access to the whole features of the application evenin full-screen mode, the mode our application is supposed to be used in.
When one goes to the time-lapse section, you can see that the blue top bar is still visible.However, all the buttons but HOME and TIMELAPSE are missing now, because theyhave no use in this part of the application.
There were 3 requirements thought for this particular time-lapse implementation:
• To be able to choose the folder/camera
• To be able to modify the speed of the time-lapse
• To be able to modify the number of pictures
Thus, there are three inputs located underneath the top bar that are part of time-lapsecreation tool. Since everything below the blue top bar is a white space, it was thought togive these buttons an blue outline. The outline would help people to see how big are thebuttons and what is the area of input, and the blue color to match with the overall themeof the application. Lastly, there is the Create button that was given the blue backgroundand the white text to visually differentiate the functionality from the input fields and alsoto match the theme.
Since this section was not going to be used for observation purposes and only to create aquick time-lapse for presentation, the inputs and the button did not need to be integratedin the top bar. Furthermore, since there are two buttons in the top bar menu, HOME andTIMELAPSE, and the folder drop-down menu size is dynamically adapted to the foldername and length, it would be better to have as much horizontal space as possible fordifferent window sizes. Under all the components, there is enough space for the GraphicsInterchange Format (GIF) to be displayed in the center of the page, more specifically1920x1080.
Since one might experiment how the time-lapse looks and behaves with different inputsand picture numbers, it was thought not to automatically download the time-lapse, but
3

to let the user decide by themselves. If one wants to download it, it can do it save it asa normal internet image with the option: ”Save image as...”. If an automatic downloadwould start save it locally in the user’s machine after creation, then the user would needextra steps to play the file. Assuming the best case possible, the user needs an extraclick once the file has been downloaded. Assuming the worst case possible, the user hasa machine which does not have the right video player or the file is not supported by it.Then the user would need to download a proper video player adding more possible extrasteps. With this method, the application is dependent on the user to function properly asit should. But in our case they can see the time-lapse in the web-page already.
The picture below shows the thought use case of the time-lapse, scrolling down to hidethe top bar and to work with different inputs and still see most of the useful information inthe GIF.
Figure 2: Time-Lapse Section
3.3 Image Slideshow
The image slideshow appears whenever you click a picture from the current layout. Allthe images that appear in the different layouts are the latest pictures retrieved from theirparticular folder nested in the HTTP server. Whenever you click a picture that is cur-rently displayed, an image slideshow is opened that makes you see all the images inthat specific folder that the picture was taken from and it occupies the entire screen (i.e.full-screen).
It has a minimalist look that displays the whole picture and a blue X on the top-right cor-ner. The X was decided to be blue for consistency and usually, for modal parts of Reactapplications, it is located on the top-left side, but this was changed with the customer’srequest. This button is always shown, overlapping the image, for easier access and fasterclose of the component.
Image slideshow also contains small arrows that spawn from top to bottom with a small
4
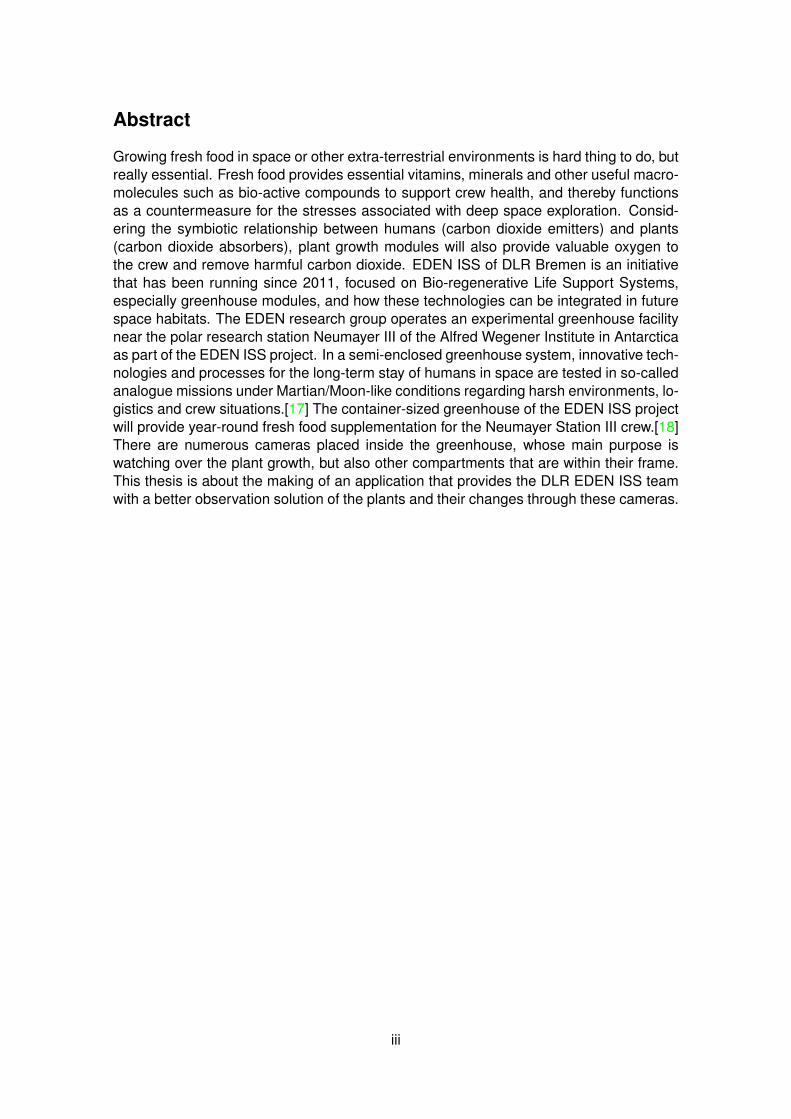
width that are used to control the flow direction of the slideshow. The arrows are alwaysshown and their clickable span only appears when you hover your mouse over to thecorners of each image. This was done to make sure to get rid small ”nuisances” whentrying to look at the picture, and also because it is pretty intuitive for them to be on theside. When the slideshow opens for the first time, it shows you the image (latest one)that you currently clicked. All the other images are located on the left side to make it asintuitive as possible so you have to use the left-side arrow in the beginning.
Besides the virtual arrows located on the screen, it was made possible so the user couldalso use the keyboard physical arrow keys. This way it give the user more options touse the image slideshow depending on their preference. One would think that since thevirtual arrows need to be hovered with the mouse to appear and disappear and hencemakes the use of the mouse slower than the physical keys. However, this is not the casewith this special component. Once you hover around the area of the virtual arrows, if youdo not move the mouse away, they stay displayed and you can click them as fast as youcan. The real reason why the keyboard physical arrows are faster is that it is easier tojust click them as fast as possible, which you could also do with the mouse, but it wouldbe harder and inconvenient as the mouse would be hard to keep in a fixed position andoccasionally move from the virtual arrows.
The slideshow is stripped off of any animations at all, to make the transition phase as fastas possible and the user can pass scroll past a lot of images in a shorter time span usingthe two options stated in the paragraph above.
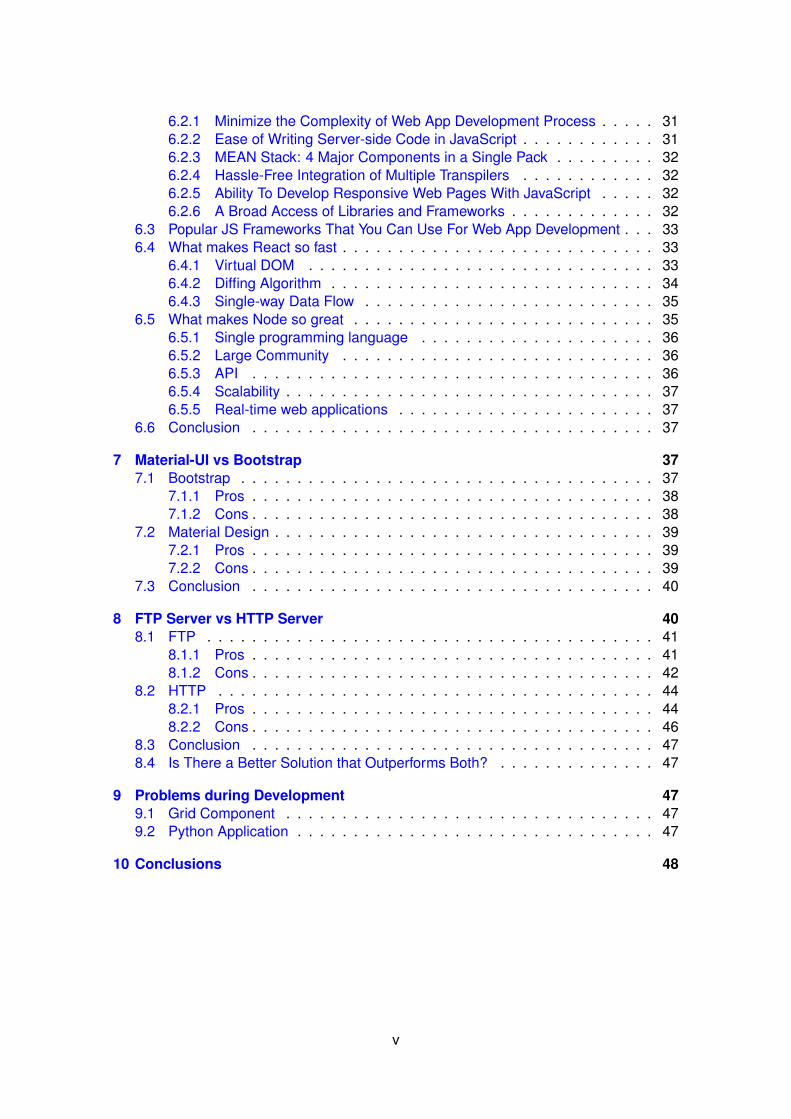
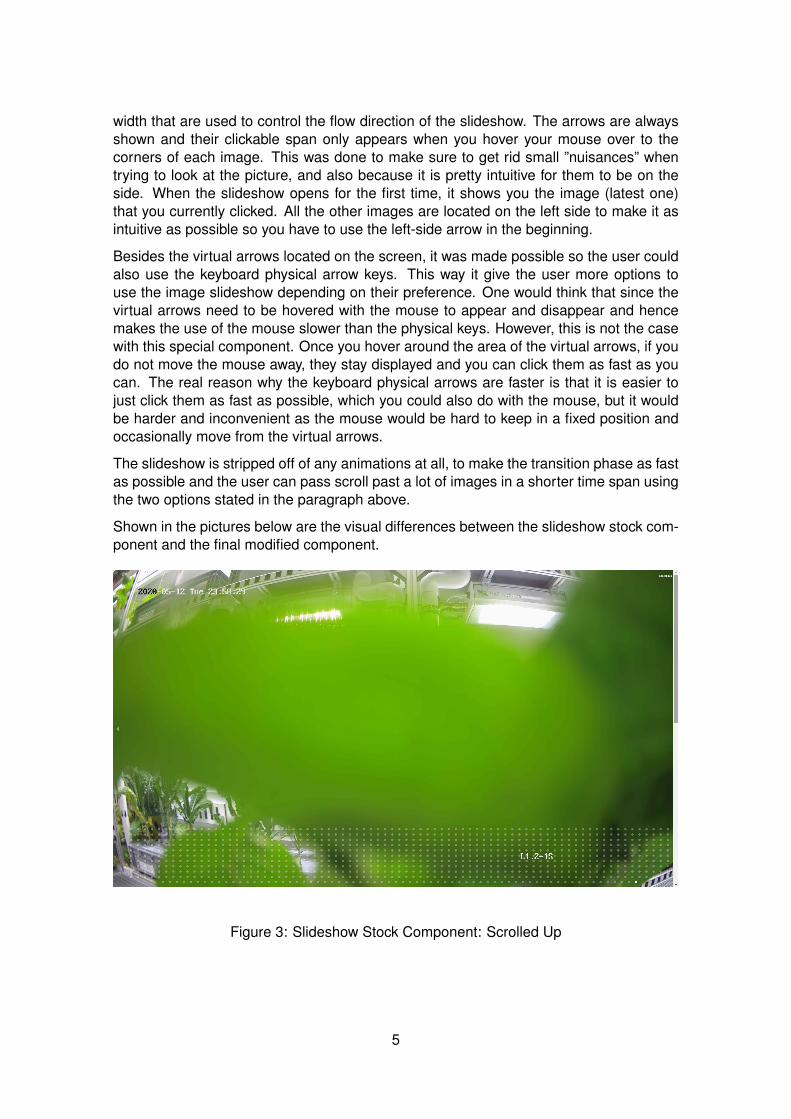
Shown in the pictures below are the visual differences between the slideshow stock com-ponent and the final modified component.
Figure 3: Slideshow Stock Component: Scrolled Up
5
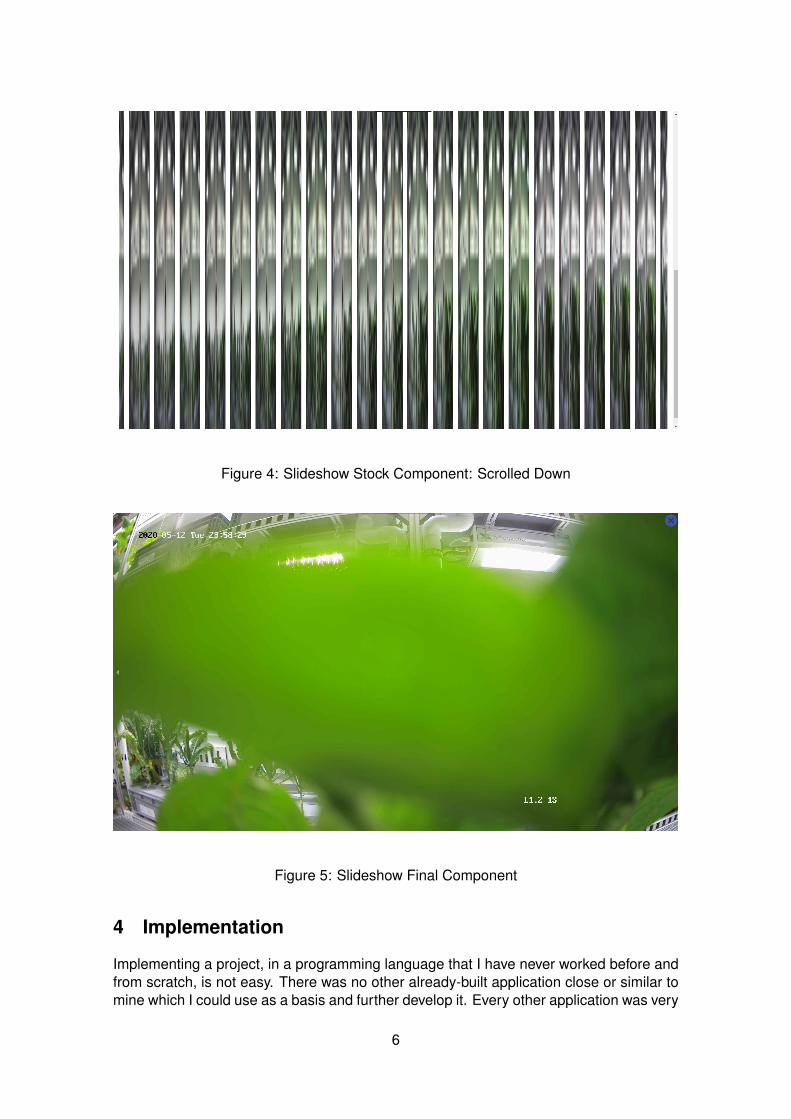
Figure 4: Slideshow Stock Component: Scrolled Down
Figure 5: Slideshow Final Component
4 Implementation
Implementing a project, in a programming language that I have never worked before andfrom scratch, is not easy. There was no other already-built application close or similar tomine which I could use as a basis and further develop it. Every other application was very
6

specific to their own requirements as this application was very specific to the DLR EDENISS team. In this section I am going to explain how the logic in my application works andhow everything is connected together.
4.1 Image Retrieval
One of the biggest challenges of this project was to come up with a way to find the latestimages needed for display. Having to do with a complex folder structure and hundreds ofpictures inside them whilst still having a decent performance, complicated things. Thereare many ways to do this, but it all comes down to being efficient and coming up with agood solution that is relatively fast for this kind of task.
It is certain that one of the slowest ways to get all the single right pictures in this kind ofstructure would be with the use of loops. A recursive way of accessing the folders andthe pictures would outperform the loop way in terms of performance any day of the week.In our case, we use a recursive way with the help of an inside forEach() loop function.
First of all, we decided to use express[48], since it is the most commonly used frameworkfor developing Node.js and helps in fast-tracking development of server-based applica-tions[63]. Since the customer’s FTP server is on local storage and we are working withpictures, which get automatically updated also in local storage, we can make use of amiddleware[57] with the function static()[49], part of express, to provide them[56].
This middleware only executes second in the middleware stack. We have yet another onewhich executes for every request that comes. This middleware handles all the possiblemissing headers to make the React client connect to the server from any port and makedifferent requests. With each request to the server, we attach a header to the response byusing res.header(), which is an alias of res.set()[50]. After this middleware is executed,we make sure to execute the second middleware by providing the next() function at theend of it and the order of the functions in the code matter, too[58].
We bind and listen for connections on a specific host and port, which in our case is 5000,and we do that using listen()[51] function and print a sentence letting the user knowabout which port is occupied with console.log()[47].
We have 2 endpoints in our server, one to the default route, i.e. ”/”, and the other one is aroute to path ”/folder”. The first endpoint’s functionality is to provide a JavaScript ObjectNotation (JSON)[16] object with all the latest images and their specific folder. The secondendpoint’s functionality is to provide all the images of a certain folder input.
Since all the images located in the local FTP server have a certain name pattern, con-cretely ”HDCAM {name of camera} {date of creation} {time of arrival}”. The nameof the camera is also the name of each folder. In order to be able to find the latest pic-ture we set a variable that holds ”{year}{month}{day}”. The variables are set using theobject Date()[77] provided by JavaScript. We always get the date one day before thecurrent day, as our application restarts at 06:00:00 and usually the pictures are uploadedto the server at 23:58. After getting the right date, we use a modification of a functionprovided open-source called walkSync()[80].
The function starts at the top of the directory, provided at its input, and checks all the con-tents of that directory with a forEach() function. The directory is read using readdirSync()[53]. Every content is checked whether it is a directory or weather it is not using isDirectory()[54]. In case the content is a directory, then we call the walkSync() function again, with
7

the new updated path to ”{top directory} + / + {content that is directory}”. Automat-ically it scans for every content in this new directory. For every content that is not adirectory, we check if it contains our specified date using includes()[79] function, and thefile ends with ”.jpeg”, with the endsWith()[78] function. If a match has been found, thenwe push an object using push()[14] containing this image and the folder it was found from:”image : {image file name}” and ”folder : {current directory}”. After, we remove a cer-tain number of characters depending on the path length using substr()[15] to filelist,which will be our return value at the end of the function. At the end of the GET requestof our root path endpoint, we return a response using walkSync({path to images}) thatwe format using json()[52] function.
The other endpoint to path /folder uses a more simplified version of the walkSync(). Wedo not make use of the date variable here, and we don’t use the function recursively. Inthis case, for the directory specified in the request, we scan every content if it is a file,using isF ile()[55] function, and if that content ends with ”.jpeg”. If a content like that hasbeen found, we push it, after removing a certain number of characters depending on thepath length, to our array filelist that we return at the end of the function. We send thearray back with a request by sorting and formatting it to JSON notation.
4.2 Layout Custom Components
As mentioned before, the layouts were not based on any ready-to-use components pro-vided by Material-UI or Bootstrap. They are created by making use of the different com-ponents defined as:
• < Container/ >
• < Column/ >
• < Row/ >
• < Cell/ >
They are located in separate files and always ready to use. I will explain each of themdown below.
4.2.1 Container
The use of the < Container/ > component was to transform the entire screen (withoutincluding the top bar) into a usable < div/ >[11]. The point in doing this was to make surethat the screen could be worked on by the other components used inside it. This page-created < div/ > contained a simple style comprised by a height attribute consisting ofthe value 100vh (100% of < div/ > vertical height), and a display attribute consisting ofthe value flex. As an input, the < Container/ > component has the entire applicationprops. Inside the < div/ >, we insert props.children as they can be passed down andused by the < Cell/ > component where the images are made sure to be rendered. Themost important part of the layout creation is this particular flex parameter that allowed usfor an easier way to work with the other components. It enables a flex-context for all itsdirect children[10]. The < Container/ > is an arrow function that returns the < div/ >,which we export to use in other files as a component.
8
4.2.2 Column
After the parent, < Container/ >, made possible to inherit the flex attribute and alsomade the screen into a giant < div/ >, we always use the < Column/ > component asthe next child. The < Column/ > component also consists of a simple style where westore 3 attributes: a flex variable, display : ”flex”, and lastly flexDirection : ”column”.The last attribute is the most important attribute, from which we have named our compo-nent from, and makes sure that the multiple < div/ > created by this component followthe column pattern style, i.e. top to bottom. As input it takes an object comprised byan integer, which accounts for the flex attribute inside the style, and the children of theprops, passed down by the < Container/ >. The < Column/ > component is also anarrow function that returns the < div/ >, which we later use in other files.
4.2.3 Row
The < Row/ > component is almost identical to the < Column/ > component, but witha small difference. It also creates a simple < div/ > with a simple style. The stylecontains 3 variables: a flex attribute which is set dynamically from the input, display :”flex”, and flexDirection : ”row”. The last variable is the one that defines the nameof the component and is the most crucial one for it. It enables the different < Row/ >components to follow a pattern with the logical direction of a row, i.e. items are arrangedin a left-to-right manner. As input, it takes flex, a variable which is used to determine thestyle attribute as mentioned above, and children, a variable which comes from a parentand is stored inside the < div/ > created. The < Row/ > component, just like the othercomponents so far, is also an arrow function that returns a < div/ > usable in other files.
4.2.4 Cell
The < Cell/ > component takes the name from its particular functionality as well and isfundamentally different from all three above components. Its purpose is a container forimage storing and slide-show opener. It has 3 inputs: url, onClick, and folder. As anoutput it creates an even simpler < div/ > with nothing inside it. It only has a style thatdefines the < div/ > and the React event handler called onClick(). First, we initializethe style with flex : 1 and border : ”1px solid white” attributes. The reason we alwaysattach a static value to flex is that the < Cell/ > is the very last component, inside othernested ones (containing < Container/ >, < Column/ >, and < Row/ > used for thelayout creations), and it is always used alone with no other components alongside it. Thereason we attach a border attribute is to differentiate the layout images from each otherand create that white-grid when appeared in a layout. To make the pictures ”appear” inthe cell and be rendered in the front-end part, we set the value of the backgroundImagestyle attribute to the particular picture. This attribute uses the url variable from the input,which is the path of the image that comes from the back-end (our HTTP server). Aftersetting backgroundImage, we also set the backgroundSize to ”100% 100%”, i.e. we forcethe image to fill 100% of the < div/ > container top to bottom, and also 100% of the< div/ > from left to right. With this last one, we are done with the style. The onClick()event handler is an arrow function that takes as input the folder variable that comes fromthe < Cell/ > input, too, and makes sure that when each image is clicked in the front-endit opens a slide-show of images of that particular folder. This component is also exportedfor uses outside the file.
9

4.3 Layout Creation
In the previous subsection we introduced our custom-made components consisting of< Container/ >, < Column/ >, < Row/ >, and < Cell/ >. In this subsection we aregoing to show an example on how to create a layout using those components and theirproperties. Our example is going to consist on how our default layout is created.
Our application’s default layout arranges the pictures in a 4x4 manner. Before everythingelse, we make sure to wrap the available working space under the top bar menu in a< div/ > created by the < Container/ > component.
Figure 6: Container (and also Column) Wrapping
This makes sure that every other < div/ > being created inside this workable spaceinherits the flex property from their parent (i.e. < Container/ >).
Then, we work our way through using the properties of the < Column/ > and < Row/ >.As stated before, we always use < Column/ > component int the space wrapped by< Container/ > (the picture representation would look the same as Fig.6, because theyoverlap each other and take the same amount of space). This allows us to make sure thatthe other < div/ > created inside it get organized in a column-way, i.e. top-to-bottom.
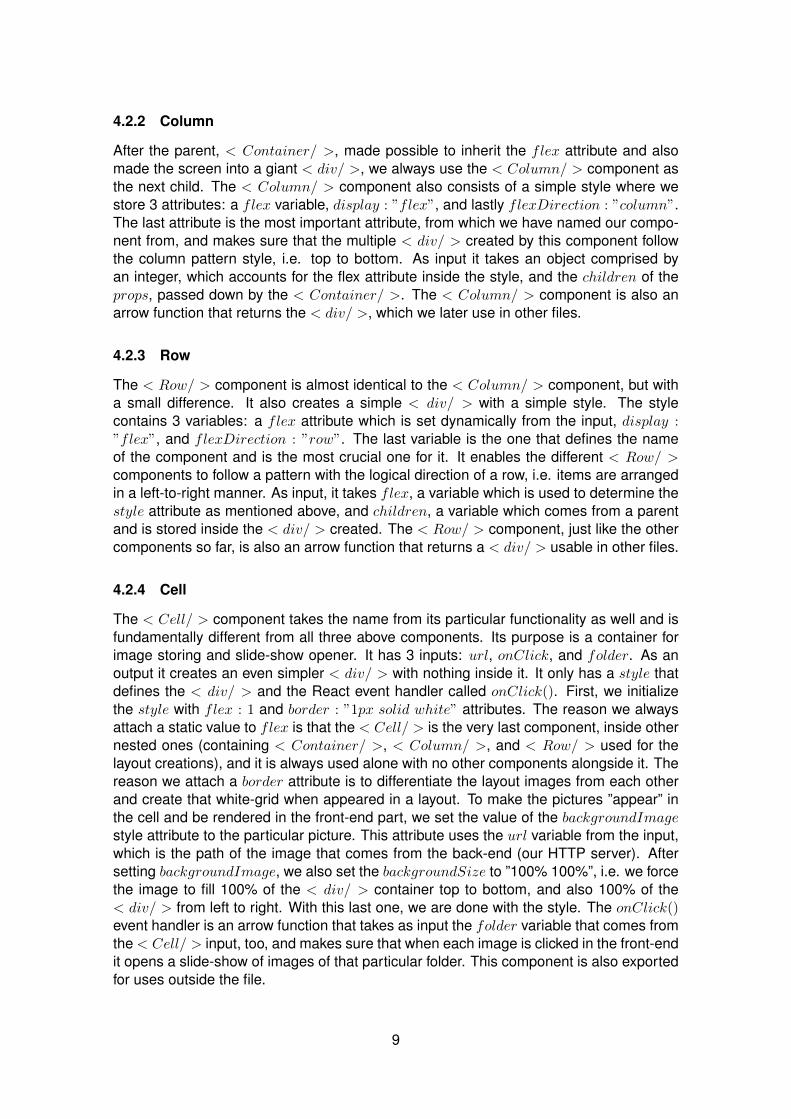
Knowing this, we build 4 different < div/ > rows with the same size using the < Row/ >component and that size is adjusted by the different flex values that we give it.
10
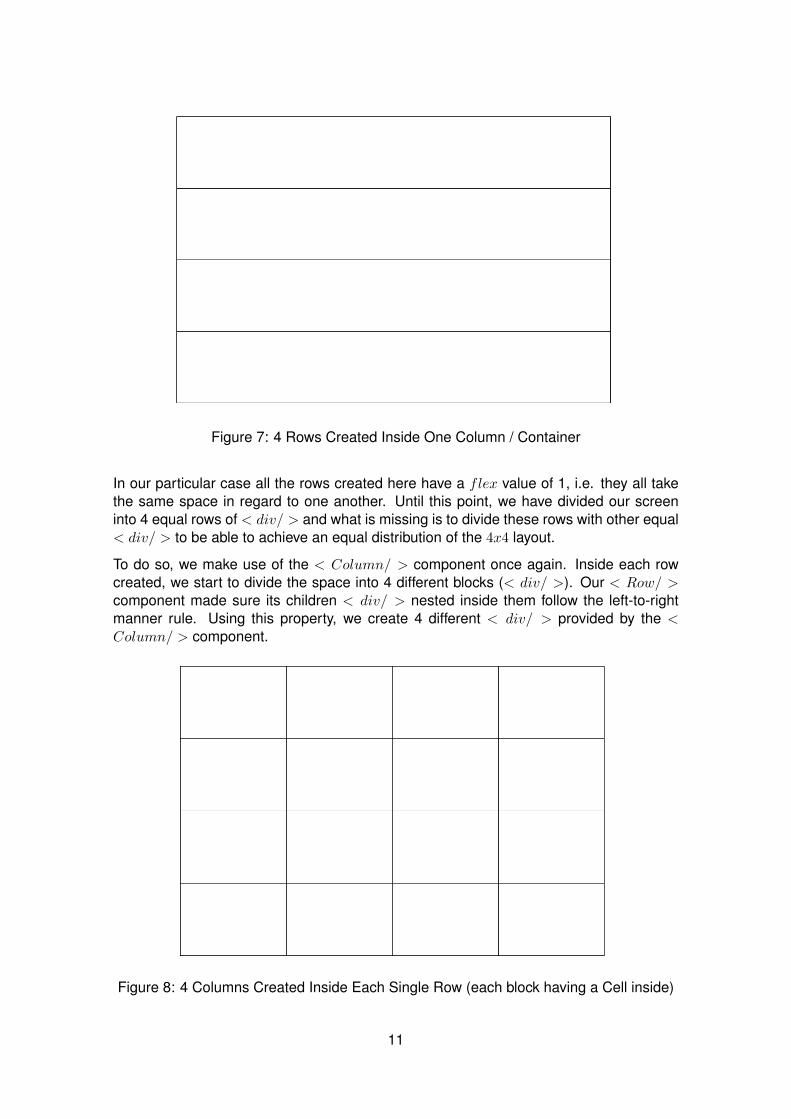
Figure 7: 4 Rows Created Inside One Column / Container
In our particular case all the rows created here have a flex value of 1, i.e. they all takethe same space in regard to one another. Until this point, we have divided our screeninto 4 equal rows of < div/ > and what is missing is to divide these rows with other equal< div/ > to be able to achieve an equal distribution of the 4x4 layout.
To do so, we make use of the < Column/ > component once again. Inside each rowcreated, we start to divide the space into 4 different blocks (< div/ >). Our < Row/ >component made sure its children < div/ > nested inside them follow the left-to-rightmanner rule. Using this property, we create 4 different < div/ > provided by the <Column/ > component.
Figure 8: 4 Columns Created Inside Each Single Row (each block having a Cell inside)
11
These also have to make sure that are spread equally inside each row, so we once againuse the flex attribute to our advantage, with each < Column/ > having a flex value of1.
For every < Row/ > and < Column/ > that we have created, since all their flex attributevalues are always 1 and there are 4 instances of each (rows and columns components),1 + 1 + 1 + 1 = 4, so that means each of them takes 1 / 4 of the space[29] and ultimatelywe have the perfect 4x 4 grid layout. Now what is left is filling the missing content withthe pictures that come from the back-end. For that we use our Cell/ > component, madespecifically for this purpose. Inside each grid block we create a < div/ > of < Cell/ >,meaning a total of 16 < div/ > and our layout is complete and ready for observation.With the < Cell/ > insertion the layout would look the same as in Fig.8.
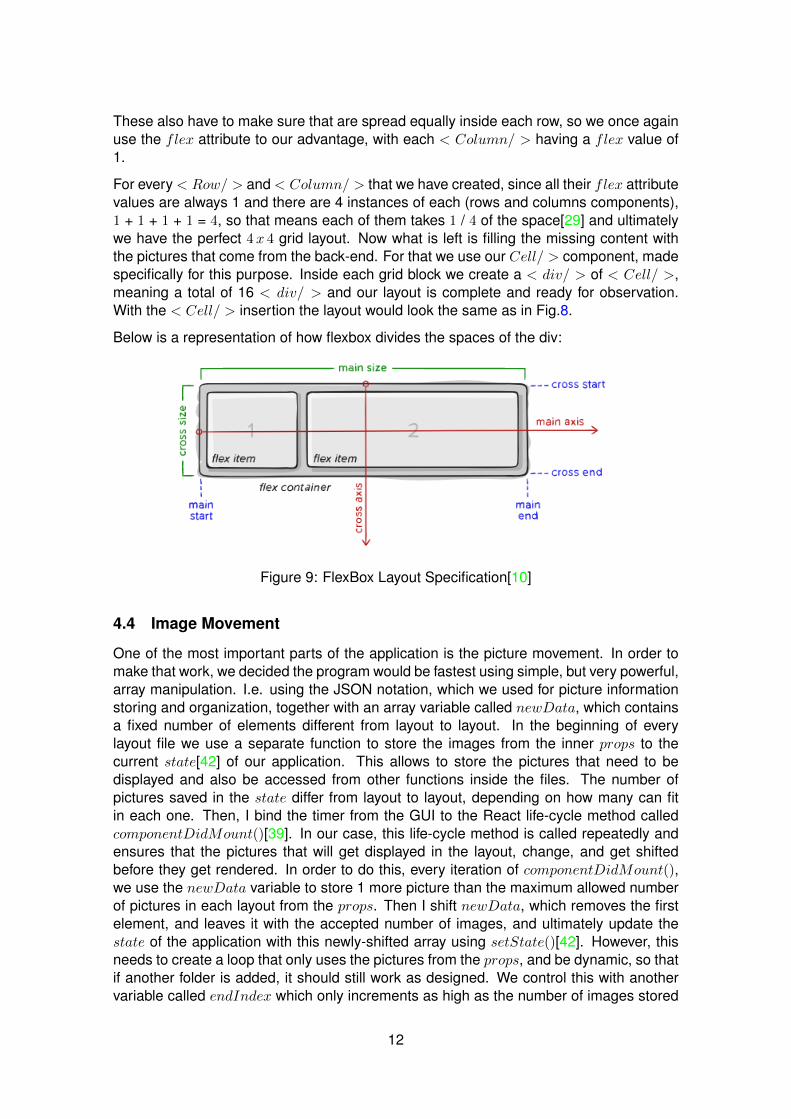
Below is a representation of how flexbox divides the spaces of the div:
Figure 9: FlexBox Layout Specification[10]
4.4 Image Movement
One of the most important parts of the application is the picture movement. In order tomake that work, we decided the program would be fastest using simple, but very powerful,array manipulation. I.e. using the JSON notation, which we used for picture informationstoring and organization, together with an array variable called newData, which containsa fixed number of elements different from layout to layout. In the beginning of everylayout file we use a separate function to store the images from the inner props to thecurrent state[42] of our application. This allows to store the pictures that need to bedisplayed and also be accessed from other functions inside the files. The number ofpictures saved in the state differ from layout to layout, depending on how many can fitin each one. Then, I bind the timer from the GUI to the React life-cycle method calledcomponentDidMount()[39]. In our case, this life-cycle method is called repeatedly andensures that the pictures that will get displayed in the layout, change, and get shiftedbefore they get rendered. In order to do this, every iteration of componentDidMount(),we use the newData variable to store 1 more picture than the maximum allowed numberof pictures in each layout from the props. Then I shift newData, which removes the firstelement, and leaves it with the accepted number of images, and ultimately update thestate of the application with this newly-shifted array using setState()[42]. However, thisneeds to create a loop that only uses the pictures from the props, and be dynamic, so thatif another folder is added, it should still work as designed. We control this with anothervariable called endIndex which only increments as high as the number of images stored
12

in props. And when it does go until the limit of the props, we reset it to 0, i.e. the startindex of props again. This process gets repeated indefinitely and creates a loop in itselfwithout the need of a normal loop, but by making use of the application life-cycle methodsof React.
However, componentDidMount() cannot, and does not handle everything. Another life-cycle function called componentDidUpdate()[40] is needed for the job. With this built-infunction we handle the changes in our application. Meaning, every time the end userincrements or decrements the timer, or somehow the pictures have retrieved from thefolders have changed, this function comes to play. What it does is that it takes as aninput the previous props and the previous state of the application and compares them tothe current ones. It gets called repeatedly, like componentDidMount(), but in case thereare no changes, it does nothing. And when there changes, it handles and updates themaccordingly.
We also make use of another React life-cycle method called componentWillUnmount()[41] that handles things when the application is stopped. Our block of code that is boundto an interval will keep executing until it is stopped. We make sure that when stop-ping/exiting the application we clear the interval to make it stop, otherwise it will run in thebackground until the memory is consumed. It is really important that we shut down thingscorrectly when the program is supposed to be turned off so we have no leftovers.
Below is a diagram of how React rendering and life cycles work:
Figure 10: React life-cycle methods diagram[70]
4.5 Image Slideshow
For the creation of our image slideshow we used a combination two powerful components:< Dialog/ >[23] and < Carousel/ >[69]. Out of these two, the most important one isthe latter. It is what the user sees and interacts with when image slideshow is opened.In the website design section it was said that we required the cleanest possible UI (userinterface), so that the user could see the images without obstacles on the way. Thecomponent itself comes with a lot of options already provided and a lot more to modifyand to insert. In our case, we needed to remove these already-provided options, modifythe animations, and add some functionality parameters to < Carousel/ >.
13
4.5.1 What Was Removed
We removed, what I would say was the most obstructing parameter of all of them, theindicators. The indicators are a dynamic parameter that overlap the image itself trying togive you a visualization with little transparent dots of how many images the slideshow hasand which one you are currently seeing. In very different cases they can just take a smallhorizontal line of space to occupying the whole screen. In our case, they take a signifi-cantly big block of image space nearly half of the screen, considering how many picturesare inside each folder. So, to remove them, we used a component built-in command:showIndicators = {false}.
Another thing that was removed is a little text, shown on the top-right of the application,that used to display ”{current image number} of {total number of images}” of the currentopened image slideshow. It is a significantly small text, but because in that top-rightcorner we have located our blue X button, it was best decided to remove it, since it hadno real functionality after the button overlap. In order to achieve this, we did: showStatus= {false}.
The other thing that was removed are the thumbnails. These were small presentationsof the following images that were located on the far bottom side of page. They wereregarded as inconvenient and a waste of space for the following reasons:
• Considering our images’ resolution, they would be far too small and hard to tell, onlyhaving the color as a differentiation factor.
• They are supposed to be used in a case with not a lot of images in the slideshowti make it easier to fit them in a straight horizontal line, otherwise they would behidden from sight.
• From their stock behavior, we noticed that the thumbnails that could be displayedwas dependent on the screen width, thus making the use of them inconsistent.
• Since our image slideshow is supposed to cover the whole screen for a better obser-vation of each image, and the thumbnails appeared in the bottom side, a scroll barappeared whenever we enabled them, making the image in word slightly smaller,so not the best observation efficiency.
Thus, the image thumbnails under the slideshow were removed by using the followingcommand: showThumbs = {false}.
The following modification takes part in the animation area. The developer made surethat his slideshow could have different transitions times made for everyone. By default,the images have a significant transition time that in our case appears as a black screenbeing filled by the image coming from left of right direction. This makes it hard to focusand tires the mind easily with the moving images. So, we completely removed it, so asnot to have a transition time between them and each image just appears on top of the lastone after the user switches. This also creates a sort of a time-lapse illusion if you switchthem fast enough and you could see even the small changes that were made to everyplant or any other area of the picture. This was made possible by modifying the transitiontime: transitionT ime = {0}.
14
4.5.2 What Was Added
As discussed in the website design, the physical keyboard arrows are significantly fasterthan the virtual ones, so the first and last thing ever added to the < Carousel/ > imageslideshow component was the keyboard functionality. It makes possible to interact withthe component with the keyboard keys and the command for what is useKeyboardArrows= {true}.
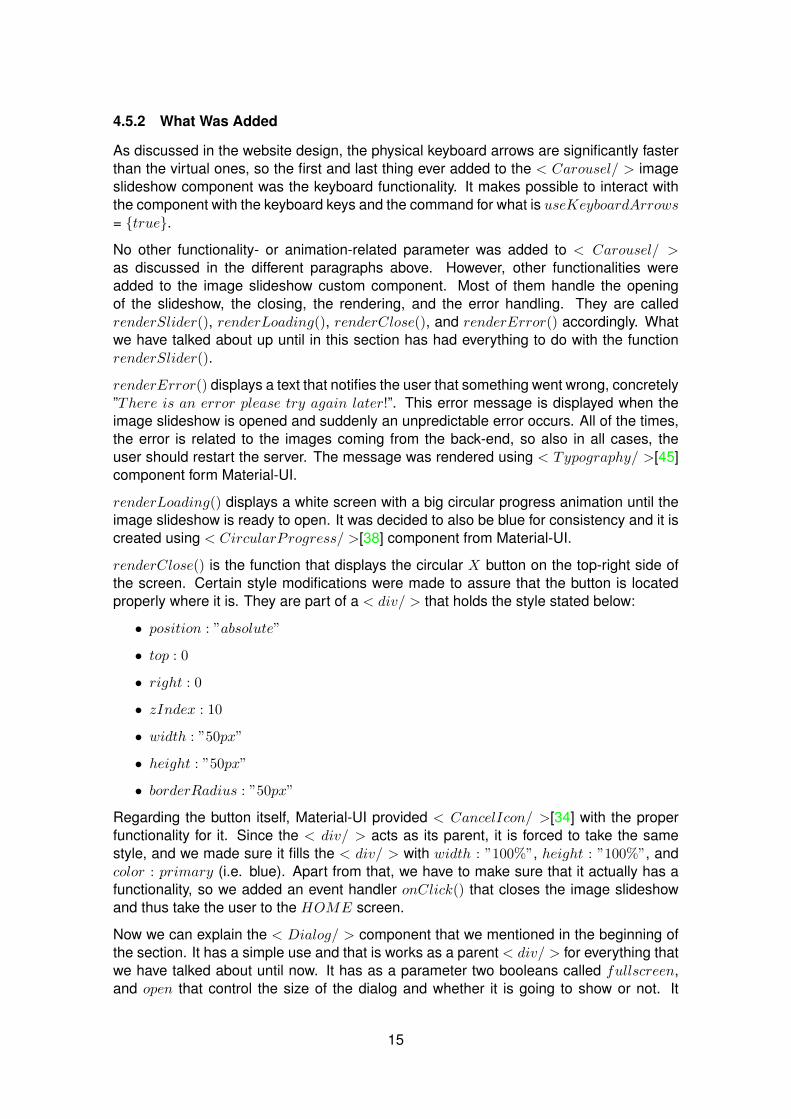
No other functionality- or animation-related parameter was added to < Carousel/ >as discussed in the different paragraphs above. However, other functionalities wereadded to the image slideshow custom component. Most of them handle the openingof the slideshow, the closing, the rendering, and the error handling. They are calledrenderSlider(), renderLoading(), renderClose(), and renderError() accordingly. Whatwe have talked about up until in this section has had everything to do with the functionrenderSlider().
renderError() displays a text that notifies the user that something went wrong, concretely”There is an error please try again later!”. This error message is displayed when theimage slideshow is opened and suddenly an unpredictable error occurs. All of the times,the error is related to the images coming from the back-end, so also in all cases, theuser should restart the server. The message was rendered using < Typography/ >[45]component form Material-UI.
renderLoading() displays a white screen with a big circular progress animation until theimage slideshow is ready to open. It was decided to also be blue for consistency and it iscreated using < CircularProgress/ >[38] component from Material-UI.
renderClose() is the function that displays the circular X button on the top-right side ofthe screen. Certain style modifications were made to assure that the button is locatedproperly where it is. They are part of a < div/ > that holds the style stated below:
• position : ”absolute”
• top : 0
• right : 0
• zIndex : 10
• width : ”50px”
• height : ”50px”
• borderRadius : ”50px”
Regarding the button itself, Material-UI provided < CancelIcon/ >[34] with the properfunctionality for it. Since the < div/ > acts as its parent, it is forced to take the samestyle, and we made sure it fills the < div/ > with width : ”100%”, height : ”100%”, andcolor : primary (i.e. blue). Apart from that, we have to make sure that it actually has afunctionality, so we added an event handler onClick() that closes the image slideshowand thus take the user to the HOME screen.
Now we can explain the < Dialog/ > component that we mentioned in the beginning ofthe section. It has a simple use and that is works as a parent < div/ > for everything thatwe have talked about until now. It has as a parameter two booleans called fullscreen,and open that control the size of the dialog and whether it is going to show or not. It
15
also has an event handler called onClose() that handles the closing of the slideshow andupdating the state in a correct way.
open boolean, loading boolean, error boolean, onClose() event handler, and all the pic-tures variables that are used in ”SlideShow.js” are taken from the application props andare controlled by ”App.js”.
4.6 Top Bar Menu
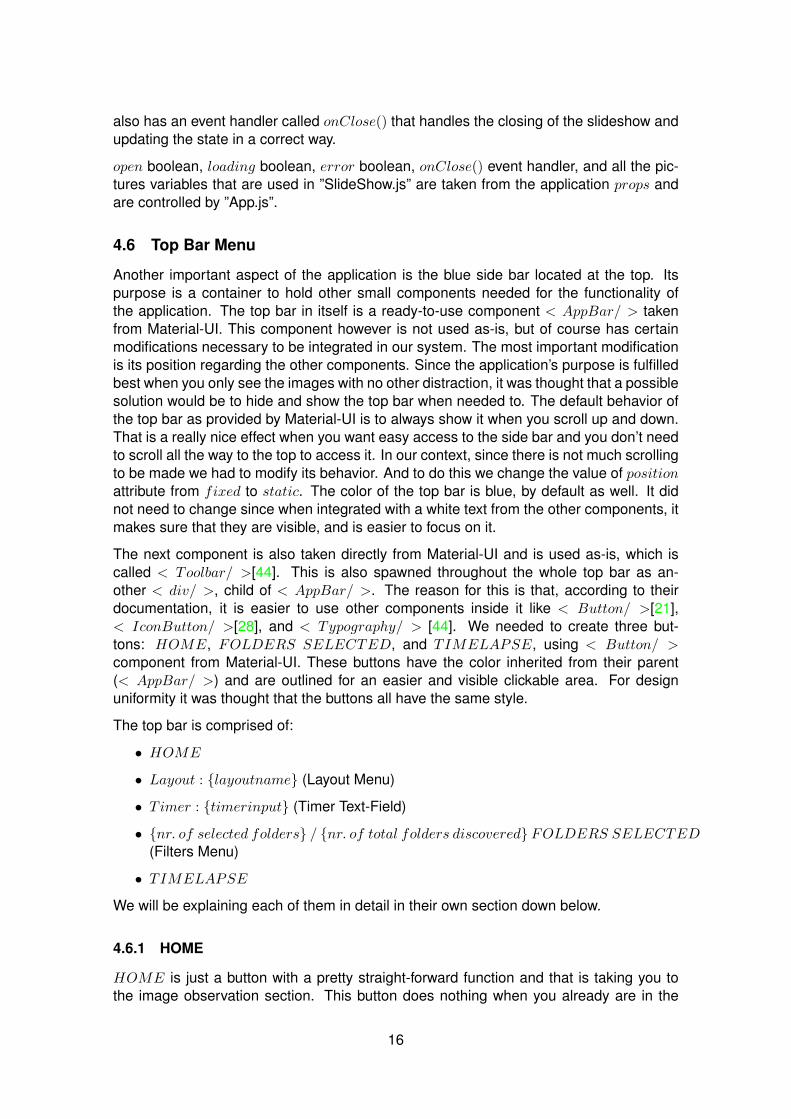
Another important aspect of the application is the blue side bar located at the top. Itspurpose is a container to hold other small components needed for the functionality ofthe application. The top bar in itself is a ready-to-use component < AppBar/ > takenfrom Material-UI. This component however is not used as-is, but of course has certainmodifications necessary to be integrated in our system. The most important modificationis its position regarding the other components. Since the application’s purpose is fulfilledbest when you only see the images with no other distraction, it was thought that a possiblesolution would be to hide and show the top bar when needed to. The default behavior ofthe top bar as provided by Material-UI is to always show it when you scroll up and down.That is a really nice effect when you want easy access to the side bar and you don’t needto scroll all the way to the top to access it. In our context, since there is not much scrollingto be made we had to modify its behavior. And to do this we change the value of positionattribute from fixed to static. The color of the top bar is blue, by default as well. It didnot need to change since when integrated with a white text from the other components, itmakes sure that they are visible, and is easier to focus on it.
The next component is also taken directly from Material-UI and is used as-is, which iscalled < Toolbar/ >[44]. This is also spawned throughout the whole top bar as an-other < div/ >, child of < AppBar/ >. The reason for this is that, according to theirdocumentation, it is easier to use other components inside it like < Button/ >[21],< IconButton/ >[28], and < Typography/ > [44]. We needed to create three but-tons: HOME, FOLDERS SELECTED, and TIMELAPSE, using < Button/ >component from Material-UI. These buttons have the color inherited from their parent(< AppBar/ >) and are outlined for an easier and visible clickable area. For designuniformity it was thought that the buttons all have the same style.
The top bar is comprised of:
• HOME
• Layout : {layoutname} (Layout Menu)
• Timer : {timerinput} (Timer Text-Field)
• {nr. of selected folders} / {nr. of total folders discovered} FOLDERS SELECTED(Filters Menu)
• TIMELAPSE
We will be explaining each of them in detail in their own section down below.
4.6.1 HOME
HOME is just a button with a pretty straight-forward function and that is taking you tothe image observation section. This button does nothing when you already are in the
16
home screen of the application, but its functionality comes to life when the user is in theTime-Lapse section. It changes the state of our application from timelapse to home withthe command setState({page : ”home”}).
4.6.2 Layout Menu
Layout : {layoutname} is a custom component called < LayoutMenu/ > that enablesyou to switch between different layouts. It is a drop-down menu consisting of 9 differenttypes of grid layouts to choose from. It utilizes ready-to-use components from Material-UI,nested together to create the drop-down. Our type of menu is what is called a ”selectedmenu”, i.e. a menu that is used for item selection and displays that item in the text areawhen the menu is closed [35].
The file containing the layout menu is an const arrow function. The input of it is anobject consisting of options, selectedIndex, setSelectedIndex, and showBorder. optionsis the list of all the layout names ready to display in the hidden menu. selectedIndex isan integer that controls which layout is currently selected, setSelectedIndex is an eventhandler which sets the new index, i.e. sets the new selected layout to be displayed, andshowBorder is a variable used to create a 1px solid blue border by our request, which weuse in section 4.7.
The ”Layout: {layout name}” that the user sees is a < div/ > that has the functionalityof a button, but it is not a button or declared as a button. What I mean by that is thatit is created by using the < ListItem/ >[30] component from Material-UI, which itselfhas a property called button. We enable set this attribute to true for its particular typeof behavior. The text that is shown inside this < ListItem/ > is also a component fromMaterial-UI called < ListItemText/ >[31]. We dynamically store the appropriate layouttext inside this component’s props from options[selectedIndex], and allows us to showthe selected name in the GUI.
We then have a menu, that by default is hidden from sight, until you click the < ListItem/ >mentioned above. It is created with < Menu/ >[32] component from Material-UI wherewe have listed the layout options coming from the input. We make use of the map()[33]function from JavaScript to map every layout option with an index, which is individuallydifferent, and create the list of layouts to display dynamically. Every layout option besidesthe according index, also has a specific key that React requires to each of their names,and an event handler that traces back to the setSelectedIndex one.
In this arrow function we also have separate functions that handle the the opening of thehidden menu, the click of a certain item in the menu, and the close of the menu. Weexport it as < LayoutMenu/ > in the end to use it as a component.
4.6.3 Timer Text-Field
Timer : {timer input} is a text-field that regulates the speed of the image shifting. For it,we use < TextF ield/ >[43] from Material-UI. There were a lot of different text inputs thatthey provided and our specific one is the filled-number input, which we have to specifyto the component’s id prop. However, with this prop modification, we are still not surethan the user will not input any other random character from the keyboard. To be surethat that does not happen, we force the text field to only take a number as an input, givingthe vale number to the type prop.
17
After making sure that it is the right text input type, we have to make sure it is properlyintegrated in out application style. As default, it comes with an underline under the input(i.e. the number), and since the main concept of design is minimalism, we decided toremove it with the props command InputProps = {{disableUnderline : true}}. We alsomodify its style to take a fixed position after the ”Timer: ” text, with marginLeft : ”5px”and padding : ”0”.
We always make sure that the number value that is displayed in the text input field comesfrom the state of the application, concretely with the component’s props command value= {‘${this.state.timer}‘}. This timer has a very important key role, because it controlsthe flow of the images and that is why we have control over it using the state, where allthe layout files access it from for the image movement.
The timer has also an event handler called onChange(), which is an arrow function. Thisarrow function has as input an event, where we take the newly changed value from theuser’s input. Inside this function we have some checks that make sure that the numberprovided by the user is appropriate, otherwise it would lead to an error or a bug. We havehandled the case of the user’s input of other keyboard characters with type : ”number”as explained above, as that would make the timer unusable in the image movement shiftspeed. Another case that makes our timer unusable is when there is no timer at all.So if this ever happens, we make sure to give it a static value, which is also the defaultone, which is 5 (seconds). However, there is yet another case that would make the timerunusable and that is if the user tries to input a number smaller or equal to zero. In thiscase, we handle the timer to have a value of 1. Otherwise, in any other case, we overridethe current value of the timer with the one that the user desires. The range of numbers itis allowed to take is from 1 to 1e+21. Since the timer is located inside the state of React,we always override it using the built-in function setState().
This timer field has its own function called renderTextInput(). It is located inside ”App.js”and it only gets properly rendered if we are in our HOME page, which is also controlledby the state of the application.
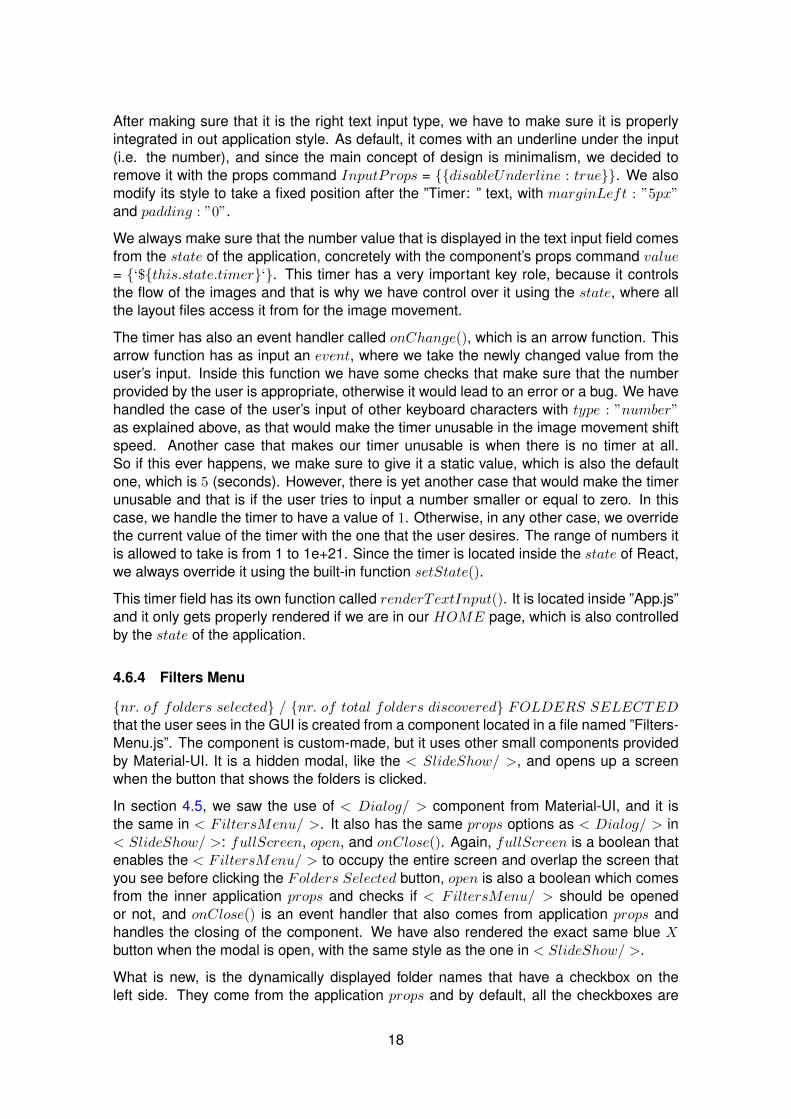
4.6.4 Filters Menu
{nr. of folders selected} / {nr. of total folders discovered} FOLDERS SELECTEDthat the user sees in the GUI is created from a component located in a file named ”Filters-Menu.js”. The component is custom-made, but it uses other small components providedby Material-UI. It is a hidden modal, like the < SlideShow/ >, and opens up a screenwhen the button that shows the folders is clicked.
In section 4.5, we saw the use of < Dialog/ > component from Material-UI, and it isthe same in < FiltersMenu/ >. It also has the same props options as < Dialog/ > in< SlideShow/ >: fullScreen, open, and onClose(). Again, fullScreen is a boolean thatenables the < FiltersMenu/ > to occupy the entire screen and overlap the screen thatyou see before clicking the Folders Selected button, open is also a boolean which comesfrom the inner application props and checks if < FiltersMenu/ > should be openedor not, and onClose() is an event handler that also comes from application props andhandles the closing of the component. We have also rendered the exact same blue Xbutton when the modal is open, with the same style as the one in < SlideShow/ >.
What is new, is the dynamically displayed folder names that have a checkbox on theleft side. They come from the application props and by default, all the checkboxes are
18
checked, thus displaying the latest picture of every folder discovered by the HTTP server.This part of the GUI was provided by < Checkbox/ >[22] from Material-UI. This compo-nent provides built-in props that allow you to input a name associated with a checkbox,and it is called name, which we assigned dynamically to the name of each folder accord-ingly. It also has a props called checked: a boolean, where it gets the functionality from,which we also assign dynamically for every checkbox. For that we have a JSON calledfilters inside the props, which contains {name of folder} : {true}. By default, it is truefor all of them, it changes from the event handler called onChange, and it is assigned toeach < Checkbox/ >.
< Checkbox/ > only enables the animation and the functionality of a simple checkboxthough, excluding the name from this process. However, since we assume that thereare a lot of folders discovered by the back-end, we wanted to make the clicking processeasier by making the name clickable, too. We solved this by wrapping the checkboxesand the names into a < FormControlLabel/ >[25]. Since this component needs to havethe functionality of < CheckBox/ >, we enable that by control = {< CheckBox/ >}, andinside it has everything we have talked about the < CheckBox/ > so far. To make thewhole name clickable we give label = {foldername} and we are done.
What we have explained until now, it is only true for one folder name with one checkboxand we don’t know how many will be there in the future. To account for this, we dy-namically create an array (called row) of arrays (called column) while pushing the foldernames to create the rows and the columns of the < FiltersMenu/ > component andassign their needed functionality. It is the same logic as when building a grid layout, butin this case we have a dynamic number of row items, with one column each. The columnonly contains a fixed number of items inside: 4. This way we display a grid with eachrow containing only four columns items of checkboxes and names at a time. In a biggerpicture we have a {dynamic nr. of rows} x 4 (row x column) layout. Then, with the helpof map(), we map each of the row items that we have to a < FormGroup/ >[26] thatgroups them together. Each < FormControlLabel/ > component created has a flexvalue of 1 which enables an equal distribution of the items, as they are created inside the< FormGroup/ >, one by one in a column-direction principle. The < FormGroup/ >components that are created also have a flex value of 1, which enables the same equaldistribution but in row-direction, and it is also reinforced by the row built-in boolean at-tribute. All of this is located inside a big < div/ > wrapped up by < FormControl/ >[24]that creates this type fieldset[12] we have talked about. We did not provide a legend[13]for our fieldset in word, because the button provides that intuitive purpose and minimal-ism. The component is exported to be used in ”App.js”.
4.6.5 TIMELAPSE
TIMELAPSE is another button that has the same exact functionality of HOME button.It takes you to the time-lapse section of the application whenever you are in the homescreen. Same as HOME button, it enables this specific functionality while changing thestate of the application with setState({page : ”timelapse”}). When the user is in thetime-lapse section, the button has no funcitonality.
19
4.7 Time-Lapse
The time lapse section of the application opens up when you click TIMELAPSE buttonlocated on the blue top bar. When this section first opens up, has a very simple and emptylayout, with 3 options below the top bar: Folder : {folder name}, Timer : {timer value},Images : {images number}, and below mainly a blank white screen.
< Timelapse/ > has a state object that get initialized with these default items and is usedto control the functionality of the component:
• folder : ”” (i.e. empty)
• imageNumber : 50
• timer : 0.1
• selectedIndex : 0
• loading : false
• error : null
• src : null
Folder : {folder name} is a drop-down menu created with the use of our custom <LayoutMenu/ > component that we have explained in section 4.6.2. It has almost thesame design as the one in the application top bar, but with a 1px solid blue border createdby giving it the showBorder input. We assign a default selected index to the menu: thefirst folder that is found by our HTTP server, i.e. selectedIndex = state.selectedIndex. Wealso pass a function that is called setSelectedIndex() to the props to allow the applicationto get the newly selected folder from the user. Finally, we use options to pass downour items that are going to be displayed in the drop-down. With the help of the map()function we create an array only with the folder names. The folders are retrieved from ourapplication props, i.e. the JSON containing all the images and their appropriate folder,gotten from the back-end. This drop-down menu has also a wrapping < div/ > with acertain style to make it in line with the other divs.
Next in line is the timer text field. It has been created by < TextF ield/ > componentfrom Material-UI, the same way as explained in section 4.6.3, and it has the same styleand props properties as the timer text field in the top bar. The only difference here is thatthe input is a float and not an integer. This means that the user is not as limited, to someextend. It can take numbers ranging from 0.1 to 1e+21 and it can hold up to 17 visibledigits after 0, the space of the input field created by < TextF ield/ >. The default valueis 0.1, always coming from the state, which we also set when the value of the user isnegative, empty, or a text by using setState(). In other cases we update it using the samefunction, too. All of this is done by an in-line event handler called onChange().
The last is the images number. This input field is created using < TextF ield/ >, too. Ithas exactly the same style and properties as the timer, but it has certain limitations. Theinput is integer and the default value is set to 2. Here, we also use an in-line event handlerdeclaration for onChange(), which sets the values of the image numbers by changing thestate of the component using setState(). The range of numbers here is from 2 to 80,because 80 is the maximum number of images it can take before the request times out,and we are going to explain later on why. So, for any value above 80, we automaticallyforce the input to stay at 80. If the user’s number is negative, empty, or a text, then we
20
force the input to be 2. In all other cases, we update it in the state with the user’s inputusing setState().
The blank space that the user initially sees is a < div/ > that is dynamically adjustedto the window’s size. This empty space is where the time-lapse will be displayed, i.e.rendered. The render function is called renderGIF () and it has 3 different functionali-ties: to render the loading component using < CircularProgress/ >, to render the errormessage using < Typography/ >, and lastly to render the GIF that is taken from thiscomponent’s state.
Finally, after the user has chosen his preferred folder, the speed of the time-lapse, andthe number of images, he/she can hit the Create button. This button is made using< Button/ >, the same as HOME and TIMELAPSE buttons. When the user clicksthis button, the ”magic” happens, making use of the event handler onClick(), which refersto the custom function called createGIF (). Whenever this function is called we first setthe state of the application to loading, so the user knows that something is being done inthe background. We then make a GET request from our server with the folder selectedby the user. Then the response is taken and worked with inside an arrow function. Wecreate an empty array that gets filled with the images coming from that specific folder.The number of images is set to choose between the smallest value of image numberselected from the user and the actual number of images located inside the folder, in casethere are less in the folder than the number selected. After our array is ready and fullwith the appropriate number of images, we use createGIF () from gifshot[90] to createthe time-lapse. I has a lot of props that one can use to create the GIF, but for us only 4of them are needed: images, interval, gifWidth, and gifHeight. We set the images tothe array that we just filled, for the interval we set it to the timer located inside the stateobject, and for the width and height we give it 1600 and 900 accordingly, which is alsoreferred as our time-lapse resolution. We then call a function inside createGIF () that setsthe finished time-lapsed images to the state of the application as src. However, since thisfunction is located on the cloud, there are some limitations to using createGIF ():
• The user needs to have an active internet connection
• We cannot calculate the time it takes to process the images and create the GIF
• We have to take account to the request timeout, which is usually 30 seconds
• The higher the resolution the smaller the image number
• The smaller the image number the worse the presentation
Usually for the GIFs all over the internet, the resolution is not that great, and it shows,because they also want to make the file size smaller and the upload / download faster.In our case, since this is referred as a time-lapse, we needed the image to be as clearas possible for presentation purposes. So we tested around with the resolutions and thetimeouts of the request and found out that a sweet spot was 1600x900 to also take theimage number to an acceptable one.
4.8 Control File
Our control file, like most other React client projects, is called ”App.js”. Everything thathas been explain until this point is almost in all cases related to this file with variablesbeing passed down from it. Firstly, this file has the biggest state of them all initializing:
21

• page : ”home”
• selectedIndex : 0
• loading : true
• error : null
• images : []
• timer : 5
• slideshowOpen : false
• sliderLoading : false
• sliderError : null
• sliderImages : []
• filtersMenuOpen : false
• imagesF ilters : {}
The names are pretty much intuitive and self-explanatory on what each of the state items’function is inside the application. In ”App.js” we mostly take care of the rendering and theput together of every other component while using them and provide their inputs. We havea life-cycle method for handling what happens when our application is given ”birth”[64].It does a GET request to the server and retrieves all the information needed for theapplication to start to work, i.e. it fills the images and imageF ilters in our state with allthe latest images and every folder using setState() function. It also sets loading to falseto stop the circular progress animation and error to null. It is only called once before therendering of the application and never again.
We have a function called renderLayout() that from the name it makes sure that it renderseach layout properly. It has a switch statement that controls which layout to display usingselectedIndex that comes from the state. When it has found a layout, it returns it bycalling the specific layout component out of the total nine that we have created. It makessure to pass down all the filtered state images, using an arrow function, the state timer,and a function as an event handler of onCellClick(). The function is called openDialog()and is used to open the slide-show modal whenever the user clicks on a picture displayedin the layout. It does that by using a GET request from the server where it makes sure toget the specific folder needed. With the response data, i.e. all images inside that folder,coming from the request, we make sure to assign it to our sliderImages to the state byusing setState().
renderLayout() is used inside a function called renderContent(), which is responsible forrendering the content of the error message using < Typograhpy/ >, the circular progressusing < CircularProgress/ >, the time-lapse content, and the homepage content. Thetime-lapse content is rendered using < TimeLapse/ > custom component passing downloading, error, and images from the state of the application. Regarding the homepagecontent, it makes sure to render the layout using renderLayout(). Then, we render theslideshow using < Slideshow/ > custom component by passing down slideShowOpen,sliderLoading, sliderError, and sliderImages inputs from the state, and lastly an eventhandler called onClose(), which refers to another function called closeDialog(). This
22

function makes sure that the slide-show is closed by updating the state of the applica-tion using setState(). After that, we render the filters menu using < FilterMenu/ >custom component while passing down filtersMenuOpen, images, and imageF iltersinputs coming from the state, too. We also have to handle the closing of this componentwith the function closeF iltersMenu(), which updates the state using setState(). There isone more props that we have to handle and that is setF ilter using the function with thesame name, which updates the state with the appropriate checked filters using setState()as well.
We have two more important functions called renderF ilters() and renderTextInput().renderF ilters() handles the < div/ > in the GUI by using the state to find out how manyof the folders are checked to display. The whole function is built from < Button/ >and that allows us to open the filters menu using the event handler function onClick(),which refers to openFiltersMenu that updates the state to open the custom component.Whereas, renderTextInput() function is what we have talked thoroughly in section 4.6.3.
Lastly, we use the render() method to combine everything together
4.9 Automation
To automate the system, in the beginning we had to figure out a way to externally controlthe opening and the closing of the React client and the HTTP server. In order to do that,we had to work with the programs on a processing level, i.e. try to find both of themon task manager, since the environment was Windows 10, and try to control them. Wedecided it was best to use Python, for the easiness of the syntax and the availability ofmany libraries that provided us with a possible solution.
The logic that was come up with was:
• Keep the python script running at all times
• Only stop the script in case of an error
• The script would restart the applications at 06:00:00 sharp
• In all other times, it would remain on standby and have no functionality
• The script would have to wait between different openings and closing of the appli-cations to take into account the time it took for each of them
• The script would display messages so the user can see what is happening in themeantime while waiting for the restart and confirming what was done
4.9.1 React Client Windows Application
But, the idea of this entire thesis was to also use many instances of the application indifferent monitor setups, so we could not control them all, the way we wanted to. Nor-mally, one would start the React client with the command: ”npm start” and then you canopen multiple instances of localhost : {port nr.} on a browser and have them to displayin multiple monitors. We could try to work with the localhost and cmd line, but Reactautomatically would open a new tab of localhost on the browser. This would be an in-convenience, since the user would want to find the applications as they left it while theyrestart. Even if we found a way to properly restart and not automatically open the local-host, every tab would go back to their default layout and the different layouts selected by
23

the user would be reset, and that was also an inconvenience. Since we wanted to providean optimal solution for the user not to touch or work with the application, and have every-thing automated, this idea was brought down quickly and we needed to provide anotherway of handling this.
After further evaluations, since React was only there to only display and render the latestimages retrieved by the HTTP server, we did not need to restart the client, but onlythe server. This would be good, because the React client would not change propertiesprovided by the user, since it got the new pictures automatically once the server providedthem again. If the restart would be fast enough, the restart would be nearly unnoticeablefrom the user even if he/she would be staring at it.
However, to make things easier for every different kinds of users, in case of any prob-lems, we needed to stop using a manual script and try to automate the client, as well.A way to do that was to build a proper Windows application from it and the user wouldopen an instance of it like any other normal application. That would be possible usingelectron-packager[62]. This package allowed us to bundle the React client to a single ex-ecutable application. But, it would take a significantly bigger space and time to build thannormal, because it would also install an entire browser inside. And now, the applicationwould open in a separate window, not inside e.x Chrome/Safari and cannot be compiledanymore using a cmd line script. It can go into full-screen however, and provide the samefunctionality as before.
4.9.2 HTTP Server Windows Application
For the same reasons as explained, we had to come up with a way to automate the serveras well, but we could not use a packager, because the server would need to be compiledevery-time to be able to retrieve the latest images being updated every-day. We solvedthis by making a python script to re-compile the server every-time. Then, we made anexecutable of this python script called server.exe, using pyinstaller[87]. Now, every-timethe user clicks the python executable, the server will re-compile automatically.
To do that, we modified a function provided by another author called process exists()[20].This function checks all currently open applications in the task manager. You can checkif a process is running or not by giving as input its name, and concretely our HTTPserver project is called ”node.exe”. We use this function to check this every-time the userdecides to re-compile the server, so that we don’t open a new instance with the sameport number, because that would refuse to open to the same port number or have someunexpected errors. If the instance of the application is already running and function findsit, we kill it using the command os.system(”taskkill /f /im node.exe”) from os[59]. Afterwe kill it, we wait for 1 second for windows to close the application and we open it againwith the command Popen(′{path to node project} && node index.js′, shell=True) usingPopen() function from subprocess[60]. Then we wait for 5 seconds to let the applicationopen properly. If there does not exist any instance of the application before-hand, wesimply open it and wait for 5 seconds.
To properly terminate the application in case it is not, when one closes the cmd window,we have implemented a functionality that can. If the user inputs the signal CTRL + C,then the application will kill itself with the same command that kills other instances, andwill make a proper sys.exit(0).
This Windows application was created in case the user wants to manually start (compile)
24

the server in case of an unexpected error to the main automation python script explainedin the subsection below.
4.9.3 Python Automation Script
The functionality of this python script and the server python script does not have toomany differences. This script also uses the function called process exists() to check if aprocess is running or not. It also only checks for our HTTP server instance and only re-compiles that. It uses the same python library functions to kill the server and compile it. Italso has a proper shutdown with the same properties as server.exe when the user inputsthe signal CTRL + C. It also build into a proper windows application using pyinstaller,and it is called automation.exe. The only difference is that it runs all the time and it onlyprovides the functionality we have talked about at 06:00:00.
5 All Layouts
5.1 Layout: 4x4
Figure 11: Layout 4x4
25
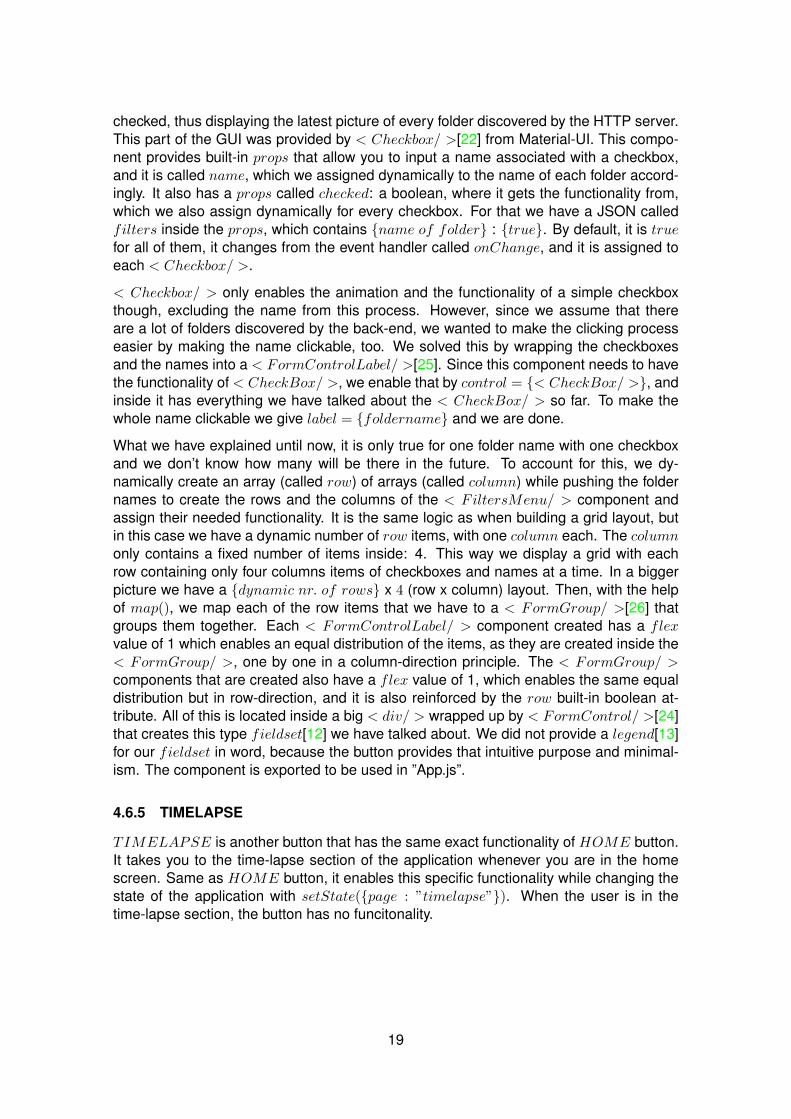
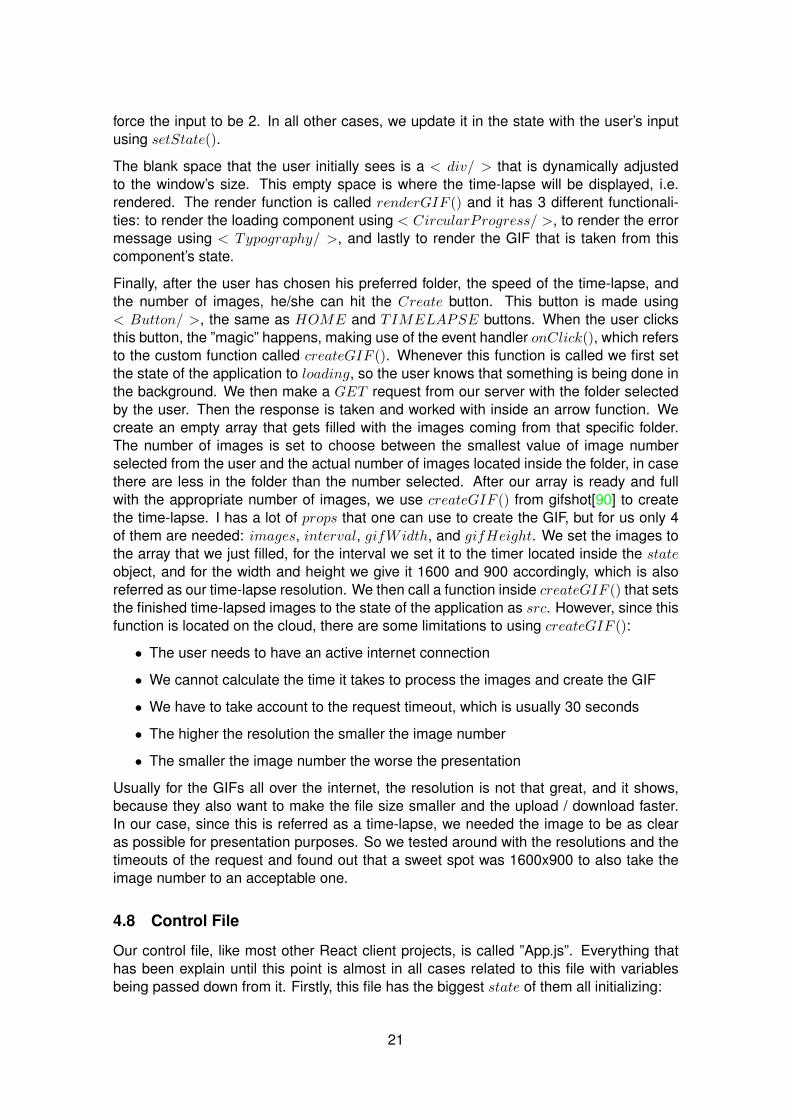
5.2 Layout: 3x3
Figure 12: Layout 3x3
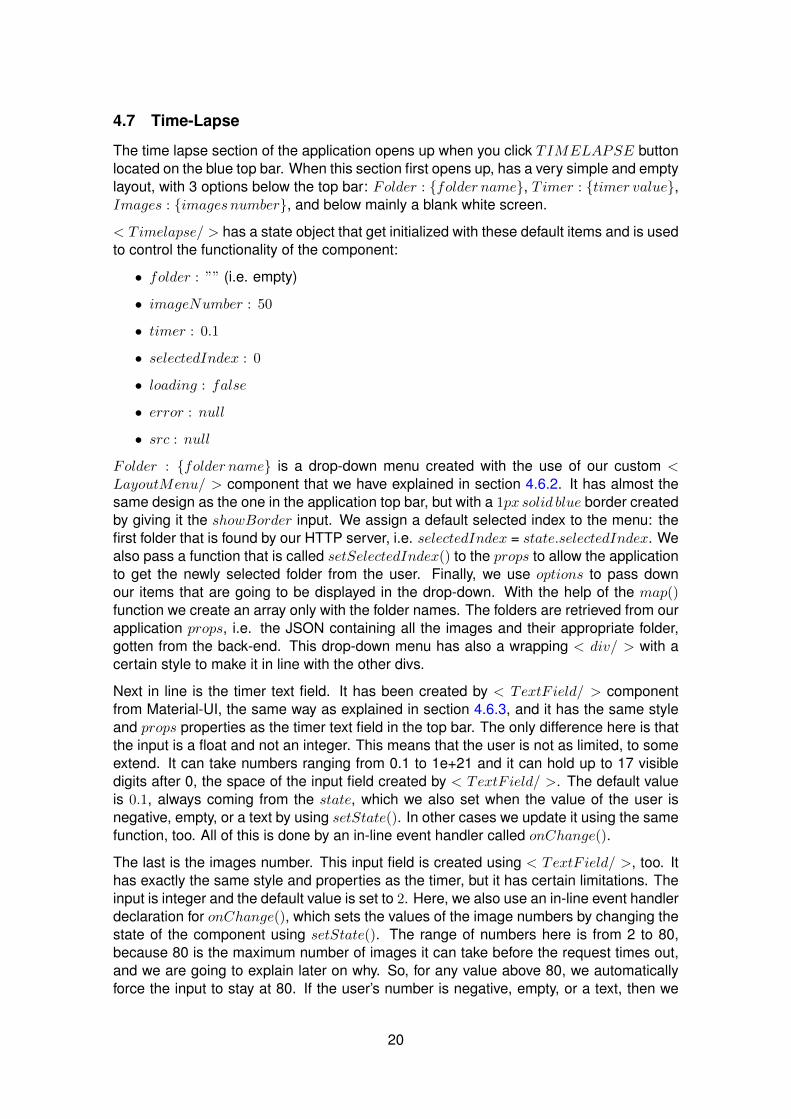
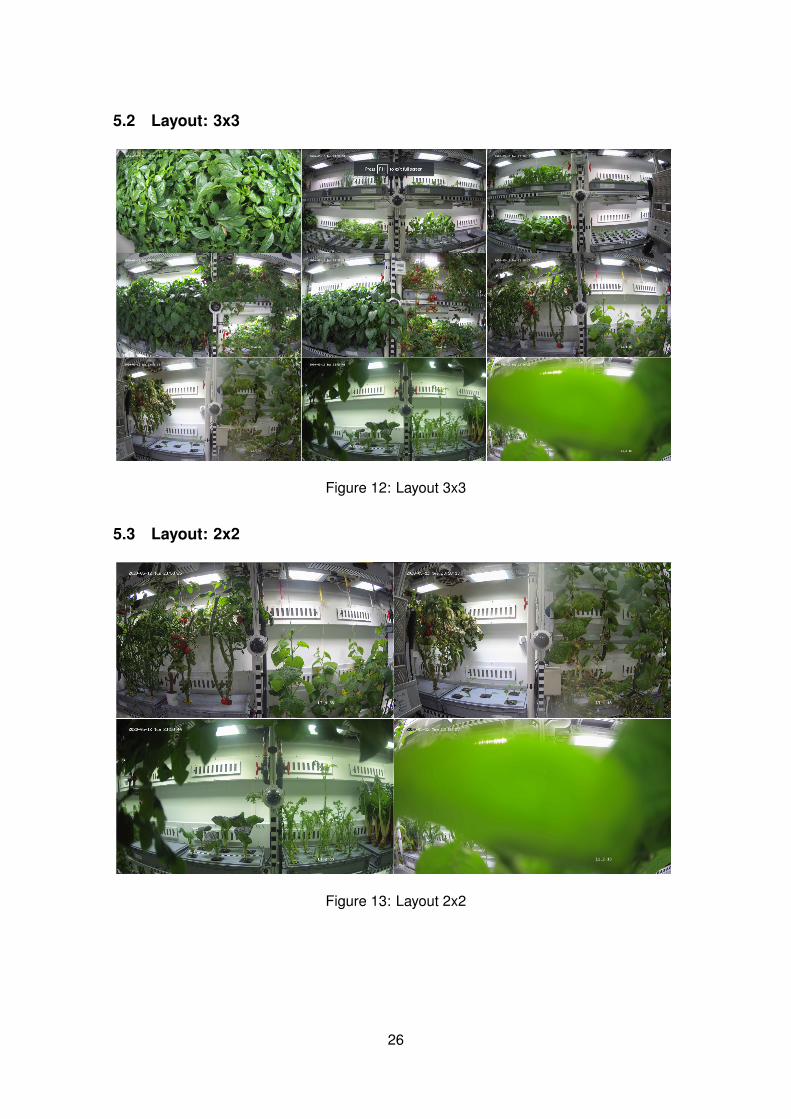
5.3 Layout: 2x2
Figure 13: Layout 2x2
26

5.4 Layout: 1x1
Figure 14: Layout 1x1
5.5 Layout: 1+12
Figure 15: Layout 1+12
27

5.6 Layout: 2+8
Figure 16: Layout 2+8
5.7 Layout: 1+7
Figure 17: Layout 1+7
28
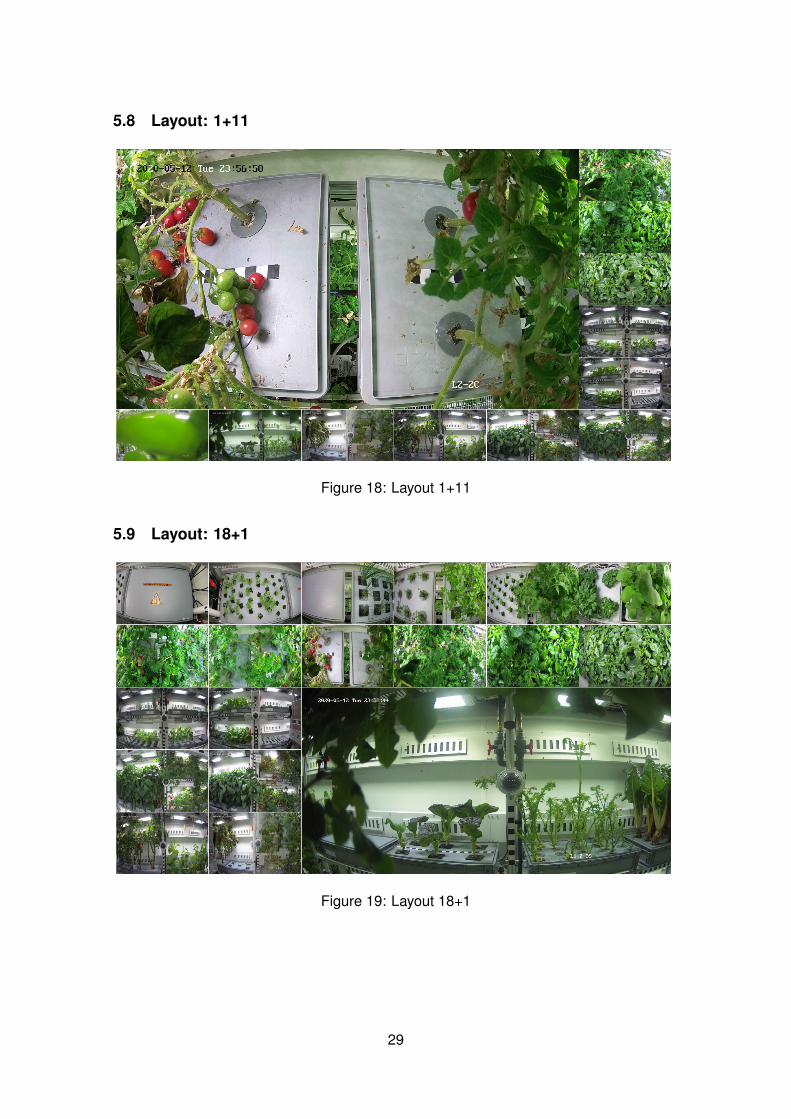
5.8 Layout: 1+11
Figure 18: Layout 1+11
5.9 Layout: 18+1
Figure 19: Layout 18+1
29

6 JavaScript + React.JS + Node.JS
6.1 What is JavaScript and its Uses
First of all, for our web-site related programming project, we decided to use JavaScript,because it has had the biggest hand in developing dynamic and interactive web pagessince 1995[72]. Over the past 20 years or so since when JavaScript was released, it hasbecome the mos popular programming language for web development today.[71] Beingone of the most powerful client-side programming language, it has not just kept its positionmaintained as a top programming language after Java, but also been empowering 96.2%of the websites on the internet.[27] In addition, it has been used by 10 million developerstoday and it is the only interpreted language that has been universally accepted by allweb applications and browsers.[27]
That’s why it stands up second in the list and software companies are widely using it invarious areas as mentioned below:
• Web Development: JavaScript is a client scripting language that helps in creatingdynamic web pages with special effects on pages and also supports external appli-cations including PDF documents, running widgets, and more on the website.[27]
• Presentations: JavaScript is not only a powerful programing language but alsoprovides a wide choice of libraries that help you develop a web-based slide back.Basically, reveal and BespokeJS are the two most common libraries that enable youto create the most beautiful and interactive decks using HTML.[27]
• Web Servers: Using Node.JS, developers can easily create a web server. Thebiggest advantage of using Node.JS is, it does not wait for the responses of theprevious call as it leverages the event to get a notification. The servers built onNode JS are very fast and never transfer the chunks of data.[27]
• Mobile Application: When it comes to mobile applications, there are majorly twopopular operating systems iOS and Android which require two different languagesto build apps for both the platforms. However, with JavaScript’s most potentialframework “PhoneGap” make it is possible to write once and use it on both plat-forms.[27]
Apart from all these uses, JavaScript and its frameworks are popularly used for creat-ing games, drawing graphics, flying robots, and contributing in other web app develop-ment solutions, with the combination of JavaScript and HTML.[27] According to the StackOverflow survey report of 2019[65], it is revealed that JavaScript is the most populartechnology for programming, scripting, and markup languages. And currently, 69.7% ofprofessional developers are using JS for modern developments.
30

Figure 20: JavaScript Usage[65]
6.2 Reasons to Use JavaScript for Modern Web App Development in 2020
With the help of its frameworks, developers can easily develop hybrid applications for dif-ferent platforms including iOS, Android, and Windows. And one of the prime reasons forusing JavaScript for app development is it allows pages to be very engaging, presentingeffective graphics, verify data, create cookies, responsive to events, and more.[27]
6.2.1 Minimize the Complexity of Web App Development Process
By accessing the JavaScript library, a developer can easily create domain (DOM) shadowboundaries which in return minimize the complexity of app composition. Furthermore, inorder to simplify the web app development process, the shadow DOM further segregatesthe components of each JavaScript library.[27]
6.2.2 Ease of Writing Server-side Code in JavaScript
One of the most common reasons for using JavaScript for web app development solutionsis the ability to write server-side code in JS. By using a cross-platform run-time[85] engine
31
like Node JS, developers can further execute the JavaScript code efficiently and with thehelp of built-in libraries, programmers can make their app run smoothly without using anyexternal web servers.[27]
6.2.3 MEAN Stack: 4 Major Components in a Single Pack
As we said above, developing anything without JavaScript seems impossible for the de-velopers. MEAN stack is a powerful package that not only helps in developing modernweb apps but also simplifies the development process. MEAN stack constist of Mon-goDB, Express.JS, Angulasr.JS, and Node.JS. On the one hand, MongoDB is a mod-ern and schema-less NoSQL database whereas Node JS is a popular cross-platformthat provides a server-side run-time environment for the simple web app developmentstructure. At the same time, Angular JS and Express JS are commonly used JavaScriptFrameworks that have been designed with the features to simplify the app developmentprocess.[27]
6.2.4 Hassle-Free Integration of Multiple Transpilers
Compared to others, JavaScript is a lightweight programming language but it lacks somerobust features that you may need in modern app development. However, that’s not thebiggest issue for the developers as they can easily extend the features of JavaScriptby using multiple Transpilers like TypeScript, DukeScript, CoffeeScript, and Vaadin. Eachtranspiler empowers developers with more features and allows them to meet their growingrequirements for developing large enterprise applications in a hassle-free manner.[27]
6.2.5 Ability To Develop Responsive Web Pages With JavaScript
Even Google says, Mobile First! It means whether you are developing a website or aweb app, make sure its pages are accessible all across multiple browsers and devices.It is true that responsive web design enables developers to optimize a web page for bothcomputers and mobile devices with a single code base, but to make it possible developershave to combine HTML, CSS3, and JavaScript. And while developing the web apps byleveraging JS libraries and frameworks, you don’t further need to integrate any othercoding to make your app responsive. JavaScript is already known for making dynamicweb pages and based on HTML & CSS.[27]
6.2.6 A Broad Access of Libraries and Frameworks
JavaScript provides access to a wide choice of libraries and frameworks that allow devel-opers to extend the functionality of JavaScript. There are various heavily feature-loadedlibraries like AngularJS, Ember that allow web developers to add functionality to morecomplex web applications without any need of writing additional codes. On the otherhand, JavaScript’s lightweight libraries like React Js make it easier for developers to ac-complish the specific task without any hassle. Furthermore, developers can choose toinstall open-source tools like NPM and manage all JS libraries for web app developmentmuch more efficiently.[27]
32
6.3 Popular JS Frameworks That You Can Use For Web App Development
JavaScript frameworks are basically the frameworks that have been written in JS. Theseframeworks are written in a way that allows developers to code the application in such amanner to make it run on multiple channels. JS frameworks are a kind of hardware thatmakes it working with JavaScript in a far simpler and smoother way.[27]
These are the few popular JavaScript frameworks that you can choose for the develop-ment:
• Angular JS For Front-End Development: Angular JS is an open-source frame-work backed by Google and utilized for developing single-page applications.[27]
• React JS For Backend Development: It is a powerful JS framework library ownedby Facebook, that has been widely used for building dynamic and high performingweb applications in a fast turnaround.[27]
• Ember JS: This framework is a composition of the Rails that provides more freedomand flexibility to write code and build interactive web design within the reducedtime.[27]
• Node JS: It is event-driven that doesn’t wait for the input and output responses.Rather, it initiates a function in a call-back queue and helps in building real-timeapplications that ensure cluster-based performance.[27]
• Vue.JS: An advanced version of AngularJS that ensures you a two-way data bind-ing and virtual DOM for the development. Vue.js is the lightweight library and lovedby hundreds of developers.[27]
6.4 What makes React so fast
6.4.1 Virtual DOM
The whole idea behind React is approaching web-sites in a ”puzzle”-like manner. Mean-ing you create piece-by-piece every component that your web-site has and then bringthem all together into the website like a puzzle. This approach makes the web-site moremaintainable and assure quality since you can easily adjust and debug different com-ponents separately in case of an issue that may occur. Moreover, one of the strongestfeatures of React, besides breaking things into components, is the use of its Virtual do-main (VirtualDOM). DOM manipulation is the heart of the modern, interactive web.[7]Unfortunately, it is also a lot slower than most JavaScript operations.[7] This slowness ismade worse by the fact that most JavaScript frameworks update the DOM much morethan they have to.[7] E.x. say you need to update a small text in your big website. Onlythat small text differs and everything else is the same, but he whole web-site has to berebuilt again, and that is more work than necessary. VirtualDOM fixes this performanceissue. In React, for every DOM object, there is a corresponding “virtual DOM object”.[7]A virtual DOM object is a representation of a DOM object, like a lightweight copy.[7]It sounds bad performance-wise, because it is a copy of the DOM and whenever youchange something the whole Virtual-DOM is updated, but the way it is used by React iswhat makes it special. Manipulating the DOM is slow.[7] Manipulating the virtual DOM ismuch faster, because nothing gets drawn onscreen.[7] Think of manipulating the virtualDOM as editing a blueprint, as opposed to moving rooms in an actual house.[7] Oncethe Virtual-DOM has been updated, React compares the virtual DOM with a virtual DOM
33

snapshot that was taken right before the update. By doing this, React figures out exactlywhich object has changed and only updates that specific one on the real DOM. Reactalso makes working with JavaScript easier, because it has all these functions that takecare of your code and transform it to a JS code the web-service can understand, so youdon’t need to write in a pure JavaScript syntax.
6.4.2 Diffing Algorithm
Like the actual DOM, the virtual DOM is just a node tree[84] that lists elements and theirattributes and content as objects and properties.[5] Their tree diffing algorithm is actuallyincredibly simple and based on the following two assumptions:
1. Two elements of different types will produce different trees
2. The developer can hint at which child elements may be stable across re-reders witha key prop
Figure 21: Performing calculations in the virtual DOM limits rendering[81]
If the root DOM element is different , it completely tears down the old tree and beginsfrom the root of the new tree. On the contrary if the root DOM element is the same, thenthe algorithm compares each and every difference in attributes, keeps the same valuedattributes and changes only the new/changed attributes.[5]
Next, when an element contains multiple child nodes (i.e. a series of ¡li¿ elements), Reactwill check for differences at the same time step by step. If the only differences in the childnodes are at the end, then that addition will be noted as the only update but if an elementis added at the beginning all the subsequent children will also be flagged to update. Inorder to solve for this, React implemented a key attribute which it leverages to match upthe children when running the comparison.[5]
The last piece that increases React’s performance is that it actually compiles a list of allthese changes necessary to the DOM and then batches them. This is done to avoid the
34
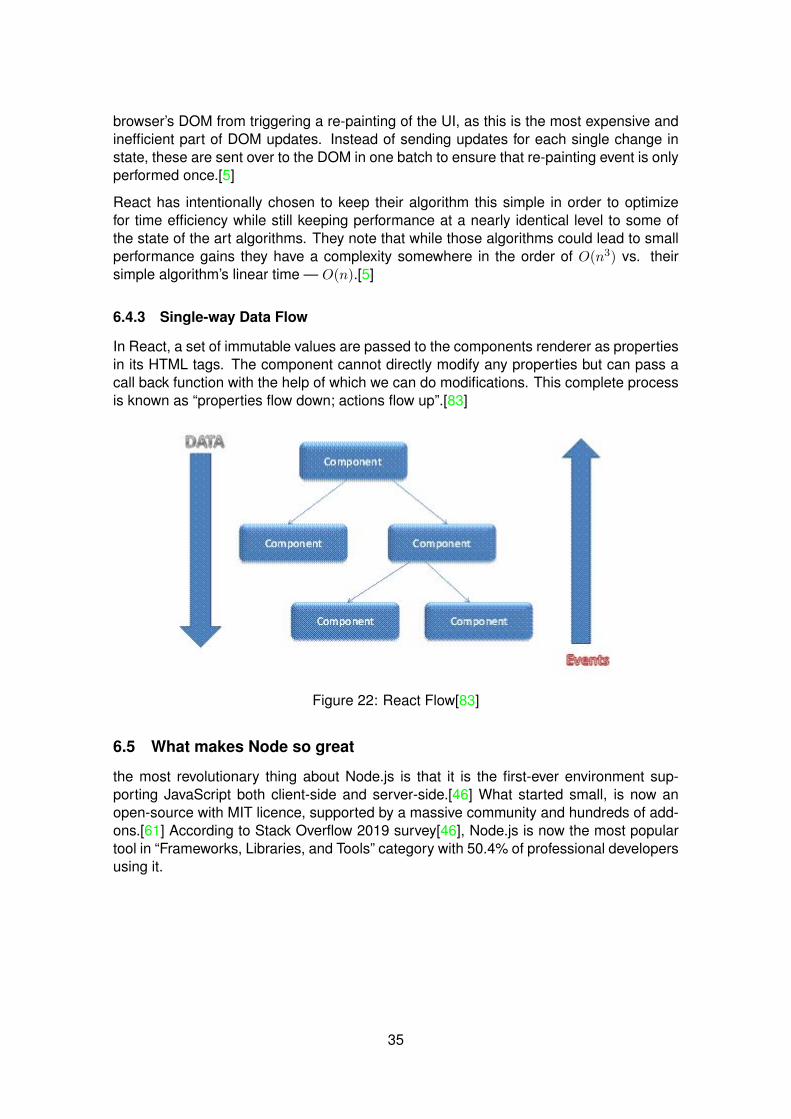
browser’s DOM from triggering a re-painting of the UI, as this is the most expensive andinefficient part of DOM updates. Instead of sending updates for each single change instate, these are sent over to the DOM in one batch to ensure that re-painting event is onlyperformed once.[5]
React has intentionally chosen to keep their algorithm this simple in order to optimizefor time efficiency while still keeping performance at a nearly identical level to some ofthe state of the art algorithms. They note that while those algorithms could lead to smallperformance gains they have a complexity somewhere in the order of O(n3) vs. theirsimple algorithm’s linear time — O(n).[5]
6.4.3 Single-way Data Flow
In React, a set of immutable values are passed to the components renderer as propertiesin its HTML tags. The component cannot directly modify any properties but can pass acall back function with the help of which we can do modifications. This complete processis known as “properties flow down; actions flow up”.[83]
Figure 22: React Flow[83]
6.5 What makes Node so great
the most revolutionary thing about Node.js is that it is the first-ever environment sup-porting JavaScript both client-side and server-side.[46] What started small, is now anopen-source with MIT licence, supported by a massive community and hundreds of add-ons.[61] According to Stack Overflow 2019 survey[46], Node.js is now the most populartool in “Frameworks, Libraries, and Tools” category with 50.4% of professional developersusing it.
35

Figure 23: Node Use Survey[66]
6.5.1 Single programming language
Nowadays, the language of choice on a front-end is JavaScript. Because you can alsouse it on backed, it improves the app’s maintainability. You no longer have to hire twopeople for separate back-end and front-end positions. It’s a huge advantage to save yourtime and money.[61]
6.5.2 Large Community
Node.js, being an open-source project, encourages support and contribution aimed atthe improvement and adoption of the platform. This is the mission of its Foundationintended for continuous development and enhancement of Node.js. Therefore, you canbe sure that, on one hand, Node.js is always getting better and, on the other hand, thereis already a lot of reusable resources.[46]
6.5.3 API
Nowadays, it’s the most popular type of application. Nearly all web applications needsome kind of backend to communicate with databases or other external services. Thanksto the big community, you can easily find a library to create e.g. REST or GraphQL API.In the past, Node.js was recommended only for applications with a low number of CPU-intensive operations. Since release version 10.5.0 you can use worker threads to doit.[61]
36
6.5.4 Scalability
This is a true jewel of the Node.js development environment, as it allows building applica-tions that can easily grow with your business. Node.js works great in systems using themicroservices architecture or containerization where the scalability and flexibility can beachieved quickly and easily.[46]
6.5.5 Real-time web applications
Because Node.js is very good at handling lots of I/O operations, you can use it to builda real-time web application, for example, a chat room where people can talk to eachother in real-time. Or maybe a collaboration tool, where co-workers will work on the samedocument at the same time. Done! Building a video conference web application alsowon’t be a problem. It is possible thanks to Node’s Events API and WebSockets.[61]
6.6 Conclusion
JavaScript has made web development a lot easier for everyone, while maintaining a topposition with the increasing technologies and programming languages over time. Thebenefits mentioned above clearly define its power in the development community andhow it is simplifying the web app development process.
React JS had a personal advantage over Angular JS, because it was a language that Ihad worked with before in my internship. I was familiar with the way it worked and how touse it efficiently.
Manipulation of the browser DOM is not inherently slow, it’s their painting of the UI thatis costly. React’s virtual DOM helps to minimize these painting events by making sureonly the elements that need to be changed in the DOM are manipulated, and that theseupdates are sent in batches. These batches of updates prevent unnecessary “slow”painting events and make React applications more efficient.[5]
Node.js is a powerful development framework showing excellent performance in manycases. It works very well with JavaScript and its libraries and frameworks.
All in all, you cannot go wrong when combining JavaScript, React.JS, and Node.JS. It isone of the most optimal and used solutions worldwide for web development.
7 Material-UI vs Bootstrap
Superior user experience is becoming increasingly important for businesses as it helpsthem to engage users and boost brand loyalty. Front-end website and app developmentplatforms, namely Bootstrap vs Material Design empower developers to create websiteswith a robust structure and advanced functionality, thereby delivering outstanding busi-ness solutions and unbeatable user experience.[4]
7.1 Bootstrap
Bootstrap is an open-source, intuitive, and powerful framework used for responsive mobile-first solutions on the web. For several years, Bootstrap has helped developers createsplendid mobile-ready front-end websites. In fact, Bootstrap is the most popular CSS
37
framework as it is easy to learn and offers a consistent design by using re-usable com-ponents.[4]
7.1.1 Pros
• High Speed of Development
If there is limited time for the website or app development , Bootstrap is an ideal choice.It offers ready-made blocks of code that can get the developer started within no time.[4]
Bootstrap also provides ready-made themes, templates, and other resources that can bedownloaded and customized to suit the needs of the developer, allowing him/her to createa unique website as quickly as possible.[4]
• Bootstrap is mobile first
Since July 1, 2019, Google started using mobile-friendliness as a critical ranking factorfor all websites. This is because users prefer using sites that are compatible with thescreen size of the device they are using. In other words, they prefer accessing responsivesites.[4]
Bootstrap is an ideal choice for responsive sites as it has an excellent fluid grid systemand responsive utility classes that make the task at hand easy and quick.[4]
• Enjoys a strong community support
Bootstrap has a huge number of resources available on its official website and enjoysimmense support from the developers’ community. Consequently, it helps all developersfix issues promptly.[4]
Furthermore, there are plenty of websites offering Bootstrap tutorials, a wide collectionsof themes, templates, plugins, and user interface kit that can be used for a project.[4]
7.1.2 Cons
• All Bootstrap sites look the same
The Twitter team introduced Bootstrap with the objective of helping developers use astandardized interface to create websites within a short time. However, one of the majordrawbacks of this framework is that all websites created using this framework are highlyrecognizable as Bootstrap sites.[4]
• Bootstrap sites can be heavy
Bootstrap is notorious for adding a lot of unnecessary bloat to websites as the files gen-erated are huge in size. This leads to longer loading time and battery draining issues.Furthermore, if you delete them manually, it defeats the whole purpose of using thisframework.[4]
• May not be suitable for simple websites
Bootstrap may not be the right front-end framework for all types of websites, especiallythe ones that do not need a full-fledged framework. This is because, Bootstrap’s themepackages are incredibly heavy with battery-draining scripts[4][1]. Moreover, Bootstraphas CSS weighing in at 126KB and 29KB of JavaScript that can increase the site’s loadingtime.[4]
38
7.2 Material Design
Material-UI is a React UI framework that follows principles of the Material Design. It isbased on Facebook’s React framework and contains components that are made accord-ing to Material guidelines[82]. When compared to Bootstrap, Material Design is hard tocustomize and learn. However, this design language was introduced by Google in 2014with the objective of enhancing Android app’s design and user interface. The language isquite popular among the developers as it offers a quick and effective way for web devel-opment. It includes responsive transitions and animations, lighting and shadows effects,and grid-based layouts.[4]
Material-UI is strongly connected with Material Design, but one should not confuse thetwo. Material-UI is just a react component library without Material design, that is whywe built our comparison from the perspective of the fact that Material guidelines go first,Material framework follows. Google uses Material Design in all of its products, Material-UIis used by Nasa, Amazon, Unity, JPMorgan, etc.[82]
7.2.1 Pros
• Offers numerous components
Material Design offers numerous components that provide a base design, guidelines, andtemplates. Developers can work on this to create a suitable website or application for thebusiness. The Material-UI concept offers the necessary information on how to fully utilizeeach component.[4]
• Is compatible across various browsers
Both Bootstrap vs Material Design have a sound browser compatibility as they are com-patible across most browsers. Material Design supports React Material User Interface.It also uses the SASS pre-processor[4], which is the most mature, stable, and powerfulprofessional grade CSS extension language in the world.[6]
• Does not require JavaScript frameworks
Bootstrap completely depends on JavaScript frameworks. However, Material Designdoes not need any JavaScript frameworks or libraries to design websites or applications.In fact, the platform provides a material design framework that allows the developers tocreate innovative components such as cards and badges.[4]
7.2.2 Cons
• The animations and vibrant colors can be distracting
Material Design extensively uses animated transitions and vibrant colors and images thathelp bring the interface to life. However, these animations can adversely affect the humanbrain’s ability to gather information.[4]
• It is affiliated to Google
Since Material Design is a Google-promoted framework, Android is its prominent adopter.Consequently, developers looking to create applications on a platform-independent UXmay find it tough to work with Material Design.[4]
• Carries performance overhead
39

Material Design extensively uses animations that carry a lot of overhead. For instance,effects like drop shadow, color fill, and transform/translate transitions can be jerky andunpleasant for regular users.[4]
7.3 Conclusion
Bootstrap is great for responsive, simple, and professional websites. It enjoys immensesupport and documentation, making it easy for developers to work with it. So, if one isworking on a project that needs to me completed within a short time, opt for Bootstrap.The framework is mainly focused on creating responsive, functional, and high-qualitywebsites and applications that enhance the user experience.[4]
Material Design on the other hand, is specific as a design language and great for buildingwebsites that focus on appearance, innovative designs, and beautiful animations, e.x.portfolio websites. The framework is pretty detailed and straightforward to use and helpsone create websites with striking effects.[4]
In conclusion, the most recommended and used framework is Bootstrap. However, thisare some of the reasons why Material-UI was used in this project:
• The < Grid/ > component in Bootstrap did not feel right and caused bugs whenwe tried to modify it to tje application’s needs.
• The < Grid/ > component in Material-UI used a more intuitive way of implementa-tion.
• The application is a little different from all the Bootstrap-build websites, and for methat was important.
• I wanted the application to look vibrant and ”alive” with the colors provided byMaterial-UI.
• Material-UI had better UX design than Bootstrap.
• Bootstrap adds a lot of unneeded bloat.
• Since it adds so much bloat, it was not very suitable for our simple website.
• Material-UI has bloat as well, but we can handle while minimizing the bundle size[36]of the application.
• We did not need the application to be super responsive, because it is going to beused accessed from monitors.
• Since we managed to implement our own custom grid layouts, in the end, it did notmatter much which one we used.
8 FTP Server vs HTTP Server
HTTP and FTP both are the file transfer protocols that are used to transfer data betweenclient and server. HTTP functions similar to the combined functioning FTP and SMTP.FTP is a protocol that sorts the problem when a communicating client and server havedifferent configuration.[8]
40

The basic point that distinguishes HTTP and FTP is that HTTP on request provides aweb page from a web server to web browser. On the other side, FTP is used to uploador download between client and server.[8]
8.1 FTP
While transferring a file from one host to another the problems that may occur are, thecommunicating host may have different file name conventions, may have different di-rectory structures, different way to represent data. FTP overcomes all these problems.FTP is used when two hosts with different configurations want to exchange data betweenthem.[8]
FTP has no meta-data when using file transfer and only the raw binary.[9] In our case,we get the latest pictures from the file name of the pictures, so if no meta-data exists,we cannot access the pictures with this method. We would need to come up with animage processing algorithm to read written information inside each picture. This is also acons and pro of the FTP, which makes it faster than HTTP in this context because, whensending small files, the headers can be a significant part of the amount of actual datatransferred.[9]
8.1.1 Pros
• Secure Data
FTP is mostly used to store secure data and information, unless shared by the admin. Forsecure transmission that protects the username and password, and encrypts the content,FTP is often secured with SSL/Transport Layer Security (TLS), also known as FTPS. Or,it is replaced with Secure Shell (SSH) File Transfer Protocol (SFTP).[67]
• Directory Listing
One area in which FTP stands out somewhat, is that it is a protocol that is directly on filelevel. It means that FTP has for example commands for listing directory contents of theremote server, while HTTP has no such concept.[76]
However, the FTP spec authors lived in a different age so the commands for listing direc-tory contents (LIST and NLST) do not have a specified output format, so it is very difficultto write programs to parse the output. Latter specs (RFC3659) have addressed this withnew commands like MLSD, but they are are not widely implemented or supported byneither servers nor clients.[9]
• Packet Verification
One of the top qualities of transferring files with FTP is the packet verification. What thismeans is that FTP is somewhat slower for a given size file, but the file is more likely toget through in one piece. That is because for a binary application file, for example, onelost packet is as good as losing the whole thing.[76]
• Two-Way System
FTP is a two-way system. This means that any file can be transferred from the server tothe client and vise-versa, from client to the server.[76]
• Good for smaller transfers
41

Compared to HTTP, FTP puts less load on the network for smaller transfers. For transfersof large amounts of data, both are comparable.[76]
• FXP
FTP supports ”third party transfers”, often called ”FXP”. It allows a client to ask a serverto send data to a third host, a host that isn’t the same as the client. This is often disabledin modern FTP servers though due to the security implications.[9]
• IPv6
HTTP and FTP both support IPv6 fine, but the original FTP spec had no such support andstill today many FTP servers don’t have support for the necessary commands that wouldenable it. This also goes for the firewalls in between that need to understand FTP.[9]
8.1.2 Cons
• State-full Connection
FTP is built on a client-server architecture and establishes two separate TCP connec-tions[67]:
• Control Connection (command port; port 21) to authenticate the user.
• Data Connection (data port; port 20) to transfer the files.
FTP has a stateful control connection, therefore the FTP server will maintain state infor-mation like a user’s current directory for a session. This can constrain the total numberof sessions FTP can maintain simultaneously. FTP also requires client authentication inorder to transfer or serve information successfully.[67]
• FTP Command / Response
FTP involved the client sending commands to which server responds. A single transfercan involve quite a series of commands. This of course has a negative impact sincethere’s a round-trip delay for each command. Retrieving a single FTP file can easily getup to 10 round-trips.[9]
• Two Connections
One of the biggest hurdles about FTP in real life is its use of two connections. It usesa first primary connection to send control commands on, and when it sends or receivesdata, it opens a second TCP stream for that purpose.[9]
• Firewalls and NATs
FTP’s use of the two connections, where the second one use dynamic port numbersand can go in either direction, gives the firewall admins grief and firewalls really have to”understand” FTP at the application protocol layer to work really well. This also meansthat if both parties are behind Network Address Translation (NAT), you cannot use FTP!Additionally, as NATs often are setup to kill idle connections and the nature of FTP makesthe control channel remain quiet during long and slow FTP transfers, we often end upwith the control channel getting cut off by the NAT due to idleness.[9]
• Active and Passive
42
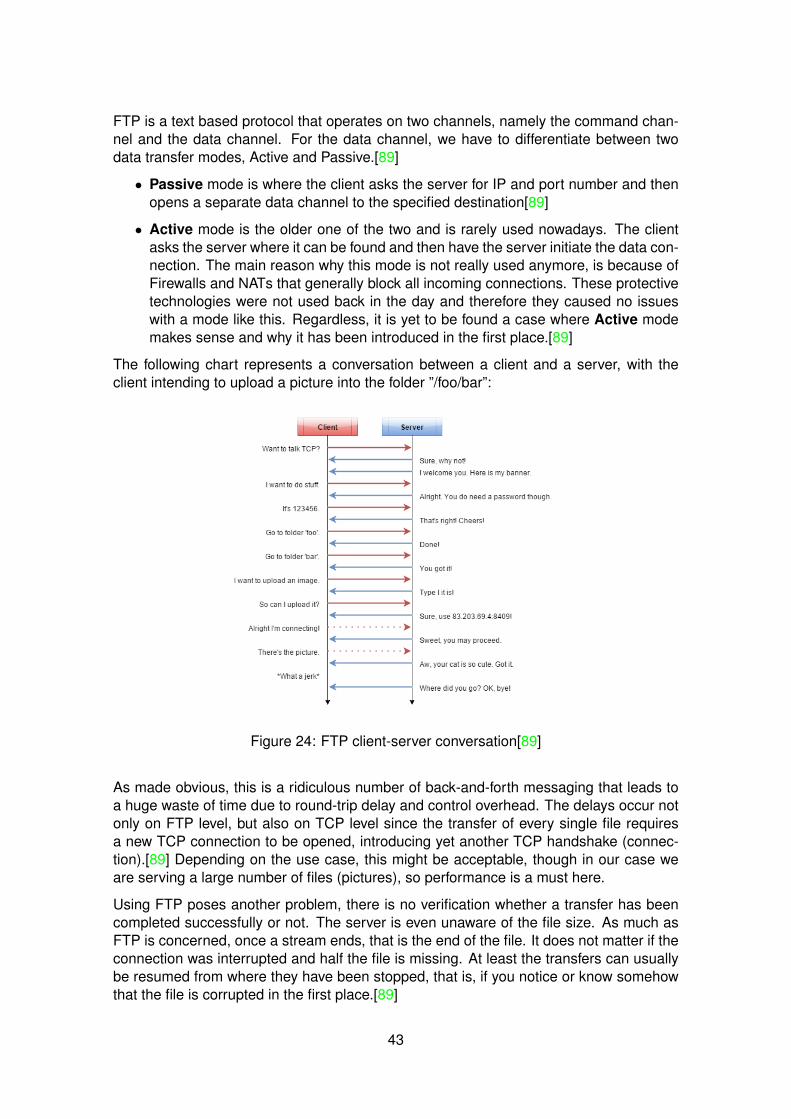
FTP is a text based protocol that operates on two channels, namely the command chan-nel and the data channel. For the data channel, we have to differentiate between twodata transfer modes, Active and Passive.[89]
• Passive mode is where the client asks the server for IP and port number and thenopens a separate data channel to the specified destination[89]
• Active mode is the older one of the two and is rarely used nowadays. The clientasks the server where it can be found and then have the server initiate the data con-nection. The main reason why this mode is not really used anymore, is because ofFirewalls and NATs that generally block all incoming connections. These protectivetechnologies were not used back in the day and therefore they caused no issueswith a mode like this. Regardless, it is yet to be found a case where Active modemakes sense and why it has been introduced in the first place.[89]
The following chart represents a conversation between a client and a server, with theclient intending to upload a picture into the folder ”/foo/bar”:
Figure 24: FTP client-server conversation[89]
As made obvious, this is a ridiculous number of back-and-forth messaging that leads toa huge waste of time due to round-trip delay and control overhead. The delays occur notonly on FTP level, but also on TCP level since the transfer of every single file requiresa new TCP connection to be opened, introducing yet another TCP handshake (connec-tion).[89] Depending on the use case, this might be acceptable, though in our case weare serving a large number of files (pictures), so performance is a must here.
Using FTP poses another problem, there is no verification whether a transfer has beencompleted successfully or not. The server is even unaware of the file size. As much asFTP is concerned, once a stream ends, that is the end of the file. It does not matter if theconnection was interrupted and half the file is missing. At least the transfers can usuallybe resumed from where they have been stopped, that is, if you notice or know somehowthat the file is corrupted in the first place.[89]
43
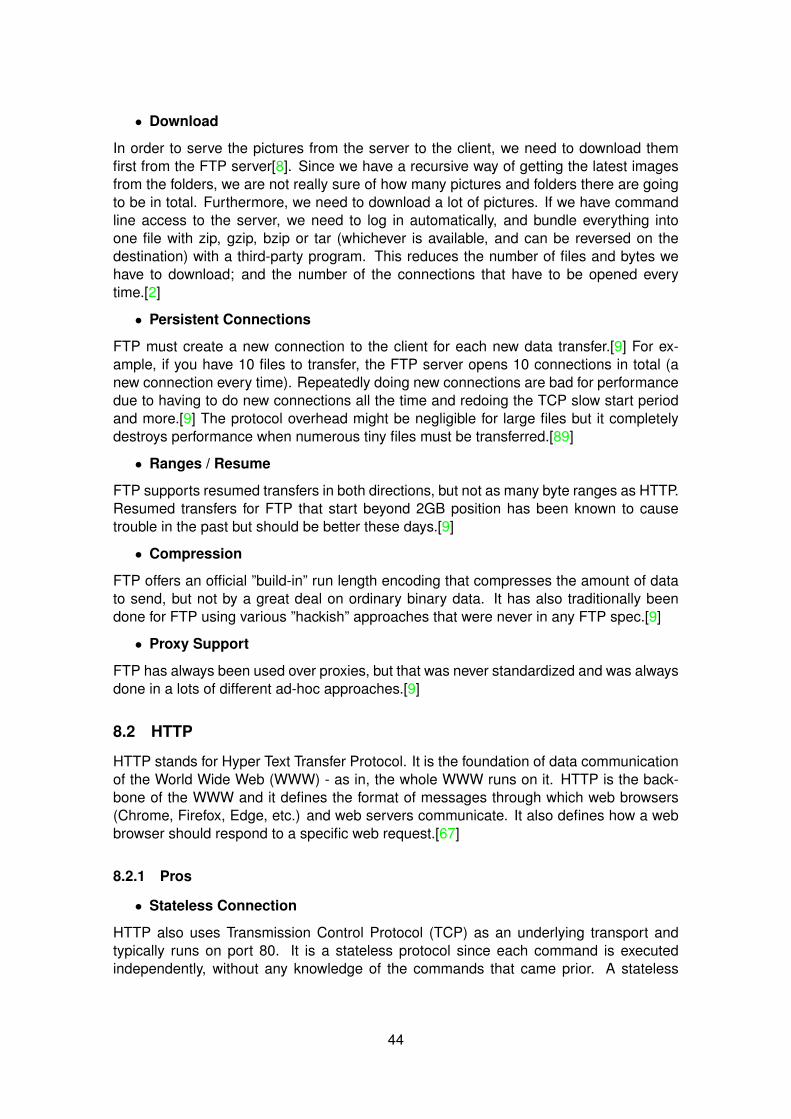
• Download
In order to serve the pictures from the server to the client, we need to download themfirst from the FTP server[8]. Since we have a recursive way of getting the latest imagesfrom the folders, we are not really sure of how many pictures and folders there are goingto be in total. Furthermore, we need to download a lot of pictures. If we have commandline access to the server, we need to log in automatically, and bundle everything intoone file with zip, gzip, bzip or tar (whichever is available, and can be reversed on thedestination) with a third-party program. This reduces the number of files and bytes wehave to download; and the number of the connections that have to be opened everytime.[2]
• Persistent Connections
FTP must create a new connection to the client for each new data transfer.[9] For ex-ample, if you have 10 files to transfer, the FTP server opens 10 connections in total (anew connection every time). Repeatedly doing new connections are bad for performancedue to having to do new connections all the time and redoing the TCP slow start periodand more.[9] The protocol overhead might be negligible for large files but it completelydestroys performance when numerous tiny files must be transferred.[89]
• Ranges / Resume
FTP supports resumed transfers in both directions, but not as many byte ranges as HTTP.Resumed transfers for FTP that start beyond 2GB position has been known to causetrouble in the past but should be better these days.[9]
• Compression
FTP offers an official ”build-in” run length encoding that compresses the amount of datato send, but not by a great deal on ordinary binary data. It has also traditionally beendone for FTP using various ”hackish” approaches that were never in any FTP spec.[9]
• Proxy Support
FTP has always been used over proxies, but that was never standardized and was alwaysdone in a lots of different ad-hoc approaches.[9]
8.2 HTTP
HTTP stands for Hyper Text Transfer Protocol. It is the foundation of data communicationof the World Wide Web (WWW) - as in, the whole WWW runs on it. HTTP is the back-bone of the WWW and it defines the format of messages through which web browsers(Chrome, Firefox, Edge, etc.) and web servers communicate. It also defines how a webbrowser should respond to a specific web request.[67]
8.2.1 Pros
• Stateless Connection
HTTP also uses Transmission Control Protocol (TCP) as an underlying transport andtypically runs on port 80. It is a stateless protocol since each command is executedindependently, without any knowledge of the commands that came prior. A stateless
44
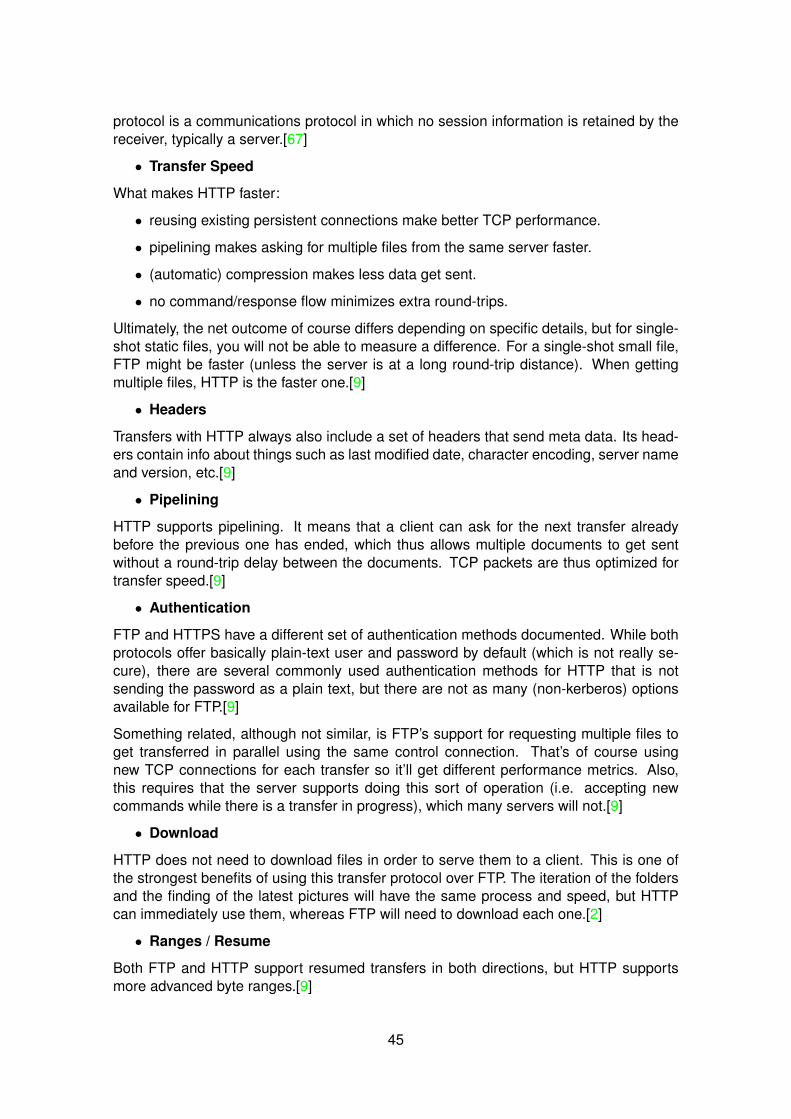
protocol is a communications protocol in which no session information is retained by thereceiver, typically a server.[67]
• Transfer Speed
What makes HTTP faster:
• reusing existing persistent connections make better TCP performance.
• pipelining makes asking for multiple files from the same server faster.
• (automatic) compression makes less data get sent.
• no command/response flow minimizes extra round-trips.
Ultimately, the net outcome of course differs depending on specific details, but for single-shot static files, you will not be able to measure a difference. For a single-shot small file,FTP might be faster (unless the server is at a long round-trip distance). When gettingmultiple files, HTTP is the faster one.[9]
• Headers
Transfers with HTTP always also include a set of headers that send meta data. Its head-ers contain info about things such as last modified date, character encoding, server nameand version, etc.[9]
• Pipelining
HTTP supports pipelining. It means that a client can ask for the next transfer alreadybefore the previous one has ended, which thus allows multiple documents to get sentwithout a round-trip delay between the documents. TCP packets are thus optimized fortransfer speed.[9]
• Authentication
FTP and HTTPS have a different set of authentication methods documented. While bothprotocols offer basically plain-text user and password by default (which is not really se-cure), there are several commonly used authentication methods for HTTP that is notsending the password as a plain text, but there are not as many (non-kerberos) optionsavailable for FTP.[9]
Something related, although not similar, is FTP’s support for requesting multiple files toget transferred in parallel using the same control connection. That’s of course usingnew TCP connections for each transfer so it’ll get different performance metrics. Also,this requires that the server supports doing this sort of operation (i.e. accepting newcommands while there is a transfer in progress), which many servers will not.[9]
• Download
HTTP does not need to download files in order to serve them to a client. This is one ofthe strongest benefits of using this transfer protocol over FTP. The iteration of the foldersand the finding of the latest pictures will have the same process and speed, but HTTPcan immediately use them, whereas FTP will need to download each one.[2]
• Ranges / Resume
Both FTP and HTTP support resumed transfers in both directions, but HTTP supportsmore advanced byte ranges.[9]
45

• HTTP Chunked Encoding
To avoid having to close down the data connection in order to signal the end of a transfer -when the size of the transfer was not known when the transfer started, chunked encodingwas introduced in HTTP.[9]
During a ”chunked encoding” transfer, the sending party sends a stream of [size-of-data][data] blocks over the wire until there is no more data to send and then it sendsa zero-size chunk to signal the end of it.[2]
Another obvious benefit (apart from having to re-open the connection again for next trans-fer) with chunked encoding compared to plain closing of the connection is the ability todetect premature connection shutdowns.[9]
• Compression
HTTP provides a way for the client and server to negotiate and choose among severalcompression algorithms. The gzip algorithm being the perhaps most widely used one,with brotli being a recent addition that often compresses data even better.[9]
• Name-based virtual hosting
Using HTTP 1.1, you can easily host many sites on the same server and they are alldifferentiated by their names.[9]
• Proxy Support
One of the biggest selling points for HTTP over FTP is its support for proxies, alreadybuild-in into the protocol from day 1. The support is so successful and well used thatlots of other protocols can be sent over HTTP these days just for its ability to go throughproxies.[9]
8.2.2 Cons
• Directory Listing
Directory listing is not usually possible with Web connections. The information is usuallyhidden from the user.[76]
Directory listings over HTTP are usually done either by serving HTML showing the direc-tory contents or by the use of WebDAV, which is an additional protocol run ”over” or inaddition to HTTP.[9]
• Little Packet Verification
HTTP was designed to be fast, but not solid. While transferring files from the server tothe client’s browser, some files might have a few packets lost on the way.[76]
• One-Way System
HTTP is a one-way system. That means that with an HTTP server, one can only transferfiles in one direction, i.e. from the server to the client’s browser.[76]
• Easy target for hackers
HTTP does not need a mandatory authentication method, unlike FTP. Furthermore, ourapplication does not have an authentication method for simplicity and fastness. This
46
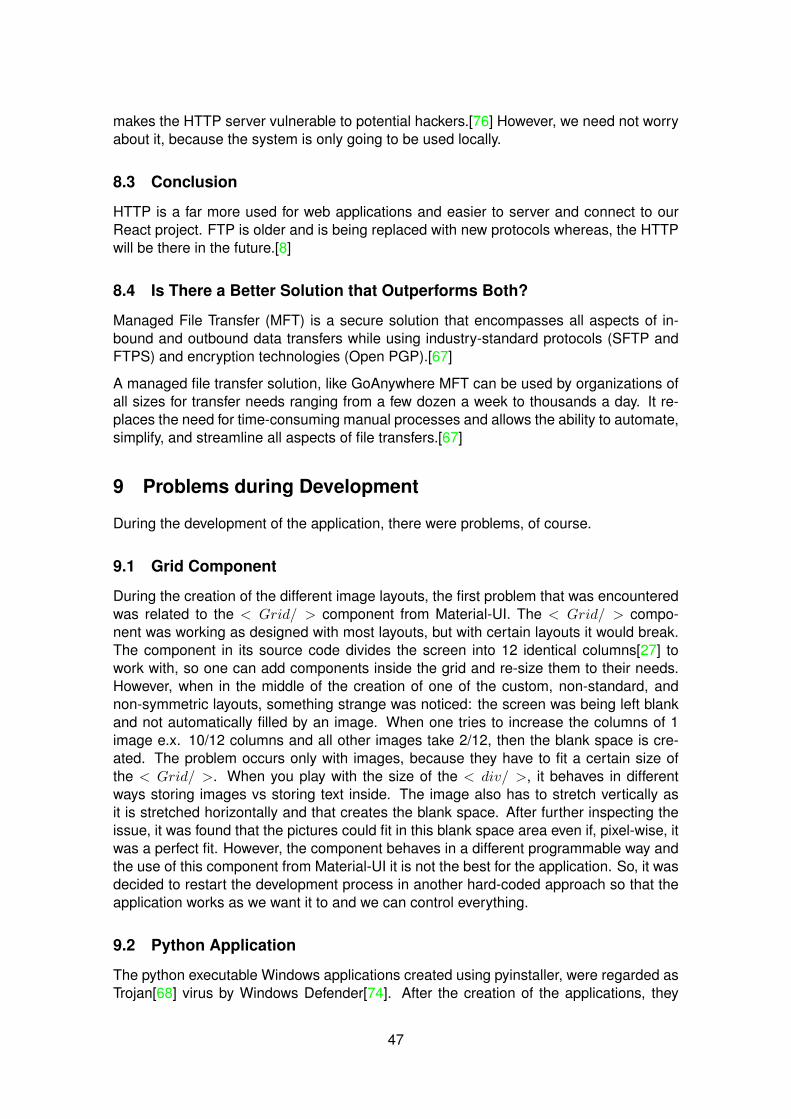
makes the HTTP server vulnerable to potential hackers.[76] However, we need not worryabout it, because the system is only going to be used locally.
8.3 Conclusion
HTTP is a far more used for web applications and easier to server and connect to ourReact project. FTP is older and is being replaced with new protocols whereas, the HTTPwill be there in the future.[8]
8.4 Is There a Better Solution that Outperforms Both?
Managed File Transfer (MFT) is a secure solution that encompasses all aspects of in-bound and outbound data transfers while using industry-standard protocols (SFTP andFTPS) and encryption technologies (Open PGP).[67]
A managed file transfer solution, like GoAnywhere MFT can be used by organizations ofall sizes for transfer needs ranging from a few dozen a week to thousands a day. It re-places the need for time-consuming manual processes and allows the ability to automate,simplify, and streamline all aspects of file transfers.[67]
9 Problems during Development
During the development of the application, there were problems, of course.
9.1 Grid Component
During the creation of the different image layouts, the first problem that was encounteredwas related to the < Grid/ > component from Material-UI. The < Grid/ > compo-nent was working as designed with most layouts, but with certain layouts it would break.The component in its source code divides the screen into 12 identical columns[27] towork with, so one can add components inside the grid and re-size them to their needs.However, when in the middle of the creation of one of the custom, non-standard, andnon-symmetric layouts, something strange was noticed: the screen was being left blankand not automatically filled by an image. When one tries to increase the columns of 1image e.x. 10/12 columns and all other images take 2/12, then the blank space is cre-ated. The problem occurs only with images, because they have to fit a certain size ofthe < Grid/ >. When you play with the size of the < div/ >, it behaves in differentways storing images vs storing text inside. The image also has to stretch vertically asit is stretched horizontally and that creates the blank space. After further inspecting theissue, it was found that the pictures could fit in this blank space area even if, pixel-wise, itwas a perfect fit. However, the component behaves in a different programmable way andthe use of this component from Material-UI it is not the best for the application. So, it wasdecided to restart the development process in another hard-coded approach so that theapplication works as we want it to and we can control everything.
9.2 Python Application
The python executable Windows applications created using pyinstaller, were regarded asTrojan[68] virus by Windows Defender[74]. After the creation of the applications, they
47
were immediately deleted at run-time by it. These are regarded as a false positives[86]and it is when the antivirus finds a legitimate file and evaluates that it is a harmful, whenreally it is not. A lot of people have had this issue with pyinstaller and there are many waysto fix it, one of which was reporting[75] the false positive, but that would take some time.So the only long-term solution would be excluding[73] the project folder to the WindowsDefender scanning.
10 Conclusions
This web application’s purpose is adapted to only be used for the observation of artificially-grown crops for the DLR Bremen EDEN ISS team. It has access to each camera, cap-turing their growth on a daily-basis, and uploading the images to their server. The serveris located in a local machine at DLR HQ, so we were able to use that to our advantage.Since the server was an FTP server, we could not work with it efficiently and feed thepictures to our client application. However, being a local folder helped us a lot, becausewe made we then created an HTTP server to retrieve all the images and to serve them. Inthe end, we managed to find a decent solution for this problem using a recursive functionapproach. HTTP was the perfect server type for our web application.
The HTTP server was implemented using Node.JS. The syntax language of Node, beingJavaScript, made it easier to get the hang of it quickly. The combination of the implemen-tation of the front-end being written in JavaScript, as well as Node in the back-end, alsosimplified the process of serving the images to the client. Furthermore, Node is requireda lot when using real-time applications. In our case it helps in the automation processwhen restarting the application because of how fast it feeds the images to the GUI.
The client application was implemented in JavaScript, making use of React library and itscharacter. By using React, we were able to use its attribute and divide the application intosmaller pieces. This way, it was faster and easier to work with each component and thenintegrate them with the GUI. The different components were controlled by one file and theapplication’s state. Actually, the entire front-end area was implemented in a way so thatit focuses on making use of the React state attribute. The state is an object, that controlsthe application itself and its different components. By initializing the state and changing itusing the designated functions, we were also able to reflect those changes in the GUI inreal-time for the users, e.x. when the timer changes. The last React attribute useful forour project was the virtual DOM. React makes use of having a copy of the actual DOMvirtually and makes the application slightly faster improving its performance.
The GUI was built using Material-UI design components. The main principles were min-imalism and simplicity of the application. These design principles were strictly followedin application and its components and it shows everywhere. The colorfulness of thecomponents was one of the reasons why Material-UI was chosen in comparison to Boot-Strap, but most of all it was the idea that BootStrap websites almost look identical and weneeded something different.
The layouts in the GUI were created using completely custom components. The <Grid/ > components from either Material-UI or BootStrap were not working properly withour application, because of their own rules and implementation. The custom componentswere each very simple, but a proper combination of them all can create various complexand uniform layout grids. Essentially, all they do is play around with the application’s< div/ >.
48

Picture shifts in the front-end were made possible using array manipulation. After thearray was manipulated and then shifted, we updated the state of the application to makesure that our changes in the GUI reflected the changes that were made to be done. Thetimer, which was part of the application’s state, was heavily integrated in the file controllerand each of the 9 layouts files, to make sure that it was updated accordingly when theuser made a change.
Image slideshow was a part of the GUI that also needed to have very good performance,because it holds all the images of a folder dynamically. It creates an effect of a reversedtime-lapse when looking the images, since the latest picture gets shown first. This effectwas achieved by removing the transition time and the transition animation that were therebefore. Furthermore, it is cleared from its bothersome props to have a minimalist lookthat makes it easier for the user to see all the details of each image.
The time-lapse section of the application also needed to have decent performance and aquick presentation of what was created. What is created is a concatenation of a certainnumber of images selected from the GUI. In essence it is a GIF, whose speed can alsobe controlled. The quality of the GIF is standard and cannot be changed, unless modifiedin the implementation. The reason for that is to make is stable and to not result in an erroror a request timeout. The request can timeout because it uses an open-source functionto create the time-lapse and return it to the client.
The client application was transformed into a proper Windows application. It opens a newindependent window every time the user clicks on it. Each window can also be configuredseparately and they have no connections with each-other. The only common connectionthat they have is the HTTP server. The server was not transformed into a Windowsapplication, because it needed to re-compile when restarted. We have a python script,which is a Windows application, that re-compiles the server. This script makes it looklike it is the server that is a proper application. Furthermore, there is another pythonapplication which runs all the time and restarts the server at 6:00:00 AM.
To conclude, the application is not perfect and has a lot of room for improvement. Theideas on how to improve it can be limitless and will grow in number over time while newprogramming languages are released and better solutions are provided.
49

References[1] JetRuby Agency. Pros and Cons of Bootstrap Themes. URL: https://expertise.
jetruby.com/pros-and-cons-of-bootstrap-themes-4274c5608d3f.
[2] alexis. CLI: quickly download large amount of small files over ftp. URL: https ://superuser.com/questions/579259/cli-quickly-download-large-amount-
of-small-files-over-ftp.
[3] D. Alimov. Collage maker. 2016. URL: https://github.com/delimitry/collage_maker.
[4] G. Belani. Should you use Bootstrap or Material Design for your web or app de-velopment project? URL: https://hub.packtpub.com/bootstrap-vs-material-design-for-your-next-web-or-app-development-project/.
[5] A. Buhler. What Makes React so Fast? 2020. URL: https://medium.com/swlh/what-makes-react-so-fast-2f2ed27afb68.
[6] H. Catlin. Syntactically awesome style sheets (Sass). URL: https://sass-lang.com/.
[7] Codeacademy. React: The Virtual DOM. 2020. URL: https://www.codecademy.com/articles/react-virtual-dom.
[8] M. Cowan et al. Difference Between HTTP and FTP. URL: https://techdifferences.com/difference-between-http-and-ftp.html#ComparisonChart.
[9] M. Cowan et al. FTP vs HTTP. URL: https://daniel.haxx.se/docs/ftp-vs-http.html.
[10] C. Coyier. A Complete Guide to Flexbox. 2020. URL: https://css-tricks.com/snippets/css/a-guide-to-flexbox/.
[11] Refsnes Data. HTML <div> Tag. 2020. URL: https://www.w3schools.com/tags/tag_div.ASP.
[12] Refsnes Data. HTML <fieldset> Tag. 2020. URL: https://www.w3schools.com/tags/tag_fieldset.asp.
[13] Refsnes Data. HTML <legend> Tag. 2020. URL: https://www.w3schools.com/tags/tag_legend.asp.
[14] Refsnes Data. JavaScript Array push() Method. 2020. URL: https://www.w3schools.com/jsref/jsref_push.asp.
[15] Refsnes Data. JavaScript String substring() Method. 2020. URL: https://www.w3schools.com/jsref/jsref_substring.asp.
[16] Refsnes Data. What is JSON? 2020. URL: https://www.w3schools.com/whatis/whatis_json.asp#:~:text=JSON%5C%20stands%5C%20for%5C%20JavaScript%5C%
20Object,describing%5C%22%5C%20and%5C%20easy%5C%20to%5C%20understand.
[17] DLR. EDEN Initiative. 2020. URL: https://www.dlr.de/irs/en/desktopdefault.aspx/tabid-11286/#gallery/35706.
[18] DLR. Ground Demonstration of Plant Cultivation Technologies for Safe Food Pro-duction in Space. 2020. URL: https://eden-iss.net/.
[19] H. Ekhtiyar, M. Sheida, and M. Amintoosi. “Picture Collage with Genetic Algorithmand Stereo vision”. In: Computer Science Issues, Vol. 8 (2011).
50
[20] ewerybody. Python check if a process is running or not. 2015. URL: https://stackoverflow.com/questions/7787120/python-check-if-a-process-is-
running-or-not.
[21] Inc. Facebook. Button. 2020. URL: https : / / material - ui . com / components /buttons/#contained-buttons.
[22] Inc. Facebook. Checkbox. 2020. URL: https://material-ui.com/components/checkboxes/#checkboxes-with-formgroup.
[23] Inc. Facebook. Dialog. 2020. URL: https : / / material - ui . com / components /dialogs/.
[24] Inc. Facebook. FormControl API. 2020. URL: https://material-ui.com/api/form-control/#formcontrol-api.
[25] Inc. Facebook. FormControlLabel API. 2020. URL: https://material-ui.com/api/form-control-label/#formcontrollabel-api.
[26] Inc. Facebook. FormGroup API. 2020. URL: https://material- ui.com/api/form-group/#formgroup-api.
[27] Inc. Facebook. Grid. 2020. URL: https://material-ui.com/components/grid/#grid.
[28] Inc. Facebook. IconButton API. 2020. URL: https://material-ui.com/api/icon-button/#iconbutton-api.
[29] Inc. Facebook. Layout with Flexbox. 2020. URL: https://reactnative.dev/docs/flexbox/.
[30] Inc. Facebook. ListItem API. 2020. URL: https://material-ui.com/api/list-item/#listitem-api.
[31] Inc. Facebook. ListItem API. 2020. URL: https://material-ui.com/api/list-item-text/#listitemtext-api.
[32] Inc. Facebook. ListItem API. 2020. URL: https://material-ui.com/api/menu/.
[33] Inc. Facebook. ListItem API. 2020. URL: https://developer.mozilla.org/de/docs/Web/JavaScript/Reference/Global_Objects/Array/map.
[34] Inc. Facebook. Material Icons. 2020. URL: https://material-ui.com/components/material-icons/#material-icons.
[35] Inc. Facebook. Menus. 2020. URL: https://material- ui.com/components/menus/#selected-menus.
[36] Inc. Facebook. Minimizing Bundle Size. 2020. URL: https://material-ui.com/guides/minimizing-bundle-size/#minimizing-bundle-size.
[37] Inc. Facebook. Modal. 2020. URL: https : / / material - ui . com / components /
modal/.
[38] Inc. Facebook. Progress. 2020. URL: https://material-ui.com/components/progress/#circular-indeterminate.
[39] Inc. Facebook. React.Component. 2020. URL: https : / / reactjs . org / docs /
react-component.html#componentdidmount.
[40] Inc. Facebook. React.Component. 2020. URL: https : / / reactjs . org / docs /
react-component.html#componentdidupdate.
51

[41] Inc. Facebook. React.Component. 2020. URL: https : / / reactjs . org / docs /
react-component.html#componentwillunmount.
[42] Inc. Facebook. State and Lifecycle. 2020. URL: https://reactjs.org/docs/state-and-lifecycle.html.
[43] Inc. Facebook. Text Field. 2020. URL: https://material-ui.com/components/text-fields/#form-props.
[44] Inc. Facebook. Toolbar API. 2020. URL: https://material-ui.com/api/toolbar/.
[45] Inc. Facebook. Typography. 2020. URL: https://material-ui.com/components/typography/#component.
[46] I. Feoktistov. Why and when to use Node.js? 2020. URL: https://relevant.software/blog/why-and-when-to-use-node-js/.
[47] OpenJS Foundation. Console. 2020. URL: https://nodejs.org/api/console.html#console_console_log_data_args.
[48] OpenJS Foundation. express - Fast, open, uncomplicated web framework for Node.js.2020. URL: https://expressjs.com/.
[49] OpenJS Foundation. express(). 2020. URL: http://expressjs.com/api.html#express.static.
[50] OpenJS Foundation. express(). 2020. URL: http://expressjs.com/en/api.html#res.set.
[51] OpenJS Foundation. express(). 2020. URL: http://expressjs.com/en/5x/api.html#app.listen_path_callback.
[52] OpenJS Foundation. express(). 2020. URL: http://expressjs.com/en/5x/api.html#res.json.
[53] OpenJS Foundation. File system. 2020. URL: https://nodejs.org/api/fs.html#fs_fs_readdirsync_path_options.
[54] OpenJS Foundation. File system. 2020. URL: https://nodejs.org/api/fs.html#fs_dirent_isdirectory.
[55] OpenJS Foundation. File system. 2020. URL: https://nodejs.org/api/fs.html#fs_dirent_isfile.
[56] OpenJS Foundation. Provide static files in Express. 2020. URL: https://expressjs.com/de/starter/static-files.html.
[57] OpenJS Foundation. Use middleware. 2020. URL: http://expressjs.com/de/guide/using-middleware.html#middleware-verwenden.
[58] OpenJS Foundation. Writing middleware for use in Express apps. 2020. URL: http://expressjs.com/en/guide/writing-middleware.html#writing-middleware-
for-use-in-express-apps.
[59] Python Software Foundation. os — Miscellaneous operating system interfaces.2020. URL: https://docs.python.org/3/library/os.html#module-os.
[60] Python Software Foundation. subprocess — Subprocess management. 2020. URL:https://docs.python.org/3/library/subprocess.html.
[61] M. Gajda. Why use Node.js web development? Scalability, performance and otherbenefits of Node based on famous web applications. 2020. URL: https://tsh.io/blog/why-use-nodejs/.
52
[62] Inc. GitHub. Electron Packager. 2020. URL: https://github.com/electron/electron-packager.
[63] Guru99. express - Fast, open, uncomplicated web framework for Node.js. 2020.URL: https://www.guru99.com/node- js- express.html#:~:text=The%5C%20express%5C%20framework%5C%20is%5C%20the,for%5C%20developing%5C%
20Node%5C%20js%5C%20applications.&text=js%5C%20framework%5C%20and%5C%
20helps%5C%20in,based%5C%20on%5C%20the%5C%20request%5C%20made..
[64] M. Hamedani. React Lifecycle Methods – A Deep Dive. 2015. URL: https : / /
programmingwithmosh.com/javascript/react-lifecycle-methods/#:~:text=
What%5C%20are%5C%20React%5C%20lifecycle%5C%20methods,birth%5C%2C%5C%
20growth%5C%2C%5C%20and%5C%20death..
[65] Stack Exchange Inc. Developer Survey Results. 2019. URL: https://insights.stackoverflow.com/survey/2019#technology- _- programming- scripting-
and-markup-languages.
[66] Stack Exchange Inc. Developer Survey Results. 2020. URL: https://insights.stackoverflow.com/survey/2019#technology-_-other-frameworks-libraries-
and-tools.
[67] H. Kath. Comparing Transfer Methods: HTTP vs. FTP. URL: https://www.goanywhere.com/blog/comparing-transfer-methods-http-vs-ftp.
[68] AO Kaspersky Lab. What is a Trojan Virus? 2020. URL: https://www.kaspersky.com/resource-center/threats/trojans.
[69] L. Leandro. React Responsive Carousel. 2020. URL: https://github.com/leandrowd/react-responsive-carousel.
[70] W. Maj. React lifecycle methods diagram. 2020. URL: https://projects.wojtekmaj.pl/react-lifecycle-methods-diagram/.
[71] S. Martin. Grid. 2018. URL: https://torquemag.io/2018/06/why-millions-of-developers-use-javascript-for-web-application-development/.
[72] S. Martin. Grid. 2020. URL: https : / / medium . com / javarevisited / why - is -
javascript-still-important-in-developing-modern-web-apps-67fcd30d7ad6.
[73] Microsoft. Add an exclusion to Windows Security. 2020. URL: https://support.microsoft.com/en-us/windows/add-an-exclusion-to-windows-security-
811816c0-4dfd-af4a-47e4-c301afe13b26.
[74] Microsoft. Stay protected with Windows Security. 2020. URL: https://support.microsoft.com/en-us/windows/stay-protected-with-windows-security-
2ae0363d-0ada-c064-8b56-6a39afb6a963.
[75] Microsoft. Submit a file for malware analysis. 2020. URL: https://www.microsoft.com/en-us/wdsi/filesubmission.
[76] Mirjana. FTP vs HTTP. 2011. URL: http : / / www . worldofintegration . com /
content/ftp-vs-http.
[77] Mozilla and individual contributors. Date. 2020. URL: https://developer.mozilla.org/de/docs/Web/JavaScript/Reference/Global_Objects/Date.
[78] Mozilla and individual contributors. String.prototype.endsWith(). 2020. URL: https://developer.mozilla.org/de/docs/Web/JavaScript/Reference/Global_
Objects/String/endsWith.
53

[79] Mozilla and individual contributors. String.prototype.includes(). 2020. URL: https://developer.mozilla.org/de/docs/Web/JavaScript/Reference/Global_
Objects/String/includes.
[80] E. NewPort. List all files in a directory in Node.js recursively in a synchronous fash-ion. 2013. URL: https://gist.github.com/kethinov/6658166.
[81] Inc. O’Reilly Media. Chapter 2. Working with React Native. 2020. URL: https ://www.oreilly.com/library/view/learning-react-native/9781491929049/
ch02.html.
[82] N. Ovchinnikova. Bootstrap Vs. Material-UI. Which One To Use For The Next WebbApp? URL: https://flatlogic.com/blog/bootstrap-vs-material-ui-which-one- to- use- for- the- next- web- app/#:~:text=Bootstrap%5C%20is%5C%
20a % 5C % 20powerful % 5C % 20CSS , both % 5C % 20for % 5C % 20mobile % 5C % 20and %
5C % 20desktop . &text = Material % 5C % 20UI % 5C % 20is % 5C % 20a % 5C % 20React ,
principles%5C%20of%5C%20the%5C%20Material%5C%20design..
[83] N. Pandit. What and Why React.js. 2020. URL: https://www.c-sharpcorner.com/article/what-and-why-reactjs/#:~:text=js%5C%3F-,React.,specifically%
5C%20for%5C%20single%5C%2Dpage%5C%20applications.&text=React%5C%
20allows%5C%20developers%5C%20to%5C%20create,fast%5C%2C%5C%20scalable%
5C%2C%5C%20and%5C%20simple..
[84] Tutorials Point. Data Structure and Algorithms - Tree. 2020. URL: https://www.tutorialspoint.com/data_structures_algorithms/tree_data_structure.
htm.
[85] Sharpened Productions. Runtime. 2020. URL: https://techterms.com/definition/runtime#:~:text=Runtime%5C%20is%5C%20the%5C%20period%5C%20of,most%5C%
20often%5C%20in%5C%20software%5C%20development..
[86] Panda Security. False positives – What are they? 2020. URL: https : / / www .
pandasecurity.com/en/mediacenter/security/false-positives-what-are-
they/#:~:text=A%5C%20false%5C%20positive%5C%20occurs%5C%20when,
scanning%5C%20or%5C%20analysis%5C%20of%5C%20behavior..
[87] PyInstaller Development Team. PyInstaller. 2020. URL: https://www.pyinstaller.org/.
[88] tttppp. Mountain Tapir Collage Maker. 2016. URL: https : / / mountain - tapir .readthedocs.io/en/latest/readme.html.
[89] WDIS. Why does FTP Suck? URL: https://whydoesitsuck.com/why-does-ftp-suck/.
[90] C. West and G. Franko. GifShot. 2020. URL: https://yahoo.github.io/gifshot/.
54