peoplesoft interaction hub 9.1: collaborative workspaces
TRANSCRIPT
PeopleSoft Interaction Hub 9.1:Collaborative Workspaces
November 2021
PeopleSoft Interaction Hub 9.1: Collaborative WorkspacesCopyright © 1988, 2021, Oracle and/or its affiliates.
This software and related documentation are provided under a license agreement containing restrictions on use anddisclosure and are protected by intellectual property laws. Except as expressly permitted in your license agreementor allowed by law, you may not use, copy, reproduce, translate, broadcast, modify, license, transmit, distribute,exhibit, perform, publish, or display any part, in any form, or by any means. Reverse engineering, disassembly, ordecompilation of this software, unless required by law for interoperability, is prohibited.
The information contained herein is subject to change without notice and is not warranted to be error-free. If youfind any errors, please report them to us in writing.
If this is software or related documentation that is delivered to the U.S. Government or anyone licensing it on behalfof the U.S. Government, then the following notice is applicable:
U.S. GOVERNMENT END USERS: Oracle programs (including any operating system, integrated software,any programs embedded, installed or activated on delivered hardware, and modifications of such programs) andOracle computer documentation or other Oracle data delivered to or accessed by U.S. Government end users are"commercial computer software" or “commercial computer software documentation” pursuant to the applicableFederal Acquisition Regulation and agency-specific supplemental regulations. As such, the use, reproduction,duplication, release, display, disclosure, modification, preparation of derivative works, and/or adaptation of i) Oracleprograms (including any operating system, integrated software, any programs embedded, installed or activatedon delivered hardware, and modifications of such programs), ii) Oracle computer documentation and/or iii) otherOracle data, is subject to the rights and limitations specified in the license contained in the applicable contract. Theterms governing the U.S. Government’s use of Oracle cloud services are defined by the applicable contract for suchservices. No other rights are granted to the U.S. Government.
This software or hardware is developed for general use in a variety of information management applications. It isnot developed or intended for use in any inherently dangerous applications, including applications that may create arisk of personal injury. If you use this software or hardware in dangerous applications, then you shall be responsibleto take all appropriate fail-safe, backup, redundancy, and other measures to ensure its safe use. Oracle Corporationand its affiliates disclaim any liability for any damages caused by use of this software or hardware in dangerousapplications.
Oracle and Java are registered trademarks of Oracle and/or its affiliates. Other names may be trademarks of theirrespective owners.
Intel and Intel Inside are trademarks or registered trademarks of Intel Corporation. All SPARC trademarks are usedunder license and are trademarks or registered trademarks of SPARC International, Inc. AMD, Epyc, and the AMDlogo are trademarks or registered trademarks of Advanced Micro Devices. UNIX is a registered trademark of TheOpen Group.
This software or hardware and documentation may provide access to or information about content, products, andservices from third parties. Oracle Corporation and its affiliates are not responsible for and expressly disclaim allwarranties of any kind with respect to third-party content, products, and services unless otherwise set forth in anapplicable agreement between you and Oracle. Oracle Corporation and its affiliates will not be responsible for anyloss, costs, or damages incurred due to your access to or use of third-party content, products, or services, except asset forth in an applicable agreement between you and Oracle.
Documentation Accessibility
For information about Oracle's commitment to accessibility, visit the Oracle Accessibility Program website at http://www.oracle.com/pls/topic/lookup?ctx=acc&id=docacc.
Access to Oracle Support
Oracle customers that have purchased support have access to electronic support through My Oracle Support. Forinformation, visit http://www.oracle.com/pls/topic/lookup?ctx=acc&id=info or visit http://www.oracle.com/pls/topic/lookup?ctx=acc&id=trs if you are hearing impaired.
Contents
Preface: Preface..........................................................................................................................................viiUnderstanding the PeopleSoft Online Help and PeopleBooks............................................................ vii
Hosted PeopleSoft Online Help.....................................................................................................viiLocally Installed Help....................................................................................................................viiDownloadable PeopleBook PDF Files...........................................................................................viiCommon Help Documentation...................................................................................................... viiField and Control Definitions....................................................................................................... viiiTypographical Conventions...........................................................................................................viiiISO Country and Currency Codes................................................................................................viiiRegion and Industry Identifiers...................................................................................................... ixTranslations and Embedded Help................................................................................................... ix
Using and Managing the PeopleSoft Online Help................................................................................. xAbout PeopleSoft Interaction Hub......................................................................................................... x
PeopleSoft Portal Solutions Product Family....................................................................................xPeopleSoft Interaction Hub and PeopleTools Portal Technology.................................................... x
Related Documentation..........................................................................................................................xiPeopleSoft Interaction Hub Documentation................................................................................... xiPeopleTools Documentation...........................................................................................................xii
PeopleSoft Portal Solutions Related Links.......................................................................................... xiiContact Us........................................................................................................................................... xiiiFollow Us.............................................................................................................................................xiii
Chapter 1: Understanding Collaborative Workspaces.......................................................................... 15Collaborative Workspaces.....................................................................................................................15The Workspace Homepage................................................................................................................... 15The Workspace Menu........................................................................................................................... 16Workspace Modules.............................................................................................................................. 17
Chapter 2: Setting Up Collaborative Workspace Options and Templates.......................................... 21Understanding Workspace Setup.......................................................................................................... 21Setting Up System Options for Workspaces........................................................................................ 21
Page Used to Set Up System Options for Workspaces................................................................. 21Installation Options Page............................................................................................................... 21
Setting Up the Workspace Category Hierarchy................................................................................... 24Pages Used to Set Up the Workspace Category Hierarchy........................................................... 24Understanding the Workspace Category Hierarchy....................................................................... 24Collaborative Workspace Category Hierarchy Page......................................................................25Adding and Editing Workspace Categories................................................................................... 26Select Category Page......................................................................................................................27
Setting Up Workspace Instant Messaging............................................................................................28Setting Up Workspace Templates.........................................................................................................28
Pages Used to Set Up Workspace Templates................................................................................ 29Understanding Workspace Templates............................................................................................ 30Manage Templates Page.................................................................................................................31Creating Workspace Templates...................................................................................................... 33Setting Workspace Template Properties.........................................................................................34Administration Members Page.......................................................................................................35Selecting Template Modules.......................................................................................................... 36
Copyright © 1988, 2021, Oracle and/or its affiliates. iii
Contents
Documents Module Properties Page.............................................................................................. 38Adding or Editing Related Pagelets in a Template........................................................................40Defining Contextual Data for Templates....................................................................................... 43Copying Changes from Templates................................................................................................. 47Administration Security Page.........................................................................................................50Workspace Administration Advanced Page...................................................................................51
Importing and Exporting Template Data..............................................................................................52Chapter 3: Creating Collaborative Workspaces.....................................................................................53
Understanding Workspace Creation......................................................................................................53Creating Root-Level Workspaces......................................................................................................... 55
Pages Used to Create Root-Level Workspaces..............................................................................55Select A Workspace Template Page.............................................................................................. 55Relate Workspace to a Transaction Page.......................................................................................56Name and Describe Workspace Page............................................................................................ 57Select Workspace Modules Page................................................................................................... 58Add Members (Optional) Page...................................................................................................... 60Create User Account Page............................................................................................................. 62
Creating Child Workspaces...................................................................................................................63Page Used to Create Child Workspaces.........................................................................................63Create Child Workspace Page........................................................................................................63
Creating and Updating Workspaces in Batch Mode............................................................................ 65Pages Used to Create and Update Workspaces in Batch Mode.....................................................65Running the Process to Create and Update Workspaces in Batch Mode.......................................66
Chapter 4: Administering Collaborative Workspaces........................................................................... 73Understanding Workspace Administration........................................................................................... 73Understanding Workspace Privilege Sets............................................................................................. 73Setting Up a Workspace....................................................................................................................... 79
Pages Used to Define Details of Workspaces................................................................................79Administering the Workspace Properties Page.............................................................................. 81Administering Workspace Members.............................................................................................. 84Administering Workspace Modules............................................................................................... 87Administration - Contextual Data Page......................................................................................... 94Administering Workspace Feeds....................................................................................................95Workspace Administration — Advanced Page..............................................................................98
Designating the Content and Layout of the Workspace Homepage.....................................................99Pages Used to Designate the Content and Layout of the Workspace Homepage.......................... 99Understanding the Content and Layout of the Workspace Homepage.......................................... 99Tab Content Page......................................................................................................................... 100Tab Layout Page...........................................................................................................................102
Managing the Status of Workspaces.................................................................................................. 105Pages Used to Manage the Status of Workspaces....................................................................... 105Understanding Workspace Statuses..............................................................................................105Manage Workspaces Page............................................................................................................ 105
Moving a Workspace in the Workspace Hierarchy............................................................................ 108Importing and Exporting Workspace Data......................................................................................... 108Managing External User Accounts for Workspaces...........................................................................108
Chapter 5: Working in Collaborative Workspaces.............................................................................. 111Accessing Workspaces........................................................................................................................ 111
Pages Used to Access Workspaces.............................................................................................. 111Understanding How to Access Workspaces.................................................................................111My Workspaces Page................................................................................................................... 112
iv Copyright © 1988, 2021, Oracle and/or its affiliates.
Contents
Workspaces - Search Page........................................................................................................... 114Workspaces - Hierarchy Page...................................................................................................... 116Browse By Category Page........................................................................................................... 118Requesting Access to a Workspace..............................................................................................119
Navigating in a Workspace.................................................................................................................121Modifying Your Workspace Homepage............................................................................................. 126Using the Wiki Content Module........................................................................................................ 126
Pages Used with the Wiki Content Module.................................................................................127Understanding the Wiki Content Module.................................................................................... 127Editing Wiki Content Module......................................................................................................128View Page..................................................................................................................................... 135Reviewing Content Information...................................................................................................136Working With the Wiki Content Pagelet..................................................................................... 138
Using the Discussions Module........................................................................................................... 139Understanding the Discussions Module.......................................................................................139Using the Recent Discussions Pagelet......................................................................................... 140
Using the Documents Module............................................................................................................ 141Understanding the Documents Module........................................................................................141Working With the Recent Documents Pagelet.............................................................................141
Using the Blogs Module.....................................................................................................................142Understanding the Blogs Module................................................................................................ 142Working With the Blogs Pagelet..................................................................................................142
Using the Links Module..................................................................................................................... 143Pages Used in the Links Module.................................................................................................144Understanding the Links Module.................................................................................................144Links Page.................................................................................................................................... 145Folder Link Page.......................................................................................................................... 146Adding a Link.............................................................................................................................. 146Folder Properties Page................................................................................................................. 151Working With the Links Pagelet..................................................................................................153
Using the Action Item Lists Module..................................................................................................154Understanding the Action Item Lists Module..............................................................................154Working With the Open Action Items Pagelet............................................................................ 154
Using the Calendar Module................................................................................................................155Understanding the Calendar Module........................................................................................... 155Working With the Calendar Pagelet.............................................................................................155Working with the Upcoming Events Pagelet...............................................................................157
Using the Members Module............................................................................................................... 158Pages Used in the Members Module........................................................................................... 158Understanding the Members Module...........................................................................................158Members Page.............................................................................................................................. 158Member Profile Page....................................................................................................................160Notify Members Page...................................................................................................................161
Using the Related Data Module......................................................................................................... 162Using the Related Discussions Pagelet........................................................................................163
Using the Polls Module...................................................................................................................... 163Understanding the Polls Module..................................................................................................164Using the Poll Pagelet..................................................................................................................164
Using the Browse Workspaces Module..............................................................................................166Searching Within Workspaces............................................................................................................ 166
Pages Used to Search Within a Workspace................................................................................. 166
Copyright © 1988, 2021, Oracle and/or its affiliates. v
Contents
Understanding Searching Within Workspaces............................................................................. 166Search Page...................................................................................................................................167Search <Module> Page................................................................................................................ 168
Viewing and Subscribing to Feeds Within a Workspace................................................................... 169Pages Used to View and Subscribe to Feeds Within a Workspace..............................................169Understanding Workspace Feeds................................................................................................. 170
Creating and Using Tags in Workspaces............................................................................................171Understanding Tags in Workspaces............................................................................................. 171Using the Tags Pagelet.................................................................................................................172
Working with Additional Workspace Pagelets................................................................................... 174Working with the Email Pagelet.................................................................................................. 174Working with the Feed Reader Pagelet....................................................................................... 174
vi Copyright © 1988, 2021, Oracle and/or its affiliates.
Preface
Understanding the PeopleSoft Online Help and PeopleBooks
The PeopleSoft Online Help is a website that enables you to view all help content for PeopleSoftapplications and PeopleTools. The help provides standard navigation and full-text searching, as well ascontext-sensitive online help for PeopleSoft users.
Hosted PeopleSoft Online HelpYou can access the hosted PeopleSoft Online Help on the Oracle Help Center. The hosted PeopleSoftOnline Help is updated on a regular schedule, ensuring that you have access to the most currentdocumentation. This reduces the need to view separate documentation posts for application maintenanceon My Oracle Support. The hosted PeopleSoft Online Help is available in English only.
To configure the context-sensitive help for your PeopleSoft applications to use the Oracle Help Center,see Configuring Context-Sensitive Help Using the Hosted Online Help Website.
Locally Installed HelpIf you’re setting up an on-premise PeopleSoft environment, and your organization has firewall restrictionsthat prevent you from using the hosted PeopleSoft Online Help, you can install the online help locally.See Configuring Context-Sensitive Help Using a Locally Installed Online Help Website.
Downloadable PeopleBook PDF FilesYou can access downloadable PDF versions of the help content in the traditional PeopleBook format onthe Oracle Help Center. The content in the PeopleBook PDFs is the same as the content in the PeopleSoftOnline Help, but it has a different structure and it does not include the interactive navigation features thatare available in the online help.
Common Help DocumentationCommon help documentation contains information that applies to multiple applications. The two maintypes of common help are:
• Application Fundamentals
• Using PeopleSoft Applications
Most product families provide a set of application fundamentals help topics that discuss essentialinformation about the setup and design of your system. This information applies to many or allapplications in the PeopleSoft product family. Whether you are implementing a single application, somecombination of applications within the product family, or the entire product family, you should be familiarwith the contents of the appropriate application fundamentals help. They provide the starting points forfundamental implementation tasks.
Copyright © 1988, 2021, Oracle and/or its affiliates. vii

Preface
In addition, the PeopleTools: Applications User's Guide introduces you to the various elements of thePeopleSoft Pure Internet Architecture. It also explains how to use the navigational hierarchy, components,and pages to perform basic functions as you navigate through the system. While your application orimplementation may differ, the topics in this user’s guide provide general information about usingPeopleSoft applications.
Field and Control DefinitionsPeopleSoft documentation includes definitions for most fields and controls that appear on applicationpages. These definitions describe how to use a field or control, where populated values come from, theeffects of selecting certain values, and so on. If a field or control is not defined, then it either requiresno additional explanation or is documented in a common elements section earlier in the documentation.For example, the Date field rarely requires additional explanation and may not be defined in thedocumentation for some pages.
Typographical ConventionsThe following table describes the typographical conventions that are used in the online help.
Typographical Convention Description
Key+Key Indicates a key combination action. For example, a plus sign (+) between keys means that you must hold down the first keywhile you press the second key. For Alt+W, hold down the Altkey while you press the W key.
. . . (ellipses) Indicate that the preceding item or series can be repeated anynumber of times in PeopleCode syntax.
{ } (curly braces) Indicate a choice between two options in PeopleCode syntax. Options are separated by a pipe ( | ).
[ ] (square brackets) Indicate optional items in PeopleCode syntax.
& (ampersand) When placed before a parameter in PeopleCode syntax, an ampersand indicates that the parameter is an alreadyinstantiated object.
Ampersands also precede all PeopleCode variables.
⇒ This continuation character has been inserted at the end of aline of code that has been wrapped at the page margin. Thecode should be viewed or entered as a single, continuous lineof code without the continuation character.
ISO Country and Currency CodesPeopleSoft Online Help topics use International Organization for Standardization (ISO) country andcurrency codes to identify country-specific information and monetary amounts.
viii Copyright © 1988, 2021, Oracle and/or its affiliates.
Preface
ISO country codes may appear as country identifiers, and ISO currency codes may appear as currencyidentifiers in your PeopleSoft documentation. Reference to an ISO country code in your documentationdoes not imply that your application includes every ISO country code. The following example is acountry-specific heading: "(FRA) Hiring an Employee."
The PeopleSoft Currency Code table (CURRENCY_CD_TBL) contains sample currency code data. TheCurrency Code table is based on ISO Standard 4217, "Codes for the representation of currencies," andalso relies on ISO country codes in the Country table (COUNTRY_TBL). The navigation to the pageswhere you maintain currency code and country information depends on which PeopleSoft applicationsyou are using. To access the pages for maintaining the Currency Code and Country tables, consult theonline help for your applications for more information.
Region and Industry IdentifiersInformation that applies only to a specific region or industry is preceded by a standard identifier inparentheses. This identifier typically appears at the beginning of a section heading, but it may also appearat the beginning of a note or other text.
Example of a region-specific heading: "(Latin America) Setting Up Depreciation"
Region Identifiers
Regions are identified by the region name. The following region identifiers may appear in the PeopleSoftOnline Help:
• Asia Pacific
• Europe
• Latin America
• North America
Industry Identifiers
Industries are identified by the industry name or by an abbreviation for that industry. The followingindustry identifiers may appear in the PeopleSoft Online Help:
• USF (U.S. Federal)
• E&G (Education and Government)
Translations and Embedded HelpPeopleSoft 9.2 software applications include translated embedded help. With the 9.2 release, PeopleSoftaligns with the other Oracle applications by focusing our translation efforts on embedded help. Weare not planning to translate our traditional online help and PeopleBooks documentation. Instead weoffer very direct translated help at crucial spots within our application through our embedded helpwidgets. Additionally, we have a one-to-one mapping of application and help translations, meaning thatthe software and embedded help translation footprint is identical—something we were never able toaccomplish in the past.
Copyright © 1988, 2021, Oracle and/or its affiliates. ix
Preface
Using and Managing the PeopleSoft Online Help
Select About This Help in the left navigation panel on any page in the PeopleSoft Online Help to seeinformation on the following topics:
• Using the PeopleSoft Online Help
• Managing Hosted online help
• Managing locally installed PeopleSoft Online Help
About PeopleSoft Interaction Hub
This section discusses:
• PeopleSoft Portal Solutions product family.
• PeopleSoft Interaction Hub and PeopleTools.
PeopleSoft Portal Solutions Product FamilyThis section discusses the products that are part of the PeopleSoft Portal Solutions product family:
• PeopleSoft Interaction Hub.
PeopleSoft Interaction Hub
Oracle's PeopleSoft Interaction Hub is a world-class portal solution with many robust content andcollaborative features. The PeopleSoft Interaction Hub is ideal for customers wishing to deploy anunlimited number of communities across an enterprise that focusses on PeopleSoft application businessprocesses.
PeopleSoft Interaction Hub 9.1 contains a rich set of Web 2.0 features. For instance, collaborativeworkspaces and related content services can be keyed to PeopleSoft application transactions providingcontextually relevant collaboration.
Two key characteristics distinguish PeopleSoft Interaction Hub as a rich Web 2.0 platform:
• First, PeopleSoft Interaction Hub is a traditional portal framework that can be used for aggregatingand managing content from multiple applications and sources. With unified navigation, it is nowsimple to configure PeopleSoft Interaction Hub to federate multiple PeopleSoft application systems.
• Second, its collaborative capabilities make PeopleSoft Interaction Hub a functional application thatcomplements the features found in PeopleSoft applications.
PeopleSoft Interaction Hub and PeopleTools Portal TechnologyTo understand the functionality of PeopleSoft Interaction Hub, Oracle recommends that you familiarizeyourself with PeopleTools, focusing especially on the subject areas and sections that are devoted to portalfunctionality. Because PeopleSoft Interaction Hub builds upon the basic internet architecture that is
x Copyright © 1988, 2021, Oracle and/or its affiliates.
Preface
delivered with PeopleTools, this information gives you an excellent foundation of knowledge upon whichthe PeopleSoft Interaction Hub suite of documentation builds.
PeopleTools portal technology is built on top of PeopleSoft Pure Internet Architecture and enables you toeasily access and administer multiple content providers, including PeopleSoft databases such as Oracle'sPeopleSoft HRMS or Oracle's PeopleSoft CRM, as well as non-PeopleSoft content. It enables you tocombine content from these multiple sources and deliver the result to users in a unified, simple-to-useinterface.
The main elements of the PeopleTools portal technology are a portal servlet and an application server.These two elements work together to provide common portal processing features such as page assembly,search, content management, navigation, and homepage personalization.
Product documentation for PeopleTools covers the PeopleSoft Pure Internet Architecture and PeopleToolsportal technology in detail.
See PeopleTools: Portal Technology.
Related Documentation
This section discusses:
• PeopleSoft Interaction Hub documentation.
• PeopleTools documentation.
PeopleSoft Interaction Hub DocumentationPeopleSoft Interaction Hub documentation includes:
• PeopleSoft Interaction Hub: Branding
This subject covers PeopleSoft Interaction Hub’s branding feature, which is built on the PeopleToolsbranding framework. Branding enables you to create branding definitions and apply branding themesto portals, sites, and workspaces allowing you to create a differentiated appearance for specific useraudiences.
• PeopleSoft Interaction Hub: Collaborative Workspaces
This subject covers setup, administration, and use of collaborative workspaces, which are virtual teamrooms that facilitate collaboration on a variety collaborative projects and processes.
• PeopleSoft Interaction Hub: Content Management System
This subject describes the content management system, which includes features to help you manage,create, and organize content. The resulting content is ready and available for placement in variousportal pagelets and news publications; reuse in workspaces, calendars, and other portal features; oravailable just for browsing.
• PeopleSoft Interaction Hub: Portal and Site Administration
Copyright © 1988, 2021, Oracle and/or its affiliates. xi
Preface
This subject covers tasks for administering portals and sites including product configuration, system-wide setup and administration, integration with third-party systems, and so on.
• PeopleSoft Interaction Hub: Using Portal Features
This subject covers setup and usage of items such as blogs, calendars, discussion forums, feeds,tagging, searching, related content services, and other features of PeopleSoft Interaction Hub.
PeopleTools DocumentationPeopleSoft Online Help for PeopleTools contains the complete set of subject areas covering PeopleTools8.53. In particular, several of these subjects are useful to the setup, administration, and use of PeopleSoftInteraction Hub including:
• PeopleTools: Feed Publishing Framework
The PeopleTools Feed Publishing Framework supports the publication of PeopleSoft Interaction Hubdata as feeds. In addition, the framework can be used to develop custom feed types.
• PeopleTools: Integration Broker
PeopleSoft Integration Broker facilitates the exposure of PeopleSoft business logic as servicesand the consumption of external web services. Integration Broker also supports synchronous andasynchronous messaging between PeopleSoft applications and with third-party systems.
• PeopleTools: Portal Technology
PeopleTools portal technology is the foundation of the PeopleSoft Interaction Hub product. Thissubject covers critical portal technologies such as portal implementation, PeopleSoft Pure InternetArchitecture, Pagelet Wizard, the PeopleSoft Related Content Framework, and others.
• PeopleTools: Security Administration
This subject covers important security-related topics including PeopleTools user profiles, roles,permission lists, single sign-on (SSO), and others.
• PeopleTools: Applications User's Guide
This subject provides general information about PeopleSoft applications useful to all users ofPeopleSoft systems. Topics include an introduction to the PeopleSoft Pure Internet Architecture,explanation of how to navigate through the system, how to perform searches, elements of applicationpages, and so on.
Note: These subjects and others in the PeopleSoft Online Help are referenced as needed.
PeopleSoft Portal Solutions Related Links
PeopleSoft Interaction Hub 9.1 Documentation Home Page [ID 887960.1]
PeopleSoft Information Portal
xii Copyright © 1988, 2021, Oracle and/or its affiliates.
Preface
My Oracle Support
PeopleSoft Training from Oracle University
PeopleSoft Video Feature Overviews on YouTube
Contact Us
Send your suggestions to [email protected].
Please include the applications update image or PeopleTools release that you’re using.
Follow Us
Field or Control Description
YouTube
Twitter@PeopleSoft_Info.
PeopleSoft Blogs
Copyright © 1988, 2021, Oracle and/or its affiliates. xiii

Chapter 1
Understanding Collaborative Workspaces
Collaborative Workspaces
In Oracle’s PeopleSoft Interaction Hub, a collaborative workspace is a virtual team room. You can createa workspace to facilitate the completion of any project that requires a team to work collaboratively toaccomplish its goals, even if team members are in different locations.
Some collaborative projects focus on temporary issues that require short, intense collaborative sessions,such as closing a sales deal or an open problem incident. Other projects may be ongoing, such ascoordinating the work for a department.
You can create workspaces to manage many different collaboration scenarios. Some examples include:
• Supplier relationships for which you manage the ongoing relationship with a supplier using contextuallinks to one or more transactions related to that supplier.
• Customer relationships for which you manage an ongoing relationship with a customer usingcontextual links to one or more transactions related to that customer.
• Period closing processes for which you manage the process to close an accounting period such as endof month, end of quarter, or end of fiscal year.
• Sales opportunities for which you manage a specific sales opportunity—from identifying a prospectthrough closing a deal.
• Proposal development for which you manage the process of developing and delivering a proposal.
• Problem resolution for which you manage a specific problem incident.
• Department management for which you manage information and processes for a particulardepartment.
The Workspace Homepage
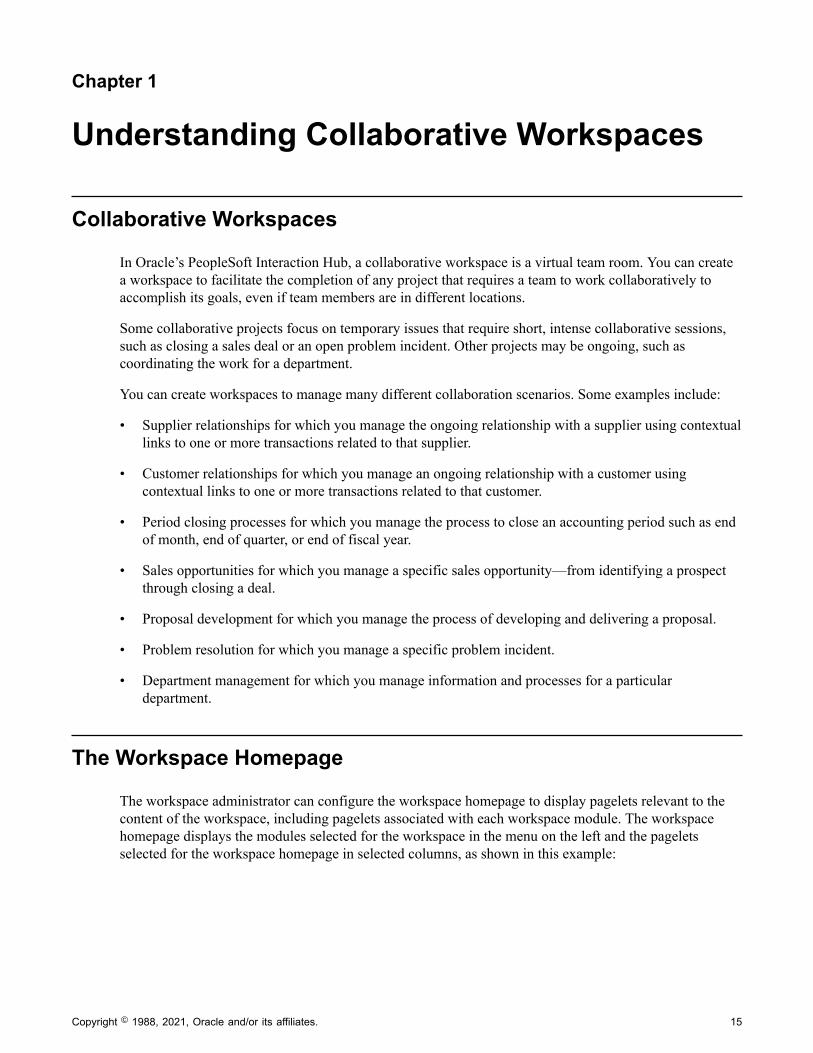
The workspace administrator can configure the workspace homepage to display pagelets relevant to thecontent of the workspace, including pagelets associated with each workspace module. The workspacehomepage displays the modules selected for the workspace in the menu on the left and the pageletsselected for the workspace homepage in selected columns, as shown in this example:
Copyright © 1988, 2021, Oracle and/or its affiliates. 15
Understanding Collaborative Workspaces Chapter 1
This example illustrates the fields and controls on the Example of a workspace homepage.
The Workspace Menu
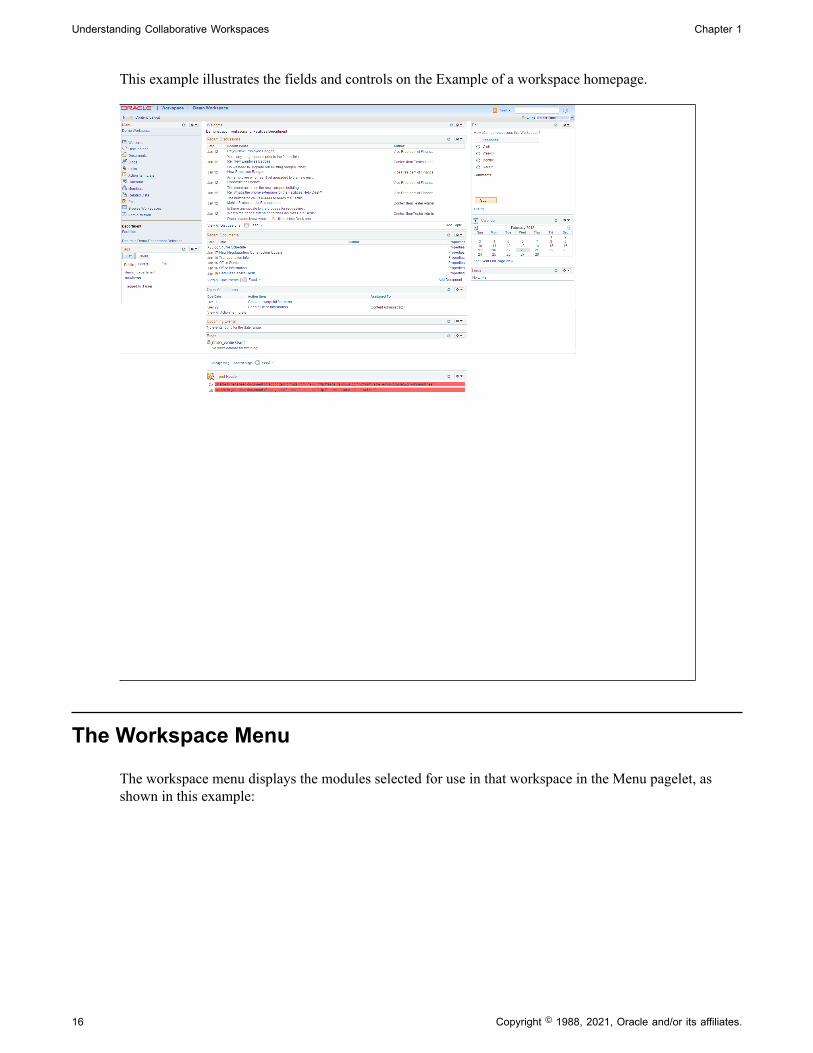
The workspace menu displays the modules selected for use in that workspace in the Menu pagelet, asshown in this example:
16 Copyright © 1988, 2021, Oracle and/or its affiliates.
Chapter 1 Understanding Collaborative Workspaces
This example illustrates the fields and controls on the Example of the workspace menu.
Workspace Modules
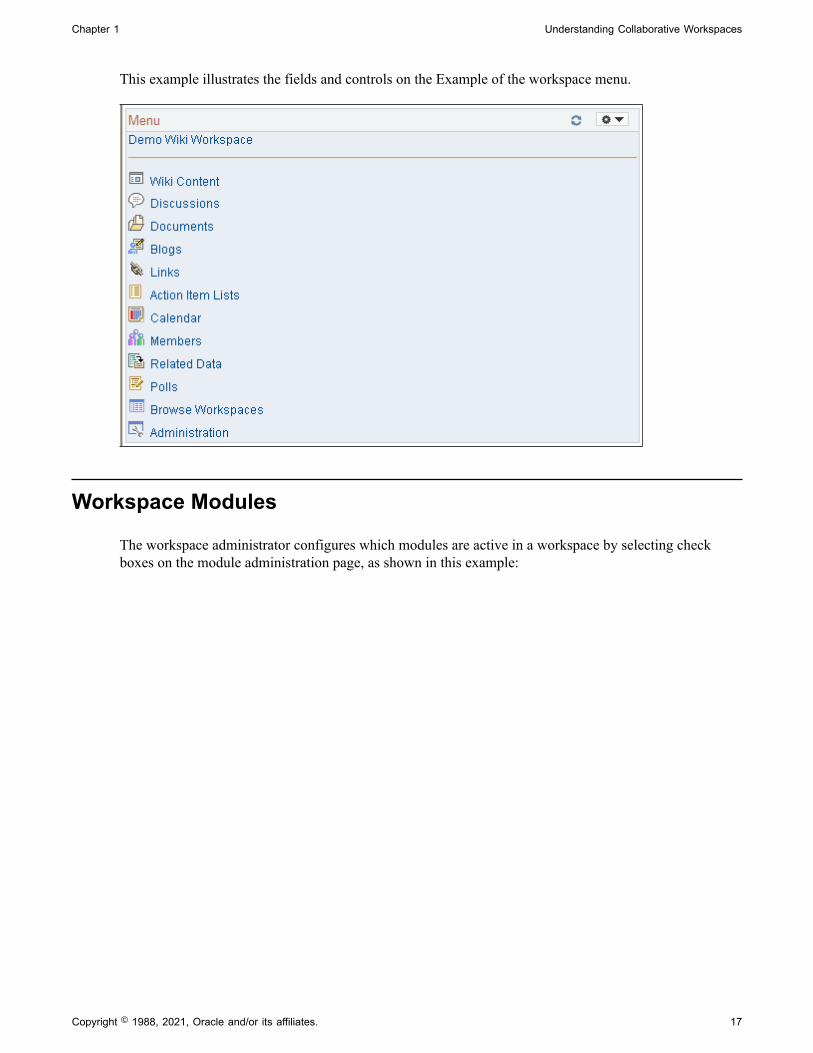
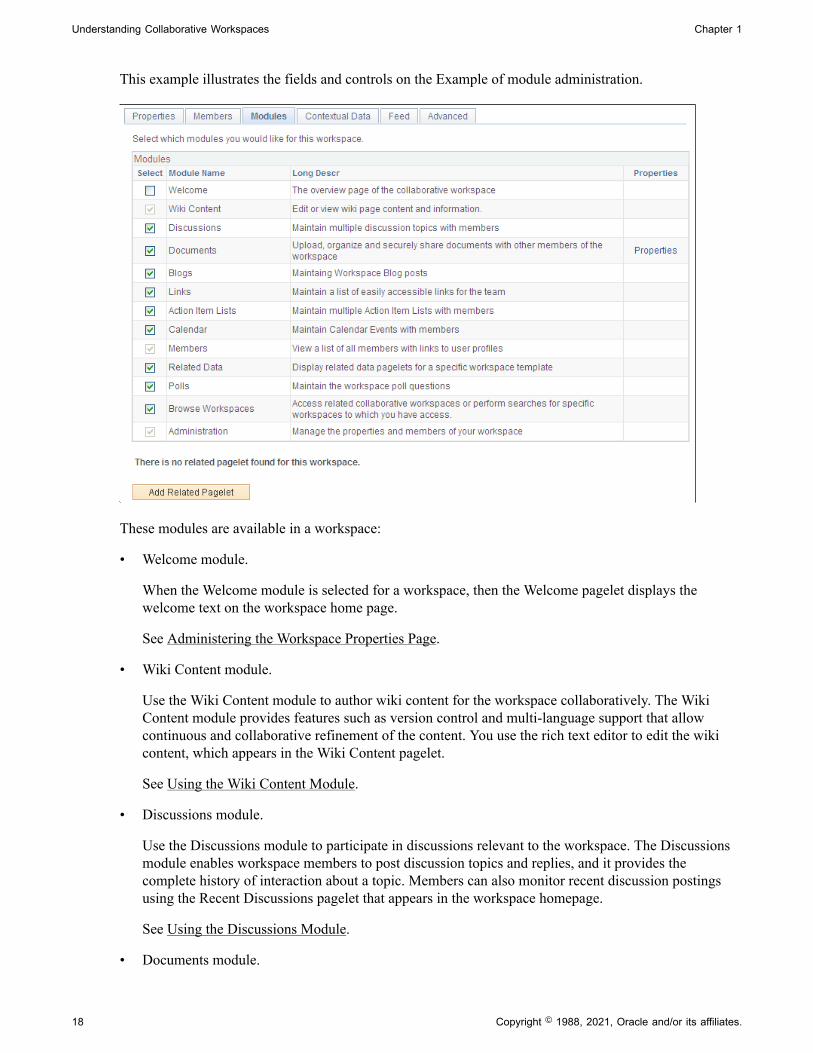
The workspace administrator configures which modules are active in a workspace by selecting checkboxes on the module administration page, as shown in this example:
Copyright © 1988, 2021, Oracle and/or its affiliates. 17
Understanding Collaborative Workspaces Chapter 1
This example illustrates the fields and controls on the Example of module administration.
These modules are available in a workspace:
• Welcome module.
When the Welcome module is selected for a workspace, then the Welcome pagelet displays thewelcome text on the workspace home page.
See Administering the Workspace Properties Page.
• Wiki Content module.
Use the Wiki Content module to author wiki content for the workspace collaboratively. The WikiContent module provides features such as version control and multi-language support that allowcontinuous and collaborative refinement of the content. You use the rich text editor to edit the wikicontent, which appears in the Wiki Content pagelet.
See Using the Wiki Content Module.
• Discussions module.
Use the Discussions module to participate in discussions relevant to the workspace. The Discussionsmodule enables workspace members to post discussion topics and replies, and it provides thecomplete history of interaction about a topic. Members can also monitor recent discussion postingsusing the Recent Discussions pagelet that appears in the workspace homepage.
See Using the Discussions Module.
• Documents module.
18 Copyright © 1988, 2021, Oracle and/or its affiliates.
Chapter 1 Understanding Collaborative Workspaces
Use the Documents module to publish, optionally approve, and view shared documents relevant to aworkspace. Members can monitor recent document postings using the Recent Documents pagelet thatappears in the workspace homepage.
See Using the Documents Module.
• Blogs module.
Use the Blogs module to participate in the blog for the workspace. The Blogs module enablesworkspace members to create news and multi-threaded commentary on topics relevant to theworkspace. Members can also monitor recent blog postings using the Blogs pagelet that appears in theworkspace homepage.
See Using the Blogs Module.
• Links module.
Use the Links module to create a collection of links relevant to the workspace. This collection appearsin the Links pagelet that appears in the workspace homepage.
See Using the Links Module.
• Action Item Lists module.
Use the Action Item Lists module to maintain action item lists and action items that defineresponsibilities for individual workspace members. Members can also monitor current action itemsusing the Open Action Items pagelet that appears in the workspace homepage.
See Using the Action Item Lists Module.
• Calendar module.
Use the Calendar module to maintain the workspace calendar and events and to coordinate activitiesof the workspace team. Members can also monitor current events using the Upcoming Events andCalendar pagelets that appear in the workspace homepage. The Calendar pagelet can simultaneouslydisplay events from the workspaces, action items from the workspace, and a user's personal tasks.
See Using the Calendar Module.
• Members module.
Use the Members module to get information about and to communicate with workspace members.The Members module provides access to member profiles as well as links to initiate email and instantmessaging with members. The Members module is required in all workspaces.
See Using the Members Module.
• Related Data module.
Use the Related Data module to access a collection of pagelets relevant to a workspace. Theworkspace administrator compiles this collection of pagelets.
See Using the Related Data Module.
• Polls module.
Copyright © 1988, 2021, Oracle and/or its affiliates. 19
Understanding Collaborative Workspaces Chapter 1
Use the Polls module to create questions for the workspace poll. Members can respond to the poll andmonitor poll results using the Poll pagelet that appears in the workspace homepage.
See Using the Polls Module.
• Browse Workspaces module.
Use the Browse Workspaces module to browse the workspace hierarchy or to search for otherworkspaces. You can create new workspaces or child workspaces in this module.
See Using the Browse Workspaces Module.
• Administration module.
The workspace administrator can use the Administration module to define workspace properties,manage workspace membership and security, select workspace modules, define contextual datarelationships, and further customize the workspace. The Administration module is required in allworkspaces.
See Setting Up a Workspace.
20 Copyright © 1988, 2021, Oracle and/or its affiliates.
Chapter 2
Setting Up Collaborative WorkspaceOptions and Templates
Understanding Workspace Setup
To use collaborative workspaces in Oracle’s PeopleSoft Interaction Hub, you must complete these setupsteps:
1. Set up system options.
2. Create a workspace category hierarchy.
3. Set up instant messaging for workspaces.
4. Create workspace templates.
Setting Up System Options for Workspaces
This section discusses how to set system options for workspaces.
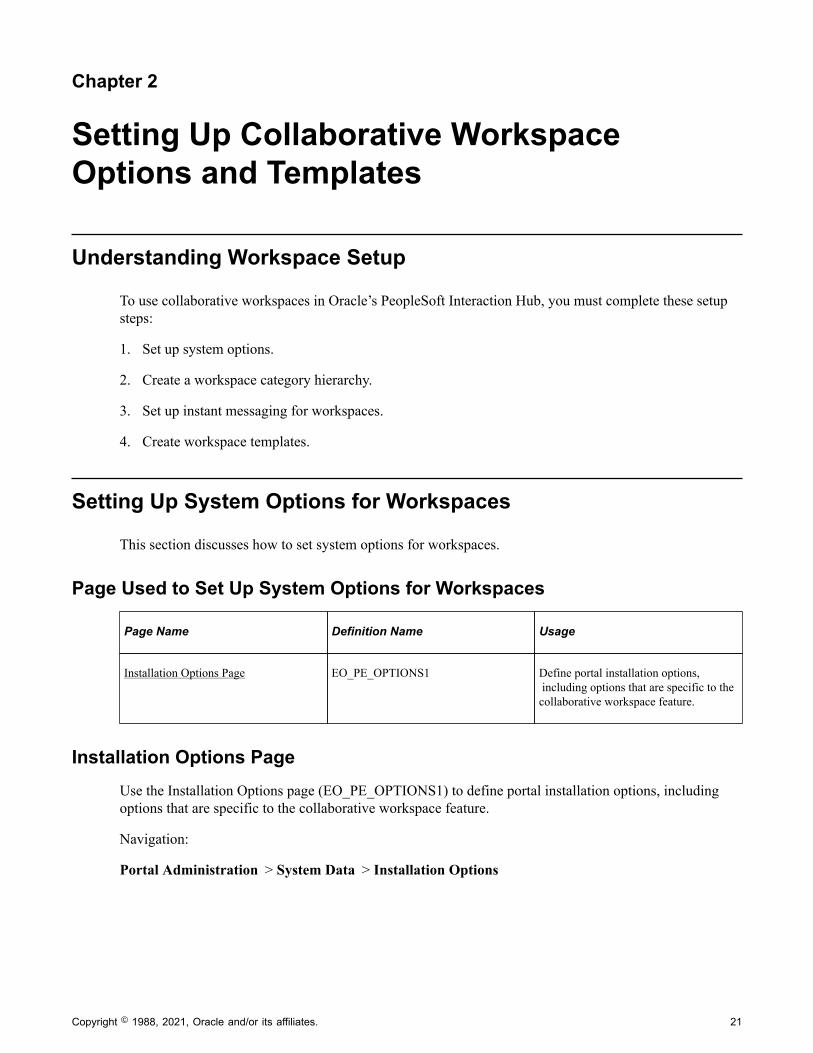
Page Used to Set Up System Options for Workspaces
Page Name Definition Name Usage
Installation Options Page EO_PE_OPTIONS1 Define portal installation options, including options that are specific to thecollaborative workspace feature.
Installation Options PageUse the Installation Options page (EO_PE_OPTIONS1) to define portal installation options, includingoptions that are specific to the collaborative workspace feature.
Navigation:
Portal Administration > System Data > Installation Options
Copyright © 1988, 2021, Oracle and/or its affiliates. 21
Setting Up Collaborative Workspace Options and Templates Chapter 2
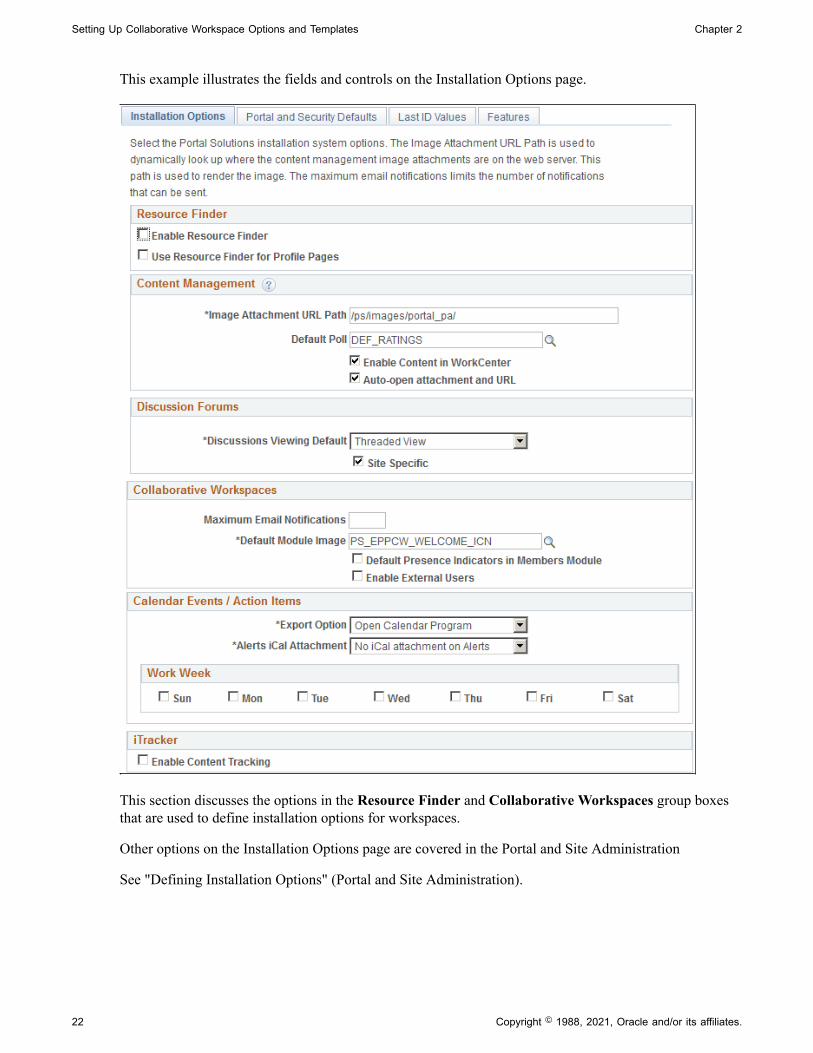
This example illustrates the fields and controls on the Installation Options page.
This section discusses the options in the Resource Finder and Collaborative Workspaces group boxesthat are used to define installation options for workspaces.
Other options on the Installation Options page are covered in the Portal and Site Administration
See "Defining Installation Options" (Portal and Site Administration).
22 Copyright © 1988, 2021, Oracle and/or its affiliates.
Chapter 2 Setting Up Collaborative Workspace Options and Templates
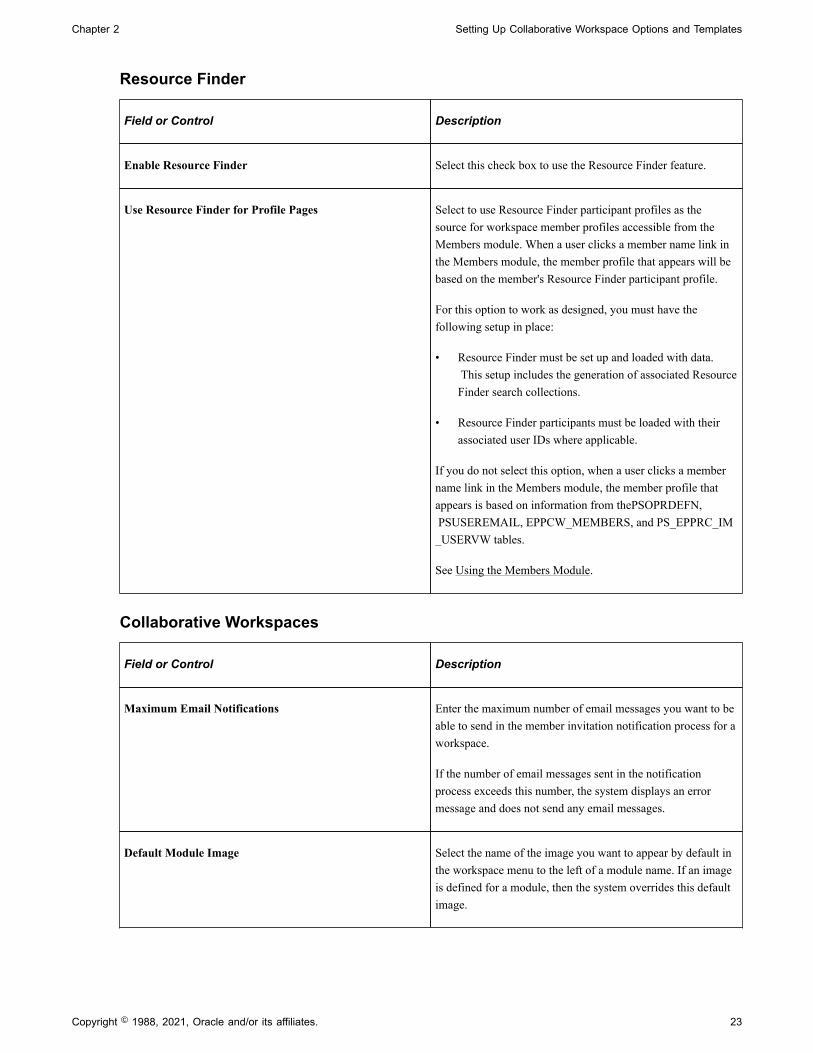
Resource Finder
Field or Control Description
Enable Resource Finder Select this check box to use the Resource Finder feature.
Use Resource Finder for Profile Pages Select to use Resource Finder participant profiles as thesource for workspace member profiles accessible from theMembers module. When a user clicks a member name link inthe Members module, the member profile that appears will bebased on the member's Resource Finder participant profile.
For this option to work as designed, you must have thefollowing setup in place:
• Resource Finder must be set up and loaded with data. This setup includes the generation of associated ResourceFinder search collections.
• Resource Finder participants must be loaded with theirassociated user IDs where applicable.
If you do not select this option, when a user clicks a membername link in the Members module, the member profile thatappears is based on information from thePSOPRDEFN, PSUSEREMAIL, EPPCW_MEMBERS, and PS_EPPRC_IM_USERVW tables.
See Using the Members Module.
Collaborative Workspaces
Field or Control Description
Maximum Email Notifications Enter the maximum number of email messages you want to beable to send in the member invitation notification process for aworkspace.
If the number of email messages sent in the notificationprocess exceeds this number, the system displays an errormessage and does not send any email messages.
Default Module Image Select the name of the image you want to appear by default inthe workspace menu to the left of a module name. If an imageis defined for a module, then the system overrides this defaultimage.
Copyright © 1988, 2021, Oracle and/or its affiliates. 23
Setting Up Collaborative Workspace Options and Templates Chapter 2
Field or Control Description
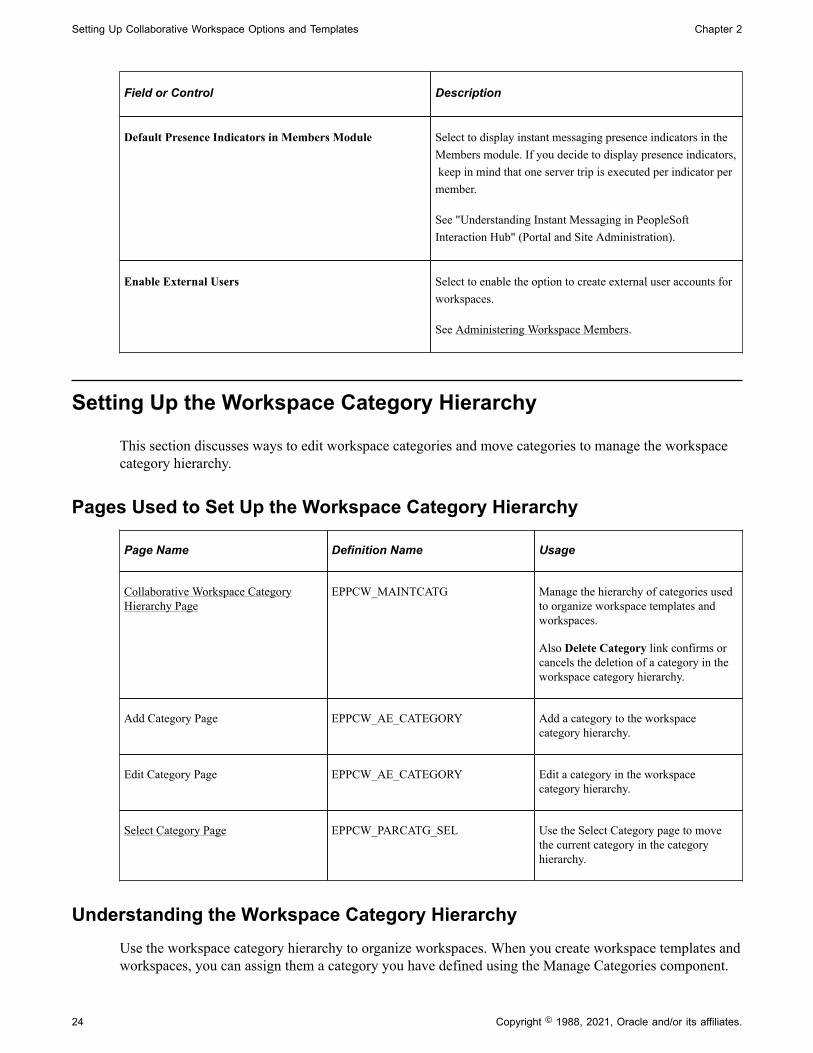
Default Presence Indicators in Members Module Select to display instant messaging presence indicators in theMembers module. If you decide to display presence indicators, keep in mind that one server trip is executed per indicator permember.
See "Understanding Instant Messaging in PeopleSoftInteraction Hub" (Portal and Site Administration).
Enable External Users Select to enable the option to create external user accounts forworkspaces.
See Administering Workspace Members.
Setting Up the Workspace Category Hierarchy
This section discusses ways to edit workspace categories and move categories to manage the workspacecategory hierarchy.
Pages Used to Set Up the Workspace Category Hierarchy
Page Name Definition Name Usage
Collaborative Workspace CategoryHierarchy Page
EPPCW_MAINTCATG Manage the hierarchy of categories usedto organize workspace templates andworkspaces.
Also Delete Category link confirms orcancels the deletion of a category in theworkspace category hierarchy.
Add Category Page EPPCW_AE_CATEGORY Add a category to the workspacecategory hierarchy.
Edit Category Page EPPCW_AE_CATEGORY Edit a category in the workspacecategory hierarchy.
Select Category Page EPPCW_PARCATG_SEL Use the Select Category page to movethe current category in the categoryhierarchy.
Understanding the Workspace Category HierarchyUse the workspace category hierarchy to organize workspaces. When you create workspace templates andworkspaces, you can assign them a category you have defined using the Manage Categories component.
24 Copyright © 1988, 2021, Oracle and/or its affiliates.
Chapter 2 Setting Up Collaborative Workspace Options and Templates
When you use the Manage Workspaces and Manage Templates components, you can choose to search for,browse, and sort existing workspace templates and workspaces by category.
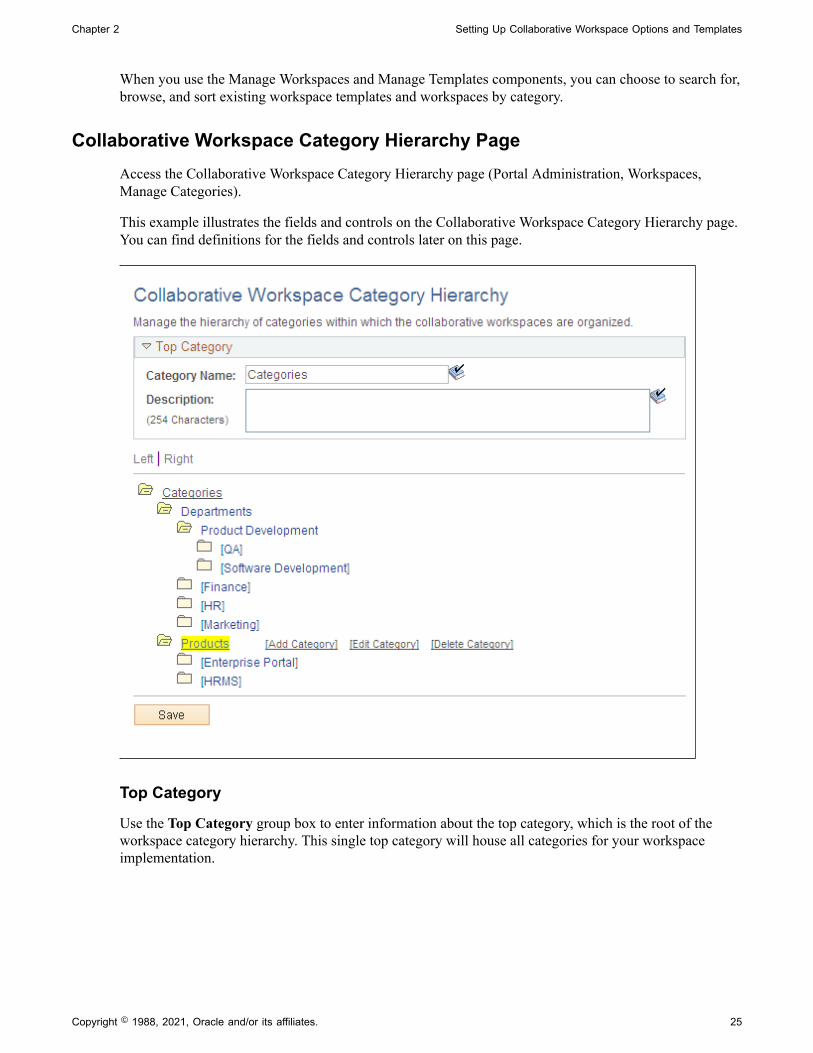
Collaborative Workspace Category Hierarchy PageAccess the Collaborative Workspace Category Hierarchy page (Portal Administration, Workspaces,Manage Categories).
This example illustrates the fields and controls on the Collaborative Workspace Category Hierarchy page.You can find definitions for the fields and controls later on this page.
Top Category
Use the Top Category group box to enter information about the top category, which is the root of theworkspace category hierarchy. This single top category will house all categories for your workspaceimplementation.
Copyright © 1988, 2021, Oracle and/or its affiliates. 25
Setting Up Collaborative Workspace Options and Templates Chapter 2
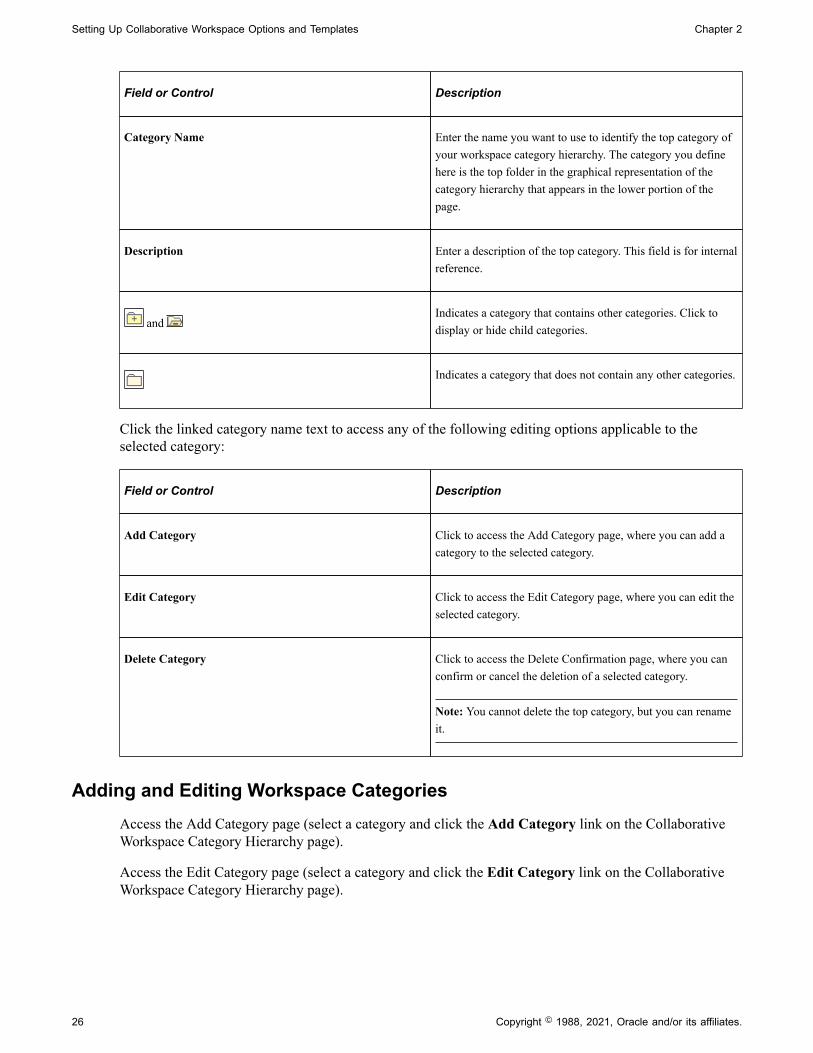
Field or Control Description
Category Name Enter the name you want to use to identify the top category ofyour workspace category hierarchy. The category you definehere is the top folder in the graphical representation of thecategory hierarchy that appears in the lower portion of thepage.
Description Enter a description of the top category. This field is for internalreference.
and Indicates a category that contains other categories. Click todisplay or hide child categories.
Indicates a category that does not contain any other categories.
Click the linked category name text to access any of the following editing options applicable to theselected category:
Field or Control Description
Add Category Click to access the Add Category page, where you can add acategory to the selected category.
Edit Category Click to access the Edit Category page, where you can edit theselected category.
Delete Category Click to access the Delete Confirmation page, where you canconfirm or cancel the deletion of a selected category.
Note: You cannot delete the top category, but you can renameit.
Adding and Editing Workspace CategoriesAccess the Add Category page (select a category and click the Add Category link on the CollaborativeWorkspace Category Hierarchy page).
Access the Edit Category page (select a category and click the Edit Category link on the CollaborativeWorkspace Category Hierarchy page).
26 Copyright © 1988, 2021, Oracle and/or its affiliates.
Chapter 2 Setting Up Collaborative Workspace Options and Templates
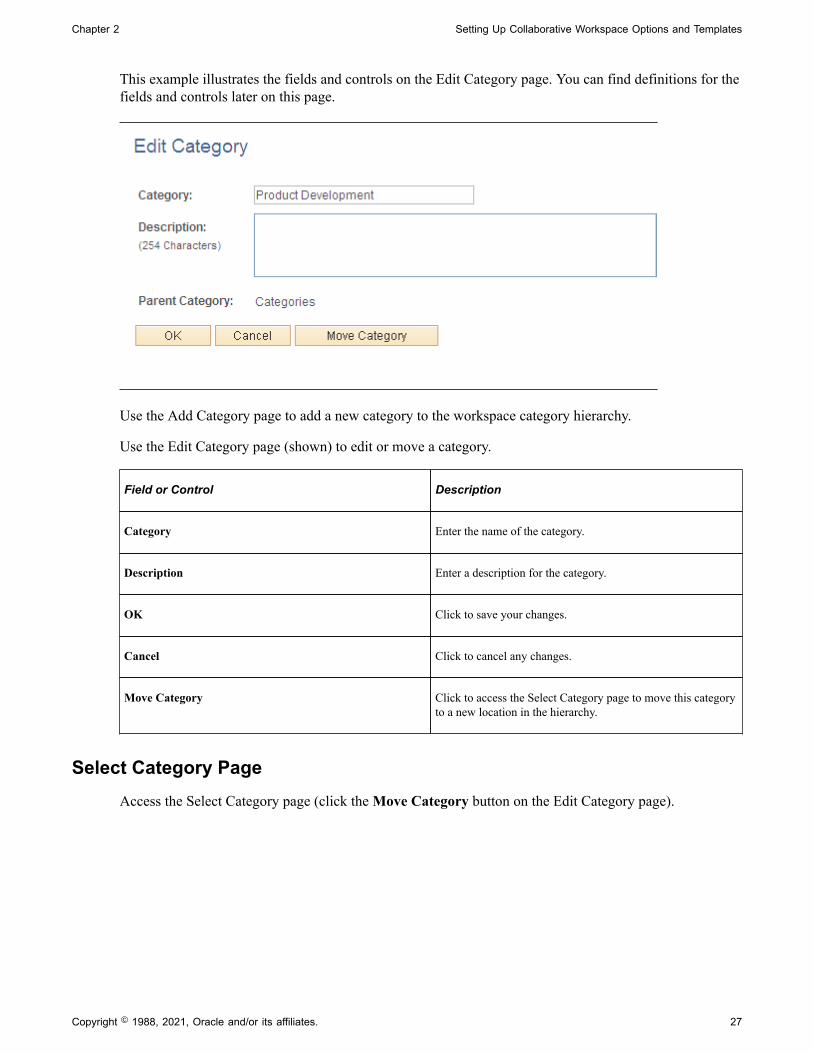
This example illustrates the fields and controls on the Edit Category page. You can find definitions for thefields and controls later on this page.
Use the Add Category page to add a new category to the workspace category hierarchy.
Use the Edit Category page (shown) to edit or move a category.
Field or Control Description
Category Enter the name of the category.
Description Enter a description for the category.
OK Click to save your changes.
Cancel Click to cancel any changes.
Move Category Click to access the Select Category page to move this categoryto a new location in the hierarchy.
Select Category PageAccess the Select Category page (click the Move Category button on the Edit Category page).
Copyright © 1988, 2021, Oracle and/or its affiliates. 27
Setting Up Collaborative Workspace Options and Templates Chapter 2
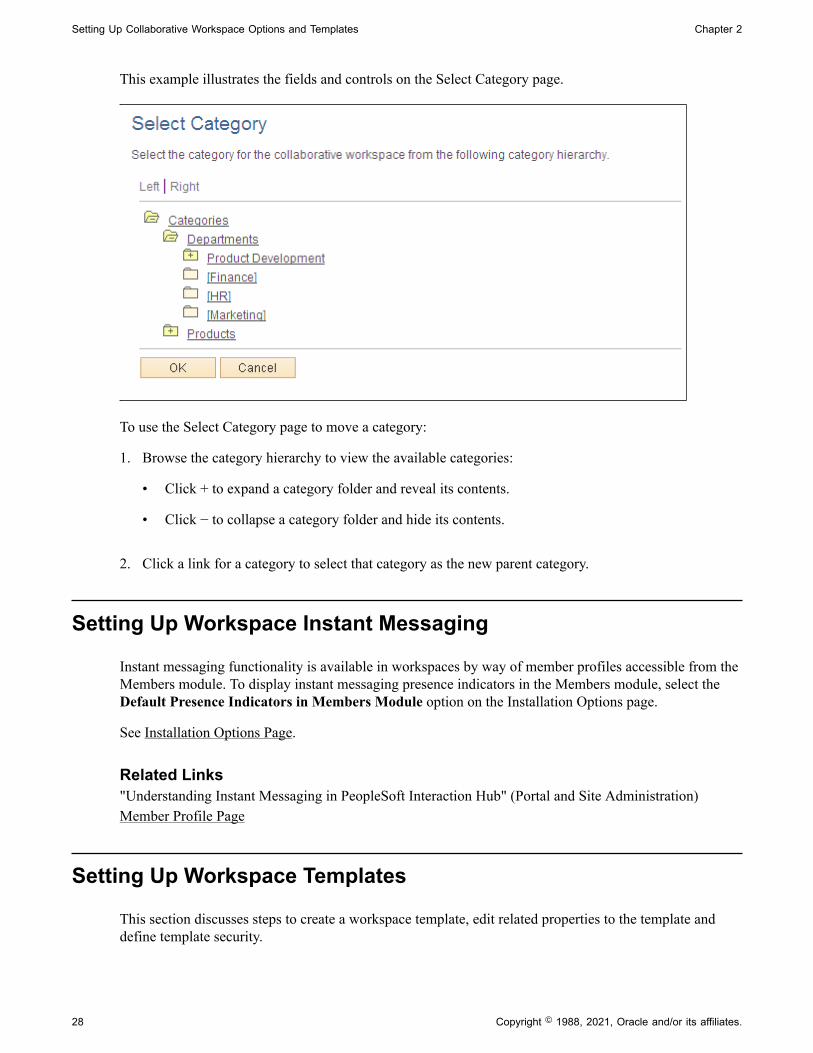
This example illustrates the fields and controls on the Select Category page.
To use the Select Category page to move a category:
1. Browse the category hierarchy to view the available categories:
• Click + to expand a category folder and reveal its contents.
• Click − to collapse a category folder and hide its contents.
2. Click a link for a category to select that category as the new parent category.
Setting Up Workspace Instant Messaging
Instant messaging functionality is available in workspaces by way of member profiles accessible from theMembers module. To display instant messaging presence indicators in the Members module, select theDefault Presence Indicators in Members Module option on the Installation Options page.
See Installation Options Page.
Related Links"Understanding Instant Messaging in PeopleSoft Interaction Hub" (Portal and Site Administration)Member Profile Page
Setting Up Workspace Templates
This section discusses steps to create a workspace template, edit related properties to the template anddefine template security.
28 Copyright © 1988, 2021, Oracle and/or its affiliates.
Chapter 2 Setting Up Collaborative Workspace Options and Templates
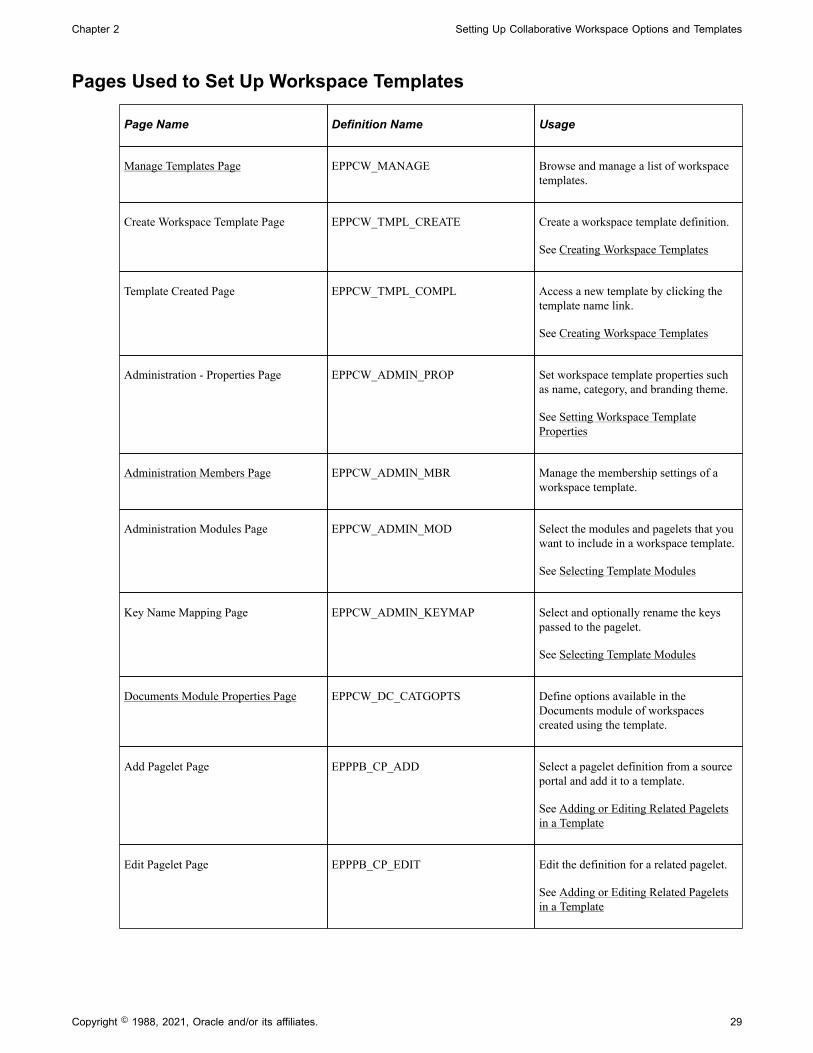
Pages Used to Set Up Workspace Templates
Page Name Definition Name Usage
Manage Templates Page EPPCW_MANAGE Browse and manage a list of workspacetemplates.
Create Workspace Template Page EPPCW_TMPL_CREATE Create a workspace template definition.
See Creating Workspace Templates
Template Created Page EPPCW_TMPL_COMPL Access a new template by clicking thetemplate name link.
See Creating Workspace Templates
Administration - Properties Page EPPCW_ADMIN_PROP Set workspace template properties suchas name, category, and branding theme.
See Setting Workspace TemplateProperties
Administration Members Page EPPCW_ADMIN_MBR Manage the membership settings of aworkspace template.
Administration Modules Page EPPCW_ADMIN_MOD Select the modules and pagelets that youwant to include in a workspace template.
See Selecting Template Modules
Key Name Mapping Page EPPCW_ADMIN_KEYMAP Select and optionally rename the keyspassed to the pagelet.
See Selecting Template Modules
Documents Module Properties Page EPPCW_DC_CATGOPTS Define options available in theDocuments module of workspacescreated using the template.
Add Pagelet Page EPPPB_CP_ADD Select a pagelet definition from a sourceportal and add it to a template.
See Adding or Editing Related Pageletsin a Template
Edit Pagelet Page EPPPB_CP_EDIT Edit the definition for a related pagelet.
See Adding or Editing Related Pageletsin a Template
Copyright © 1988, 2021, Oracle and/or its affiliates. 29
Setting Up Collaborative Workspace Options and Templates Chapter 2
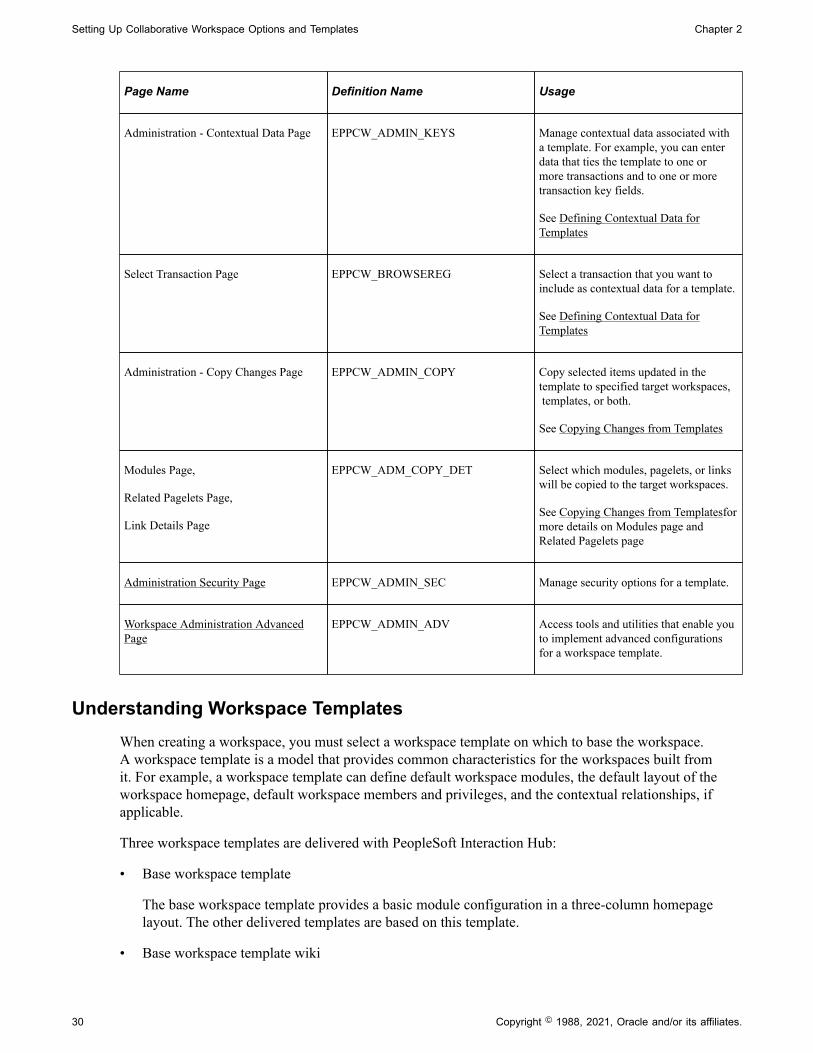
Page Name Definition Name Usage
Administration - Contextual Data Page EPPCW_ADMIN_KEYS Manage contextual data associated witha template. For example, you can enterdata that ties the template to one ormore transactions and to one or moretransaction key fields.
See Defining Contextual Data forTemplates
Select Transaction Page EPPCW_BROWSEREG Select a transaction that you want toinclude as contextual data for a template.
See Defining Contextual Data forTemplates
Administration - Copy Changes Page EPPCW_ADMIN_COPY Copy selected items updated in thetemplate to specified target workspaces, templates, or both.
See Copying Changes from Templates
Modules Page,
Related Pagelets Page,
Link Details Page
EPPCW_ADM_COPY_DET Select which modules, pagelets, or linkswill be copied to the target workspaces.
See Copying Changes from Templatesformore details on Modules page andRelated Pagelets page
Administration Security Page EPPCW_ADMIN_SEC Manage security options for a template.
Workspace Administration AdvancedPage
EPPCW_ADMIN_ADV Access tools and utilities that enable youto implement advanced configurationsfor a workspace template.
Understanding Workspace TemplatesWhen creating a workspace, you must select a workspace template on which to base the workspace.A workspace template is a model that provides common characteristics for the workspaces built fromit. For example, a workspace template can define default workspace modules, the default layout of theworkspace homepage, default workspace members and privileges, and the contextual relationships, ifapplicable.
Three workspace templates are delivered with PeopleSoft Interaction Hub:
• Base workspace template
The base workspace template provides a basic module configuration in a three-column homepagelayout. The other delivered templates are based on this template.
• Base workspace template wiki
30 Copyright © 1988, 2021, Oracle and/or its affiliates.
Chapter 2 Setting Up Collaborative Workspace Options and Templates
This template is a variation of the base workspace template. It includes the Wiki Content moduleinstead of the Welcome module and a two-column homepage layout to accommodate wiki content.
• Demo workspace template
This template is a variation of the base template. It demonstrates a contextual data relationshipbetween a transaction page (Demo Department Definition page) and an associated workspace.
Note: This template exists in the Demo database only.
A workspace template is a portal registry derived from the delivered workspace base portal template.Using the template administration pages documented in this section, you can define various aspects of thistemplate registry, including security, contextual data, associated workspace modules, and related pagelets.
You can create additional workspace templates to suit your organization's needs. You can create highlyor minimally configured templates, depending on their usage. For example, you can create separatetemplates to meet the needs of project groups, departments, business units, or transaction-basedcollaborators.
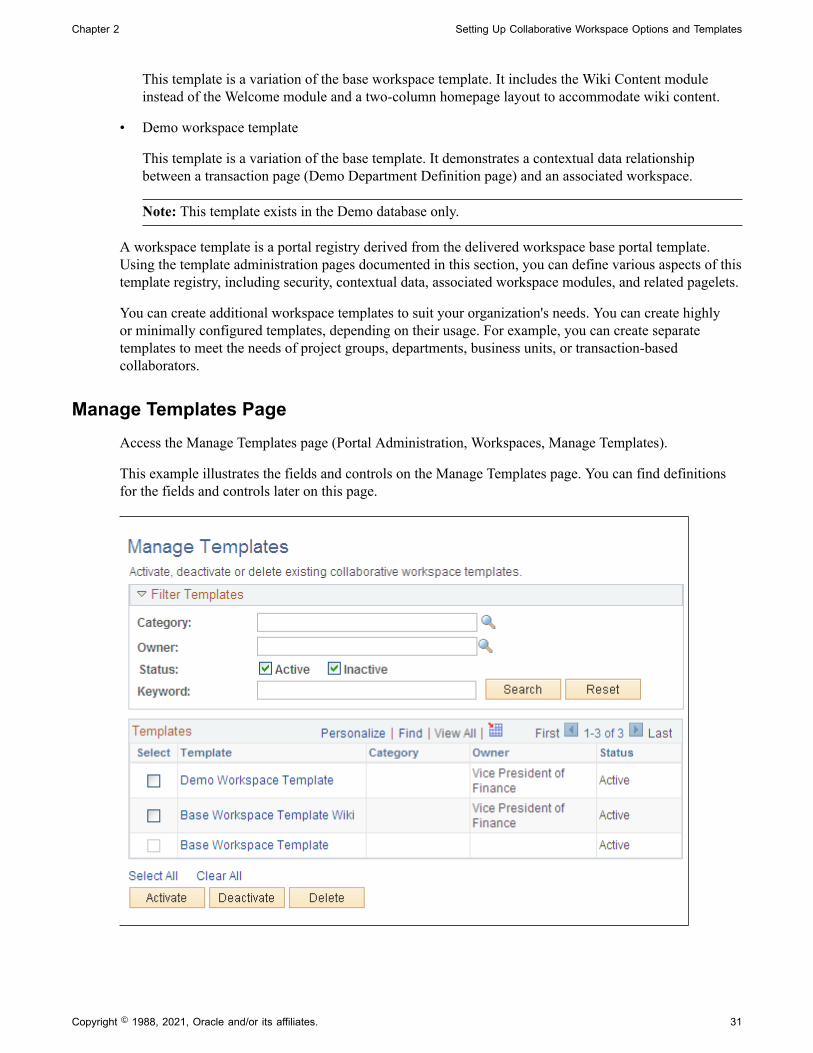
Manage Templates PageAccess the Manage Templates page (Portal Administration, Workspaces, Manage Templates).
This example illustrates the fields and controls on the Manage Templates page. You can find definitionsfor the fields and controls later on this page.
Copyright © 1988, 2021, Oracle and/or its affiliates. 31
Setting Up Collaborative Workspace Options and Templates Chapter 2
Filter Templates
Field or Control Description
Category Select the category in which you want to search for thetemplate that you want to manage.
Owner Select the owner of the template that you want to manage.
Status Select the Active check box or the Inactive check box toindicate the status of the workspace or template that you wantto manage.
Keyword Enter any keywords that you want to use to narrow yoursearch results. The keywords you enter will be matchedagainst any text that appears in the title (label) or descriptionof a template.
Search Click to perform your requested search.
Reset Click to clear all keywords that you entered.
Templates
Field or Control Description
Select Select a check box to indicate that you want to perform amanagerial action on the workspace.
Template Displays the name of the workspace template. Click the link toaccess the template.
Category The system displays the category to which the template isassigned.
Owner The system displays the name of the template owner.
Status The system displays the status of the template, active orinactive.
Activate Click to reactivate the selected template.
32 Copyright © 1988, 2021, Oracle and/or its affiliates.
Chapter 2 Setting Up Collaborative Workspace Options and Templates
Field or Control Description
Deactivate Click to deactivate the selected template The template is nolonger accessible or usable by members, but its data continuesto be stored in your database.
Delete Click to delete the selected template. You are prompted toconfirm your deletion.
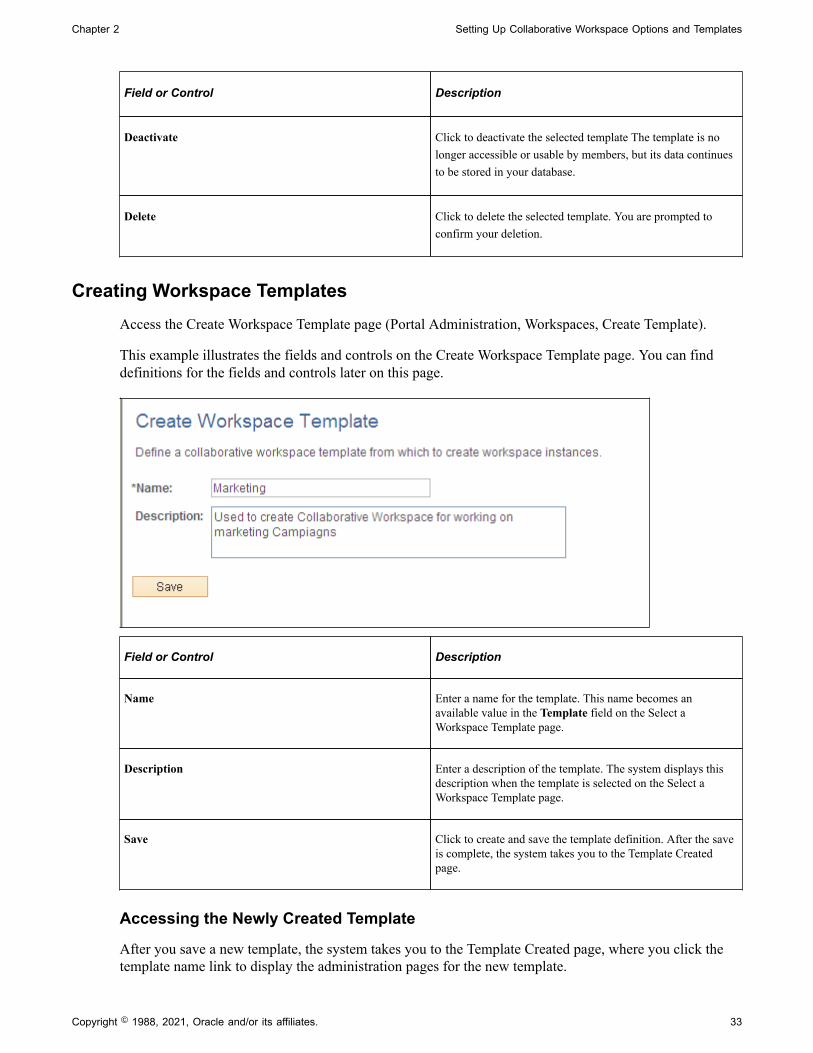
Creating Workspace TemplatesAccess the Create Workspace Template page (Portal Administration, Workspaces, Create Template).
This example illustrates the fields and controls on the Create Workspace Template page. You can finddefinitions for the fields and controls later on this page.
Field or Control Description
Name Enter a name for the template. This name becomes anavailable value in the Template field on the Select aWorkspace Template page.
Description Enter a description of the template. The system displays thisdescription when the template is selected on the Select aWorkspace Template page.
Save Click to create and save the template definition. After the saveis complete, the system takes you to the Template Createdpage.
Accessing the Newly Created Template
After you save a new template, the system takes you to the Template Created page, where you click thetemplate name link to display the administration pages for the new template.
Copyright © 1988, 2021, Oracle and/or its affiliates. 33
Setting Up Collaborative Workspace Options and Templates Chapter 2
Working With Templates and the Action Item Lists Module
When you create templates in the Action Item Lists module, the system does not create a default list.However, when you create Workspaces the system does create a default list. If the template has anymanually created lists, the Workspace created from that template will contain a default list (with the samename as the Workspace) plus any manually created lists in the template.
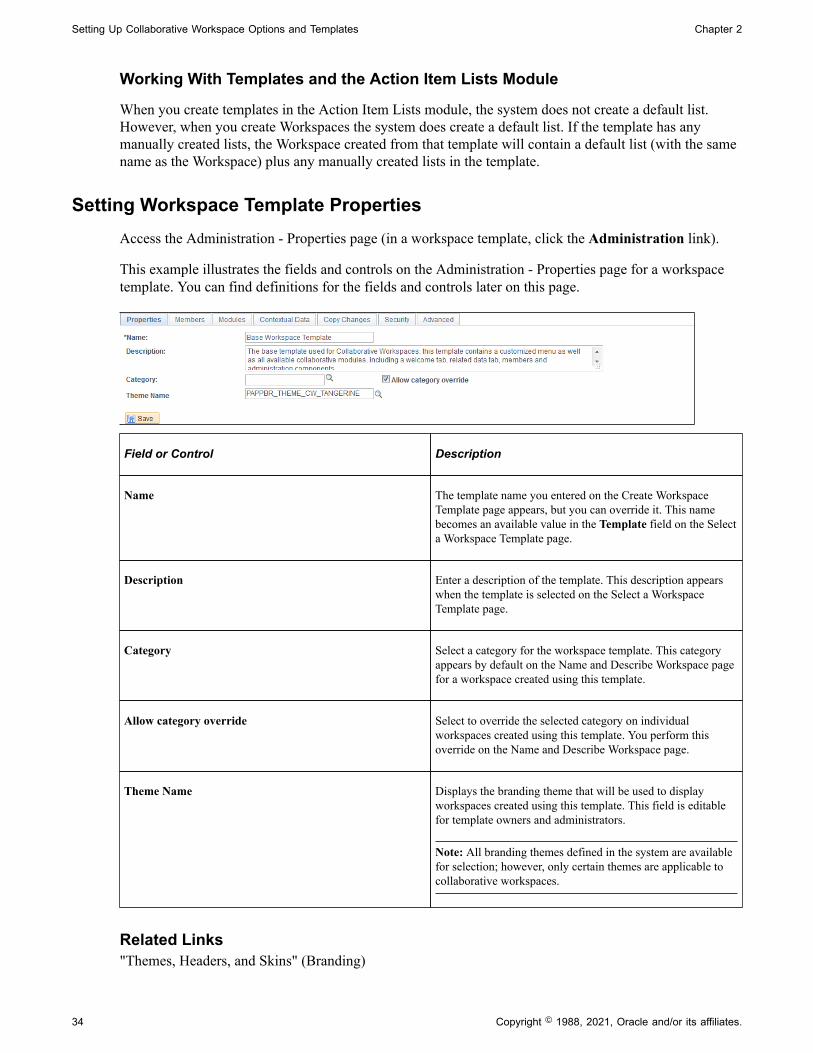
Setting Workspace Template PropertiesAccess the Administration - Properties page (in a workspace template, click the Administration link).
This example illustrates the fields and controls on the Administration - Properties page for a workspacetemplate. You can find definitions for the fields and controls later on this page.
Field or Control Description
Name The template name you entered on the Create WorkspaceTemplate page appears, but you can override it. This namebecomes an available value in the Template field on the Selecta Workspace Template page.
Description Enter a description of the template. This description appearswhen the template is selected on the Select a WorkspaceTemplate page.
Category Select a category for the workspace template. This categoryappears by default on the Name and Describe Workspace pagefor a workspace created using this template.
Allow category override Select to override the selected category on individualworkspaces created using this template. You perform thisoverride on the Name and Describe Workspace page.
Theme Name Displays the branding theme that will be used to displayworkspaces created using this template. This field is editablefor template owners and administrators.
Note: All branding themes defined in the system are availablefor selection; however, only certain themes are applicable tocollaborative workspaces.
Related Links"Themes, Headers, and Skins" (Branding)
34 Copyright © 1988, 2021, Oracle and/or its affiliates.
Chapter 2 Setting Up Collaborative Workspace Options and Templates
Setting Up the Workspace Category Hierarchy
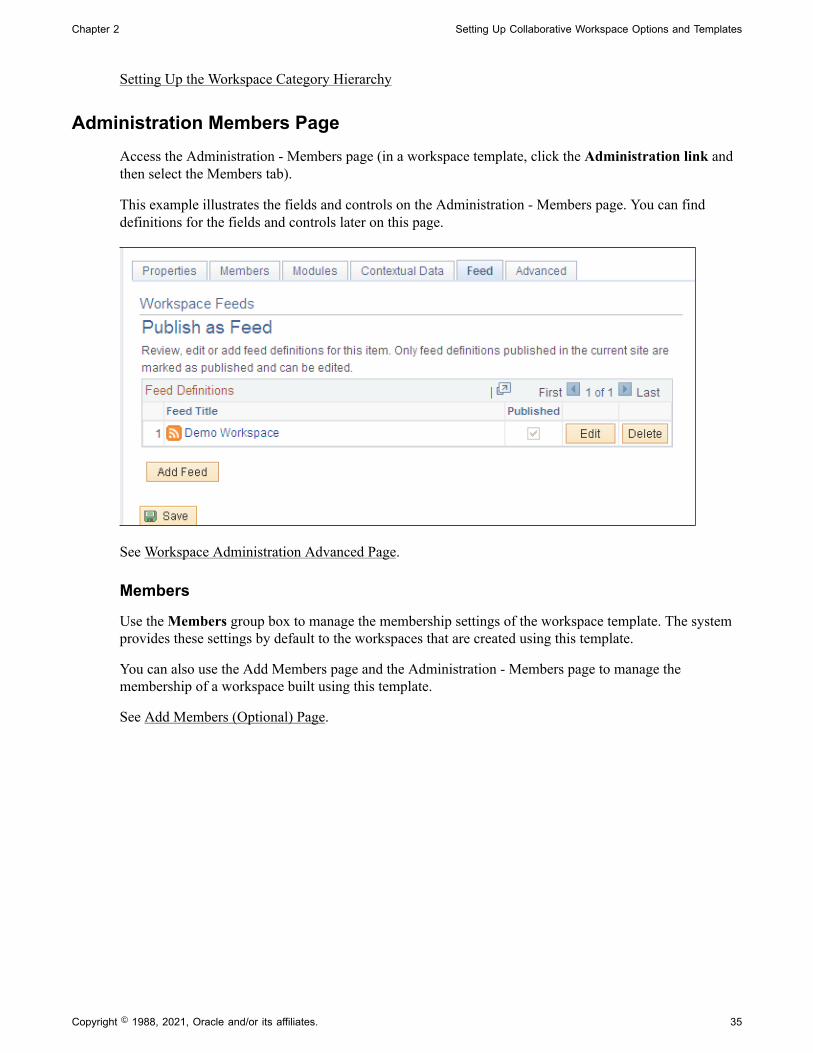
Administration Members PageAccess the Administration - Members page (in a workspace template, click the Administration link andthen select the Members tab).
This example illustrates the fields and controls on the Administration - Members page. You can finddefinitions for the fields and controls later on this page.
See Workspace Administration Advanced Page.
Members
Use the Members group box to manage the membership settings of the workspace template. The systemprovides these settings by default to the workspaces that are created using this template.
You can also use the Add Members page and the Administration - Members page to manage themembership of a workspace built using this template.
See Add Members (Optional) Page.
Copyright © 1988, 2021, Oracle and/or its affiliates. 35
Setting Up Collaborative Workspace Options and Templates Chapter 2
Field or Control Description
Type Select the type of member you want to add to the workspacetemplate. Users and roles that are available for selection arethose who have access to the PAPP5300 permission list. Available values include:
Role: Select to enable selecting a role or a group of users in theMember Name field. Available roles are defined in the Rolescomponent.
See the product documentation for PeopleTools: SecurityAdministration, “Setting Up Roles.”
User: Select to enable selecting a user in the Member Namefield. You must select this value to be able to select a PrivilegeSet field value of Owner or Administrator. Available users aredefined in the User Profiles component.
See the product documentation for PeopleTools: SecurityAdministration, “Administering User Profiles.”
Privilege Set Select the privilege set you want to assign by default to themember in workspaces created using this template. You mustselect a Type field value of User to be able to select the Owneror Administrator value. Available values are:
Administrator.
Approver.
Contributor.
Moderator.
Owner.
Viewer.
See Understanding Workspace Privilege Sets.
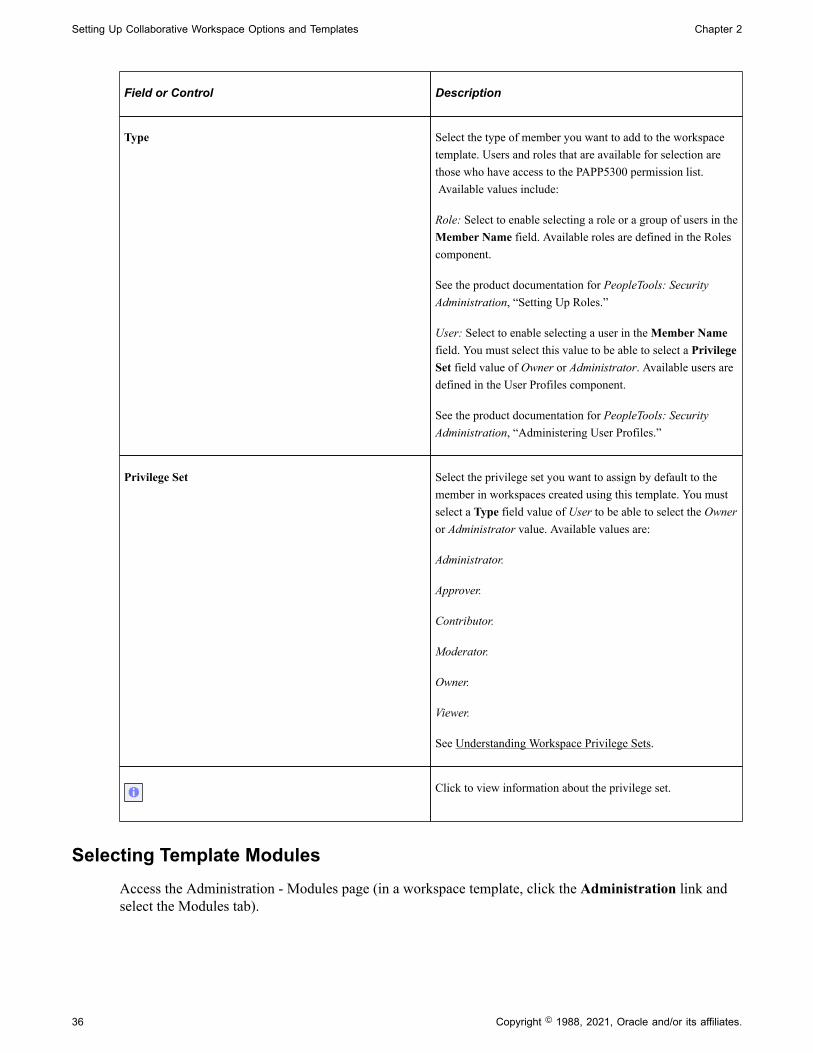
Click to view information about the privilege set.
Selecting Template ModulesAccess the Administration - Modules page (in a workspace template, click the Administration link andselect the Modules tab).
36 Copyright © 1988, 2021, Oracle and/or its affiliates.
Chapter 2 Setting Up Collaborative Workspace Options and Templates
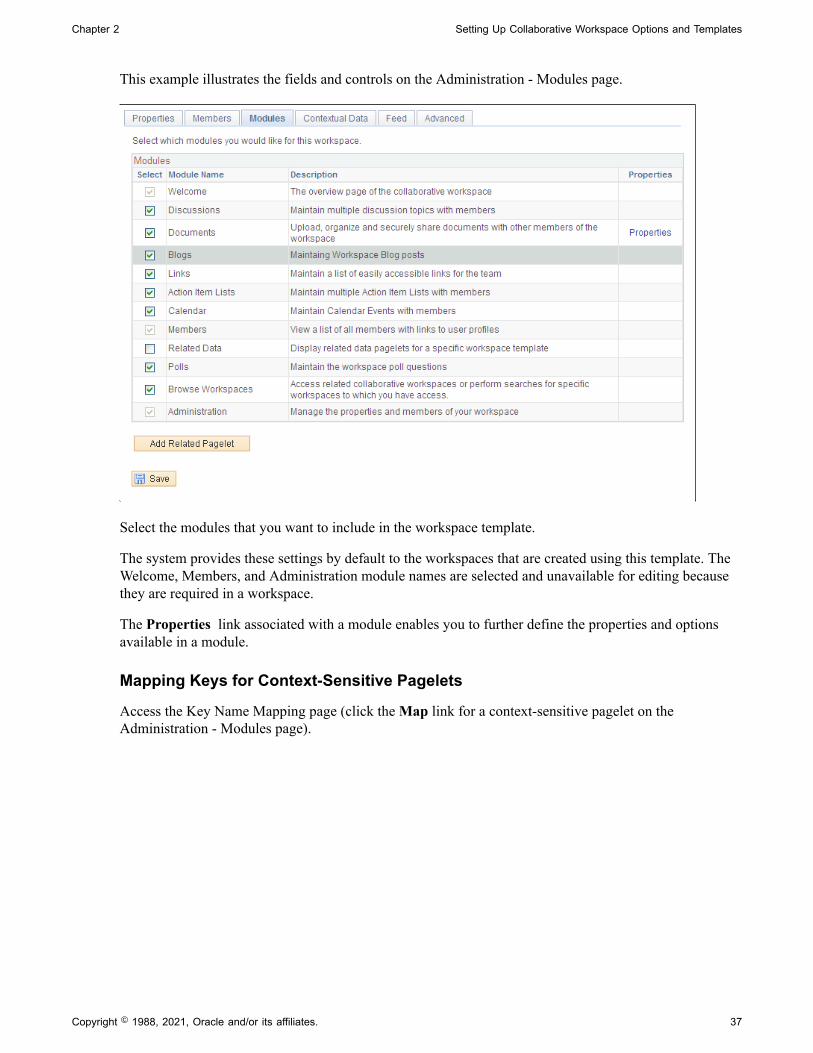
This example illustrates the fields and controls on the Administration - Modules page.
Select the modules that you want to include in the workspace template.
The system provides these settings by default to the workspaces that are created using this template. TheWelcome, Members, and Administration module names are selected and unavailable for editing becausethey are required in a workspace.
The Properties link associated with a module enables you to further define the properties and optionsavailable in a module.
Mapping Keys for Context-Sensitive Pagelets
Access the Key Name Mapping page (click the Map link for a context-sensitive pagelet on theAdministration - Modules page).
Copyright © 1988, 2021, Oracle and/or its affiliates. 37
Setting Up Collaborative Workspace Options and Templates Chapter 2
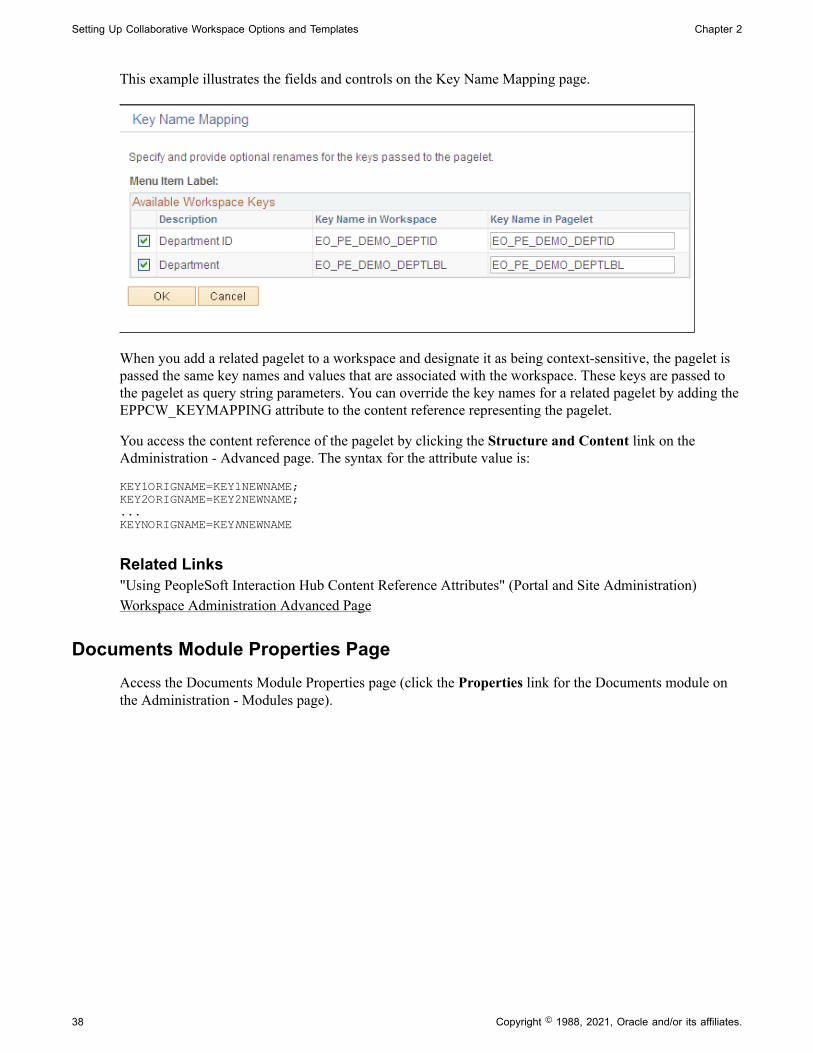
This example illustrates the fields and controls on the Key Name Mapping page.
When you add a related pagelet to a workspace and designate it as being context-sensitive, the pagelet ispassed the same key names and values that are associated with the workspace. These keys are passed tothe pagelet as query string parameters. You can override the key names for a related pagelet by adding theEPPCW_KEYMAPPING attribute to the content reference representing the pagelet.
You access the content reference of the pagelet by clicking the Structure and Content link on theAdministration - Advanced page. The syntax for the attribute value is:
KEY1ORIGNAME=KEY1NEWNAME;KEY2ORIGNAME=KEY2NEWNAME;...KEYNORIGNAME=KEYNNEWNAME
Related Links"Using PeopleSoft Interaction Hub Content Reference Attributes" (Portal and Site Administration)Workspace Administration Advanced Page
Documents Module Properties PageAccess the Documents Module Properties page (click the Properties link for the Documents module onthe Administration - Modules page).
38 Copyright © 1988, 2021, Oracle and/or its affiliates.
Chapter 2 Setting Up Collaborative Workspace Options and Templates
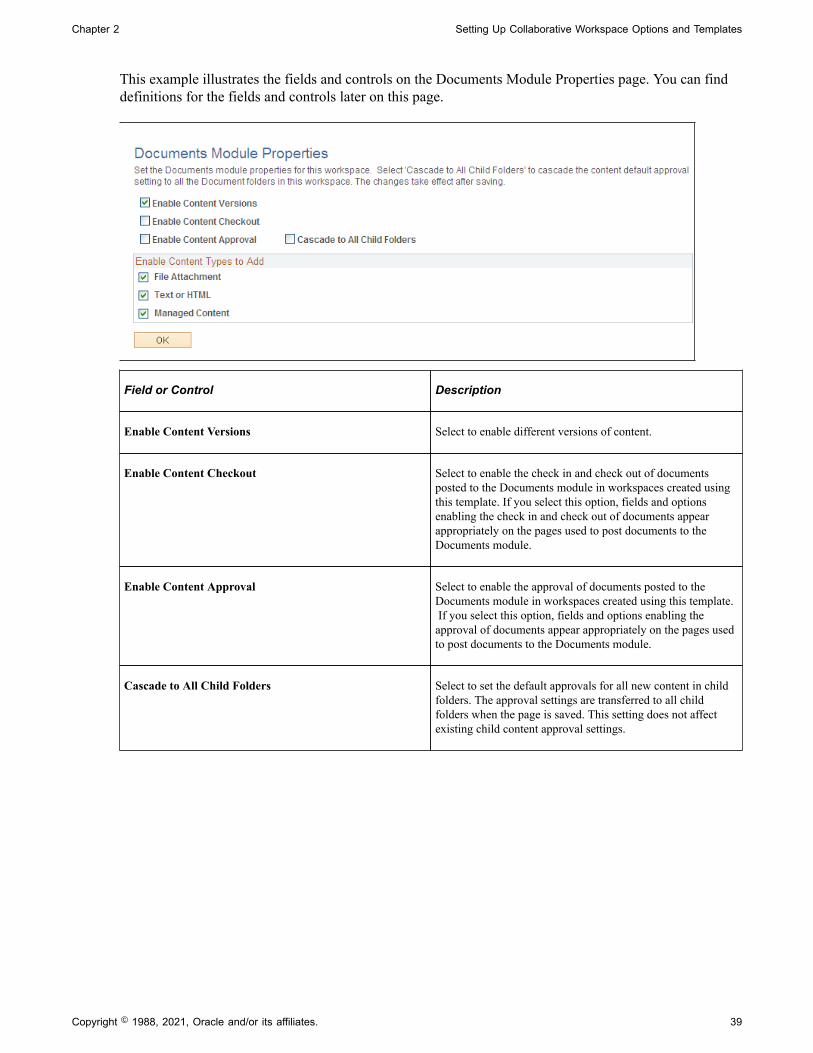
This example illustrates the fields and controls on the Documents Module Properties page. You can finddefinitions for the fields and controls later on this page.
Field or Control Description
Enable Content Versions Select to enable different versions of content.
Enable Content Checkout Select to enable the check in and check out of documentsposted to the Documents module in workspaces created usingthis template. If you select this option, fields and optionsenabling the check in and check out of documents appearappropriately on the pages used to post documents to theDocuments module.
Enable Content Approval Select to enable the approval of documents posted to theDocuments module in workspaces created using this template. If you select this option, fields and options enabling theapproval of documents appear appropriately on the pages usedto post documents to the Documents module.
Cascade to All Child Folders Select to set the default approvals for all new content in childfolders. The approval settings are transferred to all childfolders when the page is saved. This setting does not affectexisting child content approval settings.
Copyright © 1988, 2021, Oracle and/or its affiliates. 39
Setting Up Collaborative Workspace Options and Templates Chapter 2
Enable Content Types to Add
Field or Control Description
File Attachment Select to enable the posting of file attachments to theDocuments module in workspaces created using this template. If you select this option, the File Attachment option appearson the Documents - Add Documents page in the Documentsmodule.
Note: If file attachments are added to the template itself, theseattachments will not appear in workspaces created from thetemplate.
Field or Control Description
Text or HTML Select to enable the posting of text and HTML documentsto the Documents module in workspaces created using thistemplate. If you select this option, the Text or HTML optionappears on the Documents - Add Documents page in theDocuments module.
Field or Control Description
Managed Content Select to enable the posting of managed content to theDocuments module in workspaces created using this template. If you select this option, the Managed Content option appearson the Documents - Add Documents page in the Documentsmodule.
Adding or Editing Related Pagelets in a TemplateAccess the Add Pagelet page (click the Add Related Pagelet button on the Administration - Modulespage).
Access the Edit Pagelet page (click the Edit Pagelet button for an existing pagelet on the Administration -Modules page).
40 Copyright © 1988, 2021, Oracle and/or its affiliates.
Chapter 2 Setting Up Collaborative Workspace Options and Templates
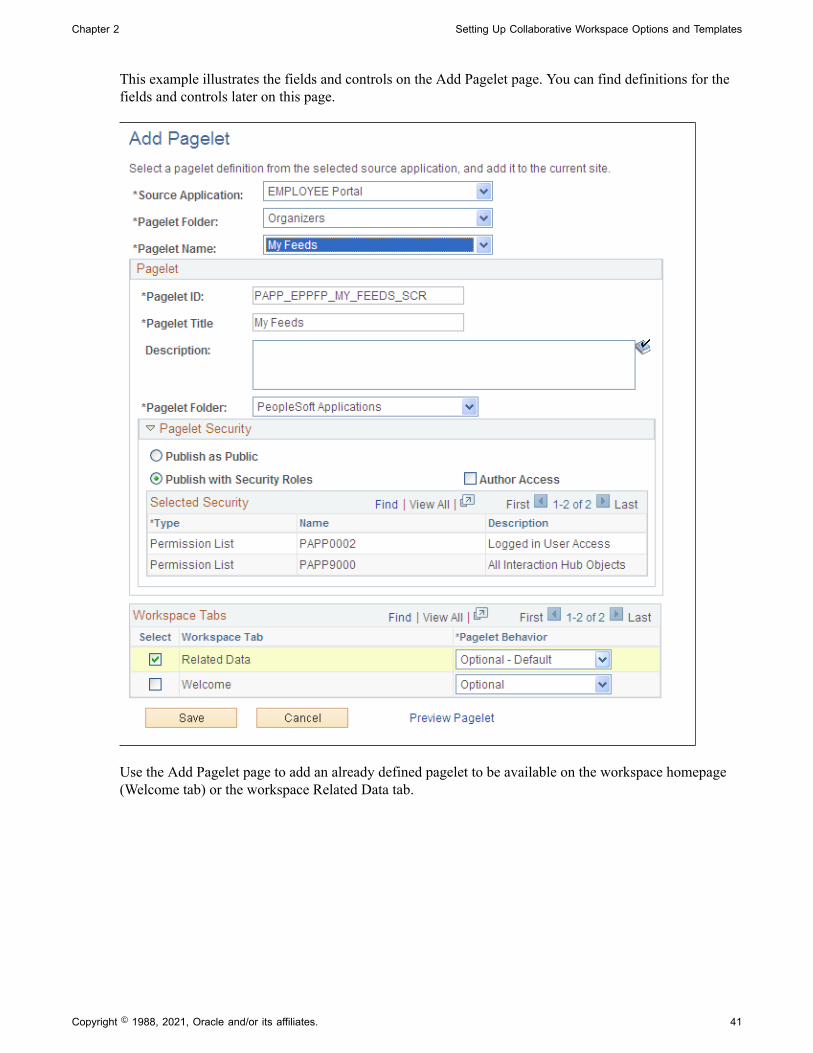
This example illustrates the fields and controls on the Add Pagelet page. You can find definitions for thefields and controls later on this page.
Use the Add Pagelet page to add an already defined pagelet to be available on the workspace homepage(Welcome tab) or the workspace Related Data tab.
Copyright © 1988, 2021, Oracle and/or its affiliates. 41
Setting Up Collaborative Workspace Options and Templates Chapter 2
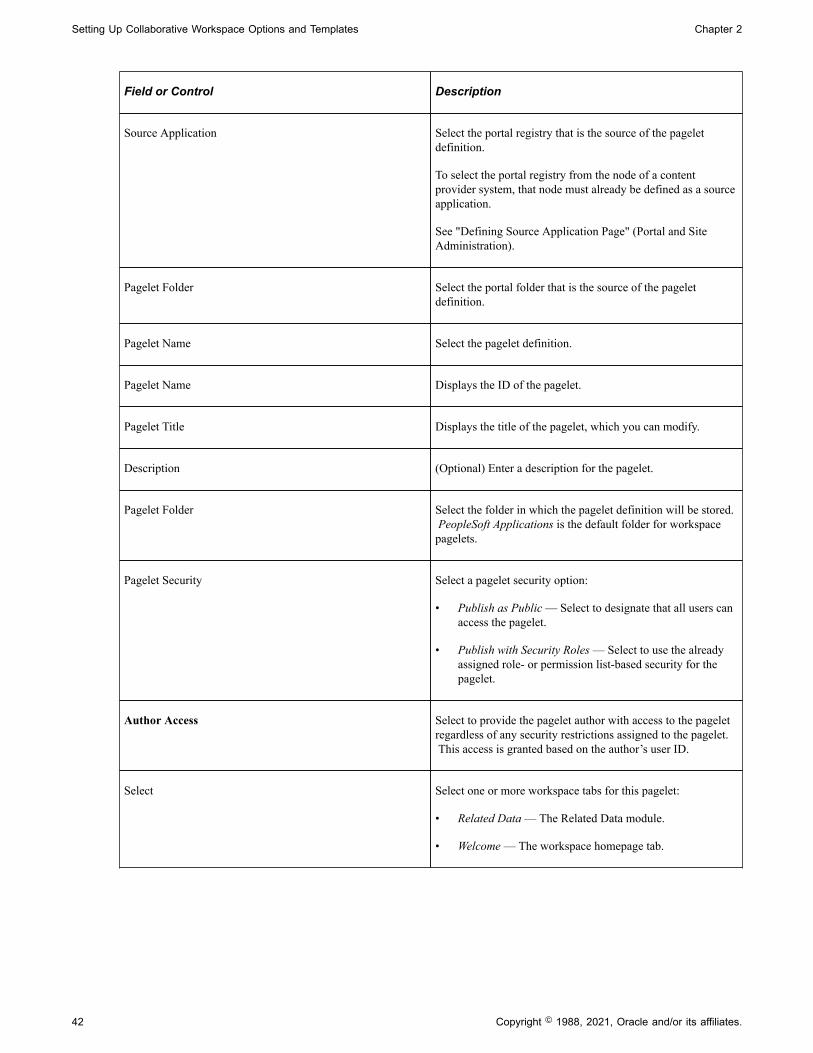
Field or Control Description
Source Application Select the portal registry that is the source of the pageletdefinition.
To select the portal registry from the node of a contentprovider system, that node must already be defined as a sourceapplication.
See "Defining Source Application Page" (Portal and SiteAdministration).
Pagelet Folder Select the portal folder that is the source of the pageletdefinition.
Pagelet Name Select the pagelet definition.
Pagelet Name Displays the ID of the pagelet.
Pagelet Title Displays the title of the pagelet, which you can modify.
Description (Optional) Enter a description for the pagelet.
Pagelet Folder Select the folder in which the pagelet definition will be stored. PeopleSoft Applications is the default folder for workspacepagelets.
Pagelet Security Select a pagelet security option:
• Publish as Public — Select to designate that all users canaccess the pagelet.
• Publish with Security Roles — Select to use the alreadyassigned role- or permission list-based security for thepagelet.
Author Access Select to provide the pagelet author with access to the pageletregardless of any security restrictions assigned to the pagelet. This access is granted based on the author’s user ID.
Select Select one or more workspace tabs for this pagelet:
• Related Data — The Related Data module.
• Welcome — The workspace homepage tab.
42 Copyright © 1988, 2021, Oracle and/or its affiliates.
Chapter 2 Setting Up Collaborative Workspace Options and Templates
Field or Control Description
Pagelet Behavior Select the default behavior for the pagelet:
• Optional — The pagelet will not appear on the workspacetab. Do not select this option.
• Optional-Default — The pagelet will appear on theworkspace tab for all members. Only the administratorcan modify the pagelet position. A member can removethe pagelet from his or her workspace homepage.
• Required — The pagelet will appear on the workspace tabfor all members. The pagelet position can be modified bythe administrator only.
• Required-Fixed — The pagelet will appear on theworkspace tab for all members. The pagelet column canbe modified by the administrator only; however, thepagelet will always appear at the top of the column.
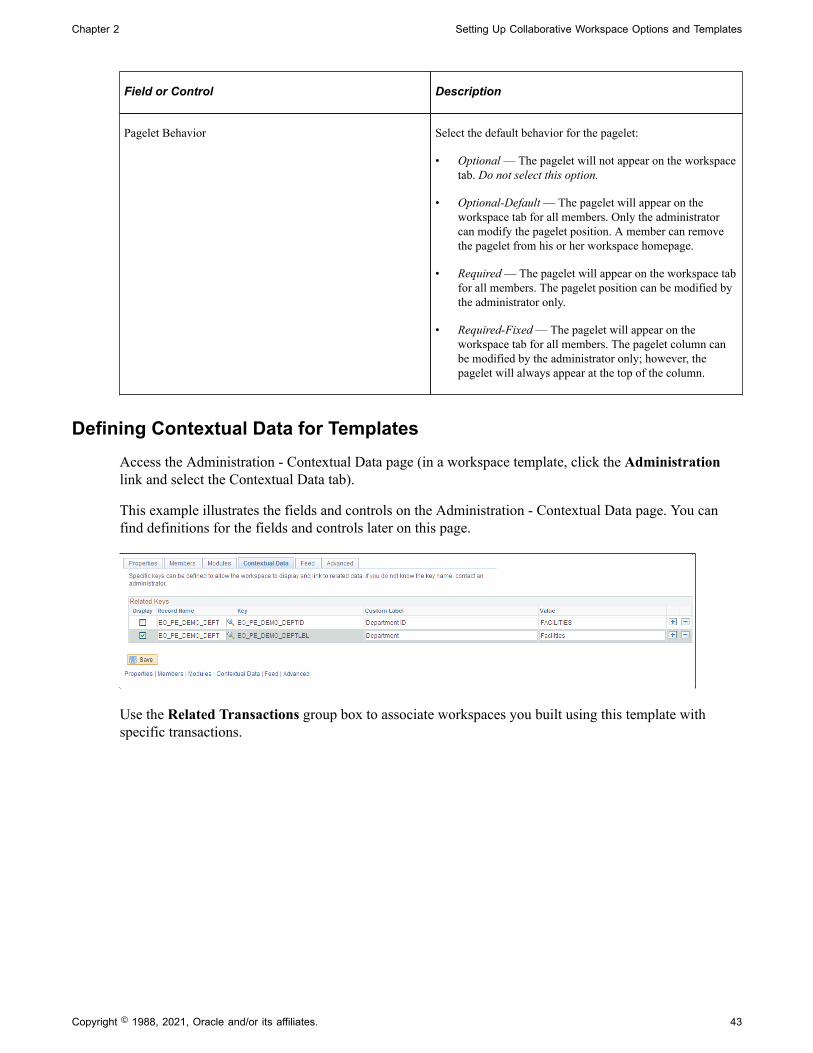
Defining Contextual Data for TemplatesAccess the Administration - Contextual Data page (in a workspace template, click the Administrationlink and select the Contextual Data tab).
This example illustrates the fields and controls on the Administration - Contextual Data page. You canfind definitions for the fields and controls later on this page.
Use the Related Transactions group box to associate workspaces you built using this template withspecific transactions.
Copyright © 1988, 2021, Oracle and/or its affiliates. 43
Setting Up Collaborative Workspace Options and Templates Chapter 2
Field or Control Description
Type Select the type of transaction you want to associate with thetemplate.
Not Registered: Select to associate the template with atransaction that is not registered in the PeopleSoft databaseenvironment. When you select this value, the Node Name,URL, and Label fields appear.
Registered: Select to associate the template with a transactionthat is registered in the PeopleSoft database environment. When you select this value, the Portal / Subsite andTransaction Name fields appear.
Portal / Subsite Select the portal or subsite in which the internal transaction towhich you want to tie this template resides. This field appearswhen the Type field is set to Registered.
Transaction Name Enter one or more internal transactions to which you want toassociate this template. This field appears when the Type fieldis set to Registered.
Click the Select Transaction button to access the SelectTransaction page, where you can select a transaction from agraphical representation of the portal registry.
Component Interface Select a component interface to update the template with thekey values of the transaction you are working with in Step 2 ofthe wizard. Any component interface that has the GET tied tothe component will update the template and, when you createthe workspace using that template, the prompt will show thekey values for you to select.
This field appears when the Type field is set to Registered.
Node Name Select the node through which the external transaction towhich you want to associate this template should be accessed. These nodes are defined content providers from which contentcan be retrieved and rendered. This field appears when theType field is set to Not Registered.
URL Enter the URL to the external transaction to which you want toassociate this template. This field appears when the Type fieldis set to Not Registered.
Label Enter the label that you want to appear for an unregisteredtransaction. This field appears when the Type field is set toNot Registered.
Label text that you enter here appears in the Relate Workspaceto a Transaction page when the keys edit boxes are presentedand in the workspace menu, below module choices to the left.
44 Copyright © 1988, 2021, Oracle and/or its affiliates.
Chapter 2 Setting Up Collaborative Workspace Options and Templates
Field or Control Description
Only for selected transactions Select if you want this template to be available for selectiononly when a user chooses to create workspaces from therelated transactions you define on this page. When a usercreates a workspace based on any other transaction, thistemplate will not be available for selection.
Use the Related Keys group box to specify key fields that you want to associate with this template.When you build a workspace using this template and associate it with a transaction that contains thesekey fields, the workspace is able to display pagelets and links related to the key field values from thetransaction.
Note: Modifying existing field values or options set in this group box initiates a function that updates allworkspace pagelet content reference URLs that contain an attribute of EPPCW_PAGELET with a valueof KEYS. This change affects all workspace pagelets as well as any related pagelets associated with theworkspace in which the key was modified.
Field or Control Description
Display Select if you want the key field and its transactional valueto appear in a workspace created from this template using atransaction that contains the key field. Deselect this option tohide certain keys and their values from workspace users.
Record Name Select the record name that you want to use to associate withthe workspace template.
Key Enter the key field name that you want to associate with theworkspace template.
These keys and their values can be used to generate context-sensitive Related Pagelets and links that are specific to theworkspace created from this template.
Custom Label Enter an overriding value for the key label. If you chooseto display the key, this label will appear alongside the keyfield value below the menu of a workspace created from thistemplate for a transaction that contains the key.
Allow key overrides Select if you want an administrator to be able to edit thesekeys in a workspace created using this template.
Selecting Transactions for a Template
Access the Select Transaction page (add a registered transaction and click the Select Transaction buttonon the Administration - Contextual Data page).
Note: You access this page by adding a transaction on the Contextual Data page. Set the type toregistered, specify a portal name, and then click the prompt button.
Copyright © 1988, 2021, Oracle and/or its affiliates. 45
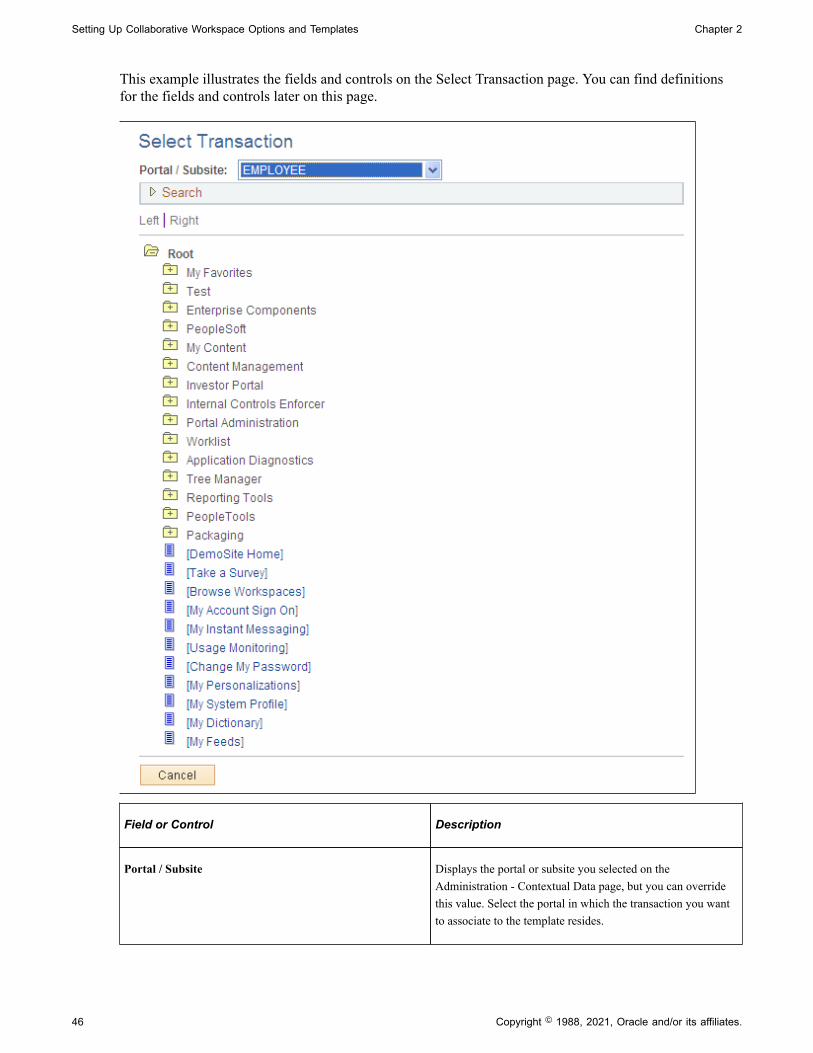
Setting Up Collaborative Workspace Options and Templates Chapter 2
This example illustrates the fields and controls on the Select Transaction page. You can find definitionsfor the fields and controls later on this page.
Field or Control Description
Portal / Subsite Displays the portal or subsite you selected on theAdministration - Contextual Data page, but you can overridethis value. Select the portal in which the transaction you wantto associate to the template resides.
46 Copyright © 1988, 2021, Oracle and/or its affiliates.
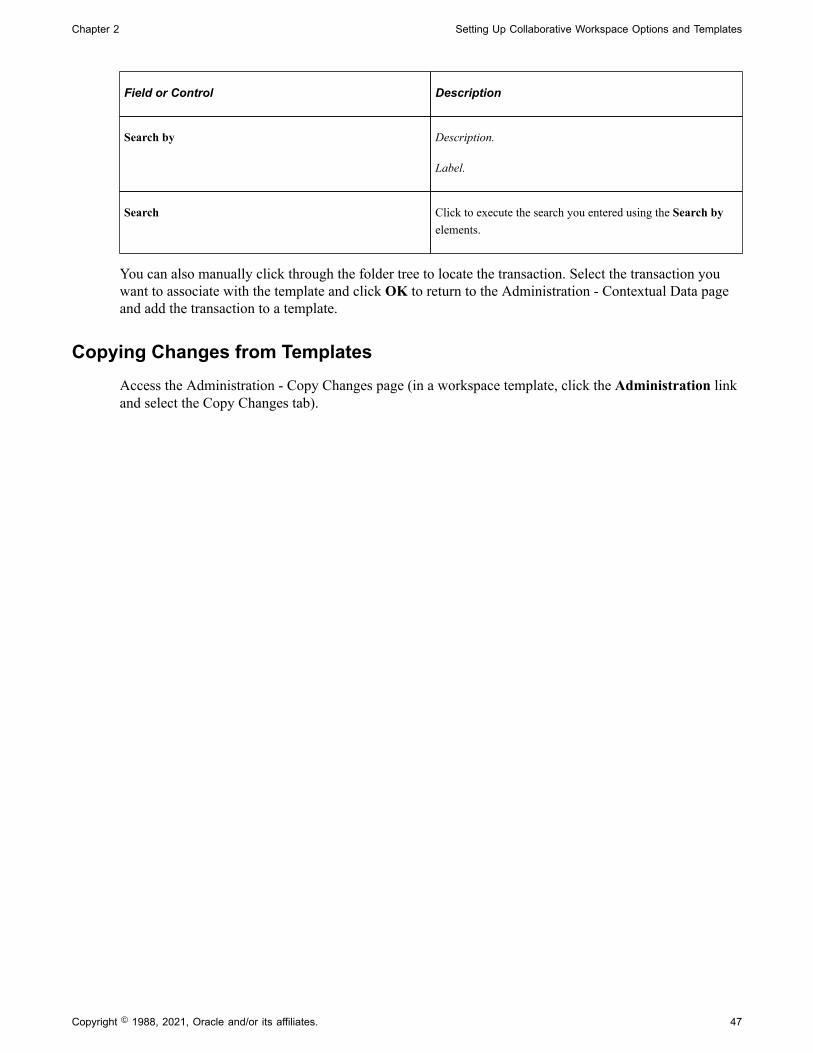
Chapter 2 Setting Up Collaborative Workspace Options and Templates
Field or Control Description
Search by Description.
Label.
Search Click to execute the search you entered using the Search byelements.
You can also manually click through the folder tree to locate the transaction. Select the transaction youwant to associate with the template and click OK to return to the Administration - Contextual Data pageand add the transaction to a template.
Copying Changes from TemplatesAccess the Administration - Copy Changes page (in a workspace template, click the Administration linkand select the Copy Changes tab).
Copyright © 1988, 2021, Oracle and/or its affiliates. 47
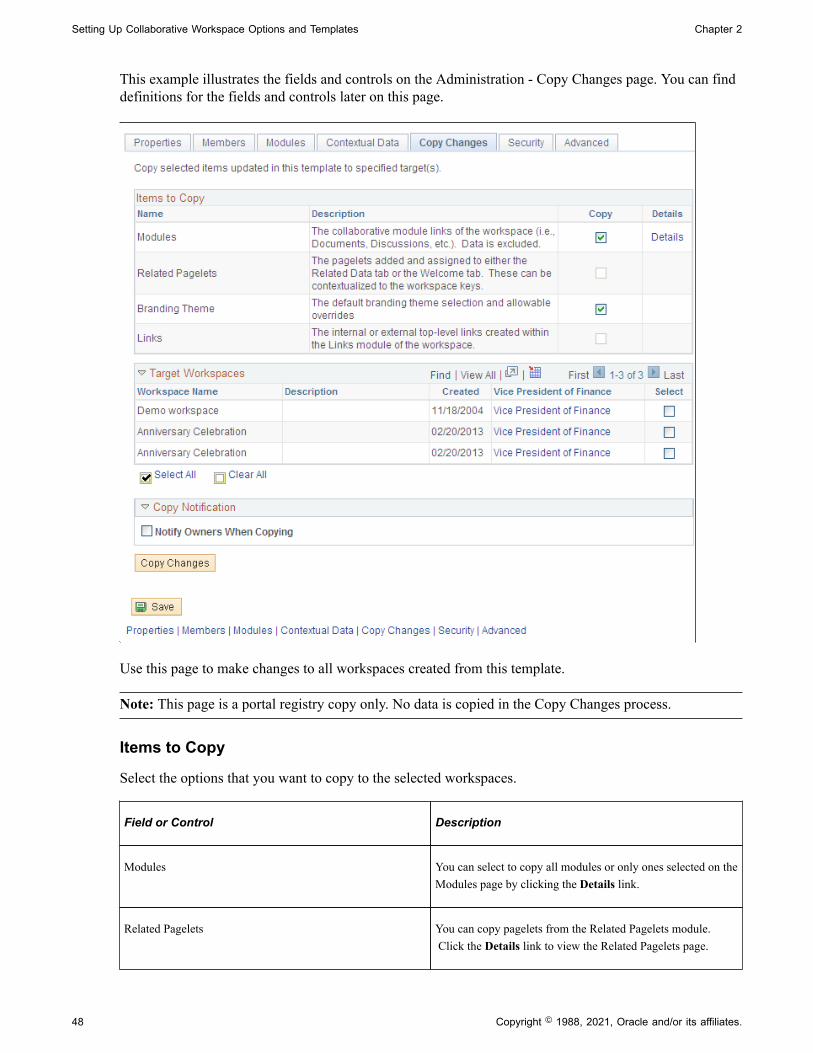
Setting Up Collaborative Workspace Options and Templates Chapter 2
This example illustrates the fields and controls on the Administration - Copy Changes page. You can finddefinitions for the fields and controls later on this page.
Use this page to make changes to all workspaces created from this template.
Note: This page is a portal registry copy only. No data is copied in the Copy Changes process.
Items to Copy
Select the options that you want to copy to the selected workspaces.
Field or Control Description
Modules You can select to copy all modules or only ones selected on theModules page by clicking the Details link.
Related Pagelets You can copy pagelets from the Related Pagelets module. Click the Details link to view the Related Pagelets page.
48 Copyright © 1988, 2021, Oracle and/or its affiliates.
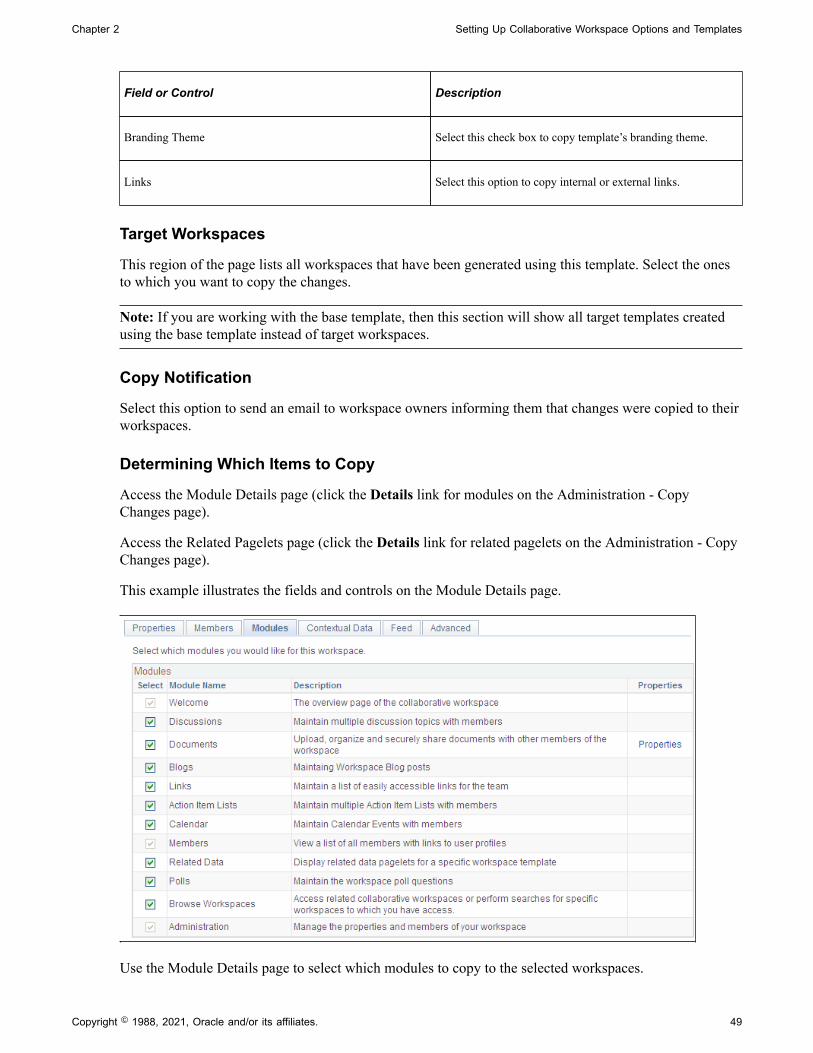
Chapter 2 Setting Up Collaborative Workspace Options and Templates
Field or Control Description
Branding Theme Select this check box to copy template’s branding theme.
Links Select this option to copy internal or external links.
Target Workspaces
This region of the page lists all workspaces that have been generated using this template. Select the onesto which you want to copy the changes.
Note: If you are working with the base template, then this section will show all target templates createdusing the base template instead of target workspaces.
Copy Notification
Select this option to send an email to workspace owners informing them that changes were copied to theirworkspaces.
Determining Which Items to Copy
Access the Module Details page (click the Details link for modules on the Administration - CopyChanges page).
Access the Related Pagelets page (click the Details link for related pagelets on the Administration - CopyChanges page).
This example illustrates the fields and controls on the Module Details page.
Use the Module Details page to select which modules to copy to the selected workspaces.
Copyright © 1988, 2021, Oracle and/or its affiliates. 49
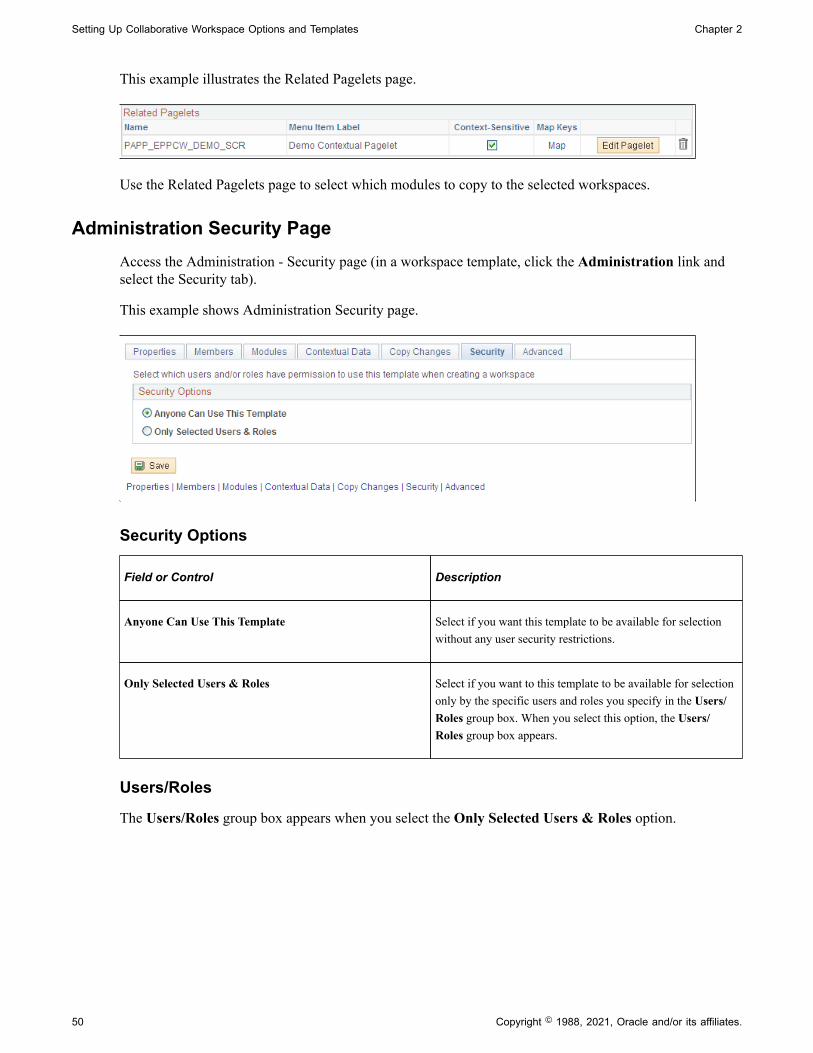
Setting Up Collaborative Workspace Options and Templates Chapter 2
This example illustrates the Related Pagelets page.
Use the Related Pagelets page to select which modules to copy to the selected workspaces.
Administration Security PageAccess the Administration - Security page (in a workspace template, click the Administration link andselect the Security tab).
This example shows Administration Security page.
Security Options
Field or Control Description
Anyone Can Use This Template Select if you want this template to be available for selectionwithout any user security restrictions.
Only Selected Users & Roles Select if you want to this template to be available for selectiononly by the specific users and roles you specify in the Users/Roles group box. When you select this option, the Users/Roles group box appears.
Users/Roles
The Users/Roles group box appears when you select the Only Selected Users & Roles option.
50 Copyright © 1988, 2021, Oracle and/or its affiliates.
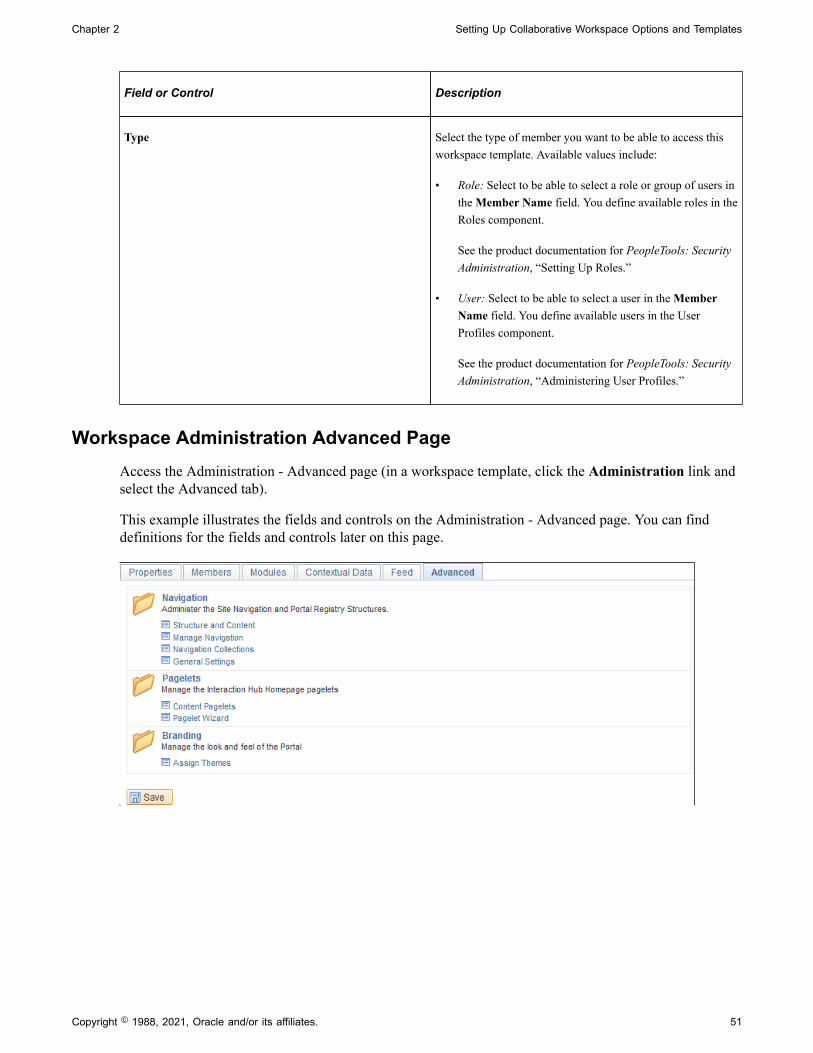
Chapter 2 Setting Up Collaborative Workspace Options and Templates
Field or Control Description
Type Select the type of member you want to be able to access thisworkspace template. Available values include:
• Role: Select to be able to select a role or group of users inthe Member Name field. You define available roles in theRoles component.
See the product documentation for PeopleTools: SecurityAdministration, “Setting Up Roles.”
• User: Select to be able to select a user in the MemberName field. You define available users in the UserProfiles component.
See the product documentation for PeopleTools: SecurityAdministration, “Administering User Profiles.”
Workspace Administration Advanced PageAccess the Administration - Advanced page (in a workspace template, click the Administration link andselect the Advanced tab).
This example illustrates the fields and controls on the Administration - Advanced page. You can finddefinitions for the fields and controls later on this page.
Copyright © 1988, 2021, Oracle and/or its affiliates. 51
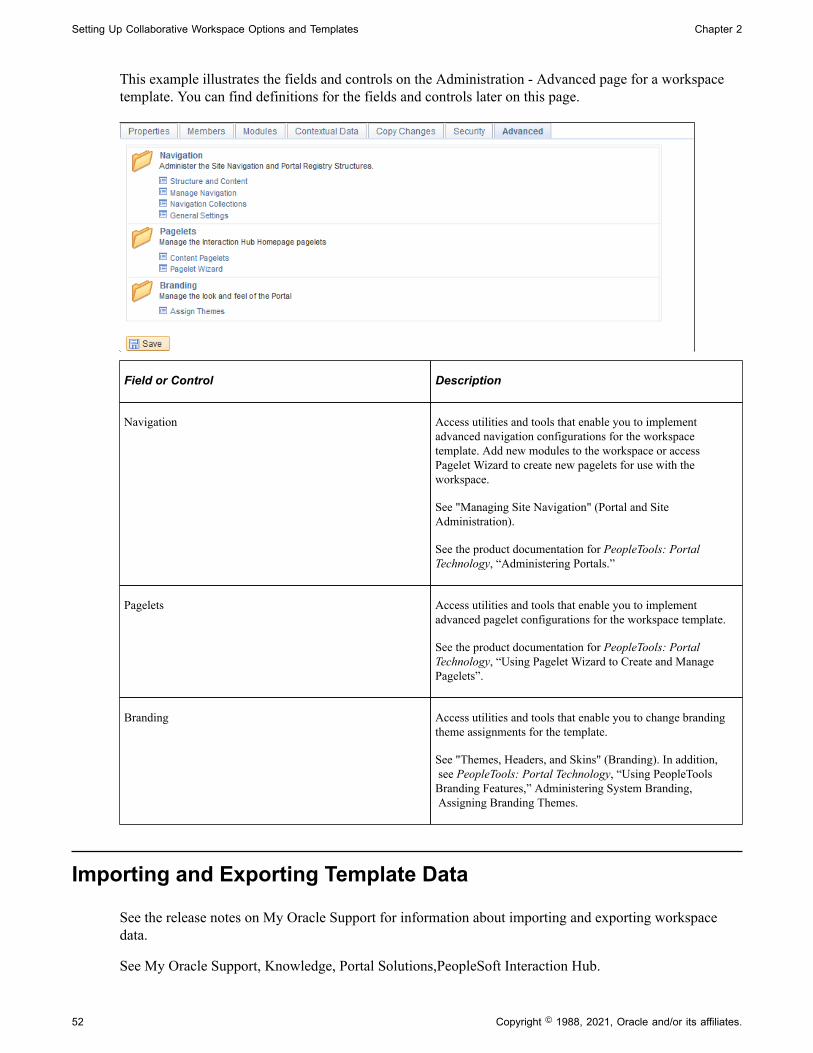
Setting Up Collaborative Workspace Options and Templates Chapter 2
This example illustrates the fields and controls on the Administration - Advanced page for a workspacetemplate. You can find definitions for the fields and controls later on this page.
Field or Control Description
Navigation Access utilities and tools that enable you to implementadvanced navigation configurations for the workspacetemplate. Add new modules to the workspace or accessPagelet Wizard to create new pagelets for use with theworkspace.
See "Managing Site Navigation" (Portal and SiteAdministration).
See the product documentation for PeopleTools: PortalTechnology, “Administering Portals.”
Pagelets Access utilities and tools that enable you to implementadvanced pagelet configurations for the workspace template.
See the product documentation for PeopleTools: PortalTechnology, “Using Pagelet Wizard to Create and ManagePagelets”.
Branding Access utilities and tools that enable you to change brandingtheme assignments for the template.
See "Themes, Headers, and Skins" (Branding). In addition, see PeopleTools: Portal Technology, “Using PeopleToolsBranding Features,” Administering System Branding, Assigning Branding Themes.
Importing and Exporting Template Data
See the release notes on My Oracle Support for information about importing and exporting workspacedata.
See My Oracle Support, Knowledge, Portal Solutions,PeopleSoft Interaction Hub.
52 Copyright © 1988, 2021, Oracle and/or its affiliates.
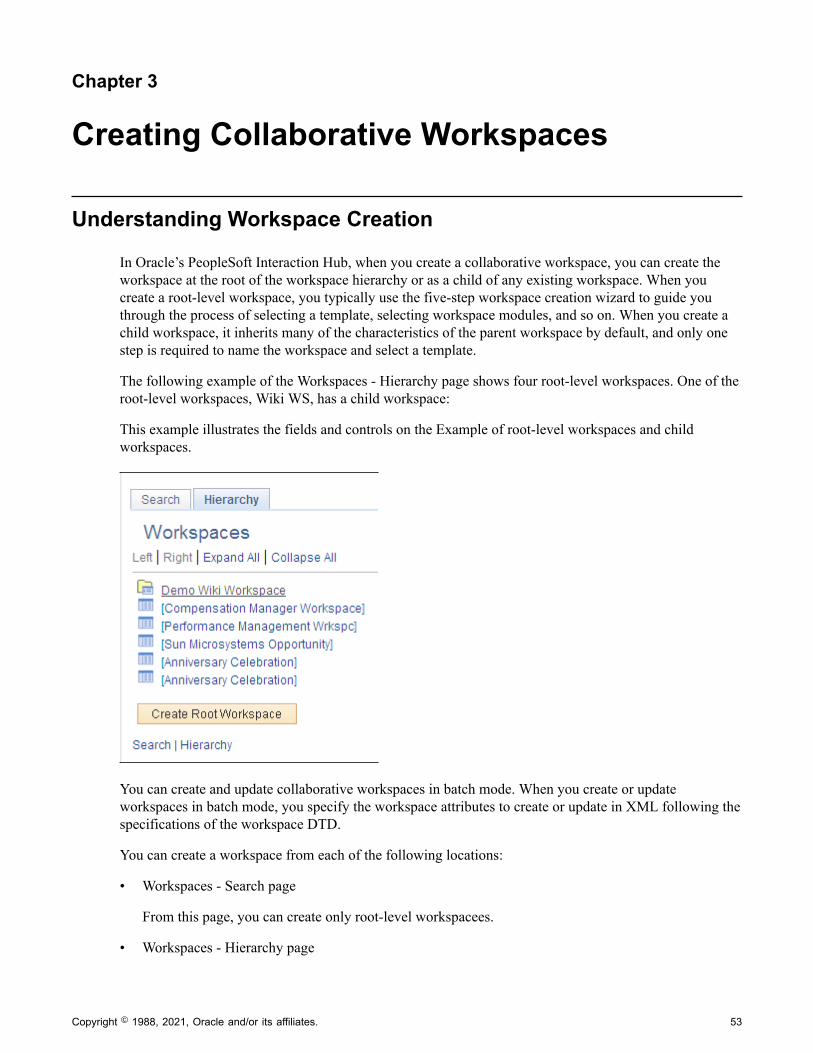
Chapter 3
Creating Collaborative Workspaces
Understanding Workspace Creation
In Oracle’s PeopleSoft Interaction Hub, when you create a collaborative workspace, you can create theworkspace at the root of the workspace hierarchy or as a child of any existing workspace. When youcreate a root-level workspace, you typically use the five-step workspace creation wizard to guide youthrough the process of selecting a template, selecting workspace modules, and so on. When you create achild workspace, it inherits many of the characteristics of the parent workspace by default, and only onestep is required to name the workspace and select a template.
The following example of the Workspaces - Hierarchy page shows four root-level workspaces. One of theroot-level workspaces, Wiki WS, has a child workspace:
This example illustrates the fields and controls on the Example of root-level workspaces and childworkspaces.
You can create and update collaborative workspaces in batch mode. When you create or updateworkspaces in batch mode, you specify the workspace attributes to create or update in XML following thespecifications of the workspace DTD.
You can create a workspace from each of the following locations:
• Workspaces - Search page
From this page, you can create only root-level workspacees.
• Workspaces - Hierarchy page
Copyright © 1988, 2021, Oracle and/or its affiliates. 53
Creating Collaborative Workspaces Chapter 3
From this page, you can create root-level workspaces or child workspaces.
• Create Workspace menu item
From this menu item, you can create only root-level workspaces.
• My Workspaces pagelet
From this pagelet, you can create only root-level workspaces.
• Batch Create Workspaces page
From this page, you can create only root-level workspaces.
• Related Links service
If you added the Related Links related content service to the transaction page, you can createworkspaces directly from the PeopleSoft application transaction for which you are creating theworkspace.
From this service, you can create only root-level workspaces. The benefits of creating a workspacefrom the Related Links service include:
• The workspace automatically includes a link back to the PeopleSoft application transaction in theLinks module.
• If the option is selected when the workspace is created, the workspace can include discussionsrelated to the PeopleSoft application transaction.
• Related Workspaces pagelet
If you assigned the Related Workspaces pagelet to the transaction page using Context Manager, youcan create workspaces directly from the transaction for which you are creating the workspace.
From this pagelet, you can create only root-level workspaces. The benefits of creating a workspacefrom the Related Workspaces pagelet include:
• On the Select a Workspace Template page, the workspace creation wizard prompts you with anyavailable, recommended, workspace templates associated with the transaction.
• On the Relate Workspace to a Transaction page, the workspace creation wizard populatesapplicable contextual data fields with values from the selected transaction.
• The workspace automatically includes a link back to the transaction page in the Links module.
Note: The Workspaces - Search page and the Workspaces - Hierarchy page are also available through theBrowse Workspaces module of each workspace.
Related LinksMy Workspaces Page"Creating and Using Links with the Related Links Service" (Using Portal Features)"Working With the Related Workspaces Pagelet" (Using Portal Features)
54 Copyright © 1988, 2021, Oracle and/or its affiliates.
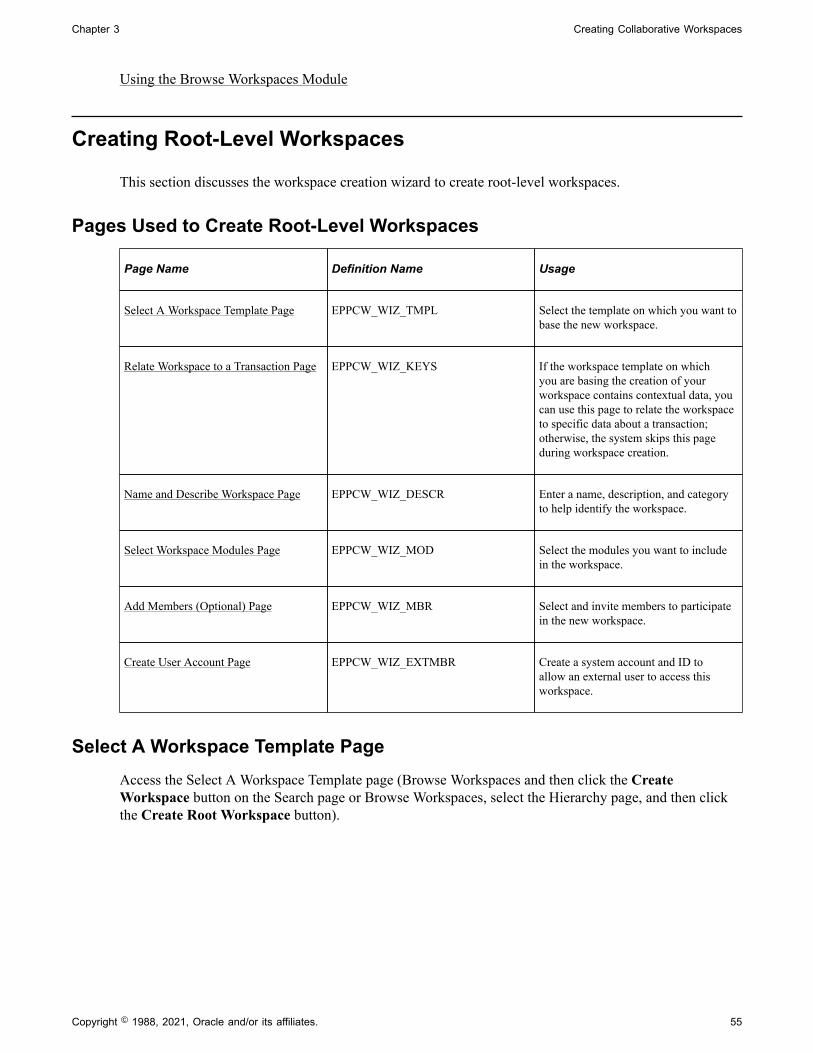
Chapter 3 Creating Collaborative Workspaces
Using the Browse Workspaces Module
Creating Root-Level Workspaces
This section discusses the workspace creation wizard to create root-level workspaces.
Pages Used to Create Root-Level Workspaces
Page Name Definition Name Usage
Select A Workspace Template Page EPPCW_WIZ_TMPL Select the template on which you want tobase the new workspace.
Relate Workspace to a Transaction Page EPPCW_WIZ_KEYS If the workspace template on whichyou are basing the creation of yourworkspace contains contextual data, youcan use this page to relate the workspaceto specific data about a transaction;otherwise, the system skips this pageduring workspace creation.
Name and Describe Workspace Page EPPCW_WIZ_DESCR Enter a name, description, and categoryto help identify the workspace.
Select Workspace Modules Page EPPCW_WIZ_MOD Select the modules you want to includein the workspace.
Add Members (Optional) Page EPPCW_WIZ_MBR Select and invite members to participatein the new workspace.
Create User Account Page EPPCW_WIZ_EXTMBR Create a system account and ID toallow an external user to access thisworkspace.
Select A Workspace Template PageAccess the Select A Workspace Template page (Browse Workspaces and then click the CreateWorkspace button on the Search page or Browse Workspaces, select the Hierarchy page, and then clickthe Create Root Workspace button).
Copyright © 1988, 2021, Oracle and/or its affiliates. 55
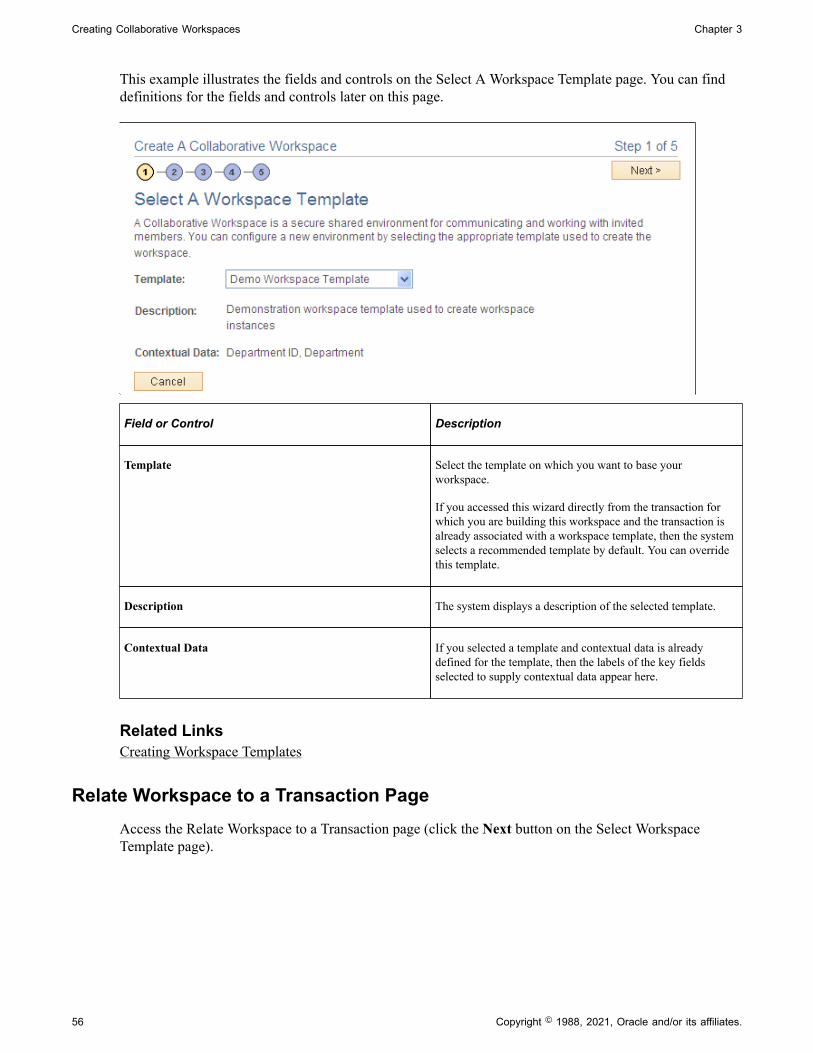
Creating Collaborative Workspaces Chapter 3
This example illustrates the fields and controls on the Select A Workspace Template page. You can finddefinitions for the fields and controls later on this page.
Field or Control Description
Template Select the template on which you want to base yourworkspace.
If you accessed this wizard directly from the transaction forwhich you are building this workspace and the transaction isalready associated with a workspace template, then the systemselects a recommended template by default. You can overridethis template.
Description The system displays a description of the selected template.
Contextual Data If you selected a template and contextual data is alreadydefined for the template, then the labels of the key fieldsselected to supply contextual data appear here.
Related LinksCreating Workspace Templates
Relate Workspace to a Transaction PageAccess the Relate Workspace to a Transaction page (click the Next button on the Select WorkspaceTemplate page).
56 Copyright © 1988, 2021, Oracle and/or its affiliates.
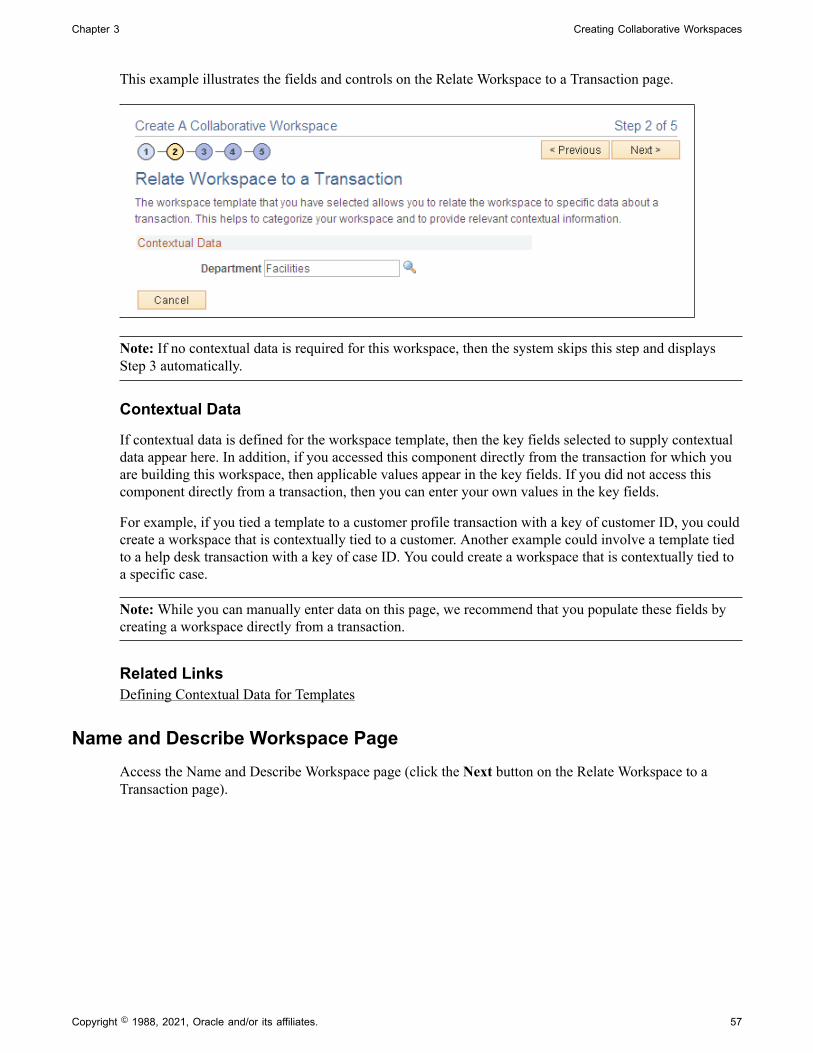
Chapter 3 Creating Collaborative Workspaces
This example illustrates the fields and controls on the Relate Workspace to a Transaction page.
Note: If no contextual data is required for this workspace, then the system skips this step and displaysStep 3 automatically.
Contextual Data
If contextual data is defined for the workspace template, then the key fields selected to supply contextualdata appear here. In addition, if you accessed this component directly from the transaction for which youare building this workspace, then applicable values appear in the key fields. If you did not access thiscomponent directly from a transaction, then you can enter your own values in the key fields.
For example, if you tied a template to a customer profile transaction with a key of customer ID, you couldcreate a workspace that is contextually tied to a customer. Another example could involve a template tiedto a help desk transaction with a key of case ID. You could create a workspace that is contextually tied toa specific case.
Note: While you can manually enter data on this page, we recommend that you populate these fields bycreating a workspace directly from a transaction.
Related LinksDefining Contextual Data for Templates
Name and Describe Workspace PageAccess the Name and Describe Workspace page (click the Next button on the Relate Workspace to aTransaction page).
Copyright © 1988, 2021, Oracle and/or its affiliates. 57
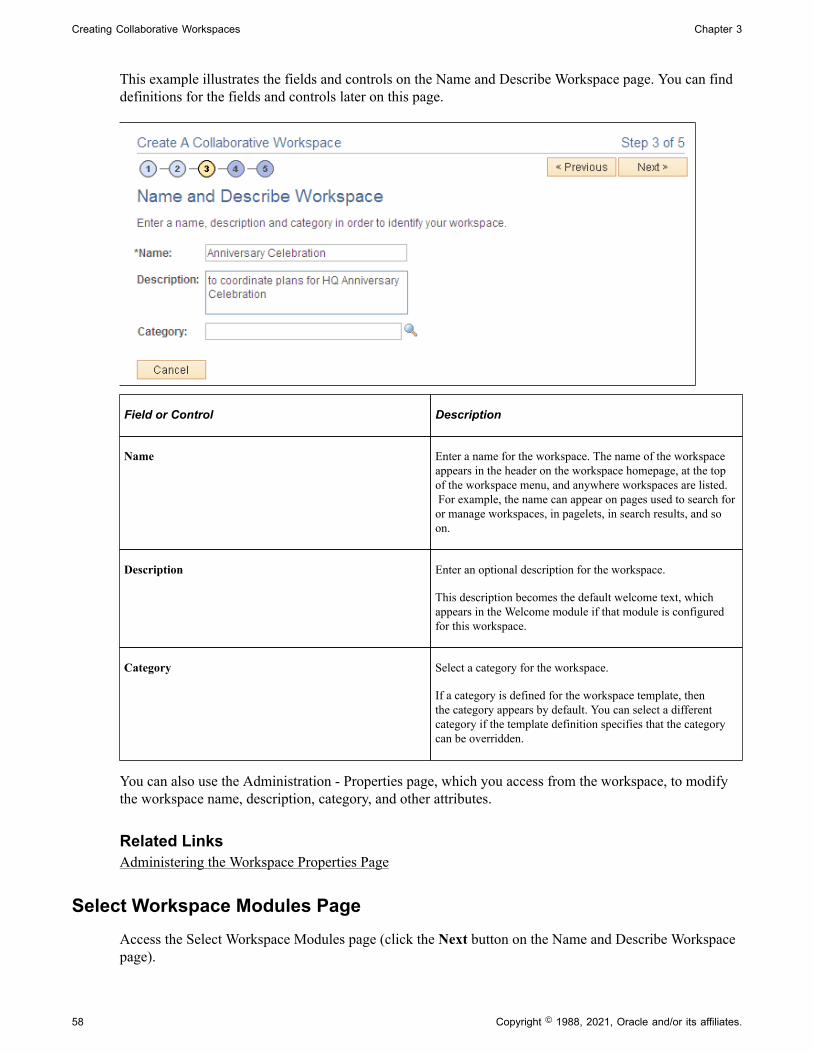
Creating Collaborative Workspaces Chapter 3
This example illustrates the fields and controls on the Name and Describe Workspace page. You can finddefinitions for the fields and controls later on this page.
Field or Control Description
Name Enter a name for the workspace. The name of the workspaceappears in the header on the workspace homepage, at the topof the workspace menu, and anywhere workspaces are listed. For example, the name can appear on pages used to search foror manage workspaces, in pagelets, in search results, and soon.
Description Enter an optional description for the workspace.
This description becomes the default welcome text, whichappears in the Welcome module if that module is configuredfor this workspace.
Category Select a category for the workspace.
If a category is defined for the workspace template, thenthe category appears by default. You can select a differentcategory if the template definition specifies that the categorycan be overridden.
You can also use the Administration - Properties page, which you access from the workspace, to modifythe workspace name, description, category, and other attributes.
Related LinksAdministering the Workspace Properties Page
Select Workspace Modules PageAccess the Select Workspace Modules page (click the Next button on the Name and Describe Workspacepage).
58 Copyright © 1988, 2021, Oracle and/or its affiliates.
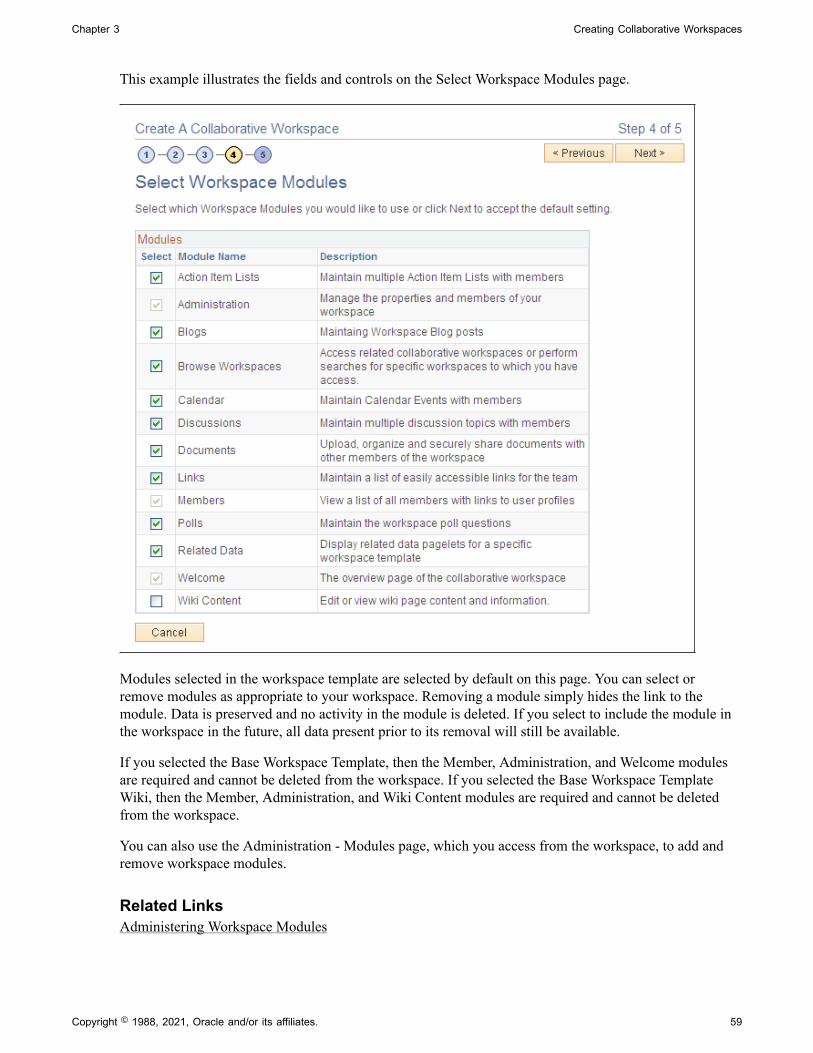
Chapter 3 Creating Collaborative Workspaces
This example illustrates the fields and controls on the Select Workspace Modules page.
Modules selected in the workspace template are selected by default on this page. You can select orremove modules as appropriate to your workspace. Removing a module simply hides the link to themodule. Data is preserved and no activity in the module is deleted. If you select to include the module inthe workspace in the future, all data present prior to its removal will still be available.
If you selected the Base Workspace Template, then the Member, Administration, and Welcome modulesare required and cannot be deleted from the workspace. If you selected the Base Workspace TemplateWiki, then the Member, Administration, and Wiki Content modules are required and cannot be deletedfrom the workspace.
You can also use the Administration - Modules page, which you access from the workspace, to add andremove workspace modules.
Related LinksAdministering Workspace Modules
Copyright © 1988, 2021, Oracle and/or its affiliates. 59

Creating Collaborative Workspaces Chapter 3
Add Members (Optional) PageAccess the Add Members (Optional) page (click the Next button on the Select Workspace Modules page).
This example illustrates the fields and controls on the Add Members (Optional) page.
You can add members and create a user account using this page when you create the workspace. If theworkspace template contains definitions for default members, those member names will appear on thispage. You can also use the Administration - Members page, which you access from the workspace, to addand remove members.
See Administering Workspace Members.
Members
Field or Control Description
Send Invite Select to send a notification to selected members alertingthem that they were added as members to the workspace. The system uses default notification text that includes alink to the workspace homepage. Alternatively, you cansend notifications after the workspace is created, which alsoallows you to modify the notification text on the Set InvitationMessage page.
See Setting Up a Workspace.
60 Copyright © 1988, 2021, Oracle and/or its affiliates.
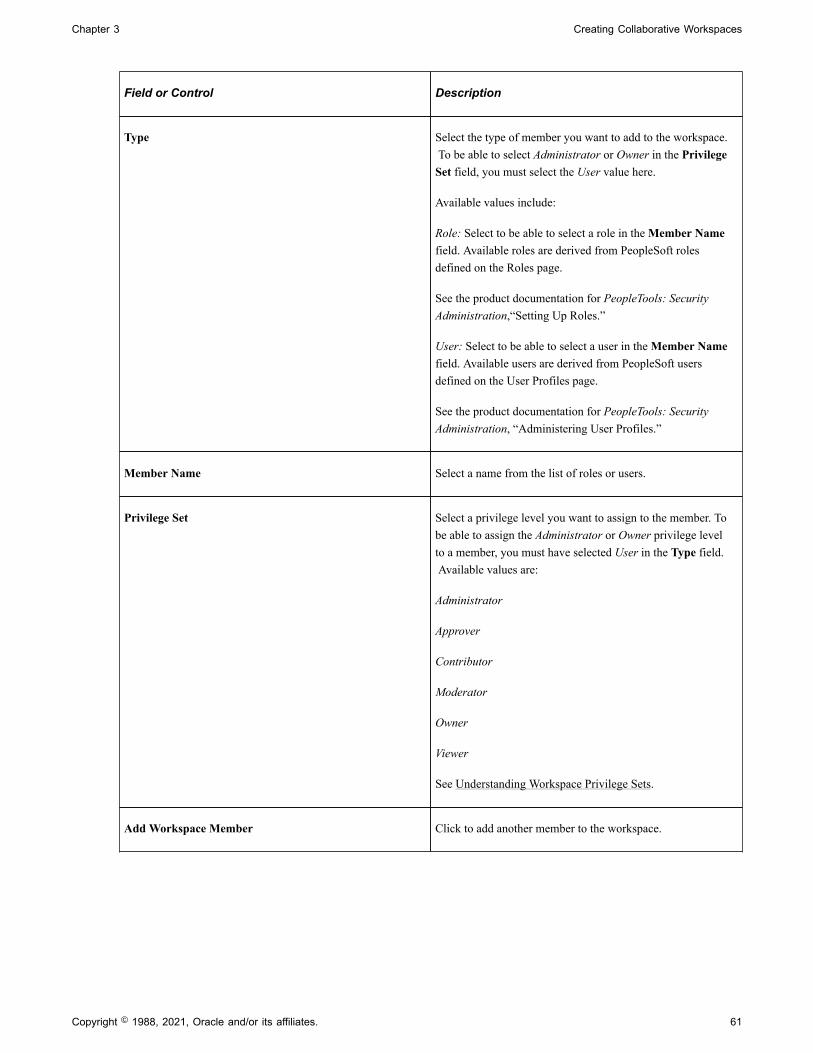
Chapter 3 Creating Collaborative Workspaces
Field or Control Description
Type Select the type of member you want to add to the workspace. To be able to select Administrator or Owner in the PrivilegeSet field, you must select the User value here.
Available values include:
Role: Select to be able to select a role in the Member Namefield. Available roles are derived from PeopleSoft rolesdefined on the Roles page.
See the product documentation for PeopleTools: SecurityAdministration,“Setting Up Roles.”
User: Select to be able to select a user in the Member Namefield. Available users are derived from PeopleSoft usersdefined on the User Profiles page.
See the product documentation for PeopleTools: SecurityAdministration, “Administering User Profiles.”
Member Name Select a name from the list of roles or users.
Privilege Set Select a privilege level you want to assign to the member. Tobe able to assign the Administrator or Owner privilege levelto a member, you must have selected User in the Type field. Available values are:
Administrator
Approver
Contributor
Moderator
Owner
Viewer
See Understanding Workspace Privilege Sets.
Add Workspace Member Click to add another member to the workspace.
Copyright © 1988, 2021, Oracle and/or its affiliates. 61
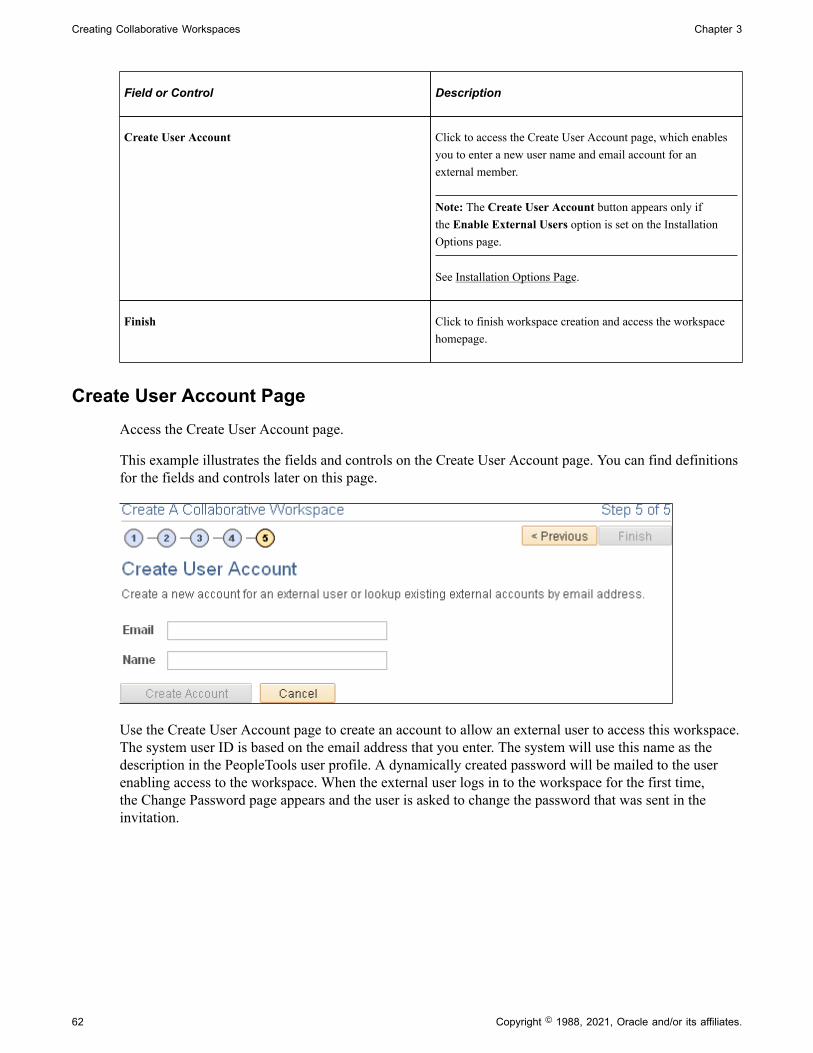
Creating Collaborative Workspaces Chapter 3
Field or Control Description
Create User Account Click to access the Create User Account page, which enablesyou to enter a new user name and email account for anexternal member.
Note: The Create User Account button appears only ifthe Enable External Users option is set on the InstallationOptions page.
See Installation Options Page.
Finish Click to finish workspace creation and access the workspacehomepage.
Create User Account PageAccess the Create User Account page.
This example illustrates the fields and controls on the Create User Account page. You can find definitionsfor the fields and controls later on this page.
Use the Create User Account page to create an account to allow an external user to access this workspace.The system user ID is based on the email address that you enter. The system will use this name as thedescription in the PeopleTools user profile. A dynamically created password will be mailed to the userenabling access to the workspace. When the external user logs in to the workspace for the first time,the Change Password page appears and the user is asked to change the password that was sent in theinvitation.
62 Copyright © 1988, 2021, Oracle and/or its affiliates.
Chapter 3 Creating Collaborative Workspaces
Field or Control Description
Email Enter a valid email address.
The system will truncate the system user ID generated fromthis email address at the @ symbol. For example, an emailaddress of [email protected] will result in a user ID ofFIRST.LAST.
Name Enter a description for this account.
The system will use this value as the description in thePeopleTools user profile.
Matching Accounts After you enter a valid email address and exit the Emailfield, if the system finds a matching email address, thenthe Matching Accounts group box appears, displaying thematching accounts.
Create Account Click the Create Account button to create a new external useraccount and return to the Add Members (Optional) page.
Cancel and Previous Click either button to return to the Add Members (Optional)page without creating an external user account.
Finish The Finish button is not active on this page. Click the CreateAccount or Cancel button.
You can access and manage external user information from the Manage External User page.
See Managing External User Accounts for Workspaces.
Creating Child Workspaces
This section discusses how to create a child workspace.
Page Used to Create Child Workspaces
Page Name Definition Name Usage
Create Child Workspace Page EPPCW_WS_CREATE Create a child workspace of the selectedparent.
Create Child Workspace PageAccess the Create Child Workspace page (select a parent workspace and click the Create ChildWorkspace button on the Workspaces - Hierarchy page).
Copyright © 1988, 2021, Oracle and/or its affiliates. 63
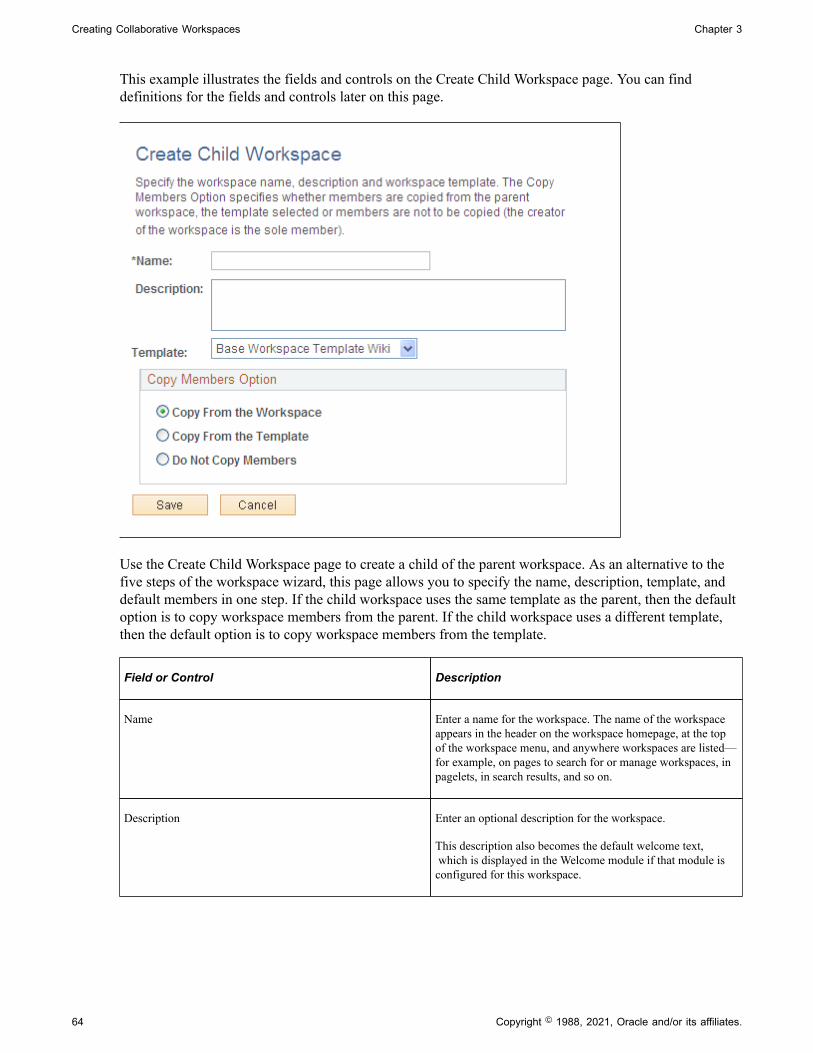
Creating Collaborative Workspaces Chapter 3
This example illustrates the fields and controls on the Create Child Workspace page. You can finddefinitions for the fields and controls later on this page.
Use the Create Child Workspace page to create a child of the parent workspace. As an alternative to thefive steps of the workspace wizard, this page allows you to specify the name, description, template, anddefault members in one step. If the child workspace uses the same template as the parent, then the defaultoption is to copy workspace members from the parent. If the child workspace uses a different template,then the default option is to copy workspace members from the template.
Field or Control Description
Name Enter a name for the workspace. The name of the workspaceappears in the header on the workspace homepage, at the topof the workspace menu, and anywhere workspaces are listed—for example, on pages to search for or manage workspaces, inpagelets, in search results, and so on.
Description Enter an optional description for the workspace.
This description also becomes the default welcome text, which is displayed in the Welcome module if that module isconfigured for this workspace.
64 Copyright © 1988, 2021, Oracle and/or its affiliates.
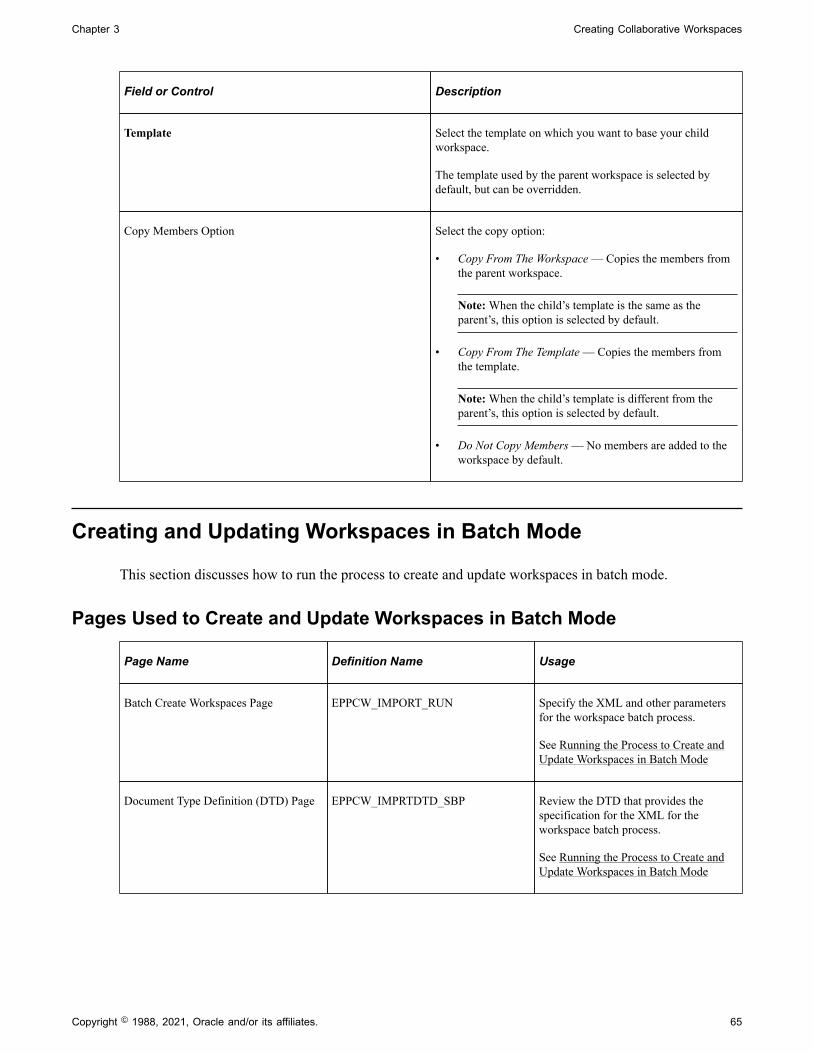
Chapter 3 Creating Collaborative Workspaces
Field or Control Description
Template Select the template on which you want to base your childworkspace.
The template used by the parent workspace is selected bydefault, but can be overridden.
Copy Members Option Select the copy option:
• Copy From The Workspace — Copies the members fromthe parent workspace.
Note: When the child’s template is the same as theparent’s, this option is selected by default.
• Copy From The Template — Copies the members fromthe template.
Note: When the child’s template is different from theparent’s, this option is selected by default.
• Do Not Copy Members — No members are added to theworkspace by default.
Creating and Updating Workspaces in Batch Mode
This section discusses how to run the process to create and update workspaces in batch mode.
Pages Used to Create and Update Workspaces in Batch Mode
Page Name Definition Name Usage
Batch Create Workspaces Page EPPCW_IMPORT_RUN Specify the XML and other parametersfor the workspace batch process.
See Running the Process to Create andUpdate Workspaces in Batch Mode
Document Type Definition (DTD) Page EPPCW_IMPRTDTD_SBP Review the DTD that provides thespecification for the XML for theworkspace batch process.
See Running the Process to Create andUpdate Workspaces in Batch Mode
Copyright © 1988, 2021, Oracle and/or its affiliates. 65
Creating Collaborative Workspaces Chapter 3
Page Name Definition Name Usage
Sample XML File Page EPPCW_IMPRTXML_SBP View example XML that can be copiedand modified to be the input to theworkspace batch process.
See Running the Process to Create andUpdate Workspaces in Batch Mode
Running the Process to Create and Update Workspaces in Batch ModeThis section discusses how to:
• Create and update workspaces in batch.
• Review the DTD.
• View the example XML.
• Modify XML attributes for workspace creation and update.
Batch Create Workspaces Page
Access the Batch Create Workspaces page (Portal Administration, Workspaces, Batch Create Workspaces,Batch Create Workspaces).
66 Copyright © 1988, 2021, Oracle and/or its affiliates.
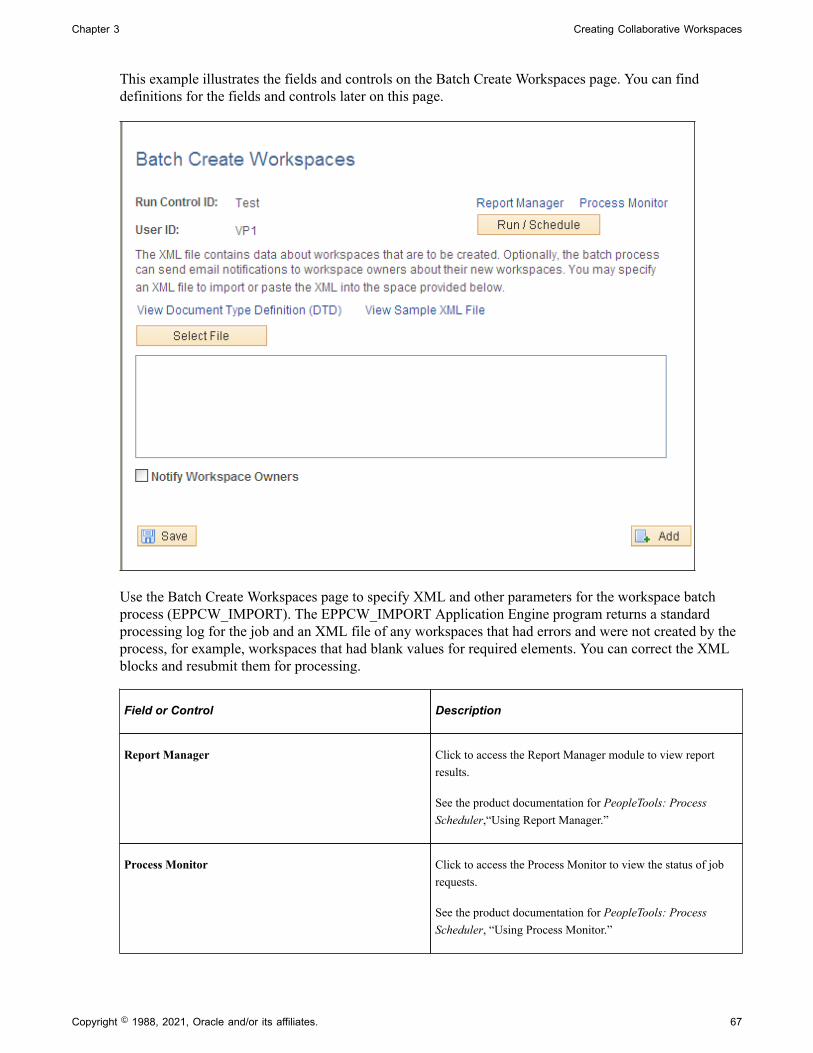
Chapter 3 Creating Collaborative Workspaces
This example illustrates the fields and controls on the Batch Create Workspaces page. You can finddefinitions for the fields and controls later on this page.
Use the Batch Create Workspaces page to specify XML and other parameters for the workspace batchprocess (EPPCW_IMPORT). The EPPCW_IMPORT Application Engine program returns a standardprocessing log for the job and an XML file of any workspaces that had errors and were not created by theprocess, for example, workspaces that had blank values for required elements. You can correct the XMLblocks and resubmit them for processing.
Field or Control Description
Report Manager Click to access the Report Manager module to view reportresults.
See the product documentation for PeopleTools: ProcessScheduler,“Using Report Manager.”
Process Monitor Click to access the Process Monitor to view the status of jobrequests.
See the product documentation for PeopleTools: ProcessScheduler, “Using Process Monitor.”
Copyright © 1988, 2021, Oracle and/or its affiliates. 67
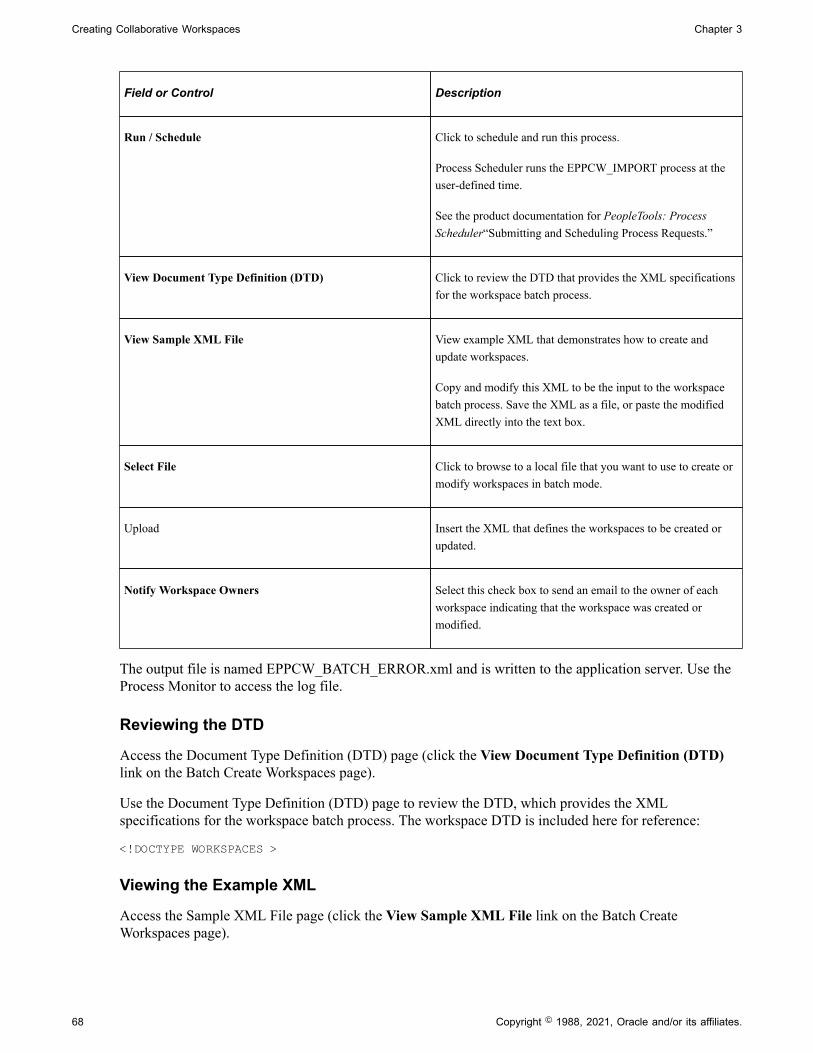
Creating Collaborative Workspaces Chapter 3
Field or Control Description
Run / Schedule Click to schedule and run this process.
Process Scheduler runs the EPPCW_IMPORT process at theuser-defined time.
See the product documentation for PeopleTools: ProcessScheduler“Submitting and Scheduling Process Requests.”
View Document Type Definition (DTD) Click to review the DTD that provides the XML specificationsfor the workspace batch process.
View Sample XML File View example XML that demonstrates how to create andupdate workspaces.
Copy and modify this XML to be the input to the workspacebatch process. Save the XML as a file, or paste the modifiedXML directly into the text box.
Select File Click to browse to a local file that you want to use to create ormodify workspaces in batch mode.
Upload Insert the XML that defines the workspaces to be created orupdated.
Notify Workspace Owners Select this check box to send an email to the owner of eachworkspace indicating that the workspace was created ormodified.
The output file is named EPPCW_BATCH_ERROR.xml and is written to the application server. Use theProcess Monitor to access the log file.
Reviewing the DTD
Access the Document Type Definition (DTD) page (click the View Document Type Definition (DTD)link on the Batch Create Workspaces page).
Use the Document Type Definition (DTD) page to review the DTD, which provides the XMLspecifications for the workspace batch process. The workspace DTD is included here for reference:
<!DOCTYPE WORKSPACES >
Viewing the Example XML
Access the Sample XML File page (click the View Sample XML File link on the Batch CreateWorkspaces page).
68 Copyright © 1988, 2021, Oracle and/or its affiliates.
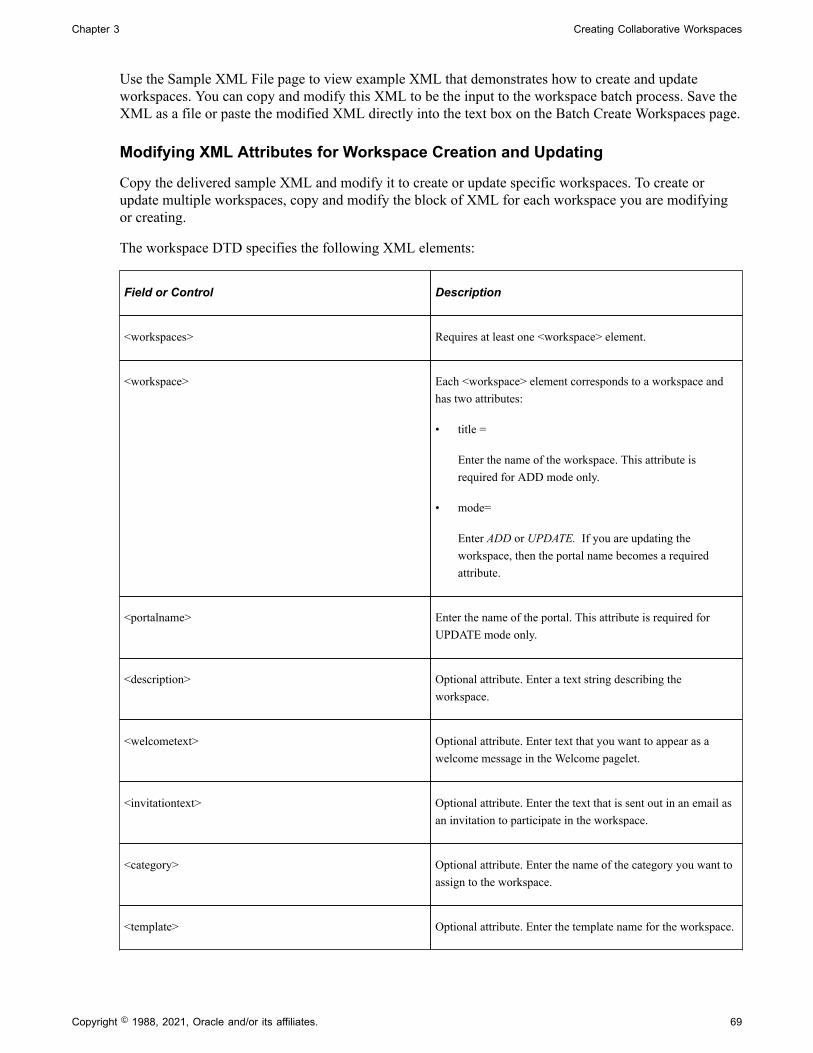
Chapter 3 Creating Collaborative Workspaces
Use the Sample XML File page to view example XML that demonstrates how to create and updateworkspaces. You can copy and modify this XML to be the input to the workspace batch process. Save theXML as a file or paste the modified XML directly into the text box on the Batch Create Workspaces page.
Modifying XML Attributes for Workspace Creation and Updating
Copy the delivered sample XML and modify it to create or update specific workspaces. To create orupdate multiple workspaces, copy and modify the block of XML for each workspace you are modifyingor creating.
The workspace DTD specifies the following XML elements:
Field or Control Description
<workspaces> Requires at least one <workspace> element.
<workspace> Each <workspace> element corresponds to a workspace andhas two attributes:
• title =
Enter the name of the workspace. This attribute isrequired for ADD mode only.
• mode=
Enter ADD or UPDATE. If you are updating theworkspace, then the portal name becomes a requiredattribute.
<portalname> Enter the name of the portal. This attribute is required forUPDATE mode only.
<description> Optional attribute. Enter a text string describing theworkspace.
<welcometext> Optional attribute. Enter text that you want to appear as awelcome message in the Welcome pagelet.
<invitationtext> Optional attribute. Enter the text that is sent out in an email asan invitation to participate in the workspace.
<category> Optional attribute. Enter the name of the category you want toassign to the workspace.
<template> Optional attribute. Enter the template name for the workspace.
Copyright © 1988, 2021, Oracle and/or its affiliates. 69
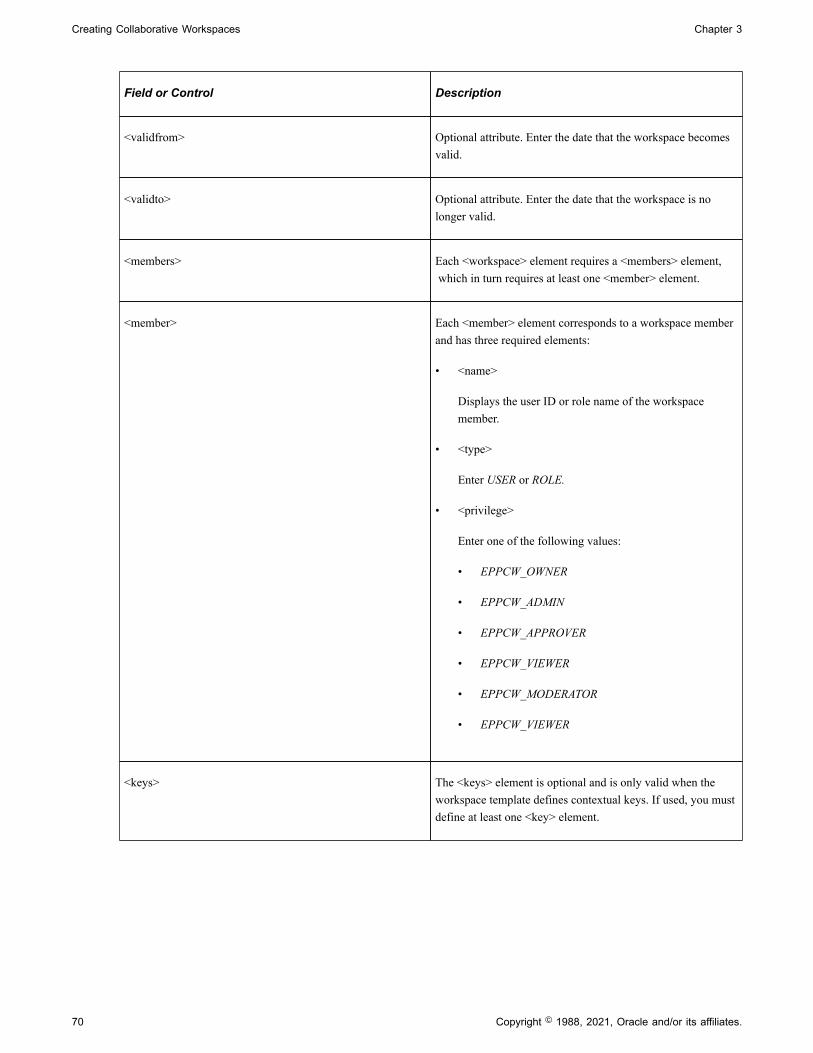
Creating Collaborative Workspaces Chapter 3
Field or Control Description
<validfrom> Optional attribute. Enter the date that the workspace becomesvalid.
<validto> Optional attribute. Enter the date that the workspace is nolonger valid.
<members> Each <workspace> element requires a <members> element, which in turn requires at least one <member> element.
<member> Each <member> element corresponds to a workspace memberand has three required elements:
• <name>
Displays the user ID or role name of the workspacemember.
• <type>
Enter USER or ROLE.
• <privilege>
Enter one of the following values:
• EPPCW_OWNER
• EPPCW_ADMIN
• EPPCW_APPROVER
• EPPCW_VIEWER
• EPPCW_MODERATOR
• EPPCW_VIEWER
<keys> The <keys> element is optional and is only valid when theworkspace template defines contextual keys. If used, you mustdefine at least one <key> element.
70 Copyright © 1988, 2021, Oracle and/or its affiliates.
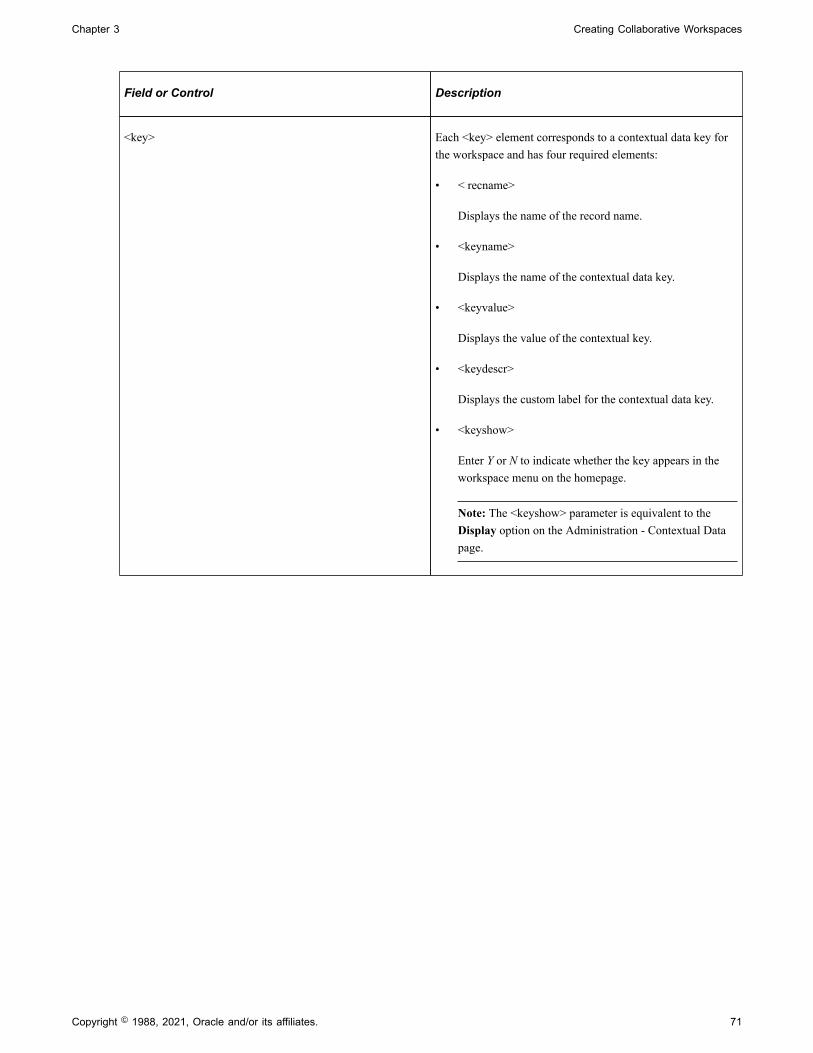
Chapter 3 Creating Collaborative Workspaces
Field or Control Description
<key> Each <key> element corresponds to a contextual data key forthe workspace and has four required elements:
• < recname>
Displays the name of the record name.
• <keyname>
Displays the name of the contextual data key.
• <keyvalue>
Displays the value of the contextual key.
• <keydescr>
Displays the custom label for the contextual data key.
• <keyshow>
Enter Y or N to indicate whether the key appears in theworkspace menu on the homepage.
Note: The <keyshow> parameter is equivalent to theDisplay option on the Administration - Contextual Datapage.
Copyright © 1988, 2021, Oracle and/or its affiliates. 71

Creating Collaborative Workspaces Chapter 3
72 Copyright © 1988, 2021, Oracle and/or its affiliates.
Chapter 4
Administering Collaborative Workspaces
Understanding Workspace Administration
In Oracle’s PeopleSoft Interaction Hub, workspace administration tasks occur inside and outside of theworkspace itself. These topics covers both types of activities.
To get a workspace ready for use by workspace members, the workspace administrator is responsible fordoing the following tasks within the workspace:
1. Setting up the workspace—that is, adding workspace members, selecting workspace modules, and soon.
2. Designating the content and layout of the workspace homepage.
After a workspace is up and running, additional administrative tasks can include:
• Managing the status of workspaces—that is, inactivating or reactivating workspaces, deletingworkspaces, or setting workspaces to read-only.
• Moving a workspace in the workspace hierarchy.
• Importing and exporting workspace data.
• Managing external user accounts for workspaces.
Understanding Workspace Privilege Sets
This section provides an overview of workspace privileges and discusses:
• Welcome module privilege
• Wiki Content module privileges
• Discussions module privileges
• Documents module privileges
• Blogs module privileges
• Links module privileges
• Action Item Lists module privileges
• Calendar module privileges
• Members module privileges
Copyright © 1988, 2021, Oracle and/or its affiliates. 73
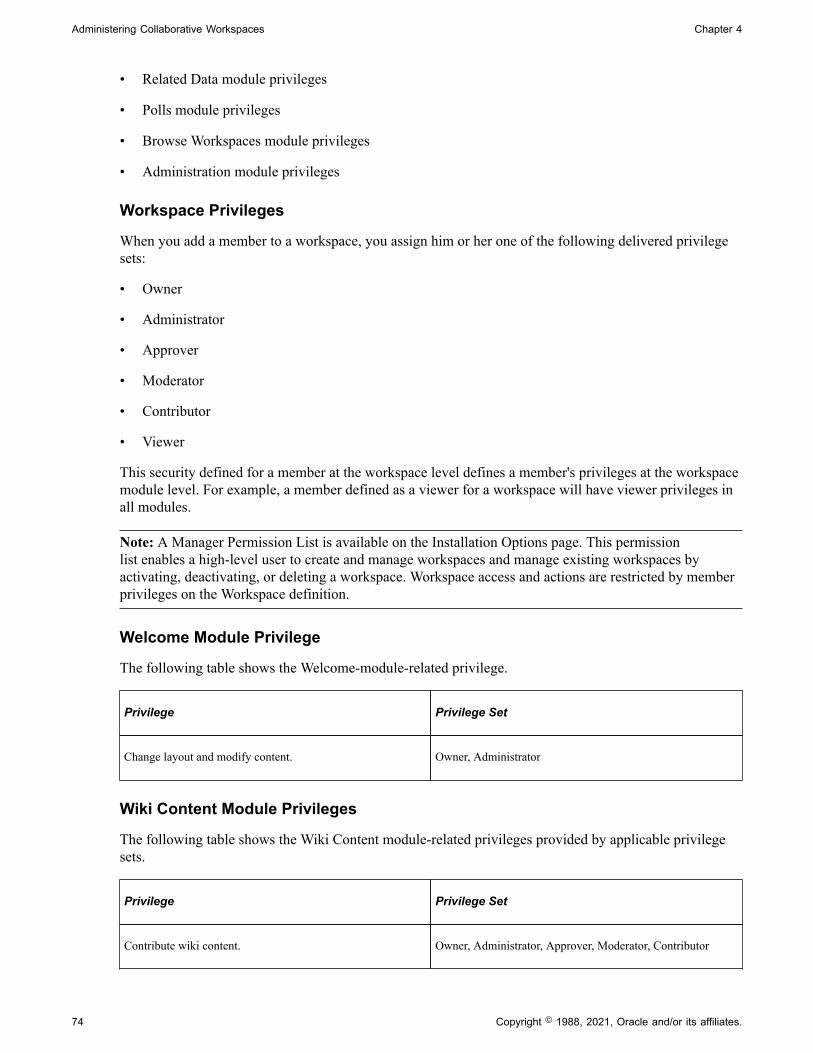
Administering Collaborative Workspaces Chapter 4
• Related Data module privileges
• Polls module privileges
• Browse Workspaces module privileges
• Administration module privileges
Workspace Privileges
When you add a member to a workspace, you assign him or her one of the following delivered privilegesets:
• Owner
• Administrator
• Approver
• Moderator
• Contributor
• Viewer
This security defined for a member at the workspace level defines a member's privileges at the workspacemodule level. For example, a member defined as a viewer for a workspace will have viewer privileges inall modules.
Note: A Manager Permission List is available on the Installation Options page. This permissionlist enables a high-level user to create and manage workspaces and manage existing workspaces byactivating, deactivating, or deleting a workspace. Workspace access and actions are restricted by memberprivileges on the Workspace definition.
Welcome Module Privilege
The following table shows the Welcome-module-related privilege.
Privilege Privilege Set
Change layout and modify content. Owner, Administrator
Wiki Content Module Privileges
The following table shows the Wiki Content module-related privileges provided by applicable privilegesets.
Privilege Privilege Set
Contribute wiki content. Owner, Administrator, Approver, Moderator, Contributor
74 Copyright © 1988, 2021, Oracle and/or its affiliates.
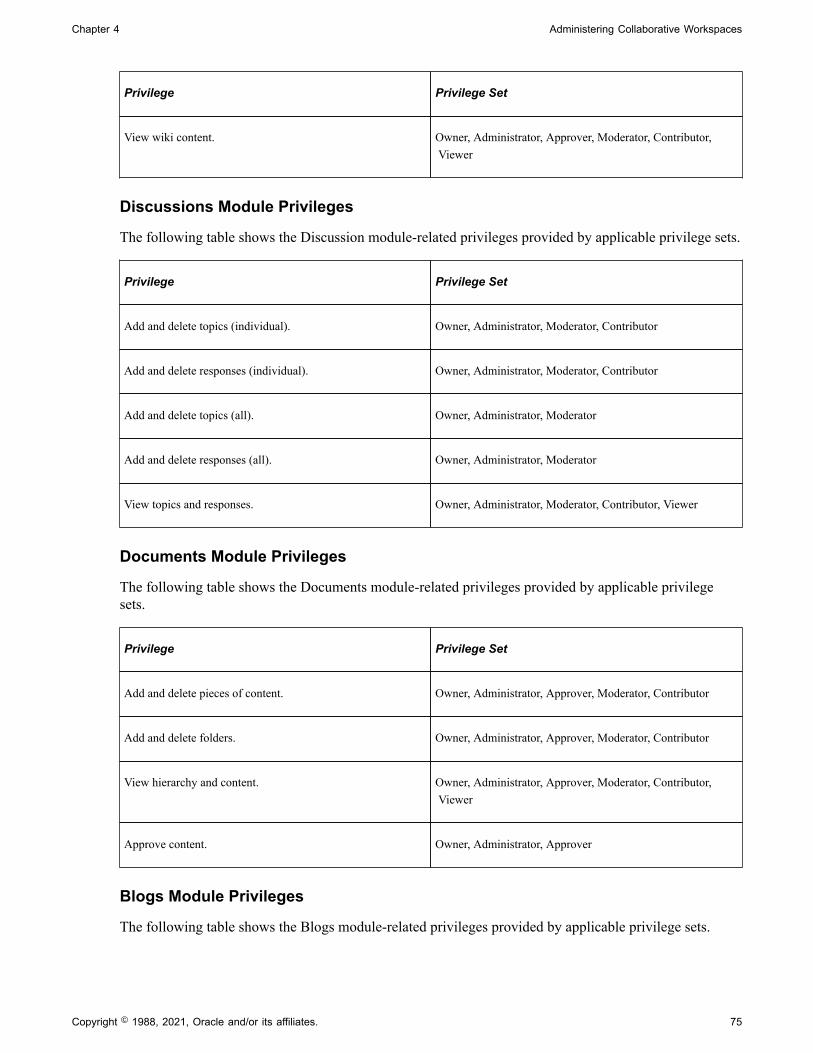
Chapter 4 Administering Collaborative Workspaces
Privilege Privilege Set
View wiki content. Owner, Administrator, Approver, Moderator, Contributor, Viewer
Discussions Module Privileges
The following table shows the Discussion module-related privileges provided by applicable privilege sets.
Privilege Privilege Set
Add and delete topics (individual). Owner, Administrator, Moderator, Contributor
Add and delete responses (individual). Owner, Administrator, Moderator, Contributor
Add and delete topics (all). Owner, Administrator, Moderator
Add and delete responses (all). Owner, Administrator, Moderator
View topics and responses. Owner, Administrator, Moderator, Contributor, Viewer
Documents Module Privileges
The following table shows the Documents module-related privileges provided by applicable privilegesets.
Privilege Privilege Set
Add and delete pieces of content. Owner, Administrator, Approver, Moderator, Contributor
Add and delete folders. Owner, Administrator, Approver, Moderator, Contributor
View hierarchy and content. Owner, Administrator, Approver, Moderator, Contributor, Viewer
Approve content. Owner, Administrator, Approver
Blogs Module Privileges
The following table shows the Blogs module-related privileges provided by applicable privilege sets.
Copyright © 1988, 2021, Oracle and/or its affiliates. 75

Administering Collaborative Workspaces Chapter 4
Privilege Privilege Set
Manage blog. Owner, Administrator, Moderator
Add blog posts. Owner, Administrator, Approver, Moderator, Contributor
Add comments and replies. Owner, Administrator, Approver, Moderator, Contributor
View blog posts. Owner, Administrator, Approver, Moderator, Contributor, Viewer
Links Module Privileges
The following table shows the Links module-related privileges provided by applicable privilege sets.
Privilege Privilege Set
Add and delete links. (individual) Owner, Approver, Moderator, Contributor
Add and delete links. (all) Owner, Administrator
Add and delete folders. (individual) Owner, Approver, Moderator, Contributor
Add and delete folders. (all) Owner, Administrator
View hierarchy and content. Owner, Administrator, Moderator, Contributor, Viewer
Action Item Lists Module Privileges
The following table lists privileges for the Action Item Lists module and the related privilege sets.
Privilege Privilege Set
Add and edit any action item. Owner, Moderator, Administrator, Contributor, Approver
Delete any action item. Owner, Moderator, Administrator
Delete list. Owner, Moderator, Administrator
Delete own action items. Owner, Moderator, Administrator, Contributor Approver
76 Copyright © 1988, 2021, Oracle and/or its affiliates.

Chapter 4 Administering Collaborative Workspaces
Privilege Privilege Set
View action items. Owner, Moderator, Administrator, Contributor, Viewer, Approver
Edit List. Administrator, Owner, Moderator
Calendar Module Privileges
The following table lists privileges for the Calendar module and the related privilege sets.
Privilege Privilege Set
View events. Administrator, Contributor, Viewer
Add events. Administrator, Contributor
Edit own events. Administrator, Contributor
Delete own events. Administrator, Contributor
Edit any event. Administrator
Delete any event. Administrator
Edit calendar properties. Administrator
Add a calendar. Administrator
Delete a calendar. Administrator
Members Module Privileges
The following table shows the Members module-related privileges provided by applicable privilege sets.
Privilege Permission Level
Add and delete members. Owner, Administrator
Change profile details. (individual) Owner, Administrator, Moderator, Contributor
Copyright © 1988, 2021, Oracle and/or its affiliates. 77

Administering Collaborative Workspaces Chapter 4
Privilege Permission Level
Change profile details. (all) Owner, Administrator
View members and profiles. Owner, Administrator, Moderator, Contributor, Viewer
Related Data Module Privileges
The following table shows the Related Data module-related privileges provided by applicable privilegesets.
Privilege Privilege Set
Add and delete pagelets. Owner, Administrator
Change layout. Owner, Administrator
Polls Module Privileges
The following table lists privileges for the Community Calendars module and the related privilege sets.
Privilege Privilege Set
Access poll results. Administrator, moderator, publisher
Assign members. Administrator, moderator
Assign respondents. Administrator, moderator, publisher
Delete poll definition. Administrator
Delete questions and responses. Administrator, moderator, publisher
Edit poll metadata. Administrator, moderator, publisher
Publish as pagelet. Administrator, publisher
Update questions. Administrator, author, moderator, publisher
View poll definition. Administrator, author, moderator, publisher, viewer
78 Copyright © 1988, 2021, Oracle and/or its affiliates.
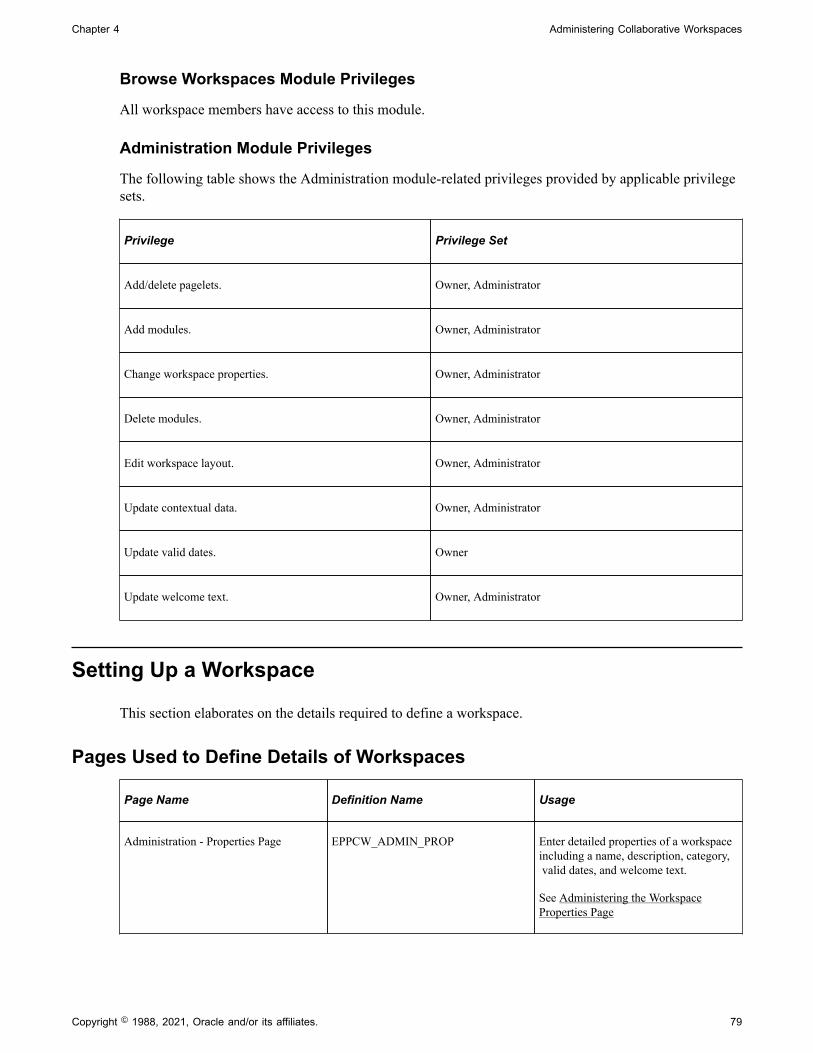
Chapter 4 Administering Collaborative Workspaces
Browse Workspaces Module Privileges
All workspace members have access to this module.
Administration Module Privileges
The following table shows the Administration module-related privileges provided by applicable privilegesets.
Privilege Privilege Set
Add/delete pagelets. Owner, Administrator
Add modules. Owner, Administrator
Change workspace properties. Owner, Administrator
Delete modules. Owner, Administrator
Edit workspace layout. Owner, Administrator
Update contextual data. Owner, Administrator
Update valid dates. Owner
Update welcome text. Owner, Administrator
Setting Up a Workspace
This section elaborates on the details required to define a workspace.
Pages Used to Define Details of Workspaces
Page Name Definition Name Usage
Administration - Properties Page EPPCW_ADMIN_PROP Enter detailed properties of a workspaceincluding a name, description, category, valid dates, and welcome text.
See Administering the WorkspaceProperties Page
Copyright © 1988, 2021, Oracle and/or its affiliates. 79
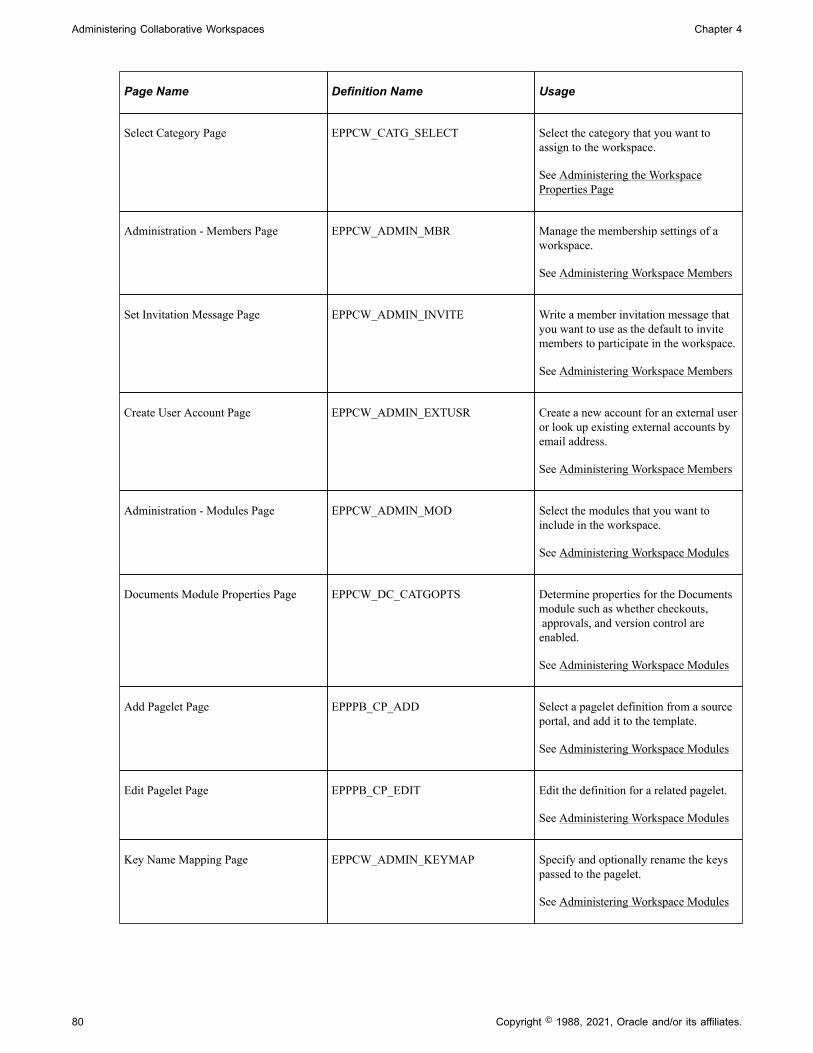
Administering Collaborative Workspaces Chapter 4
Page Name Definition Name Usage
Select Category Page EPPCW_CATG_SELECT Select the category that you want toassign to the workspace.
See Administering the WorkspaceProperties Page
Administration - Members Page EPPCW_ADMIN_MBR Manage the membership settings of aworkspace.
See Administering Workspace Members
Set Invitation Message Page EPPCW_ADMIN_INVITE Write a member invitation message thatyou want to use as the default to invitemembers to participate in the workspace.
See Administering Workspace Members
Create User Account Page EPPCW_ADMIN_EXTUSR Create a new account for an external useror look up existing external accounts byemail address.
See Administering Workspace Members
Administration - Modules Page EPPCW_ADMIN_MOD Select the modules that you want toinclude in the workspace.
See Administering Workspace Modules
Documents Module Properties Page EPPCW_DC_CATGOPTS Determine properties for the Documentsmodule such as whether checkouts, approvals, and version control areenabled.
See Administering Workspace Modules
Add Pagelet Page EPPPB_CP_ADD Select a pagelet definition from a sourceportal, and add it to the template.
See Administering Workspace Modules
Edit Pagelet Page EPPPB_CP_EDIT Edit the definition for a related pagelet.
See Administering Workspace Modules
Key Name Mapping Page EPPCW_ADMIN_KEYMAP Specify and optionally rename the keyspassed to the pagelet.
See Administering Workspace Modules
80 Copyright © 1988, 2021, Oracle and/or its affiliates.
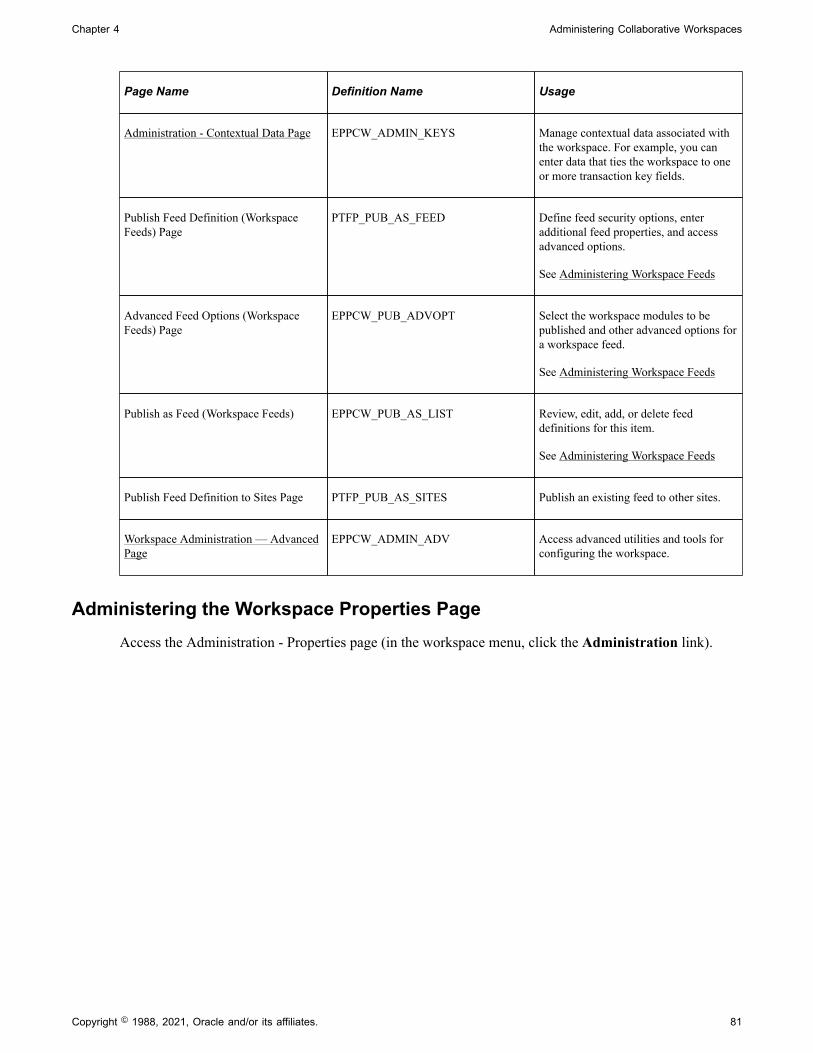
Chapter 4 Administering Collaborative Workspaces
Page Name Definition Name Usage
Administration - Contextual Data Page EPPCW_ADMIN_KEYS Manage contextual data associated withthe workspace. For example, you canenter data that ties the workspace to oneor more transaction key fields.
Publish Feed Definition (WorkspaceFeeds) Page
PTFP_PUB_AS_FEED Define feed security options, enteradditional feed properties, and accessadvanced options.
See Administering Workspace Feeds
Advanced Feed Options (WorkspaceFeeds) Page
EPPCW_PUB_ADVOPT Select the workspace modules to bepublished and other advanced options fora workspace feed.
See Administering Workspace Feeds
Publish as Feed (Workspace Feeds) EPPCW_PUB_AS_LIST Review, edit, add, or delete feeddefinitions for this item.
See Administering Workspace Feeds
Publish Feed Definition to Sites Page PTFP_PUB_AS_SITES Publish an existing feed to other sites.
Workspace Administration — AdvancedPage
EPPCW_ADMIN_ADV Access advanced utilities and tools forconfiguring the workspace.
Administering the Workspace Properties PageAccess the Administration - Properties page (in the workspace menu, click the Administration link).
Copyright © 1988, 2021, Oracle and/or its affiliates. 81
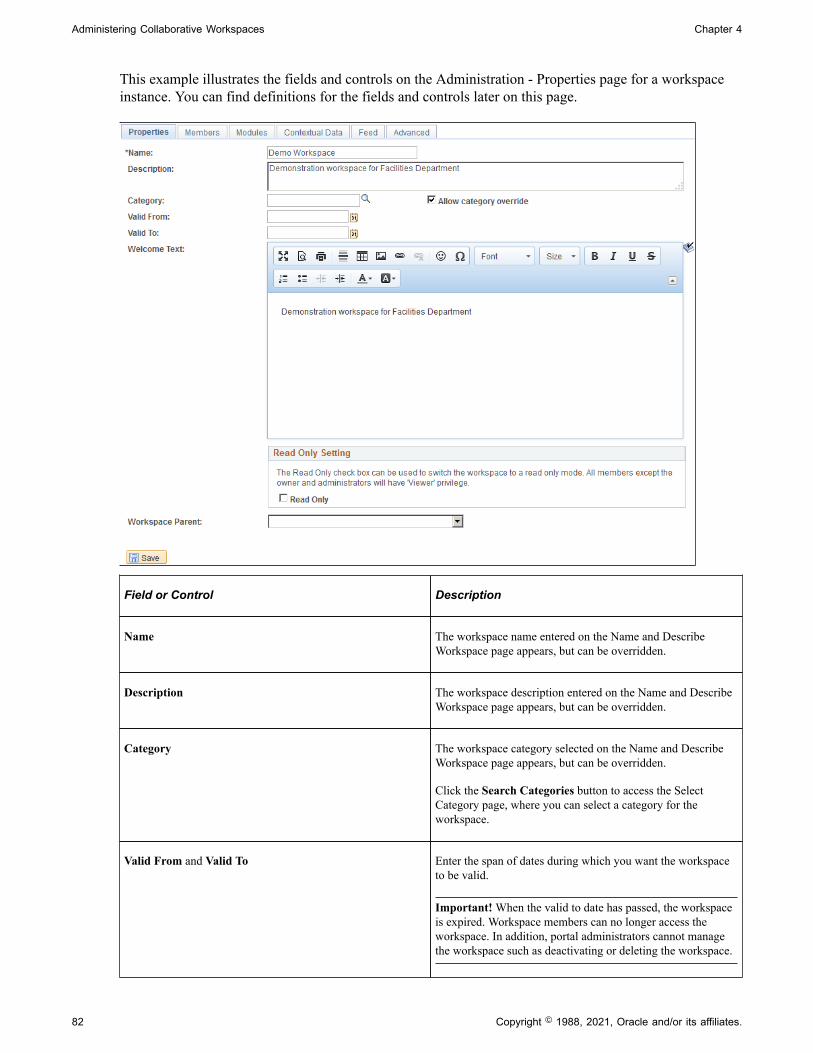
Administering Collaborative Workspaces Chapter 4
This example illustrates the fields and controls on the Administration - Properties page for a workspaceinstance. You can find definitions for the fields and controls later on this page.
Field or Control Description
Name The workspace name entered on the Name and DescribeWorkspace page appears, but can be overridden.
Description The workspace description entered on the Name and DescribeWorkspace page appears, but can be overridden.
Category The workspace category selected on the Name and DescribeWorkspace page appears, but can be overridden.
Click the Search Categories button to access the SelectCategory page, where you can select a category for theworkspace.
Valid From and Valid To Enter the span of dates during which you want the workspaceto be valid.
Important! When the valid to date has passed, the workspaceis expired. Workspace members can no longer access theworkspace. In addition, portal administrators cannot managethe workspace such as deactivating or deleting the workspace.
82 Copyright © 1988, 2021, Oracle and/or its affiliates.
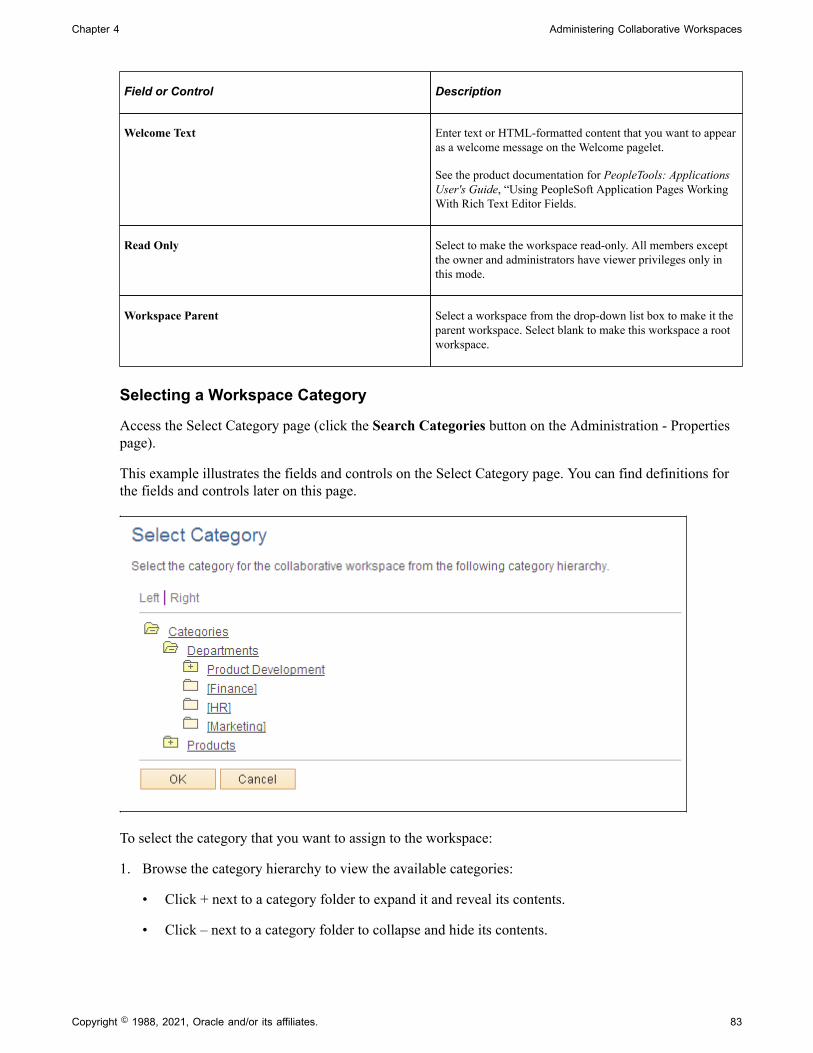
Chapter 4 Administering Collaborative Workspaces
Field or Control Description
Welcome Text Enter text or HTML-formatted content that you want to appearas a welcome message on the Welcome pagelet.
See the product documentation for PeopleTools: ApplicationsUser's Guide, “Using PeopleSoft Application Pages WorkingWith Rich Text Editor Fields.
Read Only Select to make the workspace read-only. All members exceptthe owner and administrators have viewer privileges only inthis mode.
Workspace Parent Select a workspace from the drop-down list box to make it theparent workspace. Select blank to make this workspace a rootworkspace.
Selecting a Workspace Category
Access the Select Category page (click the Search Categories button on the Administration - Propertiespage).
This example illustrates the fields and controls on the Select Category page. You can find definitions forthe fields and controls later on this page.
To select the category that you want to assign to the workspace:
1. Browse the category hierarchy to view the available categories:
• Click + next to a category folder to expand it and reveal its contents.
• Click – next to a category folder to collapse and hide its contents.
Copyright © 1988, 2021, Oracle and/or its affiliates. 83
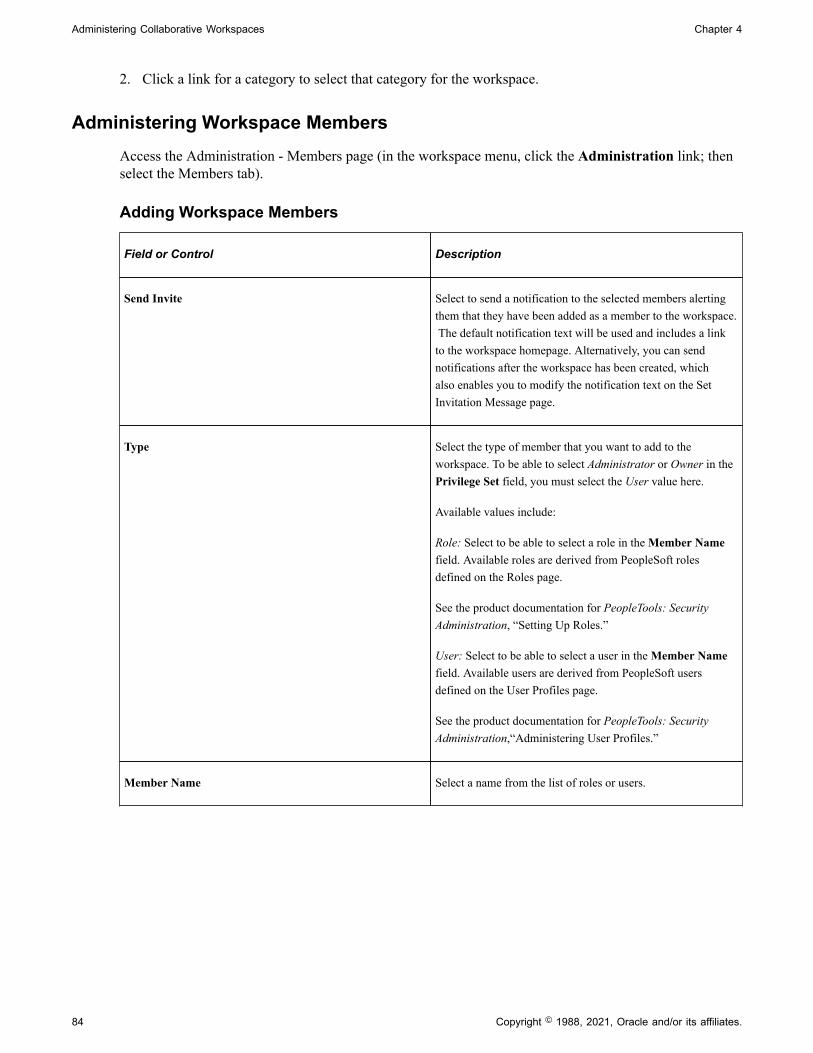
Administering Collaborative Workspaces Chapter 4
2. Click a link for a category to select that category for the workspace.
Administering Workspace MembersAccess the Administration - Members page (in the workspace menu, click the Administration link; thenselect the Members tab).
Adding Workspace Members
Field or Control Description
Send Invite Select to send a notification to the selected members alertingthem that they have been added as a member to the workspace. The default notification text will be used and includes a linkto the workspace homepage. Alternatively, you can sendnotifications after the workspace has been created, whichalso enables you to modify the notification text on the SetInvitation Message page.
Type Select the type of member that you want to add to theworkspace. To be able to select Administrator or Owner in thePrivilege Set field, you must select the User value here.
Available values include:
Role: Select to be able to select a role in the Member Namefield. Available roles are derived from PeopleSoft rolesdefined on the Roles page.
See the product documentation for PeopleTools: SecurityAdministration, “Setting Up Roles.”
User: Select to be able to select a user in the Member Namefield. Available users are derived from PeopleSoft usersdefined on the User Profiles page.
See the product documentation for PeopleTools: SecurityAdministration,“Administering User Profiles.”
Member Name Select a name from the list of roles or users.
84 Copyright © 1988, 2021, Oracle and/or its affiliates.
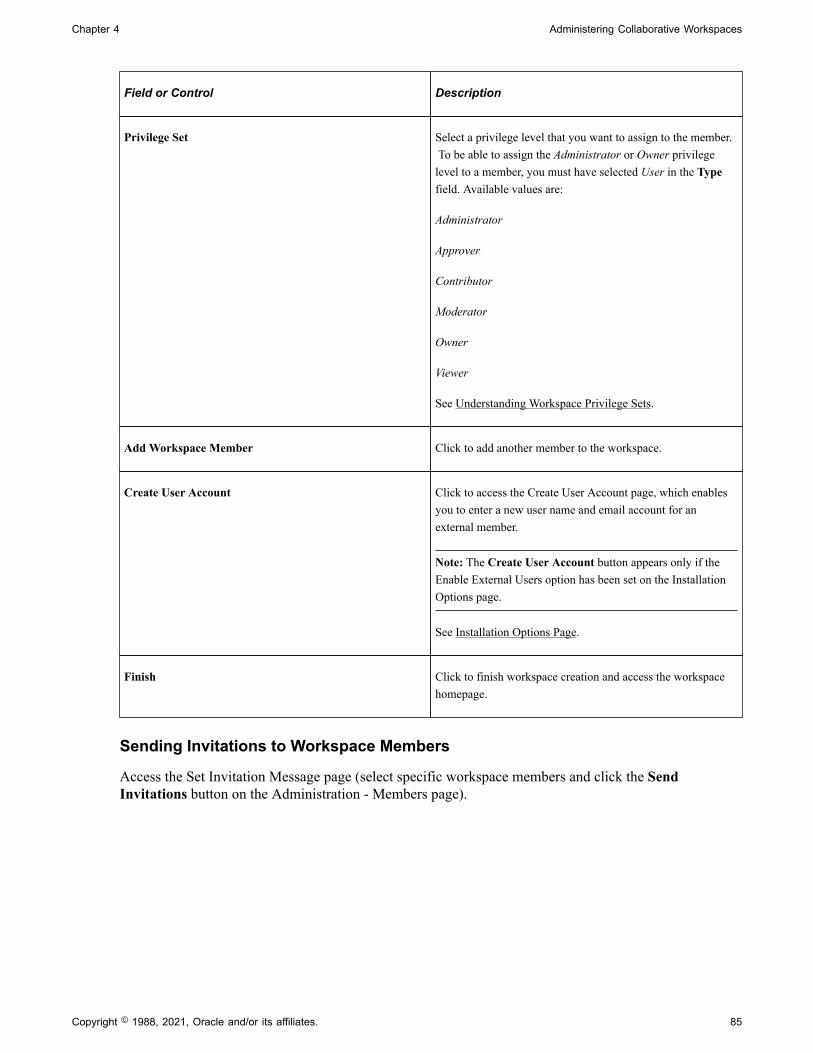
Chapter 4 Administering Collaborative Workspaces
Field or Control Description
Privilege Set Select a privilege level that you want to assign to the member. To be able to assign the Administrator or Owner privilegelevel to a member, you must have selected User in the Typefield. Available values are:
Administrator
Approver
Contributor
Moderator
Owner
Viewer
See Understanding Workspace Privilege Sets.
Add Workspace Member Click to add another member to the workspace.
Create User Account Click to access the Create User Account page, which enablesyou to enter a new user name and email account for anexternal member.
Note: The Create User Account button appears only if theEnable External Users option has been set on the InstallationOptions page.
See Installation Options Page.
Finish Click to finish workspace creation and access the workspacehomepage.
Sending Invitations to Workspace Members
Access the Set Invitation Message page (select specific workspace members and click the SendInvitations button on the Administration - Members page).
Copyright © 1988, 2021, Oracle and/or its affiliates. 85
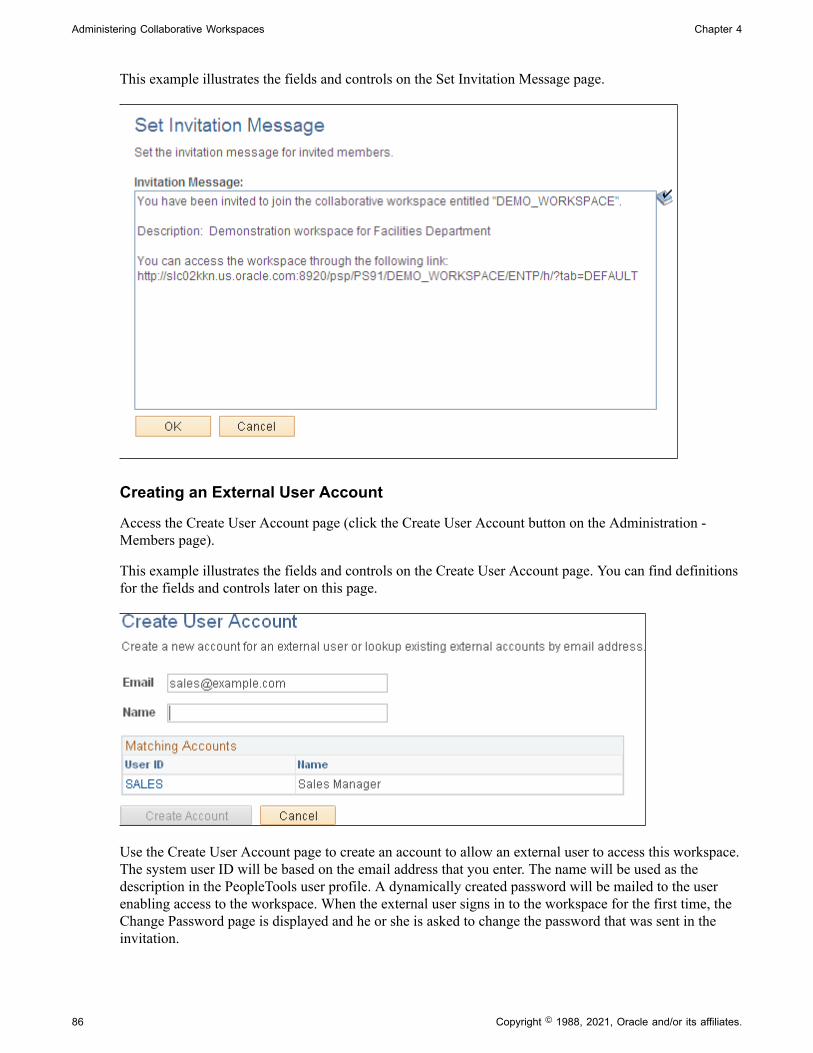
Administering Collaborative Workspaces Chapter 4
This example illustrates the fields and controls on the Set Invitation Message page.
Creating an External User Account
Access the Create User Account page (click the Create User Account button on the Administration -Members page).
This example illustrates the fields and controls on the Create User Account page. You can find definitionsfor the fields and controls later on this page.
Use the Create User Account page to create an account to allow an external user to access this workspace.The system user ID will be based on the email address that you enter. The name will be used as thedescription in the PeopleTools user profile. A dynamically created password will be mailed to the userenabling access to the workspace. When the external user signs in to the workspace for the first time, theChange Password page is displayed and he or she is asked to change the password that was sent in theinvitation.
86 Copyright © 1988, 2021, Oracle and/or its affiliates.
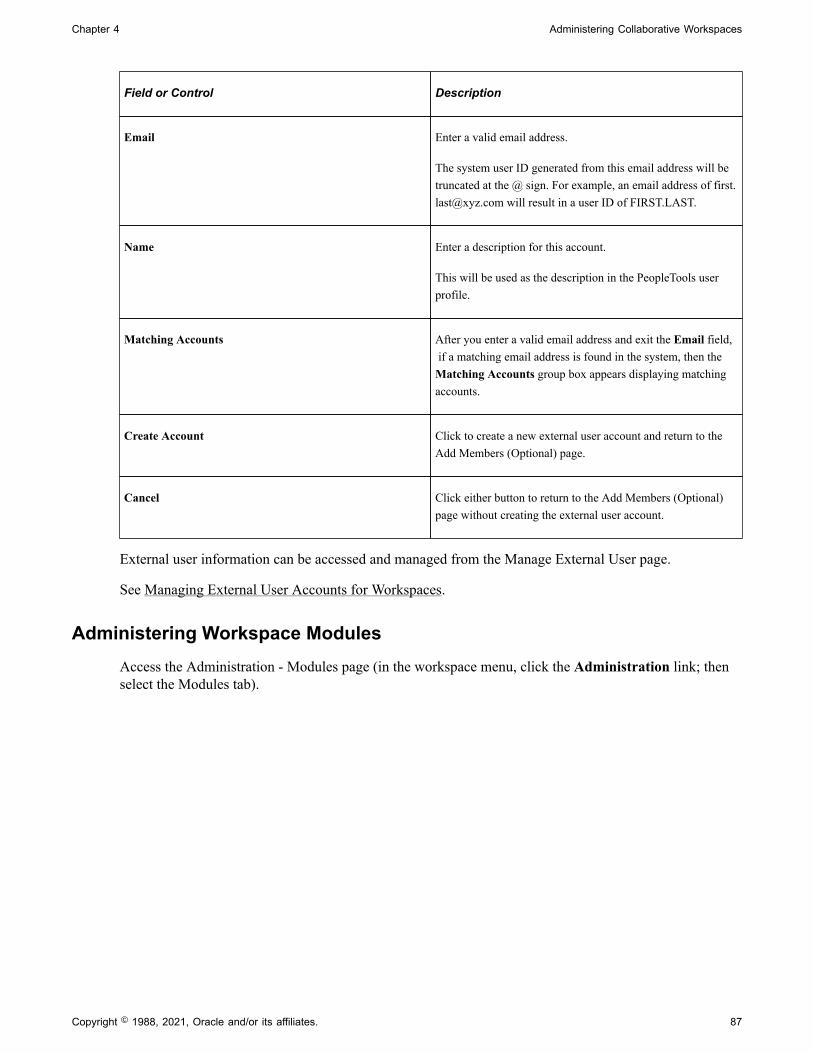
Chapter 4 Administering Collaborative Workspaces
Field or Control Description
Email Enter a valid email address.
The system user ID generated from this email address will betruncated at the @ sign. For example, an email address of [email protected] will result in a user ID of FIRST.LAST.
Name Enter a description for this account.
This will be used as the description in the PeopleTools userprofile.
Matching Accounts After you enter a valid email address and exit the Email field, if a matching email address is found in the system, then theMatching Accounts group box appears displaying matchingaccounts.
Create Account Click to create a new external user account and return to theAdd Members (Optional) page.
Cancel Click either button to return to the Add Members (Optional)page without creating the external user account.
External user information can be accessed and managed from the Manage External User page.
See Managing External User Accounts for Workspaces.
Administering Workspace ModulesAccess the Administration - Modules page (in the workspace menu, click the Administration link; thenselect the Modules tab).
Copyright © 1988, 2021, Oracle and/or its affiliates. 87
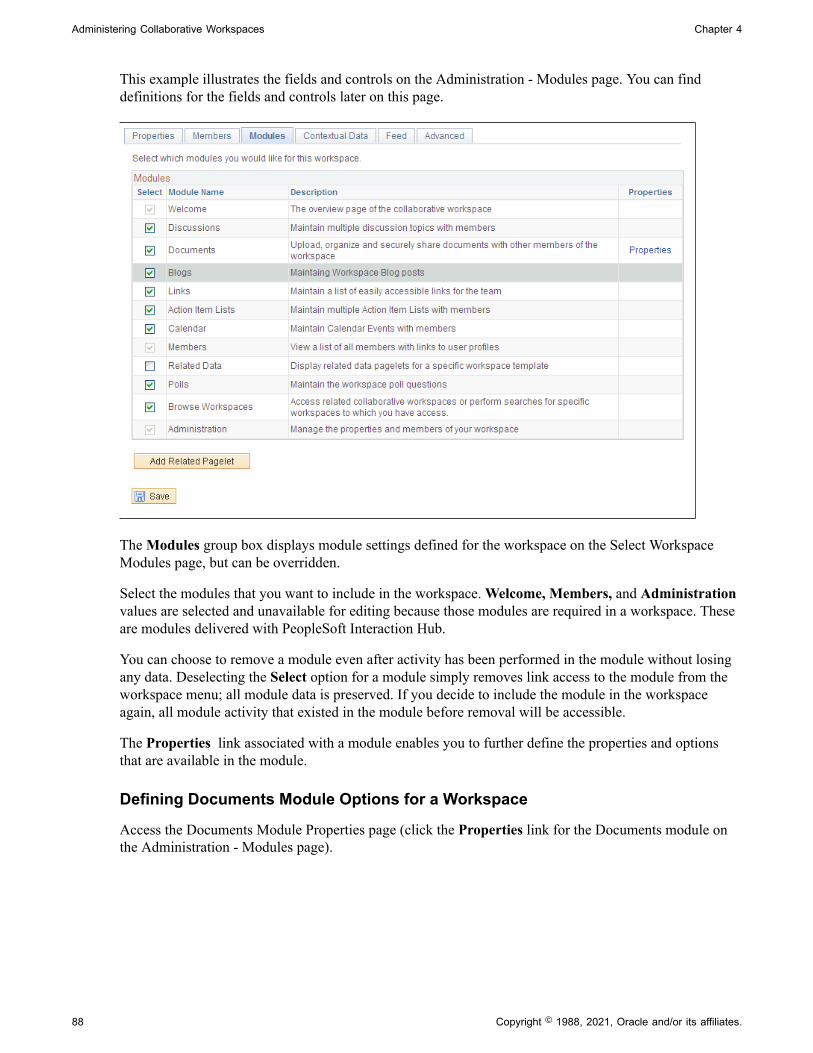
Administering Collaborative Workspaces Chapter 4
This example illustrates the fields and controls on the Administration - Modules page. You can finddefinitions for the fields and controls later on this page.
The Modules group box displays module settings defined for the workspace on the Select WorkspaceModules page, but can be overridden.
Select the modules that you want to include in the workspace. Welcome, Members, and Administrationvalues are selected and unavailable for editing because those modules are required in a workspace. Theseare modules delivered with PeopleSoft Interaction Hub.
You can choose to remove a module even after activity has been performed in the module without losingany data. Deselecting the Select option for a module simply removes link access to the module from theworkspace menu; all module data is preserved. If you decide to include the module in the workspaceagain, all module activity that existed in the module before removal will be accessible.
The Properties link associated with a module enables you to further define the properties and optionsthat are available in the module.
Defining Documents Module Options for a Workspace
Access the Documents Module Properties page (click the Properties link for the Documents module onthe Administration - Modules page).
88 Copyright © 1988, 2021, Oracle and/or its affiliates.
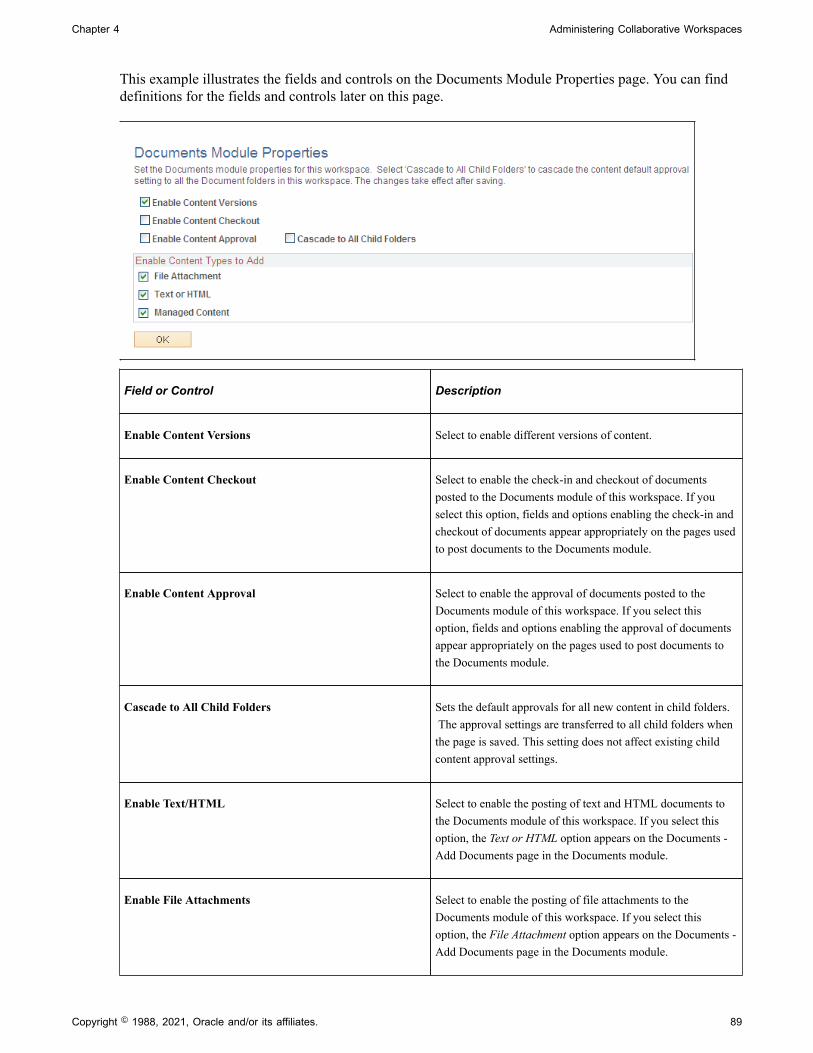
Chapter 4 Administering Collaborative Workspaces
This example illustrates the fields and controls on the Documents Module Properties page. You can finddefinitions for the fields and controls later on this page.
Field or Control Description
Enable Content Versions Select to enable different versions of content.
Enable Content Checkout Select to enable the check-in and checkout of documentsposted to the Documents module of this workspace. If youselect this option, fields and options enabling the check-in andcheckout of documents appear appropriately on the pages usedto post documents to the Documents module.
Enable Content Approval Select to enable the approval of documents posted to theDocuments module of this workspace. If you select thisoption, fields and options enabling the approval of documentsappear appropriately on the pages used to post documents tothe Documents module.
Cascade to All Child Folders Sets the default approvals for all new content in child folders. The approval settings are transferred to all child folders whenthe page is saved. This setting does not affect existing childcontent approval settings.
Enable Text/HTML Select to enable the posting of text and HTML documents tothe Documents module of this workspace. If you select thisoption, the Text or HTML option appears on the Documents -Add Documents page in the Documents module.
Enable File Attachments Select to enable the posting of file attachments to theDocuments module of this workspace. If you select thisoption, the File Attachment option appears on the Documents -Add Documents page in the Documents module.
Copyright © 1988, 2021, Oracle and/or its affiliates. 89
Administering Collaborative Workspaces Chapter 4
Field or Control Description
Enable Managed Content Select to enable the posting of managed content to theDocuments module of this workspace. If you select thisoption, the Managed Content option appears on theDocuments - Add Documents page in the Documents module.
Adding or Editing a Related Pagelet in a Workspace
Access the Add Pagelet page (click the Add Related Pagelet button on the Administration - Modulespage).
Access the Edit Pagelet page (click the Edit Pagelet button for an existing pagelet on the Administration -Modules page).
90 Copyright © 1988, 2021, Oracle and/or its affiliates.
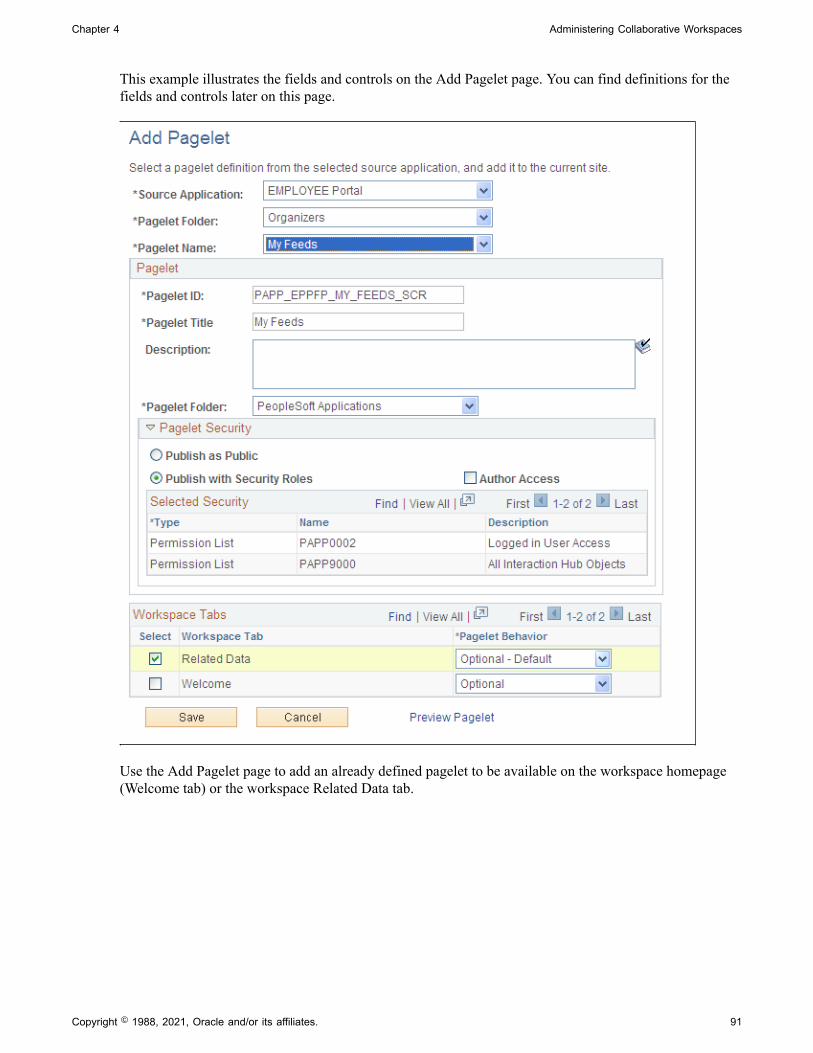
Chapter 4 Administering Collaborative Workspaces
This example illustrates the fields and controls on the Add Pagelet page. You can find definitions for thefields and controls later on this page.
Use the Add Pagelet page to add an already defined pagelet to be available on the workspace homepage(Welcome tab) or the workspace Related Data tab.
Copyright © 1988, 2021, Oracle and/or its affiliates. 91
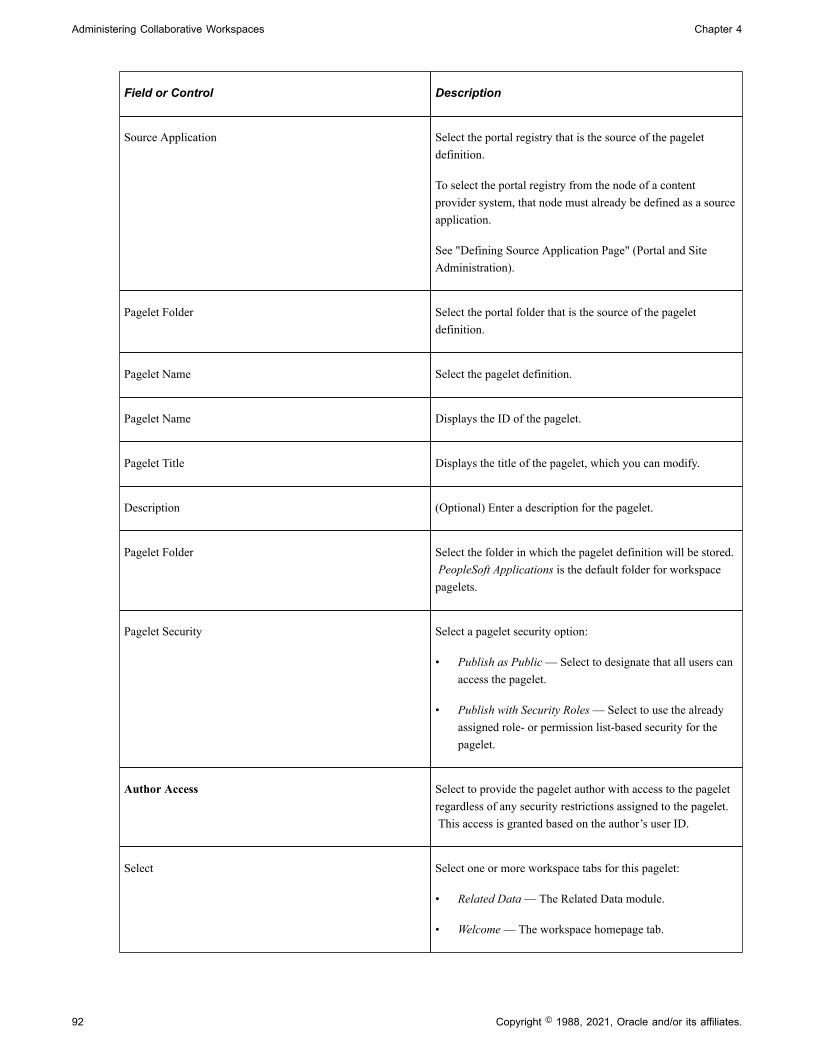
Administering Collaborative Workspaces Chapter 4
Field or Control Description
Source Application Select the portal registry that is the source of the pageletdefinition.
To select the portal registry from the node of a contentprovider system, that node must already be defined as a sourceapplication.
See "Defining Source Application Page" (Portal and SiteAdministration).
Pagelet Folder Select the portal folder that is the source of the pageletdefinition.
Pagelet Name Select the pagelet definition.
Pagelet Name Displays the ID of the pagelet.
Pagelet Title Displays the title of the pagelet, which you can modify.
Description (Optional) Enter a description for the pagelet.
Pagelet Folder Select the folder in which the pagelet definition will be stored. PeopleSoft Applications is the default folder for workspacepagelets.
Pagelet Security Select a pagelet security option:
• Publish as Public — Select to designate that all users canaccess the pagelet.
• Publish with Security Roles — Select to use the alreadyassigned role- or permission list-based security for thepagelet.
Author Access Select to provide the pagelet author with access to the pageletregardless of any security restrictions assigned to the pagelet. This access is granted based on the author’s user ID.
Select Select one or more workspace tabs for this pagelet:
• Related Data — The Related Data module.
• Welcome — The workspace homepage tab.
92 Copyright © 1988, 2021, Oracle and/or its affiliates.
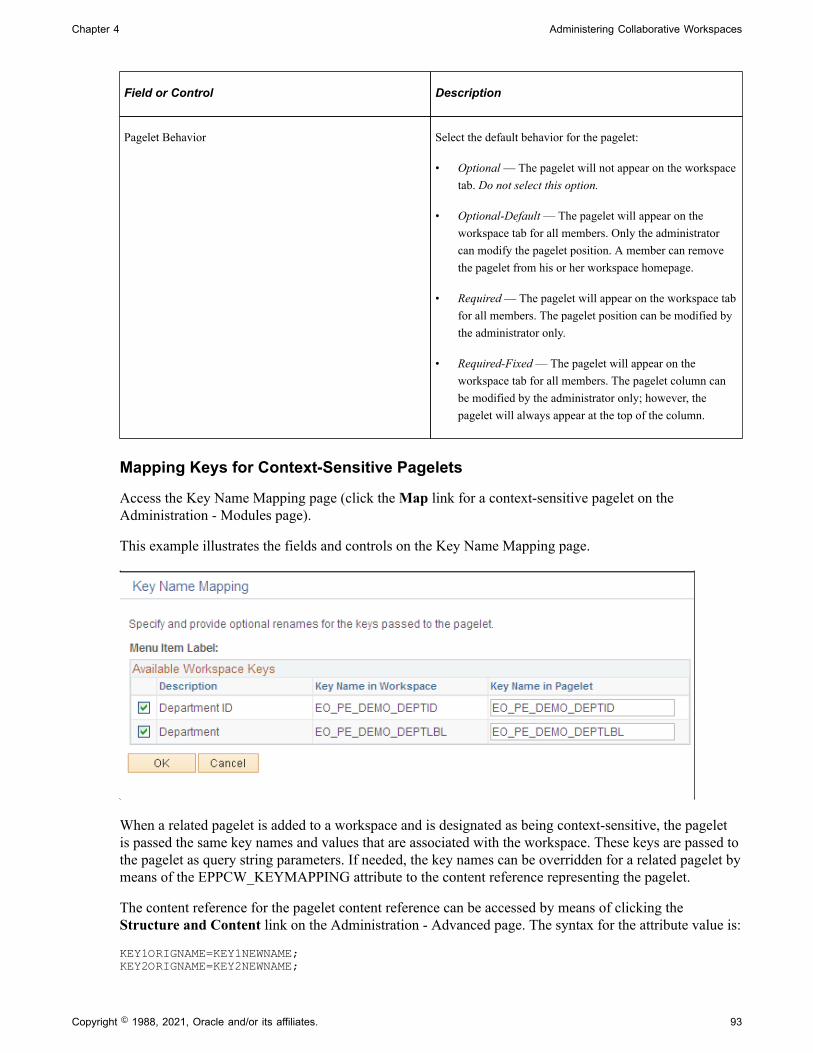
Chapter 4 Administering Collaborative Workspaces
Field or Control Description
Pagelet Behavior Select the default behavior for the pagelet:
• Optional — The pagelet will not appear on the workspacetab. Do not select this option.
• Optional-Default — The pagelet will appear on theworkspace tab for all members. Only the administratorcan modify the pagelet position. A member can removethe pagelet from his or her workspace homepage.
• Required — The pagelet will appear on the workspace tabfor all members. The pagelet position can be modified bythe administrator only.
• Required-Fixed — The pagelet will appear on theworkspace tab for all members. The pagelet column canbe modified by the administrator only; however, thepagelet will always appear at the top of the column.
Mapping Keys for Context-Sensitive Pagelets
Access the Key Name Mapping page (click the Map link for a context-sensitive pagelet on theAdministration - Modules page).
This example illustrates the fields and controls on the Key Name Mapping page.
When a related pagelet is added to a workspace and is designated as being context-sensitive, the pageletis passed the same key names and values that are associated with the workspace. These keys are passed tothe pagelet as query string parameters. If needed, the key names can be overridden for a related pagelet bymeans of the EPPCW_KEYMAPPING attribute to the content reference representing the pagelet.
The content reference for the pagelet content reference can be accessed by means of clicking theStructure and Content link on the Administration - Advanced page. The syntax for the attribute value is:
KEY1ORIGNAME=KEY1NEWNAME;KEY2ORIGNAME=KEY2NEWNAME;
Copyright © 1988, 2021, Oracle and/or its affiliates. 93
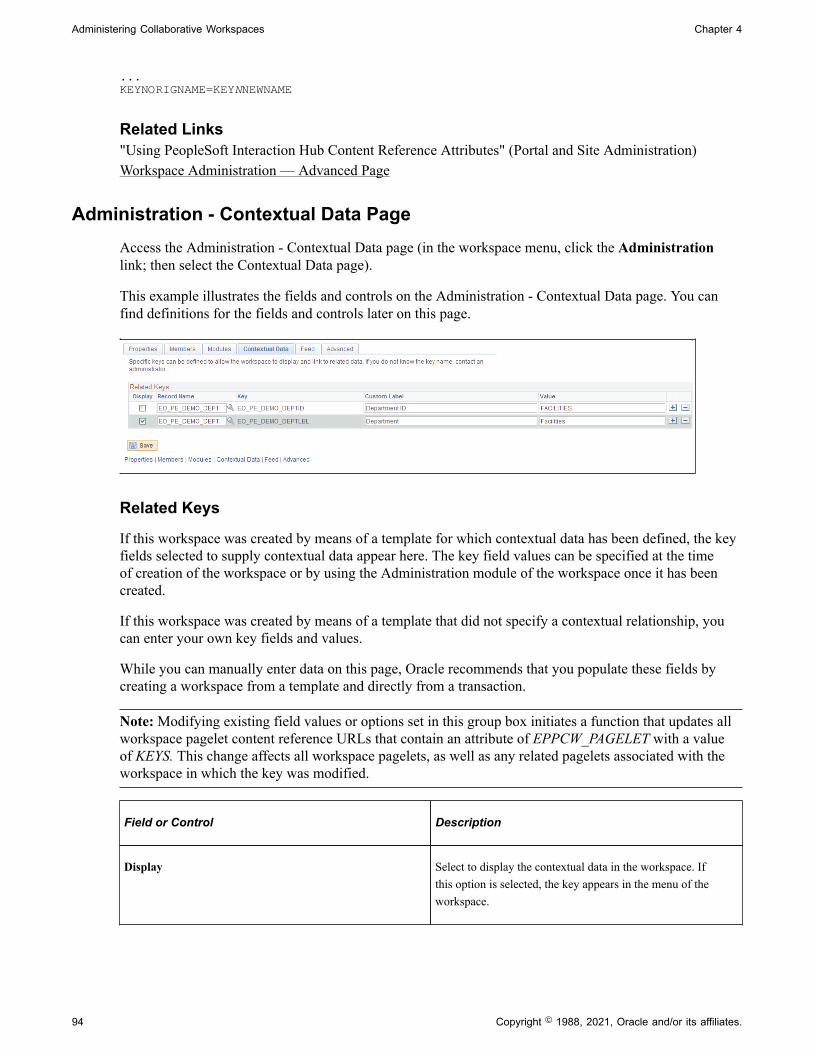
Administering Collaborative Workspaces Chapter 4
...KEYNORIGNAME=KEYNNEWNAME
Related Links"Using PeopleSoft Interaction Hub Content Reference Attributes" (Portal and Site Administration)Workspace Administration — Advanced Page
Administration - Contextual Data PageAccess the Administration - Contextual Data page (in the workspace menu, click the Administrationlink; then select the Contextual Data page).
This example illustrates the fields and controls on the Administration - Contextual Data page. You canfind definitions for the fields and controls later on this page.
Related Keys
If this workspace was created by means of a template for which contextual data has been defined, the keyfields selected to supply contextual data appear here. The key field values can be specified at the timeof creation of the workspace or by using the Administration module of the workspace once it has beencreated.
If this workspace was created by means of a template that did not specify a contextual relationship, youcan enter your own key fields and values.
While you can manually enter data on this page, Oracle recommends that you populate these fields bycreating a workspace from a template and directly from a transaction.
Note: Modifying existing field values or options set in this group box initiates a function that updates allworkspace pagelet content reference URLs that contain an attribute of EPPCW_PAGELET with a valueof KEYS. This change affects all workspace pagelets, as well as any related pagelets associated with theworkspace in which the key was modified.
Field or Control Description
Display Select to display the contextual data in the workspace. Ifthis option is selected, the key appears in the menu of theworkspace.
94 Copyright © 1988, 2021, Oracle and/or its affiliates.
Chapter 4 Administering Collaborative Workspaces
Field or Control Description
Record Name Select the record name that you want to use to derivecontextual data for the workspace.
Key Enter the key field that you want to use to derive contextualdata for the workspace.
Custom Label Enter an overriding value for the key label. If you choose todisplay the key, this label will appear alongside the key fieldvalue below the menu of a workspace for a transaction thatcontains the key.
Administering Workspace FeedsUse the Administration - Feeds page as the starting point for administering workspace feeds.
In addition to workspace modules that can be published as feeds on their own, one or more feeds canbe published for the entire workspace, each of which is known as a workspace feed. While workspacemembers with sufficient privilege can publish feeds for individual workspace modules, only theworkspace administrator can publish a workspace feed. In addition, the administrator is responsible forselecting which modules will be included in that feed.
The following steps provide a high-level overview of the process to administer workspace feeds:
1. In the workspace menu, click the Administration link to access the Administration module.
2. Select the Feeds page.
Depending on whether a workspace feed has already been published, one of the following pages isdisplayed:
• The Publish as Feed page is displayed if a workspace feed has already been published. Continuewith step 3.
• The Publish Feed Definition page is displayed if a workspace feed has not been published for thisworkspace. Continue with step 4.
3. Determine whether you want to edit one of the current workspace feeds, or create a new workspacefeed.
On the Publish as Feed page, click Edit to edit an existing workspace feed; click Add New to create anew workspace feed.
4. Set the feed parameters, additional feed parameters, and feed security options on the Publish FeedDefinition page.
See the product documentation for PeopleTools: Feed Publishing Framework,“Creating and UsingFeeds and Feed Templates ,” Understanding Creation and Use of Feeds and Feed Templates.
Copyright © 1988, 2021, Oracle and/or its affiliates. 95
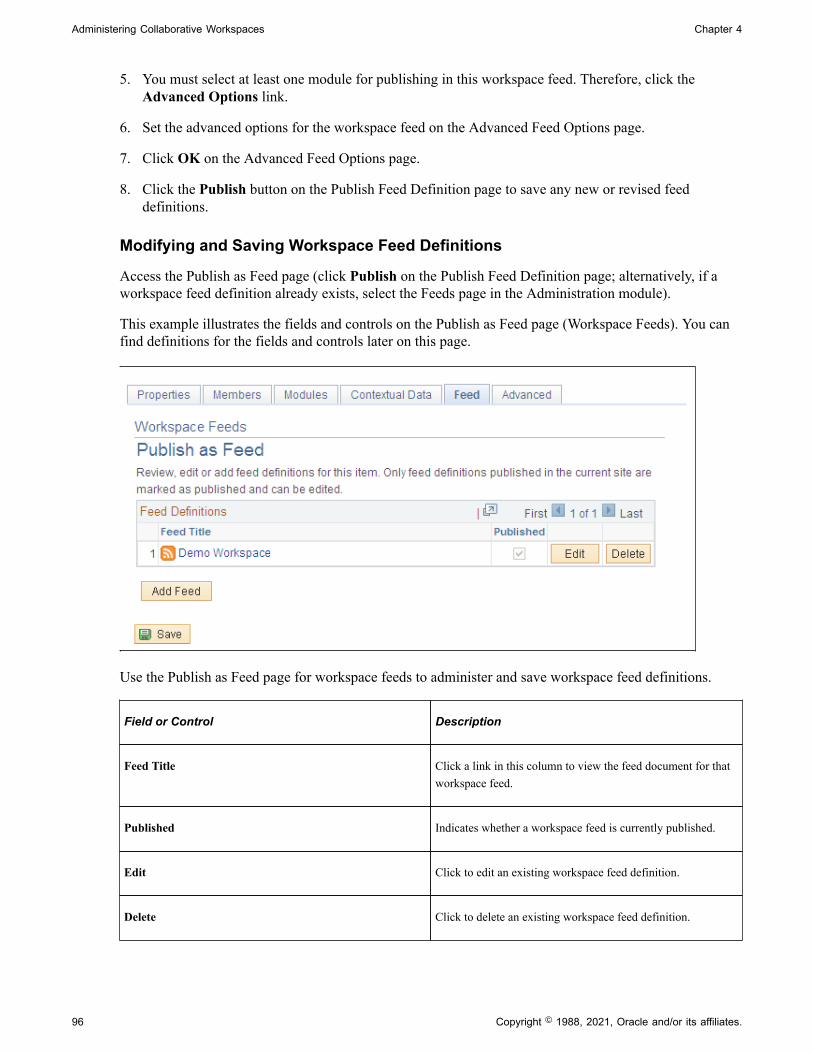
Administering Collaborative Workspaces Chapter 4
5. You must select at least one module for publishing in this workspace feed. Therefore, click theAdvanced Options link.
6. Set the advanced options for the workspace feed on the Advanced Feed Options page.
7. Click OK on the Advanced Feed Options page.
8. Click the Publish button on the Publish Feed Definition page to save any new or revised feeddefinitions.
Modifying and Saving Workspace Feed Definitions
Access the Publish as Feed page (click Publish on the Publish Feed Definition page; alternatively, if aworkspace feed definition already exists, select the Feeds page in the Administration module).
This example illustrates the fields and controls on the Publish as Feed page (Workspace Feeds). You canfind definitions for the fields and controls later on this page.
Use the Publish as Feed page for workspace feeds to administer and save workspace feed definitions.
Field or Control Description
Feed Title Click a link in this column to view the feed document for thatworkspace feed.
Published Indicates whether a workspace feed is currently published.
Edit Click to edit an existing workspace feed definition.
Delete Click to delete an existing workspace feed definition.
96 Copyright © 1988, 2021, Oracle and/or its affiliates.
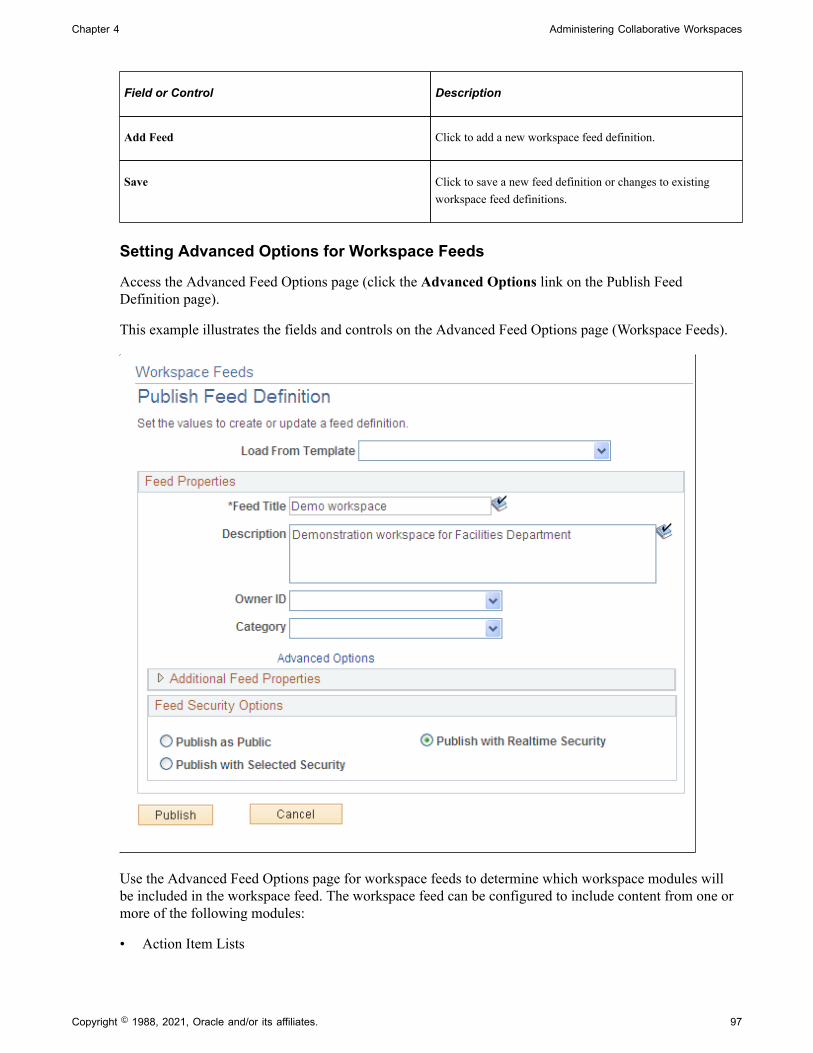
Chapter 4 Administering Collaborative Workspaces
Field or Control Description
Add Feed Click to add a new workspace feed definition.
Save Click to save a new feed definition or changes to existingworkspace feed definitions.
Setting Advanced Options for Workspace Feeds
Access the Advanced Feed Options page (click the Advanced Options link on the Publish FeedDefinition page).
This example illustrates the fields and controls on the Advanced Feed Options page (Workspace Feeds).
Use the Advanced Feed Options page for workspace feeds to determine which workspace modules willbe included in the workspace feed. The workspace feed can be configured to include content from one ormore of the following modules:
• Action Item Lists
Copyright © 1988, 2021, Oracle and/or its affiliates. 97
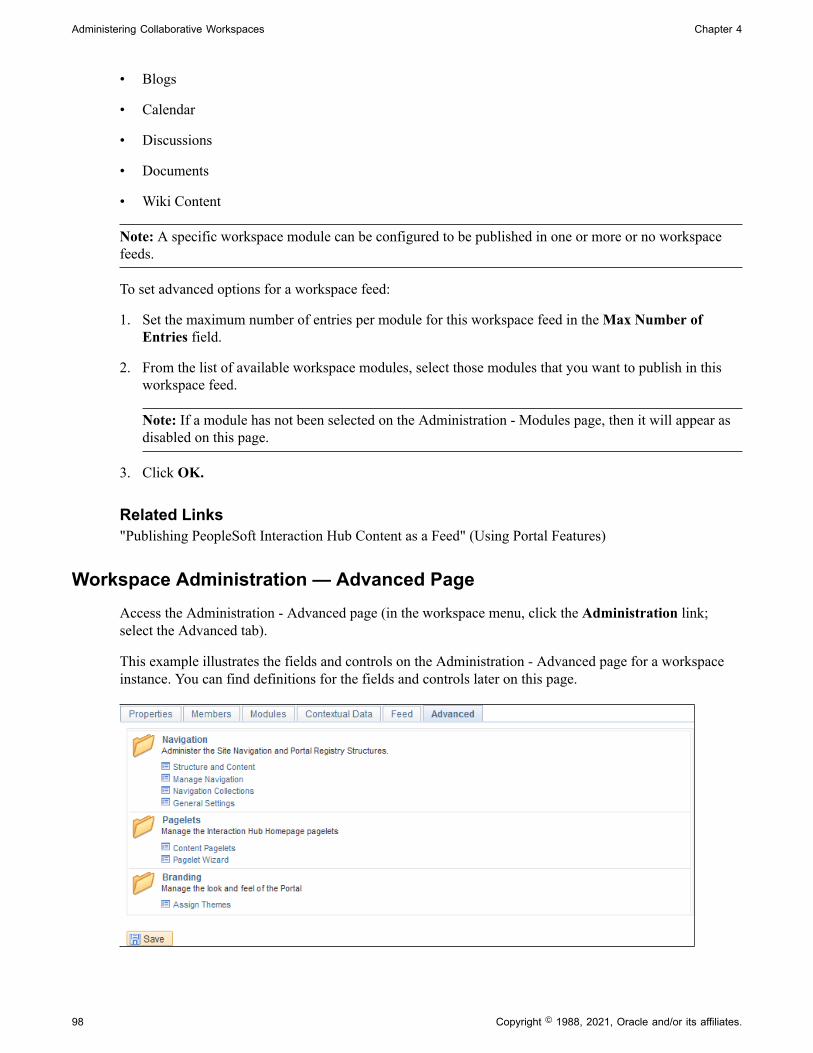
Administering Collaborative Workspaces Chapter 4
• Blogs
• Calendar
• Discussions
• Documents
• Wiki Content
Note: A specific workspace module can be configured to be published in one or more or no workspacefeeds.
To set advanced options for a workspace feed:
1. Set the maximum number of entries per module for this workspace feed in the Max Number ofEntries field.
2. From the list of available workspace modules, select those modules that you want to publish in thisworkspace feed.
Note: If a module has not been selected on the Administration - Modules page, then it will appear asdisabled on this page.
3. Click OK.
Related Links"Publishing PeopleSoft Interaction Hub Content as a Feed" (Using Portal Features)
Workspace Administration — Advanced PageAccess the Administration - Advanced page (in the workspace menu, click the Administration link;select the Advanced tab).
This example illustrates the fields and controls on the Administration - Advanced page for a workspaceinstance. You can find definitions for the fields and controls later on this page.
98 Copyright © 1988, 2021, Oracle and/or its affiliates.
Chapter 4 Administering Collaborative Workspaces
Field or Control Description
Navigation Access utilities and tools that enable you to implementadvanced navigation configurations for the workspace.
See "Manage Navigation Page" (Portal and SiteAdministration).
See the product documentation for PeopleTools: PortalTechnology, “Administering Portals.”
Pagelets Access utilities and tools that enable you to implementadvanced pagelet configurations for the workspace.
See the product documentation for PeopleTools: PortalTechnology, “Using Pagelet Wizard to Create and ManagePagelets.”
Branding Access utilities and tools that enable you to change brandingtheme assignments for the template.
See "Themes, Headers, and Skins" (Branding). In addition, see PeopleTools: Portal Technology, “Using PeopleToolsBranding Features,” Administering System Branding, Assigning Branding Themes.
Designating the Content and Layout of the Workspace Homepage
This section discusses ways to modify the content and layout of the workspace homepage.
Pages Used to Designate the Content and Layout of the WorkspaceHomepage
Page Name Definition Name Usage
Tab Content Page PTSYSTABCONTENT Designate the pagelets (types ofcontent) that you want to display on theworkspace homepage.
Tab Layout Page PTSYSTABLAYOUT Designate the layout of content on theworkspace homepage.
Understanding the Content and Layout of the Workspace HomepageThe workspace administrator or owner has the privileges necessary for maintaining the workspacehomepage. Other workspace members have limited capabilities for customizing their workspacehomepage, which is unlike their capabilities on the portal homepage. Specifically, other members cannotadd or move pagelets and can only delete pagelets configured as Opt-Dflt (optional-default).
Copyright © 1988, 2021, Oracle and/or its affiliates. 99
Administering Collaborative Workspaces Chapter 4
Note: Once a user has deleted a pagelet, it cannot be re-added easily to that user’s homepage.
The Tab Content page is used to designate the pagelets that you want to appear on the workspacehomepage. The Tab Layout page is used to modify the layout of pagelets on the homepage. Theworkspace administrator can also use the drag-and-drop feature to arrange the layout directly on theworkspace homepage.
Tab Content PageAccess the Tab Content page (click the Content link on the workspace homepage).
100 Copyright © 1988, 2021, Oracle and/or its affiliates.
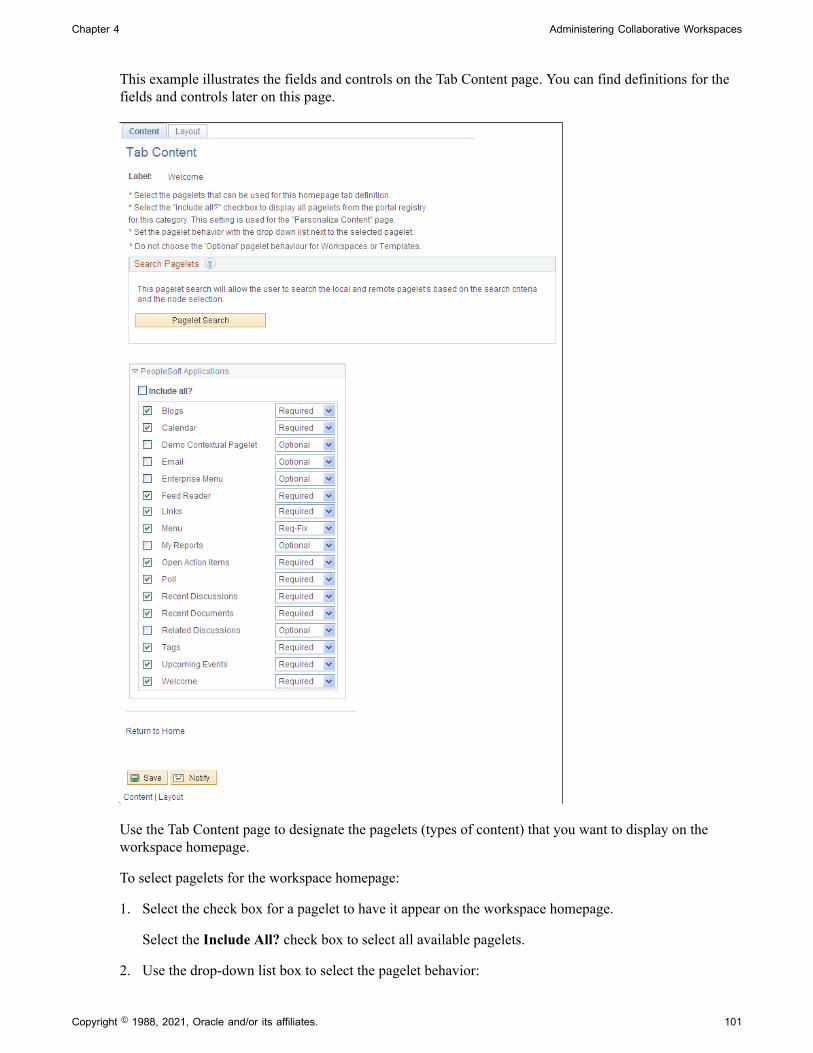
Chapter 4 Administering Collaborative Workspaces
This example illustrates the fields and controls on the Tab Content page. You can find definitions for thefields and controls later on this page.
Use the Tab Content page to designate the pagelets (types of content) that you want to display on theworkspace homepage.
To select pagelets for the workspace homepage:
1. Select the check box for a pagelet to have it appear on the workspace homepage.
Select the Include All? check box to select all available pagelets.
2. Use the drop-down list box to select the pagelet behavior:
Copyright © 1988, 2021, Oracle and/or its affiliates. 101
Administering Collaborative Workspaces Chapter 4
Field or Control Description
Optional The pagelet will not appear on the welcome page. Do notselect this option.
Opt-Dflt (optional-default) The pagelet will appear on the workspace homepage forall members. The pagelet position can be modified by theadministrator only; the pagelet can also be removed by amember from his or her workspace homepage.
Required The pagelet will appear on the workspace homepage forall members. The pagelet position can be modified by theadministrator only.
Req-Fix (required-fixed) The pagelet will appear on the workspace homepage forall members. The pagelet column can be modified by theadministrator only; however, the pagelet will always appearat the top of the column.
3. PeopleTools: Portal Technology
Click the Save button.
See the product documentation for PeopleTools: Portal Technology
“Administering Portal Homepages and Pagelets,” Managing Tabbed Homepages, Selecting Tab Content.
Tab Layout PageUse either of these two methods to modify the layout of the workspace homepage:
• Move pagelets on the Tab Layout page.
• Drag and drop pagelets on the workspace homepage.
Moving Pagelets on the Tab Layout Page
Access the Tab Layout page (click the Layout link on the workspace homepage).
102 Copyright © 1988, 2021, Oracle and/or its affiliates.
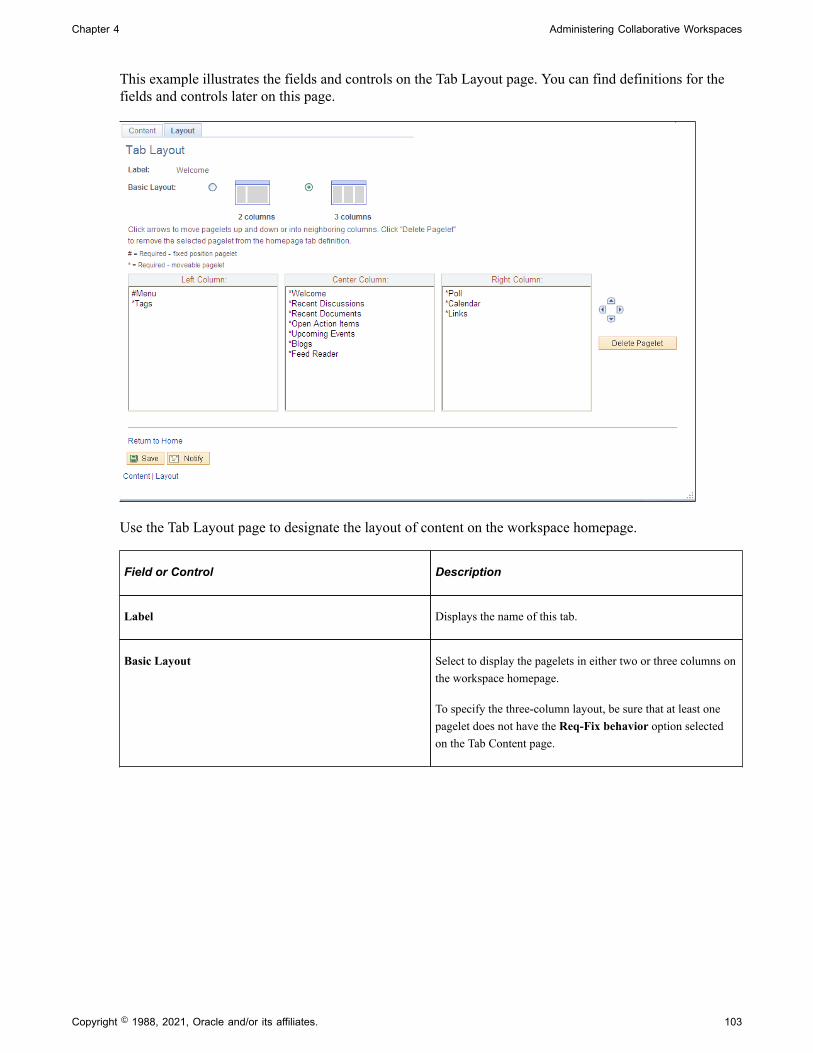
Chapter 4 Administering Collaborative Workspaces
This example illustrates the fields and controls on the Tab Layout page. You can find definitions for thefields and controls later on this page.
Use the Tab Layout page to designate the layout of content on the workspace homepage.
Field or Control Description
Label Displays the name of this tab.
Basic Layout Select to display the pagelets in either two or three columns onthe workspace homepage.
To specify the three-column layout, be sure that at least onepagelet does not have the Req-Fix behavior option selectedon the Tab Content page.
Copyright © 1988, 2021, Oracle and/or its affiliates. 103
Administering Collaborative Workspaces Chapter 4
Field or Control Description
Left Column, Center Column, and Right Column Displays the pagelets selected on the Tab Content page underthe assigned column headings.
If the basic layout is two columns, the pagelets are divided intoleft and right columns. If the basic layout is three columns, thepagelets are divided into left, center, and right columns.
Note: A pound sign (#) indicates a pagelet with the Req-Fix behavior option selected on the Tab Content page. Anasterisk (*) indicates a pagelet with the Required behavioroption selected on the Tab Content page.For example, #Menu indicates that the workspace menupagelet cannot be moved to a different location on thehomepage.
Use the Move Left, Move Up, Move Right, and Move Downbuttons to position a pagelet.
Select a pagelet, and then click the directional arrow buttons tomove the selected pagelet up in the list, down in the list, to thenext column to the right, or to the next column to the left.
Delete Pagelet Select a pagelet and then click Delete Pagelet to delete thepagelet from the workspace homepage.
See the product documentation for PeopleTools: Portal Technology,“Administering Portal Homepagesand Pagelets,” Managing Tabbed Homepages, Arranging the Tab Layout.
Dragging and Dropping Pagelets on the Workspace Homepage
You can also rearrange pagelets on the workspace homepage by dragging and dropping them betweencolumns.
To drag a pagelet, move the cursor over the pagelet title bar; the cursor changes shape to indicate that youcan drag the pagelet. Click and drag the pagelet. When you are in the new location—signified by the colorchange—release the mouse button.
Note: You cannot move pagelets that you have configured as required-fixed.
See the product documentation for PeopleTools: Applications User's Guide,“Setting User Preferences,”Personalizing Your Homepage, Personalizing Layout.
104 Copyright © 1988, 2021, Oracle and/or its affiliates.
Chapter 4 Administering Collaborative Workspaces
Managing the Status of Workspaces
This section provides an overview of workspace statuses and discusses how to manage workspaces,including how to inactivate and delete workspaces.
Pages Used to Manage the Status of Workspaces
Page Name Definition Name Usage
Manage Workspaces Page EPPCW_MANAGE Manage tasks on your workspaces, suchas inactivating, activating, and deletingthem.
Delete Confirmation Page EPPCW_DEL_CONFIRM Confirm your selected deletion.
Understanding Workspace StatusesThe Manage Workspaces component enables you to delete workspaces altogether. It also enables you toinactivate a workspace, which makes it unavailable for viewing and use by members, but keeps the datastored in your database. The component also enables you to reactivate inactive workspaces should youneed to resume use of them.
Manage Workspaces PageAccess the Manage Workspaces page (select Portal Administration > Workspaces > ManageWorkspaces).
Copyright © 1988, 2021, Oracle and/or its affiliates. 105
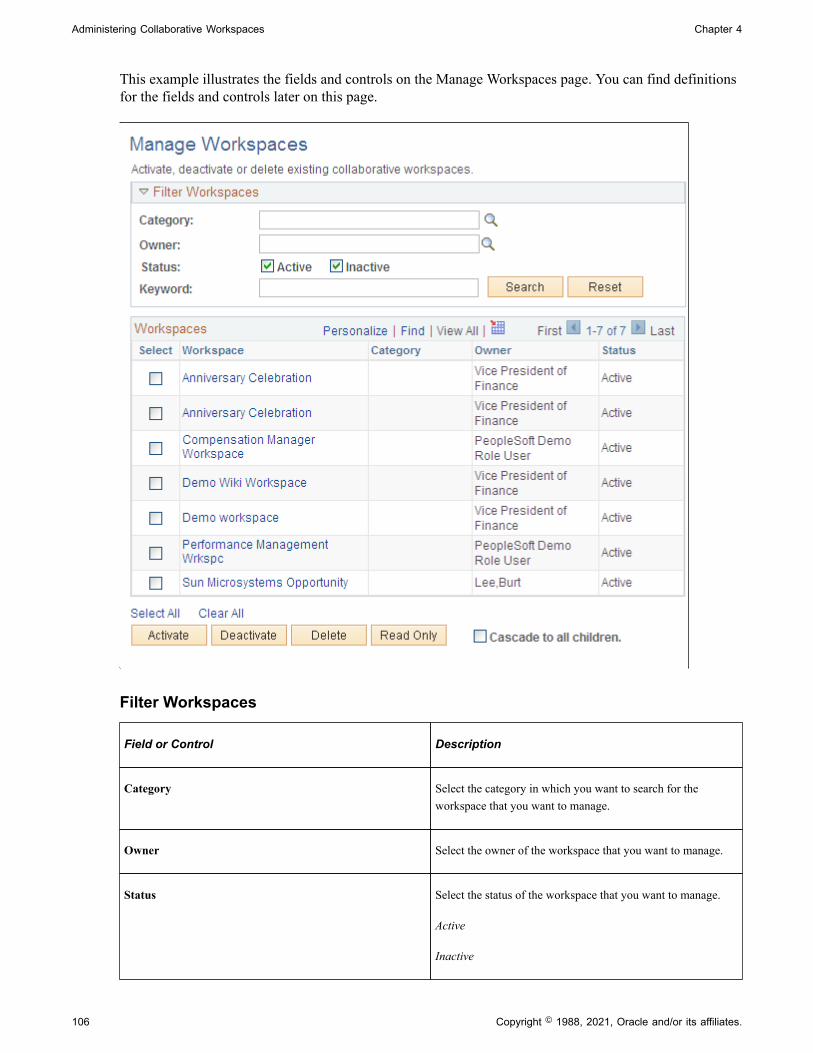
Administering Collaborative Workspaces Chapter 4
This example illustrates the fields and controls on the Manage Workspaces page. You can find definitionsfor the fields and controls later on this page.
Filter Workspaces
Field or Control Description
Category Select the category in which you want to search for theworkspace that you want to manage.
Owner Select the owner of the workspace that you want to manage.
Status Select the status of the workspace that you want to manage.
Active
Inactive
106 Copyright © 1988, 2021, Oracle and/or its affiliates.
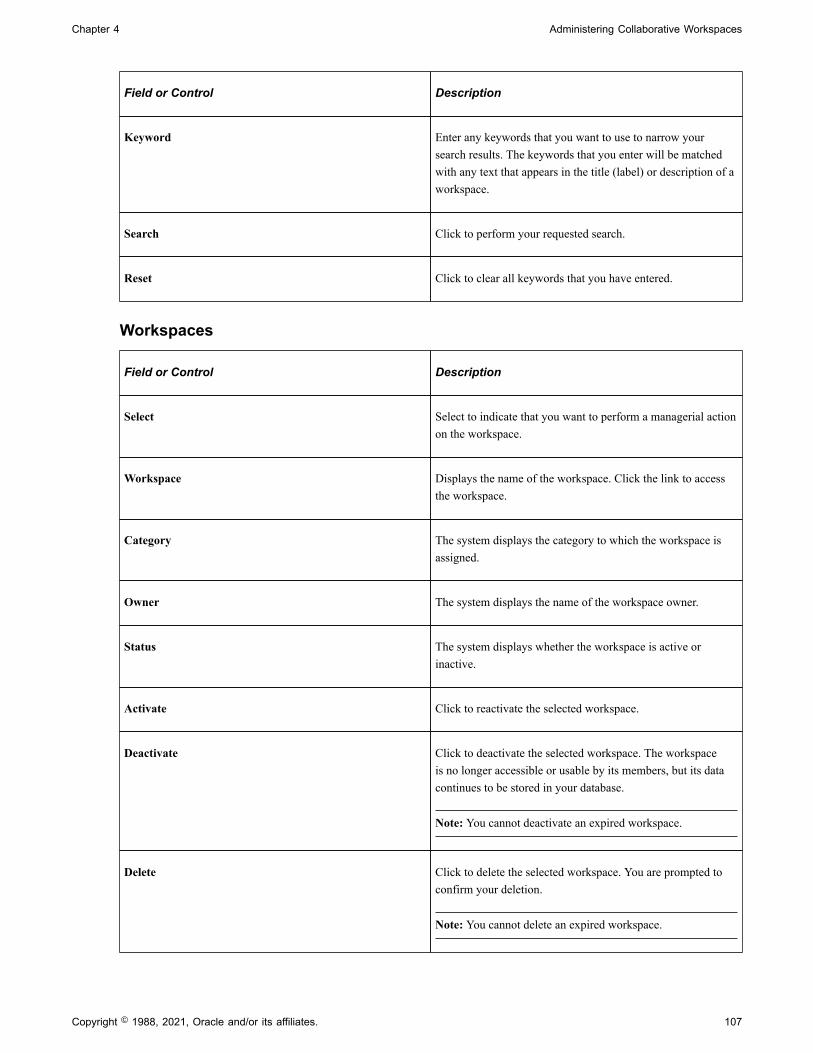
Chapter 4 Administering Collaborative Workspaces
Field or Control Description
Keyword Enter any keywords that you want to use to narrow yoursearch results. The keywords that you enter will be matchedwith any text that appears in the title (label) or description of aworkspace.
Search Click to perform your requested search.
Reset Click to clear all keywords that you have entered.
Workspaces
Field or Control Description
Select Select to indicate that you want to perform a managerial actionon the workspace.
Workspace Displays the name of the workspace. Click the link to accessthe workspace.
Category The system displays the category to which the workspace isassigned.
Owner The system displays the name of the workspace owner.
Status The system displays whether the workspace is active orinactive.
Activate Click to reactivate the selected workspace.
Deactivate Click to deactivate the selected workspace. The workspaceis no longer accessible or usable by its members, but its datacontinues to be stored in your database.
Note: You cannot deactivate an expired workspace.
Delete Click to delete the selected workspace. You are prompted toconfirm your deletion.
Note: You cannot delete an expired workspace.
Copyright © 1988, 2021, Oracle and/or its affiliates. 107

Administering Collaborative Workspaces Chapter 4
Note: To expire a workspace, define the Valid To date in the Administration - Properties page. See,Administering the Workspace Properties Page.
Moving a Workspace in the Workspace Hierarchy
You can move a workspace in the workspace hierarchy by specifying a new parent workspace on theAdministration - Properties page.
See Administering the Workspace Properties Page.
Importing and Exporting Workspace Data
See the release notes for My Oracle Support for information about importing and exporting workspacedata.
See My Oracle Support, Knowledge, Portal Solutions, PeopleSoft Interaction Hub.
Managing External User Accounts for Workspaces
Access the Manage External Users page (select Portal Administration > Workspaces > ManageExternal Users).
This example illustrates the fields and controls on the Manage External Users page.
You can search for external users based on the last sign-in date or by a keyword, such as user name.
The Users group box displays the user name, the description of the user, what workspaces the user canaccess, and when the user last signed in to that workspace.
108 Copyright © 1988, 2021, Oracle and/or its affiliates.
Chapter 4 Administering Collaborative Workspaces
To delete the external user from the system, select the name and click Delete.
To remove a user's external status and give them the status as an internal user, select the name and clickRemove External Status.
Copyright © 1988, 2021, Oracle and/or its affiliates. 109

Administering Collaborative Workspaces Chapter 4
110 Copyright © 1988, 2021, Oracle and/or its affiliates.
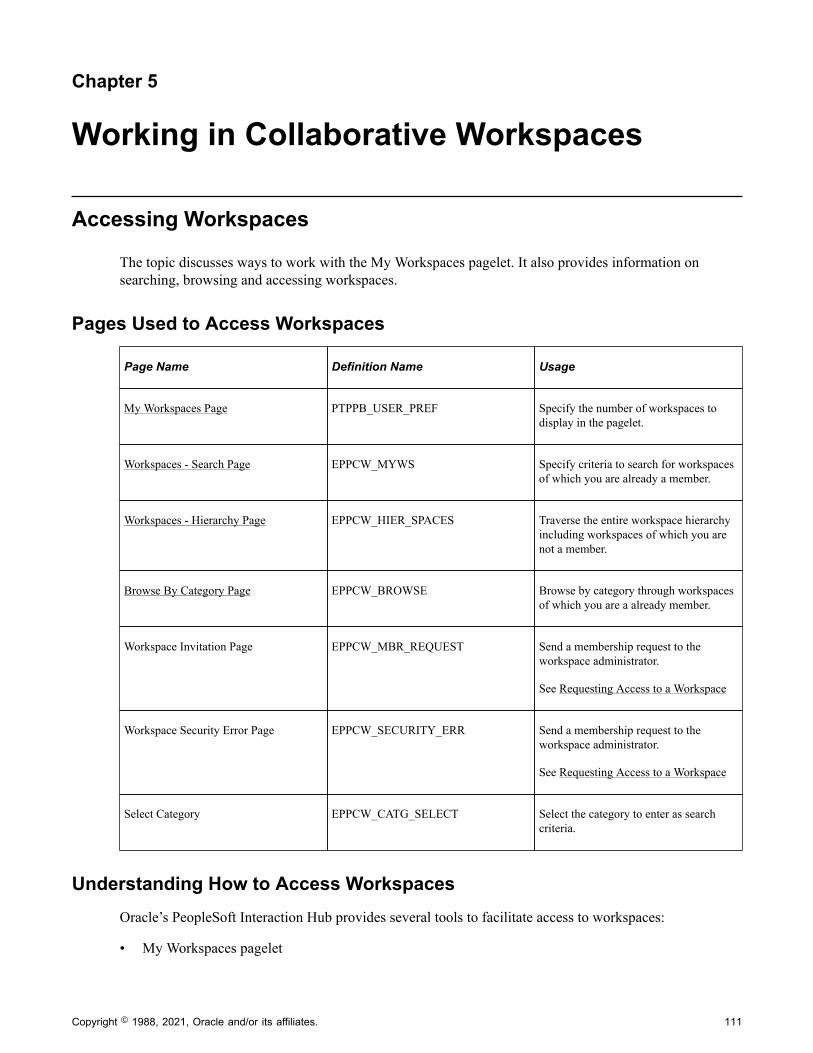
Chapter 5
Working in Collaborative Workspaces
Accessing Workspaces
The topic discusses ways to work with the My Workspaces pagelet. It also provides information onsearching, browsing and accessing workspaces.
Pages Used to Access Workspaces
Page Name Definition Name Usage
My Workspaces Page PTPPB_USER_PREF Specify the number of workspaces todisplay in the pagelet.
Workspaces - Search Page EPPCW_MYWS Specify criteria to search for workspacesof which you are already a member.
Workspaces - Hierarchy Page EPPCW_HIER_SPACES Traverse the entire workspace hierarchyincluding workspaces of which you arenot a member.
Browse By Category Page EPPCW_BROWSE Browse by category through workspacesof which you are a already member.
Workspace Invitation Page EPPCW_MBR_REQUEST Send a membership request to theworkspace administrator.
See Requesting Access to a Workspace
Workspace Security Error Page EPPCW_SECURITY_ERR Send a membership request to theworkspace administrator.
See Requesting Access to a Workspace
Select Category EPPCW_CATG_SELECT Select the category to enter as searchcriteria.
Understanding How to Access WorkspacesOracle’s PeopleSoft Interaction Hub provides several tools to facilitate access to workspaces:
• My Workspaces pagelet
Copyright © 1988, 2021, Oracle and/or its affiliates. 111
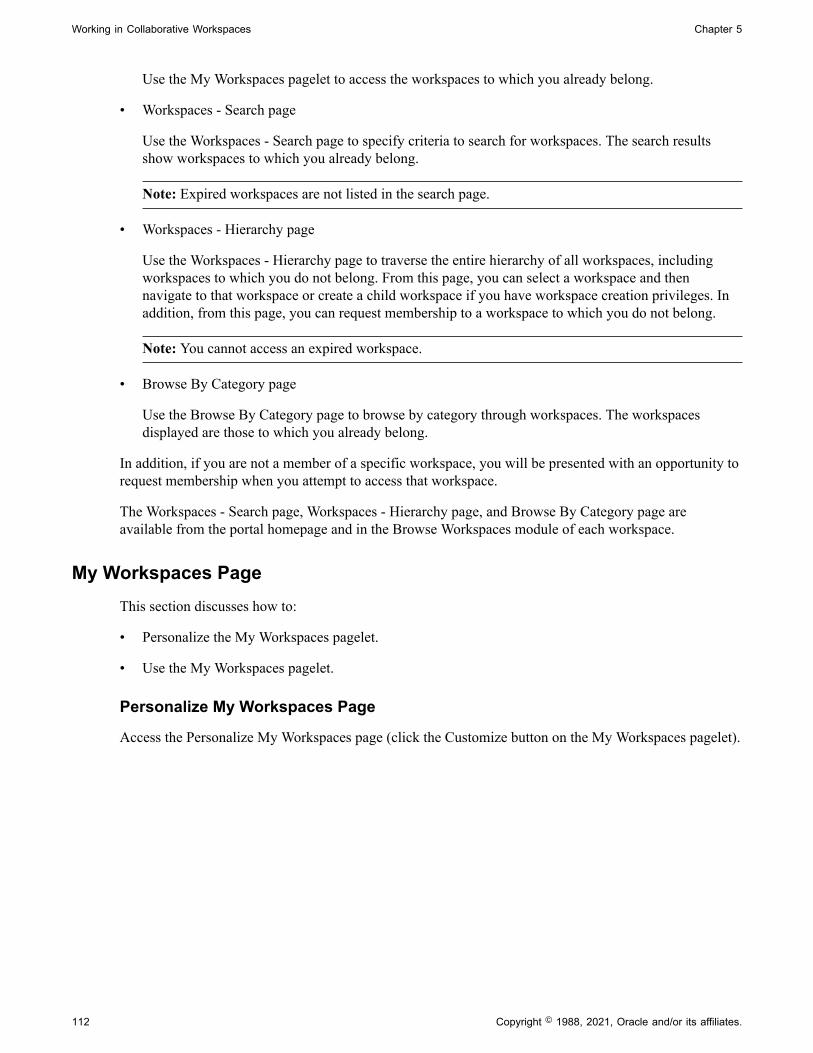
Working in Collaborative Workspaces Chapter 5
Use the My Workspaces pagelet to access the workspaces to which you already belong.
• Workspaces - Search page
Use the Workspaces - Search page to specify criteria to search for workspaces. The search resultsshow workspaces to which you already belong.
Note: Expired workspaces are not listed in the search page.
• Workspaces - Hierarchy page
Use the Workspaces - Hierarchy page to traverse the entire hierarchy of all workspaces, includingworkspaces to which you do not belong. From this page, you can select a workspace and thennavigate to that workspace or create a child workspace if you have workspace creation privileges. Inaddition, from this page, you can request membership to a workspace to which you do not belong.
Note: You cannot access an expired workspace.
• Browse By Category page
Use the Browse By Category page to browse by category through workspaces. The workspacesdisplayed are those to which you already belong.
In addition, if you are not a member of a specific workspace, you will be presented with an opportunity torequest membership when you attempt to access that workspace.
The Workspaces - Search page, Workspaces - Hierarchy page, and Browse By Category page areavailable from the portal homepage and in the Browse Workspaces module of each workspace.
My Workspaces PageThis section discusses how to:
• Personalize the My Workspaces pagelet.
• Use the My Workspaces pagelet.
Personalize My Workspaces Page
Access the Personalize My Workspaces page (click the Customize button on the My Workspaces pagelet).
112 Copyright © 1988, 2021, Oracle and/or its affiliates.
Chapter 5 Working in Collaborative Workspaces
This example illustrates the fields and controls on the Personalize My Workspaces page. You can finddefinitions for the fields and controls later on this page.
Use the Personalize My Workspaces page to specify the number of workspaces to display in the MyWorkspaces pagelet.
Field or Control Description
Max Rows Specify the maximum number of workspaces to display in theMy Workspaces pagelet.
Note: Specifying 0, display all rows up to the maximum rowallowed in Query security profiles.
Reset to Defaults Click to reset the Max Rows field to the delivered defaultvalue of 20.
My Workspaces Page
Access the My Workspaces pagelet on the portal homepage.
Copyright © 1988, 2021, Oracle and/or its affiliates. 113
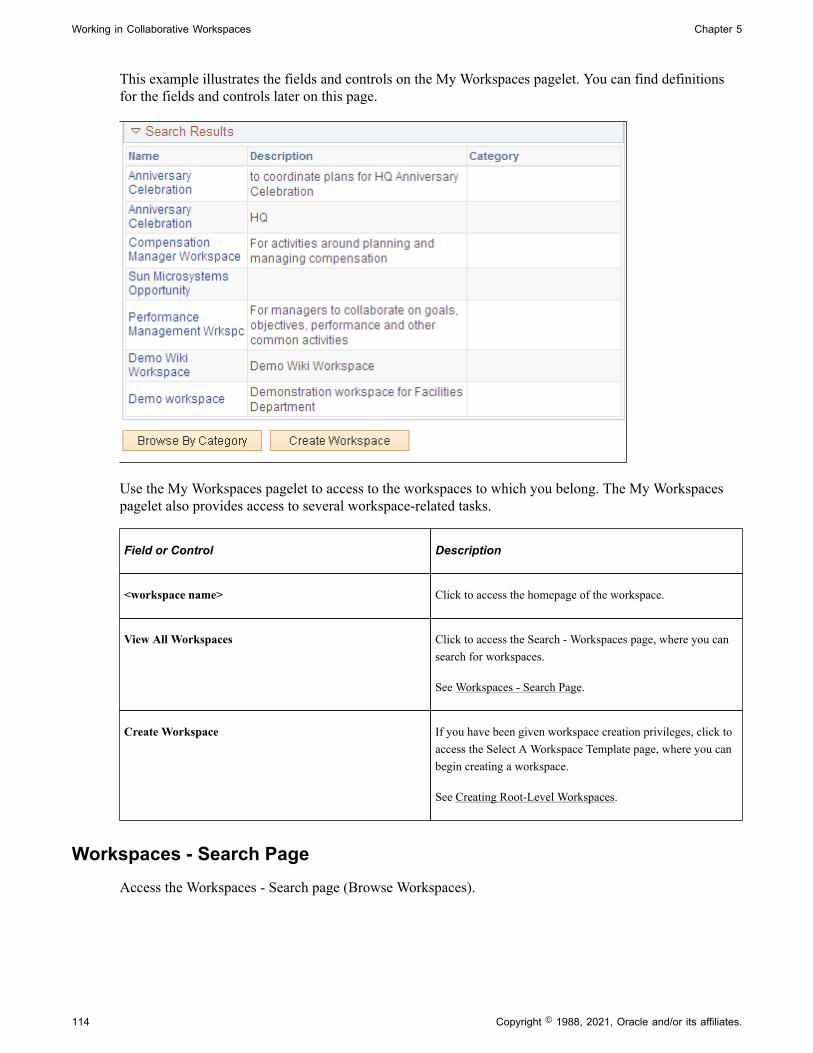
Working in Collaborative Workspaces Chapter 5
This example illustrates the fields and controls on the My Workspaces pagelet. You can find definitionsfor the fields and controls later on this page.
Use the My Workspaces pagelet to access to the workspaces to which you belong. The My Workspacespagelet also provides access to several workspace-related tasks.
Field or Control Description
<workspace name> Click to access the homepage of the workspace.
View All Workspaces Click to access the Search - Workspaces page, where you cansearch for workspaces.
See Workspaces - Search Page.
Create Workspace If you have been given workspace creation privileges, click toaccess the Select A Workspace Template page, where you canbegin creating a workspace.
See Creating Root-Level Workspaces.
Workspaces - Search PageAccess the Workspaces - Search page (Browse Workspaces).
114 Copyright © 1988, 2021, Oracle and/or its affiliates.
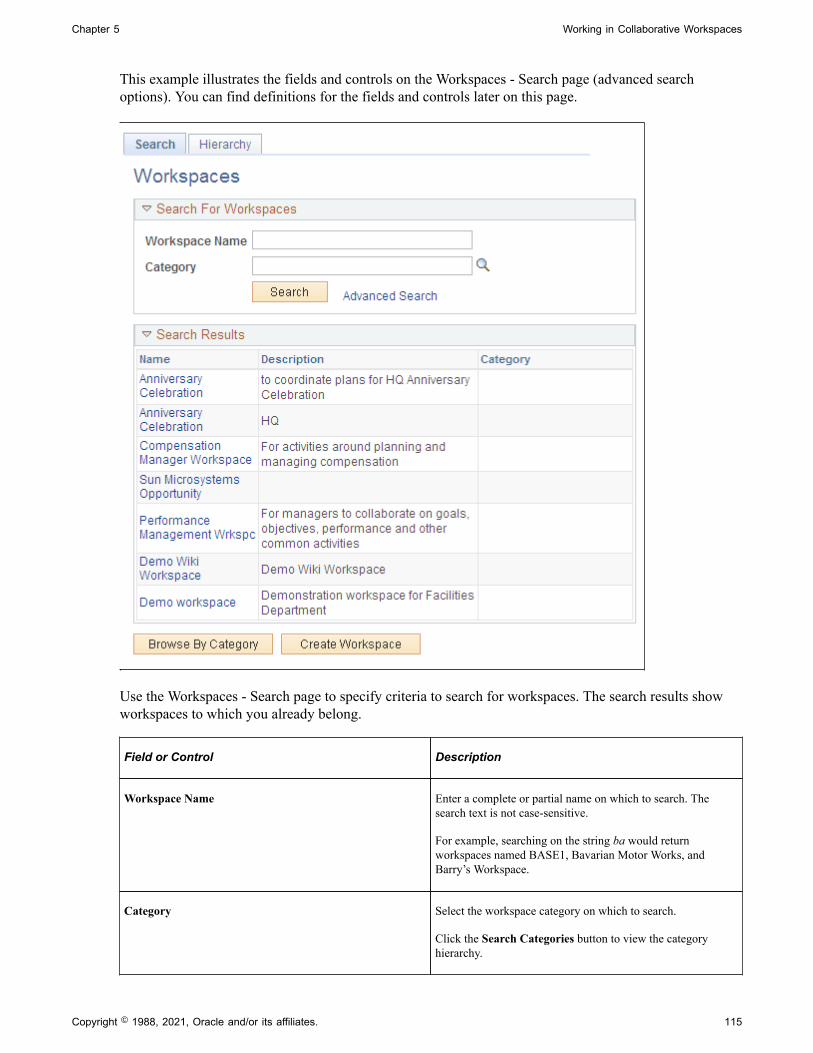
Chapter 5 Working in Collaborative Workspaces
This example illustrates the fields and controls on the Workspaces - Search page (advanced searchoptions). You can find definitions for the fields and controls later on this page.
Use the Workspaces - Search page to specify criteria to search for workspaces. The search results showworkspaces to which you already belong.
Field or Control Description
Workspace Name Enter a complete or partial name on which to search. Thesearch text is not case-sensitive.
For example, searching on the string ba would returnworkspaces named BASE1, Bavarian Motor Works, andBarry’s Workspace.
Category Select the workspace category on which to search.
Click the Search Categories button to view the categoryhierarchy.
Copyright © 1988, 2021, Oracle and/or its affiliates. 115
Working in Collaborative Workspaces Chapter 5
Field or Control Description
Owner Select the owner on which to search.
The Owner field appears when you click the AdvancedOptions link.
Template Select the template on which to search.
The Template field appears when you click the AdvancedOptions link.
Search Click to carry out the workspace search based on the criteriaentered.
Advanced Search and Basic Search Click to toggle between the advanced and basic search criteria.
Name Click a workspace name in the Search Results grid tonavigate to the homepage of the workspace.
Browse By Category Click to access the Browse By Category page.
See Browse By Category Page.
Create Workspace Click to access the workspace creation wizard, which you canuse to create a root-level workspace.
See Creating Root-Level Workspaces.
Note: Expired workspaces are not listed in the search page.
Workspaces - Hierarchy PageAccess the Workspaces - Hierarchy page (select the Hierarchy page from the Workspaces - Search page).
116 Copyright © 1988, 2021, Oracle and/or its affiliates.
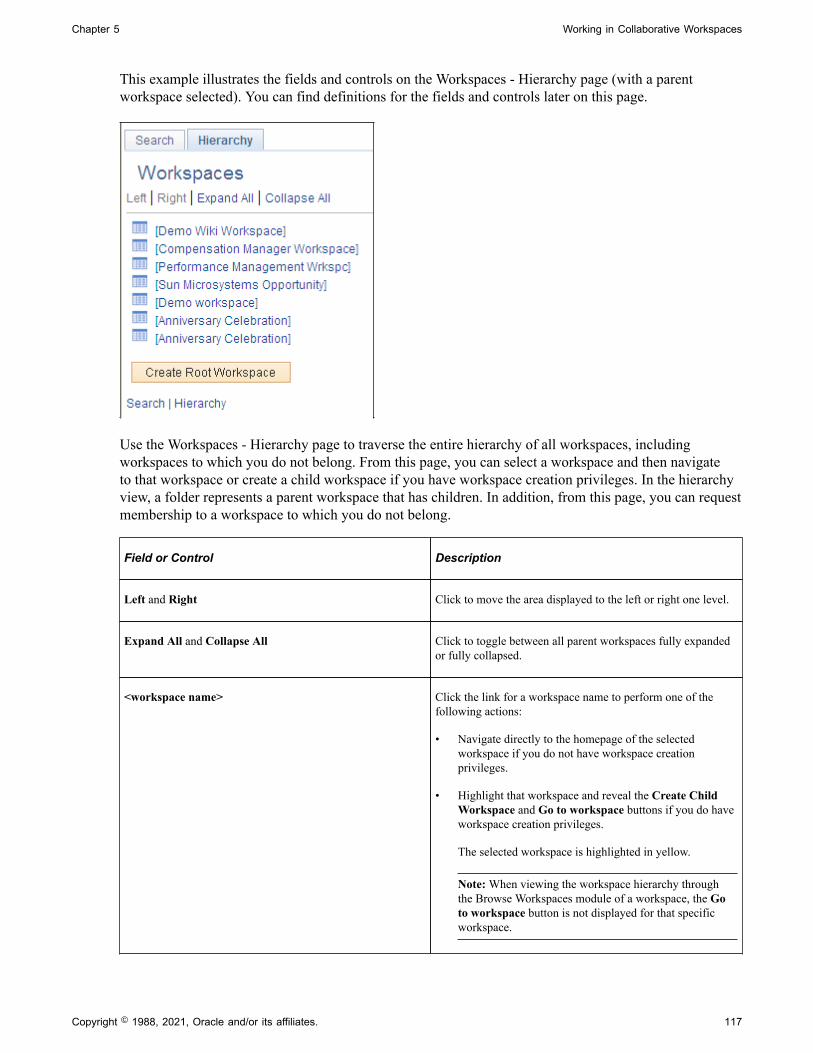
Chapter 5 Working in Collaborative Workspaces
This example illustrates the fields and controls on the Workspaces - Hierarchy page (with a parentworkspace selected). You can find definitions for the fields and controls later on this page.
Use the Workspaces - Hierarchy page to traverse the entire hierarchy of all workspaces, includingworkspaces to which you do not belong. From this page, you can select a workspace and then navigateto that workspace or create a child workspace if you have workspace creation privileges. In the hierarchyview, a folder represents a parent workspace that has children. In addition, from this page, you can requestmembership to a workspace to which you do not belong.
Field or Control Description
Left and Right Click to move the area displayed to the left or right one level.
Expand All and Collapse All Click to toggle between all parent workspaces fully expandedor fully collapsed.
<workspace name> Click the link for a workspace name to perform one of thefollowing actions:
• Navigate directly to the homepage of the selectedworkspace if you do not have workspace creationprivileges.
• Highlight that workspace and reveal the Create ChildWorkspace and Go to workspace buttons if you do haveworkspace creation privileges.
The selected workspace is highlighted in yellow.
Note: When viewing the workspace hierarchy throughthe Browse Workspaces module of a workspace, the Goto workspace button is not displayed for that specificworkspace.
Copyright © 1988, 2021, Oracle and/or its affiliates. 117
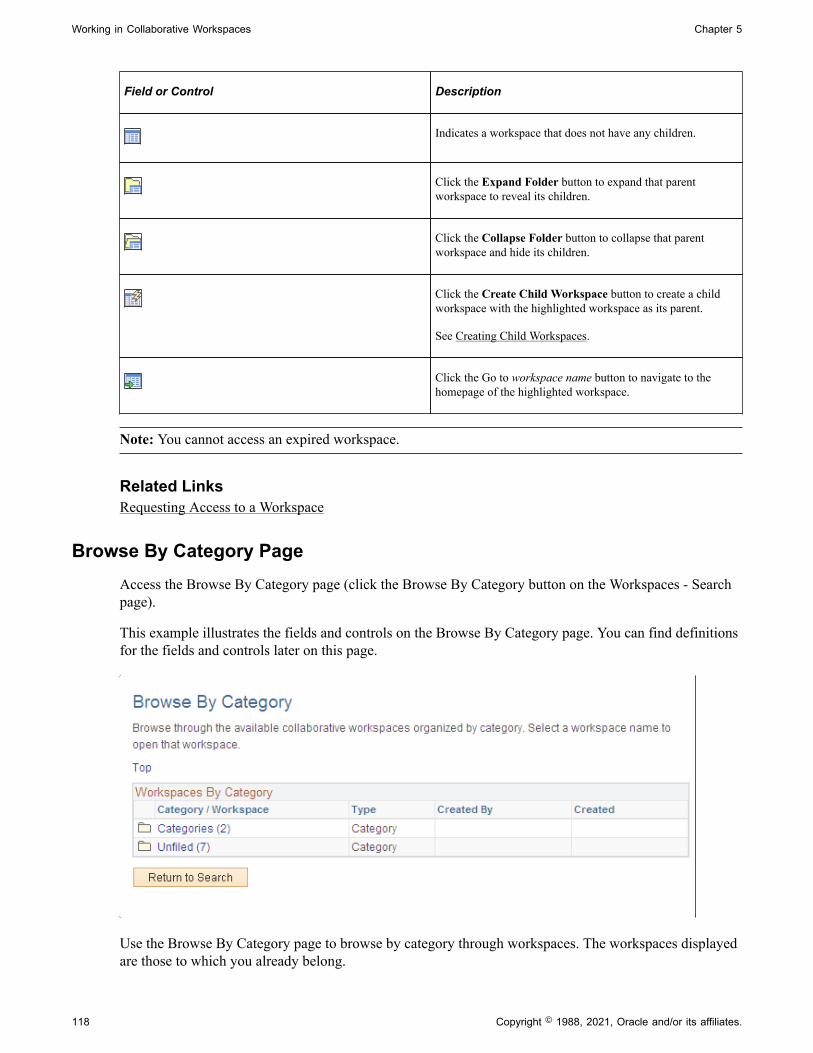
Working in Collaborative Workspaces Chapter 5
Field or Control Description
Indicates a workspace that does not have any children.
Click the Expand Folder button to expand that parentworkspace to reveal its children.
Click the Collapse Folder button to collapse that parentworkspace and hide its children.
Click the Create Child Workspace button to create a childworkspace with the highlighted workspace as its parent.
See Creating Child Workspaces.
Click the Go to workspace name button to navigate to thehomepage of the highlighted workspace.
Note: You cannot access an expired workspace.
Related LinksRequesting Access to a Workspace
Browse By Category PageAccess the Browse By Category page (click the Browse By Category button on the Workspaces - Searchpage).
This example illustrates the fields and controls on the Browse By Category page. You can find definitionsfor the fields and controls later on this page.
Use the Browse By Category page to browse by category through workspaces. The workspaces displayedare those to which you already belong.
118 Copyright © 1988, 2021, Oracle and/or its affiliates.
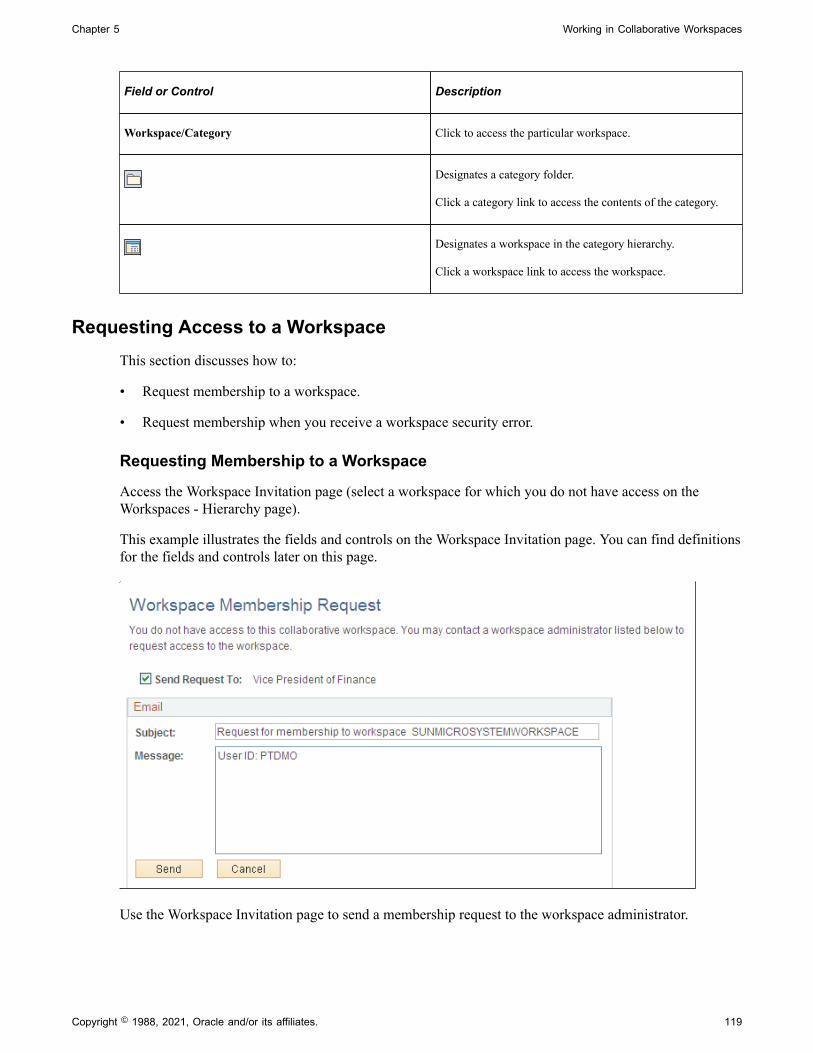
Chapter 5 Working in Collaborative Workspaces
Field or Control Description
Workspace/Category Click to access the particular workspace.
Designates a category folder.
Click a category link to access the contents of the category.
Designates a workspace in the category hierarchy.
Click a workspace link to access the workspace.
Requesting Access to a WorkspaceThis section discusses how to:
• Request membership to a workspace.
• Request membership when you receive a workspace security error.
Requesting Membership to a Workspace
Access the Workspace Invitation page (select a workspace for which you do not have access on theWorkspaces - Hierarchy page).
This example illustrates the fields and controls on the Workspace Invitation page. You can find definitionsfor the fields and controls later on this page.
Use the Workspace Invitation page to send a membership request to the workspace administrator.
Copyright © 1988, 2021, Oracle and/or its affiliates. 119
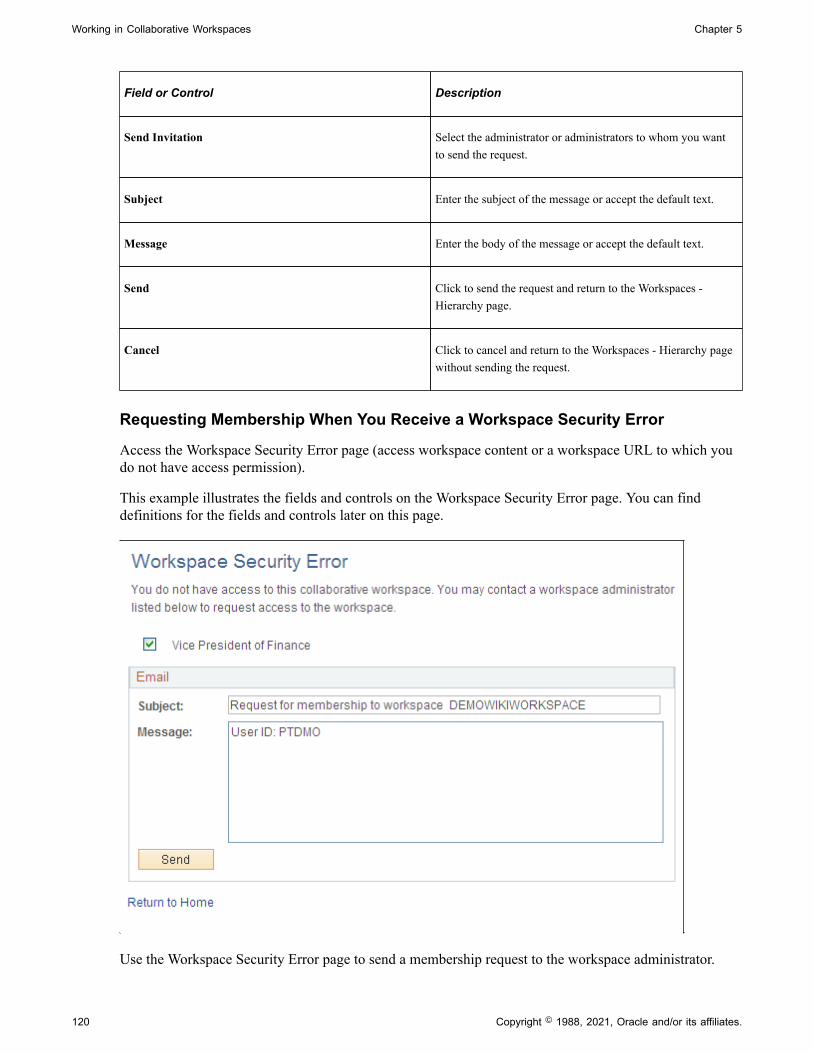
Working in Collaborative Workspaces Chapter 5
Field or Control Description
Send Invitation Select the administrator or administrators to whom you wantto send the request.
Subject Enter the subject of the message or accept the default text.
Message Enter the body of the message or accept the default text.
Send Click to send the request and return to the Workspaces -Hierarchy page.
Cancel Click to cancel and return to the Workspaces - Hierarchy pagewithout sending the request.
Requesting Membership When You Receive a Workspace Security Error
Access the Workspace Security Error page (access workspace content or a workspace URL to which youdo not have access permission).
This example illustrates the fields and controls on the Workspace Security Error page. You can finddefinitions for the fields and controls later on this page.
Use the Workspace Security Error page to send a membership request to the workspace administrator.
120 Copyright © 1988, 2021, Oracle and/or its affiliates.
Chapter 5 Working in Collaborative Workspaces
Field or Control Description
unlabeled Select the administrator or administrators to whom you wantto send the request.
Subject Enter the subject of the message or accept the default text.
Message Enter the body of the message or accept the default text.
Send Click to send the request.
Return to Home Click to return to portal homepage.
Navigating in a Workspace
When you access a workspace, the workspace homepage appears. The workspace homepage is the frontpage and standard entry area for a workspace.
The workspace administrator can configure the workspace homepage to display pagelets relevant to thecontent of the workspace, including pagelets associated with each workspace module. The workspacehomepage displays the modules selected for the workspace in the menu on the left and pagelets selectedfor the workspace homepage in selected columns as shown in the following example of a three-columnhomepage:
Copyright © 1988, 2021, Oracle and/or its affiliates. 121
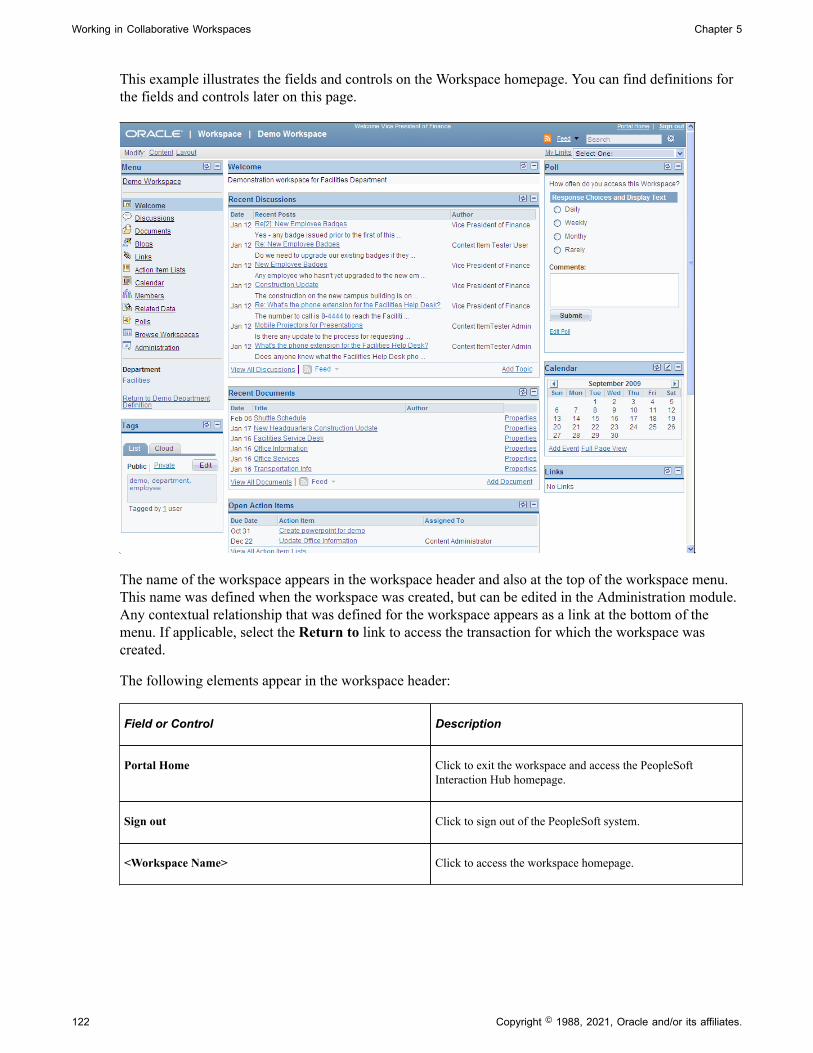
Working in Collaborative Workspaces Chapter 5
This example illustrates the fields and controls on the Workspace homepage. You can find definitions forthe fields and controls later on this page.
The name of the workspace appears in the workspace header and also at the top of the workspace menu.This name was defined when the workspace was created, but can be edited in the Administration module.Any contextual relationship that was defined for the workspace appears as a link at the bottom of themenu. If applicable, select the Return to link to access the transaction for which the workspace wascreated.
The following elements appear in the workspace header:
Field or Control Description
Portal Home Click to exit the workspace and access the PeopleSoftInteraction Hub homepage.
Sign out Click to sign out of the PeopleSoft system.
<Workspace Name> Click to access the workspace homepage.
122 Copyright © 1988, 2021, Oracle and/or its affiliates.

Chapter 5 Working in Collaborative Workspaces
Field or Control Description
Move your mouse cursor over any of these icons to view thelist of feeds published as workspace feeds. Click any list itemto open that feed document.
Click the Feed button or Feed link to open the first feeddocument in the list.
Click the Open menu button to toggle the list of feedsbetween frozen open and closed.
Search Click and enter a search phrase in the Search field.
Click to perform a search within the workspace.
Alternatively, press Enter after entering a search phrase in theSearch field.
See Searching Within Workspaces.
Content Click to access the Tab Content page. This link appears onlyfor users who have been designated as workspace owners oradministrators.
See Tab Content Page.
Layout Click to access the Tab Layout page. This link appears onlyfor users who have been designated as workspace owners oradministrators.
See Tab Layout Page.
The following links can appear in the workspace menu and depend on the modules selected by theworkspace administrator:
Note: The Administration link appears only for members designated as administrators for thisworkspace.
Field or Control Description
Welcome Click to access the workspace homepage. This link typicallydoes not appear for workspaces configured with the WikiContent module.
Copyright © 1988, 2021, Oracle and/or its affiliates. 123

Working in Collaborative Workspaces Chapter 5
Field or Control Description
Wiki Content Click to access the Wiki Content module.
Note: The Wiki Content link in the workspace menu is notshown in the preceding example.
Use the Wiki Content module to collaboratively author wikicontent for the workspace. The Wiki Content module providesfeatures such as version control and multilanguage support thatallow continuous and collaborative refinement of the content. The rich text editor is used to edit the wiki content, which alsoappears in the Wiki Content pagelet.
See Using the Wiki Content Module.
Discussions Click to access the Discussions module.
Use the Discussions module to participate in discussions thatare relevant to the collaborative workspace. The Discussionsmodule enables workspace members to post discussion topicsand replies, and provides the complete history of interaction ona topic. Members can also monitor recent discussion postingsusing the Recent Discussions pagelet that appears on theworkspace homepage.
See Using the Discussions Module.
Documents Click to access the Documents module.
Use the Documents module to publish, optionally approve, and view shared documents that are relevant to a workspace. Members can monitor recent document postings using theRecent Documents pagelet that appears on the workspacehomepage.
See Using the Documents Module.
Blogs Click to access the Blogs module.
Use the Blogs module to participate in the blog for theworkspace. The Blogs module enables workspace membersto create news and multithreaded commentary on topics thatare relevant to the workspace. Members can also monitorrecent blog postings using the Blogs pagelet that appears onthe workspace homepage.
See Using the Blogs Module.
Links Click to access the Links module.
Use the Links module to create a collection of links that arerelevant to the workspace. This collection appears in the Linkspagelet, which appears on the workspace homepage.
See Using the Links Module.
124 Copyright © 1988, 2021, Oracle and/or its affiliates.
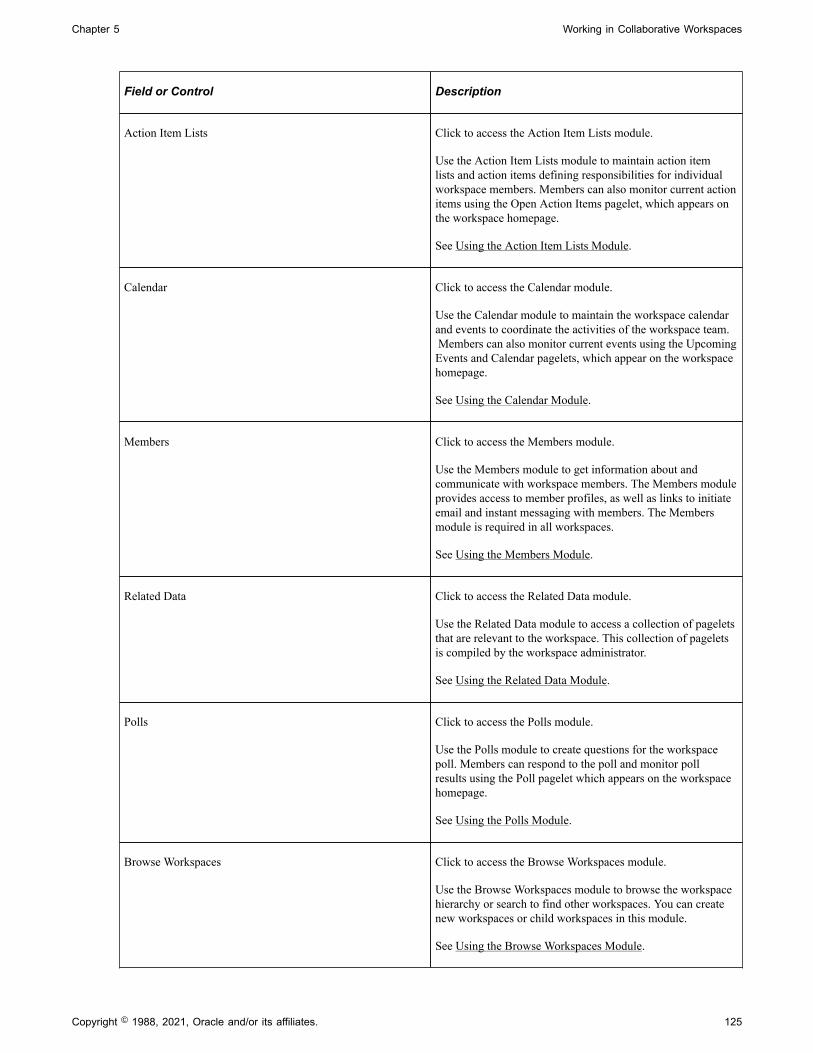
Chapter 5 Working in Collaborative Workspaces
Field or Control Description
Action Item Lists Click to access the Action Item Lists module.
Use the Action Item Lists module to maintain action itemlists and action items defining responsibilities for individualworkspace members. Members can also monitor current actionitems using the Open Action Items pagelet, which appears onthe workspace homepage.
See Using the Action Item Lists Module.
Calendar Click to access the Calendar module.
Use the Calendar module to maintain the workspace calendarand events to coordinate the activities of the workspace team. Members can also monitor current events using the UpcomingEvents and Calendar pagelets, which appear on the workspacehomepage.
See Using the Calendar Module.
Members Click to access the Members module.
Use the Members module to get information about andcommunicate with workspace members. The Members moduleprovides access to member profiles, as well as links to initiateemail and instant messaging with members. The Membersmodule is required in all workspaces.
See Using the Members Module.
Related Data Click to access the Related Data module.
Use the Related Data module to access a collection of pageletsthat are relevant to the workspace. This collection of pageletsis compiled by the workspace administrator.
See Using the Related Data Module.
Polls Click to access the Polls module.
Use the Polls module to create questions for the workspacepoll. Members can respond to the poll and monitor pollresults using the Poll pagelet which appears on the workspacehomepage.
See Using the Polls Module.
Browse Workspaces Click to access the Browse Workspaces module.
Use the Browse Workspaces module to browse the workspacehierarchy or search to find other workspaces. You can createnew workspaces or child workspaces in this module.
See Using the Browse Workspaces Module.
Copyright © 1988, 2021, Oracle and/or its affiliates. 125
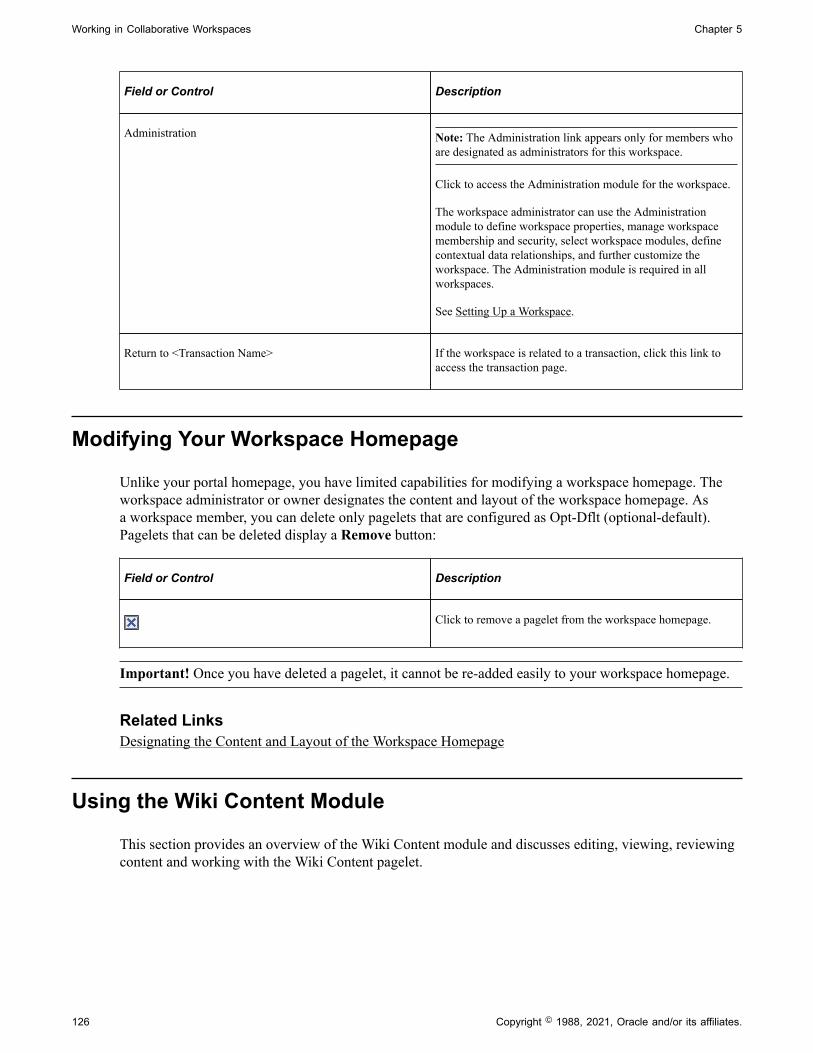
Working in Collaborative Workspaces Chapter 5
Field or Control Description
Administration Note: The Administration link appears only for members whoare designated as administrators for this workspace.
Click to access the Administration module for the workspace.
The workspace administrator can use the Administrationmodule to define workspace properties, manage workspacemembership and security, select workspace modules, definecontextual data relationships, and further customize theworkspace. The Administration module is required in allworkspaces.
See Setting Up a Workspace.
Return to <Transaction Name> If the workspace is related to a transaction, click this link toaccess the transaction page.
Modifying Your Workspace Homepage
Unlike your portal homepage, you have limited capabilities for modifying a workspace homepage. Theworkspace administrator or owner designates the content and layout of the workspace homepage. Asa workspace member, you can delete only pagelets that are configured as Opt-Dflt (optional-default).Pagelets that can be deleted display a Remove button:
Field or Control Description
Click to remove a pagelet from the workspace homepage.
Important! Once you have deleted a pagelet, it cannot be re-added easily to your workspace homepage.
Related LinksDesignating the Content and Layout of the Workspace Homepage
Using the Wiki Content Module
This section provides an overview of the Wiki Content module and discusses editing, viewing, reviewingcontent and working with the Wiki Content pagelet.
126 Copyright © 1988, 2021, Oracle and/or its affiliates.
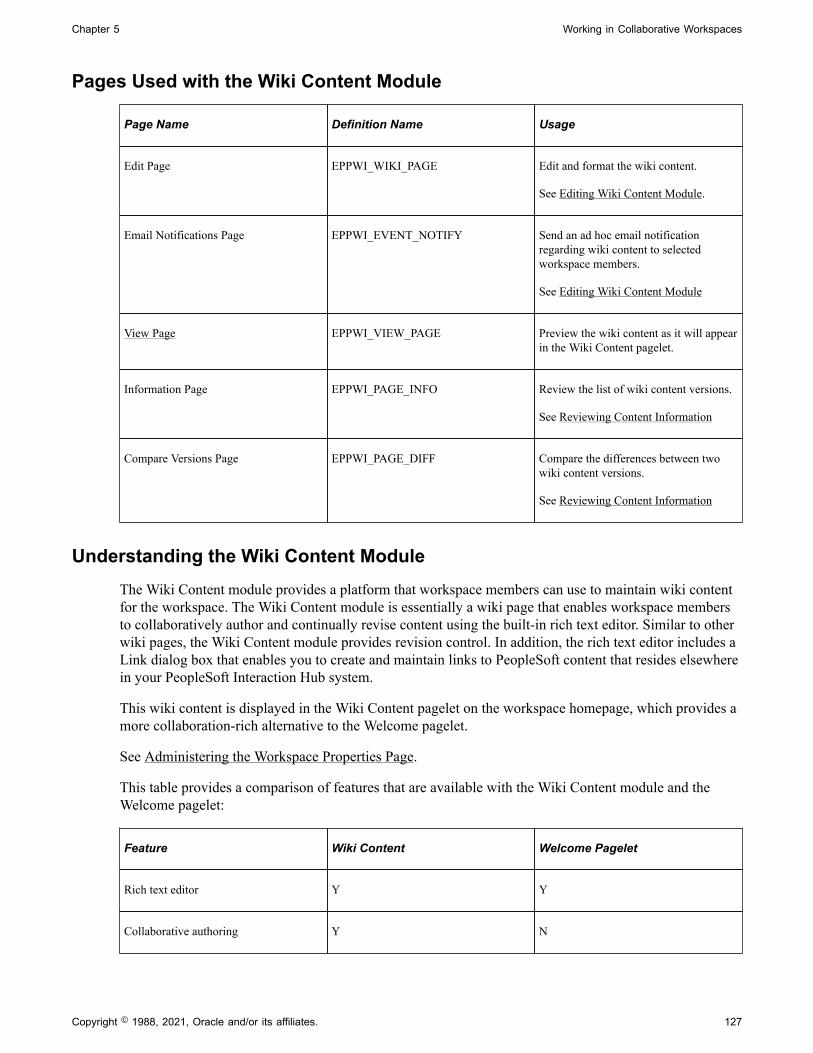
Chapter 5 Working in Collaborative Workspaces
Pages Used with the Wiki Content Module
Page Name Definition Name Usage
Edit Page EPPWI_WIKI_PAGE Edit and format the wiki content.
See Editing Wiki Content Module.
Email Notifications Page EPPWI_EVENT_NOTIFY Send an ad hoc email notificationregarding wiki content to selectedworkspace members.
See Editing Wiki Content Module
View Page EPPWI_VIEW_PAGE Preview the wiki content as it will appearin the Wiki Content pagelet.
Information Page EPPWI_PAGE_INFO Review the list of wiki content versions.
See Reviewing Content Information
Compare Versions Page EPPWI_PAGE_DIFF Compare the differences between twowiki content versions.
See Reviewing Content Information
Understanding the Wiki Content ModuleThe Wiki Content module provides a platform that workspace members can use to maintain wiki contentfor the workspace. The Wiki Content module is essentially a wiki page that enables workspace membersto collaboratively author and continually revise content using the built-in rich text editor. Similar to otherwiki pages, the Wiki Content module provides revision control. In addition, the rich text editor includes aLink dialog box that enables you to create and maintain links to PeopleSoft content that resides elsewherein your PeopleSoft Interaction Hub system.
This wiki content is displayed in the Wiki Content pagelet on the workspace homepage, which provides amore collaboration-rich alternative to the Welcome pagelet.
See Administering the Workspace Properties Page.
This table provides a comparison of features that are available with the Wiki Content module and theWelcome pagelet:
Feature Wiki Content Welcome Pagelet
Rich text editor Y Y
Collaborative authoring Y N
Copyright © 1988, 2021, Oracle and/or its affiliates. 127
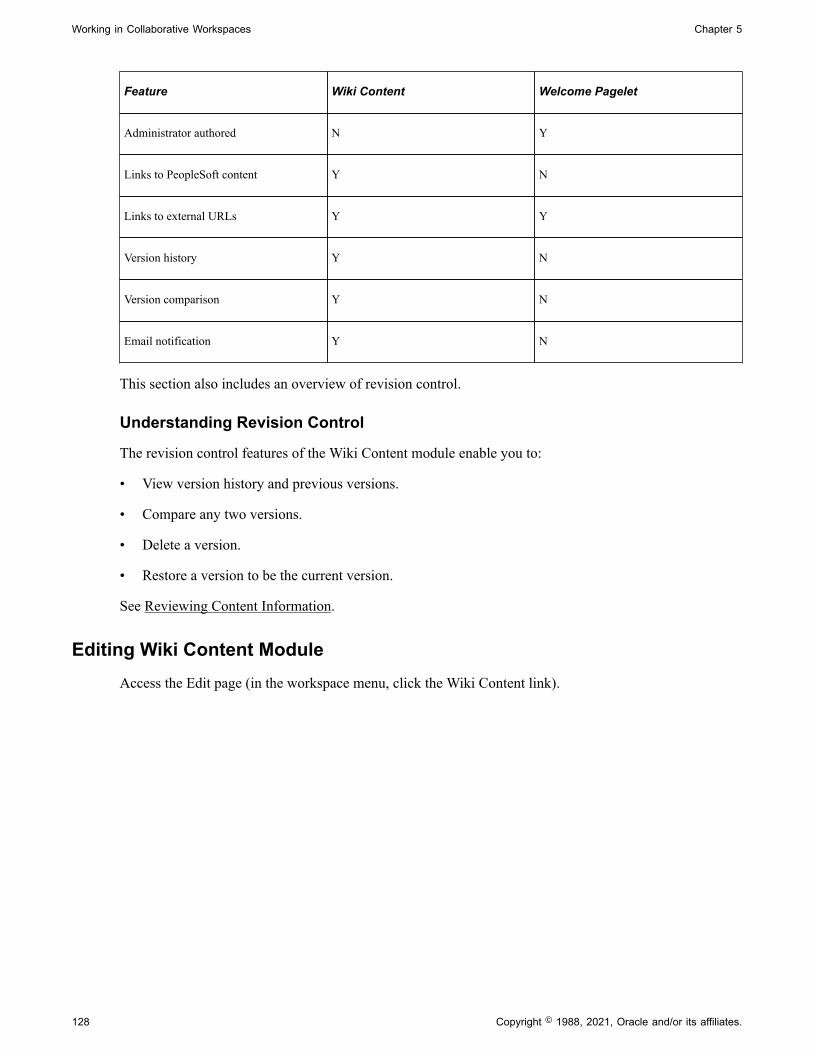
Working in Collaborative Workspaces Chapter 5
Feature Wiki Content Welcome Pagelet
Administrator authored N Y
Links to PeopleSoft content Y N
Links to external URLs Y Y
Version history Y N
Version comparison Y N
Email notification Y N
This section also includes an overview of revision control.
Understanding Revision Control
The revision control features of the Wiki Content module enable you to:
• View version history and previous versions.
• Compare any two versions.
• Delete a version.
• Restore a version to be the current version.
See Reviewing Content Information.
Editing Wiki Content ModuleAccess the Edit page (in the workspace menu, click the Wiki Content link).
128 Copyright © 1988, 2021, Oracle and/or its affiliates.
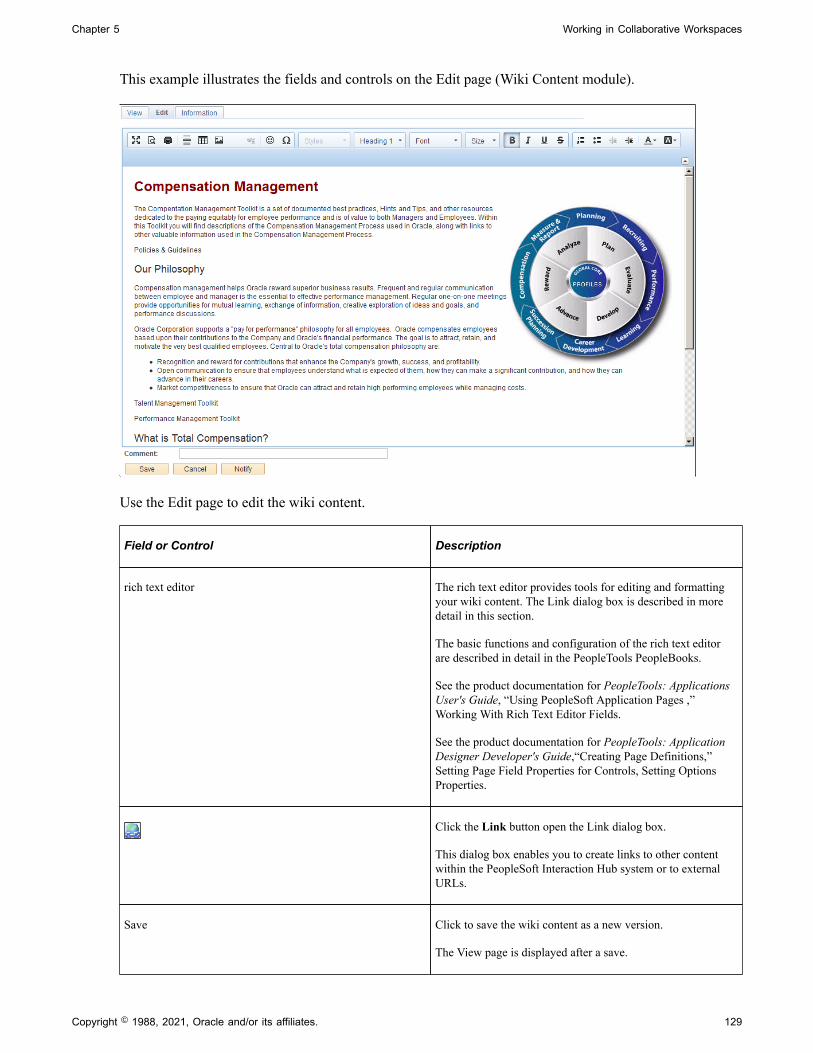
Chapter 5 Working in Collaborative Workspaces
This example illustrates the fields and controls on the Edit page (Wiki Content module).
Use the Edit page to edit the wiki content.
Field or Control Description
rich text editor The rich text editor provides tools for editing and formattingyour wiki content. The Link dialog box is described in moredetail in this section.
The basic functions and configuration of the rich text editorare described in detail in the PeopleTools PeopleBooks.
See the product documentation for PeopleTools: ApplicationsUser's Guide, “Using PeopleSoft Application Pages ,”Working With Rich Text Editor Fields.
See the product documentation for PeopleTools: ApplicationDesigner Developer's Guide,“Creating Page Definitions,”Setting Page Field Properties for Controls, Setting OptionsProperties.
Click the Link button open the Link dialog box.
This dialog box enables you to create links to other contentwithin the PeopleSoft Interaction Hub system or to externalURLs.
Save Click to save the wiki content as a new version.
The View page is displayed after a save.
Copyright © 1988, 2021, Oracle and/or its affiliates. 129
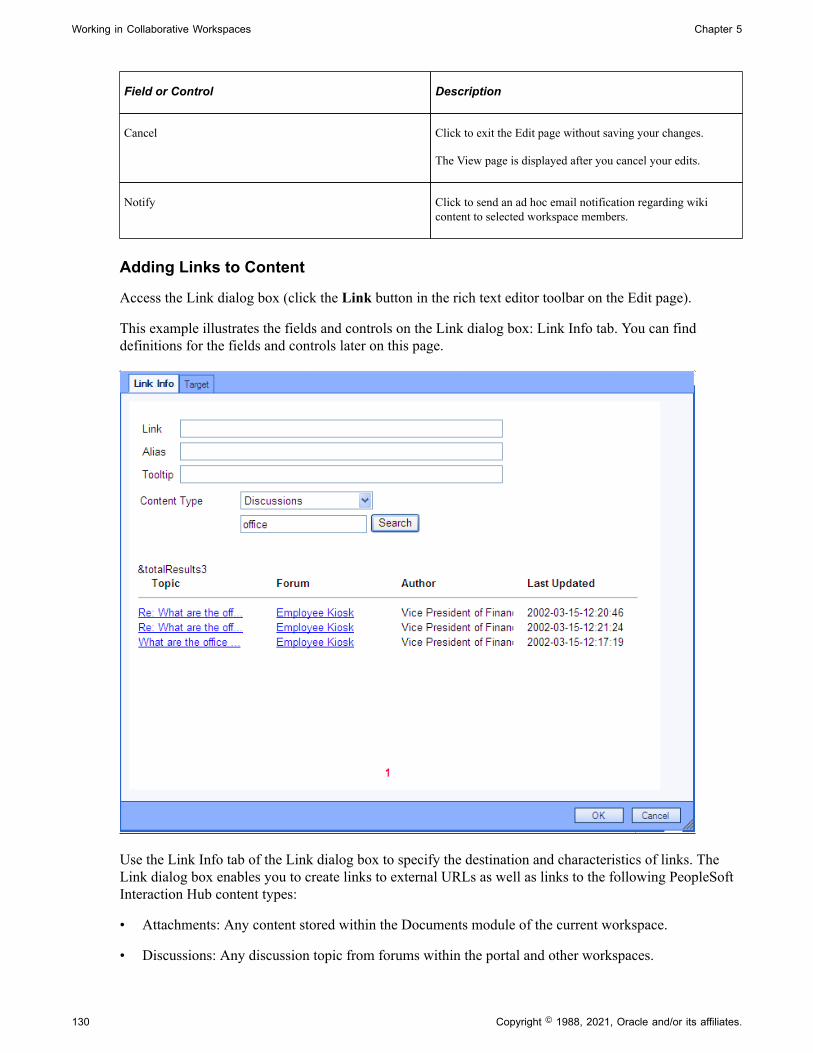
Working in Collaborative Workspaces Chapter 5
Field or Control Description
Cancel Click to exit the Edit page without saving your changes.
The View page is displayed after you cancel your edits.
Notify Click to send an ad hoc email notification regarding wikicontent to selected workspace members.
Adding Links to Content
Access the Link dialog box (click the Link button in the rich text editor toolbar on the Edit page).
This example illustrates the fields and controls on the Link dialog box: Link Info tab. You can finddefinitions for the fields and controls later on this page.
Use the Link Info tab of the Link dialog box to specify the destination and characteristics of links. TheLink dialog box enables you to create links to external URLs as well as links to the following PeopleSoftInteraction Hub content types:
• Attachments: Any content stored within the Documents module of the current workspace.
• Discussions: Any discussion topic from forums within the portal and other workspaces.
130 Copyright © 1988, 2021, Oracle and/or its affiliates.
Chapter 5 Working in Collaborative Workspaces
• Blogs: Any blog post from blogs within the portal and other workspaces.
• Workspaces: Any active workspace in the PeopleSoft Interaction Hub system.
Field or Control Description
Link Enter the complete URL for an external link—for example, http://www.oracle.com/applications/portals/enterprise/enterprise-portal.html. Otherwise, this field is automaticallypopulated with the link name when PeopleSoft content hasbeen selected.
Alias Enter the text that will appear in your wiki content as theunderlined link. If you selected text prior to clicking the Linkdialog box, do not enter any text here; you will overwrite theexisting text.
Tooltip Enter the hover text to appear as a tool tip when the mousecursor is moved over the link.
Content Type Select one of the following content types:
• Attachments — Any content stored within the Documentsmodule of the current workspace.
Enter search text to search for specific content.
• Discussions — Any discussion topic from forums withinthe portal and other workspaces.
Enter search text to search for specific discussion forumsor topics.
• Blogs — Any blog post from blogs within the portal andother workspaces.
Enter search text to search for specific blogs or posts.
• Workspaces — Any active workspace in the PeopleSoftEnterprise Portal system.
Enter search text to search for specific workspaces andlimit the search by selecting one of the following scopes:
• All Workspaces
• The selected root workspace
• The selected workspace category
• External URL — Any complete URL.
Copyright © 1988, 2021, Oracle and/or its affiliates. 131
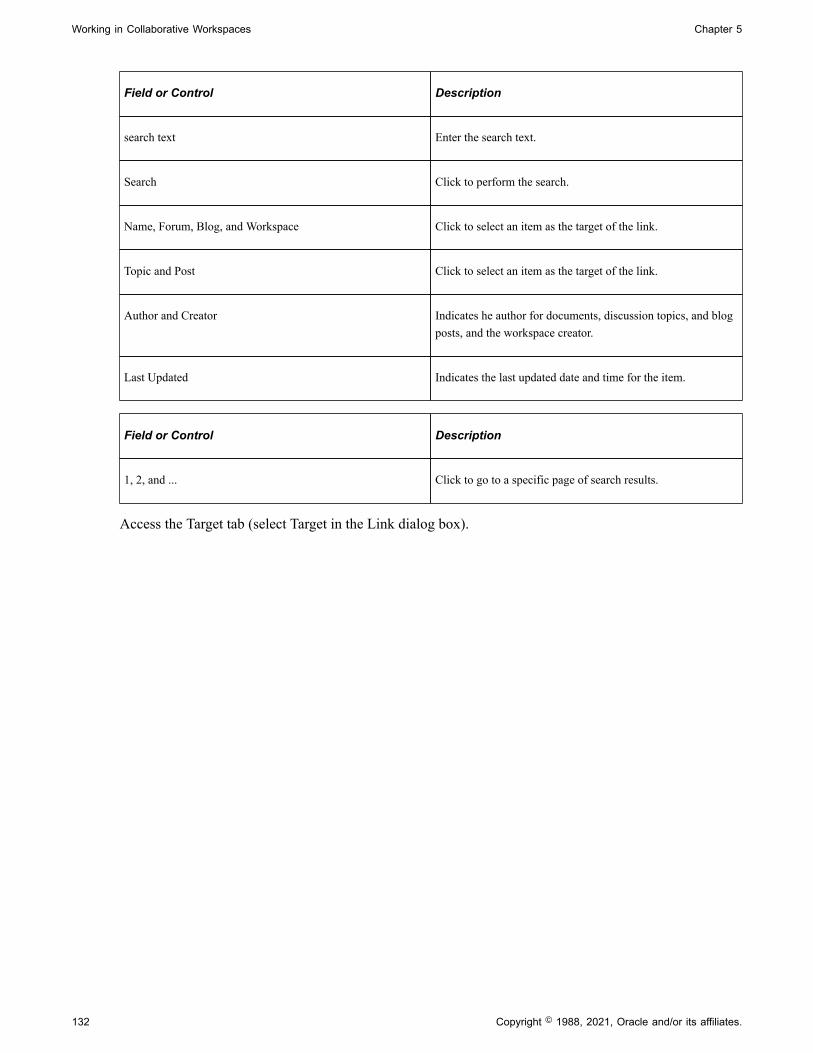
Working in Collaborative Workspaces Chapter 5
Field or Control Description
search text Enter the search text.
Search Click to perform the search.
Name, Forum, Blog, and Workspace Click to select an item as the target of the link.
Topic and Post Click to select an item as the target of the link.
Author and Creator Indicates he author for documents, discussion topics, and blogposts, and the workspace creator.
Last Updated Indicates the last updated date and time for the item.
Field or Control Description
1, 2, and ... Click to go to a specific page of search results.
Access the Target tab (select Target in the Link dialog box).
132 Copyright © 1988, 2021, Oracle and/or its affiliates.
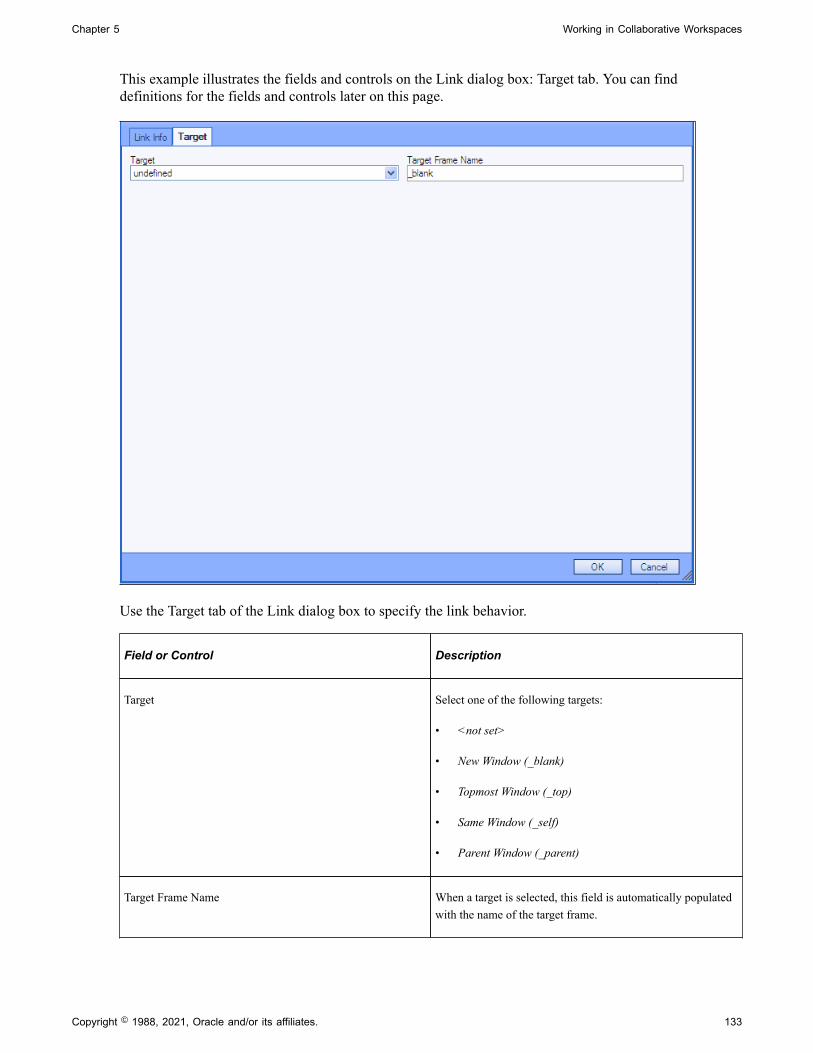
Chapter 5 Working in Collaborative Workspaces
This example illustrates the fields and controls on the Link dialog box: Target tab. You can finddefinitions for the fields and controls later on this page.
Use the Target tab of the Link dialog box to specify the link behavior.
Field or Control Description
Target Select one of the following targets:
• <not set>
• New Window (_blank)
• Topmost Window (_top)
• Same Window (_self)
• Parent Window (_parent)
Target Frame Name When a target is selected, this field is automatically populatedwith the name of the target frame.
Copyright © 1988, 2021, Oracle and/or its affiliates. 133
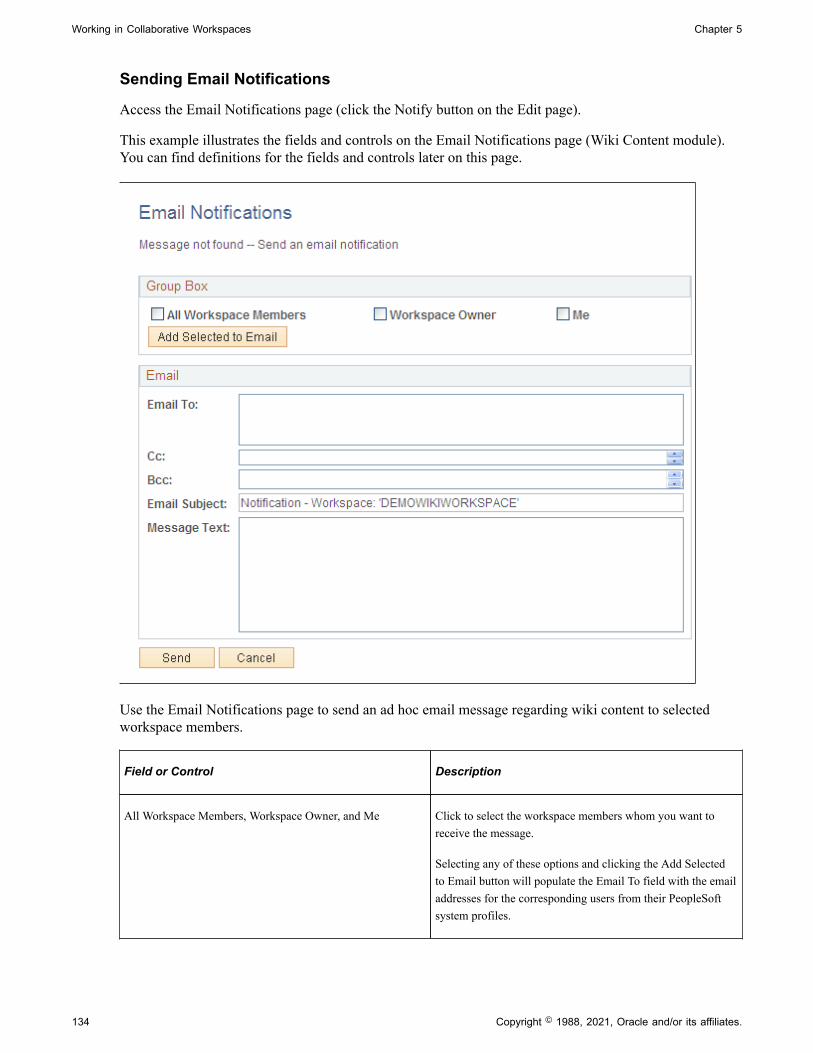
Working in Collaborative Workspaces Chapter 5
Sending Email Notifications
Access the Email Notifications page (click the Notify button on the Edit page).
This example illustrates the fields and controls on the Email Notifications page (Wiki Content module).You can find definitions for the fields and controls later on this page.
Use the Email Notifications page to send an ad hoc email message regarding wiki content to selectedworkspace members.
Field or Control Description
All Workspace Members, Workspace Owner, and Me Click to select the workspace members whom you want toreceive the message.
Selecting any of these options and clicking the Add Selectedto Email button will populate the Email To field with the emailaddresses for the corresponding users from their PeopleSoftsystem profiles.
134 Copyright © 1988, 2021, Oracle and/or its affiliates.
Chapter 5 Working in Collaborative Workspaces
Field or Control Description
Add Selected to Email Click to add email addresses for the selected workspacemembers to the Email To field.
Additionally, you can manually enter email addresses in theEmail To, Cc, and Bcc fields.
Email To Enter the email addresses for individuals whom you want toreceive the email message.
Separate addresses with a comma.
Cc Enter the email addresses for individuals whom you want toreceive the email message as a carbon copy.
Separate addresses with a comma.
Bcc Enter the email addresses for individuals whom you want toreceive the email message as a blind carbon copy.
Separate addresses with a comma.
Email Subject Enter the text for the subject of the email message.
Message Text Enter the text of the message in this text box. The text appearsin the email message along with a URL to the Wiki Contentmodule.
Send Click to send the email notification.
Cancel Click to cancel sending the email notification.
View PageAccess the View page (select View in the Wiki Content module).
Copyright © 1988, 2021, Oracle and/or its affiliates. 135
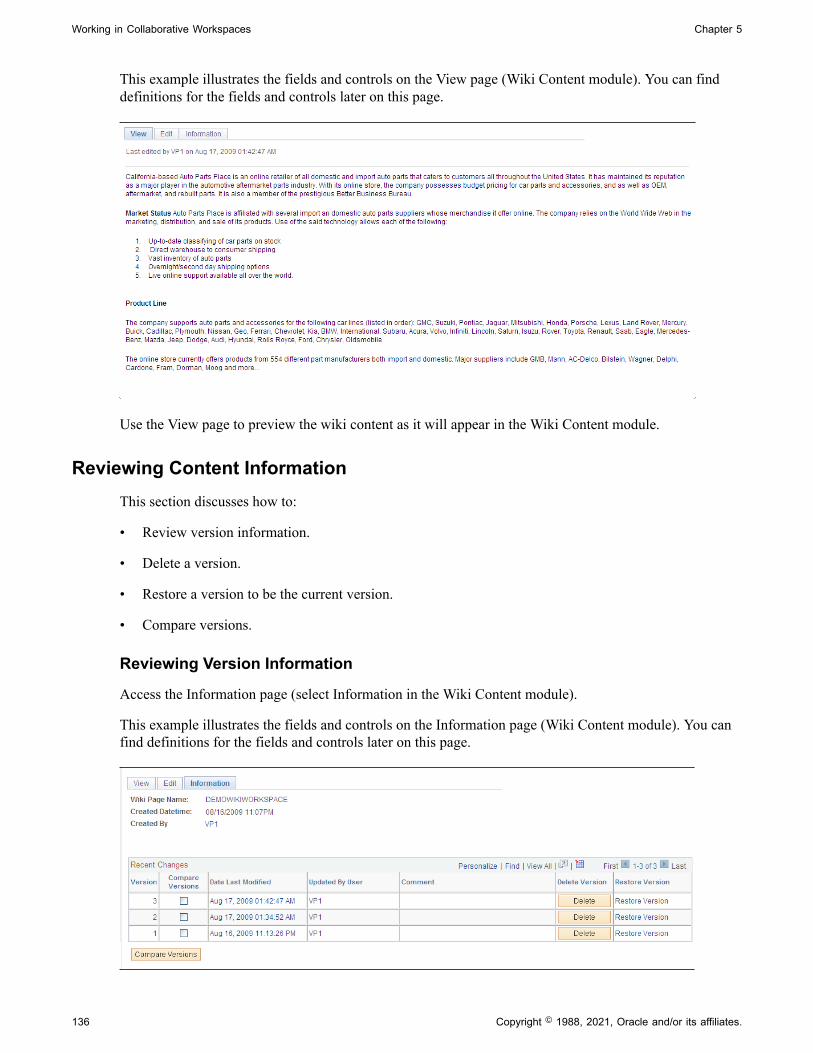
Working in Collaborative Workspaces Chapter 5
This example illustrates the fields and controls on the View page (Wiki Content module). You can finddefinitions for the fields and controls later on this page.
Use the View page to preview the wiki content as it will appear in the Wiki Content module.
Reviewing Content InformationThis section discusses how to:
• Review version information.
• Delete a version.
• Restore a version to be the current version.
• Compare versions.
Reviewing Version Information
Access the Information page (select Information in the Wiki Content module).
This example illustrates the fields and controls on the Information page (Wiki Content module). You canfind definitions for the fields and controls later on this page.
136 Copyright © 1988, 2021, Oracle and/or its affiliates.
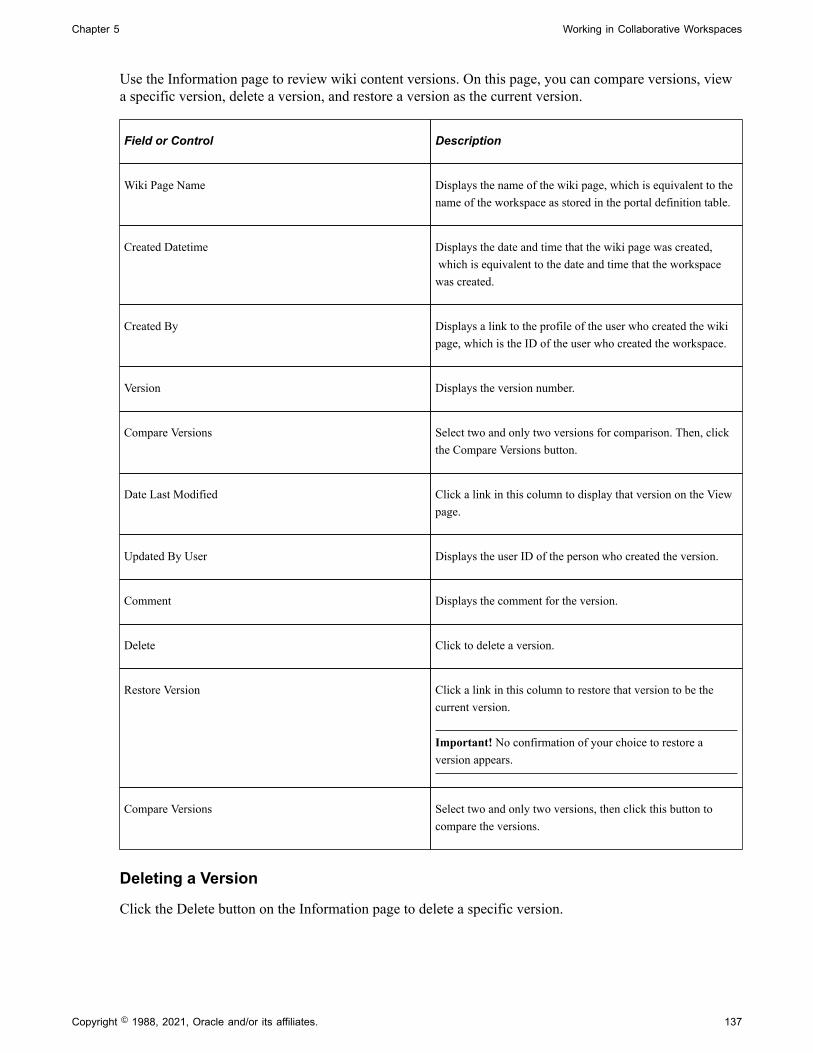
Chapter 5 Working in Collaborative Workspaces
Use the Information page to review wiki content versions. On this page, you can compare versions, viewa specific version, delete a version, and restore a version as the current version.
Field or Control Description
Wiki Page Name Displays the name of the wiki page, which is equivalent to thename of the workspace as stored in the portal definition table.
Created Datetime Displays the date and time that the wiki page was created, which is equivalent to the date and time that the workspacewas created.
Created By Displays a link to the profile of the user who created the wikipage, which is the ID of the user who created the workspace.
Version Displays the version number.
Compare Versions Select two and only two versions for comparison. Then, clickthe Compare Versions button.
Date Last Modified Click a link in this column to display that version on the Viewpage.
Updated By User Displays the user ID of the person who created the version.
Comment Displays the comment for the version.
Delete Click to delete a version.
Restore Version Click a link in this column to restore that version to be thecurrent version.
Important! No confirmation of your choice to restore aversion appears.
Compare Versions Select two and only two versions, then click this button tocompare the versions.
Deleting a Version
Click the Delete button on the Information page to delete a specific version.
Copyright © 1988, 2021, Oracle and/or its affiliates. 137
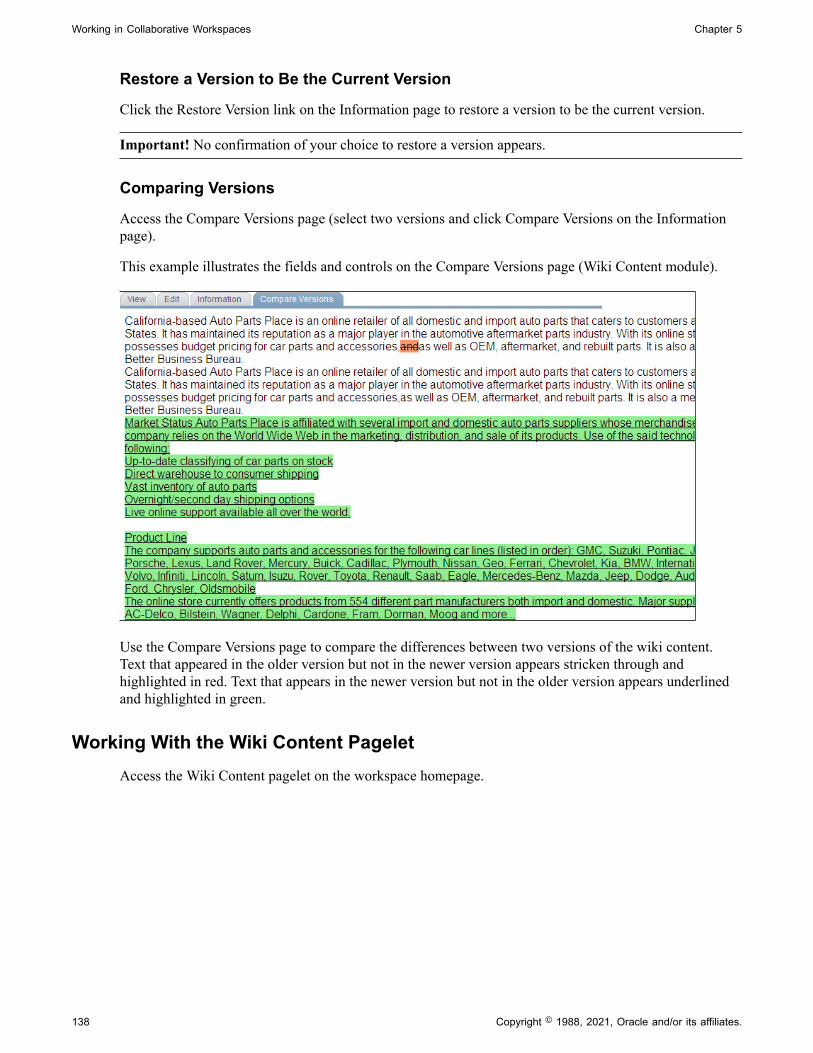
Working in Collaborative Workspaces Chapter 5
Restore a Version to Be the Current Version
Click the Restore Version link on the Information page to restore a version to be the current version.
Important! No confirmation of your choice to restore a version appears.
Comparing Versions
Access the Compare Versions page (select two versions and click Compare Versions on the Informationpage).
This example illustrates the fields and controls on the Compare Versions page (Wiki Content module).
Use the Compare Versions page to compare the differences between two versions of the wiki content.Text that appeared in the older version but not in the newer version appears stricken through andhighlighted in red. Text that appears in the newer version but not in the older version appears underlinedand highlighted in green.
Working With the Wiki Content PageletAccess the Wiki Content pagelet on the workspace homepage.
138 Copyright © 1988, 2021, Oracle and/or its affiliates.
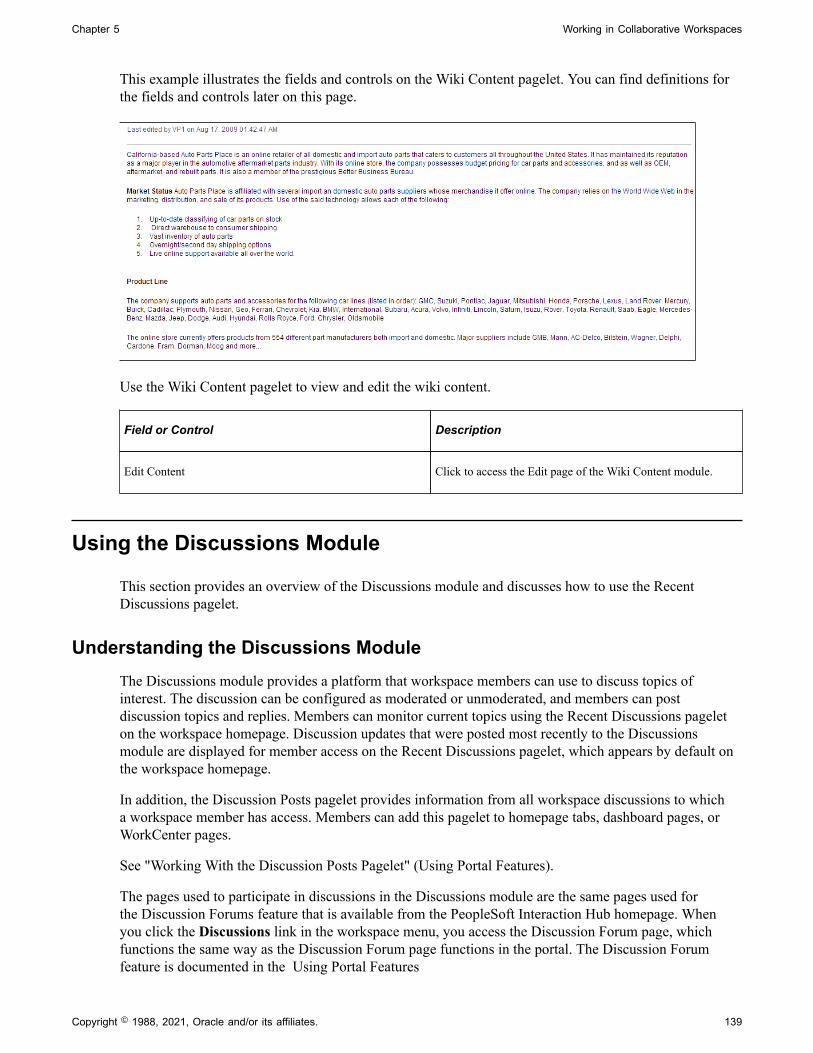
Chapter 5 Working in Collaborative Workspaces
This example illustrates the fields and controls on the Wiki Content pagelet. You can find definitions forthe fields and controls later on this page.
Use the Wiki Content pagelet to view and edit the wiki content.
Field or Control Description
Edit Content Click to access the Edit page of the Wiki Content module.
Using the Discussions Module
This section provides an overview of the Discussions module and discusses how to use the RecentDiscussions pagelet.
Understanding the Discussions ModuleThe Discussions module provides a platform that workspace members can use to discuss topics ofinterest. The discussion can be configured as moderated or unmoderated, and members can postdiscussion topics and replies. Members can monitor current topics using the Recent Discussions pageleton the workspace homepage. Discussion updates that were posted most recently to the Discussionsmodule are displayed for member access on the Recent Discussions pagelet, which appears by default onthe workspace homepage.
In addition, the Discussion Posts pagelet provides information from all workspace discussions to whicha workspace member has access. Members can add this pagelet to homepage tabs, dashboard pages, orWorkCenter pages.
See "Working With the Discussion Posts Pagelet" (Using Portal Features).
The pages used to participate in discussions in the Discussions module are the same pages used forthe Discussion Forums feature that is available from the PeopleSoft Interaction Hub homepage. Whenyou click the Discussions link in the workspace menu, you access the Discussion Forum page, whichfunctions the same way as the Discussion Forum page functions in the portal. The Discussion Forumfeature is documented in the Using Portal Features
Copyright © 1988, 2021, Oracle and/or its affiliates. 139

Working in Collaborative Workspaces Chapter 5
See "Understanding Discussion Forums" (Using Portal Features).
In addition, if a workspace is linked to a transaction or transaction instance that has been configured touse the Discussions related content service, a Related Discussions pagelet is automatically added to theRelated Data module of the workspace. The Related Discussions pagelet displays discussion topics thathave been posted to the transaction or transaction instance.
Related LinksUsing the Related Discussions Pagelet
Using the Recent Discussions PageletAccess the Recent Discussions pagelet on the workspace homepage.
This example illustrates the fields and controls on the Recent Discussions pagelet. You can finddefinitions for the fields and controls later on this page.
Use the Recent Discussions pagelet to review topics and replies that were recently posted in theDiscussions module. The pagelet also includes other convenient links and options for using theDiscussions module.
Field or Control Description
Recent Posts Click a link in the Recent Posts column to view the PostDetails page for that post.
View All Discussions Click to access the Discussion Forum page of the Discussionsmodule.
Move your mouse cursor over any of these to view the list offeeds published for the Discussions module of the workspace. Click any list item to open that feed document.
Click the Feed button or Feed link to open the first feeddocument in the list.
Click the Open menu button to toggle the list of feeds betweenfrozen open and closed.
140 Copyright © 1988, 2021, Oracle and/or its affiliates.
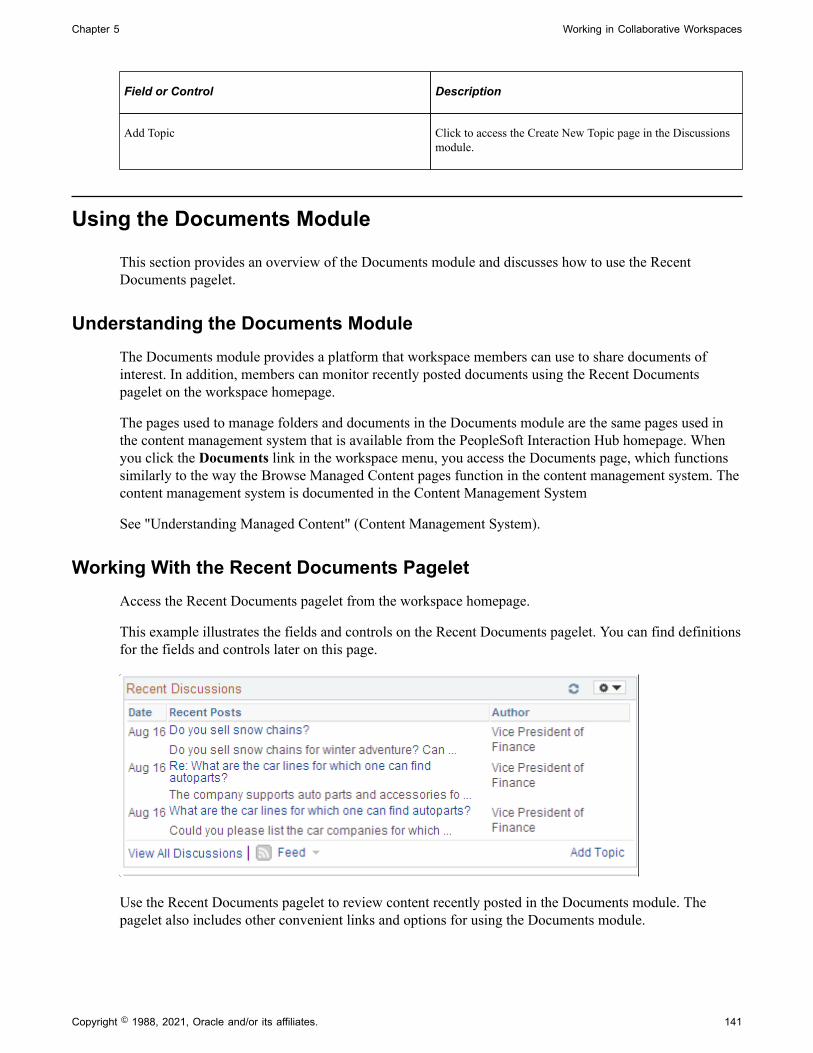
Chapter 5 Working in Collaborative Workspaces
Field or Control Description
Add Topic Click to access the Create New Topic page in the Discussionsmodule.
Using the Documents Module
This section provides an overview of the Documents module and discusses how to use the RecentDocuments pagelet.
Understanding the Documents ModuleThe Documents module provides a platform that workspace members can use to share documents ofinterest. In addition, members can monitor recently posted documents using the Recent Documentspagelet on the workspace homepage.
The pages used to manage folders and documents in the Documents module are the same pages used inthe content management system that is available from the PeopleSoft Interaction Hub homepage. Whenyou click the Documents link in the workspace menu, you access the Documents page, which functionssimilarly to the way the Browse Managed Content pages function in the content management system. Thecontent management system is documented in the Content Management System
See "Understanding Managed Content" (Content Management System).
Working With the Recent Documents PageletAccess the Recent Documents pagelet from the workspace homepage.
This example illustrates the fields and controls on the Recent Documents pagelet. You can find definitionsfor the fields and controls later on this page.
Use the Recent Documents pagelet to review content recently posted in the Documents module. Thepagelet also includes other convenient links and options for using the Documents module.
Copyright © 1988, 2021, Oracle and/or its affiliates. 141
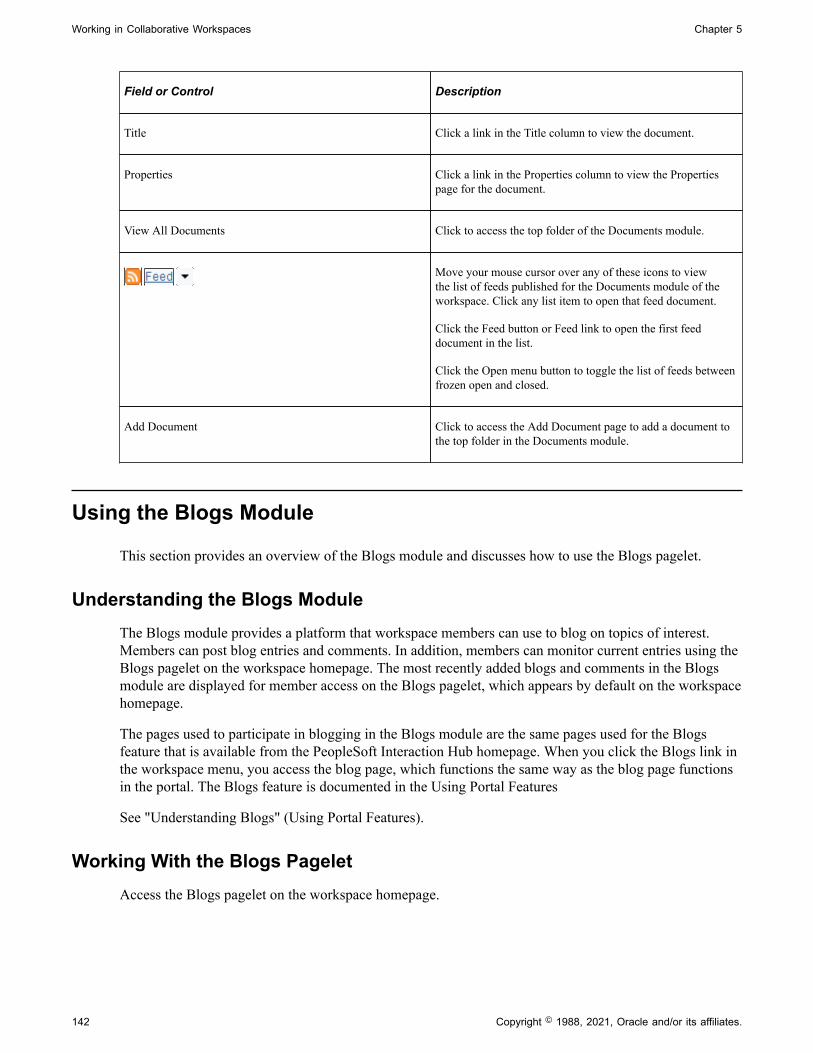
Working in Collaborative Workspaces Chapter 5
Field or Control Description
Title Click a link in the Title column to view the document.
Properties Click a link in the Properties column to view the Propertiespage for the document.
View All Documents Click to access the top folder of the Documents module.
Move your mouse cursor over any of these icons to viewthe list of feeds published for the Documents module of theworkspace. Click any list item to open that feed document.
Click the Feed button or Feed link to open the first feeddocument in the list.
Click the Open menu button to toggle the list of feeds betweenfrozen open and closed.
Add Document Click to access the Add Document page to add a document tothe top folder in the Documents module.
Using the Blogs Module
This section provides an overview of the Blogs module and discusses how to use the Blogs pagelet.
Understanding the Blogs ModuleThe Blogs module provides a platform that workspace members can use to blog on topics of interest.Members can post blog entries and comments. In addition, members can monitor current entries using theBlogs pagelet on the workspace homepage. The most recently added blogs and comments in the Blogsmodule are displayed for member access on the Blogs pagelet, which appears by default on the workspacehomepage.
The pages used to participate in blogging in the Blogs module are the same pages used for the Blogsfeature that is available from the PeopleSoft Interaction Hub homepage. When you click the Blogs link inthe workspace menu, you access the blog page, which functions the same way as the blog page functionsin the portal. The Blogs feature is documented in the Using Portal Features
See "Understanding Blogs" (Using Portal Features).
Working With the Blogs PageletAccess the Blogs pagelet on the workspace homepage.
142 Copyright © 1988, 2021, Oracle and/or its affiliates.
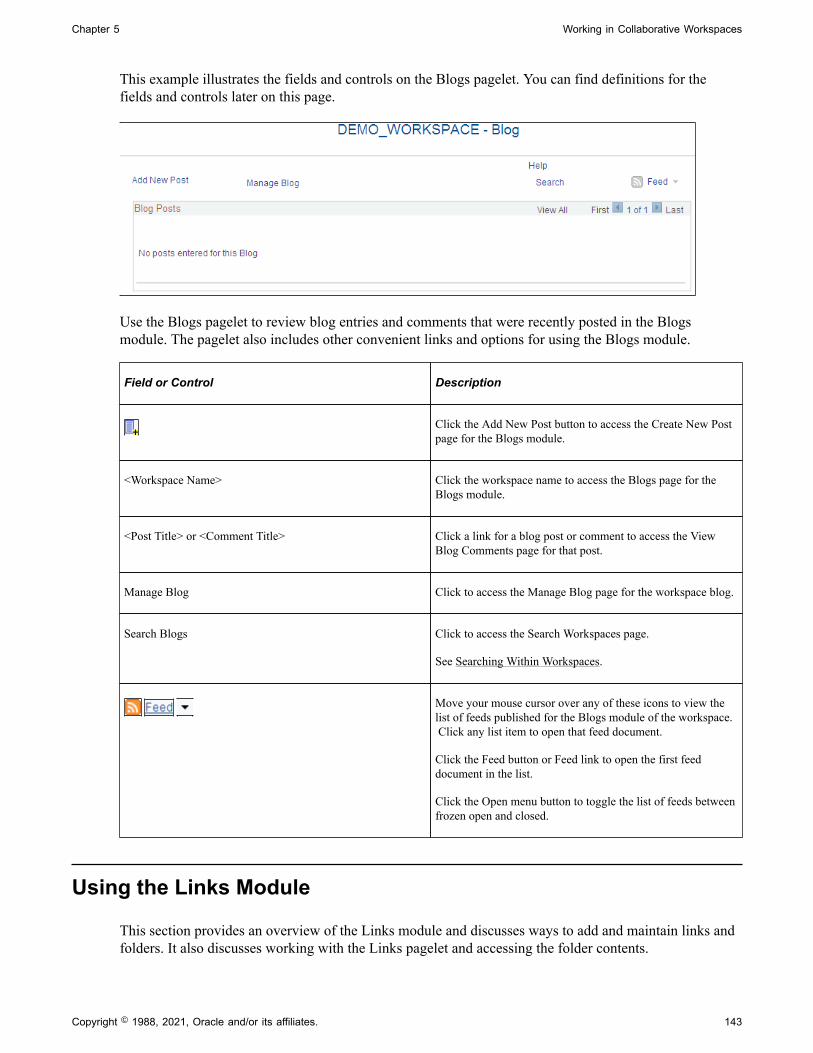
Chapter 5 Working in Collaborative Workspaces
This example illustrates the fields and controls on the Blogs pagelet. You can find definitions for thefields and controls later on this page.
Use the Blogs pagelet to review blog entries and comments that were recently posted in the Blogsmodule. The pagelet also includes other convenient links and options for using the Blogs module.
Field or Control Description
Click the Add New Post button to access the Create New Postpage for the Blogs module.
<Workspace Name> Click the workspace name to access the Blogs page for theBlogs module.
<Post Title> or <Comment Title> Click a link for a blog post or comment to access the ViewBlog Comments page for that post.
Manage Blog Click to access the Manage Blog page for the workspace blog.
Search Blogs Click to access the Search Workspaces page.
See Searching Within Workspaces.
Move your mouse cursor over any of these icons to view thelist of feeds published for the Blogs module of the workspace. Click any list item to open that feed document.
Click the Feed button or Feed link to open the first feeddocument in the list.
Click the Open menu button to toggle the list of feeds betweenfrozen open and closed.
Using the Links Module
This section provides an overview of the Links module and discusses ways to add and maintain links andfolders. It also discusses working with the Links pagelet and accessing the folder contents.
Copyright © 1988, 2021, Oracle and/or its affiliates. 143
Working in Collaborative Workspaces Chapter 5
Pages Used in the Links Module
Page Name Definition Name Usage
Links Page EPPCW_LKBROWSE Add, edit, and delete folders and links inthe Links module.
Folder Link Page EPPCW_LKCONTENT Add links to a folder. Access the linkcontents of a folder.
Link Properties Page EPPCW_LKLINK Add and maintain links in the Linksmodule.
See Adding a Link
Search Links Page EPPCW_ADD_LINK Search for blog posts, discussion topics, or workspaces to which to link.
See Adding a Link
Key Name Mapping Page EPPCW_LKKEYMAP Select the keys that you want to pass tothe link and provide optional new namesfor these keys.
See Adding a Link
Select New Parent Folder Page EPPCW_LKNEW_PRNT View a graphical display of thecollection of folders and links defined forthe Links module and select the folderin which you want the selected link toreside.
See Adding a Link
Folder Properties Page EPPCW_LKFOLDER Add and maintain folders in the Linksmodule.
Understanding the Links ModuleUse the Links module to build and maintain a collection of useful links that are related to a workspace.This collection of links is displayed for member use on the Links pagelet, which appears by default on theworkspace homepage.
You can include links to the following types of content:
• External URLs.
• PeopleSoft menu items.
If you define a Link pagelet collection as a part of a workspace template, the collection will appear in theLink pagelet in any workspaces built by means of the template.
144 Copyright © 1988, 2021, Oracle and/or its affiliates.
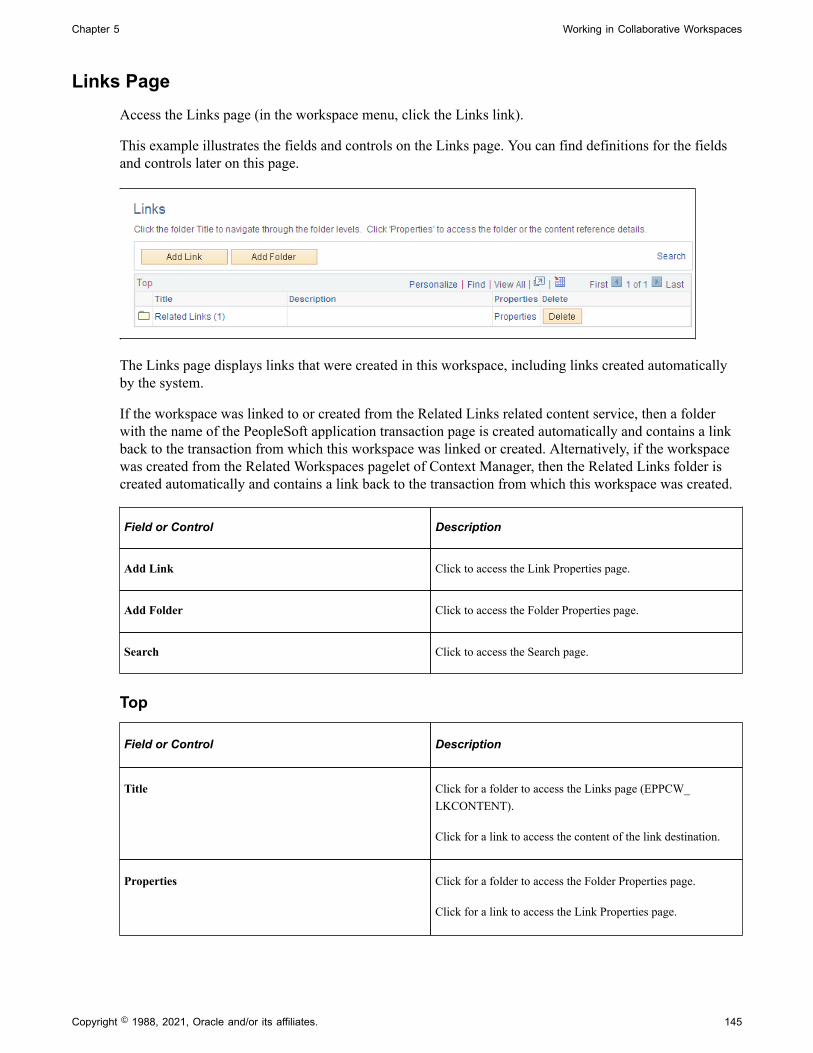
Chapter 5 Working in Collaborative Workspaces
Links PageAccess the Links page (in the workspace menu, click the Links link).
This example illustrates the fields and controls on the Links page. You can find definitions for the fieldsand controls later on this page.
The Links page displays links that were created in this workspace, including links created automaticallyby the system.
If the workspace was linked to or created from the Related Links related content service, then a folderwith the name of the PeopleSoft application transaction page is created automatically and contains a linkback to the transaction from which this workspace was linked or created. Alternatively, if the workspacewas created from the Related Workspaces pagelet of Context Manager, then the Related Links folder iscreated automatically and contains a link back to the transaction from which this workspace was created.
Field or Control Description
Add Link Click to access the Link Properties page.
Add Folder Click to access the Folder Properties page.
Search Click to access the Search page.
Top
Field or Control Description
Title Click for a folder to access the Links page (EPPCW_LKCONTENT).
Click for a link to access the content of the link destination.
Properties Click for a folder to access the Folder Properties page.
Click for a link to access the Link Properties page.
Copyright © 1988, 2021, Oracle and/or its affiliates. 145
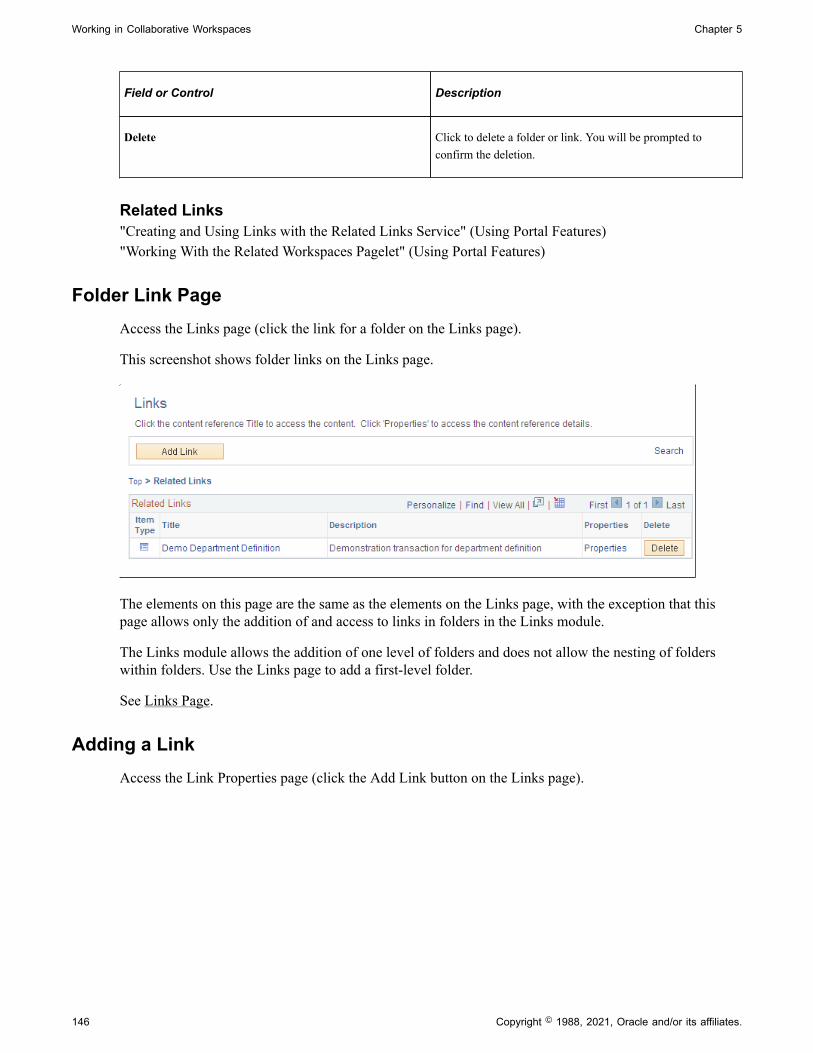
Working in Collaborative Workspaces Chapter 5
Field or Control Description
Delete Click to delete a folder or link. You will be prompted toconfirm the deletion.
Related Links"Creating and Using Links with the Related Links Service" (Using Portal Features)"Working With the Related Workspaces Pagelet" (Using Portal Features)
Folder Link PageAccess the Links page (click the link for a folder on the Links page).
This screenshot shows folder links on the Links page.
The elements on this page are the same as the elements on the Links page, with the exception that thispage allows only the addition of and access to links in folders in the Links module.
The Links module allows the addition of one level of folders and does not allow the nesting of folderswithin folders. Use the Links page to add a first-level folder.
See Links Page.
Adding a LinkAccess the Link Properties page (click the Add Link button on the Links page).
146 Copyright © 1988, 2021, Oracle and/or its affiliates.
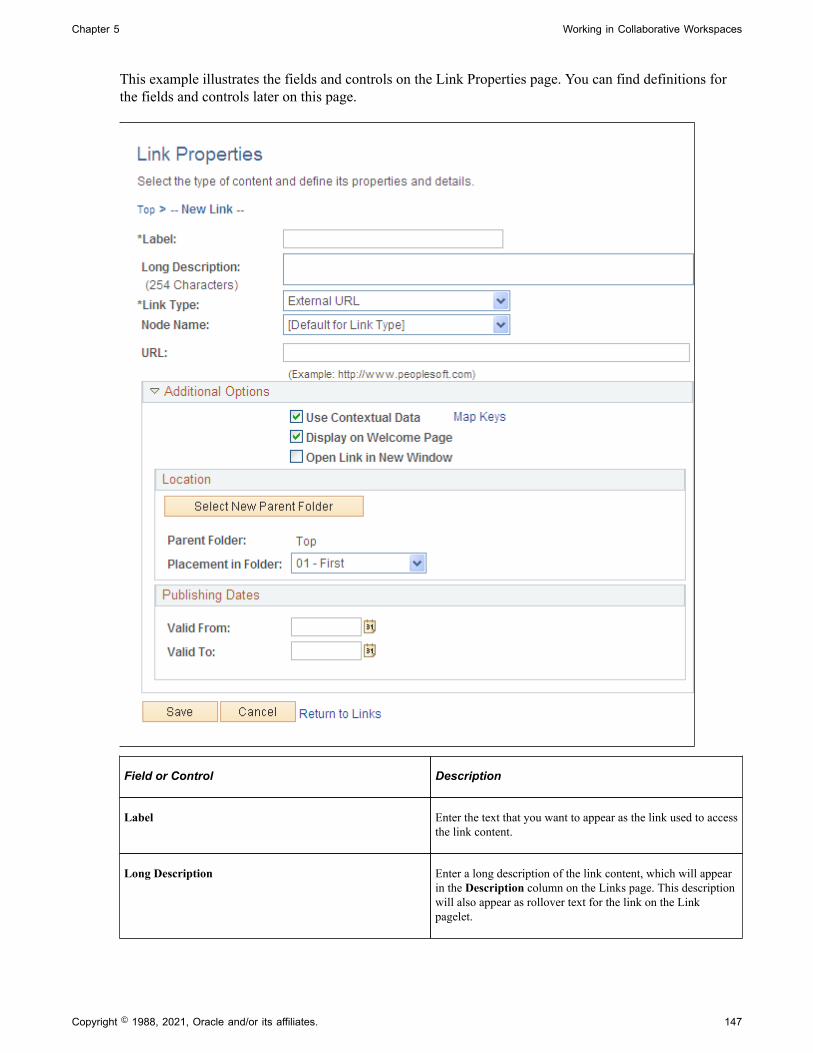
Chapter 5 Working in Collaborative Workspaces
This example illustrates the fields and controls on the Link Properties page. You can find definitions forthe fields and controls later on this page.
Field or Control Description
Label Enter the text that you want to appear as the link used to accessthe link content.
Long Description Enter a long description of the link content, which will appearin the Description column on the Links page. This descriptionwill also appear as rollover text for the link on the Linkpagelet.
Copyright © 1988, 2021, Oracle and/or its affiliates. 147
Working in Collaborative Workspaces Chapter 5
Field or Control Description
Link Type Select the link type:
• External URL — Select to add a link to an external URL. If selected, the URL field displays.
• Menu Item — Select to add a link to a PeopleSoft menuitem. This establishes a link to a content reference in theportal registry. If selected, the Portal and Menu Itemfields display.
• Portal Blog — Select to add a link to a portal blog post. Select the link on the Search Links page.
• Portal Discussions — Select to add a link to a discussionforum topic. Select the link on the Search Links page.
• Workspace — Select to add a link to a workspace. Selectthe link on the Search Links page.
URL This field appears when the Link Type field is set to ExternalURL. Enter the URL address of the website to which you wantto create a link.
Portal This field appears when the Link Type field is set to MenuItem. Select the portal in which the menu item for which youwant to provide a link resides.
Menu Item This field appears when the Link Type field is set to MenuItem. Select the menu item to which you want to provide alink.
Go to the Portal Registry Entry for this CREF The field appears once link properties have been saved. Clickto access the Content Ref Administration page for the menuitem.
See the product documentation for PeopleTools: PortalTechnology,“Administering Portals,” Administering ContentReferences.
Additional Options
Field or Control Description
Use Contextual Data Select to use contextual data defined in the workspace toderive link content.
For example, if you create a workspace that containscontextual data to a specific transaction or URL, a link to thetransaction or URL will automatically be added to the RelatedLinks folder on the Links pagelet for the workspace.
148 Copyright © 1988, 2021, Oracle and/or its affiliates.

Chapter 5 Working in Collaborative Workspaces
Field or Control Description
Map Key Click to display the Key Name Mapping page, enabling you toselect the keys passed to the link.
Display on Welcome Page Select to display the link in the Links pagelet on the workspacehomepage.
Open Link in New Window Select to indicate that, when this link is accessed, you want thelink content to appear in a new window. If this option is notselected, then when this link is accessed, the link content isdisplayed within your workspace frame.
Location
The Location group box appears once link properties have been saved. The fields in this group boxenable you to change the location of an existing link.
Field or Control Description
Select New Parent Folder Click to access the Select New Parent Folder page, where youcan move the link to a folder other than the current folder.
Parent Folder Displays the name of the parent folder of the link.
Placement in Folder Select a value in the drop-down list box to change theplacement of the link within its parent folder. Availableplacement values reflect saved link sequencing.
Publishing Dates
Field or Control Description
Valid From Enter a date on which the link will be valid. This is the date onwhich the link appears on the Links pagelet on the workspacehomepage. If you do not enter a value, the link appears whenthe data is saved.
Valid To Enter a date on which the link ceases to be valid. This is thedate on which the link no longer appears in the Links pageleton the workspace homepage. If you do not enter a value, thelink does not expire.
Copyright © 1988, 2021, Oracle and/or its affiliates. 149
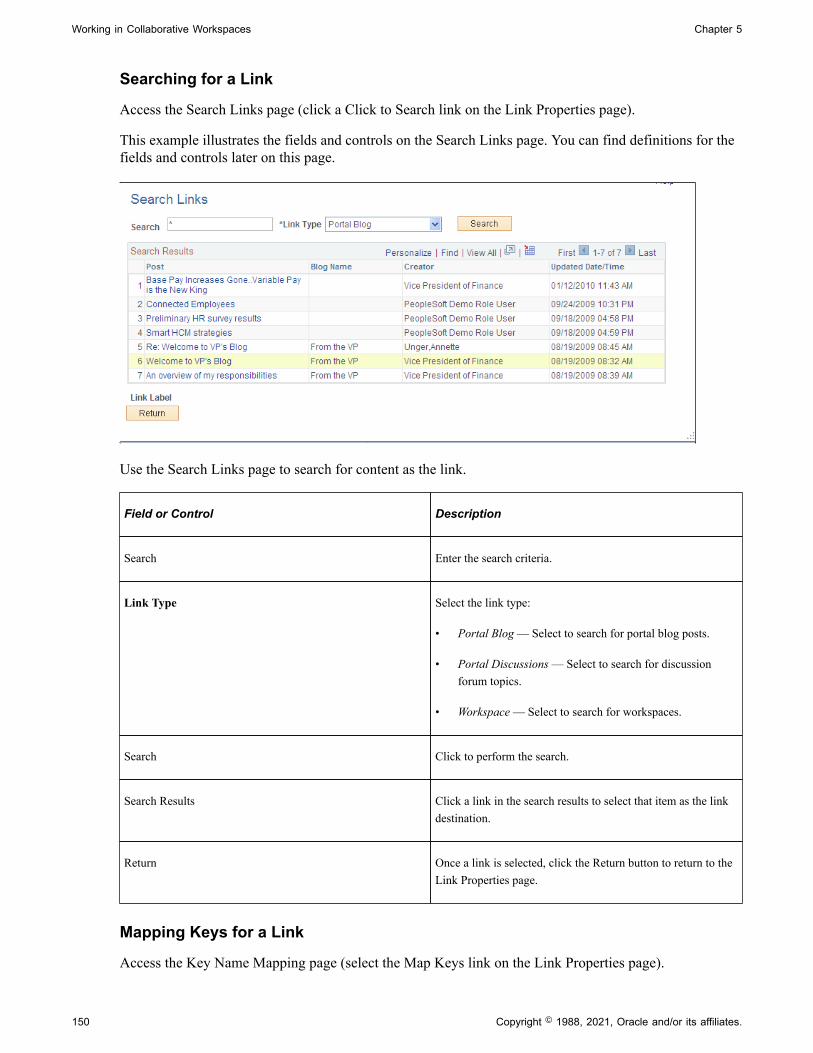
Working in Collaborative Workspaces Chapter 5
Searching for a Link
Access the Search Links page (click a Click to Search link on the Link Properties page).
This example illustrates the fields and controls on the Search Links page. You can find definitions for thefields and controls later on this page.
Use the Search Links page to search for content as the link.
Field or Control Description
Search Enter the search criteria.
Link Type Select the link type:
• Portal Blog — Select to search for portal blog posts.
• Portal Discussions — Select to search for discussionforum topics.
• Workspace — Select to search for workspaces.
Search Click to perform the search.
Search Results Click a link in the search results to select that item as the linkdestination.
Return Once a link is selected, click the Return button to return to theLink Properties page.
Mapping Keys for a Link
Access the Key Name Mapping page (select the Map Keys link on the Link Properties page).
150 Copyright © 1988, 2021, Oracle and/or its affiliates.
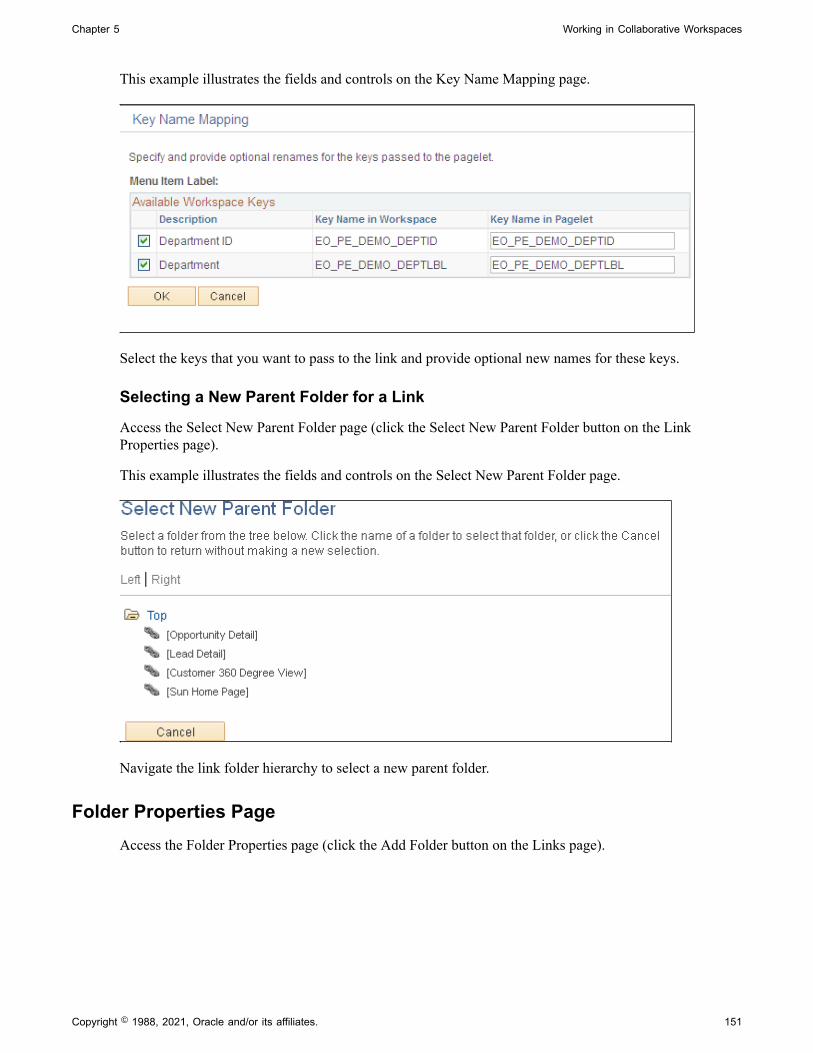
Chapter 5 Working in Collaborative Workspaces
This example illustrates the fields and controls on the Key Name Mapping page.
Select the keys that you want to pass to the link and provide optional new names for these keys.
Selecting a New Parent Folder for a Link
Access the Select New Parent Folder page (click the Select New Parent Folder button on the LinkProperties page).
This example illustrates the fields and controls on the Select New Parent Folder page.
Navigate the link folder hierarchy to select a new parent folder.
Folder Properties PageAccess the Folder Properties page (click the Add Folder button on the Links page).
Copyright © 1988, 2021, Oracle and/or its affiliates. 151
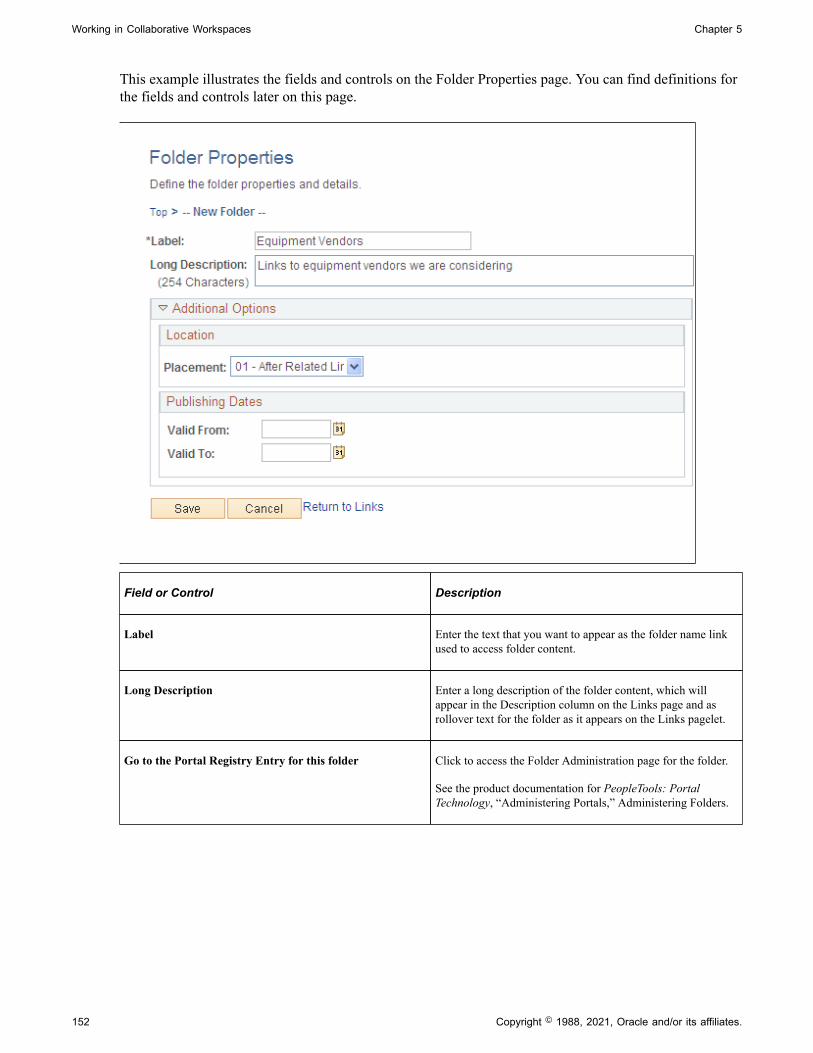
Working in Collaborative Workspaces Chapter 5
This example illustrates the fields and controls on the Folder Properties page. You can find definitions forthe fields and controls later on this page.
Field or Control Description
Label Enter the text that you want to appear as the folder name linkused to access folder content.
Long Description Enter a long description of the folder content, which willappear in the Description column on the Links page and asrollover text for the folder as it appears on the Links pagelet.
Go to the Portal Registry Entry for this folder Click to access the Folder Administration page for the folder.
See the product documentation for PeopleTools: PortalTechnology, “Administering Portals,” Administering Folders.
152 Copyright © 1988, 2021, Oracle and/or its affiliates.
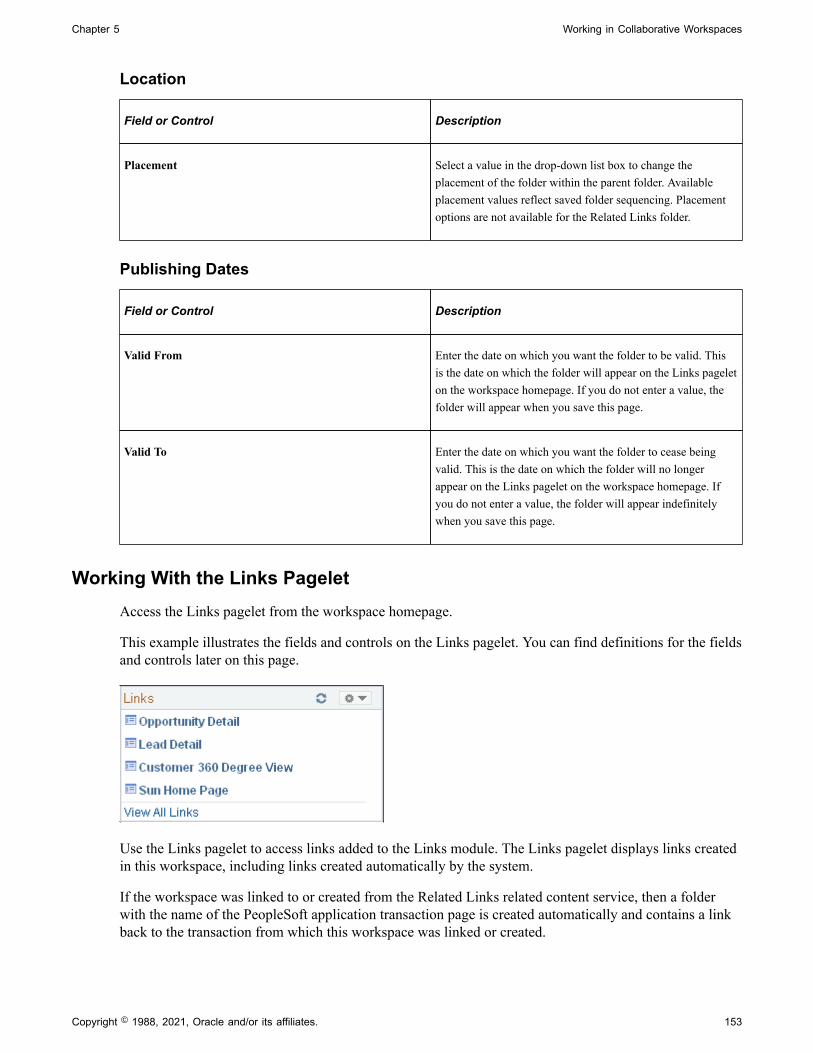
Chapter 5 Working in Collaborative Workspaces
Location
Field or Control Description
Placement Select a value in the drop-down list box to change theplacement of the folder within the parent folder. Availableplacement values reflect saved folder sequencing. Placementoptions are not available for the Related Links folder.
Publishing Dates
Field or Control Description
Valid From Enter the date on which you want the folder to be valid. Thisis the date on which the folder will appear on the Links pageleton the workspace homepage. If you do not enter a value, thefolder will appear when you save this page.
Valid To Enter the date on which you want the folder to cease beingvalid. This is the date on which the folder will no longerappear on the Links pagelet on the workspace homepage. Ifyou do not enter a value, the folder will appear indefinitelywhen you save this page.
Working With the Links PageletAccess the Links pagelet from the workspace homepage.
This example illustrates the fields and controls on the Links pagelet. You can find definitions for the fieldsand controls later on this page.
Use the Links pagelet to access links added to the Links module. The Links pagelet displays links createdin this workspace, including links created automatically by the system.
If the workspace was linked to or created from the Related Links related content service, then a folderwith the name of the PeopleSoft application transaction page is created automatically and contains a linkback to the transaction from which this workspace was linked or created.
Copyright © 1988, 2021, Oracle and/or its affiliates. 153
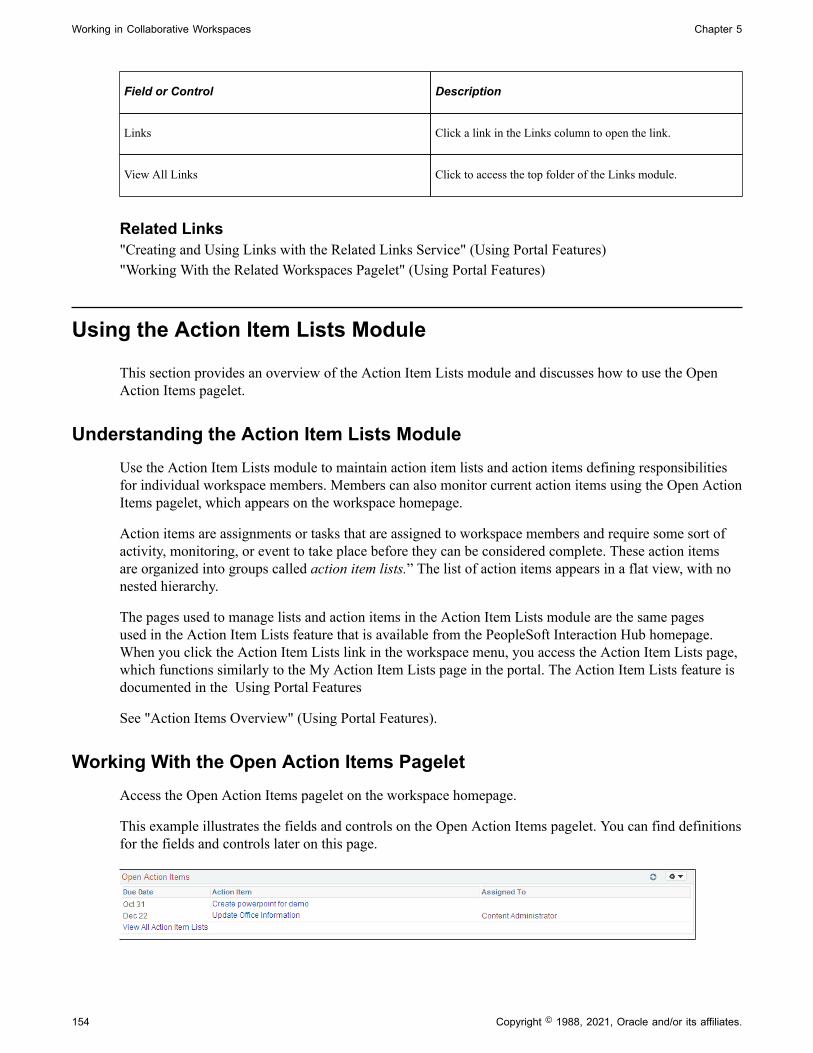
Working in Collaborative Workspaces Chapter 5
Field or Control Description
Links Click a link in the Links column to open the link.
View All Links Click to access the top folder of the Links module.
Related Links"Creating and Using Links with the Related Links Service" (Using Portal Features)"Working With the Related Workspaces Pagelet" (Using Portal Features)
Using the Action Item Lists Module
This section provides an overview of the Action Item Lists module and discusses how to use the OpenAction Items pagelet.
Understanding the Action Item Lists ModuleUse the Action Item Lists module to maintain action item lists and action items defining responsibilitiesfor individual workspace members. Members can also monitor current action items using the Open ActionItems pagelet, which appears on the workspace homepage.
Action items are assignments or tasks that are assigned to workspace members and require some sort ofactivity, monitoring, or event to take place before they can be considered complete. These action itemsare organized into groups called action item lists.” The list of action items appears in a flat view, with nonested hierarchy.
The pages used to manage lists and action items in the Action Item Lists module are the same pagesused in the Action Item Lists feature that is available from the PeopleSoft Interaction Hub homepage.When you click the Action Item Lists link in the workspace menu, you access the Action Item Lists page,which functions similarly to the My Action Item Lists page in the portal. The Action Item Lists feature isdocumented in the Using Portal Features
See "Action Items Overview" (Using Portal Features).
Working With the Open Action Items PageletAccess the Open Action Items pagelet on the workspace homepage.
This example illustrates the fields and controls on the Open Action Items pagelet. You can find definitionsfor the fields and controls later on this page.
154 Copyright © 1988, 2021, Oracle and/or its affiliates.
Chapter 5 Working in Collaborative Workspaces
Use the Open Action Items pagelet to review open action items in the Action Item Lists module. Thepagelet also includes other convenient links for using the Action Item Lists module.
Field or Control Description
Action Item Click a link in the Action Item column to view the Action ItemDetails page for that item.
View All Action Item Lists Click to access the Action Item Lists page of the Action ItemLists module.
Using the Calendar Module
This section provides an overview of the Calendar module and discusses how to:
• Work with the Calendar pagelet.
• Work with the Upcoming Events pagelet.
Understanding the Calendar ModuleUse the Calendar module to maintain and manage the workspace calendar and events to coordinate theactivities of the workspace team. Workspace members can share, organize, and communicate about eventsthat pertain to the workspace through the workspace calendar.
Using the Calendar module, you can:
• Schedule and display holidays.
• Synchronize events from holiday calendars to the workspace calendar.
• Specify weekends in the workspace calendar (in addition to the installation options).
Workspace members can also view calendar events in the Calendar pagelet and the Upcoming Eventspagelet on the workspace homepage or in the full-page view in the Calendar module.
The pages used to manage the workspace calendar and events in the Calendar module are the samepages used in the Community Calendars feature that is available from the PeopleSoft Interaction Hubhomepage. When you click the Calendar link in the workspace menu, you access the Calendar page,which functions similarly to the Calendar page in the portal. The Community Calendars feature isdocumented in the Using Portal Features
See "Understanding Community Calendars" (Using Portal Features).
Working With the Calendar PageletAccess the Calendar pagelet on the workspace homepage.
Copyright © 1988, 2021, Oracle and/or its affiliates. 155
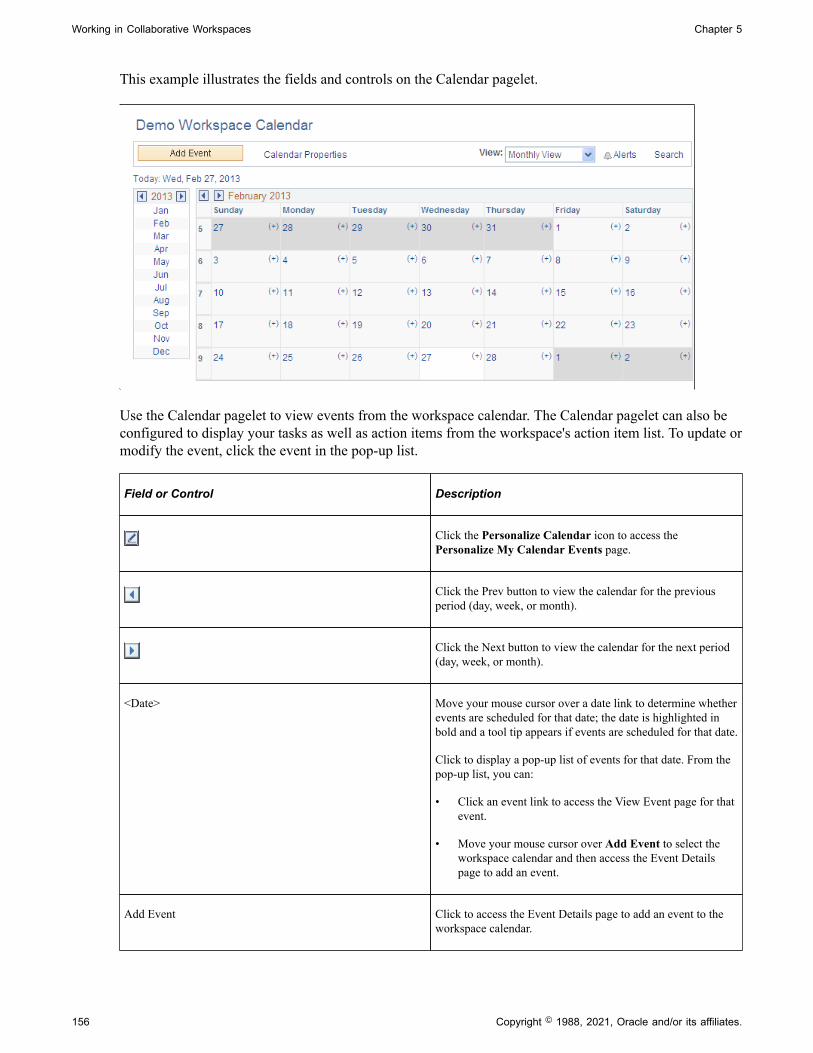
Working in Collaborative Workspaces Chapter 5
This example illustrates the fields and controls on the Calendar pagelet.
Use the Calendar pagelet to view events from the workspace calendar. The Calendar pagelet can also beconfigured to display your tasks as well as action items from the workspace's action item list. To update ormodify the event, click the event in the pop-up list.
Field or Control Description
Click the Personalize Calendar icon to access thePersonalize My Calendar Events page.
Click the Prev button to view the calendar for the previousperiod (day, week, or month).
Click the Next button to view the calendar for the next period (day, week, or month).
<Date> Move your mouse cursor over a date link to determine whetherevents are scheduled for that date; the date is highlighted inbold and a tool tip appears if events are scheduled for that date.
Click to display a pop-up list of events for that date. From thepop-up list, you can:
• Click an event link to access the View Event page for thatevent.
• Move your mouse cursor over Add Event to select theworkspace calendar and then access the Event Detailspage to add an event.
Add Event Click to access the Event Details page to add an event to theworkspace calendar.
156 Copyright © 1988, 2021, Oracle and/or its affiliates.
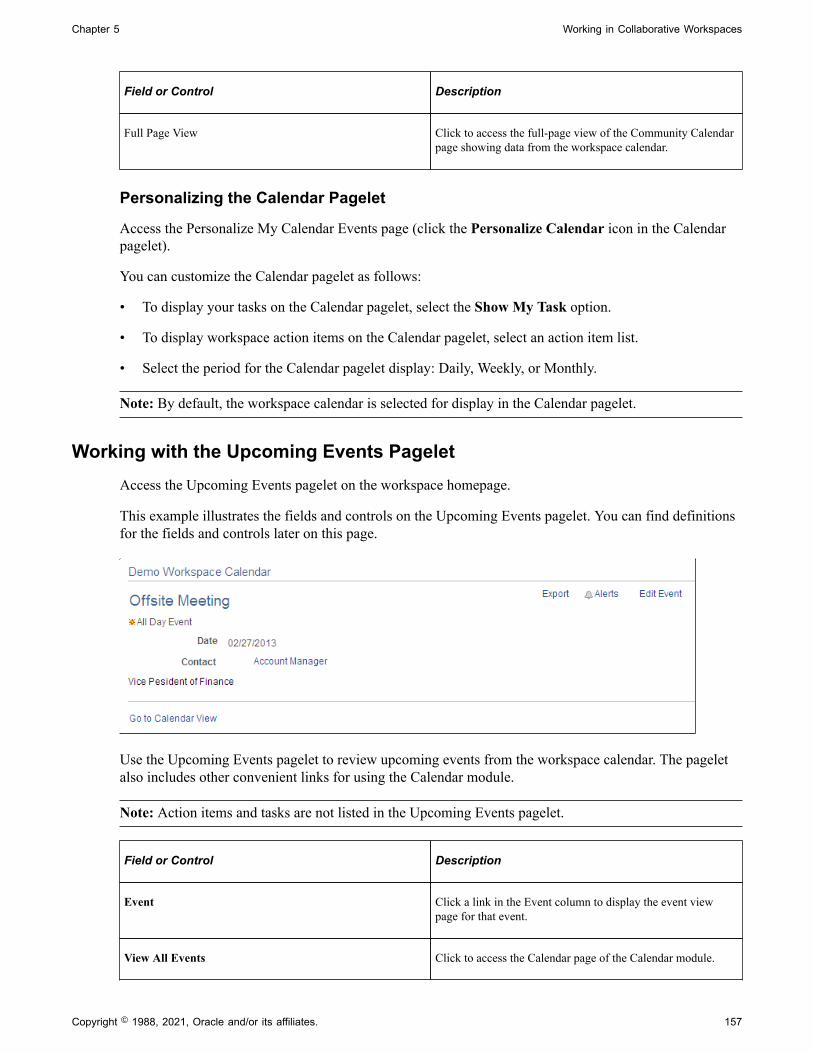
Chapter 5 Working in Collaborative Workspaces
Field or Control Description
Full Page View Click to access the full-page view of the Community Calendarpage showing data from the workspace calendar.
Personalizing the Calendar Pagelet
Access the Personalize My Calendar Events page (click the Personalize Calendar icon in the Calendarpagelet).
You can customize the Calendar pagelet as follows:
• To display your tasks on the Calendar pagelet, select the Show My Task option.
• To display workspace action items on the Calendar pagelet, select an action item list.
• Select the period for the Calendar pagelet display: Daily, Weekly, or Monthly.
Note: By default, the workspace calendar is selected for display in the Calendar pagelet.
Working with the Upcoming Events PageletAccess the Upcoming Events pagelet on the workspace homepage.
This example illustrates the fields and controls on the Upcoming Events pagelet. You can find definitionsfor the fields and controls later on this page.
Use the Upcoming Events pagelet to review upcoming events from the workspace calendar. The pageletalso includes other convenient links for using the Calendar module.
Note: Action items and tasks are not listed in the Upcoming Events pagelet.
Field or Control Description
Event Click a link in the Event column to display the event viewpage for that event.
View All Events Click to access the Calendar page of the Calendar module.
Copyright © 1988, 2021, Oracle and/or its affiliates. 157
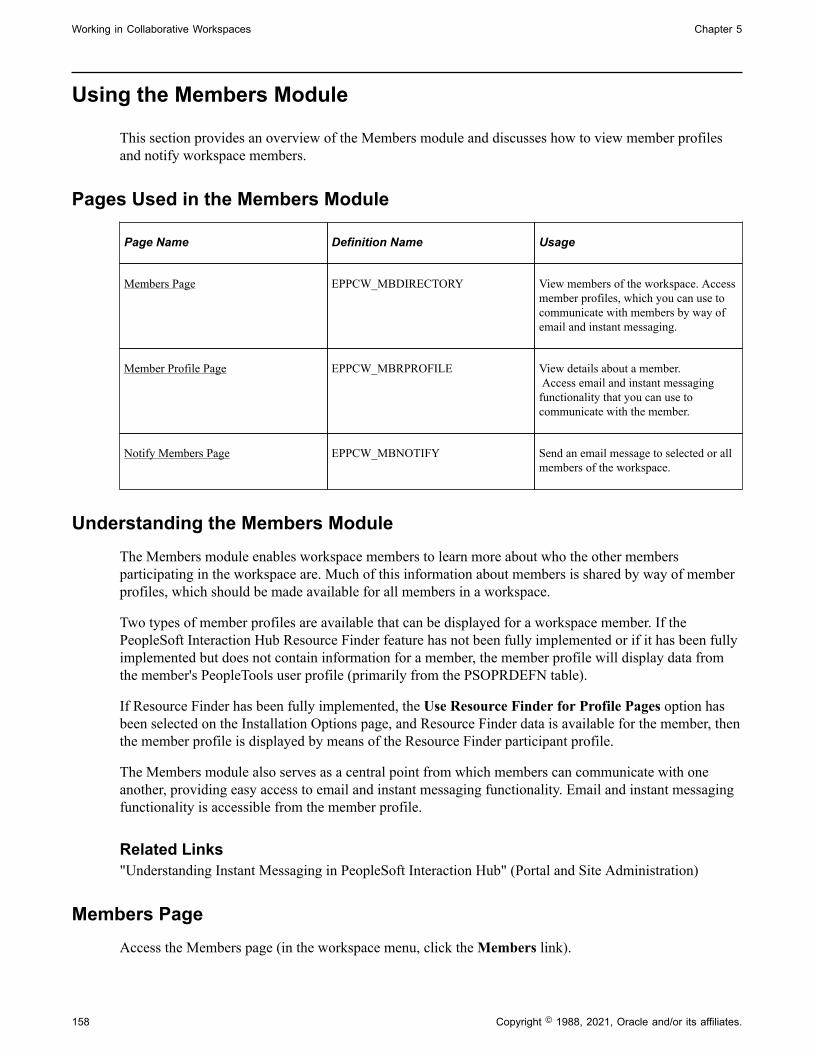
Working in Collaborative Workspaces Chapter 5
Using the Members Module
This section provides an overview of the Members module and discusses how to view member profilesand notify workspace members.
Pages Used in the Members Module
Page Name Definition Name Usage
Members Page EPPCW_MBDIRECTORY View members of the workspace. Accessmember profiles, which you can use tocommunicate with members by way ofemail and instant messaging.
Member Profile Page EPPCW_MBRPROFILE View details about a member. Access email and instant messagingfunctionality that you can use tocommunicate with the member.
Notify Members Page EPPCW_MBNOTIFY Send an email message to selected or allmembers of the workspace.
Understanding the Members ModuleThe Members module enables workspace members to learn more about who the other membersparticipating in the workspace are. Much of this information about members is shared by way of memberprofiles, which should be made available for all members in a workspace.
Two types of member profiles are available that can be displayed for a workspace member. If thePeopleSoft Interaction Hub Resource Finder feature has not been fully implemented or if it has been fullyimplemented but does not contain information for a member, the member profile will display data fromthe member's PeopleTools user profile (primarily from the PSOPRDEFN table).
If Resource Finder has been fully implemented, the Use Resource Finder for Profile Pages option hasbeen selected on the Installation Options page, and Resource Finder data is available for the member, thenthe member profile is displayed by means of the Resource Finder participant profile.
The Members module also serves as a central point from which members can communicate with oneanother, providing easy access to email and instant messaging functionality. Email and instant messagingfunctionality is accessible from the member profile.
Related Links"Understanding Instant Messaging in PeopleSoft Interaction Hub" (Portal and Site Administration)
Members PageAccess the Members page (in the workspace menu, click the Members link).
158 Copyright © 1988, 2021, Oracle and/or its affiliates.
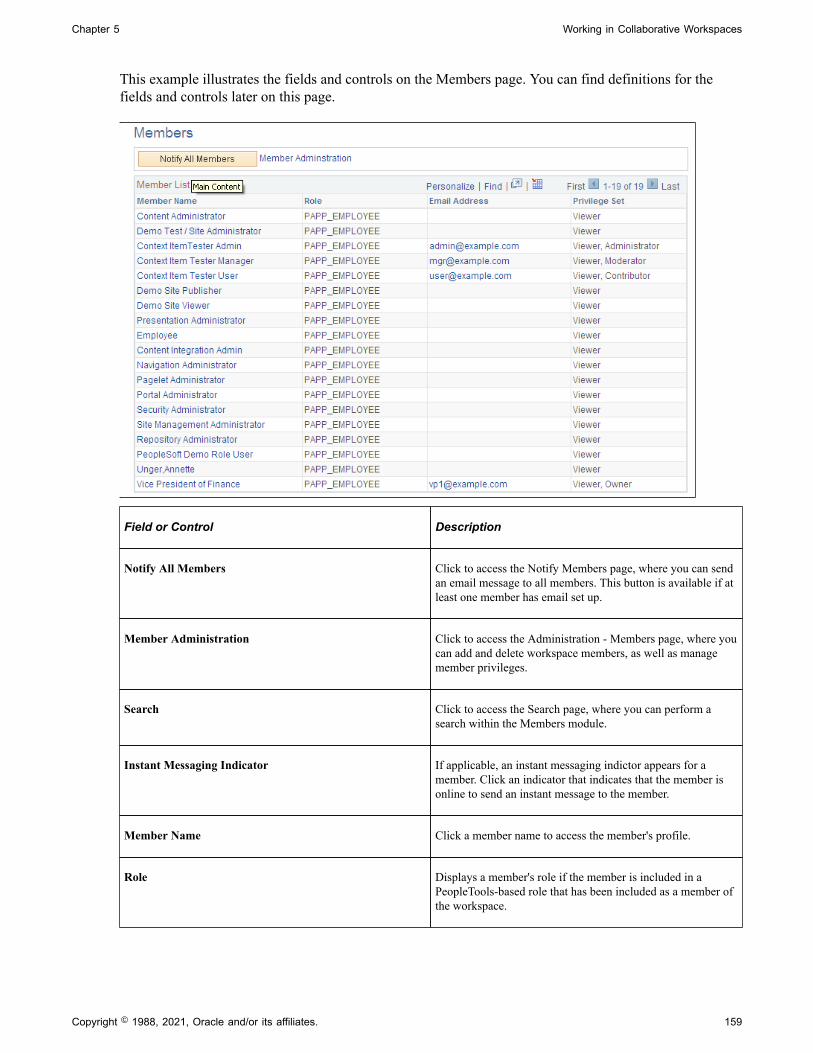
Chapter 5 Working in Collaborative Workspaces
This example illustrates the fields and controls on the Members page. You can find definitions for thefields and controls later on this page.
Field or Control Description
Notify All Members Click to access the Notify Members page, where you can sendan email message to all members. This button is available if atleast one member has email set up.
Member Administration Click to access the Administration - Members page, where youcan add and delete workspace members, as well as managemember privileges.
Search Click to access the Search page, where you can perform asearch within the Members module.
Instant Messaging Indicator If applicable, an instant messaging indictor appears for amember. Click an indicator that indicates that the member isonline to send an instant message to the member.
Member Name Click a member name to access the member's profile.
Role Displays a member's role if the member is included in aPeopleTools-based role that has been included as a member ofthe workspace.
Copyright © 1988, 2021, Oracle and/or its affiliates. 159
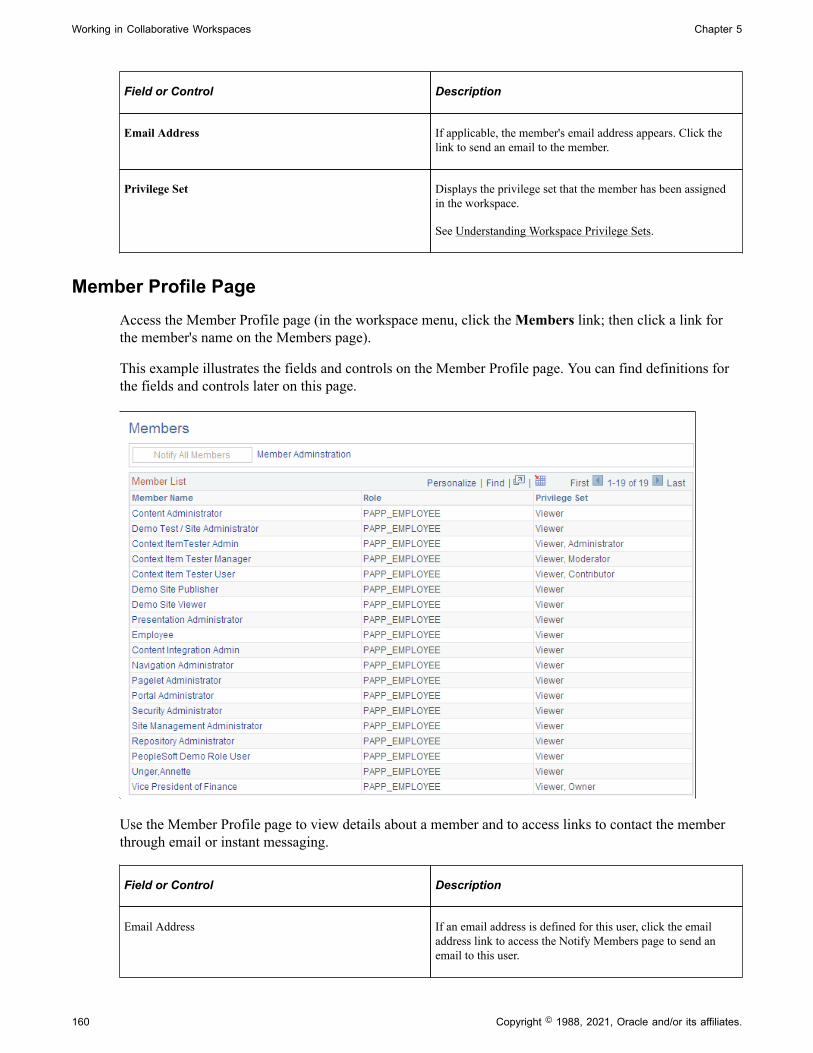
Working in Collaborative Workspaces Chapter 5
Field or Control Description
Email Address If applicable, the member's email address appears. Click thelink to send an email to the member.
Privilege Set Displays the privilege set that the member has been assignedin the workspace.
See Understanding Workspace Privilege Sets.
Member Profile PageAccess the Member Profile page (in the workspace menu, click the Members link; then click a link forthe member's name on the Members page).
This example illustrates the fields and controls on the Member Profile page. You can find definitions forthe fields and controls later on this page.
Use the Member Profile page to view details about a member and to access links to contact the memberthrough email or instant messaging.
Field or Control Description
Email Address If an email address is defined for this user, click the emailaddress link to access the Notify Members page to send anemail to this user.
160 Copyright © 1988, 2021, Oracle and/or its affiliates.
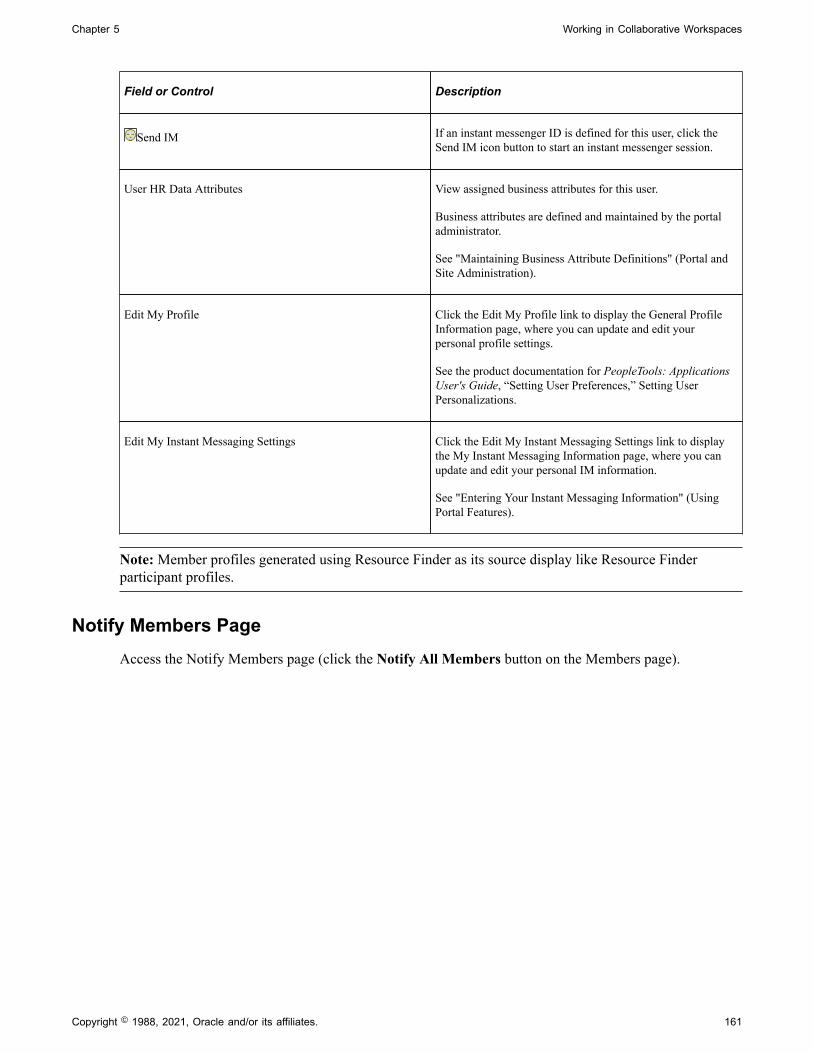
Chapter 5 Working in Collaborative Workspaces
Field or Control Description
Send IM If an instant messenger ID is defined for this user, click theSend IM icon button to start an instant messenger session.
User HR Data Attributes View assigned business attributes for this user.
Business attributes are defined and maintained by the portaladministrator.
See "Maintaining Business Attribute Definitions" (Portal andSite Administration).
Edit My Profile Click the Edit My Profile link to display the General ProfileInformation page, where you can update and edit yourpersonal profile settings.
See the product documentation for PeopleTools: ApplicationsUser's Guide, “Setting User Preferences,” Setting UserPersonalizations.
Edit My Instant Messaging Settings Click the Edit My Instant Messaging Settings link to displaythe My Instant Messaging Information page, where you canupdate and edit your personal IM information.
See "Entering Your Instant Messaging Information" (UsingPortal Features).
Note: Member profiles generated using Resource Finder as its source display like Resource Finderparticipant profiles.
Notify Members PageAccess the Notify Members page (click the Notify All Members button on the Members page).
Copyright © 1988, 2021, Oracle and/or its affiliates. 161
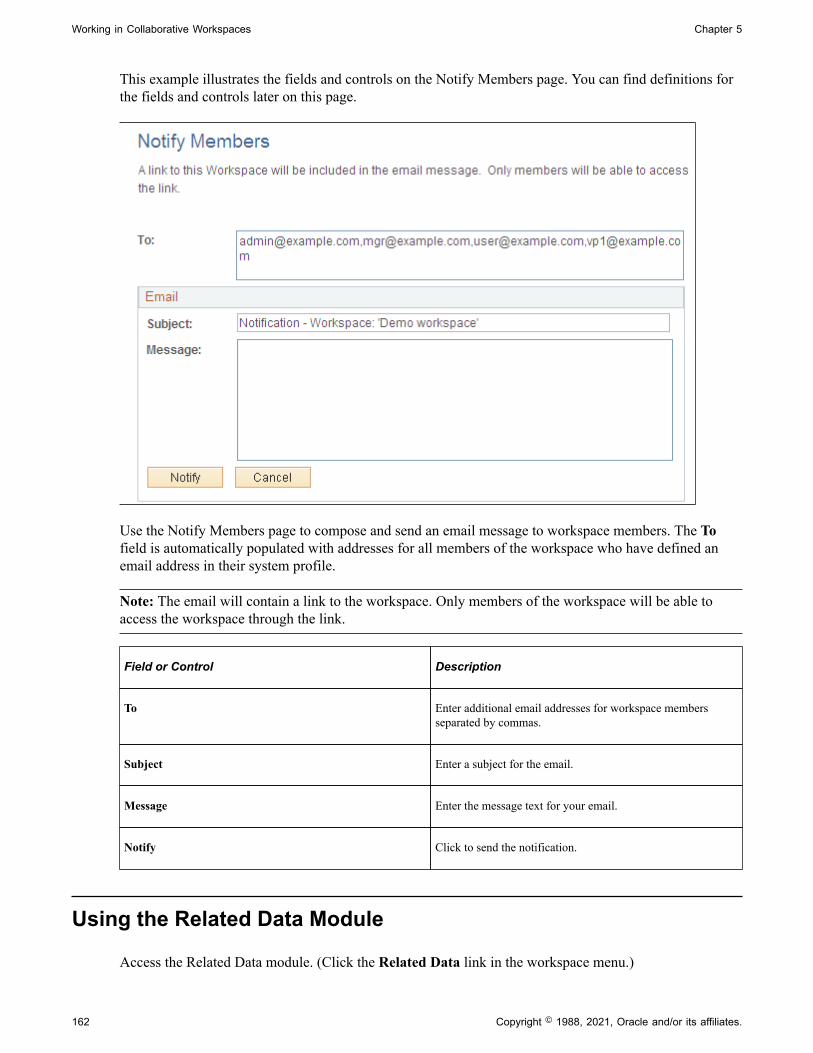
Working in Collaborative Workspaces Chapter 5
This example illustrates the fields and controls on the Notify Members page. You can find definitions forthe fields and controls later on this page.
Use the Notify Members page to compose and send an email message to workspace members. The Tofield is automatically populated with addresses for all members of the workspace who have defined anemail address in their system profile.
Note: The email will contain a link to the workspace. Only members of the workspace will be able toaccess the workspace through the link.
Field or Control Description
To Enter additional email addresses for workspace membersseparated by commas.
Subject Enter a subject for the email.
Message Enter the message text for your email.
Notify Click to send the notification.
Using the Related Data Module
Access the Related Data module. (Click the Related Data link in the workspace menu.)
162 Copyright © 1988, 2021, Oracle and/or its affiliates.
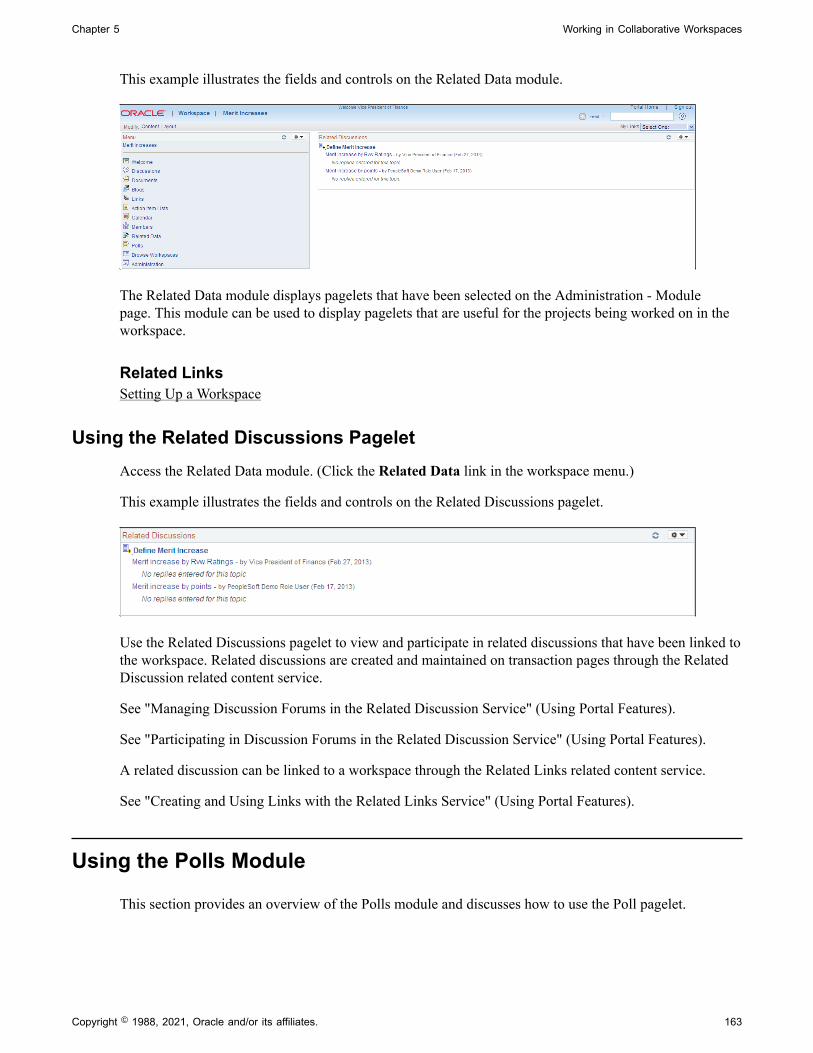
Chapter 5 Working in Collaborative Workspaces
This example illustrates the fields and controls on the Related Data module.
The Related Data module displays pagelets that have been selected on the Administration - Modulepage. This module can be used to display pagelets that are useful for the projects being worked on in theworkspace.
Related LinksSetting Up a Workspace
Using the Related Discussions PageletAccess the Related Data module. (Click the Related Data link in the workspace menu.)
This example illustrates the fields and controls on the Related Discussions pagelet.
Use the Related Discussions pagelet to view and participate in related discussions that have been linked tothe workspace. Related discussions are created and maintained on transaction pages through the RelatedDiscussion related content service.
See "Managing Discussion Forums in the Related Discussion Service" (Using Portal Features).
See "Participating in Discussion Forums in the Related Discussion Service" (Using Portal Features).
A related discussion can be linked to a workspace through the Related Links related content service.
See "Creating and Using Links with the Related Links Service" (Using Portal Features).
Using the Polls Module
This section provides an overview of the Polls module and discusses how to use the Poll pagelet.
Copyright © 1988, 2021, Oracle and/or its affiliates. 163
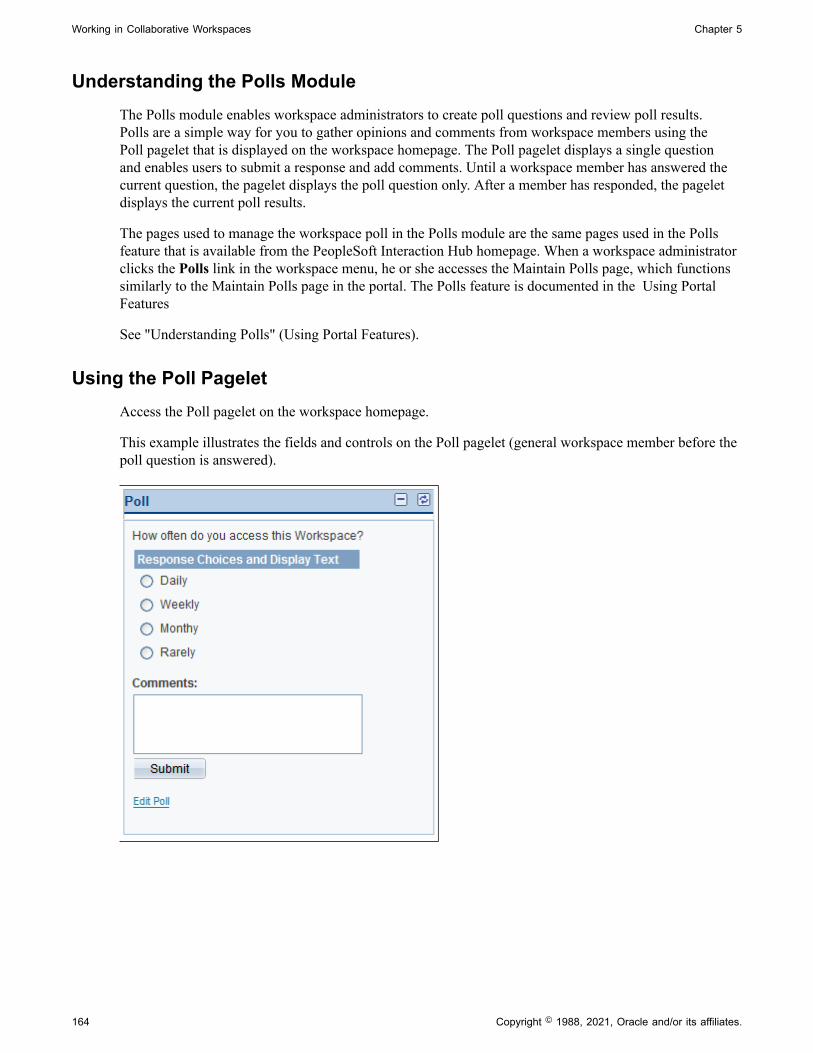
Working in Collaborative Workspaces Chapter 5
Understanding the Polls ModuleThe Polls module enables workspace administrators to create poll questions and review poll results.Polls are a simple way for you to gather opinions and comments from workspace members using thePoll pagelet that is displayed on the workspace homepage. The Poll pagelet displays a single questionand enables users to submit a response and add comments. Until a workspace member has answered thecurrent question, the pagelet displays the poll question only. After a member has responded, the pageletdisplays the current poll results.
The pages used to manage the workspace poll in the Polls module are the same pages used in the Pollsfeature that is available from the PeopleSoft Interaction Hub homepage. When a workspace administratorclicks the Polls link in the workspace menu, he or she accesses the Maintain Polls page, which functionssimilarly to the Maintain Polls page in the portal. The Polls feature is documented in the Using PortalFeatures
See "Understanding Polls" (Using Portal Features).
Using the Poll PageletAccess the Poll pagelet on the workspace homepage.
This example illustrates the fields and controls on the Poll pagelet (general workspace member before thepoll question is answered).
164 Copyright © 1988, 2021, Oracle and/or its affiliates.
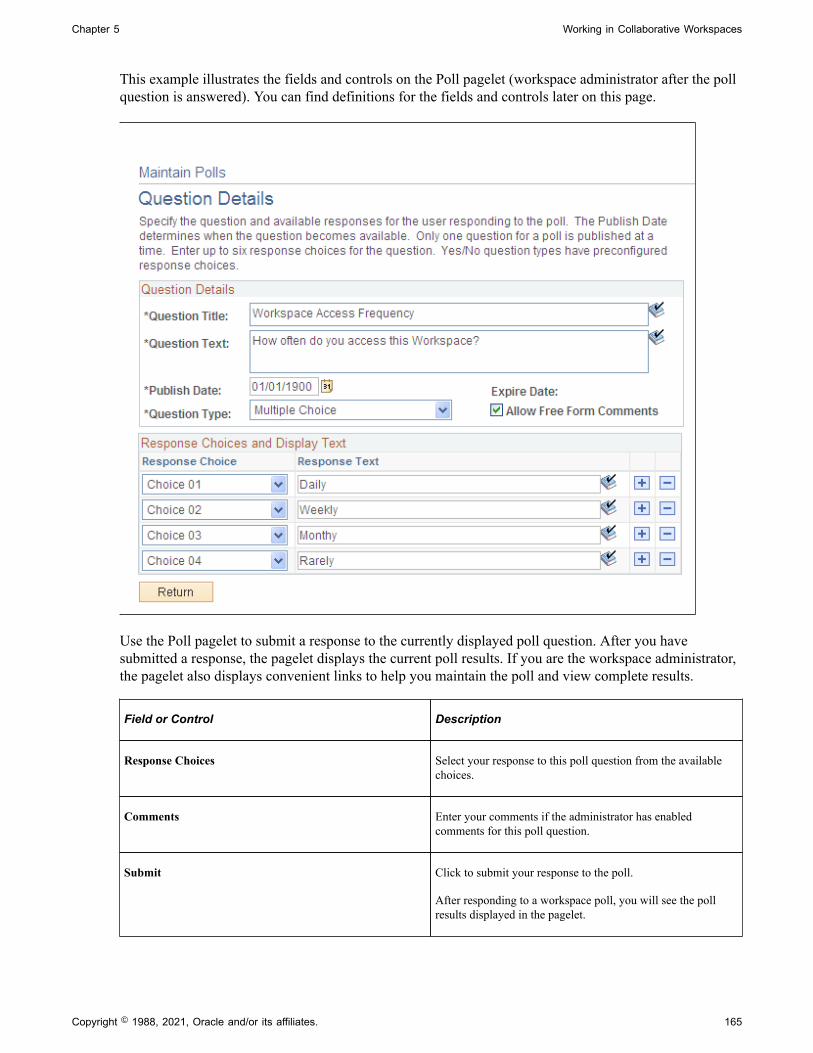
Chapter 5 Working in Collaborative Workspaces
This example illustrates the fields and controls on the Poll pagelet (workspace administrator after the pollquestion is answered). You can find definitions for the fields and controls later on this page.
Use the Poll pagelet to submit a response to the currently displayed poll question. After you havesubmitted a response, the pagelet displays the current poll results. If you are the workspace administrator,the pagelet also displays convenient links to help you maintain the poll and view complete results.
Field or Control Description
Response Choices Select your response to this poll question from the availablechoices.
Comments Enter your comments if the administrator has enabledcomments for this poll question.
Submit Click to submit your response to the poll.
After responding to a workspace poll, you will see the pollresults displayed in the pagelet.
Copyright © 1988, 2021, Oracle and/or its affiliates. 165
Working in Collaborative Workspaces Chapter 5
Field or Control Description
Edit Poll If you are a workspace administrator, click this link to accessthe Maintain Polls page in the Polls module.
View Results If you are a workspace administrator, click this link to accessthe Poll Results page in the Polls module.
Using the Browse Workspaces Module
The Workspaces - Search page, Workspaces - Hierarchy page, and Browse By Category page that areavailable in the Browse Workspaces module of each workspace are the same pages as those availablefrom the portal homepage.
See Workspaces - Search Page.
See Workspaces - Hierarchy Page.
See Browse By Category Page.
Searching Within Workspaces
This section provides an overview of searching within workspaces.
Pages Used to Search Within a Workspace
Page Name Definition Name Usage
Search Page EPPSR_SEARC Perform a search within all workspaces .
Search <Module> Page EPPSR_SEARCH Perform a search within the selectedworkspace module.
Search Tips EPPSR_SEARCH_TIPS Display search syntax and examples.
Understanding Searching Within WorkspacesYou can search for items within a workspace in one of two ways:
• Using the Search field in the workspace header.
When you use the Search field in the workspace header, your initial search scope is the currentworkspace.
166 Copyright © 1988, 2021, Oracle and/or its affiliates.
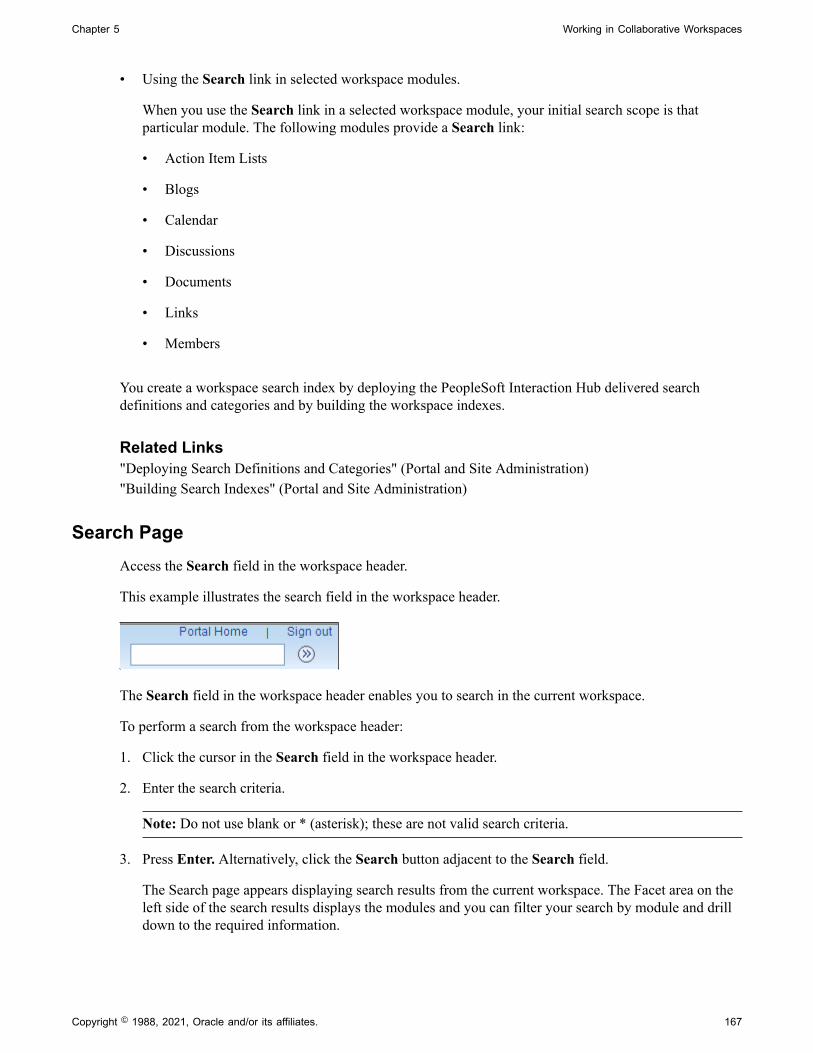
Chapter 5 Working in Collaborative Workspaces
• Using the Search link in selected workspace modules.
When you use the Search link in a selected workspace module, your initial search scope is thatparticular module. The following modules provide a Search link:
• Action Item Lists
• Blogs
• Calendar
• Discussions
• Documents
• Links
• Members
You create a workspace search index by deploying the PeopleSoft Interaction Hub delivered searchdefinitions and categories and by building the workspace indexes.
Related Links"Deploying Search Definitions and Categories" (Portal and Site Administration)"Building Search Indexes" (Portal and Site Administration)
Search PageAccess the Search field in the workspace header.
This example illustrates the search field in the workspace header.
The Search field in the workspace header enables you to search in the current workspace.
To perform a search from the workspace header:
1. Click the cursor in the Search field in the workspace header.
2. Enter the search criteria.
Note: Do not use blank or * (asterisk); these are not valid search criteria.
3. Press Enter. Alternatively, click the Search button adjacent to the Search field.
The Search page appears displaying search results from the current workspace. The Facet area on theleft side of the search results displays the modules and you can filter your search by module and drilldown to the required information.
Copyright © 1988, 2021, Oracle and/or its affiliates. 167
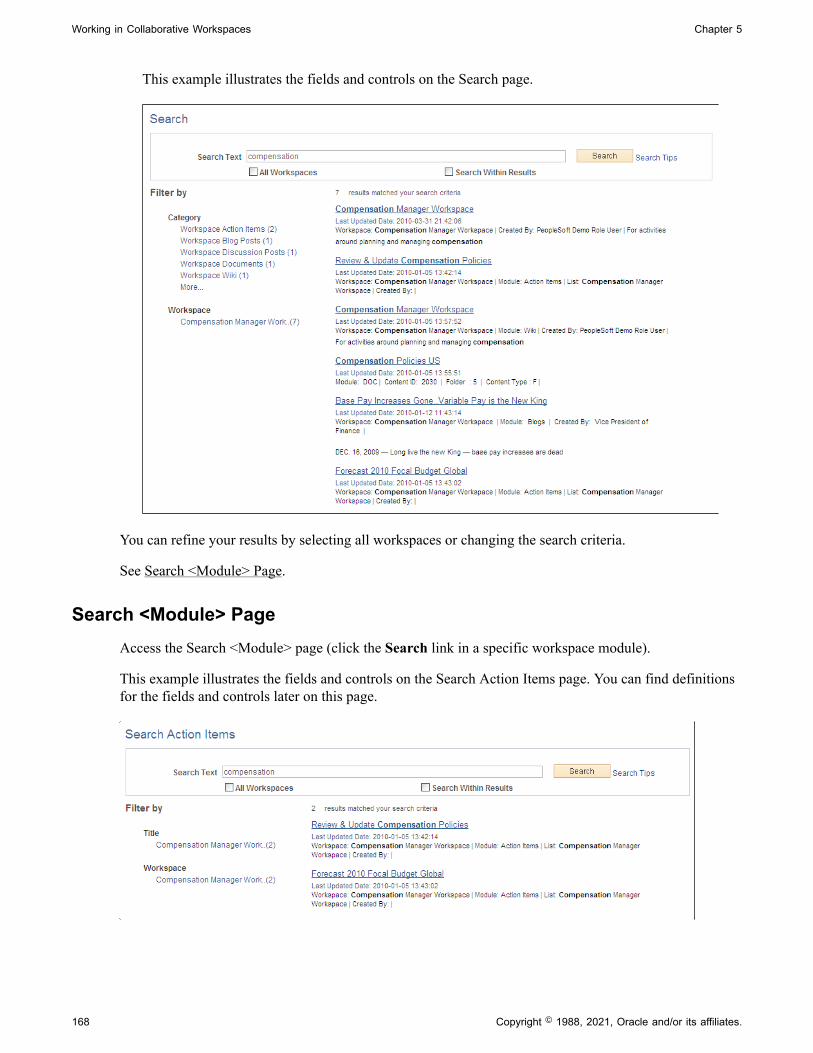
Working in Collaborative Workspaces Chapter 5
This example illustrates the fields and controls on the Search page.
You can refine your results by selecting all workspaces or changing the search criteria.
See Search <Module> Page.
Search <Module> PageAccess the Search <Module> page (click the Search link in a specific workspace module).
This example illustrates the fields and controls on the Search Action Items page. You can find definitionsfor the fields and controls later on this page.
168 Copyright © 1988, 2021, Oracle and/or its affiliates.
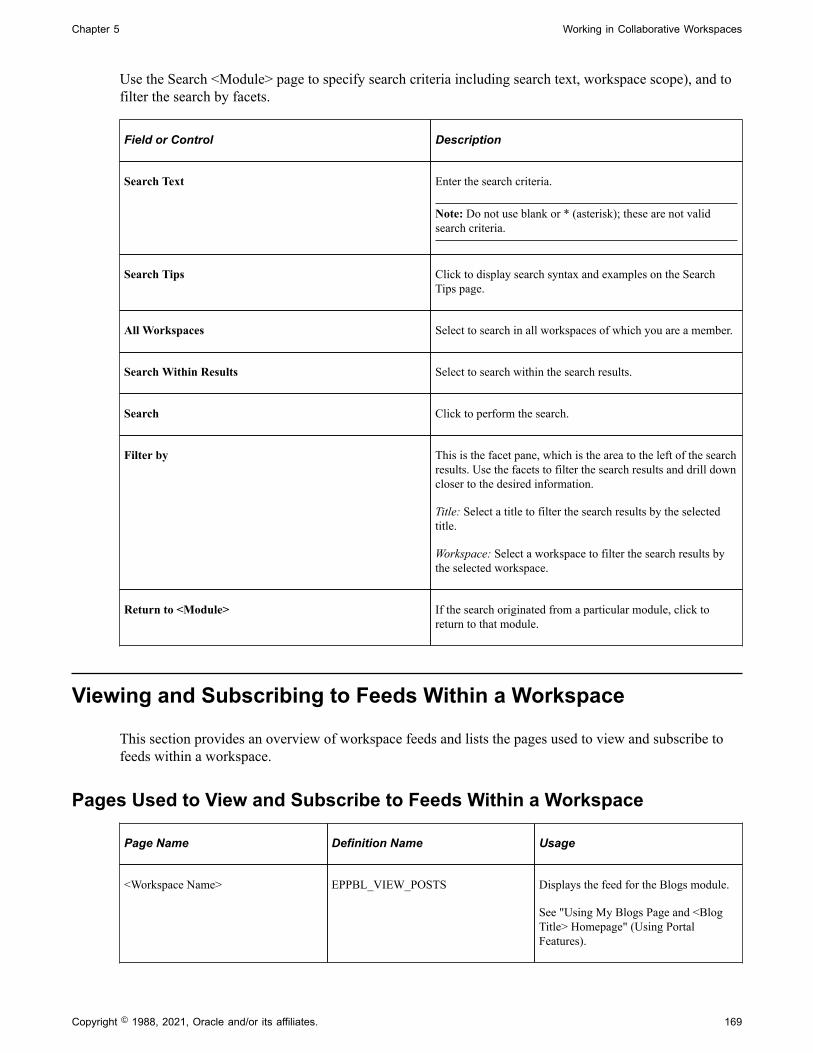
Chapter 5 Working in Collaborative Workspaces
Use the Search <Module> page to specify search criteria including search text, workspace scope), and tofilter the search by facets.
Field or Control Description
Search Text Enter the search criteria.
Note: Do not use blank or * (asterisk); these are not validsearch criteria.
Search Tips Click to display search syntax and examples on the SearchTips page.
All Workspaces Select to search in all workspaces of which you are a member.
Search Within Results Select to search within the search results.
Search Click to perform the search.
Filter by This is the facet pane, which is the area to the left of the searchresults. Use the facets to filter the search results and drill downcloser to the desired information.
Title: Select a title to filter the search results by the selectedtitle.
Workspace: Select a workspace to filter the search results bythe selected workspace.
Return to <Module> If the search originated from a particular module, click toreturn to that module.
Viewing and Subscribing to Feeds Within a Workspace
This section provides an overview of workspace feeds and lists the pages used to view and subscribe tofeeds within a workspace.
Pages Used to View and Subscribe to Feeds Within a Workspace
Page Name Definition Name Usage
<Workspace Name> EPPBL_VIEW_POSTS Displays the feed for the Blogs module.
See "Using My Blogs Page and <BlogTitle> Homepage" (Using PortalFeatures).
Copyright © 1988, 2021, Oracle and/or its affiliates. 169
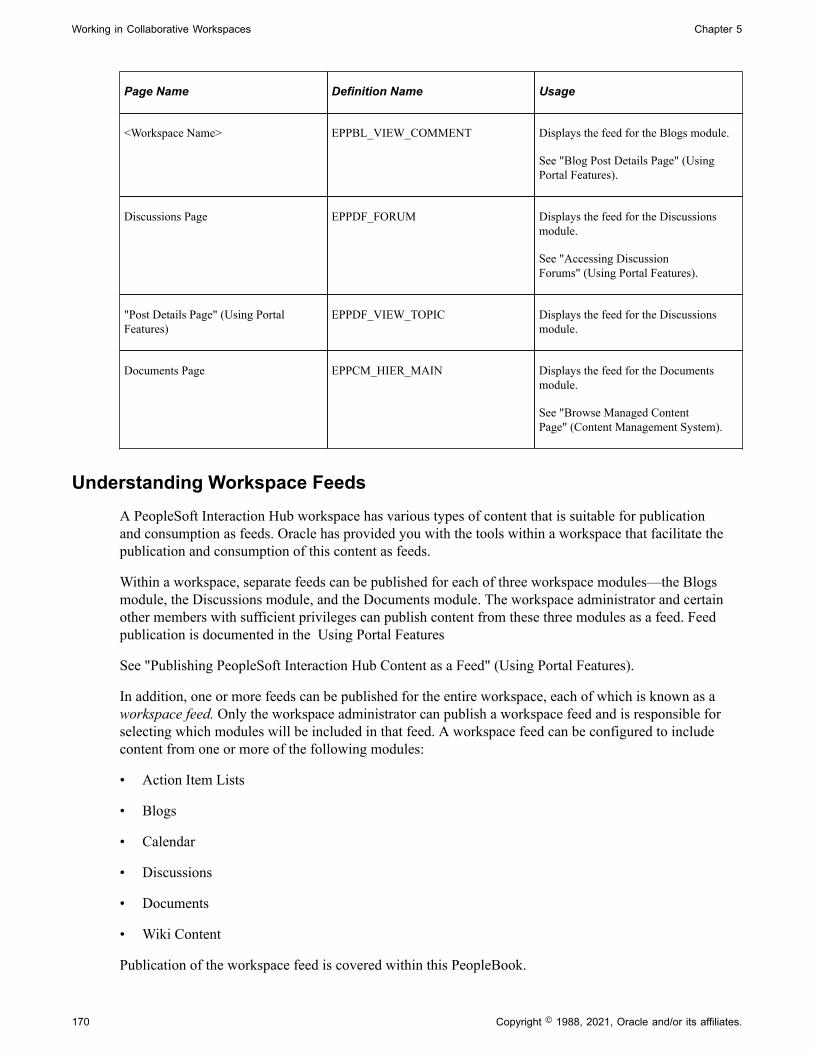
Working in Collaborative Workspaces Chapter 5
Page Name Definition Name Usage
<Workspace Name> EPPBL_VIEW_COMMENT Displays the feed for the Blogs module.
See "Blog Post Details Page" (UsingPortal Features).
Discussions Page EPPDF_FORUM Displays the feed for the Discussionsmodule.
See "Accessing DiscussionForums" (Using Portal Features).
"Post Details Page" (Using PortalFeatures)
EPPDF_VIEW_TOPIC Displays the feed for the Discussionsmodule.
Documents Page EPPCM_HIER_MAIN Displays the feed for the Documentsmodule.
See "Browse Managed ContentPage" (Content Management System).
Understanding Workspace FeedsA PeopleSoft Interaction Hub workspace has various types of content that is suitable for publicationand consumption as feeds. Oracle has provided you with the tools within a workspace that facilitate thepublication and consumption of this content as feeds.
Within a workspace, separate feeds can be published for each of three workspace modules—the Blogsmodule, the Discussions module, and the Documents module. The workspace administrator and certainother members with sufficient privileges can publish content from these three modules as a feed. Feedpublication is documented in the Using Portal Features
See "Publishing PeopleSoft Interaction Hub Content as a Feed" (Using Portal Features).
In addition, one or more feeds can be published for the entire workspace, each of which is known as aworkspace feed. Only the workspace administrator can publish a workspace feed and is responsible forselecting which modules will be included in that feed. A workspace feed can be configured to includecontent from one or more of the following modules:
• Action Item Lists
• Blogs
• Calendar
• Discussions
• Documents
• Wiki Content
Publication of the workspace feed is covered within this PeopleBook.
170 Copyright © 1988, 2021, Oracle and/or its affiliates.

Chapter 5 Working in Collaborative Workspaces
See Administering Workspace Feeds.
As a consumer of feed data, you can find feed documents that are accessible in convenient locationsacross the workspace—in the workspace header, in specific pagelets on the workspace homepage, and onthe pages that you use to manage and create specific workspace content. Use the Feed button, Feed link,and Open menu button to view feed documents for content published within the workspace.
Term Definition
Move the cursor over either of these icons to view the list offeeds published for this item. Click any list item to open thatfeed document.
Click the Feed button or Feed link to open the first feeddocument in the list.
Move the cursor over this icon to view the list of feedspublished for this item. Click any list item to open that feeddocument.
Click the Open menu button to toggle the list of feedsbetween frozen open and closed.
More information about viewing and subscribing to feeds can be found in the Using Portal Features
See "Viewing and Subscribing to Feeds" (Using Portal Features).
Creating and Using Tags in Workspaces
This section provides an overview of tags in workspaces and discusses how to use the Tags pagelet.
Understanding Tags in WorkspacesSimilar to portals and sites, you can create and view tags for blogs, blog postings, discussion forumtopics, and documents found within the workspace. In addition, you can create and view tags for theworkspace itself.
In a workspace, the Tags pagelet enables you to view the tags for the workspace itself, create tags for theworkspace itself, and view a tag cloud encompassing all public tags used within the workspace.
The page controls that are used to create and view tags for blogs, blog postings, discussion forum topics,and documents within a workspace are similar to the page controls that are used within a portal. Inaddition, the Search Tags page that is available in a workspace is similar to the Search Tags page thatis available from the PeopleSoft Interaction Hub homepage with an additional scope for the currentworkspace. These aspects of the tagging feature are documented in the Using Portal Features
See "Understanding Tagging in PeopleSoft Interaction Hub" (Using Portal Features).
Copyright © 1988, 2021, Oracle and/or its affiliates. 171
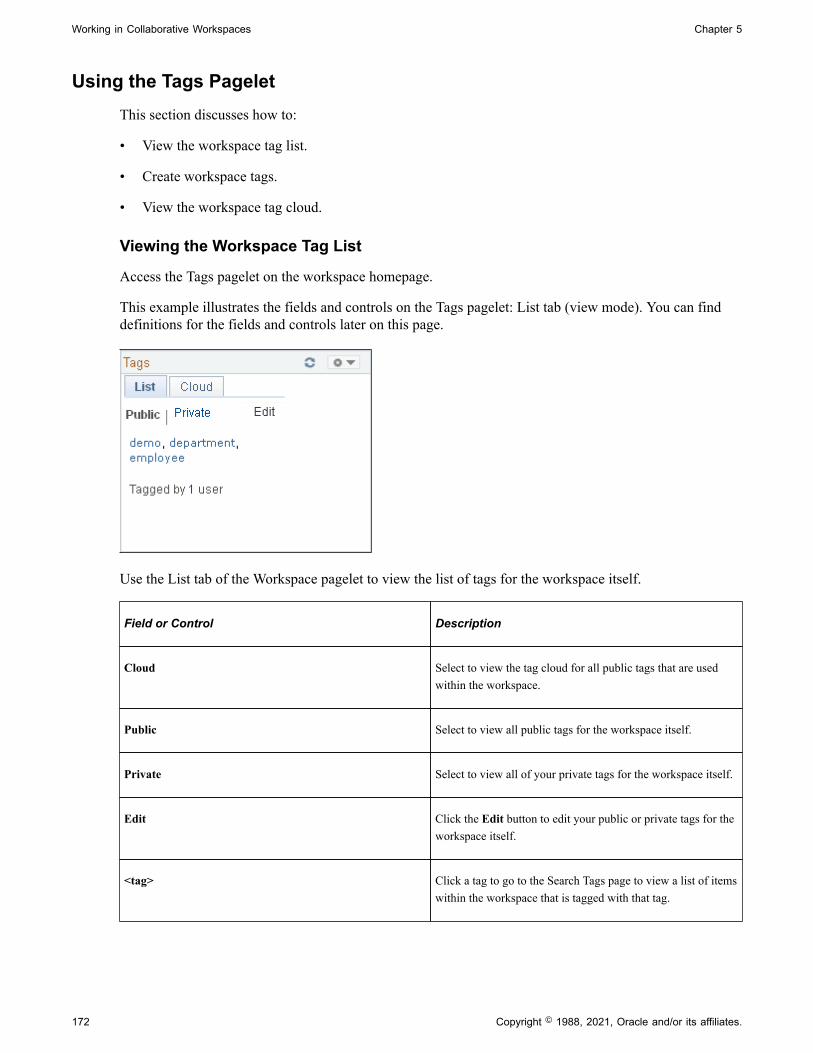
Working in Collaborative Workspaces Chapter 5
Using the Tags PageletThis section discusses how to:
• View the workspace tag list.
• Create workspace tags.
• View the workspace tag cloud.
Viewing the Workspace Tag List
Access the Tags pagelet on the workspace homepage.
This example illustrates the fields and controls on the Tags pagelet: List tab (view mode). You can finddefinitions for the fields and controls later on this page.
Use the List tab of the Workspace pagelet to view the list of tags for the workspace itself.
Field or Control Description
Cloud Select to view the tag cloud for all public tags that are usedwithin the workspace.
Public Select to view all public tags for the workspace itself.
Private Select to view all of your private tags for the workspace itself.
Edit Click the Edit button to edit your public or private tags for theworkspace itself.
<tag> Click a tag to go to the Search Tags page to view a list of itemswithin the workspace that is tagged with that tag.
172 Copyright © 1988, 2021, Oracle and/or its affiliates.

Chapter 5 Working in Collaborative Workspaces
Field or Control Description
<#> users Move the cursor over the number of users to view which usershave tagged the workspace.
Creating Workspace Tags
Access the Tags pagelet on the workspace homepage; then click the Edit button.
This example illustrates the fields and controls on the Tags pagelet: List tab (edit mode). You can finddefinitions for the fields and controls later on this page.
Use the List tab of the Workspace pagelet to edit your tags for the workspace itself.
Field or Control Description
Cloud Select to view the tag cloud for all public tags that are usedwithin the workspace.
Public Select to edit your public tags for the workspace itself.
Private Select to edit your private tags for the workspace itself.
<tag> Enter tags or tag phrases separated with a comma.
<#> users Move the cursor over the number of users to view which usershave tagged the workspace.
Update Click the Update button to save your changes.
Cancel Click the Cancel button to cancel any changes.
Copyright © 1988, 2021, Oracle and/or its affiliates. 173
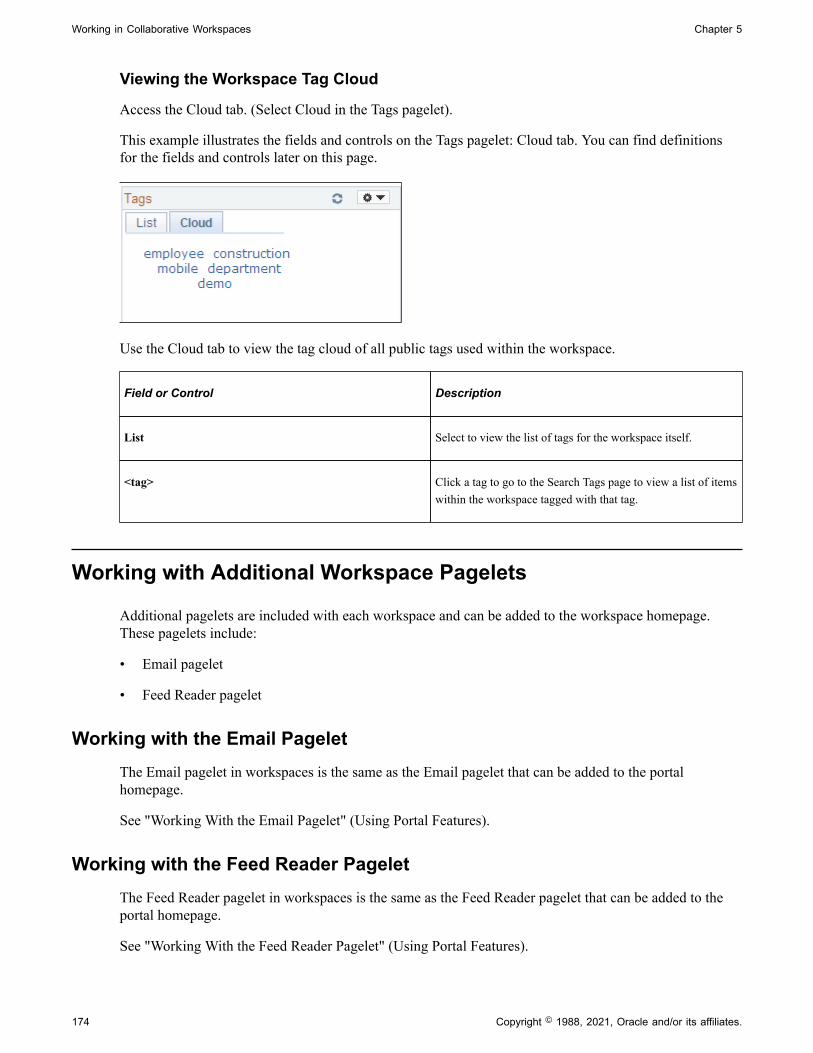
Working in Collaborative Workspaces Chapter 5
Viewing the Workspace Tag Cloud
Access the Cloud tab. (Select Cloud in the Tags pagelet).
This example illustrates the fields and controls on the Tags pagelet: Cloud tab. You can find definitionsfor the fields and controls later on this page.
Use the Cloud tab to view the tag cloud of all public tags used within the workspace.
Field or Control Description
List Select to view the list of tags for the workspace itself.
<tag> Click a tag to go to the Search Tags page to view a list of itemswithin the workspace tagged with that tag.
Working with Additional Workspace Pagelets
Additional pagelets are included with each workspace and can be added to the workspace homepage.These pagelets include:
• Email pagelet
• Feed Reader pagelet
Working with the Email PageletThe Email pagelet in workspaces is the same as the Email pagelet that can be added to the portalhomepage.
See "Working With the Email Pagelet" (Using Portal Features).
Working with the Feed Reader PageletThe Feed Reader pagelet in workspaces is the same as the Feed Reader pagelet that can be added to theportal homepage.
See "Working With the Feed Reader Pagelet" (Using Portal Features).
174 Copyright © 1988, 2021, Oracle and/or its affiliates.