operator's manual - crushing tigers
TRANSCRIPT

qj3
30
Operator’s manualserial number
Original Instructions
QJ330 © Copyright Sandvik.All rights reserved. No parts of this document may be reproduced orcopied in any form or by any means without written permission from Sandvik.All data and information in this manual may be changed without further notice. Reservations for misprints.
For further information, please contact:
Sandvik Mobile Screen’s and Crusher’sTullyvannon, BallygawleyCo. TyroneN. IrelandBT70 2HWTelephone: (+44) 028 855 67799Facsimile: (+44) 028 855 67007e-mail: [email protected]
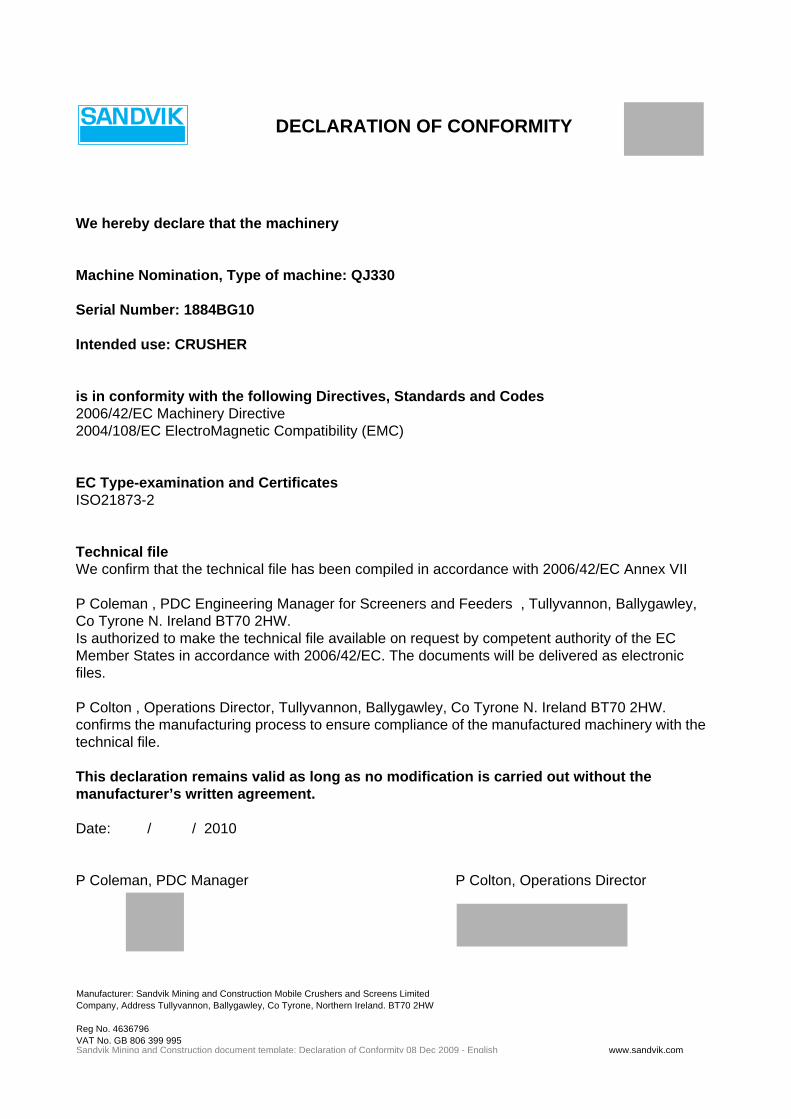
We hereby declare that the machinery
Machine Nomination, Type of machine: QJ330
Serial Number: 1884BG10
Intended use: CRUSHER
is in conformity with the following Directives, Standards and Codes2006/42/EC Machinery Directive2004/108/EC ElectroMagnetic Compatibility (EMC)
EC Type-examination and CertificatesISO21873-2
Technical fileWe confirm that the technical file has been compiled in accordance with 2006/42/EC Annex VII
P Coleman , PDC Engineering Manager for Screeners and Feeders , Tullyvannon, Ballygawley, Co Tyrone N. Ireland BT70 2HW.Is authorized to make the technical file available on request by competent authority of the EC Member States in accordance with 2006/42/EC. The documents will be delivered as electronic files.
P Colton , Operations Director, Tullyvannon, Ballygawley, Co Tyrone N. Ireland BT70 2HW.confirms the manufacturing process to ensure compliance of the manufactured machinery with the technical file.
This declaration remains valid as long as no modification is carried out without themanufacturer’s written agreement.
Date: / / 2010
P Coleman, PDC Manager P Colton, Operations Director
DECLARATION OF CONFORMITY
Manufacturer: Sandvik Mining and Construction Mobile Crushers and Screens LimitedCompany, Address Tullyvannon, Ballygawley, Co Tyrone, Northern Ireland. BT70 2HW
Reg No. 4636796VAT No. GB 806 399 995Sandvik Mining and Construction document template: Declaration of Conformity 08 Dec 2009 - English www.sandvik.com

This Page is intentionally left blank

Copyright © Sandvik Mobile Screener’s & Crusher’s
ID:QJ330.en.ver2
Contents
Copyright © Sandvik Mobile Screener’s & Crusher’s
ID:QJ330.en.ver2
1.0 Safety Section 9Safety Essentials. . . . . . . . . . . . . . . . . . . . . . . . . . . . . . . . . . . . . . . . . . . . . . . . . . . . . . . . . . . . . . . . . . . . . . . 10Safety Signs and Labels . . . . . . . . . . . . . . . . . . . . . . . . . . . . . . . . . . . . . . . . . . . . . . . . . . . . . . . . . . . . . . . . . 11Safety Hazards Pertaining to the Equipment . . . . . . . . . . . . . . . . . . . . . . . . . . . . . . . . . . . . . . . . . . . . . . . . . 11
Symbols for Mandatory Actions . . . . . . . . . . . . . . . . . . . . . . . . . . . . . . . . . . . . . . . . . . . . . . . . . . . . . . . . . 12Symbols for Prohibited Actions . . . . . . . . . . . . . . . . . . . . . . . . . . . . . . . . . . . . . . . . . . . . . . . . . . . . . . . . . 13Hazard Symbols. . . . . . . . . . . . . . . . . . . . . . . . . . . . . . . . . . . . . . . . . . . . . . . . . . . . . . . . . . . . . . . . . . . . . 13Machine Legend Plate . . . . . . . . . . . . . . . . . . . . . . . . . . . . . . . . . . . . . . . . . . . . . . . . . . . . . . . . . . . . . . . . 14
Component Safety Features . . . . . . . . . . . . . . . . . . . . . . . . . . . . . . . . . . . . . . . . . . . . . . . . . . . . . . . . . . . . . . 15Features for Operator Safety . . . . . . . . . . . . . . . . . . . . . . . . . . . . . . . . . . . . . . . . . . . . . . . . . . . . . . . . . . . . . 15Environmental Safety . . . . . . . . . . . . . . . . . . . . . . . . . . . . . . . . . . . . . . . . . . . . . . . . . . . . . . . . . . . . . . . . . . . 16
Hazardous Materials . . . . . . . . . . . . . . . . . . . . . . . . . . . . . . . . . . . . . . . . . . . . . . . . . . . . . . . . . . . . . . . . . 16Machine Disposal. . . . . . . . . . . . . . . . . . . . . . . . . . . . . . . . . . . . . . . . . . . . . . . . . . . . . . . . . . . . . . . . . . . . 16
Personal Protective Equipment (PPE) . . . . . . . . . . . . . . . . . . . . . . . . . . . . . . . . . . . . . . . . . . . . . . . . . . . . . . 17Entanglement Hazards . . . . . . . . . . . . . . . . . . . . . . . . . . . . . . . . . . . . . . . . . . . . . . . . . . . . . . . . . . . . . . . 17Required Personal Protective Equipment . . . . . . . . . . . . . . . . . . . . . . . . . . . . . . . . . . . . . . . . . . . . . . . . . 17
Measure Noise Level . . . . . . . . . . . . . . . . . . . . . . . . . . . . . . . . . . . . . . . . . . . . . . . . . . . . . . . . . . . . . . . . . . . 19Vibration Levels. . . . . . . . . . . . . . . . . . . . . . . . . . . . . . . . . . . . . . . . . . . . . . . . . . . . . . . . . . . . . . . . . . . . . . . . 19Organisational Safety Measures . . . . . . . . . . . . . . . . . . . . . . . . . . . . . . . . . . . . . . . . . . . . . . . . . . . . . . . . . . . 20Personnel Qualifications, Requirements and Responsiblities. . . . . . . . . . . . . . . . . . . . . . . . . . . . . . . . . . . . . 20Safety Advice Regarding Specific Operational Phases . . . . . . . . . . . . . . . . . . . . . . . . . . . . . . . . . . . . . . . . . 21
Standard Operation . . . . . . . . . . . . . . . . . . . . . . . . . . . . . . . . . . . . . . . . . . . . . . . . . . . . . . . . . . . . . . . . . . 21Blockage or Malfunction. . . . . . . . . . . . . . . . . . . . . . . . . . . . . . . . . . . . . . . . . . . . . . . . . . . . . . . . . . . . . . . 21Unguarded Areas. . . . . . . . . . . . . . . . . . . . . . . . . . . . . . . . . . . . . . . . . . . . . . . . . . . . . . . . . . . . . . . . . . . . 21
Special Work, Including Equipment Maintenance and Repairs During Operation, Disposal of Parts, and Haz-ardous Materials . . . . . . . . . . . . . . . . . . . . . . . . . . . . . . . . . . . . . . . . . . . . . . . . . . . . . . . . . . . . . . . . . . . . . . . 23
Securing the Equipment Before Performing Maintenance. . . . . . . . . . . . . . . . . . . . . . . . . . . . . . . . . . . . . 23Maintenance Site Conditions . . . . . . . . . . . . . . . . . . . . . . . . . . . . . . . . . . . . . . . . . . . . . . . . . . . . . . . . . . . 23 Replacement & Removal of Components. . . . . . . . . . . . . . . . . . . . . . . . . . . . . . . . . . . . . . . . . . . . . . . . . 23 Climbing, Falling . . . . . . . . . . . . . . . . . . . . . . . . . . . . . . . . . . . . . . . . . . . . . . . . . . . . . . . . . . . . . . . . . . . . 24Safety Considerations During Maintenance. . . . . . . . . . . . . . . . . . . . . . . . . . . . . . . . . . . . . . . . . . . . . . . . 25Safety Considerations During Cleaning . . . . . . . . . . . . . . . . . . . . . . . . . . . . . . . . . . . . . . . . . . . . . . . . . . . 25Removal of Safety Devices and Guards . . . . . . . . . . . . . . . . . . . . . . . . . . . . . . . . . . . . . . . . . . . . . . . . . . 25Surrounding Structures . . . . . . . . . . . . . . . . . . . . . . . . . . . . . . . . . . . . . . . . . . . . . . . . . . . . . . . . . . . . . . . 28Safety When Refueling . . . . . . . . . . . . . . . . . . . . . . . . . . . . . . . . . . . . . . . . . . . . . . . . . . . . . . . . . . . . . . . 28
Specific Hazards . . . . . . . . . . . . . . . . . . . . . . . . . . . . . . . . . . . . . . . . . . . . . . . . . . . . . . . . . . . . . . . . . . . . . . . 29Electrical Energy . . . . . . . . . . . . . . . . . . . . . . . . . . . . . . . . . . . . . . . . . . . . . . . . . . . . . . . . . . . . . . . . . . . . 29Battery . . . . . . . . . . . . . . . . . . . . . . . . . . . . . . . . . . . . . . . . . . . . . . . . . . . . . . . . . . . . . . . . . . . . . . . . . . . . 30Gas, Dust, Steam, Smoke and Noise . . . . . . . . . . . . . . . . . . . . . . . . . . . . . . . . . . . . . . . . . . . . . . . . . . . . 30Welding or Naked Flames . . . . . . . . . . . . . . . . . . . . . . . . . . . . . . . . . . . . . . . . . . . . . . . . . . . . . . . . . . . . . 31Hydraulic Equipment . . . . . . . . . . . . . . . . . . . . . . . . . . . . . . . . . . . . . . . . . . . . . . . . . . . . . . . . . . . . . . . . . 31Hazardous Substances . . . . . . . . . . . . . . . . . . . . . . . . . . . . . . . . . . . . . . . . . . . . . . . . . . . . . . . . . . . . . . . 32Lockout and Tag Procedure. . . . . . . . . . . . . . . . . . . . . . . . . . . . . . . . . . . . . . . . . . . . . . . . . . . . . . . . . . . . 33Removal of the Lockout and Tag . . . . . . . . . . . . . . . . . . . . . . . . . . . . . . . . . . . . . . . . . . . . . . . . . . . . . . . . 34Operational Safety Considerations . . . . . . . . . . . . . . . . . . . . . . . . . . . . . . . . . . . . . . . . . . . . . . . . . . . . . . 34Operator Selection And Qualification. . . . . . . . . . . . . . . . . . . . . . . . . . . . . . . . . . . . . . . . . . . . . . . . . . . . . 35Special Considerations For Maintenance And Repair Of Electrical System . . . . . . . . . . . . . . . . . . . . . . . 35Special Considerations For Maintenance Or Repair with Welding . . . . . . . . . . . . . . . . . . . . . . . . . . . . . . 36Special Considerations For Maintenance Or Repair Of Hydraulic System . . . . . . . . . . . . . . . . . . . . . . . . 37Handling And Disposal Of Hazardous Components And Materials . . . . . . . . . . . . . . . . . . . . . . . . . . . . . . 37Warning Concerning Crystalline Silica And Similar Particulates. . . . . . . . . . . . . . . . . . . . . . . . . . . . . . . . 38Special Considerations Concerning Dust Disposal. . . . . . . . . . . . . . . . . . . . . . . . . . . . . . . . . . . . . . . . . . 38Location Of Emergency Stops On QJ330 . . . . . . . . . . . . . . . . . . . . . . . . . . . . . . . . . . . . . . . . . . . . . . . . . 39
2.0 Transport &Technical Data 41Transport. . . . . . . . . . . . . . . . . . . . . . . . . . . . . . . . . . . . . . . . . . . . . . . . . . . . . . . . . . . . . . . . . . . . . . . . . . . . . 42
ContentsSpecial Considerations For Transport Of The QJ330 . . . . . . . . . . . . . . . . . . . . . . . . . . . . . . . . . . . . . . . . 42Machine Preparation for Transport . . . . . . . . . . . . . . . . . . . . . . . . . . . . . . . . . . . . . . . . . . . . . . . . . . . . . . 42Tracking the machine onto and off the transport vehicle . . . . . . . . . . . . . . . . . . . . . . . . . . . . . . . . . . . . . . 46Transport and Working Dimensions. . . . . . . . . . . . . . . . . . . . . . . . . . . . . . . . . . . . . . . . . . . . . . . . . . . . . . 47
Technical Information . . . . . . . . . . . . . . . . . . . . . . . . . . . . . . . . . . . . . . . . . . . . . . . . . . . . . . . . . . . . . . . . . . . 48Standard Features . . . . . . . . . . . . . . . . . . . . . . . . . . . . . . . . . . . . . . . . . . . . . . . . . . . . . . . . . . . . . . . . . . . 48Options. . . . . . . . . . . . . . . . . . . . . . . . . . . . . . . . . . . . . . . . . . . . . . . . . . . . . . . . . . . . . . . . . . . . . . . . . . . . 48
Indentification of Main Units . . . . . . . . . . . . . . . . . . . . . . . . . . . . . . . . . . . . . . . . . . . . . . . . . . . . . . . . . . . . . . 48Specification of Main Units . . . . . . . . . . . . . . . . . . . . . . . . . . . . . . . . . . . . . . . . . . . . . . . . . . . . . . . . . . . . . . . 49
Feeder . . . . . . . . . . . . . . . . . . . . . . . . . . . . . . . . . . . . . . . . . . . . . . . . . . . . . . . . . . . . . . . . . . . . . . . . . . . . 49Crusher . . . . . . . . . . . . . . . . . . . . . . . . . . . . . . . . . . . . . . . . . . . . . . . . . . . . . . . . . . . . . . . . . . . . . . . . . . . 49 Main Conveyor . . . . . . . . . . . . . . . . . . . . . . . . . . . . . . . . . . . . . . . . . . . . . . . . . . . . . . . . . . . . . . . . . . . . . 49Tracks . . . . . . . . . . . . . . . . . . . . . . . . . . . . . . . . . . . . . . . . . . . . . . . . . . . . . . . . . . . . . . . . . . . . . . . . . . . . 49Powerunit . . . . . . . . . . . . . . . . . . . . . . . . . . . . . . . . . . . . . . . . . . . . . . . . . . . . . . . . . . . . . . . . . . . . . . . . . . 50Magnetic Separator . . . . . . . . . . . . . . . . . . . . . . . . . . . . . . . . . . . . . . . . . . . . . . . . . . . . . . . . . . . . . . . . . . 50Side Conveyor . . . . . . . . . . . . . . . . . . . . . . . . . . . . . . . . . . . . . . . . . . . . . . . . . . . . . . . . . . . . . . . . . . . . . . 50
3.0 Product Overview 51Product Overview . . . . . . . . . . . . . . . . . . . . . . . . . . . . . . . . . . . . . . . . . . . . . . . . . . . . . . . . . . . . . . . . . . . . . . 52Major Components . . . . . . . . . . . . . . . . . . . . . . . . . . . . . . . . . . . . . . . . . . . . . . . . . . . . . . . . . . . . . . . . . . . . . 52
Identification and Operation of the QJ330 Controls . . . . . . . . . . . . . . . . . . . . . . . . . . . . . . . . . . . . . . . . . . 53Main Control Panel . . . . . . . . . . . . . . . . . . . . . . . . . . . . . . . . . . . . . . . . . . . . . . . . . . . . . . . . . . . . . . . . . . 54Hydraulic Control Banks . . . . . . . . . . . . . . . . . . . . . . . . . . . . . . . . . . . . . . . . . . . . . . . . . . . . . . . . . . . . . . 55Remote Control Unit . . . . . . . . . . . . . . . . . . . . . . . . . . . . . . . . . . . . . . . . . . . . . . . . . . . . . . . . . . . . . . . . . 56
4.0 Commissioning and Shut Down 57Commissioning & Shutdown Safety . . . . . . . . . . . . . . . . . . . . . . . . . . . . . . . . . . . . . . . . . . . . . . . . . . . . . . . . 58
What Are The Hazards And Dangers? . . . . . . . . . . . . . . . . . . . . . . . . . . . . . . . . . . . . . . . . . . . . . . . . . . . 58Who is at Risk . . . . . . . . . . . . . . . . . . . . . . . . . . . . . . . . . . . . . . . . . . . . . . . . . . . . . . . . . . . . . . . . . . . . . . 58Are Precautions Adequate? . . . . . . . . . . . . . . . . . . . . . . . . . . . . . . . . . . . . . . . . . . . . . . . . . . . . . . . . . . . . 58When carrying out maintenace or adjustment . . . . . . . . . . . . . . . . . . . . . . . . . . . . . . . . . . . . . . . . . . . . . . 58
Commissioning . . . . . . . . . . . . . . . . . . . . . . . . . . . . . . . . . . . . . . . . . . . . . . . . . . . . . . . . . . . . . . . . . . . . . . . . 59Preparation for Machine STARTUP. . . . . . . . . . . . . . . . . . . . . . . . . . . . . . . . . . . . . . . . . . . . . . . . . . . . . . 59Setting Language of Control Panel Display . . . . . . . . . . . . . . . . . . . . . . . . . . . . . . . . . . . . . . . . . . . . . . . . 59Start-up Sequence For Tracking Machine . . . . . . . . . . . . . . . . . . . . . . . . . . . . . . . . . . . . . . . . . . . . . . . . . 60Raising the Main Conveyor . . . . . . . . . . . . . . . . . . . . . . . . . . . . . . . . . . . . . . . . . . . . . . . . . . . . . . . . . . . . 62Machine Set-up . . . . . . . . . . . . . . . . . . . . . . . . . . . . . . . . . . . . . . . . . . . . . . . . . . . . . . . . . . . . . . . . . . . . . 63Setting the date/time . . . . . . . . . . . . . . . . . . . . . . . . . . . . . . . . . . . . . . . . . . . . . . . . . . . . . . . . . . . . . . . . . 64
Operating the QJ330. . . . . . . . . . . . . . . . . . . . . . . . . . . . . . . . . . . . . . . . . . . . . . . . . . . . . . . . . . . . . . . . . . . . 65Start-up Sequence For Running the Crusher . . . . . . . . . . . . . . . . . . . . . . . . . . . . . . . . . . . . . . . . . . . . . . 65Auto Run Mode . . . . . . . . . . . . . . . . . . . . . . . . . . . . . . . . . . . . . . . . . . . . . . . . . . . . . . . . . . . . . . . . . . . . . 66Manual Run Mode . . . . . . . . . . . . . . . . . . . . . . . . . . . . . . . . . . . . . . . . . . . . . . . . . . . . . . . . . . . . . . . . . . . 68Feed Conveyor Adjustment . . . . . . . . . . . . . . . . . . . . . . . . . . . . . . . . . . . . . . . . . . . . . . . . . . . . . . . . . . . . 69Parameter Adjustments . . . . . . . . . . . . . . . . . . . . . . . . . . . . . . . . . . . . . . . . . . . . . . . . . . . . . . . . . . . . . . . 70Diagnostic Menu . . . . . . . . . . . . . . . . . . . . . . . . . . . . . . . . . . . . . . . . . . . . . . . . . . . . . . . . . . . . . . . . . . . . 71Fault Logs . . . . . . . . . . . . . . . . . . . . . . . . . . . . . . . . . . . . . . . . . . . . . . . . . . . . . . . . . . . . . . . . . . . . . . . . . 72
Machine Shut Down . . . . . . . . . . . . . . . . . . . . . . . . . . . . . . . . . . . . . . . . . . . . . . . . . . . . . . . . . . . . . . . . . . . . 74Manual Stop Sequence . . . . . . . . . . . . . . . . . . . . . . . . . . . . . . . . . . . . . . . . . . . . . . . . . . . . . . . . . . . . . . . 74Auto Stop Sequence . . . . . . . . . . . . . . . . . . . . . . . . . . . . . . . . . . . . . . . . . . . . . . . . . . . . . . . . . . . . . . . . . 74Emergency Stop . . . . . . . . . . . . . . . . . . . . . . . . . . . . . . . . . . . . . . . . . . . . . . . . . . . . . . . . . . . . . . . . . . . . 75
5.0 Operation 77Engine Values . . . . . . . . . . . . . . . . . . . . . . . . . . . . . . . . . . . . . . . . . . . . . . . . . . . . . . . . . . . . . . . . . . . . . . . . . 78Setting hopper level sensor for the feed conveyor . . . . . . . . . . . . . . . . . . . . . . . . . . . . . . . . . . . . . . . . . . . . . 79Setting Down Stream Stop/Restart For the Feed Conveyor . . . . . . . . . . . . . . . . . . . . . . . . . . . . . . . . . . . . . . 79Material Level in Hopper Warning. . . . . . . . . . . . . . . . . . . . . . . . . . . . . . . . . . . . . . . . . . . . . . . . . . . . . . . . . . 80

Copyright © Sandvik Mobile Screener’s & Crusher’s
ID:QJ330.en.ver2
Contents
Copyright © Sandvik Mobile Screener’s & Crusher’s
ID:QJ330.en.ver2
6.0 Maintenance 81Maintenance Safety . . . . . . . . . . . . . . . . . . . . . . . . . . . . . . . . . . . . . . . . . . . . . . . . . . . . . . . . . . . . . . . . . . . . 82
What Are The Hazards And Dangers? . . . . . . . . . . . . . . . . . . . . . . . . . . . . . . . . . . . . . . . . . . . . . . . . . . . 82Who is at Risk . . . . . . . . . . . . . . . . . . . . . . . . . . . . . . . . . . . . . . . . . . . . . . . . . . . . . . . . . . . . . . . . . . . . . . 82Are Precautions Adequate? . . . . . . . . . . . . . . . . . . . . . . . . . . . . . . . . . . . . . . . . . . . . . . . . . . . . . . . . . . . . 82When carrying out maintenace or adjustment . . . . . . . . . . . . . . . . . . . . . . . . . . . . . . . . . . . . . . . . . . . . . . 82
Maintenance Schedule . . . . . . . . . . . . . . . . . . . . . . . . . . . . . . . . . . . . . . . . . . . . . . . . . . . . . . . . . . . . . . . . . . 83Powerunit Engine and Hydraulic . . . . . . . . . . . . . . . . . . . . . . . . . . . . . . . . . . . . . . . . . . . . . . . . . . . . . . . . 83Crusher, Feeder, Conveyors and General . . . . . . . . . . . . . . . . . . . . . . . . . . . . . . . . . . . . . . . . . . . . . . . . . 84V-Belt Tension . . . . . . . . . . . . . . . . . . . . . . . . . . . . . . . . . . . . . . . . . . . . . . . . . . . . . . . . . . . . . . . . . . . . . . 85Engine Maintenace . . . . . . . . . . . . . . . . . . . . . . . . . . . . . . . . . . . . . . . . . . . . . . . . . . . . . . . . . . . . . . . . . . 85Air Cleaner Maintenance . . . . . . . . . . . . . . . . . . . . . . . . . . . . . . . . . . . . . . . . . . . . . . . . . . . . . . . . . . . . . . 86Battery Maintenace . . . . . . . . . . . . . . . . . . . . . . . . . . . . . . . . . . . . . . . . . . . . . . . . . . . . . . . . . . . . . . . . . . 87Special Considerations For Maintenance Or Repair with Welding . . . . . . . . . . . . . . . . . . . . . . . . . . . . . . 87Changing the Hydraulic Oil . . . . . . . . . . . . . . . . . . . . . . . . . . . . . . . . . . . . . . . . . . . . . . . . . . . . . . . . . . . . 88Changing The Return Line Fliter . . . . . . . . . . . . . . . . . . . . . . . . . . . . . . . . . . . . . . . . . . . . . . . . . . . . . . . . 89Check / Adding Fuel. . . . . . . . . . . . . . . . . . . . . . . . . . . . . . . . . . . . . . . . . . . . . . . . . . . . . . . . . . . . . . . . . . 89Track Maintenance . . . . . . . . . . . . . . . . . . . . . . . . . . . . . . . . . . . . . . . . . . . . . . . . . . . . . . . . . . . . . . . . . . 90Checking the Track Tension . . . . . . . . . . . . . . . . . . . . . . . . . . . . . . . . . . . . . . . . . . . . . . . . . . . . . . . . . . . 90Tighten the Tracks . . . . . . . . . . . . . . . . . . . . . . . . . . . . . . . . . . . . . . . . . . . . . . . . . . . . . . . . . . . . . . . . . . . 91Loosen the Tracks . . . . . . . . . . . . . . . . . . . . . . . . . . . . . . . . . . . . . . . . . . . . . . . . . . . . . . . . . . . . . . . . . . . 91Track Drive Units . . . . . . . . . . . . . . . . . . . . . . . . . . . . . . . . . . . . . . . . . . . . . . . . . . . . . . . . . . . . . . . . . . . . 92Tensioning the Dirt Conveyor Beltt . . . . . . . . . . . . . . . . . . . . . . . . . . . . . . . . . . . . . . . . . . . . . . . . . . . . . . 93Tensioning The Main Conveyor belt . . . . . . . . . . . . . . . . . . . . . . . . . . . . . . . . . . . . . . . . . . . . . . . . . . . . . 94Tracking the Belts . . . . . . . . . . . . . . . . . . . . . . . . . . . . . . . . . . . . . . . . . . . . . . . . . . . . . . . . . . . . . . . . . . . 95Emptying the Fuel Filter Water Trap . . . . . . . . . . . . . . . . . . . . . . . . . . . . . . . . . . . . . . . . . . . . . . . . . . . . . 96Maintenance Data . . . . . . . . . . . . . . . . . . . . . . . . . . . . . . . . . . . . . . . . . . . . . . . . . . . . . . . . . . . . . . . . . . . 97Hydraulic Oil Requirements for QJ330 Machines . . . . . . . . . . . . . . . . . . . . . . . . . . . . . . . . . . . . . . . . . . . 97Lubricants and Fluids. . . . . . . . . . . . . . . . . . . . . . . . . . . . . . . . . . . . . . . . . . . . . . . . . . . . . . . . . . . . . . . . . 98Greasing Schedule . . . . . . . . . . . . . . . . . . . . . . . . . . . . . . . . . . . . . . . . . . . . . . . . . . . . . . . . . . . . . . . . . . 99Care of chrome . . . . . . . . . . . . . . . . . . . . . . . . . . . . . . . . . . . . . . . . . . . . . . . . . . . . . . . . . . . . . . . . . . . . 100
7.0 Trouble Shooting and Warranty 101Trouble Shootting . . . . . . . . . . . . . . . . . . . . . . . . . . . . . . . . . . . . . . . . . . . . . . . . . . . . . . . . . . . . . . . . . . . . . 102Machine Faults . . . . . . . . . . . . . . . . . . . . . . . . . . . . . . . . . . . . . . . . . . . . . . . . . . . . . . . . . . . . . . . . . . . . . . . 103
Machine Stop Pressed ... Fault Code 0 . . . . . . . . . . . . . . . . . . . . . . . . . . . . . . . . . . . . . . . . . . . . . . . . . . 103Radio Stop Pressed...Fault Code 02 . . . . . . . . . . . . . . . . . . . . . . . . . . . . . . . . . . . . . . . . . . . . . . . . . . . . 104Low Hydraulic Oil Level...Fault Code 03 . . . . . . . . . . . . . . . . . . . . . . . . . . . . . . . . . . . . . . . . . . . . . . . . . 105High Hydraulic oil Temperature …Fault Code 04 . . . . . . . . . . . . . . . . . . . . . . . . . . . . . . . . . . . . . . . . . . 105No Radio Signal …Fault Code 05 . . . . . . . . . . . . . . . . . . . . . . . . . . . . . . . . . . . . . . . . . . . . . . . . . . . . . . 106Low Toggle Pressure …Fault Code 06… . . . . . . . . . . . . . . . . . . . . . . . . . . . . . . . . . . . . . . . . . . . . . . . . 106High Drive Pressure …Fault Code 07 . . . . . . . . . . . . . . . . . . . . . . . . . . . . . . . . . . . . . . . . . . . . . . . . . . . 106Low Main Conveyor Speed …Fault Code 08. . . . . . . . . . . . . . . . . . . . . . . . . . . . . . . . . . . . . . . . . . . . . . 106Low Crusher Speed …Fault Code 09 . . . . . . . . . . . . . . . . . . . . . . . . . . . . . . . . . . . . . . . . . . . . . . . . . . . 107Low Fuel Warning …Fault Code 10. . . . . . . . . . . . . . . . . . . . . . . . . . . . . . . . . . . . . . . . . . . . . . . . . . . . . 107Unit 2 Error …Fault Code 15 . . . . . . . . . . . . . . . . . . . . . . . . . . . . . . . . . . . . . . . . . . . . . . . . . . . . . . . . . . 107Unit 3 Error …Fault Code 16 . . . . . . . . . . . . . . . . . . . . . . . . . . . . . . . . . . . . . . . . . . . . . . . . . . . . . . . . . . 107Engine Faults . . . . . . . . . . . . . . . . . . . . . . . . . . . . . . . . . . . . . . . . . . . . . . . . . . . . . . . . . . . . . . . . . . . . . . 108Engine Diagnostic Codes. . . . . . . . . . . . . . . . . . . . . . . . . . . . . . . . . . . . . . . . . . . . . . . . . . . . . . . . . . . . . 109
Diagnostic Feedback. . . . . . . . . . . . . . . . . . . . . . . . . . . . . . . . . . . . . . . . . . . . . . . . . . . . . . . . . . . . . . . . . . . 111Tracking Diagnostics.. . . . . . . . . . . . . . . . . . . . . . . . . . . . . . . . . . . . . . . . . . . . . . . . . . . . . . . . . . . . . . . . 112
Warranty . . . . . . . . . . . . . . . . . . . . . . . . . . . . . . . . . . . . . . . . . . . . . . . . . . . . . . . . . . . . . . . . . . . . . . . . . . . . 113Standard Terms and Conditions . . . . . . . . . . . . . . . . . . . . . . . . . . . . . . . . . . . . . . . . . . . . . . . . . . . . . . . 113Commissioning and Warranty Registration . . . . . . . . . . . . . . . . . . . . . . . . . . . . . . . . . . . . . . . . . . . . . . . 116
CAT Register Instructions . . . . . . . . . . . . . . . . . . . . . . . . . . . . . . . . . . . . . . . . . . . . . . . . . . . . . . . . . . . . . . . 117CAT C Series Warranty Statement . . . . . . . . . . . . . . . . . . . . . . . . . . . . . . . . . . . . . . . . . . . . . . . . . . . . . 118
ContentsMaintenance Log . . . . . . . . . . . . . . . . . . . . . . . . . . . . . . . . . . . . . . . . . . . . . . . . . . . . . . . . . . . . . . . . . . . 120
8.0 Spare Parts 123Spare Parts . . . . . . . . . . . . . . . . . . . . . . . . . . . . . . . . . . . . . . . . . . . . . . . . . . . . . . . . . . . . . . . . . . . . . . . . . . 124
Spare Parts illustrations . . . . . . . . . . . . . . . . . . . . . . . . . . . . . . . . . . . . . . . . . . . . . . . . . . . . . . . . . . . . . . 124Ordering Procedure: . . . . . . . . . . . . . . . . . . . . . . . . . . . . . . . . . . . . . . . . . . . . . . . . . . . . . . . . . . . . . . . . 124
Machine Assemblies . . . . . . . . . . . . . . . . . . . . . . . . . . . . . . . . . . . . . . . . . . . . . . . . . . . . . . . . . . . . . . . . . . . 126Top Level . . . . . . . . . . . . . . . . . . . . . . . . . . . . . . . . . . . . . . . . . . . . . . . . . . . . . . . . . . . . . . . . . . . . . . . . . 126Crusher Access Frame . . . . . . . . . . . . . . . . . . . . . . . . . . . . . . . . . . . . . . . . . . . . . . . . . . . . . . . . . . . . . . 128Feeder Assembly . . . . . . . . . . . . . . . . . . . . . . . . . . . . . . . . . . . . . . . . . . . . . . . . . . . . . . . . . . . . . . . . . . . 129Main Conveyor . . . . . . . . . . . . . . . . . . . . . . . . . . . . . . . . . . . . . . . . . . . . . . . . . . . . . . . . . . . . . . . . . . . . 130Fines Convoyeur . . . . . . . . . . . . . . . . . . . . . . . . . . . . . . . . . . . . . . . . . . . . . . . . . . . . . . . . . . . . . . . . . . . 132Powerunit . . . . . . . . . . . . . . . . . . . . . . . . . . . . . . . . . . . . . . . . . . . . . . . . . . . . . . . . . . . . . . . . . . . . . . . . . 134Deutz Powerunit. . . . . . . . . . . . . . . . . . . . . . . . . . . . . . . . . . . . . . . . . . . . . . . . . . . . . . . . . . . . . . . . . . . . 136Caterpillar Powerunit . . . . . . . . . . . . . . . . . . . . . . . . . . . . . . . . . . . . . . . . . . . . . . . . . . . . . . . . . . . . . . . . 138Deutz Engine . . . . . . . . . . . . . . . . . . . . . . . . . . . . . . . . . . . . . . . . . . . . . . . . . . . . . . . . . . . . . . . . . . . . . . 140Caterpillar Engine . . . . . . . . . . . . . . . . . . . . . . . . . . . . . . . . . . . . . . . . . . . . . . . . . . . . . . . . . . . . . . . . . . 141Jaw Crusher Assy . . . . . . . . . . . . . . . . . . . . . . . . . . . . . . . . . . . . . . . . . . . . . . . . . . . . . . . . . . . . . . . . . . 142Hydraulic Tank . . . . . . . . . . . . . . . . . . . . . . . . . . . . . . . . . . . . . . . . . . . . . . . . . . . . . . . . . . . . . . . . . . . . . 144Diesel Tank . . . . . . . . . . . . . . . . . . . . . . . . . . . . . . . . . . . . . . . . . . . . . . . . . . . . . . . . . . . . . . . . . . . . . . . 145Feeder Collection Chute . . . . . . . . . . . . . . . . . . . . . . . . . . . . . . . . . . . . . . . . . . . . . . . . . . . . . . . . . . . . . 146Jacking Legs . . . . . . . . . . . . . . . . . . . . . . . . . . . . . . . . . . . . . . . . . . . . . . . . . . . . . . . . . . . . . . . . . . . . . . 148Magnet Assy . . . . . . . . . . . . . . . . . . . . . . . . . . . . . . . . . . . . . . . . . . . . . . . . . . . . . . . . . . . . . . . . . . . . . . 149Magnet Spares. . . . . . . . . . . . . . . . . . . . . . . . . . . . . . . . . . . . . . . . . . . . . . . . . . . . . . . . . . . . . . . . . . . . . 150Recommeded 2000 hours Spare Parts . . . . . . . . . . . . . . . . . . . . . . . . . . . . . . . . . . . . . . . . . . . . . . . . . . 151CAT Engine Spare Parts . . . . . . . . . . . . . . . . . . . . . . . . . . . . . . . . . . . . . . . . . . . . . . . . . . . . . . . . . . . . . 153
9.0 Electrical and Hydraulic 155Electrical Schematics . . . . . . . . . . . . . . . . . . . . . . . . . . . . . . . . . . . . . . . . . . . . . . . . . . . . . . . . . . . . . . . . . . 156
Electrical Fittings . . . . . . . . . . . . . . . . . . . . . . . . . . . . . . . . . . . . . . . . . . . . . . . . . . . . . . . . . . . . . . . . . . . 167Hydraulic . . . . . . . . . . . . . . . . . . . . . . . . . . . . . . . . . . . . . . . . . . . . . . . . . . . . . . . . . . . . . . . . . . . . . . . . . . . . 168
Hydraulic Hose Kits . . . . . . . . . . . . . . . . . . . . . . . . . . . . . . . . . . . . . . . . . . . . . . . . . . . . . . . . . . . . . . . . . 168Hydraulic Components. . . . . . . . . . . . . . . . . . . . . . . . . . . . . . . . . . . . . . . . . . . . . . . . . . . . . . . . . . . . . . . 172Hydraulics Fittings . . . . . . . . . . . . . . . . . . . . . . . . . . . . . . . . . . . . . . . . . . . . . . . . . . . . . . . . . . . . . . . . . . 173Hydraulic Circuit Diagrams . . . . . . . . . . . . . . . . . . . . . . . . . . . . . . . . . . . . . . . . . . . . . . . . . . . . . . . . . . . 176
10.0 OEM Section 179OEM Appendicies . . . . . . . . . . . . . . . . . . . . . . . . . . . . . . . . . . . . . . . . . . . . . . . . . . . . . . . . . . . . . . . . . . . . . 180
CJ211 Jaw Crusher Operation. . . . . . . . . . . . . . . . . . . . . . . . . . . . . . . . . . . . . . . . . . . . . . . . . . . . . . . . . 180CJ211 Jaw Crusher Maintenace Manual . . . . . . . . . . . . . . . . . . . . . . . . . . . . . . . . . . . . . . . . . . . . . . . . . 180CJ211 Jaw Crusher Spare Parts . . . . . . . . . . . . . . . . . . . . . . . . . . . . . . . . . . . . . . . . . . . . . . . . . . . . . . . 180CJ211 Jaw Crusher Wear Parts . . . . . . . . . . . . . . . . . . . . . . . . . . . . . . . . . . . . . . . . . . . . . . . . . . . . . . . 180Eriez Magnetic Seperator . . . . . . . . . . . . . . . . . . . . . . . . . . . . . . . . . . . . . . . . . . . . . . . . . . . . . . . . . . . . 180Roxon Vibrating Feeder . . . . . . . . . . . . . . . . . . . . . . . . . . . . . . . . . . . . . . . . . . . . . . . . . . . . . . . . . . . . . . 180Crawler Tracks Operation Manual . . . . . . . . . . . . . . . . . . . . . . . . . . . . . . . . . . . . . . . . . . . . . . . . . . . . . . 180M-PROS Control System Spare Parts . . . . . . . . . . . . . . . . . . . . . . . . . . . . . . . . . . . . . . . . . . . . . . . . . . . 180Optional Extra’s . . . . . . . . . . . . . . . . . . . . . . . . . . . . . . . . . . . . . . . . . . . . . . . . . . . . . . . . . . . . . . . . . . . . 180

QJ330
Copyright © Sandvik Mobile Screener’s & Crusher’s 9ID:QJ330.en.ver2
1.0 Safety Section
Safety QJ330
10 Copyright © Sandvik Mobile Screener’s & Crusher’s
ID:QJ330.en.ver2
1.1 Safety Essentials
To ensure maximum safety, ALWAYS read this section carefully BEFORE carrying out any work onthe equipment or making any adjustments.
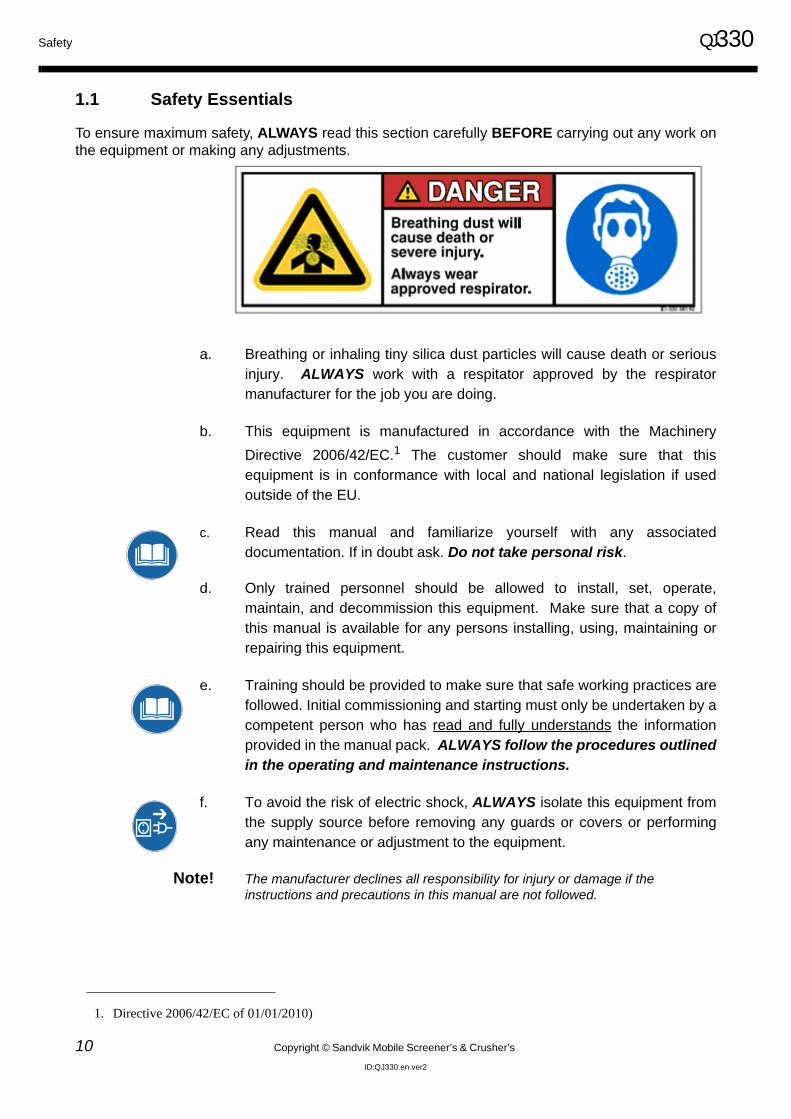
a. Breathing or inhaling tiny silica dust particles will cause death or seriousinjury. ALWAYS work with a respitator approved by the respiratormanufacturer for the job you are doing.
b. This equipment is manufactured in accordance with the MachineryDirective 2006/42/EC.1 The customer should make sure that thisequipment is in conformance with local and national legislation if usedoutside of the EU.
c. Read this manual and familiarize yourself with any associateddocumentation. If in doubt ask. Do not take personal risk.
d. Only trained personnel should be allowed to install, set, operate,maintain, and decommission this equipment. Make sure that a copy ofthis manual is available for any persons installing, using, maintaining orrepairing this equipment.
e. Training should be provided to make sure that safe working practices arefollowed. Initial commissioning and starting must only be undertaken by acompetent person who has read and fully understands the informationprovided in the manual pack. ALWAYS follow the procedures outlinedin the operating and maintenance instructions.
f. To avoid the risk of electric shock, ALWAYS isolate this equipment fromthe supply source before removing any guards or covers or performingany maintenance or adjustment to the equipment.
Note! The manufacturer declines all responsibility for injury or damage if the instructions and precautions in this manual are not followed.
1. Directive 2006/42/EC of 01/01/2010)

QJ330 Safety
Copyright © Sandvik Mobile Screener’s & Crusher’s 11ID:QJ330.en.ver2
1.2 Safety Signs and Labels
a. The term "DANGER" indicates a hazardous situation which, if notavoided, will result in death or serious injury.
b. The term "WARNING" indicates a hazardous situation which, if notavoided, could result in death or serious injury.
c. The term “NOTICE” indicates a situation which, if not avioded, couldresult in damage to property.
d. The safety alert symbol indicates a potential source of personal injury.
e. All electrical control boxes are labeled. Make sure that these labelsremain in place and are clearly visible at all times.
f. Other hazards identified within this manual may also be marked on theequipment with safety labels. Make sure that these safety labels remainin place and are clearly visible at all times.
1.3 Safety Hazards Pertaining to the Equipment
The following safety symbols may be posted on the equipment or contained in the manuals. You MUST observe all safety symbols, labels, and instructions.
a. MAKE SURE that safety instructions and safety labels attached to theequipment are ALWAYS complete and perfectly legible.
b. Keep safety instructions and safety labels clean and visible at all times.
c. Replace any illegible or missing safety instructions and safety labels withnew ones before operating the equipment.
d. Make sure replacement parts include safety instructions and labels.

Safety QJ330
12 Copyright © Sandvik Mobile Screener’s & Crusher’s
ID:QJ330.en.ver2
1.3.1 Symbols for Mandatory Actions
Wear Safety Gloves Wear Eye Protection Wear Safety Helmet
Wear Safety Harness Wear Ear Protection Wear Safety Boots
Wear Close Fitting Overalls Read the Manual Wear High Visibility Vest
Wear Respirator Disconnect Power Source From Supply
Switch Off and Lockout Equipment
l

QJ330 Safety
Copyright © Sandvik Mobile Screener’s & Crusher’s 13ID:QJ330.en.ver2
1.3.2 Symbols for Prohibited Actions
1.3.3 Hazard Symbols
No Climbing No Smoking Do Not Touch
No Open Flames Limited or Restricted Access Do Not Weld
Do Not Remove Safety Guard
Crushing Hazard - Hands Crushing Hazard - Feet Chemical Burn Hazard
Electrical Hazard Electrical Shock/Electrocution Hazard Entanglement Hazard
Safety QJ330
14 Copyright © Sandvik Mobile Screener’s & Crusher’s
ID:QJ330.en.ver2
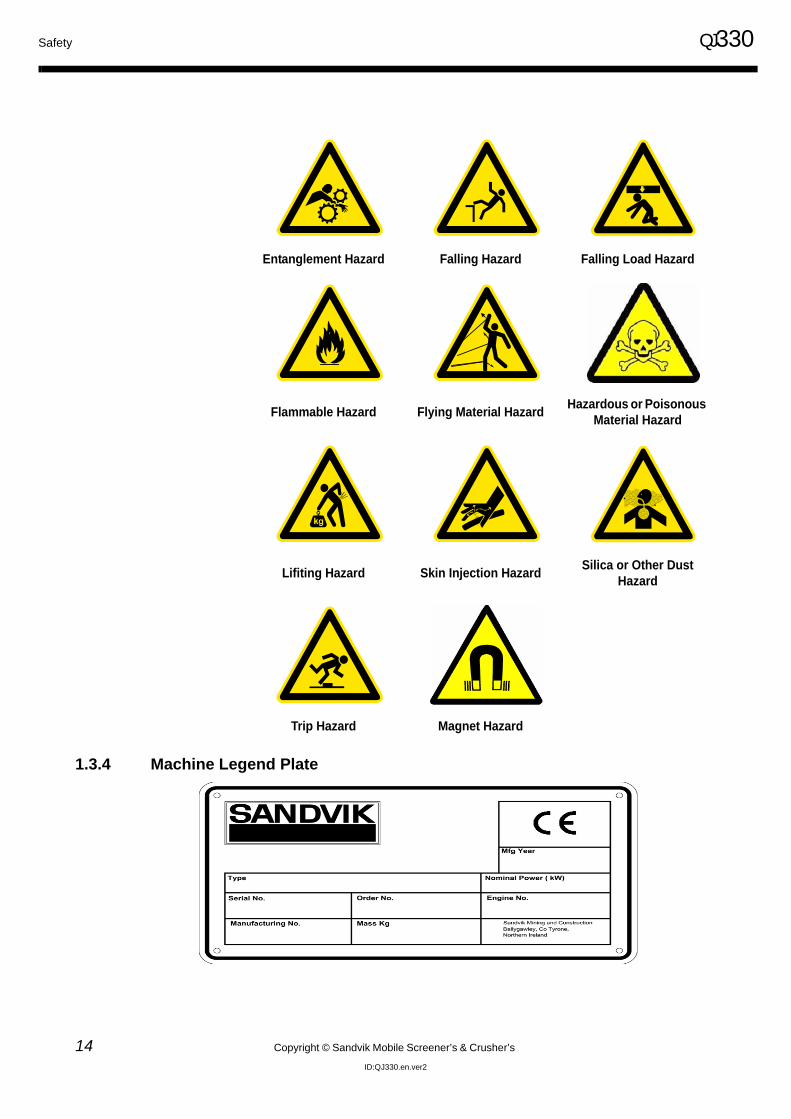
1.3.4 Machine Legend Plate
Entanglement Hazard Falling Hazard Falling Load Hazard
Flammable Hazard Flying Material Hazard Hazardous or Poisonous Material Hazard
Lifiting Hazard Skin Injection Hazard Silica or Other Dust Hazard
Trip Hazard Magnet Hazard

QJ330 Safety
Copyright © Sandvik Mobile Screener’s & Crusher’s 15ID:QJ330.en.ver2
1.4 Component Safety Features
a. DO NOT use this equipment if any safety guards or devices have beenremoved or are installed improperly.
b. Operating this equipment with any safety guards or devices which havebeen removed or installed improperly could result in death or seriousinjury.
1.5 Features for Operator Safety
a. Safety features associated with this equipment have been assessed inaccordance with BS EN 954-1 to Category 3.
b. Emergency Stop buttons have been installed to prevent death or seriousinjury. Make sure that the Emergency Stop buttons are visible and arenot obstructed in any way.
c. The Emergency Stop circuit is a 24 V DC series circuit and hard wired toremove power from the ECU Engine management system and stop theengine. To avoid electric shock or cutting injury, you MUST wait atleast ten full seconds after activating the Emergency Stop to allowthe system to release its electrical charge.
d. You MUST study the detailed Safety Circuit diagram which is within thedrawing pack as an appendix to this manual.
e. Safety guards have been installed to prevent death or serious injury. DONOT remove, modify, or alter any safety guard. Make sure that all safetyguards are bolted down.
f. Steps, handrails, tread plates, and fixed guards are provided wherepersonnel are required to climb on the machine.
g. If for any reason other areas of the machine need to be accessed, risksMUST be assessed and appropriate safety measures taken.

Safety QJ330
16 Copyright © Sandvik Mobile Screener’s & Crusher’s
ID:QJ330.en.ver2
1.6 Environmental Safety
To avoid unnecessary engine emissions, you MUST regularly service the machine as specified in themachine maintenance sections contained in this manual.
1.6.1 Hazardous Materials
a. Diesel spillages MUST be cleaned up immediately due to fire hazard.
b. ONLY use the lubricating oils recommended in the maintenanceschedule.
c. OBSERVE the COSHH information contained in the appendix to thismanual.
d. Local & National regulations MUST be observed when disposing ofwaste.
e. Improperly disposing of waste CAN THREATEN the environment andecology and is illegal.
f. MAKE SURE that all hazardous and replaced parts are disposed ofsafely and with minimum environmental impact.
1.6.2 Machine Disposal
This euipment MUST ONLY be disposed at a specialist machine breaker
• Potentially harmful waste used on this equipment includes items such as oil, fuel, coolant, filters, batteries, etc.
• DO NOT store harmful waste in food or beverage containers that may mislead someone into drinking from them, which could cause death or serious injury
• Use leak proof containers when draining fluids
• DO NOT pour waste onto the ground, down a drain or into any water source
QJ330 Safety
Copyright © Sandvik Mobile Screener’s & Crusher’s 17ID:QJ330.en.ver2
1.7 Personal Protective Equipment (PPE)
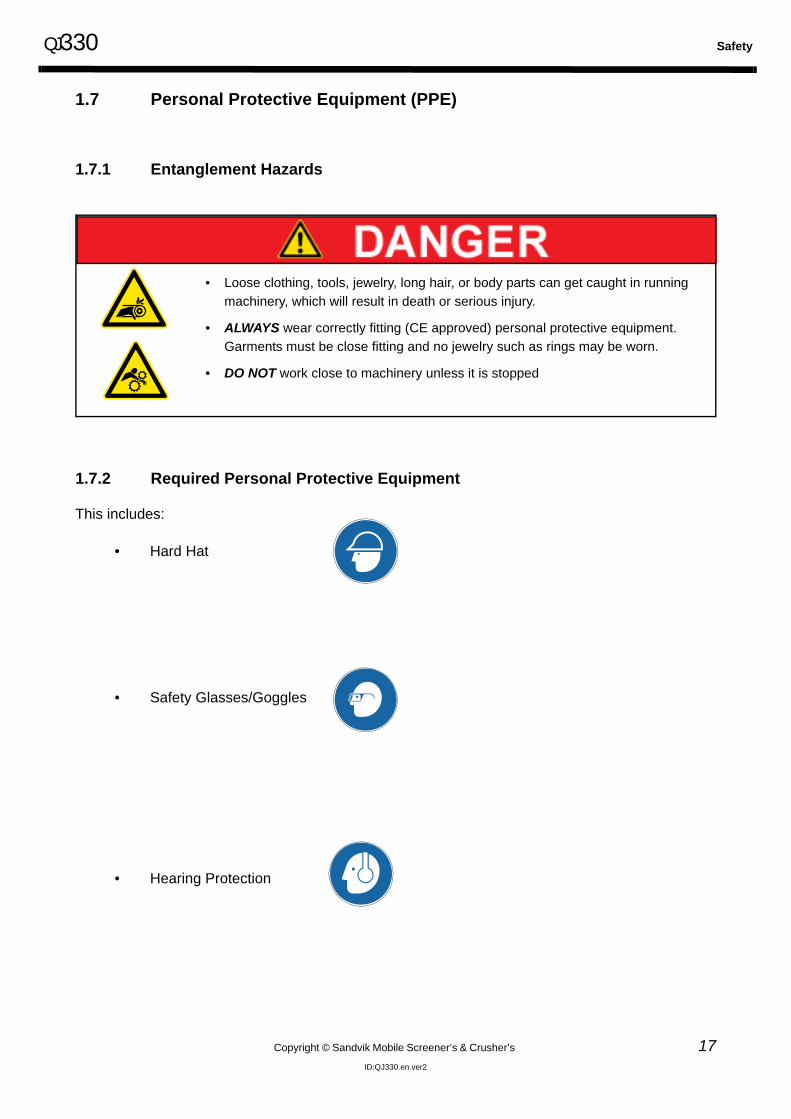
1.7.1 Entanglement Hazards
1.7.2 Required Personal Protective Equipment
This includes:
• Hard Hat
• Safety Glasses/Goggles
• Hearing Protection
• Loose clothing, tools, jewelry, long hair, or body parts can get caught in running machinery, which will result in death or serious injury.
• ALWAYS wear correctly fitting (CE approved) personal protective equipment. Garments must be close fitting and no jewelry such as rings may be worn.
• DO NOT work close to machinery unless it is stopped
Safety QJ330
18 Copyright © Sandvik Mobile Screener’s & Crusher’s
ID:QJ330.en.ver2
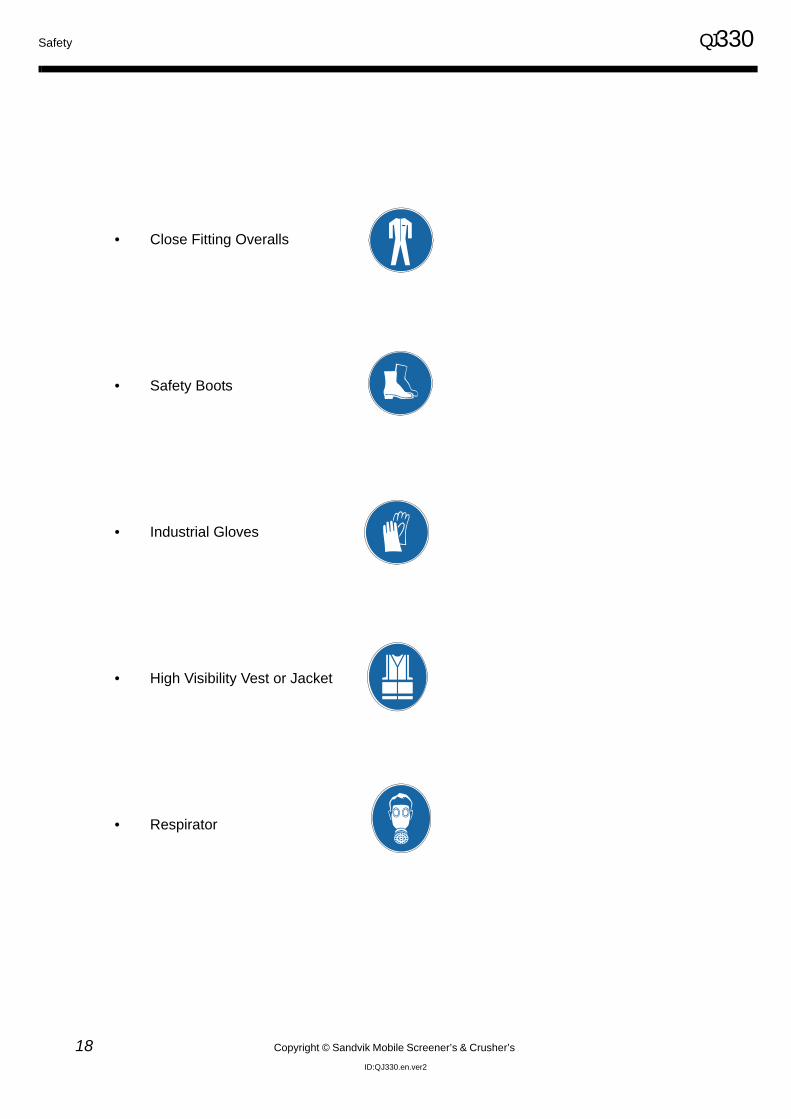
• Close Fitting Overalls
• Safety Boots
• Industrial Gloves
• High Visibility Vest or Jacket
• Respirator
QJ330 Safety
Copyright © Sandvik Mobile Screener’s & Crusher’s 19ID:QJ330.en.ver2
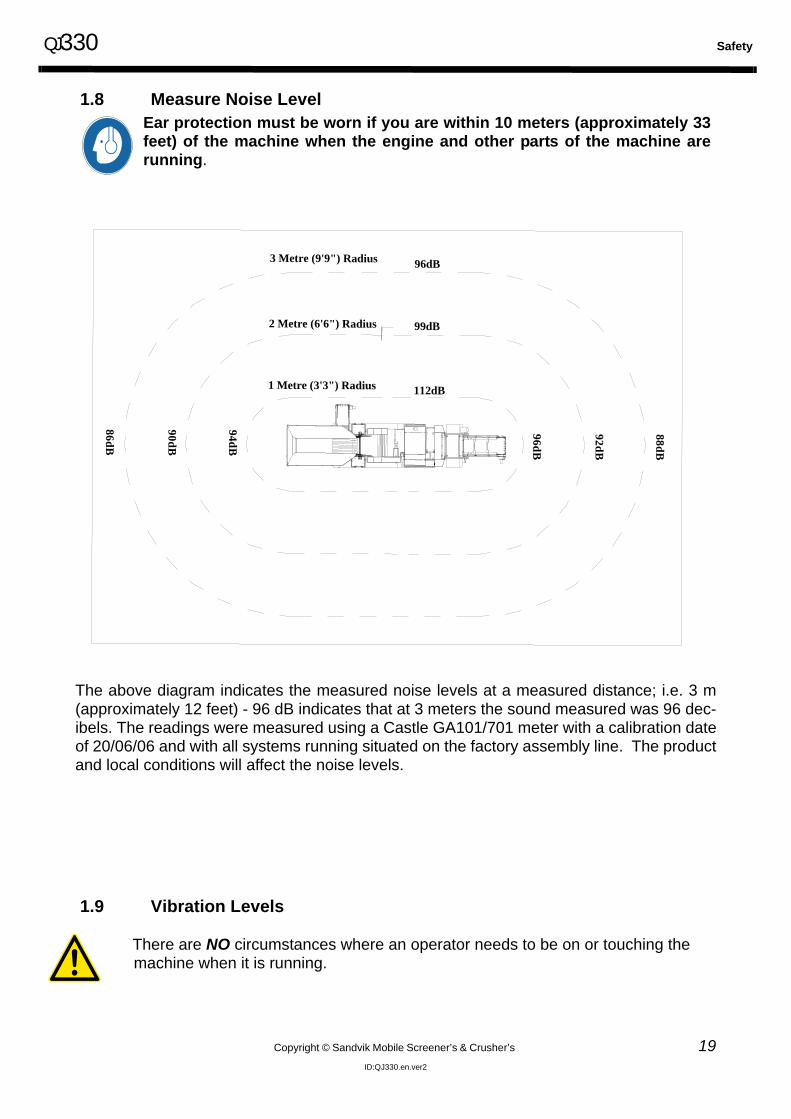
1.8 Measure Noise Level
The above diagram indicates the measured noise levels at a measured distance; i.e. 3 m(approximately 12 feet) - 96 dB indicates that at 3 meters the sound measured was 96 dec-ibels. The readings were measured using a Castle GA101/701 meter with a calibration dateof 20/06/06 and with all systems running situated on the factory assembly line. The productand local conditions will affect the noise levels.
1.9 Vibration Levels
There are NO circumstances where an operator needs to be on or touching the machine when it is running.
Ear protection must be worn if you are within 10 meters (approximately 33feet) of the machine when the engine and other parts of the machine arerunning.
3 Metre (9'9") Radius
2 Metre (6'6") Radius
1 Metre (3'3") Radius
86dB
90dB
94dB
88dB
92dB
96dB
112dB
99dB
96dB
Safety QJ330
20 Copyright © Sandvik Mobile Screener’s & Crusher’s
ID:QJ330.en.ver2
1.10 Organisational Safety Measures
The following safety measures MUST be observed at all times:
• Understand the service procedure before doing work. Keep area clean and dry.
• NEVER lubricate, clean, service, or adjust machinery while it is moving.
• Allow the machinery to cool before performing any maintenance or adjustments.
• MAKE SURE that all parts are properly installed and are in good condition. Replace worn and broken parts IMMEDIATELY.
• Remove any build up of grease, oil and debris from equipment.
• Disconnect battery ground cable before making adjustments on electrical systems or welding on the equipment.
• During maintenance ONLY use the correct tool for the job.
• NEVER make any modifications, additions, or conversions which might affect safety without the manufacturer's approval.
• If clothing, tools, or any body parts become entangled in machinery, IMMEDIATELY disengage all power and operate controls to relieve pressure. Stop the engine and implement lockout procedures.
• If the equipment exhibits any unusual movement or sound, stop the equipment, lock out IMMEDIATELY, and report the malfunction to a competent authority or personnel. Lockout and Tag Procedure (1.14.8)
1.11 Personnel Qualifications, Requirements and Responsiblities
a. All work involving the equipment MUST ONLY be performed by trained, reliableand authorized personnel only. Statutory minimum age limits must be observed.
b. Work on electrical system and its equipment MUST ONLY be carried out by askilled electrician or by instructed persons under the supervision and guidance of askilled electrician and in accordance with electrical engineering rules andregulations.
c. Work on the hydraulic system MUST ONLY be carried out by personnel withspecial knowledge and experience of hydraulic equipment.
QJ330 Safety
Copyright © Sandvik Mobile Screener’s & Crusher’s 21ID:QJ330.en.ver2
1.12 Safety Advice Regarding Specific Operational Phases
1.12.1 Standard Operation
a. Take the necessary steps to make sure that the equipment is used ONLYwhen it is in a safe and reliable state.
b. Operate the equipment ONLY for its designed purpose, and only if allguarding, protective, and safety devices, emergency shut-off equipment,sound proofing elements and exhausts, are in place and fully functional.
c. MAKE SURE that any local barriers are erected to stop unauthorizedentry to the equipment.
d. BEFORE starting the engine make sure that it is safe to do so.
1.12.2 Blockage or Malfunction
In the event of material blockage, any malfunction or operational difficulty, stop theequipment and lockout immediately. Repair any defects or hazardous conditionsimmediately.
1.12.3 Unguarded Areas
a. Limit access to the equipment and its surrounds by erecting barrierguards to reduce the risk of other mechanical hazards, falling loads andejected materials.
b. Switch off and lockout the equipment before removing any safety devicesor guarding
• To avoid death or serious injury, ALWAYS keep your hands and other body parts away from Nip points on the machine.
• DO NOT reach into unguarded machinery.
Safety QJ330
22 Copyright © Sandvik Mobile Screener’s & Crusher’s
ID:QJ330.en.ver2
QJ330 Safety
Copyright © Sandvik Mobile Screener’s & Crusher’s 23ID:QJ330.en.ver2
1.13 Special Work, Including Equipment Maintenance and Repairs During Operation, Disposal of Parts, and Hazardous Materials
a. Observe the adjusting, maintenance, and service intervals set out in the operatinginstructions, except where:
• Warning horns, lights, gauges, or indicators call for immediate action; OR
• Adverse conditions require more frequent servicing.
b. ALWAYS only use Original Equipment Manufacturer's ("OEM") recommendedreplacement parts and equipment.
c. Make sure that only properly trained personnel undertake these tasks.
1.13.1 Securing the Equipment Before Performing Maintenance
When undertaking maintenance and repair work, the equipment must first be made safe.
a. Switch off the engine using the ignition key. Switch off at isolation point andremove the ignition key.
b. Implement lockout procedures. (1.14.8)
c. Attach a hazard sign(s) to the equipment in appropriate positions to alert allpersonnel of potential hazards.
1.13.2 Maintenance Site Conditions
Prior to starting any maintenance work, MAKE SURE the equipment is positioned onstable and level ground and has been secured against inadvertent movement andbuckling.
1.13.3 Replacement & Removal of Components
a. ALWAYS observe handling instructions itemized in this manual, the OriginalEquipment Manufacturer's manuals, or the spare parts suppliers' instructions.
Safety QJ330
24 Copyright © Sandvik Mobile Screener’s & Crusher’s
ID:QJ330.en.ver2
b. NEVER allow untrained staff to attempt to remove or replace any part ofthe equipment.
c. The removal of large or heavy components without adequate liftingequipment is PROHIBITED.
d. To avoid the risk of accidents, individual parts and large assembliesbeing moved for replacement purposes should be carefully attached tolifting tackle and secured. ONLY use suitable and technically adequatelifting gear supplied or approved by Original Equipment Manufacturer.
e. NEVER work or stand under suspended loads.
f. KEEP AWAY from the feeder hopper and product conveyor discharge,where there is risk of serious injury or death from contact with ejecteddebris.
g. LIMIT ACCESS to the equipment and its surrounds by erecting barrierguards to reduce the risk of residual mechanical hazards, falling liftedloads, and ejected materials.
1.13.4 Climbing, Falling
a. Falling from and/or onto this equipment could result in death or seriousinjury.
b. NEVER climb on the equipment while it is in operation or use equipmentparts as a climbing aid.
c. ALWAYS keep the area around the equipment clear of debris and triphazards.
d. Beware of moving haulage and loading equipment in the vicinity of theequipment.
e. For carrying out overhead assembly work, ALWAYS use speciallydesigned or otherwise safety-oriented ladders and working platforms.
f. ONLY use walkways/platforms provided on the equipment. ALWAYSperform work from an approved, safe and secure platform.
g. When reaching any points 2m (approximately 6 feet) or more above theground level, ALWAYS use CE certified safety harness.
h. Keep all handles, steps, handrails, platforms, landing areas, and laddersfree from dirt, oil, snow and ice.

QJ330 Safety
Copyright © Sandvik Mobile Screener’s & Crusher’s 25ID:QJ330.en.ver2
1.13.5 Safety Considerations During Maintenance
It is essential that you take the following steps to MAKE SURE you and others are safe.
a. During maintenance, RESTRICT ACCESS to essential staff only. Whereappropriate, erect barrier guards and post warnings.
b. The fastening of loads and instructing or guiding of crane operatorsshould be entrusted to qualified persons only.
c. The marshal providing instructions must be within sight or sound of theoperator and positioned to have an all around view of the operation.
d. ALWAYS make sure that any safety device such as locking wedges,securing chains, bars, or struts are utilized as indicated in these operatinginstructions.
e. Make sure that any part of the equipment raised for any reason isprevented from falling by securing it in a safe reliable manner.
f. NEVER work under unsupported equipment.
g. NEVER work alone.
1.13.6 Safety Considerations During Cleaning
a. This equipment MUST be isolated prior to cleaning.
b. DO NOT direct power washers near or into control boxes and devices.
c. After cleaning, examine all fuel, lubricant, and hydraulic fluid lines forleaks, loose connections, chafe marks and damage. Any defects foundMUST be repaired immediately.
1.13.7 Removal of Safety Devices and Guards
a. Prior to operation, all safety devices (control devices or guards)temporarily removed for set-up, maintenance or repair purposes MUSTbe refitted and checked immediately upon completion of the maintenanceand repair work.
b. To avoid serious personal injury or death, NEVER operate the equipmentwith safety devices or guards removed or unsecured.
c. ALWAYS report any defects regarding guards, safety devices or controldevices.
Safety QJ330
26 Copyright © Sandvik Mobile Screener’s & Crusher’s
ID:QJ330.en.ver2
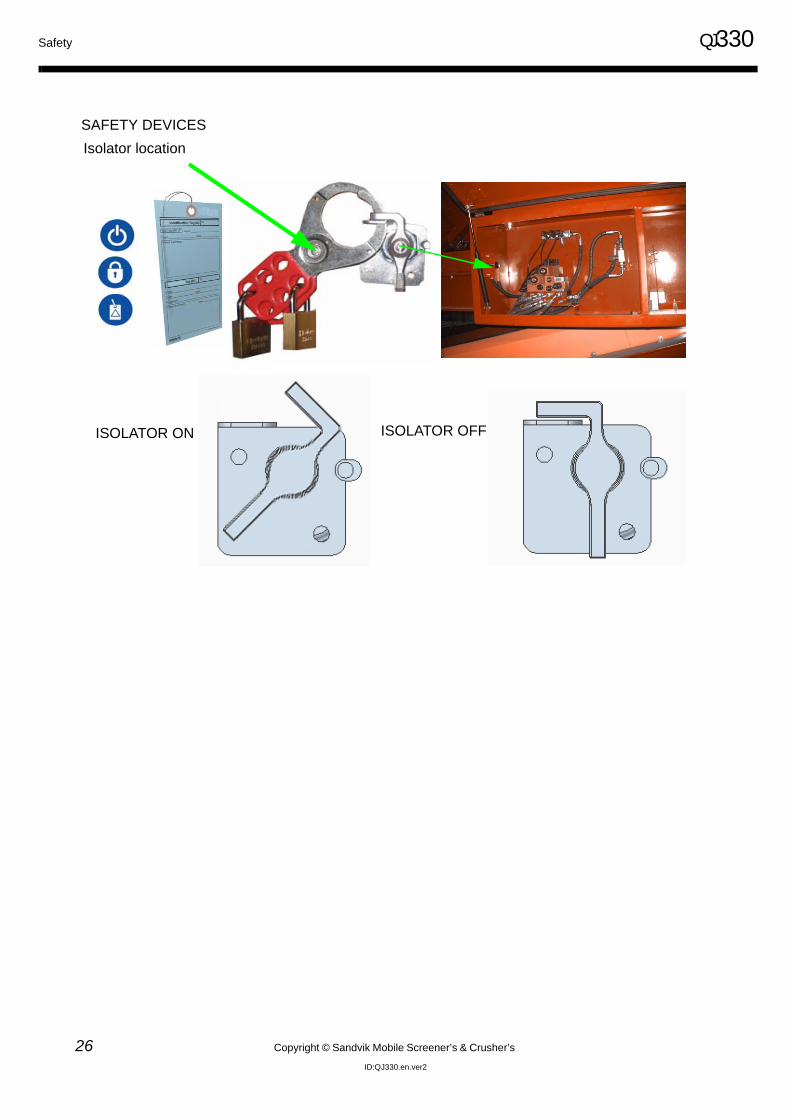
ISOLATOR ON ISOLATOR OFF
SAFETY DEVICESIsolator location
QJ330 Safety
Copyright © Sandvik Mobile Screener’s & Crusher’s 27ID:QJ330.en.ver2
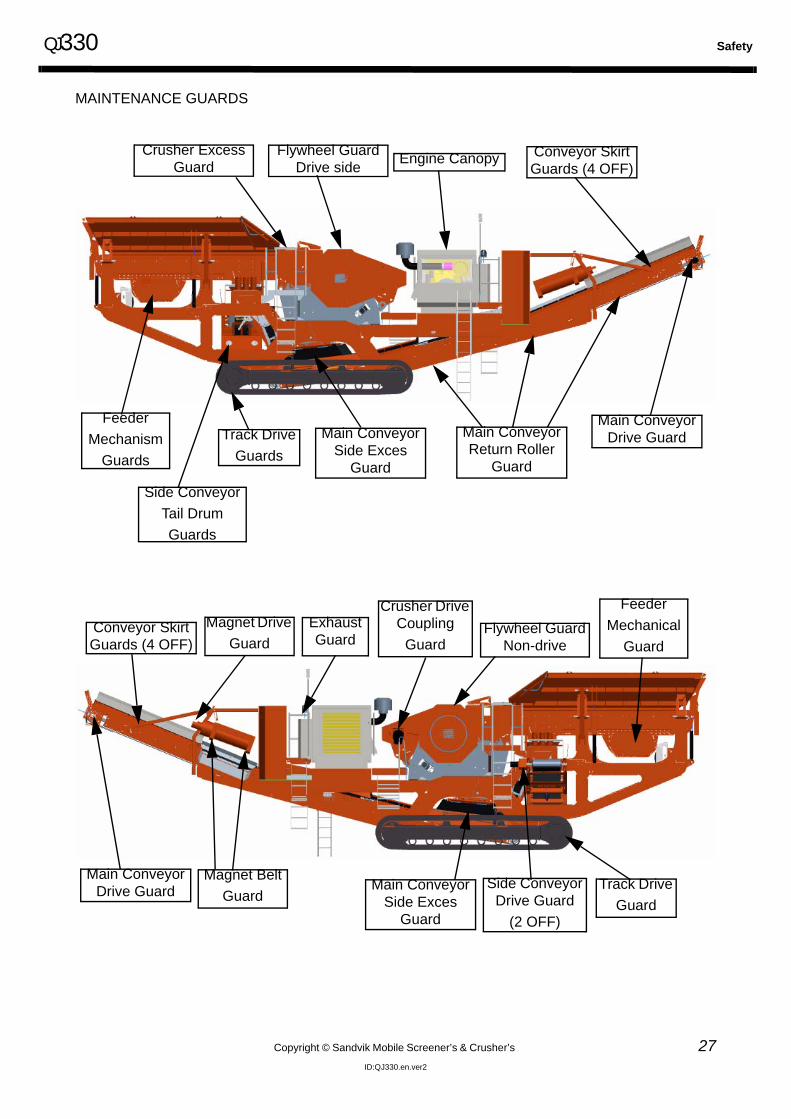
MAINTENANCE GUARDS
Crusher Excess Guard
Flywheel Guard Drive side Engine Canopy Conveyor Skirt
Guards (4 OFF)
Feeder Mechanism
Guards
Side Conveyor Tail Drum Guards
Track Drive Guards
Main Conveyor Drive GuardMain Conveyor
Side Exces Guard
Conveyor Skirt Guards (4 OFF)
Main Conveyor Drive Guard
Main Conveyor Return Roller
Guard
Main Conveyor Side Exces
Guard
Magnet Drive Guard
Magnet Belt Guard
Exhaust Guard
Crusher Drive Coupling
GuardFlywheel Guard
Non-drive
Side Conveyor Drive Guard
(2 OFF)
Track Drive Guard
Feeder Mechanical
Guard
Safety QJ330
28 Copyright © Sandvik Mobile Screener’s & Crusher’s
ID:QJ330.en.ver2
1.13.8 Surrounding Structures
a. This equipment MUST ONLY be operated in a position away frombuildings, permanent structures or high ground to eliminate the risk ofpersons falling onto the equipment or its surrounds.
b. Any temporary structures erected around the equipment MUST beremoved prior to operation.
1.13.9 Safety When Refueling
• Diesel fuel is flammable and creates a potential hazard which could result in death or serious injury.
• To avoid spillages use drip trays.
• ONLY refuel with diesel from approved storage and supply equipment.
• NEVER remove the filler cap or refuel with the engine running.
• NEVER add gasoline or any other fuels mixed to diesel due to increased fire or explosion risks and damage to the engine.
• Smoking is PROHIBITED when refueling or handling diesel fuel.
• DO NOT carry out maintenance on the fuel system near naked lights or sources of sparks, such as welding equipment.
• IMMEDIATELY clean up spilt fuel and dispose of correctly to minimize any environmental impact.
QJ330 Safety
Copyright © Sandvik Mobile Screener’s & Crusher’s 29ID:QJ330.en.ver2
1.14 Specific Hazards
1.14.1 Electrical Energy
A. External Considerations and Hazards
When working with the equipment, maintain a safe distance from overhead electric lines.If overhead cables are in the vicinity, a risk assessment MUST be completed prior to op-erating the equipment.
B. Machine - Electrical
1. Work on the electrical system or equipment MUST ONLY be carried out by a skilled andqualified electrician or by specially instructed personnel under the control and supervision ofsuch an electrician and in accordance with applicable electrical engineering rules.
2. Before starting any maintenance or repair work, the power supply to the equipment MUST beisolated. Check the de-energized parts to make sure they do not have any power. Inaddition to insulating any adjacent parts or elements, ground or short circuit them to avoid therisk of electrical shock.
3. The electrical equipment is to be inspected and checked at regular intervals. Defects such asloose connections or scorched or otherwise damaged cables MUST be fixed immediately.
4. Use ONLY original fuses with the specified current rating. Switch off the equipmentIMMEDIATELY if trouble occurs in the electrical system.
5. This equipment is wired on a negative earth. ALWAYS observe correct polarity.
• Contact with overhead electric lines will cause death or serious injury.
• If your equipment comes into contact with a live wire, you MUST:
• Vacate the area;
• Warn others against approaching and touching the equipment;
• Report the incident and have the live wire shut off.
Safety QJ330
30 Copyright © Sandvik Mobile Screener’s & Crusher’s
ID:QJ330.en.ver2
1.14.2 Battery
a. ALWAYS disconnect battery leads before carrying out any maintenanceto the electrical system.
b. Recharge the battery in a well ventilated area.
c. The battery contains sulphuric acid, an electrolyte which can causesevere burns and produce explosive gases.
d. AVOID contact with the skin, eyes or clothing.
e. Smoking is PROHIBITED when maintaining the battery.
f. ALWAYS wear appropriate personal protective equipment.
1.14.3 Gas, Dust, Steam, Smoke and Noise
a. ALWAYS operate internal combustion engines outside or in a wellventilated area.
b. If, during maintenance, the equipment must be operated in an enclosedarea, MAKE SURE that there is sufficient ventilation or provide forcedventilation.
c. Observe the regulations in force at the respective site.
d. Dust found on the equipment or produced during work on the equipmentMUST NOT be removed by blowing with compressed air.
e. Dust waste MUST ONLY be handled by authorized persons. Whendisposing of dust waste, the material must be dampened, placed in asealed container and marked to ensure proper disposal.
f. Breathing or inhaling tiny silica dust particles will cause death or seriousinjury. ALWAYS work with a respitator approved by the respiratormanufacturer for the job you are doing.
QJ330 Safety
Copyright © Sandvik Mobile Screener’s & Crusher’s 31ID:QJ330.en.ver2
1.14.4 Welding or Naked Flames
1.14.5 Hydraulic Equipment
a. Work on hydraulic equipment must be carried out by persons havingspecial knowledge and experience of hydraulic systems.
b. ALWAYS relieve pressure from the hydraulic system before carrying outany kind of maintenance or adjustment.
c. BEFORE carrying out any repair work, depressurize all system sectionsand pressure pipes (i.e. hydraulic system, compressed air system, etc.)requiring removal, in accordance with the specific instructions for the unitconcerned.
d. Hydraulic and compressed air lines MUST be laid and fitted properly.Make sure that no connections are interchanged. The fittings, lengthsand quality of the hoses MUST comply with the technical requirements.
• Welding or naked flames on or around the equipment creates the risk of an explosion or fire, which could result in death or serious injury.
• AVOID all naked flames in the vicinity of this equipment.
• Welding, flame cutting and grinding work on the equipment MUST ONLY be carried out if this has been expressly authorized, as there may be a risk of explosion and fire.
• Before carrying out welding, flame cutting and grinding operations, clean the equipment and its surroundings from dust and other flammable substances and make sure the premises are adequately ventilated, as there may be a risk of explosion
• The battery MUST BE isolated.
• Splashed oil creates the risk of a fire, which could result in death or serious injury.
• Check all lines, hoses and screwed connections regularly for leaks or other damage.
• Repair damaged lines, hoses, or screwed connections IMMEDIATELY

Safety QJ330
32 Copyright © Sandvik Mobile Screener’s & Crusher’s
ID:QJ330.en.ver2
e. ONLY fit replacement components of a type recommended by themanufacturer.
f. ALWAYS practice extreme cleanliness when servicing hydrauliccomponents
1.14.6 Hazardous Substances
a. MAKE SURE that correct procedures are formulated to safely handlehazardous materials in strict accordance with the manufacturer'sinstructions and all applicable regulations by correctly identifying,labeling, storing, using and disposing of the materials.
b. A full list of Hazardous Substances associated with this equipment canbe found in the appendix of this document.
• Hydraulic fluid under pressure can penetrate the skin, which will result in death or serious injury.
• If fluid is injected under the skin, it must be surgically removed or gangrene will result. GET MEDICAL HELP IMMEDIATELY.
• ALWAYS use a piece of cardboard to check for leaks. DO NOT USE YOUR HAND
QJ330 Safety
Copyright © Sandvik Mobile Screener’s & Crusher’s 33ID:QJ330.en.ver2
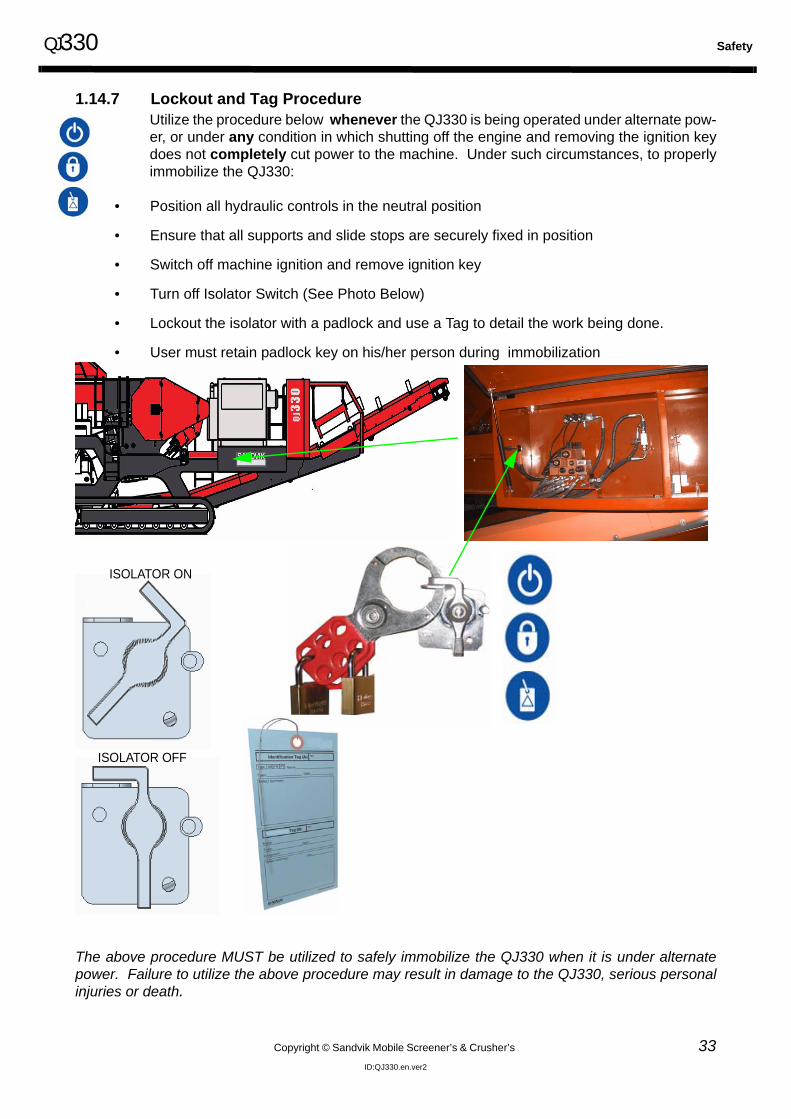
1.14.7 Lockout and Tag ProcedureUtilize the procedure below whenever the QJ330 is being operated under alternate pow-er, or under any condition in which shutting off the engine and removing the ignition keydoes not completely cut power to the machine. Under such circumstances, to properlyimmobilize the QJ330:
• Position all hydraulic controls in the neutral position
• Ensure that all supports and slide stops are securely fixed in position
• Switch off machine ignition and remove ignition key
• Turn off Isolator Switch (See Photo Below)
• Lockout the isolator with a padlock and use a Tag to detail the work being done.
• User must retain padlock key on his/her person during immobilization
The above procedure MUST be utilized to safely immobilize the QJ330 when it is under alternatepower. Failure to utilize the above procedure may result in damage to the QJ330, serious personalinjuries or death.
ISOLATOR ON
ISOLATOR OFF
Safety QJ330
34 Copyright © Sandvik Mobile Screener’s & Crusher’s
ID:QJ330.en.ver2
1.14.8 Removal of the Lockout and Tag
Once the work has finished; remove ONLY your lock and tag, as other people may be working onthe machine at the same time.
The machine can only be started when the last lock and tag is removed.
Refer to Start-up Sequence for Running the Machine ( 4.3.1)
1.14.9 Operational Safety Considerations
• Ensure that a copy of all operating instructions, including the Engine Operations Manual, is kept current and maintained with the QJ330 at all times. If the manual is unavailable obtain a replacement from Sandvik.
• Operators MUST read and understand all operating instructions, and must always work utilizing indicated safety precautions and procedures.
• Operators and anyone in the vicinity of the QJ330 must ALWAYS use appropriate Personal Protective Equipment ( 1.7.2).
• Operators MUST be familiar with and understand all warnings and labels affixed to the QJ330. Failure to do so may result in serious personal injuries or death. If warnings or labels are damaged or illegible, operators must notify management immediately and urgently obtain replacements.
• ALWAYS ensure, prior to operation of the QJ330, that all safety devices are in place and operational.
• If in doubt concerning the efficient, proper or safe operation of the QJ330, contact your Sandvik Dealer.
IMPACT HAZARD
Before starting the machine visually check the machine and area around themachine to make sure there is no one standing in the vicinity.

QJ330 Safety
Copyright © Sandvik Mobile Screener’s & Crusher’s 35ID:QJ330.en.ver2
1.14.10 Operator Selection And Qualification
• The QJ330 should only be operated by persons who have been trained and authorised.
• Training on the QJ330 must only be carried out by qualified instructors, familiar with all operational and safety considerations. Do not attempt to operate the QJ330 without having first completed appropriate training. Operation of the machine without first receiving adequate training may result in serious personal injuries or death.
• Operators must be qualified legally to operate heavy equipment, i.e., be of age in the jurisdiction in which the QJ330 is to be used, carry any required endorsements to licenses, etc.
1.14.11 Special Considerations For Maintenance And Repair Of Electrical System
• Maintenance and repairs to the QJ330’s electrical system must ALWAYS be performed by a qualified electrician or a skilled individual working under the supervision of a qualified electrician. Attempts to perform maintenance or repairs to the machine’s electrical system, without proper qualifications and/or supervision, may result in serious personal injuries or death.
• The Lockout and Tag Procedure (1.14.7) in this manual should be utilized during any maintenance or repair to the QJ330’s electrical system.
• ALWAYS seal off the area where maintenance or repairs to the machine’s electrical system will be performed, including a posted warning of the dangers of electrocution. No unqualified persons should approach the vicinity of the QJ330 during electrical system maintenance or repair.
• ALWAYS use insulated tools. Failure to do so may result in serious personal injuries or death.
• The QJ330 is grounded negatively. Procedures intended to ground positively-wired equipment may not render the machine safe for maintenance or repair work. When grounding is necessary, ALWAYS ground the feeder cable and short-circuit capacitors using a grounding rod before performing maintenance or repairs to the QJ330’S electrical system.
• Use only approved manufacturer-supplied fuses and electrical components.
Safety QJ330
36 Copyright © Sandvik Mobile Screener’s & Crusher’s
ID:QJ330.en.ver2
• ALWAYS maintain a safe distance between the QJ330 and energized power lines. Do not attempt to operate the QJ330, or perform maintenance or repairs, if the machine is in the proximity of energized power lines. Failure to keep the QJ330 from energized power lines may result in serious personal injuries or death.
• ALWAYS make sure that persons performing maintenance or repairs to the QJ330’s electrical system have ready access to emergency stop switches, and can de-energize the machine immediately in the event that the QJ330 becomes energized for any reason during maintenance or repairs.
• THE MACHINES ELECTRICAL SYSTEM UTILIZES SUFFICIENT ENERGY TO SERIOUSLY INJURE OR KILL PERSONS COMING INTO CONTACT WITH ENERGIZED ELECTRICAL COMPONENTS. ALWAYS ENSURE THAT THE MACHINE IS COMPLETELY DE-ENERGIZED BEFORE ATTEMPTING MAINTENANCE OR REPAIRS.
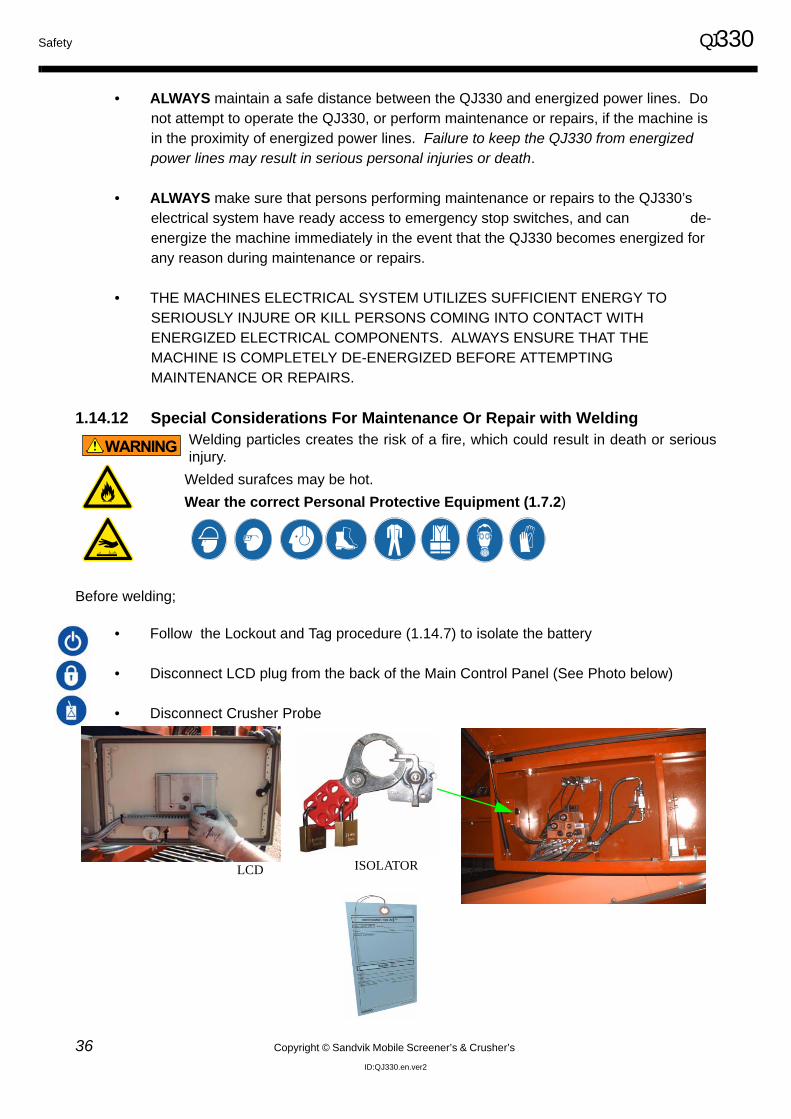
1.14.12 Special Considerations For Maintenance Or Repair with Welding
Before welding;
• Follow the Lockout and Tag procedure (1.14.7) to isolate the battery
• Disconnect LCD plug from the back of the Main Control Panel (See Photo below)
• Disconnect Crusher Probe
Welding particles creates the risk of a fire, which could result in death or seriousinjury.
Welded surafces may be hot.Wear the correct Personal Protective Equipment (1.7.2)
LCD ISOLATOR

QJ330 Safety
Copyright © Sandvik Mobile Screener’s & Crusher’s 37ID:QJ330.en.ver2
1.14.13 Special Considerations For Maintenance Or Repair Of Hydraulic System
• Wear the correct Personal Protective Equipment when maintaining or repairing the hydraulic system( 1.7.2).
• Maintenance and repairs to the QJ330’s hydraulic system must ALWAYS be performed by Trained and Authourised personnel.
• The Lockout and Tag Procedure (1.14.7) in this manual should be utilized during any maintenance or repair to the QJ330’s hydraulic system. ALWAYS ensure that the QJ330’S hydraulic lifting components are properly supported during maintenance or repairs.
• Inspect all hoses, lines and screwed connections for leaks or other damage. Repair any leaking or damaged hoses, lines or connections immediately.
• ALWAYS bleed and de-pressurize the QJ330’s hydraulic lines before attempting maintenance or repairs to the machine. Failure to de-pressurize the hydraulic lines may result in serious personal injuries or death.
• The hydraulic system of the QJ330 utilizes hydraulic fluids, oils and other caustic substances, and extreme caution should be exercised during the performance of maintenance or repairs. Do not allow hydraulic or other fluids to contact unprotected skin or eyes. Always utilize appropriate safety equipment and appliances, including Personal Protective Equipment (1.7.2), when performing maintenance or repairs to the QJ330’s hydraulic system. Failure to observe precautions may result in serious injury or death.
1.14.14 Handling And Disposal Of Hazardous Components And Materials
• The QJ330’S battery contains sulfuric acid, which can cause severe burns, and produces explosive gases. Inspect the machine’s battery regularly, and assure that it is properly connected and maintained. NEVER allow battery parts to come into contact with unprotected skin, eyes or clothing, use Personal Protective Equipment (1.7.2). NEVER attempt maintenance or repair to the QJ330’S battery while the battery is connected.
• The QJ330 includes an internal combustion engine, which produces exhaust fumes containing potentially harmful gases and particulates. NEVER operate the machine’s engine in an area lacking adequate ventilation, whether indoors or outside.
Safety QJ330
38 Copyright © Sandvik Mobile Screener’s & Crusher’s
ID:QJ330.en.ver2
• Prior to welding, cutting, or grinding, ALWAYS assure that dust and other flammable substances are removed from the work site. ALWAYS assure that the area where welding, cutting or grinding is conducted is properly ventilated. Failure to observe these precautions may increase the risk of explosion or fire, and may result in serious personal injuries or death.
• Keep flammable materials, chemicals, etc. away from the QJ330 at all times.
1.14.15 Warning Concerning Crystalline Silica And Similar Particulates.
The QJ330’S operation may produce dust containing crystalline silica or other potentially harmful par-ticulates. ALWAYS utilize appropriate and properly-fitted and approved Personal ProtectiveEquipment (1.7.2) (e.g., respirators).
DO NOT linger in areas where dust is produced, blown or otherwise found. NEVER inhale dust pro-duced by the operation of the QJ330.
Inhalation of crystalline silica dust is potentially harmful to human health, and may result in seriouspulmonary disease or other deleterious chronic lung obstruction, serious personal injuries or death.
1.14.16 Special Considerations Concerning Dust Disposal.
ALWAYS utilize appropriate and properly-fitted Personal Protective Equipment (1.7.2) (e.g., res-pirators).
Always dispose of dust produced by the operation of the QJ330 by applying water, placing dampeneddust in a marked, sealed container, and removing it from the work site.
NEVER disperse dust by blowing it; doing so may exacerbate dusty conditions in the proximity of theQJ330, and may also cause dust to enter areas where unprotected persons may be working, creatingan increased risk of injury or death.
ALWAYS assure that dust is removed from clothing, boots, etc., before leaving the work site.
QJ330 Safety
Copyright © Sandvik Mobile Screener’s & Crusher’s 39ID:QJ330.en.ver2
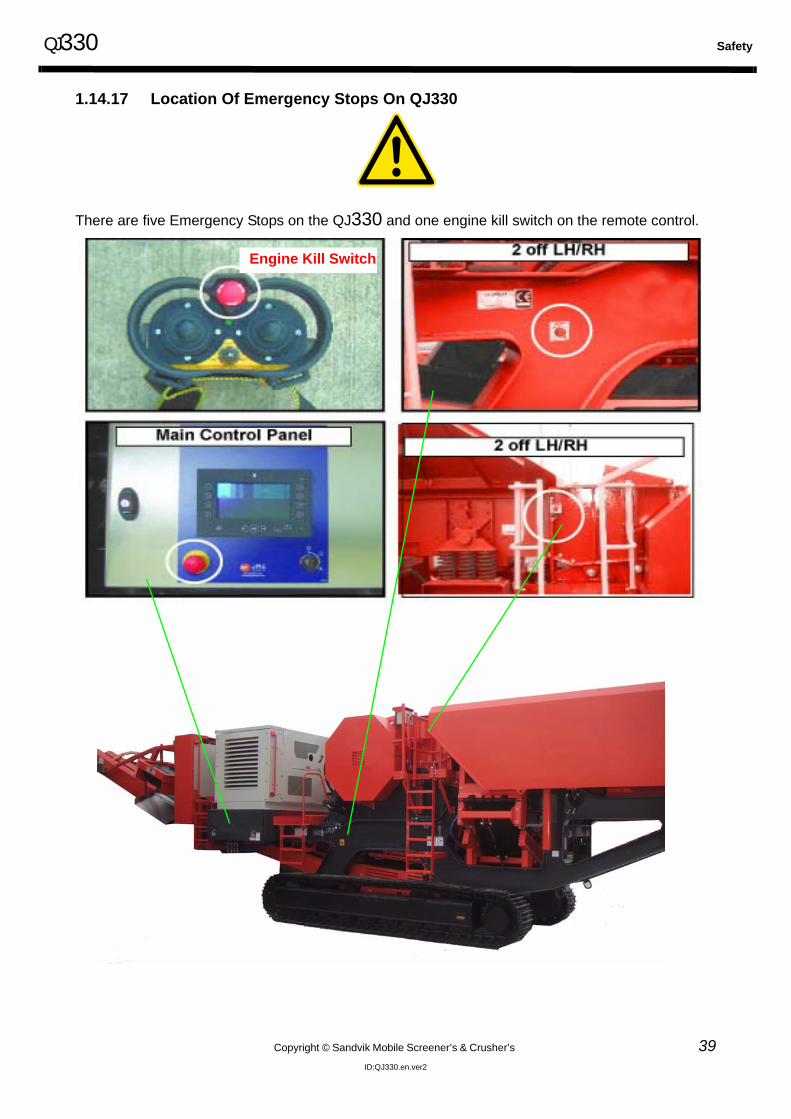
1.14.17 Location Of Emergency Stops On QJ330
There are five Emergency Stops on the QJ330 and one engine kill switch on the remote control.
Engine Kill Switch

Safety QJ330
40 Copyright © Sandvik Mobile Screener’s & Crusher’s
ID:QJ330.en.ver2

QJ330
Copyright © Sandvik Mobile Screener’s & Crusher’s 41ID:QJ330.en.ver2
2.0 Transport &Technical Data

Transport & Technical Data QJ330
42 Copyright © Sandvik Mobile Screener’s & Crusher’s
ID:QJ330.en.ver2
2.1 Transport
2.1.1 Special Considerations For Transport Of The QJ330
• Do not attempt to transport the QJ330 utilizing a vehicle not specified for hauling at least the listed gross weight of the machine. Failure to use transportation with sufficient hauling capacity may result in damage to the QJ330 and the hauling vehicle, and may result in serious personal injuries or death. Refer to 2.2 for machine transport details.
• ALWAYS observe applicable local and national regulations concerning the transportation of heavy equipment. Ensure that all appropriate permits, licenses and endorsements are obtained and maintained before transporting the QJ330.
2.1.2 Machine Preparation for Transport
a. Implement the lock out and tag procedure ( 1.14.7). Remove the bolts and swing over theCrusher Hopper Lid over top of the crusher. .
Follow the procedure for preparing the machine for shutdown, refer to section (4.4)
Before attempting to set-up the machine ensure that theoperator has read and fully understood this and all the preceeding sections in the manual
Bolt locations
QJ330 Transport & Technical Data
Copyright © Sandvik Mobile Screener’s & Crusher’s 43ID:QJ330.en.ver2
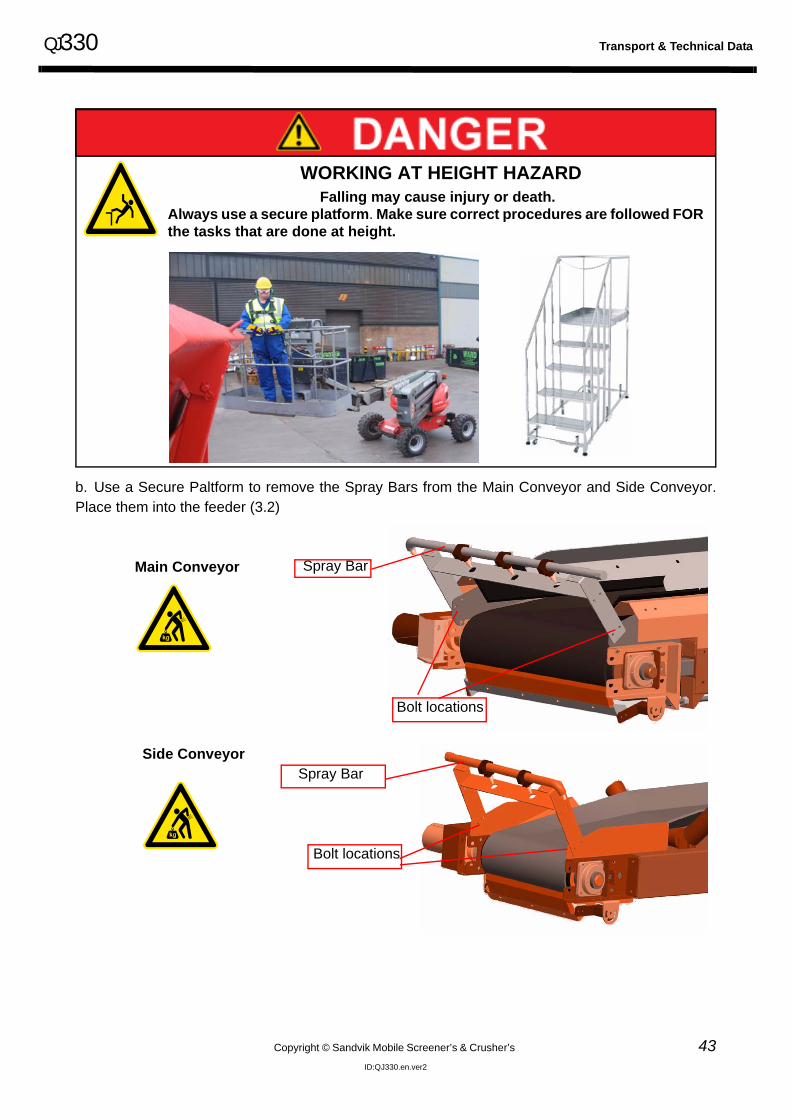
b. Use a Secure Paltform to remove the Spray Bars from the Main Conveyor and Side Conveyor.Place them into the feeder (3.2)
WORKING AT HEIGHT HAZARD Falling may cause injury or death.
Always use a secure platform. Make sure correct procedures are followed FORthe tasks that are done at height.
Bolt locations
Spray Bar
Spray Bar
Bolt locations
Main Conveyor
Side Conveyor
Transport & Technical Data QJ330
44 Copyright © Sandvik Mobile Screener’s & Crusher’s
ID:QJ330.en.ver2
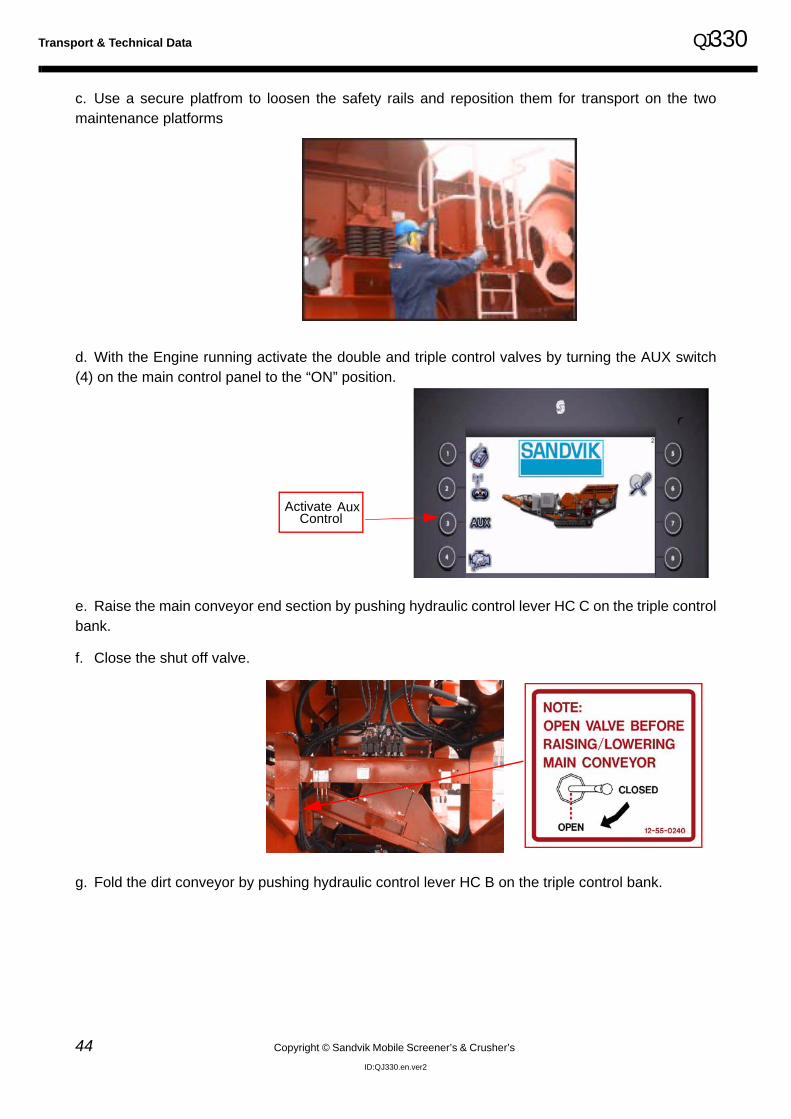
c. Use a secure platfrom to loosen the safety rails and reposition them for transport on the twomaintenance platforms
d. With the Engine running activate the double and triple control valves by turning the AUX switch(4) on the main control panel to the “ON” position.
e. Raise the main conveyor end section by pushing hydraulic control lever HC C on the triple controlbank.
f. Close the shut off valve.
g. Fold the dirt conveyor by pushing hydraulic control lever HC B on the triple control bank.
Activate AuxControl
QJ330 Transport & Technical Data
Copyright © Sandvik Mobile Screener’s & Crusher’s 45ID:QJ330.en.ver2
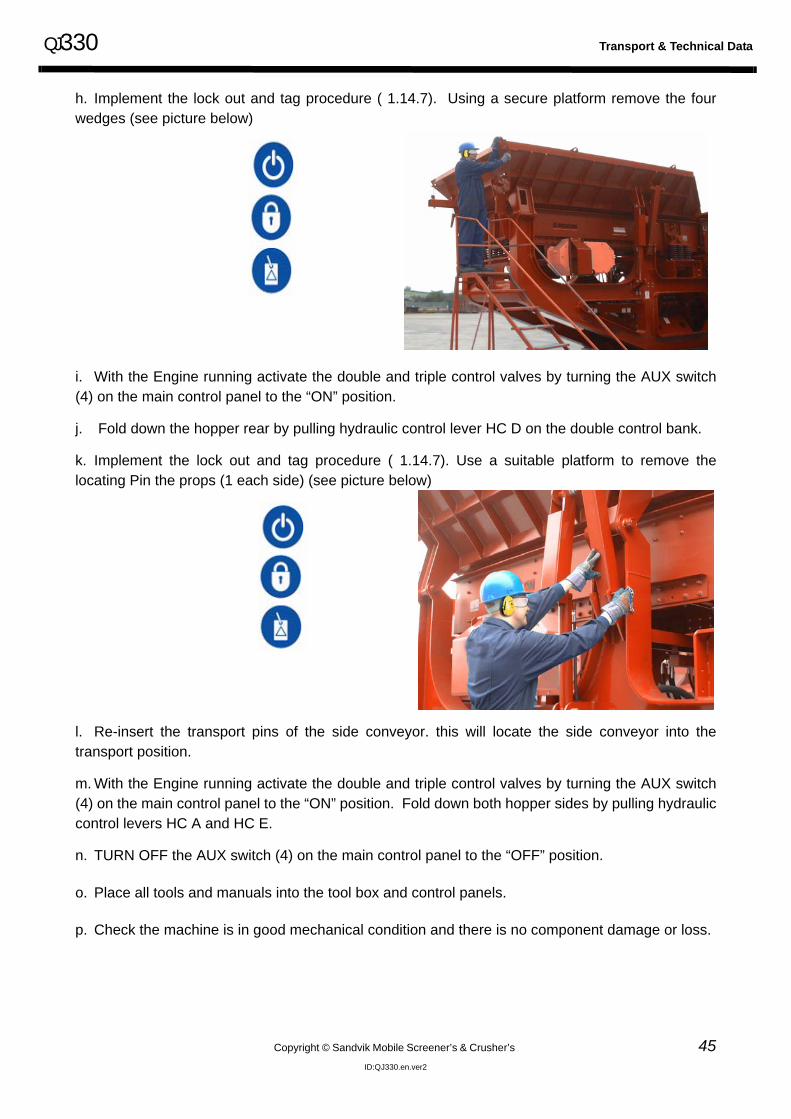
h. Implement the lock out and tag procedure ( 1.14.7). Using a secure platform remove the fourwedges (see picture below)
i. With the Engine running activate the double and triple control valves by turning the AUX switch(4) on the main control panel to the “ON” position.
j. Fold down the hopper rear by pulling hydraulic control lever HC D on the double control bank.
k. Implement the lock out and tag procedure ( 1.14.7). Use a suitable platform to remove thelocating Pin the props (1 each side) (see picture below)
l. Re-insert the transport pins of the side conveyor. this will locate the side conveyor into thetransport position.
m. With the Engine running activate the double and triple control valves by turning the AUX switch(4) on the main control panel to the “ON” position. Fold down both hopper sides by pulling hydrauliccontrol levers HC A and HC E.
n. TURN OFF the AUX switch (4) on the main control panel to the “OFF” position.
o. Place all tools and manuals into the tool box and control panels.
p. Check the machine is in good mechanical condition and there is no component damage or loss.
Transport & Technical Data QJ330
46 Copyright © Sandvik Mobile Screener’s & Crusher’s
ID:QJ330.en.ver2
2.1.3 Tracking the machine onto and off the transport vehicle
Follow the Start Up Sequence for the tracking procedure (4.2.3)
Note! engine idle rpm on engine start up is sufficient to track the machine onto or off the transport vehicle. Any higher engine rpm is not recommended.
After tracking the machine onto the transport vehicle make sure all temporary sealing and transportstraps or chains are installed. DO NOT secure by tying down over the tracks. Lashing down is theresponsibility of the driver of the low loader.
Before tracking the machine off the transport vehicle make sure all temporary sealing and transportstraps or chains are removed.
CRUSH HAZARDMoving machine can crush objects and personell.
Before moving the machine visually check the area around the machine to make sure there is no one standing in the vicinity.
QJ330 Transport & Technical Data
Copyright © Sandvik Mobile Screener’s & Crusher’s 47ID:QJ330.en.ver2
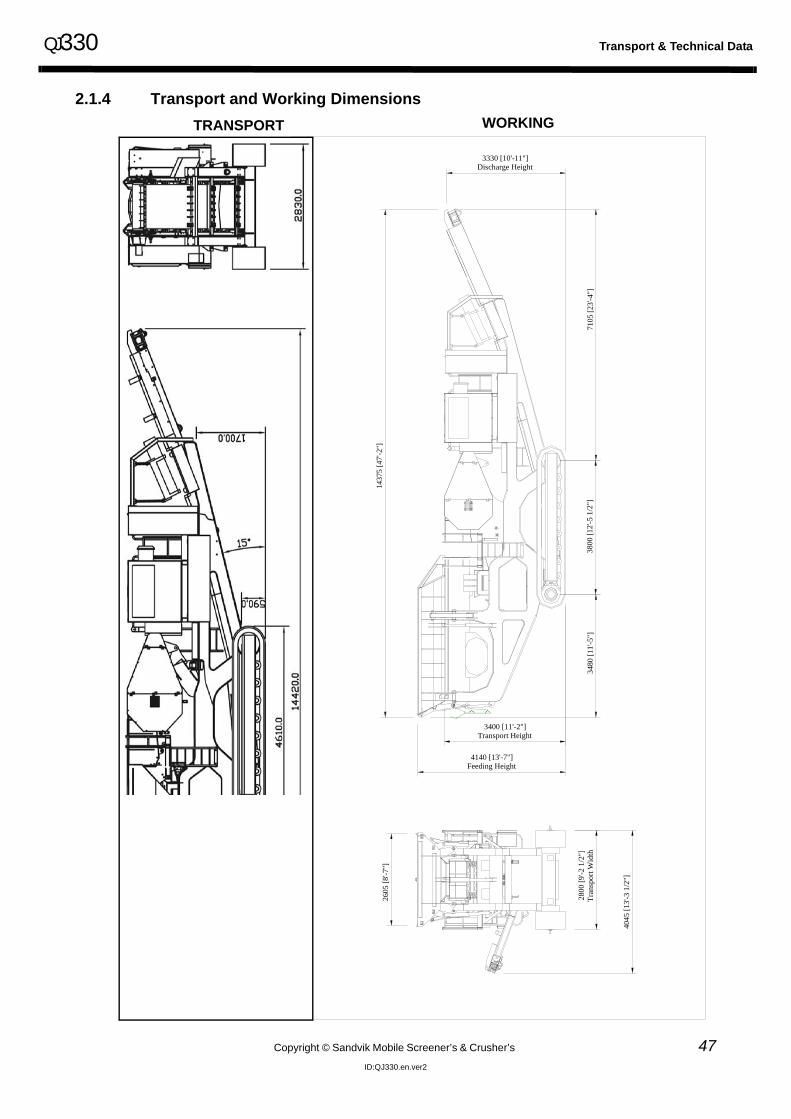
2.1.4 Transport and Working Dimensions
4045
[13'
-3 1
/2"]
2800
[9'-2
1/2
"]Tr
ansp
ort W
idth
2605
[8'-7
"]
3800
[12'
-5 1
/2"]
3330 [10'-11"]Discharge Height
4140 [13'-7"]Feeding Height
3400 [11'-2"]Transport Height
7105
[23'
-4"]
3480
[11'
-5"]
1437
5 [4
7'-2
"]
TRANSPORT WORKING
Transport & Technical Data QJ330
48 Copyright © Sandvik Mobile Screener’s & Crusher’s
ID:QJ330.en.ver2
2.2 Technical Information
Machine: Single Toggle Mobile Jaw Crushing UnitType: QJ330 (1100x700 Jaw Crusher)Total Weight: 42,500Kg (93,700lbs approx) (without options)Transport Width: 2.80m (9’ 2 1/2”)Transport Length: 14.37m (47’ 2”)Transport Height: 3.4m (11’ 2”)
2.2.1 Standard FeaturesPrimary 1100mm x 700mm Single Toggle Jaw Crusher, designed by Sandvik, utilizing the very lat-est in finite crushing analysis with rigid one piece welded Crusher Frame, which has been heat-treated after welding for internal stress relief
Hydrostatic crusher drive complete with reverse jaw movement, to quickly relieve blockages
Fully hydraulic wedgetype system for Closed Side Setting (CSS) Adjustment
Sandvik Feeder is controlled with a level monitoring system in the crusher, which will stop/start thefeeder independently.
2.2.2 OptionsDirt ConveyorMagnetic SeparatorRadio Controlled Tracks
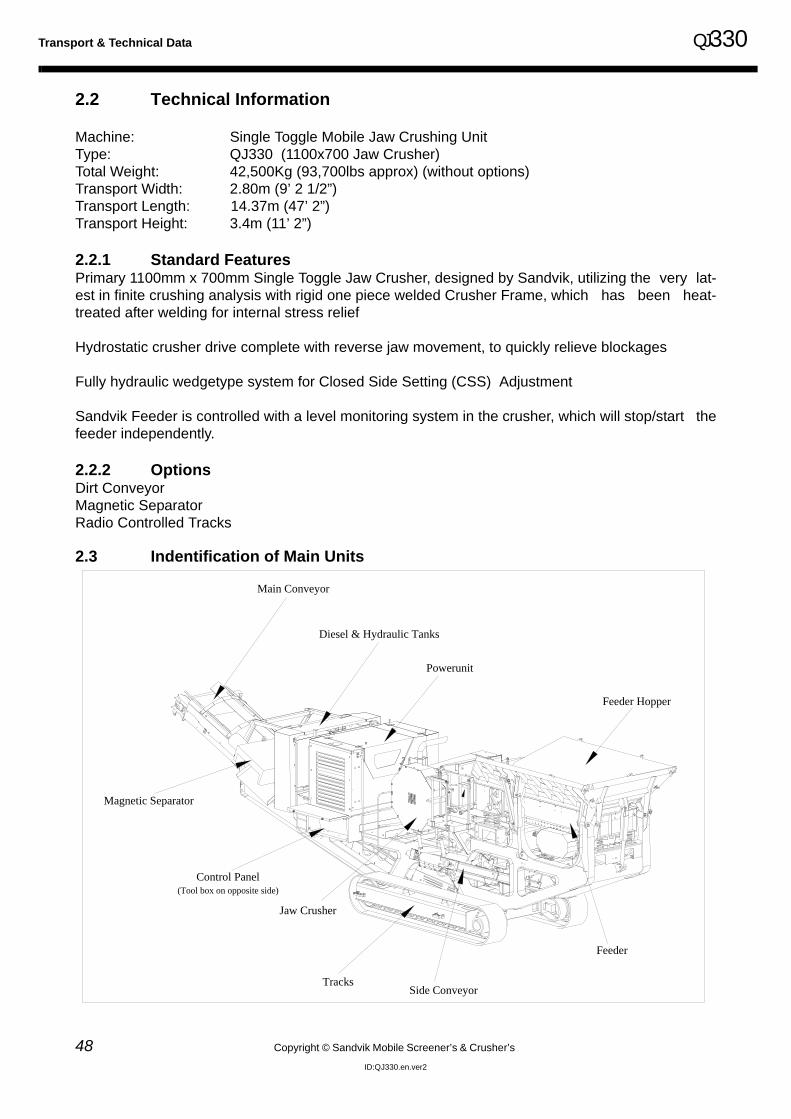
2.3 Indentification of Main Units
Main Conveyor
Diesel & Hydraulic Tanks
Powerunit
Feeder Hopper
Feeder
Side ConveyorTracks
Jaw Crusher
Control Panel(Tool box on opposite side)
Magnetic Separator
QJ330 Transport & Technical Data
Copyright © Sandvik Mobile Screener’s & Crusher’s 49ID:QJ330.en.ver2
2.4 Specification of Main Units
2.4.1 FeederType Spring Mounted Vibrating FeederWidth 1040mm (41,,)Length 4170mm (13,8,,)Drive Hydraulic MotorHopper Type Hydraulically Folding Side and Rear Extension PlatesHopper Capacity 6 m3 (7.85 yd3)Unit Twin Shaft Oil LubricatedGrizzly 1.6m with 40-50mm aperture
2.4.2 CrusherType Single Toggle JawFeed Opening 700mm (28,,)Feed Width 1100mm (44,,)Adjustment Hydraulic Wedge SystemDrive Vee Belts from Hydraulic MotorControl Panel ControlCSS Range 40-175mm (1 1/2 - 7,,) *Note Applications
2.4.3 Main ConveyorBelt Width 1000 mm (40,,)Type EP500/3 Ply Grade XDegree of Incline 15 - 23 degreesDrive Fixed Speed HydraulicBearing Type Flange Bearing - Head Drum
Pillar Bearing - Tail Drum
2.4.4 TracksTrack Type Low Ground Pressure Twin Track UndercarriageNormal Ground Pressure approx. 110 kPa (without options)Gradient max. 28o
Approximate Speed 1km/hCentre 3780 mmWidth 500mm (20,,)Drive Hydraulic Integral MotorsControl Remote HandsetStandard Cable Control Remote Handset Optional Radio Remote Handset Type Hetronic
Transport & Technical Data QJ330
50 Copyright © Sandvik Mobile Screener’s & Crusher’s
ID:QJ330.en.ver2
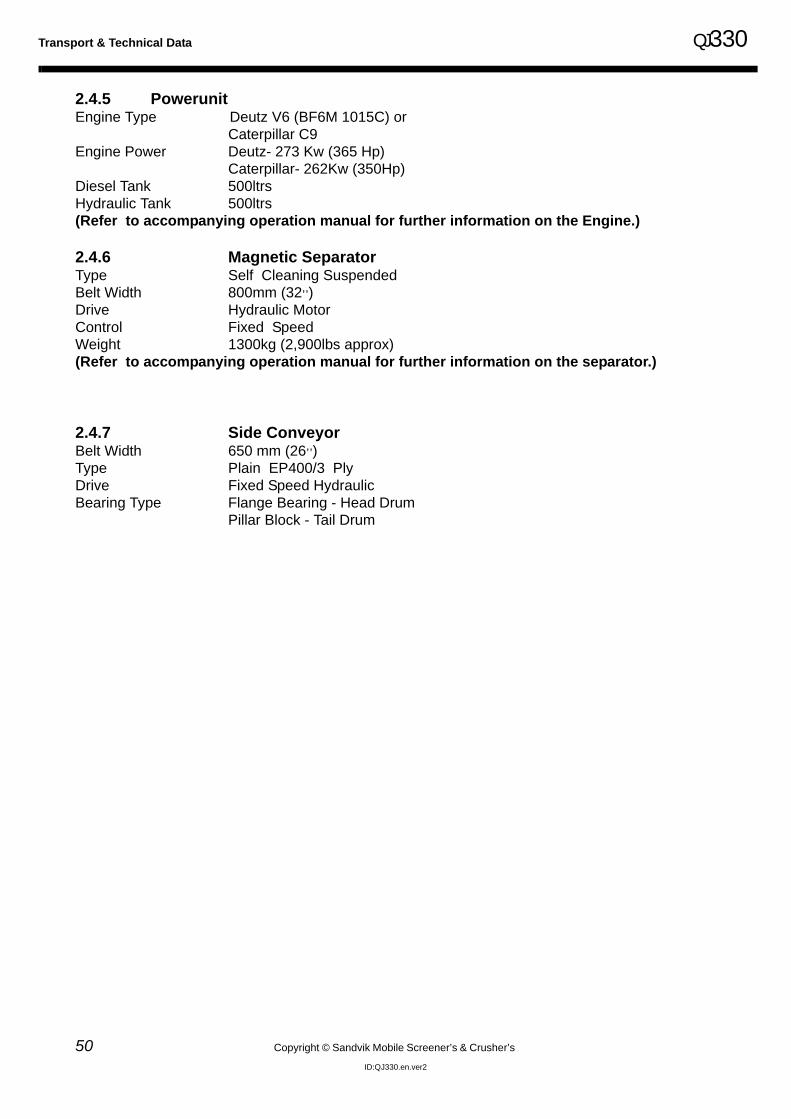
2.4.5 PowerunitEngine Type Deutz V6 (BF6M 1015C) or
Caterpillar C9Engine Power Deutz- 273 Kw (365 Hp)
Caterpillar- 262Kw (350Hp)Diesel Tank 500ltrsHydraulic Tank 500ltrs(Refer to accompanying operation manual for further information on the Engine.)
2.4.6 Magnetic SeparatorType Self Cleaning SuspendedBelt Width 800mm (32,,)Drive Hydraulic MotorControl Fixed SpeedWeight 1300kg (2,900lbs approx)(Refer to accompanying operation manual for further information on the separator.)
2.4.7 Side ConveyorBelt Width 650 mm (26,,)Type Plain EP400/3 PlyDrive Fixed Speed HydraulicBearing Type Flange Bearing - Head Drum
Pillar Block - Tail Drum

QJ330
Copyright © Sandvik Mobile Screener’s & Crusher’s 51ID:QJ330.en.ver2
3.0 Product Overview
Product Overview QJ330
52 Copyright © Sandvik Mobile Screener’s & Crusher’s
ID:QJ330.en.ver2
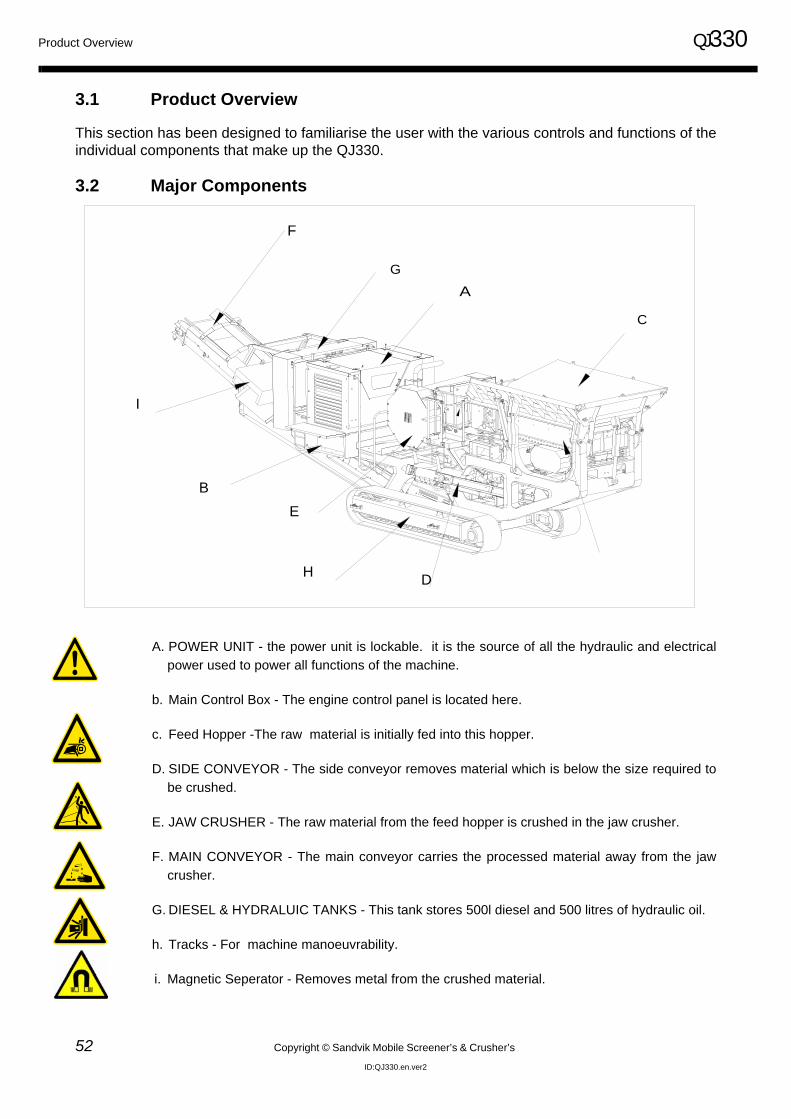
3.1 Product Overview
This section has been designed to familiarise the user with the various controls and functions of theindividual components that make up the QJ330.
3.2 Major Components
A. POWER UNIT - the power unit is lockable. it is the source of all the hydraulic and electricalpower used to power all functions of the machine.
b. Main Control Box - The engine control panel is located here.
c. Feed Hopper -The raw material is initially fed into this hopper.
D. SIDE CONVEYOR - The side conveyor removes material which is below the size required tobe crushed.
E. JAW CRUSHER - The raw material from the feed hopper is crushed in the jaw crusher.
F. MAIN CONVEYOR - The main conveyor carries the processed material away from the jawcrusher.
G. DIESEL & HYDRALUIC TANKS - This tank stores 500l diesel and 500 litres of hydraulic oil.
h. Tracks - For machine manoeuvrability.
i. Magnetic Seperator - Removes metal from the crushed material.
A
H D
EB
F
I
G
C
QJ330 Product Overview
Copyright © Sandvik Mobile Screener’s & Crusher’s 53ID:QJ330.en.ver2
3.2.1 Identification and Operation of the QJ330 Controls
There are three sets of controls on the QJ330:
1. The main control panel which is located on the right hand side of themachine in the lockable control box.
2. The double ( or triple ) hydraulic control bank at the front right hand sideof the machine.
3. The remote control which can be found in the control box upon delivery ofthe machine.
Main Control Panel Remote Control
Double / Triple HydraulicControl Bank
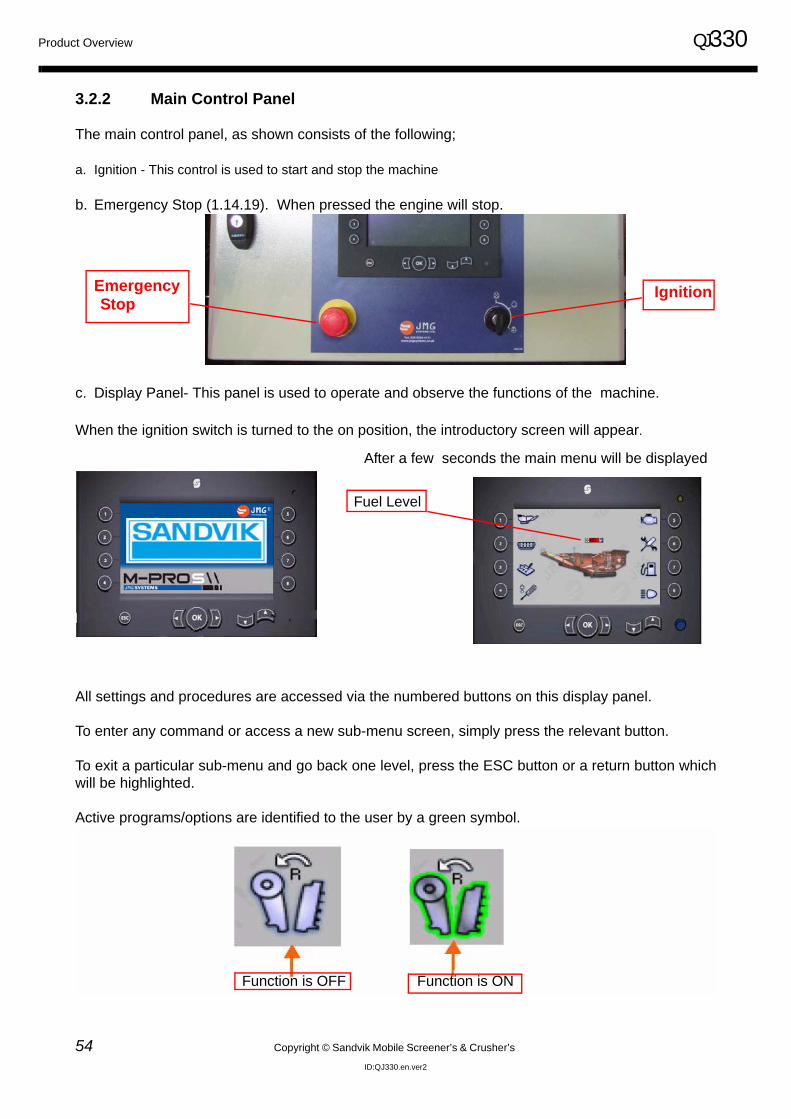
Product Overview QJ330
54 Copyright © Sandvik Mobile Screener’s & Crusher’s
ID:QJ330.en.ver2
3.2.2 Main Control Panel
The main control panel, as shown consists of the following;
a. Ignition - This control is used to start and stop the machine
b. Emergency Stop (1.14.19). When pressed the engine will stop.
c. Display Panel- This panel is used to operate and observe the functions of the machine.
When the ignition switch is turned to the on position, the introductory screen will appear.
All settings and procedures are accessed via the numbered buttons on this display panel.
To enter any command or access a new sub-menu screen, simply press the relevant button.
To exit a particular sub-menu and go back one level, press the ESC button or a return button whichwill be highlighted.
Active programs/options are identified to the user by a green symbol.
EmergencyStop
Ignition
After a few seconds the main menu will be displayed
Fuel Level
Function is OFF Function is ON
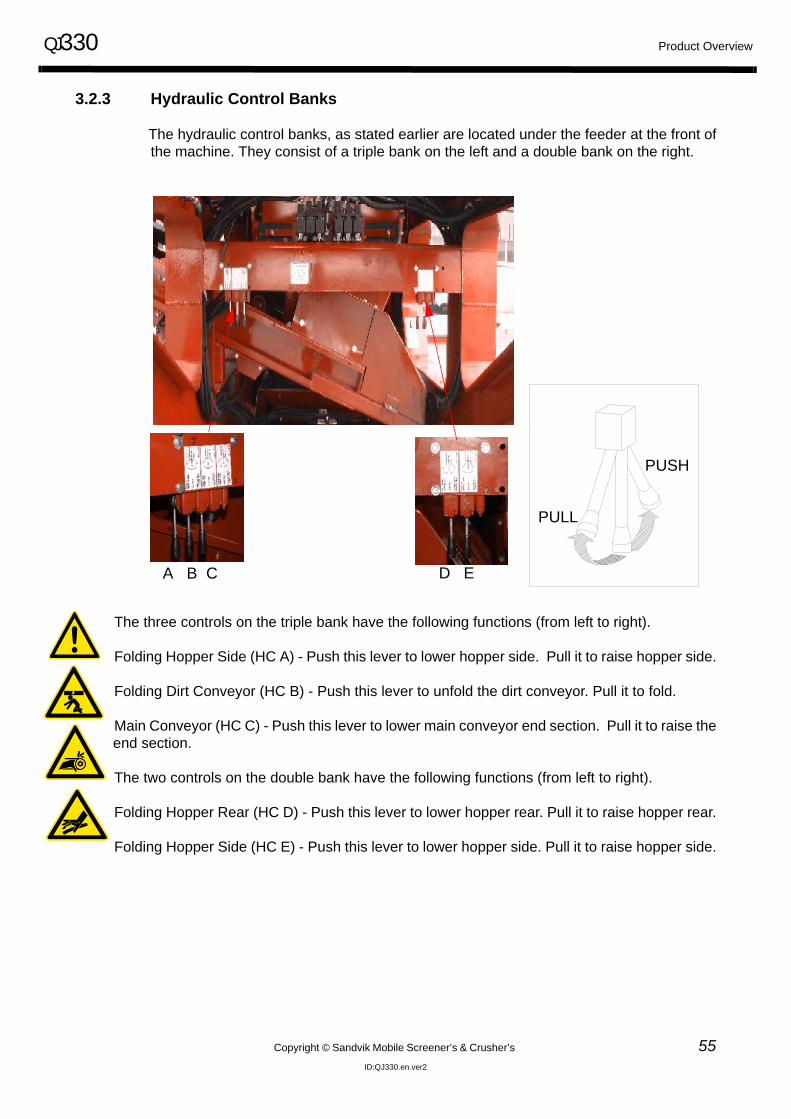
QJ330 Product Overview
Copyright © Sandvik Mobile Screener’s & Crusher’s 55ID:QJ330.en.ver2
3.2.3 Hydraulic Control Banks
The hydraulic control banks, as stated earlier are located under the feeder at the front ofthe machine. They consist of a triple bank on the left and a double bank on the right.
The three controls on the triple bank have the following functions (from left to right).
Folding Hopper Side (HC A) - Push this lever to lower hopper side. Pull it to raise hopper side.
Folding Dirt Conveyor (HC B) - Push this lever to unfold the dirt conveyor. Pull it to fold.
Main Conveyor (HC C) - Push this lever to lower main conveyor end section. Pull it to raise theend section.
The two controls on the double bank have the following functions (from left to right).
Folding Hopper Rear (HC D) - Push this lever to lower hopper rear. Pull it to raise hopper rear.
Folding Hopper Side (HC E) - Push this lever to lower hopper side. Pull it to raise hopper side.
PULL
PUSH
A B C D E

Product Overview QJ330
56 Copyright © Sandvik Mobile Screener’s & Crusher’s
ID:QJ330.en.ver2
3.2.4 Remote Control Unit
The remote control has two functions:
1.To track the machine
2.To start/stop the feeder
There are several controls on the remote unit:
• A joystick for each track (LH/RH) used to drive the tracks either forward or back. The diagram below shows the direction of forward travel. The track joysticks control the track speed proprtionally.
• An Engine kill switch button that, if pressed will shut off the engine.
• A On/Off toggle switch for the feeder for operator convenience.
• An on-off key switch (A) that is used to turn the remote unit on or off.
• A green push button (B) that must be pressed to activate the remote control unit.
DAMAGHE TO MACHINE WILL RESULT IF OVERUSED. This switch shoud onlybe used in emergency situations. Machine will require extensive preparation
before a restart of the conveyors is possible as material build may occur. Refer to4.4.4 for restart procedure.
FORWARD
BACK
FRONT
LEFT
RIGHT
Toggle Switch
Engine kill switch

QJ330
Copyright © Sandvik Mobile Screener’s & Crusher’s 57ID:QJ330.en.ver2
4.0 Commissioning and Shut Down

Commissioning & Shut Down QJ330
Copyright © Sandvik Mobile Screener’s & Crusher’s 58ID:QJ330.en.ver2
4.1 Commissioning & Shutdown Safety
! THINK SAFETY !
Please refer to the Safety Section of this manual for additional information on safe operation, main-tenance and repair of the machine. To ensure maximum safety, ALWAYS read this section carefullyBEFORE carrying out any work on the equipment or making any adjustments. Do not attempt op-eration, maintenance or repair without first consulting all pertinent safety information.
4.1.1 What Are The Hazards And Dangers?
• Trips and Falls - falls from Height• Nip or Crush Injuries - Part of or Whole Bodies• Being Struck by Falling Objects• Striking against fixed objects• Hydraulic Systems – High Pressure Oil Will Penetrate the Body• Injury from Contact With Moving Parts or Machinery• Manual Handling Injury – Lifting and Moving Parts or Components
4.1.2 Who is at Risk
• Operators, Maintenance Personnel,• Subcontractors and Anybody Else in the Vicinity of the Machine
4.1.3 Are Precautions Adequate?
• Always refer to the Safety Section in the Operation Manual• Use the Correct Personal Protection Equipment:
High Visibilty ClothingSafety HelmetSafety FootwearGlovesSafety GlassesEar Protection
• Do not wear loose or baggy clothing which could become caught in the moving parts of the machine
• Do not Climb on The Machine – Always use the Access Points and Platforms or Other Access Equipment as Required
4.1.4 When carrying out maintenace or adjustment
a. Either Switch off enginer and remove ignition key OR
Implement the Sytem Immobilisation Procedure if other power supply is used.
b. Always Relieve Pressure from the hydraulic system

QJ330 Commissioning & Shut Down
59 Copyright © Sandvik Mobile Screener’s & Crusher’s
ID:QJ330.en.ver2
4.2 Commissioning
Read And Follow All Instructions Concerning Set Up Of Your QJ330. Failure To Do So May ResultIn Damage To The Machine, May Result In Serious Injury Or Death, And May Void Manufacturer’sWarranties.
The Following Instructions Assume Transport Of The QJ330 From A Low Loader-type Vehicle InClose Proximity To The Job Site; If The Machine Is Transported In A Different Manner, Contact TheManufacturer For Additional Set Up Instructions.
IT IS RECOMMENDED THAT SET UP OF THE QJ330 BE CARRIED OUT BY A REPRESENTA-TIVE OF SANDVIK MOBILE SCREENING & CRUSHING LTD, OR BY A QUALIFIED REPRESENT-ATIVE OF THE DEALER.
4.2.1 Preparation for Machine STARTUP
• SURFACE PREPARATION: The QJ330 is designed for operation on a solid, level surface. It is important that the machine isplaced on solid ground that must be capable of carrying the weight of the machine and that the ma-chine is placed on level ground. The machine should be level to within 2 degrees from left to right.An appropriate site must be identified prior to delivery and unloading of the machine.
• VISUAL INSPECTION: Before powering up the engine a visual inspection of the QJ330 should be performed. Any damagenot noted prior to startup remains the responsibility of the end user. Inspection should ensure that(1) all safety equipment is installed and functioning properly; and (2) any loose items delivered withthe QJ330 have been secured or removed from the machine.
4.2.2 Setting Language of Control Panel Display
Currently the following languages is available, English, French, German and Spanish. Due to thememory capacity of the Control Panel no other languages are currenlty availabe.
To select a language hold down the ESC button for 3 seconds to access the information page fromthe main menu.
Press Button 3 to select the language required.
To return to main menu press ESC
Button 3
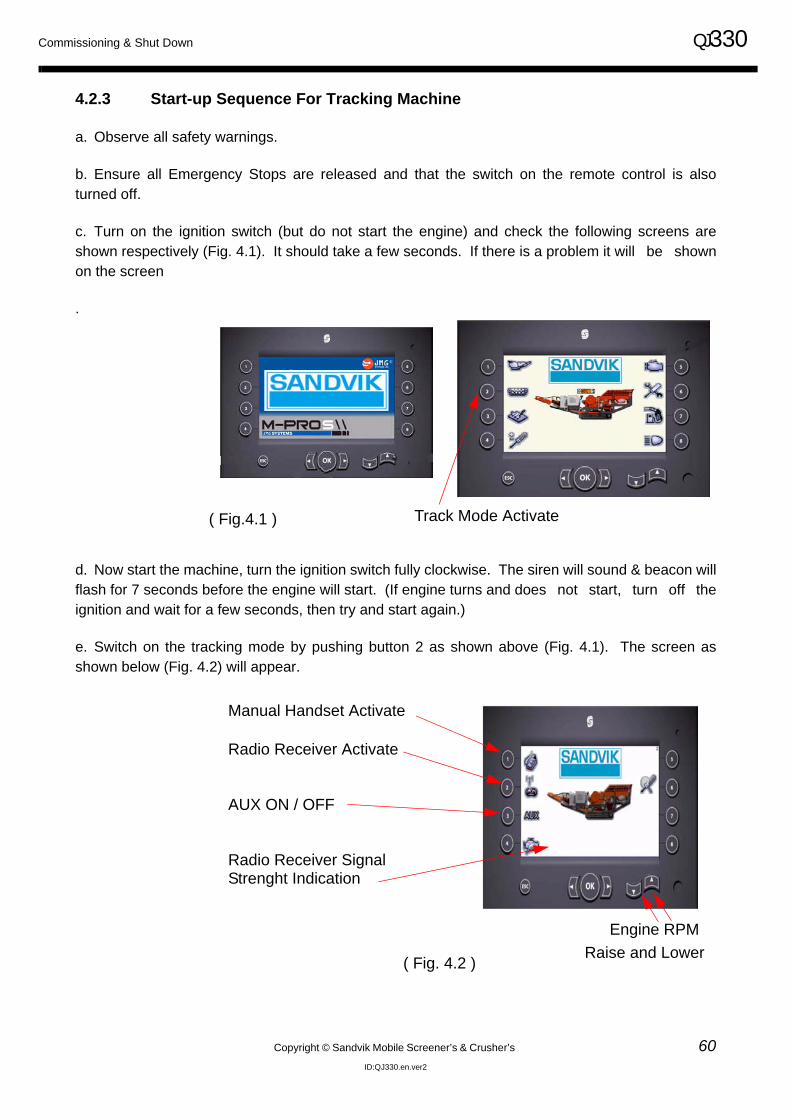
Commissioning & Shut Down QJ330
Copyright © Sandvik Mobile Screener’s & Crusher’s 60ID:QJ330.en.ver2
4.2.3 Start-up Sequence For Tracking Machine
a. Observe all safety warnings.
b. Ensure all Emergency Stops are released and that the switch on the remote control is alsoturned off.
c. Turn on the ignition switch (but do not start the engine) and check the following screens areshown respectively (Fig. 4.1). It should take a few seconds. If there is a problem it will be shownon the screen
.
d. Now start the machine, turn the ignition switch fully clockwise. The siren will sound & beacon willflash for 7 seconds before the engine will start. (If engine turns and does not start, turn off theignition and wait for a few seconds, then try and start again.)
e. Switch on the tracking mode by pushing button 2 as shown above (Fig. 4.1). The screen asshown below (Fig. 4.2) will appear.
Track Mode Activate( Fig.4.1 )
Manual Handset Activate
( Fig. 4.2 )
Engine RPMRaise and Lower
Radio Receiver Activate
AUX ON / OFF
Radio Receiver SignalStrenght Indication

QJ330 Commissioning & Shut Down
61 Copyright © Sandvik Mobile Screener’s & Crusher’s
ID:QJ330.en.ver2
f. Turn Turn the transmitter to the On ‘I’ and wait for the green light to flash consistently after a fewseconds as shown below (Fig. 4.3 & 4.4)
g. Switch on the radio receiver by pushing button 1 as shown on the screen (Fig. 4.2). This willhighlight the aeriel symbol.
h. Activate the radio transmitter by pushing the green button as shown below (Fig. 4.5). The sirenwill sound & beacon flash. It will take 7 seconds before the radio transmitter is ready to use.
i. The machine will track using the two joysticks.
j. Engine RPM can be adjusted up and down to aid tracking using the buttons as shown in(Fig. 4.2).
Note! If the main conveyor is not raised the crusher will not move and a caution will appear on the screen - to raise the main conveyor, Switch on the Aux using button 3 and rasie the conveyor using the instructions on the next page. This will eliminate the the warning and the crusher can now be moved.
RemoteControl
( Fig. 4.3 )
Wait forGreen lightto flash
( Fig. 4.4 )
on ‘I’
Activate Remote
( Fig. 4.5 )
Warning
BEFORE MOVING THE MACHINE VISUALLY CHECK THE AREA AROUND THE MACHINE TO ENSURE THERE IS NO ONE STANDING IN A
DANGEROUS POSITION

Commissioning & Shut Down QJ330
Copyright © Sandvik Mobile Screener’s & Crusher’s 62ID:QJ330.en.ver2
4.2.4 Raising the Main Conveyor
a. With the engine running and the tracking mode screen still activated press button 3 to activatethe auxiliary controls as shown below (Fig. 4.6)
Raise the main conveyor by pulling lever (C) on the triple bank control.
b. Activate the remote by pushing the green button (B). The siren will sound and the machine cannow be moved to the desired position using the two joysticks on the remote control.
( Fig 4.6 )
ActivateAuxControl
lever (C) on the triple bank control Green Button
For full explanation and location of controls refer to Product Overview Section
WarningBEFORE MOVING THE MACHINE VISUALLY
CHECK THE AREA AROUND THE MACHINE TO EN-SURE THERE IS NO ONE STANDING IN A
DANGEROUS POSITION
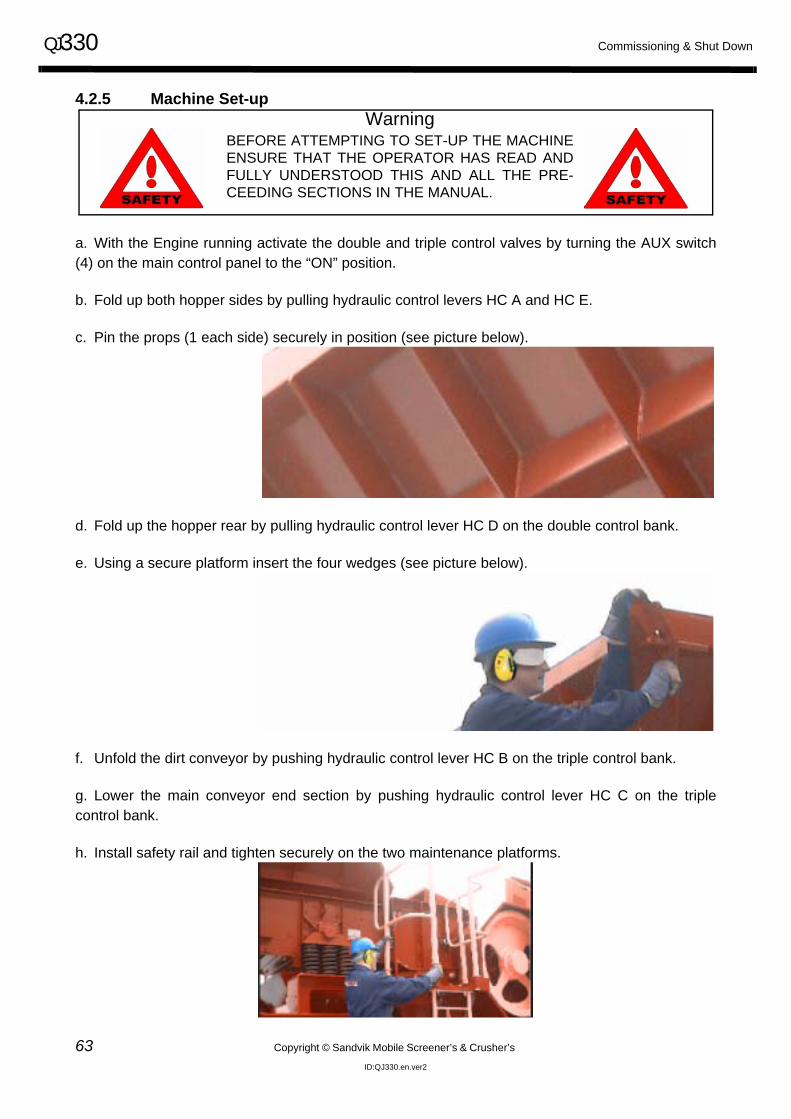
QJ330 Commissioning & Shut Down
63 Copyright © Sandvik Mobile Screener’s & Crusher’s
ID:QJ330.en.ver2
4.2.5 Machine Set-up
a. With the Engine running activate the double and triple control valves by turning the AUX switch(4) on the main control panel to the “ON” position.
b. Fold up both hopper sides by pulling hydraulic control levers HC A and HC E.
c. Pin the props (1 each side) securely in position (see picture below).
d. Fold up the hopper rear by pulling hydraulic control lever HC D on the double control bank.
e. Using a secure platform insert the four wedges (see picture below).
f. Unfold the dirt conveyor by pushing hydraulic control lever HC B on the triple control bank.
g. Lower the main conveyor end section by pushing hydraulic control lever HC C on the triplecontrol bank.
h. Install safety rail and tighten securely on the two maintenance platforms.
WarningBEFORE ATTEMPTING TO SET-UP THE MACHINEENSURE THAT THE OPERATOR HAS READ ANDFULLY UNDERSTOOD THIS AND ALL THE PRE-CEEDING SECTIONS IN THE MANUAL.

Commissioning & Shut Down QJ330
Copyright © Sandvik Mobile Screener’s & Crusher’s 64ID:QJ330.en.ver2
4.2.6 Setting the date/timeFollow the following steps:From the Main Menu page, press Esc and hold for three seconds.When the date/time fields appear, press and hold button 4 for three seconds, then press the right arrow button.
The “years” field will be highlighted first and begin to flash.To increase the years press the Up arrow button.To decrease the years press the Down arrow button.Press and hold button 4 to move to the “months” field.
The “months” field will begin to flash.To increase the months press the Up arrow button.To decrease the months press the Down arrow button.Press and hold button 4 to move to the “days” field.
The “days” field will begin to flash.To increase the days press the Up arrow button.To decrease the days press the Down arrow button.Press and hold button 4 to adjust the “hours” field.
The “hours” field will begin to flash.To increase the hours press the Up arrow button.To decrease the hours press the Down arrow button.Press and hold button 4 to adjust the “minutes” field.
The “minutes” field will begin to flash.To increase the minutes press the Up arrow button.To decrease the minutes press the Down arrow button.Press and hold button 4 to adjust the “seconds” field.
The “seconds” field will begin to flash.To increase the seconds press the Up arrow button.To decrease the seconds press the Down arrow button.Finally press and hold button 4 for three seconds to store the new date/time.The highlight will disappear from the date/time fields.
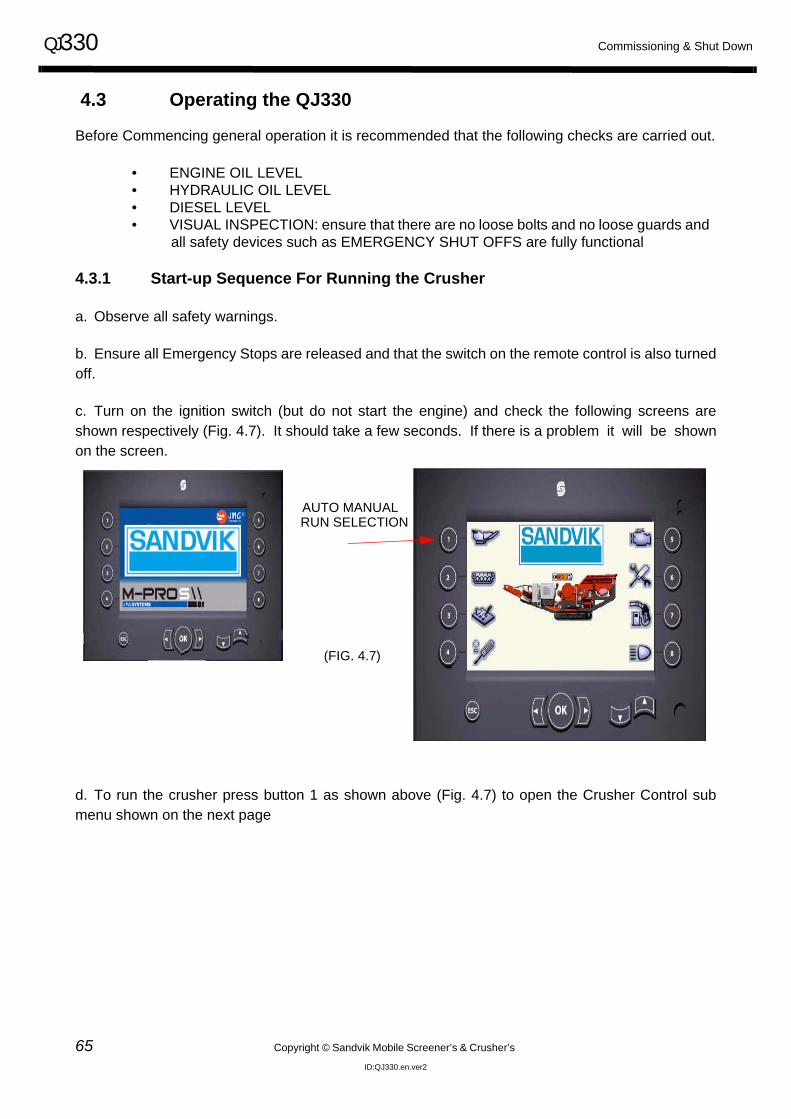
QJ330 Commissioning & Shut Down
65 Copyright © Sandvik Mobile Screener’s & Crusher’s
ID:QJ330.en.ver2
4.3 Operating the QJ330
Before Commencing general operation it is recommended that the following checks are carried out.
• ENGINE OIL LEVEL• HYDRAULIC OIL LEVEL• DIESEL LEVEL• VISUAL INSPECTION: ensure that there are no loose bolts and no loose guards and
all safety devices such as EMERGENCY SHUT OFFS are fully functional
4.3.1 Start-up Sequence For Running the Crusher
a. Observe all safety warnings.
b. Ensure all Emergency Stops are released and that the switch on the remote control is also turnedoff.
c. Turn on the ignition switch (but do not start the engine) and check the following screens areshown respectively (Fig. 4.7). It should take a few seconds. If there is a problem it will be shownon the screen.
d. To run the crusher press button 1 as shown above (Fig. 4.7) to open the Crusher Control submenu shown on the next page
AUTO MANUALRUN SELECTION
(FIG. 4.7)
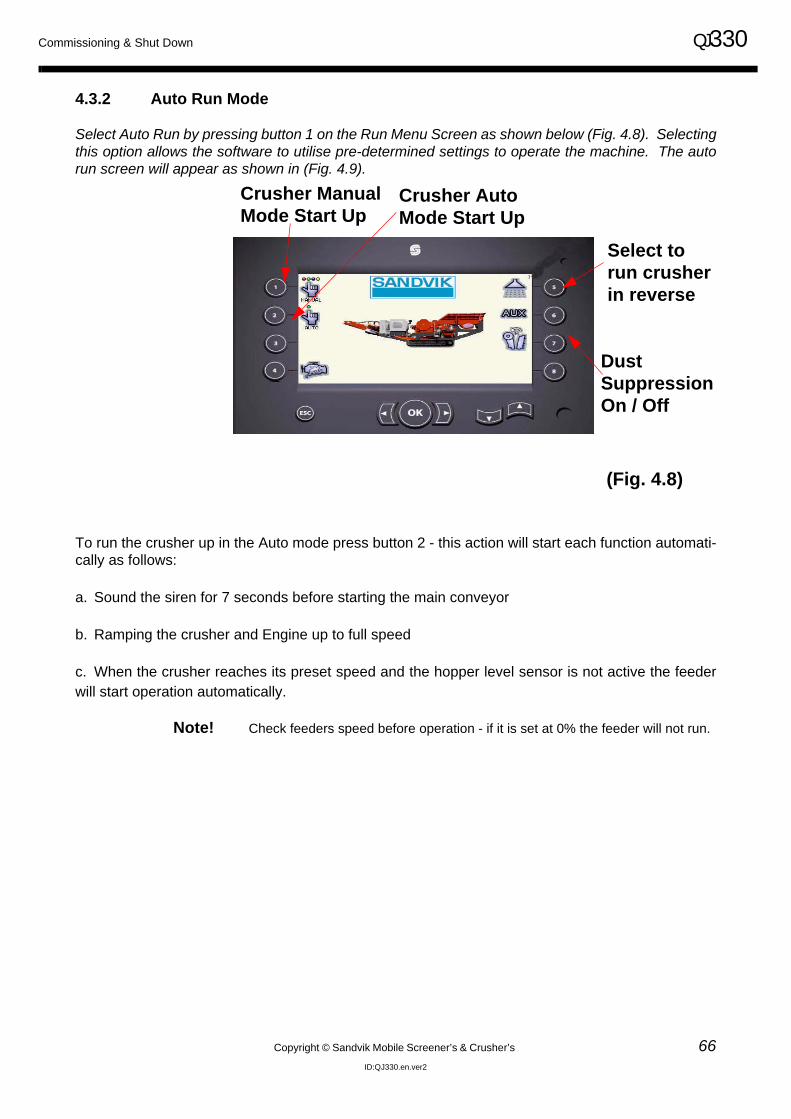
Commissioning & Shut Down QJ330
Copyright © Sandvik Mobile Screener’s & Crusher’s 66ID:QJ330.en.ver2
4.3.2 Auto Run Mode
Select Auto Run by pressing button 1 on the Run Menu Screen as shown below (Fig. 4.8). Selectingthis option allows the software to utilise pre-determined settings to operate the machine. The autorun screen will appear as shown in (Fig. 4.9).
To run the crusher up in the Auto mode press button 2 - this action will start each function automati-cally as follows:
a. Sound the siren for 7 seconds before starting the main conveyor
b. Ramping the crusher and Engine up to full speed
c. When the crusher reaches its preset speed and the hopper level sensor is not active the feederwill start operation automatically.
Note! Check feeders speed before operation - if it is set at 0% the feeder will not run.
Crusher ManualMode Start Up
Crusher AutoMode Start Up
Select torun crusherin reverse
DustSuppressionOn / Off
(Fig. 4.8)
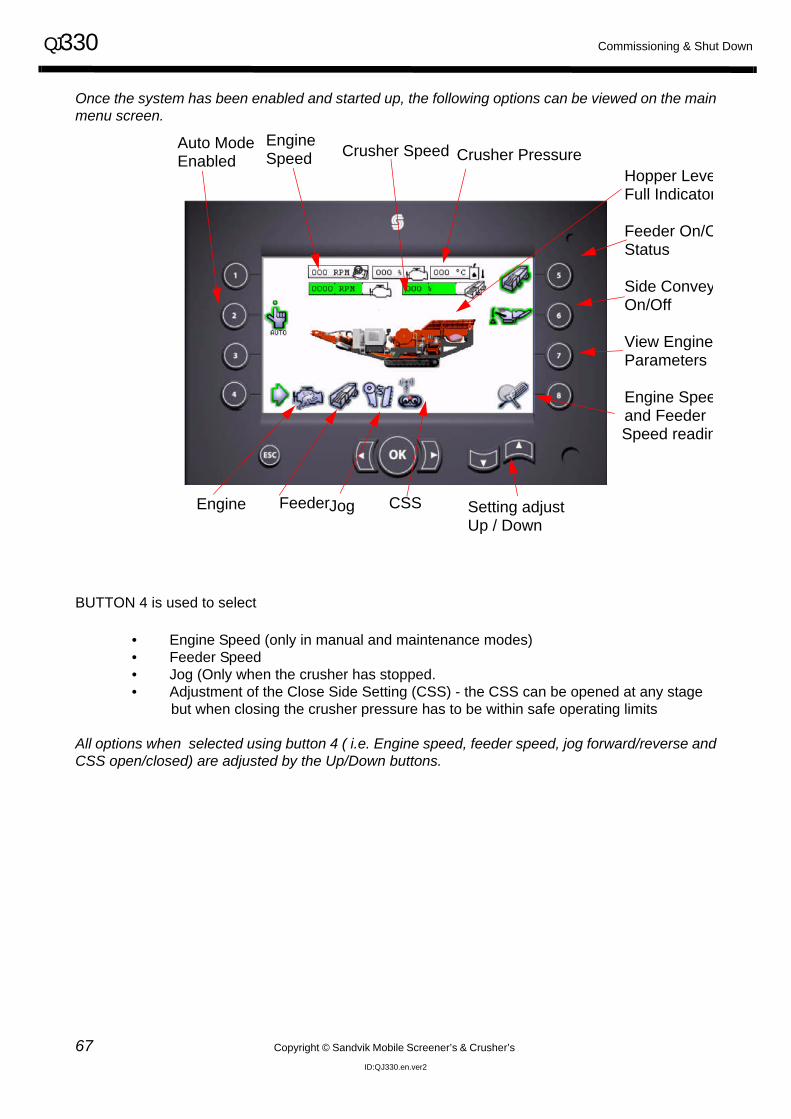
QJ330 Commissioning & Shut Down
67 Copyright © Sandvik Mobile Screener’s & Crusher’s
ID:QJ330.en.ver2
Once the system has been enabled and started up, the following options can be viewed on the mainmenu screen.
BUTTON 4 is used to select
• Engine Speed (only in manual and maintenance modes)• Feeder Speed• Jog (Only when the crusher has stopped.• Adjustment of the Close Side Setting (CSS) - the CSS can be opened at any stage
but when closing the crusher pressure has to be within safe operating limits
All options when selected using button 4 ( i.e. Engine speed, feeder speed, jog forward/reverse andCSS open/closed) are adjusted by the Up/Down buttons.
Auto ModeEnabled
Engine Speed Crusher Speed Crusher Pressure
Engine FeederJog CSS Setting adjustUp / Down
Hopper LeveFull Indicator
Feeder On/OStatus
Side ConveyOn/Off
View EngineParameters
Engine Speeand FeederSpeed readin
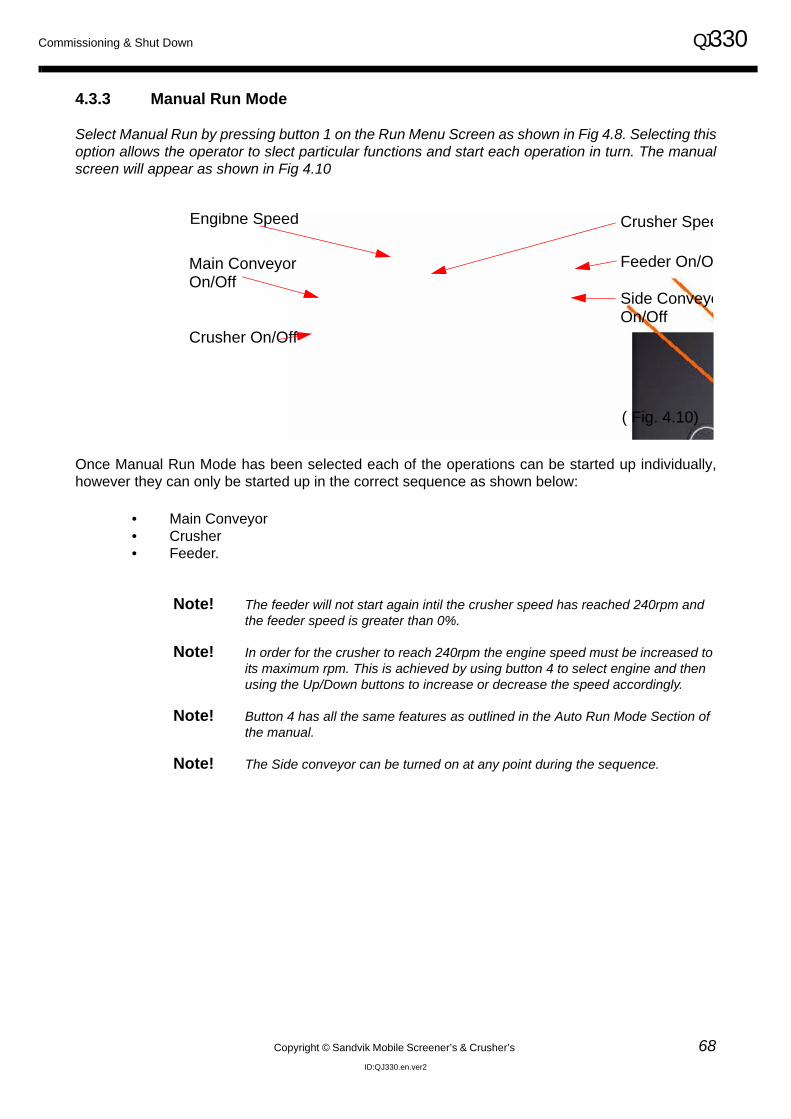
Commissioning & Shut Down QJ330
Copyright © Sandvik Mobile Screener’s & Crusher’s 68ID:QJ330.en.ver2
4.3.3 Manual Run Mode
Select Manual Run by pressing button 1 on the Run Menu Screen as shown in Fig 4.8. Selecting thisoption allows the operator to slect particular functions and start each operation in turn. The manualscreen will appear as shown in Fig 4.10
Once Manual Run Mode has been selected each of the operations can be started up individually,however they can only be started up in the correct sequence as shown below:
• Main Conveyor• Crusher• Feeder.
Note! The feeder will not start again intil the crusher speed has reached 240rpm and the feeder speed is greater than 0%.
Note! In order for the crusher to reach 240rpm the engine speed must be increased to its maximum rpm. This is achieved by using button 4 to select engine and then using the Up/Down buttons to increase or decrease the speed accordingly.
Note! Button 4 has all the same features as outlined in the Auto Run Mode Section of the manual.
Note! The Side conveyor can be turned on at any point during the sequence.
Main ConveyorOn/Off
Crusher On/Off
( Fig. 4.10)
Feeder On/O
Side Conveyo
Crusher SpeeEngibne Speed
On/Off

QJ330 Commissioning & Shut Down
69 Copyright © Sandvik Mobile Screener’s & Crusher’s
ID:QJ330.en.ver2
4.3.4 Feed Conveyor Adjustment
This option will only work when the machine is in the Run condition and will work in both Auto andManual Modes
Turn the radio Transmitter to the ON ‘I’ position
Press the green button on the transmitter and activate the reciever
Move the toggle switch in the centre of the transmitter
Toggling the button to the left will switch the feeder Off and On as required.
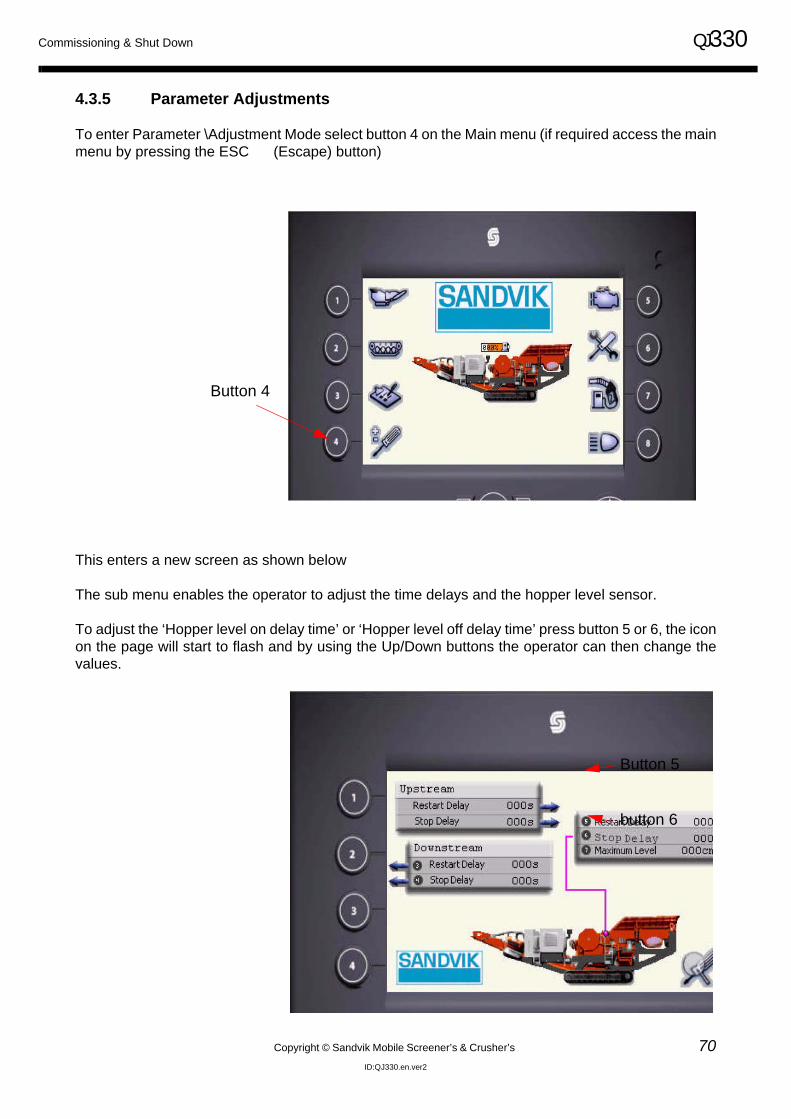
Commissioning & Shut Down QJ330
Copyright © Sandvik Mobile Screener’s & Crusher’s 70ID:QJ330.en.ver2
4.3.5 Parameter Adjustments
To enter Parameter \Adjustment Mode select button 4 on the Main menu (if required access the mainmenu by pressing the ESC (Escape) button)
This enters a new screen as shown below
The sub menu enables the operator to adjust the time delays and the hopper level sensor.
To adjust the ‘Hopper level on delay time’ or ‘Hopper level off delay time’ press button 5 or 6, the iconon the page will start to flash and by using the Up/Down buttons the operator can then change thevalues.
Button 4
Button 5
button 6
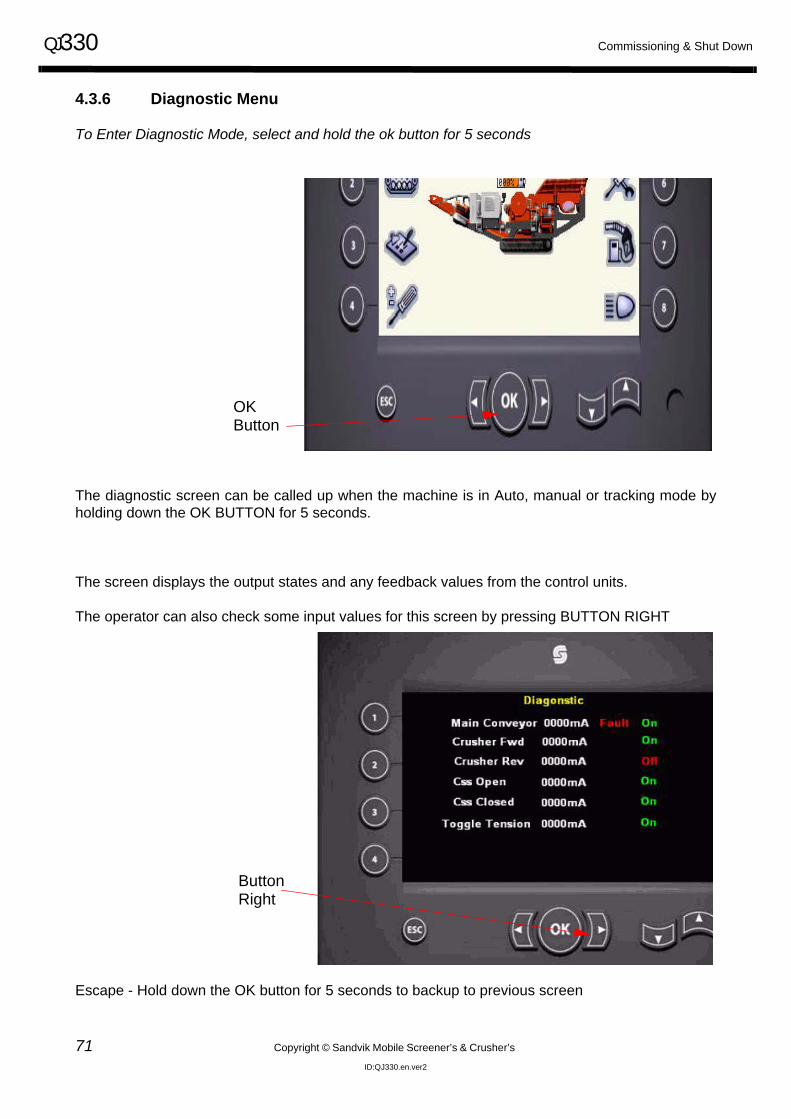
QJ330 Commissioning & Shut Down
71 Copyright © Sandvik Mobile Screener’s & Crusher’s
ID:QJ330.en.ver2
4.3.6 Diagnostic Menu
To Enter Diagnostic Mode, select and hold the ok button for 5 seconds
The diagnostic screen can be called up when the machine is in Auto, manual or tracking mode byholding down the OK BUTTON for 5 seconds.
The screen displays the output states and any feedback values from the control units.
The operator can also check some input values for this screen by pressing BUTTON RIGHT
Escape - Hold down the OK button for 5 seconds to backup to previous screen
OKButton
ButtonRight
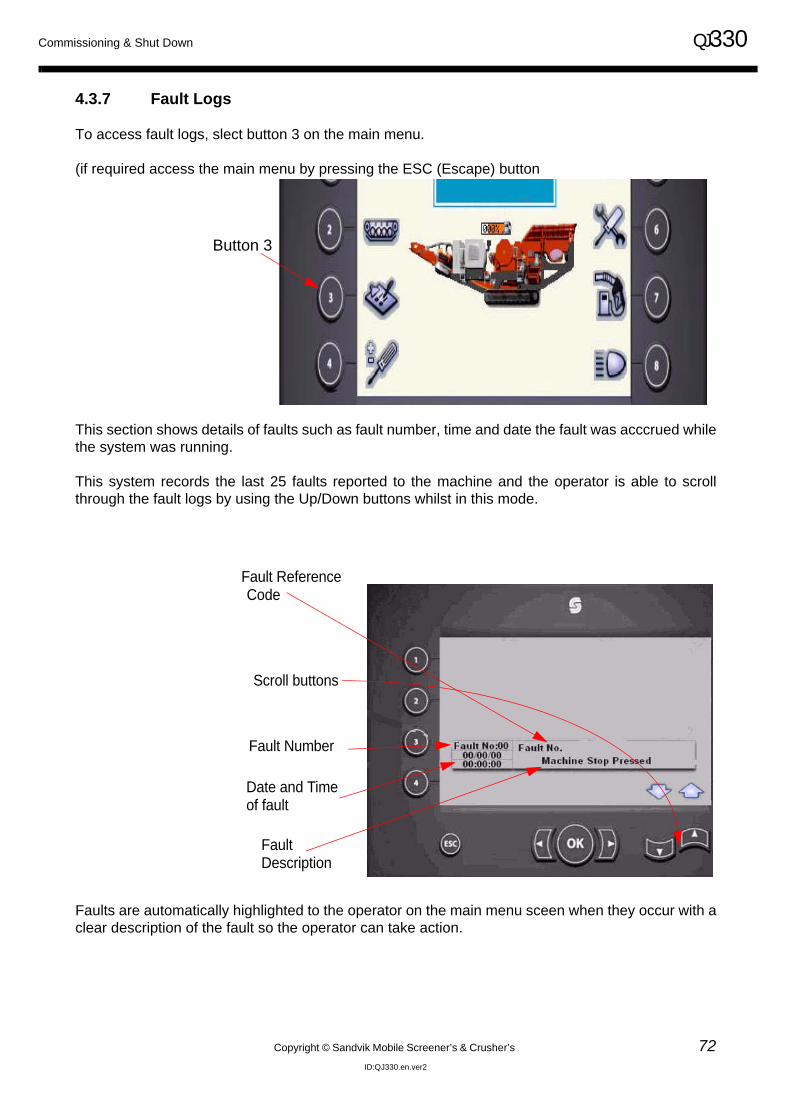
Commissioning & Shut Down QJ330
Copyright © Sandvik Mobile Screener’s & Crusher’s 72ID:QJ330.en.ver2
4.3.7 Fault Logs
To access fault logs, slect button 3 on the main menu.
(if required access the main menu by pressing the ESC (Escape) button
This section shows details of faults such as fault number, time and date the fault was acccrued whilethe system was running.
This system records the last 25 faults reported to the machine and the operator is able to scrollthrough the fault logs by using the Up/Down buttons whilst in this mode.
Faults are automatically highlighted to the operator on the main menu sceen when they occur with aclear description of the fault so the operator can take action.
Button 3
Fault Number
Fault Reference
Date and Timeof fault
Code
Fault Description
Scroll buttons
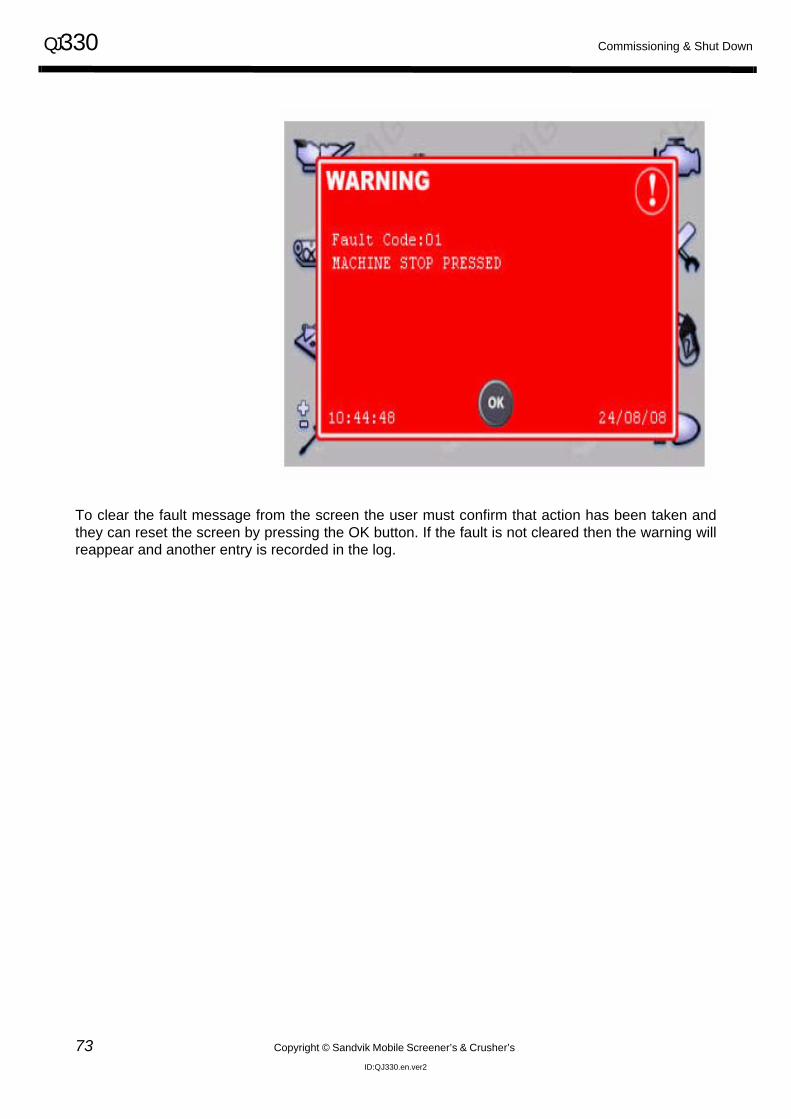
QJ330 Commissioning & Shut Down
73 Copyright © Sandvik Mobile Screener’s & Crusher’s
ID:QJ330.en.ver2
To clear the fault message from the screen the user must confirm that action has been taken andthey can reset the screen by pressing the OK button. If the fault is not cleared then the warning willreappear and another entry is recorded in the log.
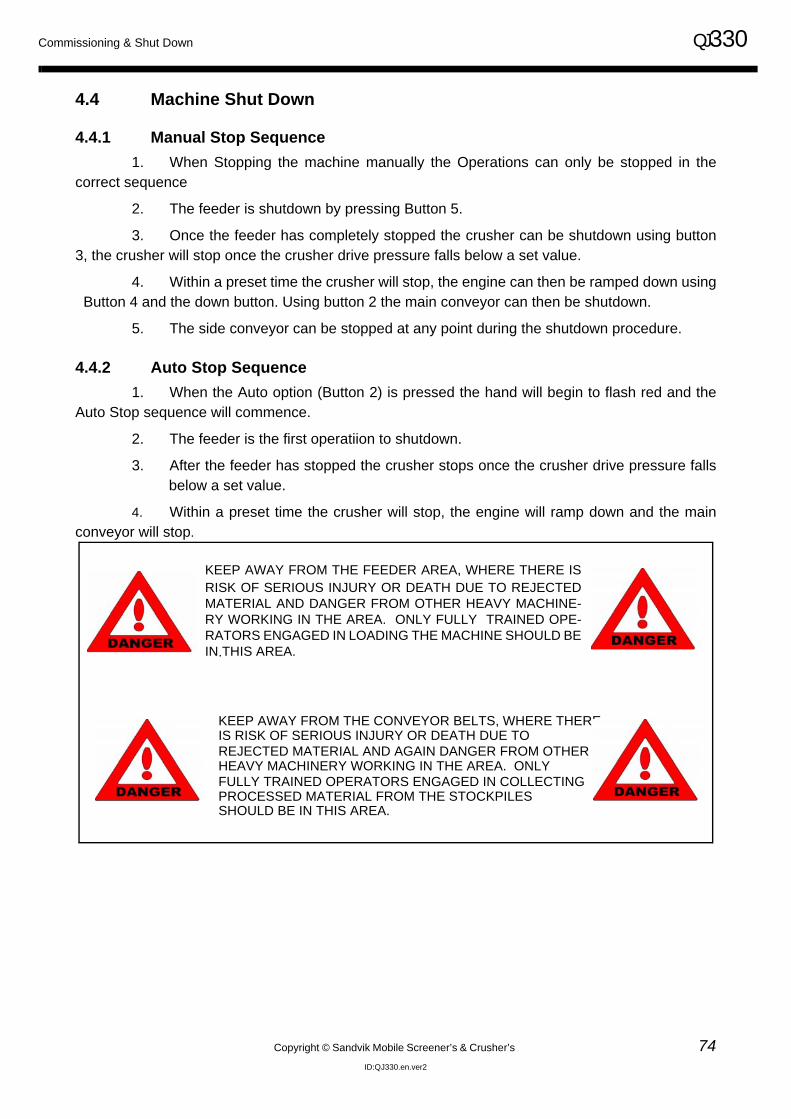
Commissioning & Shut Down QJ330
Copyright © Sandvik Mobile Screener’s & Crusher’s 74ID:QJ330.en.ver2
4.4 Machine Shut Down
4.4.1 Manual Stop Sequence1. When Stopping the machine manually the Operations can only be stopped in the
correct sequence
2. The feeder is shutdown by pressing Button 5.
3. Once the feeder has completely stopped the crusher can be shutdown using button3, the crusher will stop once the crusher drive pressure falls below a set value.
4. Within a preset time the crusher will stop, the engine can then be ramped down using Button 4 and the down button. Using button 2 the main conveyor can then be shutdown.
5. The side conveyor can be stopped at any point during the shutdown procedure.
4.4.2 Auto Stop Sequence1. When the Auto option (Button 2) is pressed the hand will begin to flash red and the
Auto Stop sequence will commence.
2. The feeder is the first operatiion to shutdown.
3. After the feeder has stopped the crusher stops once the crusher drive pressure fallsbelow a set value.
4. Within a preset time the crusher will stop, the engine will ramp down and the mainconveyor will stop.
KEEP AWAY FROM THE FEEDER AREA, WHERE THERE ISRISK OF SERIOUS INJURY OR DEATH DUE TO REJECTEDMATERIAL AND DANGER FROM OTHER HEAVY MACHINE-RY WORKING IN THE AREA. ONLY FULLY TRAINED OPE-RATORS ENGAGED IN LOADING THE MACHINE SHOULD BEIN THIS AREA.
.
KEEP AWAY FROM THE CONVEYOR BELTS, WHERE THERE
REJECTED MATERIAL AND AGAIN DANGER FROM OTHER
FULLY TRAINED OPERATORS ENGAGED IN COLLECTING
SHOULD BE IN THIS AREA.
IS RISK OF SERIOUS INJURY OR DEATH DUE TO
HEAVY MACHINERY WORKING IN THE AREA. ONLY
PROCESSED MATERIAL FROM THE STOCKPILES

QJ330 Commissioning & Shut Down
75 Copyright © Sandvik Mobile Screener’s & Crusher’s
ID:QJ330.en.ver2
4.4.3 Emergency Stop
IN THE EVENT OF AN ACCIDENT OR ANY SERIOUS PROBLEM WITH THE MACHINE YOUSHOULD PRESS THE NEAREST EMERGENCY STOP BUTTON
PLEASE REFER TO SAFETY SECTION FOR LOCATION OF EMERGENCY STOPS
EMERGENCY STOP
a. Engage the nearest emergency stop, the location of which can be found in the safety section.
b. Switch off the engine and remove the ignition key.
c. Implement the lockout procedure.
d. Only when the machine is fully switched off, should an attempt be made to solve the problem.
RESTART AFTER EMERGENCY STOP
a. Ensure that the problem has been solved
b. Ensure that all personnel are clear of the machine.
c. Ensure that all safety devices are correctly fitted and fully functional.
d. Release all emergency stops.
e. Re-start the engine in accordance with the correct procedure.

Commissioning & Shut Down QJ330
Copyright © Sandvik Mobile Screener’s & Crusher’s 76ID:QJ330.en.ver2
This Page is intentionally left blank

QJ330
Copyright © Sandvik Mobile Screener’s & Crusher’s 77ID:QJ330.en.ver2
5.0 Operation
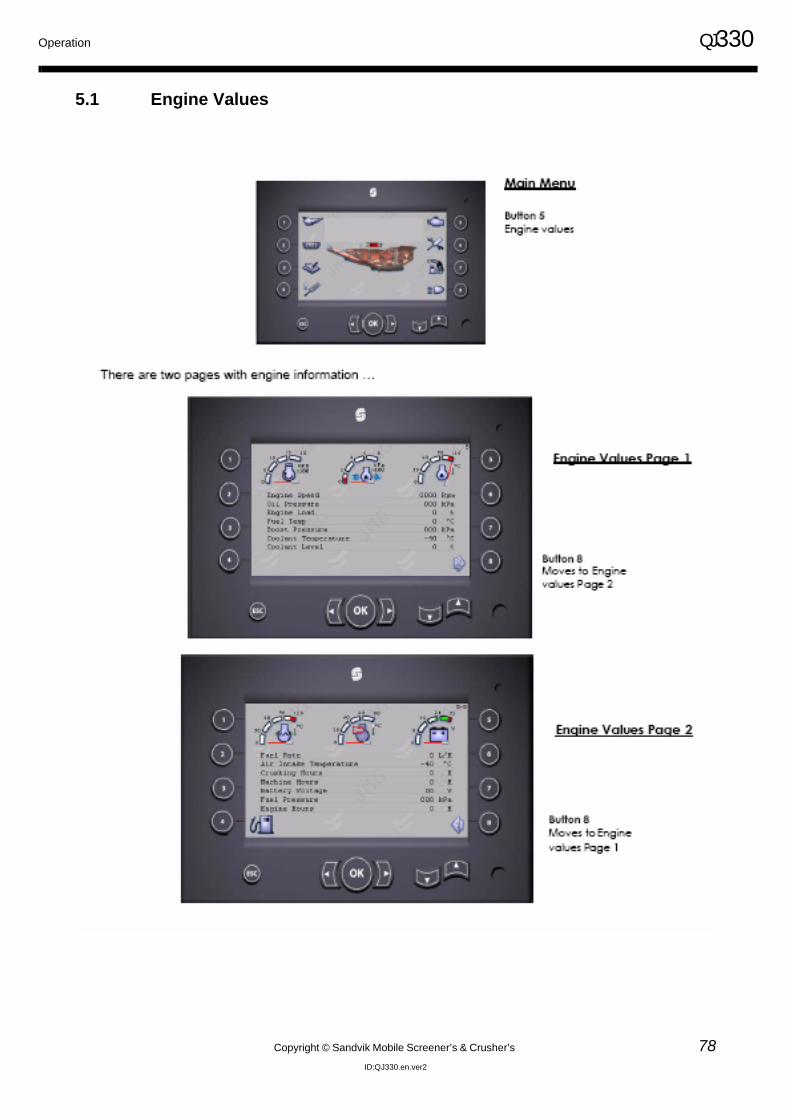
Operation QJ330
Copyright © Sandvik Mobile Screener’s & Crusher’s 78ID:QJ330.en.ver2
5.1 Engine Values
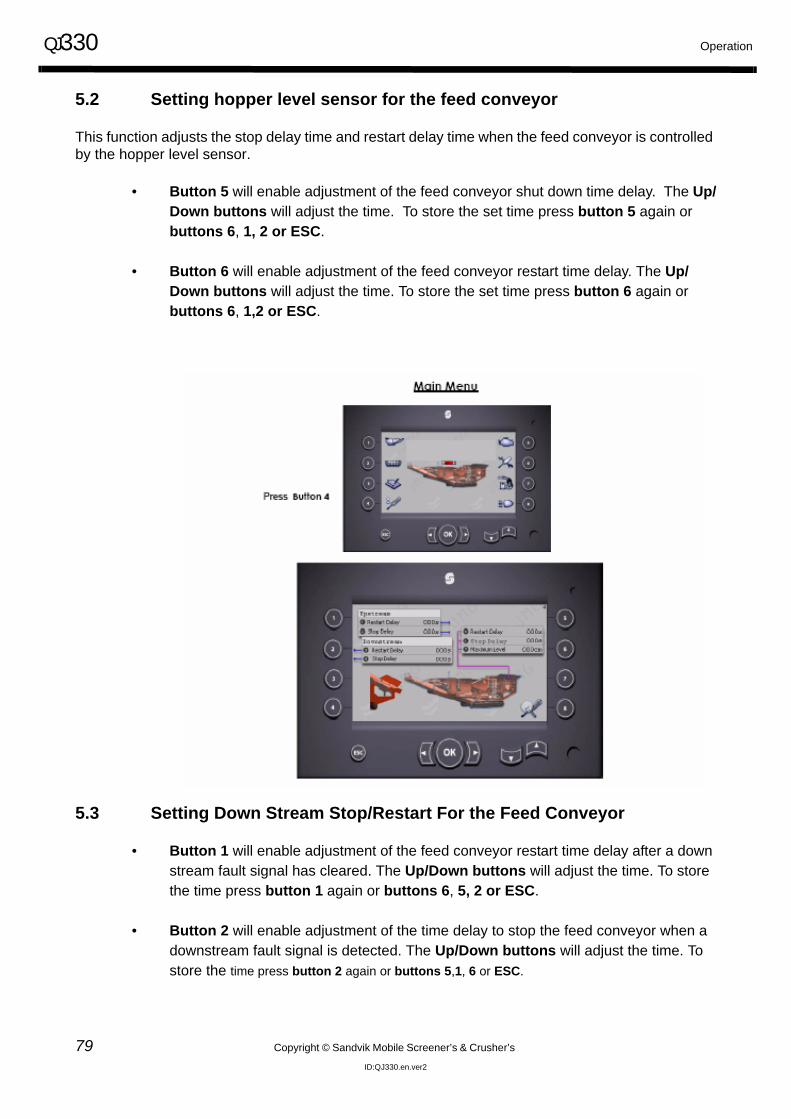
QJ330 Operation
79 Copyright © Sandvik Mobile Screener’s & Crusher’s
ID:QJ330.en.ver2
5.2 Setting hopper level sensor for the feed conveyor
This function adjusts the stop delay time and restart delay time when the feed conveyor is controlled by the hopper level sensor.
• Button 5 will enable adjustment of the feed conveyor shut down time delay. The Up/Down buttons will adjust the time. To store the set time press button 5 again or buttons 6, 1, 2 or ESC.
• Button 6 will enable adjustment of the feed conveyor restart time delay. The Up/Down buttons will adjust the time. To store the set time press button 6 again or buttons 6, 1,2 or ESC.
5.3 Setting Down Stream Stop/Restart For the Feed Conveyor
• Button 1 will enable adjustment of the feed conveyor restart time delay after a down stream fault signal has cleared. The Up/Down buttons will adjust the time. To store the time press button 1 again or buttons 6, 5, 2 or ESC.
• Button 2 will enable adjustment of the time delay to stop the feed conveyor when a downstream fault signal is detected. The Up/Down buttons will adjust the time. To store the time press button 2 again or buttons 5,1, 6 or ESC.
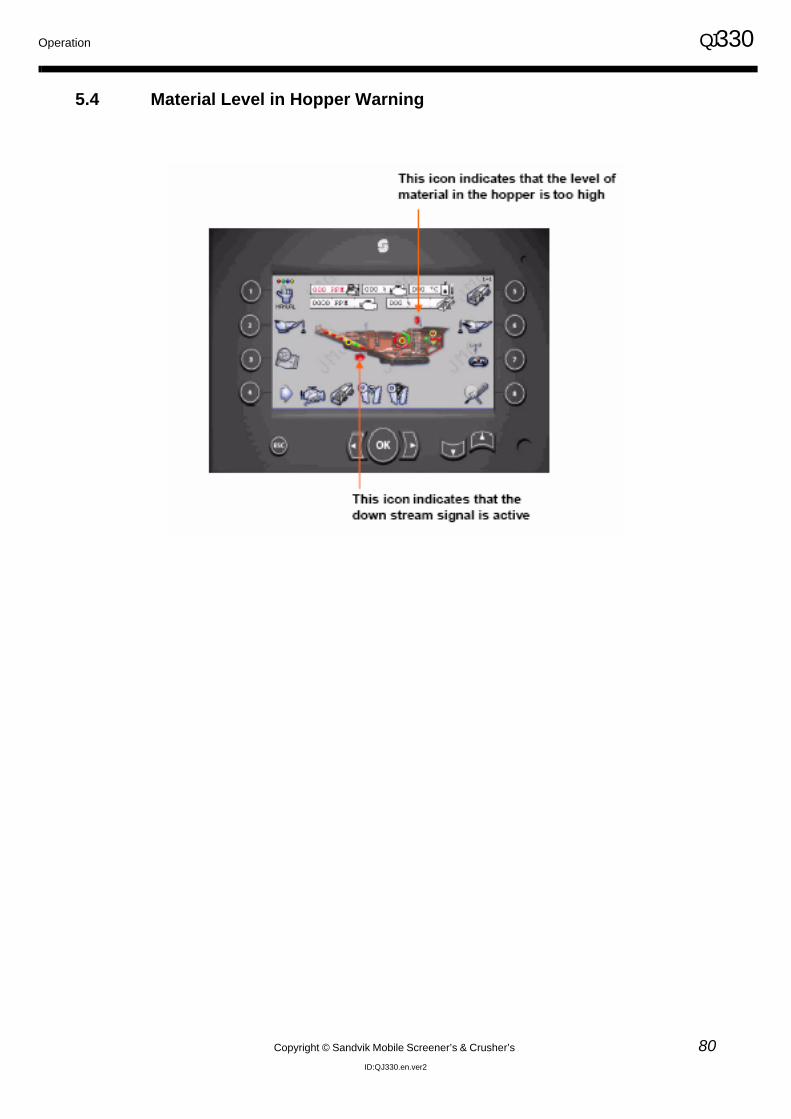
Operation QJ330
Copyright © Sandvik Mobile Screener’s & Crusher’s 80ID:QJ330.en.ver2
5.4 Material Level in Hopper Warning
QJ330
Copyright © Sandvik Mobile Screener’s & Crusher’s 81ID:QJ330.en.ver2
6.0 Maintenance

Maintenance QJ330
Copyright © Sandvik Mobile Screener’s & Crusher’s 82ID:QJ330.en.ver2
6.1 Maintenance Safety
Please refer to the Safety Section(1.0) of this manual for additional information on safe operation, maintenance and repair of the machine. To ensure maximum safety, ALWAYS read this section carefully BEFORE carrying out any work on the equipment or making any adjustments. Do notattempt operation, maintenance or repair with out first consulting all pertinent safety information.
6.1.1 What Are The Hazards And Dangers?
• Trips and Falls - falls from Height• Nip or Crush Injuries - Part of or Whole Bodies• Being Struck by Falling Objects• Striking against fixed objects• Hydraulic Systems – High Pressure Oil Will Penetrate the Body• Injury from Contact With Moving Parts or Machinery• Manual Handling Injury – Lifting and Moving Parts or Components
6.1.2 Who is at Risk
• Operators, Maintenance Personnel,• Subcontractors and Anybody Else in the Vicinity of the Machine
6.1.3 Are Precautions Adequate?
• Always refer to the Safety Section (1.0) in the Operation Manual• Use the Correct Personal Protection Equipment: ( 1.7.2)• Do not wear loose or baggy clothing which could become caught in the moving parts
of the machine• Do not Climb on The Machine – Always use the Access Points and
Platforms or Other Access Equipment as Required
6.1.4 When carrying out maintenace or adjustment
1) Implement the LOCKOUT and TAG Procedure (1.14.8).
! THINK SAFETY !
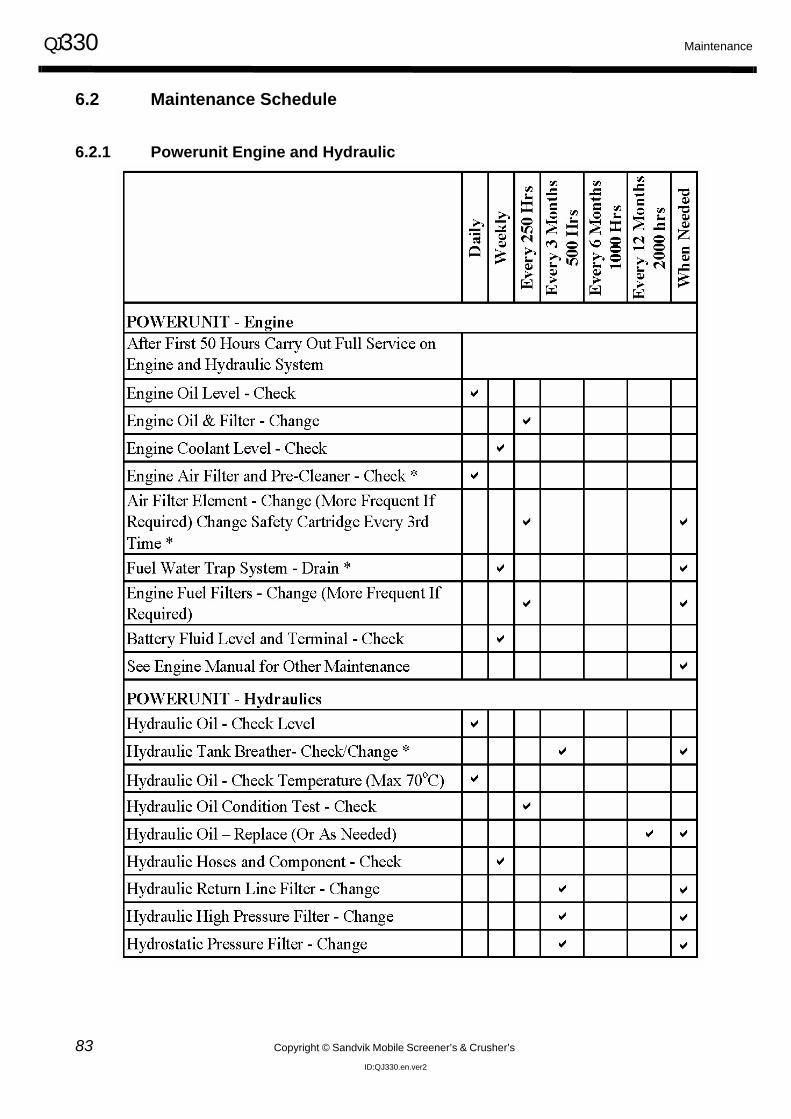
QJ330 Maintenance
83 Copyright © Sandvik Mobile Screener’s & Crusher’s
ID:QJ330.en.ver2
6.2 Maintenance Schedule
6.2.1 Powerunit Engine and Hydraulic
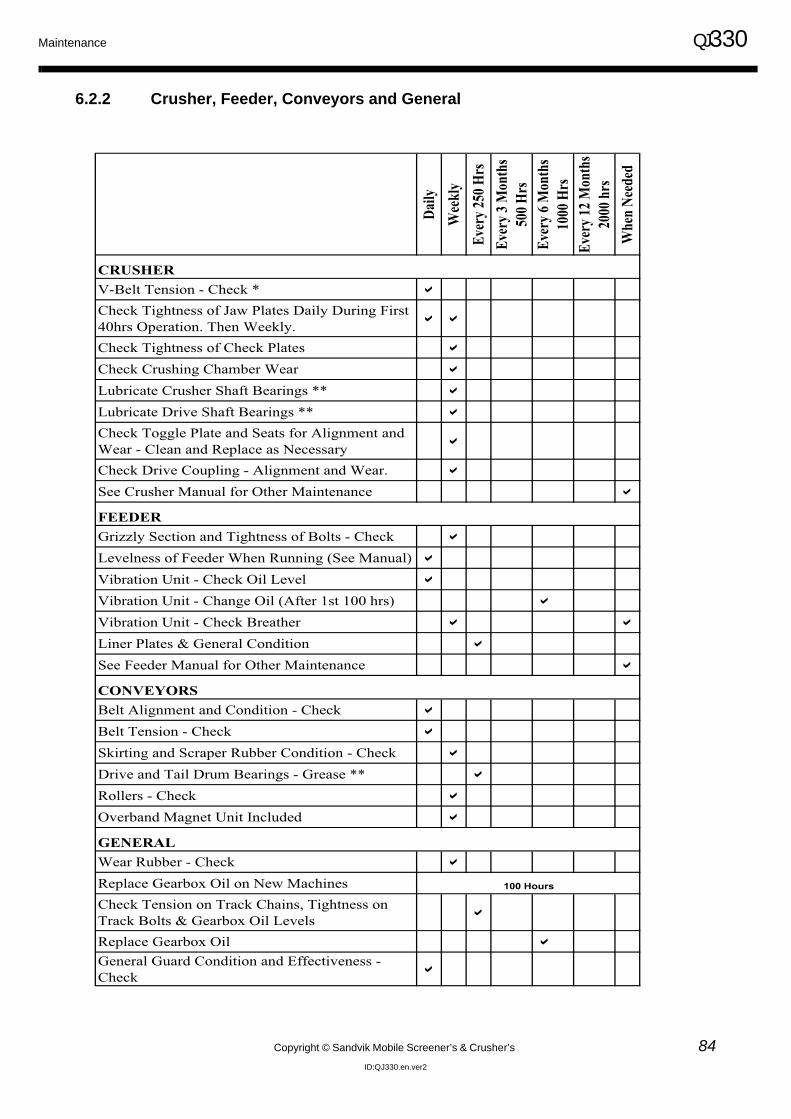
Maintenance QJ330
Copyright © Sandvik Mobile Screener’s & Crusher’s 84ID:QJ330.en.ver2
6.2.2 Crusher, Feeder, Conveyors and General
Daily
Wee
kly
Ever
y 250
Hrs
Ever
y 3 M
onth
s 50
0 Hrs
Ever
y 6 M
onth
s 10
00 H
rsEv
ery 1
2 Mon
ths
2000
hrs
Whe
n Ne
eded
V-Belt Tension - Check * �
Check Tightness of Jaw Plates Daily During First 40hrs Operation. Then Weekly. � �
Check Tightness of Check Plates �
Check Crushing Chamber Wear �
Lubricate Crusher Shaft Bearings ** �
Lubricate Drive Shaft Bearings ** �
Check Toggle Plate and Seats for Alignment and Wear - Clean and Replace as Necessary �
Check Drive Coupling - Alignment and Wear. �
See Crusher Manual for Other Maintenance �
Grizzly Section and Tightness of Bolts - Check �
Levelness of Feeder When Running (See Manual) �
Vibration Unit - Check Oil Level �
Vibration Unit - Change Oil (After 1st 100 hrs) �
Vibration Unit - Check Breather � �
Liner Plates & General Condition �
See Feeder Manual for Other Maintenance �
Belt Alignment and Condition - Check �
Belt Tension - Check �
Skirting and Scraper Rubber Condition - Check �
Drive and Tail Drum Bearings - Grease ** �
Rollers - Check �
Overband Magnet Unit Included �
Wear Rubber - Check �
Replace Gearbox Oil on New MachinesCheck Tension on Track Chains, Tightness on Track Bolts & Gearbox Oil Levels �
Replace Gearbox Oil �
General Guard Condition and Effectiveness - Check �
CRUSHER
100 Hours
GENERAL
CONVEYORS
FEEDER
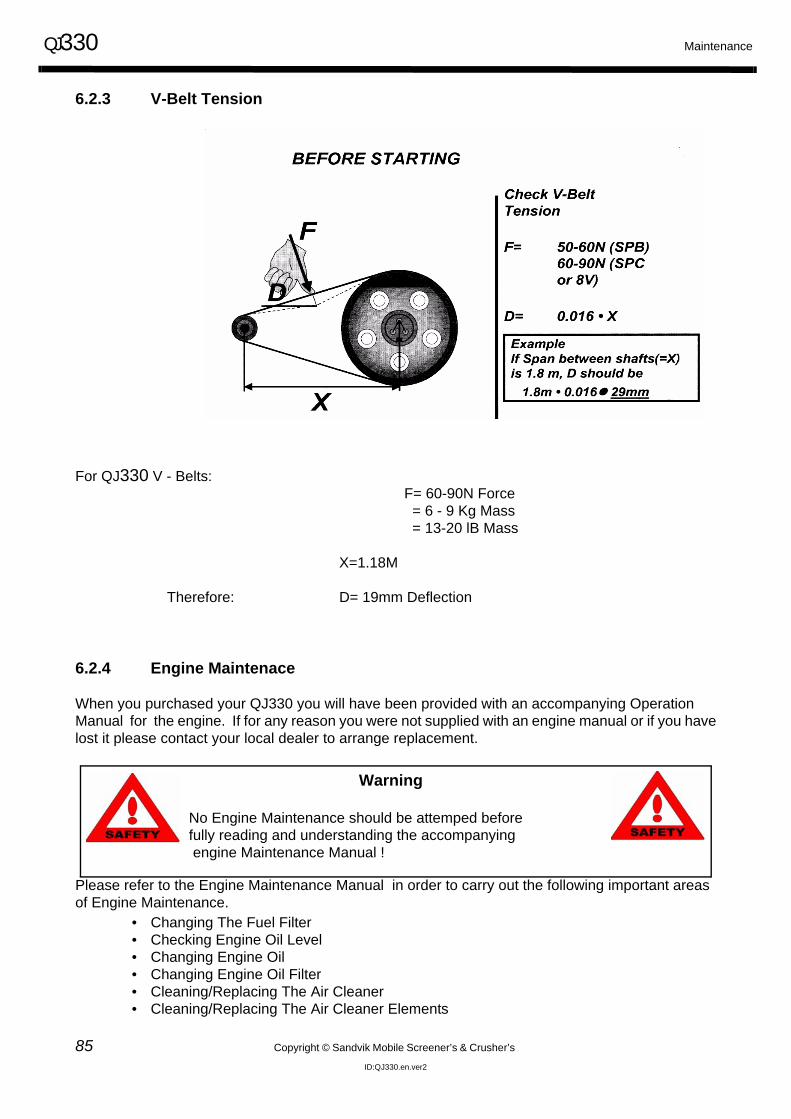
QJ330 Maintenance
85 Copyright © Sandvik Mobile Screener’s & Crusher’s
ID:QJ330.en.ver2
6.2.3 V-Belt Tension
For QJ330 V - Belts: F= 60-90N Force = 6 - 9 Kg Mass = 13-20 lB Mass
X=1.18M
Therefore: D= 19mm Deflection
6.2.4 Engine Maintenace
When you purchased your QJ330 you will have been provided with an accompanying OperationManual for the engine. If for any reason you were not supplied with an engine manual or if you havelost it please contact your local dealer to arrange replacement.
Please refer to the Engine Maintenance Manual in order to carry out the following important areasof Engine Maintenance.
• Changing The Fuel Filter• Checking Engine Oil Level• Changing Engine Oil• Changing Engine Oil Filter• Cleaning/Replacing The Air Cleaner• Cleaning/Replacing The Air Cleaner Elements
Warning
No Engine Maintenance should be attemped before fully reading and understanding the accompanying engine Maintenance Manual !

Maintenance QJ330
Copyright © Sandvik Mobile Screener’s & Crusher’s 86ID:QJ330.en.ver2
6.2.5 Air Cleaner Maintenance
1. Implement the LOCKOUT and TAG PROCEDURE (1.14.8)
2. Use a suitable platform to open the powerunit canopy door .
3. Attach the Ladder into the fixing points as shown, use a full body “fall arrest harness “ and attach the harness to the handrail.
Inspection - from the maintenace platform.
Caterpillar - Check Indicator daily and follow the instuctions on the indicator.
If Air Cleaner maintence is required follow instructions below.
Warning To Avoid Risk To Limb, Read, Understand And Implement The Safety Section In This Operational Manual
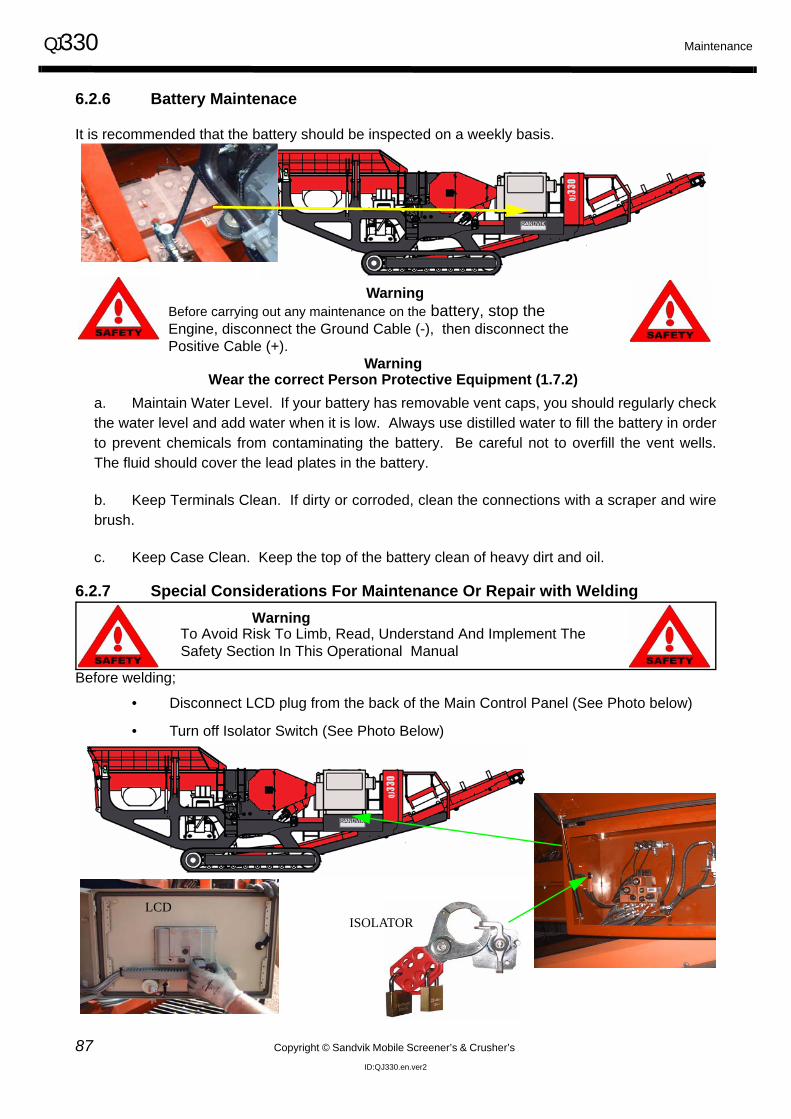
QJ330 Maintenance
87 Copyright © Sandvik Mobile Screener’s & Crusher’s
ID:QJ330.en.ver2
6.2.6 Battery Maintenace
It is recommended that the battery should be inspected on a weekly basis.
a. Maintain Water Level. If your battery has removable vent caps, you should regularly checkthe water level and add water when it is low. Always use distilled water to fill the battery in orderto prevent chemicals from contaminating the battery. Be careful not to overfill the vent wells.The fluid should cover the lead plates in the battery.
b. Keep Terminals Clean. If dirty or corroded, clean the connections with a scraper and wirebrush.
c. Keep Case Clean. Keep the top of the battery clean of heavy dirt and oil.
6.2.7 Special Considerations For Maintenance Or Repair with Welding
Before welding;
• Disconnect LCD plug from the back of the Main Control Panel (See Photo below)
• Turn off Isolator Switch (See Photo Below)
Warning Before carrying out any maintenance on the battery, stop the Engine, disconnect the Ground Cable (-), then disconnect thePositive Cable (+).
Warning Wear the correct Person Protective Equipment (1.7.2)
Warning To Avoid Risk To Limb, Read, Understand And Implement The Safety Section In This Operational Manual
LCDISOLATOR
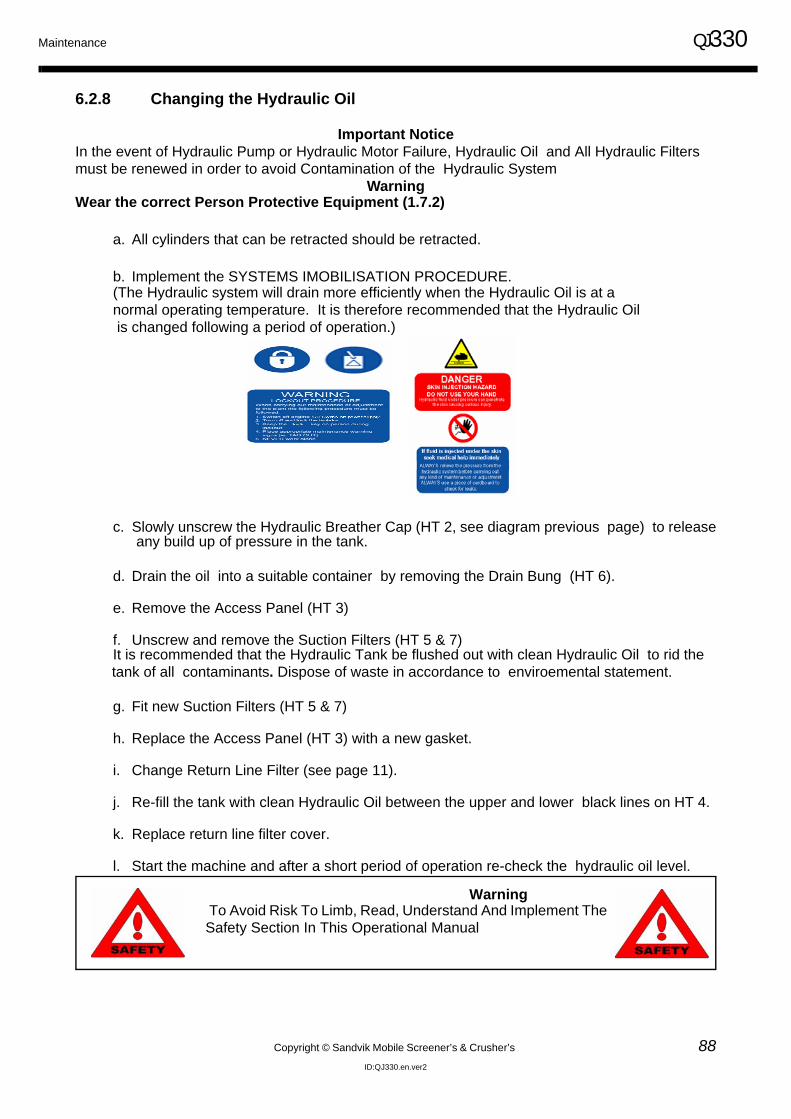
Maintenance QJ330
Copyright © Sandvik Mobile Screener’s & Crusher’s 88ID:QJ330.en.ver2
6.2.8 Changing the Hydraulic Oil
Important NoticeIn the event of Hydraulic Pump or Hydraulic Motor Failure, Hydraulic Oil and All Hydraulic Filtersmust be renewed in order to avoid Contamination of the Hydraulic System
Warning Wear the correct Person Protective Equipment (1.7.2)
a. All cylinders that can be retracted should be retracted.
b. Implement the SYSTEMS IMOBILISATION PROCEDURE.(The Hydraulic system will drain more efficiently when the Hydraulic Oil is at a normal operating temperature. It is therefore recommended that the Hydraulic Oil is changed following a period of operation.)
c. Slowly unscrew the Hydraulic Breather Cap (HT 2, see diagram previous page) to release any build up of pressure in the tank.
d. Drain the oil into a suitable container by removing the Drain Bung (HT 6).
e. Remove the Access Panel (HT 3)
f. Unscrew and remove the Suction Filters (HT 5 & 7)It is recommended that the Hydraulic Tank be flushed out with clean Hydraulic Oil to rid the
tank of all contaminants. Dispose of waste in accordance to enviroemental statement.
g. Fit new Suction Filters (HT 5 & 7)
h. Replace the Access Panel (HT 3) with a new gasket.
i. Change Return Line Filter (see page 11).
j. Re-fill the tank with clean Hydraulic Oil between the upper and lower black lines on HT 4.
k. Replace return line filter cover.
l. Start the machine and after a short period of operation re-check the hydraulic oil level.
Warning To Avoid Risk To Limb, Read, Understand And Implement TheSafety Section In This Operational Manual

QJ330 Maintenance
89 Copyright © Sandvik Mobile Screener’s & Crusher’s
ID:QJ330.en.ver2
6.2.9 Changing The Return Line Fliter
a. Implement the SYSTEMS IMOBILISATION PROCEDURE
b. Clean the Return Line Filter Cover and surrounding area.
c. Slowly unscrew the Hydraulic Breather Cap (HT 2) to release any build up of pressure in the tank.
d. Unscrew the filter cover bolts and remove the cover.
e. Lift out the filter element using the lifting handles.
f. Wash out the filter cover and dry with an air hose.
g. Re-fit the new filter.
h. Replace cover and tighten bolts.
6.2.10 Check / Adding Fuel
The fuel level of the machine can be checked by viewing the indicator “I” as shown above. It is recommended that the tank should be filled at the end of every working day. The tank is filled by removing the filler cap, funnelling in the fuel until the indicator is at its highestlevel and replacing the filler cap. It is recommended to keep the area around the filler cap clean andensure that any spilled fuel is cleaned up immediately.
Combined Screw-Washer
Removal Handle
Filter Element
Cover
WarningAIR UNDER PRESSURE
I
Warning To Avoid Risk To Limb, Read, Understand And Implement TheSafety Section In This Operational Manual

Maintenance QJ330
Copyright © Sandvik Mobile Screener’s & Crusher’s 90ID:QJ330.en.ver2
6.2.11 Track Maintenance
ALWAYS• Park the machine on flat, level ground. If it is necessary to park the machine on a
gradient, the tracks should be solidly blocked.• Ensure the terrain the machine is working on is firm enough to adequately support the
machine.• Make certain the machine is tracked at least 10m in either direction on a daily basis to
minimise the risk of track chain seizure.• Ensure the track systems are free from debris before moving the machine.• Make certain the tracks are not frozen to the ground before moving the machine.
NEVER• Attempt to track the machine if there is any build up of material around the tracks and
drivesprockets.• Attempt to track the machine if the tracks are frozen to the ground.• Push or tow the machine when unable to free itself.
Working Conditions
If your machine will be working in materials which cause corrosion to carbon steel you must replacestandard tracks with lubricated tracks to avoid seizure of the track joints. Lubricated tracks are available as an optional extra from new or as a retrofit for customers entering adverse working conditions.Contact Sandvik
6.2.12 Checking the Track Tension
a. Track the QJ330 a minimum of 2 metres in a forward direction on levelground.
b. Measure the sag on the top part of the track on the longest section of unsupported track as shown.
The sag should be between 5mm and 15mm.IF the measured track sag is above 15mm the tracks need tightened; and if the track sag is below5mm the tracks need loosened.
Track Sag
Track Cover Plate
QJ330 Maintenance
91 Copyright © Sandvik Mobile Screener’s & Crusher’s
ID:QJ330.en.ver2
6.2.13 Tighten the Tracks
a. Loosen the two screws and remove the aperture cover from the side ofthe track frame.
b. Ensure the grease fitting and grease gun adaptor are clean; ingress of dirt into the grease fitting can result in failure.
c. Connect a grease gun to the grease fitting and add grease until the track tension is within the specified values given in the previous section.
d. Drive 50 metres forward and 50 metres backwards and repeat the above procedure if the track slackens.
e. Replace the aperture cover.
6.2.14 Loosen the Tracks
a. Loosen the two screws and remove the aperture cover from the side ofthe track frame.
b. Loosen the grease fitting, by turning in an anti-clockwise direction, using gradual increments until the grease begins to be expelled.
c. Care must be taken not to loosen the grease fitting too quickly.
d. When the correct track tension has been obtained, tighten the grease fitting by turning in a clockwise direction and clean away all traces of extruded grease. Be sure not to overtighten the grease fitting.
e. Replace the aperture cover.
Warning To Avoid Risk To Limb, Read, Understand And Implement The Safety Section In This Operational Manual
Warning To Avoid Risk To Limb, Read, Understand And Implement The Safety Section In This Operational Manual
If tracks fail to loosen after the grease fitting hashas been loosened: DO NOT attempt toremove the tracks or disassemble the
track tensioner. It is possible that runningthe tracks a short distance in both directions
with the grease fitting loosened may help to expel the grease !
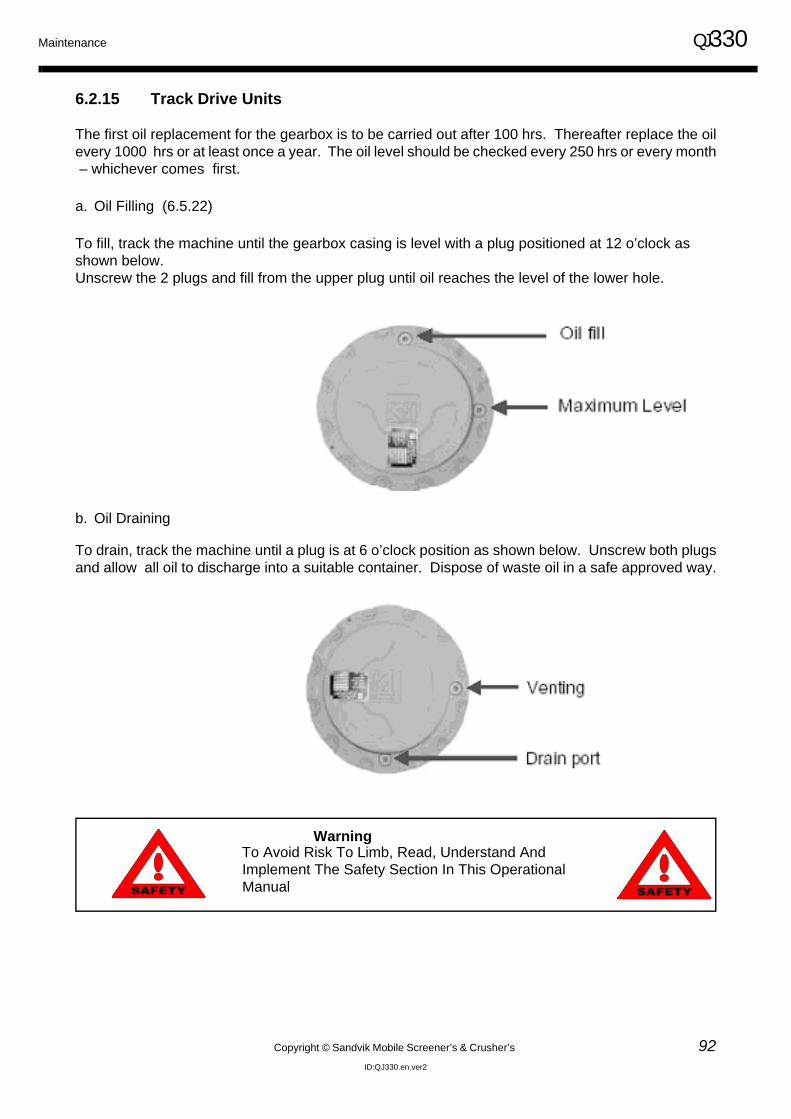
Maintenance QJ330
Copyright © Sandvik Mobile Screener’s & Crusher’s 92ID:QJ330.en.ver2
6.2.15 Track Drive Units
The first oil replacement for the gearbox is to be carried out after 100 hrs. Thereafter replace the oilevery 1000 hrs or at least once a year. The oil level should be checked every 250 hrs or every month – whichever comes first.
a. Oil Filling (6.5.22)
To fill, track the machine until the gearbox casing is level with a plug positioned at 12 o’clock asshown below. Unscrew the 2 plugs and fill from the upper plug until oil reaches the level of the lower hole.
b. Oil Draining
To drain, track the machine until a plug is at 6 o’clock position as shown below. Unscrew both plugsand allow all oil to discharge into a suitable container. Dispose of waste oil in a safe approved way.
Warning To Avoid Risk To Limb, Read, Understand And Implement The Safety Section In This Operational Manual

QJ330 Maintenance
93 Copyright © Sandvik Mobile Screener’s & Crusher’s
ID:QJ330.en.ver2
6.2.16 Tensioning the Dirt Conveyor Beltt
Before tensioning the belts ensure that they are free from obstructions and that any excess materialis washed away. If any rips/tears are discovered do not operate the machine until the belt has been repaired.
1. Remove the appropriate guards.
2. Loosen bearing bolts on both bearings of the idler drum justenough to allow movement for adjustment.
3. Replace and secure guards.
4. Start the engine and start the conveyor (please refer to operationsection).
5. Tighten both belt adjusters evenly until slippage stop.
6. Implement the SYSTEMS IMMOBILISATION PROCEDURE.
7. Remove appropriate guard and re-tighten the bearing bolts.
8. Replace guards and correctly secure in position.
WARNING
Conveyor belt tensioning must be carried out with the machine running. Adjustment of conveyor belt tension should only be attempted by persons having the requisite experience and skill in the procedure. If you have any concernsregarding training on the procedure, or the performance of the adjustments themselves, contact your distributor or the manufac-
turer. DO NOT attempt to adjust conveyor belt tension without first undertaking proper instruction and/or obtaining adequate supervision.
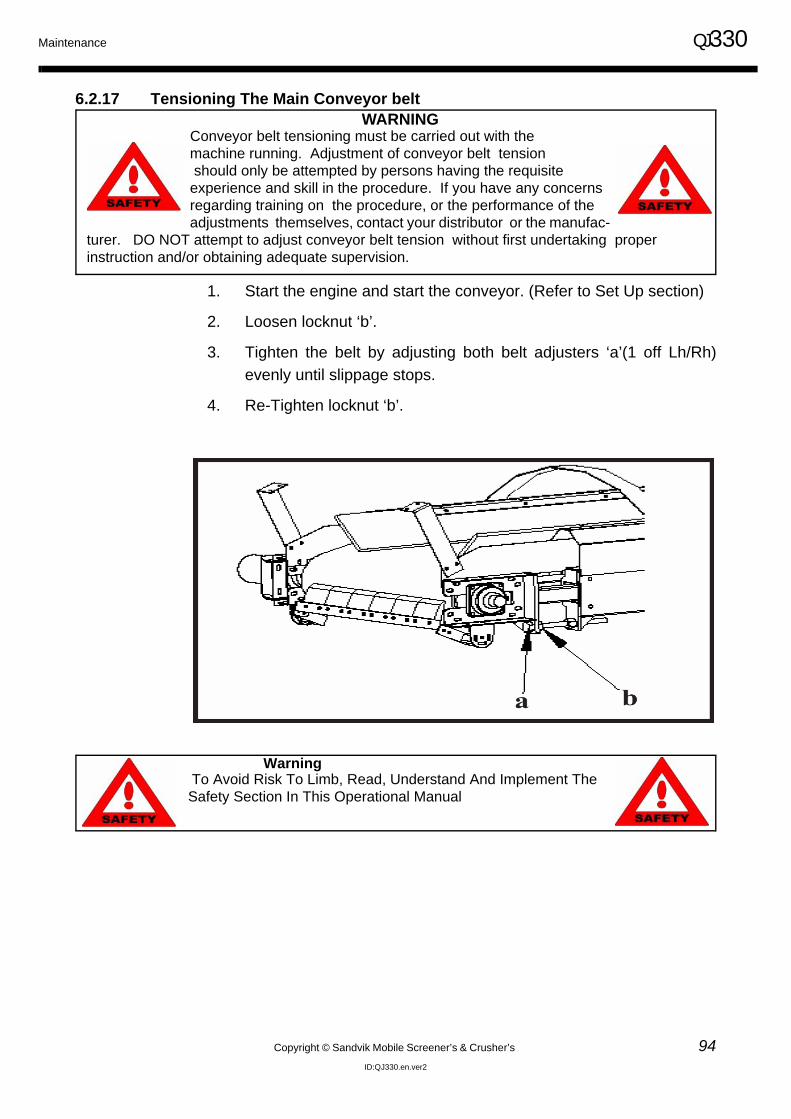
Maintenance QJ330
Copyright © Sandvik Mobile Screener’s & Crusher’s 94ID:QJ330.en.ver2
6.2.17 Tensioning The Main Conveyor belt
1. Start the engine and start the conveyor. (Refer to Set Up section)
2. Loosen locknut ‘b’.
3. Tighten the belt by adjusting both belt adjusters ‘a’(1 off Lh/Rh)evenly until slippage stops.
4. Re-Tighten locknut ‘b’.
WARNING
Conveyor belt tensioning must be carried out with the machine running. Adjustment of conveyor belt tension should only be attempted by persons having the requisite experience and skill in the procedure. If you have any concernsregarding training on the procedure, or the performance of the adjustments themselves, contact your distributor or the manufac-
turer. DO NOT attempt to adjust conveyor belt tension without first undertaking proper instruction and/or obtaining adequate supervision.
Warning To Avoid Risk To Limb, Read, Understand And Implement TheSafety Section In This Operational Manual
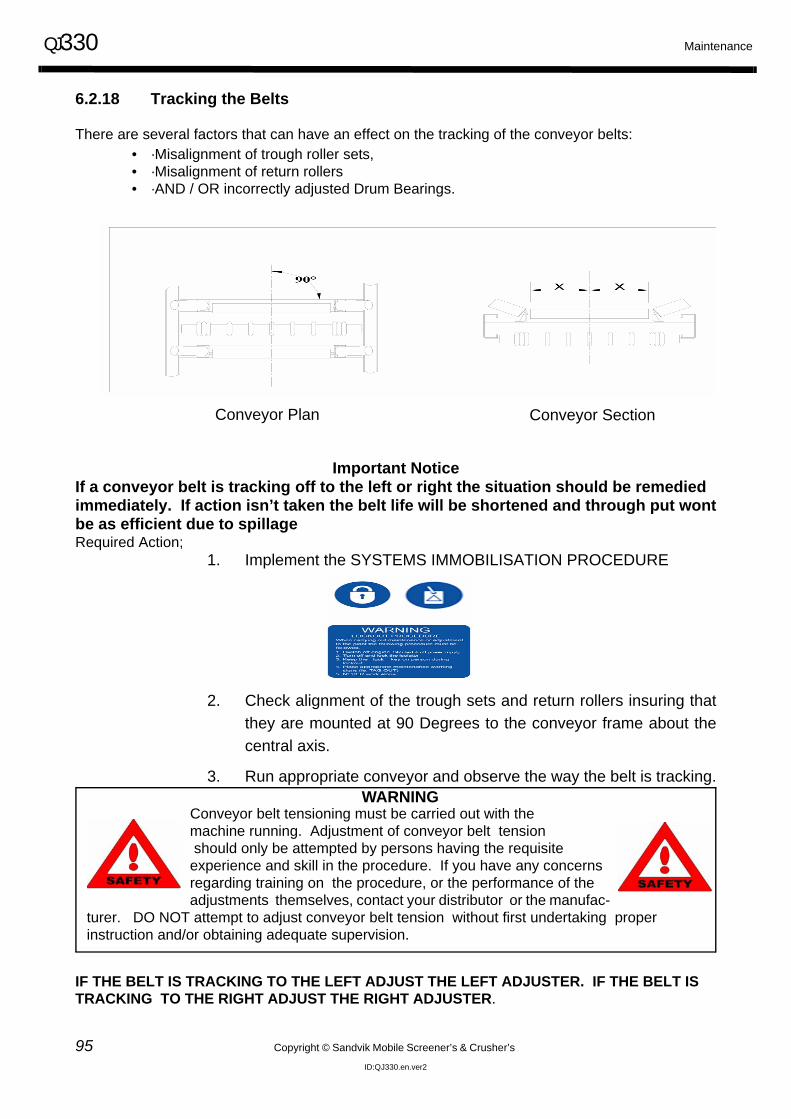
QJ330 Maintenance
95 Copyright © Sandvik Mobile Screener’s & Crusher’s
ID:QJ330.en.ver2
6.2.18 Tracking the Belts
There are several factors that can have an effect on the tracking of the conveyor belts:• ·Misalignment of trough roller sets,• ·Misalignment of return rollers• ·AND / OR incorrectly adjusted Drum Bearings.
Important NoticeIf a conveyor belt is tracking off to the left or right the situation should be remediedimmediately. If action isn’t taken the belt life will be shortened and through put wontbe as efficient due to spillageRequired Action;
1. Implement the SYSTEMS IMMOBILISATION PROCEDURE
2. Check alignment of the trough sets and return rollers insuring thatthey are mounted at 90 Degrees to the conveyor frame about thecentral axis.
3. Run appropriate conveyor and observe the way the belt is tracking.
IF THE BELT IS TRACKING TO THE LEFT ADJUST THE LEFT ADJUSTER. IF THE BELT ISTRACKING TO THE RIGHT ADJUST THE RIGHT ADJUSTER.
Conveyor Plan Conveyor Section
WARNING
Conveyor belt tensioning must be carried out with the machine running. Adjustment of conveyor belt tension should only be attempted by persons having the requisite experience and skill in the procedure. If you have any concernsregarding training on the procedure, or the performance of the adjustments themselves, contact your distributor or the manufac-
turer. DO NOT attempt to adjust conveyor belt tension without first undertaking proper instruction and/or obtaining adequate supervision.
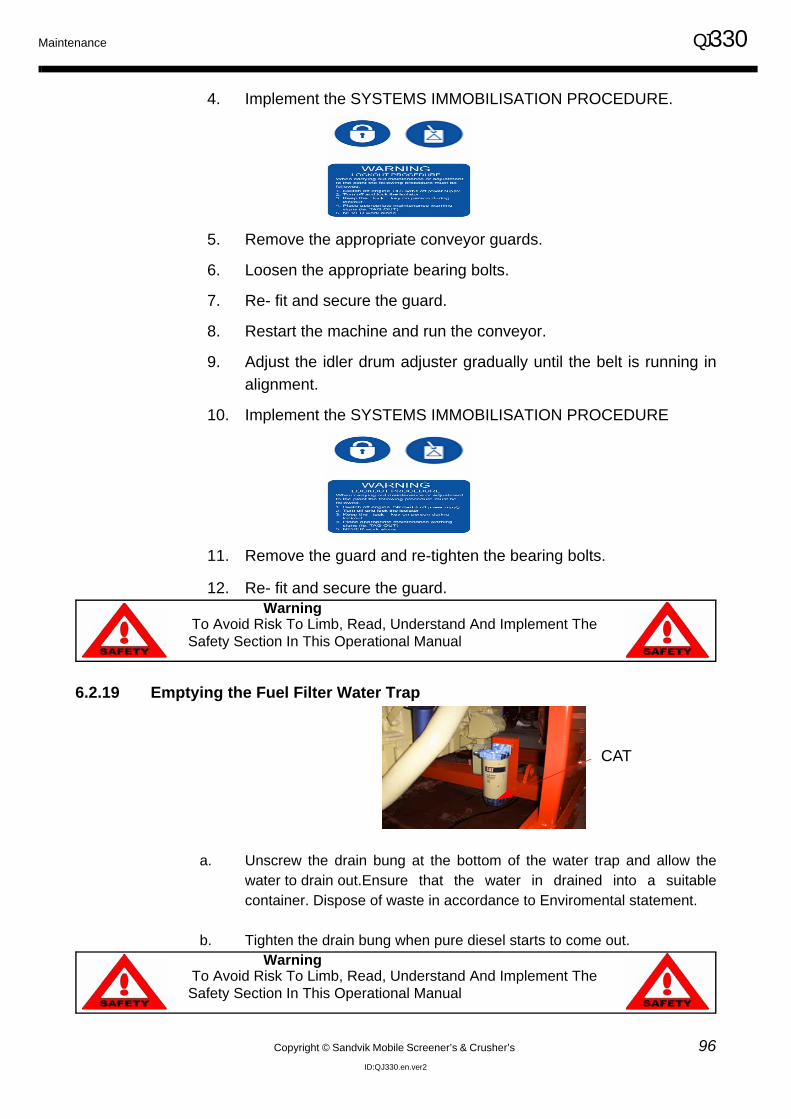
Maintenance QJ330
Copyright © Sandvik Mobile Screener’s & Crusher’s 96ID:QJ330.en.ver2
4. Implement the SYSTEMS IMMOBILISATION PROCEDURE.
5. Remove the appropriate conveyor guards.
6. Loosen the appropriate bearing bolts.
7. Re- fit and secure the guard.
8. Restart the machine and run the conveyor.
9. Adjust the idler drum adjuster gradually until the belt is running inalignment.
10. Implement the SYSTEMS IMMOBILISATION PROCEDURE
11. Remove the guard and re-tighten the bearing bolts.
12. Re- fit and secure the guard.
6.2.19 Emptying the Fuel Filter Water Trap
a. Unscrew the drain bung at the bottom of the water trap and allow thewater to drain out.Ensure that the water in drained into a suitablecontainer. Dispose of waste in accordance to Enviromental statement.
b. Tighten the drain bung when pure diesel starts to come out.
Warning To Avoid Risk To Limb, Read, Understand And Implement TheSafety Section In This Operational Manual
CAT
Warning To Avoid Risk To Limb, Read, Understand And Implement TheSafety Section In This Operational Manual
QJ330 Maintenance
97 Copyright © Sandvik Mobile Screener’s & Crusher’s
ID:QJ330.en.ver2
6.2.20 Maintenance Data
a. Adjustment Data
Engine Speed 1100rpm (idle)/1900rpm (run)Feeder Speed 500-1000rpmCrusher Speed 270rpm (approx)
b. Fluid CapacitiesEngine Coolant Deutz- 37.0ltr.
Caterpillar-38.0ltr.
Engine Oil including Filter Deutz-36.0ltr. Caterpillar-40.0ltr
Hydraulic Tank 500ltr. (110 gal)Fuel Tank 500ltr (110 gal)Feeder Shaft (each) 1.2ltrFeeder Gears 4.6ltrTrack Gearbox (each) 5ltr
c. PressuresCrusher Drive Charge Pressure 22bar (320 psi)Crusher Drive Max Pressure 350bar (5075 psi)Crusher Toggle Tension Pressure 135-155bar (1960-2250 psi)Track Drive Pressure (max) 300bar (4350 psi)General Pressure (max) 210bar (3050 psi)
6.2.21 Hydraulic Oil Requirements for QJ330 Machines
a. Basic Requirements for the Hydraulic Oil Quality• viscosity recommended operating range – 12-60 cSt.• min. viscosity 12 cSt at operating temperature.• max. viscosity 1000 cSt at starting temperature (Intermittent).• Cleanliness level - ISO 4406 Class 22/18/13
Unless otherwise mentioned, the factory fill oil is a special hydraulic oil of ISO VG 46 class. The max.allowable operating temperature with this oil type is about +80°C (175°F) and min. allowable startingtemperature is about -20°C(-5°F), which makes it suitable for use all year round in most operatingconditions. Below are some examples of oil brands meeting these requirements:
• Maxol Multivis 46• BP Energol SHF 46• Esso Univis N 46• Shell Tellus Oil T 46• Mobil DTE 15
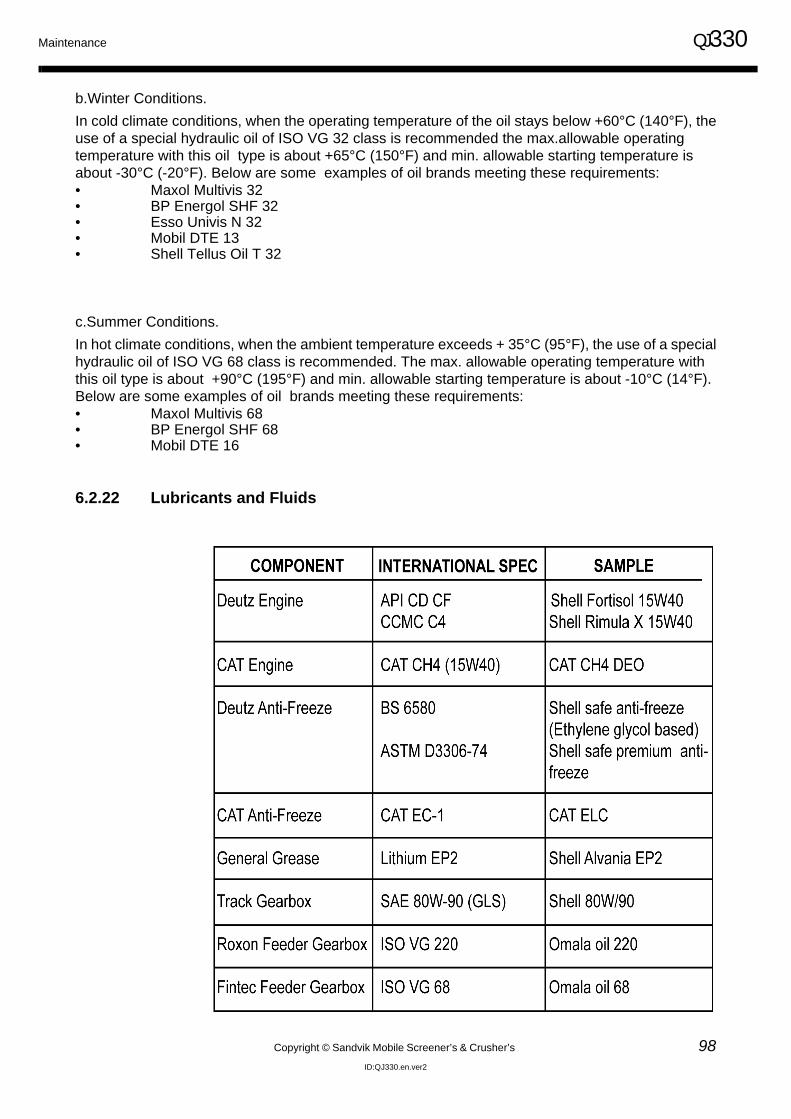
Maintenance QJ330
Copyright © Sandvik Mobile Screener’s & Crusher’s 98ID:QJ330.en.ver2
b.Winter Conditions.In cold climate conditions, when the operating temperature of the oil stays below +60°C (140°F), theuse of a special hydraulic oil of ISO VG 32 class is recommended the max.allowable operating temperature with this oil type is about +65°C (150°F) and min. allowable starting temperature is about -30°C (-20°F). Below are some examples of oil brands meeting these requirements:• Maxol Multivis 32• BP Energol SHF 32• Esso Univis N 32• Mobil DTE 13• Shell Tellus Oil T 32
c.Summer Conditions.In hot climate conditions, when the ambient temperature exceeds + 35°C (95°F), the use of a specialhydraulic oil of ISO VG 68 class is recommended. The max. allowable operating temperature withthis oil type is about +90°C (195°F) and min. allowable starting temperature is about -10°C (14°F).Below are some examples of oil brands meeting these requirements:• Maxol Multivis 68• BP Energol SHF 68• Mobil DTE 16
6.2.22 Lubricants and Fluids
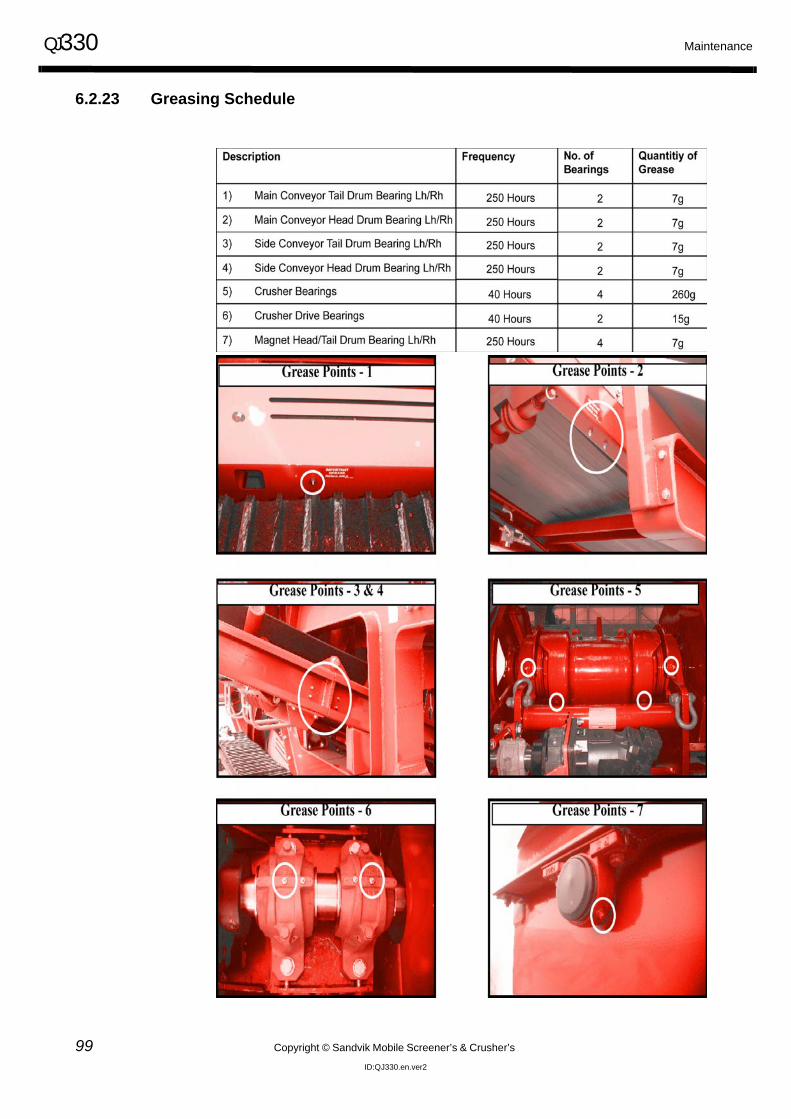
QJ330 Maintenance
99 Copyright © Sandvik Mobile Screener’s & Crusher’s
ID:QJ330.en.ver2
6.2.23 Greasing Schedule
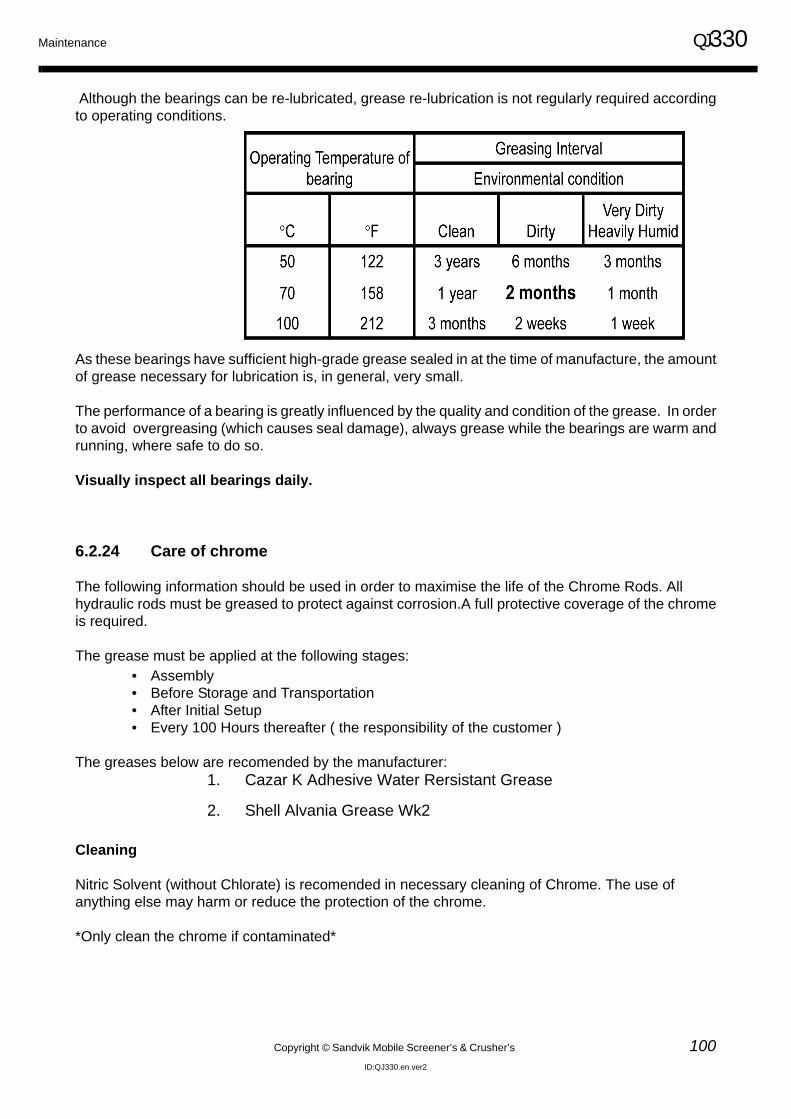
Maintenance QJ330
Copyright © Sandvik Mobile Screener’s & Crusher’s 100ID:QJ330.en.ver2
Although the bearings can be re-lubricated, grease re-lubrication is not regularly required accordingto operating conditions.
As these bearings have sufficient high-grade grease sealed in at the time of manufacture, the amountof grease necessary for lubrication is, in general, very small.
The performance of a bearing is greatly influenced by the quality and condition of the grease. In orderto avoid overgreasing (which causes seal damage), always grease while the bearings are warm andrunning, where safe to do so.
Visually inspect all bearings daily.
6.2.24 Care of chrome
The following information should be used in order to maximise the life of the Chrome Rods. All hydraulic rods must be greased to protect against corrosion.A full protective coverage of the chromeis required.
The grease must be applied at the following stages:• Assembly• Before Storage and Transportation• After Initial Setup• Every 100 Hours thereafter ( the responsibility of the customer )
The greases below are recomended by the manufacturer: 1. Cazar K Adhesive Water Rersistant Grease
2. Shell Alvania Grease Wk2
Cleaning
Nitric Solvent (without Chlorate) is recomended in necessary cleaning of Chrome. The use of anything else may harm or reduce the protection of the chrome.
*Only clean the chrome if contaminated*

QJ330
Copyright © Sandvik Mobile Screener’s & Crusher’s 101ID:QJ330.en.ver2
7.0 Trouble Shooting and Warranty

Trouble Shooting and Warranty QJ330
Copyright © Sandvik Mobile Screener’s & Crusher’s 102ID:QJ330.en.ver2
7.1 Trouble Shootting
section under construction
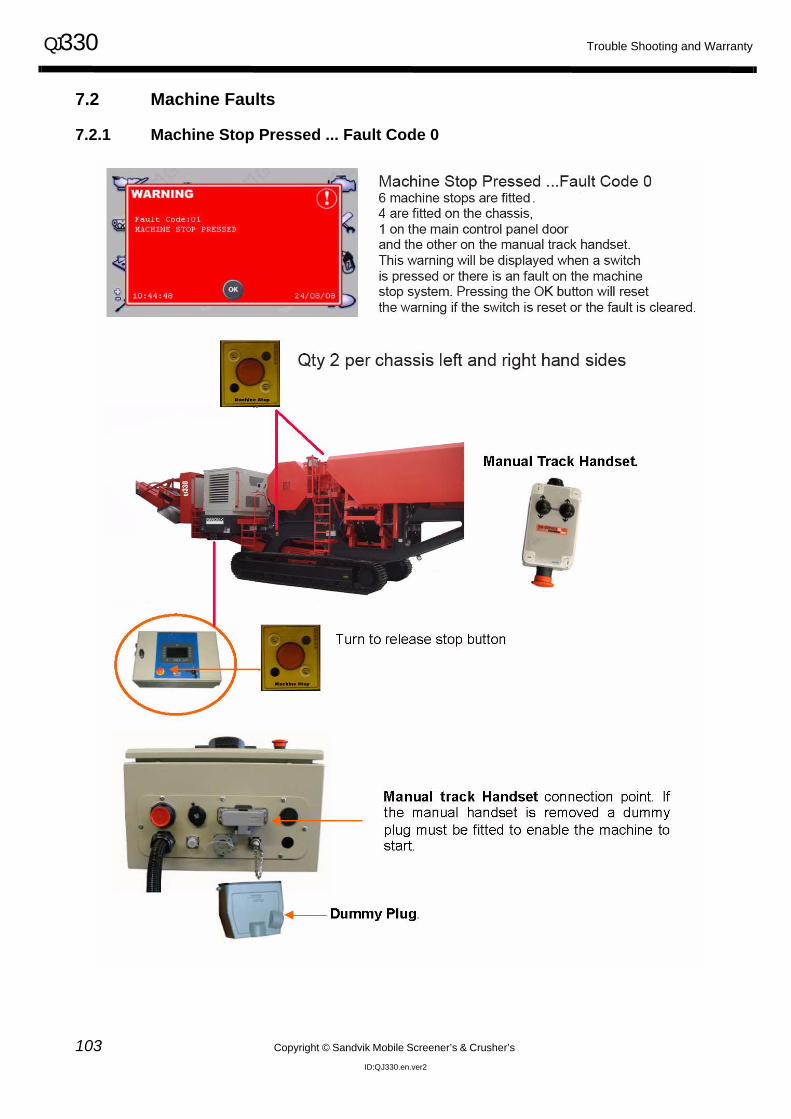
QJ330 Trouble Shooting and Warranty
103 Copyright © Sandvik Mobile Screener’s & Crusher’s
ID:QJ330.en.ver2
7.2 Machine Faults
7.2.1 Machine Stop Pressed ... Fault Code 0

Trouble Shooting and Warranty QJ330
Copyright © Sandvik Mobile Screener’s & Crusher’s 104ID:QJ330.en.ver2
7.2.2 Radio Stop Pressed...Fault Code 02
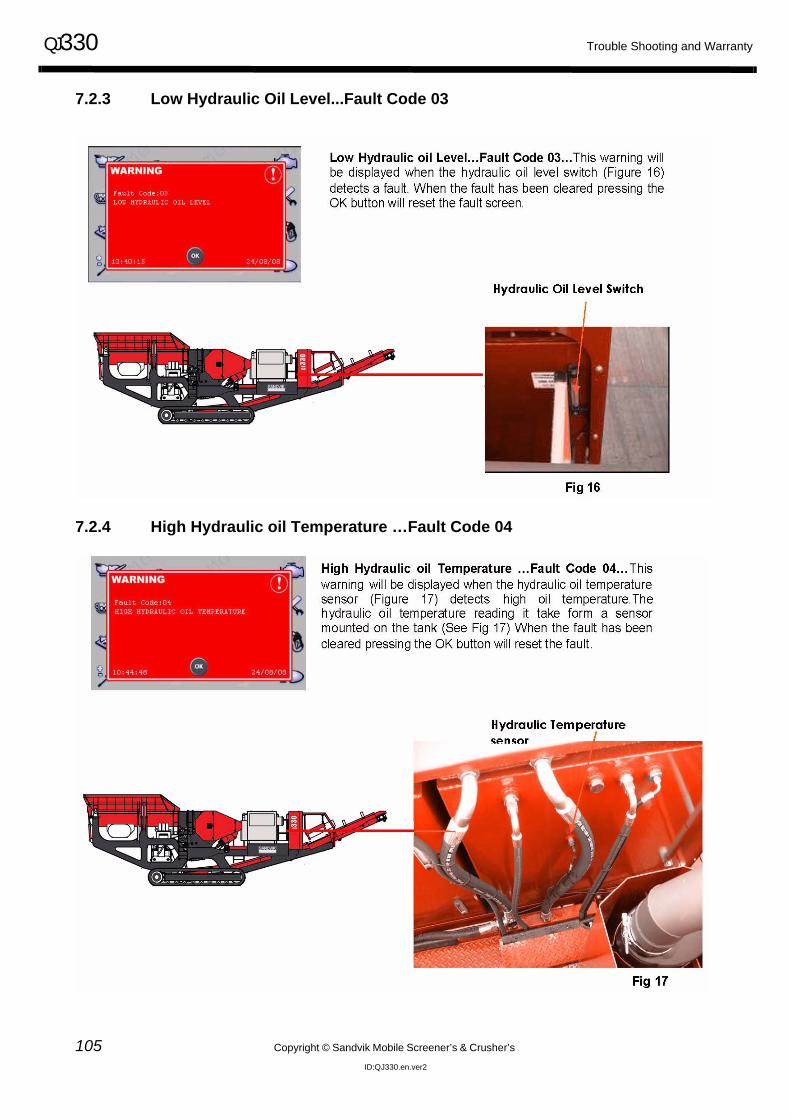
QJ330 Trouble Shooting and Warranty
105 Copyright © Sandvik Mobile Screener’s & Crusher’s
ID:QJ330.en.ver2
7.2.3 Low Hydraulic Oil Level...Fault Code 03
7.2.4 High Hydraulic oil Temperature …Fault Code 04
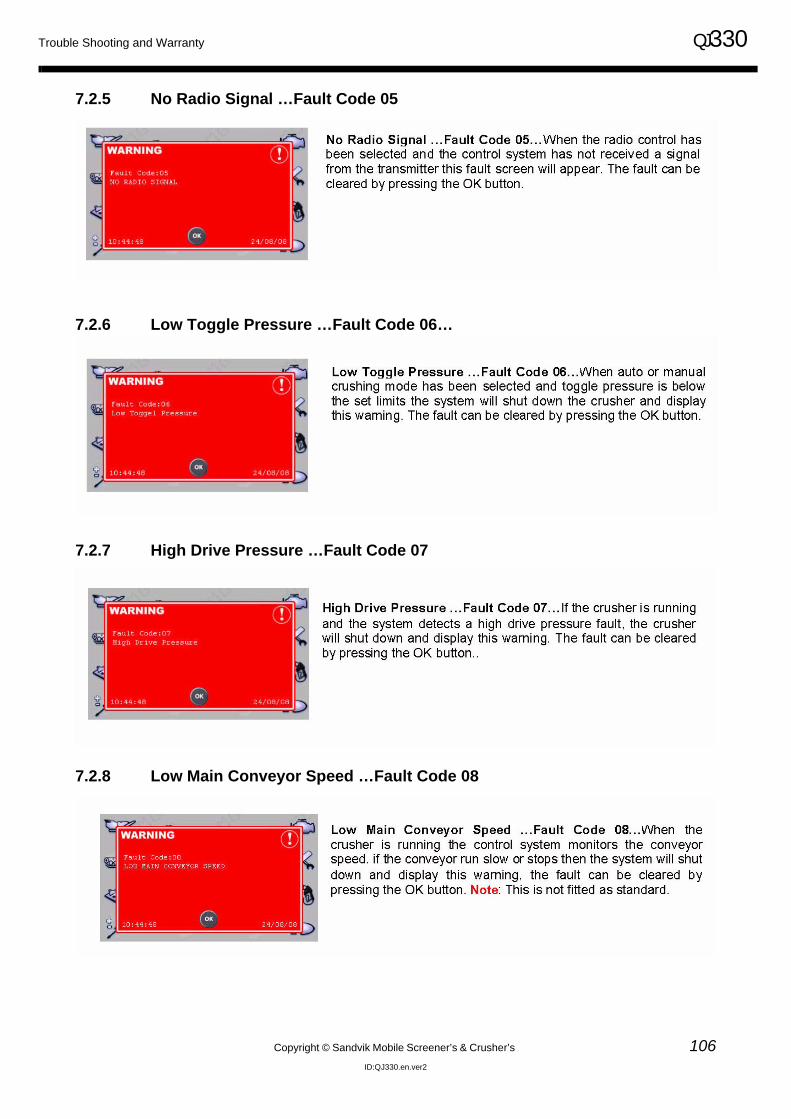
Trouble Shooting and Warranty QJ330
Copyright © Sandvik Mobile Screener’s & Crusher’s 106ID:QJ330.en.ver2
7.2.5 No Radio Signal …Fault Code 05
7.2.6 Low Toggle Pressure …Fault Code 06…
7.2.7 High Drive Pressure …Fault Code 07
7.2.8 Low Main Conveyor Speed …Fault Code 08
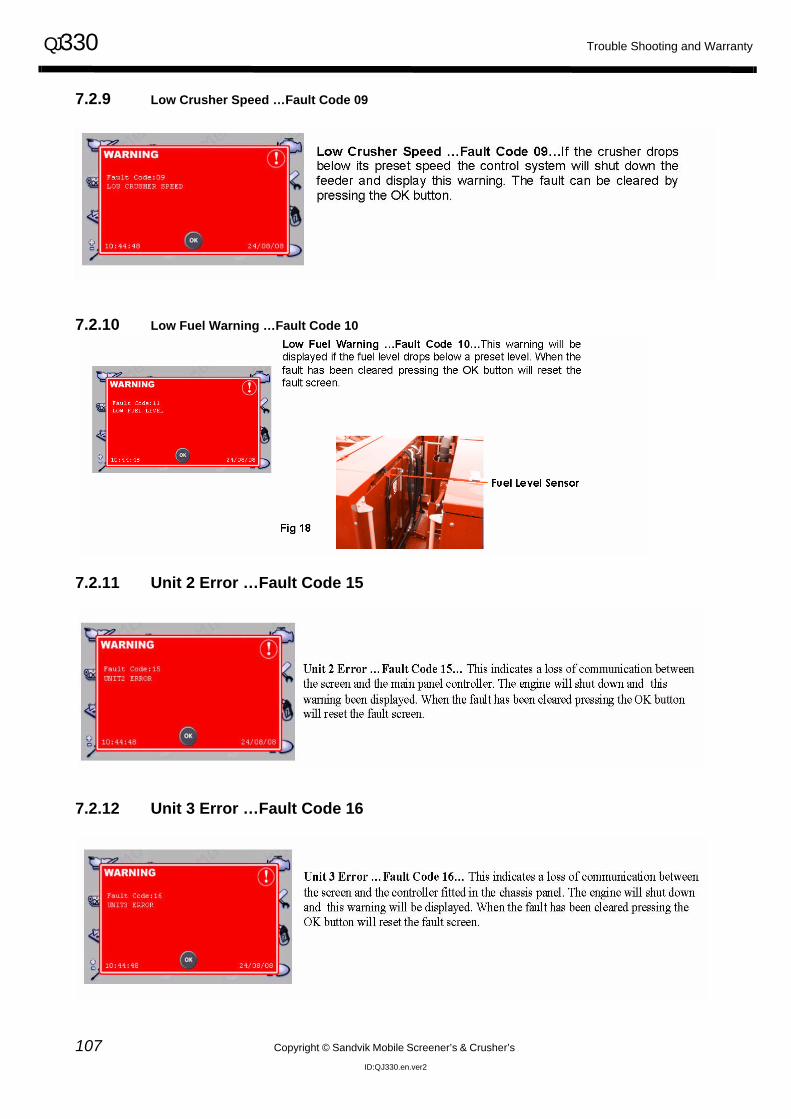
QJ330 Trouble Shooting and Warranty
107 Copyright © Sandvik Mobile Screener’s & Crusher’s
ID:QJ330.en.ver2
7.2.9 Low Crusher Speed …Fault Code 09
7.2.10 Low Fuel Warning …Fault Code 10
7.2.11 Unit 2 Error …Fault Code 15
7.2.12 Unit 3 Error …Fault Code 16

Trouble Shooting and Warranty QJ330
Copyright © Sandvik Mobile Screener’s & Crusher’s 108ID:QJ330.en.ver2
7.2.13 Engine Faults

QJ330 Trouble Shooting and Warranty
109 Copyright © Sandvik Mobile Screener’s & Crusher’s
ID:QJ330.en.ver2
7.2.14 Engine Diagnostic Codes

Trouble Shooting and Warranty QJ330
Copyright © Sandvik Mobile Screener’s & Crusher’s 110ID:QJ330.en.ver2

QJ330 Trouble Shooting and Warranty
111 Copyright © Sandvik Mobile Screener’s & Crusher’s
ID:QJ330.en.ver2
7.3 Diagnostic Feedback
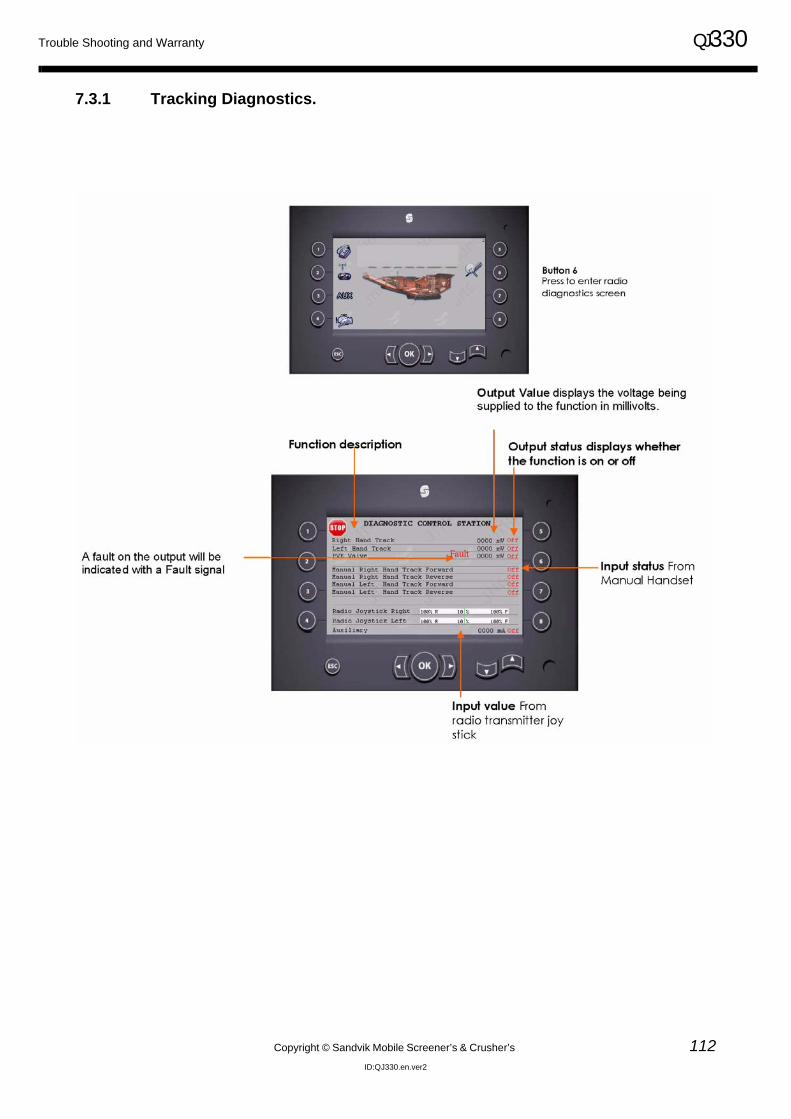
Trouble Shooting and Warranty QJ330
Copyright © Sandvik Mobile Screener’s & Crusher’s 112ID:QJ330.en.ver2
7.3.1 Tracking Diagnostics.
QJ330 Trouble Shooting and Warranty
113 Copyright © Sandvik Mobile Screener’s & Crusher’s
ID:QJ330.en.ver2
7.4 Warranty
7.4.1 Standard Terms and ConditionsGENERAL1.1) In these conditions (unless the context otherwise requires) the expression “Company” means Sandvik Crushing & Screening Ltd, and the expression “Customer” means the person, firm or company to whom the tender/quotation is addressed or whose order the Company accepts. 1.2) These conditions shall be deemed to be incorporated into all contracts made by the Company and all work undertaken by the Company shall be deemed to be carried out pursuant to a contract incorporating these conditions not withstanding anything to the contrary in the Customer’s order.1.3) No representative or agent of the Company has any authority to vary or add to these conditions. Any variation or alteration shall only be valid if authorised in writing signed by the director of the company.1.4) The Customer shall be liable to the Company as a principal for all costs, charges and expenses that shall be due to the Company in respect of work carried out by the Company subject to these conditions whether or not such customer purports to contract as an agent. A customer may not assign the benefit or burden of any contract with the Company.1.5) Any tender or quotation by the Company shall be deemed to be withdrawn unless accepted within 30 days of the date thereof. No order shall bind the Company unless and until the Customer has received written conformation from the Company.1.6) Any information from the Customer necessary to enable the Company to proceed with any order must be furnished within a reasonable time otherwise the Company may, at its option, cancel the order or charge the Customer an additional price for the delay.1.7) The singular in all cases shall include the plural and vice versa.
PRICES2.1) All published prices are subject to V.A.T. where applicable and are subject to revision without notice.2.2) Orders are only accepted on condition that they are executed at the price agreed between the customer and the Company.
CONDITIONS AND WARRANTIES3.1) Whilst the Company shall make every endeavour to use the best materials available no liability is accepted by the Company for loss, damage or injury to property or person arising directly from any failure or defect in the machinery or equipment supplied.3.2) The Company at its discretion undertakes to replace or repair free of cost any part or parts supplied by it direct to the Customer of which it will receive written notice and which shall be proved to the satisfaction of the Company to be defective in either workmanship or materials within a period of 12 months from dispatch or 2000 hours whichever is the shorter.(a) That written notice of complaint is given to the Company within seven days of the discovery of the defect.(b) That the part is returned carriage paid to the Company.(c) That the part, if replaced, shall become the property of the Company.(d) That the Company shall not be liable for the cost of removal of the defective part or the cost of fitting a new part, except otherwise at the discretion of the company.(e) No unauthorised alteration or modification has been made to the plant or machine or component subject to claim.3.3) The new part will be delivered by the Company to the Customer’s works in the United Kingdom or port of exportation.3.4) In the case of parts or components not manufactured by the company the customer shall be entitled to the benefits in so far as they may be transmitted to the customer of any guarantees given by the manufacturer in respect thereof and the company’s liability in respect of such parts or components is limited to make the benefits of the manufacturer’s guarantees available as aforesaid.
Trouble Shooting and Warranty QJ330
Copyright © Sandvik Mobile Screener’s & Crusher’s 114ID:QJ330.en.ver2
3.5) In so far as permitted by statute or otherwise the guarantee which is contained in paragraph 3.2 above is in lieu of and excludes any other conditions guarantees or warranties expressed or implied statutory or otherwise and in no event shall the Company be liable (except to the extent (if any) of its undertaking or by statute as aforesaid) for any loss, in jury or damage howsoever caused or arising.
DRAWING, CAPACITIES, ETC4.1) Dimensions, details and statements as to the suitability of machinery for any particular purpose or as to the capacity, type or power specified or contained in any drawings, quotations, catalogues, shipping or other specifications etc. and any illustrations or photographs referred to, though carefully given, are not intended as and must not be treated as the contractual description.4.2) The company undertakes no responsibility for sites or foundations or for any framework or support for machinery or for compliance with any local by-law or statutory regulations, or for the fulfilment of any special requirements that the Customer may be bound to observe or fulfil. The Customer shall be responsible for the proper adoption of any designs to his own circumstances.
DELIVERY5.1) The company shall not be liable for delays caused by any of the following:(a)Industrial disputes (b) Strikes (c) Lock-outs (d) Fire (e) Accident (f) Non Delivery or late delivery of materials or parts by other manufacturers (g)Works breakdown (h) Any other cause beyond the Company’s control;5.2) Times and dates for delivery or performance are estimates only and not contractual obligations of the Company.5.3) The Company will make every endeavour to deliver by the time or date given, but accepts no liability for any loss, consequential or otherwise, caused by delay howsoever caused5.4) If the customer shall be unable or unwilling to take delivery when the goods or any part thereof are ready for despatch, then the Customer shall pay to the Company a reasonable charge for storage until such time as he is able and willing to take delivery of such goods or part thereof. Any payments due but delayed because the Customer is unable or unwilling to take delivery shall, if not already due, fall immediately due.8.3The customer shall indemnify the Company against any claims, damages, costs and expenses in respect of any accident, injury or loss sustained by personnel recruited by the Customer and arising of and in the personnel effect the necessary employer’s liability insurance in respect of them.
TRANSIT6.1) Not withstanding anything in the tenders, quotations, order or contract, as to the place of delivery, or payment of carriage the Customer agrees that any goods in transit shall be at his own risk, and accordingly all consignments shall be deemed to be in the Customer’s possession (whether the property therein shall have passed or not) after collection from the Company’s premises.6.2) All shipping delays, demurrage charges and shipping charges of any description, after the company has fulfilled its obligation (if appropriate) to deliver to United Kingdom docks, shall be at the customers’ expense.6.3) All unloading shall be at the risk of and expense of the Customer.6.4) The Customer shall keep the goods fully insured and shall, if appropriate, indemnify the Company against any loss or damage.
PACKING7.2) All machinery shall be freighted open with small component parts crafted specifically requested on the order “to be crated”. Packing cases on all exports will be charged to the customer at cost.
COMMISSIONING8.1) Where the Company’s sale includes commissioning the company accepts no contractual obligation in respect of provision of work or materials for the preparation of a proper site with
QJ330 Trouble Shooting and Warranty
115 Copyright © Sandvik Mobile Screener’s & Crusher’s
ID:QJ330.en.ver2
suitable and sufficient access thereto. Unless otherwise expressly agreed in writing the Customer shall be responsible for and bound to provide at his own expense:
(a) A properly prepared site, with suitable foundations and adequate access; (b) All necessary lifting tackle, fuel, water, oil and other stores, and; (c) Also sufficient labour and assistance to enable the Company to proceed properly with
and complete the erection of and the starting and setting to work of the machinery.
8.2) If the customer shall require training for his personnel he shall provide operators of acceptable calibre and physical capability to the Company who shall provide suitable training at the Customer’s expense. If necessary an interpreter shall be made available at the customer’s expense. 8.3) The customer shall indemnify the Company against any claims, damages, costs and expenses in respect of any accident, injury or loss sustained by personnel recruited by the Customer and arising of and in the personnel effect the necessary employer’s liability insurance in respect of them.8.4) The Company’s workmen are supplied with time sheets, which shall be submitted by such workmen to the Customer who shall check or cause the same to be checked and signed. These time sheets shall be deemed to be the correct record of all matters therein set out.8.5) Prices quoted for erection and/or services are based on the Company’s normal order and acceptance terms and overseas travel of the Company’s employees, board and keep shall be the responsibility of the Customer unless specific alternative arrangements are agreed in writing between the Customer and the Company.
PATENT RIGHTS9.1) The Customer shall indemnify and keep indemnified the Company against all claims, damages, costs and expenses to which it may become liable through executing an order in accordance with the Customer’s specification which constitutes an infringement of any patent or registered design.
PAYMENT10.1) Payment shall be made net to the Company’s head office or its appointed bank upon notice of the goods being ready for collection or despatch. Cheques, money orders or other negotiable documents must be made payable to the Company and only the Customer’s official receipt shall be valid. For export orders, payments shall be in sterling or in a currency specified by the Company against documents at the United Kingdom, unless expressly stated otherwise by the Company. 10.2) The contract price will be payable by the customer in strict accordance with the contract terms, not withstanding any delay in delivery of performance on the contract or any adjustment or correction of minor defects which may be required to the plant, machinery or work. The Company may suspend performance on any contractual obligation to the customer so long as any account of the Customer is overdue.10.3) Interest at 1½% above minimum bank lending rate with a minimum of 9% per annum will be charged at the Company’s discretion on all overdue accounts. The term “minimum bank lending rate” in this context shall mean the minimum-lending rate from time to time fixed by the Bank of England.10.4) Legal Title remains with the Company until payment by the Customer has been made in full. In case of default by the Customer after delivery of any goods and before goods have become the Customer’s property, the Company may give notice to the Customer terminating the Customer’s right to possession whereupon the customer shall be bound, at it’s expense, to redeliver the goods to the Company. In all such cases the Company may (whether with or without previous notice) itself retake possession of the goods and the Company is in such circumstances irrevocably authorised by the Customer to enter the premises on which the goods are situated and to dismantle and remove from the same at the Customer’s expense. The Customer will not sell deal with or otherwise dispose of the goods until such time as they have been paid for in full or collected by the Company.

Trouble Shooting and Warranty QJ330
Copyright © Sandvik Mobile Screener’s & Crusher’s 116ID:QJ330.en.ver2
SAFETY 11.1) To the best of the Company’s knowledge the machinery and plant manufactured by the Company complies with the requirements imposed on a manufacturer under regulations enforced in the United Kingdom or any part thereof. Should special or additional guards be required to meet the particular local requirements of the Customer they will be charged as additional items.
JURISDICTION This contract is governed in all respects by the law of Northern Ireland within the United Kingdom and the Customer submits to the jurisdiction of the Courts of Northern Ireland.
7.4.2 Commissioning and Warranty Registration
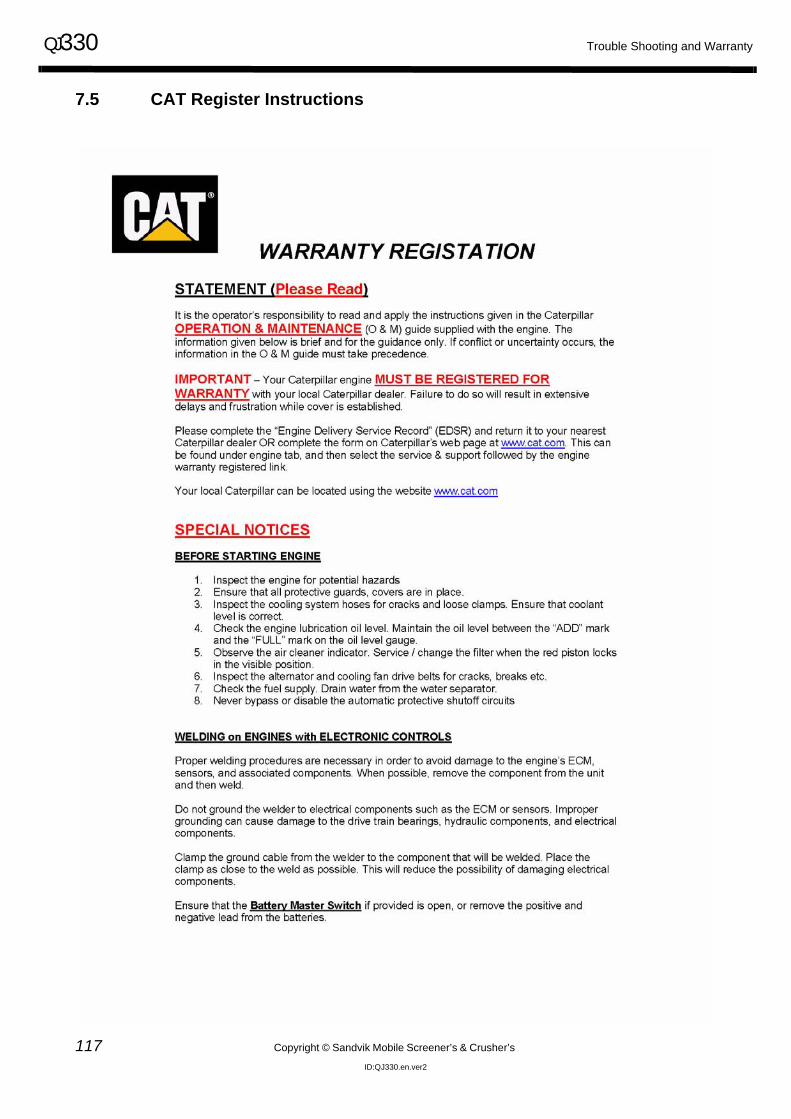
QJ330 Trouble Shooting and Warranty
117 Copyright © Sandvik Mobile Screener’s & Crusher’s
ID:QJ330.en.ver2
7.5 CAT Register Instructions
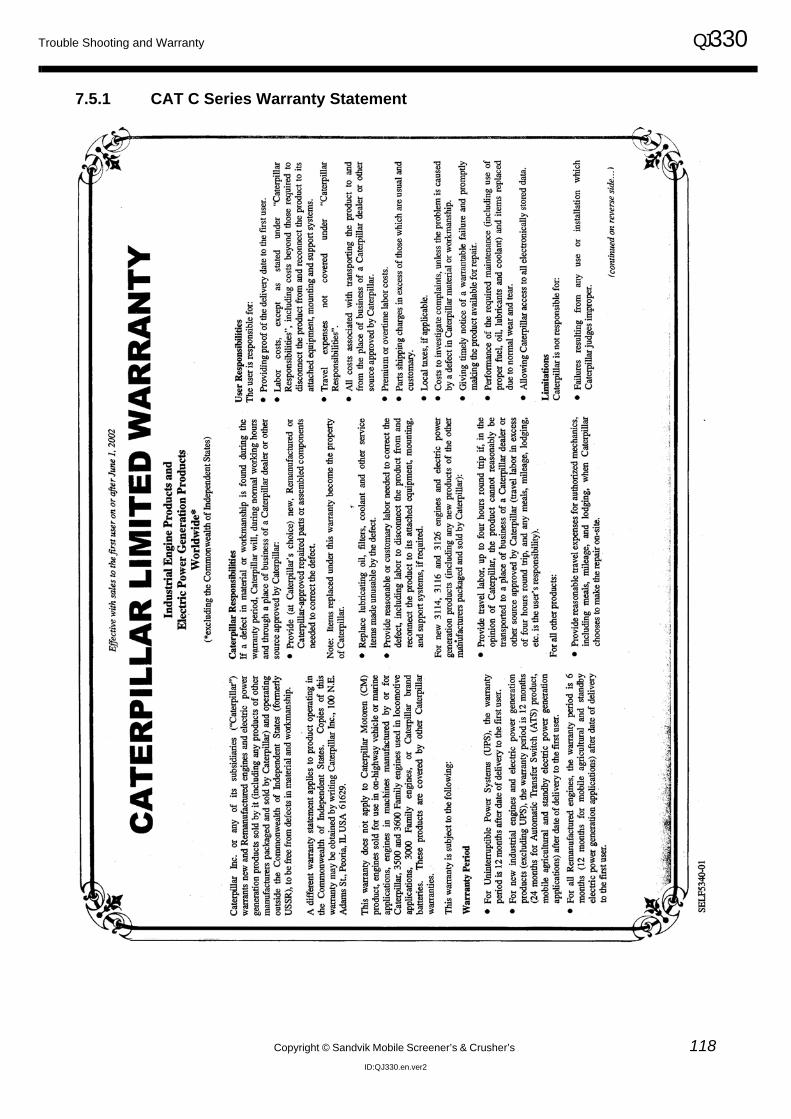
Trouble Shooting and Warranty QJ330
Copyright © Sandvik Mobile Screener’s & Crusher’s 118ID:QJ330.en.ver2
7.5.1 CAT C Series Warranty Statement
QJ330 Trouble Shooting and Warranty
119 Copyright © Sandvik Mobile Screener’s & Crusher’s
ID:QJ330.en.ver2
Trouble Shooting and Warranty QJ330
Copyright © Sandvik Mobile Screener’s & Crusher’s 120ID:QJ330.en.ver2
7.5.2 Maintenance Log
QJ330 Trouble Shooting and Warranty
121 Copyright © Sandvik Mobile Screener’s & Crusher’s
ID:QJ330.en.ver2
Trouble Shooting and Warranty QJ330
Copyright © Sandvik Mobile Screener’s & Crusher’s 122ID:QJ330.en.ver2
QJ330
Copyright © Sandvik Mobile Screener’s & Crusher’s 123ID:QJ330.en.ver1
8.0 Spare Parts
Spare Parts QJ330
124 Copyright © Sandvik Mobile Screener’s & Crusher’s
ID:QJ330.en.ver1
8.1 Spare Parts
8.1.1 Spare Parts illustrations
This manual sets out details of available spares for the QA330 Crushing Machine. The parts list takesthe form of a number of ‘exploded’ illustrations of the various machine assemblies. Components il-lustrated have reference numbers, which can be cross-referenced with the corresponding Parts list.
This list includes:
a. Illustration Reference Number
b. Actual Part Number
c. Part Description
d. Quantity of Parts per Unit Assembly
8.1.2 Ordering Procedure:
To ensure correct delivery of your replacement part when ordering please quote:
a. Machine, Model and Serial Number
b. Year of Manufacture
c. Actual Part Number
d. Part Description
e. Illustration Reference Number and Page Number
f. Quantity Required
This information will enable us to supply the part with a minimum of delay.

QJ330 Spare Parts
Copyright © Sandvik Mobile Screener’s & Crusher’s 125ID:QJ330.en.ver1
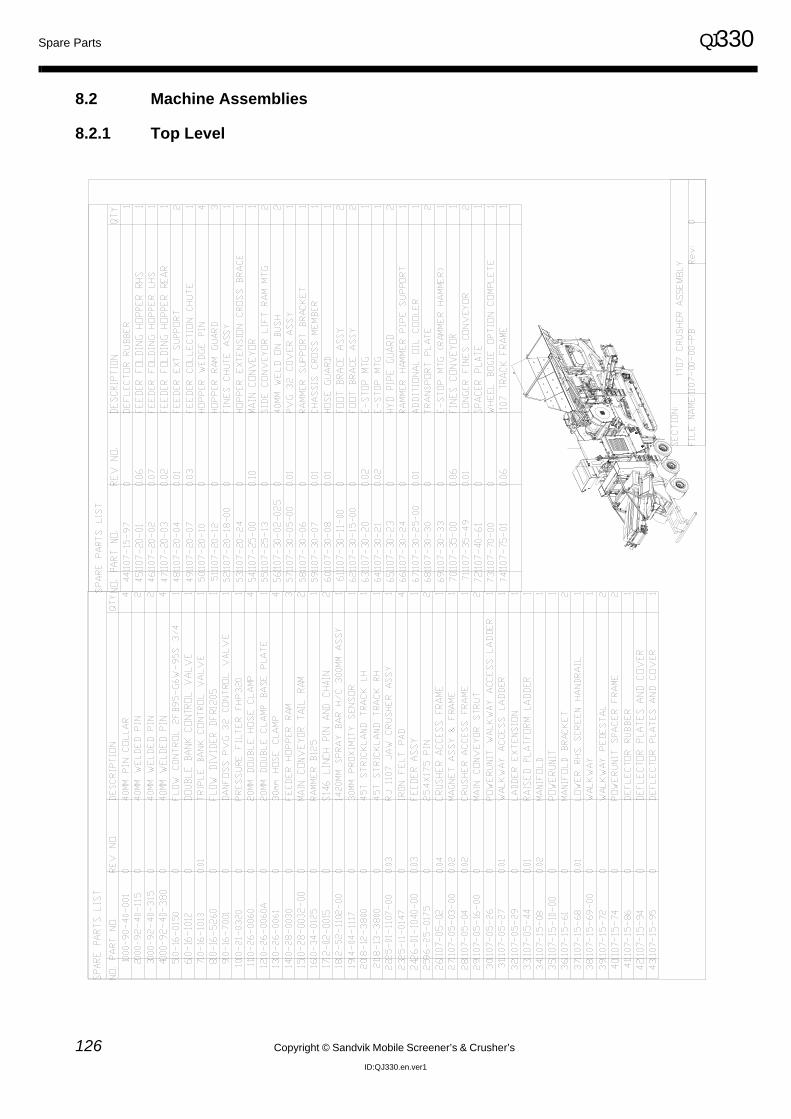
Spare Parts QJ330
126 Copyright © Sandvik Mobile Screener’s & Crusher’s
ID:QJ330.en.ver1
8.2 Machine Assemblies
8.2.1 Top Level
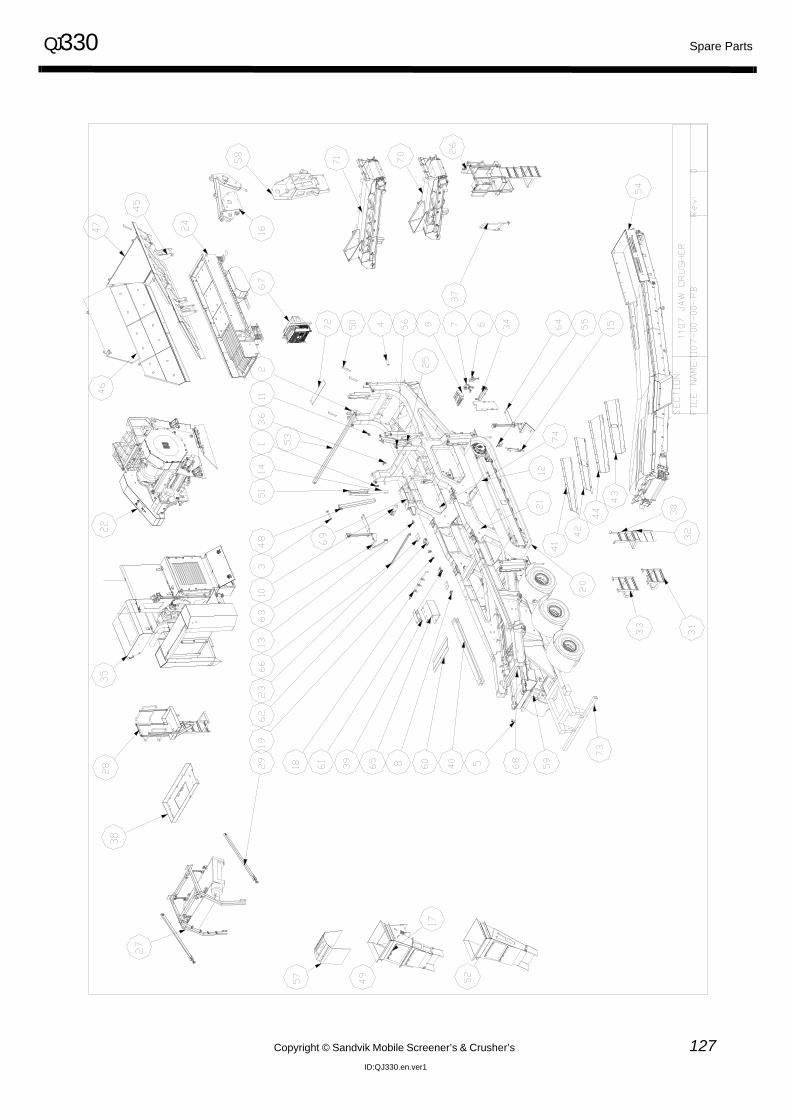
QJ330 Spare Parts
Copyright © Sandvik Mobile Screener’s & Crusher’s 127ID:QJ330.en.ver1
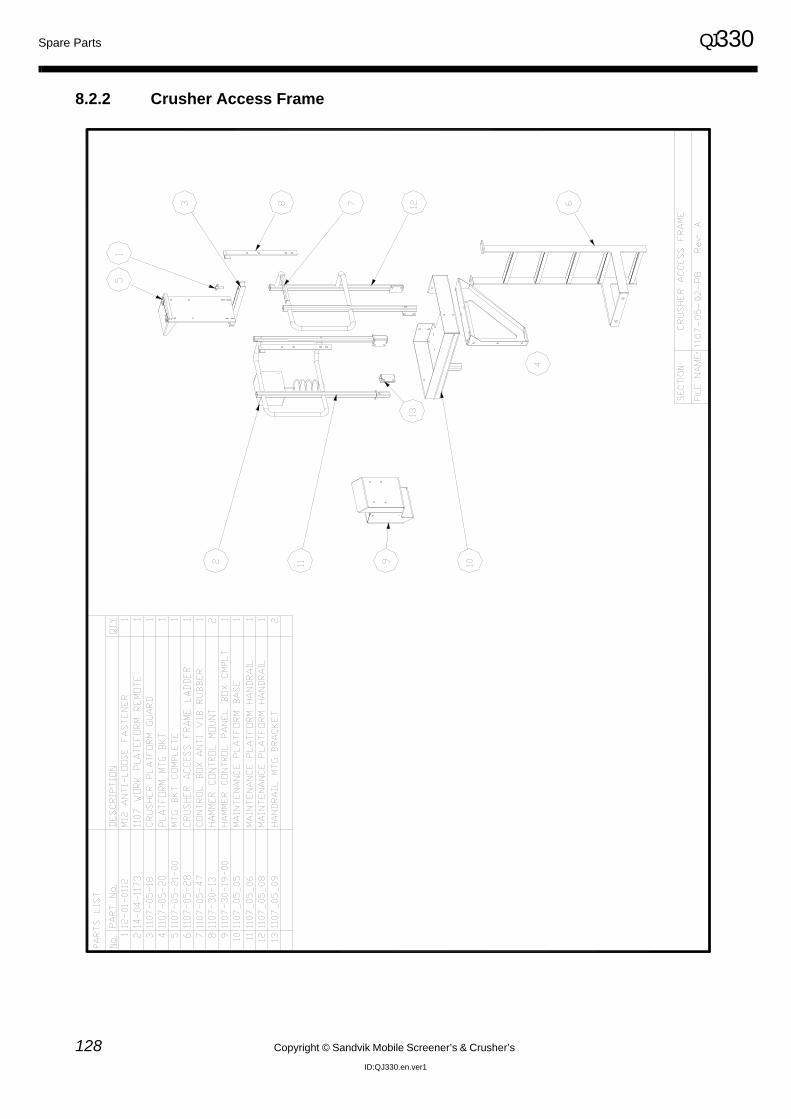
Spare Parts QJ330
128 Copyright © Sandvik Mobile Screener’s & Crusher’s
ID:QJ330.en.ver1
8.2.2 Crusher Access Frame
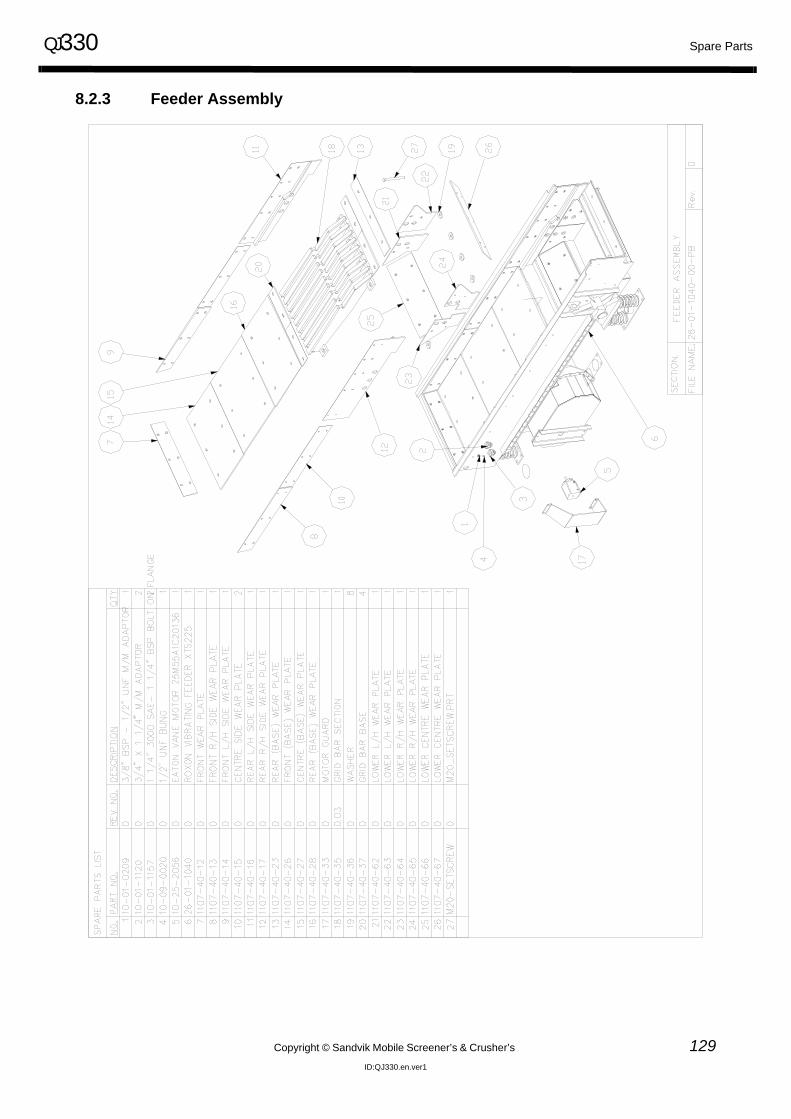
QJ330 Spare Parts
Copyright © Sandvik Mobile Screener’s & Crusher’s 129ID:QJ330.en.ver1
8.2.3 Feeder Assembly
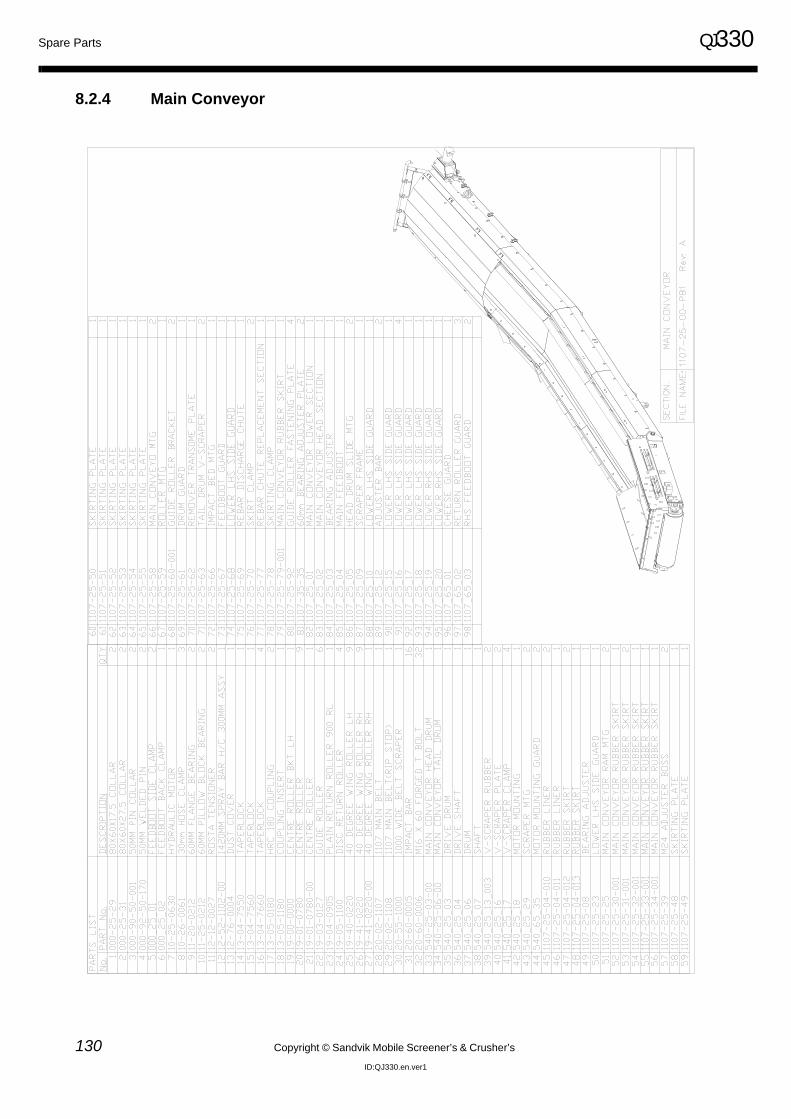
Spare Parts QJ330
130 Copyright © Sandvik Mobile Screener’s & Crusher’s
ID:QJ330.en.ver1
8.2.4 Main Conveyor

QJ330 Spare Parts
Copyright © Sandvik Mobile Screener’s & Crusher’s 131ID:QJ330.en.ver1
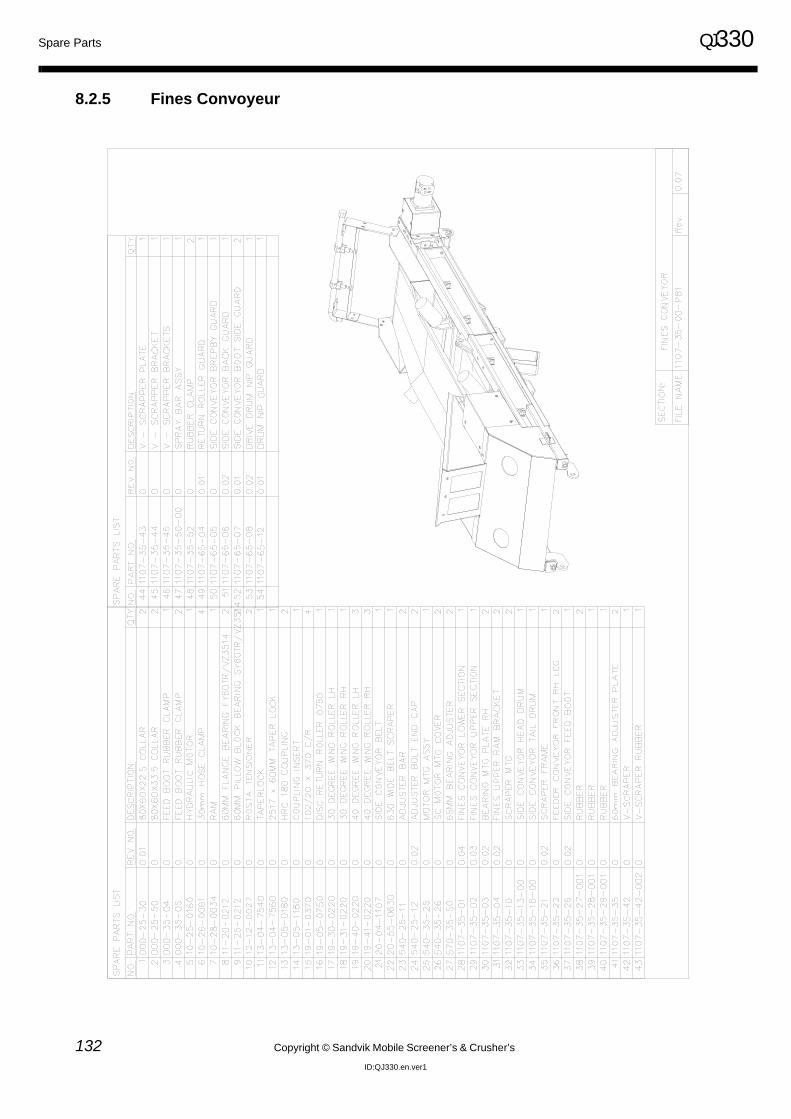
Spare Parts QJ330
132 Copyright © Sandvik Mobile Screener’s & Crusher’s
ID:QJ330.en.ver1
8.2.5 Fines Convoyeur
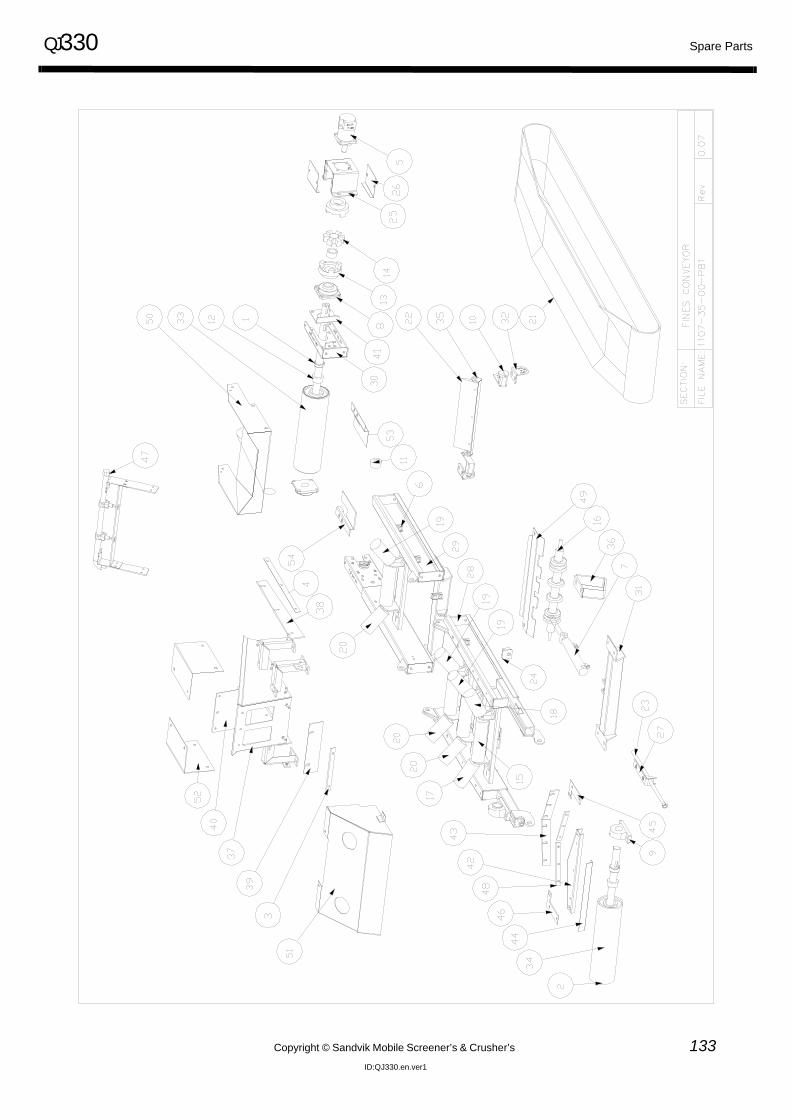
QJ330 Spare Parts
Copyright © Sandvik Mobile Screener’s & Crusher’s 133ID:QJ330.en.ver1
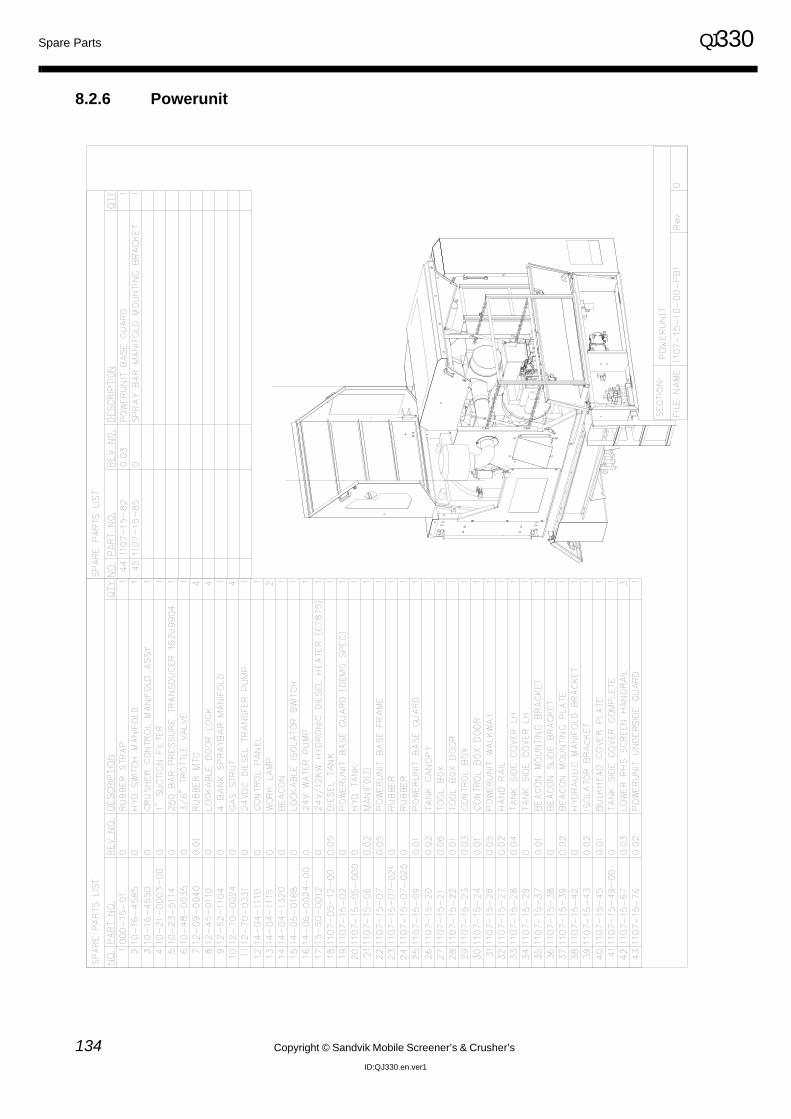
Spare Parts QJ330
134 Copyright © Sandvik Mobile Screener’s & Crusher’s
ID:QJ330.en.ver1
8.2.6 Powerunit
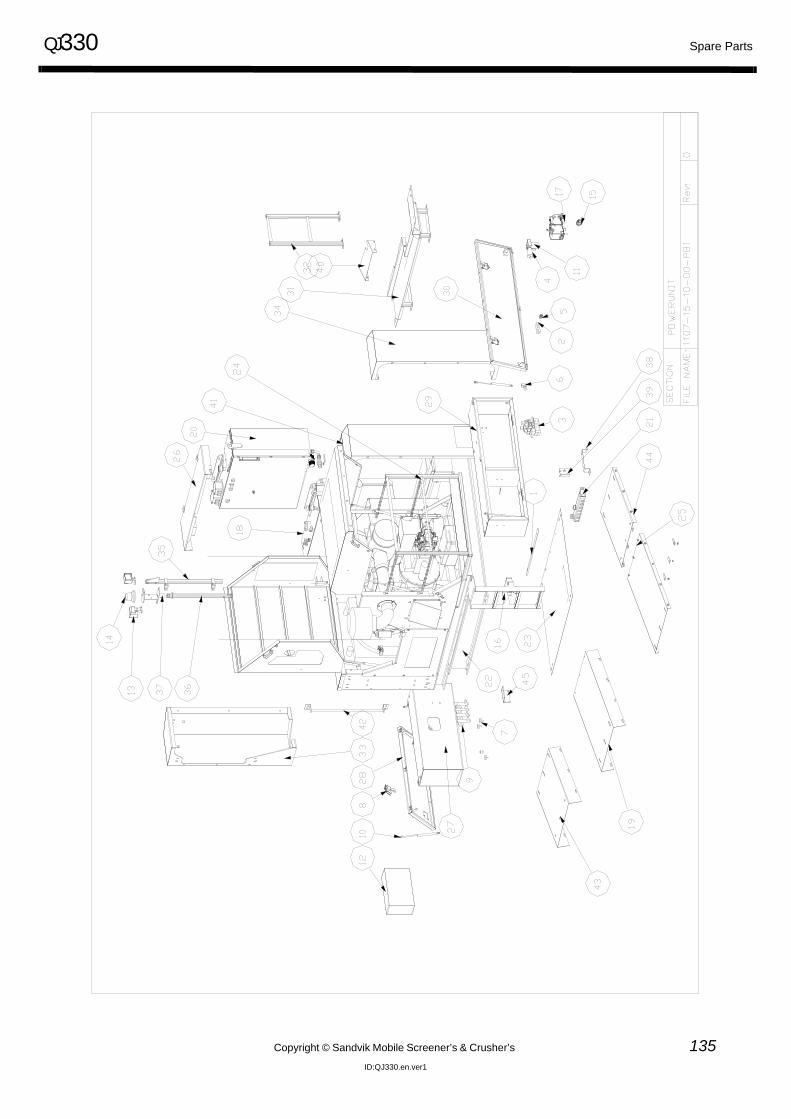
QJ330 Spare Parts
Copyright © Sandvik Mobile Screener’s & Crusher’s 135ID:QJ330.en.ver1
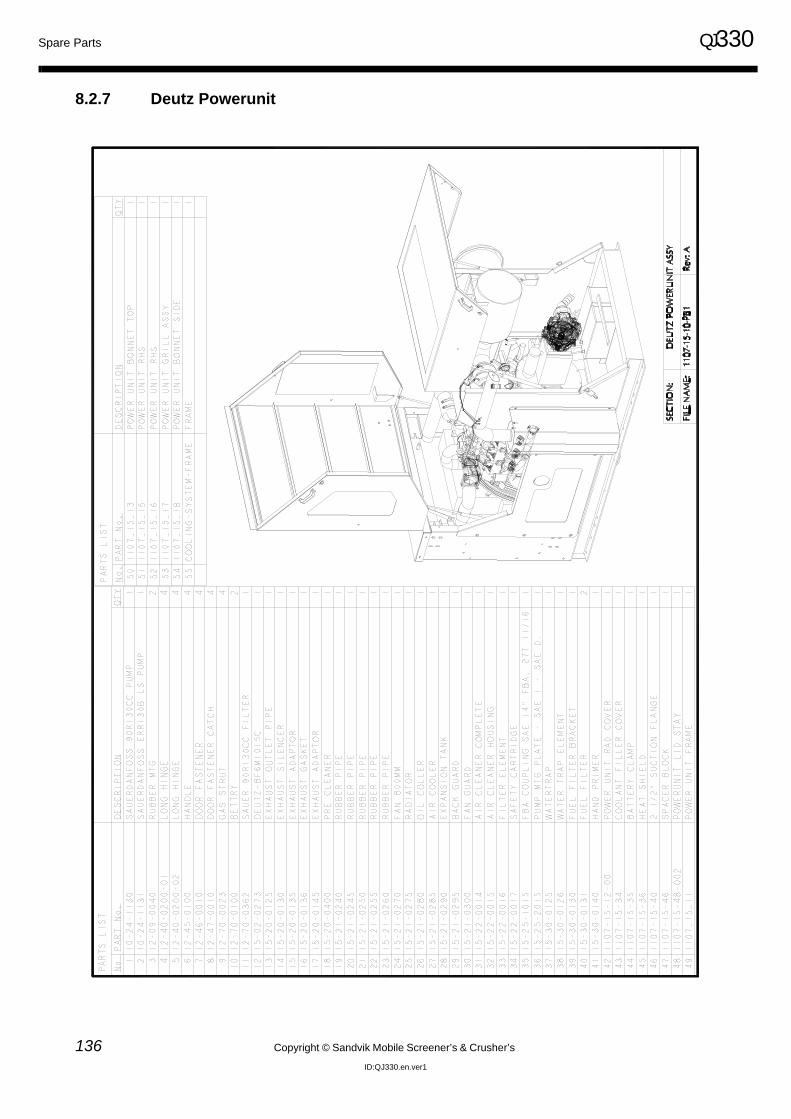
Spare Parts QJ330
136 Copyright © Sandvik Mobile Screener’s & Crusher’s
ID:QJ330.en.ver1
8.2.7 Deutz Powerunit
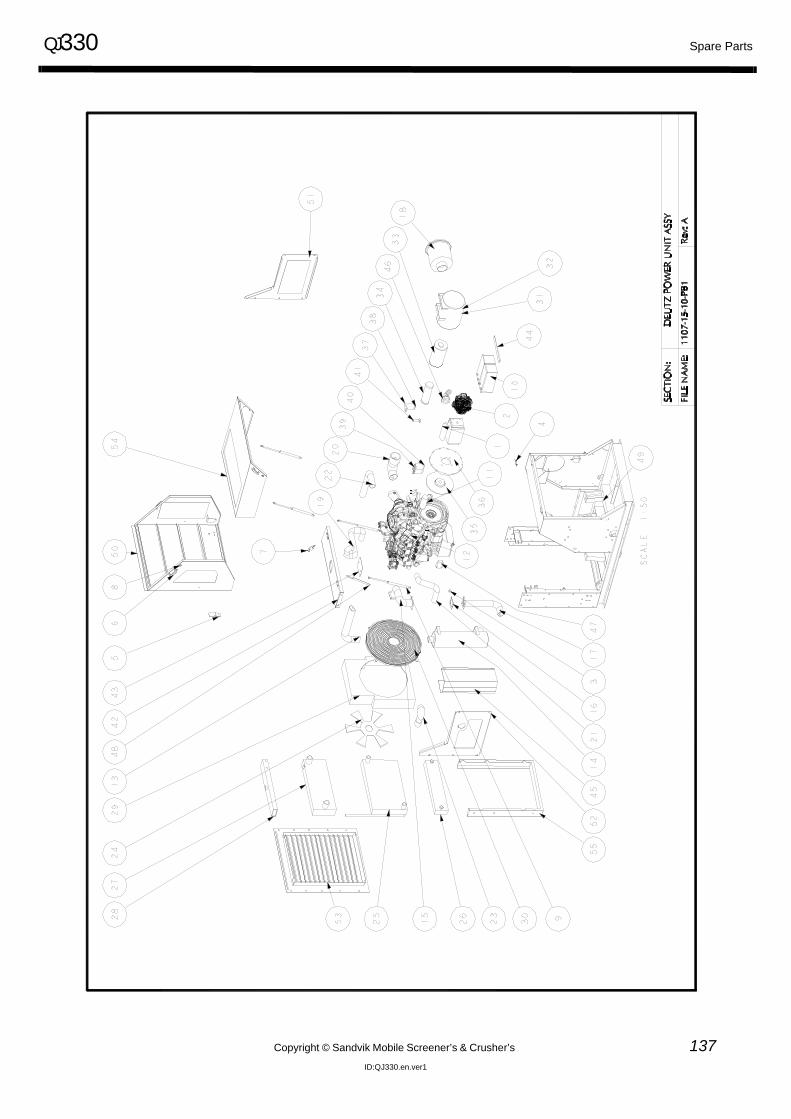
QJ330 Spare Parts
Copyright © Sandvik Mobile Screener’s & Crusher’s 137ID:QJ330.en.ver1
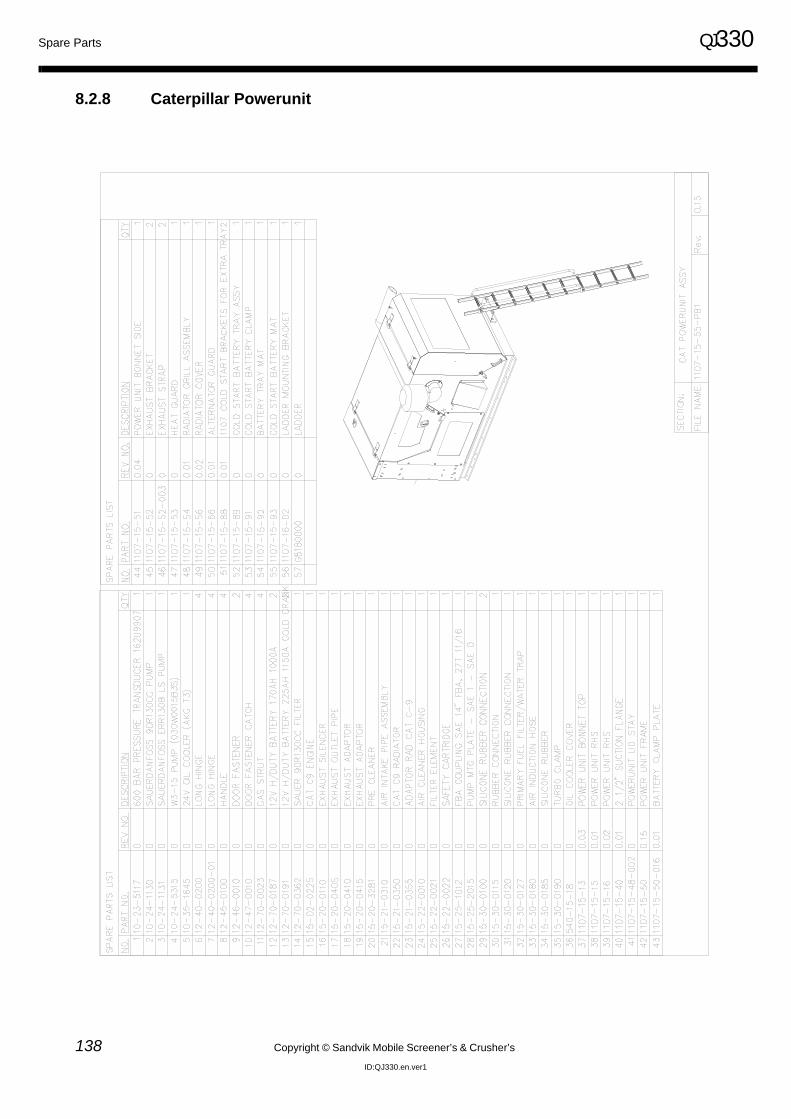
Spare Parts QJ330
138 Copyright © Sandvik Mobile Screener’s & Crusher’s
ID:QJ330.en.ver1
8.2.8 Caterpillar Powerunit
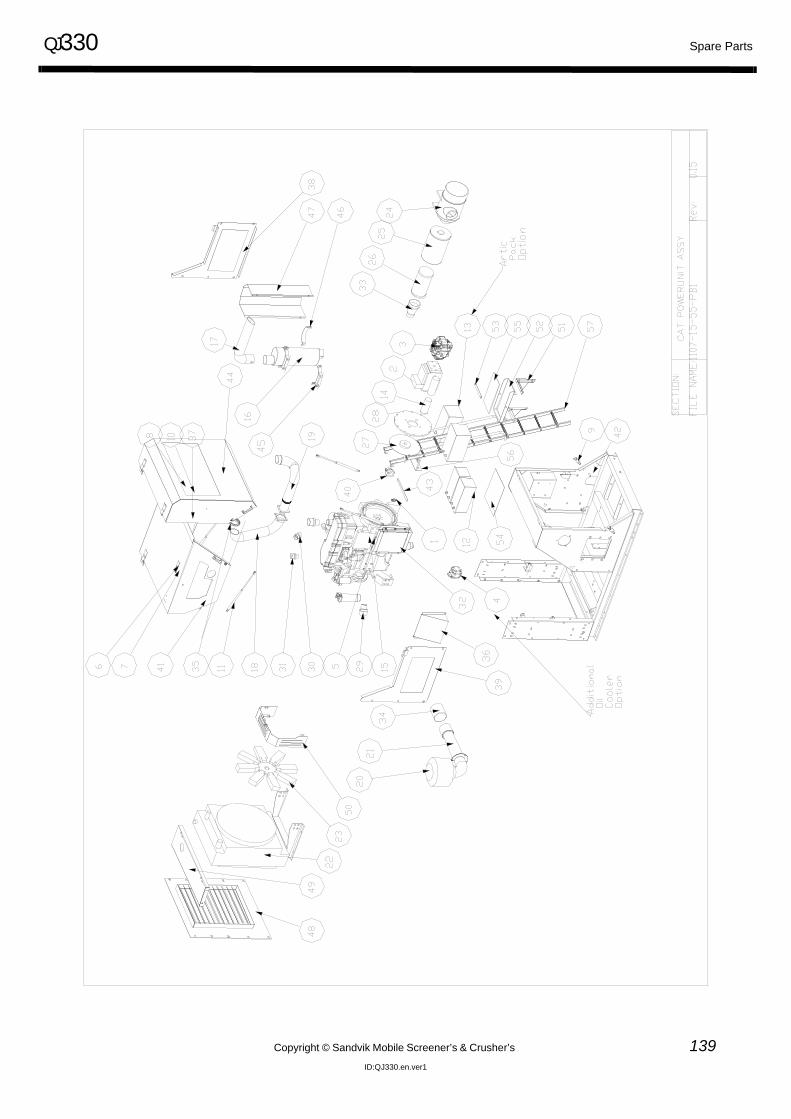
QJ330 Spare Parts
Copyright © Sandvik Mobile Screener’s & Crusher’s 139ID:QJ330.en.ver1
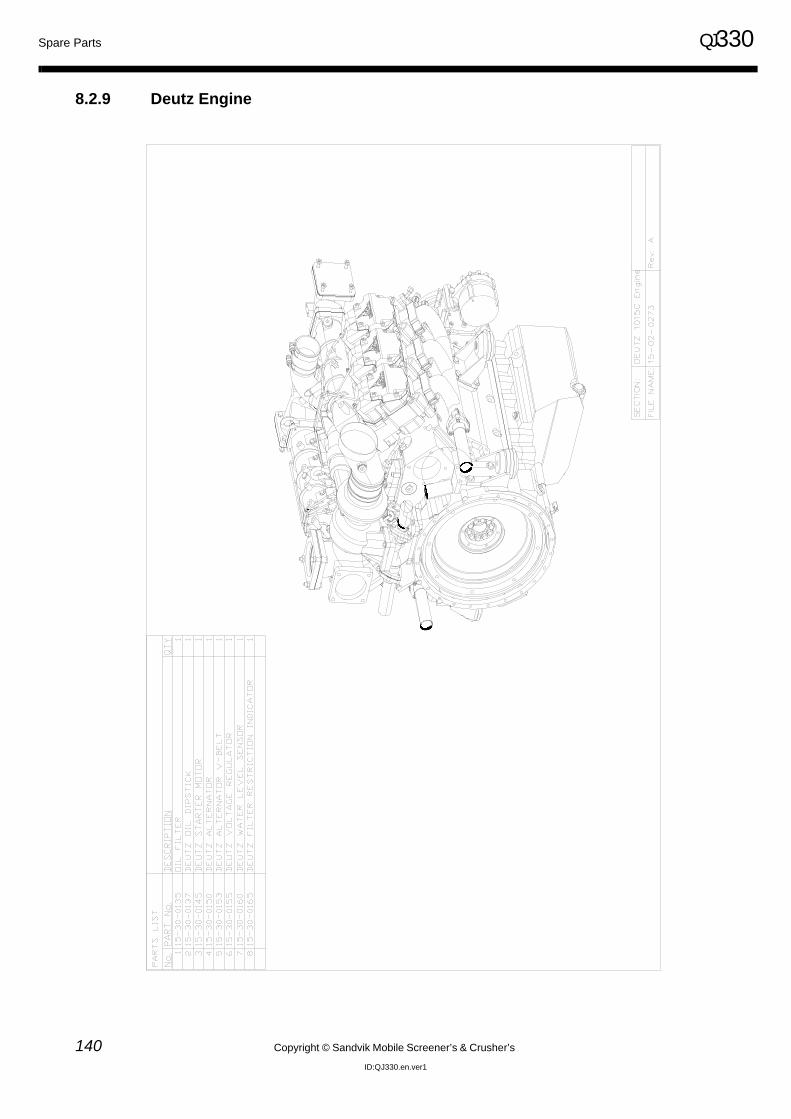
Spare Parts QJ330
140 Copyright © Sandvik Mobile Screener’s & Crusher’s
ID:QJ330.en.ver1
8.2.9 Deutz Engine
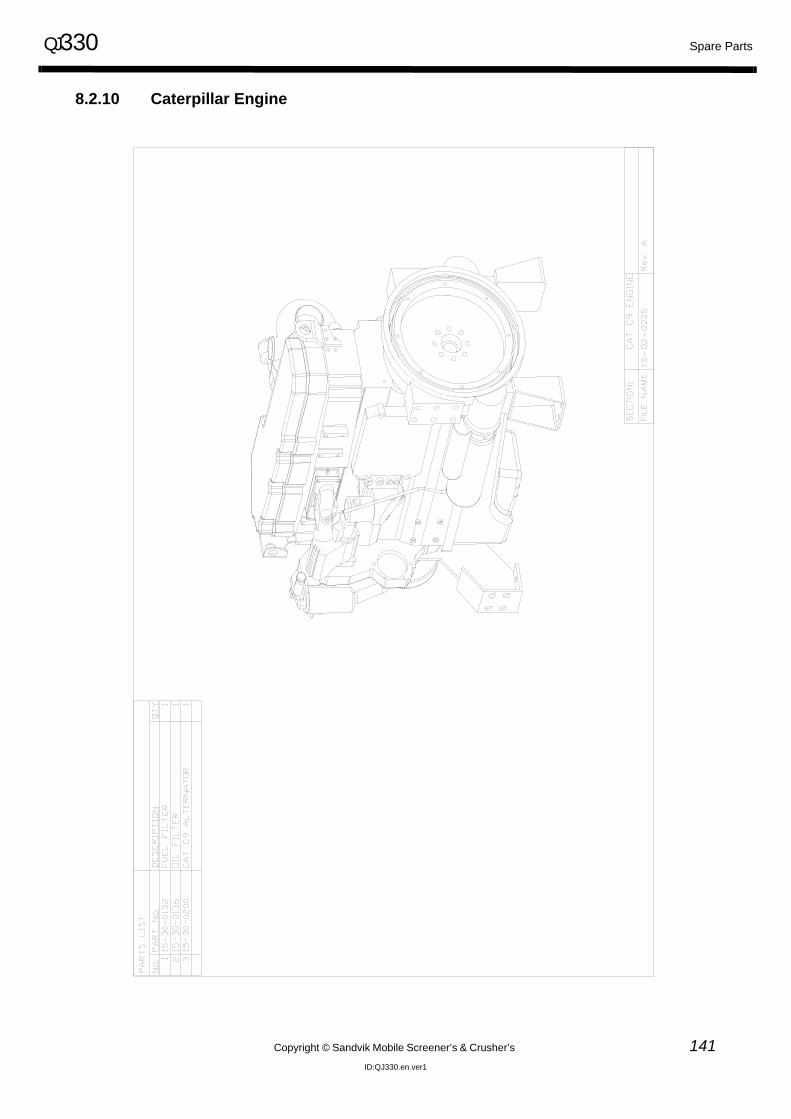
QJ330 Spare Parts
Copyright © Sandvik Mobile Screener’s & Crusher’s 141ID:QJ330.en.ver1
8.2.10 Caterpillar Engine
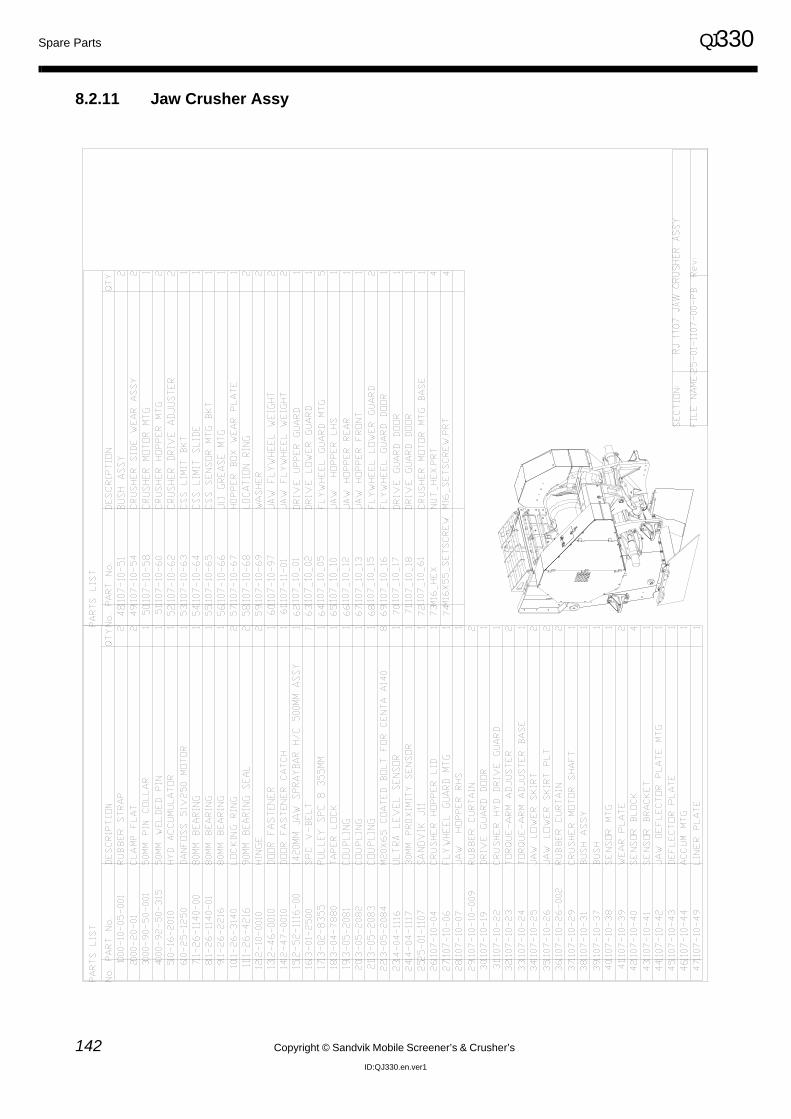
Spare Parts QJ330
142 Copyright © Sandvik Mobile Screener’s & Crusher’s
ID:QJ330.en.ver1
8.2.11 Jaw Crusher Assy
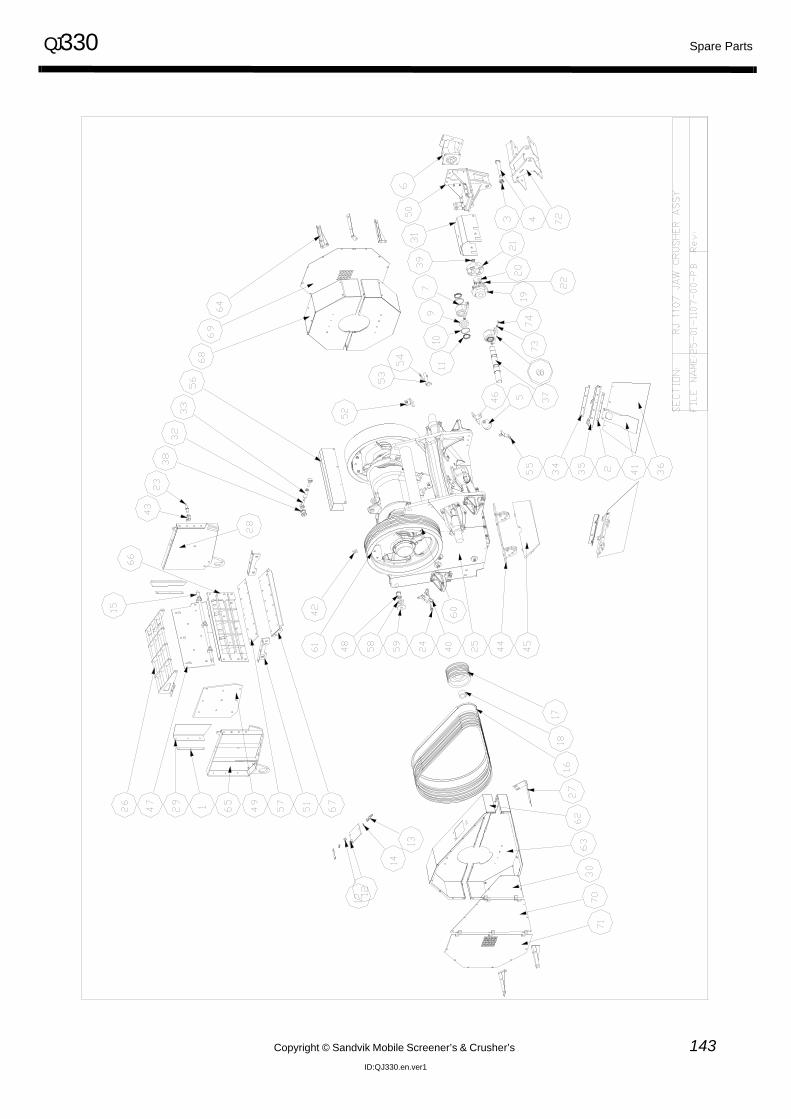
QJ330 Spare Parts
Copyright © Sandvik Mobile Screener’s & Crusher’s 143ID:QJ330.en.ver1
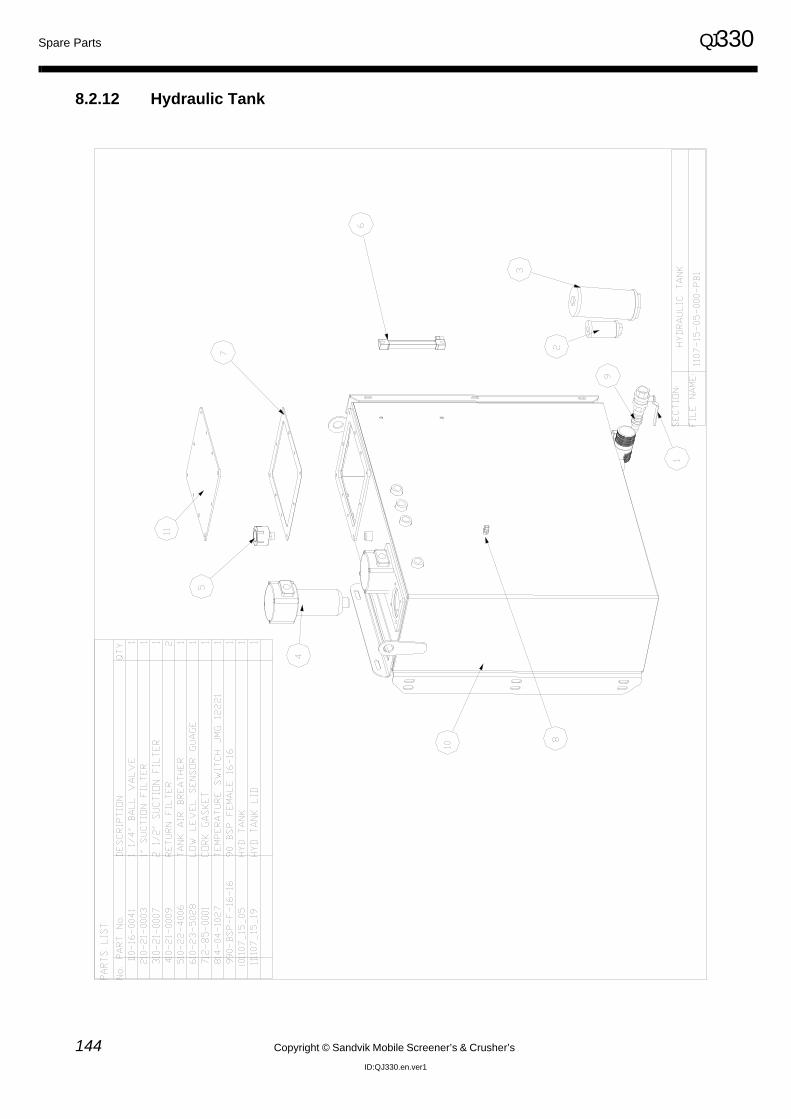
Spare Parts QJ330
144 Copyright © Sandvik Mobile Screener’s & Crusher’s
ID:QJ330.en.ver1
8.2.12 Hydraulic Tank
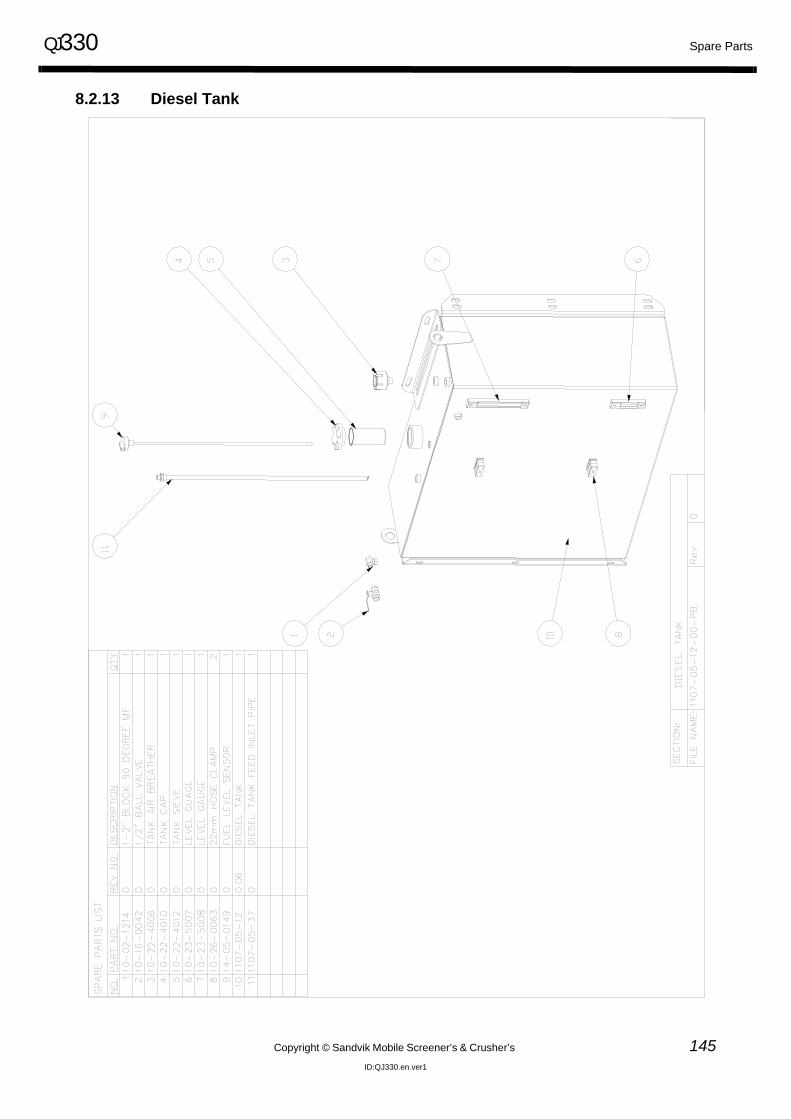
QJ330 Spare Parts
Copyright © Sandvik Mobile Screener’s & Crusher’s 145ID:QJ330.en.ver1
8.2.13 Diesel Tank
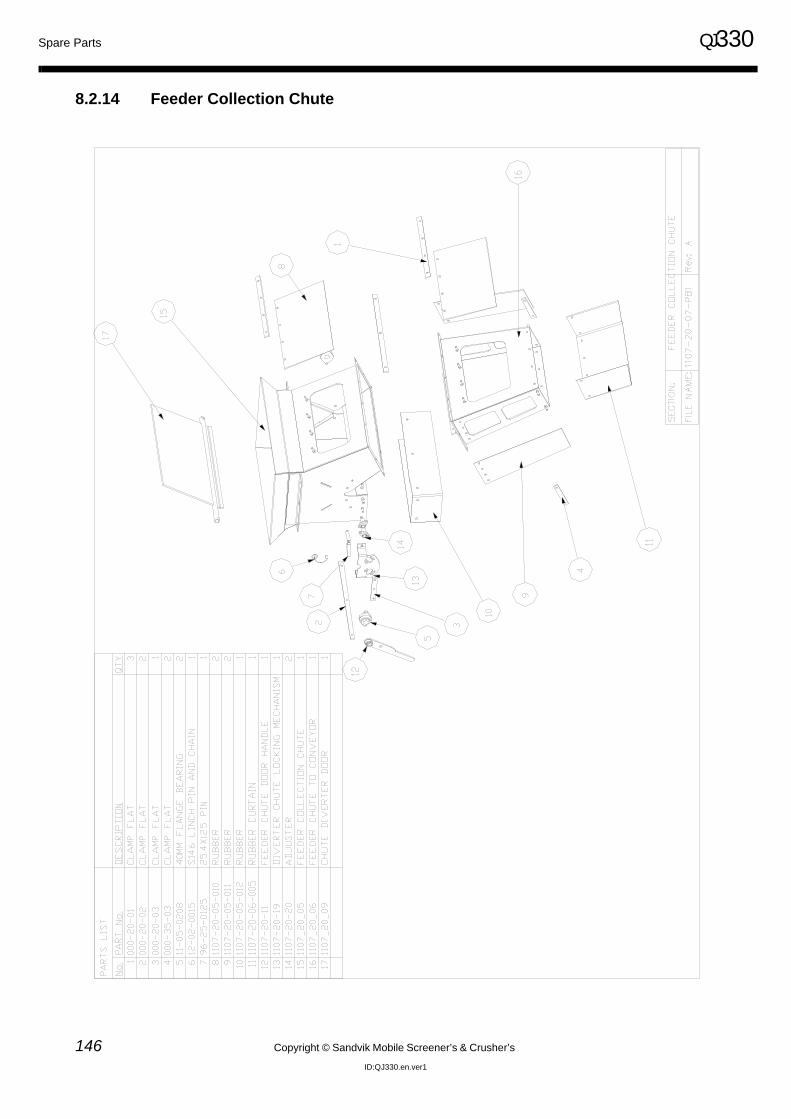
Spare Parts QJ330
146 Copyright © Sandvik Mobile Screener’s & Crusher’s
ID:QJ330.en.ver1
8.2.14 Feeder Collection Chute
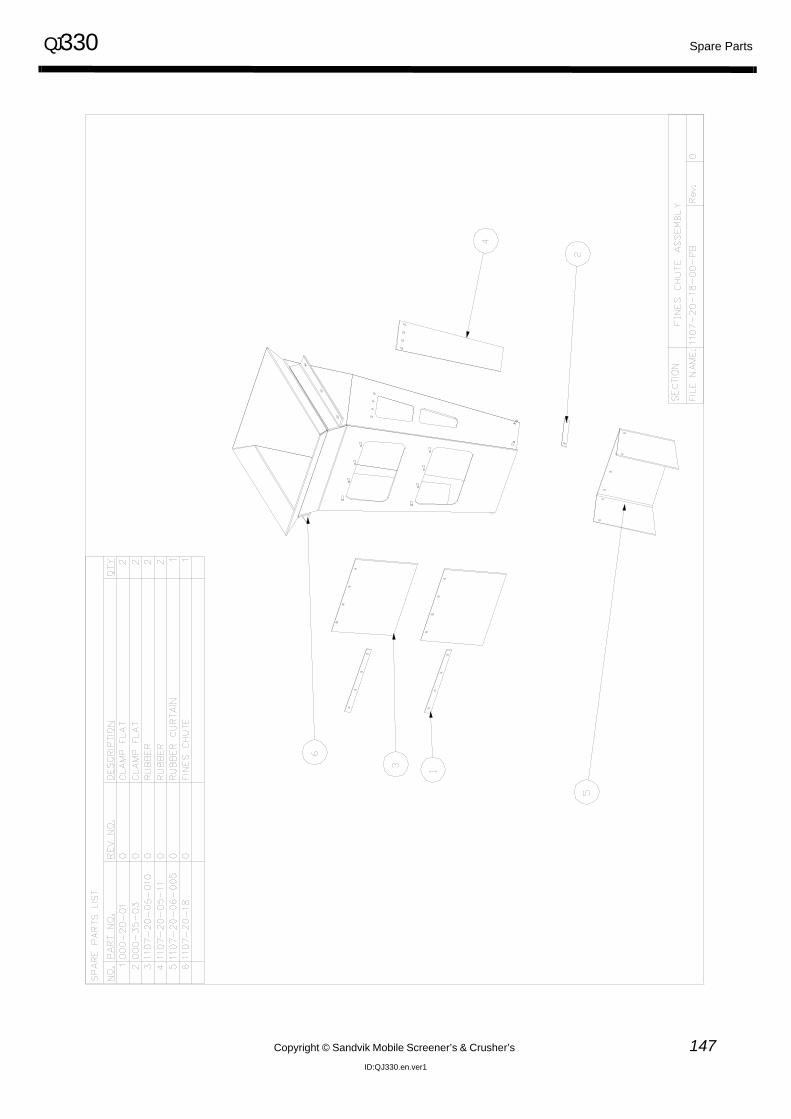
QJ330 Spare Parts
Copyright © Sandvik Mobile Screener’s & Crusher’s 147ID:QJ330.en.ver1
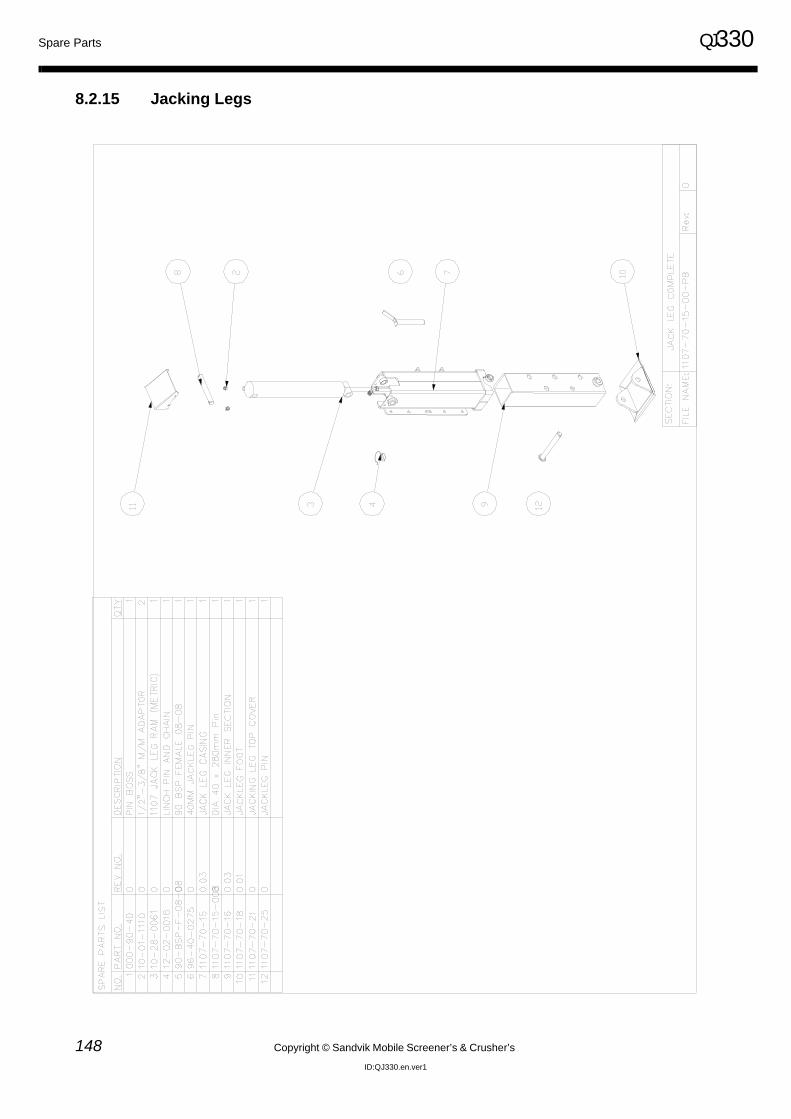
Spare Parts QJ330
148 Copyright © Sandvik Mobile Screener’s & Crusher’s
ID:QJ330.en.ver1
8.2.15 Jacking Legs
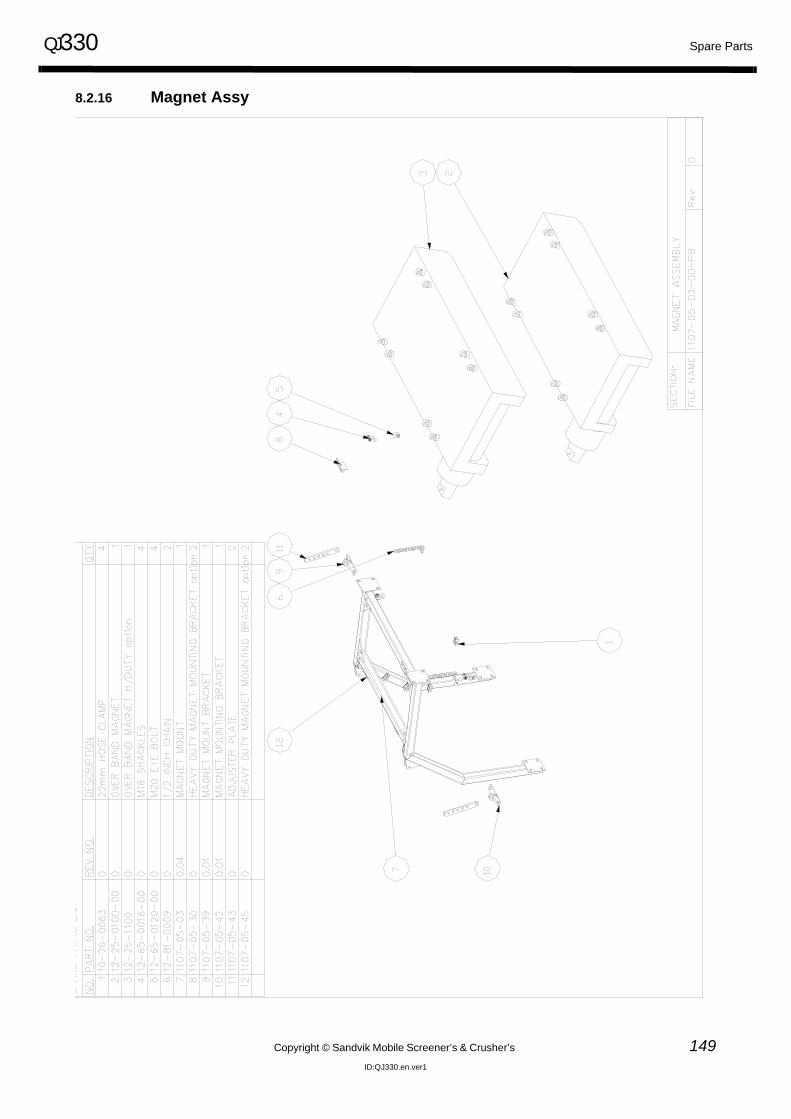
QJ330 Spare Parts
Copyright © Sandvik Mobile Screener’s & Crusher’s 149ID:QJ330.en.ver1
8.2.16 Magnet Assy
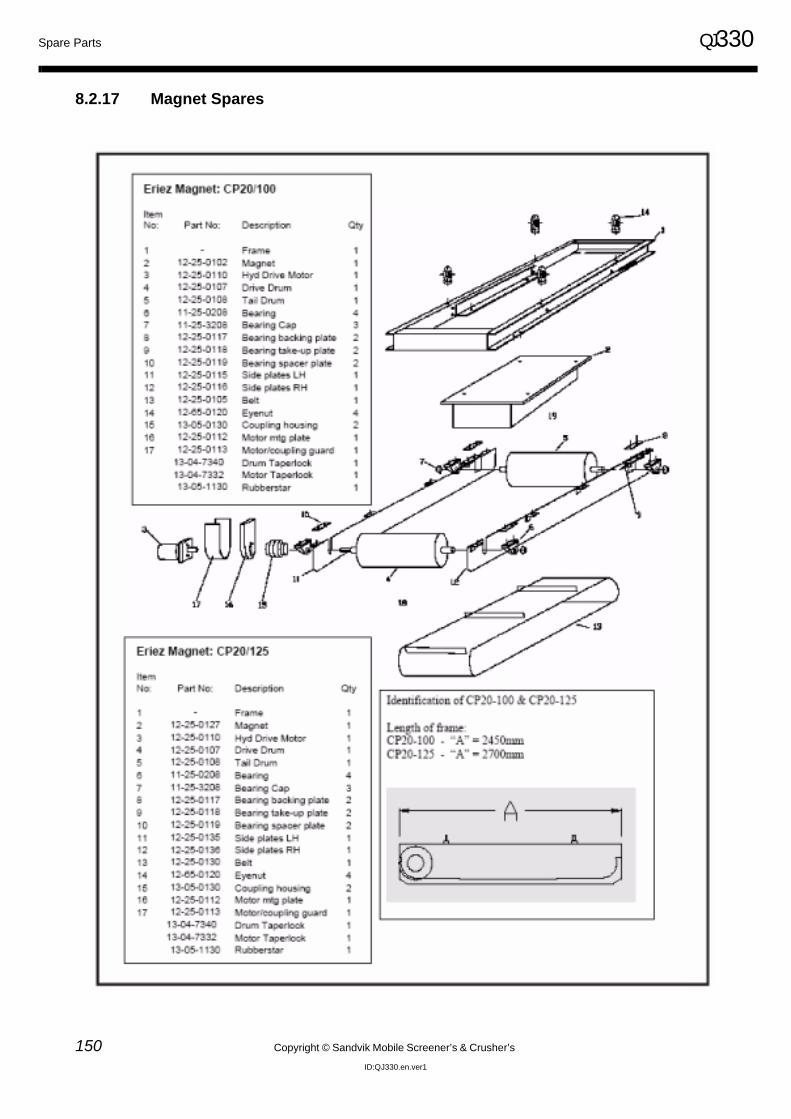
Spare Parts QJ330
150 Copyright © Sandvik Mobile Screener’s & Crusher’s
ID:QJ330.en.ver1
8.2.17 Magnet Spares

QJ330 Spare Parts
Copyright © Sandvik Mobile Screener’s & Crusher’s 151ID:QJ330.en.ver1
8.2.18 Recommeded 2000 hours Spare Parts
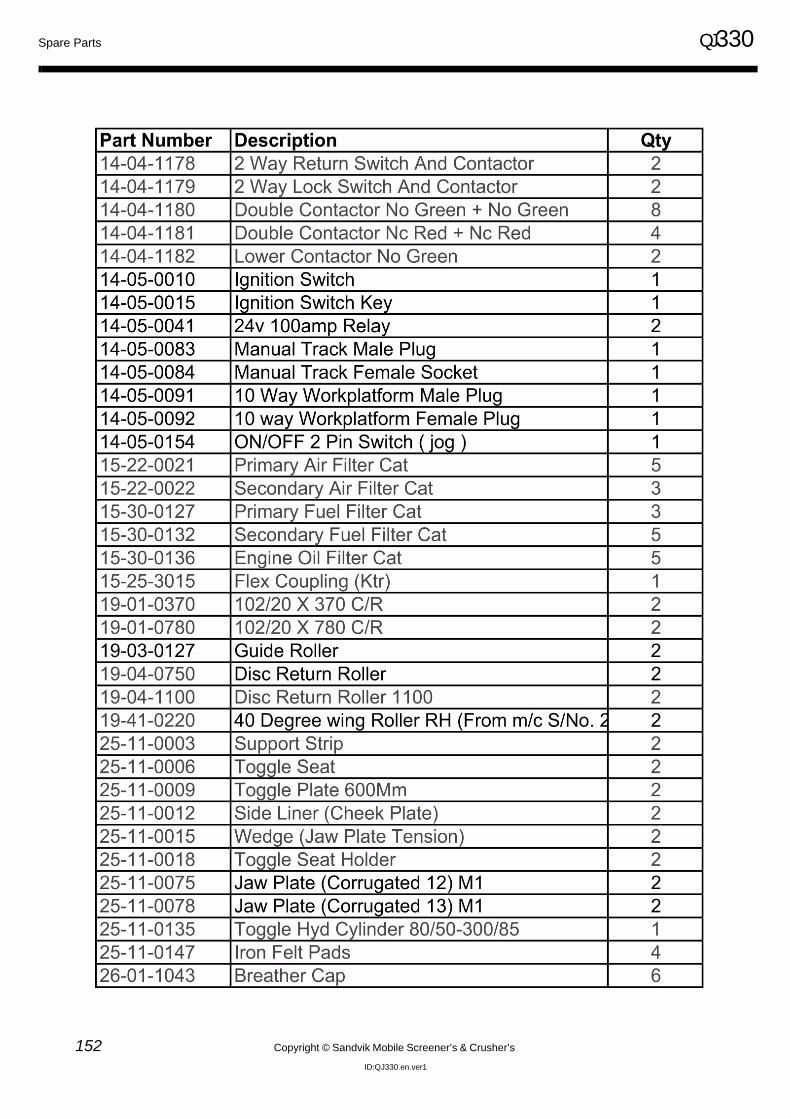
Spare Parts QJ330
152 Copyright © Sandvik Mobile Screener’s & Crusher’s
ID:QJ330.en.ver1
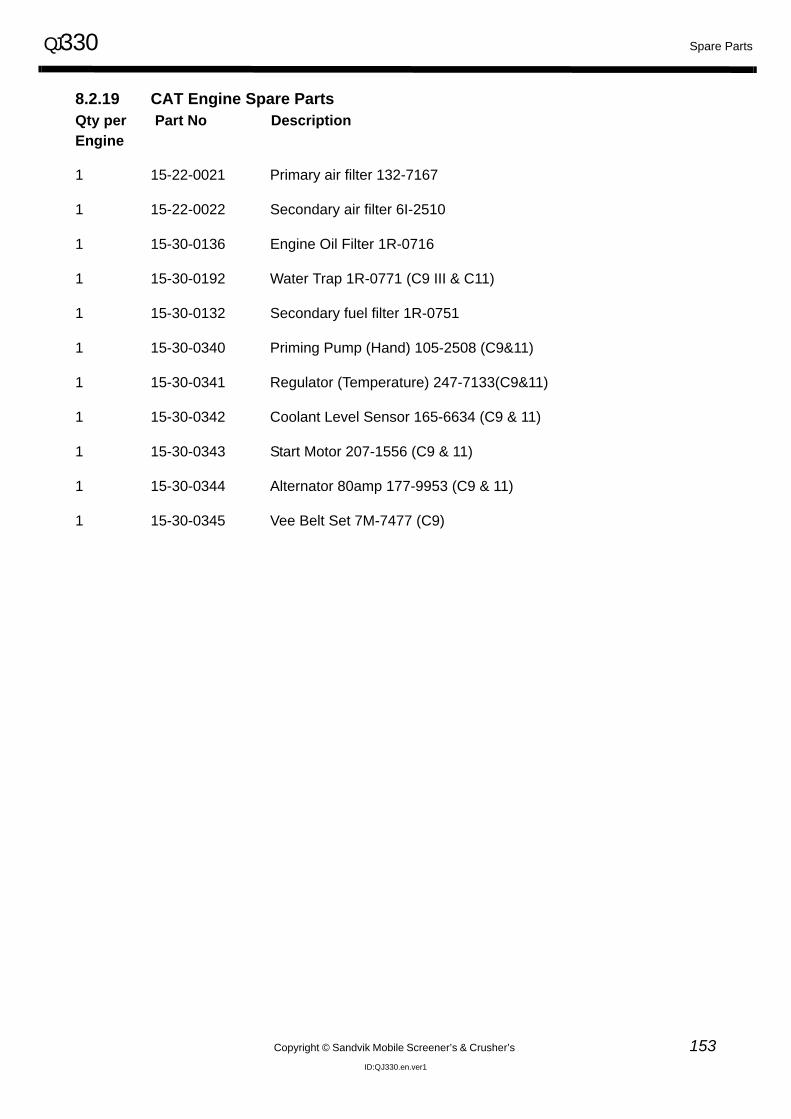
QJ330 Spare Parts
Copyright © Sandvik Mobile Screener’s & Crusher’s 153ID:QJ330.en.ver1
8.2.19 CAT Engine Spare PartsQty per Part No DescriptionEngine
1 15-22-0021 Primary air filter 132-7167
1 15-22-0022 Secondary air filter 6I-2510
1 15-30-0136 Engine Oil Filter 1R-0716
1 15-30-0192 Water Trap 1R-0771 (C9 III & C11)
1 15-30-0132 Secondary fuel filter 1R-0751
1 15-30-0340 Priming Pump (Hand) 105-2508 (C9&11)
1 15-30-0341 Regulator (Temperature) 247-7133(C9&11)
1 15-30-0342 Coolant Level Sensor 165-6634 (C9 & 11)
1 15-30-0343 Start Motor 207-1556 (C9 & 11)
1 15-30-0344 Alternator 80amp 177-9953 (C9 & 11)
1 15-30-0345 Vee Belt Set 7M-7477 (C9)

Spare Parts QJ330
154 Copyright © Sandvik Mobile Screener’s & Crusher’s
ID:QJ330.en.ver1

QJ330
Copyright © Sandvik Mobile Screener’s & Crusher’s 155ID:QJ330.en.ver2
9.0 Electrical and Hydraulic

ELECTRICAL & HYDRAULICS QJ330
156 Copyright © Sandvik Mobile Screener’s & Crusher’s
ID:QJ330.en.ver2
9.1 Electrical Schematics
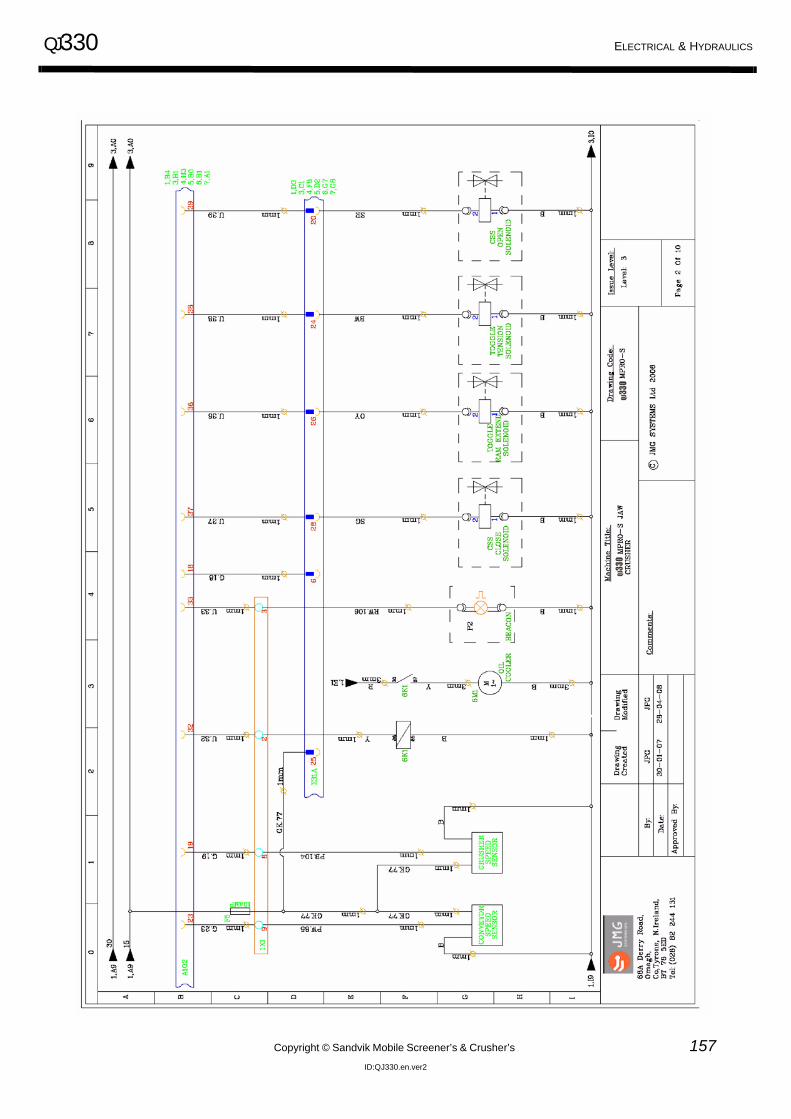
QJ330 ELECTRICAL & HYDRAULICS
Copyright © Sandvik Mobile Screener’s & Crusher’s 157ID:QJ330.en.ver2
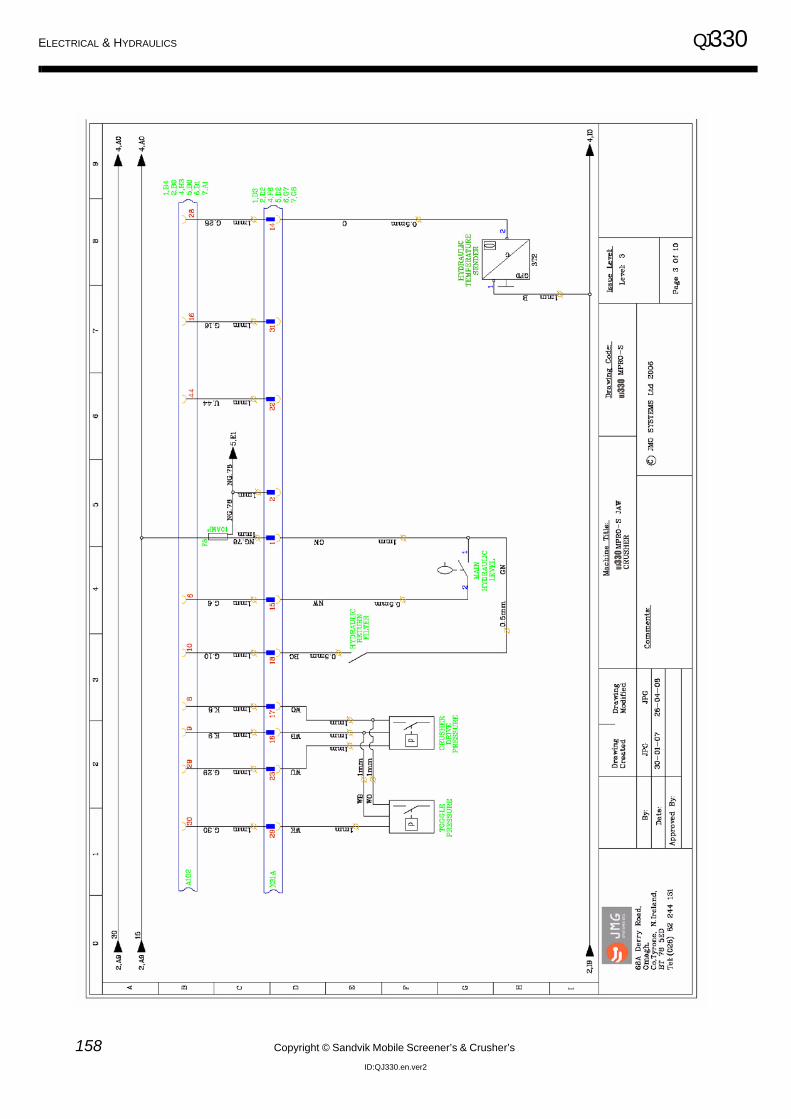
ELECTRICAL & HYDRAULICS QJ330
158 Copyright © Sandvik Mobile Screener’s & Crusher’s
ID:QJ330.en.ver2
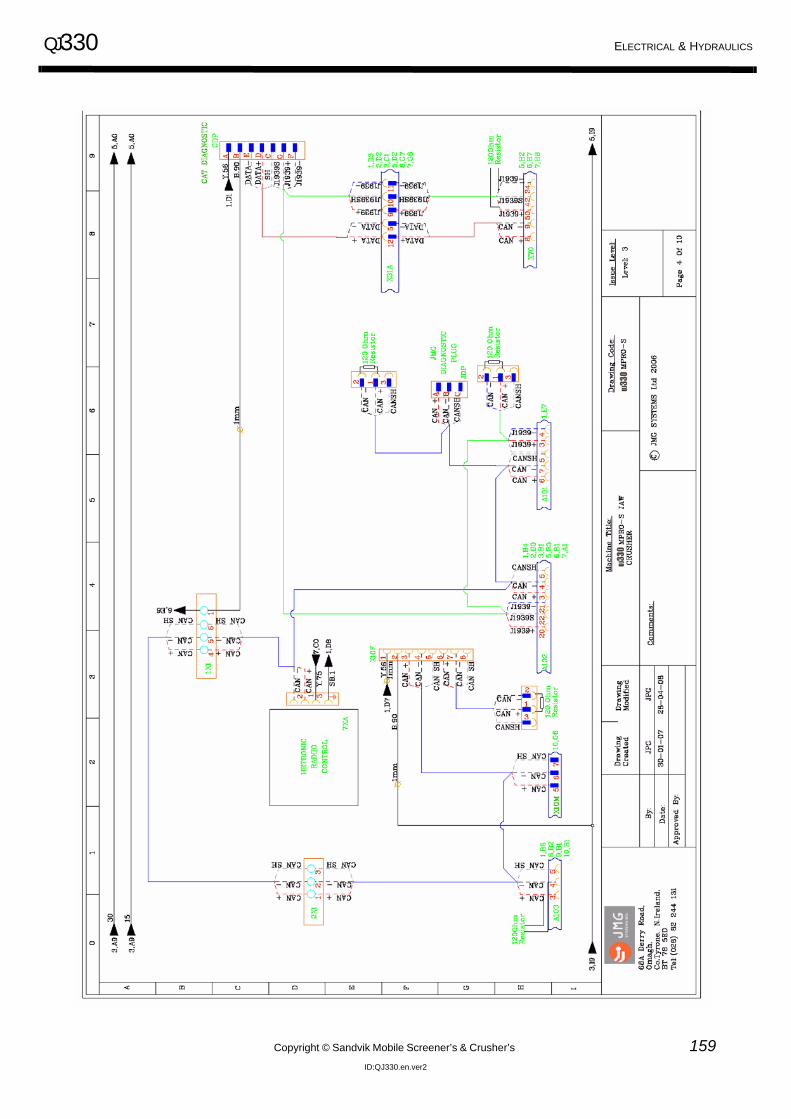
QJ330 ELECTRICAL & HYDRAULICS
Copyright © Sandvik Mobile Screener’s & Crusher’s 159ID:QJ330.en.ver2
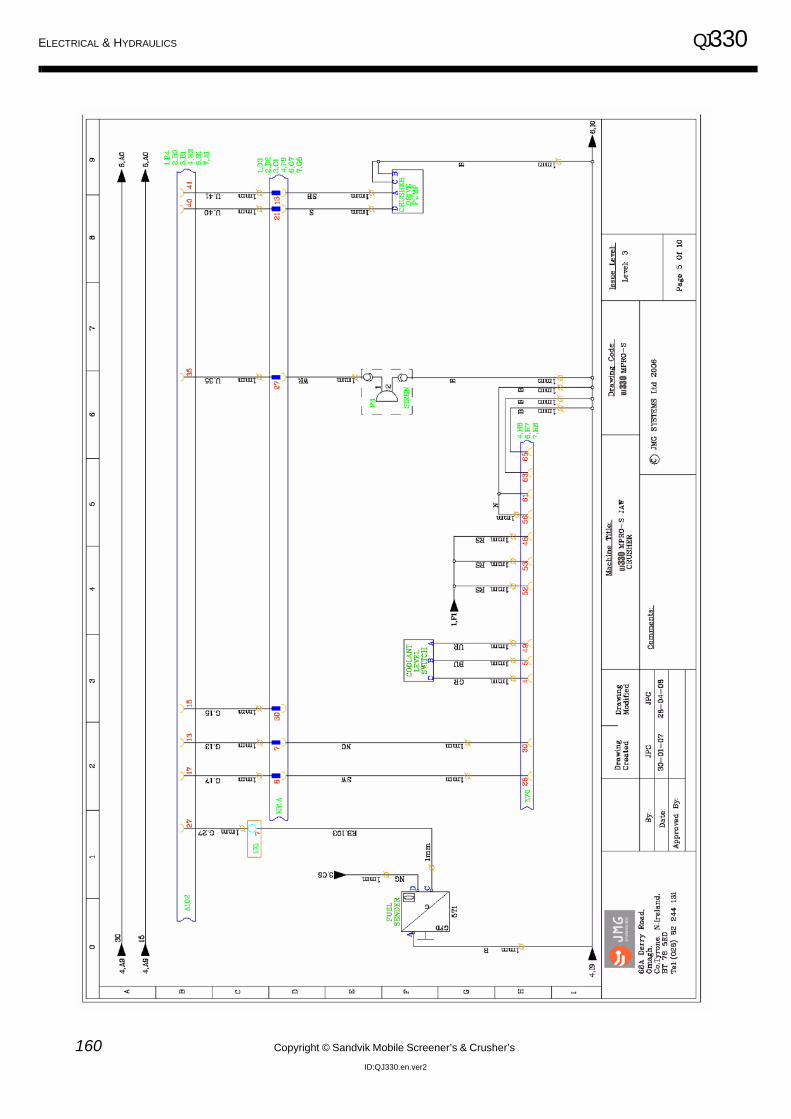
ELECTRICAL & HYDRAULICS QJ330
160 Copyright © Sandvik Mobile Screener’s & Crusher’s
ID:QJ330.en.ver2
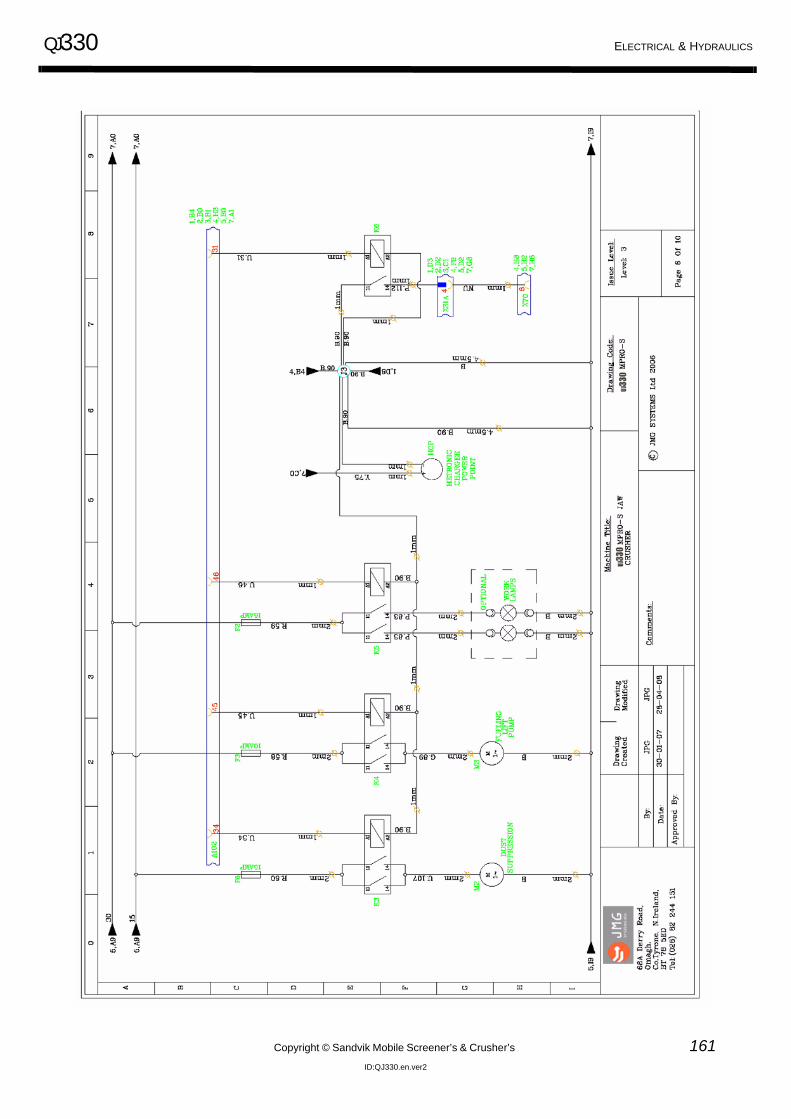
QJ330 ELECTRICAL & HYDRAULICS
Copyright © Sandvik Mobile Screener’s & Crusher’s 161ID:QJ330.en.ver2
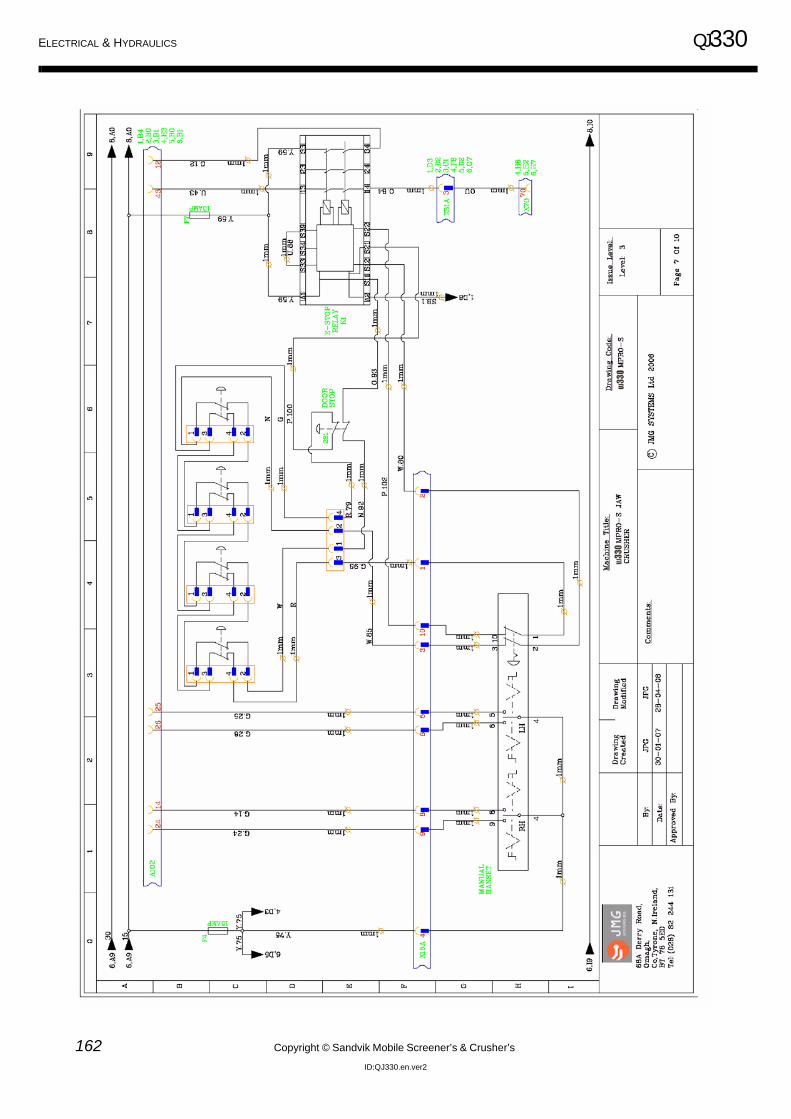
ELECTRICAL & HYDRAULICS QJ330
162 Copyright © Sandvik Mobile Screener’s & Crusher’s
ID:QJ330.en.ver2
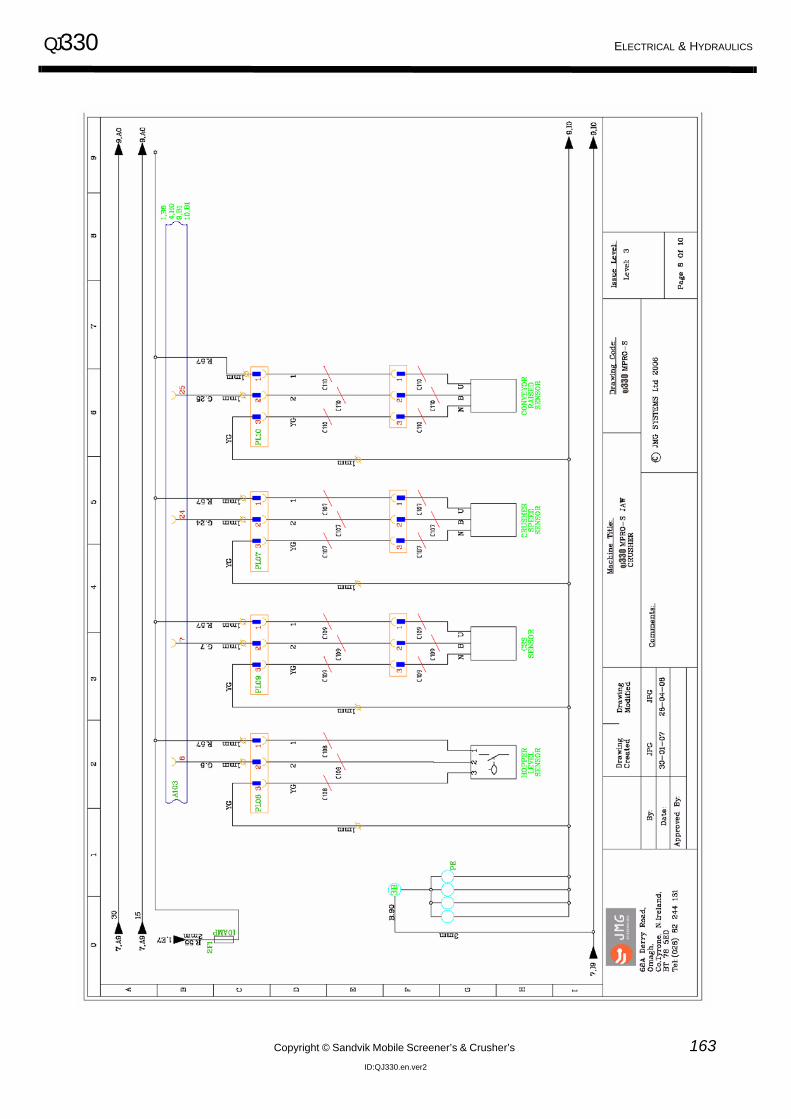
QJ330 ELECTRICAL & HYDRAULICS
Copyright © Sandvik Mobile Screener’s & Crusher’s 163ID:QJ330.en.ver2
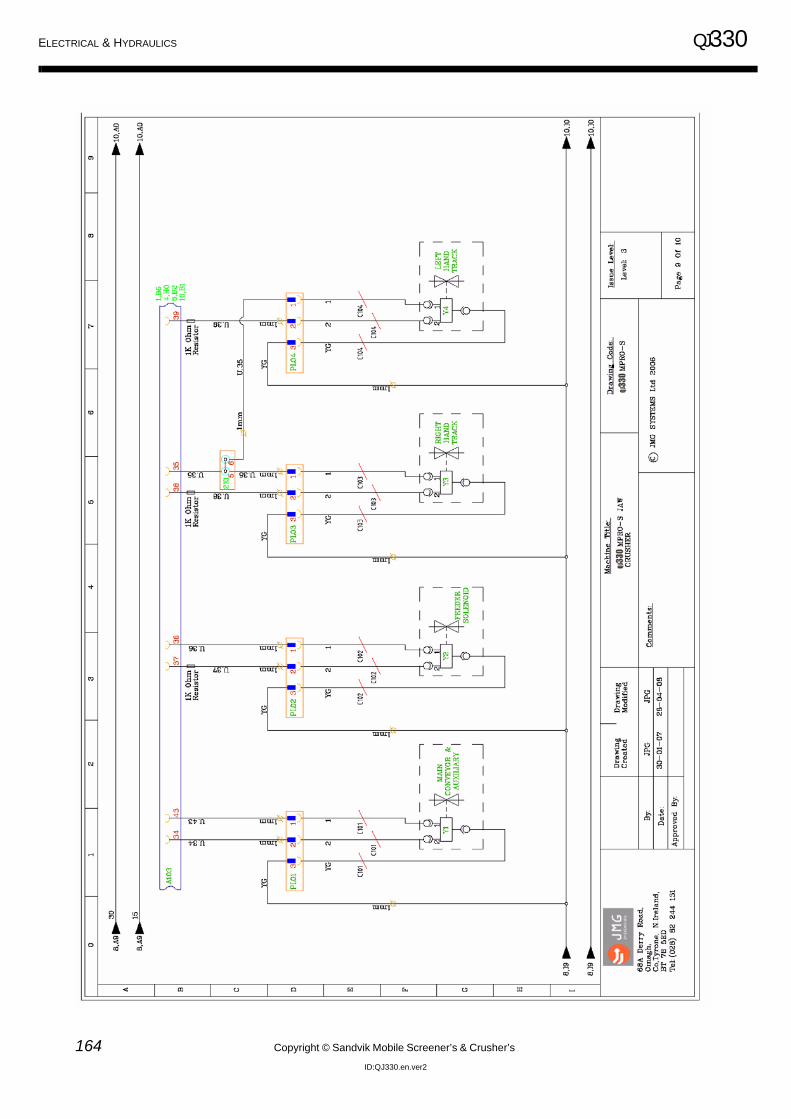
ELECTRICAL & HYDRAULICS QJ330
164 Copyright © Sandvik Mobile Screener’s & Crusher’s
ID:QJ330.en.ver2
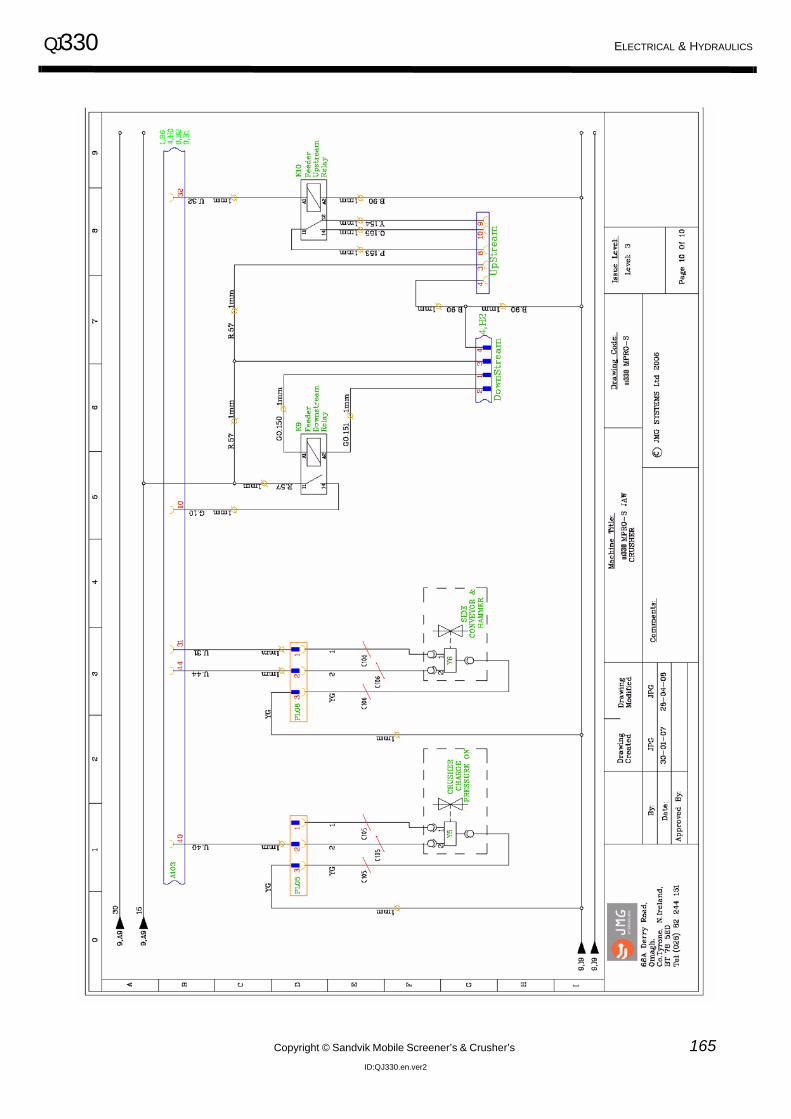
QJ330 ELECTRICAL & HYDRAULICS
Copyright © Sandvik Mobile Screener’s & Crusher’s 165ID:QJ330.en.ver2
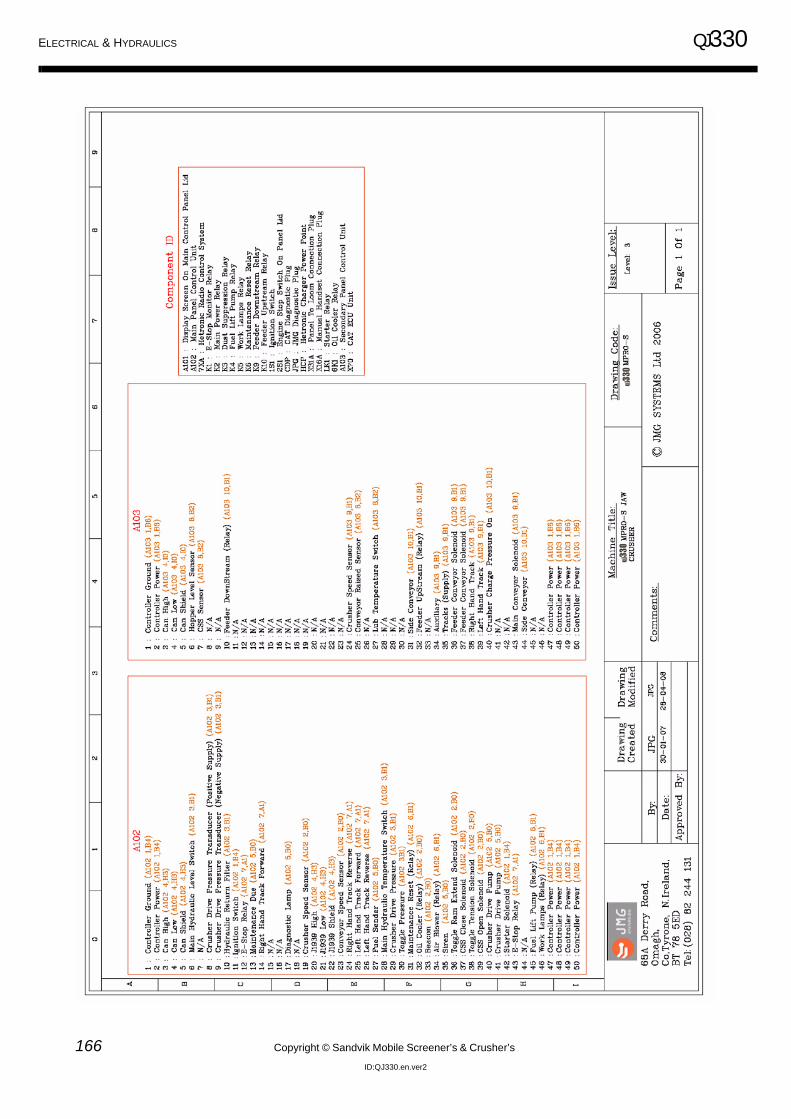
ELECTRICAL & HYDRAULICS QJ330
166 Copyright © Sandvik Mobile Screener’s & Crusher’s
ID:QJ330.en.ver2

QJ330 ELECTRICAL & HYDRAULICS
Copyright © Sandvik Mobile Screener’s & Crusher’s 167ID:QJ330.en.ver2
9.1.1 Electrical Fittings
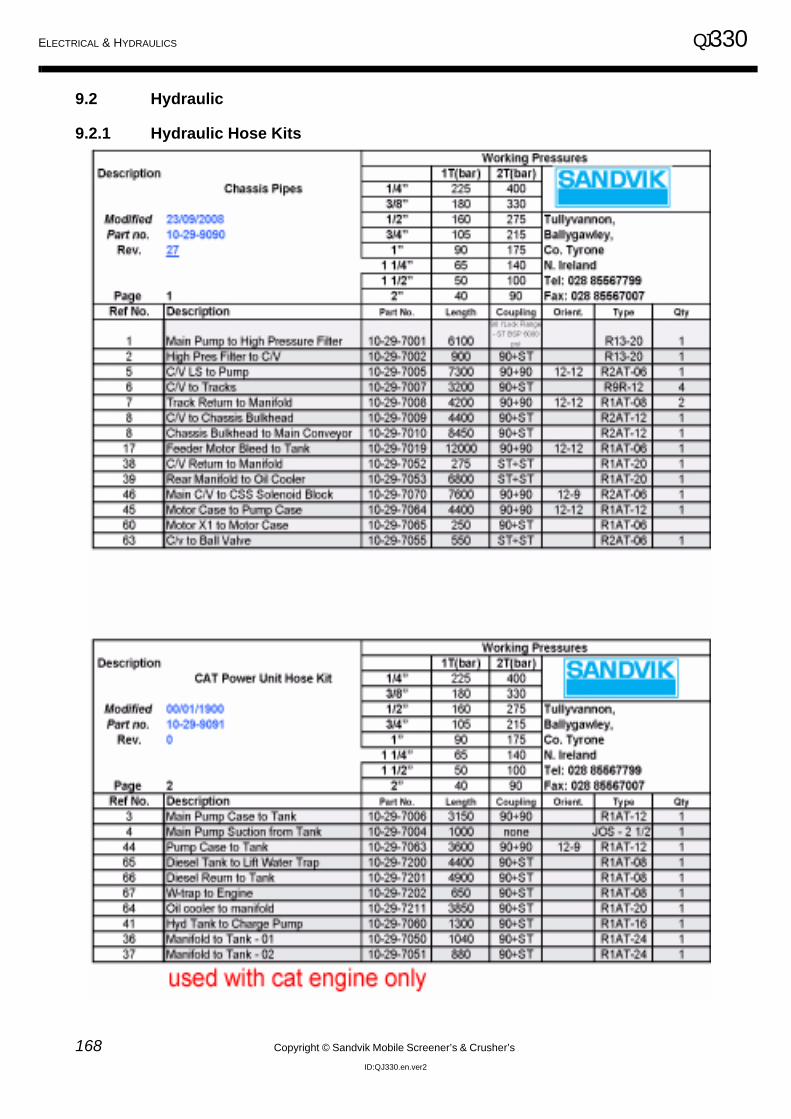
ELECTRICAL & HYDRAULICS QJ330
168 Copyright © Sandvik Mobile Screener’s & Crusher’s
ID:QJ330.en.ver2
9.2 Hydraulic
9.2.1 Hydraulic Hose Kits
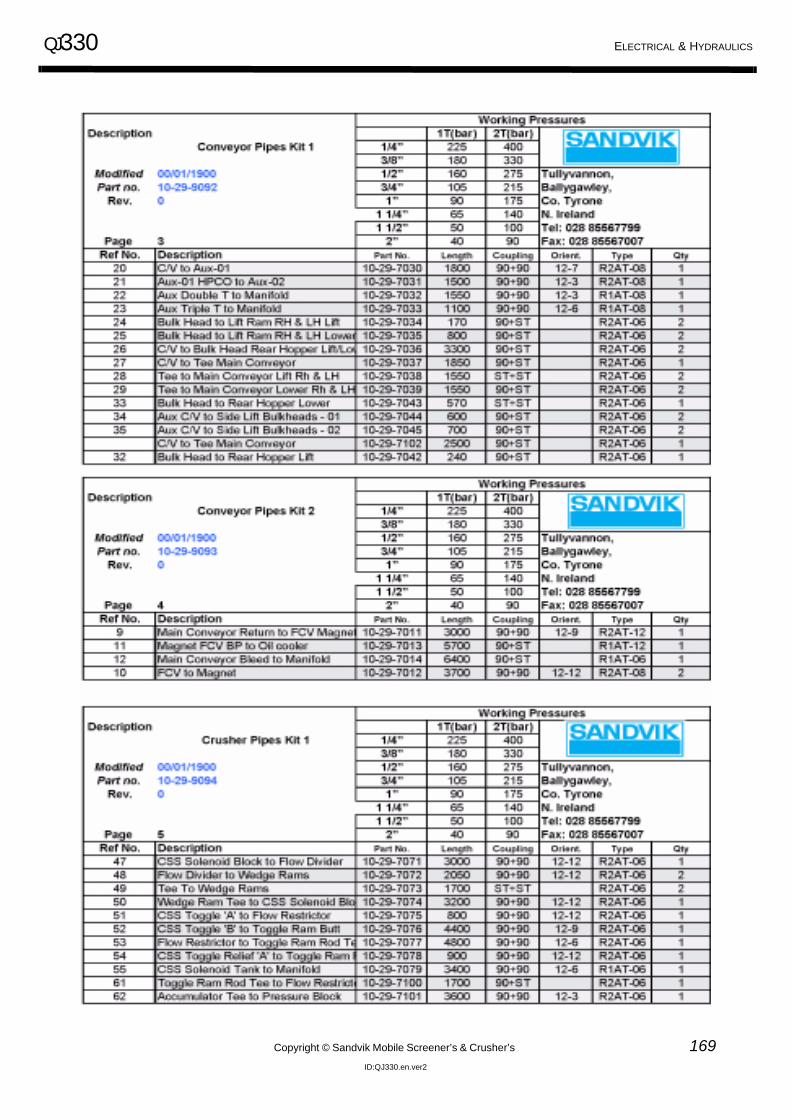
QJ330 ELECTRICAL & HYDRAULICS
Copyright © Sandvik Mobile Screener’s & Crusher’s 169ID:QJ330.en.ver2
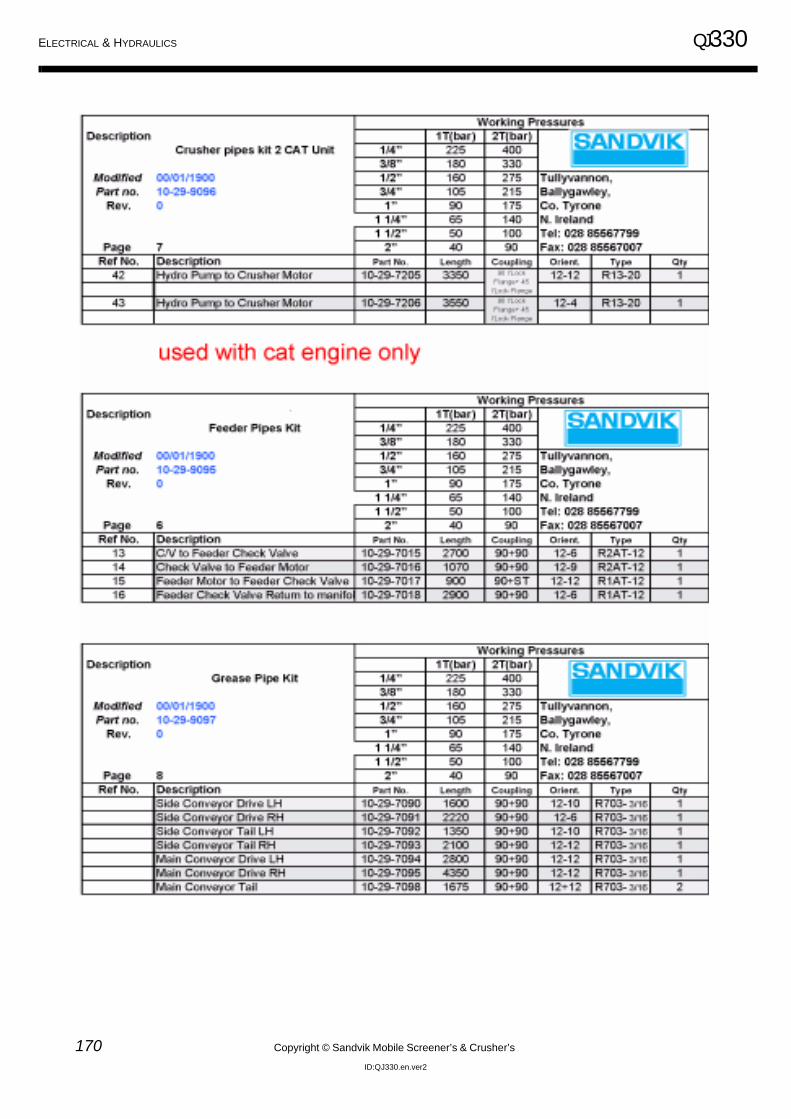
ELECTRICAL & HYDRAULICS QJ330
170 Copyright © Sandvik Mobile Screener’s & Crusher’s
ID:QJ330.en.ver2
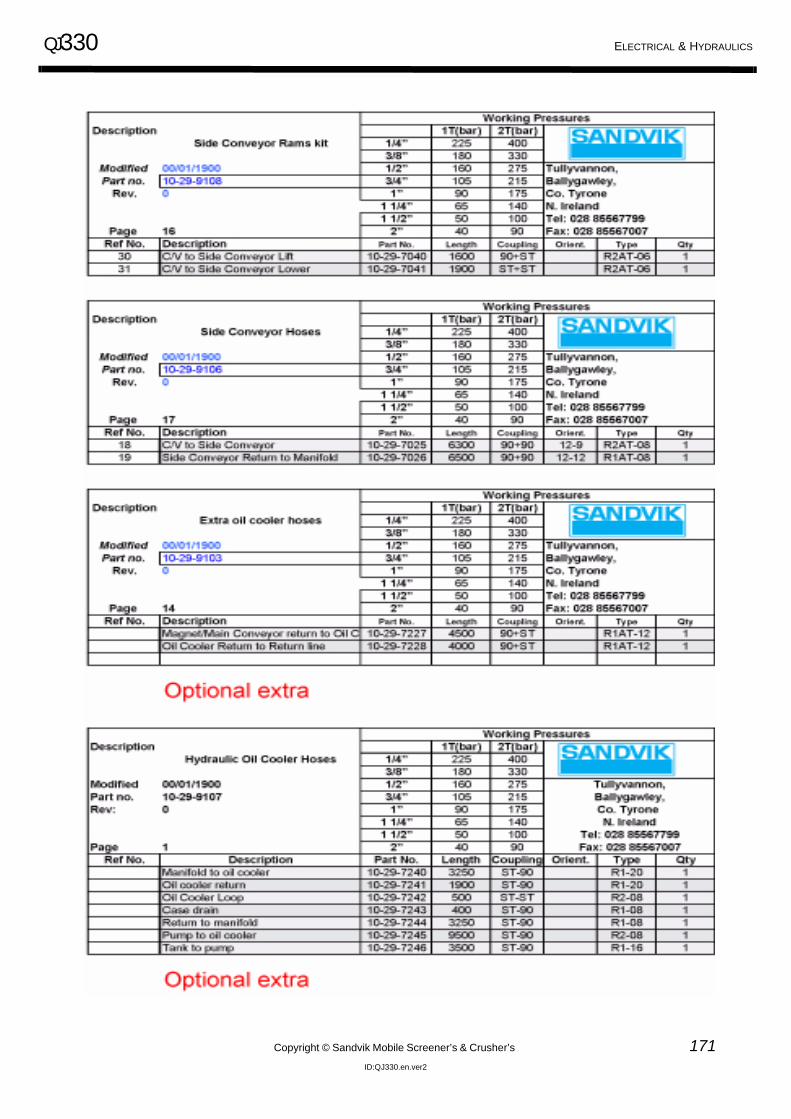
QJ330 ELECTRICAL & HYDRAULICS
Copyright © Sandvik Mobile Screener’s & Crusher’s 171ID:QJ330.en.ver2
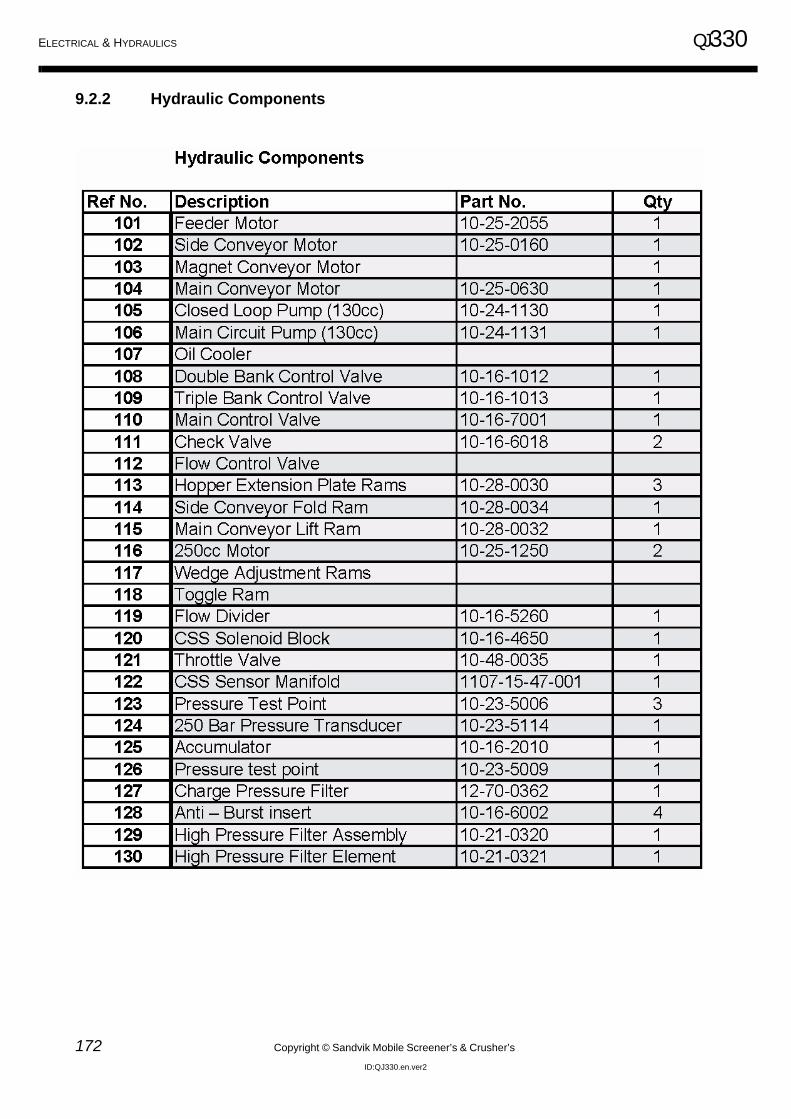
ELECTRICAL & HYDRAULICS QJ330
172 Copyright © Sandvik Mobile Screener’s & Crusher’s
ID:QJ330.en.ver2
9.2.2 Hydraulic Components
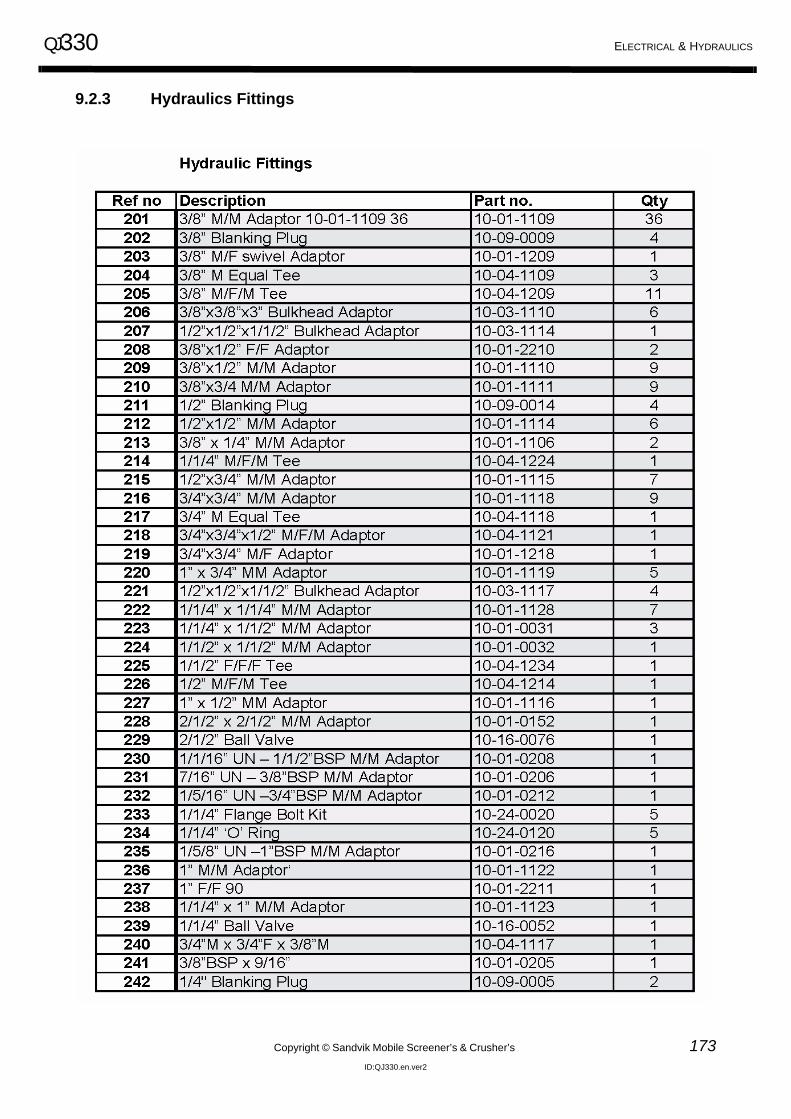
QJ330 ELECTRICAL & HYDRAULICS
Copyright © Sandvik Mobile Screener’s & Crusher’s 173ID:QJ330.en.ver2
9.2.3 Hydraulics Fittings
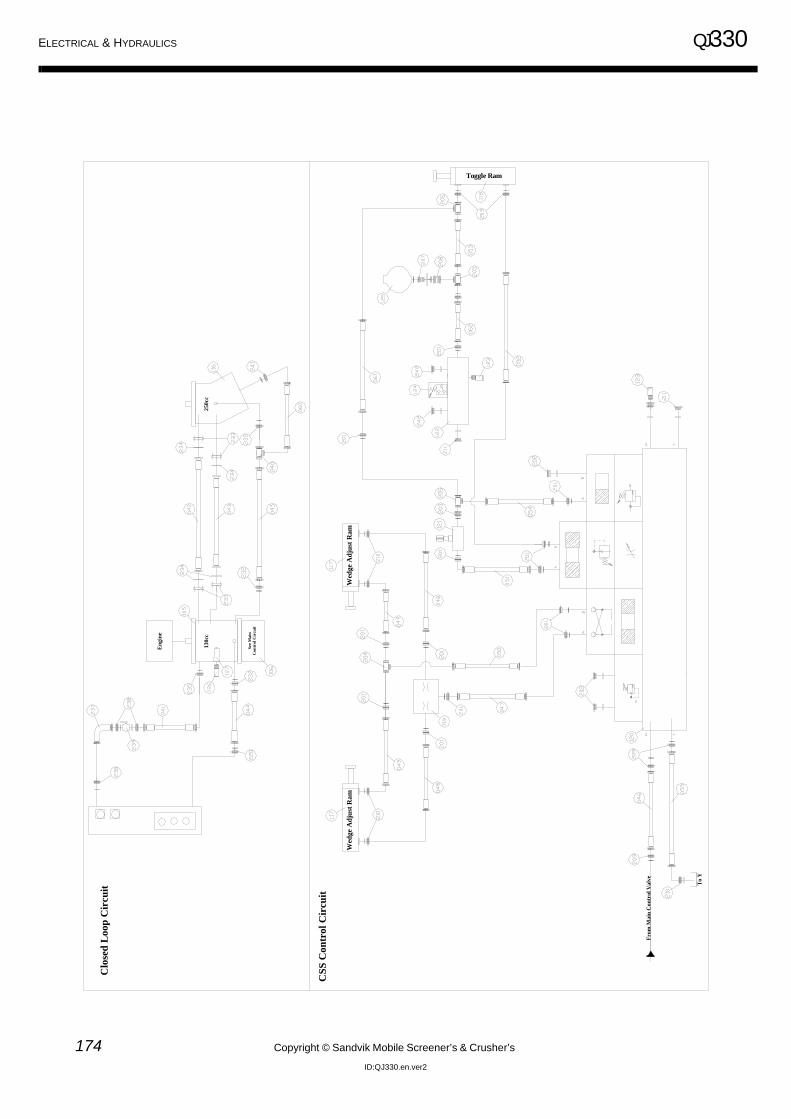
ELECTRICAL & HYDRAULICS QJ330
174 Copyright © Sandvik Mobile Screener’s & Crusher’s
ID:QJ330.en.ver2
Fro
m M
ain
Con
trol
Val
ve
CS
S C
ontr
ol C
ircu
it
Toggle Ram
Clo
sed
Loo
p C
ircu
it
Wed
ge A
dju
st R
am
W
edge
Ad
just
Ram
To
Y
250c
c
See
Mai
nC
ontr
ol C
ircu
it
130c
c
Eng
ine
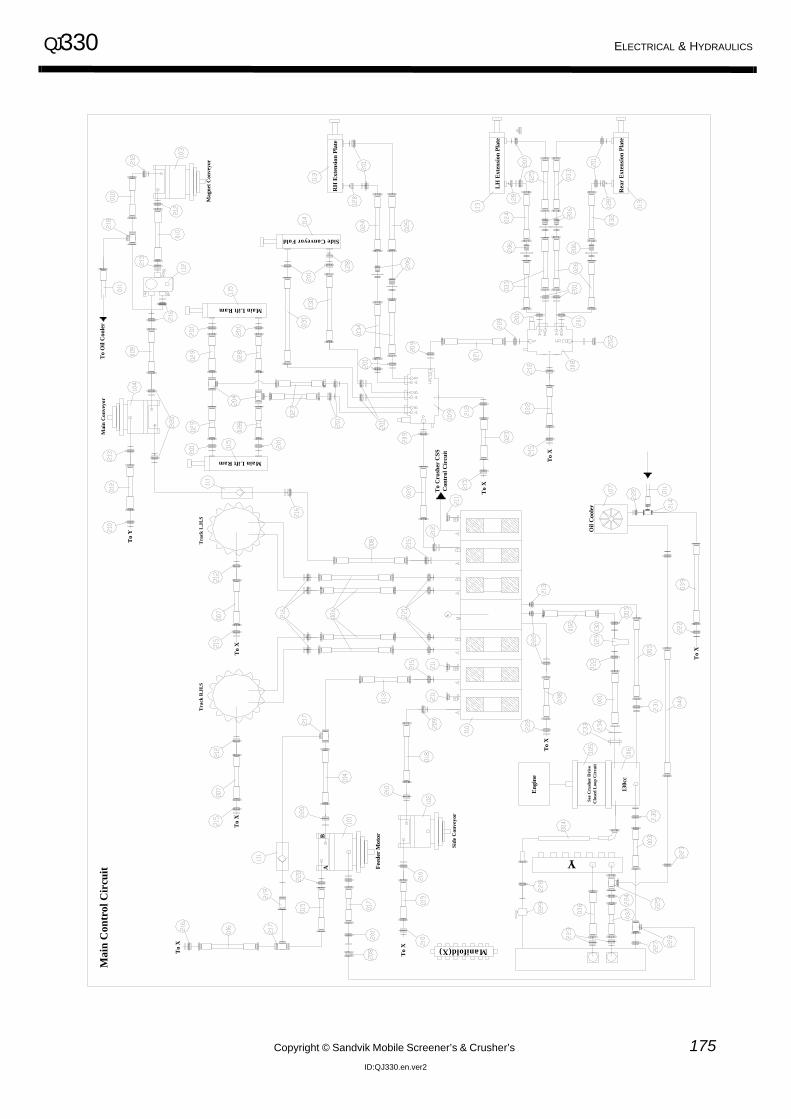
QJ330 ELECTRICAL & HYDRAULICS
Copyright © Sandvik Mobile Screener’s & Crusher’s 175ID:QJ330.en.ver2
AB
Fee
der
Mot
or
To
X
130c
c
En
gine
Sid
e C
onve
yor
To
X
Tra
ck R
.H.S
To
X
Tra
ck L
.H.S
To
X
Mai
n C
onve
yor
To
Y
Mag
net
Con
veyo
r
To
Oil
Coo
ler
Main Lift Ram
Side Conveyor Fold
Main Lift Ram
To
Cru
sher
CS
SC
ontr
ol C
ircu
it
RH
Ext
ensi
on P
late
Manifold(X)
To
X
LH
Ext
ensi
on P
late
Rea
r E
xten
sion
Pla
te
To
X
See
Cru
sher
Dri
veC
lose
d L
oop
Cir
cuit
Mai
n C
ontr
ol C
ircu
it
Y
Oil
Coo
ler
To
X
To
X
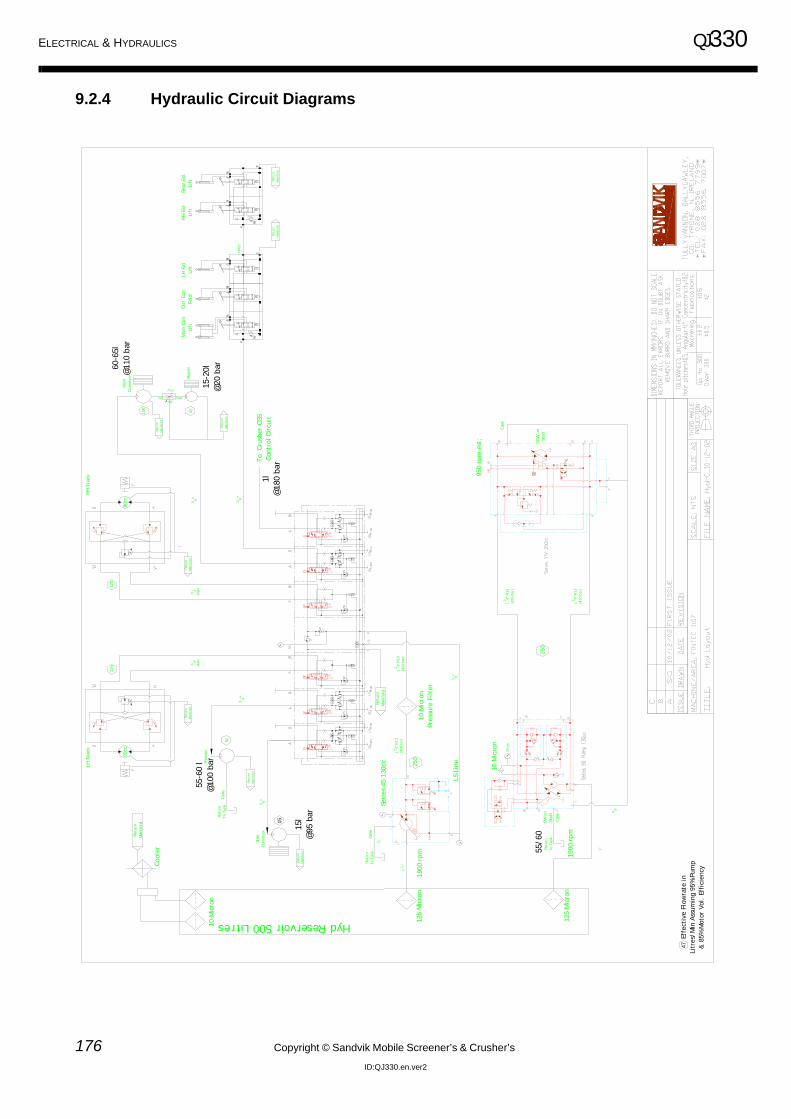
ELECTRICAL & HYDRAULICS QJ330
176 Copyright © Sandvik Mobile Screener’s & Crusher’s
ID:QJ330.en.ver2
9.2.4 Hydraulic Circuit Diagrams
Seri
es 4
5 13
0cc
125
Mic
ron
10 M
icro
n
Hyd Reservoir 500 Litres
Coo
ler
Retu
rnM
anif
old
Effe
ctiv
e Fl
owra
te in
Litr
es/M
in A
ssum
ing
95%
Pum
p&
85%
Mot
or V
ol.
Effi
cien
cy
47
1900
rpm
250
LS L
ine
125
90cc
105
Mag
net
80
15
45
Retu
rnM
anif
old
Retu
rnM
anif
old
Mai
n Co
nLi
ftD
irt
Con
Fold
RH E
xtLi
ftRe
ar E
xtLi
ft
HPC
O
LH E
xtLi
ft
Retu
rnM
anif
old
BP REG PR
FCV
10 M
icro
nPr
essu
re F
ilter
125
Mic
ron
10 M
icro
n
1900
rpm
950
rpm
est
;
250
Cas
e
Case
Retu
rnM
anif
old
RH T
rack
90cc
125
LH T
rack
1 1 4"
R13
(420
bar
)
To
Crus
her
CSS
Cont
rol C
ircu
it
Retu
rnTo
Tan
kCa
se
Cas
e
Retu
rnTo
Tan
k
Ret
urn
To T
ank
Retu
rnM
anif
old
Retu
rnM
anif
old
Retu
rnM
anif
old
Retu
rnM
anif
old
Retu
rnM
anif
old
34"
R9R
34"
34"
R9R
34" 38"
38"
1 1 4"
R13
(420
bar
)
1"
34 "
2 1 2"
1 2 "
38"
55-6
0 l
@10
0 ba
r
1 1 4"
R13
(420
bar
) 1
1 4" R
13(4
20 b
ar)
60-6
5l@
110
bar
CC
W o
nSh
aft
CW
on
Shaf
t
55/6
0
15l
@95
bar
24 b
ar
Feed
er
Side
Con
veyo
r
Mai
nCo
nvey
or
15-2
0l@
20 b
ar
1l@
180
bar
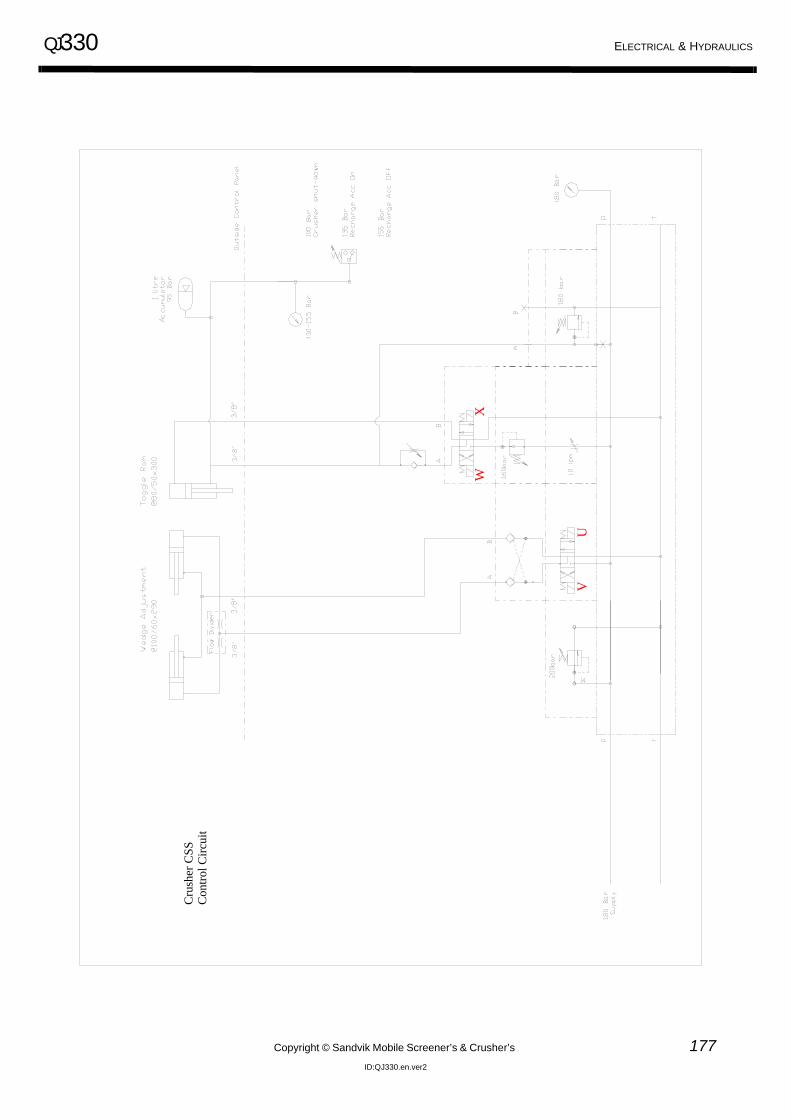
QJ330 ELECTRICAL & HYDRAULICS
Copyright © Sandvik Mobile Screener’s & Crusher’s 177ID:QJ330.en.ver2
Cru
sher
CSS
Con
trol C
ircui
t
X
VU
W

ELECTRICAL & HYDRAULICS QJ330
178 Copyright © Sandvik Mobile Screener’s & Crusher’s
ID:QJ330.en.ver2

QJ330
Copyright © Sandvik Mobile Screener’s & Crusher’s 179ID:QJ330.en.ver2
10.0 OEM Section

OEM Manuals QJ330
180 Copyright © Sandvik Mobile Screener’s & Crusher’s
ID:QJ330.en.ver2
10.1 OEM Appendicies
Please ensure you read this section carefully. It contains Manuals produced by OEM manufactures, thereforeSandvik has resevations for misprints. The OEM Manuals will be placed in the following order
10.1.1 CJ211 Jaw Crusher Operation
10.1.2 CJ211 Jaw Crusher Maintenace Manual
10.1.3 CJ211 Jaw Crusher Spare Parts
10.1.4 CJ211 Jaw Crusher Wear Parts
10.1.5 Eriez Magnetic Seperator
10.1.6 Roxon Vibrating Feeder
10.1.7 Crawler Tracks Operation Manual
10.1.8 M-PROS Control System Spare Parts
10.1.9 Optional Extra’s