openstack configuration reference
TRANSCRIPT
OpenStack ConfigurationReference
October 23, 2013 havana
ii
OpenStack Configuration Referencehavana (2013-10-23)Copyright © 2013 OpenStack Foundation All rights reserved.
This document is for system administrators who want to look up configuration options. It contains lists ofconfiguration options available with OpenStack and uses auto-generation to generate options and thedescriptions from the code for each project. It includes sample configuration files.
Licensed under the Apache License, Version 2.0 (the "License"); you may not use this file except in compliance with the License. Youmay obtain a copy of the License at
http://www.apache.org/licenses/LICENSE-2.0
Unless required by applicable law or agreed to in writing, software distributed under the License is distributed on an "AS IS" BASIS,WITHOUT WARRANTIES OR CONDITIONS OF ANY KIND, either express or implied. See the License for the specific language governingpermissions and limitations under the License.
OpenStack ConfigurationReference
October 23, 2013 havana
iii
Table of ContentsOpenStack Configuration Overview ............................................................................... 11
Document change history ...................................................................................... 111. OpenStack Identity ...................................................................................................... 1
Identity Configuration Files ..................................................................................... 1Certificates for PKI .................................................................................................. 2Configure the Identity Service with SSL ................................................................... 4Using External Authentication with OpenStack Identity ........................................... 5Configuring OpenStack Identity for an LDAP backend ............................................. 6Identity Sample Configuration Files ......................................................................... 8
2. OpenStack Compute ................................................................................................. 20Post-Installation Configuration ............................................................................... 20Database Configuration ........................................................................................ 35Components Configuration ................................................................................... 36Compute Configuration Files: nova.conf .............................................................. 108
3. OpenStack Image Service ......................................................................................... 1364. OpenStack Networking ............................................................................................ 145
Networking Configuration Options ...................................................................... 145OpenStack Identity .............................................................................................. 163Networking scenarios .......................................................................................... 168Advanced Configuration Options ......................................................................... 185Scalable and Highly Available DHCP Agents ......................................................... 190
5. OpenStack Dashboard ............................................................................................. 200Configure the dashboard ..................................................................................... 200Customize the dashboard .................................................................................... 204
6. OpenStack Object Storage ....................................................................................... 206Introduction to Object Storage ............................................................................ 206Object Storage General Service Configuration ...................................................... 206Object Server Configuration ................................................................................ 208Container Server Configuration ........................................................................... 214Account Server Configuration .............................................................................. 221Proxy Server Configuration .................................................................................. 226Configuring OpenStack Object Storage Features .................................................. 240
7. OpenStack Block Storage ......................................................................................... 255Introduction to the OpenStack Block Storage Service ........................................... 255Setting Configuration Options in the cinder.conf File ...................................... 256Volume Drivers .................................................................................................... 257Backup Drivers .................................................................................................... 308
A. Community support ................................................................................................ 311Documentation ................................................................................................... 311ask.openstack.org ................................................................................................ 312OpenStack mailing lists ........................................................................................ 312The OpenStack wiki ............................................................................................. 312The Launchpad Bugs area ................................................................................... 313The OpenStack IRC channel ................................................................................. 313Documentation feedback .................................................................................... 314OpenStack distribution packages ......................................................................... 314

OpenStack ConfigurationReference
October 23, 2013 havana
iv
List of Figures2.1. KVM, Flat, MySQL, and Glance, OpenStack or EC2 API ............................................ 252.2. KVM, Flat, MySQL, and Glance, OpenStack or EC2 API ............................................ 262.3. noVNC process ....................................................................................................... 472.4. Filtering .................................................................................................................. 897.1. Ceph architecture ................................................................................................. 2587.2. Repository Creation Plan Screen ............................................................................ 2637.3. Local configuration ............................................................................................... 3047.4. Remote configuration ........................................................................................... 304
OpenStack ConfigurationReference
October 23, 2013 havana
v
List of Tables1.1. keystone.conf file sections ........................................................................................ 12.1. Description of configuration options for common ................................................... 212.2. Description of configuration options for logging ..................................................... 262.3. Description of configuration options for authentication .......................................... 272.4. Description of configuration options for ca ............................................................. 282.5. Description of configuration options for ldap .......................................................... 282.6. Description of configuration options for ipv6 .......................................................... 292.7. Description of configuration options for livemigration ............................................. 332.8. Description of configuration options for db ............................................................ 352.9. Description of configuration options for rabbitmq .................................................. 362.10. Description of configuration options for kombu .................................................... 372.11. Description of configuration options for qpid ........................................................ 382.12. Description of configuration options for zeromq ................................................... 382.13. Description of configuration options for rpc .......................................................... 392.14. Default API Rate Limits ......................................................................................... 402.15. Description of configuration options for api .......................................................... 412.16. Description of configuration options for ec2 ......................................................... 422.17. Compute Quota Descriptions ................................................................................ 432.18. Description of configuration options for vnc ......................................................... 482.19. Description of configuration options for spice ....................................................... 512.20. Description of configuration options for zookeeper .............................................. 522.21. Description of configuration options for hypervisor ............................................... 562.22. Description of configuration options for xen ......................................................... 712.23. Description of configuration options for vmware .................................................. 772.24. Description of configuration options for powervm ................................................ 792.25. Description of configuration options for hyperv .................................................... 842.26. Description of configuration options for baremetal ............................................... 862.27. Description of configuration options for docker .................................................... 882.28. Description of configuration options for scheduling ............................................... 982.29. Description of configuration options for cells ...................................................... 1022.30. Description of configuration options for conductor ............................................. 1052.31. Description of configuration options for trustedcomputing .................................. 1072.32. Description of configuration options for api ........................................................ 1102.33. Description of configuration options for authentication ....................................... 1112.34. Description of configuration options for availabilityzones .................................... 1112.35. Description of configuration options for baremetal ............................................. 1112.36. Description of configuration options for ca ......................................................... 1122.37. Description of configuration options for cells ...................................................... 1132.38. Description of configuration options for common ............................................... 1132.39. Description of configuration options for compute ............................................... 1142.40. Description of configuration options for conductor ............................................. 1152.41. Description of configuration options for configdrive ............................................ 1162.42. Description of configuration options for console ................................................. 1162.43. Description of configuration options for db ......................................................... 1162.44. Description of configuration options for ec2 ....................................................... 1172.45. Description of configuration options for fping ..................................................... 1172.46. Description of configuration options for glance ................................................... 1172.47. Description of configuration options for hyperv .................................................. 118
OpenStack ConfigurationReference
October 23, 2013 havana
vi
2.48. Description of configuration options for hypervisor ............................................. 1182.49. Description of configuration options for ipv6 ...................................................... 1202.50. Description of configuration options for kombu .................................................. 1202.51. Description of configuration options for ldap ...................................................... 1202.52. Description of configuration options for livemigration ......................................... 1212.53. Description of configuration options for logging ................................................. 1212.54. Description of configuration options for metadata .............................................. 1222.55. Description of configuration options for network ................................................ 1222.56. Description of configuration options for periodic ................................................. 1242.57. Description of configuration options for policy .................................................... 1242.58. Description of configuration options for powervm .............................................. 1252.59. Description of configuration options for qpid ...................................................... 1252.60. Description of configuration options for neutron ................................................ 1262.61. Description of configuration options for quota .................................................... 1262.62. Description of configuration options for rabbitmq ............................................... 1272.63. Description of configuration options for rpc ........................................................ 1272.64. Description of configuration options for s3 ......................................................... 1282.65. Description of configuration options for scheduling ............................................. 1282.66. Description of configuration options for spice ..................................................... 1292.67. Description of configuration options for testing .................................................. 1292.68. Description of configuration options for tilera ..................................................... 1302.69. Description of configuration options for trustedcomputing .................................. 1302.70. Description of configuration options for vmware ................................................. 1302.71. Description of configuration options for vnc ........................................................ 1312.72. Description of configuration options for volumes ................................................ 1312.73. Description of configuration options for vpn ....................................................... 1322.74. Description of configuration options for wsgi ...................................................... 1322.75. Description of configuration options for xen ....................................................... 1332.76. Description of configuration options for xvpnvncproxy ........................................ 1352.77. Description of configuration options for zeromq ................................................. 1352.78. Description of configuration options for zookeeper ............................................. 1353.1. Description of configuration options for glance ..................................................... 1363.2. Description of configuration options for s3 ........................................................... 1363.3. Description of configuration options for common ................................................. 1373.4. Description of configuration options for api .......................................................... 1373.5. Description of configuration options for cinder ..................................................... 1383.6. Description of configuration options for db .......................................................... 1383.7. Description of configuration options for filesystem ................................................ 1393.8. Description of configuration options for gridfs ...................................................... 1393.9. Description of configuration options for imagecache ............................................. 1393.10. Description of configuration options for logging ................................................. 1393.11. Description of configuration options for paste .................................................... 1403.12. Description of configuration options for policy .................................................... 1403.13. Description of configuration options for qpid ...................................................... 1403.14. Description of configuration options for rabbitmq ............................................... 1413.15. Description of configuration options for rbd ....................................................... 1413.16. Description of configuration options for registry ................................................. 1423.17. Description of configuration options for rpc ........................................................ 1423.18. Description of configuration options for s3 ......................................................... 1423.19. Description of configuration options for sheepdog .............................................. 1433.20. Description of configuration options for ssl ......................................................... 143
OpenStack ConfigurationReference
October 23, 2013 havana
vii
3.21. Description of configuration options for swift ..................................................... 1433.22. Description of configuration options for testing .................................................. 1443.23. Description of configuration options for wsgi ...................................................... 1444.1. Description of configuration options for common ................................................. 1454.2. Description of configuration options for bigswitch ................................................ 1464.3. Description of configuration options for brocade .................................................. 1474.4. Description of configuration options for cisco ....................................................... 1484.5. Description of configuration options for hyperv .................................................... 1484.6. Description of configuration options for hyperv_agent .......................................... 1484.7. Description of configuration options for linuxbridge .............................................. 1494.8. Description of configuration options for linuxbridge_agent ................................... 1494.9. Description of configuration options for mlnx ....................................................... 1504.10. Description of configuration options for meta ..................................................... 1504.11. Description of configuration options for ml2 ....................................................... 1504.12. Description of configuration options for ml2_flat ................................................ 1504.13. Description of configuration options for ml2_vxlan .............................................. 1514.14. Description of configuration options for ml2_arista ............................................. 1514.15. Description of configuration options for ml2_cisco .............................................. 1514.16. Description of configuration options for ml2_l2pop ............................................. 1514.17. Description of configuration options for ml2_ncs ................................................. 1524.18. Description of configuration options for midonet ................................................ 1524.19. Description of configuration options for nec ....................................................... 1524.20. Description of configuration options for nicira ..................................................... 1524.21. Description of configuration options for openvswitch .......................................... 1544.22. Description of configuration options for openvswitch_agent ............................... 1544.23. Description of configuration options for plumgrid ............................................... 1554.24. Description of configuration options for ryu ........................................................ 1554.25. Description of configuration options for rabbitmq ............................................... 1564.26. Description of configuration options for kombu .................................................. 1564.27. Description of configuration options for qpid ...................................................... 1574.28. Description of configuration options for zeromq ................................................. 1574.29. Description of configuration options for rpc ........................................................ 1584.30. Description of configuration options for notifier .................................................. 1584.31. Description of configuration options for agent .................................................... 1594.32. Description of configuration options for api ........................................................ 1594.33. Description of configuration options for db ......................................................... 1594.34. Description of configuration options for logging ................................................. 1604.35. Description of configuration options for metadata .............................................. 1614.36. Description of configuration options for policy .................................................... 1614.37. Description of configuration options for quotas .................................................. 1614.38. Description of configuration options for scheduler .............................................. 1624.39. Description of configuration options for securitygroups ....................................... 1624.40. Description of configuration options for ssl ......................................................... 1624.41. Description of configuration options for testing .................................................. 1634.42. Description of configuration options for wsgi ...................................................... 1634.43. nova.conf API and Credential Settings ................................................................. 1654.44. nova.conf Security Group Settings ....................................................................... 1664.45. nova.conf Metadata Settings .............................................................................. 1664.46. nova.conf libvirt Settings ..................................................................................... 1674.47. Settings .............................................................................................................. 1864.48. Basic settings ...................................................................................................... 187
OpenStack ConfigurationReference
October 23, 2013 havana
viii
4.49. Basic settings ...................................................................................................... 1874.50. Hosts for Demo .................................................................................................. 1916.1. Description of configuration options for [DEFAULT] in object-server.conf-sample ....................................................................................................................... 2086.2. Description of configuration options for [app:object-server] in object-server.conf-sample .............................................................................................. 2096.3. Description of configuration options for [pipeline:main] in object-server.conf-sample .............................................................................................. 2096.4. Description of configuration options for [object-replicator] in object-server.conf-sample .............................................................................................. 2096.5. Description of configuration options for [object-updater] in object-server.conf-sample .............................................................................................. 2106.6. Description of configuration options for [object-auditor] in object-server.conf-sample .............................................................................................. 2106.7. Description of configuration options for [filter:healthcheck] in object-server.conf-sample .............................................................................................. 2116.8. Description of configuration options for [filter:recon] in object-server.conf-sample .............................................................................................. 2116.9. Description of configuration options for [DEFAULT] in container-server.conf-sample .............................................................................................. 2146.10. Description of configuration options for [app:container-server] incontainer-server.conf-sample ......................................................................... 2166.11. Description of configuration options for [pipeline:main] in container-server.conf-sample .............................................................................................. 2166.12. Description of configuration options for [container-replicator] incontainer-server.conf-sample ......................................................................... 2166.13. Description of configuration options for [container-updater] incontainer-server.conf-sample ......................................................................... 2176.14. Description of configuration options for [container-auditor] incontainer-server.conf-sample ......................................................................... 2176.15. Description of configuration options for [container-sync] in container-server.conf-sample .............................................................................................. 2176.16. Description of configuration options for [filter:healthcheck] incontainer-server.conf-sample ......................................................................... 2186.17. Description of configuration options for [filter:recon] in container-server.conf-sample .............................................................................................. 2186.18. Description of configuration options for [DEFAULT] in account-server.conf-sample .............................................................................................. 2216.19. Description of configuration options for [app:account-server] inaccount-server.conf-sample ............................................................................. 2226.20. Description of configuration options for [pipeline:main] in account-server.conf-sample .............................................................................................. 2226.21. Description of configuration options for [account-replicator] inaccount-server.conf-sample ............................................................................. 2226.22. Description of configuration options for [account-auditor] in account-server.conf-sample .............................................................................................. 2236.23. Description of configuration options for [account-reaper] in account-server.conf-sample .............................................................................................. 2236.24. Description of configuration options for [filter:healthcheck] inaccount-server.conf-sample ............................................................................. 224
OpenStack ConfigurationReference
October 23, 2013 havana
ix
6.25. Description of configuration options for [filter:recon] in account-server.conf-sample .............................................................................................. 2246.26. Description of configuration options for [DEFAULT] in proxy-server.conf-sample ....................................................................................................................... 2276.27. Description of configuration options for [app:proxy-server] in proxy-server.conf-sample .............................................................................................. 2286.28. Description of configuration options for [pipeline:main] in proxy-server.conf-sample .............................................................................................. 2296.29. Description of configuration options for [filter:account-quotas] inproxy-server.conf-sample ................................................................................. 2296.30. Description of configuration options for [filter:authtoken] in proxy-server.conf-sample .............................................................................................. 2296.31. Description of configuration options for [filter:cache] in proxy-server.conf-sample .............................................................................................. 2306.32. Description of configuration options for [filter:catch_errors] in proxy-server.conf-sample .............................................................................................. 2306.33. Description of configuration options for [filter:healthcheck] in proxy-server.conf-sample .............................................................................................. 2306.34. Description of configuration options for [filter:keystoneauth] in proxy-server.conf-sample .............................................................................................. 2306.35. Description of configuration options for [filter:list-endpoints] inproxy-server.conf-sample ................................................................................. 2306.36. Description of configuration options for [filter:proxy-logging] inproxy-server.conf-sample ................................................................................. 2306.37. Description of configuration options for [filter:tempauth] in proxy-server.conf-sample .............................................................................................. 2316.38. Description of configuration options for [filter:ratelimit] in proxy-server.conf-sample .............................................................................................. 2426.39. Values for Rate Limiting with Sample Configuration Settings ............................... 2436.40. Description of configuration options for [filter:healthcheck] inaccount-server.conf-sample ............................................................................. 2436.41. Description of configuration options for [filter:domain_remap] in proxy-server.conf-sample .............................................................................................. 2436.42. Description of configuration options for [filter:cname_lookup] in proxy-server.conf-sample .............................................................................................. 2446.43. Description of configuration options for [filter:tempurl] in proxy-server.conf-sample .............................................................................................. 2466.44. Description of configuration options for [filter:name_check] in proxy-server.conf-sample .............................................................................................. 2466.45. Description of configuration options for [swift-constraints] inswift.conf-sample ................................................................................................ 2466.46. Description of configuration options for [dispersion] indispersion.conf-sample ..................................................................................... 2496.47. Description of configuration options for [filter:slo] in proxy-server.conf-sample .............................................................................................. 2496.48. Description of configuration options for [filter:container-quotas] inproxy-server.conf-sample ................................................................................. 2506.49. Description of configuration options for [filter:bulk] in proxy-server.conf-sample .............................................................................................. 2516.50. Description of configuration options for [drive-audit] in drive-audit.conf-sample ................................................................................................ 252
OpenStack ConfigurationReference
October 23, 2013 havana
x
6.51. Description of configuration options for [filter:formpost] in proxy-server.conf-sample .............................................................................................. 2546.52. Description of configuration options for [filter:staticweb] in proxy-server.conf-sample .............................................................................................. 2547.1. Description of configuration options for storage_ceph .......................................... 2597.2. Description of configuration options for coraid ..................................................... 2637.3. Description of configuration options for storage_glusterfs ..................................... 2697.4. Description of configuration options for hds ......................................................... 2707.5. List of configuration options ................................................................................. 2737.6. List of configuration flags for Huawei Storage Driver ............................................. 2837.7. Description of configuration options for storage_gpfs ........................................... 2847.8. Volume Create Options for GPFS Volume Drive ..................................................... 2857.9. List of configuration flags for Storwize storage and SVC driver .............................. 2897.10. Description of configuration options for storwize ................................................ 2907.11. Description of configuration options for netapp .................................................. 2957.12. Description of configuration options for storage_nexenta_iscsi ............................ 2987.13. Description of configuration options for storage_nexenta_nfs ............................. 2997.14. Description of configuration options for storage_nfs ........................................... 3007.15. Description of configuration options for solidfire ................................................. 3037.16. Description of configuration options for windows ............................................... 3037.17. Description of configuration options for storage_xen .......................................... 3057.18. Description of configuration options for zadara .................................................. 3077.19. Description of configuration options for backups_ceph ....................................... 3097.20. Description of configuration options for backups_tsm ......................................... 3097.21. Description of configuration options for backups_swift ....................................... 310
OpenStack ConfigurationReference
October 23, 2013 havana
11
OpenStack Configuration OverviewOpenStack is a collection of open source project components that enable setting up cloudservices. Each component uses similar configuration techniques and a common frameworkfor INI file options.
This guide pulls together multiple references and configuration options for the followingOpenStack components:
• OpenStack Identity
• OpenStack Compute
• OpenStack Image Service
• OpenStack Networking
• OpenStack Dashboard
• OpenStack Object Storage
• OpenStack Block Storage
Document change historyThis version of the guide replaces and obsoletes all previous versions. The following tabledescribes the most recent changes:
Revision Date Summary of Changes
October 17, 2013 • Havana release.
August 16, 2013 • Moves Block Storage driver configuration information from the Block StorageAdministration Guide to this reference.
June 10, 2013 • Initial creation of Configuration Reference.
OpenStack ConfigurationReference
October 23, 2013 havana
1
1. OpenStack Identity
Table of ContentsIdentity Configuration Files ............................................................................................. 1Certificates for PKI .......................................................................................................... 2Configure the Identity Service with SSL ........................................................................... 4Using External Authentication with OpenStack Identity ................................................... 5Configuring OpenStack Identity for an LDAP backend ..................................................... 6Identity Sample Configuration Files ................................................................................. 8
The Identity service has several configuration options.
Identity Configuration Fileskeystone.conf The Identity Service /etc/keystone/keystone.conf
configuration file is an INI-format file with sections.
The [DEFAULT] section configures general configurationvalues.
Specific sections, such as the [sql] and [ec2] sections,configure individual services.
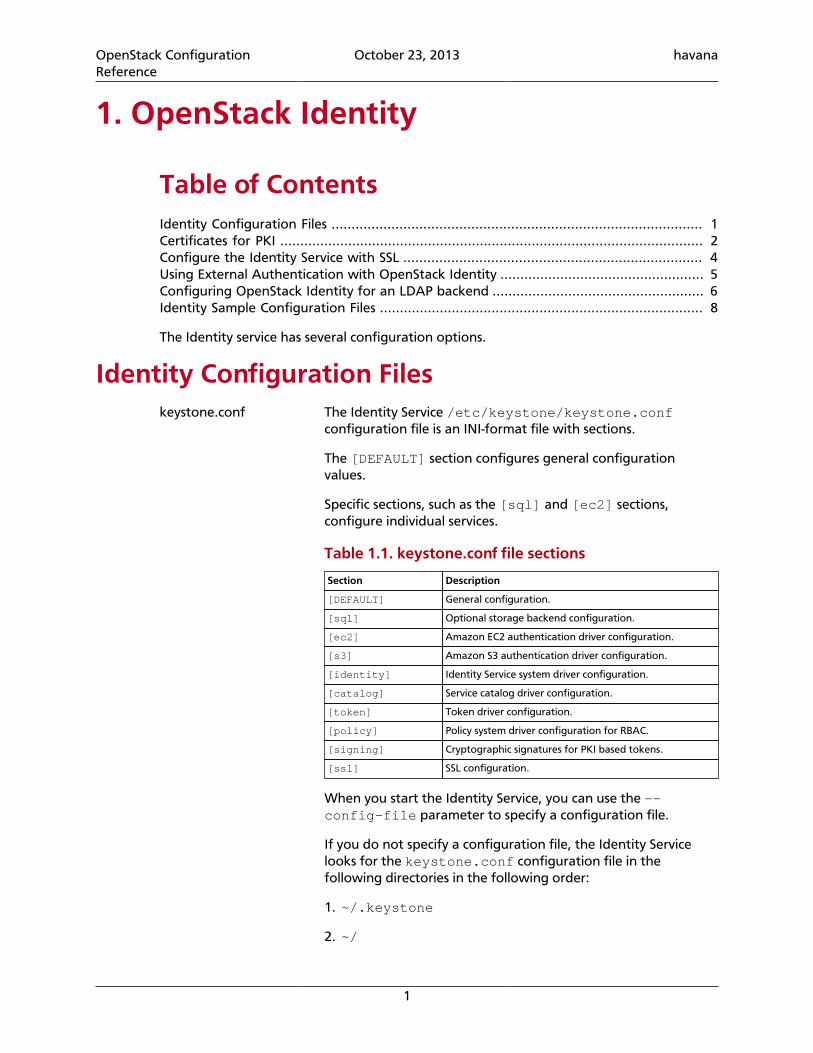
Table 1.1. keystone.conf file sections
Section Description
[DEFAULT] General configuration.
[sql] Optional storage backend configuration.
[ec2] Amazon EC2 authentication driver configuration.
[s3] Amazon S3 authentication driver configuration.
[identity] Identity Service system driver configuration.
[catalog] Service catalog driver configuration.
[token] Token driver configuration.
[policy] Policy system driver configuration for RBAC.
[signing] Cryptographic signatures for PKI based tokens.
[ssl] SSL configuration.
When you start the Identity Service, you can use the --config-file parameter to specify a configuration file.
If you do not specify a configuration file, the Identity Servicelooks for the keystone.conf configuration file in thefollowing directories in the following order:
1. ~/.keystone
2. ~/
OpenStack ConfigurationReference
October 23, 2013 havana
2
3. /etc/keystone
4. /etc
keystone-paste.ini The /etc/keystone/keystone-paste.ini file configuresthe Identity Service WSGI middleware pipeline.
Certificates for PKIPKI stands for Public Key Infrastructure. Tokens are documents, cryptographically signedusing the X509 standard. In order to work correctly token generation requires a public/private key pair. The public key must be signed in an X509 certificate, and the certificateused to sign it must be available as Certificate Authority (CA) certificate. These files can begenerated either using the keystone-manage utility, or externally generated. The files needto be in the locations specified by the top level Keystone configuration file as specified inthe above section. Additionally, the private key should only be readable by the system userthat will run Keystone.
Warning
The certificates can be world readable, but the private key cannot be. Theprivate key should only be readable by the account that is going to sign tokens.When generating files with the keystone-mange pki_setup command, yourbest option is to run as the pki user. If you run nova-manage as root, you canappend --keystone-user and --keystone-group parameters to set the usernameand group keystone is going to run under.
The values that specify where to read the certificates are under the [signing] section ofthe configuration file. The configuration values are:
• token_format - Determines the algorithm used to generate tokens. Can be eitherUUID or PKI. Defaults to PKI.
• certfile - Location of certificate used to verify tokens. Default is /etc/keystone/ssl/certs/signing_cert.pem.
• keyfile - Location of private key used to sign tokens. Default is /etc/keystone/ssl/private/signing_key.pem.
• ca_certs - Location of certificate for the authority that issued the above certificate.Default is /etc/keystone/ssl/certs/ca.pem.
• key_size - Default is 1024.
• valid_days - Default is 3650.
• ca_password - Password required to read the ca_file. Default is None.
If token_format=UUID, a typical token will look like53f7f6ef0cc344b5be706bcc8b1479e1. If token_format=PKI, a typical token willbe a much longer string, e.g.:
MIIKtgYJKoZIhvcNAQcCoIIKpzCCCqMCAQExCTAHBgUrDgMCGjCCCY8GCSqGSIb3DQEHAaCCCYAEggl8eyJhY2Nlc3MiOiB7InRva2VuIjogeyJpc3N1ZWRfYXQiOiAiMjAxMy0wNS0zMFQxNTo1MjowNi43MzMxOTgiLCAiZXhwaXJlcyI6ICIyMDEzLTA1LTMxVDE1OjUyOjA2WiIsICJpZCI6ICJwbGFjZWhvbGRlciIsICJ0ZW5hbnQiOiB7ImRlc2NyaXB0aW9uIjogbnVs

OpenStack ConfigurationReference
October 23, 2013 havana
3
bCwgImVuYWJsZWQiOiB0cnVlLCAiaWQiOiAiYzJjNTliNGQzZDI4NGQ4ZmEwOWYxNjljYjE4MDBlMDYiLCAibmFtZSI6ICJkZW1vIn19LCAic2VydmljZUNhdGFsb2ciOiBbeyJlbmRwb2ludHMiOiBbeyJhZG1pblVSTCI6ICJodHRwOi8vMTkyLjE2OC4yNy4xMDA6ODc3NC92Mi9jMmM1OWI0ZDNkMjg0ZDhmYTA5ZjE2OWNiMTgwMGUwNiIsICJyZWdpb24iOiAiUmVnaW9uT25lIiwgImludGVybmFsVVJMIjogImh0dHA6Ly8xOTIuMTY4LjI3LjEwMDo4Nzc0L3YyL2MyYzU5YjRkM2QyODRkOGZhMDlmMTY5Y2IxODAwZTA2IiwgImlkIjogIjFmYjMzYmM5M2Y5ODRhNGNhZTk3MmViNzcwOTgzZTJlIiwgInB1YmxpY1VSTCI6ICJodHRwOi8vMTkyLjE2OC4yNy4xMDA6ODc3NC92Mi9jMmM1OWI0ZDNkMjg0ZDhmYTA5ZjE2OWNiMTgwMGUwNiJ9XSwgImVuZHBvaW50c19saW5rcyI6IFtdLCAidHlwZSI6ICJjb21wdXRlIiwgIm5hbWUiOiAibm92YSJ9LCB7ImVuZHBvaW50cyI6IFt7ImFkbWluVVJMIjogImh0dHA6Ly8xOTIuMTY4LjI3LjEwMDozMzMzIiwgInJlZ2lvbiI6ICJSZWdpb25PbmUiLCAiaW50ZXJuYWxVUkwiOiAiaHR0cDovLzE5Mi4xNjguMjcuMTAwOjMzMzMiLCAiaWQiOiAiN2JjMThjYzk1NWFiNDNkYjhmMGU2YWNlNDU4NjZmMzAiLCAicHVibGljVVJMIjogImh0dHA6Ly8xOTIuMTY4LjI3LjEwMDozMzMzIn1dLCAiZW5kcG9pbnRzX2xpbmtzIjogW10sICJ0eXBlIjogInMzIiwgIm5hbWUiOiAiczMifSwgeyJlbmRwb2ludHMiOiBbeyJhZG1pblVSTCI6ICJodHRwOi8vMTkyLjE2OC4yNy4xMDA6OTI5MiIsICJyZWdpb24iOiAiUmVnaW9uT25lIiwgImludGVybmFsVVJMIjogImh0dHA6Ly8xOTIuMTY4LjI3LjEwMDo5MjkyIiwgImlkIjogIjczODQzNTJhNTQ0MjQ1NzVhM2NkOTVkN2E0YzNjZGY1IiwgInB1YmxpY1VSTCI6ICJodHRwOi8vMTkyLjE2OC4yNy4xMDA6OTI5MiJ9XSwgImVuZHBvaW50c19saW5rcyI6IFtdLCAidHlwZSI6ICJpbWFnZSIsICJuYW1lIjogImdsYW5jZSJ9LCB7ImVuZHBvaW50cyI6IFt7ImFkbWluVVJMIjogImh0dHA6Ly8xOTIuMTY4LjI3LjEwMDo4Nzc2L3YxL2MyYzU5YjRkM2QyODRkOGZhMDlmMTY5Y2IxODAwZTA2IiwgInJlZ2lvbiI6ICJSZWdpb25PbmUiLCAiaW50ZXJuYWxVUkwiOiAiaHR0cDovLzE5Mi4xNjguMjcuMTAwOjg3NzYvdjEvYzJjNTliNGQzZDI4NGQ4ZmEwOWYxNjljYjE4MDBlMDYiLCAiaWQiOiAiMzQ3ZWQ2ZThjMjkxNGU1MGFlMmJiNjA2YWQxNDdjNTQiLCAicHVibGljVVJMIjogImh0dHA6Ly8xOTIuMTY4LjI3LjEwMDo4Nzc2L3YxL2MyYzU5YjRkM2QyODRkOGZhMDlmMTY5Y2IxODAwZTA2In1dLCAiZW5kcG9pbnRzX2xpbmtzIjogW10sICJ0eXBlIjogInZvbHVtZSIsICJuYW1lIjogImNpbmRlciJ9LCB7ImVuZHBvaW50cyI6IFt7ImFkbWluVVJMIjogImh0dHA6Ly8xOTIuMTY4LjI3LjEwMDo4NzczL3NlcnZpY2VzL0FkbWluIiwgInJlZ2lvbiI6ICJSZWdpb25PbmUiLCAiaW50ZXJuYWxVUkwiOiAiaHR0cDovLzE5Mi4xNjguMjcuMTAwOjg3NzMvc2VydmljZXMvQ2xvdWQiLCAiaWQiOiAiMmIwZGMyYjNlY2U4NGJjYWE1NDAzMDMzNzI5YzY3MjIiLCAicHVibGljVVJMIjogImh0dHA6Ly8xOTIuMTY4LjI3LjEwMDo4NzczL3NlcnZpY2VzL0Nsb3VkIn1dLCAiZW5kcG9pbnRzX2xpbmtzIjogW10sICJ0eXBlIjogImVjMiIsICJuYW1lIjogImVjMiJ9LCB7ImVuZHBvaW50cyI6IFt7ImFkbWluVVJMIjogImh0dHA6Ly8xOTIuMTY4LjI3LjEwMDozNTM1Ny92Mi4wIiwgInJlZ2lvbiI6ICJSZWdpb25PbmUiLCAiaW50ZXJuYWxVUkwiOiAiaHR0cDovLzE5Mi4xNjguMjcuMTAwOjUwMDAvdjIuMCIsICJpZCI6ICJiNTY2Y2JlZjA2NjQ0ZmY2OWMyOTMxNzY2Yjc5MTIyOSIsICJwdWJsaWNVUkwiOiAiaHR0cDovLzE5Mi4xNjguMjcuMTAwOjUwMDAvdjIuMCJ9XSwgImVuZHBvaW50c19saW5rcyI6IFtdLCAidHlwZSI6ICJpZGVudGl0eSIsICJuYW1lIjogImtleXN0b25lIn1dLCAidXNlciI6IHsidXNlcm5hbWUiOiAiZGVtbyIsICJyb2xlc19saW5rcyI6IFtdLCAiaWQiOiAiZTVhMTM3NGE4YTRmNDI4NWIzYWQ3MzQ1MWU2MDY4YjEiLCAicm9sZXMiOiBbeyJuYW1lIjogImFub3RoZXJyb2xlIn0sIHsibmFtZSI6ICJNZW1iZXIifV0sICJuYW1lIjogImRlbW8ifSwgIm1ldGFkYXRhIjogeyJpc19hZG1pbiI6IDAsICJyb2xlcyI6IFsiYWRiODM3NDVkYzQzNGJhMzk5ODllNjBjOTIzYWZhMjgiLCAiMzM2ZTFiNjE1N2Y3NGFmZGJhNWUwYTYwMWUwNjM5MmYiXX19fTGB-zCB-AIBATBcMFcxCzAJBgNVBAYTAlVTMQ4wDAYDVQQIEwVVbnNldDEOMAwGA1UEBxMFVW5zZXQxDjAMBgNVBAoTBVVuc2V0MRgwFgYDVQQDEw93d3cuZXhhbXBsZS5jb20CAQEwBwYFKw4DAhowDQYJKoZIhvcNAQEBBQAEgYCAHLpsEs2RnouriuiCgFayIqCssK3SVdhOMINiuJtqv0sE-wBDFiEj-Prcudqlz-n+6q7VgV4mwMPszz39-rwp+P5l4AjrJasUm7FrO-4l02tPLaaZXU1gBQ1jUG5e5aL5jPDP08HbCWuX6wr-QQQBSrWY8lF3HrTcJT23sZIleg==
Sign certificate issued by External CAYou may use a signing certificate issued by an external CA instead of generated bykeystone-manage. However, certificate issued by external CA must satisfy the followingconditions:
• all certificate and key files must be in Privacy Enhanced Mail (PEM) format
• private key files must not be protected by a password
When using signing certificate issued by an external CA, you do not need to specifykey_size, valid_days, and ca_password as they will be ignored.
The basic workflow for using a signing certificate issued by an external CA involves:
1. Request Signing Certificate from External CA
2. Convert certificate and private key to PEM if needed
3. Install External Signing Certificate
Request a signing certificate from external CAOne way to request a signing certificate from an external CA is to first generate a PKCS #10Certificate Request Syntax (CRS) using OpenSSL CLI.
First create a certificate request configuration file (e.g. cert_req.conf):
[ req ]default_bits = 1024

OpenStack ConfigurationReference
October 23, 2013 havana
4
default_keyfile = keystonekey.pemdefault_md = sha1
prompt = nodistinguished_name = distinguished_name
[ distinguished_name ]countryName = USstateOrProvinceName = CAlocalityName = SunnyvaleorganizationName = OpenStackorganizationalUnitName = KeystonecommonName = Keystone SigningemailAddress = [email protected]
Then generate a CRS with OpenSSL CLI. Do not encrypt the generated private key. Mustuse the -nodes option.
For example:
$ openssl req -newkey rsa:1024 -keyout signing_key.pem -keyform PEM \ -out signing_cert_req.pem -outform PEM -config cert_req.conf -nodes
If everything is successfully, you should end up with signing_cert_req.pem andsigning_key.pem. Send signing_cert_req.pem to your CA to request a tokensigning certificate and make sure to ask the certificate to be in PEM format. Also, make sureyour trusted CA certificate chain is also in PEM format.
Install an external signing certificateAssuming you have the following already:
• signing_cert.pem - (Keystone token) signing certificate in PEM format
• signing_key.pem - corresponding (non-encrypted) private key in PEM format
• cacert.pem - trust CA certificate chain in PEM format
Copy the above to your certificate directory. For example:
# mkdir -p /etc/keystone/ssl/certs# cp signing_cert.pem /etc/keystone/ssl/certs/# cp signing_key.pem /etc/keystone/ssl/certs/# cp cacert.pem /etc/keystone/ssl/certs/# chmod -R 700 /etc/keystone/ssl/certs
Note
Make sure the certificate directory is only accessible by root.
If your certificate directory path is different from the default /etc/keystone/ssl/certs, make sure it is reflected in the [signing] section of the configuration file.
Configure the Identity Service with SSLYou can configure the Identity Service to support 2-way SSL.
You must obtain the x509 certificates externally and configure them.
OpenStack ConfigurationReference
October 23, 2013 havana
5
The Identity Service provides a set of sample certificates in the examples/pki/certs andexamples/pki/private directories:
Certificate types
cacert.pem Certificate Authority chain to validate against.
ssl_cert.pem Public certificate for Identity Service server.
middleware.pem Public and private certificate for Identity Servicemiddleware/client.
cakey.pem Private key for the CA.
ssl_key.pem Private key for the Identity Service server.
Note
You can choose names for these certificates. You can also combine the public/private keys in the same file, if you wish. These certificates are provided as anexample.
SSL configurationTo enable SSL with client authentication, modify the [ssl] section in the etc/keystone.conf file. The following SSL configuration example uses the included samplecertificates:
[ssl]enable = Truecertfile = <path to keystone.pem>keyfile = <path to keystonekey.pem>ca_certs = <path to ca.pem>cert_required = True
Options
• enable. True enables SSL. Default is False.
• certfile. Path to the Identity Service public certificate file.
• keyfile. Path to the Identity Service private certificate file. If you include the privatekey in the certfile, you can omit the keyfile.
• ca_certs. Path to the CA trust chain.
• cert_required. Requires client certificate. Default is False.
Using External Authentication with OpenStackIdentity
When Keystone is executed in apache-httpd it is possible to use external authenticationmethods different from the authentication provided by the identity store backend.For example, this makes possible to use a SQL identity backend together with X.509authentication, Kerberos, etc. instead of using the username/password combination.
OpenStack ConfigurationReference
October 23, 2013 havana
6
Using HTTPD authentication
Webservers like Apache HTTP support many methods of authentication. Keystone canprofit from this feature and let the authentication be done in the webserver, that willpass down the authenticated user to Keystone using the REMOTE_USER environmentvariable. This user must exist in advance in the identity backend so as to get a token fromthe controller. To use this method, OpenStack Identity should be running on apache-httpd.
Using X.509
The following snippet for the Apache conf will authenticate the user based on a valid X.509certificate from a known CA:
<VirtualHost _default_:5000> SSLEngine on SSLCertificateFile /etc/ssl/certs/ssl.cert SSLCertificateKeyFile /etc/ssl/private/ssl.key
SSLCACertificatePath /etc/ssl/allowed_cas SSLCARevocationPath /etc/ssl/allowed_cas SSLUserName SSL_CLIENT_S_DN_CN SSLVerifyClient require SSLVerifyDepth 10
(...) </VirtualHost>
Configuring OpenStack Identity for an LDAPbackend
As an alternative to the SQL Database backing store, Identity can use a directory server toprovide the Identity service. An example schema for AcmeExample would look like this:
dn: dc=AcmeExample,dc=orgdc: AcmeExampleobjectClass: dcObjectobjectClass: organizationalUnitou: AcmeExample
dn: ou=Groups,dc=AcmeExample,dc=orgobjectClass: topobjectClass: organizationalUnitou: groups
dn: ou=Users,dc=AcmeExample,dc=orgobjectClass: topobjectClass: organizationalUnitou: users
dn: ou=Roles,dc=AcmeExample,dc=orgobjectClass: topobjectClass: organizationalUnitou: roles
OpenStack ConfigurationReference
October 23, 2013 havana
7
The corresponding entries in the keystone.conf configuration file are:
[ldap]url = ldap://localhostuser = dc=Manager,dc=AcmeExample,dc=orgpassword = badpasswordsuffix = dc=AcmeExample,dc=orguse_dumb_member = Falseallow_subtree_delete = False
user_tree_dn = ou=Users,dc=AcmeExample,dc=comuser_objectclass = inetOrgPerson
tenant_tree_dn = ou=Groups,dc=AcmeExample,dc=comtenant_objectclass = groupOfNames
role_tree_dn = ou=Roles,dc=AcmeExample,dc=comrole_objectclass = organizationalRole
The default object classes and attributes are intentionally simplistic. They reflect thecommon standard objects according to the LDAP RFCs. However, in a live deployment, thecorrect attributes can be overridden to support a preexisting, more complex schema. Forexample, in the user object, the objectClass posixAccount from RFC2307 is very common.If this is the underlying objectclass, then the uid field should probably be uidNumber andusername field either uid or cn. To change these two fields, the corresponding entries in theKeystone configuration file are:
[ldap]user_id_attribute = uidNumberuser_name_attribute = cn
There is a set of allowed actions per object type that you can modify depending on yourspecific deployment. For example, the users are managed by another tool and you haveonly read access, in such case the configuration is:
[ldap]user_allow_create = Falseuser_allow_update = Falseuser_allow_delete = False
tenant_allow_create = Truetenant_allow_update = Truetenant_allow_delete = True
role_allow_create = Truerole_allow_update = Truerole_allow_delete = True
There are some configuration options for filtering users, tenants and roles, if the backend isproviding too much output, in such case the configuration will look like:
[ldap]user_filter = (memberof=CN=acme-users,OU=workgroups,DC=AcmeExample,DC=com)tenant_filter =role_filter =
OpenStack ConfigurationReference
October 23, 2013 havana
8
In case that the directory server does not have an attribute enabled of type boolean for theuser, there are several configuration parameters that can be used to extract the value froman integer attribute like in Active Directory:
[ldap]user_enabled_attribute = userAccountControluser_enabled_mask = 2user_enabled_default = 512
In this case the attribute is an integer and the enabled attribute is listed in bit 1, so theif the mask configured user_enabled_mask is different from 0, it gets the value from thefield user_enabled_attribute and it makes an ADD operation with the value indicated onuser_enabled_mask and if the value matches the mask then the account is disabled.
It also saves the value without mask to the user identity in the attribute enabled_nomask.This is needed in order to set it back in case that we need to change it to enable/disable auser because it contains more information than the status like password expiration. Lastsetting user_enabled_mask is needed in order to create a default value on the integerattribute (512 = NORMAL ACCOUNT on AD)
In case of Active Directory the classes and attributes could not match the specified classes inthe LDAP module so you can configure them like so:
[ldap]user_objectclass = personuser_id_attribute = cnuser_name_attribute = cnuser_mail_attribute = mailuser_enabled_attribute = userAccountControluser_enabled_mask = 2user_enabled_default = 512user_attribute_ignore = tenant_id,tenantstenant_objectclass = groupOfNamestenant_id_attribute = cntenant_member_attribute = membertenant_name_attribute = outenant_desc_attribute = descriptiontenant_enabled_attribute = extensionNametenant_attribute_ignore =role_objectclass = organizationalRolerole_id_attribute = cnrole_name_attribute = ourole_member_attribute = roleOccupantrole_attribute_ignore =
Identity Sample Configuration Files• etc/keystone.conf.sample
[DEFAULT]# A "shared secret" between keystone and other openstack services# admin_token = ADMIN
# The IP address of the network interface to listen on# bind_host = 0.0.0.0
OpenStack ConfigurationReference
October 23, 2013 havana
9
# The port number which the public service listens on# public_port = 5000
# The port number which the public admin listens on# admin_port = 35357
# The base endpoint URLs for keystone that are advertised to clients# (NOTE: this does NOT affect how keystone listens for connections)# public_endpoint = http://localhost:%(public_port)s/# admin_endpoint = http://localhost:%(admin_port)s/
# The port number which the OpenStack Compute service listens on# compute_port = 8774
# Path to your policy definition containing identity actions# policy_file = policy.json
# Rule to check if no matching policy definition is found# FIXME(dolph): This should really be defined as [policy] default_rule# policy_default_rule = admin_required
# Role for migrating membership relationships# During a SQL upgrade, the following values will be used to create a new role# that will replace records in the user_tenant_membership table with explicit# role grants. After migration, the member_role_id will be used in the API# add_user_to_project, and member_role_name will be ignored.# member_role_id = 9fe2ff9ee4384b1894a90878d3e92bab# member_role_name = _member_
# enforced by optional sizelimit middleware (keystone.middleware:RequestBodySizeLimiter)# max_request_body_size = 114688
# limit the sizes of user & tenant ID/names# max_param_size = 64
# similar to max_param_size, but provides an exception for token values# max_token_size = 8192
# === Logging Options ===# Print debugging output# (includes plaintext request logging, potentially including passwords)# debug = False
# Print more verbose output# verbose = False
# Name of log file to output to. If not set, logging will go to stdout.# log_file = keystone.log
# The directory to keep log files in (will be prepended to --logfile)# log_dir = /var/log/keystone
# Use syslog for logging.# use_syslog = False
# syslog facility to receive log lines# syslog_log_facility = LOG_USER
OpenStack ConfigurationReference
October 23, 2013 havana
10
# If this option is specified, the logging configuration file specified is# used and overrides any other logging options specified. Please see the# Python logging module documentation for details on logging configuration# files.# log_config = logging.conf
# A logging.Formatter log message format string which may use any of the# available logging.LogRecord attributes.# log_format = %(asctime)s %(levelname)8s [%(name)s] %(message)s
# Format string for %(asctime)s in log records.# log_date_format = %Y-%m-%d %H:%M:%S
# onready allows you to send a notification when the process is ready to serve# For example, to have it notify using systemd, one could set shell command:# onready = systemd-notify --ready# or a module with notify() method:# onready = keystone.common.systemd
# === Notification Options ===
# Notifications can be sent when users or projects are created, updated or# deleted. There are three methods of sending notifications: logging (via the# log_file directive), rpc (via a message queue) and no_op (no notifications# sent, the default)
# notification_driver can be defined multiple times# Do nothing driver (the default)# notification_driver = keystone.openstack.common.notifier.no_op_notifier# Logging driver example (not enabled by default)# notification_driver = keystone.openstack.common.notifier.log_notifier# RPC driver example (not enabled by default)# notification_driver = keystone.openstack.common.notifier.rpc_notifier
# Default notification level for outgoing notifications# default_notification_level = INFO
# Default publisher_id for outgoing notifications; included in the payload.# default_publisher_id =
# AMQP topics to publish to when using the RPC notification driver.# Multiple values can be specified by separating with commas.# The actual topic names will be %s.%(default_notification_level)s# notification_topics = notifications
# === RPC Options ===
# For Keystone, these options apply only when the RPC notification driver is# used.
# The messaging module to use, defaults to kombu.# rpc_backend = keystone.openstack.common.rpc.impl_kombu
# Size of RPC thread pool# rpc_thread_pool_size = 64
# Size of RPC connection pool
OpenStack ConfigurationReference
October 23, 2013 havana
11
# rpc_conn_pool_size = 30
# Seconds to wait for a response from call or multicall# rpc_response_timeout = 60
# Seconds to wait before a cast expires (TTL). Only supported by impl_zmq.# rpc_cast_timeout = 30
# Modules of exceptions that are permitted to be recreated upon receiving# exception data from an rpc call.# allowed_rpc_exception_modules = keystone.openstack.common.exception,nova.exception,cinder.exception,exceptions
# If True, use a fake RabbitMQ provider# fake_rabbit = False
# AMQP exchange to connect to if using RabbitMQ or Qpid# control_exchange = openstack
[sql]# The SQLAlchemy connection string used to connect to the database# connection = sqlite:///keystone.db
# the timeout before idle sql connections are reaped# idle_timeout = 200
[identity]# driver = keystone.identity.backends.sql.Identity
# This references the domain to use for all Identity API v2 requests (which are# not aware of domains). A domain with this ID will be created for you by# keystone-manage db_sync in migration 008. The domain referenced by this ID# cannot be deleted on the v3 API, to prevent accidentally breaking the v2 API.# There is nothing special about this domain, other than the fact that it must# exist to order to maintain support for your v2 clients.# default_domain_id = default## A subset (or all) of domains can have their own identity driver, each with# their own partial configuration file in a domain configuration directory.# Only values specific to the domain need to be placed in the domain specific# configuration file. This feature is disabled by default; set# domain_specific_drivers_enabled to True to enable.# domain_specific_drivers_enabled = False# domain_config_dir = /etc/keystone/domains
# Maximum supported length for user passwords; decrease to improve performance.# max_password_length = 4096
[credential]# driver = keystone.credential.backends.sql.Credential
[trust]# driver = keystone.trust.backends.sql.Trust
OpenStack ConfigurationReference
October 23, 2013 havana
12
# delegation and impersonation features can be optionally disabled# enabled = True
[os_inherit]# role-assignment inheritance to projects from owning domain can be# optionally enabled# enabled = False
[catalog]# dynamic, sql-based backend (supports API/CLI-based management commands)# driver = keystone.catalog.backends.sql.Catalog
# static, file-based backend (does *NOT* support any management commands)# driver = keystone.catalog.backends.templated.TemplatedCatalog
# template_file = default_catalog.templates
[endpoint_filter]# extension for creating associations between project and endpoints in order to# provide a tailored catalog for project-scoped token requests.# driver = keystone.contrib.endpoint_filter.backends.sql.EndpointFilter# return_all_endpoints_if_no_filter = True
[token]# Provides token persistence.# driver = keystone.token.backends.sql.Token
# Controls the token construction, validation, and revocation operations.# Core providers are keystone.token.providers.[pki|uuid].Provider# provider =
# Amount of time a token should remain valid (in seconds)# expiration = 86400
# External auth mechanisms that should add bind information to token.# eg kerberos, x509# bind =
# Enforcement policy on tokens presented to keystone with bind information.# One of disabled, permissive, strict, required or a specifically required bind# mode e.g. kerberos or x509 to require binding to that authentication.# enforce_token_bind = permissive
# Token specific caching toggle. This has no effect unless the global caching# option is set to True# caching = True
# Token specific cache time-to-live (TTL) in seconds.# cache_time =
# Revocation-List specific cache time-to-live (TTL) in seconds.# revocation_cache_time = 3600
[cache]# Global cache functionality toggle.# enabled = False
OpenStack ConfigurationReference
October 23, 2013 havana
13
# Prefix for building the configuration dictionary for the cache region. This# should not need to be changed unless there is another dogpile.cache region# with the same configuration name# config_prefix = cache.keystone
# Default TTL, in seconds, for any cached item in the dogpile.cache region.# This applies to any cached method that doesn't have an explicit cache# expiration time defined for it.# expiration_time = 600
# Dogpile.cache backend module. It is recommended that Memcache# (dogpile.cache.memcache) or Redis (dogpile.cache.redis) be used in production# deployments. Small workloads (single process) like devstack can use the# dogpile.cache.memory backend.# backend = keystone.common.cache.noop
# Arguments supplied to the backend module. Specify this option once per# argument to be passed to the dogpile.cache backend.# Example format: <argname>:<value># backend_argument =
# Proxy Classes to import that will affect the way the dogpile.cache backend# functions. See the dogpile.cache documentation on changing-backend-behavior.# Comma delimited list e.g. my.dogpile.proxy.Class, my.dogpile.proxyClass2# proxies =
# Use a key-mangling function (sha1) to ensure fixed length cache-keys. This# is toggle-able for debugging purposes, it is highly recommended to always# leave this set to True.# use_key_mangler = True
# Extra debugging from the cache backend (cache keys, get/set/delete/etc calls)# This is only really useful if you need to see the specific cache-backend# get/set/delete calls with the keys/values. Typically this should be left# set to False.# debug_cache_backend = False
[policy]# driver = keystone.policy.backends.sql.Policy
[ec2]# driver = keystone.contrib.ec2.backends.kvs.Ec2
[assignment]# driver =
# Assignment specific caching toggle. This has no effect unless the global# caching option is set to True# caching = True
# Assignment specific cache time-to-live (TTL) in seconds.# cache_time =
[oauth1]# driver = keystone.contrib.oauth1.backends.sql.OAuth1
OpenStack ConfigurationReference
October 23, 2013 havana
14
# The Identity service may include expire attributes.# If no such attribute is included, then the token lasts indefinitely.# Specify how quickly the request token will expire (in seconds)# request_token_duration = 28800# Specify how quickly the access token will expire (in seconds)# access_token_duration = 86400
[ssl]#enable = True#certfile = /etc/keystone/ssl/certs/keystone.pem#keyfile = /etc/keystone/ssl/private/keystonekey.pem#ca_certs = /etc/keystone/ssl/certs/ca.pem#ca_key = /etc/keystone/ssl/private/cakey.pem#key_size = 1024#valid_days = 3650#cert_required = False#cert_subject = /C=US/ST=Unset/L=Unset/O=Unset/CN=localhost
[signing]# Deprecated in favor of provider in the [token] section# Allowed values are PKI or UUID#token_format =
#certfile = /etc/keystone/ssl/certs/signing_cert.pem#keyfile = /etc/keystone/ssl/private/signing_key.pem#ca_certs = /etc/keystone/ssl/certs/ca.pem#ca_key = /etc/keystone/ssl/private/cakey.pem#key_size = 2048#valid_days = 3650#cert_subject = /C=US/ST=Unset/L=Unset/O=Unset/CN=www.example.com
[ldap]# url = ldap://localhost# user = dc=Manager,dc=example,dc=com# password = None# suffix = cn=example,cn=com# use_dumb_member = False# allow_subtree_delete = False# dumb_member = cn=dumb,dc=example,dc=com
# Maximum results per page; a value of zero ('0') disables paging (default)# page_size = 0
# The LDAP dereferencing option for queries. This can be either 'never',# 'searching', 'always', 'finding' or 'default'. The 'default' option falls# back to using default dereferencing configured by your ldap.conf.# alias_dereferencing = default
# The LDAP scope for queries, this can be either 'one'# (onelevel/singleLevel) or 'sub' (subtree/wholeSubtree)# query_scope = one
# user_tree_dn = ou=Users,dc=example,dc=com# user_filter =# user_objectclass = inetOrgPerson# user_id_attribute = cn# user_name_attribute = sn# user_mail_attribute = email# user_pass_attribute = userPassword# user_enabled_attribute = enabled
OpenStack ConfigurationReference
October 23, 2013 havana
15
# user_enabled_mask = 0# user_enabled_default = True# user_attribute_ignore = default_project_id,tenants# user_default_project_id_attribute =# user_allow_create = True# user_allow_update = True# user_allow_delete = True# user_enabled_emulation = False# user_enabled_emulation_dn =
# tenant_tree_dn = ou=Projects,dc=example,dc=com# tenant_filter =# tenant_objectclass = groupOfNames# tenant_domain_id_attribute = businessCategory# tenant_id_attribute = cn# tenant_member_attribute = member# tenant_name_attribute = ou# tenant_desc_attribute = desc# tenant_enabled_attribute = enabled# tenant_attribute_ignore =# tenant_allow_create = True# tenant_allow_update = True# tenant_allow_delete = True# tenant_enabled_emulation = False# tenant_enabled_emulation_dn =
# role_tree_dn = ou=Roles,dc=example,dc=com# role_filter =# role_objectclass = organizationalRole# role_id_attribute = cn# role_name_attribute = ou# role_member_attribute = roleOccupant# role_attribute_ignore =# role_allow_create = True# role_allow_update = True# role_allow_delete = True
# group_tree_dn =# group_filter =# group_objectclass = groupOfNames# group_id_attribute = cn# group_name_attribute = ou# group_member_attribute = member# group_desc_attribute = desc# group_attribute_ignore =# group_allow_create = True# group_allow_update = True# group_allow_delete = True
# ldap TLS options# if both tls_cacertfile and tls_cacertdir are set then# tls_cacertfile will be used and tls_cacertdir is ignored# valid options for tls_req_cert are demand, never, and allow# use_tls = False# tls_cacertfile =# tls_cacertdir =# tls_req_cert = demand
# Additional attribute mappings can be used to map ldap attributes to internal
OpenStack ConfigurationReference
October 23, 2013 havana
16
# keystone attributes. This allows keystone to fulfill ldap objectclass# requirements. An example to map the description and gecos attributes to a# user's name would be:# user_additional_attribute_mapping = description:name, gecos:name## domain_additional_attribute_mapping =# group_additional_attribute_mapping =# role_additional_attribute_mapping =# project_additional_attribute_mapping =# user_additional_attribute_mapping =
[auth]methods = external,password,token,oauth1#external = keystone.auth.plugins.external.ExternalDefaultpassword = keystone.auth.plugins.password.Passwordtoken = keystone.auth.plugins.token.Tokenoauth1 = keystone.auth.plugins.oauth1.OAuth
[paste_deploy]# Name of the paste configuration file that defines the available pipelinesconfig_file = keystone-paste.ini
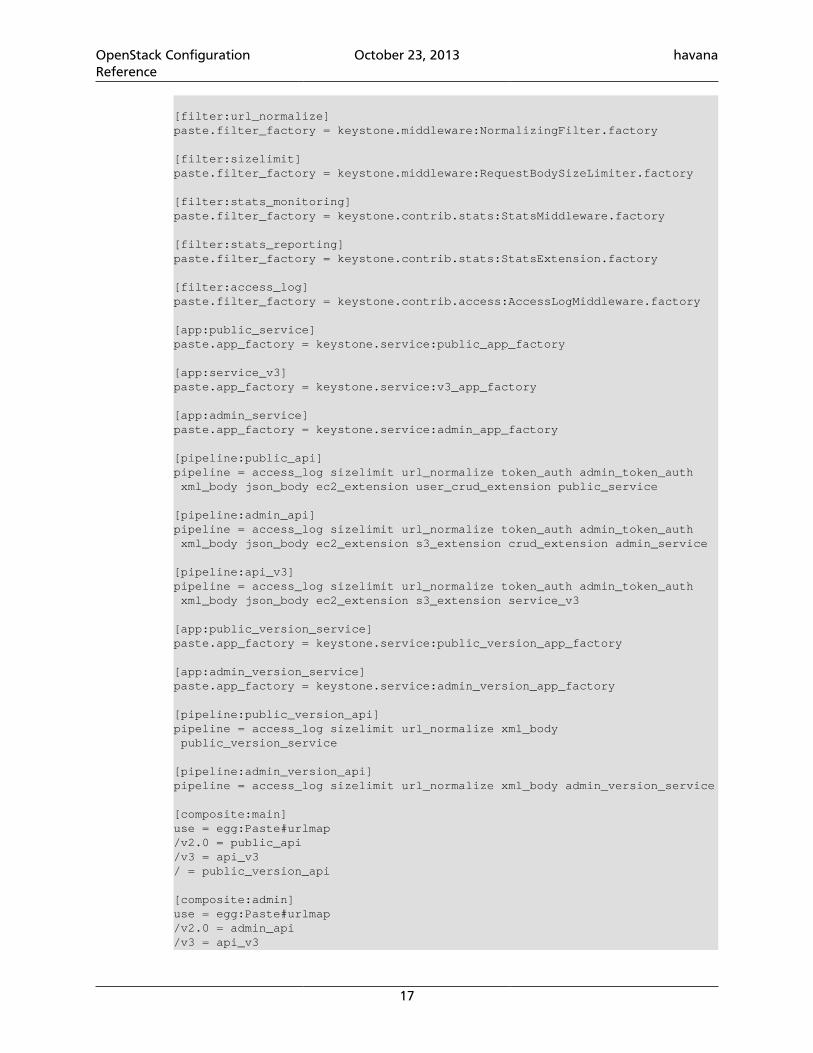
• etc/keystone-paste.ini
# Keystone PasteDeploy configuration file.
[filter:debug]paste.filter_factory = keystone.common.wsgi:Debug.factory
[filter:token_auth]paste.filter_factory = keystone.middleware:TokenAuthMiddleware.factory
[filter:admin_token_auth]paste.filter_factory = keystone.middleware:AdminTokenAuthMiddleware.factory
[filter:xml_body]paste.filter_factory = keystone.middleware:XmlBodyMiddleware.factory
[filter:json_body]paste.filter_factory = keystone.middleware:JsonBodyMiddleware.factory
[filter:user_crud_extension]paste.filter_factory = keystone.contrib.user_crud:CrudExtension.factory
[filter:crud_extension]paste.filter_factory = keystone.contrib.admin_crud:CrudExtension.factory
[filter:ec2_extension]paste.filter_factory = keystone.contrib.ec2:Ec2Extension.factory
[filter:oauth_extension]paste.filter_factory = keystone.contrib.oauth1.routers:OAuth1Extension.factory
[filter:s3_extension]paste.filter_factory = keystone.contrib.s3:S3Extension.factory
[filter:endpoint_filter_extension]paste.filter_factory = keystone.contrib.endpoint_filter.routers:EndpointFilterExtension.factory
OpenStack ConfigurationReference
October 23, 2013 havana
17
[filter:url_normalize]paste.filter_factory = keystone.middleware:NormalizingFilter.factory
[filter:sizelimit]paste.filter_factory = keystone.middleware:RequestBodySizeLimiter.factory
[filter:stats_monitoring]paste.filter_factory = keystone.contrib.stats:StatsMiddleware.factory
[filter:stats_reporting]paste.filter_factory = keystone.contrib.stats:StatsExtension.factory
[filter:access_log]paste.filter_factory = keystone.contrib.access:AccessLogMiddleware.factory
[app:public_service]paste.app_factory = keystone.service:public_app_factory
[app:service_v3]paste.app_factory = keystone.service:v3_app_factory
[app:admin_service]paste.app_factory = keystone.service:admin_app_factory
[pipeline:public_api]pipeline = access_log sizelimit url_normalize token_auth admin_token_auth xml_body json_body ec2_extension user_crud_extension public_service
[pipeline:admin_api]pipeline = access_log sizelimit url_normalize token_auth admin_token_auth xml_body json_body ec2_extension s3_extension crud_extension admin_service
[pipeline:api_v3]pipeline = access_log sizelimit url_normalize token_auth admin_token_auth xml_body json_body ec2_extension s3_extension service_v3
[app:public_version_service]paste.app_factory = keystone.service:public_version_app_factory
[app:admin_version_service]paste.app_factory = keystone.service:admin_version_app_factory
[pipeline:public_version_api]pipeline = access_log sizelimit url_normalize xml_body public_version_service
[pipeline:admin_version_api]pipeline = access_log sizelimit url_normalize xml_body admin_version_service
[composite:main]use = egg:Paste#urlmap/v2.0 = public_api/v3 = api_v3/ = public_version_api
[composite:admin]use = egg:Paste#urlmap/v2.0 = admin_api/v3 = api_v3
OpenStack ConfigurationReference
October 23, 2013 havana
18
/ = admin_version_api
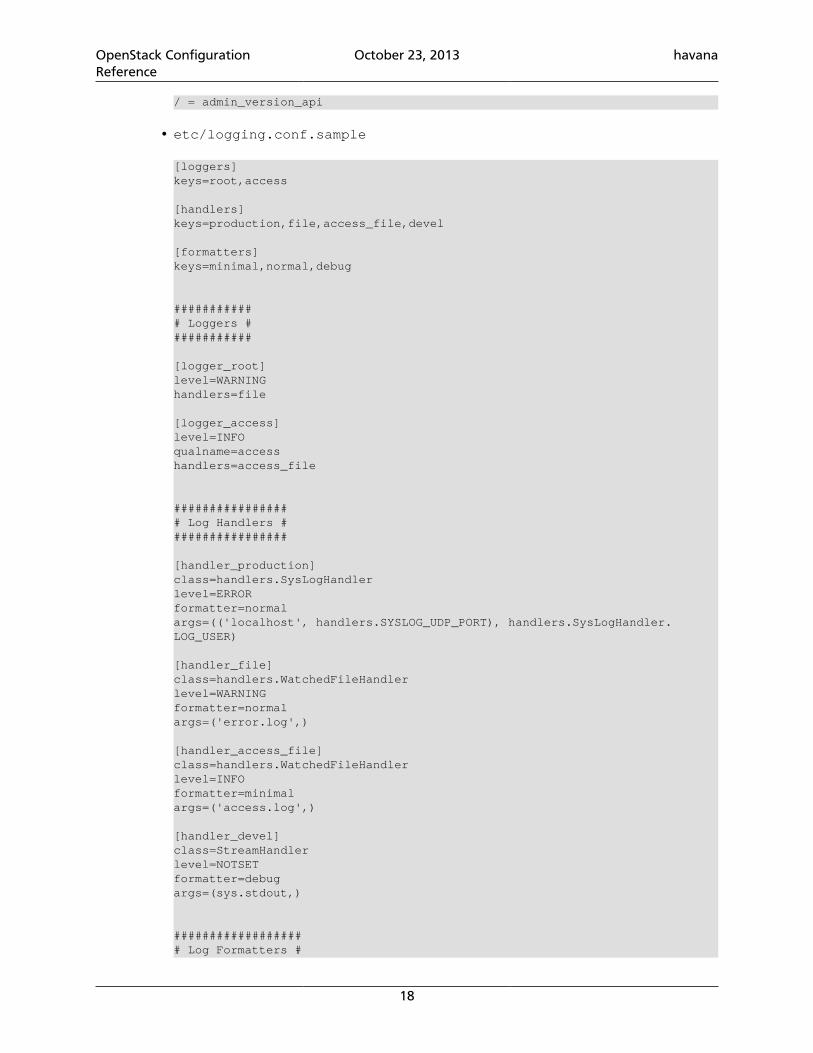
• etc/logging.conf.sample
[loggers]keys=root,access
[handlers]keys=production,file,access_file,devel
[formatters]keys=minimal,normal,debug
############ Loggers ############
[logger_root]level=WARNINGhandlers=file
[logger_access]level=INFOqualname=accesshandlers=access_file
################# Log Handlers #################
[handler_production]class=handlers.SysLogHandlerlevel=ERRORformatter=normalargs=(('localhost', handlers.SYSLOG_UDP_PORT), handlers.SysLogHandler.LOG_USER)
[handler_file]class=handlers.WatchedFileHandlerlevel=WARNINGformatter=normalargs=('error.log',)
[handler_access_file]class=handlers.WatchedFileHandlerlevel=INFOformatter=minimalargs=('access.log',)
[handler_devel]class=StreamHandlerlevel=NOTSETformatter=debugargs=(sys.stdout,)
################### Log Formatters #

OpenStack ConfigurationReference
October 23, 2013 havana
19
##################
[formatter_minimal]format=%(message)s
[formatter_normal]format=(%(name)s): %(asctime)s %(levelname)s %(message)s
[formatter_debug]format=(%(name)s): %(asctime)s %(levelname)s %(module)s %(funcName)s %(message)s
OpenStack ConfigurationReference
October 23, 2013 havana
20
2. OpenStack Compute
Table of ContentsPost-Installation Configuration ....................................................................................... 20Database Configuration ................................................................................................ 35Components Configuration ........................................................................................... 36Compute Configuration Files: nova.conf ...................................................................... 108
The OpenStack Compute service is a cloud computing fabric controller, the main part of anIaaS system. It can be used for hosting and manging cloud computing systems. This sectionprovides detail on all of the configuration options involved in Openstack Compute.
Post-Installation ConfigurationConfiguring your Compute installation involves many configuration files: the nova.conffile, the api-paste.ini file, and related Image and Identity management configurationfiles. This section contains the basics for a simple multi-node installation, but Computecan be configured many ways. You can find networking options and hypervisor optionsdescribed in separate chapters.
Setting Configuration Options in the nova.conf File
The configuration file nova.conf is installed in /etc/nova by default. A default set ofoptions are already configured in nova.conf when you install manually.
Create a nova group, so you can set permissions on the configuration file:
$ sudo addgroup nova
The nova.conf file should have its owner set to root:nova, and mode set to 0640,since the file could contain your MySQL server’s username and password. You also want toensure that the nova user belongs to the nova group.
$ sudo usermod -g nova nova$ chown -R username:nova /etc/nova$ chmod 640 /etc/nova/nova.conf
General Compute Configuration Overview
Most configuration information is available in the nova.conf configuration option file,which is in the /etc/nova directory.
You can use a particular configuration option file by using the option (nova.conf)parameter when running one of the nova-* services. This inserts configuration optiondefinitions from the given configuration file name, which may be useful for debugging orperformance tuning.
OpenStack ConfigurationReference
October 23, 2013 havana
21
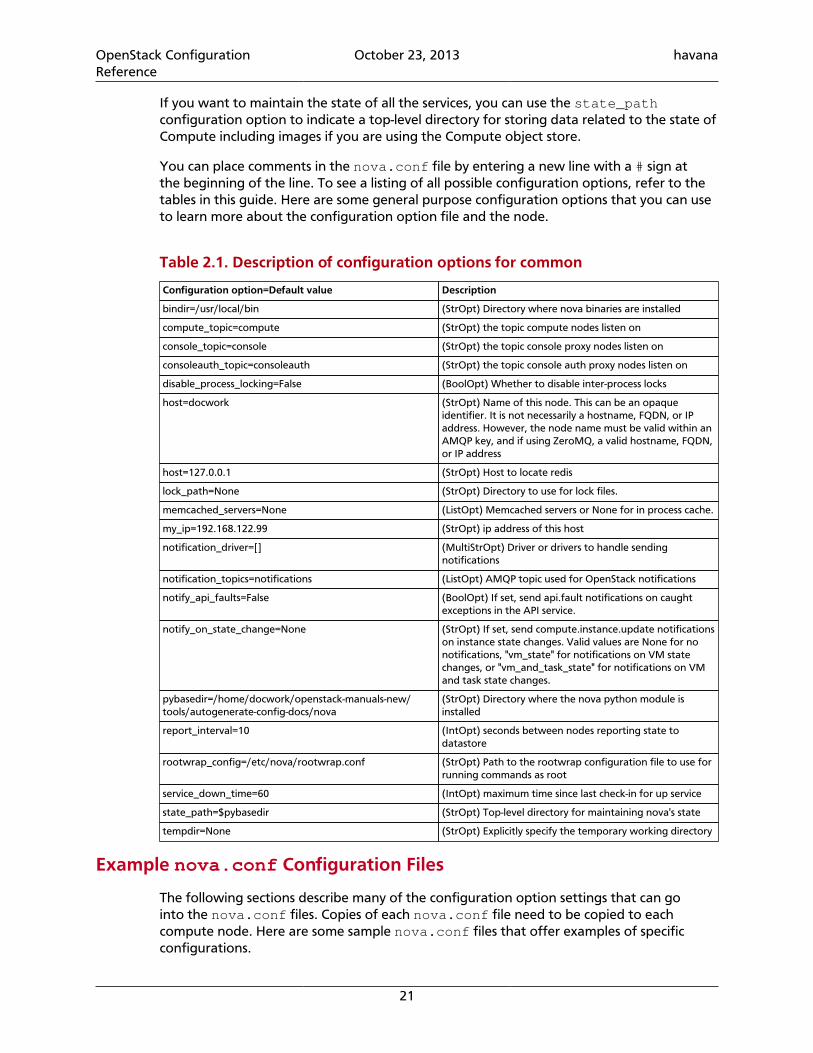
If you want to maintain the state of all the services, you can use the state_pathconfiguration option to indicate a top-level directory for storing data related to the state ofCompute including images if you are using the Compute object store.
You can place comments in the nova.conf file by entering a new line with a # sign atthe beginning of the line. To see a listing of all possible configuration options, refer to thetables in this guide. Here are some general purpose configuration options that you can useto learn more about the configuration option file and the node.
Table 2.1. Description of configuration options for common
Configuration option=Default value Description
bindir=/usr/local/bin (StrOpt) Directory where nova binaries are installed
compute_topic=compute (StrOpt) the topic compute nodes listen on
console_topic=console (StrOpt) the topic console proxy nodes listen on
consoleauth_topic=consoleauth (StrOpt) the topic console auth proxy nodes listen on
disable_process_locking=False (BoolOpt) Whether to disable inter-process locks
host=docwork (StrOpt) Name of this node. This can be an opaqueidentifier. It is not necessarily a hostname, FQDN, or IPaddress. However, the node name must be valid within anAMQP key, and if using ZeroMQ, a valid hostname, FQDN,or IP address
host=127.0.0.1 (StrOpt) Host to locate redis
lock_path=None (StrOpt) Directory to use for lock files.
memcached_servers=None (ListOpt) Memcached servers or None for in process cache.
my_ip=192.168.122.99 (StrOpt) ip address of this host
notification_driver=[] (MultiStrOpt) Driver or drivers to handle sendingnotifications
notification_topics=notifications (ListOpt) AMQP topic used for OpenStack notifications
notify_api_faults=False (BoolOpt) If set, send api.fault notifications on caughtexceptions in the API service.
notify_on_state_change=None (StrOpt) If set, send compute.instance.update notificationson instance state changes. Valid values are None for nonotifications, "vm_state" for notifications on VM statechanges, or "vm_and_task_state" for notifications on VMand task state changes.
pybasedir=/home/docwork/openstack-manuals-new/tools/autogenerate-config-docs/nova
(StrOpt) Directory where the nova python module isinstalled
report_interval=10 (IntOpt) seconds between nodes reporting state todatastore
rootwrap_config=/etc/nova/rootwrap.conf (StrOpt) Path to the rootwrap configuration file to use forrunning commands as root
service_down_time=60 (IntOpt) maximum time since last check-in for up service
state_path=$pybasedir (StrOpt) Top-level directory for maintaining nova's state
tempdir=None (StrOpt) Explicitly specify the temporary working directory
Example nova.conf Configuration Files
The following sections describe many of the configuration option settings that can gointo the nova.conf files. Copies of each nova.conf file need to be copied to eachcompute node. Here are some sample nova.conf files that offer examples of specificconfigurations.
OpenStack ConfigurationReference
October 23, 2013 havana
22
Small, private cloud
Here is a simple example nova.conf file for a small private cloud, with all the cloudcontroller services, database server, and messaging server on the same server. In thiscase, CONTROLLER_IP represents the IP address of a central server, BRIDGE_INTERFACErepresents the bridge such as br100, the NETWORK_INTERFACE represents an interface toyour VLAN setup, and passwords are represented as DB_PASSWORD_COMPUTE for yourCompute (nova) database password, and RABBIT PASSWORD represents the password toyour message queue installation.
[DEFAULT]
# LOGS/STATEverbose=Truelogdir=/var/log/novastate_path=/var/lib/novalock_path=/var/lock/novarootwrap_config=/etc/nova/rootwrap.conf
# SCHEDULERcompute_scheduler_driver=nova.scheduler.filter_scheduler.FilterScheduler
# VOLUMES# configured in cinder.conf
# COMPUTElibvirt_type=qemucompute_driver=libvirt.LibvirtDriverinstance_name_template=instance-%08xapi_paste_config=/etc/nova/api-paste.ini
# COMPUTE/APIS: if you have separate configs for separate services# this flag is required for both nova-api and nova-computeallow_resize_to_same_host=True
# APISosapi_compute_extension=nova.api.openstack.compute.contrib.standard_extensionsec2_dmz_host=192.168.206.130s3_host=192.168.206.130
# RABBITMQrabbit_host=192.168.206.130
# GLANCEimage_service=nova.image.glance.GlanceImageServiceglance_api_servers=192.168.206.130:9292
# NETWORKnetwork_manager=nova.network.manager.FlatDHCPManagerforce_dhcp_release=Truedhcpbridge_flagfile=/etc/nova/nova.conffirewall_driver=nova.virt.libvirt.firewall.IptablesFirewallDriver# Change my_ip to match each hostmy_ip=192.168.206.130public_interface=eth0vlan_interface=eth0flat_network_bridge=br100flat_interface=eth0
OpenStack ConfigurationReference
October 23, 2013 havana
23
# NOVNC CONSOLEnovncproxy_base_url=http://192.168.206.130:6080/vnc_auto.html# Change vncserver_proxyclient_address and vncserver_listen to match each compute hostvncserver_proxyclient_address=192.168.206.130vncserver_listen=192.168.206.130
# AUTHENTICATIONauth_strategy=keystone[keystone_authtoken]auth_host = 127.0.0.1auth_port = 35357auth_protocol = httpadmin_tenant_name = serviceadmin_user = novaadmin_password = novasigning_dirname = /tmp/keystone-signing-nova
# DATABASE[database]connection=mysql://nova:[email protected]/nova
KVM, Flat, MySQL, and Glance, OpenStack or EC2 API
This example nova.conf file is from an internal Rackspace test system used fordemonstrations.
[DEFAULT]
# LOGS/STATEverbose=Truelogdir=/var/log/novastate_path=/var/lib/novalock_path=/var/lock/novarootwrap_config=/etc/nova/rootwrap.conf
# SCHEDULERcompute_scheduler_driver=nova.scheduler.filter_scheduler.FilterScheduler
# VOLUMES# configured in cinder.conf
# COMPUTElibvirt_type=qemucompute_driver=libvirt.LibvirtDriverinstance_name_template=instance-%08xapi_paste_config=/etc/nova/api-paste.ini
# COMPUTE/APIS: if you have separate configs for separate services# this flag is required for both nova-api and nova-computeallow_resize_to_same_host=True
# APISosapi_compute_extension=nova.api.openstack.compute.contrib.standard_extensionsec2_dmz_host=192.168.206.130s3_host=192.168.206.130
# RABBITMQrabbit_host=192.168.206.130
OpenStack ConfigurationReference
October 23, 2013 havana
24
# GLANCEimage_service=nova.image.glance.GlanceImageServiceglance_api_servers=192.168.206.130:9292
# NETWORKnetwork_manager=nova.network.manager.FlatDHCPManagerforce_dhcp_release=Truedhcpbridge_flagfile=/etc/nova/nova.conffirewall_driver=nova.virt.libvirt.firewall.IptablesFirewallDriver# Change my_ip to match each hostmy_ip=192.168.206.130public_interface=eth0vlan_interface=eth0flat_network_bridge=br100flat_interface=eth0
# NOVNC CONSOLEnovncproxy_base_url=http://192.168.206.130:6080/vnc_auto.html# Change vncserver_proxyclient_address and vncserver_listen to match each compute hostvncserver_proxyclient_address=192.168.206.130vncserver_listen=192.168.206.130
# AUTHENTICATIONauth_strategy=keystone[keystone_authtoken]auth_host = 127.0.0.1auth_port = 35357auth_protocol = httpadmin_tenant_name = serviceadmin_user = novaadmin_password = novasigning_dirname = /tmp/keystone-signing-nova
# DATABASE[database]connection=mysql://nova:[email protected]/nova
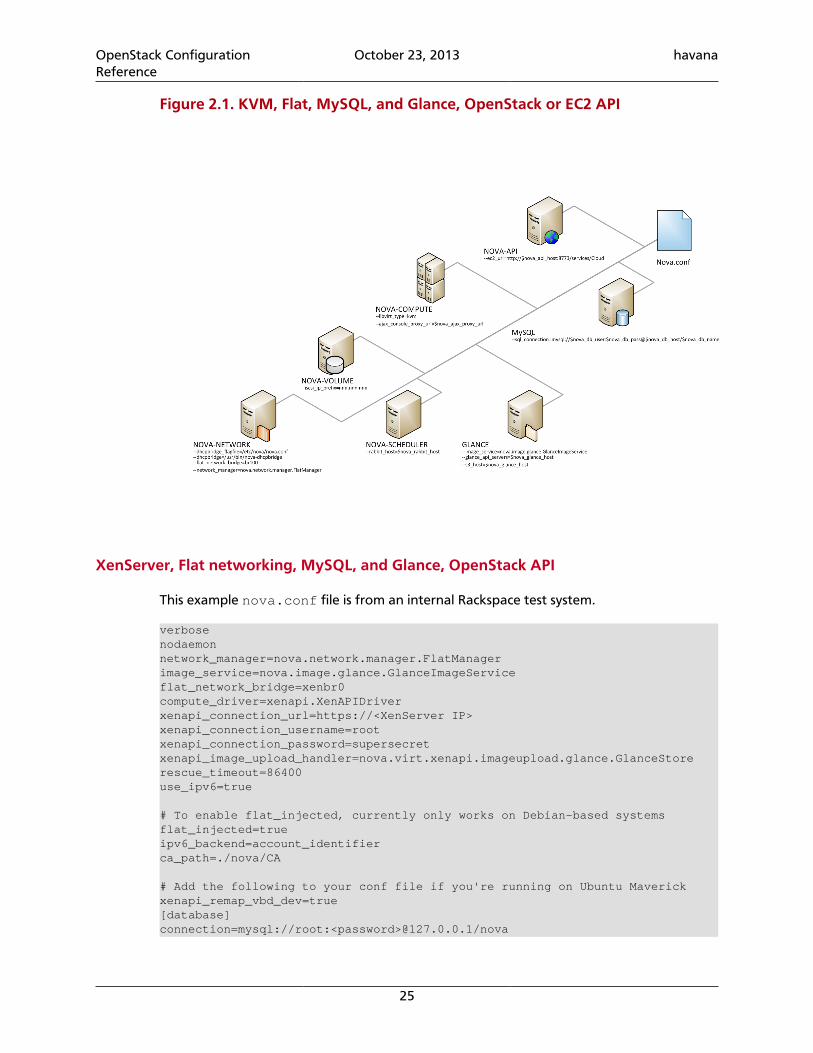
OpenStack ConfigurationReference
October 23, 2013 havana
25
Figure 2.1. KVM, Flat, MySQL, and Glance, OpenStack or EC2 API
XenServer, Flat networking, MySQL, and Glance, OpenStack API
This example nova.conf file is from an internal Rackspace test system.
verbosenodaemonnetwork_manager=nova.network.manager.FlatManagerimage_service=nova.image.glance.GlanceImageServiceflat_network_bridge=xenbr0compute_driver=xenapi.XenAPIDriverxenapi_connection_url=https://<XenServer IP>xenapi_connection_username=rootxenapi_connection_password=supersecretxenapi_image_upload_handler=nova.virt.xenapi.imageupload.glance.GlanceStorerescue_timeout=86400use_ipv6=true
# To enable flat_injected, currently only works on Debian-based systemsflat_injected=trueipv6_backend=account_identifierca_path=./nova/CA
# Add the following to your conf file if you're running on Ubuntu Maverickxenapi_remap_vbd_dev=true[database]connection=mysql://root:<password>@127.0.0.1/nova
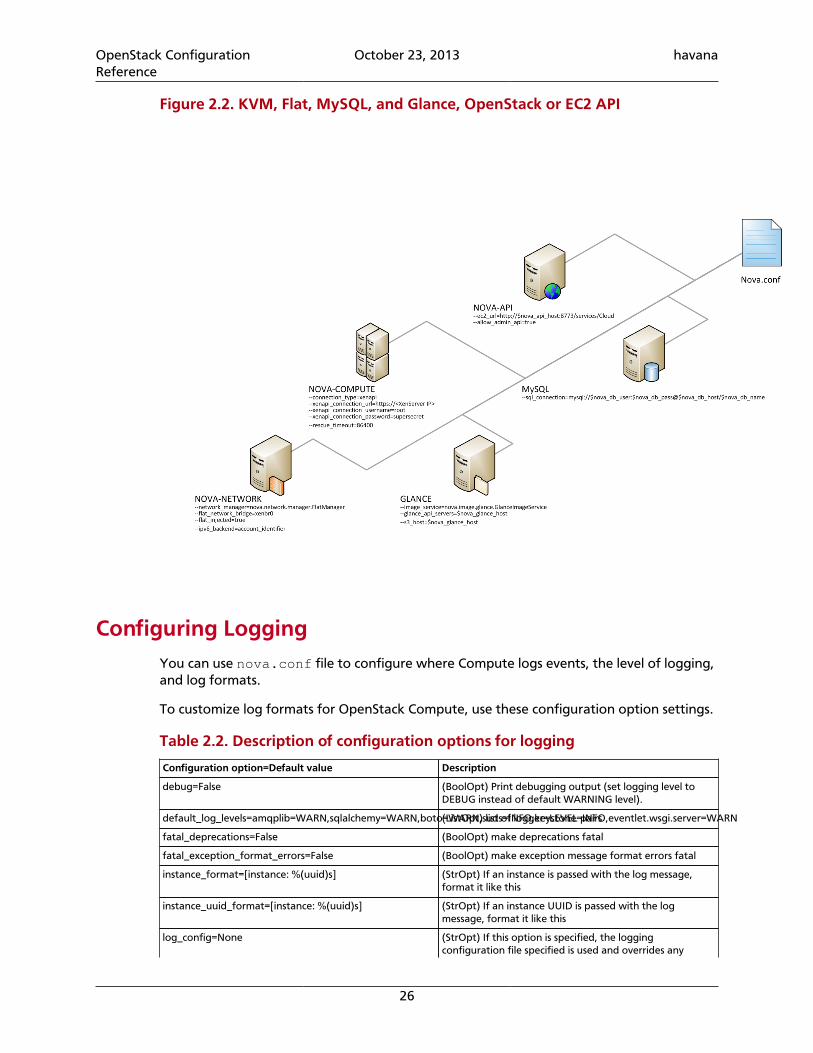
OpenStack ConfigurationReference
October 23, 2013 havana
26
Figure 2.2. KVM, Flat, MySQL, and Glance, OpenStack or EC2 API
Configuring LoggingYou can use nova.conf file to configure where Compute logs events, the level of logging,and log formats.
To customize log formats for OpenStack Compute, use these configuration option settings.
Table 2.2. Description of configuration options for logging
Configuration option=Default value Description
debug=False (BoolOpt) Print debugging output (set logging level toDEBUG instead of default WARNING level).
default_log_levels=amqplib=WARN,sqlalchemy=WARN,boto=WARN,suds=INFO,keystone=INFO,eventlet.wsgi.server=WARN(ListOpt) list of logger=LEVEL pairs
fatal_deprecations=False (BoolOpt) make deprecations fatal
fatal_exception_format_errors=False (BoolOpt) make exception message format errors fatal
instance_format=[instance: %(uuid)s] (StrOpt) If an instance is passed with the log message,format it like this
instance_uuid_format=[instance: %(uuid)s] (StrOpt) If an instance UUID is passed with the logmessage, format it like this
log_config=None (StrOpt) If this option is specified, the loggingconfiguration file specified is used and overrides any
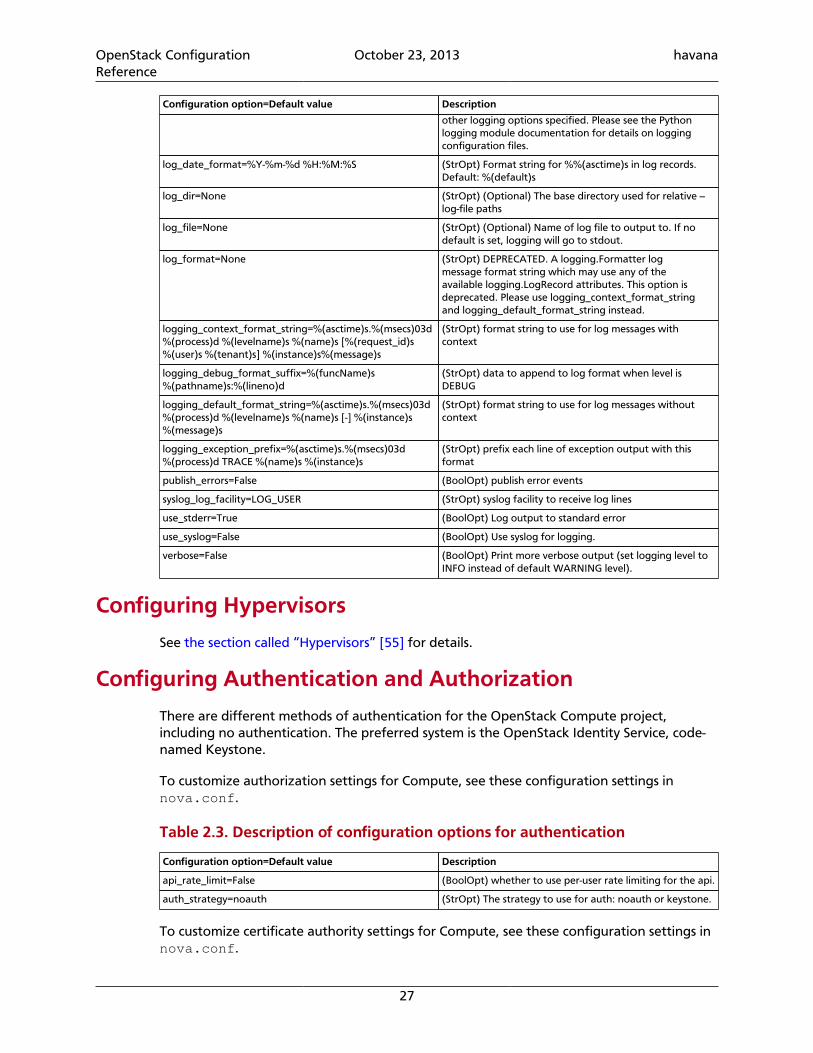
OpenStack ConfigurationReference
October 23, 2013 havana
27
Configuration option=Default value Description
other logging options specified. Please see the Pythonlogging module documentation for details on loggingconfiguration files.
log_date_format=%Y-%m-%d %H:%M:%S (StrOpt) Format string for %%(asctime)s in log records.Default: %(default)s
log_dir=None (StrOpt) (Optional) The base directory used for relative --log-file paths
log_file=None (StrOpt) (Optional) Name of log file to output to. If nodefault is set, logging will go to stdout.
log_format=None (StrOpt) DEPRECATED. A logging.Formatter logmessage format string which may use any of theavailable logging.LogRecord attributes. This option isdeprecated. Please use logging_context_format_stringand logging_default_format_string instead.
logging_context_format_string=%(asctime)s.%(msecs)03d%(process)d %(levelname)s %(name)s [%(request_id)s%(user)s %(tenant)s] %(instance)s%(message)s
(StrOpt) format string to use for log messages withcontext
logging_debug_format_suffix=%(funcName)s%(pathname)s:%(lineno)d
(StrOpt) data to append to log format when level isDEBUG
logging_default_format_string=%(asctime)s.%(msecs)03d%(process)d %(levelname)s %(name)s [-] %(instance)s%(message)s
(StrOpt) format string to use for log messages withoutcontext
logging_exception_prefix=%(asctime)s.%(msecs)03d%(process)d TRACE %(name)s %(instance)s
(StrOpt) prefix each line of exception output with thisformat
publish_errors=False (BoolOpt) publish error events
syslog_log_facility=LOG_USER (StrOpt) syslog facility to receive log lines
use_stderr=True (BoolOpt) Log output to standard error
use_syslog=False (BoolOpt) Use syslog for logging.
verbose=False (BoolOpt) Print more verbose output (set logging level toINFO instead of default WARNING level).
Configuring Hypervisors
See the section called “Hypervisors” [55] for details.
Configuring Authentication and Authorization
There are different methods of authentication for the OpenStack Compute project,including no authentication. The preferred system is the OpenStack Identity Service, code-named Keystone.
To customize authorization settings for Compute, see these configuration settings innova.conf.
Table 2.3. Description of configuration options for authentication
Configuration option=Default value Description
api_rate_limit=False (BoolOpt) whether to use per-user rate limiting for the api.
auth_strategy=noauth (StrOpt) The strategy to use for auth: noauth or keystone.
To customize certificate authority settings for Compute, see these configuration settings innova.conf.
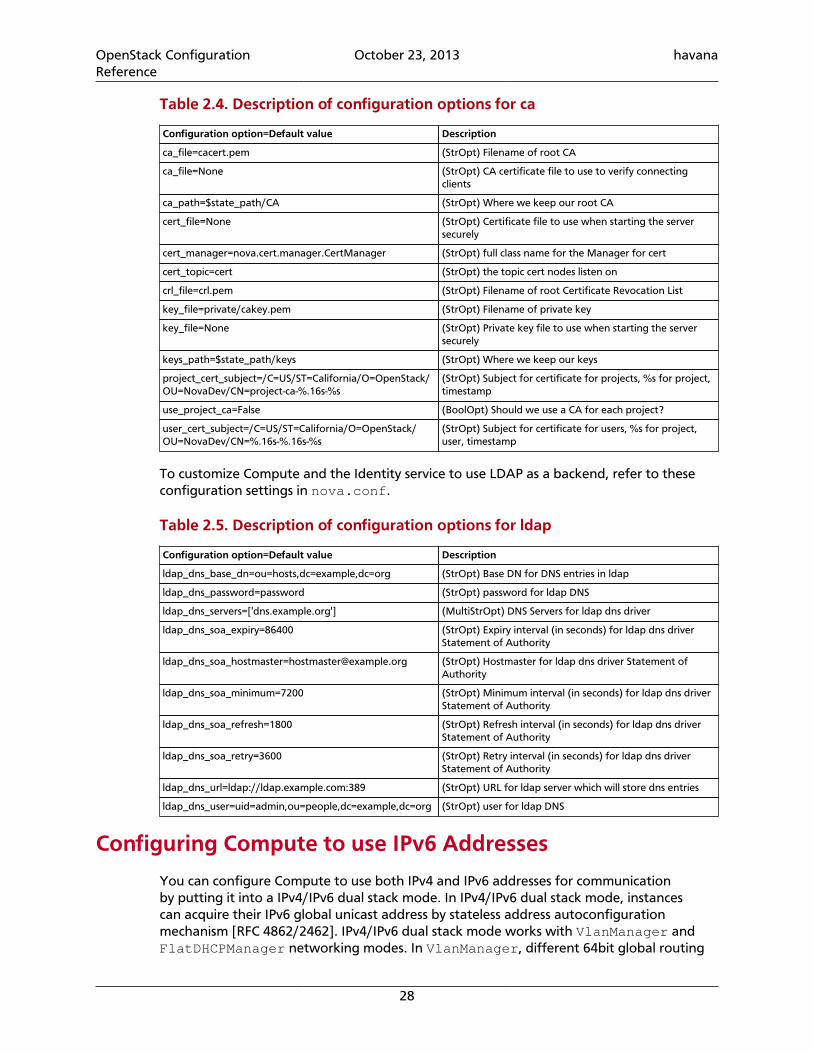
OpenStack ConfigurationReference
October 23, 2013 havana
28
Table 2.4. Description of configuration options for ca
Configuration option=Default value Description
ca_file=cacert.pem (StrOpt) Filename of root CA
ca_file=None (StrOpt) CA certificate file to use to verify connectingclients
ca_path=$state_path/CA (StrOpt) Where we keep our root CA
cert_file=None (StrOpt) Certificate file to use when starting the serversecurely
cert_manager=nova.cert.manager.CertManager (StrOpt) full class name for the Manager for cert
cert_topic=cert (StrOpt) the topic cert nodes listen on
crl_file=crl.pem (StrOpt) Filename of root Certificate Revocation List
key_file=private/cakey.pem (StrOpt) Filename of private key
key_file=None (StrOpt) Private key file to use when starting the serversecurely
keys_path=$state_path/keys (StrOpt) Where we keep our keys
project_cert_subject=/C=US/ST=California/O=OpenStack/OU=NovaDev/CN=project-ca-%.16s-%s
(StrOpt) Subject for certificate for projects, %s for project,timestamp
use_project_ca=False (BoolOpt) Should we use a CA for each project?
user_cert_subject=/C=US/ST=California/O=OpenStack/OU=NovaDev/CN=%.16s-%.16s-%s
(StrOpt) Subject for certificate for users, %s for project,user, timestamp
To customize Compute and the Identity service to use LDAP as a backend, refer to theseconfiguration settings in nova.conf.
Table 2.5. Description of configuration options for ldap
Configuration option=Default value Description
ldap_dns_base_dn=ou=hosts,dc=example,dc=org (StrOpt) Base DN for DNS entries in ldap
ldap_dns_password=password (StrOpt) password for ldap DNS
ldap_dns_servers=['dns.example.org'] (MultiStrOpt) DNS Servers for ldap dns driver
ldap_dns_soa_expiry=86400 (StrOpt) Expiry interval (in seconds) for ldap dns driverStatement of Authority
[email protected] (StrOpt) Hostmaster for ldap dns driver Statement ofAuthority
ldap_dns_soa_minimum=7200 (StrOpt) Minimum interval (in seconds) for ldap dns driverStatement of Authority
ldap_dns_soa_refresh=1800 (StrOpt) Refresh interval (in seconds) for ldap dns driverStatement of Authority
ldap_dns_soa_retry=3600 (StrOpt) Retry interval (in seconds) for ldap dns driverStatement of Authority
ldap_dns_url=ldap://ldap.example.com:389 (StrOpt) URL for ldap server which will store dns entries
ldap_dns_user=uid=admin,ou=people,dc=example,dc=org (StrOpt) user for ldap DNS
Configuring Compute to use IPv6 Addresses
You can configure Compute to use both IPv4 and IPv6 addresses for communicationby putting it into a IPv4/IPv6 dual stack mode. In IPv4/IPv6 dual stack mode, instancescan acquire their IPv6 global unicast address by stateless address autoconfigurationmechanism [RFC 4862/2462]. IPv4/IPv6 dual stack mode works with VlanManager andFlatDHCPManager networking modes. In VlanManager, different 64bit global routing
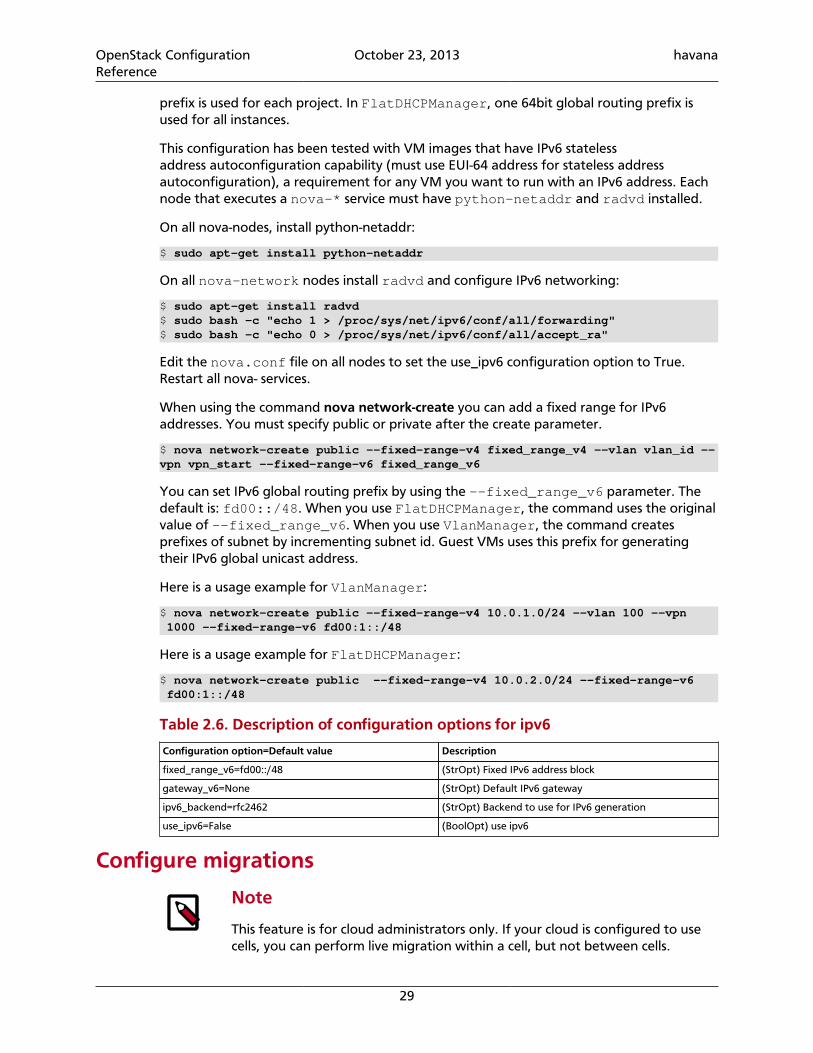
OpenStack ConfigurationReference
October 23, 2013 havana
29
prefix is used for each project. In FlatDHCPManager, one 64bit global routing prefix isused for all instances.
This configuration has been tested with VM images that have IPv6 statelessaddress autoconfiguration capability (must use EUI-64 address for stateless addressautoconfiguration), a requirement for any VM you want to run with an IPv6 address. Eachnode that executes a nova-* service must have python-netaddr and radvd installed.
On all nova-nodes, install python-netaddr:
$ sudo apt-get install python-netaddr
On all nova-network nodes install radvd and configure IPv6 networking:
$ sudo apt-get install radvd$ sudo bash -c "echo 1 > /proc/sys/net/ipv6/conf/all/forwarding"$ sudo bash -c "echo 0 > /proc/sys/net/ipv6/conf/all/accept_ra"
Edit the nova.conf file on all nodes to set the use_ipv6 configuration option to True.Restart all nova- services.
When using the command nova network-create you can add a fixed range for IPv6addresses. You must specify public or private after the create parameter.
$ nova network-create public --fixed-range-v4 fixed_range_v4 --vlan vlan_id --vpn vpn_start --fixed-range-v6 fixed_range_v6
You can set IPv6 global routing prefix by using the --fixed_range_v6 parameter. Thedefault is: fd00::/48. When you use FlatDHCPManager, the command uses the originalvalue of --fixed_range_v6. When you use VlanManager, the command createsprefixes of subnet by incrementing subnet id. Guest VMs uses this prefix for generatingtheir IPv6 global unicast address.
Here is a usage example for VlanManager:
$ nova network-create public --fixed-range-v4 10.0.1.0/24 --vlan 100 --vpn 1000 --fixed-range-v6 fd00:1::/48
Here is a usage example for FlatDHCPManager:
$ nova network-create public --fixed-range-v4 10.0.2.0/24 --fixed-range-v6 fd00:1::/48
Table 2.6. Description of configuration options for ipv6
Configuration option=Default value Description
fixed_range_v6=fd00::/48 (StrOpt) Fixed IPv6 address block
gateway_v6=None (StrOpt) Default IPv6 gateway
ipv6_backend=rfc2462 (StrOpt) Backend to use for IPv6 generation
use_ipv6=False (BoolOpt) use ipv6
Configure migrations
Note
This feature is for cloud administrators only. If your cloud is configured to usecells, you can perform live migration within a cell, but not between cells.
OpenStack ConfigurationReference
October 23, 2013 havana
30
Migration allows an administrator to move a virtual machine instance from one computehost to another. This feature is useful when a compute host requires maintenance.Migration can also be useful to redistribute the load when many VM instances are runningon a specific physical machine.
There are two types of migration:
• Migration (or non-live migration): In this case, the instance is shut down (and theinstance knows that it was rebooted) for a period of time to be moved to anotherhypervisor.
• Live migration (or true live migration): Almost no instance downtime, it is useful whenthe instances must be kept running during the migration.
There are three types of live migration:
• Shared storage based live migration: In this case both hypervisors have access to ashared storage.
• Block live migration: for this type of migration, no shared storage is required.
• Volume-backed live migration: when instances are backed by volumes, rather thanephemeral disk, no shared storage is required, and migration is supported (currently onlyin libvirt-based hypervisors).
The following sections describe how to configure your hosts and compute nodes formigrations using the KVM and XenServer hypervisors.
KVM-Libvirt
Prerequisites
• Hypervisor: KVM with libvirt
• Shared storage: NOVA-INST-DIR/instances/ (for example, /var/lib/nova/instances) has to be mounted by shared storage. This guide uses NFS but otheroptions, including the OpenStack Gluster Connector are available.
• Instances: Instance can be migrated with iSCSI based volumes
Note
Because the Compute service does not use libvirt's live migration functionalityby default, guests are suspended before migration and may thereforeexperience several minutes of downtime. See the the section called “Enablingtrue live migration” [33] section for more details.
Note
This guide assumes the default value for instances_path in yournova.conf (NOVA-INST-DIR/instances). If you have changed thestate_path or instances_path variables, please modify accordingly.
OpenStack ConfigurationReference
October 23, 2013 havana
31
Note
You must specify vncserver_listen=0.0.0.0 or live migration does notwork correctly.
Example Compute Installation Environment
• Prepare 3 servers at least; for example, HostA, HostB and HostC
• HostA is the "Cloud Controller", and should be running: nova-api, nova-scheduler,nova-network, cinder-volume, nova-objectstore.
• HostB and HostC are the "compute nodes", running nova-compute.
• Ensure that, NOVA-INST-DIR (set with state_path in nova.conf) is same on allhosts.
• In this example, HostA is the NFSv4 server that exports NOVA-INST-DIR/instances,and HostB and HostC mount it.
System configuration
1. Configure your DNS or /etc/hosts and ensure it is consistent across all hosts. Makesure that the three hosts can perform name resolution with each other. As a test, use theping command to ping each host from one another.
$ ping HostA$ ping HostB$ ping HostC
2. Ensure that the UID and GID of your nova and libvirt users are identical between each ofyour servers. This ensures that the permissions on the NFS mount works correctly.
3. Follow the instructions at the Ubuntu NFS HowTo to setup an NFS server on HostA, andNFS Clients on HostB and HostC.
Our aim is to export NOVA-INST-DIR/instances from HostA, and have it readableand writable by the nova user on HostB and HostC.
4. Using your knowledge from the Ubuntu documentation, configure the NFS server atHostA by adding a line to /etc/exports
NOVA-INST-DIR/instances HostA/255.255.0.0(rw,sync,fsid=0,no_root_squash)
Change the subnet mask (255.255.0.0) to the appropriate value to include the IPaddresses of HostB and HostC. Then restart the NFS server.
$ /etc/init.d/nfs-kernel-server restart$ /etc/init.d/idmapd restart
5. Set the 'execute/search' bit on your shared directory.
On both compute nodes, make sure to enable the 'execute/search' bit to allow qemuto be able to use the images within the directories. On all hosts, execute the followingcommand:
$ chmod o+x NOVA-INST-DIR/instances
OpenStack ConfigurationReference
October 23, 2013 havana
32
6. Configure NFS at HostB and HostC by adding below to /etc/fstab.
HostA:/ /NOVA-INST-DIR/instances nfs4 defaults 0 0
Then ensure that the exported directory can be mounted.
$ mount -a -v
Check that "NOVA-INST-DIR/instances/" directory can be seen at HostA
$ ls -ld NOVA-INST-DIR/instances/ drwxr-xr-x 2 nova nova 4096 2012-05-19 14:34 nova-install-dir/instances/
Perform the same check at HostB and HostC - paying special attention to the permissions(nova should be able to write)
$ ls -ld NOVA-INST-DIR/instances/ drwxr-xr-x 2 nova nova 4096 2012-05-07 14:34 nova-install-dir/instances/
$ df -k Filesystem 1K-blocks Used Available Use% Mounted on/dev/sda1 921514972 4180880 870523828 1% /none 16498340 1228 16497112 1% /devnone 16502856 0 16502856 0% /dev/shmnone 16502856 368 16502488 1% /var/runnone 16502856 0 16502856 0% /var/locknone 16502856 0 16502856 0% /lib/init/rwHostA: 921515008 101921792 772783104 12% /var/lib/nova/instances ( <--- this line is important.)
7. Update the libvirt configurations. Modify /etc/libvirt/libvirtd.conf:
before : #listen_tls = 0after : listen_tls = 0
before : #listen_tcp = 1after : listen_tcp = 1
add: auth_tcp = "none"
Modify /etc/libvirt/qemu.conf
before : #dynamic_ownership = 1after : dynamic_ownership = 0
Modify /etc/init/libvirt-bin.conf
before : exec /usr/sbin/libvirtd -dafter : exec /usr/sbin/libvirtd -d -l
Modify /etc/default/libvirt-bin
before :libvirtd_opts=" -d"after :libvirtd_opts=" -d -l"
Restart libvirt. After executing the command, ensure that libvirt is successfully restarted.
$ stop libvirt-bin && start libvirt-bin
OpenStack ConfigurationReference
October 23, 2013 havana
33
$ ps -ef | grep libvirt root 1145 1 0 Nov27 ? 00:00:03 /usr/sbin/libvirtd -d -l
8. Configure your firewall to allow libvirt to communicate between nodes.
Information about ports used with libvirt can be found at the libvirt documentation Bydefault, libvirt listens on TCP port 16509 and an ephemeral TCP range from 49152 to49261 is used for the KVM communications. As this guide has disabled libvirt auth, youshould take good care that these ports are only open to hosts within your installation.
9. You can now configure options for live migration. In most cases, you do not need toconfigure any options. The following chart is for advanced usage only.
Table 2.7. Description of configuration options for livemigration
Configuration option=Default value Description
live_migration_bandwidth=0 (IntOpt) Maximum bandwidth to be used duringmigration, in Mbps
live_migration_flag=VIR_MIGRATE_UNDEFINE_SOURCE,VIR_MIGRATE_PEER2PEER
(StrOpt) Migration flags to be set for live migration
live_migration_retry_count=30 (IntOpt) Number of 1 second retries needed inlive_migration
live_migration_uri=qemu+tcp://%s/system (StrOpt) Migration target URI (any included "%s" isreplaced with the migration target hostname)
Enabling true live migration
By default, the Compute service does not use libvirt's live migration functionality. To enablethis functionality, add the following line to nova.conf:
live_migration_flag=VIR_MIGRATE_UNDEFINE_SOURCE,VIR_MIGRATE_PEER2PEER,VIR_MIGRATE_LIVE
The Compute service does not use libvirt's live migration by default because there is a riskthat the migration process never ends. This can happen if the guest operating system dirtiesblocks on the disk faster than they can migrated.
XenServer
Shared Storage
Prerequisites
• Compatible XenServer hypervisors. For more information, please refer to theRequirements for Creating Resource Pools section of the XenServer Administrator'sGuide.
• Shared storage: an NFS export, visible to all XenServer hosts.
Note
Please check the NFS VHD section of the XenServer Administrator's Guide forthe supported NFS versions.
OpenStack ConfigurationReference
October 23, 2013 havana
34
To use shared storage live migration with XenServer hypervisors, the hosts must be joinedto a XenServer pool. To create that pool, a host aggregate must be created with specialmetadata. This metadata is used by the XAPI plugins to establish the pool.
1. Add an NFS VHD storage to your master XenServer, and set it as default SR. For moreinformation, please refer to the NFS VHD section of the XenServer Administrator'sGuide.
2. Configure all the compute nodes to use the default sr for pool operations, by including:
sr_matching_filter=default-sr:true
in your nova.conf configuration files across your compute nodes.
3. Create a host aggregate
$ nova aggregate-create <name-for-pool> <availability-zone>
The command displays a table which contains the id of the newly created aggregate.Now add special metadata to the aggregate, to mark it as a hypervisor pool
$ nova aggregate-set-metadata <aggregate-id> hypervisor_pool=true
$ nova aggregate-set-metadata <aggregate-id> operational_state=created
Make the first compute node part of that aggregate
$ nova aggregate-add-host <aggregate-id> <name-of-master-compute>
At this point, the host is part of a XenServer pool.
4. Add additional hosts to the pool:
$ nova aggregate-add-host <aggregate-id> <compute-host-name>
Note
At this point the added compute node and the host is shut down, to join thehost to the XenServer pool. The operation fails, if any server other than thecompute node is running/suspended on your host.
Block migration
Prerequisites
• Compatible XenServer hypervisors. The hypervisors must support the StorageXenMotion feature. Please refer to the manual of your XenServer to make sure youredition has this feature.
Note
Please note, that you need to use an extra option --block-migrate for thelive migration command, to use block migration.
OpenStack ConfigurationReference
October 23, 2013 havana
35
Note
Block migration works only with EXT local storage SRs, and the server shouldnot have any volumes attached.
Configuring ResizeResize (or Server resize) is the ability to change the flavor of a server, thus allowing it toupscale or downscale according to user needs. For this feature to work properly, someunderlying virt layers may need further configuration; this section describes the requiredconfiguration steps for each hypervisor layer provided by OpenStack.
XenServer
To get resize to work with XenServer (and XCP), please refer to the Dom0 Modifications forResize/Migration Support section in the OpenStack Compute Administration Guide.
Database ConfigurationYou can configure OpenStack Compute to use any SQLAlchemy-compatible database. Thedatabase name is nova. The nova-conductor service is the only service that writes to thedatabase. The other Compute services access the database through the nova-conductorservice.
To ensure that the database schema is current, run the following command:
$ nova-manage db sync
If nova-conductor is not used, entries to the database are mostly written by the nova-scheduler service, although all the services need to be able to update entries in thedatabase.
In either case, use these settings to configure the connection string for the nova database.
Table 2.8. Description of configuration options for db
Configuration option=Default value Description
backend=sqlalchemy (StrOpt) The backend to use for db
connection_trace=False (BoolOpt) Add python stack traces to SQL as commentstrings
connection=sqlite:////home/docwork/openstack-manuals-new/tools/autogenerate-config-docs/nova/nova/openstack/common/db/$sqlite_db
(StrOpt) The SQLAlchemy connection string used toconnect to the database
connection_debug=0 (IntOpt) Verbosity of SQL debugging information.0=None, 100=Everything
db_backend=sqlalchemy (StrOpt) The backend to use for bare-metal database
db_check_interval=60 (IntOpt) Seconds between getting fresh cell info from db.
db_driver=nova.db (StrOpt) driver to use for database access
idle_timeout=3600 (IntOpt) timeout before idle sql connections are reaped
max_pool_size=None (IntOpt) Maximum number of SQL connections to keepopen in a pool
max_overflow=None (IntOpt) If set, use this value for max_overflow withsqlalchemy
OpenStack ConfigurationReference
October 23, 2013 havana
36
Configuration option=Default value Description
max_retries=10 (IntOpt) maximum db connection retries during startup.(setting -1 implies an infinite retry count)
min_pool_size=1 (IntOpt) Minimum number of SQL connections to keepopen in a pool
pool_timeout=None (IntOpt) If set, use this value for pool_timeout withsqlalchemy
retry_interval=10 (IntOpt) interval between retries of opening a sqlconnection
slave_connection= (StrOpt) The SQLAlchemy connection string used toconnect to the slave database
sql_connection=sqlite:///$state_path/baremetal_$sqlite_db
(StrOpt) The SQLAlchemy connection string used toconnect to the bare-metal database
sqlite_db=nova.sqlite (StrOpt) the filename to use with sqlite
sqlite_synchronous=True (BoolOpt) If true, use synchronous mode for sqlite
Components Configuration
Configuring the Oslo RPC Messaging SystemOpenStack projects use an open standard for messaging middleware known as AMQP.This messaging middleware enables the OpenStack services which will exist across multipleservers to talk to each other. OpenStack Oslo RPC supports three implementations ofAMQP: RabbitMQ, Qpid, and ZeroMQ.
Configuration for RabbitMQ
OpenStack Oslo RPC uses RabbitMQ by default. This section discusses the configurationoptions that are relevant when RabbitMQ is used. The rpc_backend option is notrequired as long as RabbitMQ is the default messaging system. However, if it is included theconfiguration, it must be set to nova.openstack.common.rpc.impl_kombu.
rpc_backend=nova.openstack.common.rpc.impl_kombu
The following tables describe the rest of the options that can be used whenRabbitMQ is used as the messaging system. You can configure the messagingcommunication for different installation scenarios as well as tune RabbitMQ's retriesand the size of the RPC thread pool. If you want to monitor notifications throughRabbitMQ, you must set the notification_driver option in nova.conf tonova.notifier.rabbit_notifier. The default for sending usage data is 60 secondsplus a randomized 0-60 seconds.
Table 2.9. Description of configuration options for rabbitmq
Configuration option=Default value Description
rabbit_ha_queues=False (BoolOpt) use H/A queues in RabbitMQ (x-ha-policy:all).You need to wipe RabbitMQ database when changingthis option.
rabbit_host=localhost (StrOpt) The RabbitMQ broker address where a singlenode is used
rabbit_hosts=$rabbit_host:$rabbit_port (ListOpt) RabbitMQ HA cluster host:port pairs
rabbit_max_retries=0 (IntOpt) maximum retries with trying to connect toRabbitMQ (the default of 0 implies an infinite retry count)
OpenStack ConfigurationReference
October 23, 2013 havana
37
Configuration option=Default value Description
rabbit_password=guest (StrOpt) the RabbitMQ password
rabbit_port=5672 (IntOpt) The RabbitMQ broker port where a single node isused
rabbit_retry_backoff=2 (IntOpt) how long to backoff for between retries whenconnecting to RabbitMQ
rabbit_retry_interval=1 (IntOpt) how frequently to retry connecting withRabbitMQ
rabbit_use_ssl=False (BoolOpt) connect over SSL for RabbitMQ
rabbit_userid=guest (StrOpt) the RabbitMQ userid
rabbit_virtual_host=/ (StrOpt) the RabbitMQ virtual host
Table 2.10. Description of configuration options for kombu
Configuration option=Default value Description
kombu_ssl_ca_certs= (StrOpt) SSL certification authority file (valid only if SSLenabled)
kombu_ssl_certfile= (StrOpt) SSL cert file (valid only if SSL enabled)
kombu_ssl_keyfile= (StrOpt) SSL key file (valid only if SSL enabled)
kombu_ssl_version= (StrOpt) SSL version to use (valid only if SSL enabled).valid values are TLSv1, SSLv23 and SSLv3. SSLv2 may beavailable on some distributions
Configuration for Qpid
This section discusses the configuration options that are relevant if Qpid is used as themessaging system for OpenStack Oslo RPC. Qpid is not the default messaging system, so itmust be enabled by setting the rpc_backend option in nova.conf.
rpc_backend=nova.openstack.common.rpc.impl_qpid
This next critical option points the compute nodes to the Qpid broker (server). Setqpid_hostname in nova.conf to be the hostname where the broker is running.
Note
The --qpid_hostname option accepts a value in the form of either ahostname or an IP address.
qpid_hostname=hostname.example.com
If the Qpid broker is listening on a port other than the AMQP default of 5672, you willneed to set the qpid_port option:
qpid_port=12345
If you configure the Qpid broker to require authentication, you will need to add ausername and password to the configuration:
qpid_username=usernameqpid_password=password
By default, TCP is used as the transport. If you would like to enable SSL, set theqpid_protocol option:

OpenStack ConfigurationReference
October 23, 2013 havana
38
qpid_protocol=ssl
The following table lists the rest of the options used by the Qpid messaging driver forOpenStack Oslo RPC. It is not common that these options are used.
Table 2.11. Description of configuration options for qpid
Configuration option=Default value Description
qpid_heartbeat=60 (IntOpt) Seconds between connection keepaliveheartbeats
qpid_hostname=localhost (StrOpt) Qpid broker hostname
qpid_hosts=$qpid_hostname:$qpid_port (ListOpt) Qpid HA cluster host:port pairs
qpid_password= (StrOpt) Password for qpid connection
qpid_port=5672 (IntOpt) Qpid broker port
qpid_protocol=tcp (StrOpt) Transport to use, either 'tcp' or 'ssl'
qpid_sasl_mechanisms= (StrOpt) Space separated list of SASL mechanisms to usefor auth
qpid_tcp_nodelay=True (BoolOpt) Disable Nagle algorithm
qpid_topology_version=1 (IntOpt) The qpid topology version to use. Version 1 iswhat was originally used by impl_qpid. Version 2 includessome backwards-incompatible changes that allow brokerfederation to work. Users should update to version 2when they are able to take everything down, as it requiresa clean break.
qpid_username= (StrOpt) Username for qpid connection
Configuration Options for ZeroMQ
This section discusses the configuration options that are relevant if ZeroMQ is used as themessaging system for OpenStack Oslo RPC. ZeroMQ is not the default messaging system, soit must be enabled by setting the rpc_backend option in nova.conf.
Table 2.12. Description of configuration options for zeromq
Configuration option=Default value Description
rpc_zmq_bind_address=* (StrOpt) ZeroMQ bind address. Should be a wildcard (*),an ethernet interface, or IP. The "host" option should pointor resolve to this address.
rpc_zmq_contexts=1 (IntOpt) Number of ZeroMQ contexts, defaults to 1
rpc_zmq_host=docwork (StrOpt) Name of this node. Must be a valid hostname,FQDN, or IP address. Must match "host" option, if runningNova.
rpc_zmq_ipc_dir=/var/run/openstack (StrOpt) Directory for holding IPC sockets
rpc_zmq_matchmaker=nova.openstack.common.rpc.matchmaker.MatchMakerLocalhost(StrOpt) MatchMaker driver
rpc_zmq_port=9501 (IntOpt) ZeroMQ receiver listening port
rpc_zmq_topic_backlog=None (IntOpt) Maximum number of ingress messages to locallybuffer per topic. Default is unlimited.
Common Configuration for Messaging
This section lists options that are common between both the RabbitMQ and Qpidmessaging drivers.
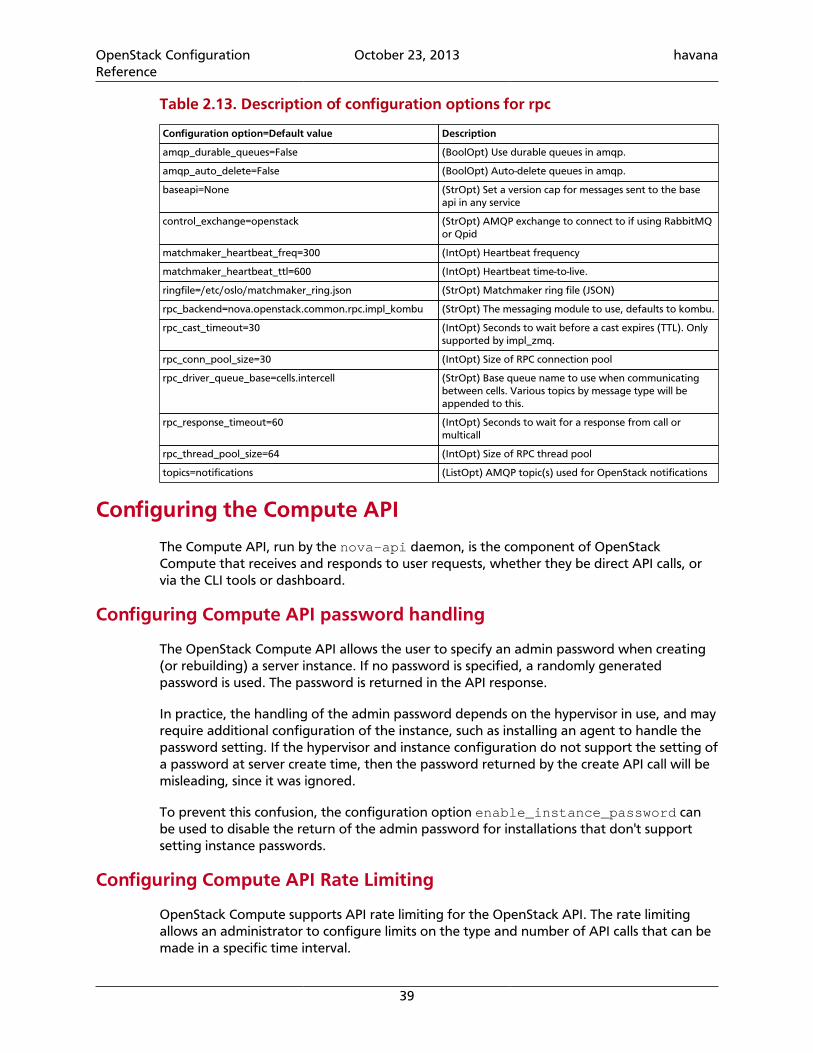
OpenStack ConfigurationReference
October 23, 2013 havana
39
Table 2.13. Description of configuration options for rpc
Configuration option=Default value Description
amqp_durable_queues=False (BoolOpt) Use durable queues in amqp.
amqp_auto_delete=False (BoolOpt) Auto-delete queues in amqp.
baseapi=None (StrOpt) Set a version cap for messages sent to the baseapi in any service
control_exchange=openstack (StrOpt) AMQP exchange to connect to if using RabbitMQor Qpid
matchmaker_heartbeat_freq=300 (IntOpt) Heartbeat frequency
matchmaker_heartbeat_ttl=600 (IntOpt) Heartbeat time-to-live.
ringfile=/etc/oslo/matchmaker_ring.json (StrOpt) Matchmaker ring file (JSON)
rpc_backend=nova.openstack.common.rpc.impl_kombu (StrOpt) The messaging module to use, defaults to kombu.
rpc_cast_timeout=30 (IntOpt) Seconds to wait before a cast expires (TTL). Onlysupported by impl_zmq.
rpc_conn_pool_size=30 (IntOpt) Size of RPC connection pool
rpc_driver_queue_base=cells.intercell (StrOpt) Base queue name to use when communicatingbetween cells. Various topics by message type will beappended to this.
rpc_response_timeout=60 (IntOpt) Seconds to wait for a response from call ormulticall
rpc_thread_pool_size=64 (IntOpt) Size of RPC thread pool
topics=notifications (ListOpt) AMQP topic(s) used for OpenStack notifications
Configuring the Compute API
The Compute API, run by the nova-api daemon, is the component of OpenStackCompute that receives and responds to user requests, whether they be direct API calls, orvia the CLI tools or dashboard.
Configuring Compute API password handling
The OpenStack Compute API allows the user to specify an admin password when creating(or rebuilding) a server instance. If no password is specified, a randomly generatedpassword is used. The password is returned in the API response.
In practice, the handling of the admin password depends on the hypervisor in use, and mayrequire additional configuration of the instance, such as installing an agent to handle thepassword setting. If the hypervisor and instance configuration do not support the setting ofa password at server create time, then the password returned by the create API call will bemisleading, since it was ignored.
To prevent this confusion, the configuration option enable_instance_password canbe used to disable the return of the admin password for installations that don't supportsetting instance passwords.
Configuring Compute API Rate Limiting
OpenStack Compute supports API rate limiting for the OpenStack API. The rate limitingallows an administrator to configure limits on the type and number of API calls that can bemade in a specific time interval.
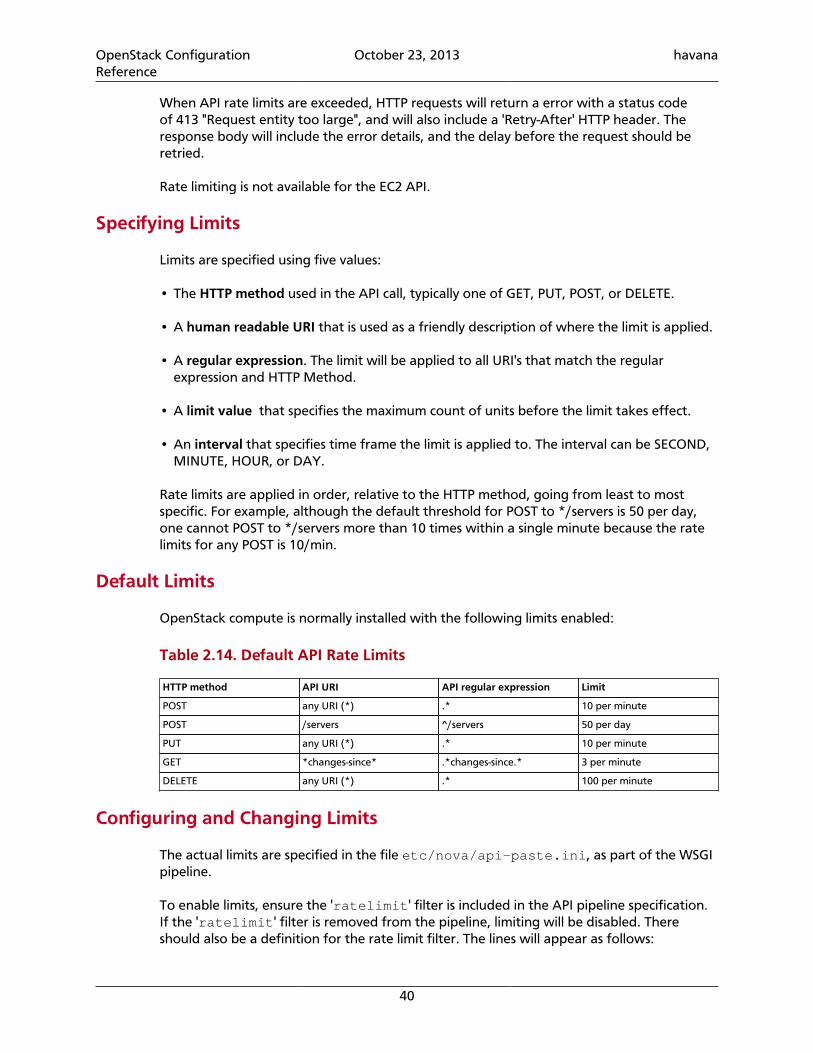
OpenStack ConfigurationReference
October 23, 2013 havana
40
When API rate limits are exceeded, HTTP requests will return a error with a status codeof 413 "Request entity too large", and will also include a 'Retry-After' HTTP header. Theresponse body will include the error details, and the delay before the request should beretried.
Rate limiting is not available for the EC2 API.
Specifying Limits
Limits are specified using five values:
• The HTTP method used in the API call, typically one of GET, PUT, POST, or DELETE.
• A human readable URI that is used as a friendly description of where the limit is applied.
• A regular expression. The limit will be applied to all URI's that match the regularexpression and HTTP Method.
• A limit value that specifies the maximum count of units before the limit takes effect.
• An interval that specifies time frame the limit is applied to. The interval can be SECOND,MINUTE, HOUR, or DAY.
Rate limits are applied in order, relative to the HTTP method, going from least to mostspecific. For example, although the default threshold for POST to */servers is 50 per day,one cannot POST to */servers more than 10 times within a single minute because the ratelimits for any POST is 10/min.
Default Limits
OpenStack compute is normally installed with the following limits enabled:
Table 2.14. Default API Rate Limits
HTTP method API URI API regular expression Limit
POST any URI (*) .* 10 per minute
POST /servers ^/servers 50 per day
PUT any URI (*) .* 10 per minute
GET *changes-since* .*changes-since.* 3 per minute
DELETE any URI (*) .* 100 per minute
Configuring and Changing Limits
The actual limits are specified in the file etc/nova/api-paste.ini, as part of the WSGIpipeline.
To enable limits, ensure the 'ratelimit' filter is included in the API pipeline specification.If the 'ratelimit' filter is removed from the pipeline, limiting will be disabled. Thereshould also be a definition for the rate limit filter. The lines will appear as follows:
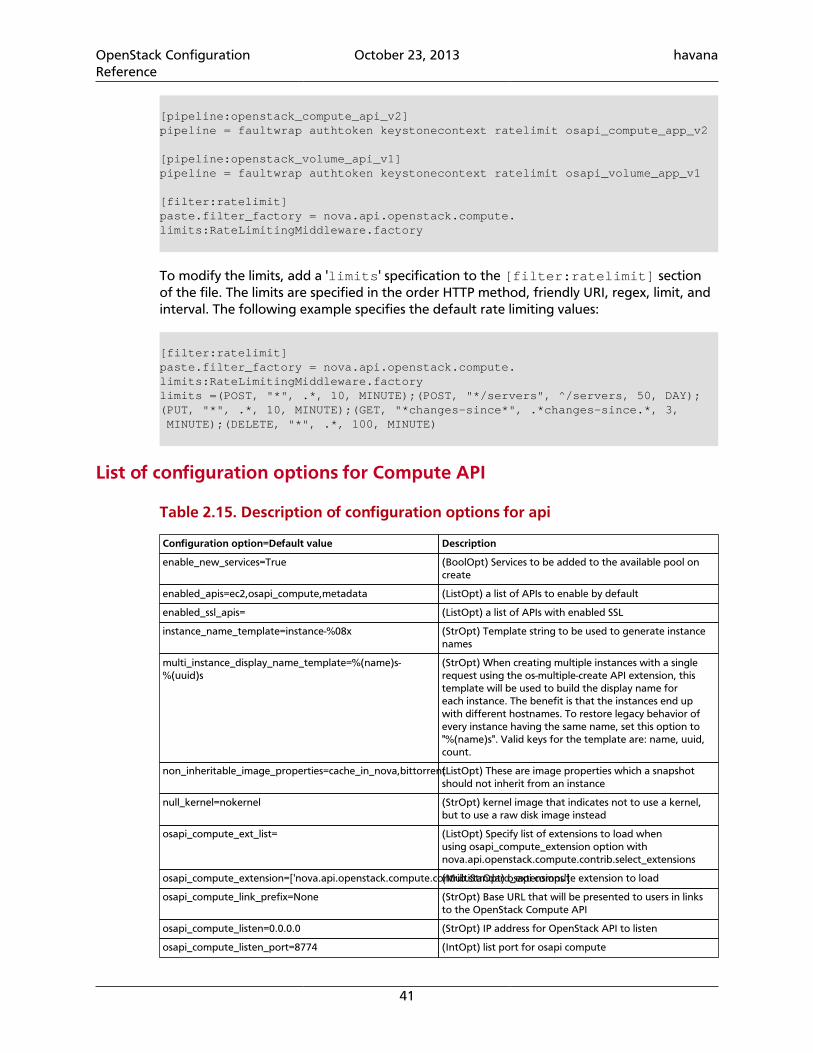
OpenStack ConfigurationReference
October 23, 2013 havana
41
[pipeline:openstack_compute_api_v2]pipeline = faultwrap authtoken keystonecontext ratelimit osapi_compute_app_v2
[pipeline:openstack_volume_api_v1]pipeline = faultwrap authtoken keystonecontext ratelimit osapi_volume_app_v1
[filter:ratelimit]paste.filter_factory = nova.api.openstack.compute.limits:RateLimitingMiddleware.factory
To modify the limits, add a 'limits' specification to the [filter:ratelimit] sectionof the file. The limits are specified in the order HTTP method, friendly URI, regex, limit, andinterval. The following example specifies the default rate limiting values:
[filter:ratelimit]paste.filter_factory = nova.api.openstack.compute.limits:RateLimitingMiddleware.factorylimits =(POST, "*", .*, 10, MINUTE);(POST, "*/servers", ^/servers, 50, DAY);(PUT, "*", .*, 10, MINUTE);(GET, "*changes-since*", .*changes-since.*, 3, MINUTE);(DELETE, "*", .*, 100, MINUTE)
List of configuration options for Compute API
Table 2.15. Description of configuration options for api
Configuration option=Default value Description
enable_new_services=True (BoolOpt) Services to be added to the available pool oncreate
enabled_apis=ec2,osapi_compute,metadata (ListOpt) a list of APIs to enable by default
enabled_ssl_apis= (ListOpt) a list of APIs with enabled SSL
instance_name_template=instance-%08x (StrOpt) Template string to be used to generate instancenames
multi_instance_display_name_template=%(name)s-%(uuid)s
(StrOpt) When creating multiple instances with a singlerequest using the os-multiple-create API extension, thistemplate will be used to build the display name foreach instance. The benefit is that the instances end upwith different hostnames. To restore legacy behavior ofevery instance having the same name, set this option to"%(name)s". Valid keys for the template are: name, uuid,count.
non_inheritable_image_properties=cache_in_nova,bittorrent(ListOpt) These are image properties which a snapshotshould not inherit from an instance
null_kernel=nokernel (StrOpt) kernel image that indicates not to use a kernel,but to use a raw disk image instead
osapi_compute_ext_list= (ListOpt) Specify list of extensions to load whenusing osapi_compute_extension option withnova.api.openstack.compute.contrib.select_extensions
osapi_compute_extension=['nova.api.openstack.compute.contrib.standard_extensions'](MultiStrOpt) osapi compute extension to load
osapi_compute_link_prefix=None (StrOpt) Base URL that will be presented to users in linksto the OpenStack Compute API
osapi_compute_listen=0.0.0.0 (StrOpt) IP address for OpenStack API to listen
osapi_compute_listen_port=8774 (IntOpt) list port for osapi compute
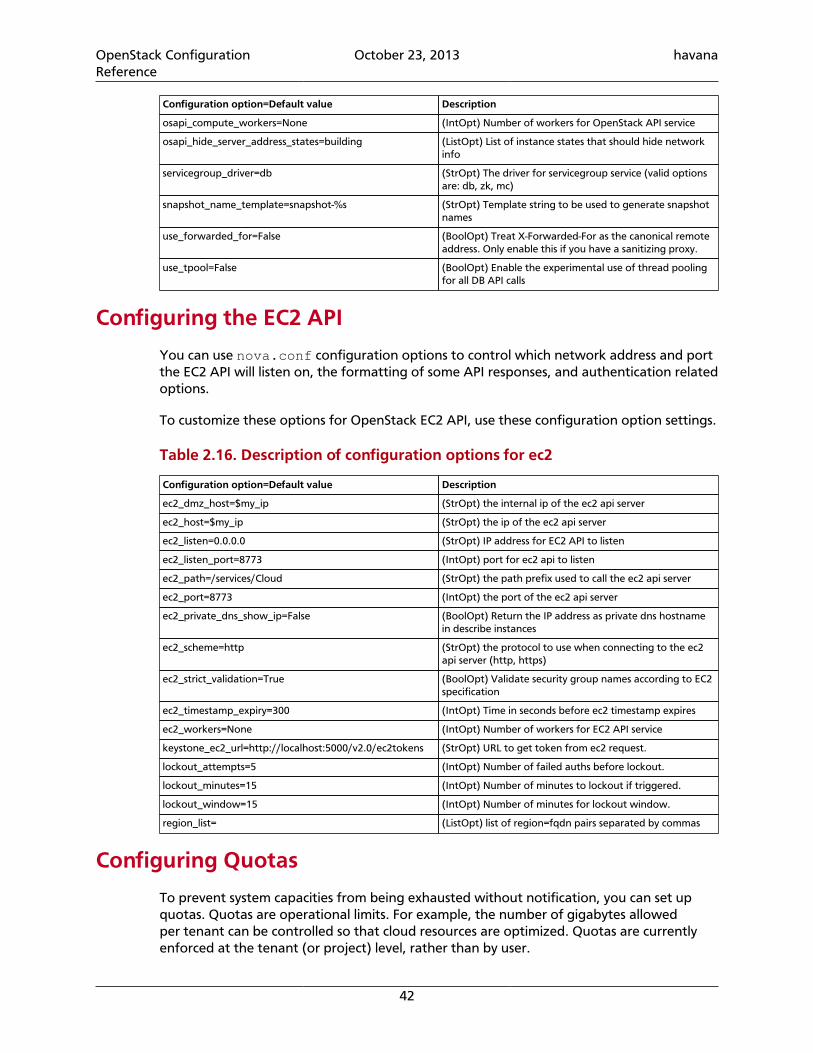
OpenStack ConfigurationReference
October 23, 2013 havana
42
Configuration option=Default value Description
osapi_compute_workers=None (IntOpt) Number of workers for OpenStack API service
osapi_hide_server_address_states=building (ListOpt) List of instance states that should hide networkinfo
servicegroup_driver=db (StrOpt) The driver for servicegroup service (valid optionsare: db, zk, mc)
snapshot_name_template=snapshot-%s (StrOpt) Template string to be used to generate snapshotnames
use_forwarded_for=False (BoolOpt) Treat X-Forwarded-For as the canonical remoteaddress. Only enable this if you have a sanitizing proxy.
use_tpool=False (BoolOpt) Enable the experimental use of thread poolingfor all DB API calls
Configuring the EC2 API
You can use nova.conf configuration options to control which network address and portthe EC2 API will listen on, the formatting of some API responses, and authentication relatedoptions.
To customize these options for OpenStack EC2 API, use these configuration option settings.
Table 2.16. Description of configuration options for ec2
Configuration option=Default value Description
ec2_dmz_host=$my_ip (StrOpt) the internal ip of the ec2 api server
ec2_host=$my_ip (StrOpt) the ip of the ec2 api server
ec2_listen=0.0.0.0 (StrOpt) IP address for EC2 API to listen
ec2_listen_port=8773 (IntOpt) port for ec2 api to listen
ec2_path=/services/Cloud (StrOpt) the path prefix used to call the ec2 api server
ec2_port=8773 (IntOpt) the port of the ec2 api server
ec2_private_dns_show_ip=False (BoolOpt) Return the IP address as private dns hostnamein describe instances
ec2_scheme=http (StrOpt) the protocol to use when connecting to the ec2api server (http, https)
ec2_strict_validation=True (BoolOpt) Validate security group names according to EC2specification
ec2_timestamp_expiry=300 (IntOpt) Time in seconds before ec2 timestamp expires
ec2_workers=None (IntOpt) Number of workers for EC2 API service
keystone_ec2_url=http://localhost:5000/v2.0/ec2tokens (StrOpt) URL to get token from ec2 request.
lockout_attempts=5 (IntOpt) Number of failed auths before lockout.
lockout_minutes=15 (IntOpt) Number of minutes to lockout if triggered.
lockout_window=15 (IntOpt) Number of minutes for lockout window.
region_list= (ListOpt) list of region=fqdn pairs separated by commas
Configuring Quotas
To prevent system capacities from being exhausted without notification, you can set upquotas. Quotas are operational limits. For example, the number of gigabytes allowedper tenant can be controlled so that cloud resources are optimized. Quotas are currentlyenforced at the tenant (or project) level, rather than by user.
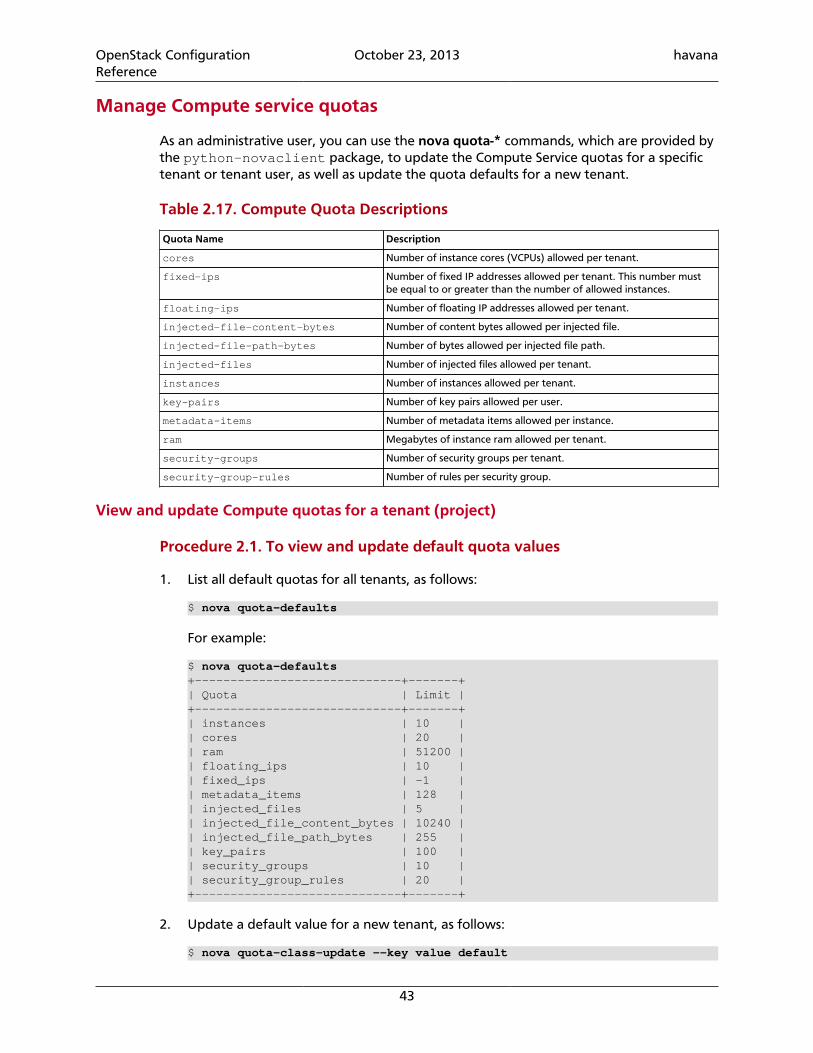
OpenStack ConfigurationReference
October 23, 2013 havana
43
Manage Compute service quotas
As an administrative user, you can use the nova quota-* commands, which are provided bythe python-novaclient package, to update the Compute Service quotas for a specifictenant or tenant user, as well as update the quota defaults for a new tenant.
Table 2.17. Compute Quota Descriptions
Quota Name Description
cores Number of instance cores (VCPUs) allowed per tenant.
fixed-ips Number of fixed IP addresses allowed per tenant. This number mustbe equal to or greater than the number of allowed instances.
floating-ips Number of floating IP addresses allowed per tenant.
injected-file-content-bytes Number of content bytes allowed per injected file.
injected-file-path-bytes Number of bytes allowed per injected file path.
injected-files Number of injected files allowed per tenant.
instances Number of instances allowed per tenant.
key-pairs Number of key pairs allowed per user.
metadata-items Number of metadata items allowed per instance.
ram Megabytes of instance ram allowed per tenant.
security-groups Number of security groups per tenant.
security-group-rules Number of rules per security group.
View and update Compute quotas for a tenant (project)
Procedure 2.1. To view and update default quota values
1. List all default quotas for all tenants, as follows:
$ nova quota-defaults
For example:
$ nova quota-defaults+-----------------------------+-------+| Quota | Limit |+-----------------------------+-------+| instances | 10 || cores | 20 || ram | 51200 || floating_ips | 10 || fixed_ips | -1 || metadata_items | 128 || injected_files | 5 || injected_file_content_bytes | 10240 || injected_file_path_bytes | 255 || key_pairs | 100 || security_groups | 10 || security_group_rules | 20 |+-----------------------------+-------+
2. Update a default value for a new tenant, as follows:
$ nova quota-class-update --key value default
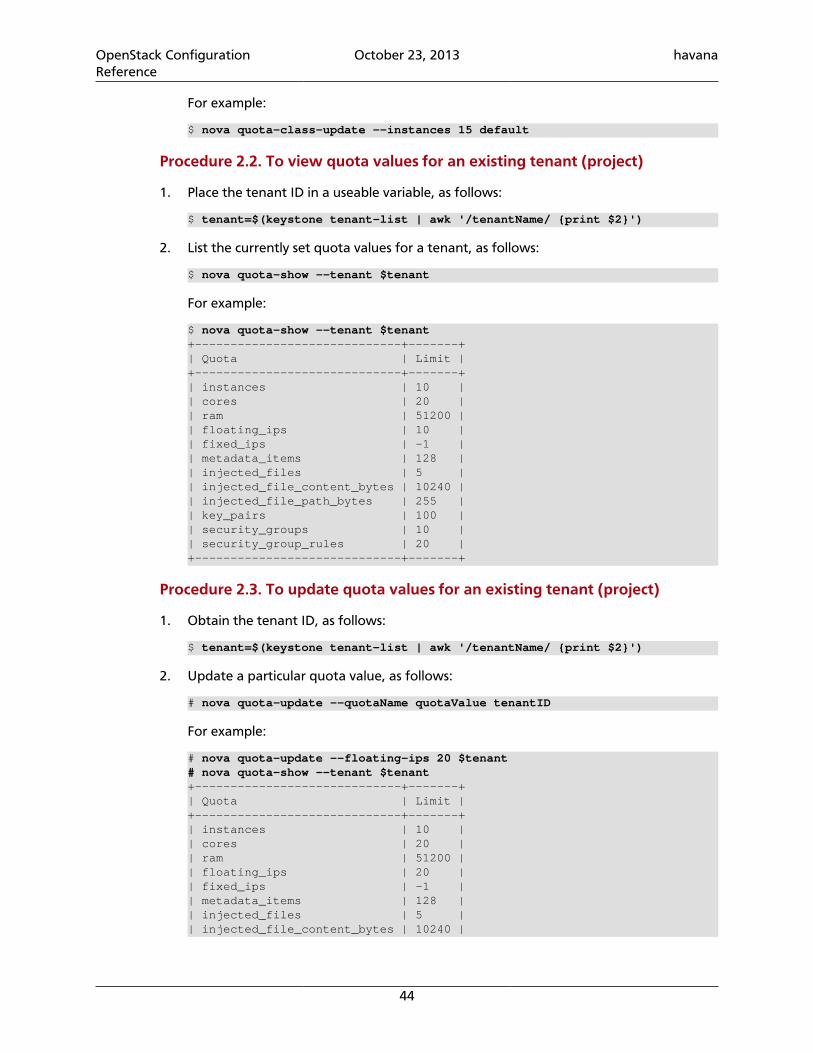
OpenStack ConfigurationReference
October 23, 2013 havana
44
For example:
$ nova quota-class-update --instances 15 default
Procedure 2.2. To view quota values for an existing tenant (project)
1. Place the tenant ID in a useable variable, as follows:
$ tenant=$(keystone tenant-list | awk '/tenantName/ {print $2}')
2. List the currently set quota values for a tenant, as follows:
$ nova quota-show --tenant $tenant
For example:
$ nova quota-show --tenant $tenant+-----------------------------+-------+| Quota | Limit |+-----------------------------+-------+| instances | 10 || cores | 20 || ram | 51200 || floating_ips | 10 || fixed_ips | -1 || metadata_items | 128 || injected_files | 5 || injected_file_content_bytes | 10240 || injected_file_path_bytes | 255 || key_pairs | 100 || security_groups | 10 || security_group_rules | 20 |+-----------------------------+-------+
Procedure 2.3. To update quota values for an existing tenant (project)
1. Obtain the tenant ID, as follows:
$ tenant=$(keystone tenant-list | awk '/tenantName/ {print $2}')
2. Update a particular quota value, as follows:
# nova quota-update --quotaName quotaValue tenantID
For example:
# nova quota-update --floating-ips 20 $tenant# nova quota-show --tenant $tenant+-----------------------------+-------+| Quota | Limit |+-----------------------------+-------+| instances | 10 || cores | 20 || ram | 51200 || floating_ips | 20 || fixed_ips | -1 || metadata_items | 128 || injected_files | 5 || injected_file_content_bytes | 10240 |
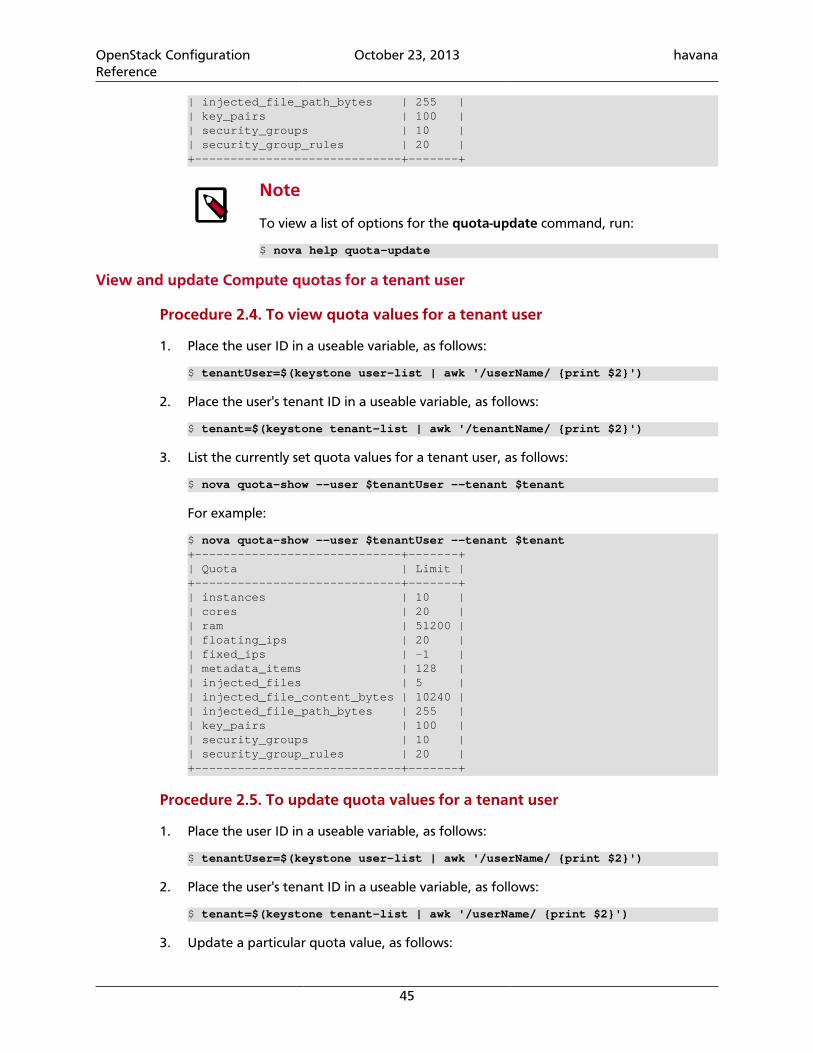
OpenStack ConfigurationReference
October 23, 2013 havana
45
| injected_file_path_bytes | 255 || key_pairs | 100 || security_groups | 10 || security_group_rules | 20 |+-----------------------------+-------+
Note
To view a list of options for the quota-update command, run:
$ nova help quota-update
View and update Compute quotas for a tenant user
Procedure 2.4. To view quota values for a tenant user
1. Place the user ID in a useable variable, as follows:
$ tenantUser=$(keystone user-list | awk '/userName/ {print $2}')
2. Place the user's tenant ID in a useable variable, as follows:
$ tenant=$(keystone tenant-list | awk '/tenantName/ {print $2}')
3. List the currently set quota values for a tenant user, as follows:
$ nova quota-show --user $tenantUser --tenant $tenant
For example:
$ nova quota-show --user $tenantUser --tenant $tenant+-----------------------------+-------+| Quota | Limit |+-----------------------------+-------+| instances | 10 || cores | 20 || ram | 51200 || floating_ips | 20 || fixed_ips | -1 || metadata_items | 128 || injected_files | 5 || injected_file_content_bytes | 10240 || injected_file_path_bytes | 255 || key_pairs | 100 || security_groups | 10 || security_group_rules | 20 |+-----------------------------+-------+
Procedure 2.5. To update quota values for a tenant user
1. Place the user ID in a useable variable, as follows:
$ tenantUser=$(keystone user-list | awk '/userName/ {print $2}')
2. Place the user's tenant ID in a useable variable, as follows:
$ tenant=$(keystone tenant-list | awk '/userName/ {print $2}')
3. Update a particular quota value, as follows:
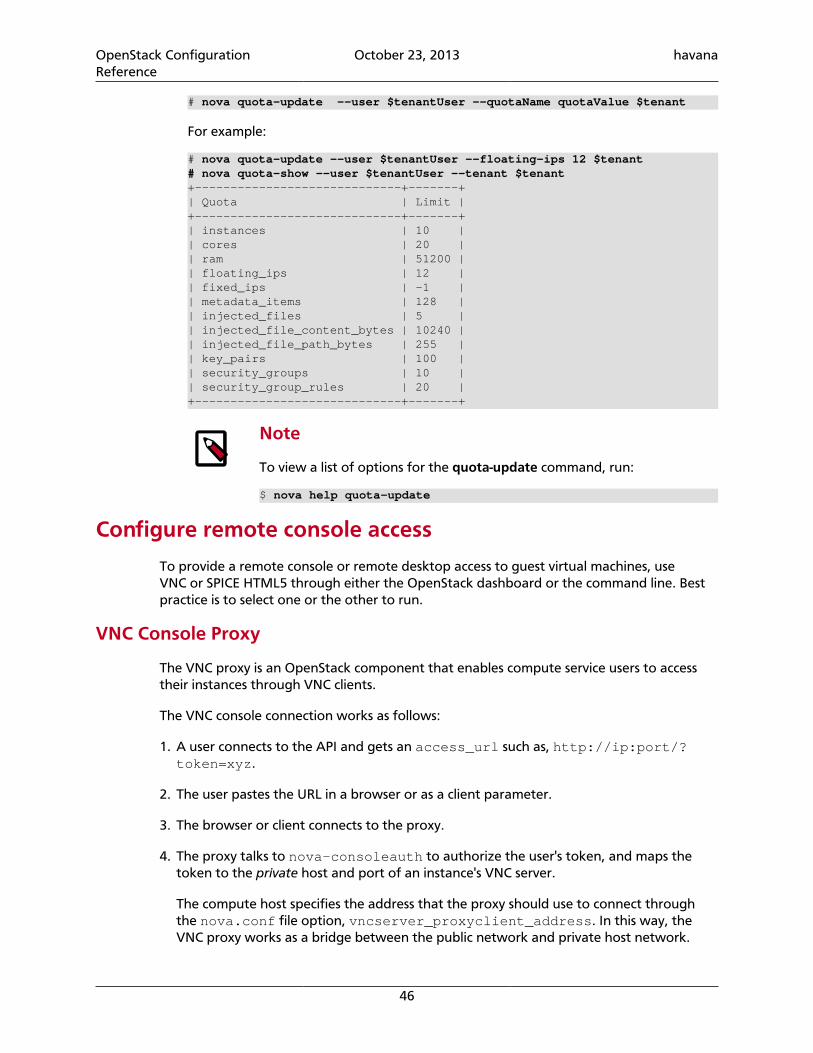
OpenStack ConfigurationReference
October 23, 2013 havana
46
# nova quota-update --user $tenantUser --quotaName quotaValue $tenant
For example:
# nova quota-update --user $tenantUser --floating-ips 12 $tenant# nova quota-show --user $tenantUser --tenant $tenant+-----------------------------+-------+| Quota | Limit |+-----------------------------+-------+| instances | 10 || cores | 20 || ram | 51200 || floating_ips | 12 || fixed_ips | -1 || metadata_items | 128 || injected_files | 5 || injected_file_content_bytes | 10240 || injected_file_path_bytes | 255 || key_pairs | 100 || security_groups | 10 || security_group_rules | 20 |+-----------------------------+-------+
Note
To view a list of options for the quota-update command, run:
$ nova help quota-update
Configure remote console access
To provide a remote console or remote desktop access to guest virtual machines, useVNC or SPICE HTML5 through either the OpenStack dashboard or the command line. Bestpractice is to select one or the other to run.
VNC Console Proxy
The VNC proxy is an OpenStack component that enables compute service users to accesstheir instances through VNC clients.
The VNC console connection works as follows:
1. A user connects to the API and gets an access_url such as, http://ip:port/?token=xyz.
2. The user pastes the URL in a browser or as a client parameter.
3. The browser or client connects to the proxy.
4. The proxy talks to nova-consoleauth to authorize the user's token, and maps thetoken to the private host and port of an instance's VNC server.
The compute host specifies the address that the proxy should use to connect throughthe nova.conf file option, vncserver_proxyclient_address. In this way, theVNC proxy works as a bridge between the public network and private host network.
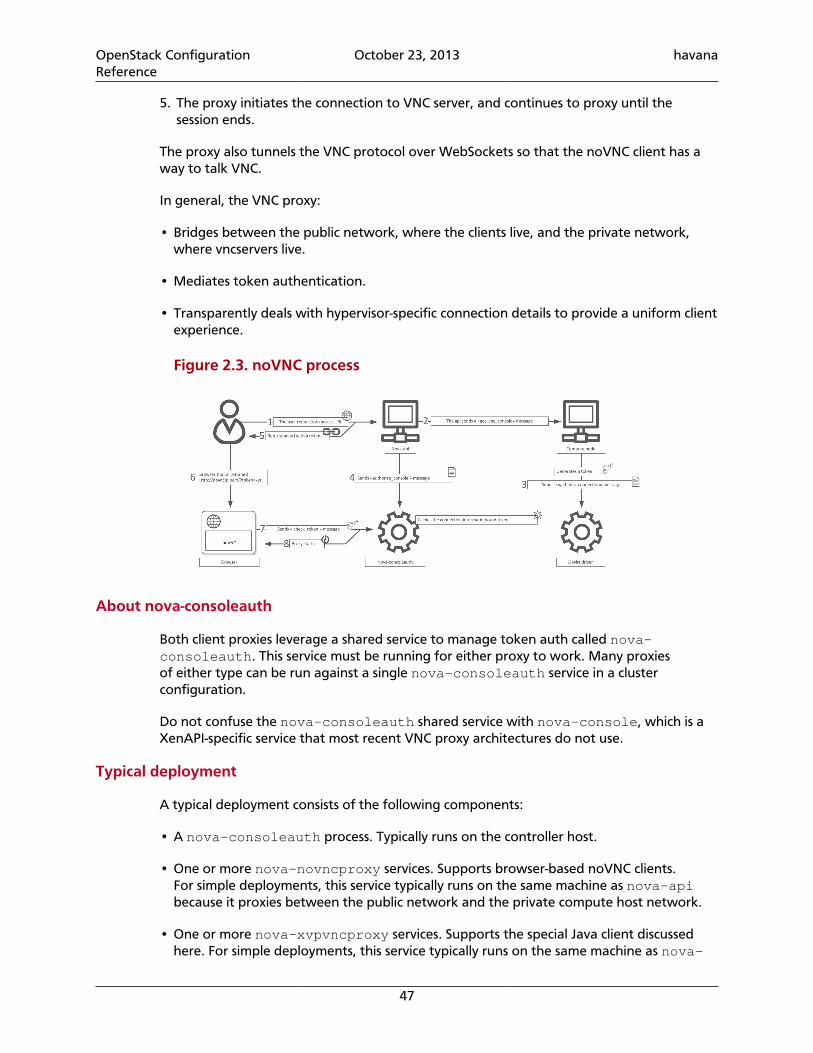
OpenStack ConfigurationReference
October 23, 2013 havana
47
5. The proxy initiates the connection to VNC server, and continues to proxy until thesession ends.
The proxy also tunnels the VNC protocol over WebSockets so that the noVNC client has away to talk VNC.
In general, the VNC proxy:
• Bridges between the public network, where the clients live, and the private network,where vncservers live.
• Mediates token authentication.
• Transparently deals with hypervisor-specific connection details to provide a uniform clientexperience.
Figure 2.3. noVNC process
About nova-consoleauth
Both client proxies leverage a shared service to manage token auth called nova-consoleauth. This service must be running for either proxy to work. Many proxiesof either type can be run against a single nova-consoleauth service in a clusterconfiguration.
Do not confuse the nova-consoleauth shared service with nova-console, which is aXenAPI-specific service that most recent VNC proxy architectures do not use.
Typical deployment
A typical deployment consists of the following components:
• A nova-consoleauth process. Typically runs on the controller host.
• One or more nova-novncproxy services. Supports browser-based noVNC clients.For simple deployments, this service typically runs on the same machine as nova-apibecause it proxies between the public network and the private compute host network.
• One or more nova-xvpvncproxy services. Supports the special Java client discussedhere. For simple deployments, this service typically runs on the same machine as nova-
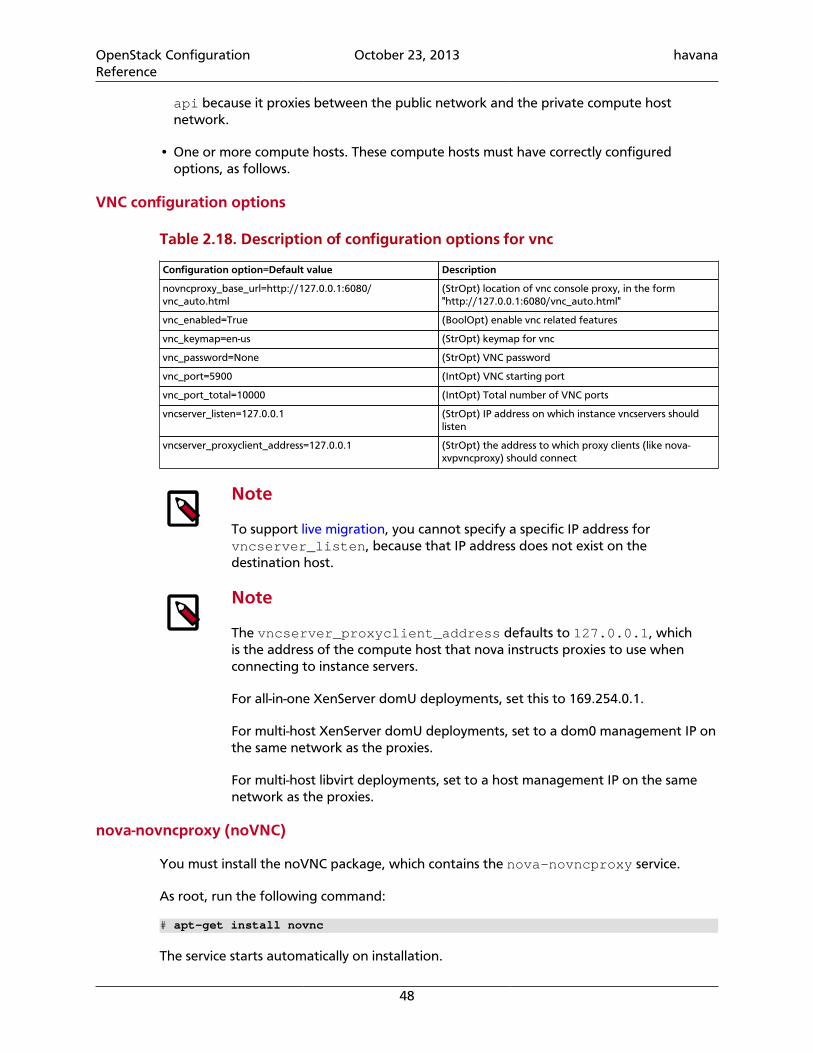
OpenStack ConfigurationReference
October 23, 2013 havana
48
api because it proxies between the public network and the private compute hostnetwork.
• One or more compute hosts. These compute hosts must have correctly configuredoptions, as follows.
VNC configuration options
Table 2.18. Description of configuration options for vnc
Configuration option=Default value Description
novncproxy_base_url=http://127.0.0.1:6080/vnc_auto.html
(StrOpt) location of vnc console proxy, in the form"http://127.0.0.1:6080/vnc_auto.html"
vnc_enabled=True (BoolOpt) enable vnc related features
vnc_keymap=en-us (StrOpt) keymap for vnc
vnc_password=None (StrOpt) VNC password
vnc_port=5900 (IntOpt) VNC starting port
vnc_port_total=10000 (IntOpt) Total number of VNC ports
vncserver_listen=127.0.0.1 (StrOpt) IP address on which instance vncservers shouldlisten
vncserver_proxyclient_address=127.0.0.1 (StrOpt) the address to which proxy clients (like nova-xvpvncproxy) should connect
Note
To support live migration, you cannot specify a specific IP address forvncserver_listen, because that IP address does not exist on thedestination host.
Note
The vncserver_proxyclient_address defaults to 127.0.0.1, whichis the address of the compute host that nova instructs proxies to use whenconnecting to instance servers.
For all-in-one XenServer domU deployments, set this to 169.254.0.1.
For multi-host XenServer domU deployments, set to a dom0 management IP onthe same network as the proxies.
For multi-host libvirt deployments, set to a host management IP on the samenetwork as the proxies.
nova-novncproxy (noVNC)
You must install the noVNC package, which contains the nova-novncproxy service.
As root, run the following command:
# apt-get install novnc
The service starts automatically on installation.
OpenStack ConfigurationReference
October 23, 2013 havana
49
To restart it, run the following command:
# service novnc restart
The configuration option parameter should point to your nova.conf file, which includesthe message queue server address and credentials.
By default, nova-novncproxy binds on 0.0.0.0:6080.
To connect the service to your nova deployment, add the following configuration optionsto your nova.conf file:
• vncserver_listen=0.0.0.0
Specifies the address on which the VNC service should bind. Make sure it is assigned oneof the compute node interfaces. This address is the one used by your domain file.
<graphics type="vnc" autoport="yes" keymap="en-us" listen="0.0.0.0"/>
Note
To use live migration, make sure to use the 0.0.0.0address.
• vncserver_ proxyclient_ address =127.0.0.1
The address of the compute host that nova instructs proxies to use when connecting toinstance vncservers.
Frequently asked questions about VNC access to virtual machines
• Q: What is the difference between nova-xvpvncproxy and nova-novncproxy?
A: nova-xvpvncproxy, which ships with nova, is a proxy that supports a simple Javaclient. nova-novncproxy uses noVNC to provide VNC support through a web browser.
• Q: I want VNC support in the Dashboard. What services do I need?
A: You need nova-novncproxy, nova-consoleauth, and correctly configuredcompute hosts.
• Q: When I use nova get-vnc-console or click on the VNC tab of the Dashboard, it hangs.Why?
A: Make sure you are running nova-consoleauth (in addition to nova-novncproxy). The proxies rely on nova-consoleauth to validate tokens, and waitsfor a reply from them until a timeout is reached.
• Q: My VNC proxy worked fine during my all-in-one test, but now it doesn't work onmulti host. Why?
A: The default options work for an all-in-one install, but changes must be made on yourcompute hosts once you start to build a cluster. As an example, suppose you have twoservers:
OpenStack ConfigurationReference
October 23, 2013 havana
50
PROXYSERVER (public_ip=172.24.1.1, management_ip=192.168.1.1)COMPUTESERVER (management_ip=192.168.1.2)
Your nova-compute configuration file must set the following values:
# These flags help construct a connection data structurevncserver_proxyclient_address=192.168.1.2novncproxy_base_url=http://172.24.1.1:6080/vnc_auto.htmlxvpvncproxy_base_url=http://172.24.1.1:6081/console
# This is the address where the underlying vncserver (not the proxy)# will listen for connections.vncserver_listen=192.168.1.2
Note
novncproxy_base_url and xvpvncproxy_base_url use a public IP;this is the URL that is ultimately returned to clients, which generally do nothave access to your private network. Your PROXYSERVER must be able toreach vncserver_proxyclient_address, because that is the addressover which the VNC connection is proxied.
• Q: My noVNC does not work with recent versions of web browsers. Why?
A: Make sure you have python-numpy installed, which is required to support a newerversion of the WebSocket protocol (HyBi-07+).
• Q: How do I adjust the dimensions of the VNC window image in the OpenStackdashboard?
A: These values are hard-coded in a Django HTML template. To alter them, edit the_detail_vnc.html template file. The location of this file varies based on Linuxdistribution. On Ubuntu 12.04, the file is at /usr/share/pyshared/horizon/dashboards/nova/instances/templates/instances/_detail_vnc.html.
Modify the width and height parameters, as follows:
<iframe src="{{ vnc_url }}" width="720" height="430"></iframe>
Spice Console
OpenStack Compute has long had support for VNC consoles to guests. The VNC protocol isfairly limited, lacking support for multiple monitors, bi-directional audio, reliable cut+paste,video streaming and more. SPICE is a new protocol which aims to address all the limitationsin VNC, to provide good remote desktop support.
SPICE support in OpenStack Compute shares a similar architecture to the VNCimplementation. The OpenStack Dashboard uses a SPICE-HTML5 widget in its console tab,that communicates to the nova-spicehtml5proxy service using SPICE-over-websockets.The nova-spicehtml5proxy service communicates directly with the hypervisor processusing SPICE.
Note
If Spice is not configured correctly, Compute will fall back upon VNC.
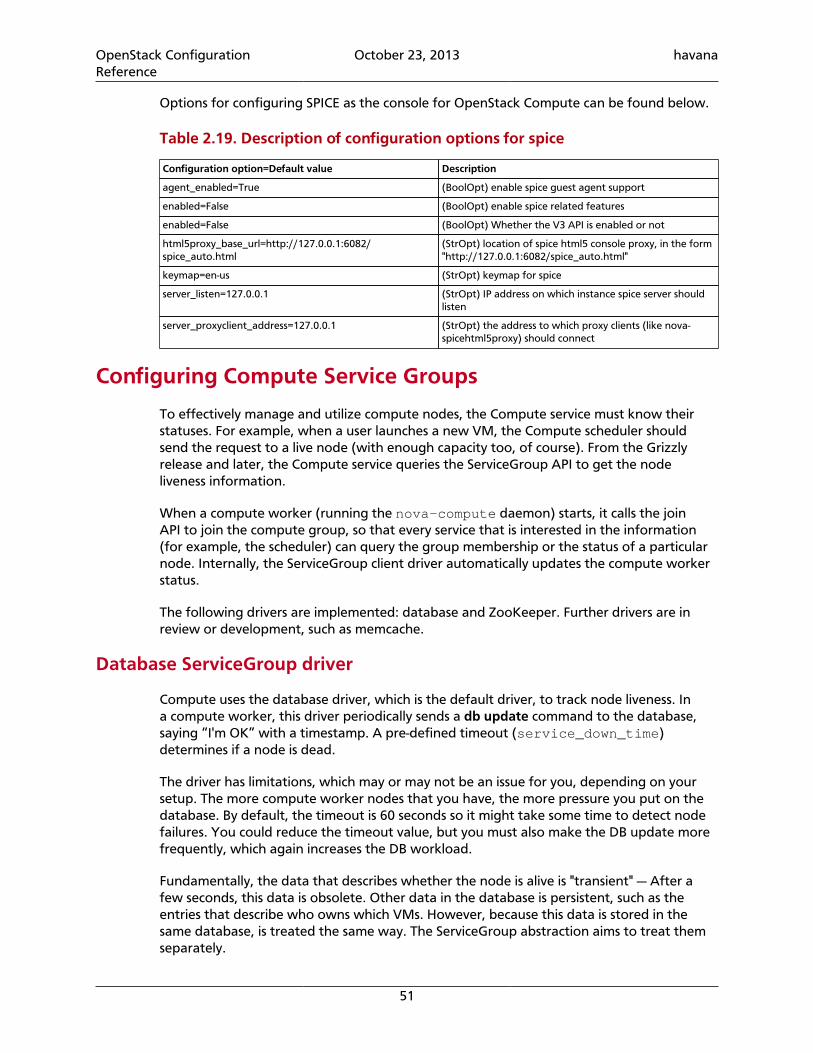
OpenStack ConfigurationReference
October 23, 2013 havana
51
Options for configuring SPICE as the console for OpenStack Compute can be found below.
Table 2.19. Description of configuration options for spice
Configuration option=Default value Description
agent_enabled=True (BoolOpt) enable spice guest agent support
enabled=False (BoolOpt) enable spice related features
enabled=False (BoolOpt) Whether the V3 API is enabled or not
html5proxy_base_url=http://127.0.0.1:6082/spice_auto.html
(StrOpt) location of spice html5 console proxy, in the form"http://127.0.0.1:6082/spice_auto.html"
keymap=en-us (StrOpt) keymap for spice
server_listen=127.0.0.1 (StrOpt) IP address on which instance spice server shouldlisten
server_proxyclient_address=127.0.0.1 (StrOpt) the address to which proxy clients (like nova-spicehtml5proxy) should connect
Configuring Compute Service Groups
To effectively manage and utilize compute nodes, the Compute service must know theirstatuses. For example, when a user launches a new VM, the Compute scheduler shouldsend the request to a live node (with enough capacity too, of course). From the Grizzlyrelease and later, the Compute service queries the ServiceGroup API to get the nodeliveness information.
When a compute worker (running the nova-compute daemon) starts, it calls the joinAPI to join the compute group, so that every service that is interested in the information(for example, the scheduler) can query the group membership or the status of a particularnode. Internally, the ServiceGroup client driver automatically updates the compute workerstatus.
The following drivers are implemented: database and ZooKeeper. Further drivers are inreview or development, such as memcache.
Database ServiceGroup driver
Compute uses the database driver, which is the default driver, to track node liveness. Ina compute worker, this driver periodically sends a db update command to the database,saying “I'm OK” with a timestamp. A pre-defined timeout (service_down_time)determines if a node is dead.
The driver has limitations, which may or may not be an issue for you, depending on yoursetup. The more compute worker nodes that you have, the more pressure you put on thedatabase. By default, the timeout is 60 seconds so it might take some time to detect nodefailures. You could reduce the timeout value, but you must also make the DB update morefrequently, which again increases the DB workload.
Fundamentally, the data that describes whether the node is alive is "transient" — After afew seconds, this data is obsolete. Other data in the database is persistent, such as theentries that describe who owns which VMs. However, because this data is stored in thesame database, is treated the same way. The ServiceGroup abstraction aims to treat themseparately.
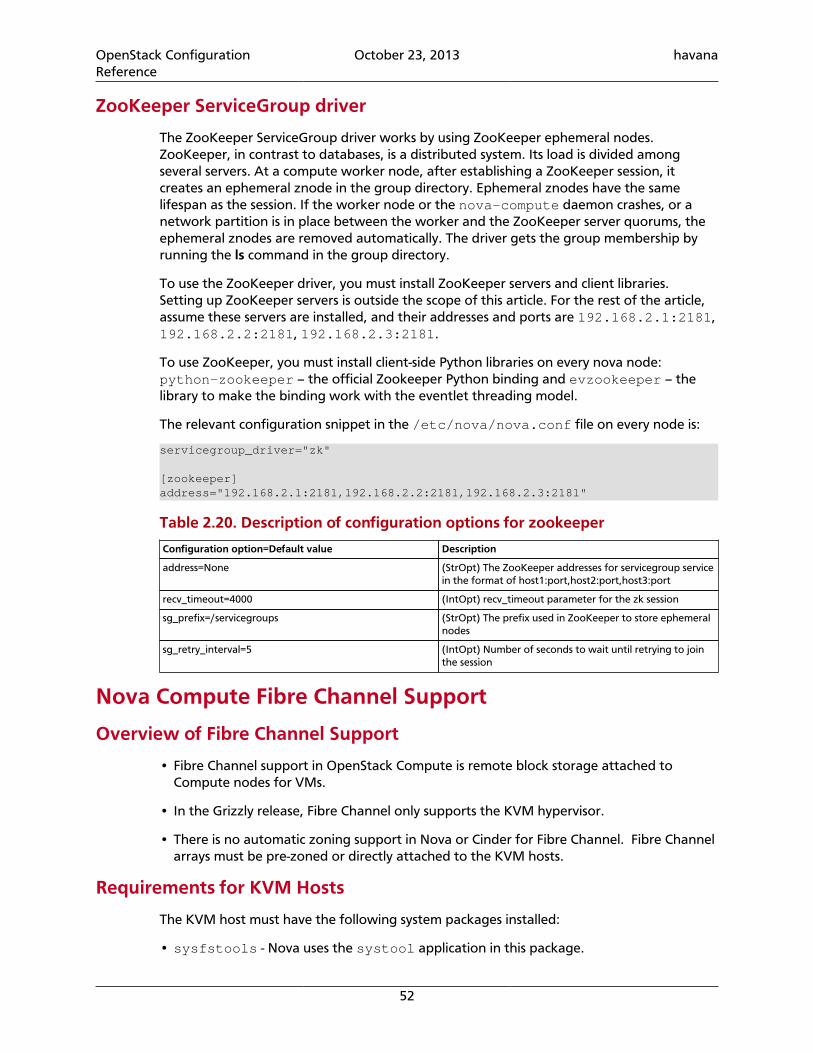
OpenStack ConfigurationReference
October 23, 2013 havana
52
ZooKeeper ServiceGroup driver
The ZooKeeper ServiceGroup driver works by using ZooKeeper ephemeral nodes.ZooKeeper, in contrast to databases, is a distributed system. Its load is divided amongseveral servers. At a compute worker node, after establishing a ZooKeeper session, itcreates an ephemeral znode in the group directory. Ephemeral znodes have the samelifespan as the session. If the worker node or the nova-compute daemon crashes, or anetwork partition is in place between the worker and the ZooKeeper server quorums, theephemeral znodes are removed automatically. The driver gets the group membership byrunning the ls command in the group directory.
To use the ZooKeeper driver, you must install ZooKeeper servers and client libraries.Setting up ZooKeeper servers is outside the scope of this article. For the rest of the article,assume these servers are installed, and their addresses and ports are 192.168.2.1:2181,192.168.2.2:2181, 192.168.2.3:2181.
To use ZooKeeper, you must install client-side Python libraries on every nova node:python-zookeeper – the official Zookeeper Python binding and evzookeeper – thelibrary to make the binding work with the eventlet threading model.
The relevant configuration snippet in the /etc/nova/nova.conf file on every node is:
servicegroup_driver="zk"
[zookeeper]address="192.168.2.1:2181,192.168.2.2:2181,192.168.2.3:2181"
Table 2.20. Description of configuration options for zookeeper
Configuration option=Default value Description
address=None (StrOpt) The ZooKeeper addresses for servicegroup servicein the format of host1:port,host2:port,host3:port
recv_timeout=4000 (IntOpt) recv_timeout parameter for the zk session
sg_prefix=/servicegroups (StrOpt) The prefix used in ZooKeeper to store ephemeralnodes
sg_retry_interval=5 (IntOpt) Number of seconds to wait until retrying to jointhe session
Nova Compute Fibre Channel Support
Overview of Fibre Channel Support
• Fibre Channel support in OpenStack Compute is remote block storage attached toCompute nodes for VMs.
• In the Grizzly release, Fibre Channel only supports the KVM hypervisor.
• There is no automatic zoning support in Nova or Cinder for Fibre Channel. Fibre Channelarrays must be pre-zoned or directly attached to the KVM hosts.
Requirements for KVM Hosts
The KVM host must have the following system packages installed:
• sysfstools - Nova uses the systool application in this package.

OpenStack ConfigurationReference
October 23, 2013 havana
53
• sg3-utils - Nova uses the sg_scan and sginfo applications.
Installing the multipath-tools package is optional.
Installing the Required Packages
Use the following commands to install the system packages.
• For systems running Ubuntu:
$ sudo apt-get install sysfstools sg3-utils multipath-tools
• For systems running Red Hat:
$ sudo yum install sysfstools sg3_utils multipath-tools
Configuring Multiple Compute NodesIf your goal is to split your VM load across more than one server, you can connect anadditional nova-compute node to a cloud controller node. This configuring can bereproduced on multiple compute servers to start building a true multi-node OpenStackCompute cluster.
To build out and scale the Compute platform, you spread out services amongst manyservers. While there are additional ways to accomplish the build-out, this section describesadding compute nodes, and the service we are scaling out is called nova-compute.
For a multi-node install you only make changes to nova.conf and copy it to additionalcompute nodes. Ensure each nova.conf file points to the correct IP addresses for therespective services.
By default, nova-network sets the bridge device based on the setting inflat_network_bridge. Now you can edit /etc/network/interfaces with thefollowing template, updated with your IP information.
# The loopback network interfaceauto lo iface lo inet loopback
# The primary network interfaceauto br100iface br100 inet static bridge_ports eth0 bridge_stp off bridge_maxwait 0 bridge_fd 0 address xxx.xxx.xxx.xxx netmask xxx.xxx.xxx.xxx network xxx.xxx.xxx.xxx broadcast xxx.xxx.xxx.xxx gateway xxx.xxx.xxx.xxx # dns-* options are implemented by the resolvconf package, if installed dns-nameservers xxx.xxx.xxx.xxx
Restart networking:
$ sudo service networking restart
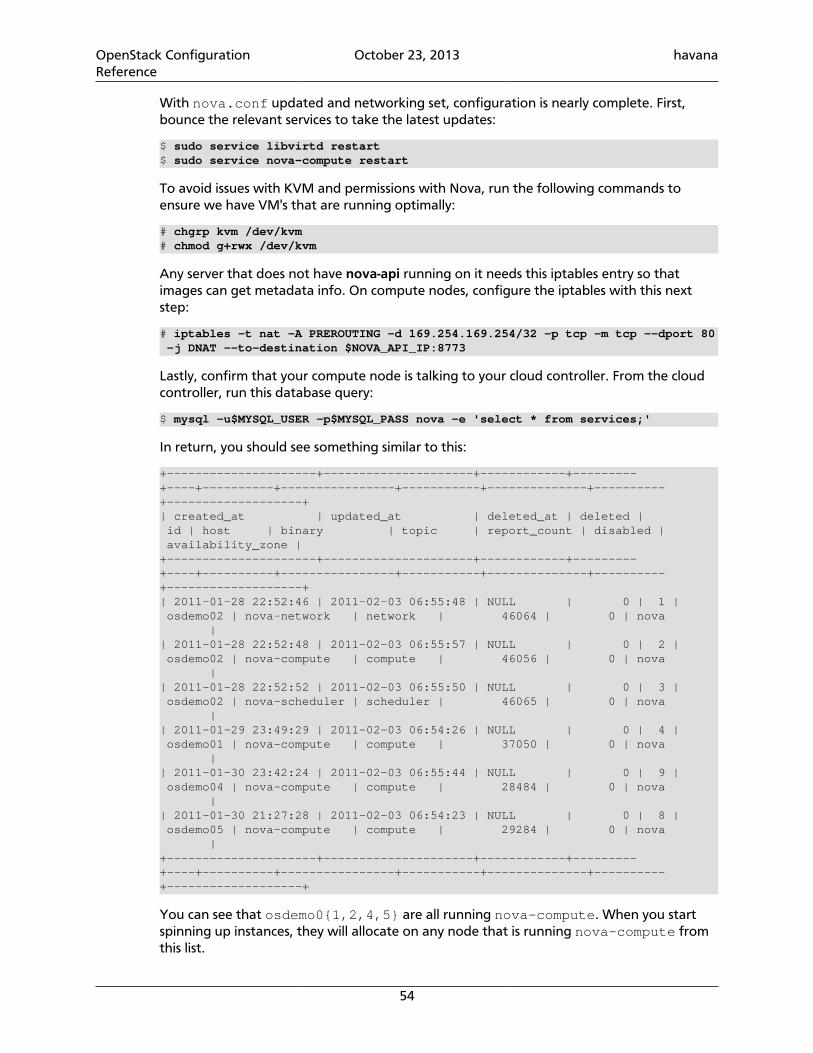
OpenStack ConfigurationReference
October 23, 2013 havana
54
With nova.conf updated and networking set, configuration is nearly complete. First,bounce the relevant services to take the latest updates:
$ sudo service libvirtd restart$ sudo service nova-compute restart
To avoid issues with KVM and permissions with Nova, run the following commands toensure we have VM's that are running optimally:
# chgrp kvm /dev/kvm# chmod g+rwx /dev/kvm
Any server that does not have nova-api running on it needs this iptables entry so thatimages can get metadata info. On compute nodes, configure the iptables with this nextstep:
# iptables -t nat -A PREROUTING -d 169.254.169.254/32 -p tcp -m tcp --dport 80 -j DNAT --to-destination $NOVA_API_IP:8773
Lastly, confirm that your compute node is talking to your cloud controller. From the cloudcontroller, run this database query:
$ mysql -u$MYSQL_USER -p$MYSQL_PASS nova -e 'select * from services;'
In return, you should see something similar to this:
+---------------------+---------------------+------------+---------+----+----------+----------------+-----------+--------------+----------+-------------------+| created_at | updated_at | deleted_at | deleted | id | host | binary | topic | report_count | disabled | availability_zone |+---------------------+---------------------+------------+---------+----+----------+----------------+-----------+--------------+----------+-------------------+| 2011-01-28 22:52:46 | 2011-02-03 06:55:48 | NULL | 0 | 1 | osdemo02 | nova-network | network | 46064 | 0 | nova || 2011-01-28 22:52:48 | 2011-02-03 06:55:57 | NULL | 0 | 2 | osdemo02 | nova-compute | compute | 46056 | 0 | nova || 2011-01-28 22:52:52 | 2011-02-03 06:55:50 | NULL | 0 | 3 | osdemo02 | nova-scheduler | scheduler | 46065 | 0 | nova || 2011-01-29 23:49:29 | 2011-02-03 06:54:26 | NULL | 0 | 4 | osdemo01 | nova-compute | compute | 37050 | 0 | nova || 2011-01-30 23:42:24 | 2011-02-03 06:55:44 | NULL | 0 | 9 | osdemo04 | nova-compute | compute | 28484 | 0 | nova || 2011-01-30 21:27:28 | 2011-02-03 06:54:23 | NULL | 0 | 8 | osdemo05 | nova-compute | compute | 29284 | 0 | nova |+---------------------+---------------------+------------+---------+----+----------+----------------+-----------+--------------+----------+-------------------+
You can see that osdemo0{1,2,4,5} are all running nova-compute. When you startspinning up instances, they will allocate on any node that is running nova-compute fromthis list.
OpenStack ConfigurationReference
October 23, 2013 havana
55
Hypervisors
OpenStack Compute supports many hypervisors, which might make it difficult for you tochoose one. Most installations use only one hypervisor. However you can use the sectioncalled “ComputeFilter” [90] and the section called “ImagePropertiesFilter” [92] toschedule to different hypervisors within the same installation. The following links help youchoose a hypervisor. See http://wiki.openstack.org/HypervisorSupportMatrix for a detailedlist of features and support across the hypervisors.
The following hypervisors are supported:
• KVM - Kernel-based Virtual Machine. The virtual disk formats that it supports it inheritsfrom QEMU since it uses a modified QEMU program to launch the virtual machine. Thesupported formats include raw images, the qcow2, and VMware formats.
• LXC - Linux Containers (through libvirt), use to run Linux-based virtual machines.
• QEMU - Quick EMUlator, generally only used for development purposes.
• UML - User Mode Linux, generally only used for development purposes.
• VMWare vSphere 4.1 update 1 and newer, runs VMWare-based Linux and Windowsimages through a connection with a vCenter server or directly with an ESXi host.
• Xen - XenServer, Xen Cloud Platform (XCP), use to run Linux or Windows virtualmachines. You must install the nova-compute service in a para-virtualized VM.
• PowerVM - Server virtualization with IBM PowerVM, use to run AIX, IBM i and Linuxenvironments on IBM POWER technology.
• Hyper-V - Server virtualization with Microsoft's Hyper-V, use to run Windows, Linux, andFreeBSD virtual machines. Runs nova-compute natively on the Windows virtualizationplatform.
• Bare Metal - Not a hypervisor in the traditional sense, this driver provisions physicalhardware through pluggable sub-drivers (for example, PXE for image deployment, andIPMI for power management).
• Dockeris an open-source engine which automates the deployment of >applicationsas highly portable, self-sufficient containers which are >independent of hardware,language, framework, packaging system and hosting >provider.
Hypervisor Configuration Basics
The node where the nova-compute service is installed and running is the machine thatruns all the virtual machines, referred to as the compute node in this guide.
By default, the selected hypervisor is KVM. To change to another hypervisor, change thelibvirt_type option in nova.conf and restart the nova-compute service.
Here are the general nova.conf options that are used to configure the compute node'shypervisor. Specific options for particular hypervisors can be found in following sections.
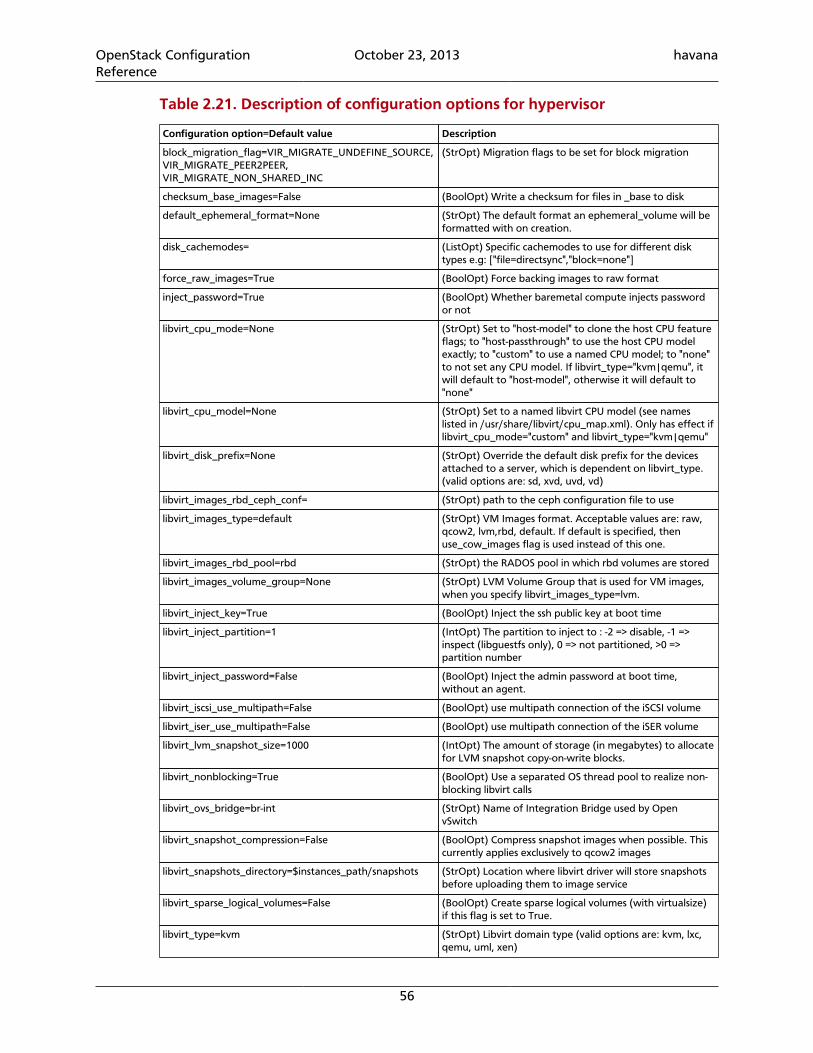
OpenStack ConfigurationReference
October 23, 2013 havana
56
Table 2.21. Description of configuration options for hypervisor
Configuration option=Default value Description
block_migration_flag=VIR_MIGRATE_UNDEFINE_SOURCE,VIR_MIGRATE_PEER2PEER,VIR_MIGRATE_NON_SHARED_INC
(StrOpt) Migration flags to be set for block migration
checksum_base_images=False (BoolOpt) Write a checksum for files in _base to disk
default_ephemeral_format=None (StrOpt) The default format an ephemeral_volume will beformatted with on creation.
disk_cachemodes= (ListOpt) Specific cachemodes to use for different disktypes e.g: ["file=directsync","block=none"]
force_raw_images=True (BoolOpt) Force backing images to raw format
inject_password=True (BoolOpt) Whether baremetal compute injects passwordor not
libvirt_cpu_mode=None (StrOpt) Set to "host-model" to clone the host CPU featureflags; to "host-passthrough" to use the host CPU modelexactly; to "custom" to use a named CPU model; to "none"to not set any CPU model. If libvirt_type="kvm|qemu", itwill default to "host-model", otherwise it will default to"none"
libvirt_cpu_model=None (StrOpt) Set to a named libvirt CPU model (see nameslisted in /usr/share/libvirt/cpu_map.xml). Only has effect iflibvirt_cpu_mode="custom" and libvirt_type="kvm|qemu"
libvirt_disk_prefix=None (StrOpt) Override the default disk prefix for the devicesattached to a server, which is dependent on libvirt_type.(valid options are: sd, xvd, uvd, vd)
libvirt_images_rbd_ceph_conf= (StrOpt) path to the ceph configuration file to use
libvirt_images_type=default (StrOpt) VM Images format. Acceptable values are: raw,qcow2, lvm,rbd, default. If default is specified, thenuse_cow_images flag is used instead of this one.
libvirt_images_rbd_pool=rbd (StrOpt) the RADOS pool in which rbd volumes are stored
libvirt_images_volume_group=None (StrOpt) LVM Volume Group that is used for VM images,when you specify libvirt_images_type=lvm.
libvirt_inject_key=True (BoolOpt) Inject the ssh public key at boot time
libvirt_inject_partition=1 (IntOpt) The partition to inject to : -2 => disable, -1 =>inspect (libguestfs only), 0 => not partitioned, >0 =>partition number
libvirt_inject_password=False (BoolOpt) Inject the admin password at boot time,without an agent.
libvirt_iscsi_use_multipath=False (BoolOpt) use multipath connection of the iSCSI volume
libvirt_iser_use_multipath=False (BoolOpt) use multipath connection of the iSER volume
libvirt_lvm_snapshot_size=1000 (IntOpt) The amount of storage (in megabytes) to allocatefor LVM snapshot copy-on-write blocks.
libvirt_nonblocking=True (BoolOpt) Use a separated OS thread pool to realize non-blocking libvirt calls
libvirt_ovs_bridge=br-int (StrOpt) Name of Integration Bridge used by OpenvSwitch
libvirt_snapshot_compression=False (BoolOpt) Compress snapshot images when possible. Thiscurrently applies exclusively to qcow2 images
libvirt_snapshots_directory=$instances_path/snapshots (StrOpt) Location where libvirt driver will store snapshotsbefore uploading them to image service
libvirt_sparse_logical_volumes=False (BoolOpt) Create sparse logical volumes (with virtualsize)if this flag is set to True.
libvirt_type=kvm (StrOpt) Libvirt domain type (valid options are: kvm, lxc,qemu, uml, xen)
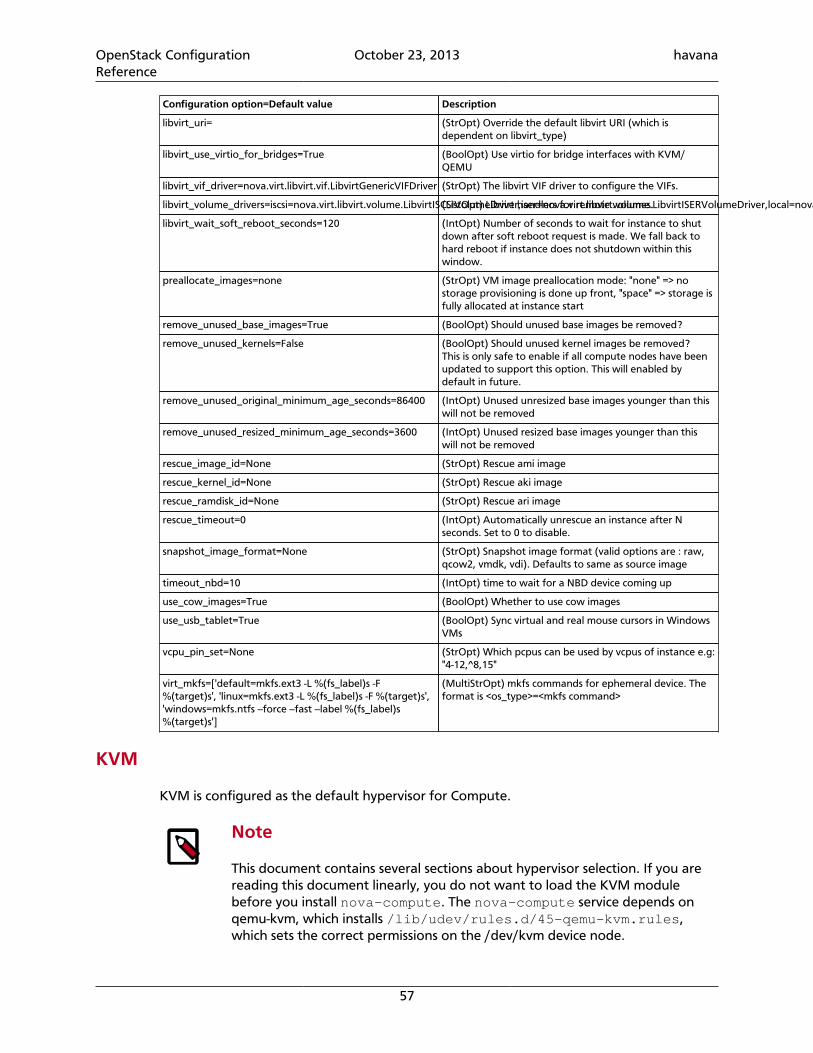
OpenStack ConfigurationReference
October 23, 2013 havana
57
Configuration option=Default value Description
libvirt_uri= (StrOpt) Override the default libvirt URI (which isdependent on libvirt_type)
libvirt_use_virtio_for_bridges=True (BoolOpt) Use virtio for bridge interfaces with KVM/QEMU
libvirt_vif_driver=nova.virt.libvirt.vif.LibvirtGenericVIFDriver (StrOpt) The libvirt VIF driver to configure the VIFs.
libvirt_volume_drivers=iscsi=nova.virt.libvirt.volume.LibvirtISCSIVolumeDriver,iser=nova.virt.libvirt.volume.LibvirtISERVolumeDriver,local=nova.virt.libvirt.volume.LibvirtVolumeDriver,fake=nova.virt.libvirt.volume.LibvirtFakeVolumeDriver,rbd=nova.virt.libvirt.volume.LibvirtNetVolumeDriver,sheepdog=nova.virt.libvirt.volume.LibvirtNetVolumeDriver,nfs=nova.virt.libvirt.volume.LibvirtNFSVolumeDriver,aoe=nova.virt.libvirt.volume.LibvirtAOEVolumeDriver,glusterfs=nova.virt.libvirt.volume.LibvirtGlusterfsVolumeDriver,fibre_channel=nova.virt.libvirt.volume.LibvirtFibreChannelVolumeDriver,scality=nova.virt.libvirt.volume.LibvirtScalityVolumeDriver(ListOpt) Libvirt handlers for remote volumes.
libvirt_wait_soft_reboot_seconds=120 (IntOpt) Number of seconds to wait for instance to shutdown after soft reboot request is made. We fall back tohard reboot if instance does not shutdown within thiswindow.
preallocate_images=none (StrOpt) VM image preallocation mode: "none" => nostorage provisioning is done up front, "space" => storage isfully allocated at instance start
remove_unused_base_images=True (BoolOpt) Should unused base images be removed?
remove_unused_kernels=False (BoolOpt) Should unused kernel images be removed?This is only safe to enable if all compute nodes have beenupdated to support this option. This will enabled bydefault in future.
remove_unused_original_minimum_age_seconds=86400 (IntOpt) Unused unresized base images younger than thiswill not be removed
remove_unused_resized_minimum_age_seconds=3600 (IntOpt) Unused resized base images younger than thiswill not be removed
rescue_image_id=None (StrOpt) Rescue ami image
rescue_kernel_id=None (StrOpt) Rescue aki image
rescue_ramdisk_id=None (StrOpt) Rescue ari image
rescue_timeout=0 (IntOpt) Automatically unrescue an instance after Nseconds. Set to 0 to disable.
snapshot_image_format=None (StrOpt) Snapshot image format (valid options are : raw,qcow2, vmdk, vdi). Defaults to same as source image
timeout_nbd=10 (IntOpt) time to wait for a NBD device coming up
use_cow_images=True (BoolOpt) Whether to use cow images
use_usb_tablet=True (BoolOpt) Sync virtual and real mouse cursors in WindowsVMs
vcpu_pin_set=None (StrOpt) Which pcpus can be used by vcpus of instance e.g:"4-12,^8,15"
virt_mkfs=['default=mkfs.ext3 -L %(fs_label)s -F%(target)s', 'linux=mkfs.ext3 -L %(fs_label)s -F %(target)s','windows=mkfs.ntfs --force --fast --label %(fs_label)s%(target)s']
(MultiStrOpt) mkfs commands for ephemeral device. Theformat is <os_type>=<mkfs command>
KVM
KVM is configured as the default hypervisor for Compute.
Note
This document contains several sections about hypervisor selection. If you arereading this document linearly, you do not want to load the KVM modulebefore you install nova-compute. The nova-compute service depends onqemu-kvm, which installs /lib/udev/rules.d/45-qemu-kvm.rules,which sets the correct permissions on the /dev/kvm device node.
OpenStack ConfigurationReference
October 23, 2013 havana
58
To enable KVM explicitly, add the following configuration options to the /etc/nova/nova.conf file:
compute_driver=libvirt.LibvirtDriverlibvirt_type=kvm
The KVM hypervisor supports the following virtual machine image formats:
• Raw
• QEMU Copy-on-write (qcow2)
• QED Qemu Enhanced Disk
• VMWare virtual machine disk format (vmdk)
This section describes how to enable KVM on your system. For more information, see thefollowing distribution-specific documentation:
• Fedora: Getting started with virtualization from the Fedora project wiki.
• Ubuntu: KVM/Installation from the Community Ubuntu documentation.
• Debian: Virtualization with KVM from the Debian handbook.
• RHEL: Installing virtualization packages on an existing Red Hat Enterprise Linux systemfrom the Red Hat Enterprise Linux Virtualization Host Configuration and Guest InstallationGuide.
• openSUSE: Installing KVM from the openSUSE Virtualization with KVM manual.
• SLES: Installing KVM from the SUSE Linux Enterprise Server Virtualization with KVMmanual.
Enabling KVM
To perform the following steps, you must be logged in as the root user.
1. To determine whether the svm or vmx CPU extensions are present, run the followingcommand:
# grep -E 'svm|vmx' /proc/cpuinfo
This command generates output if the CPU is hardware-virtualization capable. Even ifoutput is shown, you may still need to enable virtualization in the system BIOS for fullsupport.
If no output appears, consult your system documentation to ensure that your CPUand motherboard support hardware virtualization. Verify that any relevant hardwarevirtualization options are enabled in the system BIOS.
Each manufacturer's BIOS is different. If you need to enable virtualization in the BIOS,look for an option containing the words "virtualization", "VT", "VMX", or "SVM."
2. To list the loaded kernel modules and verify that the kvm modules are loaded, run thefollowing command:
OpenStack ConfigurationReference
October 23, 2013 havana
59
# lsmod | grep kvm
If the output includes kvm_intel or kvm_amd, the kvm hardware virtualizationmodules are loaded and your kernel meets the module requirements for OpenStackCompute.
If the output does not show that the kvm module is loaded, run the followingcommand to load it:
# modprobe -a kvm
Run the command for your CPU. For Intel, run this command:
# modprobe -a kvm-intel
For AMD, run this command:
# modprobe -a kvm-amd
Because a KVM installation can change user group membership, you might need to login again for changes to take effect.
If the kernel modules do not load automatically, please use the procedures listed in thesubsections below.
This completes the required checks to ensure that hardware virtualization support isavailable and enabled, and that the correct kernel modules are loaded.
If the checks indicate that required hardware virtualization support or kernel modulesare disabled or not available, you must either enable this support on the system or find asystem with this support.
Note
Some systems require that you enable VT support in the system BIOS. If youbelieve your processor supports hardware acceleration but the previouscommand did not produce output, you might need to reboot your machine,enter the system BIOS, and enable the VT option.
If KVM acceleration is not supported, configure Compute to use a different hypervisor, suchas QEMU or Xen.
The following procedures will help you load the kernel modules for Intel-based and AMD-based processors if they did not load automatically during KVM installation.
Intel-based processors
If your compute host is Intel-based, run the following command as root to load the kernelmodules:
# modprobe kvm# modprobe kvm-intel
Add the following lines to the /etc/modules file so that these modules load on reboot:
OpenStack ConfigurationReference
October 23, 2013 havana
60
kvmkvm-intel
AMD-based processors
If your compute host is AMD-based, run the following command as root to load the kernelmodules:
# modprobe kvm# modprobe kvm-amd
Add the following lines to /etc/modules file so that these modules load on reboot:
kvmkvm-amd
Specify the CPU model of KVM guests
The Compute service enables you to control the guest CPU model that is exposed to KVMvirtual machines. Use cases include:
• To maximize performance of virtual machines by exposing new host CPU features to theguest
• To ensure a consistent default CPU across all machines, removing reliance of variableQEMU defaults
In libvirt, the CPU is specified by providing a base CPU model name (which is a shorthandfor a set of feature flags), a set of additional feature flags, and the topology (sockets/cores/threads). The libvirt KVM driver provides a number of standard CPU model names.These models are defined in the /usr/share/libvirt/cpu_map.xml file. Check thisfile to determine which models are supported by your local installation.
Two Compute configuration options define which type of CPU model is exposed to thehypervisor when using KVM: libvirt_cpu_mode and libvirt_cpu_model.
The libvirt_cpu_mode option can take one of the following values: none, host-passthrough, host-model, and custom.
Host model (default for KVM & QEMU)
If your nova.conf file contains libvirt_cpu_mode=host-model, libvirt identifiesthe CPU model in /usr/share/libvirt/cpu_map.xml file that most closely matchesthe host, and requests additional CPU flags to complete the match. This configurationprovides the maximum functionality and performance and maintains good reliability andcompatibility if the guest is migrated to another host with slightly different host CPUs.
Host pass through
If your nova.conf file contains libvirt_cpu_mode=host-passthrough, libvirt tellsKVM to pass through the host CPU with no modifications. The difference to host-model,instead of just matching feature flags, every last detail of the host CPU is matched. Thisgives absolutely best performance, and can be important to some apps which check lowlevel CPU details, but it comes at a cost with respect to migration: the guest can only bemigrated to an exactly matching host CPU.
OpenStack ConfigurationReference
October 23, 2013 havana
61
Custom
If your nova.conf file contains libvirt_cpu_mode=custom, you can explicitly specifyone of the supported named model using the libvirt_cpu_model configuration option. Forexample, to configure the KVM guests to expose Nehalem CPUs, your nova.conf fileshould contain:
libvirt_cpu_mode=customlibvirt_cpu_model=Nehalem
None (default for all libvirt-driven hypervisors other than KVM & QEMU)
If your nova.conf file contains libvirt_cpu_mode=none, libvirt does not specify a CPUmodel. Instead, the hypervisor chooses the default model. This setting is equivalent to theCompute service behavior prior to the Folsom release.
KVM Performance Tweaks
The VHostNet kernel module improves network performance. To load the kernel module,run the following command as root:
# modprobe vhost_net
Troubleshooting
Trying to launch a new virtual machine instance fails with the ERRORstate, and thefollowing error appears in the /var/log/nova/nova-compute.log file:
libvirtError: internal error no supported architecture for os type 'hvm'
This message indicates that the KVM kernel modules were not loaded.
If you cannot start VMs after installation without rebooting, the permissions might not becorrect. This can happen if you load the KVM module before you install nova-compute.To check whether the group is set to kvm, run:
# ls -l /dev/kvm
If it is not set to kvm, run:
# sudo udevadm trigger
QEMU
From the perspective of the Compute service, the QEMU hypervisor is very similar tothe KVM hypervisor. Both are controlled through libvirt, both support the same featureset, and all virtual machine images that are compatible with KVM are also compatiblewith QEMU. The main difference is that QEMU does not support native virtualization.Consequently, QEMU has worse performance than KVM and is a poor choice for aproduction deployment.
The typical uses cases for QEMU are
• Running on older hardware that lacks virtualization support.
• Running the Compute service inside of a virtual machine for development or testingpurposes, where the hypervisor does not support native virtualization for guests.
OpenStack ConfigurationReference
October 23, 2013 havana
62
To enable QEMU, add these settings to nova.conf:
compute_driver=libvirt.LibvirtDriverlibvirt_type=qemu
For some operations you may also have to install the guestmount utility:
On Ubuntu:
$> sudo apt-get install guestmount
On RHEL, Fedora or CentOS:
$> sudo yum install libguestfs-tools
On openSUSE:
$> sudo zypper install guestfs-tools
The QEMU hypervisor supports the following virtual machine image formats:
• Raw
• QEMU Copy-on-write (qcow2)
• VMWare virtual machine disk format (vmdk)
Tips and fixes for QEMU on RHEL
If you are testing OpenStack in a virtual machine, you need to configure nova to use qemuwithout KVM and hardware virtualization. The second command relaxes SELinux rules toallow this mode of operation ( https://bugzilla.redhat.com/show_bug.cgi?id=753589).The last two commands here work around a libvirt issue fixed in RHEL 6.4. Note nestedvirtualization will be the much slower TCG variety, and you should provide lots of memoryto the top level guest, as the OpenStack-created guests default to 2GM RAM with noovercommit.
Note
The second command, setsebool, may take a while.
$> sudo openstack-config --set /etc/nova/nova.conf DEFAULT libvirt_type qemu $> sudo setsebool -P virt_use_execmem on $> sudo ln -s /usr/libexec/qemu-kvm /usr/bin/qemu-system-x86_64 $> sudo service libvirtd restart
Xen, XenAPI, XenServer, and XCP
This section describes Xen, XenAPI, XenServer, and XCP, their differences, and how to usethem with OpenStack. After you understand how the Xen and KVM architectures differ,you can determine when to use each architecture in your OpenStack cloud.
Xen Terminology
Xen. A hypervisor that provides the fundamental isolation between virtual machines. Xen isopen source (GPLv2) and is managed by Xen.org, an cross-industry organization.
OpenStack ConfigurationReference
October 23, 2013 havana
63
Xen is a component of many different products and projects. The hypervisor itself is verysimilar across all these projects, but the way that it is managed can be different, which cancause confusion if you're not clear which tool stack you are using. Make sure you knowwhat tool stack you want before you get started.
Xen Cloud Platform (XCP). An open source (GPLv2) tool stack for Xen. It is designedspecifically as a platform for enterprise and cloud computing, and is well integrated withOpenStack. XCP is available both as a binary distribution, installed from an iso, and fromLinux distributions, such as xcp-xapi in Ubuntu. The current versions of XCP available inLinux distributions do not yet include all the features available in the binary distribution ofXCP.
Citrix XenServer. A commercial product. It is based on XCP, and exposes the same toolstack and management API. As an analogy, think of XenServer being based on XCP in theway that Red Hat Enterprise Linux is based on Fedora. XenServer has a free version (whichis very similar to XCP) and paid-for versions with additional features enabled. Citrix providessupport for XenServer, but as of July 2012, they do not provide any support for XCP. For acomparison between these products see the XCP Feature Matrix.
Both XenServer and XCP include Xen, Linux, and the primary control daemon known asxapi.
The API shared between XCP and XenServer is called XenAPI. OpenStack usually refersto XenAPI, to indicate that the integration works equally well on XCP and XenServer.Sometimes, a careless person will refer to XenServer specifically, but you can be reasonablyconfident that anything that works on XenServer will also work on the latest version ofXCP. Read the XenAPI Object Model Overview for definitions of XenAPI specific terms suchas SR, VDI, VIF and PIF.
Privileged and Unprivileged Domains
A Xen host runs a number of virtual machines, VMs, or domains (the terms are synonymouson Xen). One of these is in charge of running the rest of the system, and is known as"domain 0," or "dom0." It is the first domain to boot after Xen, and owns the storageand networking hardware, the device drivers, and the primary control software. Anyother VM is unprivileged, and are known as a "domU" or "guest". All customer VMs areunprivileged of course, but you should note that on Xen the OpenStack control software(nova-compute) also runs in a domU. This gives a level of security isolation betweenthe privileged system software and the OpenStack software (much of which is customer-facing). This architecture is described in more detail later.
There is an ongoing project to split domain 0 into multiple privileged domains known asdriver domains and stub domains. This would give even better separation between criticalcomponents. This technology is what powers Citrix XenClient RT, and is likely to be addedinto XCP in the next few years. However, the current architecture just has three levels ofseparation: dom0, the OpenStack domU, and the completely unprivileged customer VMs.
Paravirtualized versus hardware virtualized domains
A Xen virtual machine can be paravirtualized (PV) or hardware virtualized (HVM). Thisrefers to the interaction between Xen, domain 0, and the guest VM's kernel. PV guestsare aware of the fact that they are virtualized and will co-operate with Xen and domain0; this gives them better performance characteristics. HVM guests are not aware of their
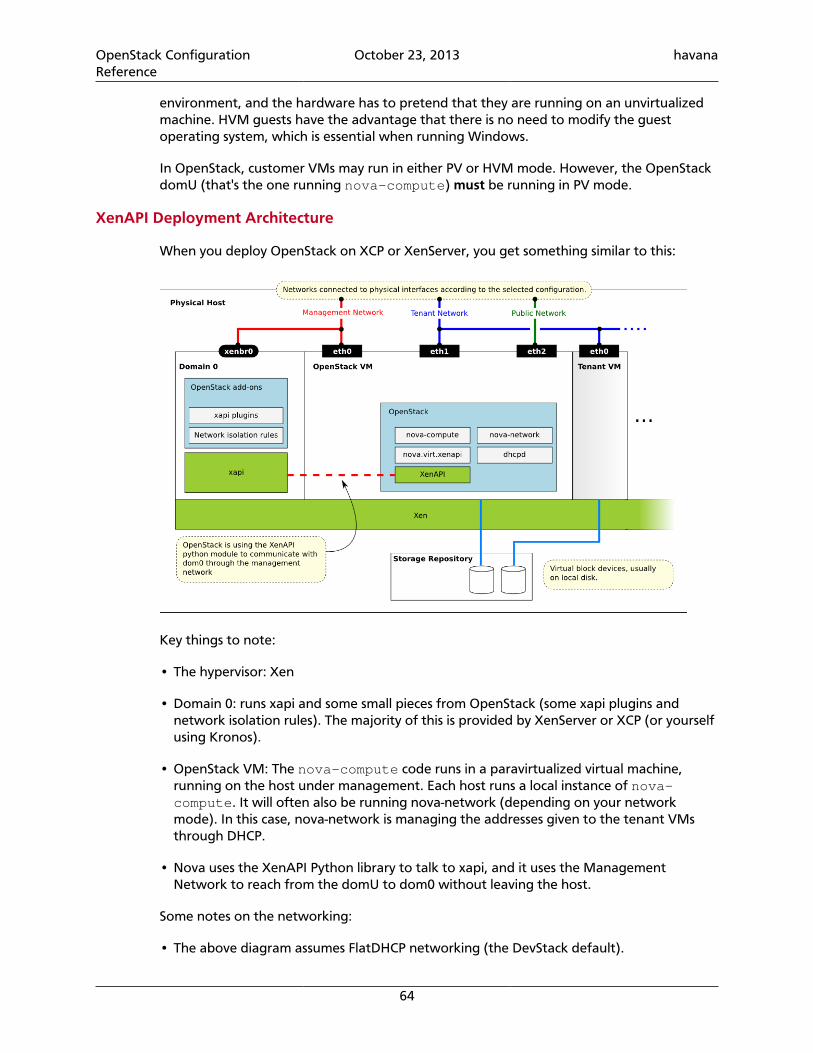
OpenStack ConfigurationReference
October 23, 2013 havana
64
environment, and the hardware has to pretend that they are running on an unvirtualizedmachine. HVM guests have the advantage that there is no need to modify the guestoperating system, which is essential when running Windows.
In OpenStack, customer VMs may run in either PV or HVM mode. However, the OpenStackdomU (that's the one running nova-compute) must be running in PV mode.
XenAPI Deployment Architecture
When you deploy OpenStack on XCP or XenServer, you get something similar to this:
Key things to note:
• The hypervisor: Xen
• Domain 0: runs xapi and some small pieces from OpenStack (some xapi plugins andnetwork isolation rules). The majority of this is provided by XenServer or XCP (or yourselfusing Kronos).
• OpenStack VM: The nova-compute code runs in a paravirtualized virtual machine,running on the host under management. Each host runs a local instance of nova-compute. It will often also be running nova-network (depending on your networkmode). In this case, nova-network is managing the addresses given to the tenant VMsthrough DHCP.
• Nova uses the XenAPI Python library to talk to xapi, and it uses the ManagementNetwork to reach from the domU to dom0 without leaving the host.
Some notes on the networking:
• The above diagram assumes FlatDHCP networking (the DevStack default).
OpenStack ConfigurationReference
October 23, 2013 havana
65
• There are three main OpenStack Networks:
• Management network - RabbitMQ, MySQL, etc. Please note that the VM imagesare downloaded by the XenAPI plugins, so please make sure that the images canbe downloaded through the management network. It usually means binding thoseservices to the management interface.
• Tenant network - controlled by nova-network. The parameters of this network dependon the networking model selected (Flat, Flat DHCP, VLAN).
• Public network - floating IPs, public API endpoints.
• The networks shown here need to be connected to the corresponding physical networkswithin the data center. In the simplest case, three individual physical network cards couldbe used. It is also possible to use VLANs to separate these networks. Please note, thatthe selected configuration must be in line with the networking model selected for thecloud. (In case of VLAN networking, the physical channels have to be able to forward thetagged traffic.)
XenAPI Pools
The host-aggregates feature enables you to create pools of XenServer hosts to enable livemigration when using shared storage. However, you cannot configure shared storage.
Further Reading
Here are some of the resources available to learn more about Xen:
• Citrix XenServer official documentation: http://docs.vmd.citrix.com/XenServer.
• What is Xen? by Xen.org: http://xen.org/files/Marketing/WhatisXen.pdf.
• Xen Hypervisor project: http://xen.org/products/xenhyp.html.
• XCP project: http://xen.org/products/cloudxen.html.
• Further XenServer and OpenStack information: http://wiki.openstack.org/XenServer.
Installing XenServer and XCP
Before you can run OpenStack with XCP or XenServer, you must install the software on anappropriate server.
Note
Xen is a type 1 hypervisor: When your server starts, Xen is the first softwarethat runs. Consequently, you must install XenServer or XCP before youinstall the operating system on which you want to run OpenStack code. TheOpenStack services then run in a virtual machine that you install on top ofXenServer.
Before you can install your system you must decide if you want to install Citrix XenServer(either the free edition, or one of the paid editions) or Xen Cloud Platform from Xen.org.You can download the software from the following locations:
OpenStack ConfigurationReference
October 23, 2013 havana
66
• http://www.citrix.com/XenServer/download
• http://www.xen.org/download/xcp/index.html
When installing many servers, you may find it easier to perform PXE boot installations ofXenServer or XCP. You can also package up any post install changes you wish to make toyour XenServer by creating your own XenServer supplemental pack.
It is also possible to get XCP by installing the xcp-xenapi package on Debian baseddistributions. However, this is not as mature or feature complete as above distributions.This will modify your boot loader to first boot Xen, then boot your existing OS on top ofXen as Dom0. It is in Dom0 that the xapi daemon will run. You can find more details on theXen.org wiki: http://wiki.xen.org/wiki/Project_Kronos
Important
Ensure you are using the EXT type of storage repository (SR). Features thatrequire access to VHD files (such as copy on write, snapshot and migration) donot work when using the LVM SR. Storage repository (SR) is a XenAPI specificterm relating to the physical storage on which virtual disks are stored.
On the XenServer/XCP installation screen, this is selected by choosing"XenDesktop Optimized" option. In case you are using an answer file, makesure you use srtype="ext" within the installation tag of the answerfile.
Post install steps
You are now ready to install OpenStack onto your XenServer system. This process involvesthe following steps:
• For resize and migrate functionality, please perform the changes described in the Configuring Resize section of the OpenStack Configuration Reference.
• Install the VIF isolation rules to help prevent mac and ip address spoofing.
• Install the XenAPI plugins - see the next section.
• To support AMI type images, you must set up /boot/guest symlink/directory in Dom0.For detailed instructions, see next section.
• To support resize/migration, set up an ssh trust relation between your XenServer hosts,and ensure /images is properly set up. See next section for more details.
• Create a Paravirtualized virtual machine that can run the OpenStack compute code.
• Install and configure the nova-compute in the above virtual machine.
For further information on these steps look at how DevStack performs the last three stepswhen doing developer deployments. For more information on DevStack, take a look at the DevStack and XenServer Readme. More information on the first step can be found in the XenServer mutli-tenancy protection doc. More information on how to install the XenAPIplugins can be found in the XenAPI plugins Readme.
OpenStack ConfigurationReference
October 23, 2013 havana
67
Installing the XenAPI Plugins
When using Xen as the hypervisor for OpenStack Compute, you can install a Pythonscript (usually, but it can be any executable) on the host side, and then call that throughthe XenAPI. These scripts are called plugins. The XenAPI plugins live in the nova coderepository. These plugins have to be copied to the hypervisor's Dom0, to the appropriatedirectory, where xapi can find them. There are several options for the installation. Theimportant thing is to ensure that the version of the plugins are in line with the novainstallation by only installing plugins from a matching nova repository.
Manual Installation
Procedure 2.6. To manually install
1. Create temporary files/directories:
$ NOVA_ZIPBALL=$(mktemp)$ NOVA_SOURCES=$(mktemp -d)
2. Get the source from github. The example assumes the master branch is used. Amendthe URL to match the version being used:
$ wget -qO "$NOVA_ZIPBALL" https://github.com/openstack/nova/archive/master.zip$ unzip "$NOVA_ZIPBALL" -d "$NOVA_SOURCES"
(Alternatively) Should you wish to use the official Ubuntu packages, use the followingcommands to get the nova code base:
$ ( cd $NOVA_SOURCES && apt-get source python-nova --download-only )$ ( cd $NOVA_SOURCES && for ARCHIVE in *.tar.gz; do tar -xzf $ARCHIVE; done )
3. Copy the plugins to the hypervisor:
$ PLUGINPATH=$(find $NOVA_SOURCES -path '*/xapi.d/plugins' -type d -print)$ tar -czf - -C "$PLUGINPATH" ./ | ssh root@xenserver tar -xozf - -C /etc/xapi.d/plugins/
4. Remove the temporary files/directories:
$ rm "$NOVA_ZIPBALL"$ rm -rf "$NOVA_SOURCES"
Packaged Installation
Follow these steps to produce a supplemental pack from the nova sources, and package itas a XenServer supplemental pack.
Procedure 2.7. To package a XenServer supplemental pack
1. Create RPM packages. Given you have the nova sources (use one of the methodsmentioned at Manual Installation):
$ cd nova/plugins/xenserver/xenapi/contrib$ ./build-rpm.sh
These commands leave an .rpm file in the rpmbuild/RPMS/noarch/ directory.
OpenStack ConfigurationReference
October 23, 2013 havana
68
2. Pack the RPM packages to a Supplemental Pack, using the XenServer DDK (thefollowing command should be issued on the XenServer DDK virtual appliance, afterthe produced rpm file has been copied over):
$ /usr/bin/build-supplemental-pack.sh \> --output=output_directory \> --vendor-code=novaplugin \> --vendor-name=openstack \> --label=novaplugins \> --text="nova plugins" \> --version=0 \> full_path_to_rpmfile
This command produces an .iso file in the output directory specified. Copy that file tothe hypervisor.
3. Install the Supplemental Pack. Log in to the hypervisor, and issue:
# xe-install-supplemental-pack path_to_isofile
Prepare for AMI Type Images
In order to support AMI type images within your OpenStack installation, a directory /boot/guest needs to be created inside Dom0. The OpenStack VM will put the kernel andramdisk extracted from the AKI and ARI images to this location.
This directory's content will be maintained by OpenStack, and its size should not increaseduring normal operation. However, in case of power failures or accidental shutdowns,some files might be left over. In order to prevent these files from filling up Dom0's disk, itis recommended to set up this directory as a symlink pointing to a subdirectory of the localSR.
Execute the following commands in Dom0 to achieve the above mentioned setup:
# LOCAL_SR=$(xe sr-list name-label="Local storage" --minimal)# LOCALPATH="/var/run/sr-mount/$LOCAL_SR/os-guest-kernels"# mkdir -p "$LOCALPATH"# ln -s "$LOCALPATH" /boot/guest
Dom0 Modifications for Resize/Migration Support
To get resize to work with XenServer (and XCP) you need to:
• Establish a root trust between all hypervisor nodes of your deployment:
You can do so by generating an ssh key-pair (with ssh-keygen) and then ensuringthat each of your dom0's authorized_keys file (located in /root/.ssh/authorized_keys) contains the public key fingerprint (located in /root/.ssh/id_rsa.pub).
• Provide an /images mount point to your hypervisor's dom0:
Dom0 space is a premium so creating a directory in dom0 is kind of dangerous, andalmost surely bound to fail especially when resizing big servers. The least you can do is tosymlink /images to your local storage SR. The instructions below work for an English-based installation of XenServer (and XCP) and in the case of ext3 based SR (with whichthe resize functionality is known to work correctly).
OpenStack ConfigurationReference
October 23, 2013 havana
69
# LOCAL_SR=$(xe sr-list name-label="Local storage" --minimal)# IMG_DIR="/var/run/sr-mount/$LOCAL_SR/images"# mkdir -p "$IMG_DIR"# ln -s "$IMG_DIR" /images
Xen Boot from ISO
XenServer, through the XenAPI integration with OpenStack provides a feature to bootinstances from an ISO file. To activate the "Boot From ISO" feature, you must configure theSR elements on XenServer host that way.
Procedure 2.8. To Xen boot from ISO
1. Create an ISO-typed SR, such as an NFS ISO library, for instance. For this, usingXenCenter is a simple method. You must export an NFS volume from a remote NFSserver. Make sure it is exported in read-write mode.
2. On the compute host, find the uuid of this ISO SR and write it down.
# xe host-list
3. Locate the uuid of the NFS ISO library:
# xe sr-list content-type=iso
4. Set the uuid and configuration. Even if an NFS mount point isn't local storage, youmust specify "local-storage-iso."
# xe sr-param-set uuid=[iso sr uuid] other-config:i18n-key=local-storage-iso
5. Make sure the host-uuid from "xe pbd-list" equals the uuid of the host you foundearlier:
# xe sr-uuid=[iso sr uuid]
6. You can now add images via the OpenStack Image Registry, with disk-format=iso,and boot them in OpenStack Compute.
# glance image-create --name=fedora_iso --disk-format=iso --container-format=bare < Fedora-16-x86_64-netinst.iso
Xen Configuration Reference
The following section discusses some commonly changed options in XenServer. The tablebelow provides a complete reference of all configuration options available for configuringXen with OpenStack.
The recommended way to use Xen with OpenStack is through the XenAPI driver. To enablethe XenAPI driver, add the following configuration options /etc/nova/nova.conf andrestart the nova-compute service:
compute_driver=xenapi.XenAPIDriverxenapi_connection_url=http://your_xenapi_management_ip_addressxenapi_connection_username=rootxenapi_connection_password=your_password
OpenStack ConfigurationReference
October 23, 2013 havana
70
These connection details are used by the OpenStack Compute service to contact yourhypervisor and are the same details you use to connect XenCenter, the XenServermanagement console, to your XenServer or XCP box.
Note
The xenapi_connection_url is generally the management network IPaddress of the XenServer. Though it is possible to use the internal network IPAddress (169.250.0.1) to contact XenAPI, this does not allow live migrationbetween hosts, and other functionalities like host aggregates do not work.
It is possible to manage Xen using libvirt, though this is not well-tested or supported. Toexperiment using Xen through libvirt add the following configuration options /etc/nova/nova.conf:
compute_driver=libvirt.LibvirtDriverlibvirt_type=xen
Agent
If you don't have the guest agent on your VMs, it takes a long time for nova to decide theVM has successfully started. Generally a large timeout is required for Windows instances,bug you may want to tweak agent_version_timeout
Firewall
If using nova-network, IPTables is supported:
firewall_driver=nova.virt.firewall.IptablesFirewallDriver
Alternately, doing the isolation in Dom0:
firewall_driver=nova.virt.xenapi.firewall.Dom0IptablesFirewallDriver
VNC Proxy Address
Assuming you are talking to XenAPI through the host local managementnetwork, and XenServer is on the address: 169.254.0.1, you can use the following:vncserver_proxyclient_address=169.254.0.1
Storage
You can specify which Storage Repository to use with nova by looking at the following flag.The default is to use the local-storage setup by the default installer:
sr_matching_filter="other-config:i18n-key=local-storage"
Another good alternative is to use the "default" storage (for example if you have attachedNFS or any other shared storage):
sr_matching_filter="default-sr:true"
Note
To use a XenServer pool, you must create the pool by using the HostAggregates feature.
OpenStack ConfigurationReference
October 23, 2013 havana
71
Configuration Reference Table for Xen
Table 2.22. Description of configuration options for xen
Configuration option=Default value Description
agent_resetnetwork_timeout=60 (IntOpt) number of seconds to wait for agent reply toresetnetwork request
agent_timeout=30 (IntOpt) number of seconds to wait for agent reply
agent_version_timeout=300 (IntOpt) number of seconds to wait for agent to be fullyoperational
cache_images=all (StrOpt) Cache glance images locally. `all` will cache allimages, `some` will only cache images that have theimage_property `cache_in_nova=True`, and `none` turnsoff caching entirely
console_driver=nova.console.xvp.XVPConsoleProxy (StrOpt) Driver to use for the console proxy
console_vmrc_error_retries=10 (IntOpt) number of retries for retrieving VMRCinformation
console_vmrc_port=443 (IntOpt) port for VMware VMRC connections
console_xvp_conf=/etc/xvp.conf (StrOpt) generated XVP conf file
console_xvp_conf_template=$pybasedir/nova/console/xvp.conf.template
(StrOpt) XVP conf template
console_xvp_log=/var/log/xvp.log (StrOpt) XVP log file
console_xvp_multiplex_port=5900 (IntOpt) port for XVP to multiplex VNC connections on
console_xvp_pid=/var/run/xvp.pid (StrOpt) XVP master process pid file
default_os_type=linux (StrOpt) Default OS type
iqn_prefix=iqn.2010-10.org.openstack (StrOpt) IQN Prefix
max_kernel_ramdisk_size=16777216 (IntOpt) Maximum size in bytes of kernel or ramdiskimages
sr_matching_filter=default-sr:true (StrOpt) Filter for finding the SR to be used to installguest instances on. To use the Local Storage in defaultXenServer/XCP installations set this flag to other-config:i18n-key=local-storage. To select an SR with adifferent matching criteria, you could set it to other-config:my_favorite_sr=true. On the other hand, to fallback on the Default SR, as displayed by XenCenter, set thisflag to: default-sr:true
stub_compute=False (BoolOpt) Stub calls to compute worker for tests
target_host=None (StrOpt) iSCSI Target Host
target_port=3260 (StrOpt) iSCSI Target Port, 3260 Default
use_join_force=True (BoolOpt) To use for hosts with different CPUs
xen_hvmloader_path=/usr/lib/xen/boot/hvmloader (StrOpt) Location where the Xen hvmloader is kept
xenapi_agent_path=usr/sbin/xe-update-networking (StrOpt) Specifies the path in which the xenapi guestagent should be located. If the agent is present,network configuration is not injected into the image.Used if compute_driver=xenapi.XenAPIDriver andflat_injected=True
xenapi_check_host=True (BoolOpt) Ensure compute service is running on hostXenAPI connects to.
xenapi_connection_concurrent=5 (IntOpt) Maximum number of concurrentXenAPI connections. Used only ifcompute_driver=xenapi.XenAPIDriver
xenapi_connection_password=None (StrOpt) Password for connection toXenServer/Xen Cloud Platform. Used only ifcompute_driver=xenapi.XenAPIDriver
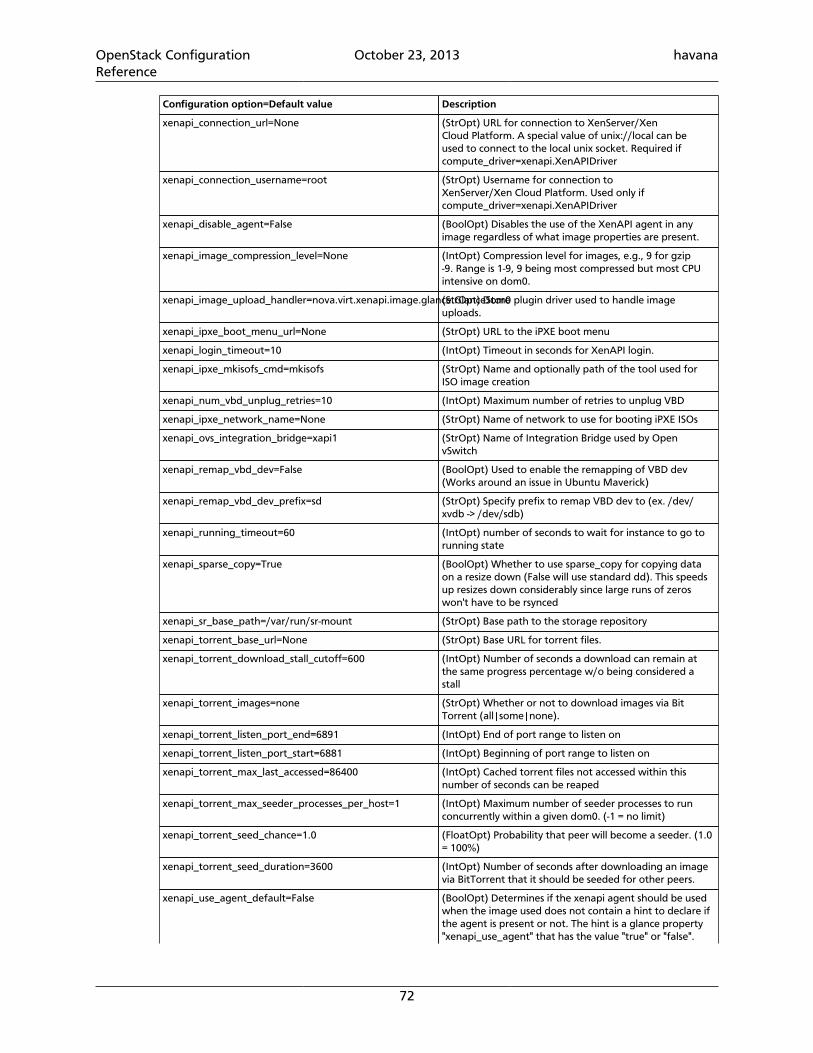
OpenStack ConfigurationReference
October 23, 2013 havana
72
Configuration option=Default value Description
xenapi_connection_url=None (StrOpt) URL for connection to XenServer/XenCloud Platform. A special value of unix://local can beused to connect to the local unix socket. Required ifcompute_driver=xenapi.XenAPIDriver
xenapi_connection_username=root (StrOpt) Username for connection toXenServer/Xen Cloud Platform. Used only ifcompute_driver=xenapi.XenAPIDriver
xenapi_disable_agent=False (BoolOpt) Disables the use of the XenAPI agent in anyimage regardless of what image properties are present.
xenapi_image_compression_level=None (IntOpt) Compression level for images, e.g., 9 for gzip-9. Range is 1-9, 9 being most compressed but most CPUintensive on dom0.
xenapi_image_upload_handler=nova.virt.xenapi.image.glance.GlanceStore(StrOpt) Dom0 plugin driver used to handle imageuploads.
xenapi_ipxe_boot_menu_url=None (StrOpt) URL to the iPXE boot menu
xenapi_login_timeout=10 (IntOpt) Timeout in seconds for XenAPI login.
xenapi_ipxe_mkisofs_cmd=mkisofs (StrOpt) Name and optionally path of the tool used forISO image creation
xenapi_num_vbd_unplug_retries=10 (IntOpt) Maximum number of retries to unplug VBD
xenapi_ipxe_network_name=None (StrOpt) Name of network to use for booting iPXE ISOs
xenapi_ovs_integration_bridge=xapi1 (StrOpt) Name of Integration Bridge used by OpenvSwitch
xenapi_remap_vbd_dev=False (BoolOpt) Used to enable the remapping of VBD dev(Works around an issue in Ubuntu Maverick)
xenapi_remap_vbd_dev_prefix=sd (StrOpt) Specify prefix to remap VBD dev to (ex. /dev/xvdb -> /dev/sdb)
xenapi_running_timeout=60 (IntOpt) number of seconds to wait for instance to go torunning state
xenapi_sparse_copy=True (BoolOpt) Whether to use sparse_copy for copying dataon a resize down (False will use standard dd). This speedsup resizes down considerably since large runs of zeroswon't have to be rsynced
xenapi_sr_base_path=/var/run/sr-mount (StrOpt) Base path to the storage repository
xenapi_torrent_base_url=None (StrOpt) Base URL for torrent files.
xenapi_torrent_download_stall_cutoff=600 (IntOpt) Number of seconds a download can remain atthe same progress percentage w/o being considered astall
xenapi_torrent_images=none (StrOpt) Whether or not to download images via BitTorrent (all|some|none).
xenapi_torrent_listen_port_end=6891 (IntOpt) End of port range to listen on
xenapi_torrent_listen_port_start=6881 (IntOpt) Beginning of port range to listen on
xenapi_torrent_max_last_accessed=86400 (IntOpt) Cached torrent files not accessed within thisnumber of seconds can be reaped
xenapi_torrent_max_seeder_processes_per_host=1 (IntOpt) Maximum number of seeder processes to runconcurrently within a given dom0. (-1 = no limit)
xenapi_torrent_seed_chance=1.0 (FloatOpt) Probability that peer will become a seeder. (1.0= 100%)
xenapi_torrent_seed_duration=3600 (IntOpt) Number of seconds after downloading an imagevia BitTorrent that it should be seeded for other peers.
xenapi_use_agent_default=False (BoolOpt) Determines if the xenapi agent should be usedwhen the image used does not contain a hint to declare ifthe agent is present or not. The hint is a glance property"xenapi_use_agent" that has the value "true" or "false".
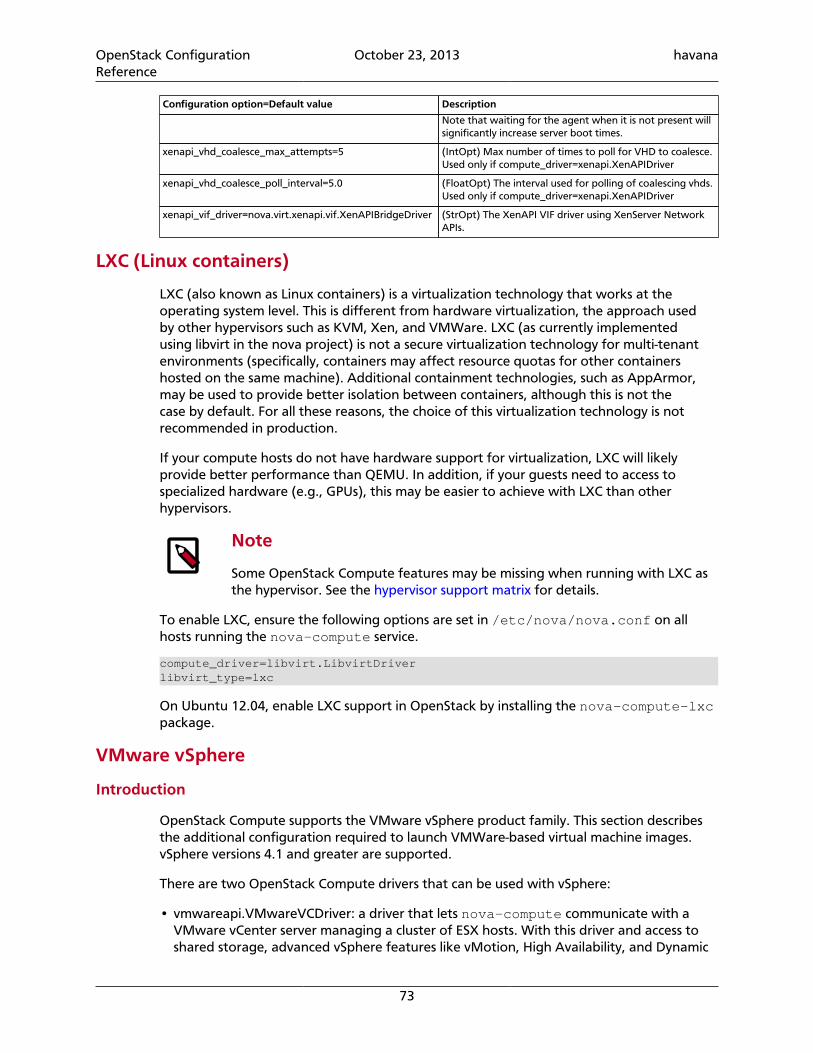
OpenStack ConfigurationReference
October 23, 2013 havana
73
Configuration option=Default value Description
Note that waiting for the agent when it is not present willsignificantly increase server boot times.
xenapi_vhd_coalesce_max_attempts=5 (IntOpt) Max number of times to poll for VHD to coalesce.Used only if compute_driver=xenapi.XenAPIDriver
xenapi_vhd_coalesce_poll_interval=5.0 (FloatOpt) The interval used for polling of coalescing vhds.Used only if compute_driver=xenapi.XenAPIDriver
xenapi_vif_driver=nova.virt.xenapi.vif.XenAPIBridgeDriver (StrOpt) The XenAPI VIF driver using XenServer NetworkAPIs.
LXC (Linux containers)
LXC (also known as Linux containers) is a virtualization technology that works at theoperating system level. This is different from hardware virtualization, the approach usedby other hypervisors such as KVM, Xen, and VMWare. LXC (as currently implementedusing libvirt in the nova project) is not a secure virtualization technology for multi-tenantenvironments (specifically, containers may affect resource quotas for other containershosted on the same machine). Additional containment technologies, such as AppArmor,may be used to provide better isolation between containers, although this is not thecase by default. For all these reasons, the choice of this virtualization technology is notrecommended in production.
If your compute hosts do not have hardware support for virtualization, LXC will likelyprovide better performance than QEMU. In addition, if your guests need to access tospecialized hardware (e.g., GPUs), this may be easier to achieve with LXC than otherhypervisors.
Note
Some OpenStack Compute features may be missing when running with LXC asthe hypervisor. See the hypervisor support matrix for details.
To enable LXC, ensure the following options are set in /etc/nova/nova.conf on allhosts running the nova-compute service.
compute_driver=libvirt.LibvirtDriverlibvirt_type=lxc
On Ubuntu 12.04, enable LXC support in OpenStack by installing the nova-compute-lxcpackage.
VMware vSphere
Introduction
OpenStack Compute supports the VMware vSphere product family. This section describesthe additional configuration required to launch VMWare-based virtual machine images.vSphere versions 4.1 and greater are supported.
There are two OpenStack Compute drivers that can be used with vSphere:
• vmwareapi.VMwareVCDriver: a driver that lets nova-compute communicate with aVMware vCenter server managing a cluster of ESX hosts. With this driver and access toshared storage, advanced vSphere features like vMotion, High Availability, and Dynamic
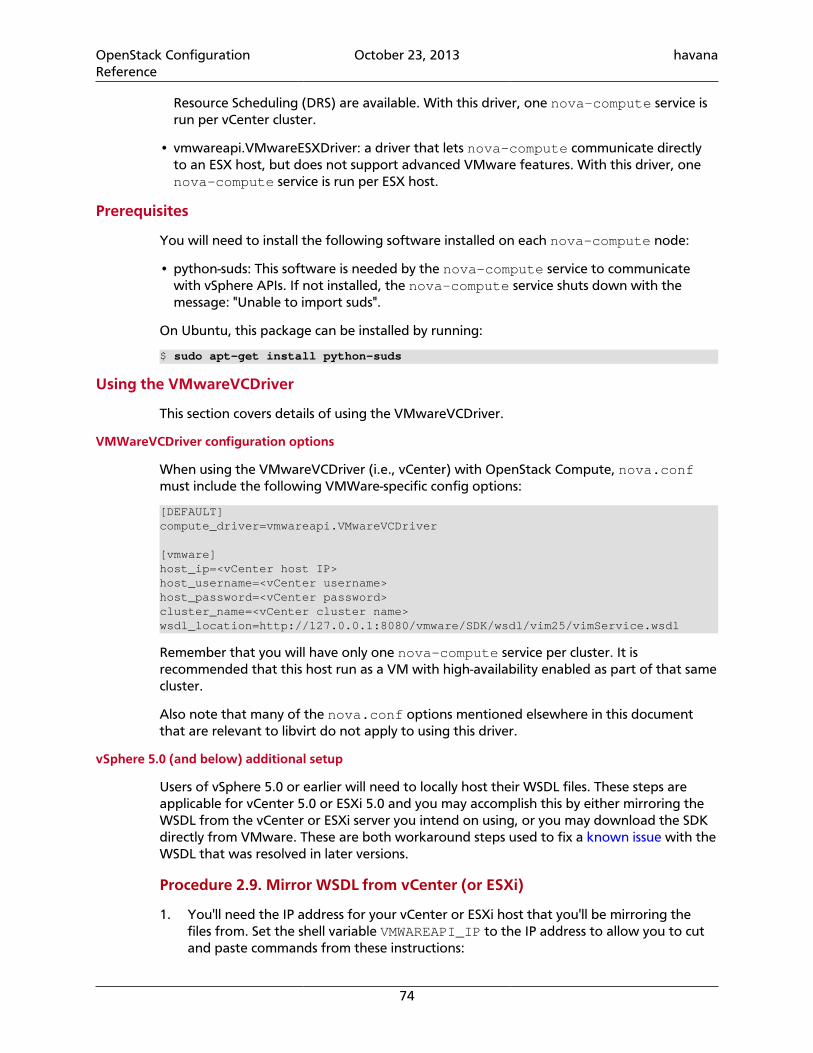
OpenStack ConfigurationReference
October 23, 2013 havana
74
Resource Scheduling (DRS) are available. With this driver, one nova-compute service isrun per vCenter cluster.
• vmwareapi.VMwareESXDriver: a driver that lets nova-compute communicate directlyto an ESX host, but does not support advanced VMware features. With this driver, onenova-compute service is run per ESX host.
Prerequisites
You will need to install the following software installed on each nova-compute node:
• python-suds: This software is needed by the nova-compute service to communicatewith vSphere APIs. If not installed, the nova-compute service shuts down with themessage: "Unable to import suds".
On Ubuntu, this package can be installed by running:
$ sudo apt-get install python-suds
Using the VMwareVCDriver
This section covers details of using the VMwareVCDriver.
VMWareVCDriver configuration options
When using the VMwareVCDriver (i.e., vCenter) with OpenStack Compute, nova.confmust include the following VMWare-specific config options:
[DEFAULT]compute_driver=vmwareapi.VMwareVCDriver
[vmware]host_ip=<vCenter host IP>host_username=<vCenter username>host_password=<vCenter password>cluster_name=<vCenter cluster name>wsdl_location=http://127.0.0.1:8080/vmware/SDK/wsdl/vim25/vimService.wsdl
Remember that you will have only one nova-compute service per cluster. It isrecommended that this host run as a VM with high-availability enabled as part of that samecluster.
Also note that many of the nova.conf options mentioned elsewhere in this documentthat are relevant to libvirt do not apply to using this driver.
vSphere 5.0 (and below) additional setup
Users of vSphere 5.0 or earlier will need to locally host their WSDL files. These steps areapplicable for vCenter 5.0 or ESXi 5.0 and you may accomplish this by either mirroring theWSDL from the vCenter or ESXi server you intend on using, or you may download the SDKdirectly from VMware. These are both workaround steps used to fix a known issue with theWSDL that was resolved in later versions.
Procedure 2.9. Mirror WSDL from vCenter (or ESXi)
1. You'll need the IP address for your vCenter or ESXi host that you'll be mirroring thefiles from. Set the shell variable VMWAREAPI_IP to the IP address to allow you to cutand paste commands from these instructions:
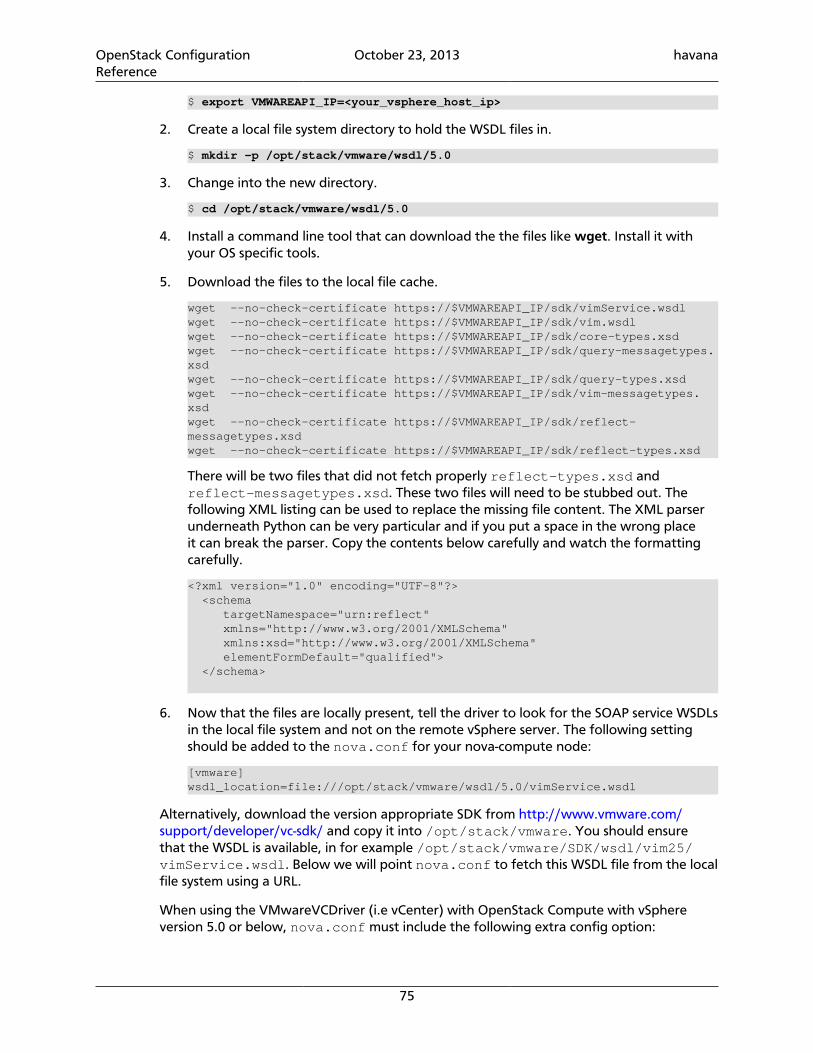
OpenStack ConfigurationReference
October 23, 2013 havana
75
$ export VMWAREAPI_IP=<your_vsphere_host_ip>
2. Create a local file system directory to hold the WSDL files in.
$ mkdir -p /opt/stack/vmware/wsdl/5.0
3. Change into the new directory.
$ cd /opt/stack/vmware/wsdl/5.0
4. Install a command line tool that can download the the files like wget. Install it withyour OS specific tools.
5. Download the files to the local file cache.
wget --no-check-certificate https://$VMWAREAPI_IP/sdk/vimService.wsdlwget --no-check-certificate https://$VMWAREAPI_IP/sdk/vim.wsdlwget --no-check-certificate https://$VMWAREAPI_IP/sdk/core-types.xsdwget --no-check-certificate https://$VMWAREAPI_IP/sdk/query-messagetypes.xsdwget --no-check-certificate https://$VMWAREAPI_IP/sdk/query-types.xsdwget --no-check-certificate https://$VMWAREAPI_IP/sdk/vim-messagetypes.xsdwget --no-check-certificate https://$VMWAREAPI_IP/sdk/reflect-messagetypes.xsdwget --no-check-certificate https://$VMWAREAPI_IP/sdk/reflect-types.xsd
There will be two files that did not fetch properly reflect-types.xsd andreflect-messagetypes.xsd. These two files will need to be stubbed out. Thefollowing XML listing can be used to replace the missing file content. The XML parserunderneath Python can be very particular and if you put a space in the wrong placeit can break the parser. Copy the contents below carefully and watch the formattingcarefully.
<?xml version="1.0" encoding="UTF-8"?> <schema targetNamespace="urn:reflect" xmlns="http://www.w3.org/2001/XMLSchema" xmlns:xsd="http://www.w3.org/2001/XMLSchema" elementFormDefault="qualified"> </schema>
6. Now that the files are locally present, tell the driver to look for the SOAP service WSDLsin the local file system and not on the remote vSphere server. The following settingshould be added to the nova.conf for your nova-compute node:
[vmware]wsdl_location=file:///opt/stack/vmware/wsdl/5.0/vimService.wsdl
Alternatively, download the version appropriate SDK from http://www.vmware.com/support/developer/vc-sdk/ and copy it into /opt/stack/vmware. You should ensurethat the WSDL is available, in for example /opt/stack/vmware/SDK/wsdl/vim25/vimService.wsdl. Below we will point nova.conf to fetch this WSDL file from the localfile system using a URL.
When using the VMwareVCDriver (i.e vCenter) with OpenStack Compute with vSphereversion 5.0 or below, nova.conf must include the following extra config option:
OpenStack ConfigurationReference
October 23, 2013 havana
76
[vmware]wsdl_location=file:///opt/stack/vmware/SDK/wsdl/vim25/vimService.wsdl
Requirements and limitations
The VMwareVCDriver is new in Grizzly, and as a result there are some importantdeployment requirements and limitations to be aware of. In many cases, these items will beaddressed in future releases.
• Each cluster can only be configured with a single Datastore. If multiple Datastores areconfigured, the first one returned via the vSphere API will be used.
• Because a single nova-compute is used per cluster, the nova-scheduler views thisas a single host with resources amounting to the aggregate resources of all ESX hostsmanaged by the cluster. This may result in unexpected behavior depending on yourchoice of scheduler.
• Security Groups are not supported if nova-network is used. Security Groups are onlysupported if the VMware driver is used in conjunction with the OpenStack NetworkingService running the Nicira NVP plugin.
Using the VMwareESXDriver
This section covers details of using the VMwareESXDriver.
VMWareESXDriver configuration options
When using the VMwareESXDriver (i.e., no vCenter) with OpenStack Compute, configurenova.conf with the following VMWare-specific config options:
[DEFAULT]compute_driver=vmwareapi.VMwareESXDriver
[vmware]host_ip=<ESXi host IP>host_username=<ESXi host username>host_password=<ESXi host password>wsdl_location=http://127.0.0.1:8080/vmware/SDK/wsdl/vim25/vimService.wsdl
Remember that you will have one nova-compute service per ESXi host. It is recommendedthat this host run as a VM on the same ESXi host it is managing.
Also note that many of the nova.conf options mentioned elsewhere in this documentthat are relevant to libvirt do not apply to using this driver.
Requirements and limitations
The ESXDriver is unable to take advantage of many of the advanced capabilities associatedwith the vSphere platform, namely vMotion, High Availability, and Dynamic ResourceScheduler (DRS).
Images with VMware vSphere
When using either VMware driver, images should be uploaded to the OpenStack ImageService in the VMDK format. Both thick and thin images are currently supported and allimages must be flat (i.e. contained within 1 file). For example:
OpenStack ConfigurationReference
October 23, 2013 havana
77
To load a thick image with a SCSI adaptor:
$ glance image-create name="ubuntu-thick-scsi" disk_format=vmdk container_format=bare \is_public=true --property vmware_adaptertype="lsiLogic" \--property vmware_disktype="preallocated" \--property vmware_ostype="ubuntu64Guest" < ubuntuLTS-flat.vmdk
To load a thin image with an IDE adaptor:
$ glance image-create name="unbuntu-thin-ide" disk_format=vmdk container_format=bare \is_public=true --property vmware_adaptertype="ide" \--property vmware_disktype="thin" \--property vmware_ostype="ubuntu64Guest" < unbuntuLTS-thin-flat.vmdk
The complete list of supported vmware disk properties is documented in the ImageManagement section. It's critical that the adaptertype is correct; In fact, the image willnot boot with the incorrect adaptertype. If you have the meta-data VMDK file, theddb.adapterType property specifies the adaptertype. The default adaptertype is "lsilogic"which is SCSI.
Networking with VMware vSphere
The VMware driver support networking with both Nova-Network and the OpenStackNetworking Service.
• If using nova-network with the FlatManager or FlatDHCPManager, before provisioningVMs, create a port group with the same name as the flat_network_bridge value innova.conf (default is br100). All VM NICs will be attached to this port group.
• If using nova-network with the VlanManager, before provisioning VMs, make sure thevlan_interface configuration option is set to match the ESX host interface thatwill handle VLAN-tagged VM traffic. OpenStack Compute will automatically create thecorresponding port groups.
• If using the OpenStack Networking Service, before provisioning VMs, create a port groupwith the same name as the vmware.integration_bridge value in nova.conf(default is br-int). All VM NICs will be attached to this port group for management bythe OpenStack Networking Plugin.
Volumes with VMware vSphere
The VMware driver has limited support for attaching Volumes from the OpenStack BlockStorage service, supporting attachments only if the volume driver type is 'iscsi'. There is nosupport for volumes based on vCenter Datastores in this release.
Configuration Reference
Table 2.23. Description of configuration options for vmware
Configuration option=Default value Description
api_retry_count=10 (IntOpt) The number of times we retry onfailures, e.g., socket error, etc. Used only if
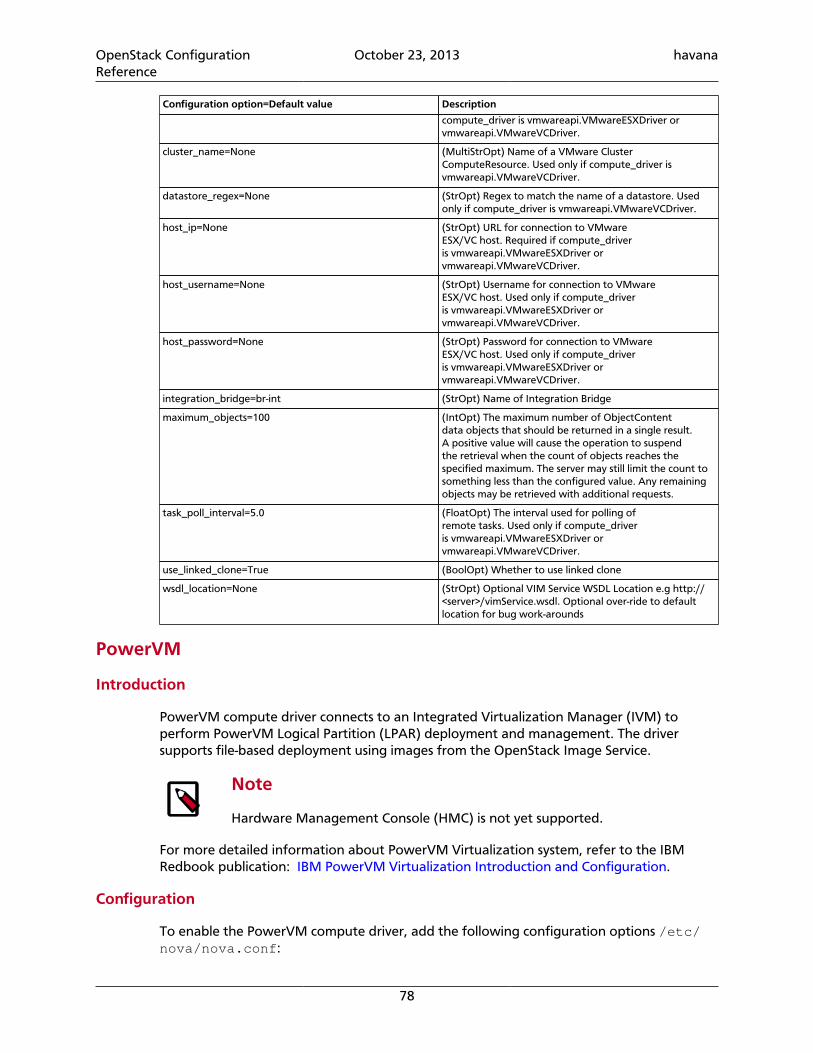
OpenStack ConfigurationReference
October 23, 2013 havana
78
Configuration option=Default value Description
compute_driver is vmwareapi.VMwareESXDriver orvmwareapi.VMwareVCDriver.
cluster_name=None (MultiStrOpt) Name of a VMware ClusterComputeResource. Used only if compute_driver isvmwareapi.VMwareVCDriver.
datastore_regex=None (StrOpt) Regex to match the name of a datastore. Usedonly if compute_driver is vmwareapi.VMwareVCDriver.
host_ip=None (StrOpt) URL for connection to VMwareESX/VC host. Required if compute_driveris vmwareapi.VMwareESXDriver orvmwareapi.VMwareVCDriver.
host_username=None (StrOpt) Username for connection to VMwareESX/VC host. Used only if compute_driveris vmwareapi.VMwareESXDriver orvmwareapi.VMwareVCDriver.
host_password=None (StrOpt) Password for connection to VMwareESX/VC host. Used only if compute_driveris vmwareapi.VMwareESXDriver orvmwareapi.VMwareVCDriver.
integration_bridge=br-int (StrOpt) Name of Integration Bridge
maximum_objects=100 (IntOpt) The maximum number of ObjectContentdata objects that should be returned in a single result.A positive value will cause the operation to suspendthe retrieval when the count of objects reaches thespecified maximum. The server may still limit the count tosomething less than the configured value. Any remainingobjects may be retrieved with additional requests.
task_poll_interval=5.0 (FloatOpt) The interval used for polling ofremote tasks. Used only if compute_driveris vmwareapi.VMwareESXDriver orvmwareapi.VMwareVCDriver.
use_linked_clone=True (BoolOpt) Whether to use linked clone
wsdl_location=None (StrOpt) Optional VIM Service WSDL Location e.g http://<server>/vimService.wsdl. Optional over-ride to defaultlocation for bug work-arounds
PowerVM
Introduction
PowerVM compute driver connects to an Integrated Virtualization Manager (IVM) toperform PowerVM Logical Partition (LPAR) deployment and management. The driversupports file-based deployment using images from the OpenStack Image Service.
Note
Hardware Management Console (HMC) is not yet supported.
For more detailed information about PowerVM Virtualization system, refer to the IBMRedbook publication: IBM PowerVM Virtualization Introduction and Configuration.
Configuration
To enable the PowerVM compute driver, add the following configuration options /etc/nova/nova.conf:
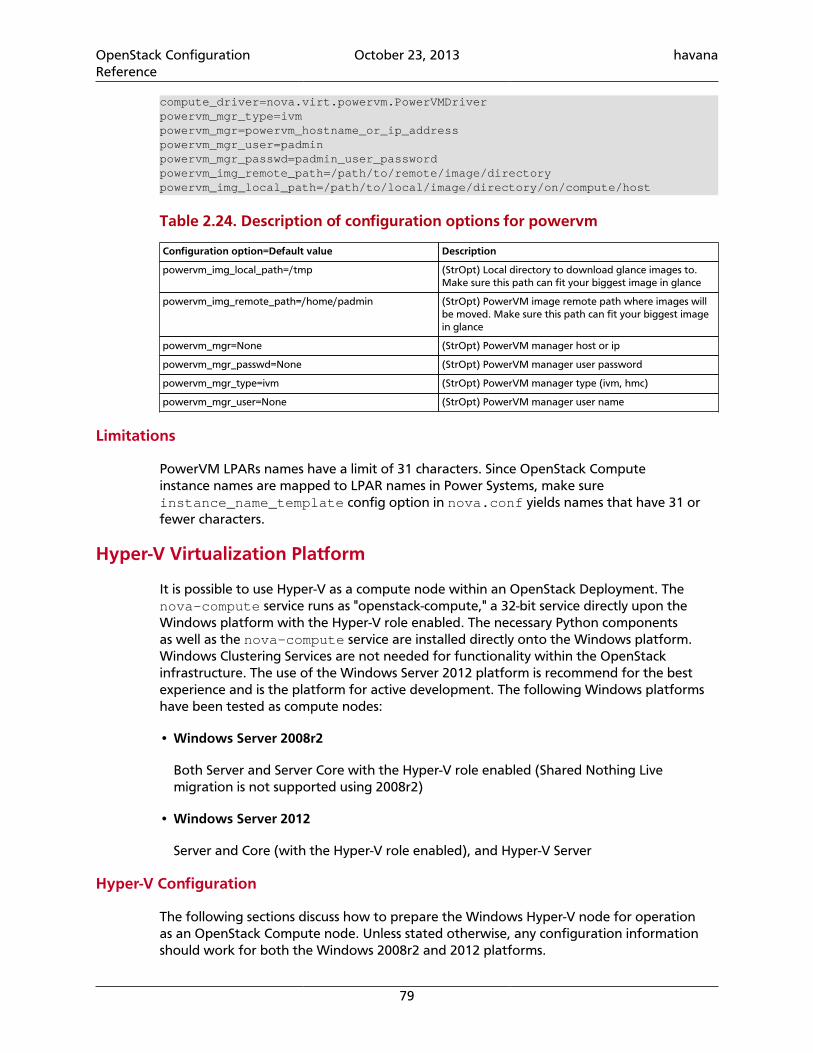
OpenStack ConfigurationReference
October 23, 2013 havana
79
compute_driver=nova.virt.powervm.PowerVMDriverpowervm_mgr_type=ivmpowervm_mgr=powervm_hostname_or_ip_addresspowervm_mgr_user=padminpowervm_mgr_passwd=padmin_user_passwordpowervm_img_remote_path=/path/to/remote/image/directorypowervm_img_local_path=/path/to/local/image/directory/on/compute/host
Table 2.24. Description of configuration options for powervm
Configuration option=Default value Description
powervm_img_local_path=/tmp (StrOpt) Local directory to download glance images to.Make sure this path can fit your biggest image in glance
powervm_img_remote_path=/home/padmin (StrOpt) PowerVM image remote path where images willbe moved. Make sure this path can fit your biggest imagein glance
powervm_mgr=None (StrOpt) PowerVM manager host or ip
powervm_mgr_passwd=None (StrOpt) PowerVM manager user password
powervm_mgr_type=ivm (StrOpt) PowerVM manager type (ivm, hmc)
powervm_mgr_user=None (StrOpt) PowerVM manager user name
Limitations
PowerVM LPARs names have a limit of 31 characters. Since OpenStack Computeinstance names are mapped to LPAR names in Power Systems, make sureinstance_name_template config option in nova.conf yields names that have 31 orfewer characters.
Hyper-V Virtualization Platform
It is possible to use Hyper-V as a compute node within an OpenStack Deployment. Thenova-compute service runs as "openstack-compute," a 32-bit service directly upon theWindows platform with the Hyper-V role enabled. The necessary Python componentsas well as the nova-compute service are installed directly onto the Windows platform.Windows Clustering Services are not needed for functionality within the OpenStackinfrastructure. The use of the Windows Server 2012 platform is recommend for the bestexperience and is the platform for active development. The following Windows platformshave been tested as compute nodes:
• Windows Server 2008r2
Both Server and Server Core with the Hyper-V role enabled (Shared Nothing Livemigration is not supported using 2008r2)
• Windows Server 2012
Server and Core (with the Hyper-V role enabled), and Hyper-V Server
Hyper-V Configuration
The following sections discuss how to prepare the Windows Hyper-V node for operationas an OpenStack Compute node. Unless stated otherwise, any configuration informationshould work for both the Windows 2008r2 and 2012 platforms.
OpenStack ConfigurationReference
October 23, 2013 havana
80
Local Storage Considerations
The Hyper-V compute node needs to have ample storage for storing the virtual machineimages running on the compute nodes. You may use a single volume for all, or partition itinto an OS volume and VM volume. It is up to the individual deploying to decide.
Configure NTP
Network time services must be configured to ensure proper operation of the Hyper-V compute node. To set network time on your Hyper-V host you will need to run thefollowing commands
C:\net stop w32time
C:\w32tm /config /manualpeerlist:pool.ntp.org,0x8 /syncfromflags:MANUAL
C:\net start w32time
Configuring Hyper-V Virtual Switching
Information regarding the Hyper-V virtual Switch can be located here: http://technet.microsoft.com/en-us/library/hh831823.aspx
To quickly enable an interface to be used as a Virtual Interface the following PowerShellmay be used:
PS C:\$if = Get-NetIPAddress –IPAddress 192* | Get-NetIPInterface
PS C:\New-VMSwitch -NetAdapterName $if.ifAlias -Name yourbridgename –AllowManagementOS $false
Enable iSCSI Initiator Service
To prepare the Hyper-V node to be able to attach to volumes provided by cinder you mustfirst make sure the Windows iSCSI initiator service is running and started automatically.
C:\sc start MSiSCSI
C:\sc config MSiSCSI start="auto"
Configuring Shared Nothing Live Migration
Detailed information on the configuration of live migration can be found here: http://technet.microsoft.com/en-us/library/jj134199.aspx
The following outlines the steps of shared nothing live migration.
OpenStack ConfigurationReference
October 23, 2013 havana
81
1. The target hosts ensures that live migration is enabled and properly configured in Hyper-V.
2. The target hosts checks if the image to be migrated requires a base VHD and pulls itfrom Glance if not already available on the target host.
3. The source hosts ensures that live migration is enabled and properly configured in Hyper-V.
4. The source hosts initiates a Hyper-V live migration.
5. The source hosts communicates to the manager the outcome of the operation.
The following two configuration options/flags are needed in order to support Hyper-V livemigration and must be added to your nova.conf on the Hyper-V compute node:
• instances_shared_storage=False
This needed to support "shared nothing" Hyper-V live migrations. It is used in nova/compute/manager.py
• limit_cpu_features=True
This flag is needed to support live migration to hosts with different CPU features. Thisflag is checked during instance creation in order to limit the CPU features used by theVM.
• instances_path=DRIVELETTER:\PATH\TO\YOUR\INSTANCES
Additional Requirements:
• Hyper-V 2012 RC or Windows Server 2012 RC with Hyper-V role enabled
• A Windows domain controller with the Hyper-V compute nodes as domain members
• The instances_path command line option/flag needs to be the same on all hosts
• The openstack-compute service deployed with the setup must run with domaincredentials. You can set the service credentials with:
C:\sc config openstack-compute obj="DOMAIN\username" password="password"
How to setup live migration on Hyper-V
To enable shared nothing live migration run the 3 PowerShell instructions below on eachHyper-V host:
PS C:\Enable-VMMigration
PS C:\Set-VMMigrationNetwork IP_ADDRESS
OpenStack ConfigurationReference
October 23, 2013 havana
82
PS C:\Set-VMHost –VirtualMachineMigrationAuthenticationTypeKerberos
Note
Please replace the IP_ADDRESS with the address of the interface which willprovide the virtual switching for nova-network.
Additional Reading
Here's an article that clarifies the various live migration options in Hyper-V:
http://ariessysadmin.blogspot.ro/2012/04/hyper-v-live-migration-of-windows.html
"Python Requirements"
Python
Python 2.7.3 must be installed prior to installing the OpenStack Compute Driver on theHyper-V server. Download and then install the MSI for windows here:
• http://www.python.org/ftp/python/2.7.3/python-2.7.3.msi
• Install the MSI accepting the default options.
• The installation will put python in C:/python27.
Setuptools
You will require pip to install the necessary python module dependencies. The installer willinstall under the C:\python27 directory structure. Setuptools for Python 2.7 for Windowscan be download from here:
http://pypi.python.org/packages/2.7/s/setuptools/setuptools-0.6c11.win32-py2.7.exe
Python Dependencies
The following packages need to be downloaded and manually installed onto the ComputeNode
• MySQL-python
http://codegood.com/download/10/
• pywin32
Download and run the installer from the following location
http://sourceforge.net/projects/pywin32/files/pywin32/Build%20217/pywin32-217.win32-py2.7.exe
• greenlet
Select the link below:
http://www.lfd.uci.edu/~gohlke/pythonlibs/

OpenStack ConfigurationReference
October 23, 2013 havana
83
You will need to scroll down to the greenlet section for the following file:greenlet-0.4.0.win32-py2.7.#exe
Click on the file, to initiate the download. Once the download is complete, run theinstaller.
The following python packages need to be installed via easy_install or pip. Run thefollowing replacing PACKAGENAME with the packages below:
C:\c:\Python27\Scripts\pip.exe install PACKAGE_NAME
• amqplib
• anyjson
• distribute
• eventlet
• httplib2
• iso8601
• jsonschema
• kombu
• netaddr
• paste
• paste-deploy
• prettytable
• python-cinderclient
• python-glanceclient
• python-keystoneclient
• repoze.lru
• routes
• sqlalchemy
• simplejson
• warlock
• webob
• wmi
OpenStack ConfigurationReference
October 23, 2013 havana
84
Installing Nova-compute
Using git on Windows to retrieve source
Git be used to download the necessary source code. The installer to run Git on Windowscan be downloaded here:
http://code.google.com/p/msysgit/downloads/list?q=full+installer+official+git
Download the latest installer. Once the download is complete double click the installer andfollow the prompts in the installation wizard. The default should be acceptable for theneeds of the document.
Once installed you may run the following to clone the Nova code.
C:\git.exe clone https://github.com/openstack/nova.git
Configuring Nova.conf
The nova.conf file must be placed in C:\etc\nova for running OpenStack on Hyper-V.Below is a sample nova.conf for Windows:
[DEFAULT]verbose=trueforce_raw_images=falseauth_strategy=keystonefake_network=truevswitch_name=openstack-brlogdir=c:\openstack\state_path=c:\openstack\lock_path=c:\openstack\instances_path=e:\Hyper-V\instancespolicy_file=C:\Program Files (x86)\OpenStack\nova\etc\nova\policy.jsonapi_paste_config=c:\openstack\nova\etc\nova\api-paste.inirabbit_host=IP_ADDRESSglance_api_servers=IP_ADDRESS:9292image_service=nova.image.glance.GlanceImageServiceinstances_shared_storage=falselimit_cpu_features=truecompute_driver=nova.virt.hyperv.driver.HyperVDrivervolume_api_class=nova.volume.cinder.API[database]connection=mysql://nova:passwd@IP_ADDRESS/nova
The following table contains a reference of all optionsfor hyper-v
Table 2.25. Description of configuration options for hyperv
Configuration option=Default value Description
dynamic_memory_ratio=1.0 (FloatOpt) Enables dynamic memory allocation(ballooning) when set to a value greater than 1. The valueexpresses the ratio between the total RAM assigned to aninstance and its startup RAM amount. For example a ratioof 2.0 for an instance with 1024MB of RAM implies 512MBof RAM allocated at startup
enable_instance_metrics_collection=False (BoolOpt) Enables metrics collections for an instanceby using Hyper-V's metric APIs. Collected data can by
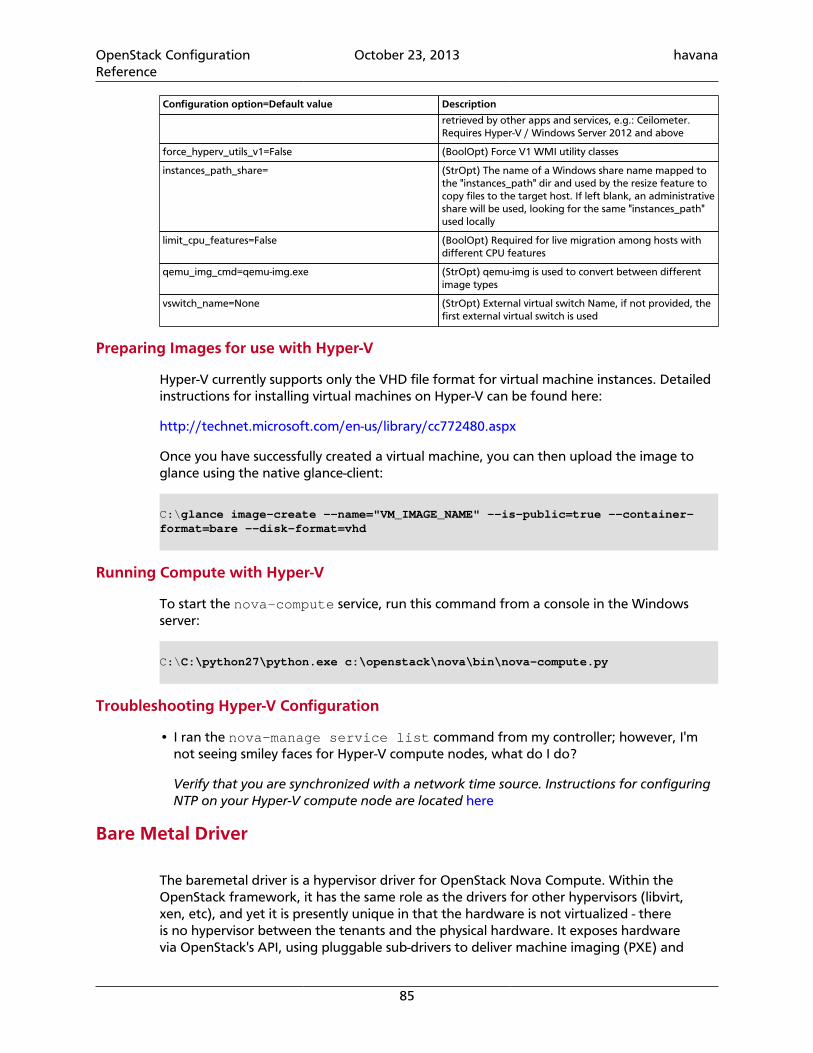
OpenStack ConfigurationReference
October 23, 2013 havana
85
Configuration option=Default value Description
retrieved by other apps and services, e.g.: Ceilometer.Requires Hyper-V / Windows Server 2012 and above
force_hyperv_utils_v1=False (BoolOpt) Force V1 WMI utility classes
instances_path_share= (StrOpt) The name of a Windows share name mapped tothe "instances_path" dir and used by the resize feature tocopy files to the target host. If left blank, an administrativeshare will be used, looking for the same "instances_path"used locally
limit_cpu_features=False (BoolOpt) Required for live migration among hosts withdifferent CPU features
qemu_img_cmd=qemu-img.exe (StrOpt) qemu-img is used to convert between differentimage types
vswitch_name=None (StrOpt) External virtual switch Name, if not provided, thefirst external virtual switch is used
Preparing Images for use with Hyper-V
Hyper-V currently supports only the VHD file format for virtual machine instances. Detailedinstructions for installing virtual machines on Hyper-V can be found here:
http://technet.microsoft.com/en-us/library/cc772480.aspx
Once you have successfully created a virtual machine, you can then upload the image toglance using the native glance-client:
C:\glance image-create --name="VM_IMAGE_NAME" --is-public=true --container-format=bare --disk-format=vhd
Running Compute with Hyper-V
To start the nova-compute service, run this command from a console in the Windowsserver:
C:\C:\python27\python.exe c:\openstack\nova\bin\nova-compute.py
Troubleshooting Hyper-V Configuration
• I ran the nova-manage service list command from my controller; however, I'mnot seeing smiley faces for Hyper-V compute nodes, what do I do?
Verify that you are synchronized with a network time source. Instructions for configuringNTP on your Hyper-V compute node are located here
Bare Metal Driver
The baremetal driver is a hypervisor driver for OpenStack Nova Compute. Within theOpenStack framework, it has the same role as the drivers for other hypervisors (libvirt,xen, etc), and yet it is presently unique in that the hardware is not virtualized - thereis no hypervisor between the tenants and the physical hardware. It exposes hardwarevia OpenStack's API, using pluggable sub-drivers to deliver machine imaging (PXE) and
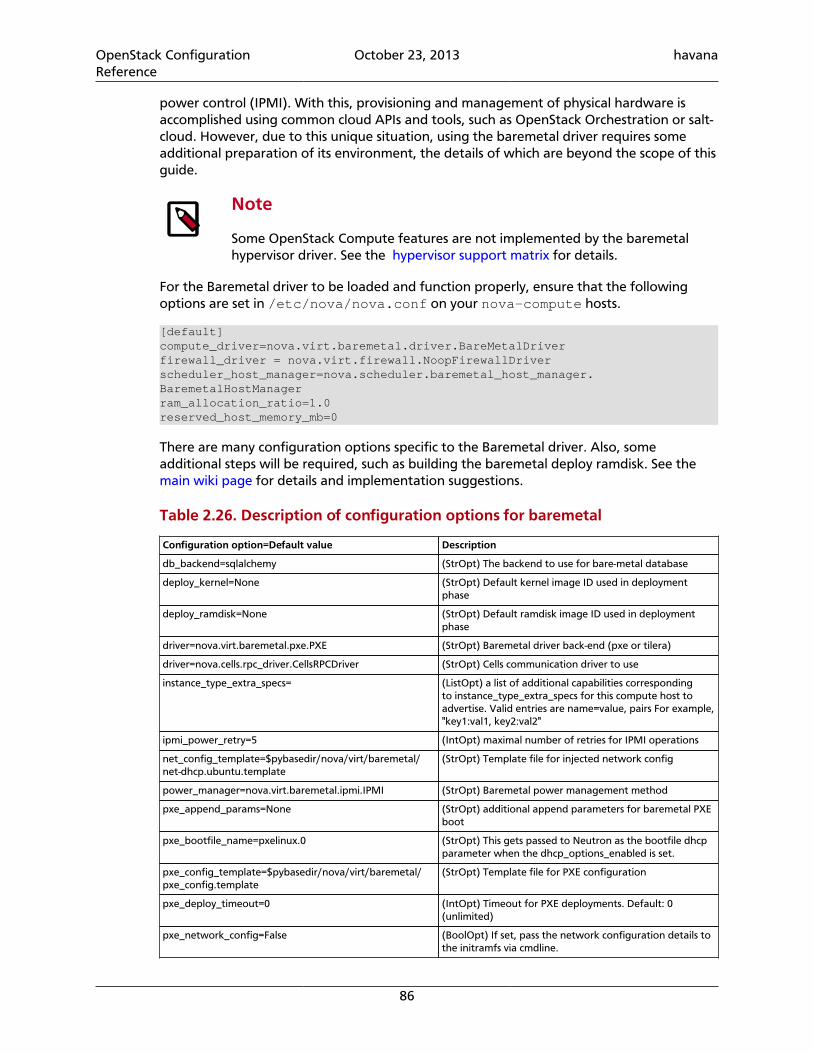
OpenStack ConfigurationReference
October 23, 2013 havana
86
power control (IPMI). With this, provisioning and management of physical hardware isaccomplished using common cloud APIs and tools, such as OpenStack Orchestration or salt-cloud. However, due to this unique situation, using the baremetal driver requires someadditional preparation of its environment, the details of which are beyond the scope of thisguide.
Note
Some OpenStack Compute features are not implemented by the baremetalhypervisor driver. See the hypervisor support matrix for details.
For the Baremetal driver to be loaded and function properly, ensure that the followingoptions are set in /etc/nova/nova.conf on your nova-compute hosts.
[default]compute_driver=nova.virt.baremetal.driver.BareMetalDriverfirewall_driver = nova.virt.firewall.NoopFirewallDriverscheduler_host_manager=nova.scheduler.baremetal_host_manager.BaremetalHostManagerram_allocation_ratio=1.0reserved_host_memory_mb=0
There are many configuration options specific to the Baremetal driver. Also, someadditional steps will be required, such as building the baremetal deploy ramdisk. See the main wiki page for details and implementation suggestions.
Table 2.26. Description of configuration options for baremetal
Configuration option=Default value Description
db_backend=sqlalchemy (StrOpt) The backend to use for bare-metal database
deploy_kernel=None (StrOpt) Default kernel image ID used in deploymentphase
deploy_ramdisk=None (StrOpt) Default ramdisk image ID used in deploymentphase
driver=nova.virt.baremetal.pxe.PXE (StrOpt) Baremetal driver back-end (pxe or tilera)
driver=nova.cells.rpc_driver.CellsRPCDriver (StrOpt) Cells communication driver to use
instance_type_extra_specs= (ListOpt) a list of additional capabilities correspondingto instance_type_extra_specs for this compute host toadvertise. Valid entries are name=value, pairs For example,"key1:val1, key2:val2"
ipmi_power_retry=5 (IntOpt) maximal number of retries for IPMI operations
net_config_template=$pybasedir/nova/virt/baremetal/net-dhcp.ubuntu.template
(StrOpt) Template file for injected network config
power_manager=nova.virt.baremetal.ipmi.IPMI (StrOpt) Baremetal power management method
pxe_append_params=None (StrOpt) additional append parameters for baremetal PXEboot
pxe_bootfile_name=pxelinux.0 (StrOpt) This gets passed to Neutron as the bootfile dhcpparameter when the dhcp_options_enabled is set.
pxe_config_template=$pybasedir/nova/virt/baremetal/pxe_config.template
(StrOpt) Template file for PXE configuration
pxe_deploy_timeout=0 (IntOpt) Timeout for PXE deployments. Default: 0(unlimited)
pxe_network_config=False (BoolOpt) If set, pass the network configuration details tothe initramfs via cmdline.
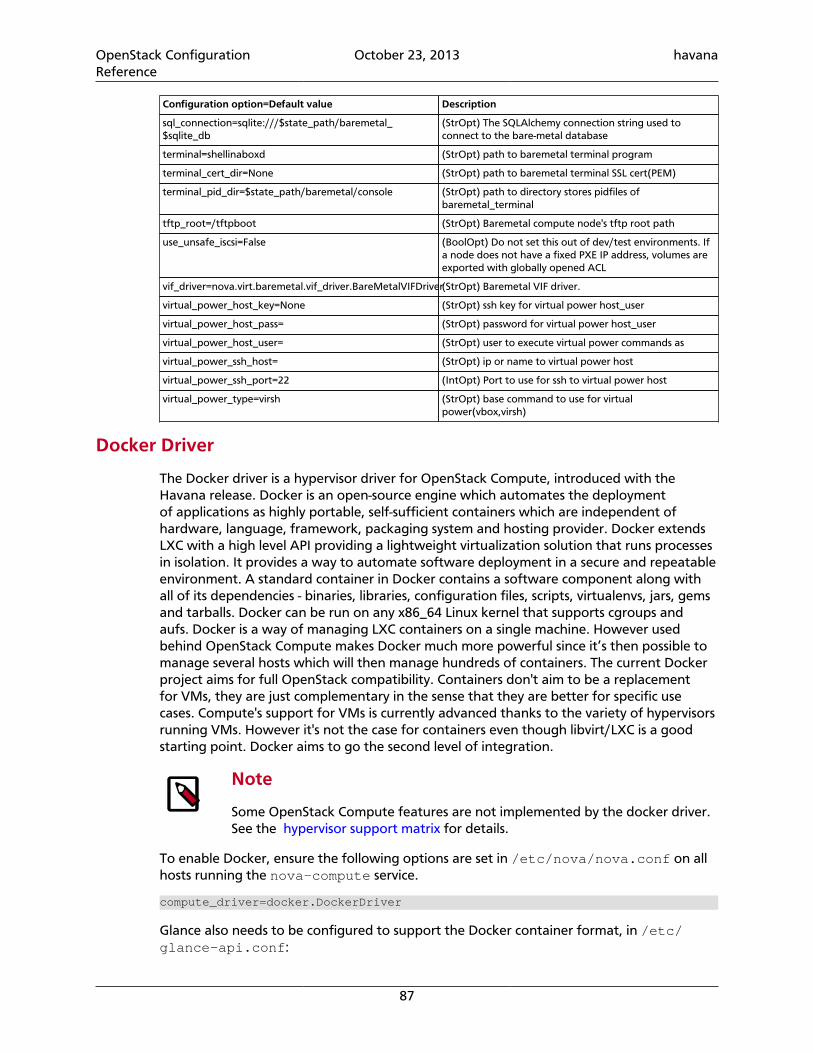
OpenStack ConfigurationReference
October 23, 2013 havana
87
Configuration option=Default value Description
sql_connection=sqlite:///$state_path/baremetal_$sqlite_db
(StrOpt) The SQLAlchemy connection string used toconnect to the bare-metal database
terminal=shellinaboxd (StrOpt) path to baremetal terminal program
terminal_cert_dir=None (StrOpt) path to baremetal terminal SSL cert(PEM)
terminal_pid_dir=$state_path/baremetal/console (StrOpt) path to directory stores pidfiles ofbaremetal_terminal
tftp_root=/tftpboot (StrOpt) Baremetal compute node's tftp root path
use_unsafe_iscsi=False (BoolOpt) Do not set this out of dev/test environments. Ifa node does not have a fixed PXE IP address, volumes areexported with globally opened ACL
vif_driver=nova.virt.baremetal.vif_driver.BareMetalVIFDriver(StrOpt) Baremetal VIF driver.
virtual_power_host_key=None (StrOpt) ssh key for virtual power host_user
virtual_power_host_pass= (StrOpt) password for virtual power host_user
virtual_power_host_user= (StrOpt) user to execute virtual power commands as
virtual_power_ssh_host= (StrOpt) ip or name to virtual power host
virtual_power_ssh_port=22 (IntOpt) Port to use for ssh to virtual power host
virtual_power_type=virsh (StrOpt) base command to use for virtualpower(vbox,virsh)
Docker Driver
The Docker driver is a hypervisor driver for OpenStack Compute, introduced with theHavana release. Docker is an open-source engine which automates the deploymentof applications as highly portable, self-sufficient containers which are independent ofhardware, language, framework, packaging system and hosting provider. Docker extendsLXC with a high level API providing a lightweight virtualization solution that runs processesin isolation. It provides a way to automate software deployment in a secure and repeatableenvironment. A standard container in Docker contains a software component along withall of its dependencies - binaries, libraries, configuration files, scripts, virtualenvs, jars, gemsand tarballs. Docker can be run on any x86_64 Linux kernel that supports cgroups andaufs. Docker is a way of managing LXC containers on a single machine. However usedbehind OpenStack Compute makes Docker much more powerful since it’s then possible tomanage several hosts which will then manage hundreds of containers. The current Dockerproject aims for full OpenStack compatibility. Containers don't aim to be a replacementfor VMs, they are just complementary in the sense that they are better for specific usecases. Compute's support for VMs is currently advanced thanks to the variety of hypervisorsrunning VMs. However it's not the case for containers even though libvirt/LXC is a goodstarting point. Docker aims to go the second level of integration.
Note
Some OpenStack Compute features are not implemented by the docker driver.See the hypervisor support matrix for details.
To enable Docker, ensure the following options are set in /etc/nova/nova.conf on allhosts running the nova-compute service.
compute_driver=docker.DockerDriver
Glance also needs to be configured to support the Docker container format, in /etc/glance-api.conf:
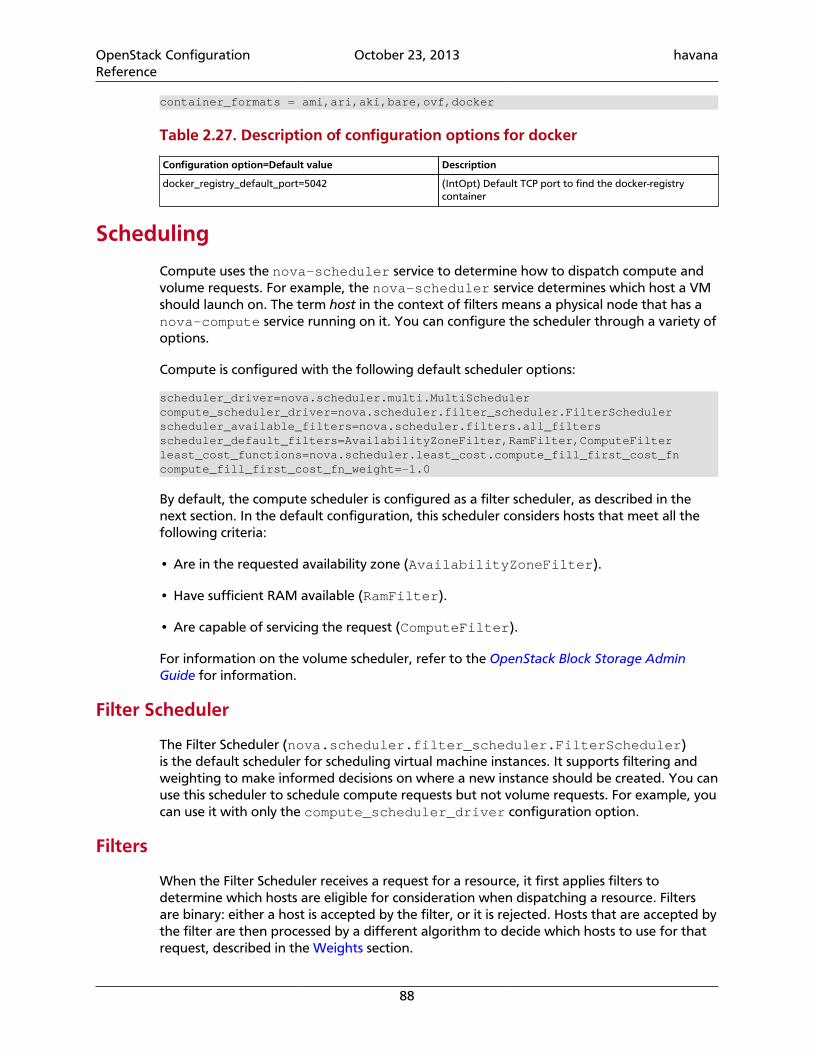
OpenStack ConfigurationReference
October 23, 2013 havana
88
container_formats = ami,ari,aki,bare,ovf,docker
Table 2.27. Description of configuration options for docker
Configuration option=Default value Description
docker_registry_default_port=5042 (IntOpt) Default TCP port to find the docker-registrycontainer
Scheduling
Compute uses the nova-scheduler service to determine how to dispatch compute andvolume requests. For example, the nova-scheduler service determines which host a VMshould launch on. The term host in the context of filters means a physical node that has anova-compute service running on it. You can configure the scheduler through a variety ofoptions.
Compute is configured with the following default scheduler options:
scheduler_driver=nova.scheduler.multi.MultiSchedulercompute_scheduler_driver=nova.scheduler.filter_scheduler.FilterSchedulerscheduler_available_filters=nova.scheduler.filters.all_filtersscheduler_default_filters=AvailabilityZoneFilter,RamFilter,ComputeFilterleast_cost_functions=nova.scheduler.least_cost.compute_fill_first_cost_fncompute_fill_first_cost_fn_weight=-1.0
By default, the compute scheduler is configured as a filter scheduler, as described in thenext section. In the default configuration, this scheduler considers hosts that meet all thefollowing criteria:
• Are in the requested availability zone (AvailabilityZoneFilter).
• Have sufficient RAM available (RamFilter).
• Are capable of servicing the request (ComputeFilter).
For information on the volume scheduler, refer to the OpenStack Block Storage AdminGuide for information.
Filter Scheduler
The Filter Scheduler (nova.scheduler.filter_scheduler.FilterScheduler)is the default scheduler for scheduling virtual machine instances. It supports filtering andweighting to make informed decisions on where a new instance should be created. You canuse this scheduler to schedule compute requests but not volume requests. For example, youcan use it with only the compute_scheduler_driver configuration option.
Filters
When the Filter Scheduler receives a request for a resource, it first applies filters todetermine which hosts are eligible for consideration when dispatching a resource. Filtersare binary: either a host is accepted by the filter, or it is rejected. Hosts that are accepted bythe filter are then processed by a different algorithm to decide which hosts to use for thatrequest, described in the Weights section.
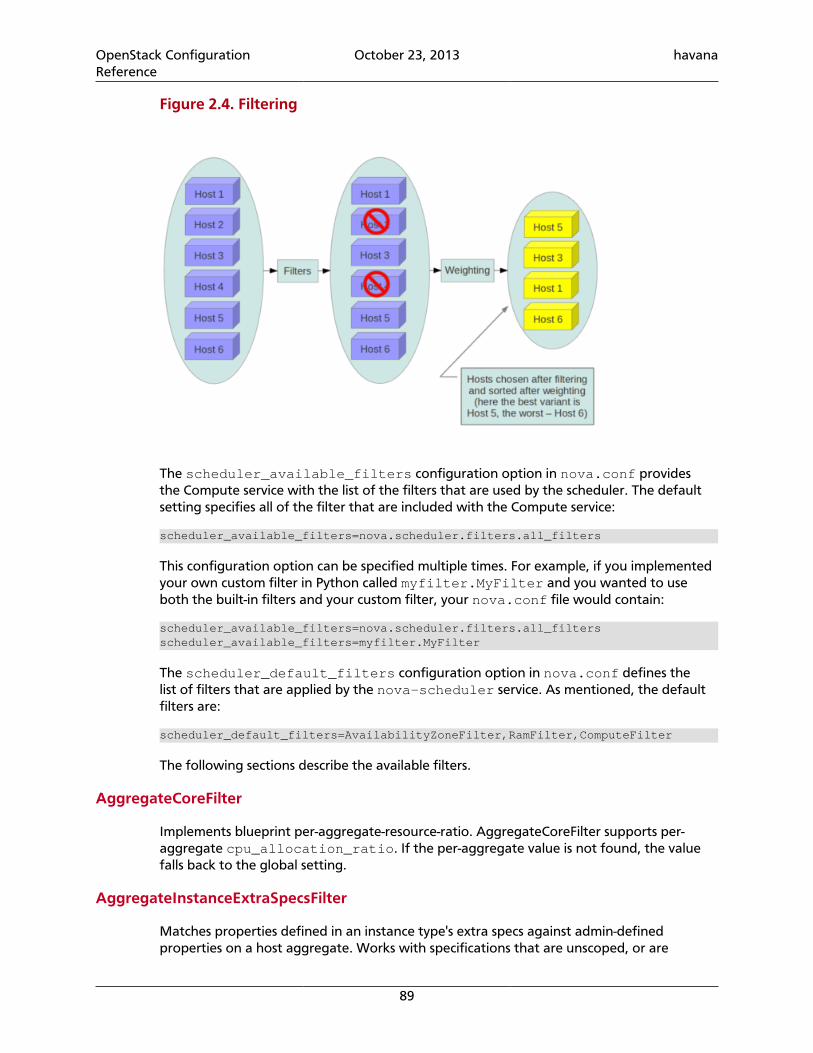
OpenStack ConfigurationReference
October 23, 2013 havana
89
Figure 2.4. Filtering
The scheduler_available_filters configuration option in nova.conf providesthe Compute service with the list of the filters that are used by the scheduler. The defaultsetting specifies all of the filter that are included with the Compute service:
scheduler_available_filters=nova.scheduler.filters.all_filters
This configuration option can be specified multiple times. For example, if you implementedyour own custom filter in Python called myfilter.MyFilter and you wanted to useboth the built-in filters and your custom filter, your nova.conf file would contain:
scheduler_available_filters=nova.scheduler.filters.all_filtersscheduler_available_filters=myfilter.MyFilter
The scheduler_default_filters configuration option in nova.conf defines thelist of filters that are applied by the nova-scheduler service. As mentioned, the defaultfilters are:
scheduler_default_filters=AvailabilityZoneFilter,RamFilter,ComputeFilter
The following sections describe the available filters.
AggregateCoreFilter
Implements blueprint per-aggregate-resource-ratio. AggregateCoreFilter supports per-aggregate cpu_allocation_ratio. If the per-aggregate value is not found, the valuefalls back to the global setting.
AggregateInstanceExtraSpecsFilter
Matches properties defined in an instance type's extra specs against admin-definedproperties on a host aggregate. Works with specifications that are unscoped, or are
OpenStack ConfigurationReference
October 23, 2013 havana
90
scoped with aggregate_instance_extra_specs. See the host aggregates section fordocumentation on how to use this filter.
AggregateMultiTenancyIsolation
Isolates tenants to specific host aggregates. If a host is in an aggregate that has themetadata key filter_tenant_id it only creates instances from that tenant (or list oftenants). A host can be in different aggregates. If a host does not belong to an aggregatewith the metadata key, it can create instances from all tenants.
AggregateRamFilter
Implements blueprint per-aggregate-resource-ratio. Supports per-aggregateram_allocation_ratio. If per-aggregate value is not found, it falls back to the defaultsetting.
AllHostsFilter
This is a no-op filter, it does not eliminate any of the available hosts.
AvailabilityZoneFilter
Filters hosts by availability zone. This filter must be enabled for the scheduler to respectavailability zones in requests.
ComputeCapabilitiesFilter
Matches properties defined in an instance type's extra specs against compute capabilities.
If an extra specs key contains a colon ":", anything before the colon is treated as anamespace, and anything after the colon is treated as the key to be matched. If anamespace is present and is not 'capabilities', it is ignored by this filter.
Note
Disable the ComputeCapabilitiesFilter when using a Bare Metal configuration,due to bug 1129485
ComputeFilter
Passes all hosts that are operational and enabled.
In general, this filter should always be enabled.
CoreFilter
Only schedule instances on hosts if there are sufficient CPU cores available. If this filter isnot set, the scheduler may over provision a host based on cores (for example, the virtualcores running on an instance may exceed the physical cores).
This filter can be configured to allow a fixed amount of vCPU overcommitment by using thecpu_allocation_ratio Configuration option in nova.conf. The default setting is:
OpenStack ConfigurationReference
October 23, 2013 havana
91
cpu_allocation_ratio=16.0
With this setting, if 8 vCPUs are on a node, the scheduler allows instances up to 128 vCPUto be run on that node.
To disallow vCPU overcommitment set:
cpu_allocation_ratio=1.0
DifferentHostFilter
Schedule the instance on a different host from a set of instances. To take advantage of thisfilter, the requester must pass a scheduler hint, using different_host as the key and alist of instance uuids as the value. This filter is the opposite of the SameHostFilter. Usingthe nova command-line tool, use the --hint flag. For example:
$ nova boot --image cedef40a-ed67-4d10-800e-17455edce175 --flavor 1 \ --hint different_host=a0cf03a5-d921-4877-bb5c-86d26cf818e1 \ --hint different_host=8c19174f-4220-44f0-824a-cd1eeef10287 server-1
With the API, use the os:scheduler_hints key. For example:
{ 'server': { 'name': 'server-1', 'imageRef': 'cedef40a-ed67-4d10-800e-17455edce175', 'flavorRef': '1' }, 'os:scheduler_hints': { 'different_host': ['a0cf03a5-d921-4877-bb5c-86d26cf818e1', '8c19174f-4220-44f0-824a-cd1eeef10287'], }
DiskFilter
Only schedule instances on hosts if there is sufficient disk space available for root andephemeral storage.
This filter can be configured to allow a fixed amount of disk overcommitment by using thedisk_allocation_ratio Configuration option in nova.conf. The default setting is:
disk_allocation_ratio=1.0
Adjusting this value to greater than 1.0 enables scheduling instances while over committingdisk resources on the node. This might be desirable if you use an image format that issparse or copy on write such that each virtual instance does not require a 1:1 allocation ofvirtual disk to physical storage.
GroupAffinityFilter
The GroupAffinityFilter ensures that an instance is scheduled on to a host from a set ofgroup hosts. To take advantage of this filter, the requester must pass a scheduler hint,using group_hosts as the key and a list of instance uuids as the value. Using the novacommand-line tool, use the --hint flag. For example:
$ nova boot --image cedef40a-ed67-4d10-800e-17455edce175 --flavor 1 \
OpenStack ConfigurationReference
October 23, 2013 havana
92
--hint group_hosts=a0cf03a5-d921-4877-bb5c-86d26cf818e1 \ --hint group_hosts=8c19174f-4220-44f0-824a-cd1eeef10287 server-1
GroupAntiAffinityFilter
The GroupAntiAffinityFilter ensures that each instance in a group is on a different host. Totake advantage of this filter, the requester must pass a scheduler hint, using group_hostsas the key and a list of instance uuids as the value. Using the nova command-line tool, usethe --hint flag. For example:
$ nova boot --image cedef40a-ed67-4d10-800e-17455edce175 --flavor 1 \ --hint group_hosts=a0cf03a5-d921-4877-bb5c-86d26cf818e1 \ --hint group_hosts=8c19174f-4220-44f0-824a-cd1eeef10287 server-1
ImagePropertiesFilter
Filters hosts based on properties defined on the instance's image. It passes hosts that cansupport the specified image properties contained in the instance. Properties include thearchitecture, hypervisor type, and virtual machine mode. for example, an instance mightrequire a host that runs an ARM-based processor and QEMU as the hypervisor. An imagecan be decorated with these properties by using:
$ glance image-update img-uuid --property architecture=arm --property hypervisor_type=qemu
The image properties that the filter checks for are:
• architecture: Architecture describes the machine architecture required by the image.Examples are i686, x86_64, arm, and ppc64.
• hypervisor_type: Hypervisor type describes the hypervisor required by the image.Examples are xen, kvm, qemu, xenapi, and powervm.
• vm_mode: Virtual machine mode describes the hypervisor application binary interface(ABI) required by the image. Examples are 'xen' for Xen 3.0 paravirtual ABI, 'hvm' fornative ABI, 'uml' for User Mode Linux paravirtual ABI, exe for container virt executableABI.
IsolatedHostsFilter
Allows the admin to define a special (isolated) set of images and a special (isolated) set ofhosts, such that the isolated images can only run on the isolated hosts, and the isolatedhosts can only run isolated images.
The admin must specify the isolated set of images and hosts in the nova.conf file usingthe isolated_hosts and isolated_images configuration options. For example:
isolated_hosts=server1,server2isolated_images=342b492c-128f-4a42-8d3a-c5088cf27d13,ebd267a6-ca86-4d6c-9a0e-bd132d6b7d09
JsonFilter
The JsonFilter allows a user to construct a custom filter by passing a scheduler hint in JSONformat. The following operators are supported:
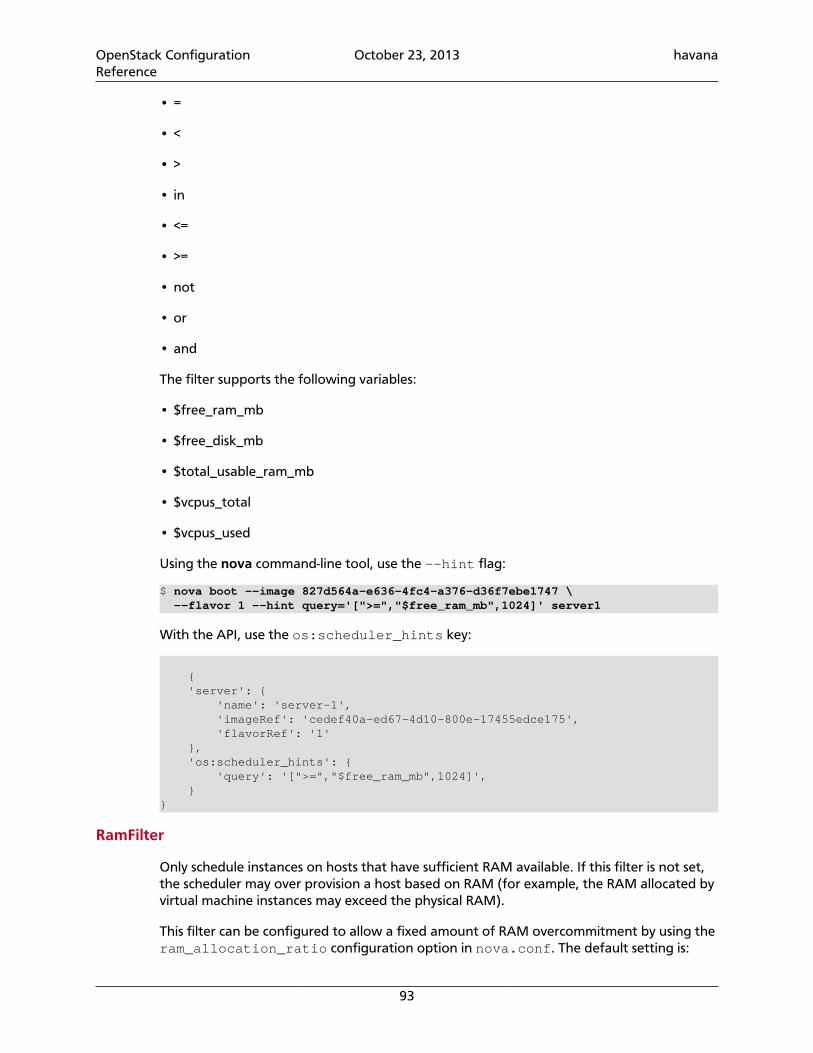
OpenStack ConfigurationReference
October 23, 2013 havana
93
• =
• <
• >
• in
• <=
• >=
• not
• or
• and
The filter supports the following variables:
• $free_ram_mb
• $free_disk_mb
• $total_usable_ram_mb
• $vcpus_total
• $vcpus_used
Using the nova command-line tool, use the --hint flag:
$ nova boot --image 827d564a-e636-4fc4-a376-d36f7ebe1747 \ --flavor 1 --hint query='[">=","$free_ram_mb",1024]' server1
With the API, use the os:scheduler_hints key:
{ 'server': { 'name': 'server-1', 'imageRef': 'cedef40a-ed67-4d10-800e-17455edce175', 'flavorRef': '1' }, 'os:scheduler_hints': { 'query': '[">=","$free_ram_mb",1024]', }}
RamFilter
Only schedule instances on hosts that have sufficient RAM available. If this filter is not set,the scheduler may over provision a host based on RAM (for example, the RAM allocated byvirtual machine instances may exceed the physical RAM).
This filter can be configured to allow a fixed amount of RAM overcommitment by using theram_allocation_ratio configuration option in nova.conf. The default setting is:

OpenStack ConfigurationReference
October 23, 2013 havana
94
ram_allocation_ratio=1.5
With this setting, if there is 1GB of free RAM, the scheduler allows instances up to size1.5GB to be run on that instance.
RetryFilter
Filter out hosts that have already been attempted for scheduling purposes. If the schedulerselects a host to respond to a service request, and the host fails to respond to the request,this filter prevents the scheduler from retrying that host for the service request.
This filter is only useful if the scheduler_max_attempts configuration option is set to avalue greater than zero.
SameHostFilter
Schedule the instance on the same host as another instance in a set of instances. To takeadvantage of this filter, the requester must pass a scheduler hint, using same_hostas the key and a list of instance uuids as the value. This filter is the opposite of theDifferentHostFilter. Using the nova command-line tool, use the --hint flag:
$ nova boot --image cedef40a-ed67-4d10-800e-17455edce175 --flavor 1 \ --hint same_host=a0cf03a5-d921-4877-bb5c-86d26cf818e1 \ --hint same_host=8c19174f-4220-44f0-824a-cd1eeef10287 server-1
With the API, use the os:scheduler_hints key:
{ 'server': { 'name': 'server-1', 'imageRef': 'cedef40a-ed67-4d10-800e-17455edce175', 'flavorRef': '1' }, 'os:scheduler_hints': { 'same_host': ['a0cf03a5-d921-4877-bb5c-86d26cf818e1', '8c19174f-4220-44f0-824a-cd1eeef10287'], }}
SimpleCIDRAffinityFilter
Schedule the instance based on host IP subnet range. To take advantage of this filter, therequester must specify a range of valid IP address in CIDR format, by passing two schedulerhints:
build_near_host_ip The first IP address in the subnet (for example, 192.168.1.1)
cidr The CIDR that corresponds to the subnet (for example, /24)
Using the nova command-line tool, use the --hint flag. For example, to specify the IPsubnet 192.168.1.1/24
$ nova boot --image cedef40a-ed67-4d10-800e-17455edce175 --flavor 1 \ --hint build_near_host_ip=192.168.1.1 --hint cidr=/24 server-1
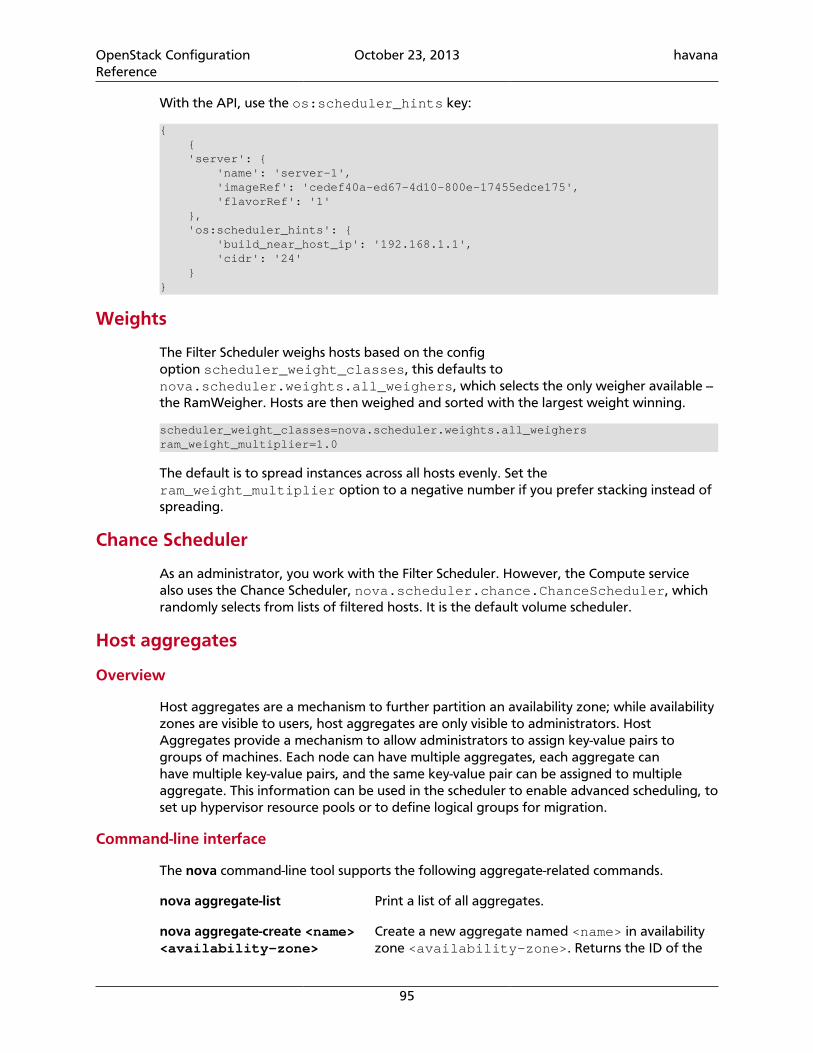
OpenStack ConfigurationReference
October 23, 2013 havana
95
With the API, use the os:scheduler_hints key:
{ { 'server': { 'name': 'server-1', 'imageRef': 'cedef40a-ed67-4d10-800e-17455edce175', 'flavorRef': '1' }, 'os:scheduler_hints': { 'build_near_host_ip': '192.168.1.1', 'cidr': '24' }}
Weights
The Filter Scheduler weighs hosts based on the configoption scheduler_weight_classes, this defaults tonova.scheduler.weights.all_weighers, which selects the only weigher available --the RamWeigher. Hosts are then weighed and sorted with the largest weight winning.
scheduler_weight_classes=nova.scheduler.weights.all_weighersram_weight_multiplier=1.0
The default is to spread instances across all hosts evenly. Set theram_weight_multiplier option to a negative number if you prefer stacking instead ofspreading.
Chance Scheduler
As an administrator, you work with the Filter Scheduler. However, the Compute servicealso uses the Chance Scheduler, nova.scheduler.chance.ChanceScheduler, whichrandomly selects from lists of filtered hosts. It is the default volume scheduler.
Host aggregates
Overview
Host aggregates are a mechanism to further partition an availability zone; while availabilityzones are visible to users, host aggregates are only visible to administrators. HostAggregates provide a mechanism to allow administrators to assign key-value pairs togroups of machines. Each node can have multiple aggregates, each aggregate canhave multiple key-value pairs, and the same key-value pair can be assigned to multipleaggregate. This information can be used in the scheduler to enable advanced scheduling, toset up hypervisor resource pools or to define logical groups for migration.
Command-line interface
The nova command-line tool supports the following aggregate-related commands.
nova aggregate-list Print a list of all aggregates.
nova aggregate-create <name><availability-zone>
Create a new aggregate named <name> in availabilityzone <availability-zone>. Returns the ID of the
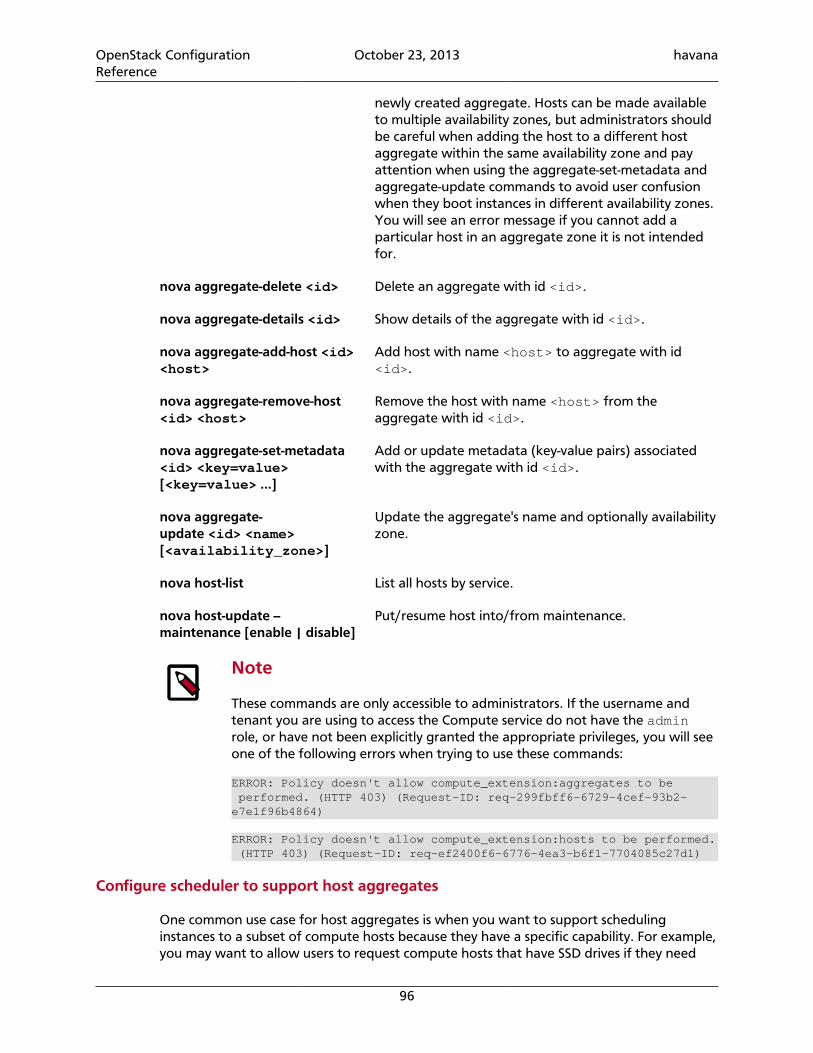
OpenStack ConfigurationReference
October 23, 2013 havana
96
newly created aggregate. Hosts can be made availableto multiple availability zones, but administrators shouldbe careful when adding the host to a different hostaggregate within the same availability zone and payattention when using the aggregate-set-metadata andaggregate-update commands to avoid user confusionwhen they boot instances in different availability zones.You will see an error message if you cannot add aparticular host in an aggregate zone it is not intendedfor.
nova aggregate-delete <id> Delete an aggregate with id <id>.
nova aggregate-details <id> Show details of the aggregate with id <id>.
nova aggregate-add-host <id><host>
Add host with name <host> to aggregate with id<id>.
nova aggregate-remove-host<id> <host>
Remove the host with name <host> from theaggregate with id <id>.
nova aggregate-set-metadata<id> <key=value>[<key=value> ...]
Add or update metadata (key-value pairs) associatedwith the aggregate with id <id>.
nova aggregate-update <id> <name>[<availability_zone>]
Update the aggregate's name and optionally availabilityzone.
nova host-list List all hosts by service.
nova host-update --maintenance [enable | disable]
Put/resume host into/from maintenance.
Note
These commands are only accessible to administrators. If the username andtenant you are using to access the Compute service do not have the adminrole, or have not been explicitly granted the appropriate privileges, you will seeone of the following errors when trying to use these commands:
ERROR: Policy doesn't allow compute_extension:aggregates to be performed. (HTTP 403) (Request-ID: req-299fbff6-6729-4cef-93b2-e7e1f96b4864)
ERROR: Policy doesn't allow compute_extension:hosts to be performed. (HTTP 403) (Request-ID: req-ef2400f6-6776-4ea3-b6f1-7704085c27d1)
Configure scheduler to support host aggregates
One common use case for host aggregates is when you want to support schedulinginstances to a subset of compute hosts because they have a specific capability. For example,you may want to allow users to request compute hosts that have SSD drives if they need
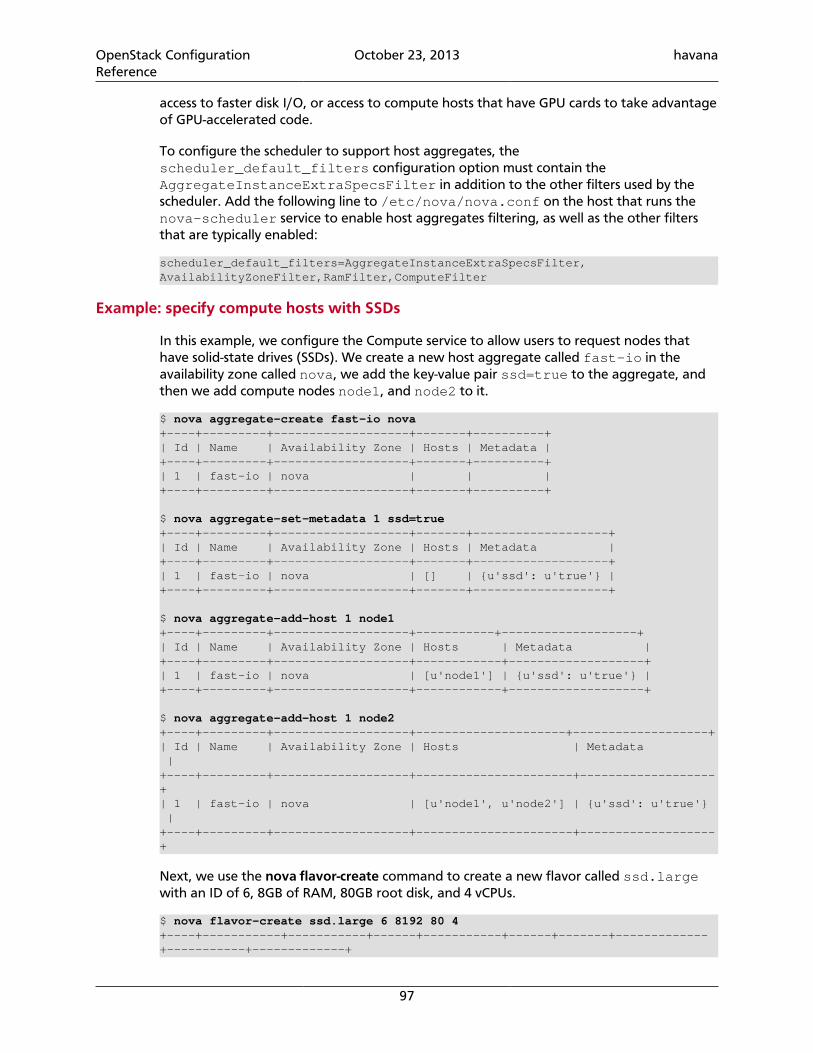
OpenStack ConfigurationReference
October 23, 2013 havana
97
access to faster disk I/O, or access to compute hosts that have GPU cards to take advantageof GPU-accelerated code.
To configure the scheduler to support host aggregates, thescheduler_default_filters configuration option must contain theAggregateInstanceExtraSpecsFilter in addition to the other filters used by thescheduler. Add the following line to /etc/nova/nova.conf on the host that runs thenova-scheduler service to enable host aggregates filtering, as well as the other filtersthat are typically enabled:
scheduler_default_filters=AggregateInstanceExtraSpecsFilter,AvailabilityZoneFilter,RamFilter,ComputeFilter
Example: specify compute hosts with SSDs
In this example, we configure the Compute service to allow users to request nodes thathave solid-state drives (SSDs). We create a new host aggregate called fast-io in theavailability zone called nova, we add the key-value pair ssd=true to the aggregate, andthen we add compute nodes node1, and node2 to it.
$ nova aggregate-create fast-io nova+----+---------+-------------------+-------+----------+| Id | Name | Availability Zone | Hosts | Metadata |+----+---------+-------------------+-------+----------+| 1 | fast-io | nova | | |+----+---------+-------------------+-------+----------+
$ nova aggregate-set-metadata 1 ssd=true+----+---------+-------------------+-------+-------------------+| Id | Name | Availability Zone | Hosts | Metadata |+----+---------+-------------------+-------+-------------------+| 1 | fast-io | nova | [] | {u'ssd': u'true'} |+----+---------+-------------------+-------+-------------------+
$ nova aggregate-add-host 1 node1+----+---------+-------------------+-----------+-------------------+| Id | Name | Availability Zone | Hosts | Metadata |+----+---------+-------------------+------------+-------------------+| 1 | fast-io | nova | [u'node1'] | {u'ssd': u'true'} |+----+---------+-------------------+------------+-------------------+
$ nova aggregate-add-host 1 node2+----+---------+-------------------+---------------------+-------------------+| Id | Name | Availability Zone | Hosts | Metadata |+----+---------+-------------------+----------------------+-------------------+| 1 | fast-io | nova | [u'node1', u'node2'] | {u'ssd': u'true'} |+----+---------+-------------------+----------------------+-------------------+
Next, we use the nova flavor-create command to create a new flavor called ssd.largewith an ID of 6, 8GB of RAM, 80GB root disk, and 4 vCPUs.
$ nova flavor-create ssd.large 6 8192 80 4+----+-----------+-----------+------+-----------+------+-------+-------------+-----------+-------------+
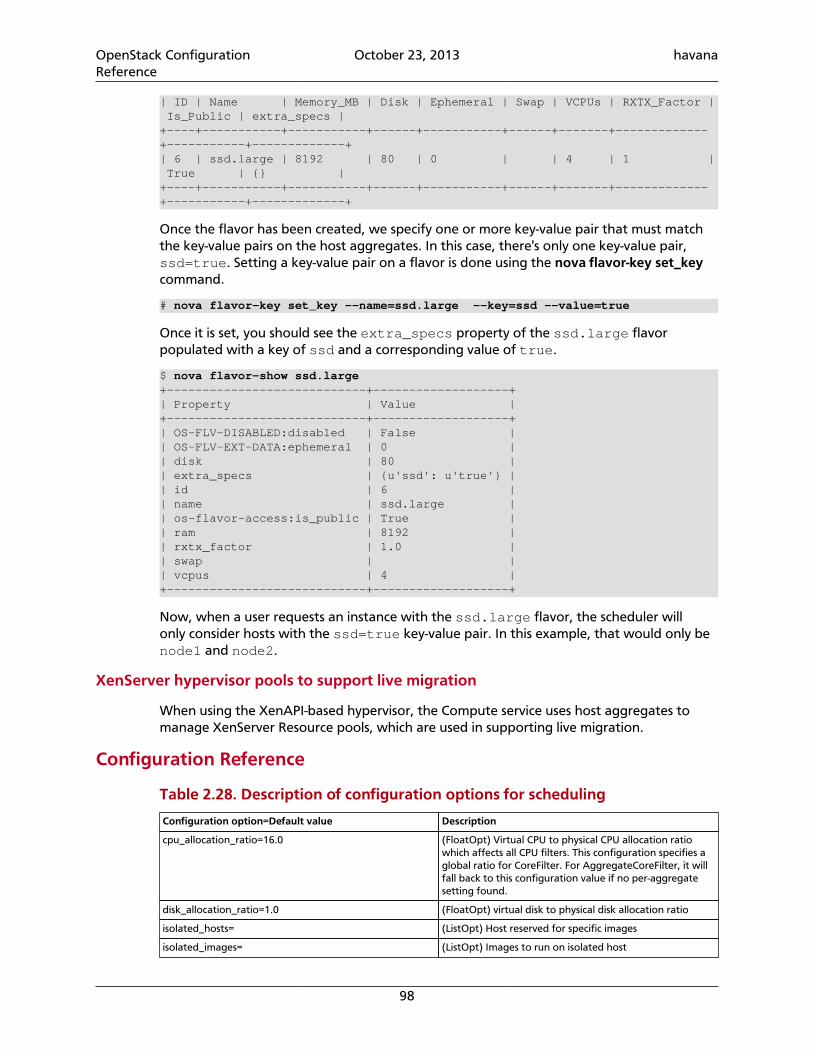
OpenStack ConfigurationReference
October 23, 2013 havana
98
| ID | Name | Memory_MB | Disk | Ephemeral | Swap | VCPUs | RXTX_Factor | Is_Public | extra_specs |+----+-----------+-----------+------+-----------+------+-------+-------------+-----------+-------------+| 6 | ssd.large | 8192 | 80 | 0 | | 4 | 1 | True | {} |+----+-----------+-----------+------+-----------+------+-------+-------------+-----------+-------------+
Once the flavor has been created, we specify one or more key-value pair that must matchthe key-value pairs on the host aggregates. In this case, there's only one key-value pair,ssd=true. Setting a key-value pair on a flavor is done using the nova flavor-key set_keycommand.
# nova flavor-key set_key --name=ssd.large --key=ssd --value=true
Once it is set, you should see the extra_specs property of the ssd.large flavorpopulated with a key of ssd and a corresponding value of true.
$ nova flavor-show ssd.large+----------------------------+-------------------+| Property | Value |+----------------------------+-------------------+| OS-FLV-DISABLED:disabled | False || OS-FLV-EXT-DATA:ephemeral | 0 || disk | 80 || extra_specs | {u'ssd': u'true'} || id | 6 || name | ssd.large || os-flavor-access:is_public | True || ram | 8192 || rxtx_factor | 1.0 || swap | || vcpus | 4 |+----------------------------+-------------------+
Now, when a user requests an instance with the ssd.large flavor, the scheduler willonly consider hosts with the ssd=true key-value pair. In this example, that would only benode1 and node2.
XenServer hypervisor pools to support live migration
When using the XenAPI-based hypervisor, the Compute service uses host aggregates tomanage XenServer Resource pools, which are used in supporting live migration.
Configuration Reference
Table 2.28. Description of configuration options for scheduling
Configuration option=Default value Description
cpu_allocation_ratio=16.0 (FloatOpt) Virtual CPU to physical CPU allocation ratiowhich affects all CPU filters. This configuration specifies aglobal ratio for CoreFilter. For AggregateCoreFilter, it willfall back to this configuration value if no per-aggregatesetting found.
disk_allocation_ratio=1.0 (FloatOpt) virtual disk to physical disk allocation ratio
isolated_hosts= (ListOpt) Host reserved for specific images
isolated_images= (ListOpt) Images to run on isolated host
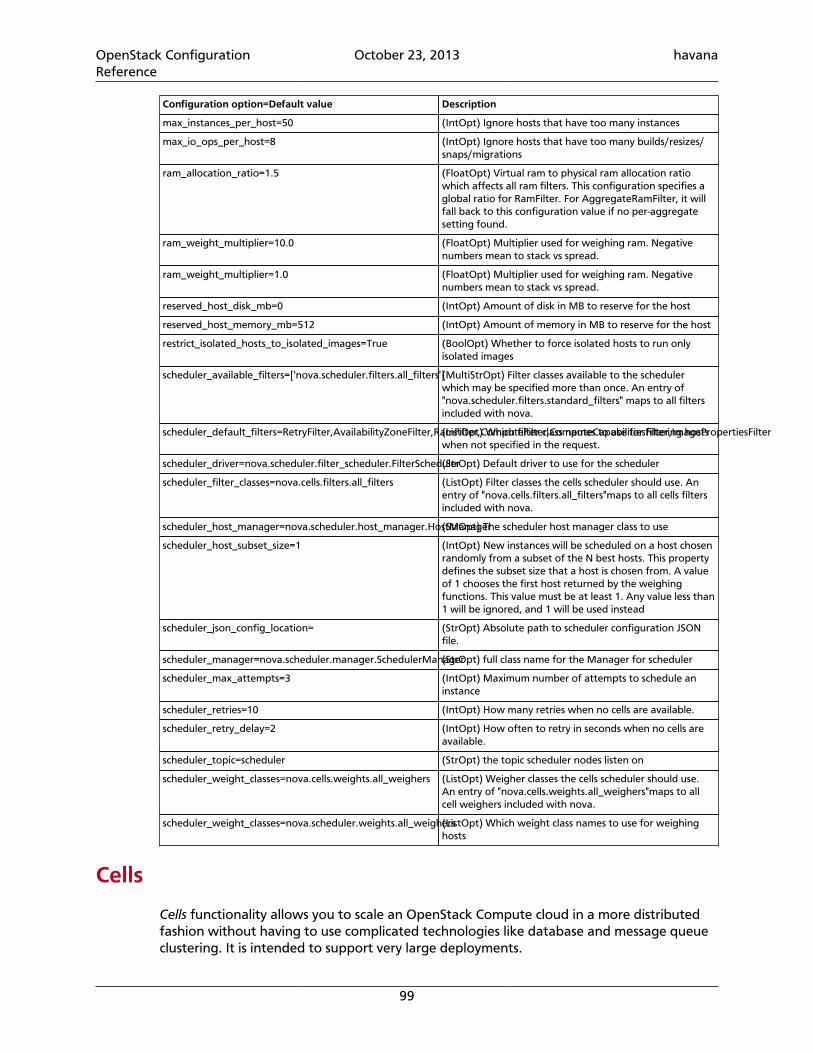
OpenStack ConfigurationReference
October 23, 2013 havana
99
Configuration option=Default value Description
max_instances_per_host=50 (IntOpt) Ignore hosts that have too many instances
max_io_ops_per_host=8 (IntOpt) Ignore hosts that have too many builds/resizes/snaps/migrations
ram_allocation_ratio=1.5 (FloatOpt) Virtual ram to physical ram allocation ratiowhich affects all ram filters. This configuration specifies aglobal ratio for RamFilter. For AggregateRamFilter, it willfall back to this configuration value if no per-aggregatesetting found.
ram_weight_multiplier=10.0 (FloatOpt) Multiplier used for weighing ram. Negativenumbers mean to stack vs spread.
ram_weight_multiplier=1.0 (FloatOpt) Multiplier used for weighing ram. Negativenumbers mean to stack vs spread.
reserved_host_disk_mb=0 (IntOpt) Amount of disk in MB to reserve for the host
reserved_host_memory_mb=512 (IntOpt) Amount of memory in MB to reserve for the host
restrict_isolated_hosts_to_isolated_images=True (BoolOpt) Whether to force isolated hosts to run onlyisolated images
scheduler_available_filters=['nova.scheduler.filters.all_filters'](MultiStrOpt) Filter classes available to the schedulerwhich may be specified more than once. An entry of"nova.scheduler.filters.standard_filters" maps to all filtersincluded with nova.
scheduler_default_filters=RetryFilter,AvailabilityZoneFilter,RamFilter,ComputeFilter,ComputeCapabilitiesFilter,ImagePropertiesFilter(ListOpt) Which filter class names to use for filtering hostswhen not specified in the request.
scheduler_driver=nova.scheduler.filter_scheduler.FilterScheduler(StrOpt) Default driver to use for the scheduler
scheduler_filter_classes=nova.cells.filters.all_filters (ListOpt) Filter classes the cells scheduler should use. Anentry of "nova.cells.filters.all_filters"maps to all cells filtersincluded with nova.
scheduler_host_manager=nova.scheduler.host_manager.HostManager(StrOpt) The scheduler host manager class to use
scheduler_host_subset_size=1 (IntOpt) New instances will be scheduled on a host chosenrandomly from a subset of the N best hosts. This propertydefines the subset size that a host is chosen from. A valueof 1 chooses the first host returned by the weighingfunctions. This value must be at least 1. Any value less than1 will be ignored, and 1 will be used instead
scheduler_json_config_location= (StrOpt) Absolute path to scheduler configuration JSONfile.
scheduler_manager=nova.scheduler.manager.SchedulerManager(StrOpt) full class name for the Manager for scheduler
scheduler_max_attempts=3 (IntOpt) Maximum number of attempts to schedule aninstance
scheduler_retries=10 (IntOpt) How many retries when no cells are available.
scheduler_retry_delay=2 (IntOpt) How often to retry in seconds when no cells areavailable.
scheduler_topic=scheduler (StrOpt) the topic scheduler nodes listen on
scheduler_weight_classes=nova.cells.weights.all_weighers (ListOpt) Weigher classes the cells scheduler should use.An entry of "nova.cells.weights.all_weighers"maps to allcell weighers included with nova.
scheduler_weight_classes=nova.scheduler.weights.all_weighers(ListOpt) Which weight class names to use for weighinghosts
Cells
Cells functionality allows you to scale an OpenStack Compute cloud in a more distributedfashion without having to use complicated technologies like database and message queueclustering. It is intended to support very large deployments.
OpenStack ConfigurationReference
October 23, 2013 havana
100
When this functionality is enabled, the hosts in an OpenStack Compute cloud arepartitioned into groups called cells. Cells are configured as a tree. The top-level cell shouldhave a host that runs a nova-api service, but no nova-compute services. Each child cellshould run all of the typical nova-* services in a regular Compute cloud except for nova-api. You can think of cells as a normal Compute deployment in that each cell has its owndatabase server and message queue broker.
The nova-cells service handles communication between cells and selects cells for newinstances. This service is required for every cell. Communication between cells is pluggable,and currently the only option is communication through RPC.
Cells scheduling is separate from host scheduling. nova-cells first picks a cell (nowrandomly, but future releases plan to add filtering/weighing functionality, and decisionswill be based on broadcasts of capacity/capabilities). Once a cell is selected and the newbuild request reaches its nova-cells service, it is sent over to the host scheduler in thatcell and the build proceeds as it would have without cells.
Warning
Cell functionality is currently considered experimental.
Cell configuration options
Cells are disabled by default. All cell-related configuration options go under a [cells]section in nova.conf. The following cell-related options are currently supported:
enable Set this is True to turn on cell functionality, which is offby default.
name Name of the current cell. This must be unique for eachcell.
capabilities List of arbitrary key=value pairs definingcapabilities of the current cell. Values includehypervisor=xenserver;kvm,os=linux;windows.
call_timeout How long in seconds to wait for replies from callsbetween cells.
scheduler_filter_classes Filter classes that the cells scheduler should use. Bydefault, uses "nova.cells.filters.all_filters"to map to all cells filters included with Compute.
scheduler_weight_classes Weight classes the cells scheduler should use. By default,uses "nova.cells.weights.all_weighers" tomap to all cells weight algorithms (weighers) includedwith Compute.
ram_weight_multiplier Multiplier used for weighing ram. Negative numbersmean you want Compute to stack VMs on one hostinstead of spreading out new VMs to more hosts in thecell. Default value is 10.0.
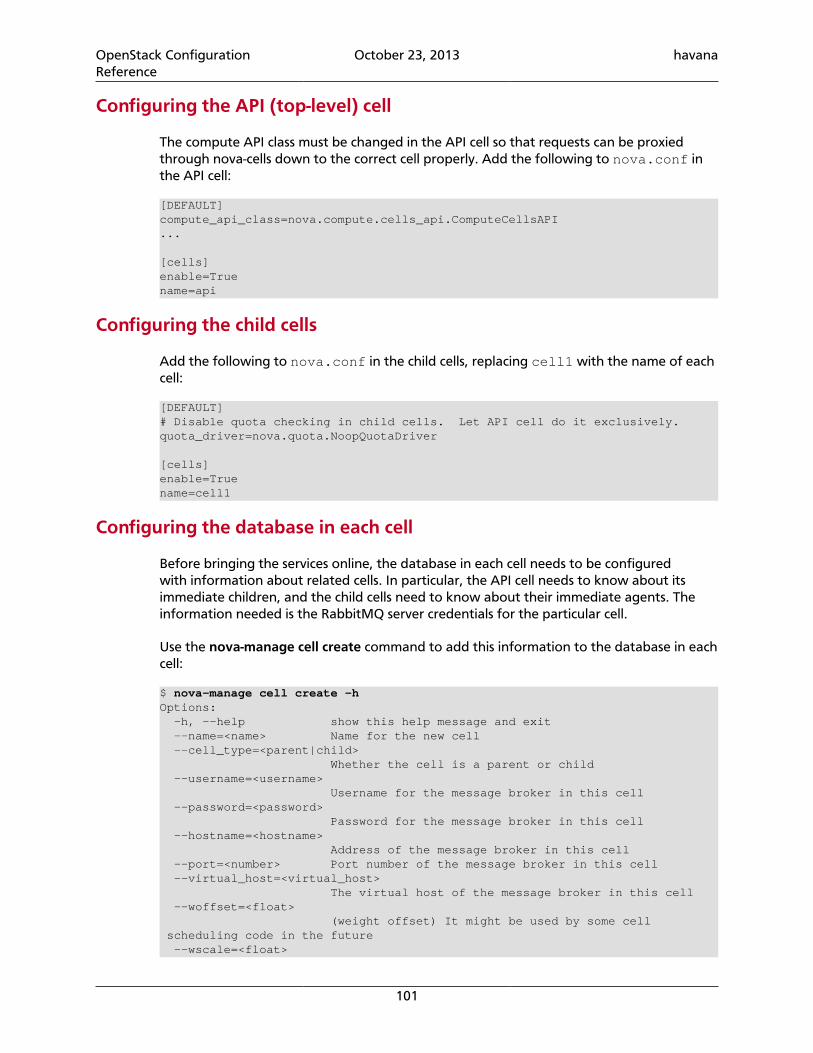
OpenStack ConfigurationReference
October 23, 2013 havana
101
Configuring the API (top-level) cell
The compute API class must be changed in the API cell so that requests can be proxiedthrough nova-cells down to the correct cell properly. Add the following to nova.conf inthe API cell:
[DEFAULT]compute_api_class=nova.compute.cells_api.ComputeCellsAPI...
[cells]enable=Truename=api
Configuring the child cells
Add the following to nova.conf in the child cells, replacing cell1 with the name of eachcell:
[DEFAULT]# Disable quota checking in child cells. Let API cell do it exclusively.quota_driver=nova.quota.NoopQuotaDriver
[cells]enable=Truename=cell1
Configuring the database in each cell
Before bringing the services online, the database in each cell needs to be configuredwith information about related cells. In particular, the API cell needs to know about itsimmediate children, and the child cells need to know about their immediate agents. Theinformation needed is the RabbitMQ server credentials for the particular cell.
Use the nova-manage cell create command to add this information to the database in eachcell:
$ nova-manage cell create -hOptions: -h, --help show this help message and exit --name=<name> Name for the new cell --cell_type=<parent|child> Whether the cell is a parent or child --username=<username> Username for the message broker in this cell --password=<password> Password for the message broker in this cell --hostname=<hostname> Address of the message broker in this cell --port=<number> Port number of the message broker in this cell --virtual_host=<virtual_host> The virtual host of the message broker in this cell --woffset=<float> (weight offset) It might be used by some cell scheduling code in the future --wscale=<float>
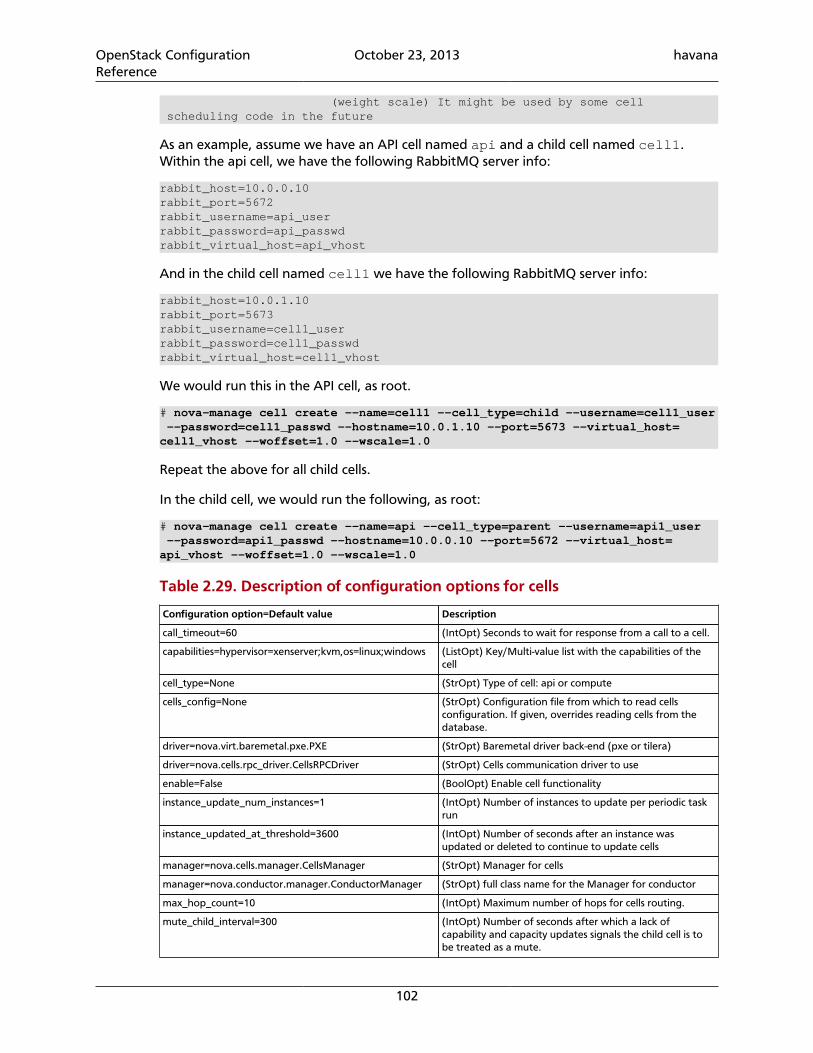
OpenStack ConfigurationReference
October 23, 2013 havana
102
(weight scale) It might be used by some cell scheduling code in the future
As an example, assume we have an API cell named api and a child cell named cell1.Within the api cell, we have the following RabbitMQ server info:
rabbit_host=10.0.0.10rabbit_port=5672rabbit_username=api_userrabbit_password=api_passwdrabbit_virtual_host=api_vhost
And in the child cell named cell1 we have the following RabbitMQ server info:
rabbit_host=10.0.1.10rabbit_port=5673rabbit_username=cell1_userrabbit_password=cell1_passwdrabbit_virtual_host=cell1_vhost
We would run this in the API cell, as root.
# nova-manage cell create --name=cell1 --cell_type=child --username=cell1_user --password=cell1_passwd --hostname=10.0.1.10 --port=5673 --virtual_host=cell1_vhost --woffset=1.0 --wscale=1.0
Repeat the above for all child cells.
In the child cell, we would run the following, as root:
# nova-manage cell create --name=api --cell_type=parent --username=api1_user --password=api1_passwd --hostname=10.0.0.10 --port=5672 --virtual_host=api_vhost --woffset=1.0 --wscale=1.0
Table 2.29. Description of configuration options for cells
Configuration option=Default value Description
call_timeout=60 (IntOpt) Seconds to wait for response from a call to a cell.
capabilities=hypervisor=xenserver;kvm,os=linux;windows (ListOpt) Key/Multi-value list with the capabilities of thecell
cell_type=None (StrOpt) Type of cell: api or compute
cells_config=None (StrOpt) Configuration file from which to read cellsconfiguration. If given, overrides reading cells from thedatabase.
driver=nova.virt.baremetal.pxe.PXE (StrOpt) Baremetal driver back-end (pxe or tilera)
driver=nova.cells.rpc_driver.CellsRPCDriver (StrOpt) Cells communication driver to use
enable=False (BoolOpt) Enable cell functionality
instance_update_num_instances=1 (IntOpt) Number of instances to update per periodic taskrun
instance_updated_at_threshold=3600 (IntOpt) Number of seconds after an instance wasupdated or deleted to continue to update cells
manager=nova.cells.manager.CellsManager (StrOpt) Manager for cells
manager=nova.conductor.manager.ConductorManager (StrOpt) full class name for the Manager for conductor
max_hop_count=10 (IntOpt) Maximum number of hops for cells routing.
mute_child_interval=300 (IntOpt) Number of seconds after which a lack ofcapability and capacity updates signals the child cell is tobe treated as a mute.
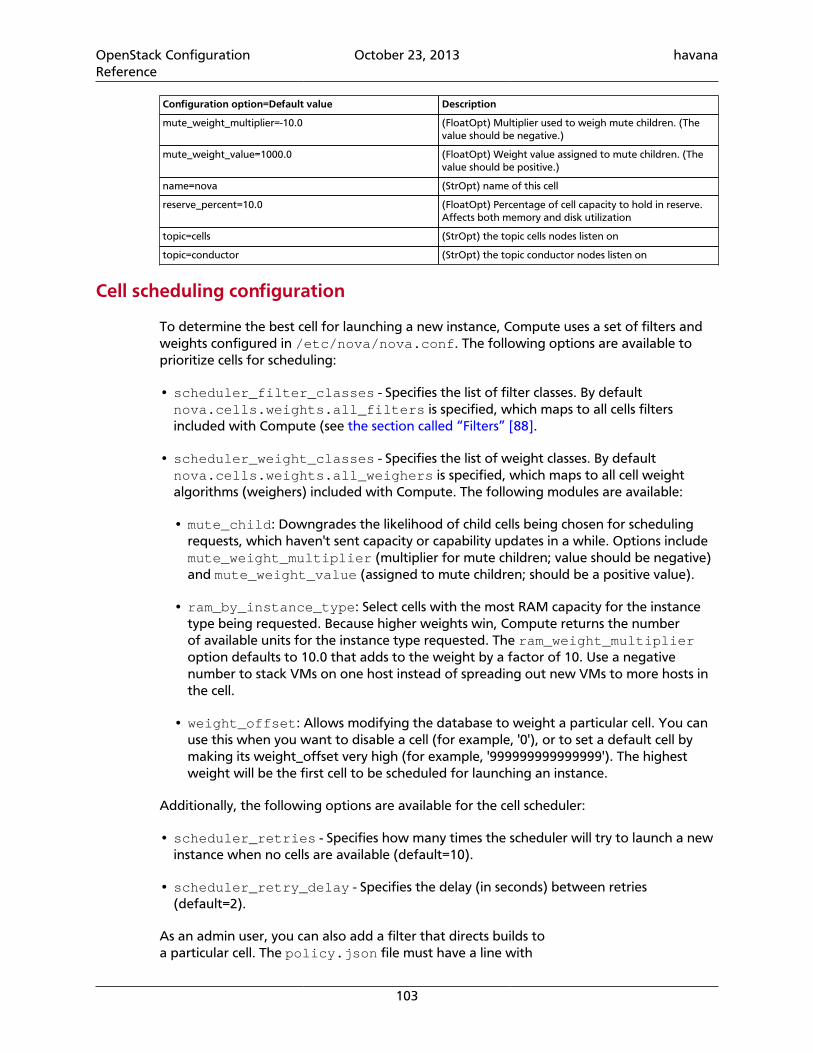
OpenStack ConfigurationReference
October 23, 2013 havana
103
Configuration option=Default value Description
mute_weight_multiplier=-10.0 (FloatOpt) Multiplier used to weigh mute children. (Thevalue should be negative.)
mute_weight_value=1000.0 (FloatOpt) Weight value assigned to mute children. (Thevalue should be positive.)
name=nova (StrOpt) name of this cell
reserve_percent=10.0 (FloatOpt) Percentage of cell capacity to hold in reserve.Affects both memory and disk utilization
topic=cells (StrOpt) the topic cells nodes listen on
topic=conductor (StrOpt) the topic conductor nodes listen on
Cell scheduling configuration
To determine the best cell for launching a new instance, Compute uses a set of filters andweights configured in /etc/nova/nova.conf. The following options are available toprioritize cells for scheduling:
• scheduler_filter_classes - Specifies the list of filter classes. By defaultnova.cells.weights.all_filters is specified, which maps to all cells filtersincluded with Compute (see the section called “Filters” [88].
• scheduler_weight_classes - Specifies the list of weight classes. By defaultnova.cells.weights.all_weighers is specified, which maps to all cell weightalgorithms (weighers) included with Compute. The following modules are available:
• mute_child: Downgrades the likelihood of child cells being chosen for schedulingrequests, which haven't sent capacity or capability updates in a while. Options includemute_weight_multiplier (multiplier for mute children; value should be negative)and mute_weight_value (assigned to mute children; should be a positive value).
• ram_by_instance_type: Select cells with the most RAM capacity for the instancetype being requested. Because higher weights win, Compute returns the numberof available units for the instance type requested. The ram_weight_multiplieroption defaults to 10.0 that adds to the weight by a factor of 10. Use a negativenumber to stack VMs on one host instead of spreading out new VMs to more hosts inthe cell.
• weight_offset: Allows modifying the database to weight a particular cell. You canuse this when you want to disable a cell (for example, '0'), or to set a default cell bymaking its weight_offset very high (for example, '999999999999999'). The highestweight will be the first cell to be scheduled for launching an instance.
Additionally, the following options are available for the cell scheduler:
• scheduler_retries - Specifies how many times the scheduler will try to launch a newinstance when no cells are available (default=10).
• scheduler_retry_delay - Specifies the delay (in seconds) between retries(default=2).
As an admin user, you can also add a filter that directs builds toa particular cell. The policy.json file must have a line with
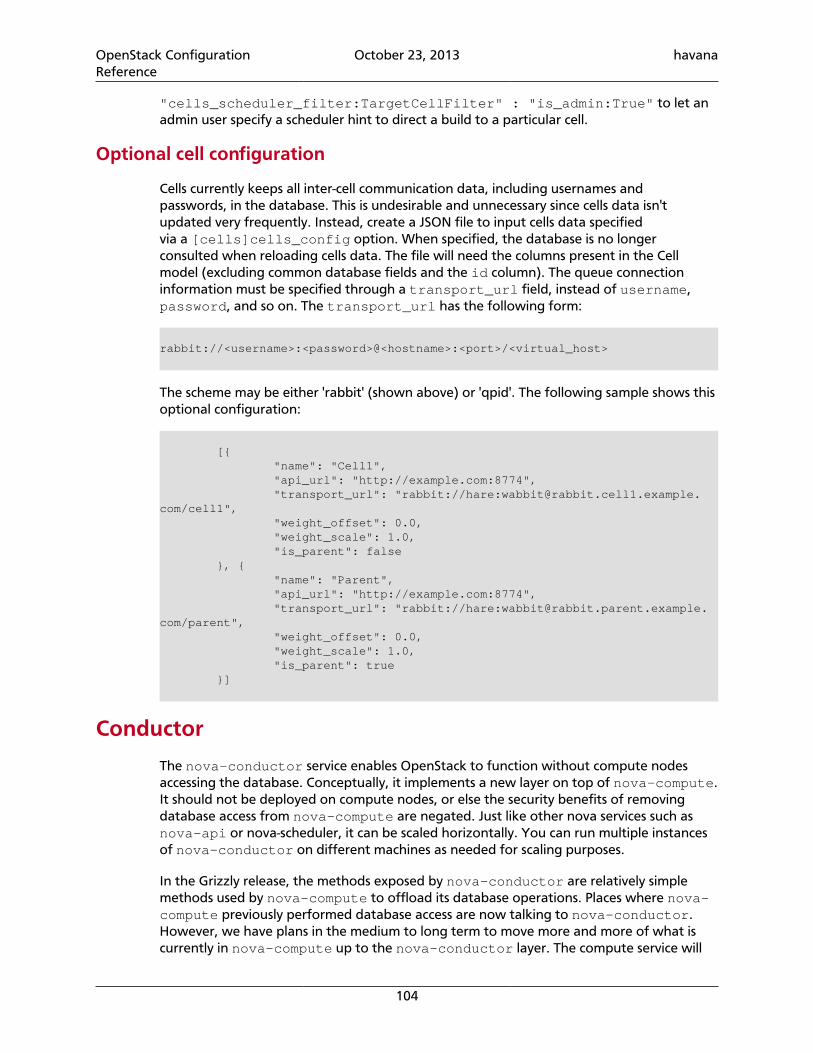
OpenStack ConfigurationReference
October 23, 2013 havana
104
"cells_scheduler_filter:TargetCellFilter" : "is_admin:True" to let anadmin user specify a scheduler hint to direct a build to a particular cell.
Optional cell configuration
Cells currently keeps all inter-cell communication data, including usernames andpasswords, in the database. This is undesirable and unnecessary since cells data isn'tupdated very frequently. Instead, create a JSON file to input cells data specifiedvia a [cells]cells_config option. When specified, the database is no longerconsulted when reloading cells data. The file will need the columns present in the Cellmodel (excluding common database fields and the id column). The queue connectioninformation must be specified through a transport_url field, instead of username,password, and so on. The transport_url has the following form:
rabbit://<username>:<password>@<hostname>:<port>/<virtual_host>
The scheme may be either 'rabbit' (shown above) or 'qpid'. The following sample shows thisoptional configuration:
[{ "name": "Cell1", "api_url": "http://example.com:8774", "transport_url": "rabbit://hare:[email protected]/cell1", "weight_offset": 0.0, "weight_scale": 1.0, "is_parent": false }, { "name": "Parent", "api_url": "http://example.com:8774", "transport_url": "rabbit://hare:[email protected]/parent", "weight_offset": 0.0, "weight_scale": 1.0, "is_parent": true }]
Conductor
The nova-conductor service enables OpenStack to function without compute nodesaccessing the database. Conceptually, it implements a new layer on top of nova-compute.It should not be deployed on compute nodes, or else the security benefits of removingdatabase access from nova-compute are negated. Just like other nova services such asnova-api or nova-scheduler, it can be scaled horizontally. You can run multiple instancesof nova-conductor on different machines as needed for scaling purposes.
In the Grizzly release, the methods exposed by nova-conductor are relatively simplemethods used by nova-compute to offload its database operations. Places where nova-compute previously performed database access are now talking to nova-conductor.However, we have plans in the medium to long term to move more and more of what iscurrently in nova-compute up to the nova-conductor layer. The compute service will
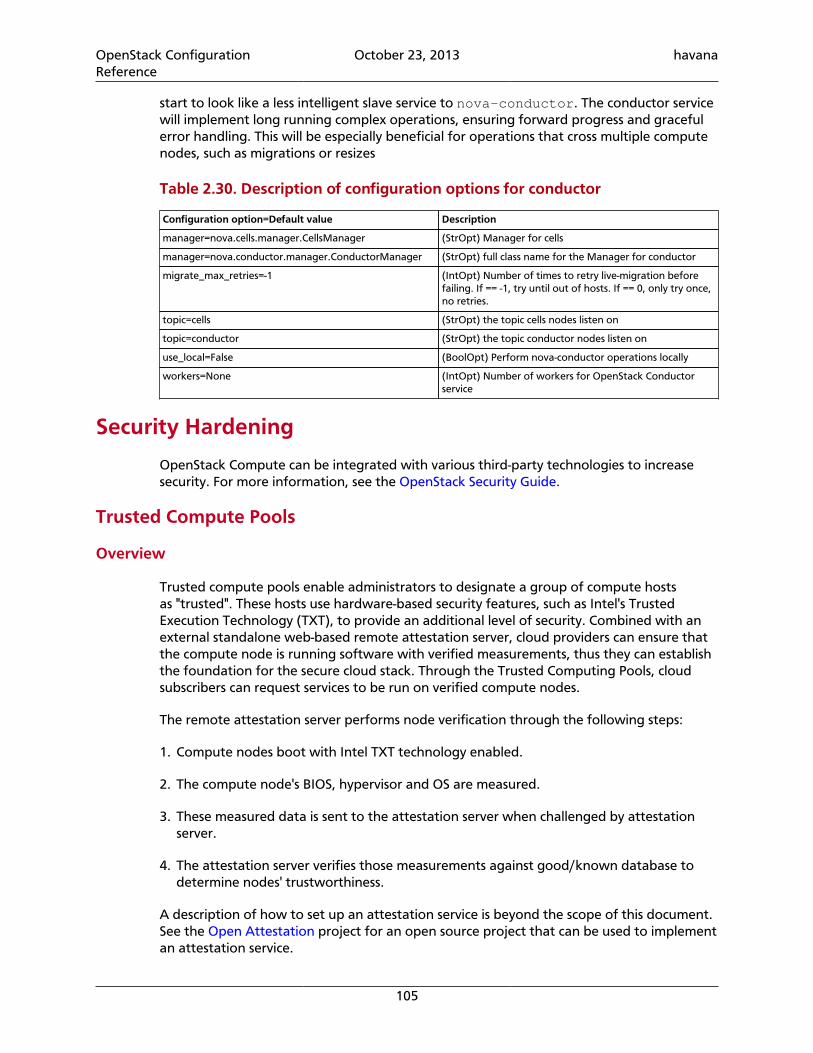
OpenStack ConfigurationReference
October 23, 2013 havana
105
start to look like a less intelligent slave service to nova-conductor. The conductor servicewill implement long running complex operations, ensuring forward progress and gracefulerror handling. This will be especially beneficial for operations that cross multiple computenodes, such as migrations or resizes
Table 2.30. Description of configuration options for conductor
Configuration option=Default value Description
manager=nova.cells.manager.CellsManager (StrOpt) Manager for cells
manager=nova.conductor.manager.ConductorManager (StrOpt) full class name for the Manager for conductor
migrate_max_retries=-1 (IntOpt) Number of times to retry live-migration beforefailing. If == -1, try until out of hosts. If == 0, only try once,no retries.
topic=cells (StrOpt) the topic cells nodes listen on
topic=conductor (StrOpt) the topic conductor nodes listen on
use_local=False (BoolOpt) Perform nova-conductor operations locally
workers=None (IntOpt) Number of workers for OpenStack Conductorservice
Security Hardening
OpenStack Compute can be integrated with various third-party technologies to increasesecurity. For more information, see the OpenStack Security Guide.
Trusted Compute Pools
Overview
Trusted compute pools enable administrators to designate a group of compute hostsas "trusted". These hosts use hardware-based security features, such as Intel's TrustedExecution Technology (TXT), to provide an additional level of security. Combined with anexternal standalone web-based remote attestation server, cloud providers can ensure thatthe compute node is running software with verified measurements, thus they can establishthe foundation for the secure cloud stack. Through the Trusted Computing Pools, cloudsubscribers can request services to be run on verified compute nodes.
The remote attestation server performs node verification through the following steps:
1. Compute nodes boot with Intel TXT technology enabled.
2. The compute node's BIOS, hypervisor and OS are measured.
3. These measured data is sent to the attestation server when challenged by attestationserver.
4. The attestation server verifies those measurements against good/known database todetermine nodes' trustworthiness.
A description of how to set up an attestation service is beyond the scope of this document.See the Open Attestation project for an open source project that can be used to implementan attestation service.
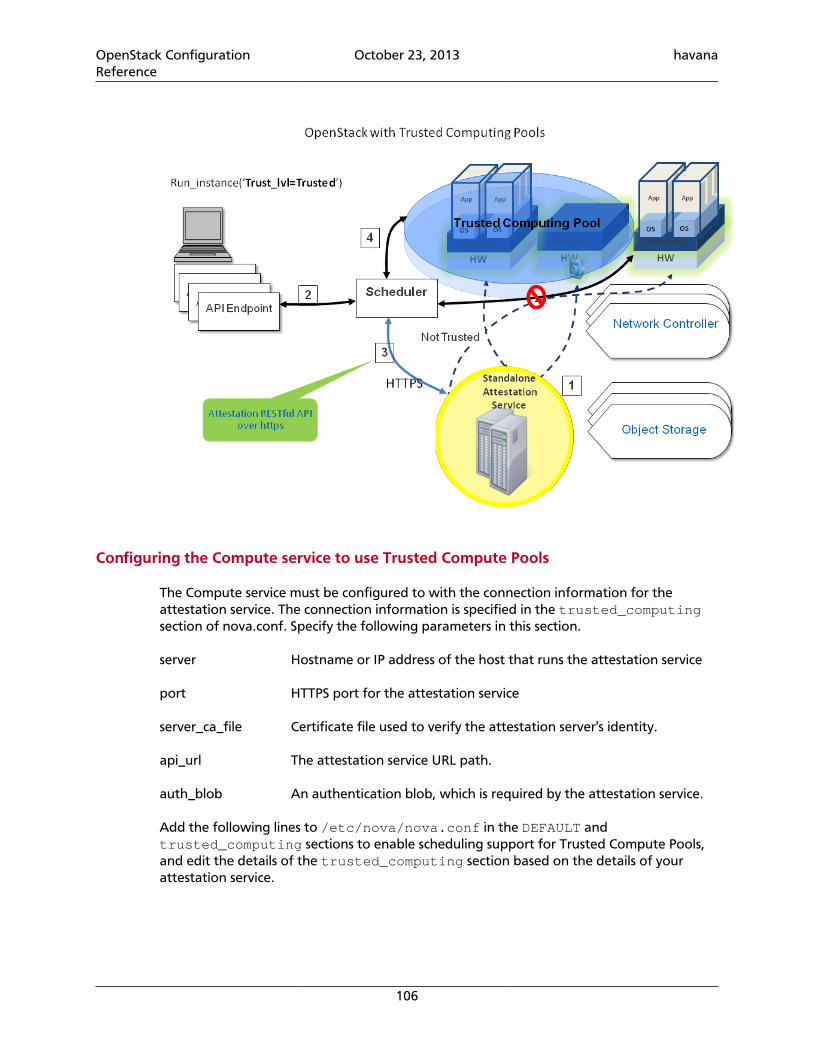
OpenStack ConfigurationReference
October 23, 2013 havana
106
Configuring the Compute service to use Trusted Compute Pools
The Compute service must be configured to with the connection information for theattestation service. The connection information is specified in the trusted_computingsection of nova.conf. Specify the following parameters in this section.
server Hostname or IP address of the host that runs the attestation service
port HTTPS port for the attestation service
server_ca_file Certificate file used to verify the attestation server's identity.
api_url The attestation service URL path.
auth_blob An authentication blob, which is required by the attestation service.
Add the following lines to /etc/nova/nova.conf in the DEFAULT andtrusted_computing sections to enable scheduling support for Trusted Compute Pools,and edit the details of the trusted_computing section based on the details of yourattestation service.
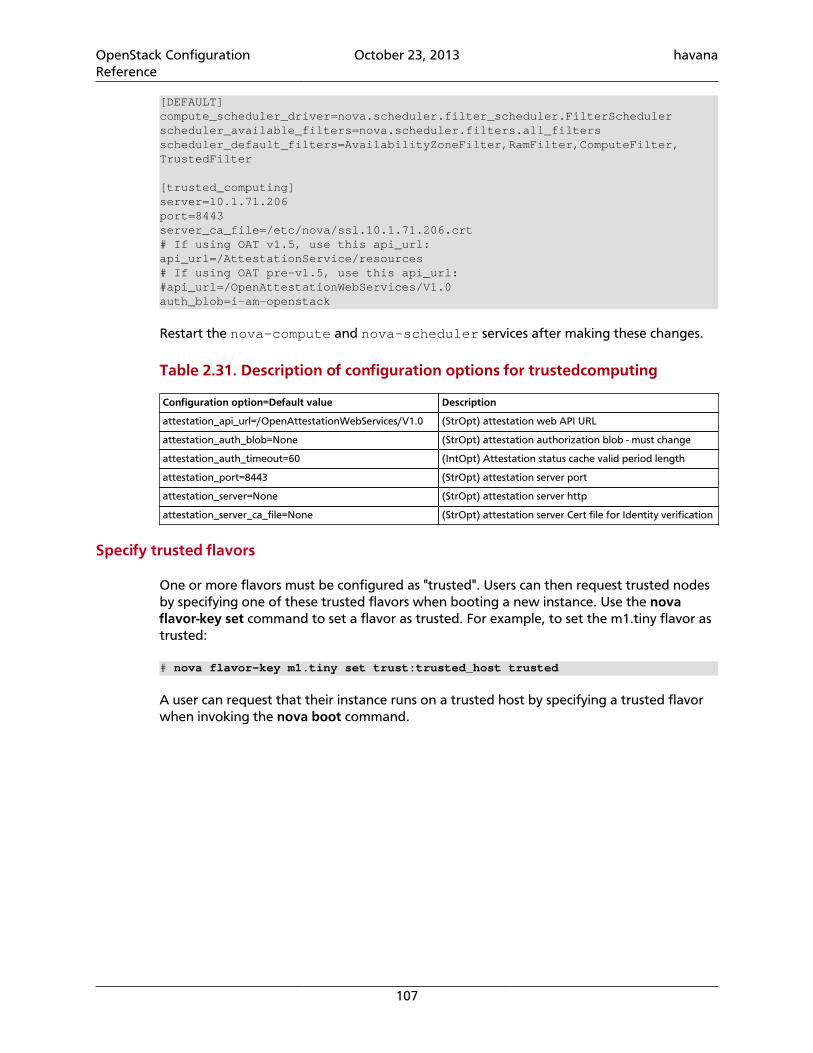
OpenStack ConfigurationReference
October 23, 2013 havana
107
[DEFAULT]compute_scheduler_driver=nova.scheduler.filter_scheduler.FilterSchedulerscheduler_available_filters=nova.scheduler.filters.all_filtersscheduler_default_filters=AvailabilityZoneFilter,RamFilter,ComputeFilter,TrustedFilter
[trusted_computing]server=10.1.71.206port=8443server_ca_file=/etc/nova/ssl.10.1.71.206.crt# If using OAT v1.5, use this api_url:api_url=/AttestationService/resources# If using OAT pre-v1.5, use this api_url:#api_url=/OpenAttestationWebServices/V1.0auth_blob=i-am-openstack
Restart the nova-compute and nova-scheduler services after making these changes.
Table 2.31. Description of configuration options for trustedcomputing
Configuration option=Default value Description
attestation_api_url=/OpenAttestationWebServices/V1.0 (StrOpt) attestation web API URL
attestation_auth_blob=None (StrOpt) attestation authorization blob - must change
attestation_auth_timeout=60 (IntOpt) Attestation status cache valid period length
attestation_port=8443 (StrOpt) attestation server port
attestation_server=None (StrOpt) attestation server http
attestation_server_ca_file=None (StrOpt) attestation server Cert file for Identity verification
Specify trusted flavors
One or more flavors must be configured as "trusted". Users can then request trusted nodesby specifying one of these trusted flavors when booting a new instance. Use the novaflavor-key set command to set a flavor as trusted. For example, to set the m1.tiny flavor astrusted:
# nova flavor-key m1.tiny set trust:trusted_host trusted
A user can request that their instance runs on a trusted host by specifying a trusted flavorwhen invoking the nova boot command.
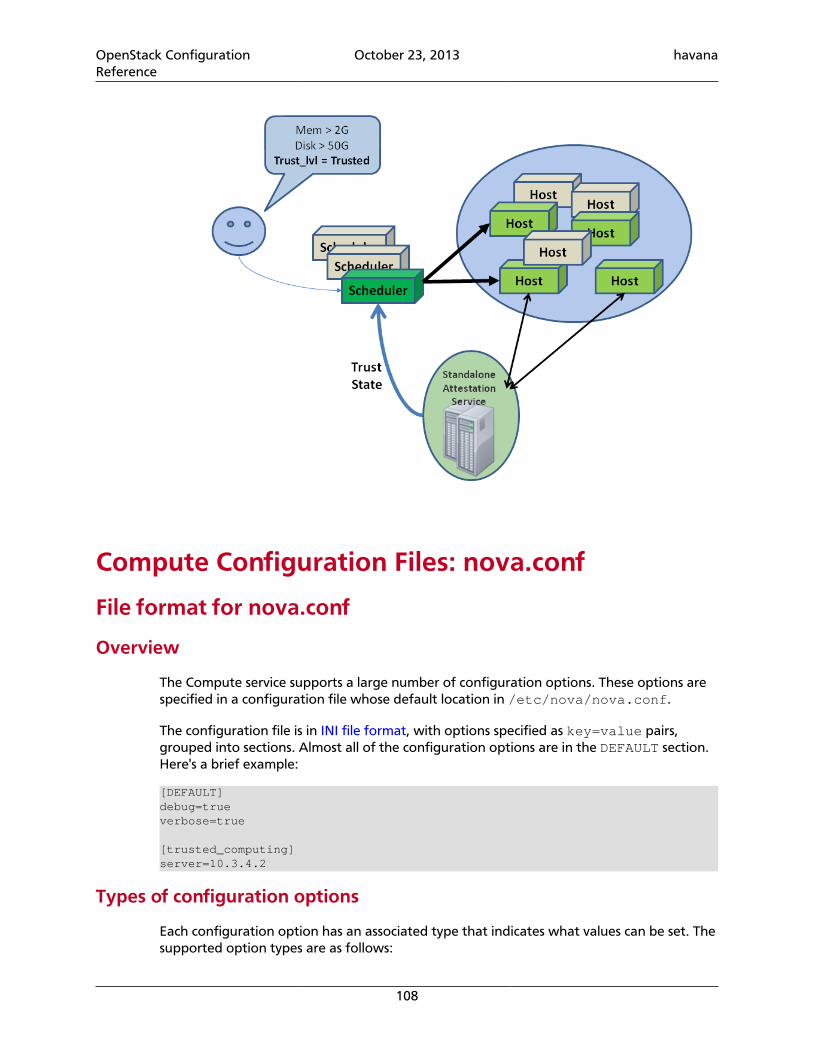
OpenStack ConfigurationReference
October 23, 2013 havana
108
Compute Configuration Files: nova.conf
File format for nova.conf
Overview
The Compute service supports a large number of configuration options. These options arespecified in a configuration file whose default location in /etc/nova/nova.conf.
The configuration file is in INI file format, with options specified as key=value pairs,grouped into sections. Almost all of the configuration options are in the DEFAULT section.Here's a brief example:
[DEFAULT]debug=trueverbose=true
[trusted_computing]server=10.3.4.2
Types of configuration options
Each configuration option has an associated type that indicates what values can be set. Thesupported option types are as follows:
OpenStack ConfigurationReference
October 23, 2013 havana
109
BoolOpt Boolean option. Value must be either true or false . Example:
debug=false
StrOpt String option. Value is an arbitrary string. Example:
my_ip=10.0.0.1
IntOption Integer option. Value must be an integer. Example:
glance_port=9292
MultiStrOpt String option. Same as StrOpt, except that it can be declared multipletimes to indicate multiple values. Example:
ldap_dns_servers=dns1.example.orgldap_dns_servers=dns2.example.org
ListOpt List option. Value is a list of arbitrary strings separated by commas.Example:
enabled_apis=ec2,osapi_compute,metadata
FloatOpt Floating-point option. Value must be a floating-point number. Example:
ram_allocation_ratio=1.5
Important
Nova options should not be quoted.
Sections
Configuration options are grouped by section. The Compute config file supports thefollowing sections.
[DEFAULT] Almost all of the configuration options are organized into thissection. If the documentation for a configuration option doesnot specify its section, assume that it should be placed in thisone.
[cells] The cells section is used for options for configuring cellsfunctionality. See the Cells section of the OpenStack ComputeAdmin Manual for more details.
[baremetal] This section is used for options that relate to the baremetalhypervisor driver.
[conductor] The conductor section is used for options for configuring thenova-conductor service.
[trusted_computing] The trusted_computing section is used for options thatrelate to the trusted computing pools functionality. Options inthis section describe how to connect to a remote attestationservice.
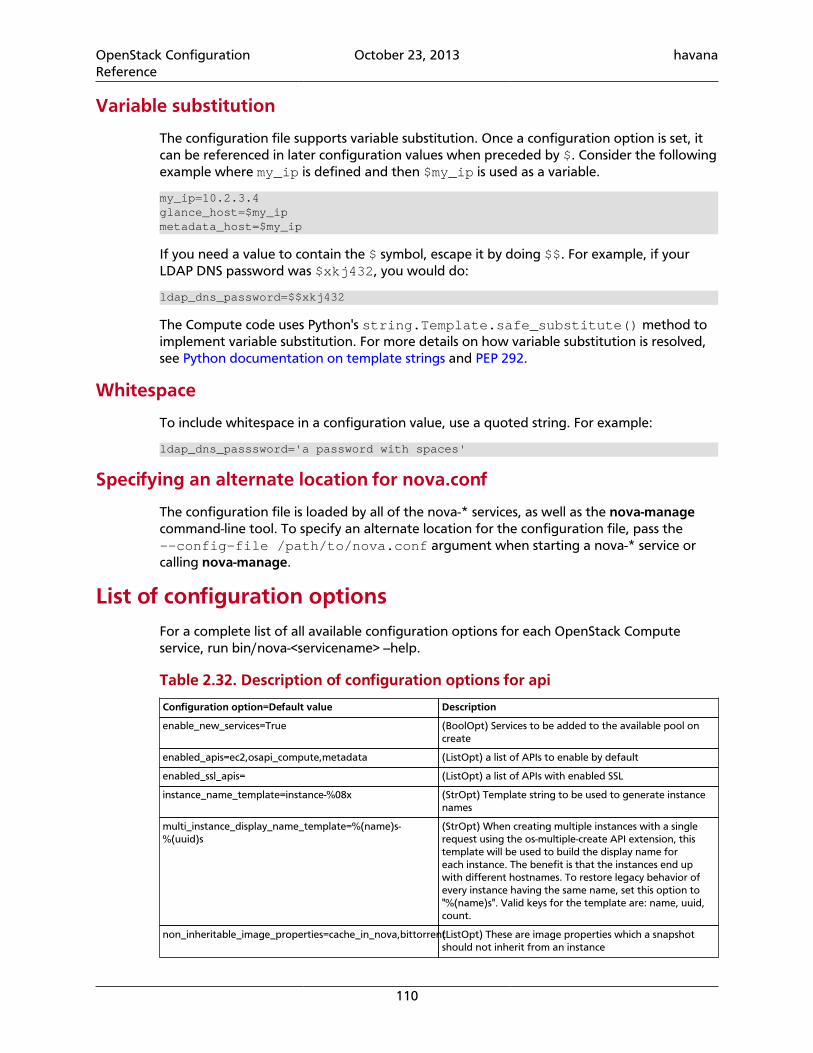
OpenStack ConfigurationReference
October 23, 2013 havana
110
Variable substitution
The configuration file supports variable substitution. Once a configuration option is set, itcan be referenced in later configuration values when preceded by $. Consider the followingexample where my_ip is defined and then $my_ip is used as a variable.
my_ip=10.2.3.4glance_host=$my_ipmetadata_host=$my_ip
If you need a value to contain the $ symbol, escape it by doing $$. For example, if yourLDAP DNS password was $xkj432, you would do:
ldap_dns_password=$$xkj432
The Compute code uses Python's string.Template.safe_substitute() method toimplement variable substitution. For more details on how variable substitution is resolved,see Python documentation on template strings and PEP 292.
Whitespace
To include whitespace in a configuration value, use a quoted string. For example:
ldap_dns_passsword='a password with spaces'
Specifying an alternate location for nova.conf
The configuration file is loaded by all of the nova-* services, as well as the nova-managecommand-line tool. To specify an alternate location for the configuration file, pass the--config-file /path/to/nova.conf argument when starting a nova-* service orcalling nova-manage.
List of configuration optionsFor a complete list of all available configuration options for each OpenStack Computeservice, run bin/nova-<servicename> --help.
Table 2.32. Description of configuration options for api
Configuration option=Default value Description
enable_new_services=True (BoolOpt) Services to be added to the available pool oncreate
enabled_apis=ec2,osapi_compute,metadata (ListOpt) a list of APIs to enable by default
enabled_ssl_apis= (ListOpt) a list of APIs with enabled SSL
instance_name_template=instance-%08x (StrOpt) Template string to be used to generate instancenames
multi_instance_display_name_template=%(name)s-%(uuid)s
(StrOpt) When creating multiple instances with a singlerequest using the os-multiple-create API extension, thistemplate will be used to build the display name foreach instance. The benefit is that the instances end upwith different hostnames. To restore legacy behavior ofevery instance having the same name, set this option to"%(name)s". Valid keys for the template are: name, uuid,count.
non_inheritable_image_properties=cache_in_nova,bittorrent(ListOpt) These are image properties which a snapshotshould not inherit from an instance
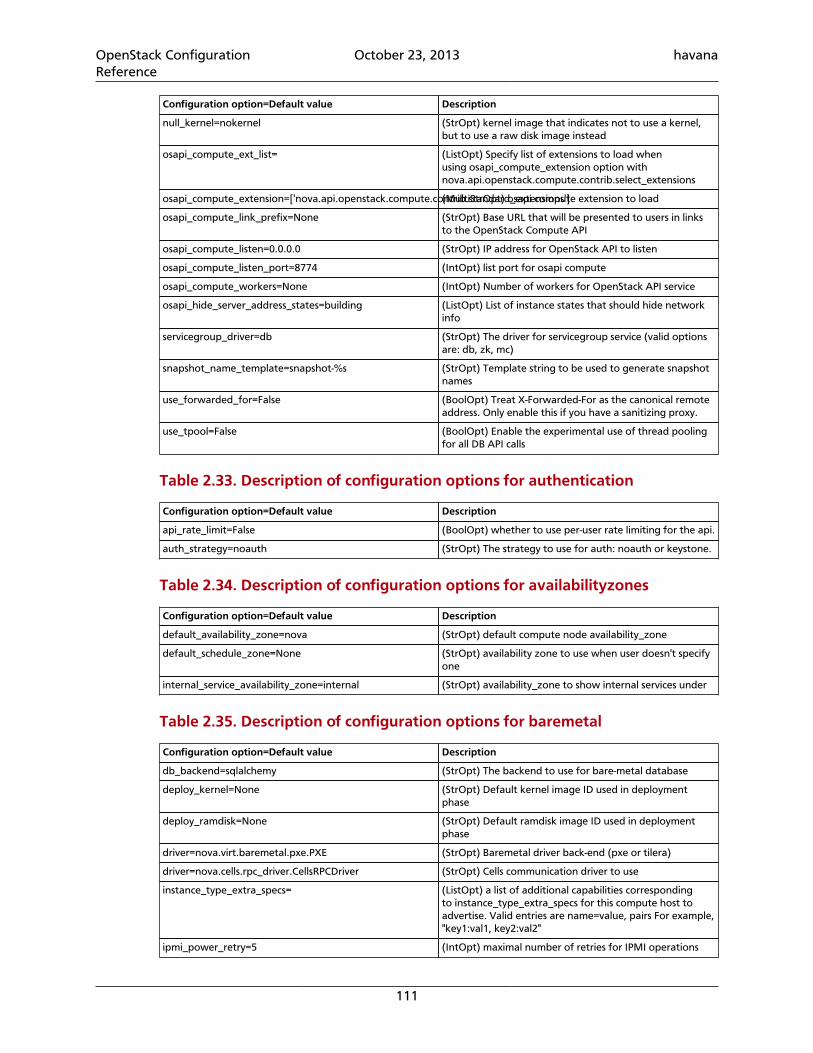
OpenStack ConfigurationReference
October 23, 2013 havana
111
Configuration option=Default value Description
null_kernel=nokernel (StrOpt) kernel image that indicates not to use a kernel,but to use a raw disk image instead
osapi_compute_ext_list= (ListOpt) Specify list of extensions to load whenusing osapi_compute_extension option withnova.api.openstack.compute.contrib.select_extensions
osapi_compute_extension=['nova.api.openstack.compute.contrib.standard_extensions'](MultiStrOpt) osapi compute extension to load
osapi_compute_link_prefix=None (StrOpt) Base URL that will be presented to users in linksto the OpenStack Compute API
osapi_compute_listen=0.0.0.0 (StrOpt) IP address for OpenStack API to listen
osapi_compute_listen_port=8774 (IntOpt) list port for osapi compute
osapi_compute_workers=None (IntOpt) Number of workers for OpenStack API service
osapi_hide_server_address_states=building (ListOpt) List of instance states that should hide networkinfo
servicegroup_driver=db (StrOpt) The driver for servicegroup service (valid optionsare: db, zk, mc)
snapshot_name_template=snapshot-%s (StrOpt) Template string to be used to generate snapshotnames
use_forwarded_for=False (BoolOpt) Treat X-Forwarded-For as the canonical remoteaddress. Only enable this if you have a sanitizing proxy.
use_tpool=False (BoolOpt) Enable the experimental use of thread poolingfor all DB API calls
Table 2.33. Description of configuration options for authentication
Configuration option=Default value Description
api_rate_limit=False (BoolOpt) whether to use per-user rate limiting for the api.
auth_strategy=noauth (StrOpt) The strategy to use for auth: noauth or keystone.
Table 2.34. Description of configuration options for availabilityzones
Configuration option=Default value Description
default_availability_zone=nova (StrOpt) default compute node availability_zone
default_schedule_zone=None (StrOpt) availability zone to use when user doesn't specifyone
internal_service_availability_zone=internal (StrOpt) availability_zone to show internal services under
Table 2.35. Description of configuration options for baremetal
Configuration option=Default value Description
db_backend=sqlalchemy (StrOpt) The backend to use for bare-metal database
deploy_kernel=None (StrOpt) Default kernel image ID used in deploymentphase
deploy_ramdisk=None (StrOpt) Default ramdisk image ID used in deploymentphase
driver=nova.virt.baremetal.pxe.PXE (StrOpt) Baremetal driver back-end (pxe or tilera)
driver=nova.cells.rpc_driver.CellsRPCDriver (StrOpt) Cells communication driver to use
instance_type_extra_specs= (ListOpt) a list of additional capabilities correspondingto instance_type_extra_specs for this compute host toadvertise. Valid entries are name=value, pairs For example,"key1:val1, key2:val2"
ipmi_power_retry=5 (IntOpt) maximal number of retries for IPMI operations
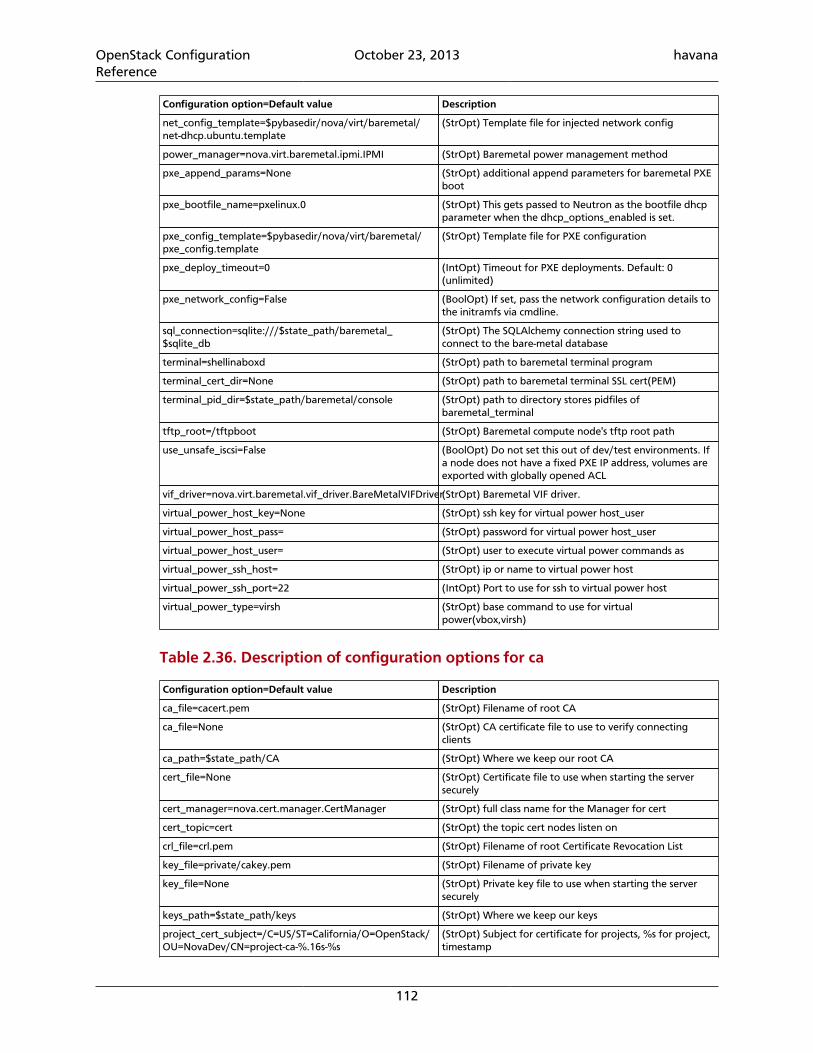
OpenStack ConfigurationReference
October 23, 2013 havana
112
Configuration option=Default value Description
net_config_template=$pybasedir/nova/virt/baremetal/net-dhcp.ubuntu.template
(StrOpt) Template file for injected network config
power_manager=nova.virt.baremetal.ipmi.IPMI (StrOpt) Baremetal power management method
pxe_append_params=None (StrOpt) additional append parameters for baremetal PXEboot
pxe_bootfile_name=pxelinux.0 (StrOpt) This gets passed to Neutron as the bootfile dhcpparameter when the dhcp_options_enabled is set.
pxe_config_template=$pybasedir/nova/virt/baremetal/pxe_config.template
(StrOpt) Template file for PXE configuration
pxe_deploy_timeout=0 (IntOpt) Timeout for PXE deployments. Default: 0(unlimited)
pxe_network_config=False (BoolOpt) If set, pass the network configuration details tothe initramfs via cmdline.
sql_connection=sqlite:///$state_path/baremetal_$sqlite_db
(StrOpt) The SQLAlchemy connection string used toconnect to the bare-metal database
terminal=shellinaboxd (StrOpt) path to baremetal terminal program
terminal_cert_dir=None (StrOpt) path to baremetal terminal SSL cert(PEM)
terminal_pid_dir=$state_path/baremetal/console (StrOpt) path to directory stores pidfiles ofbaremetal_terminal
tftp_root=/tftpboot (StrOpt) Baremetal compute node's tftp root path
use_unsafe_iscsi=False (BoolOpt) Do not set this out of dev/test environments. Ifa node does not have a fixed PXE IP address, volumes areexported with globally opened ACL
vif_driver=nova.virt.baremetal.vif_driver.BareMetalVIFDriver(StrOpt) Baremetal VIF driver.
virtual_power_host_key=None (StrOpt) ssh key for virtual power host_user
virtual_power_host_pass= (StrOpt) password for virtual power host_user
virtual_power_host_user= (StrOpt) user to execute virtual power commands as
virtual_power_ssh_host= (StrOpt) ip or name to virtual power host
virtual_power_ssh_port=22 (IntOpt) Port to use for ssh to virtual power host
virtual_power_type=virsh (StrOpt) base command to use for virtualpower(vbox,virsh)
Table 2.36. Description of configuration options for ca
Configuration option=Default value Description
ca_file=cacert.pem (StrOpt) Filename of root CA
ca_file=None (StrOpt) CA certificate file to use to verify connectingclients
ca_path=$state_path/CA (StrOpt) Where we keep our root CA
cert_file=None (StrOpt) Certificate file to use when starting the serversecurely
cert_manager=nova.cert.manager.CertManager (StrOpt) full class name for the Manager for cert
cert_topic=cert (StrOpt) the topic cert nodes listen on
crl_file=crl.pem (StrOpt) Filename of root Certificate Revocation List
key_file=private/cakey.pem (StrOpt) Filename of private key
key_file=None (StrOpt) Private key file to use when starting the serversecurely
keys_path=$state_path/keys (StrOpt) Where we keep our keys
project_cert_subject=/C=US/ST=California/O=OpenStack/OU=NovaDev/CN=project-ca-%.16s-%s
(StrOpt) Subject for certificate for projects, %s for project,timestamp
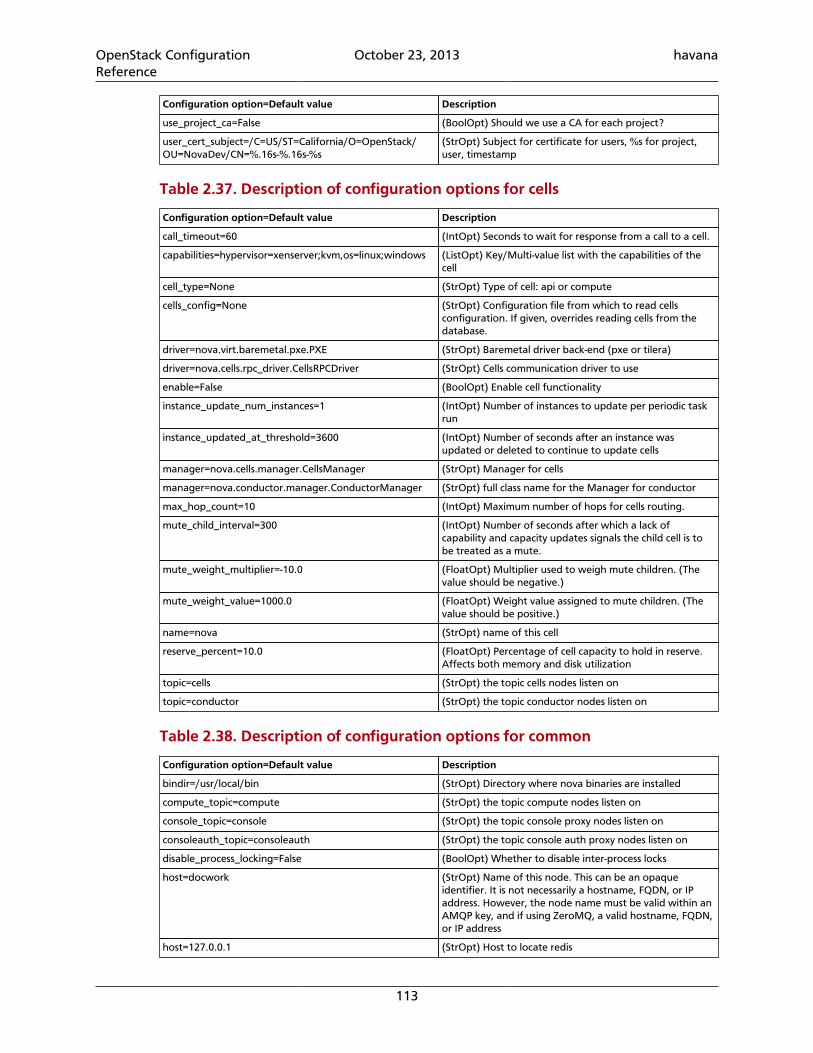
OpenStack ConfigurationReference
October 23, 2013 havana
113
Configuration option=Default value Description
use_project_ca=False (BoolOpt) Should we use a CA for each project?
user_cert_subject=/C=US/ST=California/O=OpenStack/OU=NovaDev/CN=%.16s-%.16s-%s
(StrOpt) Subject for certificate for users, %s for project,user, timestamp
Table 2.37. Description of configuration options for cells
Configuration option=Default value Description
call_timeout=60 (IntOpt) Seconds to wait for response from a call to a cell.
capabilities=hypervisor=xenserver;kvm,os=linux;windows (ListOpt) Key/Multi-value list with the capabilities of thecell
cell_type=None (StrOpt) Type of cell: api or compute
cells_config=None (StrOpt) Configuration file from which to read cellsconfiguration. If given, overrides reading cells from thedatabase.
driver=nova.virt.baremetal.pxe.PXE (StrOpt) Baremetal driver back-end (pxe or tilera)
driver=nova.cells.rpc_driver.CellsRPCDriver (StrOpt) Cells communication driver to use
enable=False (BoolOpt) Enable cell functionality
instance_update_num_instances=1 (IntOpt) Number of instances to update per periodic taskrun
instance_updated_at_threshold=3600 (IntOpt) Number of seconds after an instance wasupdated or deleted to continue to update cells
manager=nova.cells.manager.CellsManager (StrOpt) Manager for cells
manager=nova.conductor.manager.ConductorManager (StrOpt) full class name for the Manager for conductor
max_hop_count=10 (IntOpt) Maximum number of hops for cells routing.
mute_child_interval=300 (IntOpt) Number of seconds after which a lack ofcapability and capacity updates signals the child cell is tobe treated as a mute.
mute_weight_multiplier=-10.0 (FloatOpt) Multiplier used to weigh mute children. (Thevalue should be negative.)
mute_weight_value=1000.0 (FloatOpt) Weight value assigned to mute children. (Thevalue should be positive.)
name=nova (StrOpt) name of this cell
reserve_percent=10.0 (FloatOpt) Percentage of cell capacity to hold in reserve.Affects both memory and disk utilization
topic=cells (StrOpt) the topic cells nodes listen on
topic=conductor (StrOpt) the topic conductor nodes listen on
Table 2.38. Description of configuration options for common
Configuration option=Default value Description
bindir=/usr/local/bin (StrOpt) Directory where nova binaries are installed
compute_topic=compute (StrOpt) the topic compute nodes listen on
console_topic=console (StrOpt) the topic console proxy nodes listen on
consoleauth_topic=consoleauth (StrOpt) the topic console auth proxy nodes listen on
disable_process_locking=False (BoolOpt) Whether to disable inter-process locks
host=docwork (StrOpt) Name of this node. This can be an opaqueidentifier. It is not necessarily a hostname, FQDN, or IPaddress. However, the node name must be valid within anAMQP key, and if using ZeroMQ, a valid hostname, FQDN,or IP address
host=127.0.0.1 (StrOpt) Host to locate redis
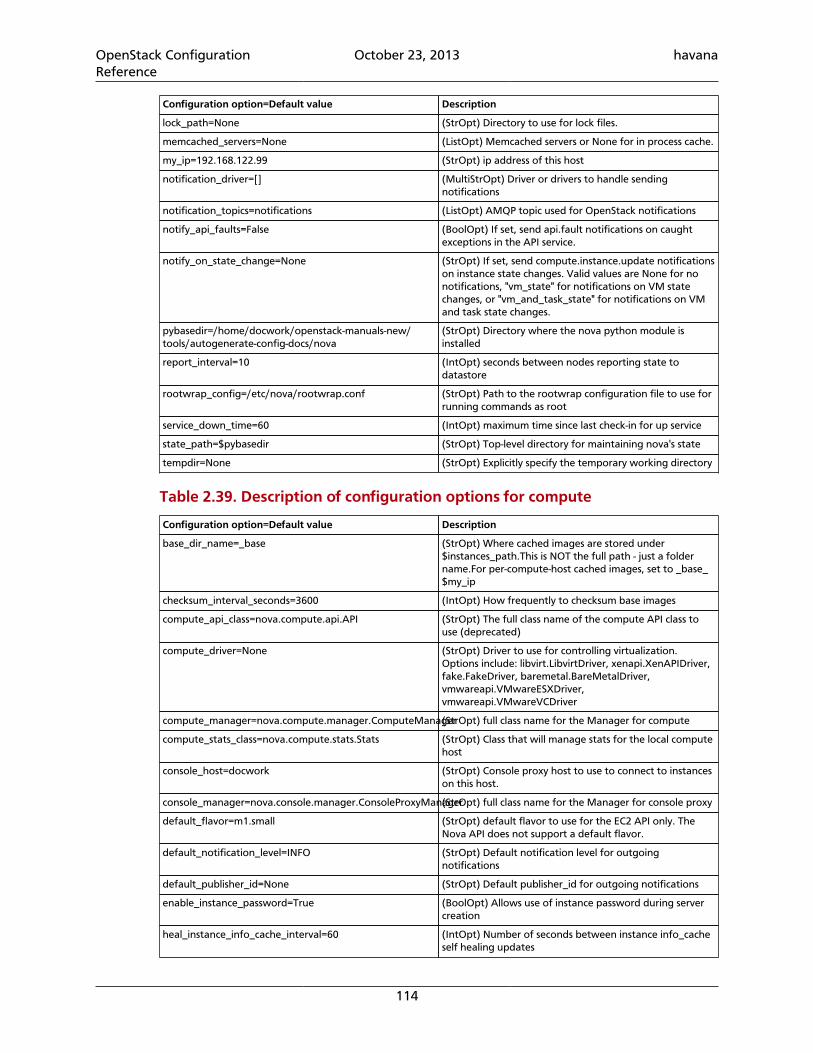
OpenStack ConfigurationReference
October 23, 2013 havana
114
Configuration option=Default value Description
lock_path=None (StrOpt) Directory to use for lock files.
memcached_servers=None (ListOpt) Memcached servers or None for in process cache.
my_ip=192.168.122.99 (StrOpt) ip address of this host
notification_driver=[] (MultiStrOpt) Driver or drivers to handle sendingnotifications
notification_topics=notifications (ListOpt) AMQP topic used for OpenStack notifications
notify_api_faults=False (BoolOpt) If set, send api.fault notifications on caughtexceptions in the API service.
notify_on_state_change=None (StrOpt) If set, send compute.instance.update notificationson instance state changes. Valid values are None for nonotifications, "vm_state" for notifications on VM statechanges, or "vm_and_task_state" for notifications on VMand task state changes.
pybasedir=/home/docwork/openstack-manuals-new/tools/autogenerate-config-docs/nova
(StrOpt) Directory where the nova python module isinstalled
report_interval=10 (IntOpt) seconds between nodes reporting state todatastore
rootwrap_config=/etc/nova/rootwrap.conf (StrOpt) Path to the rootwrap configuration file to use forrunning commands as root
service_down_time=60 (IntOpt) maximum time since last check-in for up service
state_path=$pybasedir (StrOpt) Top-level directory for maintaining nova's state
tempdir=None (StrOpt) Explicitly specify the temporary working directory
Table 2.39. Description of configuration options for compute
Configuration option=Default value Description
base_dir_name=_base (StrOpt) Where cached images are stored under$instances_path.This is NOT the full path - just a foldername.For per-compute-host cached images, set to _base_$my_ip
checksum_interval_seconds=3600 (IntOpt) How frequently to checksum base images
compute_api_class=nova.compute.api.API (StrOpt) The full class name of the compute API class touse (deprecated)
compute_driver=None (StrOpt) Driver to use for controlling virtualization.Options include: libvirt.LibvirtDriver, xenapi.XenAPIDriver,fake.FakeDriver, baremetal.BareMetalDriver,vmwareapi.VMwareESXDriver,vmwareapi.VMwareVCDriver
compute_manager=nova.compute.manager.ComputeManager(StrOpt) full class name for the Manager for compute
compute_stats_class=nova.compute.stats.Stats (StrOpt) Class that will manage stats for the local computehost
console_host=docwork (StrOpt) Console proxy host to use to connect to instanceson this host.
console_manager=nova.console.manager.ConsoleProxyManager(StrOpt) full class name for the Manager for console proxy
default_flavor=m1.small (StrOpt) default flavor to use for the EC2 API only. TheNova API does not support a default flavor.
default_notification_level=INFO (StrOpt) Default notification level for outgoingnotifications
default_publisher_id=None (StrOpt) Default publisher_id for outgoing notifications
enable_instance_password=True (BoolOpt) Allows use of instance password during servercreation
heal_instance_info_cache_interval=60 (IntOpt) Number of seconds between instance info_cacheself healing updates
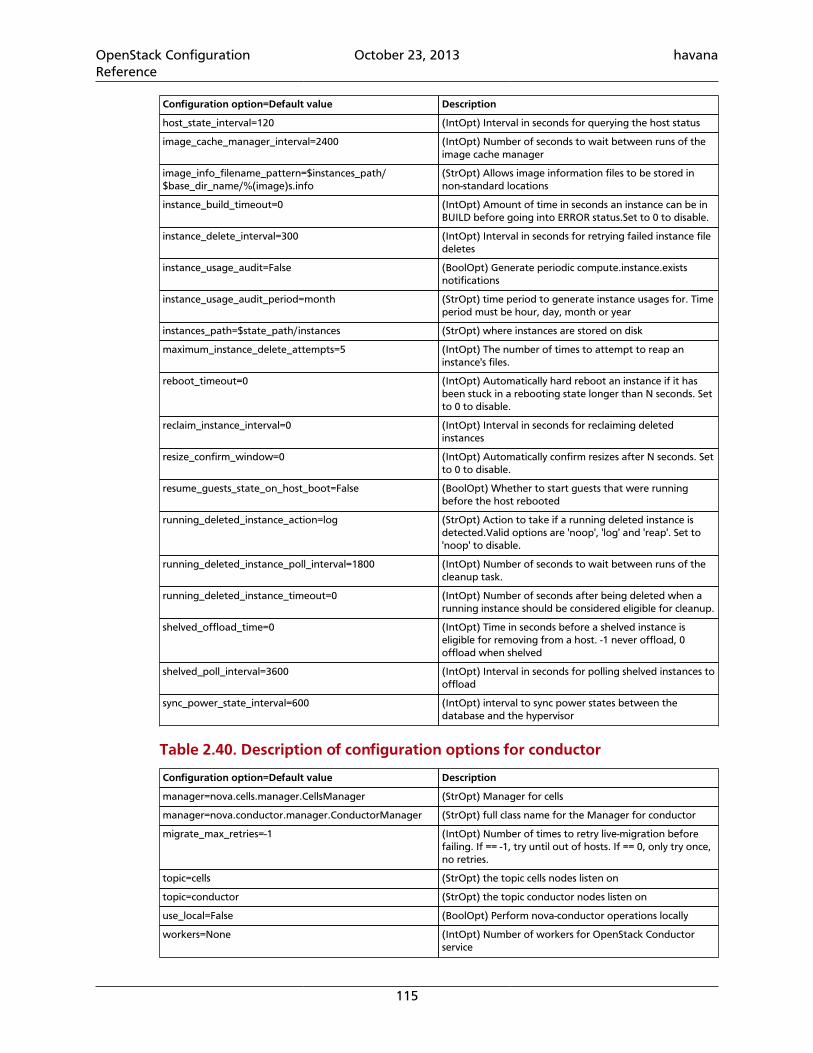
OpenStack ConfigurationReference
October 23, 2013 havana
115
Configuration option=Default value Description
host_state_interval=120 (IntOpt) Interval in seconds for querying the host status
image_cache_manager_interval=2400 (IntOpt) Number of seconds to wait between runs of theimage cache manager
image_info_filename_pattern=$instances_path/$base_dir_name/%(image)s.info
(StrOpt) Allows image information files to be stored innon-standard locations
instance_build_timeout=0 (IntOpt) Amount of time in seconds an instance can be inBUILD before going into ERROR status.Set to 0 to disable.
instance_delete_interval=300 (IntOpt) Interval in seconds for retrying failed instance filedeletes
instance_usage_audit=False (BoolOpt) Generate periodic compute.instance.existsnotifications
instance_usage_audit_period=month (StrOpt) time period to generate instance usages for. Timeperiod must be hour, day, month or year
instances_path=$state_path/instances (StrOpt) where instances are stored on disk
maximum_instance_delete_attempts=5 (IntOpt) The number of times to attempt to reap aninstance's files.
reboot_timeout=0 (IntOpt) Automatically hard reboot an instance if it hasbeen stuck in a rebooting state longer than N seconds. Setto 0 to disable.
reclaim_instance_interval=0 (IntOpt) Interval in seconds for reclaiming deletedinstances
resize_confirm_window=0 (IntOpt) Automatically confirm resizes after N seconds. Setto 0 to disable.
resume_guests_state_on_host_boot=False (BoolOpt) Whether to start guests that were runningbefore the host rebooted
running_deleted_instance_action=log (StrOpt) Action to take if a running deleted instance isdetected.Valid options are 'noop', 'log' and 'reap'. Set to'noop' to disable.
running_deleted_instance_poll_interval=1800 (IntOpt) Number of seconds to wait between runs of thecleanup task.
running_deleted_instance_timeout=0 (IntOpt) Number of seconds after being deleted when arunning instance should be considered eligible for cleanup.
shelved_offload_time=0 (IntOpt) Time in seconds before a shelved instance iseligible for removing from a host. -1 never offload, 0offload when shelved
shelved_poll_interval=3600 (IntOpt) Interval in seconds for polling shelved instances tooffload
sync_power_state_interval=600 (IntOpt) interval to sync power states between thedatabase and the hypervisor
Table 2.40. Description of configuration options for conductor
Configuration option=Default value Description
manager=nova.cells.manager.CellsManager (StrOpt) Manager for cells
manager=nova.conductor.manager.ConductorManager (StrOpt) full class name for the Manager for conductor
migrate_max_retries=-1 (IntOpt) Number of times to retry live-migration beforefailing. If == -1, try until out of hosts. If == 0, only try once,no retries.
topic=cells (StrOpt) the topic cells nodes listen on
topic=conductor (StrOpt) the topic conductor nodes listen on
use_local=False (BoolOpt) Perform nova-conductor operations locally
workers=None (IntOpt) Number of workers for OpenStack Conductorservice
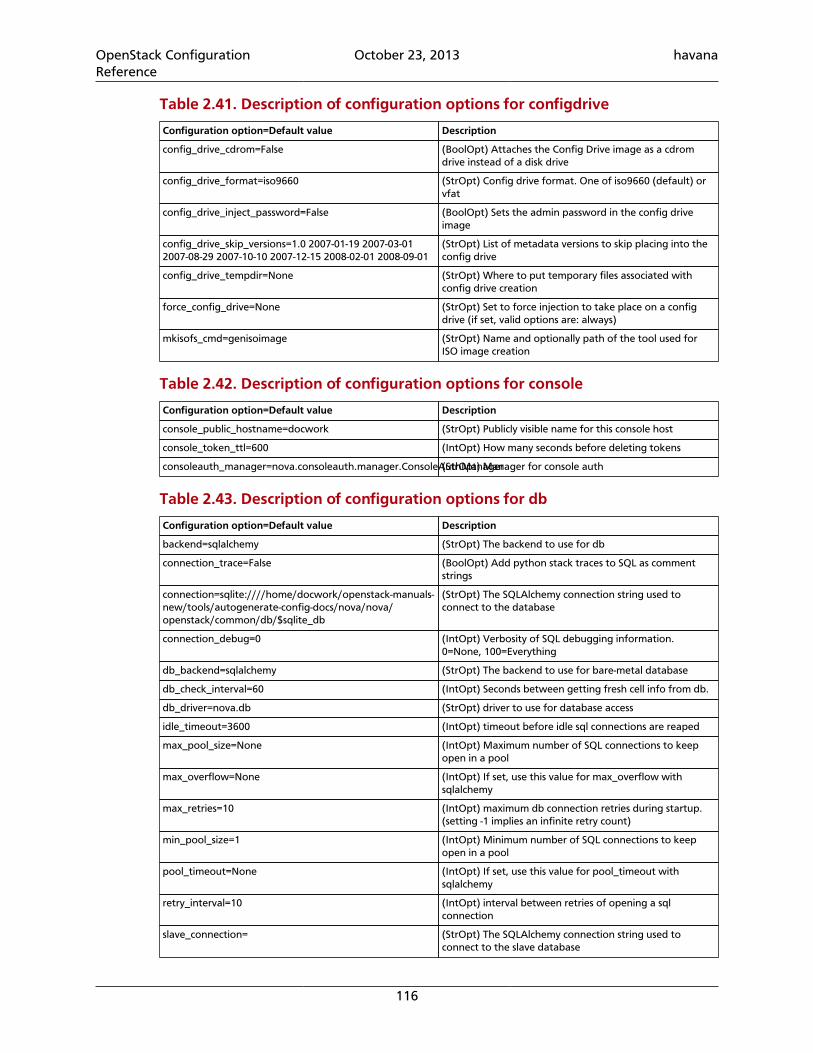
OpenStack ConfigurationReference
October 23, 2013 havana
116
Table 2.41. Description of configuration options for configdrive
Configuration option=Default value Description
config_drive_cdrom=False (BoolOpt) Attaches the Config Drive image as a cdromdrive instead of a disk drive
config_drive_format=iso9660 (StrOpt) Config drive format. One of iso9660 (default) orvfat
config_drive_inject_password=False (BoolOpt) Sets the admin password in the config driveimage
config_drive_skip_versions=1.0 2007-01-19 2007-03-012007-08-29 2007-10-10 2007-12-15 2008-02-01 2008-09-01
(StrOpt) List of metadata versions to skip placing into theconfig drive
config_drive_tempdir=None (StrOpt) Where to put temporary files associated withconfig drive creation
force_config_drive=None (StrOpt) Set to force injection to take place on a configdrive (if set, valid options are: always)
mkisofs_cmd=genisoimage (StrOpt) Name and optionally path of the tool used forISO image creation
Table 2.42. Description of configuration options for console
Configuration option=Default value Description
console_public_hostname=docwork (StrOpt) Publicly visible name for this console host
console_token_ttl=600 (IntOpt) How many seconds before deleting tokens
consoleauth_manager=nova.consoleauth.manager.ConsoleAuthManager(StrOpt) Manager for console auth
Table 2.43. Description of configuration options for db
Configuration option=Default value Description
backend=sqlalchemy (StrOpt) The backend to use for db
connection_trace=False (BoolOpt) Add python stack traces to SQL as commentstrings
connection=sqlite:////home/docwork/openstack-manuals-new/tools/autogenerate-config-docs/nova/nova/openstack/common/db/$sqlite_db
(StrOpt) The SQLAlchemy connection string used toconnect to the database
connection_debug=0 (IntOpt) Verbosity of SQL debugging information.0=None, 100=Everything
db_backend=sqlalchemy (StrOpt) The backend to use for bare-metal database
db_check_interval=60 (IntOpt) Seconds between getting fresh cell info from db.
db_driver=nova.db (StrOpt) driver to use for database access
idle_timeout=3600 (IntOpt) timeout before idle sql connections are reaped
max_pool_size=None (IntOpt) Maximum number of SQL connections to keepopen in a pool
max_overflow=None (IntOpt) If set, use this value for max_overflow withsqlalchemy
max_retries=10 (IntOpt) maximum db connection retries during startup.(setting -1 implies an infinite retry count)
min_pool_size=1 (IntOpt) Minimum number of SQL connections to keepopen in a pool
pool_timeout=None (IntOpt) If set, use this value for pool_timeout withsqlalchemy
retry_interval=10 (IntOpt) interval between retries of opening a sqlconnection
slave_connection= (StrOpt) The SQLAlchemy connection string used toconnect to the slave database
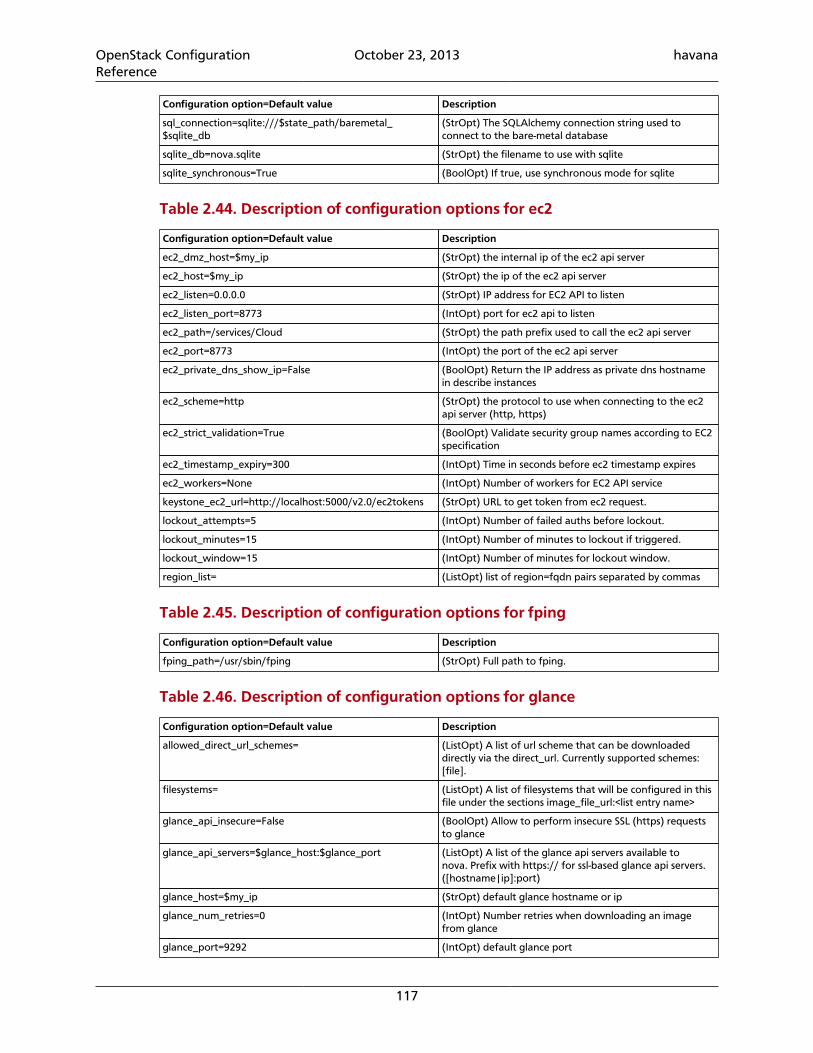
OpenStack ConfigurationReference
October 23, 2013 havana
117
Configuration option=Default value Description
sql_connection=sqlite:///$state_path/baremetal_$sqlite_db
(StrOpt) The SQLAlchemy connection string used toconnect to the bare-metal database
sqlite_db=nova.sqlite (StrOpt) the filename to use with sqlite
sqlite_synchronous=True (BoolOpt) If true, use synchronous mode for sqlite
Table 2.44. Description of configuration options for ec2
Configuration option=Default value Description
ec2_dmz_host=$my_ip (StrOpt) the internal ip of the ec2 api server
ec2_host=$my_ip (StrOpt) the ip of the ec2 api server
ec2_listen=0.0.0.0 (StrOpt) IP address for EC2 API to listen
ec2_listen_port=8773 (IntOpt) port for ec2 api to listen
ec2_path=/services/Cloud (StrOpt) the path prefix used to call the ec2 api server
ec2_port=8773 (IntOpt) the port of the ec2 api server
ec2_private_dns_show_ip=False (BoolOpt) Return the IP address as private dns hostnamein describe instances
ec2_scheme=http (StrOpt) the protocol to use when connecting to the ec2api server (http, https)
ec2_strict_validation=True (BoolOpt) Validate security group names according to EC2specification
ec2_timestamp_expiry=300 (IntOpt) Time in seconds before ec2 timestamp expires
ec2_workers=None (IntOpt) Number of workers for EC2 API service
keystone_ec2_url=http://localhost:5000/v2.0/ec2tokens (StrOpt) URL to get token from ec2 request.
lockout_attempts=5 (IntOpt) Number of failed auths before lockout.
lockout_minutes=15 (IntOpt) Number of minutes to lockout if triggered.
lockout_window=15 (IntOpt) Number of minutes for lockout window.
region_list= (ListOpt) list of region=fqdn pairs separated by commas
Table 2.45. Description of configuration options for fping
Configuration option=Default value Description
fping_path=/usr/sbin/fping (StrOpt) Full path to fping.
Table 2.46. Description of configuration options for glance
Configuration option=Default value Description
allowed_direct_url_schemes= (ListOpt) A list of url scheme that can be downloadeddirectly via the direct_url. Currently supported schemes:[file].
filesystems= (ListOpt) A list of filesystems that will be configured in thisfile under the sections image_file_url:<list entry name>
glance_api_insecure=False (BoolOpt) Allow to perform insecure SSL (https) requeststo glance
glance_api_servers=$glance_host:$glance_port (ListOpt) A list of the glance api servers available tonova. Prefix with https:// for ssl-based glance api servers.([hostname|ip]:port)
glance_host=$my_ip (StrOpt) default glance hostname or ip
glance_num_retries=0 (IntOpt) Number retries when downloading an imagefrom glance
glance_port=9292 (IntOpt) default glance port
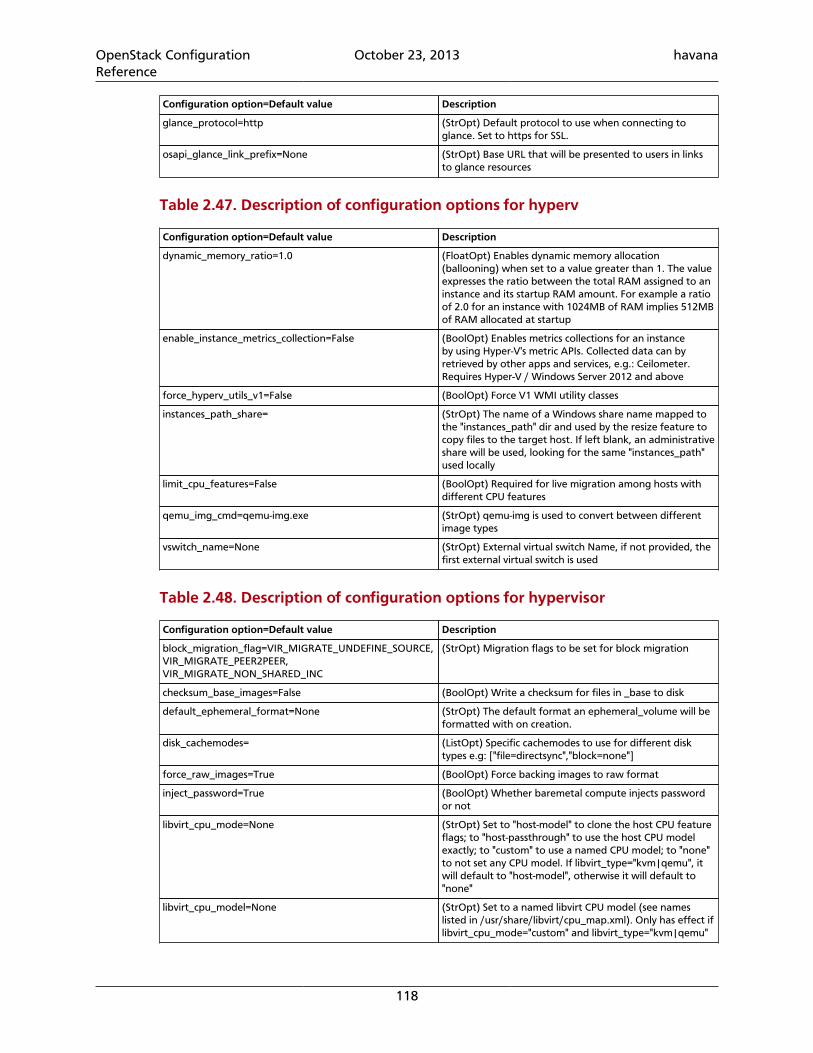
OpenStack ConfigurationReference
October 23, 2013 havana
118
Configuration option=Default value Description
glance_protocol=http (StrOpt) Default protocol to use when connecting toglance. Set to https for SSL.
osapi_glance_link_prefix=None (StrOpt) Base URL that will be presented to users in linksto glance resources
Table 2.47. Description of configuration options for hyperv
Configuration option=Default value Description
dynamic_memory_ratio=1.0 (FloatOpt) Enables dynamic memory allocation(ballooning) when set to a value greater than 1. The valueexpresses the ratio between the total RAM assigned to aninstance and its startup RAM amount. For example a ratioof 2.0 for an instance with 1024MB of RAM implies 512MBof RAM allocated at startup
enable_instance_metrics_collection=False (BoolOpt) Enables metrics collections for an instanceby using Hyper-V's metric APIs. Collected data can byretrieved by other apps and services, e.g.: Ceilometer.Requires Hyper-V / Windows Server 2012 and above
force_hyperv_utils_v1=False (BoolOpt) Force V1 WMI utility classes
instances_path_share= (StrOpt) The name of a Windows share name mapped tothe "instances_path" dir and used by the resize feature tocopy files to the target host. If left blank, an administrativeshare will be used, looking for the same "instances_path"used locally
limit_cpu_features=False (BoolOpt) Required for live migration among hosts withdifferent CPU features
qemu_img_cmd=qemu-img.exe (StrOpt) qemu-img is used to convert between differentimage types
vswitch_name=None (StrOpt) External virtual switch Name, if not provided, thefirst external virtual switch is used
Table 2.48. Description of configuration options for hypervisor
Configuration option=Default value Description
block_migration_flag=VIR_MIGRATE_UNDEFINE_SOURCE,VIR_MIGRATE_PEER2PEER,VIR_MIGRATE_NON_SHARED_INC
(StrOpt) Migration flags to be set for block migration
checksum_base_images=False (BoolOpt) Write a checksum for files in _base to disk
default_ephemeral_format=None (StrOpt) The default format an ephemeral_volume will beformatted with on creation.
disk_cachemodes= (ListOpt) Specific cachemodes to use for different disktypes e.g: ["file=directsync","block=none"]
force_raw_images=True (BoolOpt) Force backing images to raw format
inject_password=True (BoolOpt) Whether baremetal compute injects passwordor not
libvirt_cpu_mode=None (StrOpt) Set to "host-model" to clone the host CPU featureflags; to "host-passthrough" to use the host CPU modelexactly; to "custom" to use a named CPU model; to "none"to not set any CPU model. If libvirt_type="kvm|qemu", itwill default to "host-model", otherwise it will default to"none"
libvirt_cpu_model=None (StrOpt) Set to a named libvirt CPU model (see nameslisted in /usr/share/libvirt/cpu_map.xml). Only has effect iflibvirt_cpu_mode="custom" and libvirt_type="kvm|qemu"
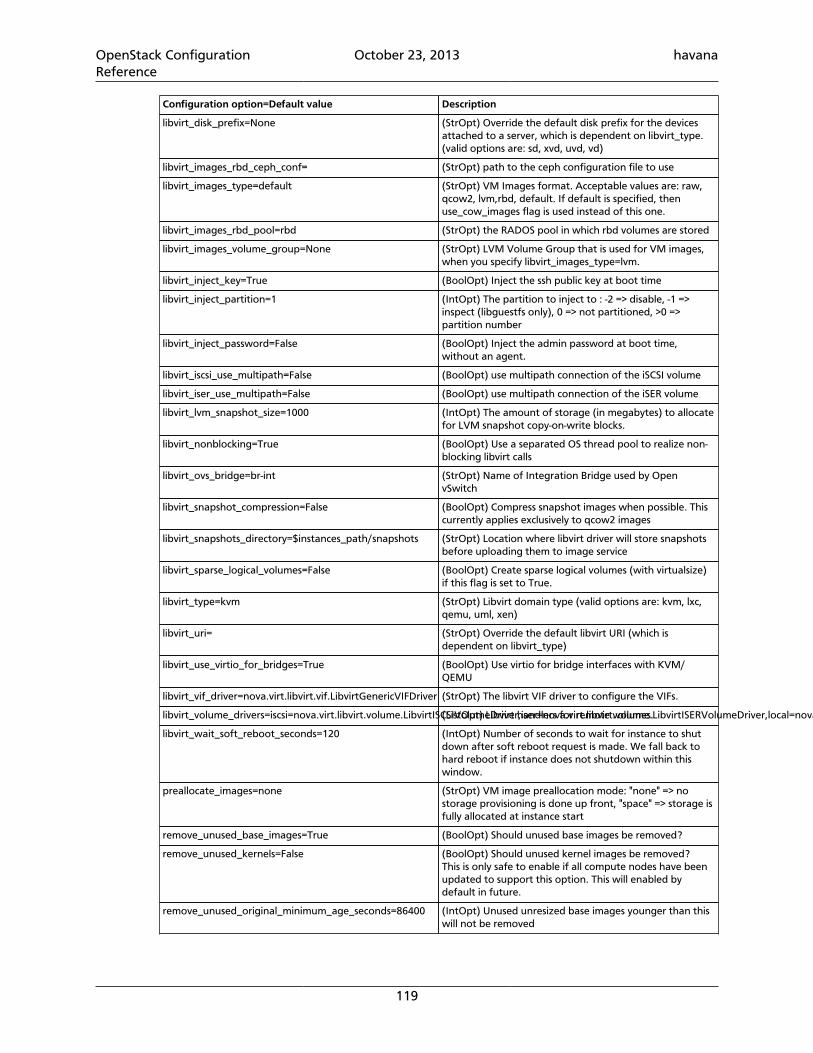
OpenStack ConfigurationReference
October 23, 2013 havana
119
Configuration option=Default value Description
libvirt_disk_prefix=None (StrOpt) Override the default disk prefix for the devicesattached to a server, which is dependent on libvirt_type.(valid options are: sd, xvd, uvd, vd)
libvirt_images_rbd_ceph_conf= (StrOpt) path to the ceph configuration file to use
libvirt_images_type=default (StrOpt) VM Images format. Acceptable values are: raw,qcow2, lvm,rbd, default. If default is specified, thenuse_cow_images flag is used instead of this one.
libvirt_images_rbd_pool=rbd (StrOpt) the RADOS pool in which rbd volumes are stored
libvirt_images_volume_group=None (StrOpt) LVM Volume Group that is used for VM images,when you specify libvirt_images_type=lvm.
libvirt_inject_key=True (BoolOpt) Inject the ssh public key at boot time
libvirt_inject_partition=1 (IntOpt) The partition to inject to : -2 => disable, -1 =>inspect (libguestfs only), 0 => not partitioned, >0 =>partition number
libvirt_inject_password=False (BoolOpt) Inject the admin password at boot time,without an agent.
libvirt_iscsi_use_multipath=False (BoolOpt) use multipath connection of the iSCSI volume
libvirt_iser_use_multipath=False (BoolOpt) use multipath connection of the iSER volume
libvirt_lvm_snapshot_size=1000 (IntOpt) The amount of storage (in megabytes) to allocatefor LVM snapshot copy-on-write blocks.
libvirt_nonblocking=True (BoolOpt) Use a separated OS thread pool to realize non-blocking libvirt calls
libvirt_ovs_bridge=br-int (StrOpt) Name of Integration Bridge used by OpenvSwitch
libvirt_snapshot_compression=False (BoolOpt) Compress snapshot images when possible. Thiscurrently applies exclusively to qcow2 images
libvirt_snapshots_directory=$instances_path/snapshots (StrOpt) Location where libvirt driver will store snapshotsbefore uploading them to image service
libvirt_sparse_logical_volumes=False (BoolOpt) Create sparse logical volumes (with virtualsize)if this flag is set to True.
libvirt_type=kvm (StrOpt) Libvirt domain type (valid options are: kvm, lxc,qemu, uml, xen)
libvirt_uri= (StrOpt) Override the default libvirt URI (which isdependent on libvirt_type)
libvirt_use_virtio_for_bridges=True (BoolOpt) Use virtio for bridge interfaces with KVM/QEMU
libvirt_vif_driver=nova.virt.libvirt.vif.LibvirtGenericVIFDriver (StrOpt) The libvirt VIF driver to configure the VIFs.
libvirt_volume_drivers=iscsi=nova.virt.libvirt.volume.LibvirtISCSIVolumeDriver,iser=nova.virt.libvirt.volume.LibvirtISERVolumeDriver,local=nova.virt.libvirt.volume.LibvirtVolumeDriver,fake=nova.virt.libvirt.volume.LibvirtFakeVolumeDriver,rbd=nova.virt.libvirt.volume.LibvirtNetVolumeDriver,sheepdog=nova.virt.libvirt.volume.LibvirtNetVolumeDriver,nfs=nova.virt.libvirt.volume.LibvirtNFSVolumeDriver,aoe=nova.virt.libvirt.volume.LibvirtAOEVolumeDriver,glusterfs=nova.virt.libvirt.volume.LibvirtGlusterfsVolumeDriver,fibre_channel=nova.virt.libvirt.volume.LibvirtFibreChannelVolumeDriver,scality=nova.virt.libvirt.volume.LibvirtScalityVolumeDriver(ListOpt) Libvirt handlers for remote volumes.
libvirt_wait_soft_reboot_seconds=120 (IntOpt) Number of seconds to wait for instance to shutdown after soft reboot request is made. We fall back tohard reboot if instance does not shutdown within thiswindow.
preallocate_images=none (StrOpt) VM image preallocation mode: "none" => nostorage provisioning is done up front, "space" => storage isfully allocated at instance start
remove_unused_base_images=True (BoolOpt) Should unused base images be removed?
remove_unused_kernels=False (BoolOpt) Should unused kernel images be removed?This is only safe to enable if all compute nodes have beenupdated to support this option. This will enabled bydefault in future.
remove_unused_original_minimum_age_seconds=86400 (IntOpt) Unused unresized base images younger than thiswill not be removed
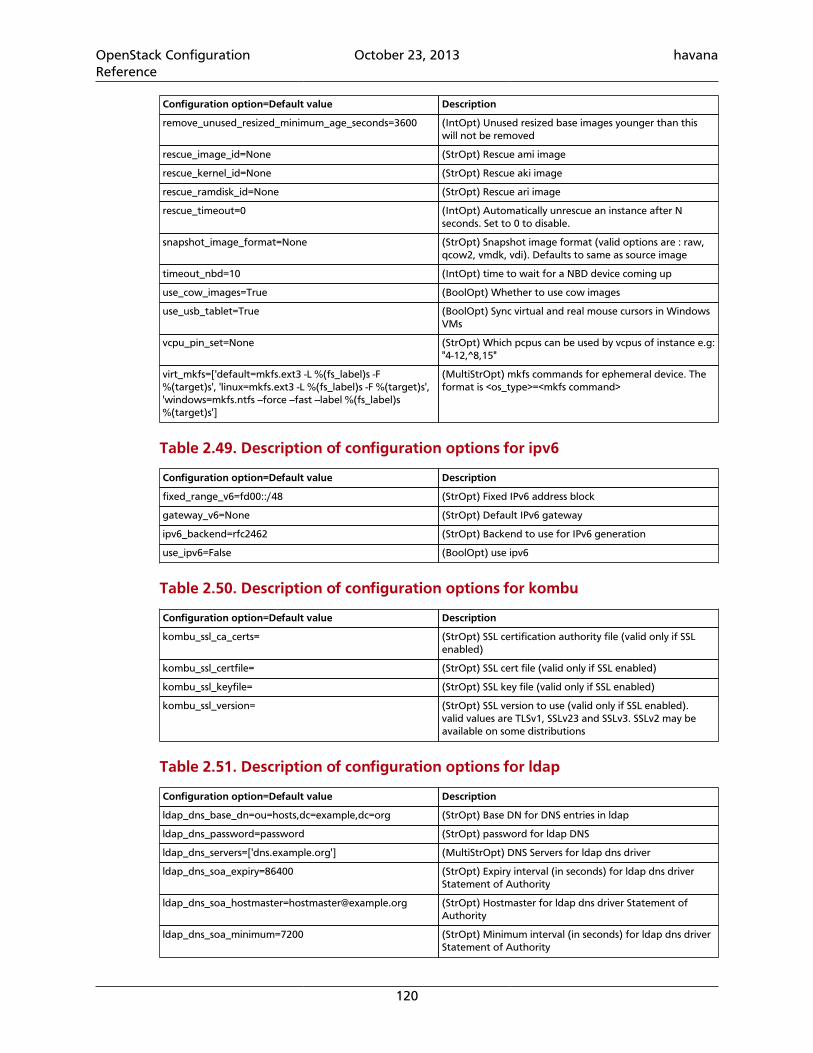
OpenStack ConfigurationReference
October 23, 2013 havana
120
Configuration option=Default value Description
remove_unused_resized_minimum_age_seconds=3600 (IntOpt) Unused resized base images younger than thiswill not be removed
rescue_image_id=None (StrOpt) Rescue ami image
rescue_kernel_id=None (StrOpt) Rescue aki image
rescue_ramdisk_id=None (StrOpt) Rescue ari image
rescue_timeout=0 (IntOpt) Automatically unrescue an instance after Nseconds. Set to 0 to disable.
snapshot_image_format=None (StrOpt) Snapshot image format (valid options are : raw,qcow2, vmdk, vdi). Defaults to same as source image
timeout_nbd=10 (IntOpt) time to wait for a NBD device coming up
use_cow_images=True (BoolOpt) Whether to use cow images
use_usb_tablet=True (BoolOpt) Sync virtual and real mouse cursors in WindowsVMs
vcpu_pin_set=None (StrOpt) Which pcpus can be used by vcpus of instance e.g:"4-12,^8,15"
virt_mkfs=['default=mkfs.ext3 -L %(fs_label)s -F%(target)s', 'linux=mkfs.ext3 -L %(fs_label)s -F %(target)s','windows=mkfs.ntfs --force --fast --label %(fs_label)s%(target)s']
(MultiStrOpt) mkfs commands for ephemeral device. Theformat is <os_type>=<mkfs command>
Table 2.49. Description of configuration options for ipv6
Configuration option=Default value Description
fixed_range_v6=fd00::/48 (StrOpt) Fixed IPv6 address block
gateway_v6=None (StrOpt) Default IPv6 gateway
ipv6_backend=rfc2462 (StrOpt) Backend to use for IPv6 generation
use_ipv6=False (BoolOpt) use ipv6
Table 2.50. Description of configuration options for kombu
Configuration option=Default value Description
kombu_ssl_ca_certs= (StrOpt) SSL certification authority file (valid only if SSLenabled)
kombu_ssl_certfile= (StrOpt) SSL cert file (valid only if SSL enabled)
kombu_ssl_keyfile= (StrOpt) SSL key file (valid only if SSL enabled)
kombu_ssl_version= (StrOpt) SSL version to use (valid only if SSL enabled).valid values are TLSv1, SSLv23 and SSLv3. SSLv2 may beavailable on some distributions
Table 2.51. Description of configuration options for ldap
Configuration option=Default value Description
ldap_dns_base_dn=ou=hosts,dc=example,dc=org (StrOpt) Base DN for DNS entries in ldap
ldap_dns_password=password (StrOpt) password for ldap DNS
ldap_dns_servers=['dns.example.org'] (MultiStrOpt) DNS Servers for ldap dns driver
ldap_dns_soa_expiry=86400 (StrOpt) Expiry interval (in seconds) for ldap dns driverStatement of Authority
[email protected] (StrOpt) Hostmaster for ldap dns driver Statement ofAuthority
ldap_dns_soa_minimum=7200 (StrOpt) Minimum interval (in seconds) for ldap dns driverStatement of Authority
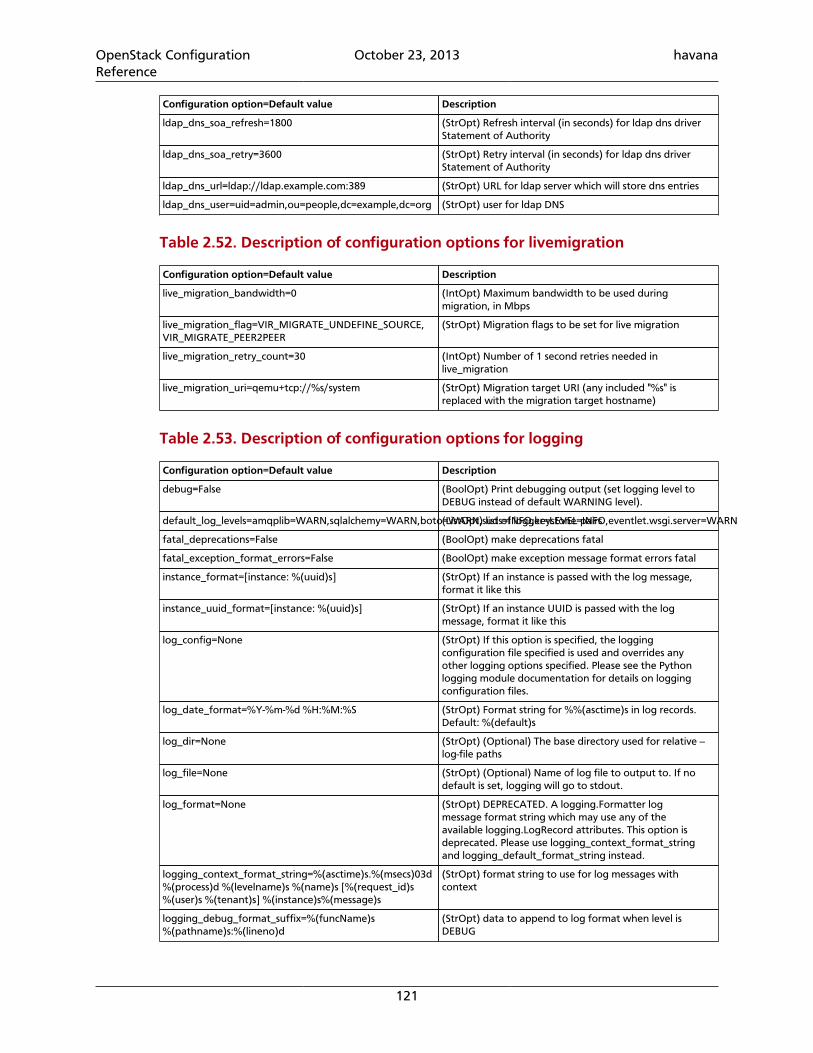
OpenStack ConfigurationReference
October 23, 2013 havana
121
Configuration option=Default value Description
ldap_dns_soa_refresh=1800 (StrOpt) Refresh interval (in seconds) for ldap dns driverStatement of Authority
ldap_dns_soa_retry=3600 (StrOpt) Retry interval (in seconds) for ldap dns driverStatement of Authority
ldap_dns_url=ldap://ldap.example.com:389 (StrOpt) URL for ldap server which will store dns entries
ldap_dns_user=uid=admin,ou=people,dc=example,dc=org (StrOpt) user for ldap DNS
Table 2.52. Description of configuration options for livemigration
Configuration option=Default value Description
live_migration_bandwidth=0 (IntOpt) Maximum bandwidth to be used duringmigration, in Mbps
live_migration_flag=VIR_MIGRATE_UNDEFINE_SOURCE,VIR_MIGRATE_PEER2PEER
(StrOpt) Migration flags to be set for live migration
live_migration_retry_count=30 (IntOpt) Number of 1 second retries needed inlive_migration
live_migration_uri=qemu+tcp://%s/system (StrOpt) Migration target URI (any included "%s" isreplaced with the migration target hostname)
Table 2.53. Description of configuration options for logging
Configuration option=Default value Description
debug=False (BoolOpt) Print debugging output (set logging level toDEBUG instead of default WARNING level).
default_log_levels=amqplib=WARN,sqlalchemy=WARN,boto=WARN,suds=INFO,keystone=INFO,eventlet.wsgi.server=WARN(ListOpt) list of logger=LEVEL pairs
fatal_deprecations=False (BoolOpt) make deprecations fatal
fatal_exception_format_errors=False (BoolOpt) make exception message format errors fatal
instance_format=[instance: %(uuid)s] (StrOpt) If an instance is passed with the log message,format it like this
instance_uuid_format=[instance: %(uuid)s] (StrOpt) If an instance UUID is passed with the logmessage, format it like this
log_config=None (StrOpt) If this option is specified, the loggingconfiguration file specified is used and overrides anyother logging options specified. Please see the Pythonlogging module documentation for details on loggingconfiguration files.
log_date_format=%Y-%m-%d %H:%M:%S (StrOpt) Format string for %%(asctime)s in log records.Default: %(default)s
log_dir=None (StrOpt) (Optional) The base directory used for relative --log-file paths
log_file=None (StrOpt) (Optional) Name of log file to output to. If nodefault is set, logging will go to stdout.
log_format=None (StrOpt) DEPRECATED. A logging.Formatter logmessage format string which may use any of theavailable logging.LogRecord attributes. This option isdeprecated. Please use logging_context_format_stringand logging_default_format_string instead.
logging_context_format_string=%(asctime)s.%(msecs)03d%(process)d %(levelname)s %(name)s [%(request_id)s%(user)s %(tenant)s] %(instance)s%(message)s
(StrOpt) format string to use for log messages withcontext
logging_debug_format_suffix=%(funcName)s%(pathname)s:%(lineno)d
(StrOpt) data to append to log format when level isDEBUG
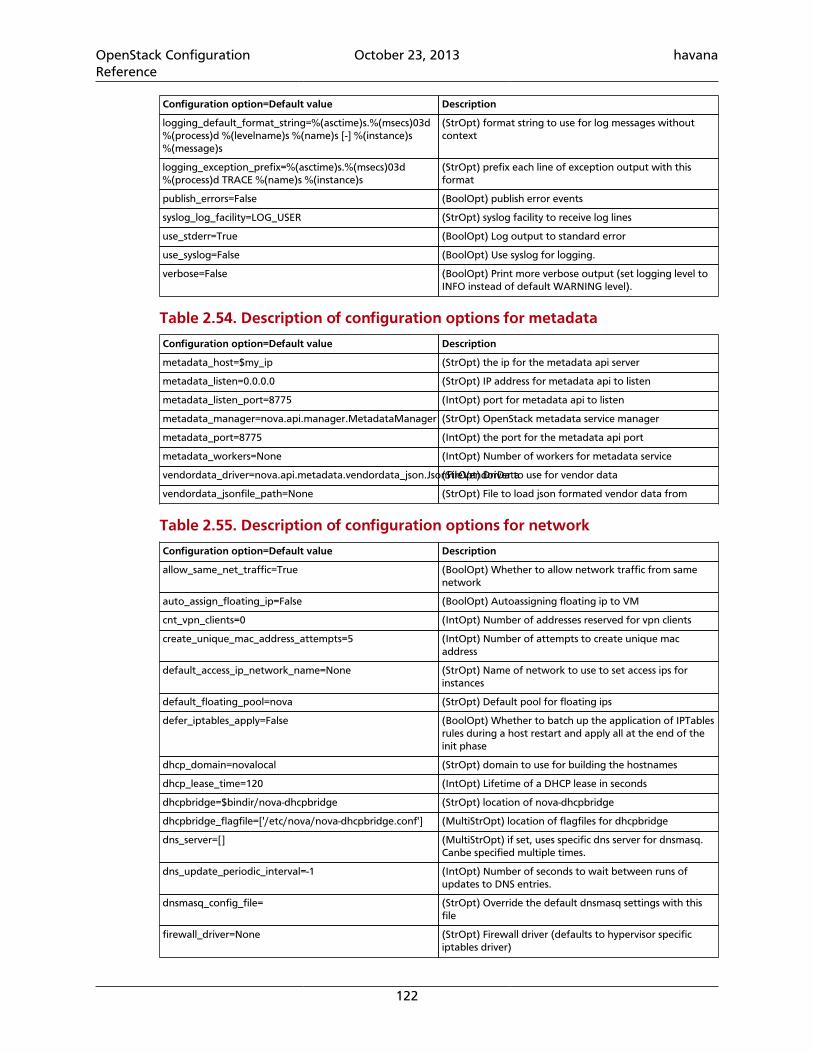
OpenStack ConfigurationReference
October 23, 2013 havana
122
Configuration option=Default value Description
logging_default_format_string=%(asctime)s.%(msecs)03d%(process)d %(levelname)s %(name)s [-] %(instance)s%(message)s
(StrOpt) format string to use for log messages withoutcontext
logging_exception_prefix=%(asctime)s.%(msecs)03d%(process)d TRACE %(name)s %(instance)s
(StrOpt) prefix each line of exception output with thisformat
publish_errors=False (BoolOpt) publish error events
syslog_log_facility=LOG_USER (StrOpt) syslog facility to receive log lines
use_stderr=True (BoolOpt) Log output to standard error
use_syslog=False (BoolOpt) Use syslog for logging.
verbose=False (BoolOpt) Print more verbose output (set logging level toINFO instead of default WARNING level).
Table 2.54. Description of configuration options for metadata
Configuration option=Default value Description
metadata_host=$my_ip (StrOpt) the ip for the metadata api server
metadata_listen=0.0.0.0 (StrOpt) IP address for metadata api to listen
metadata_listen_port=8775 (IntOpt) port for metadata api to listen
metadata_manager=nova.api.manager.MetadataManager (StrOpt) OpenStack metadata service manager
metadata_port=8775 (IntOpt) the port for the metadata api port
metadata_workers=None (IntOpt) Number of workers for metadata service
vendordata_driver=nova.api.metadata.vendordata_json.JsonFileVendorData(StrOpt) Driver to use for vendor data
vendordata_jsonfile_path=None (StrOpt) File to load json formated vendor data from
Table 2.55. Description of configuration options for network
Configuration option=Default value Description
allow_same_net_traffic=True (BoolOpt) Whether to allow network traffic from samenetwork
auto_assign_floating_ip=False (BoolOpt) Autoassigning floating ip to VM
cnt_vpn_clients=0 (IntOpt) Number of addresses reserved for vpn clients
create_unique_mac_address_attempts=5 (IntOpt) Number of attempts to create unique macaddress
default_access_ip_network_name=None (StrOpt) Name of network to use to set access ips forinstances
default_floating_pool=nova (StrOpt) Default pool for floating ips
defer_iptables_apply=False (BoolOpt) Whether to batch up the application of IPTablesrules during a host restart and apply all at the end of theinit phase
dhcp_domain=novalocal (StrOpt) domain to use for building the hostnames
dhcp_lease_time=120 (IntOpt) Lifetime of a DHCP lease in seconds
dhcpbridge=$bindir/nova-dhcpbridge (StrOpt) location of nova-dhcpbridge
dhcpbridge_flagfile=['/etc/nova/nova-dhcpbridge.conf'] (MultiStrOpt) location of flagfiles for dhcpbridge
dns_server=[] (MultiStrOpt) if set, uses specific dns server for dnsmasq.Canbe specified multiple times.
dns_update_periodic_interval=-1 (IntOpt) Number of seconds to wait between runs ofupdates to DNS entries.
dnsmasq_config_file= (StrOpt) Override the default dnsmasq settings with thisfile
firewall_driver=None (StrOpt) Firewall driver (defaults to hypervisor specificiptables driver)
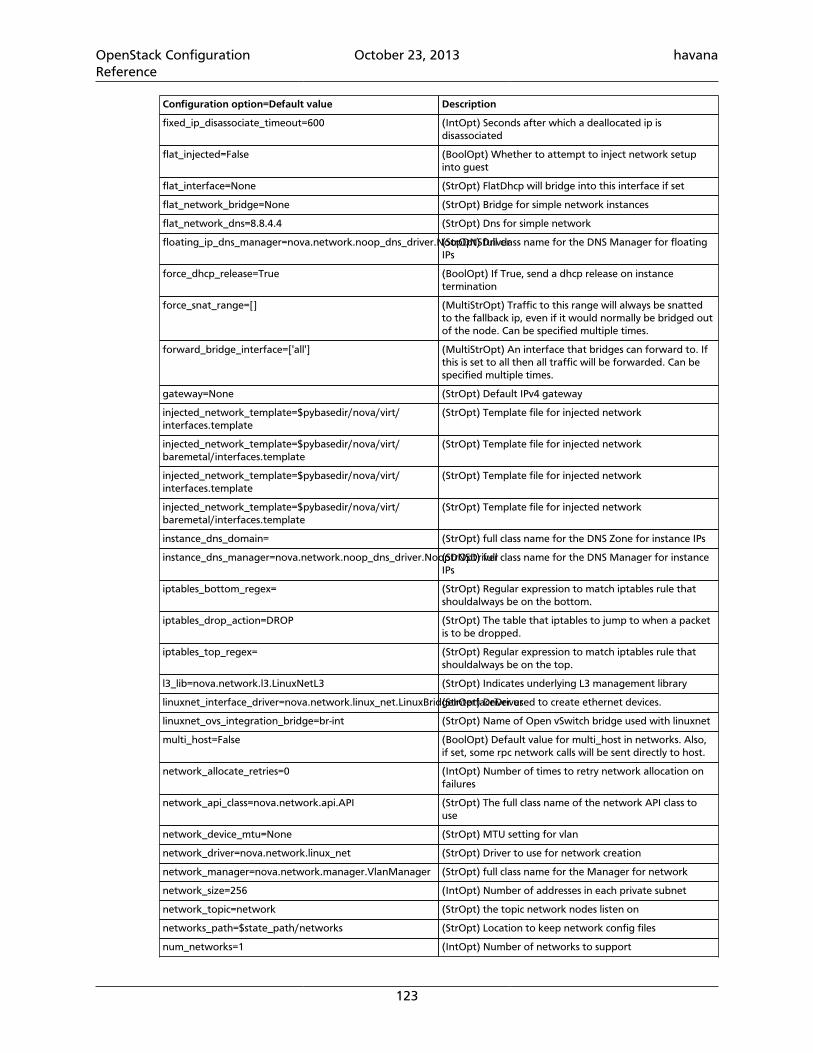
OpenStack ConfigurationReference
October 23, 2013 havana
123
Configuration option=Default value Description
fixed_ip_disassociate_timeout=600 (IntOpt) Seconds after which a deallocated ip isdisassociated
flat_injected=False (BoolOpt) Whether to attempt to inject network setupinto guest
flat_interface=None (StrOpt) FlatDhcp will bridge into this interface if set
flat_network_bridge=None (StrOpt) Bridge for simple network instances
flat_network_dns=8.8.4.4 (StrOpt) Dns for simple network
floating_ip_dns_manager=nova.network.noop_dns_driver.NoopDNSDriver(StrOpt) full class name for the DNS Manager for floatingIPs
force_dhcp_release=True (BoolOpt) If True, send a dhcp release on instancetermination
force_snat_range=[] (MultiStrOpt) Traffic to this range will always be snattedto the fallback ip, even if it would normally be bridged outof the node. Can be specified multiple times.
forward_bridge_interface=['all'] (MultiStrOpt) An interface that bridges can forward to. Ifthis is set to all then all traffic will be forwarded. Can bespecified multiple times.
gateway=None (StrOpt) Default IPv4 gateway
injected_network_template=$pybasedir/nova/virt/interfaces.template
(StrOpt) Template file for injected network
injected_network_template=$pybasedir/nova/virt/baremetal/interfaces.template
(StrOpt) Template file for injected network
injected_network_template=$pybasedir/nova/virt/interfaces.template
(StrOpt) Template file for injected network
injected_network_template=$pybasedir/nova/virt/baremetal/interfaces.template
(StrOpt) Template file for injected network
instance_dns_domain= (StrOpt) full class name for the DNS Zone for instance IPs
instance_dns_manager=nova.network.noop_dns_driver.NoopDNSDriver(StrOpt) full class name for the DNS Manager for instanceIPs
iptables_bottom_regex= (StrOpt) Regular expression to match iptables rule thatshouldalways be on the bottom.
iptables_drop_action=DROP (StrOpt) The table that iptables to jump to when a packetis to be dropped.
iptables_top_regex= (StrOpt) Regular expression to match iptables rule thatshouldalways be on the top.
l3_lib=nova.network.l3.LinuxNetL3 (StrOpt) Indicates underlying L3 management library
linuxnet_interface_driver=nova.network.linux_net.LinuxBridgeInterfaceDriver(StrOpt) Driver used to create ethernet devices.
linuxnet_ovs_integration_bridge=br-int (StrOpt) Name of Open vSwitch bridge used with linuxnet
multi_host=False (BoolOpt) Default value for multi_host in networks. Also,if set, some rpc network calls will be sent directly to host.
network_allocate_retries=0 (IntOpt) Number of times to retry network allocation onfailures
network_api_class=nova.network.api.API (StrOpt) The full class name of the network API class touse
network_device_mtu=None (StrOpt) MTU setting for vlan
network_driver=nova.network.linux_net (StrOpt) Driver to use for network creation
network_manager=nova.network.manager.VlanManager (StrOpt) full class name for the Manager for network
network_size=256 (IntOpt) Number of addresses in each private subnet
network_topic=network (StrOpt) the topic network nodes listen on
networks_path=$state_path/networks (StrOpt) Location to keep network config files
num_networks=1 (IntOpt) Number of networks to support
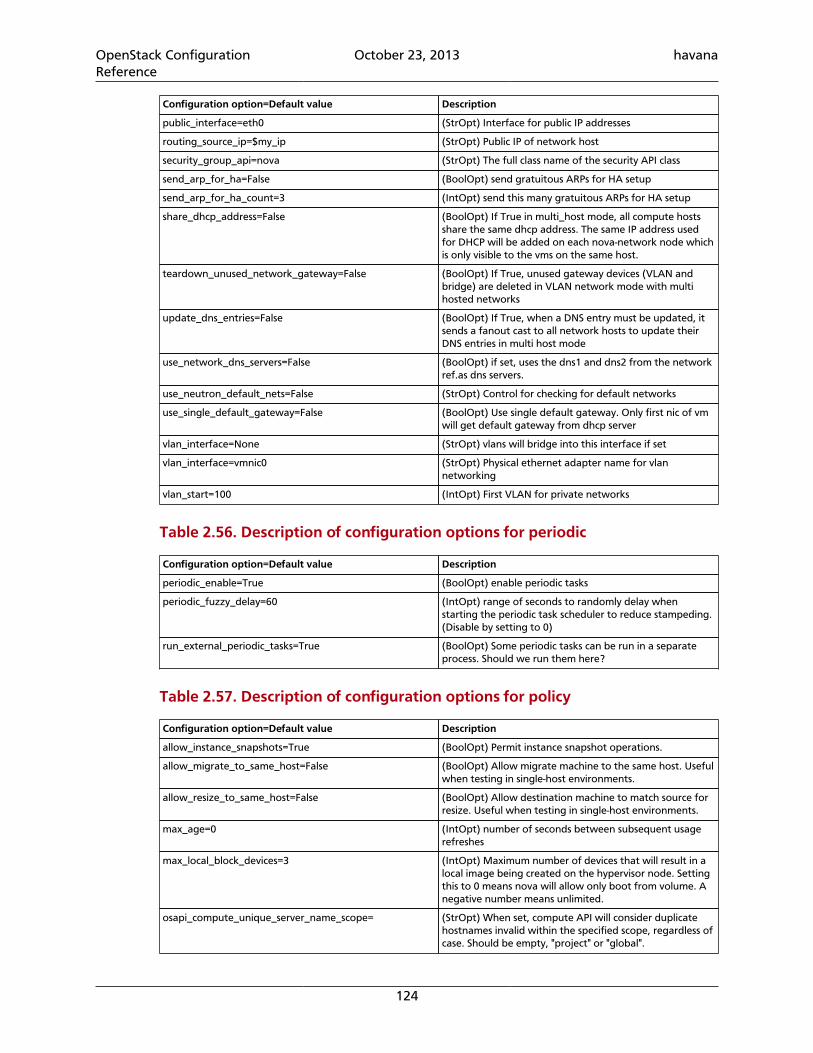
OpenStack ConfigurationReference
October 23, 2013 havana
124
Configuration option=Default value Description
public_interface=eth0 (StrOpt) Interface for public IP addresses
routing_source_ip=$my_ip (StrOpt) Public IP of network host
security_group_api=nova (StrOpt) The full class name of the security API class
send_arp_for_ha=False (BoolOpt) send gratuitous ARPs for HA setup
send_arp_for_ha_count=3 (IntOpt) send this many gratuitous ARPs for HA setup
share_dhcp_address=False (BoolOpt) If True in multi_host mode, all compute hostsshare the same dhcp address. The same IP address usedfor DHCP will be added on each nova-network node whichis only visible to the vms on the same host.
teardown_unused_network_gateway=False (BoolOpt) If True, unused gateway devices (VLAN andbridge) are deleted in VLAN network mode with multihosted networks
update_dns_entries=False (BoolOpt) If True, when a DNS entry must be updated, itsends a fanout cast to all network hosts to update theirDNS entries in multi host mode
use_network_dns_servers=False (BoolOpt) if set, uses the dns1 and dns2 from the networkref.as dns servers.
use_neutron_default_nets=False (StrOpt) Control for checking for default networks
use_single_default_gateway=False (BoolOpt) Use single default gateway. Only first nic of vmwill get default gateway from dhcp server
vlan_interface=None (StrOpt) vlans will bridge into this interface if set
vlan_interface=vmnic0 (StrOpt) Physical ethernet adapter name for vlannetworking
vlan_start=100 (IntOpt) First VLAN for private networks
Table 2.56. Description of configuration options for periodic
Configuration option=Default value Description
periodic_enable=True (BoolOpt) enable periodic tasks
periodic_fuzzy_delay=60 (IntOpt) range of seconds to randomly delay whenstarting the periodic task scheduler to reduce stampeding.(Disable by setting to 0)
run_external_periodic_tasks=True (BoolOpt) Some periodic tasks can be run in a separateprocess. Should we run them here?
Table 2.57. Description of configuration options for policy
Configuration option=Default value Description
allow_instance_snapshots=True (BoolOpt) Permit instance snapshot operations.
allow_migrate_to_same_host=False (BoolOpt) Allow migrate machine to the same host. Usefulwhen testing in single-host environments.
allow_resize_to_same_host=False (BoolOpt) Allow destination machine to match source forresize. Useful when testing in single-host environments.
max_age=0 (IntOpt) number of seconds between subsequent usagerefreshes
max_local_block_devices=3 (IntOpt) Maximum number of devices that will result in alocal image being created on the hypervisor node. Settingthis to 0 means nova will allow only boot from volume. Anegative number means unlimited.
osapi_compute_unique_server_name_scope= (StrOpt) When set, compute API will consider duplicatehostnames invalid within the specified scope, regardless ofcase. Should be empty, "project" or "global".
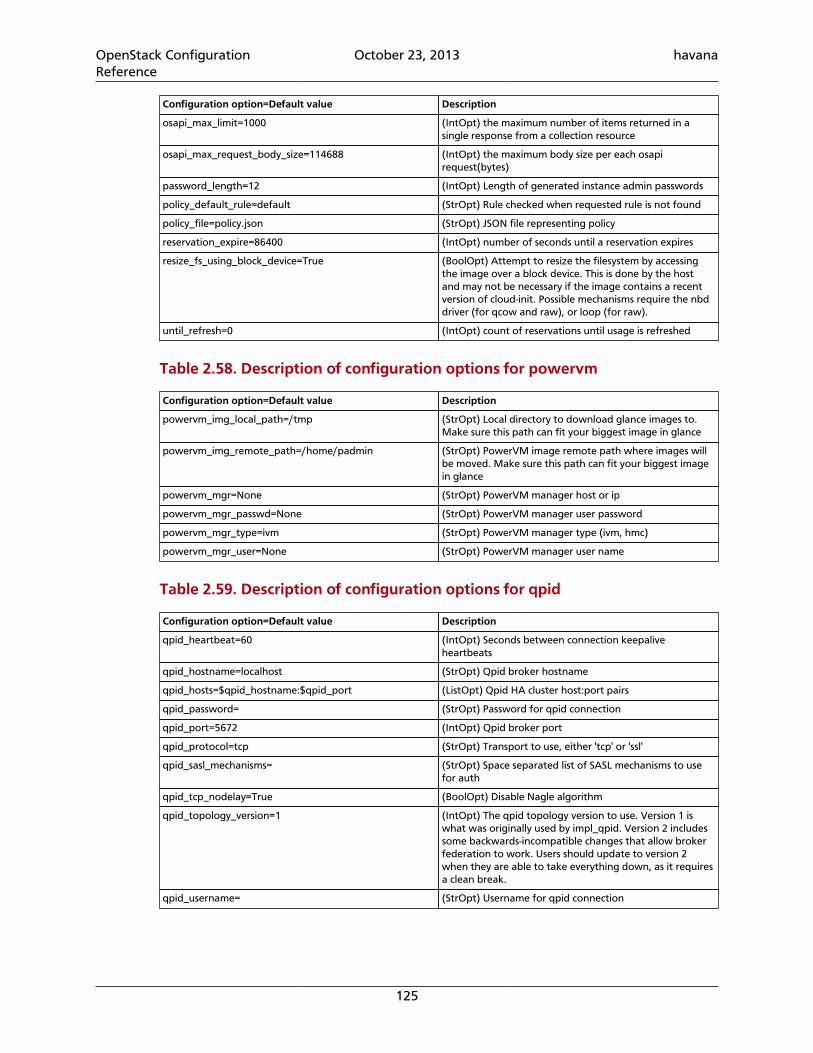
OpenStack ConfigurationReference
October 23, 2013 havana
125
Configuration option=Default value Description
osapi_max_limit=1000 (IntOpt) the maximum number of items returned in asingle response from a collection resource
osapi_max_request_body_size=114688 (IntOpt) the maximum body size per each osapirequest(bytes)
password_length=12 (IntOpt) Length of generated instance admin passwords
policy_default_rule=default (StrOpt) Rule checked when requested rule is not found
policy_file=policy.json (StrOpt) JSON file representing policy
reservation_expire=86400 (IntOpt) number of seconds until a reservation expires
resize_fs_using_block_device=True (BoolOpt) Attempt to resize the filesystem by accessingthe image over a block device. This is done by the hostand may not be necessary if the image contains a recentversion of cloud-init. Possible mechanisms require the nbddriver (for qcow and raw), or loop (for raw).
until_refresh=0 (IntOpt) count of reservations until usage is refreshed
Table 2.58. Description of configuration options for powervm
Configuration option=Default value Description
powervm_img_local_path=/tmp (StrOpt) Local directory to download glance images to.Make sure this path can fit your biggest image in glance
powervm_img_remote_path=/home/padmin (StrOpt) PowerVM image remote path where images willbe moved. Make sure this path can fit your biggest imagein glance
powervm_mgr=None (StrOpt) PowerVM manager host or ip
powervm_mgr_passwd=None (StrOpt) PowerVM manager user password
powervm_mgr_type=ivm (StrOpt) PowerVM manager type (ivm, hmc)
powervm_mgr_user=None (StrOpt) PowerVM manager user name
Table 2.59. Description of configuration options for qpid
Configuration option=Default value Description
qpid_heartbeat=60 (IntOpt) Seconds between connection keepaliveheartbeats
qpid_hostname=localhost (StrOpt) Qpid broker hostname
qpid_hosts=$qpid_hostname:$qpid_port (ListOpt) Qpid HA cluster host:port pairs
qpid_password= (StrOpt) Password for qpid connection
qpid_port=5672 (IntOpt) Qpid broker port
qpid_protocol=tcp (StrOpt) Transport to use, either 'tcp' or 'ssl'
qpid_sasl_mechanisms= (StrOpt) Space separated list of SASL mechanisms to usefor auth
qpid_tcp_nodelay=True (BoolOpt) Disable Nagle algorithm
qpid_topology_version=1 (IntOpt) The qpid topology version to use. Version 1 iswhat was originally used by impl_qpid. Version 2 includessome backwards-incompatible changes that allow brokerfederation to work. Users should update to version 2when they are able to take everything down, as it requiresa clean break.
qpid_username= (StrOpt) Username for qpid connection
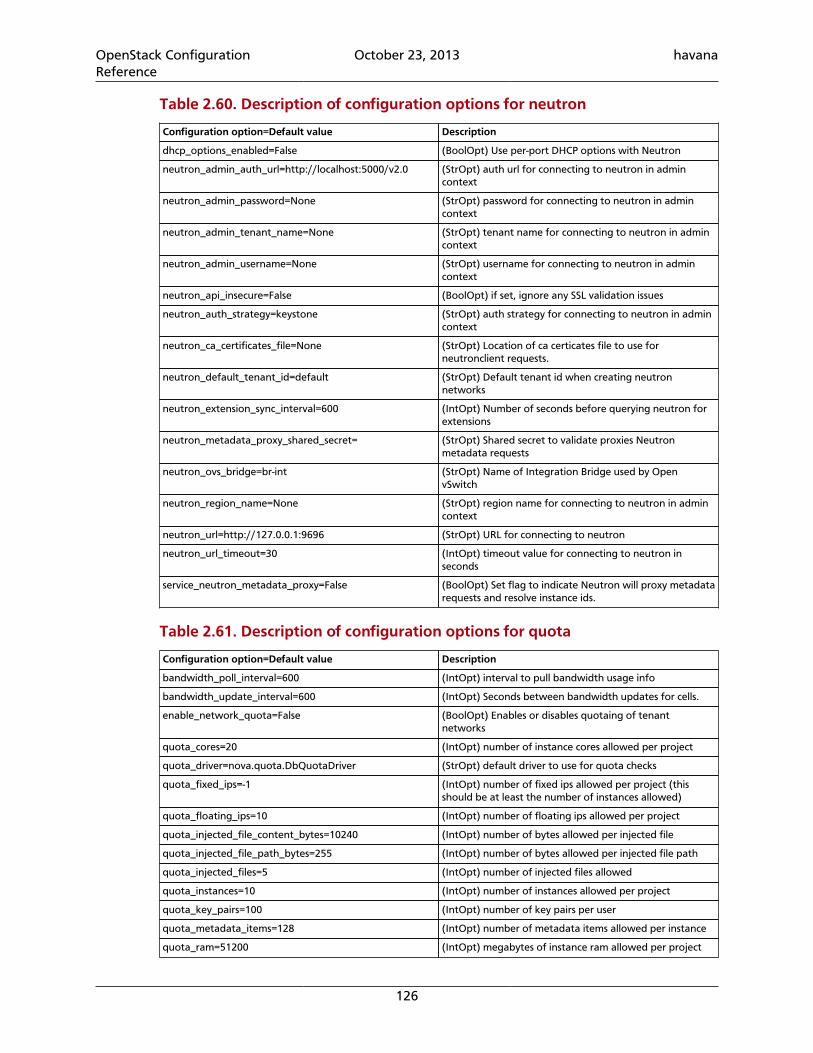
OpenStack ConfigurationReference
October 23, 2013 havana
126
Table 2.60. Description of configuration options for neutron
Configuration option=Default value Description
dhcp_options_enabled=False (BoolOpt) Use per-port DHCP options with Neutron
neutron_admin_auth_url=http://localhost:5000/v2.0 (StrOpt) auth url for connecting to neutron in admincontext
neutron_admin_password=None (StrOpt) password for connecting to neutron in admincontext
neutron_admin_tenant_name=None (StrOpt) tenant name for connecting to neutron in admincontext
neutron_admin_username=None (StrOpt) username for connecting to neutron in admincontext
neutron_api_insecure=False (BoolOpt) if set, ignore any SSL validation issues
neutron_auth_strategy=keystone (StrOpt) auth strategy for connecting to neutron in admincontext
neutron_ca_certificates_file=None (StrOpt) Location of ca certicates file to use forneutronclient requests.
neutron_default_tenant_id=default (StrOpt) Default tenant id when creating neutronnetworks
neutron_extension_sync_interval=600 (IntOpt) Number of seconds before querying neutron forextensions
neutron_metadata_proxy_shared_secret= (StrOpt) Shared secret to validate proxies Neutronmetadata requests
neutron_ovs_bridge=br-int (StrOpt) Name of Integration Bridge used by OpenvSwitch
neutron_region_name=None (StrOpt) region name for connecting to neutron in admincontext
neutron_url=http://127.0.0.1:9696 (StrOpt) URL for connecting to neutron
neutron_url_timeout=30 (IntOpt) timeout value for connecting to neutron inseconds
service_neutron_metadata_proxy=False (BoolOpt) Set flag to indicate Neutron will proxy metadatarequests and resolve instance ids.
Table 2.61. Description of configuration options for quota
Configuration option=Default value Description
bandwidth_poll_interval=600 (IntOpt) interval to pull bandwidth usage info
bandwidth_update_interval=600 (IntOpt) Seconds between bandwidth updates for cells.
enable_network_quota=False (BoolOpt) Enables or disables quotaing of tenantnetworks
quota_cores=20 (IntOpt) number of instance cores allowed per project
quota_driver=nova.quota.DbQuotaDriver (StrOpt) default driver to use for quota checks
quota_fixed_ips=-1 (IntOpt) number of fixed ips allowed per project (thisshould be at least the number of instances allowed)
quota_floating_ips=10 (IntOpt) number of floating ips allowed per project
quota_injected_file_content_bytes=10240 (IntOpt) number of bytes allowed per injected file
quota_injected_file_path_bytes=255 (IntOpt) number of bytes allowed per injected file path
quota_injected_files=5 (IntOpt) number of injected files allowed
quota_instances=10 (IntOpt) number of instances allowed per project
quota_key_pairs=100 (IntOpt) number of key pairs per user
quota_metadata_items=128 (IntOpt) number of metadata items allowed per instance
quota_ram=51200 (IntOpt) megabytes of instance ram allowed per project
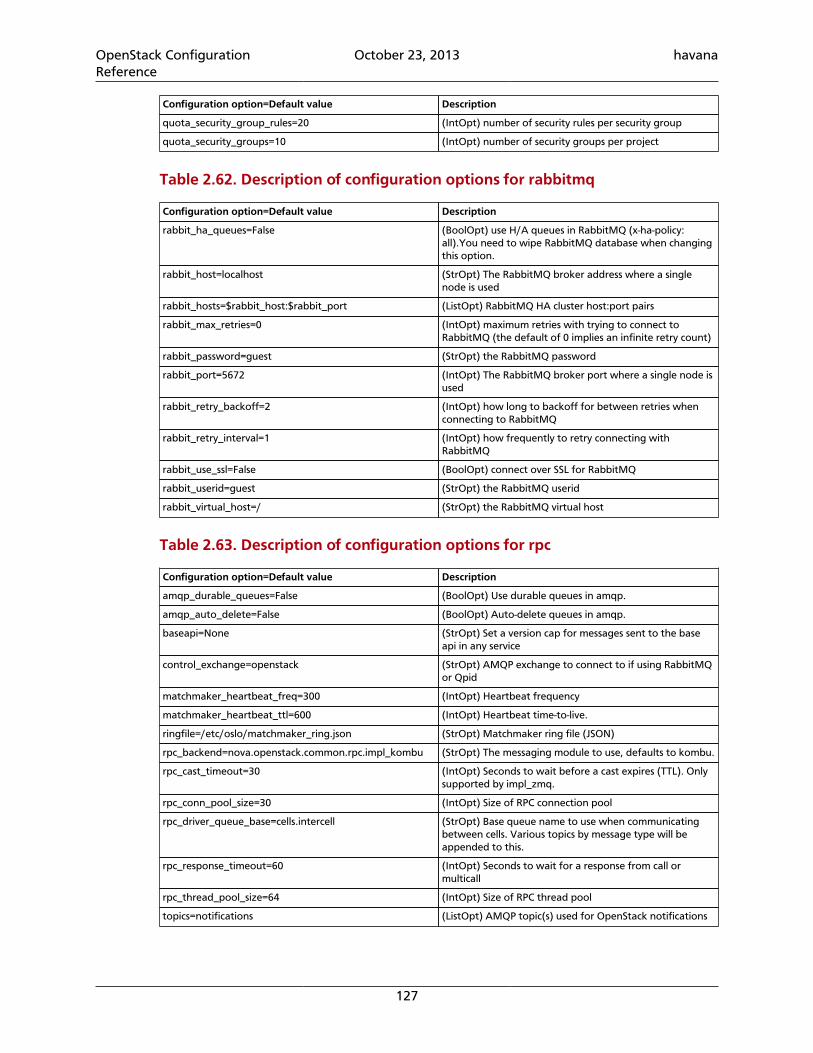
OpenStack ConfigurationReference
October 23, 2013 havana
127
Configuration option=Default value Description
quota_security_group_rules=20 (IntOpt) number of security rules per security group
quota_security_groups=10 (IntOpt) number of security groups per project
Table 2.62. Description of configuration options for rabbitmq
Configuration option=Default value Description
rabbit_ha_queues=False (BoolOpt) use H/A queues in RabbitMQ (x-ha-policy:all).You need to wipe RabbitMQ database when changingthis option.
rabbit_host=localhost (StrOpt) The RabbitMQ broker address where a singlenode is used
rabbit_hosts=$rabbit_host:$rabbit_port (ListOpt) RabbitMQ HA cluster host:port pairs
rabbit_max_retries=0 (IntOpt) maximum retries with trying to connect toRabbitMQ (the default of 0 implies an infinite retry count)
rabbit_password=guest (StrOpt) the RabbitMQ password
rabbit_port=5672 (IntOpt) The RabbitMQ broker port where a single node isused
rabbit_retry_backoff=2 (IntOpt) how long to backoff for between retries whenconnecting to RabbitMQ
rabbit_retry_interval=1 (IntOpt) how frequently to retry connecting withRabbitMQ
rabbit_use_ssl=False (BoolOpt) connect over SSL for RabbitMQ
rabbit_userid=guest (StrOpt) the RabbitMQ userid
rabbit_virtual_host=/ (StrOpt) the RabbitMQ virtual host
Table 2.63. Description of configuration options for rpc
Configuration option=Default value Description
amqp_durable_queues=False (BoolOpt) Use durable queues in amqp.
amqp_auto_delete=False (BoolOpt) Auto-delete queues in amqp.
baseapi=None (StrOpt) Set a version cap for messages sent to the baseapi in any service
control_exchange=openstack (StrOpt) AMQP exchange to connect to if using RabbitMQor Qpid
matchmaker_heartbeat_freq=300 (IntOpt) Heartbeat frequency
matchmaker_heartbeat_ttl=600 (IntOpt) Heartbeat time-to-live.
ringfile=/etc/oslo/matchmaker_ring.json (StrOpt) Matchmaker ring file (JSON)
rpc_backend=nova.openstack.common.rpc.impl_kombu (StrOpt) The messaging module to use, defaults to kombu.
rpc_cast_timeout=30 (IntOpt) Seconds to wait before a cast expires (TTL). Onlysupported by impl_zmq.
rpc_conn_pool_size=30 (IntOpt) Size of RPC connection pool
rpc_driver_queue_base=cells.intercell (StrOpt) Base queue name to use when communicatingbetween cells. Various topics by message type will beappended to this.
rpc_response_timeout=60 (IntOpt) Seconds to wait for a response from call ormulticall
rpc_thread_pool_size=64 (IntOpt) Size of RPC thread pool
topics=notifications (ListOpt) AMQP topic(s) used for OpenStack notifications
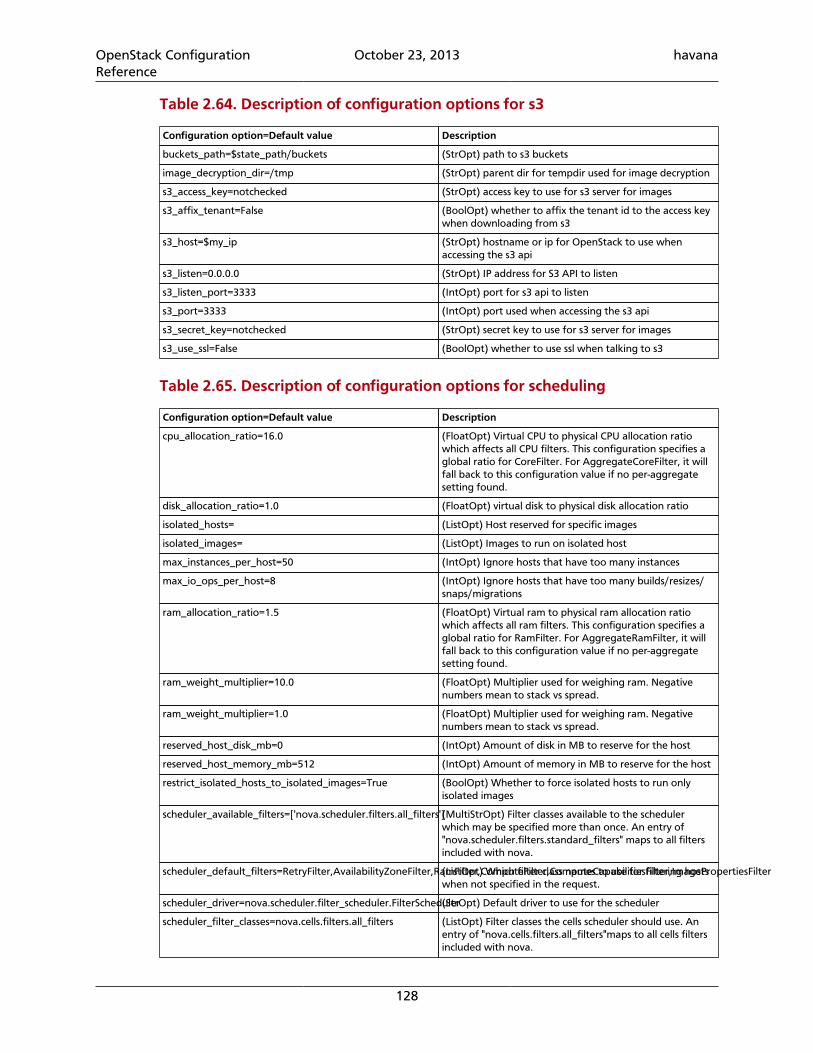
OpenStack ConfigurationReference
October 23, 2013 havana
128
Table 2.64. Description of configuration options for s3
Configuration option=Default value Description
buckets_path=$state_path/buckets (StrOpt) path to s3 buckets
image_decryption_dir=/tmp (StrOpt) parent dir for tempdir used for image decryption
s3_access_key=notchecked (StrOpt) access key to use for s3 server for images
s3_affix_tenant=False (BoolOpt) whether to affix the tenant id to the access keywhen downloading from s3
s3_host=$my_ip (StrOpt) hostname or ip for OpenStack to use whenaccessing the s3 api
s3_listen=0.0.0.0 (StrOpt) IP address for S3 API to listen
s3_listen_port=3333 (IntOpt) port for s3 api to listen
s3_port=3333 (IntOpt) port used when accessing the s3 api
s3_secret_key=notchecked (StrOpt) secret key to use for s3 server for images
s3_use_ssl=False (BoolOpt) whether to use ssl when talking to s3
Table 2.65. Description of configuration options for scheduling
Configuration option=Default value Description
cpu_allocation_ratio=16.0 (FloatOpt) Virtual CPU to physical CPU allocation ratiowhich affects all CPU filters. This configuration specifies aglobal ratio for CoreFilter. For AggregateCoreFilter, it willfall back to this configuration value if no per-aggregatesetting found.
disk_allocation_ratio=1.0 (FloatOpt) virtual disk to physical disk allocation ratio
isolated_hosts= (ListOpt) Host reserved for specific images
isolated_images= (ListOpt) Images to run on isolated host
max_instances_per_host=50 (IntOpt) Ignore hosts that have too many instances
max_io_ops_per_host=8 (IntOpt) Ignore hosts that have too many builds/resizes/snaps/migrations
ram_allocation_ratio=1.5 (FloatOpt) Virtual ram to physical ram allocation ratiowhich affects all ram filters. This configuration specifies aglobal ratio for RamFilter. For AggregateRamFilter, it willfall back to this configuration value if no per-aggregatesetting found.
ram_weight_multiplier=10.0 (FloatOpt) Multiplier used for weighing ram. Negativenumbers mean to stack vs spread.
ram_weight_multiplier=1.0 (FloatOpt) Multiplier used for weighing ram. Negativenumbers mean to stack vs spread.
reserved_host_disk_mb=0 (IntOpt) Amount of disk in MB to reserve for the host
reserved_host_memory_mb=512 (IntOpt) Amount of memory in MB to reserve for the host
restrict_isolated_hosts_to_isolated_images=True (BoolOpt) Whether to force isolated hosts to run onlyisolated images
scheduler_available_filters=['nova.scheduler.filters.all_filters'](MultiStrOpt) Filter classes available to the schedulerwhich may be specified more than once. An entry of"nova.scheduler.filters.standard_filters" maps to all filtersincluded with nova.
scheduler_default_filters=RetryFilter,AvailabilityZoneFilter,RamFilter,ComputeFilter,ComputeCapabilitiesFilter,ImagePropertiesFilter(ListOpt) Which filter class names to use for filtering hostswhen not specified in the request.
scheduler_driver=nova.scheduler.filter_scheduler.FilterScheduler(StrOpt) Default driver to use for the scheduler
scheduler_filter_classes=nova.cells.filters.all_filters (ListOpt) Filter classes the cells scheduler should use. Anentry of "nova.cells.filters.all_filters"maps to all cells filtersincluded with nova.
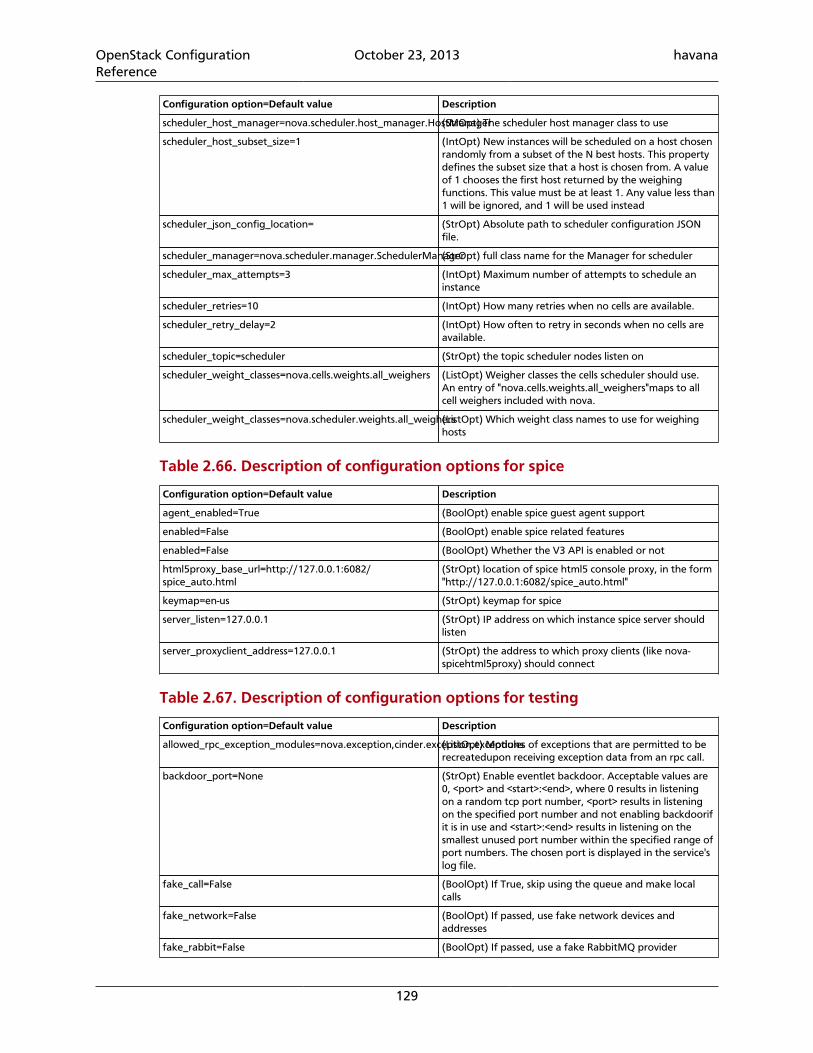
OpenStack ConfigurationReference
October 23, 2013 havana
129
Configuration option=Default value Description
scheduler_host_manager=nova.scheduler.host_manager.HostManager(StrOpt) The scheduler host manager class to use
scheduler_host_subset_size=1 (IntOpt) New instances will be scheduled on a host chosenrandomly from a subset of the N best hosts. This propertydefines the subset size that a host is chosen from. A valueof 1 chooses the first host returned by the weighingfunctions. This value must be at least 1. Any value less than1 will be ignored, and 1 will be used instead
scheduler_json_config_location= (StrOpt) Absolute path to scheduler configuration JSONfile.
scheduler_manager=nova.scheduler.manager.SchedulerManager(StrOpt) full class name for the Manager for scheduler
scheduler_max_attempts=3 (IntOpt) Maximum number of attempts to schedule aninstance
scheduler_retries=10 (IntOpt) How many retries when no cells are available.
scheduler_retry_delay=2 (IntOpt) How often to retry in seconds when no cells areavailable.
scheduler_topic=scheduler (StrOpt) the topic scheduler nodes listen on
scheduler_weight_classes=nova.cells.weights.all_weighers (ListOpt) Weigher classes the cells scheduler should use.An entry of "nova.cells.weights.all_weighers"maps to allcell weighers included with nova.
scheduler_weight_classes=nova.scheduler.weights.all_weighers(ListOpt) Which weight class names to use for weighinghosts
Table 2.66. Description of configuration options for spice
Configuration option=Default value Description
agent_enabled=True (BoolOpt) enable spice guest agent support
enabled=False (BoolOpt) enable spice related features
enabled=False (BoolOpt) Whether the V3 API is enabled or not
html5proxy_base_url=http://127.0.0.1:6082/spice_auto.html
(StrOpt) location of spice html5 console proxy, in the form"http://127.0.0.1:6082/spice_auto.html"
keymap=en-us (StrOpt) keymap for spice
server_listen=127.0.0.1 (StrOpt) IP address on which instance spice server shouldlisten
server_proxyclient_address=127.0.0.1 (StrOpt) the address to which proxy clients (like nova-spicehtml5proxy) should connect
Table 2.67. Description of configuration options for testing
Configuration option=Default value Description
allowed_rpc_exception_modules=nova.exception,cinder.exception,exceptions(ListOpt) Modules of exceptions that are permitted to berecreatedupon receiving exception data from an rpc call.
backdoor_port=None (StrOpt) Enable eventlet backdoor. Acceptable values are0, <port> and <start>:<end>, where 0 results in listeningon a random tcp port number, <port> results in listeningon the specified port number and not enabling backdoorifit is in use and <start>:<end> results in listening on thesmallest unused port number within the specified range ofport numbers. The chosen port is displayed in the service'slog file.
fake_call=False (BoolOpt) If True, skip using the queue and make localcalls
fake_network=False (BoolOpt) If passed, use fake network devices andaddresses
fake_rabbit=False (BoolOpt) If passed, use a fake RabbitMQ provider
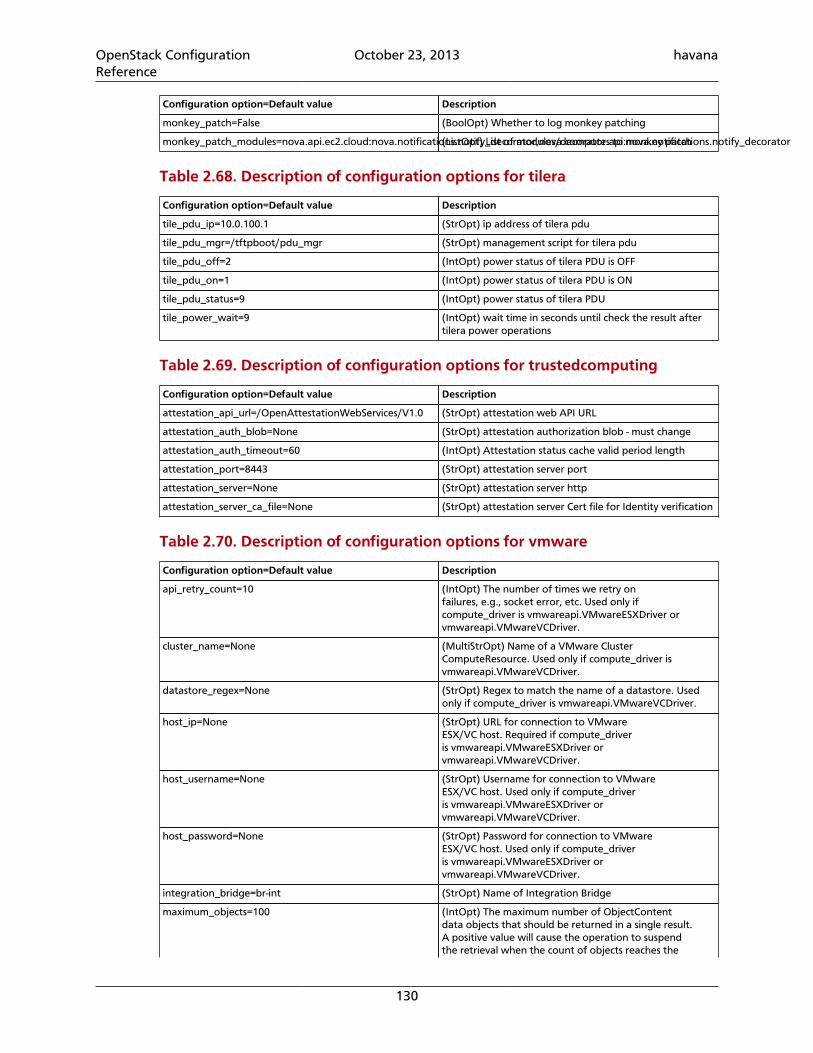
OpenStack ConfigurationReference
October 23, 2013 havana
130
Configuration option=Default value Description
monkey_patch=False (BoolOpt) Whether to log monkey patching
monkey_patch_modules=nova.api.ec2.cloud:nova.notifications.notify_decorator,nova.compute.api:nova.notifications.notify_decorator(ListOpt) List of modules/decorators to monkey patch
Table 2.68. Description of configuration options for tilera
Configuration option=Default value Description
tile_pdu_ip=10.0.100.1 (StrOpt) ip address of tilera pdu
tile_pdu_mgr=/tftpboot/pdu_mgr (StrOpt) management script for tilera pdu
tile_pdu_off=2 (IntOpt) power status of tilera PDU is OFF
tile_pdu_on=1 (IntOpt) power status of tilera PDU is ON
tile_pdu_status=9 (IntOpt) power status of tilera PDU
tile_power_wait=9 (IntOpt) wait time in seconds until check the result aftertilera power operations
Table 2.69. Description of configuration options for trustedcomputing
Configuration option=Default value Description
attestation_api_url=/OpenAttestationWebServices/V1.0 (StrOpt) attestation web API URL
attestation_auth_blob=None (StrOpt) attestation authorization blob - must change
attestation_auth_timeout=60 (IntOpt) Attestation status cache valid period length
attestation_port=8443 (StrOpt) attestation server port
attestation_server=None (StrOpt) attestation server http
attestation_server_ca_file=None (StrOpt) attestation server Cert file for Identity verification
Table 2.70. Description of configuration options for vmware
Configuration option=Default value Description
api_retry_count=10 (IntOpt) The number of times we retry onfailures, e.g., socket error, etc. Used only ifcompute_driver is vmwareapi.VMwareESXDriver orvmwareapi.VMwareVCDriver.
cluster_name=None (MultiStrOpt) Name of a VMware ClusterComputeResource. Used only if compute_driver isvmwareapi.VMwareVCDriver.
datastore_regex=None (StrOpt) Regex to match the name of a datastore. Usedonly if compute_driver is vmwareapi.VMwareVCDriver.
host_ip=None (StrOpt) URL for connection to VMwareESX/VC host. Required if compute_driveris vmwareapi.VMwareESXDriver orvmwareapi.VMwareVCDriver.
host_username=None (StrOpt) Username for connection to VMwareESX/VC host. Used only if compute_driveris vmwareapi.VMwareESXDriver orvmwareapi.VMwareVCDriver.
host_password=None (StrOpt) Password for connection to VMwareESX/VC host. Used only if compute_driveris vmwareapi.VMwareESXDriver orvmwareapi.VMwareVCDriver.
integration_bridge=br-int (StrOpt) Name of Integration Bridge
maximum_objects=100 (IntOpt) The maximum number of ObjectContentdata objects that should be returned in a single result.A positive value will cause the operation to suspendthe retrieval when the count of objects reaches the

OpenStack ConfigurationReference
October 23, 2013 havana
131
Configuration option=Default value Description
specified maximum. The server may still limit the count tosomething less than the configured value. Any remainingobjects may be retrieved with additional requests.
task_poll_interval=5.0 (FloatOpt) The interval used for polling ofremote tasks. Used only if compute_driveris vmwareapi.VMwareESXDriver orvmwareapi.VMwareVCDriver.
use_linked_clone=True (BoolOpt) Whether to use linked clone
wsdl_location=None (StrOpt) Optional VIM Service WSDL Location e.g http://<server>/vimService.wsdl. Optional over-ride to defaultlocation for bug work-arounds
Table 2.71. Description of configuration options for vnc
Configuration option=Default value Description
novncproxy_base_url=http://127.0.0.1:6080/vnc_auto.html
(StrOpt) location of vnc console proxy, in the form"http://127.0.0.1:6080/vnc_auto.html"
vnc_enabled=True (BoolOpt) enable vnc related features
vnc_keymap=en-us (StrOpt) keymap for vnc
vnc_password=None (StrOpt) VNC password
vnc_port=5900 (IntOpt) VNC starting port
vnc_port_total=10000 (IntOpt) Total number of VNC ports
vncserver_listen=127.0.0.1 (StrOpt) IP address on which instance vncservers shouldlisten
vncserver_proxyclient_address=127.0.0.1 (StrOpt) the address to which proxy clients (like nova-xvpvncproxy) should connect
Table 2.72. Description of configuration options for volumes
Configuration option=Default value Description
block_device_creation_timeout=10 (IntOpt) Time to wait for a block device to be created
cinder_api_insecure=False (BoolOpt) Allow to perform insecure SSL requests tocinder
cinder_ca_certificates_file=None (StrOpt) Location of ca certicates file to use for cinderclient requests.
cinder_catalog_info=volume:cinder:publicURL (StrOpt) Info to match when looking for cinder in theservice catalog. Format is : separated values of the form:<service_type>:<service_name>:<endpoint_type>
cinder_cross_az_attach=True (BoolOpt) Allow attach between instance and volume indifferent availability zones.
cinder_endpoint_template=None (StrOpt) Override service catalog lookup with templatefor cinder endpoint e.g. http://localhost:8776/v1/%(project_id)s
cinder_http_retries=3 (IntOpt) Number of cinderclient retries on failed http calls
force_volumeutils_v1=False (BoolOpt) Force V1 volume utility class
glusterfs_mount_point_base=$state_path/mnt (StrOpt) Dir where the glusterfs volume is mounted on thecompute node
iscsi_iqn_prefix=iqn.2010-10.org.openstack.baremetal (StrOpt) iSCSI IQN prefix used in baremetal volumeconnections.
nfs_mount_options=None (StrOpt) Mount options passed to the nfs client. Seesection of the nfs man page for details
nfs_mount_point_base=$state_path/mnt (StrOpt) Dir where the nfs volume is mounted on thecompute node

OpenStack ConfigurationReference
October 23, 2013 havana
132
Configuration option=Default value Description
num_aoe_discover_tries=3 (IntOpt) number of times to rediscover AoE target to findvolume
num_iscsi_scan_tries=3 (IntOpt) number of times to rescan iSCSI target to findvolume
num_iser_scan_tries=3 (IntOpt) number of times to rescan iSER target to findvolume
os_region_name=None (StrOpt) region name of this node
qemu_allowed_storage_drivers= (ListOpt) Protocols listed here will be accessed directlyfrom QEMU. Currently supported protocols: [gluster]
rbd_secret_uuid=None (StrOpt) the libvirt uuid of the secret for therbd_uservolumes
rbd_user=None (StrOpt) the RADOS client name for accessing rbd volumes
scality_sofs_config=None (StrOpt) Path or URL to Scality SOFS configuration file
scality_sofs_mount_point=$state_path/scality (StrOpt) Base dir where Scality SOFS shall be mounted
volume_api_class=nova.volume.cinder.API (StrOpt) The full class name of the volume API class to use
volume_attach_retry_count=10 (IntOpt) The number of times to retry to attach a volume
volume_attach_retry_interval=5 (IntOpt) Interval between volume attachment attempts, inseconds
volume_driver=nova.virt.baremetal.volume_driver.LibvirtVolumeDriver(StrOpt) Baremetal volume driver.
volume_usage_poll_interval=0 (IntOpt) Interval in seconds for gathering volume usages
Table 2.73. Description of configuration options for vpn
Configuration option=Default value Description
boot_script_template=$pybasedir/nova/cloudpipe/bootscript.template
(StrOpt) Template for cloudpipe instance boot script
dmz_cidr= (ListOpt) A list of dmz range that should be accepted
dmz_mask=255.255.255.0 (StrOpt) Netmask to push into openvpn config
dmz_net=10.0.0.0 (StrOpt) Network to push into openvpn config
vpn_flavor=m1.tiny (StrOpt) Flavor for vpn instances
vpn_image_id=0 (StrOpt) image id used when starting up a cloudpipe vpnserver
vpn_ip=$my_ip (StrOpt) Public IP for the cloudpipe VPN servers
vpn_key_suffix=-vpn (StrOpt) Suffix to add to project name for vpn key andsecgroups
vpn_start=1000 (IntOpt) First Vpn port for private networks
Table 2.74. Description of configuration options for wsgi
Configuration option=Default value Description
api_paste_config=api-paste.ini (StrOpt) File name for the paste.deploy config for nova-api
ssl_ca_file=None (StrOpt) CA certificate file to use to verify connectingclients
ssl_cert_file=None (StrOpt) SSL certificate of API server
ssl_key_file=None (StrOpt) SSL private key of API server
tcp_keepidle=600 (IntOpt) Sets the value of TCP_KEEPIDLE in seconds foreach server socket. Not supported on OS X.
wsgi_log_format=%(client_ip)s "%(request_line)s"status: %(status_code)s len: %(body_length)s time:%(wall_seconds).7f
(StrOpt) A python format string that is used as thetemplate to generate log lines. The following values can

OpenStack ConfigurationReference
October 23, 2013 havana
133
Configuration option=Default value Description
be formatted into it: client_ip, date_time, request_line,status_code, body_length, wall_seconds.
Table 2.75. Description of configuration options for xen
Configuration option=Default value Description
agent_resetnetwork_timeout=60 (IntOpt) number of seconds to wait for agent reply toresetnetwork request
agent_timeout=30 (IntOpt) number of seconds to wait for agent reply
agent_version_timeout=300 (IntOpt) number of seconds to wait for agent to be fullyoperational
cache_images=all (StrOpt) Cache glance images locally. `all` will cache allimages, `some` will only cache images that have theimage_property `cache_in_nova=True`, and `none` turnsoff caching entirely
console_driver=nova.console.xvp.XVPConsoleProxy (StrOpt) Driver to use for the console proxy
console_vmrc_error_retries=10 (IntOpt) number of retries for retrieving VMRCinformation
console_vmrc_port=443 (IntOpt) port for VMware VMRC connections
console_xvp_conf=/etc/xvp.conf (StrOpt) generated XVP conf file
console_xvp_conf_template=$pybasedir/nova/console/xvp.conf.template
(StrOpt) XVP conf template
console_xvp_log=/var/log/xvp.log (StrOpt) XVP log file
console_xvp_multiplex_port=5900 (IntOpt) port for XVP to multiplex VNC connections on
console_xvp_pid=/var/run/xvp.pid (StrOpt) XVP master process pid file
default_os_type=linux (StrOpt) Default OS type
iqn_prefix=iqn.2010-10.org.openstack (StrOpt) IQN Prefix
max_kernel_ramdisk_size=16777216 (IntOpt) Maximum size in bytes of kernel or ramdiskimages
sr_matching_filter=default-sr:true (StrOpt) Filter for finding the SR to be used to installguest instances on. To use the Local Storage in defaultXenServer/XCP installations set this flag to other-config:i18n-key=local-storage. To select an SR with adifferent matching criteria, you could set it to other-config:my_favorite_sr=true. On the other hand, to fallback on the Default SR, as displayed by XenCenter, set thisflag to: default-sr:true
stub_compute=False (BoolOpt) Stub calls to compute worker for tests
target_host=None (StrOpt) iSCSI Target Host
target_port=3260 (StrOpt) iSCSI Target Port, 3260 Default
use_join_force=True (BoolOpt) To use for hosts with different CPUs
xen_hvmloader_path=/usr/lib/xen/boot/hvmloader (StrOpt) Location where the Xen hvmloader is kept
xenapi_agent_path=usr/sbin/xe-update-networking (StrOpt) Specifies the path in which the xenapi guestagent should be located. If the agent is present,network configuration is not injected into the image.Used if compute_driver=xenapi.XenAPIDriver andflat_injected=True
xenapi_check_host=True (BoolOpt) Ensure compute service is running on hostXenAPI connects to.
xenapi_connection_concurrent=5 (IntOpt) Maximum number of concurrentXenAPI connections. Used only ifcompute_driver=xenapi.XenAPIDriver
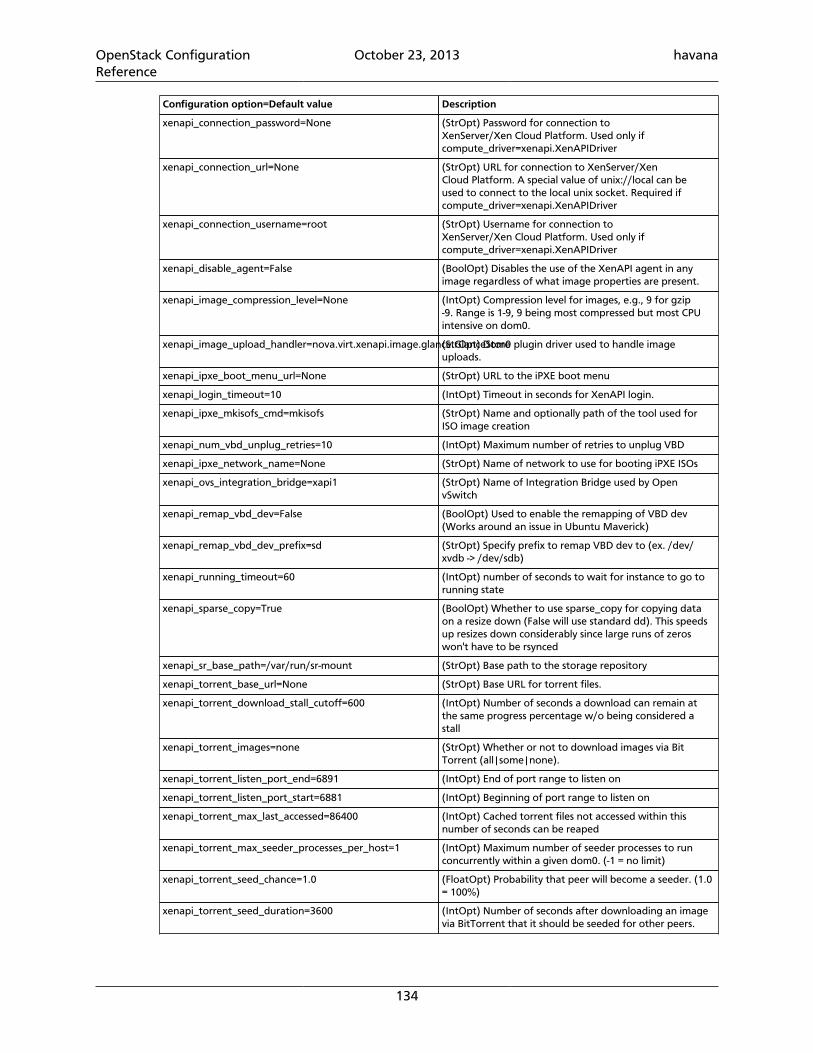
OpenStack ConfigurationReference
October 23, 2013 havana
134
Configuration option=Default value Description
xenapi_connection_password=None (StrOpt) Password for connection toXenServer/Xen Cloud Platform. Used only ifcompute_driver=xenapi.XenAPIDriver
xenapi_connection_url=None (StrOpt) URL for connection to XenServer/XenCloud Platform. A special value of unix://local can beused to connect to the local unix socket. Required ifcompute_driver=xenapi.XenAPIDriver
xenapi_connection_username=root (StrOpt) Username for connection toXenServer/Xen Cloud Platform. Used only ifcompute_driver=xenapi.XenAPIDriver
xenapi_disable_agent=False (BoolOpt) Disables the use of the XenAPI agent in anyimage regardless of what image properties are present.
xenapi_image_compression_level=None (IntOpt) Compression level for images, e.g., 9 for gzip-9. Range is 1-9, 9 being most compressed but most CPUintensive on dom0.
xenapi_image_upload_handler=nova.virt.xenapi.image.glance.GlanceStore(StrOpt) Dom0 plugin driver used to handle imageuploads.
xenapi_ipxe_boot_menu_url=None (StrOpt) URL to the iPXE boot menu
xenapi_login_timeout=10 (IntOpt) Timeout in seconds for XenAPI login.
xenapi_ipxe_mkisofs_cmd=mkisofs (StrOpt) Name and optionally path of the tool used forISO image creation
xenapi_num_vbd_unplug_retries=10 (IntOpt) Maximum number of retries to unplug VBD
xenapi_ipxe_network_name=None (StrOpt) Name of network to use for booting iPXE ISOs
xenapi_ovs_integration_bridge=xapi1 (StrOpt) Name of Integration Bridge used by OpenvSwitch
xenapi_remap_vbd_dev=False (BoolOpt) Used to enable the remapping of VBD dev(Works around an issue in Ubuntu Maverick)
xenapi_remap_vbd_dev_prefix=sd (StrOpt) Specify prefix to remap VBD dev to (ex. /dev/xvdb -> /dev/sdb)
xenapi_running_timeout=60 (IntOpt) number of seconds to wait for instance to go torunning state
xenapi_sparse_copy=True (BoolOpt) Whether to use sparse_copy for copying dataon a resize down (False will use standard dd). This speedsup resizes down considerably since large runs of zeroswon't have to be rsynced
xenapi_sr_base_path=/var/run/sr-mount (StrOpt) Base path to the storage repository
xenapi_torrent_base_url=None (StrOpt) Base URL for torrent files.
xenapi_torrent_download_stall_cutoff=600 (IntOpt) Number of seconds a download can remain atthe same progress percentage w/o being considered astall
xenapi_torrent_images=none (StrOpt) Whether or not to download images via BitTorrent (all|some|none).
xenapi_torrent_listen_port_end=6891 (IntOpt) End of port range to listen on
xenapi_torrent_listen_port_start=6881 (IntOpt) Beginning of port range to listen on
xenapi_torrent_max_last_accessed=86400 (IntOpt) Cached torrent files not accessed within thisnumber of seconds can be reaped
xenapi_torrent_max_seeder_processes_per_host=1 (IntOpt) Maximum number of seeder processes to runconcurrently within a given dom0. (-1 = no limit)
xenapi_torrent_seed_chance=1.0 (FloatOpt) Probability that peer will become a seeder. (1.0= 100%)
xenapi_torrent_seed_duration=3600 (IntOpt) Number of seconds after downloading an imagevia BitTorrent that it should be seeded for other peers.
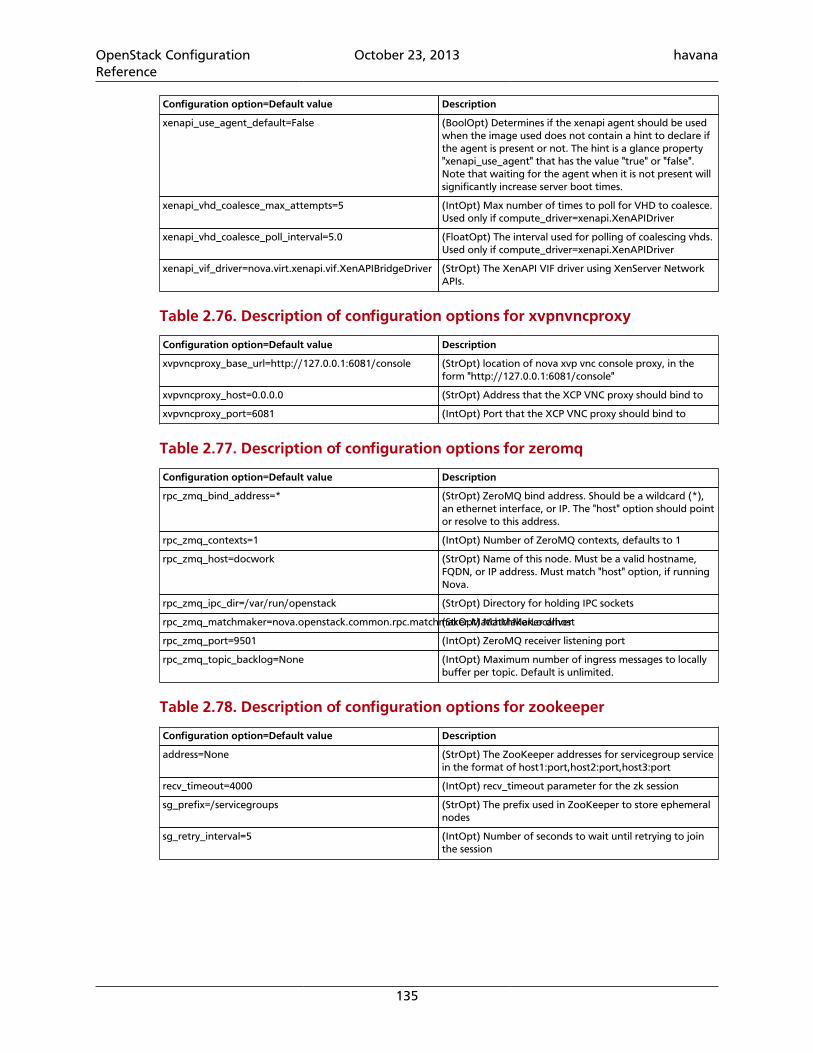
OpenStack ConfigurationReference
October 23, 2013 havana
135
Configuration option=Default value Description
xenapi_use_agent_default=False (BoolOpt) Determines if the xenapi agent should be usedwhen the image used does not contain a hint to declare ifthe agent is present or not. The hint is a glance property"xenapi_use_agent" that has the value "true" or "false".Note that waiting for the agent when it is not present willsignificantly increase server boot times.
xenapi_vhd_coalesce_max_attempts=5 (IntOpt) Max number of times to poll for VHD to coalesce.Used only if compute_driver=xenapi.XenAPIDriver
xenapi_vhd_coalesce_poll_interval=5.0 (FloatOpt) The interval used for polling of coalescing vhds.Used only if compute_driver=xenapi.XenAPIDriver
xenapi_vif_driver=nova.virt.xenapi.vif.XenAPIBridgeDriver (StrOpt) The XenAPI VIF driver using XenServer NetworkAPIs.
Table 2.76. Description of configuration options for xvpnvncproxy
Configuration option=Default value Description
xvpvncproxy_base_url=http://127.0.0.1:6081/console (StrOpt) location of nova xvp vnc console proxy, in theform "http://127.0.0.1:6081/console"
xvpvncproxy_host=0.0.0.0 (StrOpt) Address that the XCP VNC proxy should bind to
xvpvncproxy_port=6081 (IntOpt) Port that the XCP VNC proxy should bind to
Table 2.77. Description of configuration options for zeromq
Configuration option=Default value Description
rpc_zmq_bind_address=* (StrOpt) ZeroMQ bind address. Should be a wildcard (*),an ethernet interface, or IP. The "host" option should pointor resolve to this address.
rpc_zmq_contexts=1 (IntOpt) Number of ZeroMQ contexts, defaults to 1
rpc_zmq_host=docwork (StrOpt) Name of this node. Must be a valid hostname,FQDN, or IP address. Must match "host" option, if runningNova.
rpc_zmq_ipc_dir=/var/run/openstack (StrOpt) Directory for holding IPC sockets
rpc_zmq_matchmaker=nova.openstack.common.rpc.matchmaker.MatchMakerLocalhost(StrOpt) MatchMaker driver
rpc_zmq_port=9501 (IntOpt) ZeroMQ receiver listening port
rpc_zmq_topic_backlog=None (IntOpt) Maximum number of ingress messages to locallybuffer per topic. Default is unlimited.
Table 2.78. Description of configuration options for zookeeper
Configuration option=Default value Description
address=None (StrOpt) The ZooKeeper addresses for servicegroup servicein the format of host1:port,host2:port,host3:port
recv_timeout=4000 (IntOpt) recv_timeout parameter for the zk session
sg_prefix=/servicegroups (StrOpt) The prefix used in ZooKeeper to store ephemeralnodes
sg_retry_interval=5 (IntOpt) Number of seconds to wait until retrying to jointhe session
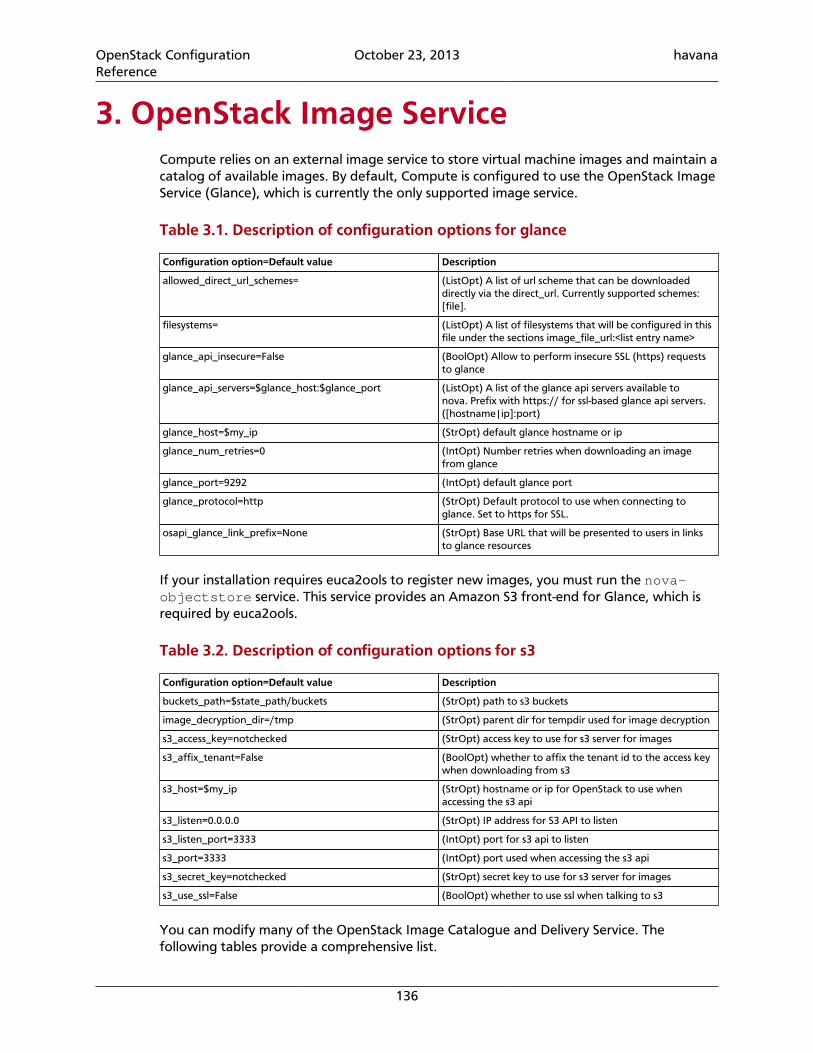
OpenStack ConfigurationReference
October 23, 2013 havana
136
3. OpenStack Image ServiceCompute relies on an external image service to store virtual machine images and maintain acatalog of available images. By default, Compute is configured to use the OpenStack ImageService (Glance), which is currently the only supported image service.
Table 3.1. Description of configuration options for glance
Configuration option=Default value Description
allowed_direct_url_schemes= (ListOpt) A list of url scheme that can be downloadeddirectly via the direct_url. Currently supported schemes:[file].
filesystems= (ListOpt) A list of filesystems that will be configured in thisfile under the sections image_file_url:<list entry name>
glance_api_insecure=False (BoolOpt) Allow to perform insecure SSL (https) requeststo glance
glance_api_servers=$glance_host:$glance_port (ListOpt) A list of the glance api servers available tonova. Prefix with https:// for ssl-based glance api servers.([hostname|ip]:port)
glance_host=$my_ip (StrOpt) default glance hostname or ip
glance_num_retries=0 (IntOpt) Number retries when downloading an imagefrom glance
glance_port=9292 (IntOpt) default glance port
glance_protocol=http (StrOpt) Default protocol to use when connecting toglance. Set to https for SSL.
osapi_glance_link_prefix=None (StrOpt) Base URL that will be presented to users in linksto glance resources
If your installation requires euca2ools to register new images, you must run the nova-objectstore service. This service provides an Amazon S3 front-end for Glance, which isrequired by euca2ools.
Table 3.2. Description of configuration options for s3
Configuration option=Default value Description
buckets_path=$state_path/buckets (StrOpt) path to s3 buckets
image_decryption_dir=/tmp (StrOpt) parent dir for tempdir used for image decryption
s3_access_key=notchecked (StrOpt) access key to use for s3 server for images
s3_affix_tenant=False (BoolOpt) whether to affix the tenant id to the access keywhen downloading from s3
s3_host=$my_ip (StrOpt) hostname or ip for OpenStack to use whenaccessing the s3 api
s3_listen=0.0.0.0 (StrOpt) IP address for S3 API to listen
s3_listen_port=3333 (IntOpt) port for s3 api to listen
s3_port=3333 (IntOpt) port used when accessing the s3 api
s3_secret_key=notchecked (StrOpt) secret key to use for s3 server for images
s3_use_ssl=False (BoolOpt) whether to use ssl when talking to s3
You can modify many of the OpenStack Image Catalogue and Delivery Service. Thefollowing tables provide a comprehensive list.
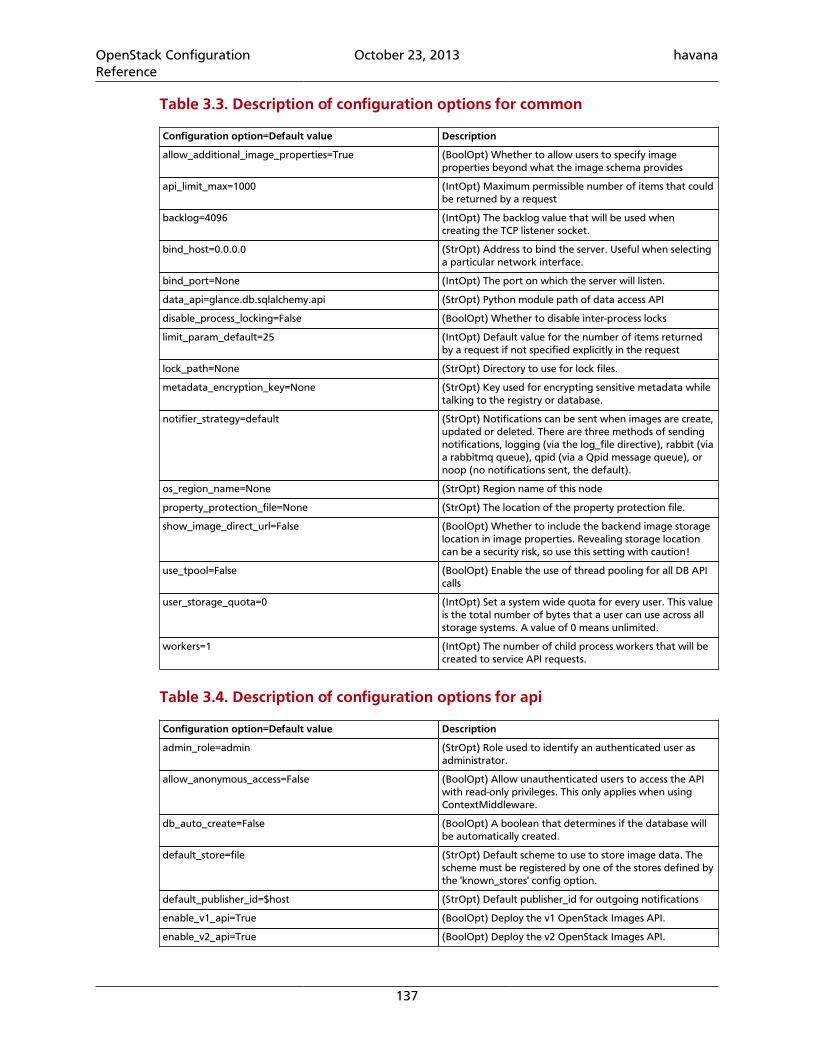
OpenStack ConfigurationReference
October 23, 2013 havana
137
Table 3.3. Description of configuration options for common
Configuration option=Default value Description
allow_additional_image_properties=True (BoolOpt) Whether to allow users to specify imageproperties beyond what the image schema provides
api_limit_max=1000 (IntOpt) Maximum permissible number of items that couldbe returned by a request
backlog=4096 (IntOpt) The backlog value that will be used whencreating the TCP listener socket.
bind_host=0.0.0.0 (StrOpt) Address to bind the server. Useful when selectinga particular network interface.
bind_port=None (IntOpt) The port on which the server will listen.
data_api=glance.db.sqlalchemy.api (StrOpt) Python module path of data access API
disable_process_locking=False (BoolOpt) Whether to disable inter-process locks
limit_param_default=25 (IntOpt) Default value for the number of items returnedby a request if not specified explicitly in the request
lock_path=None (StrOpt) Directory to use for lock files.
metadata_encryption_key=None (StrOpt) Key used for encrypting sensitive metadata whiletalking to the registry or database.
notifier_strategy=default (StrOpt) Notifications can be sent when images are create,updated or deleted. There are three methods of sendingnotifications, logging (via the log_file directive), rabbit (viaa rabbitmq queue), qpid (via a Qpid message queue), ornoop (no notifications sent, the default).
os_region_name=None (StrOpt) Region name of this node
property_protection_file=None (StrOpt) The location of the property protection file.
show_image_direct_url=False (BoolOpt) Whether to include the backend image storagelocation in image properties. Revealing storage locationcan be a security risk, so use this setting with caution!
use_tpool=False (BoolOpt) Enable the use of thread pooling for all DB APIcalls
user_storage_quota=0 (IntOpt) Set a system wide quota for every user. This valueis the total number of bytes that a user can use across allstorage systems. A value of 0 means unlimited.
workers=1 (IntOpt) The number of child process workers that will becreated to service API requests.
Table 3.4. Description of configuration options for api
Configuration option=Default value Description
admin_role=admin (StrOpt) Role used to identify an authenticated user asadministrator.
allow_anonymous_access=False (BoolOpt) Allow unauthenticated users to access the APIwith read-only privileges. This only applies when usingContextMiddleware.
db_auto_create=False (BoolOpt) A boolean that determines if the database willbe automatically created.
default_store=file (StrOpt) Default scheme to use to store image data. Thescheme must be registered by one of the stores defined bythe 'known_stores' config option.
default_publisher_id=$host (StrOpt) Default publisher_id for outgoing notifications
enable_v1_api=True (BoolOpt) Deploy the v1 OpenStack Images API.
enable_v2_api=True (BoolOpt) Deploy the v2 OpenStack Images API.

OpenStack ConfigurationReference
October 23, 2013 havana
138
Configuration option=Default value Description
image_size_cap=1099511627776 (IntOpt) Maximum size of image a user can upload inbytes. Defaults to 1099511627776 bytes (1 TB).
known_stores=glance.store.filesystem.Store,glance.store.http.Store,glance.store.rbd.Store,glance.store.s3.Store,glance.store.swift.Store,glance.store.sheepdog.Store,glance.store.cinder.Store(ListOpt) List of which store classes and store classlocations are currently known to glance at startup.
notification_driver=[] (MultiStrOpt) Driver or drivers to handle sendingnotifications
owner_is_tenant=True (BoolOpt) When true, this option sets the owner of animage to be the tenant. Otherwise, the owner of theimage will be the authenticated user issuing the request.
send_identity_headers=False (BoolOpt) Whether to pass through headers containinguser and tenant information when making requests tothe registry. This allows the registry to use the contextmiddleware without the keystoneclients' auth_tokenmiddleware, removing calls to the keystone auth service.It is recommended that when using this option, securecommunication between glance api and glance registry isensured by means other than auth_token middleware.
show_multiple_locations=False (BoolOpt) Whether to include the backend imagelocations in image properties. Revealing storage locationcan be a security risk, so use this setting with caution! Theoverrides show_image_direct_url.
use_user_token=True (BoolOpt) Whether to pass through the user token whenmaking requests to the registry.
Table 3.5. Description of configuration options for cinder
Configuration option=Default value Description
cinder_catalog_info=volume:cinder:publicURL (StrOpt) Info to match when looking for cinder in theservice catalog. Format is : separated values of the form:<service_type>:<service_name>:<endpoint_type>
cinder_ca_certificates_file=None (StrOpt) Location of ca certicates file to use for cinderclient requests.
cinder_http_retries=3 (IntOpt) Number of cinderclient retries on failed http calls
cinder_endpoint_template=None (StrOpt) Override service catalog lookup with templatefor cinder endpoint e.g. http://localhost:8776/v1/%(project_id)s
cinder_api_insecure=False (BoolOpt) Allow to perform insecure SSL requests tocinder
Table 3.6. Description of configuration options for db
Configuration option=Default value Description
sql_connection=sqlite:///glance.sqlite (StrOpt) A valid SQLAlchemy connection string for theregistry database. Default: %(default)s
sql_idle_timeout=3600 (IntOpt) Period in seconds after which SQLAlchemy shouldreestablish its connection to the database.
sql_max_retries=60 (IntOpt) The number of times to retry a connection to theSQLserver.
sql_retry_interval=1 (IntOpt) The amount of time to wait (in seconds) beforeattempting to retry the SQL connection.
sqlalchemy_debug=False (BoolOpt) Enable debug logging in sqlalchemy whichprints every query and result
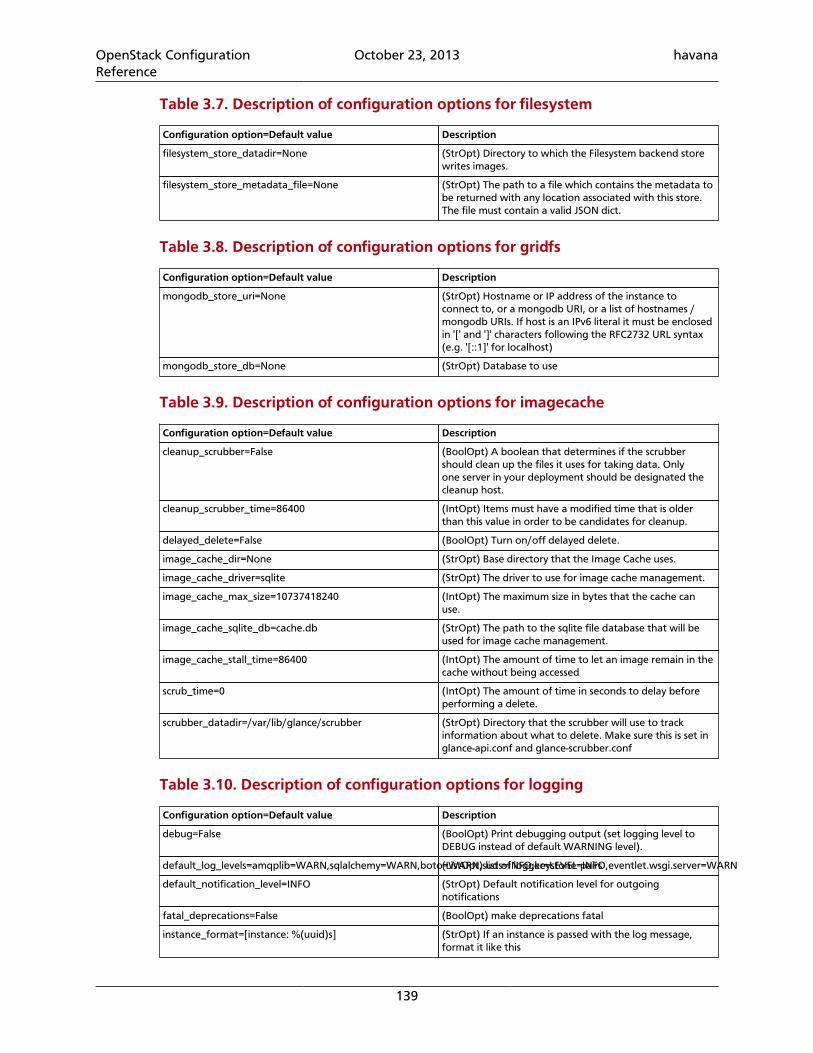
OpenStack ConfigurationReference
October 23, 2013 havana
139
Table 3.7. Description of configuration options for filesystem
Configuration option=Default value Description
filesystem_store_datadir=None (StrOpt) Directory to which the Filesystem backend storewrites images.
filesystem_store_metadata_file=None (StrOpt) The path to a file which contains the metadata tobe returned with any location associated with this store.The file must contain a valid JSON dict.
Table 3.8. Description of configuration options for gridfs
Configuration option=Default value Description
mongodb_store_uri=None (StrOpt) Hostname or IP address of the instance toconnect to, or a mongodb URI, or a list of hostnames /mongodb URIs. If host is an IPv6 literal it must be enclosedin '[' and ']' characters following the RFC2732 URL syntax(e.g. '[::1]' for localhost)
mongodb_store_db=None (StrOpt) Database to use
Table 3.9. Description of configuration options for imagecache
Configuration option=Default value Description
cleanup_scrubber=False (BoolOpt) A boolean that determines if the scrubbershould clean up the files it uses for taking data. Onlyone server in your deployment should be designated thecleanup host.
cleanup_scrubber_time=86400 (IntOpt) Items must have a modified time that is olderthan this value in order to be candidates for cleanup.
delayed_delete=False (BoolOpt) Turn on/off delayed delete.
image_cache_dir=None (StrOpt) Base directory that the Image Cache uses.
image_cache_driver=sqlite (StrOpt) The driver to use for image cache management.
image_cache_max_size=10737418240 (IntOpt) The maximum size in bytes that the cache canuse.
image_cache_sqlite_db=cache.db (StrOpt) The path to the sqlite file database that will beused for image cache management.
image_cache_stall_time=86400 (IntOpt) The amount of time to let an image remain in thecache without being accessed
scrub_time=0 (IntOpt) The amount of time in seconds to delay beforeperforming a delete.
scrubber_datadir=/var/lib/glance/scrubber (StrOpt) Directory that the scrubber will use to trackinformation about what to delete. Make sure this is set inglance-api.conf and glance-scrubber.conf
Table 3.10. Description of configuration options for logging
Configuration option=Default value Description
debug=False (BoolOpt) Print debugging output (set logging level toDEBUG instead of default WARNING level).
default_log_levels=amqplib=WARN,sqlalchemy=WARN,boto=WARN,suds=INFO,keystone=INFO,eventlet.wsgi.server=WARN(ListOpt) list of logger=LEVEL pairs
default_notification_level=INFO (StrOpt) Default notification level for outgoingnotifications
fatal_deprecations=False (BoolOpt) make deprecations fatal
instance_format=[instance: %(uuid)s] (StrOpt) If an instance is passed with the log message,format it like this
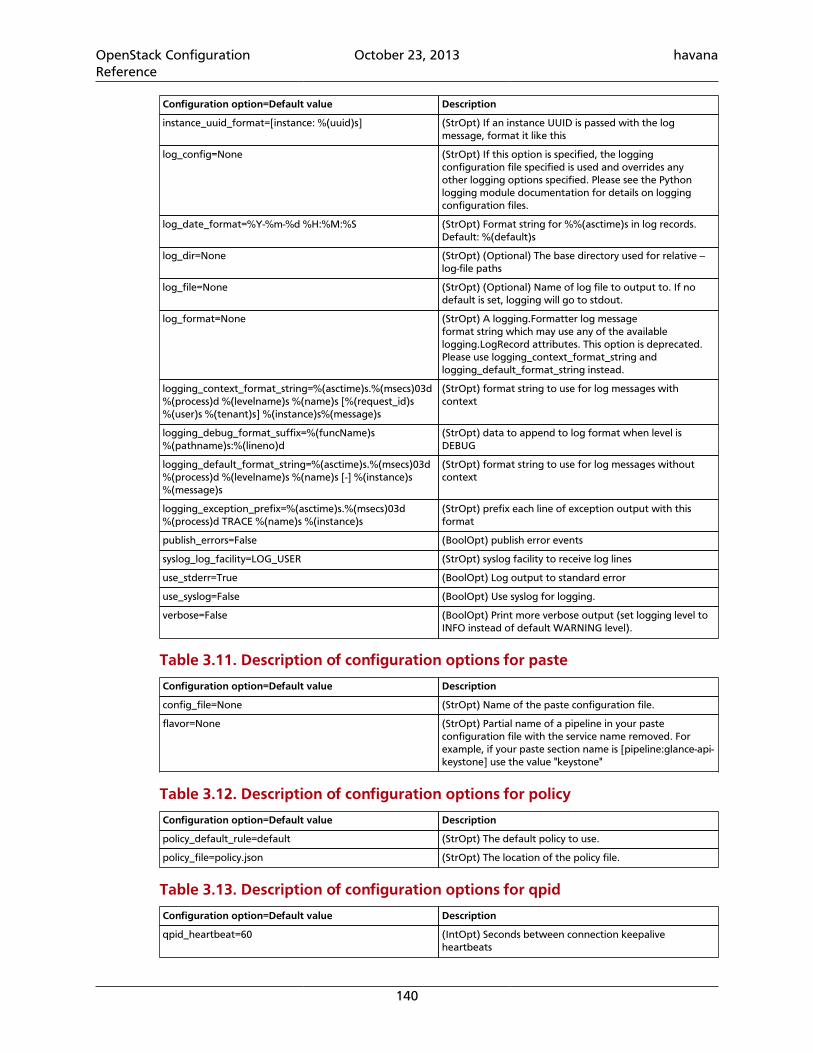
OpenStack ConfigurationReference
October 23, 2013 havana
140
Configuration option=Default value Description
instance_uuid_format=[instance: %(uuid)s] (StrOpt) If an instance UUID is passed with the logmessage, format it like this
log_config=None (StrOpt) If this option is specified, the loggingconfiguration file specified is used and overrides anyother logging options specified. Please see the Pythonlogging module documentation for details on loggingconfiguration files.
log_date_format=%Y-%m-%d %H:%M:%S (StrOpt) Format string for %%(asctime)s in log records.Default: %(default)s
log_dir=None (StrOpt) (Optional) The base directory used for relative --log-file paths
log_file=None (StrOpt) (Optional) Name of log file to output to. If nodefault is set, logging will go to stdout.
log_format=None (StrOpt) A logging.Formatter log messageformat string which may use any of the availablelogging.LogRecord attributes. This option is deprecated.Please use logging_context_format_string andlogging_default_format_string instead.
logging_context_format_string=%(asctime)s.%(msecs)03d%(process)d %(levelname)s %(name)s [%(request_id)s%(user)s %(tenant)s] %(instance)s%(message)s
(StrOpt) format string to use for log messages withcontext
logging_debug_format_suffix=%(funcName)s%(pathname)s:%(lineno)d
(StrOpt) data to append to log format when level isDEBUG
logging_default_format_string=%(asctime)s.%(msecs)03d%(process)d %(levelname)s %(name)s [-] %(instance)s%(message)s
(StrOpt) format string to use for log messages withoutcontext
logging_exception_prefix=%(asctime)s.%(msecs)03d%(process)d TRACE %(name)s %(instance)s
(StrOpt) prefix each line of exception output with thisformat
publish_errors=False (BoolOpt) publish error events
syslog_log_facility=LOG_USER (StrOpt) syslog facility to receive log lines
use_stderr=True (BoolOpt) Log output to standard error
use_syslog=False (BoolOpt) Use syslog for logging.
verbose=False (BoolOpt) Print more verbose output (set logging level toINFO instead of default WARNING level).
Table 3.11. Description of configuration options for paste
Configuration option=Default value Description
config_file=None (StrOpt) Name of the paste configuration file.
flavor=None (StrOpt) Partial name of a pipeline in your pasteconfiguration file with the service name removed. Forexample, if your paste section name is [pipeline:glance-api-keystone] use the value "keystone"
Table 3.12. Description of configuration options for policy
Configuration option=Default value Description
policy_default_rule=default (StrOpt) The default policy to use.
policy_file=policy.json (StrOpt) The location of the policy file.
Table 3.13. Description of configuration options for qpid
Configuration option=Default value Description
qpid_heartbeat=60 (IntOpt) Seconds between connection keepaliveheartbeats
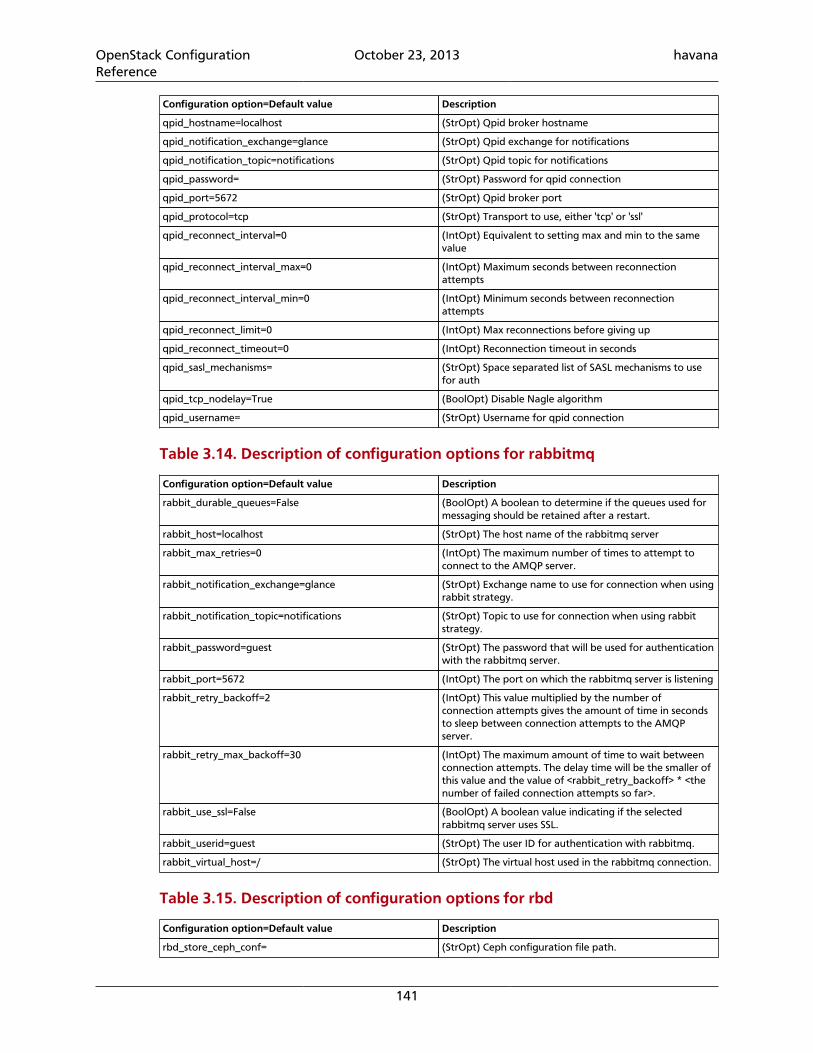
OpenStack ConfigurationReference
October 23, 2013 havana
141
Configuration option=Default value Description
qpid_hostname=localhost (StrOpt) Qpid broker hostname
qpid_notification_exchange=glance (StrOpt) Qpid exchange for notifications
qpid_notification_topic=notifications (StrOpt) Qpid topic for notifications
qpid_password= (StrOpt) Password for qpid connection
qpid_port=5672 (StrOpt) Qpid broker port
qpid_protocol=tcp (StrOpt) Transport to use, either 'tcp' or 'ssl'
qpid_reconnect_interval=0 (IntOpt) Equivalent to setting max and min to the samevalue
qpid_reconnect_interval_max=0 (IntOpt) Maximum seconds between reconnectionattempts
qpid_reconnect_interval_min=0 (IntOpt) Minimum seconds between reconnectionattempts
qpid_reconnect_limit=0 (IntOpt) Max reconnections before giving up
qpid_reconnect_timeout=0 (IntOpt) Reconnection timeout in seconds
qpid_sasl_mechanisms= (StrOpt) Space separated list of SASL mechanisms to usefor auth
qpid_tcp_nodelay=True (BoolOpt) Disable Nagle algorithm
qpid_username= (StrOpt) Username for qpid connection
Table 3.14. Description of configuration options for rabbitmq
Configuration option=Default value Description
rabbit_durable_queues=False (BoolOpt) A boolean to determine if the queues used formessaging should be retained after a restart.
rabbit_host=localhost (StrOpt) The host name of the rabbitmq server
rabbit_max_retries=0 (IntOpt) The maximum number of times to attempt toconnect to the AMQP server.
rabbit_notification_exchange=glance (StrOpt) Exchange name to use for connection when usingrabbit strategy.
rabbit_notification_topic=notifications (StrOpt) Topic to use for connection when using rabbitstrategy.
rabbit_password=guest (StrOpt) The password that will be used for authenticationwith the rabbitmq server.
rabbit_port=5672 (IntOpt) The port on which the rabbitmq server is listening
rabbit_retry_backoff=2 (IntOpt) This value multiplied by the number ofconnection attempts gives the amount of time in secondsto sleep between connection attempts to the AMQPserver.
rabbit_retry_max_backoff=30 (IntOpt) The maximum amount of time to wait betweenconnection attempts. The delay time will be the smaller ofthis value and the value of <rabbit_retry_backoff> * <thenumber of failed connection attempts so far>.
rabbit_use_ssl=False (BoolOpt) A boolean value indicating if the selectedrabbitmq server uses SSL.
rabbit_userid=guest (StrOpt) The user ID for authentication with rabbitmq.
rabbit_virtual_host=/ (StrOpt) The virtual host used in the rabbitmq connection.
Table 3.15. Description of configuration options for rbd
Configuration option=Default value Description
rbd_store_ceph_conf= (StrOpt) Ceph configuration file path.
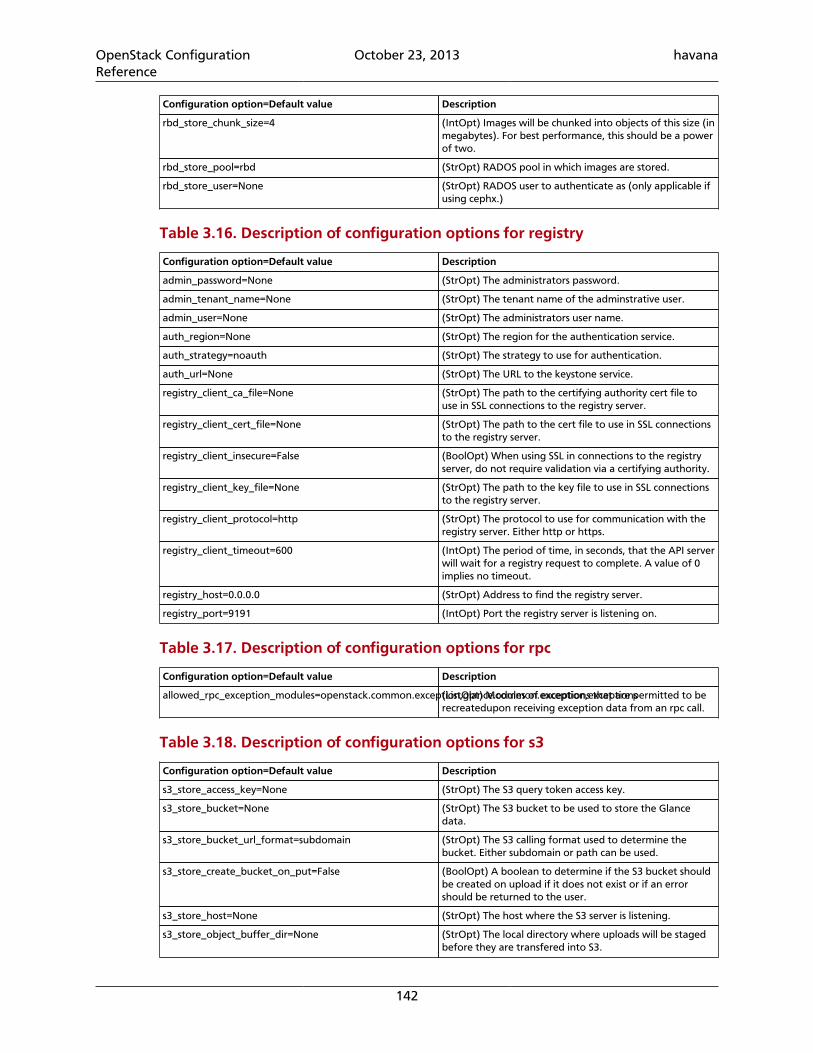
OpenStack ConfigurationReference
October 23, 2013 havana
142
Configuration option=Default value Description
rbd_store_chunk_size=4 (IntOpt) Images will be chunked into objects of this size (inmegabytes). For best performance, this should be a powerof two.
rbd_store_pool=rbd (StrOpt) RADOS pool in which images are stored.
rbd_store_user=None (StrOpt) RADOS user to authenticate as (only applicable ifusing cephx.)
Table 3.16. Description of configuration options for registry
Configuration option=Default value Description
admin_password=None (StrOpt) The administrators password.
admin_tenant_name=None (StrOpt) The tenant name of the adminstrative user.
admin_user=None (StrOpt) The administrators user name.
auth_region=None (StrOpt) The region for the authentication service.
auth_strategy=noauth (StrOpt) The strategy to use for authentication.
auth_url=None (StrOpt) The URL to the keystone service.
registry_client_ca_file=None (StrOpt) The path to the certifying authority cert file touse in SSL connections to the registry server.
registry_client_cert_file=None (StrOpt) The path to the cert file to use in SSL connectionsto the registry server.
registry_client_insecure=False (BoolOpt) When using SSL in connections to the registryserver, do not require validation via a certifying authority.
registry_client_key_file=None (StrOpt) The path to the key file to use in SSL connectionsto the registry server.
registry_client_protocol=http (StrOpt) The protocol to use for communication with theregistry server. Either http or https.
registry_client_timeout=600 (IntOpt) The period of time, in seconds, that the API serverwill wait for a registry request to complete. A value of 0implies no timeout.
registry_host=0.0.0.0 (StrOpt) Address to find the registry server.
registry_port=9191 (IntOpt) Port the registry server is listening on.
Table 3.17. Description of configuration options for rpc
Configuration option=Default value Description
allowed_rpc_exception_modules=openstack.common.exception,glance.common.exception,exceptions(ListOpt) Modules of exceptions that are permitted to berecreatedupon receiving exception data from an rpc call.
Table 3.18. Description of configuration options for s3
Configuration option=Default value Description
s3_store_access_key=None (StrOpt) The S3 query token access key.
s3_store_bucket=None (StrOpt) The S3 bucket to be used to store the Glancedata.
s3_store_bucket_url_format=subdomain (StrOpt) The S3 calling format used to determine thebucket. Either subdomain or path can be used.
s3_store_create_bucket_on_put=False (BoolOpt) A boolean to determine if the S3 bucket shouldbe created on upload if it does not exist or if an errorshould be returned to the user.
s3_store_host=None (StrOpt) The host where the S3 server is listening.
s3_store_object_buffer_dir=None (StrOpt) The local directory where uploads will be stagedbefore they are transfered into S3.
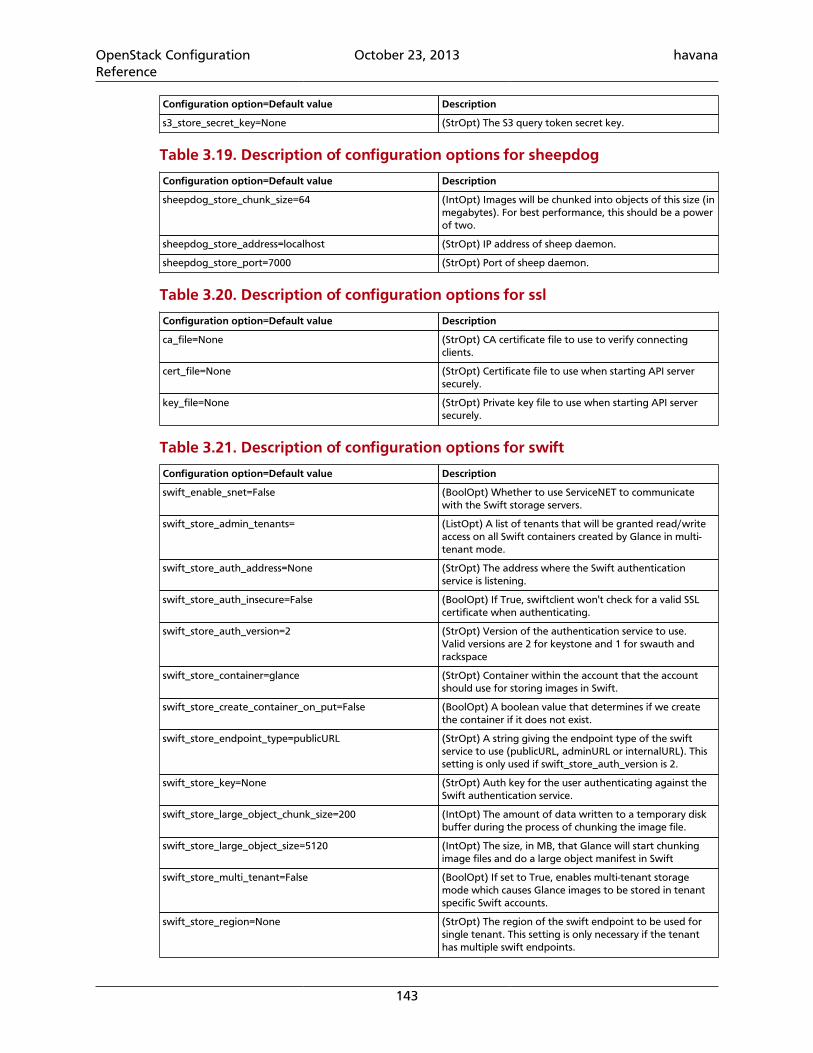
OpenStack ConfigurationReference
October 23, 2013 havana
143
Configuration option=Default value Description
s3_store_secret_key=None (StrOpt) The S3 query token secret key.
Table 3.19. Description of configuration options for sheepdog
Configuration option=Default value Description
sheepdog_store_chunk_size=64 (IntOpt) Images will be chunked into objects of this size (inmegabytes). For best performance, this should be a powerof two.
sheepdog_store_address=localhost (StrOpt) IP address of sheep daemon.
sheepdog_store_port=7000 (StrOpt) Port of sheep daemon.
Table 3.20. Description of configuration options for ssl
Configuration option=Default value Description
ca_file=None (StrOpt) CA certificate file to use to verify connectingclients.
cert_file=None (StrOpt) Certificate file to use when starting API serversecurely.
key_file=None (StrOpt) Private key file to use when starting API serversecurely.
Table 3.21. Description of configuration options for swift
Configuration option=Default value Description
swift_enable_snet=False (BoolOpt) Whether to use ServiceNET to communicatewith the Swift storage servers.
swift_store_admin_tenants= (ListOpt) A list of tenants that will be granted read/writeaccess on all Swift containers created by Glance in multi-tenant mode.
swift_store_auth_address=None (StrOpt) The address where the Swift authenticationservice is listening.
swift_store_auth_insecure=False (BoolOpt) If True, swiftclient won't check for a valid SSLcertificate when authenticating.
swift_store_auth_version=2 (StrOpt) Version of the authentication service to use.Valid versions are 2 for keystone and 1 for swauth andrackspace
swift_store_container=glance (StrOpt) Container within the account that the accountshould use for storing images in Swift.
swift_store_create_container_on_put=False (BoolOpt) A boolean value that determines if we createthe container if it does not exist.
swift_store_endpoint_type=publicURL (StrOpt) A string giving the endpoint type of the swiftservice to use (publicURL, adminURL or internalURL). Thissetting is only used if swift_store_auth_version is 2.
swift_store_key=None (StrOpt) Auth key for the user authenticating against theSwift authentication service.
swift_store_large_object_chunk_size=200 (IntOpt) The amount of data written to a temporary diskbuffer during the process of chunking the image file.
swift_store_large_object_size=5120 (IntOpt) The size, in MB, that Glance will start chunkingimage files and do a large object manifest in Swift
swift_store_multi_tenant=False (BoolOpt) If set to True, enables multi-tenant storagemode which causes Glance images to be stored in tenantspecific Swift accounts.
swift_store_region=None (StrOpt) The region of the swift endpoint to be used forsingle tenant. This setting is only necessary if the tenanthas multiple swift endpoints.
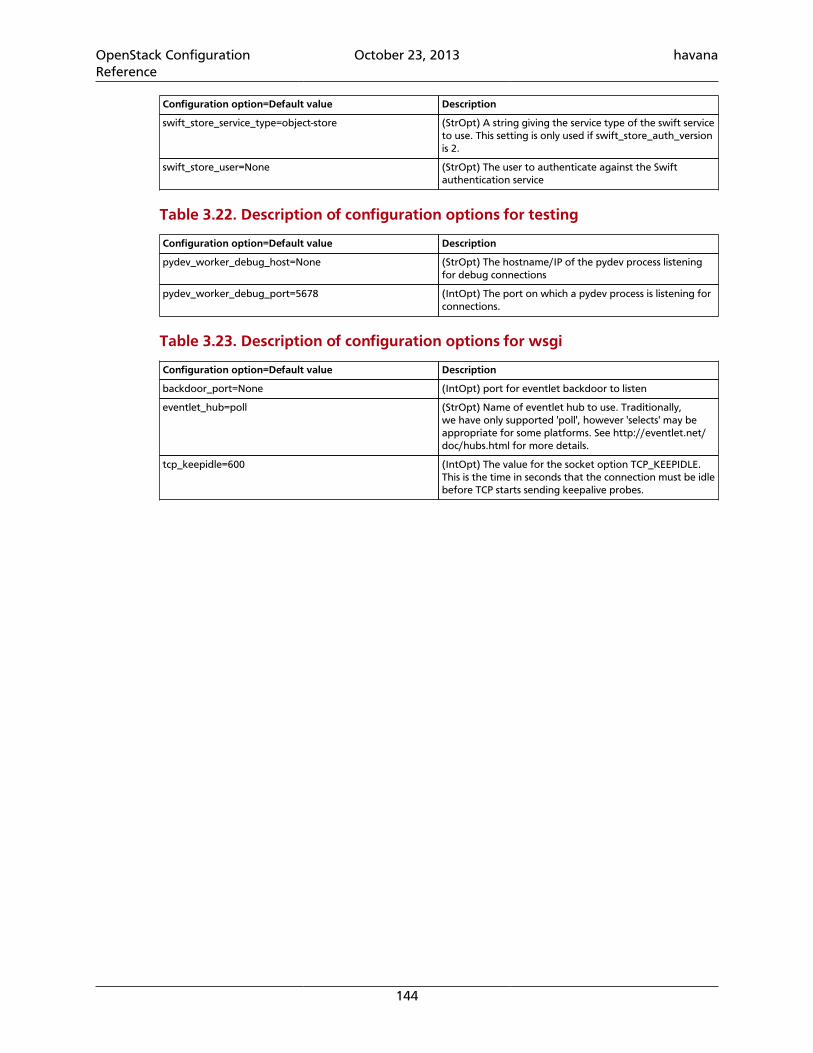
OpenStack ConfigurationReference
October 23, 2013 havana
144
Configuration option=Default value Description
swift_store_service_type=object-store (StrOpt) A string giving the service type of the swift serviceto use. This setting is only used if swift_store_auth_versionis 2.
swift_store_user=None (StrOpt) The user to authenticate against the Swiftauthentication service
Table 3.22. Description of configuration options for testing
Configuration option=Default value Description
pydev_worker_debug_host=None (StrOpt) The hostname/IP of the pydev process listeningfor debug connections
pydev_worker_debug_port=5678 (IntOpt) The port on which a pydev process is listening forconnections.
Table 3.23. Description of configuration options for wsgi
Configuration option=Default value Description
backdoor_port=None (IntOpt) port for eventlet backdoor to listen
eventlet_hub=poll (StrOpt) Name of eventlet hub to use. Traditionally,we have only supported 'poll', however 'selects' may beappropriate for some platforms. See http://eventlet.net/doc/hubs.html for more details.
tcp_keepidle=600 (IntOpt) The value for the socket option TCP_KEEPIDLE.This is the time in seconds that the connection must be idlebefore TCP starts sending keepalive probes.
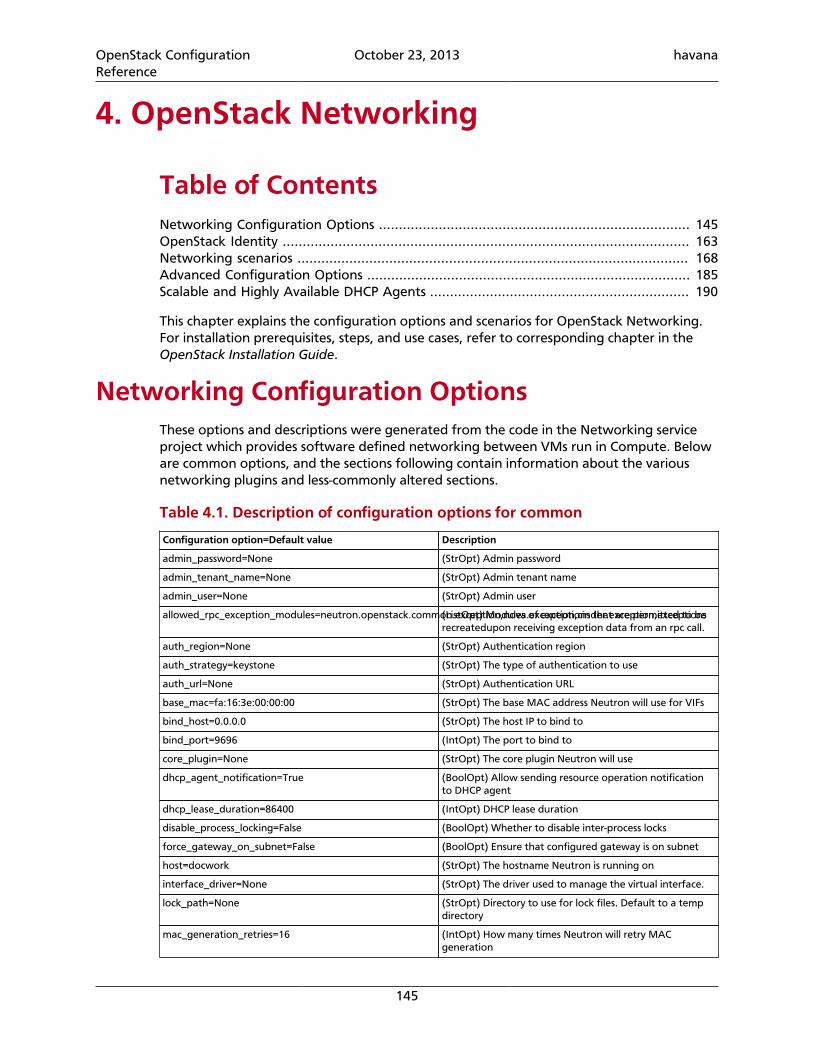
OpenStack ConfigurationReference
October 23, 2013 havana
145
4. OpenStack Networking
Table of ContentsNetworking Configuration Options .............................................................................. 145OpenStack Identity ...................................................................................................... 163Networking scenarios .................................................................................................. 168Advanced Configuration Options ................................................................................. 185Scalable and Highly Available DHCP Agents ................................................................. 190
This chapter explains the configuration options and scenarios for OpenStack Networking.For installation prerequisites, steps, and use cases, refer to corresponding chapter in theOpenStack Installation Guide.
Networking Configuration OptionsThese options and descriptions were generated from the code in the Networking serviceproject which provides software defined networking between VMs run in Compute. Beloware common options, and the sections following contain information about the variousnetworking plugins and less-commonly altered sections.
Table 4.1. Description of configuration options for common
Configuration option=Default value Description
admin_password=None (StrOpt) Admin password
admin_tenant_name=None (StrOpt) Admin tenant name
admin_user=None (StrOpt) Admin user
allowed_rpc_exception_modules=neutron.openstack.common.exception,nova.exception,cinder.exception,exceptions(ListOpt) Modules of exceptions that are permitted to berecreatedupon receiving exception data from an rpc call.
auth_region=None (StrOpt) Authentication region
auth_strategy=keystone (StrOpt) The type of authentication to use
auth_url=None (StrOpt) Authentication URL
base_mac=fa:16:3e:00:00:00 (StrOpt) The base MAC address Neutron will use for VIFs
bind_host=0.0.0.0 (StrOpt) The host IP to bind to
bind_port=9696 (IntOpt) The port to bind to
core_plugin=None (StrOpt) The core plugin Neutron will use
dhcp_agent_notification=True (BoolOpt) Allow sending resource operation notificationto DHCP agent
dhcp_lease_duration=86400 (IntOpt) DHCP lease duration
disable_process_locking=False (BoolOpt) Whether to disable inter-process locks
force_gateway_on_subnet=False (BoolOpt) Ensure that configured gateway is on subnet
host=docwork (StrOpt) The hostname Neutron is running on
interface_driver=None (StrOpt) The driver used to manage the virtual interface.
lock_path=None (StrOpt) Directory to use for lock files. Default to a tempdirectory
mac_generation_retries=16 (IntOpt) How many times Neutron will retry MACgeneration
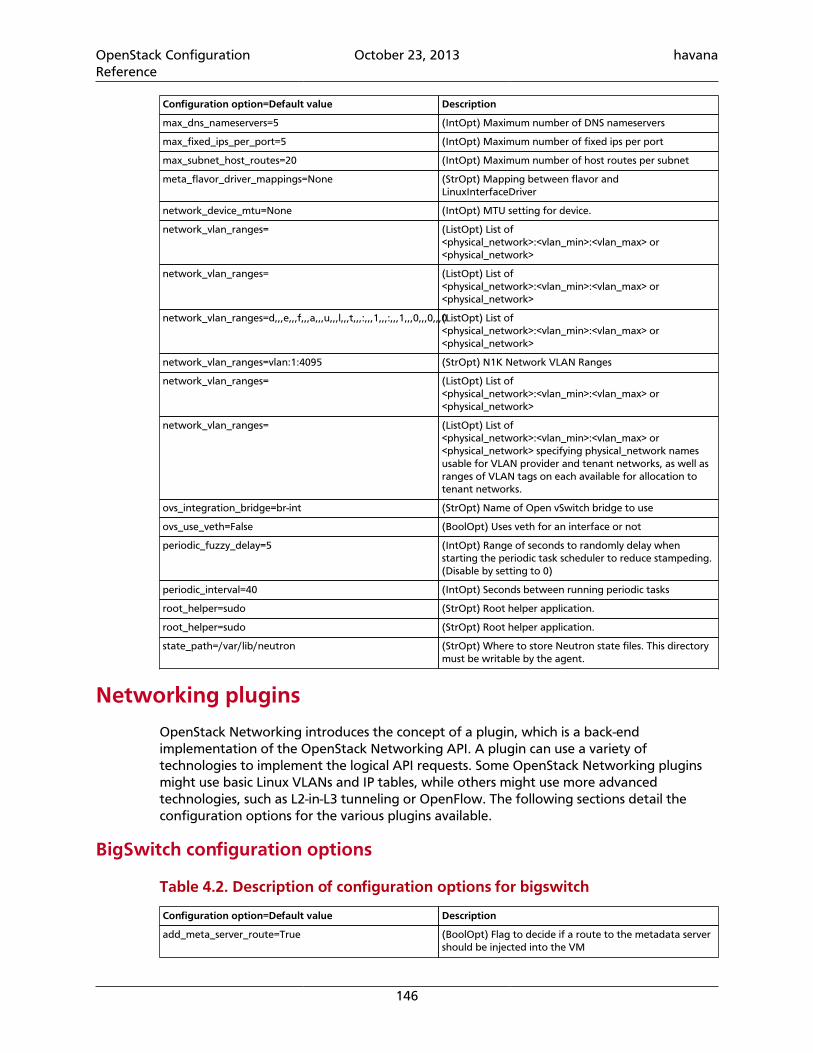
OpenStack ConfigurationReference
October 23, 2013 havana
146
Configuration option=Default value Description
max_dns_nameservers=5 (IntOpt) Maximum number of DNS nameservers
max_fixed_ips_per_port=5 (IntOpt) Maximum number of fixed ips per port
max_subnet_host_routes=20 (IntOpt) Maximum number of host routes per subnet
meta_flavor_driver_mappings=None (StrOpt) Mapping between flavor andLinuxInterfaceDriver
network_device_mtu=None (IntOpt) MTU setting for device.
network_vlan_ranges= (ListOpt) List of<physical_network>:<vlan_min>:<vlan_max> or<physical_network>
network_vlan_ranges= (ListOpt) List of<physical_network>:<vlan_min>:<vlan_max> or<physical_network>
network_vlan_ranges=d,,,e,,,f,,,a,,,u,,,l,,,t,,,:,,,1,,,:,,,1,,,0,,,0,,,0(ListOpt) List of<physical_network>:<vlan_min>:<vlan_max> or<physical_network>
network_vlan_ranges=vlan:1:4095 (StrOpt) N1K Network VLAN Ranges
network_vlan_ranges= (ListOpt) List of<physical_network>:<vlan_min>:<vlan_max> or<physical_network>
network_vlan_ranges= (ListOpt) List of<physical_network>:<vlan_min>:<vlan_max> or<physical_network> specifying physical_network namesusable for VLAN provider and tenant networks, as well asranges of VLAN tags on each available for allocation totenant networks.
ovs_integration_bridge=br-int (StrOpt) Name of Open vSwitch bridge to use
ovs_use_veth=False (BoolOpt) Uses veth for an interface or not
periodic_fuzzy_delay=5 (IntOpt) Range of seconds to randomly delay whenstarting the periodic task scheduler to reduce stampeding.(Disable by setting to 0)
periodic_interval=40 (IntOpt) Seconds between running periodic tasks
root_helper=sudo (StrOpt) Root helper application.
root_helper=sudo (StrOpt) Root helper application.
state_path=/var/lib/neutron (StrOpt) Where to store Neutron state files. This directorymust be writable by the agent.
Networking plugins
OpenStack Networking introduces the concept of a plugin, which is a back-endimplementation of the OpenStack Networking API. A plugin can use a variety oftechnologies to implement the logical API requests. Some OpenStack Networking pluginsmight use basic Linux VLANs and IP tables, while others might use more advancedtechnologies, such as L2-in-L3 tunneling or OpenFlow. The following sections detail theconfiguration options for the various plugins available.
BigSwitch configuration options
Table 4.2. Description of configuration options for bigswitch
Configuration option=Default value Description
add_meta_server_route=True (BoolOpt) Flag to decide if a route to the metadata servershould be injected into the VM
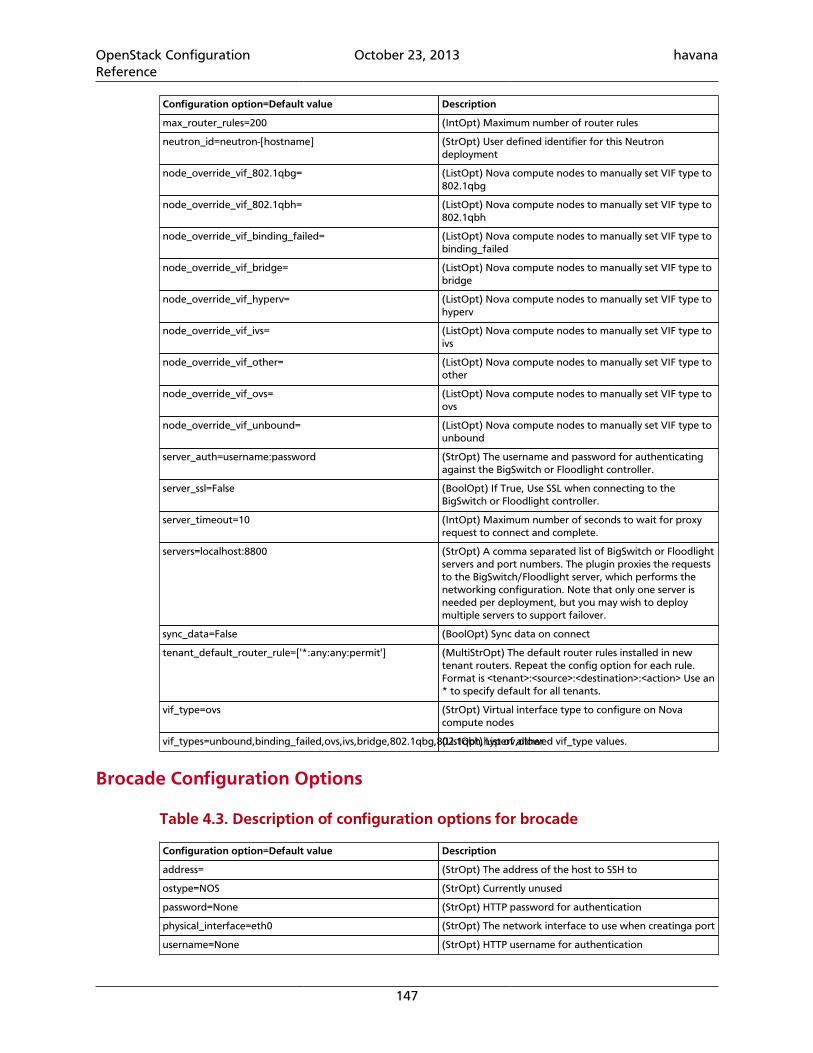
OpenStack ConfigurationReference
October 23, 2013 havana
147
Configuration option=Default value Description
max_router_rules=200 (IntOpt) Maximum number of router rules
neutron_id=neutron-[hostname] (StrOpt) User defined identifier for this Neutrondeployment
node_override_vif_802.1qbg= (ListOpt) Nova compute nodes to manually set VIF type to802.1qbg
node_override_vif_802.1qbh= (ListOpt) Nova compute nodes to manually set VIF type to802.1qbh
node_override_vif_binding_failed= (ListOpt) Nova compute nodes to manually set VIF type tobinding_failed
node_override_vif_bridge= (ListOpt) Nova compute nodes to manually set VIF type tobridge
node_override_vif_hyperv= (ListOpt) Nova compute nodes to manually set VIF type tohyperv
node_override_vif_ivs= (ListOpt) Nova compute nodes to manually set VIF type toivs
node_override_vif_other= (ListOpt) Nova compute nodes to manually set VIF type toother
node_override_vif_ovs= (ListOpt) Nova compute nodes to manually set VIF type toovs
node_override_vif_unbound= (ListOpt) Nova compute nodes to manually set VIF type tounbound
server_auth=username:password (StrOpt) The username and password for authenticatingagainst the BigSwitch or Floodlight controller.
server_ssl=False (BoolOpt) If True, Use SSL when connecting to theBigSwitch or Floodlight controller.
server_timeout=10 (IntOpt) Maximum number of seconds to wait for proxyrequest to connect and complete.
servers=localhost:8800 (StrOpt) A comma separated list of BigSwitch or Floodlightservers and port numbers. The plugin proxies the requeststo the BigSwitch/Floodlight server, which performs thenetworking configuration. Note that only one server isneeded per deployment, but you may wish to deploymultiple servers to support failover.
sync_data=False (BoolOpt) Sync data on connect
tenant_default_router_rule=['*:any:any:permit'] (MultiStrOpt) The default router rules installed in newtenant routers. Repeat the config option for each rule.Format is <tenant>:<source>:<destination>:<action> Use an* to specify default for all tenants.
vif_type=ovs (StrOpt) Virtual interface type to configure on Novacompute nodes
vif_types=unbound,binding_failed,ovs,ivs,bridge,802.1qbg,802.1qbh,hyperv,other(ListOpt) List of allowed vif_type values.
Brocade Configuration Options
Table 4.3. Description of configuration options for brocade
Configuration option=Default value Description
address= (StrOpt) The address of the host to SSH to
ostype=NOS (StrOpt) Currently unused
password=None (StrOpt) HTTP password for authentication
physical_interface=eth0 (StrOpt) The network interface to use when creatinga port
username=None (StrOpt) HTTP username for authentication
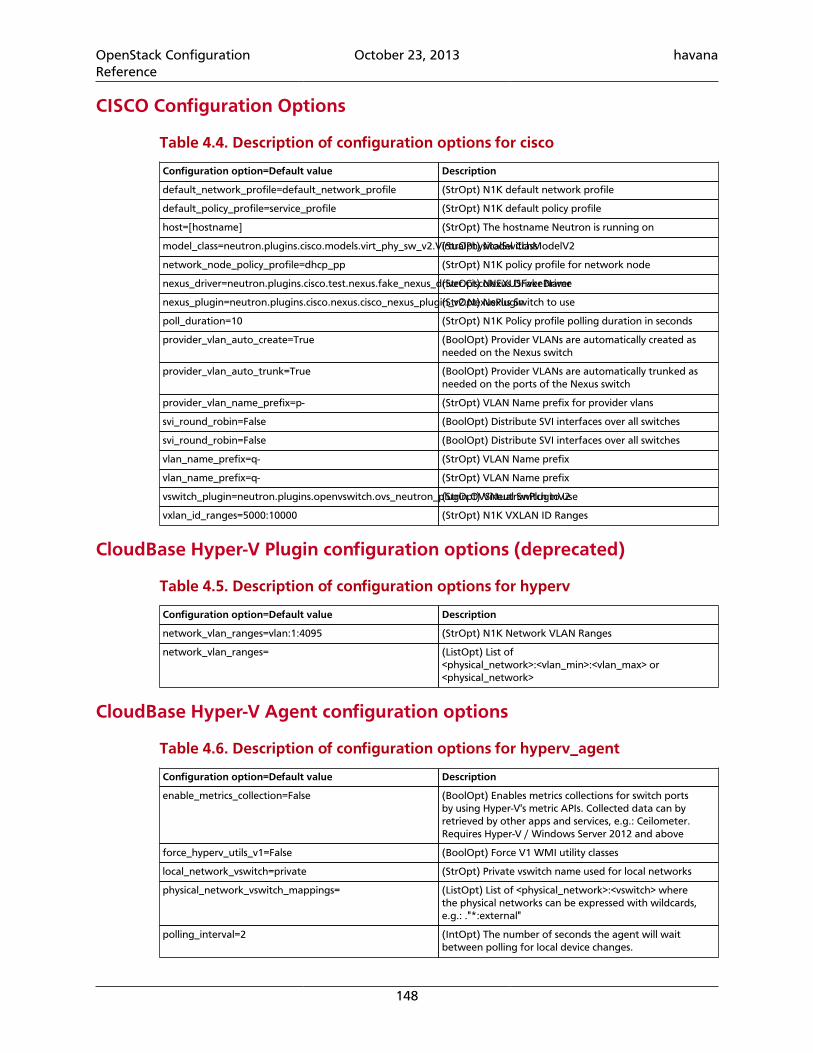
OpenStack ConfigurationReference
October 23, 2013 havana
148
CISCO Configuration Options
Table 4.4. Description of configuration options for cisco
Configuration option=Default value Description
default_network_profile=default_network_profile (StrOpt) N1K default network profile
default_policy_profile=service_profile (StrOpt) N1K default policy profile
host=[hostname] (StrOpt) The hostname Neutron is running on
model_class=neutron.plugins.cisco.models.virt_phy_sw_v2.VirtualPhysicalSwitchModelV2(StrOpt) Model Class
network_node_policy_profile=dhcp_pp (StrOpt) N1K policy profile for network node
nexus_driver=neutron.plugins.cisco.test.nexus.fake_nexus_driver.CiscoNEXUSFakeDriver(StrOpt) Nexus Driver Name
nexus_plugin=neutron.plugins.cisco.nexus.cisco_nexus_plugin_v2.NexusPlugin(StrOpt) Nexus Switch to use
poll_duration=10 (StrOpt) N1K Policy profile polling duration in seconds
provider_vlan_auto_create=True (BoolOpt) Provider VLANs are automatically created asneeded on the Nexus switch
provider_vlan_auto_trunk=True (BoolOpt) Provider VLANs are automatically trunked asneeded on the ports of the Nexus switch
provider_vlan_name_prefix=p- (StrOpt) VLAN Name prefix for provider vlans
svi_round_robin=False (BoolOpt) Distribute SVI interfaces over all switches
svi_round_robin=False (BoolOpt) Distribute SVI interfaces over all switches
vlan_name_prefix=q- (StrOpt) VLAN Name prefix
vlan_name_prefix=q- (StrOpt) VLAN Name prefix
vswitch_plugin=neutron.plugins.openvswitch.ovs_neutron_plugin.OVSNeutronPluginV2(StrOpt) Virtual Switch to use
vxlan_id_ranges=5000:10000 (StrOpt) N1K VXLAN ID Ranges
CloudBase Hyper-V Plugin configuration options (deprecated)
Table 4.5. Description of configuration options for hyperv
Configuration option=Default value Description
network_vlan_ranges=vlan:1:4095 (StrOpt) N1K Network VLAN Ranges
network_vlan_ranges= (ListOpt) List of<physical_network>:<vlan_min>:<vlan_max> or<physical_network>
CloudBase Hyper-V Agent configuration options
Table 4.6. Description of configuration options for hyperv_agent
Configuration option=Default value Description
enable_metrics_collection=False (BoolOpt) Enables metrics collections for switch portsby using Hyper-V's metric APIs. Collected data can byretrieved by other apps and services, e.g.: Ceilometer.Requires Hyper-V / Windows Server 2012 and above
force_hyperv_utils_v1=False (BoolOpt) Force V1 WMI utility classes
local_network_vswitch=private (StrOpt) Private vswitch name used for local networks
physical_network_vswitch_mappings= (ListOpt) List of <physical_network>:<vswitch> wherethe physical networks can be expressed with wildcards,e.g.: ."*:external"
polling_interval=2 (IntOpt) The number of seconds the agent will waitbetween polling for local device changes.
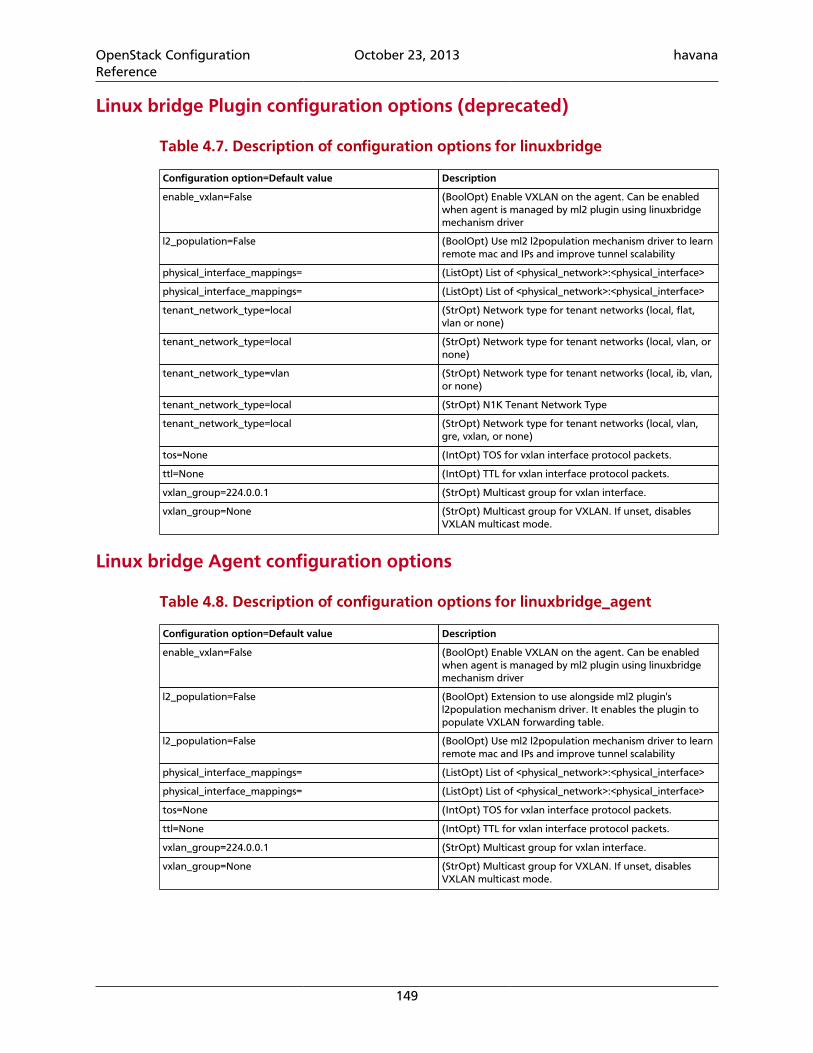
OpenStack ConfigurationReference
October 23, 2013 havana
149
Linux bridge Plugin configuration options (deprecated)
Table 4.7. Description of configuration options for linuxbridge
Configuration option=Default value Description
enable_vxlan=False (BoolOpt) Enable VXLAN on the agent. Can be enabledwhen agent is managed by ml2 plugin using linuxbridgemechanism driver
l2_population=False (BoolOpt) Use ml2 l2population mechanism driver to learnremote mac and IPs and improve tunnel scalability
physical_interface_mappings= (ListOpt) List of <physical_network>:<physical_interface>
physical_interface_mappings= (ListOpt) List of <physical_network>:<physical_interface>
tenant_network_type=local (StrOpt) Network type for tenant networks (local, flat,vlan or none)
tenant_network_type=local (StrOpt) Network type for tenant networks (local, vlan, ornone)
tenant_network_type=vlan (StrOpt) Network type for tenant networks (local, ib, vlan,or none)
tenant_network_type=local (StrOpt) N1K Tenant Network Type
tenant_network_type=local (StrOpt) Network type for tenant networks (local, vlan,gre, vxlan, or none)
tos=None (IntOpt) TOS for vxlan interface protocol packets.
ttl=None (IntOpt) TTL for vxlan interface protocol packets.
vxlan_group=224.0.0.1 (StrOpt) Multicast group for vxlan interface.
vxlan_group=None (StrOpt) Multicast group for VXLAN. If unset, disablesVXLAN multicast mode.
Linux bridge Agent configuration options
Table 4.8. Description of configuration options for linuxbridge_agent
Configuration option=Default value Description
enable_vxlan=False (BoolOpt) Enable VXLAN on the agent. Can be enabledwhen agent is managed by ml2 plugin using linuxbridgemechanism driver
l2_population=False (BoolOpt) Extension to use alongside ml2 plugin'sl2population mechanism driver. It enables the plugin topopulate VXLAN forwarding table.
l2_population=False (BoolOpt) Use ml2 l2population mechanism driver to learnremote mac and IPs and improve tunnel scalability
physical_interface_mappings= (ListOpt) List of <physical_network>:<physical_interface>
physical_interface_mappings= (ListOpt) List of <physical_network>:<physical_interface>
tos=None (IntOpt) TOS for vxlan interface protocol packets.
ttl=None (IntOpt) TTL for vxlan interface protocol packets.
vxlan_group=224.0.0.1 (StrOpt) Multicast group for vxlan interface.
vxlan_group=None (StrOpt) Multicast group for VXLAN. If unset, disablesVXLAN multicast mode.
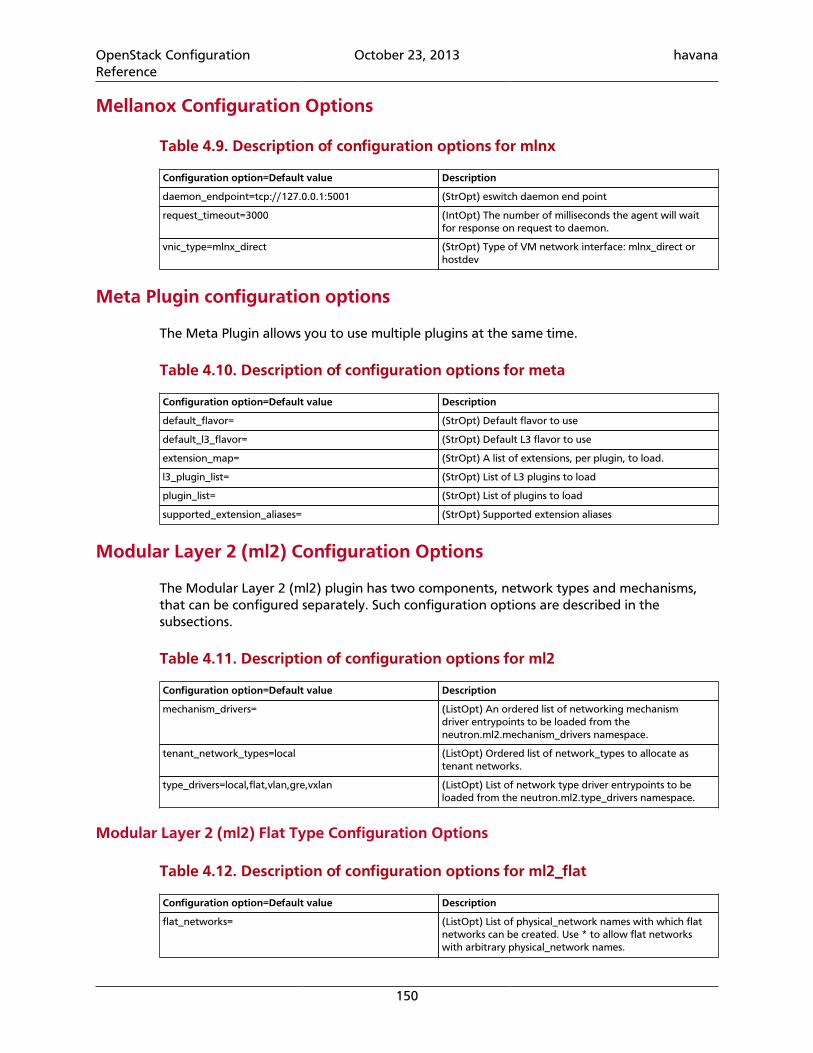
OpenStack ConfigurationReference
October 23, 2013 havana
150
Mellanox Configuration Options
Table 4.9. Description of configuration options for mlnx
Configuration option=Default value Description
daemon_endpoint=tcp://127.0.0.1:5001 (StrOpt) eswitch daemon end point
request_timeout=3000 (IntOpt) The number of milliseconds the agent will waitfor response on request to daemon.
vnic_type=mlnx_direct (StrOpt) Type of VM network interface: mlnx_direct orhostdev
Meta Plugin configuration options
The Meta Plugin allows you to use multiple plugins at the same time.
Table 4.10. Description of configuration options for meta
Configuration option=Default value Description
default_flavor= (StrOpt) Default flavor to use
default_l3_flavor= (StrOpt) Default L3 flavor to use
extension_map= (StrOpt) A list of extensions, per plugin, to load.
l3_plugin_list= (StrOpt) List of L3 plugins to load
plugin_list= (StrOpt) List of plugins to load
supported_extension_aliases= (StrOpt) Supported extension aliases
Modular Layer 2 (ml2) Configuration Options
The Modular Layer 2 (ml2) plugin has two components, network types and mechanisms,that can be configured separately. Such configuration options are described in thesubsections.
Table 4.11. Description of configuration options for ml2
Configuration option=Default value Description
mechanism_drivers= (ListOpt) An ordered list of networking mechanismdriver entrypoints to be loaded from theneutron.ml2.mechanism_drivers namespace.
tenant_network_types=local (ListOpt) Ordered list of network_types to allocate astenant networks.
type_drivers=local,flat,vlan,gre,vxlan (ListOpt) List of network type driver entrypoints to beloaded from the neutron.ml2.type_drivers namespace.
Modular Layer 2 (ml2) Flat Type Configuration Options
Table 4.12. Description of configuration options for ml2_flat
Configuration option=Default value Description
flat_networks= (ListOpt) List of physical_network names with which flatnetworks can be created. Use * to allow flat networkswith arbitrary physical_network names.
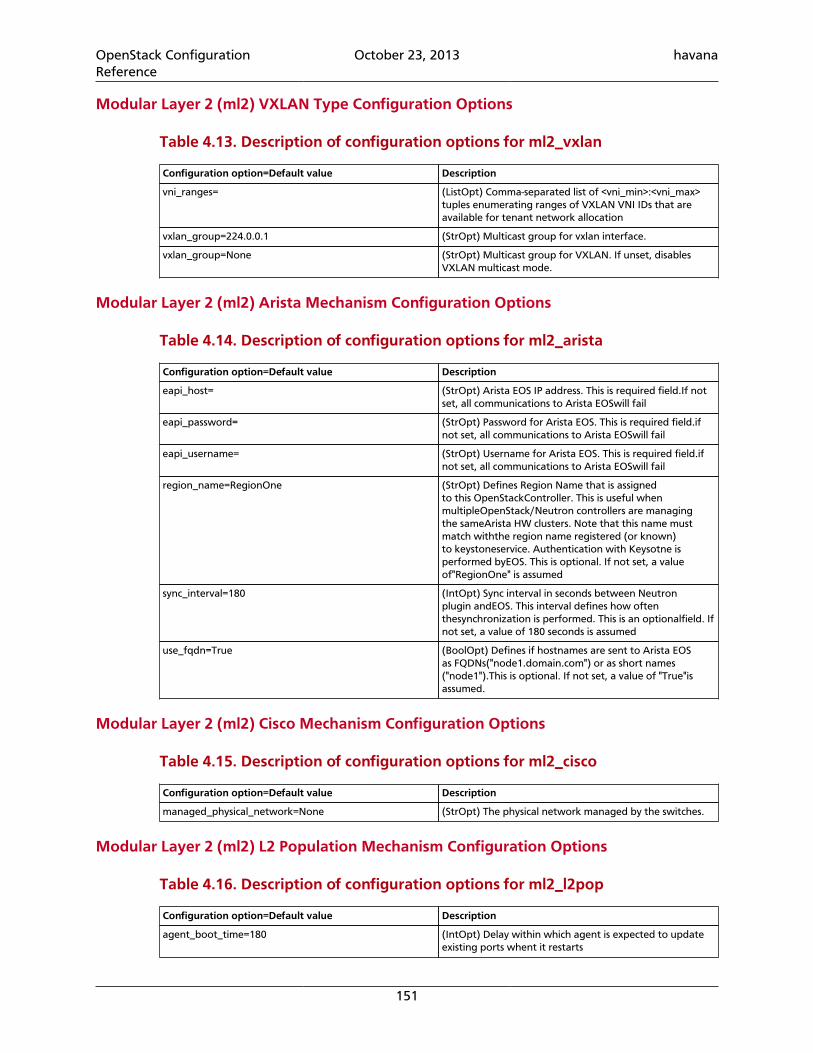
OpenStack ConfigurationReference
October 23, 2013 havana
151
Modular Layer 2 (ml2) VXLAN Type Configuration Options
Table 4.13. Description of configuration options for ml2_vxlan
Configuration option=Default value Description
vni_ranges= (ListOpt) Comma-separated list of <vni_min>:<vni_max>tuples enumerating ranges of VXLAN VNI IDs that areavailable for tenant network allocation
vxlan_group=224.0.0.1 (StrOpt) Multicast group for vxlan interface.
vxlan_group=None (StrOpt) Multicast group for VXLAN. If unset, disablesVXLAN multicast mode.
Modular Layer 2 (ml2) Arista Mechanism Configuration Options
Table 4.14. Description of configuration options for ml2_arista
Configuration option=Default value Description
eapi_host= (StrOpt) Arista EOS IP address. This is required field.If notset, all communications to Arista EOSwill fail
eapi_password= (StrOpt) Password for Arista EOS. This is required field.ifnot set, all communications to Arista EOSwill fail
eapi_username= (StrOpt) Username for Arista EOS. This is required field.ifnot set, all communications to Arista EOSwill fail
region_name=RegionOne (StrOpt) Defines Region Name that is assignedto this OpenStackController. This is useful whenmultipleOpenStack/Neutron controllers are managingthe sameArista HW clusters. Note that this name mustmatch withthe region name registered (or known)to keystoneservice. Authentication with Keysotne isperformed byEOS. This is optional. If not set, a valueof"RegionOne" is assumed
sync_interval=180 (IntOpt) Sync interval in seconds between Neutronplugin andEOS. This interval defines how oftenthesynchronization is performed. This is an optionalfield. Ifnot set, a value of 180 seconds is assumed
use_fqdn=True (BoolOpt) Defines if hostnames are sent to Arista EOSas FQDNs("node1.domain.com") or as short names("node1").This is optional. If not set, a value of "True"isassumed.
Modular Layer 2 (ml2) Cisco Mechanism Configuration Options
Table 4.15. Description of configuration options for ml2_cisco
Configuration option=Default value Description
managed_physical_network=None (StrOpt) The physical network managed by the switches.
Modular Layer 2 (ml2) L2 Population Mechanism Configuration Options
Table 4.16. Description of configuration options for ml2_l2pop
Configuration option=Default value Description
agent_boot_time=180 (IntOpt) Delay within which agent is expected to updateexisting ports whent it restarts
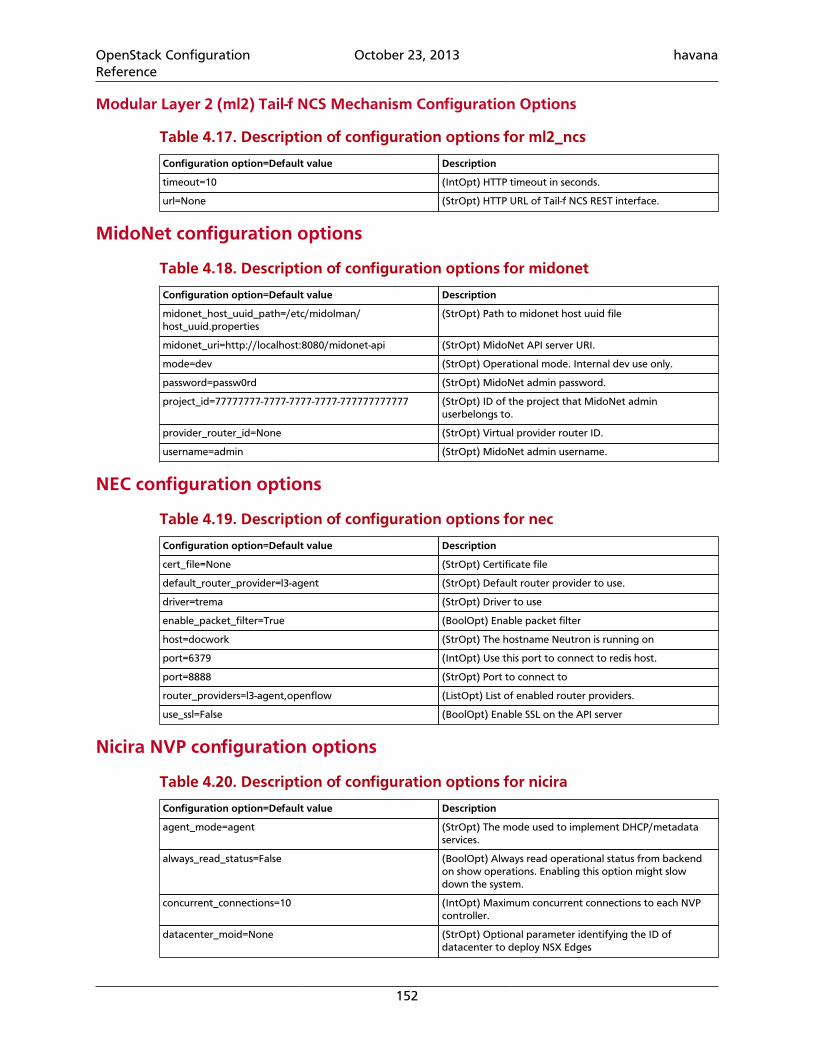
OpenStack ConfigurationReference
October 23, 2013 havana
152
Modular Layer 2 (ml2) Tail-f NCS Mechanism Configuration Options
Table 4.17. Description of configuration options for ml2_ncs
Configuration option=Default value Description
timeout=10 (IntOpt) HTTP timeout in seconds.
url=None (StrOpt) HTTP URL of Tail-f NCS REST interface.
MidoNet configuration options
Table 4.18. Description of configuration options for midonet
Configuration option=Default value Description
midonet_host_uuid_path=/etc/midolman/host_uuid.properties
(StrOpt) Path to midonet host uuid file
midonet_uri=http://localhost:8080/midonet-api (StrOpt) MidoNet API server URI.
mode=dev (StrOpt) Operational mode. Internal dev use only.
password=passw0rd (StrOpt) MidoNet admin password.
project_id=77777777-7777-7777-7777-777777777777 (StrOpt) ID of the project that MidoNet adminuserbelongs to.
provider_router_id=None (StrOpt) Virtual provider router ID.
username=admin (StrOpt) MidoNet admin username.
NEC configuration options
Table 4.19. Description of configuration options for nec
Configuration option=Default value Description
cert_file=None (StrOpt) Certificate file
default_router_provider=l3-agent (StrOpt) Default router provider to use.
driver=trema (StrOpt) Driver to use
enable_packet_filter=True (BoolOpt) Enable packet filter
host=docwork (StrOpt) The hostname Neutron is running on
port=6379 (IntOpt) Use this port to connect to redis host.
port=8888 (StrOpt) Port to connect to
router_providers=l3-agent,openflow (ListOpt) List of enabled router providers.
use_ssl=False (BoolOpt) Enable SSL on the API server
Nicira NVP configuration options
Table 4.20. Description of configuration options for nicira
Configuration option=Default value Description
agent_mode=agent (StrOpt) The mode used to implement DHCP/metadataservices.
always_read_status=False (BoolOpt) Always read operational status from backendon show operations. Enabling this option might slowdown the system.
concurrent_connections=10 (IntOpt) Maximum concurrent connections to each NVPcontroller.
datacenter_moid=None (StrOpt) Optional parameter identifying the ID ofdatacenter to deploy NSX Edges
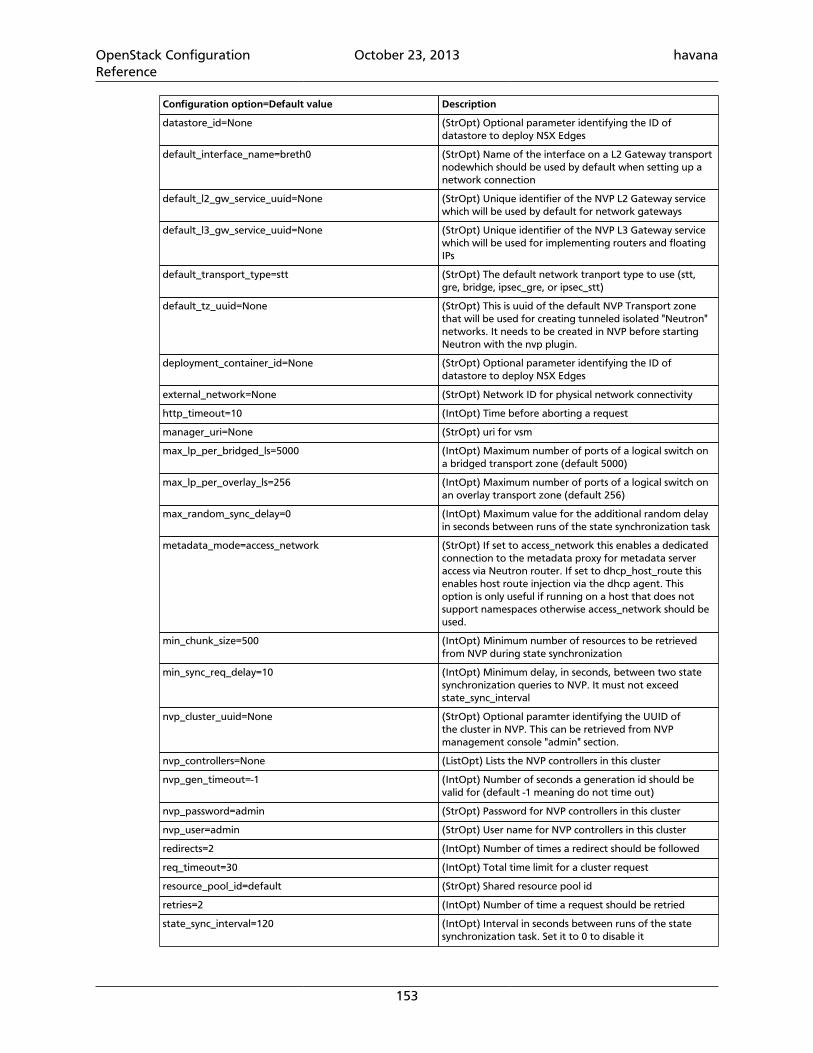
OpenStack ConfigurationReference
October 23, 2013 havana
153
Configuration option=Default value Description
datastore_id=None (StrOpt) Optional parameter identifying the ID ofdatastore to deploy NSX Edges
default_interface_name=breth0 (StrOpt) Name of the interface on a L2 Gateway transportnodewhich should be used by default when setting up anetwork connection
default_l2_gw_service_uuid=None (StrOpt) Unique identifier of the NVP L2 Gateway servicewhich will be used by default for network gateways
default_l3_gw_service_uuid=None (StrOpt) Unique identifier of the NVP L3 Gateway servicewhich will be used for implementing routers and floatingIPs
default_transport_type=stt (StrOpt) The default network tranport type to use (stt,gre, bridge, ipsec_gre, or ipsec_stt)
default_tz_uuid=None (StrOpt) This is uuid of the default NVP Transport zonethat will be used for creating tunneled isolated "Neutron"networks. It needs to be created in NVP before startingNeutron with the nvp plugin.
deployment_container_id=None (StrOpt) Optional parameter identifying the ID ofdatastore to deploy NSX Edges
external_network=None (StrOpt) Network ID for physical network connectivity
http_timeout=10 (IntOpt) Time before aborting a request
manager_uri=None (StrOpt) uri for vsm
max_lp_per_bridged_ls=5000 (IntOpt) Maximum number of ports of a logical switch ona bridged transport zone (default 5000)
max_lp_per_overlay_ls=256 (IntOpt) Maximum number of ports of a logical switch onan overlay transport zone (default 256)
max_random_sync_delay=0 (IntOpt) Maximum value for the additional random delayin seconds between runs of the state synchronization task
metadata_mode=access_network (StrOpt) If set to access_network this enables a dedicatedconnection to the metadata proxy for metadata serveraccess via Neutron router. If set to dhcp_host_route thisenables host route injection via the dhcp agent. Thisoption is only useful if running on a host that does notsupport namespaces otherwise access_network should beused.
min_chunk_size=500 (IntOpt) Minimum number of resources to be retrievedfrom NVP during state synchronization
min_sync_req_delay=10 (IntOpt) Minimum delay, in seconds, between two statesynchronization queries to NVP. It must not exceedstate_sync_interval
nvp_cluster_uuid=None (StrOpt) Optional paramter identifying the UUID ofthe cluster in NVP. This can be retrieved from NVPmanagement console "admin" section.
nvp_controllers=None (ListOpt) Lists the NVP controllers in this cluster
nvp_gen_timeout=-1 (IntOpt) Number of seconds a generation id should bevalid for (default -1 meaning do not time out)
nvp_password=admin (StrOpt) Password for NVP controllers in this cluster
nvp_user=admin (StrOpt) User name for NVP controllers in this cluster
redirects=2 (IntOpt) Number of times a redirect should be followed
req_timeout=30 (IntOpt) Total time limit for a cluster request
resource_pool_id=default (StrOpt) Shared resource pool id
retries=2 (IntOpt) Number of time a request should be retried
state_sync_interval=120 (IntOpt) Interval in seconds between runs of the statesynchronization task. Set it to 0 to disable it
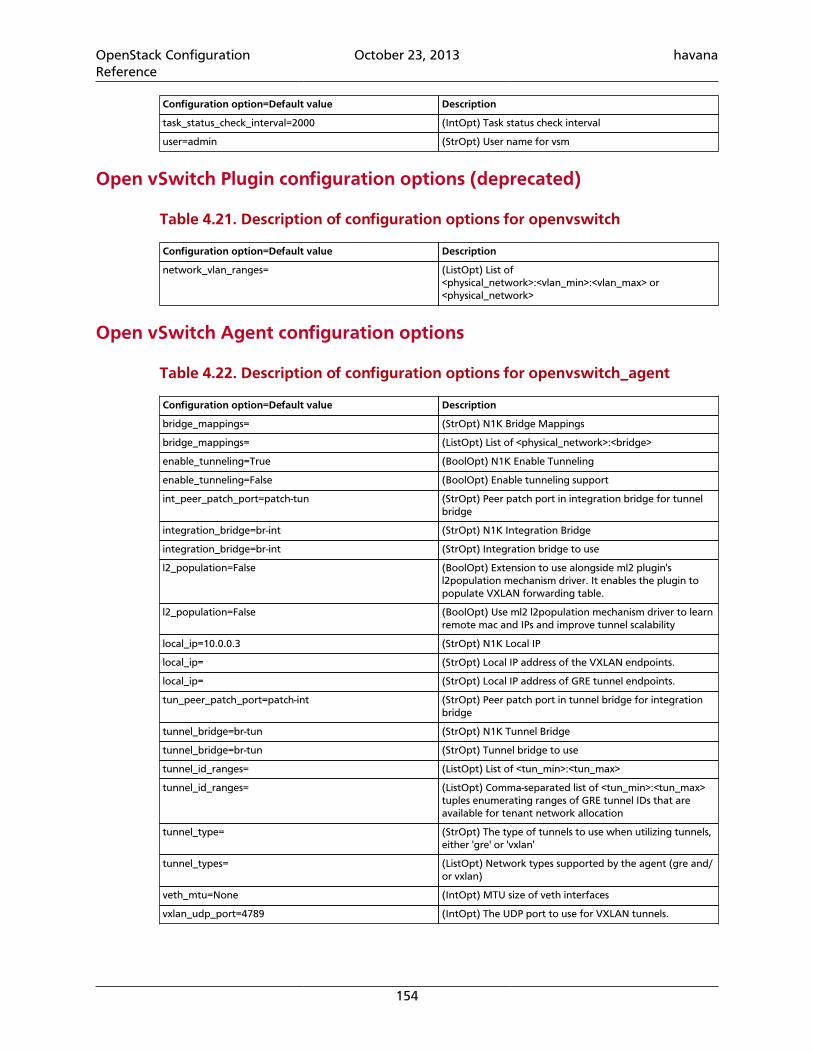
OpenStack ConfigurationReference
October 23, 2013 havana
154
Configuration option=Default value Description
task_status_check_interval=2000 (IntOpt) Task status check interval
user=admin (StrOpt) User name for vsm
Open vSwitch Plugin configuration options (deprecated)
Table 4.21. Description of configuration options for openvswitch
Configuration option=Default value Description
network_vlan_ranges= (ListOpt) List of<physical_network>:<vlan_min>:<vlan_max> or<physical_network>
Open vSwitch Agent configuration options
Table 4.22. Description of configuration options for openvswitch_agent
Configuration option=Default value Description
bridge_mappings= (StrOpt) N1K Bridge Mappings
bridge_mappings= (ListOpt) List of <physical_network>:<bridge>
enable_tunneling=True (BoolOpt) N1K Enable Tunneling
enable_tunneling=False (BoolOpt) Enable tunneling support
int_peer_patch_port=patch-tun (StrOpt) Peer patch port in integration bridge for tunnelbridge
integration_bridge=br-int (StrOpt) N1K Integration Bridge
integration_bridge=br-int (StrOpt) Integration bridge to use
l2_population=False (BoolOpt) Extension to use alongside ml2 plugin'sl2population mechanism driver. It enables the plugin topopulate VXLAN forwarding table.
l2_population=False (BoolOpt) Use ml2 l2population mechanism driver to learnremote mac and IPs and improve tunnel scalability
local_ip=10.0.0.3 (StrOpt) N1K Local IP
local_ip= (StrOpt) Local IP address of the VXLAN endpoints.
local_ip= (StrOpt) Local IP address of GRE tunnel endpoints.
tun_peer_patch_port=patch-int (StrOpt) Peer patch port in tunnel bridge for integrationbridge
tunnel_bridge=br-tun (StrOpt) N1K Tunnel Bridge
tunnel_bridge=br-tun (StrOpt) Tunnel bridge to use
tunnel_id_ranges= (ListOpt) List of <tun_min>:<tun_max>
tunnel_id_ranges= (ListOpt) Comma-separated list of <tun_min>:<tun_max>tuples enumerating ranges of GRE tunnel IDs that areavailable for tenant network allocation
tunnel_type= (StrOpt) The type of tunnels to use when utilizing tunnels,either 'gre' or 'vxlan'
tunnel_types= (ListOpt) Network types supported by the agent (gre and/or vxlan)
veth_mtu=None (IntOpt) MTU size of veth interfaces
vxlan_udp_port=4789 (IntOpt) The UDP port to use for VXLAN tunnels.
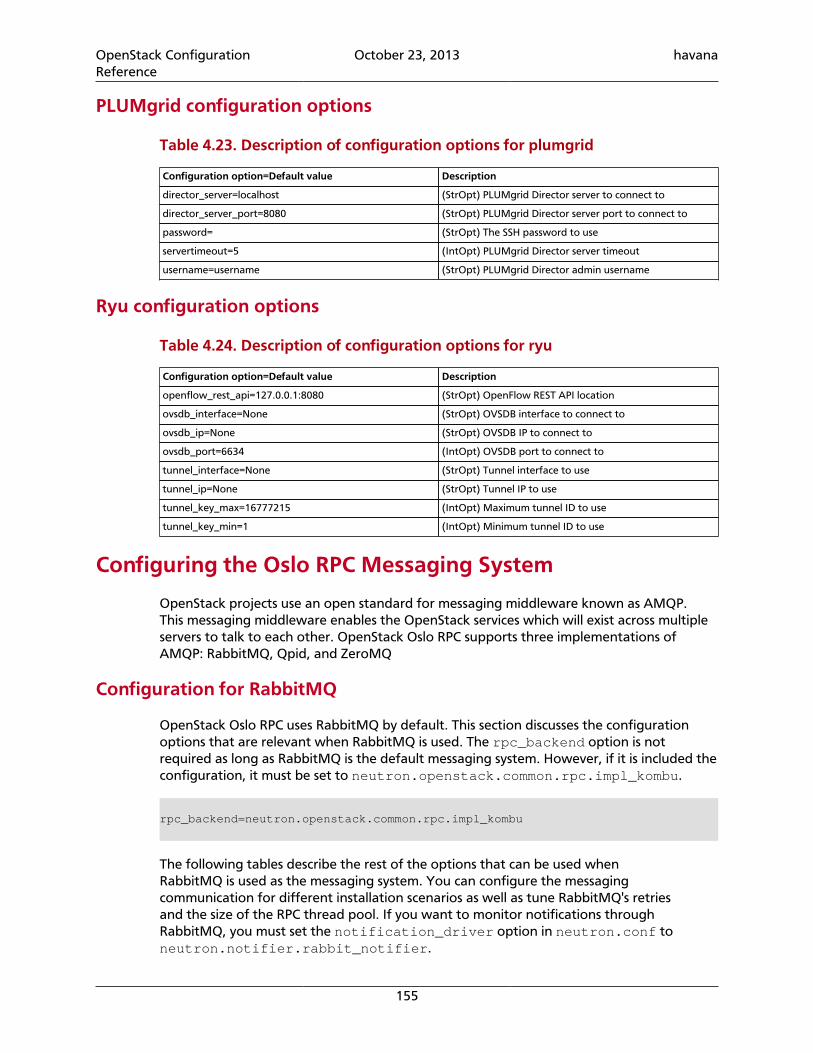
OpenStack ConfigurationReference
October 23, 2013 havana
155
PLUMgrid configuration options
Table 4.23. Description of configuration options for plumgrid
Configuration option=Default value Description
director_server=localhost (StrOpt) PLUMgrid Director server to connect to
director_server_port=8080 (StrOpt) PLUMgrid Director server port to connect to
password= (StrOpt) The SSH password to use
servertimeout=5 (IntOpt) PLUMgrid Director server timeout
username=username (StrOpt) PLUMgrid Director admin username
Ryu configuration options
Table 4.24. Description of configuration options for ryu
Configuration option=Default value Description
openflow_rest_api=127.0.0.1:8080 (StrOpt) OpenFlow REST API location
ovsdb_interface=None (StrOpt) OVSDB interface to connect to
ovsdb_ip=None (StrOpt) OVSDB IP to connect to
ovsdb_port=6634 (IntOpt) OVSDB port to connect to
tunnel_interface=None (StrOpt) Tunnel interface to use
tunnel_ip=None (StrOpt) Tunnel IP to use
tunnel_key_max=16777215 (IntOpt) Maximum tunnel ID to use
tunnel_key_min=1 (IntOpt) Minimum tunnel ID to use
Configuring the Oslo RPC Messaging System
OpenStack projects use an open standard for messaging middleware known as AMQP.This messaging middleware enables the OpenStack services which will exist across multipleservers to talk to each other. OpenStack Oslo RPC supports three implementations ofAMQP: RabbitMQ, Qpid, and ZeroMQ
Configuration for RabbitMQ
OpenStack Oslo RPC uses RabbitMQ by default. This section discusses the configurationoptions that are relevant when RabbitMQ is used. The rpc_backend option is notrequired as long as RabbitMQ is the default messaging system. However, if it is included theconfiguration, it must be set to neutron.openstack.common.rpc.impl_kombu.
rpc_backend=neutron.openstack.common.rpc.impl_kombu
The following tables describe the rest of the options that can be used whenRabbitMQ is used as the messaging system. You can configure the messagingcommunication for different installation scenarios as well as tune RabbitMQ's retriesand the size of the RPC thread pool. If you want to monitor notifications throughRabbitMQ, you must set the notification_driver option in neutron.conf toneutron.notifier.rabbit_notifier.
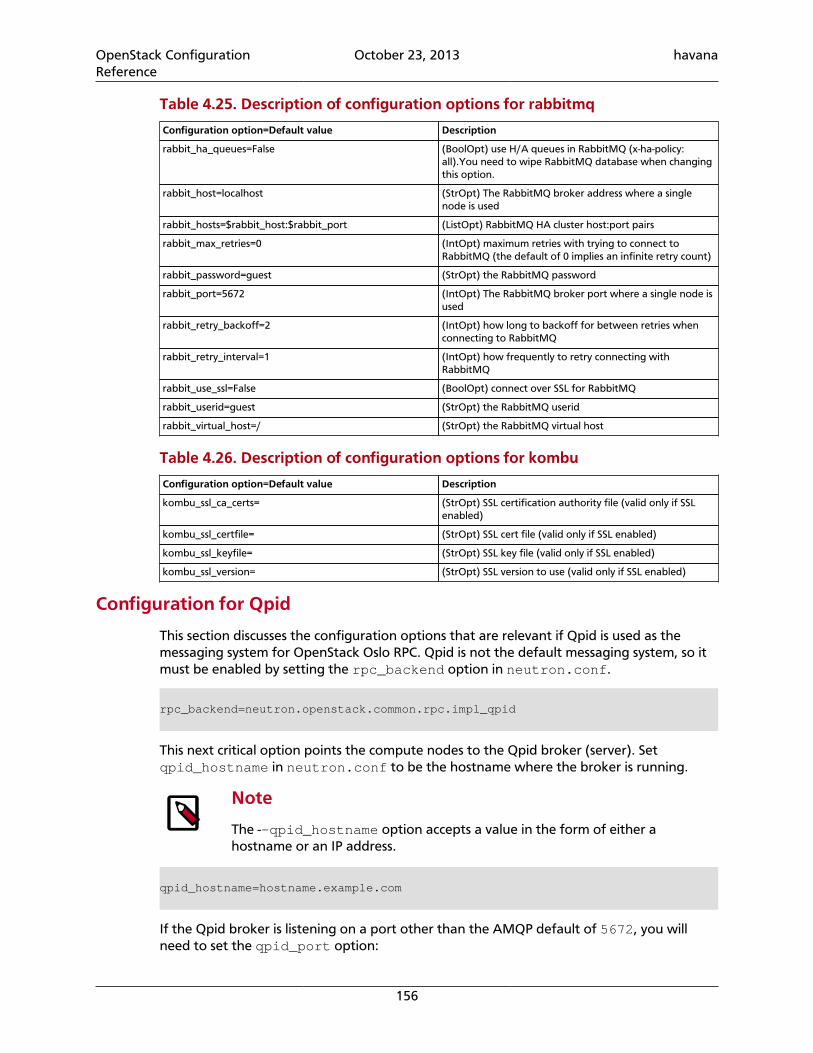
OpenStack ConfigurationReference
October 23, 2013 havana
156
Table 4.25. Description of configuration options for rabbitmq
Configuration option=Default value Description
rabbit_ha_queues=False (BoolOpt) use H/A queues in RabbitMQ (x-ha-policy:all).You need to wipe RabbitMQ database when changingthis option.
rabbit_host=localhost (StrOpt) The RabbitMQ broker address where a singlenode is used
rabbit_hosts=$rabbit_host:$rabbit_port (ListOpt) RabbitMQ HA cluster host:port pairs
rabbit_max_retries=0 (IntOpt) maximum retries with trying to connect toRabbitMQ (the default of 0 implies an infinite retry count)
rabbit_password=guest (StrOpt) the RabbitMQ password
rabbit_port=5672 (IntOpt) The RabbitMQ broker port where a single node isused
rabbit_retry_backoff=2 (IntOpt) how long to backoff for between retries whenconnecting to RabbitMQ
rabbit_retry_interval=1 (IntOpt) how frequently to retry connecting withRabbitMQ
rabbit_use_ssl=False (BoolOpt) connect over SSL for RabbitMQ
rabbit_userid=guest (StrOpt) the RabbitMQ userid
rabbit_virtual_host=/ (StrOpt) the RabbitMQ virtual host
Table 4.26. Description of configuration options for kombu
Configuration option=Default value Description
kombu_ssl_ca_certs= (StrOpt) SSL certification authority file (valid only if SSLenabled)
kombu_ssl_certfile= (StrOpt) SSL cert file (valid only if SSL enabled)
kombu_ssl_keyfile= (StrOpt) SSL key file (valid only if SSL enabled)
kombu_ssl_version= (StrOpt) SSL version to use (valid only if SSL enabled)
Configuration for Qpid
This section discusses the configuration options that are relevant if Qpid is used as themessaging system for OpenStack Oslo RPC. Qpid is not the default messaging system, so itmust be enabled by setting the rpc_backend option in neutron.conf.
rpc_backend=neutron.openstack.common.rpc.impl_qpid
This next critical option points the compute nodes to the Qpid broker (server). Setqpid_hostname in neutron.conf to be the hostname where the broker is running.
Note
The --qpid_hostname option accepts a value in the form of either ahostname or an IP address.
qpid_hostname=hostname.example.com
If the Qpid broker is listening on a port other than the AMQP default of 5672, you willneed to set the qpid_port option:
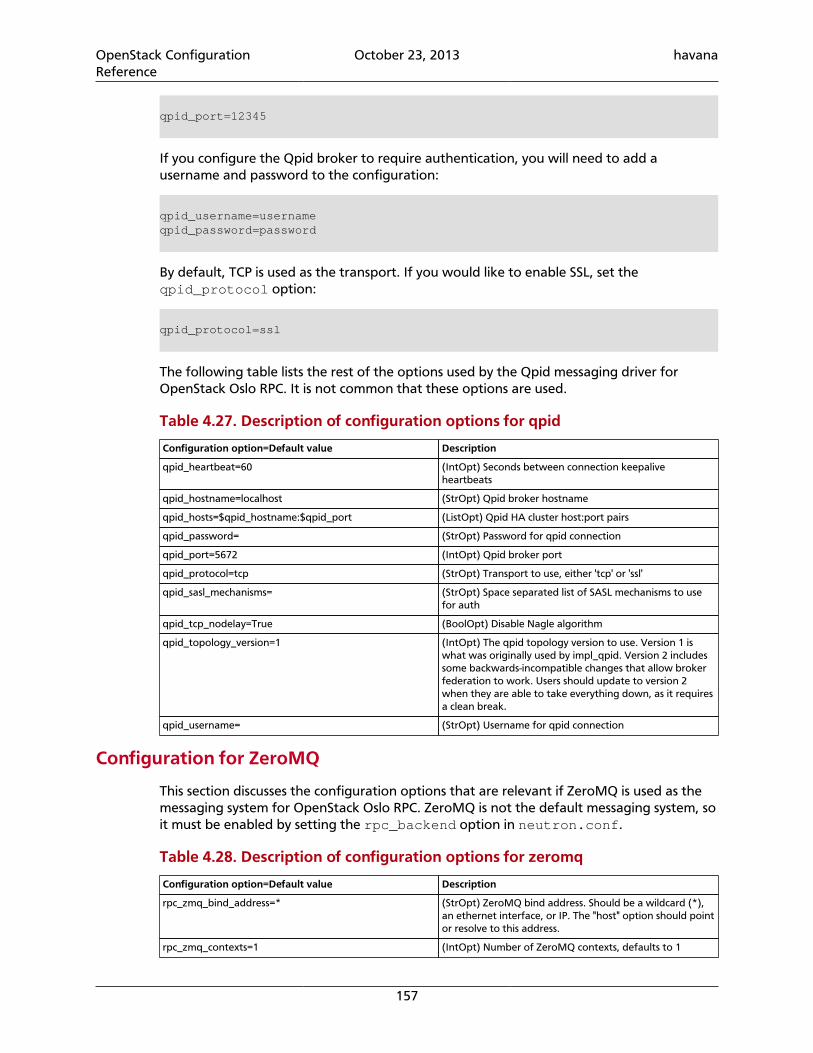
OpenStack ConfigurationReference
October 23, 2013 havana
157
qpid_port=12345
If you configure the Qpid broker to require authentication, you will need to add ausername and password to the configuration:
qpid_username=usernameqpid_password=password
By default, TCP is used as the transport. If you would like to enable SSL, set theqpid_protocol option:
qpid_protocol=ssl
The following table lists the rest of the options used by the Qpid messaging driver forOpenStack Oslo RPC. It is not common that these options are used.
Table 4.27. Description of configuration options for qpid
Configuration option=Default value Description
qpid_heartbeat=60 (IntOpt) Seconds between connection keepaliveheartbeats
qpid_hostname=localhost (StrOpt) Qpid broker hostname
qpid_hosts=$qpid_hostname:$qpid_port (ListOpt) Qpid HA cluster host:port pairs
qpid_password= (StrOpt) Password for qpid connection
qpid_port=5672 (IntOpt) Qpid broker port
qpid_protocol=tcp (StrOpt) Transport to use, either 'tcp' or 'ssl'
qpid_sasl_mechanisms= (StrOpt) Space separated list of SASL mechanisms to usefor auth
qpid_tcp_nodelay=True (BoolOpt) Disable Nagle algorithm
qpid_topology_version=1 (IntOpt) The qpid topology version to use. Version 1 iswhat was originally used by impl_qpid. Version 2 includessome backwards-incompatible changes that allow brokerfederation to work. Users should update to version 2when they are able to take everything down, as it requiresa clean break.
qpid_username= (StrOpt) Username for qpid connection
Configuration for ZeroMQ
This section discusses the configuration options that are relevant if ZeroMQ is used as themessaging system for OpenStack Oslo RPC. ZeroMQ is not the default messaging system, soit must be enabled by setting the rpc_backend option in neutron.conf.
Table 4.28. Description of configuration options for zeromq
Configuration option=Default value Description
rpc_zmq_bind_address=* (StrOpt) ZeroMQ bind address. Should be a wildcard (*),an ethernet interface, or IP. The "host" option should pointor resolve to this address.
rpc_zmq_contexts=1 (IntOpt) Number of ZeroMQ contexts, defaults to 1
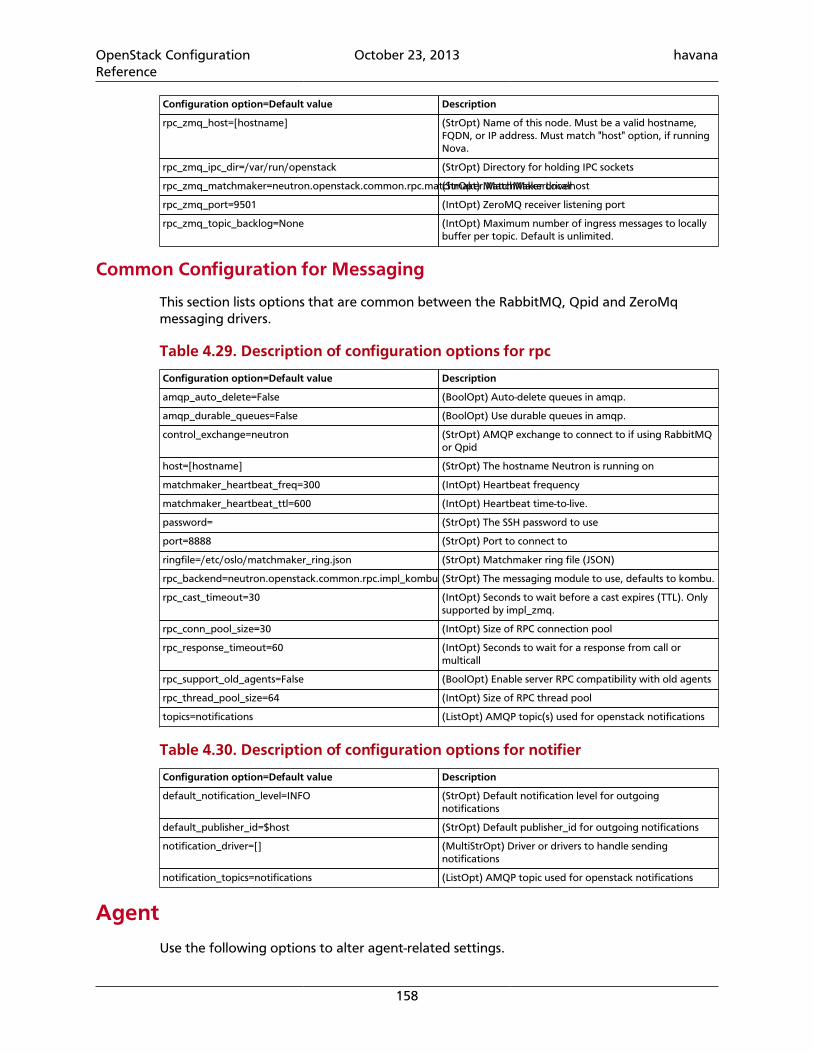
OpenStack ConfigurationReference
October 23, 2013 havana
158
Configuration option=Default value Description
rpc_zmq_host=[hostname] (StrOpt) Name of this node. Must be a valid hostname,FQDN, or IP address. Must match "host" option, if runningNova.
rpc_zmq_ipc_dir=/var/run/openstack (StrOpt) Directory for holding IPC sockets
rpc_zmq_matchmaker=neutron.openstack.common.rpc.matchmaker.MatchMakerLocalhost(StrOpt) MatchMaker driver
rpc_zmq_port=9501 (IntOpt) ZeroMQ receiver listening port
rpc_zmq_topic_backlog=None (IntOpt) Maximum number of ingress messages to locallybuffer per topic. Default is unlimited.
Common Configuration for Messaging
This section lists options that are common between the RabbitMQ, Qpid and ZeroMqmessaging drivers.
Table 4.29. Description of configuration options for rpc
Configuration option=Default value Description
amqp_auto_delete=False (BoolOpt) Auto-delete queues in amqp.
amqp_durable_queues=False (BoolOpt) Use durable queues in amqp.
control_exchange=neutron (StrOpt) AMQP exchange to connect to if using RabbitMQor Qpid
host=[hostname] (StrOpt) The hostname Neutron is running on
matchmaker_heartbeat_freq=300 (IntOpt) Heartbeat frequency
matchmaker_heartbeat_ttl=600 (IntOpt) Heartbeat time-to-live.
password= (StrOpt) The SSH password to use
port=8888 (StrOpt) Port to connect to
ringfile=/etc/oslo/matchmaker_ring.json (StrOpt) Matchmaker ring file (JSON)
rpc_backend=neutron.openstack.common.rpc.impl_kombu (StrOpt) The messaging module to use, defaults to kombu.
rpc_cast_timeout=30 (IntOpt) Seconds to wait before a cast expires (TTL). Onlysupported by impl_zmq.
rpc_conn_pool_size=30 (IntOpt) Size of RPC connection pool
rpc_response_timeout=60 (IntOpt) Seconds to wait for a response from call ormulticall
rpc_support_old_agents=False (BoolOpt) Enable server RPC compatibility with old agents
rpc_thread_pool_size=64 (IntOpt) Size of RPC thread pool
topics=notifications (ListOpt) AMQP topic(s) used for openstack notifications
Table 4.30. Description of configuration options for notifier
Configuration option=Default value Description
default_notification_level=INFO (StrOpt) Default notification level for outgoingnotifications
default_publisher_id=$host (StrOpt) Default publisher_id for outgoing notifications
notification_driver=[] (MultiStrOpt) Driver or drivers to handle sendingnotifications
notification_topics=notifications (ListOpt) AMQP topic used for openstack notifications
AgentUse the following options to alter agent-related settings.

OpenStack ConfigurationReference
October 23, 2013 havana
159
Table 4.31. Description of configuration options for agent
Configuration option=Default value Description
agent_down_time=5 (IntOpt) Seconds to regard the agent is down.
external_pids=$state_path/external/pids (StrOpt) Location to store child pid files
interface_driver=None (StrOpt) The driver used to manage the virtual interface.
report_interval=4 (FloatOpt) Seconds between nodes reporting state toserver
use_namespaces=True (BoolOpt) Allow overlapping IP.
APIUse the following options to alter API-related settings.
Table 4.32. Description of configuration options for api
Configuration option=Default value Description
allow_bulk=True (BoolOpt) Allow the usage of the bulk API
allow_pagination=False (BoolOpt) Allow the usage of the pagination
allow_sorting=False (BoolOpt) Allow the usage of the sorting
api_extensions_path= (StrOpt) The path for API extensions
api_paste_config=api-paste.ini (StrOpt) The API paste config file to use
pagination_max_limit=-1 (StrOpt) The maximum number of items returned in asingle response, value was 'infinite' or negative integermeans no limit
run_external_periodic_tasks=True (BoolOpt) Some periodic tasks can be run in a separateprocess. Should we run them here?
service_plugins= (ListOpt) The service plugins Neutron will use
service_provider=[] (MultiStrOpt) Defines providers foradvanced services using the format:<service_type>:<name>:<driver>[:default]
DatabaseUse the following options to alter Database-related settings.
Table 4.33. Description of configuration options for db
Configuration option=Default value Description
backend=sqlalchemy (StrOpt) The backend to use for db
connection=sqlite:// (StrOpt) The SQLAlchemy connection string used toconnect to the database
connection_debug=0 (IntOpt) Verbosity of SQL debugging information.0=None, 100=Everything
connection_trace=False (BoolOpt) Add python stack traces to SQL as commentstrings
dhcp_agents_per_network=1 (IntOpt) Number of DHCP agents scheduled to host anetwork.
idle_timeout=3600 (IntOpt) timeout before idle sql connections are reaped
max_overflow=20 (IntOpt) If set, use this value for max_overflow withsqlalchemy
max_pool_size=10 (IntOpt) Maximum number of SQL connections to keepopen in a pool
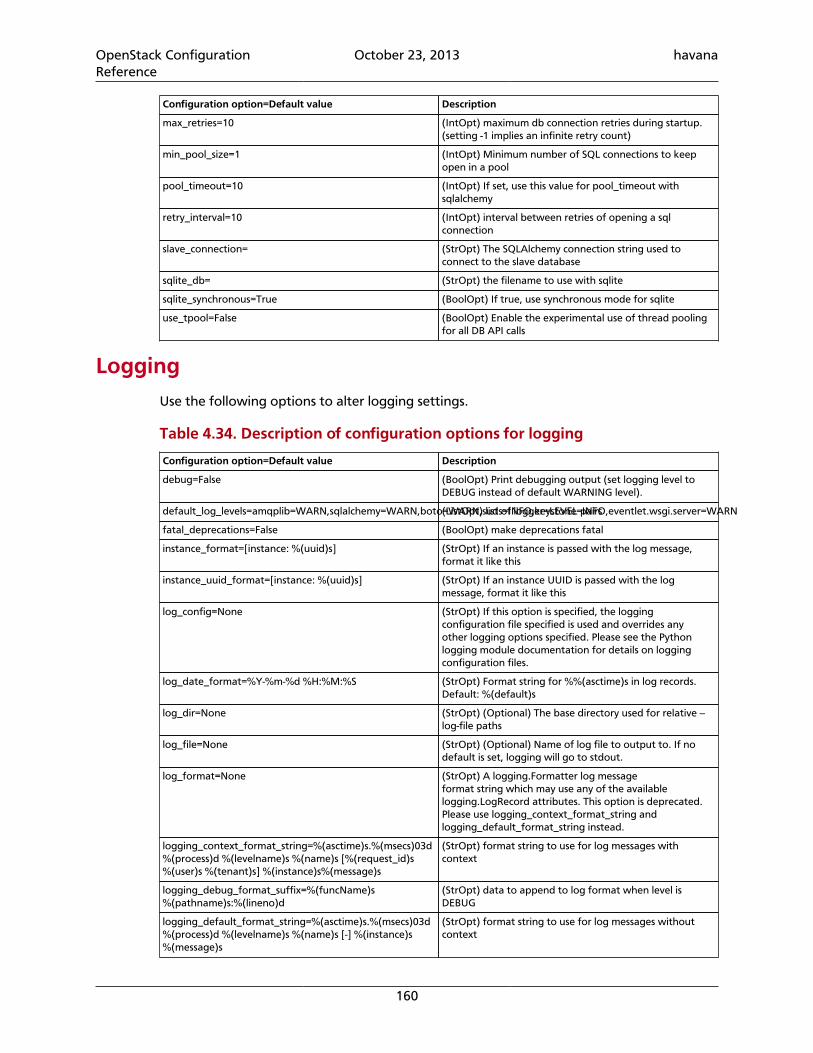
OpenStack ConfigurationReference
October 23, 2013 havana
160
Configuration option=Default value Description
max_retries=10 (IntOpt) maximum db connection retries during startup.(setting -1 implies an infinite retry count)
min_pool_size=1 (IntOpt) Minimum number of SQL connections to keepopen in a pool
pool_timeout=10 (IntOpt) If set, use this value for pool_timeout withsqlalchemy
retry_interval=10 (IntOpt) interval between retries of opening a sqlconnection
slave_connection= (StrOpt) The SQLAlchemy connection string used toconnect to the slave database
sqlite_db= (StrOpt) the filename to use with sqlite
sqlite_synchronous=True (BoolOpt) If true, use synchronous mode for sqlite
use_tpool=False (BoolOpt) Enable the experimental use of thread poolingfor all DB API calls
LoggingUse the following options to alter logging settings.
Table 4.34. Description of configuration options for logging
Configuration option=Default value Description
debug=False (BoolOpt) Print debugging output (set logging level toDEBUG instead of default WARNING level).
default_log_levels=amqplib=WARN,sqlalchemy=WARN,boto=WARN,suds=INFO,keystone=INFO,eventlet.wsgi.server=WARN(ListOpt) list of logger=LEVEL pairs
fatal_deprecations=False (BoolOpt) make deprecations fatal
instance_format=[instance: %(uuid)s] (StrOpt) If an instance is passed with the log message,format it like this
instance_uuid_format=[instance: %(uuid)s] (StrOpt) If an instance UUID is passed with the logmessage, format it like this
log_config=None (StrOpt) If this option is specified, the loggingconfiguration file specified is used and overrides anyother logging options specified. Please see the Pythonlogging module documentation for details on loggingconfiguration files.
log_date_format=%Y-%m-%d %H:%M:%S (StrOpt) Format string for %%(asctime)s in log records.Default: %(default)s
log_dir=None (StrOpt) (Optional) The base directory used for relative --log-file paths
log_file=None (StrOpt) (Optional) Name of log file to output to. If nodefault is set, logging will go to stdout.
log_format=None (StrOpt) A logging.Formatter log messageformat string which may use any of the availablelogging.LogRecord attributes. This option is deprecated.Please use logging_context_format_string andlogging_default_format_string instead.
logging_context_format_string=%(asctime)s.%(msecs)03d%(process)d %(levelname)s %(name)s [%(request_id)s%(user)s %(tenant)s] %(instance)s%(message)s
(StrOpt) format string to use for log messages withcontext
logging_debug_format_suffix=%(funcName)s%(pathname)s:%(lineno)d
(StrOpt) data to append to log format when level isDEBUG
logging_default_format_string=%(asctime)s.%(msecs)03d%(process)d %(levelname)s %(name)s [-] %(instance)s%(message)s
(StrOpt) format string to use for log messages withoutcontext
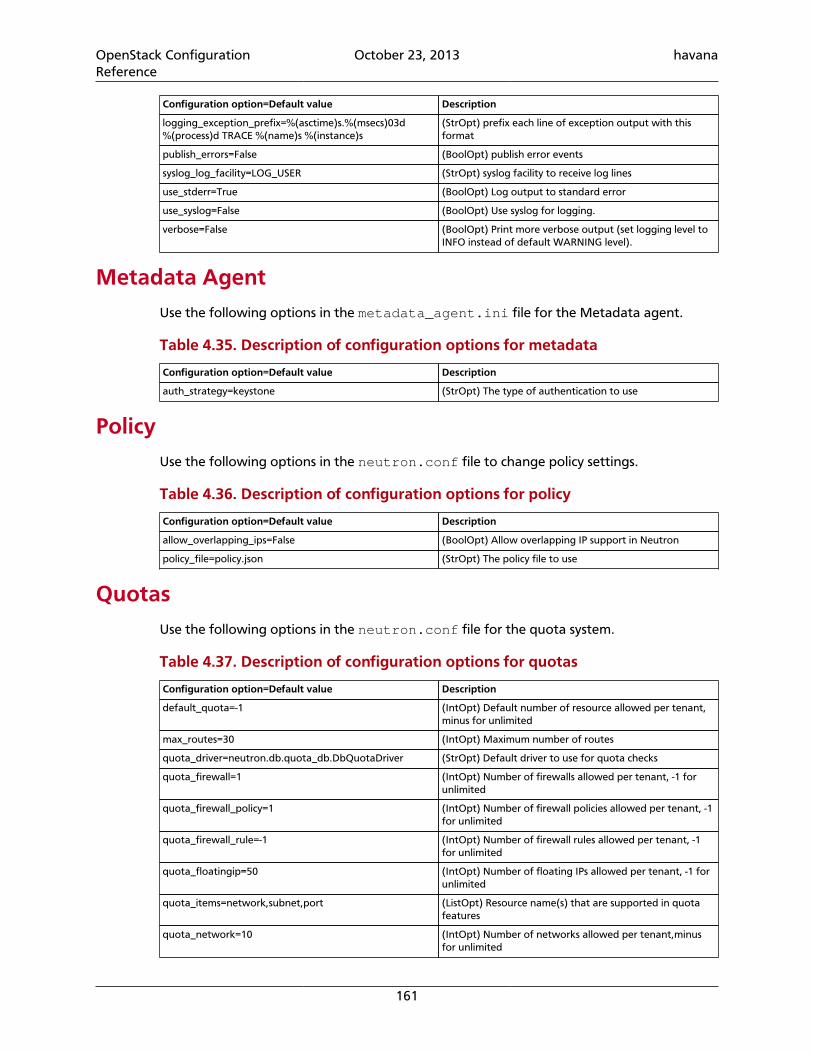
OpenStack ConfigurationReference
October 23, 2013 havana
161
Configuration option=Default value Description
logging_exception_prefix=%(asctime)s.%(msecs)03d%(process)d TRACE %(name)s %(instance)s
(StrOpt) prefix each line of exception output with thisformat
publish_errors=False (BoolOpt) publish error events
syslog_log_facility=LOG_USER (StrOpt) syslog facility to receive log lines
use_stderr=True (BoolOpt) Log output to standard error
use_syslog=False (BoolOpt) Use syslog for logging.
verbose=False (BoolOpt) Print more verbose output (set logging level toINFO instead of default WARNING level).
Metadata AgentUse the following options in the metadata_agent.ini file for the Metadata agent.
Table 4.35. Description of configuration options for metadata
Configuration option=Default value Description
auth_strategy=keystone (StrOpt) The type of authentication to use
PolicyUse the following options in the neutron.conf file to change policy settings.
Table 4.36. Description of configuration options for policy
Configuration option=Default value Description
allow_overlapping_ips=False (BoolOpt) Allow overlapping IP support in Neutron
policy_file=policy.json (StrOpt) The policy file to use
QuotasUse the following options in the neutron.conf file for the quota system.
Table 4.37. Description of configuration options for quotas
Configuration option=Default value Description
default_quota=-1 (IntOpt) Default number of resource allowed per tenant,minus for unlimited
max_routes=30 (IntOpt) Maximum number of routes
quota_driver=neutron.db.quota_db.DbQuotaDriver (StrOpt) Default driver to use for quota checks
quota_firewall=1 (IntOpt) Number of firewalls allowed per tenant, -1 forunlimited
quota_firewall_policy=1 (IntOpt) Number of firewall policies allowed per tenant, -1for unlimited
quota_firewall_rule=-1 (IntOpt) Number of firewall rules allowed per tenant, -1for unlimited
quota_floatingip=50 (IntOpt) Number of floating IPs allowed per tenant, -1 forunlimited
quota_items=network,subnet,port (ListOpt) Resource name(s) that are supported in quotafeatures
quota_network=10 (IntOpt) Number of networks allowed per tenant,minusfor unlimited
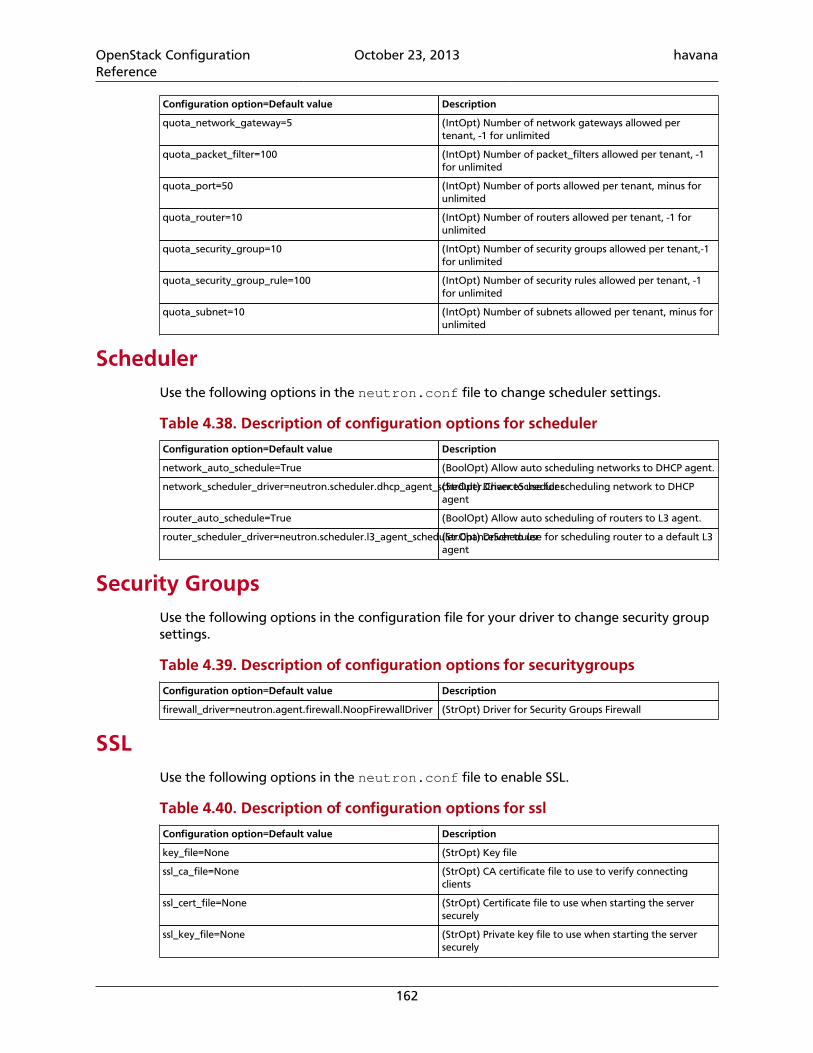
OpenStack ConfigurationReference
October 23, 2013 havana
162
Configuration option=Default value Description
quota_network_gateway=5 (IntOpt) Number of network gateways allowed pertenant, -1 for unlimited
quota_packet_filter=100 (IntOpt) Number of packet_filters allowed per tenant, -1for unlimited
quota_port=50 (IntOpt) Number of ports allowed per tenant, minus forunlimited
quota_router=10 (IntOpt) Number of routers allowed per tenant, -1 forunlimited
quota_security_group=10 (IntOpt) Number of security groups allowed per tenant,-1for unlimited
quota_security_group_rule=100 (IntOpt) Number of security rules allowed per tenant, -1for unlimited
quota_subnet=10 (IntOpt) Number of subnets allowed per tenant, minus forunlimited
SchedulerUse the following options in the neutron.conf file to change scheduler settings.
Table 4.38. Description of configuration options for scheduler
Configuration option=Default value Description
network_auto_schedule=True (BoolOpt) Allow auto scheduling networks to DHCP agent.
network_scheduler_driver=neutron.scheduler.dhcp_agent_scheduler.ChanceScheduler(StrOpt) Driver to use for scheduling network to DHCPagent
router_auto_schedule=True (BoolOpt) Allow auto scheduling of routers to L3 agent.
router_scheduler_driver=neutron.scheduler.l3_agent_scheduler.ChanceScheduler(StrOpt) Driver to use for scheduling router to a default L3agent
Security GroupsUse the following options in the configuration file for your driver to change security groupsettings.
Table 4.39. Description of configuration options for securitygroups
Configuration option=Default value Description
firewall_driver=neutron.agent.firewall.NoopFirewallDriver (StrOpt) Driver for Security Groups Firewall
SSLUse the following options in the neutron.conf file to enable SSL.
Table 4.40. Description of configuration options for ssl
Configuration option=Default value Description
key_file=None (StrOpt) Key file
ssl_ca_file=None (StrOpt) CA certificate file to use to verify connectingclients
ssl_cert_file=None (StrOpt) Certificate file to use when starting the serversecurely
ssl_key_file=None (StrOpt) Private key file to use when starting the serversecurely
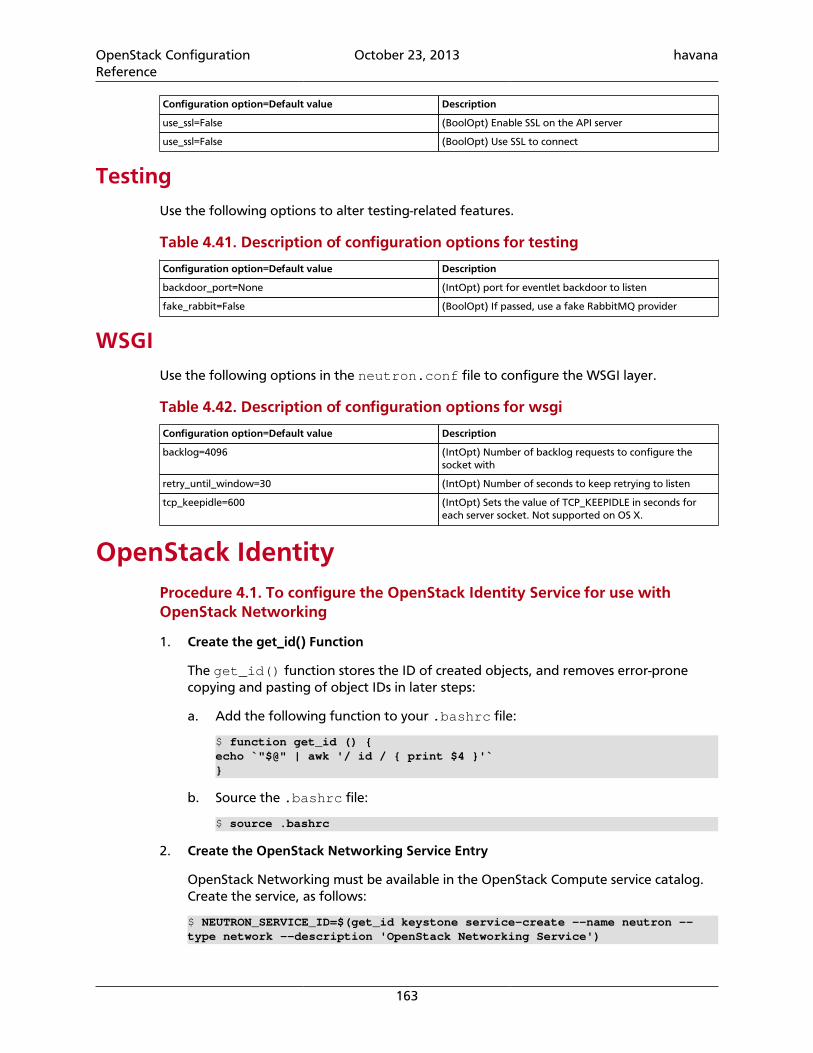
OpenStack ConfigurationReference
October 23, 2013 havana
163
Configuration option=Default value Description
use_ssl=False (BoolOpt) Enable SSL on the API server
use_ssl=False (BoolOpt) Use SSL to connect
TestingUse the following options to alter testing-related features.
Table 4.41. Description of configuration options for testing
Configuration option=Default value Description
backdoor_port=None (IntOpt) port for eventlet backdoor to listen
fake_rabbit=False (BoolOpt) If passed, use a fake RabbitMQ provider
WSGIUse the following options in the neutron.conf file to configure the WSGI layer.
Table 4.42. Description of configuration options for wsgi
Configuration option=Default value Description
backlog=4096 (IntOpt) Number of backlog requests to configure thesocket with
retry_until_window=30 (IntOpt) Number of seconds to keep retrying to listen
tcp_keepidle=600 (IntOpt) Sets the value of TCP_KEEPIDLE in seconds foreach server socket. Not supported on OS X.
OpenStack IdentityProcedure 4.1. To configure the OpenStack Identity Service for use withOpenStack Networking
1. Create the get_id() Function
The get_id() function stores the ID of created objects, and removes error-pronecopying and pasting of object IDs in later steps:
a. Add the following function to your .bashrc file:
$ function get_id () {echo `"$@" | awk '/ id / { print $4 }'`}
b. Source the .bashrc file:
$ source .bashrc
2. Create the OpenStack Networking Service Entry
OpenStack Networking must be available in the OpenStack Compute service catalog.Create the service, as follows:
$ NEUTRON_SERVICE_ID=$(get_id keystone service-create --name neutron --type network --description 'OpenStack Networking Service')
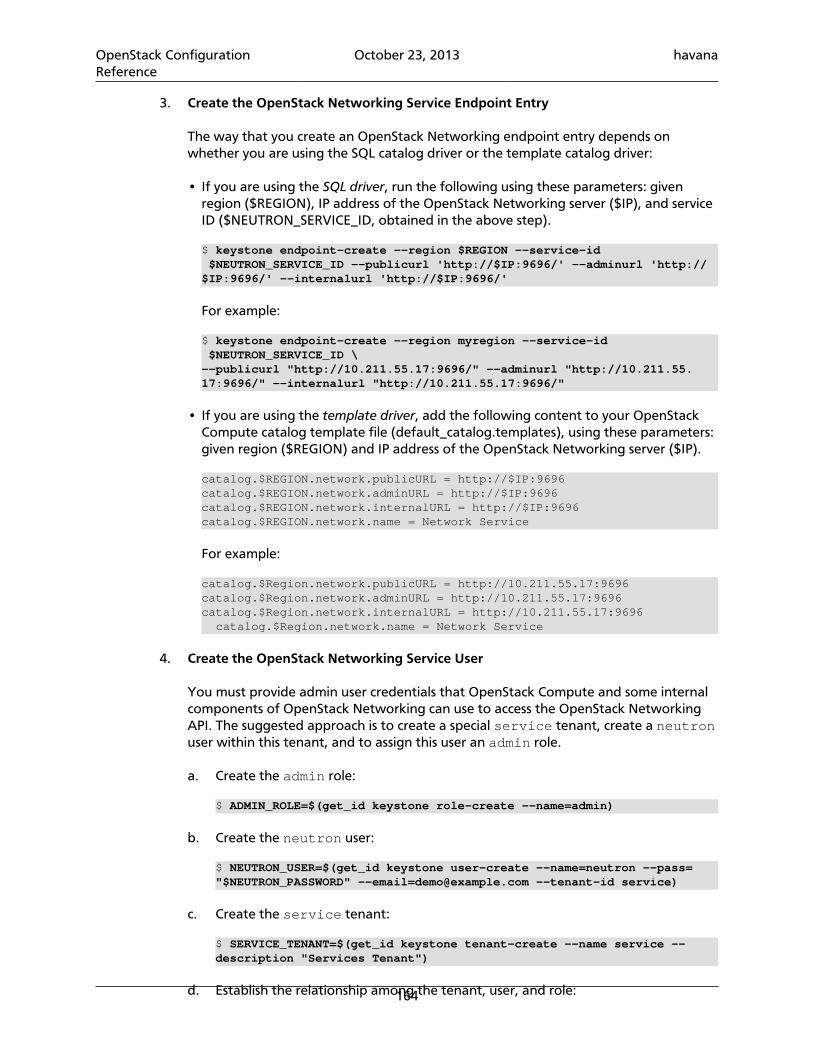
OpenStack ConfigurationReference
October 23, 2013 havana
164
3. Create the OpenStack Networking Service Endpoint Entry
The way that you create an OpenStack Networking endpoint entry depends onwhether you are using the SQL catalog driver or the template catalog driver:
• If you are using the SQL driver, run the following using these parameters: givenregion ($REGION), IP address of the OpenStack Networking server ($IP), and serviceID ($NEUTRON_SERVICE_ID, obtained in the above step).
$ keystone endpoint-create --region $REGION --service-id $NEUTRON_SERVICE_ID --publicurl 'http://$IP:9696/' --adminurl 'http://$IP:9696/' --internalurl 'http://$IP:9696/'
For example:
$ keystone endpoint-create --region myregion --service-id $NEUTRON_SERVICE_ID \--publicurl "http://10.211.55.17:9696/" --adminurl "http://10.211.55.17:9696/" --internalurl "http://10.211.55.17:9696/"
• If you are using the template driver, add the following content to your OpenStackCompute catalog template file (default_catalog.templates), using these parameters:given region ($REGION) and IP address of the OpenStack Networking server ($IP).
catalog.$REGION.network.publicURL = http://$IP:9696catalog.$REGION.network.adminURL = http://$IP:9696catalog.$REGION.network.internalURL = http://$IP:9696catalog.$REGION.network.name = Network Service
For example:
catalog.$Region.network.publicURL = http://10.211.55.17:9696catalog.$Region.network.adminURL = http://10.211.55.17:9696catalog.$Region.network.internalURL = http://10.211.55.17:9696 catalog.$Region.network.name = Network Service
4. Create the OpenStack Networking Service User
You must provide admin user credentials that OpenStack Compute and some internalcomponents of OpenStack Networking can use to access the OpenStack NetworkingAPI. The suggested approach is to create a special service tenant, create a neutronuser within this tenant, and to assign this user an admin role.
a. Create the admin role:
$ ADMIN_ROLE=$(get_id keystone role-create --name=admin)
b. Create the neutron user:
$ NEUTRON_USER=$(get_id keystone user-create --name=neutron --pass="$NEUTRON_PASSWORD" [email protected] --tenant-id service)
c. Create the service tenant:
$ SERVICE_TENANT=$(get_id keystone tenant-create --name service --description "Services Tenant")
d. Establish the relationship among the tenant, user, and role:
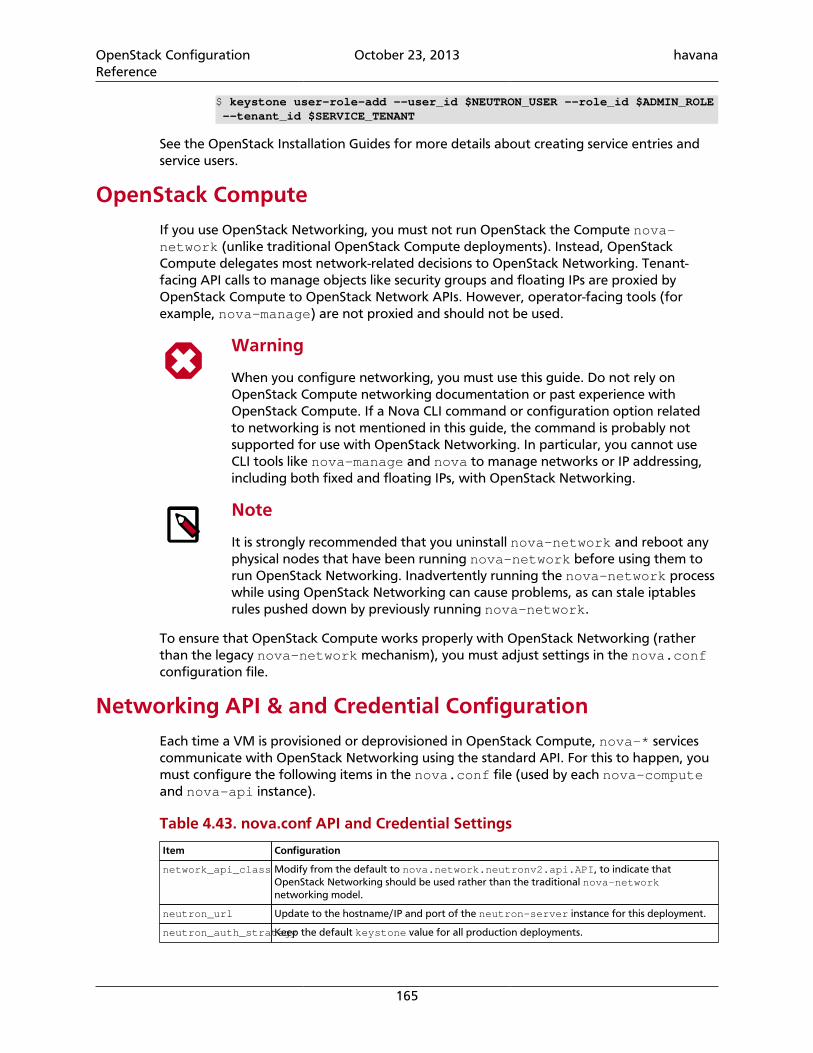
OpenStack ConfigurationReference
October 23, 2013 havana
165
$ keystone user-role-add --user_id $NEUTRON_USER --role_id $ADMIN_ROLE --tenant_id $SERVICE_TENANT
See the OpenStack Installation Guides for more details about creating service entries andservice users.
OpenStack ComputeIf you use OpenStack Networking, you must not run OpenStack the Compute nova-network (unlike traditional OpenStack Compute deployments). Instead, OpenStackCompute delegates most network-related decisions to OpenStack Networking. Tenant-facing API calls to manage objects like security groups and floating IPs are proxied byOpenStack Compute to OpenStack Network APIs. However, operator-facing tools (forexample, nova-manage) are not proxied and should not be used.
Warning
When you configure networking, you must use this guide. Do not rely onOpenStack Compute networking documentation or past experience withOpenStack Compute. If a Nova CLI command or configuration option relatedto networking is not mentioned in this guide, the command is probably notsupported for use with OpenStack Networking. In particular, you cannot useCLI tools like nova-manage and nova to manage networks or IP addressing,including both fixed and floating IPs, with OpenStack Networking.
Note
It is strongly recommended that you uninstall nova-network and reboot anyphysical nodes that have been running nova-network before using them torun OpenStack Networking. Inadvertently running the nova-network processwhile using OpenStack Networking can cause problems, as can stale iptablesrules pushed down by previously running nova-network.
To ensure that OpenStack Compute works properly with OpenStack Networking (ratherthan the legacy nova-network mechanism), you must adjust settings in the nova.confconfiguration file.
Networking API & and Credential ConfigurationEach time a VM is provisioned or deprovisioned in OpenStack Compute, nova-* servicescommunicate with OpenStack Networking using the standard API. For this to happen, youmust configure the following items in the nova.conf file (used by each nova-computeand nova-api instance).
Table 4.43. nova.conf API and Credential Settings
Item Configuration
network_api_class Modify from the default to nova.network.neutronv2.api.API, to indicate thatOpenStack Networking should be used rather than the traditional nova-network networking model.
neutron_url Update to the hostname/IP and port of the neutron-server instance for this deployment.
neutron_auth_strategyKeep the default keystone value for all production deployments.
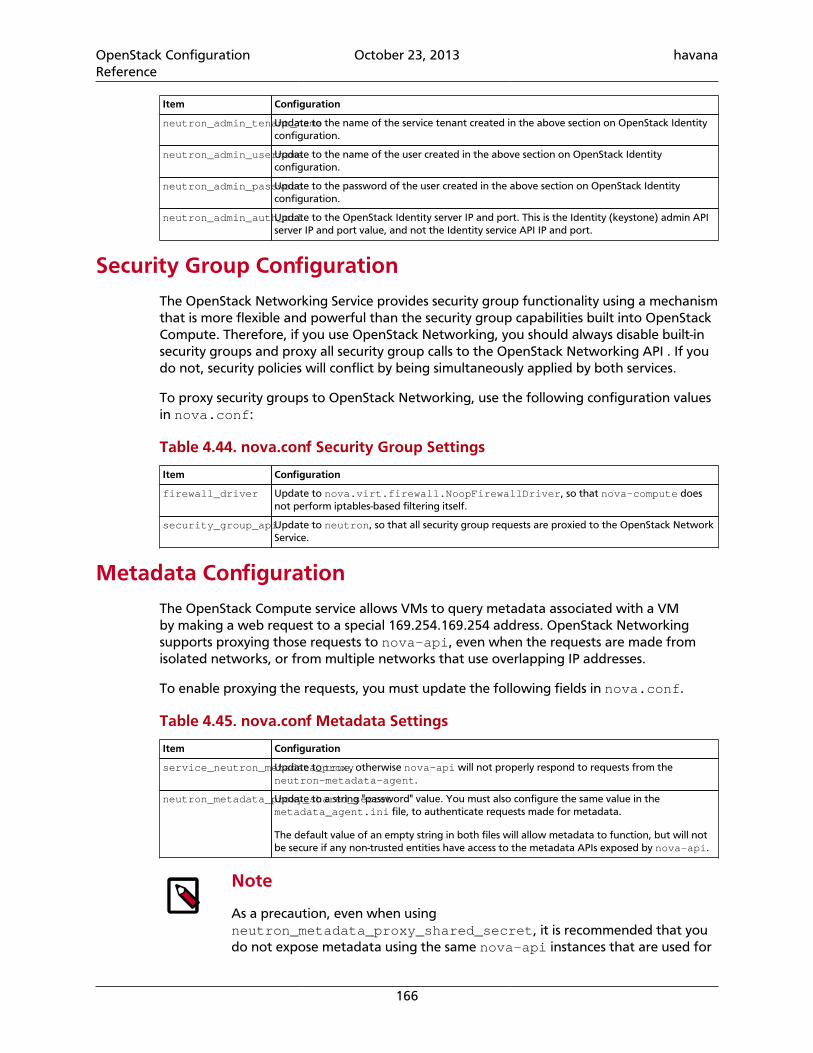
OpenStack ConfigurationReference
October 23, 2013 havana
166
Item Configuration
neutron_admin_tenant_nameUpdate to the name of the service tenant created in the above section on OpenStack Identityconfiguration.
neutron_admin_usernameUpdate to the name of the user created in the above section on OpenStack Identityconfiguration.
neutron_admin_passwordUpdate to the password of the user created in the above section on OpenStack Identityconfiguration.
neutron_admin_auth_urlUpdate to the OpenStack Identity server IP and port. This is the Identity (keystone) admin APIserver IP and port value, and not the Identity service API IP and port.
Security Group ConfigurationThe OpenStack Networking Service provides security group functionality using a mechanismthat is more flexible and powerful than the security group capabilities built into OpenStackCompute. Therefore, if you use OpenStack Networking, you should always disable built-insecurity groups and proxy all security group calls to the OpenStack Networking API . If youdo not, security policies will conflict by being simultaneously applied by both services.
To proxy security groups to OpenStack Networking, use the following configuration valuesin nova.conf:
Table 4.44. nova.conf Security Group Settings
Item Configuration
firewall_driver Update to nova.virt.firewall.NoopFirewallDriver, so that nova-compute doesnot perform iptables-based filtering itself.
security_group_apiUpdate to neutron, so that all security group requests are proxied to the OpenStack NetworkService.
Metadata ConfigurationThe OpenStack Compute service allows VMs to query metadata associated with a VMby making a web request to a special 169.254.169.254 address. OpenStack Networkingsupports proxying those requests to nova-api, even when the requests are made fromisolated networks, or from multiple networks that use overlapping IP addresses.
To enable proxying the requests, you must update the following fields in nova.conf.
Table 4.45. nova.conf Metadata Settings
Item Configuration
service_neutron_metadata_proxyUpdate to true, otherwise nova-api will not properly respond to requests from theneutron-metadata-agent.
neutron_metadata_proxy_shared_secretUpdate to a string "password" value. You must also configure the same value in themetadata_agent.ini file, to authenticate requests made for metadata.
The default value of an empty string in both files will allow metadata to function, but will notbe secure if any non-trusted entities have access to the metadata APIs exposed by nova-api.
Note
As a precaution, even when usingneutron_metadata_proxy_shared_secret, it is recommended that youdo not expose metadata using the same nova-api instances that are used for
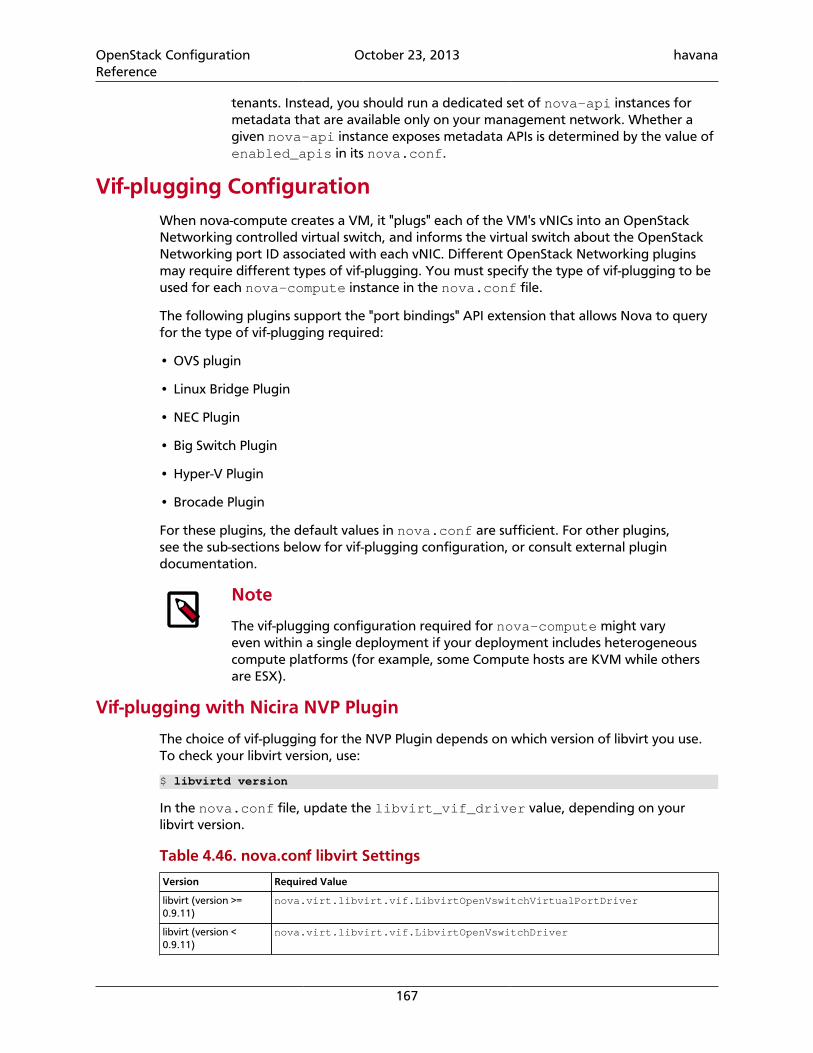
OpenStack ConfigurationReference
October 23, 2013 havana
167
tenants. Instead, you should run a dedicated set of nova-api instances formetadata that are available only on your management network. Whether agiven nova-api instance exposes metadata APIs is determined by the value ofenabled_apis in its nova.conf.
Vif-plugging ConfigurationWhen nova-compute creates a VM, it "plugs" each of the VM's vNICs into an OpenStackNetworking controlled virtual switch, and informs the virtual switch about the OpenStackNetworking port ID associated with each vNIC. Different OpenStack Networking pluginsmay require different types of vif-plugging. You must specify the type of vif-plugging to beused for each nova-compute instance in the nova.conf file.
The following plugins support the "port bindings" API extension that allows Nova to queryfor the type of vif-plugging required:
• OVS plugin
• Linux Bridge Plugin
• NEC Plugin
• Big Switch Plugin
• Hyper-V Plugin
• Brocade Plugin
For these plugins, the default values in nova.conf are sufficient. For other plugins,see the sub-sections below for vif-plugging configuration, or consult external plugindocumentation.
Note
The vif-plugging configuration required for nova-compute might varyeven within a single deployment if your deployment includes heterogeneouscompute platforms (for example, some Compute hosts are KVM while othersare ESX).
Vif-plugging with Nicira NVP Plugin
The choice of vif-plugging for the NVP Plugin depends on which version of libvirt you use.To check your libvirt version, use:
$ libvirtd version
In the nova.conf file, update the libvirt_vif_driver value, depending on yourlibvirt version.
Table 4.46. nova.conf libvirt Settings
Version Required Value
libvirt (version >=0.9.11)
nova.virt.libvirt.vif.LibvirtOpenVswitchVirtualPortDriver
libvirt (version <0.9.11)
nova.virt.libvirt.vif.LibvirtOpenVswitchDriver
OpenStack ConfigurationReference
October 23, 2013 havana
168
Version Required Value
ESX No vif-plugging configuration is required
XenServer nova.virt.xenapi.vif.XenAPIOpenVswitchDriver
For example:libvirt_vif_driver=nova.virt.libvirt.vif.LibvirtOpenVswitchDriver
Note
When using libvirt < 0.9.11, one must also edit /etc/libvirt/qemu.conf,uncomment the entry for 'cgroup_device_acl', add the value '/dev/net/tun' tothe list of items for the configuration entry, and then restart libvirtd.
Example nova.conf (for nova-compute and nova-api)
Example values for the above settings, assuming a cloud controller node runningOpenStack Compute and OpenStack Networking with an IP address of 192.168.1.2 and vif-plugging using the LibvirtHybridOVSBridgeDriver.
network_api_class=nova.network.neutronv2.api.APIneutron_url=http://192.168.1.2:9696neutron_auth_strategy=keystoneneutron_admin_tenant_name=serviceneutron_admin_username=neutronneutron_admin_password=passwordneutron_admin_auth_url=http://192.168.1.2:35357/v2.0
security_group_api=neutronfirewall_driver=nova.virt.firewall.NoopFirewallDriver
service_neutron_metadata_proxy=trueneutron_metadata_proxy_shared_secret=foo
# needed only for nova-compute and only for some pluginslibvirt_vif_driver=nova.virt.libvirt.vif.LibvirtHybridOVSBridgeDriver
Networking scenariosThis chapter describes two networking scenarios and how the Open vSwitch plug-in andthe Linux bridging plug-in implement these scenarios.
Open vSwitch
This section describes how the Open vSwitch plug-in implements the OpenStackNetworking abstractions.
Configuration
This example uses VLAN isolation on the switches to isolate tenant networks. Thisconfiguration labels the physical network associated with the public network as physnet1,and the physical network associated with the data network as physnet2, which leads tothe following configuration options in ovs_neutron_plugin.ini:
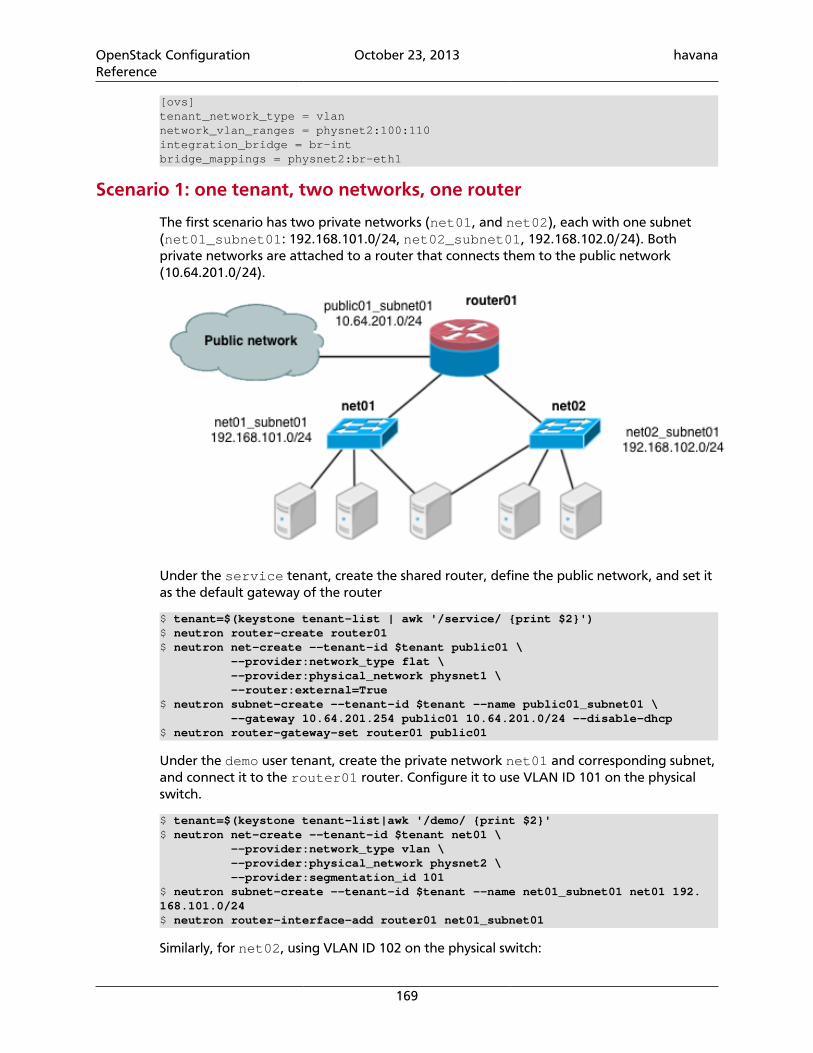
OpenStack ConfigurationReference
October 23, 2013 havana
169
[ovs]tenant_network_type = vlannetwork_vlan_ranges = physnet2:100:110integration_bridge = br-intbridge_mappings = physnet2:br-eth1
Scenario 1: one tenant, two networks, one router
The first scenario has two private networks (net01, and net02), each with one subnet(net01_subnet01: 192.168.101.0/24, net02_subnet01, 192.168.102.0/24). Bothprivate networks are attached to a router that connects them to the public network(10.64.201.0/24).
Under the service tenant, create the shared router, define the public network, and set itas the default gateway of the router
$ tenant=$(keystone tenant-list | awk '/service/ {print $2}')$ neutron router-create router01$ neutron net-create --tenant-id $tenant public01 \ --provider:network_type flat \ --provider:physical_network physnet1 \ --router:external=True$ neutron subnet-create --tenant-id $tenant --name public01_subnet01 \ --gateway 10.64.201.254 public01 10.64.201.0/24 --disable-dhcp$ neutron router-gateway-set router01 public01
Under the demo user tenant, create the private network net01 and corresponding subnet,and connect it to the router01 router. Configure it to use VLAN ID 101 on the physicalswitch.
$ tenant=$(keystone tenant-list|awk '/demo/ {print $2}'$ neutron net-create --tenant-id $tenant net01 \ --provider:network_type vlan \ --provider:physical_network physnet2 \ --provider:segmentation_id 101$ neutron subnet-create --tenant-id $tenant --name net01_subnet01 net01 192.168.101.0/24$ neutron router-interface-add router01 net01_subnet01
Similarly, for net02, using VLAN ID 102 on the physical switch:
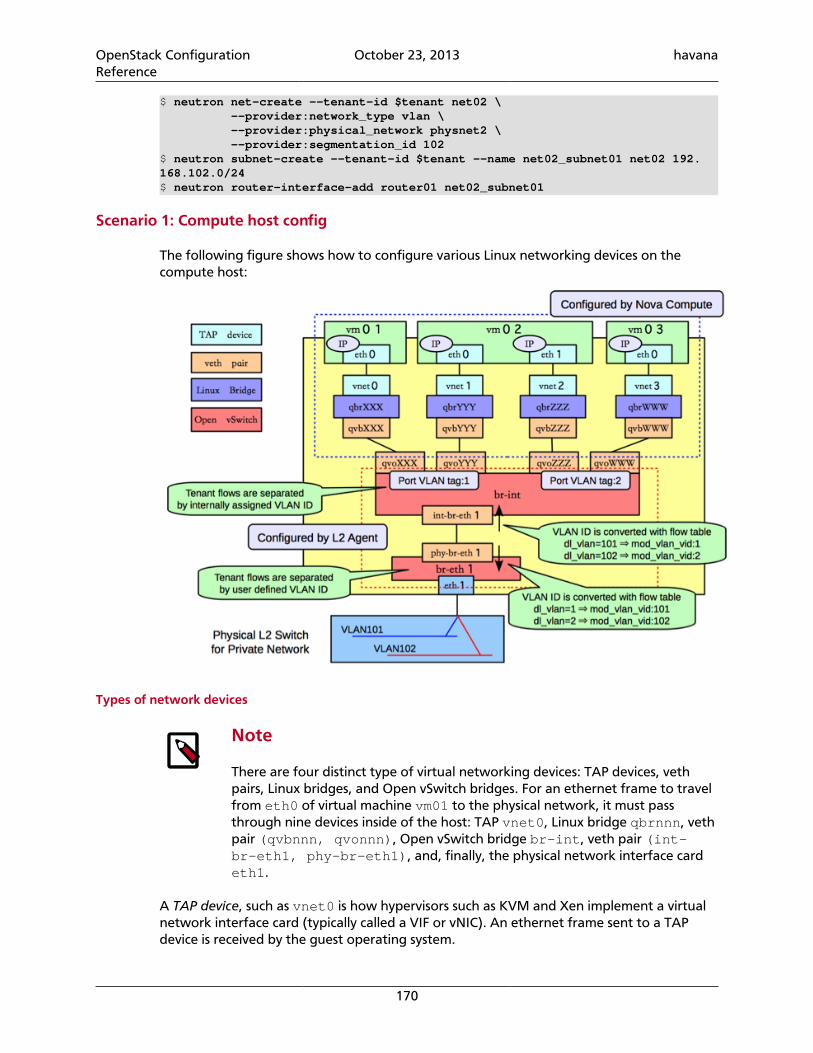
OpenStack ConfigurationReference
October 23, 2013 havana
170
$ neutron net-create --tenant-id $tenant net02 \ --provider:network_type vlan \ --provider:physical_network physnet2 \ --provider:segmentation_id 102$ neutron subnet-create --tenant-id $tenant --name net02_subnet01 net02 192.168.102.0/24$ neutron router-interface-add router01 net02_subnet01
Scenario 1: Compute host config
The following figure shows how to configure various Linux networking devices on thecompute host:
Types of network devices
Note
There are four distinct type of virtual networking devices: TAP devices, vethpairs, Linux bridges, and Open vSwitch bridges. For an ethernet frame to travelfrom eth0 of virtual machine vm01 to the physical network, it must passthrough nine devices inside of the host: TAP vnet0, Linux bridge qbrnnn, vethpair (qvbnnn, qvonnn), Open vSwitch bridge br-int, veth pair (int-br-eth1, phy-br-eth1), and, finally, the physical network interface cardeth1.
A TAP device, such as vnet0 is how hypervisors such as KVM and Xen implement a virtualnetwork interface card (typically called a VIF or vNIC). An ethernet frame sent to a TAPdevice is received by the guest operating system.
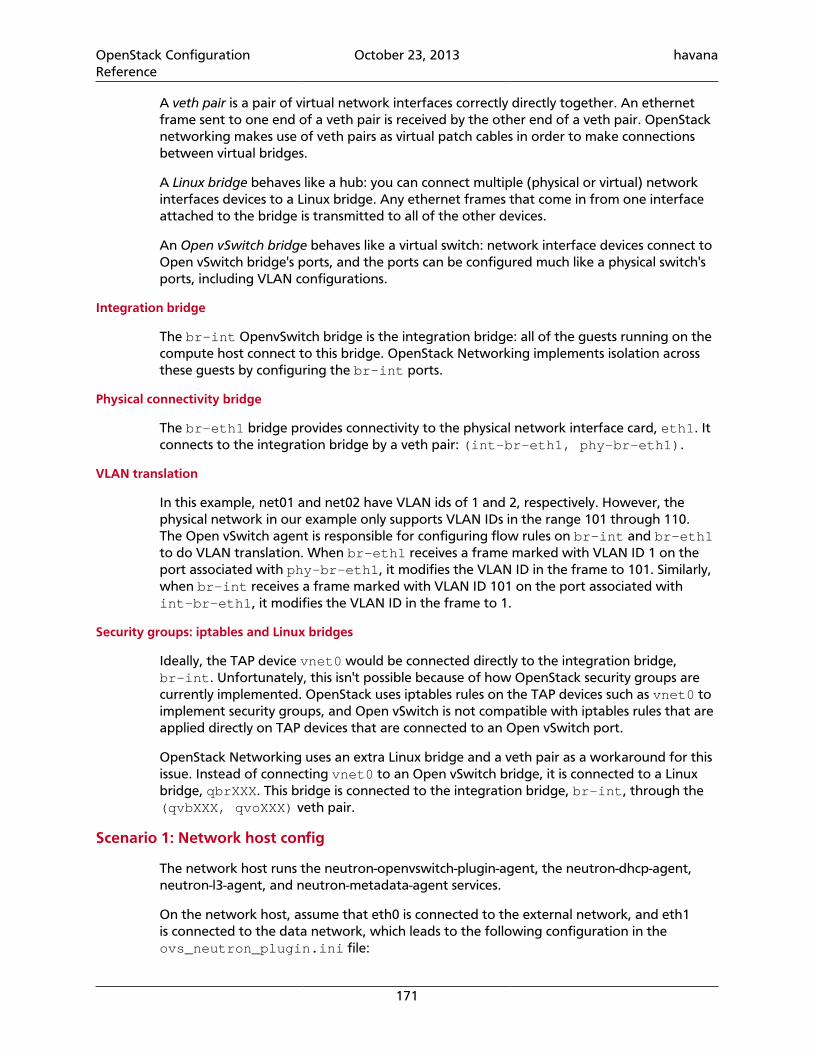
OpenStack ConfigurationReference
October 23, 2013 havana
171
A veth pair is a pair of virtual network interfaces correctly directly together. An ethernetframe sent to one end of a veth pair is received by the other end of a veth pair. OpenStacknetworking makes use of veth pairs as virtual patch cables in order to make connectionsbetween virtual bridges.
A Linux bridge behaves like a hub: you can connect multiple (physical or virtual) networkinterfaces devices to a Linux bridge. Any ethernet frames that come in from one interfaceattached to the bridge is transmitted to all of the other devices.
An Open vSwitch bridge behaves like a virtual switch: network interface devices connect toOpen vSwitch bridge's ports, and the ports can be configured much like a physical switch'sports, including VLAN configurations.
Integration bridge
The br-int OpenvSwitch bridge is the integration bridge: all of the guests running on thecompute host connect to this bridge. OpenStack Networking implements isolation acrossthese guests by configuring the br-int ports.
Physical connectivity bridge
The br-eth1 bridge provides connectivity to the physical network interface card, eth1. Itconnects to the integration bridge by a veth pair: (int-br-eth1, phy-br-eth1).
VLAN translation
In this example, net01 and net02 have VLAN ids of 1 and 2, respectively. However, thephysical network in our example only supports VLAN IDs in the range 101 through 110.The Open vSwitch agent is responsible for configuring flow rules on br-int and br-eth1to do VLAN translation. When br-eth1 receives a frame marked with VLAN ID 1 on theport associated with phy-br-eth1, it modifies the VLAN ID in the frame to 101. Similarly,when br-int receives a frame marked with VLAN ID 101 on the port associated withint-br-eth1, it modifies the VLAN ID in the frame to 1.
Security groups: iptables and Linux bridges
Ideally, the TAP device vnet0 would be connected directly to the integration bridge,br-int. Unfortunately, this isn't possible because of how OpenStack security groups arecurrently implemented. OpenStack uses iptables rules on the TAP devices such as vnet0 toimplement security groups, and Open vSwitch is not compatible with iptables rules that areapplied directly on TAP devices that are connected to an Open vSwitch port.
OpenStack Networking uses an extra Linux bridge and a veth pair as a workaround for thisissue. Instead of connecting vnet0 to an Open vSwitch bridge, it is connected to a Linuxbridge, qbrXXX. This bridge is connected to the integration bridge, br-int, through the(qvbXXX, qvoXXX) veth pair.
Scenario 1: Network host config
The network host runs the neutron-openvswitch-plugin-agent, the neutron-dhcp-agent,neutron-l3-agent, and neutron-metadata-agent services.
On the network host, assume that eth0 is connected to the external network, and eth1is connected to the data network, which leads to the following configuration in theovs_neutron_plugin.ini file:
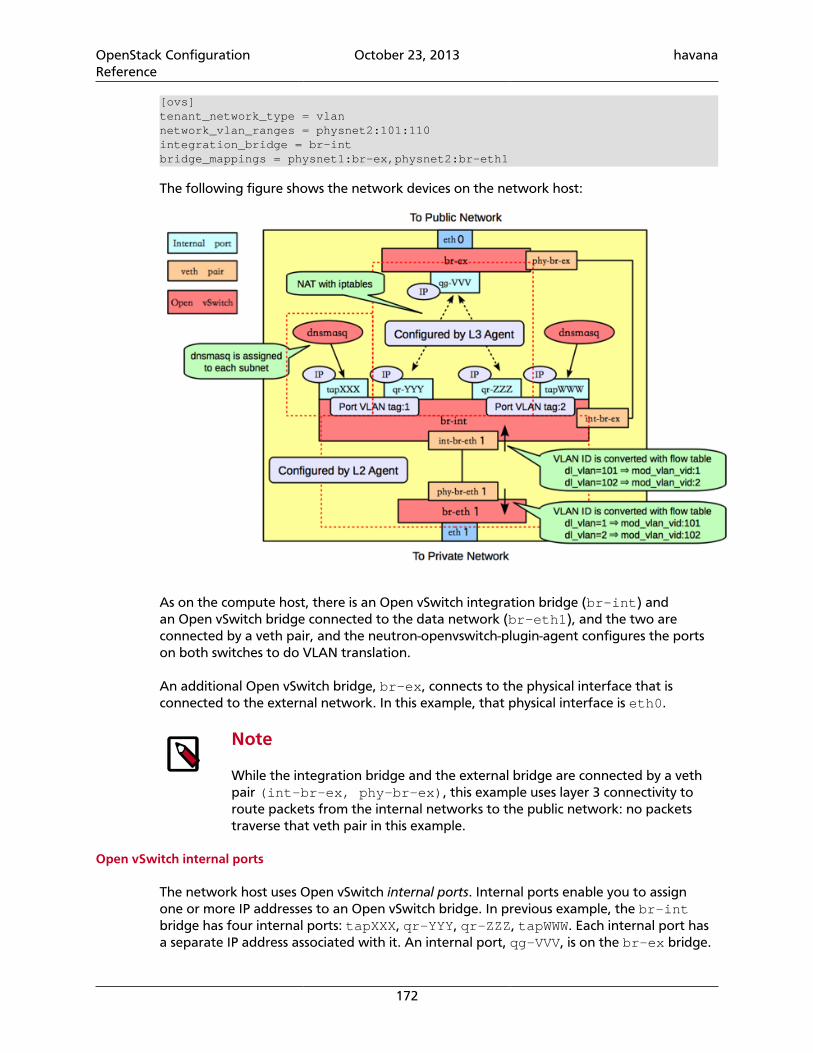
OpenStack ConfigurationReference
October 23, 2013 havana
172
[ovs]tenant_network_type = vlannetwork_vlan_ranges = physnet2:101:110integration_bridge = br-intbridge_mappings = physnet1:br-ex,physnet2:br-eth1
The following figure shows the network devices on the network host:
As on the compute host, there is an Open vSwitch integration bridge (br-int) andan Open vSwitch bridge connected to the data network (br-eth1), and the two areconnected by a veth pair, and the neutron-openvswitch-plugin-agent configures the portson both switches to do VLAN translation.
An additional Open vSwitch bridge, br-ex, connects to the physical interface that isconnected to the external network. In this example, that physical interface is eth0.
Note
While the integration bridge and the external bridge are connected by a vethpair (int-br-ex, phy-br-ex), this example uses layer 3 connectivity toroute packets from the internal networks to the public network: no packetstraverse that veth pair in this example.
Open vSwitch internal ports
The network host uses Open vSwitch internal ports. Internal ports enable you to assignone or more IP addresses to an Open vSwitch bridge. In previous example, the br-intbridge has four internal ports: tapXXX, qr-YYY, qr-ZZZ, tapWWW. Each internal port hasa separate IP address associated with it. An internal port, qg-VVV, is on the br-ex bridge.
OpenStack ConfigurationReference
October 23, 2013 havana
173
DHCP agent
By default, The OpenStack Networking DHCP agent uses a program called dnsmasq toprovide DHCP services to guests. OpenStack Networking must create an internal port foreach network that requires DHCP services and attach a dnsmasq process to that port. In theprevious example, the interface tapXXX is on subnet net01_subnet01, and the interfacetapWWW is on net02_subnet01.
L3 agent (routing)
The OpenStack Networking L3 agent implements routing through the use of Open vSwitchinternal ports and relies on the network host to route the packets across the interfaces. Inthis example: interfaceqr-YYY, which is on subnet net01_subnet01, has an IP addressof 192.168.101.1/24, interface qr-ZZZ, which is on subnet net02_subnet01, has anIP address of 192.168.102.1/24, and interface qg-VVV, which has an IP address of10.64.201.254/24. Because of each of these interfaces is visible to the network hostoperating system, it will route the packets appropriately across the interfaces, as long as anadministrator has enabled IP forwarding.
The L3 agent uses iptables to implement floating IPs to do the network address translation(NAT).
Overlapping subnets and network namespaces
One problem with using the host to implement routing is that there is a chance thatone of the OpenStack Networking subnets might overlap with one of the physicalnetworks that the host uses. For example, if the management network is implementedon eth2 (not shown in the previous example), by coincidence happens to also be on the192.168.101.0/24 subnet, then this will cause routing problems because it is impossibleot determine whether a packet on this subnet should be sent to qr-YYY or eth2. Ingeneral, if end-users are permitted to create their own logical networks and subnets, thenthe system must be designed to avoid the possibility of such collisions.
OpenStack Networking uses Linux network namespaces to prevent collisions betweenthe physical networks on the network host, and the logical networks used by the virtualmachines. It also prevents collisions across different logical networks that are not routed toeach other, as you will see in the next scenario.
A network namespace can be thought of as an isolated environment that has its ownnetworking stack. A network namespace has its own network interfaces, routes, andiptables rules. You can think of like a chroot jail, except for networking instead of afile system. As an aside, LXC (Linux containers) use network namespaces to implementnetworking virtualization.
OpenStack Networking creates network namespaces on the network host in order to avoidsubnet collisions.
Tn this example, there are three network namespaces, as depicted in the following figure.
• qdhcp-aaa: contains the tapXXX interface and the dnsmasq process that listens on thatinterface, to provide DHCP services for net01_subnet01. This allows overlapping IPsbetween net01_subnet01 and any other subnets on the network host.
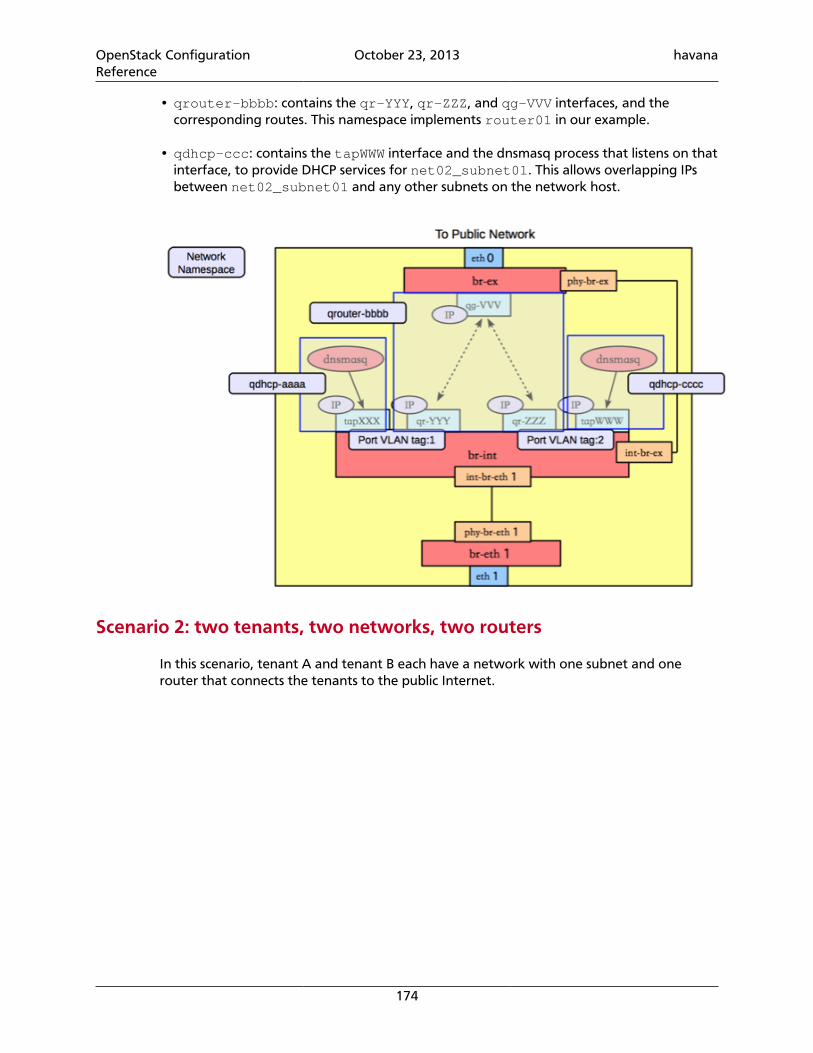
OpenStack ConfigurationReference
October 23, 2013 havana
174
• qrouter-bbbb: contains the qr-YYY, qr-ZZZ, and qg-VVV interfaces, and thecorresponding routes. This namespace implements router01 in our example.
• qdhcp-ccc: contains the tapWWW interface and the dnsmasq process that listens on thatinterface, to provide DHCP services for net02_subnet01. This allows overlapping IPsbetween net02_subnet01 and any other subnets on the network host.
Scenario 2: two tenants, two networks, two routers
In this scenario, tenant A and tenant B each have a network with one subnet and onerouter that connects the tenants to the public Internet.
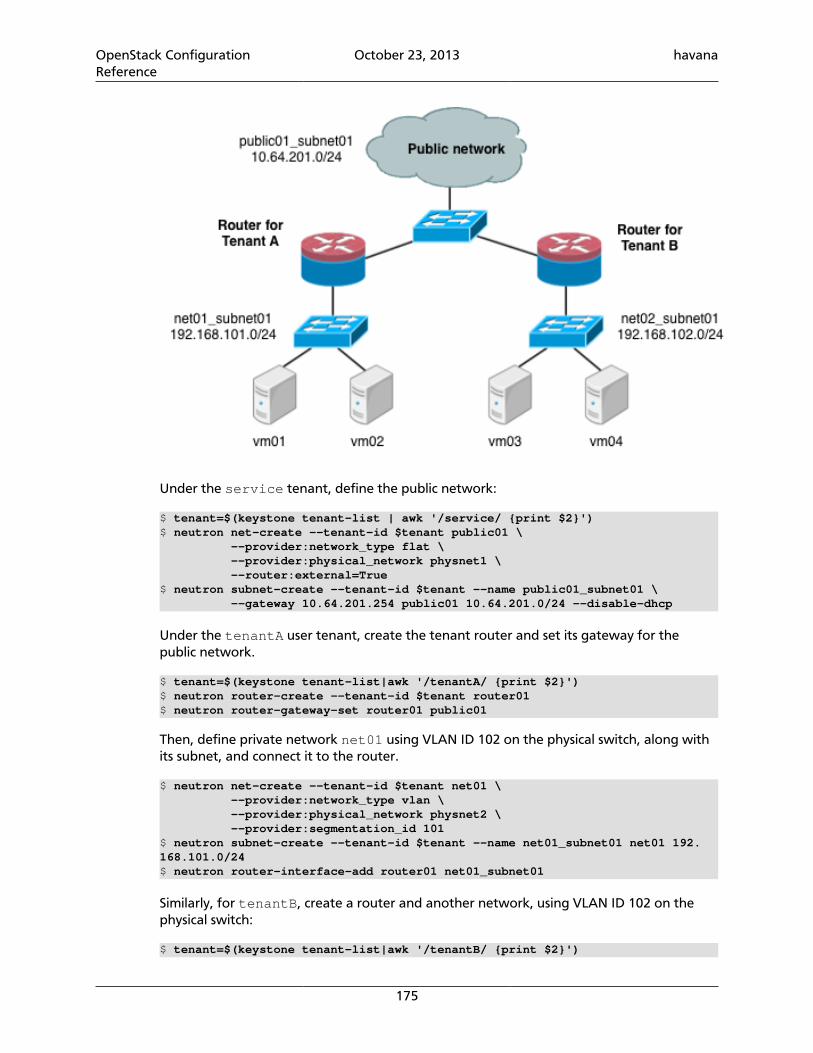
OpenStack ConfigurationReference
October 23, 2013 havana
175
Under the service tenant, define the public network:
$ tenant=$(keystone tenant-list | awk '/service/ {print $2}')$ neutron net-create --tenant-id $tenant public01 \ --provider:network_type flat \ --provider:physical_network physnet1 \ --router:external=True$ neutron subnet-create --tenant-id $tenant --name public01_subnet01 \ --gateway 10.64.201.254 public01 10.64.201.0/24 --disable-dhcp
Under the tenantA user tenant, create the tenant router and set its gateway for thepublic network.
$ tenant=$(keystone tenant-list|awk '/tenantA/ {print $2}')$ neutron router-create --tenant-id $tenant router01$ neutron router-gateway-set router01 public01
Then, define private network net01 using VLAN ID 102 on the physical switch, along withits subnet, and connect it to the router.
$ neutron net-create --tenant-id $tenant net01 \ --provider:network_type vlan \ --provider:physical_network physnet2 \ --provider:segmentation_id 101$ neutron subnet-create --tenant-id $tenant --name net01_subnet01 net01 192.168.101.0/24$ neutron router-interface-add router01 net01_subnet01
Similarly, for tenantB, create a router and another network, using VLAN ID 102 on thephysical switch:
$ tenant=$(keystone tenant-list|awk '/tenantB/ {print $2}')
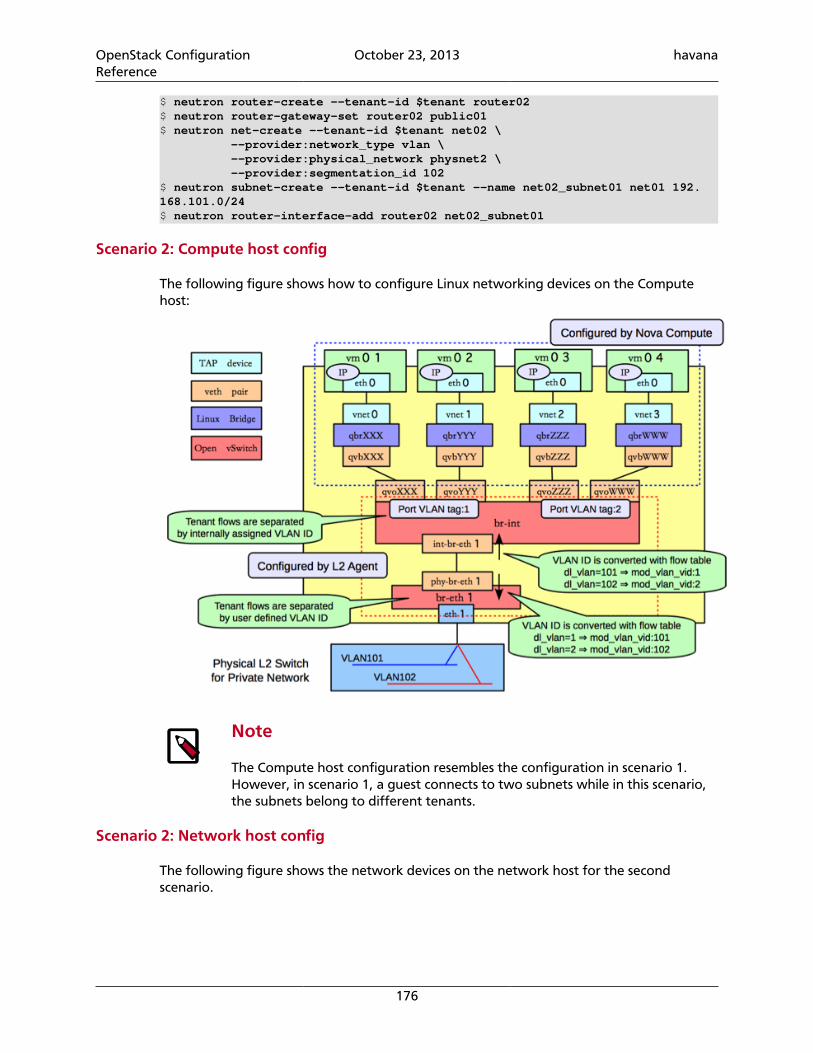
OpenStack ConfigurationReference
October 23, 2013 havana
176
$ neutron router-create --tenant-id $tenant router02$ neutron router-gateway-set router02 public01$ neutron net-create --tenant-id $tenant net02 \ --provider:network_type vlan \ --provider:physical_network physnet2 \ --provider:segmentation_id 102$ neutron subnet-create --tenant-id $tenant --name net02_subnet01 net01 192.168.101.0/24$ neutron router-interface-add router02 net02_subnet01
Scenario 2: Compute host config
The following figure shows how to configure Linux networking devices on the Computehost:
Note
The Compute host configuration resembles the configuration in scenario 1.However, in scenario 1, a guest connects to two subnets while in this scenario,the subnets belong to different tenants.
Scenario 2: Network host config
The following figure shows the network devices on the network host for the secondscenario.
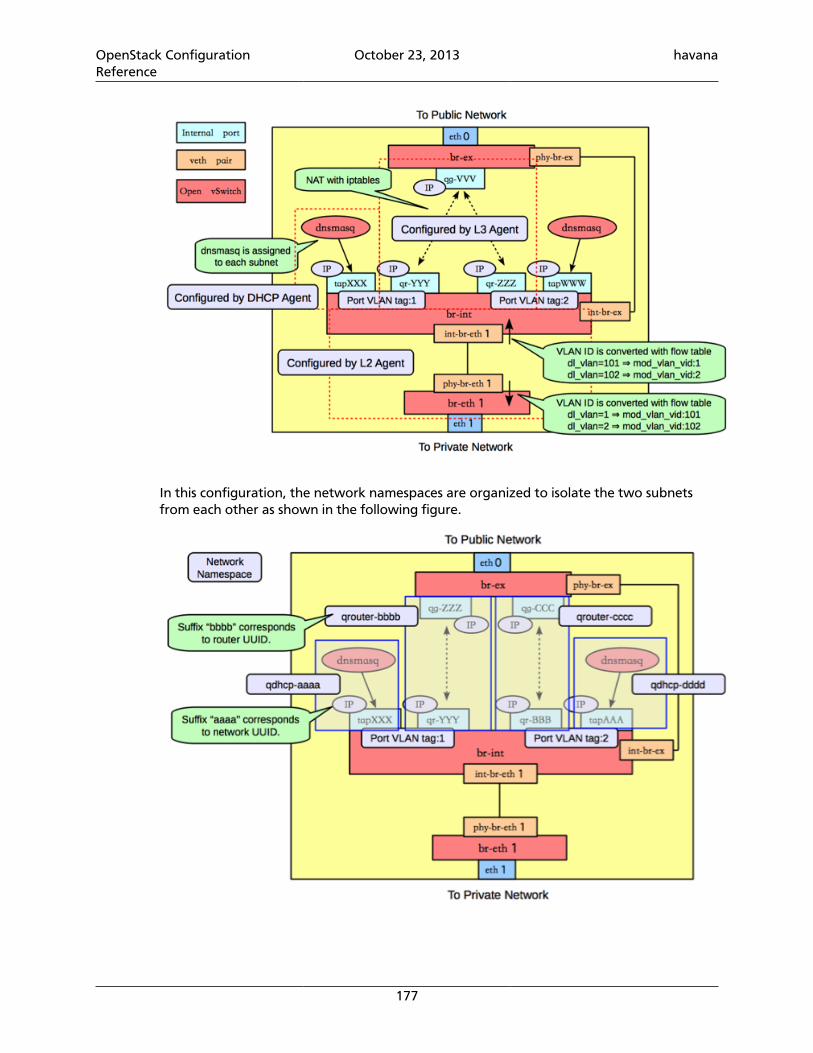
OpenStack ConfigurationReference
October 23, 2013 havana
177
In this configuration, the network namespaces are organized to isolate the two subnetsfrom each other as shown in the following figure.
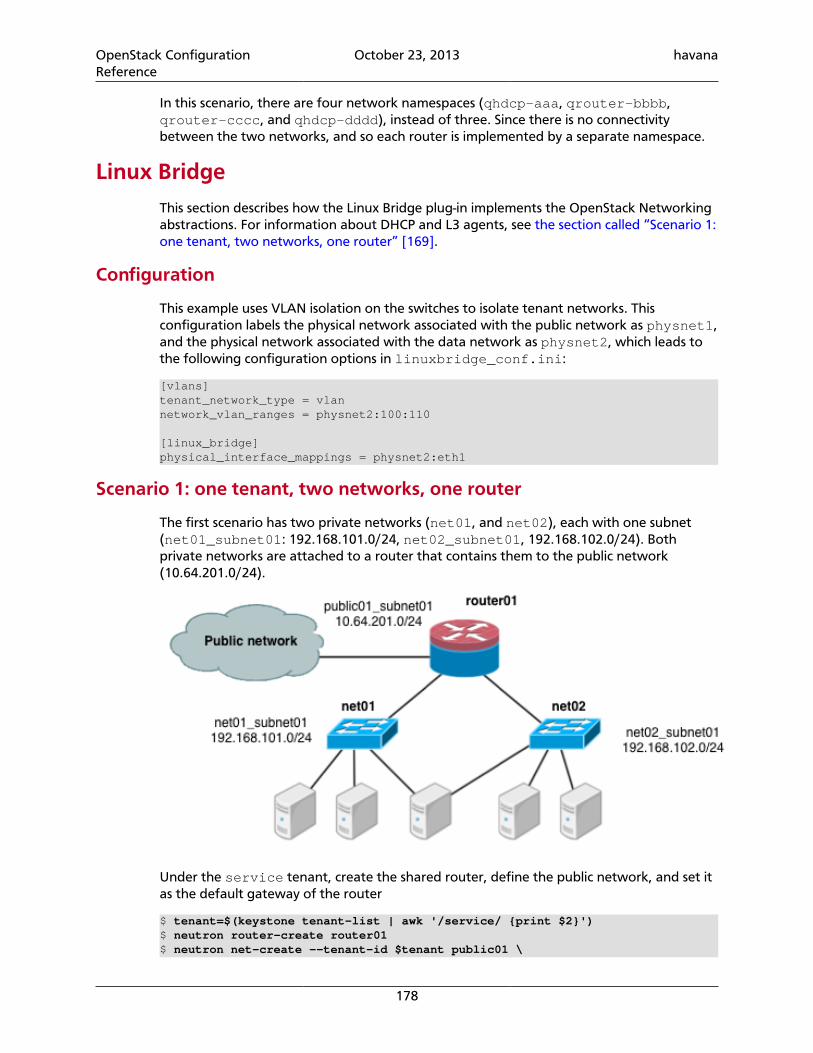
OpenStack ConfigurationReference
October 23, 2013 havana
178
In this scenario, there are four network namespaces (qhdcp-aaa, qrouter-bbbb,qrouter-cccc, and qhdcp-dddd), instead of three. Since there is no connectivitybetween the two networks, and so each router is implemented by a separate namespace.
Linux Bridge
This section describes how the Linux Bridge plug-in implements the OpenStack Networkingabstractions. For information about DHCP and L3 agents, see the section called “Scenario 1:one tenant, two networks, one router” [169].
Configuration
This example uses VLAN isolation on the switches to isolate tenant networks. Thisconfiguration labels the physical network associated with the public network as physnet1,and the physical network associated with the data network as physnet2, which leads tothe following configuration options in linuxbridge_conf.ini:
[vlans]tenant_network_type = vlannetwork_vlan_ranges = physnet2:100:110
[linux_bridge]physical_interface_mappings = physnet2:eth1
Scenario 1: one tenant, two networks, one router
The first scenario has two private networks (net01, and net02), each with one subnet(net01_subnet01: 192.168.101.0/24, net02_subnet01, 192.168.102.0/24). Bothprivate networks are attached to a router that contains them to the public network(10.64.201.0/24).
Under the service tenant, create the shared router, define the public network, and set itas the default gateway of the router
$ tenant=$(keystone tenant-list | awk '/service/ {print $2}')$ neutron router-create router01$ neutron net-create --tenant-id $tenant public01 \
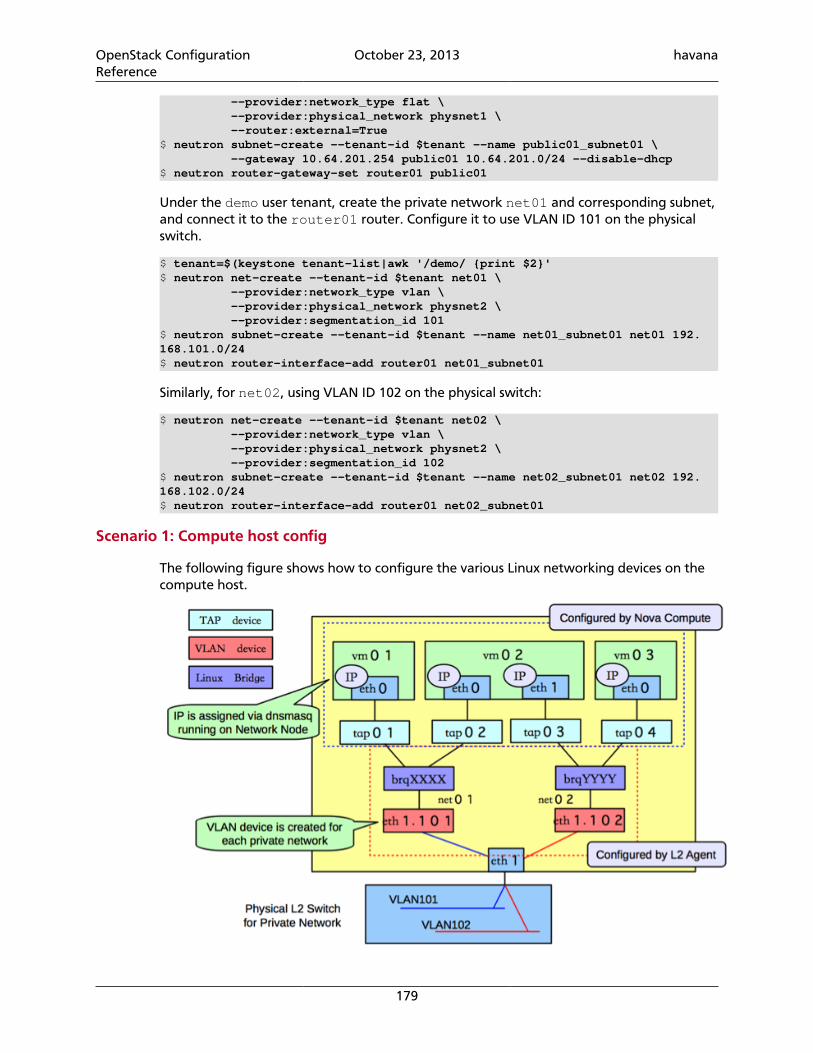
OpenStack ConfigurationReference
October 23, 2013 havana
179
--provider:network_type flat \ --provider:physical_network physnet1 \ --router:external=True$ neutron subnet-create --tenant-id $tenant --name public01_subnet01 \ --gateway 10.64.201.254 public01 10.64.201.0/24 --disable-dhcp$ neutron router-gateway-set router01 public01
Under the demo user tenant, create the private network net01 and corresponding subnet,and connect it to the router01 router. Configure it to use VLAN ID 101 on the physicalswitch.
$ tenant=$(keystone tenant-list|awk '/demo/ {print $2}'$ neutron net-create --tenant-id $tenant net01 \ --provider:network_type vlan \ --provider:physical_network physnet2 \ --provider:segmentation_id 101$ neutron subnet-create --tenant-id $tenant --name net01_subnet01 net01 192.168.101.0/24$ neutron router-interface-add router01 net01_subnet01
Similarly, for net02, using VLAN ID 102 on the physical switch:
$ neutron net-create --tenant-id $tenant net02 \ --provider:network_type vlan \ --provider:physical_network physnet2 \ --provider:segmentation_id 102$ neutron subnet-create --tenant-id $tenant --name net02_subnet01 net02 192.168.102.0/24$ neutron router-interface-add router01 net02_subnet01
Scenario 1: Compute host config
The following figure shows how to configure the various Linux networking devices on thecompute host.
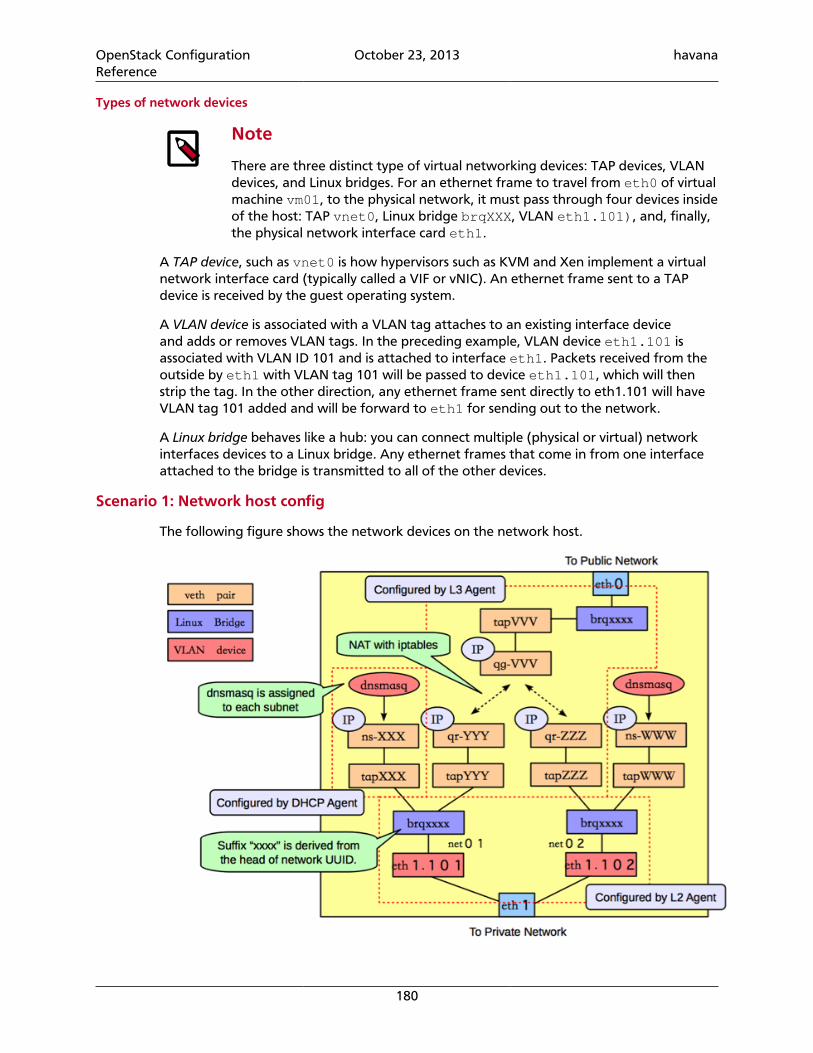
OpenStack ConfigurationReference
October 23, 2013 havana
180
Types of network devices
Note
There are three distinct type of virtual networking devices: TAP devices, VLANdevices, and Linux bridges. For an ethernet frame to travel from eth0 of virtualmachine vm01, to the physical network, it must pass through four devices insideof the host: TAP vnet0, Linux bridge brqXXX, VLAN eth1.101), and, finally,the physical network interface card eth1.
A TAP device, such as vnet0 is how hypervisors such as KVM and Xen implement a virtualnetwork interface card (typically called a VIF or vNIC). An ethernet frame sent to a TAPdevice is received by the guest operating system.
A VLAN device is associated with a VLAN tag attaches to an existing interface deviceand adds or removes VLAN tags. In the preceding example, VLAN device eth1.101 isassociated with VLAN ID 101 and is attached to interface eth1. Packets received from theoutside by eth1 with VLAN tag 101 will be passed to device eth1.101, which will thenstrip the tag. In the other direction, any ethernet frame sent directly to eth1.101 will haveVLAN tag 101 added and will be forward to eth1 for sending out to the network.
A Linux bridge behaves like a hub: you can connect multiple (physical or virtual) networkinterfaces devices to a Linux bridge. Any ethernet frames that come in from one interfaceattached to the bridge is transmitted to all of the other devices.
Scenario 1: Network host config
The following figure shows the network devices on the network host.
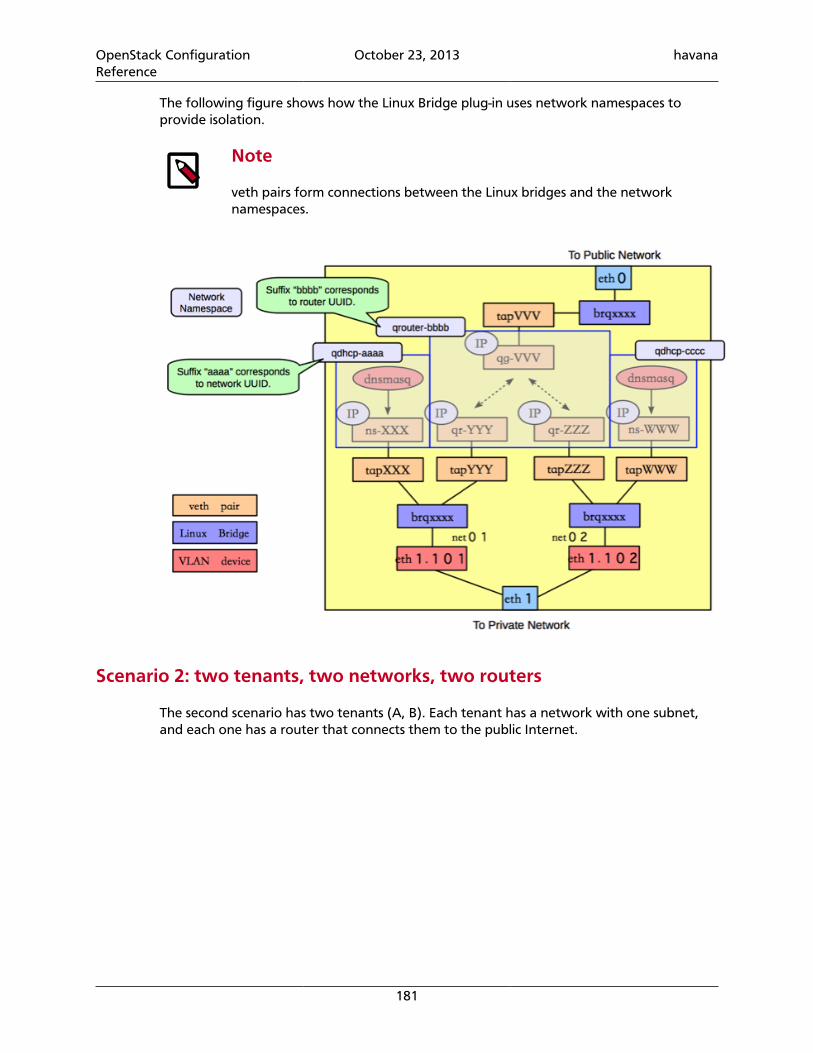
OpenStack ConfigurationReference
October 23, 2013 havana
181
The following figure shows how the Linux Bridge plug-in uses network namespaces toprovide isolation.
Note
veth pairs form connections between the Linux bridges and the networknamespaces.
Scenario 2: two tenants, two networks, two routers
The second scenario has two tenants (A, B). Each tenant has a network with one subnet,and each one has a router that connects them to the public Internet.

OpenStack ConfigurationReference
October 23, 2013 havana
182
Under the service tenant, define the public network:
$ tenant=$(keystone tenant-list | awk '/service/ {print $2}')$ neutron net-create --tenant-id $tenant public01 \ --provider:network_type flat \ --provider:physical_network physnet1 \ --router:external=True$ neutron subnet-create --tenant-id $tenant --name public01_subnet01 \ --gateway 10.64.201.254 public01 10.64.201.0/24 --disable-dhcp
Under the tenantA user tenant, create the tenant router and set its gateway for thepublic network.
$ tenant=$(keystone tenant-list|awk '/tenantA/ {print $2}')$ neutron router-create --tenant-id $tenant router01$ neutron router-gateway-set router01 public01
Then, define private network net01 using VLAN ID 102 on the physical switch, along withits subnet, and connect it to the router.
$ neutron net-create --tenant-id $tenant net01 \ --provider:network_type vlan \ --provider:physical_network physnet2 \ --provider:segmentation_id 101$ neutron subnet-create --tenant-id $tenant --name net01_subnet01 net01 192.168.101.0/24$ neutron router-interface-add router01 net01_subnet01
Similarly, for tenantB, create a router and another network, using VLAN ID 102 on thephysical switch:
$ tenant=$(keystone tenant-list|awk '/tenantB/ {print $2}')
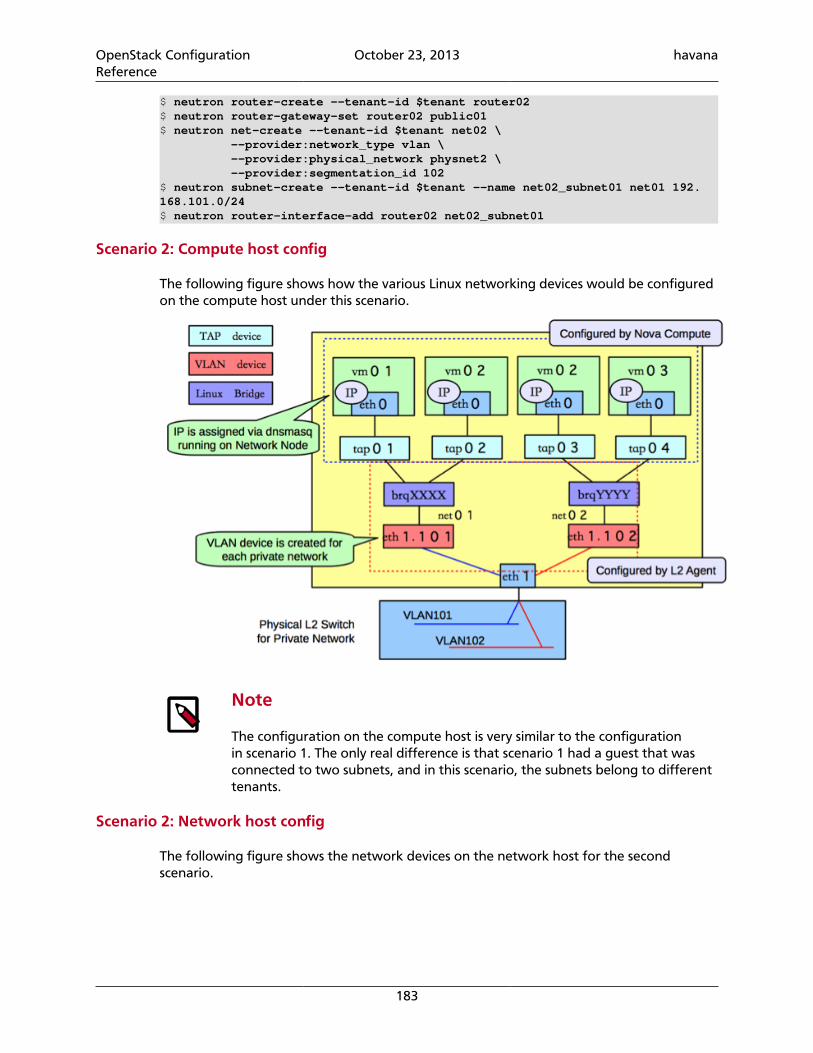
OpenStack ConfigurationReference
October 23, 2013 havana
183
$ neutron router-create --tenant-id $tenant router02$ neutron router-gateway-set router02 public01$ neutron net-create --tenant-id $tenant net02 \ --provider:network_type vlan \ --provider:physical_network physnet2 \ --provider:segmentation_id 102$ neutron subnet-create --tenant-id $tenant --name net02_subnet01 net01 192.168.101.0/24$ neutron router-interface-add router02 net02_subnet01
Scenario 2: Compute host config
The following figure shows how the various Linux networking devices would be configuredon the compute host under this scenario.
Note
The configuration on the compute host is very similar to the configurationin scenario 1. The only real difference is that scenario 1 had a guest that wasconnected to two subnets, and in this scenario, the subnets belong to differenttenants.
Scenario 2: Network host config
The following figure shows the network devices on the network host for the secondscenario.
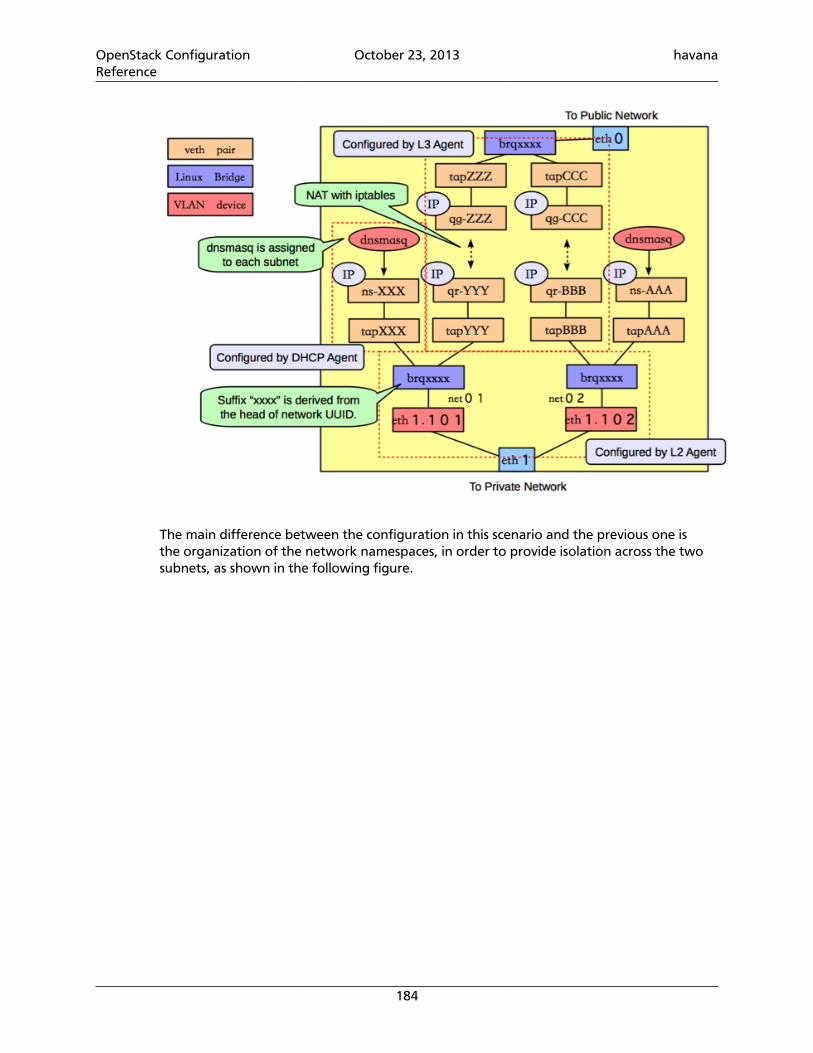
OpenStack ConfigurationReference
October 23, 2013 havana
184
The main difference between the configuration in this scenario and the previous one isthe organization of the network namespaces, in order to provide isolation across the twosubnets, as shown in the following figure.
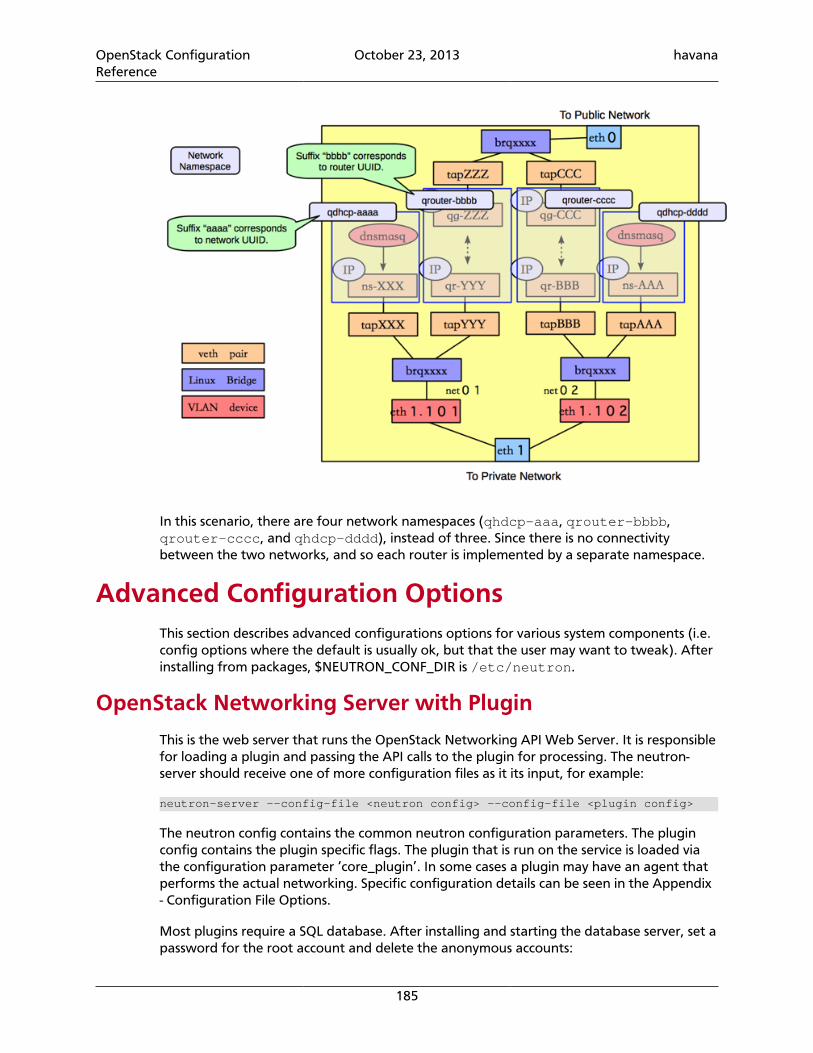
OpenStack ConfigurationReference
October 23, 2013 havana
185
In this scenario, there are four network namespaces (qhdcp-aaa, qrouter-bbbb,qrouter-cccc, and qhdcp-dddd), instead of three. Since there is no connectivitybetween the two networks, and so each router is implemented by a separate namespace.
Advanced Configuration OptionsThis section describes advanced configurations options for various system components (i.e.config options where the default is usually ok, but that the user may want to tweak). Afterinstalling from packages, $NEUTRON_CONF_DIR is /etc/neutron.
OpenStack Networking Server with Plugin
This is the web server that runs the OpenStack Networking API Web Server. It is responsiblefor loading a plugin and passing the API calls to the plugin for processing. The neutron-server should receive one of more configuration files as it its input, for example:
neutron-server --config-file <neutron config> --config-file <plugin config>
The neutron config contains the common neutron configuration parameters. The pluginconfig contains the plugin specific flags. The plugin that is run on the service is loaded viathe configuration parameter ‘core_plugin’. In some cases a plugin may have an agent thatperforms the actual networking. Specific configuration details can be seen in the Appendix- Configuration File Options.
Most plugins require a SQL database. After installing and starting the database server, set apassword for the root account and delete the anonymous accounts:
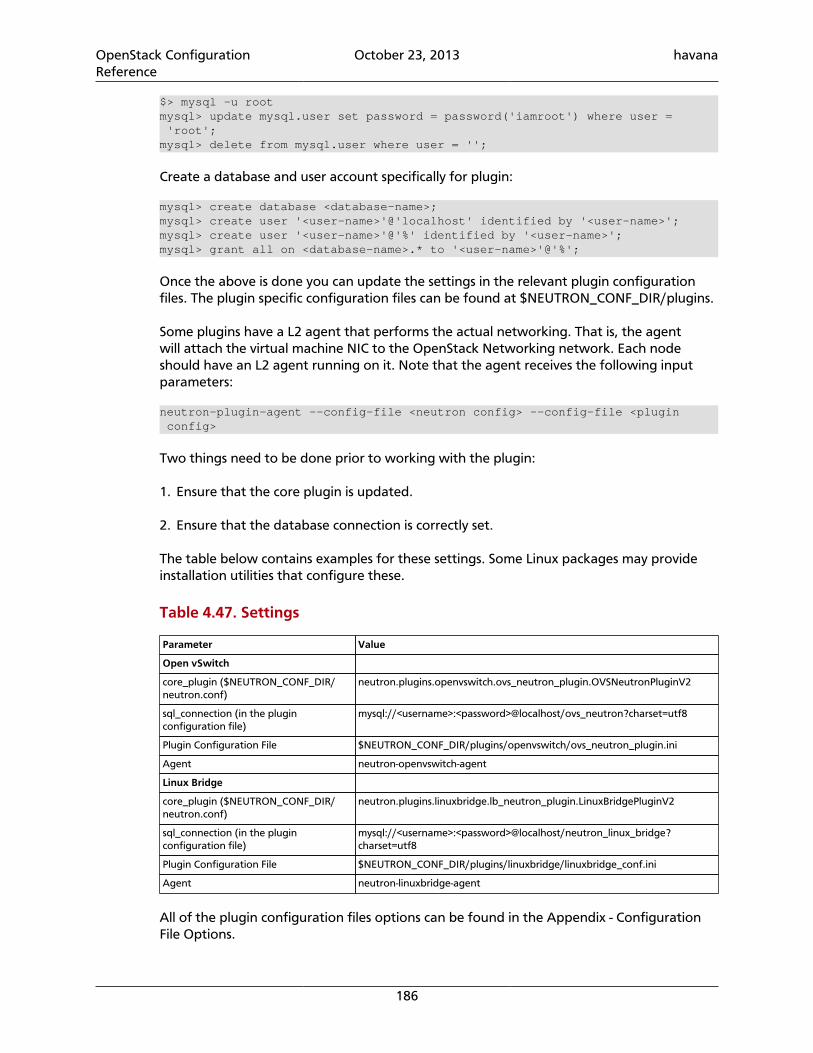
OpenStack ConfigurationReference
October 23, 2013 havana
186
$> mysql -u rootmysql> update mysql.user set password = password('iamroot') where user = 'root';mysql> delete from mysql.user where user = '';
Create a database and user account specifically for plugin:
mysql> create database <database-name>;mysql> create user '<user-name>'@'localhost' identified by '<user-name>';mysql> create user '<user-name>'@'%' identified by '<user-name>';mysql> grant all on <database-name>.* to '<user-name>'@'%';
Once the above is done you can update the settings in the relevant plugin configurationfiles. The plugin specific configuration files can be found at $NEUTRON_CONF_DIR/plugins.
Some plugins have a L2 agent that performs the actual networking. That is, the agentwill attach the virtual machine NIC to the OpenStack Networking network. Each nodeshould have an L2 agent running on it. Note that the agent receives the following inputparameters:
neutron-plugin-agent --config-file <neutron config> --config-file <plugin config>
Two things need to be done prior to working with the plugin:
1. Ensure that the core plugin is updated.
2. Ensure that the database connection is correctly set.
The table below contains examples for these settings. Some Linux packages may provideinstallation utilities that configure these.
Table 4.47. Settings
Parameter Value
Open vSwitch
core_plugin ($NEUTRON_CONF_DIR/neutron.conf)
neutron.plugins.openvswitch.ovs_neutron_plugin.OVSNeutronPluginV2
sql_connection (in the pluginconfiguration file)
mysql://<username>:<password>@localhost/ovs_neutron?charset=utf8
Plugin Configuration File $NEUTRON_CONF_DIR/plugins/openvswitch/ovs_neutron_plugin.ini
Agent neutron-openvswitch-agent
Linux Bridge
core_plugin ($NEUTRON_CONF_DIR/neutron.conf)
neutron.plugins.linuxbridge.lb_neutron_plugin.LinuxBridgePluginV2
sql_connection (in the pluginconfiguration file)
mysql://<username>:<password>@localhost/neutron_linux_bridge?charset=utf8
Plugin Configuration File $NEUTRON_CONF_DIR/plugins/linuxbridge/linuxbridge_conf.ini
Agent neutron-linuxbridge-agent
All of the plugin configuration files options can be found in the Appendix - ConfigurationFile Options.
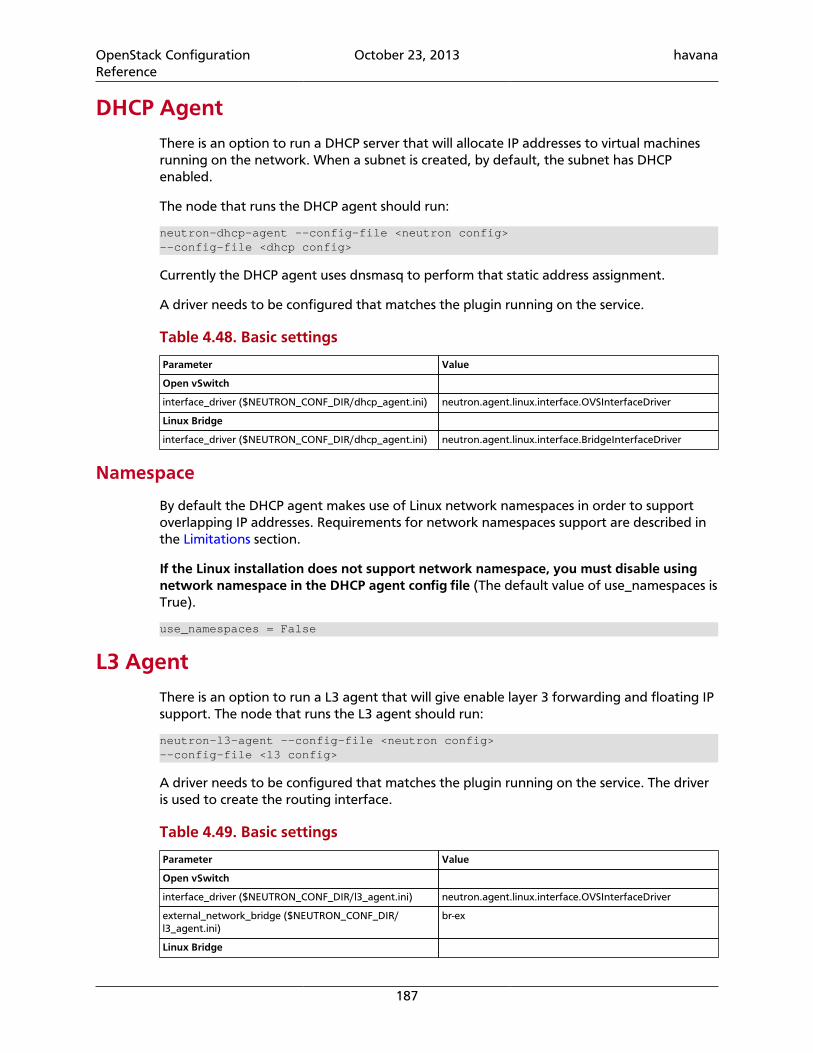
OpenStack ConfigurationReference
October 23, 2013 havana
187
DHCP AgentThere is an option to run a DHCP server that will allocate IP addresses to virtual machinesrunning on the network. When a subnet is created, by default, the subnet has DHCPenabled.
The node that runs the DHCP agent should run:
neutron-dhcp-agent --config-file <neutron config>--config-file <dhcp config>
Currently the DHCP agent uses dnsmasq to perform that static address assignment.
A driver needs to be configured that matches the plugin running on the service.
Table 4.48. Basic settings
Parameter Value
Open vSwitch
interface_driver ($NEUTRON_CONF_DIR/dhcp_agent.ini) neutron.agent.linux.interface.OVSInterfaceDriver
Linux Bridge
interface_driver ($NEUTRON_CONF_DIR/dhcp_agent.ini) neutron.agent.linux.interface.BridgeInterfaceDriver
Namespace
By default the DHCP agent makes use of Linux network namespaces in order to supportoverlapping IP addresses. Requirements for network namespaces support are described inthe Limitations section.
If the Linux installation does not support network namespace, you must disable usingnetwork namespace in the DHCP agent config file (The default value of use_namespaces isTrue).
use_namespaces = False
L3 AgentThere is an option to run a L3 agent that will give enable layer 3 forwarding and floating IPsupport. The node that runs the L3 agent should run:
neutron-l3-agent --config-file <neutron config>--config-file <l3 config>
A driver needs to be configured that matches the plugin running on the service. The driveris used to create the routing interface.
Table 4.49. Basic settings
Parameter Value
Open vSwitch
interface_driver ($NEUTRON_CONF_DIR/l3_agent.ini) neutron.agent.linux.interface.OVSInterfaceDriver
external_network_bridge ($NEUTRON_CONF_DIR/l3_agent.ini)
br-ex
Linux Bridge
OpenStack ConfigurationReference
October 23, 2013 havana
188
Parameter Value
interface_driver ($NEUTRON_CONF_DIR/l3_agent.ini) neutron.agent.linux.interface.BridgeInterfaceDriver
external_network_bridge ($NEUTRON_CONF_DIR/l3_agent.ini)
This field must be empty (or the bridge name for theexternal network).
The L3 agent communicates with the OpenStack Networking server via the OpenStackNetworking API, so the following configuration is required:
1. OpenStack Identity authentication:
auth_url="$KEYSTONE_SERVICE_PROTOCOL://$KEYSTONE_AUTH_HOST:$KEYSTONE_AUTH_PORT/v2.0"
For example,
http://10.56.51.210:5000/v2.0
2. Admin user details:
admin_tenant_name $SERVICE_TENANT_NAMEadmin_user $Q_ADMIN_USERNAMEadmin_password $SERVICE_PASSWORD
Namespace
By default the L3 agent makes use of Linux network namespaces in order to supportoverlapping IP addresses. Requirements for network namespaces support are described inthe Limitation section.
If the Linux installation does not support network namespace, you must disable usingnetwork namespace in the L3 agent config file (The default value of use_namespaces isTrue).
use_namespaces = False
When use_namespaces is set to False, only one router ID can be supported per node. Thismust be configured via the configuration variable router_id.
# If use_namespaces is set to False then the agent can only configure one router.# This is done by setting the specific router_id.router_id = 1064ad16-36b7-4c2f-86f0-daa2bcbd6b2a
To configure it, you need to run the OpenStack Networking service and create a router,and then set an ID of the router created to router_id in the L3 agent configuration file.
$ neutron router-create myrouter1Created a new router:+-----------------------+--------------------------------------+| Field | Value |+-----------------------+--------------------------------------+| admin_state_up | True || external_gateway_info | || id | 338d42d7-b22e-42c5-9df6-f3674768fe75 || name | myrouter1 || status | ACTIVE || tenant_id | 0c236f65baa04e6f9b4236b996555d56 |+-----------------------+--------------------------------------+
OpenStack ConfigurationReference
October 23, 2013 havana
189
Multiple Floating IP Pools
The L3 API in OpenStack Networking supports multiple floating IP pools. In OpenStackNetworking, a floating IP pool is represented as an external network and a floating IPis allocated from a subnet associated with the external network. Since each L3 agentcan be associated with at most one external network, we need to invoke multiple L3agent to define multiple floating IP pools. 'gateway_external_network_id' in L3 agentconfiguration file indicates the external network that the L3 agent handles. You can runmultiple L3 agent instances on one host.
In addition, when you run multiple L3 agents, make sure thathandle_internal_only_routers is set to True only for one L3 agent in an OpenStackNetworking deployment and set to False for all other L3 agents. Since the default value ofthis parameter is True, you need to configure it carefully.
Before starting L3 agents, you need to create routers and external networks, then updatethe configuration files with UUID of external networks and start L3 agents.
For the first agent, invoke it with the following l3_agent.ini wherehandle_internal_only_routers is True.
handle_internal_only_routers = Truegateway_external_network_id = 2118b11c-011e-4fa5-a6f1-2ca34d372c35external_network_bridge = br-ex
python /opt/stack/neutron/bin/neutron-l3-agent --config-file /etc/neutron/neutron.conf --config-file=/etc/neutron/l3_agent.ini
For the second (or later) agent, invoke it with the following l3_agent.ini wherehandle_internal_only_routers is False.
handle_internal_only_routers = Falsegateway_external_network_id = e828e54c-850a-4e74-80a8-8b79c6a285d8external_network_bridge = br-ex-2
Limitations• No equivalent for nova-network --multi_host flag: Nova-network has a model where
the L3, NAT, and DHCP processing happen on the compute node itself, rather than adedicated networking node. OpenStack Networking now support running multiple l3-agent and dhcp-agents with load being split across those agents, but the tight couplingof that scheduling with the location of the VM is not supported in Grizzly. The Havanarelease is expected to include an exact replacement for the --multi_host flag in nova-network.
• Linux network namespace required on nodes running neutron-l3-agent orneutron-dhcp-agent if overlapping IPs are in use: . In order to support overlappingIP addresses, the OpenStack Networking DHCP and L3 agents use Linux networknamespaces by default. The hosts running these processes must support networknamespaces. To support network namespaces, the following are required:
• Linux kernel 2.6.24 or newer (with CONFIG_NET_NS=y in kernel configuration) and
• iproute2 utilities ('ip' command) version 3.1.0 (aka 20111117) or newer
OpenStack ConfigurationReference
October 23, 2013 havana
190
To check whether your host supports namespaces try running the following as root:
# ip netns add test-ns# ip netns exec test-ns ifconfig
If the preceding commands do not produce errors, your platform is likely sufficient touse the dhcp-agent or l3-agent with namespace. In our experience, Ubuntu 12.04 or latersupport namespaces as does Fedora 17 and new, but some older RHEL platforms do notby default. It may be possible to upgrade the iproute2 package on a platform that doesnot support namespaces by default.
If you need to disable namespaces, make sure the neutron.conf used by neutron-server has the following setting:
allow_overlapping_ips=False
and that the dhcp_agent.ini and l3_agent.ini have the following setting:
use_namespaces=False
Note
If the host does not support namespaces then the neutron-l3-agentand neutron-dhcp-agent should be run on different hosts. This is due tothe fact that there is no isolation between the IP addresses created by theL3 agent and by the DHCP agent. By manipulating the routing the user canensure that these networks have access to one another.
If you run both L3 and DHCP services on the same node, you should enable namespacesto avoid conflicts with routes:
use_namespaces=True
• No IPv6 support for L3 agent: The neutron-l3-agent, used by many plugins toimplement L3 forwarding, supports only IPv4 forwarding. Currently, there are no errorsprovided if you configure IPv6 addresses via the API.
• ZeroMQ support is experimental: Some agents, including neutron-dhcp-agent,neutron-openvswitch-agent, and neutron-linuxbridge-agent use RPC tocommunicate. ZeroMQ is an available option in the configuration file, but has not beentested and should be considered experimental. In particular, there are believed to beissues with ZeroMQ and the dhcp agent.
• MetaPlugin is experimental: This release includes a "MetaPlugin" that is intended tosupport multiple plugins at the same time for different API requests, based on thecontent of those API requests. This functionality has not been widely reviewed or testedby the core team, and should be considered experimental until further validation isperformed.
Scalable and Highly Available DHCP AgentsThis section describes how to use the agent management (alias agent) and scheduler (aliasagent_scheduler) extensions for DHCP agents scalability and HA
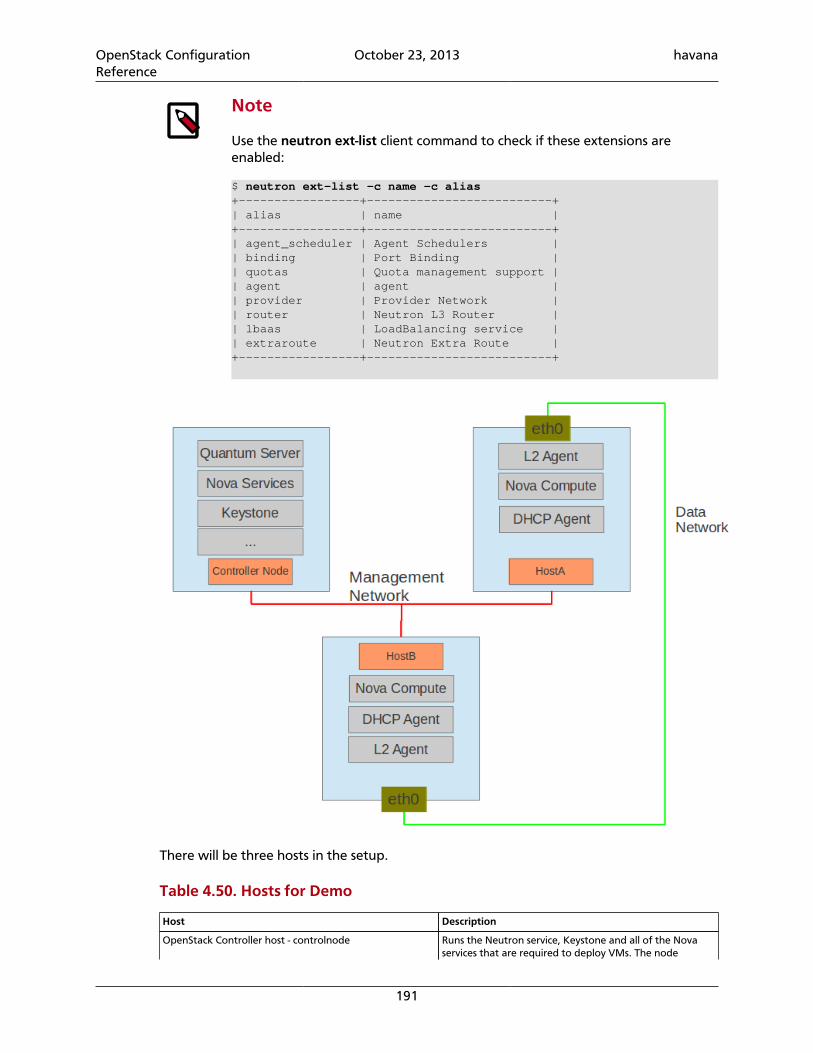
OpenStack ConfigurationReference
October 23, 2013 havana
191
Note
Use the neutron ext-list client command to check if these extensions areenabled:
$ neutron ext-list -c name -c alias+-----------------+--------------------------+| alias | name |+-----------------+--------------------------+| agent_scheduler | Agent Schedulers || binding | Port Binding || quotas | Quota management support || agent | agent || provider | Provider Network || router | Neutron L3 Router || lbaas | LoadBalancing service || extraroute | Neutron Extra Route |+-----------------+--------------------------+
There will be three hosts in the setup.
Table 4.50. Hosts for Demo
Host Description
OpenStack Controller host - controlnode Runs the Neutron service, Keystone and all of the Novaservices that are required to deploy VMs. The node
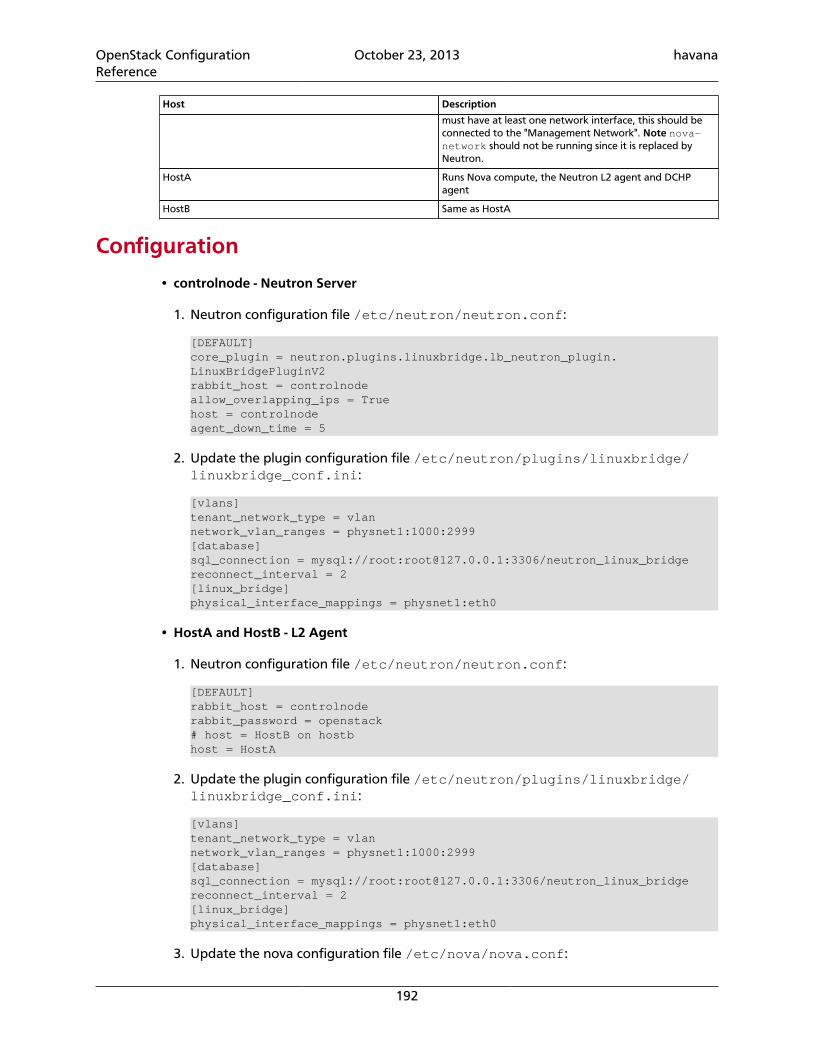
OpenStack ConfigurationReference
October 23, 2013 havana
192
Host Description
must have at least one network interface, this should beconnected to the "Management Network". Note nova-network should not be running since it is replaced byNeutron.
HostA Runs Nova compute, the Neutron L2 agent and DCHPagent
HostB Same as HostA
Configuration
• controlnode - Neutron Server
1. Neutron configuration file /etc/neutron/neutron.conf:
[DEFAULT]core_plugin = neutron.plugins.linuxbridge.lb_neutron_plugin.LinuxBridgePluginV2rabbit_host = controlnodeallow_overlapping_ips = Truehost = controlnodeagent_down_time = 5
2. Update the plugin configuration file /etc/neutron/plugins/linuxbridge/linuxbridge_conf.ini:
[vlans]tenant_network_type = vlannetwork_vlan_ranges = physnet1:1000:2999[database]sql_connection = mysql://root:[email protected]:3306/neutron_linux_bridgereconnect_interval = 2[linux_bridge]physical_interface_mappings = physnet1:eth0
• HostA and HostB - L2 Agent
1. Neutron configuration file /etc/neutron/neutron.conf:
[DEFAULT]rabbit_host = controlnoderabbit_password = openstack# host = HostB on hostbhost = HostA
2. Update the plugin configuration file /etc/neutron/plugins/linuxbridge/linuxbridge_conf.ini:
[vlans]tenant_network_type = vlannetwork_vlan_ranges = physnet1:1000:2999[database]sql_connection = mysql://root:[email protected]:3306/neutron_linux_bridgereconnect_interval = 2[linux_bridge]physical_interface_mappings = physnet1:eth0
3. Update the nova configuration file /etc/nova/nova.conf:
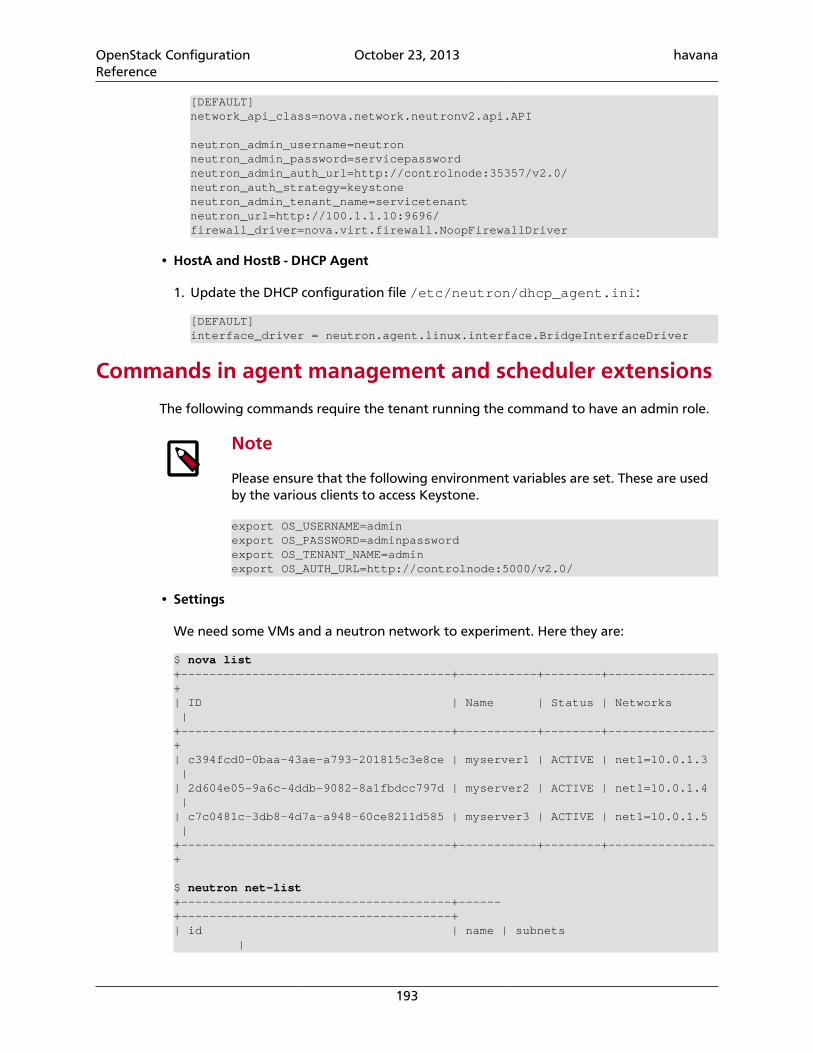
OpenStack ConfigurationReference
October 23, 2013 havana
193
[DEFAULT]network_api_class=nova.network.neutronv2.api.API
neutron_admin_username=neutronneutron_admin_password=servicepasswordneutron_admin_auth_url=http://controlnode:35357/v2.0/neutron_auth_strategy=keystoneneutron_admin_tenant_name=servicetenantneutron_url=http://100.1.1.10:9696/firewall_driver=nova.virt.firewall.NoopFirewallDriver
• HostA and HostB - DHCP Agent
1. Update the DHCP configuration file /etc/neutron/dhcp_agent.ini:
[DEFAULT]interface_driver = neutron.agent.linux.interface.BridgeInterfaceDriver
Commands in agent management and scheduler extensions
The following commands require the tenant running the command to have an admin role.
Note
Please ensure that the following environment variables are set. These are usedby the various clients to access Keystone.
export OS_USERNAME=adminexport OS_PASSWORD=adminpasswordexport OS_TENANT_NAME=adminexport OS_AUTH_URL=http://controlnode:5000/v2.0/
• Settings
We need some VMs and a neutron network to experiment. Here they are:
$ nova list+--------------------------------------+-----------+--------+---------------+| ID | Name | Status | Networks |+--------------------------------------+-----------+--------+---------------+| c394fcd0-0baa-43ae-a793-201815c3e8ce | myserver1 | ACTIVE | net1=10.0.1.3 || 2d604e05-9a6c-4ddb-9082-8a1fbdcc797d | myserver2 | ACTIVE | net1=10.0.1.4 || c7c0481c-3db8-4d7a-a948-60ce8211d585 | myserver3 | ACTIVE | net1=10.0.1.5 |+--------------------------------------+-----------+--------+---------------+
$ neutron net-list+--------------------------------------+------+--------------------------------------+| id | name | subnets |
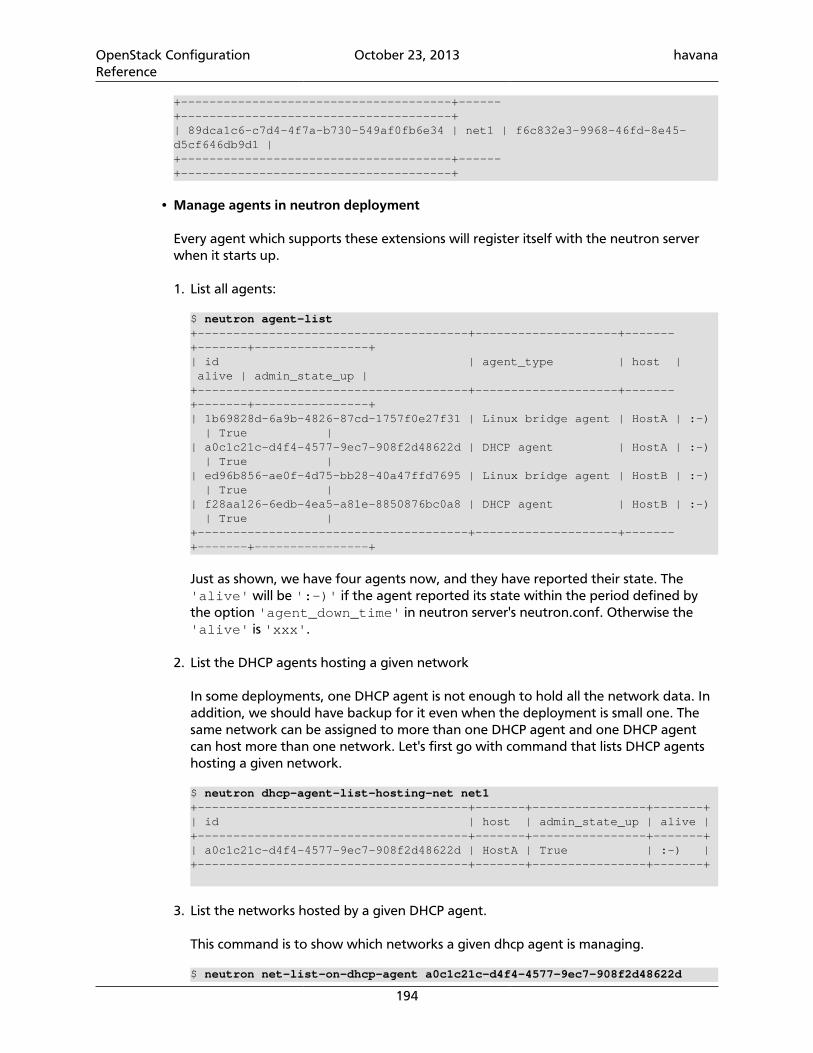
OpenStack ConfigurationReference
October 23, 2013 havana
194
+--------------------------------------+------+--------------------------------------+| 89dca1c6-c7d4-4f7a-b730-549af0fb6e34 | net1 | f6c832e3-9968-46fd-8e45-d5cf646db9d1 |+--------------------------------------+------+--------------------------------------+
• Manage agents in neutron deployment
Every agent which supports these extensions will register itself with the neutron serverwhen it starts up.
1. List all agents:
$ neutron agent-list+--------------------------------------+--------------------+-------+-------+----------------+| id | agent_type | host | alive | admin_state_up |+--------------------------------------+--------------------+-------+-------+----------------+| 1b69828d-6a9b-4826-87cd-1757f0e27f31 | Linux bridge agent | HostA | :-) | True || a0c1c21c-d4f4-4577-9ec7-908f2d48622d | DHCP agent | HostA | :-) | True || ed96b856-ae0f-4d75-bb28-40a47ffd7695 | Linux bridge agent | HostB | :-) | True || f28aa126-6edb-4ea5-a81e-8850876bc0a8 | DHCP agent | HostB | :-) | True |+--------------------------------------+--------------------+-------+-------+----------------+
Just as shown, we have four agents now, and they have reported their state. The'alive' will be ':-)' if the agent reported its state within the period defined bythe option 'agent_down_time' in neutron server's neutron.conf. Otherwise the'alive' is 'xxx'.
2. List the DHCP agents hosting a given network
In some deployments, one DHCP agent is not enough to hold all the network data. Inaddition, we should have backup for it even when the deployment is small one. Thesame network can be assigned to more than one DHCP agent and one DHCP agentcan host more than one network. Let's first go with command that lists DHCP agentshosting a given network.
$ neutron dhcp-agent-list-hosting-net net1+--------------------------------------+-------+----------------+-------+| id | host | admin_state_up | alive |+--------------------------------------+-------+----------------+-------+| a0c1c21c-d4f4-4577-9ec7-908f2d48622d | HostA | True | :-) |+--------------------------------------+-------+----------------+-------+
3. List the networks hosted by a given DHCP agent.
This command is to show which networks a given dhcp agent is managing.
$ neutron net-list-on-dhcp-agent a0c1c21c-d4f4-4577-9ec7-908f2d48622d
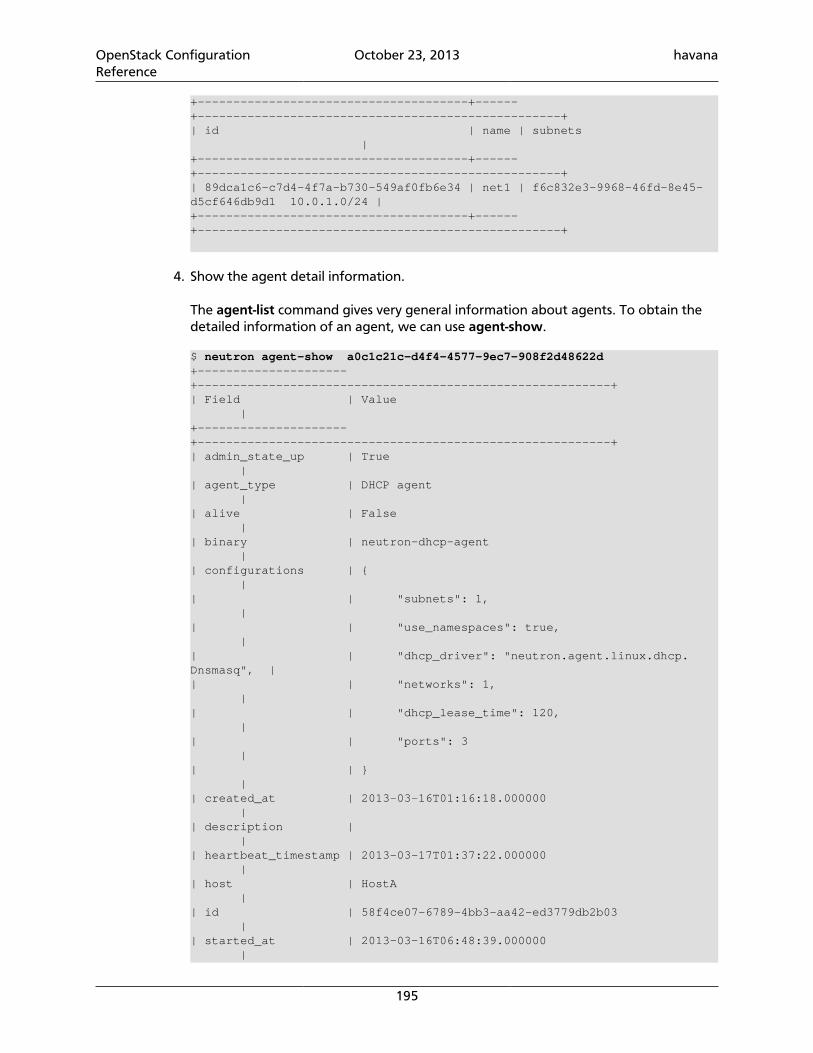
OpenStack ConfigurationReference
October 23, 2013 havana
195
+--------------------------------------+------+---------------------------------------------------+| id | name | subnets |+--------------------------------------+------+---------------------------------------------------+| 89dca1c6-c7d4-4f7a-b730-549af0fb6e34 | net1 | f6c832e3-9968-46fd-8e45-d5cf646db9d1 10.0.1.0/24 |+--------------------------------------+------+---------------------------------------------------+
4. Show the agent detail information.
The agent-list command gives very general information about agents. To obtain thedetailed information of an agent, we can use agent-show.
$ neutron agent-show a0c1c21c-d4f4-4577-9ec7-908f2d48622d+---------------------+----------------------------------------------------------+| Field | Value |+---------------------+----------------------------------------------------------+| admin_state_up | True || agent_type | DHCP agent || alive | False || binary | neutron-dhcp-agent || configurations | { || | "subnets": 1, || | "use_namespaces": true, || | "dhcp_driver": "neutron.agent.linux.dhcp.Dnsmasq", || | "networks": 1, || | "dhcp_lease_time": 120, || | "ports": 3 || | } || created_at | 2013-03-16T01:16:18.000000 || description | || heartbeat_timestamp | 2013-03-17T01:37:22.000000 || host | HostA || id | 58f4ce07-6789-4bb3-aa42-ed3779db2b03 || started_at | 2013-03-16T06:48:39.000000 |
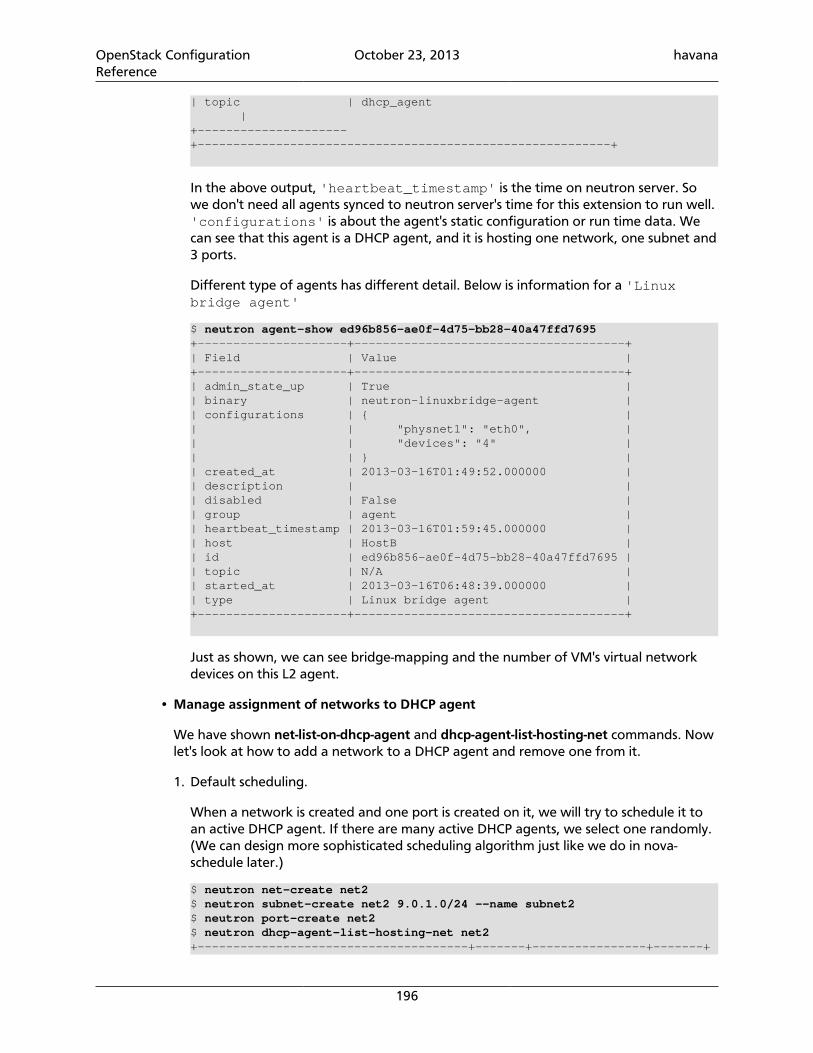
OpenStack ConfigurationReference
October 23, 2013 havana
196
| topic | dhcp_agent |+---------------------+----------------------------------------------------------+
In the above output, 'heartbeat_timestamp' is the time on neutron server. Sowe don't need all agents synced to neutron server's time for this extension to run well.'configurations' is about the agent's static configuration or run time data. Wecan see that this agent is a DHCP agent, and it is hosting one network, one subnet and3 ports.
Different type of agents has different detail. Below is information for a 'Linuxbridge agent'
$ neutron agent-show ed96b856-ae0f-4d75-bb28-40a47ffd7695+---------------------+--------------------------------------+| Field | Value |+---------------------+--------------------------------------+| admin_state_up | True || binary | neutron-linuxbridge-agent || configurations | { || | "physnet1": "eth0", || | "devices": "4" || | } || created_at | 2013-03-16T01:49:52.000000 || description | || disabled | False || group | agent || heartbeat_timestamp | 2013-03-16T01:59:45.000000 || host | HostB || id | ed96b856-ae0f-4d75-bb28-40a47ffd7695 || topic | N/A || started_at | 2013-03-16T06:48:39.000000 || type | Linux bridge agent |+---------------------+--------------------------------------+
Just as shown, we can see bridge-mapping and the number of VM's virtual networkdevices on this L2 agent.
• Manage assignment of networks to DHCP agent
We have shown net-list-on-dhcp-agent and dhcp-agent-list-hosting-net commands. Nowlet's look at how to add a network to a DHCP agent and remove one from it.
1. Default scheduling.
When a network is created and one port is created on it, we will try to schedule it toan active DHCP agent. If there are many active DHCP agents, we select one randomly.(We can design more sophisticated scheduling algorithm just like we do in nova-schedule later.)
$ neutron net-create net2$ neutron subnet-create net2 9.0.1.0/24 --name subnet2$ neutron port-create net2$ neutron dhcp-agent-list-hosting-net net2+--------------------------------------+-------+----------------+-------+
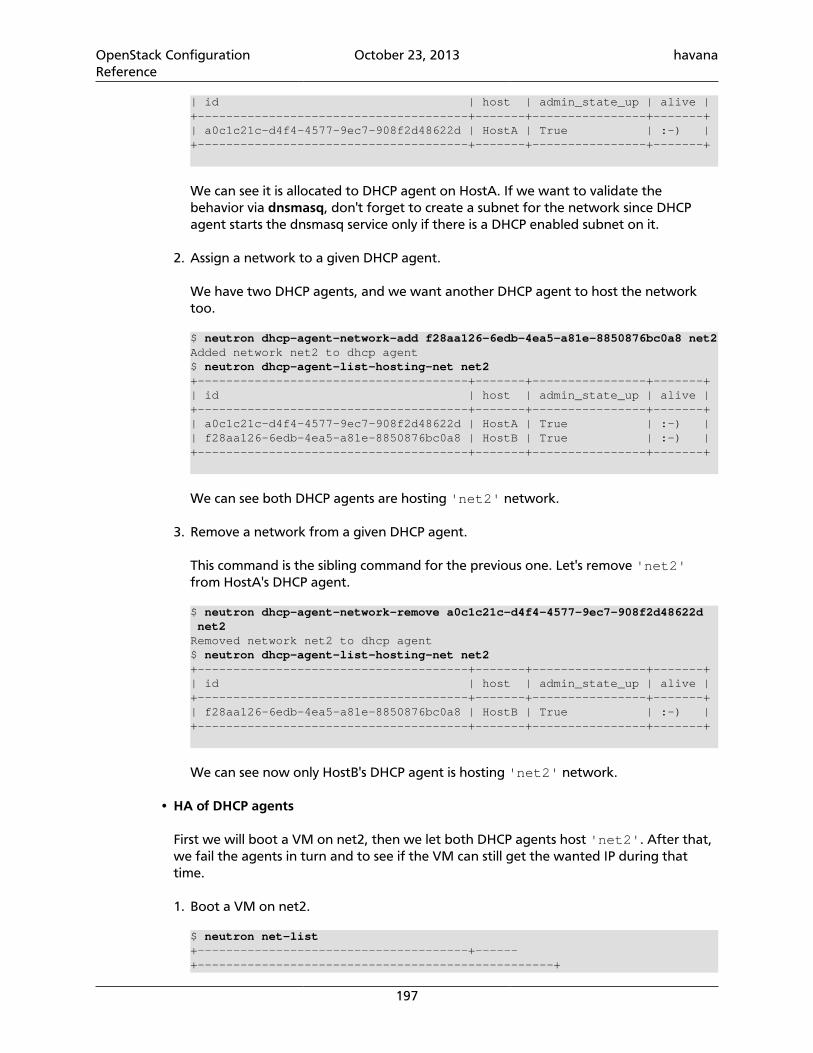
OpenStack ConfigurationReference
October 23, 2013 havana
197
| id | host | admin_state_up | alive |+--------------------------------------+-------+----------------+-------+| a0c1c21c-d4f4-4577-9ec7-908f2d48622d | HostA | True | :-) |+--------------------------------------+-------+----------------+-------+
We can see it is allocated to DHCP agent on HostA. If we want to validate thebehavior via dnsmasq, don't forget to create a subnet for the network since DHCPagent starts the dnsmasq service only if there is a DHCP enabled subnet on it.
2. Assign a network to a given DHCP agent.
We have two DHCP agents, and we want another DHCP agent to host the networktoo.
$ neutron dhcp-agent-network-add f28aa126-6edb-4ea5-a81e-8850876bc0a8 net2Added network net2 to dhcp agent$ neutron dhcp-agent-list-hosting-net net2+--------------------------------------+-------+----------------+-------+| id | host | admin_state_up | alive |+--------------------------------------+-------+----------------+-------+| a0c1c21c-d4f4-4577-9ec7-908f2d48622d | HostA | True | :-) || f28aa126-6edb-4ea5-a81e-8850876bc0a8 | HostB | True | :-) |+--------------------------------------+-------+----------------+-------+
We can see both DHCP agents are hosting 'net2' network.
3. Remove a network from a given DHCP agent.
This command is the sibling command for the previous one. Let's remove 'net2'from HostA's DHCP agent.
$ neutron dhcp-agent-network-remove a0c1c21c-d4f4-4577-9ec7-908f2d48622d net2Removed network net2 to dhcp agent$ neutron dhcp-agent-list-hosting-net net2+--------------------------------------+-------+----------------+-------+| id | host | admin_state_up | alive |+--------------------------------------+-------+----------------+-------+| f28aa126-6edb-4ea5-a81e-8850876bc0a8 | HostB | True | :-) |+--------------------------------------+-------+----------------+-------+
We can see now only HostB's DHCP agent is hosting 'net2' network.
• HA of DHCP agents
First we will boot a VM on net2, then we let both DHCP agents host 'net2'. After that,we fail the agents in turn and to see if the VM can still get the wanted IP during thattime.
1. Boot a VM on net2.
$ neutron net-list+--------------------------------------+------+--------------------------------------------------+
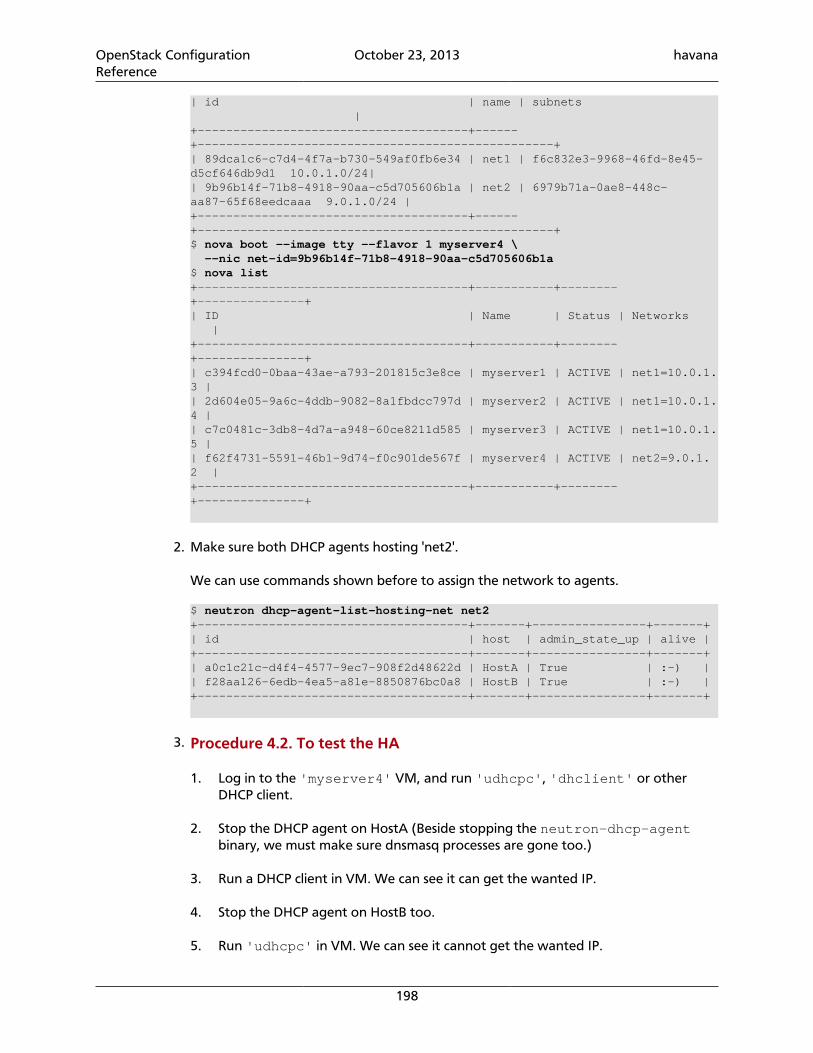
OpenStack ConfigurationReference
October 23, 2013 havana
198
| id | name | subnets |+--------------------------------------+------+--------------------------------------------------+| 89dca1c6-c7d4-4f7a-b730-549af0fb6e34 | net1 | f6c832e3-9968-46fd-8e45-d5cf646db9d1 10.0.1.0/24|| 9b96b14f-71b8-4918-90aa-c5d705606b1a | net2 | 6979b71a-0ae8-448c-aa87-65f68eedcaaa 9.0.1.0/24 |+--------------------------------------+------+--------------------------------------------------+$ nova boot --image tty --flavor 1 myserver4 \ --nic net-id=9b96b14f-71b8-4918-90aa-c5d705606b1a$ nova list+--------------------------------------+-----------+--------+---------------+| ID | Name | Status | Networks |+--------------------------------------+-----------+--------+---------------+| c394fcd0-0baa-43ae-a793-201815c3e8ce | myserver1 | ACTIVE | net1=10.0.1.3 || 2d604e05-9a6c-4ddb-9082-8a1fbdcc797d | myserver2 | ACTIVE | net1=10.0.1.4 || c7c0481c-3db8-4d7a-a948-60ce8211d585 | myserver3 | ACTIVE | net1=10.0.1.5 || f62f4731-5591-46b1-9d74-f0c901de567f | myserver4 | ACTIVE | net2=9.0.1.2 |+--------------------------------------+-----------+--------+---------------+
2. Make sure both DHCP agents hosting 'net2'.
We can use commands shown before to assign the network to agents.
$ neutron dhcp-agent-list-hosting-net net2+--------------------------------------+-------+----------------+-------+| id | host | admin_state_up | alive |+--------------------------------------+-------+----------------+-------+| a0c1c21c-d4f4-4577-9ec7-908f2d48622d | HostA | True | :-) || f28aa126-6edb-4ea5-a81e-8850876bc0a8 | HostB | True | :-) |+--------------------------------------+-------+----------------+-------+
3. Procedure 4.2. To test the HA
1. Log in to the 'myserver4' VM, and run 'udhcpc', 'dhclient' or otherDHCP client.
2. Stop the DHCP agent on HostA (Beside stopping the neutron-dhcp-agentbinary, we must make sure dnsmasq processes are gone too.)
3. Run a DHCP client in VM. We can see it can get the wanted IP.
4. Stop the DHCP agent on HostB too.
5. Run 'udhcpc' in VM. We can see it cannot get the wanted IP.
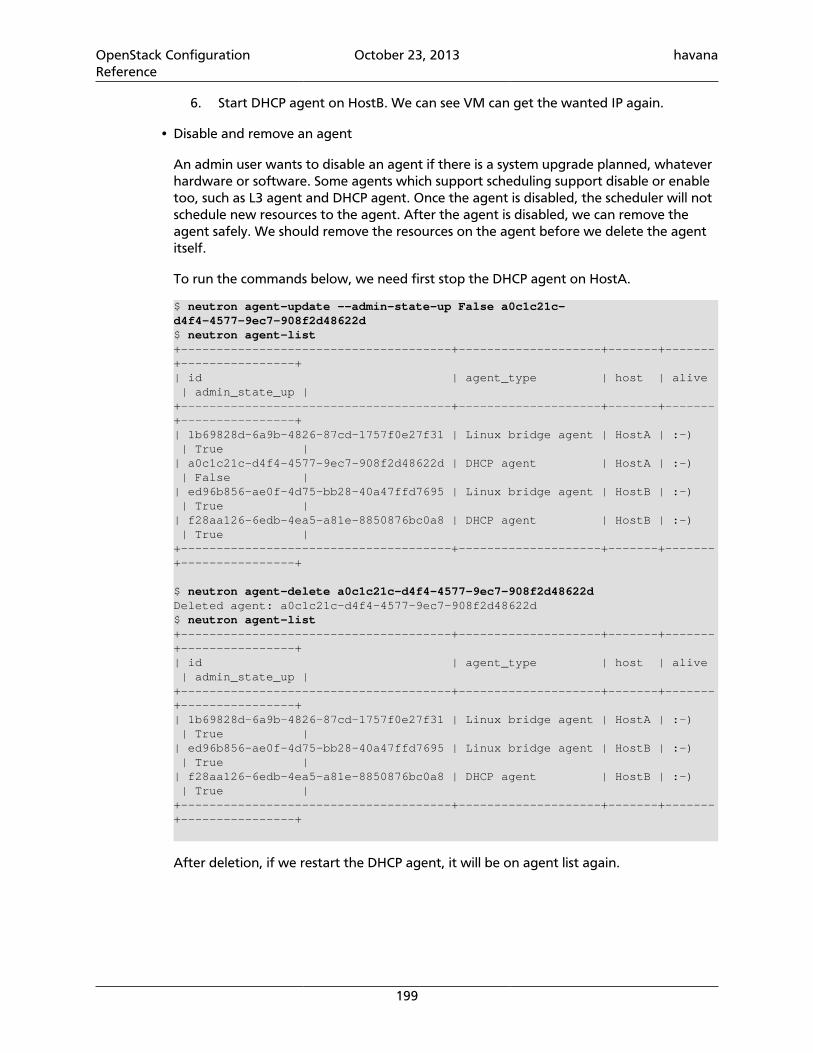
OpenStack ConfigurationReference
October 23, 2013 havana
199
6. Start DHCP agent on HostB. We can see VM can get the wanted IP again.
• Disable and remove an agent
An admin user wants to disable an agent if there is a system upgrade planned, whateverhardware or software. Some agents which support scheduling support disable or enabletoo, such as L3 agent and DHCP agent. Once the agent is disabled, the scheduler will notschedule new resources to the agent. After the agent is disabled, we can remove theagent safely. We should remove the resources on the agent before we delete the agentitself.
To run the commands below, we need first stop the DHCP agent on HostA.
$ neutron agent-update --admin-state-up False a0c1c21c-d4f4-4577-9ec7-908f2d48622d$ neutron agent-list+--------------------------------------+--------------------+-------+-------+----------------+| id | agent_type | host | alive | admin_state_up |+--------------------------------------+--------------------+-------+-------+----------------+| 1b69828d-6a9b-4826-87cd-1757f0e27f31 | Linux bridge agent | HostA | :-) | True || a0c1c21c-d4f4-4577-9ec7-908f2d48622d | DHCP agent | HostA | :-) | False || ed96b856-ae0f-4d75-bb28-40a47ffd7695 | Linux bridge agent | HostB | :-) | True || f28aa126-6edb-4ea5-a81e-8850876bc0a8 | DHCP agent | HostB | :-) | True |+--------------------------------------+--------------------+-------+-------+----------------+
$ neutron agent-delete a0c1c21c-d4f4-4577-9ec7-908f2d48622dDeleted agent: a0c1c21c-d4f4-4577-9ec7-908f2d48622d$ neutron agent-list+--------------------------------------+--------------------+-------+-------+----------------+| id | agent_type | host | alive | admin_state_up |+--------------------------------------+--------------------+-------+-------+----------------+| 1b69828d-6a9b-4826-87cd-1757f0e27f31 | Linux bridge agent | HostA | :-) | True || ed96b856-ae0f-4d75-bb28-40a47ffd7695 | Linux bridge agent | HostB | :-) | True || f28aa126-6edb-4ea5-a81e-8850876bc0a8 | DHCP agent | HostB | :-) | True |+--------------------------------------+--------------------+-------+-------+----------------+
After deletion, if we restart the DHCP agent, it will be on agent list again.
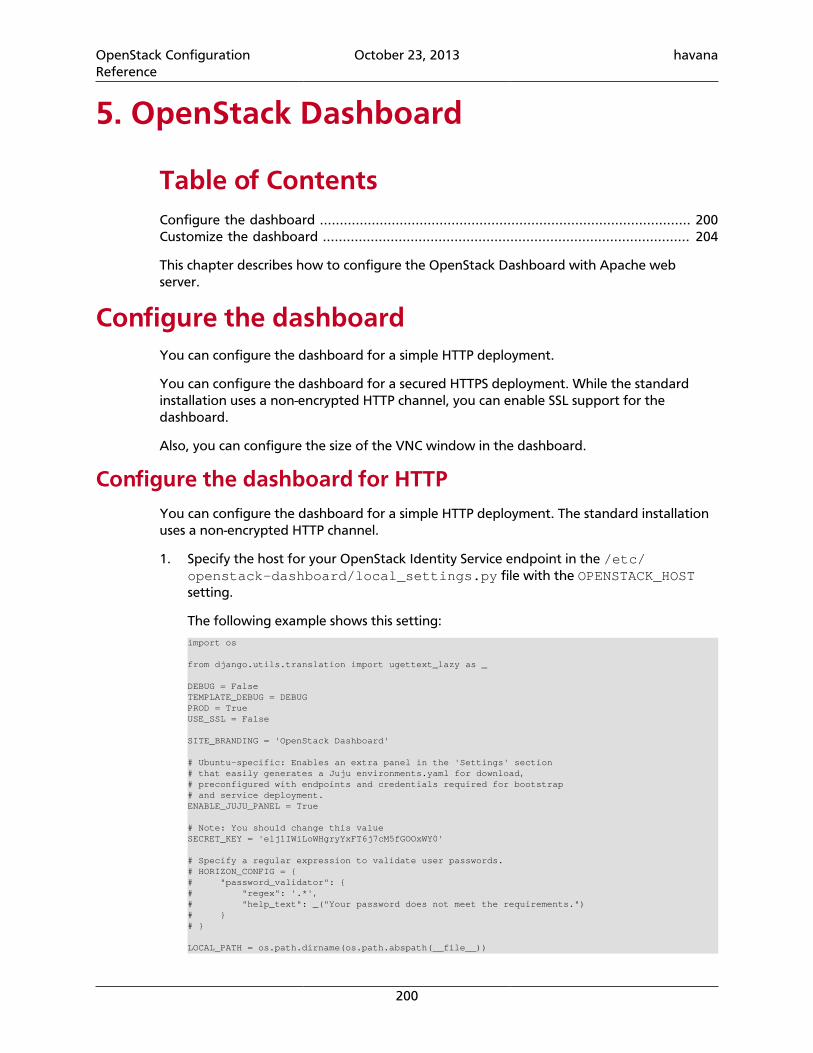
OpenStack ConfigurationReference
October 23, 2013 havana
200
5. OpenStack Dashboard
Table of ContentsConfigure the dashboard ............................................................................................. 200Customize the dashboard ............................................................................................ 204
This chapter describes how to configure the OpenStack Dashboard with Apache webserver.
Configure the dashboardYou can configure the dashboard for a simple HTTP deployment.
You can configure the dashboard for a secured HTTPS deployment. While the standardinstallation uses a non-encrypted HTTP channel, you can enable SSL support for thedashboard.
Also, you can configure the size of the VNC window in the dashboard.
Configure the dashboard for HTTPYou can configure the dashboard for a simple HTTP deployment. The standard installationuses a non-encrypted HTTP channel.
1. Specify the host for your OpenStack Identity Service endpoint in the /etc/openstack-dashboard/local_settings.py file with the OPENSTACK_HOSTsetting.
The following example shows this setting:import os
from django.utils.translation import ugettext_lazy as _
DEBUG = FalseTEMPLATE_DEBUG = DEBUGPROD = TrueUSE_SSL = False
SITE_BRANDING = 'OpenStack Dashboard'
# Ubuntu-specific: Enables an extra panel in the 'Settings' section# that easily generates a Juju environments.yaml for download,# preconfigured with endpoints and credentials required for bootstrap# and service deployment.ENABLE_JUJU_PANEL = True
# Note: You should change this valueSECRET_KEY = 'elj1IWiLoWHgryYxFT6j7cM5fGOOxWY0'
# Specify a regular expression to validate user passwords.# HORIZON_CONFIG = {# "password_validator": {# "regex": '.*',# "help_text": _("Your password does not meet the requirements.")# }# }
LOCAL_PATH = os.path.dirname(os.path.abspath(__file__))
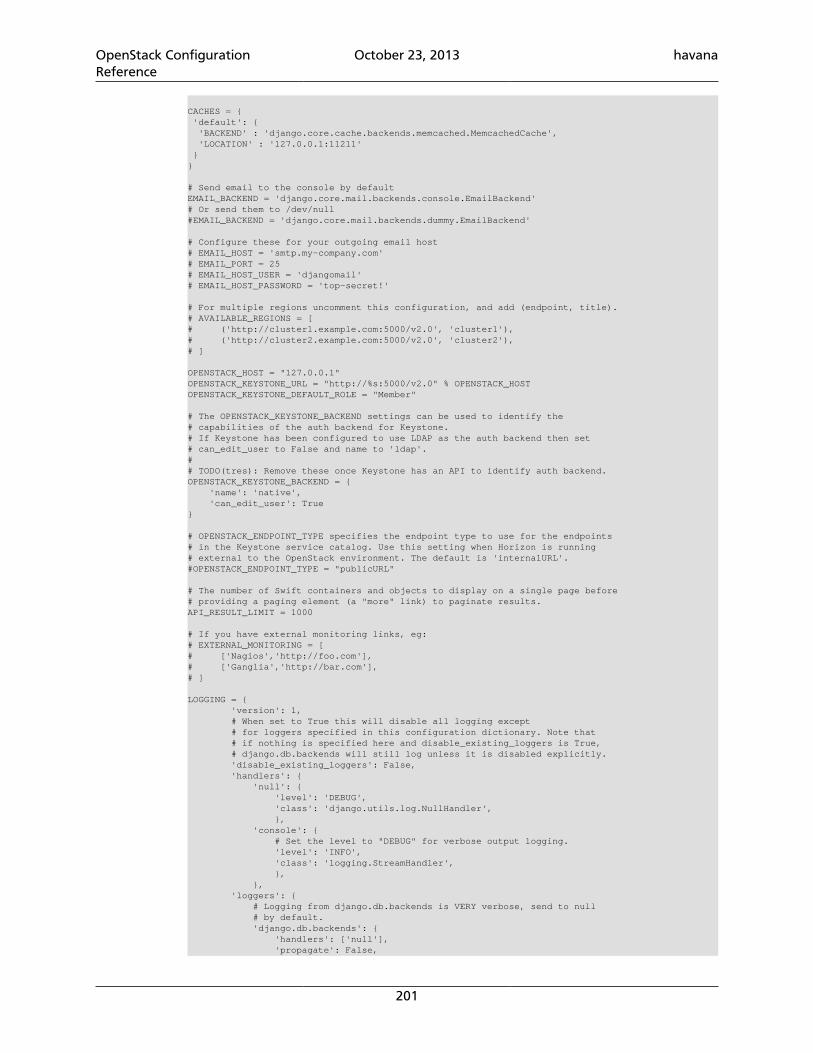
OpenStack ConfigurationReference
October 23, 2013 havana
201
CACHES = { 'default': { 'BACKEND' : 'django.core.cache.backends.memcached.MemcachedCache', 'LOCATION' : '127.0.0.1:11211' }}
# Send email to the console by defaultEMAIL_BACKEND = 'django.core.mail.backends.console.EmailBackend'# Or send them to /dev/null#EMAIL_BACKEND = 'django.core.mail.backends.dummy.EmailBackend'
# Configure these for your outgoing email host# EMAIL_HOST = 'smtp.my-company.com'# EMAIL_PORT = 25# EMAIL_HOST_USER = 'djangomail'# EMAIL_HOST_PASSWORD = 'top-secret!'
# For multiple regions uncomment this configuration, and add (endpoint, title).# AVAILABLE_REGIONS = [# ('http://cluster1.example.com:5000/v2.0', 'cluster1'),# ('http://cluster2.example.com:5000/v2.0', 'cluster2'),# ]
OPENSTACK_HOST = "127.0.0.1"OPENSTACK_KEYSTONE_URL = "http://%s:5000/v2.0" % OPENSTACK_HOSTOPENSTACK_KEYSTONE_DEFAULT_ROLE = "Member"
# The OPENSTACK_KEYSTONE_BACKEND settings can be used to identify the# capabilities of the auth backend for Keystone.# If Keystone has been configured to use LDAP as the auth backend then set# can_edit_user to False and name to 'ldap'.## TODO(tres): Remove these once Keystone has an API to identify auth backend.OPENSTACK_KEYSTONE_BACKEND = { 'name': 'native', 'can_edit_user': True}
# OPENSTACK_ENDPOINT_TYPE specifies the endpoint type to use for the endpoints# in the Keystone service catalog. Use this setting when Horizon is running# external to the OpenStack environment. The default is 'internalURL'.#OPENSTACK_ENDPOINT_TYPE = "publicURL"
# The number of Swift containers and objects to display on a single page before# providing a paging element (a "more" link) to paginate results.API_RESULT_LIMIT = 1000
# If you have external monitoring links, eg:# EXTERNAL_MONITORING = [# ['Nagios','http://foo.com'],# ['Ganglia','http://bar.com'],# ]
LOGGING = { 'version': 1, # When set to True this will disable all logging except # for loggers specified in this configuration dictionary. Note that # if nothing is specified here and disable_existing_loggers is True, # django.db.backends will still log unless it is disabled explicitly. 'disable_existing_loggers': False, 'handlers': { 'null': { 'level': 'DEBUG', 'class': 'django.utils.log.NullHandler', }, 'console': { # Set the level to "DEBUG" for verbose output logging. 'level': 'INFO', 'class': 'logging.StreamHandler', }, }, 'loggers': { # Logging from django.db.backends is VERY verbose, send to null # by default. 'django.db.backends': { 'handlers': ['null'], 'propagate': False,
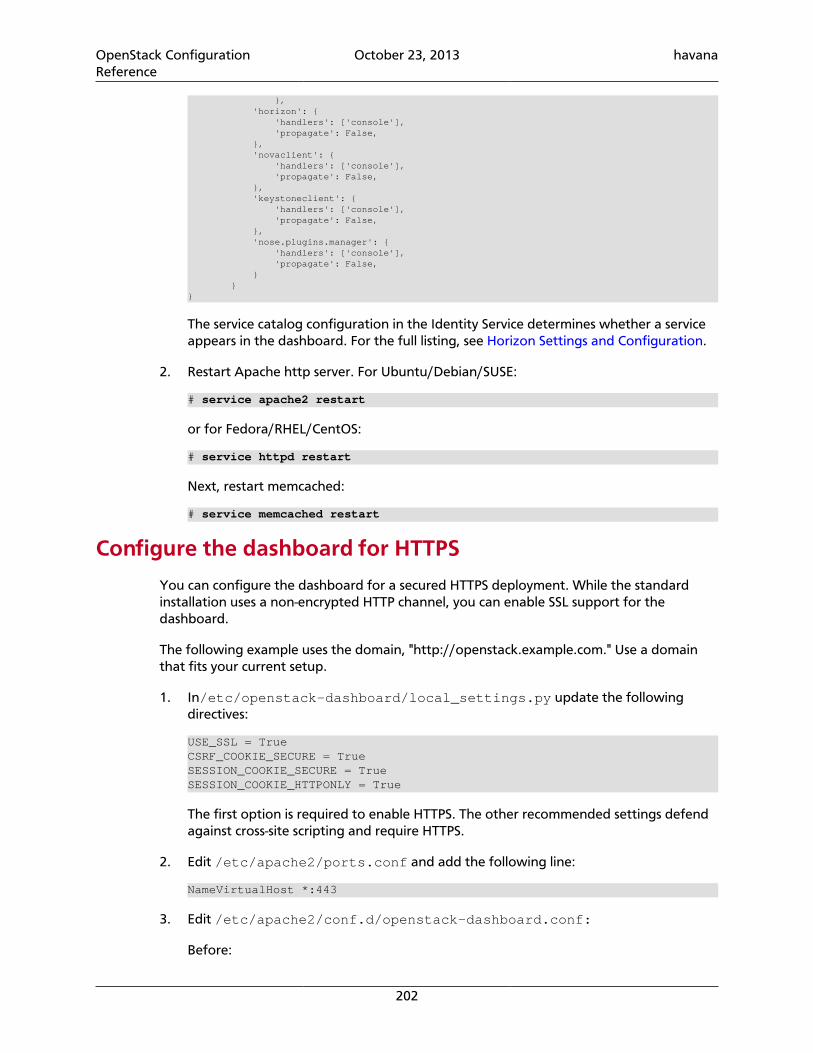
OpenStack ConfigurationReference
October 23, 2013 havana
202
}, 'horizon': { 'handlers': ['console'], 'propagate': False, }, 'novaclient': { 'handlers': ['console'], 'propagate': False, }, 'keystoneclient': { 'handlers': ['console'], 'propagate': False, }, 'nose.plugins.manager': { 'handlers': ['console'], 'propagate': False, } }}
The service catalog configuration in the Identity Service determines whether a serviceappears in the dashboard. For the full listing, see Horizon Settings and Configuration.
2. Restart Apache http server. For Ubuntu/Debian/SUSE:
# service apache2 restart
or for Fedora/RHEL/CentOS:
# service httpd restart
Next, restart memcached:
# service memcached restart
Configure the dashboard for HTTPS
You can configure the dashboard for a secured HTTPS deployment. While the standardinstallation uses a non-encrypted HTTP channel, you can enable SSL support for thedashboard.
The following example uses the domain, "http://openstack.example.com." Use a domainthat fits your current setup.
1. In/etc/openstack-dashboard/local_settings.py update the followingdirectives:
USE_SSL = TrueCSRF_COOKIE_SECURE = TrueSESSION_COOKIE_SECURE = TrueSESSION_COOKIE_HTTPONLY = True
The first option is required to enable HTTPS. The other recommended settings defendagainst cross-site scripting and require HTTPS.
2. Edit /etc/apache2/ports.conf and add the following line:
NameVirtualHost *:443
3. Edit /etc/apache2/conf.d/openstack-dashboard.conf:
Before:
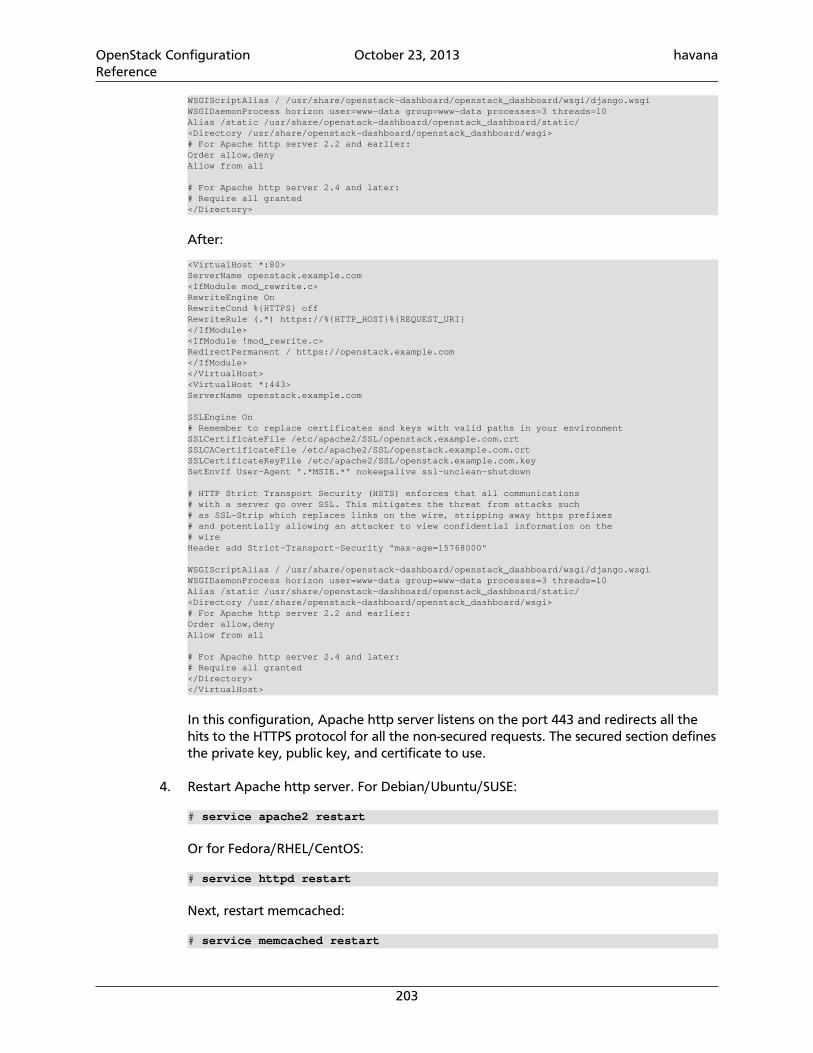
OpenStack ConfigurationReference
October 23, 2013 havana
203
WSGIScriptAlias / /usr/share/openstack-dashboard/openstack_dashboard/wsgi/django.wsgiWSGIDaemonProcess horizon user=www-data group=www-data processes=3 threads=10Alias /static /usr/share/openstack-dashboard/openstack_dashboard/static/<Directory /usr/share/openstack-dashboard/openstack_dashboard/wsgi># For Apache http server 2.2 and earlier:Order allow,denyAllow from all
# For Apache http server 2.4 and later:# Require all granted</Directory>
After:
<VirtualHost *:80>ServerName openstack.example.com<IfModule mod_rewrite.c>RewriteEngine OnRewriteCond %{HTTPS} offRewriteRule (.*) https://%{HTTP_HOST}%{REQUEST_URI}</IfModule><IfModule !mod_rewrite.c>RedirectPermanent / https://openstack.example.com</IfModule></VirtualHost><VirtualHost *:443>ServerName openstack.example.com
SSLEngine On# Remember to replace certificates and keys with valid paths in your environmentSSLCertificateFile /etc/apache2/SSL/openstack.example.com.crtSSLCACertificateFile /etc/apache2/SSL/openstack.example.com.crtSSLCertificateKeyFile /etc/apache2/SSL/openstack.example.com.keySetEnvIf User-Agent ".*MSIE.*" nokeepalive ssl-unclean-shutdown
# HTTP Strict Transport Security (HSTS) enforces that all communications# with a server go over SSL. This mitigates the threat from attacks such# as SSL-Strip which replaces links on the wire, stripping away https prefixes# and potentially allowing an attacker to view confidential information on the# wireHeader add Strict-Transport-Security "max-age=15768000"
WSGIScriptAlias / /usr/share/openstack-dashboard/openstack_dashboard/wsgi/django.wsgiWSGIDaemonProcess horizon user=www-data group=www-data processes=3 threads=10Alias /static /usr/share/openstack-dashboard/openstack_dashboard/static/<Directory /usr/share/openstack-dashboard/openstack_dashboard/wsgi># For Apache http server 2.2 and earlier:Order allow,denyAllow from all
# For Apache http server 2.4 and later:# Require all granted</Directory></VirtualHost>
In this configuration, Apache http server listens on the port 443 and redirects all thehits to the HTTPS protocol for all the non-secured requests. The secured section definesthe private key, public key, and certificate to use.
4. Restart Apache http server. For Debian/Ubuntu/SUSE:
# service apache2 restart
Or for Fedora/RHEL/CentOS:
# service httpd restart
Next, restart memcached:
# service memcached restart
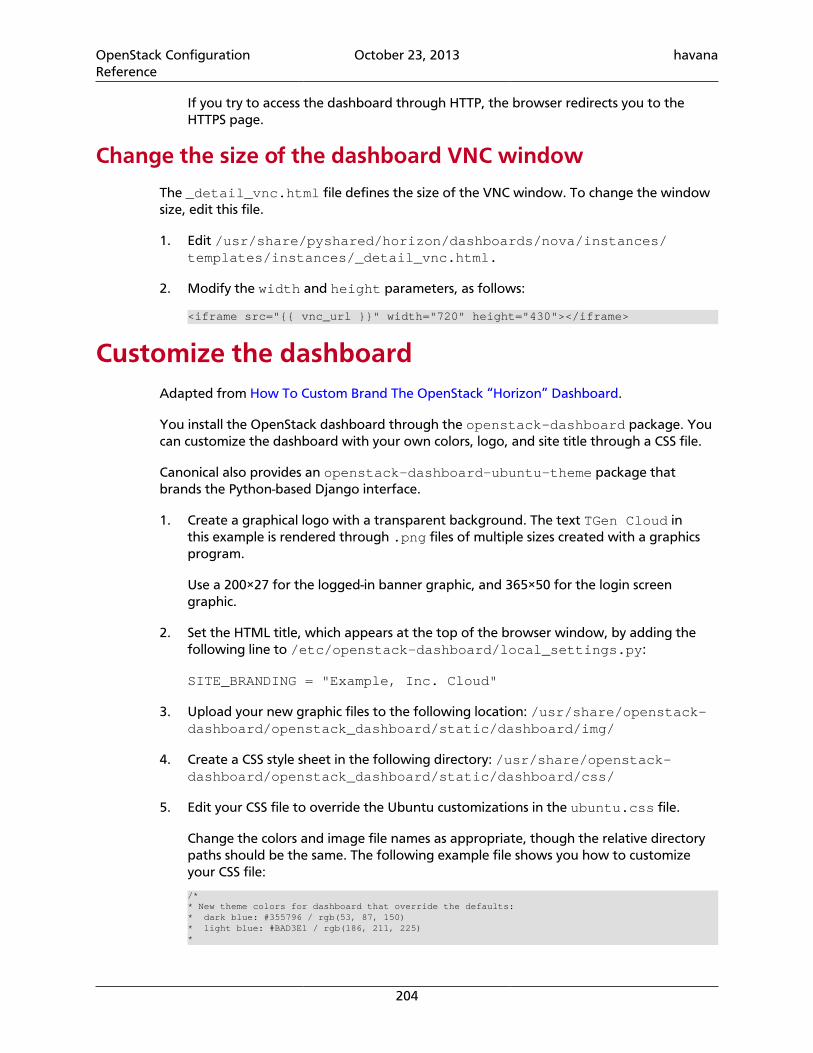
OpenStack ConfigurationReference
October 23, 2013 havana
204
If you try to access the dashboard through HTTP, the browser redirects you to theHTTPS page.
Change the size of the dashboard VNC window
The _detail_vnc.html file defines the size of the VNC window. To change the windowsize, edit this file.
1. Edit /usr/share/pyshared/horizon/dashboards/nova/instances/templates/instances/_detail_vnc.html.
2. Modify the width and height parameters, as follows:
<iframe src="{{ vnc_url }}" width="720" height="430"></iframe>
Customize the dashboardAdapted from How To Custom Brand The OpenStack “Horizon” Dashboard.
You install the OpenStack dashboard through the openstack-dashboard package. Youcan customize the dashboard with your own colors, logo, and site title through a CSS file.
Canonical also provides an openstack-dashboard-ubuntu-theme package thatbrands the Python-based Django interface.
1. Create a graphical logo with a transparent background. The text TGen Cloud inthis example is rendered through .png files of multiple sizes created with a graphicsprogram.
Use a 200×27 for the logged-in banner graphic, and 365×50 for the login screengraphic.
2. Set the HTML title, which appears at the top of the browser window, by adding thefollowing line to /etc/openstack-dashboard/local_settings.py:
SITE_BRANDING = "Example, Inc. Cloud"
3. Upload your new graphic files to the following location: /usr/share/openstack-dashboard/openstack_dashboard/static/dashboard/img/
4. Create a CSS style sheet in the following directory: /usr/share/openstack-dashboard/openstack_dashboard/static/dashboard/css/
5. Edit your CSS file to override the Ubuntu customizations in the ubuntu.css file.
Change the colors and image file names as appropriate, though the relative directorypaths should be the same. The following example file shows you how to customizeyour CSS file:
/** New theme colors for dashboard that override the defaults:* dark blue: #355796 / rgb(53, 87, 150)* light blue: #BAD3E1 / rgb(186, 211, 225)*
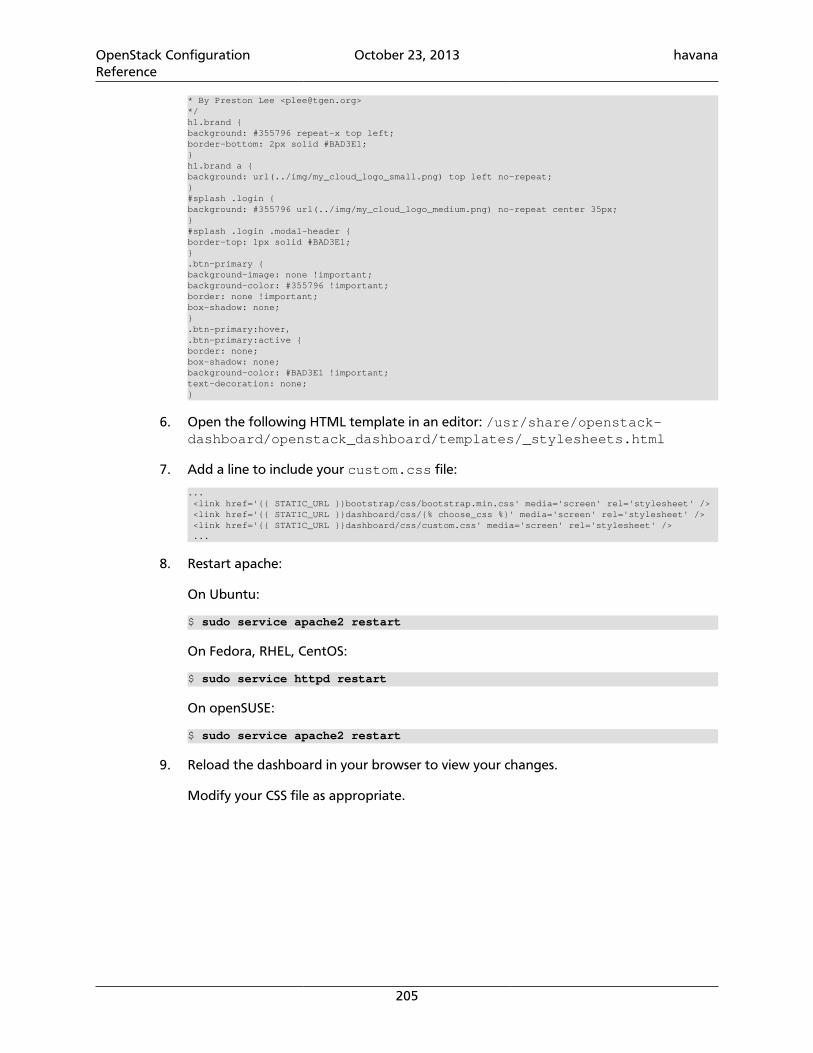
OpenStack ConfigurationReference
October 23, 2013 havana
205
* By Preston Lee <[email protected]>*/h1.brand {background: #355796 repeat-x top left;border-bottom: 2px solid #BAD3E1;}h1.brand a {background: url(../img/my_cloud_logo_small.png) top left no-repeat;}#splash .login {background: #355796 url(../img/my_cloud_logo_medium.png) no-repeat center 35px;}#splash .login .modal-header {border-top: 1px solid #BAD3E1;}.btn-primary {background-image: none !important;background-color: #355796 !important;border: none !important;box-shadow: none;}.btn-primary:hover,.btn-primary:active {border: none;box-shadow: none;background-color: #BAD3E1 !important;text-decoration: none;}
6. Open the following HTML template in an editor: /usr/share/openstack-dashboard/openstack_dashboard/templates/_stylesheets.html
7. Add a line to include your custom.css file:
... <link href='{{ STATIC_URL }}bootstrap/css/bootstrap.min.css' media='screen' rel='stylesheet' /> <link href='{{ STATIC_URL }}dashboard/css/{% choose_css %}' media='screen' rel='stylesheet' /> <link href='{{ STATIC_URL }}dashboard/css/custom.css' media='screen' rel='stylesheet' /> ...
8. Restart apache:
On Ubuntu:
$ sudo service apache2 restart
On Fedora, RHEL, CentOS:
$ sudo service httpd restart
On openSUSE:
$ sudo service apache2 restart
9. Reload the dashboard in your browser to view your changes.
Modify your CSS file as appropriate.
OpenStack ConfigurationReference
October 23, 2013 havana
206
6. OpenStack Object Storage
Table of ContentsIntroduction to Object Storage .................................................................................... 206Object Storage General Service Configuration .............................................................. 206Object Server Configuration ........................................................................................ 208Container Server Configuration ................................................................................... 214Account Server Configuration ...................................................................................... 221Proxy Server Configuration .......................................................................................... 226Configuring OpenStack Object Storage Features .......................................................... 240
OpenStack Object Storage uses multiple configuration files for multiple services andbackground daemons, and paste.deploy to manage server configurations. Defaultconfiguration options are set in the [DEFAULT] section, and any options specified therecan be overridden in any of the other sections.
Introduction to Object StorageObject Storage is a scalable object storage system - it is not a file system in the traditionalsense. You cannot mount this system like traditional SAN or NAS volumes. Because ObjectStorage requires a different way of thinking when it comes to storage, take a few momentsto review the key concepts in the developer documentation at docs.openstack.org/developer/swift/.
Object Storage General Service ConfigurationMost Object Storage services fall into two categories, Object Storage's wsgi servers andbackground daemons.
Object Storage uses paste.deploy to manage server configurations. Read more at http://pythonpaste.org/deploy/.
Default configuration options are set in the `[DEFAULT]` section, and any options specifiedthere can be overridden in any of the other sections when the syntax set option_name= value is in place.
Configuration for servers and daemons can be expressed together in the same file for eachtype of server, or separately. If a required section for the service trying to start is missingthere will be an error. The sections not used by the service are ignored.
Consider the example of an object storage node. By convention configuration for theobject-server, object-updater, object-replicator, and object-auditor exist in a single file /etc/swift/object-server.conf:
[DEFAULT]
OpenStack ConfigurationReference
October 23, 2013 havana
207
[pipeline:main]pipeline = object-server
[app:object-server]use = egg:swift#object
[object-replicator]reclaim_age = 259200
[object-updater]
[object-auditor]
Object Storage services expect a configuration path as the first argument:
$ swift-object-auditorUsage: swift-object-auditor CONFIG [options]
Error: missing config path argument
If you omit the object-auditor section this file can not be used as the configuration pathwhen starting the swift-object-auditor daemon:
$ swift-object-auditor /etc/swift/object-server.confUnable to find object-auditor config section in /etc/swift/object-server.conf
If the configuration path is a directory instead of a file all of the files in the directory withthe file extension ".conf" will be combined to generate the configuration object which isdelivered to the Object Storage service. This is referred to generally as "directory basedconfiguration".
Directory based configuration leverages ConfigParser's native multi-file support. Filesending in ".conf" in the given directory are parsed in lexicographical order. File namesstarting with '.' are ignored. A mixture of file and directory configuration paths is notsupported - if the configuration path is a file, only that file will be parsed.
The swift service management tool swift-init has adopted the convention of lookingfor /etc/swift/{type}-server.conf.d/ if the file /etc/swift/{type}-server.conf file does not exist.
When using directory based configuration, if the same option under the same sectionappears more than once in different files, the last value parsed is said to override previousoccurrences. You can ensure proper override precedence by prefixing the files in theconfiguration directory with numerical values, as in the following example file layout:
/etc/swift/ default.base object-server.conf.d/ 000_default.conf -> ../default.base 001_default-override.conf 010_server.conf 020_replicator.conf 030_updater.conf 040_auditor.conf
You can inspect the resulting combined configuration object using the swift-configcommand line tool.
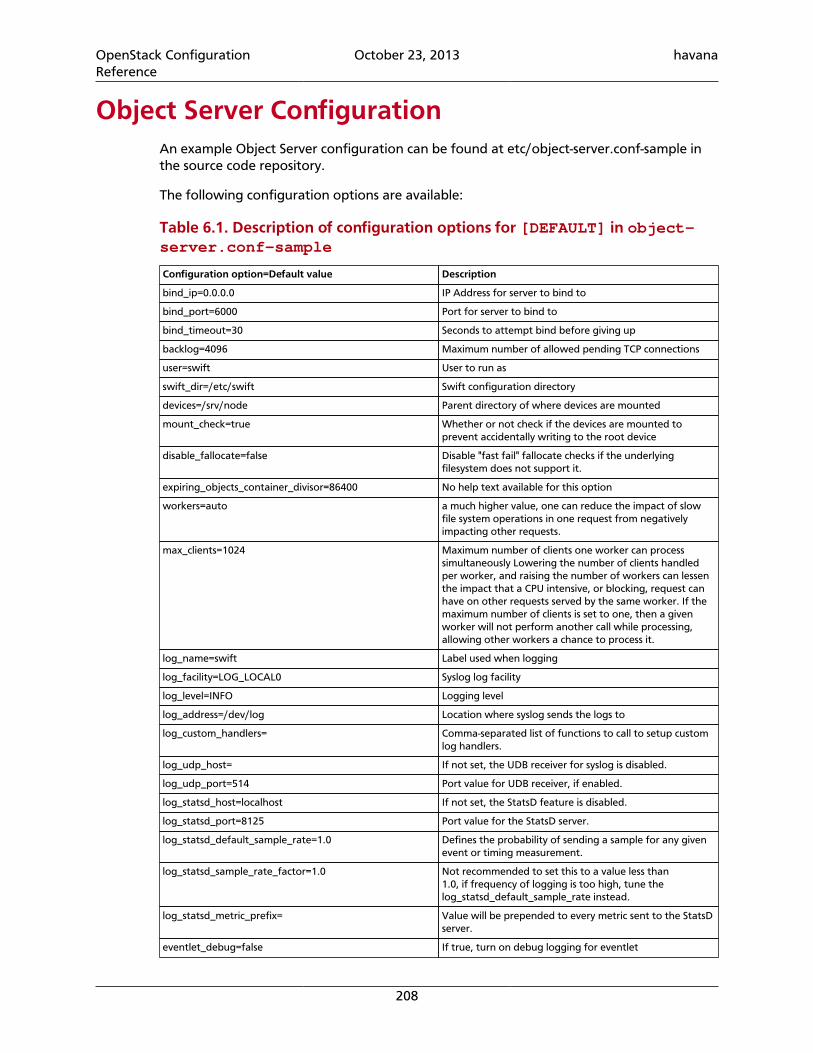
OpenStack ConfigurationReference
October 23, 2013 havana
208
Object Server ConfigurationAn example Object Server configuration can be found at etc/object-server.conf-sample inthe source code repository.
The following configuration options are available:
Table 6.1. Description of configuration options for [DEFAULT] in object-server.conf-sample
Configuration option=Default value Description
bind_ip=0.0.0.0 IP Address for server to bind to
bind_port=6000 Port for server to bind to
bind_timeout=30 Seconds to attempt bind before giving up
backlog=4096 Maximum number of allowed pending TCP connections
user=swift User to run as
swift_dir=/etc/swift Swift configuration directory
devices=/srv/node Parent directory of where devices are mounted
mount_check=true Whether or not check if the devices are mounted toprevent accidentally writing to the root device
disable_fallocate=false Disable "fast fail" fallocate checks if the underlyingfilesystem does not support it.
expiring_objects_container_divisor=86400 No help text available for this option
workers=auto a much higher value, one can reduce the impact of slowfile system operations in one request from negativelyimpacting other requests.
max_clients=1024 Maximum number of clients one worker can processsimultaneously Lowering the number of clients handledper worker, and raising the number of workers can lessenthe impact that a CPU intensive, or blocking, request canhave on other requests served by the same worker. If themaximum number of clients is set to one, then a givenworker will not perform another call while processing,allowing other workers a chance to process it.
log_name=swift Label used when logging
log_facility=LOG_LOCAL0 Syslog log facility
log_level=INFO Logging level
log_address=/dev/log Location where syslog sends the logs to
log_custom_handlers= Comma-separated list of functions to call to setup customlog handlers.
log_udp_host= If not set, the UDB receiver for syslog is disabled.
log_udp_port=514 Port value for UDB receiver, if enabled.
log_statsd_host=localhost If not set, the StatsD feature is disabled.
log_statsd_port=8125 Port value for the StatsD server.
log_statsd_default_sample_rate=1.0 Defines the probability of sending a sample for any givenevent or timing measurement.
log_statsd_sample_rate_factor=1.0 Not recommended to set this to a value less than1.0, if frequency of logging is too high, tune thelog_statsd_default_sample_rate instead.
log_statsd_metric_prefix= Value will be prepended to every metric sent to the StatsDserver.
eventlet_debug=false If true, turn on debug logging for eventlet
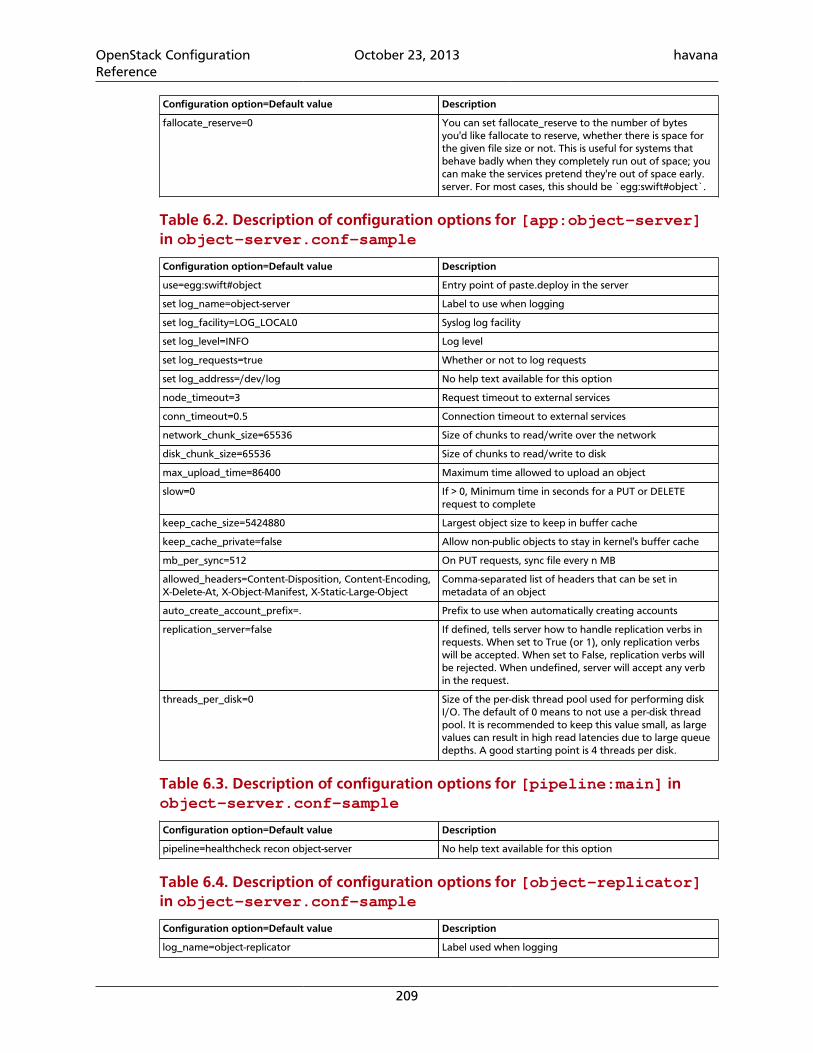
OpenStack ConfigurationReference
October 23, 2013 havana
209
Configuration option=Default value Description
fallocate_reserve=0 You can set fallocate_reserve to the number of bytesyou'd like fallocate to reserve, whether there is space forthe given file size or not. This is useful for systems thatbehave badly when they completely run out of space; youcan make the services pretend they're out of space early.server. For most cases, this should be `egg:swift#object`.
Table 6.2. Description of configuration options for [app:object-server]in object-server.conf-sample
Configuration option=Default value Description
use=egg:swift#object Entry point of paste.deploy in the server
set log_name=object-server Label to use when logging
set log_facility=LOG_LOCAL0 Syslog log facility
set log_level=INFO Log level
set log_requests=true Whether or not to log requests
set log_address=/dev/log No help text available for this option
node_timeout=3 Request timeout to external services
conn_timeout=0.5 Connection timeout to external services
network_chunk_size=65536 Size of chunks to read/write over the network
disk_chunk_size=65536 Size of chunks to read/write to disk
max_upload_time=86400 Maximum time allowed to upload an object
slow=0 If > 0, Minimum time in seconds for a PUT or DELETErequest to complete
keep_cache_size=5424880 Largest object size to keep in buffer cache
keep_cache_private=false Allow non-public objects to stay in kernel's buffer cache
mb_per_sync=512 On PUT requests, sync file every n MB
allowed_headers=Content-Disposition, Content-Encoding,X-Delete-At, X-Object-Manifest, X-Static-Large-Object
Comma-separated list of headers that can be set inmetadata of an object
auto_create_account_prefix=. Prefix to use when automatically creating accounts
replication_server=false If defined, tells server how to handle replication verbs inrequests. When set to True (or 1), only replication verbswill be accepted. When set to False, replication verbs willbe rejected. When undefined, server will accept any verbin the request.
threads_per_disk=0 Size of the per-disk thread pool used for performing diskI/O. The default of 0 means to not use a per-disk threadpool. It is recommended to keep this value small, as largevalues can result in high read latencies due to large queuedepths. A good starting point is 4 threads per disk.
Table 6.3. Description of configuration options for [pipeline:main] inobject-server.conf-sample
Configuration option=Default value Description
pipeline=healthcheck recon object-server No help text available for this option
Table 6.4. Description of configuration options for [object-replicator]in object-server.conf-sample
Configuration option=Default value Description
log_name=object-replicator Label used when logging
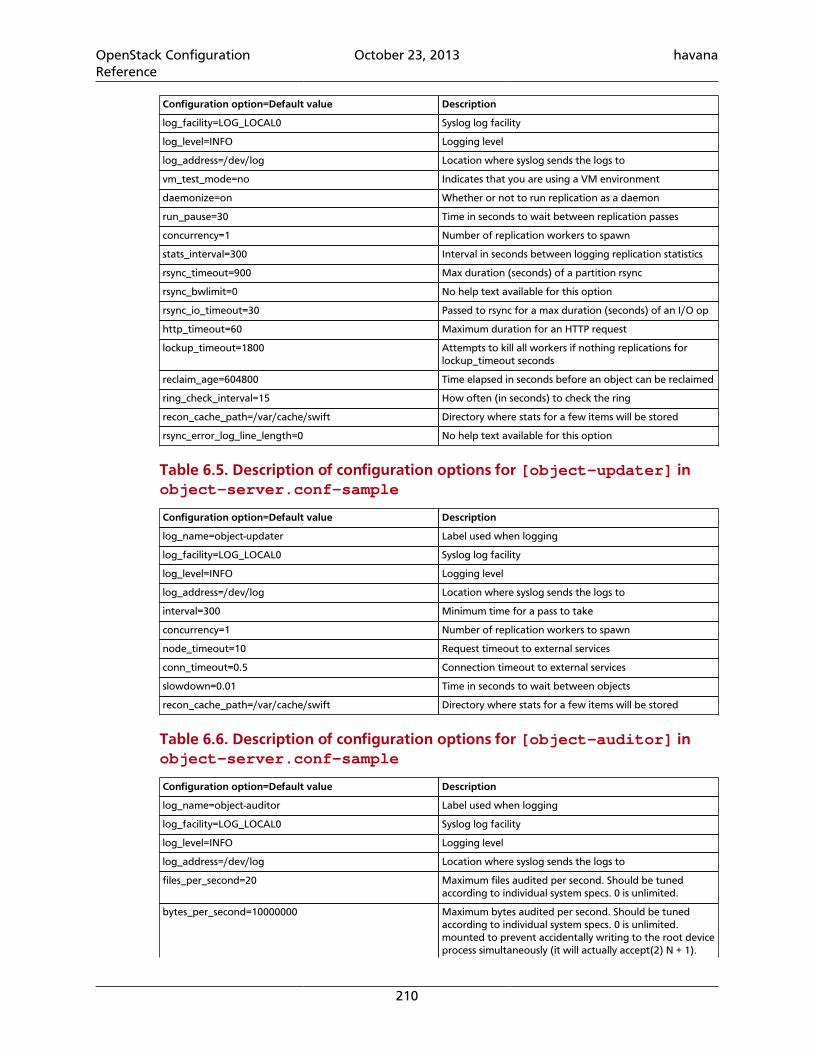
OpenStack ConfigurationReference
October 23, 2013 havana
210
Configuration option=Default value Description
log_facility=LOG_LOCAL0 Syslog log facility
log_level=INFO Logging level
log_address=/dev/log Location where syslog sends the logs to
vm_test_mode=no Indicates that you are using a VM environment
daemonize=on Whether or not to run replication as a daemon
run_pause=30 Time in seconds to wait between replication passes
concurrency=1 Number of replication workers to spawn
stats_interval=300 Interval in seconds between logging replication statistics
rsync_timeout=900 Max duration (seconds) of a partition rsync
rsync_bwlimit=0 No help text available for this option
rsync_io_timeout=30 Passed to rsync for a max duration (seconds) of an I/O op
http_timeout=60 Maximum duration for an HTTP request
lockup_timeout=1800 Attempts to kill all workers if nothing replications forlockup_timeout seconds
reclaim_age=604800 Time elapsed in seconds before an object can be reclaimed
ring_check_interval=15 How often (in seconds) to check the ring
recon_cache_path=/var/cache/swift Directory where stats for a few items will be stored
rsync_error_log_line_length=0 No help text available for this option
Table 6.5. Description of configuration options for [object-updater] inobject-server.conf-sample
Configuration option=Default value Description
log_name=object-updater Label used when logging
log_facility=LOG_LOCAL0 Syslog log facility
log_level=INFO Logging level
log_address=/dev/log Location where syslog sends the logs to
interval=300 Minimum time for a pass to take
concurrency=1 Number of replication workers to spawn
node_timeout=10 Request timeout to external services
conn_timeout=0.5 Connection timeout to external services
slowdown=0.01 Time in seconds to wait between objects
recon_cache_path=/var/cache/swift Directory where stats for a few items will be stored
Table 6.6. Description of configuration options for [object-auditor] inobject-server.conf-sample
Configuration option=Default value Description
log_name=object-auditor Label used when logging
log_facility=LOG_LOCAL0 Syslog log facility
log_level=INFO Logging level
log_address=/dev/log Location where syslog sends the logs to
files_per_second=20 Maximum files audited per second. Should be tunedaccording to individual system specs. 0 is unlimited.
bytes_per_second=10000000 Maximum bytes audited per second. Should be tunedaccording to individual system specs. 0 is unlimited.mounted to prevent accidentally writing to the root deviceprocess simultaneously (it will actually accept(2) N + 1).
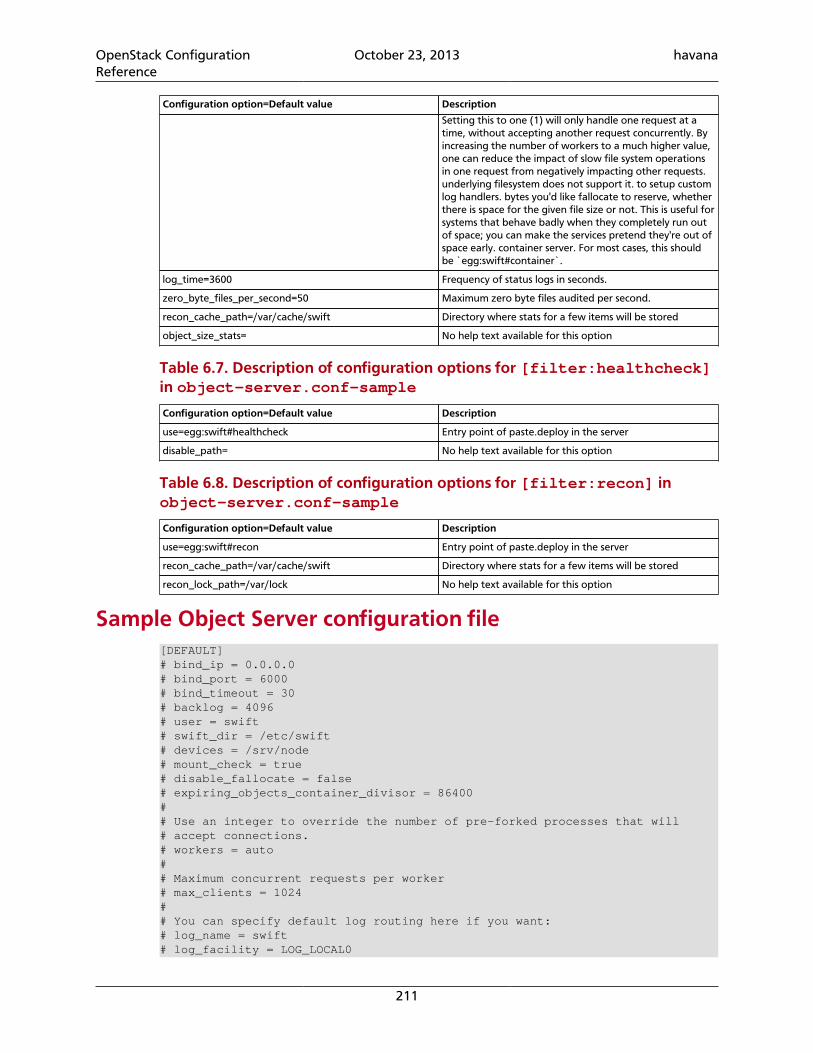
OpenStack ConfigurationReference
October 23, 2013 havana
211
Configuration option=Default value Description
Setting this to one (1) will only handle one request at atime, without accepting another request concurrently. Byincreasing the number of workers to a much higher value,one can reduce the impact of slow file system operationsin one request from negatively impacting other requests.underlying filesystem does not support it. to setup customlog handlers. bytes you'd like fallocate to reserve, whetherthere is space for the given file size or not. This is useful forsystems that behave badly when they completely run outof space; you can make the services pretend they're out ofspace early. container server. For most cases, this shouldbe `egg:swift#container`.
log_time=3600 Frequency of status logs in seconds.
zero_byte_files_per_second=50 Maximum zero byte files audited per second.
recon_cache_path=/var/cache/swift Directory where stats for a few items will be stored
object_size_stats= No help text available for this option
Table 6.7. Description of configuration options for [filter:healthcheck]in object-server.conf-sample
Configuration option=Default value Description
use=egg:swift#healthcheck Entry point of paste.deploy in the server
disable_path= No help text available for this option
Table 6.8. Description of configuration options for [filter:recon] inobject-server.conf-sample
Configuration option=Default value Description
use=egg:swift#recon Entry point of paste.deploy in the server
recon_cache_path=/var/cache/swift Directory where stats for a few items will be stored
recon_lock_path=/var/lock No help text available for this option
Sample Object Server configuration file[DEFAULT]# bind_ip = 0.0.0.0# bind_port = 6000# bind_timeout = 30# backlog = 4096# user = swift# swift_dir = /etc/swift# devices = /srv/node# mount_check = true# disable_fallocate = false# expiring_objects_container_divisor = 86400## Use an integer to override the number of pre-forked processes that will# accept connections.# workers = auto## Maximum concurrent requests per worker# max_clients = 1024## You can specify default log routing here if you want:# log_name = swift# log_facility = LOG_LOCAL0
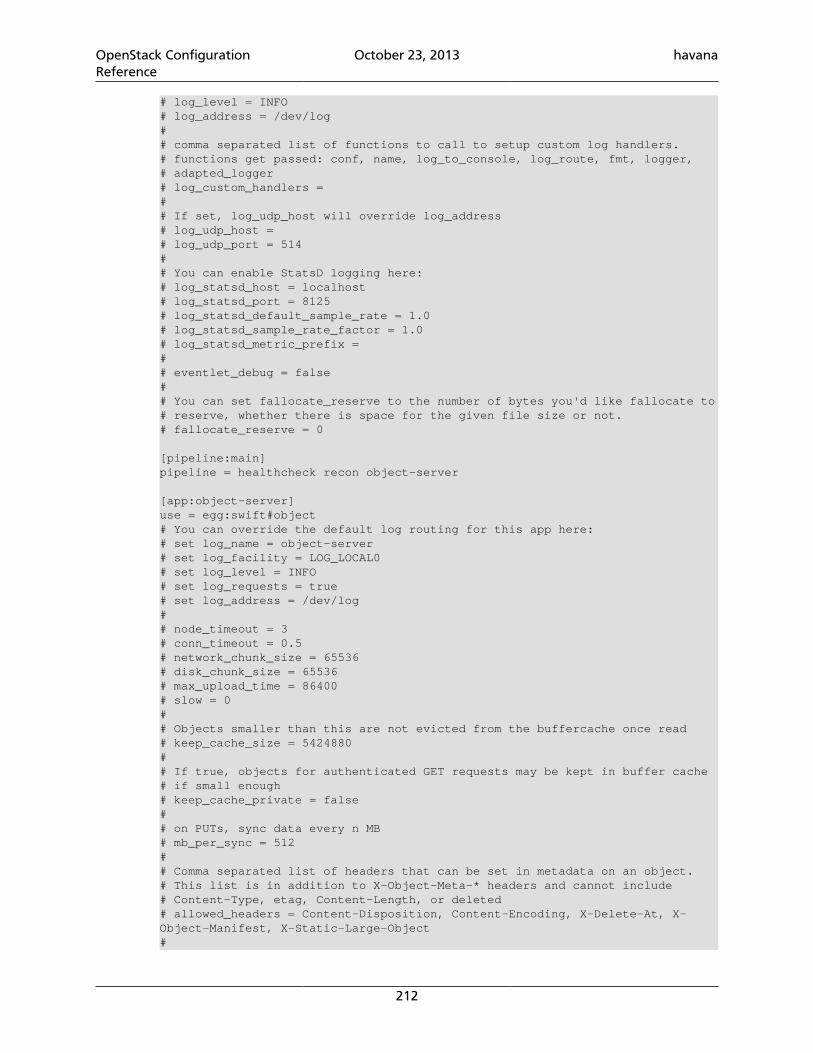
OpenStack ConfigurationReference
October 23, 2013 havana
212
# log_level = INFO# log_address = /dev/log## comma separated list of functions to call to setup custom log handlers.# functions get passed: conf, name, log_to_console, log_route, fmt, logger,# adapted_logger# log_custom_handlers =## If set, log_udp_host will override log_address# log_udp_host =# log_udp_port = 514## You can enable StatsD logging here:# log_statsd_host = localhost# log_statsd_port = 8125# log_statsd_default_sample_rate = 1.0# log_statsd_sample_rate_factor = 1.0# log_statsd_metric_prefix =## eventlet_debug = false## You can set fallocate_reserve to the number of bytes you'd like fallocate to# reserve, whether there is space for the given file size or not.# fallocate_reserve = 0
[pipeline:main]pipeline = healthcheck recon object-server
[app:object-server]use = egg:swift#object# You can override the default log routing for this app here:# set log_name = object-server# set log_facility = LOG_LOCAL0# set log_level = INFO# set log_requests = true# set log_address = /dev/log## node_timeout = 3# conn_timeout = 0.5# network_chunk_size = 65536# disk_chunk_size = 65536# max_upload_time = 86400# slow = 0## Objects smaller than this are not evicted from the buffercache once read# keep_cache_size = 5424880## If true, objects for authenticated GET requests may be kept in buffer cache# if small enough# keep_cache_private = false## on PUTs, sync data every n MB# mb_per_sync = 512## Comma separated list of headers that can be set in metadata on an object.# This list is in addition to X-Object-Meta-* headers and cannot include# Content-Type, etag, Content-Length, or deleted# allowed_headers = Content-Disposition, Content-Encoding, X-Delete-At, X-Object-Manifest, X-Static-Large-Object#
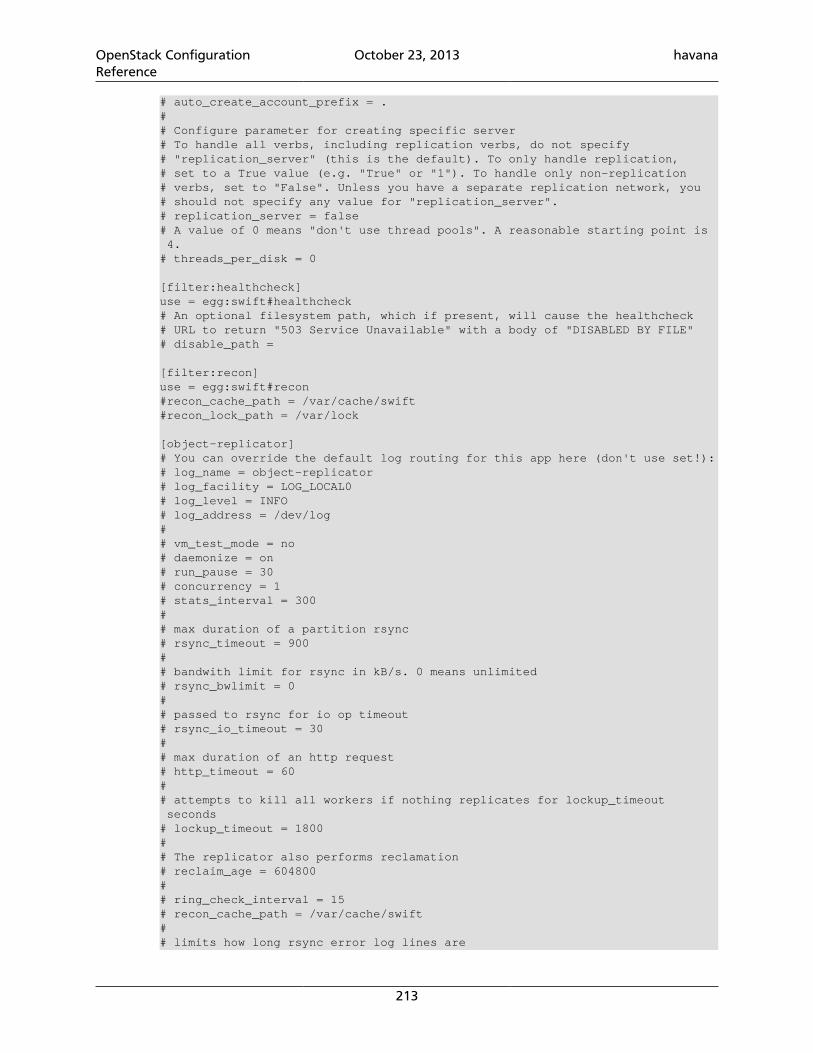
OpenStack ConfigurationReference
October 23, 2013 havana
213
# auto_create_account_prefix = .## Configure parameter for creating specific server# To handle all verbs, including replication verbs, do not specify# "replication_server" (this is the default). To only handle replication,# set to a True value (e.g. "True" or "1"). To handle only non-replication# verbs, set to "False". Unless you have a separate replication network, you# should not specify any value for "replication_server".# replication_server = false# A value of 0 means "don't use thread pools". A reasonable starting point is 4.# threads_per_disk = 0
[filter:healthcheck]use = egg:swift#healthcheck# An optional filesystem path, which if present, will cause the healthcheck# URL to return "503 Service Unavailable" with a body of "DISABLED BY FILE"# disable_path =
[filter:recon]use = egg:swift#recon#recon_cache_path = /var/cache/swift#recon_lock_path = /var/lock
[object-replicator]# You can override the default log routing for this app here (don't use set!):# log_name = object-replicator# log_facility = LOG_LOCAL0# log_level = INFO# log_address = /dev/log## vm_test_mode = no# daemonize = on# run_pause = 30# concurrency = 1# stats_interval = 300## max duration of a partition rsync# rsync_timeout = 900## bandwith limit for rsync in kB/s. 0 means unlimited# rsync_bwlimit = 0## passed to rsync for io op timeout# rsync_io_timeout = 30## max duration of an http request# http_timeout = 60## attempts to kill all workers if nothing replicates for lockup_timeout seconds# lockup_timeout = 1800## The replicator also performs reclamation# reclaim_age = 604800## ring_check_interval = 15# recon_cache_path = /var/cache/swift## limits how long rsync error log lines are
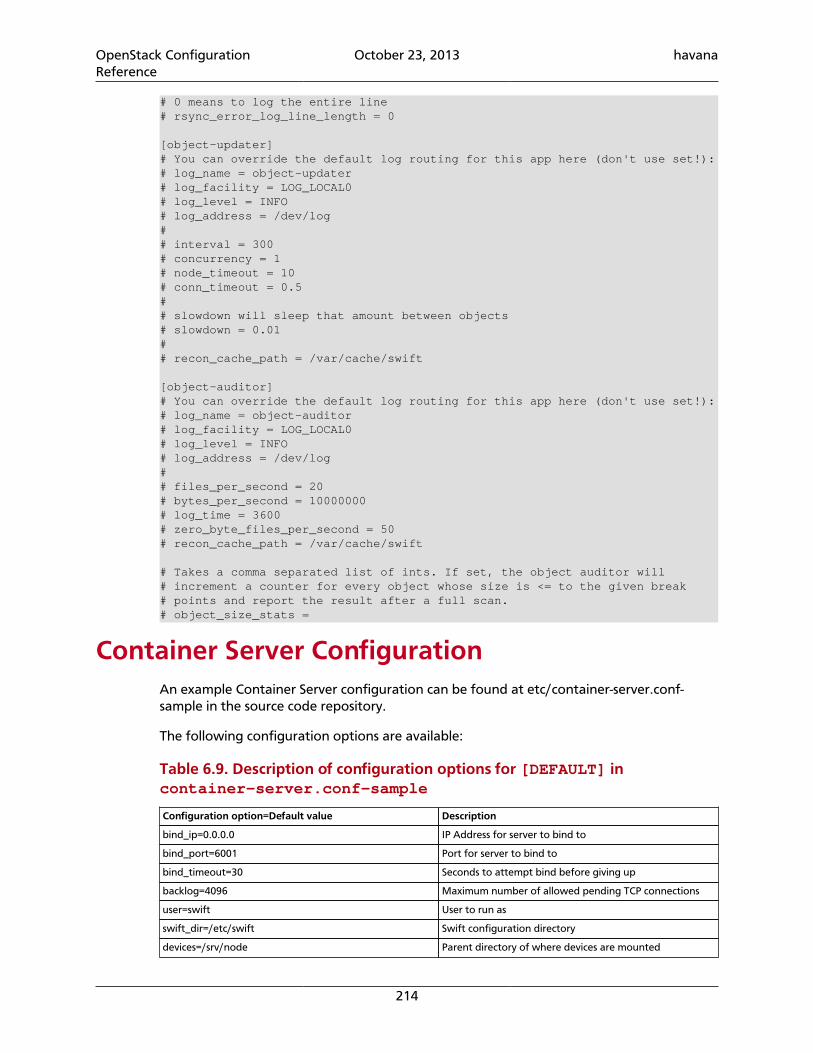
OpenStack ConfigurationReference
October 23, 2013 havana
214
# 0 means to log the entire line# rsync_error_log_line_length = 0
[object-updater]# You can override the default log routing for this app here (don't use set!):# log_name = object-updater# log_facility = LOG_LOCAL0# log_level = INFO# log_address = /dev/log## interval = 300# concurrency = 1# node_timeout = 10# conn_timeout = 0.5## slowdown will sleep that amount between objects# slowdown = 0.01## recon_cache_path = /var/cache/swift
[object-auditor]# You can override the default log routing for this app here (don't use set!):# log_name = object-auditor# log_facility = LOG_LOCAL0# log_level = INFO# log_address = /dev/log## files_per_second = 20# bytes_per_second = 10000000# log_time = 3600# zero_byte_files_per_second = 50# recon_cache_path = /var/cache/swift
# Takes a comma separated list of ints. If set, the object auditor will# increment a counter for every object whose size is <= to the given break# points and report the result after a full scan.# object_size_stats =
Container Server ConfigurationAn example Container Server configuration can be found at etc/container-server.conf-sample in the source code repository.
The following configuration options are available:
Table 6.9. Description of configuration options for [DEFAULT] incontainer-server.conf-sample
Configuration option=Default value Description
bind_ip=0.0.0.0 IP Address for server to bind to
bind_port=6001 Port for server to bind to
bind_timeout=30 Seconds to attempt bind before giving up
backlog=4096 Maximum number of allowed pending TCP connections
user=swift User to run as
swift_dir=/etc/swift Swift configuration directory
devices=/srv/node Parent directory of where devices are mounted
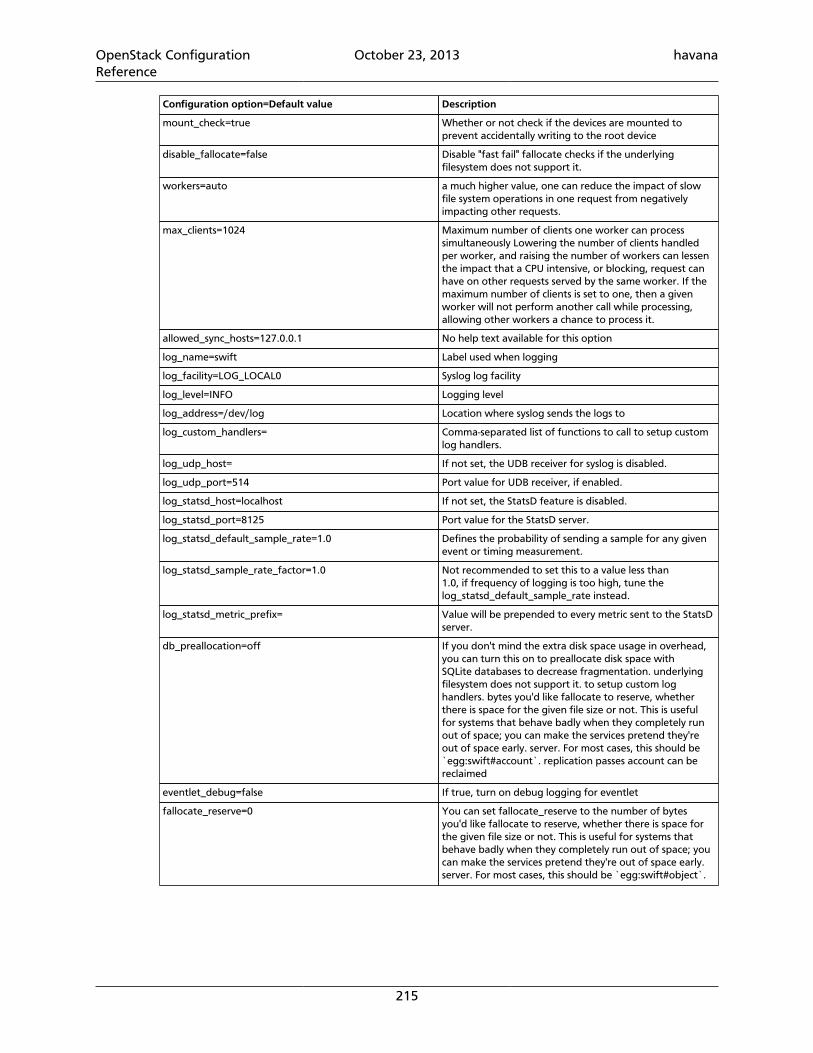
OpenStack ConfigurationReference
October 23, 2013 havana
215
Configuration option=Default value Description
mount_check=true Whether or not check if the devices are mounted toprevent accidentally writing to the root device
disable_fallocate=false Disable "fast fail" fallocate checks if the underlyingfilesystem does not support it.
workers=auto a much higher value, one can reduce the impact of slowfile system operations in one request from negativelyimpacting other requests.
max_clients=1024 Maximum number of clients one worker can processsimultaneously Lowering the number of clients handledper worker, and raising the number of workers can lessenthe impact that a CPU intensive, or blocking, request canhave on other requests served by the same worker. If themaximum number of clients is set to one, then a givenworker will not perform another call while processing,allowing other workers a chance to process it.
allowed_sync_hosts=127.0.0.1 No help text available for this option
log_name=swift Label used when logging
log_facility=LOG_LOCAL0 Syslog log facility
log_level=INFO Logging level
log_address=/dev/log Location where syslog sends the logs to
log_custom_handlers= Comma-separated list of functions to call to setup customlog handlers.
log_udp_host= If not set, the UDB receiver for syslog is disabled.
log_udp_port=514 Port value for UDB receiver, if enabled.
log_statsd_host=localhost If not set, the StatsD feature is disabled.
log_statsd_port=8125 Port value for the StatsD server.
log_statsd_default_sample_rate=1.0 Defines the probability of sending a sample for any givenevent or timing measurement.
log_statsd_sample_rate_factor=1.0 Not recommended to set this to a value less than1.0, if frequency of logging is too high, tune thelog_statsd_default_sample_rate instead.
log_statsd_metric_prefix= Value will be prepended to every metric sent to the StatsDserver.
db_preallocation=off If you don't mind the extra disk space usage in overhead,you can turn this on to preallocate disk space withSQLite databases to decrease fragmentation. underlyingfilesystem does not support it. to setup custom loghandlers. bytes you'd like fallocate to reserve, whetherthere is space for the given file size or not. This is usefulfor systems that behave badly when they completely runout of space; you can make the services pretend they'reout of space early. server. For most cases, this should be`egg:swift#account`. replication passes account can bereclaimed
eventlet_debug=false If true, turn on debug logging for eventlet
fallocate_reserve=0 You can set fallocate_reserve to the number of bytesyou'd like fallocate to reserve, whether there is space forthe given file size or not. This is useful for systems thatbehave badly when they completely run out of space; youcan make the services pretend they're out of space early.server. For most cases, this should be `egg:swift#object`.
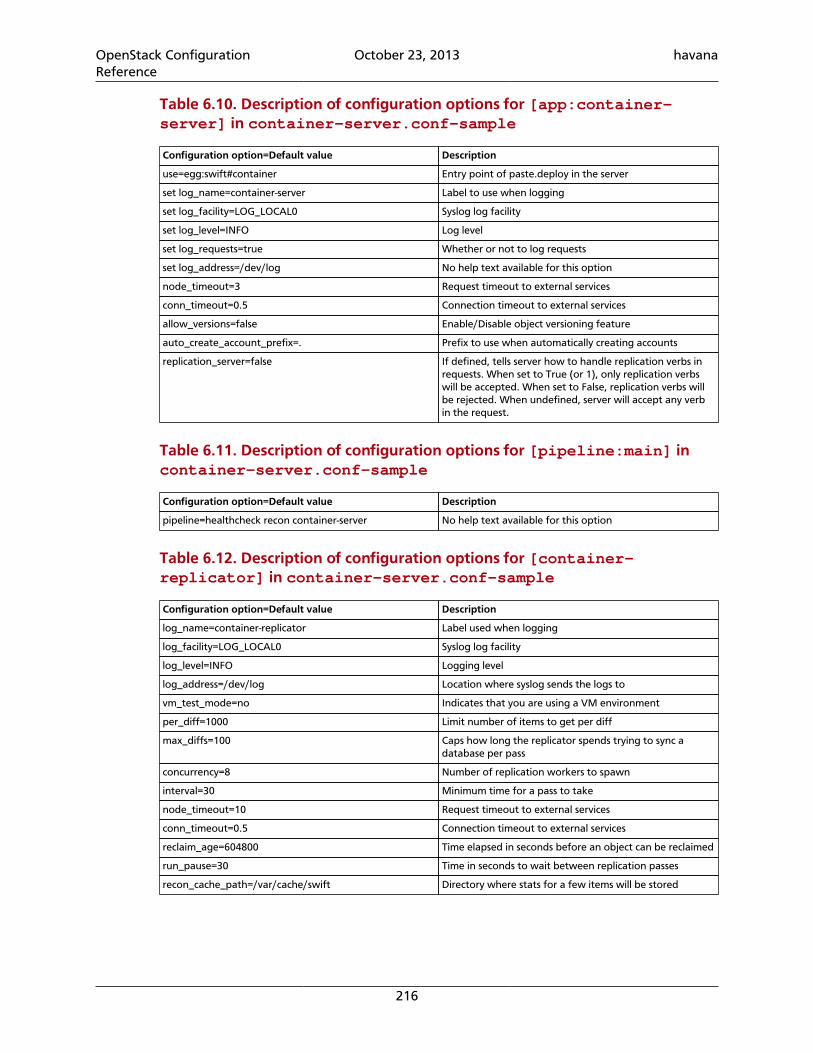
OpenStack ConfigurationReference
October 23, 2013 havana
216
Table 6.10. Description of configuration options for [app:container-server] in container-server.conf-sample
Configuration option=Default value Description
use=egg:swift#container Entry point of paste.deploy in the server
set log_name=container-server Label to use when logging
set log_facility=LOG_LOCAL0 Syslog log facility
set log_level=INFO Log level
set log_requests=true Whether or not to log requests
set log_address=/dev/log No help text available for this option
node_timeout=3 Request timeout to external services
conn_timeout=0.5 Connection timeout to external services
allow_versions=false Enable/Disable object versioning feature
auto_create_account_prefix=. Prefix to use when automatically creating accounts
replication_server=false If defined, tells server how to handle replication verbs inrequests. When set to True (or 1), only replication verbswill be accepted. When set to False, replication verbs willbe rejected. When undefined, server will accept any verbin the request.
Table 6.11. Description of configuration options for [pipeline:main] incontainer-server.conf-sample
Configuration option=Default value Description
pipeline=healthcheck recon container-server No help text available for this option
Table 6.12. Description of configuration options for [container-replicator] in container-server.conf-sample
Configuration option=Default value Description
log_name=container-replicator Label used when logging
log_facility=LOG_LOCAL0 Syslog log facility
log_level=INFO Logging level
log_address=/dev/log Location where syslog sends the logs to
vm_test_mode=no Indicates that you are using a VM environment
per_diff=1000 Limit number of items to get per diff
max_diffs=100 Caps how long the replicator spends trying to sync adatabase per pass
concurrency=8 Number of replication workers to spawn
interval=30 Minimum time for a pass to take
node_timeout=10 Request timeout to external services
conn_timeout=0.5 Connection timeout to external services
reclaim_age=604800 Time elapsed in seconds before an object can be reclaimed
run_pause=30 Time in seconds to wait between replication passes
recon_cache_path=/var/cache/swift Directory where stats for a few items will be stored
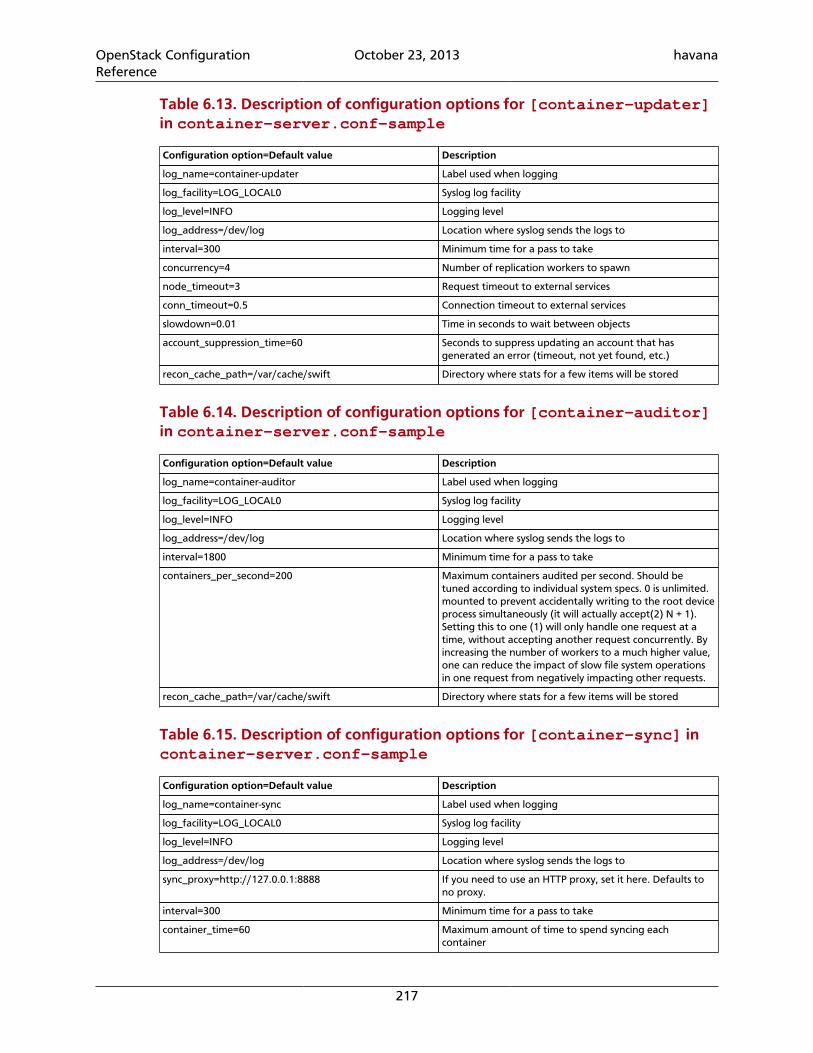
OpenStack ConfigurationReference
October 23, 2013 havana
217
Table 6.13. Description of configuration options for [container-updater]in container-server.conf-sample
Configuration option=Default value Description
log_name=container-updater Label used when logging
log_facility=LOG_LOCAL0 Syslog log facility
log_level=INFO Logging level
log_address=/dev/log Location where syslog sends the logs to
interval=300 Minimum time for a pass to take
concurrency=4 Number of replication workers to spawn
node_timeout=3 Request timeout to external services
conn_timeout=0.5 Connection timeout to external services
slowdown=0.01 Time in seconds to wait between objects
account_suppression_time=60 Seconds to suppress updating an account that hasgenerated an error (timeout, not yet found, etc.)
recon_cache_path=/var/cache/swift Directory where stats for a few items will be stored
Table 6.14. Description of configuration options for [container-auditor]in container-server.conf-sample
Configuration option=Default value Description
log_name=container-auditor Label used when logging
log_facility=LOG_LOCAL0 Syslog log facility
log_level=INFO Logging level
log_address=/dev/log Location where syslog sends the logs to
interval=1800 Minimum time for a pass to take
containers_per_second=200 Maximum containers audited per second. Should betuned according to individual system specs. 0 is unlimited.mounted to prevent accidentally writing to the root deviceprocess simultaneously (it will actually accept(2) N + 1).Setting this to one (1) will only handle one request at atime, without accepting another request concurrently. Byincreasing the number of workers to a much higher value,one can reduce the impact of slow file system operationsin one request from negatively impacting other requests.
recon_cache_path=/var/cache/swift Directory where stats for a few items will be stored
Table 6.15. Description of configuration options for [container-sync] incontainer-server.conf-sample
Configuration option=Default value Description
log_name=container-sync Label used when logging
log_facility=LOG_LOCAL0 Syslog log facility
log_level=INFO Logging level
log_address=/dev/log Location where syslog sends the logs to
sync_proxy=http://127.0.0.1:8888 If you need to use an HTTP proxy, set it here. Defaults tono proxy.
interval=300 Minimum time for a pass to take
container_time=60 Maximum amount of time to spend syncing eachcontainer
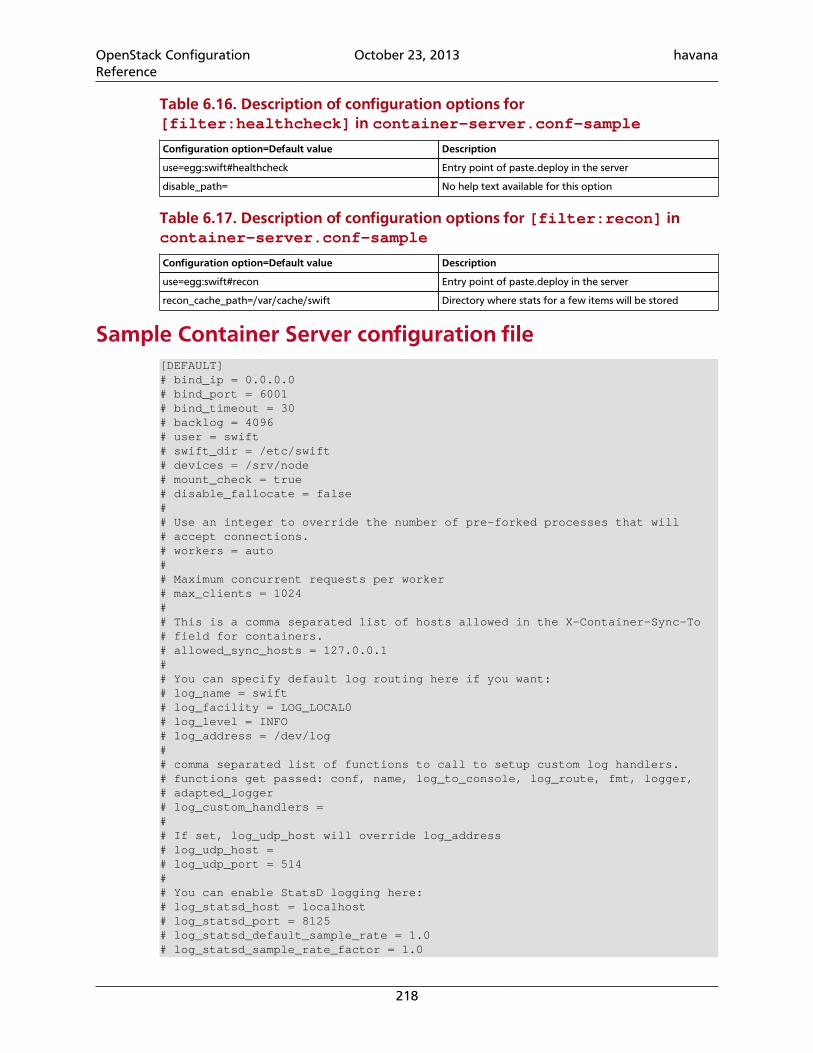
OpenStack ConfigurationReference
October 23, 2013 havana
218
Table 6.16. Description of configuration options for[filter:healthcheck] in container-server.conf-sample
Configuration option=Default value Description
use=egg:swift#healthcheck Entry point of paste.deploy in the server
disable_path= No help text available for this option
Table 6.17. Description of configuration options for [filter:recon] incontainer-server.conf-sample
Configuration option=Default value Description
use=egg:swift#recon Entry point of paste.deploy in the server
recon_cache_path=/var/cache/swift Directory where stats for a few items will be stored
Sample Container Server configuration file[DEFAULT]# bind_ip = 0.0.0.0# bind_port = 6001# bind_timeout = 30# backlog = 4096# user = swift# swift_dir = /etc/swift# devices = /srv/node# mount_check = true# disable_fallocate = false## Use an integer to override the number of pre-forked processes that will# accept connections.# workers = auto## Maximum concurrent requests per worker# max_clients = 1024## This is a comma separated list of hosts allowed in the X-Container-Sync-To# field for containers.# allowed_sync_hosts = 127.0.0.1## You can specify default log routing here if you want:# log_name = swift# log_facility = LOG_LOCAL0# log_level = INFO# log_address = /dev/log## comma separated list of functions to call to setup custom log handlers.# functions get passed: conf, name, log_to_console, log_route, fmt, logger,# adapted_logger# log_custom_handlers =## If set, log_udp_host will override log_address# log_udp_host =# log_udp_port = 514## You can enable StatsD logging here:# log_statsd_host = localhost# log_statsd_port = 8125# log_statsd_default_sample_rate = 1.0# log_statsd_sample_rate_factor = 1.0
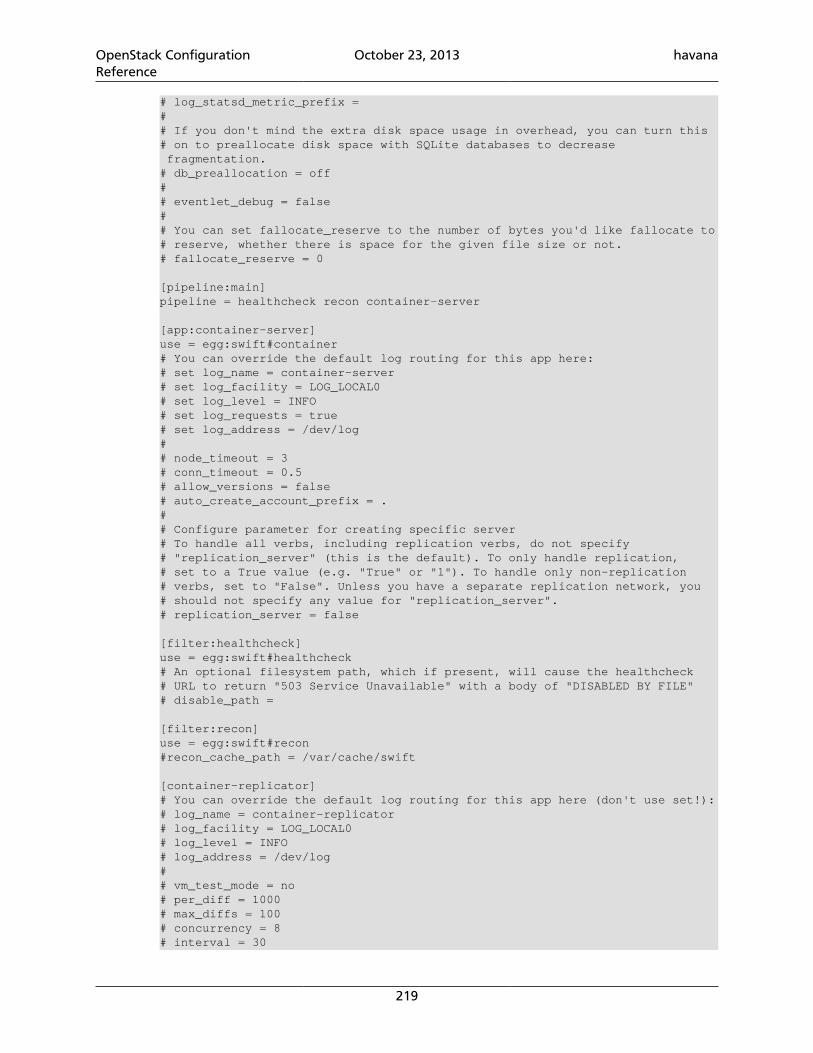
OpenStack ConfigurationReference
October 23, 2013 havana
219
# log_statsd_metric_prefix =## If you don't mind the extra disk space usage in overhead, you can turn this# on to preallocate disk space with SQLite databases to decrease fragmentation.# db_preallocation = off## eventlet_debug = false## You can set fallocate_reserve to the number of bytes you'd like fallocate to# reserve, whether there is space for the given file size or not.# fallocate_reserve = 0
[pipeline:main]pipeline = healthcheck recon container-server
[app:container-server]use = egg:swift#container# You can override the default log routing for this app here:# set log_name = container-server# set log_facility = LOG_LOCAL0# set log_level = INFO# set log_requests = true# set log_address = /dev/log## node_timeout = 3# conn_timeout = 0.5# allow_versions = false# auto_create_account_prefix = .## Configure parameter for creating specific server# To handle all verbs, including replication verbs, do not specify# "replication_server" (this is the default). To only handle replication,# set to a True value (e.g. "True" or "1"). To handle only non-replication# verbs, set to "False". Unless you have a separate replication network, you# should not specify any value for "replication_server".# replication_server = false
[filter:healthcheck]use = egg:swift#healthcheck# An optional filesystem path, which if present, will cause the healthcheck# URL to return "503 Service Unavailable" with a body of "DISABLED BY FILE"# disable_path =
[filter:recon]use = egg:swift#recon#recon_cache_path = /var/cache/swift
[container-replicator]# You can override the default log routing for this app here (don't use set!):# log_name = container-replicator# log_facility = LOG_LOCAL0# log_level = INFO# log_address = /dev/log## vm_test_mode = no# per_diff = 1000# max_diffs = 100# concurrency = 8# interval = 30
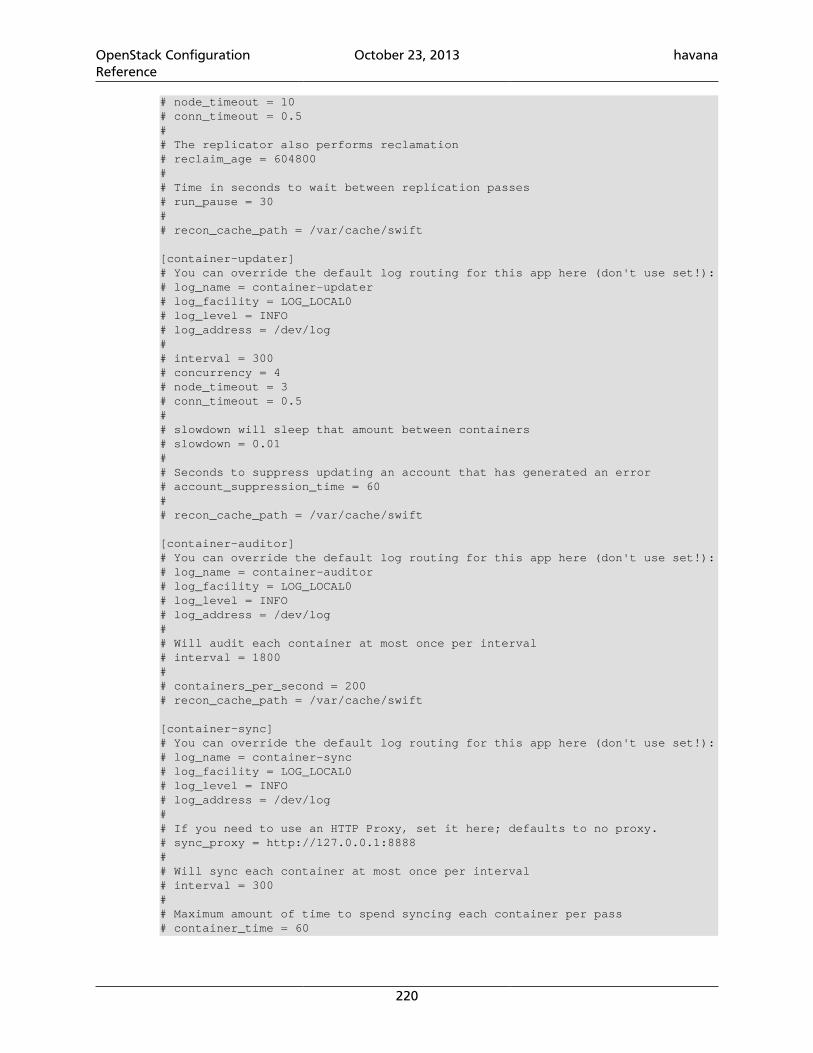
OpenStack ConfigurationReference
October 23, 2013 havana
220
# node_timeout = 10# conn_timeout = 0.5## The replicator also performs reclamation# reclaim_age = 604800## Time in seconds to wait between replication passes# run_pause = 30## recon_cache_path = /var/cache/swift
[container-updater]# You can override the default log routing for this app here (don't use set!):# log_name = container-updater# log_facility = LOG_LOCAL0# log_level = INFO# log_address = /dev/log## interval = 300# concurrency = 4# node_timeout = 3# conn_timeout = 0.5## slowdown will sleep that amount between containers# slowdown = 0.01## Seconds to suppress updating an account that has generated an error# account_suppression_time = 60## recon_cache_path = /var/cache/swift
[container-auditor]# You can override the default log routing for this app here (don't use set!):# log_name = container-auditor# log_facility = LOG_LOCAL0# log_level = INFO# log_address = /dev/log## Will audit each container at most once per interval# interval = 1800## containers_per_second = 200# recon_cache_path = /var/cache/swift
[container-sync]# You can override the default log routing for this app here (don't use set!):# log_name = container-sync# log_facility = LOG_LOCAL0# log_level = INFO# log_address = /dev/log## If you need to use an HTTP Proxy, set it here; defaults to no proxy.# sync_proxy = http://127.0.0.1:8888## Will sync each container at most once per interval# interval = 300## Maximum amount of time to spend syncing each container per pass# container_time = 60
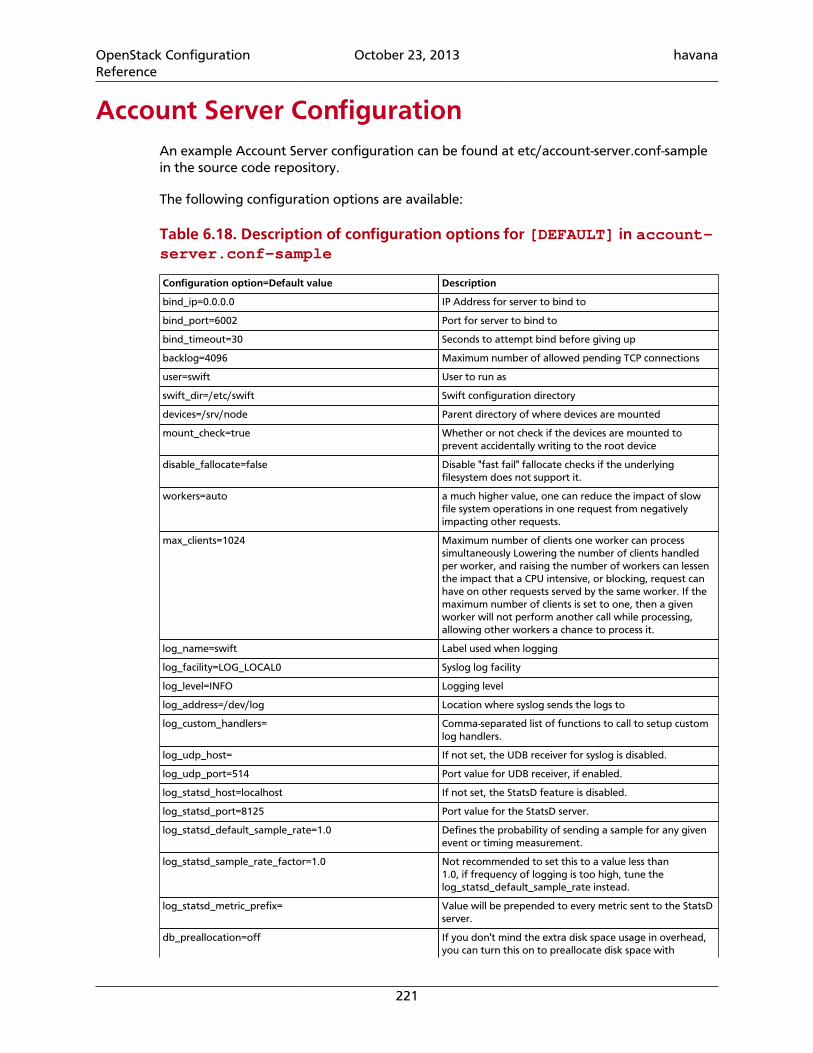
OpenStack ConfigurationReference
October 23, 2013 havana
221
Account Server ConfigurationAn example Account Server configuration can be found at etc/account-server.conf-samplein the source code repository.
The following configuration options are available:
Table 6.18. Description of configuration options for [DEFAULT] in account-server.conf-sample
Configuration option=Default value Description
bind_ip=0.0.0.0 IP Address for server to bind to
bind_port=6002 Port for server to bind to
bind_timeout=30 Seconds to attempt bind before giving up
backlog=4096 Maximum number of allowed pending TCP connections
user=swift User to run as
swift_dir=/etc/swift Swift configuration directory
devices=/srv/node Parent directory of where devices are mounted
mount_check=true Whether or not check if the devices are mounted toprevent accidentally writing to the root device
disable_fallocate=false Disable "fast fail" fallocate checks if the underlyingfilesystem does not support it.
workers=auto a much higher value, one can reduce the impact of slowfile system operations in one request from negativelyimpacting other requests.
max_clients=1024 Maximum number of clients one worker can processsimultaneously Lowering the number of clients handledper worker, and raising the number of workers can lessenthe impact that a CPU intensive, or blocking, request canhave on other requests served by the same worker. If themaximum number of clients is set to one, then a givenworker will not perform another call while processing,allowing other workers a chance to process it.
log_name=swift Label used when logging
log_facility=LOG_LOCAL0 Syslog log facility
log_level=INFO Logging level
log_address=/dev/log Location where syslog sends the logs to
log_custom_handlers= Comma-separated list of functions to call to setup customlog handlers.
log_udp_host= If not set, the UDB receiver for syslog is disabled.
log_udp_port=514 Port value for UDB receiver, if enabled.
log_statsd_host=localhost If not set, the StatsD feature is disabled.
log_statsd_port=8125 Port value for the StatsD server.
log_statsd_default_sample_rate=1.0 Defines the probability of sending a sample for any givenevent or timing measurement.
log_statsd_sample_rate_factor=1.0 Not recommended to set this to a value less than1.0, if frequency of logging is too high, tune thelog_statsd_default_sample_rate instead.
log_statsd_metric_prefix= Value will be prepended to every metric sent to the StatsDserver.
db_preallocation=off If you don't mind the extra disk space usage in overhead,you can turn this on to preallocate disk space with

OpenStack ConfigurationReference
October 23, 2013 havana
222
Configuration option=Default value Description
SQLite databases to decrease fragmentation. underlyingfilesystem does not support it. to setup custom loghandlers. bytes you'd like fallocate to reserve, whetherthere is space for the given file size or not. This is usefulfor systems that behave badly when they completely runout of space; you can make the services pretend they'reout of space early. server. For most cases, this should be`egg:swift#account`. replication passes account can bereclaimed
eventlet_debug=false If true, turn on debug logging for eventlet
fallocate_reserve=0 You can set fallocate_reserve to the number of bytesyou'd like fallocate to reserve, whether there is space forthe given file size or not. This is useful for systems thatbehave badly when they completely run out of space; youcan make the services pretend they're out of space early.server. For most cases, this should be `egg:swift#object`.
Table 6.19. Description of configuration options for [app:account-server] in account-server.conf-sample
Configuration option=Default value Description
use=egg:swift#account Entry point of paste.deploy in the server
set log_name=account-server Label to use when logging
set log_facility=LOG_LOCAL0 Syslog log facility
set log_level=INFO Log level
set log_requests=true Whether or not to log requests
set log_address=/dev/log No help text available for this option
auto_create_account_prefix=. Prefix to use when automatically creating accounts
replication_server=false If defined, tells server how to handle replication verbs inrequests. When set to True (or 1), only replication verbswill be accepted. When set to False, replication verbs willbe rejected. When undefined, server will accept any verbin the request.
Table 6.20. Description of configuration options for [pipeline:main] inaccount-server.conf-sample
Configuration option=Default value Description
pipeline=healthcheck recon account-server No help text available for this option
Table 6.21. Description of configuration options for [account-replicator] in account-server.conf-sample
Configuration option=Default value Description
log_name=account-replicator Label used when logging
log_facility=LOG_LOCAL0 Syslog log facility
log_level=INFO Logging level
log_address=/dev/log Location where syslog sends the logs to
vm_test_mode=no Indicates that you are using a VM environment
per_diff=1000 Limit number of items to get per diff
max_diffs=100 Caps how long the replicator spends trying to sync adatabase per pass
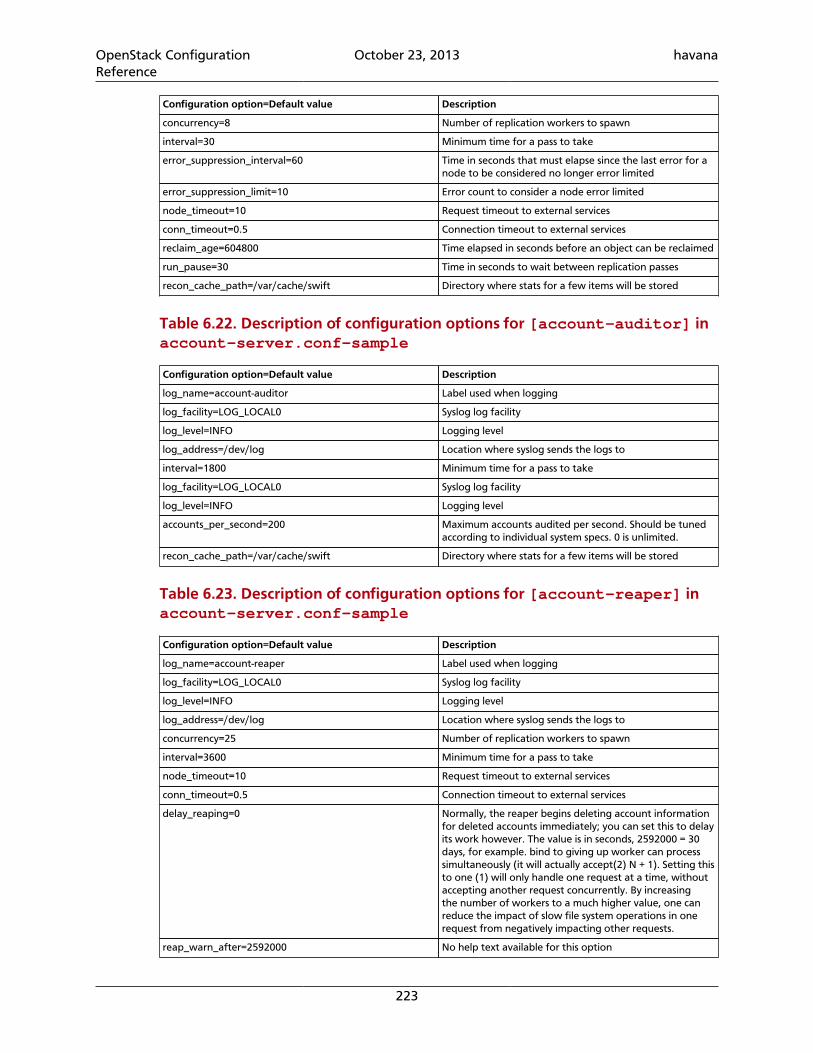
OpenStack ConfigurationReference
October 23, 2013 havana
223
Configuration option=Default value Description
concurrency=8 Number of replication workers to spawn
interval=30 Minimum time for a pass to take
error_suppression_interval=60 Time in seconds that must elapse since the last error for anode to be considered no longer error limited
error_suppression_limit=10 Error count to consider a node error limited
node_timeout=10 Request timeout to external services
conn_timeout=0.5 Connection timeout to external services
reclaim_age=604800 Time elapsed in seconds before an object can be reclaimed
run_pause=30 Time in seconds to wait between replication passes
recon_cache_path=/var/cache/swift Directory where stats for a few items will be stored
Table 6.22. Description of configuration options for [account-auditor] inaccount-server.conf-sample
Configuration option=Default value Description
log_name=account-auditor Label used when logging
log_facility=LOG_LOCAL0 Syslog log facility
log_level=INFO Logging level
log_address=/dev/log Location where syslog sends the logs to
interval=1800 Minimum time for a pass to take
log_facility=LOG_LOCAL0 Syslog log facility
log_level=INFO Logging level
accounts_per_second=200 Maximum accounts audited per second. Should be tunedaccording to individual system specs. 0 is unlimited.
recon_cache_path=/var/cache/swift Directory where stats for a few items will be stored
Table 6.23. Description of configuration options for [account-reaper] inaccount-server.conf-sample
Configuration option=Default value Description
log_name=account-reaper Label used when logging
log_facility=LOG_LOCAL0 Syslog log facility
log_level=INFO Logging level
log_address=/dev/log Location where syslog sends the logs to
concurrency=25 Number of replication workers to spawn
interval=3600 Minimum time for a pass to take
node_timeout=10 Request timeout to external services
conn_timeout=0.5 Connection timeout to external services
delay_reaping=0 Normally, the reaper begins deleting account informationfor deleted accounts immediately; you can set this to delayits work however. The value is in seconds, 2592000 = 30days, for example. bind to giving up worker can processsimultaneously (it will actually accept(2) N + 1). Setting thisto one (1) will only handle one request at a time, withoutaccepting another request concurrently. By increasingthe number of workers to a much higher value, one canreduce the impact of slow file system operations in onerequest from negatively impacting other requests.
reap_warn_after=2592000 No help text available for this option
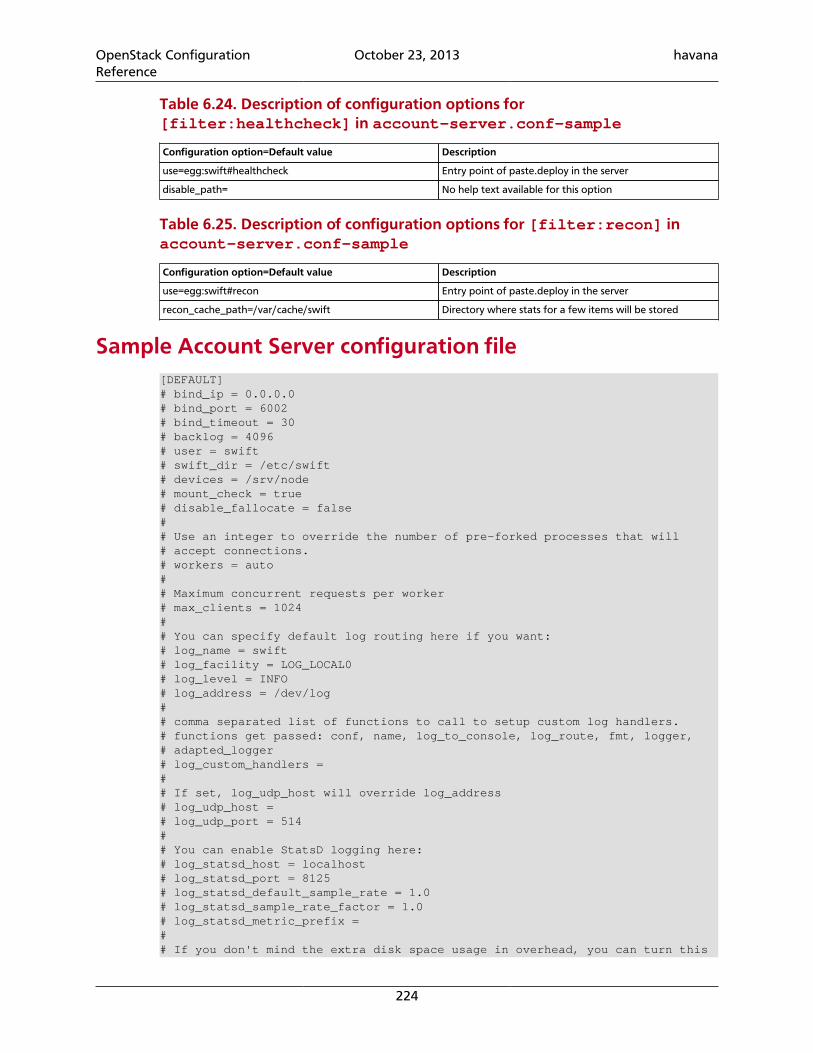
OpenStack ConfigurationReference
October 23, 2013 havana
224
Table 6.24. Description of configuration options for[filter:healthcheck] in account-server.conf-sample
Configuration option=Default value Description
use=egg:swift#healthcheck Entry point of paste.deploy in the server
disable_path= No help text available for this option
Table 6.25. Description of configuration options for [filter:recon] inaccount-server.conf-sample
Configuration option=Default value Description
use=egg:swift#recon Entry point of paste.deploy in the server
recon_cache_path=/var/cache/swift Directory where stats for a few items will be stored
Sample Account Server configuration file[DEFAULT]# bind_ip = 0.0.0.0# bind_port = 6002# bind_timeout = 30# backlog = 4096# user = swift# swift_dir = /etc/swift# devices = /srv/node# mount_check = true# disable_fallocate = false## Use an integer to override the number of pre-forked processes that will# accept connections.# workers = auto## Maximum concurrent requests per worker# max_clients = 1024## You can specify default log routing here if you want:# log_name = swift# log_facility = LOG_LOCAL0# log_level = INFO# log_address = /dev/log## comma separated list of functions to call to setup custom log handlers.# functions get passed: conf, name, log_to_console, log_route, fmt, logger,# adapted_logger# log_custom_handlers =## If set, log_udp_host will override log_address# log_udp_host =# log_udp_port = 514## You can enable StatsD logging here:# log_statsd_host = localhost# log_statsd_port = 8125# log_statsd_default_sample_rate = 1.0# log_statsd_sample_rate_factor = 1.0# log_statsd_metric_prefix =## If you don't mind the extra disk space usage in overhead, you can turn this
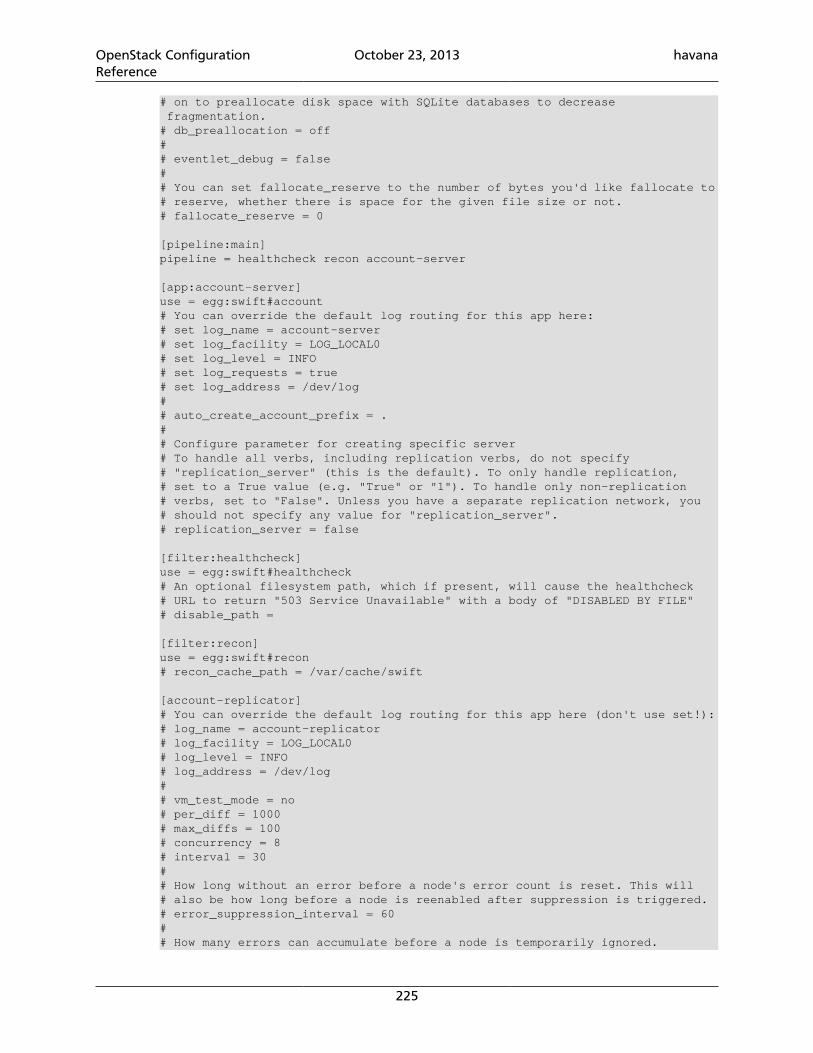
OpenStack ConfigurationReference
October 23, 2013 havana
225
# on to preallocate disk space with SQLite databases to decrease fragmentation.# db_preallocation = off## eventlet_debug = false## You can set fallocate_reserve to the number of bytes you'd like fallocate to# reserve, whether there is space for the given file size or not.# fallocate_reserve = 0
[pipeline:main]pipeline = healthcheck recon account-server
[app:account-server]use = egg:swift#account# You can override the default log routing for this app here:# set log_name = account-server# set log_facility = LOG_LOCAL0# set log_level = INFO# set log_requests = true# set log_address = /dev/log## auto_create_account_prefix = .## Configure parameter for creating specific server# To handle all verbs, including replication verbs, do not specify# "replication_server" (this is the default). To only handle replication,# set to a True value (e.g. "True" or "1"). To handle only non-replication# verbs, set to "False". Unless you have a separate replication network, you# should not specify any value for "replication_server".# replication_server = false
[filter:healthcheck]use = egg:swift#healthcheck# An optional filesystem path, which if present, will cause the healthcheck# URL to return "503 Service Unavailable" with a body of "DISABLED BY FILE"# disable_path =
[filter:recon]use = egg:swift#recon# recon_cache_path = /var/cache/swift
[account-replicator]# You can override the default log routing for this app here (don't use set!):# log_name = account-replicator# log_facility = LOG_LOCAL0# log_level = INFO# log_address = /dev/log## vm_test_mode = no# per_diff = 1000# max_diffs = 100# concurrency = 8# interval = 30## How long without an error before a node's error count is reset. This will# also be how long before a node is reenabled after suppression is triggered.# error_suppression_interval = 60## How many errors can accumulate before a node is temporarily ignored.
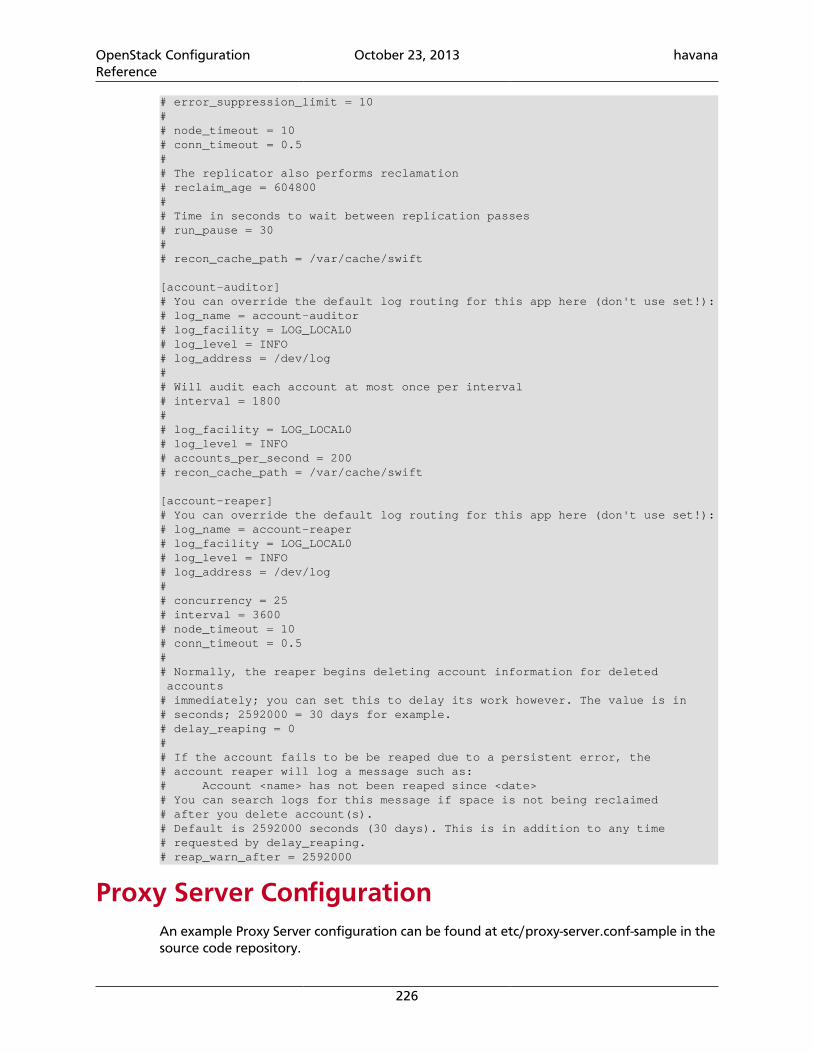
OpenStack ConfigurationReference
October 23, 2013 havana
226
# error_suppression_limit = 10## node_timeout = 10# conn_timeout = 0.5## The replicator also performs reclamation# reclaim_age = 604800## Time in seconds to wait between replication passes# run_pause = 30## recon_cache_path = /var/cache/swift
[account-auditor]# You can override the default log routing for this app here (don't use set!):# log_name = account-auditor# log_facility = LOG_LOCAL0# log_level = INFO# log_address = /dev/log## Will audit each account at most once per interval# interval = 1800## log_facility = LOG_LOCAL0# log_level = INFO# accounts_per_second = 200# recon_cache_path = /var/cache/swift
[account-reaper]# You can override the default log routing for this app here (don't use set!):# log_name = account-reaper# log_facility = LOG_LOCAL0# log_level = INFO# log_address = /dev/log## concurrency = 25# interval = 3600# node_timeout = 10# conn_timeout = 0.5## Normally, the reaper begins deleting account information for deleted accounts# immediately; you can set this to delay its work however. The value is in# seconds; 2592000 = 30 days for example.# delay_reaping = 0## If the account fails to be be reaped due to a persistent error, the# account reaper will log a message such as:# Account <name> has not been reaped since <date># You can search logs for this message if space is not being reclaimed# after you delete account(s).# Default is 2592000 seconds (30 days). This is in addition to any time# requested by delay_reaping.# reap_warn_after = 2592000
Proxy Server ConfigurationAn example Proxy Server configuration can be found at etc/proxy-server.conf-sample in thesource code repository.
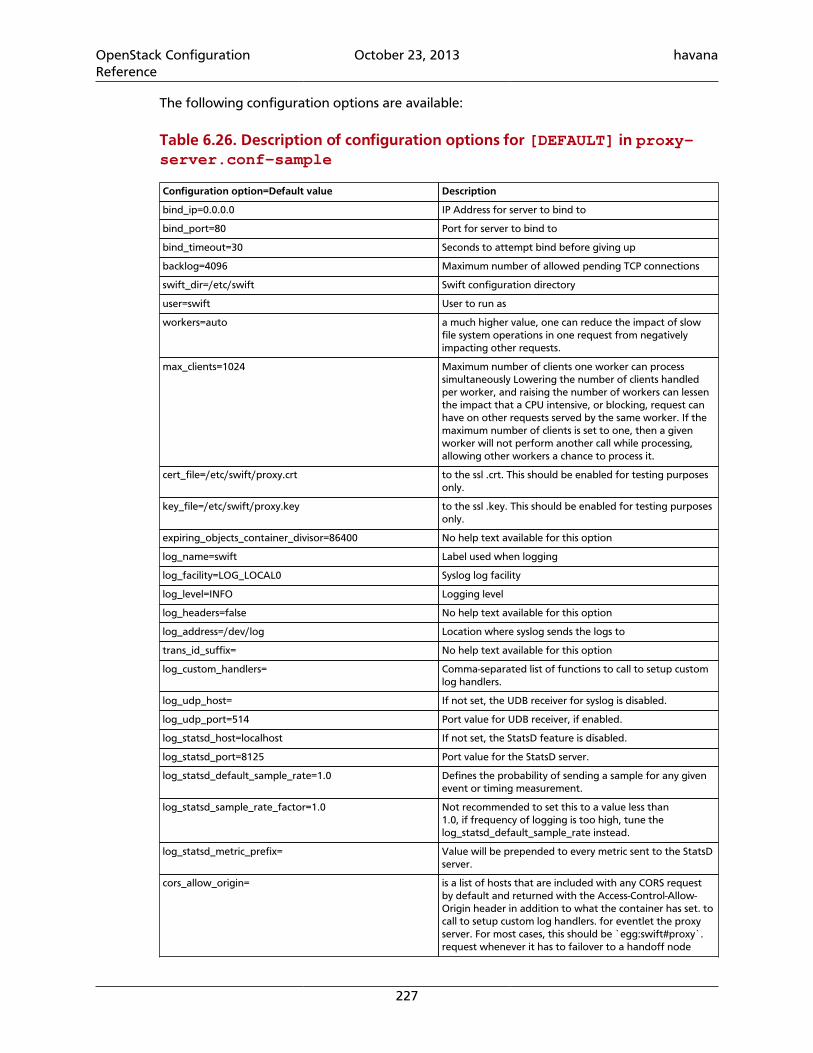
OpenStack ConfigurationReference
October 23, 2013 havana
227
The following configuration options are available:
Table 6.26. Description of configuration options for [DEFAULT] in proxy-server.conf-sample
Configuration option=Default value Description
bind_ip=0.0.0.0 IP Address for server to bind to
bind_port=80 Port for server to bind to
bind_timeout=30 Seconds to attempt bind before giving up
backlog=4096 Maximum number of allowed pending TCP connections
swift_dir=/etc/swift Swift configuration directory
user=swift User to run as
workers=auto a much higher value, one can reduce the impact of slowfile system operations in one request from negativelyimpacting other requests.
max_clients=1024 Maximum number of clients one worker can processsimultaneously Lowering the number of clients handledper worker, and raising the number of workers can lessenthe impact that a CPU intensive, or blocking, request canhave on other requests served by the same worker. If themaximum number of clients is set to one, then a givenworker will not perform another call while processing,allowing other workers a chance to process it.
cert_file=/etc/swift/proxy.crt to the ssl .crt. This should be enabled for testing purposesonly.
key_file=/etc/swift/proxy.key to the ssl .key. This should be enabled for testing purposesonly.
expiring_objects_container_divisor=86400 No help text available for this option
log_name=swift Label used when logging
log_facility=LOG_LOCAL0 Syslog log facility
log_level=INFO Logging level
log_headers=false No help text available for this option
log_address=/dev/log Location where syslog sends the logs to
trans_id_suffix= No help text available for this option
log_custom_handlers= Comma-separated list of functions to call to setup customlog handlers.
log_udp_host= If not set, the UDB receiver for syslog is disabled.
log_udp_port=514 Port value for UDB receiver, if enabled.
log_statsd_host=localhost If not set, the StatsD feature is disabled.
log_statsd_port=8125 Port value for the StatsD server.
log_statsd_default_sample_rate=1.0 Defines the probability of sending a sample for any givenevent or timing measurement.
log_statsd_sample_rate_factor=1.0 Not recommended to set this to a value less than1.0, if frequency of logging is too high, tune thelog_statsd_default_sample_rate instead.
log_statsd_metric_prefix= Value will be prepended to every metric sent to the StatsDserver.
cors_allow_origin= is a list of hosts that are included with any CORS requestby default and returned with the Access-Control-Allow-Origin header in addition to what the container has set. tocall to setup custom log handlers. for eventlet the proxyserver. For most cases, this should be `egg:swift#proxy`.request whenever it has to failover to a handoff node
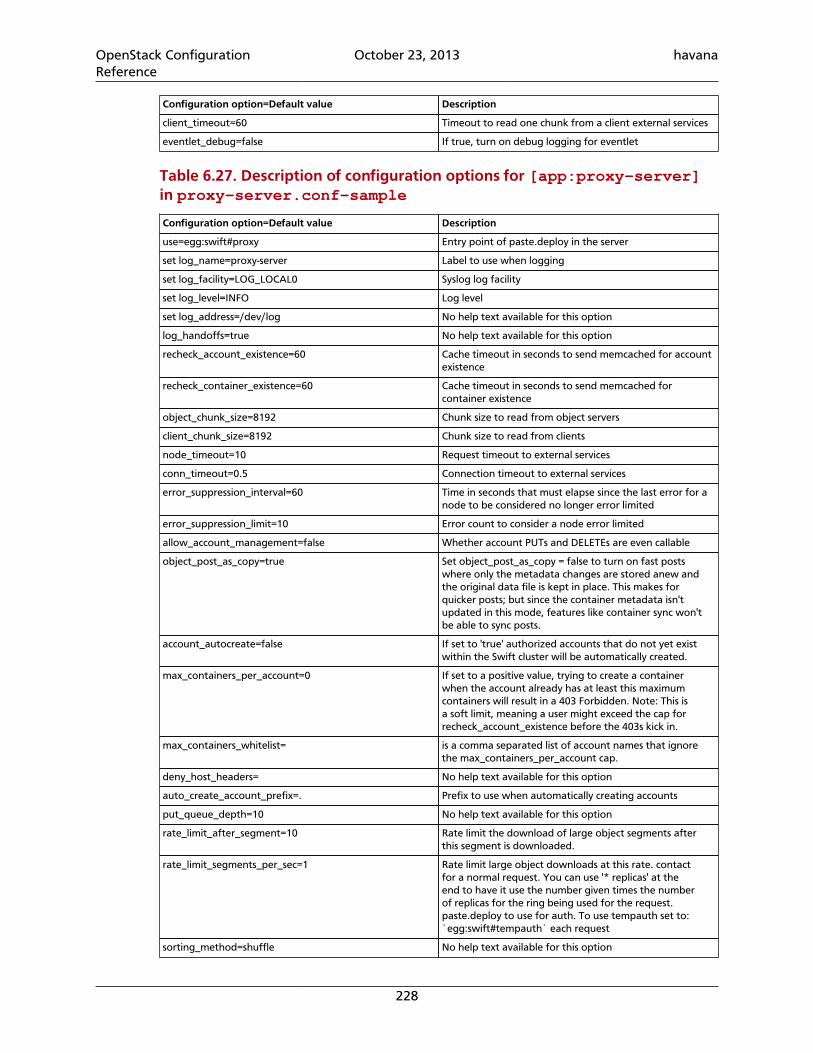
OpenStack ConfigurationReference
October 23, 2013 havana
228
Configuration option=Default value Description
client_timeout=60 Timeout to read one chunk from a client external services
eventlet_debug=false If true, turn on debug logging for eventlet
Table 6.27. Description of configuration options for [app:proxy-server]in proxy-server.conf-sample
Configuration option=Default value Description
use=egg:swift#proxy Entry point of paste.deploy in the server
set log_name=proxy-server Label to use when logging
set log_facility=LOG_LOCAL0 Syslog log facility
set log_level=INFO Log level
set log_address=/dev/log No help text available for this option
log_handoffs=true No help text available for this option
recheck_account_existence=60 Cache timeout in seconds to send memcached for accountexistence
recheck_container_existence=60 Cache timeout in seconds to send memcached forcontainer existence
object_chunk_size=8192 Chunk size to read from object servers
client_chunk_size=8192 Chunk size to read from clients
node_timeout=10 Request timeout to external services
conn_timeout=0.5 Connection timeout to external services
error_suppression_interval=60 Time in seconds that must elapse since the last error for anode to be considered no longer error limited
error_suppression_limit=10 Error count to consider a node error limited
allow_account_management=false Whether account PUTs and DELETEs are even callable
object_post_as_copy=true Set object_post_as_copy = false to turn on fast postswhere only the metadata changes are stored anew andthe original data file is kept in place. This makes forquicker posts; but since the container metadata isn'tupdated in this mode, features like container sync won'tbe able to sync posts.
account_autocreate=false If set to 'true' authorized accounts that do not yet existwithin the Swift cluster will be automatically created.
max_containers_per_account=0 If set to a positive value, trying to create a containerwhen the account already has at least this maximumcontainers will result in a 403 Forbidden. Note: This isa soft limit, meaning a user might exceed the cap forrecheck_account_existence before the 403s kick in.
max_containers_whitelist= is a comma separated list of account names that ignorethe max_containers_per_account cap.
deny_host_headers= No help text available for this option
auto_create_account_prefix=. Prefix to use when automatically creating accounts
put_queue_depth=10 No help text available for this option
rate_limit_after_segment=10 Rate limit the download of large object segments afterthis segment is downloaded.
rate_limit_segments_per_sec=1 Rate limit large object downloads at this rate. contactfor a normal request. You can use '* replicas' at theend to have it use the number given times the numberof replicas for the ring being used for the request.paste.deploy to use for auth. To use tempauth set to:`egg:swift#tempauth` each request
sorting_method=shuffle No help text available for this option
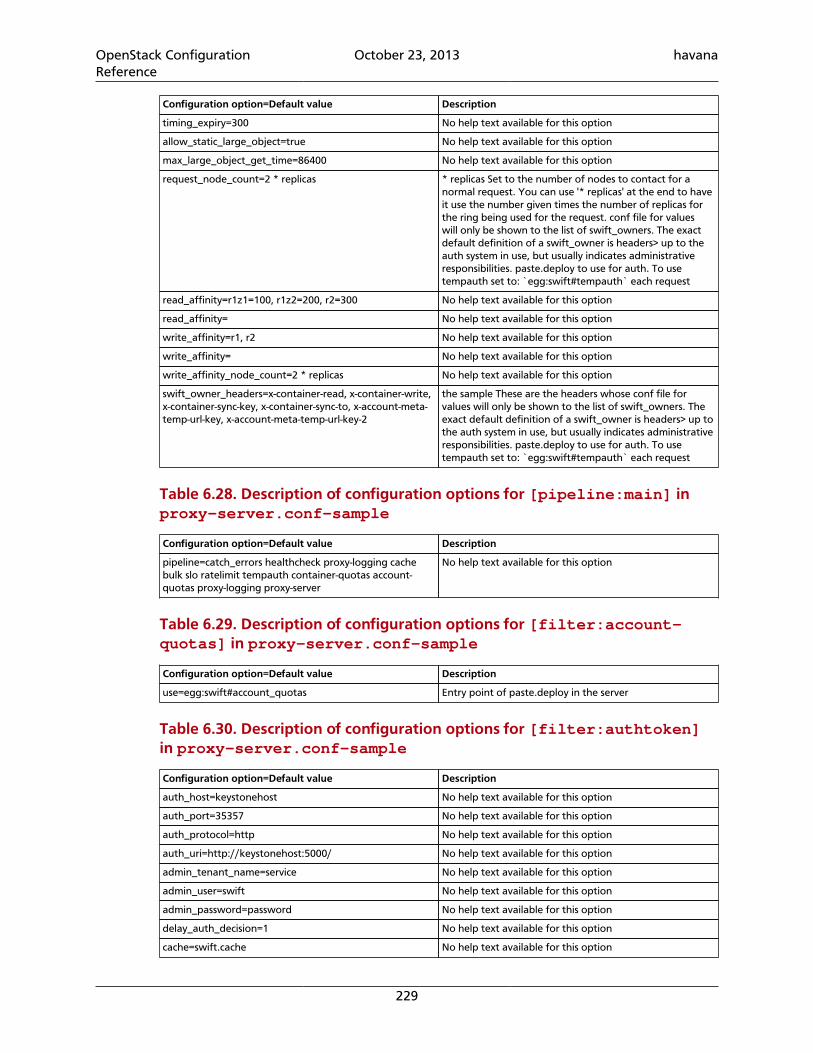
OpenStack ConfigurationReference
October 23, 2013 havana
229
Configuration option=Default value Description
timing_expiry=300 No help text available for this option
allow_static_large_object=true No help text available for this option
max_large_object_get_time=86400 No help text available for this option
request_node_count=2 * replicas * replicas Set to the number of nodes to contact for anormal request. You can use '* replicas' at the end to haveit use the number given times the number of replicas forthe ring being used for the request. conf file for valueswill only be shown to the list of swift_owners. The exactdefault definition of a swift_owner is headers> up to theauth system in use, but usually indicates administrativeresponsibilities. paste.deploy to use for auth. To usetempauth set to: `egg:swift#tempauth` each request
read_affinity=r1z1=100, r1z2=200, r2=300 No help text available for this option
read_affinity= No help text available for this option
write_affinity=r1, r2 No help text available for this option
write_affinity= No help text available for this option
write_affinity_node_count=2 * replicas No help text available for this option
swift_owner_headers=x-container-read, x-container-write,x-container-sync-key, x-container-sync-to, x-account-meta-temp-url-key, x-account-meta-temp-url-key-2
the sample These are the headers whose conf file forvalues will only be shown to the list of swift_owners. Theexact default definition of a swift_owner is headers> up tothe auth system in use, but usually indicates administrativeresponsibilities. paste.deploy to use for auth. To usetempauth set to: `egg:swift#tempauth` each request
Table 6.28. Description of configuration options for [pipeline:main] inproxy-server.conf-sample
Configuration option=Default value Description
pipeline=catch_errors healthcheck proxy-logging cachebulk slo ratelimit tempauth container-quotas account-quotas proxy-logging proxy-server
No help text available for this option
Table 6.29. Description of configuration options for [filter:account-quotas] in proxy-server.conf-sample
Configuration option=Default value Description
use=egg:swift#account_quotas Entry point of paste.deploy in the server
Table 6.30. Description of configuration options for [filter:authtoken]in proxy-server.conf-sample
Configuration option=Default value Description
auth_host=keystonehost No help text available for this option
auth_port=35357 No help text available for this option
auth_protocol=http No help text available for this option
auth_uri=http://keystonehost:5000/ No help text available for this option
admin_tenant_name=service No help text available for this option
admin_user=swift No help text available for this option
admin_password=password No help text available for this option
delay_auth_decision=1 No help text available for this option
cache=swift.cache No help text available for this option
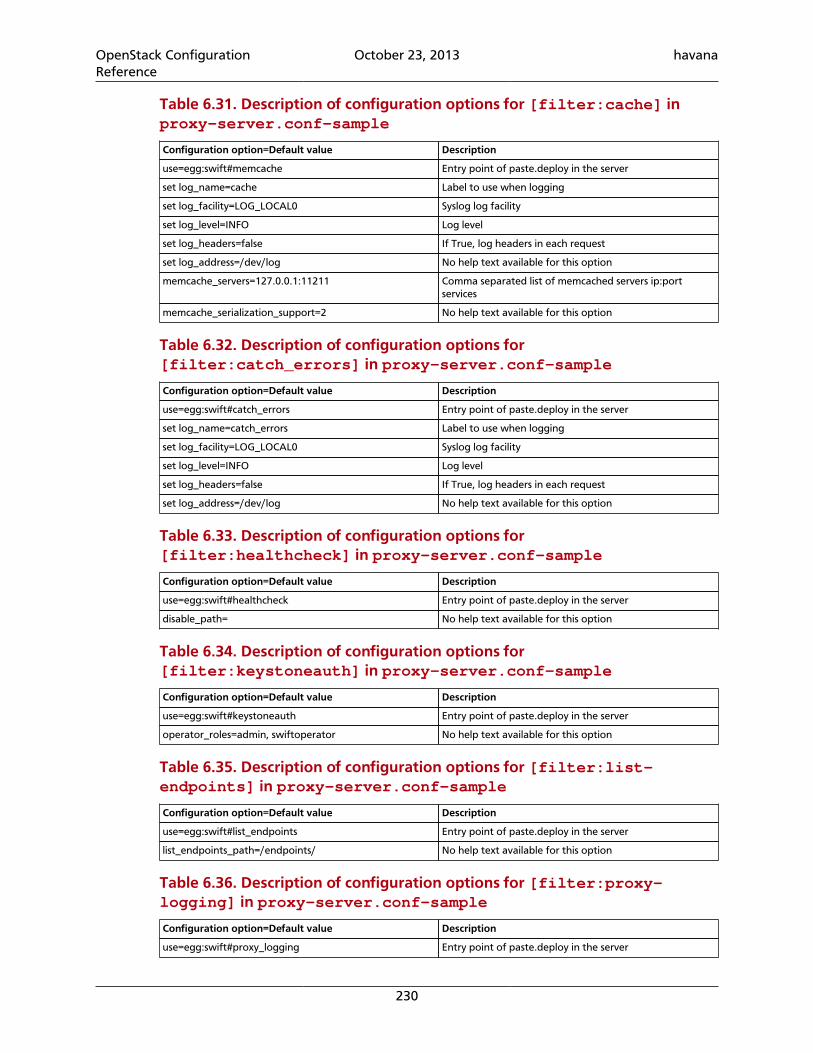
OpenStack ConfigurationReference
October 23, 2013 havana
230
Table 6.31. Description of configuration options for [filter:cache] inproxy-server.conf-sample
Configuration option=Default value Description
use=egg:swift#memcache Entry point of paste.deploy in the server
set log_name=cache Label to use when logging
set log_facility=LOG_LOCAL0 Syslog log facility
set log_level=INFO Log level
set log_headers=false If True, log headers in each request
set log_address=/dev/log No help text available for this option
memcache_servers=127.0.0.1:11211 Comma separated list of memcached servers ip:portservices
memcache_serialization_support=2 No help text available for this option
Table 6.32. Description of configuration options for[filter:catch_errors] in proxy-server.conf-sample
Configuration option=Default value Description
use=egg:swift#catch_errors Entry point of paste.deploy in the server
set log_name=catch_errors Label to use when logging
set log_facility=LOG_LOCAL0 Syslog log facility
set log_level=INFO Log level
set log_headers=false If True, log headers in each request
set log_address=/dev/log No help text available for this option
Table 6.33. Description of configuration options for[filter:healthcheck] in proxy-server.conf-sample
Configuration option=Default value Description
use=egg:swift#healthcheck Entry point of paste.deploy in the server
disable_path= No help text available for this option
Table 6.34. Description of configuration options for[filter:keystoneauth] in proxy-server.conf-sample
Configuration option=Default value Description
use=egg:swift#keystoneauth Entry point of paste.deploy in the server
operator_roles=admin, swiftoperator No help text available for this option
Table 6.35. Description of configuration options for [filter:list-endpoints] in proxy-server.conf-sample
Configuration option=Default value Description
use=egg:swift#list_endpoints Entry point of paste.deploy in the server
list_endpoints_path=/endpoints/ No help text available for this option
Table 6.36. Description of configuration options for [filter:proxy-logging] in proxy-server.conf-sample
Configuration option=Default value Description
use=egg:swift#proxy_logging Entry point of paste.deploy in the server
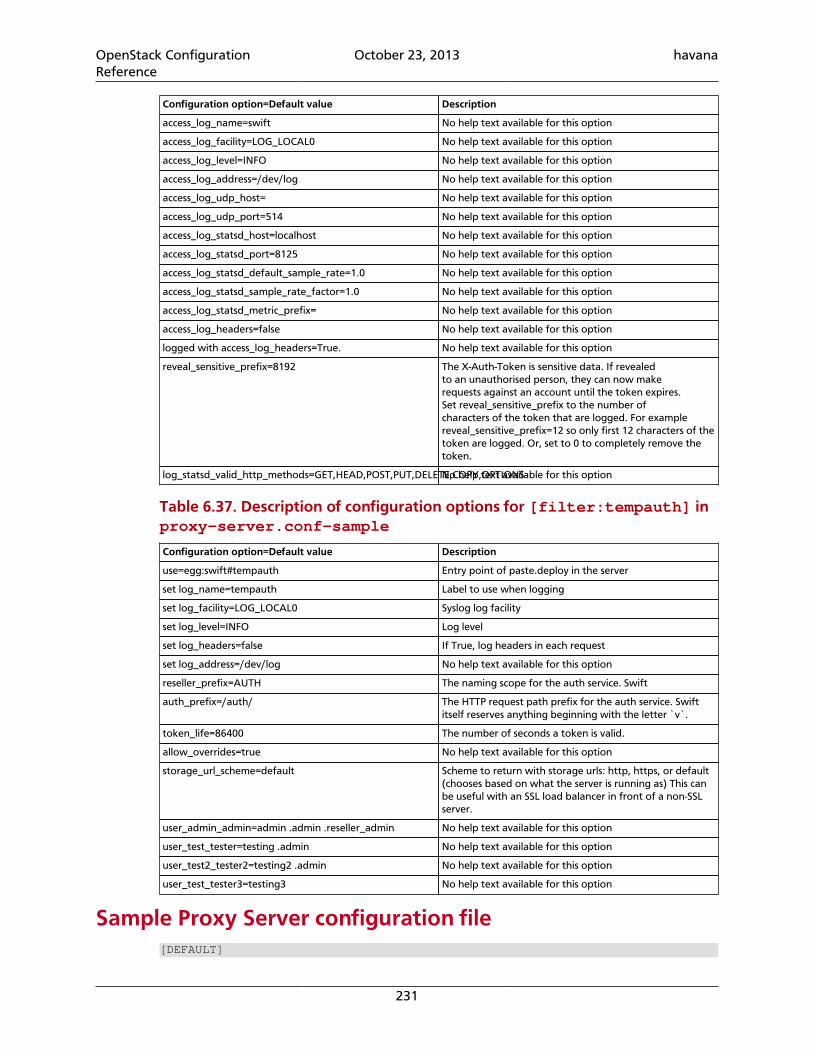
OpenStack ConfigurationReference
October 23, 2013 havana
231
Configuration option=Default value Description
access_log_name=swift No help text available for this option
access_log_facility=LOG_LOCAL0 No help text available for this option
access_log_level=INFO No help text available for this option
access_log_address=/dev/log No help text available for this option
access_log_udp_host= No help text available for this option
access_log_udp_port=514 No help text available for this option
access_log_statsd_host=localhost No help text available for this option
access_log_statsd_port=8125 No help text available for this option
access_log_statsd_default_sample_rate=1.0 No help text available for this option
access_log_statsd_sample_rate_factor=1.0 No help text available for this option
access_log_statsd_metric_prefix= No help text available for this option
access_log_headers=false No help text available for this option
logged with access_log_headers=True. No help text available for this option
reveal_sensitive_prefix=8192 The X-Auth-Token is sensitive data. If revealedto an unauthorised person, they can now makerequests against an account until the token expires.Set reveal_sensitive_prefix to the number ofcharacters of the token that are logged. For examplereveal_sensitive_prefix=12 so only first 12 characters of thetoken are logged. Or, set to 0 to completely remove thetoken.
log_statsd_valid_http_methods=GET,HEAD,POST,PUT,DELETE,COPY,OPTIONSNo help text available for this option
Table 6.37. Description of configuration options for [filter:tempauth] inproxy-server.conf-sample
Configuration option=Default value Description
use=egg:swift#tempauth Entry point of paste.deploy in the server
set log_name=tempauth Label to use when logging
set log_facility=LOG_LOCAL0 Syslog log facility
set log_level=INFO Log level
set log_headers=false If True, log headers in each request
set log_address=/dev/log No help text available for this option
reseller_prefix=AUTH The naming scope for the auth service. Swift
auth_prefix=/auth/ The HTTP request path prefix for the auth service. Swiftitself reserves anything beginning with the letter `v`.
token_life=86400 The number of seconds a token is valid.
allow_overrides=true No help text available for this option
storage_url_scheme=default Scheme to return with storage urls: http, https, or default(chooses based on what the server is running as) This canbe useful with an SSL load balancer in front of a non-SSLserver.
user_admin_admin=admin .admin .reseller_admin No help text available for this option
user_test_tester=testing .admin No help text available for this option
user_test2_tester2=testing2 .admin No help text available for this option
user_test_tester3=testing3 No help text available for this option
Sample Proxy Server configuration file[DEFAULT]
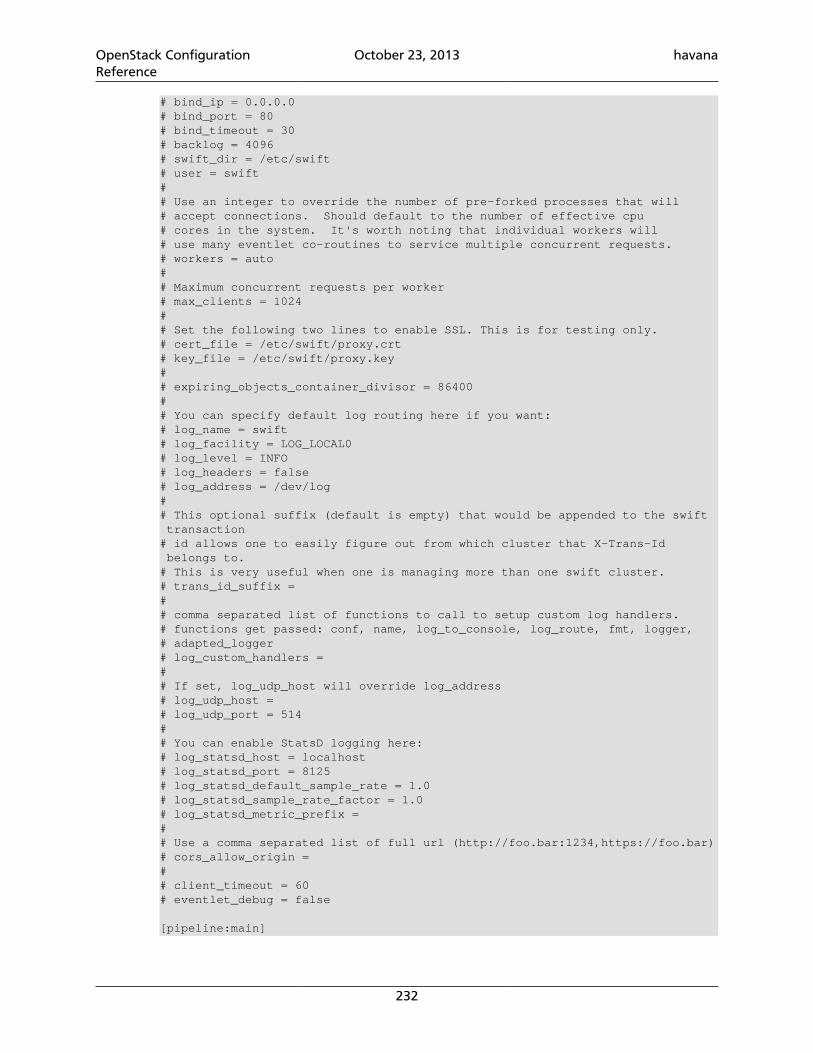
OpenStack ConfigurationReference
October 23, 2013 havana
232
# bind_ip = 0.0.0.0# bind_port = 80# bind_timeout = 30# backlog = 4096# swift_dir = /etc/swift# user = swift## Use an integer to override the number of pre-forked processes that will# accept connections. Should default to the number of effective cpu# cores in the system. It's worth noting that individual workers will# use many eventlet co-routines to service multiple concurrent requests.# workers = auto## Maximum concurrent requests per worker# max_clients = 1024## Set the following two lines to enable SSL. This is for testing only.# cert_file = /etc/swift/proxy.crt# key_file = /etc/swift/proxy.key## expiring_objects_container_divisor = 86400## You can specify default log routing here if you want:# log_name = swift# log_facility = LOG_LOCAL0# log_level = INFO# log_headers = false# log_address = /dev/log## This optional suffix (default is empty) that would be appended to the swift transaction# id allows one to easily figure out from which cluster that X-Trans-Id belongs to.# This is very useful when one is managing more than one swift cluster.# trans_id_suffix =## comma separated list of functions to call to setup custom log handlers.# functions get passed: conf, name, log_to_console, log_route, fmt, logger,# adapted_logger# log_custom_handlers =## If set, log_udp_host will override log_address# log_udp_host =# log_udp_port = 514## You can enable StatsD logging here:# log_statsd_host = localhost# log_statsd_port = 8125# log_statsd_default_sample_rate = 1.0# log_statsd_sample_rate_factor = 1.0# log_statsd_metric_prefix =## Use a comma separated list of full url (http://foo.bar:1234,https://foo.bar)# cors_allow_origin =## client_timeout = 60# eventlet_debug = false
[pipeline:main]
OpenStack ConfigurationReference
October 23, 2013 havana
233
pipeline = catch_errors healthcheck proxy-logging cache bulk slo ratelimit tempauth container-quotas account-quotas proxy-logging proxy-server
[app:proxy-server]use = egg:swift#proxy# You can override the default log routing for this app here:# set log_name = proxy-server# set log_facility = LOG_LOCAL0# set log_level = INFO# set log_address = /dev/log## log_handoffs = true# recheck_account_existence = 60# recheck_container_existence = 60# object_chunk_size = 8192# client_chunk_size = 8192# node_timeout = 10# conn_timeout = 0.5## How long without an error before a node's error count is reset. This will# also be how long before a node is reenabled after suppression is triggered.# error_suppression_interval = 60## How many errors can accumulate before a node is temporarily ignored.# error_suppression_limit = 10## If set to 'true' any authorized user may create and delete accounts; if# 'false' no one, even authorized, can.# allow_account_management = false## Set object_post_as_copy = false to turn on fast posts where only the metadata# changes are stored anew and the original data file is kept in place. This# makes for quicker posts; but since the container metadata isn't updated in# this mode, features like container sync won't be able to sync posts.# object_post_as_copy = true## If set to 'true' authorized accounts that do not yet exist within the Swift# cluster will be automatically created.# account_autocreate = false## If set to a positive value, trying to create a container when the account# already has at least this maximum containers will result in a 403 Forbidden.# Note: This is a soft limit, meaning a user might exceed the cap for# recheck_account_existence before the 403s kick in.# max_containers_per_account = 0## This is a comma separated list of account hashes that ignore the# max_containers_per_account cap.# max_containers_whitelist =## Comma separated list of Host headers to which the proxy will deny requests.# deny_host_headers =## Prefix used when automatically creating accounts.# auto_create_account_prefix = .## Depth of the proxy put queue.# put_queue_depth = 10#
OpenStack ConfigurationReference
October 23, 2013 havana
234
# Start rate-limiting object segment serving after the Nth segment of a# segmented object.# rate_limit_after_segment = 10## Once segment rate-limiting kicks in for an object, limit segments served# to N per second.# rate_limit_segments_per_sec = 1## Storage nodes can be chosen at random (shuffle), by using timing# measurements (timing), or by using an explicit match (affinity).# Using timing measurements may allow for lower overall latency, while# using affinity allows for finer control. In both the timing and# affinity cases, equally-sorting nodes are still randomly chosen to# spread load.# The valid values for sorting_method are "affinity", "shuffle", and "timing".# sorting_method = shuffle## If the "timing" sorting_method is used, the timings will only be valid for# the number of seconds configured by timing_expiry.# timing_expiry = 300## If set to false will treat objects with X-Static-Large-Object header set# as a regular object on GETs, i.e. will return that object's contents. Should# be set to false if slo is not used in pipeline.# allow_static_large_object = true## The maximum time (seconds) that a large object connection is allowed to last.# max_large_object_get_time = 86400## Set to the number of nodes to contact for a normal request. You can use# '* replicas' at the end to have it use the number given times the number of# replicas for the ring being used for the request.# request_node_count = 2 * replicas## Which backend servers to prefer on reads. Format is r<N> for region# N or r<N>z<M> for region N, zone M. The value after the equals is# the priority; lower numbers are higher priority.## Example: first read from region 1 zone 1, then region 1 zone 2, then# anything in region 2, then everything else:# read_affinity = r1z1=100, r1z2=200, r2=300# Default is empty, meaning no preference.# read_affinity =## Which backend servers to prefer on writes. Format is r<N> for region# N or r<N>z<M> for region N, zone M. If this is set, then when# handling an object PUT request, some number (see setting# write_affinity_node_count) of local backend servers will be tried# before any nonlocal ones.## Example: try to write to regions 1 and 2 before writing to any other# nodes:# write_affinity = r1, r2# Default is empty, meaning no preference.# write_affinity =## The number of local (as governed by the write_affinity setting)# nodes to attempt to contact first, before any non-local ones. You# can use '* replicas' at the end to have it use the number given
OpenStack ConfigurationReference
October 23, 2013 havana
235
# times the number of replicas for the ring being used for the# request.# write_affinity_node_count = 2 * replicas## These are the headers whose values will only be shown to swift_owners. The# exact definition of a swift_owner is up to the auth system in use, but# usually indicates administrative responsibilities.# swift_owner_headers = x-container-read, x-container-write, x-container-sync-key, x-container-sync-to, x-account-meta-temp-url-key, x-account-meta-temp-url-key-2
[filter:tempauth]use = egg:swift#tempauth# You can override the default log routing for this filter here:# set log_name = tempauth# set log_facility = LOG_LOCAL0# set log_level = INFO# set log_headers = false# set log_address = /dev/log## The reseller prefix will verify a token begins with this prefix before even# attempting to validate it. Also, with authorization, only Swift storage# accounts with this prefix will be authorized by this middleware. Useful if# multiple auth systems are in use for one Swift cluster.# reseller_prefix = AUTH## The auth prefix will cause requests beginning with this prefix to be routed# to the auth subsystem, for granting tokens, etc.# auth_prefix = /auth/# token_life = 86400## This allows middleware higher in the WSGI pipeline to override auth# processing, useful for middleware such as tempurl and formpost. If you know# you're not going to use such middleware and you want a bit of extra security,# you can set this to false.# allow_overrides = true## This specifies what scheme to return with storage urls:# http, https, or default (chooses based on what the server is running as)# This can be useful with an SSL load balancer in front of a non-SSL server.# storage_url_scheme = default## Lastly, you need to list all the accounts/users you want here. The format is:# user_<account>_<user> = <key> [group] [group] [...] [storage_url]# or if you want underscores in <account> or <user>, you can base64 encode them# (with no equal signs) and use this format:# user64_<account_b64>_<user_b64> = <key> [group] [group] [...] [storage_url]# There are special groups of:# .reseller_admin = can do anything to any account for this auth# .admin = can do anything within the account# If neither of these groups are specified, the user can only access containers# that have been explicitly allowed for them by a .admin or .reseller_admin.# The trailing optional storage_url allows you to specify an alternate url to
OpenStack ConfigurationReference
October 23, 2013 havana
236
# hand back to the user upon authentication. If not specified, this defaults to# $HOST/v1/<reseller_prefix>_<account> where $HOST will do its best to resolve# to what the requester would need to use to reach this host.# Here are example entries, required for running the tests:user_admin_admin = admin .admin .reseller_adminuser_test_tester = testing .adminuser_test2_tester2 = testing2 .adminuser_test_tester3 = testing3
# To enable Keystone authentication you need to have the auth token# middleware first to be configured. Here is an example below, please# refer to the keystone's documentation for details about the# different settings.## You'll need to have as well the keystoneauth middleware enabled# and have it in your main pipeline so instead of having tempauth in# there you can change it to: authtoken keystoneauth## [filter:authtoken]# paste.filter_factory = keystoneclient.middleware.auth_token:filter_factory# auth_host = keystonehost# auth_port = 35357# auth_protocol = http# auth_uri = http://keystonehost:5000/# admin_tenant_name = service# admin_user = swift# admin_password = password# delay_auth_decision = 1# cache = swift.cache## [filter:keystoneauth]# use = egg:swift#keystoneauth# Operator roles is the role which user would be allowed to manage a# tenant and be able to create container or give ACL to others.# operator_roles = admin, swiftoperator# The reseller admin role has the ability to create and delete accounts# reseller_admin_role = ResellerAdmin
[filter:healthcheck]use = egg:swift#healthcheck# An optional filesystem path, which if present, will cause the healthcheck# URL to return "503 Service Unavailable" with a body of "DISABLED BY FILE".# This facility may be used to temporarily remove a Swift node from a load# balancer pool during maintenance or upgrade (remove the file to allow the# node back into the load balancer pool).# disable_path =
[filter:cache]use = egg:swift#memcache# You can override the default log routing for this filter here:# set log_name = cache# set log_facility = LOG_LOCAL0# set log_level = INFO# set log_headers = false# set log_address = /dev/log## If not set here, the value for memcache_servers will be read from# memcache.conf (see memcache.conf-sample) or lacking that file, it will# default to the value below. You can specify multiple servers separated with
OpenStack ConfigurationReference
October 23, 2013 havana
237
# commas, as in: 10.1.2.3:11211,10.1.2.4:11211# memcache_servers = 127.0.0.1:11211## Sets how memcache values are serialized and deserialized:# 0 = older, insecure pickle serialization# 1 = json serialization but pickles can still be read (still insecure)# 2 = json serialization only (secure and the default)# If not set here, the value for memcache_serialization_support will be read# from /etc/swift/memcache.conf (see memcache.conf-sample).# To avoid an instant full cache flush, existing installations should# upgrade with 0, then set to 1 and reload, then after some time (24 hours)# set to 2 and reload.# In the future, the ability to use pickle serialization will be removed.# memcache_serialization_support = 2
[filter:ratelimit]use = egg:swift#ratelimit# You can override the default log routing for this filter here:# set log_name = ratelimit# set log_facility = LOG_LOCAL0# set log_level = INFO# set log_headers = false# set log_address = /dev/log## clock_accuracy should represent how accurate the proxy servers' system clocks# are with each other. 1000 means that all the proxies' clock are accurate to# each other within 1 millisecond. No ratelimit should be higher than the# clock accuracy.# clock_accuracy = 1000## max_sleep_time_seconds = 60## log_sleep_time_seconds of 0 means disabled# log_sleep_time_seconds = 0## allows for slow rates (e.g. running up to 5 sec's behind) to catch up.# rate_buffer_seconds = 5## account_ratelimit of 0 means disabled# account_ratelimit = 0
# these are comma separated lists of account names# account_whitelist = a,b# account_blacklist = c,d
# with container_limit_x = r# for containers of size x limit write requests per second to r. The container# rate will be linearly interpolated from the values given. With the values# below, a container of size 5 will get a rate of 75.# container_ratelimit_0 = 100# container_ratelimit_10 = 50# container_ratelimit_50 = 20
# Similarly to the above container-level write limits, the following will limit# container GET (listing) requests.# container_listing_ratelimit_0 = 100# container_listing_ratelimit_10 = 50
OpenStack ConfigurationReference
October 23, 2013 havana
238
# container_listing_ratelimit_50 = 20
[filter:domain_remap]use = egg:swift#domain_remap# You can override the default log routing for this filter here:# set log_name = domain_remap# set log_facility = LOG_LOCAL0# set log_level = INFO# set log_headers = false# set log_address = /dev/log## storage_domain = example.com# path_root = v1# reseller_prefixes = AUTH
[filter:catch_errors]use = egg:swift#catch_errors# You can override the default log routing for this filter here:# set log_name = catch_errors# set log_facility = LOG_LOCAL0# set log_level = INFO# set log_headers = false# set log_address = /dev/log
[filter:cname_lookup]# Note: this middleware requires python-dnspythonuse = egg:swift#cname_lookup# You can override the default log routing for this filter here:# set log_name = cname_lookup# set log_facility = LOG_LOCAL0# set log_level = INFO# set log_headers = false# set log_address = /dev/log## storage_domain = example.com# lookup_depth = 1
# Note: Put staticweb just after your auth filter(s) in the pipeline[filter:staticweb]use = egg:swift#staticweb
# Note: Put tempurl just before your auth filter(s) in the pipeline[filter:tempurl]use = egg:swift#tempurl# The methods allowed with Temp URLs.# methods = GET HEAD PUT## The headers to remove from incoming requests. Simply a whitespace delimited# list of header names and names can optionally end with '*' to indicate a# prefix match. incoming_allow_headers is a list of exceptions to these# removals.# incoming_remove_headers = x-timestamp## The headers allowed as exceptions to incoming_remove_headers. Simply a# whitespace delimited list of header names and names can optionally end with# '*' to indicate a prefix match.# incoming_allow_headers =## The headers to remove from outgoing responses. Simply a whitespace delimited# list of header names and names can optionally end with '*' to indicate a
OpenStack ConfigurationReference
October 23, 2013 havana
239
# prefix match. outgoing_allow_headers is a list of exceptions to these# removals.# outgoing_remove_headers = x-object-meta-*## The headers allowed as exceptions to outgoing_remove_headers. Simply a# whitespace delimited list of header names and names can optionally end with# '*' to indicate a prefix match.# outgoing_allow_headers = x-object-meta-public-*
# Note: Put formpost just before your auth filter(s) in the pipeline[filter:formpost]use = egg:swift#formpost
# Note: Just needs to be placed before the proxy-server in the pipeline.[filter:name_check]use = egg:swift#name_check# forbidden_chars = '"`<># maximum_length = 255# forbidden_regexp = /\./|/\.\./|/\.$|/\.\.$
[filter:list-endpoints]use = egg:swift#list_endpoints# list_endpoints_path = /endpoints/
[filter:proxy-logging]use = egg:swift#proxy_logging# If not set, logging directives from [DEFAULT] without "access_" will be used# access_log_name = swift# access_log_facility = LOG_LOCAL0# access_log_level = INFO# access_log_address = /dev/log## If set, access_log_udp_host will override access_log_address# access_log_udp_host =# access_log_udp_port = 514## You can use log_statsd_* from [DEFAULT] or override them here:# access_log_statsd_host = localhost# access_log_statsd_port = 8125# access_log_statsd_default_sample_rate = 1.0# access_log_statsd_sample_rate_factor = 1.0# access_log_statsd_metric_prefix =# access_log_headers = false## By default, the X-Auth-Token is logged. To obscure the value,# set reveal_sensitive_prefix to the number of characters to log.# For example, if set to 12, only the first 12 characters of the# token appear in the log. An unauthorized access of the log file# won't allow unauthorized usage of the token. However, the first# 12 or so characters is unique enough that you can trace/debug# token usage. Set to 0 to suppress the token completely (replaced# by '...' in the log).# Note: reveal_sensitive_prefix will not affect the value# logged with access_log_headers=True.# reveal_sensitive_prefix = 8192## What HTTP methods are allowed for StatsD logging (comma-sep); request methods# not in this list will have "BAD_METHOD" for the <verb> portion of the metric.
OpenStack ConfigurationReference
October 23, 2013 havana
240
# log_statsd_valid_http_methods = GET,HEAD,POST,PUT,DELETE,COPY,OPTIONS## Note: The double proxy-logging in the pipeline is not a mistake. The# left-most proxy-logging is there to log requests that were handled in# middleware and never made it through to the right-most middleware (and# proxy server). Double logging is prevented for normal requests. See# proxy-logging docs.
# Note: Put before both ratelimit and auth in the pipeline.[filter:bulk]use = egg:swift#bulk# max_containers_per_extraction = 10000# max_failed_extractions = 1000# max_deletes_per_request = 10000# yield_frequency = 60
# Note: Put after auth in the pipeline.[filter:container-quotas]use = egg:swift#container_quotas
# Note: Put before both ratelimit and auth in the pipeline.[filter:slo]use = egg:swift#slo# max_manifest_segments = 1000# max_manifest_size = 2097152# min_segment_size = 1048576
[filter:account-quotas]use = egg:swift#account_quotas
Configuring OpenStack Object Storage Features
OpenStack Object Storage Zones
In OpenStack Object Storage, data is placed across different tiers of failure domains. First,data is spread across regions, then zones, then servers, and finally across drives. Data isplaced to get the highest failure domain isolation. If you deploy multiple regions, theObject Storage service places the data across the regions. Within a region, each replica ofthe data is stored in unique zones, if possible. If there is only one zone, data is placed ondifferent servers. And if there is only one server, data is placed on different drives.
Regions are widely separated installations with a high-latency or otherwise constrainednetwork link between them. Zones are arbitrarily assigned, and it is up to the administratorof the Object Storage cluster to choose an isolation level and attempt to maintain theisolation level through appropriate zone assignment. For example, a zone may be definedas a rack with a single power source. Or a zone may be a DC room with a common utilityprovider. Servers are identified by a unique IP/port. Drives are locally attached storagevolumes identified by mount point.
In small clusters (five nodes or fewer), everything is normally in a single zone. LargerObject Storage deployments may assign zone designations differently; for example, anentire cabinet or rack of servers may be designated as a single zone to maintain replicaavailability if the cabinet becomes unavailable (for example, due to failure of the top ofrack switches or a dedicated circuit). In very large deployments, such as service providerlevel deployments, each zone might have an entirely autonomous switching and power
OpenStack ConfigurationReference
October 23, 2013 havana
241
infrastructure, so that even the loss of an electrical circuit or switching aggregator wouldresult in the loss of a single replica at most.
Rackspace Zone Recommendations
For ease of maintenance on OpenStack Object Storage, Rackspace recommends thatyou set up at least five nodes. Each node will be assigned its own zone (for a total of fivezones), which will give you host level redundancy. This allows you to take down a singlezone for maintenance and still guarantee object availability in the event that another zonefails during your maintenance.
You could keep each server in its own cabinet to achieve cabinet level isolation, but youmay wish to wait until your swift service is better established before developing cabinet-level isolation. OpenStack Object Storage is flexible; if you later decide to change theisolation level, you can take down one zone at a time and move them to appropriate newhomes.
RAID Controller ConfigurationOpenStack Object Storage does not require RAID. In fact, most RAID configurationscause significant performance degradation. The main reason for using a RAID controlleris the battery backed cache. It is very important for data integrity reasons that when theoperating system confirms a write has been committed that the write has actually beencommitted to a persistent location. Most disks lie about hardware commits by default,instead writing to a faster write cache for performance reasons. In most cases, thatwrite cache exists only in non-persistent memory. In the case of a loss of power, this datamay never actually get committed to disk, resulting in discrepancies that the underlyingfilesystem must handle.
OpenStack Object Storage works best on the XFS file system, and this document assumesthat the hardware being used is configured appropriately to be mounted with thenobarriers option. For more information, refer to the XFS FAQ: http://xfs.org/index.php/XFS_FAQ
To get the most out of your hardware, it is essential that every disk used in OpenStackObject Storage is configured as a standalone, individual RAID 0 disk; in the case of 6 disks,you would have six RAID 0s or one JBOD. Some RAID controllers do not support JBOD ordo not support battery backed cache with JBOD. To ensure the integrity of your data, youmust ensure that the individual drive caches are disabled and the battery backed cache inyour RAID card is configured and used. Failure to configure the controller properly in thiscase puts data at risk in the case of sudden loss of power.
You can also use hybrid drives or similar options for battery backed up cache configurationswithout a RAID controller.
Throttling Resources by Setting Rate LimitsRate limiting in OpenStack Object Storage is implemented as a pluggable middlewarethat you configure on the proxy server. Rate limiting is performed on requests that resultin database writes to the account and container sqlite dbs. It uses memcached and isdependent on the proxy servers having highly synchronized time. The rate limits are limitedby the accuracy of the proxy server clocks.
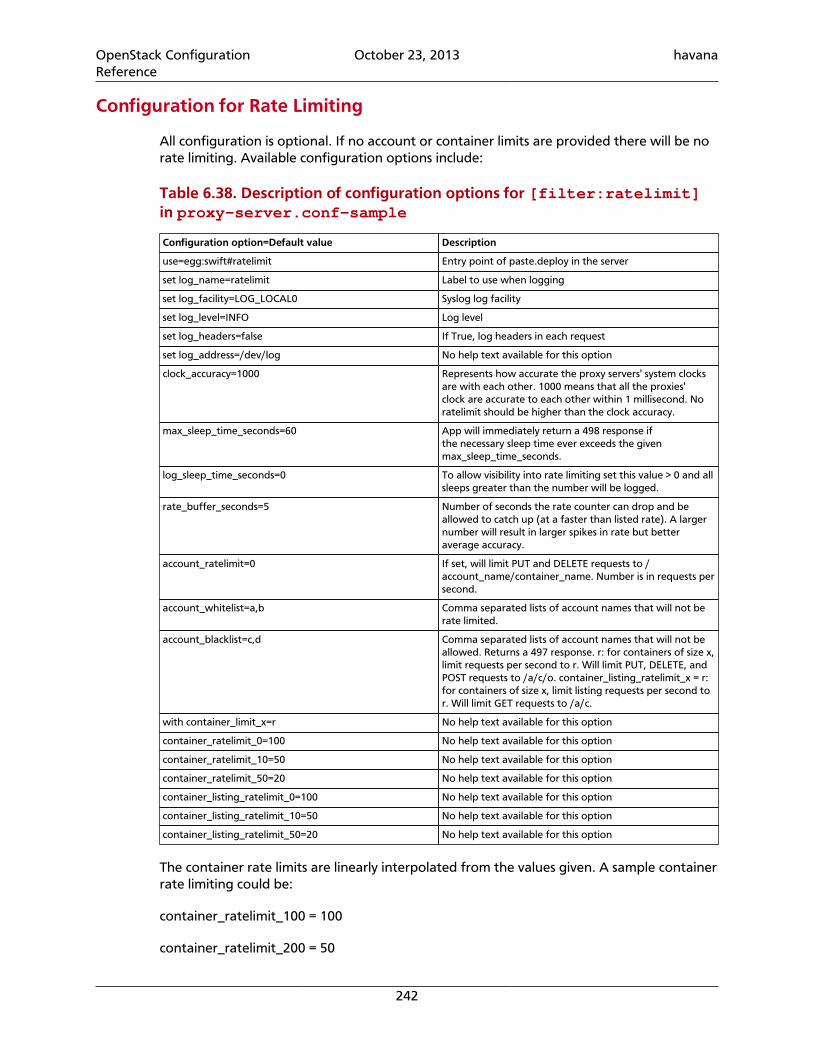
OpenStack ConfigurationReference
October 23, 2013 havana
242
Configuration for Rate Limiting
All configuration is optional. If no account or container limits are provided there will be norate limiting. Available configuration options include:
Table 6.38. Description of configuration options for [filter:ratelimit]in proxy-server.conf-sample
Configuration option=Default value Description
use=egg:swift#ratelimit Entry point of paste.deploy in the server
set log_name=ratelimit Label to use when logging
set log_facility=LOG_LOCAL0 Syslog log facility
set log_level=INFO Log level
set log_headers=false If True, log headers in each request
set log_address=/dev/log No help text available for this option
clock_accuracy=1000 Represents how accurate the proxy servers' system clocksare with each other. 1000 means that all the proxies'clock are accurate to each other within 1 millisecond. Noratelimit should be higher than the clock accuracy.
max_sleep_time_seconds=60 App will immediately return a 498 response ifthe necessary sleep time ever exceeds the givenmax_sleep_time_seconds.
log_sleep_time_seconds=0 To allow visibility into rate limiting set this value > 0 and allsleeps greater than the number will be logged.
rate_buffer_seconds=5 Number of seconds the rate counter can drop and beallowed to catch up (at a faster than listed rate). A largernumber will result in larger spikes in rate but betteraverage accuracy.
account_ratelimit=0 If set, will limit PUT and DELETE requests to /account_name/container_name. Number is in requests persecond.
account_whitelist=a,b Comma separated lists of account names that will not berate limited.
account_blacklist=c,d Comma separated lists of account names that will not beallowed. Returns a 497 response. r: for containers of size x,limit requests per second to r. Will limit PUT, DELETE, andPOST requests to /a/c/o. container_listing_ratelimit_x = r:for containers of size x, limit listing requests per second tor. Will limit GET requests to /a/c.
with container_limit_x=r No help text available for this option
container_ratelimit_0=100 No help text available for this option
container_ratelimit_10=50 No help text available for this option
container_ratelimit_50=20 No help text available for this option
container_listing_ratelimit_0=100 No help text available for this option
container_listing_ratelimit_10=50 No help text available for this option
container_listing_ratelimit_50=20 No help text available for this option
The container rate limits are linearly interpolated from the values given. A sample containerrate limiting could be:
container_ratelimit_100 = 100
container_ratelimit_200 = 50
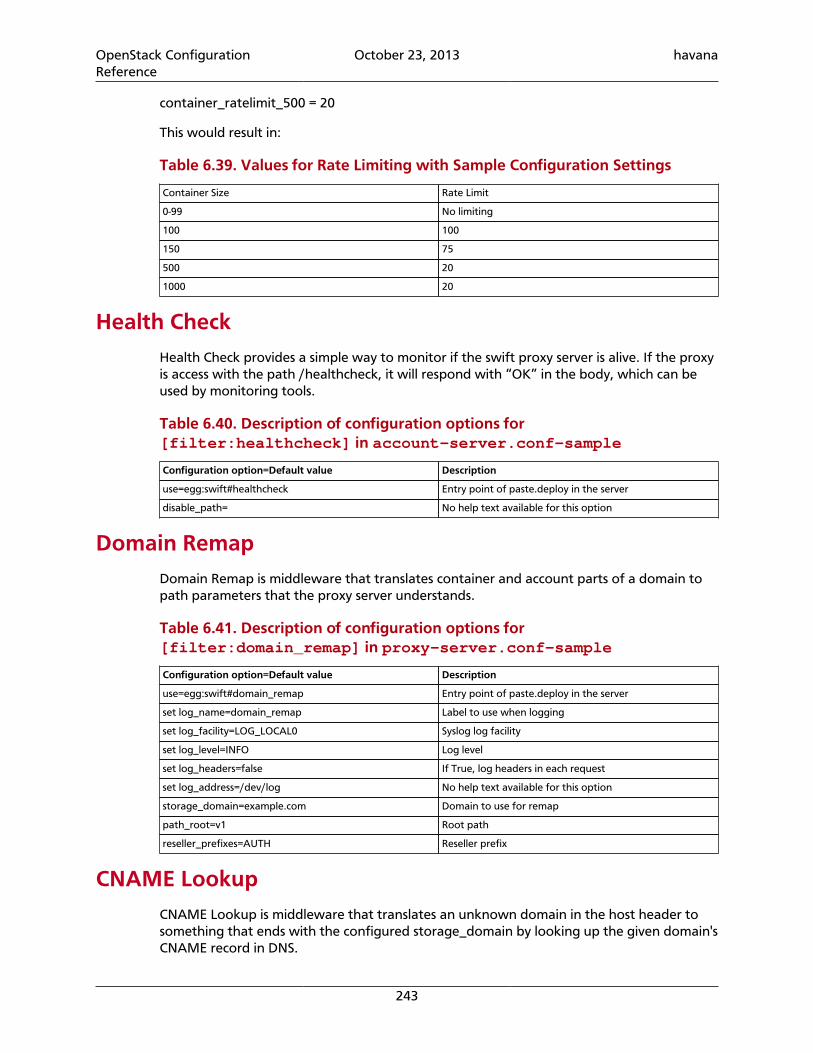
OpenStack ConfigurationReference
October 23, 2013 havana
243
container_ratelimit_500 = 20
This would result in:
Table 6.39. Values for Rate Limiting with Sample Configuration Settings
Container Size Rate Limit
0-99 No limiting
100 100
150 75
500 20
1000 20
Health CheckHealth Check provides a simple way to monitor if the swift proxy server is alive. If the proxyis access with the path /healthcheck, it will respond with “OK” in the body, which can beused by monitoring tools.
Table 6.40. Description of configuration options for[filter:healthcheck] in account-server.conf-sample
Configuration option=Default value Description
use=egg:swift#healthcheck Entry point of paste.deploy in the server
disable_path= No help text available for this option
Domain RemapDomain Remap is middleware that translates container and account parts of a domain topath parameters that the proxy server understands.
Table 6.41. Description of configuration options for[filter:domain_remap] in proxy-server.conf-sample
Configuration option=Default value Description
use=egg:swift#domain_remap Entry point of paste.deploy in the server
set log_name=domain_remap Label to use when logging
set log_facility=LOG_LOCAL0 Syslog log facility
set log_level=INFO Log level
set log_headers=false If True, log headers in each request
set log_address=/dev/log No help text available for this option
storage_domain=example.com Domain to use for remap
path_root=v1 Root path
reseller_prefixes=AUTH Reseller prefix
CNAME LookupCNAME Lookup is middleware that translates an unknown domain in the host header tosomething that ends with the configured storage_domain by looking up the given domain'sCNAME record in DNS.
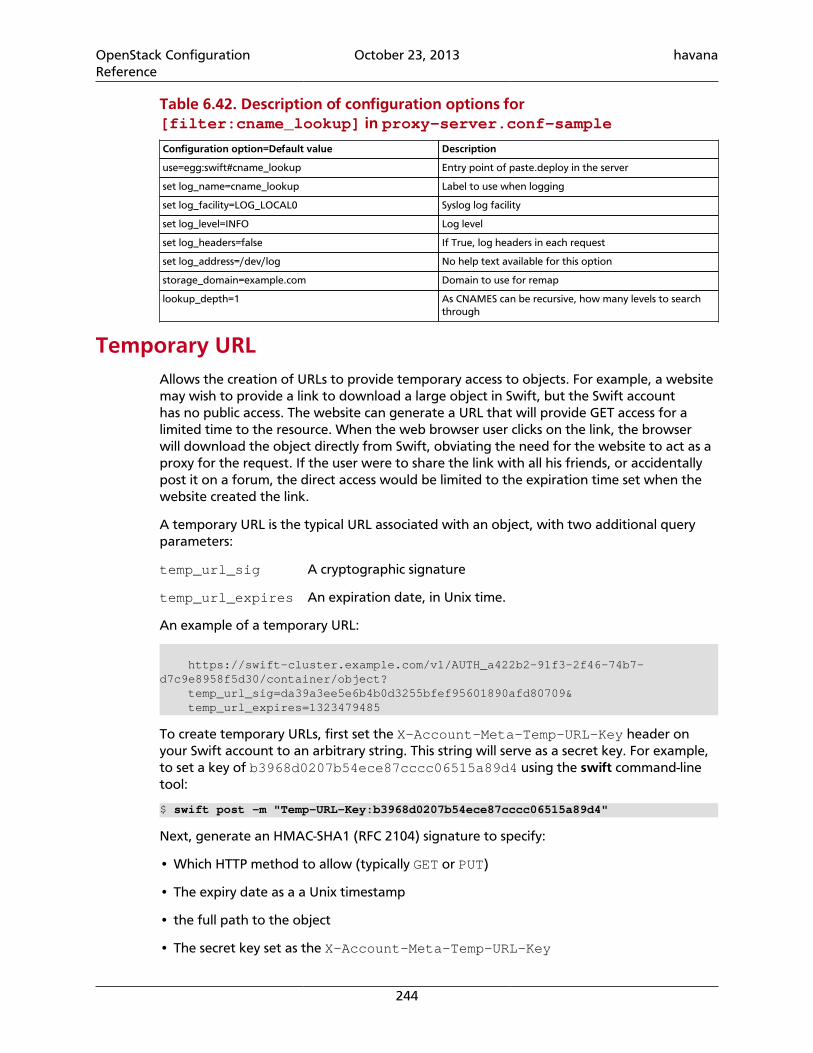
OpenStack ConfigurationReference
October 23, 2013 havana
244
Table 6.42. Description of configuration options for[filter:cname_lookup] in proxy-server.conf-sample
Configuration option=Default value Description
use=egg:swift#cname_lookup Entry point of paste.deploy in the server
set log_name=cname_lookup Label to use when logging
set log_facility=LOG_LOCAL0 Syslog log facility
set log_level=INFO Log level
set log_headers=false If True, log headers in each request
set log_address=/dev/log No help text available for this option
storage_domain=example.com Domain to use for remap
lookup_depth=1 As CNAMES can be recursive, how many levels to searchthrough
Temporary URLAllows the creation of URLs to provide temporary access to objects. For example, a websitemay wish to provide a link to download a large object in Swift, but the Swift accounthas no public access. The website can generate a URL that will provide GET access for alimited time to the resource. When the web browser user clicks on the link, the browserwill download the object directly from Swift, obviating the need for the website to act as aproxy for the request. If the user were to share the link with all his friends, or accidentallypost it on a forum, the direct access would be limited to the expiration time set when thewebsite created the link.
A temporary URL is the typical URL associated with an object, with two additional queryparameters:
temp_url_sig A cryptographic signature
temp_url_expires An expiration date, in Unix time.
An example of a temporary URL:
https://swift-cluster.example.com/v1/AUTH_a422b2-91f3-2f46-74b7-d7c9e8958f5d30/container/object? temp_url_sig=da39a3ee5e6b4b0d3255bfef95601890afd80709& temp_url_expires=1323479485
To create temporary URLs, first set the X-Account-Meta-Temp-URL-Key header onyour Swift account to an arbitrary string. This string will serve as a secret key. For example,to set a key of b3968d0207b54ece87cccc06515a89d4 using the swift command-linetool:
$ swift post -m "Temp-URL-Key:b3968d0207b54ece87cccc06515a89d4"
Next, generate an HMAC-SHA1 (RFC 2104) signature to specify:
• Which HTTP method to allow (typically GET or PUT)
• The expiry date as a a Unix timestamp
• the full path to the object
• The secret key set as the X-Account-Meta-Temp-URL-Key
OpenStack ConfigurationReference
October 23, 2013 havana
245
Here is code generating the signature for a GET for 24 hours on /v1/AUTH_account/container/object:
import hmacfrom hashlib import sha1from time import timemethod = 'GET'duration_in_seconds = 60*60*24expires = int(time() + duration_in_seconds)path = '/v1/AUTH_a422b2-91f3-2f46-74b7-d7c9e8958f5d30/container/object'key = 'mykey'hmac_body = '%s\n%s\n%s' % (method, expires, path)sig = hmac.new(key, hmac_body, sha1).hexdigest()s = 'https://{host}/{path}?temp_url_sig={sig}&temp_url_expires={expires}'url = s.format(host='swift-cluster.example.com', path=path, sig=sig, expires=expires)
Any alteration of the resource path or query arguments would result in 401 Unauthorized.Similarly, a PUT where GET was the allowed method would 401. HEAD is allowed if GET orPUT is allowed. Using this in combination with browser form post translation middlewarecould also allow direct-from-browser uploads to specific locations in Swift. Note that
Note
Changing the X-Account-Meta-Temp-URL-Key will invalidate anypreviously generated temporary URLs within 60 seconds (the memcache timefor the key). Swift supports up to two keys, specified by X-Account-Meta-Temp-URL-Key and X-Account-Meta-Temp-URL-Key-2. Signatures arechecked against both keys, if present. This is to allow for key rotation withoutinvalidating all existing temporary URLs.
Swift includes a script called swift-temp-url that will generate the query parametersautomatically:
$ bin/swift-temp-url GET 3600 /v1/AUTH_account/container/object mykey/v1/AUTH_account/container/object?temp_url_sig=5c4cc8886f36a9d0919d708ade98bf0cc71c9e91&temp_url_expires=1374497657
Because this command only returns the path, you must prepend the Swift storagehostname (for example, https://swift-cluster.example.com).
With GET Temporary URLs, a Content-Disposition header will be set on the responseso that browsers will interpret this as a file attachment to be saved. The filename chosen isbased on the object name, but you can override this with a filename query parameter.The following example specifies a filename of My Test File.pdf:
https://swift-cluster.example.com/v1/AUTH_a422b2-91f3-2f46-74b7-d7c9e8958f5d30/container/object?temp_url_sig=da39a3ee5e6b4b0d3255bfef95601890afd80709&temp_url_expires=1323479485&filename=My+Test+File.pdf
To enable Temporary URL functionality, edit /etc/swift/proxy-server.conf toadd tempurl to the pipeline variable defined in the [pipeline:main] section. Thetempurl entry should appear immediately before the authentication filters in the pipeline,such as authtoken, tempauth or keystoneauth. For example:
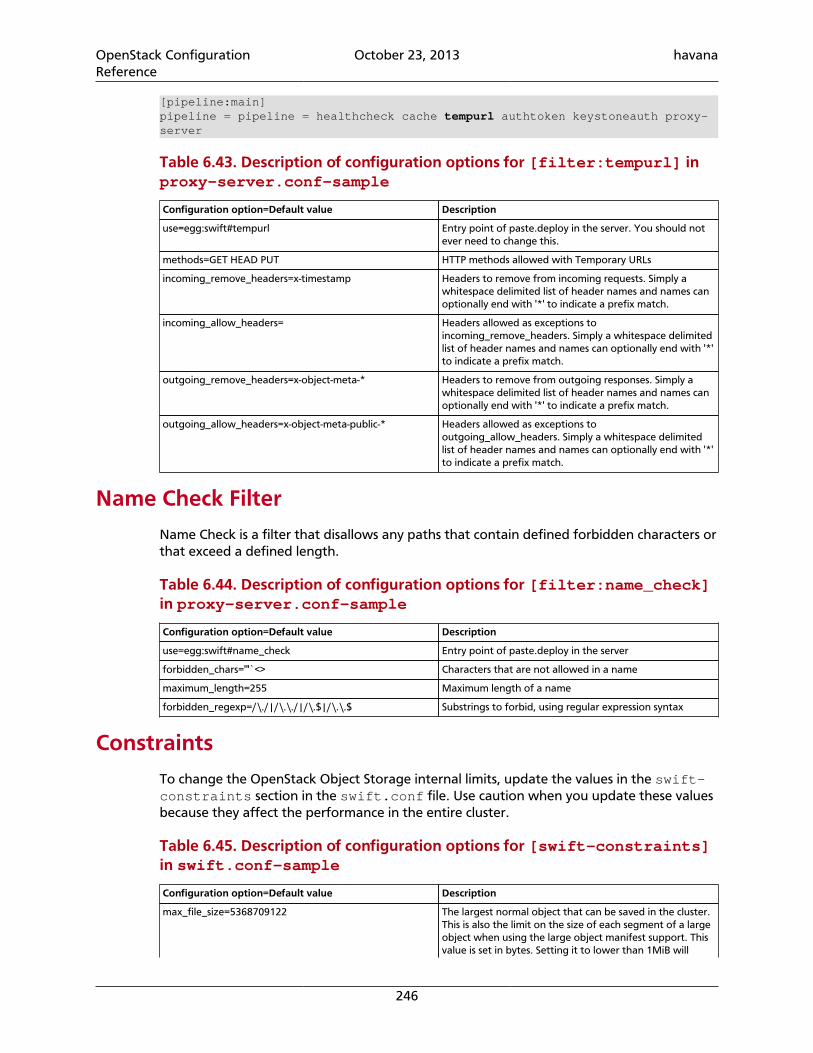
OpenStack ConfigurationReference
October 23, 2013 havana
246
[pipeline:main]pipeline = pipeline = healthcheck cache tempurl authtoken keystoneauth proxy-server
Table 6.43. Description of configuration options for [filter:tempurl] inproxy-server.conf-sample
Configuration option=Default value Description
use=egg:swift#tempurl Entry point of paste.deploy in the server. You should notever need to change this.
methods=GET HEAD PUT HTTP methods allowed with Temporary URLs
incoming_remove_headers=x-timestamp Headers to remove from incoming requests. Simply awhitespace delimited list of header names and names canoptionally end with '*' to indicate a prefix match.
incoming_allow_headers= Headers allowed as exceptions toincoming_remove_headers. Simply a whitespace delimitedlist of header names and names can optionally end with '*'to indicate a prefix match.
outgoing_remove_headers=x-object-meta-* Headers to remove from outgoing responses. Simply awhitespace delimited list of header names and names canoptionally end with '*' to indicate a prefix match.
outgoing_allow_headers=x-object-meta-public-* Headers allowed as exceptions tooutgoing_allow_headers. Simply a whitespace delimitedlist of header names and names can optionally end with '*'to indicate a prefix match.
Name Check Filter
Name Check is a filter that disallows any paths that contain defined forbidden characters orthat exceed a defined length.
Table 6.44. Description of configuration options for [filter:name_check]in proxy-server.conf-sample
Configuration option=Default value Description
use=egg:swift#name_check Entry point of paste.deploy in the server
forbidden_chars='"`<> Characters that are not allowed in a name
maximum_length=255 Maximum length of a name
forbidden_regexp=/\./|/\.\./|/\.$|/\.\.$ Substrings to forbid, using regular expression syntax
Constraints
To change the OpenStack Object Storage internal limits, update the values in the swift-constraints section in the swift.conf file. Use caution when you update these valuesbecause they affect the performance in the entire cluster.
Table 6.45. Description of configuration options for [swift-constraints]in swift.conf-sample
Configuration option=Default value Description
max_file_size=5368709122 The largest normal object that can be saved in the cluster.This is also the limit on the size of each segment of a largeobject when using the large object manifest support. Thisvalue is set in bytes. Setting it to lower than 1MiB will
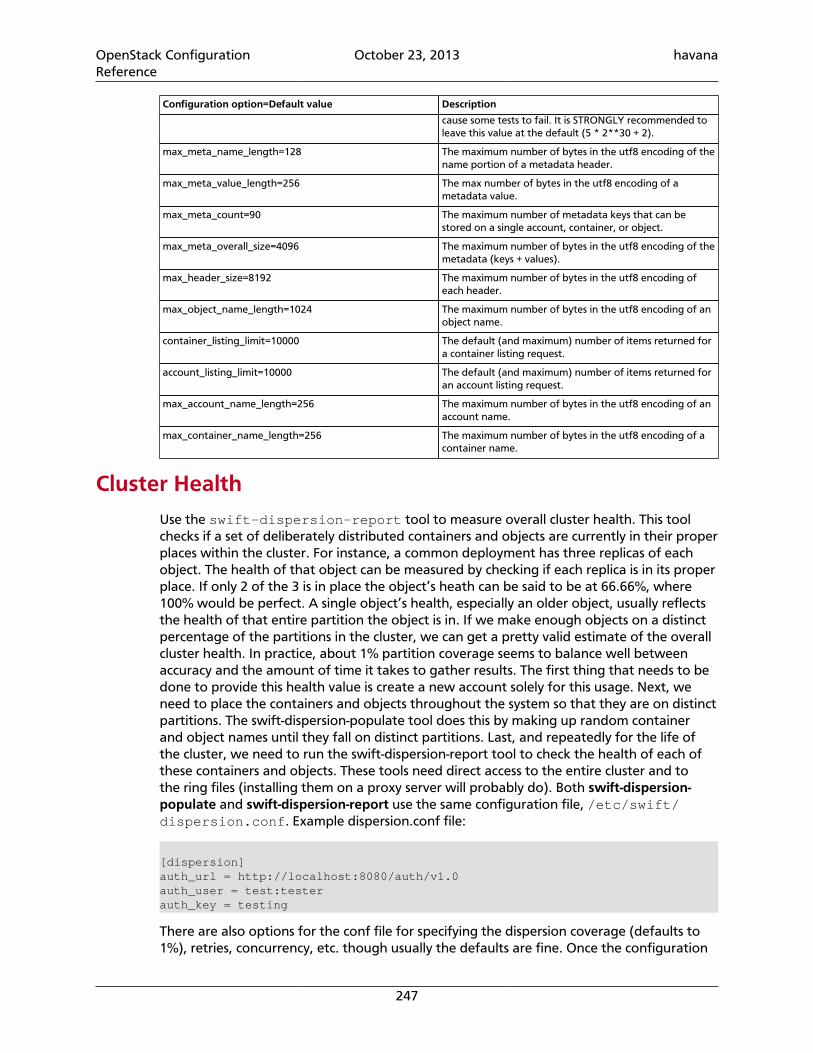
OpenStack ConfigurationReference
October 23, 2013 havana
247
Configuration option=Default value Description
cause some tests to fail. It is STRONGLY recommended toleave this value at the default (5 * 2**30 + 2).
max_meta_name_length=128 The maximum number of bytes in the utf8 encoding of thename portion of a metadata header.
max_meta_value_length=256 The max number of bytes in the utf8 encoding of ametadata value.
max_meta_count=90 The maximum number of metadata keys that can bestored on a single account, container, or object.
max_meta_overall_size=4096 The maximum number of bytes in the utf8 encoding of themetadata (keys + values).
max_header_size=8192 The maximum number of bytes in the utf8 encoding ofeach header.
max_object_name_length=1024 The maximum number of bytes in the utf8 encoding of anobject name.
container_listing_limit=10000 The default (and maximum) number of items returned fora container listing request.
account_listing_limit=10000 The default (and maximum) number of items returned foran account listing request.
max_account_name_length=256 The maximum number of bytes in the utf8 encoding of anaccount name.
max_container_name_length=256 The maximum number of bytes in the utf8 encoding of acontainer name.
Cluster HealthUse the swift-dispersion-report tool to measure overall cluster health. This toolchecks if a set of deliberately distributed containers and objects are currently in their properplaces within the cluster. For instance, a common deployment has three replicas of eachobject. The health of that object can be measured by checking if each replica is in its properplace. If only 2 of the 3 is in place the object’s heath can be said to be at 66.66%, where100% would be perfect. A single object’s health, especially an older object, usually reflectsthe health of that entire partition the object is in. If we make enough objects on a distinctpercentage of the partitions in the cluster, we can get a pretty valid estimate of the overallcluster health. In practice, about 1% partition coverage seems to balance well betweenaccuracy and the amount of time it takes to gather results. The first thing that needs to bedone to provide this health value is create a new account solely for this usage. Next, weneed to place the containers and objects throughout the system so that they are on distinctpartitions. The swift-dispersion-populate tool does this by making up random containerand object names until they fall on distinct partitions. Last, and repeatedly for the life ofthe cluster, we need to run the swift-dispersion-report tool to check the health of each ofthese containers and objects. These tools need direct access to the entire cluster and tothe ring files (installing them on a proxy server will probably do). Both swift-dispersion-populate and swift-dispersion-report use the same configuration file, /etc/swift/dispersion.conf. Example dispersion.conf file:
[dispersion]auth_url = http://localhost:8080/auth/v1.0auth_user = test:testerauth_key = testing
There are also options for the conf file for specifying the dispersion coverage (defaults to1%), retries, concurrency, etc. though usually the defaults are fine. Once the configuration
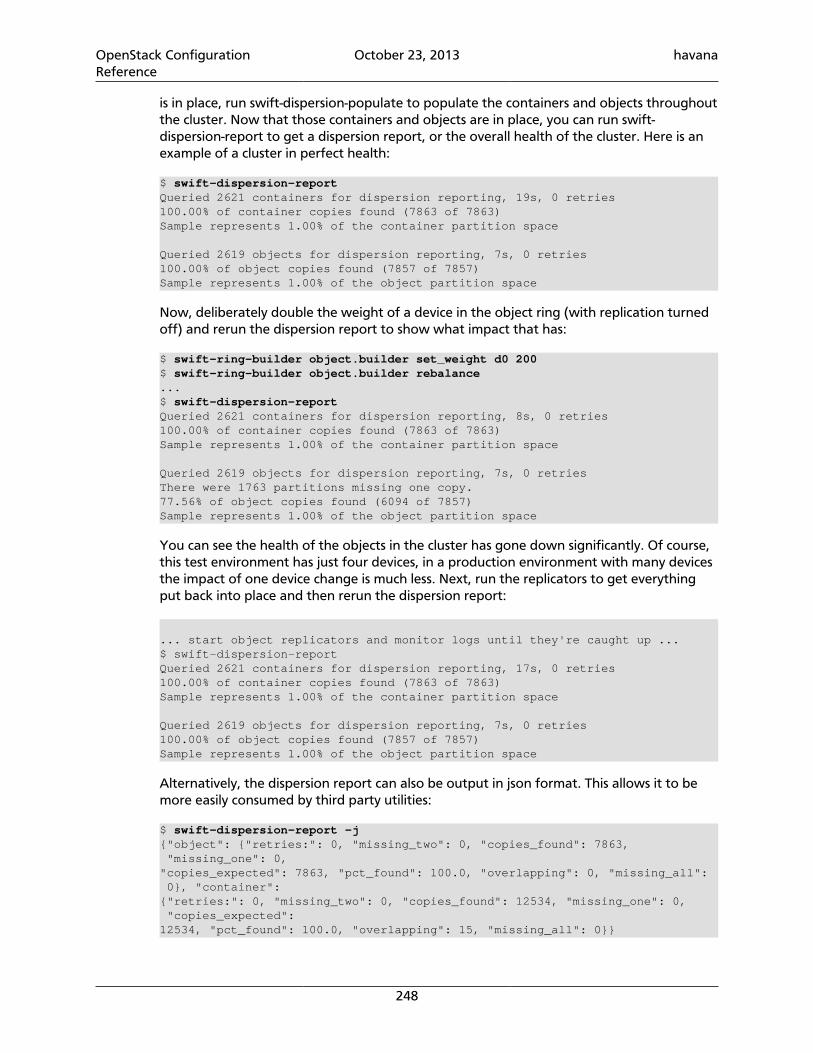
OpenStack ConfigurationReference
October 23, 2013 havana
248
is in place, run swift-dispersion-populate to populate the containers and objects throughoutthe cluster. Now that those containers and objects are in place, you can run swift-dispersion-report to get a dispersion report, or the overall health of the cluster. Here is anexample of a cluster in perfect health:
$ swift-dispersion-reportQueried 2621 containers for dispersion reporting, 19s, 0 retries100.00% of container copies found (7863 of 7863)Sample represents 1.00% of the container partition space
Queried 2619 objects for dispersion reporting, 7s, 0 retries100.00% of object copies found (7857 of 7857)Sample represents 1.00% of the object partition space
Now, deliberately double the weight of a device in the object ring (with replication turnedoff) and rerun the dispersion report to show what impact that has:
$ swift-ring-builder object.builder set_weight d0 200$ swift-ring-builder object.builder rebalance...$ swift-dispersion-reportQueried 2621 containers for dispersion reporting, 8s, 0 retries100.00% of container copies found (7863 of 7863)Sample represents 1.00% of the container partition space
Queried 2619 objects for dispersion reporting, 7s, 0 retriesThere were 1763 partitions missing one copy.77.56% of object copies found (6094 of 7857)Sample represents 1.00% of the object partition space
You can see the health of the objects in the cluster has gone down significantly. Of course,this test environment has just four devices, in a production environment with many devicesthe impact of one device change is much less. Next, run the replicators to get everythingput back into place and then rerun the dispersion report:
... start object replicators and monitor logs until they're caught up ...$ swift-dispersion-reportQueried 2621 containers for dispersion reporting, 17s, 0 retries100.00% of container copies found (7863 of 7863)Sample represents 1.00% of the container partition space
Queried 2619 objects for dispersion reporting, 7s, 0 retries100.00% of object copies found (7857 of 7857)Sample represents 1.00% of the object partition space
Alternatively, the dispersion report can also be output in json format. This allows it to bemore easily consumed by third party utilities:
$ swift-dispersion-report -j{"object": {"retries:": 0, "missing_two": 0, "copies_found": 7863, "missing_one": 0,"copies_expected": 7863, "pct_found": 100.0, "overlapping": 0, "missing_all": 0}, "container":{"retries:": 0, "missing_two": 0, "copies_found": 12534, "missing_one": 0, "copies_expected":12534, "pct_found": 100.0, "overlapping": 15, "missing_all": 0}}
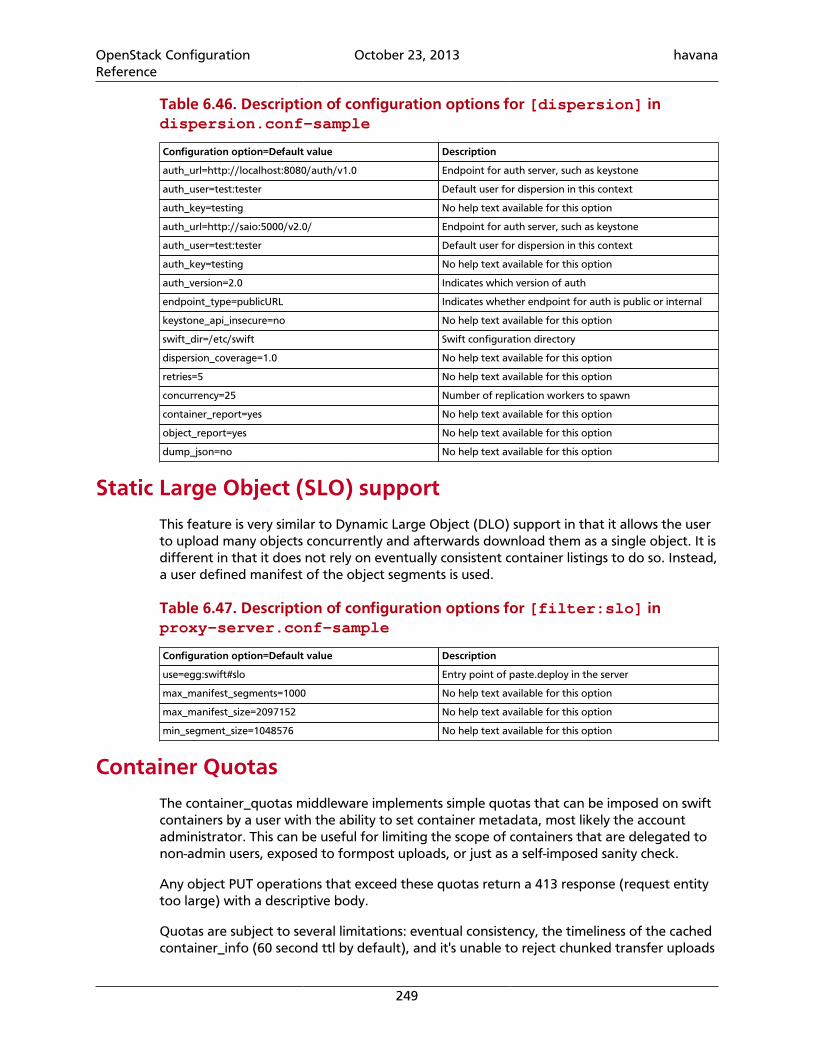
OpenStack ConfigurationReference
October 23, 2013 havana
249
Table 6.46. Description of configuration options for [dispersion] indispersion.conf-sample
Configuration option=Default value Description
auth_url=http://localhost:8080/auth/v1.0 Endpoint for auth server, such as keystone
auth_user=test:tester Default user for dispersion in this context
auth_key=testing No help text available for this option
auth_url=http://saio:5000/v2.0/ Endpoint for auth server, such as keystone
auth_user=test:tester Default user for dispersion in this context
auth_key=testing No help text available for this option
auth_version=2.0 Indicates which version of auth
endpoint_type=publicURL Indicates whether endpoint for auth is public or internal
keystone_api_insecure=no No help text available for this option
swift_dir=/etc/swift Swift configuration directory
dispersion_coverage=1.0 No help text available for this option
retries=5 No help text available for this option
concurrency=25 Number of replication workers to spawn
container_report=yes No help text available for this option
object_report=yes No help text available for this option
dump_json=no No help text available for this option
Static Large Object (SLO) support
This feature is very similar to Dynamic Large Object (DLO) support in that it allows the userto upload many objects concurrently and afterwards download them as a single object. It isdifferent in that it does not rely on eventually consistent container listings to do so. Instead,a user defined manifest of the object segments is used.
Table 6.47. Description of configuration options for [filter:slo] inproxy-server.conf-sample
Configuration option=Default value Description
use=egg:swift#slo Entry point of paste.deploy in the server
max_manifest_segments=1000 No help text available for this option
max_manifest_size=2097152 No help text available for this option
min_segment_size=1048576 No help text available for this option
Container Quotas
The container_quotas middleware implements simple quotas that can be imposed on swiftcontainers by a user with the ability to set container metadata, most likely the accountadministrator. This can be useful for limiting the scope of containers that are delegated tonon-admin users, exposed to formpost uploads, or just as a self-imposed sanity check.
Any object PUT operations that exceed these quotas return a 413 response (request entitytoo large) with a descriptive body.
Quotas are subject to several limitations: eventual consistency, the timeliness of the cachedcontainer_info (60 second ttl by default), and it's unable to reject chunked transfer uploads
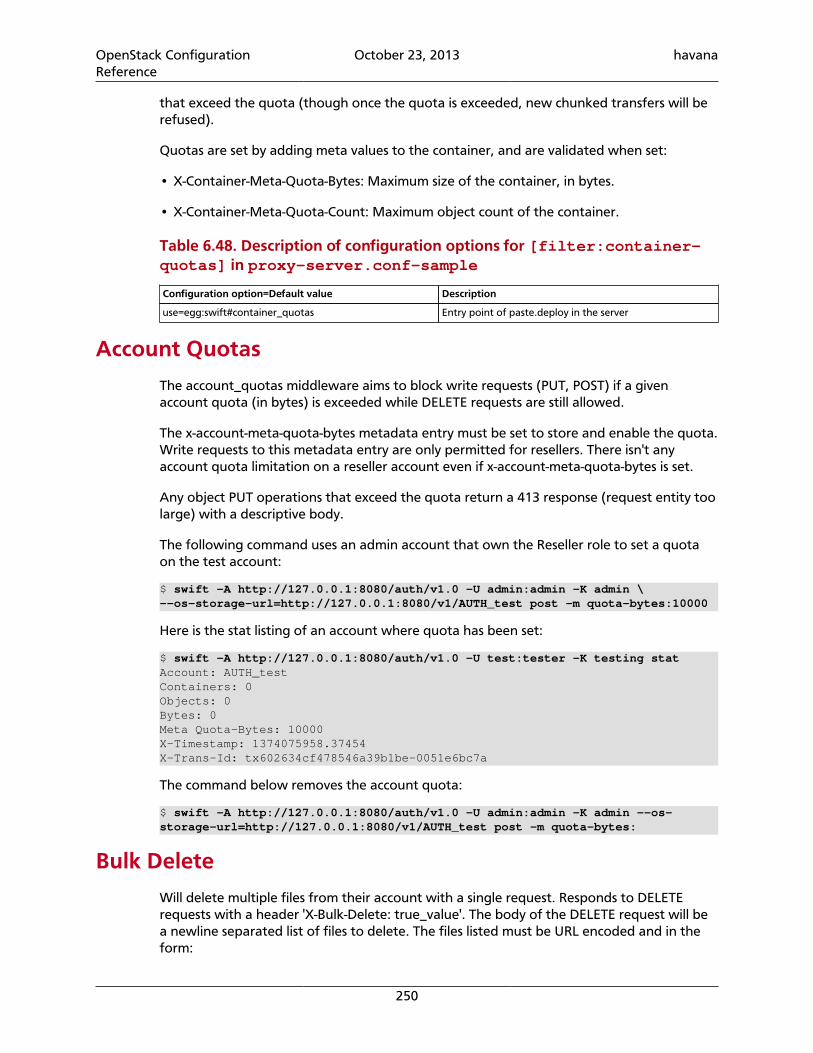
OpenStack ConfigurationReference
October 23, 2013 havana
250
that exceed the quota (though once the quota is exceeded, new chunked transfers will berefused).
Quotas are set by adding meta values to the container, and are validated when set:
• X-Container-Meta-Quota-Bytes: Maximum size of the container, in bytes.
• X-Container-Meta-Quota-Count: Maximum object count of the container.
Table 6.48. Description of configuration options for [filter:container-quotas] in proxy-server.conf-sample
Configuration option=Default value Description
use=egg:swift#container_quotas Entry point of paste.deploy in the server
Account Quotas
The account_quotas middleware aims to block write requests (PUT, POST) if a givenaccount quota (in bytes) is exceeded while DELETE requests are still allowed.
The x-account-meta-quota-bytes metadata entry must be set to store and enable the quota.Write requests to this metadata entry are only permitted for resellers. There isn't anyaccount quota limitation on a reseller account even if x-account-meta-quota-bytes is set.
Any object PUT operations that exceed the quota return a 413 response (request entity toolarge) with a descriptive body.
The following command uses an admin account that own the Reseller role to set a quotaon the test account:
$ swift -A http://127.0.0.1:8080/auth/v1.0 -U admin:admin -K admin \--os-storage-url=http://127.0.0.1:8080/v1/AUTH_test post -m quota-bytes:10000
Here is the stat listing of an account where quota has been set:
$ swift -A http://127.0.0.1:8080/auth/v1.0 -U test:tester -K testing statAccount: AUTH_testContainers: 0Objects: 0Bytes: 0Meta Quota-Bytes: 10000X-Timestamp: 1374075958.37454X-Trans-Id: tx602634cf478546a39b1be-0051e6bc7a
The command below removes the account quota:
$ swift -A http://127.0.0.1:8080/auth/v1.0 -U admin:admin -K admin --os-storage-url=http://127.0.0.1:8080/v1/AUTH_test post -m quota-bytes:
Bulk Delete
Will delete multiple files from their account with a single request. Responds to DELETErequests with a header 'X-Bulk-Delete: true_value'. The body of the DELETE request will bea newline separated list of files to delete. The files listed must be URL encoded and in theform:
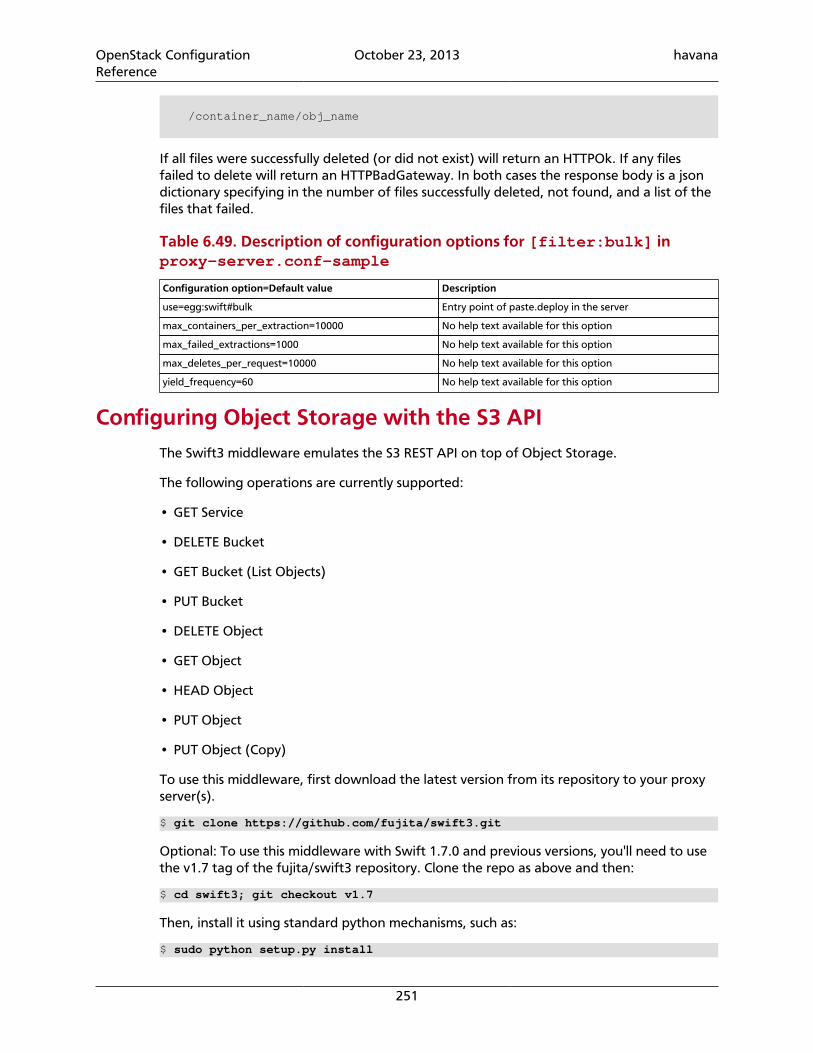
OpenStack ConfigurationReference
October 23, 2013 havana
251
/container_name/obj_name
If all files were successfully deleted (or did not exist) will return an HTTPOk. If any filesfailed to delete will return an HTTPBadGateway. In both cases the response body is a jsondictionary specifying in the number of files successfully deleted, not found, and a list of thefiles that failed.
Table 6.49. Description of configuration options for [filter:bulk] inproxy-server.conf-sample
Configuration option=Default value Description
use=egg:swift#bulk Entry point of paste.deploy in the server
max_containers_per_extraction=10000 No help text available for this option
max_failed_extractions=1000 No help text available for this option
max_deletes_per_request=10000 No help text available for this option
yield_frequency=60 No help text available for this option
Configuring Object Storage with the S3 APIThe Swift3 middleware emulates the S3 REST API on top of Object Storage.
The following operations are currently supported:
• GET Service
• DELETE Bucket
• GET Bucket (List Objects)
• PUT Bucket
• DELETE Object
• GET Object
• HEAD Object
• PUT Object
• PUT Object (Copy)
To use this middleware, first download the latest version from its repository to your proxyserver(s).
$ git clone https://github.com/fujita/swift3.git
Optional: To use this middleware with Swift 1.7.0 and previous versions, you'll need to usethe v1.7 tag of the fujita/swift3 repository. Clone the repo as above and then:
$ cd swift3; git checkout v1.7
Then, install it using standard python mechanisms, such as:
$ sudo python setup.py install
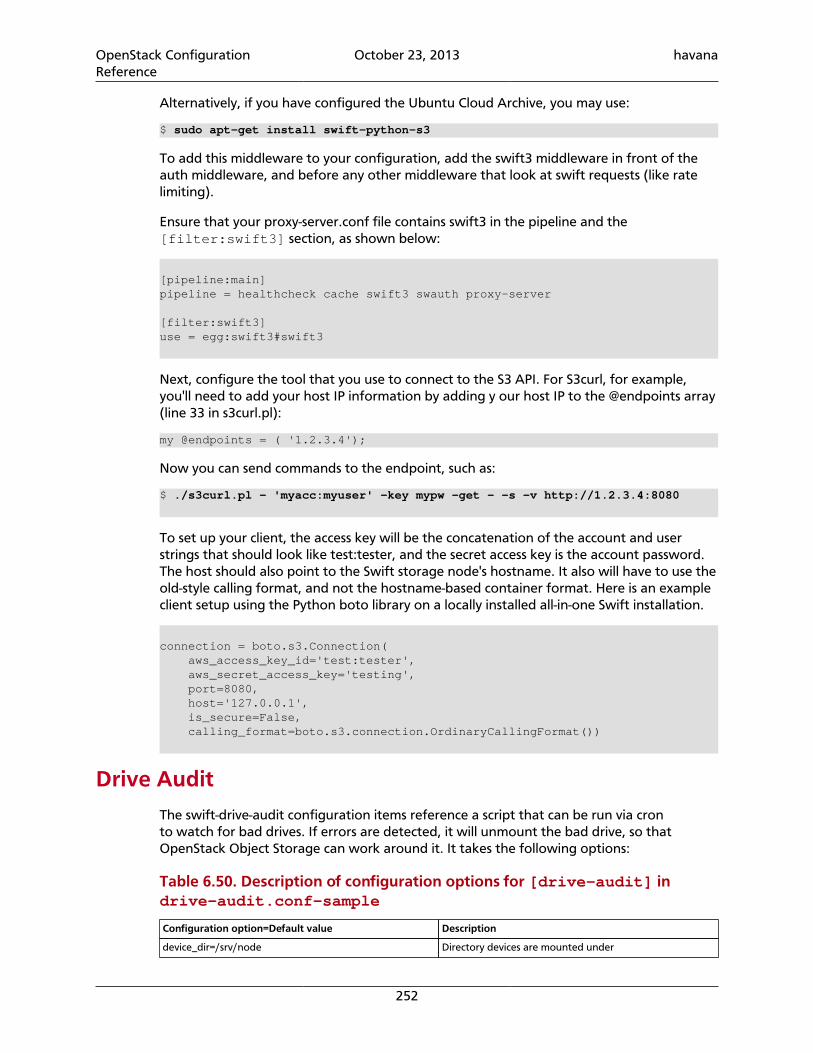
OpenStack ConfigurationReference
October 23, 2013 havana
252
Alternatively, if you have configured the Ubuntu Cloud Archive, you may use:
$ sudo apt-get install swift-python-s3
To add this middleware to your configuration, add the swift3 middleware in front of theauth middleware, and before any other middleware that look at swift requests (like ratelimiting).
Ensure that your proxy-server.conf file contains swift3 in the pipeline and the[filter:swift3] section, as shown below:
[pipeline:main]pipeline = healthcheck cache swift3 swauth proxy-server
[filter:swift3]use = egg:swift3#swift3
Next, configure the tool that you use to connect to the S3 API. For S3curl, for example,you'll need to add your host IP information by adding y our host IP to the @endpoints array(line 33 in s3curl.pl):
my @endpoints = ( '1.2.3.4');
Now you can send commands to the endpoint, such as:
$ ./s3curl.pl - 'myacc:myuser' -key mypw -get - -s -v http://1.2.3.4:8080
To set up your client, the access key will be the concatenation of the account and userstrings that should look like test:tester, and the secret access key is the account password.The host should also point to the Swift storage node's hostname. It also will have to use theold-style calling format, and not the hostname-based container format. Here is an exampleclient setup using the Python boto library on a locally installed all-in-one Swift installation.
connection = boto.s3.Connection( aws_access_key_id='test:tester', aws_secret_access_key='testing', port=8080, host='127.0.0.1', is_secure=False, calling_format=boto.s3.connection.OrdinaryCallingFormat())
Drive AuditThe swift-drive-audit configuration items reference a script that can be run via cronto watch for bad drives. If errors are detected, it will unmount the bad drive, so thatOpenStack Object Storage can work around it. It takes the following options:
Table 6.50. Description of configuration options for [drive-audit] indrive-audit.conf-sample
Configuration option=Default value Description
device_dir=/srv/node Directory devices are mounted under
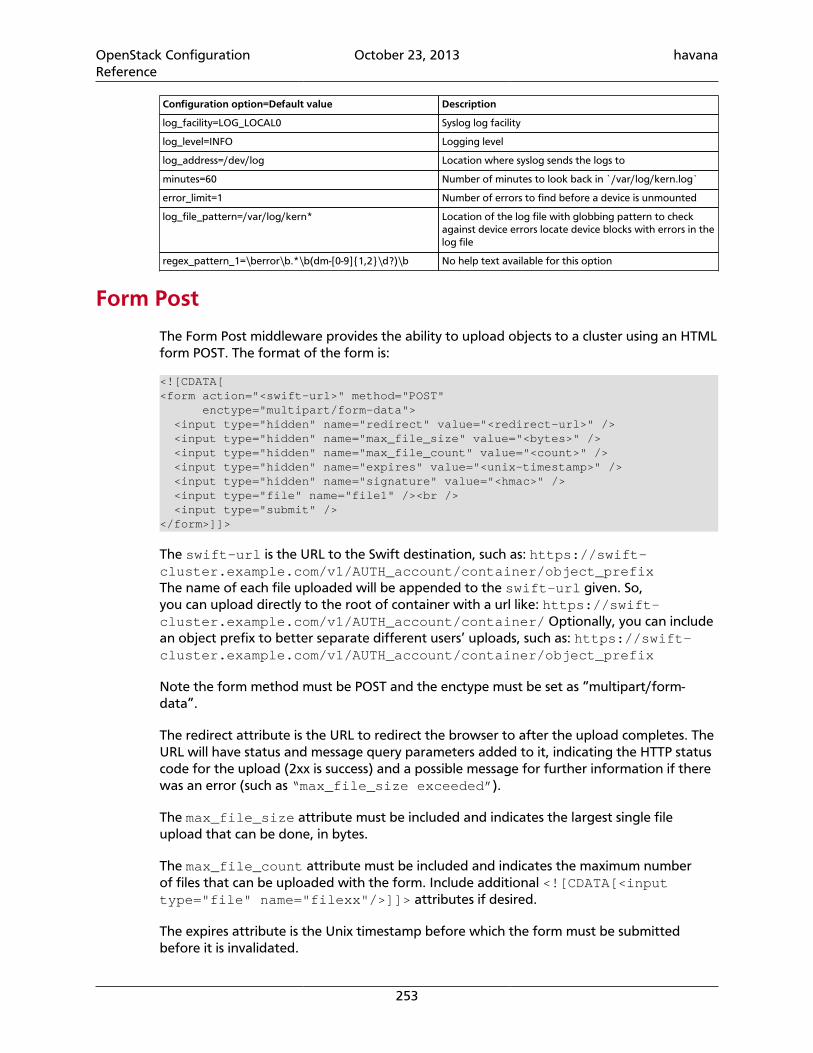
OpenStack ConfigurationReference
October 23, 2013 havana
253
Configuration option=Default value Description
log_facility=LOG_LOCAL0 Syslog log facility
log_level=INFO Logging level
log_address=/dev/log Location where syslog sends the logs to
minutes=60 Number of minutes to look back in `/var/log/kern.log`
error_limit=1 Number of errors to find before a device is unmounted
log_file_pattern=/var/log/kern* Location of the log file with globbing pattern to checkagainst device errors locate device blocks with errors in thelog file
regex_pattern_1=\berror\b.*\b(dm-[0-9]{1,2}\d?)\b No help text available for this option
Form Post
The Form Post middleware provides the ability to upload objects to a cluster using an HTMLform POST. The format of the form is:
<![CDATA[<form action="<swift-url>" method="POST" enctype="multipart/form-data"> <input type="hidden" name="redirect" value="<redirect-url>" /> <input type="hidden" name="max_file_size" value="<bytes>" /> <input type="hidden" name="max_file_count" value="<count>" /> <input type="hidden" name="expires" value="<unix-timestamp>" /> <input type="hidden" name="signature" value="<hmac>" /> <input type="file" name="file1" /><br /> <input type="submit" /></form>]]>
The swift-url is the URL to the Swift destination, such as: https://swift-cluster.example.com/v1/AUTH_account/container/object_prefixThe name of each file uploaded will be appended to the swift-url given. So,you can upload directly to the root of container with a url like: https://swift-cluster.example.com/v1/AUTH_account/container/ Optionally, you can includean object prefix to better separate different users’ uploads, such as: https://swift-cluster.example.com/v1/AUTH_account/container/object_prefix
Note the form method must be POST and the enctype must be set as “multipart/form-data”.
The redirect attribute is the URL to redirect the browser to after the upload completes. TheURL will have status and message query parameters added to it, indicating the HTTP statuscode for the upload (2xx is success) and a possible message for further information if therewas an error (such as “max_file_size exceeded”).
The max_file_size attribute must be included and indicates the largest single fileupload that can be done, in bytes.
The max_file_count attribute must be included and indicates the maximum numberof files that can be uploaded with the form. Include additional <![CDATA[<inputtype="file" name="filexx"/>]]> attributes if desired.
The expires attribute is the Unix timestamp before which the form must be submittedbefore it is invalidated.
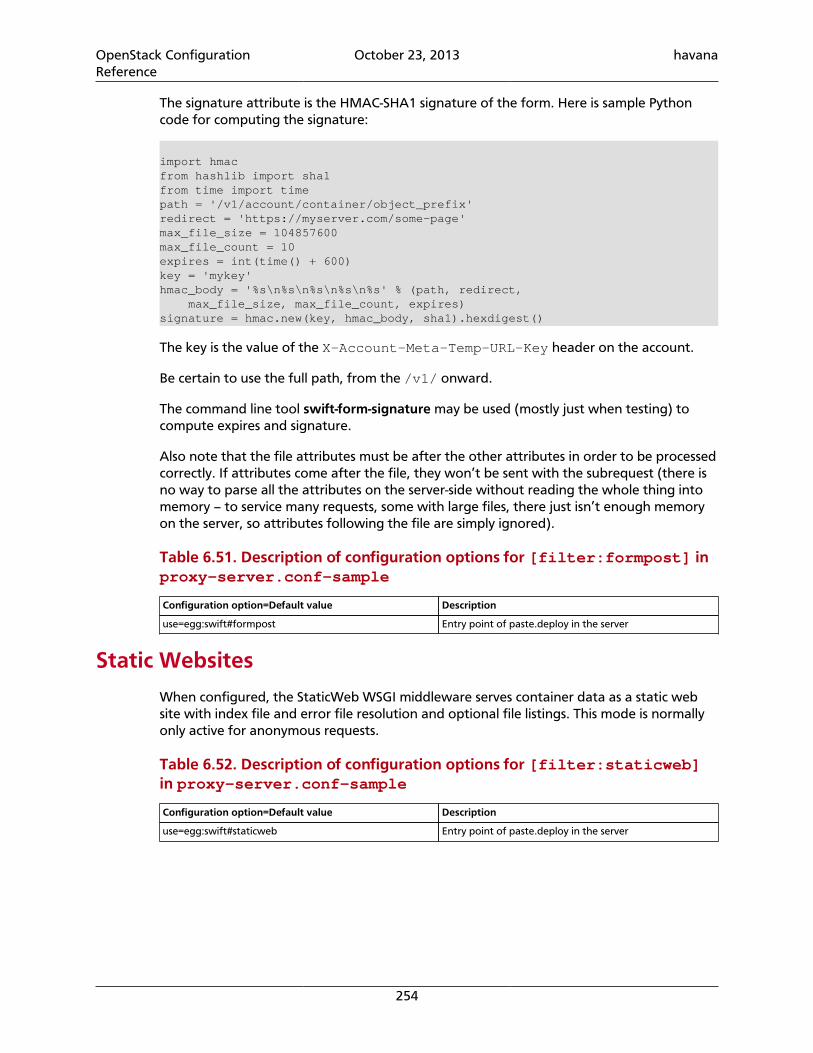
OpenStack ConfigurationReference
October 23, 2013 havana
254
The signature attribute is the HMAC-SHA1 signature of the form. Here is sample Pythoncode for computing the signature:
import hmacfrom hashlib import sha1from time import timepath = '/v1/account/container/object_prefix'redirect = 'https://myserver.com/some-page'max_file_size = 104857600max_file_count = 10expires = int(time() + 600)key = 'mykey'hmac_body = '%s\n%s\n%s\n%s\n%s' % (path, redirect, max_file_size, max_file_count, expires)signature = hmac.new(key, hmac_body, sha1).hexdigest()
The key is the value of the X-Account-Meta-Temp-URL-Key header on the account.
Be certain to use the full path, from the /v1/ onward.
The command line tool swift-form-signature may be used (mostly just when testing) tocompute expires and signature.
Also note that the file attributes must be after the other attributes in order to be processedcorrectly. If attributes come after the file, they won’t be sent with the subrequest (there isno way to parse all the attributes on the server-side without reading the whole thing intomemory – to service many requests, some with large files, there just isn’t enough memoryon the server, so attributes following the file are simply ignored).
Table 6.51. Description of configuration options for [filter:formpost] inproxy-server.conf-sample
Configuration option=Default value Description
use=egg:swift#formpost Entry point of paste.deploy in the server
Static Websites
When configured, the StaticWeb WSGI middleware serves container data as a static website with index file and error file resolution and optional file listings. This mode is normallyonly active for anonymous requests.
Table 6.52. Description of configuration options for [filter:staticweb]in proxy-server.conf-sample
Configuration option=Default value Description
use=egg:swift#staticweb Entry point of paste.deploy in the server
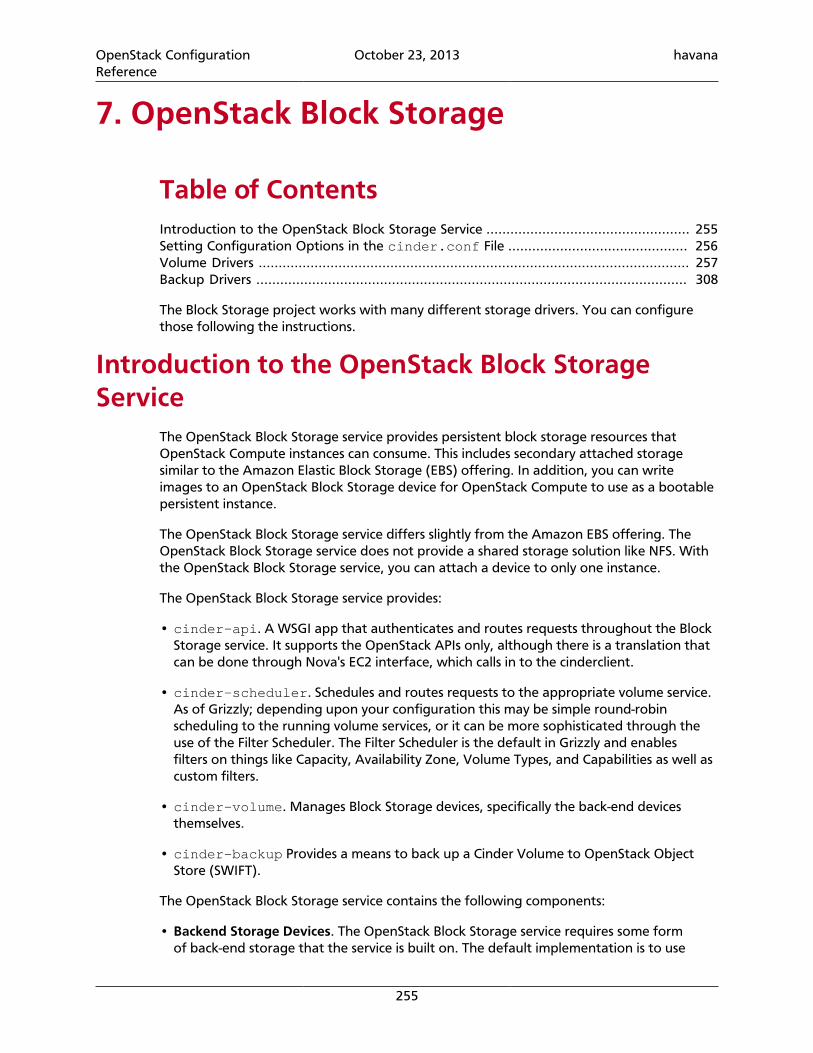
OpenStack ConfigurationReference
October 23, 2013 havana
255
7. OpenStack Block Storage
Table of ContentsIntroduction to the OpenStack Block Storage Service ................................................... 255Setting Configuration Options in the cinder.conf File ............................................. 256Volume Drivers ............................................................................................................ 257Backup Drivers ............................................................................................................ 308
The Block Storage project works with many different storage drivers. You can configurethose following the instructions.
Introduction to the OpenStack Block StorageService
The OpenStack Block Storage service provides persistent block storage resources thatOpenStack Compute instances can consume. This includes secondary attached storagesimilar to the Amazon Elastic Block Storage (EBS) offering. In addition, you can writeimages to an OpenStack Block Storage device for OpenStack Compute to use as a bootablepersistent instance.
The OpenStack Block Storage service differs slightly from the Amazon EBS offering. TheOpenStack Block Storage service does not provide a shared storage solution like NFS. Withthe OpenStack Block Storage service, you can attach a device to only one instance.
The OpenStack Block Storage service provides:
• cinder-api. A WSGI app that authenticates and routes requests throughout the BlockStorage service. It supports the OpenStack APIs only, although there is a translation thatcan be done through Nova's EC2 interface, which calls in to the cinderclient.
• cinder-scheduler. Schedules and routes requests to the appropriate volume service.As of Grizzly; depending upon your configuration this may be simple round-robinscheduling to the running volume services, or it can be more sophisticated through theuse of the Filter Scheduler. The Filter Scheduler is the default in Grizzly and enablesfilters on things like Capacity, Availability Zone, Volume Types, and Capabilities as well ascustom filters.
• cinder-volume. Manages Block Storage devices, specifically the back-end devicesthemselves.
• cinder-backup Provides a means to back up a Cinder Volume to OpenStack ObjectStore (SWIFT).
The OpenStack Block Storage service contains the following components:
• Backend Storage Devices. The OpenStack Block Storage service requires some formof back-end storage that the service is built on. The default implementation is to use

OpenStack ConfigurationReference
October 23, 2013 havana
256
LVM on a local volume group named "cinder-volumes." In addition to the base driverimplementation, the OpenStack Block Storage service also provides the means to addsupport for other storage devices to be utilized such as external Raid Arrays or otherstorage appliances. These backend storage devices may have custom block sizes whenusing KVM or QEMU as the hypervisor.
• Users and Tenants (Projects). The OpenStack Block Storage service is designed to beused by many different cloud computing consumers or customers, basically tenantson a shared system, using role-based access assignments. Roles control the actionsthat a user is allowed to perform. In the default configuration, most actions do notrequire a particular role, but this is configurable by the system administrator editing theappropriate policy.json file that maintains the rules. A user's access to particularvolumes is limited by tenant, but the username and password are assigned per user. Keypairs granting access to a volume are enabled per user, but quotas to control resourceconsumption across available hardware resources are per tenant.
For tenants, quota controls are available to limit:
• The number of volumes that can be created
• The number of snapshots that can be created
• The total number of GBs allowed per tenant (shared between snapshots and volumes)
You can revise the default quota values with the cinder CLI, so the limits placed byquotas are editable by admin users.
• Volumes, Snapshots, and Backups. The basic resources offered by the OpenStackBlock Storage service are volumes and snapshots, which are derived from volumes, andbackups:
• Volumes. Allocated block storage resources that can be attached to instances assecondary storage or they can be used as the root store to boot instances. Volumes arepersistent R/W block storage devices most commonly attached to the Compute nodethrough iSCSI.
• Snapshots. A read-only point in time copy of a volume. The snapshot can be createdfrom a volume that is currently in use (through the use of '--force True') or in anavailable state. The snapshot can then be used to create a new volume through createfrom snapshot.
• Backups. An archived copy of a volume currently stored in OpenStack Object Storage(Swift).
Setting Configuration Options in thecinder.conf File
The configuration file cinder.conf is installed in /etc/cinder by default. A default setof options are already configured in cinder.conf when you install manually.
Here is a simple example cinder.conf file.
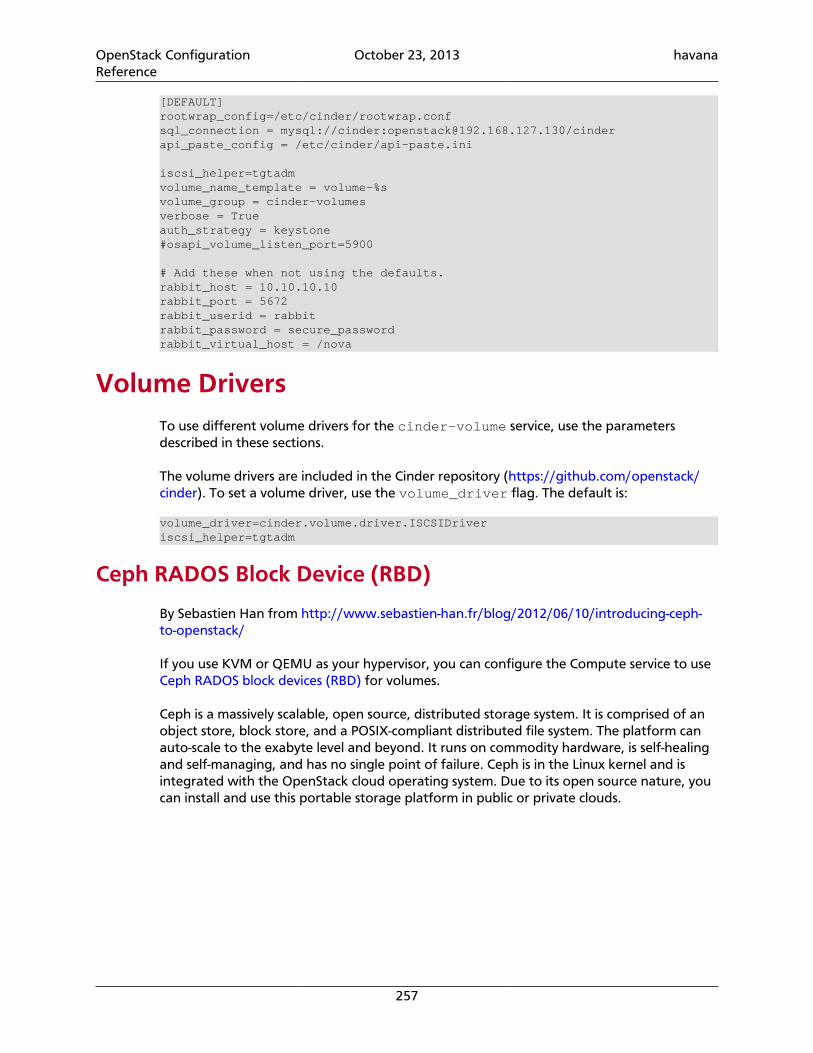
OpenStack ConfigurationReference
October 23, 2013 havana
257
[DEFAULT]rootwrap_config=/etc/cinder/rootwrap.confsql_connection = mysql://cinder:[email protected]/cinderapi_paste_config = /etc/cinder/api-paste.ini
iscsi_helper=tgtadmvolume_name_template = volume-%svolume_group = cinder-volumesverbose = Trueauth_strategy = keystone#osapi_volume_listen_port=5900
# Add these when not using the defaults.rabbit_host = 10.10.10.10rabbit_port = 5672rabbit_userid = rabbitrabbit_password = secure_passwordrabbit_virtual_host = /nova
Volume DriversTo use different volume drivers for the cinder-volume service, use the parametersdescribed in these sections.
The volume drivers are included in the Cinder repository (https://github.com/openstack/cinder). To set a volume driver, use the volume_driver flag. The default is:
volume_driver=cinder.volume.driver.ISCSIDriveriscsi_helper=tgtadm
Ceph RADOS Block Device (RBD)
By Sebastien Han from http://www.sebastien-han.fr/blog/2012/06/10/introducing-ceph-to-openstack/
If you use KVM or QEMU as your hypervisor, you can configure the Compute service to use Ceph RADOS block devices (RBD) for volumes.
Ceph is a massively scalable, open source, distributed storage system. It is comprised of anobject store, block store, and a POSIX-compliant distributed file system. The platform canauto-scale to the exabyte level and beyond. It runs on commodity hardware, is self-healingand self-managing, and has no single point of failure. Ceph is in the Linux kernel and isintegrated with the OpenStack cloud operating system. Due to its open source nature, youcan install and use this portable storage platform in public or private clouds.
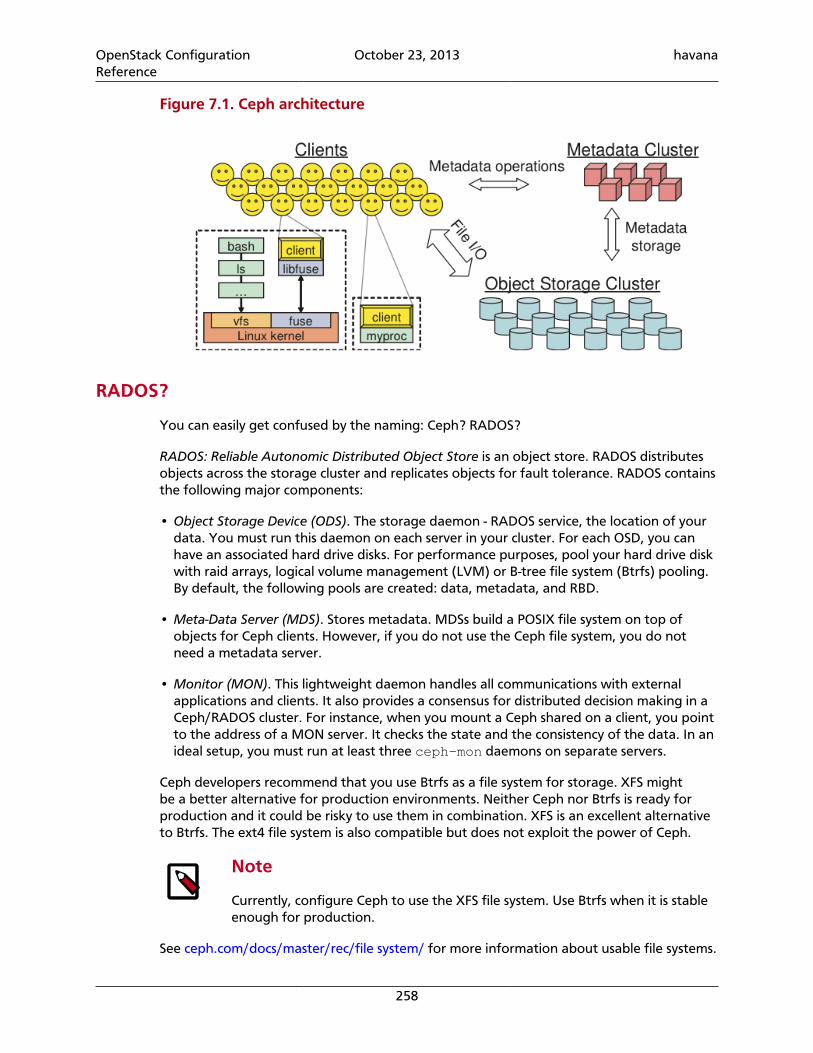
OpenStack ConfigurationReference
October 23, 2013 havana
258
Figure 7.1. Ceph architecture
RADOS?
You can easily get confused by the naming: Ceph? RADOS?
RADOS: Reliable Autonomic Distributed Object Store is an object store. RADOS distributesobjects across the storage cluster and replicates objects for fault tolerance. RADOS containsthe following major components:
• Object Storage Device (ODS). The storage daemon - RADOS service, the location of yourdata. You must run this daemon on each server in your cluster. For each OSD, you canhave an associated hard drive disks. For performance purposes, pool your hard drive diskwith raid arrays, logical volume management (LVM) or B-tree file system (Btrfs) pooling.By default, the following pools are created: data, metadata, and RBD.
• Meta-Data Server (MDS). Stores metadata. MDSs build a POSIX file system on top ofobjects for Ceph clients. However, if you do not use the Ceph file system, you do notneed a metadata server.
• Monitor (MON). This lightweight daemon handles all communications with externalapplications and clients. It also provides a consensus for distributed decision making in aCeph/RADOS cluster. For instance, when you mount a Ceph shared on a client, you pointto the address of a MON server. It checks the state and the consistency of the data. In anideal setup, you must run at least three ceph-mon daemons on separate servers.
Ceph developers recommend that you use Btrfs as a file system for storage. XFS mightbe a better alternative for production environments. Neither Ceph nor Btrfs is ready forproduction and it could be risky to use them in combination. XFS is an excellent alternativeto Btrfs. The ext4 file system is also compatible but does not exploit the power of Ceph.
Note
Currently, configure Ceph to use the XFS file system. Use Btrfs when it is stableenough for production.
See ceph.com/docs/master/rec/file system/ for more information about usable file systems.
OpenStack ConfigurationReference
October 23, 2013 havana
259
Ways to store, use, and expose data
To store and access your data, you can use the following storage systems:
• RADOS. Use as an object, default storage mechanism.
• RBD. Use as a block device. The Linux kernel RBD (rados block device) driver allowsstriping a Linux block device over multiple distributed object store data objects. It iscompatible with the kvm RBD image.
• CephFS. Use as a file, POSIX-compliant file system.
Ceph exposes its distributed object store (RADOS). You can access it through the followinginterfaces:
• RADOS Gateway. Swift and Amazon-S3 compatible RESTful interface. SeeRADOS_Gateway for more information.
• librados, and the related C/C++ bindings.
• rbd and QEMU-RBD. Linux kernel and QEMU block devices that stripe data acrossmultiple objects.
For detailed installation instructions and benchmarking information, see http://www.sebastien-han.fr/blog/2012/06/10/introducing-ceph-to-openstack/.
Driver Options
The following table contains the configuration options supported by the Ceph RADOSBlock Device driver.
Table 7.1. Description of configuration options for storage_ceph
Configuration option=Default value Description
rbd_ceph_conf= (StrOpt) path to the ceph configuration file to use
rbd_flatten_volume_from_snapshot=False (BoolOpt) flatten volumes created from snapshots toremove dependency
rbd_max_clone_depth=5 (IntOpt) maximum number of nested clones that can betaken of a volume before enforcing a flatten prior to nextclone. A value of zero disables cloning
rbd_pool=rbd (StrOpt) the RADOS pool in which rbd volumes are stored
rbd_secret_uuid=None (StrOpt) the libvirt uuid of the secret for therbd_uservolumes
rbd_user=None (StrOpt) the RADOS client name for accessing rbd volumes- only set when using cephx authentication
volume_tmp_dir=None (StrOpt) where to store temporary image files if thevolume driver does not write them directly to the volume
Coraid AoE Driver ConfigurationCoraid storage appliances can provide block-level storage to OpenStack instances. Coraidstorage appliances use the low-latency ATA-over-Ethernet (ATA) protocol to provide high-bandwidth data transfer between hosts and data on the network.
Once configured for OpenStack, you can:
OpenStack ConfigurationReference
October 23, 2013 havana
260
• Create, delete, attach, and detach block storage volumes.
• Create, list, and delete volume snapshots.
• Create a volume from a snapshot, copy an image to a volume, copy a volume to animage, clone a volume, and get volume statistics.
This document describes how to configure the OpenStack Block Storage service for use withCoraid storage appliances.
Terminology
The following terms are used throughout this section:
Term Definition
AoE ATA-over-Ethernet protocol
EtherCloud Storage Manager(ESM)
ESM provides live monitoring and management of EtherDrive appliances that use theAoE protocol, such as the SRX and VSX.
Fully-Qualified RepositoryName (FQRN)
The FQRN is the full identifier of a storage profile. FQRN syntax is:performance_class-availability_class:profile_name:repository_name
SAN Storage Area Network
SRX Coraid EtherDrive SRX block storage appliance
VSX Coraid EtherDrive VSX storage virtualization appliance
Requirements
To support OpenStack Block Storage, your SAN must include an SRX for physical storage, aVSX running at least CorOS v2.0.6 for snapshot support, and an ESM running at least v2.1.1for storage repository orchestration. Ensure that all storage appliances are installed andconnected to your network before configuring OpenStack volumes.
Each compute node on the network running an OpenStack instance must have the CoraidAoE Linux driver installed so that the node can communicate with the SAN.
Overview
To configure the OpenStack Block Storage for use with Coraid storage appliances, performthe following procedures:
1. Download and install the Coraid Linux AoE driver.
2. Create a storage profile using the Coraid ESM GUI.
3. Create a storage repository using the ESM GUI and record the FQRN.
4. Configure the cinder.conf file.
5. Create and associate a block storage volume type.
Installing the Coraid AoE Driver
Install the Coraid AoE driver on every compute node that will require access to blockstorage.
The latest AoE drivers will always be located at http://support.coraid.com/support/linux/.

OpenStack ConfigurationReference
October 23, 2013 havana
261
To download and install the AoE driver, follow the instructions below, replacing “aoeXXX”with the AoE driver file name:
1. Download the latest Coraid AoE driver.
# wget http://support.coraid.com/support/linux/aoeXXX.tar.gz
2. Unpack the AoE driver.
3. Install the AoE driver.
# cd aoeXXX
# make
# make install
4. Initialize the AoE driver.
# modprobe aoe
5. Optionally, specify the Ethernet interfaces that the node can use to communicate withthe SAN.
The AoE driver may use every Ethernet interface available to the node unless limitedwith the aoe_iflist parameter. For more information about the aoe_iflistparameter, see the aoe readme file included with the AoE driver.
# modprobe aoe_iflist="eth1 eth2 ..."
Creating a Storage Profile
To create a storage profile using the ESM GUI:
1. Log on to the ESM.
2. Click on Storage Profiles in the SAN Domain pane.
3. Choose Menu > Create Storage Profile. If the option is unavailable, you may not havethe appropriate permission level. Make sure you are logged on to the ESM as the SANAdministrator.
4. Select a storage class using the storage class selector.
Each storage class includes performance and availability criteria (see the StorageClasses topic in the ESM Online Help for information on the different options).
5. Select a RAID type (if more than one is available) for the selected profile type.
6. Type a Storage Profile name.
The name is restricted to alphanumeric characters, underscore (_), and hyphen (-), andcannot exceed 32 characters.
7. Select the drive size from the drop-down menu.
8. Select the number of drives to be initialized per RAID (LUN) from the drop-down menu(if the RAID type selected requires multiple drives).
OpenStack ConfigurationReference
October 23, 2013 havana
262
9. Type the number of RAID sets (LUNs) you want to create in the repository using thisprofile.
10. Click Next to continue with creating a Storage Repository.
Creating a Storage Repository and Retrieving the FQRN
To create a storage repository and retrieve the FQRN:
1. Access the Create Storage Repository dialog box.
2. Type a Storage Repository name.
The name is restricted to alphanumeric characters, underscore (_), hyphen (-), andcannot exceed 32 characters.
3. Click on Limited or Unlimited to indicate the maximum repository size.
Limited—Limited means that the amount of space that can be allocated to therepository is set to a size you specify (size is specified in TB, GB, or MB).
When the difference between the reserved space and the space already allocatedto LUNs is less than is required by a LUN allocation request, the reserved space isincreased until the repository limit is reached.
Note
The reserved space does not include space used for parity or space usedfor mirrors. If parity and/or mirrors are required, the actual space allocatedto the repository from the SAN is greater than that specified in reservedspace.
Unlimited—Unlimited means that the amount of space allocated to the repository isunlimited and additional space is allocated to the repository automatically when spaceis required and available.
Note
Drives specified in the associated Storage Profile must be available on theSAN in order to allocate additional resources.
4. Check the Resizable LUN box.
This is required for OpenStack volumes.
Note
If the Storage Profile associated with the repository has platinumavailability, the Resizable LUN box is automatically checked.
5. Check the Show Allocation Plan API calls box. Click Next.
6. Record the FQRN and then click Finish.
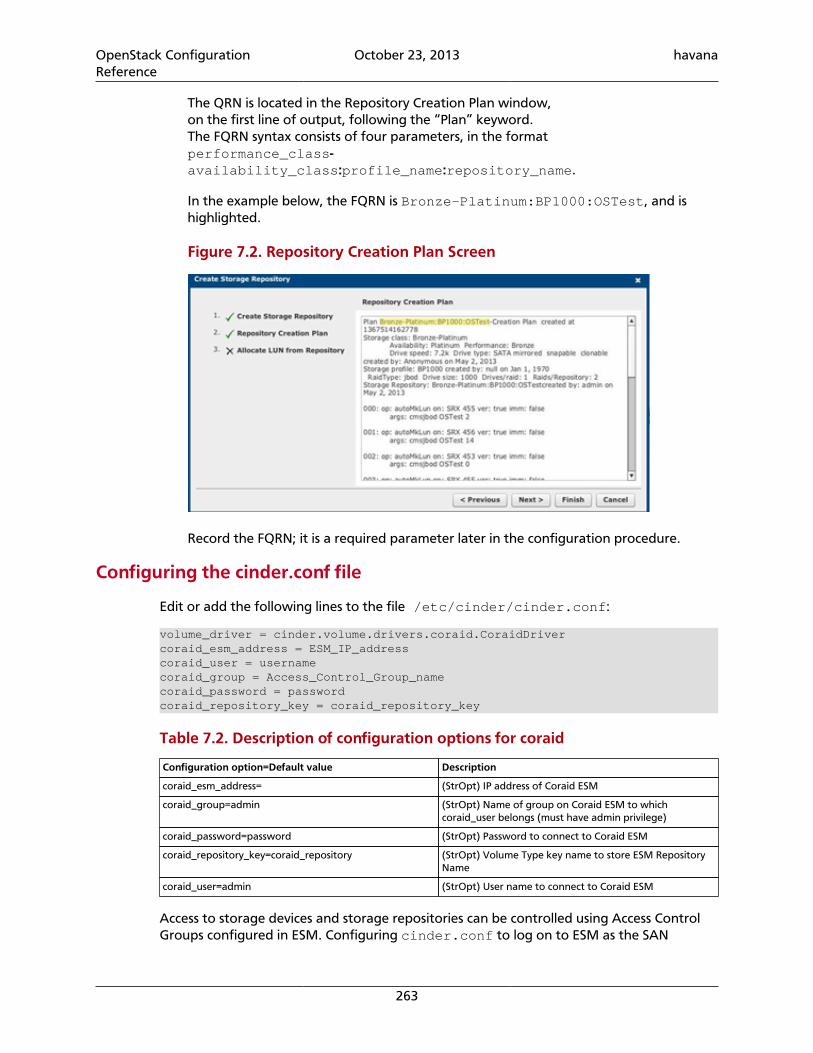
OpenStack ConfigurationReference
October 23, 2013 havana
263
The QRN is located in the Repository Creation Plan window,on the first line of output, following the “Plan” keyword.The FQRN syntax consists of four parameters, in the formatperformance_class-availability_class:profile_name:repository_name.
In the example below, the FQRN is Bronze-Platinum:BP1000:OSTest, and ishighlighted.
Figure 7.2. Repository Creation Plan Screen
Record the FQRN; it is a required parameter later in the configuration procedure.
Configuring the cinder.conf file
Edit or add the following lines to the file /etc/cinder/cinder.conf:
volume_driver = cinder.volume.drivers.coraid.CoraidDrivercoraid_esm_address = ESM_IP_addresscoraid_user = usernamecoraid_group = Access_Control_Group_namecoraid_password = passwordcoraid_repository_key = coraid_repository_key
Table 7.2. Description of configuration options for coraid
Configuration option=Default value Description
coraid_esm_address= (StrOpt) IP address of Coraid ESM
coraid_group=admin (StrOpt) Name of group on Coraid ESM to whichcoraid_user belongs (must have admin privilege)
coraid_password=password (StrOpt) Password to connect to Coraid ESM
coraid_repository_key=coraid_repository (StrOpt) Volume Type key name to store ESM RepositoryName
coraid_user=admin (StrOpt) User name to connect to Coraid ESM
Access to storage devices and storage repositories can be controlled using Access ControlGroups configured in ESM. Configuring cinder.conf to log on to ESM as the SAN
OpenStack ConfigurationReference
October 23, 2013 havana
264
administrator (user name admin), will grant full access to the devices and repositoriesconfigured in ESM.
Optionally, configuring an ESM Access Control Group and user, and then configuringcinder.conf to access the ESM using that Access Control Group and user limits accessfrom the OpenStack instance to devices and storage repositories defined in the ESM AccessControl Group.
To manage access to the SAN using Access Control Groups, you must enable the Use AccessControl setting in the ESM System Setup > Security screen.
For more information about creating Access Control Groups and setting access rights, seethe ESM Online Help.
Creating and Associating a Volume Type
To create and associate a volume with the ESM storage repository:
1. Restart Cinder.
# service openstack-cinder-api restart
# service openstack-cinder-scheduler restart
# service openstack-cinder-volume restart
2. Create a volume.
# cinder type-create ‘volume_type_name’
where volume_type_name is the name you assign the volume. You will see outputsimilar to the following:
+--------------------------------------+-------------+| ID | Name |+--------------------------------------+-------------+| 7fa6b5ab-3e20-40f0-b773-dd9e16778722 | JBOD-SAS600 |+--------------------------------------+-------------+
Record the value in the ID field; you will use this value in the next configuration step.
3. Associate the volume type with the Storage Repository.
#cinder type-key UUID set coraid_repository_key=’FQRN’
Variable Description
UUID The ID returned after issuing the cinder type-create command. Note: youcan use the command cinder type-list to recover the ID.
coraid_repository_key The key name used to associate the Cinder volume type with the ESM in thecinder.conf file. If no key name was defined, this will be the default value ofcoraid_repository.
FQRN The FQRN recorded during the Create Storage Repository process.
EMC SMI-S iSCSI DriverThe EMCSMISISCSIDriver is based on the existing ISCSIDriver, with the ability to create/delete and attach/detach volumes and create/delete snapshots, and so on.

OpenStack ConfigurationReference
October 23, 2013 havana
265
The EMCSMISISCSIDriver runs volume operations by communicating with the backend EMCstorage. It uses a CIM client in python called PyWBEM to make CIM operations over HTTP.
The EMC CIM Object Manager (ECOM) is packaged with the EMC SMI-S Provider. It is aCIM server that allows CIM clients to make CIM operations over HTTP, using SMI-S in thebackend for EMC storage operations.
The EMC SMI-S Provider supports the SNIA Storage Management Initiative (SMI), an ANSIstandard for storage management. It supports VMAX and VNX storage systems.
System Requirements
EMC SMI-S Provider V4.5.1 and higher is required. You can download SMI-S from EMC'sPowerlink web site. See the EMC SMI-S Provider release notes for installation instructions.
EMC storage VMAX Family and VNX Series are supported.
Supported Operations
The following operations are supported on both VMAX and VNX arrays:
• Create volume
• Delete volume
• Attach volume
• Detach volume
• Create snapshot
• Delete snapshot
• Create cloned volume
• Copy image to volume
• Copy volume to image
The following operations are supported on VNX only:
• Create volume from snapshot
Only thin provisioning is supported.
Task flow
Procedure 7.1. To set up the EMC SMI-S iSCSI driver
1. Install the python-pywbem package for your distribution. See the section called “Installthe python-pywbem package” [266].
2. Download SMI-S from PowerLink and install it. Add your VNX/VMAX arrays to SMI-S.
For information, see the section called “Set up SMI-S” [266] and the SMI-S releasenotes.
OpenStack ConfigurationReference
October 23, 2013 havana
266
3. Register with VNX. See the section called “Register with VNX” [266].
4. Create a masking view on VMAX. See the section called “Create a Masking View onVMAX” [267].
Install the python-pywbem package
• Install the python-pywbem package for your distribution, as follows:
• On Ubuntu:
$ sudo apt-get install python-pywbem
• On openSUSE:
$ zypper install python-pywbem
• On Fedora:
$ yum install pywbem
Set up SMI-S
You can install SMI-S on a non-OpenStack host. Supported platforms include differentflavors of Windows, Red Hat, and SUSE Linux. It can be either a physical server or a VMhosted by an ESX server. See the EMC SMI-S Provider release notes for supported platformsand installation instructions.
Note
Storage arrays must be discovered on the SMI-S server before using the CinderDriver. Follow instructions in the SMI-S release notes to discover the arrays.
SMI-S is usually installed at /opt/emc/ECIM/ECOM/bin on Linux and C:\ProgramFiles\EMC\ECIM\ECOM\bin on Windows. After you install and configure SMI-S, go tothat directory and type TestSmiProvider.exe.
Use addsys in TestSmiProvider.exe to add an array. Use dv and examine the output afterthe array is added. Make sure that the arrays are recognized by the SMI-S server beforeusing the EMC Cinder Driver.
Register with VNX
To export a VNX volume to a Compute node, you must register the node with VNX.
On the Compute node 1.1.1.1, do the following (assume 10.10.61.35 is the iscsitarget):
$ sudo /etc/init.d/open-iscsi start
$ sudo iscsiadm -m discovery -t st -p 10.10.61.35
$ cd /etc/iscsi
$ sudo more initiatorname.iscsi
$ iscsiadm -m node
Log in to VNX from the Compute node using the target corresponding to the SPA port:

OpenStack ConfigurationReference
October 23, 2013 havana
267
$ sudo iscsiadm -m node -T iqn.1992-04.com.emc:cx.apm01234567890.a0 -p 10.10.61.35 -l
Assume iqn.1993-08.org.debian:01:1a2b3c4d5f6g is the initiator name of theCompute node. Login to Unisphere, go to VNX00000->Hosts->Initiators, Refresh and waituntil initiator iqn.1993-08.org.debian:01:1a2b3c4d5f6g with SP Port A-8v0appears.
Click the "Register" button, select "CLARiiON/VNX" and enter the host name myhost1 andIP address myhost1. Click Register. Now host 1.1.1.1 appears under Hosts->Host List aswell.
Log out of VNX on the Compute node:
$ sudo iscsiadm -m node -u
Log in to VNX from the Compute node using the target corresponding to the SPB port:
$ sudo iscsiadm -m node -T iqn.1992-04.com.emc:cx.apm01234567890.b8 -p 10.10.10.11 -l
In Unisphere register the initiator with the SPB port.
Log out:
$ sudo iscsiadm -m node -u
Create a Masking View on VMAX
For VMAX, you must set up the Unisphere for VMAX server. On the Unisphere for VMAXserver, create initiator group, storage group, port group, and put them in a masking view.Initiator group contains the initiator names of the openstack hosts. Storage group shouldhave at least six gatekeepers.
Config file cinder.conf
Make the following changes in /etc/cinder/cinder.conf.
For VMAX, add the following entries, where 10.10.61.45 is the IP address of the VMAXiscsi target:
iscsi_target_prefix = iqn.1992-04.com.emciscsi_ip_address = 10.10.61.45volume_driver = cinder.volume.drivers.emc.emc_smis_iscsi.EMCSMISISCSIDrivercinder_emc_config_file = /etc/cinder/cinder_emc_config.xml
For VNX, add the following entries, where 10.10.61.35 is the IP address of the VNX iscsitarget:
iscsi_target_prefix = iqn.2001-07.com.vnxiscsi_ip_address = 10.10.61.35volume_driver = cinder.volume.drivers.emc.emc_smis_iscsi.EMCSMISISCSIDrivercinder_emc_config_file = /etc/cinder/cinder_emc_config.xml
Restart the cinder-volume service.
Config file cinder_emc_config.xml
Create the file /etc/cinder/cinder_emc_config.xml. You do not need to restartthe service for this change.
OpenStack ConfigurationReference
October 23, 2013 havana
268
For VMAX, add the following lines to the XML file:
<?xml version='1.0' encoding='UTF-8'?><EMC><StorageType>xxxx</StorageType><MaskingView>xxxx</MaskingView><EcomServerIp>x.x.x.x</EcomServerIp><EcomServerPort>xxxx</EcomServerPort><EcomUserName>xxxxxxxx</EcomUserName><EcomPassword>xxxxxxxx</EcomPassword></EMC<
For VNX, add the following lines to the XML file:
<?xml version='1.0' encoding='UTF-8'?><EMC><StorageType>xxxx</StorageType><EcomServerIp>x.x.x.x</EcomServerIp><EcomServerPort>xxxx</EcomServerPort><EcomUserName>xxxxxxxx</EcomUserName><EcomPassword>xxxxxxxx</EcomPassword></EMC<
To attach VMAX volumes to an OpenStack VM, you must create a Masking View by usingUnisphere for VMAX. The Masking View must have an Initiator Group that contains theinitiator of the OpenStack compute node that hosts the VM.
StorageType is the thin pool where user wants to create the volume from. Only thin LUNsare supported by the plugin. Thin pools can be created using Unisphere for VMAX andVNX.
EcomServerIp and EcomServerPort are the IP address and port number of the ECOM serverwhich is packaged with SMI-S. EcomUserName and EcomPassword are credentials for theECOM server.
GlusterFS Driver
GlusterFS is an open-source scalable distributed filesystem that is able to grow to petabytesand beyond in size. More information can be found on Gluster's homepage.
This driver enables use of GlusterFS in a similar fashion as the NFS driver. It supports basicvolume operations, and like NFS, does not support snapshot/clone.
Note
You must use a Linux kernel of version 3.4 or greater (or version 2.6.32 orgreater in RHEL/CentOS 6.3+) when working with Gluster-based volumes. SeeBug 1177103 for more information.
To use Cinder with GlusterFS, first set the volume_driver in cinder.conf:
volume_driver=cinder.volume.drivers.glusterfs.GlusterfsDriver
The following table contains the configuration options supported by the GlusterFS driver.
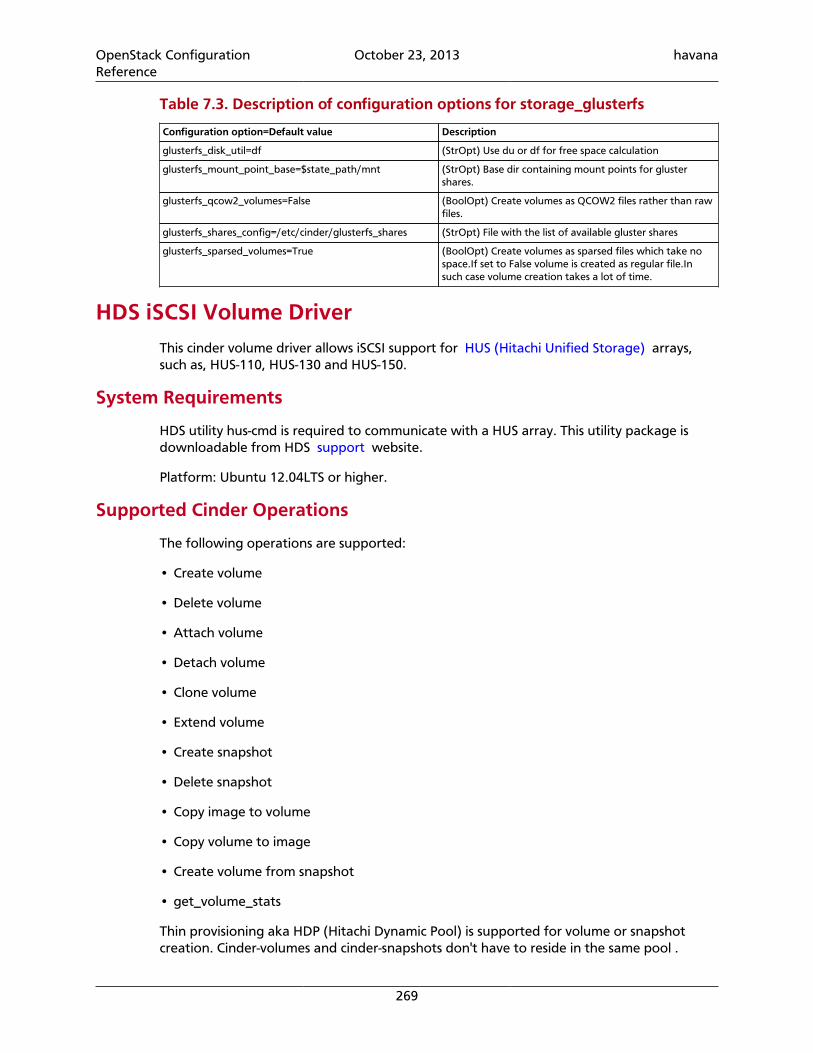
OpenStack ConfigurationReference
October 23, 2013 havana
269
Table 7.3. Description of configuration options for storage_glusterfs
Configuration option=Default value Description
glusterfs_disk_util=df (StrOpt) Use du or df for free space calculation
glusterfs_mount_point_base=$state_path/mnt (StrOpt) Base dir containing mount points for glustershares.
glusterfs_qcow2_volumes=False (BoolOpt) Create volumes as QCOW2 files rather than rawfiles.
glusterfs_shares_config=/etc/cinder/glusterfs_shares (StrOpt) File with the list of available gluster shares
glusterfs_sparsed_volumes=True (BoolOpt) Create volumes as sparsed files which take nospace.If set to False volume is created as regular file.Insuch case volume creation takes a lot of time.
HDS iSCSI Volume DriverThis cinder volume driver allows iSCSI support for HUS (Hitachi Unified Storage) arrays,such as, HUS-110, HUS-130 and HUS-150.
System Requirements
HDS utility hus-cmd is required to communicate with a HUS array. This utility package isdownloadable from HDS support website.
Platform: Ubuntu 12.04LTS or higher.
Supported Cinder Operations
The following operations are supported:
• Create volume
• Delete volume
• Attach volume
• Detach volume
• Clone volume
• Extend volume
• Create snapshot
• Delete snapshot
• Copy image to volume
• Copy volume to image
• Create volume from snapshot
• get_volume_stats
Thin provisioning aka HDP (Hitachi Dynamic Pool) is supported for volume or snapshotcreation. Cinder-volumes and cinder-snapshots don't have to reside in the same pool .
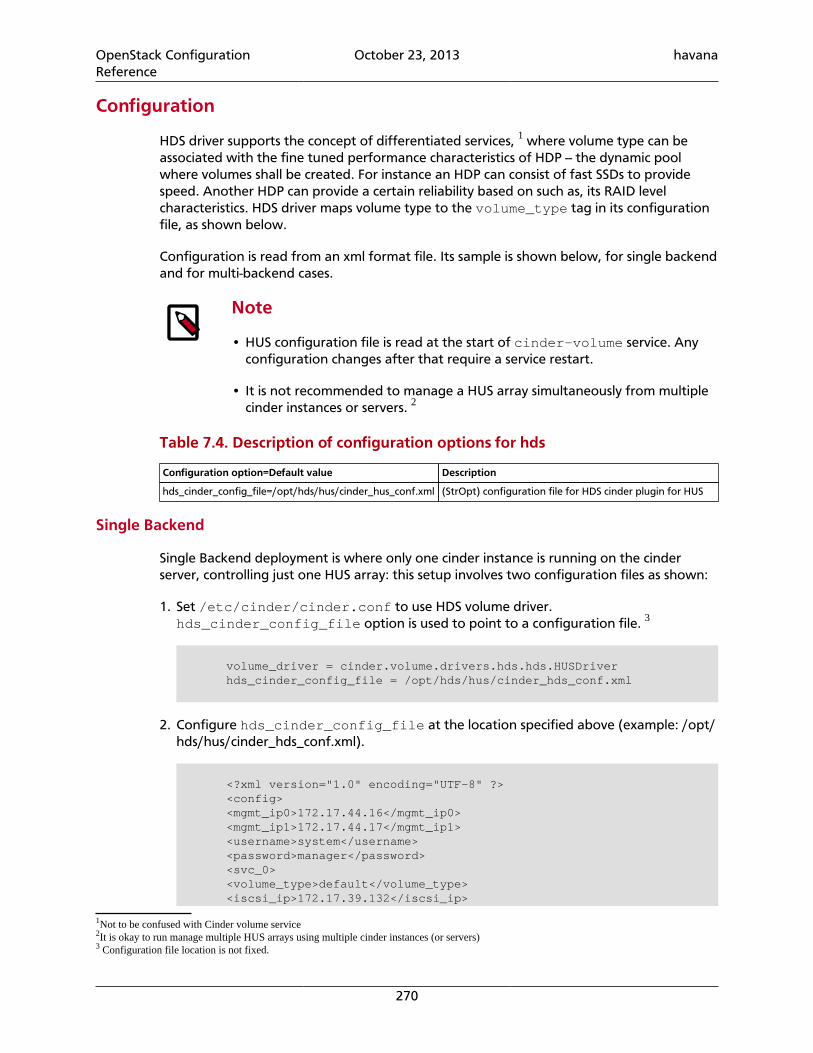
OpenStack ConfigurationReference
October 23, 2013 havana
270
Configuration
HDS driver supports the concept of differentiated services, 1 where volume type can beassociated with the fine tuned performance characteristics of HDP -- the dynamic poolwhere volumes shall be created. For instance an HDP can consist of fast SSDs to providespeed. Another HDP can provide a certain reliability based on such as, its RAID levelcharacteristics. HDS driver maps volume type to the volume_type tag in its configurationfile, as shown below.
Configuration is read from an xml format file. Its sample is shown below, for single backendand for multi-backend cases.
Note
• HUS configuration file is read at the start of cinder-volume service. Anyconfiguration changes after that require a service restart.
• It is not recommended to manage a HUS array simultaneously from multiplecinder instances or servers. 2
Table 7.4. Description of configuration options for hds
Configuration option=Default value Description
hds_cinder_config_file=/opt/hds/hus/cinder_hus_conf.xml (StrOpt) configuration file for HDS cinder plugin for HUS
Single Backend
Single Backend deployment is where only one cinder instance is running on the cinderserver, controlling just one HUS array: this setup involves two configuration files as shown:
1. Set /etc/cinder/cinder.conf to use HDS volume driver.hds_cinder_config_file option is used to point to a configuration file. 3
volume_driver = cinder.volume.drivers.hds.hds.HUSDriver hds_cinder_config_file = /opt/hds/hus/cinder_hds_conf.xml
2. Configure hds_cinder_config_file at the location specified above (example: /opt/hds/hus/cinder_hds_conf.xml).
<?xml version="1.0" encoding="UTF-8" ?> <config> <mgmt_ip0>172.17.44.16</mgmt_ip0> <mgmt_ip1>172.17.44.17</mgmt_ip1> <username>system</username> <password>manager</password> <svc_0> <volume_type>default</volume_type> <iscsi_ip>172.17.39.132</iscsi_ip>
1Not to be confused with Cinder volume service2It is okay to run manage multiple HUS arrays using multiple cinder instances (or servers)3 Configuration file location is not fixed.
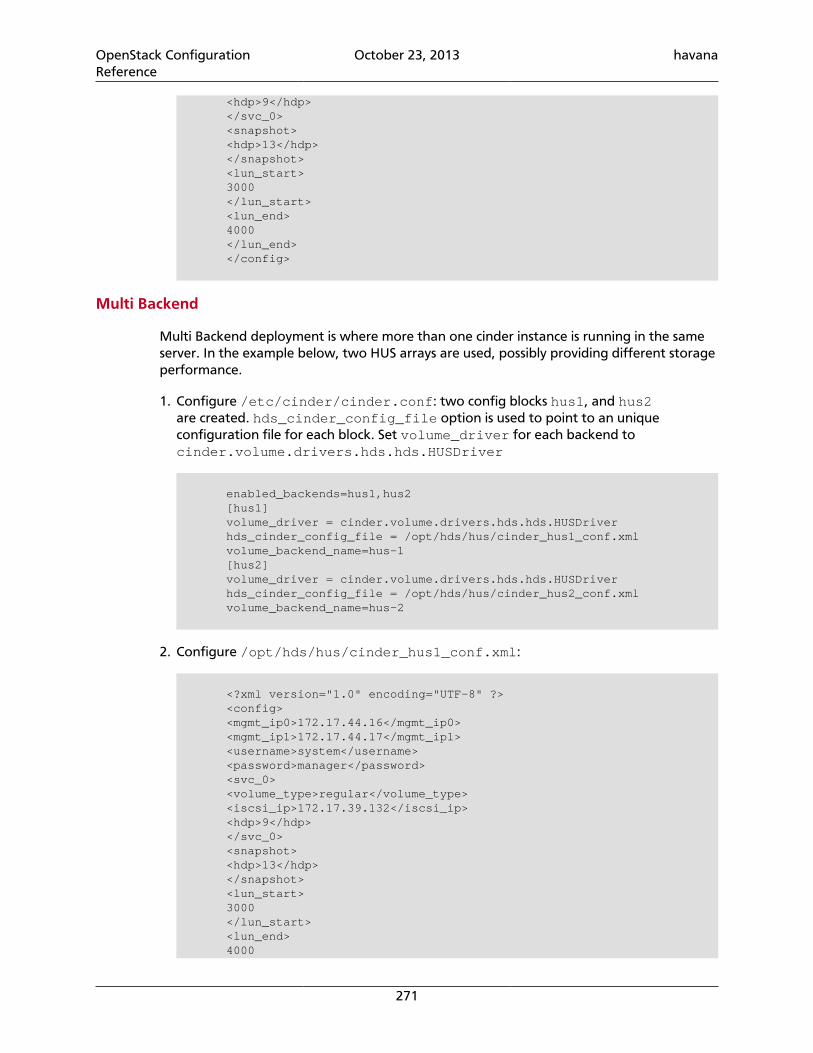
OpenStack ConfigurationReference
October 23, 2013 havana
271
<hdp>9</hdp> </svc_0> <snapshot> <hdp>13</hdp> </snapshot> <lun_start> 3000 </lun_start> <lun_end> 4000 </lun_end> </config>
Multi Backend
Multi Backend deployment is where more than one cinder instance is running in the sameserver. In the example below, two HUS arrays are used, possibly providing different storageperformance.
1. Configure /etc/cinder/cinder.conf: two config blocks hus1, and hus2are created. hds_cinder_config_file option is used to point to an uniqueconfiguration file for each block. Set volume_driver for each backend tocinder.volume.drivers.hds.hds.HUSDriver
enabled_backends=hus1,hus2 [hus1] volume_driver = cinder.volume.drivers.hds.hds.HUSDriver hds_cinder_config_file = /opt/hds/hus/cinder_hus1_conf.xml volume_backend_name=hus-1 [hus2] volume_driver = cinder.volume.drivers.hds.hds.HUSDriver hds_cinder_config_file = /opt/hds/hus/cinder_hus2_conf.xml volume_backend_name=hus-2
2. Configure /opt/hds/hus/cinder_hus1_conf.xml:
<?xml version="1.0" encoding="UTF-8" ?> <config> <mgmt_ip0>172.17.44.16</mgmt_ip0> <mgmt_ip1>172.17.44.17</mgmt_ip1> <username>system</username> <password>manager</password> <svc_0> <volume_type>regular</volume_type> <iscsi_ip>172.17.39.132</iscsi_ip> <hdp>9</hdp> </svc_0> <snapshot> <hdp>13</hdp> </snapshot> <lun_start> 3000 </lun_start> <lun_end> 4000
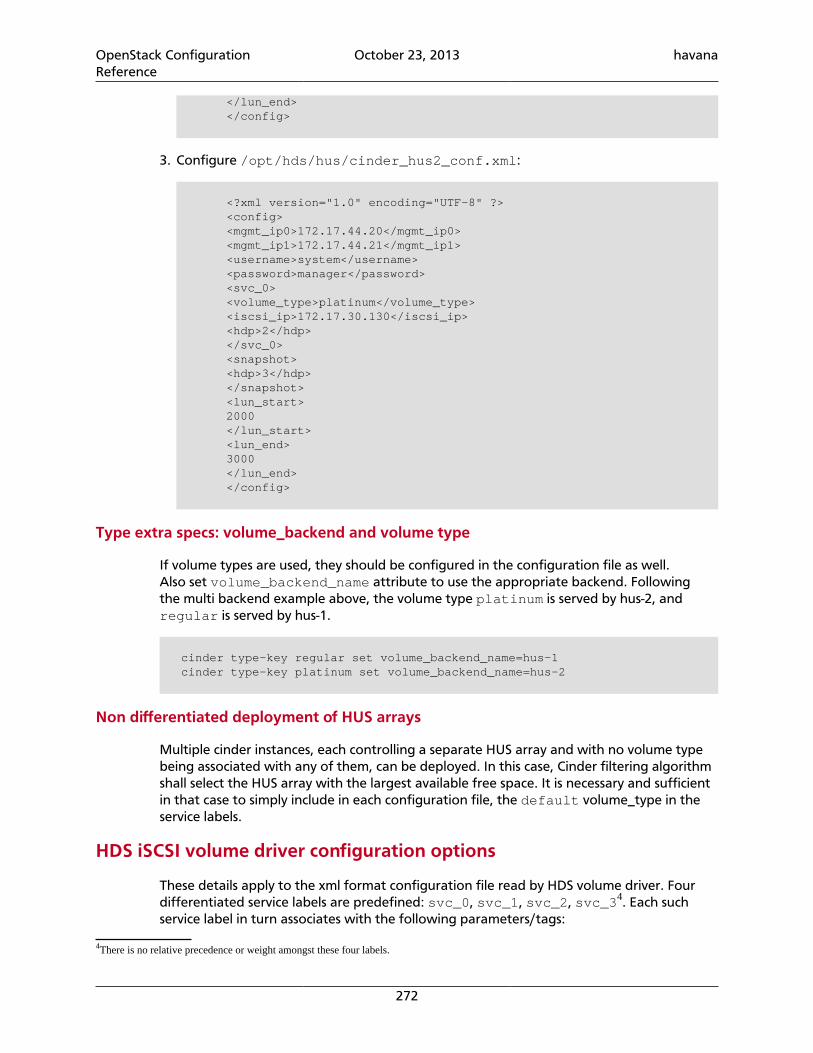
OpenStack ConfigurationReference
October 23, 2013 havana
272
</lun_end> </config>
3. Configure /opt/hds/hus/cinder_hus2_conf.xml:
<?xml version="1.0" encoding="UTF-8" ?> <config> <mgmt_ip0>172.17.44.20</mgmt_ip0> <mgmt_ip1>172.17.44.21</mgmt_ip1> <username>system</username> <password>manager</password> <svc_0> <volume_type>platinum</volume_type> <iscsi_ip>172.17.30.130</iscsi_ip> <hdp>2</hdp> </svc_0> <snapshot> <hdp>3</hdp> </snapshot> <lun_start> 2000 </lun_start> <lun_end> 3000 </lun_end> </config>
Type extra specs: volume_backend and volume type
If volume types are used, they should be configured in the configuration file as well.Also set volume_backend_name attribute to use the appropriate backend. Followingthe multi backend example above, the volume type platinum is served by hus-2, andregular is served by hus-1.
cinder type-key regular set volume_backend_name=hus-1 cinder type-key platinum set volume_backend_name=hus-2
Non differentiated deployment of HUS arrays
Multiple cinder instances, each controlling a separate HUS array and with no volume typebeing associated with any of them, can be deployed. In this case, Cinder filtering algorithmshall select the HUS array with the largest available free space. It is necessary and sufficientin that case to simply include in each configuration file, the default volume_type in theservice labels.
HDS iSCSI volume driver configuration options
These details apply to the xml format configuration file read by HDS volume driver. Fourdifferentiated service labels are predefined: svc_0, svc_1, svc_2, svc_34. Each suchservice label in turn associates with the following parameters/tags:
4There is no relative precedence or weight amongst these four labels.
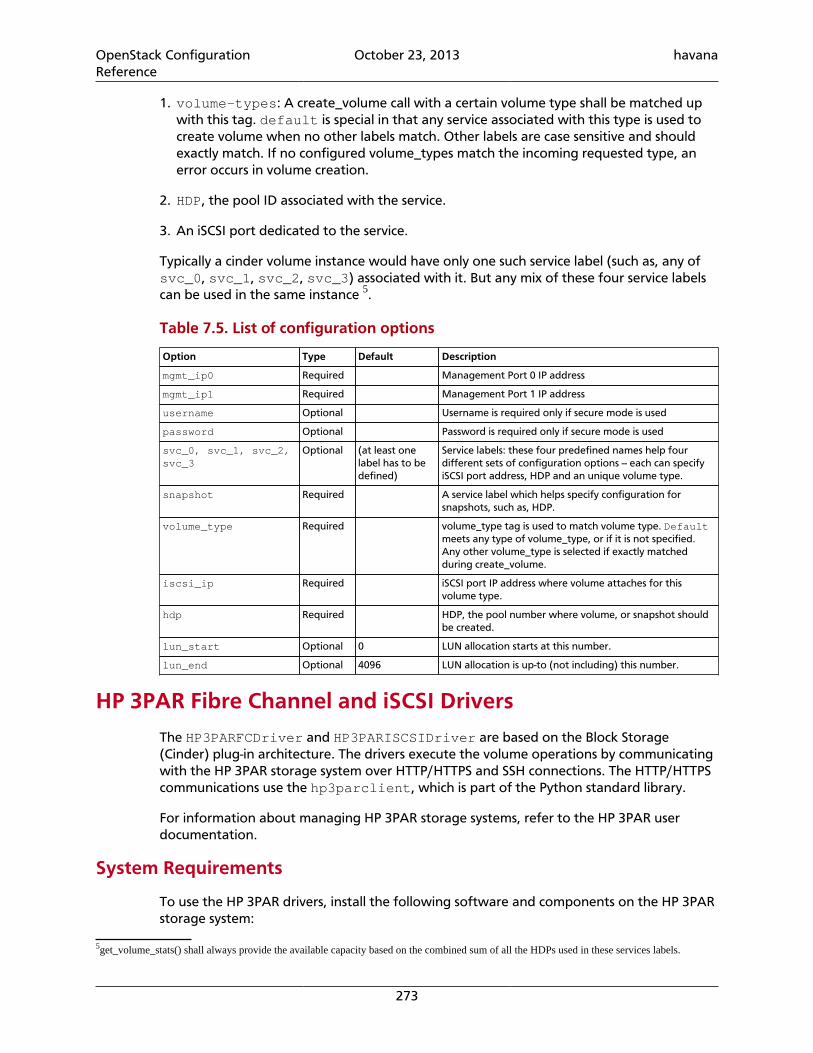
OpenStack ConfigurationReference
October 23, 2013 havana
273
1. volume-types: A create_volume call with a certain volume type shall be matched upwith this tag. default is special in that any service associated with this type is used tocreate volume when no other labels match. Other labels are case sensitive and shouldexactly match. If no configured volume_types match the incoming requested type, anerror occurs in volume creation.
2. HDP, the pool ID associated with the service.
3. An iSCSI port dedicated to the service.
Typically a cinder volume instance would have only one such service label (such as, any ofsvc_0, svc_1, svc_2, svc_3) associated with it. But any mix of these four service labelscan be used in the same instance 5.
Table 7.5. List of configuration options
Option Type Default Description
mgmt_ip0 Required Management Port 0 IP address
mgmt_ip1 Required Management Port 1 IP address
username Optional Username is required only if secure mode is used
password Optional Password is required only if secure mode is used
svc_0, svc_1, svc_2,svc_3
Optional (at least onelabel has to bedefined)
Service labels: these four predefined names help fourdifferent sets of configuration options -- each can specifyiSCSI port address, HDP and an unique volume type.
snapshot Required A service label which helps specify configuration forsnapshots, such as, HDP.
volume_type Required volume_type tag is used to match volume type. Defaultmeets any type of volume_type, or if it is not specified.Any other volume_type is selected if exactly matchedduring create_volume.
iscsi_ip Required iSCSI port IP address where volume attaches for thisvolume type.
hdp Required HDP, the pool number where volume, or snapshot shouldbe created.
lun_start Optional 0 LUN allocation starts at this number.
lun_end Optional 4096 LUN allocation is up-to (not including) this number.
HP 3PAR Fibre Channel and iSCSI Drivers
The HP3PARFCDriver and HP3PARISCSIDriver are based on the Block Storage(Cinder) plug-in architecture. The drivers execute the volume operations by communicatingwith the HP 3PAR storage system over HTTP/HTTPS and SSH connections. The HTTP/HTTPScommunications use the hp3parclient, which is part of the Python standard library.
For information about managing HP 3PAR storage systems, refer to the HP 3PAR userdocumentation.
System Requirements
To use the HP 3PAR drivers, install the following software and components on the HP 3PARstorage system:
5get_volume_stats() shall always provide the available capacity based on the combined sum of all the HDPs used in these services labels.
OpenStack ConfigurationReference
October 23, 2013 havana
274
• HP 3PAR Operating System software version 3.1.2 (MU2) or higher
• HP 3PAR Web Services API Server must be enabled and running
• One Common Provisioning Group (CPG)
• Additionally, you must install the hp3parclient from the Python standard library onthe system with the enabled Block Storage volume drivers.
Supported Operations
• Create volumes.
• Delete volumes.
• Extend volumes.
• Attach volumes.
• Detach volumes.
• Create snapshots.
• Delete snapshots.
• Create volumes from snapshots.
• Create cloned volumes.
• Copy images to volumes.
• Copy volumes to images.
Volume type support for both HP 3PAR drivers includes the ability to set the followingcapabilities in the OpenStack Cinder API cinder.api.contrib.types_extra_specsvolume type extra specs extension module:
• hp3par:cpg
• hp3par:snap_cpg
• hp3par:provisioning
• hp3par:persona
• hp3par:vvs
• qos:maxBWS
• qos:maxIOPS
To work with the default filter scheduler, the key values are case sensitive and scoped withhp3par: or qos:. For information about how to set the key-value pairs and associatethem with a volume type, run the following command:
$ cinder help type-key
OpenStack ConfigurationReference
October 23, 2013 havana
275
Note
Volumes that are cloned only support extra specs keys cpg, snap_cpg,provisioning and vvs. The others are ignored. In addition the comments sectionof the cloned volume in the HP 3PAR StoreServ storage array is not populated.
The following keys require that the HP 3PAR StoreServ storage array has a PriorityOptimization license installed.
• hp3par:vvs - The virtual volume set name that has been predefined by theAdministrator with Quality of Service (QoS) rules associated to it. If you specifyhp3par:vvs, the qos:maxIOPS and qos:maxBWS settings are ignored.
• qos:maxBWS - The QoS I/O issue count rate limit in MBs. If not set, the I/O issuebandwidth rate has no limit.
• qos:maxIOPS - The QoS I/O issue count rate limit. If not set, the I/O issue count rate hasno limit.
If volume types are not used or a particular key is not set for a volume type, the followingdefaults are used.
• hp3par:cpg - Defaults to the hp3par_cpg setting in the cinder.conf file.
• hp3par:snap_cpg - Defaults to the hp3par_snap setting in the cinder.conf file. Ifhp3par_snap is not set, it defaults to the hp3par_cpg setting.
• hp3par:provisioning - Defaults to thin provisioning, the valid values are thin andfull.
• hp3par:persona - Defaults to the 1 – Generic persona. The valid values are, 1– Generic, 2 - Generic-ALUA, 6 - Generic-legacy, 7 - HPUX-legacy, 8- AIX-legacy, 9 – EGENERA, 10 - ONTAP-legacy, 11 – VMware, and 12 -OpenVMS.
Enabling the HP 3PAR Fibre Channel and iSCSI Drivers
The HP3PARFCDriver and HP3PARISCSIDriver are installed with the OpenStacksoftware.
1. Install the hp3parclient Python package on the OpenStack Block Storage system.
$sudo pip install hp3parclient
2. Verify that the HP 3PAR Web Services API server is enabled and running on the HP 3PARstorage system.
a. Log onto the HP 3PAR storage system with administrator access.
#ssh 3paradm@<HP 3PAR IP Address>
b. View the current state of the Web Services API Server.
#showwsapi
-Service- -State- -HTTP_State- HTTP_Port -HTTPS_State- HTTPS_Port -Version-
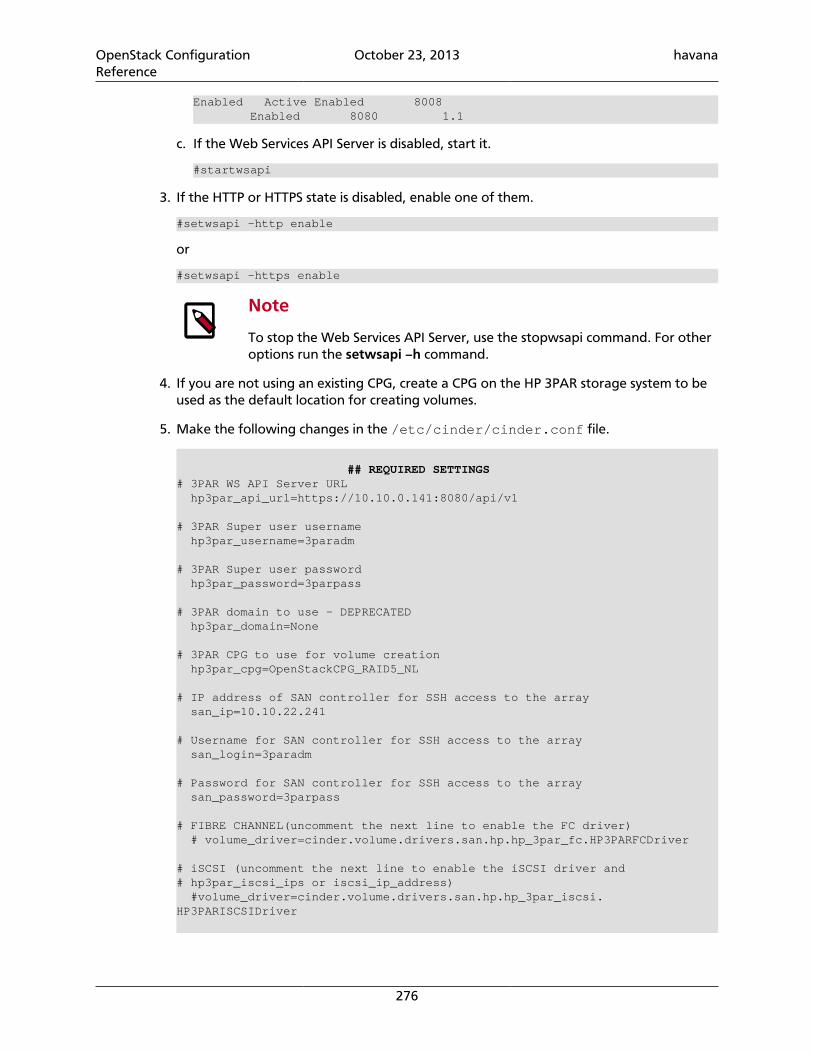
OpenStack ConfigurationReference
October 23, 2013 havana
276
Enabled Active Enabled 8008 Enabled 8080 1.1
c. If the Web Services API Server is disabled, start it.
#startwsapi
3. If the HTTP or HTTPS state is disabled, enable one of them.
#setwsapi -http enable
or
#setwsapi -https enable
Note
To stop the Web Services API Server, use the stopwsapi command. For otheroptions run the setwsapi –h command.
4. If you are not using an existing CPG, create a CPG on the HP 3PAR storage system to beused as the default location for creating volumes.
5. Make the following changes in the /etc/cinder/cinder.conf file.
## REQUIRED SETTINGS# 3PAR WS API Server URL hp3par_api_url=https://10.10.0.141:8080/api/v1
# 3PAR Super user username hp3par_username=3paradm
# 3PAR Super user password hp3par_password=3parpass
# 3PAR domain to use - DEPRECATED hp3par_domain=None
# 3PAR CPG to use for volume creation hp3par_cpg=OpenStackCPG_RAID5_NL
# IP address of SAN controller for SSH access to the array san_ip=10.10.22.241
# Username for SAN controller for SSH access to the array san_login=3paradm
# Password for SAN controller for SSH access to the array san_password=3parpass
# FIBRE CHANNEL(uncomment the next line to enable the FC driver) # volume_driver=cinder.volume.drivers.san.hp.hp_3par_fc.HP3PARFCDriver
# iSCSI (uncomment the next line to enable the iSCSI driver and# hp3par_iscsi_ips or iscsi_ip_address) #volume_driver=cinder.volume.drivers.san.hp.hp_3par_iscsi.HP3PARISCSIDriver
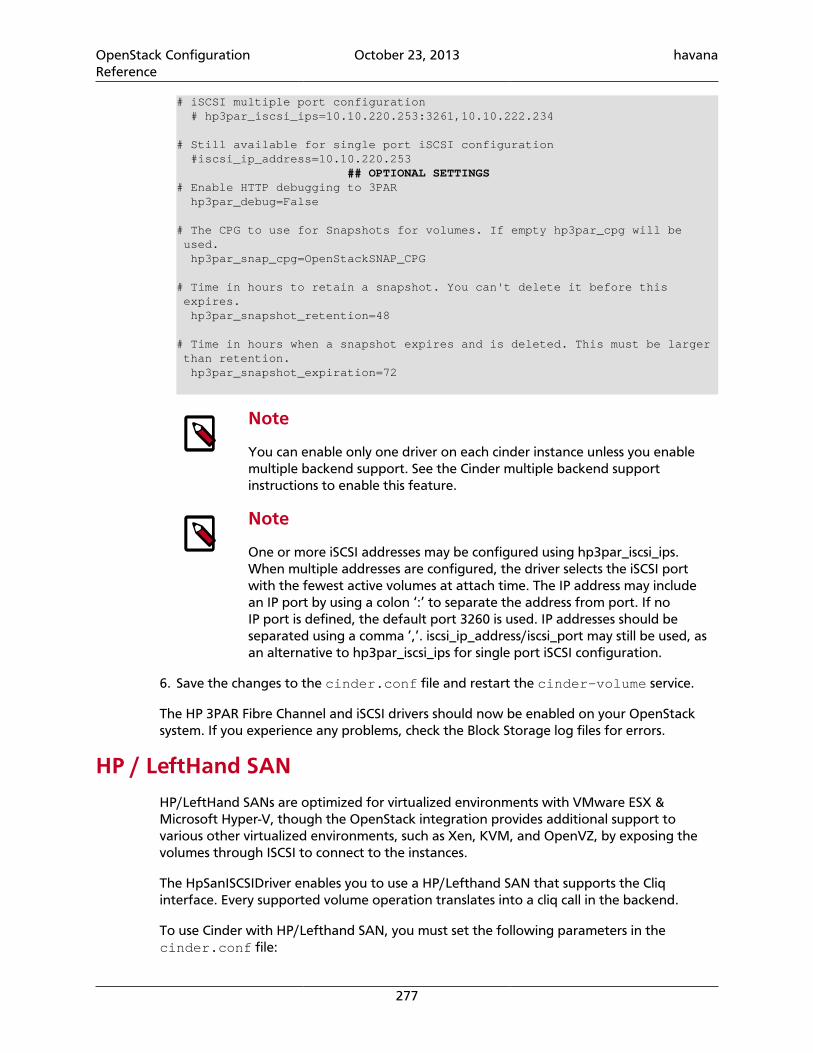
OpenStack ConfigurationReference
October 23, 2013 havana
277
# iSCSI multiple port configuration # hp3par_iscsi_ips=10.10.220.253:3261,10.10.222.234
# Still available for single port iSCSI configuration #iscsi_ip_address=10.10.220.253 ## OPTIONAL SETTINGS# Enable HTTP debugging to 3PAR hp3par_debug=False
# The CPG to use for Snapshots for volumes. If empty hp3par_cpg will be used. hp3par_snap_cpg=OpenStackSNAP_CPG
# Time in hours to retain a snapshot. You can't delete it before this expires. hp3par_snapshot_retention=48
# Time in hours when a snapshot expires and is deleted. This must be larger than retention. hp3par_snapshot_expiration=72
Note
You can enable only one driver on each cinder instance unless you enablemultiple backend support. See the Cinder multiple backend supportinstructions to enable this feature.
Note
One or more iSCSI addresses may be configured using hp3par_iscsi_ips.When multiple addresses are configured, the driver selects the iSCSI portwith the fewest active volumes at attach time. The IP address may includean IP port by using a colon ‘:’ to separate the address from port. If noIP port is defined, the default port 3260 is used. IP addresses should beseparated using a comma ’,’. iscsi_ip_address/iscsi_port may still be used, asan alternative to hp3par_iscsi_ips for single port iSCSI configuration.
6. Save the changes to the cinder.conf file and restart the cinder-volume service.
The HP 3PAR Fibre Channel and iSCSI drivers should now be enabled on your OpenStacksystem. If you experience any problems, check the Block Storage log files for errors.
HP / LeftHand SAN
HP/LeftHand SANs are optimized for virtualized environments with VMware ESX &Microsoft Hyper-V, though the OpenStack integration provides additional support tovarious other virtualized environments, such as Xen, KVM, and OpenVZ, by exposing thevolumes through ISCSI to connect to the instances.
The HpSanISCSIDriver enables you to use a HP/Lefthand SAN that supports the Cliqinterface. Every supported volume operation translates into a cliq call in the backend.
To use Cinder with HP/Lefthand SAN, you must set the following parameters in thecinder.conf file:

OpenStack ConfigurationReference
October 23, 2013 havana
278
• Set volume_driver=cinder.volume.drivers.san.HpSanISCSIDriver.
• Set san_ip flag to the hostname or VIP of your Virtual Storage Appliance (VSA).
• Set san_login and san_password to the user name and password of the ssh userwith all necessary privileges on the appliance.
• Set san_ssh_port=16022. The default is 22. However, the default for the VSA isusually 16022.
• Set san_clustername to the name of the cluster where the associated volumes arecreated.
The following optional parameters have the following default values:
• san_thin_provision=True. To disable thin provisioning, set to False.
• san_is_local=False. Typically, this parameter is set to False for this driver. Toconfigure the cliq commands to run locally instead of over ssh, set this parameter toTrue.
Configuring the VSA
In addition to configuring the cinder-volume service, you must configure the VSA tofunction in an OpenStack environment.
1. Configure Chap on each of the nova-compute nodes.
2. Add Server associations on the VSA with the associated Chap and initiator information.The name should correspond to the 'hostname' of the nova-compute node. ForXen, this is the hypervisor host name. To do this, use either Cliq or the CentralizedManagement Console.
Huawei Storage Driver
Huawei driver supports the iSCSI and Fibre Channel connections and enables OceanStor Tseries unified storage, OceanStor Dorado high-performance storage, and OceanStor HVShigh-end storage to provide block storage services for OpenStack.
Supported Operations
OceanStor T series unified storage supports the following operations:
• Create volume
• Delete volume
• Attach volume
• Detach volume
• Create snapshot
• Delete snapshot
OpenStack ConfigurationReference
October 23, 2013 havana
279
• Create volume from snapshot
• Create clone volume
• Copy image to volume
• Copy volume to image
OceanStor Dorado5100 supports the following operations :
• Create volume
• Delete volume
• Attach volume
• Detach volume
• Create snapshot
• Delete snapshot
• Copy image to volume
• Copy volume to image
OceanStor Dorado2100 G2 supports the following operations :
• Create volume
• Delete volume
• Attach volume
• Detach volume
• Copy image to volume
• Copy volume to image
OceanStor HVS supports the following operations:
• Create volume
• Delete volume
• Attach volume
• Detach volume
• Create snapshot
• Delete snapshot
• Create volume from snapshot
• Create clone volume
• Copy image to volume
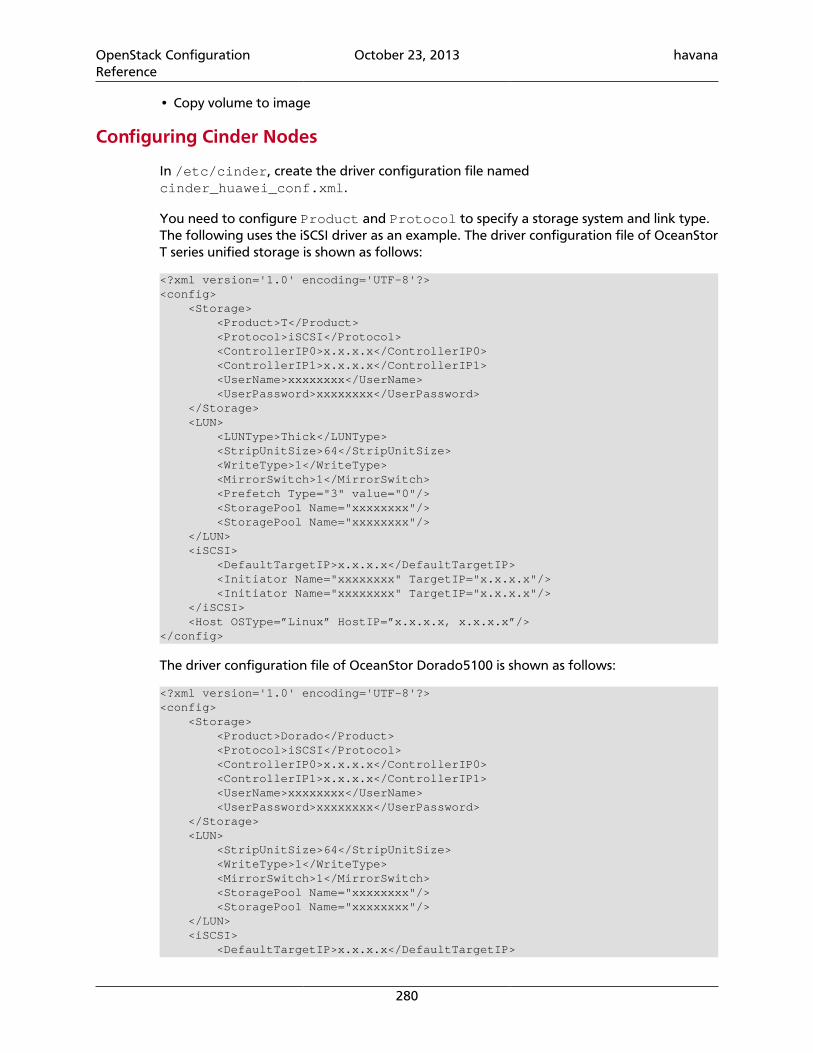
OpenStack ConfigurationReference
October 23, 2013 havana
280
• Copy volume to image
Configuring Cinder Nodes
In /etc/cinder, create the driver configuration file namedcinder_huawei_conf.xml.
You need to configure Product and Protocol to specify a storage system and link type.The following uses the iSCSI driver as an example. The driver configuration file of OceanStorT series unified storage is shown as follows:
<?xml version='1.0' encoding='UTF-8'?><config> <Storage> <Product>T</Product> <Protocol>iSCSI</Protocol> <ControllerIP0>x.x.x.x</ControllerIP0> <ControllerIP1>x.x.x.x</ControllerIP1> <UserName>xxxxxxxx</UserName> <UserPassword>xxxxxxxx</UserPassword> </Storage> <LUN> <LUNType>Thick</LUNType> <StripUnitSize>64</StripUnitSize> <WriteType>1</WriteType> <MirrorSwitch>1</MirrorSwitch> <Prefetch Type="3" value="0"/> <StoragePool Name="xxxxxxxx"/> <StoragePool Name="xxxxxxxx"/> </LUN> <iSCSI> <DefaultTargetIP>x.x.x.x</DefaultTargetIP> <Initiator Name="xxxxxxxx" TargetIP="x.x.x.x"/> <Initiator Name="xxxxxxxx" TargetIP="x.x.x.x"/> </iSCSI> <Host OSType=”Linux” HostIP=”x.x.x.x, x.x.x.x”/></config>
The driver configuration file of OceanStor Dorado5100 is shown as follows:
<?xml version='1.0' encoding='UTF-8'?><config> <Storage> <Product>Dorado</Product> <Protocol>iSCSI</Protocol> <ControllerIP0>x.x.x.x</ControllerIP0> <ControllerIP1>x.x.x.x</ControllerIP1> <UserName>xxxxxxxx</UserName> <UserPassword>xxxxxxxx</UserPassword> </Storage> <LUN> <StripUnitSize>64</StripUnitSize> <WriteType>1</WriteType> <MirrorSwitch>1</MirrorSwitch> <StoragePool Name="xxxxxxxx"/> <StoragePool Name="xxxxxxxx"/> </LUN> <iSCSI> <DefaultTargetIP>x.x.x.x</DefaultTargetIP>
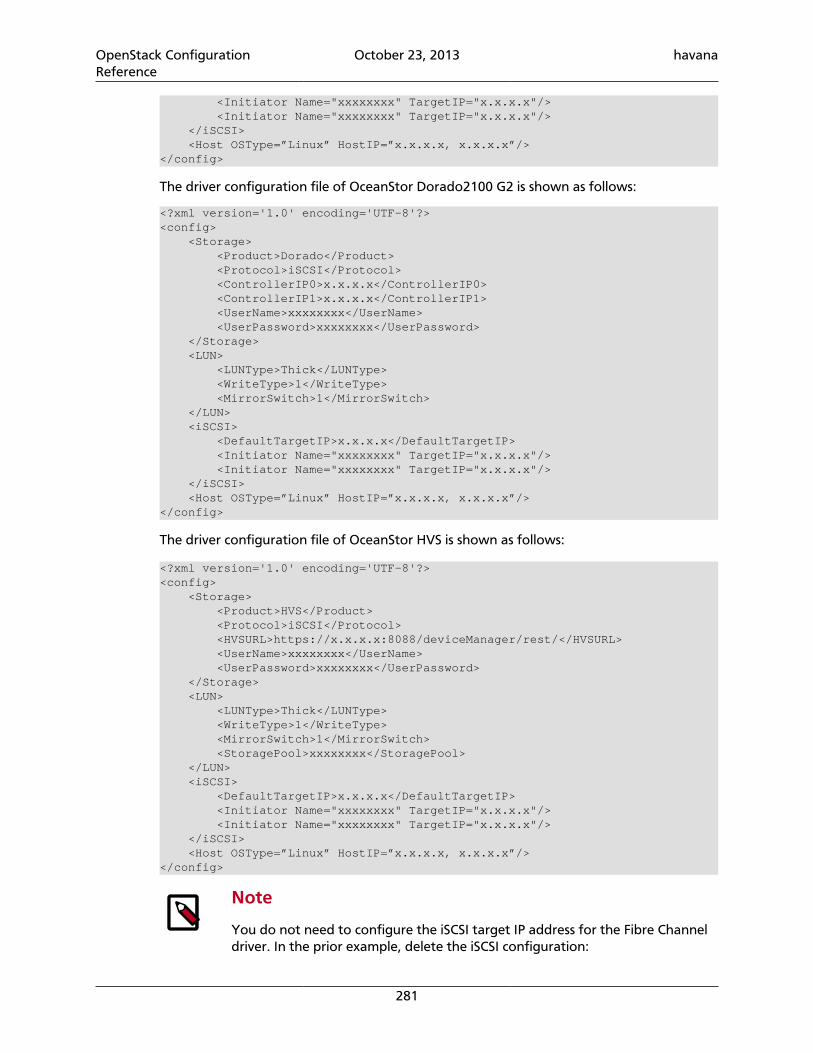
OpenStack ConfigurationReference
October 23, 2013 havana
281
<Initiator Name="xxxxxxxx" TargetIP="x.x.x.x"/> <Initiator Name="xxxxxxxx" TargetIP="x.x.x.x"/> </iSCSI> <Host OSType=”Linux” HostIP=”x.x.x.x, x.x.x.x”/></config>
The driver configuration file of OceanStor Dorado2100 G2 is shown as follows:
<?xml version='1.0' encoding='UTF-8'?><config> <Storage> <Product>Dorado</Product> <Protocol>iSCSI</Protocol> <ControllerIP0>x.x.x.x</ControllerIP0> <ControllerIP1>x.x.x.x</ControllerIP1> <UserName>xxxxxxxx</UserName> <UserPassword>xxxxxxxx</UserPassword> </Storage> <LUN> <LUNType>Thick</LUNType> <WriteType>1</WriteType> <MirrorSwitch>1</MirrorSwitch> </LUN> <iSCSI> <DefaultTargetIP>x.x.x.x</DefaultTargetIP> <Initiator Name="xxxxxxxx" TargetIP="x.x.x.x"/> <Initiator Name="xxxxxxxx" TargetIP="x.x.x.x"/> </iSCSI> <Host OSType=”Linux” HostIP=”x.x.x.x, x.x.x.x”/></config>
The driver configuration file of OceanStor HVS is shown as follows:
<?xml version='1.0' encoding='UTF-8'?><config> <Storage> <Product>HVS</Product> <Protocol>iSCSI</Protocol> <HVSURL>https://x.x.x.x:8088/deviceManager/rest/</HVSURL> <UserName>xxxxxxxx</UserName> <UserPassword>xxxxxxxx</UserPassword> </Storage> <LUN> <LUNType>Thick</LUNType> <WriteType>1</WriteType> <MirrorSwitch>1</MirrorSwitch> <StoragePool>xxxxxxxx</StoragePool> </LUN> <iSCSI> <DefaultTargetIP>x.x.x.x</DefaultTargetIP> <Initiator Name="xxxxxxxx" TargetIP="x.x.x.x"/> <Initiator Name="xxxxxxxx" TargetIP="x.x.x.x"/> </iSCSI> <Host OSType=”Linux” HostIP=”x.x.x.x, x.x.x.x”/></config>
Note
You do not need to configure the iSCSI target IP address for the Fibre Channeldriver. In the prior example, delete the iSCSI configuration:
OpenStack ConfigurationReference
October 23, 2013 havana
282
<iSCSI> <DefaultTargetIP>x.x.x.x</DefaultTargetIP> <Initiator Name="xxxxxxxx" TargetIP="x.x.x.x"/> <Initiator Name="xxxxxxxx" TargetIP="x.x.x.x"/> </iSCSI>
To add volume_driver and cinder_huawei_conf_file items, you can modifyconfiguration file cinder.conf as follows:
volume_driver = cinder.volume.drivers.huawei.HuaweiVolumeDrivercinder_huawei_conf_file = /etc/cinder/cinder_huawei_conf.xml
You can configure multiple Huawei back-end storages as follows:
enabled_backends = t_iscsi, dorado5100_iscsi[t_iscsi]volume_driver = cinder.volume.drivers.huawei.HuaweiVolumeDrivercinder_huawei_conf_file = /etc/cinder/cinder_huawei_conf_t_iscsi.xmlvolume_backend_name = HuaweiTISCSIDriver[dorado5100_iscsi]volume_driver = cinder.volume.drivers.huawei.HuaweiVolumeDrivercinder_huawei_conf_file = /etc/cinder/cinder_huawei_conf_dorado5100_iscsi.xmlvolume_backend_name = HuaweiDorado5100ISCSIDriver
OceanStor HVS storage system supports the QoS function. You need to create a QoS policyfor the HVS storage system and create the volume type to enable QoS as follows:
Create volume type: QoS_highcinder type-create QoS_highConfigure extra_specs for QoS_high:cinder type-key QoS_high set capabilities:QoS_support="<is> True" drivers:flow_strategy=OpenStack_QoS_high drivers:io_priority=high
Note
OpenStack_QoS_high is a QoS policy created by a user for the HVS storagesystem. QoS_high is the self-defined volume type. io_priority can only beset to high, normal, or low.
OceanStor HVS storage system supports the SmartTier function. SmartTier has three tiers.You can create the volume type to enable SmartTier as follows:
Create volume type: Tier_highcinder type-create Tier_highConfigure extra_specs for Tier_high:cinder type-key Tier_high set capabilities:Tier_support="<is> True" drivers:distribute_policy=high drivers:transfer_strategy=high
Note
distribute_policy and transfer_strategy can only be set to high,normal, or low.
Configuration File Details
All flags of a configuration file are described as follows:
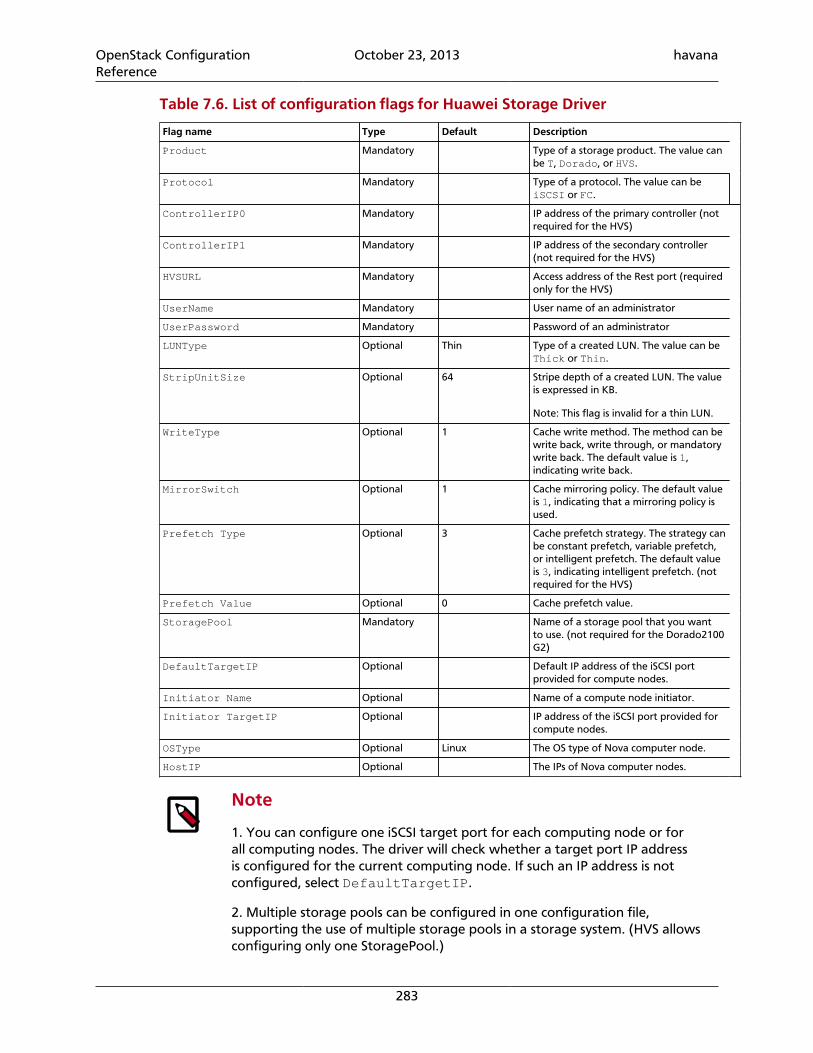
OpenStack ConfigurationReference
October 23, 2013 havana
283
Table 7.6. List of configuration flags for Huawei Storage Driver
Flag name Type Default Description
Product Mandatory Type of a storage product. The value canbe T, Dorado, or HVS.
Protocol Mandatory Type of a protocol. The value can beiSCSI or FC.
ControllerIP0 Mandatory IP address of the primary controller (notrequired for the HVS)
ControllerIP1 Mandatory IP address of the secondary controller(not required for the HVS)
HVSURL Mandatory Access address of the Rest port (requiredonly for the HVS)
UserName Mandatory User name of an administrator
UserPassword Mandatory Password of an administrator
LUNType Optional Thin Type of a created LUN. The value can beThick or Thin.
StripUnitSize Optional 64 Stripe depth of a created LUN. The valueis expressed in KB.
Note: This flag is invalid for a thin LUN.
WriteType Optional 1 Cache write method. The method can bewrite back, write through, or mandatorywrite back. The default value is 1,indicating write back.
MirrorSwitch Optional 1 Cache mirroring policy. The default valueis 1, indicating that a mirroring policy isused.
Prefetch Type Optional 3 Cache prefetch strategy. The strategy canbe constant prefetch, variable prefetch,or intelligent prefetch. The default valueis 3, indicating intelligent prefetch. (notrequired for the HVS)
Prefetch Value Optional 0 Cache prefetch value.
StoragePool Mandatory Name of a storage pool that you wantto use. (not required for the Dorado2100G2)
DefaultTargetIP Optional Default IP address of the iSCSI portprovided for compute nodes.
Initiator Name Optional Name of a compute node initiator.
Initiator TargetIP Optional IP address of the iSCSI port provided forcompute nodes.
OSType Optional Linux The OS type of Nova computer node.
HostIP Optional The IPs of Nova computer nodes.
Note
1. You can configure one iSCSI target port for each computing node or forall computing nodes. The driver will check whether a target port IP addressis configured for the current computing node. If such an IP address is notconfigured, select DefaultTargetIP.
2. Multiple storage pools can be configured in one configuration file,supporting the use of multiple storage pools in a storage system. (HVS allowsconfiguring only one StoragePool.)
OpenStack ConfigurationReference
October 23, 2013 havana
284
3. For details about LUN configuration information, see command createlunin the specific command-line interface (CLI) document for reference or run help-c createlun on the storage system CLI.
4. After the driver is loaded, the storage system obtains any modification ofthe driver configuration file in real time and you do not need to restart thecinder-volume service.
IBM GPFS Volume Driver
IBM General Parallel File System (GPFS) is a cluster file system that provides concurrentaccess to file systems from multiple nodes. The storage provided by these nodes can bedirect attached, network attached, SAN attached, or a combination of these methods.GPFS provides many features beyond common data access, including data replication,policy based storage management, and space efficient file snapshot and clone operations.
How the GPFS Driver Works
The GPFS driver enables the use of GPFS in a fashion similar to that of the NFS driver. Withthe GPFS driver, instances do not actually access a storage device at the block level. Instead,volume backing files are created in a GPFS file system and mapped to instances, whichemulate a block device.
Note
GPFS software must be installed and running on nodes where Block Storgeand Compute services are running in the OpenStack environment. A GPFS filesystem must also be created and mounted on these nodes before starting thecinder-volume service. The details of these GPFS specific steps are covered inGPFS: Concepts, Planning, and Installation Guide and GPFS: Administration andProgramming Reference.
Optionally, the Image service can be configured to store images on a GPFS file system.When a Block Storage volume is created from an image, if both image data and volumedata reside in the same GPFS file system, the data from image file is moved efficiently tothe volume file using copy-on-write optimization strategy.
Enabling the GPFS Driver
To use the Block Storage service with the GPFS driver, first set the volume_driver incinder.conf:
volume_driver = cinder.volume.drivers.gpfs.GPFSDriver
The following table contains the configuration options supported by the GPFS driver.
Table 7.7. Description of configuration options for storage_gpfs
Configuration option=Default value Description
gpfs_images_dir=None (StrOpt) Specifies the path of the Image service repositoryin GPFS. Leave undefined if not storing images in GPFS.
OpenStack ConfigurationReference
October 23, 2013 havana
285
Configuration option=Default value Description
gpfs_images_share_mode=None (StrOpt) Specifies the type of image copy to be used. Setthis when the Image service repository also uses GPFS sothat image files can be transferred efficiently from theImage service to the Block Storage service. There are twovalid values: "copy" specifies that a full copy of the imageis made; "copy_on_write" specifies that copy-on-writeoptimization strategy is used and unmodified blocks of theimage file are shared efficiently.
gpfs_max_clone_depth=0 (IntOpt) Specifies an upper limit on the number ofindirections required to reach a specific block due tosnapshots or clones. A lengthy chain of copy-on-writesnapshots or clones can have a negative impact onperformance, but improves space utilization. 0 indicatesunlimited clone depth.
gpfs_mount_point_base=None (StrOpt) Specifies the path of the GPFS directory whereBlock Storage volume and snapshot files are stored.
gpfs_sparse_volumes=True (BoolOpt) Specifies that volumes are created as sparsefiles which initially consume no space. If set to False, thevolume is created as a fully allocated file, in which case,creation may take a significantly longer time.
Note
The gpfs_images_share_mode flag is only valid if the Image serviceis configured to use GPFS with the gpfs_images_dir flag. Whenthe value of this flag is copy_on_write, the paths specified by thegpfs_mount_point_base and gpfs_images_dir flags must both reside inthe same GPFS file system and in the same GPFS file set.
Volume Creation Options
It is possible to specify additional volume configuration options on a per-volume basis byspecifying volume metadata. The volume is created using the specified options. Changingthe metadata after the volume is created has no effect. The following table lists the volumecreation options supported by the GPFS volume driver.
Table 7.8. Volume Create Options for GPFS Volume Drive
Metadata Item Name Description
fstype Specifies whether to create a file system or a swaparea on the new volume. If fstype=swap is specified,the mkswap command is used to create a swap area.Otherwise the mkfs command is passed the specified filesystem type, for example ext3, ext4 or ntfs.
fslabel Sets the file system label for the file system specifiedby fstype option. This value is only used if fstype isspecified.
data_pool_name Specifies the GPFS storage pool to which the volume is tobe assigned. Note: The GPFS storage pool must alreadyhave been created.
replicas Specifies how many copies of the volume file to create.Valid values are 1, 2, and, for GPFS V3.5.0.7 and later,3. This value cannot be greater than the value of theMaxDataReplicas attribute of the file system.
dio Enables or disables the Direct I/O caching policy for thevolume file. Valid values are yes and no.
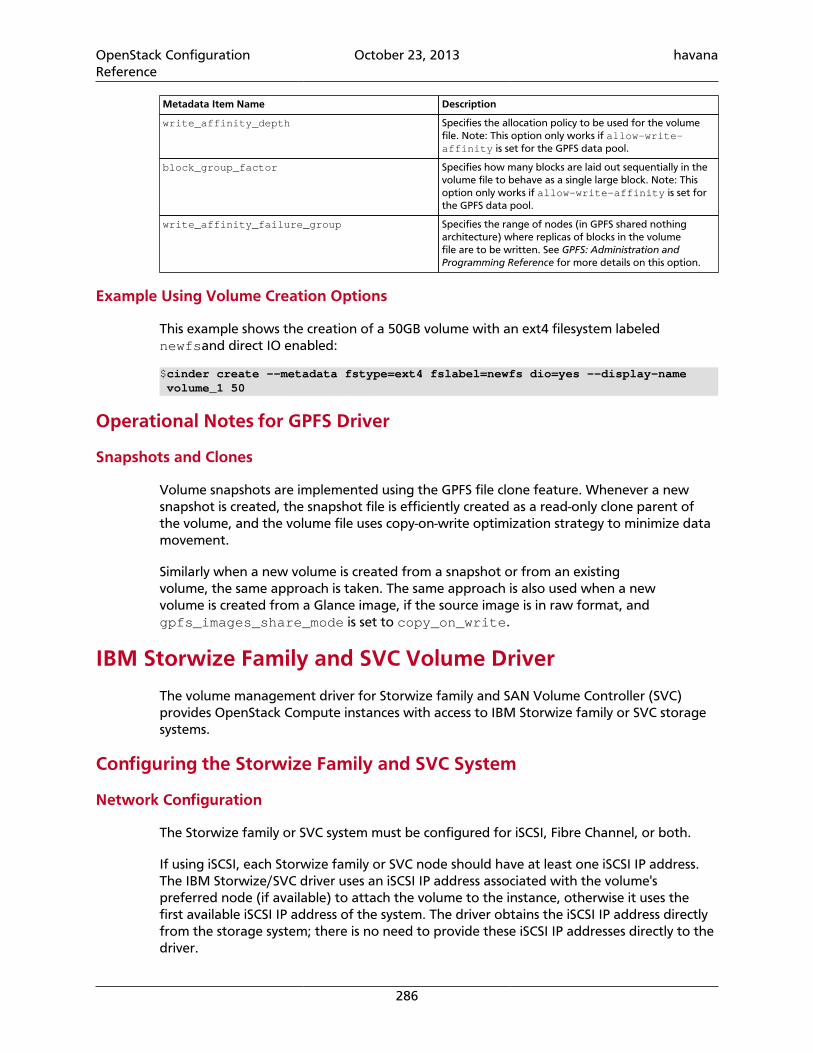
OpenStack ConfigurationReference
October 23, 2013 havana
286
Metadata Item Name Description
write_affinity_depth Specifies the allocation policy to be used for the volumefile. Note: This option only works if allow-write-affinity is set for the GPFS data pool.
block_group_factor Specifies how many blocks are laid out sequentially in thevolume file to behave as a single large block. Note: Thisoption only works if allow-write-affinity is set forthe GPFS data pool.
write_affinity_failure_group Specifies the range of nodes (in GPFS shared nothingarchitecture) where replicas of blocks in the volumefile are to be written. See GPFS: Administration andProgramming Reference for more details on this option.
Example Using Volume Creation Options
This example shows the creation of a 50GB volume with an ext4 filesystem labelednewfsand direct IO enabled:
$cinder create --metadata fstype=ext4 fslabel=newfs dio=yes --display-name volume_1 50
Operational Notes for GPFS Driver
Snapshots and Clones
Volume snapshots are implemented using the GPFS file clone feature. Whenever a newsnapshot is created, the snapshot file is efficiently created as a read-only clone parent ofthe volume, and the volume file uses copy-on-write optimization strategy to minimize datamovement.
Similarly when a new volume is created from a snapshot or from an existingvolume, the same approach is taken. The same approach is also used when a newvolume is created from a Glance image, if the source image is in raw format, andgpfs_images_share_mode is set to copy_on_write.
IBM Storwize Family and SVC Volume Driver
The volume management driver for Storwize family and SAN Volume Controller (SVC)provides OpenStack Compute instances with access to IBM Storwize family or SVC storagesystems.
Configuring the Storwize Family and SVC System
Network Configuration
The Storwize family or SVC system must be configured for iSCSI, Fibre Channel, or both.
If using iSCSI, each Storwize family or SVC node should have at least one iSCSI IP address.The IBM Storwize/SVC driver uses an iSCSI IP address associated with the volume'spreferred node (if available) to attach the volume to the instance, otherwise it uses thefirst available iSCSI IP address of the system. The driver obtains the iSCSI IP address directlyfrom the storage system; there is no need to provide these iSCSI IP addresses directly to thedriver.
OpenStack ConfigurationReference
October 23, 2013 havana
287
Note
If using iSCSI, ensure that the compute nodes have iSCSI network access to theStorwize family or SVC system.
Note
OpenStack Nova's Grizzly version supports iSCSI multipath. Once this isconfigured on the Nova host (outside the scope of this documentation),multipath is enabled.
If using Fibre Channel (FC), each Storwize family or SVC node should have at least oneWWPN port configured. If the storwize_svc_multipath_enabled flag is set to Truein the Cinder configuration file, the driver uses all available WWPNs to attach the volumeto the instance (details about the configuration flags appear in the next section). If theflag is not set, the driver uses the WWPN associated with the volume's preferred node (ifavailable), otherwise it uses the first available WWPN of the system. The driver obtains theWWPNs directly from the storage system; there is no need to provide these WWPNs directlyto the driver.
Note
If using FC, ensure that the compute nodes have FC connectivity to the Storwizefamily or SVC system.
iSCSI CHAP Authentication
If using iSCSI for data access and the storwize_svc_iscsi_chap_enabled is set toTrue, the driver will associate randomly-generated CHAP secrets with all hosts on theStorwize family system. OpenStack compute nodes use these secrets when creating iSCSIconnections.
Note
CHAP secrets are added to existing hosts as well as newly-created ones. If theCHAP option is enabled, hosts will not be able to access the storage without thegenerated secrets.
Note
Not all OpenStack Compute drivers support CHAP authentication. Please checkcompatibility before using.
Note
CHAP secrets are passed from OpenStack Block Storage to Compute in cleartext. This communication should be secured to ensure that CHAP secrets arenot discovered.
Configuring storage pools
Each instance of the IBM Storwize/SVC driver allocates all volumes in a single pool.The pool should be created in advance and be provided to the driver using the
OpenStack ConfigurationReference
October 23, 2013 havana
288
storwize_svc_volpool_name configuration flag. Details about the configuration flagsand how to provide the flags to the driver appear in the next section.
Configuring user authentication for the driver
The driver requires access to the Storwize family or SVC system management interface. Thedriver communicates with the management using SSH. The driver should be provided withthe Storwize family or SVC management IP using the san_ip flag, and the managementport should be provided by the san_ssh_port flag. By default, the port value isconfigured to be port 22 (SSH).
Note
Make sure the compute node running the nova-volume management driver hasSSH network access to the storage system.
To allow the driver to communicate with the Storwize family or SVC system, you mustprovide the driver with a user on the storage system. The driver has two authenticationmethods: password-based authentication and SSH key pair authentication. The user shouldhave an Administrator role. It is suggested to create a new user for the managementdriver. Please consult with your storage and security administrator regarding the preferredauthentication method and how passwords or SSH keys should be stored in a securemanner.
Note
When creating a new user on the Storwize or SVC system, make sure theuser belongs to the Administrator group or to another group that has anAdministrator role.
If using password authentication, assign a password to the user on the Storwize or SVCsystem. The driver configuration flags for the user and password are san_login andsan_password, respectively.
If you are using the SSH key pair authentication, create SSH private and public keysusing the instructions below or by any other method. Associate the public key with theuser by uploading the public key: select the "choose file" option in the Storwize familyor SVC management GUI under "SSH public key". Alternatively, you may associate theSSH public key using the command line interface; details can be found in the Storwizeand SVC documentation. The private key should be provided to the driver using thesan_private_key configuration flag.
Creating a SSH key pair using OpenSSH
You can create an SSH key pair using OpenSSH, by running:
$ ssh-keygen -t rsa
The command prompts for a file to save the key pair. For example, if you select 'key' as thefilename, two files are created: key and key.pub. The key file holds the private SSH keyand key.pub holds the public SSH key.
The command also prompts for a pass phrase, which should be empty.
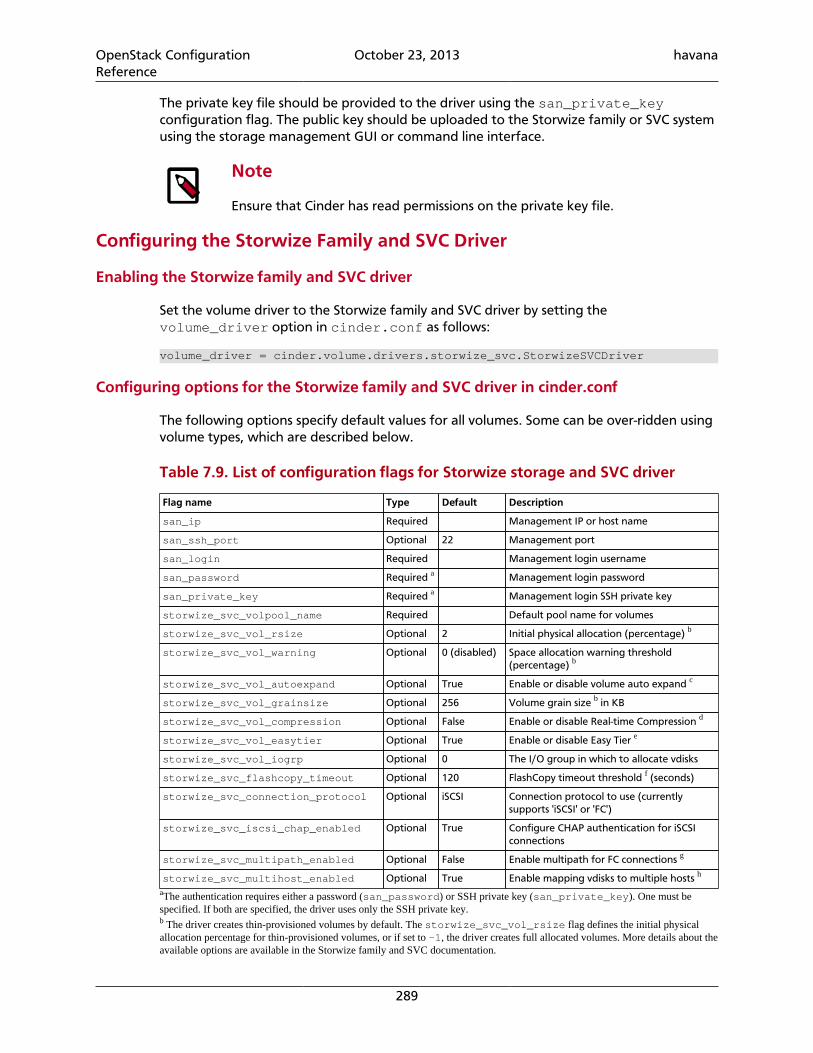
OpenStack ConfigurationReference
October 23, 2013 havana
289
The private key file should be provided to the driver using the san_private_keyconfiguration flag. The public key should be uploaded to the Storwize family or SVC systemusing the storage management GUI or command line interface.
Note
Ensure that Cinder has read permissions on the private key file.
Configuring the Storwize Family and SVC Driver
Enabling the Storwize family and SVC driver
Set the volume driver to the Storwize family and SVC driver by setting thevolume_driver option in cinder.conf as follows:
volume_driver = cinder.volume.drivers.storwize_svc.StorwizeSVCDriver
Configuring options for the Storwize family and SVC driver in cinder.conf
The following options specify default values for all volumes. Some can be over-ridden usingvolume types, which are described below.
Table 7.9. List of configuration flags for Storwize storage and SVC driver
Flag name Type Default Description
san_ip Required Management IP or host name
san_ssh_port Optional 22 Management port
san_login Required Management login username
san_password Required a Management login password
san_private_key Required a Management login SSH private key
storwize_svc_volpool_name Required Default pool name for volumes
storwize_svc_vol_rsize Optional 2 Initial physical allocation (percentage) b
storwize_svc_vol_warning Optional 0 (disabled) Space allocation warning threshold(percentage) b
storwize_svc_vol_autoexpand Optional True Enable or disable volume auto expand c
storwize_svc_vol_grainsize Optional 256 Volume grain size b in KB
storwize_svc_vol_compression Optional False Enable or disable Real-time Compression d
storwize_svc_vol_easytier Optional True Enable or disable Easy Tier e
storwize_svc_vol_iogrp Optional 0 The I/O group in which to allocate vdisks
storwize_svc_flashcopy_timeout Optional 120 FlashCopy timeout threshold f (seconds)
storwize_svc_connection_protocol Optional iSCSI Connection protocol to use (currentlysupports 'iSCSI' or 'FC')
storwize_svc_iscsi_chap_enabled Optional True Configure CHAP authentication for iSCSIconnections
storwize_svc_multipath_enabled Optional False Enable multipath for FC connections g
storwize_svc_multihost_enabled Optional True Enable mapping vdisks to multiple hosts h
aThe authentication requires either a password (san_password) or SSH private key (san_private_key). One must bespecified. If both are specified, the driver uses only the SSH private key.b The driver creates thin-provisioned volumes by default. The storwize_svc_vol_rsize flag defines the initial physicalallocation percentage for thin-provisioned volumes, or if set to -1, the driver creates full allocated volumes. More details about theavailable options are available in the Storwize family and SVC documentation.
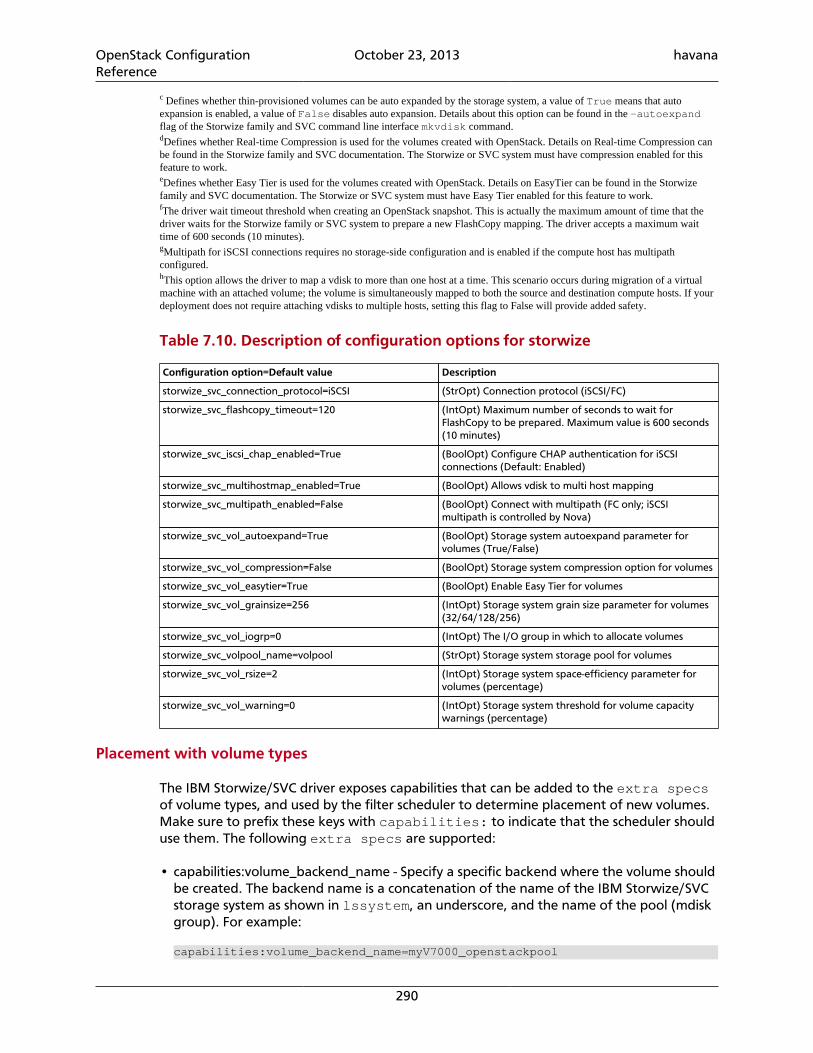
OpenStack ConfigurationReference
October 23, 2013 havana
290
c Defines whether thin-provisioned volumes can be auto expanded by the storage system, a value of True means that autoexpansion is enabled, a value of False disables auto expansion. Details about this option can be found in the –autoexpandflag of the Storwize family and SVC command line interface mkvdisk command.dDefines whether Real-time Compression is used for the volumes created with OpenStack. Details on Real-time Compression canbe found in the Storwize family and SVC documentation. The Storwize or SVC system must have compression enabled for thisfeature to work.eDefines whether Easy Tier is used for the volumes created with OpenStack. Details on EasyTier can be found in the Storwizefamily and SVC documentation. The Storwize or SVC system must have Easy Tier enabled for this feature to work.fThe driver wait timeout threshold when creating an OpenStack snapshot. This is actually the maximum amount of time that thedriver waits for the Storwize family or SVC system to prepare a new FlashCopy mapping. The driver accepts a maximum waittime of 600 seconds (10 minutes).gMultipath for iSCSI connections requires no storage-side configuration and is enabled if the compute host has multipathconfigured.hThis option allows the driver to map a vdisk to more than one host at a time. This scenario occurs during migration of a virtualmachine with an attached volume; the volume is simultaneously mapped to both the source and destination compute hosts. If yourdeployment does not require attaching vdisks to multiple hosts, setting this flag to False will provide added safety.
Table 7.10. Description of configuration options for storwize
Configuration option=Default value Description
storwize_svc_connection_protocol=iSCSI (StrOpt) Connection protocol (iSCSI/FC)
storwize_svc_flashcopy_timeout=120 (IntOpt) Maximum number of seconds to wait forFlashCopy to be prepared. Maximum value is 600 seconds(10 minutes)
storwize_svc_iscsi_chap_enabled=True (BoolOpt) Configure CHAP authentication for iSCSIconnections (Default: Enabled)
storwize_svc_multihostmap_enabled=True (BoolOpt) Allows vdisk to multi host mapping
storwize_svc_multipath_enabled=False (BoolOpt) Connect with multipath (FC only; iSCSImultipath is controlled by Nova)
storwize_svc_vol_autoexpand=True (BoolOpt) Storage system autoexpand parameter forvolumes (True/False)
storwize_svc_vol_compression=False (BoolOpt) Storage system compression option for volumes
storwize_svc_vol_easytier=True (BoolOpt) Enable Easy Tier for volumes
storwize_svc_vol_grainsize=256 (IntOpt) Storage system grain size parameter for volumes(32/64/128/256)
storwize_svc_vol_iogrp=0 (IntOpt) The I/O group in which to allocate volumes
storwize_svc_volpool_name=volpool (StrOpt) Storage system storage pool for volumes
storwize_svc_vol_rsize=2 (IntOpt) Storage system space-efficiency parameter forvolumes (percentage)
storwize_svc_vol_warning=0 (IntOpt) Storage system threshold for volume capacitywarnings (percentage)
Placement with volume types
The IBM Storwize/SVC driver exposes capabilities that can be added to the extra specsof volume types, and used by the filter scheduler to determine placement of new volumes.Make sure to prefix these keys with capabilities: to indicate that the scheduler shoulduse them. The following extra specs are supported:
• capabilities:volume_backend_name - Specify a specific backend where the volume shouldbe created. The backend name is a concatenation of the name of the IBM Storwize/SVCstorage system as shown in lssystem, an underscore, and the name of the pool (mdiskgroup). For example:
capabilities:volume_backend_name=myV7000_openstackpool
OpenStack ConfigurationReference
October 23, 2013 havana
291
• capabilities:compression_support - Specify a backend according to compression support.A value of True should be used to request a backend that supports compression, and avalue of False will request a backend that does not support compression. If you do nothave constraints on compression support, do not set this key. Note that specifying Truedoes not enable compression; it only requests that the volume be placed on a backendthat supports compression. Example syntax:
capabilities:compression_support='<is> True'
• capabilities:easytier_support - Similar semantics as the compression_support key, butfor specifying according to support of the Easy Tier feature. Example syntax:
capabilities:easytier_support='<is> True'
• capabilities:storage_protocol - Specifies the connection protocol used to attach volumesof this type to instances. Legal values are iSCSI and FC. This extra specs value isused for both placement and setting the protocol used for this volume. In the examplesyntax, note <in> is used as opposed to <is> used in the previous examples.
capabilities:storage_protocol='<in> FC'
Configuring per-volume creation options
Volume types can also be used to pass options to the IBM Storwize/SVC driver, which over-ride the default values set in the configuration file. Contrary to the previous exampleswhere the "capabilities" scope was used to pass parameters to the Cinder scheduler, optionscan be passed to the IBM Storwize/SVC driver with the "drivers" scope.
The following extra specs keys are supported by the IBM Storwize/SVC driver:
• rsize
• warning
• autoexpand
• grainsize
• compression
• easytier
• multipath
• iogrp
These keys have the same semantics as their counterparts in the configuration file. They areset similarly; for example, rsize=2 or compression=False.
Example using volume types
In the following example, we create a volume type to specify a controller that supportsiSCSI and compression, to use iSCSI when attaching the volume, and to enable compression:
$ cinder type-create compressed
OpenStack ConfigurationReference
October 23, 2013 havana
292
$ cinder type-key compressed set capabilities:storage_protocol='<in> iSCSI' capabilities:compression_support='<is> True' drivers:compression=True
We can then create a 50GB volume using this type:
$ cinder create --display-name "compressed volume" --volume-type compressed 50
Volume types can be used, for example, to provide users with different
• performance levels (such as, allocating entirely on an HDD tier, using Easy Tier for anHDD-SDD mix, or allocating entirely on an SSD tier)
• resiliency levels (such as, allocating volumes in pools with different RAID levels)
• features (such as, enabling/disabling Real-time Compression)
Operational Notes for the Storwize Family and SVC Driver
Volume Migration
In the context of OpenStack Block Storage's volume migration feature, the IBM Storwize/SVC driver enables the storage's virtualization technology. When migrating a volume fromone pool to another, the volume will appear in the destination pool almost immediately,while the storage moves the data in the background.
Note
To enable this feature, both pools involved in a given volume migration musthave the same values for extent_size. If the pools have different values forextent_size, the data will still be moved directly between the pools (nothost-side copy), but the operation will be synchronous.
Extending Volumes
The IBM Storwize/SVC driver allows for extending a volume's size, but only for volumeswithout snapshots.
Snapshots and Clones
Snapshots are implemented using FlashCopy with no background copy (space-efficient).Volume clones (volumes created from existing volumes) are implemented with FlashCopy,but with background copy enabled. This means that volume clones are independent, fullcopies. While this background copy is taking place, attempting to delete or extend thesource volume will result in that operation waiting for the copy to complete.
NetApp Unified Driver
NetApp unified driver is a block storage driver that supports multiple storage families andstorage protocols. The storage family corresponds to storage systems built on differenttechnologies like 7-Mode and clustered Data ONTAP®. The storage protocol refers to theprotocol used to initiate data storage and access operations on those storage systemslike iSCSI and NFS. NetApp unified driver can be configured to provision and manage
OpenStack ConfigurationReference
October 23, 2013 havana
293
OpenStack volumes on a given storage family for the specified storage protocol. TheOpenStack volumes can then be used for accessing and storing data using the the storageprotocol on the storage family system. NetApp unified driver is an extensible interface thatcan support new storage families and storage protocols.
NetApp clustered Data ONTAP storage family
The NetApp clustered Data ONTAP storage family represents a configuration group whichprovides OpenStack compute instances access to clustered Data ONTAP storage systems. Atpresent it can be configured in cinder to work with iSCSI and NFS storage protocols.
NetApp iSCSI configuration for clustered Data ONTAP
The NetApp iSCSI configuration for clustered Data ONTAP is an interface from OpenStackto clustered Data ONTAP storage systems for provisioning and managing the SAN blockstorage entity, that is, NetApp LUN which can be accessed using iSCSI protocol.
The iSCSI configuration for clustered Data ONTAP is a direct interface from OpenStack toclustered Data ONTAP and it does not require additional management software to achievethe desired functionality. It uses NetApp APIs to interact with the clustered Data ONTAP.
Configuration options for clustered Data ONTAP family with iSCSI protocol
Set the volume driver, storage family and storage protocol to NetApp unified driver,clustered Data ONTAP and iSCSI respectively by setting the volume_driver,netapp_storage_family and netapp_storage_protocol options incinder.conf as follows:
volume_driver=cinder.volume.drivers.netapp.common.NetAppDriver netapp_storage_family=ontap_cluster netapp_storage_protocol=iscsi
Refer to OpenStack NetApp community for detailed information on available configurationoptions.
NetApp NFS configuration for clustered Data ONTAP
The NetApp NFS configuration for clustered Data ONTAP is an interface from OpenStack toclustered Data ONTAP system for provisioning and managing OpenStack volumes on NFSexports provided by the clustered Data ONTAP system which can then be accessed usingNFS protocol.
The NFS configuration for clustered Data ONTAP does not require any additionalmanagement software to achieve the desired functionality. It uses NetApp APIs to interactwith the clustered Data ONTAP.
Configuration options for the clustered Data ONTAP family with NFS protocol
Set the volume driver, storage family and storage protocol to NetApp unifieddriver, clustered Data ONTAP and NFS respectively by setting the volume_driver,netapp_storage_family and netapp_storage_protocol options incinder.conf as follows:
OpenStack ConfigurationReference
October 23, 2013 havana
294
volume_driver=cinder.volume.drivers.netapp.common.NetAppDriver netapp_storage_family=ontap_cluster netapp_storage_protocol=nfs
Refer to OpenStack NetApp community for detailed information on available configurationoptions.
NetApp 7-Mode Data ONTAP storage family
The NetApp 7-Mode Data ONTAP storage family represents a configuration group whichprovides OpenStack compute instances access to 7-Mode storage systems. At present it canbe configured in cinder to work with iSCSI and NFS storage protocols.
NetApp iSCSI configuration for 7-Mode storage controller
The NetApp iSCSI configuration for 7-Mode Data ONTAP is an interface from OpenStack to7-Mode storage systems for provisioning and managing the SAN block storage entity, thatis, NetApp LUN which can be accessed using iSCSI protocol.
The iSCSI configuration for 7-Mode Data ONTAP is a direct interface from OpenStack to 7-Mode storage system and it does not require additional management software to achievethe desired functionality. It uses NetApp APIs to interact with the 7-Mode storage system.
Configuration options for the 7-Mode Data ONTAP storage family with iSCSI protocol
Set the volume driver, storage family and storage protocol to NetApp unifieddriver, 7-Mode Data ONTAP and iSCSI respectively by setting the volume_driver,netapp_storage_family and netapp_storage_protocol options incinder.conf as follows:
volume_driver=cinder.volume.drivers.netapp.common.NetAppDriver netapp_storage_family=ontap_7mode netapp_storage_protocol=iscsi
Refer to OpenStack NetApp community for detailed information on available configurationoptions.
NetApp NFS configuration for 7-Mode Data ONTAP
The NetApp NFS configuration for 7-Mode Data ONTAP is an interface from OpenStack to7-Mode storage system for provisioning and managing OpenStack volumes on NFS exportsprovided by the 7-Mode storage system which can then be accessed using NFS protocol.
The NFS configuration for 7-Mode Data ONTAP does not require any additionalmanagement software to achieve the desired functionality. It uses NetApp APIs to interactwith the 7-Mode storage system.
Configuration options for the 7-Mode Data ONTAP family with NFS protocol
Set the volume driver, storage family and storage protocol to NetApp unifieddriver, 7-Mode Data ONTAP and NFS respectively by setting the volume_driver,
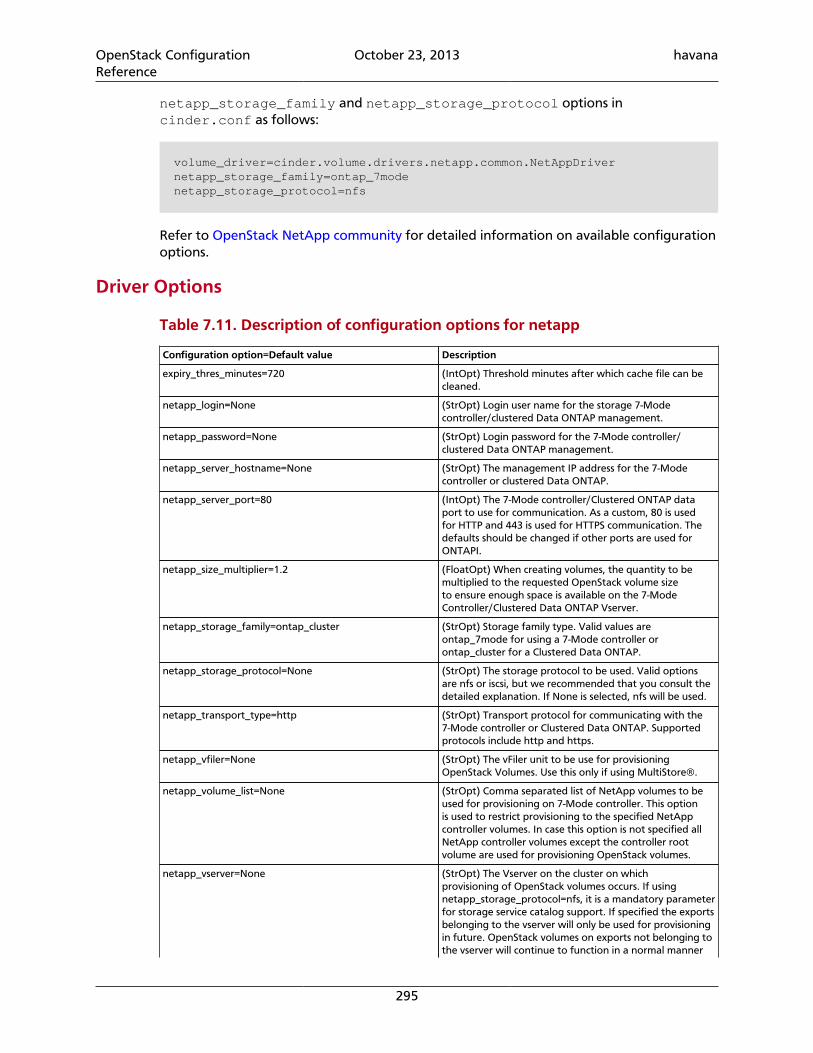
OpenStack ConfigurationReference
October 23, 2013 havana
295
netapp_storage_family and netapp_storage_protocol options incinder.conf as follows:
volume_driver=cinder.volume.drivers.netapp.common.NetAppDriver netapp_storage_family=ontap_7mode netapp_storage_protocol=nfs
Refer to OpenStack NetApp community for detailed information on available configurationoptions.
Driver Options
Table 7.11. Description of configuration options for netapp
Configuration option=Default value Description
expiry_thres_minutes=720 (IntOpt) Threshold minutes after which cache file can becleaned.
netapp_login=None (StrOpt) Login user name for the storage 7-Modecontroller/clustered Data ONTAP management.
netapp_password=None (StrOpt) Login password for the 7-Mode controller/clustered Data ONTAP management.
netapp_server_hostname=None (StrOpt) The management IP address for the 7-Modecontroller or clustered Data ONTAP.
netapp_server_port=80 (IntOpt) The 7-Mode controller/Clustered ONTAP dataport to use for communication. As a custom, 80 is usedfor HTTP and 443 is used for HTTPS communication. Thedefaults should be changed if other ports are used forONTAPI.
netapp_size_multiplier=1.2 (FloatOpt) When creating volumes, the quantity to bemultiplied to the requested OpenStack volume sizeto ensure enough space is available on the 7-ModeController/Clustered Data ONTAP Vserver.
netapp_storage_family=ontap_cluster (StrOpt) Storage family type. Valid values areontap_7mode for using a 7-Mode controller orontap_cluster for a Clustered Data ONTAP.
netapp_storage_protocol=None (StrOpt) The storage protocol to be used. Valid optionsare nfs or iscsi, but we recommended that you consult thedetailed explanation. If None is selected, nfs will be used.
netapp_transport_type=http (StrOpt) Transport protocol for communicating with the7-Mode controller or Clustered Data ONTAP. Supportedprotocols include http and https.
netapp_vfiler=None (StrOpt) The vFiler unit to be use for provisioningOpenStack Volumes. Use this only if using MultiStore®.
netapp_volume_list=None (StrOpt) Comma separated list of NetApp volumes to beused for provisioning on 7-Mode controller. This optionis used to restrict provisioning to the specified NetAppcontroller volumes. In case this option is not specified allNetApp controller volumes except the controller rootvolume are used for provisioning OpenStack volumes.
netapp_vserver=None (StrOpt) The Vserver on the cluster on whichprovisioning of OpenStack volumes occurs. If usingnetapp_storage_protocol=nfs, it is a mandatory parameterfor storage service catalog support. If specified the exportsbelonging to the vserver will only be used for provisioningin future. OpenStack volumes on exports not belonging tothe vserver will continue to function in a normal manner
OpenStack ConfigurationReference
October 23, 2013 havana
296
Configuration option=Default value Description
and recieve Block Storage operations like snapshotcreation etc.
thres_avl_size_perc_start=20 (IntOpt) Threshold available percent to start cachecleaning.
thres_avl_size_perc_stop=60 (IntOpt) Threshold available percent to stop cachecleaning.
Upgrading NetApp drivers to Havana
NetApp has introduced a new unified driver in Havana for configuring differentstorage families and storage protocols. This requires defining upgrade path for NetAppdrivers which existed in a previous release like Grizzly. This section covers the upgradeconfiguration for NetApp drivers and lists deprecated NetApp drivers.
Upgraded NetApp drivers
This section shows upgrade configuration in Havana for NetApp drivers in Grizzly.
Driver upgrade configuration
1. NetApp iSCSI direct driver for clustered Data ONTAP in Grizzly
volume_driver=cinder.volume.drivers.netapp.iscsi.NetAppDirectCmodeISCSIDriver
NetApp Unified Driver configuration
volume_driver=cinder.volume.drivers.netapp.common.NetAppDriver netapp_storage_family=ontap_cluster netapp_storage_protocol=iscsi
2. NetApp NFS direct driver for clustered Data ONTAP in Grizzly
volume_driver=cinder.volume.drivers.netapp.nfs.NetAppDirectCmodeNfsDriver
NetApp Unified Driver configuration
volume_driver=cinder.volume.drivers.netapp.common.NetAppDriver netapp_storage_family=ontap_cluster netapp_storage_protocol=nfs
3. NetApp iSCSI direct driver for 7-Mode storage controller in Grizzly
volume_driver=cinder.volume.drivers.netapp.iscsi.NetAppDirect7modeISCSIDriver
NetApp Unified Driver configuration
OpenStack ConfigurationReference
October 23, 2013 havana
297
volume_driver=cinder.volume.drivers.netapp.common.NetAppDriver netapp_storage_family=ontap_7mode netapp_storage_protocol=iscsi
4. NetApp NFS direct driver for 7-Mode storage controller in Grizzly
volume_driver=cinder.volume.drivers.netapp.nfs.NetAppDirect7modeNfsDriver
NetApp Unified Driver configuration
volume_driver=cinder.volume.drivers.netapp.common.NetAppDriver netapp_storage_family=ontap_7mode netapp_storage_protocol=nfs
Deprecated NetApp drivers
This section lists the NetApp drivers in Grizzly which have been deprecated in Havana.
Deprecated NetApp drivers
1. NetApp iSCSI driver for clustered Data ONTAP.
volume_driver=cinder.volume.drivers.netapp.iscsi.NetAppCmodeISCSIDriver
2. NetApp NFS driver for clustered Data ONTAP.
volume_driver=cinder.volume.drivers.netapp.nfs.NetAppCmodeNfsDriver
3. NetApp iSCSI driver for 7-Mode storage controller.
volume_driver=cinder.volume.drivers.netapp.iscsi.NetAppISCSIDriver
4. NetApp NFS driver for 7-Mode storage controller.
volume_driver=cinder.volume.drivers.netapp.nfs.NetAppNFSDriver
Note
Refer to OpenStack NetApp community for information on supportingdeprecated NetApp drivers in Havana.
Nexenta DriversNexentaStor Appliance is NAS/SAN software platform designed for building reliableand fast network storage arrays. The Nexenta Storage Appliance uses ZFS as a disk
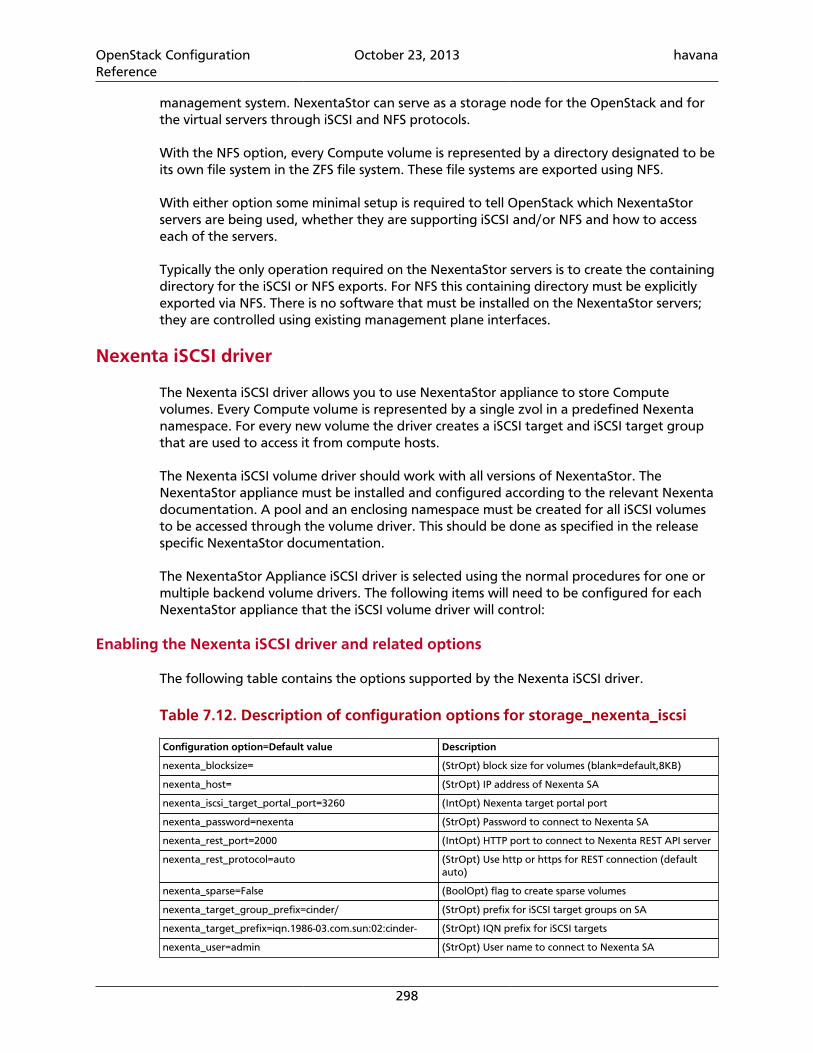
OpenStack ConfigurationReference
October 23, 2013 havana
298
management system. NexentaStor can serve as a storage node for the OpenStack and forthe virtual servers through iSCSI and NFS protocols.
With the NFS option, every Compute volume is represented by a directory designated to beits own file system in the ZFS file system. These file systems are exported using NFS.
With either option some minimal setup is required to tell OpenStack which NexentaStorservers are being used, whether they are supporting iSCSI and/or NFS and how to accesseach of the servers.
Typically the only operation required on the NexentaStor servers is to create the containingdirectory for the iSCSI or NFS exports. For NFS this containing directory must be explicitlyexported via NFS. There is no software that must be installed on the NexentaStor servers;they are controlled using existing management plane interfaces.
Nexenta iSCSI driver
The Nexenta iSCSI driver allows you to use NexentaStor appliance to store Computevolumes. Every Compute volume is represented by a single zvol in a predefined Nexentanamespace. For every new volume the driver creates a iSCSI target and iSCSI target groupthat are used to access it from compute hosts.
The Nexenta iSCSI volume driver should work with all versions of NexentaStor. TheNexentaStor appliance must be installed and configured according to the relevant Nexentadocumentation. A pool and an enclosing namespace must be created for all iSCSI volumesto be accessed through the volume driver. This should be done as specified in the releasespecific NexentaStor documentation.
The NexentaStor Appliance iSCSI driver is selected using the normal procedures for one ormultiple backend volume drivers. The following items will need to be configured for eachNexentaStor appliance that the iSCSI volume driver will control:
Enabling the Nexenta iSCSI driver and related options
The following table contains the options supported by the Nexenta iSCSI driver.
Table 7.12. Description of configuration options for storage_nexenta_iscsi
Configuration option=Default value Description
nexenta_blocksize= (StrOpt) block size for volumes (blank=default,8KB)
nexenta_host= (StrOpt) IP address of Nexenta SA
nexenta_iscsi_target_portal_port=3260 (IntOpt) Nexenta target portal port
nexenta_password=nexenta (StrOpt) Password to connect to Nexenta SA
nexenta_rest_port=2000 (IntOpt) HTTP port to connect to Nexenta REST API server
nexenta_rest_protocol=auto (StrOpt) Use http or https for REST connection (defaultauto)
nexenta_sparse=False (BoolOpt) flag to create sparse volumes
nexenta_target_group_prefix=cinder/ (StrOpt) prefix for iSCSI target groups on SA
nexenta_target_prefix=iqn.1986-03.com.sun:02:cinder- (StrOpt) IQN prefix for iSCSI targets
nexenta_user=admin (StrOpt) User name to connect to Nexenta SA
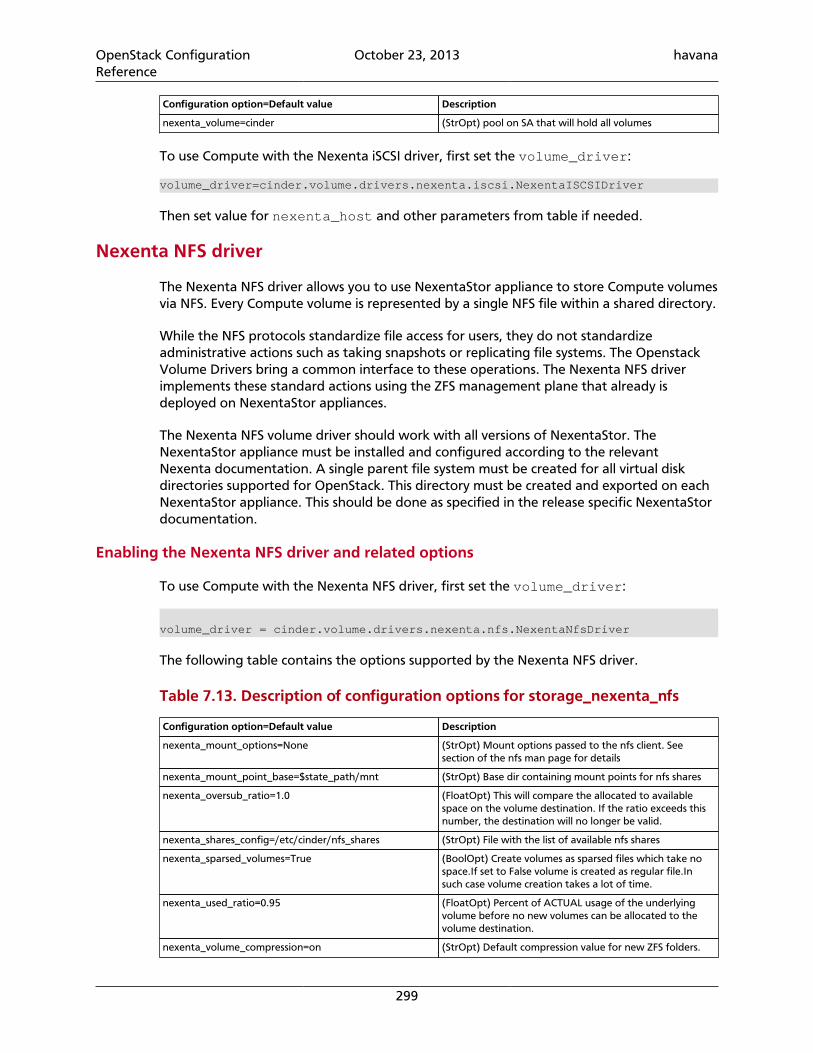
OpenStack ConfigurationReference
October 23, 2013 havana
299
Configuration option=Default value Description
nexenta_volume=cinder (StrOpt) pool on SA that will hold all volumes
To use Compute with the Nexenta iSCSI driver, first set the volume_driver:
volume_driver=cinder.volume.drivers.nexenta.iscsi.NexentaISCSIDriver
Then set value for nexenta_host and other parameters from table if needed.
Nexenta NFS driver
The Nexenta NFS driver allows you to use NexentaStor appliance to store Compute volumesvia NFS. Every Compute volume is represented by a single NFS file within a shared directory.
While the NFS protocols standardize file access for users, they do not standardizeadministrative actions such as taking snapshots or replicating file systems. The OpenstackVolume Drivers bring a common interface to these operations. The Nexenta NFS driverimplements these standard actions using the ZFS management plane that already isdeployed on NexentaStor appliances.
The Nexenta NFS volume driver should work with all versions of NexentaStor. TheNexentaStor appliance must be installed and configured according to the relevantNexenta documentation. A single parent file system must be created for all virtual diskdirectories supported for OpenStack. This directory must be created and exported on eachNexentaStor appliance. This should be done as specified in the release specific NexentaStordocumentation.
Enabling the Nexenta NFS driver and related options
To use Compute with the Nexenta NFS driver, first set the volume_driver:
volume_driver = cinder.volume.drivers.nexenta.nfs.NexentaNfsDriver
The following table contains the options supported by the Nexenta NFS driver.
Table 7.13. Description of configuration options for storage_nexenta_nfs
Configuration option=Default value Description
nexenta_mount_options=None (StrOpt) Mount options passed to the nfs client. Seesection of the nfs man page for details
nexenta_mount_point_base=$state_path/mnt (StrOpt) Base dir containing mount points for nfs shares
nexenta_oversub_ratio=1.0 (FloatOpt) This will compare the allocated to availablespace on the volume destination. If the ratio exceeds thisnumber, the destination will no longer be valid.
nexenta_shares_config=/etc/cinder/nfs_shares (StrOpt) File with the list of available nfs shares
nexenta_sparsed_volumes=True (BoolOpt) Create volumes as sparsed files which take nospace.If set to False volume is created as regular file.Insuch case volume creation takes a lot of time.
nexenta_used_ratio=0.95 (FloatOpt) Percent of ACTUAL usage of the underlyingvolume before no new volumes can be allocated to thevolume destination.
nexenta_volume_compression=on (StrOpt) Default compression value for new ZFS folders.
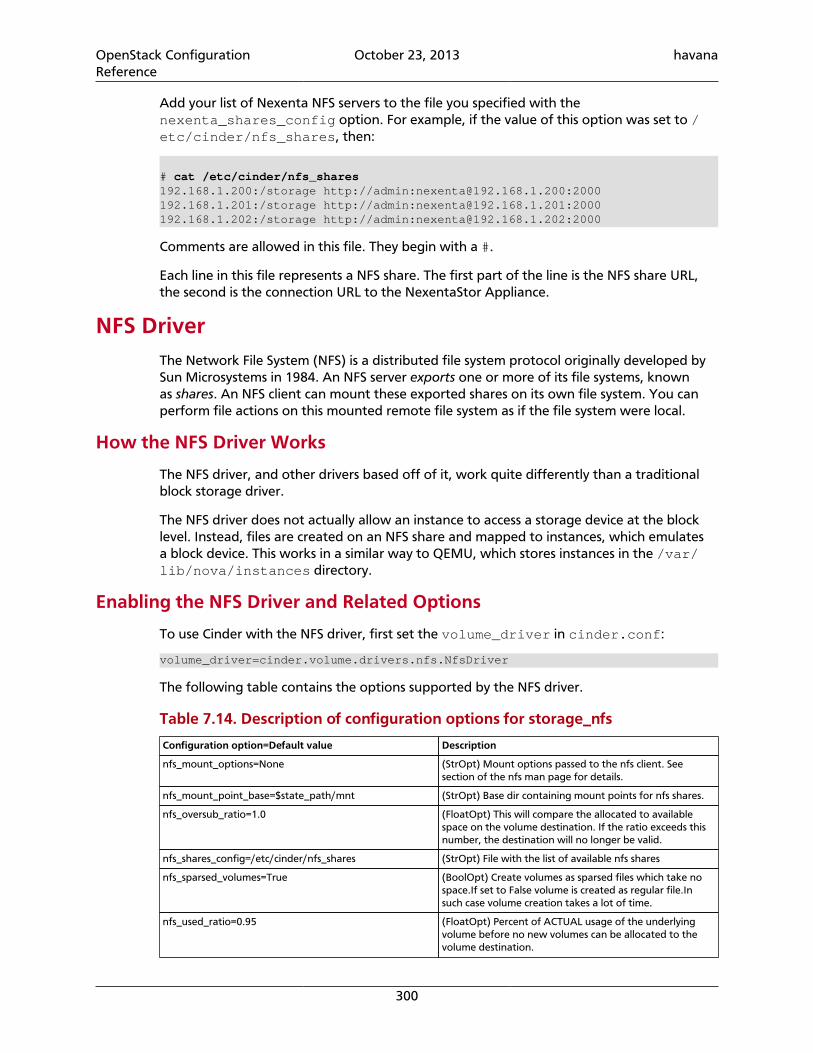
OpenStack ConfigurationReference
October 23, 2013 havana
300
Add your list of Nexenta NFS servers to the file you specified with thenexenta_shares_config option. For example, if the value of this option was set to /etc/cinder/nfs_shares, then:
# cat /etc/cinder/nfs_shares192.168.1.200:/storage http://admin:[email protected]:2000192.168.1.201:/storage http://admin:[email protected]:2000192.168.1.202:/storage http://admin:[email protected]:2000
Comments are allowed in this file. They begin with a #.
Each line in this file represents a NFS share. The first part of the line is the NFS share URL,the second is the connection URL to the NexentaStor Appliance.
NFS DriverThe Network File System (NFS) is a distributed file system protocol originally developed bySun Microsystems in 1984. An NFS server exports one or more of its file systems, knownas shares. An NFS client can mount these exported shares on its own file system. You canperform file actions on this mounted remote file system as if the file system were local.
How the NFS Driver Works
The NFS driver, and other drivers based off of it, work quite differently than a traditionalblock storage driver.
The NFS driver does not actually allow an instance to access a storage device at the blocklevel. Instead, files are created on an NFS share and mapped to instances, which emulatesa block device. This works in a similar way to QEMU, which stores instances in the /var/lib/nova/instances directory.
Enabling the NFS Driver and Related Options
To use Cinder with the NFS driver, first set the volume_driver in cinder.conf:
volume_driver=cinder.volume.drivers.nfs.NfsDriver
The following table contains the options supported by the NFS driver.
Table 7.14. Description of configuration options for storage_nfs
Configuration option=Default value Description
nfs_mount_options=None (StrOpt) Mount options passed to the nfs client. Seesection of the nfs man page for details.
nfs_mount_point_base=$state_path/mnt (StrOpt) Base dir containing mount points for nfs shares.
nfs_oversub_ratio=1.0 (FloatOpt) This will compare the allocated to availablespace on the volume destination. If the ratio exceeds thisnumber, the destination will no longer be valid.
nfs_shares_config=/etc/cinder/nfs_shares (StrOpt) File with the list of available nfs shares
nfs_sparsed_volumes=True (BoolOpt) Create volumes as sparsed files which take nospace.If set to False volume is created as regular file.Insuch case volume creation takes a lot of time.
nfs_used_ratio=0.95 (FloatOpt) Percent of ACTUAL usage of the underlyingvolume before no new volumes can be allocated to thevolume destination.
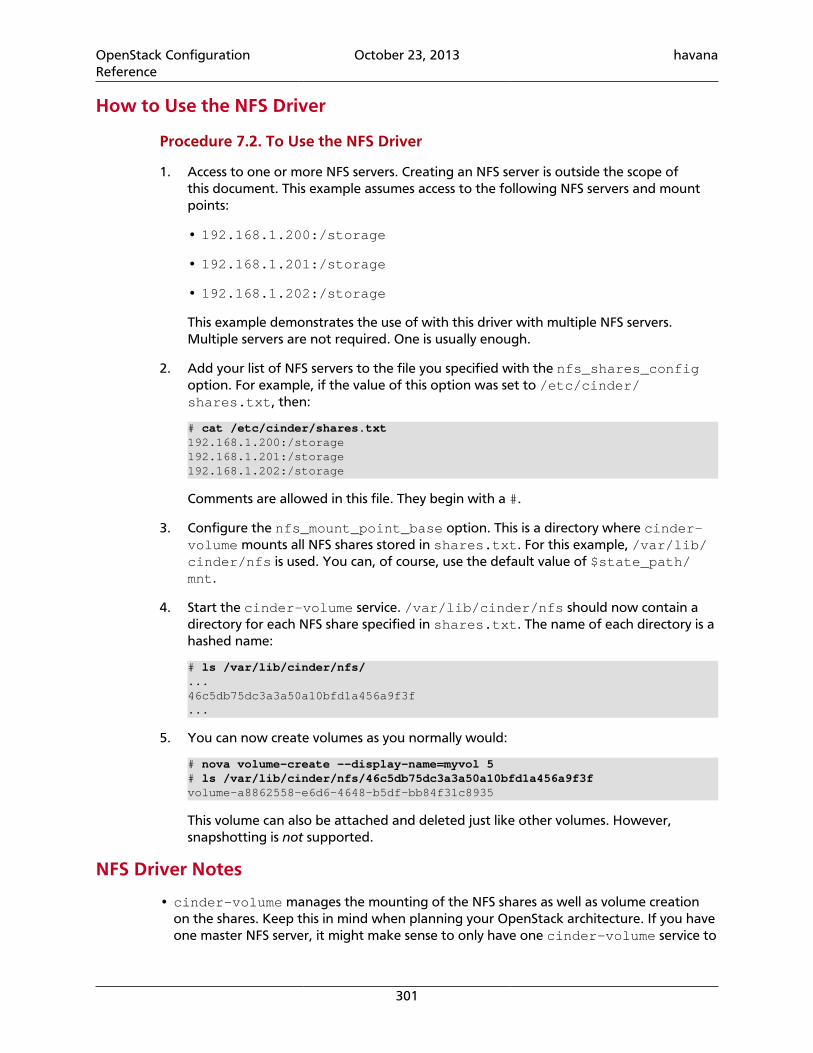
OpenStack ConfigurationReference
October 23, 2013 havana
301
How to Use the NFS Driver
Procedure 7.2. To Use the NFS Driver
1. Access to one or more NFS servers. Creating an NFS server is outside the scope ofthis document. This example assumes access to the following NFS servers and mountpoints:
• 192.168.1.200:/storage
• 192.168.1.201:/storage
• 192.168.1.202:/storage
This example demonstrates the use of with this driver with multiple NFS servers.Multiple servers are not required. One is usually enough.
2. Add your list of NFS servers to the file you specified with the nfs_shares_configoption. For example, if the value of this option was set to /etc/cinder/shares.txt, then:
# cat /etc/cinder/shares.txt192.168.1.200:/storage192.168.1.201:/storage192.168.1.202:/storage
Comments are allowed in this file. They begin with a #.
3. Configure the nfs_mount_point_base option. This is a directory where cinder-volume mounts all NFS shares stored in shares.txt. For this example, /var/lib/cinder/nfs is used. You can, of course, use the default value of $state_path/mnt.
4. Start the cinder-volume service. /var/lib/cinder/nfs should now contain adirectory for each NFS share specified in shares.txt. The name of each directory is ahashed name:
# ls /var/lib/cinder/nfs/...46c5db75dc3a3a50a10bfd1a456a9f3f...
5. You can now create volumes as you normally would:
# nova volume-create --display-name=myvol 5# ls /var/lib/cinder/nfs/46c5db75dc3a3a50a10bfd1a456a9f3fvolume-a8862558-e6d6-4648-b5df-bb84f31c8935
This volume can also be attached and deleted just like other volumes. However,snapshotting is not supported.
NFS Driver Notes
• cinder-volume manages the mounting of the NFS shares as well as volume creationon the shares. Keep this in mind when planning your OpenStack architecture. If you haveone master NFS server, it might make sense to only have one cinder-volume service to
OpenStack ConfigurationReference
October 23, 2013 havana
302
handle all requests to that NFS server. However, if that single server is unable to handleall requests, more than one cinder-volume service is needed as well as potentiallymore than one NFS server.
• Because data is stored in a file and not actually on a block storage device, you might notsee the same IO performance as you would with a traditional block storage driver. Pleasetest accordingly.
• Despite possible IO performance loss, having volume data stored in a file might bebeneficial. For example, backing up volumes can be as easy as copying the volume files.
Note
Regular IO flushing and syncing still stands.
SolidFire
The SolidFire Cluster is a high performance all SSD iSCSI storage device that providesmassive scale out capability and extreme fault tolerance. A key feature of the SolidFirecluster is the ability to set and modify during operation specific QoS levels on a volume forvolume basis. The SolidFire cluster offers this along with de-duplication, compression, andan architecture that takes full advantage of SSDs.
To configure the use of a SolidFire cluster with Block Storage, modify your cinder.conffile as follows:
volume_driver=cinder.volume.drivers.solidfire.SolidFiresan_ip=172.17.1.182 # the address of your MVIPsan_login=sfadmin # your cluster admin loginsan_password=sfpassword # your cluster admin passwordsf_account_prefix='' # prefix for tenant account creation on solidfire cluster (see warning below)
Warning
The SolidFire driver creates a unique account prefixed with $cinder-volume-service-hostname-$tenant-id on the SolidFire cluster for eachtenant that accesses the cluster through the Volume API. Unfortunately, thisaccount formation results in issues for High Availability (HA) installations andinstallations where the cinder-volume service can move to a new node.HA installations can return an Account Not Found error because the call tothe SolidFire cluster is not always going to be sent from the same node. Ininstallations where the cinder-volume service moves to a new node, thesame issue can occur when you perform operations on existing volumes, such asclone, extend, delete, and so on.
Tip
Set the sf_account_prefix option to an empty string ('') in thecinder.conf file. This setting results in unique accounts being created onthe SolidFire cluster, but the accounts are prefixed with the tenant-id or anyunique identifier that you choose and are independent of the host where thecinder-volume service resides.
OpenStack ConfigurationReference
October 23, 2013 havana
303
Table 7.15. Description of configuration options for solidfire
Configuration option=Default value Description
sf_account_prefix=docwork (StrOpt) Create SolidFire accounts with this prefix
sf_allow_tenant_qos=False (BoolOpt) Allow tenants to specify QOS on create
sf_api_port=443 (IntOpt) SolidFire API port. Useful if the device api isbehind a proxy on a different port.
sf_emulate_512=True (BoolOpt) Set 512 byte emulation on volume creation;
Windows
There is a volume backend for Windows. Set the following in your cinder.conf, and usethe options below to configure it.
volume_driver=cinder.volume.drivers.windows.WindowsDriver
Table 7.16. Description of configuration options for windows
Configuration option=Default value Description
windows_iscsi_lun_path=C:\iSCSIVirtualDisks (StrOpt) Path to store VHD backed volumes
XenAPINFS
XenAPINFS is a Block Storage (Cinder) driver which is using an NFS share through XenAPI'sStorage Manager to store virtual disk images and exposing those virtual disks as volumes.
This driver is not accessing the NFS share directly, it is only accessing the share throughXenAPI Storage Manager. This driver should be considered as a reference implementationfor using XenAPI's storage manager in OpenStack (present in XenServer and XCP).
Requirements
• A XenServer/XCP installation acting as Storage Controller. This document refers to thishypervisor as Storage Controller.
• Use XenServer/XCP as your hypervisor for compute nodes.
• An NFS share, that is configured for XenServer/XCP. For the specific requirements, exportoptions, please refer to the administration guide of your specific XenServer version. It isalso required that the NFS share is accessible by all the XenServers components withinyour cloud.
• For creating volumes from XenServer type images (vhd tgz files), XenServer Nova pluginsare also required on the Storage Controller.
Note
It is possible to use a XenServer as a Storage Controller and as a compute nodein the same time, thus the minimal configuration consists of a XenServer/XCPbox and an NFS share.
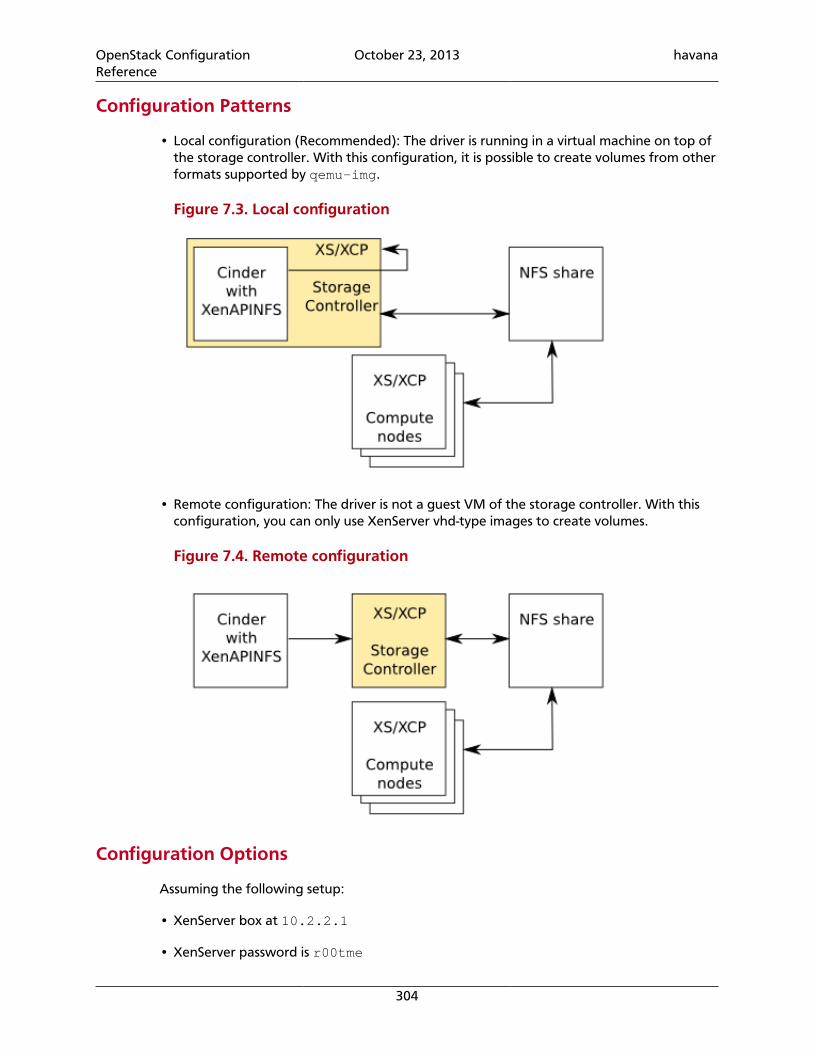
OpenStack ConfigurationReference
October 23, 2013 havana
304
Configuration Patterns
• Local configuration (Recommended): The driver is running in a virtual machine on top ofthe storage controller. With this configuration, it is possible to create volumes from otherformats supported by qemu-img.
Figure 7.3. Local configuration
• Remote configuration: The driver is not a guest VM of the storage controller. With thisconfiguration, you can only use XenServer vhd-type images to create volumes.
Figure 7.4. Remote configuration
Configuration Options
Assuming the following setup:
• XenServer box at 10.2.2.1
• XenServer password is r00tme
OpenStack ConfigurationReference
October 23, 2013 havana
305
• NFS server is nfs.example.com
• NFS export is at /volumes
To use XenAPINFS as your cinder driver, set the following configuration options incinder.conf:
volume_driver = cinder.volume.drivers.xenapi.sm.XenAPINFSDriverxenapi_connection_url = http://10.2.2.1xenapi_connection_username = rootxenapi_connection_password = r00tmexenapi_nfs_server = nfs.example.comxenapi_nfs_serverpath = /volumes
The following table contains the configuration options supported by the XenAPINFS driver.
Table 7.17. Description of configuration options for storage_xen
Configuration option=Default value Description
xenapi_connection_password=None (StrOpt) Password for XenAPI connection
xenapi_connection_url=None (StrOpt) URL for XenAPI connection
xenapi_connection_username=root (StrOpt) Username for XenAPI connection
xenapi_nfs_server=None (StrOpt) NFS server to be used by XenAPINFSDriver
xenapi_nfs_serverpath=None (StrOpt) Path of exported NFS, used by XenAPINFSDriver
xenapi_sr_base_path=/var/run/sr-mount (StrOpt) Base path to the storage repository
Using the XenAPI Storage Manager Volume DriverThe Xen Storage Manager Volume driver (xensm) is a XenAPI hypervisor specific volumedriver, and can be used to provide basic storage functionality, including volume creationand destruction, on a number of different storage back-ends. It also enables the capabilityof using more sophisticated storage back-ends for operations like cloning/snapshots, etc.The list below shows some of the storage plugins already supported in Citrix XenServer andXen Cloud Platform (XCP):
1. NFS VHD: Storage repository (SR) plugin which stores disks as Virtual Hard Disk (VHD)files on a remote Network File System (NFS).
2. Local VHD on LVM: SR plugin which represents disks as VHD disks on Logical Volumes(LVM) within a locally-attached Volume Group.
3. HBA LUN-per-VDI driver: SR plugin which represents Logical Units (LUs) as Virtual DiskImages (VDIs) sourced by host bus adapters (HBAs). For example, hardware-based iSCSIor FC support.
4. NetApp: SR driver for mapping of LUNs to VDIs on a NETAPP server, providing use offast snapshot and clone features on the filer.
5. LVHD over FC: SR plugin which represents disks as VHDs on Logical Volumes withina Volume Group created on an HBA LUN. For example, hardware-based iSCSI or FCsupport.
6. iSCSI: Base ISCSI SR driver, provides a LUN-per-VDI. Does not support creation of VDIs butaccesses existing LUNs on a target.
OpenStack ConfigurationReference
October 23, 2013 havana
306
7. LVHD over iSCSI: SR plugin which represents disks as Logical Volumes within a VolumeGroup created on an iSCSI LUN.
8. EqualLogic: SR driver for mapping of LUNs to VDIs on a EQUALLOGIC array group,providing use of fast snapshot and clone features on the array.
Design and Operation
Definitions
• Backend: A term for a particular storage backend. This could be iSCSI, NFS, Netapp etc.
• Backend-config: All the parameters required to connect to a specific backend. Forexample, for NFS, this would be the server, path, and so on.
• Flavor: This term is equivalent to volume "types". A user friendly term to specify somenotion of quality of service. For example, "gold" might mean that the volumes use abackend where backups are possible. A flavor can be associated with multiple backends.The volume scheduler, with the help of the driver, decides which backend is used tocreate a volume of a particular flavor. Currently, the driver uses a simple "first-fit" policy,where the first backend that can successfully create this volume is the one that is used.
Operation
The admin uses the nova-manage command detailed below to add flavors and backends.
One or more cinder-volume service instances are deployed for each availability zone.When an instance is started, it creates storage repositories (SRs) to connect to the backendsavailable within that zone. All cinder-volume instances within a zone can see all theavailable backends. These instances are completely symmetric and hence should be able toservice any create_volume request within the zone.
On XenServer, PV guests required
Note that when using XenServer you can only attach a volume to a PV guest.
Configuring XenAPI Storage Manager
Prerequisites
1. xensm requires that you use either Citrix XenServer or XCP as the hypervisor. TheNetApp and EqualLogic backends are not supported on XCP.
2. Ensure all hosts running volume and compute services have connectivity to the storagesystem.
Configuration
• Set the following configuration options for the nova volume service: (nova-computealso requires the volume_driver configuration option.)
--volume_driver="nova.volume.xensm.XenSMDriver"--use_local_volumes=False
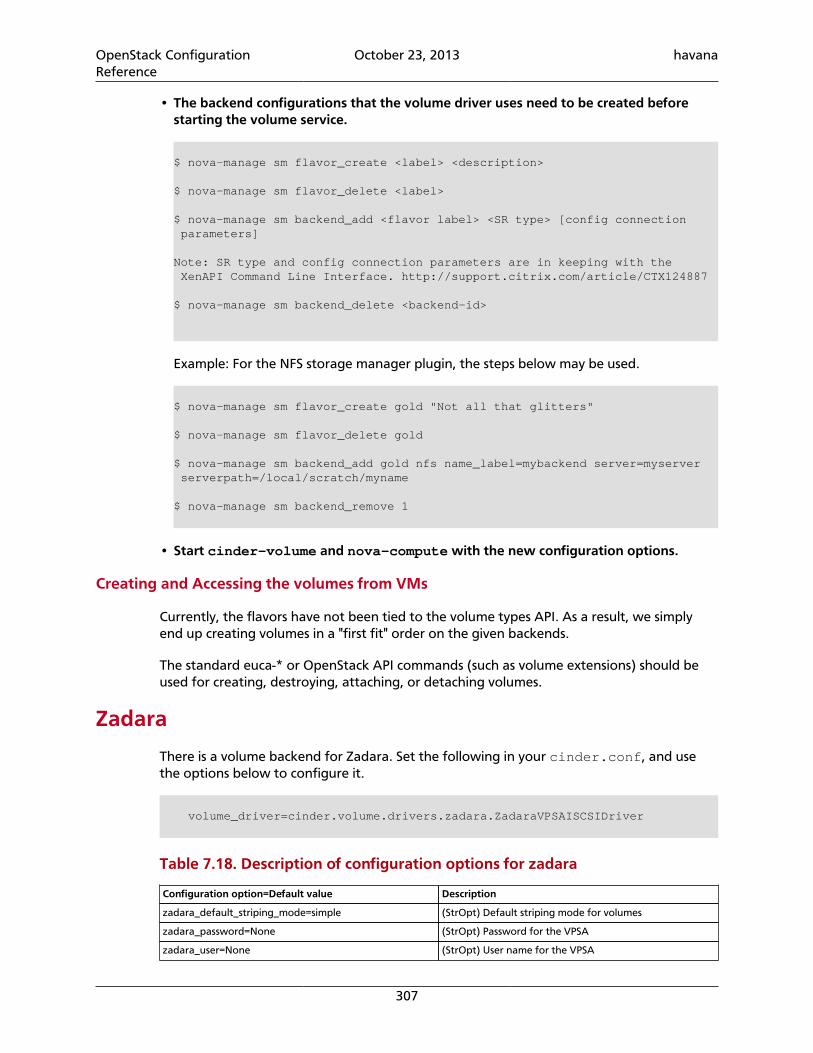
OpenStack ConfigurationReference
October 23, 2013 havana
307
• The backend configurations that the volume driver uses need to be created beforestarting the volume service.
$ nova-manage sm flavor_create <label> <description>
$ nova-manage sm flavor_delete <label>
$ nova-manage sm backend_add <flavor label> <SR type> [config connection parameters]
Note: SR type and config connection parameters are in keeping with the XenAPI Command Line Interface. http://support.citrix.com/article/CTX124887
$ nova-manage sm backend_delete <backend-id>
Example: For the NFS storage manager plugin, the steps below may be used.
$ nova-manage sm flavor_create gold "Not all that glitters"
$ nova-manage sm flavor_delete gold
$ nova-manage sm backend_add gold nfs name_label=mybackend server=myserver serverpath=/local/scratch/myname
$ nova-manage sm backend_remove 1
• Start cinder-volume and nova-compute with the new configuration options.
Creating and Accessing the volumes from VMs
Currently, the flavors have not been tied to the volume types API. As a result, we simplyend up creating volumes in a "first fit" order on the given backends.
The standard euca-* or OpenStack API commands (such as volume extensions) should beused for creating, destroying, attaching, or detaching volumes.
Zadara
There is a volume backend for Zadara. Set the following in your cinder.conf, and usethe options below to configure it.
volume_driver=cinder.volume.drivers.zadara.ZadaraVPSAISCSIDriver
Table 7.18. Description of configuration options for zadara
Configuration option=Default value Description
zadara_default_striping_mode=simple (StrOpt) Default striping mode for volumes
zadara_password=None (StrOpt) Password for the VPSA
zadara_user=None (StrOpt) User name for the VPSA
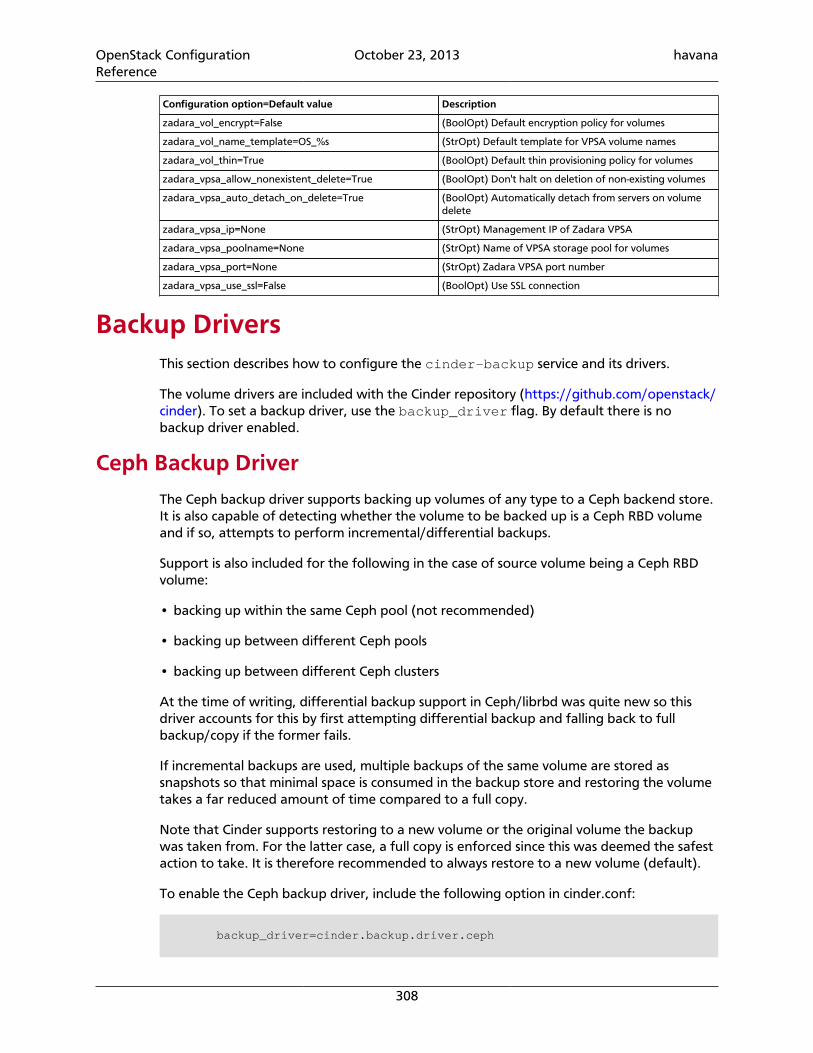
OpenStack ConfigurationReference
October 23, 2013 havana
308
Configuration option=Default value Description
zadara_vol_encrypt=False (BoolOpt) Default encryption policy for volumes
zadara_vol_name_template=OS_%s (StrOpt) Default template for VPSA volume names
zadara_vol_thin=True (BoolOpt) Default thin provisioning policy for volumes
zadara_vpsa_allow_nonexistent_delete=True (BoolOpt) Don't halt on deletion of non-existing volumes
zadara_vpsa_auto_detach_on_delete=True (BoolOpt) Automatically detach from servers on volumedelete
zadara_vpsa_ip=None (StrOpt) Management IP of Zadara VPSA
zadara_vpsa_poolname=None (StrOpt) Name of VPSA storage pool for volumes
zadara_vpsa_port=None (StrOpt) Zadara VPSA port number
zadara_vpsa_use_ssl=False (BoolOpt) Use SSL connection
Backup DriversThis section describes how to configure the cinder-backup service and its drivers.
The volume drivers are included with the Cinder repository (https://github.com/openstack/cinder). To set a backup driver, use the backup_driver flag. By default there is nobackup driver enabled.
Ceph Backup Driver
The Ceph backup driver supports backing up volumes of any type to a Ceph backend store.It is also capable of detecting whether the volume to be backed up is a Ceph RBD volumeand if so, attempts to perform incremental/differential backups.
Support is also included for the following in the case of source volume being a Ceph RBDvolume:
• backing up within the same Ceph pool (not recommended)
• backing up between different Ceph pools
• backing up between different Ceph clusters
At the time of writing, differential backup support in Ceph/librbd was quite new so thisdriver accounts for this by first attempting differential backup and falling back to fullbackup/copy if the former fails.
If incremental backups are used, multiple backups of the same volume are stored assnapshots so that minimal space is consumed in the backup store and restoring the volumetakes a far reduced amount of time compared to a full copy.
Note that Cinder supports restoring to a new volume or the original volume the backupwas taken from. For the latter case, a full copy is enforced since this was deemed the safestaction to take. It is therefore recommended to always restore to a new volume (default).
To enable the Ceph backup driver, include the following option in cinder.conf:
backup_driver=cinder.backup.driver.ceph
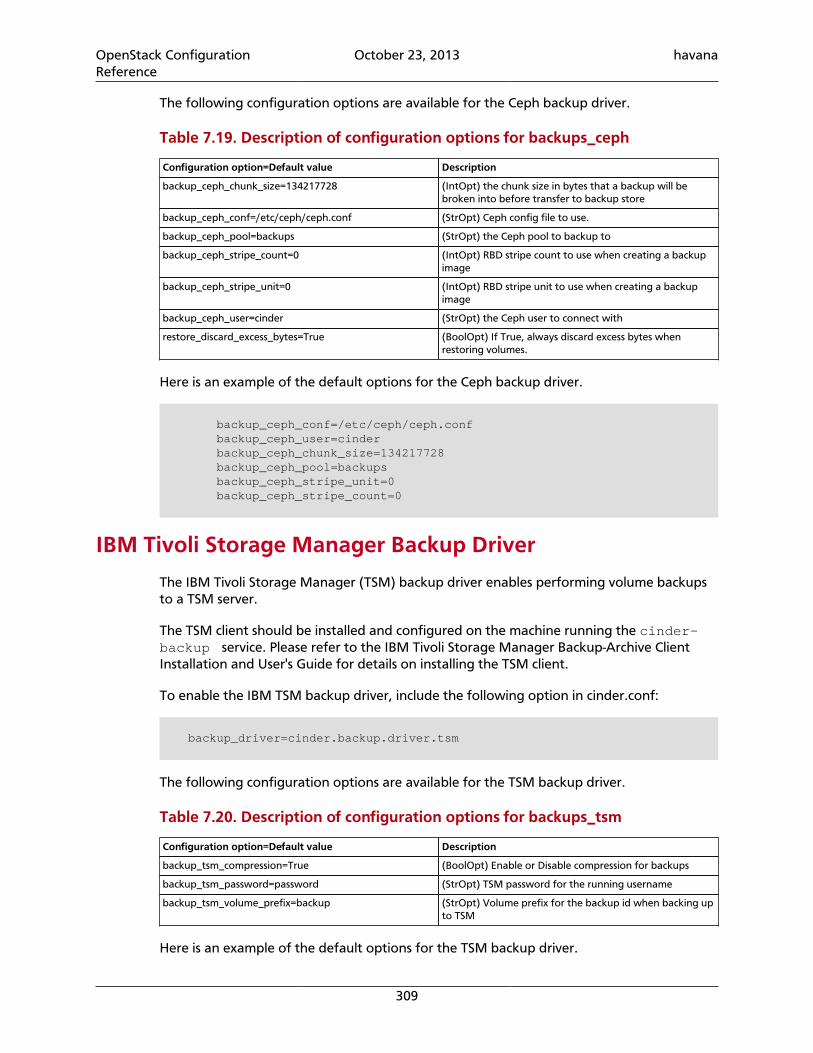
OpenStack ConfigurationReference
October 23, 2013 havana
309
The following configuration options are available for the Ceph backup driver.
Table 7.19. Description of configuration options for backups_ceph
Configuration option=Default value Description
backup_ceph_chunk_size=134217728 (IntOpt) the chunk size in bytes that a backup will bebroken into before transfer to backup store
backup_ceph_conf=/etc/ceph/ceph.conf (StrOpt) Ceph config file to use.
backup_ceph_pool=backups (StrOpt) the Ceph pool to backup to
backup_ceph_stripe_count=0 (IntOpt) RBD stripe count to use when creating a backupimage
backup_ceph_stripe_unit=0 (IntOpt) RBD stripe unit to use when creating a backupimage
backup_ceph_user=cinder (StrOpt) the Ceph user to connect with
restore_discard_excess_bytes=True (BoolOpt) If True, always discard excess bytes whenrestoring volumes.
Here is an example of the default options for the Ceph backup driver.
backup_ceph_conf=/etc/ceph/ceph.conf backup_ceph_user=cinder backup_ceph_chunk_size=134217728 backup_ceph_pool=backups backup_ceph_stripe_unit=0 backup_ceph_stripe_count=0
IBM Tivoli Storage Manager Backup Driver
The IBM Tivoli Storage Manager (TSM) backup driver enables performing volume backupsto a TSM server.
The TSM client should be installed and configured on the machine running the cinder-backup service. Please refer to the IBM Tivoli Storage Manager Backup-Archive ClientInstallation and User's Guide for details on installing the TSM client.
To enable the IBM TSM backup driver, include the following option in cinder.conf:
backup_driver=cinder.backup.driver.tsm
The following configuration options are available for the TSM backup driver.
Table 7.20. Description of configuration options for backups_tsm
Configuration option=Default value Description
backup_tsm_compression=True (BoolOpt) Enable or Disable compression for backups
backup_tsm_password=password (StrOpt) TSM password for the running username
backup_tsm_volume_prefix=backup (StrOpt) Volume prefix for the backup id when backing upto TSM
Here is an example of the default options for the TSM backup driver.
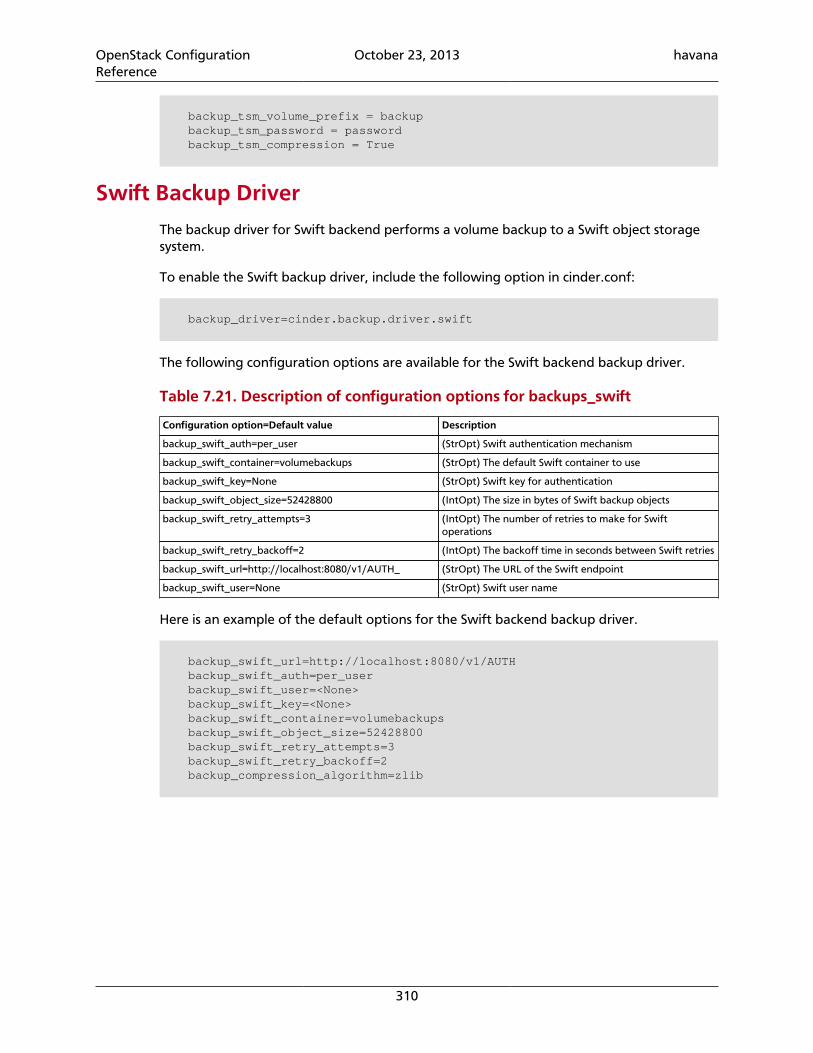
OpenStack ConfigurationReference
October 23, 2013 havana
310
backup_tsm_volume_prefix = backup backup_tsm_password = password backup_tsm_compression = True
Swift Backup Driver
The backup driver for Swift backend performs a volume backup to a Swift object storagesystem.
To enable the Swift backup driver, include the following option in cinder.conf:
backup_driver=cinder.backup.driver.swift
The following configuration options are available for the Swift backend backup driver.
Table 7.21. Description of configuration options for backups_swift
Configuration option=Default value Description
backup_swift_auth=per_user (StrOpt) Swift authentication mechanism
backup_swift_container=volumebackups (StrOpt) The default Swift container to use
backup_swift_key=None (StrOpt) Swift key for authentication
backup_swift_object_size=52428800 (IntOpt) The size in bytes of Swift backup objects
backup_swift_retry_attempts=3 (IntOpt) The number of retries to make for Swiftoperations
backup_swift_retry_backoff=2 (IntOpt) The backoff time in seconds between Swift retries
backup_swift_url=http://localhost:8080/v1/AUTH_ (StrOpt) The URL of the Swift endpoint
backup_swift_user=None (StrOpt) Swift user name
Here is an example of the default options for the Swift backend backup driver.
backup_swift_url=http://localhost:8080/v1/AUTH backup_swift_auth=per_user backup_swift_user=<None> backup_swift_key=<None> backup_swift_container=volumebackups backup_swift_object_size=52428800 backup_swift_retry_attempts=3 backup_swift_retry_backoff=2 backup_compression_algorithm=zlib

OpenStack ConfigurationReference
October 23, 2013 havana
311
Appendix A. Community support
Table of ContentsDocumentation ........................................................................................................... 311ask.openstack.org ........................................................................................................ 312OpenStack mailing lists ................................................................................................ 312The OpenStack wiki ..................................................................................................... 312The Launchpad Bugs area ........................................................................................... 313The OpenStack IRC channel ......................................................................................... 313Documentation feedback ............................................................................................ 314OpenStack distribution packages ................................................................................. 314
To help you run and use OpenStack, many resources are available. Many OpenStackcommunity members can answer questions and help with bug suspicions. We are constantlyimproving and adding to the main features of OpenStack, but if you have any problems,do not hesitate to ask. Use the following resources to get OpenStack support andtroubleshoot your existing installations.
DocumentationFor the available OpenStack documentation, see docs.openstack.org.
To provide feedback on documentation, join and use the<[email protected]> mailing list at OpenStack DocumentationMailing List, or report a bug.
The following books explain how to install an OpenStack cloud and its components:
• Installation Guide for openSUSE
• Installation Guide for Red Hat Enterprise Linux, CentOS, and Fedora
• Installation Guide for Ubuntu 12.04 (LTS)
The following books explain how to configure and run an OpenStack cloud:
• Cloud Administrator Guide
• Configuration Reference
• Operations Guide
• High Availability Guide
• Security Guide
• Virtual Machine Image Guide
OpenStack ConfigurationReference
October 23, 2013 havana
312
The following books explain how to use the OpenStack dashboard and command-lineclients:
• API Quick Start
• End User Guide
• Admin User Guide
The following documentation provides reference and guidance information for theOpenStack APIs:
• OpenStack API Reference
• OpenStack Block Storage Service API v2 Reference
• OpenStack Compute API v2 and Extensions Reference
• OpenStack Identity Service API v2.0 Reference
• OpenStack Image Service API v2 Reference
• OpenStack Networking API v2.0 Reference
• OpenStack Object Storage API v1 Reference
ask.openstack.orgDuring set up or testing, you might have questions about how to do something or be ina situation where a feature does not work correctly. Use the ask.openstack.org site toask questions and get answers. When you visit the http://ask.openstack.org site, scan therecently asked questions to see whether your question was already answered. If not, aska new question. Be sure to give a clear, concise summary in the title and provide as muchdetail as possible in the description. Paste in your command output or stack traces, link toscreen shots, and so on.
OpenStack mailing listsA great way to get answers and insights is to post your question or scenario to theOpenStack mailing list. You can learn from and help others who might have the samescenario as you. To subscribe or view the archives, go to http://lists.openstack.org/cgi-bin/mailman/listinfo/openstack. You might be interested in the other mailing lists for specificprojects or development, which you can find on the wiki. A description of all mailing lists isavailable at http://wiki.openstack.org/MailingLists.
The OpenStack wikiThe OpenStack wiki contains content on a broad range of topics but some of it sits a bitbelow the surface. Fortunately, the wiki search feature enables you to search by title orcontent. If you search for specific information, such as about networking or nova, you canfind lots of content. More is being added all the time, so be sure to check back often. Youcan find the search box in the upper right corner of any OpenStack wiki page.
OpenStack ConfigurationReference
October 23, 2013 havana
313
The Launchpad Bugs areaSo you think you've found a bug. That's great! Seriously, it is. The OpenStack communityvalues your set up and testing efforts and wants your feedback. To log a bug, you mustsign up for a Launchpad account at https://launchpad.net/+login. You can view existingbugs and report bugs in the Launchpad Bugs area. Use the search feature to determinewhether the bug was already reported (or even better, already fixed). If it still seems likeyour bug is unreported, fill out a bug report.
Some tips:
• Give a clear, concise summary!
• Provide as much detail as possible in the description. Paste in your command output orstack traces, link to screen shots, and so on.
• Be sure to include the software version that you are using, especially if you areusing a development branch, such as, "Grizzly release" vs git commitbc79c3ecc55929bac585d04a03475b72e06a3208.
• Any deployment specific information is helpful, such as Ubuntu 12.04 or multi-nodeinstall.
The Launchpad Bugs areas are available here:
• Bugs: OpenStack Compute (nova)
• Bugs : OpenStack Object Storage (swift)
• Bugs : OpenStack Image Service (glance)
• Bugs : OpenStack Identity (keystone)
• Bugs : OpenStack Dashboard (horizon)
• Bugs : OpenStack Networking (neutron)
• Bugs : OpenStack Orchestration (heat)
• Bugs : OpenStack Metering (ceilometer)
The OpenStack IRC channelThe OpenStack community lives and breathes in the #openstack IRC channel on theFreenode network. You can hang out, ask questions, or get immediate feedback for urgentand pressing issues. To install an IRC client or use a browser-based client, go to http://webchat.freenode.net/. You can also use Colloquy (Mac OS X, http://colloquy.info/), mIRC(Windows, http://www.mirc.com/), or XChat (Linux). When you are in the IRC channel andwant to share code or command output, the generally accepted method is to use a PasteBin. The OpenStack project has one at http://paste.openstack.org. Just paste your longeramounts of text or logs in the web form and you get a URL you can paste into the channel.The OpenStack IRC channel is: #openstack on irc.freenode.net. You can find a listof all OpenStack-related IRC channels at https://wiki.openstack.org/wiki/IRC.
OpenStack ConfigurationReference
October 23, 2013 havana
314
Documentation feedbackTo provide feedback on documentation, join and use the<[email protected]> mailing list at OpenStack DocumentationMailing List, or report a bug.
OpenStack distribution packagesThe following Linux distributions provide community-supported packages for OpenStack:
• CentOS, Fedora, and Red Hat Enterprise Linux: http://openstack.redhat.com/
• openSUSE and SUSE Linux Enterprise Server: http://en.opensuse.org/Portal:OpenStack
• Ubuntu: https://wiki.ubuntu.com/ServerTeam/CloudArchive