nokia 5310 xpressmusic user guide - the informr
TRANSCRIPT
Nokia 5310 XpressMusic User Guide
Issue 1.1
DECLARATION OF CONFORMITYHereby, NOKIA CORPORATION declares that this RM-303 product is in compliance with the essential requirements and other relevantprovisions of Directive 1999/5/EC. A copy of the Declaration of Conformity can be found at http://www.nokia.com/phones/declaration_of_conformity/.
© 2007 Nokia. All rights reserved.Nokia, Nokia Connecting People, Visual Radio, and Navi are trademarks or registered trademarks of Nokia Corporation. Nokia tune is a sound mark of NokiaCorporation. Other product and company names mentioned herein may be trademarks or tradenames of their respective owners.
Reproduction, transfer, distribution, or storage of part or all of the contents in this document in any form without the prior written permission of Nokia isprohibited.US Patent No 5818437 and other pending patents. T9 text input software Copyright © 1997-2007. Tegic Communications, Inc. All rights reserved.
Includes RSA BSAFE cryptographic or security protocol software from RSA Security.
Java and all Java-based marks are trademarks or registered trademarks of Sun Microsystems, Inc.
This product is licensed under the MPEG-4 Visual Patent Portfolio License (i) for personal and noncommercial use in connection with information which hasbeen encoded in compliance with the MPEG-4 Visual Standard by a consumer engaged in a personal and noncommercial activity and (ii) for use in connectionwith MPEG-4 video provided by a licensed video provider. No license is granted or shall be implied for any other use. Additional information, including thatrelated to promotional, internal, and commercial uses, may be obtained from MPEG LA, LLC. See http://www.mpegla.com.Nokia operates a policy of ongoing development. Nokia reserves the right to make changes and improvements to any of the products described in this documentwithout prior notice.TO THE MAXIMUM EXTENT PERMITTED BY APPLICABLE LAW, UNDER NO CIRCUMSTANCES SHALL NOKIA OR ANY OF ITS LICENSORS BE RESPONSIBLE FOR ANY LOSS OFDATA OR INCOME OR ANY SPECIAL, INCIDENTAL, CONSEQUENTIAL OR INDIRECT DAMAGES HOWSOEVER CAUSED.THE CONTENTS OF THIS DOCUMENT ARE PROVIDED "AS IS". EXCEPT AS REQUIRED BY APPLICABLE LAW, NO WARRANTIES OF ANY KIND, EITHER EXPRESS OR IMPLIED,INCLUDING, BUT NOT LIMITED TO, THE IMPLIED WARRANTIES OF MERCHANTABILITY AND FITNESS FOR A PARTICULAR PURPOSE, ARE MADE IN RELATION TO THE ACCURACY,RELIABILITY OR CONTENTS OF THIS DOCUMENT. NOKIA RESERVES THE RIGHT TO REVISE THIS DOCUMENT OR WITHDRAW IT AT ANY TIME WITHOUT PRIOR NOTICE.The availability of particular products and applications and services for these products may vary by region. Please check with your Nokia dealer for details, andavailability of language options.Export controls
This device may contain commodities, technology or software subject to export laws and regulations from the US and other countries. Diversion contrary tolaw is prohibited.The third-party applications provided with your device may have been created and may be owned by persons or entities not affiliated with or related to Nokia.Nokia does not own the copyrights or intellectual property rights to the third-party applications. As such, Nokia does not take any responsibility for end-usersupport, functionality of the applications, or the information in the applications or these materials. Nokia does not provide any warranty for the third-partyapplications.BY USING THE APPLICATIONS YOU ACKNOWLEDGE THAT THE APPLICATIONS ARE PROVIDED AS IS WITHOUT WARRANTY OF ANY KIND, EXPRESS OR IMPLIED, TO THEMAXIMUM EXTENT PERMITTED BY APPLICABLE LAW. YOU FURTHER ACKNOWLEDGE THAT NEITHER NOKIA NOR ITS AFFILIATES MAKE ANY REPRESENTATIONS ORWARRANTIES, EXPRESS OR IMPLIED, INCLUDING BUT NOT LIMITED TO WARRANTIES OF TITLE, MERCHANTABILITY OR FITNESS FOR A PARTICULAR PURPOSE, OR THATTHE APPLICATIONS WILL NOT INFRINGE ANY THIRD-PARTY PATENTS, COPYRIGHTS, TRADEMARKS, OR OTHER RIGHTS.Issue 1.1
ContentsFor your safety .................................................6
General information.........................................7About your phone.................................................................7Network services...................................................................7Enhancements.......................................................................7Access codes..........................................................................7Configuration setting service..............................................8Download content................................................................8Software updates..................................................................8Nokia support........................................................................9Digital rights management..................................................9
Get started........................................................9Install SIM card and battery.................................................9Insert a microSD card.........................................................10Remove the microSD card..................................................10Charge the battery..............................................................11Antenna...............................................................................11Headset................................................................................11Strap.....................................................................................12Keys and parts.....................................................................12Switch the phone on and off.............................................13Standby mode.....................................................................13
Display...............................................................................13Power saving....................................................................13Active standby..................................................................14Shortcuts in the standby mode......................................14Indicators..........................................................................14
Flight mode.........................................................................14Keypad lock (keyguard)......................................................15Functions without a SIM card............................................15
Calls................................................................15Make a call...........................................................................15Answer or end a call...........................................................16Dialing shortcuts.................................................................16Voice dialing........................................................................16Options during a call..........................................................16
Write text.......................................................17Text modes..........................................................................17Traditional text input.........................................................17Predictive text input...........................................................17
Navigate the menus.......................................17
Messaging.......................................................18Text and multimedia messages........................................18
Text messages..................................................................18Multimedia messages......................................................18Create a text or multimedia message............................19Read a message and reply..............................................19Send messages.................................................................19
E-mail...................................................................................19E-mail setup wizard.........................................................20Write and send an e-mail................................................20Read an e-mail and reply................................................20New e-mail notifications.................................................20
Flash messages...................................................................20Nokia Xpress audio messages...........................................21Instant messaging..............................................................21Info messages, SIM messages and servicecommands...........................................................................21Voice messages...................................................................21
Message settings................................................................21
Contacts..........................................................22Manage contacts.................................................................22Business cards.....................................................................23Assign dialing shortcuts.....................................................23
Call log ...........................................................23
Settings..........................................................24Profiles.................................................................................24Themes................................................................................24Tones....................................................................................24Display..................................................................................24Date and time.....................................................................25My shortcuts........................................................................25
Left and right selection key............................................25Other shortcuts................................................................25
Synchronization and backup.............................................25Connectivity.........................................................................26
Bluetooth wireless technology.......................................26Packet data.......................................................................26USB data cable..................................................................27Nokia PC Suite..................................................................27
Call........................................................................................27Phone...................................................................................28Voice commands.................................................................28Software updates over the air...........................................29Enhancements.....................................................................29Configuration......................................................................29Security................................................................................30Restore factory settings.....................................................30
Operator menu...............................................30
Gallery............................................................31Folders and files..................................................................31Print images........................................................................31Memory card........................................................................31
Media..............................................................32Camera and video...............................................................32
Take a picture...................................................................32Record a video clip...........................................................32Camera and video options..............................................32
Music player.........................................................................32Music menu.......................................................................33Play music tracks..............................................................33Change the music player look.........................................34
Radio....................................................................................34Tune in to radio stations.................................................34Radio features..................................................................34
Voice recorder.....................................................................35Equalizer..............................................................................35
Push to talk....................................................35
Applications....................................................36Launch an application........................................................36Download an application...................................................36
Organizer........................................................37Alarm clock..........................................................................37Calendar...............................................................................37To-do list..............................................................................37Notes....................................................................................37Calculator.............................................................................38Timers..................................................................................38Stopwatch............................................................................38
Web ...............................................................38Connect to a service............................................................39Appearance settings...........................................................39Security settings.................................................................39
Cache memory..................................................................39Scripts over secure connection.......................................40
Service inbox.......................................................................40Browser security.................................................................40
Certificates........................................................................40Digital signature..............................................................41
SIM services....................................................41
Genuine enhancements.................................42Enhancements.....................................................................42Battery.................................................................................42Nokia Stereo Headset HS-16..............................................42Nokia Wireless Audio Gateway AD-42W...........................42Nokia Bluetooth Display Car Kit CK-15W...........................42
Battery information.......................................43Charging and discharging..................................................43Nokia battery authentication guidelines.........................43
Authenticate hologram...................................................44What if your battery is not authentic?..........................44
Care and maintenance....................................45
Additional safety information.......................46Small children.....................................................................46Operating environment.....................................................46Medical devices...................................................................46
Implanted medical devices.............................................46Hearing aids.....................................................................46
Vehicles................................................................................47Potentially explosive environments.................................47Emergency calls...................................................................47CERTIFICATION INFORMATION (SAR)...................................48MANUFACTURER’S LIMITED WARRANTY..............................48
Warranty period...............................................................48How to get warranty service..........................................49What is not covered?.......................................................49Other important notices..................................................50Limitation of Nokia's liability.........................................51Statutory obligations.......................................................51
Index..............................................................52
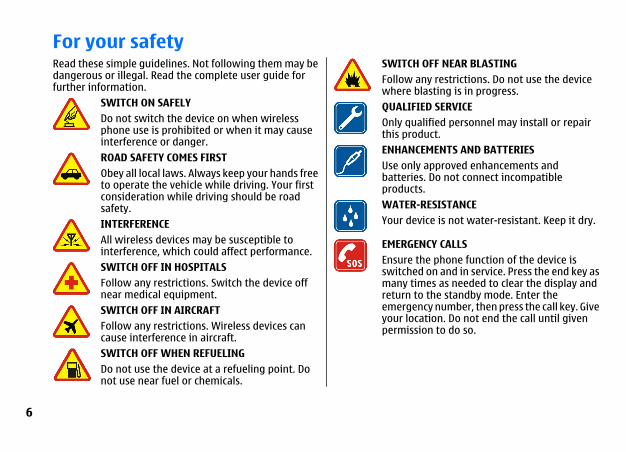
For your safetyRead these simple guidelines. Not following them may bedangerous or illegal. Read the complete user guide forfurther information.
SWITCH ON SAFELYDo not switch the device on when wirelessphone use is prohibited or when it may causeinterference or danger.ROAD SAFETY COMES FIRSTObey all local laws. Always keep your hands freeto operate the vehicle while driving. Your firstconsideration while driving should be roadsafety.INTERFERENCEAll wireless devices may be susceptible tointerference, which could affect performance.SWITCH OFF IN HOSPITALSFollow any restrictions. Switch the device offnear medical equipment.SWITCH OFF IN AIRCRAFTFollow any restrictions. Wireless devices cancause interference in aircraft.SWITCH OFF WHEN REFUELINGDo not use the device at a refueling point. Donot use near fuel or chemicals.
SWITCH OFF NEAR BLASTINGFollow any restrictions. Do not use the devicewhere blasting is in progress.QUALIFIED SERVICEOnly qualified personnel may install or repairthis product.ENHANCEMENTS AND BATTERIESUse only approved enhancements andbatteries. Do not connect incompatibleproducts.WATER-RESISTANCEYour device is not water-resistant. Keep it dry.
EMERGENCY CALLSEnsure the phone function of the device isswitched on and in service. Press the end key asmany times as needed to clear the display andreturn to the standby mode. Enter theemergency number, then press the call key. Giveyour location. Do not end the call until givenpermission to do so.
6

General informationAbout your phoneThe wireless device described in this guide is approved foruse on the EGSM 900 and GSM 1800 and 1900 networks.Contact your service provider for more information aboutnetworks.When using the features in this device, obey all laws andrespect local customs, privacy and legitimate rights ofothers, including copyrights.Copyright protections may prevent some images, music(including ringing tones), and other content from beingcopied, modified, transferred, or forwarded.Remember to make back-up copies or keep a writtenrecord of all important information stored in your device.When connecting to any other device, read its user guidefor detailed safety instructions. Do not connectincompatible products.
Warning: To use any features in this device, otherthan the alarm clock, the device must be switched on. Donot switch the device on when wireless device use maycause interference or danger.
Network servicesTo use the phone you must have service from a wirelessservice provider. Many of the features require specialnetwork features. These features are not available on allnetworks; other networks may require that you makespecific arrangements with your service provider before
you can use the network services. Your service providercan give you instructions and explain what charges willapply. Some networks may have limitations that affecthow you can use network services. For instance, somenetworks may not support all language-dependentcharacters and services.Your service provider may have requested that certainfeatures be disabled or not activated in your device. If so,these features will not appear on your device menu. Yourdevice may also have a special configuration such aschanges in menu names, menu order, and icons. Contactyour service provider for more information.
EnhancementsPractical rules about accessories and enhancements● Keep all accessories and enhancements out of the reach
of small children.● When you disconnect the power cord of any accessory
or enhancement, grasp and pull the plug, not the cord.● Check regularly that enhancements installed in a
vehicle are mounted and are operating properly.● Installation of any complex car enhancements must be
made by qualified personnel only.
Access codesTo set how your phone uses the access codes and securitysettings, select Menu > Settings > Security. 7
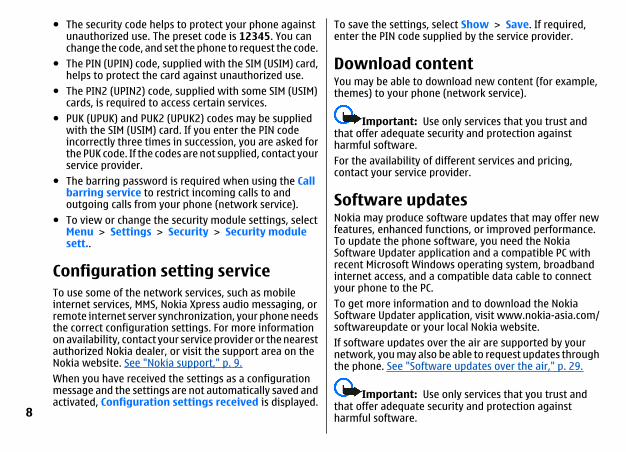
● The security code helps to protect your phone againstunauthorized use. The preset code is 12345. You canchange the code, and set the phone to request the code.
● The PIN (UPIN) code, supplied with the SIM (USIM) card,helps to protect the card against unauthorized use.
● The PIN2 (UPIN2) code, supplied with some SIM (USIM)cards, is required to access certain services.
● PUK (UPUK) and PUK2 (UPUK2) codes may be suppliedwith the SIM (USIM) card. If you enter the PIN codeincorrectly three times in succession, you are asked forthe PUK code. If the codes are not supplied, contact yourservice provider.
● The barring password is required when using the Callbarring service to restrict incoming calls to andoutgoing calls from your phone (network service).
● To view or change the security module settings, selectMenu > Settings > Security > Security modulesett..
Configuration setting serviceTo use some of the network services, such as mobileinternet services, MMS, Nokia Xpress audio messaging, orremote internet server synchronization, your phone needsthe correct configuration settings. For more informationon availability, contact your service provider or the nearestauthorized Nokia dealer, or visit the support area on theNokia website. See "Nokia support," p. 9.When you have received the settings as a configurationmessage and the settings are not automatically saved andactivated, Configuration settings received is displayed.
To save the settings, select Show > Save. If required,enter the PIN code supplied by the service provider.
Download contentYou may be able to download new content (for example,themes) to your phone (network service).
Important: Use only services that you trust andthat offer adequate security and protection againstharmful software.For the availability of different services and pricing,contact your service provider.
Software updatesNokia may produce software updates that may offer newfeatures, enhanced functions, or improved performance.To update the phone software, you need the NokiaSoftware Updater application and a compatible PC withrecent Microsoft Windows operating system, broadbandinternet access, and a compatible data cable to connectyour phone to the PC.To get more information and to download the NokiaSoftware Updater application, visit www.nokia-asia.com/softwareupdate or your local Nokia website.If software updates over the air are supported by yournetwork, you may also be able to request updates throughthe phone. See "Software updates over the air," p. 29.
Important: Use only services that you trust andthat offer adequate security and protection againstharmful software.8

Nokia supportCheck www.nokia-asia.com/support or your local Nokiawebsite for the latest version of this guide, additionalinformation, downloads, and services related to yourNokia product.Configuration settings serviceDownload free configuration settings such as MMS, GPRS,e-mail, and other services for your phone model atwww.nokia-asia.com/setup.Nokia PC SuiteYou may find PC Suite and related information on the Nokiawebsite at www.nokia-asia.com/pcsuite.Customer serviceIf you need to contact customer service,check the list of local Nokia Care contactcenters at www.nokia-asia.com/contactus.MaintenanceFor maintenance services, check your nearest Nokiaservice center at www.nokia-asia.com/repair.
Digital rights managementContent owners may use different types of digital rightsmanagement technologies (DRM) to protect their
intellectual property including copyrights. This device usesvarious types of DRM software to access DRM protectedcontent. With this device you may be able to accesscontent protected with WMDRM 10, OMA DRM 1.0, OMA DRM1.0 forward lock, and OMA DRM 2.0. If certain DRM softwarefails to protect the content, content owners may ask thatsuch DRM software's ability to access new DRM protectedcontent be revoked. Revocation may also prevent renewalof such DRM protected content already in your device.Revocation of such DRM software does not affect the useof content protected with other types of DRM or the use ofnon-DRM-protected content.DRM protected content comes with an associatedactivation key that defines your rights to use the content.To back up OMA DRM protected content, use the backupfeature of Nokia PC Suite.If your device has WMDRM protected content, both theactivation keys and the content will be lost if the devicememory is formatted. You may also lose the activationkeys and the content in case the files on your device getcorrupted. Losing the activation keys or the content maylimit your ability to use the same content on your deviceagain. For more information, contact your serviceprovider.
Get startedInstall SIM card and batteryAlways switch the device off and disconnect the chargerbefore removing the battery.
For availability and information on using SIM card services,contact your SIM card vendor. This may be the serviceprovider or other vendor. 9
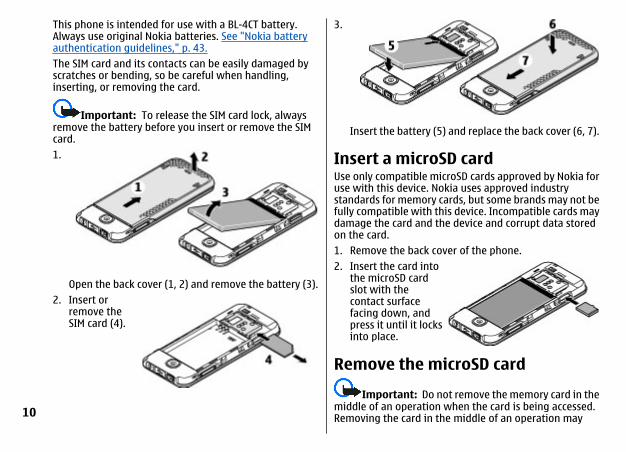
This phone is intended for use with a BL-4CT battery.Always use original Nokia batteries. See "Nokia batteryauthentication guidelines," p. 43.The SIM card and its contacts can be easily damaged byscratches or bending, so be careful when handling,inserting, or removing the card.
Important: To release the SIM card lock, alwaysremove the battery before you insert or remove the SIMcard.1.
Open the back cover (1, 2) and remove the battery (3).2. Insert or
remove theSIM card (4).
3.
Insert the battery (5) and replace the back cover (6, 7).
Insert a microSD cardUse only compatible microSD cards approved by Nokia foruse with this device. Nokia uses approved industrystandards for memory cards, but some brands may not befully compatible with this device. Incompatible cards maydamage the card and the device and corrupt data storedon the card.1. Remove the back cover of the phone.2. Insert the card into
the microSD cardslot with thecontact surfacefacing down, andpress it until it locksinto place.
Remove the microSD cardImportant: Do not remove the memory card in the
middle of an operation when the card is being accessed.Removing the card in the middle of an operation may10
damage the memory card as well as the device, and datastored on the card may be corrupted.You can remove or replace the microSD card during phoneoperation without switching the device off.1. Make sure that no application is currently accessing the
microSD memory card.2. Remove the back cover of the device.3. Press the microSD card slightly in to release the lock
and remove it.
Charge the batteryCheck the model number of any charger before use withthis device. This device is intended for use when suppliedwith power from the AC-3 and AC-4 charger.
Warning: Use only batteries, chargers, andenhancements approved by Nokia for use with thisparticular model. The use of any other types mayinvalidate any approval or warranty, and may bedangerous.For availability of approved enhancements, please checkwith your dealer. When you disconnect the power cord ofany enhancement, grasp and pull the plug, not the cord.1. Connect the charger to a wall socket.
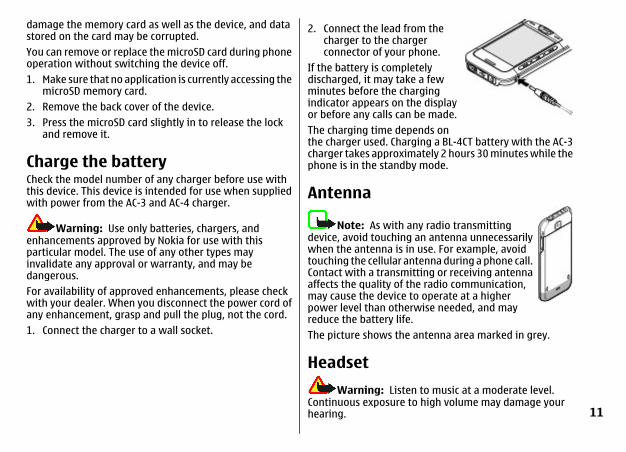
2. Connect the lead from thecharger to the chargerconnector of your phone.
If the battery is completelydischarged, it may take a fewminutes before the chargingindicator appears on the displayor before any calls can be made.The charging time depends onthe charger used. Charging a BL-4CT battery with the AC-3charger takes approximately 2 hours 30 minutes while thephone is in the standby mode.
Antenna
Note: As with any radio transmittingdevice, avoid touching an antenna unnecessarilywhen the antenna is in use. For example, avoidtouching the cellular antenna during a phone call.Contact with a transmitting or receiving antennaaffects the quality of the radio communication,may cause the device to operate at a higherpower level than otherwise needed, and mayreduce the battery life.The picture shows the antenna area marked in grey.
HeadsetWarning: Listen to music at a moderate level.
Continuous exposure to high volume may damage yourhearing. 11
When connecting any external device or any headset,other than those approved by Nokia for use with thisdevice, to the Nokia AV Connector, pay special attention tovolume levels.
Warning: When you use the headset, your abilityto hear outside sounds may be affected. Do not use theheadset where it can endanger your safety.Do not connect products that create an output signal asthis may cause damage to the device. Do not connect anyvoltage source to the Nokia AV Connector.
StrapThread the strap as shown in the pictureand tighten it.
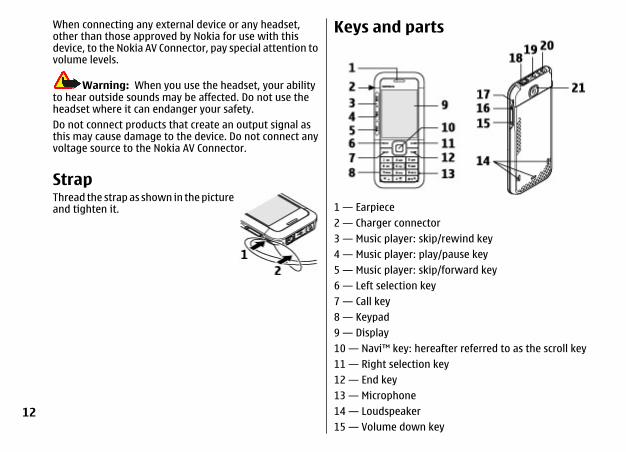
Keys and parts
1 — Earpiece2 — Charger connector3 — Music player: skip/rewind key4 — Music player: play/pause key5 — Music player: skip/forward key6 — Left selection key7 — Call key8 — Keypad9 — Display10 — Navi™ key: hereafter referred to as the scroll key11 — Right selection key12 — End key13 — Microphone14 — Loudspeaker15 — Volume down key
12
16 — Volume up key17 — Strap eyelet18 — Nokia AV Connector (3.5 mm)19 — Micro USB cable connector20 — Power key21 — Camera lens
Switch the phone on and offTo switch the phone on or off, press and hold the powerkey.If the phone prompts for a PIN or a UPIN code, enter thecode (displayed as ****).The phone may prompt you to set the time and date. Enterthe local time, select the time zone of your location interms of the time difference with respect to GreenwichMean Time (GMT), and enter the date. See "Date andtime," p. 25.When you switch on your phone for the first time, you maybe prompted to get the configuration settings from yourservice provider (network service). For more information,refer to Connect to support. See"Configuration", p. 29,and "Configuration setting service", p. 8
Standby modeWhen the phone is ready for use, and you have not enteredany characters, the phone is in the standby mode.
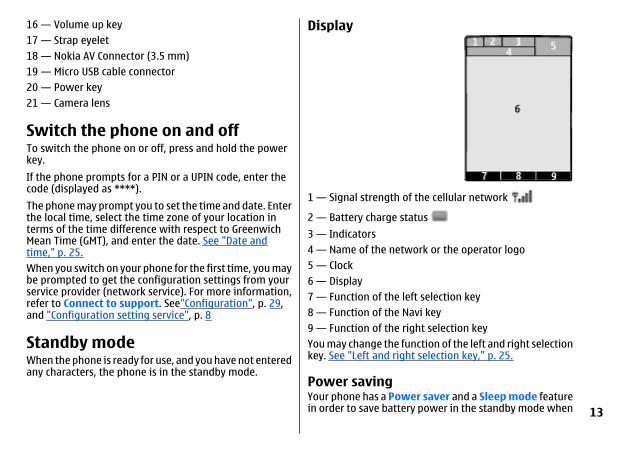
Display
1 — Signal strength of the cellular network
2 — Battery charge status 3 — Indicators4 — Name of the network or the operator logo5 — Clock6 — Display7 — Function of the left selection key8 — Function of the Navi key9 — Function of the right selection keyYou may change the function of the left and right selectionkey. See "Left and right selection key," p. 25.
Power savingYour phone has a Power saver and a Sleep mode featurein order to save battery power in the standby mode when 13
no keys are pressed. These features may be activated. See"Display," p. 24.
Active standbyThe active standby mode displays a list of selected phonefeatures and information that you can directly access.To switch active standby on or off, select Menu >Settings > Display > Active standby > Activestandby mode.In the standby mode, scroll up or down to navigate in thelist, and choose Select or View. The arrows indicate thatfurther information is available. To stop navigation, selectExit.To organize and change the active standby mode, selectOptions.
Shortcuts in the standby modeTo access the list of dialed numbers, press the call key once.Scroll to the number or name, and press the call key to callthe number.To open the web browser, press and hold 0.To call your voice mailbox, press and hold 1.Use keys as a shortcut. See "Dialing shortcuts," p. 16.
Indicators unread messages
unsent, canceled, or failed messages missed call The keypad is locked.
The phone does not ring for an incoming call or textmessage.
The alarm clock is activated.
/ The phone is registered to the GPRS or EGPRSnetwork.
/ A GPRS or EGPRS connection is established.
/ The GPRS or EGPRS connection is suspended (onhold).
A Bluetooth connection is active. If you have two phone lines, the second phone line is
selected. All incoming calls are diverted to another number. Calls are limited to a closed user group. The timed profile is selected.
Flight modeUse the flight mode in radio sensitive environments—onboard aircraft or in hospitals—to deactivate all radiofrequency functions. You still have access to offline games,calendar, and phone numbers. When the flight mode isactive, is shown.To activate or set up the flight mode, select Menu >Settings > Profiles > Flight > Activate orPersonalise.To deactivate the flight mode, select any other profile.
14
Emergency call in flight modeEnter the emergency number, press the call key, and selectYes when Exit flight profile? is displayed.
Warning: With the flight profile you cannot makeor receive any calls, including emergency calls, or use otherfeatures that require network coverage. To make calls, youmust first activate the phone function by changingprofiles. If the device has been locked, enter the lock code.If you need to make an emergency call while the device islocked and in the flight profile, you may be also able toenter an official emergency number programmed in yourdevice in the lock code field and select 'Call'. The devicewill confirm that you are about to exit flight profile to startan emergency call.
Keypad lock (keyguard)To prevent accidental keypresses, select Menu, and press* within 3.5 seconds to lock the keypad.
To unlock the keypad, select Unlock, and press * within1.5 seconds. If Security keyguard is set to on, enter thesecurity code if requested.To answer a call when the keypad is locked, press the callkey. When you end or reject the call, the keypadautomatically locks.Further features are Automatic keyguard and Securitykeyguard. See "Phone," p. 28.When the device or keypad is locked, calls may be possibleto the official emergency number programmed into yourdevice.
Functions without a SIM cardSome functions of your phone may be used withoutinstalling a SIM card, such as music player, radio, games,and data transfer with a compatible PC or anothercompatible device. Some functions appear dimmed in themenus and cannot be used.
CallsMake a callYou can start a call in several ways:● Enter the phone number, including the area code, and
press the call key.For international calls, press * twice for theinternational prefix (the + character replaces theinternational access code), enter the country code, thearea code without the leading 0, if necessary, and thephone number.
● To access the list of dialed numbers, press the call keyonce in the standby mode. Select a number or name,and press the call key.
● Search for a name or phone number that you saved inContacts. See "Manage contacts," p. 22.
To adjust the volume in a call, press the volume key up ordown.
15
Answer or end a callTo answer an incoming call, press the call key. To end thecall, press the end key.To reject an incoming call, press the end key. To mute theringing tone, select Silence.
Dialing shortcutsFirst assign a phone number to one of the number keys, 2to 9. See "Assign dialing shortcuts," p. 23.Use a dialing shortcut to make a call in one of the followingways:● Press a number key, then the call key.● If Menu > Settings > Call > Speed dialling > On
is selected, press and hold a number key.
Voice dialingMake a phone call by saying the name that is saved in thecontact list of the phone.As voice commands are language-dependent, you mustselect Menu > Settings > Phone > Languagesettings > Recognition lang. and your language beforeusing voice dialing.
Note: Using voice tags may be difficult in a noisyenvironment or during an emergency, so you should notrely solely upon voice dialing in all circumstances.1. In the standby mode, press and hold the right selection
key or the volume down key. A short tone sounds, andSpeak now is displayed.
2. Speak the name of the contact you want to dial. If thevoice recognition is successful, a list with matches isshown. The phone plays the voice command of the firstmatch on the list. If it is not the correct command, scrollto another entry.
Options during a callMany of the options that you can use during a call arenetwork services. For availability, contact your serviceprovider.During a call, select Options and from the followingoptions:Call options are Mute or Unmute, Contacts, Menu, Lockkeypad, Record, Voice clarity, Loudspeaker orHandset.Network options are Answer or Reject, Hold or Unhold,New call, Add to conference, End call, End all calls, andthe following:● Send DTMF — to send tone strings● Swap — to switch between the active call and the call
on hold● Transfer — to connect a call on hold to an active call
and disconnect yourself● Conference — to make a conference call● Private call — to have a private discussion in a
conference call
Warning: Do not hold the device near your earwhen the loudspeaker is in use, because the volume maybe extremely loud.
16
Write textText modesTo enter text (for example, when writing messages) youcan use traditional or predictive text input.When you write text, press and hold Options to togglebetween traditional text input, indicated by , andpredictive text input, indicated by . Not all languagesare supported by predictive text input.The character cases are indicated by , , and . Tochange the character case, press #. To change from theletter to number mode, indicated by , press and hold#, and select Number mode. To change from the numberto the letter mode, press and hold #.To set the writing language, select Options > Writinglanguage.
Traditional text inputPress a number key, 2 to 9, repeatedly until the desiredcharacter appears. The available characters depend on theselected writing language.If the next letter you want is located on the same key asthe present one, wait until the cursor appears and enterthe letter.
To access the most common punctuation marks andspecial characters, repeatedly press the number key 1 orpress * to select a special character.
Predictive text inputPredictive text input is based on a built-in dictionary towhich you can also add new words.1. Start writing a word, using the keys 2 to 9. Press each
key only once for one letter.2. To confirm a word by adding a space, press 0.
● If the word is not correct, press * repeatedly, andselect the word from the list.
● If the ? character is displayed after the word, theword you intended to write is not in the dictionary.To add the word to the dictionary, select Spell. Enterthe word using traditional text input, and selectSave.
● To write compound words, enter the first part of theword, and press the scroll key right to confirm it.Write the last part of the word, and confirm theword.
3. Start writing the next word.
Navigate the menusThe phone offers you an extensive range of functions thatare grouped into menus.
1. To access the menu, select Menu. 17
2. Scroll through the menu, and select an option (forexample, Settings).
3. If the selected menu contains further submenus, selectone (for example, Call).
4. If the selected menu contains further submenus,repeat step 3.
5. Select the setting of your choice.6. To return to the previous menu level, select Back.
To exit the menu, select Exit.To change the menu view, select Options > Main menuview > List, Grid, Grid with labels, or Tab.To rearrange the menu, scroll to the menu to be moved,and select Options > Organise > Move. Scroll to whereyou want to move the menu, and select OK. To save thechange, select Done > Yes.
MessagingYou can read, write, send and save text and multimediamessages, e-mail, audio and flash messages. Themessaging services can only be used if they are supportedby your network or service provider.
Text and multimedia messagesYou can create a message and optionally attach forexample a picture. Your phone automatically changes atext message to a multimedia message when a file isattached.
Text messagesYour device supports the sending of text messages beyondthe limit for a single message. Longer messages are sentas two or more messages. Your service provider maycharge accordingly. Characters with accents or othermarks, and characters from some language options, takeup more space, and limit the number of characters thatcan be sent in a single message.
An indicator at the top of the display shows the totalnumber of characters left and the number of messagesneeded for sending.Before you can send any text or SMS e-mail messages, youmust save your message center number. Select Menu >Messaging > Message settings > Text messages >Message centres > Add centre, enter a name, and thenumber from the service provider.
Multimedia messagesA multimedia message can contain text, pictures, soundclips, and video clips.
Important: Exercise caution when openingmessages. Messages may contain malicious software orotherwise be harmful to your device or PC.To check availability and to subscribe to the multimediamessaging service (MMS), contact your service provider.You also may download the configuration settings. See"Nokia support," p. 9.18
Create a text or multimedia message1. Select Menu > Messaging > Create message >
Message.2. To add recipients, scroll to the To: field, and enter the
recipient’s number or e-mail address, or select Add toselect recipients from the available options. SelectOptions to add recipients and subjects and to setsending options.
3. Scroll to the Text: field, and enter the message text.4. To attach content to the message, scroll to the
attachment bar at the bottom of the display and selectthe desired type of content.
5. To send the message, press Send.The message type is indicated at the top of the display andchanges automatically depending on the content of themessage.Service providers may charge differently depending on themessage type. Check with your service provider for details.
Read a message and reply
Important: Exercise caution when openingmessages. E-mail messages or multimedia messageobjects may contain malicious software or otherwise beharmful to your device or PC.Your phone issues a notification when a message isreceived. Press Show to display the message. If more thanone message was received select a message from theinbox and press Open. Use the scroll key to view all partsof the message.Select Reply to create an answer message.
Send messagesMessage sendingTo send the message, select Send. The phone saves themessage in the Outbox folder, and the sending starts.
Note: The message sent icon or text on your devicescreen does not indicate that the message is received atthe intended destination.If message sending is interrupted, the phone tries toresend the message a few times. If these attempts fail, themessage remains in the Outbox folder. To cancel thesending of the messages in the Outbox folder, selectOptions > Cancel sending.To save the sent messages in the Sent items folder, selectMenu > Messaging > Message settings > Generalsettings > Save sent messages.Organize your messagesThe phone saves received messages in the Inbox folder.Organize your messages in the saved items folder.To add, rename, or delete a folder, select Menu >Messaging > Saved items > Options.
E-mailAccess your POP3 or IMAP4 e-mail account with your phoneto read, write and send e-mail. This e-mail application isdifferent from the SMS e-mail function.Before you can use e-mail, you must have an e-mailaccount and the correct settings. To check the availabilityand the settings of your e-mail account, contact your e-mail service provider. You may receive the e-mail 19

configuration settings as a configuration message. See"Configuration setting service," p. 8.
E-mail setup wizardThe e-mail setup wizard starts automatically if no e-mailsettings are defined in the phone. To start the setupwizard for an additional e-mail account, select Menu >Messaging and the existing e-mail account. SelectOptions > Add mailbox to start the e-mail setup wizard.Follow the instructions on the display.
Write and send an e-mailYou may write your e-mail before connecting to the e-mailservice.1. Select Menu > Messaging > Create message > E-
mail message.2. If more than one e-mail account is defined, select the
account from which you want to send the e-mail.3. Enter the recipient’s e-mail address, the subject, and
the e-mail message. To attach a file, select Insert andfrom the options.
4. To send the e-mail, select Send.
Read an e-mail and reply
Important: Exercise caution when openingmessages. E-mail messages may contain malicioussoftware or otherwise be harmful to your device or PC.1. To download e-mail message headers, select Menu >
Messaging and your e-mail account.
2. To download an e-mail and attachments, select an e-mail and press Open or Retrieve.
3. To reply or forward the e-mail, select Options.4. To disconnect from your e-mail account, select
Options > Disconnect. The connection to the e-mailaccount automatically ends after some time withoutactivity.
New e-mail notificationsYour phone can automatically check your e-mail accountin time intervals and issue a notification when new e-mailis received.1. Select Menu > Messaging > Message settings >
E-mail messages > Edit mailboxes.2. Select your e-mail account, Downloading sett., and
the following options:● Mailbox upd. interval — to set how often your
phone checks your e-mail account for new e-mail● Automatic retrieval — to retrieve new e-mail
automatically from your e-mail account3. To enable the new e-mail notification, select Menu >
Messaging > Message settings > E-mailmessages > New e-mail notif. > On.
Flash messagesFlash messages are text messages that are instantlydisplayed upon reception.1. To write a flash message, select Menu > Messaging >
Create message > Flash message.2. Enter the recipient’s phone number, write your
message (maximum 70 characters), and select Send.20
Nokia Xpress audio messagesCreate and send an audio message using MMS in aconvenient way.1. Select Menu > Messaging > Create message >
Audio message. The voice recorder opens.2. Record your message. See "Voice recorder," p. 35.3. Enter one or more phone numbers in the To: field, or
select Add to retrieve a number.4. To send the message, select Send.
Instant messagingWith instant messaging (IM, network service) you can sendshort text messages to online users. You must subscribeto a service and register with the IM service you want touse. Check the availability of these services, pricing, andinstructions with your service provider. The menus mayvary depending on your IM provider.To connect to the service, select Menu > Messaging >I M and follow the instructions on the display.
Info messages, SIM messages andservice commandsInfo messagesYou can receive messages on various topics from yourservice provider (network service). For more information,contact your service provider.Select Menu > Messaging > Info messages and fromthe available options.
Service commandsService commands allow you to write and send servicerequests (USSD commands) to your service provider, suchas activation commands for network services.To write and send the service request, select Menu >Messaging > Serv. commands. For details, contact yourservice provider.SIM messagesSIM messages are specific text messages that are saved toyour SIM card. You can copy or move those messages fromthe SIM to the phone memory, but not vice versa.To read SIM messages, select Menu > Messaging >Options > SIM messages.
Voice messagesThe voice mailbox is a network service to which you mayneed to subscribe. For more information, contact yourservice provider.To call your voice mailbox, press and hold 1.To edit your voice mailbox number, select Menu >Messaging > Voice messages > Voice mailbox no..
Message settingsSelect Menu > Messaging > Message settings to setup your messaging features.● General settings — to set your phone to save sent
messages, to allow overwriting of older messages if themessage memory is full, and to set up other preferencesrelated to messages 21
● Text messages — to allow delivery reports, to set upmessage centers for SMS and SMS e-mail, to select thetype of character support, and to set up otherpreferences related to text messages
● Multimedia messages — to allow delivery reports, toset up the appearance of multimedia messages, to
allow the reception of multimedia messages andadverts, and to set up other preferences related tomultimedia messages
● E-mail messages — to allow e-mail reception, to setthe image size in e-mail, and to set up other preferencesrelated to e-mail
ContactsYou can save names, phone numbers as contacts in thephone memory and on the SIM card memory and searchand recall them to make a phone call or to create amessage.
Manage contactsSelect the memory for contactsThe phone memory can save contacts with additionaldetails, such as various phone numbers and text items. Youcan also save an image, a tone, or a video clip for a limitednumber of contacts.The SIM card memory can save names with one phonenumber attached to them. The contacts saved in the SIMcard memory are indicated by .1. Select Menu > Contacts > Settings > Memory in
use to select the SIM card, the phone memory, or bothfor your contacts.
2. Select Phone and SIM to recall contacts from bothmemories. When you save contacts, they will be savedin the phone memory.
Save names and numbersTo save a name and phone number, select Menu >Contacts > Names > Options > Add new contact.Add and edit detailsThe first number you save is automatically set as thedefault number and is indicated with a frame around thenumber type indicator (for example, ). When you selecta name from contacts (for example, to make a call), thedefault number is used unless you select another number.Search for the contact to add a detail, and select Details >Options > Add detail and from the available options.Search for a contactSelect Menu > Contacts > Names and scroll through thelist of contacts, or enter the first characters of the name tosearch.Copy or move a contact between SIM card and phonememory1. Select Menu > Contacts > Names.2. Select the contact to copy or move and Options >
Copy contact or Move contact.22
Copy or move several contacts between SIM card andphone memory1. Select the first contact to copy or move and Options >
Mark.2. Mark the other contacts, and select Options > Copy
marked or Move marked.Copy or move all contacts between SIM card andphone memorySelect Menu > Contacts > Copy contacts or Movecontacts.Delete contactsSearch for the desired contact, and select Options >Delete contact.To delete all the contacts and the details attached to themfrom the phone or SIM card memory, select Menu >Contacts > Del. all contacts > From phone memoryor From SIM card.To delete a number, text item, or an image attached to thecontact, search for the contact, and select Details. Scrollto the desired detail, and select Options > Delete andfrom the available options.Create a contact groupArrange contacts into caller groups with different ringingtones and group images.1. Select Menu > Contacts > Groups.
2. Select Add or Options > Add new group to create anew group.
3. Enter the group name, optionally select an image anda ringing tone and select Save.
4. Select the group and View > Add to add contacts tothe group.
Business cardsYou can send and receive a person’s contact informationfrom a compatible device that supports the vCardstandard.To send a business card, search for the contact, and selectDetails > Options > Send business card.When you receive a business card, select Show > Save tosave the business card in the phone memory.
Assign dialing shortcutsAssign phone numbers to the number keys 2–9 as ashortcut.1. Select Menu > Contacts > Speed dials, and scroll to
a number key.2. Select Assign, or if a number has already been
assigned to the key, select Options > Change.3. Enter a number or search for a contact.
Call log To view the information on your calls, select Menu >Log.
● Call log — to view your recently missed and receivedcalls and dialed numbers chronologically 23
● Missed calls, Received calls, or Diallednumbers — for information about your recent calls
● Msg. recipients — to view the contacts to whom youmost recently sent messages
● Call duration, Data counter, or Pack. data timer — toview the general information on your recentcommunications
● Message log, or Sync log — to view the number of sentand received messages or synchronizations
Note: The actual invoice for calls and services fromyour service provider may vary, depending on networkfeatures, rounding off for billing, taxes, and so forth.
SettingsProfilesYour phone has various setting groups called profiles,which you can customize with ringing tones for differentevents and environments.Select Menu > Settings > Profiles, the desired profile,and from the following options:● Activate — to activate the selected profile● Personalise — to change the profile settings● Timed — to set the profile to be active until an end
time. When the time set for the profile expires, theprevious profile that was not timed becomes active.
ThemesA theme contains elements for personalizing your phone.Select Menu > Settings > Themes and from thefollowing options:● Select theme — Open the Themes folder, and select a
theme.● Theme downloads — Open a list of links to download
more themes.
TonesYou can change the tone settings of the selected activeprofile.Select Menu > Settings > Tones. You can find the samesettings in the Profiles menu.If you select the highest ringing tone level, the ringingtone reaches its highest level after a few seconds.
DisplaySelect Menu > Settings > Display and from theavailable options:● Wallpaper — to add a background image for the
standby mode● Active standby — to activate, organize, and
personalize the active standby mode● Standby font colour — to select the font color for the
standby mode● Navigation key icons — to display the icons of the
scroll key shortcuts in the standby mode when activestandby is off
● Notification details — to display details in missed calland message notifications
24
● Screen saver — to create and set a screen saver● Power saver — to dim the display automatically and
to display a clock when the phone is not used for acertain time
● Sleep mode — to switch off the display automaticallywhen the phone is not used for a certain time
● Font size — to set the font size for messaging,contacts, and web pages
● Operator logo — to display the operator logo● Cell info display — to display the cell identity, if
available from the network
Date and timeTo change the clock type, time, time zone, and datesettings, select Menu > Settings > Date and time.When traveling to a different time zone, select Menu >Settings > Date and time > Date & time settings >Time zone: and scroll left or right to select the time zoneof your location. The time and date are set according tothe time zone and enable your phone to display the correctsending time of received text or multimedia messages.For example, GMT +7 denotes the time zone for Thailand,Indonesia, and Vietnam, 7 hours east of Greenwich/London (UK).For example, GMT +8 denotes the time zone for Singapore,Malaysia, and Philippines, 8 hours east of Greenwich/London (UK).For example, GMT +10 denotes the time zone for Sydney(Australia), 10 hours east of Greenwich/London (UK).For example, GMT +12 denotes the time zone for Auckland(New Zealand), 12 hours east of Greenwich/London (UK).
My shortcutsWith personal shortcuts you get quick access to often usedfunctions of the phone.
Left and right selection keyTo select a function from the list, select Menu >Settings > My shortcuts > Left selection key or Rightselection key.In the standby mode, if the left selection key is Go to, toactivate a function, select Go to > Options and from thefollowing options:● Select options — to add or remove a function● Organise — to rearrange the functions
Other shortcutsSelect Menu > Settings > My shortcuts and from thefollowing options:● Navigation key — to assign other functions from a
predefined list to the navigation key (scroll key).● Active standby key — to select the movement of the
navigation key to activate the active standby mode
Synchronization and backupSelect Menu > Settings > Sync and backup and fromfollowing options.● Phone switch — Synchronize or copy selected data
between your phone and another phone usingBluetooth.
● Create backup — Create a backup of selected data tothe memory card. 25
● Restore backup — Select a backup file stored on thememory card and restore it to the phone. SelectOptions > Details for information about the selectedbackup file.
● — Synchronize or copy selected databetween your phone and another device, PC or networkserver (network service).
ConnectivityYour phone provides several features to connect to otherdevices to transmit and receive data.
Bluetooth wireless technologyBluetooth technology allows you to connect your phoneusing radio waves to a compatible Bluetooth device within10 meters (32 feet).This device is compliant with Bluetooth Specification 2.0+ EDR supporting the following profiles: generic access,network access, generic object exchange, advanced audiodistribution, audio video remote control, hands-free,headset, object push, file transfer, dial-up networking, SIMaccess, and serial port. To ensure interoperability betweenother devices supporting Bluetooth technology, use Nokiaapproved enhancements for this model. Check with themanufacturers of other devices to determine theircompatibility with this device.There may be restrictions on using Bluetooth technologyin some locations. Check with your local authorities orservice provider.Setup a Bluetooth connectionSelect Menu > Settings > Connectivity > Bluetoothand take the following steps:
1. Select My phone's name and enter a name for yourphone.
2. To activate Bluetooth connectivity select Bluetooth >On. indicates that Bluetooth is active.
3. To connect your phone with an audio enhancement,select Search audio enhanc. and the device that youwant to connect.
4. To connect your phone with any Bluetooth device inrange, select Paired devices > New .Select a device and Pair.Enter a passcode (up to 16 characters) on your phoneand allow the connection on the other Bluetoothdevice.
If you are concerned about security, turn off the Bluetoothfunction, or set My phone's visibility to Hidden. Alwaysaccept only Bluetooth communication from others whomyou trust.PC connection to the internetUse Bluetooth to connect your compatible PC to theinternet without PC Suite software. Your phone must haveactivated a service provider that supports internet access,and your PC has to support Bluetooth personal areanetwork (PAN). After connecting to the network accesspoint (NAP) service of the phone and pairing with your PC,your phone automatically opens a packet data connectionto the internet.
Packet dataGeneral packet radio service (GPRS) is a network servicethat allows mobile phones to send and receive data overan internet protocol (IP)-based network.26
Server sync

To define how to use the service, select Menu >Settings > Connectivity > Packet data > Packet dataconn. and from the following options:● When needed — to set the packet data connection to
established when an application needs it. Theconnection will be closed when the application isterminated.
● Always online — to automatically connect to a packetdata network when you switch the phone on
You can connect a compatible PC to the phone byBluetooth or USB data cable and use the phone as amodem. For details refer to Nokia PC Suite. See "Nokiasupport," p. 9.
USB data cableYou can use the USB data cable to transfer data betweenthe phone and a compatible PC or a printer supportingPictBridge.To activate the phone for data transfer or image printing,connect the data cable and select the mode:● PC Suite — to use the cable for PC Suite● Printing & media — to use the phone with a
PictBridge compatible printer or with a compatible PC● Data storage — to connect to a PC that does not have
Nokia software and use the phone as a data storagedevice
To change the USB mode, select Menu > Settings >Connectivity > USB data cable and the desired USBmode.
Nokia PC SuiteWith Nokia PC Suite you can manage your music,synchronize contacts, calendar, notes, and to-do notesbetween your phone and the compatible PC or a remoteinternet server (network service). You may find moreinformation and PC Suite on the Nokia website. See "Nokiasupport," p. 9.
CallSelect Menu > Settings > Call and from the followingoptions:● Call divert — to divert your incoming calls (network
service). You may not be able to divert your calls if somecall barring functions are active. See"Security," p. 30.
● Anykey answer — to answer an incoming call bybriefly pressing any key, except the power key, the leftand right selection keys, or the end key
● Automatic redial — to make a maximum of 10attempts to connect the call after an unsuccessful callattempt
● Voice clarity — to enhance speech intelligibility,especially in noisy environments
● Speed dialling — to dial the names and phonenumbers assigned to the number keys 2 to 9 by pressingand holding the corresponding number key
● Call waiting — to have the network notify you of anincoming call while you have a call in progress (networkservice)
● Summary after call — to briefly display theapproximate duration after each call
● Send my caller ID — to show your phone number tothe person you are calling (network service). To use the 27
setting agreed upon with your service provider, selectSet by network.
● Outgoing call line — to select the phone line 1 or 2for making calls if supported by your SIM card (networkservice)
PhoneSelect Menu > Settings > Phone and from the followingoptions:● Language settings — To set the display language of
your phone, select Phone language. Automaticselects the language according to the information onthe SIM card. To set a language for the voice commands,select Recognition lang..
● Memory status — to check the memory consumption● Automatic keyguard — to lock the keypad
automatically after a preset time delay when the phoneis in the standby mode and no function has been used.
● Voice recognition — See "Voice commands," p. 28.● Security keyguard — to ask for the security code
when you unlock the keyguard ● Welcome note — to write a note that is shown when
the phone is switched on● Phone updates — to receive software updates from
your service provider (network service). This optionmay not be available, depending on your phone. See"Software updates over the air," p. 29.
● Operator selection — to set a cellular networkavailable in your area
● Help text activation — to select whether the phoneshows help texts
● Start-up tone — to let the phone plays tone when itis switched on
● Flight query — to let the phone ask when it is switchedon whether to use the flight mode. With the flightmode, all radio connections are switched off.
● Confirm SIM actions — See "SIM services," p. 41.
Voice commandsCall contacts and carry out phone functions by speaking avoice command.Voice commands are language-dependent. Select Menu >Settings > Phone > Language settings >Recognition lang. and your language before using voicecommands.To train the voice recognition of your phone to your voice,select Menu > Settings > Phone > Voicerecognition > Voice recog. training.To activate a voice command for a function, select Menu >Settings > Phone > Voice recognition > Voicecommands, a feature and a subsequent function. indicates that the voice command is activated.To activate the voice tag, select Add. To play the activatedvoice command, select Play.To use voice commands, see "Voice dialing", p.16.To manage the voice commands, scroll to a function, andselect Options and from the following:● Edit or Remove — to rename or deactivate the voice
command● Add all or Remove all — to activate or deactivate voice
commands for all functions in the voice commands list
28
Software updates over the airYour service provider may send phone software updatesover the air directly to your phone (network service). Thisoption may not be available, depending on your phone.
Warning: If you install a software update, youcannot use the device, even to make emergency calls, untilthe installation is completed and the device is restarted.Be sure to back up data before accepting installation of anupdate.Software update settingsTo allow or disallow software and configuration updates,select Menu > Settings > Configuration > Devicemanager sett. > Serv. softw. updates.Request a software update1. Select Menu > Settings > Phone > Phone
updates to request available software updates fromyour service provider.
2. Select Current softw. details to display the currentsoftware version and check whether an update isneeded.
3. Select Downl. phone softw. to download and installa software update. Follow the instructions on thedisplay.
4. If the installation was canceled after the download,select Install softw. update to start the installation.
The software update may take several minutes. If thereare problems with the installation, contact your serviceprovider.
EnhancementsThis menu or the following options are shown only if thephone is or has been connected to a compatible mobileenhancement.Select Menu > Settings > Enhancements. Select anenhancement, and an option depending on theenhancement.
ConfigurationYou can configure your phone with settings that arerequired for certain services. Your service provider mayalso send you these settings. See "Configuration settingservice," p. 8.Select Menu > Settings > Configuration and from thefollowing options:● Default config. sett. — to view the service providers
saved in the phone and set a default service provider● Activ. def. in all apps. — to activate the default
configuration settings for supported applications● Preferred access pt. — to view the saved access points● Connect to support — to download the configuration
settings from your service provider● Device manager sett. — to allow or prevent the
phone from receiving software updates. This optionmay not be available, depending on your phone. See"Software updates over the air," p. 29.
● Personal config. sett. — to manually add newpersonal accounts for various services and to activateor delete them. To add a new personal account, selectAdd, or Options > Add new. Select the service type,and enter the required parameters. To activate a 29
personal account, scroll to it, and select Options >Activate .
SecurityWhen security features that restrict calls are in use (suchas call barring, closed user group, and fixed dialling), callsmay be possible to the official emergency numberprogrammed into your device.Select Menu > Settings > Security and from thefollowing options:● PIN code request or UPIN code request — to request
for your PIN or UPIN code every time the phone isswitched on. Some SIM cards do not allow the coderequest to be turned off.
● PIN2 code request — to select whether the PIN2 codeis required when using a specific phone feature whichis protected by the PIN2 code. Some SIM cards do notallow the code request to be turned off.
● Call barring service — to restrict incoming calls to andoutgoing calls from your phone (network service). Abarring password is required.
● Fixed dialling — to restrict your outgoing calls toselected phone numbers if supported by your SIM card.When the fixed dialing is on, GPRS connections are notpossible except while sending text messages over aGPRS connection. In this case, the recipient’s phonenumber and the message center number must beincluded in the fixed dialing list.
● Closed user group — to specify a group of peoplewhom you can call and who can call you (networkservice)
● Security level — Select Phone to request the securitycode whenever a new SIM card is inserted into thephone. Select Memory, to request the security codewhen the SIM card memory is selected, and you wantto change the memory in use.
● Access codes — to change the security code, PIN code,UPIN code, PIN2 code, or barring password
● Code in use — to select whether the PIN code or UPINcode should be active
● Authority certificates or User certificates — to viewthe list of the authority or user certificates downloadedinto your phone. See "Certificates," p. 40.
● Security module sett. — to view Secur. moduledetails, activate Module PIN request, or change themodule PIN and signing PIN. See "Access codes," p. 7.
Restore factory settingsTo restore the phone back to factory conditions, selectMenu > Settings > Rest. factory sett. and from thefollowing options:● Restore settings only — to reset all preference
settings without deleting any personal data● Restore all — to reset all preference settings and
delete all personal data, such as contacts, messages,media files and activation keys
Operator menuAccess a portal to services provided by your networkoperator. For more information contact your network
operator. The operator can update this menu with aservice message. See "Service inbox," p. 40.
30
GalleryManage images, video clips, music files, themes, graphics,tones, recordings, and received files. These files are storedin the phone memory or an attached memory card andmay be arranged in folders.Copyright protections may prevent some images, music(including ringing tones), and other content from beingcopied, modified, transferred or forwarded.Your phone supports an activation key system to protectacquired content. Always check the delivery terms of anycontent and activation key before acquiring them, as theymay be subject to a fee.
Folders and filesTo view the list of folders, select Menu > Gallery. To viewthe list of files in a folder, select a folder and Open. To viewthe folders of the memory card when moving a file, scrollto the memory card, and press the scroll key right.
Print imagesYour phone supports Nokia XPressPrint to print imagesthat are in the jpeg format.1. To connect your phone to a compatible printer, use a
data cable or send the image by Bluetooth to a printersupporting Bluetooth technology. See "Bluetoothwireless technology," p. 26.
2. Select the image you want to print and Options >Print.
Memory cardUse a memory card to store your multimedia files such asvideo clips, music tracks, sound files, images, andmessaging data.
Warning: Keep all memory cards out of the reachof small children.Some of the folders in Gallery with content that the phoneuses (for example, Themes) may be stored on the memorycard.To insert and remove a memory card see "Insert a microSDcard", p. 10 and "Remove the microSD card", p. 10.Format the memory cardSome supplied memory cards are preformatted; othersrequire formatting. When you format a memory card, alldata on the card is permanently lost.1. To format a memory card, select Menu > Gallery or
Applications, the memory card folder , andOptions > Format memory card > Yes.
2. When formatting is complete, enter a name for thememory card.
Lock the memory cardSet a password (maximum 8 characters) to lock yourmemory card against unauthorized use.
Select the memory card folder and Options > Setpassword. 31
The password is stored in your phone, and you do not haveto enter it again while you are using the memory card onthe same phone. If you want to use the memory card onanother device, you are asked for the password.To remove the password, select Options > Deletepassword.
Check memory consumptionCheck the memory consumption of different data groupsand the available memory to install new software on yourmemory card.
Select the memory card and Options > Details.
MediaCamera and videoTake images or record video clips with the built-in camera.
Take a pictureTo use the still picture function, select Menu > Media >Camera or if the video function is on, scroll left or right.To zoom in and out in the camera mode, scroll up anddown or press the volume keys.To take a picture, select Capture. The phone saves thepictures on the memory card, if available, or on the phonememory.Select Options > Settings > Image preview time anda preview time to display the taken pictures. During thepreview time, select Back to take another picture orSend to send the picture as a multimedia message.Your phone supports a picture capture resolution up to1600 x 1200 pixels.
Record a video clipTo activate the video function, select Menu > Media >Video; or if the camera function is on, scroll left or right.
To start the video recording, select Record; to pause therecording, select Pause; to resume the recording, selectContinue; to stop the recording, select Stop.The phone saves the video clips on the memory card, ifavailable, or in the phone memory.
Camera and video optionsTo use a filter, select Options > Effects.To adapt the camera to the light conditions, selectOptions > White balance.To change other camera and video settings and to selectthe image and video storage, select Options >Settings.
Music playerYour phone includes a music player for listening to musictracks or other MP3 or AAC sound files that you havedownloaded from the web or transferred to the phonewith Nokia PC Suite. See "Nokia PC Suite," p. 27. You canalso view your recorded or downloaded video clips.Music and video files stored in the music folder in thephone memory or on the memory card are automatically32
detected and added to the music library during the startupof the phone.To open the music player, select Menu > Media > Musicplayer.
Music menuAccess your music and video files stored on the phonememory or the memory card, download music or videoclips from the web, or view compatible video streams froma network server (network service).To listen to music or play a video clip, select a file fromPlaylists, Artists, Albums, or Genres, and select Play.To download files from the web, select Options >Downloads and a download site.To update the music library after you have added files,select Options > Update library.Create a playlistTo create a playlist with your selection of music, do thefollowing:1. Select Playlists > Create playlist, and enter the name
of the playlist.2. Add music or video clips from the displayed lists.3. Select Done to store the playlist.Configuration for a streaming serviceYou may receive the configuration settings required forstreaming as a configuration message from the serviceprovider. See "Configuration setting service," p. 8. You canalso enter the settings manually. See"Configuration," p. 29.To activate the settings, do the following:
1. Select Options > Downloads > Streamingsettings > Configuration.
2. Select a service provider, Default, or Personalconfig. for streaming.
3. Select Account and a streaming service accountcontained in the active configuration settings.
Play music tracksWarning: Listen to music at a moderate level.
Continuous exposure to high volume may damage yourhearing. Do not hold the device near your ear when theloudspeaker is in use, because the volume may beextremely loud.To adjust the volume level, press the volume keys of thephone.Operate the music player with the music player keys orsimilarly with the virtual keys on the display.To start or pause playing, press .To skip to the next track, press . To skip to thebeginning of the previous track, press twice.To fast forward the current track, press and hold . Torewind the current track, press and hold . Release thekey at the position you want to continue the musicplayback.To stop the music player, press and hold the end key.In the music player menu you can use following shortcuts:To switch to the music menu, select .To switch to the current playlist, select .To stop the music player, press and hold the end key.
33

Change the music player lookYour phone provides several themes to change the look ofthe music player.Select Menu > Media > Music player > Go to Musicplayer > Options > Settings > Music player themeand one of the listed themes. The virtual keys may changedepending on the theme.
RadioThe FM radio depends on an antenna other than thewireless device antenna. A compatible headset orenhancement needs to be attached to the device for theFM radio to function properly.
Warning: Listen to music at a moderate level.Continuous exposure to high volume may damage yourhearing. Do not hold the device near your ear when theloudspeaker is in use, because the volume may beextremely loud.To adjust the volume, press the volume keys.Select Menu > Media > Radio.To use the graphical keys , , , or on the display,scroll left or right to the desired key, and select it.
Tune in to radio stationsSearch and save stations1. To start the search, select and hold or . To change
the radio frequency in 0.05 MHz steps, briefly press or .
2. To save a station to a memory location, selectOptions > Save station.
3. To enter the name of the radio station, selectOptions > Stations > Options > Rename.
Select Options and from the following.● Search all stations — to automatically search the
available stations at your location● Set frequency — to enter the frequency of the desired
radio station● Station directory — to access a website with a list of
radio stations● Save station — to save the currently tuned in station● Stations — to list and rename or delete saved stationsChange stationsSelect or , or press the corresponding number keys.
Radio featuresSelect Options > Settings to switch off the radio, swapbetween headset and loudspeaker, and switch betweenstereo and mono output. Select RDS on to displayinformation from the radio data system of the tuned instation. Select Auto-freq. change on to enable theautomatic switch to a frequency with the best receptionof the tuned in station.Visual radioSome radio stations may send text or graphicalinformation that you can view using the Visual Radioapplication (network service). To check the availability andcosts, contact your service provider.To set the Visual service ID of a station select Options >Stations and a station. Select Options > Visual serviceID and enter the ID.Select Options > Visual Radio to start Visual radio.34
Select Options > Enable visual service to start VisualRadio automatically or after confirmation when you turnon the radio.
Voice recorderRecord speech, sound, or an active call, and save them inGallery.Select Menu > Media > Voice recorder. To use thegraphical keys , , or on the display, scroll left orright.Record sound1. Select , or during a call, select Options > Record.
While recording a call, all parties to the call hear a faintbeeping. To pause the recording, select .
2. To end the recording, select . The recording is savedin Gallery > Recordings.
Select Options to play or send the last recording, to accessthe list of recordings and to select the memory and thefolder to store the recordings.
EqualizerAdjust the sound when using the music player.Select Menu > Media > Equaliser.To activate a predefined set, scroll to one of the equalizersets and select Activate.Create a personal equalizer set1. Select one of the last two sets in the list and Options >
Edit.2. Scroll left or right to access the virtual sliders and up or
down to adjust the slider.3. Select Save and Options > Rename to save the
settings with a name.
Push to talkPush to talk (PTT) is a two-way radio service available overa GPRS cellular network (network service).You can use PTT to have a conversation with one personor with a group of people (channel) having compatiblephones. While you are connected to the PTT service, youcan use the other functions of the phone.To check availability, costs, additional features and tosubscribe to the service, contact your service provider.
Roaming services may be more limited than for normalcalls. This feature may not be available, depending on yourphone.For more information about signing up for the PTT servicesand the usage, contact your service provider.To connect to the PTT service, select Menu > Push totalk > Switch PTT on.
35
ApplicationsYou can manage applications and games. Your phone mayhave some games or applications installed. These files arestored in the phone memory or an attached memory cardand may be arranged in folders. See "Memorycard," p. 31.
Launch an applicationSelect Menu > Applications > Games, Memory card,or Collection. Scroll to a game or an application, and selectOpen.To set sounds, lights, and shakes for a game, selectMenu > Applications > Options > Applicationsettings.Other available options may include the following:● Update version — to verify that a new version of the
application is available for download from the web(network service)
● Web page — to provide further information oradditional data for the application from an internetpage (network service), if available
● Application access — to restrict the application fromaccessing the network
Download an applicationYour phone supports J2ME Java applications. Ensure thatthe application is compatible with your phone beforedownloading it.
Important: Only install and use applications andother software from trusted sources, such as applicationsthat are Symbian Signed or have passed the JavaVerifiedTM testing.You can download new applications and games indifferent ways.● Select Menu > Applications > Options >
Downloads > App. downloads or Gamedownloads; the list of available bookmarks is shown.
● Use the Nokia Application Installer from PC Suite todownload the applications to your phone.
For the availability of different services and pricing,contact your service provider.Your device may have some bookmarks or linkspreinstalled for or may allow access to sites provided bythird parties not affiliated with Nokia. Nokia does notendorse or assume any liability for these sites. If youchoose to access them, you should take the sameprecautions, for security or content, as you would with anyinternet site.
36
OrganizerAlarm clockTo sound an alarm at a desired time.Set the alarm1. Select Menu > Organiser > Alarm clock.2. Set the alarm on and enter the alarm time.3. To issue an alarm on selected days of the week, select
Repeat: On and the days.4. Select the alarm tone. If you select the radio as an alarm
tone, connect the headset to the phone.5. Set the snooze time-out and select Save.Stop the alarmIf the alarm time is reached while the device is switchedoff, the device switches itself on and starts sounding thealarm tone. If you select Stop, the device asks whether youwant to activate the device for calls. Select No to switchoff the device or Yes to make and receive calls. Do notselect Yes when wireless device use may causeinterference or danger.To stop the alarm, select Stop. If you let the phonecontinue to sound the alarm for a minute or selectSnooze, the alarm stops for the snooze time-out, thenresumes.
CalendarSelect Menu > Organiser > Calendar.The current day has a frame around the number. If thereare any notes set for the day, the day is in bold type. To
view the day notes, select View. To view a week, selectOptions > Week view. To delete all notes in thecalendar, select the month or week view, and Options >Delete notes > All notes.Select Options > Settings to set the date, time, timezone, date or time format, date separator, default view, orthe first day of the week. Select Options > Auto-deletenotes to delete old notes automatically after a specifiedtime.Make a calendar noteScroll to the date, and select Options > Make a note andone of the following note types: Reminder, Meeting, Call, Birthday, or Memo. Fill in thefields.
To-do listTo save a note for a task that you must do, select Menu >Organiser > To-do list.To make a note if no note is added, select Add; otherwise,select Options > Add. Fill in the fields, and select Save.To view a note, scroll to it, and select View. SelectOptions to edit the attributes, to delete the selected noteand all notes that you have marked as done.
NotesTo write and send notes, select Menu > Organiser >Notes. 37

To make a note if no note is added, select Add; otherwise,select Options > Make a note. Write the note, and selectSave.
CalculatorThe calculator in your phone provides a standard, ascientific, and a loan calculator.Select Menu > Organiser > Calculator, the calculatortype, and from the available options that also include theoperating instructions.
Note: This calculator has limited accuracy and isdesigned for simple calculations.
TimersCountdown timer1. To activate the countdown timer, select Menu >
Organiser > Countd. timer > Normal timer, enterthe alarm time, and write a note that is displayed whenthe time expires. To change the countdown time,select Change time.
2. To start the timer, select Start.3. To stop the timer, select Stop timer.
Interval timer1. To have an interval timer with up to 10 intervals
started, first enter the intervals.2. Select Menu > Organiser > Countd. timer >
Interval timer.3. To start the timer, select Start timer > Start.
StopwatchYou can measure time, take intermediate times, or takelap times using the stopwatch.Select Menu > Organiser > Stopwatch and from thefollowing options:● Split timing — to take intermediate times. To reset
the time without saving it, select Options > Reset.● Lap timing — to take lap times● Continue — to view the timing that you have set in
the background● Show last — to view the most recently measured time
if the stopwatch is not reset● View times or Delete times — to view or delete the
saved timesTo set the stopwatch timing in the background, press theend key.
Web You can access various mobile internet services with yourphone browser. Appearance may vary due to screen size.You may not be able to view all details of the internetpages.
Important: Use only services that you trust andthat offer adequate security and protection againstharmful software.38
Check the availability of these services, pricing, andinstructions with your service provider.You may receive the configuration settings required forbrowsing as a configuration message from the serviceprovider. See "Configuration setting service," p. 8.To set a service, select Menu > Web > Settings >Configuration sett., and select a configuration and anaccount.
Connect to a serviceTo make a connection to the service, select Menu >Web > Home; or in the standby mode, press and hold0.To select a bookmark, select Menu > Web >Bookmarks. Your device may have some bookmarks orlinks preinstalled for or may allow access to sites providedby third parties not affiliated with Nokia. Nokia does notendorse or assume any liability for these sites. If youchoose to access them, you should take the sameprecautions, for security or content, as you would with anyinternet site.To select the last URL, select Menu > Web > Last webaddr..To enter an address of a service, select Menu > Web >Go to address. Enter the address, and select OK.After you make a connection to the service, you can startbrowsing its pages. The function of the phone keys mayvary in different services. Follow the text guides on thephone display. For more information, contact your serviceprovider.
Appearance settingsWhile browsing, select Options > Other options >Appearance settings; or in the standby mode, selectMenu > Web > Settings > Appearance settings.Available options may include the following:● Text wrapping — to select how the text is displayed● Alerts — Select Alert for unsec. conn. > Yes to alert
when a secure connection changes to an unsecureconnection while browsing.
● Alerts — Select Alert for unsec. items > Yes to alertwhen a secure page contains an unsecure item. Thesealerts do not guarantee a secure connection. See"Browser security," p. 40.
● Character encoding — Select Content encoding toset the encoding for the browser page content.
Security settingsCache memoryA cache is a memory location that is used to store datatemporarily, such as passwords and cookies. If you havetried to access or have accessed confidential informationrequiring passwords, empty the cache after each use. Acookie is data that a site saves in the cache memory of yourphone. Cookies are saved until you clear the cachememory.To clear the cache while browsing, select Options >Other options > Clear the cache. To allow or preventthe phone from receiving cookies, while browsing selectOptions > Other options > Security > Cookiesettings; or in the standby mode select Menu > Web >Settings > Security settings > Cookies. 39

Scripts over secure connectionYou can select whether to run scripts from a secure page.The phone supports WML scripts.While browsing, to allow the scripts, select Options >Other options > Security > WMLScript settings; or inthe standby mode, select Menu > Web > Settings >Security settings > WMLScripts in conn. > Allow.
Service inboxThe phone is able to receive service messages sent by yourservice provider (network service). Service messages arenotifications (for example, news headlines) that maycontain a text message or an address of a service.Select Show to access the Service inbox when you receivea service message. If you select Exit, the message is movedto the Service inbox.To access the Service inbox later, select Menu > Web >Service inbox. To access the Service inbox whilebrowsing, select Options > Other options > Serviceinbox. To activate the browser and download thecomplete message, select the message and Retrieve.To change the service inbox settings, select Menu >Web > Settings > Service inbox sett. and from thefollowing options:● Service messages — to set whether you want to
receive service messages● Message filter — Select On to receive service messages
only from content authors approved by the serviceprovider.
● Autom. connection — Select On to automaticallyactivate the browser from the standby mode, when the
phone has received a service message. If you selectOff, the phone activates the browser only after youselect Retrieve when the phone has received a servicemessage.
Browser securitySecurity features may be required for some services, suchas online banking or shopping. For such connections youneed security certificates and possibly a security module,which may be available on your SIM card. For moreinformation, contact your service provider.To view or change the security module settings, selectMenu > Settings > Security > Security modulesett..
Certificates
Important: Even if the use of certificates makes therisks involved in remote connections and softwareinstallation considerably smaller, they must be usedcorrectly in order to benefit from increased security. Theexistence of a certificate does not offer any protection byitself; the certificate manager must contain correct,authentic, or trusted certificates for increased security tobe available. Certificates have a restricted lifetime. If"Expired certificate" or "Certificate not valid yet" is shown,even if the certificate should be valid, check that thecurrent date and time in your device are correct.There are three kinds of certificates: server certificates,authority certificates, and user certificates. You mayreceive these certificates from your service provider.Authority certificates and user certificates may also besaved in the security module by your service provider.
40
To view the list of the authority or user certificatesdownloaded to your phone, select Menu > Settings >Security > Authority certificates or User certificates.During a connection if the data transmission between thephone and the content server is encrypted, isdisplayed.The security icon does not indicate that the datatransmission between the gateway and the content server(or place where the requested resource is stored) is secure.The service provider secures the data transmissionbetween the gateway and the content server.
Digital signatureYou can create digital signatures with your phone if yourSIM card has a security module. The digital signature is thesame as signing your name to a paper bill, contract, orother document.
To create a digital signature, select a link on a page, forexample, the title of the book you want to buy and itsprice. The text to be signed is shown and may include theamount and date.Check that the header text is Read and that the digitalsignature icon is shown. If the digital signature icondoes not appear, there is a security breach; do not enterany personal data (such as your signing PIN).To sign the text, read all of the text first, and select Sign.The text may not fit within a single screen. Therefore,make sure to scroll through and read all of the text beforesigning.Select the user certificate you want to use, and enter thesigning PIN. The digital signature icon disappears, and theservice may display a confirmation of your purchase.
SIM servicesYour SIM card may provide additional services. You canaccess this menu only if it is supported by your SIM card.The name and contents of the menu depend on theavailable services.For availability and information on using SIM card services,contact your SIM card vendor. This may be the serviceprovider or other vendor.
To show the confirmation messages sent between yourphone and the network when you are using the SIMservices, select Menu > Settings > Phone > ConfirmSIM actionsAccessing these services may involve sending messages ormaking a phone call for which you may be charged.
41
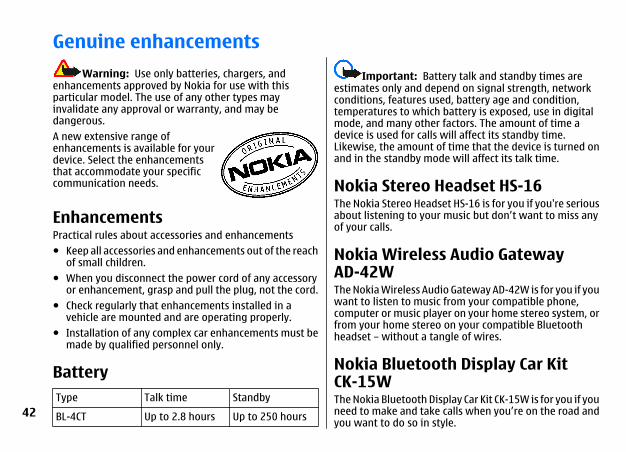
Genuine enhancementsWarning: Use only batteries, chargers, and
enhancements approved by Nokia for use with thisparticular model. The use of any other types mayinvalidate any approval or warranty, and may bedangerous.A new extensive range ofenhancements is available for yourdevice. Select the enhancementsthat accommodate your specificcommunication needs.
EnhancementsPractical rules about accessories and enhancements● Keep all accessories and enhancements out of the reach
of small children.● When you disconnect the power cord of any accessory
or enhancement, grasp and pull the plug, not the cord.● Check regularly that enhancements installed in a
vehicle are mounted and are operating properly.● Installation of any complex car enhancements must be
made by qualified personnel only.
BatteryType Talk time StandbyBL-4CT Up to 2.8 hours Up to 250 hours
Important: Battery talk and standby times areestimates only and depend on signal strength, networkconditions, features used, battery age and condition,temperatures to which battery is exposed, use in digitalmode, and many other factors. The amount of time adevice is used for calls will affect its standby time.Likewise, the amount of time that the device is turned onand in the standby mode will affect its talk time.
Nokia Stereo Headset HS-16The Nokia Stereo Headset HS-16 is for you if you're seriousabout listening to your music but don’t want to miss anyof your calls.
Nokia Wireless Audio GatewayAD-42WThe Nokia Wireless Audio Gateway AD-42W is for you if youwant to listen to music from your compatible phone,computer or music player on your home stereo system, orfrom your home stereo on your compatible Bluetoothheadset – without a tangle of wires.
Nokia Bluetooth Display Car KitCK-15WThe Nokia Bluetooth Display Car Kit CK-15W is for you if youneed to make and take calls when you’re on the road andyou want to do so in style.
42
Battery informationCharging and dischargingYour device is powered by a rechargeable battery. Thebattery can be charged and discharged hundreds of times,but it will eventually wear out. When the talk and standbytimes are noticeably shorter than normal, replace thebattery. Use only Nokia approved batteries, and rechargeyour battery only with Nokia approved chargersdesignated for this device.If a replacement battery is being used for the first time orif the battery has not been used for a prolonged period, itmay be necessary to connect the charger, then disconnectand reconnect it to begin charging the battery.Unplug the charger from the electrical plug and the devicewhen not in use. Do not leave a fully charged batteryconnected to a charger, since overcharging may shortenits lifetime. If left unused, a fully charged battery will loseits charge over time.If the battery is completely discharged, it may take severalminutes before the charging indicator appears on thedisplay or before any calls can be made.Use the battery only for its intended purpose. Never useany charger or battery that is damaged.Do not short-circuit the battery. Accidental short-circuitingcan occur when a metallic object such as a coin, clip, or pencauses direct connection of the positive (+) and negative(-) terminals of the battery. (These look like metal stripson the battery.) This might happen, for example, when youcarry a spare battery in your pocket or purse. Short-
circuiting the terminals may damage the battery or theconnecting object.Leaving the battery in hot or cold places, such as in a closedcar in summer or winter conditions, will reduce thecapacity and lifetime of the battery. Always try to keep thebattery between 15°C and 25°C (59°F and 77°F). A devicewith a hot or cold battery may not work temporarily, evenwhen the battery is fully charged. Battery performance isparticularly limited in temperatures well below freezing.Do not dispose of batteries in a fire as they may explode.Batteries may also explode if damaged. Dispose ofbatteries according to local regulations. Please recyclewhen possible. Do not dispose as household waste.Do not dismantle or shred cells or batteries. In the eventof a battery leak, do not allow the liquid to come in contactwith the skin or eyes. In the event of such a leak, flush yourskin or eyes immediately with water, or seek medical help.
Nokia battery authenticationguidelinesAlways use original Nokia batteries for your safety. Tocheck that you are getting an original Nokia battery,purchase it from an authorised Nokia dealer, and inspectthe hologram label using the following steps:
43
Successful completion of the steps is not a totalassurance of the authenticity of the battery. If you haveany reason to believe that your battery is not anauthentic, original Nokia battery, you should refrain
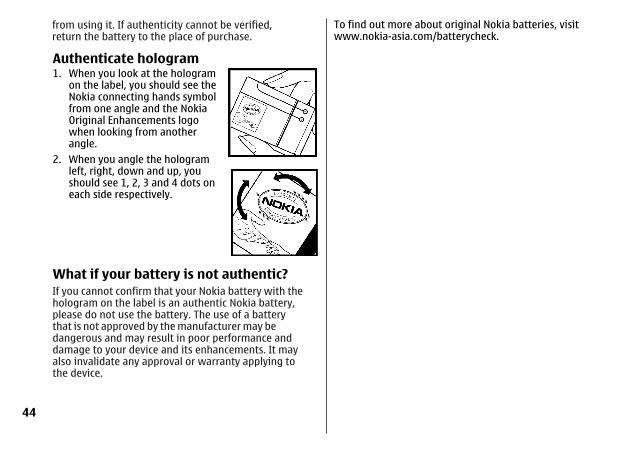
Authenticate hologram1. When you look at the hologram
on the label, you should see theNokia connecting hands symbolfrom one angle and the NokiaOriginal Enhancements logowhen looking from anotherangle.
2. When you angle the hologramleft, right, down and up, youshould see 1, 2, 3 and 4 dots oneach side respectively.
What if your battery is not authentic?
To find out more about original Nokia batteries, visitwww.nokia .com/battery .
44
from using it. If authenticity cannot be verified,return the battery to the place of purchase.
If you cannot confirm that your Nokia battery with thehologram on the label is an authentic Nokia battery,please do not use the battery. The use of a batterythat is not approved by the manufacturer may bedangerous and may result in poor performance anddamage to your device and its enhancements. It mayalso invalidate any approval or warranty applying tothe device.
-asia check
Care and maintenanceYour device is a product of superior design andcraftsmanship and should be treated with care. Thefollowing suggestions will help you protect your warrantycoverage.● Keep the device dry. Precipitation, humidity, and all
types of liquids or moisture can contain minerals thatwill corrode electronic circuits. If your device does getwet, remove the battery, and allow the device to drycompletely before replacing it.
● Do not use or store the device in dusty, dirty areas. Itsmoving parts and electronic components can bedamaged.
● Do not store the device in hot areas. High temperaturescan shorten the life of electronic devices, damagebatteries, and warp or melt certain plastics.
● Do not store the device in cold areas. When the devicereturns to its normal temperature, moisture can forminside the device and damage electronic circuit boards.
● Do not attempt to open the device other than asinstructed in this guide.
● Do not drop, knock, or shake the device. Roughhandling can break internal circuit boards and finemechanics.
● Do not use harsh chemicals, cleaning solvents, or strongdetergents to clean the device.
● Do not paint the device. Paint can clog the moving partsand prevent proper operation.
● Use a soft, clean, dry cloth to clean any lenses, such ascamera, proximity sensor, and light sensor lenses.
● Use only the supplied or an approved replacementantenna. Unauthorized antennas, modifications, orattachments could damage the device and may violateregulations governing radio devices.
● Use chargers indoors.● Always create a backup of data you want to keep, such
as contacts and calendar notes.● To reset the device from time to time for optimum
performance, power off the device and remove thebattery.
These suggestions apply equally to your device, battery,charger, or any enhancement. If any device is not workingproperly, take it to the nearest authorized service facilityfor service.
45
Additional safety informationSmall childrenYour device and its enhancements may contain smallparts. Keep them out of the reach of small children.
Operating environmentThis device meets RF exposure guidelines when usedeither in the normal use position against the ear or whenpositioned at least 1.0 centimeters (3/8 inches) away fromthe body. When a carry case, belt clip, or holder is used forbody-worn operation, it should not contain metal andshould position the device the above-stated distance fromyour body.To transmit data files or messages, this device requires aquality connection to the network. In some cases,transmission of data files or messages may be delayeduntil such a connection is available. Ensure the aboveseparation distance instructions are followed until thetransmission is completed.
Medical devicesOperation of any radio transmitting equipment, includingwireless phones, may interfere with the functionality ofinadequately protected medical devices. Consult aphysician or the manufacturer of the medical device todetermine if they are adequately shielded from externalRF energy or if you have any questions. Switch off yourdevice in health care facilities when any regulationsposted in these areas instruct you to do so. Hospitals or
health care facilities may be using equipment that couldbe sensitive to external RF energy.
Implanted medical devicesManufacturers of medical devices recommend that aminimum separation of 15.3 centimeters (6 inches) shouldbe maintained between a wireless device and animplanted medical device, such as a pacemaker orimplanted cardioverter defibrillator, to avoid potentialinterference with the medical device. Persons who havesuch devices should:● Always keep the wireless device more than 15.3
centimeters (6 inches) from the medical device whenthe wireless device is turned on.
● Not carry the wireless device in a breast pocket.● Hold the wireless device to the ear opposite the medical
device to minimize the potential for interference.● Turn the wireless device off immediately if there is any
reason to suspect that interference is taking place.● Read and follow the directions from the manufacturer
of their implanted medical device.If you have any questions about using your wireless devicewith an implanted medical device, consult your healthcare provider.
Hearing aidsSome digital wireless devices may interfere with somehearing aids. If interference occurs, consult your serviceprovider.
46
VehiclesRF signals may affect improperly installed or inadequatelyshielded electronic systems in motor vehicles such aselectronic fuel injection systems, electronic antiskid(antilock) braking systems, electronic speed controlsystems, and air bag systems. For more information, checkwith the manufacturer, or its representative, of yourvehicle or any equipment that has been added.Only qualified personnel should service the device orinstall the device in a vehicle. Faulty installation or servicemay be dangerous and may invalidate any warranty thatmay apply to the device. Check regularly that all wirelessdevice equipment in your vehicle is mounted andoperating properly. Do not store or carry flammableliquids, gases, or explosive materials in the samecompartment as the device, its parts, or enhancements.For vehicles equipped with an air bag, remember that airbags inflate with great force. Do not place objects,including installed or portable wireless equipment in thearea over the air bag or in the air bag deployment area. Ifin-vehicle wireless equipment is improperly installed andthe air bag inflates, serious injury could result.Using your device while flying in aircraft is prohibited.Switch off your device before boarding an aircraft. The useof wireless teledevices in an aircraft may be dangerous tothe operation of the aircraft, disrupt the wirelesstelephone network, and may be illegal.
Potentially explosive environmentsSwitch off your device when in any area with a potentiallyexplosive atmosphere, and obey all signs and instructions.Potentially explosive atmospheres include areas whereyou would normally be advised to turn off your vehicle
engine. Sparks in such areas could cause an explosion orfire resulting in bodily injury or even death. Switch off thedevice at refuelling points such as near gas pumps atservice stations. Observe restrictions on the use of radioequipment in fuel depots, storage, and distribution areas;chemical plants; or where blasting operations are inprogress. Areas with a potentially explosive atmosphereare often, but not always, clearly marked. They includebelow deck on boats, chemical transfer or storage facilitiesand areas where the air contains chemicals or particlessuch as grain, dust, or metal powders. You should checkwith the manufacturers of vehicles using liquefiedpetroleum gas (such as propane or butane) to determineif this device can be safely used in their vicinity.
Emergency callsImportant: Wireless phones, including this device,
operate using radio signals, wireless networks, landlinenetworks, and user-programmed functions. Because ofthis, connections in all conditions cannot be guaranteed.You should never rely solely on any wireless device foressential communications like medical emergencies.To make an emergency call:1. If the device is not on, switch it on. Check for adequate
signal strength.Some networks may require that a valid SIM card isproperly inserted in the device.
2. Press the end key as many times as needed to clear thedisplay and ready the device for calls.
3. Enter the official emergency number for your presentlocation. Emergency numbers vary by location. 47

4. Press the call key.If certain features are in use, you may first need to turnthose features off before you can make an emergency call.Consult this guide or your service provider for moreinformation.When making an emergency call, give all the necessaryinformation as accurately as possible. Your wireless devicemay be the only means of communication at the scene ofan accident. Do not end the call until given permission todo so.
CERTIFICATION INFORMATION (SAR)This mobile device meets guidelines for exposure toradio waves.Your mobile device is a radio transmitter and receiver. Itis designed not to exceed the limits for exposure to radiowaves recommended by international guidelines. Theseguidelines were developed by the independent scientificorganization ICNIRP and include safety margins designedto assure the protection of all persons, regardless of ageand health.The exposure guidelines for mobile devices employ a unitof measurement known as the Specific Absorption Rate orSAR. The SAR limit stated in the ICNIRP guidelines is 2.0watts/kilogram (W/kg) averaged over 10 grams of tissue.Tests for SAR are conducted using standard operatingpositions with the device transmitting at its highestcertified power level in all tested frequency bands. Theactual SAR level of an operating device can be below themaximum value because the device is designed to use onlythe power required to reach the network. That amountchanges depending on a number of factors such as howclose you are to a network base station. The highest SAR
value under the ICNIRP guidelines for use of the device atthe ear is 1.07 W/kg.Use of device accessories and enhancements may result indifferent SAR values. SAR values may vary depending onnational reporting and testing requirements and thenetwork band. Additional SAR information may beprovided under product information at www.nokia-asia.com.
MANUFACTURER’S LIMITEDWARRANTYThis Limited Warranty is in addition to, and does not affectyour legal (statutory) rights under your applicablenational laws relating to the sale of consumer products.Nokia Corporation (“Nokia”) provides this LimitedWarranty to person who has purchased the Nokiaproduct(s) included in the sales package (“Product”).Nokia warrants to you that during the warranty periodNokia or a Nokia authorized service company will in acommercially reasonable time remedy defects inmaterials, design and workmanship free of charge byrepairing or, should Nokia in its absolute discretion deemit necessary, replacing the Product in accordance with thisLimited Warranty (unless otherwise required by law). ThisLimited Warranty is only valid and enforceable in thecountry where you have purchased the Product providedthat it is intended for sale in that country.
Warranty periodThe warranty period starts at the time of Product's originalpurchase by the first end-user. The Product may consist ofseveral different parts and different parts may be covered
48
by a different warranty period (hereinafter “WarrantyPeriod”). The different Warranty Periods are:a) twelve (12) months for the mobile device andaccessories (whether included in the mobile device salespackage or sold separately) other than the consumableparts and accessories listed in (b) and (c) below;b) six (6) months for the following consumable parts andaccessories: batteries, chargers, desk stands, headsets,cables and covers; andc) ninety (90) days for the media on which any software isprovided, for example, CD-ROM or memory cardAs far as your national laws permit, the Warranty Periodwill not be extended or renewed or otherwise affected dueto subsequent resale, repair or replacement of theProduct. However, repaired part(s) will be warranted forthe remainder of the original Warranty Period or for sixty(60) days from the date of repair, whichever is longer.
How to get warranty serviceIf you wish to make a claim under the Limited Warranty,you may call the Nokia call center (where this is availableand please note national rates apply to calls) and/or wherenecessary, return your Product or the affected part (if it isnot the entire Product) to a Nokia care center or Nokiadesignated service location. Information about Nokia carecenters, Nokia designated service locations and Nokia callcenters can be found at local Nokia web pages whereavailable.You must return your Product or the affected part (if it isnot the entire Product) to a Nokia care center or Nokiadesignated service location before the expiry of theWarranty Period.
When making a Limited Warranty claim you have topresent: a) the Product (or affected part thereto), b) thelegible and unmodified original proof of purchase, whichclearly indicates the name and address of the seller, thedate and place of purchase, the product type and the IMEIor other serial number.This Limited Warranty extends only to the original firstend-user of the Product and is not assignable ortransferable to any subsequent purchaser/end-user.
What is not covered?1. This Limited Warranty does not cover user manuals orany third party software, settings, content, data or links,whether included/downloaded in the Product, whetherincluded during installment, assembly, shipping or at anyother time in the delivery chain or otherwise and in anyway acquired by you. To the extent permitted byapplicable law(s), Nokia does not warrant that any Nokiasoftware will meet your requirements, will work incombination with any hardware or software applicationsprovided by a third party, that the operation of thesoftware will be uninterrupted or error free or that anydefects in the software are correctable or will be corrected.2. This Limited Warranty does not cover a) normal wearand tear (including, without limitation, wear and tear ofcamera lenses, batteries or displays), b) transport costs, c)defects caused by rough handling (including, withoutlimitation, defects caused by sharp items, by bending,compressing or dropping, etc.), d) defects or damagecaused by misuse of the Product, including use that iscontrary to the instructions provided by Nokia (e.g. as setout in the Product's user guide) and/or e) other actsbeyond the reasonable control of Nokia. 49
3. This Limited Warranty does not cover defects or allegeddefects caused by the fact that the Product was used with,or connected to, a product, accessories, software and/orservice not manufactured, supplied or authorized by Nokiaor was used otherwise than for its intended use. Defectscan be caused by viruses from your or from a third party'sunauthorised access to services, other accounts, computersystems or networks. This unauthorised access can takeplace through hacking, password-mining or through avariety of other means.4. This Limited Warranty does not cover defects caused bythe fact that the battery has been short-circuited or by thefact that the seals of the battery enclosure or the cells arebroken or show evidence of tampering or by the fact thatthe battery has been used in equipment other than thosefor which it has been specified.5. This Limited Warranty does not apply if the Product hasbeen opened, modified or repaired by anyone other thanan authorized service centre, if it is repaired usingunauthorised spare parts or if the Product’s serial number,the mobile accessory date code or the IMEI number hasbeen removed, erased, defaced, altered or are illegible inany way and this shall be determined in the sole discretionof Nokia.6. This Limited Warranty does not apply if the Product hasbeen exposed to moisture, to dampness or to extremethermal or environmental conditions or to rapid changesin such conditions, to corrosion, to oxidation, to spillageof food or liquid or to influence from chemical products.
Other important noticesA third party, independent operator provides the SIM cardand cellular and/or other network or system on which the
Product operates. Therefore, Nokia will not acceptresponsibility under this warranty for the operation,availability, coverage, services or range of the cellular orother network or system. Before the Product can berepaired or replaced, the operator may need to unlock anySIM-lock or other lock that may have been added to lockthe product to a specific network or operator. Accordingly,Nokia does not accept responsibility for any delays inwarranty repairs or for the inability of Nokia to completewarranty repairs that are caused by the operator's delayor failure to unlock any SIM-lock or other lock.Please remember to make backup copies or keep writtenrecords of all important content and data stored in yourProduct, because content and data may be lost duringrepair or replacement of the Product. Nokia, in a mannerconsistent with the provisions of the section entitled“Limitation of Nokia's Liability” below, to the extentpermitted by applicable law(s), shall not under anycircumstances be liable, either expressly or implied, forany damages or losses of any kind whatsoever resultingfrom loss of, damage to, or corruption of, content or dataduring repair or replacement of the Product.All parts of the Product or other equipment that Nokia hasreplaced shall become the property of Nokia. If thereturned Product is found not to be covered by the termsand conditions of the Limited Warranty, Nokia and itsauthorized service companies reserve the right to chargea handling fee. When repairing or replacing the Product,Nokia may use products or parts that are new, equivalentto new or reconditioned.Your Product may contain country specific elements,including software. If the Product has been re-exportedfrom its original destination country to another country,50
the Product may contain country specific elements that arenot considered to be a defect under this Limited Warranty.
Limitation of Nokia's liabilityThis Limited Warranty is your sole and exclusive remedyagainst Nokia and Nokia's sole and exclusive liability inrespect of defects in your Product. However, this LimitedWarranty shall neither exclude nor limit i) any of your legal(statutory) rights under the applicable national laws or ii)any of your rights against the seller of the Product.This Limited Warranty replaces all other Nokia warrantiesand liabilities, whether oral, written, (non-mandatory)statutory, contractual, in tort or otherwise, including,without limitation, and where permitted by applicablelaw, any implied conditions, warranties or other terms asto satisfactory quality or fitness for purpose. To the extentpermitted by applicable law(s) Nokia does not assume anyliability for loss of or damage to or corruption of data, forany loss of profit, loss of use of Products or functionality,loss of business, loss of contracts, loss of revenues or lossof anticipated savings, increased costs or expenses or forany indirect loss or damage, consequential loss or damageor special loss or damage. To the extent permitted byapplicable law, Nokia’s liability shall be limited to thepurchase value of the Product. The above limitations shallnot apply to death or personal injury resulting fromNokia’s proven negligence.
Statutory obligationsThis Limited Warranty must be read subject to anystatutory provisions that imply warranties or conditionsinto this Limited Warranty that cannot be excluded,restricted or modified or cannot be excluded, restricted ormodified except to a limited extent. If such statutory
provisions apply, to the extent to which Nokia is able todo so, its liability under those provisions will be limited,at its option to, in the case of goods: the replacement ofthe goods or the supply of equivalent goods, the repair ofthe goods, the payment of the cost of replacing the goodsor of acquiring equivalent goods, or the payment of thecost of having the goods repaired; and in the case ofservices: the supplying of the services again or thepayment of the cost of having the services supplied again.
Note: Your Product is a sophisticated electronicdevice. Nokia strongly encourages you to familiariseyourself with the user guide and instructions providedwith and for the Product. Please also note that the Productmight contain high precision displays, camera lenses andother such parts, which could be scratched or otherwisedamaged if not handled very carefully.All warranty information, product features andspecifications are subject to change without notice.
Nokia CorporationKeilalahdentie 2-4FIN-02150 EspooFinland
51
IndexAaccess code 7active standby 14, 24anykey answer 27applications 36audio messages 21automatic redial 27
Bbarring password 7battery 43
charging 11battery charge status 13browser 38
security 40business cards 23
Ccache memory 39calculator 38call divert 27call log 23call waiting 27caller id 28calling 15calls 15
options 16camera 32certificates 40charge the battery 11configuration 29configuration setting service 8
contact information 9contacts 22
memory 22cookies 39customer service 9
Ddata cable 27dialing 15dialing shortcuts 16, 23digital signature 41display 13, 24downloads 8
Ee-mail 19enhancements 29equalizer 35
Ffiles 31flash messages 20flight mode 14flight query 28FM radio 34folders 31font size 25
Ggallery 31games 36Genuine enhancements 42
Hhandsfree
See loudspeakerheadphones 11headset 11help text 28
Iidle mode 13IM 21indicators 14info messages 21installation 9instant messaging 21internet 38
Kkeyguard 15, 28keypad lock 15keys 12
Llanguage 28loudspeaker 16
Mmemory card 31
insert 10message centre number 18message sending 1952
messagessettings 21
messagingaudio messages 21
microSD cardinsert 10
music player 32
Nnavigation 17Nokia contact information 9notes 37number mode 17
Ooffline mode 15operator menu 30organiser 37
Pparts 12PC Suite 27phone software updates 28phonebook
See contactsPictBridge 27picture 32PIN 7power saver 25power saving 13predictive text input 17print images 31profiles 24PTT
See push to talkPUK 7push to talk 35
Rradio 34recorder 35redial 27
Sscreen saver 25scrolling 17security code 7security module 7service commands 21service inbox 40settings 24
active standby 24call 27configuration 29date 25display 24factory 30font size 25messages 21phone 28power saver 25profiles 24screen saver 25security 30shortcuts 25sleep mode 25streaming 33themes 24
time 25tones 24wallpaper 24
shortcuts 14, 25signal strength 13SIM
services 41SIM card 15
installation 9SIM messages 21sleep mode 25software update 8, 29speed dialing 16, 23speed dialling 27standby mode 13start up tone 28status indicators 13stopwatch 38strap 12
Ttake a picture 32text modes 17themes 24timer 38to-do list 37tones 24traditional text input 17
UUPIN 7USB data cable 27
53

Vvideo clips 32visual radio 34voice clarity 27voice commands 28voice dialing 16voice messages 21voice recognition 28voice recorder 35
Wwallpaper 24web 38welcome note 28WML scripts 40write text 17
54