nikon lite •touch zoom80 lite •touch zoom80 qd
TRANSCRIPT

Nikon Lite •Touch Zoom80 Lite •Touch Zoom80 QD
Instruction Manual / Manual de instrucciones
Foreword
Thank you for purchasing the Nikon LiteTouch Zoom 80/80 QD. For obtaining the best results with this easy-to-use camera, be sure to read this instruction manual thoroughly before you begin.
LiteTouch Zoom 80 QD user: For instructions on data imprint functions, see "Data imprinting function" on pages 68 to 76.
Note: Panorama photography is possible with the LiteTouch Zoom 80 QD only.
Important notes oh panorama photographs In some cases, your film processing lab may not be able to handle the printing of panorama-format photographs. For details, consult your local photo lab or camera dealer. Also, before having your film processed, ask your local lab about possible options for processing panorama photographs.
2
For easy identification, attach the appropriate supplied label, "PANORAMA," "NORMAL & PANORAMA MIXED" or "DEVELOPED ONLY" to the film cartridge when you bring the film to the photo lab for processing. 1) If you take an entire roll of panorama-format photographs, be sure to
specifically request panorama finishing and explain that your film consists entirely of panorama photographs, and attach a "PANORAMA" label to the film cartridge.
2) When you shift the Panorama switch in the middle of a roll (thereby mixing regular and panorama pictures in a single roll), you should have your film processed according to one of the following conditions: If your local photo lab has photo processing machinery that is equipped to process a single roll of film containing a mix of both panorama and regular format photographs:

a) Explain that your film consists of a mix of panorama and regular format photographs when you have your film processed and attach a "NORMAL & PANORAMA MIXED" label to the film cartridge.
If your local photo lab can only process panorama or regular format photographs in a given roll: b) Have the roll developed only, so that you can review the negatives before
printing, and later specify separate printing of panorama and regular format frames. Attach a "DEVELOP ONLY" label to the film cartridge.
c) Print all of the photographs in regular format prints first, then later point out the panorama format frames on the film and have them printed again in panorama format prints.
English
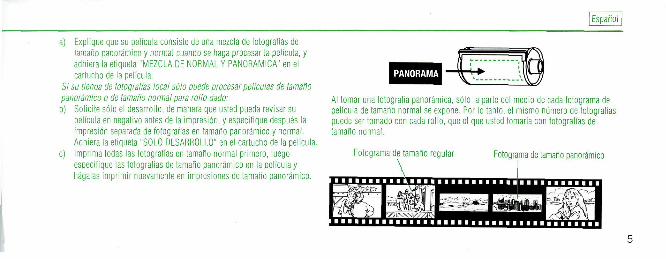
When taking a panorama photograph, only the middle portion of each regular-format film frame is exposed. Therefore, the same number of pictures can be taken with each roll as with regular-format photographs.
Regular-format frame Panorama-format frame
3
Prefacio
Le agradecemos por eiegir nuestro modelo Nikon LiteTouch Zoom 80/80 QD. A fin de obtener los mejores resultados con esta camara tan facil de usar, asegurese de leer atentamente este manual de instrucciones antes de comenzar.
Usuarios de LiteTouch Zoom 80 QD: Para las instrucciones relacionadas con las funciones de impresidn de datos, vea la section "impresion de datos" en las paginas 68 a 76.
Nota: La fotografia panoramica es posible solamente con LiteTouch Zoom 80 QD.
Notas importantes sobre fotograffas panoramicas En algunos casos, su laboratorio de porcesamiento de peliculas local podria no ser capaz de procesar la impresion de fotograffas de tamano panoramico. Para los detalles, consulte con su tienda de fotografias local y su distribuidor de camaras. Tambien, antes de procesar su peliculas, consulte al encargado de su tienda de fotografias local sobre las opciones de prpcesamiento posibles para fotograffas panoramicas.
Para facilidad de identification, adhiera la etiqueta adhesiva que se suministra, "PANORAMA", "MEZCLA DE NORMAL Y PANORAMICA" 0 "SOLO DESARROLLO" al cartucho de pelfcula cuando lo Neve a la tienda fotografica para procesarlo. 1) Si usted ha tornado un rollo complete de fotograffas panoramicas, asegurese
de solicitar la termination en tamano panoramico, y explicar que la pelfcula fue tomada completa en modo panoramico, adhiera la etiqueta "PANORAMA" en el cartucho de la pelfcula.
2) Cuando usted cambie el conmutador panoramico a la mitad del rollo (por lo tanto mezclando fotografias de tamano normal y panoramicas en un solo rollo), used debe hacer que su pelfcula se procese de acuerdo con las siguientescondiciones:
Si su tienda de fotografias local cuenta con maquinaria de procesamiento equipada para procesar un rollo de pelfcula que contenga una mezcla de fotograffas de ambos tamatfos, panoramico y normal:
4
a) Explique que su pelicula consiste de una mezcla de fotografias de tamano panoramico y normal cuando se haga procesar la pelicula, y adhiera la etiqueta "MEZCLA DE NORMAL Y PANORAMICA" en el cartucho de la pelicula.
Si su lienda de iotogralias local solo puede procesar pelicuias de tamano panoramico o de tamano normal para rollo dado: b) Solicite solo el desarrollo, de manera que usted pueda revisar su
pelicula en negativo antes de la impresidn, y especifique despues la impresidn separada de fotografias en tamano panoramico y normal. Adhiera la etiqueta "SOLO DESARROLLO" en el cartucho de la pelicula.
c) Imprima todas las fotografias en tamano normal primero, luego especifique las fotografias de tamano panoramico en la pelicula y hagalas imprimir nuevamente en impresiones de tamano panoramico.
Esparto
Al tomar una fotografia panoramica, solo la parte del medio de cada fotograma de pelicula de tamano normal se expone. Por lo tanto, el mismo numero de fotografias puede ser tornado con cada rollo, que el que usted tomaria con fotografias de tamano normal.
Fotograma de tamano regular Fotograma de tamano panoramico
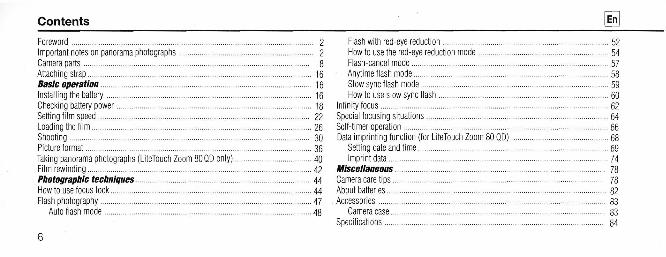
Contents @
Foreword 2 Important notes on panorama photographs 2 Camera parts 8 Attaching strap 16 Basic operation 16 Installing the battery 16 Checking battery power 18 Setting film speed 22 Loading the film 26 Shooting 30 Picture format 36 Taking panorama photographs (LiteTouch Zoom 80 QD only) 40 Film rewinding 42 Photographic techniques 44 How to use focus lock 44 Flash photography 47
Auto flash mode 48
Flash with red-eye reduction 52 How to use the red-eye reduction mode 54 Flash-cancel mode 57 Anytime flash mode 58 Slow sync flash mode 59 How to use slow sync flash 60
Infinity focus 62 Special focusing situations 64 Self-timer operation 66 Data imprinting function (for LiteTouch Zoom 80 QD) 68
Setting date and time 69 Imprint data 74
Miscellaneous 78 Camera care tips 78 About batteries 82 Accessories 83
Camera case 83 Specifications 84
Indice
Prefacio 4 Notas importantes sorbre fotograias panoramicas 4 Nomenclature 9 Fijacion de correa 16 Operation basics 17 Instalaciebn de la pila 17 Verification de la potencia de la pila 18 Ajuste de la sensibilidad de la peicula 22 Carga de la pelfcula 26 Toma de fotografias 30 Formato de fotografia 36 Toma de fotografias panoramicas (LiteTouch Zoom 80 QD solamente) 40 Rebobinado de la pelfcula 42 Tecnlcas fotograficas 44 Mode de empleo del bloqueo de enfoque 44 Fotografia con flash 47
Modo de flash automatico 48 Flash con reduccion de ojo rojo 52
H Utilizacibn de reduccion de ojo rojo 54 Mode de cancelacion de flash 57 Mode de flash permanente 58 Modalidad de flash sincr, lento 59
Utilizacibn del flash sincr. lente 60 Enfoque infinito 62 Situaciones especiales de enfoque 64 Operacion del disparador automatico 66 Funcibn de impresion de datos (para LiteTouch Zoom 80 QD) 68
Ajustes de la fecha y la hora 69 Impresion de datos 74
Miscelaneos 78 Consejos para el cuidado de la camara 78 Acerca de las pilas 82 Accesorios 83
Estuche de la camara 83 Especificaciones 86
7
eTouch Zoom 80 QD
1 0
1 1
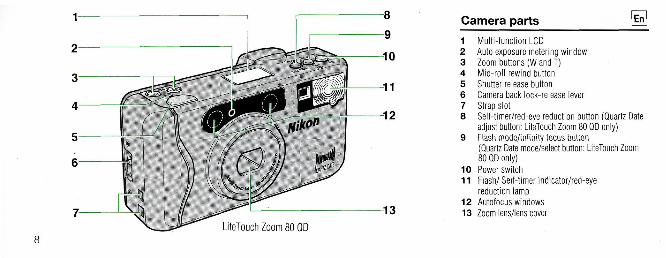
Camera parts W
1 Multi-function LCD 2 Auto exposure metering window 3 Zoom buttons (W and T) 4 Mid-roll rewind button 5 Shutter release button 6 Camera back lock-release lever 7 Strap slot
-12 8 Self-timer/red-eye reduction button (Quartz Date adjust button: LiteTouch Zoom 80 QD only)
9 Flash mode/infinity focus button (Quartz Date mode/select button: LiteTouch Zoom 80 QD only)
10 Power switch 11 Flash/ Self-timer indicator/red-eye
reduction lamp 12 Autofocus windows
1 3 13 Zoom lens/lens cover

Nomenclature [|sj
1 LCD multifuncional 2 Ventanilla de medicion de exposition automata 3 Tecla del zoom (W y T) 4 Botdn de rebobinado a medio rollo 5 Disparador 6 Paianca de liberacidn del seguro del respaldo de
la camara 7 Ranurade la correa 8 Botdn autodisparador/reduccibn de ojos rojos
(Botdn de ajuste Quartz Date: LiteTouch Zoom 80 QD solamente)
9 Botdn de modo de flash/enfoque infinito (Botdn modo Quartz Date/seleccidn: LiteTouch Zoom 80 QD solamente)
10 Botdn depoder 11 Flash/ Indicador del crondmetro automatico/
reduccidn de ojo rojo
12 Ventanilla deenfoque automatico
13 Lente zoom/tapa del objetivo
En
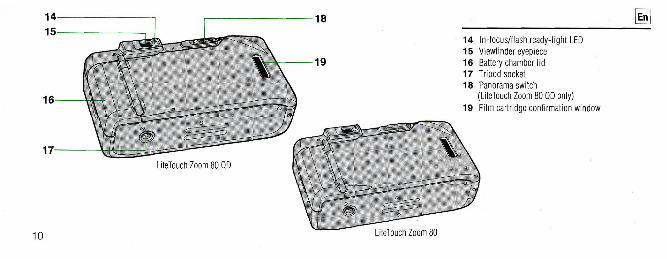
14 In-focus/flash ready-light LED 15 Viewfinder eyepiece
16 Battery chamber lid 17 Tripod socket 18 Panorama switch
(LiteTouch Zoom 80 QD only)
19 Film cartridge confirmation window
10
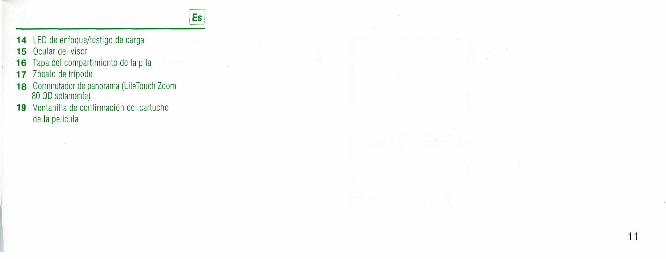
® 14 LED de enfoque/lestigo de carga 15 Ocular del visor 16 Tapadel compartimientode lapila 17 Zdcalo de tripode
18 Commutador de panorama (LiteTouch Zoom 80 QD solamente)
19 Ventanilla de confirmacidn del cartucho de la pelicula
11
12
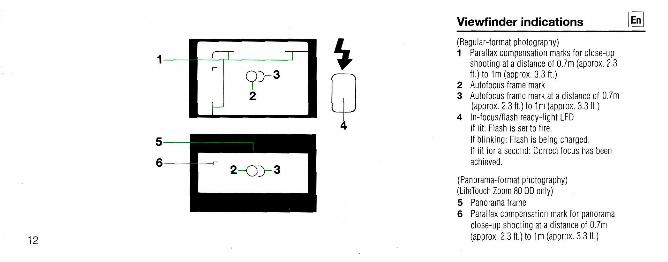
Viewfinder indications g (Regular-format photography) 1 Parallax compensation marks for close-up
shooting at a distance of 0.7m (approx. 2.3 ft.) to 1m (apprax. 3.3 ft.)
2 Autofocus frame mark 3 Autofocus frame mark at a distance of 0.7m
(approx. 2.3 ft.) to 1m (approx. 3.3 ft.) 4 In-focus/flash ready-light LED
If lit: Flash is set to fire. If blinking: Flash is being charged. If lit for a second: Correct focus has been achieved.
(Panorama-format photography) (LiteTouch Zoom 80 QD only) 5 Panorama frame 6 Parallax compensation mark for panorama
close-up shooting at a distance of 0.7m (approx. 2.3 ft.) to 1m (approx. 3.3 ft.)

Informacion del visor @ (Fotografia en formato estandar) 1 Marcas de compensacion parallax para tomas
de acercamiento panorama a una distancia de 0.7 a 1m.
2 Marca de encuandre de enfoque automatico 3 Marcas de encuandre de enfoque automatico a
una distancia de 0,7 a 1m. 4 LED de enfoque/testigo de carga
Si es enciende: El flash esta activado. Si esta intermitente: el flash se esta cargando Si se enciende por un segundo: se ha logrado el enfoque correcto.
(Fotografia en formato panoramico) (LiteTouch Zoom 80 QD solamente) 5 Cuadro panoramico 6 Marca de compensacion parallax para tomas
de acercamiento panorama a una distancia de 0,7 a 1m. 13

14
(LiteTouch Zoom 80) 88 3S.J8S
3 1-
HM-
(LiteTouch Zoom 80 QD)
LCD panel ® 1 Red-eye reduction indicator 2 Insufficient battery power indicator 3 Flash mode indicator 4 Self-timer indicator 5 Infinity focus indicator 6 Frame counter 7 Month indicator
- 9 8 Year indicator - 8 9 Time indicator colon
10 Frame counter/imprint data 10 11 Data imprint indicator
2 11
5 4

Pantalla LCD [ES]
1 Indicador de reduccidn de ojos rojos 2 Indicador de potencia insuficiente de la pila 3 Indicador del modode flash 4 Indicador de disparador automatico 5 Indicador de enfoque al infinito 6 Contador de fotogramas 7 Indicador del mes 8 Indicador del ano 9 Dos puntos indicador de la hora
10 Contador de fotogramas/lmpresion de datos 11 Indicador de impresidn de datos
15
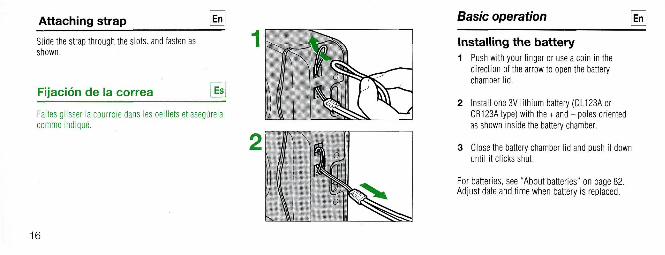
Attaching strap En
Slide the strap through the slots, and fasten as shown.
Fijacion de la correa Es
Faltes glisser la courroie dans les oei I lets et asegurela comme indtque.
16
Basic operation [In]
y i w
Installing the battery 1 Push with your finger or use a coin in the
direction of the arrow to open the battery chamber lid.
2 Install one 3V lithium battery (DL123A or CR123A type) with the + and - poles oriented as shown inside the battery chamber.
3 Close the battery chamber lid and push it down until it clicks shut.
For batteries, see "About batteries" on page 82. Adjust date and time when battery is replaced.
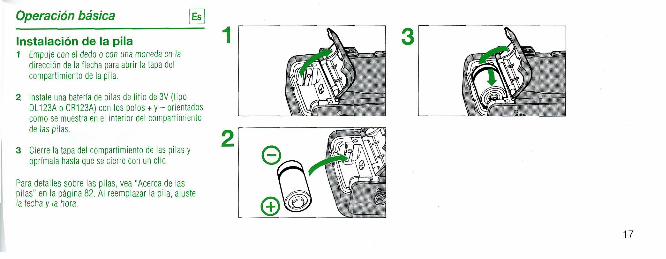
Operation basica Es!
Instalacion de la pila 1 Empuje con el dedo o con una moneda en la
direccion de la flecha para abrir la tapa del compartimiento de la pila.
2 Instale una bateria de pilas de litlo de 3V (tipo DL123A o CR123A) con los polos + y - orientados como se muestra en el interior del compartimiento de las pilas.
3 Cierre la tapa del compartimiento de las pilas y oprimala hasta que se cierre con un die.
Para detalles sobre las pilas, vea "Acerca de las pilas" en la pagina 82. Al reemplazar la pila, ajuste lafechay lahora.
17
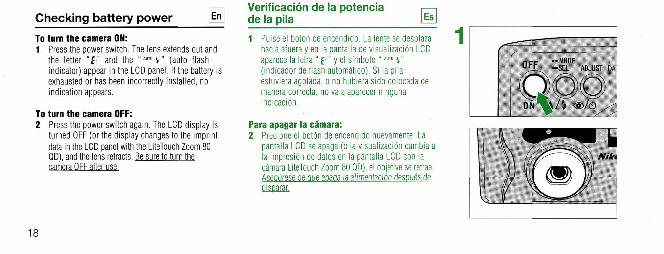
Checking battery power Verificacion de la potencia de la pila \ES\
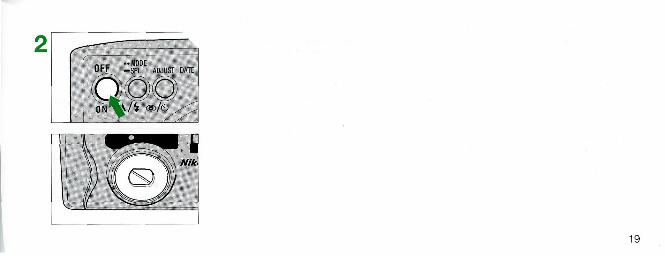
To turn the camera ON: 1 Press the power switch. The lens extends out and
the letter " £ " and the " " " 4 " (auto flash indicator) appear in the LCD panel. If the battery is exhausted or has been incorrectly installed, no indication appears.
To turn the camera OFF: 2 Press the power switch again. The LCD display is
turned OFF (or the display changes to the imprint data in the LCD panel with the LiteTouch Zoom 80 QD), and the lens retracts. Be sure to turn the camera OFF after use.
1 Pulse el boton de encendido. La lente se desplaza hacia afuera y en la pantalla de visualizacion LCD aparece la letra" f " y el simbolo"AU,D v" (indicador de flash automatico). Si la pila estuviera agotada, 0 no hubiera sido colocada de manera correcta, no va a aparecer ninguna indicacion.
Para apagar la camara: 2 Precione el boton de encendido nuevamente. La
pantalla LCD se apaga (0 la visualizacion cambia a la impresidn de datos en la pantalla LCD con la camara LiteTouch Zoom 80 QD), el objetive se retrae. Aseourese de oue apaoa la alimentacidn despues de disparar.
18
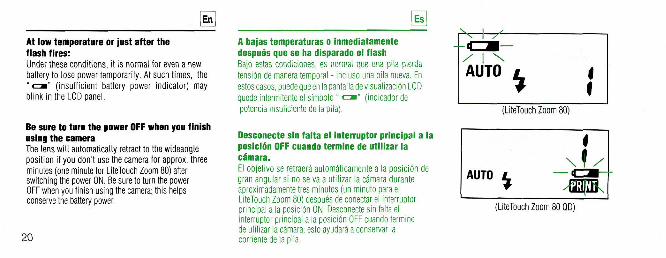
@ At low temperature or just after the flash fires: Under these conditions, it is normal for even a new battery to lose power temporarily. At such times, the " < = • " (insufficient battery power indicator) may blink in the LCD panel.
Be sure to turn the power OFF when you finish using the camera The lens will automatically retract to the wideangle position if you don't use the camera for approx. three minutes (one minute for LiteTouch Zoom 80) after switching the power ON. Be sure to turn the power OFF when you finish using the camera; this helps conserve the battery power.
20
!Esi
A bajas temperaturas o inmediatamente despues que se ha disparado el flash Bajo estas condiciones, es normal que una pila pierda tension de manera temporal - incluso una pila nueva. En estos casos, puede que en la pantalla de visualizacion LCD quede intermitente el simbolo" < = • " (indicador de potencia insuficiente de la pila).
Desconecte sin falta el interruptor principal a la posicion OFF cuando termine de utilizar la camara. El objetivo se retraera automaticamente a la posicion de gran angular si no se va a utilizar la camara durante aproximadamente tres minutos (un minuto para el LiteTouch Zoom 80) despues de conectar el interruptor principal a la posicion ON. Desconecte sin falta el interruptor principal a la posicion OFF cuando termine de ulilizar la camara; esto ayudara a conservar la corriente de la pila.
(LiteTouch Zoom 80 QD)
@
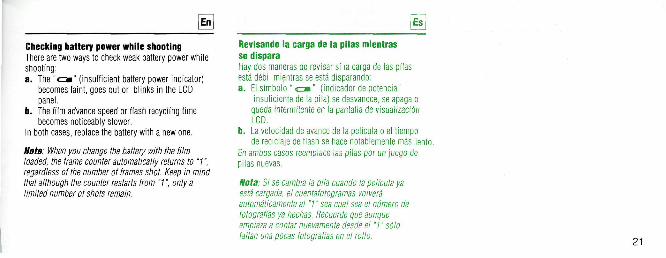
Checking battery power while shooting There are two ways to check weak battery power while shooting: a. The " « = • " (insufficient battery power indicator)
becomes faint, goes out or blinks in the LCD panel.
b. The film advance speed or flash recycling time becomes noticeably slower.
In both cases, replace the battery with a new one.
Note: When you change the battery with the film loaded, the frame counter automatically returns to "I", regardless of the number of frames shot. Keep in mind that although the counter restarts from "1', only a limited number of shots remain.
@ Revisando la carga de la pilas mientras se dispara Hay dos maneras de revisar si la carga de las pilas esta debi mientras se esta disparando: a. El simbolo "cm" (indicador de potencia
insuficiente de la pila) se desvanece, se apaga o queda intermitente en la pantalla de visualizacidn LCD.
b. La velocidad de avance de la pelfcula o el tiempo de reciclaje de flash se hace notablemente mas lento
En ambos casos reemplace las pilas por un juego de pilas nuevas.
Nota Si se cambia la pila cuando la pelicula ya esta cargada, el cuentafotogramas volvera automaticamente al "1" sea cual sea el numero de fotografias ya hechas. Recuerde que aunque empieza a contar nuevamente desde el "1" solo faltan una pocas fotografias en el rollo.
Setting film speed w
Use DX-coded film. The usable film speed range for DX-coded film is ISO 100 to 800. With ISO 100, 200, 400 and 800 film, the camera is automatically set to the exact film speed. With other film within the usable film speed range (i.e. IS0125, ISO 250, etc.), film speed is automatically set to an appropriate ISO as shown in the table. With non-DX-coded film, film speed is automatically set to ISO 100.
22
Ajuste de la sensibilidad de la pelfcula
Utilice peliculas con cddigo DX. La gama de sensibilidad de pelfcula a utilizar es ISO 100 a 800- Con las peliculas ISO 100, 200, 400 y 800, la camara es ajustada de manera automata a la sensibilidad exacta de la pelfcula. Con otras peliculas dentro de la gama de sensibilidad a utilizar (p.ej. IS0125,250, etc.) la sensibilidad de la pelfcula es ajustada automatica-mente a la sensibilidad ISO correspondiente como se muestra en el cuadro a continuacion. Con peliculas sin cbdigo DX, la sensibilidad de la pelfcula es ajustada automaticamente en ISO 100,

23

@ a] For color slide film Most color negative films have good exposure latitude, and the appropriate settings shown in the table will yield good results. Slide film does not have broad exposure latitude; use only DX-coded IS0100, 200, 400, or 800 color slide film.
Para peliculas de diapositivas en colores. La mayoria de las peliculas negativas a color poseen una buena latitud de exposicidn, y el ajuste correspondiente que se muestra en el cuadro le va a proporcionar buenos resultados. Las peliculas para diapositivas no poseen una latitud de exposicion tan amplia. Para diapositivas, utilice solamente peliculas con codigo DX ISO 100, 200, 400 o 800.
DX-coded film in use Pelicula con codigo DX
ISO 100 125 160
ISO 200 250 320
ISO 400 500 600
ISO 800 1000 1250 ISO 800 1000 1250
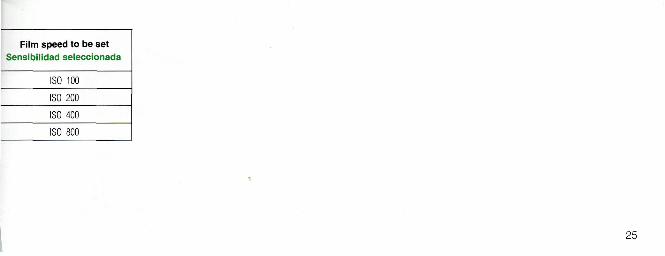
Film speed to be set Sensibilidad seleccionada
ISO 100
ISO 200
ISO 400
ISO 800
25

Loading the film |EnJ
1 Slide the camera back lock-release lever upward to open the camera back. The camera automatically turns OFF and the lens retracts.
Avoid loading/unloading film in direct sunlight.
2 Position the hole in the bottom of the film cartridge over the film rewind fork and slip the film cartridge into the chamber.
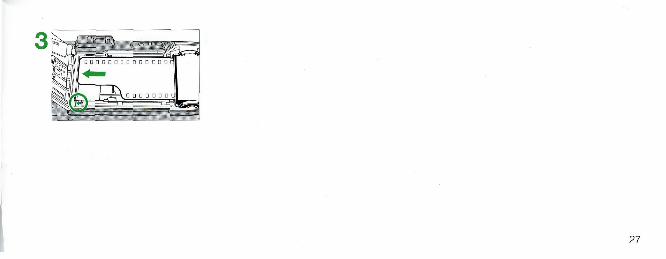
3 Pull the film leader 2 to 3 mm across the film leader position index.
(Continued on page 28)
26
Carga de la pelfcula [EsJ
1 Deslice la palanca de desbloqueo de respaldo de la camara hacia arriba para abrir la parte trasera de la camara. La camara automaticamente se apaga y el objetivo se retrae.
Evite cargar o descargar la pelicula en un lugar expuesto a la luz solar directa.
2 Coloque el orificio en la parte inferior del cartucho de la pelfcula por sobre la horquilla del rebobinador de la pelicula y deslice el cartucho de peliculas dentro de la camara.
3 Tire la lengueta de la pelicula 2 a 3 mm. mas adelante de la serial indicadora de posicionamiento del extremo de la pelicula.
(Continua en la pagina 28)
27
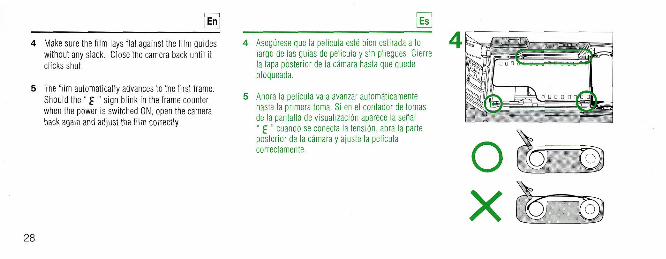
a 4 Make sure the film lays flat against the film guides
without any slack. Close the camera back until it clicks shut.
5 The film automatically advances to the first frame. Should the " £ " sign blink in the frame counter when the power is switched ON, open the camera back again and adjust the film correctly.
28
@ 4 Asegurese que la pelicula este bien estirada a lo
largo de las guias de pelicula y sin pliegues. Cierre la tapa posterior de la camara hasta que quede bloqueada.
5 Ahora la pelicula va a avanzar automaticamente hasta la primera toma. Si en el contador de tomas de la pantalla de visualizacidn aparece la sehal " £ " cuando se conecta la tension, abra la parte posterior de la camara y ajuste la pelicula correctamente.
H
29
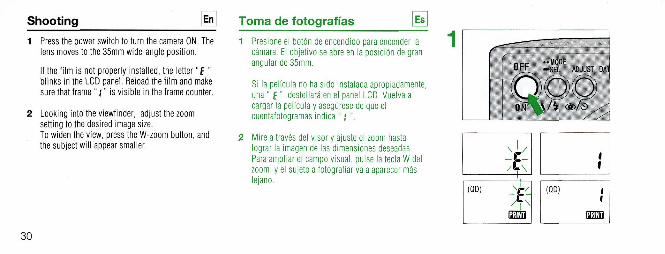
Shooting @
1 Press the power switch to turn the camera ON. The lens moves to the 35mm wide-angle position.
If the film is not properly installed, the letter"{ " blinks in the LCD panel. Reload the film and make sure that f rame";" is visible in the frame counter.
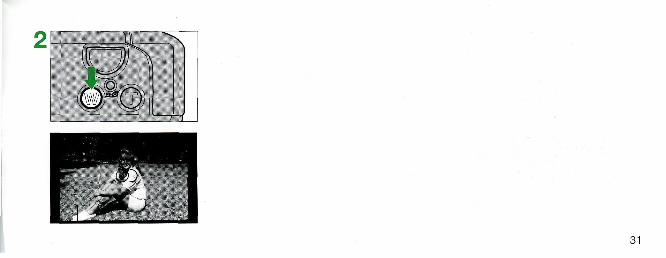
2 Looking into the viewfinder, adjust the zoom setting to the desired image size. To widen the view, press the W-zoom button, and the subject will appear smaller.
Toma de fotograffas [Esj
1 Presione el boton de encendido para encender la camara. El objetivo se abre en la posicibn de gran angular de 35mm.
Si la pelicula no ha sido instalada apropiadamente. una" f " destellara en el panel LCD. Vuelva a cargar la pelicula y asegurese de que el cuentafotogramas indica " j ".
2 Mire a traves del visor y ajuste el zoom hasta lograr la imagen de las dimensiones deseadas. Para ampliar el campo visual, pulse la tecla W del zoom, y el sujeto a fotografiar va a aparecer mas leiano.
2 "cf 1 •O 3
31
cr %
c^^ ^—m
—A... . ..
32
\M
''.«sM*
i&r
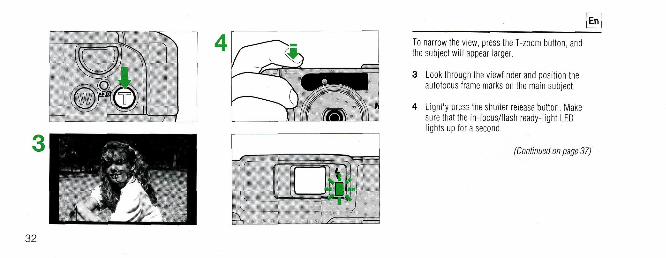
To narrow the view, press the T-zoom button, and the subject will appear larger.
3 Look through the viewfinder and position the autofocus frame marks on the main subject.
4 Lightly press the shutter release button. Make sure that the in-focus/flash ready-light LED lights up for a second.
(Continued on page 37)
@ Para reducir el campo visual, pulse la tecla T del zoom, y el sujeto va a aparecer mas cercano
3 Mire a traves del visor y ubique los marcos de autoenfoque en el sujeto principal.
4 Presione levemente el disparado. Confirme que el LED de enfoque/testigo del flash se enciende por un segundo.
(Continua en la pagina 37)
m
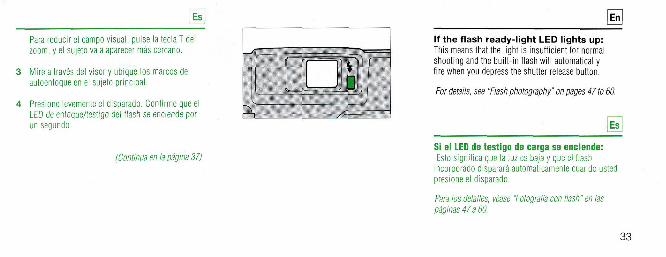
M If the flash ready-light LED lights up: This means that the light is insufficient for normal shooting and the built-in flash will automatically fire when you depress the shutter release button.
For details, see "Flash photography" on pages 47 to 60.
lEs
Si el LED de testigo de carga se enciende: Esto significa que la luz es baja y que el flash
incorporado disparara automaticamente cuando usted presione el disparado.
Para los detalles, vease "Fotogralia con flash" en las paginas 47 a 60.
33
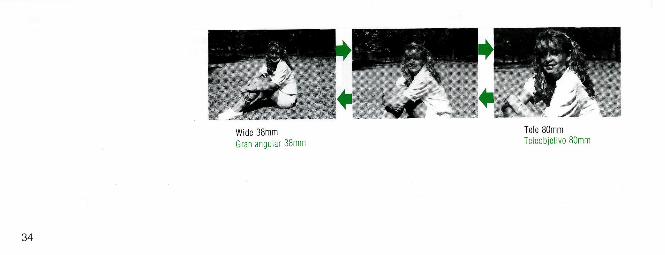
Wide 38mm Gran angular 38mm
34
Tele 80mm Teleobjetivo 80mm

K Guide to zooming At the 38mm focal length setting, the picture angle is wider. This wide-angle setting is suitable for group portraits and landscapes.
At the 80mm focal length setting, the picture angle is narrower. This telephoto setting is good for portraiture or subjects you can't get close to. Be sure to hold the camera firmly to prevent camera shake.
[Esj
Guia para usar el zoom En el ajuste de la distancia focal de 38mm, el angulo de fotografia es mas ancho. Esta fijacion de angulo ancho es adecuado para fotos de grupos y paisajes.
En e! ajuste de la distancia focal de 80mm, el angulo de fotografia es mas angosto. Esta fijacion de la telefotografia es buena para retratos o cuando no se puede llegar cerca del sujeto. Asegurese de sostener la camara firmemente para evitar vibraciones.
35
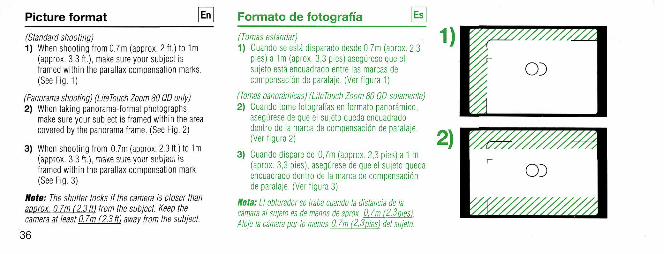
Picture format I En Formato de fotografia Es
(Standard shooting) 1) When shooting from 0.7m (approx. 2 ft.) to 1m
(approx. 3.3 ft.), make sure your subject is framed within the parallax compensation marks. (See Fig. 1)
(Panorama shooting) (LiteTouch Zoom 80 QD only) 2) When taking panorama-format photographs,
make sure your subject is framed within the area covered by the panorama frame. (See Fig. 2)
3) When shooting from 0.7m (approx. 2.3 ft.) to 1m (approx. 3.3 ft.), make sure your subject is framed within the parallax compensation mark. (See Fig. 3)
Note: The shutter locks it the camera is closer than approx. 0.7m (2.3 HI Irpm the subject. Keep the camera at least 0.7m (2.3It) away from the subject.
36
(Tomas estandar) J I 1) Cuando se esta disparado desde 0,7m (aprox. 2,3
pies) a 1m (aprox. 3,3 pies) asegurese que e sujeto esta encuadrado entre las marcas de compensacidn de paralaje. (Ver figura 1)
(Tomas panoramicas) (LiteTouch Zoom 80 QD solamente) 2) Cuando tome fotografias en formato panoramico
asegurese de que el sujeto queda encuadrado dentro de la marca de compensacidn de paralaje. _ . (Ver figura 2) 2 )
3) Cuando dispare de 0,7m (approx. 2,3 pies) a 1 m (aprox. 3,3 pies), asegurese de que el sujeto queda encuadrado dentro de la marca de compensacidn de paralaje. (Ver figura 3)
Hota: El obturador se traba cuando la distancia de la camara al sujeto es de menos de aprox. 0.7m (2,3'oiesl. Aleje la camara poj lo menos 0.7m (2,3 pies) del sujeto.
En
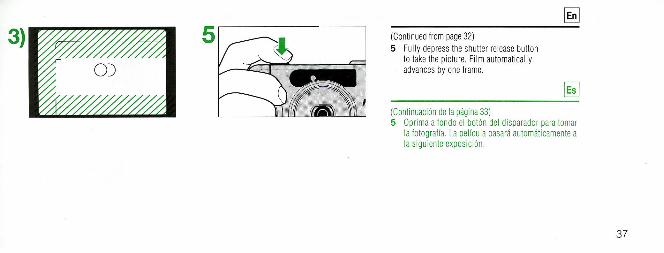
(Continued from page 32)
5 Fully depress the shutter release button to take the picture. Film automatically advances by one frame.
ESi
(Continuacion de la pagina 33} 5 Oprima a fondo el botdn del disparador para tomar
la fotograffa. La pelfcula pasara automaticamente a a siguiente exposicion.
37
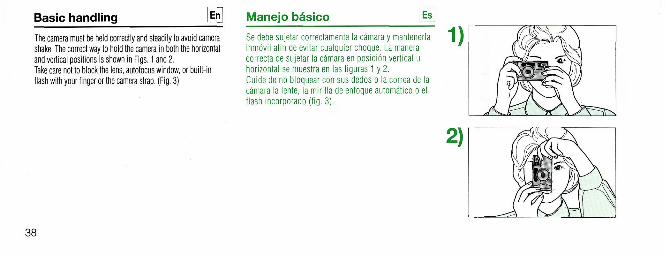
Manejo basico @ Basic handling \R The camera musl be held correctly and steadily to avoid camera shake. The correct way to hold the camera in both the horizontal and vertical positions is shown in Figs. 1 and 2. Take care not to block the lens, autofocus window, or built-in flash with your finger or the camera strap. (Fig. 3)
Se debe sujetar correctamente la camara y mantenerla inmovil afin de evitar cualquier choque. La manera correcta de sujetar la camara en posicion vertical u horizontal se muestra en las figuras 1 y 2. Cuide de no bloquear con sus dedos o la correa de la camara la lente, la mirilla de enfoque automatico o e! flash incorporado (fig. 3).
2)
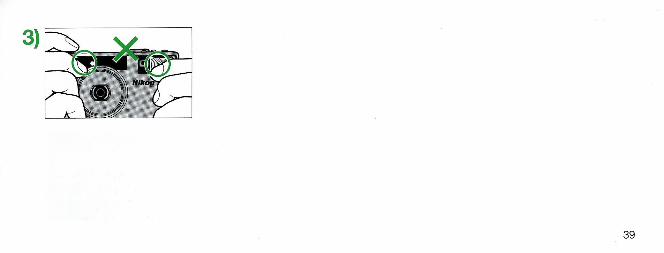
3)
\ MAai
39
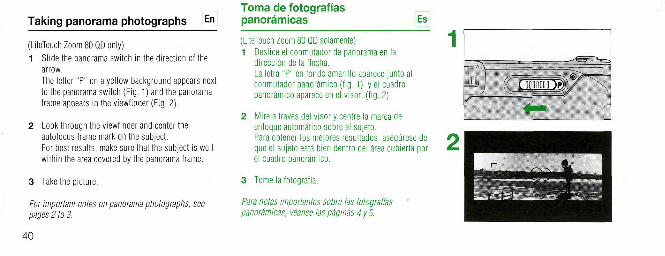
Taking panorama photographs [EnJ
(LiteTouch Zoom 80 QD only)
1 Slide the panorama switch in the direction of the
arrow. The letter "P* on a yellow background appears next to the panorama switch (Fig. 1) and the panorama frame appears in the viewfinder (Fig. 2).
2 Look through the viewfinder and center the autofocus frame mark on the subject. For best results, make sure that the subject is well within the area covered by the panorama frame
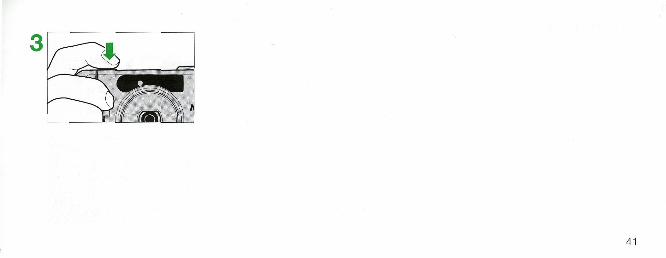
3 Take the picture
For important notes on panorama photographs, see pages 2 to 3.
40
Toma de fotograffas panoramicas Es
(LiteTouch Zoom 80 QD solamente)
1 Deslice el conmutador de panorama en la direccidn de laflecha. La letra "P" en fondo amarillo aparece junto al conmutador panoramico (fig. 1) y el cuadro panoramico aparece en el visor, (fig, 2)
2 Mire a traves del visor y centre la marca de enfogue automatico sobre el sujeto. Para obtener los mejores resultados, asegurese de que el sujeto esta bien dentro del area cubierta por el cuadro panoramico.
3 Tome la fotografia
Para notas importantes sobre las fotograffas panoramicas, veanse laspaginas 4y5.
1
J?
41
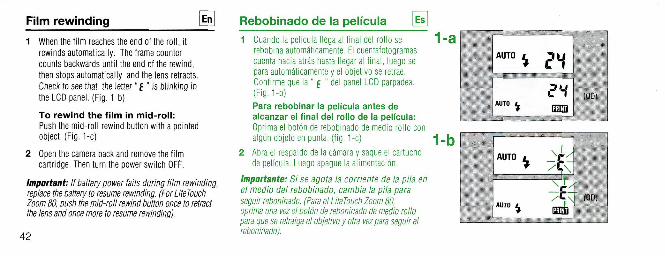
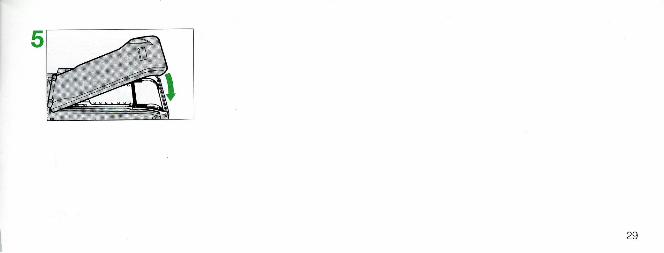
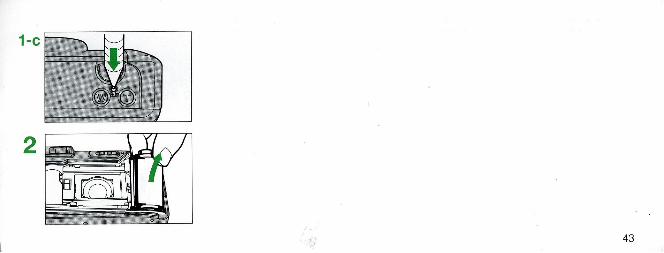
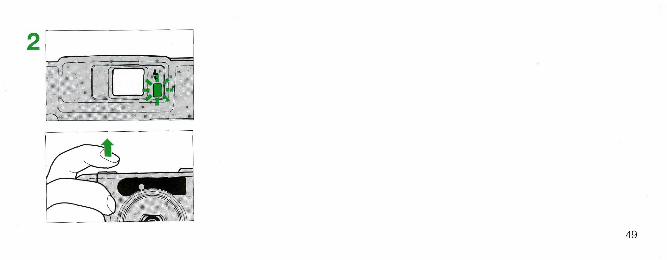
Film rewinding @ 1 When the film reaches the end of the roll, it
rewinds automatically. The frame counter counts backwards until the end of the rewind, then stops automatically and the lens retracts. Check to see that the letter" f " is blinking in the LCD panel. (Fig. 1-b)
To rewind the film in mid-roll: Push the mid-roll rewind button with a pointed object. (Fig. 1-c)
2 Open the camera back and remove the film cartridge. Then turn the power switch OFF.
Important: II battery power fails during film rewinding replace the battery to resume rewinding. (For LiteTouch Zoom 80, push the mid-roll rewind button once to retract the lens and once more to resume rewinding).
4 2
Rebobinado de la pelicula Es
AUTO i
AUT0*
j?S'J
SH\ m MS
1 Cuando la pelicula llegaal final del rollo se 1 - 3 H rebobina automaticamente. El cuentafotogramas cuenta hacia atras hasta llegar al final, luego se para automaticamente y el objetivo se retrae. Confirme que la " £ " del panel LCD parpadea. (Fig. 1-b) Para rebobinar la pelicula antes de alcanzar el final del rollo de la pelicula: I Oprima el boton de rebobinado de medio rollo con algun objeto en punta. (fig. 1-c) - | _ h *•••-=;-•• -,
2 Abrael respaldo de la camaray saque el cartucho AUTO ^rA de pelicula. Luego apague la aiimentacion. % / t \ l
Importante: Si se agota la corriente de la pila en \ , el medio del rebobinado, cambie la pila para — C -seguirreboninado. (Para el LiteTouch Zoom 80, AUTO t ^ J ^ oprima una vez el boton de reboninado de medio rollo | [ * BM para que se retraiga el objetivo y otra vez para seguir el • — . reboninado).
1-c
43
Photographic techniques \&y
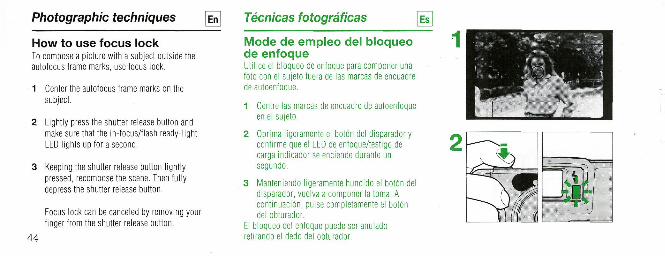
How to use focus lock To compose a picture with a subject outside the autofocus frame marks, use focus lock
1 Center the autofocus frame marks on the subject.
2 Lightly press the shutter release button and make sure that the in-focus/flash ready-light LED lights up for a second.
3 Keeping the shutter release button lightly pressed, recompose the scene. Then fully depress the shutter release button.
Focus lock can be canceled by removing your finger from the shutter release button.
4 4
Tecnicas fotograficas [is]
Mode de empleo del bloqueo de enfoque Utilice el bloqueo de enfoque para componer una foto con el sujeto fuera de las marcas de encuadre de autoenfoque.
1 Centre las marcas de encuadre de autoenfoque en el sujeto.
2 Oprima ligeramente el botdn del disparador y confirme gue el LED de enfoque/testigo de carga indicador se enciende durante un segundo
3 Manteniendo ligeramente hundido el boton del disparador, vuelva a componer la toma. A continuacibn, pulse completamente el boton del obturador.
El blogueo del enfoque puede ser anulado retirandoel dedo del obturador.

45

1 2 3 4 5
46
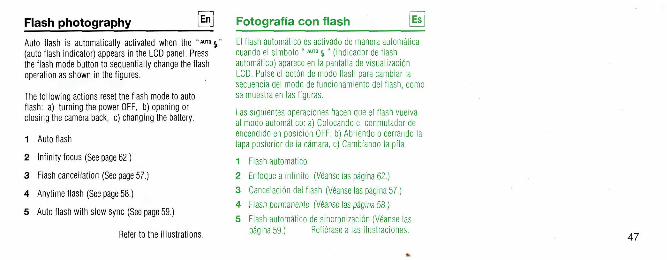
Flash photography &i
Auto flash is automatically activated when the , | m j " (auto flash indicator) appears in the LCD panel. Press the flash mode button to sequentially change the flash operation as shown in the figures.
The following actions reset the flash mode to auto flash: a) turning the power OFF, b) opening or closing the camera back, c) changing the battery.
1 Auto flash
2 Infinity focus (See page 62.)
3 Flash cancellation (See page 57.)
4 Anytime flash (See page 58.)
5 Auto flash with slow sync (See page 59.)
Refer to the illustrations.
Fotografia con flash [EsJ
El flash automatico es activado de manera automata cuando el simbolo" ,UI° •," (indicador de flash automatico) aparece en la pantalla de visualizacion LCD. Pulse el botbn de modo flash para cambiar la secuencia del modo de funcionamiento del flash, como se muestraen las figuras.
Las siguientes operaciones hacen que el flash vuelva al modo automatico: a) Colocando el conmutador de encendido en posici6n OFF, b) Abriendo o cerrando la tapa posterior de la camara, c) Cambiando la pila
1 Flash automatico
2 Enfoque a Infinite (Veanse las pagina 62.)
3 Cancelacidn del flash (Veanse las pagina 57.)
4 Flash permanente (Veanse las pagina 58.)
5 Flash automatico de sincronizacion (Veanse las pagina 59.) Refierase a las ilustraciones.
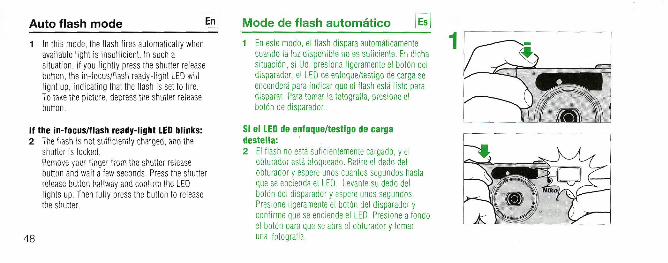
Auto flash mode &
1 In this mode, the flash fires automatically when available light is insufficient. In such a situation, if you lightly press the shutter release button, the in-focus/flash ready-light LED will light up, indicating that the flash is set to fire. To take the picture, depress the shutter release button.
If the in-focus/flash ready-light LED blinks: 2 The flash is not sufficiently charged, and the
shutter is locked. Remove your finger from the shutter release button and wait a few seconds. Press the shutter release button halfway and confirm the LED lights up. Then fully press the button to release the shutter.
48
Mode de flash automatico [EsJ
1 En este modo, el flash dispara automaticamente cuando la luz disponible no es suficiente. En dicha situacidn, si Ud. presiona ligeramente el boton del disparador, el LED de enfoque/testigo de carga se encendera para indicar que el flash esta listo para disparar. Para tomar la fotografia, presione el boton de disparador.
Si el LED de enfoque/testigo de carga destella: 2 El flash no esta suficientemente cargado, y el
obturador esta bloqueado. Retire el dedo del obturador y espere unos cuantos segundos hasta que se encienda el LED. Levante su dedo del boton del disparador y espere unos segundos. Presione ligeramente el boton del disparador y confirme que se enciende el LED. Presione a fondo el boton para que se abra el obturador y tomar una fotografia.
49

s Before shooting with flash, make sure the subject is within the flash shooting range for the film speed in use (see table). Note that overexposure may occur if you take pictures within 1m (approx. 3.3 ft.) of the subject with film rated higher than ISO 800.
For color slide film Note that the table indicates the flash shooting range for negative film. Max. shooting range for ISO 100 color slide film is approx. 1/3 less than for negative film.
50
H Antes de tomar una fotografia con flash, asegurese de que el sujeto esta dentro del alcance del flash para la sensibilidad de la pelicula que se esta utilizando (ver tabla). Note que puede producirse sobreexposicidn si se toman fotografias a menos de 1 m (aprox. 3,3 pies) del sujeto con pelicula de valor superior a ISO 800.
Para pelfculas de diapositivas en colores La tabla indica el alcance del flash para negativos. El alcance maximo para el flash en el caso de diapositivas en color ISO 100 es de aproximadamente 1/3 menos que para los negativos.
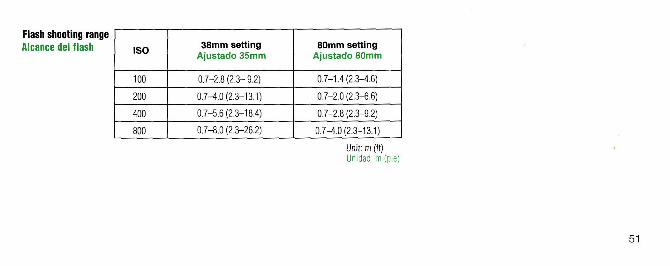
Flash shooting range
Alcance del flash ISO 38mm setting
Ajustado 35mm 80mm setting
Ajustado 80mm
100 0.7-2.8(2.3-9.2) 0.7-1.4(2.3-4.6)
200 0.7-4.0(2.3-13.1) 0.7-2.0 (2.3-6.6)
400 0.7-5.6(2.3-18.4) 0.7-2.8(2.3-9.2)
800 0.7-8.0 (2.3-26.2) 0.7-4.0(2.3-13.1)
Unit: m (ft) Unidad: m (pie)
51
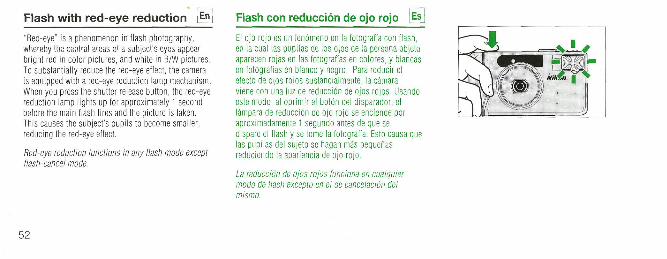
Flash with red-eye reduction [EJL Flash con reduccion de ojo rojo [EsJ
"Red-eye" is a phenomenon in flash photography, whereby the central areas of a subject's eyes appear bright red in color pictures, and white in B/W pictures To substantially reduce the red-eye effect, the camera is equipped with a red-eye reduction lamp mechanism. When you press the shutter release button, the red-eye reduction lamp lights up for approximately 1 second before the main flash fires and the picture is taken This causes the subject's pupils to become smaller, reducing the red-eye effect.
Red-eye reduction functions in any flash mode except flash-cancel mode.
El ojo rojo es un fenomeno en la fotograffa con flash, en la cual las pupilas de los ojos de la persona objeto aparecen rojas en las fotograffas en colores, y blancas en fotografias en bianco y negro. Para reducir el efecto de ojos rojos sustancialmente, la camara viene con una luz de reduccion de ojos rojos Usando este modo, al oprimir el boton del disparador, el lampara de reduccion de ojo rojo se enciende por aproximadamente 1 segundo antes de que se dispare el flash y se tome la fotograffa, Esto causa que las pupilas del sujeto se hagan mas pequenas reduciendo la apariencia de ojo rojo.
La reduccion de ojos rojos funciona en cualquier modo de flash exceplo en el de cancelacion del mismo.

53
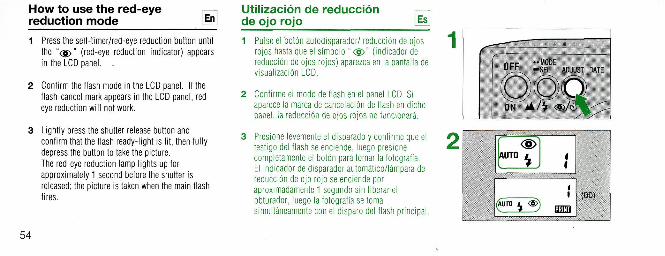
Utilizacion de reduccion de ojo rojo a How to use the red-eye
reduction mode @ 1 Press the self-timer/red-eye reduction button until
the "<§>" (red-eye reduction indicator) appears in the LCD panel. .
2 Confirm the flash mode in the LCD panel. If the flash-cancel mark appears in the LCD panel, redeye reduction will not work.
3 Lightly press the shutter release button and confirm that the flash ready-light is lit, then fully depress the button to take the picture. The red-eye reduction lamp lights up for approximately 1 second before the shutter is released; the picture is taken when the main flash fires.
54
1 Pulse el boton autodisparador/ reduccion de ojos rojos hasta que el simbolo" <§>'" (indicador de reduccion de ojos rojos) aparezca en la pantalla de visualizacion LCD.
2 Confirme el modo de flash en el panel LCD. Si aparece la marca de cancelacion de flash en dicho panel, la reduccion de ojos rojos no funcionara.
3 Presione levemente el disparado y confirme que el testigo del flash se enciende, luego presione completamente el boton para tomar la fotografia. El indicador de disparador automatico/lampara de reduccion de ojo rojo se enciende por aproximadamente 1 segundo sin liberar el obturador, luego la fotografia se toma simultaneamente con el disparo del flash principal.
O O Q Oil tlft W d \
If <§>} AUTO i I
1 --3J i
PUTO L <§}) [v * J HED
(OD)
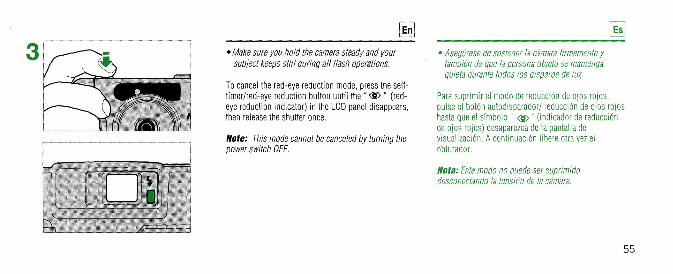
[En] @ • Make sure you hold the camera steady and your
subject keeps still during all Hash operations.
To cancel the red-eye reduction mode, press the self-timer/red-eye reduction button until'the" <§>" (redeye reduction indicator) in the LCD panel disappears, then release the shutter once.
Note: This mode cannot be canceled by turning the power switch OFF.
• Asegurese de sostener la camara tirmemente y tambien de que la persona objeto se mantenga quieta durante todos los disparos de luz.
Para suprimir el modo de reduccion de ojos rojos, pulse el botdn autodisparador/ reduccion de ojos rojos hasta que el simbolo" <§>" (indicador de reduccion de ojos rojos) desaparezca de la pantalla de visualizacidn. A continuacidn libere otra vez el obturador.
Httta: Fste modo no puede ser suprimido desconectando la tension de la camara.

m To achieve maximum red-eye reduction, please observe the following: • Subjects should look directly at the camera. • Subjects with poor vision should wear corrective
eyeglasses or contact lenses. • For indoor shots, light up the room as much as
possible • Select a wide-angle lens setting and stand close to
your subject.
Red-eye effect tends to be more pronounced with children and cannot be as effectively reduced.
56
5 Para asegurar la mejor reduccion del ojo-rojo, verifique losiguiente: •Las personas de la fotografia deben mirar
directamente a la camara. •Las personas cortas de vista deben usar lentes
correctivos o lentes de contacto. •Para la toma de fotografias en interior, ilumine la
sala tan claro como sea posible. • Seleccione un ajuste de lente gran angular y
acerquese al sujeto.
El efecto de ojo rojo tiende a ser mas pronunciado con ninos y no puede ser reducido en forma satislactoria.
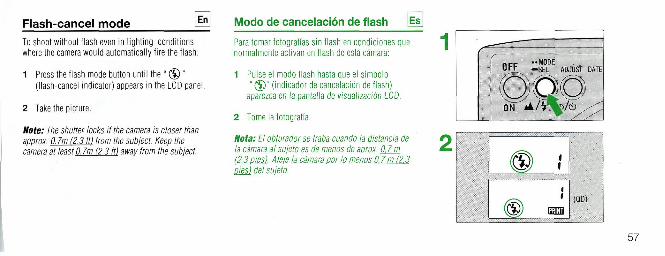
Modo de cancelacion de flash Es Flash-cancel mode |En|
To shoot without flash even in lighting conditions where the camera would automatically fire the flash:
1 Press the flash mode button until the" ® " (flash-cancel indicator) appears in the LCD panel
2 Take the picture.
Note: The shutter locks it the camera is closer than approx. 0.7m (2.3 ft) from the subject. Keep the camera at least 0.7m (2.3 ft) away from the subject.
Para tomar fotografias sin flash en condiciones gue normalmente activan en flash de esta camara:
1 Pulse el modo flash hasta que el simbolo " (§)" (indicador de cancelacion de flash)
aparezca en la pantalla de visualizacion LCD.
2 Tome la fotografia.
Nota: El obturador se traba cuando la dislancia de la camara a/ sujeto es de menos de aprox. 0.7 m (2.3 pies). Aleje la camara per lo menos 0.7 m (2,3 pies) del sujeto.
f ncc "MODE Urr —SEL ADJUST DATE
OQO ON Aft Vo
S I 1
(QD)
57
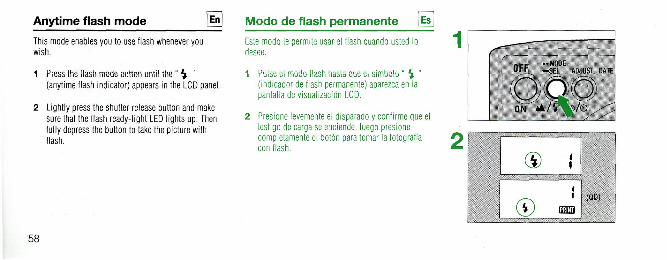
Anytime flash mode S Modo de flash permanente [fsj
This mode enables you to use flash whenever you wish.
1 Press the flash mode button until the" ^ " (anytime flash indicator) appears in the LCD panel.
2 Lightly press the shutter release button and make sure that the flash ready-light LED lights up. Then fully depress the button to take the picture with flash.
Esie modo le permite usar el flash cuando usted lo desee.
1 Pulse el modo flash hasta que el simbolo" if " (indicador de flash permanente) aparezca en la pantallade visualizacidn LCD.
2 Presione levemente el disparado y confirme que el testigo de carga se enciende, luego presione completamente el boton para tomar la fotograffa con flash.
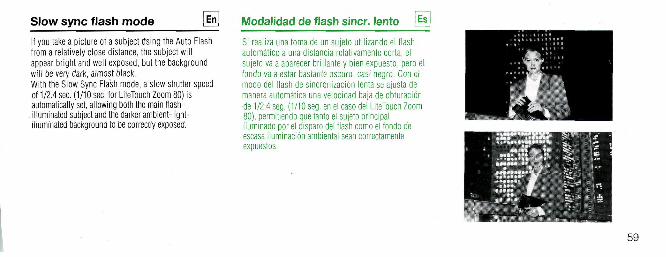
Slow sync flash mode w Modalidad de flash sincr. lento [|sj
If you take a picture of a subject Using the Auto Flash from a relatively close distance, the subject will appear bright and well exposed, but the background will be very dark, almost black. With the Slow Sync Flash mode, a slow shutter speed of 1/2.4 sec. (1/10 sec. for LiteTouch Zoom 80) is automatically set, allowing both the main flash-illuminated subject and the darker ambient-light-illuminated background to be correctly exposed.
Si realiza una toma de un sujeto utilizando el flash automatico a una distancia relativamente corta, el sujeto va a aparecer brillante y bien expuesto, pero el fondo va a estar bastante oscuro casi negro. Con el modo del flash de sincronizacidn lenta se ajusta de manera automatica una velocidad baja de obturacidn de 1/2,4 seg. (1/10 seg. en el caso del LiteTouch Zoom 80), permitiendo que tanto el sujeto principal iluminado por el disparo del flash como el fondo de escasa iluminacidn ambiental sean correctamente expuestos.
Utilizacion del flash sincr. lento @
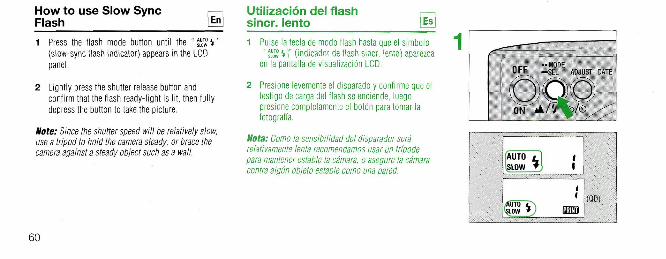
How to use Slow Sync Flash [ft]
1 Press the flash mode button until the " K 4 " (slow-sync flash indicator) appears in the LCD panel.
2 Lightly press the shutter release button and confirm that the flash ready-light is lit, then fully depress the button to take the picture.
Note: Since the shutter speed will be relatively slow, use a tripod to hold the camera steady, or brace the camera against a steady object such as a wall.
1 Pulse la tecla de modo flash hasta que el sfmbolo " 5 ! 41" (indicador de flash sincr. lento) aparezca
en la pantalla de visualizacion LCD.
2 Presione levemente el disparado y confirme que el testigo de carga del flash se enciende, luego presione completamente el botdn para tomar la fotografia.
Hota: Como la sensibilidad del disparador sera relativamente lenta recomendamos usar un trfpode para mantener estable la camara, o asegure la camara contra algun objeto estable como una pared.

61
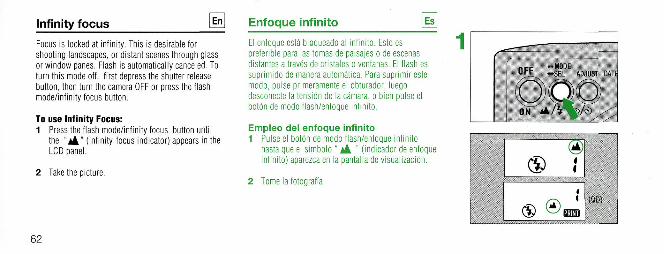
Infinity focus I En | Enfoque infinito
Focus is locked at infinity. This is desirable for shooting landscapes, or distant scenes through glass or window panes. Flash is automatically canceled. To turn this mode off, first depress the shutter release button, then turn the camera OFF or press the flash mode/infinity focus button.
To use Infinity Focus: 1 Press the flash mode/infinity focus button until
the " J 4 " (infinity-focus indicator) appears in the LCD panel.
El enfoque esta bloqueado al infinito. Esto es preferible para las tomas de paisajes o de escenas distantes a traves de cristales o ventanas. El flash es suprimido de manera automatica. Para suprimir este modo, pulse primeramente el obturador, luego desconecte la tension de la camara, o bien pulse el botdn de modo flash/enfoque infinito.
Empleo del enfoque infinito 1 Pulse el botdn de modo flash/enfoque infinito
hasta que el sfmbolo" ik " (mdicador de enfoque infinito) aparezca en la pantalla de visualizacidn.
1
2 Take the picture. 2 Tome la fotograffa.

63
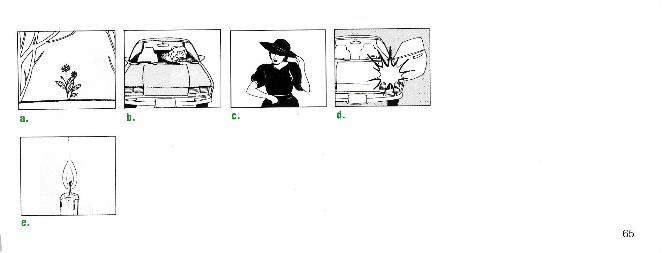
Special focusing situations W
The following subjects may be too difficult to focus: (Refer to illustrations) a. Subjects too small to fully cover the autofocus
frame marks b. Subjects behind giass c. Dark subjects with no reflection d. Glossy, light-reflecting surfaces, such as shiny
cars or water e. Subjects without solid content (i.e. candle flame,
fireworks, etc.)
In the above cases, use focus lock. (See "How to use focus lock" on page 44.)
Situaciones especiales de enfoque a Los siguientes objetos pueden ser muy difficiles de enfocar: (Refierase a las ilustraciones.) a. Objetos demasiado pequenos para cubrir
completamente las marcas del autoenfoque b. Objetos que se encuentren detras de vidrios c. Sujetos obscuros sin reflejo d. Superficies brillantes, que reflejen la luz, tales
como automdviles o agua e. Sujetos sin contenido sblido (por ejemplo, la llama
de una vela, fuegos artificiales, etc.)
Utilice el bloqueo de enfoque en los casos anteriores (Vea "Mode de empleo del bloqueo de enfoque" en la pagina 44.)
65
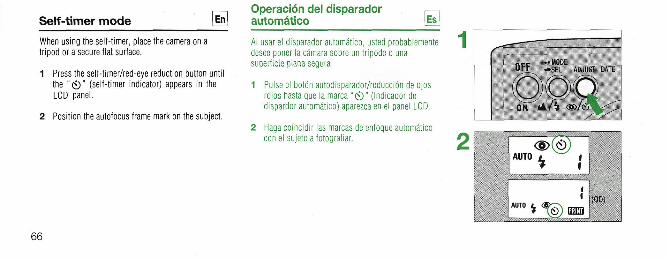
Self-timer mode En
When using the self-timer, place the camera on a tripod or a secure flat surface.
1 Press the self-timer/red-eye reduction button until the " 0 " (self-timer indicator) appears in the LCD panel.
2 Position the autofocus frame mark on the subject.
Operacion del disparador automatico iEs
Al usar el disparador automatico, usted probablemente desee poner la camara sobre un tripode o una superficie plana segura.
1 Pulse el boton autodisparador/reduccidn de ojos rojos hasta que la marca " (£)" (Indicador de dispardor automatico) aparezca en el panel LCD.
2 Haga coincidir las marcas de enfoque automatico con el sujeto afotografiar.
1 OFF ZTl WJUS1
O'OQ ON iklh - W ^
<§>(<£)) AUTO 1 f
AUTO L <§r?\ _ _ I * \&J MB
66
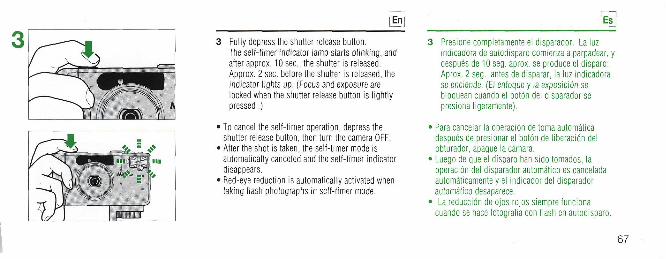
g a 3 Fully depress the shutter release button.
The self-timer indicator lamp starts blinking, and after approx. 10 sec, the shutter is released. Approx. 2 sec. before the shutter is released, the indicator lights up. (Focus and exposure are ocked when the shutter release button is lightly
pressed.)
• To cancel the self-timer operation, depress the shutter release button, then turn the camera OFF.
• After the shot is taken, the seif-timer mode is automatically canceled and the self-timer indicator disappears.
• Red-eye reduction is automatically activated when taking flash photographs in self-timer mode.
3 Presionecompletamenteel disparador. Laluz indicadora de autodisparo comienza a parpadear, y despues de 10 seg. aprox. se produce el disparo: Aprox 2 seg. antes de disparar, la luz indicadora se enciende. (El enfogue y la exposicibn se bloguean cuando el botbn de! disparador se presiona ligeramente)
• Para cancelar la operacion de toma automata despues de presionar el botbn de liberacibn del obturador, apague lacamara.
• Luego de gue el disparo han sido tornados, la operacion del disparador automatico es cancelada automaticamente y el indicador del disparador automatico desaparece.
• La reduccion de ojos rojos siempre funciona cuando se hace fotografia con flash en autodisparo.
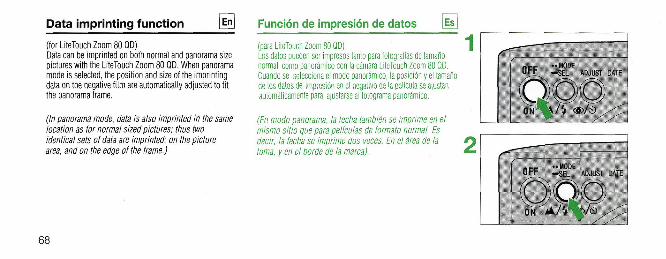
Data imprinting function @ Funcion de impresion de datos [EsJ
(for LiteTouch Zoom 80 QD) Data can be imprinted on both normal and panorama size pictures with the LiteTouch Zoom 80 QD. When panorama mode is selected, the position and size of the imprinting data on the negative film are automatically adjusted to fit the panorama frame.
(In panorama mode, data is also imprinted in the same location as for normal sized pictures; thus two identical sels of data are imprinted: on the picture area, and on the edge of the frame.)
(para LiteTouch Zoom 80 QD) Los datos pueden ser impresos tanto para fotografias de tamarlo normal como panoramico con la camara LiteTouch Zoom 80 QD. Cuando se selecciona el modo panoramico, la posicion y el tamaho de los datos de impresion en el negativo de la pelicula se ajustan automaticamente para ajustarse al fotograma panoramico.
(En modo panorama, la fecha tambien se imprime en el mismo sitio que para pellculas de formato normal. Es decir, la fecha se imprime dos veces. En el area de la toma, y en el horde de la marca).
68
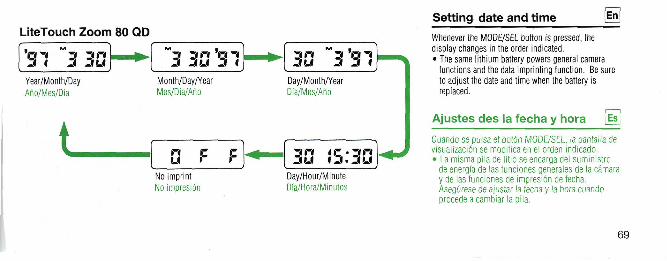
LiteTouch Zoom 80 QD
Year/Month/Day
Ano/Mes/Dia
3 30'3^ Month/Day/Year Mes/Dia/Ano
30 3 3 Day/Montti/Year Dia/Mes/Ano
1 0 No imprint No impresion
30 JS:30 Day/Hour/Minute Dia/Hora/Minutos
Setting date and time lEnl
Whenever the MODE/SEL button is pressed, the display changes in the order indicated. • The same lithium battery powers general camera
functions and the data imprinting function. Be sure to adjust the date and time when the battery is replaced.
Ajustes des la fecha y hora [ESJ
Cuando se pulsa et boton MODE/SEL, la pantalla de visuaiizacion se modificaen el orden indicado. • La misma pila de litio se encarga del suministro
de energia de las funciones generates de la camara y de las funciones de impresion de fecha. Asegurese de ajustar la fecha y la hora cuando procede a cambiar la pila.
69
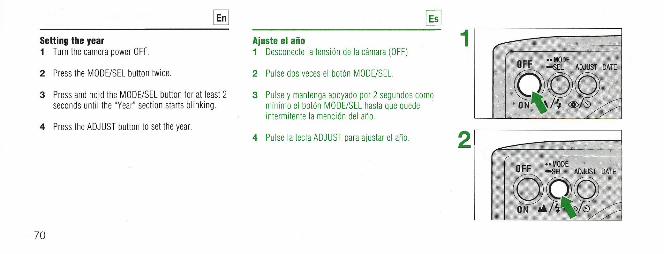
@ @ Setting the year 1 Turn the camera power OFF.
2 Press the MODE/SEL button twice.
3 Press and hold the MODE/SEL button for at least 2 seconds until the "Year" section starts blinking
4 Press the ADJUST button to set the year.
Ajuste el ana 1 Desconecte la tension de la camara (OFF)
2 Pulse dos veces el botdn MODE/SEL.
3 Pulse y mantenga apoyado por 2 segundos como minimo el boton MODE/SEL hasta que quede intermitente la mencion del ano.
4 Pulse la tecla ADJUST para ajustar el ano.
1 (IFF " m l \ Ul-h _ S E L ADJUS1 D»TE
QOO O N " ^ : 'J I
OFF l : ' f • „,,
O O O ON J 4 / * % • / • • •
=1
70
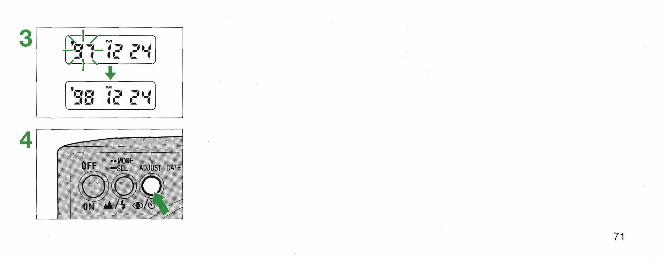
1
rlt-i? in *
'38 l? ?4
„ „ -MODE UFh _ S E L AOJUS1 : ' : ' : '
O': ? ON ' - <s>/tii --;..
71
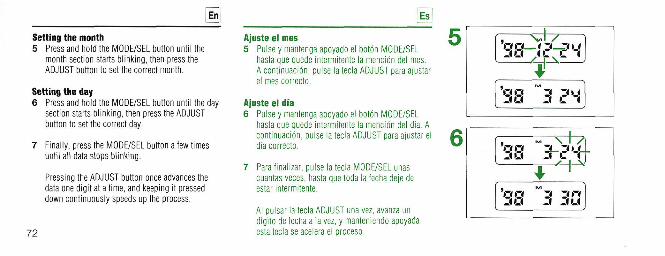
^ m Setting the month 5 Press and hold the MODE/SEL button until the
month section starts blinking, then press the ADJUST button to set the correct month.
Setting the day 6 Press and hold the MODE/SEL button until the day
section starts blinking, then press the ADJUST button to set the correct day.
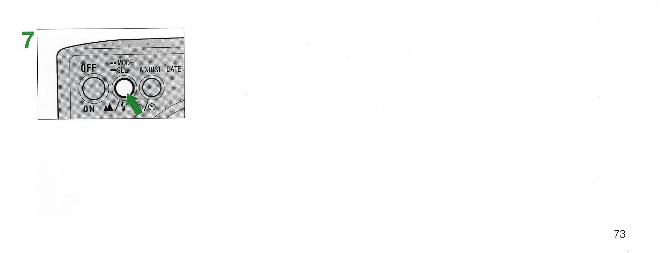
7 Finally, press the MODE/SEL button a few times until alt data stops blinking.
Pressing the ADJUST button once advances the data one digit at a time, and keeping it pressed down continuously speeds up the process.
72
Ajuste el mes 5 Pulse y mantenga apoyado el boton MODE/SEL
hasta que quede intermitente la mencion del mes. A continuacidn, pulse ia tecla ADJUST para ajustar el mes correcto
Ajuste el dia 6 Pulse y mantenga apoyado el boton MODE/SEL
hasta que quede intermitente la mencion del dia. A continuacidn, pulse la tecla ADJUST para ajustar el dia correcto.
7 Para finalizar, pulse la tecla MODE/SEL unas cuantas veces, hasta que toda la fecha deje de estar intermitente.
Al pulsar la tecla ADJUST una vez, avanza un digito de fecha a la vez, y manteniendo apoyada esta tecla se acelera el proceso.
73
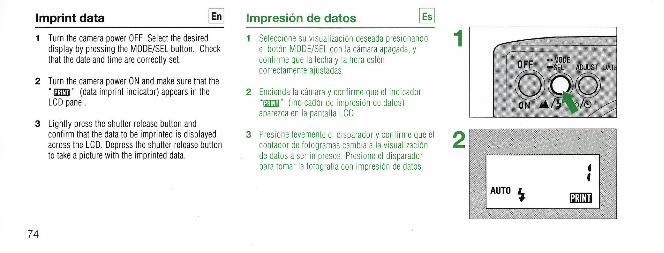
Imprint data [fn]
1 Turn the camera power OFF. Select the desired display by pressing the MODE/SEL button. Check that the date and time are correctly set.
2 Turn the camera power ON and make sure that the " QiffiD" (data imprint indicator) appears in the LCD panel.
3 Lightly press the shutter release button and confirm that the data to be imprinted is displayed across the LCD. Depress the shutter release button to take a picture with the imprinted data.
Impresion de datos L§!
1 Seleccione su visualizacion deseada presionando el botdn MODE/SEL con la camara apagada, y confirme gue la fecha y la hora esten correctamente ajustadas.
2 Encienda la camara y confirme gue el indicador "CUB" (indicador de impresion de datos) aparezcaen la pantaila LCD.
3 Presione levemente el disparador y confirme gue el contador de fotogramas cambia a la visualizacion de datos a ser impresos. Presione el disparador para tomar la fotografia con impresion de datos.
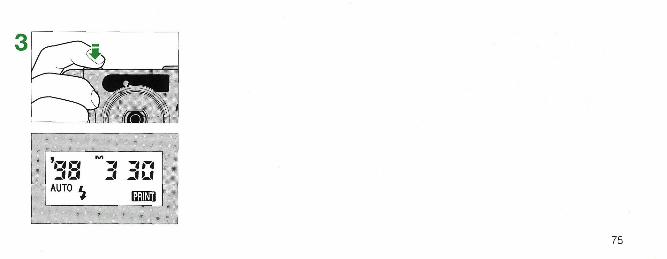
"SB "3 3D AUT0 V can
75
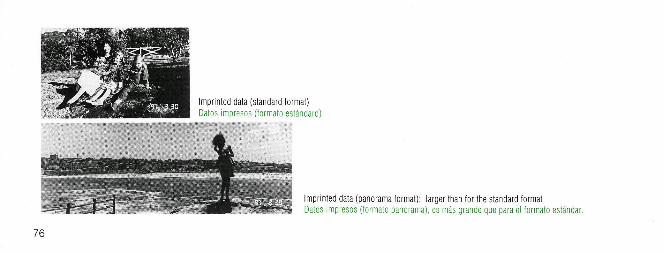
Imprinted data (standard format) Datos impresos (formato estandard)
Imprinted data (panorama format): larger than for the standard format Datos impresos (formato panorama), es mas grande que para el formato estandar.
76

77
Miscellaneous [in] Miscelaneos @
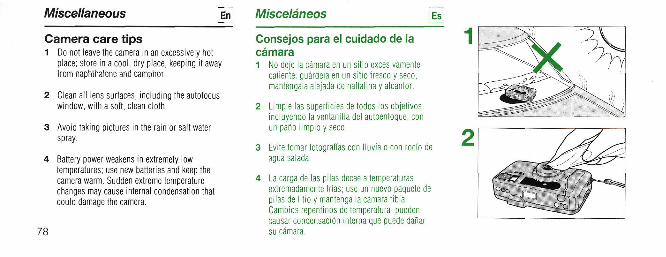
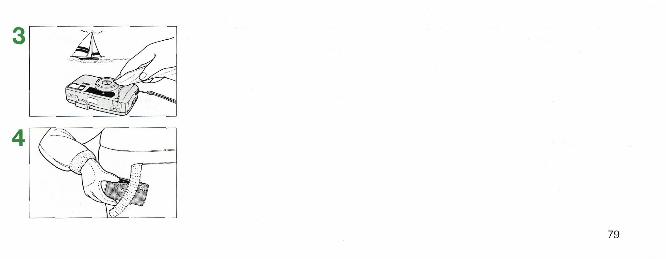
Camera care tips 1 Do not leave the camera in an excessively hot
place; store in a cool, dry place, keeping it away from naphthalene and camphor.
2 Clean all lens surfaces, including the autofocus window, with a soft, clean cloth.
3 Avoid taking pictures in the rain or salt water spray.
4 Battery power weakens in extremely low temperatures; use new batteries and keep the camera warm. Sudden extreme temperature changes may cause internal condensation that could damage the camera.
78
Consejos para el cuidado de la camara 1 No deje la camara en un sitio excesivamente
caliente: guardela en un sitio fresco y seco, mantengala alejada de naftalina y alcanfor,
2 Limpie las superficies de todos los objetivos, incluyendo la ventanilla del autoenfogue, con un pano limpioyseco.
3 Evite tomar fotograffas con 11 u via o con rocio de agua salada.
4 La carga de las piias decae a temperaturas extremadamente frfas; use un nuevo paguete de pilas de litio y mantenga la camara tibia. Cambios repentinos de temperatura pueden causar condensacidn interna que puede danar su camara.
79
\En_
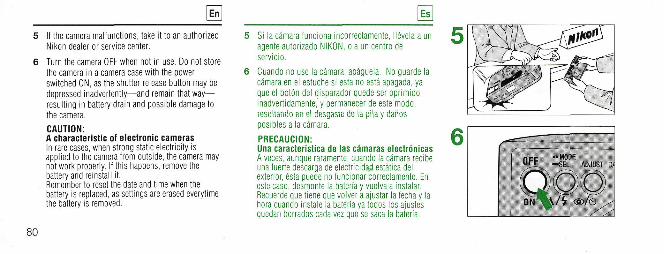
5 If the camera malfunctions, take it to an authorized Nikon dealer or service center.
6 Turn the camera OFF when not in use. Do not store the camera in a camera case with the power switched ON, as the shutter release button may be depressed inadvertently—and remain that way— resulting in battery drain and possible damage to the camera.
CAUTION: A characteristic of electronic cameras In rare cases, when strong static electricity is applied to the camera from outside, the camera may not work properly. If this happens, remove the battery and reinstall it. Remember to reset the date and time when the battery is replaced, as settings are erased everytime the battery is removed.
8 0
m 5 Si la camara funciona incorrectamente, llevela a un
agente autorizado NIKON, o a un centro de servicio.
6 Cuando no use la camara, apaguela. No guarde la camara en el estuche si esta no esta apagada, ya que el boton del disparador quede ser oprimido inadvertidamente, y permanecer de este modo, resultando en el desgaste de la pi la y danos posibles a la camara.
PRECAUCION: Una caracteristica de las camaras electrfjnicas A veces, aunque raramente, cuando la camara recibe una fuerte descarga de electricidad estatica del exterior, esta puede no funcionar correctamente. En este caso, desmonte la bateria y vuelva a instalar. Recuerde que tiene que volver aajustar la fecha y la hora cuando instale la bateria ya todos los ajustes quedan borrados cada vez que se saca la bateria.

81
About batteries I En I Acerca de las pilas [Es]
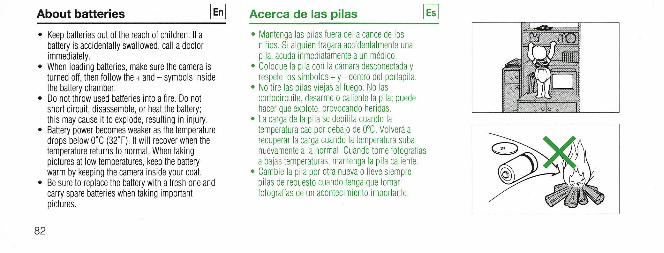
• Keep batteries out of the reach of children. If a battery is accidentally swallowed, call a doctor immediately.
• When loading batteries, make sure the camera is turned off, then follow the + and - symbols inside the battery chamber.
• Do not throw used batteries into a fire. Do not short circuit, disassemble, or heat the battery; this may cause it to explode, resulting in injury.
• Battery power becomes weaker as the temperature drops below 0°C (32°F). It will recover when the temperature returns to normal. When taking pictures at low temperatures, keep the battery warm by keeping the camera inside your coat.
• Be sure to replace the battery with a fresh one and carry spare batteries when taking important pictures.
• Mantenga las pilas fuera del alcance de los niffos. Si alguien tragara accidentalmente una pila, acuda inmediatamente a un medico.
• Cologue la pila con la camara desconectada y respete los simbolos + y - dentro del portapila.
• No tire las pilas viejas al fuego. No las cortocircuite, desarme o caliente la pila; puede hacer gue explote, provocando heridas.
• La carga de la pila se debilita cuando la ternperatura cae por debajo de 0°C. Volvera a recuperar la carga cuando la ternperatura suba nuevamente a la normal. Cuando tome fotografias a bajas temperaturas, mantenga la pila caliente.
• Cambie la pila por otra nueva o lleve siempre piias de repuesto cuando tenga gue tomar fotografias de un acontecimiento importante.
82
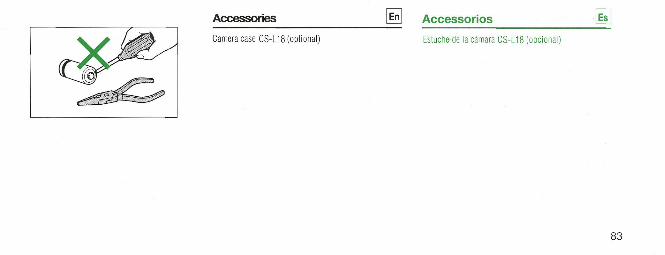
Accessories Enl Accessorios Es
Camera case CS-L18 (optional) Estuche de la camara CS-L18 (opcional)
83
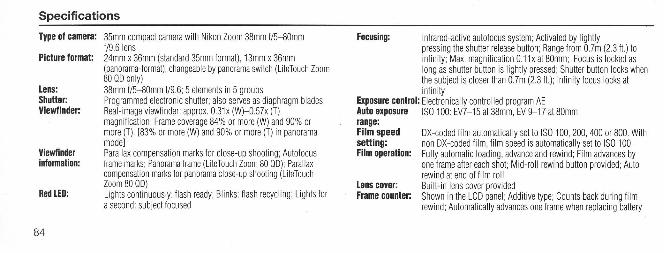
Specifications
Type of camera: 35mm compact camera with Nikon Zoom 38mm f/5-80mm f/9.6 lens
Picture format: 24mm x 36mm (standard 35mm format), 13mm x 36mm (panorama-format), changeable by panorama switch (LiteTouch Zoom 80 QD only)
Lens: 38mm f/5-80mm f/9.6; 5 elements in 5 groups Shutter: Programmed electronic shutter; also serves as diaphragm blades Viewfinder: Real-image viewfinder; approx. 0.31 x (W)-0.57x (T)
magnification; Frame coverage 84% or more (W) and 90% or more (T). [83% or more (W) and 90% or more (T) in panorama mode]
Viewfinder Parallax compensation marks for close-up shooting; Autofocus information: frame marks; Panorama frame (LiteTouch Zoom 80 QD); Parallax
compensation marks for panorama close-up shooting (LiteTouch Zoom 80 QD)
Red LED: Lights continuously; flash ready; Blinks: flash recycling; Lights for a second:subject focused
84
Focusing:
Exposure control Auto exposure range: Film speed setting: Film operation:
Lens cover: Frame counter:
Infrared-active autofocus system; Activated by lightly pressing the shutter release button; Range from 0.7m (2.3 ft.) to infinity; Max. magnification 0.11x at 80mm; Focus is locked as long as shutter button is lightly pressed; Shutter button locks when the subject is closer than 0.7m (2.3 ft.); Infinity focus locks at infinity Electronically controlled program AE ISO 100: EV7-15 at 38mm, EV 9-17 at 80mm
DX-coded film automatically set to IS0100,200,400 or 800. With non DX-coded film, film speed is automatically set to ISO 100. Fully automatic loading, advance and rewind; Film advances by one frame after each shot; Mid-roll rewind button provided; Auto rewind at end of film roll Built-in lens cover provided Shown in the LCD panel; Additive type; Counts back during film rewind; Automatically advances one frame when replacing battery
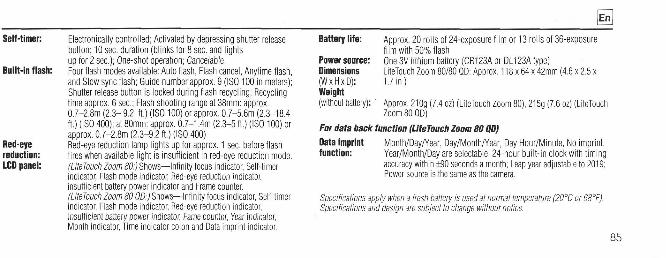
Self-timer: Electronically controlled; Activated by depressing shutter release button; 10 sec. duration (blinks for 8 sec. and lights up for 2 sec); One-shot operation; Cancelable.
Built-in flash: Four flash modes available: Auto flash, Flash cancel, Anytime flash, and Slow sync flash; Guide number approx. 9 (ISO 100 in meters); Shutter release button is locked during flash recycling; Recycling time approx. 6 sec; Flash shooting range at 38mm: approx. 0.7-2.8m (2.3- 9.2 ft.) (ISO 100) or approx. 0.7-5.6m (2.3-18.4 ft.) (ISO 400); at 80mm: approx. 0.7-1.4m (2.3-5 ft.) (IS0100) or approx. 0.7-2.8m (2.3-9.2 ft.) (ISO 400)
Red-eye Red-eye reduction lamp lights up for approx. 1 sec. before flash reduction: fires when available light is insufficient in red-eye reduction mode. LCD panel: (LiteTouch Zoom 80:) Shows—Infinity focus indicator, Self-timer
indicator, Flash mode indicator, Red-eye reduction indicator, insufficient battery power indicator and Frame counter. (LiteTouch Zoom 80 QD:) Shows—Infinity focus indicator, Self-timer indicator, Flash mode indicator, Red-eye reduction indicator, Insufficient battery power indicator, Fame counter, Year indicator, Month indicator, Time indicator colon and Data imprint indicator.
@
Battery life: Approx. 20 rolls of 24-exposure film or 13 rolls of 36-exposure film with 50% flash
Power source: One 3V lithium battery (CR123A or DL123A type) Dimensions LiteTouch Zoom 80/80 QD: Approx. 118 x 64 x 42mm (4.6 x 2.5 x (WxHxD): 1.7 in.) Weight (without battery): ' Approx. 210g (7.4 oz) (LiteTouch Zoom 80), 215g (7.6 oz) (LiteTouch
Zoom 80 QD)
For data back function /LiteTouch Zoom 80 QD)
Data imprint Month/Day/Year, Day/Month/Year, Day Hour/Minute, No imprint, function: Year/Month/Day are selectable; 24-hour built-in clock with timing
accuracy within iSO seconds a month; Leap year adjustable to 2019; Power source is the same as the camera.
Specifications apply when a iresh battery is used at normal temperature (20°C or 68°F). Specifications and design are subject to change without notice.
85

Especificaciones
Tipo de camara: Camara compacta de 35 mm con objetivo zoom de Nikon de 38 mm f/5-80 mm f/9,6
Tamano de 24 mm x 36 mm (formato normal 35 mm), 13 mm x 36 mm imagen: (formato panorama), conmutable con el interrupter panorama (solo
LiteTouch Zoom 80 QD) Objetivo 38 mm f/5-80 mm f/9,6; 5 elementos en 5 grupos
Obturador: Obturador electrbnico programado; tambien como bojas del diafragma
Visor: Imagen real; aprox, 0,31x (gran angular)-0,57x (teleobjetivo); cobertura de imagen 84% o mas (gran angular) y 90% o mas (teleobjetivo). [83% o mas (gran angular) y 90% o mas (teleobjetivo) en panorama]
Information del Marcas de compensacibn de paralaje para acercamiento; cuadrado visor: para enfoque automatico; marcas de panorama (LiteTouch Zoom 80
QD); marcas de compensacion de paralaja para acercamiento en panorama (LiteTouch Zoom 80 QD)
LED rojo: Encendido: flash pronto; destella: carga de flash; se enciende un segundo; objeto enfocado
86
Enfoque: Sistema de enfoque automatico por infrarrojos activo; al oprimir ligeramente el obturador; alcance de 0,7 m a infinito; ampliation max. 0,1 Ix a 80 mm; enfoque fijo mientras mantiene oprimido el obturador; obturador bloqueado cuando el objeto esta a menos de 0,7 m; enfoque a infinito bloqueado en infinito
Control de Control electrbnico de exposicidn automata programada exposition: Alcance de exposition automatics:
IS0100: EV7-15 a 38 mm, EV9-17 a 80 mm Sensibilidad de Pelicula con cbdigo DX que ajusta automaticamente la pelicula a la pelicula: ISO 100,200,400 u 800. Si no tiene cbdigo DX, se ajusta
automaticamente a IS0100. Movimiento de Carga totalmente automata, avance y rebobinado; avanza un la pelicula: fotograma despues de cada fotografia; boton de rebobinado en la
mitad del rollo; rebobinado automatico al final de la pelicula Tapa del objetivo:Tapa de objetivo incorporada Contador de Aparece en la pantalla de cristal Ifquido; Tipo cuenta progresiva; fotogramas: vuelve hacia atras durante el rebobinado; avanza automaticamente
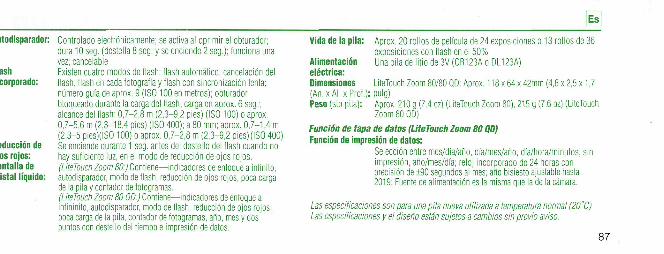
todisparador: Controlado electrdnicamente; se activa al oprimir el obturador; dura 10 seg. (destella 8 seg. y se enciende 2 seg.); funciona una vez; cancelable Existen cuatro modos de flash: flash automatico, cancelacidn del flash, flash en cada fotograffa y flash con sincronizacidn lenta; numero gufa de aprox. 9 (IS0100 en metros); obturador bloqueado durante la carga del flash, carga en aprox. 6 seg.; alcance del flash: 0,7-2,8 m (2,3-9,2 pies) (ISO 100) o aprox. 0,7-5,6 m (2,3-18,4 pies) (ISO 400); a 80 mm; aprox. 0,7-1,4 m (2,3-5 pies)(IS0100) o aprox. 0,7-2,8 m (2,3-9,2 pies) (ISO 400)
iduccidn de Se enciende durante 1 seg. antes del destello del flash cuando no »s rojos: hay suficiente luz, en el modo de reduccidn de ojos rojos.
mtalla de (LiteTouch Zoom 80:) Contiene—indicadores de enfoque a infinito, istal Ifquido: autodisparador, modo de flash, reduccidn de ojos rojos, poca carga
de la pila y contador de fotogramas. (LiteTouch Zoom 80 QD:) Contiene—indicadores de enfoque a infininito, autodisparador, modo de flash, reduccidn de ojos rojos, poca carga de la pila, contador de fotogramas, ano, mes y dos puntos con destello del tiempo e impresidn de datos.
S Vida de la pila: Aprox. 20 rollos de pelicula de 24 expostciones o 13 rollos de 36
exposiciones con flash en el 50% Alimentation Una pila de litio de 3V (CR123A o DL123A) electrica: Dimensiones LiteTouch Zoom 80/80 QD: Aprox. 118 x 64 x 42mm (4,6 x 2,5 x 1,7 (An. x Al. x Prof.): pulg) Peso (sin pila): Aprox. 210 g (7.4 ozl (LiteTouch Zoom 80), 215 g (7.6 oz) (LiteTouch
Zoom 80 QD)
Funcion de tapa de datos (LiteTouch Zoom 80 QD) Funcion de impresidn de datos:
Seleccidn entre mes/dia/ano, dia/mes/aho, dia/hora/minutos, sin impresidn, ano/mes/dia; reloj incorporado de 24 horas con precision de iSO segundos al mes; ano bisiesto ajustable hasta 2019; Fuente de alimentacidn es la misma que la de la camara.
Las especificaciones son para una pila nueva utilizada a temperatura normal (20'C) Las especificaciones y el diseno eslan sujetos a cambios sin previo aviso.
87
No reproduction in any form of this manual, in whole or in part (except tor brief quotation in critical articles or reviews), may be made without written authorization from NIKON CORPORATION.
Queda prohibida la reproduccion total o parcial de esta folleto (salvo en lo que se refiere a citas breves en articulo o revistas especializadas), sin la autorizacion escrita de NIKON CORPORATION.
Nikon
NIKON CORPORATION FUJI BLDG., 2-3, MARUNOUCHI 3-CHOME, CHIYODA-KU, TOKYO 100, JAPAN PHONE: 81-3-3214-5311 TELEX: NIKON J22601 FAX: 81-3-3201-5856