masoneilantm svi iiii ap advanced performance digital
TRANSCRIPT

MasoneilanTM
SVI IIII AP Advanced Performance Digital Positioner
Quick Start Guide (Rev. AA)
Baker Hughes Data Classification: Public
TM

About this GuideThis Quick Start Guide applies to the following instruments and supported software:SVI II AP and SVI II AP / AD with:
Firmware version 3.1.1, 3.1.2, 3.2.1, 3.2.3/4.1.1, 3.2.5/5.1.1 and 3.2.7/5.1.3.ValVue suite version 2.40.0 or greater (including PRM Plug-In & AMS SNAP-ON)DTM version 1.01.0 or greaterA handheld communicator with DD published for SVI II AP
The information contained in this manual, in whole or part, shall not be transcribed or copied without Baker Hughes’ written permission.In no case does this manual guarantee the merchantability of the positioner or the software or its adaptability to a specific client needs.Please report any errors or questions about the information in this manual to your local supplier or visit valves.bhge.com.
DISCLAIMER
THESE INSTRUCTIONS PROVIDE THE CUSTOMER/OPERATOR WITH IMPORTANT PROJECT-SPECIFIC REFERENCE INFORMATION IN ADDITION TO THE CUSTOMER/OPERATOR'S NORMAL OPERATION AND MAINTENANCE PROCEDURES. SINCE OPERATION AND MAINTENANCE PHILOSOPHIES VARY, BAKER HUGHES COMPANY (AND ITS SUBSIDIARIES AND AFFILIATES) DOES NOT ATTEMPT TO DICTATE SPECIFIC PROCEDURES, BUT TO PROVIDE BASIC LIMITATIONS AND REQUIREMENTS CREATED BY THE TYPE OF EQUIPMENT PROVIDED. THESE INSTRUCTIONS ASSUME THAT OPERATORS ALREADY HAVE A GENERAL UNDERSTANDING OF THE REQUIREMENTS FOR SAFE OPERATION OF MECHANICAL AND ELECTRICAL EQUIPMENT IN POTENTIALLY HAZARDOUS ENVIRONMENTS. THEREFORE, THESE INSTRUCTIONS SHOULD BE INTERPRETED AND APPLIED IN CONJUNCTION WITH THE SAFETY RULES AND REGULATIONS APPLICABLE AT THE SITE AND THE PARTICULAR REQUIREMENTS FOR OPERATION OF OTHER EQUIPMENT AT THE SITE.THESE INSTRUCTIONS DO NOT PURPORT TO COVER ALL DETAILS OR VARIATIONS IN EQUIPMENT NOR TO PROVIDE FOR EVERY POSSIBLE CONTINGENCY TO BE MET IN CONNECTION WITH INSTALLATION, OPERATION OR MAINTENANCE. SHOULD FURTHER INFORMATION BE DESIRED OR SHOULD PARTICULAR PROBLEMS ARISE WHICH ARE NOT COVERED SUFFICIENTLY FOR THE CUSTOMER/OPERATOR'S PURPOSES THE MATTER SHOULD BE REFERRED TO BAKER HUGHES.THE RIGHTS, OBLIGATIONS AND LIABILITIES OF BAKER HUGHES AND THE CUSTOMER/OPERATOR ARE STRICTLY LIMITED TO THOSE EXPRESSLY PROVIDED IN THE CONTRACT RELATING TO THE SUPPLY OF THE EQUIPMENT. NO ADDITIONAL REPRESENTATIONS OR WARRANTIES BY BAKER HUGHES REGARDING THE EQUIPMENT OR ITS USE ARE GIVEN OR IMPLIED BY THE ISSUE OF THESE INSTRUCTIONS.THESE INSTRUCTIONS ARE FURNISHED TO THE CUSTOMER/OPERATOR SOLELY TO ASSIST IN THE INSTALLATION, TESTING, OPERATION, AND/OR MAINTENANCE OF THE EQUIPMENT DESCRIBED. THIS DOCUMENT SHALL NOT BE REPRODUCED IN WHOLE OR IN PART WITHOUT THE WRITTEN APPROVAL OF BAKER HUGHES.Copyright
All information contained herein is believed to be accurate at the time of publication and is subject to change without notice. Copyright 2020 by Baker Hughes Company. All rights reserved. PN 055201-167 REV AA.
© 2020 Baker Hughes Company. All rights reserved. =Masoneilan SVI II AP Digital Positioner Quick Start Guide | 2

Contents1: Safety Information ............................................................... 7Safety Symbols ................................................................................... 7SVI II AP Product Safety..................................................................................8Masoneilan Help Contacts...............................................................................102: Installation and Set Up ........................................................ 11Introduction .......................................................................................... 11Using the Quick Start Guide ............................................................................13Single Acting Positioner...................................................................................15Double Acting Positioner .................................................................................17Pushbuttons and Local Display .......................................................................18Pushbuttons ..............................................................................................................................................19ValVue Software ..............................................................................................24System Requirements ...........................................................................................................................24ValVue and SV II AP DTM Trial Version ..........................................................................................24Masoneilan Software Download .....................................................................................................26Mounting the SVI II AP ....................................................................................30Necessary Precautions ........................................................................................................................30Mounting the SVI II AP on Rotary Valves ......................................................................................31Travel Sensor Alignment ......................................................................................................................33Mounting the SVI II AP on Reciprocating Valves ......................................................................34Checking the Magnet ............................................................................................................................39Installing the SVI II AP for Double- Acting Operation ......................................40Connecting the Tubing and Air Supply ............................................................43Natural Gas Supply Considerations ...............................................................................................43Installation Procedure ..........................................................................................................................45Connecting the Air Supply ..................................................................................................................46Wiring the SVI II AP .........................................................................................47Connecting to the Control Loop .......................................................................................................47Wiring Guidelines ....................................................................................................................................48SVI II AP Setups ........................................................................................................................................50Grounding Practices ..............................................................................................................................51Compliance Voltage in Single Drop Current Mode ..................................................................52Verify Wiring and Connections .........................................................................................................523: Check Out, Configuration and Calibration ........................ 55Overview ............................................................................................. 55Check Out Procedures ....................................................................................56Inspecting Actuator, Linkages, or Rotary Adapter ..................................................................57Verifying Mounting and Linkage Adjustment ............................................................................57
Masoneilan SVI II AP Digital Positioner Quick Start Guide =| 3© 2020 Baker Hughes Company. All rights reserved.

Checking the Magnet ............................................................................................................................57Checking the Air Supply .......................................................................................................................59Checking the Electronic Module Connections ...........................................................................60Operational Checkout ......................................................................................62Connecting to the Current Source ..................................................................................................62Powering Up the SVI II AP ....................................................................................................................62Configuration....................................................................................................64Configuration with Pushbuttons ......................................................................................................66Viewing Status Messages ....................................................................................................................68VIEW DATA Settings ...............................................................................................................................68Calibration........................................................................................................69Check-out with a HART® Handheld Communicator ..............................................................734: Maintenance ......................................................................... 77SVI II AP Maintenance.....................................................................................77Repair ............................................................................................................................................................78Tools Needed for Cover Replacement ...........................................................................................78Display Cover Removal and Installation ......................................................................................78A: Specifications and References .......................................... 83Physical and Operational Specifications.......................................................................... 83Hazardous Location Installation.......................................................................90Spare Parts ......................................................................................................104B: Optional Switch Load Limits .............................................. 109General Configuration Notes ...........................................................................109C: Burst Mode Operations ....................................................... 113Sample Tri-Loop Configuration ........................................................................................................117D: Determining an SVI Positioner Compliance Voltage in a Control System ................................................................. 119Compliance Test Set-Up..................................................................................120
© 2020 Baker Hughes Company. All rights reserved. =Masoneilan SVI II AP Digital Positioner Quick Start Guide | 4

Document Changes
Version/Date Changes
H/12-2010 Changes ES-699 doc to Rev N. See Appendix A
J/03-2011 Changes ES-699 doc to Rev P. See Appendix A
K/12-2011 Added description and procedures relevant to introduction of the high throughput version. ES-699 updated.
L/10-2012 Changed the specifications to reflect single acting supply pressure of up to 100 and double-acting up to 150 psi.
M/09-2013 Added the Load Limits sections and a cross reference to it from the wiring installation.Updated ES-699 to Rev. Y.
N/10-2015 Updated the Load Limits section.Updated ES-699 to Rev. AA.Updated Disclaimer statement.Added information on position retransmit switches.Removed Remote Positioner Installation.
P/12-2015 Added section and Warning on installation in a natural gas environment.Update the ES-699 to Rev. AB.Added instructions for wiring Position Retransmit.Changed references to ValVue software to reflect ValVue 3.Added Device Identification information.
R/04-2016 Made changes to indicate upgrades for HART® 7 (Squawk command and firmware areas).
T/09-2016 Changed firmware references for 3.2.7/5.1.3.Changed download site throughout.Note: Rev S skipped.
U/03-2017 Added section on compliance voltage testing.Changed references to HART® Foundation to Field Comm.Changed software download section.Added Notes on Aggressiveness.Added note on DI and PV switch use.Updated ES-699 to Rev AC.
V/12-2017 Updated Optional Switches section.Updated Intrinsic Safety images.Added notes for PV and DI to card interface drawing.Change ESS-699 to Rev AD.
W/01-2018 Updated Optional Switches section.
Y/06-2018Note Rev X skipped
Updated Optional Switches section.Added help contacts.Amended Burst mode sections and added Tri-loop configuration.
AA/01-2020 Note: Rev Z was skipped.Updated ES to Rev AE.Rebranded to Baker Hughes standards.Changed torque for cover from 50 to 55.
Masoneilan SVI II AP Digital Positioner Quick Start Guide =| 5© 2020 Baker Hughes Company. All rights reserved.

This page intentionally left blank.

1. Safety Information
This section provides safety information and defines the documentation symbols.
Safety Symbols
Indicates a potentially hazardous situation, which if not avoided could result in serious injury or death.
Indicates a potentially hazardous situation, which if not avoided could result in instru-ment or property damage, or data loss.
Indicates important facts and conditions.
WARNING
CAUTION
NOTE
Masoneilan SVI II AP Digital Positioner Quick Start Guide =| 7© 2020 Baker Hughes Company. All rights reserved.

SVI II AP Product SafetyThe SVI II AP digital valve positioner is intended for use with industrial compressed air or, natural gas systems only.
NOTE See “Hazardous Location Installation” on page 90 for natural gas safety information.
Ensure that an adequate pressure relief provision is installed when the application of system supply pressure could cause peripheral equipment to malfunction. Installation must be in accordance with local and national compressed air and instrumentation codes.
General installation, maintenance or replacement
Products must be installed in compliance with all local and national codes and standards by qualified personnel using safe site work practices. Personal Protective Equipment (PPE) must be used per safe site work practices.
Ensure proper use of fall protection when working at heights, per safe site work practices. Use appropriate safety equipment and practices to prevent the dropping of tools or equipment during installation.
Under normal operation, compressed supply gas is vented from the SVI II AP to the surrounding area, and may require additional precautions or specialized installations.
Intrinsically Safe Installation
Products certified as explosion proof or flame proof equipment or for use in intrinsically safe installations MUST BE:
Installed, put into service, used and maintained in compliance with national and local regulations and in
© 2020 Baker Hughes Company. All rights reserved.=Masoneilan SVI II AP Digital Positioner Quick Start Guide | 8

accordance with the recommendations contained in the relevant standards concerning potentially explosive atmospheres.
Used only in situations that comply with the certification conditions shown in this document and after verification of their compatibility with the zone of intended use and the permitted maximum ambient temperature
Installed, put into service and maintained by qualified and competent professionals who have undergone suitable training for instrumentation used in areas with potentially explosive atmospheres.
WARNING Before using these products with fluids/compressed gases other than air or for non-industrial applications, consult the factory. This product is not intended for use in life support systems.
WARNING Under certain operating conditions, the use of dam-aged instruments could cause a degradation of the performance of the system which may lead to per-sonal injury or death.
Under certain operating conditions the SVI II AP High Flow unit can produce noise levels greater than 85 dBA. Perform proper site monitoring and testing to verify the need for engineering or administrative con-trols to eliminate or reduce hazardous noise levels.
Installation in poorly ventilated confined areas, with any potential of gases other than oxygen being pres-ent, can lead to a risk of personnel asphyxiation.
Use only genuine replacement parts which are provided by the manufacturer, to guarantee that the products comply with the essential safety requirements of the European Directives.
Changes to specifications, structure, and components used may not lead to the revision of this manual unless such changes affect the function and performance of the product.
Masoneilan SVI II AP Digital Positioner Quick Start Guide =| 9© 2020 Baker Hughes Company. All rights reserved.

Masoneilan Help ContactsEmail: [email protected]
Phone: 888-SVI-LINE (888-784-5463)
© 2020 Baker Hughes Company. All rights reserved.=Masoneilan SVI II AP Digital Positioner Quick Start Guide | 10

2. Installation and Set Up
IntroductionThe SVI II AP provides for reliable operations of control valves with utmost simplicity in setup and commissioning. It is uniquely equipped with a non-contact travel sensor allowing for accurate positioning and maintenance free operations. The pneumatic train of the SVI II AP is a dual-stage amplification system with stainless steel wetted parts for durability. Intrinsically Safe, Flameproof and Explosion proof designs are offered as standard. The High Flow version is capable of 2.2 Cv air throughput. Some of the SVI II AP options include marine grade construction, local indicating LCD with push buttons for local calibration, position transmitter, discrete outputs, double-acting (not available for the High Flow version) and a remote mount position-sensing mechanism. Using HART® eDDL and FDT-DTM technologies, the Masoneilan SVI II AP digital valve positioner provides interoperability with leading control systems suppliers.
Figure 1 SVI II AP Digital Positioner
Masoneilan SVI II AP Digital Positioner Quick Start Guide =| 11© 2020 Baker Hughes Company. All rights reserved.

Figure 2 SVI II AP Components
Figure 3 SVI II AP High Flow Components
SVI II AP Cover SVI II AP Assembled
ElectronicsModule
Pneumatic Train andCover (I/P Module, Relay)
Manifold
Pneumatic Relay
I/P
SVI II AP Cover
ElectronicsModule
Cover
Relay
I/PManifold
(I/P Module)
© 2020 Baker Hughes Company. All rights reserved.=Masoneilan SVI II AP Digital Positioner Quick Start Guide | 12

Using the Quick Start GuideThe SVI II AP Quick Start Guide is intended to help experienced field personnel install, setup, and calibrate an SVI II AP in an efficient manner. This document provides basic installation and setup instructions and is not intended to replace the in-depth information contained in the SVI II AP Instruction Manual, downloadable at https://valves.bhge.com/resource-center.
If you experience problems that are not documented in this guide refer to the SVI II AP Instruction Manual, call your local representative, or go to www.ge-energy.com/valves. Sales offices are listed on the last page of this document
Compliance voltage testing is best done before installation. See “Determining an SVI Positioner Compliance Voltage in a Control System” on page 119.
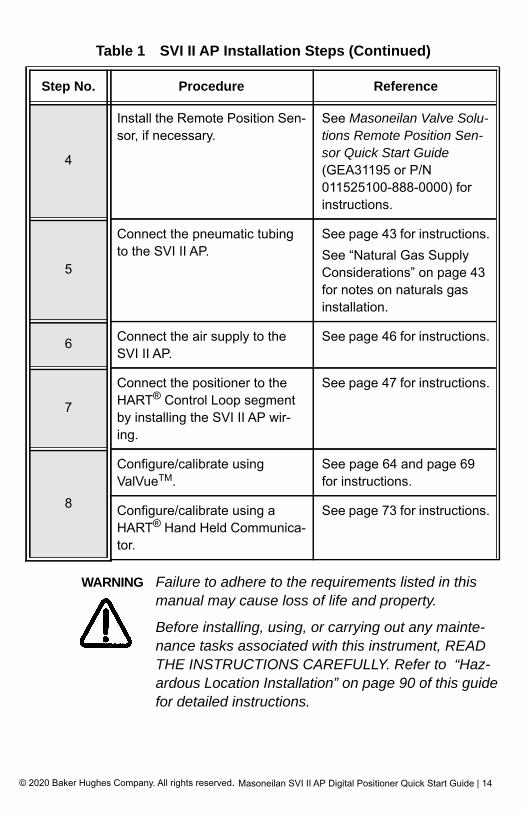
The steps necessary to complete the SVI II AP installation and software setup are outlined in Table 1.
Table 1 SVI II AP Installation Steps
Step No. Procedure Reference
1Attach mounting bracket to the actuator.
See page 30 for rotary valve and reciprocating valve instructions.
2 Install the SVI II AP magnetic assembly (rotary valves only).
See page 30 for instructions.
3Assemble the SVI II AP on the bracket that is mounted to the valve actuator.
See page 30 for rotary valve and reciprocating valve instructions.
Masoneilan SVI II AP Digital Positioner Quick Start Guide =| 13© 2020 Baker Hughes Company. All rights reserved.
WARNING Failure to adhere to the requirements listed in this manual may cause loss of life and property.
Before installing, using, or carrying out any mainte-nance tasks associated with this instrument, READ THE INSTRUCTIONS CAREFULLY. Refer to “Haz-ardous Location Installation” on page 90 of this guide for detailed instructions.
4
Install the Remote Position Sen-sor, if necessary.
See Masoneilan Valve Solu-tions Remote Position Sen-sor Quick Start Guide (GEA31195 or P/N 011525100-888-0000) for instructions.
5
Connect the pneumatic tubing to the SVI II AP.
See page 43 for instructions.See “Natural Gas Supply Considerations” on page 43 for notes on naturals gas installation.
6 Connect the air supply to the SVI II AP.
See page 46 for instructions.
7
Connect the positioner to the HART® Control Loop segment by installing the SVI II AP wir-ing.
See page 47 for instructions.
8
Configure/calibrate using ValVueTM.
See page 64 and page 69 for instructions.
Configure/calibrate using a HART® Hand Held Communica-tor.
See page 73 for instructions.
Table 1 SVI II AP Installation Steps (Continued)
Step No. Procedure Reference
© 2020 Baker Hughes Company. All rights reserved.=Masoneilan SVI II AP Digital Positioner Quick Start Guide | 14

Single Acting PositionerThe supply and output connections for the SVI II AP, located on bottom of the pneumatic block, are tapped 1⁄4" NPT. The output port 1 is toward the front while the supply is toward the back. Two pressure gauges, output on top, supply port on bottom, are located on the front of the pneumatic block.
The supply and output connections for the SVI II AP High Flow (Figure 5 on page 16), located on bottom and leftside of the pneumatic block, are tapped 1⁄2" NPT.
Maximum allowable air supply pressure to the SVI II AP varies according to actuator, valve size, and valve type. Refer to the serial plate of the valve to know the specified supply pressure; it must never be less than the maximum spring pressure +5 psi.
Figure 4 Air Ports on Single Acting Positioner
OutputSupply
Masoneilan SVI II AP Digital Positioner Quick Start Guide =| 15© 2020 Baker Hughes Company. All rights reserved.

Figure 5 SVI II AP High Flow Air Ports on Single Acting Positioner
OutputSupply
© 2020 Baker Hughes Company. All rights reserved.=Masoneilan SVI II AP Digital Positioner Quick Start Guide | 16

Double Acting PositionerConnect Output 1, labeled(I) to the inlet port of the actuator and Output 2, labeled (II) to the opposing actuator port (see Figure 6).
Figure 6 Air Ports on Double Acting Positioner
Output I
Supply Output II
Masoneilan SVI II AP Digital Positioner Quick Start Guide =| 17© 2020 Baker Hughes Company. All rights reserved.

Pushbuttons and Local DisplayThis section covers the optional local interface consisting of the LCD alphanumeric display and pushbuttons. Operation of the SVI II AP Digital Valve Positioner as a local device is controlled through the optional device-mounted pushbuttons and digital display, shown in Figure 7 on page 20. Using the display you can read the input signal, valve position, and actuator pressure. The display sequences from one variable to the next every 1.5 seconds.
Using the pushbuttons you can exit from operating mode at any time and step through a menu structure to perform a wide range of manual operation, calibration, configuration, and monitoring functions that are described later in this section. ValVue is used to perform all diagnostics functions. The pushbuttons do not support diagnostics functions.
The SVI II AP has two operational modes: Normal Operating mode and Manual mode and two setup modes, Configuration and Calibration. The SVI II AP also has two modes for handling of faults and power-up: Reset and Failsafe. When commissioning or checking a control valve with SVI II AP fully installed the following steps are recommended:
Change mode to Manual mode
Examine and adjust all CONFIGuration items
Enter Calibration mode
Run STOPS to automatically calibrate stroke
Run autoTUNE to set dynamic response
Examine the device STATUS
Introduce manual set point changes to verify dynamic performance
© 2020 Baker Hughes Company. All rights reserved.=Masoneilan SVI II AP Digital Positioner Quick Start Guide | 18

Pushbuttons
The local pushbuttons are located behind a hinged cover, directly below the display window. To open the cover loosen the screw and swing the cover down. Always re-fasten the cover after use to protect the pushbuttons from environmental contamination.
The three pushbuttons perform the following functions:
Left Button - Marked with *, permits you to select or accept the value or parameter option currently displayed.
Middle Button - Marked –, permits you to move back through the menu structure to the previous item in the menu or decrement the value currently shown in the digital display. When used to decrease a displayed value, holding the button down causes the value to decrease at a faster rate.
Right Button - Marked +, permits you to move forward through the menu structure to the next item in the menu, or to increment the value currently shown in the digital display. When used to increase a displayed value holding this button down causes the value to increase at a faster rate.
NOTE When an exclamation point (!) appears in the SVI II AP display window, it indicates that there is instru-ment status available.
Masoneilan SVI II AP Digital Positioner Quick Start Guide =| 19© 2020 Baker Hughes Company. All rights reserved.

Figure 7 SVI II AP Display Pushbuttons
*+-
(Select) (Forward)(Back)
© 2020 Baker Hughes Company. All rights reserved.=Masoneilan SVI II AP Digital Positioner Quick Start Guide | 20

Pushbutton Locks and Configuration-Lock Jumper
Before performing any of these functions with the local display you must first ensure that the pushbuttons are placed in the unlocked mode using ValVue. The positioner is provided in the unlocked mode. See ValVue documentation for more details.
The SVI II AP offers several levels of accessibility. It may be desirable, after initial setup, to lock the pushbuttons so that the SVI II AP parameters cannot be inadvertently changed by the buttons. Several levels of pushbutton locks are provided.
Table 2 Pushbutton Lock Security Level
Level Access
Security Level 3
Allow Local Buttons: Buttons on the SVI II AP are fully enabled.
Security Level 2
Lock Out Local Calibration and Configuration: Use the but-tons to perform operations in normal operating mode and manual mode. Do not go to configure or calibrate mode.
Security Level 1
Lock Out Local Manual: Examine variables in normal operat-ing mode but do not put the valve in manual operating mode. Access to calibrate or configure modes is not avail-able.
Security Level 0
Lock Out All Buttons: The buttons are disabled (level 0).
Masoneilan SVI II AP Digital Positioner Quick Start Guide =| 21© 2020 Baker Hughes Company. All rights reserved.

Hardware Configuration Lock
Additional security is achieved using the hardware configuration-lock jumper shown in Figure 8. When set to the secure position, shorting the two-pin header, configuration and calibration are not permitted by the local interface or by remote communications. Pushbuttons, ValVue and handheld are locked out, except to examine configuration, calibration, and position. This is similar to Security Level 1 shown in the Pushbutton Lock Security Level table.
Figure 8 Connections to Electronics Module (via Terminal Board)
Display
Remote
Process Variable
Position Retransmit
Position
Input
Configuration LockJumper
4- 20 mA Input Signal
Solid State Switch SW #1Solid State Switch SW #2
Sensor
Digital Input
(not used)
(enabled usingSMARTs Assistant)
© 2020 Baker Hughes Company. All rights reserved.=Masoneilan SVI II AP Digital Positioner Quick Start Guide | 22

NOTE The PV (Process Variable is not used for the SVI II AP. The Digital Input (DI) is activated using SMARTs Assistant, which is downloaded at https://valves.bhge.com/resource-center.
The DI switch is a dry contact switch. As an example, the switch may be utilized as a mechanical limit switch backup. The most common way to read the switch status is via the DTM or DD. The input to the switch can be automated by sending Device Variable 8 (DI) via CMD 9 or CMD 33 from a DCS.
Masoneilan SVI II AP Digital Positioner Quick Start Guide =| 23© 2020 Baker Hughes Company. All rights reserved.

ValVue SoftwareNot only does ValVueTM provide the ability to quickly and easily set up the SVI II AP you can also monitor operation and diagnose problems with ValVue’s advanced diagnostic capabilities.
NOTE You must use the ValVue3 software and the SVI II AP DTM software to support HART® 7. ValVue 2.x will not work.
System Requirements
Minimum requirements for all versions of ValVue software are Windows® 2003 Server (SP3), Windows® 2008 Server (SP2), XP, Windows® 7, Windows® 8, Windows® Server 2012, 64 MB RAM, and a serial or USB port connected to a HART® modem. For software installation, a connection to the internet to download ValVue and the SVII AP DTM.
ValVue and SV II AP DTM Trial Version
You must download the ValVue software and the SVII AP DTM software and install to configure and use the SVI II AP. For the most recent software visit our SVI II AP web site at: https://valves.bhge.com/resource-center.
The SVI II AP DTM software and the Valve software comes with a trial version of ValVue. For 60 days after the initial installation, The ValVue software provides the FDT frame capability in which the SVI II AP DTM software operates. The SVI II AP DTM software provides the capability of configuring, calibrating, diagnosing, trending and much more. After the 60 trial period ValVue must be registered for use. ValVue functionality includes:
© 2020 Baker Hughes Company. All rights reserved.=Masoneilan SVI II AP Digital Positioner Quick Start Guide | 24

Setup Wizard Remote display of valve posi-tion, actuator pressure(s)
Set calibration parameters Set configuration parameters
Monitor status⁄error indicators
Input/Output configuration
Remote calibration of the SVI II AP
Remote configuration of the SVI II AP
Remote operation of the SVI II AP
Backup and restore configura-tion (clone device)
Trend setpoint, valve position, actuator pressure
Display comparative test results (full version only)
Perform diagnostic test proce-dures (full version only)
Advanced and Online Diagnostics
The SVI II AP offers various levels of control valve diagnostics. Up to five pressure sensors that detect circuit board temperature, loop current, and reference voltage, are available for diagnostics.
For more details on the use of ValVue software, refer to the ValVue User’s Guide. Contact the factory or your local representative to obtain licensing information.
Masoneilan SVI II AP Digital Positioner Quick Start Guide =| 25© 2020 Baker Hughes Company. All rights reserved.

Masoneilan Software Download
Download and Install ValVue3
1. Go to the Resource Library (https://valves.bhge.com/resource-center) and enter ValVue in the search field (arrow in Figure 9).
Figure 9 Download Center: Search for ValVue
The results appear (red box in Figure 9).
2. Use the arrows to move through the selections. Select Download below ValVue and Figure 10 appears.
Figure 10 Opening Dialog
© 2020 Baker Hughes Company. All rights reserved.=Masoneilan SVI II AP Digital Positioner Quick Start Guide | 26

NOTE The dialog that appears for download varies by the program used.
3. Click Save File, click OK and it saves to the Windows Downloads folder.
NOTE For fastest installation, save the download file to your laptop/PC. Don't install from the website.
4. Open Windows Explorer and click the Windows Downloads folder.
NOTE If you are upgrading from ValVue 2.x you must update the SQL database location to match ValVue3’s.
5. Double-click on the installer and follow the instructions to install.
Masoneilan SVI II AP Digital Positioner Quick Start Guide =| 27© 2020 Baker Hughes Company. All rights reserved.

Download and Install the SVI II AP DTM
1. Go to the Resource Library (https://valves.bhge.com/resource-center) and enter SVI II AP DTM in the search field (red arrow in Figure 11).
Figure 11 Download Center: Search for SVI II AP DTM
The results appear (Figure 11).
2. Select Download below SVI II AP DTM and Figure 12 appears.
Figure 12 Opening Dialog
© 2020 Baker Hughes Company. All rights reserved.=Masoneilan SVI II AP Digital Positioner Quick Start Guide | 28

NOTE The dialog that appears for download varies by the program used.
3. Click Save File, click OK and it saves to the Windows Downloads folder.
NOTE For fastest installation, save the download file to your laptop/PC. Don't install from the website.
4. Open Windows Explorer and click the Windows Downloads folder.
5. Double-click on the installer and follow the instructions to install.
Masoneilan SVI II AP Digital Positioner Quick Start Guide =| 29© 2020 Baker Hughes Company. All rights reserved.

Mounting the SVI II APThis guide provides installation instructions for mounting an SVI II AP on both rotary and reciprocating actuated valves. The mounting process can be broken down into the following:
Attach the mounting bracket to the actuator.
Install the magnetic assembly.
Assemble the SVI II AP on the mounting bracket.
NOTE The SVI II AP should be mounted with the conduit connections down in order to facilitate drainage of condensate from the conduit.
Necessary Precautions
To avoid injury or the process being affected when installing or replacing a positioner on a control valve, ensure that:
If the valve is located in a hazardous area make sure the area has been certified as safe or that all electrical power to the area has been disconnected before removing any covers or disconnecting any leads.
Shut off air supply to the actuator and to any valve mounted equipment.
Ensure the valve is isolated from the process by either shutting off the process or using bypass valves for isolation. Tag shutoff or bypass valves to guard against a turn-on while work is in progress.
Bleed air from actuator and check that valve is in its unenergized position.
It is now safe to disconnect and remove any valve mounted equipment that is being replaced.
© 2020 Baker Hughes Company. All rights reserved.=Masoneilan SVI II AP Digital Positioner Quick Start Guide | 30

For the procedure to mount rotary and reciprocating valves, refer to the Mounting Instructions contained in the valve’s Mounting Box kit.
Mounting the SVI II AP on Rotary Valves
This section describes the procedure for mounting the SVI II AP on rotary control valves that have less than 60° rotation, such as a Masoneilan CamflexTM II or a Masoneilan VarimaxTM. Figure 13 shows a side view of a Camflex actuator and the SVI II AP actuator mounting brackets.
Figure 13 Camflex with Mounting Bracket (Side View)
Mounting the SVI II AP on a Rotary Actuator
Tools required:
3⁄16" Hex Key
5⁄32" Hex Key
3 mm, 4 mm, 5 mm Hex Key
7⁄16" Wrench
To mount the SVI II AP:
1. Attach the SVI II AP rotary mounting bracket to the valve actuator using two (2) 5⁄16 - 18 UNC flat-head cap screws. In the preferred mounting position, the long end of the mounting bracket is on your left when facing the actuator, for any position of the valve and actuator.
Masoneilan SVI II AP Digital Positioner Quick Start Guide =| 31© 2020 Baker Hughes Company. All rights reserved.

2. Bolt the extension shaft to the valve position take-off shaft using a 1⁄4 - 28 UNF socket flathead screw. Secure the machine screw holding the extension shaft with a torque of 144 in-lbs (16.269 N-m).
3. On internal valve pressure the thrust shaft is pushed out to the mechanical stops, usually a thrust bearing. On valves where the valve position take-off is mounted directly on the end of the plug shaft, a Camflex for example, the shaft must be bearing on its stop to properly set up the SVI II AP Controller. During hydrostatic testing the shaft is thrust to its stop and a normally tightened packing retains it in that position.
4. On vacuum service, the valve shaft may be drawn into the body by the vacuum acting on the shaft, but the magnetic coupling must be assembled flush with the mounting bracket with the shaft pulled fully out to its thrust bearing. Check that the endplay from the vacuum position to the fully extended position is less than 0.06 in. (1.524 mm).
5. Slide the magnet holder into the extension shaft. The location of the magnets is in the ring of the magnet holder. The magnetic axis is the imaginary line through the center of both magnets.
6. Rotate the magnet holder so that the magnet axis is vertical when the valve is in the closed position.
7. Align the end of the magnet holder flush with the end of the mounting bracket. Secure the magnet holder with two M6 set screws.
8. Slide the V-Seal over the magnet holder.
9. Secure the SVI II AP onto the mounting bracket using four M6 x 20 mm socket head cap screws.
10. Ensure no interference exists with the position sensor protrusion.
11. Ensure that the V-Seal makes contact with the skirt around the position sensor protrusion on SVI II AP housing.
© 2020 Baker Hughes Company. All rights reserved.=Masoneilan SVI II AP Digital Positioner Quick Start Guide | 32

Travel Sensor Alignment
Table 3 shows the general guidelines for travel sensor alignment. Review the table prior to installing the SVI II AP on a rotary valve actuator for proper alignment of the magnet.
Table 3 Travel Sensor Alignment
Rotary Mounting System
Stroke Direction Magnet Orientation
Valve Position
Sensor Counts
Rotary <60° RotationClockwise or coun-terclockwise rotation
(0°)
Closed (0%)
0 +/- 1000
>60° RotationClockwise with increasing setpoint
(-45°)
Full Open or Full Closed
-8000 +/- 1500 or+8000 +/- 1500
>60° RotationCounter Clockwise rotation with increas-ing setpoint
(+45°)
Full Open or Full Closed
-8000 +/- 1500 or+8000 +/- 1500
General Rule for other con-figurations
Any amount of rota-tion Clockwise or counterclockwise
(0°)
50% Travel(Mid-Stroke)
0 +/- 1000
Masoneilan SVI II AP Digital Positioner Quick Start Guide =| 33© 2020 Baker Hughes Company. All rights reserved.

Dismantling the SVI II AP from Rotary Valves
Before carrying out any work on the device, power off the instrument or ensure that the device’s location conditions for potentially explosive atmosphere permit the safe opening of the cover.
To remove the SVI II AP Controller from a rotary valve perform Steps 1 - 9 on page 31 in reverse.
Mounting the SVI II AP on Reciprocating Valves
The process of mounting the SVI II AP on a reciprocating valve consists of mounting the unit on the actuator that is attached to the valve. This section describes the procedure for mounting the SVI II AP on Reciprocating Valves (using Masoneilan’s 87⁄88 Multi-Spring actuators as an example).
Mounting the SVI II AP on a Reciprocating Actuator
Tools required:
7⁄16" Combination Wrench (2 required)
3⁄8" Combination Wrench
1⁄2" Combination Wrench
Phillips Head Screw Driver
5 mm Hex Key Wrench
1. Ensure that the lever is pinned to the magnet assembly and held securely by an M5 flat head screw to ensure that the magnet axis is vertical when the lever is in the valve closed position. Tighten the lever screw securely. Refer to Figure 14.
© 2020 Baker Hughes Company. All rights reserved.=Masoneilan SVI II AP Digital Positioner Quick Start Guide | 34

Figure 14 Magnet Holder for Reciprocating Valves
2. Mount the SVI II AP reciprocating mounting bracket to the actuator using two (2) 5⁄16 - 18 UNC cap screws.The mounting location of the bracket depends on the size and stroke of the actuator. Refer to Figure 15 and Figure 4 on page 38.
Figure 15 Reciprocating Valve Mounting Bracket
3. Select mounting hole A, B, C or D for the stroke of the valve. For example, hole B is shown in Figure 17 on page 37 for a size 10 actuator with 1.0" stroke. Unless otherwise specified, the SVI II AP mounting assumes that the actuator is in the normal upright position. The mounting hole in the slotted opening of the mounting bracket must be left when facing the actuator, with the actuator in the upright position.
M5 Flat
Pin
head screw
Masoneilan SVI II AP Digital Positioner Quick Start Guide =| 35© 2020 Baker Hughes Company. All rights reserved.

4. Move the valve to its closed position. For air to extend, this requires using air pressure in the actuator to fully stroke the actuator. For air to retract, actuators vent the actuator of air pressure.
5. Thread the take-off rod to the actuator stem connector. Refer to Figure 16 on page 36. Ensure that the travel pointer located on the coupling is correctly positioned.
6. Attach the right hand threaded rod end to the SVI II AP lever using a 1⁄4 - 20 x 1" cap screw and nut as shown. The lever hole position to be used depends upon the specific valve stroke. Refer to Figure 17 on page 37 and the Reciprocating Valve Linkage Selection, Table 4 on page 38.
7. Thread the right hand lock nut and turnbuckle onto the right hand rod end approximately two turns. Turnbuckle length is a function of actuator size. (Refer to Table 4 on page 38.)
8. Secure the magnet housing assembly, including the lever and right hand rod end, to the bracket using four M5 X 10 mm flat head screws.
9. Attach the left hand threaded rod end to the take-off rod with 1⁄4 - 20 UNC nut and thread the left hand lock nut onto the rod end.
Figure 16 Reciprocating Linkage
© 2020 Baker Hughes Company. All rights reserved.=Masoneilan SVI II AP Digital Positioner Quick Start Guide | 36

10. Thread the turnbuckle onto the left hand threaded rod end (Figure 16).
11. Adjust the turnbuckle until the hole in the SVI II AP lever is aligned with the indicating hole in the bracket. Tighten both turnbuckle lock nuts. Refer to Figure 15.
12. For reciprocating valves the adjustable link turnbuckle must be parallel to the valve stem. To ensure linearity in positioning, verify that the hole in the lever aligns with the indicating hole in the bracket when the valve is in the closed position. Check that the bracket is mounted using the proper holes. (Refer Table 4 on page 38.)
13. Mount the SVI II AP to the bracket and secure with four M6 socket head cap screws.
Figure 17 Lever for Masoneilan Model 87/88 Multispring Actuator
Masoneilan SVI II AP Digital Positioner Quick Start Guide =| 37© 2020 Baker Hughes Company. All rights reserved.

Table 4 Reciprocating Valve Mounting Hole and Turnbuckle Length
MasoneilanActuator
Size
Stroke Mounting Hole
Lever Hole
Turnbuckle Length
6 and 10 0.5 - 0.8" (12.7 - 20.32 mm)
A A 1.25" (31.75 mm)
10 0.5 - 0.8"(12.7 - 20.32 mm)
A A 1.25" (31.75 mm)
10 >0.8 – 1.5" (20.32 - 41.5 mm)
B B 1.25" (31.75 mm)
16 0.5 - 0.8" (12.7 - 20.32 mm)
B A 2.90" (73.66 mm)
16 >0.8 – 1.5" (20.32 - 41.5 mm)
C B 2.90" (73.66 mm)
16 >1.5 – 2.5" (41.5 - 63.5 mm)
D C 2.90" (73.66 mm)
23 0.5 - 0.8" (12.7 - 20.32 mm)
B A 5.25" (133.35 mm)
23 >0.8 – 1.5" (20.32 - 41.5 mm)
C B 5.25" (133.35 mm)
23 >1.5 – 2.5" (41.5 - 63.5 mm)
D C 5.25" (133.35 mm)
Dismantling the SVI II AP from Reciprocating Valves
WARNING Before carrying out any work on the device, power off the instrument or ensure that the local conditions for potentially explosive atmosphere permit the safe opening of the cover.
To remove the SVI II AP Controller from a reciprocating valve perform Steps 1 - 12 on page 34 in the reverse order.
© 2020 Baker Hughes Company. All rights reserved.=Masoneilan SVI II AP Digital Positioner Quick Start Guide | 38

Checking the Magnet
There are two methods of checking the SVI II AP magnet:
Perform a visual inspection
Use ValVue to check the magnet
Performing a Visual Inspection
To perform a visual inspection refer to Table 3 on page 33 and ensure that the magnet is correctly oriented for the actuator/valve configuration.
Masoneilan SVI II AP Digital Positioner Quick Start Guide =| 39© 2020 Baker Hughes Company. All rights reserved.

Installing the SVI II AP for Double- Acting Operation
This section explains how to mount the SVI II AP for the 84/85/86 kit for double-acting valve positioner configurations.
To mount the kit:
1. Set valve to the closed position.
2. Install the mounting assembly to the yoke (Figure 18) using helical spring washer 5/16, flat washer 5/16 and hex screw 5/16-18x44.5 [1.75] LG.
Figure 18 84/85/86 Actuator
NOTE Mount all components snug enough to stay in place but loose enough to tap with rubber hammer into final position.
Lever
Rod-endKit
Mount
© 2020 Baker Hughes Company. All rights reserved.=Masoneilan SVI II AP Digital Positioner Quick Start Guide | 40

3. Set rod-ends and brackets to stroke and size of actuator. The default setting is a 4.00” stroke. Other stroke settings are as in Figure 19.
Figure 19 Stroke Settings
4. Mount take-off bracket to stem block at angle which keeps turnbuckle assembly parallel to stem (Figure 20) using:
a. For top: two plain 5/16 flat washers, helical spring washer 5/16, two hex nuts 5/16-18 regular.
b. For bottom: hex nut regular 1/4-20 and hex screw 1/4-20 UNC x 22.2 [.88] LG.
Figure 20 Bracket Configuration Strokes .5 - 2.50” and 3-6”
Masoneilan SVI II AP Digital Positioner Quick Start Guide =| 41© 2020 Baker Hughes Company. All rights reserved.

5. Ensure the turnbuckle assembly is parallel to the stem and the magnets are in the valve closed position (Figure 21) and connect to take-off bracket.
Figure 21 Magnet Position with Valve Closed
6. Verify lever is in correct position with valve closed. Adjust rod-ends, if necessary.
Figure 22 Lever Alignment
7. Mount the SVI-II with M6-1 screws.
8. Cycle the valve open to close verifying proper components movement and that rod-ends move free and clear from other components.
© 2020 Baker Hughes Company. All rights reserved.=Masoneilan SVI II AP Digital Positioner Quick Start Guide | 42

Connecting the Tubing and Air SupplyThe last step in hardware installation for the SVI II AP is to connect the air supply to the positioner. This section describes the process for connecting the tubing and air supply to a single and double acting positioner.
Natural Gas Supply Considerations
If the pneumatic system is connected to natural gas, the pneumatic control system constantly bleeds a small amount of the natural gas into the area around the SVI II AP. Also, during a vent cycle (actuator pressure relief), natural gas from the actuator is released into the area around the SVI vent port. Consider both sources of natural gas when evaluating the Hazardous Classification for the area (See GEA19681 Masoneilan Valves SVI II AP Installation and Maintenance Manual for further discussion on installing an SVI II AP in a natural gas environment).
Remote piping of the actuator venting is possible to reduce the amount of natural gas released into the area around the SVI II AP (See GEA19681 Masoneilan Valves SVI II AP Installation and Maintenance Manual for further discussion on installing an SVI II AP in a natural gas environment). Installing remote actuator vent gas piping does not capture all gas emitted. A small amount of natural gas still bleeds constantly in the area around the SVI II AP. Consider the bleeding and releasing of natural gas when evaluating the Hazardous Clarification for the area.
NOTE Area classification is the responsibility of the end user.
Masoneilan SVI II AP Digital Positioner Quick Start Guide =| 43© 2020 Baker Hughes Company. All rights reserved.

The interior of the SVI II AP is positively pressurized with supply medium. Appropriate safety measures must be taken to handle pressurized natural gas that may enter the electrical conduit or cable system.
WARNING Do not remove the instrument cover or connect to an electrical circuit unless the power is disconnected. Natural gas will escape into the surrounding atmo-sphere upon disconnecting any of the pneumatic con-nections or removing any cover or pressure containing component.
WARNING EXPLOSION HAZARD - Do not disconnect equip-ment or remove cover unless power has been de-energized or the area is know to be non-hazardous. Natural gas may be contained within the SVI II AP. Even after disconnecting the SVI II AP from all the pneumatic connections Natural Gas may still be pres-ent within the SVI II AP.
WARNING EXPLOSION HAZARD - Natural gas may escape from the SVI II AP upon removal of any cover or com-ponent. Ensure the cover is correctly installed before putting this unit into service.
WARNING EXPLOSION HAZARD - An improperly installed cover could leak natural gas into the area. The interior of the SVI II AP is positively pressure with supply medium. Appropriate safety measures must be taken to handle pressurized natural gas that may enter the electrical conduit or cable system.
WARNING EXPLOSION HAZARD - A missing or improperly installed conduit seal, cable seal, or cable gland could leak natural gas into the conduit/cable system, and/or into any area where the conduit/cabling system is present or connected to.
© 2020 Baker Hughes Company. All rights reserved.=Masoneilan SVI II AP Digital Positioner Quick Start Guide | 44

WARNING Natural gas will constantly bleed and possibly vent from the SVI II AP if connected to a natural gas sup-ply. Hazardous area clarification is the responsibility of the end user. area ventilation and other safety mea-sures may be required to maintain a safe environ-ment.
WARNING Installation in poorly ventilated confined areas, with any potential of gases other than oxygen being pres-ent, can lead to a risk of personnel asphyxiation.
WARNING Isolate the valve from the process and disconnect air tubing from the positioner. Disconnect air fully to avoid injury or process damage.
Installation Procedure1. Install the tubing to the air supply port S (arrow only for
High Flow).
2. For a:
Single acting actuator: Pipe the outbound air from the output pressure port I (arrow only for High Flow) to the actuator.
Double acting actuator: Pipe output pressure port one I for one side of the actuator and output pressure port twoII for the other side of the actuator.
3. Air supply:
Supply pressure for single acting SVI II and AP High Flow: 20 -100 psi (1.4 - 6.9 bar) (138 - 690 kPa)
Supply pressure for double acting SVI II AP: 25 - 150 psi (1.73 - 10.4 bar) (172.4 - 1034 kPa)
Minimum tubing diameter 1⁄4" (6 mm x 4 mm)
Masoneilan SVI II AP Digital Positioner Quick Start Guide =| 45© 2020 Baker Hughes Company. All rights reserved.

NOTE The SVI II AP Digital Valve Positioner is designed to operate with clean, dry, oil-free, instrument grade air to ANSI-ISA-57.3 1975 (R1981) or ISA-S7.3-1975 (R1981) or with clean, dry, oil-free sweet natural gas supply ((H2S content not to exceed 20 ppm) (SVI II AP models SVI II AP/SD through SVI II AP/AD).
Table 5
Dew Point At least 18° F (-7° C) below minimum anticipated ambient temperature
Particulate Mat-ter
Filtered to 5 microns
Oil Content Less than 1 ppm w/w
Contaminants Free of all corrosive contaminants
Air Supply Requirements
CAUTION The SVI II AP High Flow digital valve positioner can-not be placed in parallel with another volume booster. Contact the factory for further instructions regarding configuration with boosters as well as other non-stan-dard configurations.
Connecting the Air Supply
After the tubing is installed, use the following procedure to connect the air supply.
1. Supply clean, dry compressed air to the filter regulator.
2. Turn on the air supply.
3. Adjust the filter regulator. Supply pressure must be 5 - 10 psi greater than the spring range of the actuator but may not exceed the rated actuator pressure. Refer to the valve or actuator instruction manual.
© 2020 Baker Hughes Company. All rights reserved.=Masoneilan SVI II AP Digital Positioner Quick Start Guide | 46

Wiring the SVI II APIn order for the SVI II AP to communicate the positioner data the SVI II AP positioner must be physically connected to a HART® communication. The procedure below outlines wiring the SVI II AP.
WARNING Comply with current national and local regulations for electrical installation work. Comply with national and local explosive atmosphere regulations. Before carrying out any work on the device, power off the instrument or make sure that the local conditions for potentially explosive atmosphere permit the safe opening of the cover.
CAUTION Refer to “Optional Switch Load Limits” on page 109 for guidelines on safely wiring switch load limits.
Connecting to the Control Loop
The SVI II AP digital valve positioner MUST BE grounded according to local regulations. It is important to maintain correct polarity at all times, otherwise the positioner may not operate properly. Physically connect the SVI II AP to the HART® loop using a cable specified by the FieldCommTM Group. A shielded cable is recommended. To connect the Control Loop to the SVI II AP:
1. Connect one end of the cable to the control loop's 4 - 20mA output
2. Remove the threaded wiring covers on the positioner.
3. Connect the other end of the cable to the SVI II AP. There are two threaded openings on the positioner. Use the opening with the red plastic insert.
4. Maintain polarity + and - respectively.
Masoneilan SVI II AP Digital Positioner Quick Start Guide =| 47© 2020 Baker Hughes Company. All rights reserved.

Wiring a Position Retransmit
CAUTION For proper operation, maintain signal polarity + and - respectively.
To connect:
1. Strip the insulation at the end of the wires. Strip approximately 1/4” (6.35 mm) of the insulation at the end of wires (wire size 14 to 28 AWG, 2.5 mm2 to .08 mm2).
2. Connect the +⁄- terminals from the 4-20 mA Out to the position retransmit input signal: + to + and - to -. See Figure 8 on page 22.
To troubleshoot retransmit connections:
Ensure that the retransmit circuit has a minimum voltage of 10 V (maximum 30 V).
Ensure the minimum AO current is 3.2 mA. If the module loses power and the AO circuit remains powered, the AO signal will be 3.2 mA.
Wiring Guidelines
Guidelines for a successful implementation of DC current signal, DC power, and HART® communication to the SVI II AP:
Compliance voltage at the SVI II AP is approximately 9 V at 20 mA, 11 V @ 4 mA. See “Determining an SVI Positioner Compliance Voltage in a Control System” on page 119.
Signal to the SVI II AP must be a regulated current in the range 3.2 to 22 mA.
Controller output circuit must be unaffected by the HART® tones which are in the frequency range between 1200 and 2200 Hz.
© 2020 Baker Hughes Company. All rights reserved.=Masoneilan SVI II AP Digital Positioner Quick Start Guide | 48

In the frequency range of the HART® tones, the controller must have a circuit impedance of more than 220 Ohms, typically 250 Ohms.
HART® tones may be imposed by the positioner and a communication device located anywhere on the signaling circuit.
Cabling must be shielded to prevent electrical noise that would interfere with the HART® tones, with the shield grounded.
Shield must be properly grounded in only one place.
For details and calculation methods for wiring resistance, and capacitance and for calculation of cable characteristics, refer to the HART® FSK Physical Layer Specification.
For split range installations the output voltage must be sufficient to operate two positioners (11 V @ 4 mA, 9 V @ 20 mA) and the expected voltage drop in the cable.
Use of a low impedance voltage source damages the SVI II AP The current source must be a true high impedance current limiting device. A proper current source explicitly enables adjustment of the current, not the voltage.
When wiring a position retransmit:
Use the same gauge wires as the 4-20 mA control loop.
Ensure that the position retransmit signal is connected to the control system’s analog input card.
Ensure the control loop is powered while making make measurements with a meter.
Masoneilan SVI II AP Digital Positioner Quick Start Guide =| 49© 2020 Baker Hughes Company. All rights reserved.

SVI II AP Setups
Control Systems using Explosion Proof or Conventional I/O Systems must have a compliance voltage greater than 9 V at 20 mA including wiring losses. See “Determining an SVI Positioner Compliance Voltage in a Control System” on page 119.
Typical Control Systems using Intrinsic Safety methods must have a compliance voltage greater than 17.64 V.
Typical system setups are shown in Figure 23 on page 53, General Purpose and Explosion Proof (EEx d) Installation Schematic and Figure 24 on page 54, Intrinsically Safe Installation Schematic. The SVI II AP digital valve positioner can be located in a general-purpose or hazardous area protected by Explosion Proof (EEx d) methods. Wiring diagrams are generalized, actual wiring must adhere to Electrical Installation section of manual and local electrical codes. The use of a Handheld Communicator or a HART® modem is not permitted in the Hazardous Area protected by Explosion Proof (EEx d) methods. In Figure 24 on page 54 the SVI II AP digital valve positioner is located in a hazardous area that is protected by Intrinsically Safe wiring practices.
The SVI II AP requires an electrical input from a 4-20 mA current source. The SVI II AP input signal can carry a HART communication protocol signal from ValVue software and a HART modem, or from a HART Hand Held Communicator. Since the process control system, the source of the input signal, is located in a non-hazardous location, setup requires an intrinsic safety barrier be placed between the process control system and the SVI II AP. If the SVI II AP is located in a hazardous area with Intrinsically Safe protection a barrier is not required for a flameproof installation. Alternatively the system can be installed as Explosion Proof ⁄ flameproof.
© 2020 Baker Hughes Company. All rights reserved.=Masoneilan SVI II AP Digital Positioner Quick Start Guide | 50

SVI II AP can communicate with a remote PC running ValVue software via a modem connected to the PC's serial or USB port. The PC, which is not intrinsically safe, must be connected to the circuit on the safe area side of the intrinsic safety barrier if the valve is located in a hazardous area.
The SVI II AP can be operated, calibrated, configured, and interrogated either by using local pushbutton and display, or by using a PC running ValVue software, HART® Handheld Communicator, or any registered HART® Host that supports DDs. The HART® Handheld Communicator is approved for Intrinsically Safe use in accordance with FM and ATEX standards. Read and observe all handheld labeling. The SVI II AP is polarity sensitive so the positive lead must be connected to the positive (+) terminal and the negative lead to the negative (-) terminal. Reversing the input will not cause damage but the unit will not function.
Grounding Practices
There must never be more than one ground point for the shield wiring. Normally ground is connected at the controller or at the intrinsic safety barrier.
The case grounding screws are located on the outside of the case at the lower right of the display cover and inside the cover. The case is isolated from all circuitry and can be grounded locally in accordance with applicable codes.
If noise or instability is present, set the positioner to MANUAL mode of operation and manually position the valve over its entire range. If the valve is stable in MANUAL mode then the problem can be noise in the control system. Recheck all wiring connections and ground points.
Masoneilan SVI II AP Digital Positioner Quick Start Guide =| 51© 2020 Baker Hughes Company. All rights reserved.

Compliance Voltage in Single Drop Current Mode
The SVI II AP requires 9.0 V at 20 mA and 11.0 V at 4 mA. Typical HART® devices require MORE Voltage at higher current and MORE current source have LESS Voltage available at higher current. The SVI II AP is noteworthy in that it requires LESS Voltage at higher current that complements the characteristic of the source requiring only 9 V at 20 mA. See “Determining an SVI Positioner Compliance Voltage in a Control System” on page 119.
Verify Wiring and Connections
NOTE For split range installations the compliance voltage must be capable of the minimum span being 5 mA; the upper range value must be 8 mA to 20 mA; the lower range values must be 4 mA to 14 mA.
Use the following procedure to ensure that the SVI II AP is properly powered:
1. Connect a DC voltmeter across the input terminals.
For an input current between 4 and 20 mA the voltage varies between 11 V and 9 V respective. See “Determining an SVI Positioner Compliance Voltage in a Control System” on page 119.
When voltage exceeds 11 V check that polarity is correct.
If voltage is less than 9 V and polarity is correct, voltage compliance of current source is inadequate.
2. Connect a milliampmeter in series with the current signal.
3. Verify that source can supply 20 mA to SVI II AP input. If 20 mA is not attainable, troubleshoot the source and set up.
© 2020 Baker Hughes Company. All rights reserved.=Masoneilan SVI II AP Digital Positioner Quick Start Guide | 52

NOTE Improperly or inadequately grounded installations can cause noise or instability in the control loop. The inter-nal electronic components are isolated from ground. Grounding the case is unnecessary for functional pur-poses but grounding the case may be necessary to conform to local codes.
Figure 23 General Purpose and Explosion Proof Installation
Hazardous Area Non-Hazardous Area
PowerSupply
220 OhmsHART® compliantcontrol systemoutput card
HART®
Modem
SVI II AP
DPI620
ValVue
Masoneilan SVI II AP Digital Positioner Quick Start Guide =| 53© 2020 Baker Hughes Company. All rights reserved.

Figure 24 Intrinsically Safe Installation
© 2020 Baker Hughes Company. All rights reserved.=Masoneilan SVI II AP Digital Positioner Quick Start Guide | 54

3. Check Out, Configuration and Calibration
Overview
This section provides the calibration procedures to ensure proper valve positioning. Operational checkout, configuration and calibration procedures are described using an SVI II AP that has a display with pushbuttons.
Perform all procedures in this section before putting the SVI II AP into operation.
NOTE
Masoneilan SVI II AP Digital Positioner Quick Start Guide =| 55© 2020 Baker Hughes Company. All rights reserved.

Check Out ProceduresSVI II AP checkout consists of physical and operational checkout procedures. The physical checkout procedures include:
“Inspecting Actuator, Linkages, or Rotary Adapter” on page 57
“Verifying Mounting and Linkage Adjustment” on page 57
“Checking the Magnet” on page 57
“Checking the Air Supply” on page 59
“Checking the Electronic Module Connections” on page 60
The SVI II AP cover must be in place and secured using all four screws during oper-ation.
CAUTION
© 2020 Baker Hughes Company. All rights reserved.=Masoneilan SVI II AP Digital Positioner Quick Start Guide | 56

Inspecting Actuator, Linkages, or Rotary Adapter
Verify that the mounting has not been damaged in shipment for a pre-mounted SVI II AP, physically inspect the actuator, linkage. Record the following information for the configuration checkout:
1. Valve Air to Open (ATO) or Air to Close (ATC)
2. Actuator pressure rating
3. Actuator bench range
4. Inherent trim characteristic of the control valve; linear, equal percentage, or other.
NOTE Refer to the valve data sheet or model number of con-trol valve.
Verifying Mounting and Linkage Adjustment
Inspect the mounting and make any needed adjustments before running the positioner and checking the digital configuration.
Checking the Magnet
There are two methods of checking the SVI II AP magnet:
Perform a visual inspection
Use ValVue to check the magnet
Performing a Visual Inspection
You must remove the positioner from the bracket to visually inspect the magnet orientation.
For rotary valves, such as a Camflex, or for actuators with rotation of less than 60°, the magnet assembly must be aligned as shown in Figure 25.
Masoneilan SVI II AP Digital Positioner Quick Start Guide =| 57© 2020 Baker Hughes Company. All rights reserved.

For rotary valves with rotations greater than 60°, the magnet assembly must be aligned as shown in Figure 26 on page 58.
NOTE For a reciprocating globe valve, it is not necessary to remove the positioner from the bracket. Details are given below.
For reciprocating valves the adjustable link turnbuckle must be parallel to the valve stem. To ensure linearity in positioning, verify that the hole in the lever aligns with the indicating hole in the bracket when the valve is in the closed position. Check that the bracket is mounted using the proper holes (refer to Table 4 on page 38).
Figure 25 Magnet Orientation for Camflex with Valve Closed
Figure 26 Magnet Orientation for 90° Valve Rotation with Valve Closed
Magnet Axiswith ValveClosed
MagnetAxiswith
Valve Closed
Clockwise to Close Clockwise to Open45¬
© 2020 Baker Hughes Company. All rights reserved.=Masoneilan SVI II AP Digital Positioner Quick Start Guide | 58

Using ValVue to Check Magnet Position
Use this procedure to check the magnet using ValVue.
1. Connect to the positioner in accordance with the ValVue instructions.
a. Ensure the positioner has been installed and set up with a HART® Modem in a HART® compliant communications loop, if required, install ValVue on the computer that is connected to the HART® modem.
b. Run ValVue.
c. Select the installed positioner from the list of connected devices.
d. Select the Raw Data tab to view the current operating conditions of the selected positioner.
2. Read Raw Position data. When the valve is:
Closed, the value should be between – 1000 and +1000 for a reciprocating valve or a 60° rotation rotary valve.
At mid-travel, the value should be between –1000 and +1000 for a greater than 60° rotation rotary valve.
Checking the Air Supply
Use this procedure to check the air supply.
1. Turn on the air supply.
2. Adjust the filter regulator. Supply pressure must be a minimum of 10 psi greater than the spring range of the actuator but may not exceed the rated actuator pressure. Refer to the valve or actuator instruction manual.
3. Inspect the tubing connections between the filter-regulator and the positioner for leaks.
4. Verify that the tubing is not bent or crushed.
5. Verify that all fittings are leak tight.
Masoneilan SVI II AP Digital Positioner Quick Start Guide =| 59© 2020 Baker Hughes Company. All rights reserved.

NOTE Do not use Teflon pipe seal tape. The Teflon tape can shred into particles that are harmful to the pneumatic components.
Checking the Electronic Module Connections
WARNING Do not remove the instrument cover or connect to an electrical circuit in a Hazardous Area unless the power is disconnected.
All connections to electronic module in the SVI II AP are made through the terminal board. The SVI II AP terminal board has a terminal block with cage clamp connectors. Confirm that all applicable connections to the electronics module connectors are correct. Not all options are available for every model. Refer to Table 6 for available functionality.
Table 6 SVI II AP Models and Functionality
Available Functionality Positioner Model Number
SVI II AP-2 SVI II AP-3
4 - 20 mA Input Setpoint
Display/ Pushbuttons Optional Optional
Remote Mount Input
Solid State Switch #1 and #2 Optional Optional
4- 20 mA Out Position Trans-mit
Optional Optional
Confirm the correctness of all applicable connections to the electronics module.
© 2020 Baker Hughes Company. All rights reserved.=Masoneilan SVI II AP Digital Positioner Quick Start Guide | 60

Figure 27 Connections to Electronics Module (via Terminal Board)
NOTE When an SVI II AP is turned on it is advisable to apply the air supply before applying the electrical input sig-nal.
NOTE The PV (Process Variable is not used for the SVI II AP. The Digital Input (DI) is activated using SMARTs Assistant, which is downloaded at https://www.geoilandgas.com/file-download-search.
Display
Remote
Process Variable
Position Retransmit
Position
Input
Configuration LockJumper
4- 20 mA Input Signal
Solid State Switch SW #1Solid State Switch SW #
Sensor
Digital Input
(not used)
(enabled using SMARTs Assistant))
Masoneilan SVI II AP Digital Positioner Quick Start Guide =| 61© 2020 Baker Hughes Company. All rights reserved.

Operational CheckoutThe operational checkout of the SVI II AP consists of:
Connecting the SVI II AP to a current source
Checking the pushbutton locks
Powering up the SVI II AP
Connecting to the Current Source
Connect to a DC mA current source then check and configure with the local display and pushbuttons, if so equipped. The following section describes configuration and calibration with the optional local display and pushbuttons. If the SVI II AP is not equipped with local display use ValVue and a PC with a HART® modem or a HART® Handheld Communicator.
NOTE When an SVI II AP is turned on it is advisable to apply the air supply before applying the electrical input sig-nal.
Powering Up the SVI II AP
WARNING This process can cause the valve to move. Before proceeding be sure the valve is isolated from the pro-cess. Keep hands clear from moving parts.
NOTE When an SVI II AP is turned on it is advisable to apply the air supply before applying the electrical input sig-nal.
© 2020 Baker Hughes Company. All rights reserved.=Masoneilan SVI II AP Digital Positioner Quick Start Guide | 62

CAUTION Use of a low impedance voltage source will damage the SVI II AP. The current source must be a true high impedance current limiting device. A proper current source explicitly enables adjustment of the current in mA, not V.
To power up the SVI II AP:
1. Loosen the four (4) cover screws and remove the cover of the SVI II AP. Connect the +⁄- terminals to the current source + to + and - to -. See Figure 27 on page 61. Reinstall the cover and display.
2. Adjust current to 12 mA. On initial power up of a newly installed SVI II AP, the positioner runs in NORMAL mode using the default instrument parameters installed at the factory. The positioner cycles through the NORMAL cycle menu and LCD displays the following values:
PRES: Pressure - unit of measurement and value*
SIGNAL
POS (Position)
An exclamation point (!) appears in the top left corner of the display window to indicate that there is further instrument status available.
3. Proceed to Configuration and Calibration.
* For firmware version 3.2.1, the supply pressure appears on the LCD. Additionally, Stops results and Autotune results, stay displayed until cleared.
NOTE If the SVI II AP is specified without local pushbuttons and display, local operation is not available. Configure and calibrate with ValVue and a HART® modem.
Masoneilan SVI II AP Digital Positioner Quick Start Guide =| 63© 2020 Baker Hughes Company. All rights reserved.

ConfigurationUse the procedures that follow to: calibrate, tune, view configuration data and status messages for the SVI II AP. Observe all warnings as the valve moves during these procedures.
WARNING These procedures can cause the valve to move. Before proceeding be sure the valve is isolated from the process. Keep hands clear from moving parts.
NOTE All calibration and configuration procedures are described using an SVI II AP with pushbuttons and display and ValVue software.
NOTE Starting with firmware version 3.2.7/5.1.3, if Autotune is unsuccessful the message TuneERR appears on the pushbutton display or when using the DD. Previ-ous firmware versions reported this as TuneFail. These messages do not mean the positioner is defec-tive but indicate a need to perform a manual tune.
© 2020 Baker Hughes Company. All rights reserved.=Masoneilan SVI II AP Digital Positioner Quick Start Guide | 64

Setting Aggressive-ness
While the SVI II AP DTM and the DD allow you to set Aggressiveness, the pushbuttons do not. In all three methods, however, the Aggressiveness value is inher-ited from any previously performed tuning (Autotune or manual). Once Aggressiveness, and other tuning val-ues are determined, they are stored in NVRAM.The SVI II AP provides a user define Aggressiveness Level for auto-tuning, the allowable range varies from -9 to +9 where 0 (Zero) is consider normal tuning. The Aggressiveness Level influences stroking speed and over-shoot. A negative value will SLOW stroking speed and help minimized over-shoot. A positive value will INCREASE stroking speed and may add some over-shoot. The recommended values for Aggressiveness is 0 for control valves without volume boosters.In applications with volume boosters and/or quick exhaust valves are used the Aggressiveness Level is not as influential. For Auto-tuning it is usually between 0 and 3. Reduce the volume boosters sensitivity by opening the integral bypass needle valve about 1 to 2 turns. Use caution when adjusting the needle valve so as to not to damage the seat, close gently to seat and then open 1 or 2 turns.
Aggressiveness Dynamic
Lower values of aggressiveness lead to lower PID val-ues and slower response and less overshoot.Higher values lead to higher PID values and quicker response and more overshoot.Once you have a preferred aggressiveness and you tune once, all future autotunes automatically use that same value, until user-changed.
Notes on Aggressiveness
Masoneilan SVI II AP Digital Positioner Quick Start Guide =| 65© 2020 Baker Hughes Company. All rights reserved.

Configuration with Pushbuttons
Prior to changing the SVI II AP configuration, check the existing configuration.
Viewing Configuration Data
To view SVI II AP configuration data:
1. Access the VIEW DATA menu from the MANUAL menu by pressing the + button.
2. In the VIEW DATA menu, press * to examine the configuration.
3. Press + to scroll through and observe the factory configuration.
4. Press + until MANPOS appears.
5. Select with *.
6. When the adjustment screen appears stroke the valve open by holding + down. The rate of set point change is slow to begin, but increases speed while the + is pressed.
7. Stroke the valve to several values.
8. Verify the action is as desired.
9. Press + to move to the SETUP menu.
10. In the SETUP menu press the * button to access the CONFIGuration menu.
11. In the CONFIG menu set the configuration parameters.
12. When in CONFIGure or CALIBrate, pressing * changes values.
13. Return to NORMAL mode. The valve moves to the value set by the current calibrator.
14. Stroke the valve through its range to verify that the movement is as desired.
© 2020 Baker Hughes Company. All rights reserved.=Masoneilan SVI II AP Digital Positioner Quick Start Guide | 66

Configuration Menu
Because calibration depends on certain configuration options you must perform Configuration before you perform Calibration when installing the SVI II AP for the first time.
If a change is made in the Air-to-Open / Air-to-Close configuration option or if you move the SVI II AP to a different valve or make any change to the valve position linkage, you must run the find STOPS calibration again.
Figure 28 CONFIGure Menu
Masoneilan SVI II AP Digital Positioner Quick Start Guide =| 67© 2020 Baker Hughes Company. All rights reserved.

Viewing Status Messages
To view SVI II AP status messages:
1. Press + and * to select VIEW ERR.
2. Observe any internal errors. For example, there should be a RESET status caused by powering up. If the positioner was powered without air a Position Error or POSERR can appear.
3. Press + to view all faults.
4. Press * to return to MANual menu.
5. Press + until CLR ERR appears.
6. Press * CLR ERR. WAIT appears for a second or two.
VIEW DATA Settings
Table 7 VIEWDATA Settings
Typical Setting Optional Setting
SINGLE DOUBLE
ATO ATC
LINEAR EQUAL 30
EQUAL 50
QUICK 50 CUSTOM CAMFXE
Q
PSI BAR KPA
0.00TS OFF
2.00TS ON
4.00SIG LO
4.00SIG LO
20.00SIG HI
12.00SIG HI
English French
© 2020 Baker Hughes Company. All rights reserved.=Masoneilan SVI II AP Digital Positioner Quick Start Guide | 68

Calibration
CAUTION Pilot Trim Valve Applications require the use of the Manual Stop calibration procedure (refer to Configura-tion and Calibration of the SVI II AP Instruction Man-ual, GEA19681). Do not run Find Stops or the ValVue Setup Wizard on valves with Pilot Trim or damage to the valve will occur.
To calibrate the SVI II AP:
1. Observe the display following power-up. The SVI II AP powers up in the previously active mode either MANUAL or NORMAL (operating) mode:
In NORMAL mode, the display alternates between POS and SIGNAL.
In MANUAL, the display alternates between POS –M and SIG.
2. With MANUAL mode displayed, press * to select the MANUAL mode.
3. Press + again; CONFIG appears. Pressing + again brings CALIB.
4. Select CALIB by pressing *. STOPS appears. The valve moves full open and back to full closed. Observe all warnings.
5. Press * to cause the valve to stroke and to automatically calibrate valve travel.
6. After the STOPS procedure finishes, press + twice until TUNE appears.
Masoneilan SVI II AP Digital Positioner Quick Start Guide =| 69© 2020 Baker Hughes Company. All rights reserved.

Calibration Menu
The Calibration menu shown in Figure 29 provides access to all the calibration functions for the SVI II AP. If a change is made in the Air-To-Open/Air-To-Close configuration option or if you move the SVI II AP to a different valve or make any change to the valve position linkage, you must run the find STOPS calibration again.
Figure 29 CALIBration Menu
© 2020 Baker Hughes Company. All rights reserved.=Masoneilan SVI II AP Digital Positioner Quick Start Guide | 70

Auto Tune
This process takes 3 to 10 minutes and strokes the valve in large and small steps to set the PID parameters for best positioning response.
WARNING DO NOT perform STOPS while the valve is controlling the process. DO NOT perform Auto Tune while the valve is con-trolling the process.
To auto tune the SVI II AP:
1. Press *to begin the autoTUNE procedure. As autoTUNE proceeds, numerical messages display, indicating the procedure is working.
2. When autoTUNE is complete, TUNE appears.
3. Press + repeatedly until SETUP appears.
4. Press * to return to SETUP menu;CALIB appears.
Masoneilan SVI II AP Digital Positioner Quick Start Guide =| 71© 2020 Baker Hughes Company. All rights reserved.

Figure 30 NORMAL Operation and MANUAL Menu Structures
Normal CyclingMenu Normal Manual View
Data View ERR CLR ERR
Manual ModeCycling Menu
ViewDataMenu
ViewErrorsMenu
InstantAction
Normal Manual ViewData View ERR CLR ERR
Manual
Setup MAN POS
<value>
<value>
* - +
Config
Config Calib
*
+ + +
+ + + + + +
+
*
*
**
** ** **
any key
++
++++
****
*
Calib
MenuMenu
Pressing any key while in Normal cycling moves to Normal Mode
© 2020 Baker Hughes Company. All rights reserved.=Masoneilan SVI II AP Digital Positioner Quick Start Guide | 72

Check-out with a HART® Handheld Communicator
If the SVI II AP is not equipped with optional push buttons and local display the checkout and configuration is performed using the standard HART® communications interface.
Connect the HART® handheld communicator to the SVI II AP as shown in Figure 31. Refer to the product manual for the HART® communicator in use.
Figure 31 SVI II AP HART® Communicator Connections
+ -
12.00 mAConfigurationLock Jumper
Input Signal
DPI620
Masoneilan SVI II AP Digital Positioner Quick Start Guide =| 73© 2020 Baker Hughes Company. All rights reserved.

Be sure that the configuration lock jumper is in the unlock position. When the jumper is in the lock position (shorting the two-pin header) the handheld is not permitted to make any changes. However, parameters are readable. If fault messages appear, they must be handled before proceeding with HART® communications. Before communications proceeds all error messages must be cleared. For example, the following message is displayed if the instrument has been serviced and the air is not connected.
Process applied to the non-primary variable is outside the operating limits of the field device
© 2020 Baker Hughes Company. All rights reserved.=Masoneilan SVI II AP Digital Positioner Quick Start Guide | 74

Proceed with the following steps:
1. Press NEXT.
2. Field device has more status available
3. Press NEXT
4. Ignore next 50 occurrences of status?
5. Press YES
6. Change to MANual mode
7. Scroll to line 6 EXAMINE, press ->8. Scroll down to 5 read status.
9. Read message.
10. Press OK.
11. Repeat OK to read all messages until the display returns to read status.
12. Scroll down to 6 clear status, press ->13. If clear fault codes not completed appears, press OK and
read the message (Position Error, for example) or go to the troubleshooting guide.
14. Correct the problem (Is the air supply on?), and then go to clear status until Clear Fault codes Completed appears.
15. Press OK.
Masoneilan SVI II AP Digital Positioner Quick Start Guide =| 75© 2020 Baker Hughes Company. All rights reserved.

This page intentionally left blank.

4. Maintenance
SVI II AP MaintenanceThe SVI II AP was designed based on a modular concept. All components are interchangeable allowing for easy, quick component swapping.
The only maintenance procedures recommended for the SVI II AP are:
Remove and install the cover
Remove and install the I/P module
Remove and install the pneumatic relay
Upgrade to display cover
Do not remove the instrument cover or connect to an electrical circuit in a Hazard-ous Area unless the power is discon-nected.
If natural gas is supplied, natural gas may escape from the SVI II AP on removal of the cover or components.
WARNING
Masoneilan SVI II AP Digital Positioner Quick Start Guide =| 77© 2020 Baker Hughes Company. All rights reserved.

Repair
Replacement of the Pneumatic Relay, I/P and cover (with or without display) are the only field repairs permitted.
Only qualified service personnel are permitted to make repairs.
Only factory-supplied parts are permitted. This includes not only the major assemblies but also mounting screws and O-rings. No substitutions with non-Masoneilan parts are permitted.
Detailed replacement procedures are described in the Instruction Manual. The following summary assures the integrity of the SVI II AP.
Tools Needed for Cover Replacement5 mm hex key for the cover
3 mm hex key for the lanyard
Display Cover Removal and Installation
The cover with display (shown in Figure 32) is an option for the SVI II AP. If you have an SVI II AP with a solid cover and would like to upgrade to a display cover, follow the instructions below for removal and installation.
© 2020 Baker Hughes Company. All rights reserved.=Masoneilan SVI II AP Digital Positioner Quick Start Guide | 78

Removing the SVI II AP Display Cover
To remove the SVI II AP display cover:
1. Using a 5 mm Hex key unscrew the four screws around the perimeter of the SVI II AP cover.
2. Lift the cover off the positioner.
Figure 32 SVI II AP Pneumatic and Display Covers
PneumaticCover
CoverDisplay
Masoneilan SVI II AP Digital Positioner Quick Start Guide =| 79© 2020 Baker Hughes Company. All rights reserved.

Installing the SVI II AP Display Cover
NOTE After replacing the SVI II AP display cover you must power up the unit (see “Powering Up the SVI II AP” on page 62).
The replacement display cover is shipped with a lanyard to prevent the cable (that connects from the display to the terminal board) from breaking. The lanyard must be inserted under the screw in the lower left corner that attaches the terminal board to the SVI II AP housing.
To install the cover:
1. Install the lanyard and tighten the screw to 5 in/lb.
2. Using the 3 mm hex key, remove the screw from the lower left corner, connecting the terminal board to the SVI II AP housing.
3. Connect the cable from the display into the LCD connector on the terminal board.
4. Ensure that the gasket is in its groove in the housing.
5. Place the cover over the screw mounts.
6. Tighten the four screws with the 5 mm hex key.
7. After installing the new display, power up the unit (refer to “Powering Up the SVI II AP” on page 62 for further information).
NOTE The cover of the SVI II AP is a critical component for safety in Hazardous Areas. To ensure safe operation the flat surfaces of the cover and the housing must be clean and absolutely free of particles or dents. There must be no gap between the housing and cover; torque spec is 55 in/lb.
© 2020 Baker Hughes Company. All rights reserved.=Masoneilan SVI II AP Digital Positioner Quick Start Guide | 80

Ensure that:
1. The gasket is seated in the groove in the housing flange.
2. No wires or retaining cable can be trapped under the cover flange.
3. The flange area is not corroded and the surface is not scarred.
4. The four cover bolts are securely tightened to 55 in/lb.
Masoneilan SVI II AP Digital Positioner Quick Start Guide =| 81© 2020 Baker Hughes Company. All rights reserved.

This page intentionally left blank.

A: Specifications and References
Physical and Operational SpecificationsThis section provides the physical and operational specifications for the SVI II AP.
Specifications are subject to change without notice.
Table 8 Environmental Specifications
Operating Temperature Limits -58° F to 185° F (-50° C to 85° C)
Storage Temperature Limits -58° F to 200° F (-50° C to 93° C)
Temperature Effect < 0.005% / °F typical; -40° F to 180° F (< 0.01% / °C typical; -40° C to 82° C)
Supply Pressure Effect 0.05% per psi (.73% per bar)
Relative Humidity 10 to 90% non-condensing
Humidity Effect Less than 0.2% after 2 days at 104 °F (40° C), 95% Relative Humid-ity.
Insulation Resistance Greater than 10 G Ohms at 50% RH.
MTBF 49 years based on MIL handbook calculation for electronic parts and field data on mechanical parts
Electromagnetic Compatibility Electrostatic
Electrostatic discharge — No effect with contact discharge level of 4KV and air discharge level of 8 kV (IEC 1000-4-2)Radio frequency interference — Less than 0.2% at 10 V per meter (EN 50140)
Fast Transient Burst No effect at 2 kV (Coupling clamp IEC 1000-4-4).
Vibration InfluenceMeasured at SVI II AP Housing
4 mm at 5 - 15 Hz - Negligible2 G at 15 - 150 Hz Less than 2 % of span1 G at 150 - 2000 Hz - Less than 2% of span
Magnetic Field Influence Negligible at 30 A/m (EN61000-4-8)CE MARK certified to EN50081-2 and EN50082-2
Masoneilan SVI II AP Digital Positioner Quick Start Guide =| 83© 2020 Baker Hughes Company. All rights reserved.

Table 9 Operational Specifications
Accuracy +/- 0.5% (typical +/-0. 10% or less) Full Span
Hysteresis and Deadband +/- 0.3% Full Span
Repeatability +/- 0.3% Full Span
Conformity +/- 0.5% Full Span
Start-Up Drift Less than 0.02% in first hour
Long Term Drift Less than 0.003% per month
Position Travel Limits Rotary: 18 - 140° Reciprocating: 0.25” - 2.5“ (6 mm - 64 mm)
Note: Above 2.5” (64 mm) consult factory for mounting instructions.
Flow CharacteristicsApplied in addition to the control valve’s inherent characteristic.
Linear Equal Percentage (of 50:1 or 30:1) CamflexQuick Opening (inverse of 50:1 equal percentage)User ConfigurableTight Shut Off (0 -20% of input)
Auto TuneSVI II AP performs automatic determination of the optimal valve positioner control parameters. In addi-tion to P, I, D, the position algorithm uses damping, symmetry for exhaust and fill time constants, dead zone and magnitude characterization parameters. Auto Tune is optimized for 5% step changes with neg-ligible overshoot. After the Auto Tune process is com-pleted, the user can further adjust the positioner tuning parameters to more conservative or to more responsive values.
Proportional gain: 0 to 5, displayed as 0 to 5000Integral time: 0 to 100 seconds - displayed as 0 to 1000 (1/10s)Derivative time: 0 to 200 millisecondsDead Zone: 0 to +/-5% (0 to 10% deadband)Padj: +/- 3000 (depends on P)Beta (non-linear gain factor): -9 to +9Stroking Time: 0 to 250 secondsPosition compensation coefficient: 1 to 20Boost: 0 to 20
Full open position adjustment 60 to 100% of actual stop
Start Up Time (from no power) Less than 200 ms
Minimum current to maintain HART® 3.0 mA
HART® Command #3 Mapping HART® 4-20 mA input signalPV = Valve Position, 0-100%SV = Actuator Pressure (P1-P2) (N/A for standard diagnostic version; units sends zero)TV = Supply PressureQV = P2 for double acting units (N/A for standard diagnostic version; units sends zero)
© 2020 Baker Hughes Company. All rights reserved.=Masoneilan SVI II AP Digital Positioner Quick Start Guide | 84

Table 10 Input Signal, Power, and Display Specifications
Power Supply Loop powered from 4-20 mA control signal
Compliance Voltage Rating 9.0 V at 20 mA, 11.0 V at 4.0 mA
Minimum Current Signal to Start Up 3.2 mA
Impedance Range Low: 450 Ohms; High: 2750 Ohms
Minimum Input Span for Split Range Operation 5 mA
Upper Range Value for Split Range Operation 8 mA to 20 mA
Lower Range Value for Split Range Operation 4 mA to 14 mA
Wire Size 14/28 AWG
Strip Length 0.22 in / 6 mm
Digital Communication HART® Communication protocol revision 5, 6 or 7
Local Display LCD, Explosion proof with two lines of nine alpha numeric characters.Display becomes unreadable between 0 °C and -10 °C. Display is shutdown at -15 °C.
Push Buttons External, Three Explosion Proof / Flameproof push but-tons
Table 11 Construction Material Specifications
Housing and Cover Aluminum ASTM B85 SG100A standardStainless Steel optional
Weight Standard Flow Model:Aluminum - 7.4 lbs./ 3.3 kgStainless Steel - 16 lbs/ 7.3 kg
High Flow Model:With Display: 9.4 lbs./ 4.2 kgWithout Display: 8.9 lbs./ 4.0 kg
Relay and Manifold Standard Flow Model:Single Acting - PPS, 300 Series Stainless Steel, nitrile diaphragmsDouble Acting - 300 Series Stainless Steel, Ryton; Aluminum 6061 T6, Ryton
High Flow Model: 300 Series Stainless Steel, Ryton; Aluminum 6061 T6, Ryton
I/P Motor 430 stainless steel, PPS, 300 series stainless steel
Mounting Bracket 300 series stainless steel
Magnet Holder Corrosion Protected Anodized Aluminum 6061 T6
Masoneilan SVI II AP Digital Positioner Quick Start Guide =| 85© 2020 Baker Hughes Company. All rights reserved.

Pole Ring 416 stainless steel
Levers 300 Series stainless steel
Table 13 Pneumatics Single Acting Standard Flow
Air Supply Dry, oil-free, 5 micron filtered air (per ISA S7.3)
Action Direct Acting
Supply Pressure 20-100 psi max. (1.4 to 6.9 bar)Regulate 5 to 10 psi above actuator spring range. Do not exceed actuator rating.
Air Delivery - Single Acting Relay 10.0 scf/min. (283 L/min) at 30 psi (2.1 bar) supply16.6 scf/min. (470 L/min) at 60 psi (4.2 bar) supply23.3 scf/min. (660 L/min) at 90 psi (6.3 bar) supply
Air Capacity(flow coefficient)
Loading CV = 0.57Venting CV = 0.53
Air Consumption 0.2 scf/min. (5.7 L/min) at 30 psi (2.1 bar) supply0.26 scf/min. (7.4 L/min) at 45 psi (3.1 bar) supply
Air Supply Failure Single Acting RelayOn supply failure the actuator output fails to atmosphere. Some overshoot may occur when air pressure returns after a period without air supply pressure. Always set con-trol set point to 0%, and put the process control system in manual, for smooth recovery from air supply failure.
Loss of Input Signal Actuator Output fails to atmosphere
Output Pressure 0-150 psi (10.3 bar) max.
Table 12 System Connectivity
HART® Physical Device Type Actuator Device Type:Rev 1: HART®5: CA (202); HART®6: 65CE (206), HART®7: 65EE (238)Rev 2: HART®5: CA (202)
DD Registered with HART® Commu-nication Foundation
Yes
Integration with HART® Host soft-ware
ValVue AMS SNAP-ON application available, Plug-In Application For Yokogawa® PRM, ValVue For Honeywell® FDM, Device Type Manager (DTM) for FDT Host
Diagnostics Standard: Alarms, cycle counter, travel accumulator, time open, time close, time near close, Step Test, Positioner TestAdvanced:Includes Standard Diagnostics and the following: Low Air Supply alarm, Valve Signature (Friction, spring range, seat profile)
Table 11 Construction Material Specifications
© 2020 Baker Hughes Company. All rights reserved.=Masoneilan SVI II AP Digital Positioner Quick Start Guide | 86

Table 14 High Flow Pneumatics Single Acting High Flow
Air Supply Dry, oil-free, 5 micron filtered air (See ISA S7.3)
Action Direct Acting
Supply Pressure 20 -100 psi max. (1.4 - 6.9 bar)Regulate 5 - 10 psi (.345 bar - .69 bar) above actuator spring range. Do not exceed actuator rating.
Air Delivery - Single Acting Relay 39.0 scf/min. (1104 L/min) at 30 psi (2.1 bar) sup-ply70.6 scf/min. (2000 L/min) at 60 psi (4.2 bar) sup-ply102.0 scf/min. (2888 L/min) at 90 psi (6.3 bar) sup-ply
Air Capacity(flow coefficient)
Loading CV = 2.2Venting CV = 2.8
Air Consumption 0.28 scf/min. (8.0 L/min) at 30 psi (2.1 bar) supply0.35 scf/min. (10.5 L/min) at 45 psi (3.1bar) supply
Air Supply Failure Single Acting RelayOn supply failure the actuator output drops. Some over-shoot may occur when air pressure returns after a period without air supply pressure. Always set control set point to 0%, and put the process control system in manual, for smooth recovery from air supply failure.
Loss of Input Signal Output drops to low pressure.
Output Pressure 0-150 psi (10 bar) max
Masoneilan SVI II AP Digital Positioner Quick Start Guide =| 87© 2020 Baker Hughes Company. All rights reserved.

Table 15 Pneumatics Double Acting Standard Flow
Air Supply Dry, oil-free, 5 micron filtered air see ISA S7.3
Action Output 1 increases with increasing signalOutput 2 decreases with increasing signal
Supply Pressure for Double Acting
25 - 150 psi max. (1.73 to 10.3 bar)Do not exceed actuator rating.
Air Delivery for Double Acting
7.2 scf/min. (204 L/min) at 30 psi (2.1 bar) supply12.8 scf/min. (362 L/min) at 60 psi (4.2 bar) supply18.3 scf/min. (518 L/min) at 90 psi (6.3 bar) supply23.8 scf/min. (674 L/min) at 120 psi (8.3 bar) supply
Air Capacity(flow coefficient)
Loading CV = 0.39Venting CV = 0.33
Air Consumption for Double Acting
0.4 scf/min. (11.3 L/min) at 30 psi (2.1 bar) supply0.85 scf/min. (24.1 L/min) at 80 psi (5.52 bar) supply
Air Supply Failure Positioner cannot control the failure position of an actuator without a spring. The actu-ator can, under different conditions, fail in place, fail open, or fail close. In cases where the valve must fail to a required position additional accessories are required.Some overshoot can occur when air pressure returns after a period without air supply pressure. Always set control set point to 0%, and put the process control system in manual, for smooth recovery from air supply failure.
Loss of Input Signal Output 1 fails to atmosphereOutput 2 fails to supply pressure.
© 2020 Baker Hughes Company. All rights reserved.=Masoneilan SVI II AP Digital Positioner Quick Start Guide | 88

Figure 33 SVI II AP Model Numbering
Series Identification SVI II AP-abcdefgh
a Style 1,2,31. ES Version - Easy Smart2. SD Version - Standard Diagnostics3. AD Version - Advanced Diagnostics
b Pneumatic Train 1,21. Single Acting2. Double Acting
c Pneumatics1. Standard flow
d Display 1,2,3,41. No Display and Pushbuttons2. With Display and Pushbuttons3. No Display and Pushbuttons, Marine4. With Display and Pushbuttons, Marine
e Hardware Version 33.
f Communications 11. 4 to 20 mA - HART® Communications
g Option Board 1,2
1. None2. Position Retransmit
h Agency Approvals 1,41. ATEX/FM/CSA/Intrinsic Safety & Exprf4. ATEX (IS, NI)
Approved Configuration Codes
SVI2 AP- 123
12
12
1234
3 1 12
1
and Limit Switches
2. High Flow
4
Masoneilan SVI II AP Digital Positioner Quick Start Guide =| 89© 2020 Baker Hughes Company. All rights reserved.

Hazardous Location InstallationThe following pages provide the agency approved installation procedure for hazardous locations.
NOTE The installation procedure is accurate at time of print. For further hazardous installation information please consult the factory.
© 2020 Baker Hughes Company. All rights reserved.=Masoneilan SVI II AP Digital Positioner Quick Start Guide | 90

ES-699 Rev AE Page 1 of 13
GE Oil & Gas
ES-699
SPECIAL INSTRUCTIONS FOR INSTALLING MASONEILAN
SVI-II AP IN AREAS WHERE THERE IS A POTENTIAL FOR EXPLOSIVE GAS ATMOSPHERE OR INFLAMMABLE DUST
1 INTRODUCTION
This manual covers the requirements for safe installation, repair, and operation of the SVI-II AP as it relates to operation in areas where there is a potential for explosive atmosphere or inflammable dust. Adherence to these requirements assures that the SVI-II AP will not cause ignition of the surrounding atmosphere. Hazards related to control of the process are beyond the scope of this manual. For mounting instructions on specific valves refer to the mounting instructions supplied with the mounting kit. Mounting does not affect the suitability of the SVI-II AP for use in a potentially hazardous environment. The SVI-II AP is manufactured by: Dresser LLC. 12970 Normandy Blvd Jacksonville FL 32221 USA
2 GENERAL REQUIREMENTS
Installation and maintenance must be performed only by qualified personnel. Area Classification, Protection Type, Temperature Class, Gas Group, and Ingress protection must conform to the data indicated on the label. Wiring and conduit must conform to all local and national codes governing the installation. Wiring must be rated for at least 5ºC above the highest expected ambient temperature.
!WARNING! Failure to adhere to the requirements listed in this manual may cause loss of life and property.
g
Masoneilan SVI II AP Digital Positioner Quick Start Guide =| 91© 2020 Baker Hughes Company. All rights reserved.

ES-699 Rev AE Page 2 of 13
Approved wire seals against ingress of water and dust are required and the NPT fittings must be sealed with tape or thread sealant in order to meet the highest level of ingress protection. Where the protection type depends on wiring glands, the glands must be certified for the type of protection required. The metal housing is a die-casting alloy which is predominately aluminum. Before powering the SVI-II AP:
1. Verify that the pneumatic and electronic cover screws are tightened. This is important to maintain the ingress protection level and the integrity of the flameproof enclosure.
2. If the Installation is Intrinsically Safe, then check that the proper barriers are installed and the field wiring meets local and national codes for an IS installation. Never install a device, which was previously installed without an intrinsically safe barrier, in an intrinsically safe system.
3. Under normal operation, compressed supply gas is vented from the SVI II AP to the surrounding area, and may require additional precautions or specialized installations.
4. If the Installation is Non-Incendive, then check that all the electrical connections are made to approved devices and wiring meets local and national codes.
5. Verify that the markings on the label are consistent with the application. 6. Verify that the air supply pressure cannot exceed the marking on the
respective label.
© 2020 Baker Hughes Company. All rights reserved.=Masoneilan SVI II AP Digital Positioner Quick Start Guide | 92

ES-699 Rev AE Page 3 of 13
3 MODEL NUMBER DESCRIPTION OF SVI-II AP “SVI2-abcdefgh” (Not all combinations are available)
SVI2- a b c d e f g h
0 Generic ( National Labeling as Required)
1 Single Acting Standard Flow No Display No Buttons Industrial
Hart 4 to 20 MADC None
FM, CSA,ATEX, IEC, Regional (4) (XP, DIP, IS, NI)
2 SD - Standard Diagnostics
Remote Sensing Double Acting High Capacity
Display Buttons
Industrial (1)
Retransmit and Digital
Out (2)
3 AD - Advanced
Diagnostics Remote Sensing
No Display No Buttons
Offshore
Plug-in Electronics
Module Retransmit
(3) FM, CSA ATEX (IS,
NI)
4 OD - On-Line Diagnostics
Remote Sensing
Display Buttons
Offshore (1)
5 PC - Process
Controller Remote Sensing
6 FM, CSA,ATEX,IEC
(XP, DIP, IS, NI) Nuclear
Style Pneumatics Capacity Display Electronics Communication Option Hazardous Certification
(1) The SVI-II AP may be up-graded in the field by the addition of a display and buttons. (2) Not available on SVI2-abcdefg0 (3) Retransmit without digital output is available only on SVI2-abcdefg0 (4) Regional certifications include: CU-TR, Nepsi, CCOE, Inmetro, Kosha, IA
4 FLAMEPROOF and DUST IGNITION PROOF REQUIREMENTS 4.1 General
The 1/2-inch NPT fittings must enter the housing at least five full turns. If replacing any NPT blanking element that was installed with the unit as shipped, or when plugging any unused ports, replace with a blanking element suitably certified for the hazardous area installation. The cover flange must be clean and free of corrosion products.
4.2 Cable Glands
Certified cable glands are required based on the hazardous area the device is installed in. That is, the particular cable gland used must have the same certification as the tick-box checked off on the label (see Section 6).
4.3 Bolting
“X” Marking on label - M8 X 1.25-6g cover screws must be supplied by Masoneilan. No substitution allowed. Minimum yield stress to be 296 N/mm^2 (43,000 psi)
4.4 Carbon Disulphide Exclusion
Masoneilan SVI II AP Digital Positioner Quick Start Guide =| 93© 2020 Baker Hughes Company. All rights reserved.

ES-699 Rev AE Page 4 of 13
Carbon Disulphide is excluded. (IEC 60079-1, Clause 15.4.3.2.2., carbon disulphide is excluded for enclosures with a volume greater than 100cm3)
4.5 Electrostatic Discharge
"X" Marking on label - Potential Electrostatic Charge Hazard – For safe operation use only wet cloth when cleaning or wiping device, and only when local conditions around the device are free of potentially explosive atmospheres. Do not use dry cloth. Do not use solvent.
4.6 Dust
"X" Marking on label - Instruments installed in dusty hazardous areas, Zones 20, 21 and 22; must be cleaned regularly to prevent the buildup of dust layers on any surface. To avoid the risk from electrostatic discharge, you must follow the guidance as detailed in EN TR50404. For safe operation, use only wet cloth when cleaning or wiping the device. Cleaning must only be done when local conditions around the device are free of potentially explosive atmospheres. Do not use dry cloth or any solvents.
5 INTRINSICALLY SAFE REQUIREMENTS 5.1 Div 2
WARNING: EXPLOSION HAZARD – DO NOT DISCONNECT EQUIPMENT UNLESS POWER HAS BEEN SWITCHED OFF OR THE AREA IS KNOW TO BE NON-HAZARDOUS.
5.2 Category II 1 (Zone 0)
For operation in hazardous area category II 1, over-voltage protection of the electrical connections need to be installed according to EN 60079-14 For operation in hazardous area category II 1 the ambient temperature needs to be lowered according to the requirements of EN 1127-1 (reduction factor of 80%). The max. allowed ambient temperature for category 1 inclusive the requirement of EN1127-1 is: T6 : Ta = -40°C to +43°C T5 : Ta = -40°C to +55°C T4 : Ta = -40°C to +83°C
5.3 Category II 1 (Zone 0)
“X” Marking on label - Since the SVI2-abcdefgh (“SVI-II AP”) contains greater than 10% aluminum; care must be taken during installation to avoid impacts or friction that could create an ignition source.
5.4 Category II 3 (Zone 2)
© 2020 Baker Hughes Company. All rights reserved.=Masoneilan SVI II AP Digital Positioner Quick Start Guide | 94

ES-699 Rev AE Page 5 of 13
When installing in Category 3 (Zone 2) areas using ‘ic’ protection, ‘ic’ safety barriers are required.
6 DESCRIPTION OF FLAMEPROOF AND INTRINSICALLY SAFE MARKINGS
Applicable Model Numbers: SVI2-abcdefgh, where “a” thru “h” can take on the following values: a = 2,3,4,5 ; b = 1,2 ; c = 1,2 ; d = 1,2,3,4 ; e = 3 ; f = 1 ; g = 1,2,3 ; h = 1,6
The label may not appear exactly as shown, but must contain the following information listed below. Other information is allowed on the label.
IECEx FMG 07.0007X
Ex ia I IC T6..T4 Ga
II 1G Ex ia II C T6...T4 GaII 1D Ex ia II IC T96°C DaII 2G Ex db m b IIC T6...T4 Gb II 2D Ex tb I II C T96°C Db
Ex db mb II C T6..T4 GbEx tb II IC T96Ta=-40
FM17ATEX0072X
01
153
174
1 R
ev
N
DO NOT OP EN EVEN WHEN ISOLA TED WHE N EX PLOSIVE ATMOSP HERES AR E PRE SENT.IN GROUP A XP INSTA LLATI ONS, C ONDUIT SEA L RE QUIR ED WITHI N 18 INCHES OF ENCLOSUR E ENTR ANCE. (FM)PER MA NENTLY MA RK THE PROTEC TION TYPE C HOSE N. ONCE T HE TYPE IS MAR KED , IT C ANNOT BE CHA NGED.SUBS TITUTION OF C OMPONENTS MAY IMPA IR INTRINS IC SA FETYSUPP LY CONNEC TION W IR ING RATE D 5ºC A BOVE MA XIMUM AMB IENT TEM PERA TUREAM BIENT TE MPER ATUR E: -40° C to +85 ºC30 V, 4-20 m A, 10 .3 BA R (15 0 PSI )
NE PA S OUVR IR (MEM E SI HORS TENSION) SI UNE AT MOSPHER E EXP LOSIVE P EUT ETRE PRES ENTE.MA RQUER DE M ANIER E PER MA NE NTE LE MODE DE PR OTECTION UTILISE . UNE FOIS LE M AR QUA GE EFFE CTUE, IL NE PE UT E TRE M ODIFI E.LA SUB STITUTION DE COM POSA NTS PEUT C OM PROM ETTRE LA SEC URITE INTR INSEQUETEM PERA TURE A DMISSIB LE DU CA BLE DOIT ETR E 5° C AU -DESSUS DE LA TEMP ERA TURE A MBI ANTE MA XI .
: -40 ° C to +85 ºC
SVI™ II AP
R 2.00 [0.078]
54.00 [2.126]
40.00 [1.575]
Dresser LLC. (Not to be used in Ketone atmospheres)12970 Normandy Blvd. Jacksonville FL 32221 USA
II 3G Ex ic I IC T6...T4 GcII 3D Ex tc II IC T96°C Dc
FM17ATEX0093X
Masoneilan SVI II AP Digital Positioner Quick Start Guide =| 95© 2020 Baker Hughes Company. All rights reserved.

ES-699 Rev AE Page 6 of 13
6.1 Manufacturers Name and Location Dresser LLC.12970 Normandy Blvd. Jacksonville FL 32221 USA 6.2 Summary of Agency Markings
(Factory Mutual)
{Certifying Agency} IN GROUP A XP INSTALLATIONS CONDUIT SEAL REQUIRED WITHIN 18 INCHES OF ENCLOSURE IS – CL I/II/III; DIV 1; GP A, B, C, D, E, F, G {Intrinsically Safe} XP – CL I; DIV 1; GP A, B, C, D {Explosionproof} NI – CL I; DIV 2; GP A, B, C, D {Non-Incendive} DIP – CL II/III; DIV 1; GP E, F, G {Dust Ignition proof} S – CL II/III; DIV 2; GP F, G {Special Protection}
{Certifying Agency} CL I; DIV 1; GP B, C, D {Explosionproof, gas} CL II; DIV 1; GP E, F, G {Explosionproof, dust} CL III, DIV 1 {Explosionproof, fiber} IS – CL I; DIV 1; GP A, B, C, D {Intrinsically Safe, gas} IS – CL II; DIV 1; GP E, F, G {Intrinsically Safe, dust} IS – CL III; DIV 1 {Intrinsically Safe, fiber} (ATEX)
{Explosion Protected Mark}
{CE Conformity Marking, QAN Notified Body Number}
FM17ATEX0072X {Certificate Number} II 1G Ex ia IIC T6..T4 Ga {Intrinsically Safe, gas} II 1D Ex ia IIIC T96°C Da {Intrinsically Safe, dust} II 2G Ex db mb IIC T6..T4 Gb {Flameproof/Encapsulation, gas} II 2D Ex tb IIIC T96°C Db {Protection by Enclosure, dust} FM17ATEX0093X {Certificate Number} II 3G Ex ic IIC T6..T4 Gc {Intrinsically Safe, gas} II 3D Ex tc IIIC T96°C Dc {Protection by Enclosure, dust}
© 2020 Baker Hughes Company. All rights reserved.=Masoneilan SVI II AP Digital Positioner Quick Start Guide | 96

ES-699 Rev AE Page 7 of 13
(IEC) IECEx FMG 07.0007X {Certificate Number} Ex ia IIC T6..T4 Ga {Intrinsically Safe} Ex db mb IIC T6..T4 Gb; {Explosion proof, gas} Ex tb IIIC T96°C Db {Protection by enclosure, dust} Ta=-40°C to +85°C {Operating Temperature} IP66 {Ingress Protection}
6.3 Operating Ranges 6.3.1 Temp: -40°C to +85°C
6.3.2 Voltage: 30 Volts
6.3.3 Pressure: 150 psig (1.03MPa)
6.3.4 Current: 4-20mA
6.4 Enclosure Type
Type 4X-IP66 6.5 Temperature Code
T6 Ta=60°C, T5 Ta=75°C, T4 Ta=85°C 6.6 Notes Related to Explosionproof Rating
DO NOT OPEN EVEN WHEN ISOLATED WHEN EXPLOSIVE ATMOSPHERES ARE PRESENT
6.7 Notes Related to Intrinsic Safety
1) REFER TO ES-699 FOR ADDITIONAL CAUTIONS OR WARNINGS 2) Supply Connection Wiring Rated for 5ºC above Max Ambient 3) PERMANENTLY MARK THE PROTECTION TYPE CHOSEN. ONCE THE TYPE HAS BEEN MARKED, IT CAN NOT BE CHANGED
6.8 Model Code:
SVI2-abcdefgh (see section 3 above for explanation)
6.9 Serial Number: SN-nnyywwnnnn
Masoneilan SVI II AP Digital Positioner Quick Start Guide =| 97© 2020 Baker Hughes Company. All rights reserved.

ES-699 Rev AE Page 8 of 13
7 *Intrinsically Safe Installation Wiring Requirements Each intrinsically safe cable must include a grounded shield or be run in a separate metal conduit.
TRANSMITTER
+
-
NON-HAZARDOUS LOCATION - UNSPECIFIED EXCEPTTHAT BARRIERS MUST NOT BE SUPPLIED FROM NORCONTAIN UNDER NORMAL OR ABNORMAL CONDITIONSA SOURCE OF POTENTIAL WITH RESPECT TO EARTH INEXCESS OF 250 VOLTS RMS OR 250 VOLTS DC
HAZARDOUS LOCATIONSEE 8.1, 8.2
1
24
3250Ω
+
-
123
REM
SVI-IIRemoteMount
SVI-II AP 4-20 mAIN
-
4-20 mAOUT
SW PV1-5 VDC
OPTIONAL HANDHELD
COMMUNICATOR(SEE NOTE 8.9)
1
24
3
1
24
3
1
24
3
1
24
3
Transmitter Barrier Type withinteranl of external SenseResistor (SEE NOTE 8.4)
24 VDC fromControl System
1 to 5 Volts POSTIONFEEDBACK to ControlSystem
4-20 mA SETPOINT fromControl System
OPTIONAL HANDHELD
COMMUNICATOR
OptionalSolendoid
SEE NOTE 8.6
+
+-
-
SHUNT ZENER DIODE SAFETYBARRIER Transmitter Type with
Internal or External Sensing Resistor(SEE NOTE 8.5)
SHUNT ZENER DIODESAFETY BARRIER (SEE
NOTE 8.6)
SHUNT ZENER DIODE SAFETYBARRIER Controller Output Type
(SEE NOTE 8.3 and 8.5)
24 VDC fromControl System
1 to 5 Volts to ControlSystem
24 VDC fromControl System
DI to ControlSystem
Optional Intrinsically Safe ProcessVariable Transmitter
LOAD
The Optional 4-20mA PositionOutput from the SVI-II AP must notbe connected in an Intrinsically SafeInstallation which requires FM orCSA approval (SEE NOTE 8.4)
Optional 1-5 VoltProcess VariableInput to SVI-II AP
250Ω
Equi-Potential
SEE NOTE 8.6
*Applies to ‘ia’ and ‘ic’
© 2020 Baker Hughes Company. All rights reserved.=Masoneilan SVI II AP Digital Positioner Quick Start Guide | 98

ES-699 Rev AE Page 9 of 13
8 Notes for Intrinsically Safe Installation and Division 2 8.1 HAZARDOUS LOCATION
Refer to the device label for the description of the environment in which the device may be installed.
8.2 FIELD WIRING Intrinsically Safe wiring must be made with grounded shielded cable or installed in grounded metal conduit. The electrical circuit in the hazardous area must be capable of withstanding an A.C. test voltage of 500 volts R.M.S. to earth or frame of the apparatus for 1 minute. Installation must be in accordance with Masoneilan guidelines. The installation including the barrier earthing requirements must comply with the installation requirements of the country of use. Factory Mutual requirements (USA): ANSI/ISA RP12.6 (Installation of Intrinsically Safe Systems for Hazardous (Classified) Locations) and the National Electrical Code, ANSI/NFPA 70. Division 2 installations must be installed per the National Electrical Code, ANSI/NFPA 70. See also, note 4. CSA requirements (Canada): Canadian Electrical Code Part 1. Division 2 installations must be installed per the Canadian Electrical Code Division 2 Wiring Methods. See also note 4. ATEX requirements (EU): Intrinsically safe installations must be installed per EN60079-10 and EN60079-14 as they apply to the specific category.
8.3 SVI-II AP (+) and (-) 4-20 mA IN Terminals These terminals power the SVI-II AP. The barrier is the Controller Output Type, for example MTL 728. Entity/NIFW Parameters: Vmax= 30 Vdc; Imax=125 mA; Ci = 6.5 nF; Li = 1 uH; Pmax = 900 mW
8.4 SVI-II AP (+) and (-) 4-20mA OUT Terminals These terminals provide a 4 to 20 mA signal related to valve position. The 4 to 20 OUT terminals behave much like the terminals of a transmitter so a Transmitter type barrier with 250 Ohm series resistance (internal or external) is used for this connection. For example, MTL 788 or 788R. Use of the 4-20 OUT feature is certified to ATEX intrinsically safe requirements and is approved for use in Zone 0. Use of the 4-20 mA OUT feature has not been certified by FM or CSA. The 4-20 mA OUT feature may not be used in an intrinsically safe installation when FM or CSA intrinsically safe approval is required. The 4-20 mA OUT feature is certified by FM and CSA for use in a DIV 2 area and in a DIV 1 area when the SVI2 is installed in accordance with flameproof requirements. Entity/NIFW Parameters: Vmax = 30 Vdc; Imax = 125 mA; Ci = 8 nF; Li = 1 uH max = 900 mW.
8.5 SVI-II AP (+) and (-) PV 1-5VDC Terminals
Masoneilan SVI II AP Digital Positioner Quick Start Guide =| 99© 2020 Baker Hughes Company. All rights reserved.

ES-699 Rev AE Page 10 of 13
The Process Transmitter and the SVI-II AP PV Input are both barrier protected. The transmitter 4 to 20 mA signal is converted to 1 to 5 Volts at the Transmitter barrier. The 1 to 5 volt signal is monitored by the DCS and used by the SVI-II AP for the embedded process controller. The sense resistor may be in the barrier or in the Digital Control System. The Process Transmitter must be approved for use with the Process Transmitter Barrier. An example of a suitable barrier is MTL 788 or 788R An example of the PV INPUT barrier is MTL 728. Entity/NIFW Parameters of the SVI-II AP PV terminals: Vmax = 30 Vdc; Imax = 125 mA; Ci = 1 nF; Li = 0 uH; Pmax = 900 mW
8.6 SVI-II AP (+) and (-) SW Terminals
There are two independent isolated solid state switch contact outputs on the SVI-II AP. They are labeled SW#1 and SW#2. The switches are polarity sensitive – that is, conventional current flows INTO the plus terminal. An examples of suitable barriers are MTL 707, MTL 787 and MTL 787S. Entity/NIFW parameters: Vmax = 30 Vdc Imax = 125 mA Ci = 5 nF Li = 10 uH Pmax = 900 mW
8.7 SVI-II AP (1) and (2) and (3) REMOTE Terminals The REMOTE terminals deliver reference Voltage to an optional remote position sensing potentiometer. Current, Voltage, and Power are limited by the SVI-II AP. The REMOTE terminals entity parameters are the parameters of the 4 to 20 mA INPUT barrier. The SVI-II REMOTE MOUNT is approved for use as a remote position sensing device with the SVI-II AP. SVI-II AP Entity/NIFW parameters: Uo/Voc = 6.5 Volts Io/Isc = 9.6 mA Ca = 22 uF La = 300 mH Connect only to suitable potentiometer SVI-II REMOTE MOUNT Entity parameters/Energy Limitation Parameters are: Ui/Vmax=6.5Volts, Ii/Imax=10.5mA, Ci=0.066uF, Li=0, Pi=68mW
8.8 Digital In Terminals
The Digital In terminal is suitable for direct connection to a passive switch. Entity/NIFW Parameters: Uo/Voc = 6.5 Volts Io/Isc = 72 mA Ca = 1.25 uF La = 2 mH Connect only to passive (Un-powered) switch.
© 2020 Baker Hughes Company. All rights reserved.=Masoneilan SVI II AP Digital Positioner Quick Start Guide | 100

ES-699 Rev AE Page 11 of 13
8.9 Entity Requirement
Cable capacitance and inductance plus the I.S. apparatus unprotected capacitance (Ci) and inductance (Li) must not exceed the allowed capacitance (Ca) and inductance (La) indicated on the associated apparatus. If the optional Hand Held Communicator is used on the Hazardous Area side of the barrier, then the capacity and inductance of the communicator must be added and the communicator must be agency approved for use in the hazardous area. Also, the current output of the Hand Held Communicator must be included in the current output of the associated equipment. The barriers may be active or passive and from any certified manufacturer as long as the barriers comply with the listed entity parameters.
8.10 Use in dust atmosphere Dust-tight conduit seal must be used when installed in dust hazard environments.
8.11 A device which has previously been installed without an approved IS barrier must
NEVER be used subsequently in an intrinsically safe system. Installing the device without a barrier can permanently damage the safety related components in the device making the device unsuitable for use in an intrinsically safe system.
9 REPAIR
THE FLAMEPATHS OF THE EQUIPMENT ARE NOT INTENDED TO BE REPAIRED. CONSULT THE MANUFACTURER IF REPAIR OF A FLAMEPATH JOINT IS NECESSARY. WARNING: EXPLOSION HAZARD – SUBSTITUTION OF COMPONENTS MAY IMPAIR SUITABILITY FOR USE IN A HAZARDOUS LOCATION. Only qualified service personnel are permitted to make repairs On the SVI II AP, replacement of the pneumatic cover, electronics module, the pneumatic relay, the I/P, and the main cover (with or without display) are the only field repairs permitted. Replace ONLY with genuine Masoneilan parts. Only parts supplied by Masoneilan are permitted. This includes not only the major assemblies but also mounting screws and “O” rings. No substitutions with non-Masoneilan parts are permitted. Detailed replacement procedures are described in the SVI-II AP Quick Start Guide. The following summary assures the safe operation of the SVI-II AP. For more information, contact Masoneilan Dresser LLC. 50 Thomas Patten Dr. Randolph MA 02368 USA.
9.1 Main Cover Make sure that: The gasket is seated in the groove in the housing flange. No wires or retaining cable can be trapped under the cover flange. The flange area is not corroded and the surface is not scarred. The four cover bolts are securely tightened. Secure the four cover bolts by applying a torque of 55±5 in-lbs.
Masoneilan SVI II AP Digital Positioner Quick Start Guide =| 101© 2020 Baker Hughes Company. All rights reserved.

ES-699 Rev AE Page 12 of 13
9.2 Electronics Module Make sure that: The 4 O-rings are seated on the base of the electronics assembly and are not damaged. The four retaining screws are snug
9.3 I/P
Make sure that: The wire is not damaged when feeding it through the housing. A single O-ring is in place on the wire-sleeve and is not damaged. The four retaining screws are snug. Inserting the wire sleeve through the housing does not require force.
9.4 Relay Make sure that: The five O-rings are seated in the base of the relay and are not damaged The three mounting screws are snug.
9.5 Pneumatic Cover
Make sure that: The gasket is seated in the groove. The retaining screws are snug.
© 2020 Baker Hughes Company. All rights reserved.=Masoneilan SVI II AP Digital Positioner Quick Start Guide | 102

ES-699 Rev AE Page 13 of 13
10 HISTORY:
Copyright 2019. This document and all information herein is the property of Dresser LLC.
REV Description Date A Initial Release 16 Aug 05
B Revised model code, min XP temp was –20°C; FM/CSA no Analog Out 27 SEP 05
C PDev DR 0208 10/12/05 D PDev DR 0225 11/28/05 E ADR-002909 5/8/06 F ADR-002948 9/6/06 G ADR-002987 12 FEB 07 H ADR-003099 28MAY08 J ADR-003318 2FEB10 K ADR-003330 25MAR10 L ADR-003353 18MAY10 M ADR-003412 17SEP10 N ADR-003430 27OCT10 P ADR-003505 7MAR11 R ADR-003581 20SEP11 T ADR-003626 24FEB12 U ADR-003666 19APR12 V ADR-003737 04SEP12 W ADR-003833 19MAR13 Y ADR-003853 03JUN13 AA ADR-003984 22APR15 AB ADR-004071 06OCT15 AC PDR ECO-0026891 28OCT16 AD PDR ECO-0029774 15NOV17 AE PDR ECO-0038580 23AUG19
Masoneilan SVI II AP Digital Positioner Quick Start Guide =| 103© 2020 Baker Hughes Company. All rights reserved.

Spare Parts
© 2020 Baker Hughes Company. All rights reserved.=Masoneilan SVI II AP Digital Positioner Quick Start Guide | 104

Masoneilan SVI II AP Digital Positioner Quick Start Guide =| 105© 2020 Baker Hughes Company. All rights reserved.

© 2020 Baker Hughes Company. All rights reserved.=Masoneilan SVI II AP Digital Positioner Quick Start Guide | 106

Relay Spare Part Kit, Standard Construc-tion, High Flow, Single Acting SVI II AP-2
720014541-999-0000
Item No.
Part Number Description Quantity
1720017771-265-0000 SCR HEX SHCS M4
X 0.7 X 60 MICRO-SPHERES 593 PATCH
5
2971886015-681-0000 O-RING ID 9.19
[0.362] WIDTH 2.62 [0.103] REF NO 2-110
3
3971886124-681-0000 O-RING ID 29.87
[1.176] WIDTH 1.78 [0.0703] REF NO 2-025
1
4720020224-681-0000 O-RING ID 9.137.82
[1.498] WIDTH 1.78 [0.0703] REF NO 2-029
1
5 720014540-779-0000 Instructions 1
Masoneilan SVI II AP Digital Positioner Quick Start Guide =| 107© 2020 Baker Hughes Company. All rights reserved.

This page intentionally left blank.

B: Optional Switch Load Limits
General Configuration NotesThe SVI II AP supports two identical contact outputs, SW #1 and SW #2 (Digital Output switches), that can be logically linked to status bits.
The switches are polarity sensitive and must be connected only to a DC circuit. The switch (+) terminal must be electrically positive with respect to the (–) terminal. If the (+) terminal is electrically negative with respect to the (–) terminal, then the switch will conduct, regardless of switch state.
If the switch is connected directly across the power source, the current will be limited only by the capacity of the power source and the switch can be damaged.
This section discusses the necessary precautions when configuring a system.
Without a load, when the switch is on (closed) the external voltage would be dropped across the switch. This damages the switch (Figure 34).
Figure 34 Switch Installation Drawing without Load: Configuration Not Allowed
SVI II AP Switch Output
External Voltage Source
NOT ALLOWED
Full voltage drop is occurring across the switch (no current limit in place)
+
-
-
+
Masoneilan SVI II AP Digital Positioner Quick Start Guide =| 109© 2020 Baker Hughes Company. All rights reserved.

Switch OFF Switch ON
VSWITCH 30 VDC max. 1 V (Switch saturation volt-age)
ISWITCH 0.200 mA (Switch leakage current)
1 A max.
Incorrect polarity connection results in an effectively closed connection.
Consult with qualified personnel to ensure that electrical requirements for the switch are met.
The maximum voltage that can be applied to the digital switch outputs is 30 VDC. This is an open circuit parameter (the digital switch is in the open state). Under open circuit conditions, the switch current will be less than 0.200 mA.
The switch maximum current rating is 1 A. When the switch is ON, the typical switch voltage is 1V.
When the switch is on (closed) the external voltage must be dropped across the load (Figure 35).
CAUTION
CAUTION
© 2020 Baker Hughes Company. All rights reserved.=Masoneilan SVI II AP Digital Positioner Quick Start Guide | 110

The load must be designed such that the current in the circuit is 1 A at all times. Some 3rd party devices, such as incan-descent lamps or solenoids, require surge and back EMF protection to prevent volt-age spikes.
Inductive Load, Solenoid, Incandescent Lamp Configuration
Figure 35 Simplified Switch Installation Drawing: Correct Configuration
CAUTION
SVI II AP Switch Output: 1 V with switch ON
External Voltage Source
LOAD
Load is designed to limit current through the switch to < 1 A.
+
-
If the load is inductive (solenoid, incandescent lamp, etc.), then install a Freewheel or Flyback diode to prevent switch damaging EMF voltage spikes.+
-
Masoneilan SVI II AP Digital Positioner Quick Start Guide =| 111© 2020 Baker Hughes Company. All rights reserved.

Distributed Control Systems Configurations
This section gives guidance for configuration in a DCS application. Figure 36 gives two generalized drawings that cover DCS applications to ensure switch safety.
Figure 36 DCS Switches Wiring Options
Configuration Considerations
A typical value for 24 AWG cable about 0.025 Ohm/ft (see Wiring Option #1)).
If IS barrier is a combination of fuse, resistor and Zener diode then the connection is shown in Option #2. The barrier must have adequate resistance to limit inrush current, as the fuse cannot limit inrush current (see Wiring Option #2).
Power source can be part of DCS/PLS card. Power source requirements: V 30 V. Imax 1 A.
SVI Switch
Add resistor so load with resistance ≥ 30 (including wire resistance)
+
-
Negative switch pole must be directly wired to negative
+
-
Wiring Option #1
SVI Switch
Add resistance sized to limit in-rush current < 50 mA.
+
-
+
-
Wiring Option #2
Power source can be part of DCS/PLS card. Power source requirements: V 30 V. Imax 1 A.
Any load. Power source is not directly connected to the switch. Load can be a circuit within DCS/PLS card, between power source and switch.
© 2020 Baker Hughes Company. All rights reserved.=Masoneilan SVI II AP Digital Positioner Quick Start Guide | 112

C: Burst Mode
The Burst mode is when the HART® device continuously sends out data for a device not capable of being polled by a Master. Use this mode only for devices that are passive (i.e. not a HART® master), such as a HART® to Analog converter (SPA from Moore Industries, Tri-Loop by Rosemount). Turning on Burst mode affects the overall communication bandwidth. Burst mode is not available for SVI II AP in HART® 7.In a DCS-controlled environment, if you are using a:
Tri-Loop configuration: Here the DCS does not have an analog-capable card. The SVI must be in BURST mode when using Tri-Loop.
DCS with a mix of analog output cards: Some without HART® and some with HART®. SVIs connected to cards without HART® need to use HART® to analog converter. The SVI also must be set to use Burst mode so it sends the response as requested.To see how the Burst mode is configured see the ValVue or SVI II AP DTM online help.
The Burst mode can send the following commands:
Cmd1: PV
Cmd2: %range/current
Cmd3: Dyn vars/current
Cmd9: Device vars w/status
Cmd33: Device variables
Choose the Burst command variables to be returned by referring to list of device variables in Table 16.
Masoneilan SVI II AP Digital Positioner Quick Start Guide =| 113© 2020 Baker Hughes Company. All rights reserved.

Figure 37 Burst Mode Configuration
Table 16 variables are returned from HART® command 9.
Table 16 Device Variables
Variable Code
Variable Name
Description Unit Availabilityby
Firmware Revision
0
Position Valve position Percent Available for both firm-ware 4.1.1 (in HART® 6) and 5.1.X (in HART® 7)
.1
P1-P2 Actuator pressure (if single acting)Differential pressure (if double acting)
psi
"
© 2020 Baker Hughes Company. All rights reserved.=Masoneilan SVI II AP Digital Positioner Quick Start Guide | 114

2 Supply Pressure
Supply pressure psi "
3 P2 Pressure on port 2 (for double-acting)
psi "
4 Setpoint Valve setpoint Percent "
5 Signal Analog Input current signal
mA "
6SW1 Switch 1 (DO1) Percent (0% =
off, 100% = on)
"
7SW2 Switch 2 (DO2) Percent (0% =
off, 100% = on)
"
8DI Digital Input Percent (0% =
off, 100% = on)
"
9 Tempera-ture
Board temperature Celsius "
10 Reserved Reserved Reserved "
11 Raw Posi-tion
Raw valve position Counts "
12
Strokes Total valve travel odometer (An accumulated value of 100% travel = 1 stroke. The travel does not need to occur in one move-ment.)
Counts
"
Table 16 Device Variables (Continued)
Variable Code
Variable Name
Description Unit Availabilityby
Firmware Revision
Masoneilan SVI II AP Digital Positioner Quick Start Guide =| 115© 2020 Baker Hughes Company. All rights reserved.

13Cycles Number of direction
reversals in valve travel
Counts"
14 Position Retransmit
Position retransmit via Analog Output
Counts "
15
I/P Current Current to pressure transducer current
mA Available for firmware 5.1.X (in HART® 7 only).
16 Friction Static valve friction psi "
17
Position Error Band
Allowed position devi-ation range from set-point; position deviation range from setpoint greater than this value results in position error.
Percent
"
18Open Stop Adjust-ment
Upper limit for valve travel
Percent"
19 Percent of Range
Analog Input current signal in percentage
Percent "
Table 16 Device Variables (Continued)
Variable Code
Variable Name
Description Unit Availabilityby
Firmware Revision
© 2020 Baker Hughes Company. All rights reserved.=Masoneilan SVI II AP Digital Positioner Quick Start Guide | 116

Sample Tri-Loop Configuration
Figure 38 shows a simplified schematic showing the connection between the SVI II AP a Tri-Loop and a control system. Some considerations:
The input channel from the control system must have an impedance of at least 250 Ohms or else the HART® signal will be attenuated.
Channel one must be enabled and set for Primary Variable with a range of 0-100%. Other vendors may have the Tri-Loop set to function on another channel.
You can enable channel 2 and 3 even if you don't connect them.
CAUTION Consult the instruction manual of the TRI-LOOP for wring diagrams. Masoneilan is not responsible for improperly wiring the TRI-LOOP. A resistor might be required on the positive leg of Channel 1 to limit the current to the TRI-LOOP.
Masoneilan SVI II AP Digital Positioner Quick Start Guide =| 117© 2020 Baker Hughes Company. All rights reserved.

Figure 38 Sample Tri-loop Configuration
© 2020 Baker Hughes Company. All rights reserved.=Masoneilan SVI II AP Digital Positioner Quick Start Guide | 118

D: Determining an SVI Positioner Compliance Voltage in a Control
This discussion explains how to determine compliance voltage for an SVI positioner. It applies to the SVI II AP, SVI II ESD, SVI II APN and SVi1000.
A definition of compliance voltage is: The voltage that must be available at the control system output in order to drive the control current through the SVI II AP and all the resistive devices in series with it.
Measuring the voltage across the SVI II AP terminals doesn't give the true available system compliance voltage as the positioner self-regulates voltage as current flows through it. Additionally, it also doesn't confirm what system voltage is available under load conditions. Therefore, if compliance testing needs to be done, it is best done before installation.
Use a 1K potentiometer as this is the maximum for most analog output cards and as at 20 mA this equals 20 VDC, which is a sufficient maximum.
Masoneilan SVI II AP Digital Positioner Quick Start Guide =| 119© 2020 Baker Hughes Company. All rights reserved.

Compliance Test Set-Up1. Configure a test set-up as in Figure 39.
Figure 39 Compliance Voltage Test Set-Up
2. Send 4 mA to the test set-up.
3. Increase the potentiometer value until the loop current reaches 3.95 mA.
4. Read the voltage across the potentiometer, which should be > 11 VDC. This is the available system voltage at the minimum output.
5. Send 20 mA to the test set-up.
6. Increase the potentiometer value until the loop current reaches 19.95 mA.
7. Read the voltage across the potentiometer, which should be > 9 VDC. This is the available system voltage at the maximum output.
Table 17 lists some compliance voltage readings at positioner terminals at several currents.
© 2020 Baker Hughes Company. All rights reserved.=Masoneilan SVI II AP Digital Positioner Quick Start Guide | 120

Table 17 Expected Voltage Range at Positioner Terminals
Current Compliance Voltage Requirement at
Positioner Terminals
Expected Voltage Measured at Positioner Terminals
4 mA 11 V 10 to 11 V
8 mA 10.5 V 9.5 to 10.5 V
12 mA 10 V 9 to 10 V
16 mA 9.5 V 8.5 to 9.5 V
20 mA 9 V 8 to 9 V
Masoneilan SVI II AP Digital Positioner Quick Start Guide =| 121© 2020 Baker Hughes Company. All rights reserved.

This page intentionally left blank.

This page intentionally left blank.

Direct Sales Office Locations Australia BrisbanePhone: +61-7-3001-4319Fax: 88 +61-7-3001-4399
Japan Tokyo Phone: +81-03-6871-9008Fax: == +81-03-6890-4620
South AfricaPhone: +27-11-452-1550Fax: 8 8+27-11-452-6542
PerthPhone: +61-8-6595-7018Fax: 88+61-8-6595-7299
KoreaPhone: +82-2-2274-0748Fax: 88 +82-2-2274-0794
South and Central America and the Caribbean Phone: +55-12-2134-1201Fax: 88 +55-12-2134-1238
MelbournePhone: +61-3-8807-6002Fax: 88 +61-3-8807-6577
MalaysiaPhone: +60-3-2161-0322Fax: 88 +60-3-2163-6312
SpainPhone: +34-935-877-605
BrazilPhone: +55-19-2104-6900
MexicoPhone: +52-55-3640-5060
United Arab EmiratesPhone: +971-4-8991-777Fax: 88 +971-4-8991-778
ChinaPhone: +86-10-5738-8888Fax: 88 +86-10-5918-9707
RussiaVeliky NovgorodPhone: +7-8162-55-7898Fax: 88 +7-8162-55-7921
United Kingdom BracknellPhone: +44-1344-460-500Fax: +44-1344-460-537
France CourbevoiePhone: +33-1-4904-9000Fax: 88 +33-1-4904-9010
MoscowPhone: +7 495-585-1276Fax: 88 +7 495-585-1279
United States Jacksonville, FloridaPhone: +1-904-570-3409
India MumbaiPhone: +91-22-8354790Fax: 88 +91-22-8354791
Saudi ArabiaPhone: +966-3-341-0278Fax: 88 +966-3-341-7624
Deer Park, TexasPhone: +1-281-884-1000Fax: 88 +1-281-884-1010
New DelhiPhone: +91-11-2-6164175Fax: 88 +91-11-5-1659635
SingaporePhone: +65-6861-6100Fax: 88 +65-6861-7172
Houston, TexasPhone: +1-281-671-1640Fax: 88 +1-281-671-1735
ItalyPhone: +39-081-7892-111Fax: 88 +39-081-7892-208
valves.bhge.com
bakerhughes.com
Copyright 2020 Baker Hughes Company. All rights reserved. Baker Hughes provides this information on an “as is” basis for general information purposes. Baker Hughes does not make any representation as to the accuracy or completeness of the information and makes no warranties of any kind, specific, implied or oral, to the fullest extent permissible by law, including those of merchantability and fitness for a particular purpose or use. Baker Hughes hereby disclaims any and all liability for any direct, indirect, consequential or special damages, claims for lost profits, or third party claims arising from the use of the information, whether a claim is asserted in contract, tort, or otherwise. Baker Hughes reserves the right to make changes in specifications and features shown herein, or discontinue the product described at any time without notice or obligation. Contact your Baker Hughes representative for the most current information. The Baker Hughes logo, Masoneilan, ValVue, SVI Camflex, and Varimax are trademarks of Baker Hughes Company. Other company names and product names used in this document are the registered trademarks or trademarks of their respective owners.
GEA19679AA 01/2020