manual r.c750 fs r.x750 fs r.e750 fs r.t750 ht r ... - rotwild
TRANSCRIPT
MANUAL
R.C750 FS
R.X750 FS
R.E750 FS
R.T750 HT�
R.T750 FS
R.X375 FS�
R.E375 FS
R.G375 FS
1
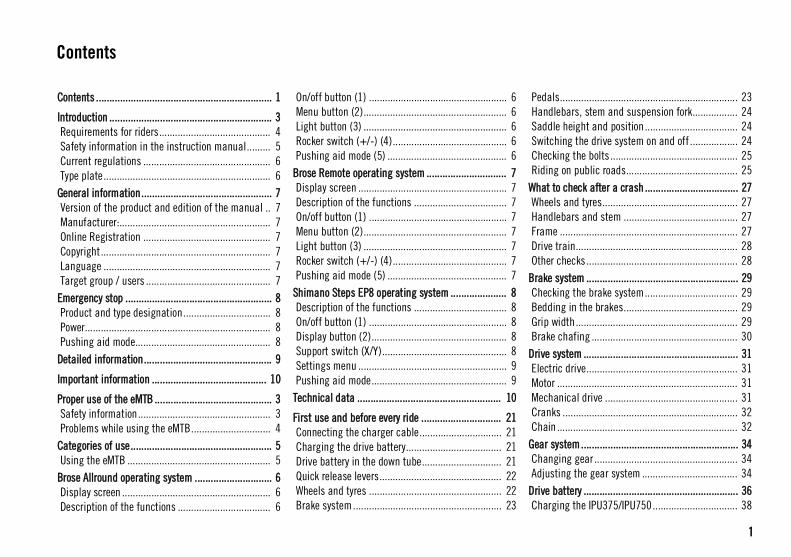
Contents .................................................................. 1
Introduction ............................................................. 3Requirements for riders.......................................... 4Safety information in the instruction manual......... 5Current regulations ................................................ 6Type plate............................................................... 6
General information................................................. 7Version of the product and edition of the manual .. 7Manufacturer:......................................................... 7Online Registration ................................................ 7Copyright................................................................ 7Language ............................................................... 7Target group / users ............................................... 7
Emergency stop ....................................................... 8Product and type designation................................. 8Power...................................................................... 8Pushing aid mode................................................... 8
Detailed information................................................ 9
Important information ........................................... 10
Proper use of the eMTB ............................................ 3Safety information.................................................. 3Problems while using the eMTB.............................. 4
Categories of use..................................................... 5Using the eMTB ...................................................... 5
Brose Allround operating system ............................. 6Display screen ........................................................ 6Description of the functions ................................... 6
On/off button (1) .................................................... 6Menu button (2)...................................................... 6Light button (3) ...................................................... 6Rocker switch (+/-) (4)........................................... 6Pushing aid mode (5) ............................................. 6
Brose Remote operating system .............................. 7Display screen ........................................................ 7Description of the functions ................................... 7On/off button (1) .................................................... 7Menu button (2)...................................................... 7Light button (3) ...................................................... 7Rocker switch (+/-) (4)........................................... 7Pushing aid mode (5) ............................................. 7
Shimano Steps EP8 operating system ..................... 8Description of the functions ................................... 8On/off button (1) .................................................... 8Display button (2)................................................... 8Support switch (X/Y)............................................... 8Settings menu ........................................................ 9Pushing aid mode................................................... 9
Technical data ...................................................... 10
First use and before every ride .............................. 21Connecting the charger cable............................... 21Charging the drive battery.................................... 21Drive battery in the down tube.............................. 21Quick release levers.............................................. 22Wheels and tyres .................................................. 22Brake system........................................................ 23
Pedals................................................................... 23Handlebars, stem and suspension fork................. 24Saddle height and position................................... 24Switching the drive system on and off .................. 24Checking the bolts................................................ 25Riding on public roads.......................................... 25
What to check after a crash ................................... 27Wheels and tyres................................................... 27Handlebars and stem ........................................... 27Frame ................................................................... 27Drive train............................................................. 28Other checks......................................................... 28
Brake system ......................................................... 29Checking the brake system................................... 29Bedding in the brakes........................................... 29Grip width............................................................. 29Brake chafing ....................................................... 30
Drive system .......................................................... 31Electric drive......................................................... 31Motor .................................................................... 31Mechanical drive .................................................. 31Cranks .................................................................. 32Chain .................................................................... 32
Gear system........................................................... 34Changing gear ...................................................... 34Adjusting the gear system .................................... 34
Drive battery .......................................................... 36Charging the IPU375/IPU750................................ 38
Contents
2
Removing the IPU375 ........................................... 39Installing the IPU375............................................ 39Removing the IPU750 ........................................... 41Installing the IPU750............................................ 41Adjusting the tension on the drive battery............ 42Charger ................................................................ 43Storing the eMTB .................................................. 43
Handlebars, stem, headset and saddle ................. 44Adjusting the handlebars ..................................... 44Headset ................................................................ 44Stem..................................................................... 44Adjusting the saddle ............................................ 45Adjusting the Eightpins seat post ........................ 46Adjusting the seat post – quick release lever....... 47Adjusting the seat post – clamping screw ........... 47Adjusting the E13 seat post ................................. 47Lowering the saddle ............................................. 48
Suspension - suspension fork................................ 49Adjusting the suspension fork .............................. 49Compression damping.......................................... 50Rebound damping ................................................ 51
Running gear - rear triangle.................................. 52Adjusting the rear shock....................................... 52Compression damping.......................................... 52Rebound damping ................................................ 53Testing the fork and shock settings...................... 54
Wheels and tyres.................................................... 55Checks before every ride ....................................... 55
Quick test ............................................................. 55Front wheel ........................................................... 56Rear wheel............................................................ 57Tyres ..................................................................... 57Checking the tyres ................................................ 57Checking the spokes............................................. 58Checking that the rims run true............................ 58
Transporting the ROTWILD eMTB ........................... 59Transporting the eMTB by car ............................... 59Transporting the eMTB by air................................ 60
Troubleshooting..................................................... 61
Warranty, wear and brake pads............................. 62Wear parts excluded from the warranty ................ 62Normal wear and tear ........................................... 62Brake pads ........................................................... 62
Cleaning, packaging and disposal ........................ 63Cleaning ............................................................... 63Recycling and disposal......................................... 63Packaging material .............................................. 64
Service record........................................................ 651. service .............................................................. 652. service .............................................................. 653. service .............................................................. 654. service .............................................................. 665th service............................................................ 666th service............................................................ 667th service............................................................ 678th service............................................................ 67
9th service ............................................................ 67List of tables.......................................................... 68Recommended tightening torques ........................ 68Torque table.......................................................... 68Tyre pressure table................................................ 68
EU Declaration of Conformity ................................. 69
List of figures......................................................... 70
3
Dear customer,
Thank you for buying this ROTWILD eMTB. You have chosen a high-quality product.
This instruction manual contains information about the safe use and maintenance of your ROTWILD eMTB. Please read the instruction manual carefully before you go for your first ride,
so that you can find out about the risks associated with the incorrect use of your eMTB.
In this instruction manual it is not possible to describe in detail all the maintenance that your ROTWILD eMTB needs. Therefore, you should also refer to the enclosed instructions provided by our component manufacturers and visit their websites.
It is important that you care for and maintain your ROTWILD eMTB correctly. This will help to ensure that it runs without problems and performs at its best. This manual cannot teach you the skills you need to be a bike mechanic. In addition, special tools are needed for some jobs.
Therefore, You should have maintenance and repairs carried out by the ROTWILD authorised dealer that supplied your bike. You will find the
contact details and company stamp of the authorised dealer on the back page of this original instruction manual.
If you are not able to contact this dealer, you will find a list of other ROTWILD authorised dealers on our website at www.rotwild.de.
ROTWILD is constantly developing and improving its cycles and reserves the right to make changes to the design, equipment and technology. For this reason, you cannot make any legal claims on the basis of the information, illustrations and descriptions in this instruction manual.
The ROTWILD eMTB is supplied almost completely pre-assembled. Nevertheless we recommend that you check the bike’s functions before riding it. Always wear suitable safety clothing, including a helmet, gloves and glasses.
Before you ride the bike on public roads, you should check the regulations that apply in your country and ensure that your eMTB meets the necessary requirements. You should also follow the road traffic regulations and behave considerately to avoid putting yourself and other road users in danger.
The standard equipment required on bicycles in other countries may differ from that in Germany. In particular, the road traffic regulations may be different.
Before you use your bike, find out about the regulations that apply to cyclists and bikes on the roads in your country.
When you use your ROTWILD eMTB off road, you must comply with the law in your country. We would also ask you to respect nature and the environment.
We at ROTWILD hope that you enjoy riding your new ROTWILD eMTB.
Introduction
4
Requirements for ridersPlease follow the national regulations in your country.
Where no other legal requirements apply to riders of electrically assisted bikes, we recommend that the rider should be a minimum of 15 years old and have experience of riding pedal-powered bikes.
In addition, the rider must have the physical and mental capability to ride a pedal-powered eMTB.
You should only use your ROTWILD eMTB for its intended purpose (see the section “Proper use of the eMTB”). This will ensure that the ROTWILD eMTB is always ridden in accordance with the intended category of use.
If the ROTWILD eMTB is not used properly, this will invalidate the warranty.
Make sure that you understand the technical terms that are explained in this instruction manual on the page where there is an overview of your bike.
Please note that this instruction manual does not describe how to build a ROTWILD eMTB from parts or how to turn a partially assembled eMTB into a
roadworthy bike.
Keep this manual in a safe place so that you can carry out the function checks correctly at any time. Parents should explain the contents of the manual to their children if they do not understand it.
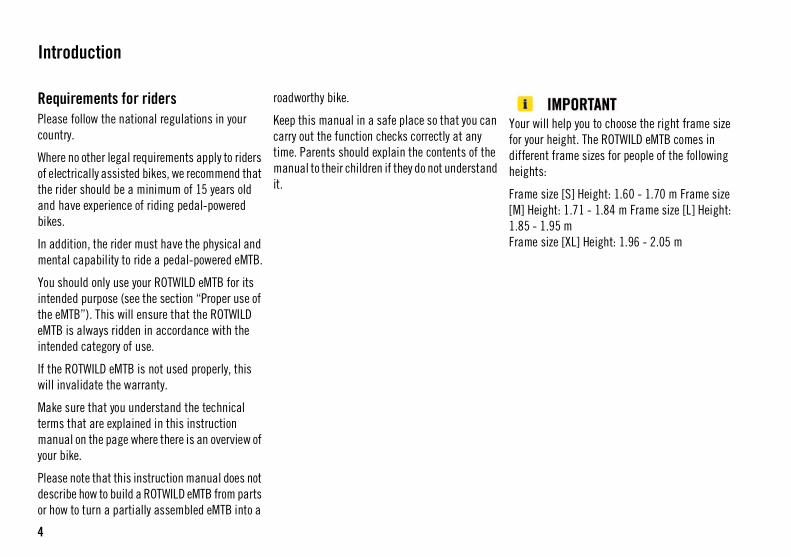
Your will help you to choose the right frame size for your height. The ROTWILD eMTB comes in different frame sizes for people of the following heights:
Frame size [S] Height: 1.60 - 1.70 m Frame size [M] Height: 1.71 - 1.84 m Frame size [L] Height: 1.85 - 1.95 mFrame size [XL] Height: 1.96 - 2.05 m
Introduction
5
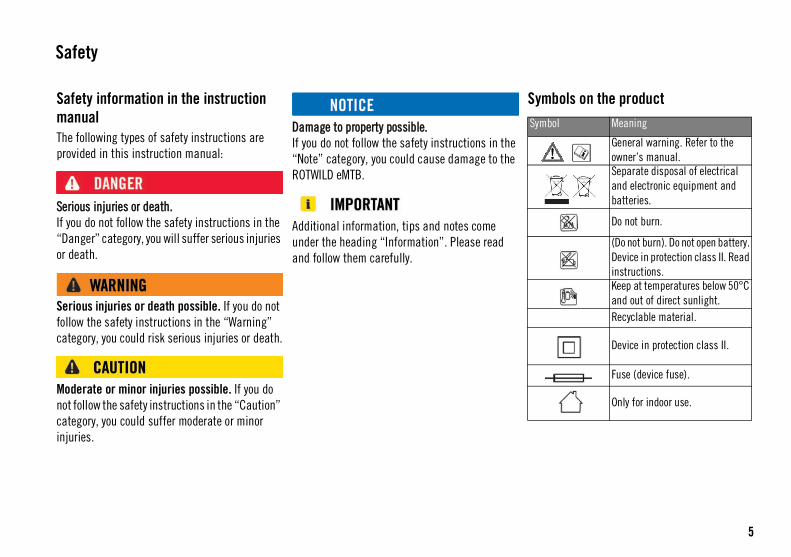
Safety information in the instruction manualThe following types of safety instructions are provided in this instruction manual:
Serious injuries or death.If you do not follow the safety instructions in the “Danger” category, you will suffer serious injuries or death.
Serious injuries or death possible. If you do not follow the safety instructions in the “Warning” category, you could risk serious injuries or death.
Moderate or minor injuries possible. If you do not follow the safety instructions in the “Caution” category, you could suffer moderate or minor injuries.
Damage to property possible.If you do not follow the safety instructions in the “Note” category, you could cause damage to the ROTWILD eMTB.
Additional information, tips and notes come under the heading “Information”. Please read and follow them carefully.
Symbols on the productSymbol Meaning
General warning. Refer to the owner’s manual.Separate disposal of electrical and electronic equipment and batteries.
Do not burn.
(Do not burn). Do not open battery. Device in protection class II. Read instructions.Keep at temperatures below 50°C and out of direct sunlight.Recyclable material.
Device in protection class II.
Fuse (device fuse).
Only for indoor use.
Safety
6
Current regulationsThe ROTWILD eMTB models described in this instruction manual are electrically assisted. They meet the requirements of the EN 15194 standard, among others.
This instruction manual complies with the standards listed in the EU declaration of conformity
that can be found at the end of the instruction manual.
You should use only original spare parts and accessories on your eMTB. ROTWILD cannot be held liable for any damage caused if other spare parts and accessories are used.
Your ROTWILD authorised dealer will have a list of approved accessories.
Before you fit accessories to your eMTB, please check with your dealer that they are permitted and approved for road use.
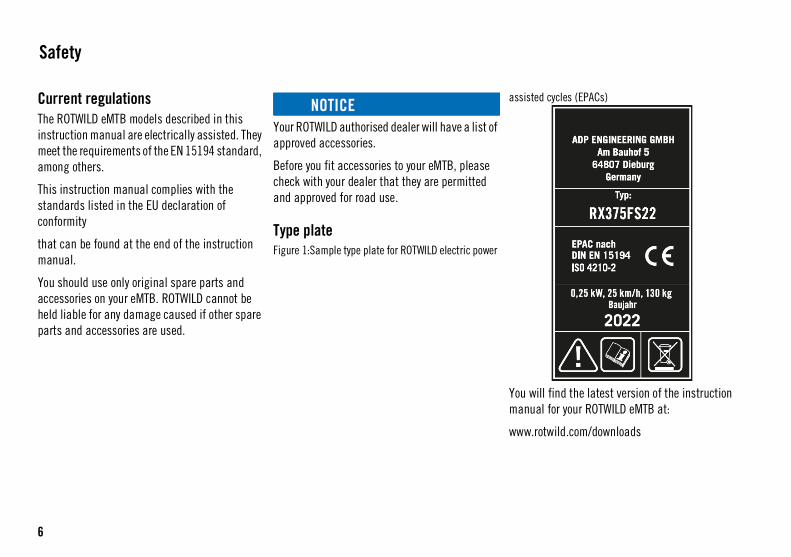
Type plateFigure 1:Sample type plate for ROTWILD electric power
assisted cycles (EPACs)
You will find the latest version of the instruction manual for your ROTWILD eMTB at:
www.rotwild.com/downloads
Safety

7
Version of the product and edition of the manualThis original instruction manual relates to the 2022 model year, which runs from August 2021 to August 2022.
The manual was published in August 2021.
Manufacturer:The manufacturer of the eMTBs is:
ADP ENGINEERING GMBH
Am Bauhof 5
64807 Dieburg, Germany
Tel.: +49 6071 921 55 0
Fax: +49 6071 921 55 - 25
E-mail: [email protected]
Website: www.rotwild.de
Online RegistrationPlease register your ROTWILD eMTB online at www.rotwild.de. We will confirm immediately that your warranty has started. Once you have registered your product, you can request an extended manufacturer’s warranty.
You will find more information in the ROTWILD warranty terms at www.rotwild.de.
Copyright© ADP ENGINEERING GMBH, 2021
This original instruction manual must not be reproduced or distributed and its content must not be used or communicated, unless specific permission has been given. If you breach these regulations, you will be liable for damages. All rights reserved in the event of the registration of a patent, utility model or industrial design.
LanguageThe original instruction manual is written in German. Other language versions are translations and are not valid without the German original instruction manual.
Target group / usersThis original instruction manual is intended for the rider and operator of the ROTWILD eMTB described here.
The operator generally has the right of disposal over the ROTWILD eMTB and makes it available for the rider to use and for the specialist dealer to maintain and repair. If the eMTB is being test ridden, hired out or loaned, for example, the operator and the rider may be different people.
ROTWILD authorised dealers have trained staff who are able to identify and prevent the risks that can occur when maintaining and repairing the ROTWILD eMTB.
General information
8
Product and type designationThis original instruction manual applies to the following ROTWILD eMTBs:
RC750FS22 / RX750FSC22 / RX750FSP22 / RX750FSU22 / RE750FSC22 / RE750FSP22 / RT750HT22 / RT750FS22 RX375FS22/RE375FS22/RG375FS22
The eMTB does not have a separate emergency stop or shut-off button.The bike can be shut down by removing the battery or taking the connector out of the drive system.
PowerThe power is switched off as soon as the rider stops pedalling. The eMTB can be stopped mechanically using the brakes. The brake system is not connected to the drive system.
When support mode is switched on, the drive system responds to the smallest pressure on the pedals.When you get off the bike, you should apply the brakes to prevent it from rolling away and to
reduce the risk of an accident.
Pushing aid modeWhen the pushing aid mode is switched on, the drive train will disconnect as soon as you release the walk-assist button.
The drive system does not switch off when you apply the brakes, which means that it is always available.
Figure 2:Applying the brakes / pulling away
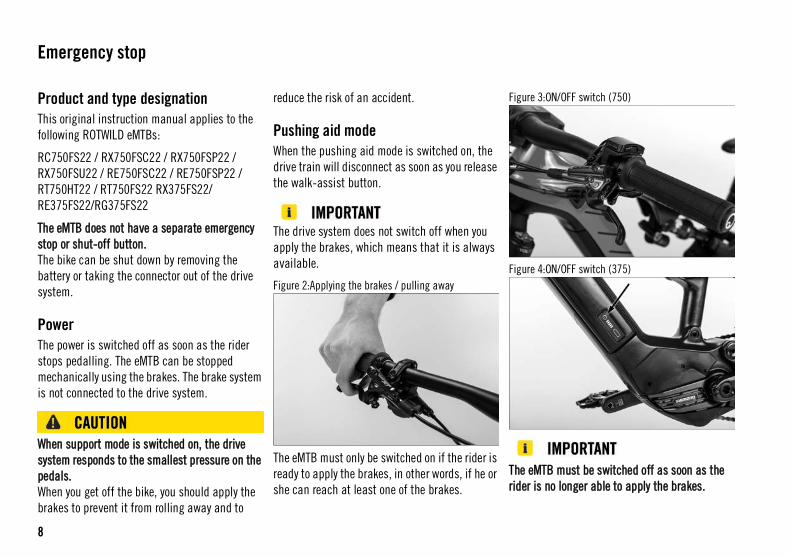
The eMTB must only be switched on if the rider is ready to apply the brakes, in other words, if he or she can reach at least one of the brakes.
Figure 3:ON/OFF switch (750)
Figure 4:ON/OFF switch (375)
The eMTB must be switched off as soon as the rider is no longer able to apply the brakes.
Emergency stop

9
Figure 5:Detailed information about the ROTWILD
1
2
3 4
6
7
5 13 12
11
8 20
21
22
19
17 15 16 14
18
9 10
Detailed information
10
The frame of the ROTWILD eMTB is made by hand from high-quality carbon fibre composite and is designed to be robust enough for the intended category of use of the eMTB (see the section “Proper use of the eMTB”).
Damage to the frame caused by excessive stresses, accidents or crashes.A damaged frame can suddenly fail and cause a crash. If your ROTWILD eMTB is damaged or if you have had an accident or a crash, contact your ROTWILD authorised dealer.
The ROTWILD eMTB has a modern, lightweight design and its components have a limited life span. Different materials and components react in different ways to wear and fatigue caused by stress. If a component exceeds its design service life, it can suddenly fail. This may result in the rider being injured.
Specific information about carbon. Please note that carbon and aluminium behave in a fundamentally different way when damaged.
Unlike aluminium, when carbon is overstressed it does not become dented or deformed.
The effects of damage to carbon are generally internal and invisible (cracks). After a crash, the frame and front wheel fork must be checked by a dealer and replaced if the carbon structure has been damaged. Carbon components can suddenly fail as a result of damage.
If the fibres have broken, take care when handling the material. The fine carbon fibres can cause injuries.
Components made from carbon must never be straightened after they have been damaged. They must be replaced immediately. Paint damage must be repaired to prevent the material from absorbing moisture, which could have a negative impact on its properties. Please note that carbon fibre is highly sensitive to pressure when clamped (for example the saddle and dérailleur clamps).
Important information
11
Always use a torque wrench and note the recommended tightening torques (see the section “Recommended tightening torques”).
Keep the contact surfaces of the carbon free of grease. Use special carbon assembly paste (available from bike dealers). Never clamp a carbon frame in a stand (when maintaining the bike) or in a roof rack. Only use the seat post for this purpose, providing that it is not made from carbon fibre.
Make sure that carbon components do not get too hot, for example if exposed to sunlight in a car.
We recommend that you do not paint or powder coat your frame or front wheel fork. These processes can involve high temperatures which could damage or destroy the components.
If you have had the frame or fork partially repainted, you must ask your ROTWILD authorised dealer to check them.
Material fatigue in carbon components. Carbon components that are exposed to high levels of stress, such as handlebars, stems and seat posts, can suffer from material fatigue in the same way as metal parts.
Have your bike serviced regularly at the recommended intervals so that these components can be checked.
Using damaged carbon components. If carbon frames, carbon forks or other carbon components make cracking noises or if you can see cracks, nicks, dents or discolouration, you must stop using them. Damaged carbon components can suddenly fail and cause a crash.
The damaged carbon components must be replaced immediately.
Your ROTWILD dealer will clean the eMTB thoroughly and check it for signs of material fatigue.
If you notice any signs of material fatigue while you are using the bike, you must stop using it immediately and ask your ROTWILD authorised dealer to check it.
3
Using the eMTB properly includes following the instructions on operating, maintaining and servicing the bike in this instruction manual. The instruction manual has been written specifically for your ROTWILD eMTB, but cannot describe it down to the smallest detail.
The ROTWILD eMTB is an electric mountain bike. The models described in this manual are designed for private use on paved roads and paths and for off-road riding in accordance with the specified category of use. They are intended to transport one person. See the section "Categories of use".
Safety informationIf you do not follow the safety instructions in this instruction manual, you run the risk of the eMTB breaking down. ROTWILD will not be liable for the resulting damage.
The total permitted weight of the ROTWILD eMTB, including the rider and any luggage, is shown on the type plate of the eMTB.
Using child seats and child trailers. ROTWILD eMTBs are not approved for child seats or for towing child trailers. Do not use child seats or child trailers.
Your ROTWILD authorised dealer will have a list of approved accessories.
If the drive system is switched on, bags or loads can activate the pushing aid mode. They can also interfere with other functions, such as braking.
Overloading the eMTB. Overloading the eMTB can cause safety-related components to break or fail (for example the frame, front wheel fork, handlebars, stem, seat post etc.). Do not exceed the total permitted weight under any circumstances. Never take a second person on the bike.
You must not use the eMTB if it is damaged or incomplete, for example if the drive battery has been removed.
Uncontrolled riding.By failing to fasten loads properly and riding carelessly you can put yourself and other road users at risk. You can lose control of the eMTB. Do not transport bags or other loads on the handlebars. Do not ride with your hands off the handlebars. Only ride on suitable surfaces that have sufficient grip.
Proper use of the eMTB
4
Kickstands / centre stands. Fitting a kickstand to the ROTWILD models with the type designation specified on the cover is not permitted unless the ROTWILD stand adapter is used to fit the kickstand (available from ROTWILD authorised dealers).
Using the eMTB in any other way does not constitute proper use. ROTWILD will not accept liability if the eMTB is not used properly. This will also invalidate the warranty. This includes lending the eMTB to a rider who is not familiar with it, transporting more than one person, riding with excessive luggage, riding with your hands off the handlebars, riding on unsuitable surfaces (ice or snow) and incorrect maintenance or repairs.
You must not hang shopping bags or similar loads on the handlebars.
Problems while using the eMTBIf you notice unusual noises, vibrations, smells, discolouration, deformed components, friction or wear while riding or maintaining the eMTB or while charging the drive battery, you must stop using it and take it to your ROTWILD authorised dealer. The same applies if the bike feels different, for example during braking, pedalling or steering.
Please follow the instructions for use and assembly provided by the component manufacturers which are included with your eMTB, together with the instruction manual for use on the component manufacturers’ websites.
Your ROTWILD authorised dealer will be happy to answer any further questions you may have.
The various ROTWILD models are suitable/designed for different categories of use:
5
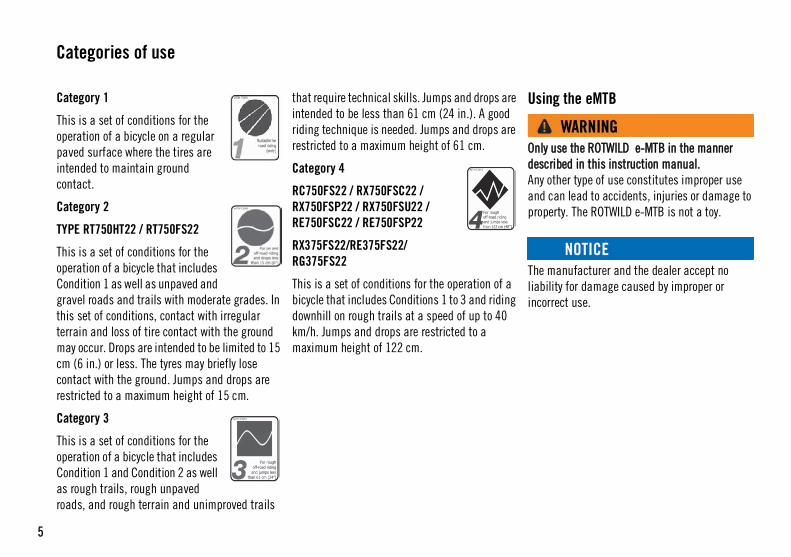
Category 1
This is a set of conditions for the operation of a bicycle on a regular paved surface where the tires are intended to maintain ground contact.
Category 2
TYPE RT750HT22 / RT750FS22
This is a set of conditions for the operation of a bicycle that includes Condition 1 as well as unpaved and gravel roads and trails with moderate grades. In this set of conditions, contact with irregular terrain and loss of tire contact with the ground may occur. Drops are intended to be limited to 15 cm (6 in.) or less. The tyres may briefly lose contact with the ground. Jumps and drops are restricted to a maximum height of 15 cm.
Category 3
This is a set of conditions for the operation of a bicycle that includes Condition 1 and Condition 2 as well as rough trails, rough unpaved roads, and rough terrain and unimproved trails
that require technical skills. Jumps and drops are intended to be less than 61 cm (24 in.). A good riding technique is needed. Jumps and drops are restricted to a maximum height of 61 cm.
Category 4
RC750FS22 / RX750FSC22 / RX750FSP22 / RX750FSU22 / RE750FSC22 / RE750FSP22
RX375FS22/RE375FS22/RG375FS22
This is a set of conditions for the operation of a bicycle that includes Conditions 1 to 3 and riding downhill on rough trails at a speed of up to 40 km/h. Jumps and drops are restricted to a maximum height of 122 cm.
Using the eMTB
Only use the ROTWILD e-MTB in the manner described in this instruction manual.Any other type of use constitutes improper use and can lead to accidents, injuries or damage to property. The ROTWILD e-MTB is not a toy.
The manufacturer and the dealer accept no liability for damage caused by improper or incorrect use.
Categories of use

6
The Brose Allround operating system is on the left of the handlebars when you are sitting on the bike.
Display screenFigure 6: Overview of the fields on the display.
Description of the functionsThe operating system has four buttons and a rocker switch. The functions are as follows:
On/off button (1)The on/off button (1) located in the eMTB’s direction of travel is used to switch the ROTWILD eMTB on and off. Hold the button down for approx. 2 seconds to switch the eMTB off. If the ROTWILD eMTB has not been used for approx. 15 minutes, the system switches off automatically to save energy.
Menu button (2)On the display, you can switch between different pieces of information about your ride by pressing the menu button (2).
To access the menu, hold down the menu button (2) for two seconds. You can navigate through the list items with the rocker switch (4) and then select them by pressing the menu button (2).
The menu cannot be accessed while you are riding your eBike.
Light button (3)When you press the light button (3), the light symbol appears on the display and the eMTB lights are switched on, if your bike has this option.
Rocker switch (+/-) (4)The rocker switch (4) is used to select the different levels of support. If you press the "+” button, you increase the level of support. To reduce the level of support, you press the "-" button.
Pushing aid mode (5)Pushing aid mode is switched on by pressing and holding the pushing aid button (5).
Using pushing aid mode. You must steer the eMTB using both hands in pushing aid mode.
Please note that because of the design of the bike, the pedals may turn, so you should leave enough space for them to move. The power and speed of pushing aid mode can be adjusted by selecting a different gear.
Brose Allround operating system
7
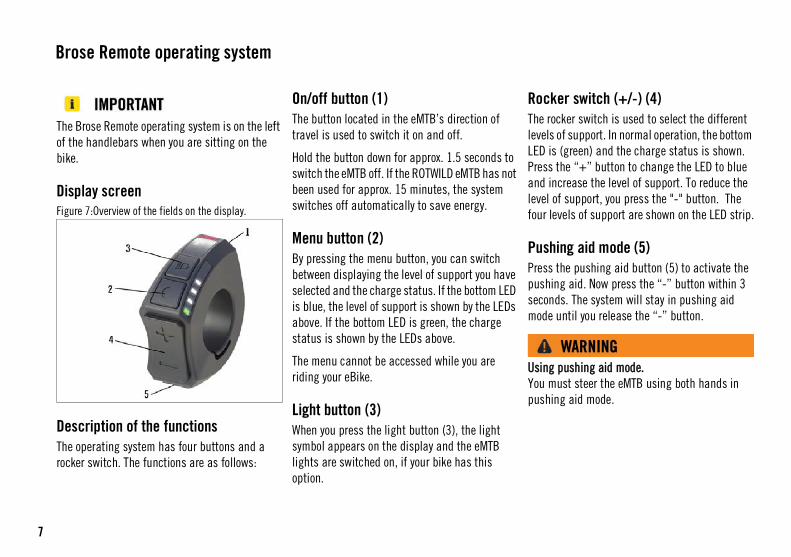
The Brose Remote operating system is on the left of the handlebars when you are sitting on the bike.
Display screenFigure 7:Overview of the fields on the display.
Description of the functionsThe operating system has four buttons and a rocker switch. The functions are as follows:
On/off button (1)The button located in the eMTB’s direction of travel is used to switch it on and off.
Hold the button down for approx. 1.5 seconds to switch the eMTB off. If the ROTWILD eMTB has not been used for approx. 15 minutes, the system switches off automatically to save energy.
Menu button (2)By pressing the menu button, you can switch between displaying the level of support you have selected and the charge status. If the bottom LED is blue, the level of support is shown by the LEDs above. If the bottom LED is green, the charge status is shown by the LEDs above.
The menu cannot be accessed while you are riding your eBike.
Light button (3)When you press the light button (3), the light symbol appears on the display and the eMTB lights are switched on, if your bike has this option.
Rocker switch (+/-) (4)The rocker switch is used to select the different levels of support. In normal operation, the bottom LED is (green) and the charge status is shown. Press the “+” button to change the LED to blue and increase the level of support. To reduce the level of support, you press the "-" button. The four levels of support are shown on the LED strip.
Pushing aid mode (5)Press the pushing aid button (5) to activate the pushing aid. Now press the “-” button within 3 seconds. The system will stay in pushing aid mode until you release the “-” button.
Using pushing aid mode. You must steer the eMTB using both hands in pushing aid mode.
Brose Remote operating system
8
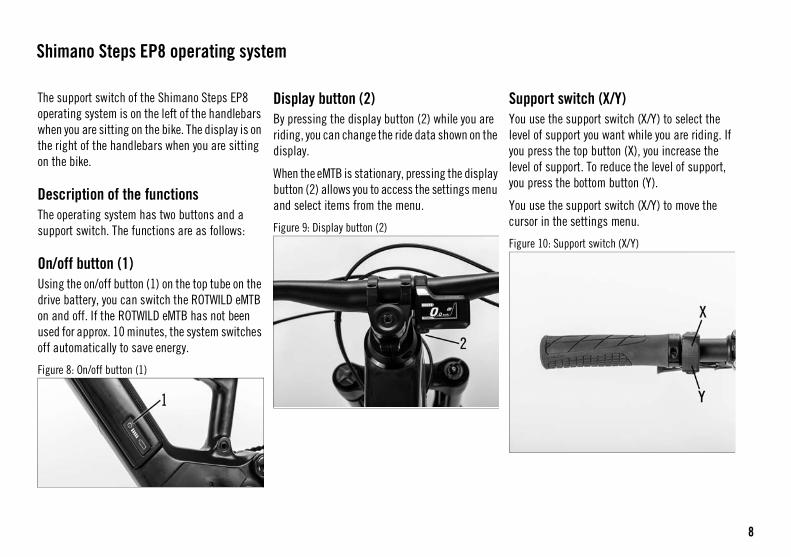
The support switch of the Shimano Steps EP8 operating system is on the left of the handlebars when you are sitting on the bike. The display is on the right of the handlebars when you are sitting on the bike.
Description of the functionsThe operating system has two buttons and a support switch. The functions are as follows:
On/off button (1)Using the on/off button (1) on the top tube on the drive battery, you can switch the ROTWILD eMTB on and off. If the ROTWILD eMTB has not been used for approx. 10 minutes, the system switches off automatically to save energy.
Figure 8: On/off button (1)
Display button (2)By pressing the display button (2) while you are riding, you can change the ride data shown on the display.
When the eMTB is stationary, pressing the display button (2) allows you to access the settings menu and select items from the menu.
Figure 9: Display button (2)
Support switch (X/Y)You use the support switch (X/Y) to select the level of support you want while you are riding. If you press the top button (X), you increase the level of support. To reduce the level of support, you press the bottom button (Y).
You use the support switch (X/Y) to move the cursor in the settings menu.
Figure 10: Support switch (X/Y)
Shimano Steps EP8 operating system
9
Settings menuOn the settings menu you can choose different options. Using the (Light) menu item, you can switch the lights on and off, if your bike has this option. The (Unit) menu item allows you to switch between metric and imperial measurements.
You cannot access the settings menu while you are riding.
Pushing aid modeYou switch on pushing aid mode by pressing and holding the bottom button in the support switch (Y) for around 2 seconds. The level of support shown in the display changes to (WALK). Pushing aid mode only continues working while you hold down the bottom button in the support switch (Y). As soon as you release the bottom button in the support switch (Y), pushing aid mode stops. To end pushing aid mode, you press the top button in the support switch (X). The level of support in the display changes from (WALK) to the support mode you had selected before switching to pushing aid mode.
Using pushing aid mode. You must steer the eMTB using both hands in pushing aid mode.
Please note that because of the design of the bike, the pedals may turn, so you should leave enough space for them to move. The power and speed of pushing aid mode can be adjusted by selecting a different gear.

10
R.G375 PROSUSPENSION ELEMENT FOX FLOAT X2 LSC/LSR 2-POS LEVERPERFORMANCE 230x 65
HEADSET ACROS RW375 1.5 HEADSET W/ BLOCKLOCK
FORK FOX 38 FLOAT 180 FIT GRIP2 HSC/LSC HSR/LSR PERFORMANCE ELITE E-TUNED
HANDLEBARS E13 PLUS AL7050 I.C.R (20-780)
STEM E13 PLUS 35 AL7050 I.C.R. (50)
DISPLAY SHIMANO EP800
SEAT POST E13 VARIO COVERT INFINITE (INDIVIDUAL - UP TO 260(XL))
SADDLE ERGON SM ENDURO COMP
HANDLEBAR GRIPS ERGON GD10 SLIM FACTORY FROZEN
DRIVE TRAIN SHIMANO EP8
BATTERY IPU375 QR CARBON // 4,5A CHARGER
CRANK E13 PLUS (160(M)/165(L/XL)) // E13 DIRECT MOUNT CHAINRING 34T.
CHAIN GUIDE E13 TRS
SHIFTING LEVER SHIMANO XT I-SPEC EV
REAR DERAILLEUR SHIMANO XT 8100 SGS STANDARD PLUS
CHAIN SHIMANO HG 7100
CASSETTE SHIMANO CS 6100 10-51T. 12-SPEED
BRAKES MAGURA MT5 HC-W / SHIFTMIX
DISC ROTOR MAGURA MDR-P SENSOR 220/203
WHEELS CRANKBROTHERS SYNTHESIS ENDURO110-15/148-12 TAS 6-BOLT
TYRES SCHWALBE MAGIC MARY / BIG BETTY EVOSUPER GROUND / TRAIL TLE SOFT 29x 2.40
COLOUR MAHOGANY METALLIC
TOTAL PERMITTED W ASTM4 - 130 KG
Technical data

11
R.E375 CORE PROSUSPENSION ELEMENT FOX FLOAT X 3-POS PERFORMANCE 230x 60 FOX FLOAT X 3-POS ADJUST FACTORY KASHIMA 230x 60
HEADSET ACROS RW375 1.5 HEADSET W/ BLOCKLOCK ACROS RW375 1.5 HEADSET W/ BLOCKLOCK
FORK FOX 36 FLOAT 170 FIT GRIP 3-POS MICRO ADJUST PERFORMANCE E-TUNED FOX 36 FLOAT 170 FIT4 3-POS ADJUST FACTORY KASHIMA E-TUNED
HANDLEBARS E13 PLUS AL7050 I.C.R (20-780) E13 PLUS AL7050 I.C.R (20-780)
STEM E13 PLUS 35 AL7050 I.C.R. (50) E13 PLUS 35 AL7050 I.C.R. (50)
DISPLAY SHIMANO EP800 SHIMANO EP800
SEAT POST E13 VARIO COVERT INFINITE (INDIVIDUAL - UP TO 260(XL)) E13 VARIO COVERT INFINITE (INDIVIDUAL - UP TO 260(XL))
SADDLE ERGON SM ENDURO COMP ERGON SM ENDURO COMP
HANDLEBAR GRIPS ERGON GD10 SLIM FACTORY FROZEN ERGON GD10 SLIM FACTORY FROZEN
DRIVE TRAIN SHIMANO EP8 SHIMANO EP8
BATTERY IPU375 QR CARBON // 4,5A CHARGER IPU375 QR CARBON // 4,5A CHARGER
CRANK E13 PLUS (160(M)/165(L/XL)) //E13 DIRECT MOUNT CHAINRING 34T. E13 PLUS (160(M)/165(L/XL)) //E13 DIRECT MOUNT CHAINRING 34T.
CHAIN GUIDE E13 TRS E13 TRS
SHIFTING LEVER SHIMANO XT I-SPEC EV SHIMANO XT I-SPEC EV
REAR DERAILLEUR SHIMANO XT 8100 SGS STANDARD PLUS SHIMANO XT 8100 SGS STANDARD PLUS
CHAIN SHIMANO HG 7100 SHIMANO HG 7100
CASSETTE SHIMANO CS 6100 10-51T. 12-SPEED SHIMANO CS 7100 10-51T. 12-SPEED
BRAKES MAGURA MT5 HC-W / SHIFTMIX SHIMANO XT 8120 FIN PAD
DISC ROTOR MAGURA MDR-P SENSOR 220/203 SHIMANO RT800/810 SENSOR ICE 203/203
WHEELS CRANKBROTHERS SYNTHESIS ENDURO110-15/148-12 TAS 6-BOLT CRANKBROTHERS SYNTHESIS ENDURO I9 110-15/148-12 TAS CL
TYRES SCHWALBE MAGIC MARY / HANS DAMPF EVO SUPER GROUND / TRAIL TLE SOFT 29x 2.40 SCHWALBE MAGIC MARY / HANS DAMPF EVO SUPER GROUND / TRAIL TLE SOFT 29x 2.40
COLOUR VOLCANO GRAY METALLIC VOLCANO GRAY METALLIC
TOTAL PERMITTED W ASTM4 - 130 KG ASTM4 - 130 KG

12
R.X375 CORE PRO SUSPENSION ELEMENT FOX FLOAT DPS 3-POS PERFORMANCE 210x50 FOX FLOAT DPS 3-POS PERFORMANCE 210x 50
HEADSET ACROS RW375 1.5 HEADSET W/ BLOCKLOCK ACROS RW375 1.5 HEADSET W/ BLOCKLOCK
FORK FOX 36 FLOAT 150 FIT GRIP 3-POS MICRO ADJUST PERFORMANCE E-TUNED FOX 36 FLOAT 150 FIT GRIP 3-POS MICRO ADJUST PERFORMANCE E-TUNED
HANDLEBARS ROTWILD B280 AL7075 (15-780) ROTWILD B220 CARBON (15-780)
STEM ROTWILD S140 AL7075 (50) ROTWILD S140 AL7075 (50)
DISPLAY SHIMANO EP800 SHIMANO EP800
SEAT POST E13 VARIO COVERT INFINITE (INDIVIDUAL - UP TO 260(XL)) 8PINS H01 (INDIVIDUAL - UP TO 200(XL))
SADDLE ERGON SM SPORT ERGON SM COMP
HANDLEBAR GRIPS ERGON GD10 SLIM FACTORY FROZEN ERGON GD10 SLIM FACTORY FROZEN
DRIVE TRAIN SHIMANO EP8 SHIMANO EP8
BATTERY IPU375 QR CARBON // 4,5A CHARGER IPU375 QR CARBON // 4,5A CHARGER
CRANK E13 PLUS (160(S)/165(M/L)/170(XL)) // E13 DIRECT MOUNT CHAINRING 34T. E13 PLUS (160(S)/165(M/L)/170(XL)) // E13 DIRECT MOUNT CHAINRING 34T.
CHAIN GUIDE E13 TRS E13 TRS
SHIFTING LEVER SHIMANO XT I-SPEC EV SHIMANO XT I-SPEC EV
REAR DERAILLEUR SHIMANO XT 8100 SGS STANDARD PLUS SHIMANO XT 8100 SGS STANDARD PLUS
CHAIN SHIMANO HG 7100 SHIMANO HG 7100
CASSETTE SHIMANO CS 6100 10-51T. 12-SPEED SHIMANO CS 7100 10-51T. 12-SPEED
BRAKES MAGURA MT5 HC-W / SHIFTMIX SHIMANO XT 8120 FIN PAD
DISC ROTOR MAGURA MDR-P SENSOR 203/180 SHIMANO RT800/810 SENSOR ICE 203/180
WHEELS CRANKBROTHERS SYNTHESIS ENDURO (31.5/29.5)110-15/148-12 TAS 6-BOLT CRANKBROTHERS SYNTHESIS ENDURO I9 (31.5/29.5)110-15/148-12 TAS CL
TYRES SCHWALBE NOBBY NIC EVOSUPER GROUND TLE SPEEDGRIP 29x 2.4 SCHWALBE NOBBY NIC EVOSUPER GROUND TLE SPEEDGRIP 29x 2.4
COLOUR RED METALLIC RED METALLIC
TOTAL PERMITTED WEIGHT ASTM4 - 130 KG ASTM4 - 130 KG

13
R.X375 ULTRA SUSPENSION ELEMENT FOX FLOAT DPS 3-POS FACTORY KASHIMA 210x 50
HEADSET ACROS RW375 1.5 HEADSET W/ BLOCKLOCK
FORK FOX 36 FLOAT 150 FIT4 3-POS ADJUST FACTORY KASHIMA E-TUNED
HANDLEBARS ROTWILD B220 CARBON (15-780)
STEM ROTWILD S140 AL7075 (50)
DISPLAY SHIMANO EP800
SEAT POST 8PINS NGS2.0 (INDIVIDUAL - UP TO 230(XL))
SADDLE ERGON SM PRO
HANDLEBAR GRIPS ERGON GD10 SLIM FACTORY FROZEN
DRIVE TRAIN SHIMANO EP8
BATTERY IPU375 QR CARBON // 4,5A CHARGER
CRANK E13 RACE CARBON (160(S)/165(M/L)/170(XL)) // E13 DIRECT MOUNT CHAINRING 34T.
CHAIN GUIDE E13 TRS
SHIFTING LEVER SHIMANO XTR I-SPEC EV
REAR DERAILLEUR SHIMANO XTR 9100 SGS STANDARD PLUS
CHAIN SHIMANO HG 7100
CASSETTE SHIMANO CS 9100 10-51T. 12-SPEED
BRAKES SHIMANO XTR 9120 FIN PAD
DISC ROTOR SHIMANO RT900/910 SENSOR ICE 203/180
WHEELS CRANKBROTHERS SYNTHESIS ENDURO I9 CARBON (31.5/29.5)110-15/148-12 TAS CL
TYRES SCHWALBE NOBBY NIC EVOSUPER GROUND TLE SPEEDGRIP 29x 2.4
COLOUR RED METALLIC
TOTAL PERMITTED WEIGHT ASTM4 - 130 KG
14
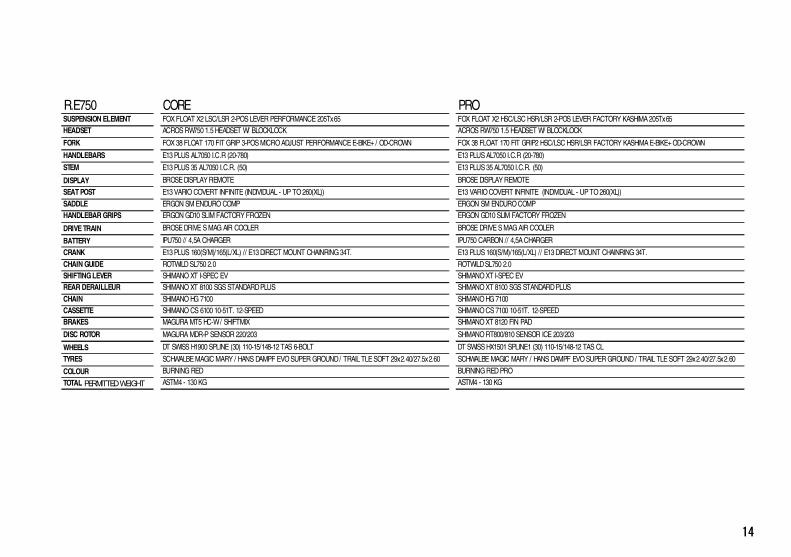
R.E750 CORE PROSUSPENSION ELEMENT FOX FLOAT X2 LSC/LSR 2-POS LEVER PERFORMANCE 205Tx65 FOX FLOAT X2 HSC/LSC HSR/LSR 2-POS LEVER FACTORY KASHIMA 205Tx65
HEADSET ACROS RW750 1.5 HEADSET W/ BLOCKLOCK ACROS RW750 1.5 HEADSET W/ BLOCKLOCK
FORK FOX 38 FLOAT 170 FIT GRIP 3-POS MICRO ADJUST PERFORMANCE E-BIKE+ / OD-CROWN FOX 38 FLOAT 170 FIT GRIP2 HSC/LSC HSR/LSR FACTORY KASHIMA E-BIKE+ OD-CROWN
HANDLEBARS E13 PLUS AL7050 I.C.R (20-780) E13 PLUS AL7050 I.C.R (20-780)
STEM E13 PLUS 35 AL7050 I.C.R. (50) E13 PLUS 35 AL7050 I.C.R. (50)
DISPLAY BROSE DISPLAY REMOTE BROSE DISPLAY REMOTE
SEAT POST E13 VARIO COVERT INFINITE (INDIVIDUAL - UP TO 260(XL)) E13 VARIO COVERT INFINITE (INDIVIDUAL - UP TO 260(XL))
SADDLE ERGON SM ENDURO COMP ERGON SM ENDURO COMP
HANDLEBAR GRIPS ERGON GD10 SLIM FACTORY FROZEN ERGON GD10 SLIM FACTORY FROZEN
DRIVE TRAIN BROSE DRIVE S MAG AIR COOLER BROSE DRIVE S MAG AIR COOLER
BATTERY IPU750 // 4,5A CHARGER IPU750 CARBON // 4,5A CHARGER
CRANK E13 PLUS 160(S/M)/165(L/XL) // E13 DIRECT MOUNT CHAINRING 34T. E13 PLUS 160(S/M)/165(L/XL) // E13 DIRECT MOUNT CHAINRING 34T.
CHAIN GUIDE ROTWILD SL750 2.0 ROTWILD SL750 2.0
SHIFTING LEVER SHIMANO XT I-SPEC EV SHIMANO XT I-SPEC EV
REAR DERAILLEUR SHIMANO XT 8100 SGS STANDARD PLUS SHIMANO XT 8100 SGS STANDARD PLUS
CHAIN SHIMANO HG 7100 SHIMANO HG 7100
CASSETTE SHIMANO CS 6100 10-51T. 12-SPEED SHIMANO CS 7100 10-51T. 12-SPEED
BRAKES MAGURA MT5 HC-W / SHIFTMIX SHIMANO XT 8120 FIN PAD
DISC ROTOR MAGURA MDR-P SENSOR 220/203 SHIMANO RT800/810 SENSOR ICE 203/203
WHEELS DT SWISS H1900 SPLINE (30) 110-15/148-12 TAS 6-BOLT DT SWISS HX1501 SPLINE1 (30) 110-15/148-12 TAS CL
TYRES SCHWALBE MAGIC MARY / HANS DAMPF EVO SUPER GROUND / TRAIL TLE SOFT 29x2.40/27.5x2.60 SCHWALBE MAGIC MARY / HANS DAMPF EVO SUPER GROUND / TRAIL TLE SOFT 29x2.40/27.5x2.60
COLOUR BURNING RED BURNING RED PRO
TOTAL PERMITTED WEIGHT ASTM4 - 130 KG ASTM4 - 130 KG

15
R.X750 CORE PRO SUSPENSION ELEMENT FOX FLOAT X 3-POS EVOL LV PERFORMANCE 205Tx60 FOX FLOAT X 3-POS EVOL LV PERFORMANCE 205Tx60
HEADSET ACROS RW750 1.5 HEADSET W/ BLOCKLOCK ACROS RW750 1.5 HEADSET W/ BLOCKLOCK
FORK FOX 36 FLOAT 150 FIT GRIP 3-POS MICRO ADJUST PERFORMANCE E-BIKE+ FOX 36 FLOAT 150 FIT GRIP 3-POS MICRO ADJUST PERFORMANCE E-BIKE+
HANDLEBARS ROTWILD B280 AL7075 (15-780) ROTWILD B220 CARBON (15-780)
STEM ROTWILD S140 AL7075 (50) / ML-INTERFACE ROTWILD S140 AL7075 (50) / ML-INTERFACE
DISPLAY BROSE DISPLAY ALLROUND BROSE DISPLAY ALLROUND
SEAT POST E13 VARIO COVERT INFINITE (INDIVIDUAL - UP TO 260(XL)) 8PINS H01 (INDIVIDUAL - UP TO 200(XL))
SADDLE ERGON SM MOUNTAIN SPORT ERGON SM MOUNTAIN COMP
HANDLEBAR GRIPS ERGON GD10 SLIM FACTORY FROZEN ERGON GD10 SLIM FACTORY FROZEN
DRIVE TRAIN BROSE DRIVE S MAG AIR COOLER BROSE DRIVE S MAG AIR COOLER
BATTERY IPU750 // 4,5A CHARGER IPU750 CARBON // 4,5A CHARGER
CRANK E13 PLUS (160(S)/165(M/L)/170(XL)) // E13 DIRECT MOUNT CHAINRING 34T. E13 PLUS (160(S)/165(M/L)/170(XL)) // E13 DIRECT MOUNT CHAINRING 34T.
CHAIN GUIDE ROTWILD SL750 2.0 ROTWILD SL750 2.0
SHIFTING LEVER SHIMANO XT I-SPEC EV SHIMANO XT I-SPEC EV
REAR DERAILLEUR SHIMANO XT 8100 SGS STANDARD PLUS SHIMANO XT 8100 SGS STANDARD PLUS
CHAIN SHIMANO HG 7100 SHIMANO HG 7100
CASSETTE SHIMANO CS 6100 10-51T. 12-SPEED SHIMANO CS 7100 10-51T. 12-SPEED
BRAKES MAGURA MT5 HC-W / SHIFTMIX SHIMANO XT 8120 FIN PAD
DISC ROTOR MAGURA MDR-P SENSOR 203/203 SHIMANO RT800/810 SENSOR ICE 203/203
WHEELS DT SWISS H1900 SPLINE (30) 110-15/148-12 TAS 6-BOLT DT SWISS HX1501 SPLINE1 (30) 110-15/148-12 TAS CL
TYRES SCHWALBE MAGIC MARY / HANS DAMPF EVO SUPER GROUND / TRAIL TLE SOFT 29x2.40/27.5x2.60 SCHWALBE MAGIC MARY / HANS DAMPF EVO SUPER GROUND / TRAIL TLE SOFT 29x2.40/27.5x2.60
COLOUR RED CORE RED PRO
TOTAL PERMITTED WEIGHT ASTM4 - 130 KG ASTM4 - 130 KG
16
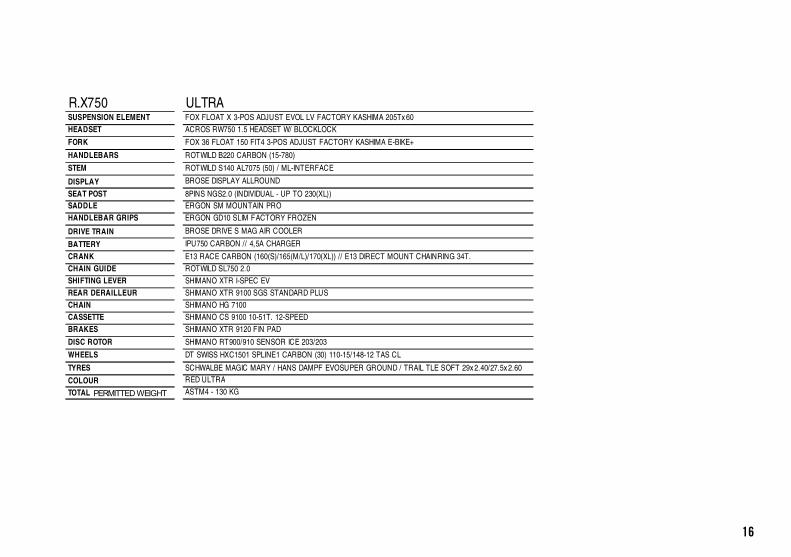
R.X750 ULTRA SUSPENSION ELEMENT FOX FLOAT X 3-POS ADJUST EVOL LV FACTORY KASHIMA 205Tx 60
HEADSET ACROS RW750 1.5 HEADSET W/ BLOCKLOCK
FORK FOX 36 FLOAT 150 FIT4 3-POS ADJUST FACTORY KASHIMA E-BIKE+
HANDLEBARS ROTWILD B220 CARBON (15-780)
STEM ROTWILD S140 AL7075 (50) / ML-INTERFACE
DISPLAY BROSE DISPLAY ALLROUND
SEAT POST 8PINS NGS2.0 (INDIVIDUAL - UP TO 230(XL))
SADDLE ERGON SM MOUNTAIN PRO
HANDLEBAR GRIPS ERGON GD10 SLIM FACTORY FROZEN
DRIVE TRAIN BROSE DRIVE S MAG AIR COOLER
BATTERY IPU750 CARBON // 4,5A CHARGER
CRANK E13 RACE CARBON (160(S)/165(M/L)/170(XL)) // E13 DIRECT MOUNT CHAINRING 34T.
CHAIN GUIDE ROTWILD SL750 2.0
SHIFTING LEVER SHIMANO XTR I-SPEC EV
REAR DERAILLEUR SHIMANO XTR 9100 SGS STANDARD PLUS
CHAIN SHIMANO HG 7100
CASSETTE SHIMANO CS 9100 10-51T. 12-SPEED
BRAKES SHIMANO XTR 9120 FIN PAD
DISC ROTOR SHIMANO RT900/910 SENSOR ICE 203/203
WHEELS DT SWISS HXC1501 SPLINE1 CARBON (30) 110-15/148-12 TAS CL
TYRES SCHWALBE MAGIC MARY / HANS DAMPF EVOSUPER GROUND / TRAIL TLE SOFT 29x 2.40/27.5x 2.60
COLOUR RED ULTRA
TOTAL PERMITTED WEIGHT ASTM4 - 130 KG

17
R.C750 CORE PRO SUSPENSION ELEMENT DT SWISS R535 ONE LINEAIR / INCONTROL 185Tx55 DT SWISS R535 ONE LINEAIR / INCONTROL 185Tx55
HEADSET ACROS RW750 1.5 HEADSET W/ BLOCKLOCK ACROS RW750 1.5 HEADSET W/ BLOCKLOCK
FORK DT SWISS F535 ONE 140 APT LINEAIR/COILPAIR / INCONTROL/PLUSHPORT DT SWISS F535 ONE 140 APT LINEAIR/COILPAIR / INCONTROL/PLUSHPORT
HANDLEBARS ROTWILD B280 AL7075 (35-740/740/780/780) ROTWILD B280 AL7075 (35-740/740/780/780)
STEM ROTWILD S240 AL6061 (50) / ML-INTERFACE ROTWILD S240 AL6061 (50) / ML-INTERFACE
DISPLAY BROSE DISPLAY ALLROUND BROSE DISPLAY ALLROUND
SEAT POST CRANKBROTHERS HIGHLINE 3 (UP TO 125(S)/150(M/L/XL) TRAVEL) 8PINS H01 (INDIVIDUAL - UP TO 200(XL))
SADDLE ERGON SM MOUNTAIN SPORT ERGON SM MOUNTAIN COMP
HANDLEBAR GRIPS ERGON GA30 SPORTIVE WING ERGON GA30 SPORTIVE WING
DRIVE TRAIN BROSE DRIVE S MAG AIR COOLER BROSE DRIVE S MAG AIR COOLER
BATTERY IPU750 // 4,5A CHARGER IPU750 CARBON // 4,5A CHARGER
CRANK E13 PLUS (165(S/M)/170(L/XL)) // E13 DIRECT MOUNT CHAINRING 36T. E13 PLUS (165(S/M)/170(L/XL)) // E13 DIRECT MOUNT CHAINRING 36T.
CHAIN GUIDE ROTWILD SL750 2.0 ROTWILD SL750 2.0
SHIFTING LEVER SHIMANO XT I-SPEC EV SHIMANO XT I-SPEC EV
REAR DERAILLEUR SHIMANO XT 8100 SGS STANDARD PLUS SHIMANO XT 8100 SGS STANDARD PLUS
CHAIN SHIMANO HG 7100 SHIMANO HG 7100
CASSETTE SHIMANO CS 6100 10-51T. 12-SPEED SHIMANO CS 7100 10-51T. 12-SPEED
BRAKES MAGURA MT5 HC-W / SHIFTMIX SHIMANO XT 8120 FIN PAD
DISC ROTOR MAGURA MDR-P SENSOR 203/203 SHIMANO RT800/810 SENSOR ICE 203/203
WHEELS DT SWISS H1900 SPLINE (30) 110-15/148-12 TAS 6-BOLT DT SWISS HX1700 SPLINE (30) 110-15/148-12 TAS CL
TYRES SCHWALBE NOBBY NIC EVO SUPER GROUND TLE SPEEDGRIP 29x2.4 SCHWALBE NOBBY NIC EVO SUPER GROUND TLE SPEEDGRIP 29x2.4
COLOUR COOL WHITE COOL WHITE
TOTAL PERMITTED WEIGHT ASTM4 - 130 KG ASTM4 - 130 KG

18
R.C750 ULTRA SUSPENSION ELEMENT DT SWISS R535 ONE LINEAIR / INCONTROL 185Tx55
HEADSET ACROS RW750 1.5 HEADSET W/ BLOCKLOCK
FORK DT SWISS F535 ONE 140 APT LINEAIR/COILPAIR / INCONTROL/PLUSHPORT
HANDLEBARS ROTWILD B220 CARBON (15-780)
STEM ROTWILD S240 AL6061 (50) / ML-INTERFACE
DISPLAY BROSE DISPLAY ALLROUND
SEAT POST 8PINS NGS2.0 (INDIVIDUAL - UP TO 230(XL))
SADDLE ERGON SM MOUNTAIN PRO
HANDLEBAR GRIPS ERGON GA30 SPORTIVE WING
DRIVE TRAIN BROSE DRIVE S MAG AIR COOLER
BATTERY IPU750 CARBON // 4,5A CHARGER
CRANK E13 RACE CARBON (165(S/M)/170(L/XL)) // E13 DIRECT MOUNT CHAINRING 36T.
CHAIN GUIDE ROTWILD SL750 2.0
SHIFTING LEVER SHIMANO XTR I-SPEC EV
REAR DERAILLEUR SHIMANO XTR 9100 SGS STANDARD PLUS
CHAIN SHIMANO HG 7100
CASSETTE SHIMANO CS 8100 10-51T. 12-SPEED
BRAKES SHIMANO XTR 9120 FIN PAD
DISC ROTOR SHIMANO RT900/910 SENSOR ICE 203/203
WHEELS DT SWISS HXC1501 SPLINE1 CARBON (30) 110-15/148-12 TAS CL
TYRES SCHWALBE NOBBY NIC EVO SUPER GROUND TLE SPEEDGRIP 29x 2.4
COLOUR COOL WHITE
TOTAL PERMITTED WEIGHT ASTM4 - 130 KG

19
R.T750 FS TOUR
SUSPENSION ELEMENT FOX FLOAT DPS 3-POS PERFORMANCE 185Tx 50
HEADSET ACROS RW750 1.5 HEADSET W/ BLOCKLOCK
FORK FOX 34 AWL 140 FIT GRIP SWEEP ADJUST PERFORMANCE E-BIKE+
HANDLEBARS ROTWILD B280 AL7075 (35-740/740/780/780)
STEM ROTWILD S240 AL6061(50)
DISPLAY BROSE DISPLAY ALLROUND
SEAT POST CRANKBROTHERS HIGHLINE 3 (UP TO 100(S)/125(M/L/XL))
SADDLE ERGON SMC MOUNTAIN COMFORT GEL
HANDLEBAR GRIPS ERGON GA30 SPORTIVE WING
DRIVE TRAIN BROSE DRIVE S MAG AIR COOLER
BATTERY IPU750 // 4,5A CHARGER
CRANK E13 PLUS (165(S)/170(M/L/XL)) // E13 DIRECT MOUNT CHAINRING 36T.
CHAIN GUIDE ROTWILD SL750 2.0
SHIFTING LEVER SHIMANO XT I-SPEC EV
REAR DERAILLEUR SHIMANO XT 8130 LINKGLIDE SHADOW RD+
CHAIN SHIMANO LG 500
CASSETTE SHIMANO LG 600 11-50T. 11-SPEED
BRAKES TRP C2.3
DISC ROTOR RC01E 2.3 / MAGNET SENSOR 203/203
WHEELS DT SWISS H1900 SPLINE (30) 110-15QR/148-12 TA CL
TYRES SCHWALBE RACING RAY / RACING RALPH EVO SUPER TERRAIN TLE 29x 2.35
CITY KIT
SUPERNOVA M99 MINI PRO HIGH BEAM
SUPERNOVA M99 TL2 LED TAIL LIGHT
CURANA FENDER / PANNIER CARRIER
BELL
KICKSTAND
COLOUR BLACK
TOTAL PERMITTED WEIGHT ASTM2 - 150 KG
20
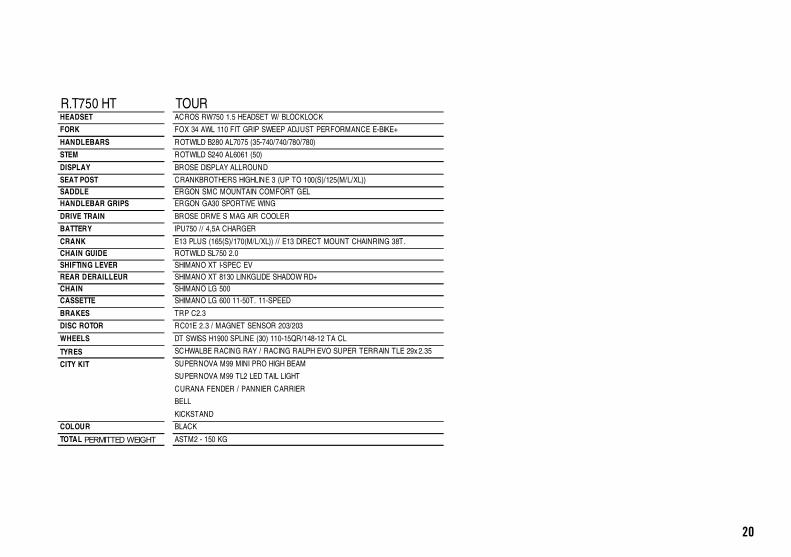
R.T750 HT TOUR HEADSET ACROS RW750 1.5 HEADSET W/ BLOCKLOCK
FORK FOX 34 AWL 110 FIT GRIP SWEEP ADJUST PERFORMANCE E-BIKE+
HANDLEBARS ROTWILD B280 AL7075 (35-740/740/780/780)
STEM ROTWILD S240 AL6061 (50)
DISPLAY BROSE DISPLAY ALLROUND
SEAT POST CRANKBROTHERS HIGHLINE 3 (UP TO 100(S)/125(M/L/XL))
SADDLE ERGON SMC MOUNTAIN COMFORT GEL
HANDLEBAR GRIPS ERGON GA30 SPORTIVE WING
DRIVE TRAIN BROSE DRIVE S MAG AIR COOLER
BATTERY IPU750 // 4,5A CHARGER
CRANK E13 PLUS (165(S)/170(M/L/XL)) // E13 DIRECT MOUNT CHAINRING 38T.
CHAIN GUIDE ROTWILD SL750 2.0
SHIFTING LEVER SHIMANO XT I-SPEC EV
REAR DERAILLEUR SHIMANO XT 8130 LINKGLIDE SHADOW RD+
CHAIN SHIMANO LG 500
CASSETTE SHIMANO LG 600 11-50T. 11-SPEED
BRAKES TRP C2.3
DISC ROTOR RC01E 2.3 / MAGNET SENSOR 203/203
WHEELS DT SWISS H1900 SPLINE (30) 110-15QR/148-12 TA CL
TYRES SCHWALBE RACING RAY / RACING RALPH EVO SUPER TERRAIN TLE 29x 2.35
CITY KIT SUPERNOVA M99 MINI PRO HIGH BEAM
SUPERNOVA M99 TL2 LED TAIL LIGHT
CURANA FENDER / PANNIER CARRIER
BELL
KICKSTAND
COLOUR BLACK
TOTAL PERMITTED WEIGHT ASTM2 - 150 KG
21
Please note that you must only use the e-MTB as described in the section “Proper use of the eMTB". Find out about the intended use and maximum weight of your eMTB in this important section.
During the assembly and final inspection processes for eMTBs, we carry out several checks to ensure that they function properly. However, the functioning of your eMTB may have been affected during transport and it is possible that an unauthorised third party has worked on your eMTB.
The ROTWILD authorised dealer who supplies the eMTB will inform the rider or the operator about its functions at the latest during the handover process. The dealer will explain in particular about the electrical system and the correct use of the charger.
You must check over your eMTB before every ride.
The drive train starts unexpectedly.In order to prevent the drive train from starting
unexpectedly the first time you use the bike or during assembly work, the drive battery must be removed from the down tube.
The system must be completely switched off when you first use the bike and during care, maintenance and repairs to ensure that an accident does not occur.
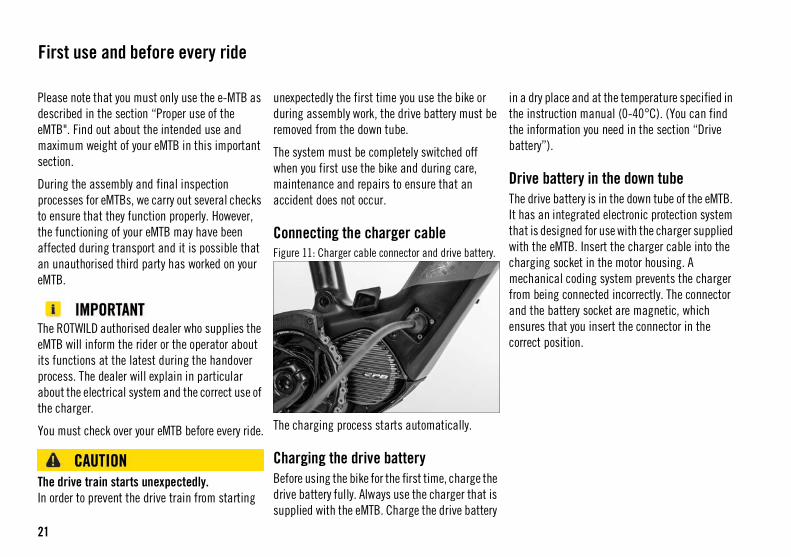
Connecting the charger cableFigure 11: Charger cable connector and drive battery.
The charging process starts automatically.
Charging the drive batteryBefore using the bike for the first time, charge the drive battery fully. Always use the charger that is supplied with the eMTB. Charge the drive battery
in a dry place and at the temperature specified in the instruction manual (0-40°C). (You can find the information you need in the section “Drive battery”).
Drive battery in the down tubeThe drive battery is in the down tube of the eMTB. It has an integrated electronic protection system that is designed for use with the charger supplied with the eMTB. Insert the charger cable into the charging socket in the motor housing. A mechanical coding system prevents the charger from being connected incorrectly. The connector and the battery socket are magnetic, which ensures that you insert the connector in the correct position.
First use and before every ride
22
The drive battery must only be charged using the charger supplied with the eMTB. If you use another charger, you could cause a fire or an explosion.
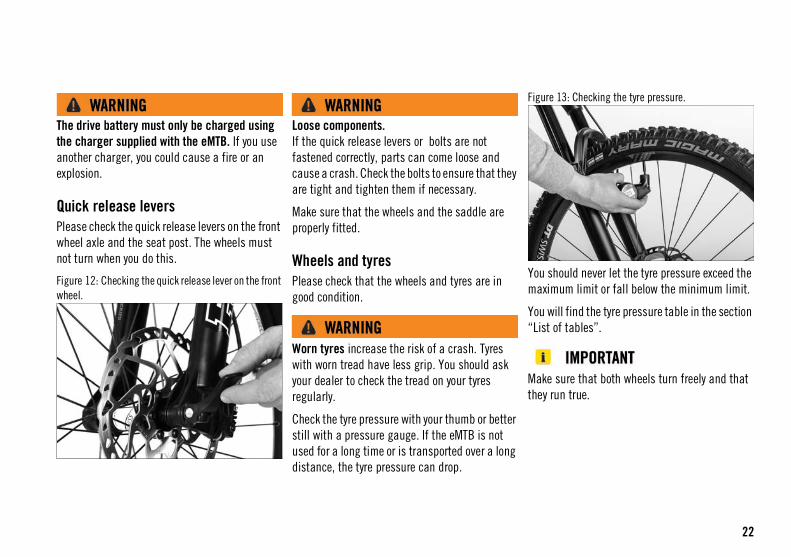
Quick release leversPlease check the quick release levers on the front wheel axle and the seat post. The wheels must not turn when you do this.
Figure 12: Checking the quick release lever on the front wheel.
Loose components. If the quick release levers or bolts are not fastened correctly, parts can come loose and cause a crash. Check the bolts to ensure that they are tight and tighten them if necessary.
Make sure that the wheels and the saddle are properly fitted.
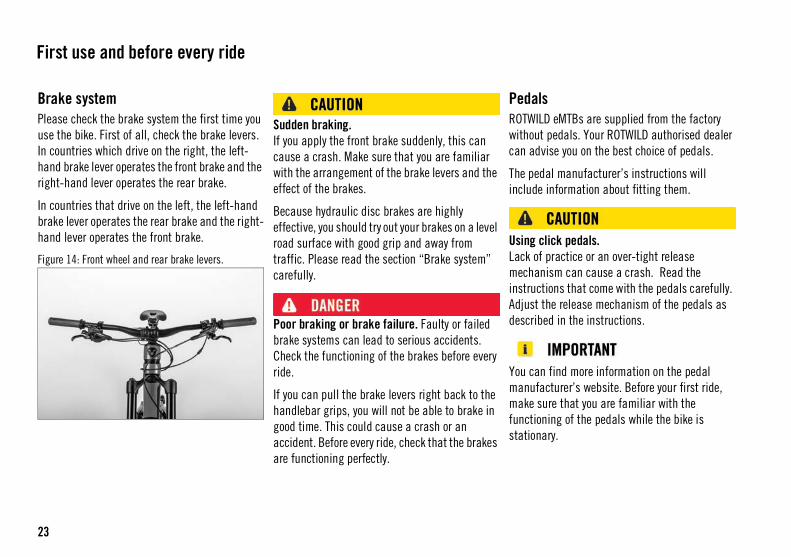
Wheels and tyresPlease check that the wheels and tyres are in good condition.
Worn tyres increase the risk of a crash. Tyres with worn tread have less grip. You should ask your dealer to check the tread on your tyres regularly.
Check the tyre pressure with your thumb or better still with a pressure gauge. If the eMTB is not used for a long time or is transported over a long distance, the tyre pressure can drop.
Figure 13: Checking the tyre pressure.
You should never let the tyre pressure exceed the maximum limit or fall below the minimum limit.
You will find the tyre pressure table in the section “List of tables”.
Make sure that both wheels turn freely and that they run true.
23
Brake systemPlease check the brake system the first time you use the bike. First of all, check the brake levers. In countries which drive on the right, the left-hand brake lever operates the front brake and the right-hand lever operates the rear brake.
In countries that drive on the left, the left-hand brake lever operates the rear brake and the right-hand lever operates the front brake.
Figure 14: Front wheel and rear brake levers.
Sudden braking. If you apply the front brake suddenly, this can cause a crash. Make sure that you are familiar with the arrangement of the brake levers and the effect of the brakes.
Because hydraulic disc brakes are highly effective, you should try out your brakes on a level road surface with good grip and away from traffic. Please read the section “Brake system” carefully.
Poor braking or brake failure. Faulty or failed brake systems can lead to serious accidents. Check the functioning of the brakes before every ride.
If you can pull the brake levers right back to the handlebar grips, you will not be able to brake in good time. This could cause a crash or an accident. Before every ride, check that the brakes are functioning perfectly.
PedalsROTWILD eMTBs are supplied from the factory without pedals. Your ROTWILD authorised dealer can advise you on the best choice of pedals.
The pedal manufacturer’s instructions will include information about fitting them.
Using click pedals. Lack of practice or an over-tight release mechanism can cause a crash. Read the instructions that come with the pedals carefully. Adjust the release mechanism of the pedals as described in the instructions.
You can find more information on the pedal manufacturer’s website. Before your first ride, make sure that you are familiar with the functioning of the pedals while the bike is stationary.
First use and before every ride
24
Handlebars, stem and suspension forkYou can adjust the handlebars, stem and suspension fork to suit your requirements.
You can find detailed instructions on how to do this in the sections “Handlebars, stem, headset and saddle” on page 44 and “Adjusting the suspension fork” on page 49. Read these sections carefully to ensure that you make the adjustments correctly.
Heavy or stiff steering. If the steering is heavy or stiff, this can lead to a crash.
Make sure that the steering is light and the cables and brake hoses do not restrict the steering lock.
An incorrectly adjusted suspension fork can lead to a crash.Make sure that your suspension fork is correctly adjusted and has sufficient air. (You can find information about this in the section “Adjusting the suspension fork” on page 49).
Saddle height and positionYou can adjust the saddle height and position to suit your height and your preferences.
You can find further information on how to adjust your saddle in the section “Adjusting the saddle” on page 45.
Switching the drive system on and offUse the on/off button to switch the system on. The display field of the operating system shows that the system is ready for use.
Figure 15: On/off button (750)
Figure 16: On/off button (375)
When support mode is switched on, the drive system responds to the smallest pressure on the pedals.
You will find information about riding on public roads The section “Riding on public roads” on page 25 must be observed.
Before you ride on the roads, find out about any special requirements in your country.
25
Checking the boltsLift your eMTB about 10 cm off the ground with both wheels at the same height and let it fall vertically onto its tyres. If you hear any rattling noises, this can indicate that some components are loose.
Find out where the noises are coming from and check the screw connections, the positioning of the drive battery and the bearings. If you are in any doubt, contact your ROTWILD authorised dealer.
Riding on public roads
If you want to ride your ROTWILD eMTB on public roads, you must ensure that it has the equipment needed to meet the legal requirements in your country.
Incorrect or inadequate set-up of the eMTB. An eMTB that has been incorrectly or inadequately set up can cause a serious accident.
Do not use the eMTB if it does not meet one of the requirements in this section. If you have questions or are unsure about using your eMTB for the first time, contact your ROTWILD authorised dealer.
Fatigue damage and wear. Damage due to fatigue and wear can take the form of scratched, bent or cracked components or a poorly functioning eMTB. Components that have passed the end of their service life may suddenly fail. Check your eMTB regularly for signs of fatigue damage and wear. Replace the handlebar grips and plugs if they are damaged or worn. If you notice a problem, contact your ROTWILD authorised dealer.
First use and before every ride

26
Precautionary measures when riding in the dark. If you are riding at night or in poor visibility using lights, make sure that your lighting system meets the legal requirements in your country. Check that the front and rear lights are working properly.
Do not ride with dirty or damaged reflectors.
Precautionary measures in rain, snow or strong winds. Be aware that your eMTB may react or function differently in bad or extreme weather conditions. For example, your braking performance will be less good in wet weather and you should adapt your riding style accordingly. In snowy or icy conditions you could lose control of your ROTWILD eMTB and have a bad crash. Avoid riding your bike in extreme weather conditions. Only ride on suitable surfaces that have sufficient grip.
27
A crash can prevent your eMTB from functioning correctly and can also cause damage. After a crash you may not be able to use your bike again immediately. For this reason, you should carry out the following checks.
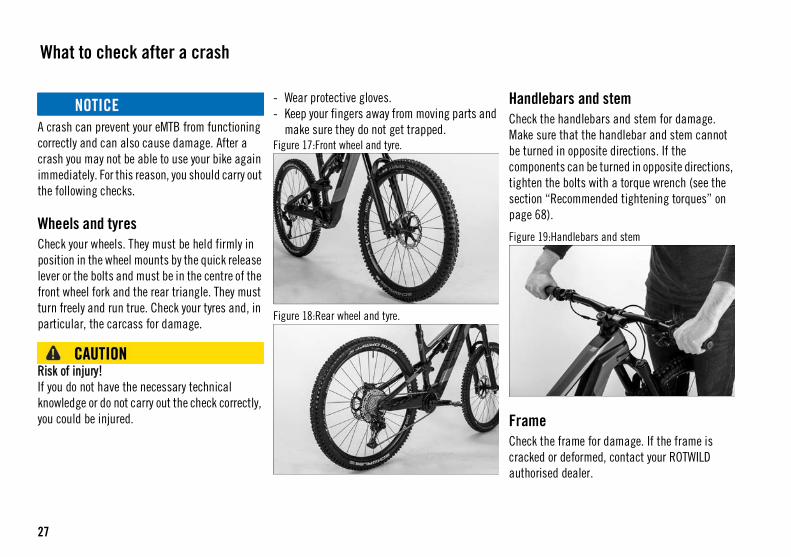
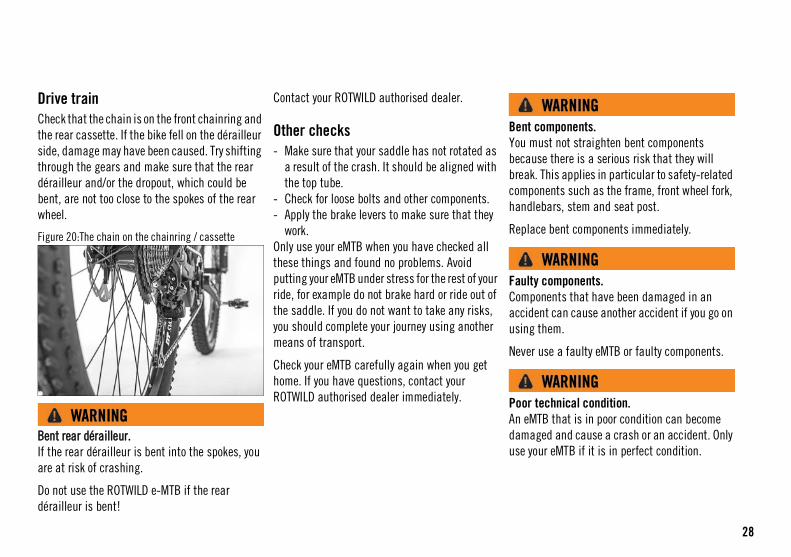
Wheels and tyresCheck your wheels. They must be held firmly in position in the wheel mounts by the quick release lever or the bolts and must be in the centre of the front wheel fork and the rear triangle. They must turn freely and run true. Check your tyres and, in particular, the carcass for damage.
Risk of injury! If you do not have the necessary technical knowledge or do not carry out the check correctly, you could be injured.
- Wear protective gloves.- Keep your fingers away from moving parts and
make sure they do not get trapped.Figure 17:Front wheel and tyre.
Figure 18:Rear wheel and tyre.
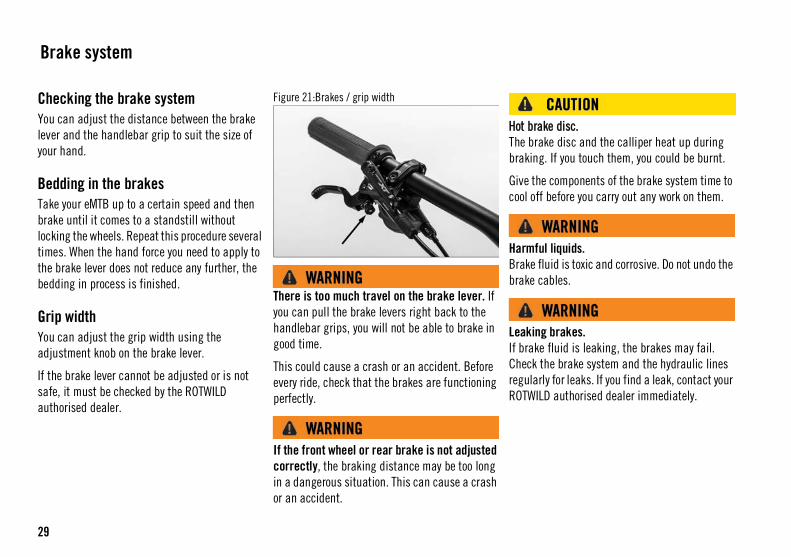
Handlebars and stemCheck the handlebars and stem for damage. Make sure that the handlebar and stem cannot be turned in opposite directions. If the components can be turned in opposite directions, tighten the bolts with a torque wrench (see the section “Recommended tightening torques” on page 68).
Figure 19:Handlebars and stem
FrameCheck the frame for damage. If the frame is cracked or deformed, contact your ROTWILD authorised dealer.
What to check after a crash
28
Drive trainCheck that the chain is on the front chainring and the rear cassette. If the bike fell on the dérailleur side, damage may have been caused. Try shifting through the gears and make sure that the rear dérailleur and/or the dropout, which could be bent, are not too close to the spokes of the rear wheel.
Figure 20:The chain on the chainring / cassette
Bent rear dérailleur.If the rear dérailleur is bent into the spokes, you are at risk of crashing.
Do not use the ROTWILD e-MTB if the rear dérailleur is bent!
Contact your ROTWILD authorised dealer.
Other checks- Make sure that your saddle has not rotated as
a result of the crash. It should be aligned with the top tube.
- Check for loose bolts and other components.- Apply the brake levers to make sure that they
work.Only use your eMTB when you have checked all these things and found no problems. Avoid putting your eMTB under stress for the rest of your ride, for example do not brake hard or ride out of the saddle. If you do not want to take any risks, you should complete your journey using another means of transport.
Check your eMTB carefully again when you get home. If you have questions, contact your ROTWILD authorised dealer immediately.
Bent components. You must not straighten bent components because there is a serious risk that they will break. This applies in particular to safety-related components such as the frame, front wheel fork, handlebars, stem and seat post.
Replace bent components immediately.
Faulty components. Components that have been damaged in an accident can cause another accident if you go on using them.
Never use a faulty eMTB or faulty components.
Poor technical condition. An eMTB that is in poor condition can become damaged and cause a crash or an accident. Only use your eMTB if it is in perfect condition.
29
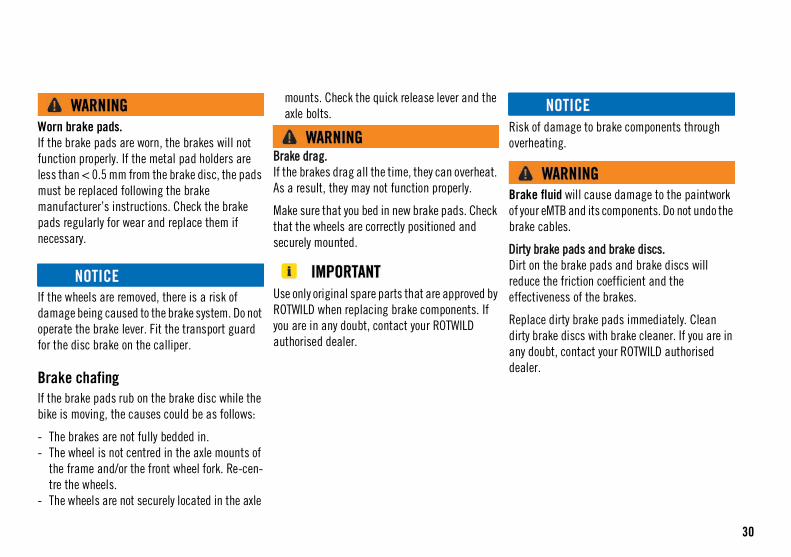
Checking the brake systemYou can adjust the distance between the brake lever and the handlebar grip to suit the size of your hand.
Bedding in the brakesTake your eMTB up to a certain speed and then brake until it comes to a standstill without locking the wheels. Repeat this procedure several times. When the hand force you need to apply to the brake lever does not reduce any further, the bedding in process is finished.
Grip widthYou can adjust the grip width using the adjustment knob on the brake lever.
If the brake lever cannot be adjusted or is not safe, it must be checked by the ROTWILD authorised dealer.
Figure 21:Brakes / grip width
There is too much travel on the brake lever. If you can pull the brake levers right back to the handlebar grips, you will not be able to brake in good time.
This could cause a crash or an accident. Before every ride, check that the brakes are functioning perfectly.
If the front wheel or rear brake is not adjusted correctly, the braking distance may be too long in a dangerous situation. This can cause a crash or an accident.
Hot brake disc.The brake disc and the calliper heat up during braking. If you touch them, you could be burnt.
Give the components of the brake system time to cool off before you carry out any work on them.
Harmful liquids.Brake fluid is toxic and corrosive. Do not undo the brake cables.
Leaking brakes. If brake fluid is leaking, the brakes may fail. Check the brake system and the hydraulic lines regularly for leaks. If you find a leak, contact your ROTWILD authorised dealer immediately.
Brake system
30
Worn brake pads. If the brake pads are worn, the brakes will not function properly. If the metal pad holders are less than < 0.5 mm from the brake disc, the pads must be replaced following the brake manufacturer’s instructions. Check the brake pads regularly for wear and replace them if necessary.
If the wheels are removed, there is a risk of damage being caused to the brake system. Do not operate the brake lever. Fit the transport guard for the disc brake on the calliper.
Brake chafingIf the brake pads rub on the brake disc while the bike is moving, the causes could be as follows:
- The brakes are not fully bedded in.- The wheel is not centred in the axle mounts of
the frame and/or the front wheel fork. Re-cen-tre the wheels.
- The wheels are not securely located in the axle
mounts. Check the quick release lever and the axle bolts.
Brake drag.If the brakes drag all the time, they can overheat. As a result, they may not function properly.
Make sure that you bed in new brake pads. Check that the wheels are correctly positioned and securely mounted.
Use only original spare parts that are approved by ROTWILD when replacing brake components. If you are in any doubt, contact your ROTWILD authorised dealer.
Risk of damage to brake components through overheating.
Brake fluid will cause damage to the paintwork of your eMTB and its components. Do not undo the brake cables.
Dirty brake pads and brake discs.Dirt on the brake pads and brake discs will reduce the friction coefficient and the effectiveness of the brakes.
Replace dirty brake pads immediately. Clean dirty brake discs with brake cleaner. If you are in any doubt, contact your ROTWILD authorised dealer.

31
Electric driveThe bikes described in this instruction manual are fitted with an integral electric drive system. This consists of a motor, a control panel of the drive system, a display, a rechargeable battery and an external charger that is designed for use with the drive battery.
The drive system operates automatically. As soon as the muscle power being exerted by the rider exceeds a certain level, the motor gradually starts up and provides assistance for the rider. If the rider stops pedalling or if the bike reaches the speed of 25 km/h, the motor gradually shuts down.
The bike has a pushing aid mode. In this mode, you can power the eMTB at walking speed while pressing the button on the handlebars that is provided for this purpose. If you release the button, the drive train switches off immediately.
Motor
Your eMTB will make an audible noise.
It is normal for you to hear noises from the electric motor. The noise your eMTB makes may change over time and under different loads.
If your motor vibrates or makes a lot of loud and unusual noises, it may be faulty. If the motor sounds different from normal, you should switch it off.
We recommend having your eMTB serviced regularly by your ROTWILD authorised dealer to ensure that it functions perfectly and to keep noise emissions to a minimum.
Mechanical driveThe mechanical drive train consists of all the components of the eMTB that convert your pedalling power into propulsion.
These include the chain ring, pedal cranks, pedals, cassette, rear dérailleur, geared hub and chain or belt pulleys and belt.
The dérailleur allows you to adjust the gear ratio and to determine how far your bike will travel for each rotation of the cranks.
With a dérailleur, selecting a large rear sprocket will give you a low gear ratio that makes riding uphill easier.
A medium-sized or small rear sprocket gives you higher gear ratio. These are ideal for travelling at higher speed on level ground.
A geared hub has several different gear ratios and a gear display.
Drive system
32
Chain and chainring.Wide-legged trousers can get caught in the chain or chainring and cause a crash. Wear tight-fitting trousers or use bicycle clips.
Shoe laces, scarves and other items of clothing can get trapped in the spokes and the chain.
Sudden loss of power and drive.If you change gear under load, the chain can slip or jump off the chain rings. The resulting sudden loss of power and drive can cause a crash. Continue pedalling without excessive force when changing gear.
CranksCheck to make sure that both cranks are securely fitted by shaking them. There should be no play.
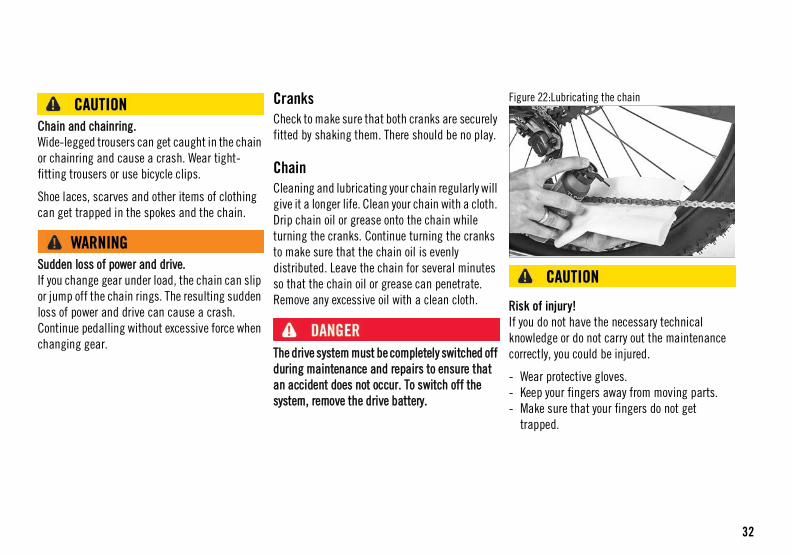
ChainCleaning and lubricating your chain regularly will give it a longer life. Clean your chain with a cloth. Drip chain oil or grease onto the chain while turning the cranks. Continue turning the cranks to make sure that the chain oil is evenly distributed. Leave the chain for several minutes so that the chain oil or grease can penetrate. Remove any excessive oil with a clean cloth.
The drive system must be completely switched off during maintenance and repairs to ensure that an accident does not occur. To switch off the system, remove the drive battery.
Figure 22:Lubricating the chain
Risk of injury!If you do not have the necessary technical knowledge or do not carry out the maintenance correctly, you could be injured.
- Wear protective gloves.- Keep your fingers away from moving parts.- Make sure that your fingers do not get
trapped.
33
Danger to the environment and risk of damage to property. Oil and grease can pollute the environment. Excess oil and grease can make your clothes and other items dirty while you are riding.
To reduce your impact on the environment, use only biodegradable lubricants. Place a tray under the bike to catch drips of oil.
Do not put any remaining oil or grease in your household waste bin. Dispose of it at a recycling centre.
Poor braking.Oil or grease on the brake pads and brake discs will reduce the friction coefficient and the effectiveness of the brakes.
Make sure that there is no oil or grease on the brakes.
Even if you maintain your chain regularly, it will still wear out. Chains will generally last for around 800 to 2500 km or for 40 to 125 hours of use.
Replacing your chain regularly can extend the life of your chain rings and cassettes.
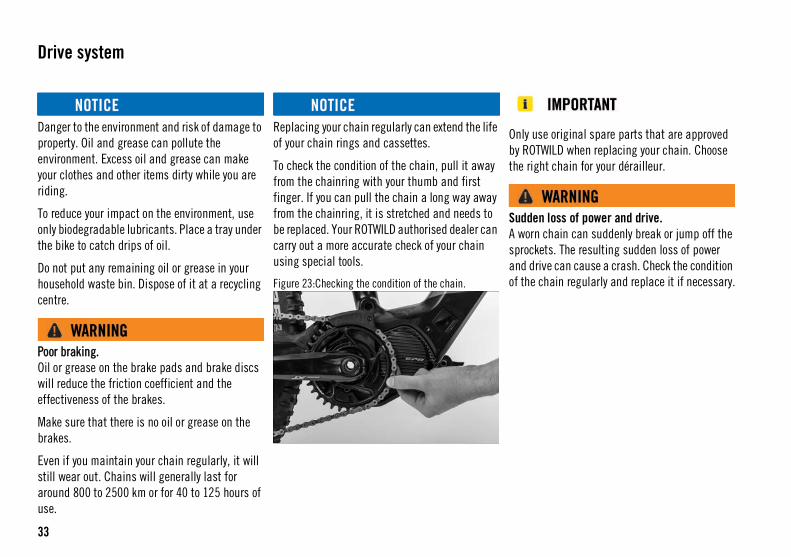
To check the condition of the chain, pull it away from the chainring with your thumb and first finger. If you can pull the chain a long way away from the chainring, it is stretched and needs to be replaced. Your ROTWILD authorised dealer can carry out a more accurate check of your chain using special tools.
Figure 23:Checking the condition of the chain.
Only use original spare parts that are approved by ROTWILD when replacing your chain. Choose the right chain for your dérailleur.
Sudden loss of power and drive. A worn chain can suddenly break or jump off the sprockets. The resulting sudden loss of power and drive can cause a crash. Check the condition of the chain regularly and replace it if necessary.
Drive system

34
Changing gearThe shifting lever for the rear dérailleur is on the right-hand side of the handlebars.
Each shifting lever has one large and one small lever. The large shifting lever is used to shift to the larger sprocket and the small lever to the smaller sprocket.
The correct pedalling frequency is between 70 and 90 revolutions per minute. You must choose the right gear in order for the electric drive system to function correctly.
Figure 24:The position of the shifting lever.
Adjusting the gear systemIf you cannot change gear cleanly, you need to make adjustments to the gear system on the shifting level housing. Gradually unscrew the adjuster on the shifting lever housing with your fingers and check the functioning of the gears after each turn.
To be able to turn the adjuster, you need to pull it out of position slightly. Make sure that it is back in position before you check the functioning of the gears.
If you cannot adjust the gear shifting using this method, the system must be checked by the ROTWILD authorised dealer.
Figure 25:Gear shifting and adjuster.
Gear system

35
Figure 26:Limit stop screw
The levers may be arranged differently depending on the model and the manufacturer. Read the instruction manual provided by the gear system manufacturer.
The arrangement of the low and high limit stop screws on the rear dérailleur may differ. It is essential that you read the instructions provided by the gear system manufacturer.
Incorrectly adjusted gear system.Problems with changing gear can distract you from what is happening on the road and from possible dangers. The result can be a crash or an accident.
Check the adjustment of the gear system on a test ride away from traffic.
You need technical knowledge to be able to adjust the rear dérailleur. Incorrect adjustments can cause mechanical damage. Read the instructions provided by the gear system manufacturer. If you have questions, contact your ROTWILD authorised dealer.
Put the bike in a suitable stand when making the adjustments. This allows the rear wheel to turn freely and enables you to shift through all the gears.
36
IPU375/IPU750The drive battery is in the down tube of the eMTB. It has an integrated electronic protection system that is designed for use with the charger supplied with the eMTB.
The drive battery and the charger must be kept out of the reach of children.
The drive battery in the down tube is only protected against splashes of water. You must never clean your eMTB with a pressure washer, a hose or compressed air.
You must not immerse your eMTB in water. This can cause a short circuit, malfunction, fire or explosion. If you think that there may be water in the drive battery, you must not use the eMTB.
Do not put paper clips, screws, coins, keys, other small objects or conductive materials in the drive battery charging socket.They can cause a short circuit in the drive battery. The battery could get hot, catch fire and explode.
If the drive battery is not used correctly, fluid could leak out of it. If you come into contact with the fluid, rinse it off with water. If you get the fluid in your eye, visit a doctor. The fluid can cause irritation and burns. If the battery emits vapour, ventilate the area well. Visit a doctor if the vapour causes problems. The vapour can irritate your airways.
If a crash or an accident causes external damage to the down tube, you must not use the eMTB. If the eMTB has survived an impact without external damage, the drive battery may still be damaged internally. In this case you must not use the eMTB for at least 24 hours and you must monitor it.
The electrical connections on the drive battery must only be cleaned with a dry cloth or a soft brush.
You must follow the legal regulations on handling, transporting and disposing of drive batteries.
Faulty batteries are classed as hazardous materials. They must not come into contact with water and must be stored in a dry place.
Drive battery
37
The lithium ion drive battery in your eMTB is classed as a hazardous material because of the risk of fire if there is a short circuit. It must be declared to be a hazardous material.
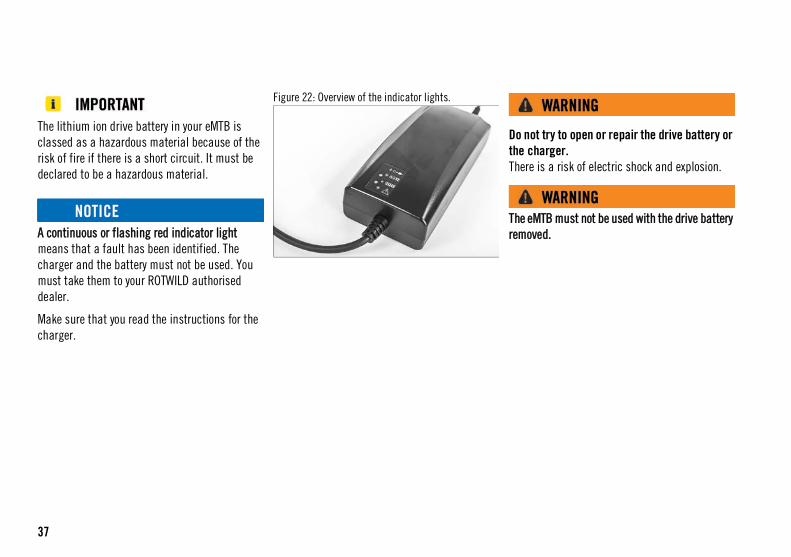
A continuous or flashing red indicator light means that a fault has been identified. The charger and the battery must not be used. You must take them to your ROTWILD authorised dealer.
Make sure that you read the instructions for the charger.
Figure 22: Overview of the indicator lights.
Do not try to open or repair the drive battery or the charger. There is a risk of electric shock and explosion.
The eMTB must not be used with the drive battery removed.
38
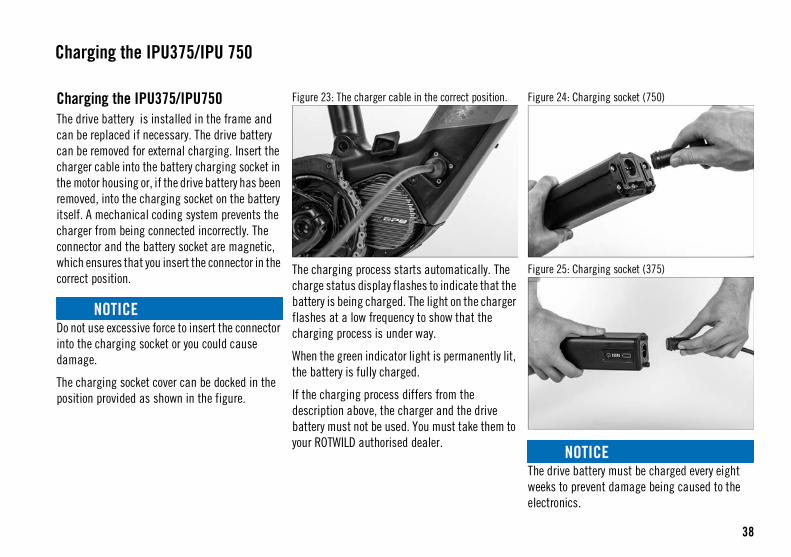
Charging the IPU375/IPU750The drive battery is installed in the frame and can be replaced if necessary. The drive battery can be removed for external charging. Insert the charger cable into the battery charging socket in the motor housing or, if the drive battery has been removed, into the charging socket on the battery itself. A mechanical coding system prevents the charger from being connected incorrectly. The connector and the battery socket are magnetic, which ensures that you insert the connector in the correct position.
Do not use excessive force to insert the connector into the charging socket or you could cause damage.
The charging socket cover can be docked in the position provided as shown in the figure.
Figure 23: The charger cable in the correct position.
The charging process starts automatically. The charge status display flashes to indicate that the battery is being charged. The light on the charger flashes at a low frequency to show that the charging process is under way.
When the green indicator light is permanently lit, the battery is fully charged.
If the charging process differs from the description above, the charger and the drive battery must not be used. You must take them to your ROTWILD authorised dealer.
Figure 24: Charging socket (750)
Figure 25: Charging socket (375)
The drive battery must be charged every eight weeks to prevent damage being caused to the electronics.
Charging the IPU375/IPU 750
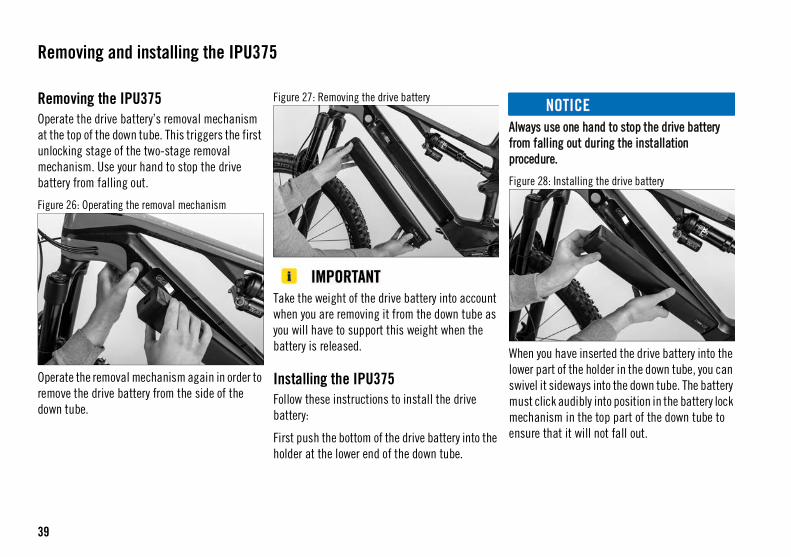
39
Removing the IPU375Operate the drive battery’s removal mechanism at the top of the down tube. This triggers the first unlocking stage of the two-stage removal mechanism. Use your hand to stop the drive battery from falling out.
Figure 26: Operating the removal mechanism
Operate the removal mechanism again in order to remove the drive battery from the side of the down tube.
Figure 27: Removing the drive battery
Take the weight of the drive battery into account when you are removing it from the down tube as you will have to support this weight when the battery is released.
Installing the IPU375Follow these instructions to install the drive battery:
First push the bottom of the drive battery into the holder at the lower end of the down tube.
Always use one hand to stop the drive battery from falling out during the installation procedure.
Figure 28: Installing the drive battery
When you have inserted the drive battery into the lower part of the holder in the down tube, you can swivel it sideways into the down tube. The battery must click audibly into position in the battery lock mechanism in the top part of the down tube to ensure that it will not fall out.
Removing and installing the IPU375
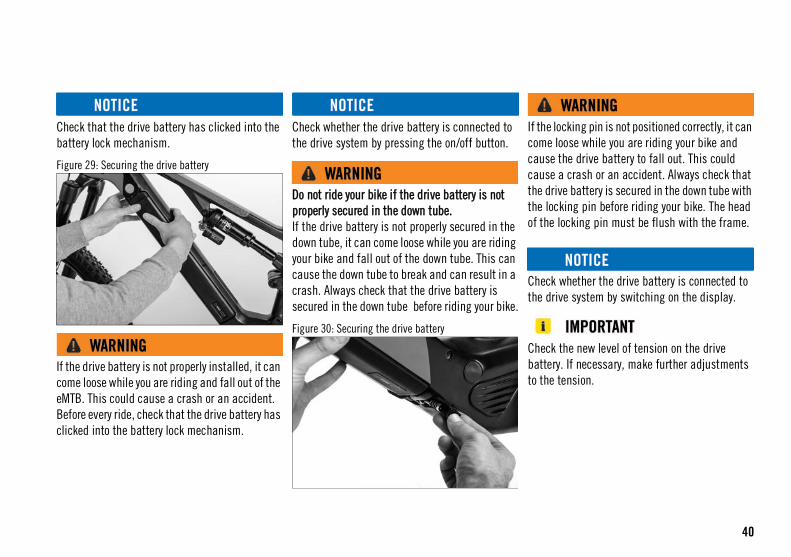
40
Check that the drive battery has clicked into the battery lock mechanism.
Figure 29: Securing the drive battery
If the drive battery is not properly installed, it can come loose while you are riding and fall out of the eMTB. This could cause a crash or an accident. Before every ride, check that the drive battery has clicked into the battery lock mechanism.
Check whether the drive battery is connected to the drive system by pressing the on/off button.
Do not ride your bike if the drive battery is not properly secured in the down tube. If the drive battery is not properly secured in the down tube, it can come loose while you are riding your bike and fall out of the down tube. This can cause the down tube to break and can result in a crash. Always check that the drive battery is secured in the down tube before riding your bike.
Figure 30: Securing the drive battery
If the locking pin is not positioned correctly, it can come loose while you are riding your bike and cause the drive battery to fall out. This could cause a crash or an accident. Always check that the drive battery is secured in the down tube with the locking pin before riding your bike. The head of the locking pin must be flush with the frame.
Check whether the drive battery is connected to the drive system by switching on the display.
Check the new level of tension on the drive battery. If necessary, make further adjustments to the tension.
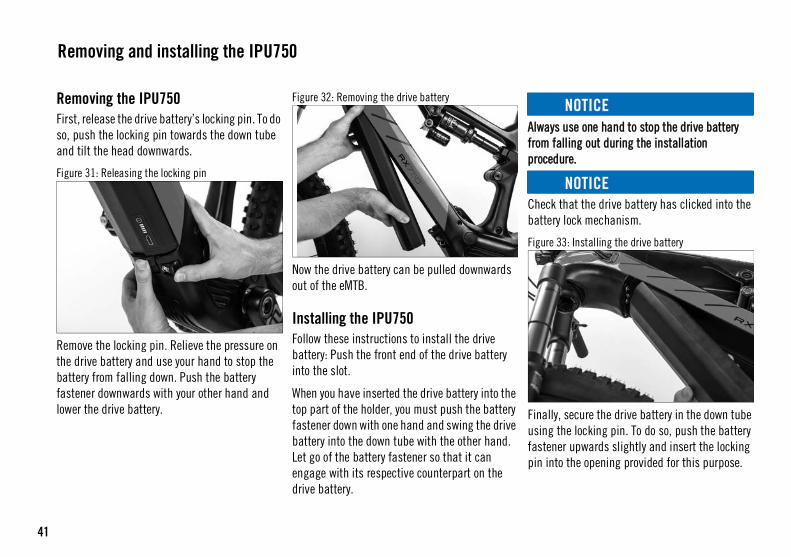
41
Removing the IPU750First, release the drive battery’s locking pin. To do so, push the locking pin towards the down tube and tilt the head downwards.
Figure 31: Releasing the locking pin
Remove the locking pin. Relieve the pressure on the drive battery and use your hand to stop the battery from falling down. Push the battery fastener downwards with your other hand and lower the drive battery.
Figure 32: Removing the drive battery
Now the drive battery can be pulled downwards out of the eMTB.
Installing the IPU750Follow these instructions to install the drive battery: Push the front end of the drive battery into the slot.
When you have inserted the drive battery into the top part of the holder, you must push the battery fastener down with one hand and swing the drive battery into the down tube with the other hand. Let go of the battery fastener so that it can engage with its respective counterpart on the drive battery.
Always use one hand to stop the drive battery from falling out during the installation procedure.
Check that the drive battery has clicked into the battery lock mechanism.
Figure 33: Installing the drive battery
Finally, secure the drive battery in the down tube using the locking pin. To do so, push the battery fastener upwards slightly and insert the locking pin into the opening provided for this purpose.
Removing and installing the IPU750
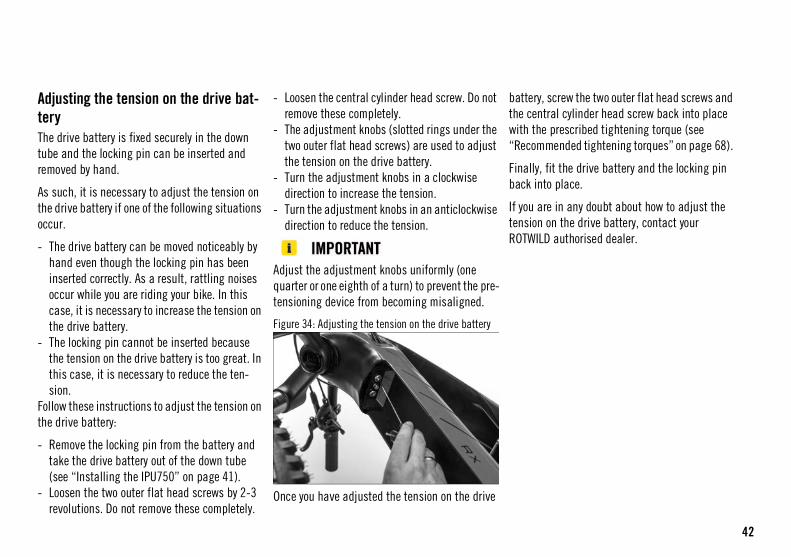
42
Adjusting the tension on the drive bat-teryThe drive battery is fixed securely in the down tube and the locking pin can be inserted and removed by hand.
As such, it is necessary to adjust the tension on the drive battery if one of the following situations occur.
- The drive battery can be moved noticeably by hand even though the locking pin has been inserted correctly. As a result, rattling noises occur while you are riding your bike. In this case, it is necessary to increase the tension on the drive battery.
- The locking pin cannot be inserted because the tension on the drive battery is too great. In this case, it is necessary to reduce the ten-sion.
Follow these instructions to adjust the tension on the drive battery:
- Remove the locking pin from the battery and take the drive battery out of the down tube (see “Installing the IPU750” on page 41).
- Loosen the two outer flat head screws by 2-3 revolutions. Do not remove these completely.
- Loosen the central cylinder head screw. Do not remove these completely.
- The adjustment knobs (slotted rings under the two outer flat head screws) are used to adjust the tension on the drive battery.
- Turn the adjustment knobs in a clockwise direction to increase the tension.
- Turn the adjustment knobs in an anticlockwise direction to reduce the tension.
Adjust the adjustment knobs uniformly (one quarter or one eighth of a turn) to prevent the pre-tensioning device from becoming misaligned.
Figure 34: Adjusting the tension on the drive battery
Once you have adjusted the tension on the drive
battery, screw the two outer flat head screws and the central cylinder head screw back into place with the prescribed tightening torque (see “Recommended tightening torques” on page 68).
Finally, fit the drive battery and the locking pin back into place.
If you are in any doubt about how to adjust the tension on the drive battery, contact your ROTWILD authorised dealer.

43
The ROTWILD eMTB is supplied with a charger manufactured by BMZ. The charger is designed for a 100-240 V and 50/60 Hz power supply and must only be used with this type of power supply. The mains plug on the charger must be plugged into a household electrical socket that is earthed. The yellow LED flashes at high frequency to show that the charger is ready for use. To avoid possible confusion, we recommend clearly labelling the charger and this instruction manual, for example with the frame number of the ROTWILD eMTB.
Figure 35: Charger
The drive battery must only be charged using the charger supplied with the eMTB. If you use another charger, you could cause a fire or an explosion.
Do not put paper clips, screws, coins, keys, other small objects or conductive materials in the drive battery charging socket.They can cause a short circuit in the drive battery.
Risk of electric shock caused by moisture.The charger must not be used outdoors. It must be stored and used in a dry, clean area. Make sure that you read the safety instructions on the charger.
The charger must be stored at a temperature between 5°C and 25°C. The ideal storage temperature is 10 °C-15 °C. The charger must only be used in a clean area that is free from dust. The temperature must be between 0°C and 40°C. The charger heats up during the charging process. The area must be clean and there must
not be any flammable materials nearby.
A continuous or flashing red indicator light means that a fault has been identified. The charger and the drive battery must not be used. You must take them to your ROTWILD authorised dealer.
Storing the eMTBIf the e-MTB will not be used for a period of at least four weeks, the drive battery must first be charged to between 60% and 80%.
The charger must not be left permanently connected to the eMTB.
Charger
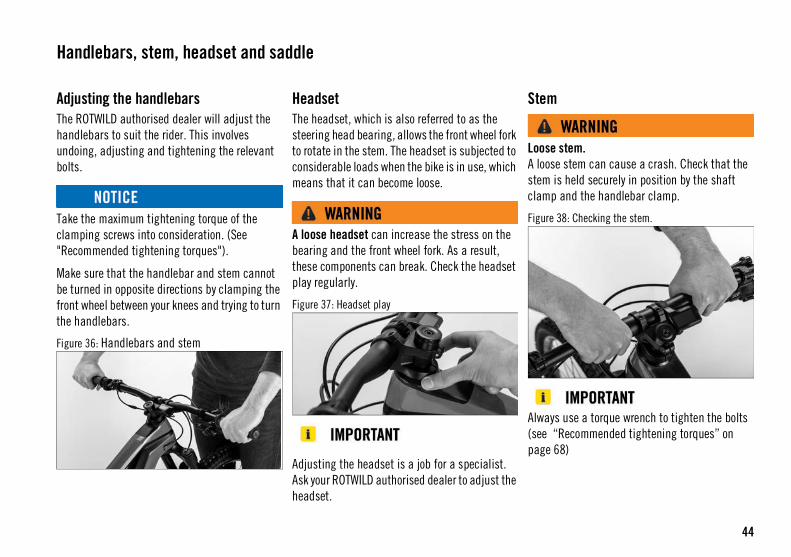
44
Adjusting the handlebarsThe ROTWILD authorised dealer will adjust the handlebars to suit the rider. This involves undoing, adjusting and tightening the relevant bolts.
Take the maximum tightening torque of the clamping screws into consideration. (See "Recommended tightening torques").
Make sure that the handlebar and stem cannot be turned in opposite directions by clamping the front wheel between your knees and trying to turn the handlebars.
Figure 36: Handlebars and stem
HeadsetThe headset, which is also referred to as the steering head bearing, allows the front wheel fork to rotate in the stem. The headset is subjected to considerable loads when the bike is in use, which means that it can become loose.
A loose headset can increase the stress on the bearing and the front wheel fork. As a result, these components can break. Check the headset play regularly.
Figure 37: Headset play
Adjusting the headset is a job for a specialist. Ask your ROTWILD authorised dealer to adjust the headset.
Stem
Loose stem. A loose stem can cause a crash. Check that the stem is held securely in position by the shaft clamp and the handlebar clamp.
Figure 38: Checking the stem.
Always use a torque wrench to tighten the bolts (see “Recommended tightening torques” on page 68)
Handlebars, stem, headset and saddle
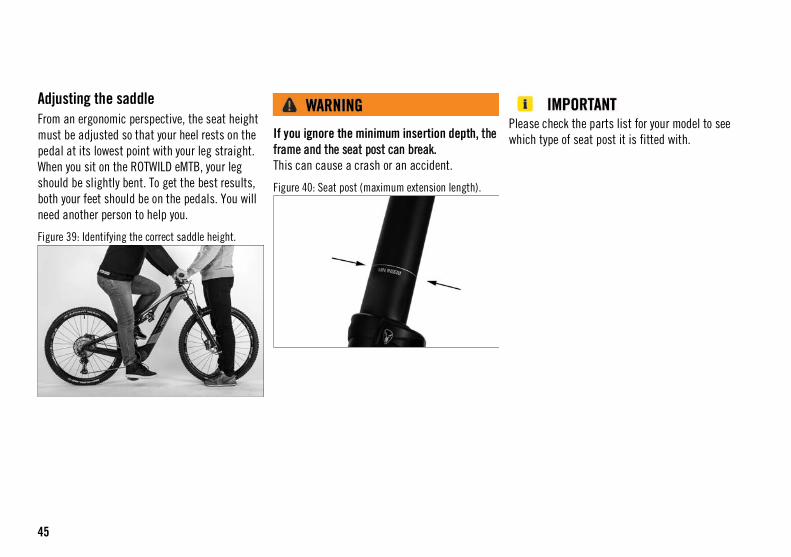
45
Adjusting the saddleFrom an ergonomic perspective, the seat height must be adjusted so that your heel rests on the pedal at its lowest point with your leg straight. When you sit on the ROTWILD eMTB, your leg should be slightly bent. To get the best results, both your feet should be on the pedals. You will need another person to help you.
Figure 39: Identifying the correct saddle height.
If you ignore the minimum insertion depth, the frame and the seat post can break.This can cause a crash or an accident.
Figure 40: Seat post (maximum extension length).
Please check the parts list for your model to see which type of seat post it is fitted with.
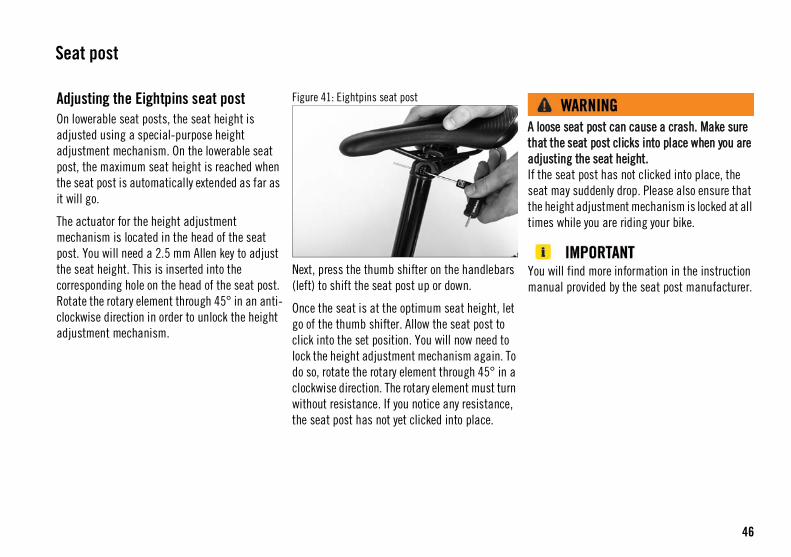
46
Adjusting the Eightpins seat postOn lowerable seat posts, the seat height is adjusted using a special-purpose height adjustment mechanism. On the lowerable seat post, the maximum seat height is reached when the seat post is automatically extended as far as it will go.
The actuator for the height adjustment mechanism is located in the head of the seat post. You will need a 2.5 mm Allen key to adjust the seat height. This is inserted into the corresponding hole on the head of the seat post. Rotate the rotary element through 45° in an anti-clockwise direction in order to unlock the height adjustment mechanism.
Figure 41: Eightpins seat post
Next, press the thumb shifter on the handlebars (left) to shift the seat post up or down.
Once the seat is at the optimum seat height, let go of the thumb shifter. Allow the seat post to click into the set position. You will now need to lock the height adjustment mechanism again. To do so, rotate the rotary element through 45° in a clockwise direction. The rotary element must turn without resistance. If you notice any resistance, the seat post has not yet clicked into place.
A loose seat post can cause a crash. Make sure that the seat post clicks into place when you are adjusting the seat height. If the seat post has not clicked into place, the seat may suddenly drop. Please also ensure that the height adjustment mechanism is locked at all times while you are riding your bike.
You will find more information in the instruction manual provided by the seat post manufacturer.
Seat post
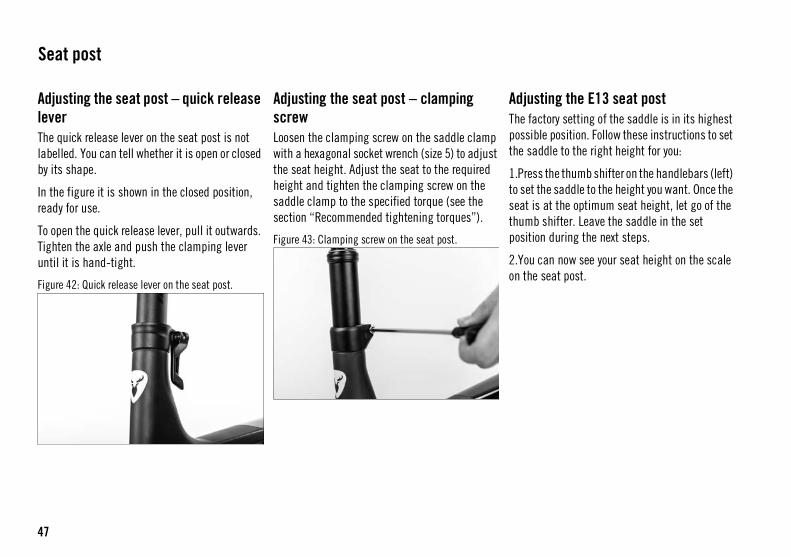
47
Adjusting the seat post – quick release leverThe quick release lever on the seat post is not labelled. You can tell whether it is open or closed by its shape.
In the figure it is shown in the closed position, ready for use.
To open the quick release lever, pull it outwards. Tighten the axle and push the clamping lever until it is hand-tight.
Figure 42: Quick release lever on the seat post.
Adjusting the seat post – clamping screwLoosen the clamping screw on the saddle clamp with a hexagonal socket wrench (size 5) to adjust the seat height. Adjust the seat to the required height and tighten the clamping screw on the saddle clamp to the specified torque (see the section “Recommended tightening torques”).
Figure 43: Clamping screw on the seat post.
Adjusting the E13 seat postThe factory setting of the saddle is in its highest possible position. Follow these instructions to set the saddle to the right height for you:
1.Press the thumb shifter on the handlebars (left) to set the saddle to the height you want. Once the seat is at the optimum seat height, let go of the thumb shifter. Leave the saddle in the set position during the next steps.
2.You can now see your seat height on the scale on the seat post.
Seat post
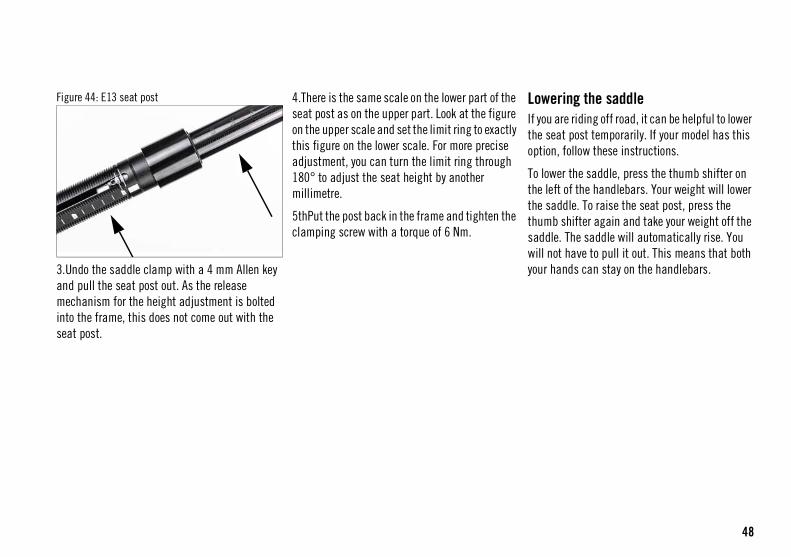
48
Figure 44: E13 seat post
3.Undo the saddle clamp with a 4 mm Allen key and pull the seat post out. As the release mechanism for the height adjustment is bolted into the frame, this does not come out with the seat post.
4.There is the same scale on the lower part of the seat post as on the upper part. Look at the figure on the upper scale and set the limit ring to exactly this figure on the lower scale. For more precise adjustment, you can turn the limit ring through 180° to adjust the seat height by another millimetre.
5thPut the post back in the frame and tighten the clamping screw with a torque of 6 Nm.
Lowering the saddleIf you are riding off road, it can be helpful to lower the seat post temporarily. If your model has this option, follow these instructions.
To lower the saddle, press the thumb shifter on the left of the handlebars. Your weight will lower the saddle. To raise the seat post, press the thumb shifter again and take your weight off the saddle. The saddle will automatically rise. You will not have to pull it out. This means that both your hands can stay on the handlebars.
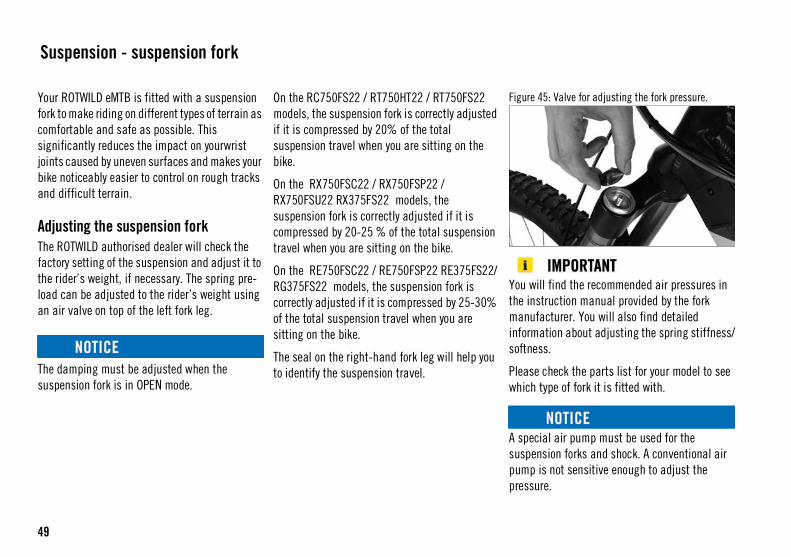
49
Your ROTWILD eMTB is fitted with a suspension fork to make riding on different types of terrain as comfortable and safe as possible. This significantly reduces the impact on yourwrist joints caused by uneven surfaces and makes your bike noticeably easier to control on rough tracks and difficult terrain.
Adjusting the suspension forkThe ROTWILD authorised dealer will check the factory setting of the suspension and adjust it to the rider’s weight, if necessary. The spring pre-load can be adjusted to the rider’s weight using an air valve on top of the left fork leg.
The damping must be adjusted when the suspension fork is in OPEN mode.
On the RC750FS22 / RT750HT22 / RT750FS22 models, the suspension fork is correctly adjusted if it is compressed by 20% of the total suspension travel when you are sitting on the bike.
On the RX750FSC22 / RX750FSP22 / RX750FSU22 RX375FS22 models, the suspension fork is correctly adjusted if it is compressed by 20-25 % of the total suspension travel when you are sitting on the bike.
On the RE750FSC22 / RE750FSP22 RE375FS22/RG375FS22 models, the suspension fork is correctly adjusted if it is compressed by 25-30% of the total suspension travel when you are sitting on the bike.
The seal on the right-hand fork leg will help you to identify the suspension travel.
Figure 45: Valve for adjusting the fork pressure.
You will find the recommended air pressures in the instruction manual provided by the fork manufacturer. You will also find detailed information about adjusting the spring stiffness/softness.
Please check the parts list for your model to see which type of fork it is fitted with.
A special air pump must be used for the suspension forks and shock. A conventional air pump is not sensitive enough to adjust the pressure.
Suspension - suspension fork
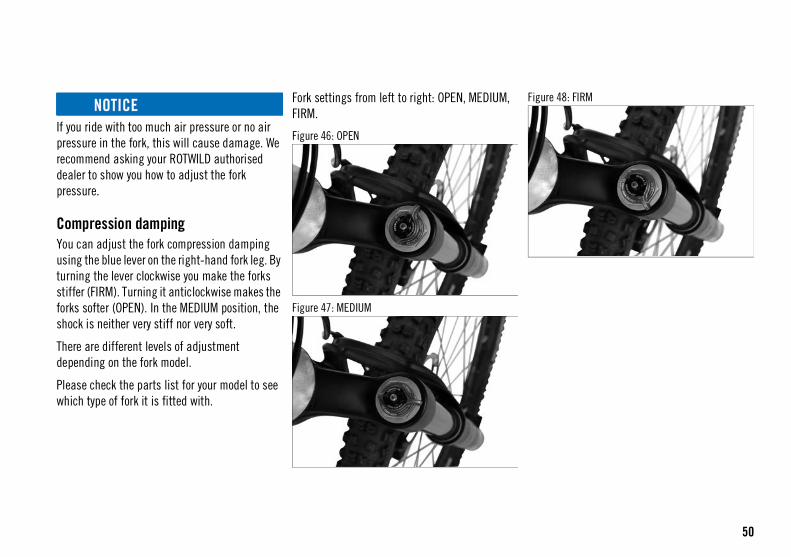
50
If you ride with too much air pressure or no air pressure in the fork, this will cause damage. We recommend asking your ROTWILD authorised dealer to show you how to adjust the fork pressure.
Compression dampingYou can adjust the fork compression damping using the blue lever on the right-hand fork leg. By turning the lever clockwise you make the forks stiffer (FIRM). Turning it anticlockwise makes the forks softer (OPEN). In the MEDIUM position, the shock is neither very stiff nor very soft.
There are different levels of adjustment depending on the fork model.
Please check the parts list for your model to see which type of fork it is fitted with.
Fork settings from left to right: OPEN, MEDIUM, FIRM.
Figure 46: OPEN
Figure 47: MEDIUM
Figure 48: FIRM
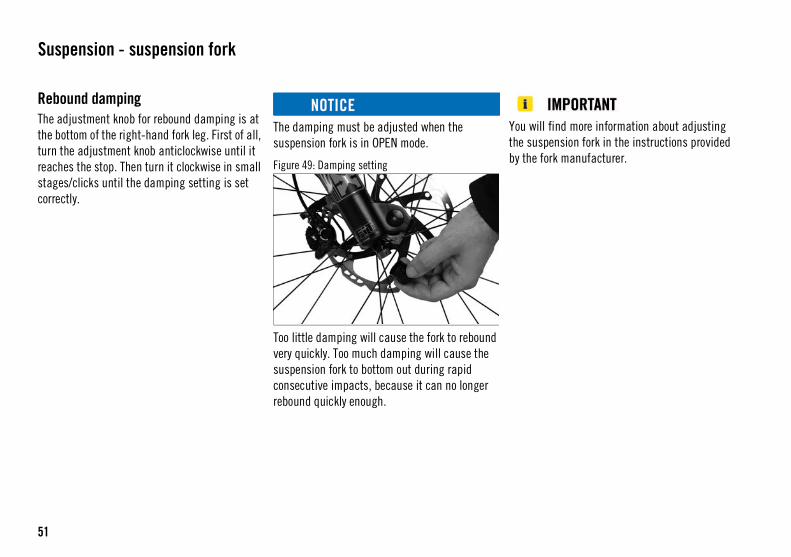
51
Rebound dampingThe adjustment knob for rebound damping is at the bottom of the right-hand fork leg. First of all, turn the adjustment knob anticlockwise until it reaches the stop. Then turn it clockwise in small stages/clicks until the damping setting is set correctly.
The damping must be adjusted when the suspension fork is in OPEN mode.
Figure 49: Damping setting
Too little damping will cause the fork to rebound very quickly. Too much damping will cause the suspension fork to bottom out during rapid consecutive impacts, because it can no longer rebound quickly enough.
You will find more information about adjusting the suspension fork in the instructions provided by the fork manufacturer.
Suspension - suspension fork

52
Adjusting the rear shockThe ROTWILD authorised dealer will check the factory setting of the suspension and adjust it to the rider’s weight, if necessary. The spring pre-load can be adjusted to the rider’s weight using an air valve on the shock.
The damping must be adjusted when the shock is in OPEN mode.
The air valve for adjusting the shock is under the screw cap.
On the RC750FS22 / RT750HT22 / RT750FS22 models, the shock is correctly adjusted if it is compressed by 20% of the total suspension travel when you are sitting on the bike.
On the RX750FSC22 / RX750FSP22 / RX750FSU22 RX375FS22 models, the shock is correctly adjusted if it is compressed by 20-25 % of the total suspension travel when you are sitting on the bike.
On the RE750FSC22 / RE750FSP22 RE375FS22 / RG375FS22 models, the shock is correctly adjusted if it is compressed by 25-30% of the
total suspension travel when you are sitting on the bike.
The rubber ring on the shock will help you to measure the suspension travel.
Figure 50: The air valve on the shock.
You will find more information about adjusting the air pressure in the instruction manual provided by the shock manufacturer. You will also find detailed information about adjusting the spring stiffness/softness.
Please check the parts list for your model to see which type of shock it is fitted with.
A special air pump must be used for the suspension forks and shock. A conventional air pump is not sensitive enough to adjust the pressure.
If you ride with too much air pressure or no air pressure in the shock, this will cause damage. We recommend asking your ROTWILD authorised dealer to show you how to adjust the shock pressure.
Compression dampingYou can adjust the shock compression damping using the blue lever. By turning the lever to the FIRM position you make the shock stiffer. Turning it to the OPEN position makes the shock softer. In the MEDIUM position, the shock is neither very stiff nor very soft.
Running gear - rear triangle
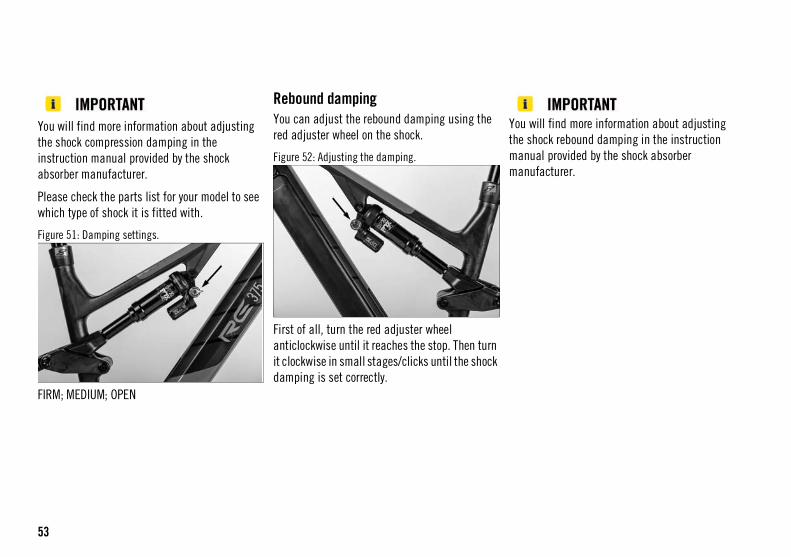
53
You will find more information about adjusting the shock compression damping in the instruction manual provided by the shock absorber manufacturer.
Please check the parts list for your model to see which type of shock it is fitted with.
Figure 51: Damping settings.
FIRM; MEDIUM; OPEN
Rebound dampingYou can adjust the rebound damping using the red adjuster wheel on the shock.
Figure 52: Adjusting the damping.
First of all, turn the red adjuster wheel anticlockwise until it reaches the stop. Then turn it clockwise in small stages/clicks until the shock damping is set correctly.
You will find more information about adjusting the shock rebound damping in the instruction manual provided by the shock absorber manufacturer.
54
Testing the fork and shock settingsFind some suitable ground to test the suspension fork and shock settings.
Special FIRM function
The suspension elements have a lockout function. This allows you to lock the suspension elements, which means that they do not compress when you ride over obstacles. You should only use this function on smooth road surfaces with few bumps or when riding uphill out of the saddle.
Risk of crashing when riding downhill with the FIRM function selected.Always remember to deactivate the FIRM function before riding downhill or over unknown terrain, because sudden potholes or bumps could result in the running gear being subjected to severe stresses. The impacts will be transferred directly to the rider, which could lead to you losing control and crashing.
The suspension element manufacturers provide detailed instruction manuals on setting up the suspension.
Read these instruction manuals carefully before you begin making adjustments.
55
Loose wheels.A loose wheel can cause a crash or an accident. Before every ride, check that the wheels are not loose.
Sudden loss of tyre pressure.If the tyre pressure is too high, the tyre can burst or come off the rim. In this case, there is a risk of crashing. Always ride with tyres at the correct tyre pressure.
Worn tyres increase the risk of a crash!Tyres with worn tread have less grip. You should ask your ROTWILD authorised dealer to check the tread on your tyres regularly.
When you first use the bike, the spokes and nipples can settle. Check that your wheels run true. If they do not, have them checked and, if necessary, centred by your ROTWILD authorised dealer.
Risk of injury! If you do not have the necessary technical knowledge or do not carry out the maintenance correctly, you could be injured.
- Wear protective gloves.- Keep your fingers away from moving parts.- Make sure that your fingers do not get
trapped.
Checks before every rideCheck the quick release lever before every ride to make sure that the wheel is securely fixed in the fork. This is particularly important if you leave your eMTB parked in a public place.
Quick testLift your eMTB up so that the front and rear wheels are off the ground. Hit the wheel hard with a downward motion a few times. The wheel should not become loose or fall out. There should also be no play between the wheel and the fork. This test does not guarantee that the quick release lever has been adequately tightened. If you are not certain whether your quick release lever is properly fitted, contact your ROTWILD authorised dealer.
If too much pre-load force is applied, this will damage the quick release lever and it will no longer function correctly. If not enough pre-load is used, the force will be applied incorrectly. This can cause the fork or the frame to break.
Wheels and tyres
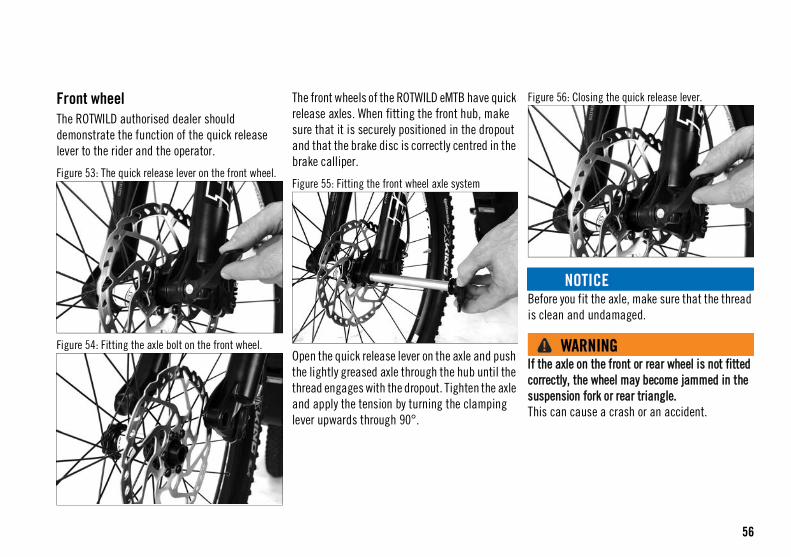
56
Front wheelThe ROTWILD authorised dealer should demonstrate the function of the quick release lever to the rider and the operator.
Figure 53: The quick release lever on the front wheel.
Figure 54: Fitting the axle bolt on the front wheel.
The front wheels of the ROTWILD eMTB have quick release axles. When fitting the front hub, make sure that it is securely positioned in the dropout and that the brake disc is correctly centred in the brake calliper.
Figure 55: Fitting the front wheel axle system
Open the quick release lever on the axle and push the lightly greased axle through the hub until the thread engages with the dropout. Tighten the axle and apply the tension by turning the clamping lever upwards through 90°.
Figure 56: Closing the quick release lever.
Before you fit the axle, make sure that the thread is clean and undamaged.
If the axle on the front or rear wheel is not fitted correctly, the wheel may become jammed in the suspension fork or rear triangle.This can cause a crash or an accident.
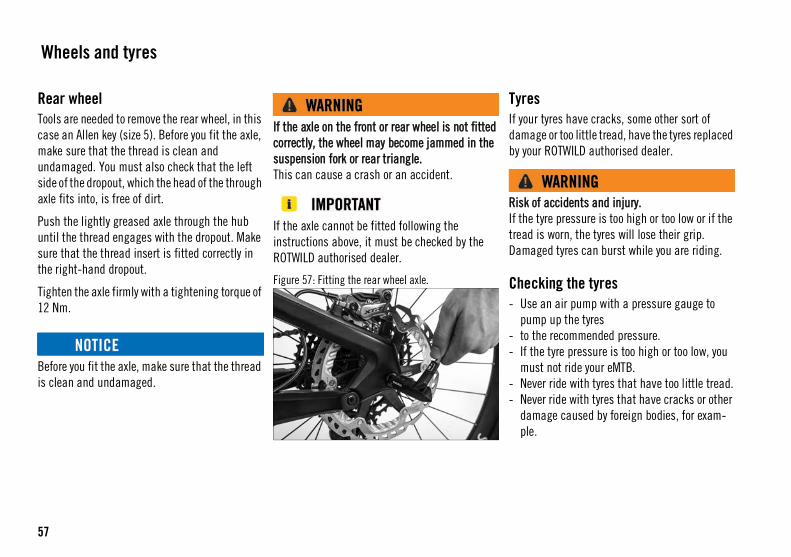
57
Rear wheelTools are needed to remove the rear wheel, in this case an Allen key (size 5). Before you fit the axle, make sure that the thread is clean and undamaged. You must also check that the left side of the dropout, which the head of the through axle fits into, is free of dirt.
Push the lightly greased axle through the hub until the thread engages with the dropout. Make sure that the thread insert is fitted correctly in the right-hand dropout.
Tighten the axle firmly with a tightening torque of 12 Nm.
Before you fit the axle, make sure that the thread is clean and undamaged.
If the axle on the front or rear wheel is not fitted correctly, the wheel may become jammed in the suspension fork or rear triangle.This can cause a crash or an accident.
If the axle cannot be fitted following the instructions above, it must be checked by the ROTWILD authorised dealer.
Figure 57: Fitting the rear wheel axle.
TyresIf your tyres have cracks, some other sort of damage or too little tread, have the tyres replaced by your ROTWILD authorised dealer.
Risk of accidents and injury. If the tyre pressure is too high or too low or if the tread is worn, the tyres will lose their grip. Damaged tyres can burst while you are riding.
Checking the tyres- Use an air pump with a pressure gauge to
pump up the tyres- to the recommended pressure.- If the tyre pressure is too high or too low, you
must not ride your eMTB.- Never ride with tyres that have too little tread.- Never ride with tyres that have cracks or other
damage caused by foreign bodies, for exam-ple.
Wheels and tyres
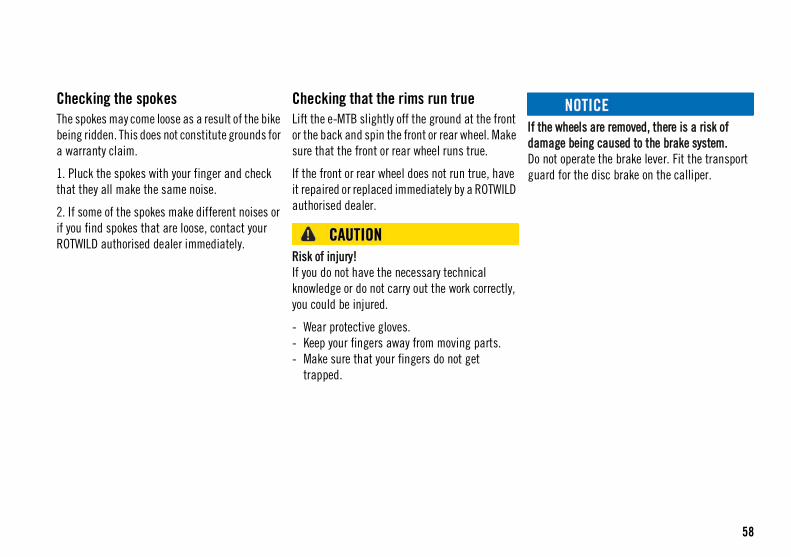
58
Checking the spokesThe spokes may come loose as a result of the bike being ridden. This does not constitute grounds for a warranty claim.
1. Pluck the spokes with your finger and check that they all make the same noise.
2. If some of the spokes make different noises or if you find spokes that are loose, contact your ROTWILD authorised dealer immediately.
Checking that the rims run trueLift the e-MTB slightly off the ground at the front or the back and spin the front or rear wheel. Make sure that the front or rear wheel runs true.
If the front or rear wheel does not run true, have it repaired or replaced immediately by a ROTWILD authorised dealer.
Risk of injury!If you do not have the necessary technical knowledge or do not carry out the work correctly, you could be injured.
- Wear protective gloves.- Keep your fingers away from moving parts.- Make sure that your fingers do not get
trapped.
If the wheels are removed, there is a risk of damage being caused to the brake system. Do not operate the brake lever. Fit the transport guard for the disc brake on the calliper.
59
Transporting the eMTB by carWhen you buy a bike rack for your car, make sure that it complies with the safety standards in your country, for example the GS mark.
In Germany bike racks must be approved in accordance with section 22 of the road traffic regulations.
Read the instruction manual that come with your bike rack and do not exceed the maximum permitted load or speed.
When transporting the ROTWILD eMTB, find out about the specific labelling requirements in your country.
If you are sending your ROTWILD eMTB by courier, we recommend that you ask your ROTWILD authorised dealer to partially disassemble and pack the bike for you.
We recommend transporting ROTWILD eMTBs inside the vehicle.
Transporting an unsecured or incorrectly secured eMTB. An unsecured or incorrectly secured eMTB can become loose while being transported and cause a serious accident. Check the eMTB before every journey and at regular intervals during longer journeys to make sure that it is correctly and firmly secured.
Air in the brake system. If an eMTB with hydraulic disc brakes is transported upside down, air can get into the brake system and the brakes may fail.
Racks where the bike is transported standing on its handlebars and saddle must not be used, because this can expose the components to excessive stresses.
When transporting the eMTB on a bike rack, you must make sure that the down tube is not clamped in place, because this can cause damage to the drive battery inside the tube.
Transporting the ROTWILD eMTB
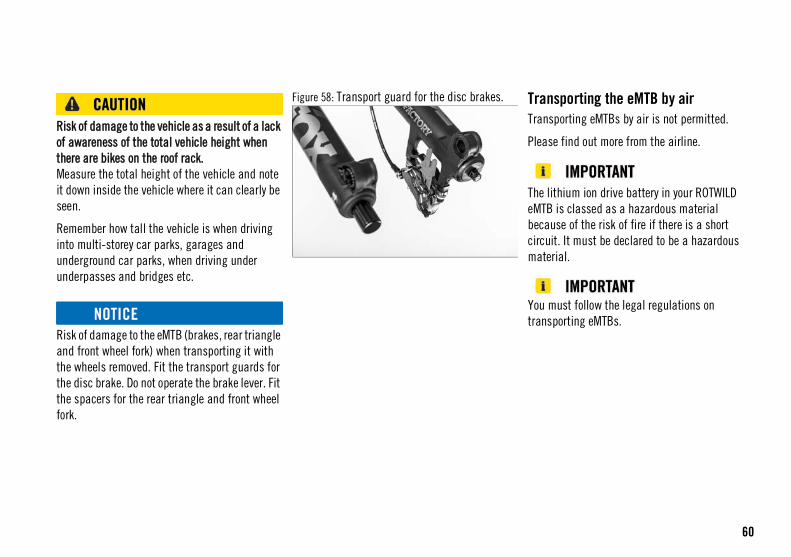
60
Risk of damage to the vehicle as a result of a lack of awareness of the total vehicle height when there are bikes on the roof rack. Measure the total height of the vehicle and note it down inside the vehicle where it can clearly be seen.
Remember how tall the vehicle is when driving into multi-storey car parks, garages and underground car parks, when driving under underpasses and bridges etc.
Risk of damage to the eMTB (brakes, rear triangle and front wheel fork) when transporting it with the wheels removed. Fit the transport guards for the disc brake. Do not operate the brake lever. Fit the spacers for the rear triangle and front wheel fork.
Figure 58: Transport guard for the disc brakes. Transporting the eMTB by airTransporting eMTBs by air is not permitted.
Please find out more from the airline.
The lithium ion drive battery in your ROTWILD eMTB is classed as a hazardous material because of the risk of fire if there is a short circuit. It must be declared to be a hazardous material.
You must follow the legal regulations on transporting eMTBs.
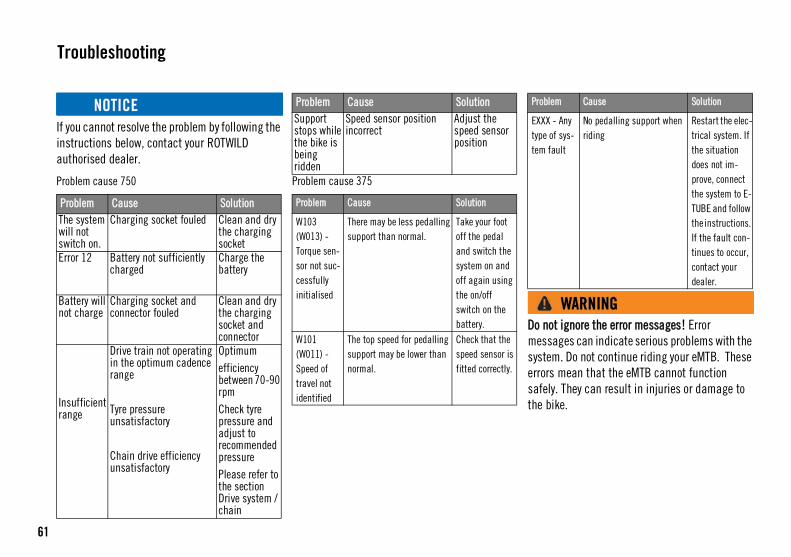
61
If you cannot resolve the problem by following the instructions below, contact your ROTWILD authorised dealer.
Problem cause 750 Problem cause 375
Do not ignore the error messages! Error messages can indicate serious problems with the system. Do not continue riding your eMTB. These errors mean that the eMTB cannot function safely. They can result in injuries or damage to the bike.
Problem Cause SolutionThe system will not switch on.
Charging socket fouled Clean and dry the charging socket
Error 12 Battery not sufficiently charged
Charge the battery
Battery will not charge
Charging socket and connector fouled
Clean and dry the charging socket and connector
Insufficient range
Drive train not operating in the optimum cadence range
Tyre pressure unsatisfactory
Chain drive efficiency unsatisfactory
Optimum efficiency between 70-90 rpmCheck tyre pressure and adjust to recommended pressurePlease refer to the section Drive system / chain
Support stops while the bike is being ridden
Speed sensor position incorrect
Adjust the speed sensor position
Problem Cause Solution
W103 (W013) - Torque sen-sor not suc-cessfully initialised
There may be less pedalling support than normal.
Take your foot off the pedal and switch the system on and off again using the on/off switch on the battery.
W101 (W011) - Speed of travel not identified
The top speed for pedalling support may be lower than normal.
Check that the speed sensor is fitted correctly.
Problem Cause Solution
EXXX - Any type of sys-tem fault
No pedalling support when riding
Restart the elec-trical system. If the situation does not im-prove, connect the system to E-TUBE and follow the instructions. If the fault con-tinues to occur, contact your dealer.
Problem Cause Solution
Troubleshooting
62
Wear parts excluded from the warrantyWear does not constitute a manufacturing defect. Worn components or adjustments that have changed as a result of wear are not covered by the warranty. These include:
- Brake pad wear- Tyre wear- Rim wear- Adjustment of the brake cable- Adjustment of the dérailleur cable- Adjustment of the spokes- Noises made by the eMTB**The noise your eMTB makes may change over time and under different loads.
Normal wear and tearSome components of your ROTWILD eMTB are subject to normal wear and tear.
This sort of wear and tear is not covered by the warranty or by the legal liability for defects.
The extent of the wear depends on the care, maintenance and type of use of the eMTB (distance travelled, use in the rain, dirt, salt etc.).
eMTBs that are often left outside will be subject to greater wear and tear because of the effects of the weather. This applies particularly near the sea where the air is salty.
Wear parts need regular maintenance and care. However, depending on the level of use and the conditions, they will sooner or later reach the end of their life span.
When these parts reach their wear limit, they must be replaced. This applies in particular to the following parts:
Drive chain/belt/battery, sprocket cassette, chain rings and belt pulleys, electric motor, handlebar grips, rear dérailleur, dérailleur cables, handlebars and stem, seat post and saddle, brake pads and discs, wheels including tyres and inner tubes, brake cables.
Brake padsThe pads used in disc brakes systems will wear with use. If the bike is ridden fast or in hilly terrain, the pads may need to be changed frequently.
Check the condition of the pads regularly and, if
necessary, have them replaced by your ROTWILD authorised dealer.
Riding a bike with worn parts is dangerous and can lead to accidents.In addition, the use of a worn part can cause damage to other components of the bike.
Have your bike serviced and maintained at the intervals specified in the instruction manuals provided by the component manufacturers.
Warranty, wear and brake pads
63
When your eMTB is handed over to you, it is ready to use. Every bike requires care and maintenance.
This is essential in order to make sure that your ROTWILD eMTB functions correctly and is safe to ride.
After the first 5 to 15 hours or 100 to 300 kilometres your eMTB must have its first service. During this time the cables can stretch and gear changes may become slightly less accurate.
After the running-in period you should have your eMTB checked at regular intervals by a ROTWILD authorised dealer.The length of the maintenance intervals will vary depending on the type of area you ride in and the weather conditions.
Unprofessional servicing and repairs.Servicing and repairs should be carried out by experts. Specialist knowledge and special tools are needed.
Maintenance work and adjustments that are carried out incorrectly can lead to the failure of components of your ROTWILD eMTB.
Only take on tasks yourself if you have the necessary knowledge and tools, for example a torque wrench.
You should have your ROTWILD eMTB cleaned thoroughly twice a year, preferably as part of regular servicing, by your ROTWILD authorised dealer.
CleaningIt is important to protect your e-MTB against environmental influences such as dirt, sweat, road salt in winter and salty air. Clean your ROTWILD eMTB with a damp cloth.
You can add a little detergent to the water.
Afterwards protect your ROTWILD eMTB with polish.
Always check that there are no cleaning products or lubricants on the friction surfaces of the brake system.
The electric drive system is only protected against splashes of water.You must never clean your eMTB with a pressure washer, a hose or compressed air. This can cause a short circuit, malfunction, fire or explosion.
Recycling and disposalEvery ROTWILD authorised dealer will accept bikes, unopened and undamaged drive batteries and chargers and will dispose of them in accordance with regulations.
The drive battery and the charger will not be dismantled before disposal.
Cleaning, packaging and disposal
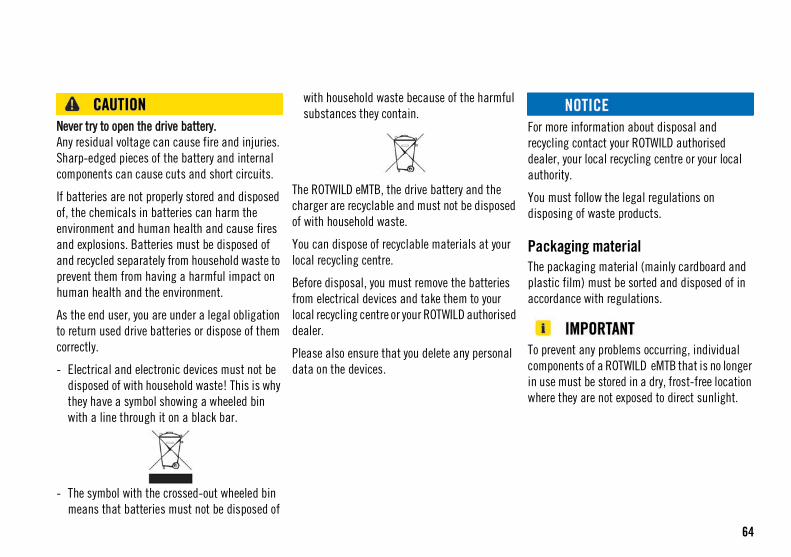
64
Never try to open the drive battery.Any residual voltage can cause fire and injuries. Sharp-edged pieces of the battery and internal components can cause cuts and short circuits.
If batteries are not properly stored and disposed of, the chemicals in batteries can harm the environment and human health and cause fires and explosions. Batteries must be disposed of and recycled separately from household waste to prevent them from having a harmful impact on human health and the environment.
As the end user, you are under a legal obligation to return used drive batteries or dispose of them correctly.
- Electrical and electronic devices must not be disposed of with household waste! This is why they have a symbol showing a wheeled bin with a line through it on a black bar.
- The symbol with the crossed-out wheeled bin means that batteries must not be disposed of
with household waste because of the harmful substances they contain.
The ROTWILD eMTB, the drive battery and the charger are recyclable and must not be disposed of with household waste.
You can dispose of recyclable materials at your local recycling centre.
Before disposal, you must remove the batteries from electrical devices and take them to your local recycling centre or your ROTWILD authorised dealer.
Please also ensure that you delete any personal data on the devices.
For more information about disposal and recycling contact your ROTWILD authorised dealer, your local recycling centre or your local authority.
You must follow the legal regulations on disposing of waste products.
Packaging materialThe packaging material (mainly cardboard and plastic film) must be sorted and disposed of in accordance with regulations.
To prevent any problems occurring, individual components of a ROTWILD eMTB that is no longer in use must be stored in a dry, frost-free location where they are not exposed to direct sunlight.
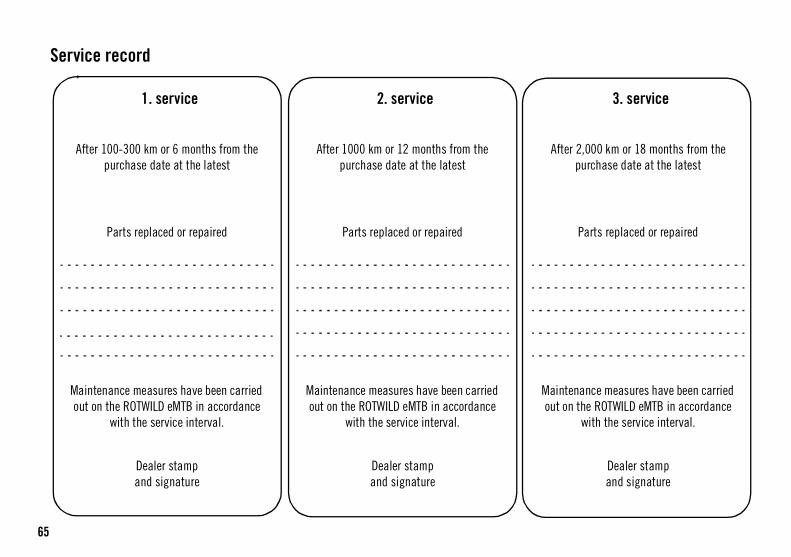
65
1. service 2. service 3. service
Dealer stamp and signature
Maintenance measures have been carried out on the ROTWILD eMTB in accordance
with the service interval.
Parts replaced or repaired
After 100-300 km or 6 months from the purchase date at the latest
After 1000 km or 12 months from the purchase date at the latest
Parts replaced or repaired
Maintenance measures have been carried out on the ROTWILD eMTB in accordance
with the service interval.
Dealer stamp and signature
After 2,000 km or 18 months from the purchase date at the latest
Parts replaced or repaired
Maintenance measures have been carried out on the ROTWILD eMTB in accordance
with the service interval.
Dealer stamp and signature
Service record
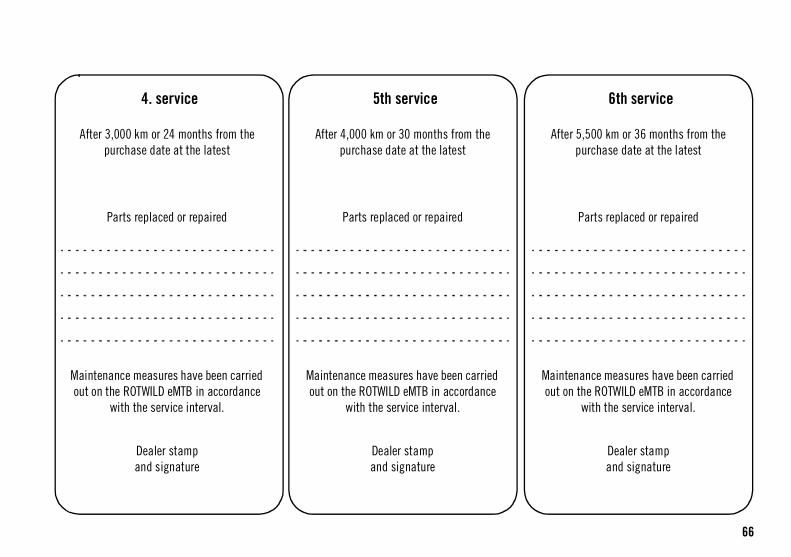
66
4. service 5th service 6th service
After 3,000 km or 24 months from the purchase date at the latest
Parts replaced or repaired
Maintenance measures have been carried out on the ROTWILD eMTB in accordance
with the service interval.
Dealer stamp and signature
After 4,000 km or 30 months from the purchase date at the latest
Parts replaced or repaired
Maintenance measures have been carried out on the ROTWILD eMTB in accordance
with the service interval.
Dealer stamp and signature
After 5,500 km or 36 months from the purchase date at the latest
Parts replaced or repaired
Maintenance measures have been carried out on the ROTWILD eMTB in accordance
with the service interval.
Dealer stamp and signature
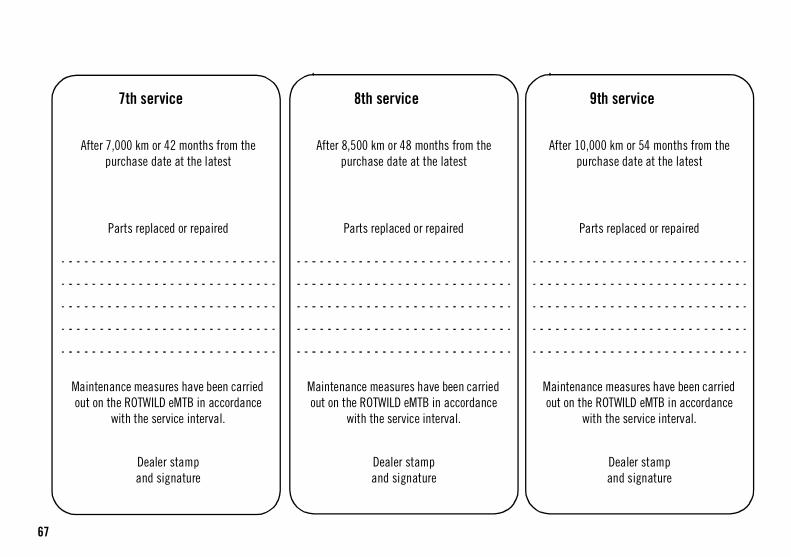
67
7th service 8th service 9th service
After 7,000 km or 42 months from the purchase date at the latest
Parts replaced or repaired
Maintenance measures have been carried out on the ROTWILD eMTB in accordance
with the service interval.
Dealer stamp and signature
After 8,500 km or 48 months from the purchase date at the latest
Parts replaced or repaired
Maintenance measures have been carried out on the ROTWILD eMTB in accordance
with the service interval.
Dealer stamp and signature
After 10,000 km or 54 months from the purchase date at the latest
Parts replaced or repaired
Maintenance measures have been carried out on the ROTWILD eMTB in accordance
with the service interval.
Dealer stamp and signature
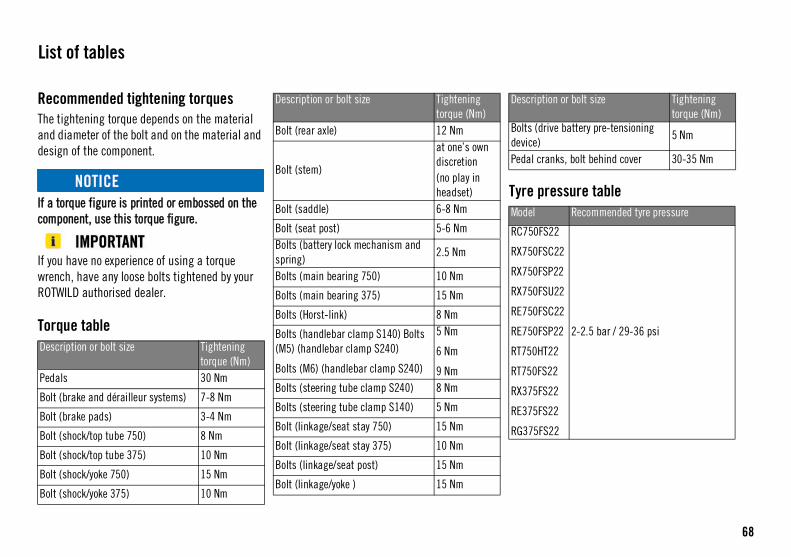
68
Recommended tightening torquesThe tightening torque depends on the material and diameter of the bolt and on the material and design of the component.
If a torque figure is printed or embossed on the component, use this torque figure.
If you have no experience of using a torque wrench, have any loose bolts tightened by your ROTWILD authorised dealer.
Torque table
Tyre pressure table
Description or bolt size Tightening torque (Nm)
Pedals 30 Nm
Bolt (brake and dérailleur systems) 7-8 Nm
Bolt (brake pads) 3-4 Nm
Bolt (shock/top tube 750) 8 Nm
Bolt (shock/top tube 375) 10 Nm
Bolt (shock/yoke 750) 15 Nm
Bolt (shock/yoke 375) 10 Nm
Bolt (rear axle) 12 Nm
Bolt (stem)
at one’s own discretion(no play in headset)
Bolt (saddle) 6-8 Nm
Bolt (seat post) 5-6 Nm Bolts (battery lock mechanism and spring)
2.5 Nm
Bolts (main bearing 750) 10 Nm
Bolts (main bearing 375) 15 Nm
Bolts (Horst-link) 8 Nm
Bolts (handlebar clamp S140) Bolts (M5) (handlebar clamp S240)
Bolts (M6) (handlebar clamp S240)
5 Nm
6 Nm
9 Nm Bolts (steering tube clamp S240) 8 Nm
Bolts (steering tube clamp S140) 5 Nm
Bolt (linkage/seat stay 750) 15 Nm
Bolt (linkage/seat stay 375) 10 Nm
Bolts (linkage/seat post) 15 Nm
Bolt (linkage/yoke ) 15 Nm
Description or bolt size Tightening torque (Nm)
Bolts (drive battery pre-tensioning device)
5 Nm
Pedal cranks, bolt behind cover 30-35 Nm
Model Recommended tyre pressure
RC750FS22
RX750FSC22
RX750FSP22
RX750FSU22
RE750FSC22
RE750FSP22
RT750HT22
RT750FS22
RX375FS22
RE375FS22
RG375FS22
2-2.5 bar / 29-36 psi
Description or bolt size Tightening torque (Nm)
List of tables

69
Dieburg, 09/01/2021
EU Declaration of Conformity
The ADP ENGINEERING GMBH
Am Bauhof 5
64807 Dieburg, Germany
hereby declares that the ROTWILD electrically assisted bicycles
comply with all the relevant provisions of the Machinery Directive 2006/42/EC.
The electrically assisted bicycles also comply with all the relevant essential requirements of the Electromagnetic Compatibility Directive 2014/30/EU and the RoHS Directive 2011/65/EU.
Product names: RC750FS22 RX750FSC22RX750FSP22 RX750FSU22 RE750FSC22RE750FSP22RT750HT22 RT750FS22RX375FS22RE375FS22RG375FS22
Year of 2021 and 2022
The following standards have been applied:
DIN EN 15194:2018 Cycles. Electrically power assisted cycles. EPAC bicycles
DIN ISO 4210:2015 Mountain bicycles
DIN ISO 4210:2015 City and trekking bicycles
Johannes Matschos - Research and Development Engineer,
ADP ENGINEERING GMBH, Am Bauhof 5, 64807 Dieburg, Germany
is authorised to compile the technical documents.
ADP Engineering GmbH // Am Bauhof 5 // 64807 Dieburg // DE // Darmstadt District Court // HRB 90547 // WEEE reg. no. DE 55745781 // VAT no. DE
Place / Date / Signature
Peter Schlitt - Director
70
Sample type plate for ROTWILD electric power assisted cycles (EPACs) ...................................................... 6Applying the brakes / pulling away....................... 8ON/OFF switch (750) ............................................. 8ON/OFF switch (375) ............................................. 8Detailed information about the ROTWILD ............. 9Overview of the fields on the display. ................... 6Overview of the fields on the display. ................... 7On/off button (1)................................................... 8Display button (2) ................................................. 8Support switch (X/Y) ............................................. 8Charger cable connector and drive battery. .......... 21Checking the quick release lever on the front wheel. 22Checking the tyre pressure. .................................. 22Front wheel and rear brake levers. ....................... 23On/off button (750)............................................... 24On/off button (375)............................................... 24Front wheel and tyre. ............................................ 27Rear wheel and tyre. ............................................. 27Handlebars and stem ........................................... 27The chain on the chainring / cassette................... 28Brakes / grip width ............................................... 29Lubricating the chain ........................................... 32Checking the condition of the chain. .................... 33The position of the shifting lever. ......................... 34Gear shifting and adjuster.................................... 34Limit stop screw ................................................... 35Overview of the indicator lights. ........................... 37
The charger cable in the correct position. ............. 38Charging socket (750) .......................................... 38Charging socket (375) .......................................... 38Operating the removal mechanism ....................... 39Removing the drive battery ................................... 39Installing the drive battery.................................... 39Securing the drive battery..................................... 40Securing the drive battery..................................... 40Releasing the locking pin...................................... 41Removing the drive battery ................................... 41Installing the drive battery.................................... 41Adjusting the tension on the drive battery ............ 42Charger................................................................. 43Handlebars and stem............................................ 44Headset play ......................................................... 44Checking the stem. ............................................... 44Identifying the correct saddle height. ................... 45Seat post (maximum extension length). ................ 45Eightpins seat post ............................................... 46Quick release lever on the seat post...................... 47Clamping screw on the seat post.......................... 47E13 seat post........................................................ 48Valve for adjusting the fork pressure. ................... 49OPEN..................................................................... 50MEDIUM ................................................................ 50FIRM...................................................................... 50Damping setting ................................................... 51The air valve on the shock..................................... 52Damping settings. ................................................ 53
Adjusting the damping.......................................... 53The quick release lever on the front wheel............. 56Fitting the axle bolt on the front wheel.................. 56Fitting the front wheel axle system........................ 56Closing the quick release lever.............................. 56Fitting the rear wheel axle..................................... 57Transport guard for the disc brakes. ..................... 60Problem cause 375................................................ 61Problem cause 750................................................ 61
List of figures

71
This instruction manual has been written with the greatest of care. However, many of the functions and add-on parts described here may change as a result of ongoing development work.
Changes of this kind can be made without advance notice.
ADP ENGINEERING GMBH
Am Bauhof 5
64807 Dieburg, Germany
Tel.: +49 6071 921 55 0
Fax: +49 6071 921 55 - 25
E-mail: [email protected]
Website: www.rotwild.de
Instruction manual for ROTWILD eMTBs, 2021
1st edition 08/2021
Editor: Thomas Kraus