mafia bikes / complete bike owners manual
TRANSCRIPT

1MAFIA BIKES / COMPLETE BIKE OWNERS MANUAL

2
Make sure that you always wear a certified bicycle helmet when riding; but also make sure that you understand that a bicycle helmet is for bicycling only, and must be removed when not riding. Failure to follow this warning could result in serious injury or death.
INTR
O INTRODUCTIONCongratulations on the purchase of your new bicycle. This manual is designed to give you the information you need for safe operation and maintenance of your new bicycle. Please read it thoroughly before riding your bicycle.
Road Use: All mafiabikes are supplied with a road kit. If you intend to use your bicycle on the road, please ensure you have installed the appropriate legally required features to do so, such as front and rear brakes, chain guard, reflectors and bell. If these items where missing from your bike upon purchase please contact the dealer you purchased the bike from and they will provide them to you as required.
Note For Users: You are responsible for your own safety and that includes making sure that the bicycle is properly sized; that it is in good repair and safe operating condition; that you have learned and understand the safe operation of the bicycle; and that you have learned, understand and obey not only the applicable local motor vehicle, bicycle and traffic laws but also the common sense rules of safe and responsible bicycling. You should read this manual, as well as note the warnings, the bicycle’s functions and operating procedures before riding the bicycle.
Before Assembly: Please note, your bicycle has been supplied in a carton (box) in a semi-knock-down state. This means it requires some basic assembly and a thorough inspection by a competent experienced person prior to riding. In most cases this inspection is carried out prior to purchase by the shop. However, if you have purchased the bike direct from us please take it too a trained bicycle technician at one of our Mafia service centres.
It’s paramount for the rider’s safety that this bicycle is thoroughly checked over for any potential safety issues prior to riding. We will not accept any liability whatsoever for injury or death sustained as a result of improper assembly and inspection of your new bicycle. If you should encounter any such issue during assembly / inspection, please do not hesitate in contacting the shop you purchased the bike from.
3
NOTES.
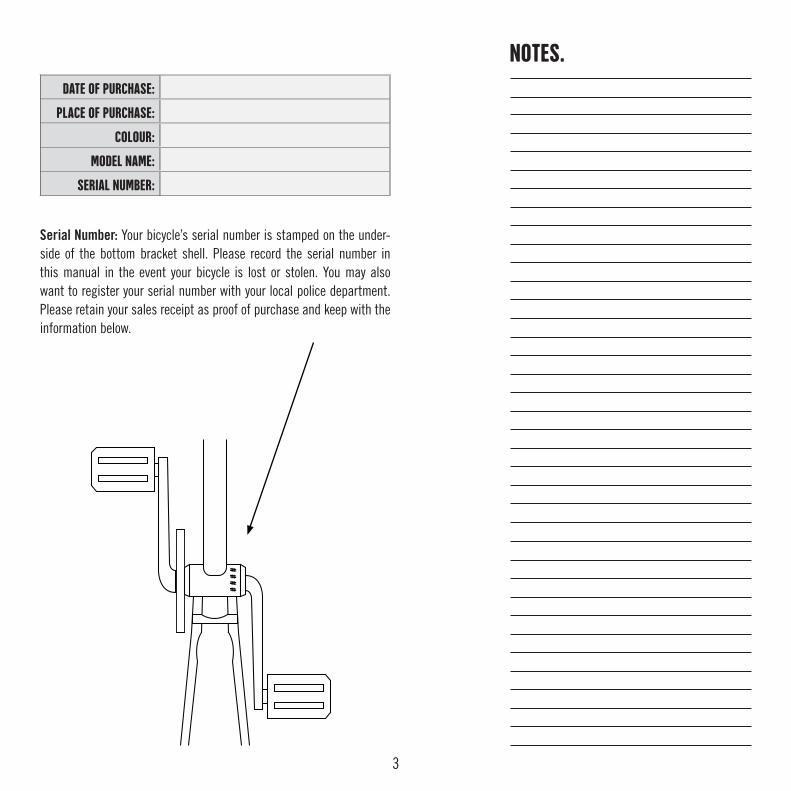
Serial Number: Your bicycle’s serial number is stamped on the under-side of the bottom bracket shell. Please record the serial number in this manual in the event your bicycle is lost or stolen. You may also want to register your serial number with your local police department. Please retain your sales receipt as proof of purchase and keep with the information below.
DATE OF PURCHASE:
PLACE OF PURCHASE:
COLOUR:
MODEL NAME:
SERIAL NUMBER:

4

5
1. First (p6)A. Bike fitB. Safety firstC. Mechanical safety check D. First ride
2. Safety (p8)A. The basicsB. Riding safetyC. Off road safetyD. Wet weather ridingE. Night ridingF: Bicycling in traffic G. Extreme, stunt or competition ridingH. Changing components or adding accessories
3. Fit (p12) A. Standover heightB. Saddle positionC. Control position adjustments D. Brake reach
4. Assembly (p14)A. First stepsB. StemC. HandlebarsD. Front wheel (Solid Axle)E. Front wheel (Quick Release Security Skewer)F Front wheel (Quick Release)G. PedalsH. Seat clampI. Brakes (Installation)J. U-Brake (Installation)K. Hydraulic disc brake (Installation)L. Cable disc brake (Installation)M. Brakes (Fine Tuning)N. Road kit and Installation
CONT
ENTS
5. Tech (p22)A. BrakesB. WheelsC. PedalsD. Crank-arm adjustmentE. Headset adjustmentF. Tyres and tubesG. Chain adjustment6. Service (p31)A. Service intervalsB. If your bicycle sustains an impact
7. Appendix (p34) A. Learning the rules
8. Warranty (p37)A. How to claimB. One week service

6
Please note that not all bicycles have all of the features described in this manual. Ask a trained bike technician, or a bike shop to point out the features of your bicycle that are covered in this manual, if required.
A. BIKE FIT1. Is your bike the right size? To check, see Section 3.A. If your bicycle is too large or too small for you, you may lose control and fall. If your new bike is not the right size, please contact your local mafia dealer before your first ride.
2. Is the saddle at the right height? To check, see Section 3.B. If you adjust your saddle height, make sure that you follow the Minimum Insertion line. Instructions in Section 3.B.
3. Are saddle and seat post securely clamped? A correctly tightened saddle will allow no saddle movement in any direction. See Section 3.B for details.
4. Can you comfortably operate the brakes? If not, you may be able to adjust their angle and reach. See Section 3.D for details.
5. Do you fully understand how to operate your new bicycle? If not and before you ride, have your local mafia dealer explain any functions or features which you do not understand.
6. Our maximum recommended weight for a rider is 110kgs, this is to ensure your safety and that all components of the bike are within their safe working limits.
B. SAFETY FIRST1. Always wear a certified helmet when riding your bike. Follow the v manufacturer’s instructions for fit, use and care.
2. Do you have all the other required and recommended safety equipment? See Section 2. It’s your responsibility to familiarise yourself with the laws of the areas where you ride, and to comply with all applicable laws.
3. Do you have “toe overlap”? On smaller framed bicycles your toe may be able to contact the front wheel when a pedal is all the way forward and the wheel is turned.
1. FIR
ST
7
C. MECHANICAL SAFETY CHECK Routinely check the condition of your bicycle before every ride. If you see that parts are worn, cracked or generally in bad condition then please replace immediately with only genuine replacement parts. If non-genuine replacement parts are used for critical components then you may invalidate your warranty, or more importantly, the safe working of your bicycle.
Nuts, bolts and straps: Make sure nothing is loose. Lift the front wheel off the ground by two or three inches, then let it bounce on the ground. Does anything sound, feel or look loose? Do a quick visual and tactile inspection of the whole bike. Any loose parts or accessories? If so, secure them. If you’re not sure, ask someone with experience to check.
Tyres and Wheels: Make sure tyres are correctly inflated (see Section 4.G.1). Check by putting one hand on the saddle, one on the junction of the handlebars and stem, then bouncing your weight on the bike while looking at tyre deflection. Compare what you see with how it looks when you know the tyres are correctly inflated and adjust if necessary .Tyres in good shape? Spin each wheel slowly and look for cuts in the tread and sidewall. Replace damaged tyres before riding the bike. Wheels true? Spin each wheel and check for brake clearance and side-to-side wobble. If a wheel wobbles side to side even slightly, or rubs against or hits the brake pads, take the bike to a trained bike shop to true the wheel.
Brakes: Check the brakes for proper operation (see Section 4.A). Squeeze the brake levers. Are the brake quick-releases closed? All control cables seated and securely engaged? Do the brake pads contact the wheel rim squarely and make full contact with the rim? Do the brake pads touch the wheel rim within an inch of brake lever movement? Can you apply full braking force at the levers without having them touch the handlebar? If not, your brakes need adjustment. Do not ride the bike until the brakes are properly adjusted.
Handlebar, Grips & Ends: Make sure the handlebar grips are secure and in good condition. If not, replace them. Make sure the handlebar ends are plugged and that the handle bar end is in good shape. If not, plug or replace them before you ride.
D. FIRST RIDE When you buckle up your helmet and go for your first familiarisation ride on your new bicycle, be sure to pick a controlled environment away from cars, other cyclists, obstacles or other hazards. Ride to become familiar with the controls, features and performance of your new bike.
Familiarise yourself with the braking action of the bike (see Section 4.A). Test the brakes at slow speed, putting your weight toward the rear and gently applying the brakes, rear brake first. Sudden or excessive application of the front brake, if your bicycle has one, could pitch you over the handlebars. Applying brakes too hard can lock up a wheel, which could cause you to lose control and fall. Skidding is an example of what can happen when a wheel locks up.
Check out the handling and response of the bike and check the comfort. If you have any questions, or if you feel anything about the bike is not as it should be take the bike to your local mafia dealer or a qualified bike technician for advice.
- Wheels must be true for the brakes to work effectively. Wheel truing requires special tools and experience. Do not attempt to true a wheel unless you have the knowledge, experience and tools needed to do the job correctly.-Loose or damaged handlebar grips can cause you to lose control and fall. Unplugged handlebars can cut your body, and can cause serious injury in an otherwise minor accident.

8
An important note to all users: Appendix 7 of this Manual contains some rules and lessons which road users are already expected to know but which some bike users need to be taught. Please familiarise yourself with the Appendices as well as with the information below and the Highway Code / General Road Rules, to teach yourself road safety.
A. THE BASICS1. Always wear a cycling helmet which meets the latest certification standards and is appropriate for the type of riding you do. Always follow the helmet manufacturer’s instructions for fit, use and care of your helmet. Most serious bicycle injuries involve head injuries which might have been avoided if the rider had worn an appropriate helmet.
2. Always do the Mechanical Safety Check (Section 1.C) before you get on a bike.
3. Be thoroughly familiar with the controls of your bicycle: brakes (Section 4.A) and pedals (Section 4.C).
4. Be careful to keep body parts and other objects away from the sharp teeth of chainrings, the moving chain, the turning pedals and cranks and also the spinning wheels of your bicycle.
5. Always wear:- Shoes that will stay on your feet and will grip the pedals. Never ride barefoot or whilst wearing sandals.- Bright, visible clothing that is not so loose that it could be tangled in the bicycle or snagged by objects at the side of the road or trail.- Protective eyewear, to protect against airborne dirt, dust and bugs when the sun is bright, when it’s hot.
6. Ride at a speed appropriate for conditions. Increased speed means higher risk.
7. Before you attempt to jump, do stunt riding or race with your bike, read and understand Section 2.G. Extreme, stunt or competition biking.
B. RIDING SAFETY1. Observe all local bicycle laws and regulations. Observe regulations
2. SA
FETY

9
about licensing of bicycles, riding on sidewalks, laws regulating bike path and trail use, and so on. Observe helmet laws and special bicycle traffic laws. It’s your responsibility to know and obey the laws.
2. You are sharing the road or the path with others motorists, pedestrians and other cyclists. Respect their rights.
3. Ride defensively. Always assume that others do not see you.
4. Look ahead, and be ready to avoid:- Vehicles slowing or turning, entering the road or your lane ahead of you, or coming up behind you.- Parked car doors opening.- Pedestrians stepping out.- Children or pets playing near the road.- Pot holes, sewer grating, railroad tracks, expansion joints, road or sidewalk construction, debris and other obstructions that could cause you to swerve into traffic, catch your wheel or otherwise cause you to lose control and have an accident.- The many other hazards and distractions which can occur on a bicycle ride.
5. Ride in designated bike lanes, on designated bike paths or as close to the edge of the road as possible, in the direction of traffic flow or as directed by local governing laws.
6. Stop at stop signs and traffic lights; slow down and look both ways at street junction. Remember that a bicycle always loses in a collision with a motor vehicle, so be prepared to yield even if you have the right of way.
7. Use approved hand signals for turning and stopping.
8. Never ride with headphones. They mask traffic sounds and emergency vehicle sirens, distract you from concentrating on what’s going on around you, and their wires can tangle in the moving parts of the bicycle causing you to lose control.
9. Never carry anything which obstructs your vision or your complete control of the bicycle, or which could become entangled in the moving parts of the bicycle. 10. Never hitch a ride by holding on to another vehicle.
11. Don’t weave through traffic or make any moves that may surprise people with whom you are sharing the road.
12. Observe and yield the right of way.
13. Never ride your bicycle while under the influence of alcohol or drugs
14. If possible, avoid riding in bad weather, when visibility is obscured, at dawn, dusk or in the dark, or when extremely tired. Each of these conditions increases the risk of accident.
15. Before you attempt to jump, do stunt riding or race with your bike, read and understand Section 2.G. Extreme, stunt or competition biking.
Many states require specific safety devices. It is your responsibility to familiarise yourself with the laws of the county where you ride and to comply with all applicable laws, including properly equipping yourself and your bike as the law requires.
CORRECT INCORRECT

10
NOTE: We recommend that you do not ride off-road unless accompanied by a proficient bicycle rider. In any event, never ride alone in remote areas. Even when riding with others, make sure that someone knows where you’re going and when you expect to be back. Always take along some kind of identification, so that people know who you are in case of an accident; and take sufficient funds for food, drinks or an emergency phone call.
C. OFF ROAD SAFETY1. The variable conditions and hazards of off-road riding require close attention and specific skills. Start slowly on easier terrain and build up your skills. If your bike has suspension, the increased speed you may develop also increases your risk of losing control and falling. Get to know how to handle your bike safely before trying increased speed or more difficult terrain.
2. Wear safety gear appropriate to the kind of riding.
3. Don’t ride alone in remote areas. Even when riding with others, make sure that someone knows where you’re going and when you expect to be back.
4. Learn and obey the local laws regulating where and how you can ride off-road, and respect private property.
5. You may be sharing the trail with hikers, equestrians and other cyclists. Respect their rights.
6. Yield right of way to pedestrians and animals. Ride in a way that does not frighten or endanger them, and stay far enough away so that their unexpected moves don’t endanger you.
7. Stay on the designated trail. Don’t contribute to erosion by riding in mud or with unnecessary sliding. Don’t disturb the ecosystem by cutting your own trail or shortcut through vegetation or streams. It is your responsibility to minimize your impact on the environment. Leave things as you found them and always take out everything you brought in.
8. Be prepared. If something goes wrong while you’re riding off-road, help may not be close.
9. Before you attempt to jump with your bike, do stunt riding or race
with your bike, read and understand Section 2.G. Extreme, stunt or competition biking.
D. WET WEATHER RIDINGUnder wet conditions, the stopping power of your brakes (as well as the brakes of other vehicles sharing the road) is dramatically reduced and your tyres don’t grip nearly as well. This makes it harder to control speed and easier to lose control. To make sure that you can slow down and stop safely in wet conditions, ride more slowly and apply your brakes earlier and more gradually than you would under normal, dry conditions. See also Section 4.A. Breaks. E. NIGHT RIDINGRiding a bicycle at night is many times more dangerous than riding during the day. A bicyclist is very difficult for motorists and pedestrians to see. Therefore, it is advised not to ride at dawn, at dusk or at night.
1. Bicycle reflectors are designed to pick up and reflect street lights and car lights in a way that may help you to be seen and recognised as a moving bicyclist.
2. If you must ride under conditions of poor visibility, check and be sure you comply with all local laws about night riding, and take the following strongly recommended additional precautions:
- Make sure that your bicycle is equipped with correctly positioned and securely mounted reflectors.- Purchase and install battery or generator powered head and tail lights which meet all regulatory requirements and provide adequate visibility.- Wear light coloured, reflective clothing and accessories, such as a reflective vest, reflective arm and leg bands, reflective stripes on your helmet, flashing lights. Any reflective device or light source that moves will help you get the attention of approaching motorists, pedestrians and other traffic. Make sure your clothing or anything you may be carrying on the bicycle does not obstruct a reflector or light. - Avoid dark areas and areas of heavy or fast-moving traffic, hazardous roads and use familiar routes when possible.

11
F: BICYCLING IN TRAFFIC1. Be predictable. Ride so that drivers can see you and easily predict your movements whilst on the road.
2. Read Appendix A. Learning the rules for riding in traffic which are illustrated there.
G. EXTREME STUNT OR COMPETITION RIDING We recommend against this type of riding because of the increased risks, but if you ignore this recommendation, at least:
1. Do stunts, racing or fast downhill riding only in areas designated for this type of riding.
2. Start with easy learning exercises and slowly develop your skills before trying more dangerous riding.
3. Wear a full face helmet and safety pads.
4. Make sure by checking with a qualified bike technician that your bike is suitable for the kind of stunt or competition riding you plan to do.
5. Understand and recognise that the stresses imposed on your bike by this kind of activity may break or damage parts of the bicycle and void the warranty.
6. Take your bicycle to a qualified bike technician if anything breaks or bends. Do not ride your bicycle when any part is damaged.
H. CHANGING COMPONENTS OR ADDING ACCESSORIESThere are many components and accessories available to enhance the comfort, performance and appearance of your bicycle. However, if you change components or add accessories, you do so at your own risk. The bicycle’s manufacturer may not have tested that component or accessory for compatibility, reliability or safety on your bicycle. Before installing any component or accessory, including a different size tyre, make sure that it is compatible with your bicycle by checking with a qualified bike technician. Be sure to read, understand and follow the instructions that accompany the products you purchase for your bicycle.
Wet weather impairs traction, braking and visibility, both for the bicyclist and for other vehicles sharing the road. The risk of an accident is dramatically increased in wet conditions.- Reflectors are not a substitute for required lights. Riding at dawn, at dusk, at night or at other times of poor visibility without an adequate bicycle lighting system and without reflectors is dangerous and may result in serious injury or death. The risk of an accident is dramatically increased in wet conditions.
- Do not remove the front or rear reflectors or reflector brackets from your bicycle. They are an integral part of the bicycle’s safety system. Removing reflectors may reduce your visibility to others using the roadway. Being struck by other vehicles may result in serious injury or death.Although many catalogues, advertisements and articles about bicycling depict riders jumping, racing or stunt riding, this activity is extremely dangerous and increases your risk of injury or death. Remember that the action depicted is being performed by professionals with many years of training and experience. Know your limits and always wear a helmet and other appropriate safety gear. Even with state-of-the-art protective safety gear, you could be seriously injured or killed when jumping, stunt riding, riding downhill at speed or in competition.
Changing the components on your bike may void the warranty. Refer to your warranty, and check with your dealer before changing the components on your bike.

12
NOTE: Correct fit is an essential element of bicycling safety, performance and comfort. Making adjustments to your bicycle which result in correct fit for your body and riding conditions requires experience, skill and special tools. Always have a qualified bike technician make adjustments to your bicycle.
A. STANDOVER HEIGHTStandover height is the basic element of bike fit. It is the distance from the ground to the top of the bicycle’s frame at that point where your crotch would be if you were straddling the bike and standing half way between the saddle and the handlebars. To check for correct standover height, straddle the bike and adjust the seat appropriately to match your riding style. For more control, raise the height allowing your knees to pinch the seat whilst airborne. A bike which you ride only on paved surfaces and never take off-road should give you a minimum standover height clearance of two inches (5 cm’s). A bike that you’ll ride on unpaved surfaces should give you a minimum of four inches (10 cm) of standover height clearance and a bike that you’ll use for rough terrain, jumping or stunt riding should give you four inches (10 cm’s) or more of clearance.
B. SADDLE POSITIONCorrect saddle adjustment is an important factor in getting the most performance and comfort from your bicycle. If the saddle position is not comfortable for you, see a qualified bike technician who has the tools and skill to change it. The saddle can be adjusted in three directions: up and down, seat tilt and forward/ back at a horizontal angle. Ask a qualified bike technician to set the saddle in the position he recommends for you and to show you how to make further adjustments. A large number of Mafia bikes come with a 1pc seat/post combo. This does not allow for any change in the tilt of the seat or horizontal forward/ back movement. Always make sure that your seat post does not extend from the frame beyond the Minimum Insertion or Maximum Extension mark engraved on it, example shown.
3. FIT
MINMIN
MINIMUMINSERTION
LINE
Minimum Inside Leg25” inches (18” Bike)26”inches (20” bike)35” inches (26” bike)
Minimum inside leg20” inches (18” Bike)23” inches (20” bike)32” inches (26” bike)33” inches (27.5” bike)37” inches (29” bike)

13
- If you plan to use your bike for jumping or stunt riding, read Section 2.G again.- If your bicycle does not fit properly, you may lose control and fall. - After any saddle adjustment, be sure that the saddle adjusting mechanism is properly tightened before riding. A loose saddle clamp or seat post binder can cause damage to the seat post, or can cause you to lose control and fall. A correctly tightened saddle adjusting mechanism will allow no saddle movement in any direction. Periodically check to make sure that the saddle adjusting mechanism is properly tightened. The seat post may break, which could cause you to lose control and fall.- An insufficiently tightened stem binder bolt, handlebar binder bolt or bar end extension clamping bolt may compromise steering action, which could cause you to lose control and fall. Place the front wheel of the bicycle between your legs and attempt to twist the handlebar/stem assembly. If you can twist the stem in relation to the front wheel, turn the handlebars in relation to the stem, or turn the bar end extensions in relation to the handlebar, the bolts are insufficiently tightened.
BMX STANDOVER
ROAD BIKE STANDOVER
C. HANDLEBAR ADJUSTMENTYour bars should normally be installed inline with your forks (looking from the side). However if you are a little small for the bike you maywant them back towards you a touch. There is very little reason to angle your bars forward, this will simply affect the bikes geometry and thus performance, making riding difficult, but ultimately bar position is down to personal preference.
Make sure you install the faceplate for the stem evenly, with an equal gap to the top and bottom of the stem to faceplate. Make sure the bolts have a little grease on them as this will allow you to tighten them more than without grease. Tighten the bolts diagonally top to bottom, and then switch to opposing side. This will ensure even pressure on the bars. If your bars persist to slip, try roughing up the knurled section of the bar and also scratch grooves into the stem faceplate and body. This will help the two parts grip each other better.
D. BRAKE REACHMany bikes have brake levers which can be adjusted for reach. You can angle your brake lever however you like. The best angle is normally one tending down pointing to the ground. This allows the lever to be out of the way whilst performing bar spins, etc.
To adjust, simply loosen the lever on the bars and slide/angle to your desired position. If you have small hands or find it difficult to squeeze the brake levers, a qualified bike technician can either adjust the reach or fit shorter reach brake levers.

14
4. AS
SEMB
LY

15
Your Mafia bike was assembled and checked in the factory and then partially disassembled for shipping. If you have ordered your bike direct from us or one of our dealers your bike will arrive to you in the shipping carton in a partially disassembled form. The followinginstructions will enable you to re-assemble your bicycle.For more details on inspection, lubrication, maintenance and adjustment of any area please, refer to the relevant sections in this manual. If you feel you are unable to properly assemble this bicycle, please consult a qualified bicycle technician.
TOOLS REQUIRED• 5mm and 6mm allen key.
• Adjustable wrench or a 15mm and 17mm open end wrench or socket.
• A pair of pliers with cable cutting ability.
You will be supplied with a multi tool which will be sufficient to assemble your bike. However, we recommend using your own tools with which you will be more familiar.
A. FIRST STEPS1. Open your carton from the top and remove the bicycle.
2. Remove all the straps and protective packaging. IMPORTANT! Do not discard packing material until assembly is complete to ensure that no parts are discarded accidentally.
3. Inspect the bicycle, all accessories and parts for possible missing items. It is recommended that the threads of all moving parts in the package be lubricated prior to installation (see section 6.SERVICE)
B. STEM1.Turn the front forks to face forward (i.e. the fork dropout is in the furthest forward position).
2. Using a 5 or 6 mm alley key slightly loosen the topcap bolt on the steerer tube/stem.
3. While holding the fork assembly in place use the appropriate allen key to loosen the stem pinch bolts.
4. Tighten the top cap bolt until it is snug. DO NOT TIGHTEN COMPLETELY AT THIS TIME! 5. Look down over the bars and stem and check that the stem is in line with the tyre.
6. Finish tightening the stem top cap bolt and rear pinch bolts.
C. HANDLEBARS1. Loosen and remove the pinch bolts holding the stem face plate on the front or top of the stem.
2. Although the pinch bolts should come with some grease applied, you may wish to apply some extra grease to the threads before threading the bolts back into the stem
3. Insert the handlebar into the stem. NOTE: Use the rough, knurled area of the handlebar to help center the stem.
4. Place the faceplate over the handlebar.
5. Begin threading the pinch bolts into the stem body. Tighten the bolts in a cross pattern. Do not overtighten the bolts. As you tighten the bolts the gap between the face plate and the stem body should be even at the top and the bottom of the faceplate.
6. Look from the side of the bike and check that the handlebars are parallel with the fork. (In time you may find that you want to move the bars forward or back from this position but this is down to personal preference.)
- Do not disassemble the headset or any loose parts. Be sure the end of the fork is on the ground or being held with your free hand, as once you loosen the top cap the fork assembly may fall out of the frame.

16
D. FRONT WHEEL (SOLID AXLE)1. Loosen the axle nuts on the front wheel. There is a washer inside of the axle nut. It belongs outside of the fork dropouts between the dropout and axle nut.
2. Position the front wheel between the front fork legs with the axle resting inside the fork drop out. IMPORTANT! Be sure that the wheel is as centered as possible between the fork legs.
3. Place the clip retaining washer on the axle and slide it up against the fork drop out. Make sure the hooked end is inside the small hole of the fork dropout, if present. Please note that some suspension forks do not have a provision for this washer to be installed.
4. Place the outer axle nut on and tighten. Tighten one side part way, then tighten the other side and repeat until both sides are tightened securely. Be sure that the wheel remained centered between the fork legs.
5. If the wheel is off center, loosen the axle nut on the side that has a smaller gap between tyre and fork leg and use your hand to pull the wheel to a centered position; hold the wheel with one hand and tighten the axle nut and check if centered again. Repeat if needed to be sure the wheel is centered and securely tightened.
E. FRONT WHEEL (QUICK-RELEASE SECURITY SKEWER)1. Loosen the skewer on the front wheel using a 5mm allen key. Ensure that you do not loosen the retention nut too much to avoid loosing the nut and conical springs.
2. Position the front wheel between the front fork legs with the axle resting inside the fork drop out, ensure that the conical springs are on the outside of the fork dropout. IMPORTANT! Be sure that the wheel is as centered as possible between the fork legs.
3. Ensure that the larger end of the conical springs are facing outwards to the heads of the axle nuts.
4. Tighten the skewer by hand at first to keep the wheel centered within the forks.
5. Once the axle is hand tight and the wheel is centered in the forks fully tighten down the axle using an allen key.
F. FRONT WHEEL (QUICK-RELEASE)1. Release the locking lever on the front wheel axle by flipping it 180°. Ensure that you do not loosen the axle too much to avoid loosing the nut and conical springs.
2. Position the front wheel between the front fork legs with the axle resting inside the fork drop out, ensure that the conical springs are on the outside of the fork dropout. IMPORTANT! Be sure that the wheel is as centered as possible between the fork legs.
3. Ensure that the larger end of the conical springs are facing outwards to the heads of the axle nuts.
4. Tighten the skewer by hand at first to keep the wheel centered within the forks, the axle does not need to be fully tight at this point, there should still be 1-2mm of lateral movement in the axle.
5. Once the axle is snug and the wheel is centered in the forks fully tighten down the axle by flipping the locking lever 180° to the closed position. This action will clamp the wheel into place so there should be minimal force required to do so. It is a good idea to ensure that the lever, once locked, is situated out of harms way. This is usually parallel to the fork leg.
G. PEDALS1.Match the pedal marked R with the right-hand crank arm and match the pedal marked L with the left-hand crank arm.
2. Apply a small amount of grease to the spindle threads of the pedal, this will aid with insertion into the crank.
3. Place the threaded pedal into the threaded hole on the crank arm.
4. By hand, slowly turn the spindle in the correct direction; clockwise for the right-side pedal, anti-clockwise for the left side pedal. IMPORTANT! Stop if you feel resistance. This may be an indication the spindle is entering the hole at an angle. Remove the spindle and repeat step three and four.5. If the spindle is entering the hole cleanly then use a 15mm pedal

17
spanner to tighten completely.
6. Repeat steps 1-5 for the remaining pedal.
H. SEAT CLAMPIt is recommended to add some grease to all threads and bonders on a bicycle, especially on the outside of the seatpost. Otherwise it may corrode over time and not be able to be adjusted again.
1. Using a 5mm or 6mm allen key, loosen the seat clamp bolt and insert the seat post into the seat tube.
2. Adjust the seat height up or down until you feel you have control of the bicycle and are comfortable. IMPORTANT! Be sure the minimum insertion marks do not go past the top of the seat clamp and are not visible. (Refer to section 3.b)
3. Tighten the seat clamp bolt to lock the seat in place (see Torque Table).
4. Check the seat to be sure it does not move.
I. BRAKESThe vast majority of our bikes come with the braking system pre-installed from the factory. However, if your model doesn’t come with the brake pre-installed, then please follow these installation instructions.
J. U-BRAKE (Installation)1. We recommend that you grease your brake mounts and all bolts before assembling your brake set-up, This will aide in effective brake pull and efficiency.
2 Take your right brake arm and slide it onto the brake mount. IMPORTANT! Always start with the right brake arm first otherwise the arms will rub and your brake will not work.
3. Put the correct spring onto the right-hand arm. IMPORTANT! The springs are left or right side specific. The left side spring will tighten when turned clockwise and the right when turned anit-clockwise.
4. Install top hat and bolt. Tighten the bolt until it is snug with the top of the brake arm. DO NOT tighten fully yet.
- Attachment of an incorrect pedal into the crank arm can strip pedal threads and cause irreparable damage to both pedal and crank arm. Visually match the R and L stickers on the pedal and crank arm before attaching the pedals. Before your first ride, please check to ensure your pedals are attached correctly.- It is very important that you check the crank set for correct adjustment and tightness before riding your bicycle.
5. Use a 13mm wrench to tighten down the spring and pull the brakemount out towards the frame. Once there is adequate tension on the spring, fully tighten the top bolt to keep it in place.
6. Repeat steps 1-5 for the left-hand arm, ensuring an equal amount of tension is in both the left and right-hand spring.
7. Remove the bar end and grip from the left hand side of the handlebars.
8. Loosen the 5mm bolt on the rear of the brake lever and slide it onto the handlebars. Position the lever to your liking and re-tighten the 5mm bolt.
9. Refit your grip and barend.
10. Hook the ball end of the cable into the recess of the lever blade.
11. Align the 2 slots in the barrel adjuster on the inside of the lever and pull cable through them. Then place the outer cable into the recess of the adjuster.
12. Run your brake cable from your bars to the cable stop on the frame, and through the threaded adjuster. IMPORTANT! When positioning the cable make sure that there are no kinks or harsh bends in the cable to allow for a smooth and solid brake pull.
13. Slide the end of the cable hanger over the cable, leaving roughly 15mm of cable between the hanger and the cable stop, and tighten using a 10mm wrench.
14. Hook the ball end of the straddle cable through the left arm of your brake, and into the recess. Then wrap around your cable hanger and down through the bolt on the right brake arm.

18
15. Pull the straddle cable through until the pads are roughly 5mm away from your rim on either side, and tighten the retaining bolt.
16. Make sure all bolts on the brake arms, lever and cable hanger are adequately tightened before using your bicycle.
K. HYDRAULIC DISC BRAKE (Installation)A hydraulic brake system is a closed system. This means that it is relatively easy to install as no initial set up is required.
1. Start by installing the disc brake adaptor to the mounting tabs located above the rear left dropout. The adaptor should be installed on the inside of the frame with the 2 attaching bolts fed through from the outside of the frame and into the adaptor.
2. The Longer section of the adaptor should face the front of the bike. Correct orientation of the adaptor will ensure full pad contact on the disc.
3. Do not fully tighten the adaptor bolts at this point.
4. Feed the brake assembly over the disc of the rear wheel and line up the holes to the threaded holes on the adaptor.
5. Secure the brake to the adaptor. Again, do not fully tighten these bolts at this point.
6. Route the brake cable along the frames tubing towards the bars and secure in the guides using the provided u-clips, small zip ties can be used as an alternative.
7. Remove the barend and grip from the left hand side of the handlebars.
8. Loosen the 5mm bolt on the rear of the brake lever and slide it onto the handlebars. Position the lever to your liking and re-tighten the 5mm bolt.
9. Refit your grip and barend.
10. Adjust the position of the brake and adaptor using the slotted holes on the frame to ensure full pad contact with the disc.
11. Fully tighten the adaptor bolts.
12. Pull the brake lever to centre the brake on the disc.
13. Tighten down the brake bolts while the brake lever is depressed and release the brake lever.
14. Lift the back wheel off the floor and spin, checking that the wheel will rotate freely and without the brakes pads dragging on the disc surface.
L. CABLE DISC BRAKE (Installation)1. Start by installing the disc brake adaptor to the mounting tabs located above the rear left dropout. The adaptor should be installed on the inside of the frame with the 2 attaching bolts fed through from the outside of the frame and into the adaptor.
2. The Longer section of the adaptor should face the front of the bike. Correct orientation of the adaptor will ensure full pad contact on the disc.
3. Do not fully tighten the adaptor bolts at this point.
4. Feed the brake assembly over the disc of the rear wheel and line up the holes to the threaded holes on the adaptor.
5. Secure the brake to the adaptor. Again, do not fully tighten these bolts at this point.
10. Adjust the position of the brake and adaptor using the slotted holes on the frame to ensure full pad contact with the disc. Then tighten both the adaptor and brake bolts fully.
6. Remove the barend and grip from the left hand side of the handlebars.
7. Loosen the 5mm bolt on the rear of the brake lever and slide it onto the handlebars. Position the lever to your liking and re-tighten the 5mm bolt.
8. Refit your grip and barend.
9. Hook the ball end of the cable into the recess of the lever blade.
10. Align the 2 slots in the barrel adjuster on the inside of the lever and pull cable through them. Then place the outer cable into the recess of the adjuster.
11. Run your brake cable from your bars to the cable stop directly on the brake caliper, and through the threaded adjuster. IMPORTANT! When positioning the cable make sure that there are no kinks or harsh

19
in the cable to allow for a smooth and solid brake pull.
12. Slide the end of the cable through the caliper barrel adjuster and past the cable clamp bolt on the brakes articulating arm.
13. Rotate the arm on the caliper until it there is a small gap (1-2mm) between the disc and pad. This amount can be fine tuned later on.
14. Tighten the cable retaining bolt down firmly.
15. On the back side (wheel side) of the caliper there is a pad adjustment bolt. By rotating the bolt you will move the inside pad closer to or further from the brake disc.
16. Adjust the pad until it is sitting 0.5-1mm away from the disc surface.
Once you have completed the initial set-up of your brake, it will require some fine tuning to work to it’s full potential. This will involve following the steps below.
M. BRAKES (Fine Tuning)U or V Brake pad adjustment
1. As your brakes bed in they may require some adjustment. To adjust your brake pad, first loosen the allen bolt attaching it to the caliper enough that the shoe will move freely.
2. Next pull your brake lever so the pad makes firm flat contact with the wheel rim. Whilst holding the brake lever, adjust and position the pad so that it sits flat on the rim. Make sure the pad is away from the tyre. A pad rubbing on the tyre will cause the tyre sidewall to fail and the tube to blow out. This can cause injury.
3. Once you are fully satisfied with the position of the pad, tighten the pad retaining bolt/nut whilst FIRMLY pulling the brake lever and preventing the pad from spinning (sometimes this requires 3 hands). This will give a nice flat pad adjustment and very effective braking performance. However, it may also cause the brake to squeal, especially if rim protecting soft pads are being used (clear pads). To prevent brake squeal, attempt to angle the leading edge of the pad slightly into the rim. The rear of the pad should be approx 1-2 mm off the rim when the leading edge first touches the rim. Braking performance will
U or V brake adjustment
1. The U or V-brake utilises 2 separate levers to apply pressure to the wheel rims. Each lever has a spring which is adjustable in tension. In order for both levers to pull together and for the pads to make contact at the same time, the springs need to be adjusted for balanced movement. If one arm is moving more than the other, you must reduce it’s spring tension (usually a small allen key bolt in the side of the brake/pad lever).
2. Depending on the brake this can be either clockwise or anticlockwise, therefore you will need to experiment. You are trying to achieve the brake arms to be in roughly the same position at rest and pull together at the same time when you pull the brake. A perfect set-up will see
CABLE PULL DISC BRAKE
CABLE CLAMP BOLT
BRAKE CALIPERCABLE BARREL ADJUSTER
ARTICULATING ARM

20
both pads hit the rim at the same time. You can adjust how evenly your brake arms pull independantly by adjusting the spring tension
U-brake cable adjustment
Once your brake is set up correctly you may want to finally adjust the brake lever pull for your personal preference. There are normally 2 adjusters, 1 on the lever and 1 on the cable termination on the frame.
1. Screw the cable adjuster anticlockwise to reduce cable pull i.e. in order that the pads hit the rim sooner and therefore the lever has less pull.
2. If you have run out of adjustment, it may be necessary to adjust the cable length at the cable hanger or on the straddle cable itself. Simply loosen the cable connection and pull a small amount of cable through
NOTE: Screw your cable adjusters clockwise until they are approx 1/3 turn from the hard stop before you carry this out. This will allow you to fine adjust your cable pull afterwards.
Cable disc brake cable adjustment
Much the same as fine tuning on a Ubrake a cable disc can be fine tuned after initial set up to adjust the brake lever pull for your personal preference. There are normally 2 adjusters, 1 on the lever and 1 on the cable termination on the brake caliper itself.
1. Screw the cable adjuster on the lever anticlockwise to reduce cable pull i.e. in order that the pads hit the disc sooner and therefore the lever has less pull.
2. If you have run out of adjustment, it may be necessary to adjust the cable length at the caliper itself. Simply loosen the cable connection and pull a small amount of cable through
NOTE: Screw your cable adjusters clockwise until they are approx 1/3 turn from the hard stop before you carry this out. This will allow you to fine adjust your cable pull afterwards.
RECOMMENDED TIGHTENING INFORMATIONFront Wheel Nuts 22-27 Newton Metres
(194-238 in/lbs)Rear Wheel Nuts 35-40 Newton Metres
(309-354 in/lbs)Seat Clamp Bolt 9-9.5 Newton Metres
(79-84 in/lbs)Brake Arm Bolt 5-7 Newton Metres
(44-61 in/lbs)Cable Hanger Nut 7-11 Newton Metres
(61-97 in/lbs)Stem bolts (Fork clamp) 11-14 Newton Metres
(97-123 in/lbs)Stem bolts (Handlebar clamp) 17-19 Newton Metres
(150-168 in/lbs)Pedals 24-29 Newton Metres
(212-256 in/lbs)
Brake Lever Position
1. You can angle your brake lever however you like, however the best angle is normally pointing partially downwards to the ground. This allows the lever to be out of the way whilst performing bar spins etc.
2. To adjust, simply loosen the lever on bar and slide/angle to your desired position.
NOTE: If you do not fully tighten, it is less likely that the lever will be damaged whilst bailing a trick or jump as it will simply spin out of the way under the impact force. If fully tight, the lever may fail as a result of a given impact.
While assembling your bike, it is recommended that, where possible, a torque wrench is used to tighten nuts and bolts. The table below provides a list of torque settings for the major nuts and bolts on your bicycle.

21
spoke.
2. Put the reflective portion of the reflector vertically onto the retaining clip and rotate it through 90° to secure. Make sure the reflector is within 3” of the inside edge of the rim.
Front Brake
1.Fit the brake lever onto the bar adjacent to the grip. Fasten in a comfortable position, normally pointing partially downwards to the ground, and tighten down the clamp bolt.
2. Attach the side pull brake to the front of the forks using the in-built through bolt. Make sure your forks are correctly orientated when you do this. Make sure that the brake pads are spaced evenly apart from the rim, and tighten down the retaining bolt.
Front Brake With Fork Adaptor (Where Applicable)
1. Thread a washer and one of the adaptor brackets onto the long allen bolt. Ensure that slotted side of the bracket is used on this bolt.
2. Thread the bolt through the front side of the forks, and mount the second adaptor plate, washer and nyloc nut to the back side of the fork. Do not fully tighten at this point.
3. Attach the side pull brake to the adaptor bracket using the in-built through bolt and spacer from the adaptor kit. Make sure your forks are correctly orientated when you do this.
4. Position the adaptor to ensure you have sufficient clearance between the brake and tyre, then tighten the fork through bolt on the adaptor bracket.
5. Make sure that the brake pads are spaced evenly apart from the rim, and tighten down the retaining bolt. 6. Fit the brake lever onto the bar adjacent to the grip. Fasten in a comfortable position, normally pointing partially downwards to the ground, and tighten down the clamp bolt.
Bell
Attach the bell to your handlebars and secure. Ensure that the bell is positioned so that is easily accessible with your hand still safely on the grip.
N. ROAD KITAll Mafia bikes are provided with a road kit. If you have not been supplied with a road kit and would like one, please contact your local Mafia dealer.Items included in your kit:
1. Chain guard with fixings2. Front clear handlebar reflector3. Rear offside red reflector4. 4x Amber pedal reflectors5. 2x wheel reflectors6. Bell7. Front brake assembly (lever, cable and brake)8*. Some Mafia bikes are also supplied with a front brake fork adaptor
INSTALLATIONChain Guard
Install the chain guard using the fixings provided. There are 2 clamps. One is fixed to the downtube, and one to the chainstay of the bike. Wrap the clamp around the tube, then insert the screw into the nut, tighten down and this will secure the clamp around the tube. Ensure that the guard is fully covering the chain, but will not interfere with the rotation of the cranks assembly.
Front and Rear Reflector
1. Fix the clear reflector to the crossbar of the handlebars with the rubber spacer, and tighten. Ensuring that the reflecting surface is directed forward and set within 5° of the horizontal axis. 2. Fix the rear reflector onto the seatstay with the rubber spacer. Ensuring that the reflection surface is perpendicular to the ground. It should be visible at all times whether riding seated or standing.
Pedal Reflectors
Fix the 4 pedal reflectors onto the pedals, press firmly onto the front and back side of the pedals until it clicks into place.
Wheel Reflectors
1. Place the retaining clip of the reflector around the back side of the

22
5. TE
CH
23
If your bicycle is equipped with both front and rear brakes, the most effective braking is achieved by using both brakes and applying them simultaneously. (See also par. 5. Braking technique).
A. BRAKES1. How hand brakes workA bicycle with hand brakes may have one hand lever which operates a rear brake, or two hand levers, one of which operates on the front wheel and the other on the rear wheel. If your bicycle has two hand brakes, it’s important to your safety that you instinctively know which brake lever controls which brake on your bike. In the U.K., bikes are required to be set up with the left brake lever controlling the rear brake, and the right lever controlling the front brake.
The braking action of bicycle hand brakes is a function of the friction between the brake shoes and the wheel rim or brake disc. To make sure that you have maximum friction available, keep your wheel rims, brake shoes and brake discs clean and free of lubricants, waxes or polishes.
Make sure that your hands can reach and squeeze the brake levers comfortably. If your hands are too small to operate the levers comfortably, consult a qualified bike technician before riding the bike. The lever reach may be adjustable; or you may need a different brake lever design.
In most other territories, bikes are required to set up with the right brake lever controlling the rear brake and the left lever controlling the front brake.
2. Adjusting your hand brakesIf either brake lever on your bike fails the Mechanical Safety Check (Section 1.C.), you may be able to restore brake lever travel by turning the brake cable adjusting barrel counterclockwise then lock the adjustment in by turning the barrel’s lock nut clockwise as far as it will go. If the lever still fails the Mechanical Safety Check, have your dealer check the brakes.
3. U-Brake cable adjustmentOnce your brake is set up correctly you may want to finally adjust the brake lever pull for your personal preference. There are normally 2
adjusters, one on the lever and one on the cable termination on the frame.- Screw the cable adjuster anticlockwise to reduce cable pull i.e. in order that the pads hit the rim sooner for a greater brake lever operation.- If you have run out of adjustment it may be necessary to adjust the cable length at the crossover junction or on the cross over cable itself. Simply loosen the cable connection and pull through a small amount. Note: screw your cable adjusters clockwise until they are approx 1/3 from the hard stop before you carry this out. This will allow you to fine adjust your cable pull afterwards.
4. Brake lever position- You can angle your brake lever however you like, however the best angle is normally tending down pointing to the ground. This allows the lever to be out of the way whilst performing bar spins etc.- To adjust, simply loosen the lever on bar and slide/angle to your desired position.Note: if you do not fully tighten, it is less likely that the lever will be damaged whilst bailing a trick or jump as it will simply spin out of the way under the impact force. If fully tight, the lever may fail as a result of a given impact.
5. Braking techniqueBrakes are designed to control your speed, not just to stop the bike. Maximum braking force for a wheel occurs at the point just before the wheel “locks up” (stops rotating) and starts to skid. Once the tyre skids, you actually lose most of your stopping force and all directional control. You need to practice slowing and stopping smoothly without locking up a wheel. The technique is called progressive brake modulation.
Everything changes when you ride on loose surfaces or in wet weather. Tyre adhesion is reduced, so the wheels have less cornering and braking traction and can lock up with less brake force. Moisture or dirt on the brake shoes of hand brakes reduces their ability to grip. The way to maintain control on loose or wet surfaces is to go more slowly to begin with.

24
OPENOPEN OPENOPEN
TIGHTE N
LOOSEN
‘V’ BRAKE‘SIDE PULL’ BRAKE‘U’ BRAKE
‘DISC’ BRAKEBRAKE LEVER

25
- Sudden or excessive application of the front brake may pitch the rider over the handlebars, which may result in serious injury or death.- Riding with improperly adjusted brakes or worn brake pads is dangerous and can result in serious injury or death.- Applying brakes too hard or too suddenly can lock up a wheel, which could cause you to lose control and fall. Sudden or excessive application of the front brake may pitch the rider over the handlebars, which may result in serious injury or death.- Some bicycle brakes, such as disc brakes and linear pull brakes, are extremely powerful. Take extra care in becoming familiar with these brakes and exercise particular care when using them.- Disc brakes can get extremely hot with extended use. Be careful not to touch a disc brake until it has had plenty of time to cool.- See the brake manufacturer’s instructions for operation and care of your disk brake. If you do not have the manufacturer’s instructions, see your dealer or contact the brake manufacturer.- Before riding, make sure that the brake is working properly. If it is not working properly, have the bicycle checked by a qualified bike technician before you ride it.
Some bicycles are equipped with a device called a Brake Rotor, which allows the steering mechanism to turn a full 360 degrees. Adjusting brakes equipped with a Brake Rotor requires special knowledge and skill. Do not attempt to adjust the front brake of a bicycle equipped with a Brake Rotor. Take the bicycle to a dealer for service and adjustment of the brakes. A rotor may also decrease the clearance between the front wheel and the pedals when the wheel is turned backwards.
B. WHEELS1. Front Wheel Secondary Retention Devices
Most bicycles have front forks which utilise a secondary wheel retention device to keep the wheel from disengaging if it’s clamping mechanism is incorrectly adjusted. Secondary retention devices are not a substitute for correct wheel clamping. Secondary retention devices fall into three basic categories:a. The clip-on type is a part which the manufacturer adds to the front wheel hub or front fork.b. The integral type is moulded, cast or machined into the outer faces of the front fork dropouts.c. The washer type is a hat-shaped washer which fits into a matching hole in the front fork dropout. Most Mafia bikes use this type.
2. Removing a Bolt
a. With a correctly sized socket, box, open-end or adjustable wrench, loosen the two axle nuts.b. If your front fork has a clip-on type secondary retention device,disengage it and go to step (4). If your front fork has an integral or a washer type secondary retention device, loosen the axle nuts enough to allow removal of the wheel; then go to step (4).
3. Installing a Bolt-On Front Wheel
a. With the steering fork facing forward, insert the wheel between the fork blades so that the axle seats firmly at the top of the slots which are at the tips of the fork blades. The axle nut washers should be on the outside, between the fork blade and the axle nut. If your bike has a clip-on or washer type secondary retention device, engage it.b. While pushing the wheel firmly to the top of the slots in the fork dropouts, and at the same time centering the wheel rim in the fork, use a correctly sized socket, box, open-end or adjustable wrench to tighten the axle nuts as tight as you can.c. If your bicycle has a front wheel hand brake with quick release, close the brake shoes; then spin the wheel to make sure that it is centered in the frame and clears the brake shoes, and squeeze the brake lever to make sure the brake is functioning correctly.

26
6. Spokes
When you get your bike, the spokes have not been pre-stressed. Your wheels were built by automated machines and machines can sometimes make minor mistakes. 1. Check all your spokes are tight. 2. If any are very loose carefully tighten them. First, remove the free play (wobble) from the spoke, then carefully tighten to a similar tension as that of the looser spokes in your wheel. Note: If you over tighten what was a loose spoke it can often cause the wheel to buckle. As your wheels bed in, you may find some of the spokes become loose. The best way to deal with a wheel’s bedding in is to regularly put a 1/4 turn on each spoke after riding (especially the rear wheel). This will keep them tight and your wheels true (running straight). Once the spokes have passed their bedding in stage (stretching) you should not have to tighten spokes very often. If your wheel is buckled you can true the wheel by finding the bend in the rim and applying tension to the correct spokes to pull the rim back in line. This is a relatively skilled procedure and we recommend that you at least follow some of the tutorial videos on YouTube: search ‘true bicycle wheel’.
7. Installing a Bolt-On Rear Wheel with Hand Brake
a. Put the chain on to the wheel sprocket. Then, insert the wheel into the frame dropouts and push it all the way in to the dropouts. The axle nut washers should be on the outside, between the frame and the axle nut.b. Put the chain on to the chainring.c. If your frame has integrated chain tensioners, pull the wheel back in the dropouts so that it is straight in the frame and the chain has about 1/4 inches of up-and-down play then use an allen-key to turn the tensioner bolt clockwise and stop the wheel being able to move forward in the dropout.d. Tighten the axle nuts as tightly as you can, using a correctly sized socket, box, open-end or adjustable wrench.e. Close the brake, then spin the wheel to make sure that it is centered in the frame and clears the brake shoes. Squeeze the brake lever to make sure the brake is functioning correctly.
4. Removing a Bolt-On Rear Wheel with Hand Brake
a. Open the rear brake shoes (see Section 5.A.2.a. above).b. If the wheel is equipped with integrated chain tensioners, loosen the bolt that is threaded through the dropout by turning counterclockwise with a correctly sized allen key an equal number of turns for both sides of the wheel. This allows you to move the wheel as required by step (d) below.c. With a correctly sized socket, box, open-end or adjustable wrench, loosen the two axle nuts.d. Push the wheel forward to slacken the chain, and remove the chain from the chainring and wheel sprocket.e. Pull the wheel out of the frame.
4. Removing a Bolt-On Rear Wheel with Disc Brake and Gears
a. With a correctly sized socket, box, open-end or adjustable wrench, loosen the two axle nuts.b. Pull the wheel straight up out of the dropout and remove the chain from the rear wheel cassette, being careful not to hit the derailleur assembly.
5. Hubs and bearings
Some Mafia bikes use loose ball hubs unless specified otherwise. As the bearings bed in, it may be necessary to tighten the cone nuts from time to time. If there is wobble (side-to-side) your bearings could probably do with a slight tweak. Remove the wheel, loosen the cone locking nuts and carefully tighten the cone nuts. The wheel should spin freely, but there should be no side-to-side play. Once you are satisfied, re-tighten the locking nuts and replace the wheel. Note this can also be a good time to check there is plenty of grease in your bearings. If they are looking/feeling a bit dry, stuff in some fresh grease before adjusting the cone nuts.

27
8. Installing a Bolt-On Rear Wheel with Disc Brake
a. Feed the cassette around the rear derailleur and mount the chain onto the smallest cog.b. Ensure the chain is routed around the rear wheel and derailleur correctly.c. Drop the wheel into the dropout of the frame, making sure the disc feeds between the 2 brake pads.d. Fully seat the wheel in the frames dropouts. The axle nut washers should be on the outside, between the frame and the axle nut. e. Tighten the axle nuts as tightly as you can, using a correctly sized socket, box, open-end or adjustable wrench.f. Mount the chain onto the front sprocket.
LOOSENOPEN CLOSED
- BMX pedals are designed to provide greater grip from the tread surface than an ordinary bicycle pedals. This can result in the pedal tread surface being very rough and possibly containing sharp edges. Therefore riders should wear adequate safety protection while riding their bicycle.
C. PEDALS
1. Toe overlap is when your toe can touch the front wheel when you turn the handlebars to steer while a pedal is in the forward most position. This is common on small-framed bicycles and is avoided by keeping the inside pedal up and the outside pedal down when turning. 2. Some higher performance bicycles come equipped with pedals that have abrasive and potentially dangerous surfaces. These surfaces are designed to add safety by increasing adhesion between the rider’s shoe and the pedal. If your bicycle has this type of high-performance pedal, you must take extra care to avoid serious injury from the pedal’s sharp surfaces. Based on your riding style or skill level, you may prefer a less aggressive pedal design. A trained bike shop technician can show you a number of options and make suitable recommendations.

28
D. CRANK ARM ADJUSTMENT
Your cranks may come loose from time to time. If they do, this is how to tighten them:Loosen the pinch bolts on the crank arm (if present). Next tighten the center crank arm bolt (in line with crank axle) then re-tighten the pinch bolts.If your cranks are still loose after tightening, it may be that your bearings are not fully pressed in. To ensure they are pressed in firmly, remove the crank arms fully and using a suitably sized large socket matching the outer race of the bearing unit, drift the bearing hard into place in the BB housing (using a hammer). Do this on both sides and then re-assemble the crank arms. NOTE: Be very careful with USA looseball BB found on some mafiabikes.
E. HEADSET ADJUSTMENT
Loosen the 2 rear pinch bolts at the back of the handlebar stem and tighten the top bolt (centre of the stem top cap). Not too hard, the bolt simply preloads the bearings. You should be able to still turn the bars easily and smoothly. If they feel notchy then loosen the bolt slightly. If there is movement back and forth in line with the frame, then tighten the bolt. Once satisfied, re-tighten the pinch bolts on the stem nice and tight to prevent the stem slipping on the fork steer tube.
F. TYRES AND TUBES1. TyresBicycle tyres are available in many designs and specifications, ranging from general-purpose designs to tyres designed to perform best under very specific weather or terrain conditions. If, once you’ve gained experience with your new bike, you feel that a different tyre might better suit your riding needs, a trained bike shop technician can help you select the most appropriate design.
The size, pressure rating, and on some high-performance tyres, the specific recommended use, are marked on the sidewall of the tyre. The part of this information which is most important to you is Tyre Pressure. The best and safest way to inflate a bicycle tyre to the correct pressure is with a bicycle pump which has a built-in pressure gauge.
Tyre pressure is given either as maximum pressure or as a pressure range. How a tyre performs under different terrain or weather conditions depends largely on tyre pressure. Inflating the tyre to near its maximum recommended pressure not only gives the lowest rolling resistance but also produces the harshest ride. High pressures work best on smooth, dry pavements.
Very low pressures, at the bottom of the recommended pressure range, give the best performance on smooth, slick terrain such as hard-packed clay, and on deep, loose surfaces such as deep, dry sand.
Tyre pressure that is too low for your weight and the riding conditions can cause a puncture of the tube by allowing the tyre to deform sufficiently to pinch the inner tube between the rim and the riding surface, or damage the wheel rim, making the wheel unsafe. Some tyres may need to be brought up to pressure every week or two.
Some special high-performance tyres have unidirectional treads: their tread pattern is designed to work better in one direction than in the other. The sidewall marking of a unidirectional tyre will have an arrow showing the correct rotation direction. If your bike has unidirectional tyres, be sure that they are mounted to rotate in the correct direction.
2. Tyre ValvesThere are primarily two kinds of bicycle tube valves: The Schrader Valve and the Presta Valve. The bicycle pump you use must have the fitting
PRESTA VALVE
SCHRADER VALVE

29
- Toe Overlap could cause you to lose control and fall. If you have toe overlap, exercise extra care when turning. A brake rotor (see Section 5.A.2.b) may also decrease the clearance between the front wheel and the pedal when the wheel is turned backwards. - Never inflate a tyre beyond the maximum pressure marked on the tyres sidewall. Exceeding the recommended maximum pressure may blow the tyre off the rim, which could cause damage to the bike and injury to the rider and bystanders.- There is a safety risk in using petrol station air hoses or other air compressors. They are not made for bicycle tyres. They move a large volume of air very rapidly and will raise the pressure in your tyre very rapidly, which could cause the tube to explode.- Patching a tube is an emergency repair. If you do not apply the patch correctly or apply several patches, the tube can fail, resulting in possible tube failure, which could cause you to lose control and fall. Replace a patched tube as soon as possible.- Components that are subject to friction, e.g. tyres, chain, grips etc will need changing more regularly than others. Please make sure to regularly check these components for signs of excessive wear or degradation and replace with a genuine replacement as and when needed.
appropriate to the valve stems on your bicycle. The Schrader valve is like the valve on a car tyre. To inflate a Schrader valve tube, remove the valve cap and clamp the pump head onto the end of the valve stem. To let air out of a Schrader valve, depress the pin in the end of the valve stem with the end of a key or other appropriate object.
The Presta valve has a narrower diameter and is only found on bicycle tyres. To inflate a Presta valve tube using a Presta headed bicycle pump, remove the valve cap; unscrew (counter clockwise) the valve stem lock nut and push down on the valve stem to free it up. Then push the pump head on to the valve head, and inflate.
To inflate a Presta valve with a Schrader pump fitting, you need a Presta adapter (available at your bike shop) which screws on to the valve stem once you’ve freed up the valve. The adapter fits into the Schrader pump fitting. Close the valve after inflation. To let air out of a Presta valve, open up the valve stem lock nut and depress the valve stem.
Pencil type automotive tyre gauges can be inaccurate and should not be relied upon for consistent, accurate pressure readings. Instead, use a high quality dial gauge. Ask a bike shop to recommend the best tyre pressure for the kind of riding you will most often do, and have the technician inflate your tyres to that pressure. Then, check inflation as described in Section 1.C.
PRESTAvalve
SCHRADERValve
CHAIN TENSIONADJUST
COASTERBREAKCLAMP
CLOSEDOPEN
OPEN POSITION
CLOSED POSITION
TURN TO ADJUSTCLAMPING FORCE
MIN
MININSERSION
MARK
CLOSEDOPEN
ROTATING DIRECTION
56-406 (20x2.1)
35-80 PSI (2.5-5.5 BAR)
Loosen
30
G. CHAIN ADJUSTMENTWhen performing tricks, your chain should be tight at all times. The reason for this is that a tight chain will make it easier for you to keep your pedals in the desired position whilst performing tricks where you feet leave the pedals e.g. foot-jam-whip. To tighten your chain, first loosen your rear wheel nuts enough so that the wheel only just moves in the rear drop outs (moves with a little force). Pull the rear wheel hard back keeping it in line in the frame.Next, pull the non-drive side back a tiny bit more that the now tight chain side and tighten the non-drive side wheel nut. The wheel will now be slightly out of line in the frame. Next grab the tyre somewhere close to the seat tube and pull the wheel hard over towards the drive side until the wheel is centralised. Once you have it centralised, tighten the drive side wheel nut. This procedure can be a little tricky and will take a few attempts to get the hang of, but the result is a very tight chain and pedals that stay put whilst performing tricks. When you rotate the pedals you may notice a very tight spot, or a very loose spot. This is often caused by the chain wheel (front sprocket) not being centralised. In order to centralise it, try loosening the sprocket bolt (to the rear) a small amount and then spinning the crank arms. The chain wheel should centralise please note that you should not fully loosen, only a little. Once centralised, tighten the sprocket bolt.NOTE: No chain adjustment is needed on a geared bike. The derailleur will automatically provide the chain with the correct amount of tension.
NOTE: if this is all too complicated and you are not interested in tight crank arms for tricks, simply align your rear wheel centrally pulling back on the wheel until the chain is tight, then tighten the wheel nuts.

31
6.SER
VICERegular maintenance and servicing will ensure that your
bicycle continues to be smooth running and will subsequently increase the life of the components. It will also ensure safer riding as well as lower running costs.
There are a number of different ways you can ensure the correct running of your bicycle most crucially by spending time on regular maintenance tasks. However if you are unsure how to do so please consult a qualified bicycle technician.
The following service schedule is only a guide, but we recommend that maintenance and checks should be carried out at the intervals suggested in the tables below:
SERVICE SCHEDULE 1.Lubrication
Frequency Component LubricantMonthly chain chain lube
brake pivot synthetic greasebrake/ gear shift lever
chain lube
brake rotor N/AEvery 6 Months brake/ gear cables chain lube
freewheel/ cassette chain lubeYearly seatpost (in frame) synthetic grease
pedal threads and bearings
synthetic grease
bottom bracket cups synthetic grease
bottom bracket (non-cartridge)
synthetic grease
wheel bearings (non-cartridge)
synthetic grease
headset bearings (non-cartridge)
synthetic grease

32
NOTE: For your safety and also to validate your warranty,your new bike needs to be serviced after approximately 1 weeks riding or 30 miles (whichever comes sooner). This is because all moving parts are liable to bed-in and require adjustment e.g. crank bearings, wheel bearings and headset bearings. The chain may also require re- tensioning. All nuts and bolts should also be checked to ensure they are sufficiently tight along with wheel spokes (especially on BMX bikes which tend to be ridden much harder than other bikes). If you have bought your bike from a mafia dealer they will usually request you to book your 1 week service with them.
A. SERVICE INTERVALSSome service and maintenance can and should be performed by the owner and requires no special tools or knowledge beyond what is presented in this manual. The following are examples of the type of service you should perform yourself. All other service, maintenance and repair should be performed in a properly equipped facility by a qualified bicycle technician using the correct tools and procedures specified by the manufacturer.
Break-in Period: Your bike will last longer and work better if you break it in before riding it hard. Control cables and wheel spokes may stretch or “seat” when a new bike is first used and may require re-adjustment by a trained bike shop. Your Mechanical Safety Check will help you identify some things that need re-adjustment. But even if everything seems fine to you, it’s best to take your bike back to the bike shop for a checkup.
Before every ride: Mechanical Safety Check
After every long or hard ride if the bike has been exposed to water or grit, or at least every 100 miles: Clean the bike and lightly oil the chain. Wipe off excess oil. Talk to a trained bike technician about the best lubricants and the recommended lubrication frequency for your area.
2. Service Checklist
Before Every Ride check tyre pressurecheck brake operation
check wheels for loose spokes and any wobblecheck wheel bolts
inspect tyres for wear and damagecheck frame and forks for cracks
Weekly quick wipe down with a damp clothcheck handlebar and stem adjustment check seat and seatpost adjustmentinspect chain and freewheel for wearcheck headset adjustment
check brake pads for wear
check that all nuts and bolts are tight
Monthly lubrication as per schedule 1check all points as per weekly serviceinspect brakepads for wear and replace as neededinspect chainring for wear
Yearly lubrication as per schedule 1schedule service with qualified bike technician
33
- Technological advances have made bicycles and bicycle components more complex, and the pace of innovation is increasing. It is impossible for this manual to provide all the information required to properly repair and/or maintain your bicycle. In order to help minimise the chances of an accident and possible injury, it is critical that you have any repair or maintenance which is not specifically described in this manual performed by a trained bike shop. Equally important is that your individual maintenance requirements will be determined by everything from your riding style to geographic location. Consult a trained bike technician for help in determining your maintenance requirements.- Many bicycle service and repair tasks require special knowledge and tools. Do not begin any adjustments or service on your bicycle until you have learned from a qualified bike technician how to properly complete them. Improper adjustment or service may result in damage to the bicycle or in an accident which can cause serious injury or death.- Like any mechanical device, a bicycle and its components are subject to wear and stress. Different materials and mechanisms wear or fatigue from stress at different rates and have different life cycles. If a component’s life cycle is exceeded, the component can suddenly and catastrophically fail, causing serious injury or death to the rider. Scratches, cracks, fraying and discoloration are signs of stress-caused fatigue and indicate that a part is at the end of its useful life and needs to be replaced. While the materials and workmanship of your bicycle or of individual components may be covered by a warranty for a specified period of time by the manufacturer, this is no guarantee that the product will last the term of the warranty. Product life is often related to the kind of riding you do and to the treatment to which you subject the bicycle. The bicycle’s warranty is not meant to suggest that the bicycle cannot be broken or will last forever. It only means that the bicycle is covered subject to the terms of the warranty.- A crash or other impact can put extraordinary stress on bicycle components, causing them to fatigue prematurely. Components suffering from stress fatigue can fail suddenly and catastrophically, causing loss of control, serious injury or death.
After every long or hard ride or after every 10 to 20 hours of riding:- Squeeze the front brake (if you have one) and rock the bike forward and back. Everything feel solid? If you feel a clunk with each forward or backward movement of the bike, you probably have a loose headset. Have a qualified bike technician to check it.- Lift the front wheel off the ground and swing it from side to side. Feel smooth? If you feel any binding or roughness in the steering, you may have a tight headset. Have a qualified bike technician check it.- Grab one pedal and rock it toward and away from the center-line of the bike, then do the same with the other pedal. Anything feel loose? If so, have a qualified bike technician check it.- Take a look at the brake pads. Starting to look worn or not hitting the brake surface squarely? Time to have a qualified bike technician adjust or replace them.- Carefully check the control cables and cable housings. Any rust? Kinks? Fraying? If so, have a qualified bike technician replace them.- Squeeze each adjoining pair of spokes on either side of each wheel between your thumb and index finger. Do they all feel about the same? If any feel loose, have a qualified bike technician check the wheel for tension and trueness.- Check the frame (particularly in the area around all tube joints), the handlebars, the stem and the seatpost for any deep scratches, cracks or discolouration. These are signs of stress-caused fatigue and indicate that a part is at the end of its useful life and needs to be replaced.- Check to make sure that all parts and accessories are still secure, and tighten any which are not.
As required: If either brake lever fails the Mechanical Safety Check (Section 1.C), don’t ride the bike. Have a qualified bike technician check the brakes.
Every 15 (hard off-road) to 30 (on-road) hours of riding: Take your bike to a qualified bike technician for a complete checkup.
B. IF YOUR BICYCLE SUSTAINS AN IMPACT:First, check yourself for injuries, and take care of them as best you can. Seek medical help if necessary. Next, check your bike for damage, and fix what you can so you can get home. Then, take your bicycle to a qualified bike technician for a thorough check.

34
A. LEARNING THE RULESIn addition to the basics, riding safely, off road safety, wet weather riding, night riding, bicycling in traffic and extreme, stunt and competition biking, you need to be taught and to have frequently reinforced the following rules and lessons which we are all expected to know. We urge you to take the time to familiarise yourself with these rules.
1. Rules- No riding in the road or in the street. - No riding on busy streets.- No riding at dawn, dusk or at night.- Stop for all STOP signs.- Ride on the appropriate side of the road for your territory. This is the left for UK / Ireland / Australia / NZ / India / Japan. This is the right for most other countries. 2. LessonsThe lessons that follow relate to some of the most common real situations that you may encounter when riding your bikes.
a. Driveway RideoutWhen someone rides out of the driveway and is struck by a car, that is called a rideout accident. What can you do? First, realise the danger of your own driveway. If there are obstructions to the view of passing motorists (like bushes or trees), trim them back. You might park your car in front of the driveway, if local ordinance permits. This way, you can’t use the driveway as a launching pad. But the most important thing you can do, is consider driveway safety. Start by practicing the following steps:1) Stop before entering the street.2) Look left, right and left again for traffic.3) If there is no traffic, proceed into the roadway.b. Running the Stop SignCar/bike crashes can happen when a cyclist runs a stop sign. Most cyclists who get hit riding through stop signs know that they were supposed to stop. They just thought it would be OK this time; or they may have been distracted. The most important thing to remember is that while you may not get hit every time, running stop signs will eventually result in an accident.
7.APP
ENDI
X

35
What can you do? Go to a stop sign near home. Explain what it means by emphasising the following points:1) Stop at all stop signs, regardless of what is happening. 2) Look in all directions for traffic.3) Watch for oncoming cars making right turns.4) Watch for cars behind you making left turns. 5) Wait for any cross traffic to clear.6) Proceed when safe.In order to make this lesson stick, you may have to change your own driving habits. If you creep through junctions controlled by stop signs, you are showing that you don’t really believe what you preach and are endangering cyclists on the road.
c. Turning Without WarningAnother major accident type involves cyclists who make unexpected right turns. They neither look behind for traffic, nor do they signal. The key factor here is neglecting to look to the rear. If the cyclist had looked, he/she would have seen the danger coming up from behind.
What can you do? Of course, you ought to instruct the rider not to ride across busy streets - at least until the rider has had some advanced training and is proficient enough to understand traffic. But in the meantime, for residential street riding, you can teach the rider to always look and signal before turning. A big part of this lesson is teaching the rider how to look to the rear without swerving. Take the rider to a safe area away from traffic or obstructions to practice riding along a straight line while looking behind. Stand alongside and hold up a different number of fingers on your hand after the rider rides by. Call his/her name. After 15 minutes of practice, the rider should be able to look behind his/herself and identify how many fingers you are holding up without swerving.
d. Riding at Dawn, at Dusk or at Night (See also Section 4.F). Most car/bicycle accidents happen at night where an overtaking car hits a bike. (An overtaking car is one that comes up from behind and passes the cyclist on the right.) These overtaking accidents can be very serious.
What can you do? First, you should keep the new rider from riding at dawn, dusk or at night. It requires special skills and equipment. Few new cyclists have either. Secondly, make sure the rider understands that if he/she gets caught out at dusk or after dark on a bike, the thing to do is to call for a ride home.
e. Following the LeaderThere is increased risk of car/bike collision if riders are following each other, because if the first one does something dangerous, those following may do it too.What can you do? Instruct the rider to always assess the traffic situation for him/herself. When a group is riding around, each cyclist should stop for stop signs, each cyclist should look to the rear before making right turns and so on. Riders need to learn to think for themselves to ride safely.

36
ONLY
left right
Never ride against traffic - motorists are not looking for bicycles riding on the wrong side of the road.
Keep both hands ready to brake - You may not stop in time if you brake one- handed. Allow extra distance for stopping in the rain, since brakes are less effective in the wet.
Use hand signals - Hand signals, using the apropriate arm signal to motorists which direction you intend to turn.
Watch for dogs - Ignore them or try a firm “NO!”. If the dog does doesn’t stop, stand with your bike between you and the dog. Dogs are attracted to spinning wheels and feet.
Avoid road hazards - Watch out for parallel slot drain grates, slippery man hole covers, oily pavements, gravel and ice. Cross road tracks carefully at a right angle to the track. To get better control as you move across bumps and other hazards, stand up on your pedals.
Don’t pass on the left - Motorists may not look for, or see, a bicycle passing on the left.
Ride in the middle lane in slow traffic. Get in the middle lane at busy junctions and whenever you are moving at the same speed as traffic.
Don’t weave between parked cars - Don’t move to the curb between parked cars unless they are far apart. Motorists may not see you when you try to move back into traffic.
Obey traffic siganls - bicycles must drive like others vehicles if they are to be taken seriously by motorists.
Ride in a straight line - Whenever possible ride in a straight line, to the left of traffic, but about a car door’s width away from parked cars.
Go slow on the pavement - By law, you must give pedestrians audible warning when you pass.
Choose the best way to turn - There are 2 ways to make a right turn. 1. Bike on road - Signal. move into the right lane and then turn. 2. Like pedestrian - Ride straight to the far side crossing. Walk your bicycle.
Scan the road behind - Learn to look back over your shoulder without losing your balance or swerving right. Some riders use rear view mirrors.
Watch for cars pulling out - Make eye contact with the driver. Assume they don’t see you until you are sure they do.
Follow middle lane markings - Don’t go straight in a lane marked “Left Turn Only”.
Please note these diagrams depict correct road positioning for countries that ride on the left hand side of the road. For countries that ride on the right, such as the USA, the diagrams should be considered reversed.

378.W
ARRA
NTY

38
abuse or misuse (NOTE: you will need to supply photos of both sides of your bike and then may further be asked to return the failed component):
• Cracked or broken frames• Cracked or broken forks• Cracked or broken bars• Cracked or broken hubs• Internal axle failure BB/wheels• Cracked or broken cranks• Visible manufacturing defects to any part or component should be reported as soon as noticed. You are expected to keep your bike in serviceable condition. Any failure attributed to incorrect or lack of maintenance will be easily detected by our engineers and in most cases rejected.
When you make a claim, you will be expected to provide photographic evidence of your complete bike (photos of both sides even if it is a single small component failure) including close up shots of the failed component(s). In most instances you will then be required to send the failed part/component back to our head office for inspection at your own cost.
For any warranty or return enquiry please fill out the relevant application form to be found at www.stomp-group.com.
Mafia Bike is a registered trademark owned and operated by Stomp Distribution LTD
A. HOW TO CLAIMWarranty claims will only be handled through the appropriate channel which is our online form. If you do not supply all of the requested information, your claim may be rejected. Please go to the following page and fill out the warranty enquiry form in full: www.stomp-group.com Completes and Parts are covered by a 6 month manufacturer’s warranty: This covers unexpected failure/defect of all parts/components that may not be attributed to fair wear and tear or crash damage outside that considered normal use. The claimant must be the original owner/purchaser and be able to produce a receipt to prove the date of purchase. The bicycle/parts/components must be free from modification including shot blasting, non-standard parts and/ or painting/powder coating.
B. IMPORTANT - 1 WEEK SERVICEIf you do not have your 1 week service record (signed and stamped receipt), then your warranty is invalid.Please note: ‘Raw’ finished frames, forks, etc will be subject to corrosion at a faster rate than painted bikes. This is simply because there is no rust protection applied to give the parts the ‘raw look’, i.e. where you can see the blueing of the tubes as a result of welding. Therefore, we cannot offer warranty on the basis of corrosion. In order to minimise the potential for corrosion, it is advised that the bikes/parts are kept away from water and stored inside.
Examples of items not covered by your warranty:• Buckled wheels• Worn tyres• Worn/broken chains (unless clearly a manufacturing defect)• Worn sprockets• Worn bearings or hub internals• Bent forks / frame / bars / axles / cranks / pedalsExamples of items that are covered where it is clear there has been no

39
