loan shark - state library of louisiana
TRANSCRIPT
Loan SHARK
User Manual
Virginia R. Smith
Baton Rouge, Louisiana 2002

Loan SHARK
User Manual
Virginia R. Smith
Baton Rouge, Louisiana 2002
INTRODUCTION
The Loan SHARK User Manual was developed by the State Library of Louisiana with assistance from Louisiana public library interlibrary loan staff. The manual is designed to help library staff train new employees who will be using Loan SHARK and to serve as a refresher for trained staff.
The manual is written for an audience with basic computer skills and a basic
understanding of library procedures and interlibrary loan. The step-by-step directions should be followed at a computer. A Glossary of Terms, interlibrary loan policies, the Louisiana Interlibrary Loan Code, a list of Loan SHARK interlibrary loan symbols, and instructions for updating records in the Loan SHARK public access catalog (PAC) are included for the convenience of library staff.
The Loan SHARK User Manual will be updated as needed to reflect upgrades in software and policy and procedure changes. A Feedback Form is included in the Appendix. The form may be used to suggest additions and changes to the manual.
The manual may be photocopied by Louisiana libraries for use in their libraries.
It is also available in PDF format on the State Library of Louisiana website at www.state.lib.la.us.
TABLE OF CONTENTS Chapter I: WHAT YOU NEED TO KNOW TO GET STARTED
System and Equipment.........................................................................I-1 Logging in to Loan SHARK ................................................................I-1 Toolbars ...............................................................................................I-2 PAC (Public Access Catalog) ..............................................................I-2 Transaction Lists ..................................................................................I-3 Pull Slips ..............................................................................................I-5 Expiration Timer ..................................................................................I-5 Using Help ...........................................................................................I-6 More Help ............................................................................................I-7 Statistics ...............................................................................................I-7
Chapter II. LENDING ACTIVITY Logging in to Lending........................................................................ II-1 Daily Activities .................................................................................. II-1
Checking for Unanswered Requests................................................ II-1 Batch Printing Pull Slips.................................................................. II-2 Cancel Pending ................................................................................ II-3 Renew/Pending and Renew/Overdue .............................................. II-4
Finding Requests to Answer .............................................................. II-4 In Process – Printed Transaction List .............................................. II-4 Search .............................................................................................. II-5 Scan Mode ....................................................................................... II-5
Answering New Requests .................................................................. II-6 Unfilled ............................................................................................ II-6 Ship .................................................................................................. II-6 Hold Placed...................................................................................... II-7 Retry ................................................................................................ II-7 Message ........................................................................................... II-8 Shipping Hold Placed Items ............................................................ II-8
Other Lending Activities.................................................................... II-9 Check In Returned Items ................................................................. II-9 Recall ............................................................................................... II-9
Weekly Activities............................................................................. II-10 Checking the Return Pending Transaction List ............................. II-10 Checking Other Transactions ........................................................ II-10
Chapter III. PLACING REQUESTS Types of Searches ............................................................................. III-1 Help Screens ..................................................................................... III-2 Searching the PAC ............................................................................ III-2 Placing a Request .............................................................................. III-2 Manual Requests ............................................................................... III-4 Canceling a Request.......................................................................... III-5 Subject Requests ............................................................................... III-6
i
Chapter IV. BORROWING ACTIVITIES Logging in to Borrowing................................................................... IV-1 Receiving Items................................................................................. IV-1
Shipped Transaction List ................................................................ IV-1 Search ............................................................................................. IV-2 Scan Mode ...................................................................................... IV-3
Returning Items................................................................................. IV-3 Retrieving Pull Slips ....................................................................... IV-3 Received Transaction List .............................................................. IV-4 Search ............................................................................................. IV-4 Scan Mode ...................................................................................... IV-4
State Library as OCLC Agent ........................................................... IV-5 Receiving OCLC Items................................................................... IV-5 Returning OCLC Items................................................................... IV-6
Renewing Items................................................................................. IV-6 Daily Activities ................................................................................. IV-7
In Review........................................................................................ IV-7 Checking Pending Transaction List for New Messages ................. IV-7 Conditional Answers ...................................................................... IV-8 More Lenders.................................................................................. IV-9 Retry Answers .............................................................................. IV-10 Renew/Pending and Renew/Overdue ........................................... IV-10 Overdue Items............................................................................... IV-11 Items Being Recalled.................................................................... IV-11
Weekly Activities............................................................................ IV-11 Shipped But Not Received............................................................ IV-11 Returned But Not Checked In....................................................... IV-12 Canceled Requests ........................................................................ IV-12
Chapter V SETTING UP INTERLIBRARY LOAN TRANSACTIONS Logging in to Settings ........................................................................ V-1 Configuration ..................................................................................... V-1 Calendar ............................................................................................. V-1 Subject Requests ................................................................................ V-2 Pull Slips ............................................................................................ V-2 Add User ............................................................................................ V-3 Update User........................................................................................ V-4 Delete User......................................................................................... V-4
Chapter VI GLOSSARY OF TERMS ...................................................VI-1 APPENDIXES
Interlibrary Loan Policies and Procedures ......................................... A-1 State Library of Louisiana ............................................................... A-1 All Loan SHARK Libraries ............................................................. A-3
Louisiana Interlibrary Loan Code .......................................................B-1 Loan SHARK Library Interlibrary Loan Symbols..............................C-1 Updating Your Library’s Records in the PAC................................... D-1 Feedback Form....................................................................................E-1
ii

I. WHAT YOU NEED TO KNOW TO GET STARTED
System and Equipment Required:
• Windows 95 or higher • Microsoft Internet Explorer 5.0 or higher
Recommended • Laser printer for pull slips • Code 39 barcode scanner
Logging in to Loan SHARK Loan SHARK is accessed through the Internet. No software is required. 1. Open Internet Explorer and type http://la.library.net in the Address field.
Result: You will see the Main Menu screen with three yellow boxes: ILL Librarian, Public Access Catalog and System Administrator.
2. Click on the yellow ILL Librarian box. Result: You will see the ILL Librarian login form.
3. Type your Login Name and Password and select your library using the dropdown box. Click on the Go! button. Result: You will see the Home screen.
• There are two blue toolbars on the left side of the screen. The buttons on the toolbars are used to select interlibrary loan activities.
• An information line appears at the top of the page. The line displays the User Name of the person currently logged in, followed by the name of the library.
• The body of the screen contains explanatory text. 4. If you do not have a Login Name and Password:
• Login as someone else from your library. Follow the directions in steps 5 through 7 for adding a new user to get a Login Name and Password for yourself.
• If you do not know a Login Name and Password, call the State Library at either 225/342-4920 or 225/342-4918.
5. Click on the blue Settings button on the Home toolbar on the left. Result: You will see the Settings screen.
6. Click on the blue Add User button on the Settings toolbar on the left. Result: You will see the Add User form.
I-1
7
Fill in the required fields listed below for adding users. The others are optional. • First name: Capitalize first letter only. • Last name: Capitalize first letter only. • 10 digit phone number • Login Name: Use a name that will be easy for you to remember. • Password: Use a password that will be easy for you to remember. • Security Level: Select ILL Librarian. • User Type: There are three User Types in the dropdown box. Select NONE
(-1): This is an administrator. Users with ILL Librarian security level should be assigned this User Type.
After entering data in the form, save by clicking the Go! button. Result: You will receive a confirmation (or error) message.
Toolbars
• Most Loan SHARK interlibrary loan screens have two toolbars on the left. The System toolbar with Home and Logout buttons beneath appears on all the Loan SHARK screens. Home brings you back to the Home screen from any screen in Loan SHARK. Logout brings you to the Main Menu page at http://la.library.net. The lower toolbar changes from screen to screen. The buttons in the lower toolbar, which help you find information about interlibrary loan transactions, will be explained in more detail in other chapters.
• The lower Home toolbar allows you to select interlibrary loan activities. o Home brings you back to the Home screen from any other screen in Loan
SHARK. o Help button is available on each page so you can access Library•Request
Help. o Borrowing takes you to all the Loan SHARK borrowing functions. o Lending takes you to all the Loan SHARK lending functions. o Copyright Compliance tracks copyright for your library. o Settings is used to add, update and delete users. Local libraries can also use
Settings to override selected system-wide defaults. o The PAC button provides access to the Loan SHARK database of member
libraries’ holdings. Clicking on the PAC button allows ILL Librarians to place requests. The PAC button is only accessible from the Home screen.
PAC (Public Access Catalog) The Loan SHARK PAC is a database of the catalog records and holdings of all automated Louisiana public libraries and the State Library of Louisiana. Louisiana libraries update their holdings for the PAC either monthly or quarterly. Once logged in as ILL Librarian, you can search the PAC and place requests for items found. The PAC is accessible on the Internet for searching, but requests can’t be placed without logging in as ILL Librarian. Records in the PAC can be viewed as Label Display or MARC Display. A list of holdings follows the Label Display of the record. Holdings are not shown in the MARC Display. Some libraries have included branch holdings. Others have included only library
I-2
system holdings. The holdings record shows the holding library’s interlibrary loan symbol, library system or library branch name, and local call number. MARC records can be downloaded from the Loan SHARK PAC for cataloging. Transaction Lists When you click on one of the blue buttons below the Help button in the Borrowing toolbar or below the Help button and above the Pull Slips button in the Lending toolbar, you get an interlibrary loan transaction list. Each list contains the following:
• List title: The list includes a display title at the top, describing how the current list was obtained. For example, when you select the Pending button in Borrowing, the title is: “Pending” followed by information about the number of requests and which results page you are currently viewing, such as “1 to 10 of 33 items.”
• Lost Messages: If the borrowing or lending library sends a Lost Message about a transaction, or if there is any response to a Lost Message by either partner, a notification is displayed in blue type at the top of all transaction lists. The purpose is to alert the library partner that some new activity has occurred.
• Columns and actions: The information below describes the list columns and some actions you can take from the list entries: o Id: The unique Identifier number assigned automatically to a transaction by
the system is shown in the Id column. To access the history of the transaction, click the underlined Identifier number.
o Prec. (Precedence): A description of the material handling and breadth of searching appears in this column. The Precedence in Loan SHARK is always Normal.
o This icon marks active transactions that have new activity, such as a Shipped response from the lender. These transactions have not been Marked as Read. The purpose of the NEW icon is to alert you to requests that have a new message or need to have some action taken.
o Transactions that have notes from a borrower or lender are marked with a Scroll and Hand icon. To read the notes, click the underlined entry in the Latest Activity column.
o The More Lenders icon (gray plus sign) appears in the Borrowing Not – Supplied transaction list beside requests that have lenders in the Lender String that have not been tried, but the automatic referral to lenders was stopped by the referral "pause" setup or by a Retry answer.
I-3
o Latest Activity: This indicates the very latest Message that has arrived at your library or has been sent by your library.
o Status: The Status column shows the current Status or state of the transaction. Those in red are completed transactions.
o Date: This column indicates the date of the latest activity. o Title: The title of the item requested is shown in the Title column. o Partner: A brief name of the borrowing library is shown in the Partner
column. The Partner column appears only in Lending lists. o Tracking Number: A column for the request Tracking Number is included in
Borrowing transactions lists. The Tracking Number is a function of Patron Initiated ILL and is not used by Loan SHARK at this time.
o Patron: A Patron column appears in Borrowing transaction lists only. It includes the names of patrons who requested the loans.
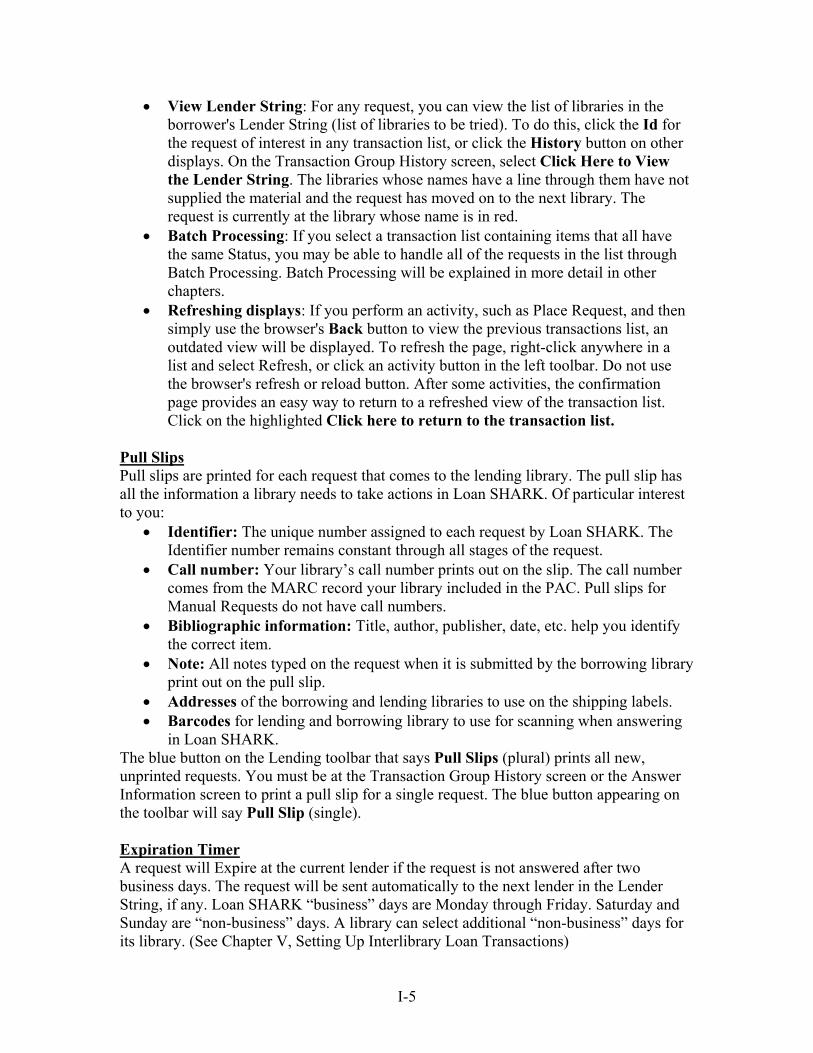
o : The dropdown box (on the right side of each request line) contains a list of the next possible actions that you can take on this transaction. After selecting an action, click the Go! button. An entry form appears in which you can add information and confirm the action. Other activity buttons are available on the left toolbar on these pages, depending on the type of action selected.
o Sorting transaction lists: By default, most transaction lists are sorted by date. To re-sort a transaction list, click any of the highlighted/underlined column headers. To re-sort a column in the opposite order (descending or ascending order), click the column header again. A small up or down arrow appears to the right of the header to indicate the current sort order. Transaction lists of completed transactions and the Show All list are sorted descending by date (small arrow pointing down), so requests with the most recent Latest Activity appear first. Re-sort the list by clicking the Date column.
• View Page Up or Page Down: Click the Page Up and Page Down buttons to go to the next or previous pages in a long list. A label also appears at the top of each page displaying the current location in the list, for example, "1 to 10 of 32 items." A dropdown box beside the Page Up or Page Down buttons lets you select how many items you want to view at one time, ranging from 10 to 100 items.
• History of a transaction: Click on the underlined Id number beside a transaction line. This displays the Transaction Group History screen, showing all Messages and actions on this request from start through the current activity. You can also access the history by clicking the underlined entry under the Latest Activity column, and then clicking the History button available in the toolbar on the next page. Included on the History page is the Service Types column, showing every step in the transitions between library partners in chronological order. To view information about any step, click the underlined word(s) in the Service Type column. Note that the time is shown in Coordinated Universal Time (UTC), formerly known as Greenwich Mean Time (GMT).
I-4
• View Lender String: For any request, you can view the list of libraries in the borrower's Lender String (list of libraries to be tried). To do this, click the Id for the request of interest in any transaction list, or click the History button on other displays. On the Transaction Group History screen, select Click Here to View the Lender String. The libraries whose names have a line through them have not supplied the material and the request has moved on to the next library. The request is currently at the library whose name is in red.
• Batch Processing: If you select a transaction list containing items that all have the same Status, you may be able to handle all of the requests in the list through Batch Processing. Batch Processing will be explained in more detail in other chapters.
• Refreshing displays: If you perform an activity, such as Place Request, and then simply use the browser's Back button to view the previous transactions list, an outdated view will be displayed. To refresh the page, right-click anywhere in a list and select Refresh, or click an activity button in the left toolbar. Do not use the browser's refresh or reload button. After some activities, the confirmation page provides an easy way to return to a refreshed view of the transaction list. Click on the highlighted Click here to return to the transaction list.
Pull Slips Pull slips are printed for each request that comes to the lending library. The pull slip has all the information a library needs to take actions in Loan SHARK. Of particular interest to you:
• Identifier: The unique number assigned to each request by Loan SHARK. The Identifier number remains constant through all stages of the request.
• Call number: Your library’s call number prints out on the slip. The call number comes from the MARC record your library included in the PAC. Pull slips for Manual Requests do not have call numbers.
• Bibliographic information: Title, author, publisher, date, etc. help you identify the correct item.
• Note: All notes typed on the request when it is submitted by the borrowing library print out on the pull slip.
• Addresses of the borrowing and lending libraries to use on the shipping labels. • Barcodes for lending and borrowing library to use for scanning when answering
in Loan SHARK. The blue button on the Lending toolbar that says Pull Slips (plural) prints all new, unprinted requests. You must be at the Transaction Group History screen or the Answer Information screen to print a pull slip for a single request. The blue button appearing on the toolbar will say Pull Slip (single). Expiration Timer A request will Expire at the current lender if the request is not answered after two business days. The request will be sent automatically to the next lender in the Lender String, if any. Loan SHARK “business” days are Monday through Friday. Saturday and Sunday are “non-business” days. A library can select additional “non-business” days for its library. (See Chapter V, Setting Up Interlibrary Loan Transactions)
I-5
Using Help A blue Help button that appears on any Loan SHARK page brings you to the Help file. Topics in Help are written for staff that manage day-to-day interlibrary loan transactions at their libraries. Use Help to find information on a topic more detailed than you find in the Loan SHARK User Manual. The Help file is written by The Library Corporation for Library•Request Interlibrary Loan software. It is not written specifically for Loan SHARK. Some of the sample screens are not the same ones you see in Loan SHARK. Some of the explanations do not apply to Loan SHARK. 1. Click on the blue Help button on the left toolbar from any screen.
Result: You will see the Help window. Hint: Click the Maximize button at the top right of the screen to see a full view of the screen.
2. The Table of Contents in the left frame of the Help display is an expandable list of main topics.
• Click on the plus sign beside a Book icon to expand the list. • Click on the question mark next to a topic to go to that topic. • Click the Contents button in the Help toolbar across the top of the screen to
return to the initial display of the contents. 3. Click the Index button in the Help toolbar on the top of the screen to search help
topics by significant keywords. Result: You will see a list of all the available keywords.
• If you don't see the words you want in the initial list, type a word and the list will narrow to show this word and nearby words and phrases. To select, click on the word or phrase of interest and press Enter on the keyboard, or double-click on the word or phrase.
• If the word is found in only one Help topic, that topic will appear immediately in the frame on the right. If the word is used in multiple topics, a Topics Found window appears listing the topic titles. Follow the instructions in the window to select the topic you want.
• Help topics often have more than one keyword. If you do not find the word you want at first, try typing another word of interest.
4. Click the Search button in the Help toolbar on the top of the screen to search Help by any word in any topic. Type any words, and click on the Search button. Result: You will see a list of topics that contain the word(s).
5. Select from the list of topics by double-clicking a topic, or click on the topic title to highlight it, then press Enter on the keyboard. Result: You will see the Help text. Note: Help topics often contain colored, underlined words or phrases. Click on these to link to another topic of interest.
6. Use the Hand buttons at the bottom of the Help topic window to browse topics that are logically related by subject matter: Prev takes you back to a previous topic, and Next takes you to the next related topic.
7. Click the Home button on every help topic page to return to the introductory Help topic, “Welcome to Library•Request Help!”
I-6
8. Click the Back and Forward buttons in the Help toolbar at the top of the screen to see the previous topic you just viewed or go forward to the next topic.
More Help A Loan SHARK page is available on the Home Page of the State Library of Louisiana at http://www.state.lib.la.us/Dept/UserServ/LS/index.htm. The page includes contact information for Louisiana public libraries and State Library of Louisiana interlibrary loan staff, a list of interlibrary loan symbols, Loan SHARK usage statistics by library, Loan SHARK PAC statistics, and other information. State Library staff is available for assistance 8 a.m. to 4:30 p.m., Monday through Friday. You can contact:
Virginia Smith, 225/342-4920 or [email protected] Donna D’Andrea, 225/342-4918 or [email protected]
Statistics Monthly Loan SHARK usage and PAC statistics for each library are posted on the Home Page of the State Library of Louisiana at:
http://www.state.lib.la.us/Dept/UserServ/LS/index.htm.
I-7

II. LENDING ACTIVITIES A. Logging in to Lending The Lending activity screens allow you to review requests and messages sent by borrowing libraries, send items requested, send messages to libraries, and check in items returned from libraries. 1. Log in as ILL Librarian.
Result: You will see the Home screen. 2. Click on the blue Lending button on the Home toolbar on the left.
Result: You will see the Lending screen. B. Daily Activities The State Library recommends that libraries perform these In Process – Printed, In Process – Unprinted, Cancel – Pending, and Renew Pending activities outlined below daily. Checking for Unanswered Requests In this step, you will look for old pending requests that have not been answered. When new requests are batch printed by the lending library, the Latest Activity automatically changes from ILL Request to ILL Answer – Will Supply. A request should keep the ILL Answer – Will Supply answer only long enough for you to go to the shelf to pull the item or to get the item from a branch. These requests are waiting for you to do something. Clear out all the ones that are more than several days old by either answering Ship and sending the item or saying no by answering Unfilled. 1. At the Lending screen, click on the blue In Process – Printed button in the Lending
toolbar on the left. Result: You will see the In Process – Printed transaction list. The list is sorted by date with the most recent requests first.
2. The pull slips for each of the titles in the list were printed once. That is how the request got the Will Supply answer. If you can’t find the pull slip for a request, click on the Id number on the left side of the transaction. Result: You will see the Transaction Group History screen.
3. Click on the blue Pull Slip button at the bottom of the Lending toolbar on the left. Result: You will see the Print screen.
4. Click the Print button. Result: The pull slip will print.
5. Write the word Reprint on the pull slip so that you will know that another pull slip for that request is floating around someplace. Hold the reprinted pull slips until the pull slips for the new ILL Requests are printed. You can look for the items and answer all the requests at once.
6. Click on the browser Back button twice or right click any place on the screen, left click on Back two times to return to the In Process – Printed transaction list. Result: You are back at the In Process – Printed transaction list.
II-1
7. Look over the In Process – Printed transaction list for a red NEW over a Scroll and Hand icon. These are new Messages sent by the borrowing library about requests. Click on the Scroll and Hand icon. Result: You will see a screen that contains information about the transaction and the Message.
8. Read the Message. Click the blue Mark as Read button on the bottom of the Lending toolbar on the left. Then, click on Click here to return to the transaction list. Result: You will see the transaction list. The red NEW over the Scroll and Hand icon is gone.
Batch Printing Pull Slips
• Designate one workstation and only one person at a time at your library to print pull slips to avoid confusion.
• For every pull slip that is batch printed, the Message Answer – Will Supply –Being processed for supply is automatically sent to the borrowing library for each, which stops the expiration clock. Will Supply means that you have printed the pull slip and are looking for the item. The answer gives you time to look for it and get it from a branch if necessary before sending the item.
• Printing the pull slips one at a time from a transaction list does not automatically change the Latest Activity to Answer –Will Supply, and the expiration clock keeps ticking.
• If printing is interrupted before the pull slips actually print, the system thinks the slips were printed. The requests move from In Process – Unprinted to In Process –Printed and the latest activity on each is ILL Answer – Will Supply. You may not be able to batch print the pull slips if this happens. You may have to print the pull slips one at a time from the Transaction Group History screen.
1. At the Lending screen, click on the blue In Process – Unprinted button on the
Lending toolbar on the left. Result: You will see the In Process – Unprinted transaction list.
2. Note the number of unprinted items in the list. Click on the blue Pull Slips button on the bottom of the Lending toolbar on the left. Result: You will see the Sort Pull Slips screen with sorting options. Note: The State Library suggests you keep the default “sort by call number.” Call numbers print out on the pull slips and they will be in shelf order for you.
3. Click on the Print Pull Slips button at the bottom of the screen. Press this button only once. Result: You will first see one pull slip on the screen and then eventually the Microsoft Print screen will appear. Be patient; it might take a little while.
4. Press the Print button and wait. Result: The pull slips will begin to print.
5. A batch printing will only print 100 pull slips at one time. If you had more than 100 unprinted requests, click on the Back button on your browser. At the Print screen, press the Print button at the bottom of the print screen again to repeat the process. Continue until you see a Message that there are no more to print. Count the pull slips
II-2
to be sure that you printed the same number that was in the In Process – Unprinted transaction list.
6. If your printer fails and a pull slip is still visible on the screen, you can start the print job again. Click the Print button on your Web browser. Result: The pull slips will print. -OR- If your printer fails, you can click the Back button on your browser to return to the Sort Pull Slips screen. Scroll down to the bottom of the screen and check the box If the last batch of pull slips did not print or printed incorrectly. Click on the Print Pull Slips button. Result: The very last batch you tried to print will reprint.
Cancel Pending 1. At the Lending screen, click on the blue Cancel – Pending button on the Lending
toolbar on the left. Result: You will see a Cancel Pending transaction list. This is list of requests that the borrowing libraries want to cancel. Each line represents a request from a borrowing library. Note: If there are no Cancel Pendings for your library, you will see a Message “Unable to show transactions: There are no items with this status for this library.” Go to the next lending activity.
2. Click on the arrow by the dropdown box on the right of each item in the list. The list gives the possible actions that can be taken on a Cancel – Pending. The list includes Cancel Reply, Message, Status Query, and Status Report. Cancel Reply is the only action that should be taken by the lending library. Highlight Cancel Reply and click on the Go! button. Result: The Cancel Reply form comes up.
3. Select yes or no, type in a note if necessary. Then click the Send Cancel Reply button. Result: You will see a confirmation page.
4. Click the blue Click here to return to transaction list line on the confirmation page. Result: You will return to the Cancel Reply transaction list. The transaction you just answered will no longer appear on the list.
5. You have the option of batch answering. If you want to answer all the items in the Cancel – Pending list the same way, use the Use Defaults and Batch Process These Transactions options at the bottom of the list. Click on the arrow by the dropdown box on the right of each. Highlight Cancel Reply and click on the Go! button. Result: The Cancel Reply form comes up.
6. Select yes or no and type in a note if necessary. Click the Send Cancel Reply button. Result: You will see a confirmation page.
II-3
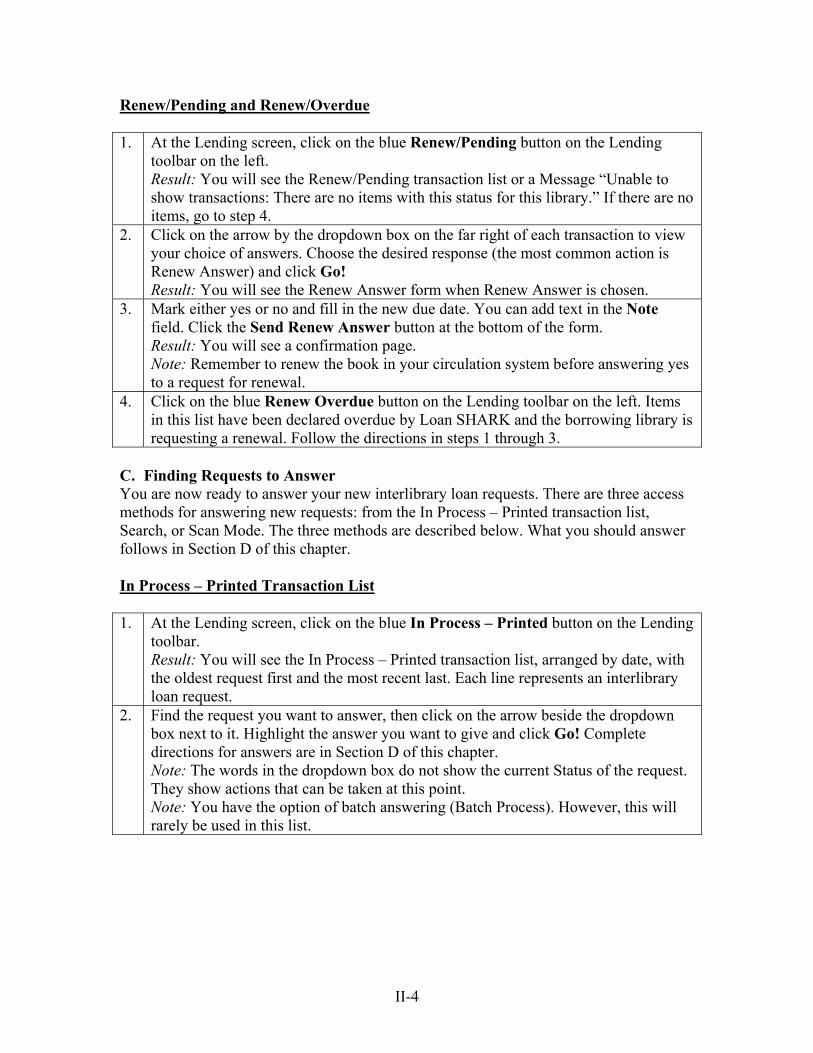
Renew/Pending and Renew/Overdue 1. At the Lending screen, click on the blue Renew/Pending button on the Lending
toolbar on the left. Result: You will see the Renew/Pending transaction list or a Message “Unable to show transactions: There are no items with this status for this library.” If there are no items, go to step 4.
2. Click on the arrow by the dropdown box on the far right of each transaction to view your choice of answers. Choose the desired response (the most common action is Renew Answer) and click Go! Result: You will see the Renew Answer form when Renew Answer is chosen.
3. Mark either yes or no and fill in the new due date. You can add text in the Note field. Click the Send Renew Answer button at the bottom of the form. Result: You will see a confirmation page. Note: Remember to renew the book in your circulation system before answering yes to a request for renewal.
4. Click on the blue Renew Overdue button on the Lending toolbar on the left. Items in this list have been declared overdue by Loan SHARK and the borrowing library is requesting a renewal. Follow the directions in steps 1 through 3.
C. Finding Requests to Answer You are now ready to answer your new interlibrary loan requests. There are three access methods for answering new requests: from the In Process – Printed transaction list, Search, or Scan Mode. The three methods are described below. What you should answer follows in Section D of this chapter. In Process – Printed Transaction List 1. At the Lending screen, click on the blue In Process – Printed button on the Lending
toolbar. Result: You will see the In Process – Printed transaction list, arranged by date, with the oldest request first and the most recent last. Each line represents an interlibrary loan request.
2. Find the request you want to answer, then click on the arrow beside the dropdown box next to it. Highlight the answer you want to give and click Go! Complete directions for answers are in Section D of this chapter. Note: The words in the dropdown box do not show the current Status of the request. They show actions that can be taken at this point. Note: You have the option of batch answering (Batch Process). However, this will rarely be used in this list.
II-4
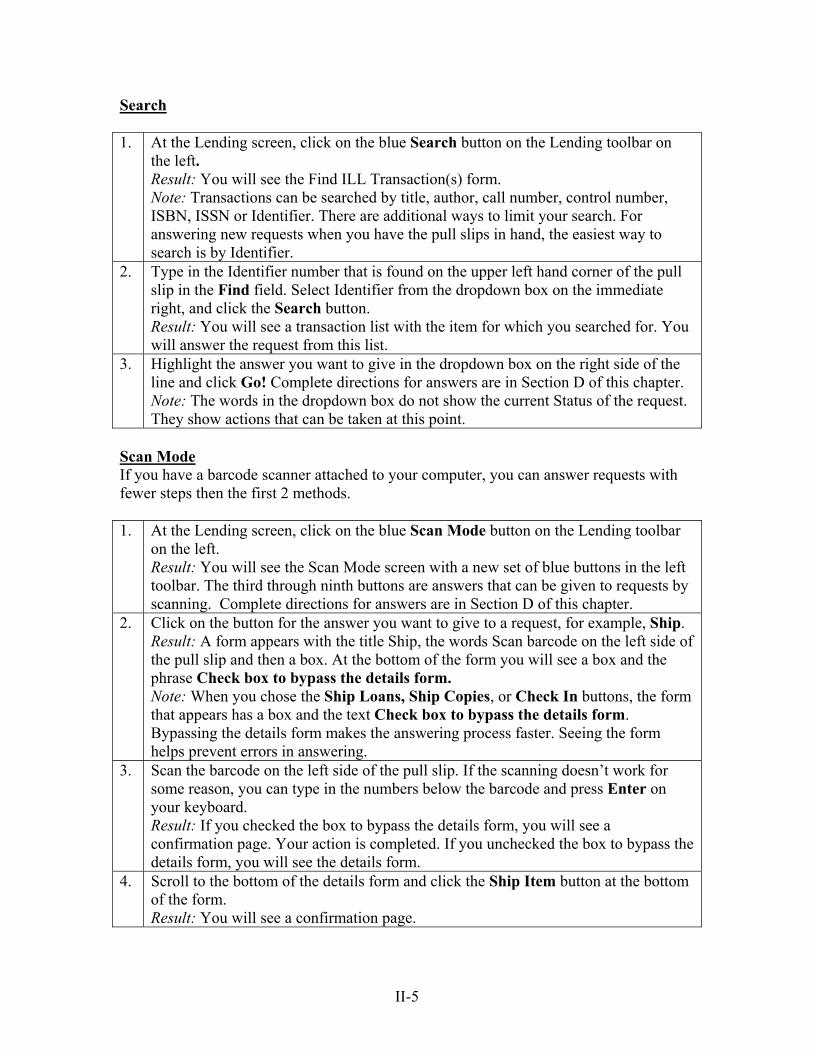
Search 1. At the Lending screen, click on the blue Search button on the Lending toolbar on
the left. Result: You will see the Find ILL Transaction(s) form. Note: Transactions can be searched by title, author, call number, control number, ISBN, ISSN or Identifier. There are additional ways to limit your search. For answering new requests when you have the pull slips in hand, the easiest way to search is by Identifier.
2. Type in the Identifier number that is found on the upper left hand corner of the pull slip in the Find field. Select Identifier from the dropdown box on the immediate right, and click the Search button. Result: You will see a transaction list with the item for which you searched for. You will answer the request from this list.
3. Highlight the answer you want to give in the dropdown box on the right side of the line and click Go! Complete directions for answers are in Section D of this chapter. Note: The words in the dropdown box do not show the current Status of the request. They show actions that can be taken at this point.
Scan Mode If you have a barcode scanner attached to your computer, you can answer requests with fewer steps then the first 2 methods. 1. At the Lending screen, click on the blue Scan Mode button on the Lending toolbar
on the left. Result: You will see the Scan Mode screen with a new set of blue buttons in the left toolbar. The third through ninth buttons are answers that can be given to requests by scanning. Complete directions for answers are in Section D of this chapter.
2. Click on the button for the answer you want to give to a request, for example, Ship. Result: A form appears with the title Ship, the words Scan barcode on the left side of the pull slip and then a box. At the bottom of the form you will see a box and the phrase Check box to bypass the details form. Note: When you chose the Ship Loans, Ship Copies, or Check In buttons, the form that appears has a box and the text Check box to bypass the details form. Bypassing the details form makes the answering process faster. Seeing the form helps prevent errors in answering.
3. Scan the barcode on the left side of the pull slip. If the scanning doesn’t work for some reason, you can type in the numbers below the barcode and press Enter on your keyboard. Result: If you checked the box to bypass the details form, you will see a confirmation page. Your action is completed. If you unchecked the box to bypass the details form, you will see the details form.
4. Scroll to the bottom of the details form and click the Ship Item button at the bottom of the form. Result: You will see a confirmation page.
II-5
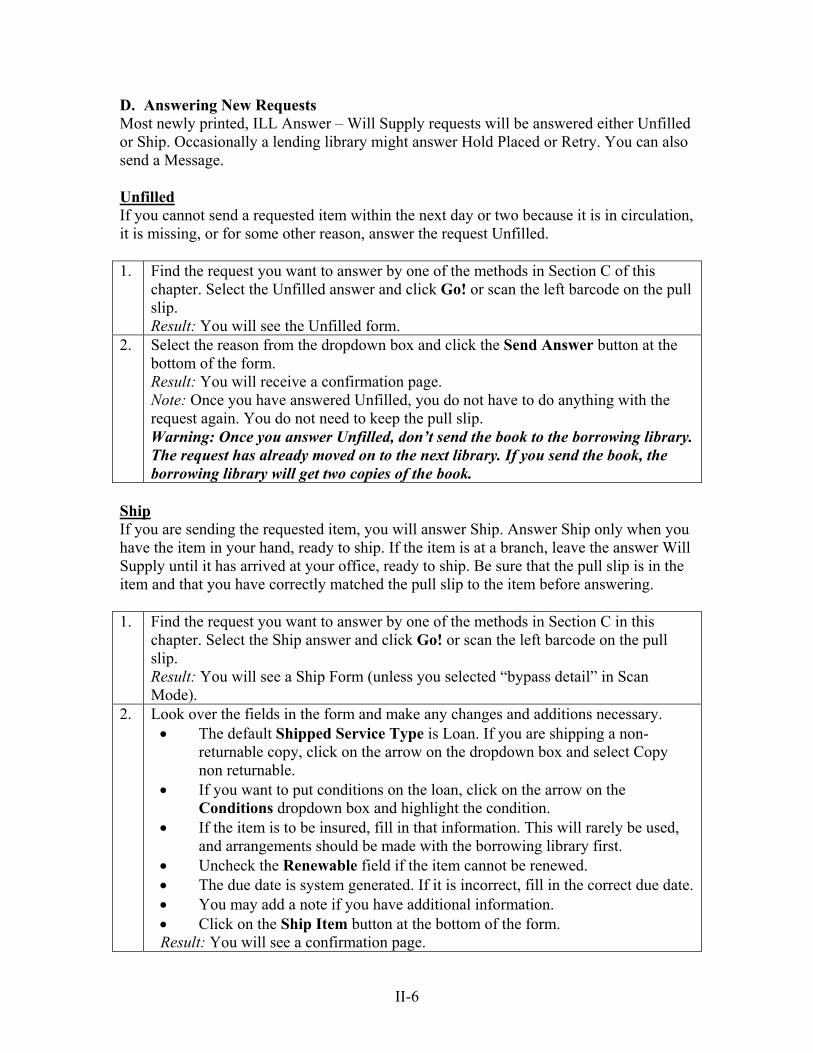
D. Answering New Requests Most newly printed, ILL Answer – Will Supply requests will be answered either Unfilled or Ship. Occasionally a lending library might answer Hold Placed or Retry. You can also send a Message. Unfilled If you cannot send a requested item within the next day or two because it is in circulation, it is missing, or for some other reason, answer the request Unfilled. 1. Find the request you want to answer by one of the methods in Section C of this
chapter. Select the Unfilled answer and click Go! or scan the left barcode on the pull slip. Result: You will see the Unfilled form.
2. Select the reason from the dropdown box and click the Send Answer button at the bottom of the form. Result: You will receive a confirmation page. Note: Once you have answered Unfilled, you do not have to do anything with the request again. You do not need to keep the pull slip. Warning: Once you answer Unfilled, don’t send the book to the borrowing library. The request has already moved on to the next library. If you send the book, the borrowing library will get two copies of the book.
Ship If you are sending the requested item, you will answer Ship. Answer Ship only when you have the item in your hand, ready to ship. If the item is at a branch, leave the answer Will Supply until it has arrived at your office, ready to ship. Be sure that the pull slip is in the item and that you have correctly matched the pull slip to the item before answering. 1. Find the request you want to answer by one of the methods in Section C in this
chapter. Select the Ship answer and click Go! or scan the left barcode on the pull slip. Result: You will see a Ship Form (unless you selected “bypass detail” in Scan Mode).
2. Look over the fields in the form and make any changes and additions necessary. • The default Shipped Service Type is Loan. If you are shipping a non-
returnable copy, click on the arrow on the dropdown box and select Copy non returnable.
• If you want to put conditions on the loan, click on the arrow on the Conditions dropdown box and highlight the condition.
• If the item is to be insured, fill in that information. This will rarely be used, and arrangements should be made with the borrowing library first.
• Uncheck the Renewable field if the item cannot be renewed. • The due date is system generated. If it is incorrect, fill in the correct due date. • You may add a note if you have additional information. • Click on the Ship Item button at the bottom of the form. Result: You will see a confirmation page.
II-6
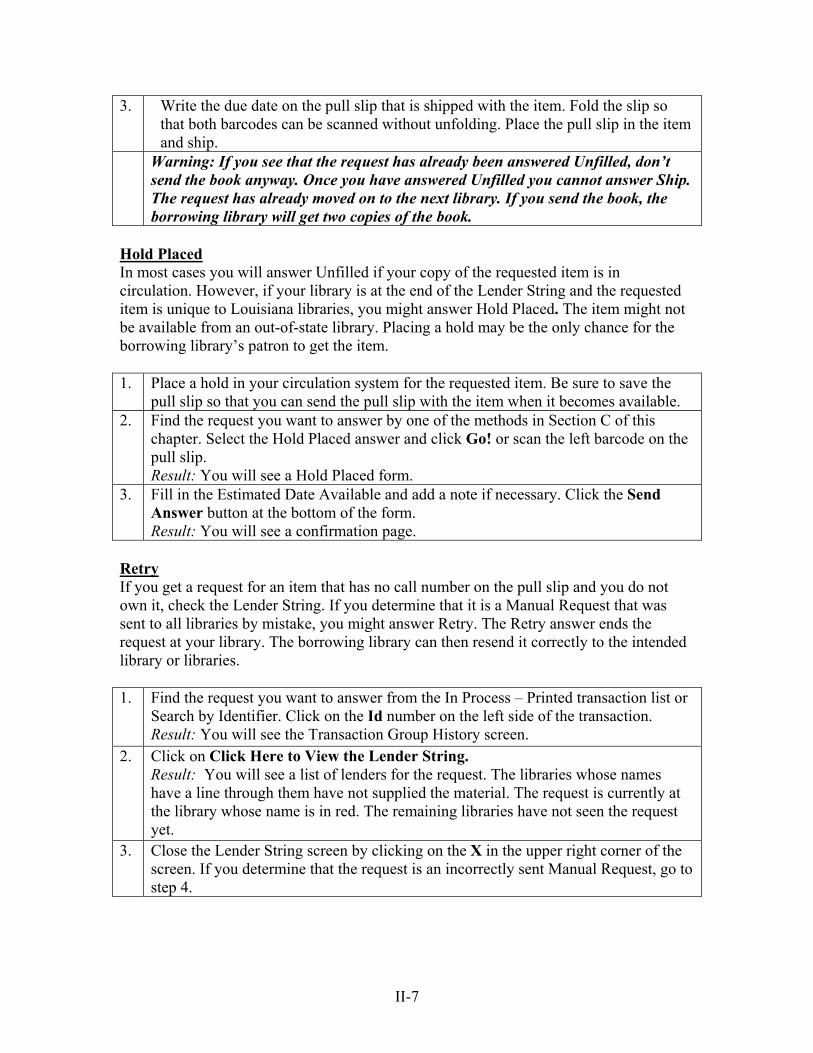
3. Write the due date on the pull slip that is shipped with the item. Fold the slip so that both barcodes can be scanned without unfolding. Place the pull slip in the item and ship.
Warning: If you see that the request has already been answered Unfilled, don’t send the book anyway. Once you have answered Unfilled you cannot answer Ship. The request has already moved on to the next library. If you send the book, the borrowing library will get two copies of the book.
Hold Placed In most cases you will answer Unfilled if your copy of the requested item is in circulation. However, if your library is at the end of the Lender String and the requested item is unique to Louisiana libraries, you might answer Hold Placed. The item might not be available from an out-of-state library. Placing a hold may be the only chance for the borrowing library’s patron to get the item. 1. Place a hold in your circulation system for the requested item. Be sure to save the
pull slip so that you can send the pull slip with the item when it becomes available. 2. Find the request you want to answer by one of the methods in Section C of this
chapter. Select the Hold Placed answer and click Go! or scan the left barcode on the pull slip. Result: You will see a Hold Placed form.
3. Fill in the Estimated Date Available and add a note if necessary. Click the Send Answer button at the bottom of the form. Result: You will see a confirmation page.
Retry If you get a request for an item that has no call number on the pull slip and you do not own it, check the Lender String. If you determine that it is a Manual Request that was sent to all libraries by mistake, you might answer Retry. The Retry answer ends the request at your library. The borrowing library can then resend it correctly to the intended library or libraries. 1. Find the request you want to answer from the In Process – Printed transaction list or
Search by Identifier. Click on the Id number on the left side of the transaction. Result: You will see the Transaction Group History screen.
2. Click on Click Here to View the Lender String. Result: You will see a list of lenders for the request. The libraries whose names have a line through them have not supplied the material. The request is currently at the library whose name is in red. The remaining libraries have not seen the request yet.
3. Close the Lender String screen by clicking on the X in the upper right corner of the screen. If you determine that the request is an incorrectly sent Manual Request, go to step 4.
II-7
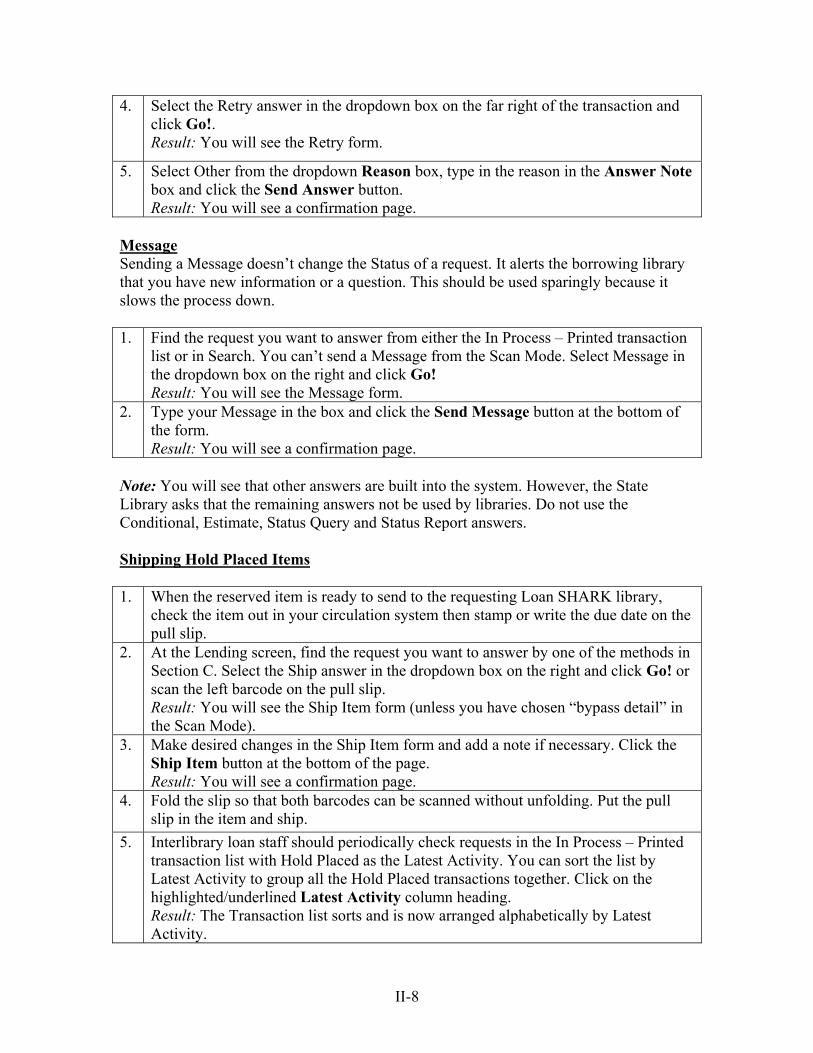
4. Select the Retry answer in the dropdown box on the far right of the transaction and click Go!. Result: You will see the Retry form.
5. Select Other from the dropdown Reason box, type in the reason in the Answer Note box and click the Send Answer button. Result: You will see a confirmation page.
Message Sending a Message doesn’t change the Status of a request. It alerts the borrowing library that you have new information or a question. This should be used sparingly because it slows the process down. 1. Find the request you want to answer from either the In Process – Printed transaction
list or in Search. You can’t send a Message from the Scan Mode. Select Message in the dropdown box on the right and click Go! Result: You will see the Message form.
2. Type your Message in the box and click the Send Message button at the bottom of the form. Result: You will see a confirmation page.
Note: You will see that other answers are built into the system. However, the State Library asks that the remaining answers not be used by libraries. Do not use the Conditional, Estimate, Status Query and Status Report answers. Shipping Hold Placed Items 1. When the reserved item is ready to send to the requesting Loan SHARK library,
check the item out in your circulation system then stamp or write the due date on the pull slip.
2. At the Lending screen, find the request you want to answer by one of the methods in Section C. Select the Ship answer in the dropdown box on the right and click Go! or scan the left barcode on the pull slip. Result: You will see the Ship Item form (unless you have chosen “bypass detail” in the Scan Mode).
3. Make desired changes in the Ship Item form and add a note if necessary. Click the Ship Item button at the bottom of the page. Result: You will see a confirmation page.
4. Fold the slip so that both barcodes can be scanned without unfolding. Put the pull slip in the item and ship.
5. Interlibrary loan staff should periodically check requests in the In Process – Printed transaction list with Hold Placed as the Latest Activity. You can sort the list by Latest Activity to group all the Hold Placed transactions together. Click on the highlighted/underlined Latest Activity column heading. Result: The Transaction list sorts and is now arranged alphabetically by Latest Activity.
II-8
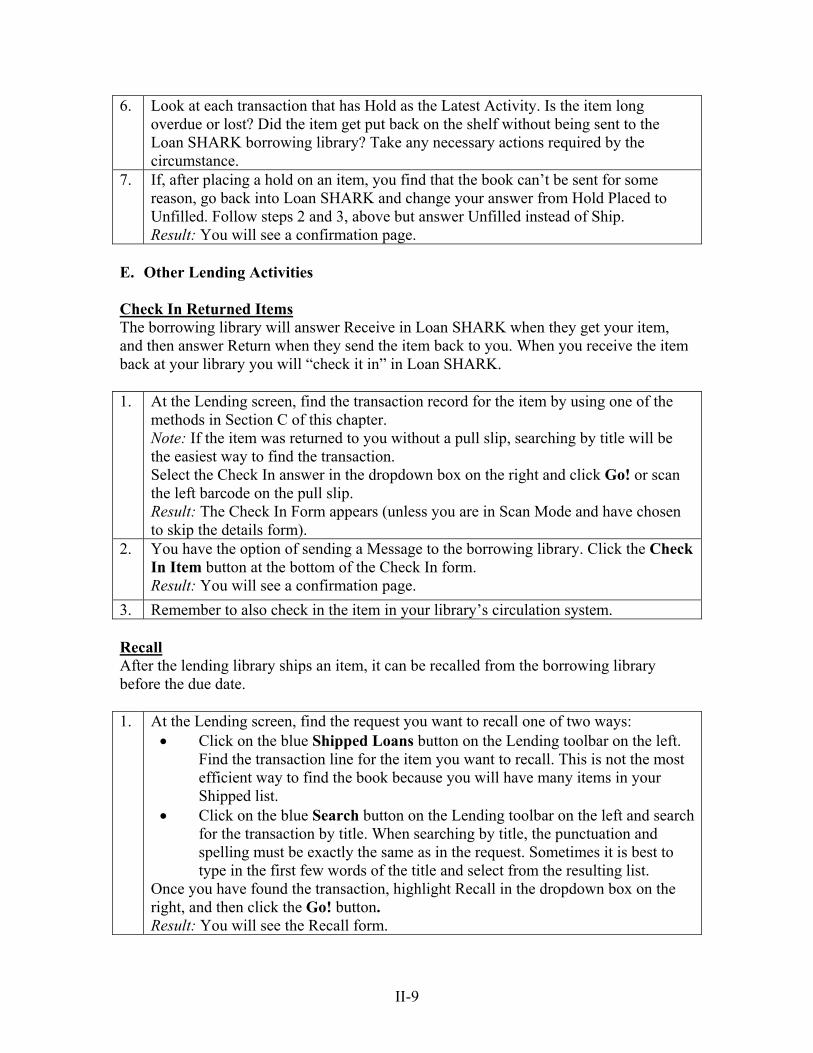
6. Look at each transaction that has Hold as the Latest Activity. Is the item long overdue or lost? Did the item get put back on the shelf without being sent to the Loan SHARK borrowing library? Take any necessary actions required by the circumstance.
7. If, after placing a hold on an item, you find that the book can’t be sent for some reason, go back into Loan SHARK and change your answer from Hold Placed to Unfilled. Follow steps 2 and 3, above but answer Unfilled instead of Ship. Result: You will see a confirmation page.
E. Other Lending Activities Check In Returned Items The borrowing library will answer Receive in Loan SHARK when they get your item, and then answer Return when they send the item back to you. When you receive the item back at your library you will “check it in” in Loan SHARK. 1. At the Lending screen, find the transaction record for the item by using one of the
methods in Section C of this chapter. Note: If the item was returned to you without a pull slip, searching by title will be the easiest way to find the transaction. Select the Check In answer in the dropdown box on the right and click Go! or scan the left barcode on the pull slip. Result: The Check In Form appears (unless you are in Scan Mode and have chosen to skip the details form).
2. You have the option of sending a Message to the borrowing library. Click the Check In Item button at the bottom of the Check In form. Result: You will see a confirmation page.
3. Remember to also check in the item in your library’s circulation system. Recall After the lending library ships an item, it can be recalled from the borrowing library before the due date. 1. At the Lending screen, find the request you want to recall one of two ways:
• Click on the blue Shipped Loans button on the Lending toolbar on the left. Find the transaction line for the item you want to recall. This is not the most efficient way to find the book because you will have many items in your Shipped list.
• Click on the blue Search button on the Lending toolbar on the left and search for the transaction by title. When searching by title, the punctuation and spelling must be exactly the same as in the request. Sometimes it is best to type in the first few words of the title and select from the resulting list.
Once you have found the transaction, highlight Recall in the dropdown box on the right, and then click the Go! button. Result: You will see the Recall form.
II-9
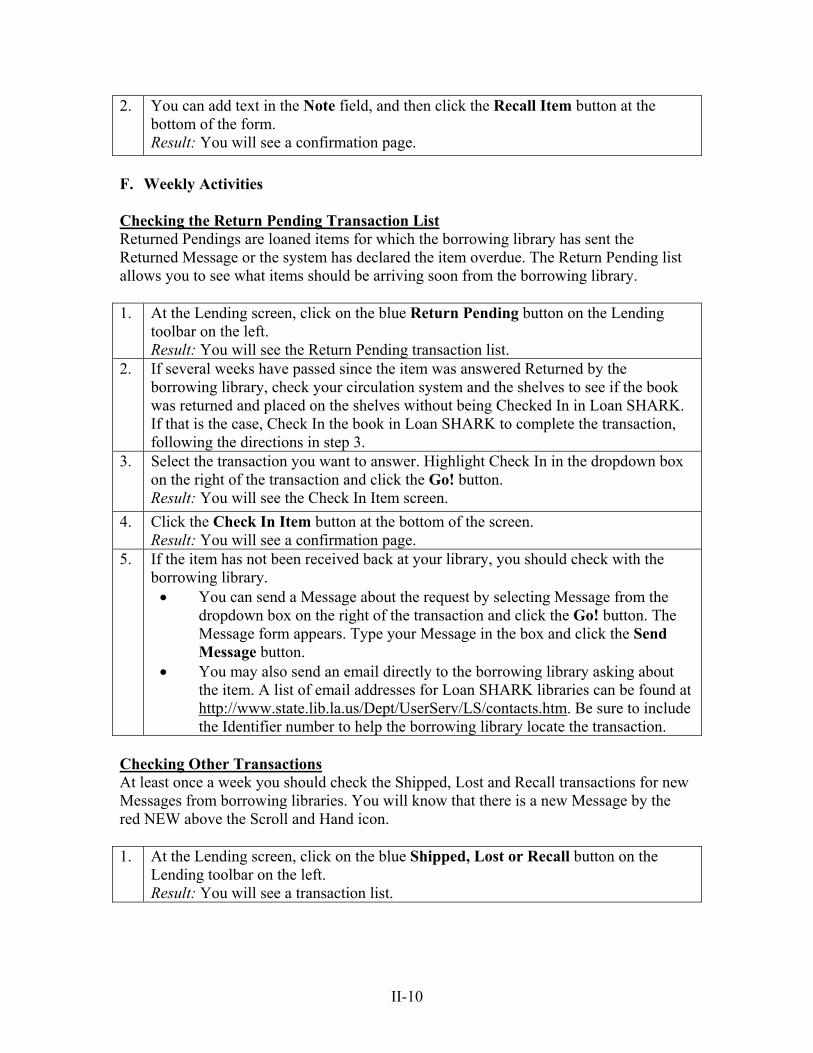
2. You can add text in the Note field, and then click the Recall Item button at the bottom of the form. Result: You will see a confirmation page.
F. Weekly Activities
Checking the Return Pending Transaction List Returned Pendings are loaned items for which the borrowing library has sent the Returned Message or the system has declared the item overdue. The Return Pending list allows you to see what items should be arriving soon from the borrowing library. 1. At the Lending screen, click on the blue Return Pending button on the Lending
toolbar on the left. Result: You will see the Return Pending transaction list.
2. If several weeks have passed since the item was answered Returned by the borrowing library, check your circulation system and the shelves to see if the book was returned and placed on the shelves without being Checked In in Loan SHARK. If that is the case, Check In the book in Loan SHARK to complete the transaction, following the directions in step 3.
3. Select the transaction you want to answer. Highlight Check In in the dropdown box on the right of the transaction and click the Go! button. Result: You will see the Check In Item screen.
4. Click the Check In Item button at the bottom of the screen. Result: You will see a confirmation page.
5. If the item has not been received back at your library, you should check with the borrowing library.
• You can send a Message about the request by selecting Message from the dropdown box on the right of the transaction and click the Go! button. The Message form appears. Type your Message in the box and click the Send Message button.
• You may also send an email directly to the borrowing library asking about the item. A list of email addresses for Loan SHARK libraries can be found at http://www.state.lib.la.us/Dept/UserServ/LS/contacts.htm. Be sure to include the Identifier number to help the borrowing library locate the transaction.
Checking Other Transactions At least once a week you should check the Shipped, Lost and Recall transactions for new Messages from borrowing libraries. You will know that there is a new Message by the red NEW above the Scroll and Hand icon. 1. At the Lending screen, click on the blue Shipped, Lost or Recall button on the
Lending toolbar on the left. Result: You will see a transaction list.
II-10
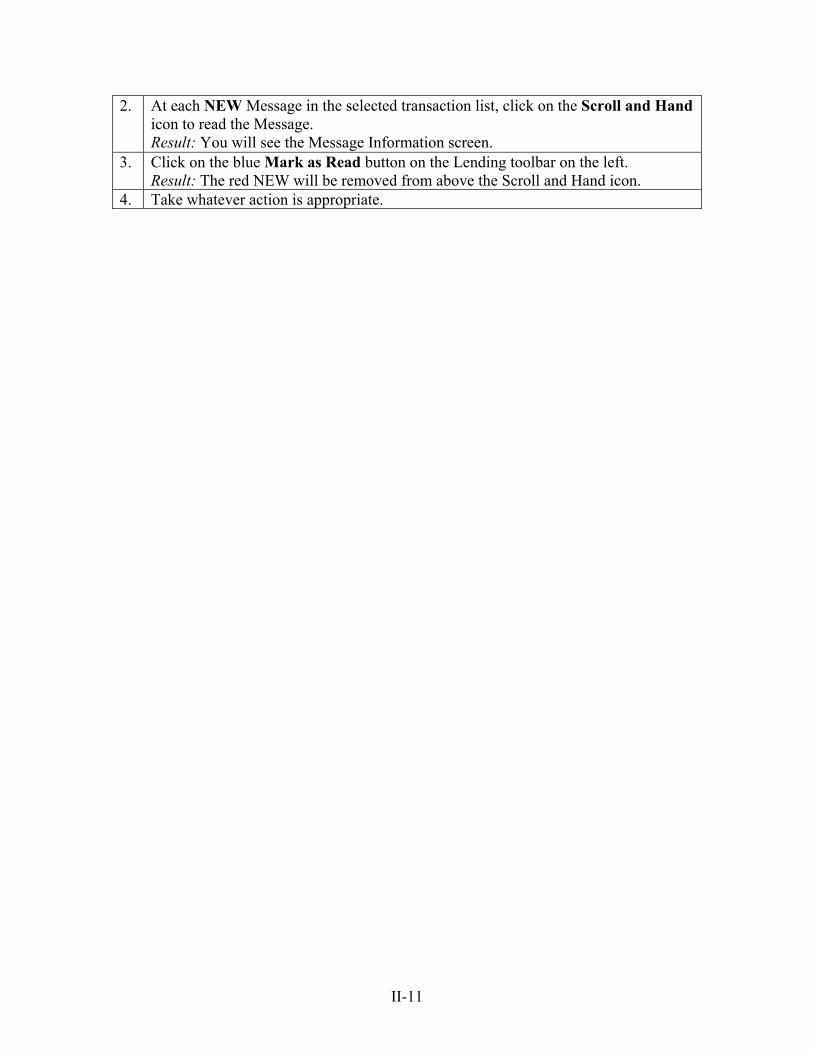
2. At each NEW Message in the selected transaction list, click on the Scroll and Hand icon to read the Message. Result: You will see the Message Information screen.
3. Click on the blue Mark as Read button on the Lending toolbar on the left. Result: The red NEW will be removed from above the Scroll and Hand icon.
4. Take whatever action is appropriate.
II-11
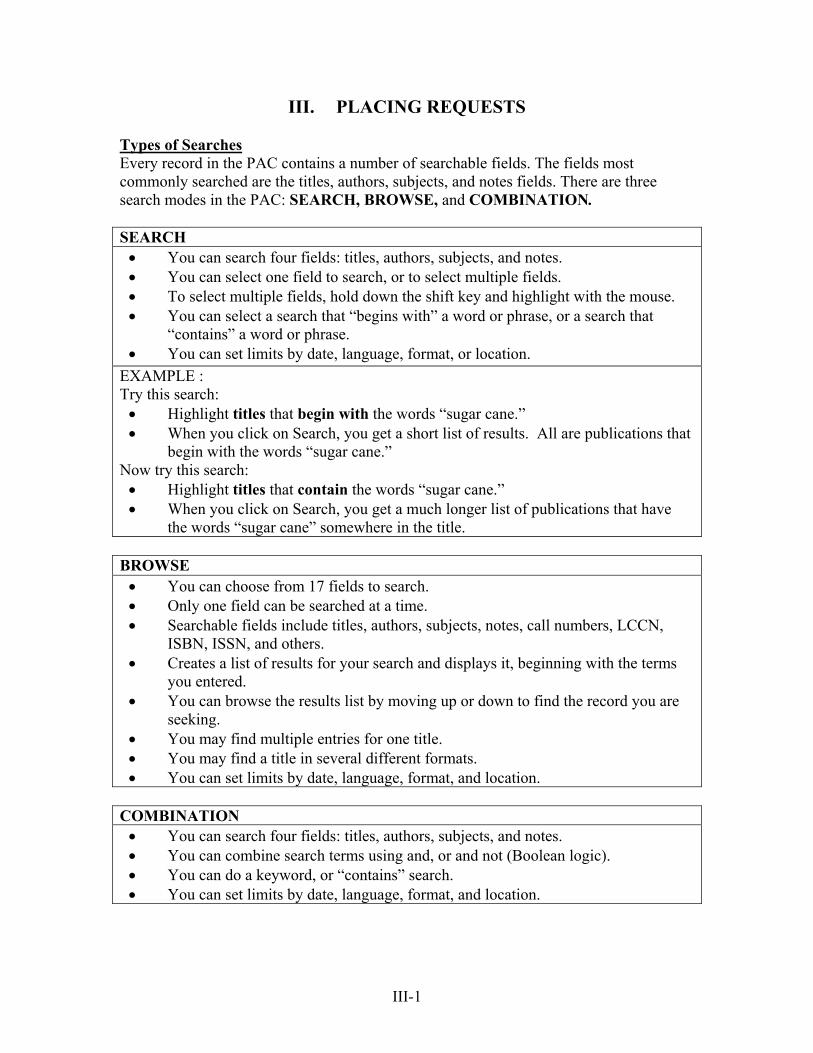
III. PLACING REQUESTS Types of Searches Every record in the PAC contains a number of searchable fields. The fields most commonly searched are the titles, authors, subjects, and notes fields. There are three search modes in the PAC: SEARCH, BROWSE, and COMBINATION. SEARCH
• You can search four fields: titles, authors, subjects, and notes. • You can select one field to search, or to select multiple fields. • To select multiple fields, hold down the shift key and highlight with the mouse. • You can select a search that “begins with” a word or phrase, or a search that
“contains” a word or phrase. • You can set limits by date, language, format, or location.
EXAMPLE : Try this search:
• Highlight titles that begin with the words “sugar cane.” • When you click on Search, you get a short list of results. All are publications that
begin with the words “sugar cane.” Now try this search:
• Highlight titles that contain the words “sugar cane.” • When you click on Search, you get a much longer list of publications that have
the words “sugar cane” somewhere in the title. BROWSE
• You can choose from 17 fields to search. • Only one field can be searched at a time. • Searchable fields include titles, authors, subjects, notes, call numbers, LCCN,
ISBN, ISSN, and others. • Creates a list of results for your search and displays it, beginning with the terms
you entered. • You can browse the results list by moving up or down to find the record you are
seeking. • You may find multiple entries for one title. • You may find a title in several different formats. • You can set limits by date, language, format, and location.
COMBINATION
• You can search four fields: titles, authors, subjects, and notes. • You can combine search terms using and, or and not (Boolean logic). • You can do a keyword, or “contains” search. • You can set limits by date, language, format, and location.
III-1
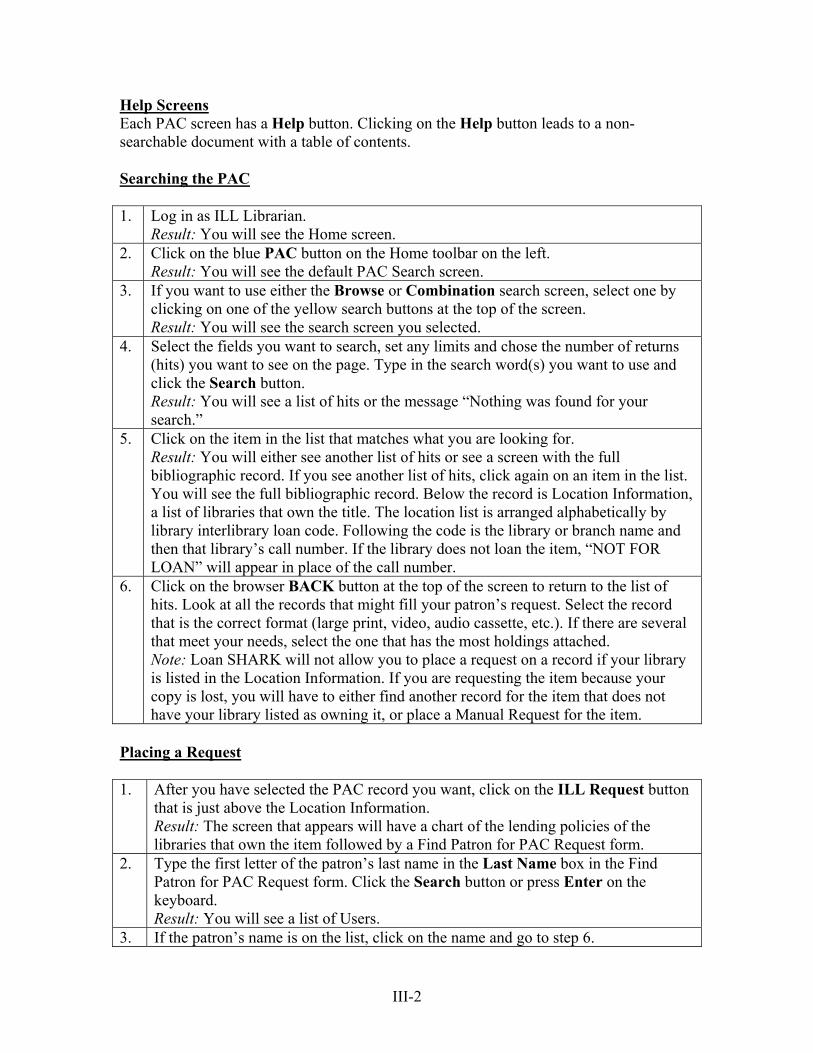
Help Screens Each PAC screen has a Help button. Clicking on the Help button leads to a non-searchable document with a table of contents. Searching the PAC 1. Log in as ILL Librarian.
Result: You will see the Home screen. 2. Click on the blue PAC button on the Home toolbar on the left.
Result: You will see the default PAC Search screen. 3. If you want to use either the Browse or Combination search screen, select one by
clicking on one of the yellow search buttons at the top of the screen. Result: You will see the search screen you selected.
4. Select the fields you want to search, set any limits and chose the number of returns (hits) you want to see on the page. Type in the search word(s) you want to use and click the Search button. Result: You will see a list of hits or the message “Nothing was found for your search.”
5. Click on the item in the list that matches what you are looking for. Result: You will either see another list of hits or see a screen with the full bibliographic record. If you see another list of hits, click again on an item in the list. You will see the full bibliographic record. Below the record is Location Information, a list of libraries that own the title. The location list is arranged alphabetically by library interlibrary loan code. Following the code is the library or branch name and then that library’s call number. If the library does not loan the item, “NOT FOR LOAN” will appear in place of the call number.
6. Click on the browser BACK button at the top of the screen to return to the list of hits. Look at all the records that might fill your patron’s request. Select the record that is the correct format (large print, video, audio cassette, etc.). If there are several that meet your needs, select the one that has the most holdings attached. Note: Loan SHARK will not allow you to place a request on a record if your library is listed in the Location Information. If you are requesting the item because your copy is lost, you will have to either find another record for the item that does not have your library listed as owning it, or place a Manual Request for the item.
Placing a Request 1. After you have selected the PAC record you want, click on the ILL Request button
that is just above the Location Information. Result: The screen that appears will have a chart of the lending policies of the libraries that own the item followed by a Find Patron for PAC Request form.
2. Type the first letter of the patron’s last name in the Last Name box in the Find Patron for PAC Request form. Click the Search button or press Enter on the keyboard. Result: You will see a list of Users.
3. If the patron’s name is on the list, click on the name and go to step 6.
III-2
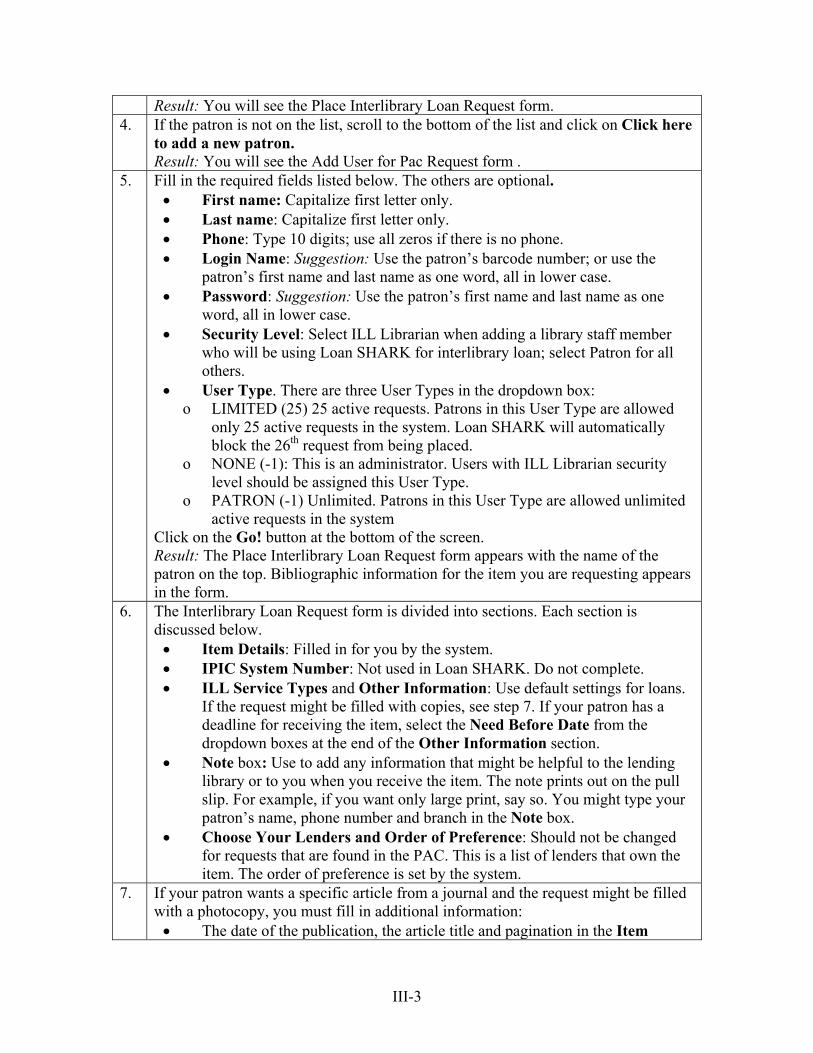
Result: You will see the Place Interlibrary Loan Request form. 4. If the patron is not on the list, scroll to the bottom of the list and click on Click here
to add a new patron. Result: You will see the Add User for Pac Request form .
5. Fill in the required fields listed below. The others are optional. • First name: Capitalize first letter only. • Last name: Capitalize first letter only. • Phone: Type 10 digits; use all zeros if there is no phone. • Login Name: Suggestion: Use the patron’s barcode number; or use the
patron’s first name and last name as one word, all in lower case. • Password: Suggestion: Use the patron’s first name and last name as one
word, all in lower case. • Security Level: Select ILL Librarian when adding a library staff member
who will be using Loan SHARK for interlibrary loan; select Patron for all others.
• User Type. There are three User Types in the dropdown box: o LIMITED (25) 25 active requests. Patrons in this User Type are allowed
only 25 active requests in the system. Loan SHARK will automatically block the 26th request from being placed.
o NONE (-1): This is an administrator. Users with ILL Librarian security level should be assigned this User Type.
o PATRON (-1) Unlimited. Patrons in this User Type are allowed unlimited active requests in the system
Click on the Go! button at the bottom of the screen. Result: The Place Interlibrary Loan Request form appears with the name of the patron on the top. Bibliographic information for the item you are requesting appears in the form.
6. The Interlibrary Loan Request form is divided into sections. Each section is discussed below.
• Item Details: Filled in for you by the system. • IPIC System Number: Not used in Loan SHARK. Do not complete. • ILL Service Types and Other Information: Use default settings for loans.
If the request might be filled with copies, see step 7. If your patron has a deadline for receiving the item, select the Need Before Date from the dropdown boxes at the end of the Other Information section.
• Note box: Use to add any information that might be helpful to the lending library or to you when you receive the item. The note prints out on the pull slip. For example, if you want only large print, say so. You might type your patron’s name, phone number and branch in the Note box.
• Choose Your Lenders and Order of Preference: Should not be changed for requests that are found in the PAC. This is a list of lenders that own the item. The order of preference is set by the system.
7. If your patron wants a specific article from a journal and the request might be filled with a photocopy, you must fill in additional information:
• The date of the publication, the article title and pagination in the Item
III-3

Details section. • The Maximum Lending Fee box in the Other Information section. The
recommended amount is $5.00. Change the If a fee applies, do you agree to pay it? box answer to yes. If your patron wants copies but will NOT pay, you should put that in the Note box.
8. Click the Submit Request button just below the Note box and above the Choose Your Lenders and Order of Preference section. Result: A confirmation screen appears saying “The request service was successfully placed!” The screen also gives a Tracking Number. The Tracking Number is for Patron Initiated Interlibrary Loan and is not currently used in Loan SHARK. Note: If you do not get the confirmation screen, you clicked the Close Window button at the bottom of the Request Form instead of the Submit Request button. The request is not lost. It will be found in the In Review list (see Chapter IV, Borrowing Activities).
9. Click the Close Window button at the bottom of the confirmation screen to return to the PAC. Result: You will see the Search screen.
10. To place another request, click on the yellow Search, Browse or Combination buttons at the top of the Search screen. Follow the steps above. Note: At the screen with the Find Patron For Pac Request form, you will have the option of placing another request for the previous patron or using the form to place a request for another patron. It will save you steps if you group all requests for one patron together.
Manual Requests It is appropriate to send a Manual Request:
• When the item can’t be found in the PAC. • When the PAC location list shows your library owning the item. You want to
borrow it because your copy is lost and Loan SHARK won’t let you place a request from the PAC. Make a note of the other libraries that own the title. When placing the Manual Request, uncheck all the libraries, then recheck those that own the item. Also check the State Library as OCLC Agent so that the item can be borrowed through OCLC if no other library will lend.
If you didn’t find the item in the PAC, probably no member library owns it. You want the request to go to the State Library as OCLC Agent so it can be borrowed through OCLC. You do not want it to go to all the libraries on the list. It is a waste of time for the other libraries to look for and answer a request for an item they don’t own and it slows down the request.
1. At the Home screen, click on the blue Borrowing button in the Home toolbar on the left. Result: You will see the Borrowing screen.
2. Click on the blue Manual Request button in the Borrowing toolbar on the left. Result: You will see the Find Patron For Manual Request form.
3. Type the first letter of the patron’s last name in the Last Name box and click Search or press Enter on your keyboard. If the patron is on the list, click on the patron’s
III-4
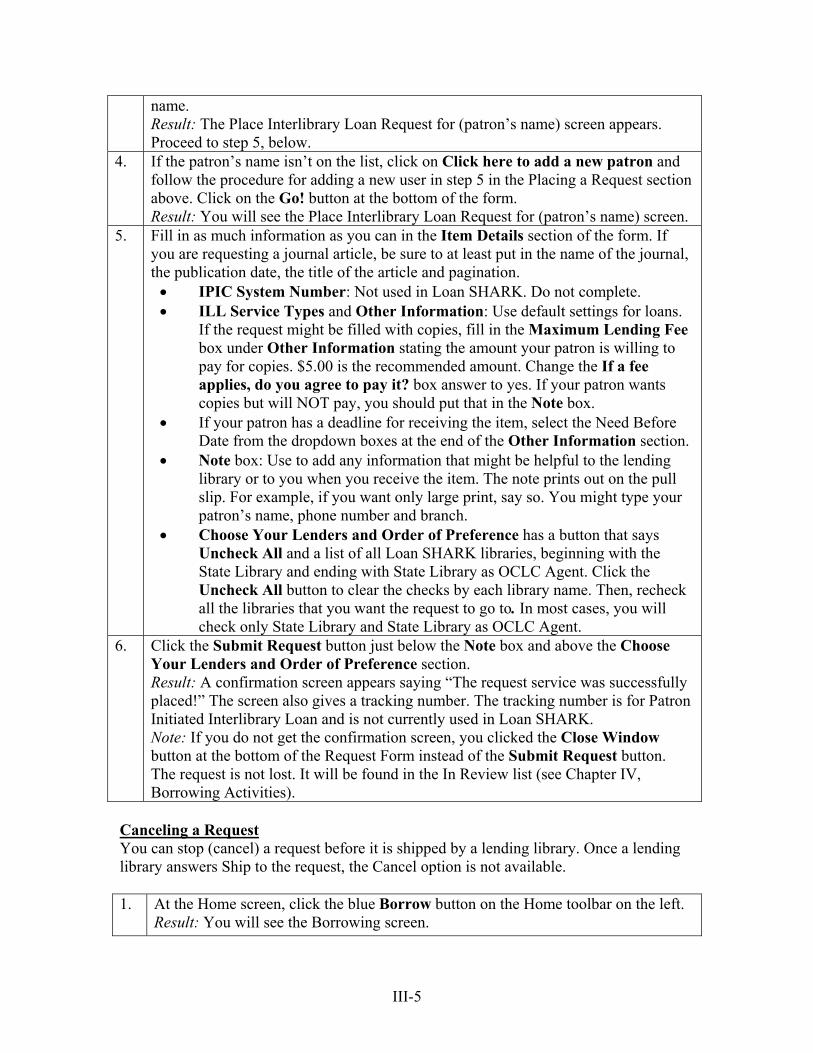
name. Result: The Place Interlibrary Loan Request for (patron’s name) screen appears. Proceed to step 5, below.
4. If the patron’s name isn’t on the list, click on Click here to add a new patron and follow the procedure for adding a new user in step 5 in the Placing a Request section above. Click on the Go! button at the bottom of the form. Result: You will see the Place Interlibrary Loan Request for (patron’s name) screen.
5. Fill in as much information as you can in the Item Details section of the form. If you are requesting a journal article, be sure to at least put in the name of the journal, the publication date, the title of the article and pagination.
• IPIC System Number: Not used in Loan SHARK. Do not complete. • ILL Service Types and Other Information: Use default settings for loans.
If the request might be filled with copies, fill in the Maximum Lending Fee box under Other Information stating the amount your patron is willing to pay for copies. $5.00 is the recommended amount. Change the If a fee applies, do you agree to pay it? box answer to yes. If your patron wants copies but will NOT pay, you should put that in the Note box.
• If your patron has a deadline for receiving the item, select the Need Before Date from the dropdown boxes at the end of the Other Information section.
• Note box: Use to add any information that might be helpful to the lending library or to you when you receive the item. The note prints out on the pull slip. For example, if you want only large print, say so. You might type your patron’s name, phone number and branch.
• Choose Your Lenders and Order of Preference has a button that says Uncheck All and a list of all Loan SHARK libraries, beginning with the State Library and ending with State Library as OCLC Agent. Click the Uncheck All button to clear the checks by each library name. Then, recheck all the libraries that you want the request to go to. In most cases, you will check only State Library and State Library as OCLC Agent.
6. Click the Submit Request button just below the Note box and above the Choose Your Lenders and Order of Preference section. Result: A confirmation screen appears saying “The request service was successfully placed!” The screen also gives a tracking number. The tracking number is for Patron Initiated Interlibrary Loan and is not currently used in Loan SHARK. Note: If you do not get the confirmation screen, you clicked the Close Window button at the bottom of the Request Form instead of the Submit Request button. The request is not lost. It will be found in the In Review list (see Chapter IV, Borrowing Activities).
Canceling a Request You can stop (cancel) a request before it is shipped by a lending library. Once a lending library answers Ship to the request, the Cancel option is not available. 1. At the Home screen, click the blue Borrow button on the Home toolbar on the left.
Result: You will see the Borrowing screen.
III-5
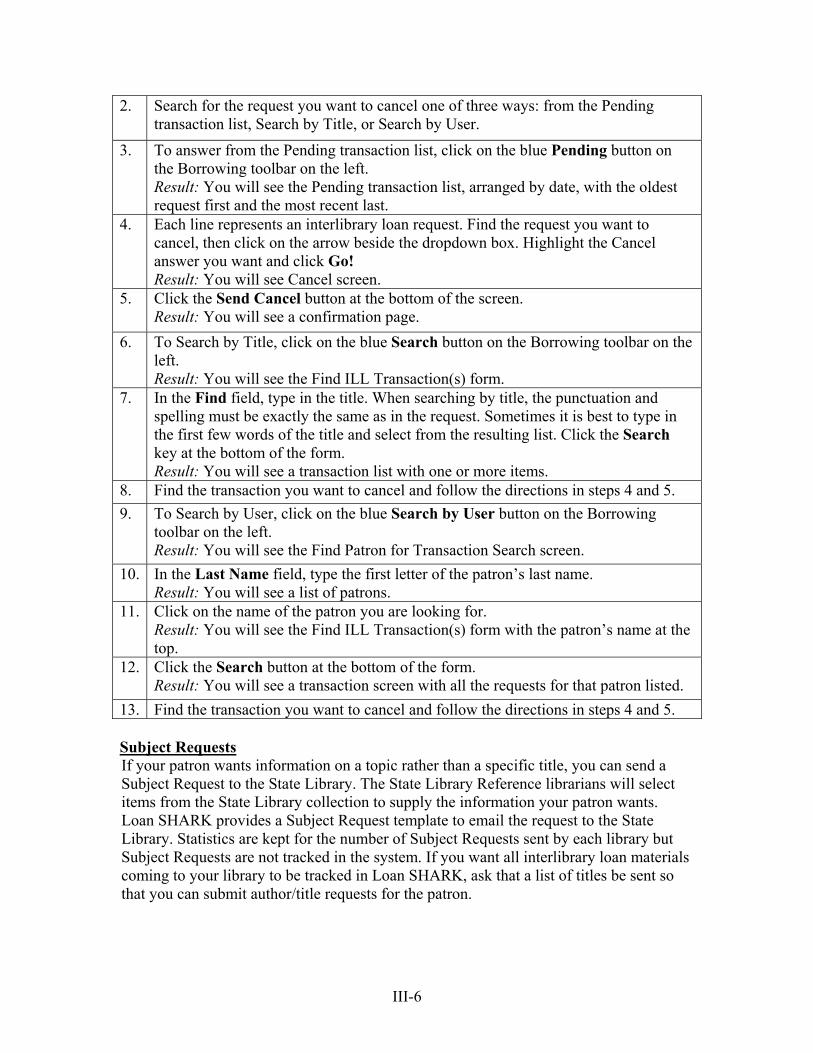
2. Search for the request you want to cancel one of three ways: from the Pending transaction list, Search by Title, or Search by User.
3. To answer from the Pending transaction list, click on the blue Pending button on the Borrowing toolbar on the left. Result: You will see the Pending transaction list, arranged by date, with the oldest request first and the most recent last.
4. Each line represents an interlibrary loan request. Find the request you want to cancel, then click on the arrow beside the dropdown box. Highlight the Cancel answer you want and click Go! Result: You will see Cancel screen.
5. Click the Send Cancel button at the bottom of the screen. Result: You will see a confirmation page.
6. To Search by Title, click on the blue Search button on the Borrowing toolbar on the left. Result: You will see the Find ILL Transaction(s) form.
7. In the Find field, type in the title. When searching by title, the punctuation and spelling must be exactly the same as in the request. Sometimes it is best to type in the first few words of the title and select from the resulting list. Click the Search key at the bottom of the form. Result: You will see a transaction list with one or more items.
8. Find the transaction you want to cancel and follow the directions in steps 4 and 5. 9. To Search by User, click on the blue Search by User button on the Borrowing
toolbar on the left. Result: You will see the Find Patron for Transaction Search screen.
10. In the Last Name field, type the first letter of the patron’s last name. Result: You will see a list of patrons.
11. Click on the name of the patron you are looking for. Result: You will see the Find ILL Transaction(s) form with the patron’s name at the top.
12. Click the Search button at the bottom of the form. Result: You will see a transaction screen with all the requests for that patron listed.
13. Find the transaction you want to cancel and follow the directions in steps 4 and 5. Subject Requests If your patron wants information on a topic rather than a specific title, you can send a Subject Request to the State Library. The State Library Reference librarians will select items from the State Library collection to supply the information your patron wants. Loan SHARK provides a Subject Request template to email the request to the State Library. Statistics are kept for the number of Subject Requests sent by each library but Subject Requests are not tracked in the system. If you want all interlibrary loan materials coming to your library to be tracked in Loan SHARK, ask that a list of titles be sent so that you can submit author/title requests for the patron.
III-6
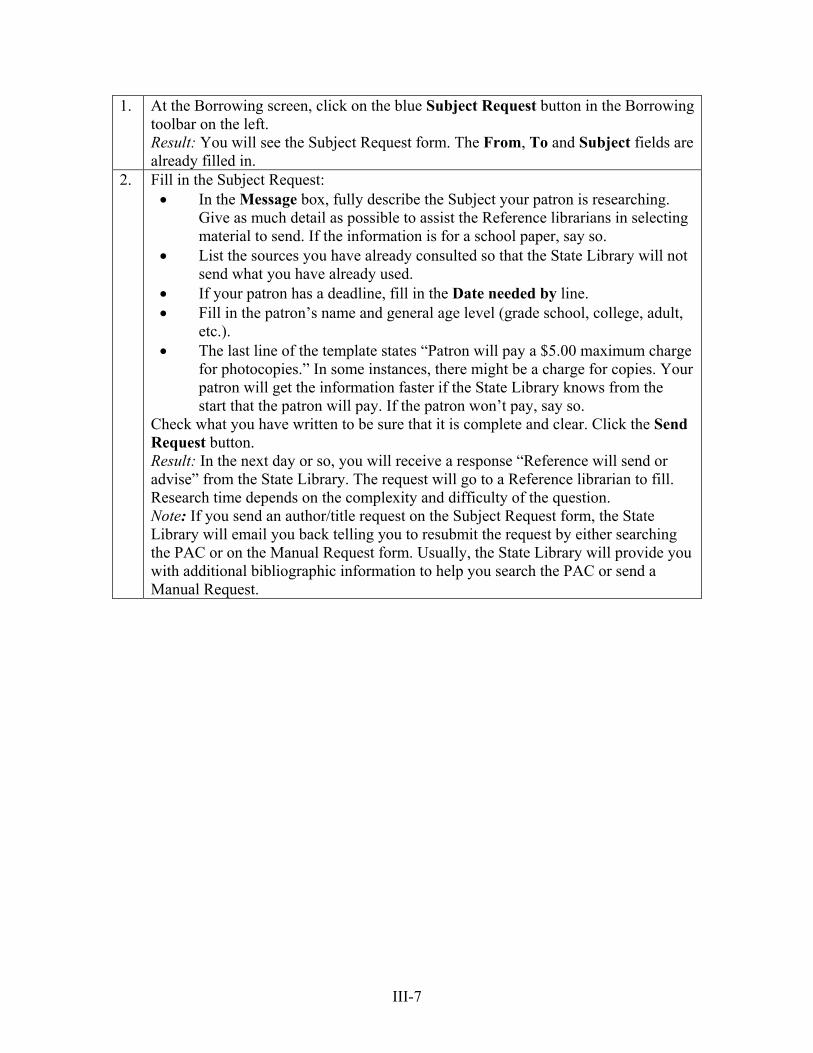
1. At the Borrowing screen, click on the blue Subject Request button in the Borrowing toolbar on the left. Result: You will see the Subject Request form. The From, To and Subject fields are already filled in.
2. Fill in the Subject Request: • In the Message box, fully describe the Subject your patron is researching.
Give as much detail as possible to assist the Reference librarians in selecting material to send. If the information is for a school paper, say so.
• List the sources you have already consulted so that the State Library will not send what you have already used.
• If your patron has a deadline, fill in the Date needed by line. • Fill in the patron’s name and general age level (grade school, college, adult,
etc.). • The last line of the template states “Patron will pay a $5.00 maximum charge
for photocopies.” In some instances, there might be a charge for copies. Your patron will get the information faster if the State Library knows from the start that the patron will pay. If the patron won’t pay, say so.
Check what you have written to be sure that it is complete and clear. Click the Send Request button. Result: In the next day or so, you will receive a response “Reference will send or advise” from the State Library. The request will go to a Reference librarian to fill. Research time depends on the complexity and difficulty of the question. Note: If you send an author/title request on the Subject Request form, the State Library will email you back telling you to resubmit the request by either searching the PAC or on the Manual Request form. Usually, the State Library will provide you with additional bibliographic information to help you search the PAC or send a Manual Request.
III-7
IV. BORROWING ACTIVITIES
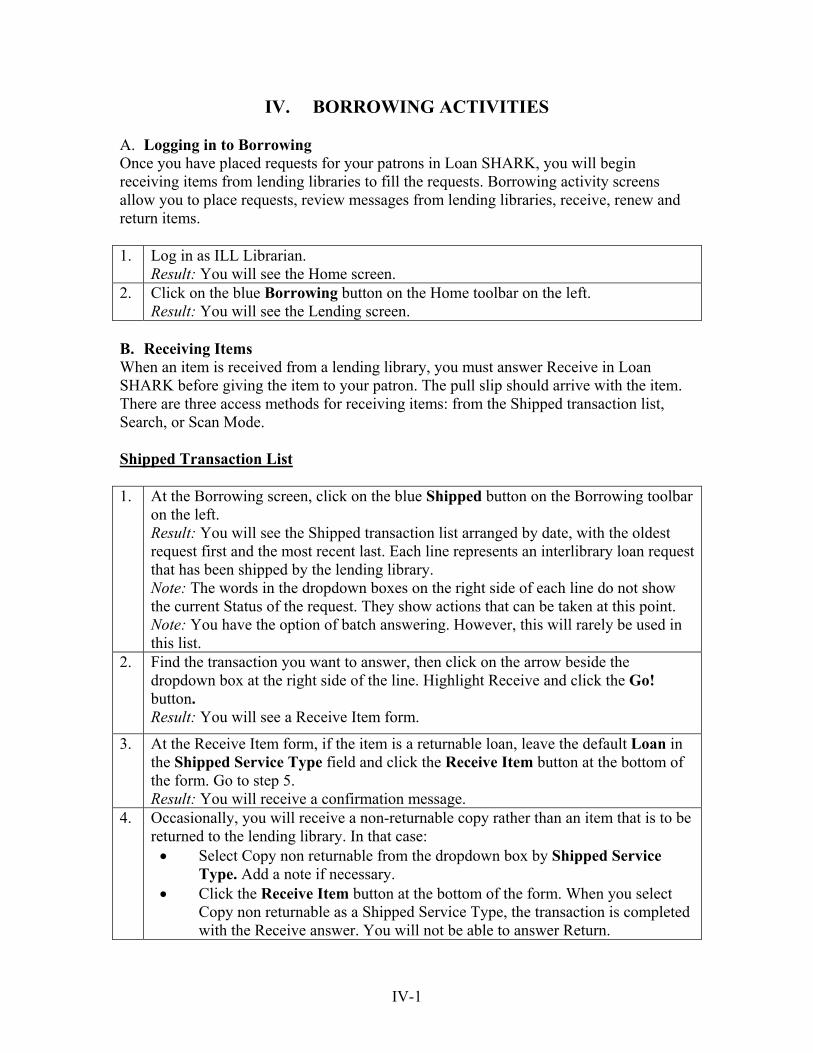
A. Logging in to Borrowing Once you have placed requests for your patrons in Loan SHARK, you will begin receiving items from lending libraries to fill the requests. Borrowing activity screens allow you to place requests, review messages from lending libraries, receive, renew and return items. 1. Log in as ILL Librarian.
Result: You will see the Home screen. 2. Click on the blue Borrowing button on the Home toolbar on the left.
Result: You will see the Lending screen. B. Receiving Items When an item is received from a lending library, you must answer Receive in Loan SHARK before giving the item to your patron. The pull slip should arrive with the item. There are three access methods for receiving items: from the Shipped transaction list, Search, or Scan Mode. Shipped Transaction List 1. At the Borrowing screen, click on the blue Shipped button on the Borrowing toolbar
on the left. Result: You will see the Shipped transaction list arranged by date, with the oldest request first and the most recent last. Each line represents an interlibrary loan request that has been shipped by the lending library. Note: The words in the dropdown boxes on the right side of each line do not show the current Status of the request. They show actions that can be taken at this point. Note: You have the option of batch answering. However, this will rarely be used in this list.
2. Find the transaction you want to answer, then click on the arrow beside the dropdown box at the right side of the line. Highlight Receive and click the Go! button. Result: You will see a Receive Item form.
3. At the Receive Item form, if the item is a returnable loan, leave the default Loan in the Shipped Service Type field and click the Receive Item button at the bottom of the form. Go to step 5. Result: You will receive a confirmation message.
4. Occasionally, you will receive a non-returnable copy rather than an item that is to be returned to the lending library. In that case:
• Select Copy non returnable from the dropdown box by Shipped Service Type. Add a note if necessary.
• Click the Receive Item button at the bottom of the form. When you select Copy non returnable as a Shipped Service Type, the transaction is completed with the Receive answer. You will not be able to answer Return.
IV-1
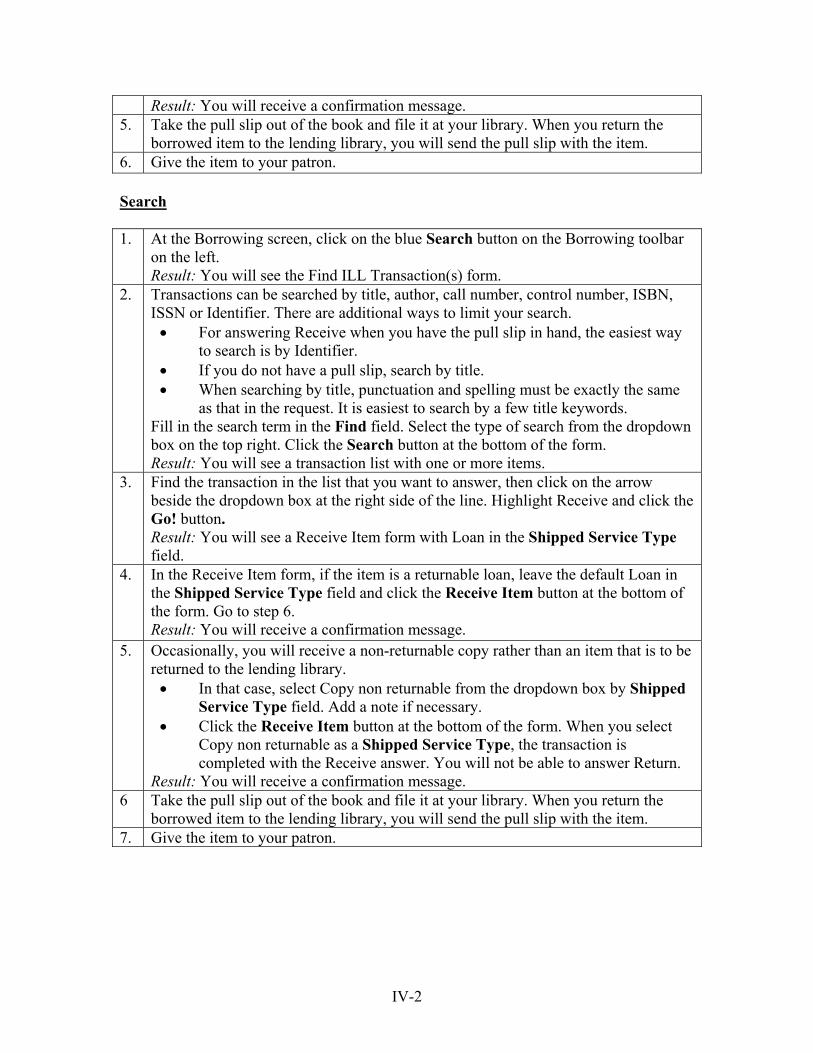
Result: You will receive a confirmation message. 5. Take the pull slip out of the book and file it at your library. When you return the
borrowed item to the lending library, you will send the pull slip with the item. 6. Give the item to your patron. Search 1. At the Borrowing screen, click on the blue Search button on the Borrowing toolbar
on the left. Result: You will see the Find ILL Transaction(s) form.
2. Transactions can be searched by title, author, call number, control number, ISBN, ISSN or Identifier. There are additional ways to limit your search.
• For answering Receive when you have the pull slip in hand, the easiest way to search is by Identifier.
• If you do not have a pull slip, search by title. • When searching by title, punctuation and spelling must be exactly the same
as that in the request. It is easiest to search by a few title keywords. Fill in the search term in the Find field. Select the type of search from the dropdown box on the top right. Click the Search button at the bottom of the form. Result: You will see a transaction list with one or more items.
3. Find the transaction in the list that you want to answer, then click on the arrow beside the dropdown box at the right side of the line. Highlight Receive and click the Go! button. Result: You will see a Receive Item form with Loan in the Shipped Service Type field.
4. In the Receive Item form, if the item is a returnable loan, leave the default Loan in the Shipped Service Type field and click the Receive Item button at the bottom of the form. Go to step 6. Result: You will receive a confirmation message.
5. Occasionally, you will receive a non-returnable copy rather than an item that is to be returned to the lending library.
• In that case, select Copy non returnable from the dropdown box by Shipped Service Type field. Add a note if necessary.
• Click the Receive Item button at the bottom of the form. When you select Copy non returnable as a Shipped Service Type, the transaction is completed with the Receive answer. You will not be able to answer Return.
Result: You will receive a confirmation message. 6 Take the pull slip out of the book and file it at your library. When you return the
borrowed item to the lending library, you will send the pull slip with the item. 7. Give the item to your patron.
IV-2
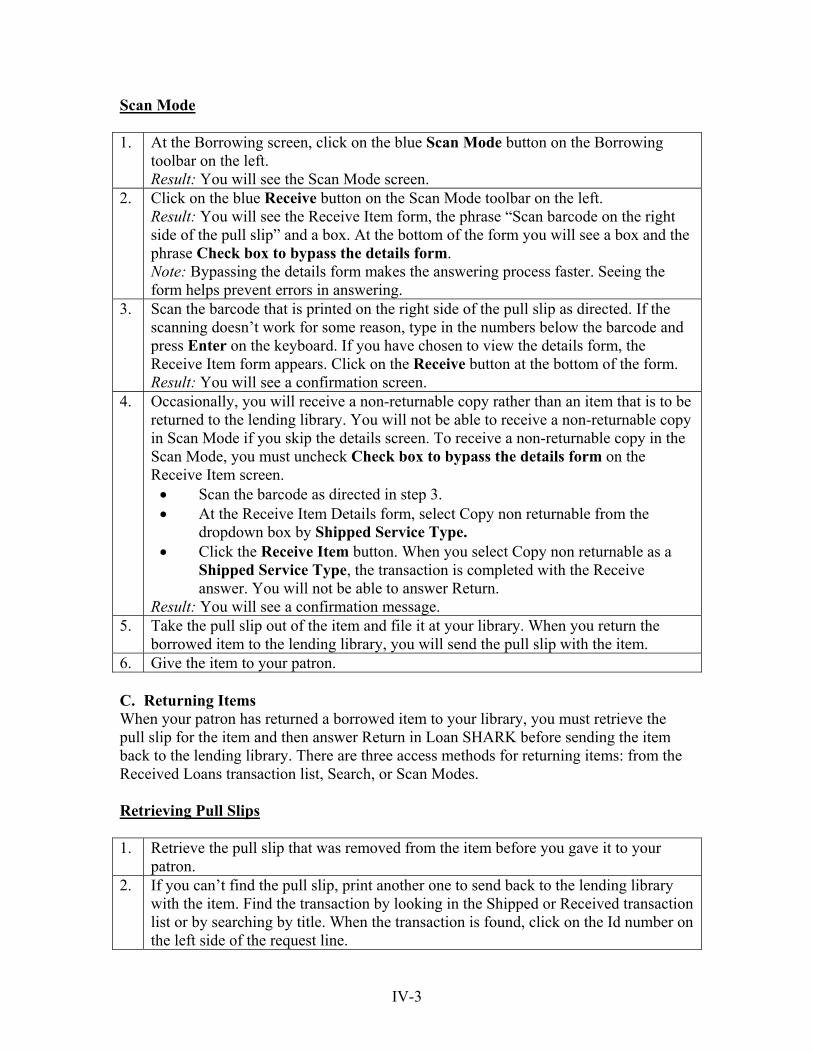
Scan Mode 1. At the Borrowing screen, click on the blue Scan Mode button on the Borrowing
toolbar on the left. Result: You will see the Scan Mode screen.
2. Click on the blue Receive button on the Scan Mode toolbar on the left. Result: You will see the Receive Item form, the phrase “Scan barcode on the right side of the pull slip” and a box. At the bottom of the form you will see a box and the phrase Check box to bypass the details form. Note: Bypassing the details form makes the answering process faster. Seeing the form helps prevent errors in answering.
3. Scan the barcode that is printed on the right side of the pull slip as directed. If the scanning doesn’t work for some reason, type in the numbers below the barcode and press Enter on the keyboard. If you have chosen to view the details form, the Receive Item form appears. Click on the Receive button at the bottom of the form. Result: You will see a confirmation screen.
4. Occasionally, you will receive a non-returnable copy rather than an item that is to be returned to the lending library. You will not be able to receive a non-returnable copy in Scan Mode if you skip the details screen. To receive a non-returnable copy in the Scan Mode, you must uncheck Check box to bypass the details form on the Receive Item screen.
• Scan the barcode as directed in step 3. • At the Receive Item Details form, select Copy non returnable from the
dropdown box by Shipped Service Type. • Click the Receive Item button. When you select Copy non returnable as a
Shipped Service Type, the transaction is completed with the Receive answer. You will not be able to answer Return.
Result: You will see a confirmation message. 5. Take the pull slip out of the item and file it at your library. When you return the
borrowed item to the lending library, you will send the pull slip with the item. 6. Give the item to your patron. C. Returning Items When your patron has returned a borrowed item to your library, you must retrieve the pull slip for the item and then answer Return in Loan SHARK before sending the item back to the lending library. There are three access methods for returning items: from the Received Loans transaction list, Search, or Scan Modes. Retrieving Pull Slips 1. Retrieve the pull slip that was removed from the item before you gave it to your
patron. 2. If you can’t find the pull slip, print another one to send back to the lending library
with the item. Find the transaction by looking in the Shipped or Received transaction list or by searching by title. When the transaction is found, click on the Id number on the left side of the request line.
IV-3
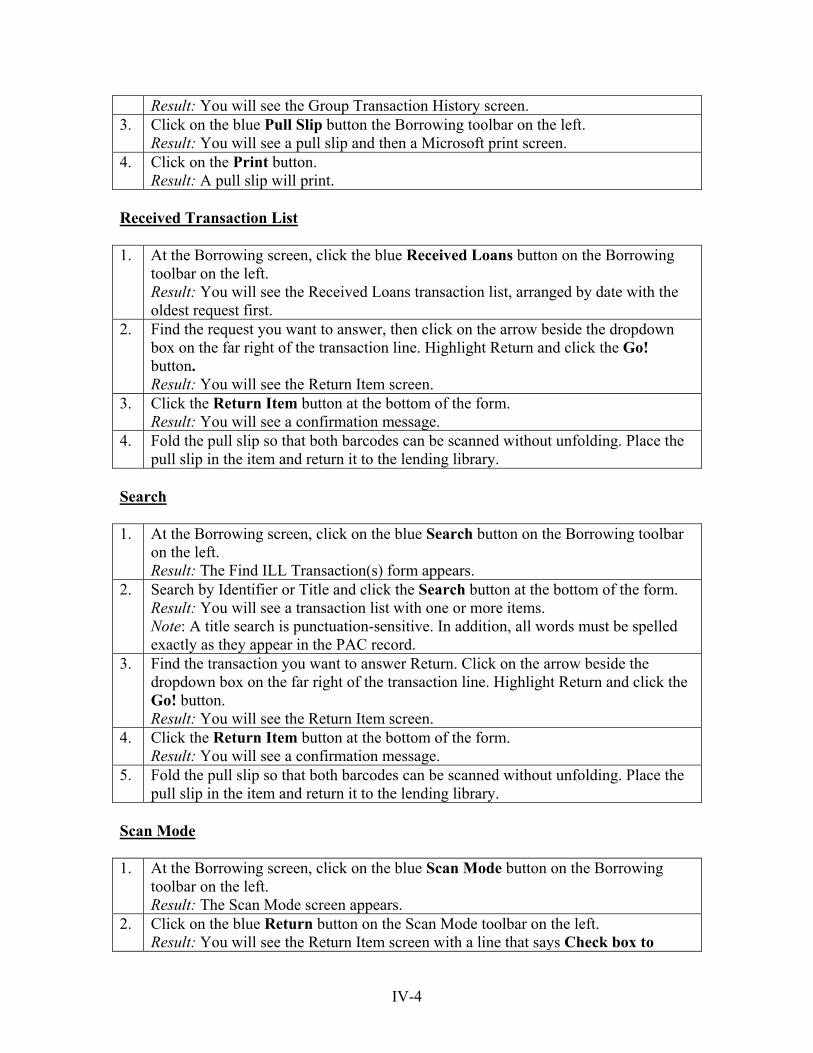
Result: You will see the Group Transaction History screen. 3. Click on the blue Pull Slip button the Borrowing toolbar on the left.
Result: You will see a pull slip and then a Microsoft print screen. 4. Click on the Print button.
Result: A pull slip will print. Received Transaction List 1. At the Borrowing screen, click the blue Received Loans button on the Borrowing
toolbar on the left. Result: You will see the Received Loans transaction list, arranged by date with the oldest request first.
2. Find the request you want to answer, then click on the arrow beside the dropdown box on the far right of the transaction line. Highlight Return and click the Go! button. Result: You will see the Return Item screen.
3. Click the Return Item button at the bottom of the form. Result: You will see a confirmation message.
4. Fold the pull slip so that both barcodes can be scanned without unfolding. Place the pull slip in the item and return it to the lending library.
Search 1. At the Borrowing screen, click on the blue Search button on the Borrowing toolbar
on the left. Result: The Find ILL Transaction(s) form appears.
2. Search by Identifier or Title and click the Search button at the bottom of the form. Result: You will see a transaction list with one or more items. Note: A title search is punctuation-sensitive. In addition, all words must be spelled exactly as they appear in the PAC record.
3. Find the transaction you want to answer Return. Click on the arrow beside the dropdown box on the far right of the transaction line. Highlight Return and click the Go! button. Result: You will see the Return Item screen.
4. Click the Return Item button at the bottom of the form. Result: You will see a confirmation message.
5. Fold the pull slip so that both barcodes can be scanned without unfolding. Place the pull slip in the item and return it to the lending library.
Scan Mode 1. At the Borrowing screen, click on the blue Scan Mode button on the Borrowing
toolbar on the left. Result: The Scan Mode screen appears.
2. Click on the blue Return button on the Scan Mode toolbar on the left. Result: You will see the Return Item screen with a line that says Check box to
IV-4
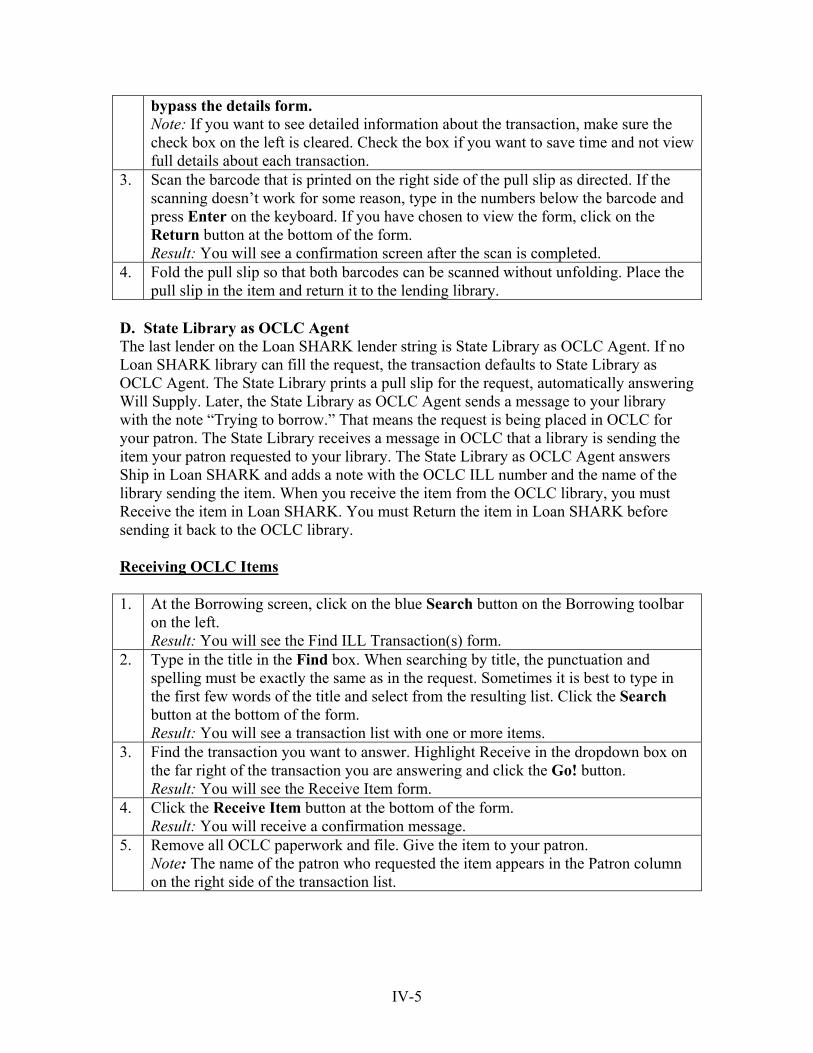
bypass the details form. Note: If you want to see detailed information about the transaction, make sure the check box on the left is cleared. Check the box if you want to save time and not view full details about each transaction.
3. Scan the barcode that is printed on the right side of the pull slip as directed. If the scanning doesn’t work for some reason, type in the numbers below the barcode and press Enter on the keyboard. If you have chosen to view the form, click on the Return button at the bottom of the form. Result: You will see a confirmation screen after the scan is completed.
4. Fold the pull slip so that both barcodes can be scanned without unfolding. Place the pull slip in the item and return it to the lending library.
D. State Library as OCLC Agent The last lender on the Loan SHARK lender string is State Library as OCLC Agent. If no Loan SHARK library can fill the request, the transaction defaults to State Library as OCLC Agent. The State Library prints a pull slip for the request, automatically answering Will Supply. Later, the State Library as OCLC Agent sends a message to your library with the note “Trying to borrow.” That means the request is being placed in OCLC for your patron. The State Library receives a message in OCLC that a library is sending the item your patron requested to your library. The State Library as OCLC Agent answers Ship in Loan SHARK and adds a note with the OCLC ILL number and the name of the library sending the item. When you receive the item from the OCLC library, you must Receive the item in Loan SHARK. You must Return the item in Loan SHARK before sending it back to the OCLC library. Receiving OCLC Items 1. At the Borrowing screen, click on the blue Search button on the Borrowing toolbar
on the left. Result: You will see the Find ILL Transaction(s) form.
2. Type in the title in the Find box. When searching by title, the punctuation and spelling must be exactly the same as in the request. Sometimes it is best to type in the first few words of the title and select from the resulting list. Click the Search button at the bottom of the form. Result: You will see a transaction list with one or more items.
3. Find the transaction you want to answer. Highlight Receive in the dropdown box on the far right of the transaction you are answering and click the Go! button. Result: You will see the Receive Item form.
4. Click the Receive Item button at the bottom of the form. Result: You will receive a confirmation message.
5. Remove all OCLC paperwork and file. Give the item to your patron. Note: The name of the patron who requested the item appears in the Patron column on the right side of the transaction list.
IV-5
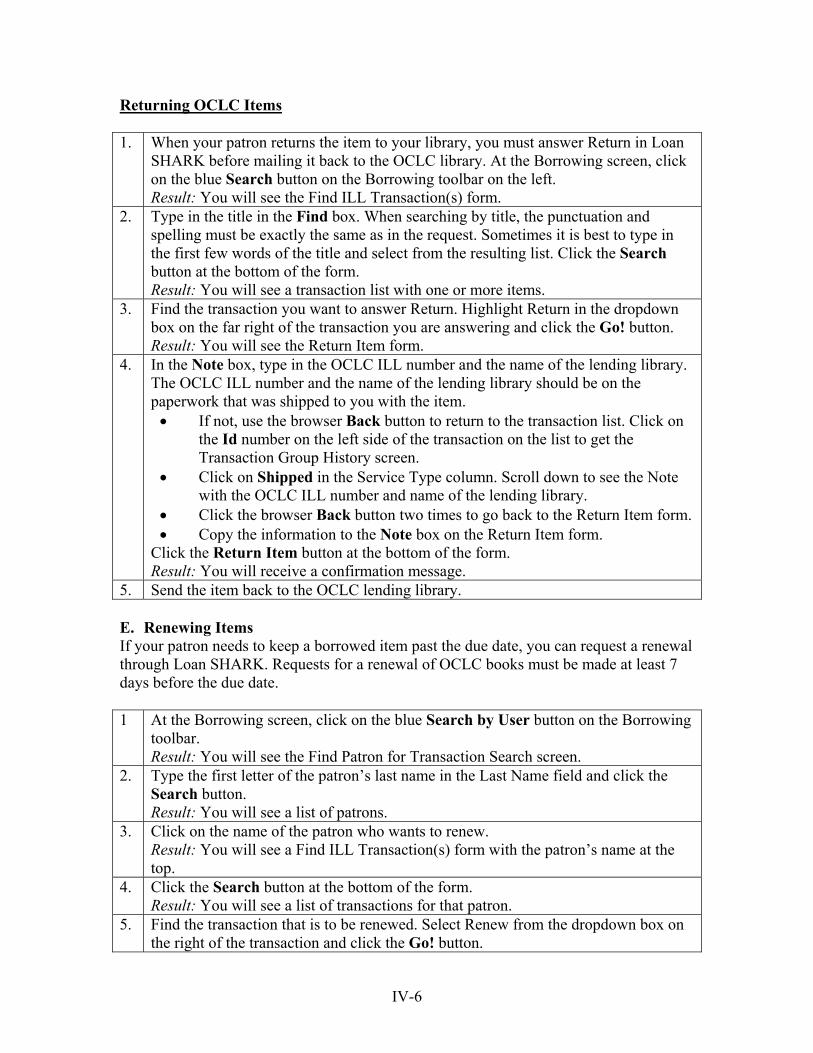
Returning OCLC Items 1. When your patron returns the item to your library, you must answer Return in Loan
SHARK before mailing it back to the OCLC library. At the Borrowing screen, click on the blue Search button on the Borrowing toolbar on the left. Result: You will see the Find ILL Transaction(s) form.
2. Type in the title in the Find box. When searching by title, the punctuation and spelling must be exactly the same as in the request. Sometimes it is best to type in the first few words of the title and select from the resulting list. Click the Search button at the bottom of the form. Result: You will see a transaction list with one or more items.
3. Find the transaction you want to answer Return. Highlight Return in the dropdown box on the far right of the transaction you are answering and click the Go! button. Result: You will see the Return Item form.
4. In the Note box, type in the OCLC ILL number and the name of the lending library. The OCLC ILL number and the name of the lending library should be on the paperwork that was shipped to you with the item.
• If not, use the browser Back button to return to the transaction list. Click on the Id number on the left side of the transaction on the list to get the Transaction Group History screen.
• Click on Shipped in the Service Type column. Scroll down to see the Note with the OCLC ILL number and name of the lending library.
• Click the browser Back button two times to go back to the Return Item form. • Copy the information to the Note box on the Return Item form.
Click the Return Item button at the bottom of the form. Result: You will receive a confirmation message.
5. Send the item back to the OCLC lending library. E. Renewing Items If your patron needs to keep a borrowed item past the due date, you can request a renewal through Loan SHARK. Requests for a renewal of OCLC books must be made at least 7 days before the due date. 1 At the Borrowing screen, click on the blue Search by User button on the Borrowing
toolbar. Result: You will see the Find Patron for Transaction Search screen.
2. Type the first letter of the patron’s last name in the Last Name field and click the Search button. Result: You will see a list of patrons.
3. Click on the name of the patron who wants to renew. Result: You will see a Find ILL Transaction(s) form with the patron’s name at the top.
4. Click the Search button at the bottom of the form. Result: You will see a list of transactions for that patron.
5. Find the transaction that is to be renewed. Select Renew from the dropdown box on the right of the transaction and click the Go! button.
IV-6
Result: You will see a Renew form. 6. Ask for a new due date and add any notes that are necessary. Click the Send Renew
button at the bottom of the form. Result: You will receive a confirmation message. Note: Items that were sent to fill a Subject Request are not in Loan SHARK. Those items cannot be renewed in Loan SHARK. You must contact the lending library directly.
F. Daily Activities In Review If requests are incompletely submitted, they may end up in the In Review transaction list. You must do another step with the requests to submit them to Loan SHARK libraries. 1. At the Borrowing screen, click the blue In Review button on the Borrowing toolbar
on the left. You should get a screen with a message “Unable to show transactions: There are no items with this status.” If you get this message, skip steps 2 through 5 and go on to the next Borrowing activity.
2. You may get an In Review (Known Patrons) transaction list when you click on the In Review button. The transactions in the list are requests incompletely submitted by your library. Loan SHARK collects the requests in In Review. The dropdown box on the right side of the each transaction allows you to select Place Request, Deny Request or Patron Message. Patron Message is not used in Loan SHARK. There is a line at the bottom of the list “Use Defaults and Batch Process These Transactions” followed by a dropdown box with Place Request and Deny Request as possible answers.
3. If you are answering each transaction one at a time, complete submitting the requests by highlighting the answer you want in the dropdown box at the far right of each transaction and click the Go! button. Result: You will see the Place Interlibrary Loan Request for (patron’s name) form or a Deny Interlibrary Loan Request form.
4. Click on the Deny Request or Submit Request button at the bottom of the form. Result: You will see a confirmation message.
5. If you are batch answering, select the answer you want in the Use Defaults and Batch Process These Transactions dropdown box at the end of the page and click the Go! button. Result: You will see the Batch Process Interlibrary Loan Requests form.
6. Look over the request or the Batch Process form to see if everything is correct. Click the Submit Request button under the Note box. Result: You will see a confirmation message.
Checking Pending Transaction List for New Messages Pending items are requests that have been placed in Loan SHARK for your patrons and items are expected from a lender. They have been answered Will Supply or Hold Placed by a lending library.
IV-7
1. At the Borrowing screen, click the blue Pending button on the Borrowing toolbar on the left. Result: You will see the Pending transaction list, arranged by date with the oldest transactions first, most recent last. Note: If it is more convenient for you, you can reverse the order by clicking on the blue Date heading at the top of the column. When you see an arrow pointing up, click on the blue Date heading again. The list will re-sort and the arrow will be pointing down. The most recent activity will be first.
2. Look for a red NEW above a Scroll and Hand icon next to the Latest Activity column. Click on the Scroll and Hand icon to read the message. After reading the message, click on the blue Mark as Read button on the bottom of the Borrowing toolbar on the left. Results: The red NEW will be removed from above the Scroll and Hand icon.
3. If you need to respond to the message, return to the transaction list by right clicking anywhere on the screen and then clicking on Back. Result: You will be back at the transaction list.
4. Click on the arrow beside the dropdown box on the right side of the transaction and select Message. Click the Go! button. Result: You will see the Message form.
5. Type your message in the Note box and click the Submit Message button at the bottom of the form. Result: You will see a confirmation message.
Conditional Answers The State Library asks lending libraries not to use the Conditional reply. However, if a lending library answers Conditional to one of your requests, the request is stalled until you reply to the conditions placed on the request. 1. At the Borrowing screen, click on the blue Conditional button on the Borrowing
toolbar on the left. You should see the message “Unable to show transactions: There are no items with this status for this library.” If you get this message, skip steps 2 through 5, and go on to the next Borrowing activity.
2. If a lending library sent a Conditional answer, you will get a Conditional transaction list when you click on the Conditional button. Look for a red NEW above a Scroll and Hand icon next to the Latest Activity column. Click on the Scroll and Hand icon to read the message. After reading the message, click on the blue Mark as Read button on the bottom of the Borrowing toolbar on the left. Results: The red NEW will be removed from above the Scroll and Hand icon.
3. Return to the transaction list by right clicking anywhere on the screen and then clicking Back. Result: You will be back at the transaction list.
4. Click on the arrow beside the dropdown box on the right side of the transaction and select Message. Click the Go! button. Result: You will see the Message form.
5. Send a reply of Yes, accepting the conditions or No. You can enter an optional note to the lender. Click on the Submit button at the bottom of the form.
IV-8
Result: You will receive a confirmation message. More Lenders Requests “pause” and stop moving down the lender string after 15 lending libraries have answered Unfilled or Expired. If there are still more lenders in the string that have not been tried, a More Lenders (gray plus sign) icon appears beside the transaction in the Not Supplied transaction list. You will need to follow the steps below to get the request moving again. 1. At the Borrowing screen, click the blue Not Supplied button on the Borrowing
toolbar on the left. Result: You will see the Not Supplied transaction list arranged by date with most recent activity first.
2. Look for More Lenders (gray plus sign) icons. The More Lenders icon appears beside requests that have lenders in the lender string that have not been tried, but the automatic referral to lenders was stopped by the referral “pause” setup after 15 lenders were tried.
3. To continue the referral process for a selected transaction, click the Identifier number in the Id column. Result: You will see the Transaction Group History screen.
4. Click on the blue Mark as Read button on the Borrowing toolbar on the left. Result: The red NEW will be removed from above the More Lenders icon.
5. At the Transaction Group History screen, click on Click Here to View Lender String. Determine if the request is a Manual Request that you incorrectly sent to all the libraries or if it is a request for an item that many libraries own. • If it is a Manual Request incorrectly placed, follow steps 6 and 7. • If it is a request for an item that many libraries own, follow step 8. Close the Lender String screen by clicking on the X in the upper right corner of the screen.
6. For a Manual Request that was incorrectly placed, at the Transaction Group History screen, click on the blue More Lenders button on the Borrowing toolbar on the left. Result: You will see the Select Institution(s) to Continue Trying screen.
7. Click the Uncheck All button at the top of the list of lending libraries. Scroll to the bottom of the list and check State Library as OCLC Agent. Click Go! Result: You will receive a confirmation message and the request will be sent to the State Library as OCLC Agent only.
8. For a request for an item that many libraries own that paused after 15 lenders, at the Transaction Group History screen, click on the More Lenders button on the Borrowing toolbar on the left. Follow the instructions on the page to de-select (or select back) other lenders to try. On the lower part of the form, the Pause-referral field lets you change the number of additional lenders to try: "Pause automatic request referral after every [number of] lenders do not fill." Click the Go! button. Result: You will see a confirmation message and the request will continue down the lender string.
IV-9
Retry Answers The State Library has requested that libraries answer Retry only to Manual Requests that were incorrectly sent to all 66 libraries in Loan SHARK. The Retry answer pauses the request and allows the borrowing library to resubmit the request correctly.
1. At the Borrowing screen, click on the blue Not Supplied button on the Borrowing toolbar on the left. Look for ILL Answer – Retry in the Latest Activity column. If the list is long, click on the underlined Latest Activity at the top of the column. The transaction list will sort alphabetically by Latest Activity. All transactions with ILL Answer – Retry will be group together. Click on the Latest Activity for that transaction to see why the answer was Retry. Result: You will see the Answer Information screen.
2. Click on the blue History button on the Borrowing toolbar on the left. Result: You will return to the Transaction Group History screen.
3. At the Transaction Group History screen, click on the blue Mark as Read button on the Borrowing toolbar on the left. Result: The red NEW will be removed from above the Scroll and Hand icon.
4. Decide if you want to resubmit the request. If you do, click on the blue More Lenders button on the Borrowing toolbar on the left. Result: You will see the Select Institution(s) to Continue Trying form.
5. Make any changes necessary for the request to be filled. If you sent a Manual Request to all the libraries on the list, click the Uncheck All button. Scroll down to the bottom and check State Library as OCLC Agent. Click on the Retry Request button at the bottom of the form. Result: The Manual Request will go directly to the State Library as OCLC Agent.
Renew/Pending and Renew/Overdue When you ask for a renewal on an item you borrowed, the lending library will reply either no or yes with a new due date. 1. At the Borrowing screen, click on the blue Renew/Pending button on the Borrowing
toolbar on the left. Result: You will see the Renew/Pending transaction list or the Message “Unable to show transactions: There are no items with this status for this library.” If you get the Message, go on to another Borrowing activity.
2. Look for red NEW above the Scroll and Hand icon for responses to your request to renew an item. Click on the Scroll and Hand icon. Result: You will see the Message Information screen.
3. At the Message Information screen, click the Mark as Red button on the Borrowing toolbar on the left. Result: The red NEW will be removed from above the Scroll and Hand icon.
4. Notify your patron with either the new due date or tell the patron that the library will not renew the item.
5. At the Borrowing screen, click on the blue Renew/Overdue button on the Borrowing toolbar on the left. Result: You will see the Renew/Overdue Transaction list or the Message “Unable to
IV-10
show transactions: There are no items with this status for this library.” If you get the Message, go on to another Borrowing activity.
6. Repeat steps 2 through 4. Overdue Items Loan SHARK automatically changes the Status to Overdue if the request isn’t answered Returned by the due date in Loan SHARK. 1. At the Borrowing screen, click on the blue Overdue button on the left toolbar.
Result: You will see the Overdue transaction list. This is a list of all items sent to your library that have been declared Overdue by Loan SHARK. Or, you may see the Message “Unable to show transactions: There are no items with this status for this library.” If you get the Message, go on to another Borrowing activity.
2. Contact each patron to remind them that they need to return the item to your library. Items Being Recalled Once a lending library sends an item to your library, they can send a Recall Message asking for the return of the item before the due date. 1. At the Borrowing screen, click on the blue Recall button on the Borrowing toolbar
on the left. Result: You will see the Recall transaction list (a list of items that the lending library wants back before the due date) or the Message “Unable to show transactions: There are no items with this status for this library.” If you get the Message, go on to another Borrowing activity.
2. Contact the patron to tell them they need to return the item to your library. G. Weekly Activities Shipped But Not Received 1. At the Borrowing screen, click on the blue Shipped button on the Borrowing toolbar
on the left. Result: You will see the Shipped transaction list, arranged by date, with the oldest activity first and the most recent activity last. This is a list of items for which lending libraries have answered Shipped to requests received from your library.
2. Allowing 10 days for arrival of an item from a Loan SHARK library and 14 days for an item from an OCLC library, follow up on any item that you have not received within that timeframe.
• You can send a Message on the Loan SHARK request by selecting Message from the dropdown box to the right of the transaction and click the Go! button. Result: The Message form appears.
• Type your text in the box and click the Send Message button. • You may also send an email directly to the lending Loan SHARK library
asking about the item. A list of email addresses for Loan SHARK libraries
IV-11
can be found at http://www.state.lib.la.us/Dept/UserServ/LS/contacts.htm. If it is an OCLC book, email [email protected].
Items Returned But Not Checked In A transaction remains active until the lending library answers Checked In. 1. At the Borrowing screen, click on the blue Returned button on the Borrowing
toolbar on the left. Result: You will see the Returned transaction list, arranged by date, with the oldest activity first and the most recent activity last. This is a list of items for which your library has answered Returned on items borrowed but the lending library has not yet answered Checked In.
2. Allowing 10 days for shipment through the courier service to the lending library and 14 days for an item from an OCLC library, follow up on any transaction that is not received within that timeframe.
• You can send a Message on the request by selecting Message from the dropdown box to the right of the transaction and click the Go! button. Result: The Message form appears.
• Type your text in the box and click the Send Message button. • You may also send an email directly to the lending Loan SHARK library
asking about the item. A list of email addresses for Loan SHARK libraries can be found at http://www.state.lib.la.us/Dept/UserServ/LS/contacts.htm. If it is an OCLC book, email [email protected].
Canceled Requests Requests that you are trying to cancel remain active until the lending library responds to your Cancel Message. 1. At the Borrowing screen, click on the blue Cancel Pending button on the
Borrowing toolbar on the left. Result: You will see either a Cancel Pending transaction list arranged by date with the oldest transaction first, or a Message “Unable to show transactions: There are no items with this status for this library.” If you see the Message that there are no transactions, go on to another activity. If you see a transaction list, go to step 2.
2. Lending libraries should check their Cancel Pendings every day. If you have some transactions that have the Status Cancel Pending that are more than 1 week old, contact the lending library.
• You can send a Message on the request by selecting Message from the dropdown box to the right of the transaction and click the Go! button. Result: The Message form appears. Type your text in the box and click the Send Message button.
• You may also send an email directly to the lending Loan SHARK library asking about the item. A list of email addresses for Loan SHARK libraries can be found at http://www.state.lib.la.us/Dept/UserServ/LS/contacts.htm.
.
IV-12
V. SETTING UP INTERLIBRARY LOAN TRANSACTIONS Some settings for Loan SHARK can be set at the local library level. These include overriding some system-wide default settings, adding closed days to the Calendar, changing the local library’s email address on Subject Requests, configuring pull slips, and adding, updating and deleting users. Logging in to Settings 1. Log in as ILL Librarian.
Result: You will see the Home screen. 2. Click the blue Settings button on the Home toolbar on the left.
Result: You will see the Settings screen. Blue buttons on the left toolbar include Configuration, Lenders, Calendar, Email Setup, Subject Request, Pull Slips, and Add, Update and Delete Users. Note: The list of Lenders and the Lender String have been set by the system. The State Library asks that local libraries not change the default settings. Loan SHARK does not use patron email notification, so the Email Setup does not apply to our system.
Configuration 1. Click on the blue Configuration button on the Settings toolbar on the left.
Results: You will see the Edit Library Configuration form. 2. The State Library recommends that only the following configuration details be
considered for modification by local libraries: • Skip Details Form in Scan Mode?: Answering No displays a detailed page
about the transaction whenever a barcode is scanned. It helps prevent answering errors. Answering Yes skips the detail page.
• Warn before placing a Lost: Answering Yes provides a warning that a lost message terminates the ILL transaction and the lost status cannot be changed. Answering No skips the warning.
• Default Transactions Per Page: Sets the number of transactions that will show in a transaction list: 10 to 100 may be selected; 50 is the optimum number for speed and system performance.
• The other items in the form should be left as they have been set by the System Administrator.
3. To save the settings, click the Update button at the bottom of the form. Result: You will see a confirmation message.
Calendar 1. Click on the blue Calendar button on the Settings toolbar on the left.
Result: You will see the Library Calendar screen. Days that are considered “non-business” days by the system are indicated in red. The days marked in red cannot be overridden by a local library.
V-1
2. In the Weekday Calendar, set Open or Closed for each weekday that is always open or closed at your library. To change a setting, click the down arrow and select the needed option. Saturday and Sunday are not shown on the Weekday Calendar because they are considered “non-business” days.
3. If there are other days (such as special holidays) when your library is closed, move down the page to find the month and day and click the check box under that day. (The check mark means "closed.") To remove a check mark, click the box. Hint: If you are the only person at your library who does interlibrary loan, and you are going on vacation, you might want to “close” your library during the period that you are gone so that all interlibrary loan transactions will bypass your library. Note: If a request arrives at the library on a closed day, and the request is set to Expire before the library reopens, an automatic response of Unfilled will immediately be sent to the borrowing library. Otherwise, the request remains at a potential lending library for 2 days waiting to be answered before moving on to the next library in the lender string. Changing the calendar settings for the days your library will not be providing interlibrary loan service helps the borrowing patron get the item faster.
4. To save the settings, click the Update button on the lower part of the Library Calendar page. Result: You will see a confirmation screen.
Subject Requests The defaults for Subject Request email messages to the State Library have been set by the system. The default should be edited only if the local library’s email address changes. 1. Click on the blue Subject Request button on the Settings toolbar on the left.
Result: You will see the Subject Request Setup form with the template already filled in.
2. Change the From field to show the new email address for interlibrary loan for your local library.
3. Click the Set Defaults button. Result: You will see a confirmation message.
Pull Slips 1. Select the blue Pull Slips button on the Settings toolbar on the left.
Result: You will see the Local Pull Slip Settings form. 2. Click in each check box as needed to turn on (or off) the printing of each type of
information. You can also change the number of pull slips to be printed per page. Note: The State Library recommends that the Local Pull Slip Setting look like the figure that follows. However, you should determine whether you want 1 or 2 pull slips printed per page.
3. After making changes, click the Save button on the lower part of the form.
V-2

Local Pull Slip Settings
Item Type:
Publisher:
Place Of Publication:
Publication Date:
Pagination:
Sponsoring Body:
Verification Reference Source:
Copyright Compliance:
Note:
Level Of Service:
Request Date: Place On Hold:
Maximum Lending Fee: Reciprocal Agreement:
Will Pay Fee: Payment Provided:
Delivery Method: Bar Codes:
Send-To Address: Billing Address:
Return-To Address:
How many pull slips would you like to print per page?: 1 2
Add User 1. Click on the blue Add User button on the Settings toolbar on the left.
Result: You will see the Add User form. 2. Fill in the required fields listed below for adding users. The others are optional.
• First name: Capitalize first letter only. • Last name: Capitalize first letter only • Phone: Type 10 digits; use all zeros if there is no phone • Login Name: If the new user is a staff member who will be doing
interlibrary loan activities in Loan SHARK, select a name that will be easy to remember. Suggestion for new patron: Use the patron’s barcode number; or use the patron’s first name and last name as one word, all in lower case.
• Password: If the new user is a staff member who will be doing interlibrary loan activities in Loan SHARK, select a name that will be easy to remember. Suggestion for new patron: Use the patron’s first name and last name as one word, all in lower case.
• Security Level: Select ILL Librarian when adding a library staff member who will be using Loan SHARK for interlibrary loan; select patron for all others.
V-3
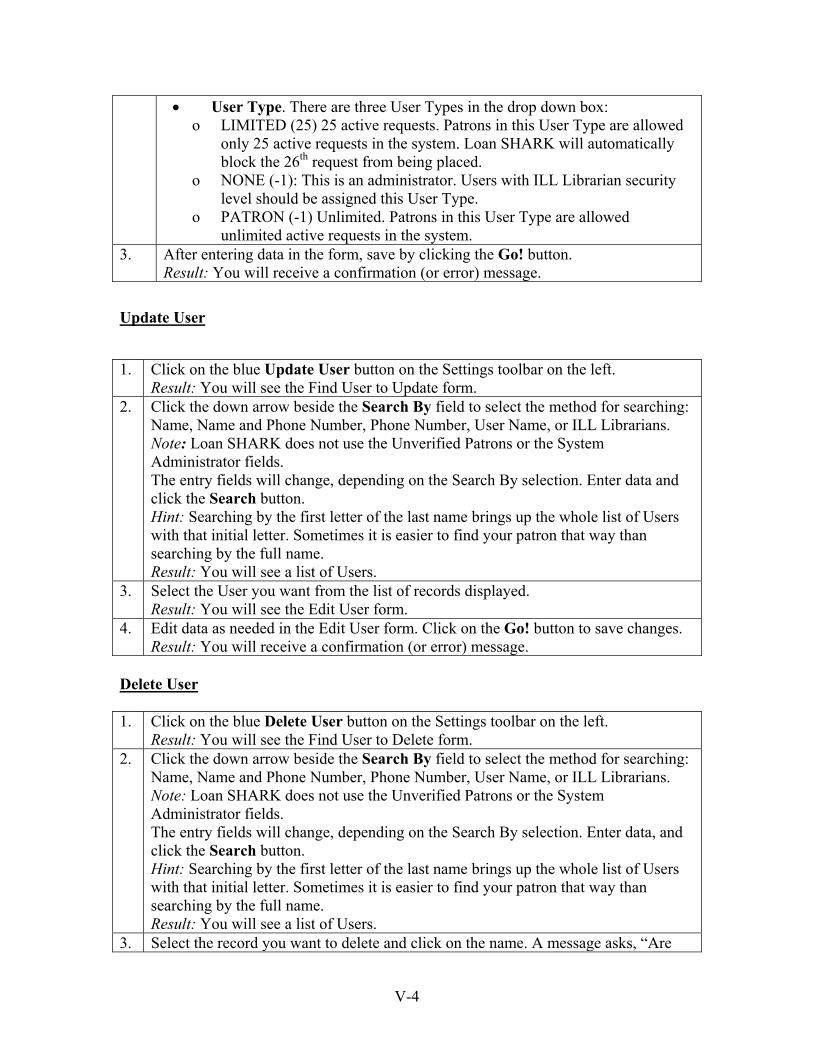
• User Type. There are three User Types in the drop down box: o LIMITED (25) 25 active requests. Patrons in this User Type are allowed
only 25 active requests in the system. Loan SHARK will automatically block the 26th request from being placed.
o NONE (-1): This is an administrator. Users with ILL Librarian security level should be assigned this User Type.
o PATRON (-1) Unlimited. Patrons in this User Type are allowed unlimited active requests in the system.
3. After entering data in the form, save by clicking the Go! button. Result: You will receive a confirmation (or error) message.
Update User
1. Click on the blue Update User button on the Settings toolbar on the left. Result: You will see the Find User to Update form.
2. Click the down arrow beside the Search By field to select the method for searching: Name, Name and Phone Number, Phone Number, User Name, or ILL Librarians. Note: Loan SHARK does not use the Unverified Patrons or the System Administrator fields. The entry fields will change, depending on the Search By selection. Enter data and click the Search button. Hint: Searching by the first letter of the last name brings up the whole list of Users with that initial letter. Sometimes it is easier to find your patron that way than searching by the full name. Result: You will see a list of Users.
3. Select the User you want from the list of records displayed. Result: You will see the Edit User form.
4. Edit data as needed in the Edit User form. Click on the Go! button to save changes. Result: You will receive a confirmation (or error) message.
Delete User 1. Click on the blue Delete User button on the Settings toolbar on the left.
Result: You will see the Find User to Delete form. 2. Click the down arrow beside the Search By field to select the method for searching:
Name, Name and Phone Number, Phone Number, User Name, or ILL Librarians. Note: Loan SHARK does not use the Unverified Patrons or the System Administrator fields. The entry fields will change, depending on the Search By selection. Enter data, and click the Search button. Hint: Searching by the first letter of the last name brings up the whole list of Users with that initial letter. Sometimes it is easier to find your patron that way than searching by the full name. Result: You will see a list of Users.
3. Select the record you want to delete and click on the name. A message asks, “Are
V-4

you sure you want to delete this user?” Click OK to delete. Result: You will see a confirmation (or error) Message. If the user has an interlibrary loan transaction in the system, the User record cannot be deleted, and an error Message will appear.
V-5
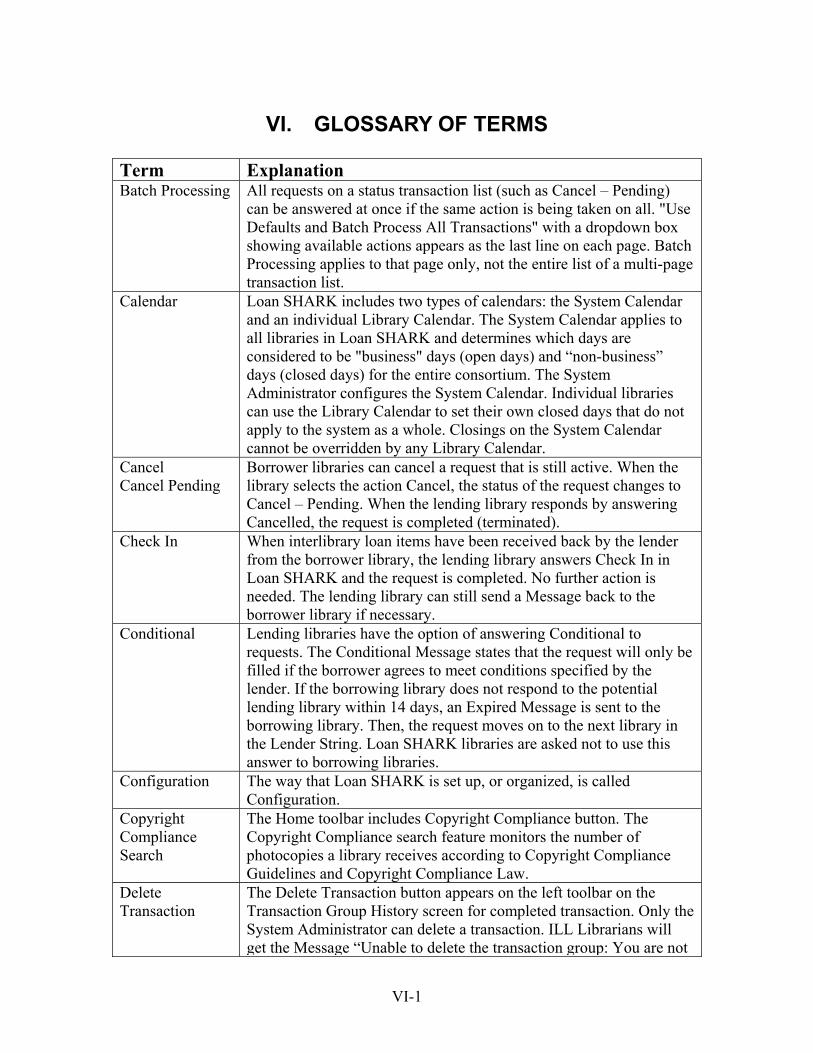
VI. GLOSSARY OF TERMS Term Explanation Batch Processing All requests on a status transaction list (such as Cancel – Pending)
can be answered at once if the same action is being taken on all. "Use Defaults and Batch Process All Transactions" with a dropdown box showing available actions appears as the last line on each page. Batch Processing applies to that page only, not the entire list of a multi-page transaction list.
Calendar Loan SHARK includes two types of calendars: the System Calendar and an individual Library Calendar. The System Calendar applies to all libraries in Loan SHARK and determines which days are considered to be "business" days (open days) and “non-business” days (closed days) for the entire consortium. The System Administrator configures the System Calendar. Individual libraries can use the Library Calendar to set their own closed days that do not apply to the system as a whole. Closings on the System Calendar cannot be overridden by any Library Calendar.
Cancel Cancel Pending
Borrower libraries can cancel a request that is still active. When the library selects the action Cancel, the status of the request changes to Cancel – Pending. When the lending library responds by answering Cancelled, the request is completed (terminated).
Check In When interlibrary loan items have been received back by the lender from the borrower library, the lending library answers Check In in Loan SHARK and the request is completed. No further action is needed. The lending library can still send a Message back to the borrower library if necessary.
Conditional
Lending libraries have the option of answering Conditional to requests. The Conditional Message states that the request will only be filled if the borrower agrees to meet conditions specified by the lender. If the borrowing library does not respond to the potential lending library within 14 days, an Expired Message is sent to the borrowing library. Then, the request moves on to the next library in the Lender String. Loan SHARK libraries are asked not to use this answer to borrowing libraries.
Configuration The way that Loan SHARK is set up, or organized, is called Configuration.
Copyright Compliance Search
The Home toolbar includes Copyright Compliance button. The Copyright Compliance search feature monitors the number of photocopies a library receives according to Copyright Compliance Guidelines and Copyright Compliance Law.
Delete Transaction
The Delete Transaction button appears on the left toolbar on the Transaction Group History screen for completed transaction. Only the System Administrator can delete a transaction. ILL Librarians will get the Message “Unable to delete the transaction group: You are not
VI-1
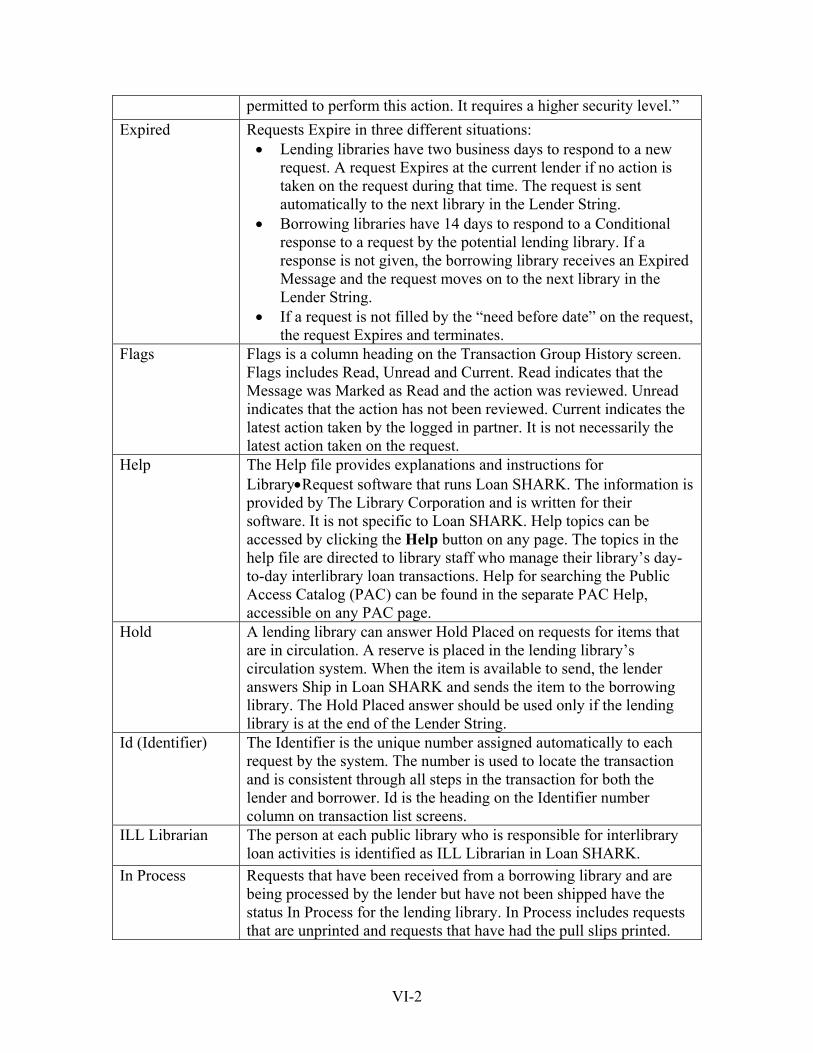
permitted to perform this action. It requires a higher security level.” Expired Requests Expire in three different situations:
• Lending libraries have two business days to respond to a new request. A request Expires at the current lender if no action is taken on the request during that time. The request is sent automatically to the next library in the Lender String.
• Borrowing libraries have 14 days to respond to a Conditional response to a request by the potential lending library. If a response is not given, the borrowing library receives an Expired Message and the request moves on to the next library in the Lender String.
• If a request is not filled by the “need before date” on the request, the request Expires and terminates.
Flags Flags is a column heading on the Transaction Group History screen. Flags includes Read, Unread and Current. Read indicates that the Message was Marked as Read and the action was reviewed. Unread indicates that the action has not been reviewed. Current indicates the latest action taken by the logged in partner. It is not necessarily the latest action taken on the request.
Help The Help file provides explanations and instructions for Library•Request software that runs Loan SHARK. The information is provided by The Library Corporation and is written for their software. It is not specific to Loan SHARK. Help topics can be accessed by clicking the Help button on any page. The topics in the help file are directed to library staff who manage their library’s day-to-day interlibrary loan transactions. Help for searching the Public Access Catalog (PAC) can be found in the separate PAC Help, accessible on any PAC page.
Hold A lending library can answer Hold Placed on requests for items that are in circulation. A reserve is placed in the lending library’s circulation system. When the item is available to send, the lender answers Ship in Loan SHARK and sends the item to the borrowing library. The Hold Placed answer should be used only if the lending library is at the end of the Lender String.
Id (Identifier) The Identifier is the unique number assigned automatically to each request by the system. The number is used to locate the transaction and is consistent through all steps in the transaction for both the lender and borrower. Id is the heading on the Identifier number column on transaction list screens.
ILL Librarian The person at each public library who is responsible for interlibrary loan activities is identified as ILL Librarian in Loan SHARK.
In Process Requests that have been received from a borrowing library and are being processed by the lender but have not been shipped have the status In Process for the lending library. In Process includes requests that are unprinted and requests that have had the pull slips printed.
VI-2
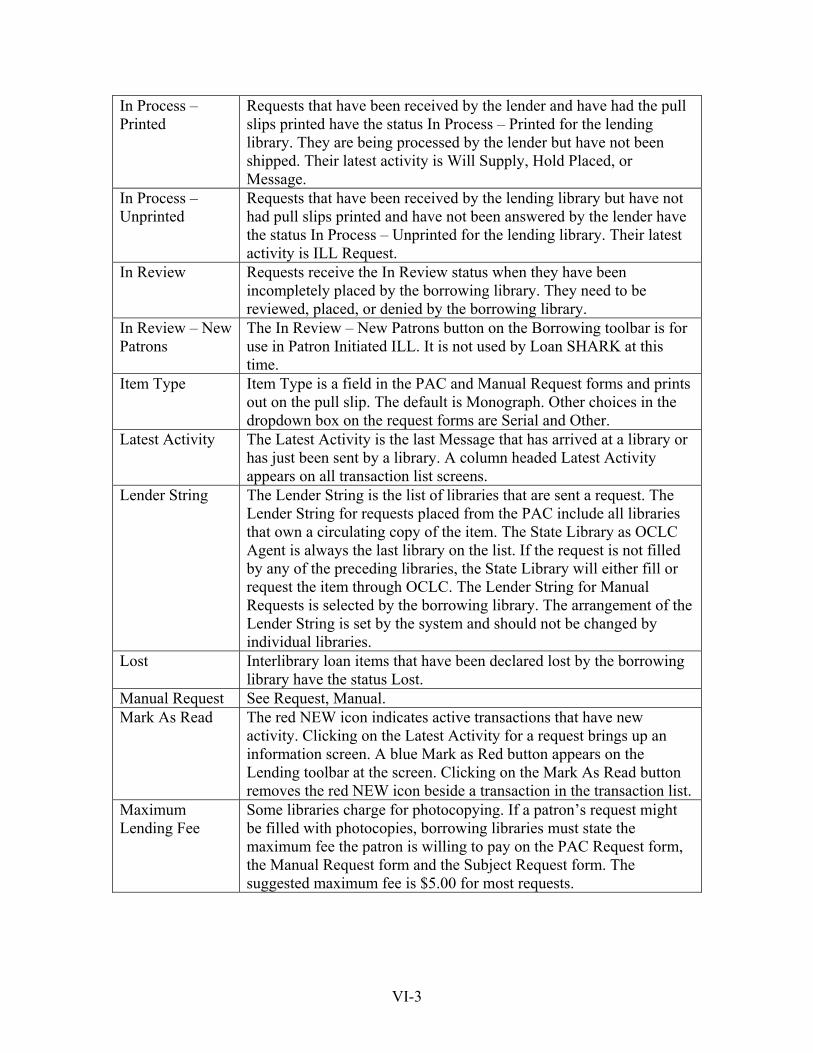
In Process – Printed
Requests that have been received by the lender and have had the pull slips printed have the status In Process – Printed for the lending library. They are being processed by the lender but have not been shipped. Their latest activity is Will Supply, Hold Placed, or Message.
In Process – Unprinted
Requests that have been received by the lending library but have not had pull slips printed and have not been answered by the lender have the status In Process – Unprinted for the lending library. Their latest activity is ILL Request.
In Review Requests receive the In Review status when they have been incompletely placed by the borrowing library. They need to be reviewed, placed, or denied by the borrowing library.
In Review – New Patrons
The In Review – New Patrons button on the Borrowing toolbar is for use in Patron Initiated ILL. It is not used by Loan SHARK at this time.
Item Type Item Type is a field in the PAC and Manual Request forms and prints out on the pull slip. The default is Monograph. Other choices in the dropdown box on the request forms are Serial and Other.
Latest Activity The Latest Activity is the last Message that has arrived at a library or has just been sent by a library. A column headed Latest Activity appears on all transaction list screens.
Lender String The Lender String is the list of libraries that are sent a request. The Lender String for requests placed from the PAC include all libraries that own a circulating copy of the item. The State Library as OCLC Agent is always the last library on the list. If the request is not filled by any of the preceding libraries, the State Library will either fill or request the item through OCLC. The Lender String for Manual Requests is selected by the borrowing library. The arrangement of the Lender String is set by the system and should not be changed by individual libraries.
Lost Interlibrary loan items that have been declared lost by the borrowing library have the status Lost.
Manual Request See Request, Manual. Mark As Read The red NEW icon indicates active transactions that have new
activity. Clicking on the Latest Activity for a request brings up an information screen. A blue Mark as Red button appears on the Lending toolbar at the screen. Clicking on the Mark As Read button removes the red NEW icon beside a transaction in the transaction list.
Maximum Lending Fee
Some libraries charge for photocopying. If a patron’s request might be filled with photocopies, borrowing libraries must state the maximum fee the patron is willing to pay on the PAC Request form, the Manual Request form and the Subject Request form. The suggested maximum fee is $5.00 for most requests.
VI-3
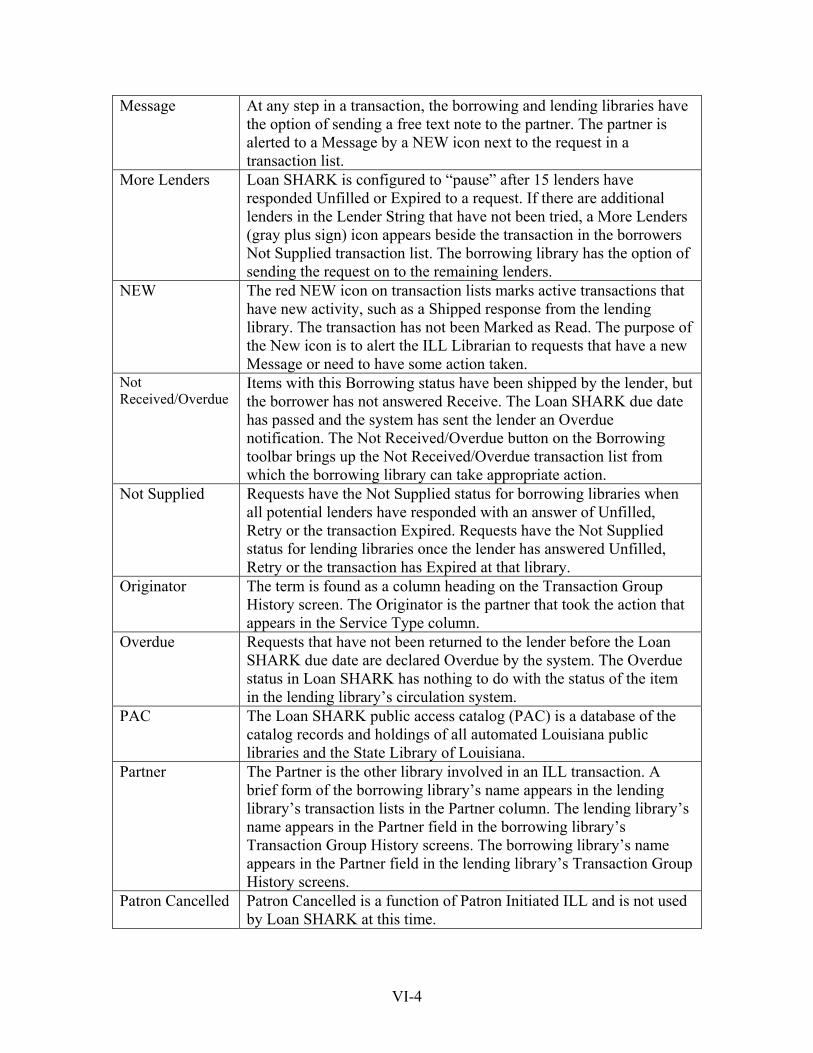
Message At any step in a transaction, the borrowing and lending libraries have the option of sending a free text note to the partner. The partner is alerted to a Message by a NEW icon next to the request in a transaction list.
More Lenders
Loan SHARK is configured to “pause” after 15 lenders have responded Unfilled or Expired to a request. If there are additional lenders in the Lender String that have not been tried, a More Lenders (gray plus sign) icon appears beside the transaction in the borrowers Not Supplied transaction list. The borrowing library has the option of sending the request on to the remaining lenders.
NEW The red NEW icon on transaction lists marks active transactions that have new activity, such as a Shipped response from the lending library. The transaction has not been Marked as Read. The purpose of the New icon is to alert the ILL Librarian to requests that have a new Message or need to have some action taken.
Not Received/Overdue
Items with this Borrowing status have been shipped by the lender, but the borrower has not answered Receive. The Loan SHARK due date has passed and the system has sent the lender an Overdue notification. The Not Received/Overdue button on the Borrowing toolbar brings up the Not Received/Overdue transaction list from which the borrowing library can take appropriate action.
Not Supplied Requests have the Not Supplied status for borrowing libraries when all potential lenders have responded with an answer of Unfilled, Retry or the transaction Expired. Requests have the Not Supplied status for lending libraries once the lender has answered Unfilled, Retry or the transaction has Expired at that library.
Originator The term is found as a column heading on the Transaction Group History screen. The Originator is the partner that took the action that appears in the Service Type column.
Overdue Requests that have not been returned to the lender before the Loan SHARK due date are declared Overdue by the system. The Overdue status in Loan SHARK has nothing to do with the status of the item in the lending library’s circulation system.
PAC The Loan SHARK public access catalog (PAC) is a database of the catalog records and holdings of all automated Louisiana public libraries and the State Library of Louisiana.
Partner
The Partner is the other library involved in an ILL transaction. A brief form of the borrowing library’s name appears in the lending library’s transaction lists in the Partner column. The lending library’s name appears in the Partner field in the borrowing library’s Transaction Group History screens. The borrowing library’s name appears in the Partner field in the lending library’s Transaction Group History screens.
Patron Cancelled
Patron Cancelled is a function of Patron Initiated ILL and is not used by Loan SHARK at this time.
VI-4
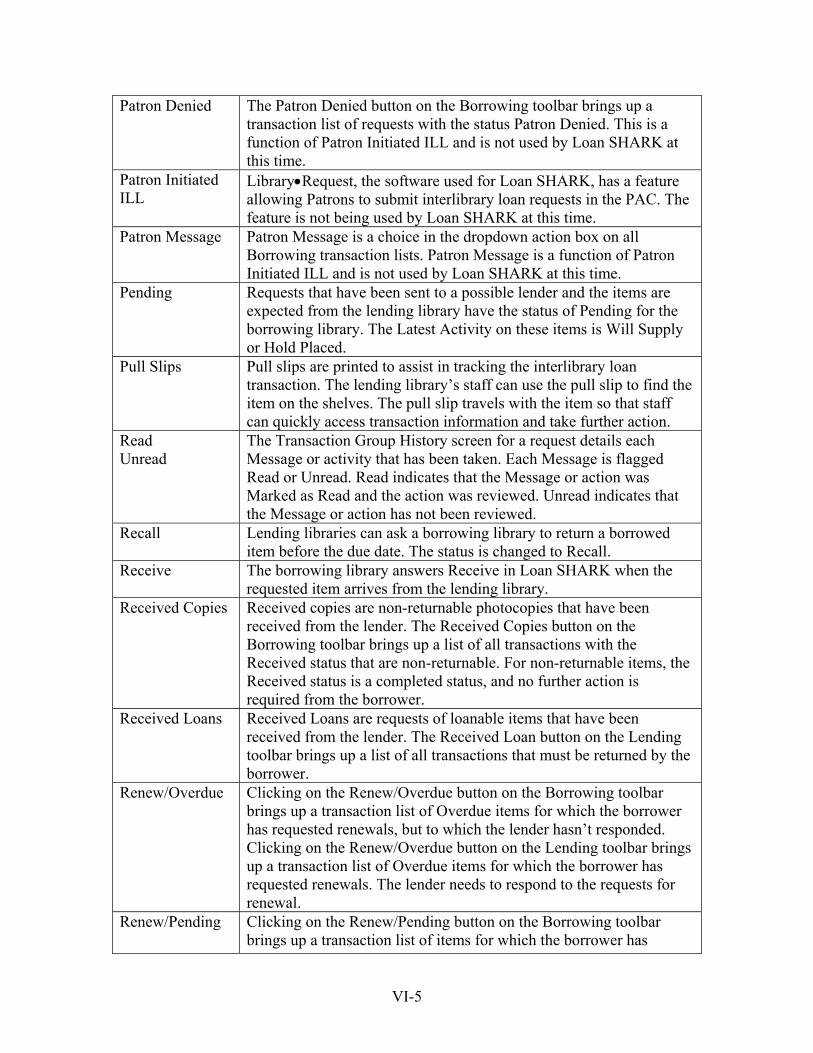
Patron Denied The Patron Denied button on the Borrowing toolbar brings up a transaction list of requests with the status Patron Denied. This is a function of Patron Initiated ILL and is not used by Loan SHARK at this time.
Patron Initiated ILL
Library•Request, the software used for Loan SHARK, has a feature allowing Patrons to submit interlibrary loan requests in the PAC. The feature is not being used by Loan SHARK at this time.
Patron Message Patron Message is a choice in the dropdown action box on all Borrowing transaction lists. Patron Message is a function of Patron Initiated ILL and is not used by Loan SHARK at this time.
Pending Requests that have been sent to a possible lender and the items are expected from the lending library have the status of Pending for the borrowing library. The Latest Activity on these items is Will Supply or Hold Placed.
Pull Slips Pull slips are printed to assist in tracking the interlibrary loan transaction. The lending library’s staff can use the pull slip to find the item on the shelves. The pull slip travels with the item so that staff can quickly access transaction information and take further action.
Read Unread
The Transaction Group History screen for a request details each Message or activity that has been taken. Each Message is flagged Read or Unread. Read indicates that the Message or action was Marked as Read and the action was reviewed. Unread indicates that the Message or action has not been reviewed.
Recall Lending libraries can ask a borrowing library to return a borrowed item before the due date. The status is changed to Recall.
Receive The borrowing library answers Receive in Loan SHARK when the requested item arrives from the lending library.
Received Copies Received copies are non-returnable photocopies that have been received from the lender. The Received Copies button on the Borrowing toolbar brings up a list of all transactions with the Received status that are non-returnable. For non-returnable items, the Received status is a completed status, and no further action is required from the borrower.
Received Loans Received Loans are requests of loanable items that have been received from the lender. The Received Loan button on the Lending toolbar brings up a list of all transactions that must be returned by the borrower.
Renew/Overdue Clicking on the Renew/Overdue button on the Borrowing toolbar brings up a transaction list of Overdue items for which the borrower has requested renewals, but to which the lender hasn’t responded. Clicking on the Renew/Overdue button on the Lending toolbar brings up a transaction list of Overdue items for which the borrower has requested renewals. The lender needs to respond to the requests for renewal.
Renew/Pending Clicking on the Renew/Pending button on the Borrowing toolbar brings up a transaction list of items for which the borrower has
VI-5
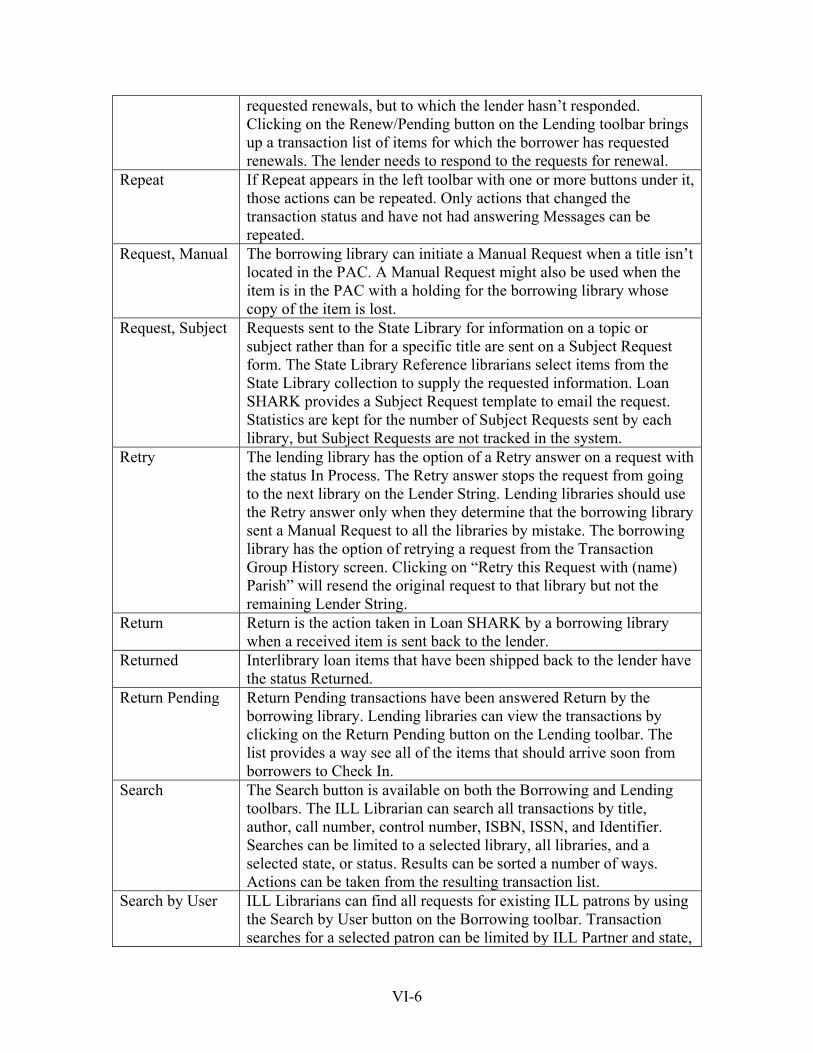
requested renewals, but to which the lender hasn’t responded. Clicking on the Renew/Pending button on the Lending toolbar brings up a transaction list of items for which the borrower has requested renewals. The lender needs to respond to the requests for renewal.
Repeat If Repeat appears in the left toolbar with one or more buttons under it, those actions can be repeated. Only actions that changed the transaction status and have not had answering Messages can be repeated.
Request, Manual The borrowing library can initiate a Manual Request when a title isn’t located in the PAC. A Manual Request might also be used when the item is in the PAC with a holding for the borrowing library whose copy of the item is lost.
Request, Subject Requests sent to the State Library for information on a topic or subject rather than for a specific title are sent on a Subject Request form. The State Library Reference librarians select items from the State Library collection to supply the requested information. Loan SHARK provides a Subject Request template to email the request. Statistics are kept for the number of Subject Requests sent by each library, but Subject Requests are not tracked in the system.
Retry The lending library has the option of a Retry answer on a request with the status In Process. The Retry answer stops the request from going to the next library on the Lender String. Lending libraries should use the Retry answer only when they determine that the borrowing library sent a Manual Request to all the libraries by mistake. The borrowing library has the option of retrying a request from the Transaction Group History screen. Clicking on “Retry this Request with (name) Parish” will resend the original request to that library but not the remaining Lender String.
Return Return is the action taken in Loan SHARK by a borrowing library when a received item is sent back to the lender.
Returned
Interlibrary loan items that have been shipped back to the lender have the status Returned.
Return Pending Return Pending transactions have been answered Return by the borrowing library. Lending libraries can view the transactions by clicking on the Return Pending button on the Lending toolbar. The list provides a way see all of the items that should arrive soon from borrowers to Check In.
Search The Search button is available on both the Borrowing and Lending toolbars. The ILL Librarian can search all transactions by title, author, call number, control number, ISBN, ISSN, and Identifier. Searches can be limited to a selected library, all libraries, and a selected state, or status. Results can be sorted a number of ways. Actions can be taken from the resulting transaction list.
Search by User ILL Librarians can find all requests for existing ILL patrons by using the Search by User button on the Borrowing toolbar. Transaction searches for a selected patron can be limited by ILL Partner and state,
VI-6
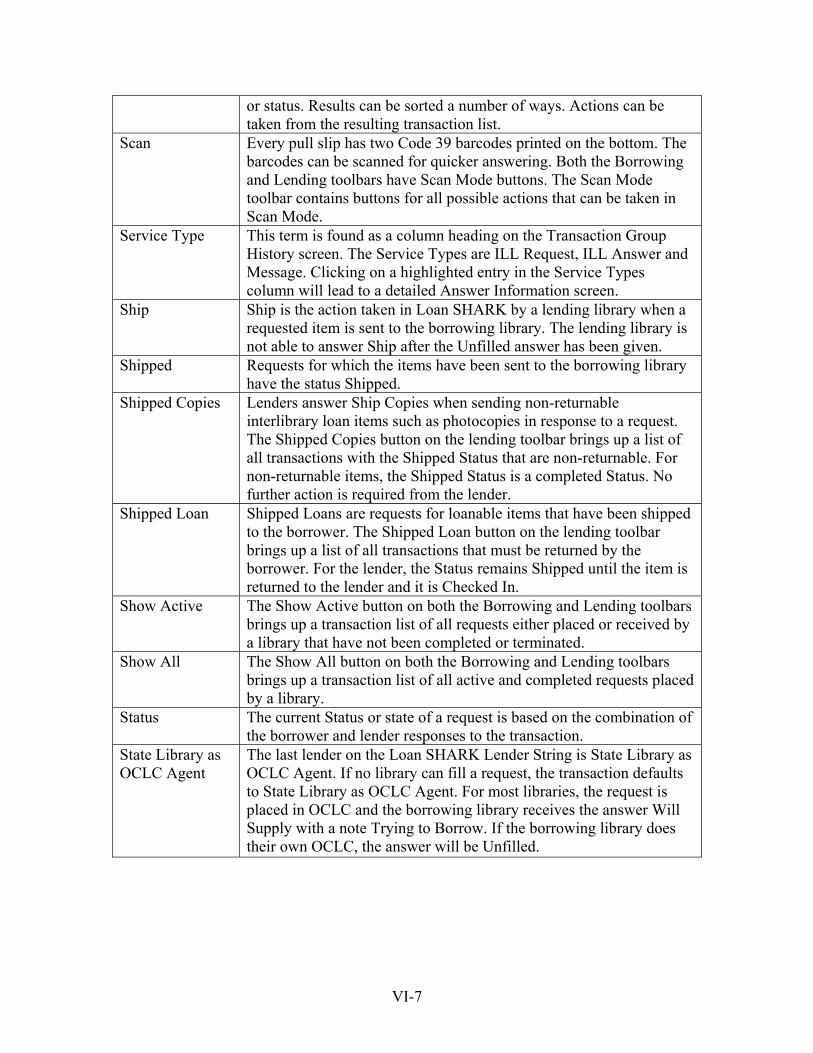
or status. Results can be sorted a number of ways. Actions can be taken from the resulting transaction list.
Scan Every pull slip has two Code 39 barcodes printed on the bottom. The barcodes can be scanned for quicker answering. Both the Borrowing and Lending toolbars have Scan Mode buttons. The Scan Mode toolbar contains buttons for all possible actions that can be taken in Scan Mode.
Service Type This term is found as a column heading on the Transaction Group History screen. The Service Types are ILL Request, ILL Answer and Message. Clicking on a highlighted entry in the Service Types column will lead to a detailed Answer Information screen.
Ship Ship is the action taken in Loan SHARK by a lending library when a requested item is sent to the borrowing library. The lending library is not able to answer Ship after the Unfilled answer has been given.
Shipped Requests for which the items have been sent to the borrowing library have the status Shipped.
Shipped Copies Lenders answer Ship Copies when sending non-returnable interlibrary loan items such as photocopies in response to a request. The Shipped Copies button on the lending toolbar brings up a list of all transactions with the Shipped Status that are non-returnable. For non-returnable items, the Shipped Status is a completed Status. No further action is required from the lender.
Shipped Loan Shipped Loans are requests for loanable items that have been shipped to the borrower. The Shipped Loan button on the lending toolbar brings up a list of all transactions that must be returned by the borrower. For the lender, the Status remains Shipped until the item is returned to the lender and it is Checked In.
Show Active The Show Active button on both the Borrowing and Lending toolbars brings up a transaction list of all requests either placed or received by a library that have not been completed or terminated.
Show All The Show All button on both the Borrowing and Lending toolbars brings up a transaction list of all active and completed requests placed by a library.
Status The current Status or state of a request is based on the combination of the borrower and lender responses to the transaction.
State Library as OCLC Agent
The last lender on the Loan SHARK Lender String is State Library as OCLC Agent. If no library can fill a request, the transaction defaults to State Library as OCLC Agent. For most libraries, the request is placed in OCLC and the borrowing library receives the answer Will Supply with a note Trying to Borrow. If the borrowing library does their own OCLC, the answer will be Unfilled.
VI-7

Status/Error Report and Status Query
At any step in a transaction, the borrowing and lending libraries have the option of sending a Status Query Message to the partner. The system responds by automatically sending a report about the current transaction. Either partner library can also send a Status Report at any time, even if no Status Query has been received. The Status Report form includes a free text box for a detailed note. Error reports can also be generated by the system. Once this action has been taken, Status can’t be changed, no further action can be taken.
Subject Request See Request, Subject. System Administrator
The System Administrator is the staff at the State Library of Louisiana responsible for maintaining information on participating libraries, setting overall borrowing and lending parameters, and monitoring ILL performance throughout the system. Currently, the System Administrator is Virginia R. Smith, Coordinator of User Services. 225/342-4920 or [email protected]
Toolbar The toolbar is a group of buttons that help navigation in Loan SHARK, help find information about interlibrary loan transactions and help taking action on transactions. Most screens have two toolbars on the left. The System toolbar is available on all screens. The buttons in the lower toolbar change from screen to screen.
Tracking Number
The Tracking Number is a function of Patron Initiated ILL and is not used by Loan SHARK at this time.
Transaction Group History
The Transaction Group History for a request can be found by clicking on the Id (Identifier) number in any transaction list or clicking on the History button in some toolbars. The Transaction Group History shows all Messages and actions on a request from the start through the current activity.
Transaction List Clicking on most toolbar buttons brings up a list of all the transactions with a particular status for a library. The Transaction List provides information about each request. Further action can be taken from the list. Clicking on any column heading resorts the list by the contents of that column. Clicking again on the same heading resorts the list in reverse order.
Transaction Qualifier
Transaction Qualifiers are shown on Transaction Group History screens and refer to Messages between two partners.
Unfilled When a lending library cannot supply a requested item, the Unfilled answer is given.
Unread See Read. Will Supply When a lending library batch prints pull slips, an automatic “Will
Supply – Being processed for supply” Message is sent to the borrowing library. This answer means the lender is processing the request and plans to send another response later. The Message disables the expiration timer to give the lender time to process the request and determine whether or not the library can fill it. For the borrowing library, the status of each of these requests becomes Pending and the Latest Activity is ILL Answer – Will Supply.
VI-8

VI-9
STATE LIBRARY OF LOUISIANA INTERLIBRARY LOAN POLICIES AND PROCEDURES
What the State Library of Louisiana Lends Through Interlibrary Loan Most of the materials in the collection of the State Library of Louisiana are available for interlibrary loan to Louisiana libraries. Included are: • Audiovisual materials • Back issues of magazines and newspapers in microform • Genealogy materials • Hardcopy magazines (except current issue) • Large print materials • Louisiana and general collection fiction and nonfiction • State and federal government documents What the State Library of Louisiana Doesn’t Lend Through Interlibrary Loan • Braille and Talking Books for the Blind (Patrons of the State Library Blind and
Physically Handicapped Section receive direct library service.) • Current issues of magazines • Hardcopy newspapers • Reference materials (Reference materials in the general collection are sometimes
loaned; decision is made on request-by-request basis.) Limits for Requests • 5 reels of microfilm per request
Placing Holds on State Library Materials That Are in Circulation If the State Library owns a title, the State Library of Louisiana is first on the Loan SHARK lender string for all libraries. The State Library as OCLC Agent is the last library on all Loan SHARK lender strings. A hold is placed on a title that is in circulation for requests that default to the State Library as OCLC Agent unless otherwise instructed by the borrowing library. Holds are not placed when requests are received by the State Library. Borrowing Through OCLC When a request defaults to the State Library of Louisiana for a title that is not owned by the State Library or that is missing, the State Library tries to borrow the title from another library through OCLC. The referral is automatic unless the borrowing library does their own OCLC interlibrary loan or has put “do not borrow” in the note field of the request. • The State Library borrows through OCLC the same types of materials that the State
Library loans. • Most libraries do not circulate magazines, but will fill a request for an article by
making photocopies. The following information must be included on all periodical requests before the State Library will borrow through OCLC:
o There is usually a charge for photocopies. The request must state that the patron is willing to pay for copies and the maximum amount the patron
A-1
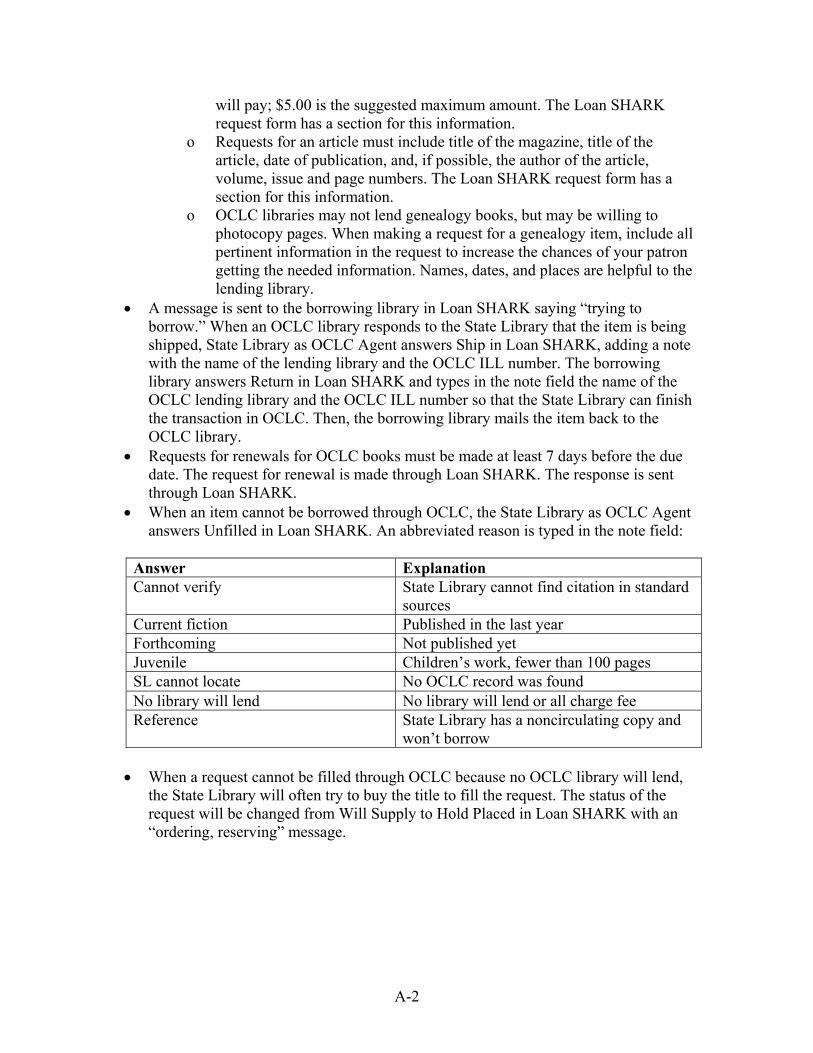
will pay; $5.00 is the suggested maximum amount. The Loan SHARK request form has a section for this information.
o Requests for an article must include title of the magazine, title of the article, date of publication, and, if possible, the author of the article, volume, issue and page numbers. The Loan SHARK request form has a section for this information.
o OCLC libraries may not lend genealogy books, but may be willing to photocopy pages. When making a request for a genealogy item, include all pertinent information in the request to increase the chances of your patron getting the needed information. Names, dates, and places are helpful to the lending library.
• A message is sent to the borrowing library in Loan SHARK saying “trying to borrow.” When an OCLC library responds to the State Library that the item is being shipped, State Library as OCLC Agent answers Ship in Loan SHARK, adding a note with the name of the lending library and the OCLC ILL number. The borrowing library answers Return in Loan SHARK and types in the note field the name of the OCLC lending library and the OCLC ILL number so that the State Library can finish the transaction in OCLC. Then, the borrowing library mails the item back to the OCLC library.
• Requests for renewals for OCLC books must be made at least 7 days before the due date. The request for renewal is made through Loan SHARK. The response is sent through Loan SHARK.
• When an item cannot be borrowed through OCLC, the State Library as OCLC Agent answers Unfilled in Loan SHARK. An abbreviated reason is typed in the note field:
Answer Explanation Cannot verify State Library cannot find citation in standard
sources Current fiction Published in the last year Forthcoming Not published yet Juvenile Children’s work, fewer than 100 pages SL cannot locate No OCLC record was found No library will lend No library will lend or all charge fee Reference State Library has a noncirculating copy and
won’t borrow
• When a request cannot be filled through OCLC because no OCLC library will lend, the State Library will often try to buy the title to fill the request. The status of the request will be changed from Will Supply to Hold Placed in Loan SHARK with an “ordering, reserving” message.
A-2
INTERLIBRARY LOAN POLICIES AND PROCEDURES FOR ALL LOAN SHARK LIBRARIES
Responsibilities of Borrowing Libraries • Loan SHARK libraries have the responsibility of building collections that provide
resources to meet the ordinary needs of the community they serve. No libraries will depend on interlibrary loan to supply the everyday material requests of its patrons.
• Borrowing libraries will make every effort to exhaust their own resources, including full text articles available to patrons in electronic format, before resorting to interlibrary loan.
• Libraries will not borrow what they don’t lend. • Borrowing libraries will carefully screen all requests for interlibrary loan and submit
only those that conform to Louisiana Interlibrary Loan policies. • Interlibrary loan staff will use standard bibliographic tools to verify all requested
items. If the bibliographic citation cannot be verified, “cannot verify” is typed on the request. Unverified material is described as completely as possible on the request, including the original source of the citation.
• When a request might be filled with photocopies, it will state the maximum amount the patron is willing to pay for copies; $5.00 is the suggested amount.
• The borrowing library is responsible for copyright compliance. • The borrowing library is responsible for borrowed material from the time it leaves the
lending library until it is received back at the lending library. If borrowed material is lost or damaged, the borrowing library must pay for the cost of repairs or replacement, in accordance with the preferences of the lending library.
• The borrowing library will return interlibrary loan material before the due date. A renewal request is sent to the lending library before the due date. If the lending library does not respond, it should be assumed that the renewal was not granted.
• If the borrowing library asks for a shipping method other than the courier service, the borrowing library will pay the cost.
• The Loan SHARK pull slip will always be sent back with the borrowed item when it is returned to the lending library.
Responsibilities of Lending Libraries • Libraries are encouraged to loan as generously as possible to other Loan SHARK
libraries. Interlibrary loan between Loan SHARK libraries is free. However, lending libraries may choose to charge for photocopies.
• Libraries should adopt a 4-week lending period for all interlibrary loan materials, regardless of format, to allow for delivery time.
• Libraries may choose to not lend the following: o Books in heavy demand by their patrons o Whole issues of magazines and newspapers o Reference materials o Rare materials o A large number of items to one person at one time o Bulky or fragile material
A-3
o Materials which can be copied inexpensively o Genealogical materials
• Lending libraries will answer all Loan SHARK requests promptly. All requests for cancellations and renewals will receive a timely response.
• The Loan SHARK pull slip and a return shipping label are sent with each item. The due date will be clearly noted on the pull slip.
• A copyright protection statement will be stamped on each photocopy sent to a borrowing library in response to a request.
A-4
LOUISIANA INTERLIBRARY LOAN CODE
This code was adopted by LALINC and the State Library April 2, 1998, and by the LLA Executive Board June 12, 1998.
Although correlated with the ALA National Interlibrary Code (adopted February 8, 1994, published in RQ, Summer 1994, page 477-479) this code is intended to promote a more liberalized loan policy among libraries adopting it. It is based on the premise that lending among libraries is in the public interest and should be encouraged. However, liberal interlibrary lending should be no substitute for the development of adequate collections based on the needs of clientele of a library or a library system.
I. DEFINITION
Interlibrary loans are transactions in which library materials are made available by one library to another; for the purposes of this code they also include the provision of copies as substitutes for loans of the original materials.
Use of the word "libraries" in this document means libraries of all types, including public, academic, special, school, business, learning resource center, and audiovisual centers.
II. PURPOSE
The purpose of interlibrary loan as defined by this code is to obtain, upon request of a library user, materials not available in the user's local library at which the user has borrowing privileges.
III. SCOPE
A. Any type of library material may be requested on loan, except, at the discretion of each library, those listed in D below. The lending library has the privilege of deciding in each case whether the original or a copy should be sent. These decisions should be determined by the nature of the material, its physical condition, the degree of active demand for the material requested or other specific reasons.
B. Interlibrary loan is a mutual relationship and libraries must be willing to lend materials as freely as they borrow materials.
C. Each library should have an interlibrary loan policy statement that should be available upon request. If the library uses OCLC for interlibrary loan their policy should be in the Name Address Directory (NAD) of OCLC. If the library is a member of another interlibrary loan consortium, their policy should be available by the appropriate means used by that group.
B-1
D. Under the terms of this agreement, libraries may choose not to lend:
1. Books in current and/or recurring demand. 2. Serials. 3. Reference materials. 4. Rare materials including manuscripts. 5. A large number of titles for one person at one time. 6. Bulky or fragile material. 7. Materials for class, reserve, group or other extended uses. 8. Materials which can be copied inexpensively. 9. Genealogical or heraldic materials.
IV. RESPONSIBILITIES OF BORROWING LIBRARIES.
A. It is recognized that interlibrary lending does not relieve any library of the responsibility of developing its own collection. Each library should provide resources to meet the ordinary study, educational, instructional, informational and research needs of its users. No library should depend upon another to supply the normal needs of its clientele except under agreement for such a service.
B. Borrowing libraries should make every effort to exhaust their own resources, including full text articles available to patrons in electronic format, before resorting to interlibrary loan.
C. Each library will inform its users of the purpose of interlibrary loan and of the library's interlibrary loan borrowing policy. Borrowing libraries should screen carefully all applications for loans, rejecting those which do not conform to this code or the library's policy statement.
D. The interlibrary loan staff of each library should follow accepted statewide procedures when requesting materials including:
1. Using standard bibliographic citations and formats when transmitting requests.
2. Sending requests following accepted methods of transmission.
3. Using the statement "cannot verify" when the item can not be verified and providing complete information about the original source of the citation.
4. Describing as completely as possible the requested material following accepted bibliographic practice.
B-2
5. Labeling all requests and shipments as "Interlibrary Loan" or "ILL".
E. The borrowing library is responsible for compliance with the Copyright Law (Title 17, U.S. Code) and its accompanying guidelines, and should inform its users of the applicable portions of the law. An indication of compliance must be provided with all photocopy requests.
F. The borrowing library should attempt to spread their borrowing requests to a broad number of libraries, with due consideration given to accepted practice or consortia agreements.
G. The safety of borrowed materials should be the responsibility of the borrowing library from the time the material leaves the lending library until it is received back at the lending library.
1. The borrowing library should be responsible for packaging the materials so as to ensure their return in good condition. 2. If damage or loss occurs, the borrowing library must meet all cost of repairs or replacement, in accordance with the preferences of the lending library.
H. The borrowing library and its users must comply with the conditions of loan established by the lending library. Unless specifically forbidden by the lending library, copying by the borrowing library is permitted provided it is in accordance with the Copyright Law and no damage to the original volume will result.
I. The borrowing library should be responsible for returning interlibrary loan material promptly and in good condition.
J. A renewal request should be sent in time to reach the lending library no later than the due date. If the lending library does not respond, it should be assumed that the renewal was not granted.
K. Borrowing libraries should inform their library users of their special reciprocal borrowing agreements with other libraries.
L. When returning a book to the lender the request form or some other means of identifying the material by the ILL number should be included with the book.
M. A borrowing library that requests RUSH material should assume the "nonstandard" cost incurred by the lending library to fill the rush request e.g., Priority Mail, commercial delivery services, fax, etc.
B-3
V. RESPONSIBILITIES OF LENDING LIBRARIES
A. The decision to lend materials is at the discretion of the lending library. Each library is encouraged, however, to interpret as generously as possible its own lending policy with due consideration to the interests of its primary clientele.
B. The lending library should process requests promptly. The due date and any other conditions of the loan should be clearly stated. Material should be packaged and conspicuously labeled ILL. The lending library should promptly notify the requesting library if they are unable to fill a request.
C. The lending library should be responsible for honoring the requesting library's noted restrictions or cost limitations.
D. The lending library should state any conditions, and/or restriction on the use of the materials lent and specify if any special return packaging is required.
E. The delivery of materials should be by the most effective means available to the lending library to ensure timely receipt of materials.
F. A copy of the requesting library's request or some other means of identifying the material and the lending library's mailing label should be included in all materials that are sent out.
G. The duration of the loan, unless otherwise specified by the lending library, should be the period of time the item may remain with the borrowing library, disregarding the time spent in transit.
H. Each photocopy sent to a borrower should have a copyright protection statement stamped on it.
VI. VIOLATION OF CODE
A. Each library should be responsible for maintaining the provisions of this code in good faith.
B. The lending library should be responsible for informing any borrowing library of its apparent failure to follow the provisions of this code.
C. Continued disregard of the provisions of this code should be sufficient reason for a lending library to suspend borrowing privileges of an offending library.
B-4
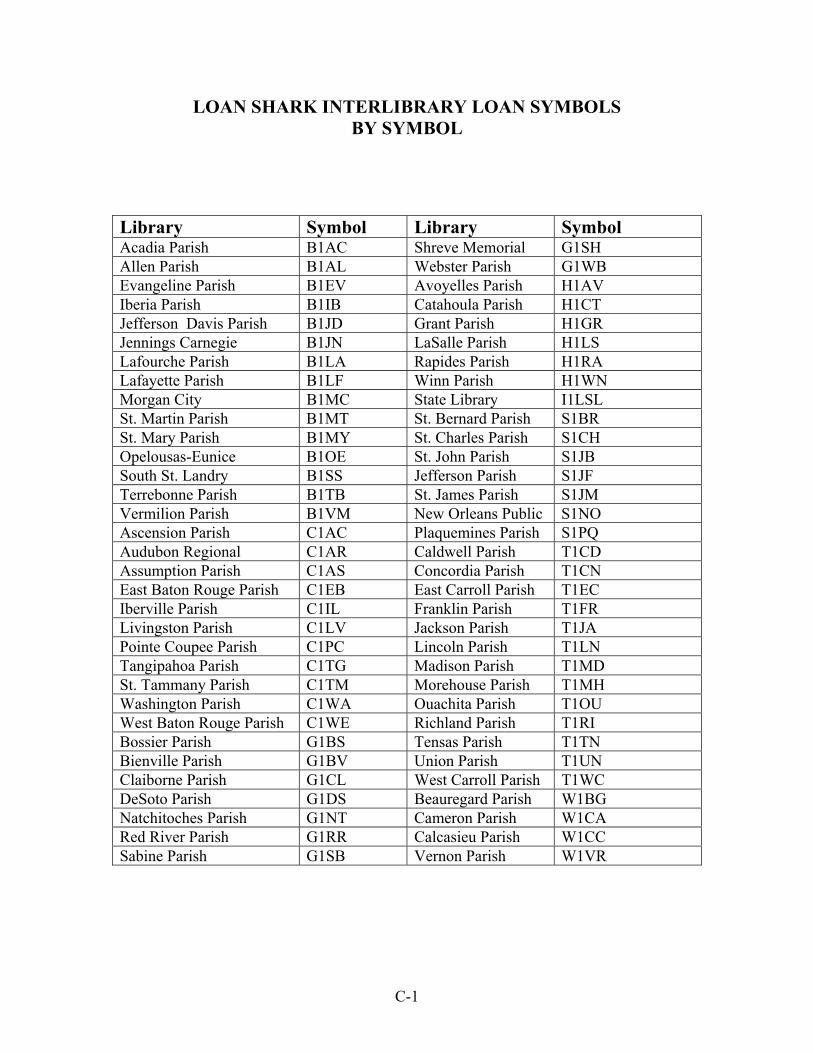
LOAN SHARK INTERLIBRARY LOAN SYMBOLS BY SYMBOL
Library Symbol Library Symbol Acadia Parish B1AC Shreve Memorial G1SH Allen Parish B1AL Webster Parish G1WB Evangeline Parish B1EV Avoyelles Parish H1AV Iberia Parish B1IB Catahoula Parish H1CT Jefferson Davis Parish B1JD Grant Parish H1GR Jennings Carnegie B1JN LaSalle Parish H1LS Lafourche Parish B1LA Rapides Parish H1RA Lafayette Parish B1LF Winn Parish H1WN Morgan City B1MC State Library I1LSL St. Martin Parish B1MT St. Bernard Parish S1BR St. Mary Parish B1MY St. Charles Parish S1CH Opelousas-Eunice B1OE St. John Parish S1JB South St. Landry B1SS Jefferson Parish S1JF Terrebonne Parish B1TB St. James Parish S1JM Vermilion Parish B1VM New Orleans Public S1NO Ascension Parish C1AC Plaquemines Parish S1PQ Audubon Regional C1AR Caldwell Parish T1CD Assumption Parish C1AS Concordia Parish T1CN East Baton Rouge Parish C1EB East Carroll Parish T1EC Iberville Parish C1IL Franklin Parish T1FR Livingston Parish C1LV Jackson Parish T1JA Pointe Coupee Parish C1PC Lincoln Parish T1LN Tangipahoa Parish C1TG Madison Parish T1MD St. Tammany Parish C1TM Morehouse Parish T1MH Washington Parish C1WA Ouachita Parish T1OU West Baton Rouge Parish C1WE Richland Parish T1RI Bossier Parish G1BS Tensas Parish T1TN Bienville Parish G1BV Union Parish T1UN Claiborne Parish G1CL West Carroll Parish T1WC DeSoto Parish G1DS Beauregard Parish W1BG Natchitoches Parish G1NT Cameron Parish W1CA Red River Parish G1RR Calcasieu Parish W1CC Sabine Parish G1SB Vernon Parish W1VR
C-1
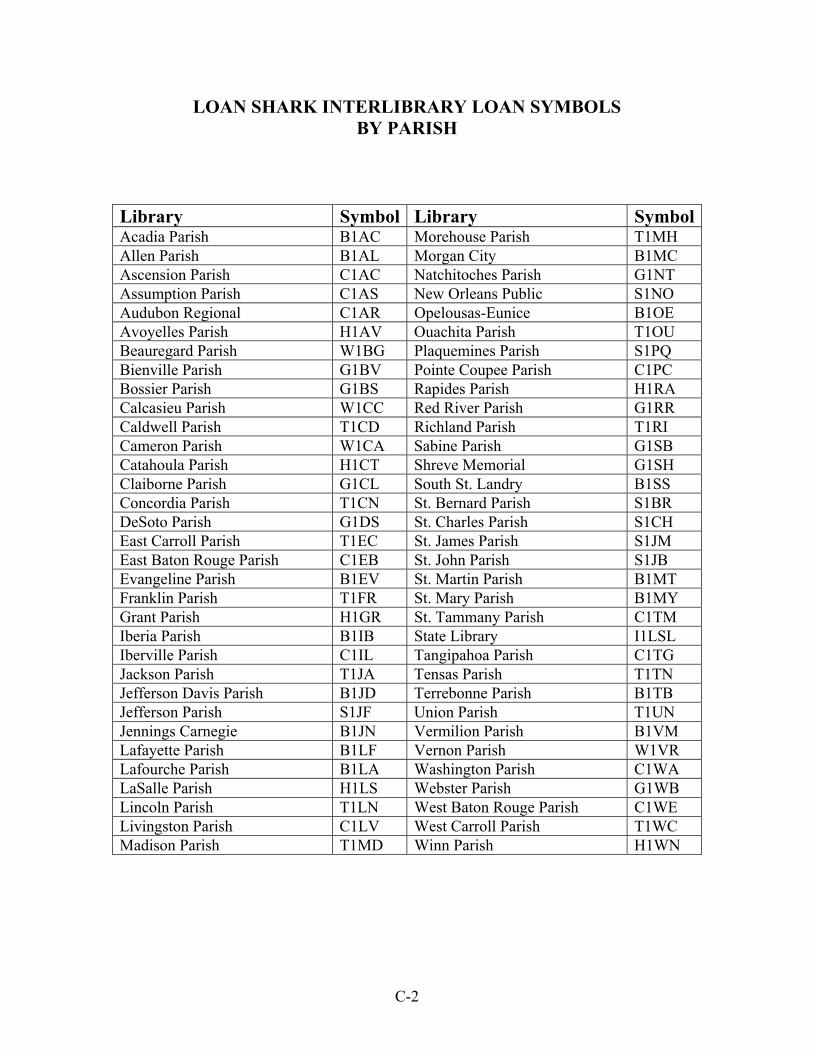
LOAN SHARK INTERLIBRARY LOAN SYMBOLS BY PARISH
Library Symbol Library SymbolAcadia Parish B1AC Morehouse Parish T1MH Allen Parish B1AL Morgan City B1MC Ascension Parish C1AC Natchitoches Parish G1NT Assumption Parish C1AS New Orleans Public S1NO Audubon Regional C1AR Opelousas-Eunice B1OE Avoyelles Parish H1AV Ouachita Parish T1OU Beauregard Parish W1BG Plaquemines Parish S1PQ Bienville Parish G1BV Pointe Coupee Parish C1PC Bossier Parish G1BS Rapides Parish H1RA Calcasieu Parish W1CC Red River Parish G1RR Caldwell Parish T1CD Richland Parish T1RI Cameron Parish W1CA Sabine Parish G1SB Catahoula Parish H1CT Shreve Memorial G1SH Claiborne Parish G1CL South St. Landry B1SS Concordia Parish T1CN St. Bernard Parish S1BR DeSoto Parish G1DS St. Charles Parish S1CH East Carroll Parish T1EC St. James Parish S1JM East Baton Rouge Parish C1EB St. John Parish S1JB Evangeline Parish B1EV St. Martin Parish B1MT Franklin Parish T1FR St. Mary Parish B1MY Grant Parish H1GR St. Tammany Parish C1TM Iberia Parish B1IB State Library I1LSL Iberville Parish C1IL Tangipahoa Parish C1TG Jackson Parish T1JA Tensas Parish T1TN Jefferson Davis Parish B1JD Terrebonne Parish B1TB Jefferson Parish S1JF Union Parish T1UN Jennings Carnegie B1JN Vermilion Parish B1VM Lafayette Parish B1LF Vernon Parish W1VR Lafourche Parish B1LA Washington Parish C1WA LaSalle Parish H1LS Webster Parish G1WB Lincoln Parish T1LN West Baton Rouge Parish C1WE Livingston Parish C1LV West Carroll Parish T1WC Madison Parish T1MD Winn Parish H1WN
C-2
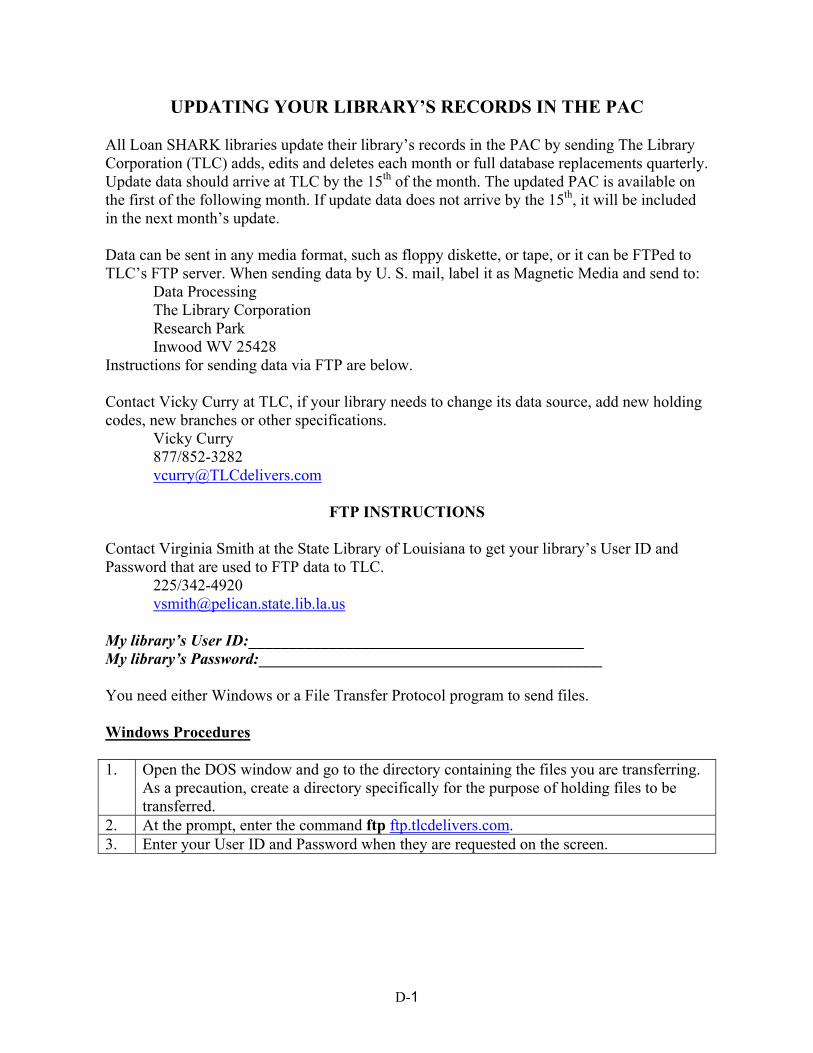
UPDATING YOUR LIBRARY’S RECORDS IN THE PAC All Loan SHARK libraries update their library’s records in the PAC by sending The Library Corporation (TLC) adds, edits and deletes each month or full database replacements quarterly. Update data should arrive at TLC by the 15th of the month. The updated PAC is available on the first of the following month. If update data does not arrive by the 15th, it will be included in the next month’s update. Data can be sent in any media format, such as floppy diskette, or tape, or it can be FTPed to TLC’s FTP server. When sending data by U. S. mail, label it as Magnetic Media and send to:
Data Processing The Library Corporation Research Park Inwood WV 25428
Instructions for sending data via FTP are below. Contact Vicky Curry at TLC, if your library needs to change its data source, add new holding codes, new branches or other specifications.
Vicky Curry 877/852-3282 [email protected]
FTP INSTRUCTIONS Contact Virginia Smith at the State Library of Louisiana to get your library’s User ID and Password that are used to FTP data to TLC.
225/342-4920 [email protected]
My library’s User ID:__________________________________________ My library’s Password:___________________________________________ You need either Windows or a File Transfer Protocol program to send files. Windows Procedures 1. Open the DOS window and go to the directory containing the files you are transferring.
As a precaution, create a directory specifically for the purpose of holding files to be transferred.
2. At the prompt, enter the command ftp ftp.tlcdelivers.com. 3. Enter your User ID and Password when they are requested on the screen.
D-1
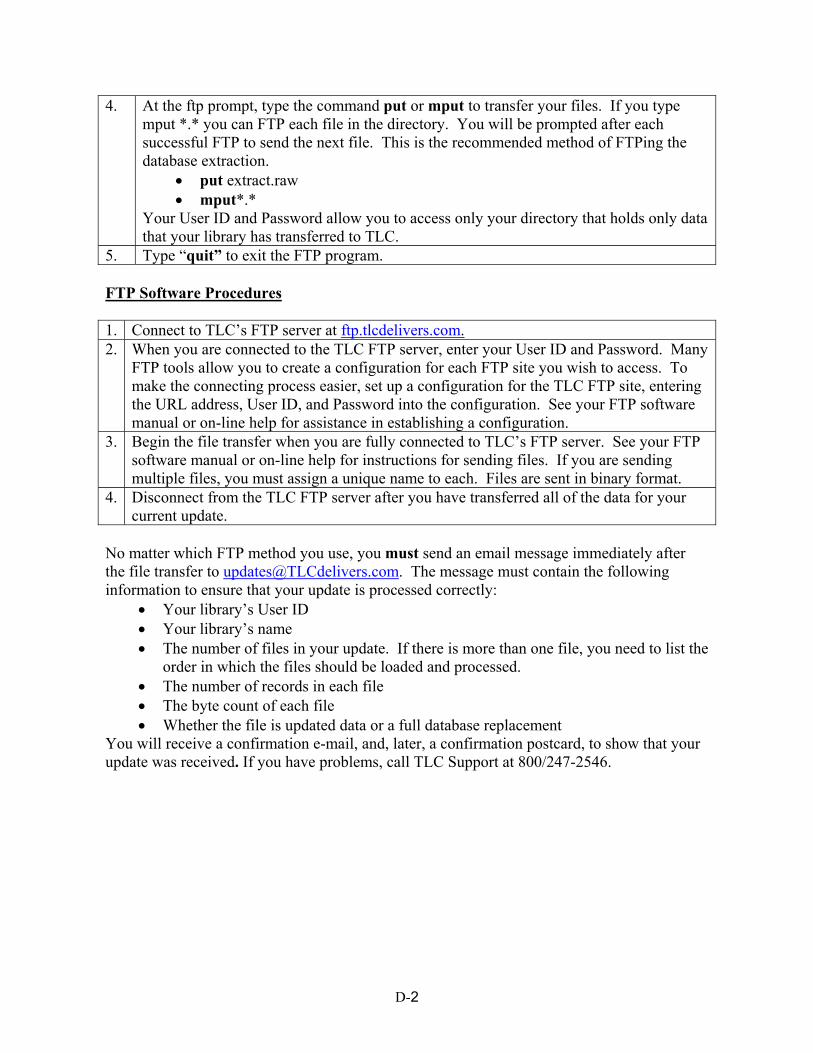
4. At the ftp prompt, type the command put or mput to transfer your files. If you type mput *.* you can FTP each file in the directory. You will be prompted after each successful FTP to send the next file. This is the recommended method of FTPing the database extraction.
• put extract.raw • mput*.*
Your User ID and Password allow you to access only your directory that holds only data that your library has transferred to TLC.
5. Type “quit” to exit the FTP program. FTP Software Procedures 1. Connect to TLC’s FTP server at ftp.tlcdelivers.com. 2. When you are connected to the TLC FTP server, enter your User ID and Password. Many
FTP tools allow you to create a configuration for each FTP site you wish to access. To make the connecting process easier, set up a configuration for the TLC FTP site, entering the URL address, User ID, and Password into the configuration. See your FTP software manual or on-line help for assistance in establishing a configuration.
3. Begin the file transfer when you are fully connected to TLC’s FTP server. See your FTP software manual or on-line help for instructions for sending files. If you are sending multiple files, you must assign a unique name to each. Files are sent in binary format.
4. Disconnect from the TLC FTP server after you have transferred all of the data for your current update.
No matter which FTP method you use, you must send an email message immediately after the file transfer to [email protected]. The message must contain the following information to ensure that your update is processed correctly:
• Your library’s User ID • Your library’s name • The number of files in your update. If there is more than one file, you need to list the
order in which the files should be loaded and processed. • The number of records in each file • The byte count of each file • Whether the file is updated data or a full database replacement
You will receive a confirmation e-mail, and, later, a confirmation postcard, to show that your update was received. If you have problems, call TLC Support at 800/247-2546.
D-2
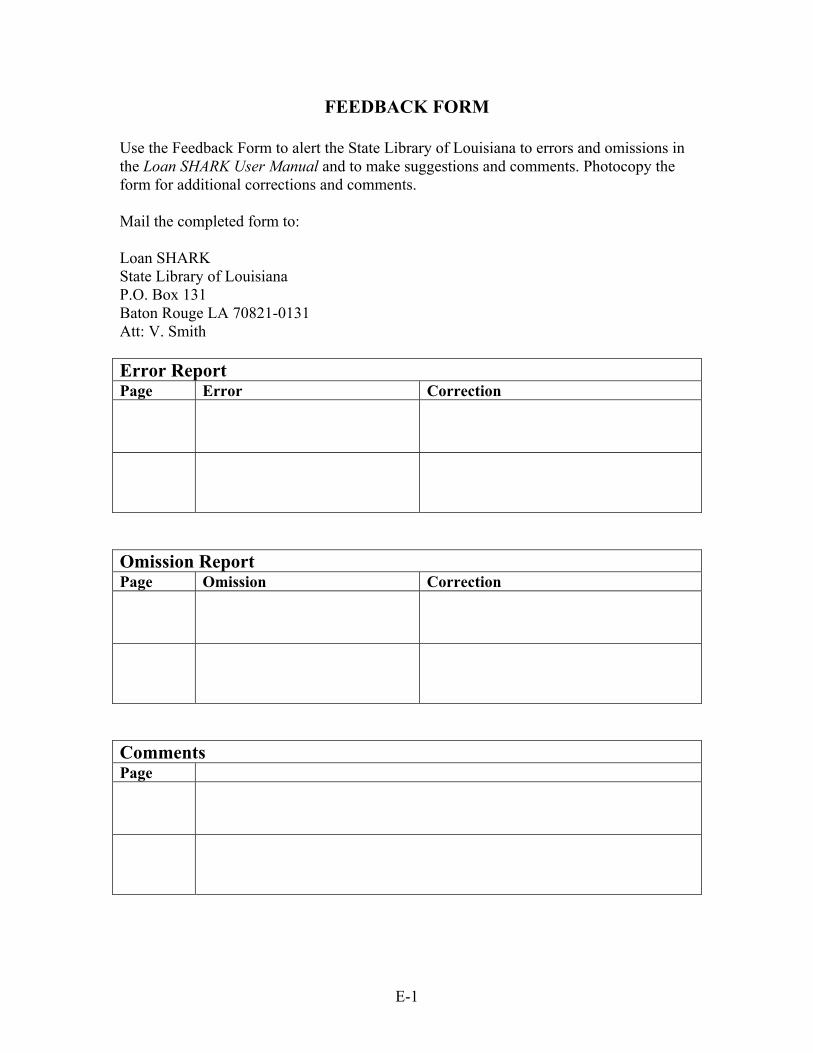
FEEDBACK FORM
Use the Feedback Form to alert the State Library of Louisiana to errors and omissions in the Loan SHARK User Manual and to make suggestions and comments. Photocopy the form for additional corrections and comments. Mail the completed form to: Loan SHARK State Library of Louisiana P.O. Box 131 Baton Rouge LA 70821-0131 Att: V. Smith Error Report Page Error Correction
Omission Report Page Omission Correction
Comments Page
E-1