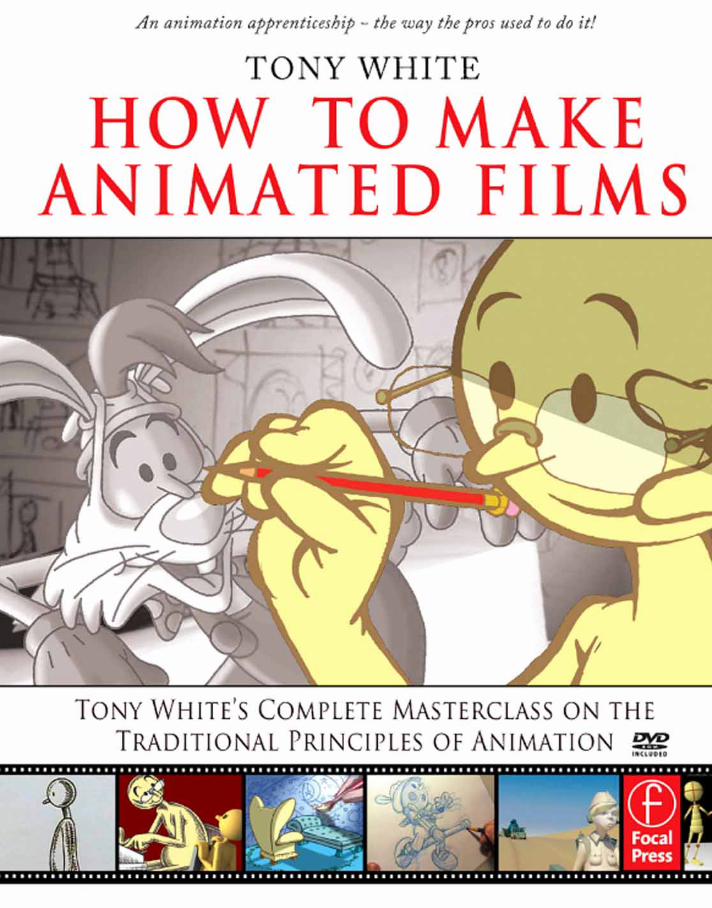
how to make animated films - ftp isdi
TRANSCRIPT
How to Make Animated Films

To the spirit of WALT:
Long may his vision live in the hearts and minds of animators everywhere!
How to Make Animated Films
Tony White’s Complete Masterclass
on the Traditional Principles of
Animation
Tony White
AMSTERDAM • BOSTON • HEIDELBERG • LONDON • NEW YORK • OXFORD
PARIS • SAN DIEGO • SAN FRANCISCO • SINGAPORE • SYDNEY • TOKYO
Focal Press is an imprint of Elsevier
An animation apprenticeship —
the way the pros used to do it!
Focal Press is an imprint of Elsevier
30 Corporate Drive, Suite 400, Burlington, MA 01803, USA
Linacre House, Jordan Hill, Oxford OX2 8DP, UK
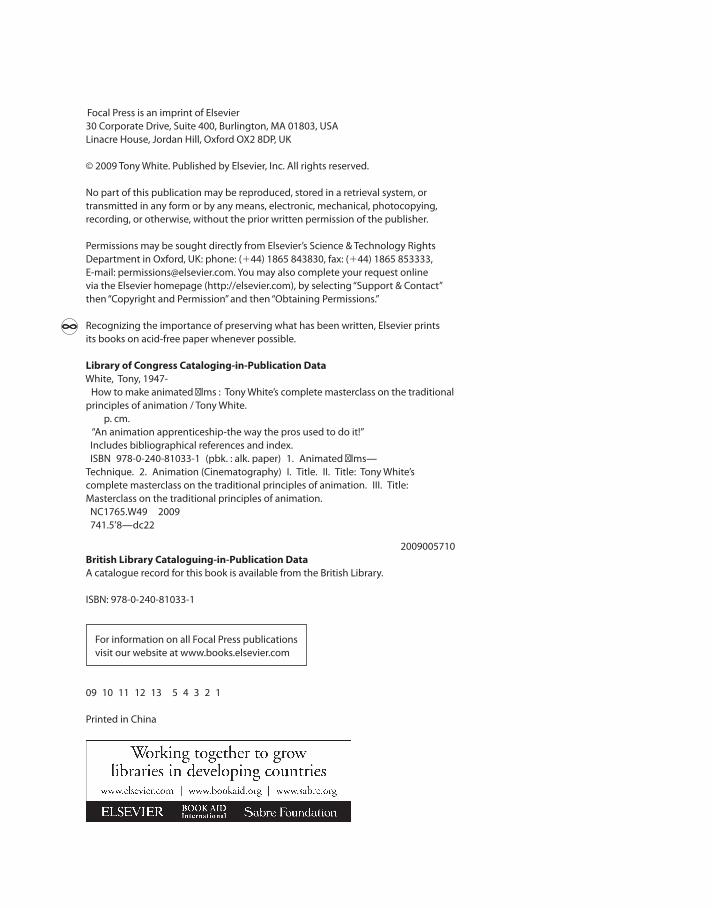
© 2009 Tony White. Published by Elsevier, Inc. All rights reserved.
No part of this publication may be reproduced, stored in a retrieval system, or
transmitted in any form or by any means, electronic, mechanical, photocopying,
recording, or otherwise, without the prior written permission of the publisher.
Permissions may be sought directly from Elsevier’s Science & Technology Rights
Department in Oxford, UK: phone: ( � 44) 1865 843830, fax: ( � 44) 1865 853333,
E-mail: [email protected] . You may also complete your request online
via the Elsevier homepage ( http://elsevier.com ), by selecting “ Support & Contact ”
then “ Copyright and Permission ” and then “ Obtaining Permissions. ”
Recognizing the importance of preserving what has been written, Elsevier prints
its books on acid-free paper whenever possible.
Library of Congress Cataloging-in-Publication Data
White, Tony, 1947-
How to make animated fi lms : Tony White ’ s complete masterclass on the traditional
principles of animation / Tony White.
p. cm.
“ An animation apprenticeship-the way the pros used to do it! ”
Includes bibliographical references and index.
ISBN 978-0-240-81033-1 (pbk. : alk. paper) 1. Animated fi lms —
Technique. 2. Animation (Cinematography) I. Title. II. Title: Tony White’s
complete masterclass on the traditional principles of animation. III. Title:
Masterclass on the traditional principles of animation.
NC1765.W49 2009
741.5’8 — dc22
2009005710
British Library Cataloguing-in-Publication Data
A catalogue record for this book is available from the British Library.
ISBN: 978-0-240-81033-1
For information on all Focal Press publications
visit our website at www.books.elsevier.com
09 10 11 12 13 5 4 3 2 1
Printed in China
v
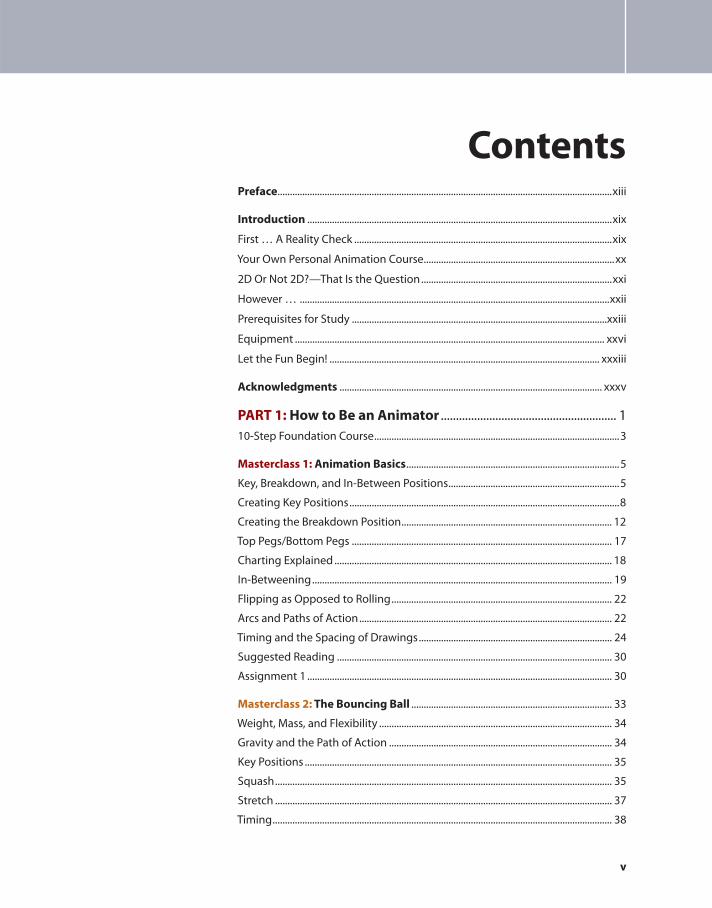
Preface .......................................................................................................................................xiii
Introduction ...........................................................................................................................xix
First … A Reality Check ........................................................................................................xix
Your Own Personal Animation Course .............................................................................xx
2D Or Not 2D? — That Is the Question .............................................................................xxi
However … .............................................................................................................................xxii
Prerequisites for Study .......................................................................................................xxiii
Equipment ............................................................................................................................. xxvi
Let the Fun Begin! ............................................................................................................. xxxiii
Acknowledgments .......................................................................................................... xxxv
PART 1: How to Be an Animator .......................................................... 1
10-Step Foundation Course ...................................................................................................3
Masterclass 1: Animation Basics ......................................................................................5
Key, Breakdown, and In-Between Positions .....................................................................5
Creating Key Positions .............................................................................................................8
Creating the Breakdown Position ..................................................................................... 12
Top Pegs/Bottom Pegs ......................................................................................................... 17
Charting Explained ................................................................................................................ 18
In-Betweening ......................................................................................................................... 19
Flipping as Opposed to Rolling ......................................................................................... 22
Arcs and Paths of Action ...................................................................................................... 22
Timing and the Spacing of Drawings .............................................................................. 24
Suggested Reading ............................................................................................................... 30
Assignment 1 ........................................................................................................................... 30
Masterclass 2: The Bouncing Ball ................................................................................. 33
Weight, Mass, and Flexibility .............................................................................................. 34
Gravity and the Path of Action .......................................................................................... 34
Key Positions ............................................................................................................................ 35
Squash ........................................................................................................................................ 35
Stretch ........................................................................................................................................ 37
Timing ......................................................................................................................................... 38
Contents

Contents
vi
Weight ........................................................................................................................................ 40
In-Betweening the Bouncing Ball ..................................................................................... 41
Distorting Mass and Volume .............................................................................................. 46
The Descending Bounce ...................................................................................................... 47
Flip Your Drawings … Always! ........................................................................................... 47
Final Double-Checks ............................................................................................................. 48
Suggested Reading ............................................................................................................... 50
Assignment 2 ........................................................................................................................... 50
Masterclass 3: Generic Walks ......................................................................................... 59
The Lower Body ....................................................................................................................... 60
Walk Cycle ................................................................................................................................. 65
Shooting a Walk Cycle ........................................................................................................... 69
In-Betweening on One’s ....................................................................................................... 69
Testing the Walk ...................................................................................................................... 72
The Upper Body ...................................................................................................................... 72
Suggested Reading ............................................................................................................... 76
Assignment 3 ........................................................................................................................... 76
Masterclass 4: Personality Walks .................................................................................. 77
Hip and Shoulder Rotation ................................................................................................. 77
Overlapping Action on the Hands ................................................................................... 79
Overlapping Action on the Head ..................................................................................... 81
Rotation on the Head ............................................................................................................ 81
Keeping Good Balance Throughout ................................................................................ 81
In-Between Placement and Timing .................................................................................. 84
Double-Bounce Walk ............................................................................................................ 87
Chart Timing and Variation ................................................................................................. 88
Observation and Reference Footage .............................................................................. 89
The Animator’s Survival Kit ................................................................................................. 89
Suggested Reading ............................................................................................................... 89
Assignment 4 ........................................................................................................................... 90
Masterclass 5: Generic Runs ........................................................................................... 91
Key Generic Run Stages ....................................................................................................... 92
Run Exercise ............................................................................................................................. 95
Additional Pointers for Runs ............................................................................................... 96

Contents
vii
Head-On Runs .......................................................................................................................100
Suggested Reading .............................................................................................................102
Assignment 5 .........................................................................................................................102
Masterclass 6: Quadruped Walks ...............................................................................111
Front Legs ................................................................................................................................113
Rear Legs .................................................................................................................................114
Synching the Legs Together .............................................................................................115
Adding the Body ...................................................................................................................117
Neck and Head ......................................................................................................................119
Adding the Tail ......................................................................................................................123
Moving Background ............................................................................................................126
Multilayered Backgrounds ................................................................................................129
Nonwalk Pans ........................................................................................................................131
Realistic Quadrupeds ..........................................................................................................132
Suggested Reading .............................................................................................................135
Assignment 6 .........................................................................................................................135
Masterclass 7: Weight ......................................................................................................137
Standard Rubber Ball ..........................................................................................................138
Ping-Pong Ball .......................................................................................................................140
Bowling Ball ............................................................................................................................141
Comparing the Three Versions ........................................................................................142
The Pose Is Everything ........................................................................................................143
Tips .............................................................................................................................................145
Suggested Reading .............................................................................................................149
Assignment 7 .........................................................................................................................149
Masterclass 8: Anticipation ...........................................................................................151
The Benefi ts of Anticipation .............................................................................................152
Anticipations Are for Everything .....................................................................................156
Suggested Reading .............................................................................................................159
Assignment 8 .........................................................................................................................159
Masterclass 9: Dialog .......................................................................................................161
Body Language .....................................................................................................................162
Facial Animation ...................................................................................................................172
Lip Synching ...........................................................................................................................179
Contents
viii
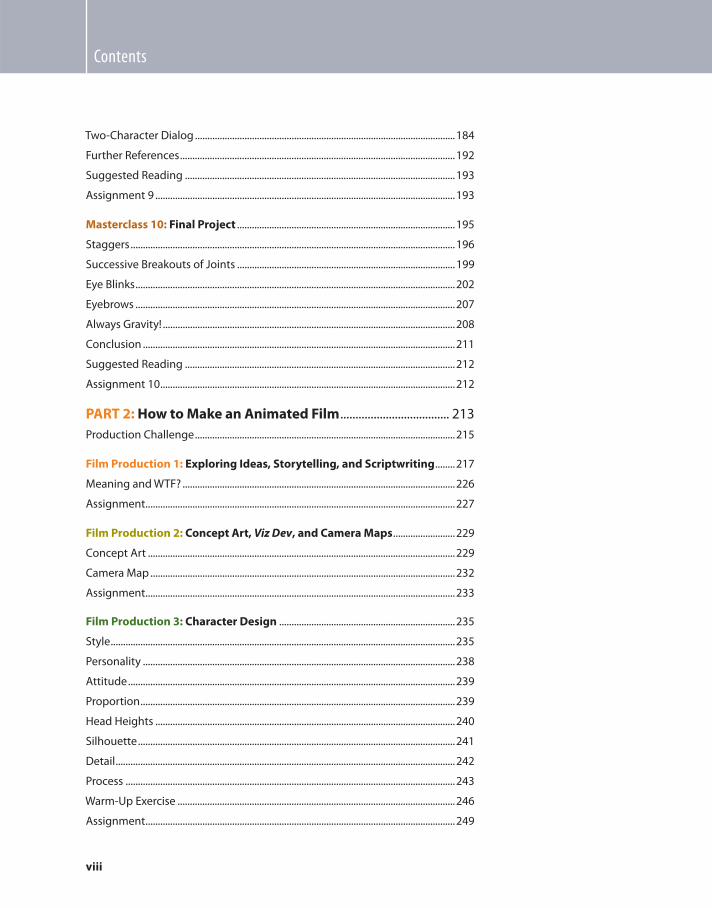
Two-Character Dialog .........................................................................................................184
Further References ...............................................................................................................192
Suggested Reading .............................................................................................................193
Assignment 9 .........................................................................................................................193
Masterclass 10: Final Project ........................................................................................195
Staggers ...................................................................................................................................196
Successive Breakouts of Joints ........................................................................................199
Eye Blinks .................................................................................................................................202
Eyebrows .................................................................................................................................207
Always Gravity! ......................................................................................................................208
Conclusion ..............................................................................................................................211
Suggested Reading .............................................................................................................212
Assignment 10 .......................................................................................................................212
PART 2: How to Make an Animated Film .................................... 213
Production Challenge .........................................................................................................215
Film Production 1: Exploring Ideas, Storytelling, and Scriptwriting ........217
Meaning and WTF? ..............................................................................................................226
Assignment .............................................................................................................................227
Film Production 2: Concept Art, Viz Dev , and Camera Maps .........................229
Concept Art ............................................................................................................................229
Camera Map ...........................................................................................................................232
Assignment .............................................................................................................................233
Film Production 3: Character Design .......................................................................235
Style ...........................................................................................................................................235
Personality ..............................................................................................................................238
Attitude ....................................................................................................................................239
Proportion ...............................................................................................................................239
Head Heights .........................................................................................................................240
Silhouette ................................................................................................................................241
Detail .........................................................................................................................................242
Process .....................................................................................................................................243
Warm-Up Exercise ................................................................................................................246
Assignment .............................................................................................................................249
Contents
ix
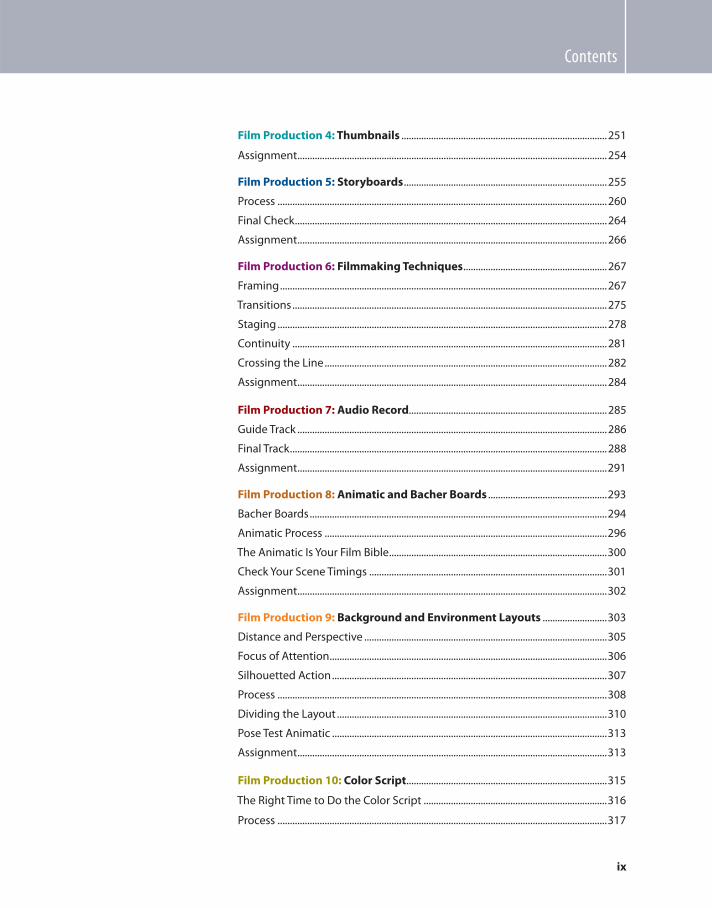
Film Production 4: Thumbnails ...................................................................................251
Assignment .............................................................................................................................254
Film Production 5: Storyboards ..................................................................................255
Process .....................................................................................................................................260
Final Check ..............................................................................................................................264
Assignment .............................................................................................................................266
Film Production 6: Filmmaking Techniques ..........................................................267
Framing ....................................................................................................................................267
Transitions ...............................................................................................................................275
Staging .....................................................................................................................................278
Continuity ...............................................................................................................................281
Crossing the Line ..................................................................................................................282
Assignment .............................................................................................................................284
Film Production 7: Audio Record ................................................................................285
Guide Track .............................................................................................................................286
Final Track ................................................................................................................................288
Assignment .............................................................................................................................291
Film Production 8: Animatic and Bacher Boards ................................................293
Bacher Boards ........................................................................................................................294
Animatic Process ..................................................................................................................296
The Animatic Is Your Film Bible ........................................................................................300
Check Your Scene Timings ................................................................................................301
Assignment .............................................................................................................................302
Film Production 9: Background and Environment Layouts ..........................303
Distance and Perspective ..................................................................................................305
Focus of Attention ................................................................................................................306
Silhouetted Action ...............................................................................................................307
Process .....................................................................................................................................308
Dividing the Layout .............................................................................................................310
Pose Test Animatic ...............................................................................................................313
Assignment .............................................................................................................................313
Film Production 10: Color Script .................................................................................315
The Right Time to Do the Color Script ..........................................................................316
Process .....................................................................................................................................317
Contents
x
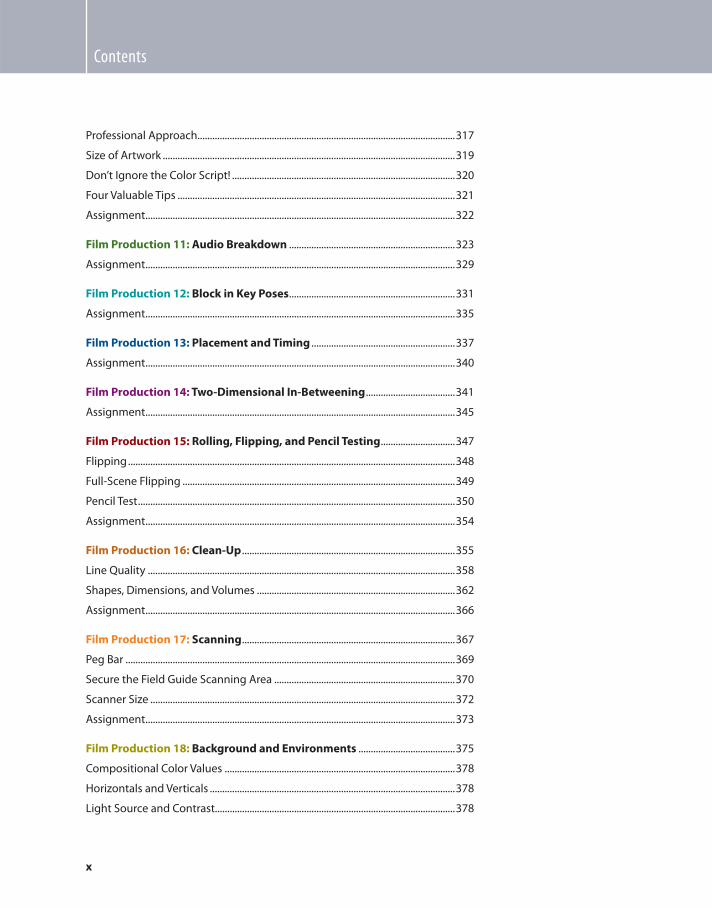
Professional Approach ........................................................................................................317
Size of Artwork ......................................................................................................................319
Don’t Ignore the Color Script! ..........................................................................................320
Four Valuable Tips ................................................................................................................321
Assignment .............................................................................................................................322
Film Production 11: Audio Breakdown ...................................................................323
Assignment .............................................................................................................................329
Film Production 12: Block in Key Poses ...................................................................331
Assignment .............................................................................................................................335
Film Production 13: Placement and Timing ..........................................................337
Assignment .............................................................................................................................340
Film Production 14: Two-Dimensional In-Betweening ....................................341
Assignment .............................................................................................................................345
Film Production 15: Rolling, Flipping, and Pencil Testing ..............................347
Flipping ....................................................................................................................................348
Full-Scene Flipping ..............................................................................................................349
Pencil Test ................................................................................................................................350
Assignment .............................................................................................................................354
Film Production 16: Clean-Up ......................................................................................355
Line Quality ............................................................................................................................358
Shapes, Dimensions, and Volumes ................................................................................362
Assignment .............................................................................................................................366
Film Production 17: Scanning ......................................................................................367
Peg Bar .....................................................................................................................................369
Secure the Field Guide Scanning Area .........................................................................370
Scanner Size ...........................................................................................................................372
Assignment .............................................................................................................................373
Film Production 18: Background and Environments .......................................375
Compositional Color Values .............................................................................................378
Horizontals and Verticals ...................................................................................................378
Light Source and Contrast .................................................................................................378
Contents
xi
Perspective and Lines of Focus .......................................................................................381
Verticals in Panning Shots .................................................................................................382
Light Against Dark, Dark Against Light ........................................................................384
Areas of Greatest Contrast ................................................................................................385
Use Your Eyes .........................................................................................................................386
Assignment .............................................................................................................................387
Film Production 19: Coloring .......................................................................................389
Flat-Colored Backgrounds .................................................................................................396
Imported Background Artwork .......................................................................................396
Assignment .............................................................................................................................398
Film Production 20: Compositing ..............................................................................399
Layers ........................................................................................................................................400
Transparency ..........................................................................................................................402
Cycle Animation ....................................................................................................................403
Depth of Field ........................................................................................................................404
Titles and Eff ects ...................................................................................................................405
Assignment .............................................................................................................................406
Film Production 21: Rendering ...................................................................................407
Screen Format Ratio ............................................................................................................408
Resolution ...............................................................................................................................409
Frame Rates ............................................................................................................................410
Assignment .............................................................................................................................410
Film Production 22: Final Edit ......................................................................................411
Scene Edit ................................................................................................................................412
Music .........................................................................................................................................414
Sound Eff ects .........................................................................................................................417
Final Audio Mix ......................................................................................................................419
Music and Eff ects Track ......................................................................................................420
Assignment .............................................................................................................................421
APPENDIXES .........................................................................................................................423
1: About the Accompanying DVD ..................................................................................423
2: About the Desktop Academy ......................................................................................427

Contents
xii
3: About the Animaticus Foundation ............................................................................429
4: About the DigiPen Institute of Technology ............................................................431
5: Exposure, Exhibitions, and Festivals ..........................................................................435
6: Exposure Sheets and Production Folders ...............................................................439
7: Glossary ...............................................................................................................................453
Index ........................................................................................................................................463
xiii
We are in an era where there are probably more books about animation than
there ever were. So you would presume that with all that information out
there, a young and aspiring student of animation would have more than
enough to choose from. However, if you objectively look around at all those
books off ered, you will fi nd one or two truly great books, but the rest tend to
regurgitate the same old material over and over again, much of it losing its
value and accuracy in translation and through imitation. Many people also
refer to the classic age of “ cartoon fi lms, ” without ever really acknowledging
that the great cartoon industry we once knew in “ the good old days ” has
eff ectively been long, long gone! The actual core principles of animation
never change of course — they are timeless and eternal, and will forever be
so. However, the obsessive presentations that still hark back to an era where
rubbery characters, slapstick gags, and the inevitable “ squash and stretch ”
chase scenes proliferate ad infi nitum are totally misleading. The animation
that once was, is no more, and the classic industry of cartoon fi lmmaking is
now merely an illusion.
I am often criticized for being so pedantic about this knowledge, and for
insisting that there is one way to do something and no other. In reality,
animation can be approached in any way that you wish to. And may it
forever be so, for variety is the spice of life! However, I write what I write with
a knowledge that if you want to animate well and you want to animate in
keeping with the requirements of the modern production age, you will fi nd it
so much easier and so much better to adhere to the core principles that grace
every era of the world of animation. Today, there is a new animation industry
to conquer — arguably as powerful as it ever was in the cartoon days. Games
animation proliferates, as well as Web animation, TV animation, and also still a
little Hollywood-style theatrical animation. Yet each one of these can take the
art form to previously unconquered heights, and there is still huge cause for
optimism.
As a veteran who spans four decades of animation’s expression, covering
eras old and new, I still very much believe that what I have learned and
experienced are still worthy of sharing and still of value to modern student
and professional animators, whatever form of animation they pursue. In
truth, my heart lies with the independent animated fi lmmakers, who spend
hours, days, weeks, months, and even years on a project that they believe has
something to say outside of the more predictable mainstream animation,
and with those who believe that new and wonderful forms of animated
expression can be found. My writing speaks to these valiant folk too, because
I believe there may still emerge a true renaissance of what animation as an art
Preface
Preface
xiv
form is and what it may still be. I, therefore, humbly lay out before you what
animation can do through my own experiences and hope that this book will
assist you to discover fi ner and more assured ways of fi nding your voice .
Some, but sadly not nearly enough, amazing innovative movies of note have
graced our screens in recent years, such as Hayao Miyazaki’s Spirited Away
and Silvan Chomet’s Triplets of Belleville . These fi lms seem cut from a diff erent
cloth from the classic fi lms, and it really shows. They keep my belief in real
and vital animated storytelling — well made, alive! Beyond fi lms like these,
Hollywood seems to regurgitate the same tired, old script and visual formulas
ad infi nitum, and already the dominant three-dimensional (3D) animation
industry off erings are beginning to fi nd a creative rut in the mainstream. The
only exception to this trend is the mercurial and ever-innovative Pixar studio,
the most recent fi lm of which, Wall-e , took a defi nite turn toward something
even more innovative. But beyond that cherished shrine for “ good things, ”
there is very little of the classic world that is around and that off ers anything
new and exciting for the professional animator with any degree of consistency.
Therefore, we have to consider new ground for exploration — that is, if the
industry is to grow and thrive and the animators of tomorrow are to fi nd
a career worthy of the name. One area that has most defi nitely grown and
thrived, of course, is the games-based animation industry. It now represents
the most immediate and approachable source of income for an aspiring,
young animator, and as an industry, it well outpaces the languishing world
of the more traditional cartoon-based production world (i.e., movies, TV,
and Web-based animation). In fact, I am told that the games industry is now
rapidly approaching the music industry for the world’s largest producer of
consumer-targeted media entertainment!
So what constitutes a “ professional ” animator in this day and age? Certainly,
modern animators need to be more chameleon and even somewhat
schizophrenic when it comes to their chosen career path. Contemporary
animators tend to be more nomadic as well, often having to travel far and
wide to where the work is for much of the time. They have to be signifi cantly
more versatile too — working in the games industry one moment, the Web
animation industry the next, and on feature fi lm entertainment when they
are lucky. Occasionally an animated commercial will become an opportunity,
but production in that fi eld is a pale shadow of what it was in the 1970s and
1980s, when I was able to perfect my craft and both volume and creativity
reached a kind of golden age in the United Kingdom through the work of
remarkable animators such as Richard Williams, Oscar Grillo, Eric Goldberg,
and, of course, the remarkable folks in my own Animus Productions studio, as
it once was called.
Artistic ability in cartoon styles alone doesn’t cut it anymore. Modern animators,
whether they use two-dimensional (2D), 3D, clay, or cut-out styles, seem to be

Preface
xv
most in demand if they have an outstanding additional ability in drawing or
classical art. The most prized animators can also demonstrate a clear design
capability and have a fi rm grasp of color theory, anatomy, and the classical art
notions of perspective, form, and tone. Many are quite amazing classical artists
in their own right. Even the students who enter my classroom at DigiPen in
Redmond, WA, arrive with classical art skills that often lie far beyond their reach
or that of their admiring teacher’s reach! Consequently, I believe the future
is very bright for the noncartoon horizons of animation. Yes, contemporary
animators may be working in a cartoon style on occasion, and it is still a joy to
behold this style some of the time; however, the professionals of the future will
more likely be required to work in more “ mature, ” “ illustrative ” styles as well.
Those who prefer to animate their own fi lms have complete liberty toward
what they can and want to create. Advertising, too, can sporadically off er
opportunities that can break the mold. Yet the signs show that things are
quickly changing. In my own experience in the Pacifi c Northwest, the main
employment opportunities for animators is the blossoming games industry
from Microsoft, Nintendo, and ArenaNet, and others. These opportunities
are beginning to go immediately to students who have an education based
on hard-won traditional principles — that is, art training with an emphasis
on drawing and hand-drawn animation. This is proving to be a shrewd and
wise investment for young artists (or their parents, who usually pay for their
education), who wish to enter the modern world of professional animation.
Consequently, to be ahead of the curve it is essential that present and future
student animators begin to embrace the hardcore principles of animated
movement that have been handed down through many decades of amazing
expression and accomplishment!
I have tried to make this course of instruction the complete package based
on this requirement. It is, I believe, the fi rst-ever comprehensive, structured
course set in the requirements of the modern animation world. It is structured
to give you just about everything you’ll ever need to know to become
competent as a professional-level animator for this day and age. With all
you’ll fi nd written within the pages of this book, as well as the additional
fi lmed lectures and demonstrations on the accompanying DVD, you’ll
have at your fi ngertips a virtual degree-level academy of instruction that
is a comprehensive and realistic introduction to what I believe is the most
wonderful art form the world has ever known. It will not teach you how to
draw or paint, however, and it will certainly not instruct you on the art of
drawing “ cartoons. ” (Those things I urge you to do anyway — even drawing
cartoons alongside the more classic-based artistic subjects.) Neither will this
book necessarily give you a deep appreciation for art or the history of art, or
provide you with knowledge of all the great classic principles of anatomy,
perspective, and color. All these things you need to bring to the table with
you if you want to compete with the top professional animators of today.
Preface
xvi
Of course there can be no substitute for a well-structured and comprehensive
animation school education, such as the truly inspired program we provide at
the DigiPen Institute of Technology. (And as demonstrated by the outstanding
student work shown in this book and on the DVD … lest there be those who
have doubt!) However, if you don’t have such an outstanding animation
program of education where you are, or you quite simply can’t aff ord one in
this current economic climate, this book will be an answer to all your prayers!
It should provide you with the most comprehensive book/disk – based course
ever, covering the core principles of classic animated movement, but with a
contemporary, professionally targeted slant that addresses the modern reality
of the animation world. Additionally, as well as teaching you how to become
an animator, it also guides you through the animation production process
too, so you have the capability of turning each one of your fi lm- or games-
based dreams into a reality. (Note: The actual production process of creating
animated work for both fi lm and games is pretty similar overall. Consequently,
an understanding in one strongly prepares you for a sound application in the
other!)
How to Make Animated Films has been planned for several years and is the
fi nal part of the instructional trilogy I set out to create many years ago. The
Animator’s Workbook kicked off this process as the defi nitive “ beginner’s
guide to animation, ” which, through the test of time, has established itself as
one of the principal textbooks for teaching in the professional and academic
industries. Pencils to Pixels: Classical Techniques for Digital Animators more
recently took this instructional material to the next level, by providing the
more ambitious animator with just about everything he or she might need to
know about the tools, techniques, and practices of their subject. Finally, this
book rounds off this entire process by tying everything together in the form
of a comprehensive educational package that will work for everyone, whether
they are raw high school beginners or evolving professional animators in
the games, Web, or fi lm industries. All you need to add is your own talent,
commitment, enthusiasm, and tenacity!
Additionally, should you wish to take your home-schooling ambitions to
the next level, you might want to visit my Desktop Academy website ( www.
desktopacademy.com ) where, for a little extra investment, you can receive my
personal critiques and feedback for the work you submit from the stage-
by-stage assignments I off er in this book. You can even be graded for these,
earning credits toward my own “ Certifi cate of Animated Excellence, ” which is
awarded to all students who successfully complete the coursework provided
in this book. This does not mean, however, that you cannot study the material
in this book alone. Far from it! What is contained here should give you all the
information and instruction you will ever need to become a solid animator
and fi lmmaker in your own right, as well as reach a competence that can be
embraced by the fi lm, TV, or games industries as a whole.
Preface
xvii
So, if you dream of becoming an animator in this modern day and age, why
not take this book home and jump straight into your studies! I cannot, of
course, guarantee that this course will absolutely give you a job at Pixar or
Disney (or at Nintendo, ArenaNet, or Blizzard), as clearly a great deal depends
on the talents you bring to your work, the tenacity you apply in sticking with
it, and the personality you project when you eventually apply for positions.
However, what I can assure you is that if you follow the stage-by-stage
instructions contained here, you will have a professional-level knowledge
in animation. To make things as easy as I can, I will talk you through all the
core techniques and approaches you will need in a way that is simple to
understand and methodical in its process. I will give you tangible onscreen
examples of everything you need to achieve, as well as instruct you on the
process of putting this all together in the form of an animated production.
How to Make Animated Films will make the entire process of learning the
principles of animation and fi lmmaking so much more accessible to you
in your home-based environment, and you’ll even be able to make good,
old-fashioned “ cartoon ” fi lms if that still remains your ambition at the end
of it all!

This page intentionally left blank
xix
First … A Reality Check
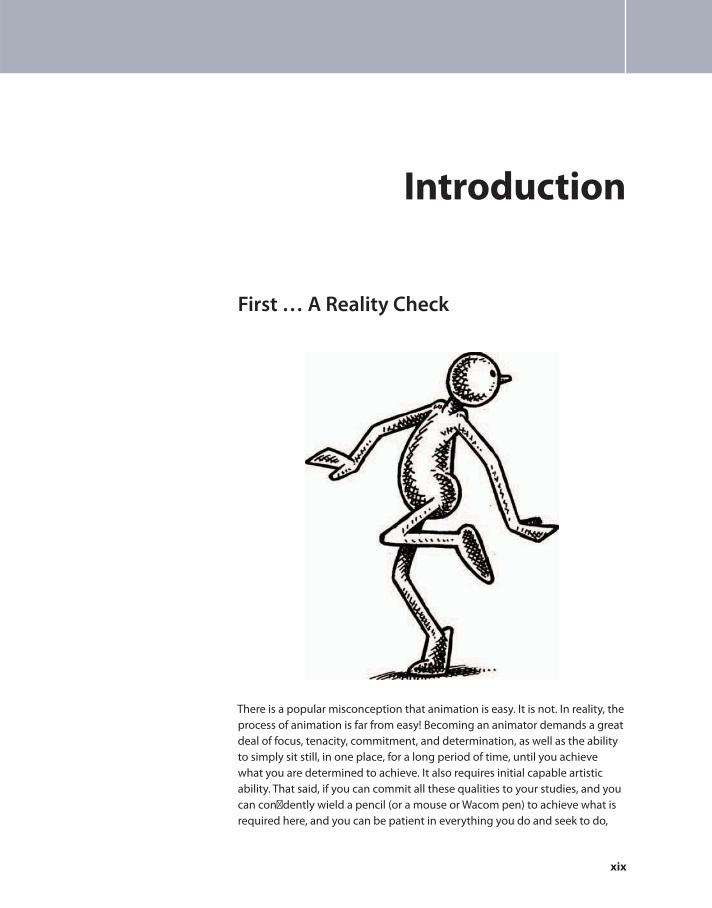
There is a popular misconception that animation is easy. It is not. In reality, the
process of animation is far from easy! Becoming an animator demands a great
deal of focus, tenacity, commitment, and determination, as well as the ability
to simply sit still, in one place, for a long period of time, until you achieve
what you are determined to achieve. It also requires initial capable artistic
ability. That said, if you can commit all these qualities to your studies, and you
can confi dently wield a pencil (or a mouse or Wacom pen) to achieve what is
required here, and you can be patient in everything you do and seek to do,
Introduction
Introduction
xx
there is absolutely no reason whatsoever why you cannot become an expert
animator and/or fi lmmaker in the fullness of time! Easy, it ain’t. (But what in
this world is worth having if it isn’t hard to achieve?) At the same time, who
said anything about not being easy couldn’t be fun! What lies ahead is most
defi nitely fun — that is, if you have the heart, the will, and the passion to see
the hard parts through to the very end!
Your Own Personal Animation Course
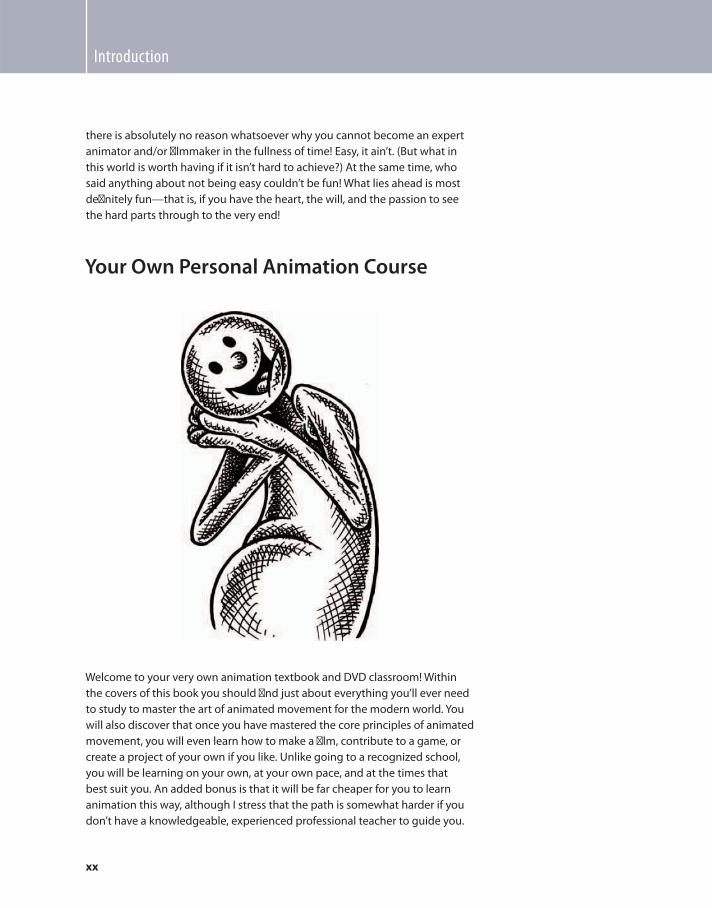
Welcome to your very own animation textbook and DVD classroom! Within
the covers of this book you should fi nd just about everything you’ll ever need
to study to master the art of animated movement for the modern world. You
will also discover that once you have mastered the core principles of animated
movement, you will even learn how to make a fi lm, contribute to a game, or
create a project of your own if you like. Unlike going to a recognized school,
you will be learning on your own, at your own pace, and at the times that
best suit you. An added bonus is that it will be far cheaper for you to learn
animation this way, although I stress that the path is somewhat harder if you
don’t have a knowledgeable, experienced professional teacher to guide you.
Introduction
xxi
(And yes, sometimes to bully you along, whenever that is necessary!) That
said, with all the course work laid out in this book, you should just about
be able to fi nd an answer to pretty much every question you’re ever likely
to ask about the techniques and production process of animation. If you
should want further professional-level feedback, however, you will be able
to obtain online critiques of your assignment work, and even receive
published recognition at the successful completion of your degree-level
assignment work, if you so choose. (Details of this can be obtained in
Appendix 2.)
2D Or Not 2D? — That Is the Question
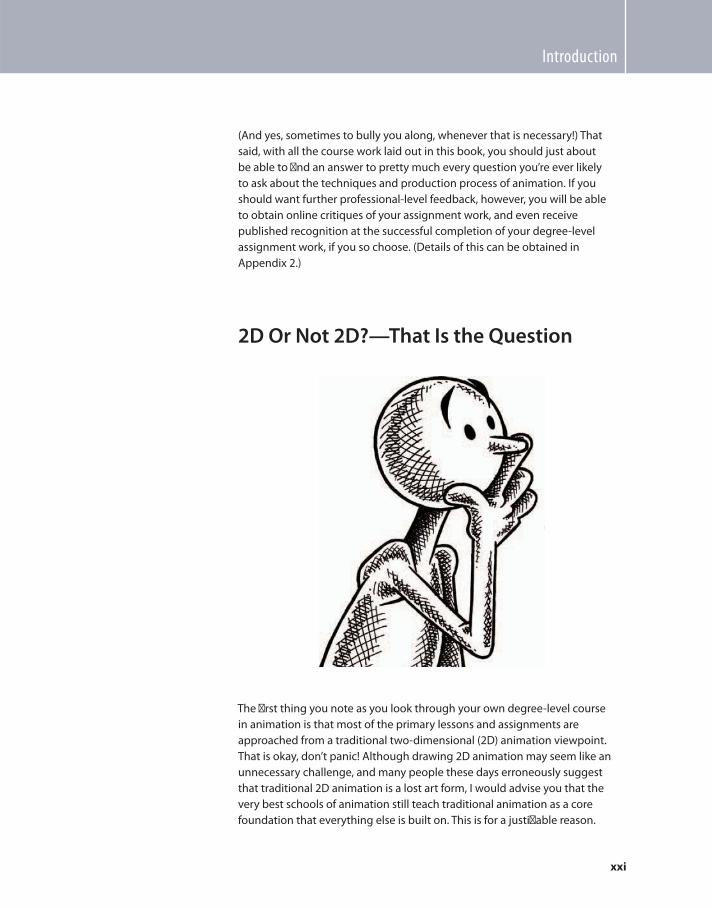
The fi rst thing you note as you look through your own degree-level course
in animation is that most of the primary lessons and assignments are
approached from a traditional two-dimensional (2D) animation viewpoint.
That is okay, don’t panic! Although drawing 2D animation may seem like an
unnecessary challenge, and many people these days erroneously suggest
that traditional 2D animation is a lost art form, I would advise you that the
very best schools of animation still teach traditional animation as a core
foundation that everything else is built on. This is for a justifi able reason.
Introduction
xxii
Traditional 2D animation techniques are still the best way of studying the core
principles of movement. Two-dimensional animation’s inherent disciplines
really underline the process of frame-by-frame movement, and once a student
learns the process of animation through having to draw every exercise
assignment, he or she will undoubtedly never forget them!
It is not a coincidence that the formative work of the great Pixar studio was
founded by traditional 2D animators who where taught what software
buttons to push so they could weave their traditional magic through the
digital art form. Indeed, many companies — both fi lm-based and games-
based — prefer to hire 3D computer animators with traditional 2D animation
skill sets before they hire computer-skilled-only animators, simply because
they know that they have a more comprehensive understanding of the
medium, and with an artistic foundation to their work, they become more
versatile members of the company’s animation team. Remember, purely
“ button-pushing ” animators are severely limited in terms of their artistic
range and versatility when faced with the more aesthetic and broadly ranged
production challenges that are invariably required in the demanding and
competitive world of animation today.
However … Even though the core material in this book is composed of primarily
2D-based material, every eff ort has been made to respect the essential 3D
processes that contemporary animators need to know when considering a
career in the modern animation world. Consequently, in many cases,
students can substitute 3D animation for the 2D animation assignments
given. The intention is not to penalize potentially wonderful animators if
they do not have any facility for drawing in the fi rst place! In truth, the
ability to demonstrate a comprehensive knowledge of all the principles
and techniques of animated movement, whether they are created in a
2D or 3D environment, should be enough to convince a potential employer
that the animator before them does indeed “ know their stuff . ” That said, an
animator who can demonstrate an ability in both 2D and 3D animation is of
a higher premium these days than an animator who is myopic in his or her
approach.
Introduction
xxiii
Prerequisites for Study
All serious academic courses require certain prerequisites on the part of
students before they begin, and this book course is no diff erent! Although
this kind of home-based study is far less formal and organized than a regular,
structured college education, the prerequisites for study on behalf of the
students for this course will be no less real than others. Therefore, before you
begin your studies, it might help for me to go over the ideal prerequisites
you will need if you are to maximize the eff ectiveness of the course material
presented here. Of course, these prerequisites do not mean that you have
to have them in order to complete the course. But, being aware of the ideal
circumstances and attitudes when approaching your studies will help you
better cope with what is to follow.
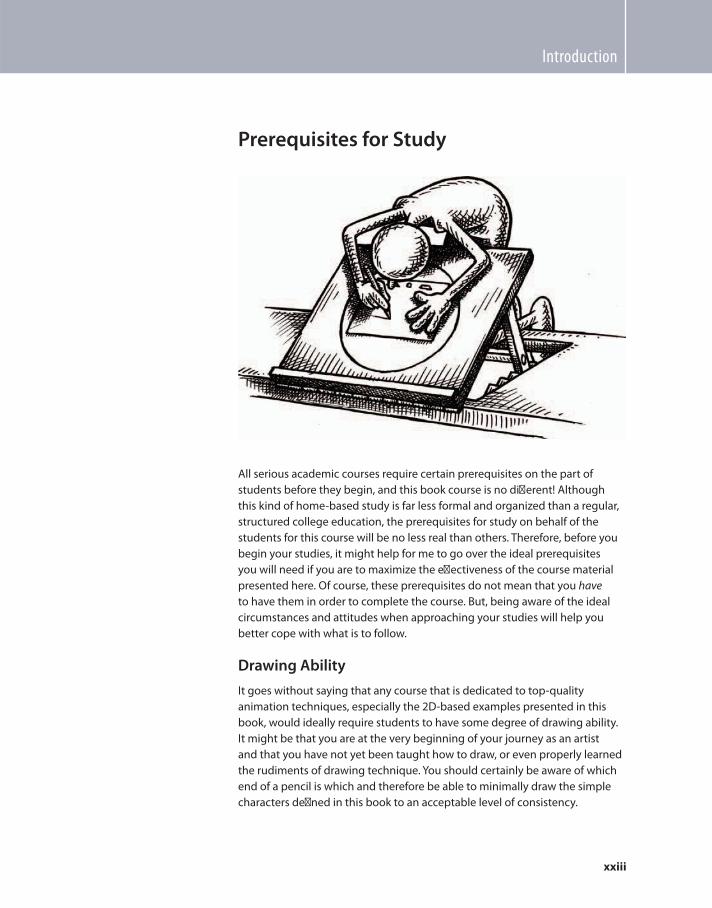
Drawing Ability
It goes without saying that any course that is dedicated to top-quality
animation techniques, especially the 2D-based examples presented in this
book, would ideally require students to have some degree of drawing ability.
It might be that you are at the very beginning of your journey as an artist
and that you have not yet been taught how to draw, or even properly learned
the rudiments of drawing technique. You should certainly be aware of which
end of a pencil is which and therefore be able to minimally draw the simple
characters defi ned in this book to an acceptable level of consistency.
Introduction
xxiv
The better you draw, the better it will be for you to address the requirements
of this course. If you don’t know how to draw, I certainly recommend you take
some classes in the subject before you go too far with what follows, because
the artistic demands increase as the process is further explored and executed.
When all is said and done, animation is all about drawing — you cannot escape
that fact, whether you want to be a 2D or 3D animator. The very best of Pixar’s
and Disney’s animators as well as those in other major fi lm or game studios,
will acknowledge that fact. Indeed, many of the fi nest among them come
from a traditional art or animation background before they arrived! (Actually,
many of these top studios provide drawing and other art-based instruction
sessions within the company solely to improve the artistic skills of their
workforce and make them more eff ective animators as a result!) The fact that
to understand a character in all its dimensions, you ideally need to visualize
and replicate it from a number of viewpoints and at a number of repeatedly
changing angles, is testimony to this requirement. Drawing it out beforehand,
even in a thumbnail sketch form, assists this process, even if your ultimate
output is through a 3D environment. Consequently, you will be signifi cantly
hindered if you do not have drawing capability, and the better your drawing
ability is, the better it will work for you as an animator.
Consequently, it is my most earnest suggestion that as a supplement to
the coursework contained in this book, you should at least keep a separate
sketchbook with you to draw, draw, and draw from life around you at every
possible opportunity! Better still, if you are currently a raw rookie in the art of
drawing, at least buy yourself a good book on basic drawing and observational
techniques, such as Betty Edward’s The New Drawing from the Right Side of the
Brain (Tarcher; Rev Exp edition, Spetember 6, 1999), and immerse yourself
in the desire to be a better artist. Also, if you can take classes in drawing too,
your studies will only benefi t as a result. Certainly your animation will be of a
much higher order if you develop a good drawing capability, especially if you
ultimately intend to be a professional animator in the modern world.
A Basic Knowledge of the Classic Principles of Art
A knowledge of the classic principles of art really fi nishes off where the initial
drawing training begins. If your ambition is to be at the top of the totem
pole professionally, then you cannot possibly become an accomplished
animator without fi rst being an accomplished artist in some way or another.
By being an “ accomplished ” artist, I mean immersing yourself in the traditional
principles of art technique and appreciation and being able to respect and
replicate them to some degree through your own work. At a very minimum,
you should at least study and understand classic art principles such as
perspective; human and animal anatomy; light, tone, and color; layout and
composition; and perhaps with a more contemporary slant, “ fi lmmaking
Introduction
xxv
101 ” techniques if you want to make your own productions too. All these
disciplines are crucial in order to use your fullest expressions as an animator,
for even a rudimentary glance at the capabilities of the world’s top 2D and 3D
animators will reveal a knowledge of classic art principles .
A certain appreciation of the wide spectrum of dance, mime, music, and drama
signifi cantly adds to your cause too! Fundamentally, you cannot possibly
express yourself fully in a visual medium like animation without fi rst having a
knowledge and grasp of the principles that support the process of that visual
medium. Animation is totally a visual medium, and even though it is invariably
viewed on a screen and not on a sheet of paper, it does intrinsically rely on the
principles contained in all other traditionally based art forms to make it work.
Therefore, if you fully wish to reap the potential that this book off ers you, you
are advised to study the rudiments of all of the abovementioned before you
start in earnest as an animation student. If you don’t have this knowledge or
these skills at the very beginning of your journey, then you certainly should
have them available at your fi ngertips at its conclusion, especially if your
ambition is to be a top professional in your own right!
Patience, Commitment, and Tenacity
Animation is a slow, focused, painstaking process, and you’re fooling yourself
if you think otherwise. Good animation, or indeed great fi lms, are not made
overnight. It takes months … maybe years … to perfect something in
animation, whether that be a collection of repeatable animator skills or an
animated fi lm that really expresses itself to its full potential and capability.
Consequently, to be a signifi cant animator you need to be a dedicated and
somewhat patient individual. You also need to have a determined commitment
to see through whatever you start. Finally, you need to have the tenacity to
hang in there when all seems to be failing, or the world seems to be against
you fulfi lling your dream (as it most certainly will over such a period of time).
If you’re a video game player and you think that what you see in the game is
easy to accomplish … think on! If you believe animation is easy, then you are
misguided! If you think animation is something you can pick up, then put it
down, pick it up again, and put it down again, ad infi nitum … you’re wrong!
Great animation is eff ectively a great obsession. Only the truly obsessed — or
to put it more delicately, the more dedicated — will ever fully succeed with
it as pure animators. It takes an iron will, blood and sweat, and some tears
sometimes to see it through to its fullest conclusion. It is not for the faint-
hearted or for the easily distracted. It is totally involving and demands as
much dedication and commitment from you than if you were studying to be a
great lawyer, surgeon, or scientist. Yes, it is still all about having fun with what
you love to do. But, if you want to be as fi ne as the great master animators of
the past, or as accomplished as the greatest of the Pixar-level animators of the
Introduction
xxvi
present, then you do have to accept the sacrifi ce of the long, hard road that
lies ahead of you.
As I suggested earlier, nothing worth having in this world is easy, and
animation is no exception. Professionally, the world is extremely competitive.
Great schools like the DigiPen Institute of Technology and even popular
online courses such as Animation Mentor are turning out professional-level
animators of the highest capability, and the employment market is not infi nite
and all-absorbing. Consequently, if you’re ambitious for a serious career in
animation and think this book is a shortcut to your professional ambitions,
then you’re wrong. The competition is so stiff these days that you will almost
have to err on the verge of total obsession with these exercises if you hope
to compete with each new generation of highly trained, wannabe animators.
That said, what is presented here is everything about the core principles of
movement that you’ll ever need to know to be a good animator, as long as
you develop the focus, temperament, and commitment to see it through to
its ultimate conclusion. At the other end of the spectrum, if you’re just looking
for fun ways to make your cartoon drawings move, or want to know how to
make a short fi lm on your own for friends and family, then you’ll fi nd more
than you need with what follows!
Equipment
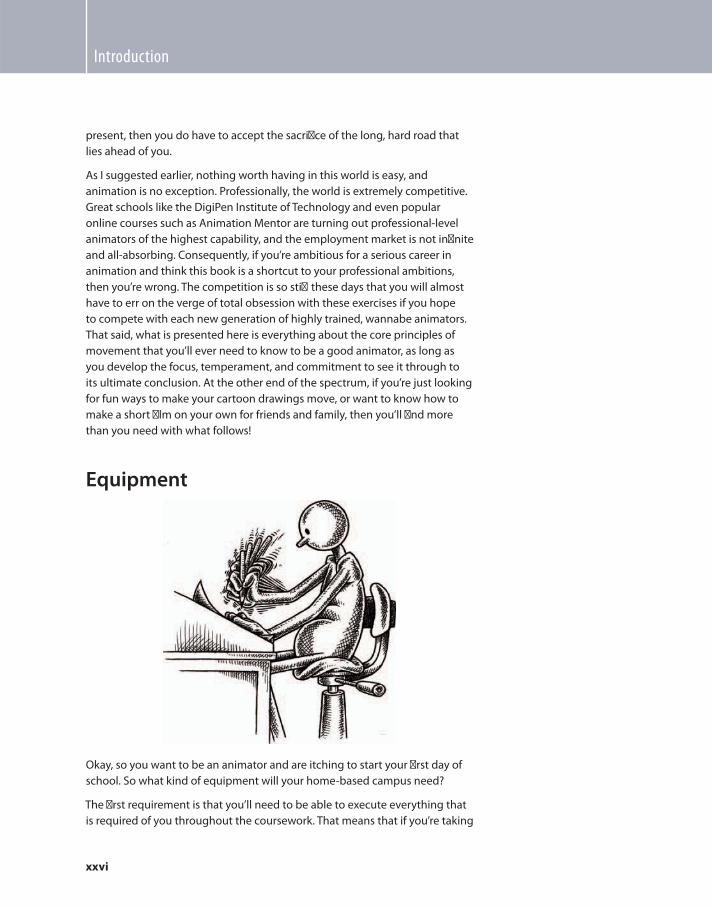
Okay, so you want to be an animator and are itching to start your fi rst day of
school. So what kind of equipment will your home-based campus need?
The fi rst requirement is that you’ll need to be able to execute everything that
is required of you throughout the coursework. That means that if you’re taking
Introduction
xxvii
the purely 2D route, you’ll need a lightbox. Animators of a 3D persuasion will
of course need a computer with suitable 3D animation software that can also
render work to movie fi les. But let’s look more at the equipment requirements
in greater detail.
Two-Dimensional Animation Lightbox
The traditional animator’s lightbox has evolved over decades of practice
and experience and really provides the ideal drawing setup for a new
animator to work with. Lightboxes can come in all shapes and sizes, from
the wonderfully grandiose Disney classics that can fi ll the good part of a
small room, to the simple crafting boxes that easily sit on the top of even
the smallest of tables or your lap if space is a premium. A good animator’s
lightbox, however, will ideally have an adjustable working surface with a
rotating circle cut into it, so that that animator can fi nd the best angles to
comfortably draw anything he or she needs to draw and be able to turn the
drawings accordingly.
The crucial thing about any animator’s work surface, however, is that it
has to be composed of some kind of translucent material that enables a
backlight to shine through several layers of animation paper at a time; thus,
the term lightbox . The rotating disk in the surface of the lightbox can be
either a circular, translucent sheet of Plexiglas sunk into a wooden surface, or,
alternatively, the whole disk can be made entirely of Plexiglas and the circular
disk cut out of it and installed in such a way that it can rotate but not fall
through the hole. A really top-grade professional will have a custom-made,
metal disk that not only includes a Perspex surface within it, but it will also
have a number of other animated “ gizmos ” built into it, such as slideable top
and bottom panning peg bars. However, for the purposes of the course work
in this book, none of that will be necessary. I would recommend to the cash-
strapped student that it is perfectly acceptable to use one of the inexpensive
crafting lightboxes that many stores carry these days for home hobbyists. A
perfect example of one of these is the LightTracer II.
Peg Bar
A 2D animation lightbox is not entirely complete unless you have an
animation peg bar attached to it. All animation paper is punched with holes
that ensure perfect registration from drawing to drawing. The peg bar is the
means by which these punched sheets of animation paper can be kept in
perfect alignment with one another as they are being worked on upon the
lightbox surface. The professional standard Acme peg system is the most
universally used system today. An Acme peg setup contains a circular central
peg with two horizontally elongated ones on either side of it, engineered to
Introduction
xxviii
specifi c measurements. However, cost-conscious students can alternatively
buy a simple three-circular-peg plastic peg bar, which is quite inexpensive but
will enable them to use paper that is punched using a standard three-hole
offi ce punch. Inexpensive three-hole peg bars can be obtained online from
Lightfoot Limited ( www.lightfootltd.com ).
Animation Paper
Most online animation stores, such as Lightfoot Limited, Cartoon Color
Company ( www.cartooncolour.com ), and Chromacolour International ( www.
chromacolour.com ), will have all kinds of animation supplies on order,
including prepunched or unpunched animation paper. There are three major
paper sizes that you can consider: student-size paper and 12-fi eld- and 16-
fi eld-size paper.
Student-Size Paper
Student-size paper is the simplest and cheapest paper. It can be
ultratranslucent (to avoid the need for a really bright lightbox, and, in some
cases, no lightbox at all) or else standard opaque white bond paper that
is used in most desktop printers or photocopiers. The standard student
size in the United States is 8.5 � 11 inches and elsewhere it will probably
be A4. Although this is a very cheap and easy-to-obtain paper size, it does
signifi cantly limit the dimensions of the drawing surface area, especially
if a large-screen fi lm production is being attempted. Its huge advantage,
however, is that when it comes to the fi nal scanning stages of a fi lm
production, this paper size perfectly fi ts most standard, and therefore far more
inexpensive, scanners without any cutoff around the edges.
12 - Field – Size Paper
This is the smallest of the professional animation papers. Measuring
approximately 10.5 � 12.5 inches, this paper size is what most commercial-
based studios will use when creating animation for games, Web, TV, or direct-
to-DVD/video distribution. It is also the most recommended size for the more
seriously minded student, although its disadvantage is that it is more expensive
than the standard offi ce letterhead-size paper, and will require a larger, and
therefore more expensive, scanner to ensure the whole drawing area is covered.
16 - Field – Size Paper (15-Field in the United Kingdom)
This is the largest of the two professional animation paper sizes used. It is the
size that is predominantly used in large-screen, theatrical movies, although
many professional animators prefer to work with this size on all projects
because it maximizes the drawing area and therefore the detail they can put
into their drawings. Clearly, this is much more costly to obtain than any of the
Introduction
xxix
other paper sizes and requires a more expensive fl atbed scanner that can cover
a minimum of an 11 � 17 – inch image area when working on a fi lm production.
Animation Pencils
Pretty much all pencils will work for animation, but there are ones that are
preferred by most animators. The industry standard norm is Sanford’s Blue
( not the nonphotographic blue!) Col-erase pencils. These pencils have an
excellent drawing lead in them and are provided with an eraser at the end,
which, although it wears down pretty quickly (often more quickly than the
pencil lead, unfortunately) is a one-stop shop for serious animators. A number
of the old Disney studio animators would also have used Sanford’s Red Col-
erase pencils since a number of their animators preferred the slightly softer
lead that the red version provides.
Red and blue pencils are quite often used for the rough and clean-up stages
of work, however, if a strong black, scanner-friendly pencil-style line is
required for clean-up, then Tombo’s Mono is usually the preferred pencil to
use. They use graphic-based leads in them, which provides for an excellent
high-density look. Sometimes cleaned-up drawings need to be created with
an even black line for premium scanner copying and digital coloring. In these
cases, using a mechanical pencil with replaceable leads (the softer rather
than harder variety), black fi ber-tip pens such as PaperMate’s Flair, or Pigma’s
Micron range of pens (which are my favorite inking pens) are more useful.
Pencil Sharpener
If you are using pencils to animate, then you will defi nitely need some kind
of mechanical pencil sharpener. In the old days, pencils were sharpened by
fi nely honed knives. But with the volume of work an animator was required
to get through, hand-turned pencil sharpeners became the norm. Today, true
professional animators will have a strong and reliable electric pencil sharpener
beside their lightboxes. There are a number of excellent ones out there, but
I tend to fi nd that Xacto’s Powerhouse is the one that has least let me down.
However, always make sure before you buy one that the point on the pencil is
acceptable for detailed animation drawings, as some of the cheaper varieties
can create a stumpy point, which is really not ideal.
Field Guide
Although the above equipment enables animators to work, they do need
to defi ne a required area to work in. Consequently, transparent plastic fi eld
guides are required to identify the “ fi eld ” (or viewable screen area) that the
animation is to be seen in. Field guides come in various sizes but the normal
standard ones are 12 fi eld and 16 fi eld (15 fi eld in the United Kingdom). These

Introduction
xxx
come in either regular “ academy ” size (3:4 screen ratio) or else more rarely in a
widescreen format (1.75:1 screen ratio). Available from most online animation
stores, the fi eld guide (known as a graticule in some places) is an essential
piece of 2D animation equipment when fi lmmaking is the ultimate objective.
Many of the exercise details in this book, however, do not require a fi eld guide.
Miscellaneous Two-Dimensional Equipment
Most of the other equipment an animator uses is not just standard to
animation stores, but can be purchased from art stores pretty much
anywhere. As will be recognized later, it is always advisable to have a ruler
and a small tape dispenser close at hand. I also strongly advise getting a
good-size, adjustable desktop lamp, as quite often the lighting in a room is
not suffi ciently bright enough to illuminate the drawing surface and therefore
some kind of local light is needed. A stopwatch is also an invaluable item for
animators who need to work out action and timings in their head. Inexpensive
digital ones can be obtained from chain stores such as Radio Shack.
Paperwork
It’s strange to think of an animator requiring paperwork other than just
the paper for drawing on, but it is true that paperwork is needed. The key
administrative paperwork that 2D animators specifi cally will need is a pad or
two of exposure sheets. Exposure sheets (also called X-sheets or dope sheets in
some places) are crucial to animators who are organizing their thoughts and
plotting their movements and layers.
We will discuss this in detail later, but suffi ce it to say, it is important that
animators are equipped with exposure sheets at the onset of their more
advanced work. It is possible to either print them from a standard template
(available from Desktop Academy, at www.desktopacademy.com ) or else
purchase them from one of the excellent online animation stores on the
Web. If you are an intended fi lmmaker too, you will need to consider scene
production folders, which will contain both exposure sheets and animation
drawings when the work is completed. These too can be printed from
templates available at the Desktop Academy site, or created individually
according to design and taste. Another downloadable paperwork item is an
animator’s progress chart, which we’ll deal with later in more detail.
Technology Requirements
If you are to take the process of animation seriously, you will want to make
sure you have the means of not only drawing your animation, but also fi lming
and playing it back for inspection and critique. This is universally known as a
pencil test . Consequently, you will need some kind of image-capture device
Introduction
xxxi
and software that will allow you to do this. The most inexpensive approach
would be to purchase a simple golfball-style webcam from a local computer
store and hook it up to your computer that has something like Digicel’s
Flipbook or the more recent addition to the pencil-test software community,
ToonBoom Technology’s Pencil Check. Although the basic webcam setup
gives soft and slightly blurry pencil test images, it is perfectly usable for any
animators who draw their animations in strong, dark lines (i.e., soft, tentative
lines tend not to show up on the webcam’s lens resolution level).
Of course, a higher-level video camera with high-resolution capabilities
will give a much better picture. For both my own production work and
my teaching work I use Lightfoot Limited’s Teacher Demo Station ( www.
lightfootltd.com ), which has an excellent lightbox, as well as fi lming and
teaching capabilities all combined into one unit. However, unless you are
teaching (or writing a book about animation teaching!), this is defi nitely
overkill for most student, novice, and even professional animation
requirements. The Flipbook, ToonBoom, and Premier software will enable you
to adjust your individually shot images into a suitable playback speed and
order, and also give you the option of saving the moving sequence as avi,
mov, and Flash-based movie clips too.
Production Scanners and Software
Once an animation is pencil tested and approved, it will need to be cleaned
up and taken to the next level if it is to be part of a fi nished fi lm production.
Here, each individual drawing will be scanned as individual fi les, then digitally
colored, and then composited together with a suitable piece of background
artwork, adding whatever special eff ects may be required on a scene-by-
scene basis. To initiate this process, you will obviously need a suitable fl atbed
scanner. If you’re working at a basic student level with 10 fi eld – size paper
(i.e., 8.5 � 11 inches), then the standard, inexpensive fl atbed scanners that
can be found in most computer or technology stores will be all you need.
However, if you’re working more professionally — that is, at the 12 fi eld or 16
fi eld paper level — you will need to get a larger, much more expensive scanner
that can scan areas up to 11 � 17 inches. If you already have a “ super-duper, ”
high-resolution video camera for pencil testing, however, you can use that
to capture your fi nal line images. (But this does have to be a high-level
professional camera with an exception lens to make this really workable.)
As previously mentioned, animation software will make digitally coloring your
scanned images very easy. The software should also enable you to composite
and fi nal render your scanned fi les onto any fi lm medium too. The most
exciting developing software in recent years is the collection of animation-
centric applications that ToonBoom Technology is putting out … especially
“ ToonBoom Studio ” and “ Animate ” for the desktop-based more serious
Introduction
xxxii
animator, down to the fabulous, fun program for beginners of ages 5 – 50,
“ Flip Boom ” . With the company ’ s recent acquisition of the pioneering “ Animo ”
company, and their total dedication to the 2D-animated art-form, there are
clearly even greater things to come from ToonBoom in the future! (Watch this
space … http://www.toonboom.com).
Audio Requirements
Sound can be a huge factor in an animated production, but the equipment
you need for it should be kept to a minimum, as it often can be both
complicated and expensive to acquire. When fi lmmaking, it is always best to
record your soundtrack elements professionally — that is, if you want the fi lm
to look professional. I would not recommend, however, buying professional
equipment to do this because it will be a huge expense and something that
you will rarely use. Consequently, if you can beg, borrow, or steal (not literally!)
the services of a professional studio for your recorded tracks, you will be in
better fi nancial shape. This applies to both dialog- and music-based tracks. If
you are using dialog in your work, you will defi nitely need some kind of sound
breakdown technology. A sound breakdown is where you take your fi nal audio
track and break down all the phonetic sounds it contains on a frame-by-frame
basis. Some of the software previously mentioned does this, but I have always
found the standalone Magpie program, produced by Third Wish Software
( www.thirdwishsoftware.com ), to be my long-term favorite.
With Magpie, you can import the soundtrack and then manually (or
automatically) analyze its sounds frame by frame, checking visually as you
go along. You can also import your own lip-sync (or phoneme) mouth sets,
so you can actually watch the mouth moving as you play back your sound
breakdown attempts. Finally, you will ultimately need to mix (balance) your
various audio tracks (i.e., dialog, music, sound eff ects, etc.) onto one master
audio track. Software such as Adobe’s Premiere enables you to do this to
some degree, as do other animation-targeted software designed for this
purpose. (But always check the specs of any software before you buy it, to
see if it has all the specifi c elements you require.) Audio-specifi c software,
such as Sony’s Sound Forge or Adobe’s Audition, will also allow you to do this,
but again this is an added expense that most animators will not need to take
on. (Remember, too, that offi cial full-time students or teachers at approved
institutions can obtain software at signifi cantly large discounts through online
stores such as www.academicsuperstor.com , www.journeyed.com , and www.
campustech.com .)
Three-Dimensional Equipment
Pretty much everyone has access to a good computer these days, but you
should be aware that the programs you’ll need for 3D animation will need
Introduction
xxxiii
a signifi cant amount of RAM storage and a large hard drive to contain the
inevitably large fi les that animation movie fi les require. Most software
packages will reveal the minimum requirements, including a fast-operating
motherboard for faster speed rendering. Many very ambitious animated
fi lmmakers might want to hook up several computers to create a “ render
farm, ” which will enable them to access a great deal of rendering power if time
becomes an issue.
Three-Dimensional Software
Much to the annoyance of large companies such as Softimage, eff ectively the
“ big two ” software titles of 3D animation are Maya and 3DMax. In the past,
it was said that 3DMax dominated the games industry and Maya dominated
the fi lm industry. Now both brands are actually owned by Autodesk ( www.
usa.autodesk.com ) , and the gaps between them are beginning to narrow. I
am advised by many working professional 3D animators and educators that
Maya tends to be the preferred software of animators, whereas 3DMax is
the preferred modeling platform. However, as I say, the gap is closing, both
in capability and application, and in time, we will probably see this balance
change further. Raw beginners with a limited purchasing power, however,
should seriously look at Animation Master ( www.hash.com ) as a software
to begin with. It is a highly impressive starter program that costs only a few
hundred dollars (as opposed to professional-level software that costs many
times that). I have seen some amazing work created on Animation Master
and the owner, Martin Hash, of Hash Inc., speaks with the soul of an animator.
Consequently, I am more than happy to support their commitment and their
superb program with this free endorsement.
Let the Fun Begin! Now that we’ve established what you need to start to learn animation, let’s
now start the adventure of what needs to be learnt. …

This page intentionally left blank
xxxv
I cannot express enough the indebtedness I have toward all who have
supported me in my obsessive mission to bring sound animation knowledge
to all who seek it. In more recent times, I thank Claude Comair for having
the vision and selfl ess commitment of creating something as unique and
wonderful as the DigiPen Institute of Technology, as well as being able to
use the DigiPen student art in this book. Also, to Raymond Yan for making
my journey at DigiPen so pleasantly inspirational. I thank, too, the faculty
of DigiPen for their support, ideas, and inspiration — each one of them is
an amazing artist in his or her own right and teachers par excellence, who
somehow teach me something new and important each and every day.
I thank friends and family, near and far, who have tolerated my passive-
obsessiveness, and especially Ken Rowe for being a stalwart friend and
colleague, who has helped me keep the fl ames of my Animaticus Foundation
and 2D Or Not 2D Animation Festival dreams alive. I sincerely thank, too, all
those kind and generous folks at Focal Press, who for some reason or other
seem keen to publish my ramblings and who have helped focus the diff use
and vague into the tangible.
And fi nally, with all my heart, I thank you dear Saille, for you have somehow
managed to endure all of this without a single complaint! Even though I have
driven myself to exhaustion and isolation in pursuit of everything at times,
you still manage to give reason for my smiles and keep my sagging spirits
alive. Thank you, dear Saille. Even when I have been mentally and physically
lost through the distractions and challenges of creating this book, you have
kept me going through your unconditional love and understanding. Truly,
without you, none of this could have ever happened!
Acknowledgments

This page intentionally left blank
How to Be an Animator
PART 1

This page intentionally left blank
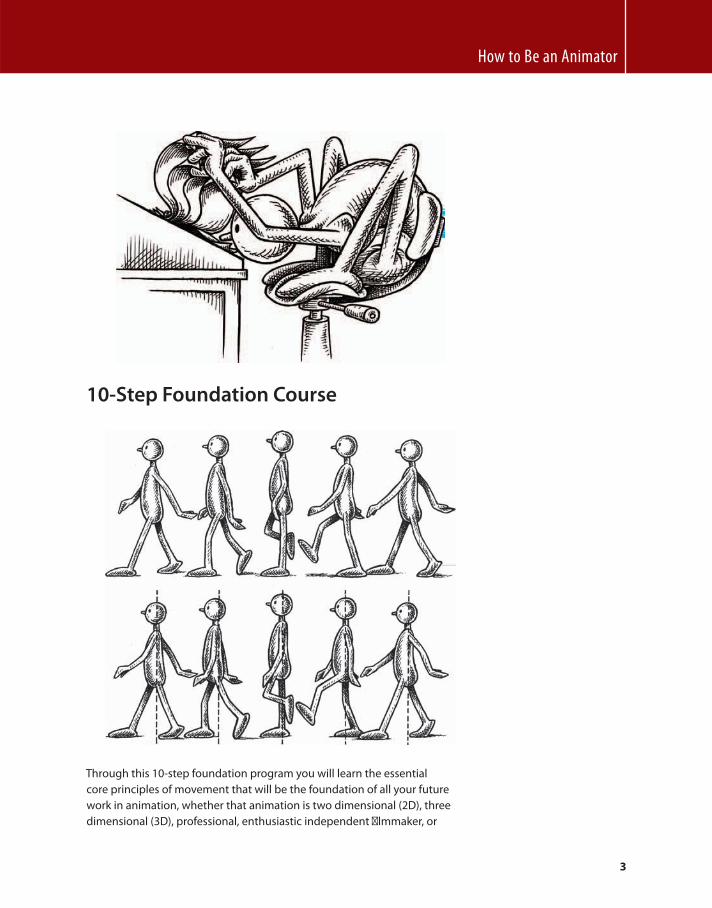
How to Be an Animator
3
10-Step Foundation Course
Through this 10-step foundation program you will learn the essential
core principles of movement that will be the foundation of all your future
work in animation, whether that animation is two dimensional (2D), three
dimensional (3D), professional, enthusiastic independent fi lmmaker, or

How to Make Animated Films
4
Note
If you want further one-on-one feedback on anything you are doing by
the author, please read Appendix 2 .
Either way, if you follow the lectures, guidelines, and assignments as
indicated, you should fi nd the process of learning to be an animator easier
and more comprehensive.
otherwise. As with a regular school curriculum I have broken down the key
principles into 10 clearly defi nable master-class lessons, MC 1 – MC 10. It is
very important, however, that you don’t jump the sequence in any way. Start
with MC 1 and don’t begin any other exercises until you have mastered that
one fi rst.
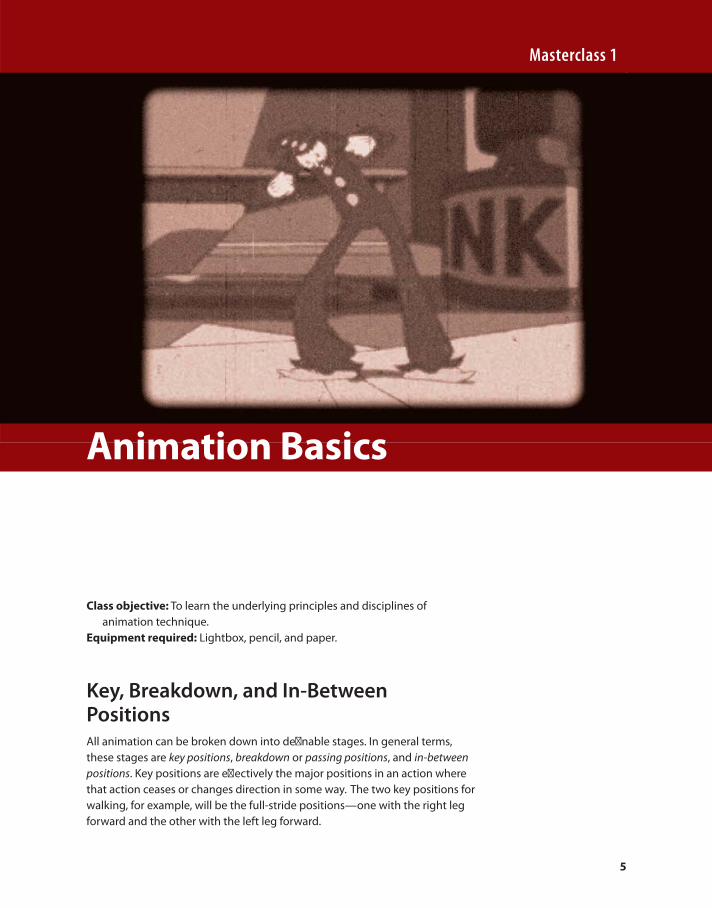
5
Class objective: To learn the underlying principles and disciplines of
animation technique.
Equipment required: Lightbox, pencil, and paper.
Key, Breakdown, and In-Between Positions All animation can be broken down into defi nable stages. In general terms,
these stages are key positions , breakdown or passing positions , and in-between
positions . Key positions are eff ectively the major positions in an action where
that action ceases or changes direction in some way. The two key positions for
walking, for example, will be the full-stride positions — one with the right leg
forward and the other with the left leg forward.
Masterclass 1
Animation Basics
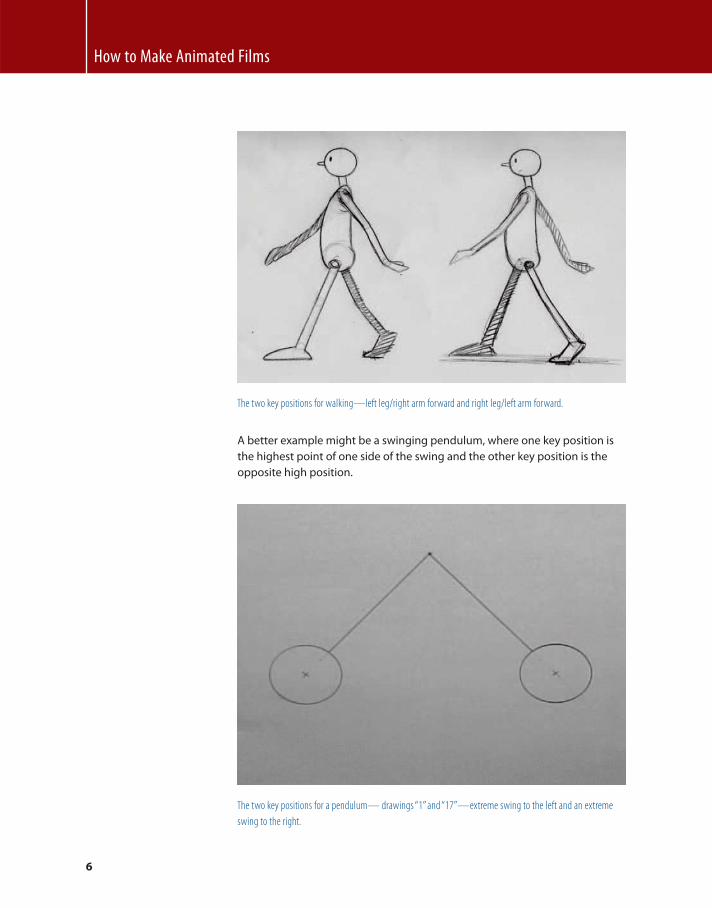
How to Make Animated Films
6
The two key positions for walking — left leg/right arm forward and right leg/left arm forward.
A better example might be a swinging pendulum, where one key position is
the highest point of one side of the swing and the other key position is the
opposite high position.
The two key positions for a pendulum — drawings “1” and “17” — extreme swing to the left and an extreme
swing to the right.
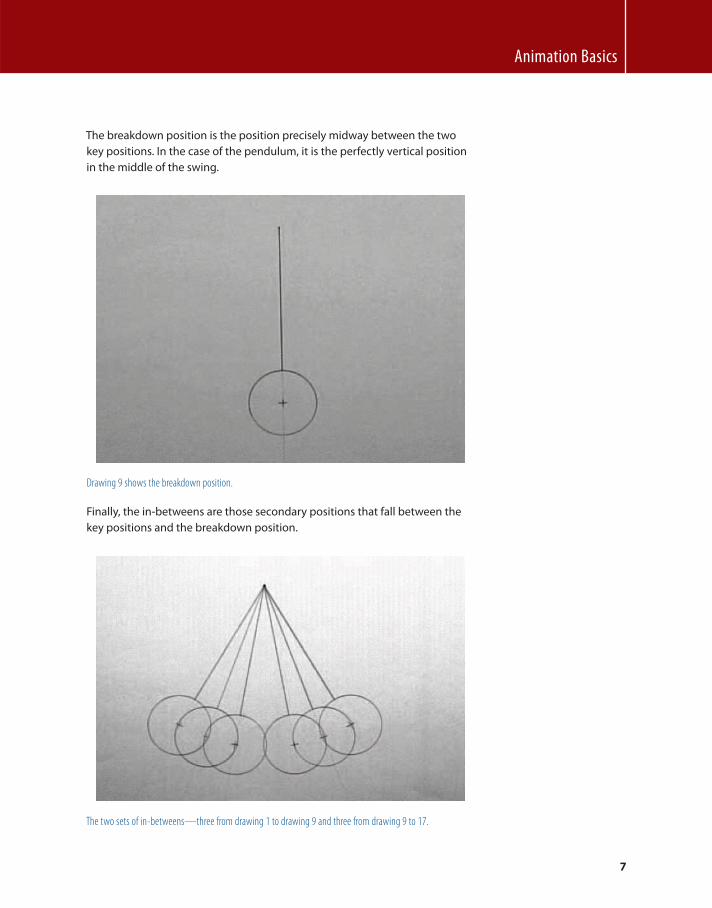
Animation Basics
7
Drawing 9 shows the breakdown position .
Finally, the in-betweens are those secondary positions that fall between the
key positions and the breakdown position.
The two sets of in-betweens — three from drawing 1 to drawing 9 and three from drawing 9 to 17.
The breakdown position is the position precisely midway between the two
key positions. In the case of the pendulum, it is the perfectly vertical position
in the middle of the swing.

How to Make Animated Films
8
In the case of the pendulum, we will have two key positions, one in-between
position, and three in-between positions on either side, giving us nine
drawings (or positions) in total for one swing.
The full set of drawings for the pendulum swing, including the key and breakdown positions, which are shaded.
Creating Key Positions With the understanding that we need key, breakdown, and in-between
positions to create a sequence of animation, we should now look at the
process of in-betweening , which applies as much to the breakdown drawing
as it does to the in-betweens. Let us return to our swinging pendulum and
consider the way to approach it. First, using a fresh sheet of animation paper,
select a fulcrum (or point) from which the pendulum will swing. The best
location to place this will be along the central/vertical line of the fi eld guide,
which can be placed beneath the paper with the lightbox on. Put a single
dot somewhere along this line, which will represent the point from which the
pendulum will swing.
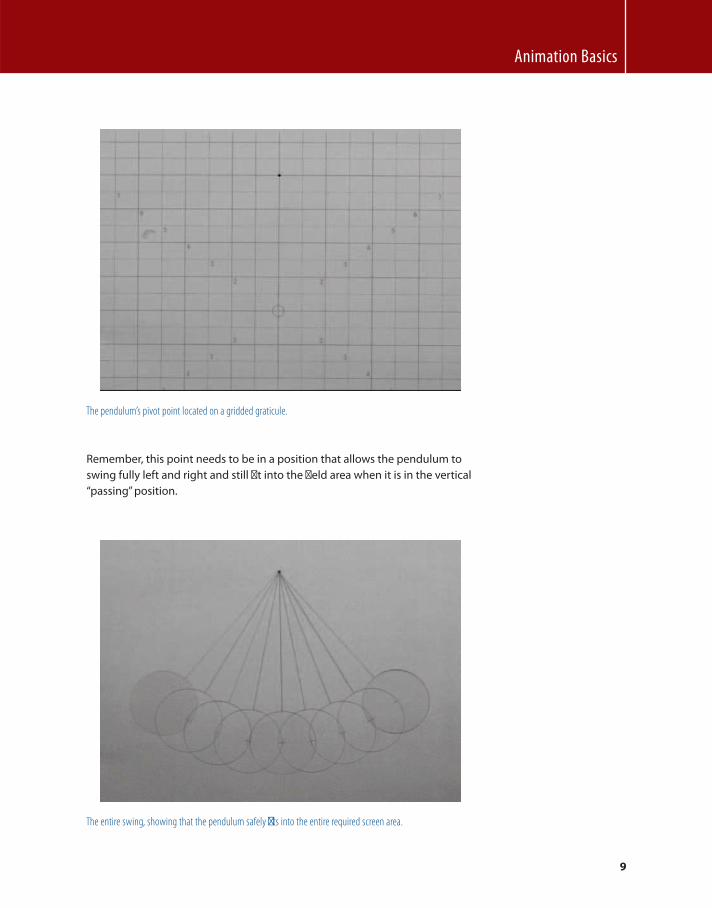
Animation Basics
9
The pendulum’s pivot point located on a gridded graticule.
Remember, this point needs to be in a position that allows the pendulum to
swing fully left and right and still fi t into the fi eld area when it is in the vertical
“ passing ” position.
The entire swing, showing that the pendulum safely fi ts into the entire required screen area.
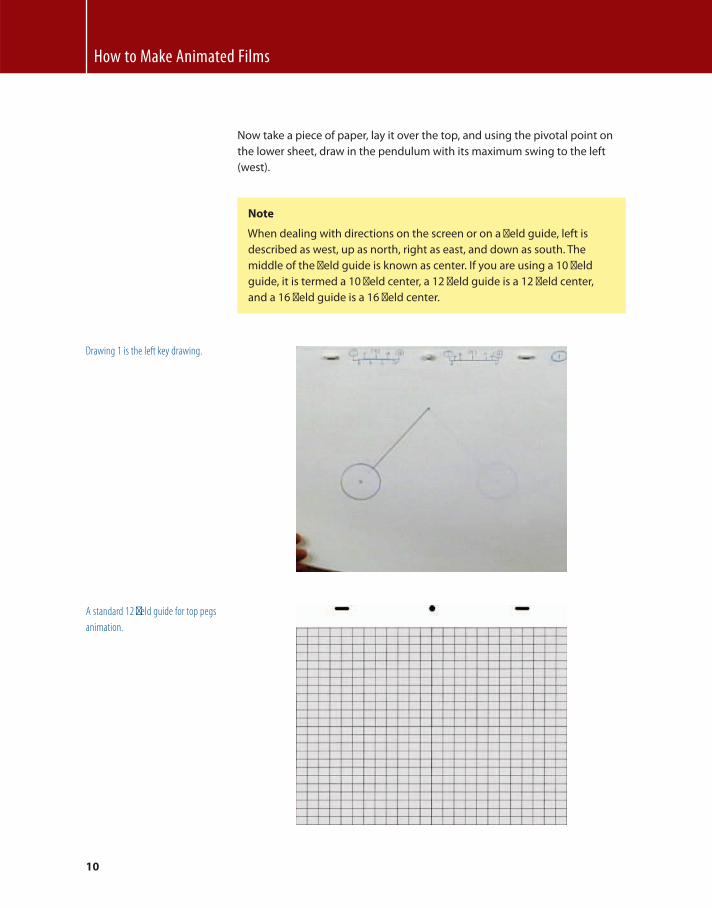
How to Make Animated Films
10
Note
When dealing with directions on the screen or on a fi eld guide, left is
described as west, up as north, right as east, and down as south. The
middle of the fi eld guide is known as center. If you are using a 10 fi eld
guide, it is termed a 10 fi eld center, a 12 fi eld guide is a 12 fi eld center,
and a 16 fi eld guide is a 16 fi eld center.
A standard 12 fi eld guide for top pegs
animation.
Now take a piece of paper, lay it over the top, and using the pivotal point on
the lower sheet, draw in the pendulum with its maximum swing to the left
(west).
Drawing 1 is the left key drawing .
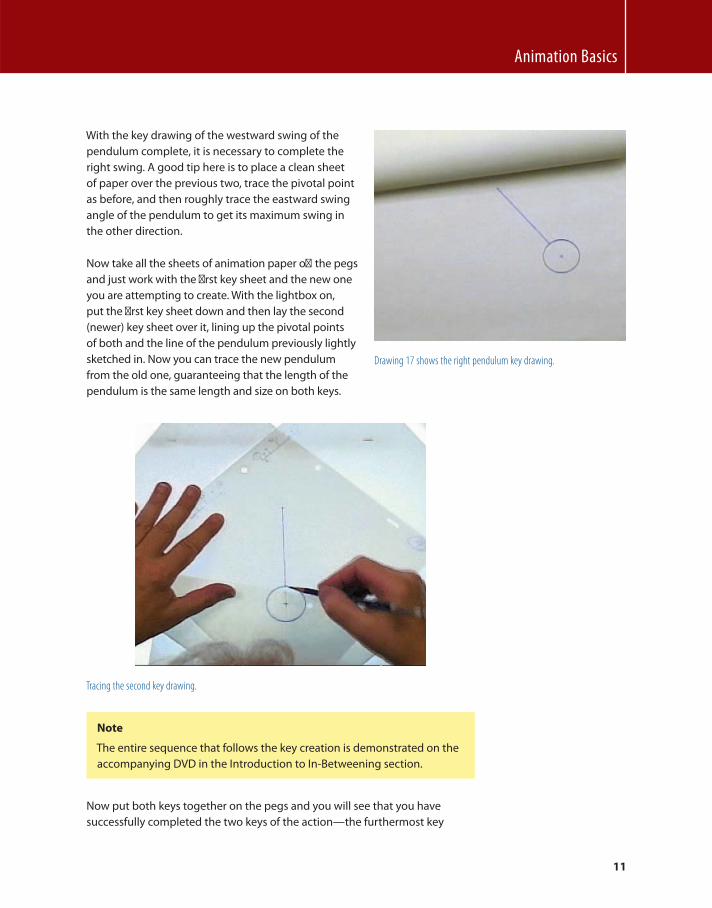
Animation Basics
11
With the key drawing of the westward swing of the
pendulum complete, it is necessary to complete the
right swing. A good tip here is to place a clean sheet
of paper over the previous two, trace the pivotal point
as before, and then roughly trace the eastward swing
angle of the pendulum to get its maximum swing in
the other direction.
Drawing 17 shows the right p endulum key drawing.
Now take all the sheets of animation paper off the pegs
and just work with the fi rst key sheet and the new one
you are attempting to create. With the lightbox on,
put the fi rst key sheet down and then lay the second
(newer) key sheet over it, lining up the pivotal points
of both and the line of the pendulum previously lightly
sketched in. Now you can trace the new pendulum
from the old one, guaranteeing that the length of the
pendulum is the same length and size on both keys.
Tracing the second key drawing.
Note
The entire sequence that follows the key creation is demonstrated on the
accompanying DVD in the Introduction to In-Betweening section.
Now put both keys together on the pegs and you will see that you have
successfully completed the two keys of the action — the furthermost key
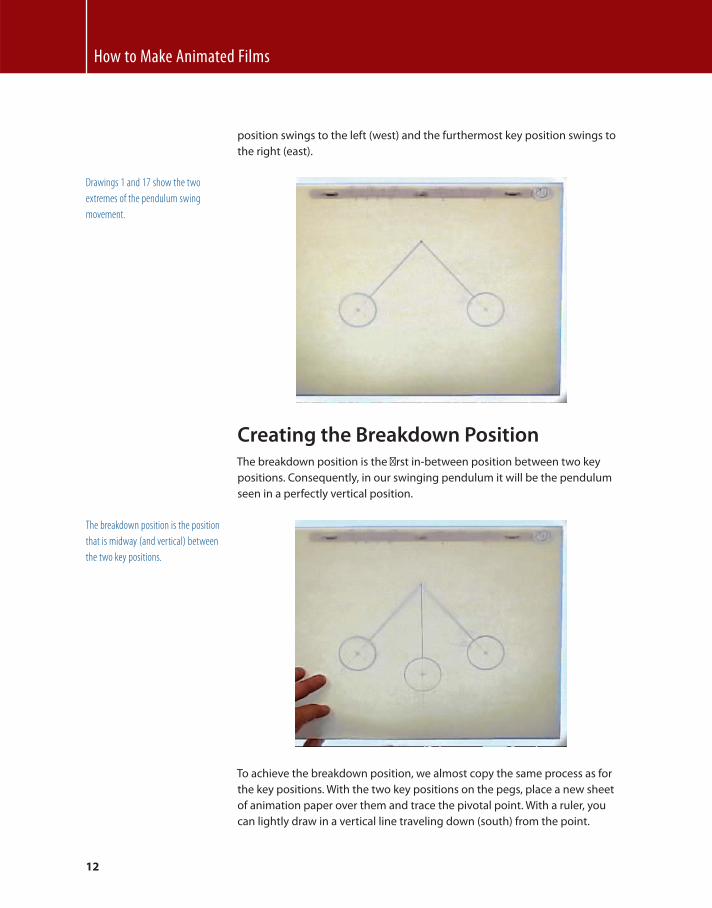
How to Make Animated Films
12
Creating the Breakdown Position The breakdown position is the fi rst in-between position between two key
positions. Consequently, in our swinging pendulum it will be the pendulum
seen in a perfectly vertical position.
To achieve the breakdown position, we almost copy the same process as for
the key positions. With the two key positions on the pegs, place a new sheet
of animation paper over them and trace the pivotal point. With a ruler, you
can lightly draw in a vertical line traveling down (south) from the point.
Drawings 1 and 17 show the two
extremes of the pendulum swing
movement.
The breakdown position is the position
that is midway (and vertical) between
the two key positions.
position swings to the left (west) and the furthermost key position swings to
the right (east).
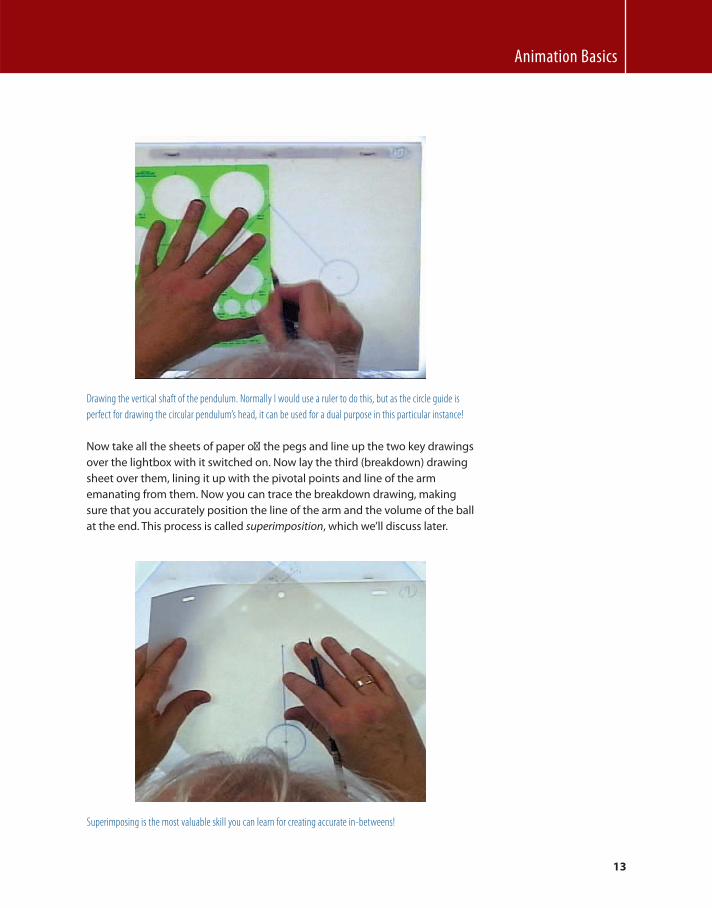
Animation Basics
13
Drawing the vertical shaft of the pendulum. Normally I would use a ruler to do this, but as the circle guide is
perfect for drawing the circular pendulum’s head, it can be used for a dual purpose in this particular instance!
Now take all the sheets of paper off the pegs and line up the two key drawings
over the lightbox with it switched on. Now lay the third (breakdown) drawing
sheet over them, lining it up with the pivotal points and line of the arm
emanating from them. Now you can trace the breakdown drawing, making
sure that you accurately position the line of the arm and the volume of the ball
at the end. This process is called superimposition , which we’ll discuss later.
Superimposing is the most valuable skill you can learn for creating accurate in-betweens!
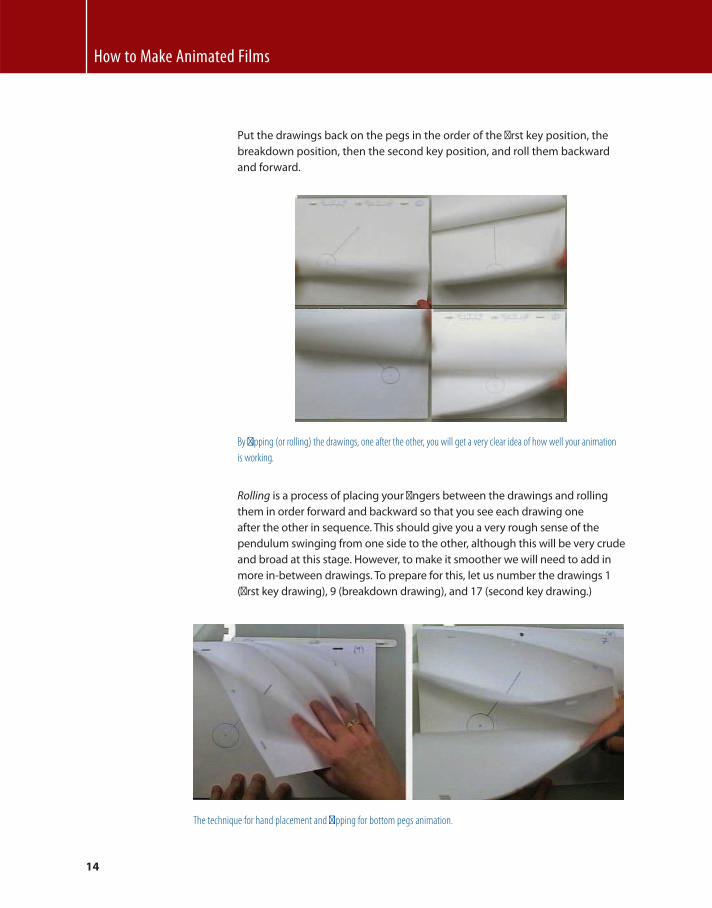
How to Make Animated Films
14
Put the drawings back on the pegs in the order of the fi rst key position, the
breakdown position, then the second key position, and roll them backward
and forward.
By fl ipping (or rolling) the drawings, one after the other, you will get a very clear idea of how well your animation
is working.
Rolling is a process of placing your fi ngers between the drawings and rolling
them in order forward and backward so that you see each drawing one
after the other in sequence. This should give you a very rough sense of the
pendulum swinging from one side to the other, although this will be very crude
and broad at this stage. However, to make it smoother we will need to add in
more in-between drawings. To prepare for this, let us number the drawings 1
(fi rst key drawing), 9 (breakdown drawing), and 17 (second key drawing.)
The technique for hand placement and fl ipping for bottom pegs animation.
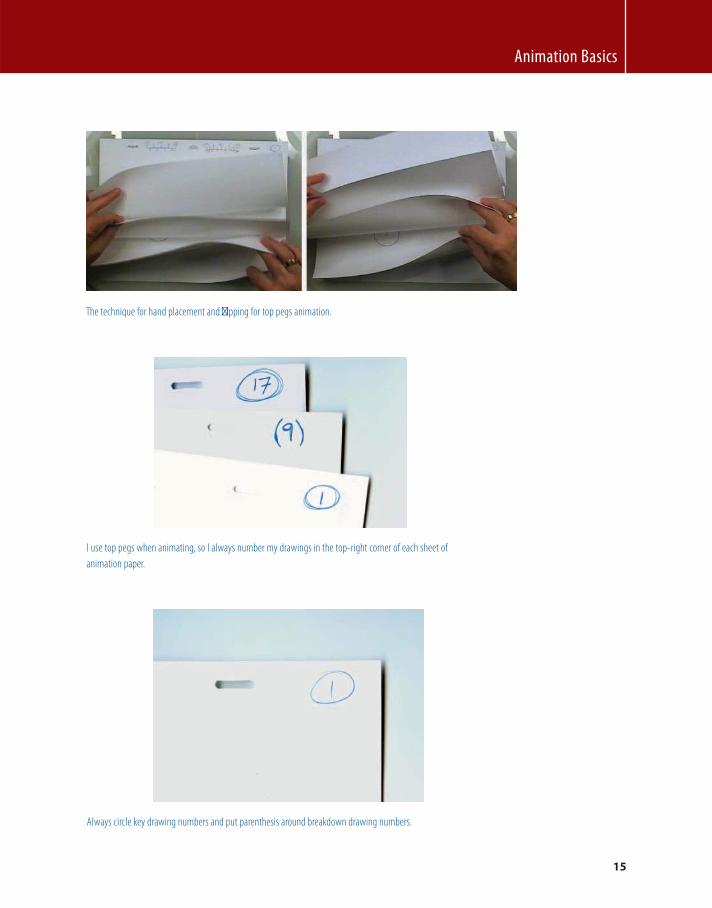
Animation Basics
15
The technique for hand placement and fl ipping for top pegs animation.
I use top pegs when animating, so I always number my drawings in the top-right corner of each sheet of
animation paper.
Always circle key drawing numbers and put parenthesis around breakdown drawing numbers.
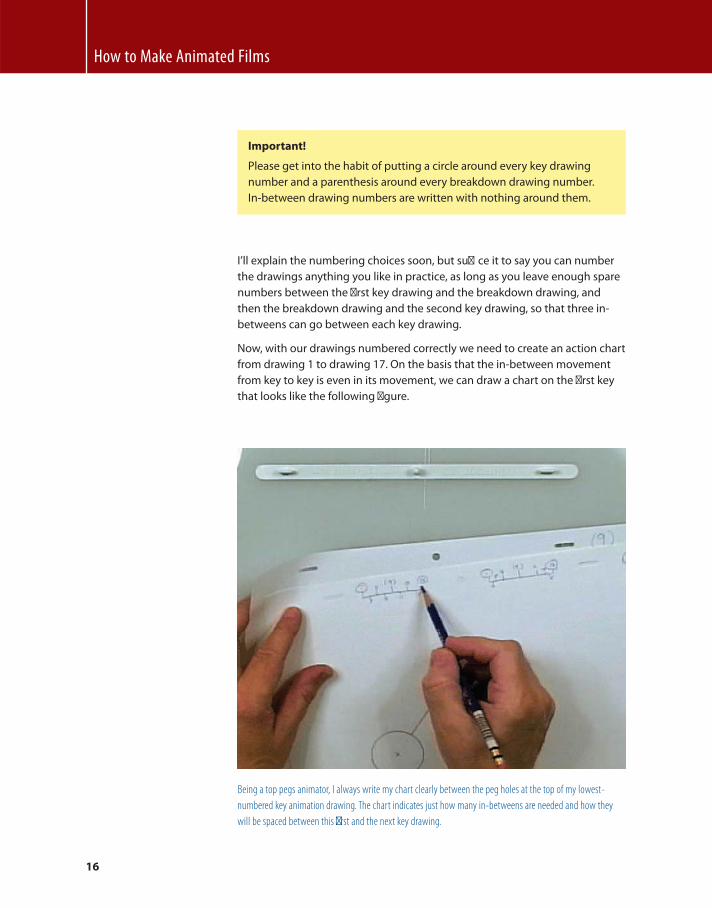
How to Make Animated Films
16
Important!
Please get into the habit of putting a circle around every key drawing
number and a parenthesis around every breakdown drawing number.
In-between drawing numbers are written with nothing around them.
I’ll explain the numbering choices soon, but suffi ce it to say you can number
the drawings anything you like in practice, as long as you leave enough spare
numbers between the fi rst key drawing and the breakdown drawing, and
then the breakdown drawing and the second key drawing, so that three in-
betweens can go between each key drawing.
Now, with our drawings numbered correctly we need to create an action chart
from drawing 1 to drawing 17. On the basis that the in-between movement
from key to key is even in its movement, we can draw a chart on the fi rst key
that looks like the following fi gure.
Being a top pegs animator, I always write my chart clearly between the peg holes at the top of my lowest-
numbered key animation drawing. The chart indicates just how many in-betweens are needed and how they
will be spaced between this fi rst and the next key drawing.
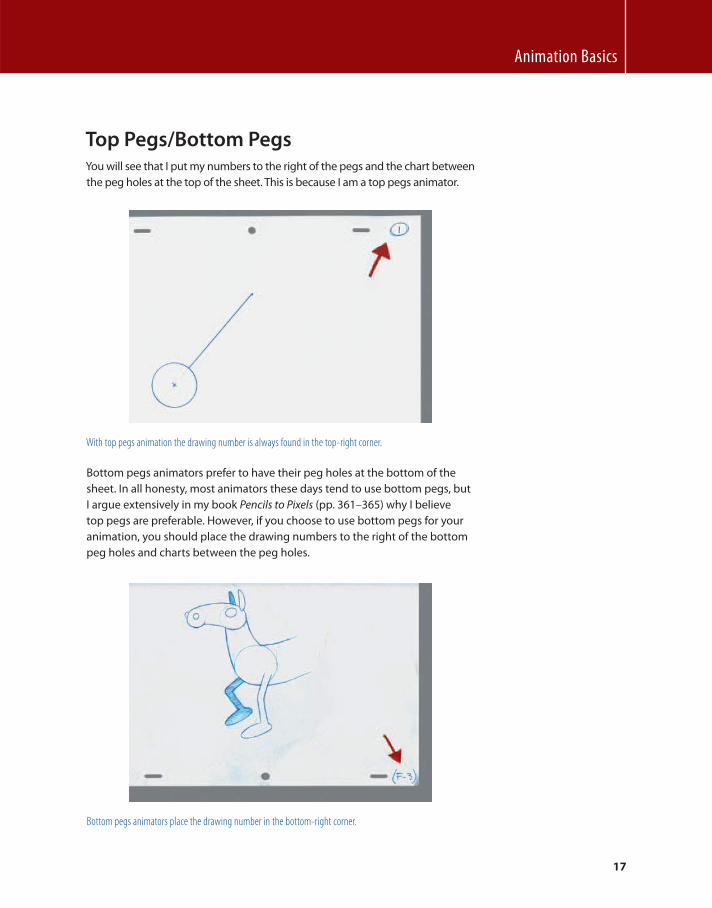
Animation Basics
17
Top Pegs/Bottom Pegs You will see that I put my numbers to the right of the pegs and the chart between
the peg holes at the top of the sheet. This is because I am a top pegs animator.
With top pegs animation the drawing number is always found in the top-right corner.
Bottom pegs animators prefer to have their peg holes at the bottom of the
sheet. In all honesty, most animators these days tend to use bottom pegs, but
I argue extensively in my book Pencils to Pixels (pp. 361 – 365) why I believe
top pegs are preferable. However, if you choose to use bottom pegs for your
animation, you should place the drawing numbers to the right of the bottom
peg holes and charts between the peg holes.
Bottom pegs animators place the drawing number in the bottom-right corner.
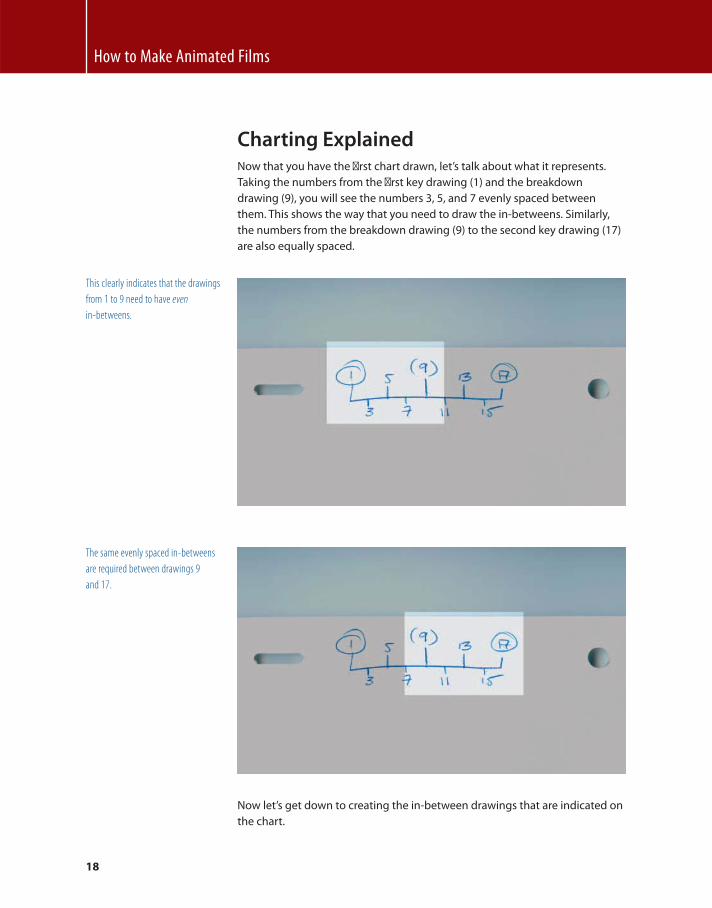
How to Make Animated Films
18
Charting Explained Now that you have the fi rst chart drawn, let’s talk about what it represents.
Taking the numbers from the fi rst key drawing (1) and the breakdown
drawing (9), you will see the numbers 3, 5, and 7 evenly spaced between
them. This shows the way that you need to draw the in-betweens. Similarly,
the numbers from the breakdown drawing (9) to the second key drawing (17)
are also equally spaced.
This clearly indicates that the drawings
from 1 to 9 need to have even
in-betweens.
The same evenly spaced in-betweens
are required between drawings 9
and 17.
Now let’s get down to creating the in-between drawings that are indicated on
the chart.
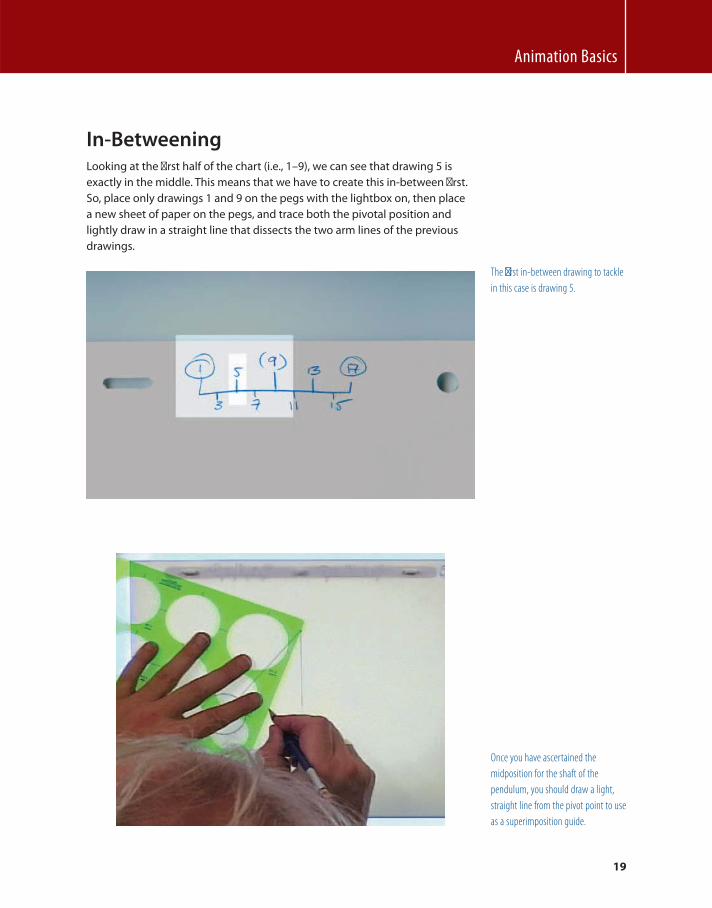
Animation Basics
19
In-Betweening Looking at the fi rst half of the chart (i.e., 1 – 9), we can see that drawing 5 is
exactly in the middle. This means that we have to create this in-between fi rst.
So, place only drawings 1 and 9 on the pegs with the lightbox on, then place
a new sheet of paper on the pegs, and trace both the pivotal position and
lightly draw in a straight line that dissects the two arm lines of the previous
drawings.
The fi rst in-between drawing to tackle
in this case is drawing 5.
Once you have ascertained the
midposition for the shaft of the
pendulum, you should draw a light,
straight line from the pivot point to use
as a superimposition guide.
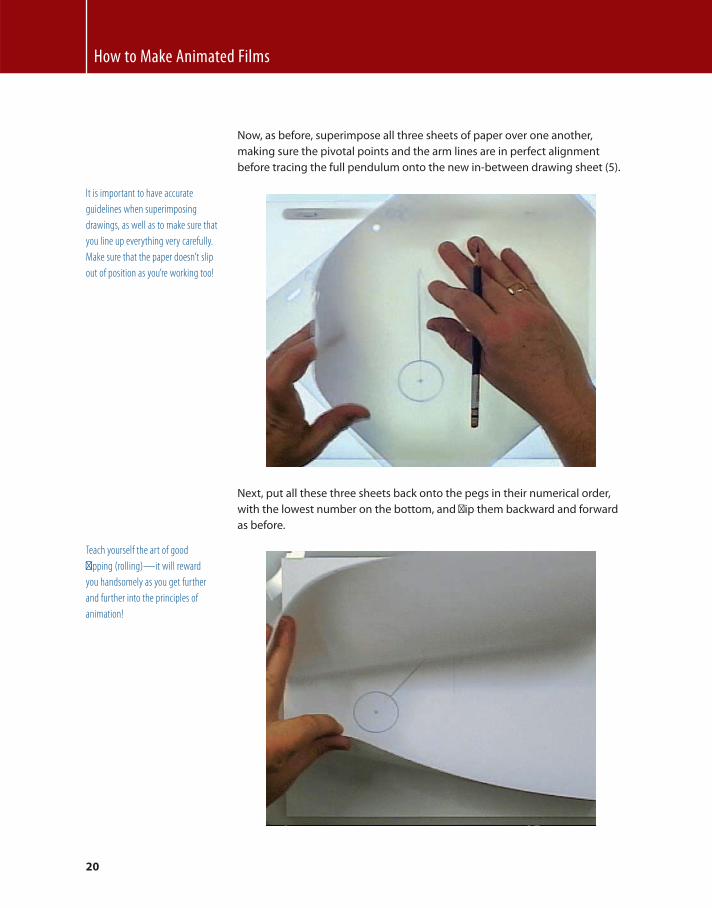
How to Make Animated Films
20
Now, as before, superimpose all three sheets of paper over one another,
making sure the pivotal points and the arm lines are in perfect alignment
before tracing the full pendulum onto the new in-between drawing sheet (5).
Next, put all these three sheets back onto the pegs in their numerical order,
with the lowest number on the bottom, and fl ip them backward and forward
as before.
It is important to have accurate
guidelines when superimposing
drawings, as well as to make sure that
you line up everything very carefully.
Make sure that the paper doesn’t slip
out of position as you’re working too!
Teach yourself the art of good
fl ipping (rolling) — it will reward
you handsomely as you get further
and further into the principles of
animation!
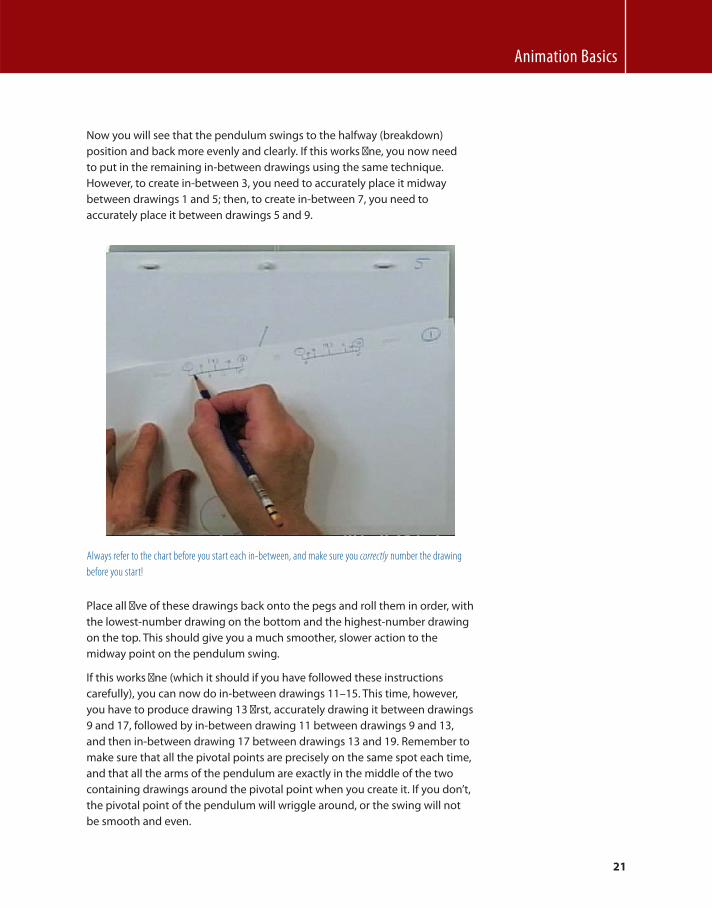
Animation Basics
21
Always refer to the chart before you start each in-between, and make sure you correctly number the drawing
before you start!
Place all fi ve of these drawings back onto the pegs and roll them in order, with
the lowest-number drawing on the bottom and the highest-number drawing
on the top. This should give you a much smoother, slower action to the
midway point on the pendulum swing.
If this works fi ne (which it should if you have followed these instructions
carefully), you can now do in-between drawings 11 – 15. This time, however,
you have to produce drawing 13 fi rst, accurately drawing it between drawings
9 and 17, followed by in-between drawing 11 between drawings 9 and 13,
and then in-between drawing 17 between drawings 13 and 19. Remember to
make sure that all the pivotal points are precisely on the same spot each time,
and that all the arms of the pendulum are exactly in the middle of the two
containing drawings around the pivotal point when you create it. If you don’t,
the pivotal point of the pendulum will wriggle around, or the swing will not
be smooth and even.
Now you will see that the pendulum swings to the halfway (breakdown)
position and back more evenly and clearly. If this works fi ne, you now need
to put in the remaining in-between drawings using the same technique.
However, to create in-between 3, you need to accurately place it midway
between drawings 1 and 5; then, to create in-between 7, you need to
accurately place it between drawings 5 and 9.
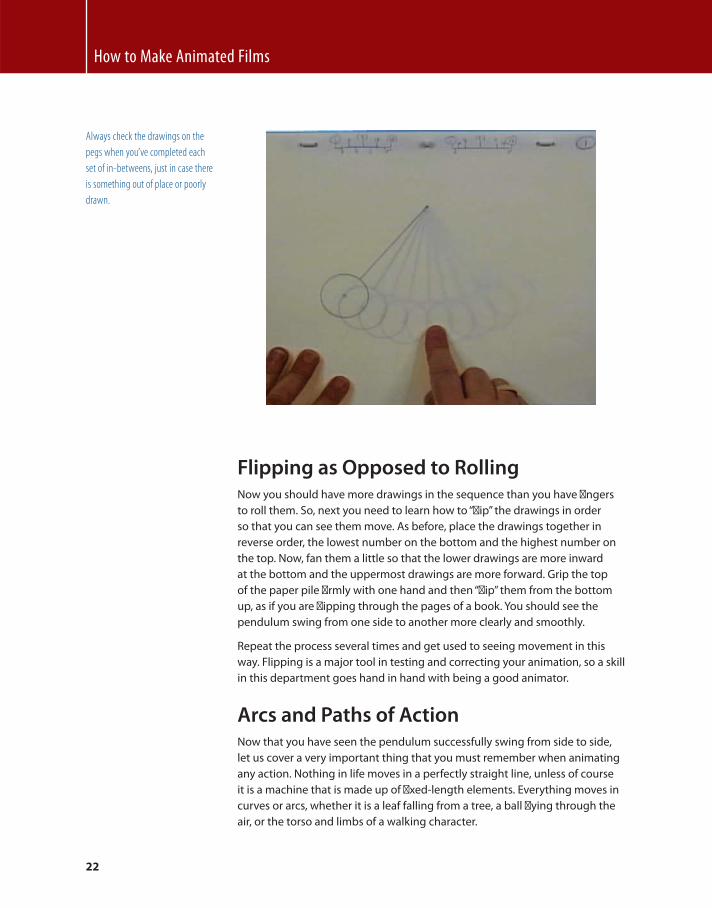
How to Make Animated Films
22
Always check the drawings on the
pegs when you’ve completed each
set of in-betweens, just in case there
is something out of place or poorly
drawn.
Flipping as Opposed to Rolling Now you should have more drawings in the sequence than you have fi ngers
to roll them. So, next you need to learn how to “ fl ip ” the drawings in order
so that you can see them move. As before, place the drawings together in
reverse order, the lowest number on the bottom and the highest number on
the top. Now, fan them a little so that the lower drawings are more inward
at the bottom and the uppermost drawings are more forward. Grip the top
of the paper pile fi rmly with one hand and then “ fl ip ” them from the bottom
up, as if you are fl ipping through the pages of a book. You should see the
pendulum swing from one side to another more clearly and smoothly.
Repeat the process several times and get used to seeing movement in this
way. Flipping is a major tool in testing and correcting your animation, so a skill
in this department goes hand in hand with being a good animator.
Arcs and Paths of Action Now that you have seen the pendulum successfully swing from side to side,
let us cover a very important thing that you must remember when animating
any action. Nothing in life moves in a perfectly straight line, unless of course
it is a machine that is made up of fi xed-length elements. Everything moves in
curves or arcs, whether it is a leaf falling from a tree, a ball fl ying through the
air, or the torso and limbs of a walking character.
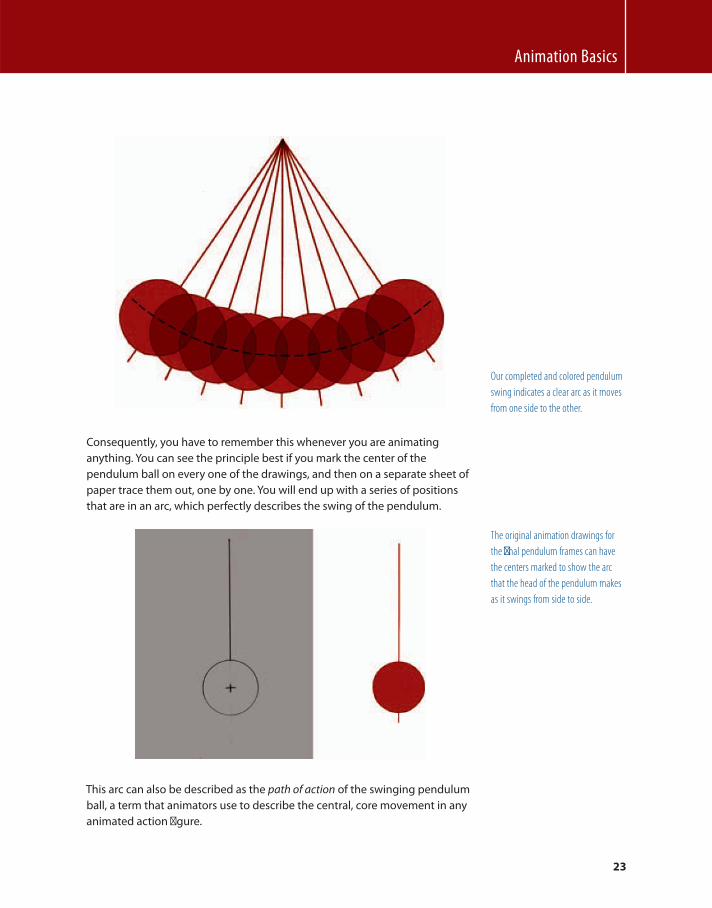
Animation Basics
23
Consequently, you have to remember this whenever you are animating
anything. You can see the principle best if you mark the center of the
pendulum ball on every one of the drawings, and then on a separate sheet of
paper trace them out, one by one. You will end up with a series of positions
that are in an arc, which perfectly describes the swing of the pendulum.
The original animation drawings for
the fi nal pendulum frames can have
the centers marked to show the arc
that the head of the pendulum makes
as it swings from side to side.
Our completed and colored pendulum
swing indicates a clear arc as it moves
from one side to the other.
This arc can also be described as the path of action of the swinging pendulum
ball, a term that animators use to describe the central, core movement in any
animated action fi gure.
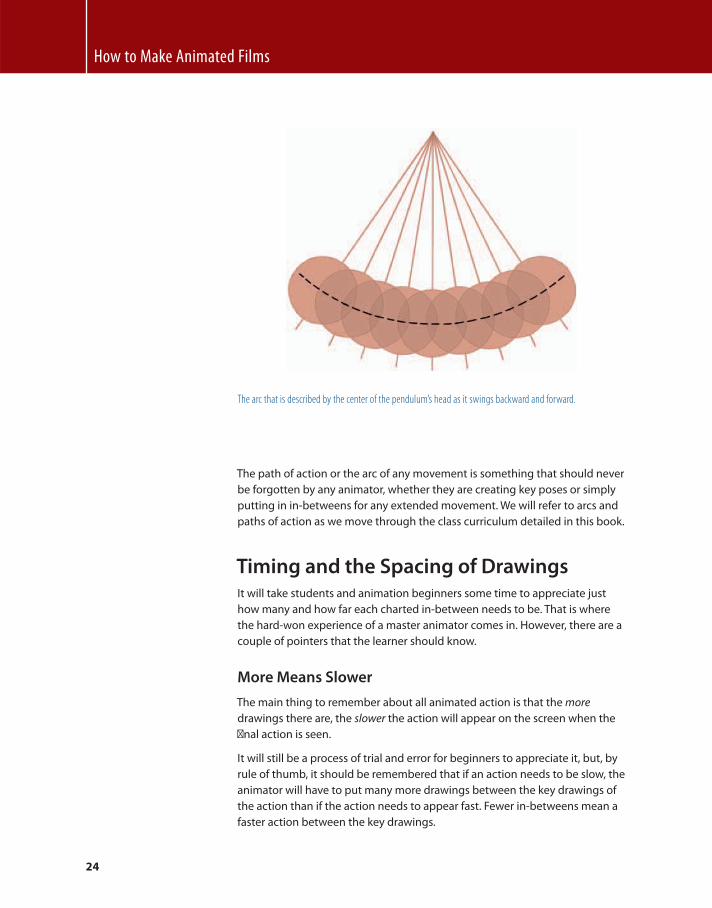
How to Make Animated Films
24
The arc that is described by the center of the pendulum’s head as it swings backward and forward.
The path of action or the arc of any movement is something that should never
be forgotten by any animator, whether they are creating key poses or simply
putting in in-betweens for any extended movement. We will refer to arcs and
paths of action as we move through the class curriculum detailed in this book.
Timing and the Spacing of Drawings It will take students and animation beginners some time to appreciate just
how many and how far each charted in-between needs to be. That is where
the hard-won experience of a master animator comes in. However, there are a
couple of pointers that the learner should know.
More Means Slower
The main thing to remember about all animated action is that the more
drawings there are, the slower the action will appear on the screen when the
fi nal action is seen.
It will still be a process of trial and error for beginners to appreciate it, but, by
rule of thumb, it should be remembered that if an action needs to be slow, the
animator will have to put many more drawings between the key drawings of
the action than if the action needs to appear fast. Fewer in-betweens mean a
faster action between the key drawings.
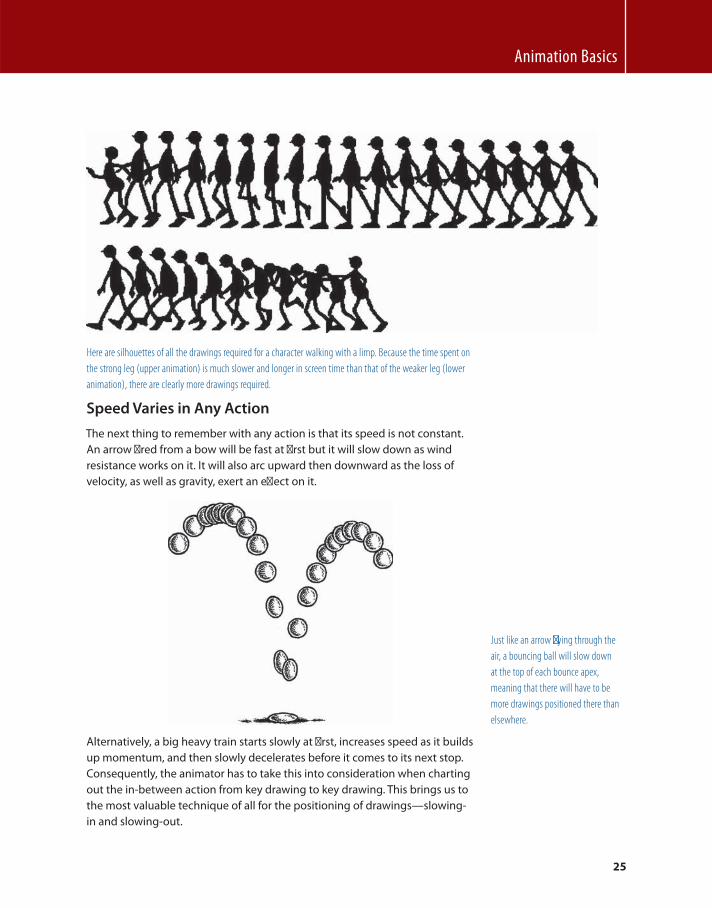
Animation Basics
25
Here are silhouettes of all the drawings required for a character walking with a limp. Because the time spent on
the strong leg (upper animation) is much slower and longer in screen time than that of the weaker leg (lower
animation), there are clearly more drawings required.
Speed Varies in Any Action
The next thing to remember with any action is that its speed is not constant.
An arrow fi red from a bow will be fast at fi rst but it will slow down as wind
resistance works on it. It will also arc upward then downward as the loss of
velocity, as well as gravity, exert an eff ect on it.
Just like an arrow fl ying through the
air, a bouncing ball will slow down
at the top of each bounce apex,
meaning that there will have to be
more drawings positioned there than
elsewhere.
Alternatively, a big heavy train starts slowly at fi rst, increases speed as it builds
up momentum, and then slowly decelerates before it comes to its next stop.
Consequently, the animator has to take this into consideration when charting
out the in-between action from key drawing to key drawing. This brings us to
the most valuable technique of all for the positioning of drawings — slowing-
in and slowing-out.
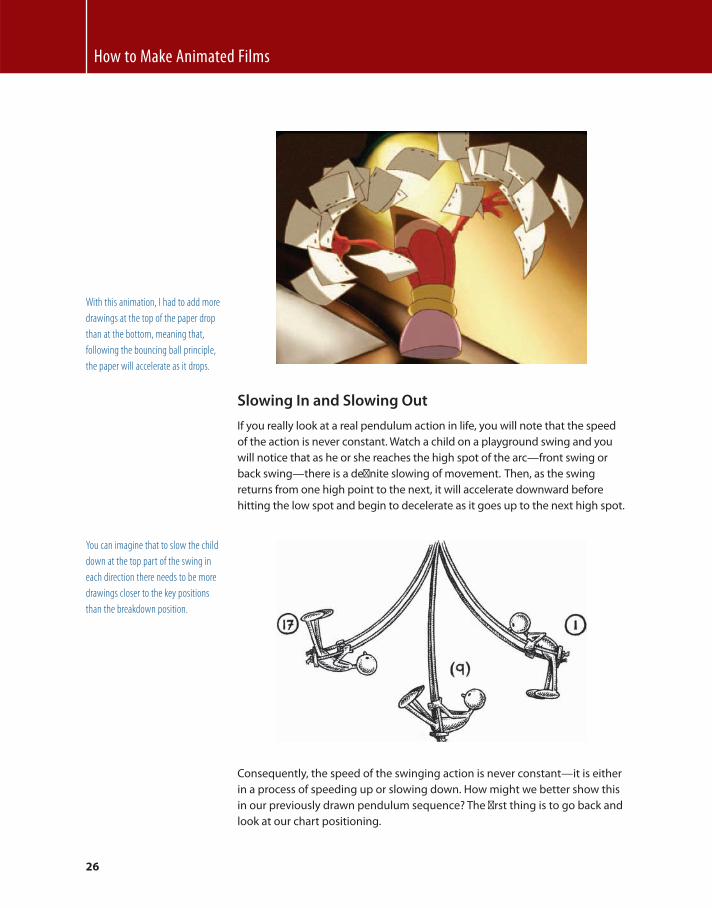
How to Make Animated Films
26
With this animation, I had to add more
drawings at the top of the paper drop
than at the bottom, meaning that,
following the bouncing ball principle,
the paper will accelerate as it drops.
Slowing In and Slowing Out
If you really look at a real pendulum action in life, you will note that the speed
of the action is never constant. Watch a child on a playground swing and you
will notice that as he or she reaches the high spot of the arc — front swing or
back swing — there is a defi nite slowing of movement. Then, as the swing
returns from one high point to the next, it will accelerate downward before
hitting the low spot and begin to decelerate as it goes up to the next high spot.
You can imagine that to slow the child
down at the top part of the swing in
each direction there needs to be more
drawings closer to the key positions
than the breakdown position.
Consequently, the speed of the swinging action is never constant — it is either
in a process of speeding up or slowing down. How might we better show this
in our previously drawn pendulum sequence? The fi rst thing is to go back and
look at our chart positioning.
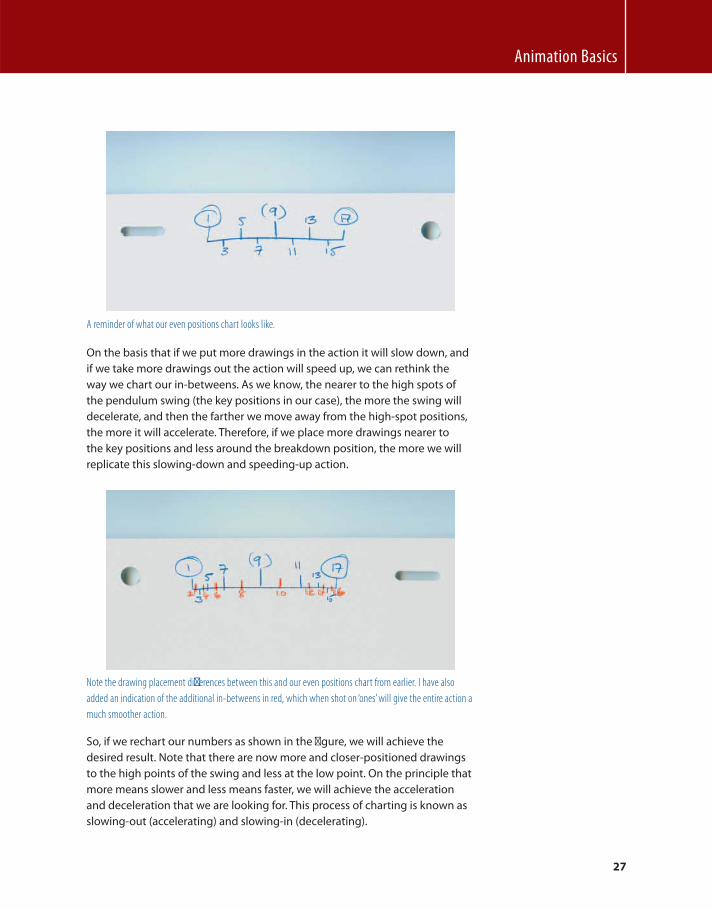
Animation Basics
27
A reminder of what our even positions chart looks like.
On the basis that if we put more drawings in the action it will slow down, and
if we take more drawings out the action will speed up, we can rethink the
way we chart our in-betweens. As we know, the nearer to the high spots of
the pendulum swing (the key positions in our case), the more the swing will
decelerate, and then the farther we move away from the high-spot positions,
the more it will accelerate. Therefore, if we place more drawings nearer to
the key positions and less around the breakdown position, the more we will
replicate this slowing-down and speeding-up action.
Note the drawing placement diff erences between this and our even positions chart from earlier. I have also
added an indication of the additional in-betweens in red, which when shot on ‘ones’ will give the entire action a
much smoother action.
So, if we rechart our numbers as shown in the fi gure, we will achieve the
desired result. Note that there are now more and closer-positioned drawings
to the high points of the swing and less at the low point. On the principle that
more means slower and less means faster, we will achieve the acceleration
and deceleration that we are looking for. This process of charting is known as
slowing-out (accelerating) and slowing-in (decelerating).
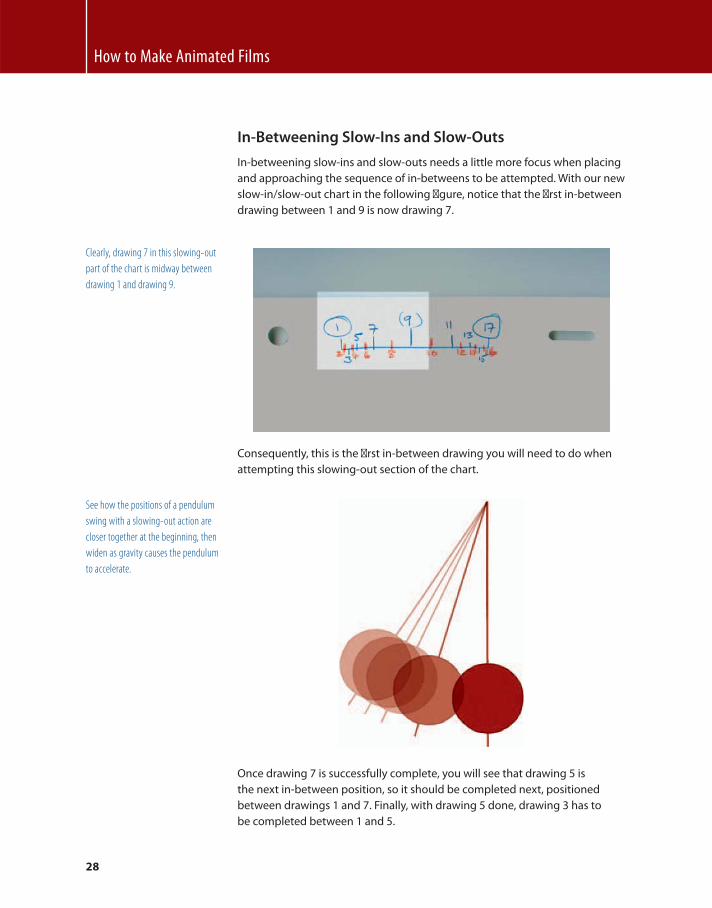
How to Make Animated Films
28
In-Betweening Slow-Ins and Slow-Outs
In-betweening slow-ins and slow-outs needs a little more focus when placing
and approaching the sequence of in-betweens to be attempted. With our new
slow-in/slow-out chart in the following fi gure, notice that the fi rst in-between
drawing between 1 and 9 is now drawing 7.
Clearly, drawing 7 in this slowing-out
part of the chart is midway between
drawing 1 and drawing 9.
Consequently, this is the fi rst in-between drawing you will need to do when
attempting this slowing-out section of the chart.
See how the positions of a pendulum
swing with a slowing-out action are
closer together at the beginning, then
widen as gravity causes the pendulum
to accelerate.
Once drawing 7 is successfully complete, you will see that drawing 5 is
the next in-between position, so it should be completed next, positioned
between drawings 1 and 7. Finally, with drawing 5 done, drawing 3 has to
be completed between 1 and 5.
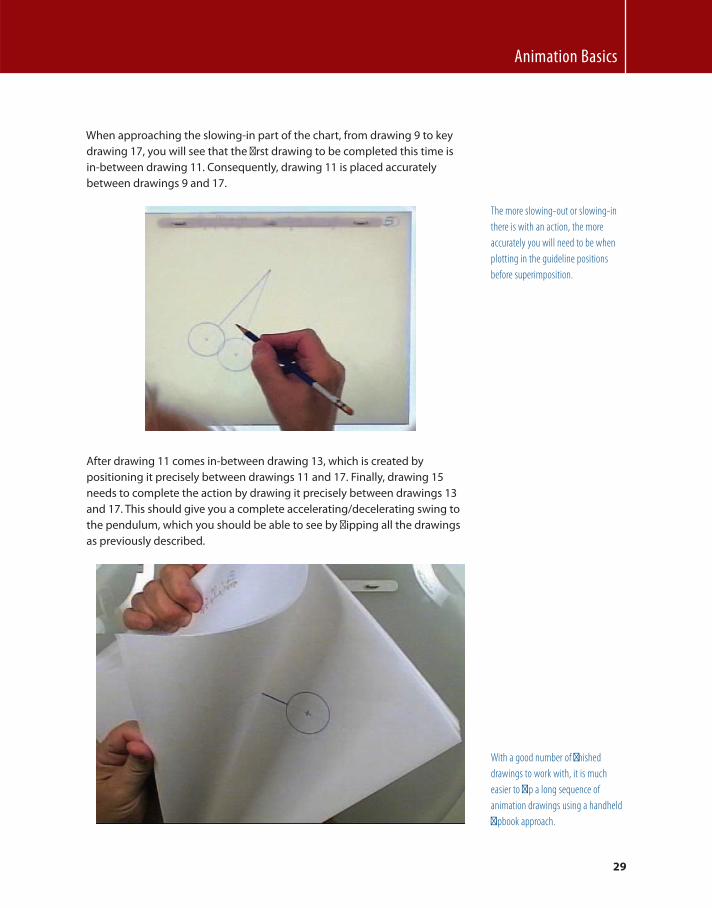
Animation Basics
29
When approaching the slowing-in part of the chart, from drawing 9 to key
drawing 17, you will see that the fi rst drawing to be completed this time is
in-between drawing 11. Consequently, drawing 11 is placed accurately
between drawings 9 and 17.
The more slowing-out or slowing-in
there is with an action, the more
accurately you will need to be when
plotting in the guideline positions
before superimposition.
After drawing 11 comes in-between drawing 13, which is created by
positioning it precisely between drawings 11 and 17. Finally, drawing 15
needs to complete the action by drawing it precisely between drawings 13
and 17. This should give you a complete accelerating/decelerating swing to
the pendulum, which you should be able to see by fl ipping all the drawings
as previously described.
With a good number of fi nished
drawings to work with, it is much
easier to fl ip a long sequence of
animation drawings using a handheld
fl ipbook approach.
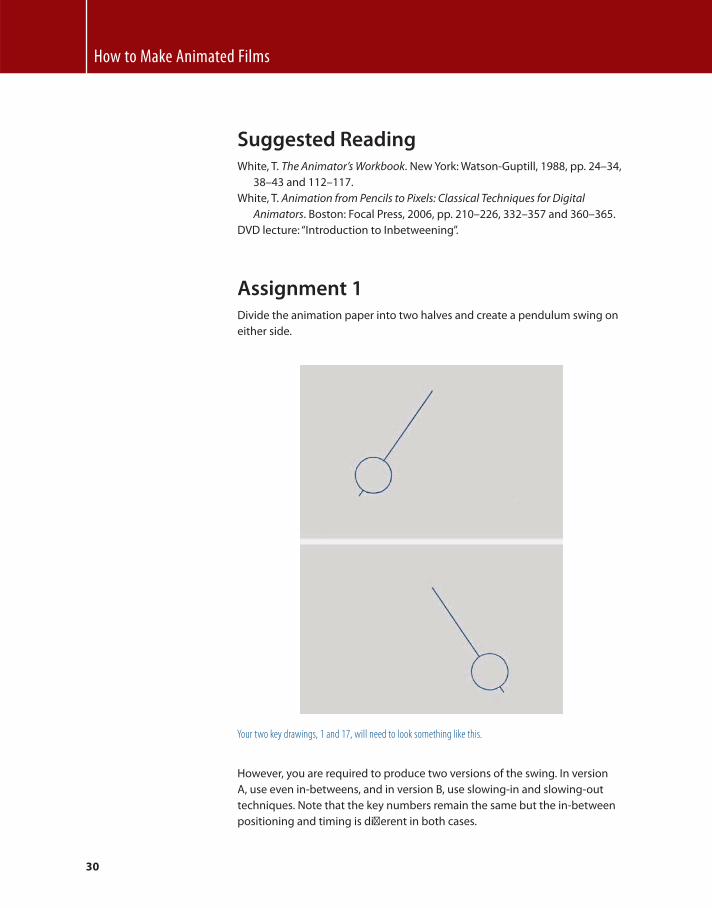
How to Make Animated Films
30
Suggested Reading White , T. The Animator’s Workbook . New York : Watson-Guptill , 1988 , pp. 24 – 34,
38 – 43 and 112 – 117.
White , T. Animation from Pencils to Pixels: Classical Techniques for Digital
Animators . Boston : Focal Press , 2006 , pp. 210 – 226, 332 – 357 and 360 – 365.
DVD lecture: “Introduction to Inbetweening”.
Assignment 1 Divide the animation paper into two halves and create a pendulum swing on
either side.
Your two key drawings, 1 and 17, will need to look something like this.
However, you are required to produce two versions of the swing. In version
A, use even in-betweens, and in version B, use slowing-in and slowing-out
techniques. Note that the key numbers remain the same but the in-between
positioning and timing is diff erent in both cases.
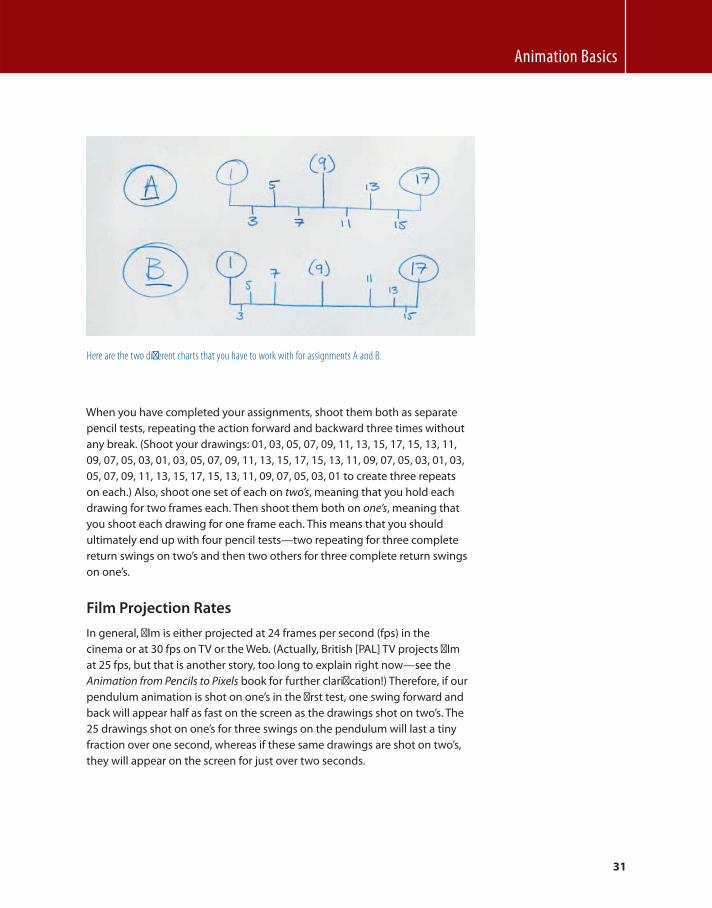
Animation Basics
31
Here are the two diff erent charts that you have to work with for assignments A and B.
When you have completed your assignments, shoot them both as separate
pencil tests, repeating the action forward and backward three times without
any break. (Shoot your drawings: 0 1 , 03, 05, 07, 09, 11, 13, 15, 17, 15, 13, 11,
09, 07, 05, 03, 01, 03, 05, 07, 09, 11, 13, 15, 17, 15, 13, 11, 09, 07, 05, 03, 01, 03,
05, 07, 09, 11, 13, 15, 17, 15, 13, 11, 09, 07, 05, 03, 01 to create three repeats
on each.) Also, shoot one set of each on two’s , meaning that you hold each
drawing for two frames each. Then shoot them both on one’s , meaning that
you shoot each drawing for one frame each. This means that you should
ultimately end up with four pencil tests — two repeating for three complete
return swings on two’s and then two others for three complete return swings
on one’s.
Film Projection Rates
In general, fi lm is either projected at 24 frames per second (fps) in the
cinema or at 30 fps on TV or the Web. (Actually, British [PAL] TV projects fi lm
at 25 fps, but that is another story, too long to explain right now — see the
Animation from Pencils to Pixels book for further clarifi cation!) Therefore, if our
pendulum animation is shot on one’s in the fi rst test, one swing forward and
back will appear half as fast on the screen as the drawings shot on two’s. The
25 drawings shot on one’s for three swings on the pendulum will last a tiny
fraction over one second, whereas if these same drawings are shot on two’s,
they will appear on the screen for just over two seconds.

This page intentionally left blank
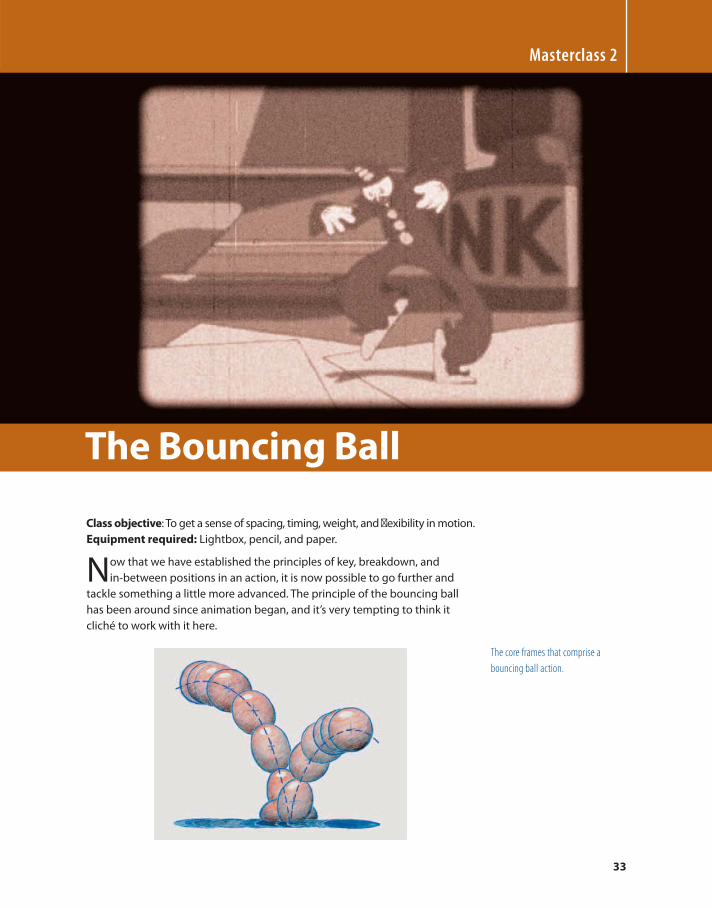
33
Class objective : To get a sense of spacing, timing, weight, and fl exibility in motion.
Equipment required: Lightbox, pencil, and paper.
Now that we have established the principles of key, breakdown, and
in-between positions in an action, it is now possible to go further and
tackle something a little more advanced. The principle of the bouncing ball
has been around since animation began, and it’s very tempting to think it
clich é to work with it here.
Masterclass 2
The Bouncing Ball
The core frames that comprise a
bouncing ball action.
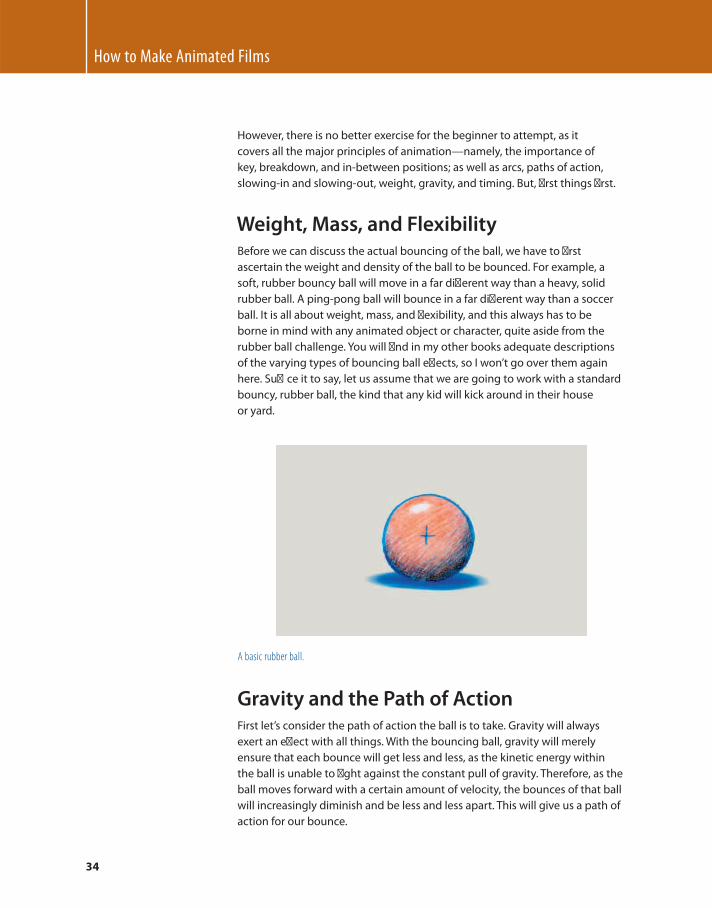
How to Make Animated Films
34
However, there is no better exercise for the beginner to attempt, as it
covers all the major principles of animation — namely, the importance of
key, breakdown, and in-between positions; as well as arcs, paths of action,
slowing-in and slowing-out, weight, gravity, and timing. But, fi rst things fi rst.
Weight, Mass, and Flexibility Before we can discuss the actual bouncing of the ball, we have to fi rst
ascertain the weight and density of the ball to be bounced. For example, a
soft, rubber bouncy ball will move in a far diff erent way than a heavy, solid
rubber ball. A ping-pong ball will bounce in a far diff erent way than a soccer
ball. It is all about weight, mass, and fl exibility, and this always has to be
borne in mind with any animated object or character, quite aside from the
rubber ball challenge. You will fi nd in my other books adequate descriptions
of the varying types of bouncing ball eff ects, so I won’t go over them again
here. Suffi ce it to say, let us assume that we are going to work with a standard
bouncy, rubber ball, the kind that any kid will kick around in their house
or yard.
A basic rubber ball.
Gravity and the Path of Action First let’s consider the path of action the ball is to take. Gravity will always
exert an eff ect with all things. With the bouncing ball, gravity will merely
ensure that each bounce will get less and less, as the kinetic energy within
the ball is unable to fi ght against the constant pull of gravity. Therefore, as the
ball moves forward with a certain amount of velocity, the bounces of that ball
will increasingly diminish and be less and less apart. This will give us a path of
action for our bounce.
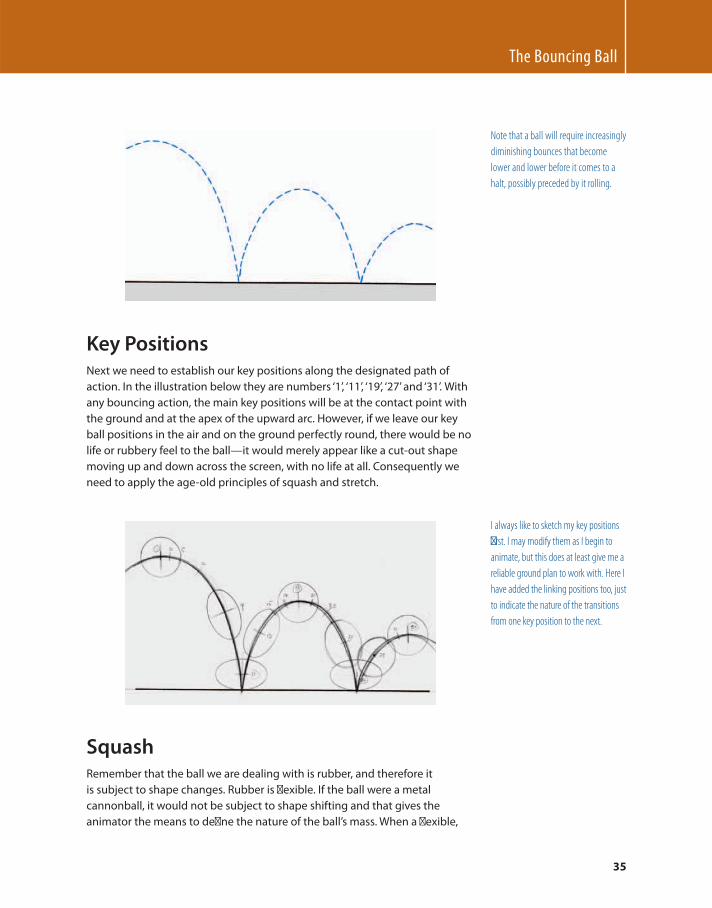
The Bouncing Ball
35
Key Positions Next we need to establish our key positions along the designated path of
action. In the illustration below they are numbers ‘ 1 ’ , ‘ 11 ’ , ‘ 19 ’ , ‘ 27 ’ and ‘ 31 ’ . With
any bouncing action, the main key positions will be at the contact point with
the ground and at the apex of the upward arc. However, if we leave our key
ball positions in the air and on the ground perfectly round, there would be no
life or rubbery feel to the ball — it would merely appear like a cut-out shape
moving up and down across the screen, with no life at all. Consequently we
need to apply the age-old principles of squash and stretch.
Note that a ball will require increasingly
diminishing bounces that become
lower and lower before it comes to a
halt, possibly preceded by it rolling.
I always like to sketch my key positions
fi rst. I may modify them as I begin to
animate, but this does at least give me a
reliable ground plan to work with. Here I
have added the linking positions too, just
to indicate the nature of the transitions
from one key position to the next.
Squash Remember that the ball we are dealing with is rubber, and therefore it
is subject to shape changes. Rubber is fl exible. If the ball were a metal
cannonball, it would not be subject to shape shifting and that gives the
animator the means to defi ne the nature of the ball’s mass. When a fl exible,
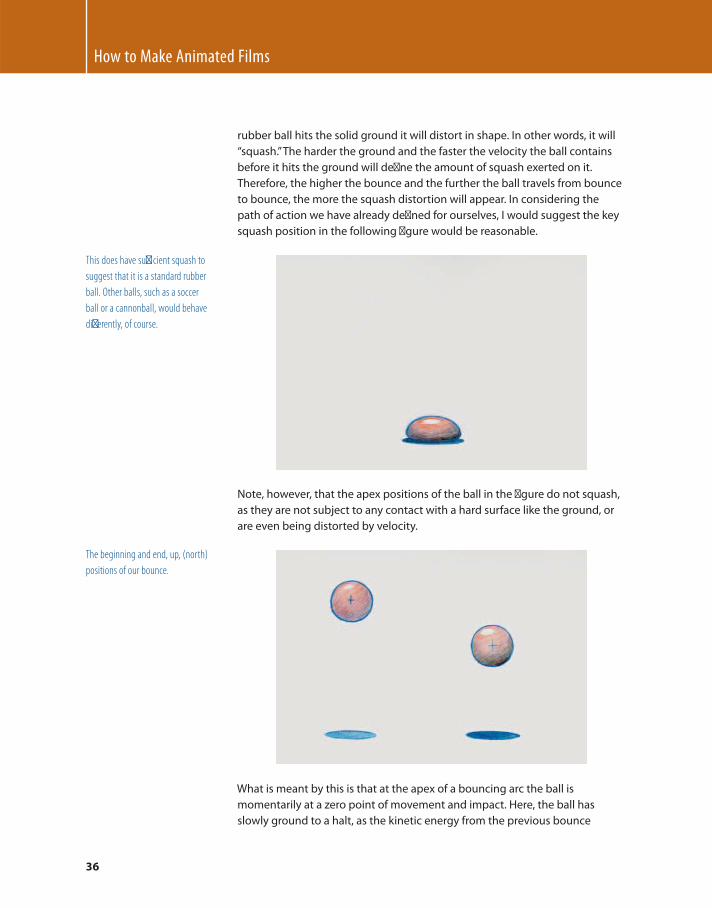
How to Make Animated Films
36
rubber ball hits the solid ground it will distort in shape. In other words, it will
“ squash. ” The harder the ground and the faster the velocity the ball contains
before it hits the ground will defi ne the amount of squash exerted on it.
Therefore, the higher the bounce and the further the ball travels from bounce
to bounce, the more the squash distortion will appear. In considering the
path of action we have already defi ned for ourselves, I would suggest the key
squash position in the following fi gure would be reasonable.
This does have suffi cient squash to
suggest that it is a standard rubber
ball. Other balls, such as a soccer
ball or a cannonball, would behave
diff erently, of course.
Note, however, that the apex positions of the ball in the fi gure do not squash,
as they are not subject to any contact with a hard surface like the ground, or
are even being distorted by velocity.
The beginning and end, up, (north)
positions of our bounce.
What is meant by this is that at the apex of a bouncing arc the ball is
momentarily at a zero point of movement and impact. Here, the ball has
slowly ground to a halt, as the kinetic energy from the previous bounce

The Bouncing Ball
37
has run out, and yet the forces of gravity have not taken hold quite yet.
Consequently, our rubber ball returns to its natural, circular shape. This is not
true, however, of its shape on the way up or the way down.
Stretch If you freeze a movie sequence of a moving shape you will notice that it will
actually appear as a blur. This is because at the regular fi lm speed of 24 fps the
shutter is not fast enough to capture a sharp image of the moving object, thus
the motion blur it presents. In animation, specifi cally drawn 2D animation, it is
not easy to emulate the blur look. Consequently, the animator has to distort, or
“ stretch, ” the object to give the illusion of this fast-action blur. This is especially
so with the action of our ball when it is on the way up and on the way down.
A simulated-motion blur eff ect to
emulate the real-world appearance of
a ball moving fast through space.
The dropping-down and rising-up
stretch eff ects on the ball, which are
separated by the moment when it
actually hits the ground.
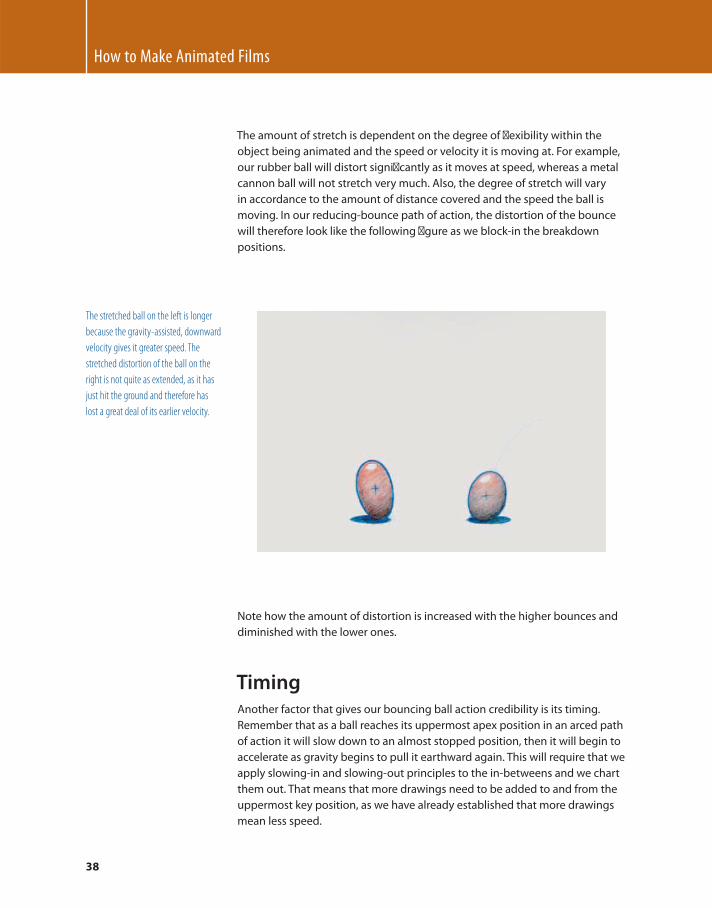
How to Make Animated Films
38
The amount of stretch is dependent on the degree of fl exibility within the
object being animated and the speed or velocity it is moving at. For example,
our rubber ball will distort signifi cantly as it moves at speed, whereas a metal
cannon ball will not stretch very much. Also, the degree of stretch will vary
in accordance to the amount of distance covered and the speed the ball is
moving. In our reducing-bounce path of action, the distortion of the bounce
will therefore look like the following fi gure as we block-in the breakdown
positions.
The stretched ball on the left is longer
because the gravity-assisted, downward
velocity gives it greater speed. The
stretched distortion of the ball on the
right is not quite as extended, as it has
just hit the ground and therefore has
lost a great deal of its earlier velocity.
Note how the amount of distortion is increased with the higher bounces and
diminished with the lower ones.
Timing Another factor that gives our bouncing ball action credibility is its timing.
Remember that as a ball reaches its uppermost apex position in an arced path
of action it will slow down to an almost stopped position, then it will begin to
accelerate as gravity begins to pull it earthward again. This will require that we
apply slowing-in and slowing-out principles to the in-betweens and we chart
them out. That means that more drawings need to be added to and from the
uppermost key position, as we have already established that more drawings
mean less speed.
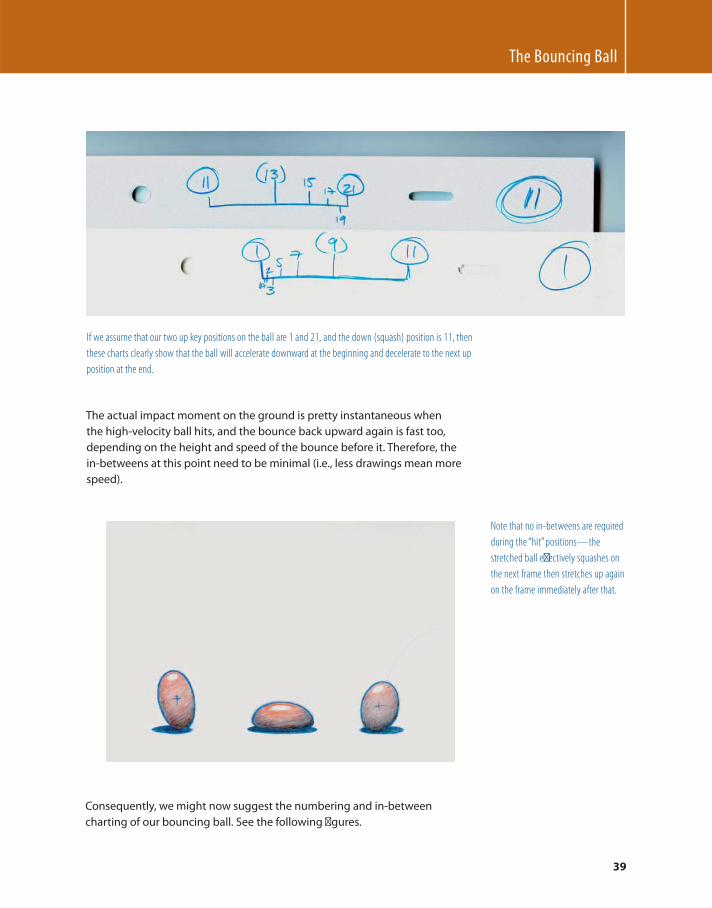
The Bouncing Ball
39
If we assume that our two up key positions on the ball are 1 and 21, and the down (squash) position is 11, then
these charts clearly show that the ball will accelerate downward at the beginning and decelerate to the next up
position at the end.
The actual impact moment on the ground is pretty instantaneous when
the high-velocity ball hits, and the bounce back upward again is fast too,
depending on the height and speed of the bounce before it. Therefore, the
in-betweens at this point need to be minimal (i.e., less drawings mean more
speed).
Note that no in-betweens are required
during the “ hit ” positions — the
stretched ball eff ectively squashes on
the next frame then stretches up again
on the frame immediately after that.
Consequently, we might now suggest the numbering and in-between
charting of our bouncing ball. See the following fi gures.
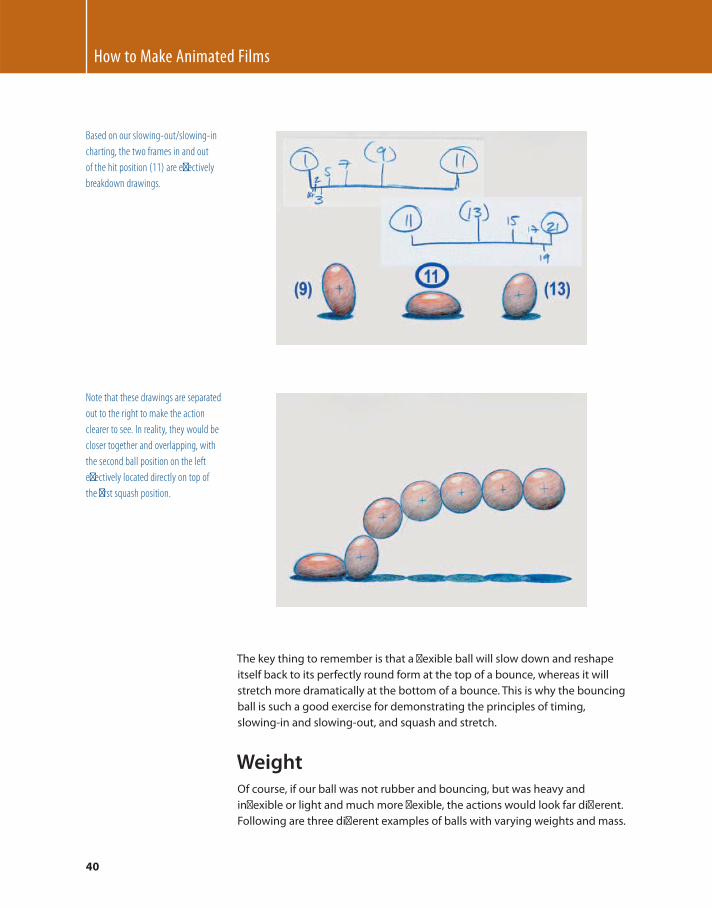
How to Make Animated Films
40
Based on our slowing-out/slowing-in
charting, the two frames in and out
of the hit position (11) are eff ectively
breakdown drawings.
Note that these drawings are separated
out to the right to make the action
clearer to see. In reality, they would be
closer together and overlapping, with
the second ball position on the left
eff ectively located directly on top of
the fi rst squash position.
The key thing to remember is that a fl exible ball will slow down and reshape
itself back to its perfectly round form at the top of a bounce, whereas it will
stretch more dramatically at the bottom of a bounce. This is why the bouncing
ball is such a good exercise for demonstrating the principles of timing,
slowing-in and slowing-out, and squash and stretch.
Weight Of course, if our ball was not rubber and bouncing, but was heavy and
infl exible or light and much more fl exible, the actions would look far diff erent.
Following are three diff erent examples of balls with varying weights and mass.
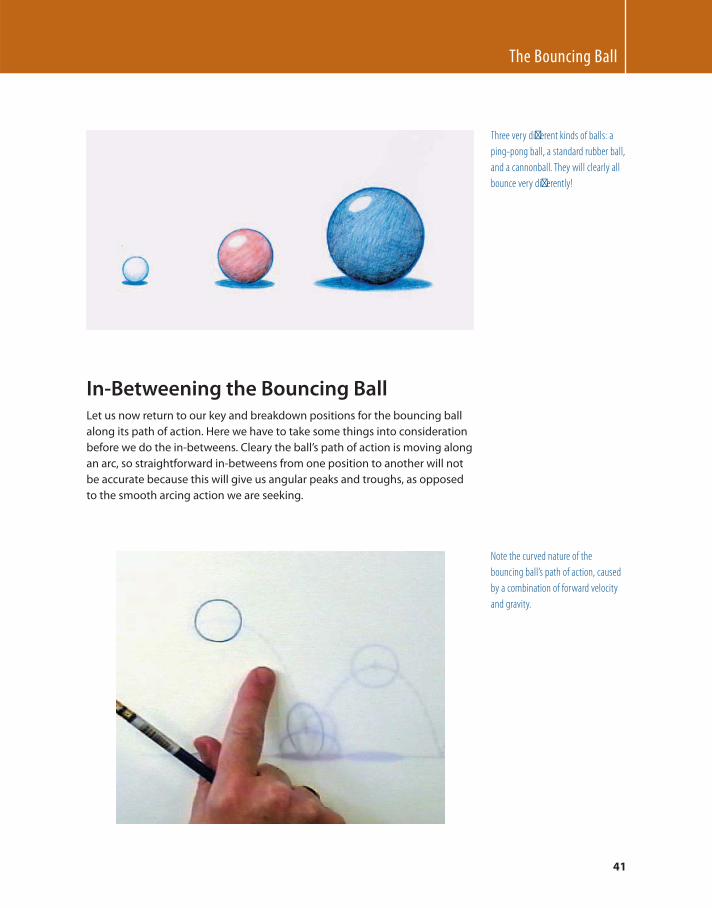
The Bouncing Ball
41
In-Betweening the Bouncing Ball Let us now return to our key and breakdown positions for the bouncing ball
along its path of action. Here we have to take some things into consideration
before we do the in-betweens. Cleary the ball’s path of action is moving along
an arc, so straightforward in-betweens from one position to another will not
be accurate because this will give us angular peaks and troughs, as opposed
to the smooth arcing action we are seeking.
Note the curved nature of the
bouncing ball’s path of action, caused
by a combination of forward velocity
and gravity.
Three very diff erent kinds of balls: a
ping-pong ball, a standard rubber ball,
and a cannonball. They will clearly all
bounce very diff erently!
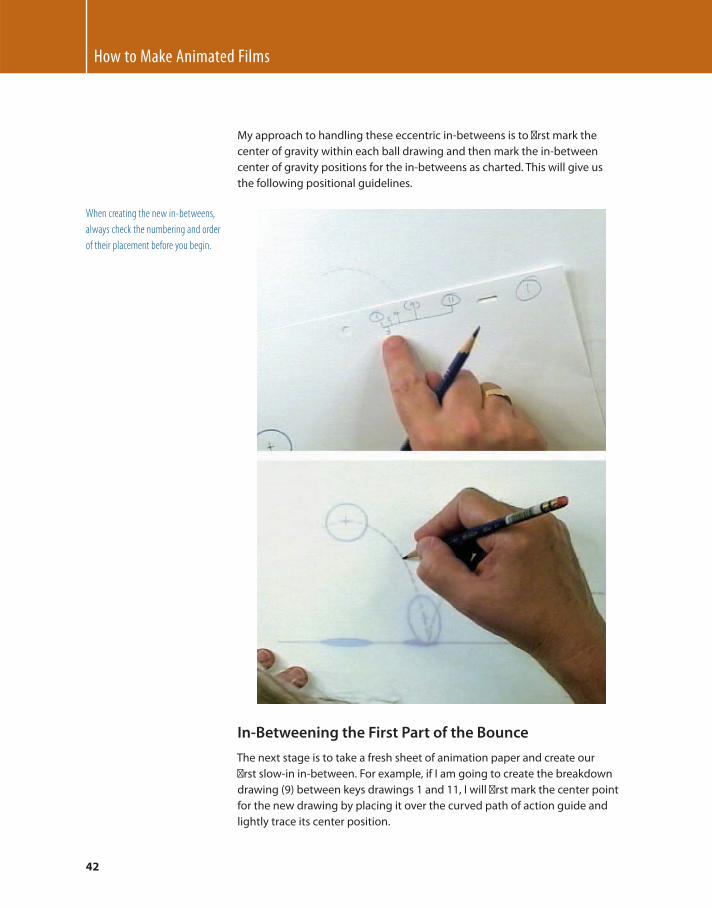
How to Make Animated Films
42
My approach to handling these eccentric in-betweens is to fi rst mark the
center of gravity within each ball drawing and then mark the in-between
center of gravity positions for the in-betweens as charted. This will give us
the following positional guidelines.
When creating the new in-betweens,
always check the numbering and order
of their placement before you begin.
In-Betweening the First Part of the Bounce
The next stage is to take a fresh sheet of animation paper and create our
fi rst slow-in in-between. For example, if I am going to create the breakdown
drawing (9) between keys drawings 1 and 11, I will fi rst mark the center point
for the new drawing by placing it over the curved path of action guide and
lightly trace its center position.
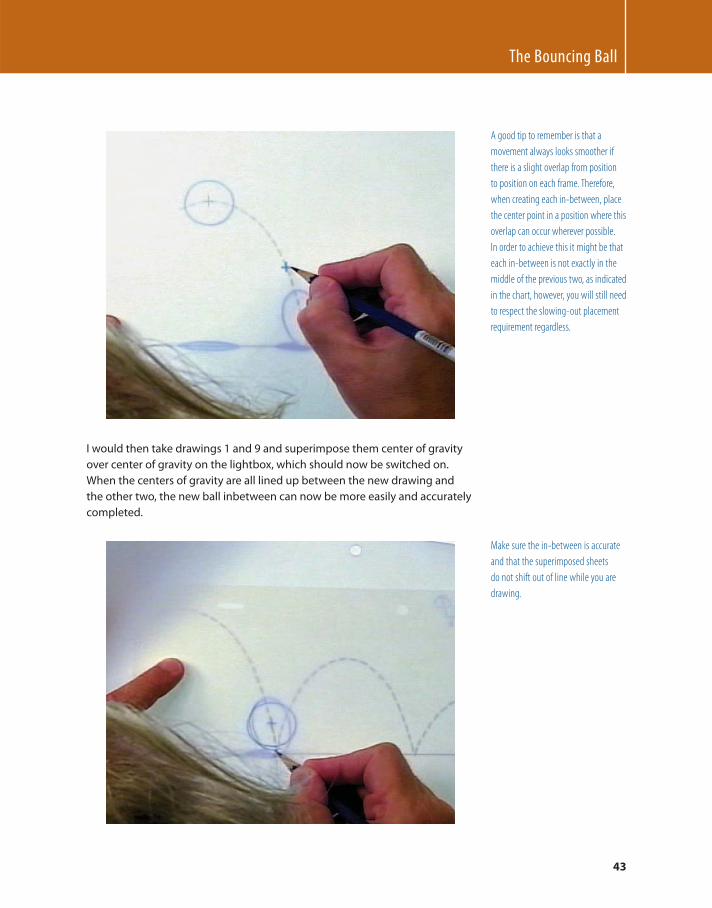
The Bouncing Ball
43
A good tip to remember is that a
movement always looks smoother if
there is a slight overlap from position
to position on each frame. Therefore,
when creating each in-between, place
the center point in a position where this
overlap can occur wherever possible.
In order to achieve this it might be that
each in-between is not exactly in the
middle of the previous two, as indicated
in the chart, however, you will still need
to respect the slowing-out placement
requirement regardless.
I would then take drawings 1 and 9 and superimpose them center of gravity
over center of gravity on the lightbox, which should now be switched on.
When the centers of gravity are all lined up between the new drawing and
the other two, the new ball inbetween can now be more easily and accurately
completed.
Make sure the in-between is accurate
and that the superimposed sheets
do not shift out of line while you are
drawing.
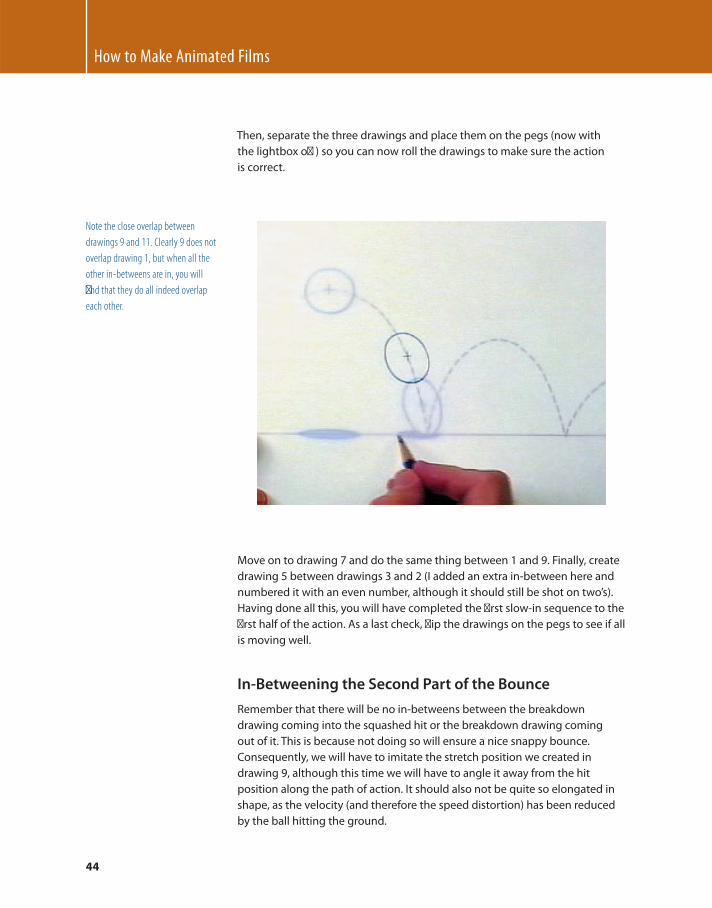
How to Make Animated Films
44
Then, separate the three drawings and place them on the pegs (now with
the lightbox off ) so you can now roll the drawings to make sure the action
is correct.
Note the close overlap between
drawings 9 and 11. Clearly 9 does not
overlap drawing 1, but when all the
other in-betweens are in, you will
fi nd that they do all indeed overlap
each other.
Move on to drawing 7 and do the same thing between 1 and 9. Finally, create
drawing 5 between drawings 3 and 2 (I added an extra in-between here and
numbered it with an even number, although it should still be shot on two’s).
Having done all this, you will have completed the fi rst slow-in sequence to the
fi rst half of the action. As a last check, fl ip the drawings on the pegs to see if all
is moving well.
In-Betweening the Second Part of the Bounce
Remember that there will be no in-betweens between the breakdown
drawing coming into the squashed hit or the breakdown drawing coming
out of it. This is because not doing so will ensure a nice snappy bounce.
Consequently, we will have to imitate the stretch position we created in
drawing 9, although this time we will have to angle it away from the hit
position along the path of action. It should also not be quite so elongated in
shape, as the velocity (and therefore the speed distortion) has been reduced
by the ball hitting the ground.
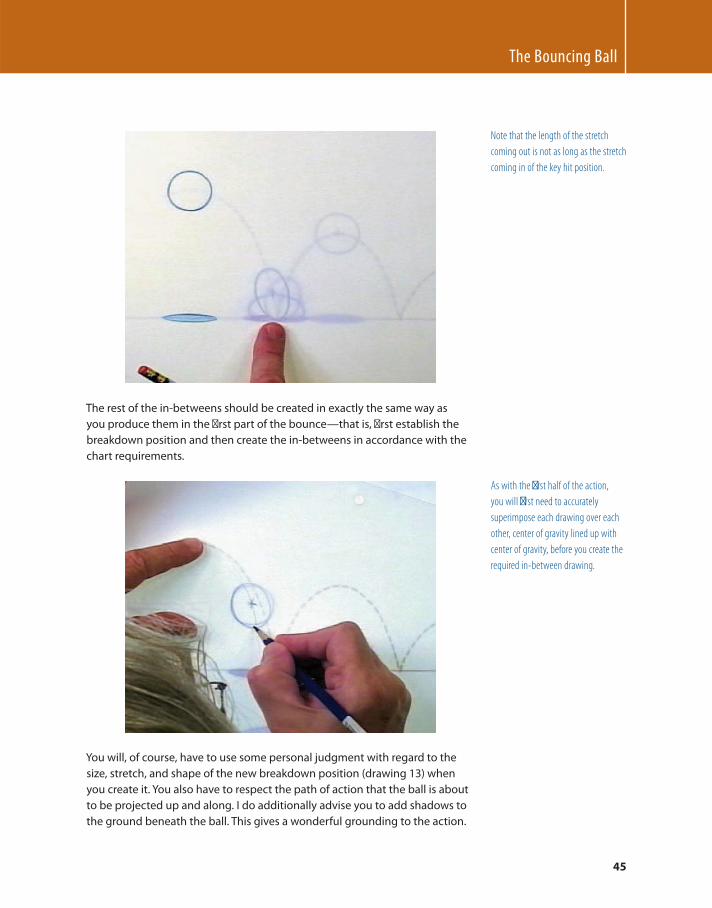
The Bouncing Ball
45
Note that the length of the stretch
coming out is not as long as the stretch
coming in of the key hit position.
The rest of the in-betweens should be created in exactly the same way as
you produce them in the fi rst part of the bounce — that is, fi rst establish the
breakdown position and then create the in-betweens in accordance with the
chart requirements.
As with the fi rst half of the action,
you will fi rst need to accurately
superimpose each drawing over each
other, center of gravity lined up with
center of gravity, before you create the
required in-between drawing.
You will, of course, have to use some personal judgment with regard to the
size, stretch, and shape of the new breakdown position (drawing 13) when
you create it. You also have to respect the path of action that the ball is about
to be projected up and along. I do additionally advise you to add shadows to
the ground beneath the ball. This gives a wonderful grounding to the action.
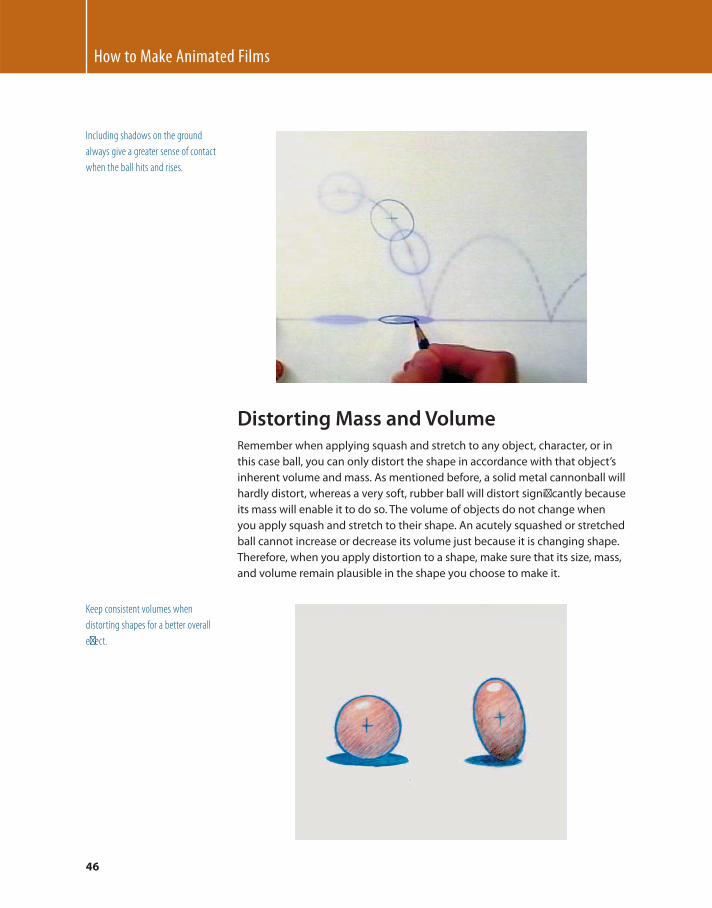
How to Make Animated Films
46
Including shadows on the ground
always give a greater sense of contact
when the ball hits and rises.
Distorting Mass and Volume Remember when applying squash and stretch to any object, character, or in
this case ball, you can only distort the shape in accordance with that object’s
inherent volume and mass. As mentioned before, a solid metal cannonball will
hardly distort, whereas a very soft, rubber ball will distort signifi cantly because
its mass will enable it to do so. The volume of objects do not change when
you apply squash and stretch to their shape. An acutely squashed or stretched
ball cannot increase or decrease its volume just because it is changing shape.
Therefore, when you apply distortion to a shape, make sure that its size, mass,
and volume remain plausible in the shape you choose to make it.
Keep consistent volumes when
distorting shapes for a better overall
eff ect.
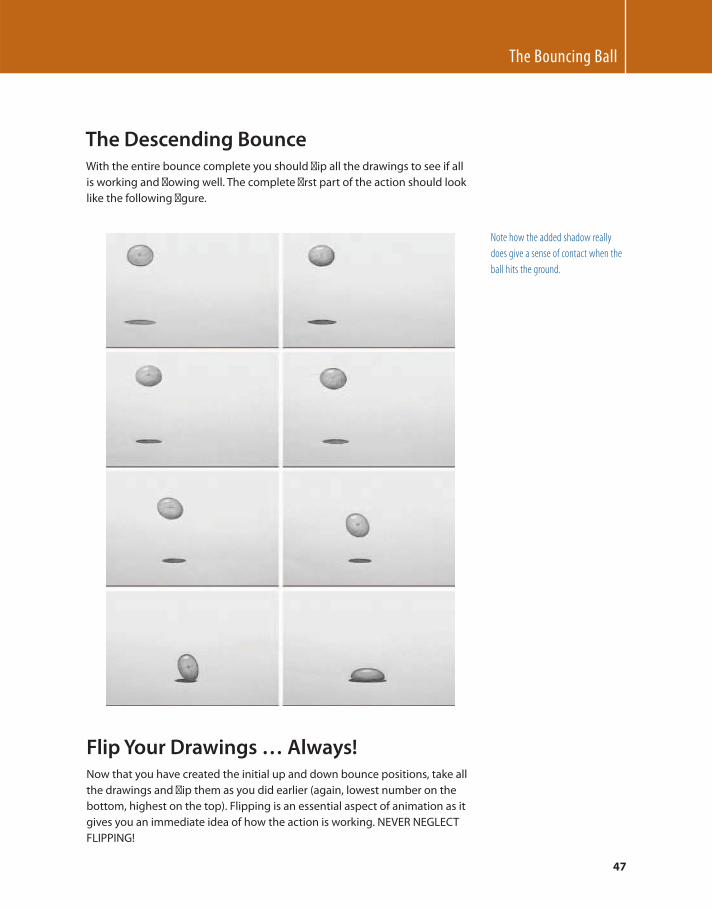
The Bouncing Ball
47
The Descending Bounce With the entire bounce complete you should fl ip all the drawings to see if all
is working and fl owing well. The complete fi rst part of the action should look
like the following fi gure.
Note how the added shadow really
does give a sense of contact when the
ball hits the ground.
Flip Your Drawings … Always! Now that you have created the initial up and down bounce positions, take all
the drawings and fl ip them as you did earlier (again, lowest number on the
bottom, highest on the top). Flipping is an essential aspect of animation as it
gives you an immediate idea of how the action is working. NEVER NEGLECT
FLIPPING!
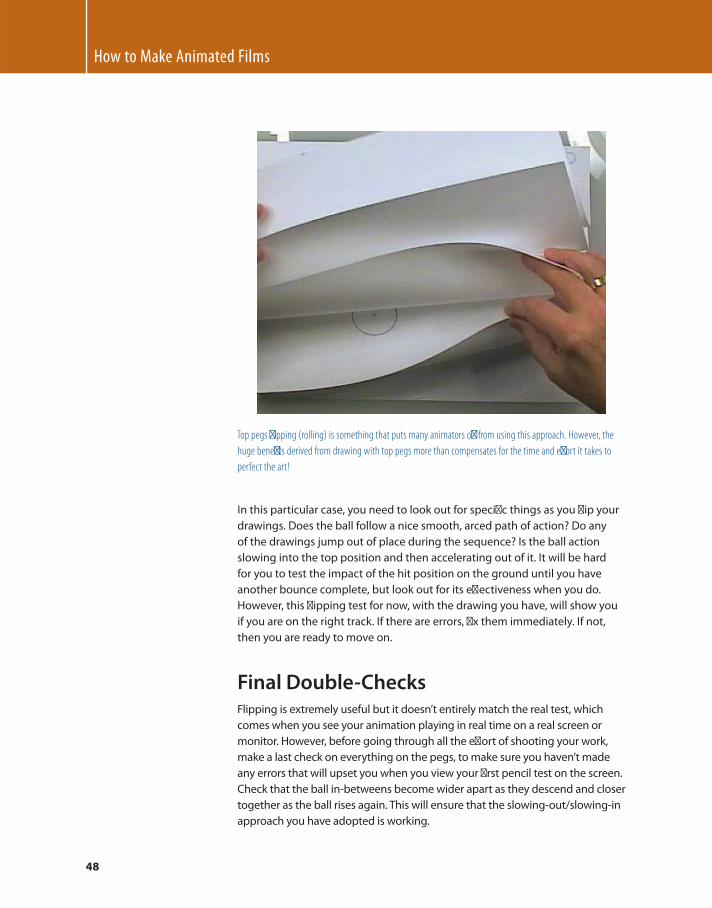
How to Make Animated Films
48
Top pegs fl ipping (rolling) is something that puts many animators off from using this approach. However, the
huge benefi ts derived from drawing with top pegs more than compensates for the time and eff ort it takes to
perfect the art!
In this particular case, you need to look out for specifi c things as you fl ip your
drawings. Does the ball follow a nice smooth, arced path of action? Do any
of the drawings jump out of place during the sequence? Is the ball action
slowing into the top position and then accelerating out of it. It will be hard
for you to test the impact of the hit position on the ground until you have
another bounce complete, but look out for its eff ectiveness when you do.
However, this fl ipping test for now, with the drawing you have, will show you
if you are on the right track. If there are errors, fi x them immediately. If not,
then you are ready to move on.
Final Double-Checks Flipping is extremely useful but it doesn’t entirely match the real test, which
comes when you see your animation playing in real time on a real screen or
monitor. However, before going through all the eff ort of shooting your work,
make a last check on everything on the pegs, to make sure you haven’t made
any errors that will upset you when you view your fi rst pencil test on the screen.
Check that the ball in-betweens become wider apart as they descend and closer
together as the ball rises again. This will ensure that the slowing-out/slowing-in
approach you have adopted is working.
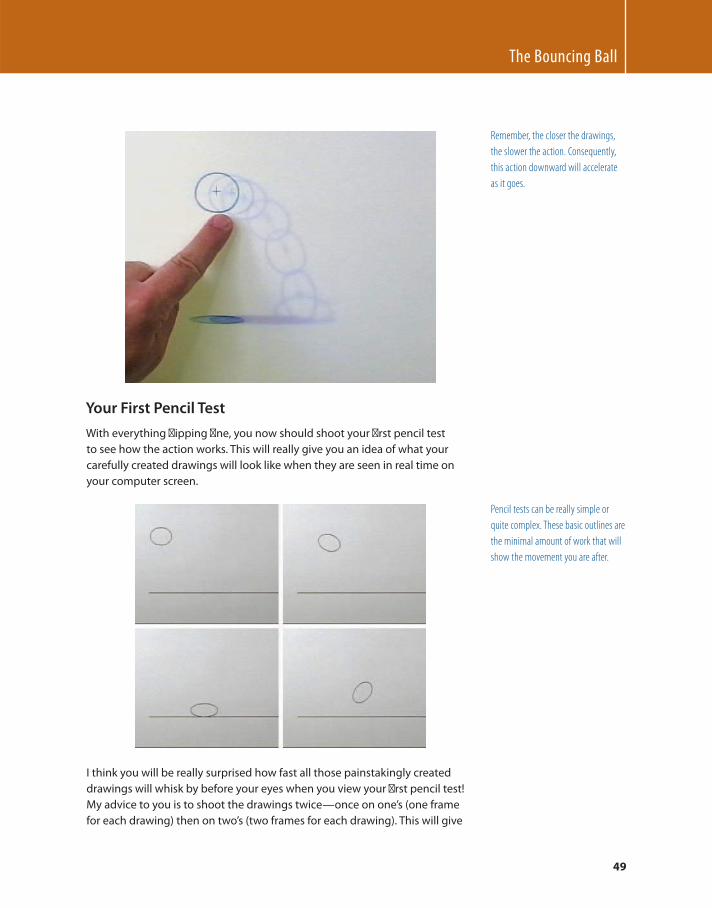
The Bouncing Ball
49
Remember, the closer the drawings,
the slower the action. Consequently,
this action downward will accelerate
as it goes.
Your First Pencil Test
With everything fl ipping fi ne, you now should shoot your fi rst pencil test
to see how the action works. This will really give you an idea of what your
carefully created drawings will look like when they are seen in real time on
your computer screen.
Pencil tests can be really simple or
quite complex. These basic outlines are
the minimal amount of work that will
show the movement you are after.
I think you will be really surprised how fast all those painstakingly created
drawings will whisk by before your eyes when you view your fi rst pencil test!
My advice to you is to shoot the drawings twice — once on one’s (one frame
for each drawing) then on two’s (two frames for each drawing). This will give
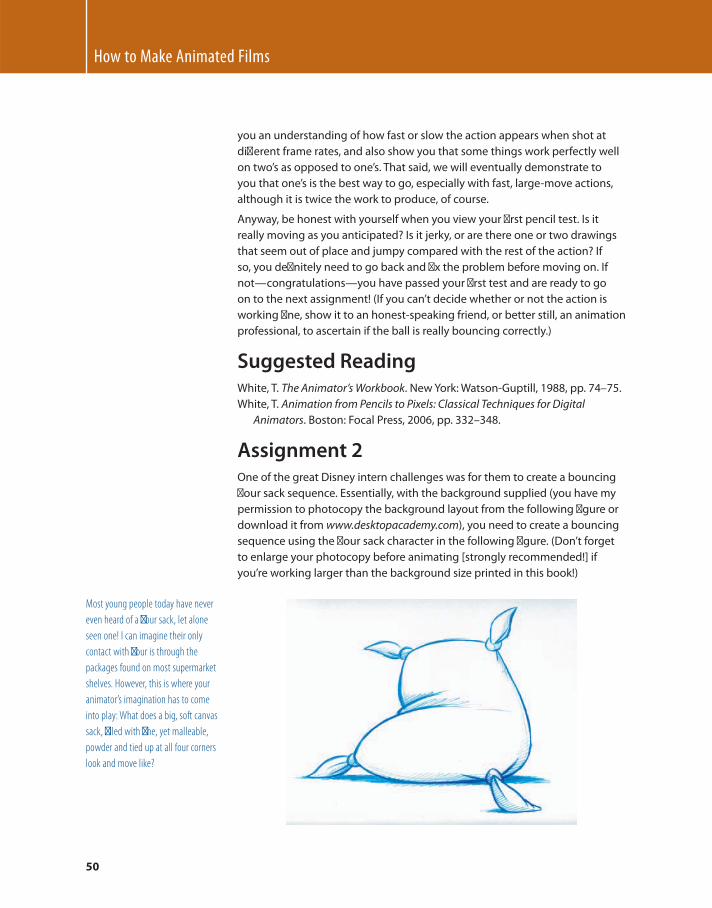
How to Make Animated Films
50
you an understanding of how fast or slow the action appears when shot at
diff erent frame rates, and also show you that some things work perfectly well
on two’s as opposed to one’s. That said, we will eventually demonstrate to
you that one’s is the best way to go, especially with fast, large-move actions,
although it is twice the work to produce, of course.
Anyway, be honest with yourself when you view your fi rst pencil test. Is it
really moving as you anticipated? Is it jerky, or are there one or two drawings
that seem out of place and jumpy compared with the rest of the action? If
so, you defi nitely need to go back and fi x the problem before moving on. If
not — congratulations — you have passed your fi rst test and are ready to go
on to the next assignment! (If you can’t decide whether or not the action is
working fi ne, show it to an honest-speaking friend, or better still, an animation
professional, to ascertain if the ball is really bouncing correctly.)
Suggested Reading White , T. The Animator’s Workbook . New York : Watson-Guptill , 1988 , pp. 74 – 75.
White , T. Animation from Pencils to Pixels: Classical Techniques for Digital
Animators . Boston : Focal Press , 2006 , pp. 332 – 348 .
Assignment 2 One of the great Disney intern challenges was for them to create a bouncing
fl our sack sequence. Essentially, with the background supplied (you have my
permission to photocopy the background layout from the following fi gure or
download it from www.desktopacademy.com ), you need to create a bouncing
sequence using the fl our sack character in the following fi gure. (Don’t forget
to enlarge your photocopy before animating [strongly recommended!] if
you’re working larger than the background size printed in this book!)
Most young people today have never
even heard of a fl our sack, let alone
seen one! I can imagine their only
contact with fl our is through the
packages found on most supermarket
shelves. However, this is where your
animator’s imagination has to come
into play: What does a big, soft canvas
sack, fi lled with fi ne, yet malleable,
powder and tied up at all four corners
look and move like?
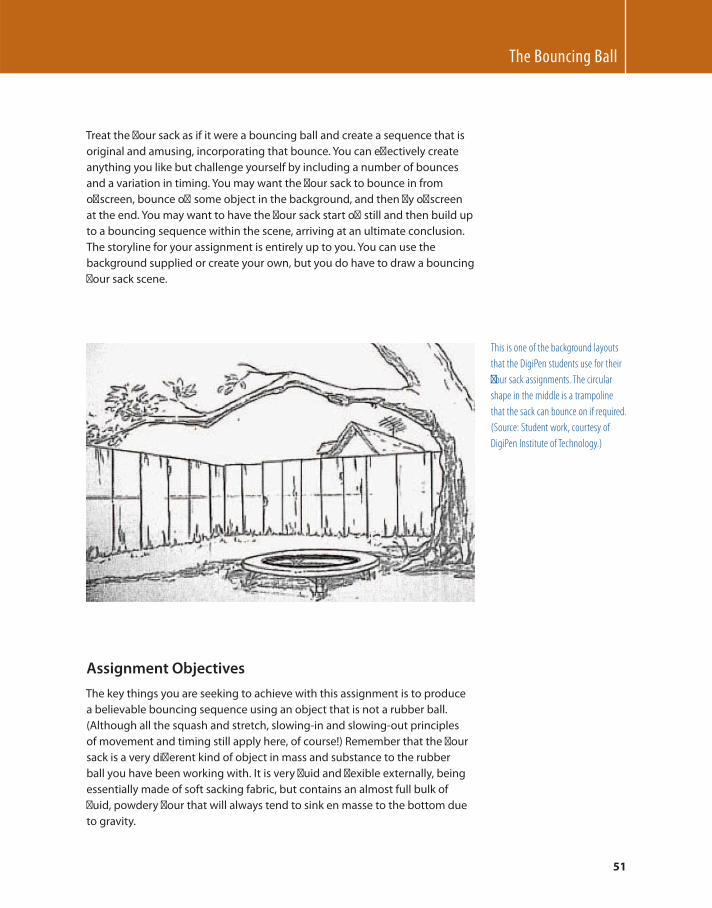
The Bouncing Ball
51
Treat the fl our sack as if it were a bouncing ball and create a sequence that is
original and amusing, incorporating that bounce. You can eff ectively create
anything you like but challenge yourself by including a number of bounces
and a variation in timing. You may want the fl our sack to bounce in from
off screen, bounce off some object in the background, and then fl y off screen
at the end. You may want to have the fl our sack start off still and then build up
to a bouncing sequence within the scene, arriving at an ultimate conclusion.
The storyline for your assignment is entirely up to you. You can use the
background supplied or create your own, but you do have to draw a bouncing
fl our sack scene.
This is one of the background layouts
that the DigiPen students use for their
fl our sack assignments. The circular
shape in the middle is a trampoline
that the sack can bounce on if required.
(Source: Student work, courtesy of
DigiPen Institute of Technology.)
Assignment Objectives
The key things you are seeking to achieve with this assignment is to produce
a believable bouncing sequence using an object that is not a rubber ball.
(Although all the squash and stretch, slowing-in and slowing-out principles
of movement and timing still apply here, of course!) Remember that the fl our
sack is a very diff erent kind of object in mass and substance to the rubber
ball you have been working with. It is very fl uid and fl exible externally, being
essentially made of soft sacking fabric, but contains an almost full bulk of
fl uid, powdery fl our that will always tend to sink en masse to the bottom due
to gravity.
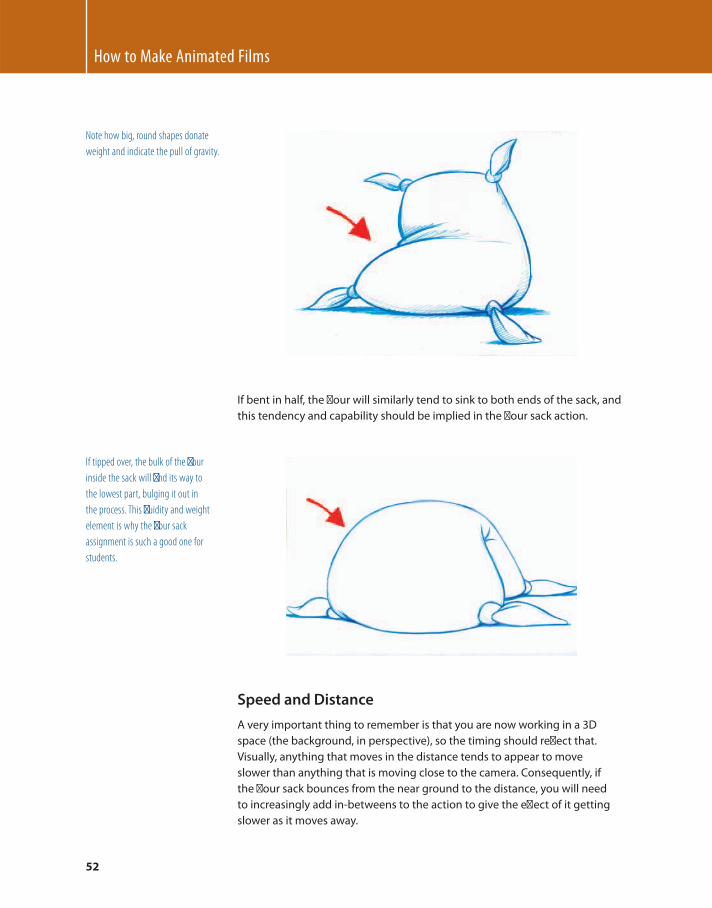
How to Make Animated Films
52
Note how big, round shapes donate
weight and indicate the pull of gravity.
If bent in half, the fl our will similarly tend to sink to both ends of the sack, and
this tendency and capability should be implied in the fl our sack action.
If tipped over, the bulk of the fl our
inside the sack will fi nd its way to
the lowest part, bulging it out in
the process. This fl uidity and weight
element is why the fl our sack
assignment is such a good one for
students.
Speed and Distance
A very important thing to remember is that you are now working in a 3D
space (the background, in perspective), so the timing should refl ect that.
Visually, anything that moves in the distance tends to appear to move
slower than anything that is moving close to the camera. Consequently, if
the fl our sack bounces from the near ground to the distance, you will need
to increasingly add in-betweens to the action to give the eff ect of it getting
slower as it moves away.
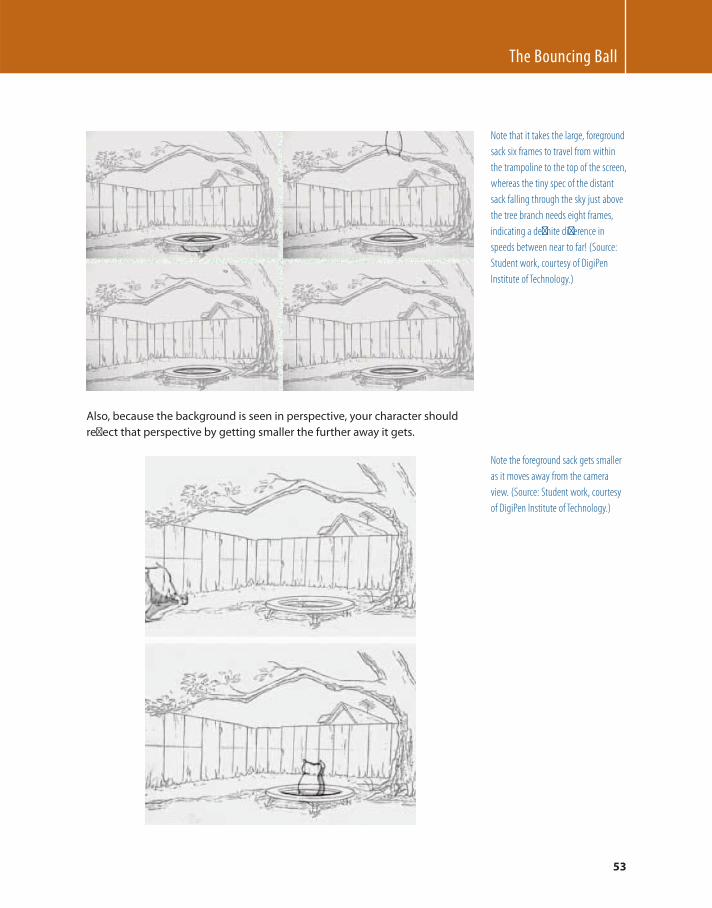
The Bouncing Ball
53
Note that it takes the large, foreground
sack six frames to travel from within
the trampoline to the top of the screen,
whereas the tiny spec of the distant
sack falling through the sky just above
the tree branch needs eight frames,
indicating a defi nite diff erence in
speeds between near to far! (Source:
Student work, courtesy of DigiPen
Institute of Technology.)
Also, because the background is seen in perspective, your character should
refl ect that perspective by getting smaller the further away it gets.
Note the foreground sack gets smaller
as it moves away from the camera
view. (Source: Student work, courtesy
of DigiPen Institute of Technology.)
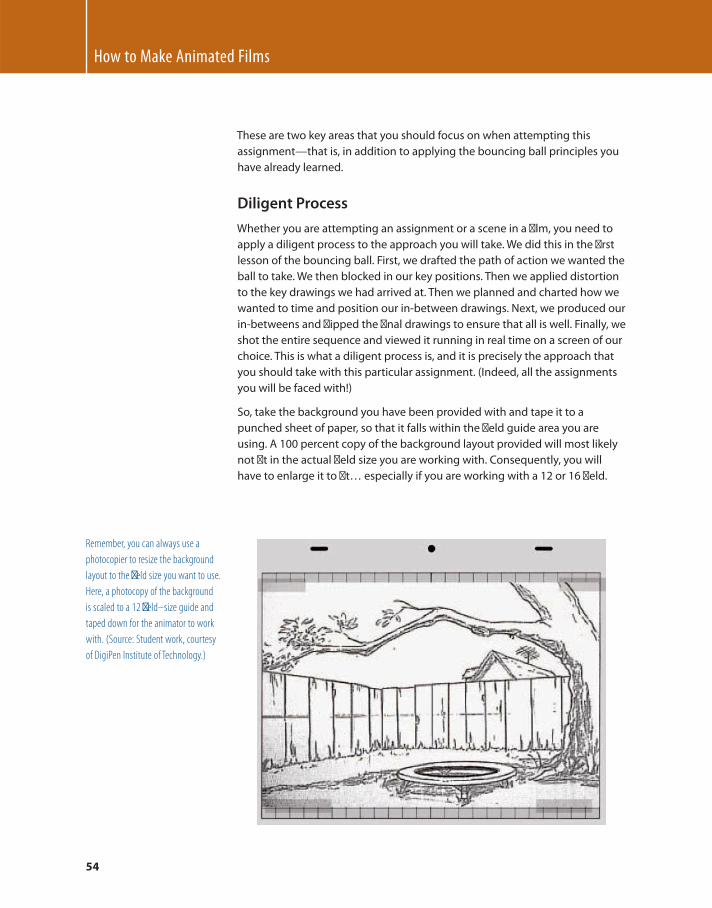
How to Make Animated Films
54
These are two key areas that you should focus on when attempting this
assignment — that is, in addition to applying the bouncing ball principles you
have already learned.
Diligent Process
Whether you are attempting an assignment or a scene in a fi lm, you need to
apply a diligent process to the approach you will take. We did this in the fi rst
lesson of the bouncing ball. First, we drafted the path of action we wanted the
ball to take. We then blocked in our key positions. Then we applied distortion
to the key drawings we had arrived at. Then we planned and charted how we
wanted to time and position our in-between drawings. Next, we produced our
in-betweens and fl ipped the fi nal drawings to ensure that all is well. Finally, we
shot the entire sequence and viewed it running in real time on a screen of our
choice. This is what a diligent process is, and it is precisely the approach that
you should take with this particular assignment. (Indeed, all the assignments
you will be faced with!)
So, take the background you have been provided with and tape it to a
punched sheet of paper, so that it falls within the fi eld guide area you are
using. A 100 percent copy of the background layout provided will most likely
not fi t in the actual fi eld size you are working with. Consequently, you will
have to enlarge it to fi t… especially if you are working with a 12 or 16 fi eld.
Remember, you can always use a
photocopier to resize the background
layout to the fi eld size you want to use.
Here, a photocopy of the background
is scaled to a 12 fi eld – size guide and
taped down for the animator to work
with. (Source: Student work, courtesy
of DigiPen Institute of Technology.)
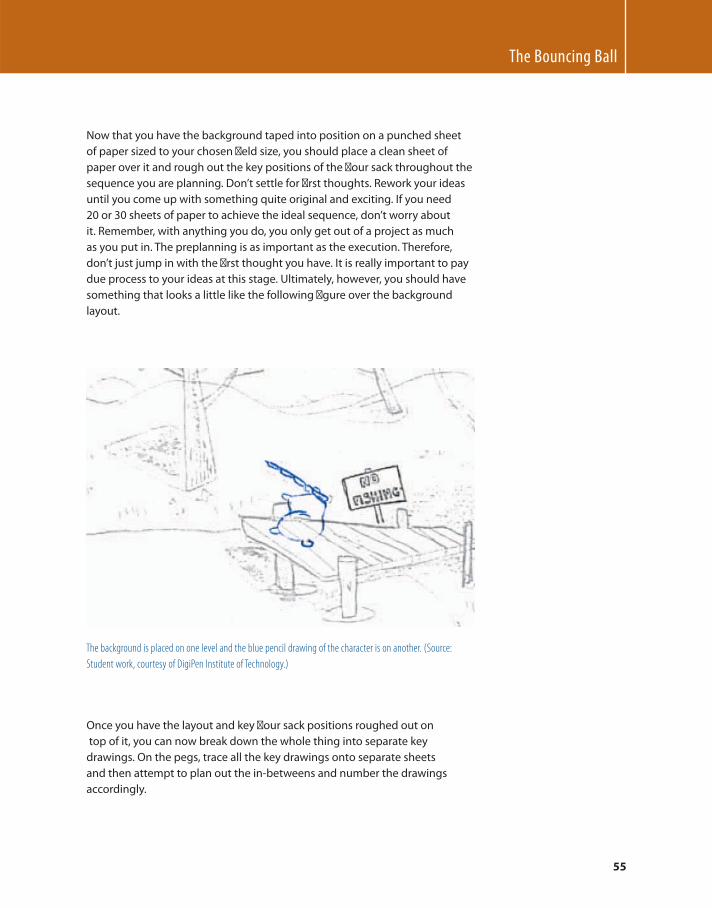
The Bouncing Ball
55
Now that you have the background taped into position on a punched sheet
of paper sized to your chosen fi eld size, you should place a clean sheet of
paper over it and rough out the key positions of the fl our sack throughout the
sequence you are planning. Don’t settle for fi rst thoughts. Rework your ideas
until you come up with something quite original and exciting. If you need
20 or 30 sheets of paper to achieve the ideal sequence, don’t worry about
it. Remember, with anything you do, you only get out of a project as much
as you put in. The preplanning is as important as the execution. Therefore,
don’t just jump in with the fi rst thought you have. It is really important to pay
due process to your ideas at this stage. Ultimately, however, you should have
something that looks a little like the following fi gure over the background
layout.
The background is placed on one level and the blue pencil drawing of the character is on another. (Source:
Student work, courtesy of DigiPen Institute of Technology.)
Once you have the layout and key fl our sack positions roughed out on
top of it, you can now break down the whole thing into separate key
drawings. On the pegs, trace all the key drawings onto separate sheets
and then attempt to plan out the in-betweens and number the drawings
accordingly.
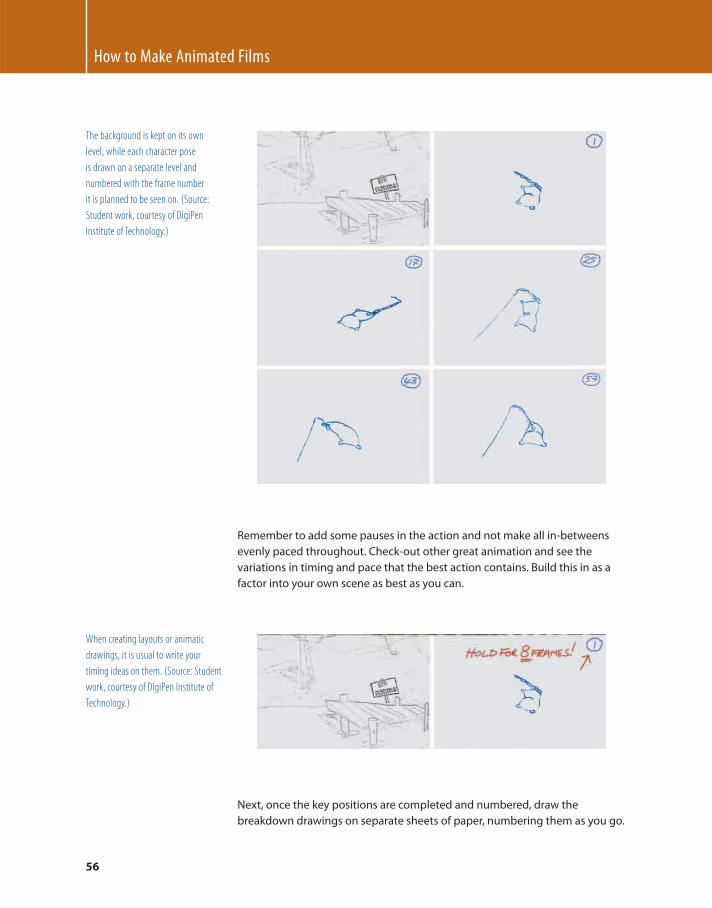
How to Make Animated Films
56
The background is kept on its own
level, while each character pose
is drawn on a separate level and
numbered with the frame number
it is planned to be seen on. (Source:
Student work, courtesy of DigiPen
Institute of Technology.)
Remember to add some pauses in the action and not make all in-betweens
evenly paced throughout. Check-out other great animation and see the
variations in timing and pace that the best action contains. Build this in as a
factor into your own scene as best as you can.
When creating layouts or animatic
drawings, it is usual to write your
timing ideas on them. (Source: Student
work, courtesy of DigiPen Institute of
Technology.)
Next, once the key positions are completed and numbered, draw the
breakdown drawings on separate sheets of paper, numbering them as you go.
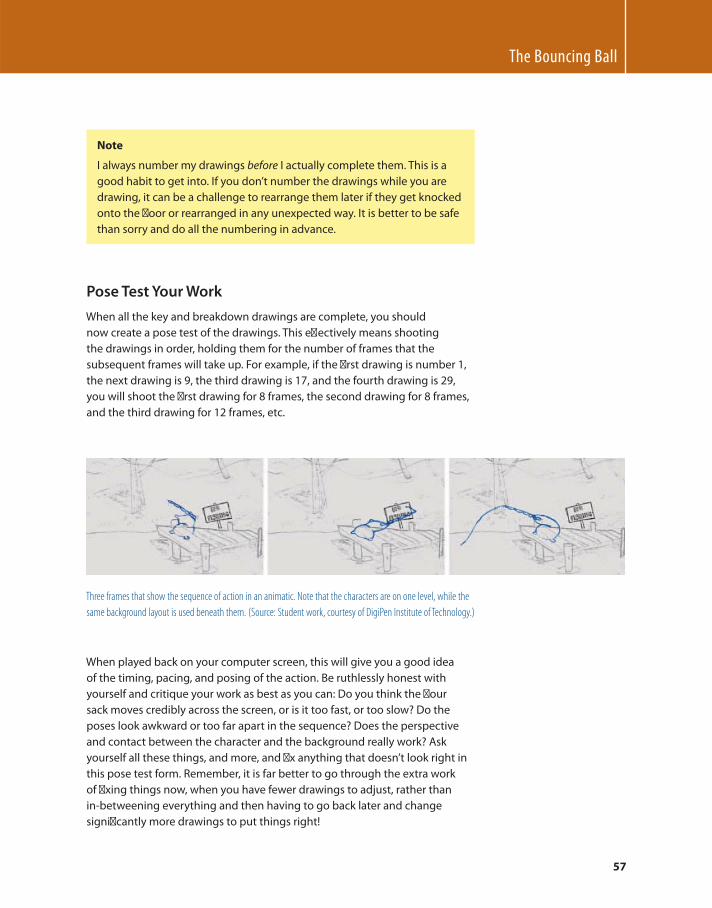
The Bouncing Ball
57
Note
I always number my drawings before I actually complete them. This is a
good habit to get into. If you don’t number the drawings while you are
drawing, it can be a challenge to rearrange them later if they get knocked
onto the fl oor or rearranged in any unexpected way. It is better to be safe
than sorry and do all the numbering in advance.
Pose Test Your Work
When all the key and breakdown drawings are complete, you should
now create a pose test of the drawings. This eff ectively means shooting
the drawings in order, holding them for the number of frames that the
subsequent frames will take up. For example, if the fi rst drawing is number 1,
the next drawing is 9, the third drawing is 17, and the fourth drawing is 29,
you will shoot the fi rst drawing for 8 frames, the second drawing for 8 frames,
and the third drawing for 12 frames, etc.
Three frames that show the sequence of action in an animatic. Note that the characters are on one level, while the
same background layout is used beneath them. (Source: Student work, courtesy of DigiPen Institute of Technology.)
When played back on your computer screen, this will give you a good idea
of the timing, pacing, and posing of the action. Be ruthlessly honest with
yourself and critique your work as best as you can: Do you think the fl our
sack moves credibly across the screen, or is it too fast, or too slow? Do the
poses look awkward or too far apart in the sequence? Does the perspective
and contact between the character and the background really work? Ask
yourself all these things, and more, and fi x anything that doesn’t look right in
this pose test form. Remember, it is far better to go through the extra work
of fi xing things now, when you have fewer drawings to adjust, rather than
in-betweening everything and then having to go back later and change
signifi cantly more drawings to put things right!
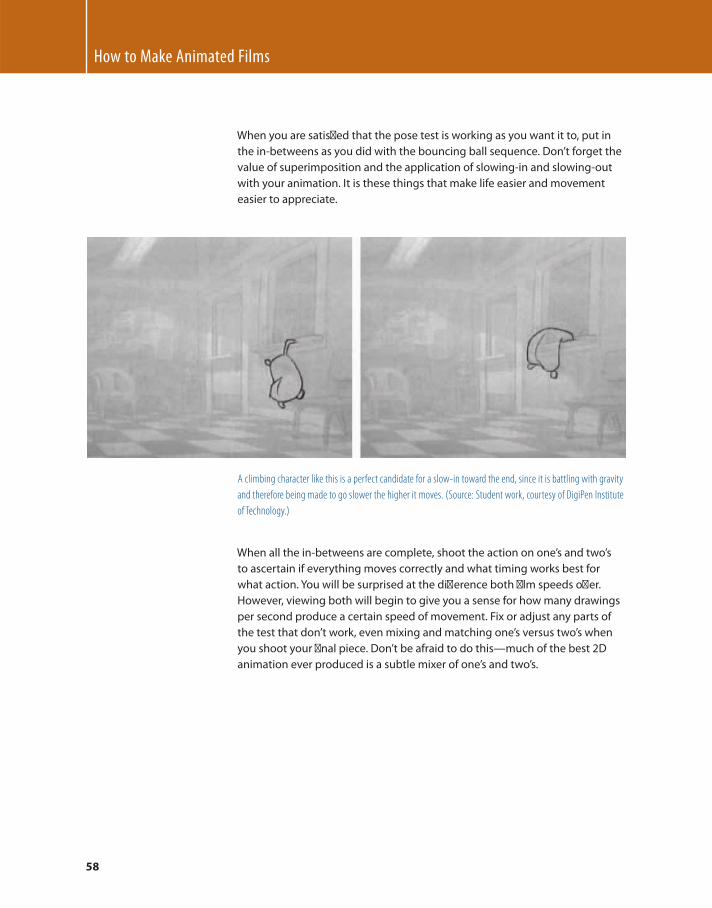
How to Make Animated Films
58
When you are satisfi ed that the pose test is working as you want it to, put in
the in-betweens as you did with the bouncing ball sequence. Don’t forget the
value of superimposition and the application of slowing-in and slowing-out
with your animation. It is these things that make life easier and movement
easier to appreciate.
A climbing character like this is a perfect candidate for a slow-in toward the end, since it is battling with gravity
and therefore being made to go slower the higher it moves . (Source: Student work, courtesy of DigiPen Institute
of Technology.)
When all the in-betweens are complete, shoot the action on one’s and two’s
to ascertain if everything moves correctly and what timing works best for
what action. You will be surprised at the diff erence both fi lm speeds off er.
However, viewing both will begin to give you a sense for how many drawings
per second produce a certain speed of movement. Fix or adjust any parts of
the test that don’t work, even mixing and matching one’s versus two’s when
you shoot your fi nal piece. Don’t be afraid to do this — much of the best 2D
animation ever produced is a subtle mixer of one’s and two’s.
59
Class objective: To achieve a basic walk sequence that is believable and
convincing.
Equipment required: Lightbox, pencil, and paper.
DVD lecture: “ Generic Walks. ”
Those of you who have read my previous books, or have studied with
me in class, know that I prefer to approach walks in stages — that is, the
bottom half fi rst; then the trunk, arms, and head; then the subtle overlapping
actions that can give the walk more fl uidity. This section of our book-based
animation course is no diff erent. In presenting it here, I can only repeat what I
have said before: A good walk is the hardest thing for an animator to master,
as it contains pretty much all the principles of animation that any animator
needs to know for other things, such as poses, breakdowns, overlapping
action, weight, arcs, fl owing paths of action, etc. Consequently, I’ll guide you
through the challenges of creating a generic walk on a stage-by-stage basis,
so that you will successfully understand all the principles involved one piece
at a time. If I ultimately make you good at creating a good generic walk, then
Masterclass 3
Generic Walks
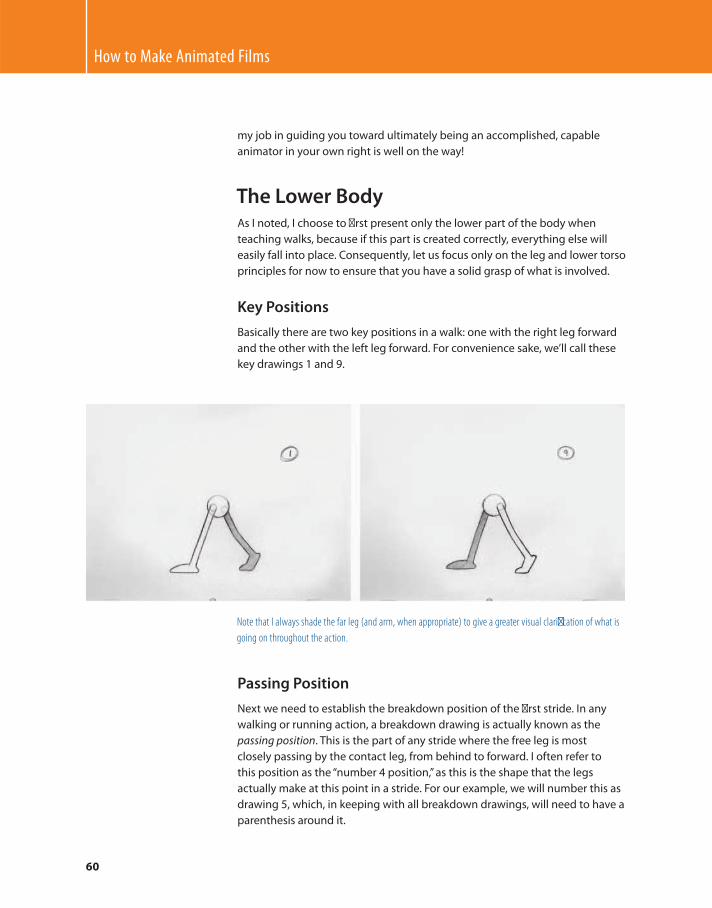
How to Make Animated Films
60
my job in guiding you toward ultimately being an accomplished, capable
animator in your own right is well on the way!
The Lower Body As I noted, I choose to fi rst present only the lower part of the body when
teaching walks, because if this part is created correctly, everything else will
easily fall into place. Consequently, let us focus only on the leg and lower torso
principles for now to ensure that you have a solid grasp of what is involved.
Key Positions
Basically there are two key positions in a walk: one with the right leg forward
and the other with the left leg forward. For convenience sake, we’ll call these
key drawings 1 and 9.
Note that I always shade the far leg (and arm, when appropriate) to give a greater visual clarifi cation of what is
going on throughout the action.
Passing Position
Next we need to establish the breakdown position of the fi rst stride. In any
walking or running action, a breakdown drawing is actually known as the
passing position . This is the part of any stride where the free leg is most
closely passing by the contact leg, from behind to forward. I often refer to
this position as the “ number 4 position, ” as this is the shape that the legs
actually make at this point in a stride. For our example, we will number this as
drawing 5, which, in keeping with all breakdown drawings, will need to have a
parenthesis around it.

Generic Walks
61
The passing (a.k.a. number 4) position.
Note that with a passing position the body area, or in this case the pelvic area,
is always raised up higher than its position on the two key “ stride ” positions.
This is because with the straight contact leg below it, the hip is pushed upward.
The body of any passing position will always be raised for anything but a specialized, or eccentric, walk.
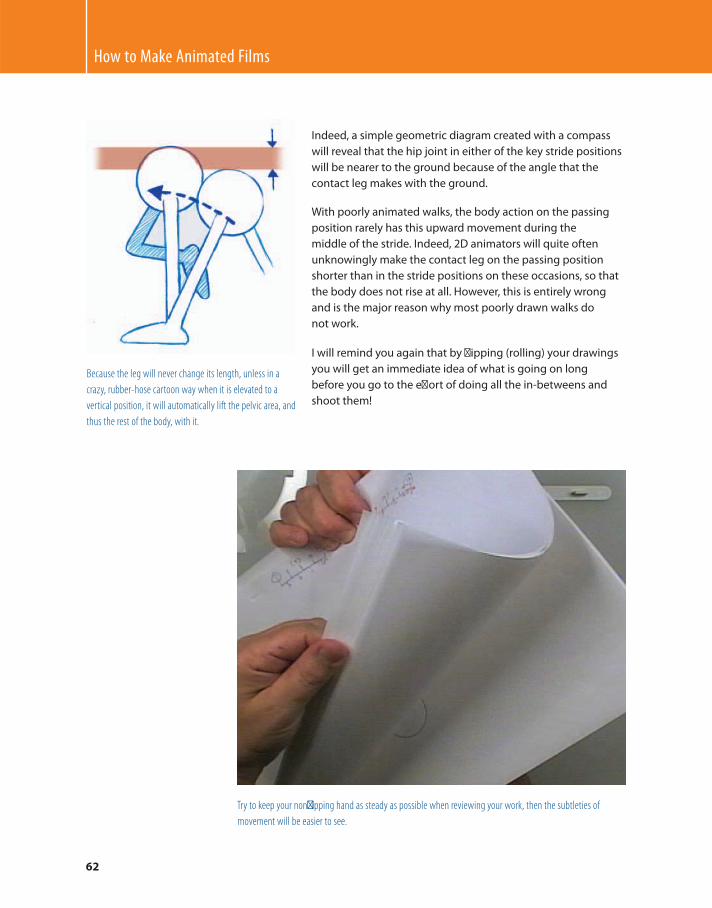
How to Make Animated Films
62
Indeed, a simple geometric diagram created with a compass
will reveal that the hip joint in either of the key stride positions
will be nearer to the ground because of the angle that the
contact leg makes with the ground.
Because the leg will never change its length, unless in a
crazy, rubber-hose cartoon way when it is elevated to a
vertical position, it will automatically lift the pelvic area, and
thus the rest of the body, with it.
With poorly animated walks, the body action on the passing
position rarely has this upward movement during the
middle of the stride. Indeed, 2D animators will quite often
unknowingly make the contact leg on the passing position
shorter than in the stride positions on these occasions, so that
the body does not rise at all. However, this is entirely wrong
and is the major reason why most poorly drawn walks do
not work.
I will remind you again that by fl ipping (rolling) your drawings
you will get an immediate idea of what is going on long
before you go to the eff ort of doing all the in-betweens and
shoot them!
Try to keep your nonfl ipping hand as steady as possible when reviewing your work, then the subtleties of
movement will be easier to see.
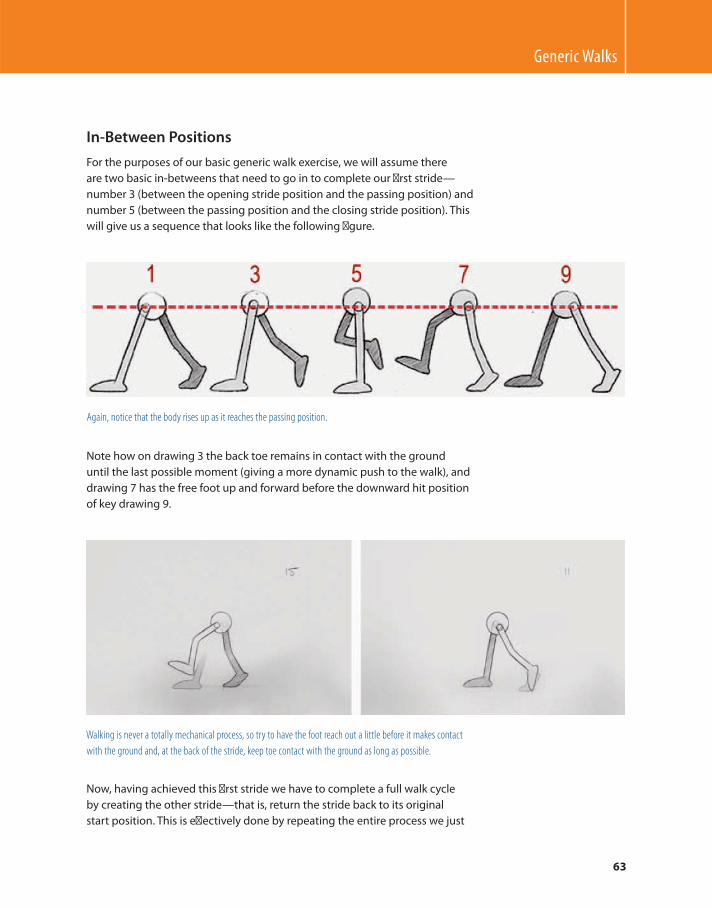
Generic Walks
63
In-Between Positions
For the purposes of our basic generic walk exercise, we will assume there
are two basic in-betweens that need to go in to complete our fi rst stride —
number 3 (between the opening stride position and the passing position) and
number 5 (between the passing position and the closing stride position). This
will give us a sequence that looks like the following fi gure.
Again, notice that the body rises up as it reaches the passing position.
Note how on drawing 3 the back toe remains in contact with the ground
until the last possible moment (giving a more dynamic push to the walk), and
drawing 7 has the free foot up and forward before the downward hit position
of key drawing 9.
Walking is never a totally mechanical process, so try to have the foot reach out a little before it makes contact
with the ground and, at the back of the stride, keep toe contact with the ground as long as possible.
Now, having achieved this fi rst stride we have to complete a full walk cycle
by creating the other stride — that is, return the stride back to its original
start position. This is eff ectively done by repeating the entire process we just
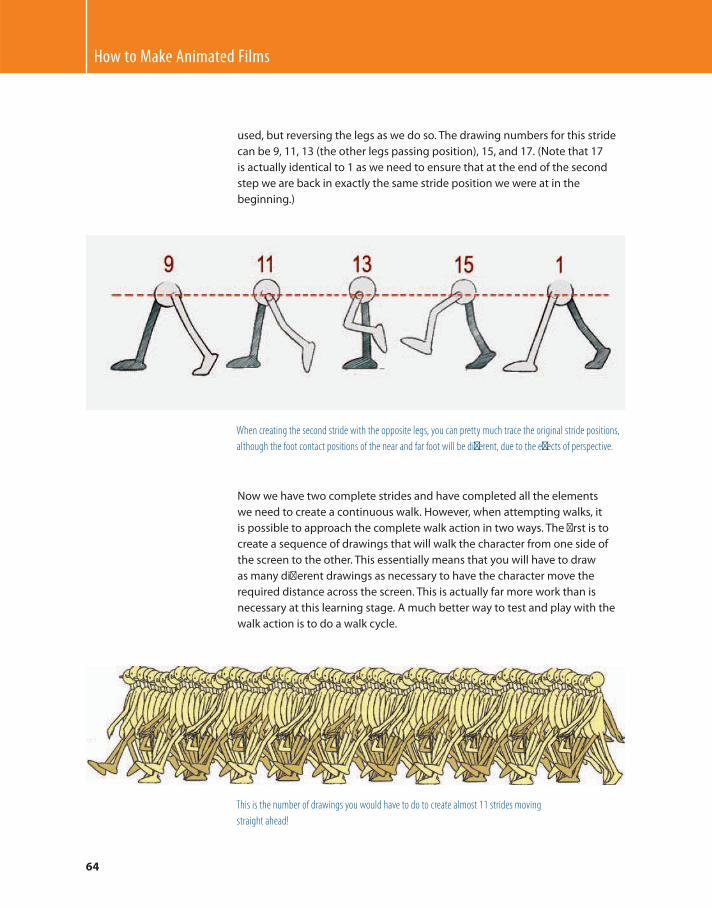
How to Make Animated Films
64
used, but reversing the legs as we do so. The drawing numbers for this stride
can be 9, 11, 13 (the other legs passing position), 15, and 17. (Note that 17
is actually identical to 1 as we need to ensure that at the end of the second
step we are back in exactly the same stride position we were at in the
beginning.)
When creating the second stride with the opposite legs, you can pretty much trace the original stride positions,
although the foot contact positions of the near and far foot will be diff erent, due to the eff ects of perspective.
Now we have two complete strides and have completed all the elements
we need to create a continuous walk. However, when attempting walks, it
is possible to approach the complete walk action in two ways. The fi rst is to
create a sequence of drawings that will walk the character from one side of
the screen to the other. This essentially means that you will have to draw
as many diff erent drawings as necessary to have the character move the
required distance across the screen. This is actually far more work than is
necessary at this learning stage. A much better way to test and play with the
walk action is to do a walk cycle.
This is the number of drawings you would have to do to create almost 11 strides moving
straight ahead!
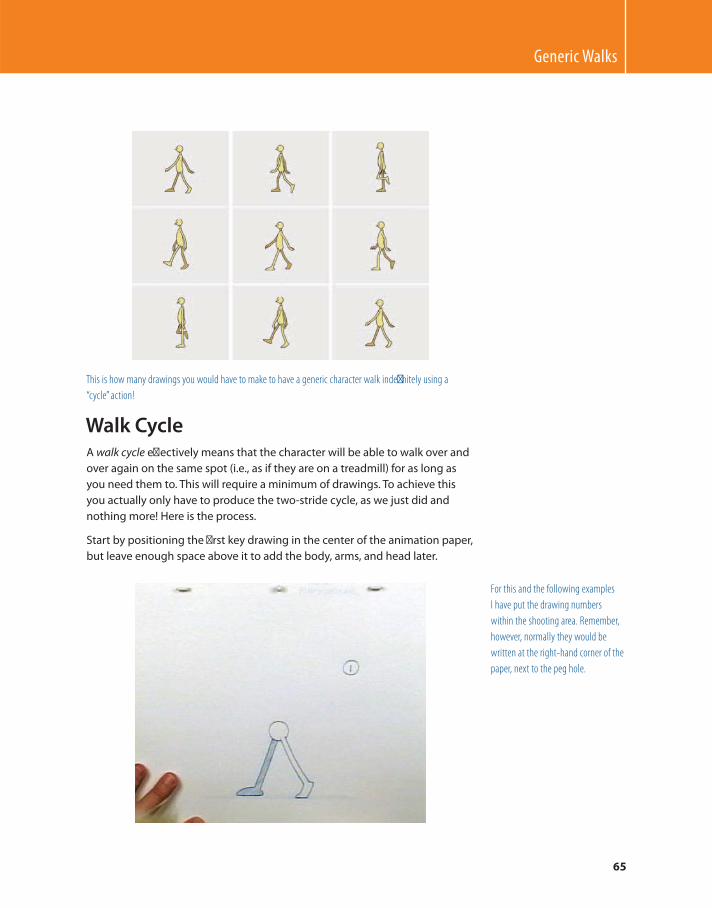
Generic Walks
65
This is how many drawings you would have to make to have a generic character walk indefi nitely using a
“cycle” action!
Walk Cycle A walk cycle eff ectively means that the character will be able to walk over and
over again on the same spot (i.e., as if they are on a treadmill) for as long as
you need them to. This will require a minimum of drawings. To achieve this
you actually only have to produce the two-stride cycle, as we just did and
nothing more! Here is the process.
Start by positioning the fi rst key drawing in the center of the animation paper,
but leave enough space above it to add the body, arms, and head later.
For this and the following examples
I have put the drawing numbers
within the shooting area. Remember,
however, normally they would be
written at the right-hand corner of the
paper, next to the peg hole.
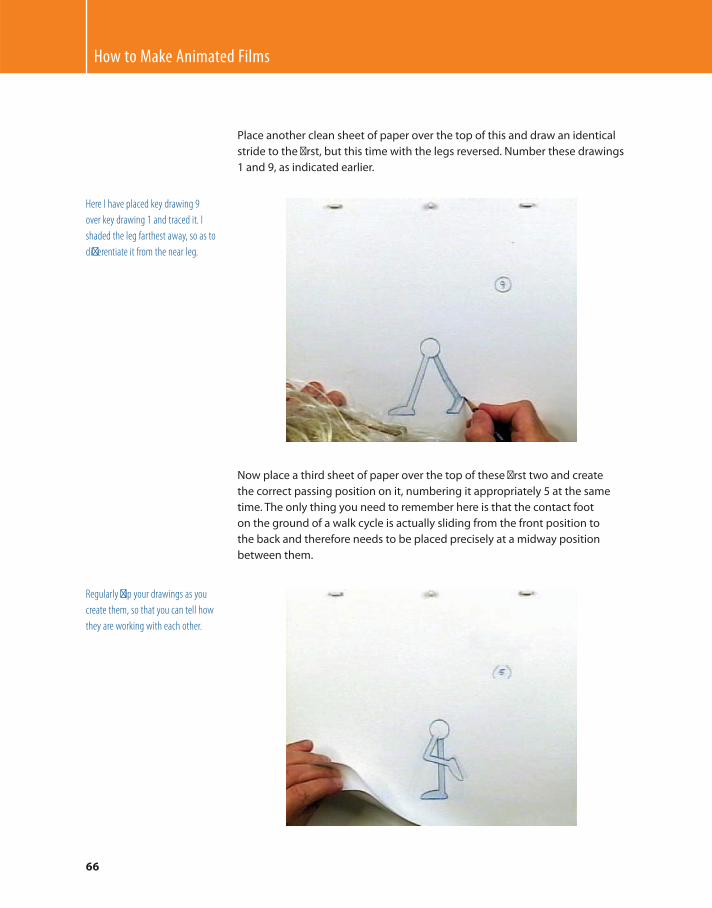
How to Make Animated Films
66
Place another clean sheet of paper over the top of this and draw an identical
stride to the fi rst, but this time with the legs reversed. Number these drawings
1 and 9, as indicated earlier.
Here I have placed key drawing 9
over key drawing 1 and traced it. I
shaded the leg farthest away, so as to
diff erentiate it from the near leg.
Now place a third sheet of paper over the top of these fi rst two and create
the correct passing position on it, numbering it appropriately 5 at the same
time. The only thing you need to remember here is that the contact foot
on the ground of a walk cycle is actually sliding from the front position to
the back and therefore needs to be placed precisely at a midway position
between them.
Regularly fl ip your drawings as you
create them, so that you can tell how
they are working with each other.
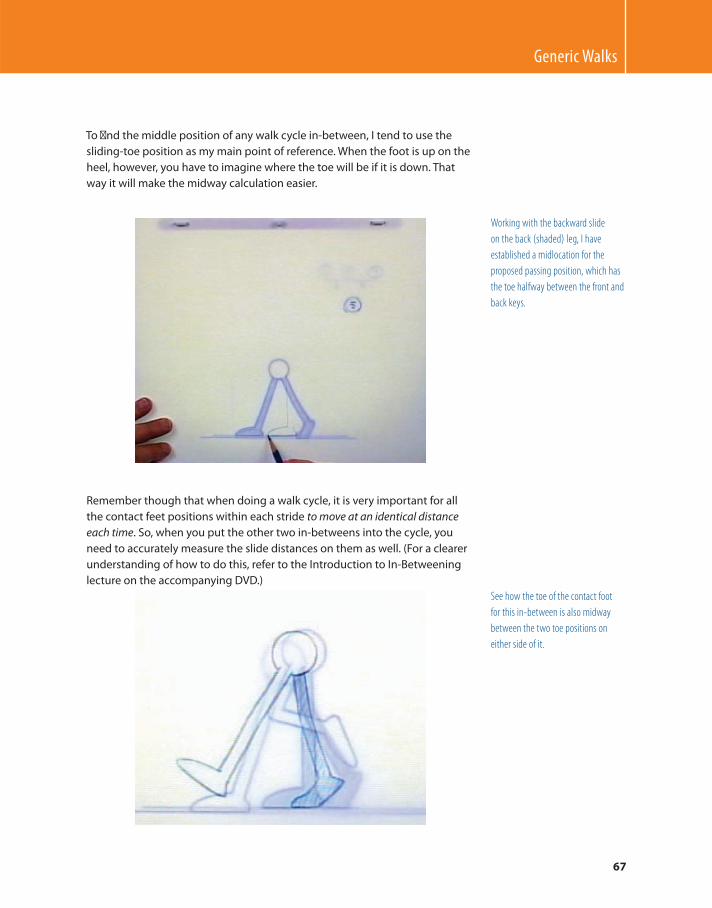
Generic Walks
67
To fi nd the middle position of any walk cycle in-between, I tend to use the
sliding-toe position as my main point of reference. When the foot is up on the
heel, however, you have to imagine where the toe will be if it is down. That
way it will make the midway calculation easier.
Working with the backward slide
on the back (shaded) leg, I have
established a midlocation for the
proposed passing position, which has
the toe halfway between the front and
back keys.
Remember though that when doing a walk cycle, it is very important for all
the contact feet positions within each stride to move at an identical distance
each time . So, when you put the other two in-betweens into the cycle, you
need to accurately measure the slide distances on them as well. (For a clearer
understanding of how to do this, refer to the Introduction to In-Betweening
lecture on the accompanying DVD.)
See how the toe of the contact foot
for this in-between is also midway
between the two toe positions on
either side of it.

How to Make Animated Films
68
Now you have completed the drawings of the fi rst stride and the second
stride in an identical manner (except for the fact that this time the legs are
reversed, of course).
Note that the leg positioning within the second (bottom) set of frames is identical to that of the fi rst (upper) set.
It is just the legs that are reversed, made clear by the shaded back leg.
Note that when doing profi le walks like this, the far foot should be on a
slightly higher path of action for the contact slide than the near foot, due to
the perspective involved from this viewpoint.
You can make this easier for yourself by adding two lines (paths of action) to an underlying background sheet.
Make sure that the far foot always locates to the upper line at all times and the nearer foot to the lower line. This
will ensure that you get a correct sense of perspective at all times.
The second stride can be numbered exactly as indicated earlier, except that
for the walk cycle you can reuse drawing 1 for drawing 17 (as both these
drawings are identical and you don’t want to draw it twice). Consequently, if
we were drawing the in-between charts for both strides here, they would look
like the following fi gure.
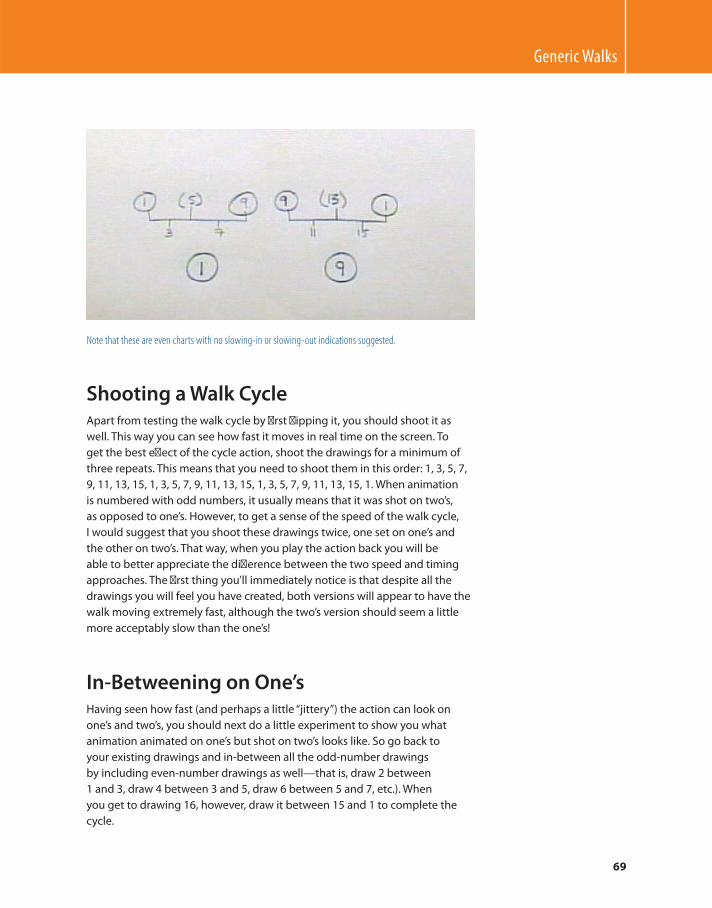
Generic Walks
69
Note that these are even charts with no slowing-in or slowing-out indications suggested.
Shooting a Walk Cycle Apart from testing the walk cycle by fi rst fl ipping it, you should shoot it as
well. This way you can see how fast it moves in real time on the screen. To
get the best eff ect of the cycle action, shoot the drawings for a minimum of
three repeats. This means that you need to shoot them in this order: 1, 3, 5, 7,
9, 11, 13, 15, 1, 3, 5, 7, 9, 11, 13, 15, 1, 3, 5, 7, 9, 11, 13, 15, 1. When animation
is numbered with odd numbers, it usually means that it was shot on two’s,
as opposed to one’s. However, to get a sense of the speed of the walk cycle,
I would suggest that you shoot these drawings twice, one set on one’s and
the other on two’s. That way, when you play the action back you will be
able to better appreciate the diff erence between the two speed and timing
approaches. The fi rst thing you’ll immediately notice is that despite all the
drawings you will feel you have created, both versions will appear to have the
walk moving extremely fast, although the two’s version should seem a little
more acceptably slow than the one’s !
In-Betweening on One’s Having seen how fast (and perhaps a little “ jittery ” ) the action can look on
one’s and two’s, you should next do a little experiment to show you what
animation animated on one’s but shot on two’s looks like. So go back to
your existing drawings and in-between all the odd-number drawings
by including even-number drawings as well — that is, draw 2 between
1 and 3, draw 4 between 3 and 5, draw 6 between 5 and 7, etc.). When
you get to drawing 16, however, draw it between 15 and 1 to complete the
cycle.

How to Make Animated Films
70
Two important things you need to know about when you do this. First, for
drawing 10 make sure you keep the toe down on the back foot before it lifts
up and begins to come forward on drawing 11. This will give you a little extra
push on the back leg. However, on walk cycles all the slide distances have to
be even for every contact foot position on the ground, so you will need to
calculate the average foot slide distance back throughout the preceding stride
and add it to the drawing 9 position for drawing 10 (see the following fi gure).
I am superimposing one foot over
another to keep size consistency,
although on this occasion I am
choosing to keep the foot planted
fi rmly down on the ground for the
in-between.
Note how the back leg on the in-
between remains in contact with the
ground until the last possible moment,
with the toe sliding back the same
distance as all the other in-between
foot slides.
Also, for drawing 16, which links up to drawing 1 again on the cycle, place the
heel of the foot just a little higher and forward of the heel on drawing 1. This
will give you a forward and back action on the free foot before the heel hits
the ground, which is a more natural way of walking that echoes real life.
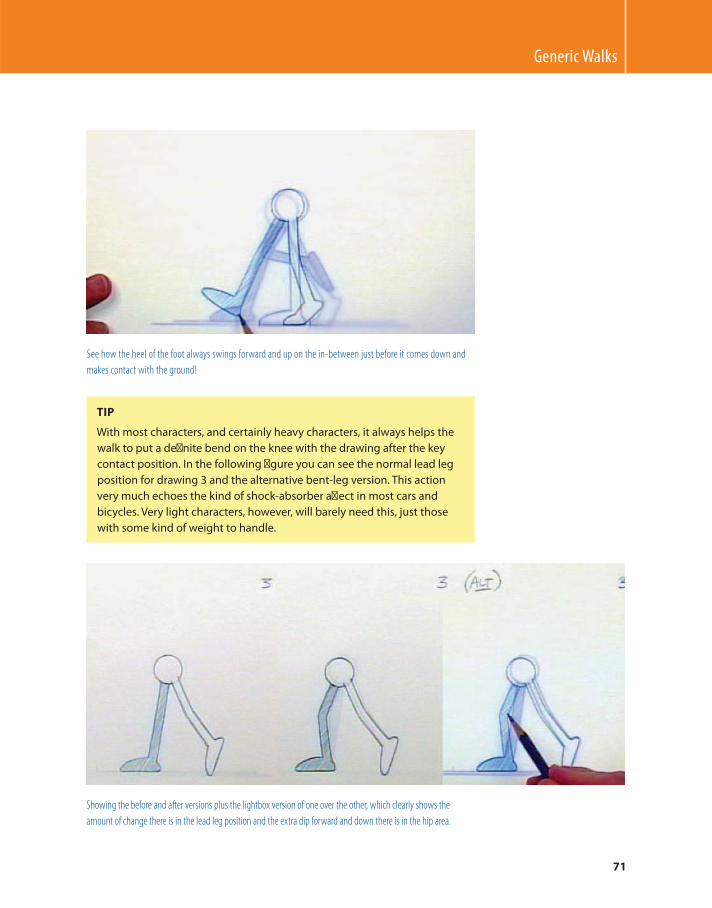
Generic Walks
71
See how the heel of the foot always swings forward and up on the in-between just before it comes down and
makes contact with the ground!
TIP
With most characters, and certainly heavy characters, it always helps the
walk to put a defi nite bend on the knee with the drawing after the key
contact position. In the following fi gure you can see the normal lead leg
position for drawing 3 and the alternative bent-leg version. This action
very much echoes the kind of shock-absorber aff ect in most cars and
bicycles. Very light characters, however, will barely need this, just those
with some kind of weight to handle.
Showing the before and after versions plus the lightbox version of one over the other, which clearly shows the
amount of change there is in the lead leg position and the extra dip forward and down there is in the hip area.
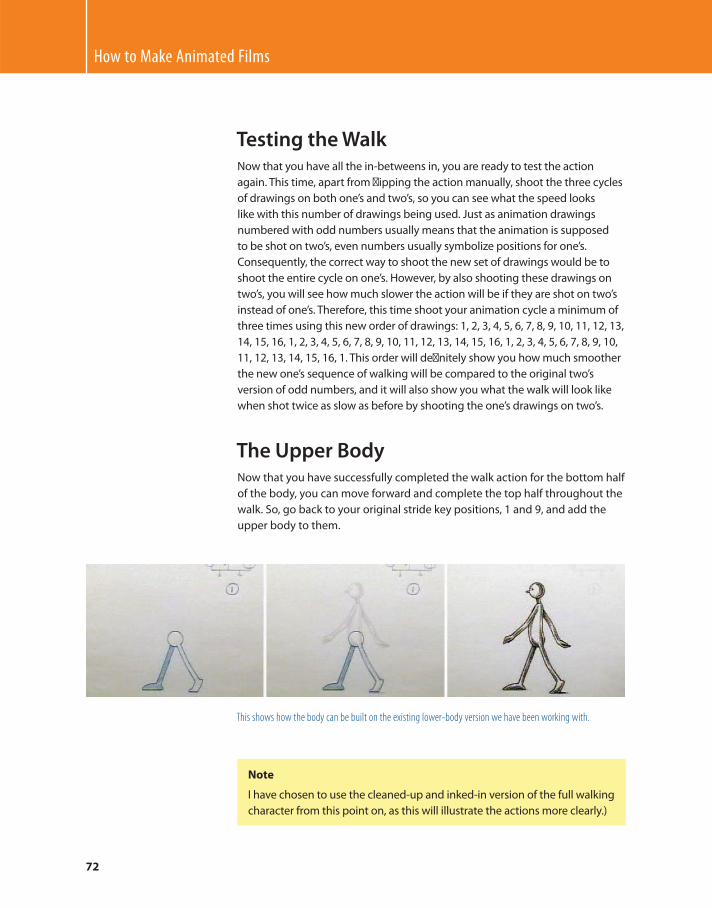
How to Make Animated Films
72
Testing the Walk Now that you have all the in-betweens in, you are ready to test the action
again. This time, apart from fl ipping the action manually, shoot the three cycles
of drawings on both one’s and two’s, so you can see what the speed looks
like with this number of drawings being used. Just as animation drawings
numbered with odd numbers usually means that the animation is supposed
to be shot on two’s, even numbers usually symbolize positions for one’s.
Consequently, the correct way to shoot the new set of drawings would be to
shoot the entire cycle on one’s. However, by also shooting these drawings on
two’s, you will see how much slower the action will be if they are shot on two’s
instead of one’s. Therefore, this time shoot your animation cycle a minimum of
three times using this new order of drawings: 1, 2, 3, 4, 5, 6, 7, 8, 9, 10, 11, 12, 13,
14, 15, 16, 1, 2, 3, 4, 5, 6, 7, 8, 9, 10, 11, 12, 13, 14, 15, 16, 1, 2, 3, 4, 5, 6, 7, 8, 9, 10,
11, 12, 13, 14, 15, 16, 1. This order will defi nitely show you how much smoother
the new one’s sequence of walking will be compared to the original two’s
version of odd numbers, and it will also show you what the walk will look like
when shot twice as slow as before by shooting the one’s drawings on two’s.
The Upper Body Now that you have successfully completed the walk action for the bottom half
of the body, you can move forward and complete the top half throughout the
walk. So, go back to your original stride key positions, 1 and 9, and add the
upper body to them.
This shows how the body can be built on the existing lower-body version we have been working with.
Note
I have chosen to use the cleaned-up and inked-in version of the full walking
character from this point on, as this will illustrate the actions more clearly.)
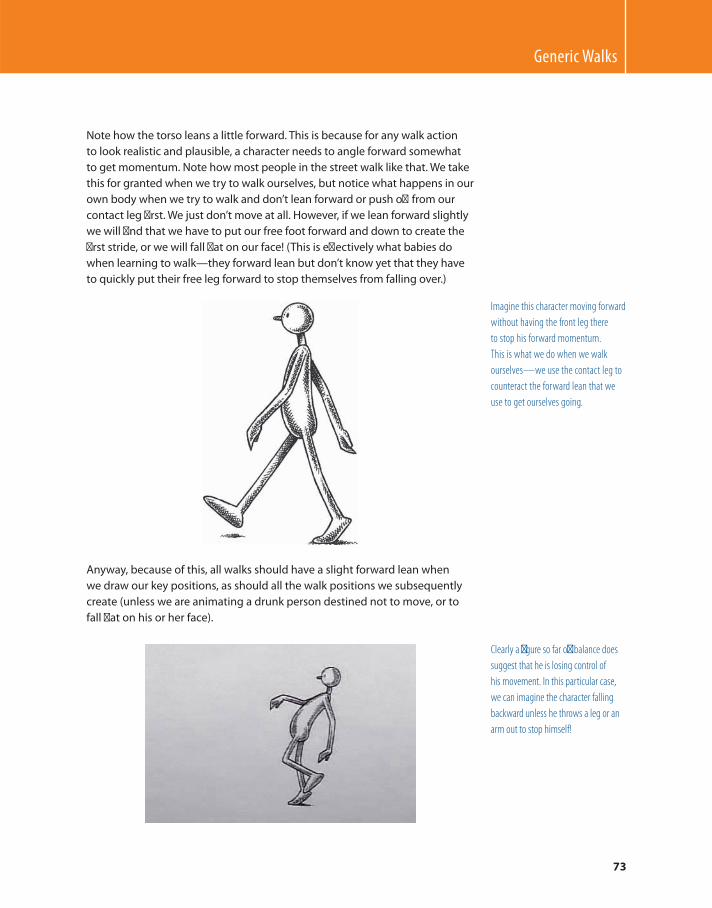
Generic Walks
73
Note how the torso leans a little forward. This is because for any walk action
to look realistic and plausible, a character needs to angle forward somewhat
to get momentum. Note how most people in the street walk like that. We take
this for granted when we try to walk ourselves, but notice what happens in our
own body when we try to walk and don’t lean forward or push off from our
contact leg fi rst. We just don’t move at all. However, if we lean forward slightly
we will fi nd that we have to put our free foot forward and down to create the
fi rst stride, or we will fall fl at on our face! (This is eff ectively what babies do
when learning to walk — they forward lean but don’t know yet that they have
to quickly put their free leg forward to stop themselves from falling over.)
Anyway, because of this, all walks should have a slight forward lean when
we draw our key positions, as should all the walk positions we subsequently
create (unless we are animating a drunk person destined not to move, or to
fall fl at on his or her face).
Imagine this character moving forward
without having the front leg there
to stop his forward momentum.
This is what we do when we walk
ourselves — we use the contact leg to
counteract the forward lean that we
use to get ourselves going.
Clearly a fi gure so far off balance does
suggest that he is losing control of
his movement. In this particular case,
we can imagine the character falling
backward unless he throws a leg or an
arm out to stop himself!
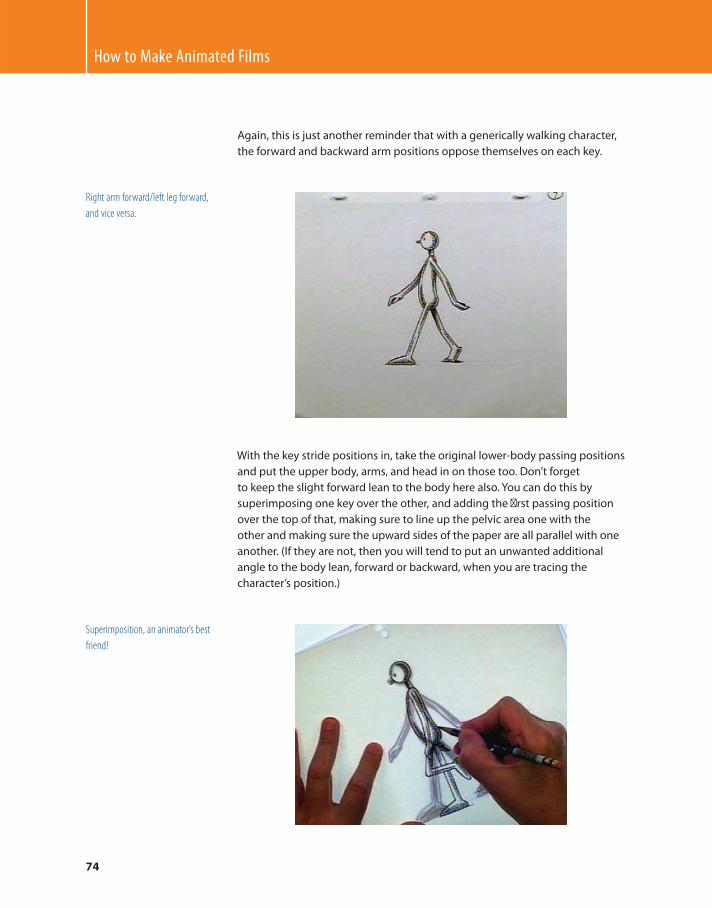
How to Make Animated Films
74
Again, this is just another reminder that with a generically walking character,
the forward and backward arm positions oppose themselves on each key.
With the key stride positions in, take the original lower-body passing positions
and put the upper body, arms, and head in on those too. Don’t forget
to keep the slight forward lean to the body here also. You can do this by
superimposing one key over the other, and adding the fi rst passing position
over the top of that, making sure to line up the pelvic area one with the
other and making sure the upward sides of the paper are all parallel with one
another. (If they are not, then you will tend to put an unwanted additional
angle to the body lean, forward or backward, when you are tracing the
character’s position.)
Right arm forward/left leg forward,
and vice versa.
Superimposition, an animator’s best
friend!
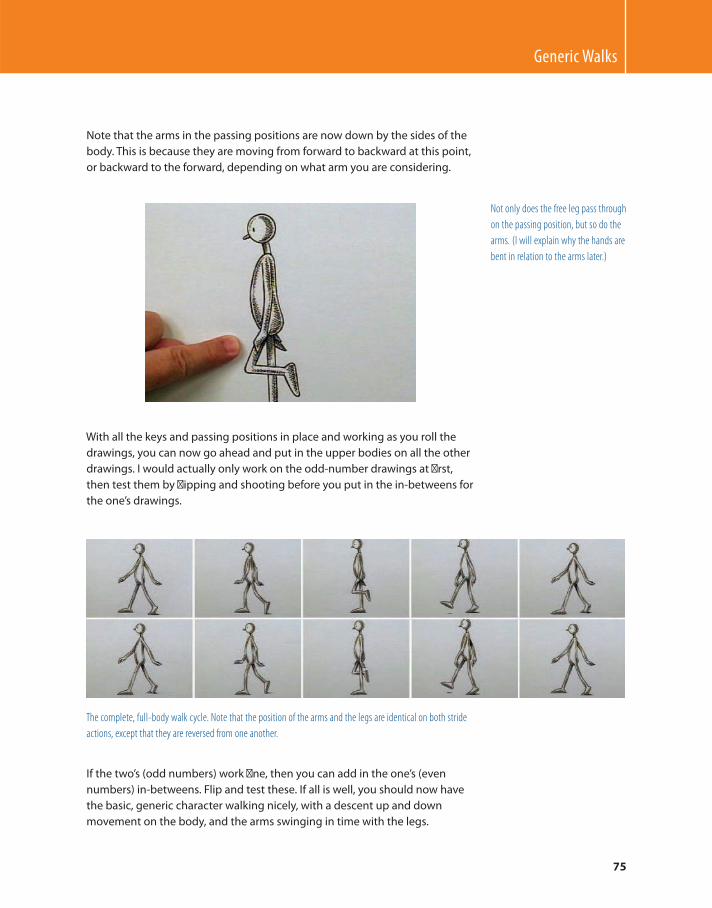
Generic Walks
75
Note that the arms in the passing positions are now down by the sides of the
body. This is because they are moving from forward to backward at this point,
or backward to the forward, depending on what arm you are considering.
With all the keys and passing positions in place and working as you roll the
drawings, you can now go ahead and put in the upper bodies on all the other
drawings. I would actually only work on the odd-number drawings at fi rst,
then test them by fl ipping and shooting before you put in the in-betweens for
the one’s drawings.
The complete, full-body walk cycle. Note that the position of the arms and the legs are identical on both stride
actions, except that they are reversed from one another.
If the two’s (odd numbers) work fi ne, then you can add in the one’s (even
numbers) in-betweens. Flip and test these. If all is well, you should now have
the basic, generic character walking nicely, with a descent up and down
movement on the body, and the arms swinging in time with the legs.
Not only does the free leg pass through
on the passing position, but so do the
arms. (I will explain why the hands are
bent in relation to the arms later.)
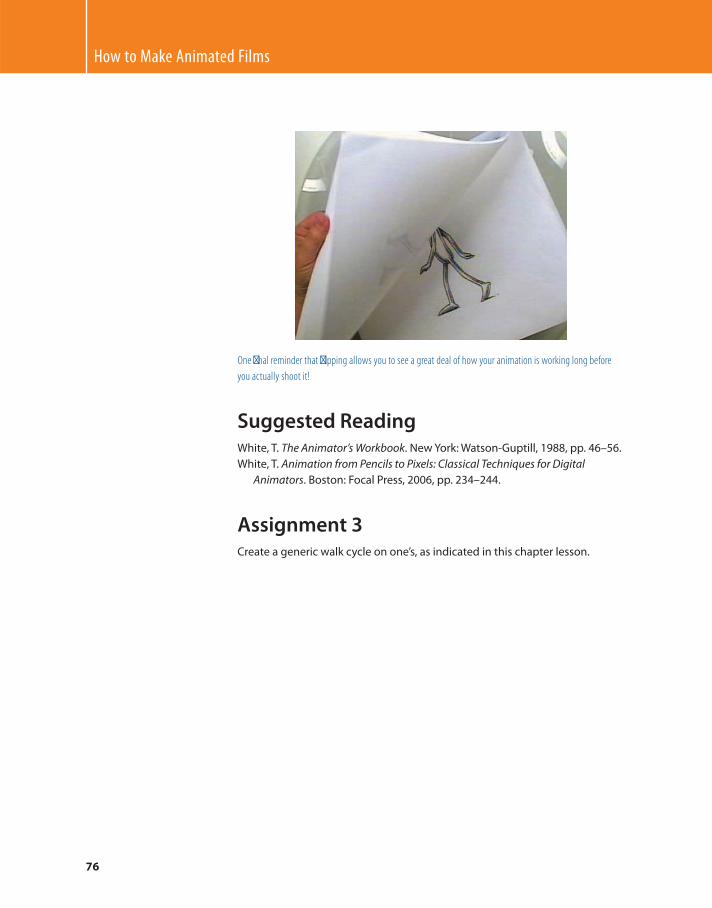
How to Make Animated Films
76
One fi nal reminder that fl ipping allows you to see a great deal of how your animation is working long before
you actually shoot it!
Suggested Reading White , T. The Animator’s Workbook . New York : Watson-Guptill , 1988 , pp. 46 – 56.
White , T. Animation from Pencils to Pixels: Classical Techniques for Digital
Animators . Boston : Focal Press , 2006 , pp. 234 – 244 .
Assignment 3 Create a generic walk cycle on one’s, as indicated in this chapter lesson.
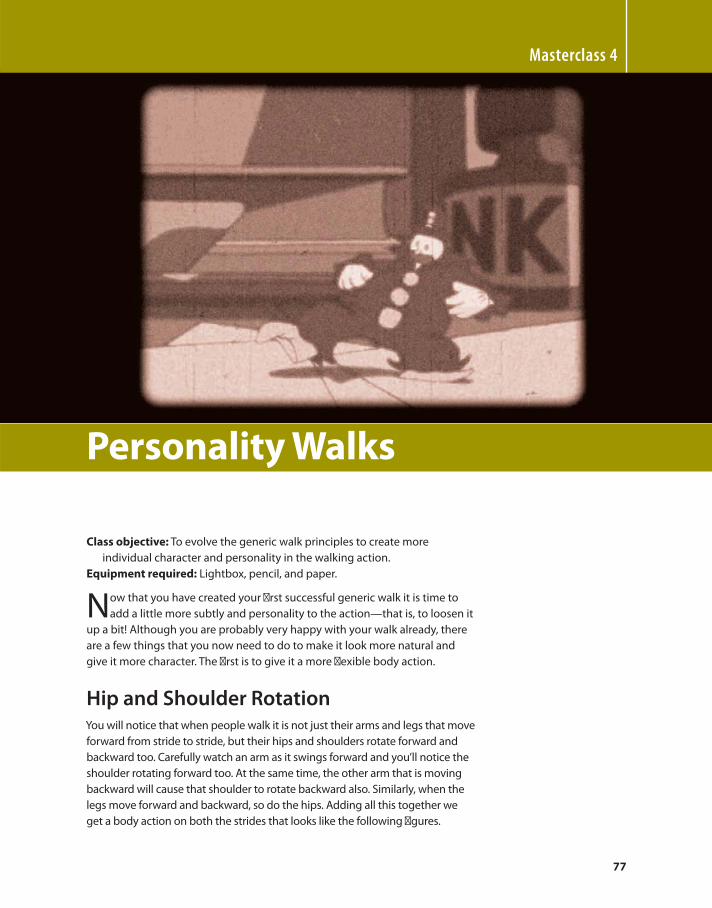
77
Class objective: To evolve the generic walk principles to create more
individual character and personality in the walking action.
Equipment required: Lightbox, pencil, and paper.
Now that you have created your fi rst successful generic walk it is time to
add a little more subtly and personality to the action — that is, to loosen it
up a bit! Although you are probably very happy with your walk already, there
are a few things that you now need to do to make it look more natural and
give it more character. The fi rst is to give it a more fl exible body action.
Hip and Shoulder Rotation You will notice that when people walk it is not just their arms and legs that move
forward from stride to stride, but their hips and shoulders rotate forward and
backward too. Carefully watch an arm as it swings forward and you’ll notice the
shoulder rotating forward too. At the same time, the other arm that is moving
backward will cause that shoulder to rotate backward also. Similarly, when the
legs move forward and backward, so do the hips. Adding all this together we
get a body action on both the strides that looks like the following fi gures.
Masterclass 4
Personality Walks
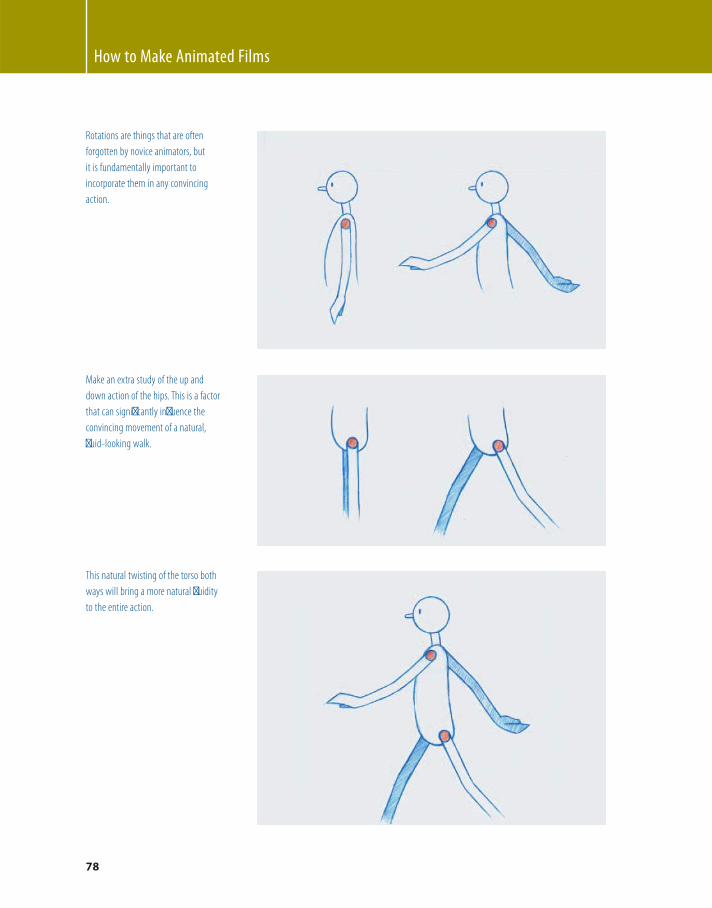
How to Make Animated Films
78
Rotations are things that are often
forgotten by novice animators, but
it is fundamentally important to
incorporate them in any convincing
action.
Make an extra study of the up and
down action of the hips. This is a factor
that can signifi cantly infl uence the
convincing movement of a natural,
fl uid-looking walk.
This natural twisting of the torso both
ways will bring a more natural fl uidity
to the entire action.
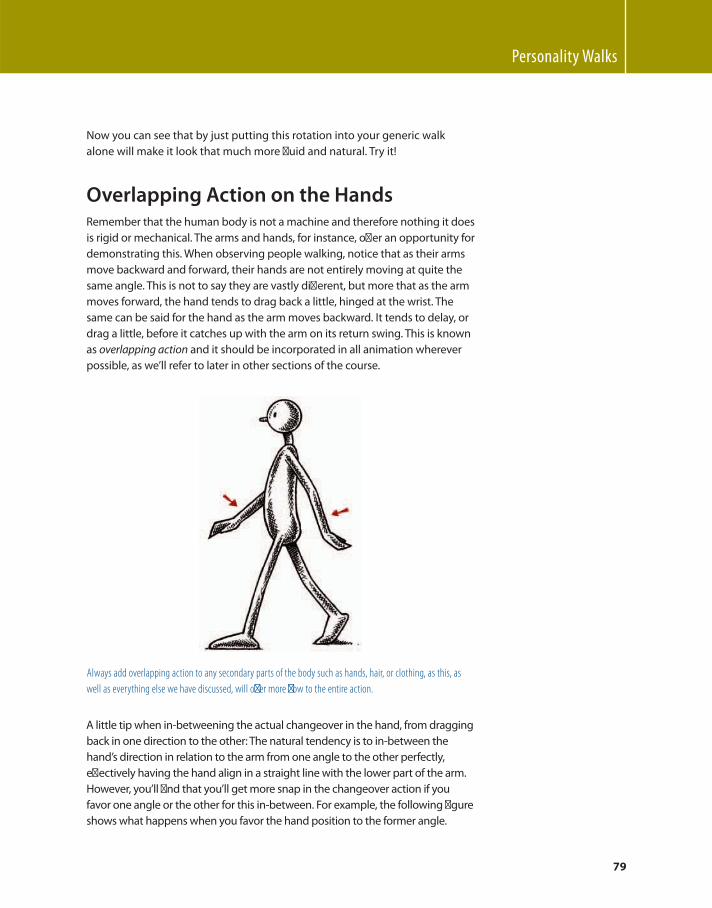
Personality Walks
79
Now you can see that by just putting this rotation into your generic walk
alone will make it look that much more fl uid and natural. Try it!
Overlapping Action on the Hands Remember that the human body is not a machine and therefore nothing it does
is rigid or mechanical. The arms and hands, for instance, off er an opportunity for
demonstrating this. When observing people walking, notice that as their arms
move backward and forward, their hands are not entirely moving at quite the
same angle. This is not to say they are vastly diff erent, but more that as the arm
moves forward, the hand tends to drag back a little, hinged at the wrist. The
same can be said for the hand as the arm moves backward. It tends to delay, or
drag a little, before it catches up with the arm on its return swing. This is known
as overlapping action and it should be incorporated in all animation wherever
possible, as we’ll refer to later in other sections of the course.
Always add overlapping action to any secondary parts of the body such as hands, hair, or clothing, as this, as
well as everything else we have discussed, will off er more fl ow to the entire action.
A little tip when in-betweening the actual changeover in the hand, from dragging
back in one direction to the other: The natural tendency is to in-between the
hand’s direction in relation to the arm from one angle to the other perfectly,
eff ectively having the hand align in a straight line with the lower part of the arm.
However, you’ll fi nd that you’ll get more snap in the changeover action if you
favor one angle or the other for this in-between. For example, the following fi gure
shows what happens when you favor the hand position to the former angle.
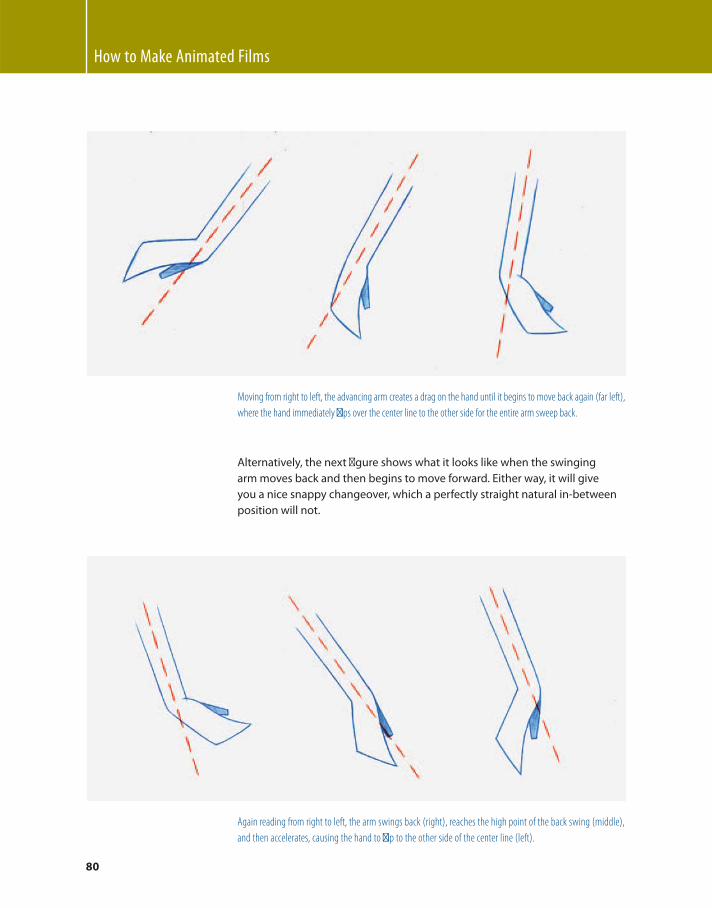
How to Make Animated Films
80
Moving from right to left, the advancing arm creates a drag on the hand until it begins to move back again (far left),
where the hand immediately fl ips over the center line to the other side for the entire arm sweep back.
Alternatively, the next fi gure shows what it looks like when the swinging
arm moves back and then begins to move forward. Either way, it will give
you a nice snappy changeover, which a perfectly straight natural in-between
position will not.
Again reading from right to left, the arm swings back (right), reaches the high point of the back swing (middle),
and then accelerates, causing the hand to fl ip to the other side of the center line (left).
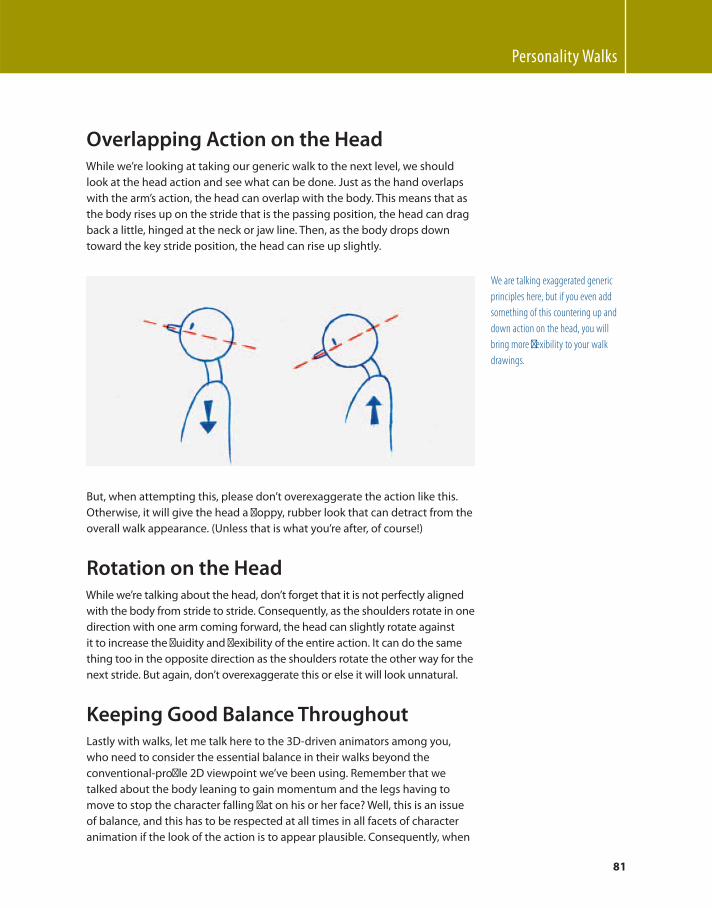
Personality Walks
81
Overlapping Action on the Head While we’re looking at taking our generic walk to the next level, we should
look at the head action and see what can be done. Just as the hand overlaps
with the arm’s action, the head can overlap with the body. This means that as
the body rises up on the stride that is the passing position, the head can drag
back a little, hinged at the neck or jaw line. Then, as the body drops down
toward the key stride position, the head can rise up slightly.
But, when attempting this, please don’t overexaggerate the action like this.
Otherwise, it will give the head a fl oppy, rubber look that can detract from the
overall walk appearance. (Unless that is what you’re after, of course!)
Rotation on the Head While we’re talking about the head, don’t forget that it is not perfectly aligned
with the body from stride to stride. Consequently, as the shoulders rotate in one
direction with one arm coming forward, the head can slightly rotate against
it to increase the fl uidity and fl exibility of the entire action. It can do the same
thing too in the opposite direction as the shoulders rotate the other way for the
next stride. But again, don’t overexaggerate this or else it will look unnatural.
Keeping Good Balance Throughout Lastly with walks, let me talk here to the 3D-driven animators among you,
who need to consider the essential balance in their walks beyond the
conventional-profi le 2D viewpoint we’ve been using. Remember that we
talked about the body leaning to gain momentum and the legs having to
move to stop the character falling fl at on his or her face? Well, this is an issue
of balance, and this has to be respected at all times in all facets of character
animation if the look of the action is to appear plausible. Consequently, when
We are talking exaggerated generic
principles here, but if you even add
something of this countering up and
down action on the head, you will
bring more fl exibility to your walk
drawings.

How to Make Animated Films
82
looking at the profi le action we have just animated, remember that unless all
of our drawn characters respect the natural balance we need, the audience
will not feel comfortable with the action they are watching, albeit they may
not be consciously aware of it. Therefore, when moving the weight from one
leg to another during the stride, the body’s center of gravity must always
remain in balance over the one or two points of contact the feet provide. So,
with both feet on the ground, the bulk of the torso will need to be placed
somewhere between the two points of contact.
Red indicates the area that the body’s
center of gravity can be between the
two contact feet.
However, once one foot leaves the ground, the center of gravity needs to
move above the point of contact the grounded foot makes. Not to do this
creates an ugly and uncomfortable pose that implies that the character is
falling over, one way or the other.
Here the body’s center of gravity
needs to be adjusted above the much
narrower red area. Keep the lean in the
body, however, to maintain a sense of
forward momentum.

Personality Walks
83
This pose is grossly exaggerated, but it
does underline the fact that if a body
is outside of the red contact area it will
appear to be falling over!
Similarly, when we consider a walk from the front or back view, we have
to also shift the center of gravity over whatever foot is in contact with the
ground at any particular point in time. Not to do so gives a stilted, false
impression of the walk. This is a common error with many animated walks,
especially with poorly animated 3D walks where the character’s center of
gravity tends to be positioned somewhere in between the feet, whether they
are both on the ground or not.
Remember that the contact area is
all important, so that any view of
the action will require the body to
appear over it, unless the character is
deliberately out of balance or falling
over.
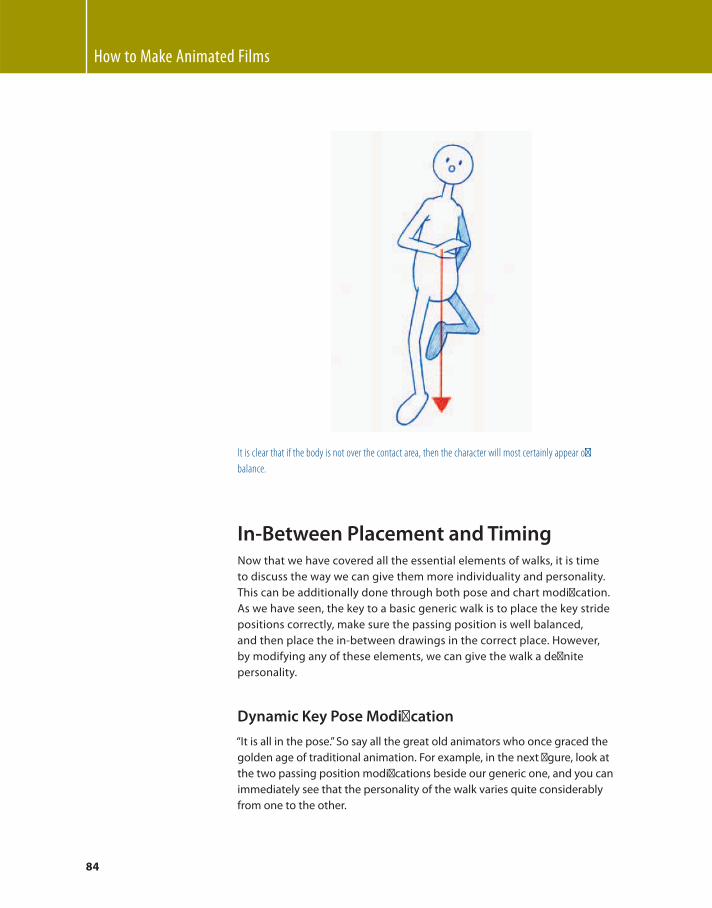
How to Make Animated Films
84
In-Between Placement and Timing Now that we have covered all the essential elements of walks, it is time
to discuss the way we can give them more individuality and personality.
This can be additionally done through both pose and chart modifi cation.
As we have seen, the key to a basic generic walk is to place the key stride
positions correctly, make sure the passing position is well balanced,
and then place the in-between drawings in the correct place. However,
by modifying any of these elements, we can give the walk a defi nite
personality.
Dynamic Key Pose Modifi cation
“ It is all in the pose. ” So say all the great old animators who once graced the
golden age of traditional animation. For example, in the next fi gure, look at
the two passing position modifi cations beside our generic one, and you can
immediately see that the personality of the walk varies quite considerably
from one to the other.
It is clear that if the body is not over the contact area, then the character will most certainly appear off
balance.

Personality Walks
85
Clearly, apart from the generic walk pose, in the fi gure we have one that is
very predictable and quite eccentric. All this is communicated through the
pose alone, which is why the pose is everything!
At the same time, you should remember that if you mess around with any of
the generic pose positions, you have to keep the character in perfect balance
at all times to make him or her perform fully. That is, in a key stride position
the center of gravity has to be positioned above the two points of contact
at all times. However, the following fi gure shows the kind of pose I often see
students produce, which is incorrect and gives the sense that the character
would fall backward if a puff of wind came along.
Passing positions can be infi nite in
their pose arrangement, but even
an extremely exaggerated, eccentric
one like this should still nevertheless
appear plausible and in balance.
Another example of a clearly
unbalanced character’s center of
gravity being away from the foot’s
actual contact point on the ground.
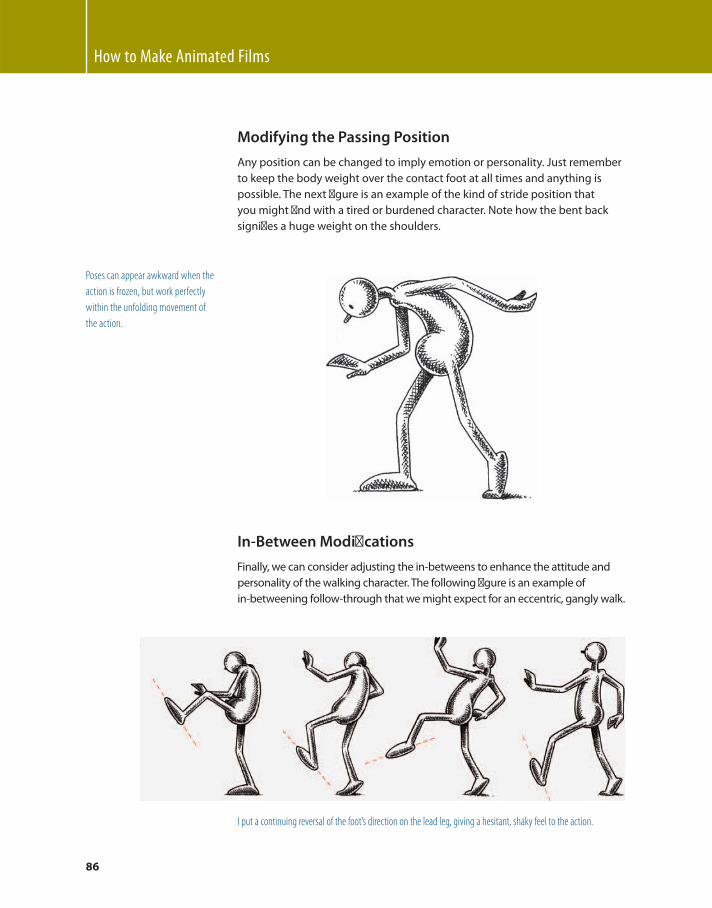
How to Make Animated Films
86
Modifying the Passing Position
Any position can be changed to imply emotion or personality. Just remember
to keep the body weight over the contact foot at all times and anything is
possible. The next fi gure is an example of the kind of stride position that
you might fi nd with a tired or burdened character. Note how the bent back
signifi es a huge weight on the shoulders.
Poses can appear awkward when the
action is frozen, but work perfectly
within the unfolding movement of
the action.
In-Between Modifi cations
Finally, we can consider adjusting the in-betweens to enhance the attitude and
personality of the walking character. The following fi gure is an example of
in-betweening follow-through that we might expect for an eccentric, gangly walk.
I put a continuing reversal of the foot’s direction on the lead leg, giving a hesitant, shaky feel to the action.
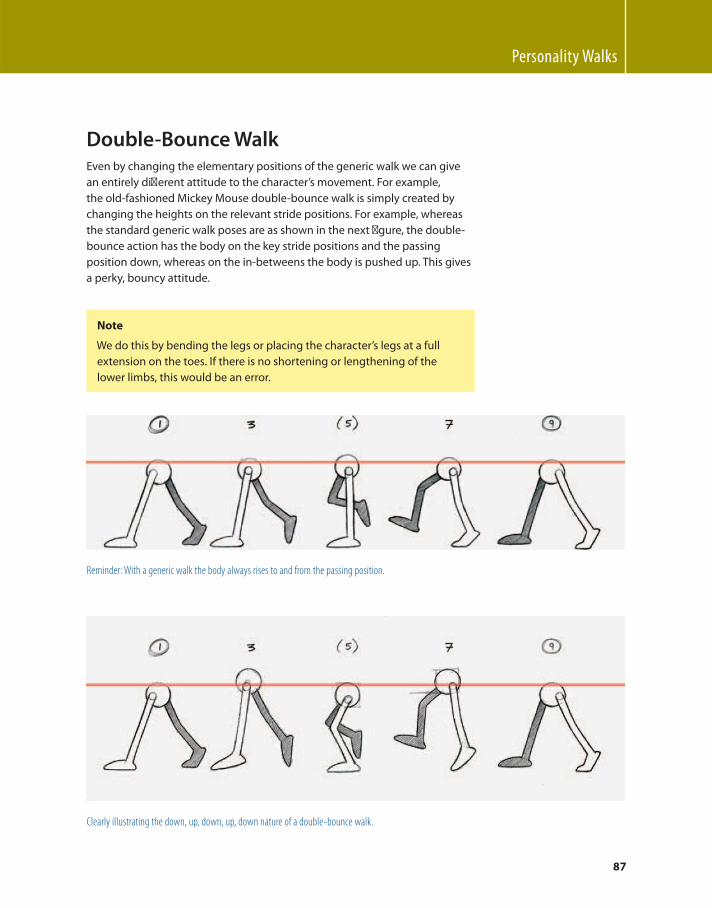
Personality Walks
87
Double-Bounce Walk Even by changing the elementary positions of the generic walk we can give
an entirely diff erent attitude to the character’s movement. For example,
the old-fashioned Mickey Mouse double-bounce walk is simply created by
changing the heights on the relevant stride positions. For example, whereas
the standard generic walk poses are as shown in the next fi gure, the double-
bounce action has the body on the key stride positions and the passing
position down, whereas on the in-betweens the body is pushed up. This gives
a perky, bouncy attitude.
Note
We do this by bending the legs or placing the character’s legs at a full
extension on the toes. If there is no shortening or lengthening of the
lower limbs, this would be an error.
Reminder: With a generic walk the body always rises to and from the passing position.
Clearly illustrating the down, up, down, up, down nature of a double-bounce walk.
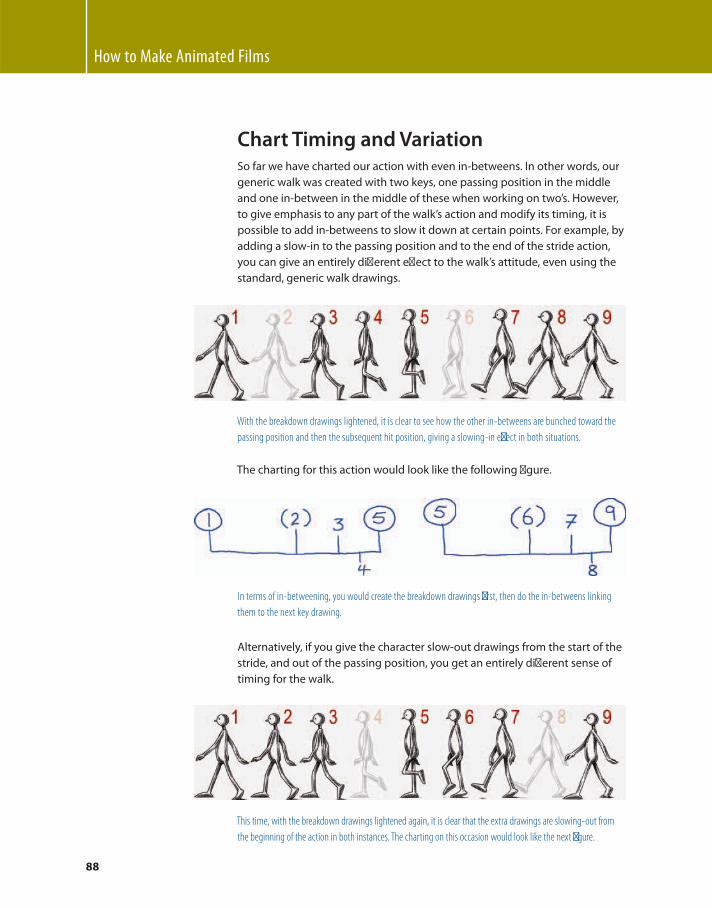
How to Make Animated Films
88
Chart Timing and Variation So far we have charted our action with even in-betweens. In other words, our
generic walk was created with two keys, one passing position in the middle
and one in-between in the middle of these when working on two’s. However,
to give emphasis to any part of the walk’s action and modify its timing, it is
possible to add in-betweens to slow it down at certain points. For example, by
adding a slow-in to the passing position and to the end of the stride action,
you can give an entirely diff erent eff ect to the walk’s attitude, even using the
standard, generic walk drawings.
With the breakdown drawings lightened, it is clear to see how the other in-betweens are bunched toward the
passing position and then the subsequent hit position, giving a slowing-in eff ect in both situations.
The charting for this action would look like the following fi gure.
In terms of in-betweening, you would create the breakdown drawings fi rst, then do the in-betweens linking
them to the next key drawing.
Alternatively, if you give the character slow-out drawings from the start of the
stride, and out of the passing position, you get an entirely diff erent sense of
timing for the walk.
This time, with the breakdown drawings lightened again, it is clear that the extra drawings are slowing-out from
the beginning of the action in both instances. The charting on this occasion would look like the next fi gure.
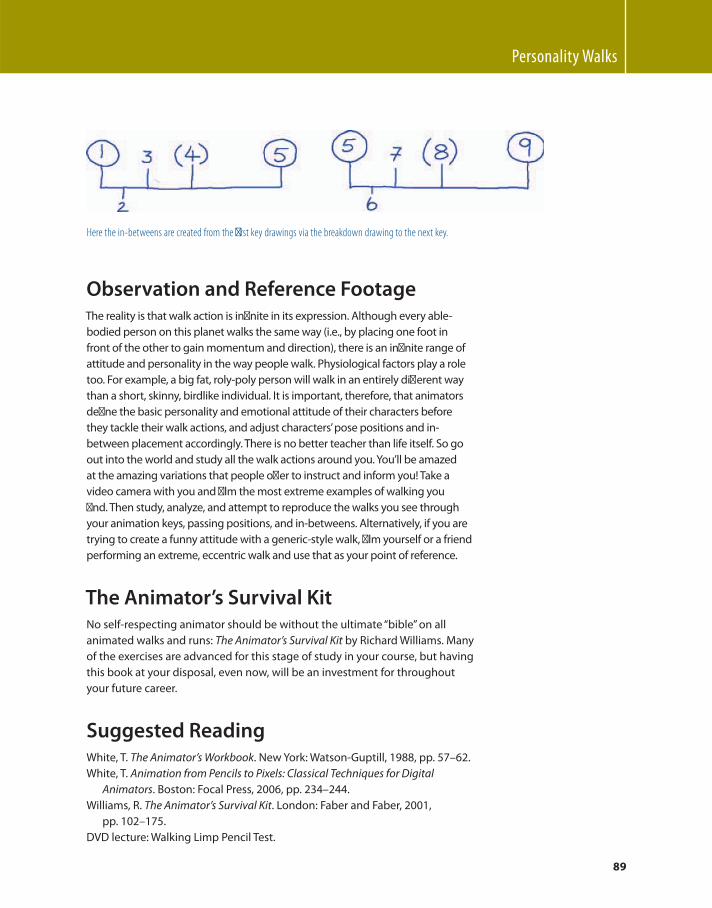
Personality Walks
89
Here the in-betweens are created from the fi rst key drawings via the breakdown drawing to the next key.
Observation and Reference Footage The reality is that walk action is infi nite in its expression. Although every able-
bodied person on this planet walks the same way (i.e., by placing one foot in
front of the other to gain momentum and direction), there is an infi nite range of
attitude and personality in the way people walk. Physiological factors play a role
too. For example, a big fat, roly-poly person will walk in an entirely diff erent way
than a short, skinny, birdlike individual. It is important, therefore, that animators
defi ne the basic personality and emotional attitude of their characters before
they tackle their walk actions, and adjust characters ’ pose positions and in-
between placement accordingly. There is no better teacher than life itself. So go
out into the world and study all the walk actions around you. You’ll be amazed
at the amazing variations that people off er to instruct and inform you! Take a
video camera with you and fi lm the most extreme examples of walking you
fi nd. Then study, analyze, and attempt to reproduce the walks you see through
your animation keys, passing positions, and in-betweens. Alternatively, if you are
trying to create a funny attitude with a generic-style walk, fi lm yourself or a friend
performing an extreme, eccentric walk and use that as your point of reference.
The Animator’s Survival Kit No self-respecting animator should be without the ultimate “ bible ” on all
animated walks and runs: The Animator’s Survival Kit by Richard Williams. Many
of the exercises are advanced for this stage of study in your course, but having
this book at your disposal, even now, will be an investment for throughout
your future career.
Suggested Reading White , T. The Animator’s Workbook . New York : Watson-Guptill , 1988 , pp. 57 – 62.
White , T. Animation from Pencils to Pixels: Classical Techniques for Digital
Animators . Boston : Focal Press , 2006 , pp . 234 – 244.
Williams , R. The Animator’s Survival Kit . London : Faber and Faber , 2001 ,
pp. 102 – 175.
DVD lecture: Walking Limp Pencil Test.
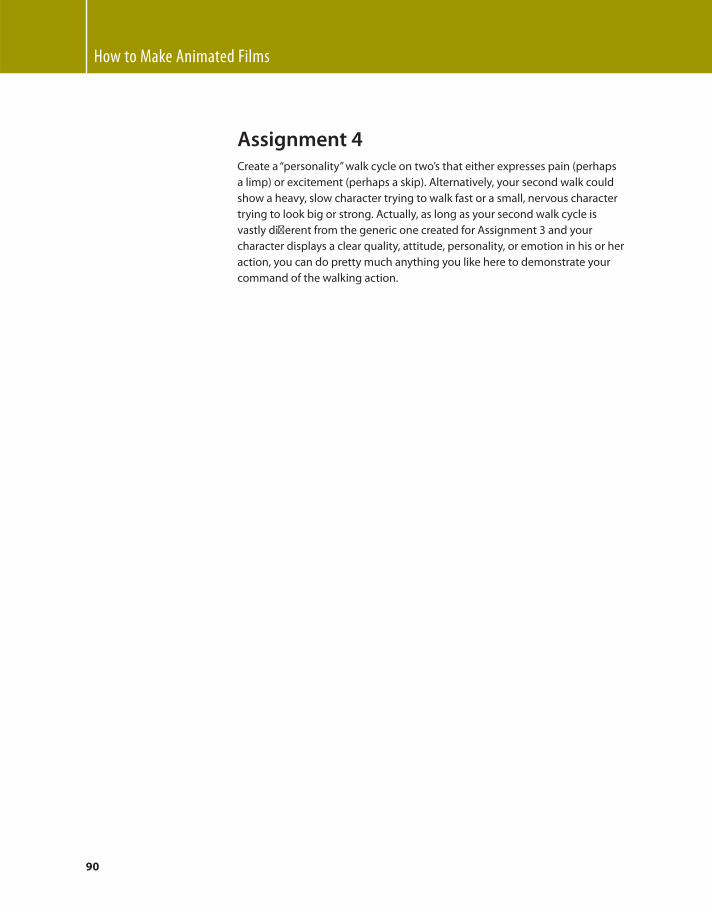
How to Make Animated Films
90
Assignment 4 Create a “ personality ” walk cycle on two’s that either expresses pain (perhaps
a limp) or excitement (perhaps a skip). Alternatively, your second walk could
show a heavy, slow character trying to walk fast or a small, nervous character
trying to look big or strong. Actually, as long as your second walk cycle is
vastly diff erent from the generic one created for Assignment 3 and your
character displays a clear quality, attitude, personality, or emotion in his or her
action, you can do pretty much anything you like here to demonstrate your
command of the walking action.
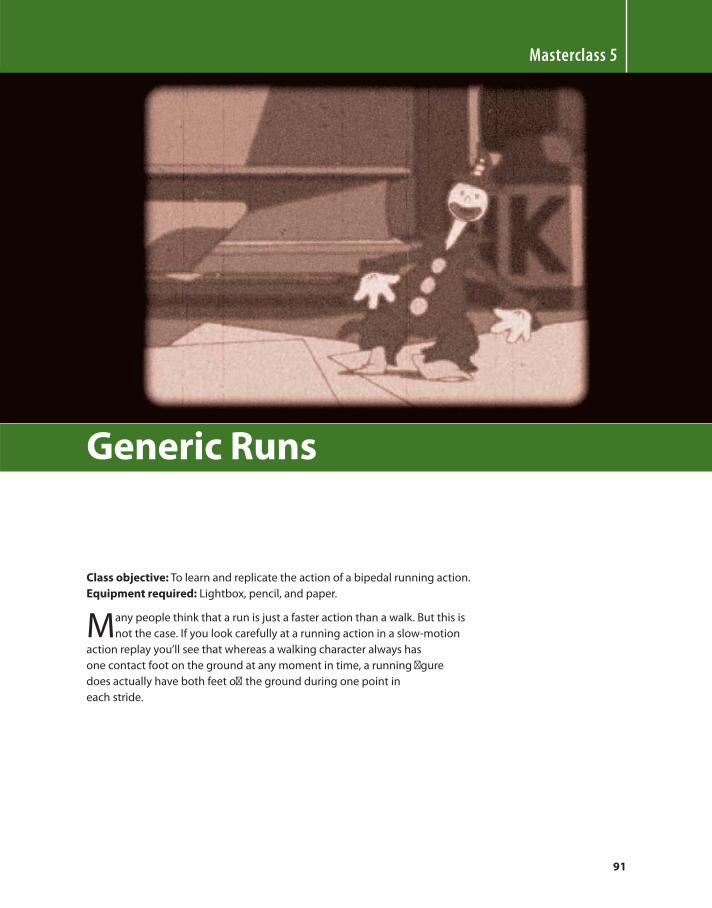
91
Class objective: To learn and replicate the action of a bipedal running action.
Equipment required: Lightbox, pencil, and paper.
Many people think that a run is just a faster action than a walk. But this is
not the case. If you look carefully at a running action in a slow-motion
action replay you’ll see that whereas a walking character always has
one contact foot on the ground at any moment in time, a running fi gure
does actually have both feet off the ground during one point in
each stride.
Masterclass 5
Generic Runs
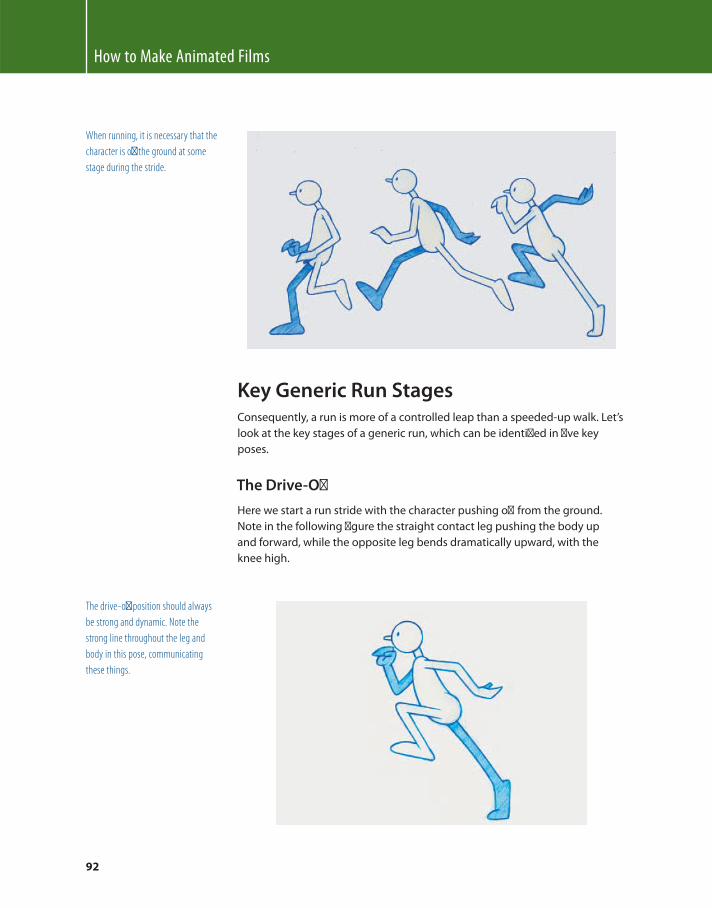
How to Make Animated Films
92
Key Generic Run Stages Consequently, a run is more of a controlled leap than a speeded-up walk. Let’s
look at the key stages of a generic run, which can be identifi ed in fi ve key
poses.
The Drive-Off
Here we start a run stride with the character pushing off from the ground.
Note in the following fi gure the straight contact leg pushing the body up
and forward, while the opposite leg bends dramatically upward, with the
knee high.
When running, it is necessary that the
character is off the ground at some
stage during the stride.
The drive-off position should always
be strong and dynamic. Note the
strong line throughout the leg and
body in this pose, communicating
these things.
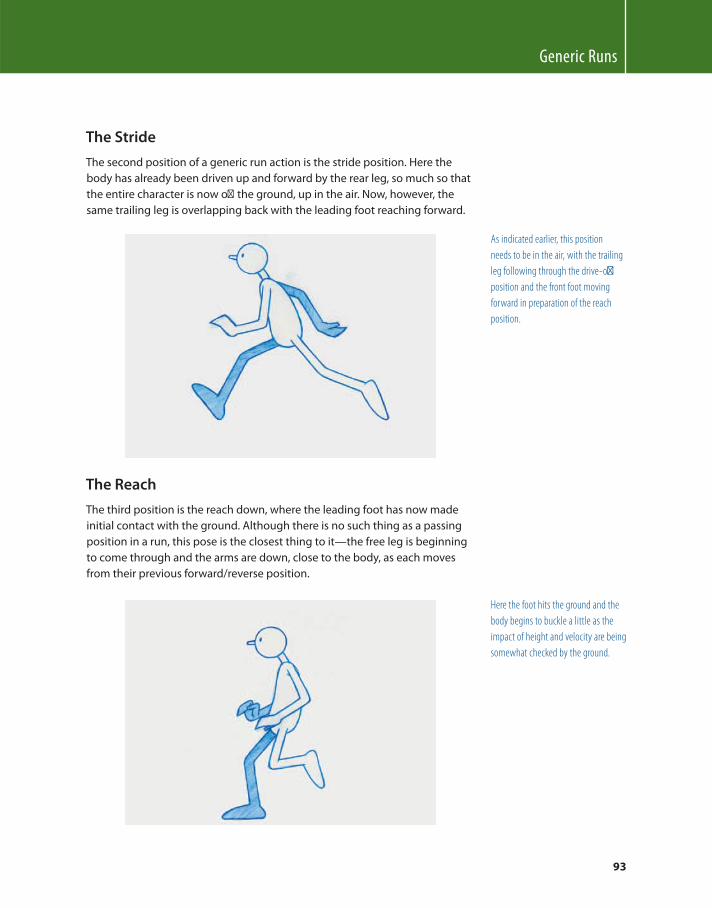
Generic Runs
93
The Stride
The second position of a generic run action is the stride position. Here the
body has already been driven up and forward by the rear leg, so much so that
the entire character is now off the ground, up in the air. Now, however, the
same trailing leg is overlapping back with the leading foot reaching forward.
As indicated earlier, this position
needs to be in the air, with the trailing
leg following through the drive-off
position and the front foot moving
forward in preparation of the reach
position.
The Reach
The third position is the reach down, where the leading foot has now made
initial contact with the ground. Although there is no such thing as a passing
position in a run, this pose is the closest thing to it — the free leg is beginning
to come through and the arms are down, close to the body, as each moves
from their previous forward/reverse position.
Here the foot hits the ground and the
body begins to buckle a little as the
impact of height and velocity are being
somewhat checked by the ground.
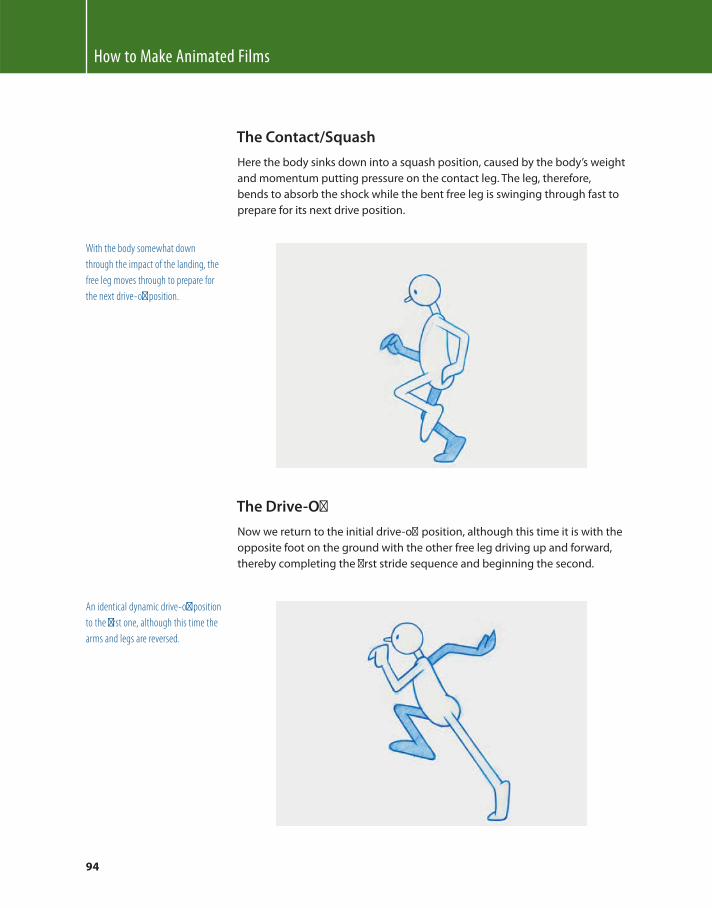
How to Make Animated Films
94
The Contact/Squash
Here the body sinks down into a squash position, caused by the body’s weight
and momentum putting pressure on the contact leg. The leg, therefore,
bends to absorb the shock while the bent free leg is swinging through fast to
prepare for its next drive position.
With the body somewhat down
through the impact of the landing, the
free leg moves through to prepare for
the next drive-off position.
The Drive-Off
Now we return to the initial drive-off position, although this time it is with the
opposite foot on the ground with the other free leg driving up and forward,
thereby completing the fi rst stride sequence and beginning the second.
An identical dynamic drive-off position
to the fi rst one, although this time the
arms and legs are reversed.
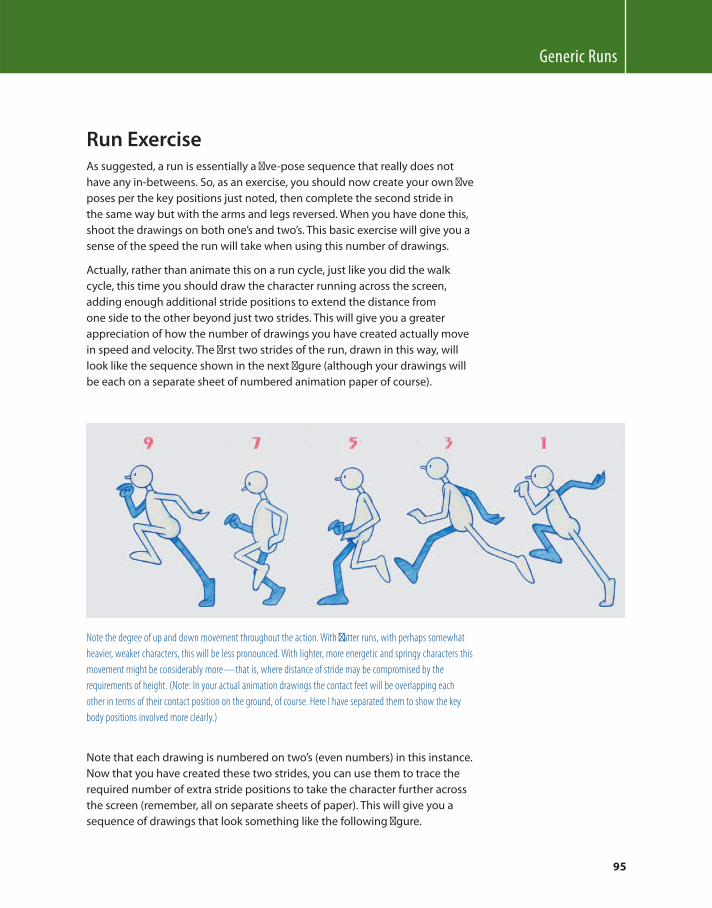
Generic Runs
95
Run Exercise As suggested, a run is essentially a fi ve-pose sequence that really does not
have any in-betweens. So, as an exercise, you should now create your own fi ve
poses per the key positions just noted, then complete the second stride in
the same way but with the arms and legs reversed. When you have done this,
shoot the drawings on both one’s and two’s. This basic exercise will give you a
sense of the speed the run will take when using this number of drawings.
Actually, rather than animate this on a run cycle, just like you did the walk
cycle, this time you should draw the character running across the screen,
adding enough additional stride positions to extend the distance from
one side to the other beyond just two strides. This will give you a greater
appreciation of how the number of drawings you have created actually move
in speed and velocity. The fi rst two strides of the run, drawn in this way, will
look like the sequence shown in the next fi gure (although your drawings will
be each on a separate sheet of numbered animation paper of course).
Note the degree of up and down movement throughout the action. With fl atter runs, with perhaps somewhat
heavier, weaker characters, this will be less pronounced. With lighter, more energetic and springy characters this
movement might be considerably more — that is, where distance of stride may be compromised by the
requirements of height. (Note: In your actual animation drawings the contact feet will be overlapping each
other in terms of their contact position on the ground, of course. Here I have separated them to show the key
body positions involved more clearly.)
Note that each drawing is numbered on two’s (even numbers) in this instance.
Now that you have created these two strides, you can use them to trace the
required number of extra stride positions to take the character further across
the screen (remember, all on separate sheets of paper). This will give you a
sequence of drawings that look something like the following fi gure.
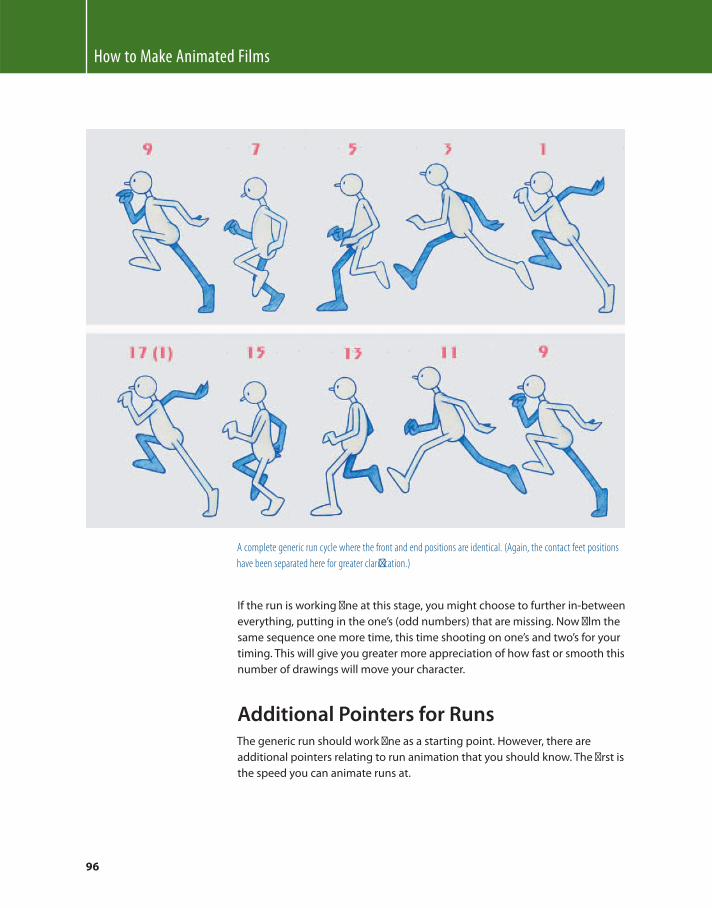
How to Make Animated Films
96
A complete generic run cycle where the front and end positions are identical. (Again, the contact feet positions
have been separated here for greater clarifi cation.)
If the run is working fi ne at this stage, you might choose to further in-between
everything, putting in the one’s (odd numbers) that are missing. Now fi lm the
same sequence one more time, this time shooting on one’s and two’s for your
timing. This will give you greater more appreciation of how fast or smooth this
number of drawings will move your character.
Additional Pointers for Runs The generic run should work fi ne as a starting point. However, there are
additional pointers relating to run animation that you should know. The fi rst is
the speed you can animate runs at.
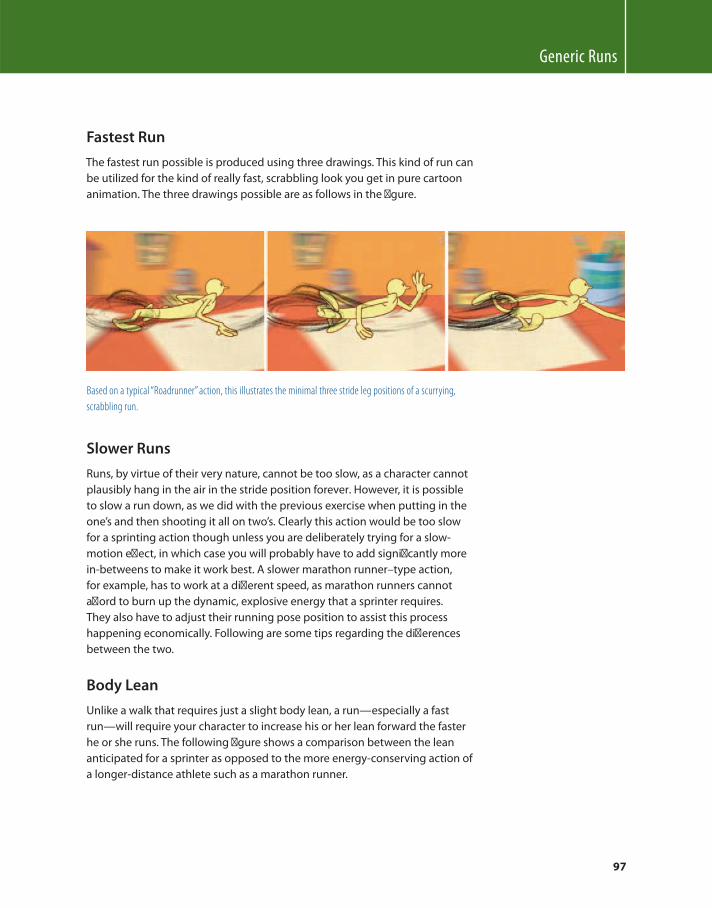
Generic Runs
97
Fastest Run
The fastest run possible is produced using three drawings. This kind of run can
be utilized for the kind of really fast, scrabbling look you get in pure cartoon
animation. The three drawings possible are as follows in the fi gure.
Based on a typical “ Roadrunner ” action, this illustrates the minimal three stride leg positions of a scurrying,
scrabbling run.
Slower Runs
Runs, by virtue of their very nature, cannot be too slow, as a character cannot
plausibly hang in the air in the stride position forever . However, it is possible
to slow a run down, as we did with the previous exercise when putting in the
one’s and then shooting it all on two’s. Clearly this action would be too slow
for a sprinting action though unless you are deliberately trying for a slow-
motion eff ect, in which case you will probably have to add signifi cantly more
in-betweens to make it work best. A slower marathon runner – type action,
for example, has to work at a diff erent speed, as marathon runners cannot
aff ord to burn up the dynamic, explosive energy that a sprinter requires.
They also have to adjust their running pose position to assist this process
happening economically. Following are some tips regarding the diff erences
between the two.
Body Lean
Unlike a walk that requires just a slight body lean, a run — especially a fast
run — will require your character to increase his or her lean forward the faster
he or she runs. The following fi gure shows a comparison between the lean
anticipated for a sprinter as opposed to the more energy-conserving action of
a longer-distance athlete such as a marathon runner.
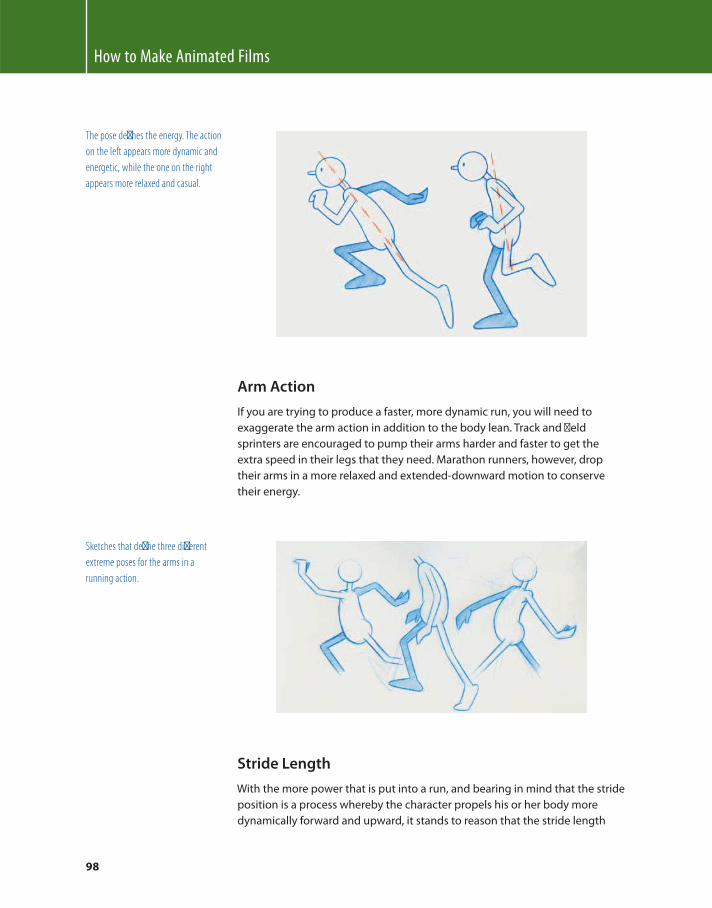
How to Make Animated Films
98
The pose defi nes the energy. The action
on the left appears more dynamic and
energetic, while the one on the right
appears more relaxed and casual.
Arm Action
If you are trying to produce a faster, more dynamic run, you will need to
exaggerate the arm action in addition to the body lean. Track and fi eld
sprinters are encouraged to pump their arms harder and faster to get the
extra speed in their legs that they need. Marathon runners, however, drop
their arms in a more relaxed and extended-downward motion to conserve
their energy.
Sketches that defi ne three diff erent
extreme poses for the arms in a
running action.
Stride Length
With the more power that is put into a run, and bearing in mind that the stride
position is a process whereby the character propels his or her body more
dynamically forward and upward, it stands to reason that the stride length
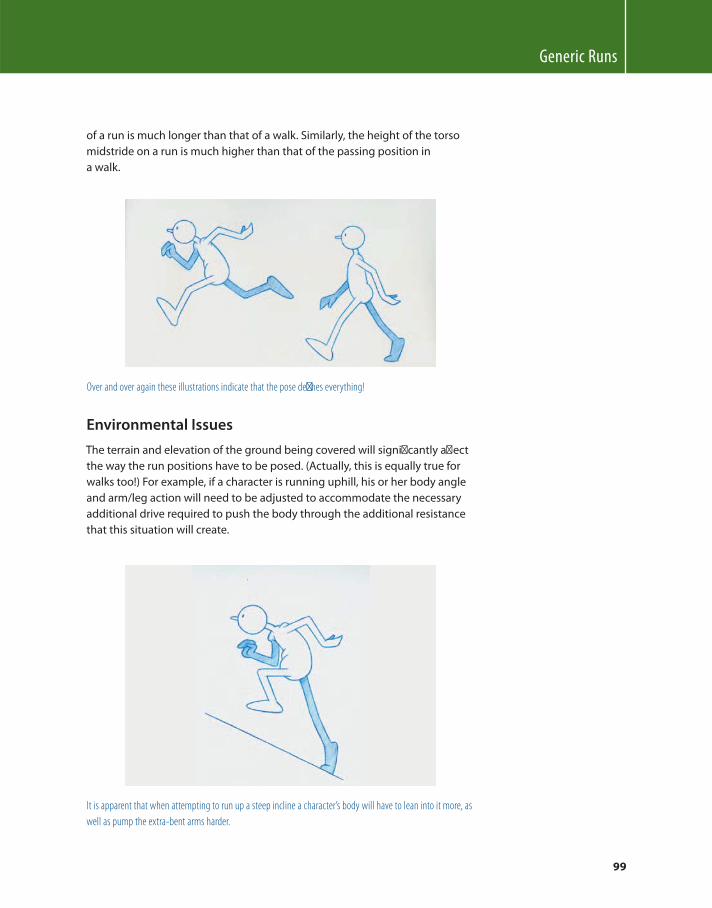
Generic Runs
99
of a run is much longer than that of a walk. Similarly, the height of the torso
midstride on a run is much higher than that of the passing position in
a walk.
Over and over again these illustrations indicate that the pose defi nes everything!
Environmental Issues
The terrain and elevation of the ground being covered will signifi cantly aff ect
the way the run positions have to be posed. (Actually, this is equally true for
walks too!) For example, if a character is running uphill, his or her body angle
and arm/leg action will need to be adjusted to accommodate the necessary
additional drive required to push the body through the additional resistance
that this situation will create.
It is apparent that when attempting to run up a steep incline a character’s body will have to lean into it more, as
well as pump the extra-bent arms harder.
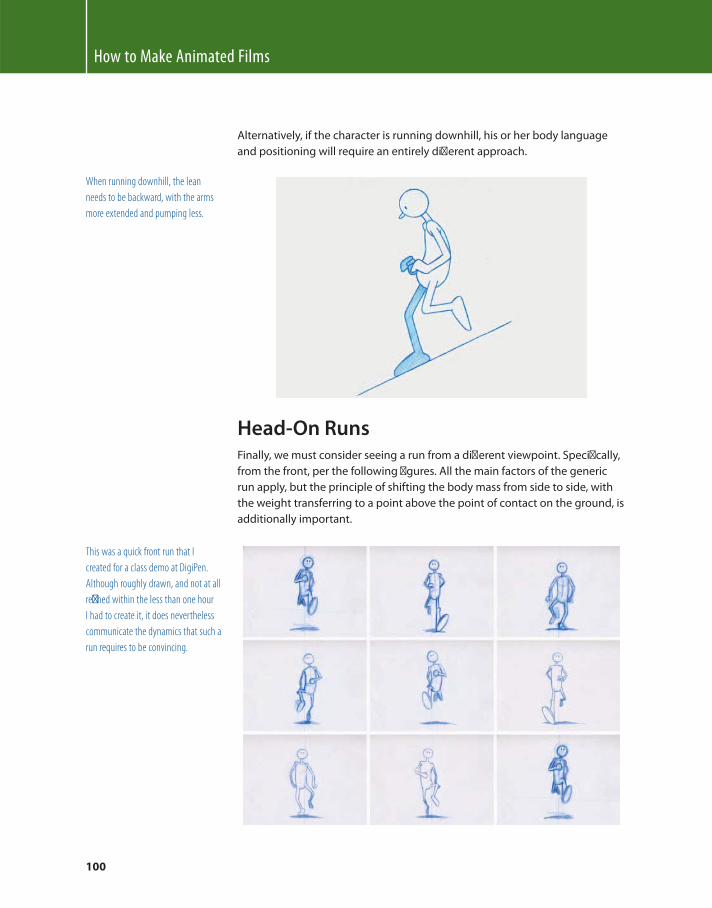
How to Make Animated Films
100
Alternatively, if the character is running downhill, his or her body language
and positioning will require an entirely diff erent approach.
Head-On Runs Finally, we must consider seeing a run from a diff erent viewpoint. Specifi cally,
from the front, per the following fi gures. All the main factors of the generic
run apply, but the principle of shifting the body mass from side to side, with
the weight transferring to a point above the point of contact on the ground, is
additionally important.
When running downhill, the lean
needs to be backward, with the arms
more extended and pumping less.
This was a quick front run that I
created for a class demo at DigiPen.
Although roughly drawn, and not at all
refi ned within the less than one hour
I had to create it, it does nevertheless
communicate the dynamics that such a
run requires to be convincing.
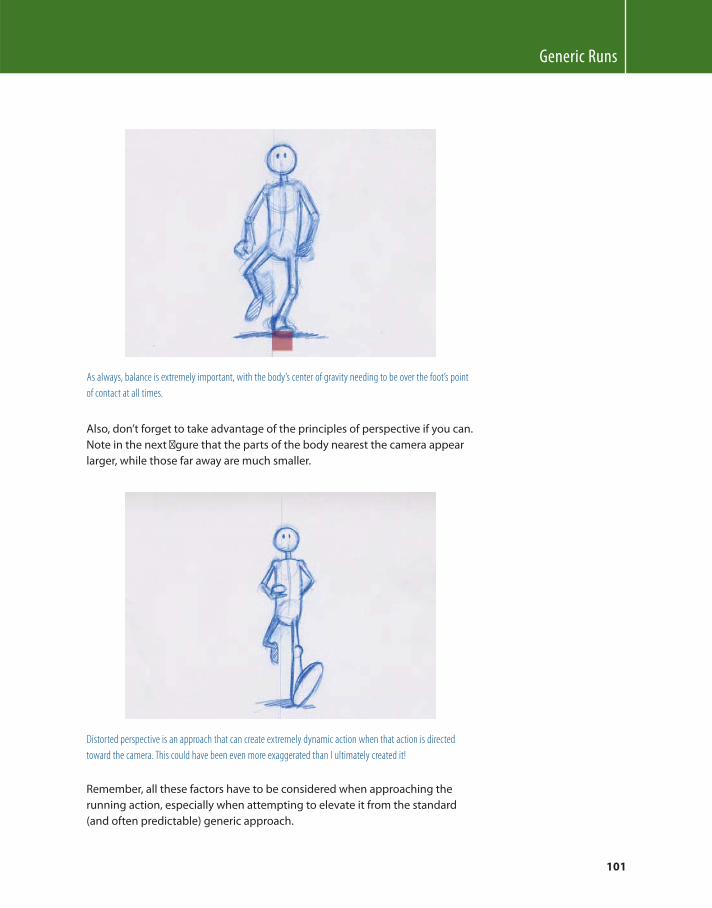
Generic Runs
101
As always, balance is extremely important, with the body’s center of gravity needing to be over the foot’s point
of contact at all times.
Also, don’t forget to take advantage of the principles of perspective if you can.
Note in the next fi gure that the parts of the body nearest the camera appear
larger, while those far away are much smaller.
Distorted perspective is an approach that can create extremely dynamic action when that action is directed
toward the camera. This could have been even more exaggerated than I ultimately created it!
Remember, all these factors have to be considered when approaching the
running action, especially when attempting to elevate it from the standard
(and often predictable) generic approach.
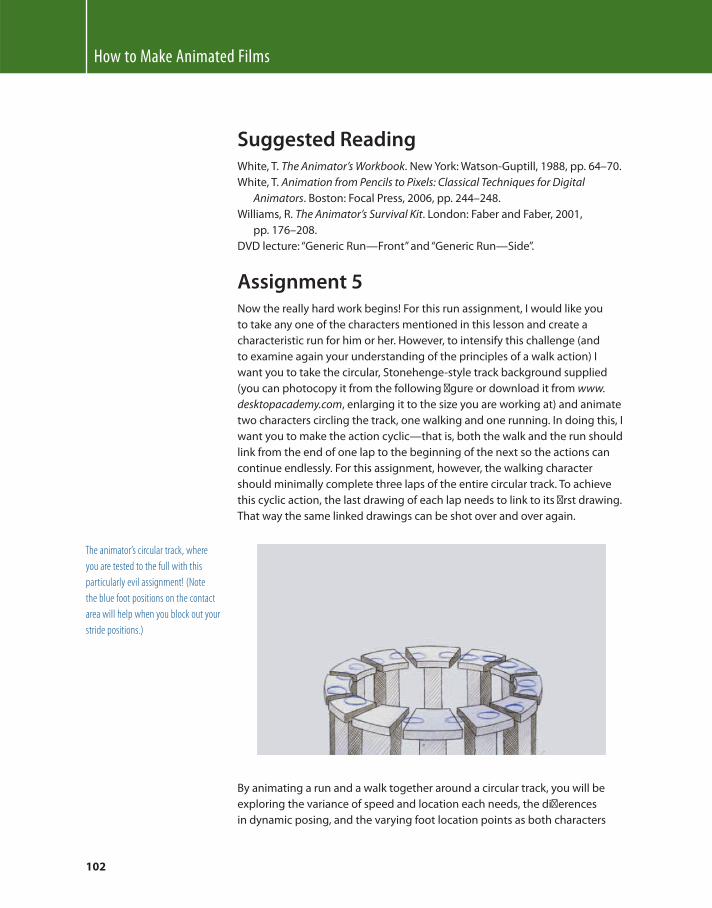
How to Make Animated Films
102
Suggested Reading White , T. The Animator’s Workbook . New York : Watson-Guptill , 1988 , pp. 64 – 70.
White , T. Animation from Pencils to Pixels: Classical Techniques for Digital
Animators . Boston : Focal Press , 2006 , pp. 244 – 248.
Williams , R. The Animator’s Survival Kit . London : Faber and Faber , 2001 ,
pp. 176 – 208.
DVD lecture: “Generic Run — Front” and “Generic Run — Side”.
Assignment 5 Now the really hard work begins! For this run assignment, I would like you
to take any one of the characters mentioned in this lesson and create a
characteristic run for him or her. However, to intensify this challenge (and
to examine again your understanding of the principles of a walk action) I
want you to take the circular, Stonehenge-style track background supplied
(you can photocopy it from the following fi gure or download it from www.
desktopacademy.com , enlarging it to the size you are working at) and animate
two characters circling the track, one walking and one running. In doing this, I
want you to make the action cyclic — that is, both the walk and the run should
link from the end of one lap to the beginning of the next so the actions can
continue endlessly. For this assignment, however, the walking character
should minimally complete three laps of the entire circular track. To achieve
this cyclic action, the last drawing of each lap needs to link to its fi rst drawing.
That way the same linked drawings can be shot over and over again.
The animator’s circular track, where
you are tested to the full with this
particularly evil assignment! (Note
the blue foot positions on the contact
area will help when you block out your
stride positions.)
By animating a run and a walk together around a circular track, you will be
exploring the variance of speed and location each needs, the diff erences
in dynamic posing, and the varying foot location points as both characters
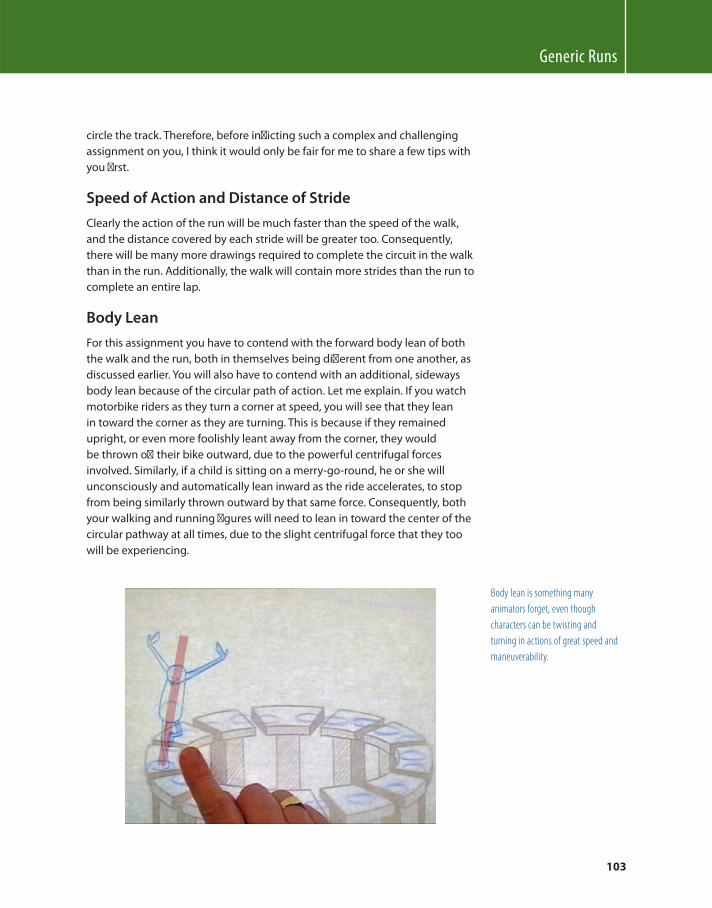
Generic Runs
103
circle the track. Therefore, before infl icting such a complex and challenging
assignment on you, I think it would only be fair for me to share a few tips with
you fi rst.
Speed of Action and Distance of Stride
Clearly the action of the run will be much faster than the speed of the walk,
and the distance covered by each stride will be greater too. Consequently,
there will be many more drawings required to complete the circuit in the walk
than in the run. Additionally, the walk will contain more strides than the run to
complete an entire lap.
Body Lean
For this assignment you have to contend with the forward body lean of both
the walk and the run, both in themselves being diff erent from one another, as
discussed earlier. You will also have to contend with an additional, sideways
body lean because of the circular path of action. Let me explain. If you watch
motorbike riders as they turn a corner at speed, you will see that they lean
in toward the corner as they are turning. This is because if they remained
upright, or even more foolishly leant away from the corner, they would
be thrown off their bike outward, due to the powerful centrifugal forces
involved. Similarly, if a child is sitting on a merry-go-round, he or she will
unconsciously and automatically lean inward as the ride accelerates, to stop
from being similarly thrown outward by that same force. Consequently, both
your walking and running fi gures will need to lean in toward the center of the
circular pathway at all times, due to the slight centrifugal force that they too
will be experiencing.
Body lean is something many
animators forget, even though
characters can be twisting and
turning in actions of great speed and
maneuverability.
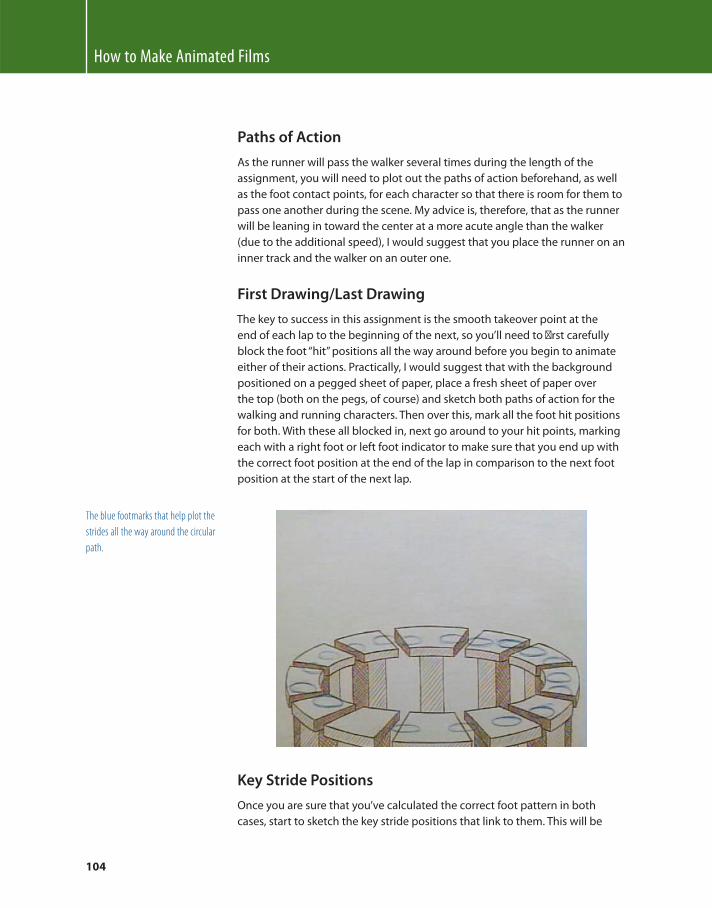
How to Make Animated Films
104
Paths of Action
As the runner will pass the walker several times during the length of the
assignment, you will need to plot out the paths of action beforehand, as well
as the foot contact points, for each character so that there is room for them to
pass one another during the scene. My advice is, therefore, that as the runner
will be leaning in toward the center at a more acute angle than the walker
(due to the additional speed), I would suggest that you place the runner on an
inner track and the walker on an outer one.
First Drawing/Last Drawing
The key to success in this assignment is the smooth takeover point at the
end of each lap to the beginning of the next, so you’ll need to fi rst carefully
block the foot “ hit ” positions all the way around before you begin to animate
either of their actions. Practically, I would suggest that with the background
positioned on a pegged sheet of paper, place a fresh sheet of paper over
the top (both on the pegs, of course) and sketch both paths of action for the
walking and running characters. Then over this, mark all the foot hit positions
for both. With these all blocked in, next go around to your hit points, marking
each with a right foot or left foot indicator to make sure that you end up with
the correct foot position at the end of the lap in comparison to the next foot
position at the start of the next lap.
The blue footmarks that help plot the
strides all the way around the circular
path.
Key Stride Positions
Once you are sure that you’ve calculated the correct foot pattern in both
cases, start to sketch the key stride positions that link to them. This will be
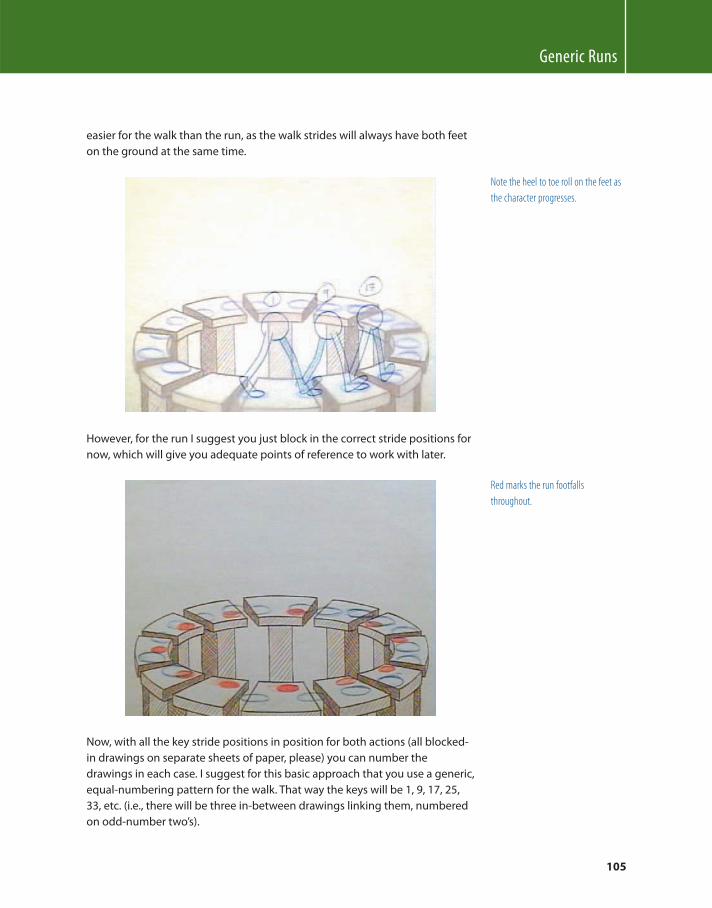
Generic Runs
105
easier for the walk than the run, as the walk strides will always have both feet
on the ground at the same time.
However, for the run I suggest you just block in the correct stride positions for
now, which will give you adequate points of reference to work with later.
Note the heel to toe roll on the feet as
the character progresses.
Red marks the run footfalls
throughout.
Now, with all the key stride positions in position for both actions (all blocked-
in drawings on separate sheets of paper, please) you can number the
drawings in each case. I suggest for this basic approach that you use a generic,
equal-numbering pattern for the walk. That way the keys will be 1, 9, 17, 25,
33, etc. (i.e., there will be three in-between drawings linking them, numbered
on odd-number two’s).
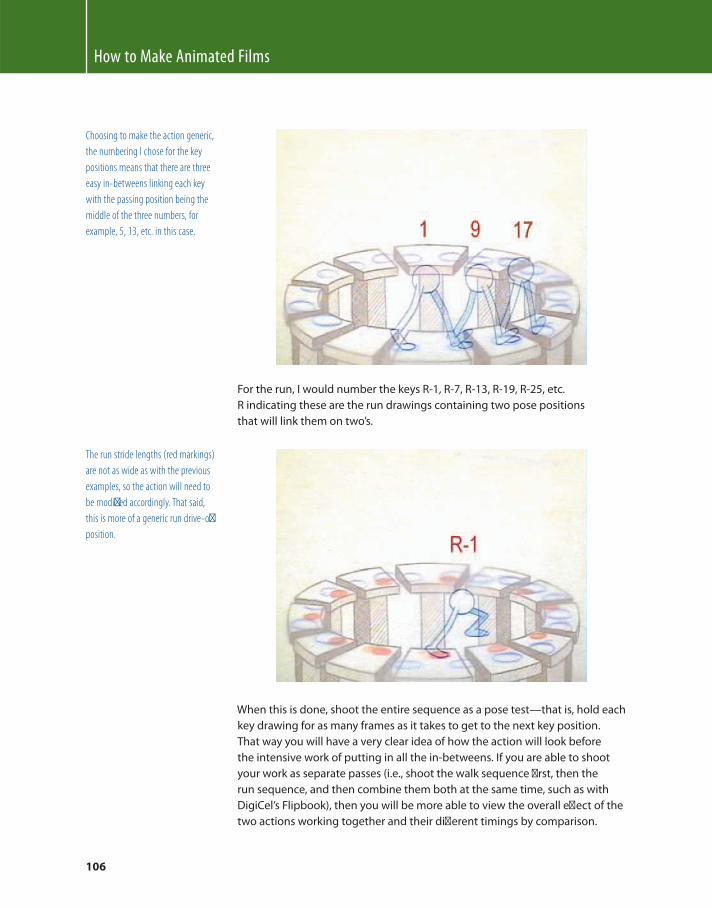
How to Make Animated Films
106
Choosing to make the action generic,
the numbering I chose for the key
positions means that there are three
easy in-betweens linking each key
with the passing position being the
middle of the three numbers, for
example, 5, 13, etc. in this case.
For the run, I would number the keys R-1, R-7, R-13, R-19, R-25, etc.
R indicating these are the run drawings containing two pose positions
that will link them on two’s.
The run stride lengths (red markings)
are not as wide as with the previous
examples, so the action will need to
be modifi ed accordingly. That said,
this is more of a generic run drive-off
position.
When this is done, shoot the entire sequence as a pose test — that is, hold each
key drawing for as many frames as it takes to get to the next key position.
That way you will have a very clear idea of how the action will look before
the intensive work of putting in all the in-betweens. If you are able to shoot
your work as separate passes (i.e., shoot the walk sequence fi rst, then the
run sequence, and then combine them both at the same time, such as with
DigiCel’s Flipbook), then you will be more able to view the overall eff ect of the
two actions working together and their diff erent timings by comparison.

Generic Runs
107
I don’t know why I chose to have a
birdlike fl apping of wings on the arms
but in viewing the preceding body
animation if felt like the character was
trying to take off , thus my adopting
this action with the arms.
The big challenge is not to have both
actions hit each other at any point
within the scene. I tried to separate the
foot placements somewhat but it does
require some careful preplanning to
make it work in the fi nal analysis.
Note
This is a very good time for you to turn to Appendix 6 and study the
process of working with animation exposure sheets (dope sheets).
Exposure sheets enable animators to keep track of scene and drawing
planning, as well as to organize their thinking clearly and precisely. In
this case, the exposure sheet planning will enable you to accurately place
the drawings with good timings, as well as organize the various layers
of action with one another. This can only help you in the challenging
assignment you are about to attempt.
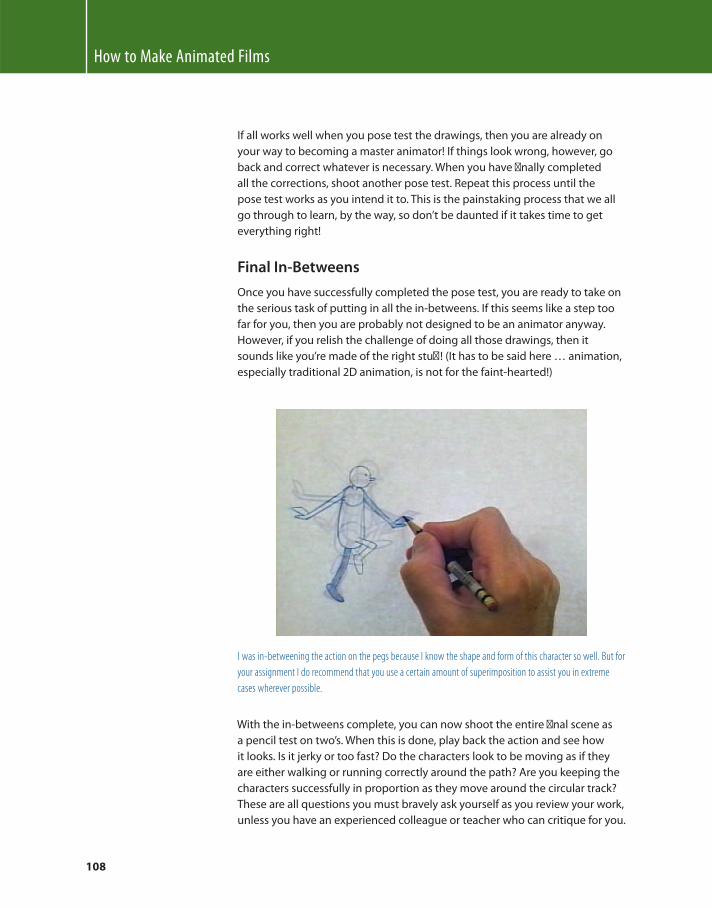
How to Make Animated Films
108
If all works well when you pose test the drawings, then you are already on
your way to becoming a master animator! If things look wrong, however, go
back and correct whatever is necessary. When you have fi nally completed
all the corrections, shoot another pose test. Repeat this process until the
pose test works as you intend it to. This is the painstaking process that we all
go through to learn, by the way, so don’t be daunted if it takes time to get
everything right!
Final In-Betweens
Once you have successfully completed the pose test, you are ready to take on
the serious task of putting in all the in-betweens. If this seems like a step too
far for you, then you are probably not designed to be an animator anyway.
However, if you relish the challenge of doing all those drawings, then it
sounds like you’re made of the right stuff ! (It has to be said here … animation,
especially traditional 2D animation, is not for the faint-hearted!)
I was in-betweening the action on the pegs because I know the shape and form of this character so well. But for
your assignment I do recommend that you use a certain amount of superimposition to assist you in extreme
cases wherever possible.
With the in-betweens complete, you can now shoot the entire fi nal scene as
a pencil test on two’s. When this is done, play back the action and see how
it looks. Is it jerky or too fast? Do the characters look to be moving as if they
are either walking or running correctly around the path? Are you keeping the
characters successfully in proportion as they move around the circular track?
These are all questions you must bravely ask yourself as you review your work,
unless you have an experienced colleague or teacher who can critique for you.

Generic Runs
109
These are also questions that, if working alone, you have to answer honestly
if you are really serious about being a great animator. All glitches, mistakes,
or distortions of characters should be fi xed now and tested again before you
are fi nished with the assignment. As with everything you must do, it has to
be right at each stage and you cannot allow yourself to take shortcuts if your
ambition is strong. I do believe that the greatest learning ultimately comes
from making the greatest mistakes — that is what experience is. So don’t
despair if you’ve made one or more mistakes here. It is natural to do so, so just
realize that you are not alone. All master animators including myself made
horrendous and regular mistakes when we started out, and we still do so now,
if the truth must be told!

This page intentionally left blank
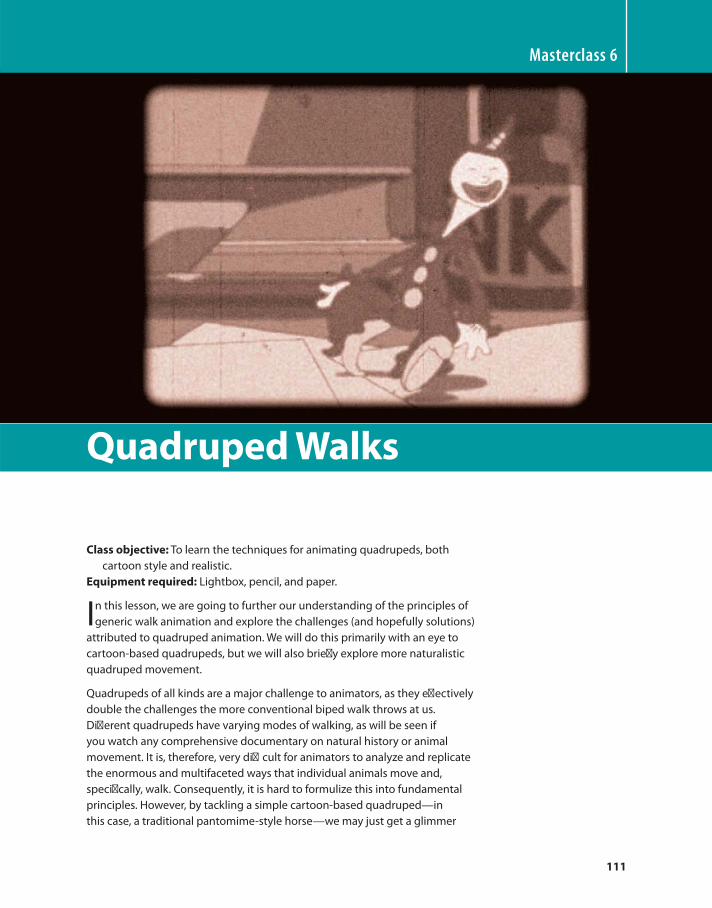
111
Class objective: To learn the techniques for animating quadrupeds, both
cartoon style and realistic.
Equipment required: Lightbox, pencil, and paper.
In this lesson, we are going to further our understanding of the principles of
generic walk animation and explore the challenges (and hopefully solutions)
attributed to quadruped animation. We will do this primarily with an eye to
cartoon-based quadrupeds, but we will also briefl y explore more naturalistic
quadruped movement.
Quadrupeds of all kinds are a major challenge to animators, as they eff ectively
double the challenges the more conventional biped walk throws at us.
Diff erent quadrupeds have varying modes of walking, as will be seen if
you watch any comprehensive documentary on natural history or animal
movement. It is, therefore, very diffi cult for animators to analyze and replicate
the enormous and multifaceted ways that individual animals move and,
specifi cally, walk. Consequently, it is hard to formulize this into fundamental
principles. However, by tackling a simple cartoon-based quadruped — in
this case, a traditional pantomime-style horse — we may just get a glimmer
Masterclass 6
Quadruped Walks
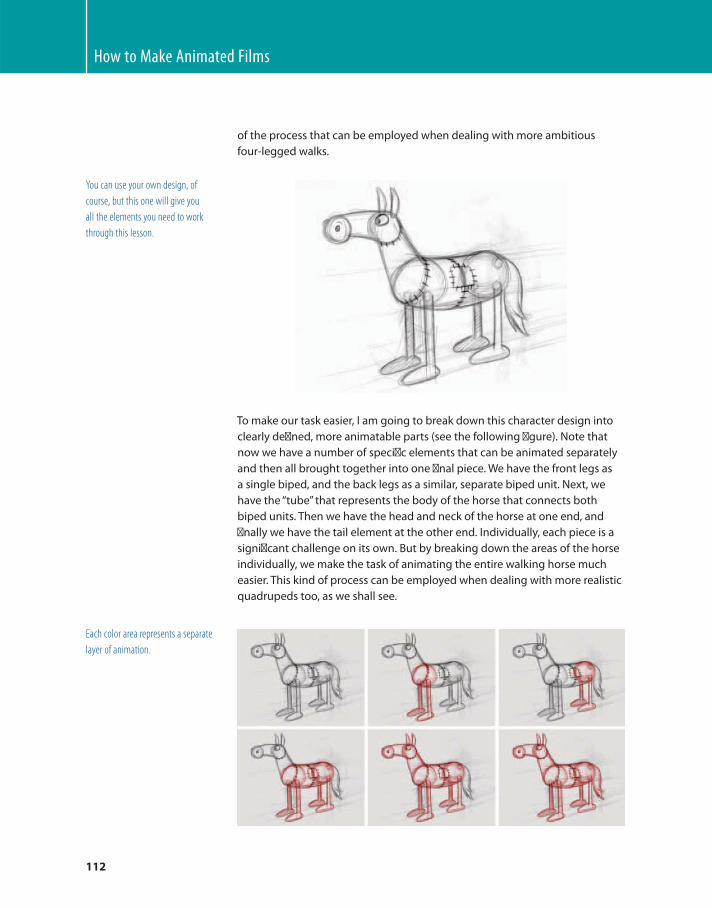
How to Make Animated Films
112
of the process that can be employed when dealing with more ambitious
four-legged walks.
To make our task easier, I am going to break down this character design into
clearly defi ned, more animatable parts (see the following fi gure). Note that
now we have a number of specifi c elements that can be animated separately
and then all brought together into one fi nal piece. We have the front legs as
a single biped, and the back legs as a similar, separate biped unit. Next, we
have the “ tube ” that represents the body of the horse that connects both
biped units. Then we have the head and neck of the horse at one end, and
fi nally we have the tail element at the other end. Individually, each piece is a
signifi cant challenge on its own. But by breaking down the areas of the horse
individually, we make the task of animating the entire walking horse much
easier. This kind of process can be employed when dealing with more realistic
quadrupeds too, as we shall see.
You can use your own design, of
course, but this one will give you
all the elements you need to work
through this lesson.
Each color area represents a separate
layer of animation.
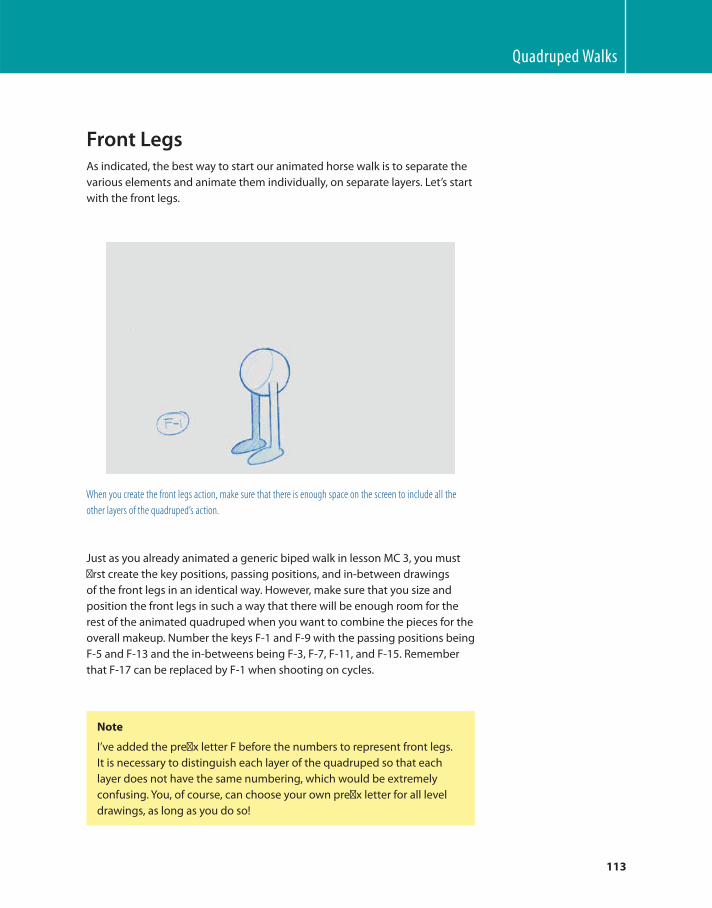
Quadruped Walks
113
Front Legs As indicated, the best way to start our animated horse walk is to separate the
various elements and animate them individually, on separate layers. Let’s start
with the front legs.
When you create the front legs action, make sure that there is enough space on the screen to include all the
other layers of the quadruped’s action.
Note
I’ve added the prefi x letter F before the numbers to represent front legs.
It is necessary to distinguish each layer of the quadruped so that each
layer does not have the same numbering, which would be extremely
confusing. You, of course, can choose your own prefi x letter for all level
drawings, as long as you do so!
Just as you already animated a generic biped walk in lesson MC 3 , you must
fi rst create the key positions, passing positions, and in-between drawings
of the front legs in an identical way. However, make sure that you size and
position the front legs in such a way that there will be enough room for the
rest of the animated quadruped when you want to combine the pieces for the
overall makeup. Number the keys F-1 and F-9 with the passing positions being
F-5 and F-13 and the in-betweens being F-3, F-7, F-11, and F-15. Remember
that F-17 can be replaced by F-1 when shooting on cycles.
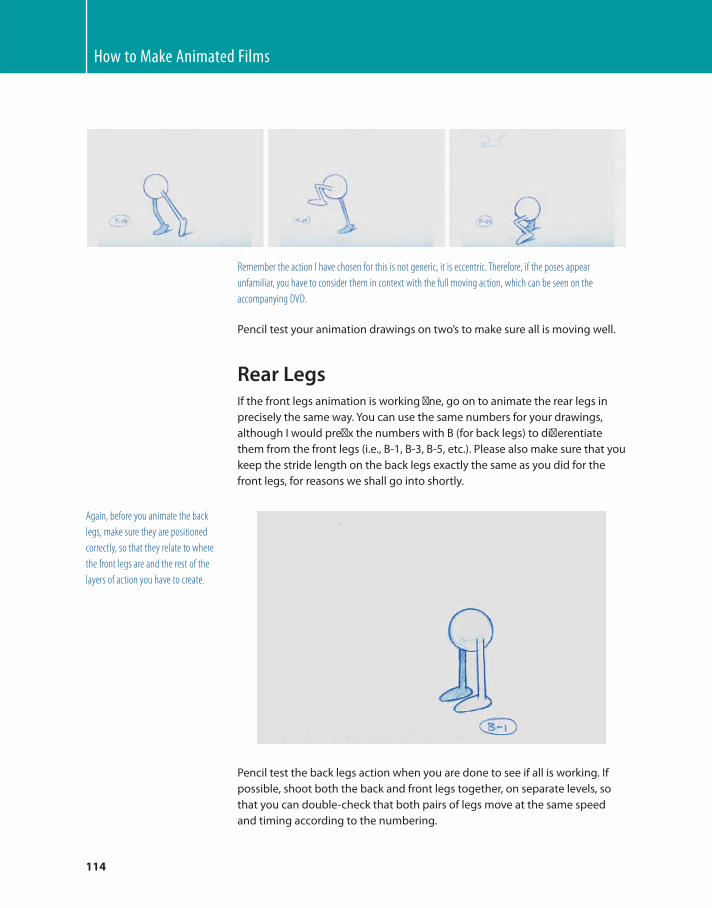
How to Make Animated Films
114
Remember the action I have chosen for this is not generic, it is eccentric. Therefore, if the poses appear
unfamiliar, you have to consider them in context with the full moving action, which can be seen on the
accompanying DVD.
Pencil test the back legs action when you are done to see if all is working. If
possible, shoot both the back and front legs together, on separate levels, so
that you can double-check that both pairs of legs move at the same speed
and timing according to the numbering.
Pencil test your animation drawings on two’s to make sure all is moving well.
Rear Legs If the front legs animation is working fi ne, go on to animate the rear legs in
precisely the same way. You can use the same numbers for your drawings,
although I would prefi x the numbers with B (for back legs) to diff erentiate
them from the front legs (i.e., B-1, B-3, B-5, etc.). Please also make sure that you
keep the stride length on the back legs exactly the same as you did for the
front legs, for reasons we shall go into shortly.
Again, before you animate the back
legs, make sure they are positioned
correctly, so that they relate to where
the front legs are and the rest of the
layers of action you have to create.

Quadruped Walks
115
Note that the passing position I have created here is also eccentric. In this case, I wanted the back legs to rotate
then move straight through in a regular way, thus the passing position here is high and back, as part of a large,
looping arc.
If you want to write this down on an exposure sheet, the following fi gure
shows what this particular doping will look like.
Note that I always identify the
animation layers by describing them
clearly at the top of the exposure sheet.
This ensures that I don’t get confused
once there are several layers being
used, something that is quite possible
the more intricate and involved the
scene can be.
Synching the Legs Together With the leg animation complete, decide what sync the front legs will have
with the back legs. In other words, if you line up all the drawing numbers
of the front and back legs in sync as doped on the exposure sheet, you will
have both sets of legs moving with identical timing at the front and at the
back. However, you might want them moving with diff erent sync timing,
so you could, for example, off set the timing of the back legs with those of
the front by two, four, or six frames to give a variation in their comparative
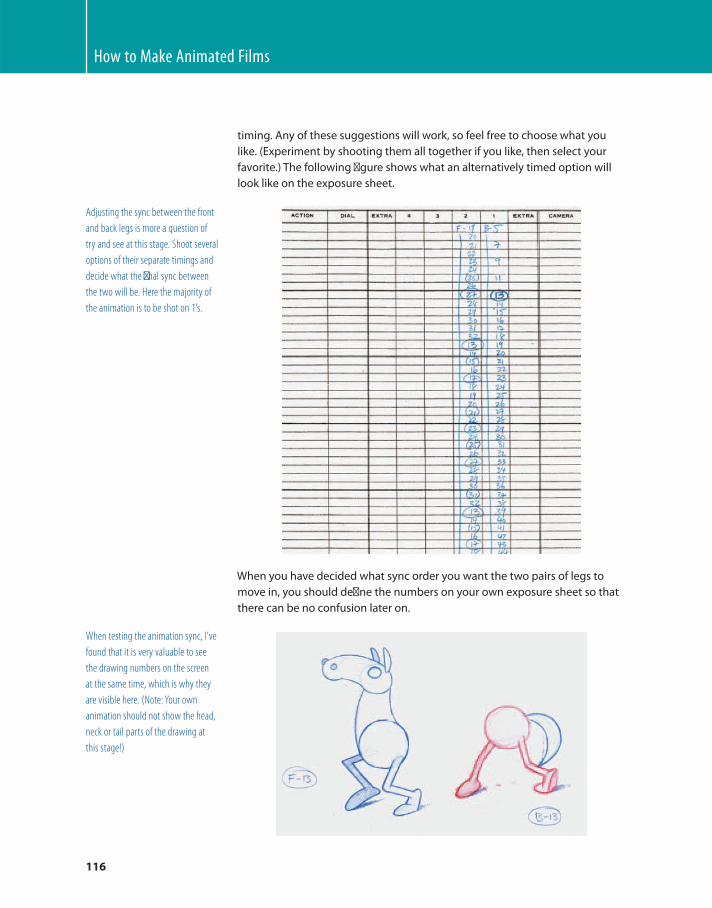
How to Make Animated Films
116
timing. Any of these suggestions will work, so feel free to choose what you
like. (Experiment by shooting them all together if you like, then select your
favorite.) The following fi gure shows what an alternatively timed option will
look like on the exposure sheet.
When you have decided what sync order you want the two pairs of legs to
move in, you should defi ne the numbers on your own exposure sheet so that
there can be no confusion later on.
Adjusting the sync between the front
and back legs is more a question of
try and see at this stage. Shoot several
options of their separate timings and
decide what the fi nal sync between
the two will be. Here the majority of
the animation is to be shot on 1’s.
When testing the animation sync, I’ve
found that it is very valuable to see
the drawing numbers on the screen
at the same time, which is why they
are visible here. (Note: Your own
animation should not show the head,
neck or tail parts of the drawing at
this stage!)
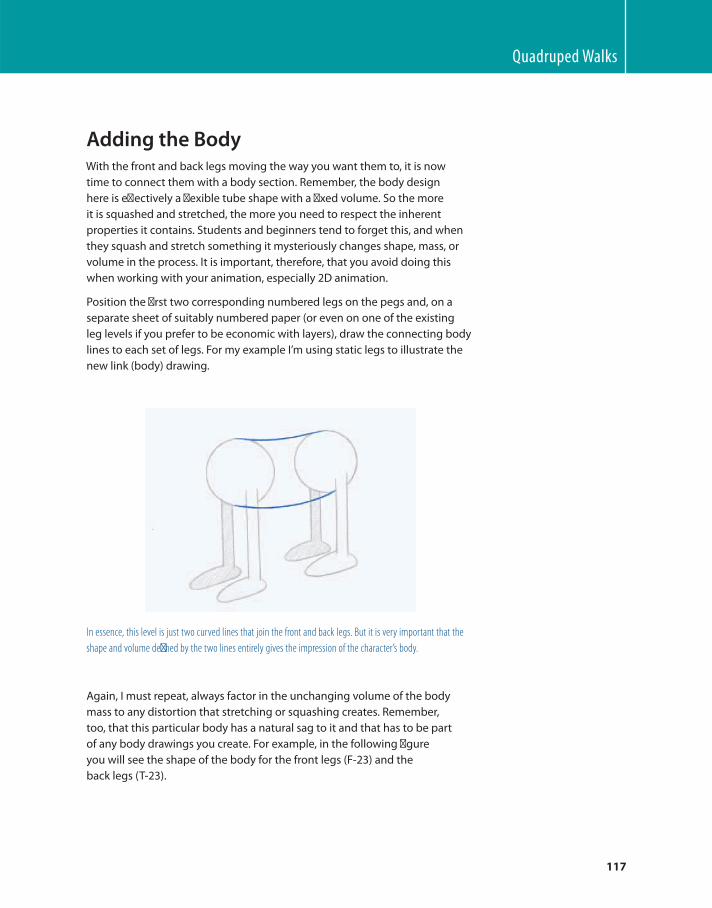
Quadruped Walks
117
Adding the Body With the front and back legs moving the way you want them to, it is now
time to connect them with a body section. Remember, the body design
here is eff ectively a fl exible tube shape with a fi xed volume. So the more
it is squashed and stretched, the more you need to respect the inherent
properties it contains. Students and beginners tend to forget this, and when
they squash and stretch something it mysteriously changes shape, mass, or
volume in the process. It is important, therefore, that you avoid doing this
when working with your animation, especially 2D animation.
Position the fi rst two corresponding numbered legs on the pegs and, on a
separate sheet of suitably numbered paper (or even on one of the existing
leg levels if you prefer to be economic with layers), draw the connecting body
lines to each set of legs. For my example I’m using static legs to illustrate the
new link (body) drawing.
In essence, this level is just two curved lines that join the front and back legs. But it is very important that the
shape and volume defi ned by the two lines entirely gives the impression of the character’s body.
Again, I must repeat, always factor in the unchanging volume of the body
mass to any distortion that stretching or squashing creates. Remember,
too, that this particular body has a natural sag to it and that has to be part
of any body drawings you create. For example, in the following fi gure
you will see the shape of the body for the front legs (F-23) and the
back legs (T-23).
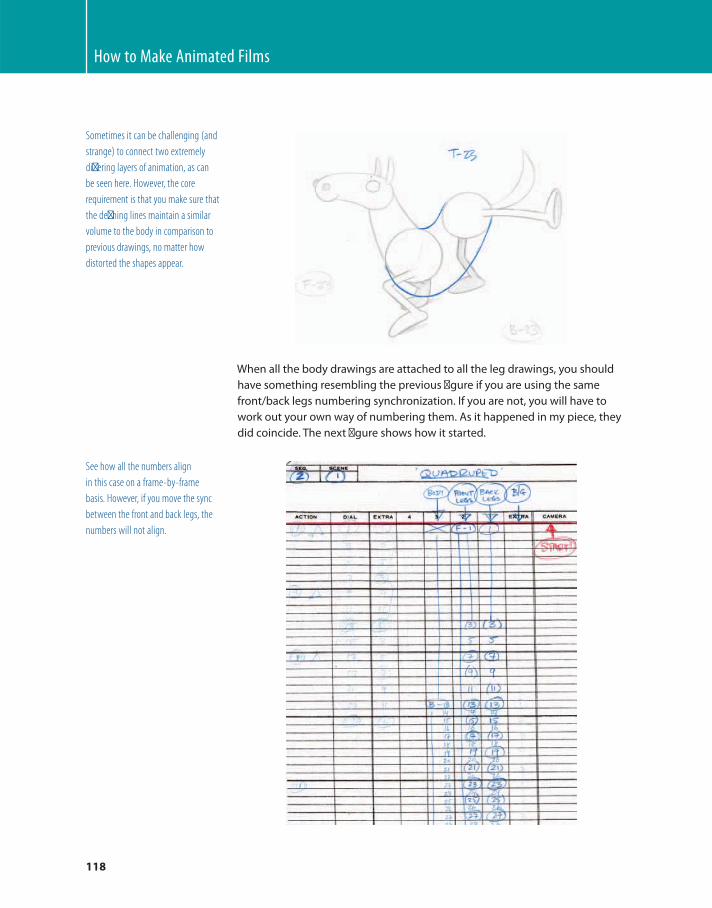
How to Make Animated Films
118
Sometimes it can be challenging (and
strange) to connect two extremely
diff ering layers of animation, as can
be seen here. However, the core
requirement is that you make sure that
the defi ning lines maintain a similar
volume to the body in comparison to
previous drawings, no matter how
distorted the shapes appear.
When all the body drawings are attached to all the leg drawings, you should
have something resembling the previous fi gure if you are using the same
front/back legs numbering synchronization. If you are not, you will have to
work out your own way of numbering them. As it happened in my piece, they
did coincide. The next fi gure shows how it started.
See how all the numbers align
in this case on a frame-by-frame
basis. However, if you move the sync
between the front and back legs, the
numbers will not align .

Quadruped Walks
119
Pencil test the resulting drawing together to make sure that all pieces are
linking and moving as you intend them to throughout the cycled action.
Shoot the drawing for three continuous repeat cycles as a minimum. If it is not
working, then correct the problem. If it is, you can now move on to the neck
and head animation.
Neck and Head Now that you have a moving legs and torso quadruped action complete, you
need to review your latest pencil test and imagine how the head and neck
action might go. Look at footage of real horses to get a better idea before you
proceed.
Remember, for the cartoon horse, the simpler looking you create the various layer elements of the character,
the easier it will be to animate them.
At this point, let me remind you of the overlapping action principle we talked
about earlier. The principle of overlapping action is that a secondary object,
connected to the main one, will move slightly diff erently, usually delaying
behind, the main action. In the case of our horse, the neck will be secondary
to the body, but the head will be secondary to the neck . Therefore, when
animating the neck section you have to fi rst consider the body’s front leg
action. The core, generic principle here (which we are working with) is that
as the body rises, the neck will delay downward slightly, and then when the
body drops, the neck will rise in comparison.
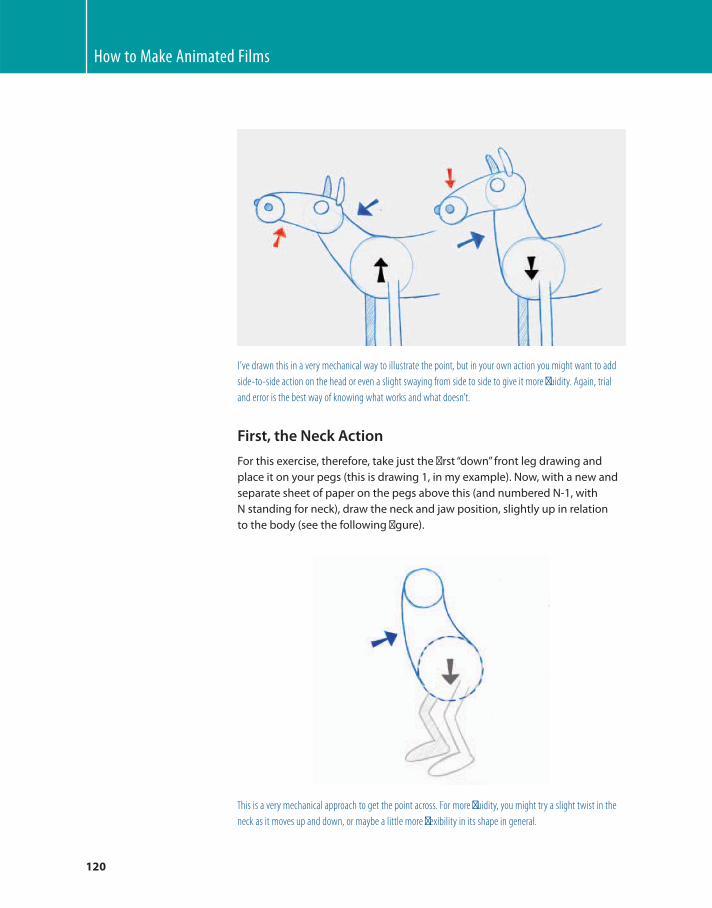
How to Make Animated Films
120
I’ve drawn this in a very mechanical way to illustrate the point, but in your own action you might want to add
side-to-side action on the head or even a slight swaying from side to side to give it more fl uidity. Again, trial
and error is the best way of knowing what works and what doesn’t.
First, the Neck Action
For this exercise, therefore, take just the fi rst “ down ” front leg drawing and
place it on your pegs (this is drawing 1, in my example). Now, with a new and
separate sheet of paper on the pegs above this (and numbered N-1, with
N standing for neck), draw the neck and jaw position, slightly up in relation
to the body (see the following fi gure).
This is a very mechanical approach to get the point across. For more fl uidity, you might try a slight twist in the
neck as it moves up and down, or maybe a little more fl exibility in its shape in general.
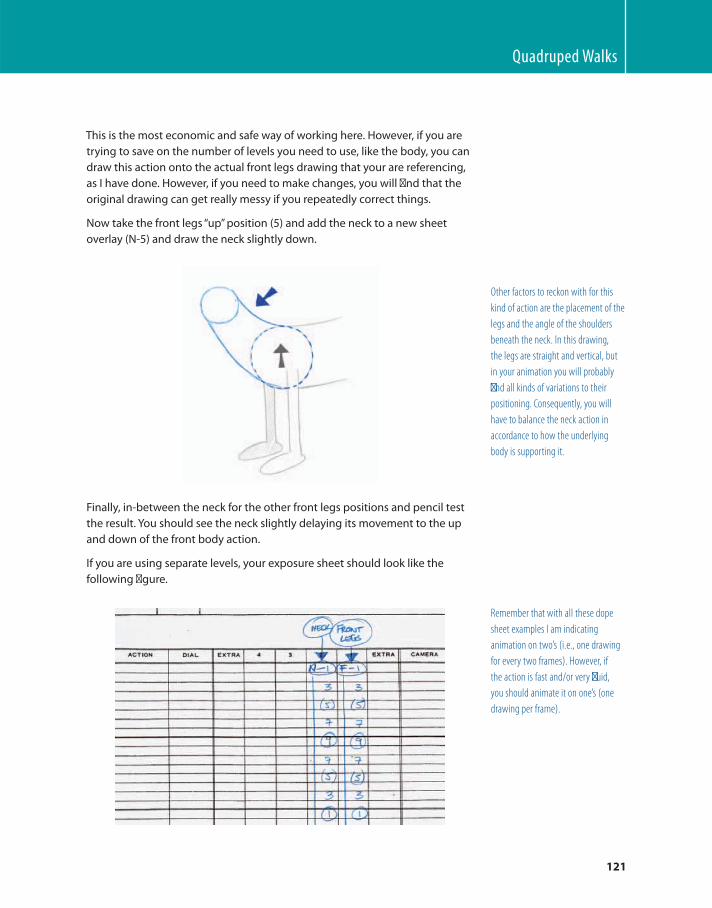
Quadruped Walks
121
This is the most economic and safe way of working here. However, if you are
trying to save on the number of levels you need to use, like the body, you can
draw this action onto the actual front legs drawing that your are referencing,
as I have done. However, if you need to make changes, you will fi nd that the
original drawing can get really messy if you repeatedly correct things.
Now take the front legs “ up ” position (5) and add the neck to a new sheet
overlay (N-5) and draw the neck slightly down.
Other factors to reckon with for this
kind of action are the placement of the
legs and the angle of the shoulders
beneath the neck. In this drawing,
the legs are straight and vertical, but
in your animation you will probably
fi nd all kinds of variations to their
positioning. Consequently, you will
have to balance the neck action in
accordance to how the underlying
body is supporting it.
Finally, in-between the neck for the other front legs positions and pencil test
the result. You should see the neck slightly delaying its movement to the up
and down of the front body action.
If you are using separate levels, your exposure sheet should look like the
following fi gure.
Remember that with all these dope
sheet examples I am indicating
animation on two’s (i.e., one drawing
for every two frames). However, if
the action is fast and/or very fl uid,
you should animate it on one’s (one
drawing per frame).
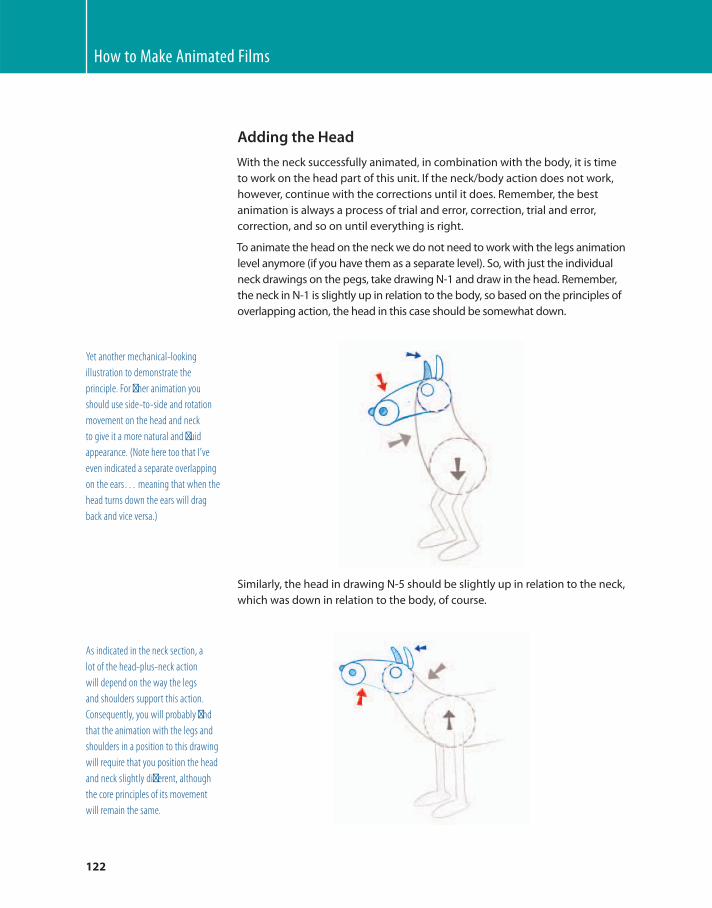
How to Make Animated Films
122
Adding the Head
With the neck successfully animated, in combination with the body, it is time
to work on the head part of this unit. If the neck/body action does not work,
however, continue with the corrections until it does. Remember, the best
animation is always a process of trial and error, correction, trial and error,
correction, and so on until everything is right.
To animate the head on the neck we do not need to work with the legs animation
level anymore (if you have them as a separate level). So, with just the individual
neck drawings on the pegs, take drawing N-1 and draw in the head. Remember,
the neck in N-1 is slightly up in relation to the body, so based on the principles of
overlapping action, the head in this case should be somewhat down.
Yet another mechanical-looking
illustration to demonstrate the
principle. For fi ner animation you
should use side-to-side and rotation
movement on the head and neck
to give it a more natural and fl uid
appearance. (Note here too that I’ve
even indicated a separate overlapping
on the ears… meaning that when the
head turns down the ears will drag
back and vice versa.)
Similarly, the head in drawing N-5 should be slightly up in relation to the neck,
which was down in relation to the body, of course.
As indicated in the neck section, a
lot of the head-plus-neck action
will depend on the way the legs
and shoulders support this action.
Consequently, you will probably fi nd
that the animation with the legs and
shoulders in a position to this drawing
will require that you position the head
and neck slightly diff erent, although
the core principles of its movement
will remain the same.
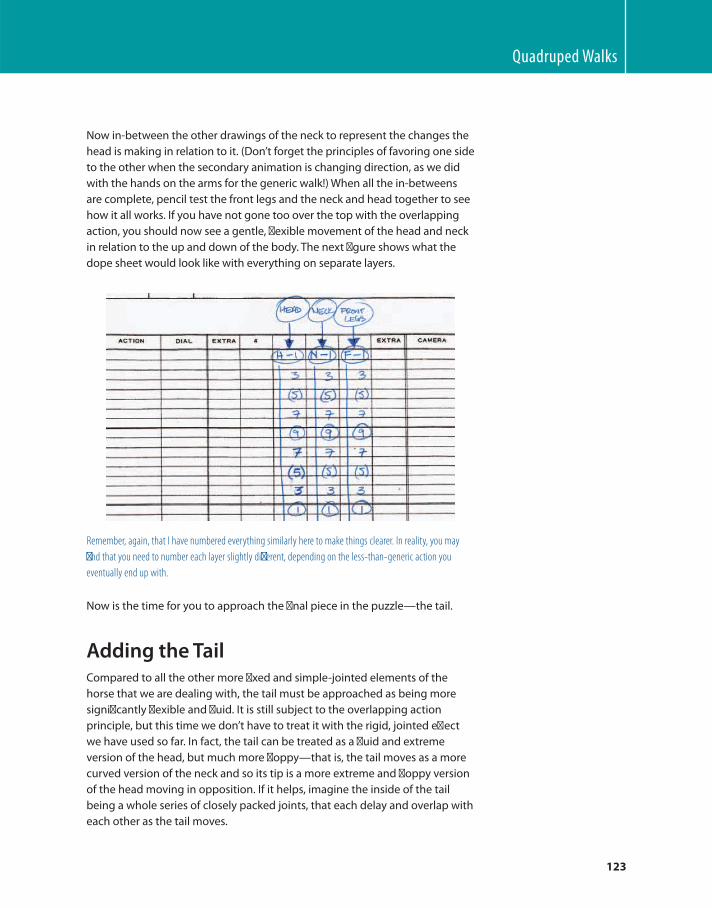
Quadruped Walks
123
Now in-between the other drawings of the neck to represent the changes the
head is making in relation to it. (Don’t forget the principles of favoring one side
to the other when the secondary animation is changing direction, as we did
with the hands on the arms for the generic walk!) When all the in-betweens
are complete, pencil test the front legs and the neck and head together to see
how it all works. If you have not gone too over the top with the overlapping
action, you should now see a gentle, fl exible movement of the head and neck
in relation to the up and down of the body. The next fi gure shows what the
dope sheet would look like with everything on separate layers.
Remember, again, that I have numbered everything similarly here to make things clearer. In reality, you may
fi nd that you need to number each layer slightly diff erent, depending on the less-than-generic action you
eventually end up with.
Now is the time for you to approach the fi nal piece in the puzzle — the tail.
Adding the Tail Compared to all the other more fi xed and simple-jointed elements of the
horse that we are dealing with, the tail must be approached as being more
signifi cantly fl exible and fl uid. It is still subject to the overlapping action
principle, but this time we don’t have to treat it with the rigid, jointed eff ect
we have used so far. In fact, the tail can be treated as a fl uid and extreme
version of the head, but much more fl oppy — that is, the tail moves as a more
curved version of the neck and so its tip is a more extreme and fl oppy version
of the head moving in opposition. If it helps, imagine the inside of the tail
being a whole series of closely packed joints, that each delay and overlap with
each other as the tail moves.
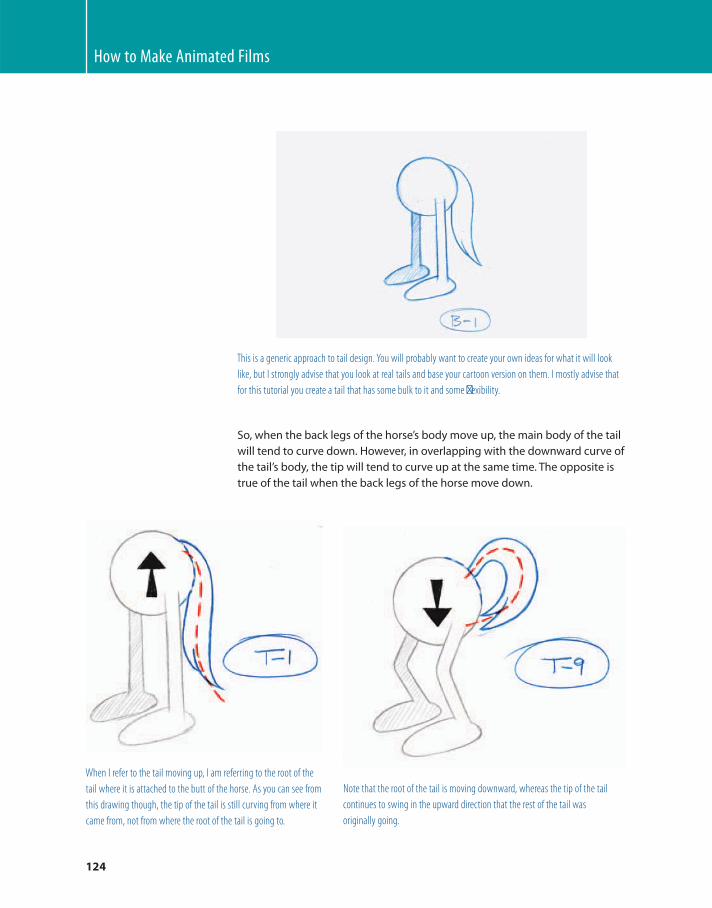
How to Make Animated Films
124
This is a generic approach to tail design. You will probably want to create your own ideas for what it will look
like, but I strongly advise that you look at real tails and base your cartoon version on them. I mostly advise that
for this tutorial you create a tail that has some bulk to it and some fl exibility.
So, when the back legs of the horse’s body move up, the main body of the tail
will tend to curve down. However, in overlapping with the downward curve of
the tail’s body, the tip will tend to curve up at the same time. The opposite is
true of the tail when the back legs of the horse move down.
When I refer to the tail moving up, I am referring to the root of the
tail where it is attached to the butt of the horse. As you can see from
this drawing though, the tip of the tail is still curving from where it
came from, not from where the root of the tail is going to.
Note that the root of the tail is moving downward, whereas the tip of the tail
continues to swing in the upward direction that the rest of the tail was
originally going.
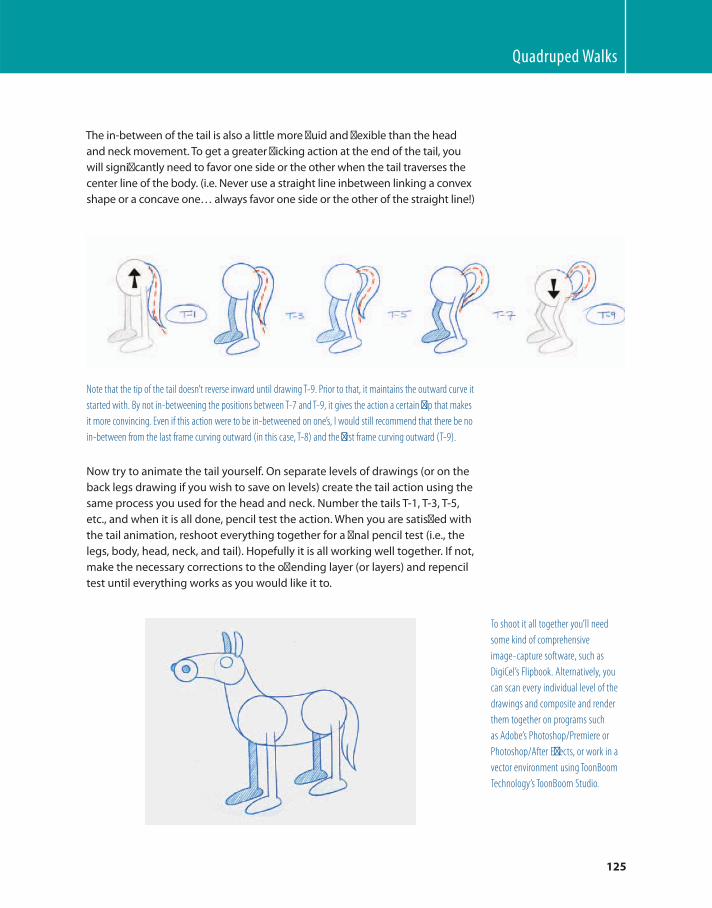
Quadruped Walks
125
The in-between of the tail is also a little more fl uid and fl exible than the head
and neck movement. To get a greater fl icking action at the end of the tail, you
will signifi cantly need to favor one side or the other when the tail traverses the
center line of the body. (i.e. Never use a straight line inbetween linking a convex
shape or a concave one… always favor one side or the other of the straight line!)
Note that the tip of the tail doesn’t reverse inward until drawing T-9. Prior to that, it maintains the outward curve it
started with. By not in-betweening the positions between T-7 and T-9, it gives the action a certain fl ip that makes
it more convincing. Even if this action were to be in-betweened on one’s, I would still recommend that there be no
in-between from the last frame curving outward (in this case, T-8) and the fi rst frame curving outward (T-9).
Now try to animate the tail yourself. On separate levels of drawings (or on the
back legs drawing if you wish to save on levels) create the tail action using the
same process you used for the head and neck. Number the tails T-1, T-3, T-5,
etc., and when it is all done, pencil test the action. When you are satisfi ed with
the tail animation, reshoot everything together for a fi nal pencil test (i.e., the
legs, body, head, neck, and tail). Hopefully it is all working well together. If not,
make the necessary corrections to the off ending layer (or layers) and repencil
test until everything works as you would like it to.
To shoot it all together you’ll need
some kind of comprehensive
image-capture software, such as
DigiCel’s Flipbook. Alternatively, you
can scan every individual level of the
drawings and composite and render
them together on programs such
as Adobe’s Photoshop/Premiere or
Photoshop/After Eff ects, or work in a
vector environment using ToonBoom
Technology’s ToonBoom Studio.
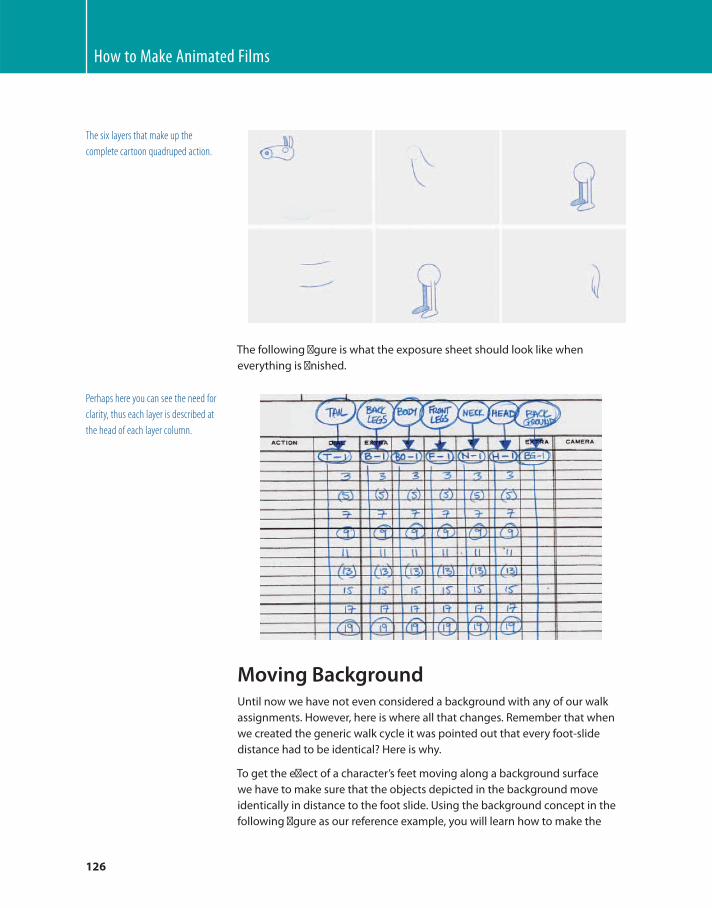
How to Make Animated Films
126
The six layers that make up the
complete cartoon quadruped action.
The following fi gure is what the exposure sheet should look like when
everything is fi nished.
Perhaps here you can see the need for
clarity, thus each layer is described at
the head of each layer column.
Moving Background Until now we have not even considered a background with any of our walk
assignments. However, here is where all that changes. Remember that when
we created the generic walk cycle it was pointed out that every foot-slide
distance had to be identical? Here is why.
To get the eff ect of a character’s feet moving along a background surface
we have to make sure that the objects depicted in the background move
identically in distance to the foot slide. Using the background concept in the
following fi gure as our reference example, you will learn how to make the

Quadruped Walks
127
background move and the foot slides synchronize. (Although you’re free to
design and use your own background artwork if you so choose, of course.)
Because the animation we are using moves on a cycle with the foot sliding
a consisting distance from one drawing to the other, the background has
to move this identical distance as well. Consequently, all the elements in
this simple background structure have been designed as a repeat pattern
of movement from left to right, so one section can be in-betweened to the
other… creating a repeating action as it moves through the screen.
This is a very simple background with basic coloring to clearly illustrate the
principles involved.
In this background the light area to the left is identical to the dark-shaded
area to the right, meaning that these are eff ectively key positions that can
easily be in-betweened so that a repeat cycle action can be utilized.
Note that usually the background behind a walk cycle is an extremely long
piece of artwork that pans past at precisely the same distance per frame as
the character’s foot slides. However, for our pencil test examples here, I want
you to draw the moves to avoid any unnecessary technical requirements, as
well as to help you learn the process of synchronized movement by the more
comprehensive hand-drawn process.
Note that the items on the background move exactly the same distance as the foot slide, frame by frame. If the
scene is long, the same cycle animation drawings can be used over and over again throughout. However, the
single piece of background art will have to be long enough to pan through for the entire scene without
the edges of the artwork appearing in the shot.
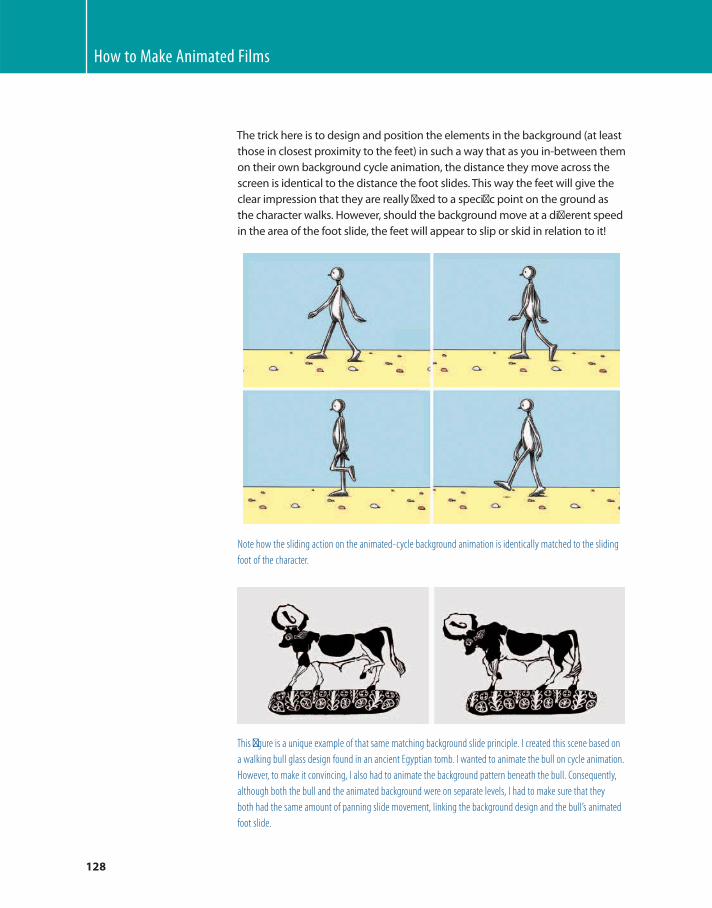
How to Make Animated Films
128
The trick here is to design and position the elements in the background (at least
those in closest proximity to the feet) in such a way that as you in-between them
on their own background cycle animation, the distance they move across the
screen is identical to the distance the foot slides. This way the feet will give the
clear impression that they are really fi xed to a specifi c point on the ground as
the character walks. However, should the background move at a diff erent speed
in the area of the foot slide, the feet will appear to slip or skid in relation to it!
Note how the sliding action on the animated-cycle background animation is identically matched to the sliding
foot of the character.
This fi gure is a unique example of that same matching background slide principle. I created this scene based on
a walking bull glass design found in an ancient Egyptian tomb. I wanted to animate the bull on cycle animation.
However, to make it convincing, I also had to animate the background pattern beneath the bull. Consequently,
although both the bull and the animated background were on separate levels, I had to make sure that they
both had the same amount of panning slide movement, linking the background design and the bull’s animated
foot slide.
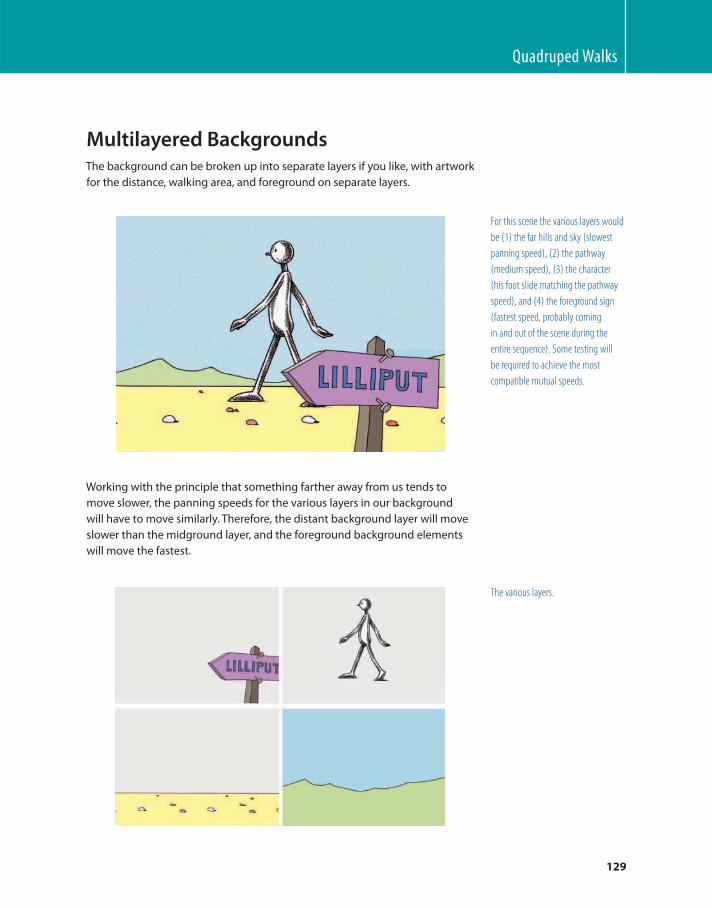
Quadruped Walks
129
Multilayered Backgrounds The background can be broken up into separate layers if you like, with artwork
for the distance, walking area, and foreground on separate layers.
Working with the principle that something farther away from us tends to
move slower, the panning speeds for the various layers in our background
will have to move similarly. Therefore, the distant background layer will move
slower than the midground layer, and the foreground background elements
will move the fastest.
For this scene the various layers would
be (1) the far hills and sky (slowest
panning speed), (2) the pathway
(medium speed), (3) the character
(his foot slide matching the pathway
speed), and (4) the foreground sign
(fastest speed, probably coming
in and out of the scene during the
entire sequence). Some testing will
be required to achieve the most
compatible mutual speeds.
The various layers.
How to Make Animated Films
130
This kind of parallax action is commonly known as a multiplane action , based
on the eff ects that the Walt Disney studio once achieved on their complex
multiplane camera. So, if you do decide to have a multiplane eff ect with
your background, make sure that the layer on which the character’s feet
are in contact with is the one that moves at the same speed as the
foot slide.
All that said, it is perfectly fi ne to have a single layer for the entire background,
however, as long as that too moves at the same distance as the foot slide each
time. Alternatively, if you use an entirely fl at-colored, plain background at the
foot contact position, any slight slippage that may occur will probably not be
noticeable.
We are talking here of matching the movement on the background with the
movement on the feet of the horse, which is currently animated on two’s.
However, the very best background panning movements are achieved by
panning the artwork on one’s, particularly with backgrounds that contain
strong vertical elements in their design, which tend to strobe (or judder)
when moving on two’s. If you pan/animate the background on one’s, however,
and keep the overlying animation on two’s, there will be a slide discrepancy
every other frame, which might look unacceptable. Consequently, for really
top-drawer work, all walk animation in panning scenes really should be
in-betweened and then shot on one’s to match the optimum background
speed. This is not always necessary for the exercises we are working on here,
unless otherwise requested.
Once you know the distance from toe
to toe on a single key stride position,
it is easy to divide that distance by
the number of frames you have to get
the character to the next full stride
position. This therefore gives you the
amount of slide distance that will be
necessary on the contact foot for every
frame of the walk cycle.
Quadruped Walks
131
Although the scene seems dark in appearance, I think it still remains clear that the various layers are moving at
diff erent speeds throughout the scene, giving an interesting parallax eff ect.
Nonwalk Pans Of course, not all multilevel pans are connected to walking action and foot
slides. Quite often stunning visual eff ects can be achieved by simply having
separate layers of background artwork pan at separate speeds to give
the illusion of traveling through, or across, scenes that have depth. This is
extremely eff ective with both horizontal and vertical pans.
The three main layers of background artwork that made up the previously illustrated scene.
How to Make Animated Films
132
Realistic Quadrupeds Of course, animators ’ work will not always be focused on producing the
kind of simple, cartoon-style characters that we have dealt with here. This is
especially true in the world of games or movie special eff ects, where animators
are more and more required to replicate lifelike quadruped action through
creatures, dinosaurs, or space monsters that cannot be fi lmed in any other way.
Consequently, we need to consider a slightly diff erent approach in this case,
although at the heart of it we can apply pretty much the same process of creation.
For this example, I am going to use a walking puma, footage of which I obtained
from the wonderful Oxford Scientifi c Film natural history website ( www.osf.
co.uk ) and began to partially animate by way of a class tutorial. At the Oxford
Scientifi c Film site you will fi nd a huge library of still and fi lm imagery of animals
and other natural things that you can draw from as a key reference. It is possible
to freely view and replay that low-resolution footage as much as you like on the
site, but if you want to use that footage in a commercial fi lm for some reason,
you will have to pay for it.
Anyway, the sequence I chose was of a puma briefl y pacing backward and
forward. Clearly there is a lot of complex action here for the animator to
take in. However, based on a design of a puma that was created for me by
Dr. Charles Woods at the DigiPen Institute of Technology, I was able to break
down the shape of the cat into defi nable, primitive shapes. See the following
fi gures.
The full fi lm sequence shows the puma pacing backward and forward, providing more than enough information
to make an educated guess at an acceptable and realistic animated example of how the big cat moves. The only
diffi culty was that with the long grass it was hard for me to see how the cat placed its feet on the ground,
which, of course, is diff erent than a generic human walk.
Quadruped Walks
133
Note that before animating the scene I created a Xerox copy of the original Dr. Woods ’ drawing, sized to the
dimensions I needed for animation. Then I blocked out (in blue pencil) the foot-slide paths of action, on which
I also marked the front and back foot positions.
By breaking the body parts of our realistic-looking character to simple primitive shapes, it makes the animating
of these body parts so much easier.
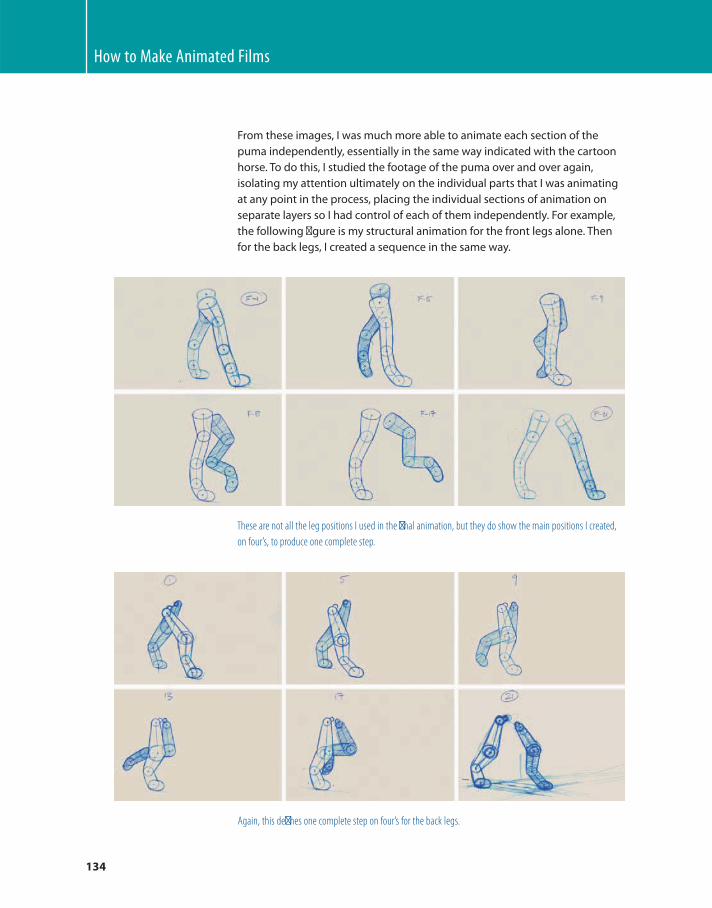
How to Make Animated Films
134
From these images, I was much more able to animate each section of the
puma independently, essentially in the same way indicated with the cartoon
horse. To do this, I studied the footage of the puma over and over again,
isolating my attention ultimately on the individual parts that I was animating
at any point in the process, placing the individual sections of animation on
separate layers so I had control of each of them independently. For example,
the following fi gure is my structural animation for the front legs alone. Then
for the back legs, I created a sequence in the same way.
These are not all the leg positions I used in the fi nal animation, but they do show the main positions I created,
on four’s, to produce one complete step.
Again, this defi nes one complete step on four’s for the back legs.
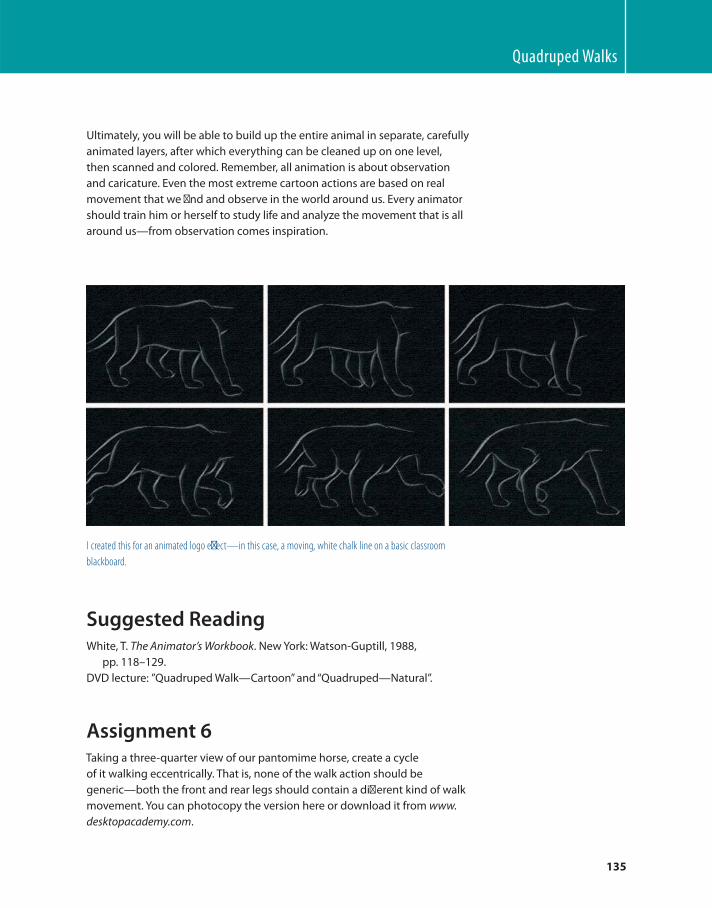
Quadruped Walks
135
Ultimately, you will be able to build up the entire animal in separate, carefully
animated layers, after which everything can be cleaned up on one level,
then scanned and colored. Remember, all animation is about observation
and caricature. Even the most extreme cartoon actions are based on real
movement that we fi nd and observe in the world around us. Every animator
should train him or herself to study life and analyze the movement that is all
around us — from observation comes inspiration.
I created this for an animated logo eff ect — in this case, a moving, white chalk line on a basic classroom
blackboard.
Suggested Reading White , T. The Animator’s Workbook . New York : Watson-Guptill , 1988 ,
pp. 118 – 129.
DVD lecture: ”Quadruped Walk — Cartoon” and “Quadruped — Natural”.
Assignment 6 Taking a three-quarter view of our pantomime horse, create a cycle
of it walking eccentrically. That is, none of the walk action should be
generic — both the front and rear legs should contain a diff erent kind of walk
movement. You can photocopy the version here or download it from www.
desktopacademy.com .
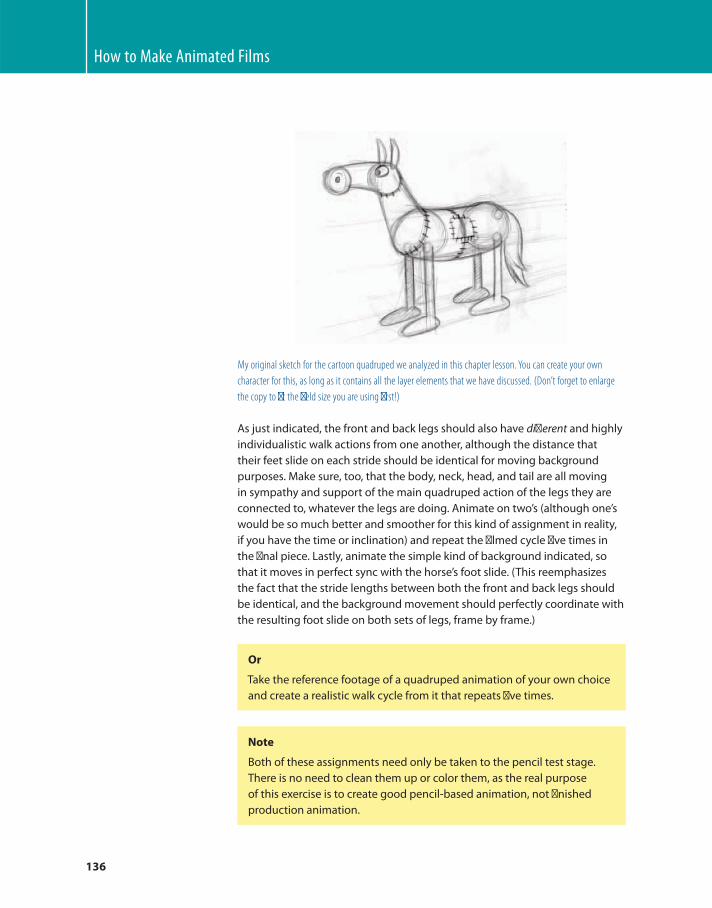
How to Make Animated Films
136
My original sketch for the cartoon quadruped we analyzed in this chapter lesson. You can create your own
character for this, as long as it contains all the layer elements that we have discussed. (Don’t forget to enlarge
the copy to fi t the fi eld size you are using fi rst!)
As just indicated, the front and back legs should also have diff erent and highly
individualistic walk actions from one another, although the distance that
their feet slide on each stride should be identical for moving background
purposes. Make sure, too, that the body, neck, head, and tail are all moving
in sympathy and support of the main quadruped action of the legs they are
connected to, whatever the legs are doing. Animate on two’s (although one’s
would be so much better and smoother for this kind of assignment in reality,
if you have the time or inclination) and repeat the fi lmed cycle fi ve times in
the fi nal piece. Lastly, animate the simple kind of background indicated, so
that it moves in perfect sync with the horse’s foot slide. (This reemphasizes
the fact that the stride lengths between both the front and back legs should
be identical, and the background movement should perfectly coordinate with
the resulting foot slide on both sets of legs, frame by frame.)
Or
Take the reference footage of a quadruped animation of your own choice
and create a realistic walk cycle from it that repeats fi ve times.
Note
Both of these assignments need only be taken to the pencil test stage.
There is no need to clean them up or color them, as the real purpose
of this exercise is to create good pencil-based animation, not fi nished
production animation .
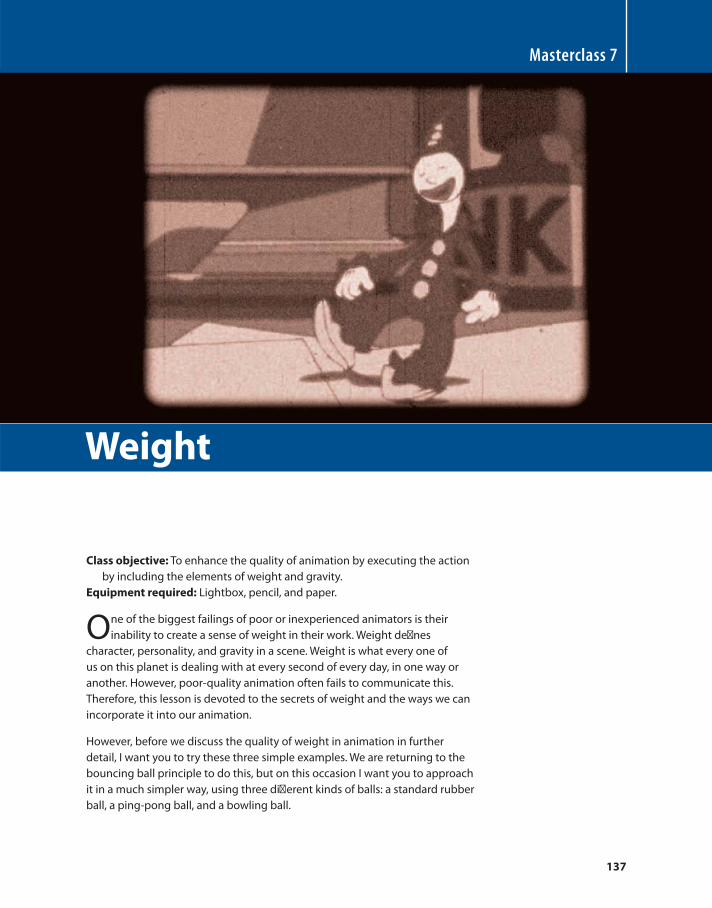
137
Class objective: To enhance the quality of animation by executing the action
by including the elements of weight and gravity.
Equipment required: Lightbox, pencil, and paper.
One of the biggest failings of poor or inexperienced animators is their
inability to create a sense of weight in their work. Weight defi nes
character, personality, and gravity in a scene. Weight is what every one of
us on this planet is dealing with at every second of every day, in one way or
another. However, poor-quality animation often fails to communicate this.
Therefore, this lesson is devoted to the secrets of weight and the ways we can
incorporate it into our animation.
However, before we discuss the quality of weight in animation in further
detail, I want you to try these three simple examples. We are returning to the
bouncing ball principle to do this, but on this occasion I want you to approach
it in a much simpler way, using three diff erent kinds of balls: a standard rubber
ball, a ping-pong ball, and a bowling ball.
Masterclass 7
Weight
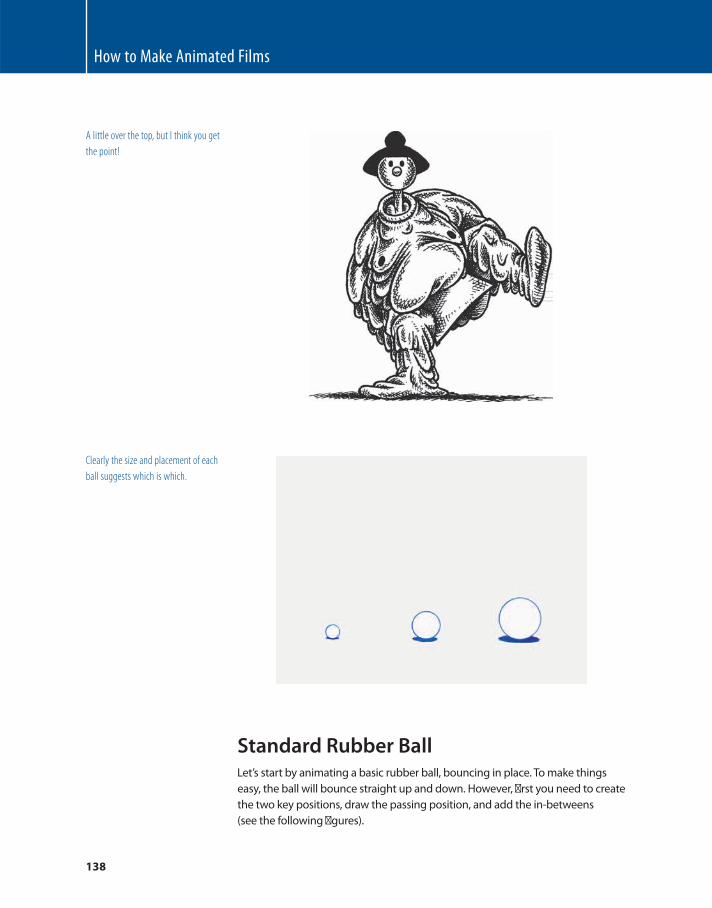
How to Make Animated Films
138
A little over the top, but I think you get
the point!
Clearly the size and placement of each
ball suggests which is which.
Standard Rubber Ball Let’s start by animating a basic rubber ball, bouncing in place. To make things
easy, the ball will bounce straight up and down. However, fi rst you need to create
the two key positions, draw the passing position, and add the in-betweens
(see the following fi gures).
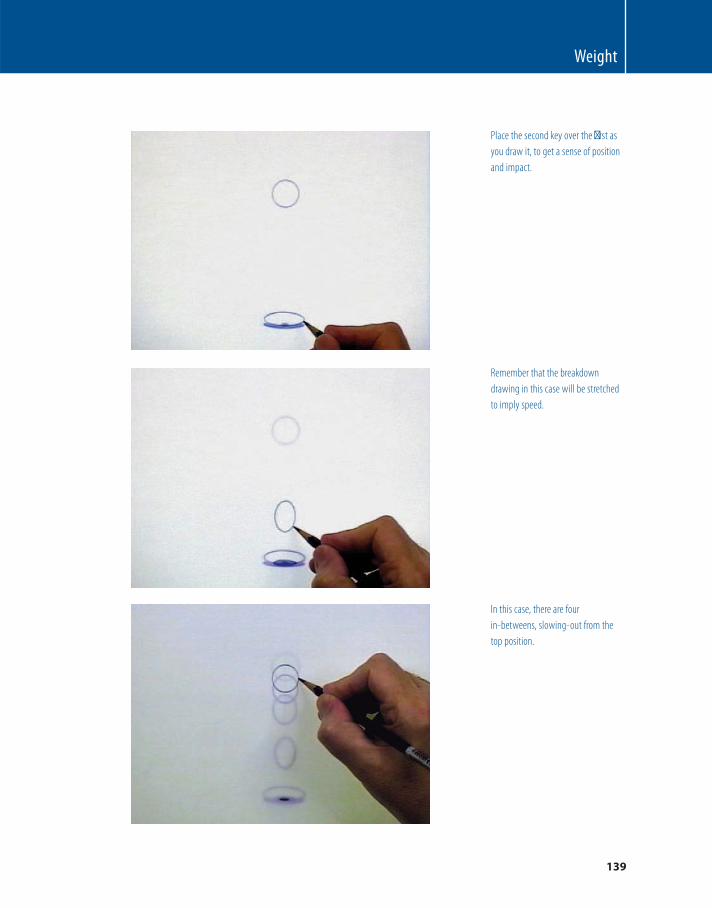
Weight
139
Place the second key over the fi rst as
you draw it, to get a sense of position
and impact.
Remember that the breakdown
drawing in this case will be stretched
to imply speed.
In this case, there are four
in-betweens, slowing-out from the
top position.

How to Make Animated Films
140
Pencil test for fi ve bounce cycles, on two’s, and save the drawings for future
review.
Ping-Pong Ball Now for the ping-pong ball. Create the two key positions, add the breakdown
drawing, and add the in-betweens (see the following fi gures).
The nature of the ping-pong ball is
much diff erent, although there will still
be a squash position as it impacts with
the ground.
Again there is stretch on the passing
position here but not as much as there
is for a heavier, rubber ball.
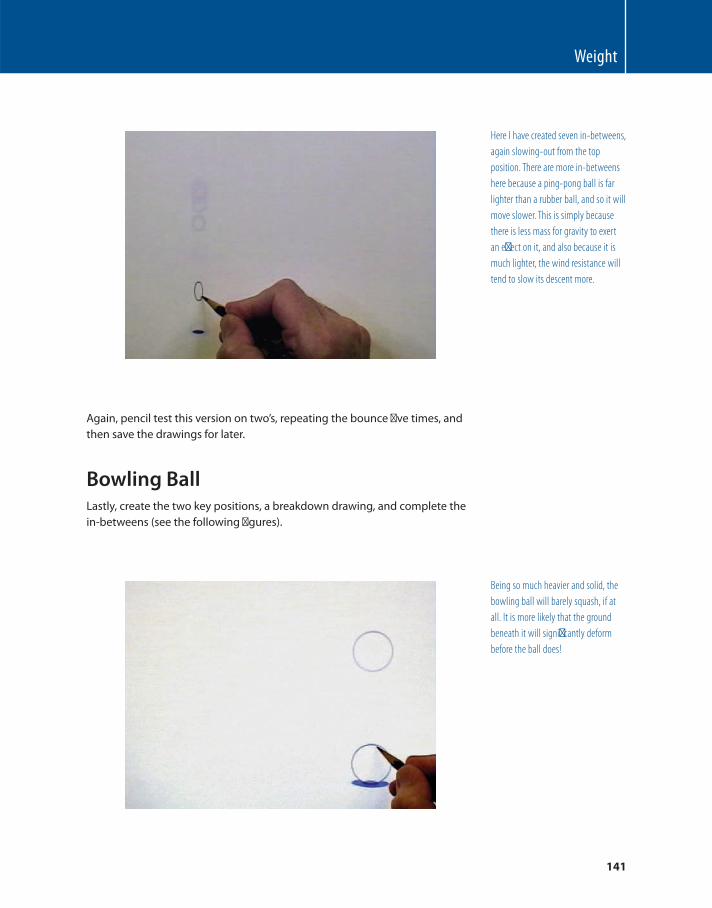
Weight
141
Here I have created seven in-betweens,
again slowing-out from the top
position. There are more in-betweens
here because a ping-pong ball is far
lighter than a rubber ball, and so it will
move slower. This is simply because
there is less mass for gravity to exert
an eff ect on it, and also because it is
much lighter, the wind resistance will
tend to slow its descent more.
Again, pencil test this version on two’s, repeating the bounce fi ve times, and
then save the drawings for later.
Bowling Ball Lastly, create the two key positions, a breakdown drawing, and complete the
in-betweens (see the following fi gures).
Being so much heavier and solid, the
bowling ball will barely squash, if at
all. It is more likely that the ground
beneath it will signifi cantly deform
before the ball does!
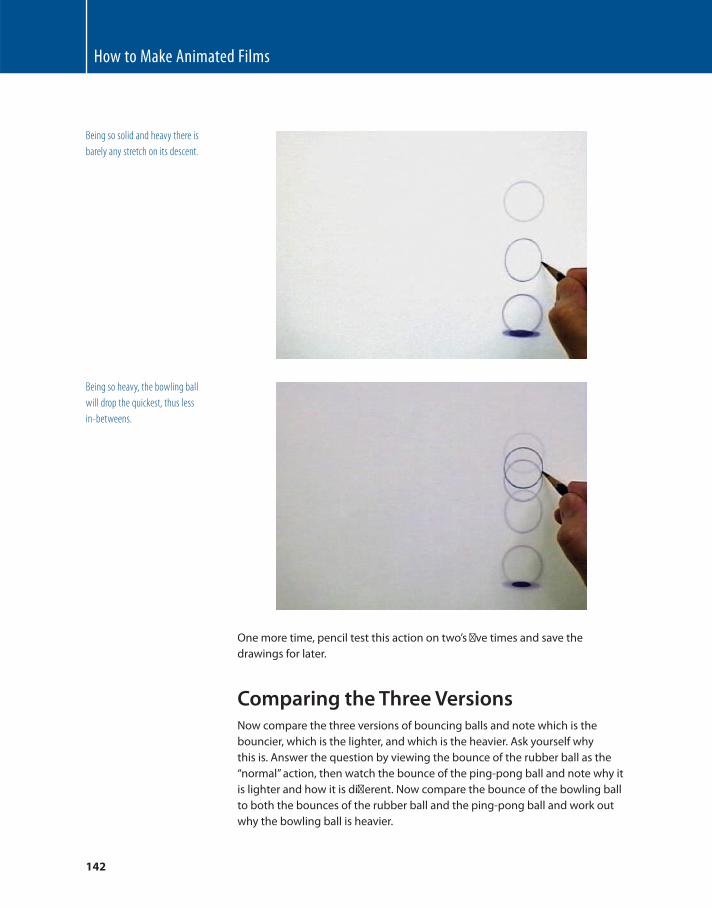
How to Make Animated Films
142
Being so solid and heavy there is
barely any stretch on its descent.
Being so heavy, the bowling ball
will drop the quickest, thus less
in-betweens.
One more time, pencil test this action on two’s fi ve times and save the
drawings for later.
Comparing the Three Versions Now compare the three versions of bouncing balls and note which is the
bouncier, which is the lighter, and which is the heavier. Ask yourself why
this is. Answer the question by viewing the bounce of the rubber ball as the
“ normal ” action, then watch the bounce of the ping-pong ball and note why it
is lighter and how it is diff erent. Now compare the bounce of the bowling ball
to both the bounces of the rubber ball and the ping-pong ball and work out
why the bowling ball is heavier.
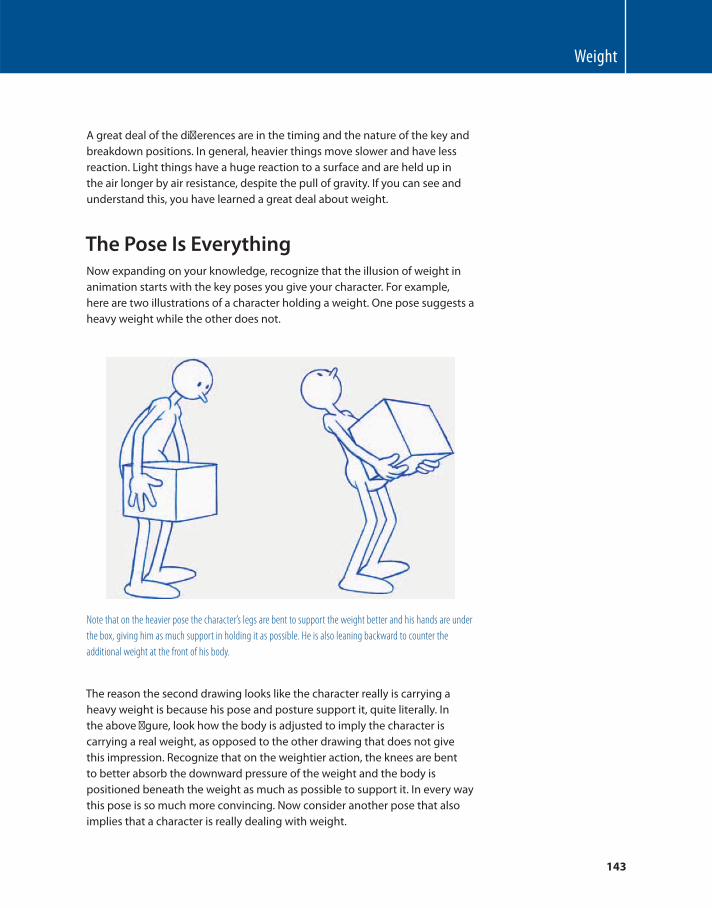
Weight
143
A great deal of the diff erences are in the timing and the nature of the key and
breakdown positions. In general, heavier things move slower and have less
reaction. Light things have a huge reaction to a surface and are held up in
the air longer by air resistance, despite the pull of gravity. If you can see and
understand this, you have learned a great deal about weight.
The Pose Is Everything Now expanding on your knowledge, recognize that the illusion of weight in
animation starts with the key poses you give your character. For example,
here are two illustrations of a character holding a weight. One pose suggests a
heavy weight while the other does not.
Note that on the heavier pose the character’s legs are bent to support the weight better and his hands are under
the box, giving him as much support in holding it as possible. He is also leaning backward to counter the
additional weight at the front of his body.
The reason the second drawing looks like the character really is carrying a
heavy weight is because his pose and posture support it, quite literally. In
the above fi gure, look how the body is adjusted to imply the character is
carrying a real weight, as opposed to the other drawing that does not give
this impression. Recognize that on the weightier action, the knees are bent
to better absorb the downward pressure of the weight and the body is
positioned beneath the weight as much as possible to support it. In every way
this pose is so much more convincing. Now consider another pose that also
implies that a character is really dealing with weight.

How to Make Animated Films
144
This time the character’s whole body
mass is beneath the weight, implying
that it is heavy and needs maximum
support to carry it. Again, the knees
are bent to take the weight better.
The objective of any animator is to maximize the eff ect of what is required
through dynamic poses, long before the animation is even created. The
following poses therefore suggest a believable series of weighty poses that
support the illusion that real weight is involved… or do not!
Here the whole of the character’s
body is directly beneath the weight,
suggesting that balance is important.
If this balance was not drawn into the
pose it would not look like the weight
needs to be taken seriously.

Weight
145
Next, consider another pose, where a similar object is being carried but
without the dynamic posture that suggests weight is involved.
Here the box is clearly not heavy because no part of the character’s body, except an ineff ective hand, is
beneath to control it. Note too the legs are straight, suggesting that there is no downward pressure on the
body at all.
Consequently, it is extremely important that you, as an accomplished
animator, understand your responsibility here — to always maximize the eff ect
that pose and posture communicate to your audience in any animation you
present to them (whether this is dealing with the issue of weight or not). That
said, there are a number of other things you can do that will create the illusion
of weight.
Tips Here are a few tips that will help you create weight in your animation:
1. When posing a character who is dealing with weight, remember that the
strongest parts of the human body are the legs, therefore, they need to
bend to cushion the impact of any weight placed on them.
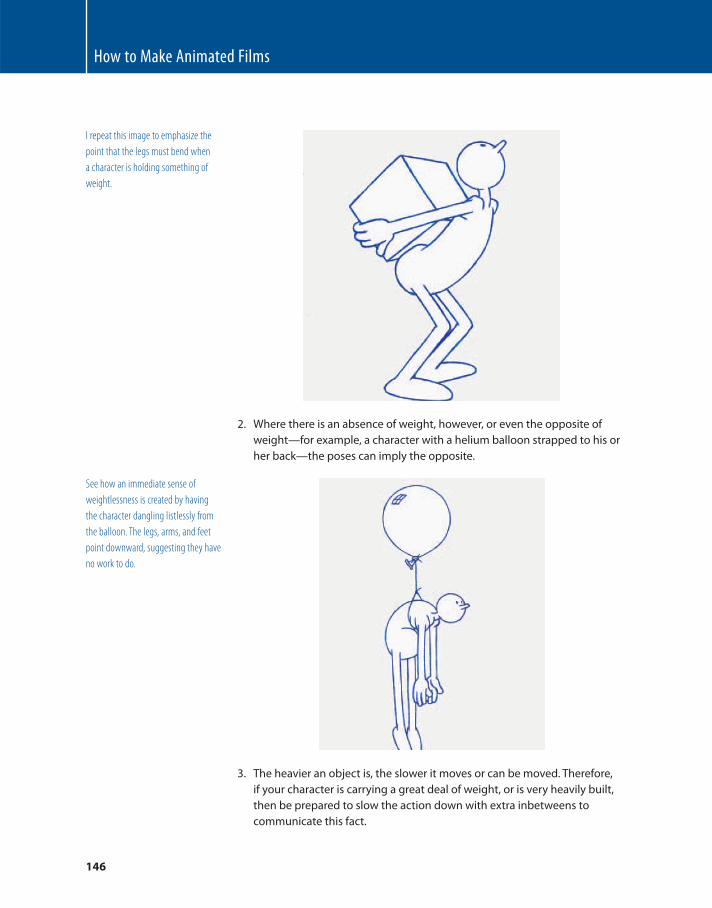
How to Make Animated Films
146
3. The heavier an object is, the slower it moves or can be moved. Therefore,
if your character is carrying a great deal of weight, or is very heavily built,
then be prepared to slow the action down with extra inbetweens to
communicate this fact.
I repeat this image to emphasize the
point that the legs must bend when
a character is holding something of
weight .
2. Where there is an absence of weight, however, or even the opposite of
weight — for example, a character with a helium balloon strapped to his or
her back — the poses can imply the opposite.
See how an immediate sense of
weightlessness is created by having
the character dangling listlessly from
the balloon. The legs, arms, and feet
point downward, suggesting they have
no work to do.
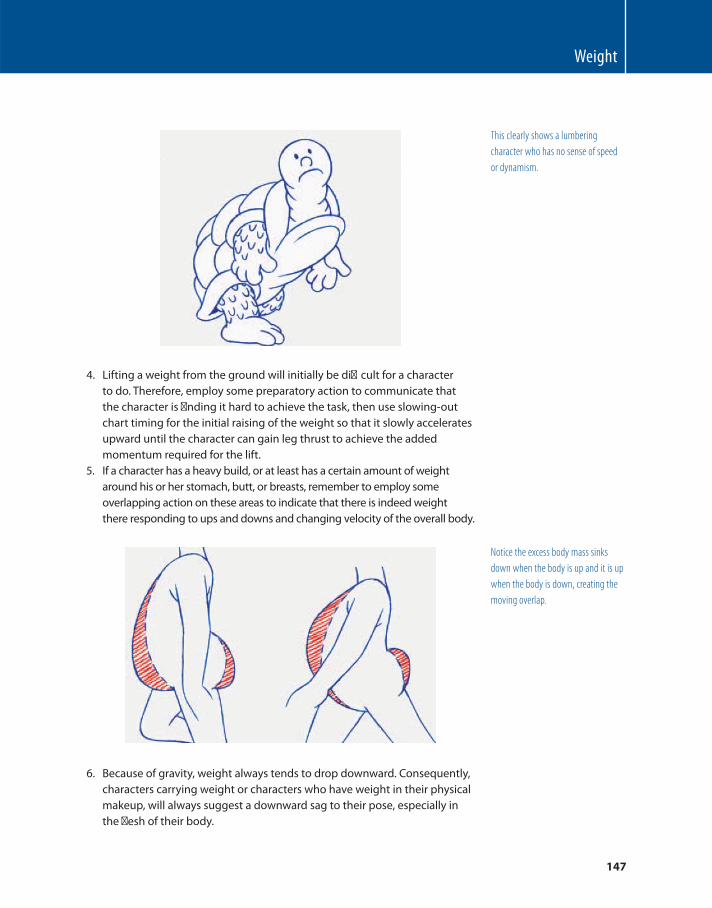
Weight
147
This clearly shows a lumbering
character who has no sense of speed
or dynamism.
4. Lifting a weight from the ground will initially be diffi cult for a character
to do. Therefore, employ some preparatory action to communicate that
the character is fi nding it hard to achieve the task, then use slowing-out
chart timing for the initial raising of the weight so that it slowly accelerates
upward until the character can gain leg thrust to achieve the added
momentum required for the lift.
5. If a character has a heavy build, or at least has a certain amount of weight
around his or her stomach, butt, or breasts, remember to employ some
overlapping action on these areas to indicate that there is indeed weight
there responding to ups and downs and changing velocity of the overall body.
Notice the excess body mass sinks
down when the body is up and it is up
when the body is down, creating the
moving overlap.
6. Because of gravity, weight always tends to drop downward. Consequently,
characters carrying weight or characters who have weight in their physical
makeup, will always suggest a downward sag to their pose, especially in
the fl esh of their body.
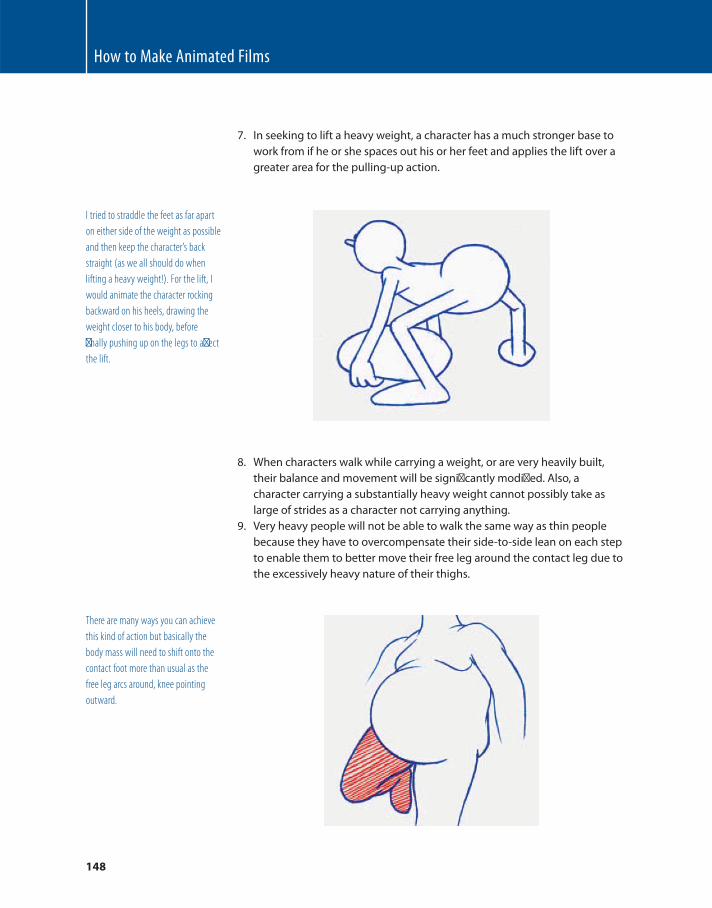
How to Make Animated Films
148
7. In seeking to lift a heavy weight, a character has a much stronger base to
work from if he or she spaces out his or her feet and applies the lift over a
greater area for the pulling-up action.
I tried to straddle the feet as far apart
on either side of the weight as possible
and then keep the character’s back
straight (as we all should do when
lifting a heavy weight!). For the lift, I
would animate the character rocking
backward on his heels, drawing the
weight closer to his body, before
fi nally pushing up on the legs to aff ect
the lift.
8. When characters walk while carrying a weight, or are very heavily built,
their balance and movement will be signifi cantly modifi ed. Also, a
character carrying a substantially heavy weight cannot possibly take as
large of strides as a character not carrying anything.
9. Very heavy people will not be able to walk the same way as thin people
because they have to overcompensate their side-to-side lean on each step
to enable them to better move their free leg around the contact leg due to
the excessively heavy nature of their thighs.
There are many ways you can achieve
this kind of action but basically the
body mass will need to shift onto the
contact foot more than usual as the
free leg arcs around, knee pointing
outward.

Weight
149
10. In order for a character to move while carrying a very heavy weight, he
or she will fi rst have to use a certain amount of a swing in the opposite
direction to get some kind of momentum going. For example, as I
illustrated in Animation from Pencils to Pixels , if a character is attempting
to throw a fl our sack forward, he or she will fi nd it easier to swing the fl our
sack back fi rst, then swing it forward to gain extra momentum for the
release.
View fi rst the central, static pose. Then the character swings the sack away from the direction of the throw
before fi nally tossing it in that direction.
Suggested Reading White , T. The Animator’s Workbook . New York : Watson-Guptill , 1988 , pp. 76 – 79.
White , T. Animation from Pencils to Pixels: Classical Techniques for Digital
Animators . Boston : Focal Press , 2006 , pp. 227 – 231.
Assignment 7 Taking all this into consideration, demonstrate how you can execute a
character action that communicates a greater sense of weight. Let us have our
character moving the location of two boxes.
Note
This is called anticipation , but we deal with that specifi cally in the next
lesson.
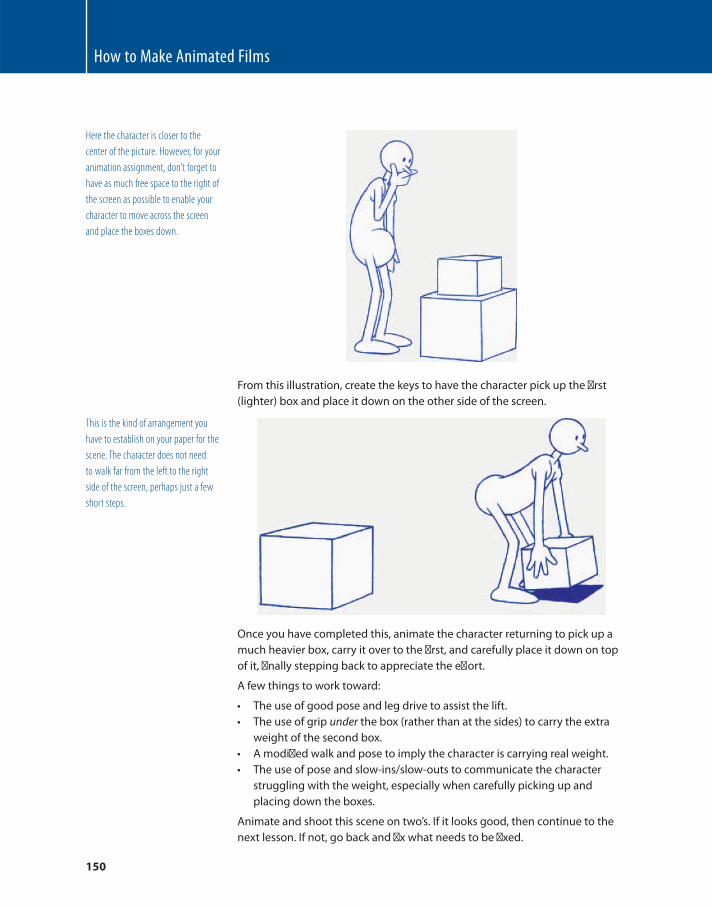
How to Make Animated Films
150
Here the character is closer to the
center of the picture. However, for your
animation assignment, don’t forget to
have as much free space to the right of
the screen as possible to enable your
character to move across the screen
and place the boxes down.
From this illustration, create the keys to have the character pick up the fi rst
(lighter) box and place it down on the other side of the screen.
This is the kind of arrangement you
have to establish on your paper for the
scene. The character does not need
to walk far from the left to the right
side of the screen, perhaps just a few
short steps.
Once you have completed this, animate the character returning to pick up a
much heavier box, carry it over to the fi rst, and carefully place it down on top
of it, fi nally stepping back to appreciate the eff ort.
A few things to work toward:
● The use of good pose and leg drive to assist the lift.
● The use of grip under the box (rather than at the sides) to carry the extra
weight of the second box.
● A modifi ed walk and pose to imply the character is carrying real weight.
● The use of pose and slow-ins/slow-outs to communicate the character
struggling with the weight, especially when carefully picking up and
placing down the boxes.
Animate and shoot this scene on two’s. If it looks good, then continue to the
next lesson. If not, go back and fi x what needs to be fi xed.
151
Class objective: To better prepare the audience for a major action and to give
more impact with the action being attempted.
Equipment required: Lightbox, pencil, and paper.
Most students know that Newton’s third law is that for every action
there is an equal and opposite reaction. We might use a little artistic
liberty with this and say that animators ’ fi rst law is “ for every action there
is a subtle and opposite anticipation. ” The ancient tradition of Tai Chi also
refl ects this understanding by suggesting that before any major movement
in one direction there is a slight and subtle movement in the opposite
direction fi rst.
Simply put, anticipation demands that if you have to animate a character’s
action in one particular direction, then you should fi rst have a little back
movement in the opposite direction to make it more dynamic. We hinted
at this in our previous lesson on weight, where the character fi rst swings
the fl our sack backward before fi nally swinging and throwing it forward.
Masterclass 8
Anticipation
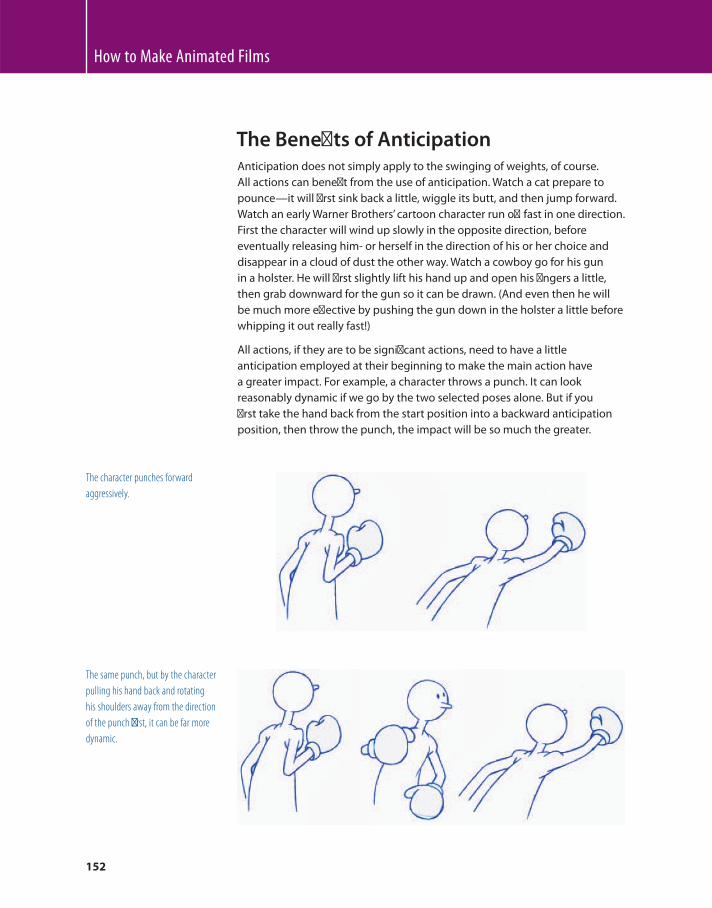
How to Make Animated Films
152
The Benefi ts of Anticipation Anticipation does not simply apply to the swinging of weights, of course.
All actions can benefi t from the use of anticipation. Watch a cat prepare to
pounce — it will fi rst sink back a little, wiggle its butt, and then jump forward.
Watch an early Warner Brothers ’ cartoon character run off fast in one direction.
First the character will wind up slowly in the opposite direction, before
eventually releasing him- or herself in the direction of his or her choice and
disappear in a cloud of dust the other way. Watch a cowboy go for his gun
in a holster. He will fi rst slightly lift his hand up and open his fi ngers a little,
then grab downward for the gun so it can be drawn. (And even then he will
be much more eff ective by pushing the gun down in the holster a little before
whipping it out really fast!)
All actions, if they are to be signifi cant actions, need to have a little
anticipation employed at their beginning to make the main action have
a greater impact. For example, a character throws a punch. It can look
reasonably dynamic if we go by the two selected poses alone. But if you
fi rst take the hand back from the start position into a backward anticipation
position, then throw the punch, the impact will be so much the greater.
The same punch, but by the character
pulling his hand back and rotating
his shoulders away from the direction
of the punch fi rst, it can be far more
dynamic.
The character punches forward
aggressively.
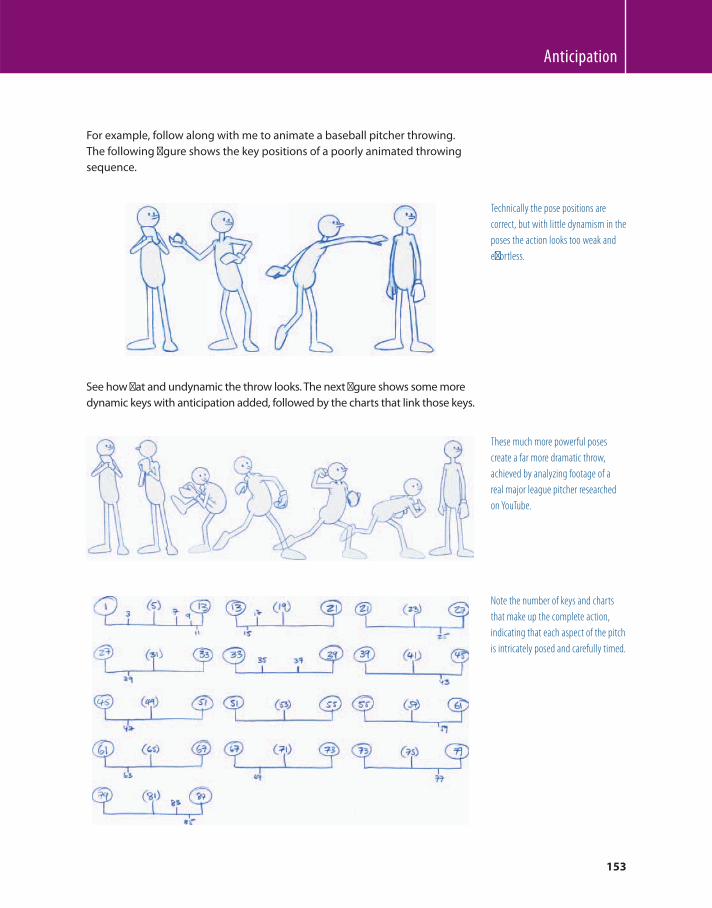
Anticipation
153
For example, follow along with me to animate a baseball pitcher throwing.
The following fi gure shows the key positions of a poorly animated throwing
sequence.
Technically the pose positions are
correct, but with little dynamism in the
poses the action looks too weak and
eff ortless.
See how fl at and undynamic the throw looks. The next fi gure shows some more
dynamic keys with anticipation added, followed by the charts that link those keys.
These much more powerful poses
create a far more dramatic throw,
achieved by analyzing footage of a
real major league pitcher researched
on YouTube.
Note the number of keys and charts
that make up the complete action,
indicating that each aspect of the pitch
is intricately posed and carefully timed.
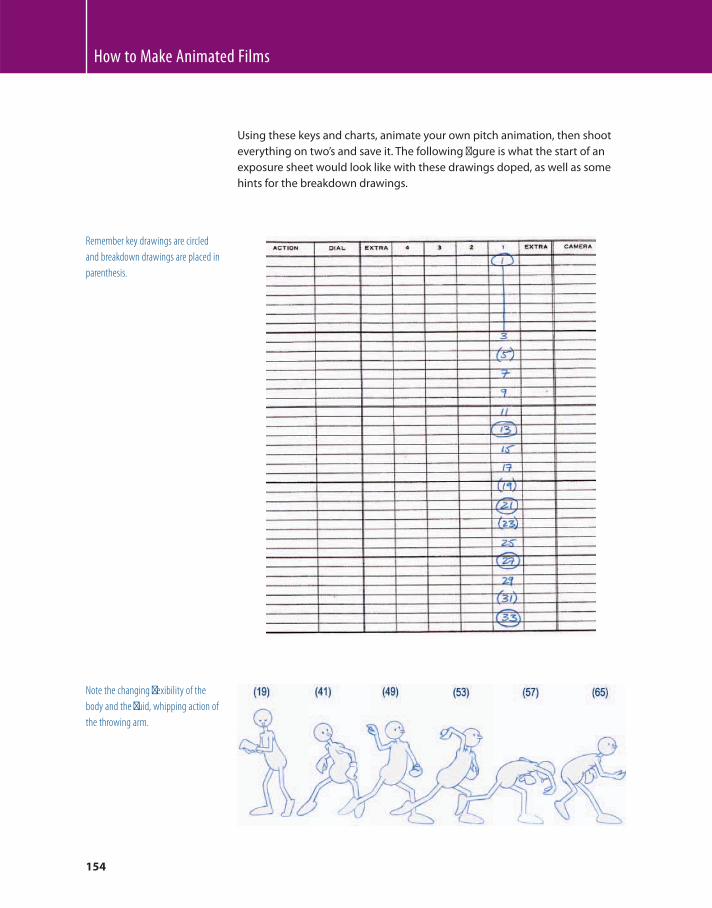
How to Make Animated Films
154
Using these keys and charts, animate your own pitch animation, then shoot
everything on two’s and save it. The following fi gure is what the start of an
exposure sheet would look like with these drawings doped, as well as some
hints for the breakdown drawings.
Note the changing fl exibility of the
body and the fl uid, whipping action of
the throwing arm.
Remember key drawings are circled
and breakdown drawings are placed in
parenthesis.
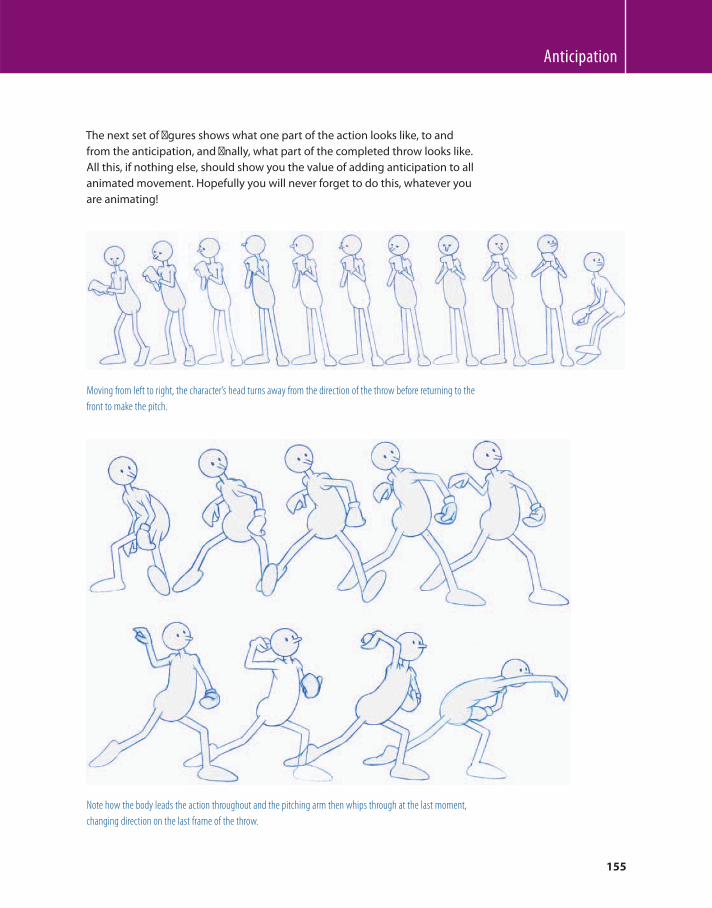
Anticipation
155
The next set of fi gures shows what one part of the action looks like, to and
from the anticipation, and fi nally, what part of the completed throw looks like.
All this, if nothing else, should show you the value of adding anticipation to all
animated movement. Hopefully you will never forget to do this, whatever you
are animating!
Moving from left to right, the character’s head turns away from the direction of the throw before returning to the
front to make the pitch.
Note how the body leads the action throughout and the pitching arm then whips through at the last moment,
changing direction on the last frame of the throw.
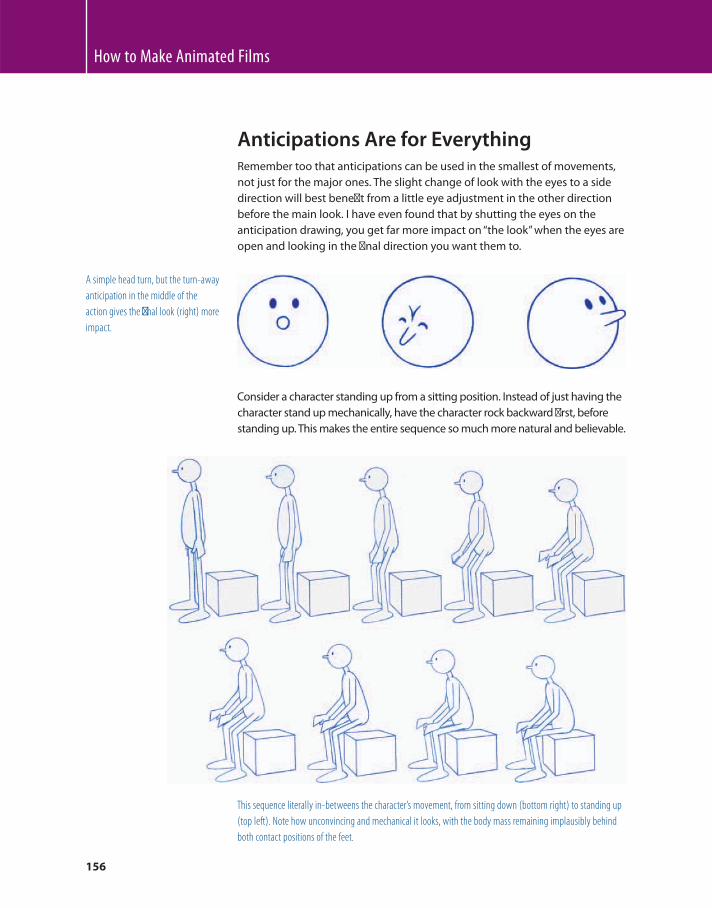
How to Make Animated Films
156
Anticipations Are for Everything Remember too that anticipations can be used in the smallest of movements,
not just for the major ones. The slight change of look with the eyes to a side
direction will best benefi t from a little eye adjustment in the other direction
before the main look. I have even found that by shutting the eyes on the
anticipation drawing, you get far more impact on “ the look ” when the eyes are
open and looking in the fi nal direction you want them to.
Consider a character standing up from a sitting position. Instead of just having the
character stand up mechanically, have the character rock backward fi rst, before
standing up. This makes the entire sequence so much more natural and believable.
This sequence literally in-betweens the character’s movement, from sitting down (bottom right) to standing up
(top left). Note how unconvincing and mechanical it looks, with the body mass remaining implausibly behind
both contact positions of the feet.
A simple head turn, but the turn-away
anticipation in the middle of the
action gives the fi nal look (right) more
impact.
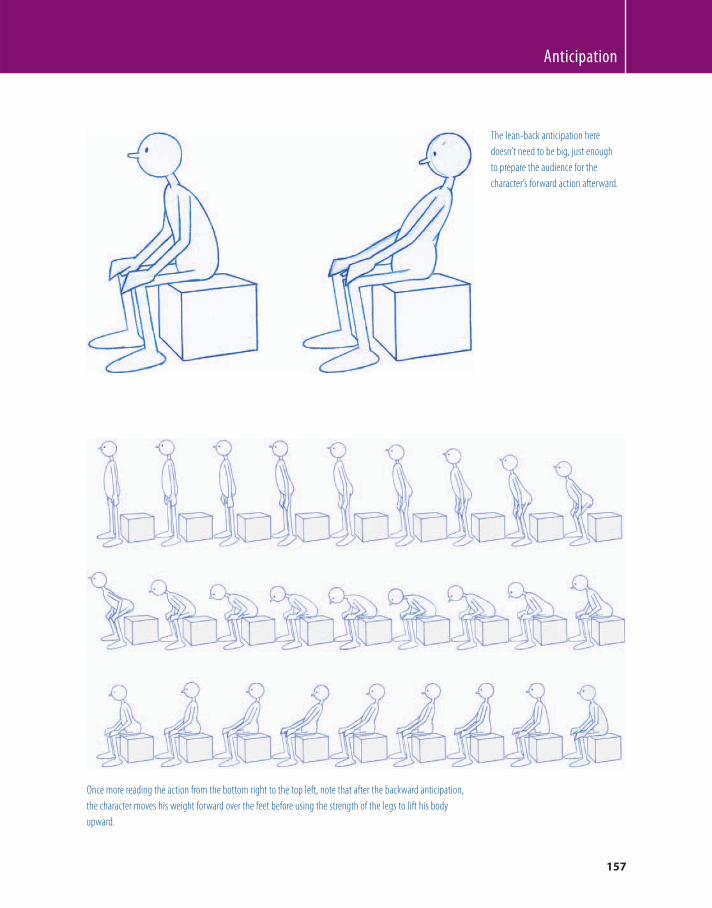
Anticipation
157
Once more reading the action from the bottom right to the top left, note that after the backward anticipation,
the character moves his weight forward over the feet before using the strength of the legs to lift his body
upward.
The lean-back anticipation here
doesn’t need to be big, just enough
to prepare the audience for the
character’s forward action afterward.
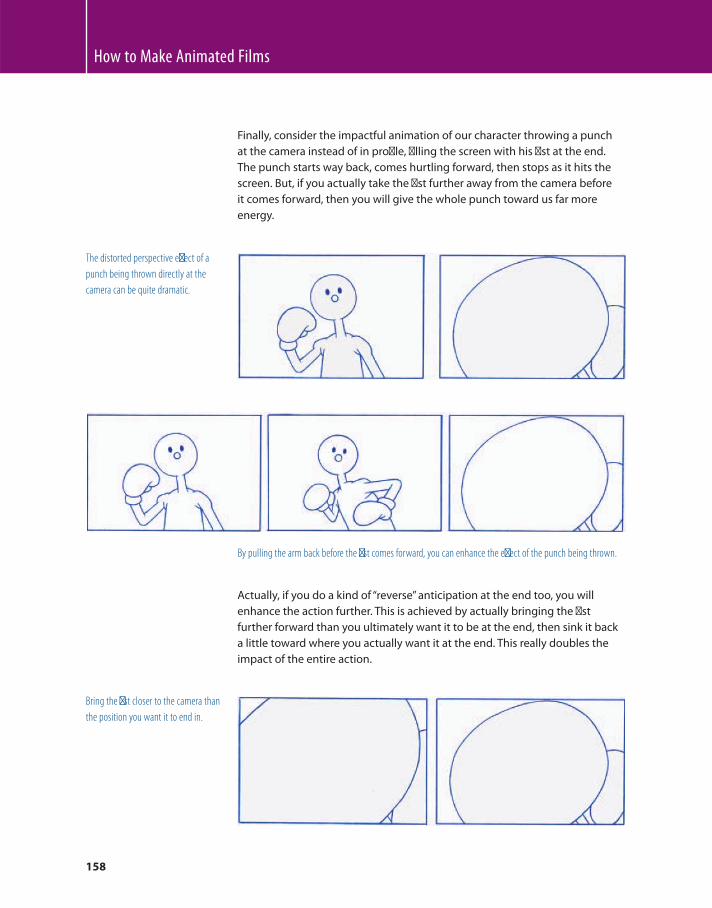
How to Make Animated Films
158
Finally, consider the impactful animation of our character throwing a punch
at the camera instead of in profi le, fi lling the screen with his fi st at the end.
The punch starts way back, comes hurtling forward, then stops as it hits the
screen. But, if you actually take the fi st further away from the camera before
it comes forward, then you will give the whole punch toward us far more
energy.
The distorted perspective eff ect of a
punch being thrown directly at the
camera can be quite dramatic.
By pulling the arm back before the fi st comes forward, you can enhance the eff ect of the punch being thrown.
Actually, if you do a kind of “ reverse ” anticipation at the end too, you will
enhance the action further. This is achieved by actually bringing the fi st
further forward than you ultimately want it to be at the end, then sink it back
a little toward where you actually want it at the end. This really doubles the
impact of the entire action.
Bring the fi st closer to the camera than
the position you want it to end in.
Anticipation
159
Remember that you can be as subtle with the anticipations as you can be with
the main actions on occasion. The simple blink of an eye can be occasionally
emphasized by the eye widening for a fraction a split-second before it closes.
A closed hand opening can look stronger if you just tighten the closed
position fi rst. A child being swung on a swing can be started more eff ectively
by pulling him or her a little further back before being pushed forward. There
is no end to the innovative ways a good anticipation can be applied. The only
way you can ever really go wrong is NOT to use anticipation at all!
Suggested Reading White , T. The Animator’s Workbook . New York : Watson-Guptill , 1988 ,
pp. 70 – 71, 79.
White , T. Animation from Pencils to Pixels: Classical Techniques for Digital
Animators . Boston : Focal Press , 2006 , pp . 226 – 227.
DVD lecture: “DEMO — Jump” and “DEMO — Pitcher”.
Assignment 8 With a character of your own design, animate a basketball player taking a
penalty shot. From the player in a static position, holding the ball and facing
the hoop, have him or her make the shot, score the point, then jump up and
down in triumph afterward, while the ball bounces to a stop. For this, use all
the techniques we have discussed so far, but most of all, fi nd ways to use well-
timed anticipations as much as you can throughout.

This page intentionally left blank
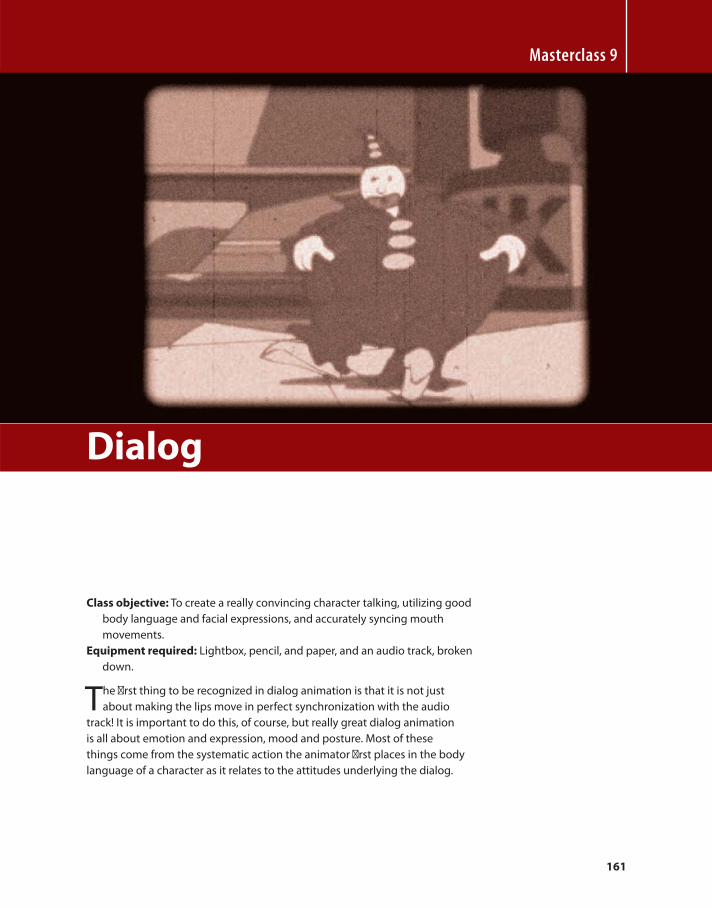
161
Class objective: To create a really convincing character talking, utilizing good
body language and facial expressions, and accurately syncing mouth
movements.
Equipment required: Lightbox, pencil, and paper, and an audio track, broken
down.
The fi rst thing to be recognized in dialog animation is that it is not just
about making the lips move in perfect synchronization with the audio
track! It is important to do this, of course, but really great dialog animation
is all about emotion and expression, mood and posture. Most of these
things come from the systematic action the animator fi rst places in the body
language of a character as it relates to the attitudes underlying the dialog.
Masterclass 9
Dialog
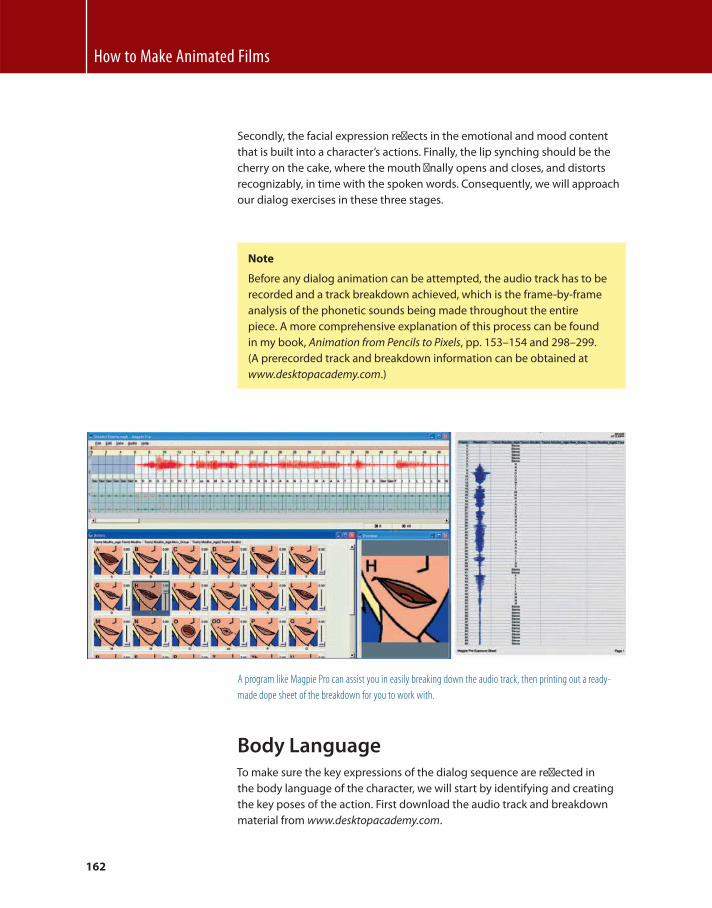
How to Make Animated Films
162
Note
Before any dialog animation can be attempted, the audio track has to be
recorded and a track breakdown achieved, which is the frame-by-frame
analysis of the phonetic sounds being made throughout the entire
piece. A more comprehensive explanation of this process can be found
in my book, Animation from Pencils to Pixels , pp . 153 – 154 and 298 – 299.
(A prerecorded track and breakdown information can be obtained at
www.desktopacademy.com .)
A program like Magpie Pro can assist you in easily breaking down the audio track, then printing out a ready-
made dope sheet of the breakdown for you to work with.
Body Language To make sure the key expressions of the dialog sequence are refl ected in
the body language of the character, we will start by identifying and creating
the key poses of the action. First download the audio track and breakdown
material from www.desktopacademy.com .
Secondly, the facial expression refl ects in the emotional and mood content
that is built into a character’s actions. Finally, the lip synching should be the
cherry on the cake, where the mouth fi nally opens and closes, and distorts
recognizably, in time with the spoken words. Consequently, we will approach
our dialog exercises in these three stages.
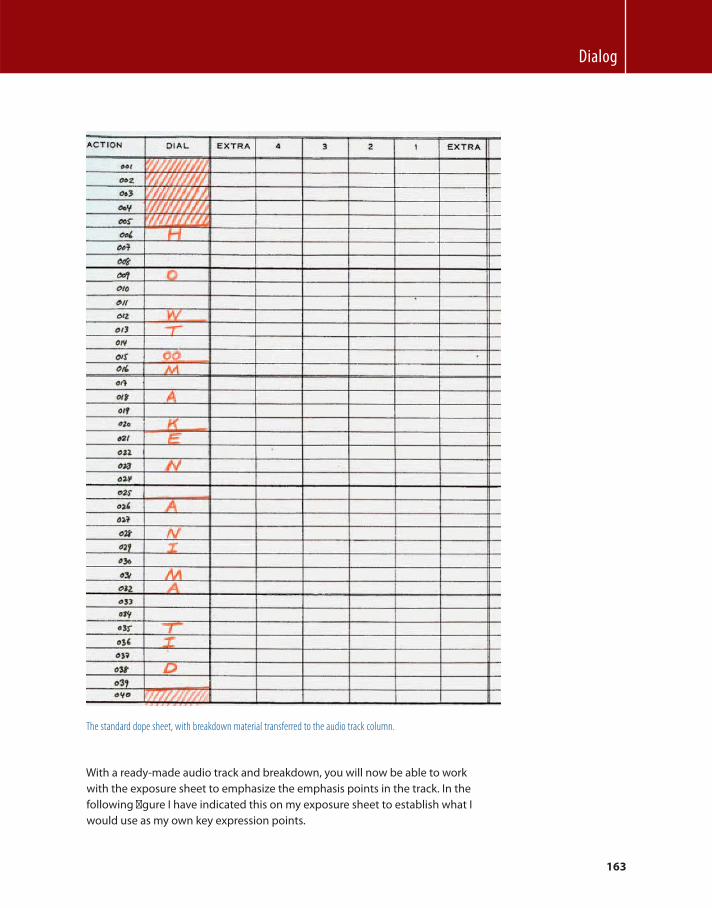
Dialog
163
The standard dope sheet, with breakdown material transferred to the audio track column.
With a ready-made audio track and breakdown, you will now be able to work
with the exposure sheet to emphasize the emphasis points in the track. In the
following fi gure I have indicated this on my exposure sheet to establish what I
would use as my own key expression points.
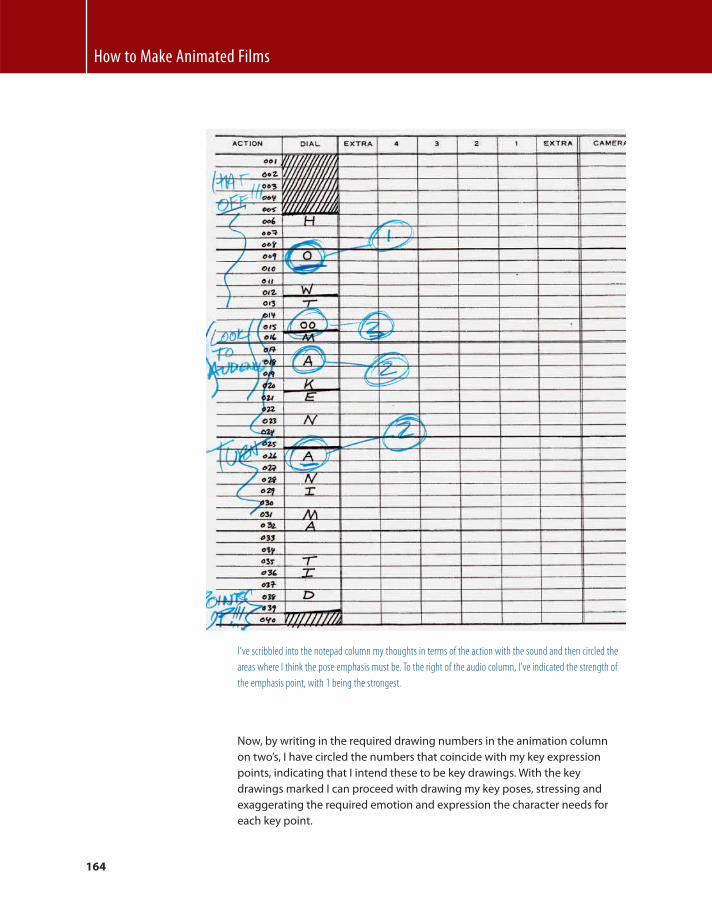
How to Make Animated Films
164
I’ve scribbled into the notepad column my thoughts in terms of the action with the sound and then circled the
areas where I think the pose emphasis must be. To the right of the audio column, I’ve indicated the strength of
the emphasis point, with 1 being the strongest.
Now, by writing in the required drawing numbers in the animation column
on two’s, I have circled the numbers that coincide with my key expression
points, indicating that I intend these to be key drawings. With the key
drawings marked I can proceed with drawing my key poses, stressing and
exaggerating the required emotion and expression the character needs for
each key point.
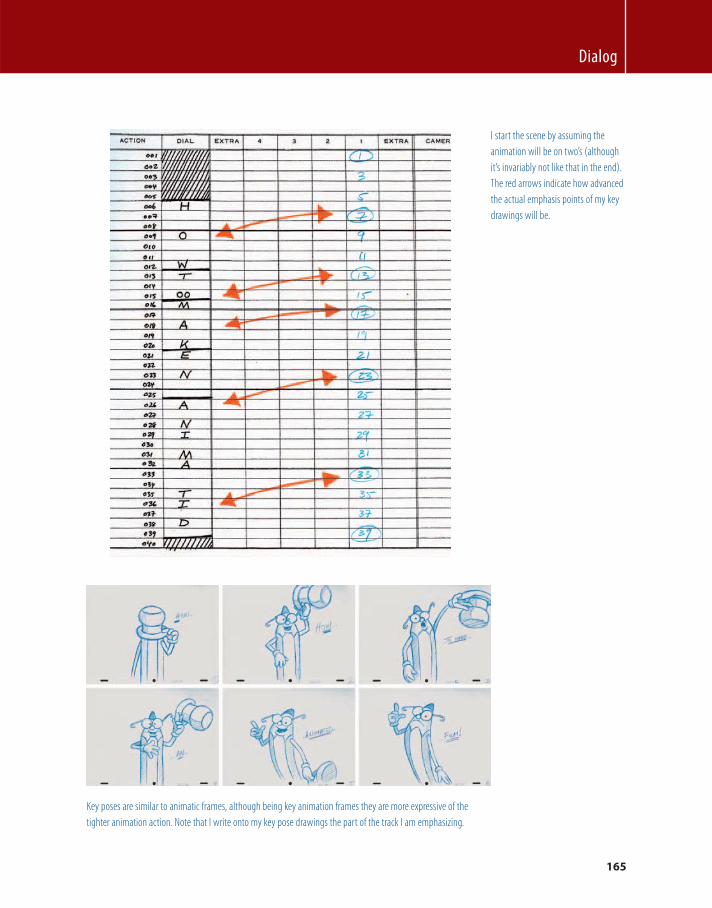
Dialog
165
I start the scene by assuming the
animation will be on two’s (although
it’s invariably not like that in the end).
The red arrows indicate how advanced
the actual emphasis points of my key
drawings will be.
Key poses are similar to animatic frames, although being key animation frames they are more expressive of the
tighter animation action. Note that I write onto my key pose drawings the part of the track I am emphasizing.
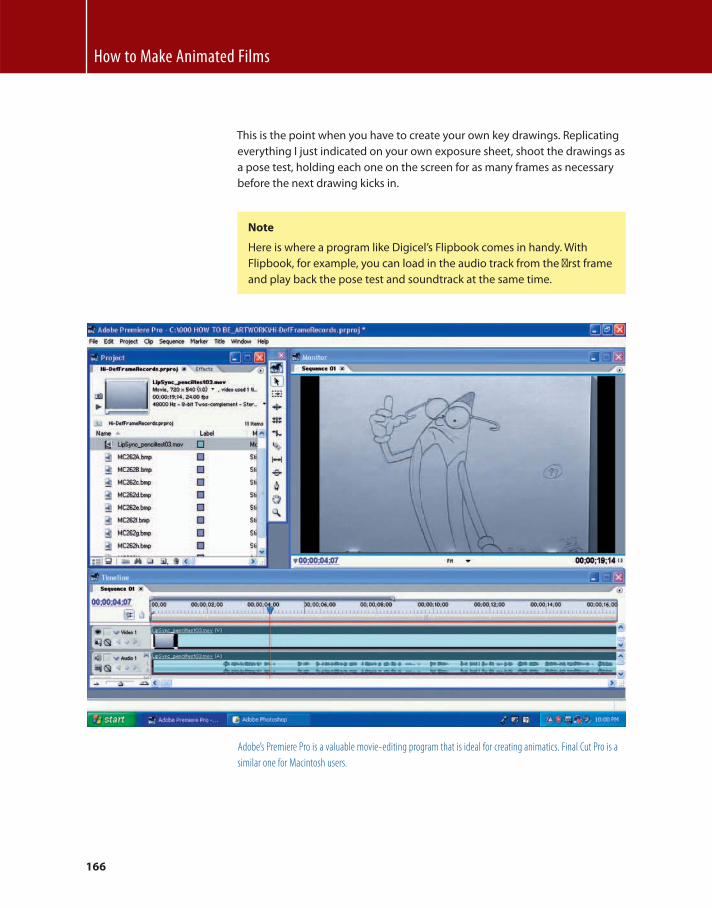
How to Make Animated Films
166
This is the point when you have to create your own key drawings. Replicating
everything I just indicated on your own exposure sheet, shoot the drawings as
a pose test, holding each one on the screen for as many frames as necessary
before the next drawing kicks in.
Note
Here is where a program like Digicel’s Flipbook comes in handy. With
Flipbook, for example, you can load in the audio track from the fi rst frame
and play back the pose test and soundtrack at the same time.
Adobe’s Premiere Pro is a valuable movie-editing program that is ideal for creating animatics. Final Cut Pro is a
similar one for Macintosh users.

Dialog
167
Check if the overall sync of the action and the sounds work together as
anticipated. If not, adjust the timing, or the drawings, then reshoot over and
over again until it moves with the soundtrack as you want it to.
Note that there is a case for positioning a key pose several frames ahead of
the actual sound it is attempting to hit. By anticipating in this way, there is an
added emphasis, because placing the image exactly on the same frame as
where the sound occurs can give the impression that the impact is late. This
is very much true of synching open-mouth positions when working on the lip
sync, but more on that shortly.
Mouth shapes are so expressive of emotion, whether the character is speaking or not!
With all the key pose positions located visually, you should now adapt your
exposure sheet accordingly. In these kinds of situations, the visual editing of
the picture against the audio track is the preferred way of tightening up the
sync between them both. However, when you have done that to your full
satisfaction, go back to the exposure sheet and check where the drawings
have shifted in relation to your original doping of them. Renumber the
drawings to match their new frame numbers if necessary until your exposure
sheet refl ects exactly what your visual editing arrived at.
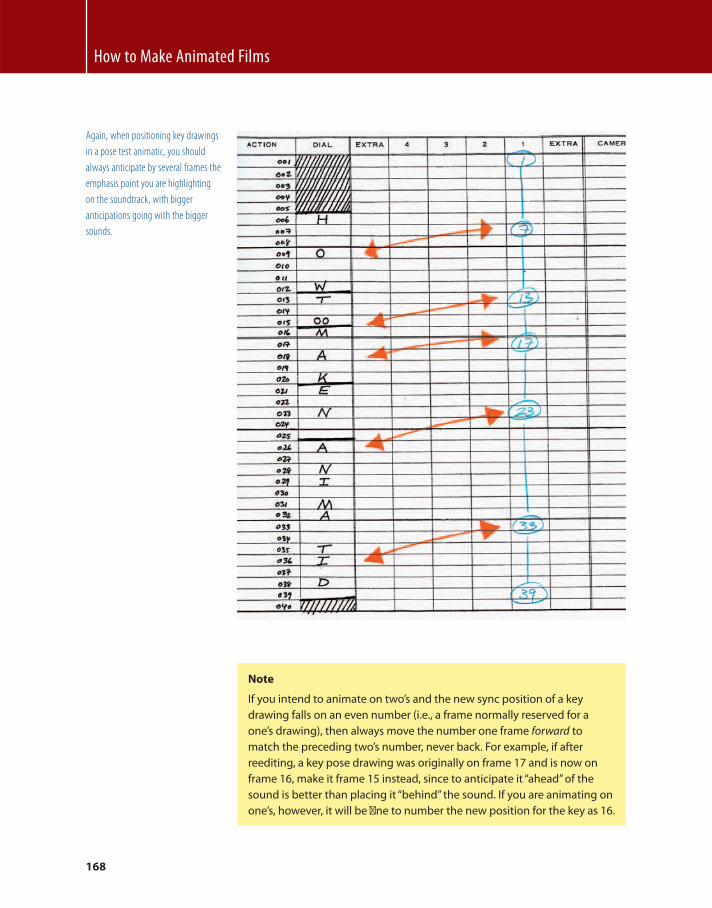
How to Make Animated Films
168
Note
If you intend to animate on two’s and the new sync position of a key
drawing falls on an even number (i.e., a frame normally reserved for a
one’s drawing), then always move the number one frame forward to
match the preceding two’s number, never back. For example, if after
reediting, a key pose drawing was originally on frame 17 and is now on
frame 16, make it frame 15 instead, since to anticipate it “ ahead ” of the
sound is better than placing it “ behind ” the sound. If you are animating on
one’s, however, it will be fi ne to number the new position for the key as 16.
Again, when positioning key drawings
in a pose test animatic, you should
always anticipate by several frames the
emphasis point you are highlighting
on the soundtrack, with bigger
anticipations going with the bigger
sounds.
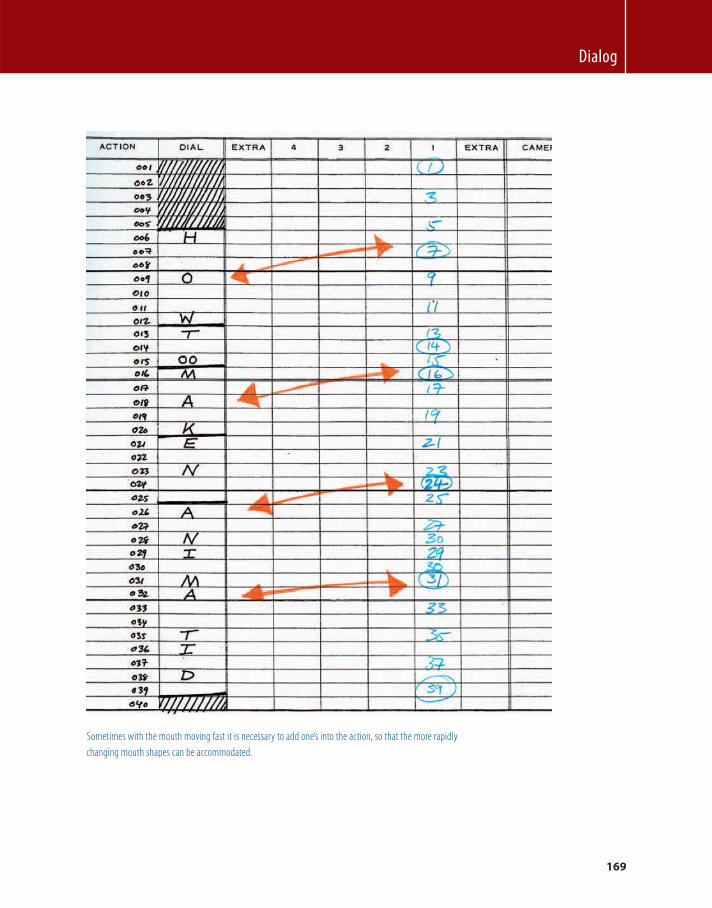
Dialog
169
Sometimes with the mouth moving fast it is necessary to add one’s into the action, so that the more rapidly
changing mouth shapes can be accommodated.
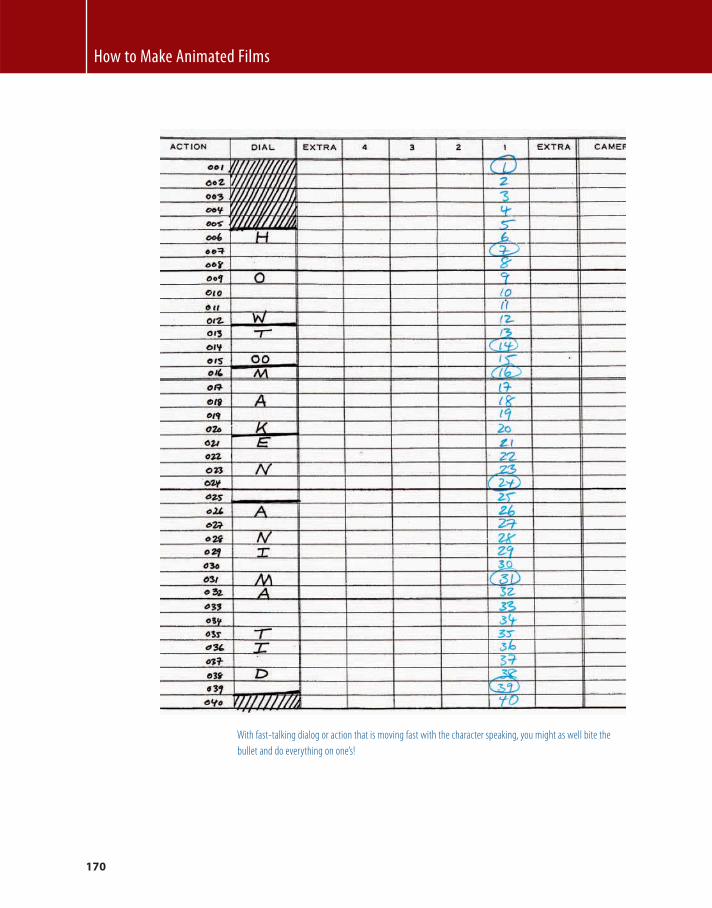
How to Make Animated Films
170
With fast-talking dialog or action that is moving fast with the character speaking, you might as well bite the
bullet and do everything on one’s!
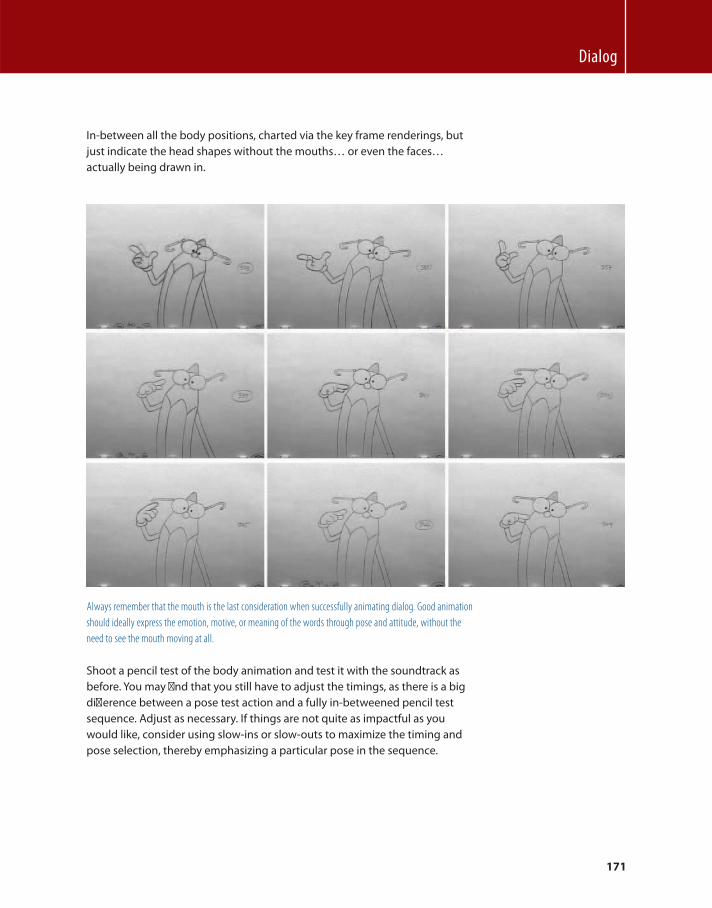
Dialog
171
In-between all the body positions, charted via the key frame renderings, but
just indicate the head shapes without the mouths… or even the faces…
actually being drawn in.
Always remember that the mouth is the last consideration when successfully animating dialog. Good animation
should ideally express the emotion, motive, or meaning of the words through pose and attitude, without the
need to see the mouth moving at all.
Shoot a pencil test of the body animation and test it with the soundtrack as
before. You may fi nd that you still have to adjust the timings, as there is a big
diff erence between a pose test action and a fully in-betweened pencil test
sequence. Adjust as necessary. If things are not quite as impactful as you
would like, consider using slow-ins or slow-outs to maximize the timing and
pose selection, thereby emphasizing a particular pose in the sequence.
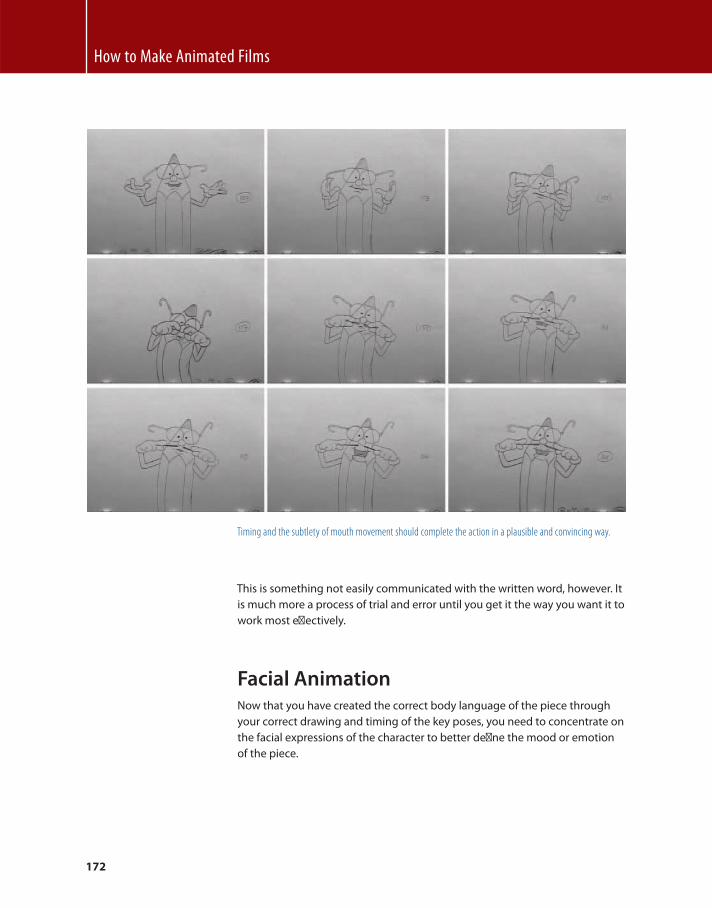
How to Make Animated Films
172
Timing and the subtlety of mouth movement should complete the action in a plausible and convincing way.
This is something not easily communicated with the written word, however. It
is much more a process of trial and error until you get it the way you want it to
work most eff ectively.
Facial Animation Now that you have created the correct body language of the piece through
your correct drawing and timing of the key poses, you need to concentrate on
the facial expressions of the character to better defi ne the mood or emotion
of the piece.
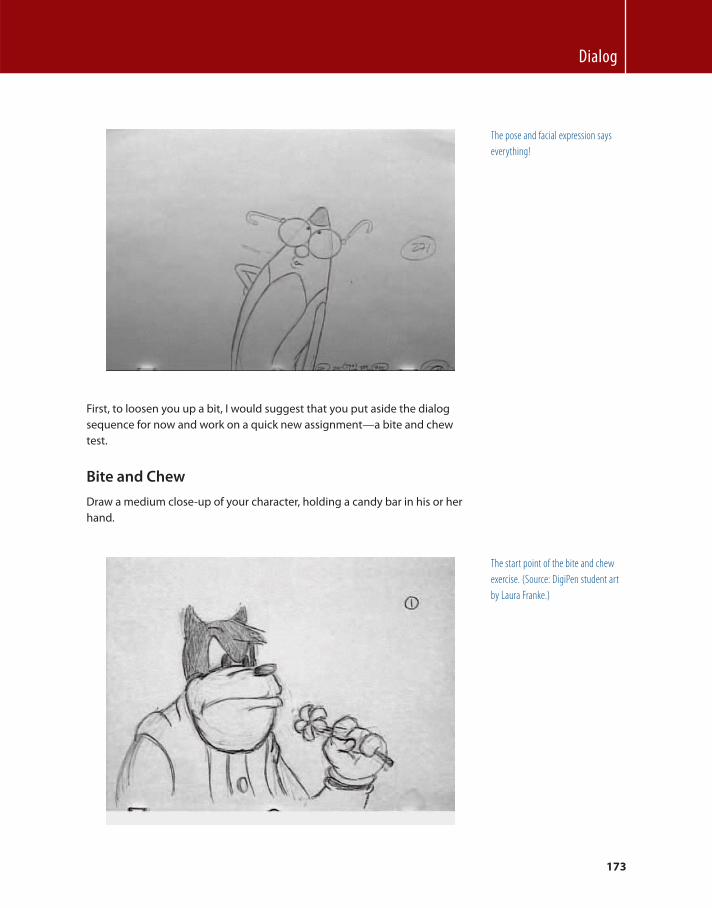
Dialog
173
The pose and facial expression says
everything!
First, to loosen you up a bit, I would suggest that you put aside the dialog
sequence for now and work on a quick new assignment — a bite and chew
test.
Bite and Chew
Draw a medium close-up of your character, holding a candy bar in his or her
hand.
The start point of the bite and chew
exercise. (Source: DigiPen student art
by Laura Franke.)
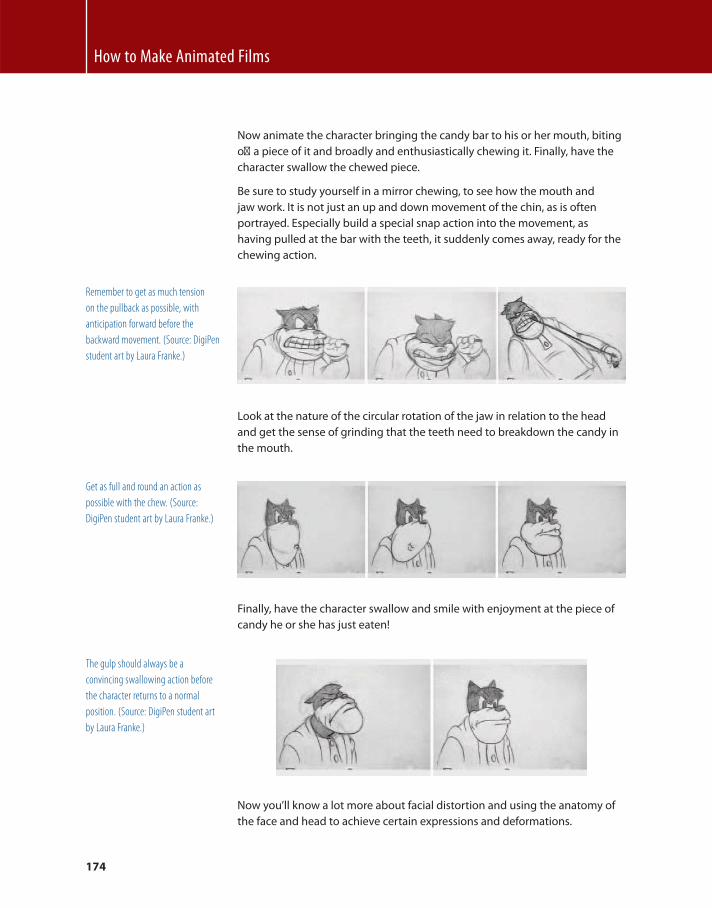
How to Make Animated Films
174
Now animate the character bringing the candy bar to his or her mouth, biting
off a piece of it and broadly and enthusiastically chewing it. Finally, have the
character swallow the chewed piece.
Be sure to study yourself in a mirror chewing, to see how the mouth and
jaw work. It is not just an up and down movement of the chin, as is often
portrayed. Especially build a special snap action into the movement, as
having pulled at the bar with the teeth, it suddenly comes away, ready for the
chewing action.
Look at the nature of the circular rotation of the jaw in relation to the head
and get the sense of grinding that the teeth need to breakdown the candy in
the mouth.
Finally, have the character swallow and smile with enjoyment at the piece of
candy he or she has just eaten!
Remember to get as much tension
on the pullback as possible, with
anticipation forward before the
backward movement. (Source: DigiPen
student art by Laura Franke.)
Get as full and round an action as
possible with the chew. (Source:
DigiPen student art by Laura Franke.)
The gulp should always be a
convincing swallowing action before
the character returns to a normal
position. (Source: DigiPen student art
by Laura Franke.)
Now you’ll know a lot more about facial distortion and using the anatomy of
the face and head to achieve certain expressions and deformations.
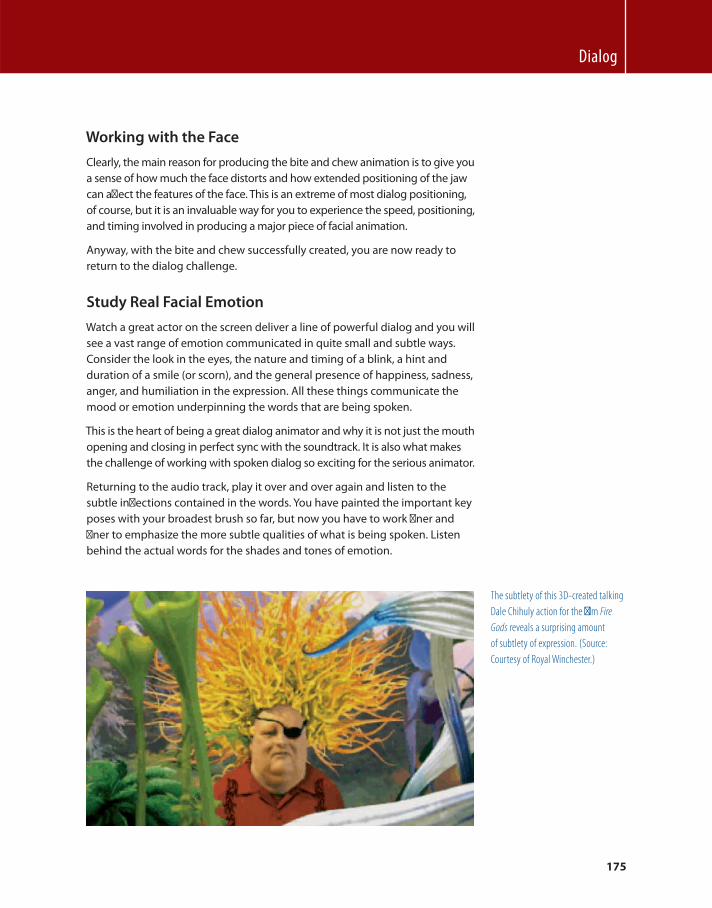
Dialog
175
Working with the Face
Clearly, the main reason for producing the bite and chew animation is to give you
a sense of how much the face distorts and how extended positioning of the jaw
can aff ect the features of the face. This is an extreme of most dialog positioning,
of course, but it is an invaluable way for you to experience the speed, positioning,
and timing involved in producing a major piece of facial animation.
Anyway, with the bite and chew successfully created, you are now ready to
return to the dialog challenge.
Study Real Facial Emotion
Watch a great actor on the screen deliver a line of powerful dialog and you will
see a vast range of emotion communicated in quite small and subtle ways.
Consider the look in the eyes, the nature and timing of a blink, a hint and
duration of a smile (or scorn), and the general presence of happiness, sadness,
anger, and humiliation in the expression. All these things communicate the
mood or emotion underpinning the words that are being spoken.
This is the heart of being a great dialog animator and why it is not just the mouth
opening and closing in perfect sync with the soundtrack. It is also what makes
the challenge of working with spoken dialog so exciting for the serious animator.
Returning to the audio track, play it over and over again and listen to the
subtle infl ections contained in the words. You have painted the important key
poses with your broadest brush so far, but now you have to work fi ner and
fi ner to emphasize the more subtle qualities of what is being spoken. Listen
behind the actual words for the shades and tones of emotion.
The subtlety of this 3D-created talking
Dale Chihuly action for the fi lm Fire Gods reveals a surprising amount
of subtlety of expression. (Source:
Courtesy of Royal Winchester.)
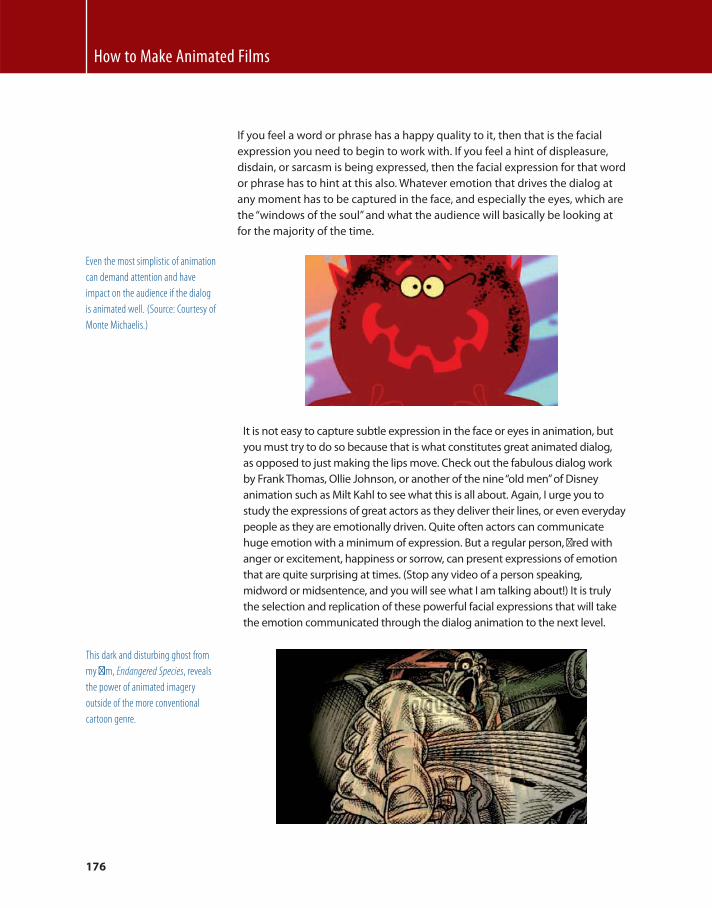
How to Make Animated Films
176
If you feel a word or phrase has a happy quality to it, then that is the facial
expression you need to begin to work with. If you feel a hint of displeasure,
disdain, or sarcasm is being expressed, then the facial expression for that word
or phrase has to hint at this also. Whatever emotion that drives the dialog at
any moment has to be captured in the face, and especially the eyes, which are
the “ windows of the soul ” and what the audience will basically be looking at
for the majority of the time.
It is not easy to capture subtle expression in the face or eyes in animation, but
you must try to do so because that is what constitutes great animated dialog,
as opposed to just making the lips move. Check out the fabulous dialog work
by Frank Thomas, Ollie Johnson, or another of the nine “ old men ” of Disney
animation such as Milt Kahl to see what this is all about. Again, I urge you to
study the expressions of great actors as they deliver their lines, or even everyday
people as they are emotionally driven. Quite often actors can communicate
huge emotion with a minimum of expression. But a regular person, fi red with
anger or excitement, happiness or sorrow, can present expressions of emotion
that are quite surprising at times. (Stop any video of a person speaking,
midword or midsentence, and you will see what I am talking about!) It is truly
the selection and replication of these powerful facial expressions that will take
the emotion communicated through the dialog animation to the next level.
Even the most simplistic of animation
can demand attention and have
impact on the audience if the dialog
is animated well. (Source: Courtesy of
Monte Michaelis.)
This dark and disturbing ghost from
my fi lm, Endangered Species , reveals
the power of animated imagery
outside of the more conventional
cartoon genre.
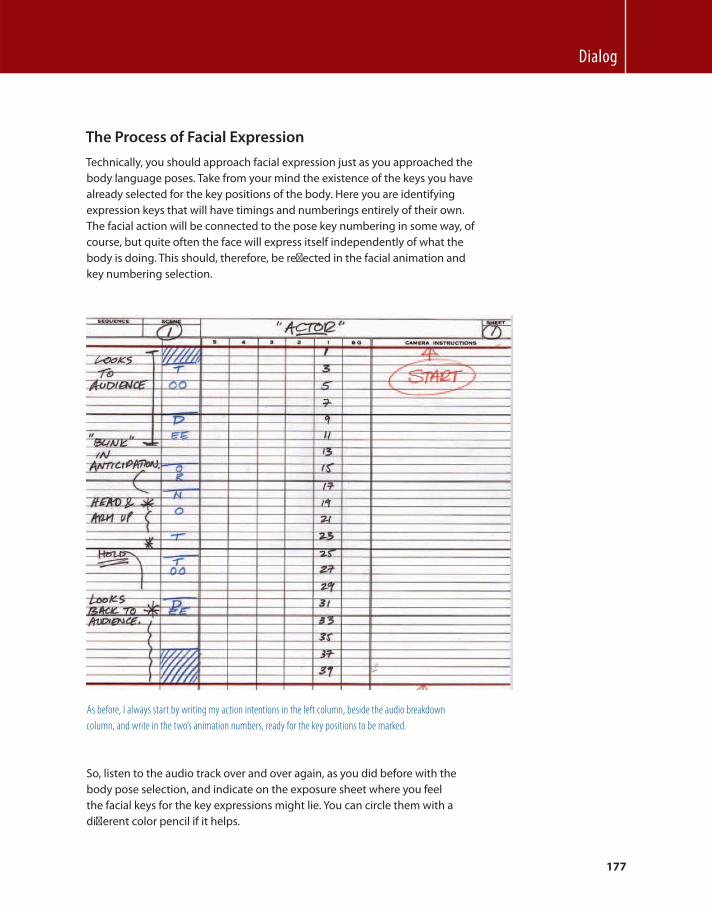
Dialog
177
The Process of Facial Expression
Technically, you should approach facial expression just as you approached the
body language poses. Take from your mind the existence of the keys you have
already selected for the key positions of the body. Here you are identifying
expression keys that will have timings and numberings entirely of their own.
The facial action will be connected to the pose key numbering in some way, of
course, but quite often the face will express itself independently of what the
body is doing. This should, therefore, be refl ected in the facial animation and
key numbering selection.
As before, I always start by writing my action intentions in the left column, beside the audio breakdown
column, and write in the two’s animation numbers, ready for the key positions to be marked.
So, listen to the audio track over and over again, as you did before with the
body pose selection, and indicate on the exposure sheet where you feel
the facial keys for the key expressions might lie. You can circle them with a
diff erent color pencil if it helps.
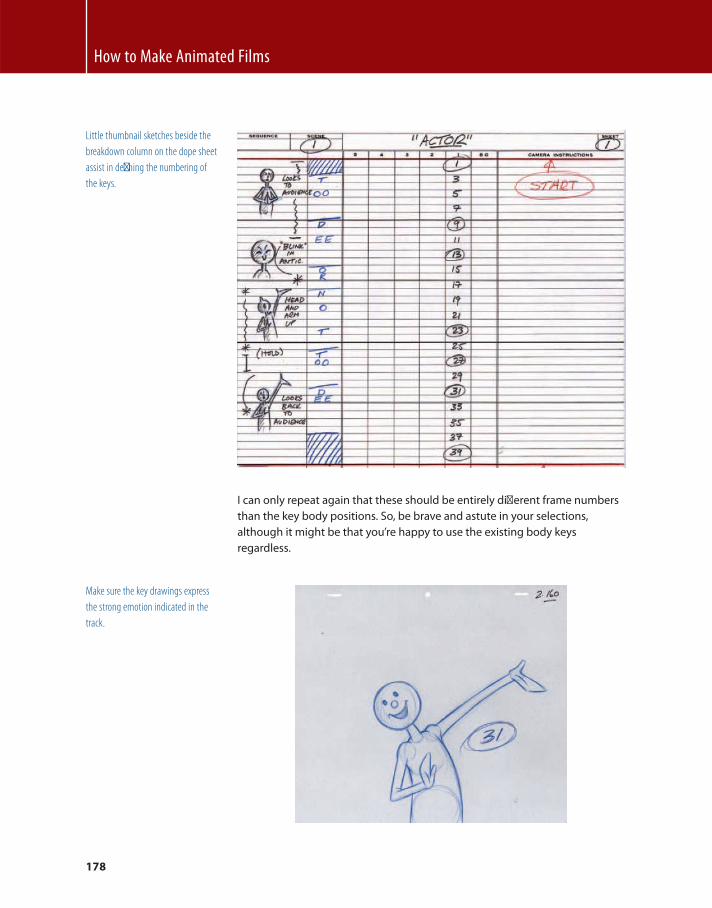
How to Make Animated Films
178
I can only repeat again that these should be entirely diff erent frame numbers
than the key body positions. So, be brave and astute in your selections,
although it might be that you’re happy to use the existing body keys
regardless.
Little thumbnail sketches beside the
breakdown column on the dope sheet
assist in defi ning the numbering of
the keys.
Make sure the key drawings express
the strong emotion indicated in the
track.
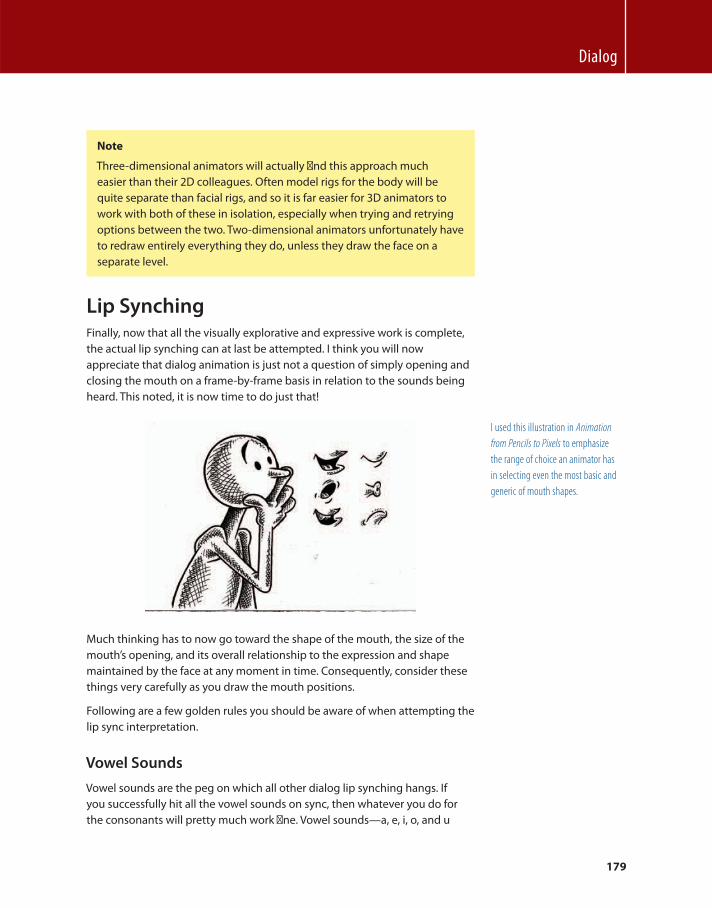
Dialog
179
Note
Three-dimensional animators will actually fi nd this approach much
easier than their 2D colleagues. Often model rigs for the body will be
quite separate than facial rigs, and so it is far easier for 3D animators to
work with both of these in isolation, especially when trying and retrying
options between the two. Two-dimensional animators unfortunately have
to redraw entirely everything they do, unless they draw the face on a
separate level.
Lip Synching Finally, now that all the visually explorative and expressive work is complete,
the actual lip synching can at last be attempted. I think you will now
appreciate that dialog animation is just not a question of simply opening and
closing the mouth on a frame-by-frame basis in relation to the sounds being
heard. This noted, it is now time to do just that!
I used this illustration in Animation from Pencils to Pixels to emphasize
the range of choice an animator has
in selecting even the most basic and
generic of mouth shapes.
Much thinking has to now go toward the shape of the mouth, the size of the
mouth’s opening, and its overall relationship to the expression and shape
maintained by the face at any moment in time. Consequently, consider these
things very carefully as you draw the mouth positions.
Following are a few golden rules you should be aware of when attempting the
lip sync interpretation.
Vowel Sounds
Vowel sounds are the peg on which all other dialog lip synching hangs. If
you successfully hit all the vowel sounds on sync, then whatever you do for
the consonants will pretty much work fi ne. Vowel sounds — a, e, i, o, and u
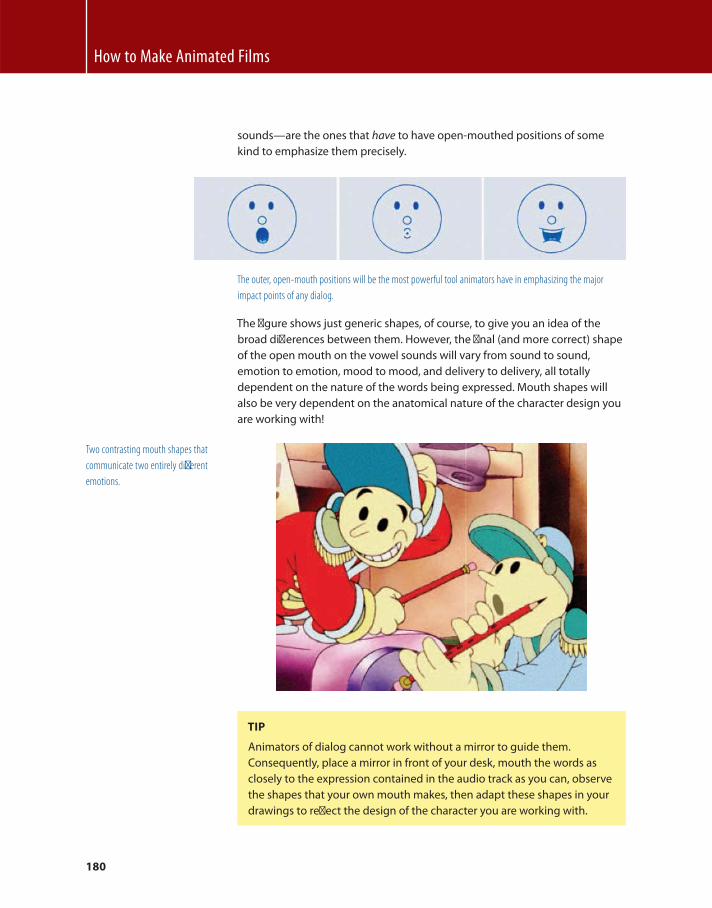
How to Make Animated Films
180
sounds — are the ones that have to have open-mouthed positions of some
kind to emphasize them precisely.
The outer, open-mouth positions will be the most powerful tool animators have in emphasizing the major
impact points of any dialog.
The fi gure shows just generic shapes, of course, to give you an idea of the
broad diff erences between them. However, the fi nal (and more correct) shape
of the open mouth on the vowel sounds will vary from sound to sound,
emotion to emotion, mood to mood, and delivery to delivery, all totally
dependent on the nature of the words being expressed. Mouth shapes will
also be very dependent on the anatomical nature of the character design you
are working with!
Two contrasting mouth shapes that
communicate two entirely diff erent
emotions.
TIP
Animators of dialog cannot work without a mirror to guide them.
Consequently, place a mirror in front of your desk, mouth the words as
closely to the expression contained in the audio track as you can, observe
the shapes that your own mouth makes, then adapt these shapes in your
drawings to refl ect the design of the character you are working with.
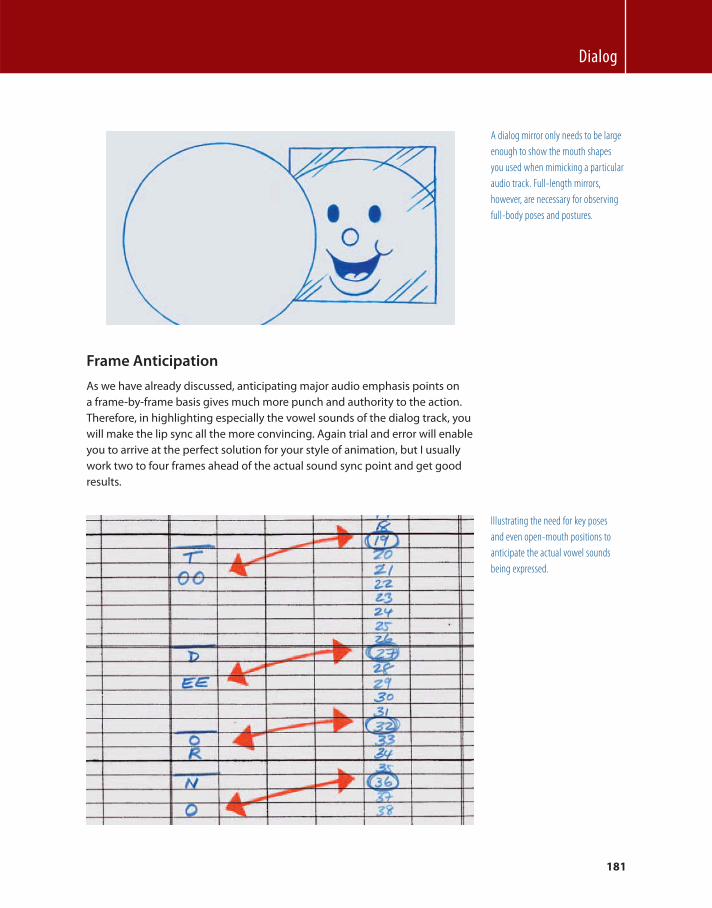
Dialog
181
A dialog mirror only needs to be large
enough to show the mouth shapes
you used when mimicking a particular
audio track. Full-length mirrors,
however, are necessary for observing
full-body poses and postures.
Frame Anticipation
As we have already discussed, anticipating major audio emphasis points on
a frame-by-frame basis gives much more punch and authority to the action.
Therefore, in highlighting especially the vowel sounds of the dialog track, you
will make the lip sync all the more convincing. Again trial and error will enable
you to arrive at the perfect solution for your style of animation, but I usually
work two to four frames ahead of the actual sound sync point and get good
results.
Illustrating the need for key poses
and even open-mouth positions to
anticipate the actual vowel sounds
being expressed.
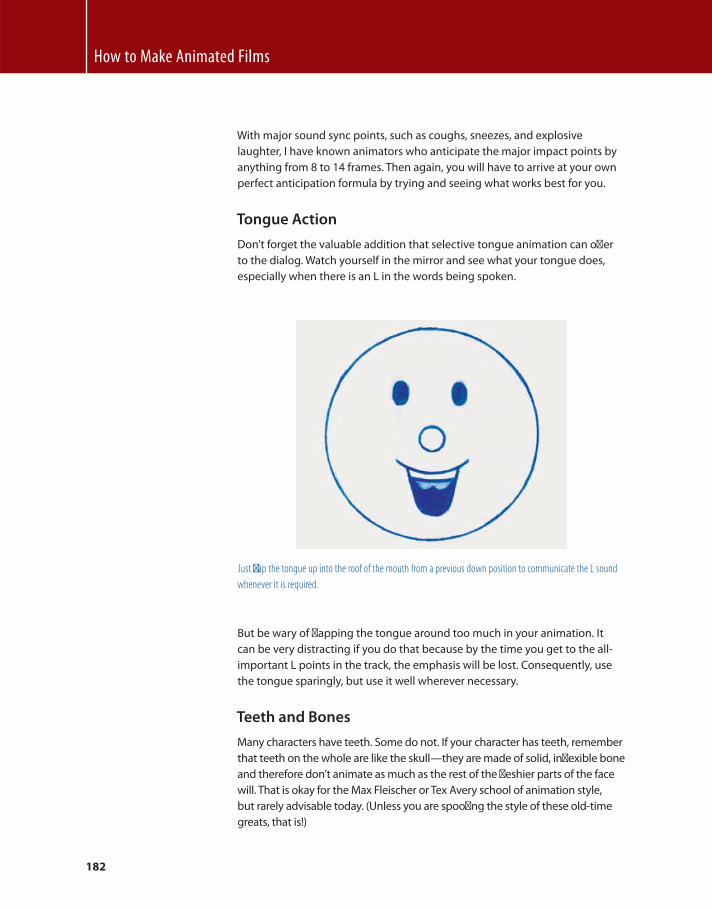
How to Make Animated Films
182
With major sound sync points, such as coughs, sneezes, and explosive
laughter, I have known animators who anticipate the major impact points by
anything from 8 to 14 frames. Then again, you will have to arrive at your own
perfect anticipation formula by trying and seeing what works best for you.
Tongue Action
Don’t forget the valuable addition that selective tongue animation can off er
to the dialog. Watch yourself in the mirror and see what your tongue does,
especially when there is an L in the words being spoken.
Just fl ap the tongue up into the roof of the mouth from a previous down position to communicate the L sound
whenever it is required.
But be wary of fl apping the tongue around too much in your animation. It
can be very distracting if you do that because by the time you get to the all-
important L points in the track, the emphasis will be lost. Consequently, use
the tongue sparingly, but use it well wherever necessary.
Teeth and Bones
Many characters have teeth. Some do not. If your character has teeth, remember
that teeth on the whole are like the skull — they are made of solid, infl exible bone
and therefore don’t animate as much as the rest of the fl eshier parts of the face
will. That is okay for the Max Fleischer or Tex Avery school of animation style,
but rarely advisable today. (Unless you are spoofi ng the style of these old-time
greats, that is!)
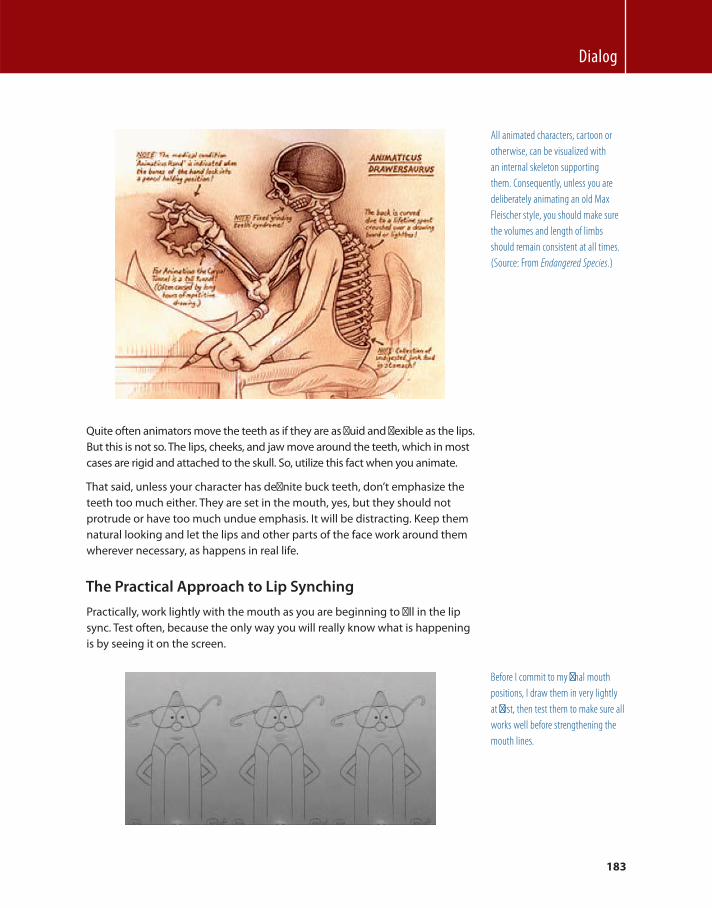
Dialog
183
Quite often animators move the teeth as if they are as fl uid and fl exible as the lips.
But this is not so. The lips, cheeks, and jaw move around the teeth, which in most
cases are rigid and attached to the skull. So, utilize this fact when you animate.
That said, unless your character has defi nite buck teeth, don’t emphasize the
teeth too much either. They are set in the mouth, yes, but they should not
protrude or have too much undue emphasis. It will be distracting. Keep them
natural looking and let the lips and other parts of the face work around them
wherever necessary, as happens in real life.
The Practical Approach to Lip Synching
Practically, work lightly with the mouth as you are beginning to fi ll in the lip
sync. Test often, because the only way you will really know what is happening
is by seeing it on the screen.
All animated characters, cartoon or
otherwise, can be visualized with
an internal skeleton supporting
them. Consequently, unless you are
deliberately animating an old Max
Fleischer style, you should make sure
the volumes and length of limbs
should remain consistent at all times.
(Source: From Endangered Species .)
Before I commit to my fi nal mouth
positions, I draw them in very lightly
at fi rst, then test them to make sure all
works well before strengthening the
mouth lines.

How to Make Animated Films
184
Some animators are natural dialog people. Others are not. Some fi nd it quite
natural to hit the right blend of movement and expression from the get-go.
Others (like myself ) have to work really hard to get it right! So don’t settle for
your fi rst eff ort and think it is fi ne. There can always be improvements. As I say,
it is not just about opening and closing the mouth in perfect synchronization
with the audio track, although much animation today usually doesn’t demand
much more than that .
Using your own imported mouth sets, in addition to the moving preview window (on the right) in the Magpie
Pro, actually enables you to test the lip-sync timing before even drawing it!
The secret to being a great animator is practice, practice, practice. The more
you try (and maybe even fail) the more you will begin to learn the subtleties
that work for you and separate you from the herd. Dialog is a very subtle art in
many ways and so it does take a lot of eff ort to pull it off if you’re not naturally
inclined to it in the fi rst place. But try, and keep trying. We all do get there in
the end, no matter how long it may take!
Two-Character Dialog Not much is ever written about two-character (or more) dialog. So we will
briefl y touch on it. Just as with single-character dialog, two-character dialog
is not just opposing characters looking at each other and opening or closing
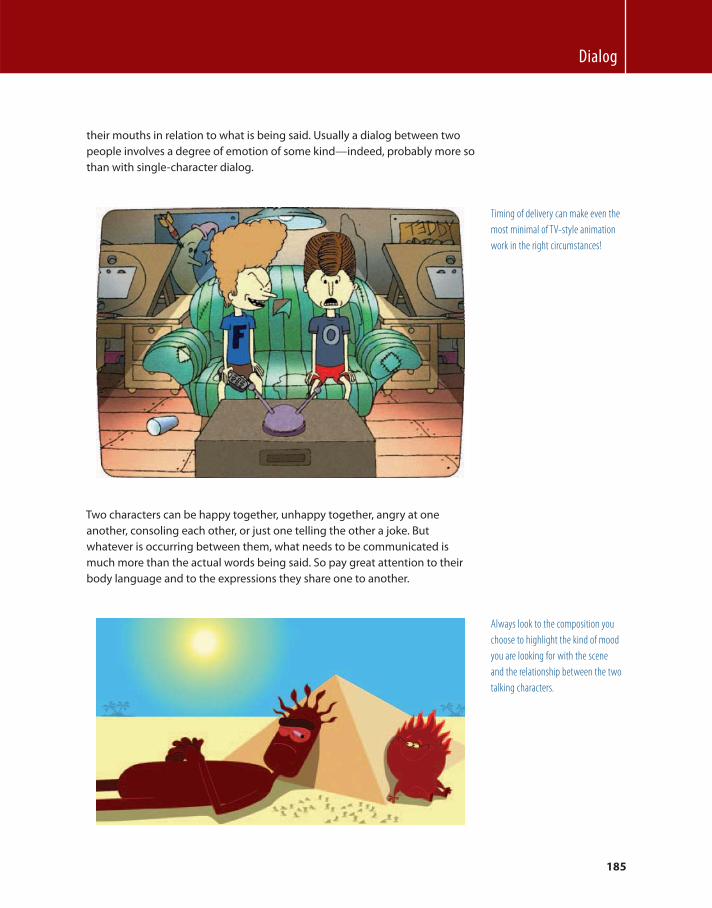
Dialog
185
their mouths in relation to what is being said. Usually a dialog between two
people involves a degree of emotion of some kind — indeed, probably more so
than with single-character dialog.
Two characters can be happy together, unhappy together, angry at one
another, consoling each other, or just one telling the other a joke. But
whatever is occurring between them, what needs to be communicated is
much more than the actual words being said. So pay great attention to their
body language and to the expressions they share one to another.
Timing of delivery can make even the
most minimal of TV-style animation
work in the right circumstances!
Always look to the composition you
choose to highlight the kind of mood
you are looking for with the scene
and the relationship between the two
talking characters.
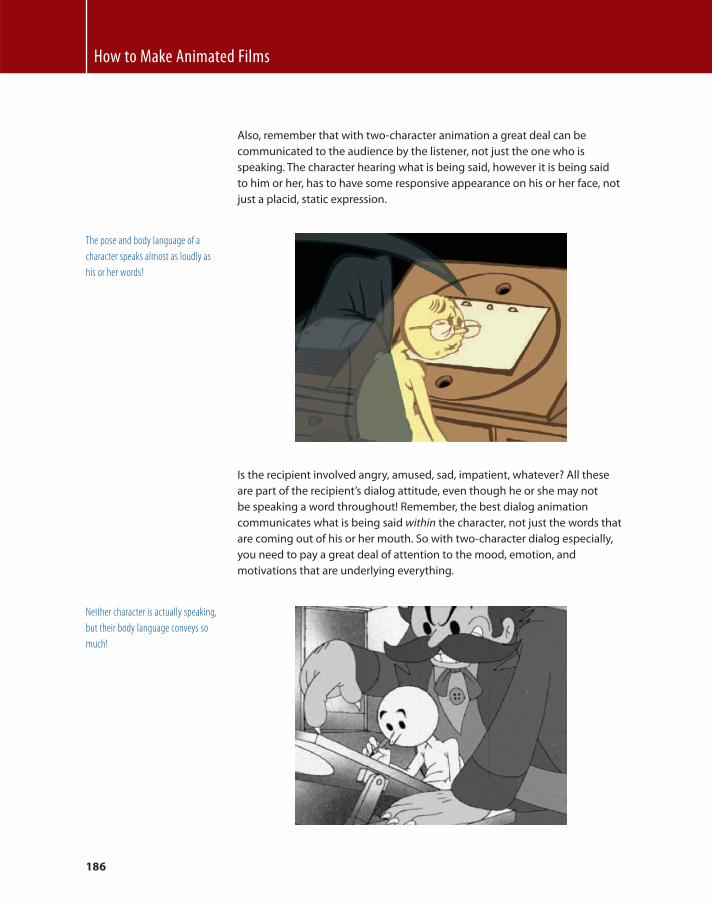
How to Make Animated Films
186
Also, remember that with two-character animation a great deal can be
communicated to the audience by the listener, not just the one who is
speaking. The character hearing what is being said, however it is being said
to him or her, has to have some responsive appearance on his or her face, not
just a placid, static expression.
Is the recipient involved angry, amused, sad, impatient, whatever? All these
are part of the recipient’s dialog attitude, even though he or she may not
be speaking a word throughout! Remember, the best dialog animation
communicates what is being said within the character, not just the words that
are coming out of his or her mouth. So with two-character dialog especially,
you need to pay a great deal of attention to the mood, emotion, and
motivations that are underlying everything.
The pose and body language of a
character speaks almost as loudly as
his or her words!
Neither character is actually speaking,
but their body language conveys so
much!
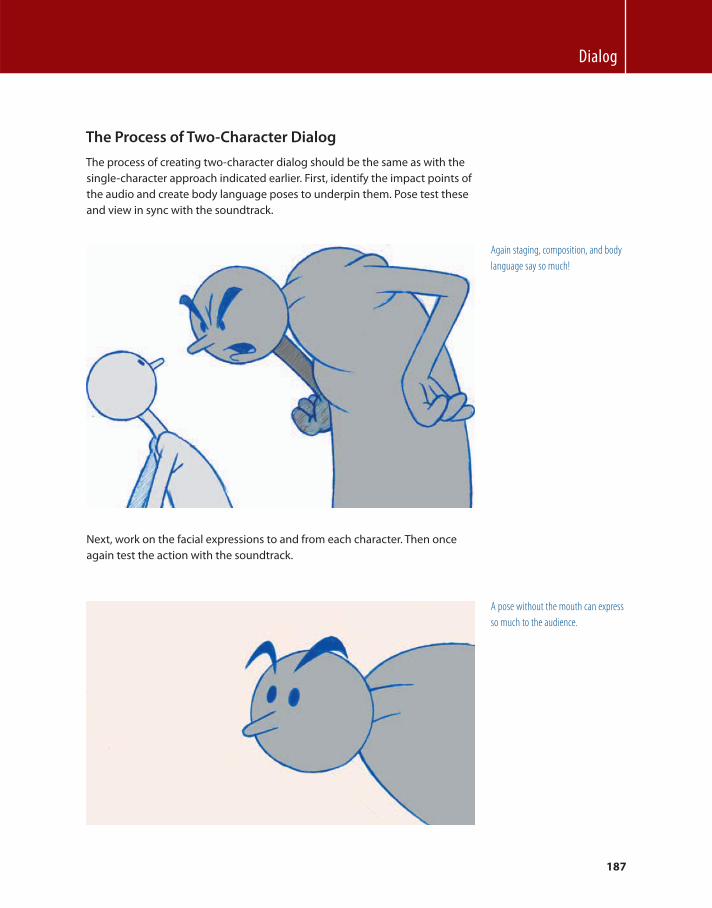
Dialog
187
The Process of Two-Character Dialog
The process of creating two-character dialog should be the same as with the
single-character approach indicated earlier. First, identify the impact points of
the audio and create body language poses to underpin them. Pose test these
and view in sync with the soundtrack.
Again staging, composition, and body
language say so much!
Next, work on the facial expressions to and from each character. Then once
again test the action with the soundtrack.
A pose without the mouth can express
so much to the audience.
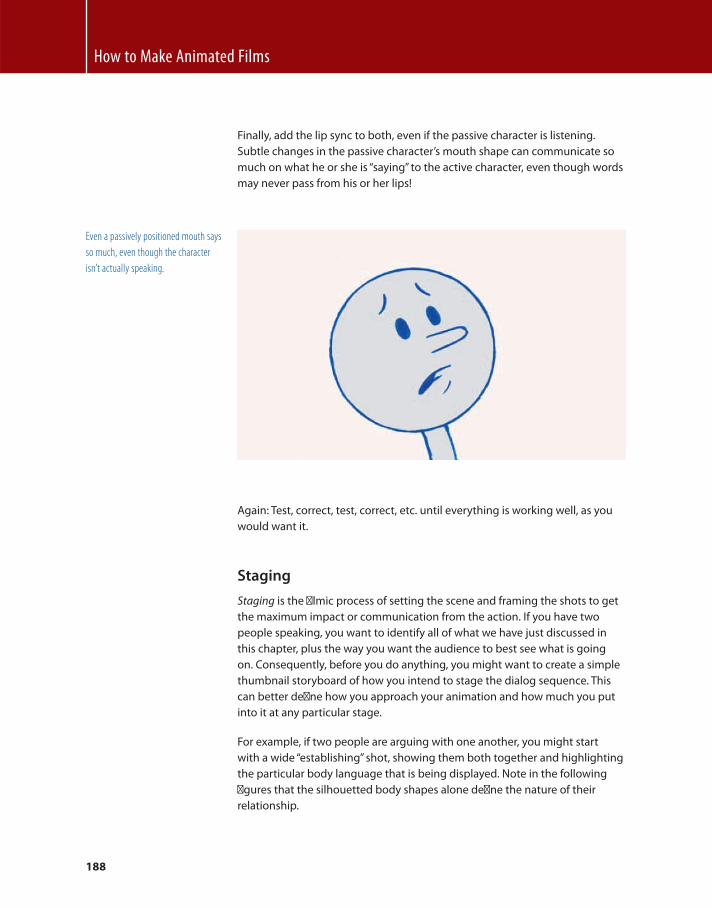
How to Make Animated Films
188
Finally, add the lip sync to both, even if the passive character is listening.
Subtle changes in the passive character’s mouth shape can communicate so
much on what he or she is “ saying ” to the active character, even though words
may never pass from his or her lips!
Even a passively positioned mouth says
so much, even though the character
isn’t actually speaking.
Again: Test, correct, test, correct, etc. until everything is working well, as you
would want it.
Staging
Staging is the fi lmic process of setting the scene and framing the shots to get
the maximum impact or communication from the action. If you have two
people speaking, you want to identify all of what we have just discussed in
this chapter, plus the way you want the audience to best see what is going
on. Consequently, before you do anything, you might want to create a simple
thumbnail storyboard of how you intend to stage the dialog sequence. This
can better defi ne how you approach your animation and how much you put
into it at any particular stage.
For example, if two people are arguing with one another, you might start
with a wide “ establishing ” shot, showing them both together and highlighting
the particular body language that is being displayed. Note in the following
fi gures that the silhouetted body shapes alone defi ne the nature of their
relationship.
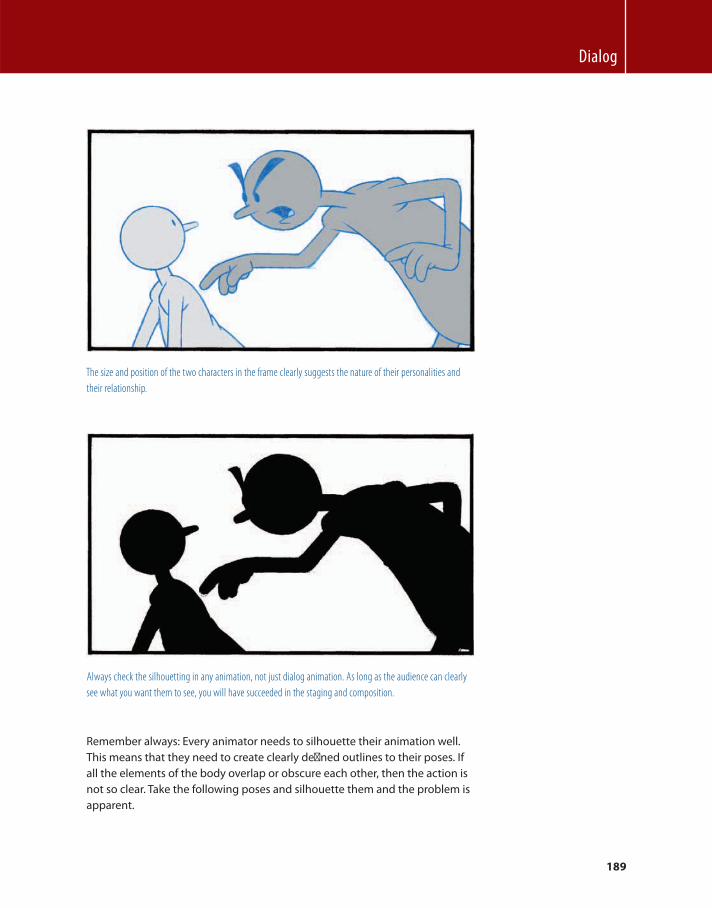
Dialog
189
The size and position of the two characters in the frame clearly suggests the nature of their personalities and
their relationship.
Always check the silhouetting in any animation, not just dialog animation. As long as the audience can clearly
see what you want them to see, you will have succeeded in the staging and composition.
Remember always: Every animator needs to silhouette their animation well.
This means that they need to create clearly defi ned outlines to their poses. If
all the elements of the body overlap or obscure each other, then the action is
not so clear. Take the following poses and silhouette them and the problem is
apparent.
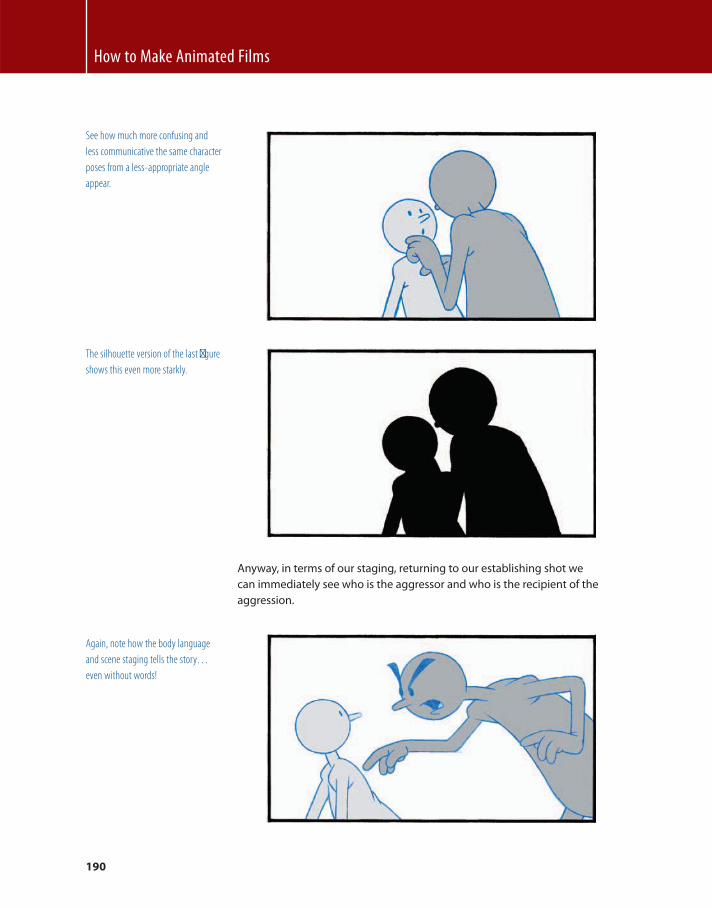
How to Make Animated Films
190
See how much more confusing and
less communicative the same character
poses from a less-appropriate angle
appear.
The silhouette version of the last fi gure
shows this even more starkly.
Anyway, in terms of our staging, returning to our establishing shot we
can immediately see who is the aggressor and who is the recipient of the
aggression.
Again, note how the body language
and scene staging tells the story…
even without words!
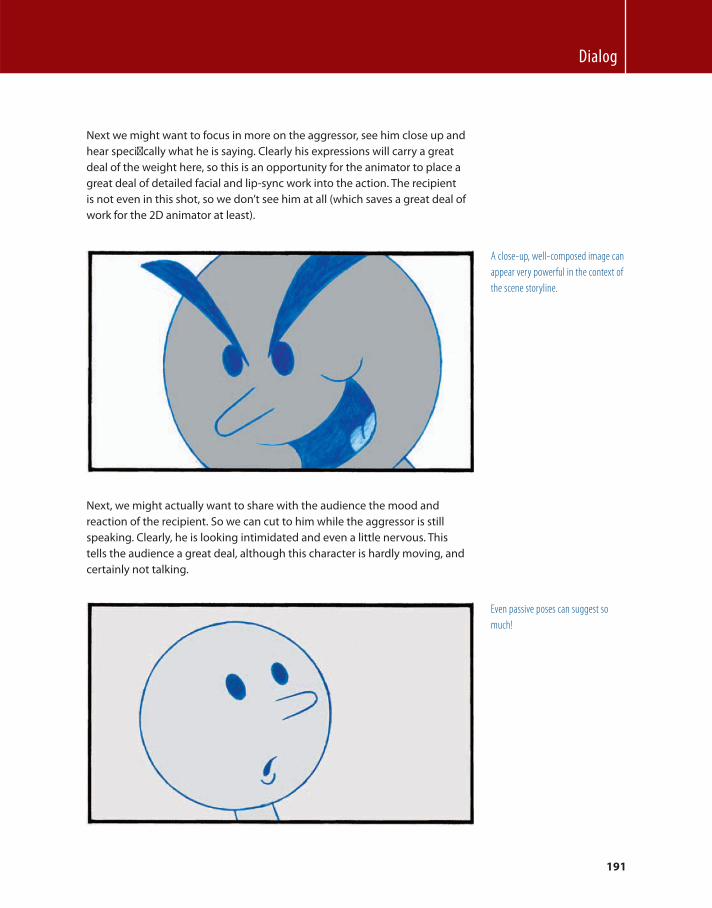
Dialog
191
Next we might want to focus in more on the aggressor, see him close up and
hear specifi cally what he is saying. Clearly his expressions will carry a great
deal of the weight here, so this is an opportunity for the animator to place a
great deal of detailed facial and lip-sync work into the action. The recipient
is not even in this shot, so we don’t see him at all (which saves a great deal of
work for the 2D animator at least).
A close-up, well-composed image can
appear very powerful in the context of
the scene storyline.
Next, we might actually want to share with the audience the mood and
reaction of the recipient. So we can cut to him while the aggressor is still
speaking. Clearly, he is looking intimidated and even a little nervous. This
tells the audience a great deal, although this character is hardly moving, and
certainly not talking.
Even passive poses can suggest so
much!
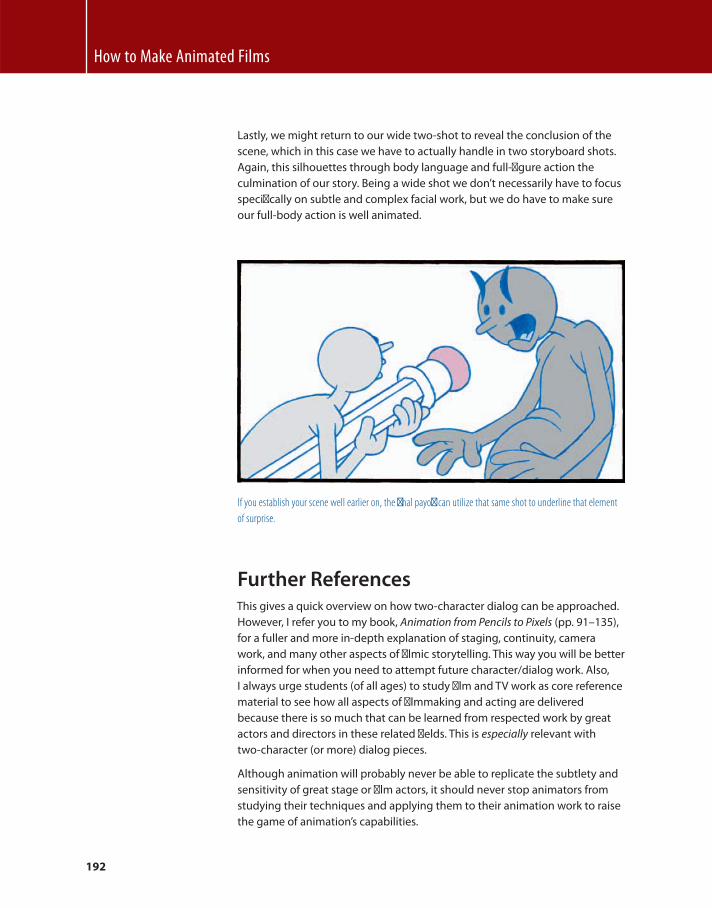
How to Make Animated Films
192
Lastly, we might return to our wide two-shot to reveal the conclusion of the
scene, which in this case we have to actually handle in two storyboard shots.
Again, this silhouettes through body language and full-fi gure action the
culmination of our story. Being a wide shot we don’t necessarily have to focus
specifi cally on subtle and complex facial work, but we do have to make sure
our full-body action is well animated.
If you establish your scene well earlier on, the fi nal payoff can utilize that same shot to underline that element
of surprise.
Further References This gives a quick overview on how two-character dialog can be approached.
However, I refer you to my book, Animation from Pencils to Pixels (pp. 91 – 135) ,
for a fuller and more in-depth explanation of staging, continuity, camera
work, and many other aspects of fi lmic storytelling. This way you will be better
informed for when you need to attempt future character/dialog work. Also,
I always urge students (of all ages) to study fi lm and TV work as core reference
material to see how all aspects of fi lmmaking and acting are delivered
because there is so much that can be learned from respected work by great
actors and directors in these related fi elds. This is especially relevant with
two-character (or more) dialog pieces.
Although animation will probably never be able to replicate the subtlety and
sensitivity of great stage or fi lm actors, it should never stop animators from
studying their techniques and applying them to their animation work to raise
the game of animation’s capabilities.
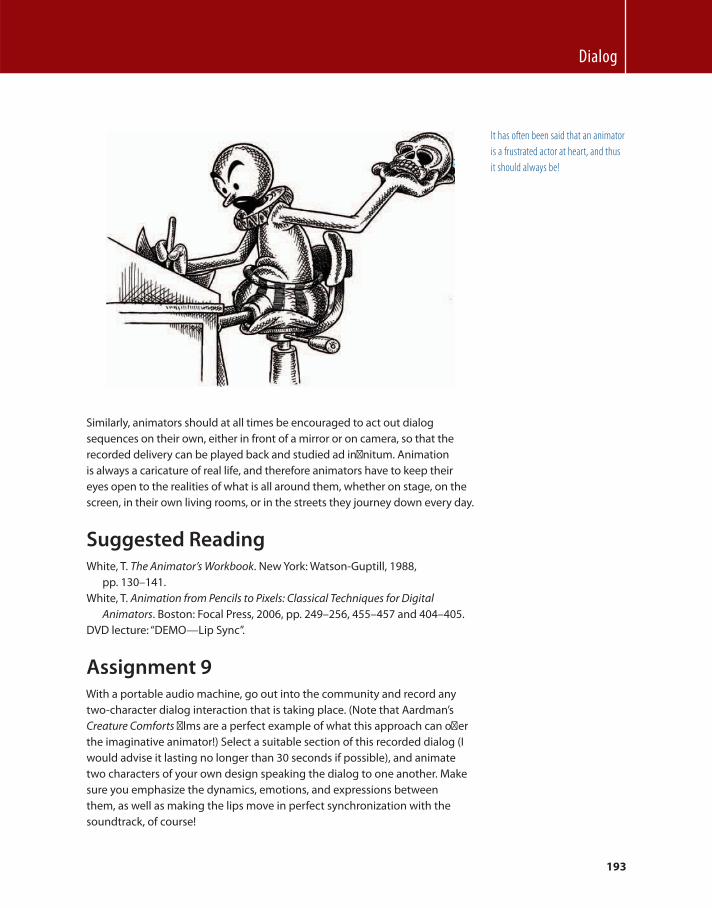
Dialog
193
It has often been said that an animator
is a frustrated actor at heart, and thus
it should always be!
Similarly, animators should at all times be encouraged to act out dialog
sequences on their own, either in front of a mirror or on camera, so that the
recorded delivery can be played back and studied ad infi nitum. Animation
is always a caricature of real life, and therefore animators have to keep their
eyes open to the realities of what is all around them, whether on stage, on the
screen, in their own living rooms, or in the streets they journey down every day.
Suggested Reading White , T. The Animator’s Workbook . New York : Watson-Guptill , 1988 ,
pp. 130 – 141.
White , T. Animation from Pencils to Pixels: Classical Techniques for Digital
Animators . Boston : Focal Press , 2006 , pp. 249 – 256, 455 – 457 and 404 – 405.
DVD lecture: “DEMO — Lip Sync”.
Assignment 9 With a portable audio machine, go out into the community and record any
two-character dialog interaction that is taking place. (Note that Aardman’s
Creature Comforts fi lms are a perfect example of what this approach can off er
the imaginative animator!) Select a suitable section of this recorded dialog (I
would advise it lasting no longer than 30 seconds if possible), and animate
two characters of your own design speaking the dialog to one another. Make
sure you emphasize the dynamics, emotions, and expressions between
them, as well as making the lips move in perfect synchronization with the
soundtrack, of course!

This page intentionally left blank
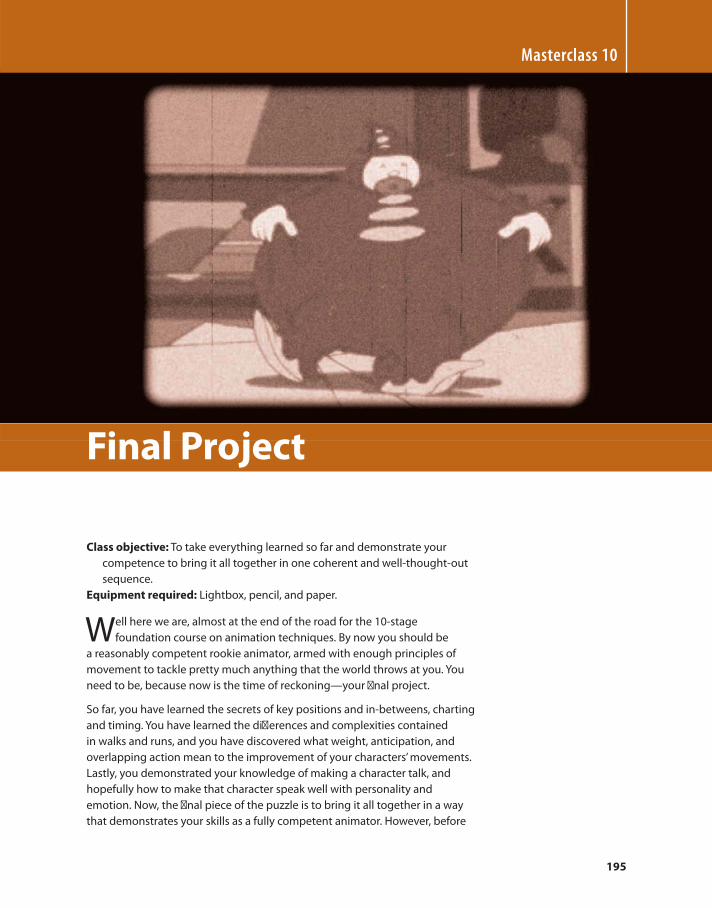
195
Class objective: To take everything learned so far and demonstrate your
competence to bring it all together in one coherent and well-thought-out
sequence.
Equipment required: Lightbox, pencil, and paper.
Well here we are, almost at the end of the road for the 10-stage
foundation course on animation techniques. By now you should be
a reasonably competent rookie animator, armed with enough principles of
movement to tackle pretty much anything that the world throws at you. You
need to be, because now is the time of reckoning — your fi nal project.
So far, you have learned the secrets of key positions and in-betweens, charting
and timing. You have learned the diff erences and complexities contained
in walks and runs, and you have discovered what weight, anticipation, and
overlapping action mean to the improvement of your characters ’ movements.
Lastly, you demonstrated your knowledge of making a character talk, and
hopefully how to make that character speak well with personality and
emotion. Now, the fi nal piece of the puzzle is to bring it all together in a way
that demonstrates your skills as a fully competent animator. However, before
Masterclass 10
Final Project
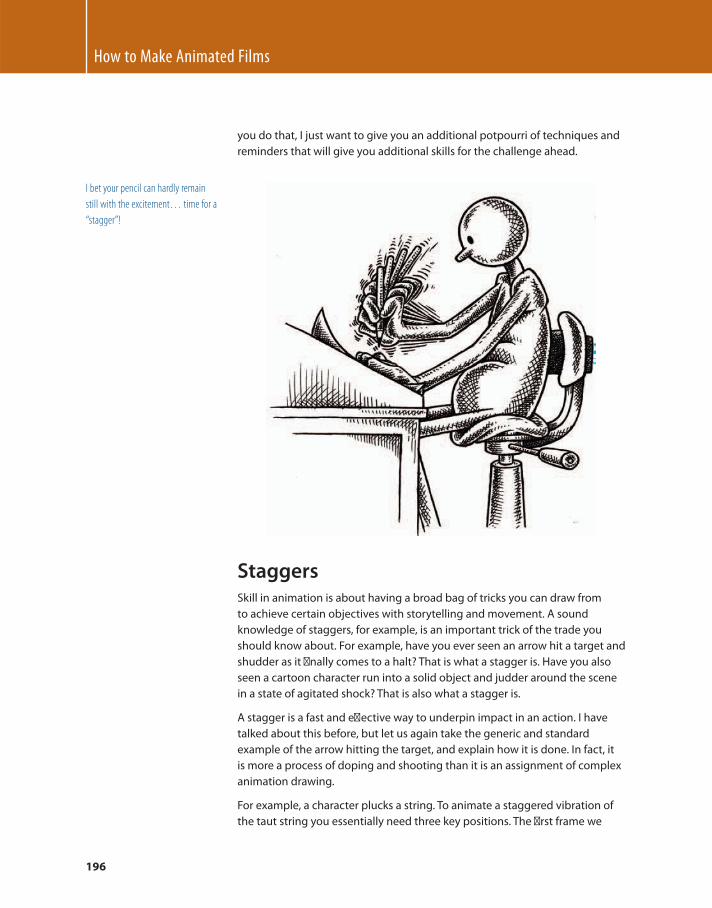
How to Make Animated Films
196
you do that, I just want to give you an additional potpourri of techniques and
reminders that will give you additional skills for the challenge ahead.
Staggers Skill in animation is about having a broad bag of tricks you can draw from
to achieve certain objectives with storytelling and movement. A sound
knowledge of staggers, for example, is an important trick of the trade you
should know about. For example, have you ever seen an arrow hit a target and
shudder as it fi nally comes to a halt? That is what a stagger is. Have you also
seen a cartoon character run into a solid object and judder around the scene
in a state of agitated shock? That is also what a stagger is.
A stagger is a fast and eff ective way to underpin impact in an action. I have
talked about this before, but let us again take the generic and standard
example of the arrow hitting the target, and explain how it is done. In fact, it
is more a process of doping and shooting than it is an assignment of complex
animation drawing.
For example, a character plucks a string. To animate a staggered vibration of
the taut string you essentially need three key positions. The fi rst frame we
I bet your pencil can hardly remain
still with the excitement… time for a
“stagger”!
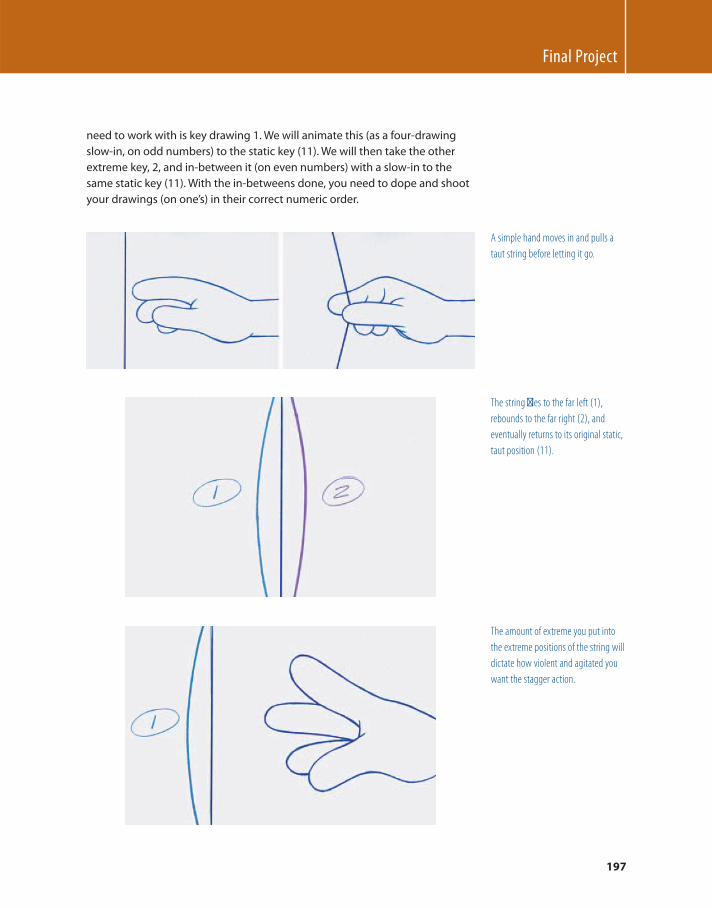
Final Project
197
need to work with is key drawing 1. We will animate this (as a four-drawing
slow-in, on odd numbers) to the static key (11). We will then take the other
extreme key, 2, and in-between it (on even numbers) with a slow-in to the
same static key (11). With the in-betweens done, you need to dope and shoot
your drawings (on one’s) in their correct numeric order.
A simple hand moves in and pulls a
taut string before letting it go.
The string fl ies to the far left (1),
rebounds to the far right (2), and
eventually returns to its original static,
taut position (11).
The amount of extreme you put into
the extreme positions of the string will
dictate how violent and agitated you
want the stagger action.
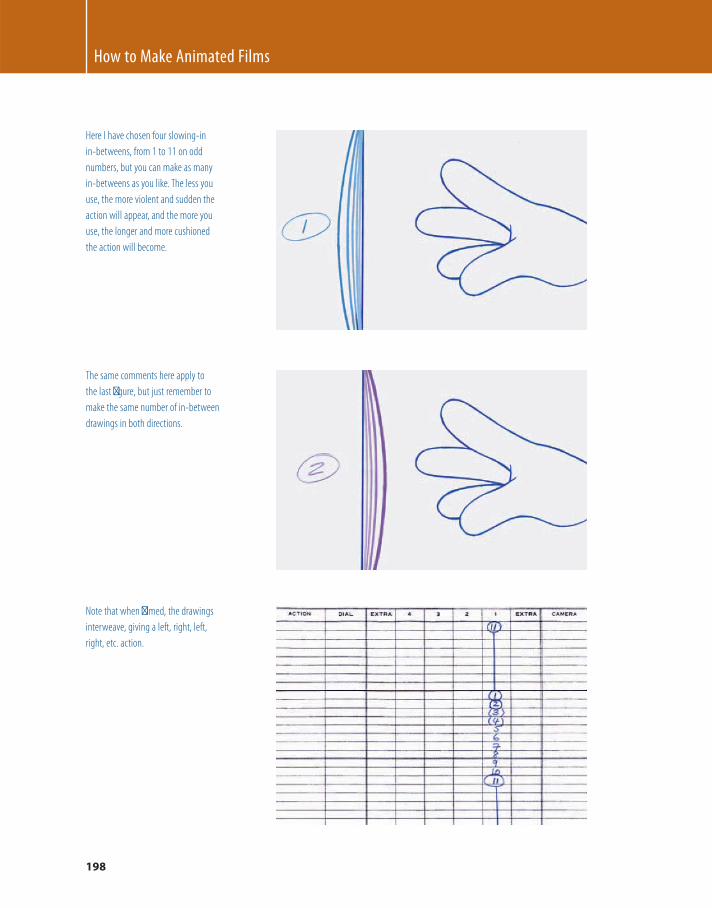
How to Make Animated Films
198
Here I have chosen four slowing-in
in-betweens, from 1 to 11 on odd
numbers, but you can make as many
in-betweens as you like. The less you
use, the more violent and sudden the
action will appear, and the more you
use, the longer and more cushioned
the action will become.
The same comments here apply to
the last fi gure , but just remember to
make the same number of in-between
drawings in both directions.
Note that when fi lmed, the drawings
interweave, giving a left, right, left,
right, etc. action.
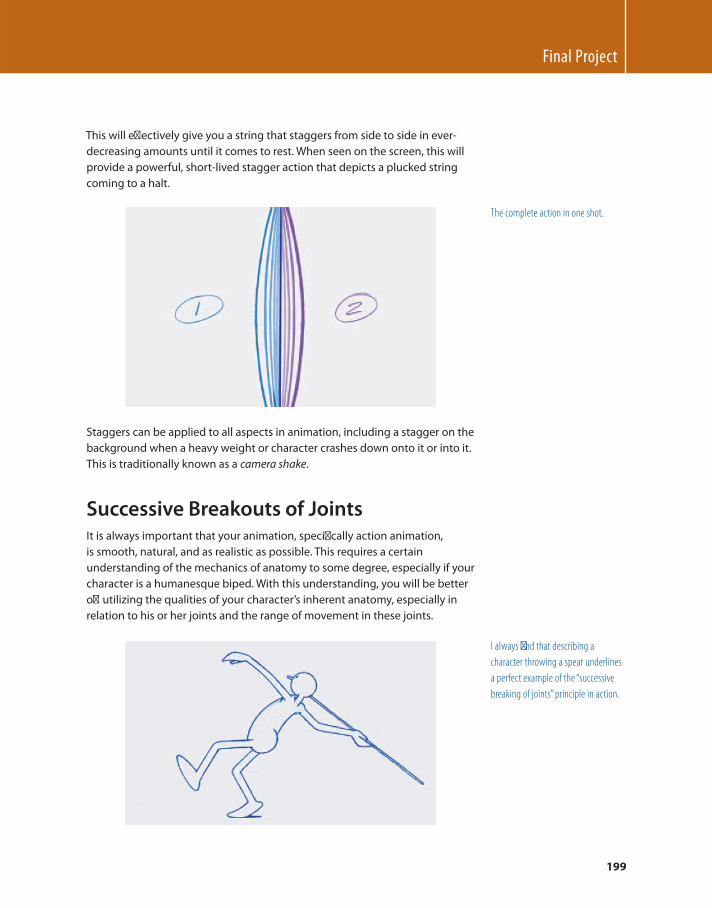
Final Project
199
This will eff ectively give you a string that staggers from side to side in ever-
decreasing amounts until it comes to rest. When seen on the screen, this will
provide a powerful, short-lived stagger action that depicts a plucked string
coming to a halt.
The complete action in one shot.
Staggers can be applied to all aspects in animation, including a stagger on the
background when a heavy weight or character crashes down onto it or into it.
This is traditionally known as a camera shake .
Successive Breakouts of Joints It is always important that your animation, specifi cally action animation,
is smooth, natural, and as realistic as possible. This requires a certain
understanding of the mechanics of anatomy to some degree, especially if your
character is a humanesque biped. With this understanding, you will be better
off utilizing the qualities of your character’s inherent anatomy, especially in
relation to his or her joints and the range of movement in these joints.
I always fi nd that describing a
character throwing a spear underlines
a perfect example of the “ successive
breaking of joints ” principle in action.
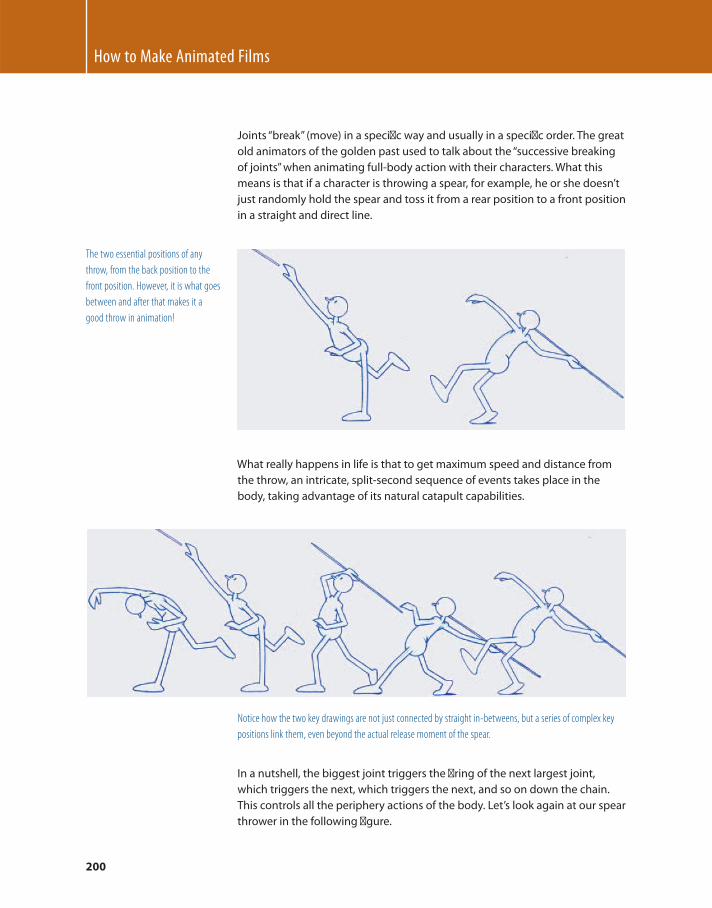
How to Make Animated Films
200
Joints “ break ” (move) in a specifi c way and usually in a specifi c order. The great
old animators of the golden past used to talk about the “ successive breaking
of joints ” when animating full-body action with their characters. What this
means is that if a character is throwing a spear, for example, he or she doesn’t
just randomly hold the spear and toss it from a rear position to a front position
in a straight and direct line.
The two essential positions of any
throw, from the back position to the
front position. However, it is what goes
between and after that makes it a
good throw in animation!
What really happens in life is that to get maximum speed and distance from
the throw, an intricate, split-second sequence of events takes place in the
body, taking advantage of its natural catapult capabilities.
Notice how the two key drawings are not just connected by straight in-betweens, but a series of complex key
positions link them, even beyond the actual release moment of the spear.
In a nutshell, the biggest joint triggers the fi ring of the next largest joint,
which triggers the next, which triggers the next, and so on down the chain.
This controls all the periphery actions of the body. Let’s look again at our spear
thrower in the following fi gure.
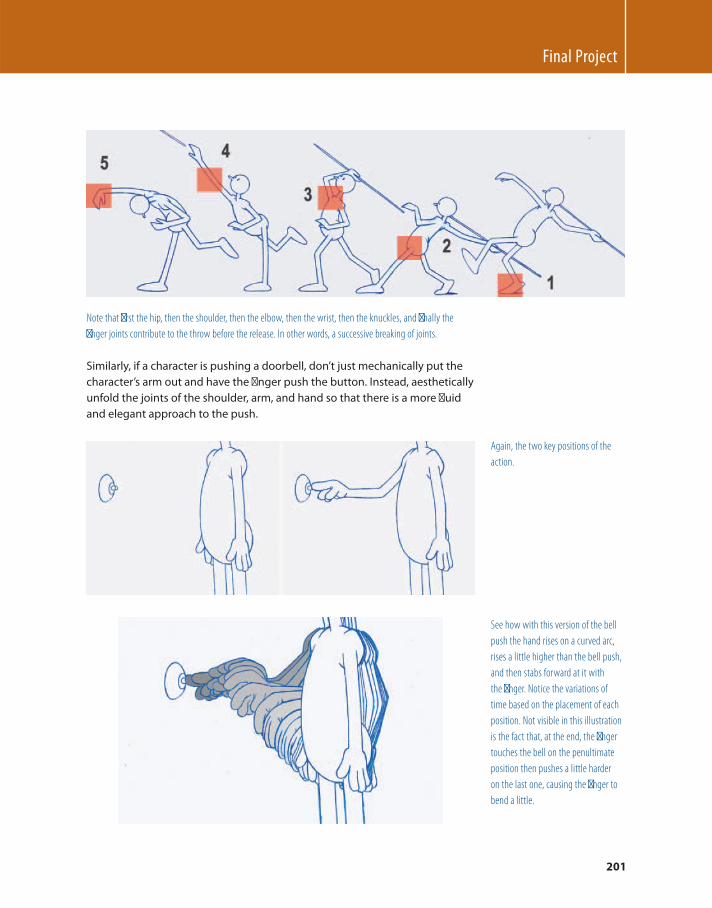
Final Project
201
Note that fi rst the hip, then the shoulder, then the elbow, then the wrist, then the knuckles, and fi nally the
fi nger joints contribute to the throw before the release. In other words, a successive breaking of joints.
Similarly, if a character is pushing a doorbell, don’t just mechanically put the
character’s arm out and have the fi nger push the button. Instead, aesthetically
unfold the joints of the shoulder, arm, and hand so that there is a more fl uid
and elegant approach to the push.
Again, the two key positions of the
action.
See how with this version of the bell
push the hand rises on a curved arc,
rises a little higher than the bell push,
and then stabs forward at it with
the fi nger. Notice the variations of
time based on the placement of each
position. Not visible in this illustration
is the fact that, at the end, the fi nger
touches the bell on the penultimate
position then pushes a little harder
on the last one, causing the fi nger to
bend a little.
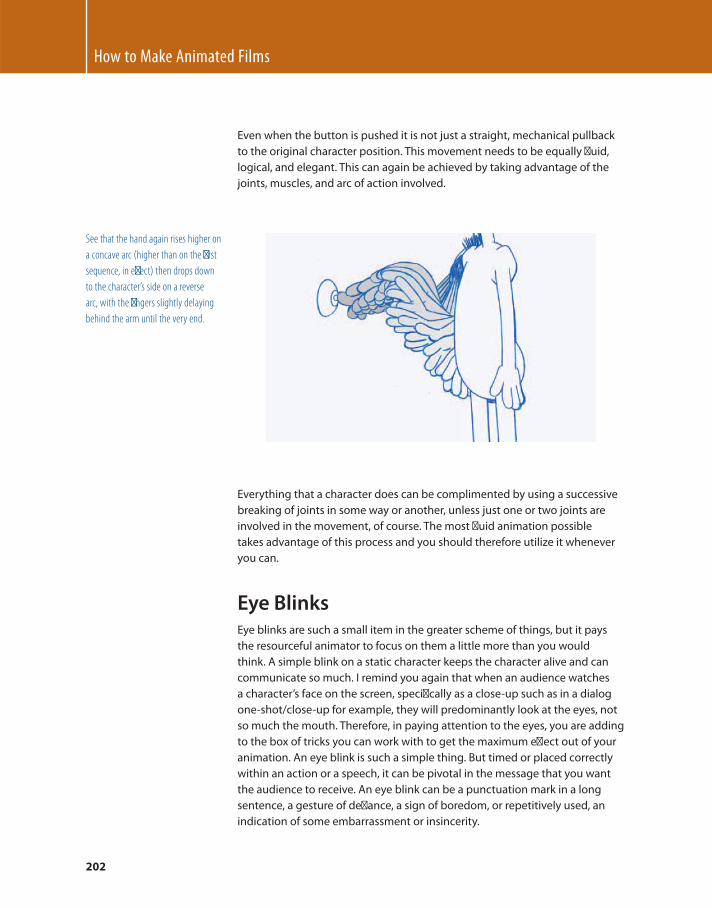
How to Make Animated Films
202
Even when the button is pushed it is not just a straight, mechanical pullback
to the original character position. This movement needs to be equally fl uid,
logical, and elegant. This can again be achieved by taking advantage of the
joints, muscles, and arc of action involved.
See that the hand again rises higher on
a concave arc (higher than on the fi rst
sequence, in eff ect) then drops down
to the character’s side on a reverse
arc, with the fi ngers slightly delaying
behind the arm until the very end.
Everything that a character does can be complimented by using a successive
breaking of joints in some way or another, unless just one or two joints are
involved in the movement, of course. The most fl uid animation possible
takes advantage of this process and you should therefore utilize it whenever
you can.
Eye Blinks Eye blinks are such a small item in the greater scheme of things, but it pays
the resourceful animator to focus on them a little more than you would
think. A simple blink on a static character keeps the character alive and can
communicate so much. I remind you again that when an audience watches
a character’s face on the screen, specifi cally as a close-up such as in a dialog
one-shot/close-up for example, they will predominantly look at the eyes, not
so much the mouth. Therefore, in paying attention to the eyes, you are adding
to the box of tricks you can work with to get the maximum eff ect out of your
animation. An eye blink is such a simple thing. But timed or placed correctly
within an action or a speech, it can be pivotal in the message that you want
the audience to receive. An eye blink can be a punctuation mark in a long
sentence, a gesture of defi ance, a sign of boredom, or repetitively used, an
indication of some embarrassment or insincerity.
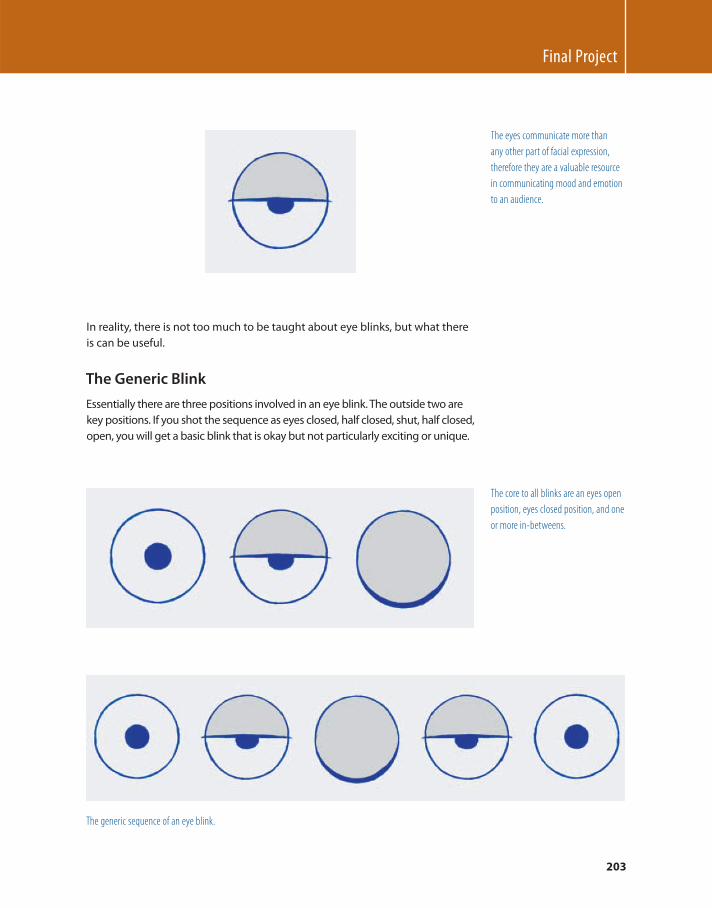
Final Project
203
In reality, there is not too much to be taught about eye blinks, but what there
is can be useful.
The Generic Blink
Essentially there are three positions involved in an eye blink. The outside two are
key positions. If you shot the sequence as eyes closed, half closed, shut, half closed,
open, you will get a basic blink that is okay but not particularly exciting or unique.
The generic sequence of an eye blink.
The eyes communicate more than
any other part of facial expression,
therefore they are a valuable resource
in communicating mood and emotion
to an audience.
The core to all blinks are an eyes open
position, eyes closed position, and one
or more in-betweens.
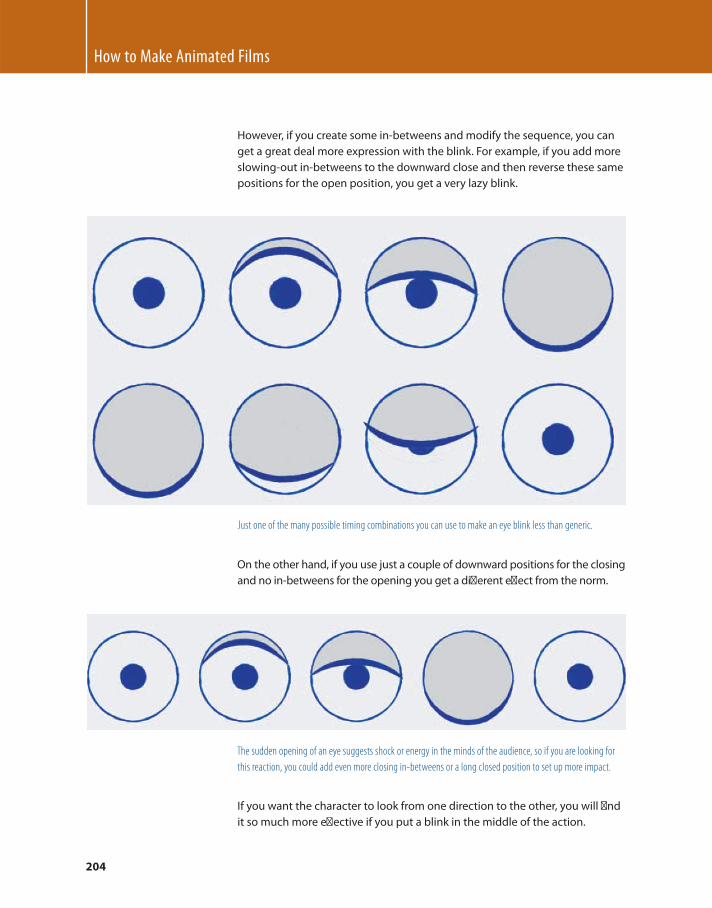
How to Make Animated Films
204
However, if you create some in-betweens and modify the sequence, you can
get a great deal more expression with the blink. For example, if you add more
slowing-out in-betweens to the downward close and then reverse these same
positions for the open position, you get a very lazy blink.
Just one of the many possible timing combinations you can use to make an eye blink less than generic.
On the other hand, if you use just a couple of downward positions for the closing
and no in-betweens for the opening you get a diff erent eff ect from the norm.
The sudden opening of an eye suggests shock or energy in the minds of the audience, so if you are looking for
this reaction, you could add even more closing in-betweens or a long closed position to set up more impact.
If you want the character to look from one direction to the other, you will fi nd
it so much more eff ective if you put a blink in the middle of the action.
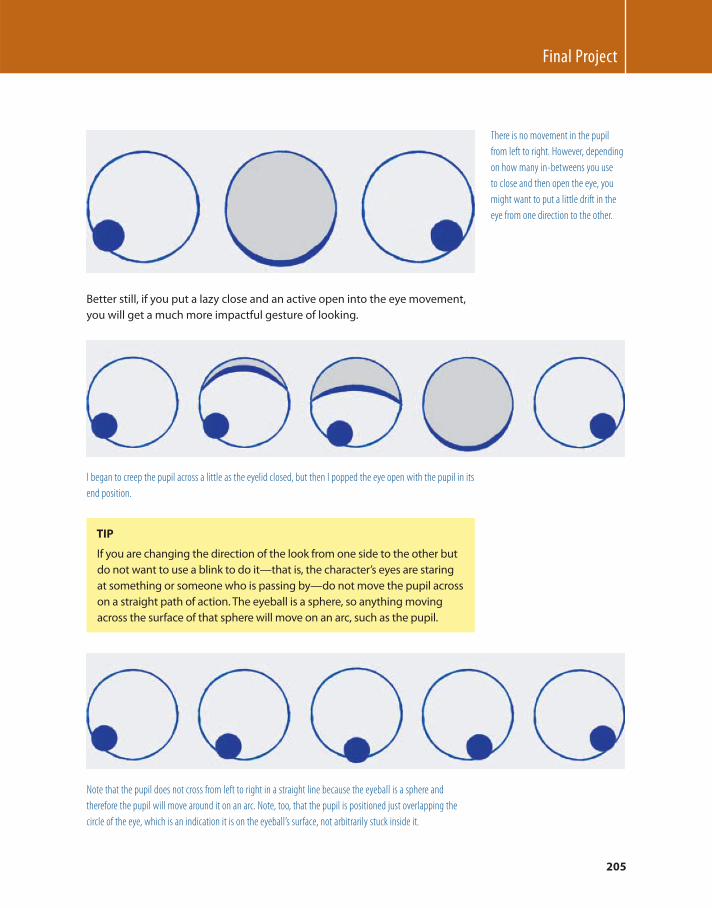
Final Project
205
There is no movement in the pupil
from left to right. However, depending
on how many in-betweens you use
to close and then open the eye, you
might want to put a little drift in the
eye from one direction to the other.
Better still, if you put a lazy close and an active open into the eye movement,
you will get a much more impactful gesture of looking.
I began to creep the pupil across a little as the eyelid closed, but then I popped the eye open with the pupil in its
end position.
TIP
If you are changing the direction of the look from one side to the other but
do not want to use a blink to do it — that is, the character’s eyes are staring
at something or someone who is passing by — do not move the pupil across
on a straight path of action. The eyeball is a sphere, so anything moving
across the surface of that sphere will move on an arc, such as the pupil.
Note that the pupil does not cross from left to right in a straight line because the eyeball is a sphere and
therefore the pupil will move around it on an arc. Note, too, that the pupil is positioned just overlapping the
circle of the eye, which is an indication it is on the eyeball’s surface, not arbitrarily stuck inside it.
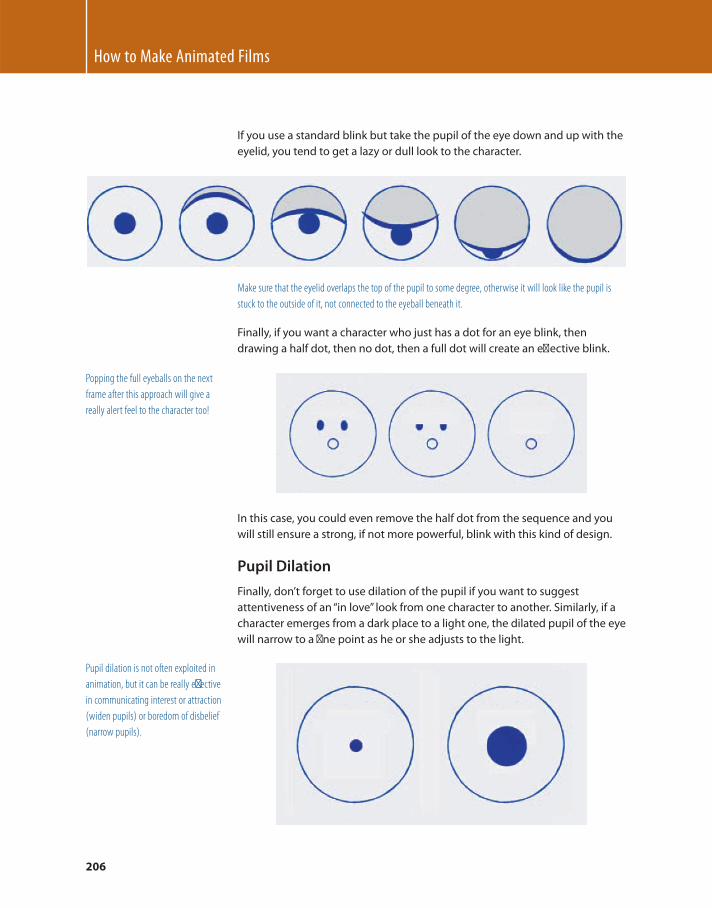
How to Make Animated Films
206
If you use a standard blink but take the pupil of the eye down and up with the
eyelid, you tend to get a lazy or dull look to the character.
Make sure that the eyelid overlaps the top of the pupil to some degree, otherwise it will look like the pupil is
stuck to the outside of it, not connected to the eyeball beneath it.
Finally, if you want a character who just has a dot for an eye blink, then
drawing a half dot, then no dot, then a full dot will create an eff ective blink.
Popping the full eyeballs on the next
frame after this approach will give a
really alert feel to the character too!
In this case, you could even remove the half dot from the sequence and you
will still ensure a strong, if not more powerful, blink with this kind of design.
Pupil Dilation
Finally, don’t forget to use dilation of the pupil if you want to suggest
attentiveness of an “ in love ” look from one character to another. Similarly, if a
character emerges from a dark place to a light one, the dilated pupil of the eye
will narrow to a fi ne point as he or she adjusts to the light.
Pupil dilation is not often exploited in
animation, but it can be really eff ective
in communicating interest or attraction
(widen pupils) or boredom of disbelief
(narrow pupils).
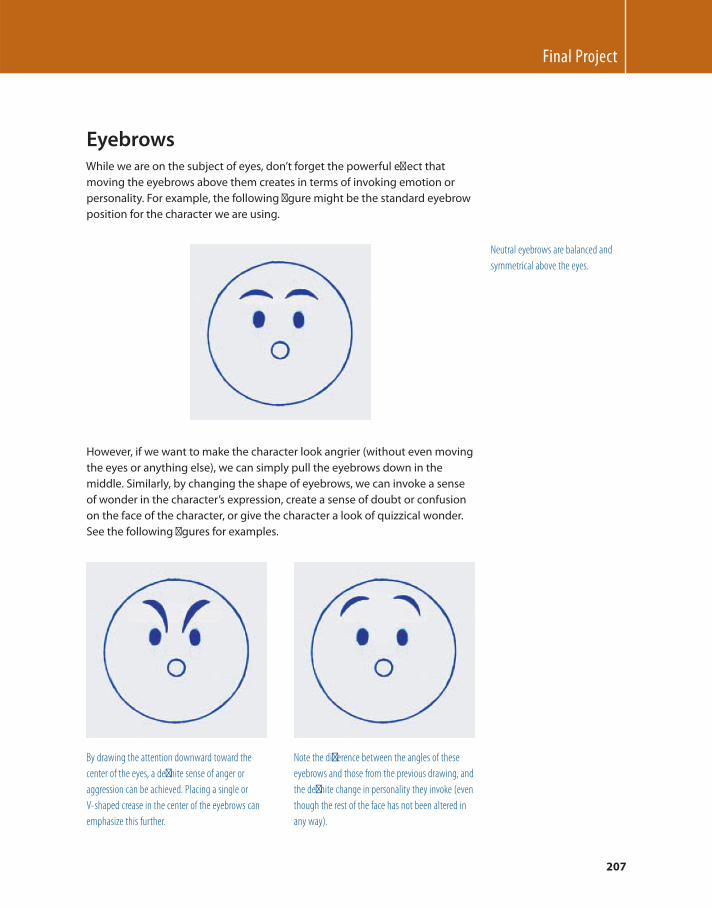
Final Project
207
Eyebrows While we are on the subject of eyes, don’t forget the powerful eff ect that
moving the eyebrows above them creates in terms of invoking emotion or
personality. For example, the following fi gure might be the standard eyebrow
position for the character we are using.
Neutral eyebrows are balanced and
symmetrical above the eyes.
However, if we want to make the character look angrier (without even moving
the eyes or anything else), we can simply pull the eyebrows down in the
middle. Similarly, by changing the shape of eyebrows, we can invoke a sense
of wonder in the character’s expression, create a sense of doubt or confusion
on the face of the character, or give the character a look of quizzical wonder.
See the following fi gures for examples.
By drawing the attention downward toward the
center of the eyes, a defi nite sense of anger or
aggression can be achieved. Placing a single or
V-shaped crease in the center of the eyebrows can
emphasize this further.
Note the diff erence between the angles of these
eyebrows and those from the previous drawing, and
the defi nite change in personality they invoke (even
though the rest of the face has not been altered in
any way).
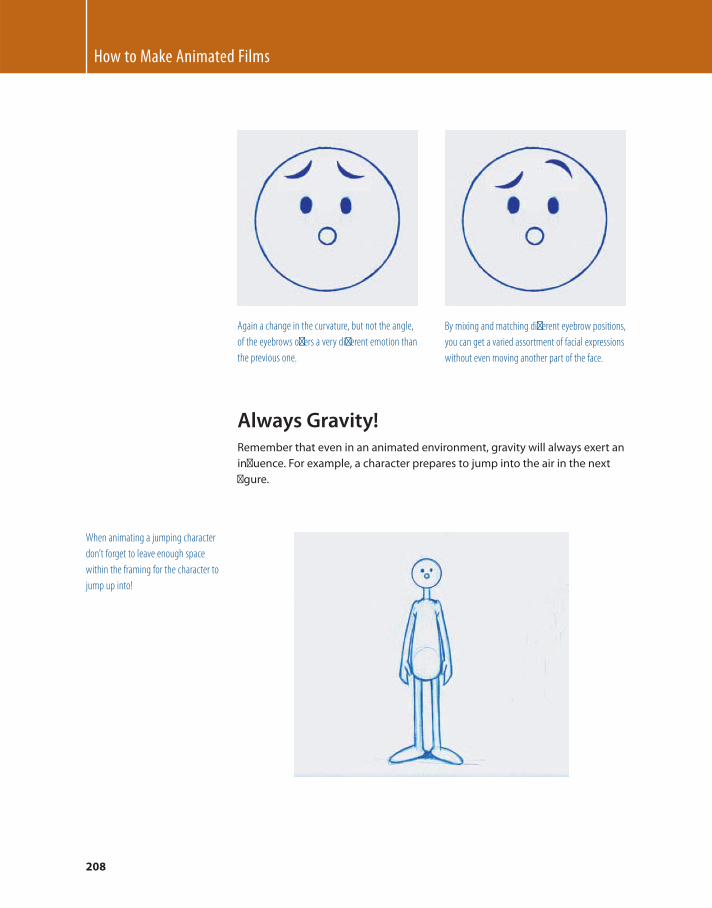
How to Make Animated Films
208
Again a change in the curvature, but not the angle,
of the eyebrows off ers a very diff erent emotion than
the previous one.
By mixing and matching diff erent eyebrow positions,
you can get a varied assortment of facial expressions
without even moving another part of the face.
Always Gravity! Remember that even in an animated environment, gravity will always exert an
infl uence. For example, a character prepares to jump into the air in the next
fi gure.
When animating a jumping character
don’t forget to leave enough space
within the framing for the character to
jump up into!
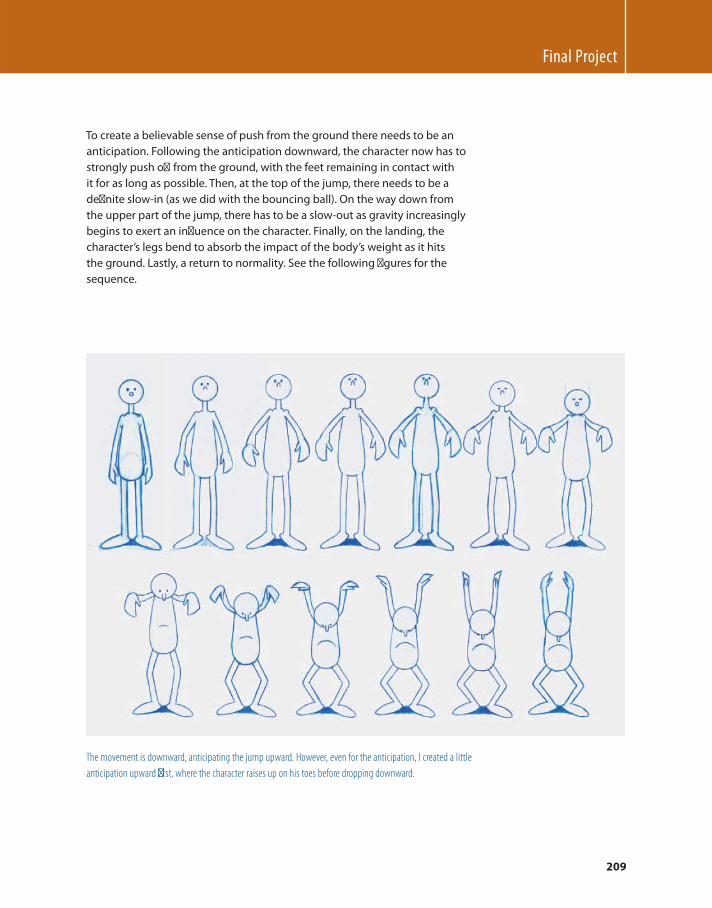
Final Project
209
To create a believable sense of push from the ground there needs to be an
anticipation. Following the anticipation downward, the character now has to
strongly push off from the ground, with the feet remaining in contact with
it for as long as possible. Then, at the top of the jump, there needs to be a
defi nite slow-in (as we did with the bouncing ball). On the way down from
the upper part of the jump, there has to be a slow-out as gravity increasingly
begins to exert an infl uence on the character. Finally, on the landing, the
character’s legs bend to absorb the impact of the body’s weight as it hits
the ground. Lastly, a return to normality. See the following fi gures for the
sequence.
The movement is downward, anticipating the jump upward. However, even for the anticipation, I created a little
anticipation upward fi rst, where the character raises up on his toes before dropping downward.
How to Make Animated Films
210
When pushing vertically it helps to use the arms to assist the drive up.
The more you slow-in to the upper motion, the better you will anticipate the accelerating downward action.
During the enhanced slow-in I actually temporarily lifted the feet up higher as the body began to move downward,
as a piece of overlapping action, prior to accelerating them down quickly to touch the ground ahead of the body.
Final Project
211
Again, I use the arms to balance the landing as the character adjusts to his new contact with the ground.
Another slow-in to the fi nal position.
All this thinking needs to go into a simple jumping action if you want your
audience to believe that your character is plausible, as well as the world he or
she is acting in. If you can achieve all this, then you are more than on your way
to being an animator!
Conclusion Remember that in life no two human characters are the same, therefore in
animation no two animated characters will move in exactly the same way. It is
How to Make Animated Films
212
incumbent on you as a potential master animator to really get under the skin
of your character’s personality before you begin to animate, and have your
character pose and move in accordance with that inherent way of being. Even
then, the same character will have a number of diff erent emotional states that
he or she will be going through from moment to moment, so you have to use
your bag of tricks to eff ect accordingly the character’s normal way of moving.
That is what animation, the infusing of believable life to the inanimate, is all
about. That is why you need to know, and perfect, your bag of tricks to make
the animated experience for the audience all the more real, plausible, and, of
course, entertaining.
Suggested Reading White , T. The Animator’s Workbook . New York : Watson-Guptill , 1988 , pp. 38 – 43,
80 – 84, 106 – 109 and 112 – 117.
White , T. Animation from Pencils to Pixels: Classical Techniques for Digital
Animators . Boston : Focal Press , 2006 , pp. 232 – 234 and 259 – 264.
Williams , R. The Animator’s Survival Kit . London : Faber and Faber , 2001 ,
pp. 297 – 302.
DVD lecture: “DEMO — Jump”.
Assignment 10 For the fi nal assignment for Part 1 you need to take a minimum of four of the
styles you have learned from all the preceding lessons and add them together
with a walk to tell a single, simple story. (For example, you can combine a
sample of weight, anticipation, stagger, and a bouncing ball action together
with the walk, or even add more if you so wish.) Your story should involve one
character, a minimum of one prop that the character works with, and one
environment that all the action takes place in. There has to be an establishing/
setup shot, an interaction with the prop, and then a satisfactory conclusion.
Throughout this process the character needs to have a change in emotion
or personality — that is, go from happy to sad, angry to appeased, nervous
to confi dent, etc. The scene can be animated on two’s but use one’s where
necessary. Sound can be a factor, but it is not mandatory. Overall, I would
suggest that your sequence be 20 – 40 seconds long .
Note
You are invited to submit your fi nal assignment to www.desktopacademy.
com , as those worthy of inclusion will be screened in the student gallery
section of the web site.
PART 2
How to Make an Animated Film

This page intentionally left blank
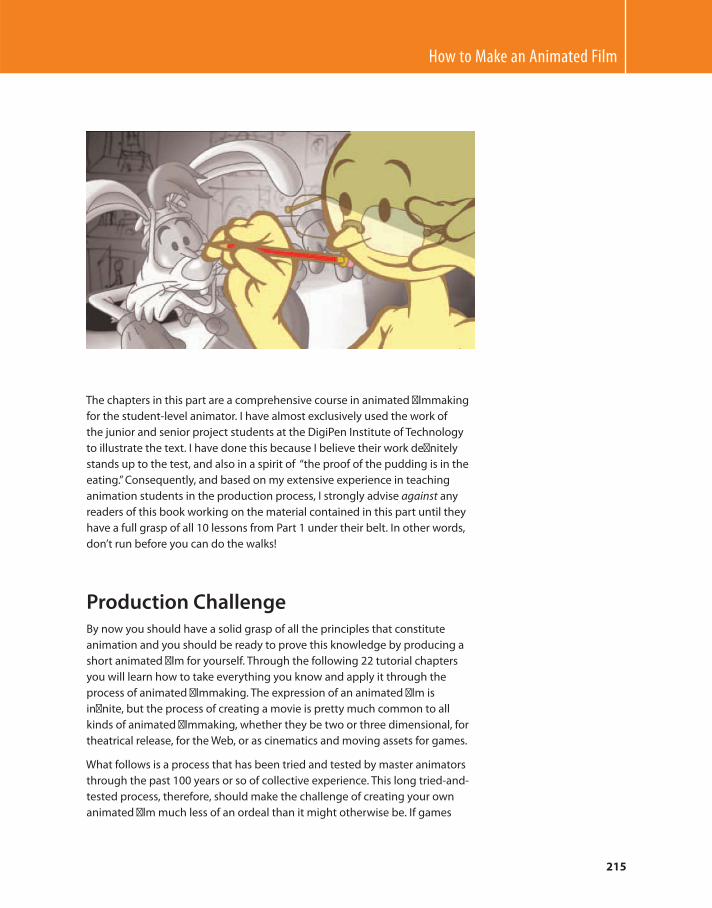
How to Make an Animated Film
215
The chapters in this part are a comprehensive course in animated fi lmmaking
for the student-level animator. I have almost exclusively used the work of
the junior and senior project students at the DigiPen Institute of Technology
to illustrate the text. I have done this because I believe their work defi nitely
stands up to the test, and also in a spirit of “ the proof of the pudding is in the
eating. ” Consequently, and based on my extensive experience in teaching
animation students in the production process, I strongly advise against any
readers of this book working on the material contained in this part until they
have a full grasp of all 10 lessons from Part 1 under their belt. In other words,
don’t run before you can do the walks!
Production Challenge By now you should have a solid grasp of all the principles that constitute
animation and you should be ready to prove this knowledge by producing a
short animated fi lm for yourself. Through the following 22 tutorial chapters
you will learn how to take everything you know and apply it through the
process of animated fi lmmaking. The expression of an animated fi lm is
infi nite, but the process of creating a movie is pretty much common to all
kinds of animated fi lmmaking, whether they be two or three dimensional, for
theatrical release, for the Web, or as cinematics and moving assets for games.
What follows is a process that has been tried and tested by master animators
through the past 100 years or so of collective experience. This long tried-and-
tested process, therefore, should make the challenge of creating your own
animated fi lm much less of an ordeal than it might otherwise be. If games

How to Make Animated Films
216
animation is your ultimate passion, then recognize that most of the processes
contained here also apply identically to games — you just have to modify them
to the slightly varying production terminology and proprietary refi nements
that games studios adopt.
Students should also know that additional illustrated DVD lectures of this
production process will be available from www.desktopacademy.com as part
of the Pencils to Pixels Lecture Series.
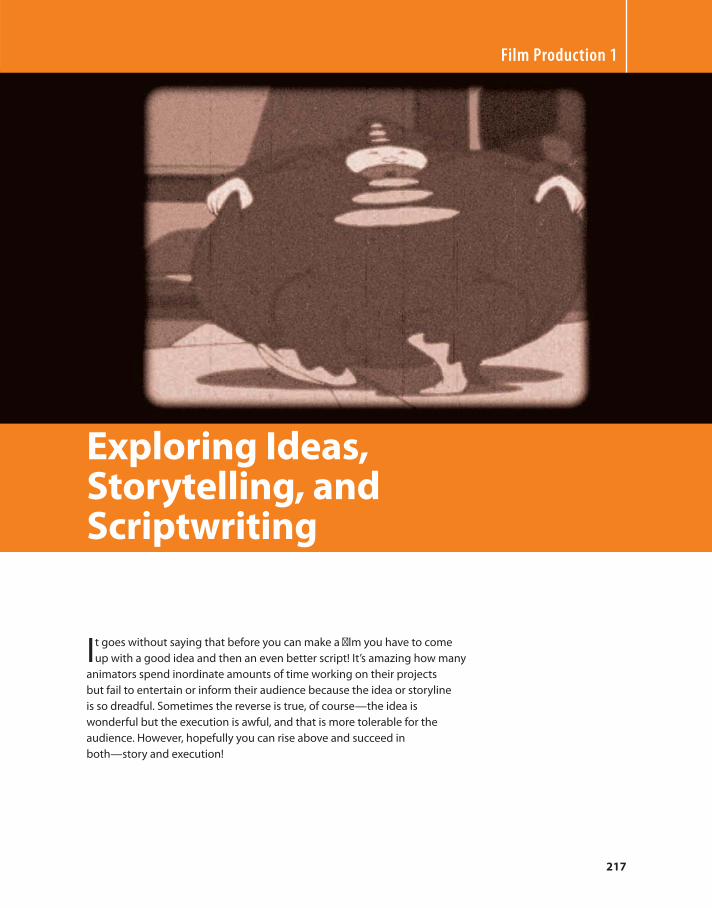
217
It goes without saying that before you can make a fi lm you have to come
up with a good idea and then an even better script! It’s amazing how many
animators spend inordinate amounts of time working on their projects
but fail to entertain or inform their audience because the idea or storyline
is so dreadful. Sometimes the reverse is true, of course — the idea is
wonderful but the execution is awful, and that is more tolerable for the
audience. However, hopefully you can rise above and succeed in
both — story and execution!
Film Production 1
Exploring Ideas, Storytelling, and Scriptwriting
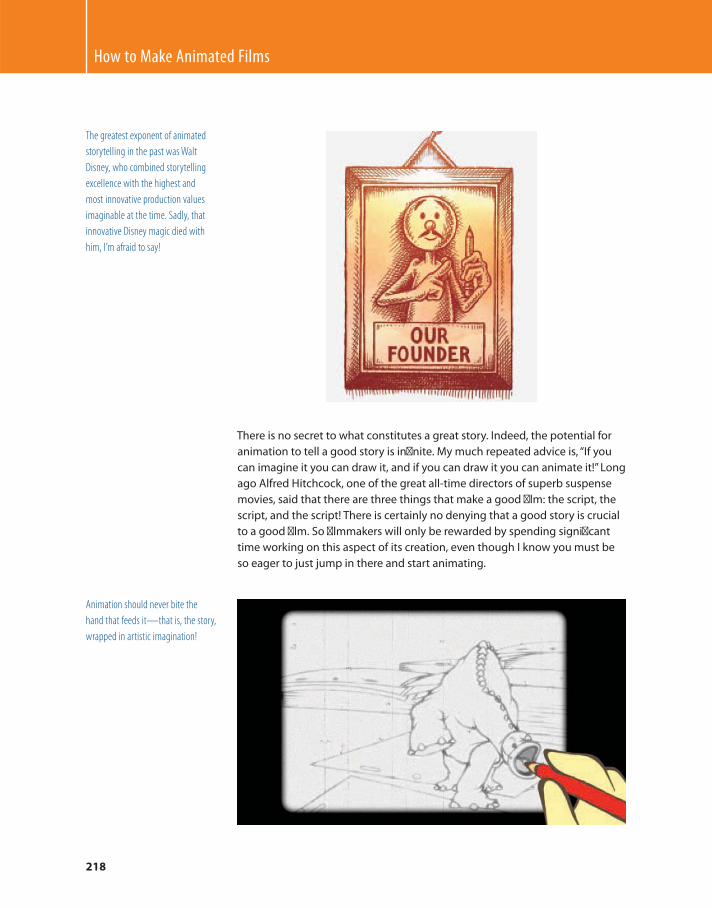
How to Make Animated Films
218
The greatest exponent of animated
storytelling in the past was Walt
Disney, who combined storytelling
excellence with the highest and
most innovative production values
imaginable at the time. Sadly, that
innovative Disney magic died with
him, I’m afraid to say!
There is no secret to what constitutes a great story. Indeed, the potential for
animation to tell a good story is infi nite. My much repeated advice is, “ If you
can imagine it you can draw it, and if you can draw it you can animate it! ” Long
ago Alfred Hitchcock, one of the great all-time directors of superb suspense
movies, said that there are three things that make a good fi lm: the script, the
script, and the script! There is certainly no denying that a good story is crucial
to a good fi lm. So fi lmmakers will only be rewarded by spending signifi cant
time working on this aspect of its creation, even though I know you must be
so eager to just jump in there and start animating.
Animation should never bite the
hand that feeds it — that is, the story,
wrapped in artistic imagination!
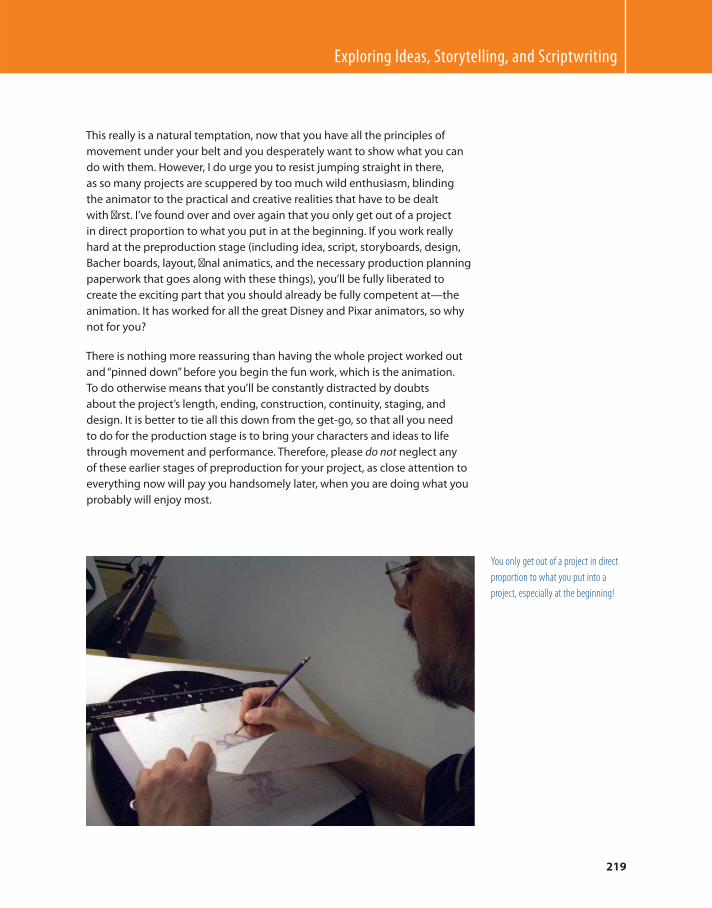
Exploring Ideas, Storytelling, and Scriptwriting
219
This really is a natural temptation, now that you have all the principles of
movement under your belt and you desperately want to show what you can
do with them. However, I do urge you to resist jumping straight in there,
as so many projects are scuppered by too much wild enthusiasm, blinding
the animator to the practical and creative realities that have to be dealt
with fi rst. I’ve found over and over again that you only get out of a project
in direct proportion to what you put in at the beginning. If you work really
hard at the preproduction stage (including idea, script, storyboards, design,
Bacher boards, layout, fi nal animatics, and the necessary production planning
paperwork that goes along with these things), you’ll be fully liberated to
create the exciting part that you should already be fully competent at — the
animation. It has worked for all the great Disney and Pixar animators, so why
not for you?
There is nothing more reassuring than having the whole project worked out
and “ pinned down ” before you begin the fun work, which is the animation.
To do otherwise means that you’ll be constantly distracted by doubts
about the project’s length, ending, construction, continuity, staging, and
design. It is better to tie all this down from the get-go, so that all you need
to do for the production stage is to bring your characters and ideas to life
through movement and performance. Therefore, please do not neglect any
of these earlier stages of preproduction for your project, as close attention to
everything now will pay you handsomely later, when you are doing what you
probably will enjoy most.
You only get out of a project in direct
proportion to what you put into a
project, especially at the beginning!
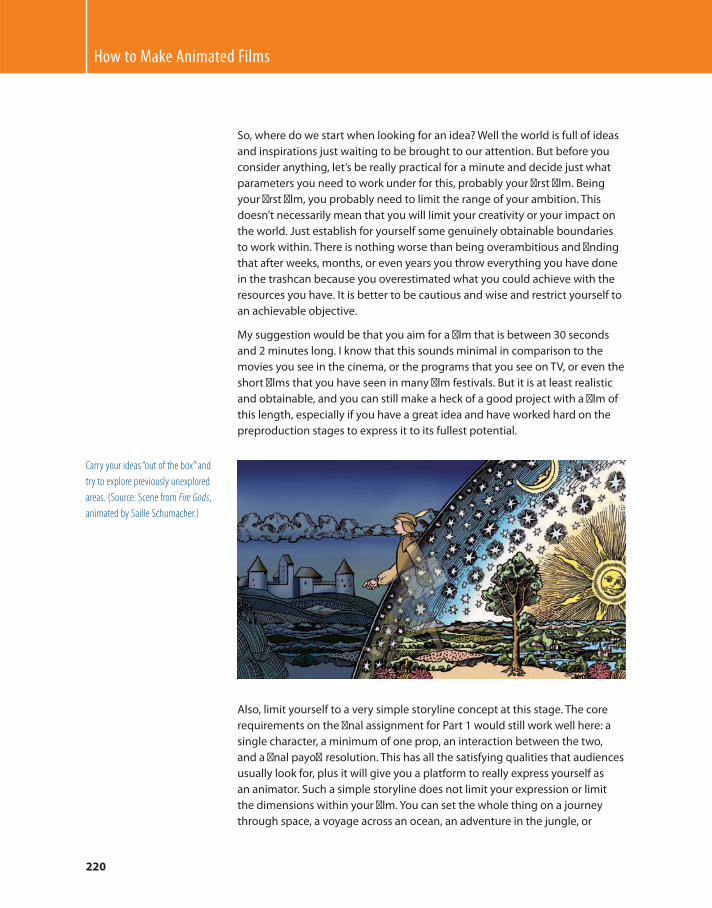
How to Make Animated Films
220
So, where do we start when looking for an idea? Well the world is full of ideas
and inspirations just waiting to be brought to our attention. But before you
consider anything, let’s be really practical for a minute and decide just what
parameters you need to work under for this, probably your fi rst fi lm. Being
your fi rst fi lm, you probably need to limit the range of your ambition. This
doesn’t necessarily mean that you will limit your creativity or your impact on
the world. Just establish for yourself some genuinely obtainable boundaries
to work within. There is nothing worse than being overambitious and fi nding
that after weeks, months, or even years you throw everything you have done
in the trashcan because you overestimated what you could achieve with the
resources you have. It is better to be cautious and wise and restrict yourself to
an achievable objective.
My suggestion would be that you aim for a fi lm that is between 30 seconds
and 2 minutes long. I know that this sounds minimal in comparison to the
movies you see in the cinema, or the programs that you see on TV, or even the
short fi lms that you have seen in many fi lm festivals. But it is at least realistic
and obtainable, and you can still make a heck of a good project with a fi lm of
this length, especially if you have a great idea and have worked hard on the
preproduction stages to express it to its fullest potential.
Carry your ideas “ out of the box ” and
try to explore previously unexplored
areas. (Source: Scene from Fire Gods ,
animated by Saille Schumacher.)
Also, limit yourself to a very simple storyline concept at this stage. The core
requirements on the fi nal assignment for Part 1 would still work well here: a
single character, a minimum of one prop, an interaction between the two,
and a fi nal payoff resolution. This has all the satisfying qualities that audiences
usually look for, plus it will give you a platform to really express yourself as
an animator. Such a simple storyline does not limit your expression or limit
the dimensions within your fi lm. You can set the whole thing on a journey
through space, a voyage across an ocean, an adventure in the jungle, or
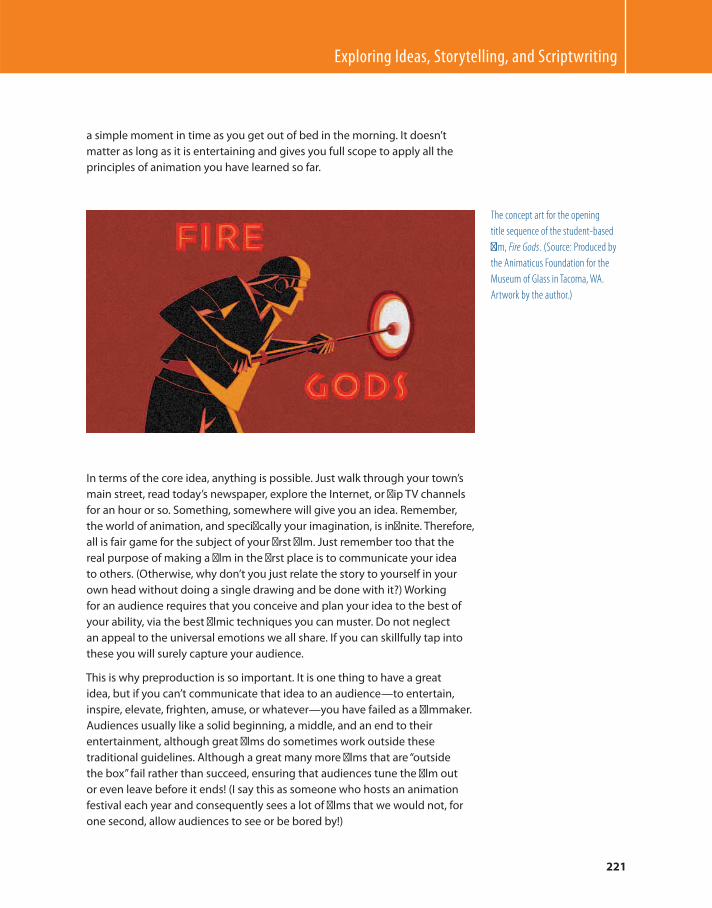
Exploring Ideas, Storytelling, and Scriptwriting
221
a simple moment in time as you get out of bed in the morning. It doesn’t
matter as long as it is entertaining and gives you full scope to apply all the
principles of animation you have learned so far.
The concept art for the opening
title sequence of the student-based
fi lm, Fire Gods . (Source: Produced by
the Animaticus Foundation for the
Museum of Glass in Tacoma, WA.
Artwork by the author.)
In terms of the core idea, anything is possible. Just walk through your town’s
main street, read today’s newspaper, explore the Internet, or fl ip TV channels
for an hour or so. Something, somewhere will give you an idea. Remember,
the world of animation, and specifi cally your imagination, is infi nite. Therefore,
all is fair game for the subject of your fi rst fi lm. Just remember too that the
real purpose of making a fi lm in the fi rst place is to communicate your idea
to others. (Otherwise, why don’t you just relate the story to yourself in your
own head without doing a single drawing and be done with it?) Working
for an audience requires that you conceive and plan your idea to the best of
your ability, via the best fi lmic techniques you can muster. Do not neglect
an appeal to the universal emotions we all share. If you can skillfully tap into
these you will surely capture your audience.
This is why preproduction is so important. It is one thing to have a great
idea, but if you can’t communicate that idea to an audience — to entertain,
inspire, elevate, frighten, amuse, or whatever — you have failed as a fi lmmaker.
Audiences usually like a solid beginning, a middle, and an end to their
entertainment, although great fi lms do sometimes work outside these
traditional guidelines. Although a great many more fi lms that are “ outside
the box ” fail rather than succeed, ensuring that audiences tune the fi lm out
or even leave before it ends! (I say this as someone who hosts an animation
festival each year and consequently sees a lot of fi lms that we would not, for
one second, allow audiences to see or be bored by!)
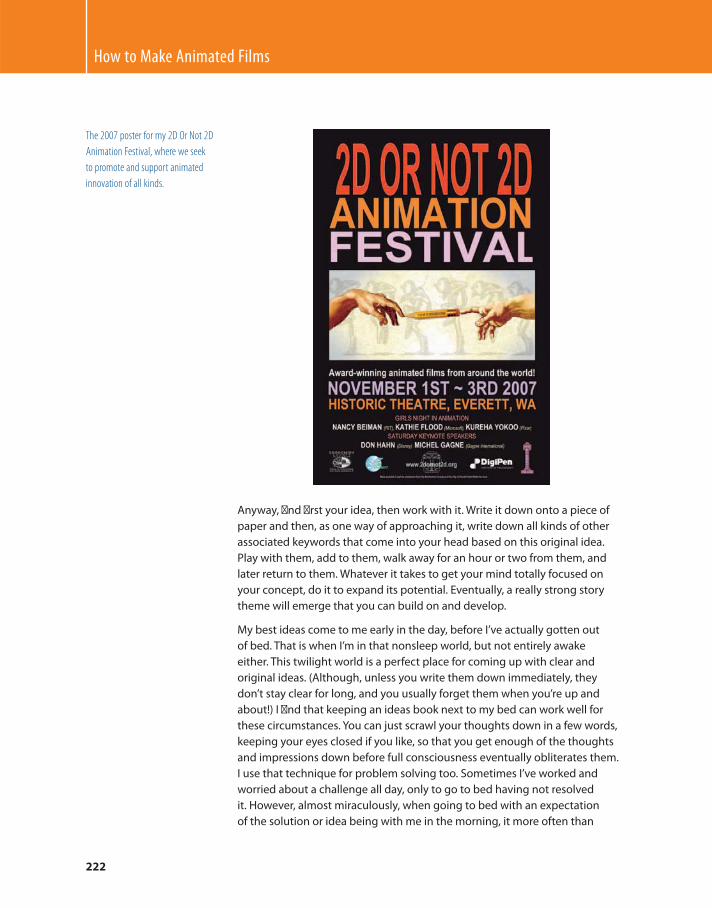
How to Make Animated Films
222
The 2007 poster for my 2D Or Not 2D
Animation Festival, where we seek
to promote and support animated
innovation of all kinds.
Anyway, fi nd fi rst your idea, then work with it. Write it down onto a piece of
paper and then, as one way of approaching it, write down all kinds of other
associated keywords that come into your head based on this original idea.
Play with them, add to them, walk away for an hour or two from them, and
later return to them. Whatever it takes to get your mind totally focused on
your concept, do it to expand its potential. Eventually, a really strong story
theme will emerge that you can build on and develop.
My best ideas come to me early in the day, before I’ve actually gotten out
of bed. That is when I’m in that nonsleep world, but not entirely awake
either. This twilight world is a perfect place for coming up with clear and
original ideas. (Although, unless you write them down immediately, they
don’t stay clear for long, and you usually forget them when you’re up and
about!) I fi nd that keeping an ideas book next to my bed can work well for
these circumstances. You can just scrawl your thoughts down in a few words,
keeping your eyes closed if you like, so that you get enough of the thoughts
and impressions down before full consciousness eventually obliterates them.
I use that technique for problem solving too. Sometimes I’ve worked and
worried about a challenge all day, only to go to bed having not resolved
it. However, almost miraculously, when going to bed with an expectation
of the solution or idea being with me in the morning, it more often than
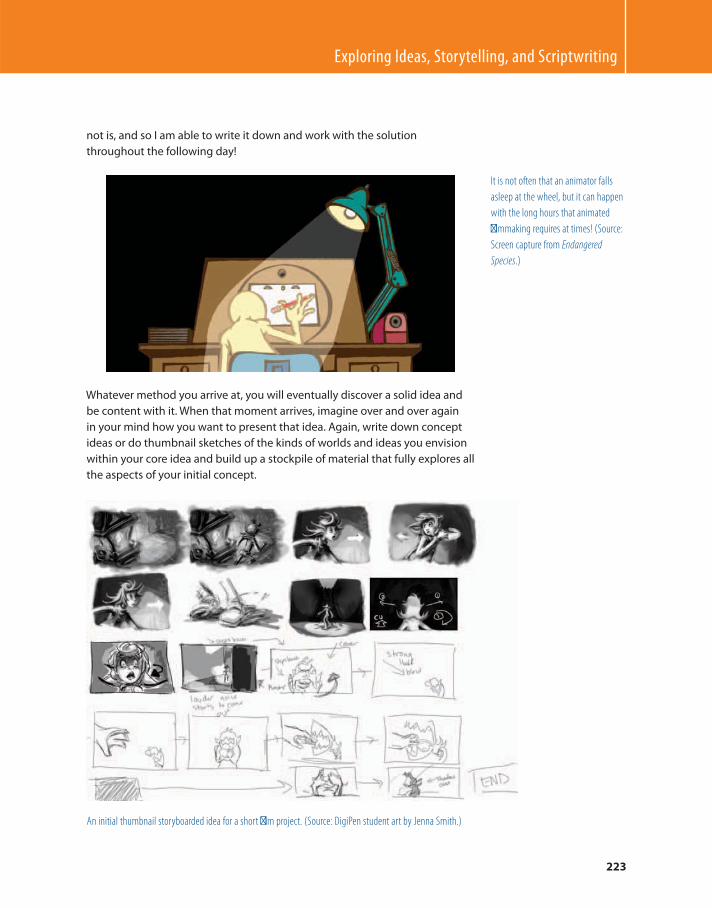
Exploring Ideas, Storytelling, and Scriptwriting
223
not is, and so I am able to write it down and work with the solution
throughout the following day!
It is not often that an animator falls
asleep at the wheel, but it can happen
with the long hours that animated
fi lmmaking requires at times! (Source:
Screen capture from Endangered Species .)
Whatever method you arrive at, you will eventually discover a solid idea and
be content with it. When that moment arrives, imagine over and over again
in your mind how you want to present that idea. Again, write down concept
ideas or do thumbnail sketches of the kinds of worlds and ideas you envision
within your core idea and build up a stockpile of material that fully explores all
the aspects of your initial concept.
An initial thumbnail storyboarded idea for a short fi lm project. (Source: DigiPen student art by Jenna Smith.)
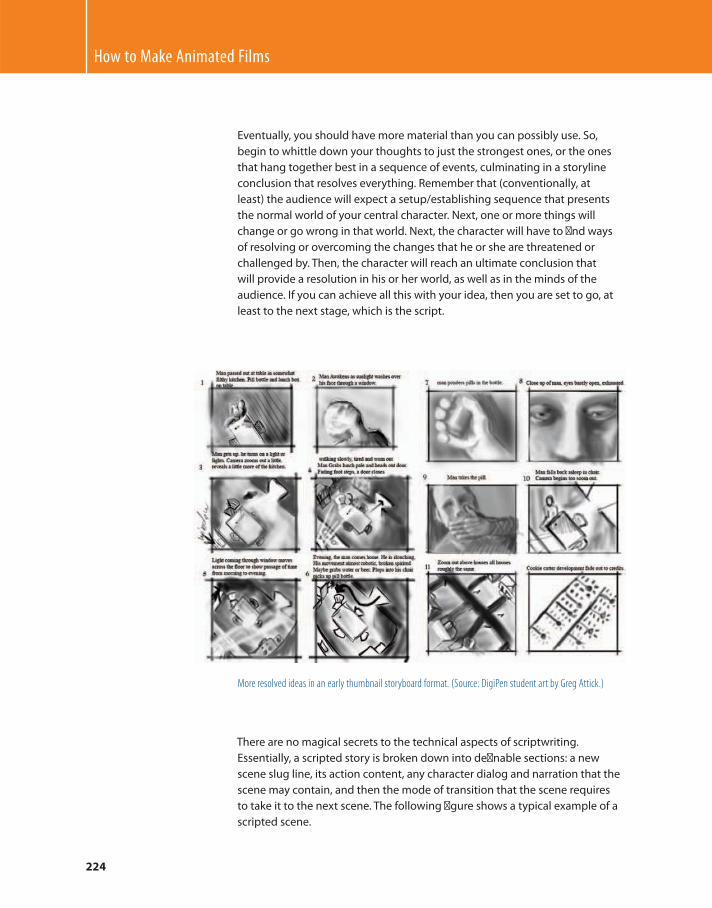
How to Make Animated Films
224
Eventually, you should have more material than you can possibly use. So,
begin to whittle down your thoughts to just the strongest ones, or the ones
that hang together best in a sequence of events, culminating in a storyline
conclusion that resolves everything. Remember that (conventionally, at
least) the audience will expect a setup/establishing sequence that presents
the normal world of your central character. Next, one or more things will
change or go wrong in that world. Next, the character will have to fi nd ways
of resolving or overcoming the changes that he or she are threatened or
challenged by. Then, the character will reach an ultimate conclusion that
will provide a resolution in his or her world, as well as in the minds of the
audience. If you can achieve all this with your idea, then you are set to go, at
least to the next stage, which is the script.
More resolved ideas in an early thumbnail storyboard format. (Source: DigiPen student art by Greg Attick.)
There are no magical secrets to the technical aspects of scriptwriting.
Essentially, a scripted story is broken down into defi nable sections: a new
scene slug line, its action content, any character dialog and narration that the
scene may contain, and then the mode of transition that the scene requires
to take it to the next scene. The following fi gure shows a typical example of a
scripted scene.
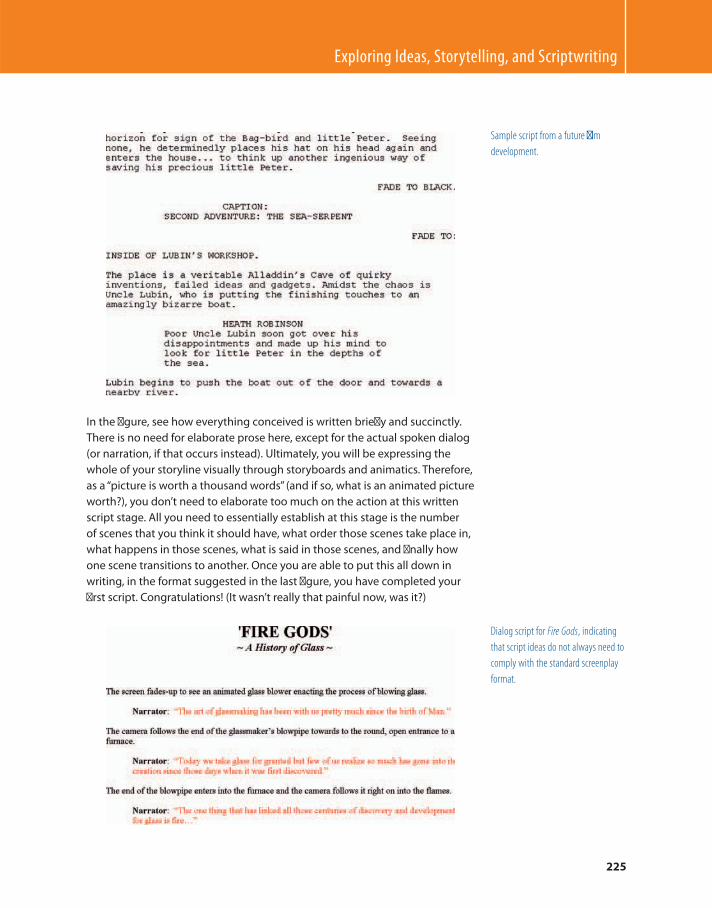
Exploring Ideas, Storytelling, and Scriptwriting
225
In the fi gure, see how everything conceived is written briefl y and succinctly.
There is no need for elaborate prose here, except for the actual spoken dialog
(or narration, if that occurs instead). Ultimately, you will be expressing the
whole of your storyline visually through storyboards and animatics. Therefore,
as a “ picture is worth a thousand words ” (and if so, what is an animated picture
worth?), you don’t need to elaborate too much on the action at this written
script stage. All you need to essentially establish at this stage is the number
of scenes that you think it should have, what order those scenes take place in,
what happens in those scenes, what is said in those scenes, and fi nally how
one scene transitions to another. Once you are able to put this all down in
writing, in the format suggested in the last fi gure, you have completed your
fi rst script. Congratulations! (It wasn’t really that painful now, was it?)
Sample script from a future fi lm
development.
Dialog script for Fire Gods , indicating
that script ideas do not always need to
comply with the standard screenplay
format.
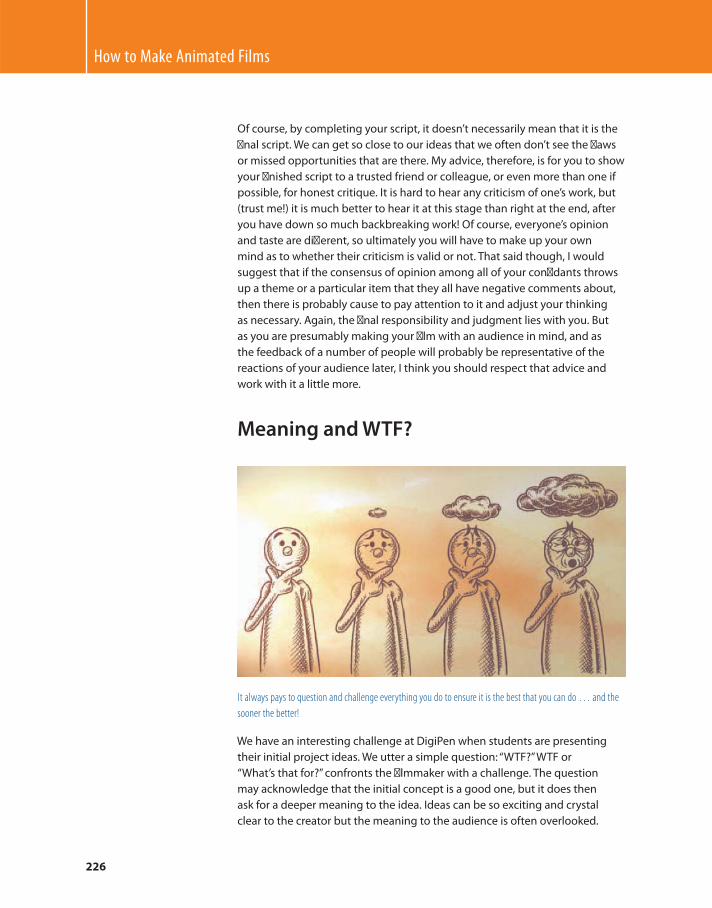
How to Make Animated Films
226
Of course, by completing your script, it doesn’t necessarily mean that it is the
fi nal script. We can get so close to our ideas that we often don’t see the fl aws
or missed opportunities that are there. My advice, therefore, is for you to show
your fi nished script to a trusted friend or colleague, or even more than one if
possible, for honest critique. It is hard to hear any criticism of one’s work, but
(trust me!) it is much better to hear it at this stage than right at the end, after
you have down so much backbreaking work! Of course, everyone’s opinion
and taste are diff erent, so ultimately you will have to make up your own
mind as to whether their criticism is valid or not. That said though, I would
suggest that if the consensus of opinion among all of your confi dants throws
up a theme or a particular item that they all have negative comments about,
then there is probably cause to pay attention to it and adjust your thinking
as necessary. Again, the fi nal responsibility and judgment lies with you. But
as you are presumably making your fi lm with an audience in mind, and as
the feedback of a number of people will probably be representative of the
reactions of your audience later, I think you should respect that advice and
work with it a little more.
Meaning and WTF?
It always pays to question and challenge everything you do to ensure it is the best that you can do … and the
sooner the better!
We have an interesting challenge at DigiPen when students are presenting
their initial project ideas. We utter a simple question: “ WTF? ” WTF or
“ What’s that for? ” confronts the fi lmmaker with a challenge. The question
may acknowledge that the initial concept is a good one, but it does then
ask for a deeper meaning to the idea. Ideas can be so exciting and crystal
clear to the creator but the meaning to the audience is often overlooked.
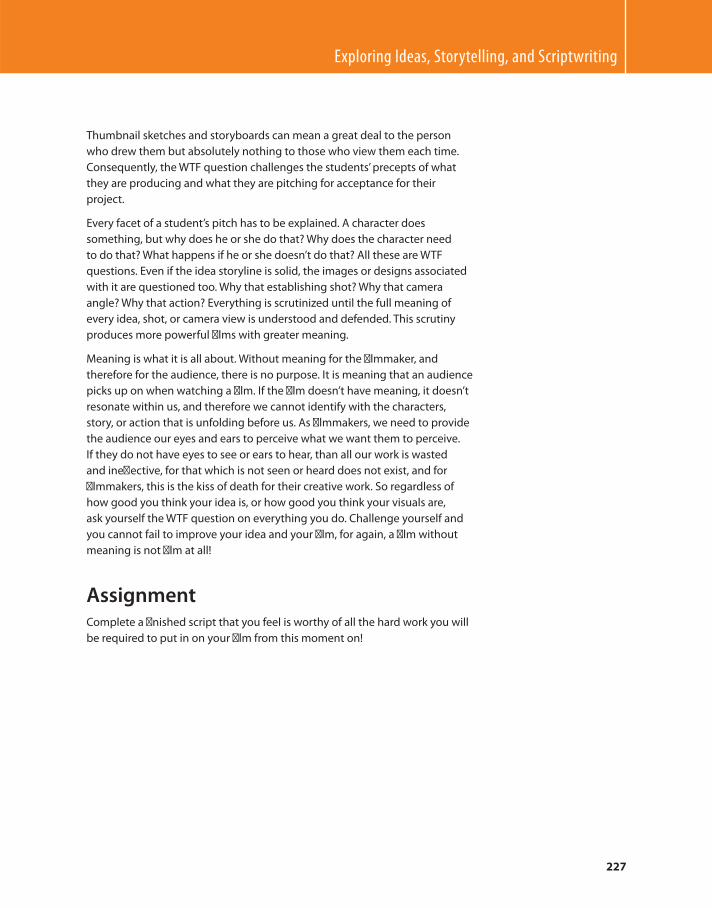
Exploring Ideas, Storytelling, and Scriptwriting
227
Thumbnail sketches and storyboards can mean a great deal to the person
who drew them but absolutely nothing to those who view them each time.
Consequently, the WTF question challenges the students ’ precepts of what
they are producing and what they are pitching for acceptance for their
project.
Every facet of a student’s pitch has to be explained. A character does
something, but why does he or she do that? Why does the character need
to do that? What happens if he or she doesn’t do that? All these are WTF
questions. Even if the idea storyline is solid, the images or designs associated
with it are questioned too. Why that establishing shot? Why that camera
angle? Why that action? Everything is scrutinized until the full meaning of
every idea, shot, or camera view is understood and defended. This scrutiny
produces more powerful fi lms with greater meaning.
Meaning is what it is all about. Without meaning for the fi lmmaker, and
therefore for the audience, there is no purpose. It is meaning that an audience
picks up on when watching a fi lm. If the fi lm doesn’t have meaning, it doesn’t
resonate within us, and therefore we cannot identify with the characters,
story, or action that is unfolding before us. As fi lmmakers, we need to provide
the audience our eyes and ears to perceive what we want them to perceive.
If they do not have eyes to see or ears to hear, than all our work is wasted
and ineff ective, for that which is not seen or heard does not exist, and for
fi lmmakers, this is the kiss of death for their creative work. So regardless of
how good you think your idea is, or how good you think your visuals are,
ask yourself the WTF question on everything you do. Challenge yourself and
you cannot fail to improve your idea and your fi lm, for again, a fi lm without
meaning is not fi lm at all!
Assignment Complete a fi nished script that you feel is worthy of all the hard work you will
be required to put in on your fi lm from this moment on!

This page intentionally left blank
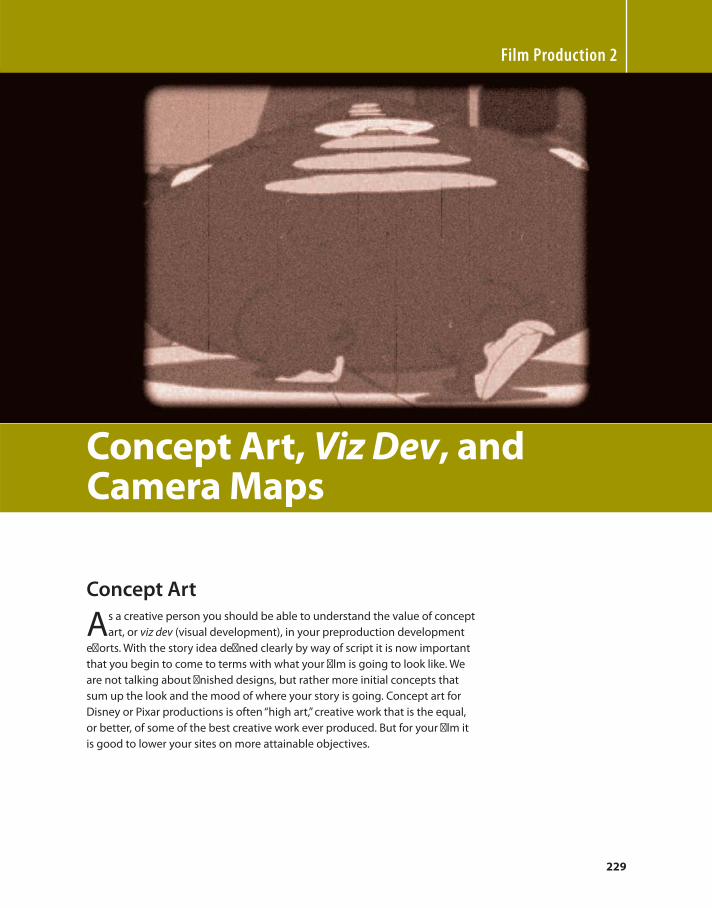
229
Concept Art
As a creative person you should be able to understand the value of concept
art, or viz dev (visual development), in your preproduction development
eff orts. With the story idea defi ned clearly by way of script it is now important
that you begin to come to terms with what your fi lm is going to look like. We
are not talking about fi nished designs, but rather more initial concepts that
sum up the look and the mood of where your story is going. Concept art for
Disney or Pixar productions is often “ high art, ” creative work that is the equal,
or better, of some of the best creative work ever produced. But for your fi lm it
is good to lower your sites on more attainable objectives.
Film Production 2
Concept Art , Viz Dev , and Camera Maps
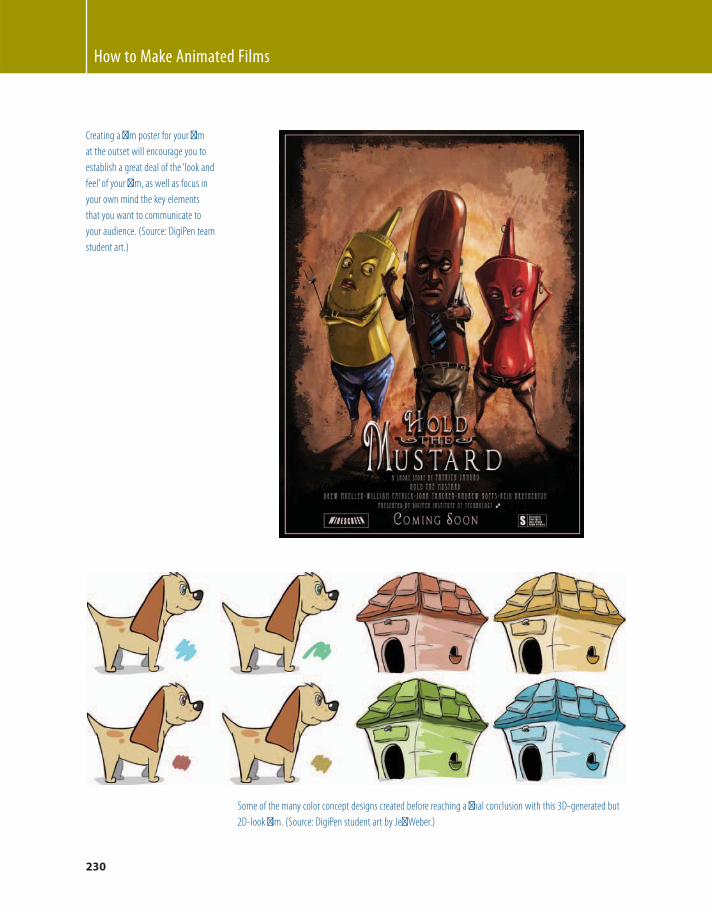
How to Make Animated Films
230
Creating a fi lm poster for your fi lm
at the outset will encourage you to
establish a great deal of the ‘ look and
feel ’ of your fi lm, as well as focus in
your own mind the key elements
that you want to communicate to
your audience. (Source: DigiPen team
student art.)
Some of the many color concept designs created before reaching a fi nal conclusion with this 3D-generated but
2D-look fi lm. (Source: DigiPen student art by Jeff Weber.)
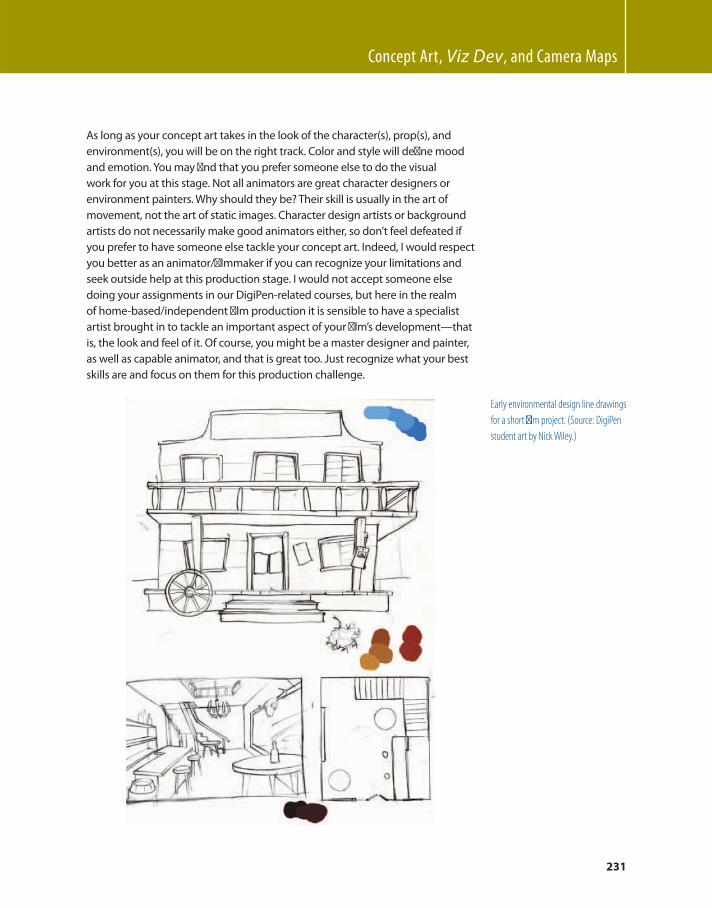
Concept Art , Viz Dev , and Camera Maps
231
As long as your concept art takes in the look of the character(s), prop(s), and
environment(s), you will be on the right track. Color and style will defi ne mood
and emotion. You may fi nd that you prefer someone else to do the visual
work for you at this stage. Not all animators are great character designers or
environment painters. Why should they be? Their skill is usually in the art of
movement, not the art of static images. Character design artists or background
artists do not necessarily make good animators either, so don’t feel defeated if
you prefer to have someone else tackle your concept art. Indeed, I would respect
you better as an animator/fi lmmaker if you can recognize your limitations and
seek outside help at this production stage. I would not accept someone else
doing your assignments in our DigiPen-related courses, but here in the realm
of home-based/independent fi lm production it is sensible to have a specialist
artist brought in to tackle an important aspect of your fi lm’s development — that
is, the look and feel of it. Of course, you might be a master designer and painter,
as well as capable animator, and that is great too. Just recognize what your best
skills are and focus on them for this production challenge.
Early environmental design line drawings
for a short fi lm project. (Source: DigiPen
student art by Nick Wiley.)
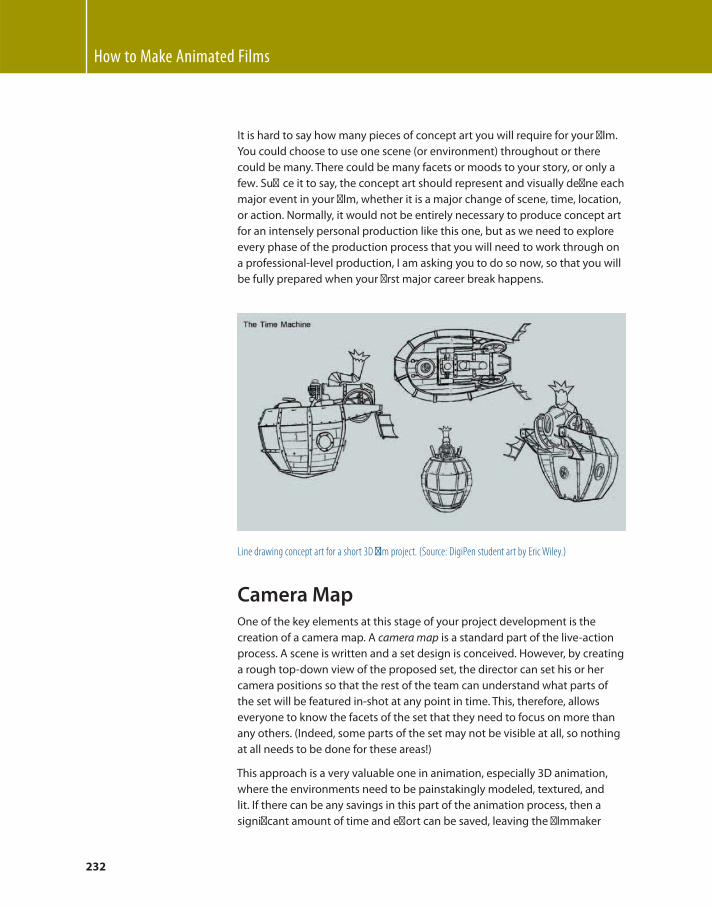
How to Make Animated Films
232
It is hard to say how many pieces of concept art you will require for your fi lm.
You could choose to use one scene (or environment) throughout or there
could be many. There could be many facets or moods to your story, or only a
few . Suffi ce it to say, the concept art should represent and visually defi ne each
major event in your fi lm, whether it is a major change of scene, time, location,
or action. Normally, it would not be entirely necessary to produce concept art
for an intensely personal production like this one, but as we need to explore
every phase of the production process that you will need to work through on
a professional-level production, I am asking you to do so now, so that you will
be fully prepared when your fi rst major career break happens.
Line drawing concept art for a short 3D fi lm project. (Source: DigiPen student art by Eric Wiley.)
Camera Map One of the key elements at this stage of your project development is the
creation of a camera map. A camera map is a standard part of the live-action
process. A scene is written and a set design is conceived. However, by creating
a rough top-down view of the proposed set, the director can set his or her
camera positions so that the rest of the team can understand what parts of
the set will be featured in-shot at any point in time. This, therefore, allows
everyone to know the facets of the set that they need to focus on more than
any others. (Indeed, some parts of the set may not be visible at all, so nothing
at all needs to be done for these areas!)
This approach is a very valuable one in animation, especially 3D animation,
where the environments need to be painstakingly modeled, textured, and
lit. If there can be any savings in this part of the animation process, then a
signifi cant amount of time and eff ort can be saved, leaving the fi lmmaker
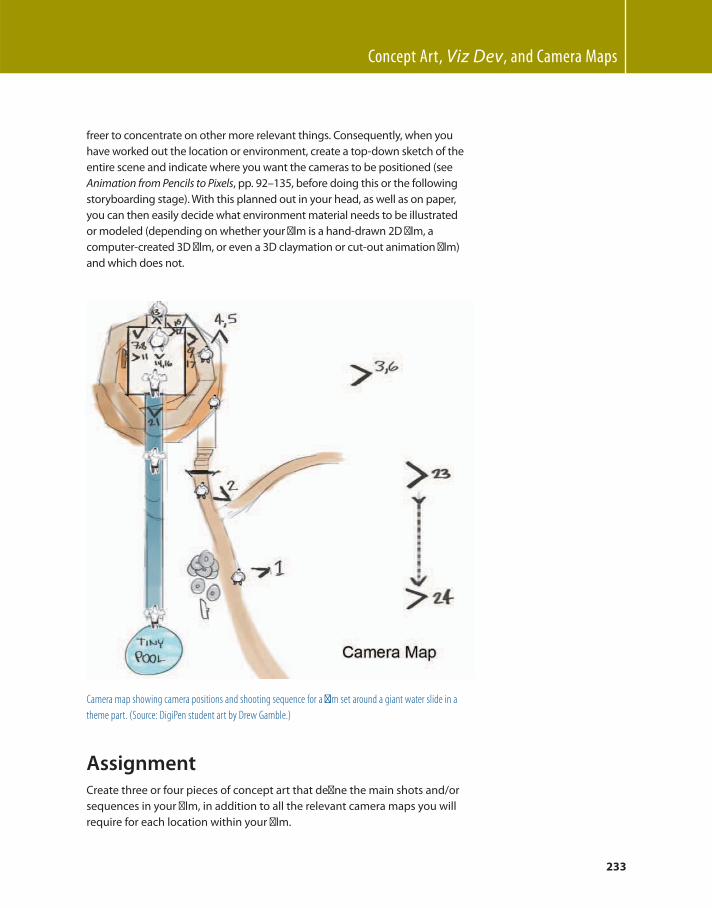
Concept Art , Viz Dev , and Camera Maps
233
freer to concentrate on other more relevant things. Consequently, when you
have worked out the location or environment, create a top-down sketch of the
entire scene and indicate where you want the cameras to be positioned (see
Animation from Pencils to Pixels , pp. 92 – 135 , before doing this or the following
storyboarding stage). With this planned out in your head, as well as on paper,
you can then easily decide what environment material needs to be illustrated
or modeled (depending on whether your fi lm is a hand-drawn 2D fi lm, a
computer-created 3D fi lm, or even a 3D claymation or cut-out animation fi lm)
and which does not.
Camera map showing camera positions and shooting sequence for a fi lm set around a giant water slide in a
theme part. (Source: DigiPen student art by Drew Gamble.)
Assignment Create three or four pieces of concept art that defi ne the main shots and/or
sequences in your fi lm, in addition to all the relevant camera maps you will
require for each location within your fi lm.

This page intentionally left blank
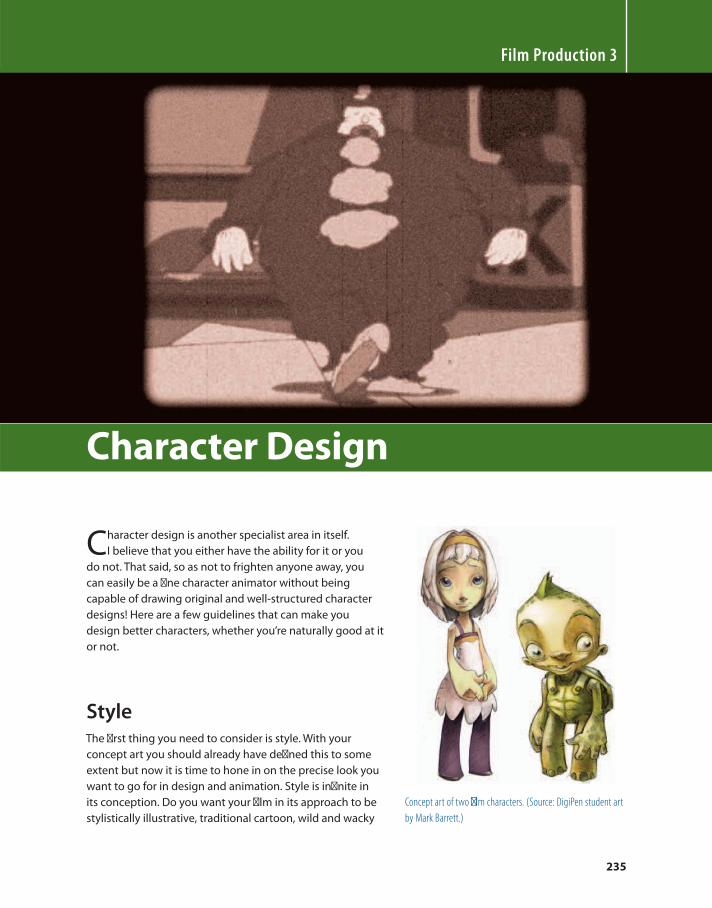
235
Film Production 3
Character Design
Character design is another specialist area in itself.
I believe that you either have the ability for it or you
do not. That said, so as not to frighten anyone away, you
can easily be a fi ne character animator without being
capable of drawing original and well-structured character
designs! Here are a few guidelines that can make you
design better characters, whether you’re naturally good at it
or not.
Style The fi rst thing you need to consider is style. With your
concept art you should already have defi ned this to some
extent but now it is time to hone in on the precise look you
want to go for in design and animation. Style is infi nite in
its conception. Do you want your fi lm in its approach to be
stylistically illustrative, traditional cartoon, wild and wacky
Concept art of two fi lm characters. (Source: DigiPen student art
by Mark Barrett.)
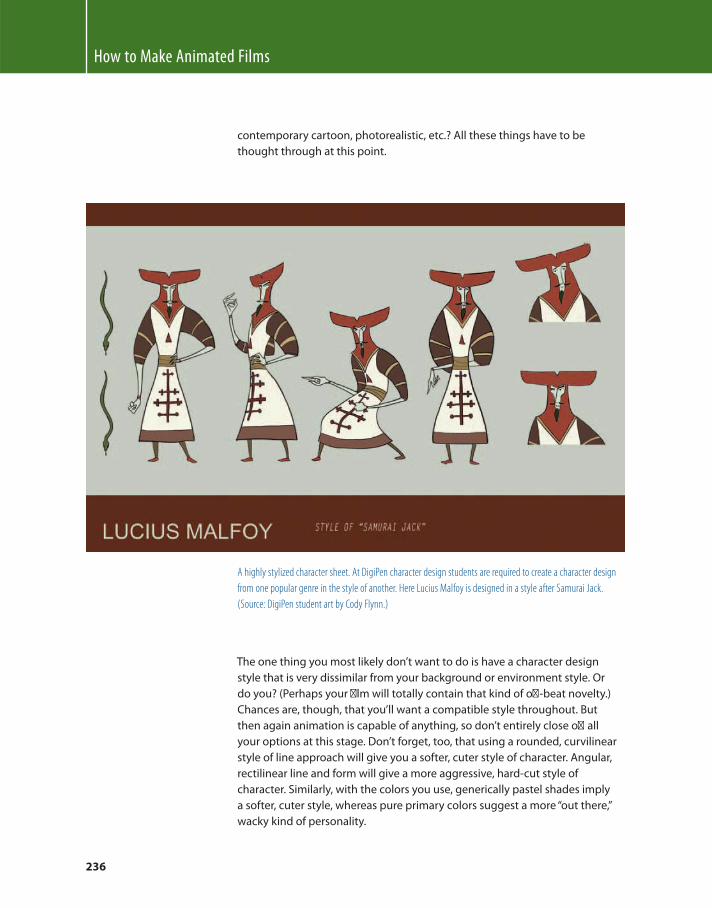
How to Make Animated Films
236
A highly stylized character sheet. At DigiPen character design students are required to create a character design
from one popular genre in the style of another. Here Lucius Malfoy is designed in a style after Samurai Jack .
(Source: DigiPen student art by Cody Flynn.)
The one thing you most likely don’t want to do is have a character design
style that is very dissimilar from your background or environment style. Or
do you? (Perhaps your fi lm will totally contain that kind of off -beat novelty.)
Chances are, though, that you’ll want a compatible style throughout. But
then again animation is capable of anything, so don’t entirely close off all
your options at this stage. Don’t forget, too, that using a rounded, curvilinear
style of line approach will give you a softer, cuter style of character. Angular,
rectilinear line and form will give a more aggressive, hard-cut style of
character. Similarly, with the colors you use, generically pastel shades imply
a softer, cuter style, whereas pure primary colors suggest a more “ out there, ”
wacky kind of personality.
contemporary cartoon, photorealistic, etc.? All these things have to be
thought through at this point.

Character Design
237
Designs in a harsh and hard rectilinear style and others in a soft and gentle curvilinear style. (Source: DigiPen
student art by Mike Mazza and Jarod Erwin.)
Just remember than when you ultimately make your decision, be conscious
about why you have made it and why it works best that way in the fi rst place.
Don’t just stumble through, thinking it will all look good in the end. It won’t.
You have to have a reason for doing everything in animation. Everything you
do needs to be planned with eyes wide open.
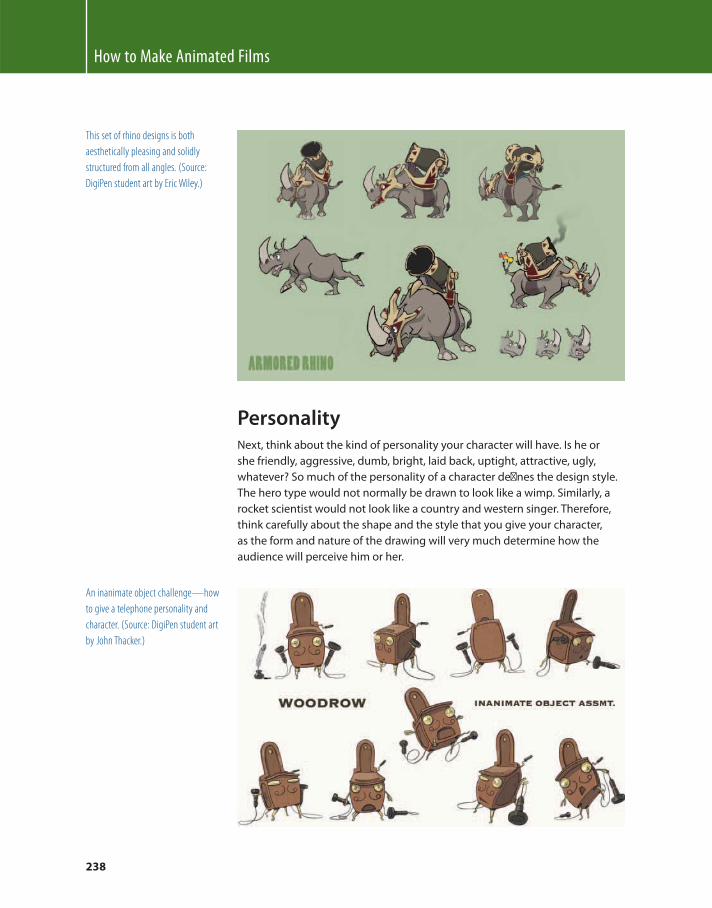
How to Make Animated Films
238
This set of rhino designs is both
aesthetically pleasing and solidly
structured from all angles. (Source:
DigiPen student art by Eric Wiley.)
Personality Next, think about the kind of personality your character will have. Is he or
she friendly, aggressive, dumb, bright, laid back, uptight, attractive, ugly,
whatever? So much of the personality of a character defi nes the design style.
The hero type would not normally be drawn to look like a wimp. Similarly, a
rocket scientist would not look like a country and western singer. Therefore,
think carefully about the shape and the style that you give your character,
as the form and nature of the drawing will very much determine how the
audience will perceive him or her.
An inanimate object challenge — how
to give a telephone personality and
character. (Source: DigiPen student art
by John Thacker.)
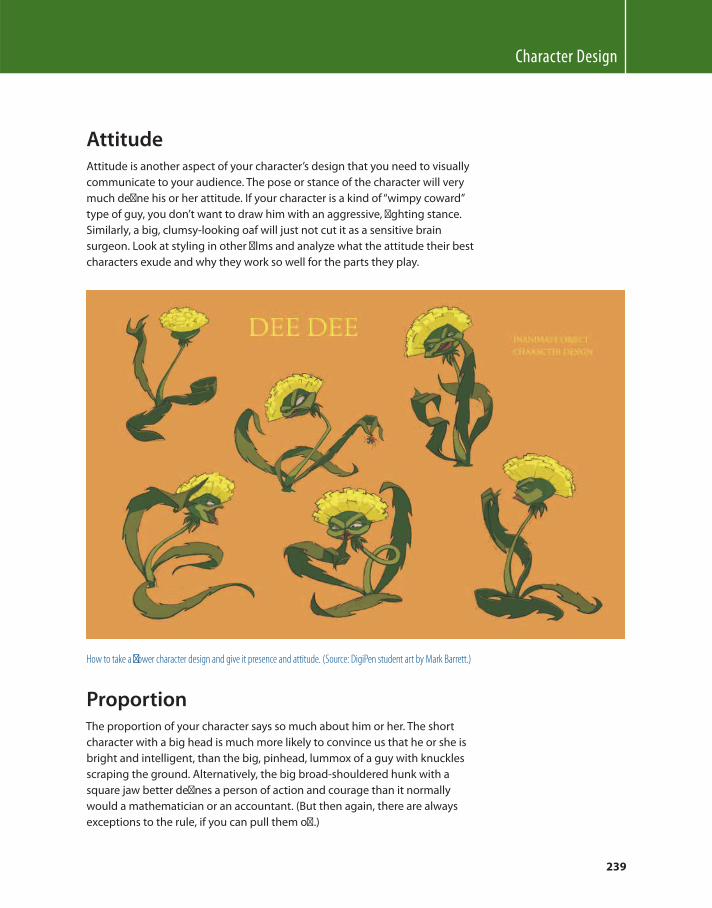
Character Design
239
Attitude Attitude is another aspect of your character’s design that you need to visually
communicate to your audience. The pose or stance of the character will very
much defi ne his or her attitude. If your character is a kind of “ wimpy coward ”
type of guy, you don’t want to draw him with an aggressive, fi ghting stance.
Similarly, a big, clumsy-looking oaf will just not cut it as a sensitive brain
surgeon. Look at styling in other fi lms and analyze what the attitude their best
characters exude and why they work so well for the parts they play.
How to take a fl ower character design and give it presence and attitude. (Source: DigiPen student art by Mark Barrett.)
Proportion The proportion of your character says so much about him or her. The short
character with a big head is much more likely to convince us that he or she is
bright and intelligent, than the big, pinhead, lummox of a guy with knuckles
scraping the ground. Alternatively, the big broad-shouldered hunk with a
square jaw better defi nes a person of action and courage than it normally
would a mathematician or an accountant. (But then again, there are always
exceptions to the rule, if you can pull them off .)
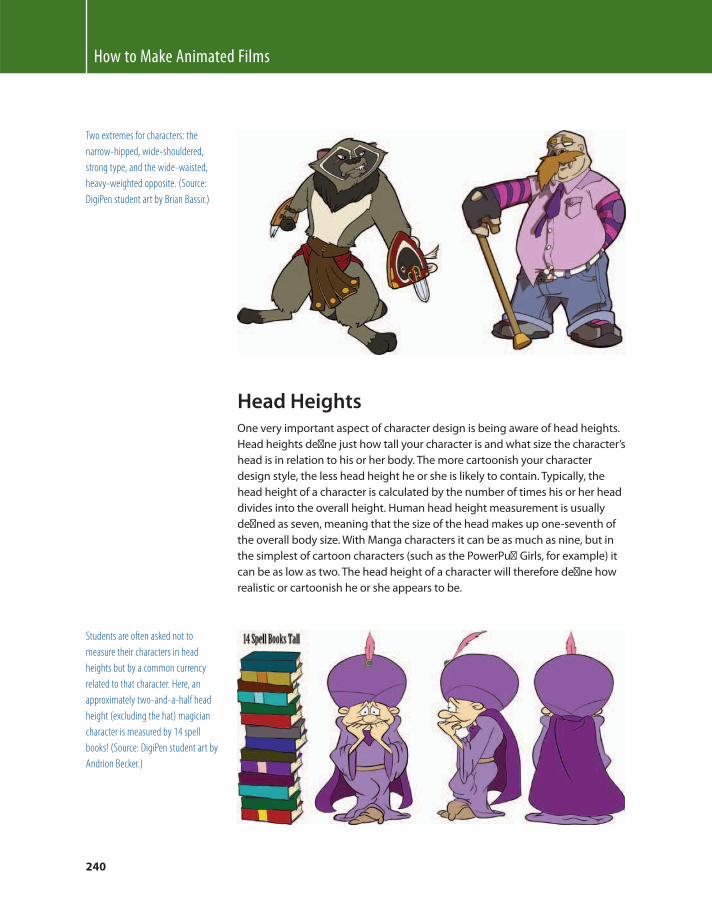
How to Make Animated Films
240
Two extremes for characters: the
narrow-hipped, wide-shouldered,
strong type, and the wide-waisted,
heavy-weighted opposite. (Source:
DigiPen student art by Brian Bassir.)
Head Heights One very important aspect of character design is being aware of head heights.
Head heights defi ne just how tall your character is and what size the character’s
head is in relation to his or her body. The more cartoonish your character
design style, the less head height he or she is likely to contain. Typically, the
head height of a character is calculated by the number of times his or her head
divides into the overall height. Human head height measurement is usually
defi ned as seven, meaning that the size of the head makes up one-seventh of
the overall body size. With Manga characters it can be as much as nine, but in
the simplest of cartoon characters (such as the PowerPuff Girls, for example) it
can be as low as two. The head height of a character will therefore defi ne how
realistic or cartoonish he or she appears to be.
Students are often asked not to
measure their characters in head
heights but by a common currency
related to that character. Here, an
approximately two-and-a-half head
height (excluding the hat) magician
character is measured by 14 spell
books! (Source: DigiPen student art by
Andrion Becker.)
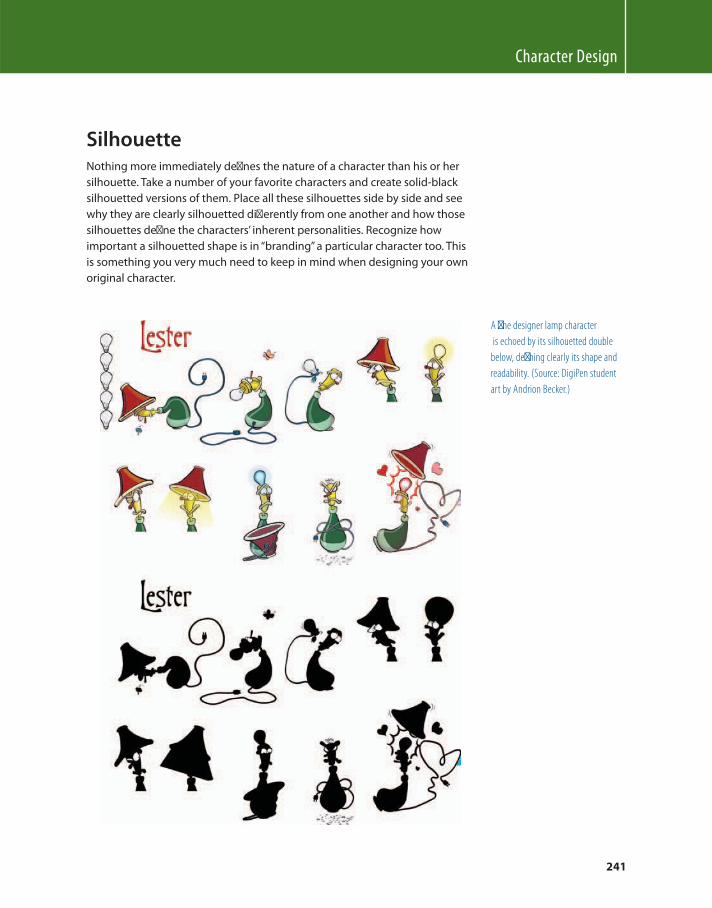
Character Design
241
Silhouette Nothing more immediately defi nes the nature of a character than his or her
silhouette. Take a number of your favorite characters and create solid-black
silhouetted versions of them. Place all these silhouettes side by side and see
why they are clearly silhouetted diff erently from one another and how those
silhouettes defi ne the characters ’ inherent personalities. Recognize how
important a silhouetted shape is in “ branding ” a particular character too. This
is something you very much need to keep in mind when designing your own
original character.
A fi ne designer lamp character
is echoed by its silhouetted double
below, defi ning clearly its shape and
readability. (Source: DigiPen student
art by Andrion Becker.)
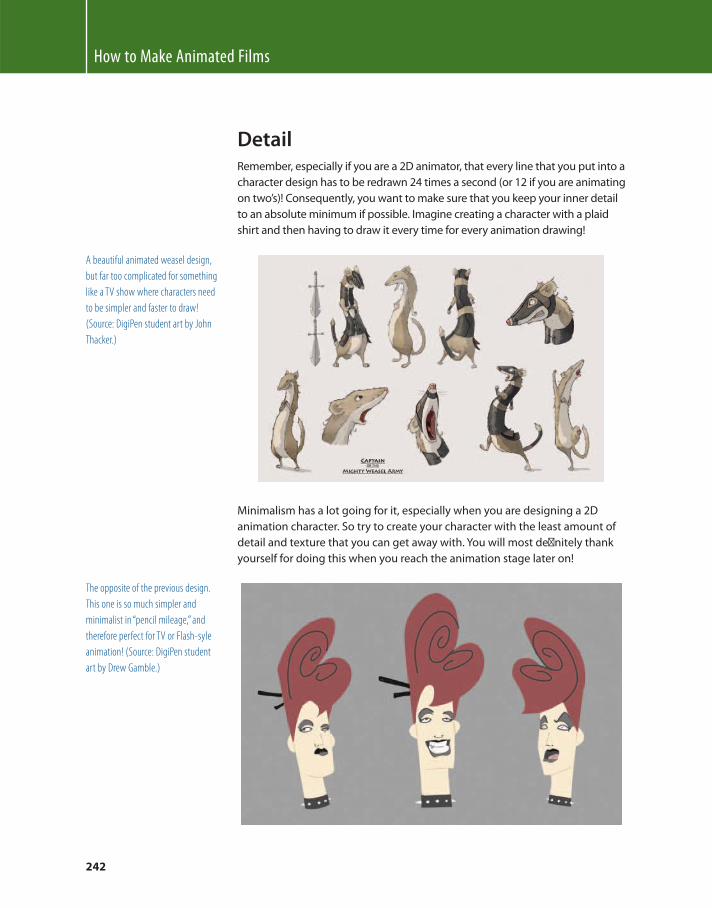
How to Make Animated Films
242
Detail Remember, especially if you are a 2D animator, that every line that you put into a
character design has to be redrawn 24 times a second (or 12 if you are animating
on two’s)! Consequently, you want to make sure that you keep your inner detail
to an absolute minimum if possible. Imagine creating a character with a plaid
shirt and then having to draw it every time for every animation drawing!
A beautiful animated weasel design,
but far too complicated for something
like a TV show where characters need
to be simpler and faster to draw!
(Source: DigiPen student art by John
Thacker.)
Minimalism has a lot going for it, especially when you are designing a 2D
animation character. So try to create your character with the least amount of
detail and texture that you can get away with. You will most defi nitely thank
yourself for doing this when you reach the animation stage later on!
The opposite of the previous design.
This one is so much simpler and
minimalist in “ pencil mileage, ” and
therefore perfect for TV or Flash-syle
animation! (Source: DigiPen student
art by Drew Gamble.)
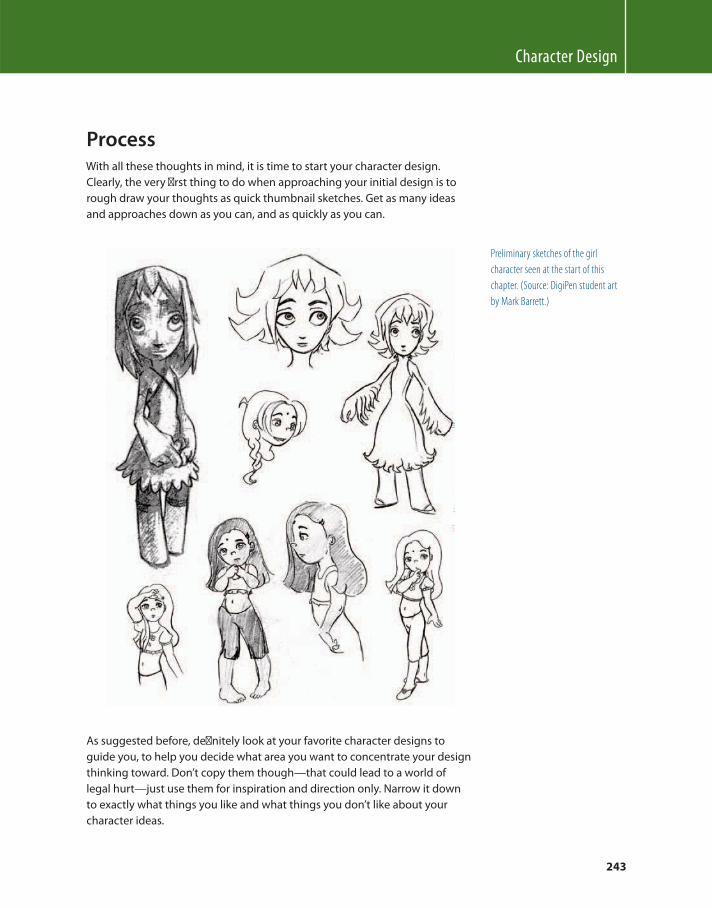
Character Design
243
Process With all these thoughts in mind, it is time to start your character design.
Clearly, the very fi rst thing to do when approaching your initial design is to
rough draw your thoughts as quick thumbnail sketches. Get as many ideas
and approaches down as you can, and as quickly as you can.
Preliminary sketches of the girl
character seen at the start of this
chapter. (Source: DigiPen student art
by Mark Barrett.)
As suggested before, defi nitely look at your favorite character designs to
guide you, to help you decide what area you want to concentrate your design
thinking toward. Don’t copy them though — that could lead to a world of
legal hurt — just use them for inspiration and direction only. Narrow it down
to exactly what things you like and what things you don’t like about your
character ideas.
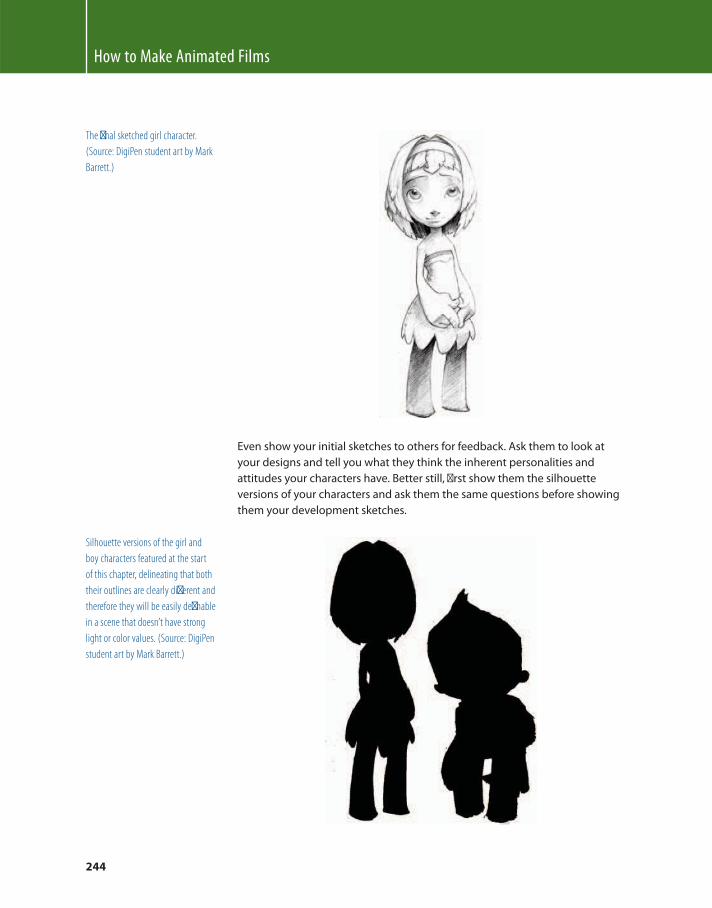
How to Make Animated Films
244
The fi nal sketched girl character.
(Source: DigiPen student art by Mark
Barrett.)
Even show your initial sketches to others for feedback. Ask them to look at
your designs and tell you what they think the inherent personalities and
attitudes your characters have. Better still, fi rst show them the silhouette
versions of your characters and ask them the same questions before showing
them your development sketches.
Silhouette versions of the girl and
boy characters featured at the start
of this chapter, delineating that both
their outlines are clearly diff erent and
therefore they will be easily defi nable
in a scene that doesn’t have strong
light or color values. (Source: DigiPen
student art by Mark Barrett.)
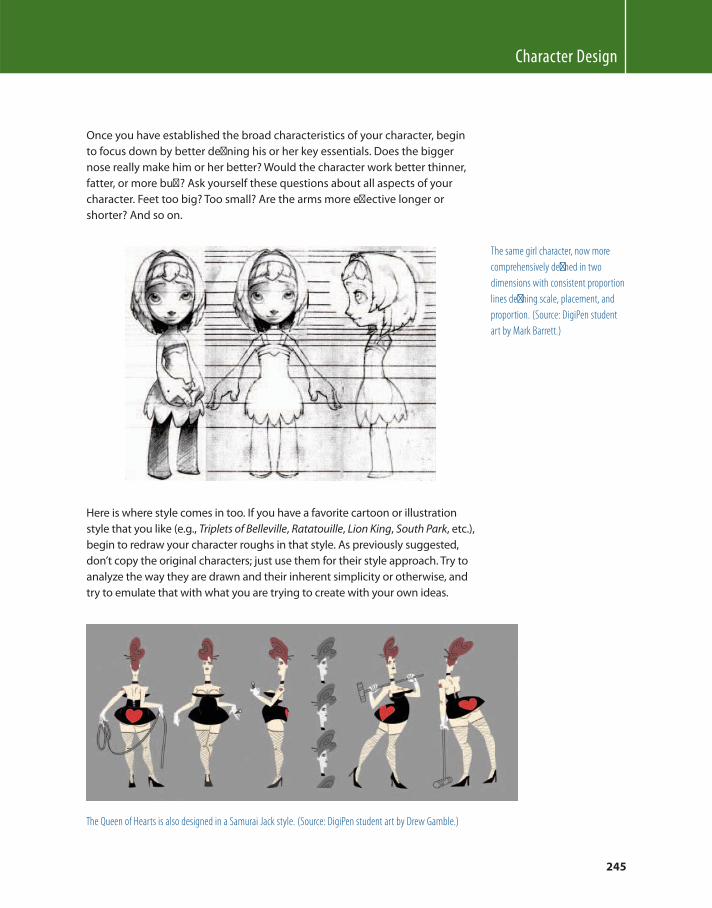
Character Design
245
Once you have established the broad characteristics of your character, begin
to focus down by better defi ning his or her key essentials. Does the bigger
nose really make him or her better? Would the character work better thinner,
fatter, or more buff ? Ask yourself these questions about all aspects of your
character. Feet too big? Too small? Are the arms more eff ective longer or
shorter? And so on.
The same girl character, now more
comprehensively defi ned in two
dimensions with consistent proportion
lines defi ning scale, placement, and
proportion. (Source: DigiPen student
art by Mark Barrett.)
Here is where style comes in too. If you have a favorite cartoon or illustration
style that you like (e.g., Triplets of Belleville , Ratatouille , Lion King , South Park , etc.),
begin to redraw your character roughs in that style. As previously suggested,
don’t copy the original characters; just use them for their style approach. Try to
analyze the way they are drawn and their inherent simplicity or otherwise, and
try to emulate that with what you are trying to create with your own ideas.
The Queen of Hearts is also designed in a Samurai Jack style. (Source: DigiPen student art by Drew Gamble.)
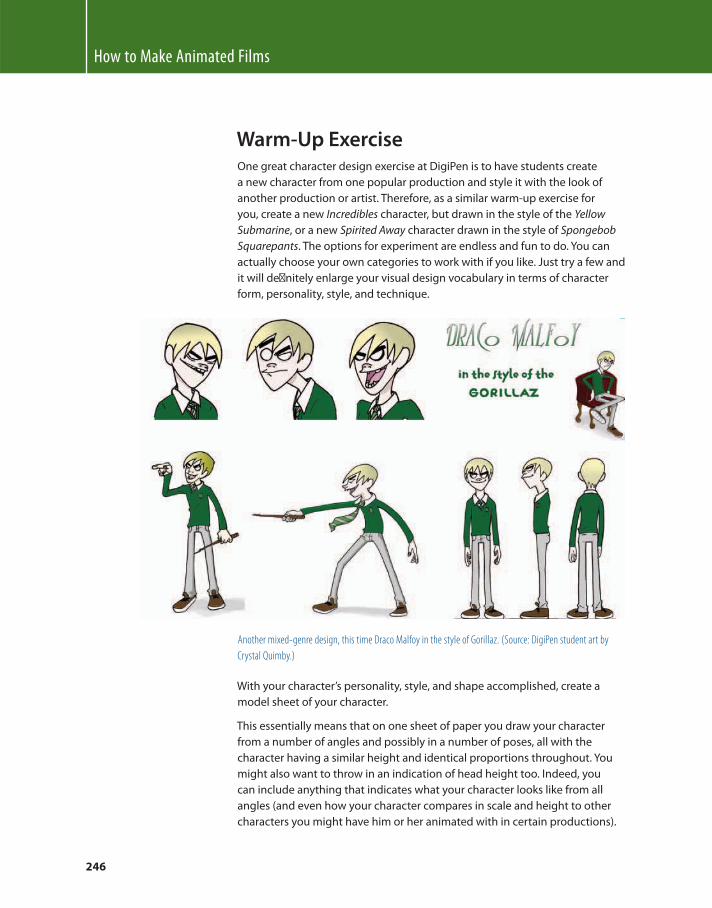
How to Make Animated Films
246
Warm-Up Exercise One great character design exercise at DigiPen is to have students create
a new character from one popular production and style it with the look of
another production or artist. Therefore, as a similar warm-up exercise for
you, create a new Incredibles character, but drawn in the style of the Yellow
Submarine , or a new Spirited Away character drawn in the style of Spongebob
Squarepants . The options for experiment are endless and fun to do. You can
actually choose your own categories to work with if you like. Just try a few and
it will defi nitely enlarge your visual design vocabulary in terms of character
form, personality, style, and technique.
Another mixed-genre design, this time Draco Malfoy in the style of Gorillaz. (Source: DigiPen student art by
Crystal Quimby.)
With your character’s personality, style, and shape accomplished, create a
model sheet of your character.
This essentially means that on one sheet of paper you draw your character
from a number of angles and possibly in a number of poses, all with the
character having a similar height and identical proportions throughout. You
might also want to throw in an indication of head height too. Indeed, you
can include anything that indicates what your character looks like from all
angles (and even how your character compares in scale and height to other
characters you might have him or her animated with in certain productions).
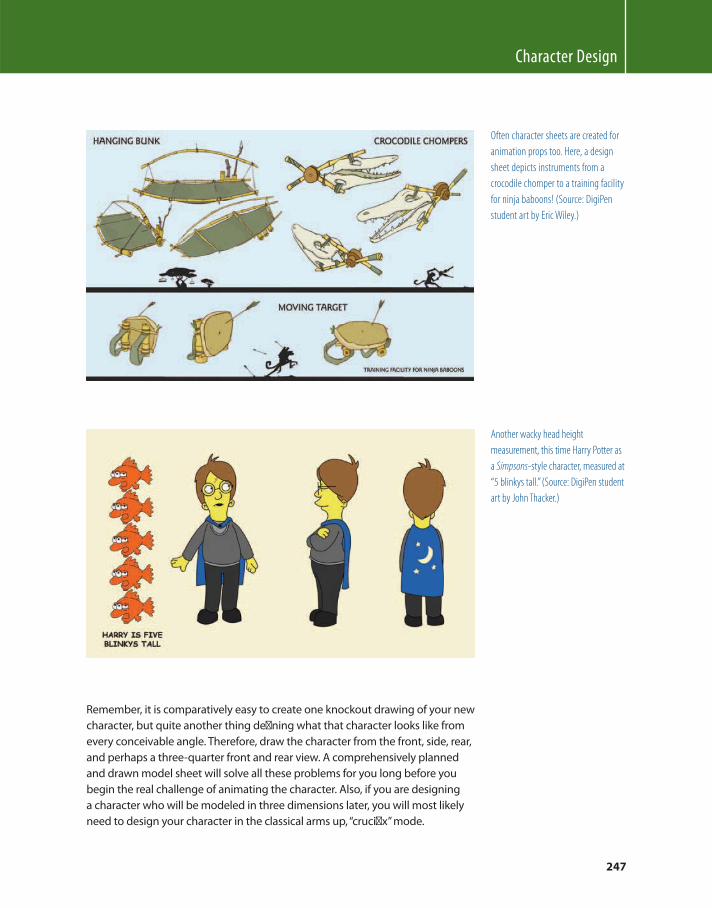
Character Design
247
Often character sheets are created for
animation props too. Here, a design
sheet depicts instruments from a
crocodile chomper to a training facility
for ninja baboons! (Source: DigiPen
student art by Eric Wiley.)
Another wacky head height
measurement, this time Harry Potter as
a Simpsons -style character, measured at
“ 5 blinkys tall. ” (Source: DigiPen student
art by John Thacker.)
Remember, it is comparatively easy to create one knockout drawing of your new
character, but quite another thing defi ning what that character looks like from
every conceivable angle. Therefore, draw the character from the front, side, rear,
and perhaps a three-quarter front and rear view. A comprehensively planned
and drawn model sheet will solve all these problems for you long before you
begin the real challenge of animating the character. Also, if you are designing
a character who will be modeled in three dimensions later, you will most likely
need to design your character in the classical arms up, “ crucifi x ” mode.
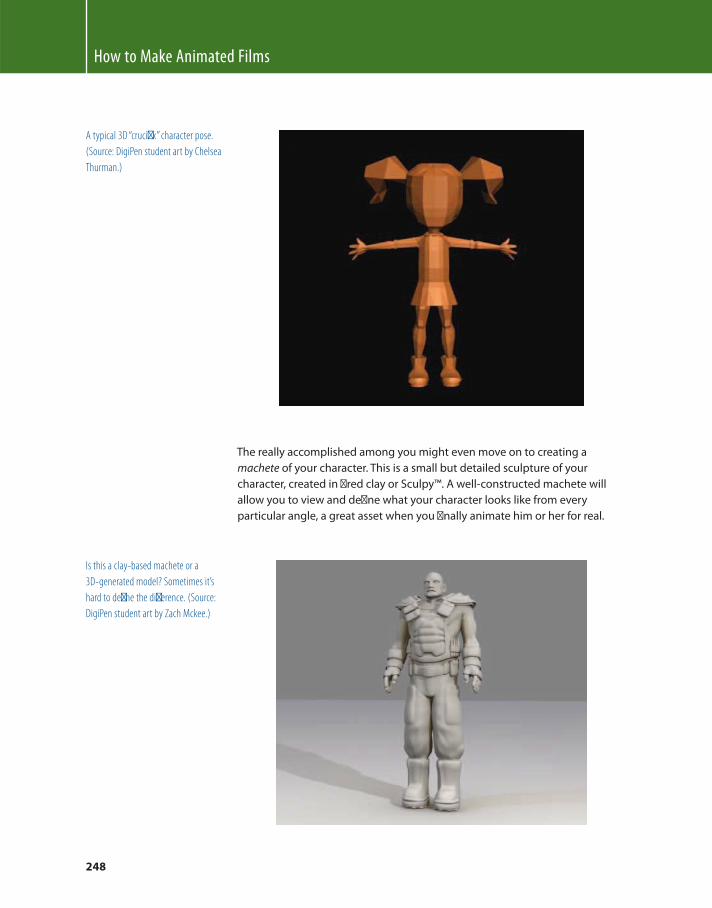
How to Make Animated Films
248
The really accomplished among you might even move on to creating a
machete of your character. This is a small but detailed sculpture of your
character, created in fi red clay or Sculpy ™ . A well-constructed machete will
allow you to view and defi ne what your character looks like from every
particular angle, a great asset when you fi nally animate him or her for real.
A typical 3D “ crucifi x ” character pose.
(Source: DigiPen student art by Chelsea
Thurman.)
Is this a clay-based machete or a
3D-generated model? Sometimes it’s
hard to defi ne the diff erence. (Source:
DigiPen student art by Zach Mckee.)
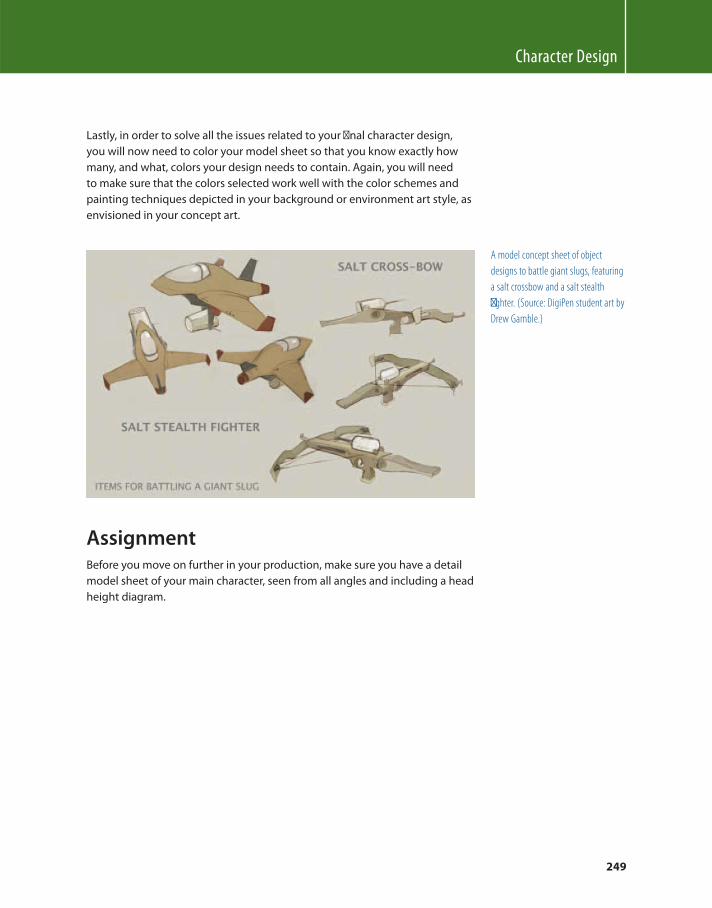
Character Design
249
Lastly, in order to solve all the issues related to your fi nal character design,
you will now need to color your model sheet so that you know exactly how
many, and what, colors your design needs to contain. Again, you will need
to make sure that the colors selected work well with the color schemes and
painting techniques depicted in your background or environment art style, as
envisioned in your concept art.
A model concept sheet of object
designs to battle giant slugs, featuring
a salt crossbow and a salt stealth
fi ghter. (Source: DigiPen student art by
Drew Gamble.)
Assignment Before you move on further in your production, make sure you have a detail
model sheet of your main character, seen from all angles and including a head
height diagram.

This page intentionally left blank
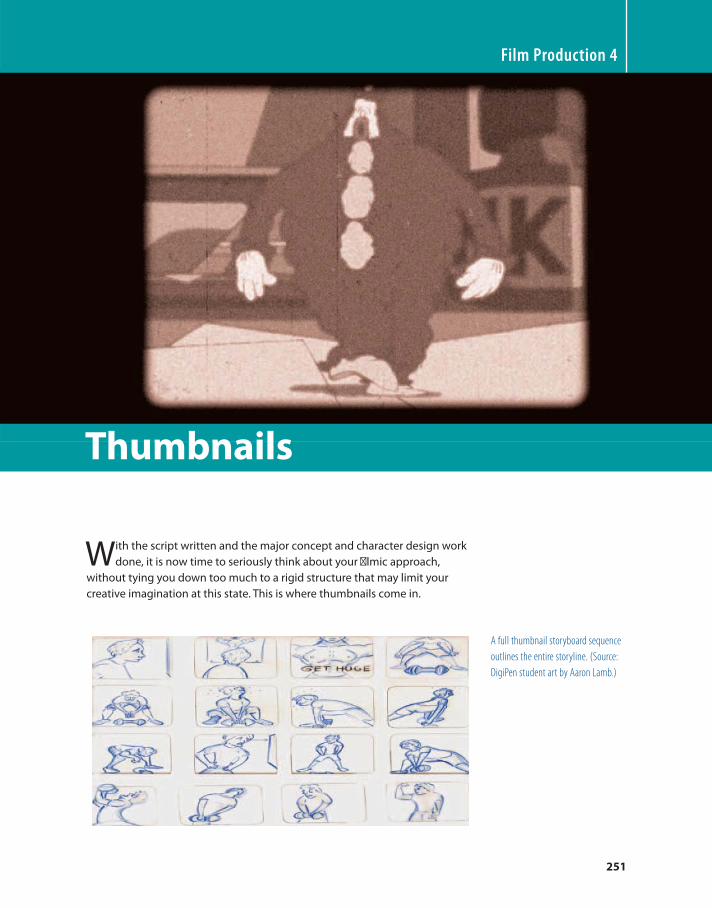
251
With the script written and the major concept and character design work
done, it is now time to seriously think about your fi lmic approach,
without tying you down too much to a rigid structure that may limit your
creative imagination at this state. This is where thumbnails come in.
Film Production 4
Thumbnails
A full thumbnail storyboard sequence
outlines the entire storyline. (Source:
DigiPen student art by Aaron Lamb.)
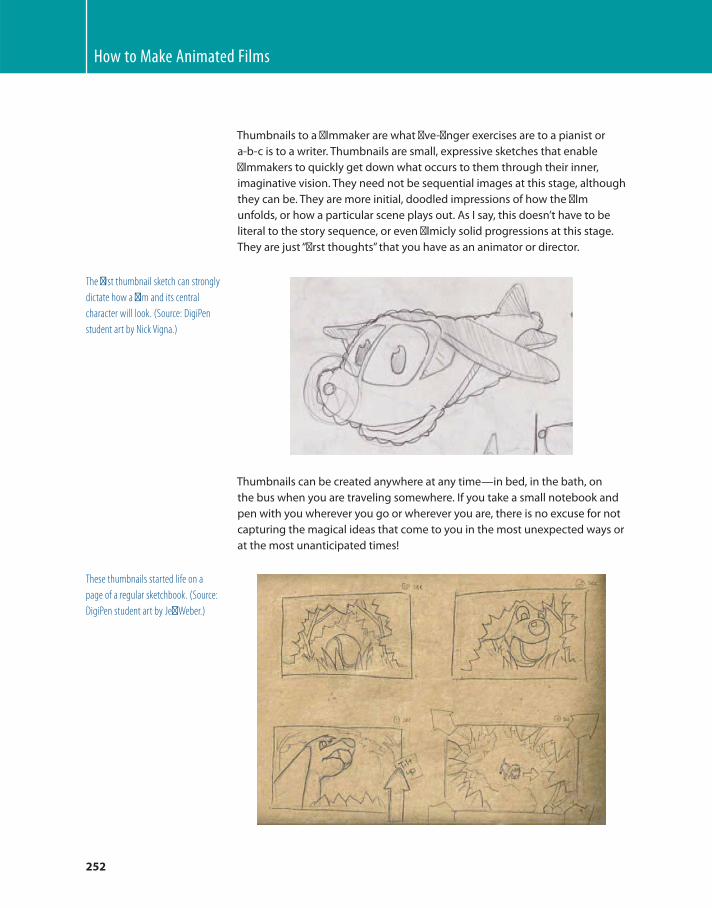
How to Make Animated Films
252
Thumbnails to a fi lmmaker are what fi ve-fi nger exercises are to a pianist or
a-b-c is to a writer. Thumbnails are small, expressive sketches that enable
fi lmmakers to quickly get down what occurs to them through their inner,
imaginative vision. They need not be sequential images at this stage, although
they can be. They are more initial, doodled impressions of how the fi lm
unfolds, or how a particular scene plays out. As I say, this doesn’t have to be
literal to the story sequence, or even fi lmicly solid progressions at this stage.
They are just “ fi rst thoughts ” that you have as an animator or director.
Thumbnails can be created anywhere at any time — in bed, in the bath, on
the bus when you are traveling somewhere. If you take a small notebook and
pen with you wherever you go or wherever you are, there is no excuse for not
capturing the magical ideas that come to you in the most unexpected ways or
at the most unanticipated times!
The fi rst thumbnail sketch can strongly
dictate how a fi lm and its central
character will look. (Source: DigiPen
student art by Nick Vigna.)
These thumbnails started life on a
page of a regular sketchbook. (Source:
DigiPen student art by Jeff Weber.)
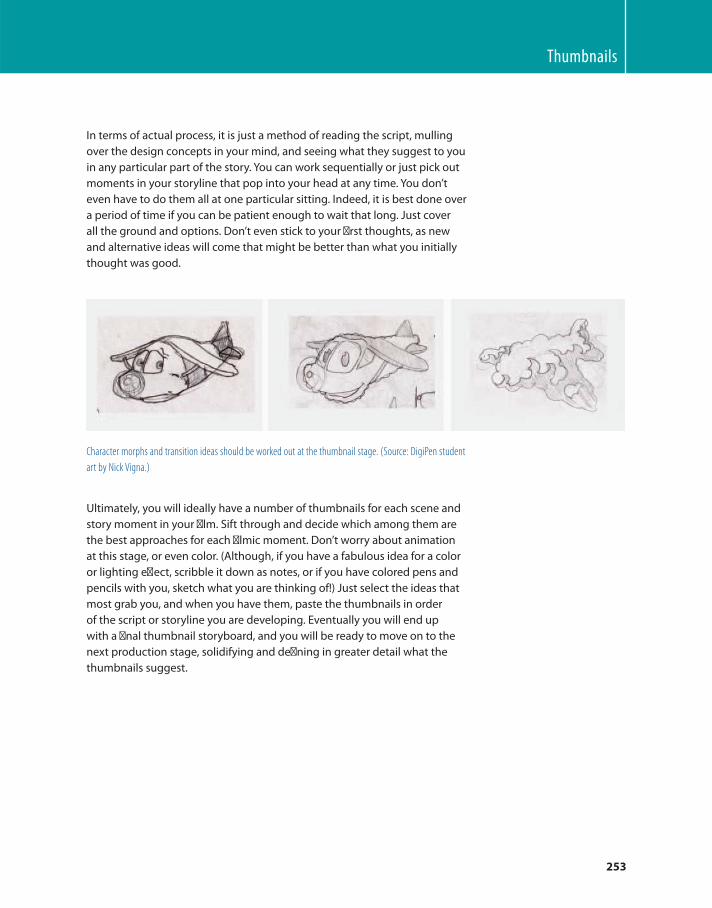
Thumbnails
253
In terms of actual process, it is just a method of reading the script, mulling
over the design concepts in your mind, and seeing what they suggest to you
in any particular part of the story. You can work sequentially or just pick out
moments in your storyline that pop into your head at any time. You don’t
even have to do them all at one particular sitting. Indeed, it is best done over
a period of time if you can be patient enough to wait that long. Just cover
all the ground and options. Don’t even stick to your fi rst thoughts, as new
and alternative ideas will come that might be better than what you initially
thought was good.
Character morphs and transition ideas should be worked out at the thumbnail stage. (Source: DigiPen student
art by Nick Vigna.)
Ultimately, you will ideally have a number of thumbnails for each scene and
story moment in your fi lm. Sift through and decide which among them are
the best approaches for each fi lmic moment. Don’t worry about animation
at this stage, or even color. (Although, if you have a fabulous idea for a color
or lighting eff ect, scribble it down as notes, or if you have colored pens and
pencils with you, sketch what you are thinking of!) Just select the ideas that
most grab you, and when you have them, paste the thumbnails in order
of the script or storyline you are developing. Eventually you will end up
with a fi nal thumbnail storyboard, and you will be ready to move on to the
next production stage, solidifying and defi ning in greater detail what the
thumbnails suggest.
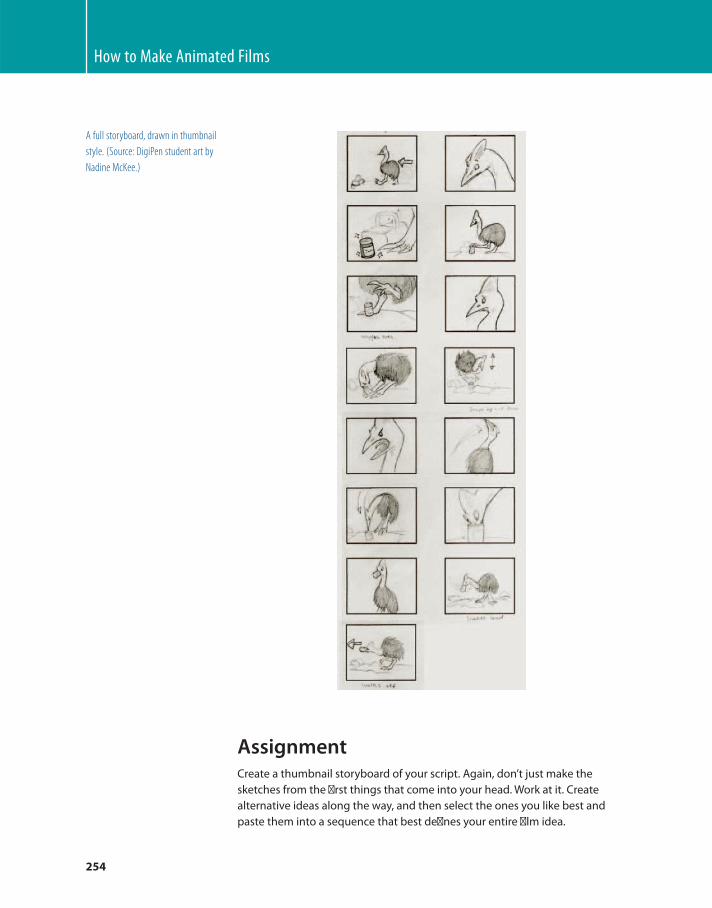
How to Make Animated Films
254
A full storyboard, drawn in thumbnail
style. (Source: DigiPen student art by
Nadine McKee.)
Assignment Create a thumbnail storyboard of your script. Again, don’t just make the
sketches from the fi rst things that come into your head. Work at it. Create
alternative ideas along the way, and then select the ones you like best and
paste them into a sequence that best defi nes your entire fi lm idea.
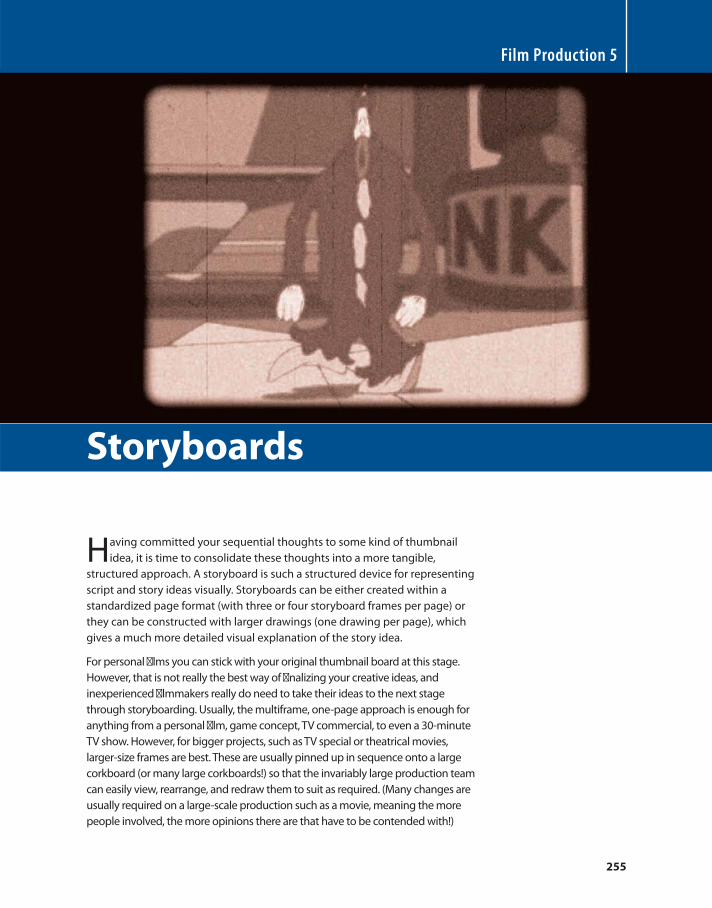
255
Having committed your sequential thoughts to some kind of thumbnail
idea, it is time to consolidate these thoughts into a more tangible,
structured approach. A storyboard is such a structured device for representing
script and story ideas visually. Storyboards can be either created within a
standardized page format (with three or four storyboard frames per page) or
they can be constructed with larger drawings (one drawing per page), which
gives a much more detailed visual explanation of the story idea.
For personal fi lms you can stick with your original thumbnail board at this stage.
However, that is not really the best way of fi nalizing your creative ideas, and
inexperienced fi lmmakers really do need to take their ideas to the next stage
through storyboarding. Usually, the multiframe, one-page approach is enough for
anything from a personal fi lm, game concept, TV commercial, to even a 30-minute
TV show. However, for bigger projects, such as TV special or theatrical movies,
larger-size frames are best. These are usually pinned up in sequence onto a large
corkboard (or many large corkboards!) so that the invariably large production team
can easily view, rearrange, and redraw them to suit as required. (Many changes are
usually required on a large-scale production such as a movie, meaning the more
people involved, the more opinions there are that have to be contended with!)
Film Production 5
Storyboards
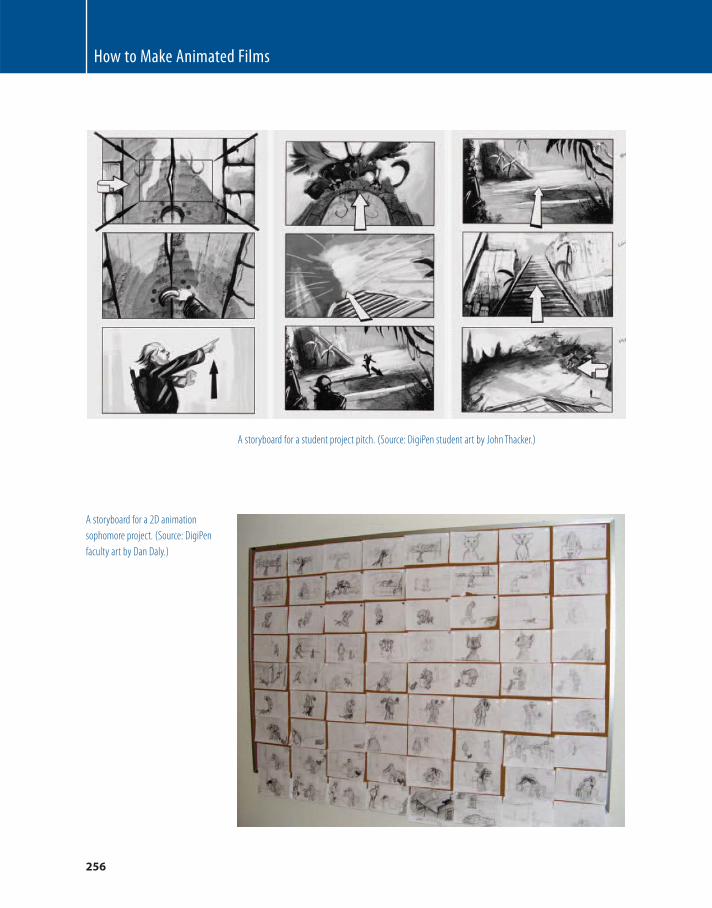
How to Make Animated Films
256
A storyboard for a student project pitch. (Source: DigiPen student art by John Thacker.)
A storyboard for a 2D animation
sophomore project. (Source: DigiPen
faculty art by Dan Daly.)
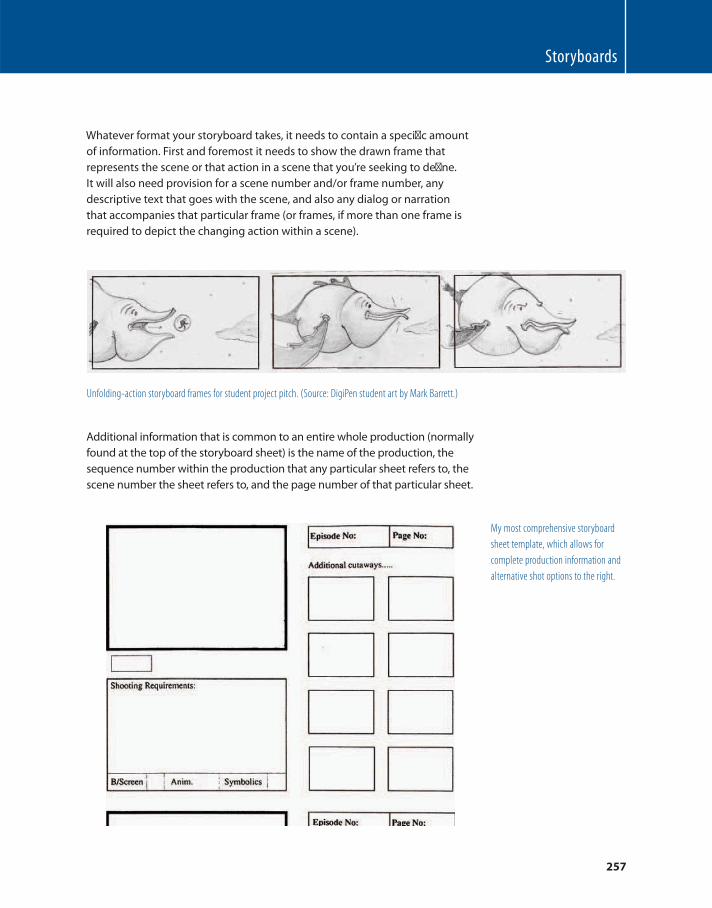
Storyboards
257
Whatever format your storyboard takes, it needs to contain a specifi c amount
of information. First and foremost it needs to show the drawn frame that
represents the scene or that action in a scene that you’re seeking to defi ne.
It will also need provision for a scene number and/or frame number, any
descriptive text that goes with the scene, and also any dialog or narration
that accompanies that particular frame (or frames, if more than one frame is
required to depict the changing action within a scene).
Unfolding-action storyboard frames for student project pitch. (Source: DigiPen student art by Mark Barrett.)
Additional information that is common to an entire whole production (normally
found at the top of the storyboard sheet) is the name of the production, the
sequence number within the production that any particular sheet refers to, the
scene number the sheet refers to, and the page number of that particular sheet.
My most comprehensive storyboard
sheet template, which allows for
complete production information and
alternative shot options to the right.
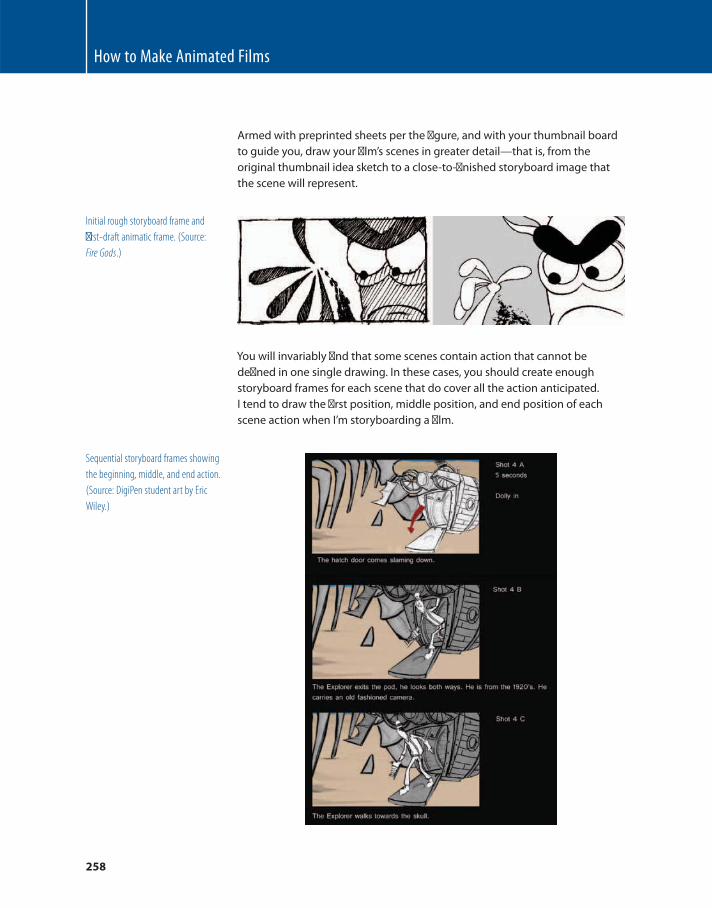
How to Make Animated Films
258
Armed with preprinted sheets per the fi gure, and with your thumbnail board
to guide you, draw your fi lm’s scenes in greater detail — that is, from the
original thumbnail idea sketch to a close-to-fi nished storyboard image that
the scene will represent.
Initial rough storyboard frame and
fi rst-draft animatic frame. (Source:
Fire Gods .)
You will invariably fi nd that some scenes contain action that cannot be
defi ned in one single drawing. In these cases, you should create enough
storyboard frames for each scene that do cover all the action anticipated.
I tend to draw the fi rst position, middle position, and end position of each
scene action when I’m storyboarding a fi lm.
Sequential storyboard frames showing
the beginning, middle, and end action.
(Source: DigiPen student art by Eric
Wiley.)
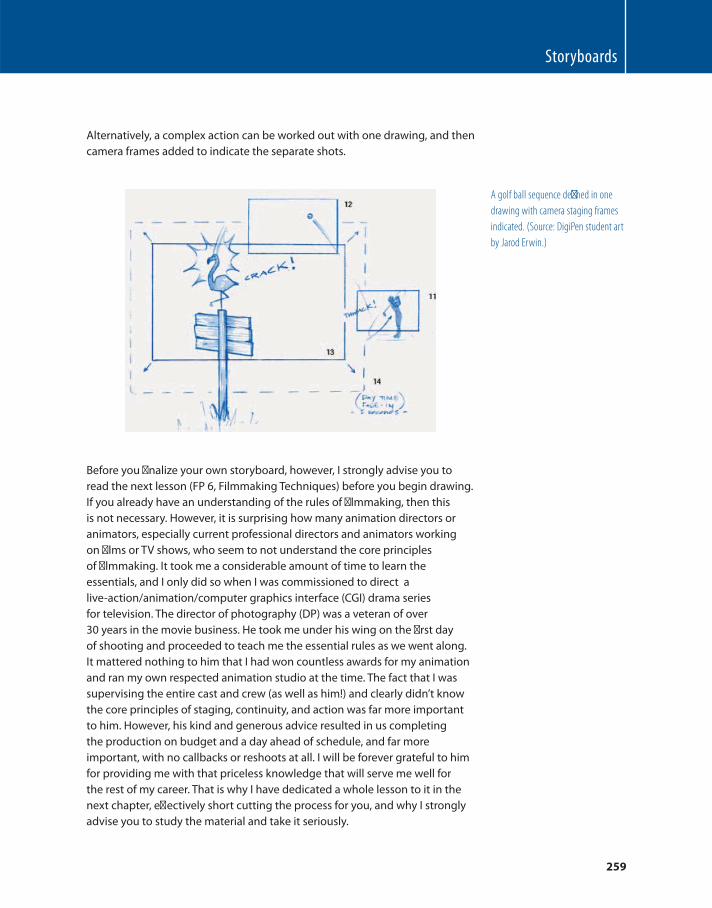
Storyboards
259
Alternatively, a complex action can be worked out with one drawing, and then
camera frames added to indicate the separate shots.
A golf ball sequence defi ned in one
drawing with camera staging frames
indicated. (Source: DigiPen student art
by Jarod Erwin.)
Before you fi nalize your own storyboard, however, I strongly advise you to
read the next lesson (FP 6, Filmmaking Techniques) before you begin drawing.
If you already have an understanding of the rules of fi lmmaking, then this
is not necessary. However, it is surprising how many animation directors or
animators, especially current professional directors and animators working
on fi lms or TV shows, who seem to not understand the core principles
of fi lmmaking. It took me a considerable amount of time to learn the
essentials, and I only did so when I was commissioned to direct a
live-action/animation/computer graphics interface (CGI) drama series
for television. The director of photography (DP) was a veteran of over
30 years in the movie business. He took me under his wing on the fi rst day
of shooting and proceeded to teach me the essential rules as we went along.
It mattered nothing to him that I had won countless awards for my animation
and ran my own respected animation studio at the time. The fact that I was
supervising the entire cast and crew (as well as him!) and clearly didn’t know
the core principles of staging, continuity, and action was far more important
to him. However, his kind and generous advice resulted in us completing
the production on budget and a day ahead of schedule, and far more
important, with no callbacks or reshoots at all. I will be forever grateful to him
for providing me with that priceless knowledge that will serve me well for
the rest of my career. That is why I have dedicated a whole lesson to it in the
next chapter, eff ectively short cutting the process for you, and why I strongly
advise you to study the material and take it seriously.
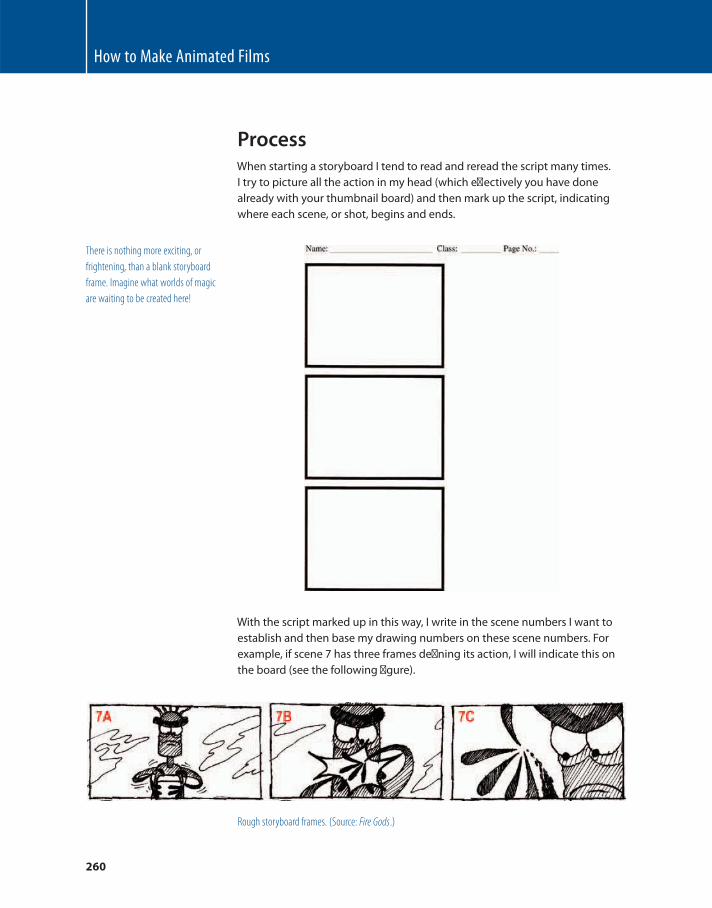
How to Make Animated Films
260
Process When starting a storyboard I tend to read and reread the script many times.
I try to picture all the action in my head (which eff ectively you have done
already with your thumbnail board) and then mark up the script, indicating
where each scene, or shot, begins and ends.
There is nothing more exciting, or
frightening, than a blank storyboard
frame. Imagine what worlds of magic
are waiting to be created here!
With the script marked up in this way, I write in the scene numbers I want to
establish and then base my drawing numbers on these scene numbers. For
example, if scene 7 has three frames defi ning its action, I will indicate this on
the board (see the following fi gure).
Rough storyboard frames. (Source: Fire Gods .)
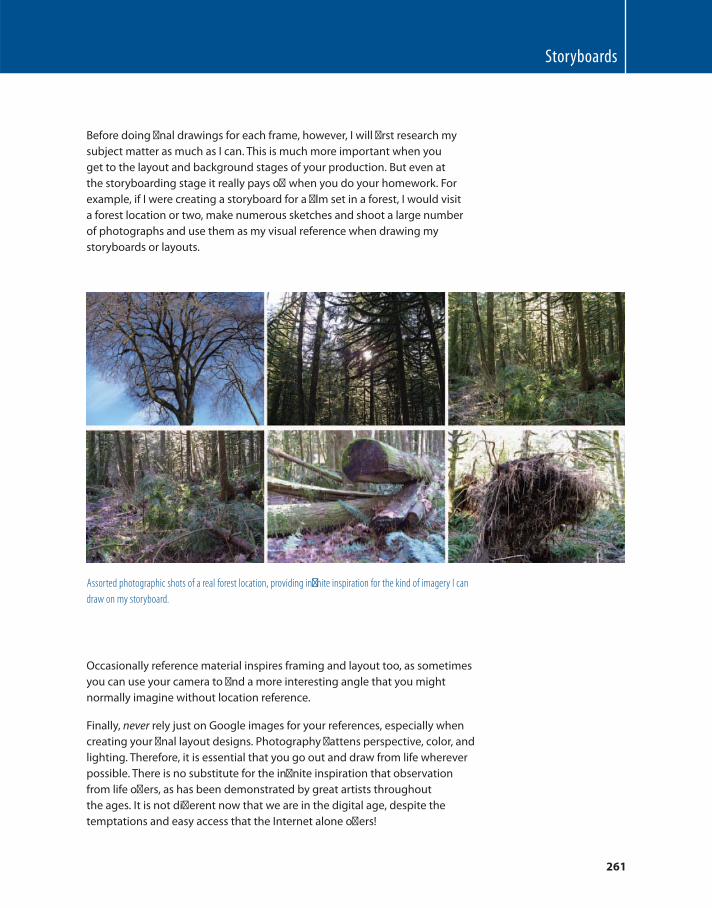
Storyboards
261
Before doing fi nal drawings for each frame, however, I will fi rst research my
subject matter as much as I can. This is much more important when you
get to the layout and background stages of your production. But even at
the storyboarding stage it really pays off when you do your homework. For
example, if I were creating a storyboard for a fi lm set in a forest, I would visit
a forest location or two, make numerous sketches and shoot a large number
of photographs and use them as my visual reference when drawing my
storyboards or layouts.
Assorted photographic shots of a real forest location, providing infi nite inspiration for the kind of imagery I can
draw on my storyboard.
Occasionally reference material inspires framing and layout too, as sometimes
you can use your camera to fi nd a more interesting angle that you might
normally imagine without location reference.
Finally, never rely just on Google images for your references, especially when
creating your fi nal layout designs. Photography fl attens perspective, color, and
lighting. Therefore, it is essential that you go out and draw from life wherever
possible. There is no substitute for the infi nite inspiration that observation
from life off ers, as has been demonstrated by great artists throughout
the ages. It is not diff erent now that we are in the digital age, despite the
temptations and easy access that the Internet alone off ers!
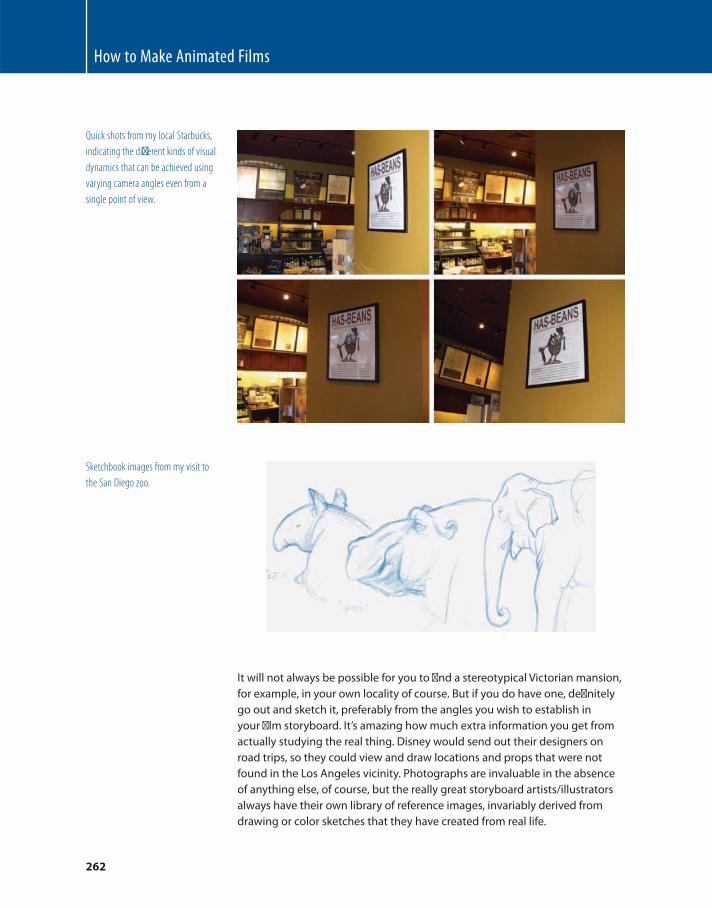
How to Make Animated Films
262
Quick shots from my local Starbucks,
indicating the diff erent kinds of visual
dynamics that can be achieved using
varying camera angles even from a
single point of view.
Sketchbook images from my visit to
the San Diego zoo.
It will not always be possible for you to fi nd a stereotypical Victorian mansion,
for example, in your own locality of course. But if you do have one, defi nitely
go out and sketch it, preferably from the angles you wish to establish in
your fi lm storyboard. It’s amazing how much extra information you get from
actually studying the real thing. Disney would send out their designers on
road trips, so they could view and draw locations and props that were not
found in the Los Angeles vicinity. Photographs are invaluable in the absence
of anything else, of course, but the really great storyboard artists/illustrators
always have their own library of reference images, invariably derived from
drawing or color sketches that they have created from real life.
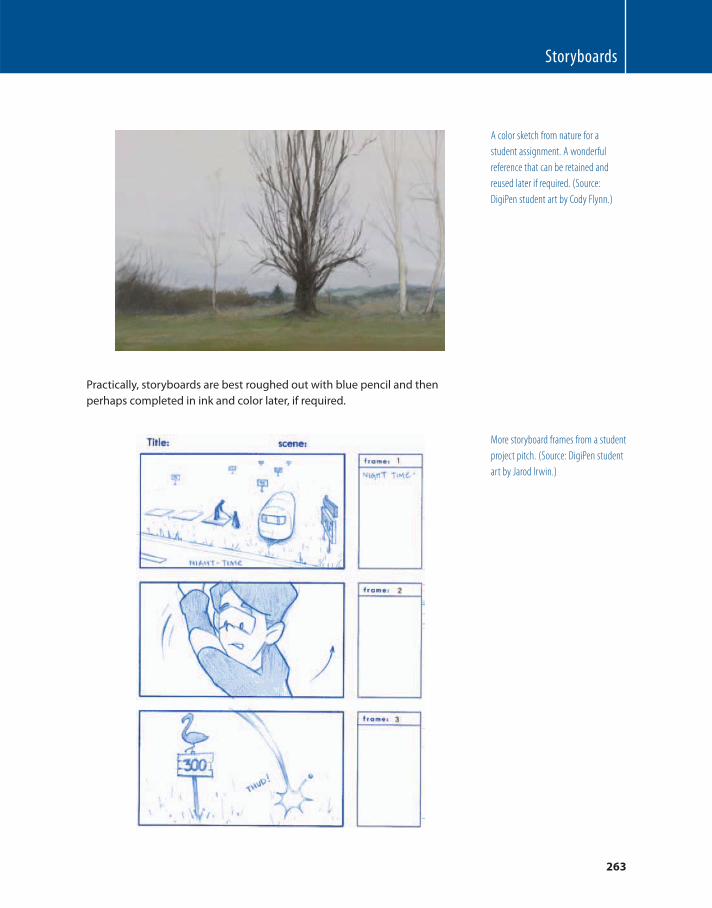
Storyboards
263
A color sketch from nature for a
student assignment. A wonderful
reference that can be retained and
reused later if required. (Source:
DigiPen student art by Cody Flynn.)
Practically, storyboards are best roughed out with blue pencil and then
perhaps completed in ink and color later, if required.
More storyboard frames from a student
project pitch. (Source: DigiPen student
art by Jarod Irwin.)
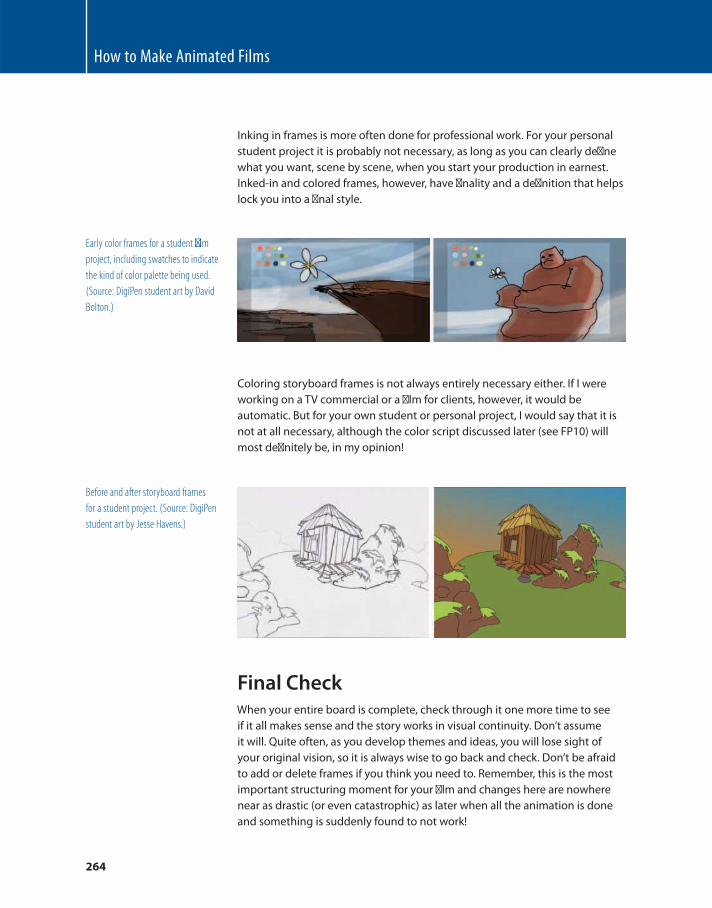
How to Make Animated Films
264
Inking in frames is more often done for professional work. For your personal
student project it is probably not necessary, as long as you can clearly defi ne
what you want, scene by scene, when you start your production in earnest.
Inked-in and colored frames, however, have fi nality and a defi nition that helps
lock you into a fi nal style.
Coloring storyboard frames is not always entirely necessary either. If I were
working on a TV commercial or a fi lm for clients, however, it would be
automatic. But for your own student or personal project, I would say that it is
not at all necessary, although the color script discussed later (see FP10) will
most defi nitely be, in my opinion!
Early color frames for a student fi lm
project, including swatches to indicate
the kind of color palette being used.
(Source: DigiPen student art by David
Bolton.)
Before and after storyboard frames
for a student project. (Source: DigiPen
student art by Jesse Havens.)
Final Check When your entire board is complete, check through it one more time to see
if it all makes sense and the story works in visual continuity. Don’t assume
it will. Quite often, as you develop themes and ideas, you will lose sight of
your original vision, so it is always wise to go back and check. Don’t be afraid
to add or delete frames if you think you need to. Remember, this is the most
important structuring moment for your fi lm and changes here are nowhere
near as drastic (or even catastrophic) as later when all the animation is done
and something is suddenly found to not work!
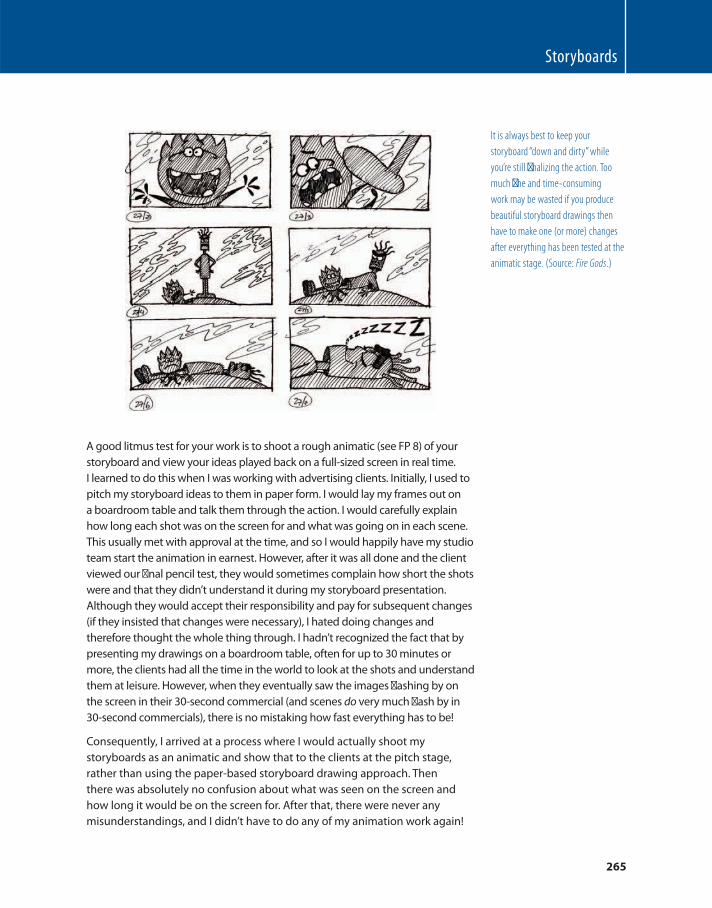
Storyboards
265
It is always best to keep your
storyboard “ down and dirty ” while
you’re still fi nalizing the action. Too
much fi ne and time-consuming
work may be wasted if you produce
beautiful storyboard drawings then
have to make one (or more) changes
after everything has been tested at the
animatic stage. (Source: Fire Gods .)
A good litmus test for your work is to shoot a rough animatic (see FP 8) of your
storyboard and view your ideas played back on a full-sized screen in real time.
I learned to do this when I was working with advertising clients. Initially, I used to
pitch my storyboard ideas to them in paper form. I would lay my frames out on
a boardroom table and talk them through the action. I would carefully explain
how long each shot was on the screen for and what was going on in each scene.
This usually met with approval at the time, and so I would happily have my studio
team start the animation in earnest. However, after it was all done and the client
viewed our fi nal pencil test, they would sometimes complain how short the shots
were and that they didn’t understand it during my storyboard presentation.
Although they would accept their responsibility and pay for subsequent changes
(if they insisted that changes were necessary), I hated doing changes and
therefore thought the whole thing through. I hadn’t recognized the fact that by
presenting my drawings on a boardroom table, often for up to 30 minutes or
more, the clients had all the time in the world to look at the shots and understand
them at leisure. However, when they eventually saw the images fl ashing by on
the screen in their 30-second commercial (and scenes do very much fl ash by in
30-second commercials), there is no mistaking how fast everything has to be!
Consequently, I arrived at a process where I would actually shoot my
storyboards as an animatic and show that to the clients at the pitch stage,
rather than using the paper-based storyboard drawing approach. Then
there was absolutely no confusion about what was seen on the screen and
how long it would be on the screen for. After that, there were never any
misunderstandings, and I didn’t have to do any of my animation work again!
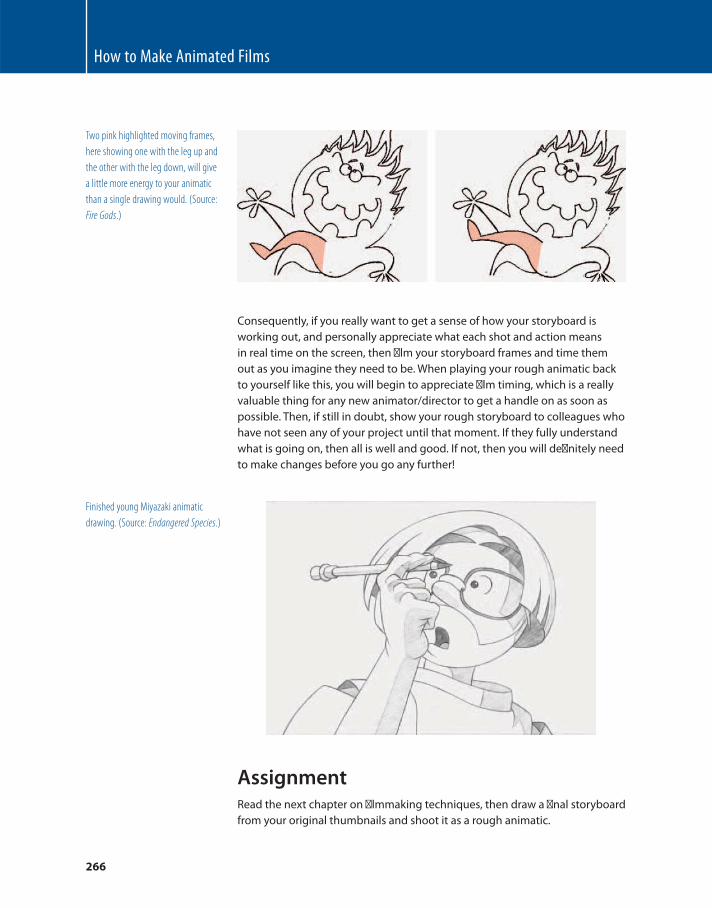
How to Make Animated Films
266
Two pink highlighted moving frames,
here showing one with the leg up and
the other with the leg down, will give
a little more energy to your animatic
than a single drawing would. (Source:
Fire Gods .)
Consequently, if you really want to get a sense of how your storyboard is
working out, and personally appreciate what each shot and action means
in real time on the screen, then fi lm your storyboard frames and time them
out as you imagine they need to be. When playing your rough animatic back
to yourself like this, you will begin to appreciate fi lm timing, which is a really
valuable thing for any new animator/director to get a handle on as soon as
possible. Then, if still in doubt, show your rough storyboard to colleagues who
have not seen any of your project until that moment. If they fully understand
what is going on, then all is well and good. If not, then you will defi nitely need
to make changes before you go any further!
Finished young Miyazaki animatic
drawing. (Source: Endangered Species .)
Assignment Read the next chapter on fi lmmaking techniques, then draw a fi nal storyboard
from your original thumbnails and shoot it as a rough animatic.
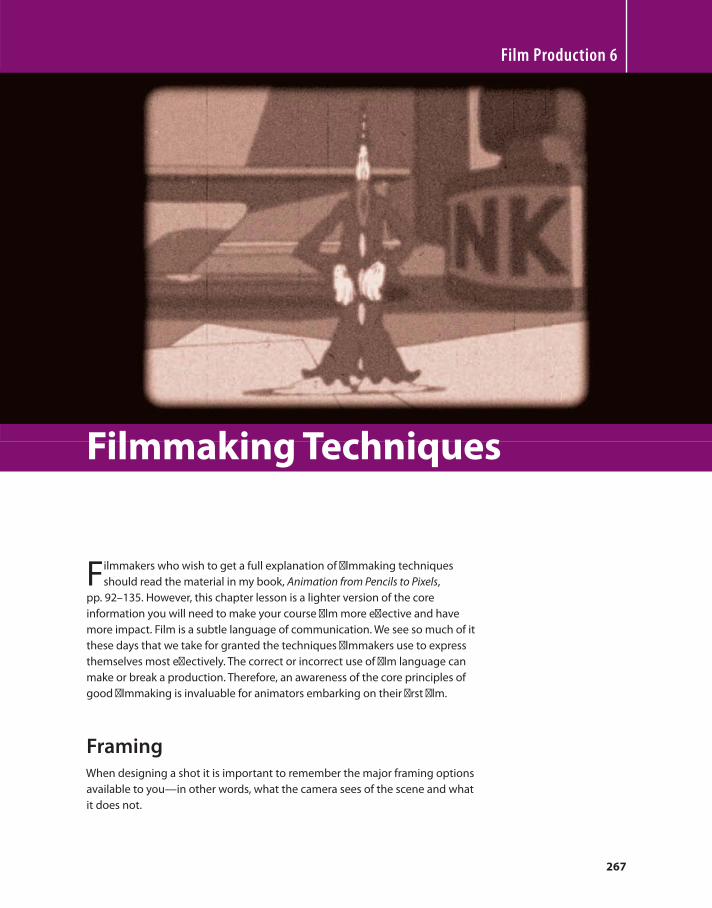
267
Filmmakers who wish to get a full explanation of fi lmmaking techniques
should read the material in my book, Animation from Pencils to Pixels ,
pp. 92 – 135. However, this chapter lesson is a lighter version of the core
information you will need to make your course fi lm more eff ective and have
more impact. Film is a subtle language of communication. We see so much of it
these days that we take for granted the techniques fi lmmakers use to express
themselves most eff ectively. The correct or incorrect use of fi lm language can
make or break a production. Therefore, an awareness of the core principles of
good fi lmmaking is invaluable for animators embarking on their fi rst fi lm.
Framing When designing a shot it is important to remember the major framing options
available to you — in other words, what the camera sees of the scene and what
it does not.
Film Production 6
Filmmaking Techniques
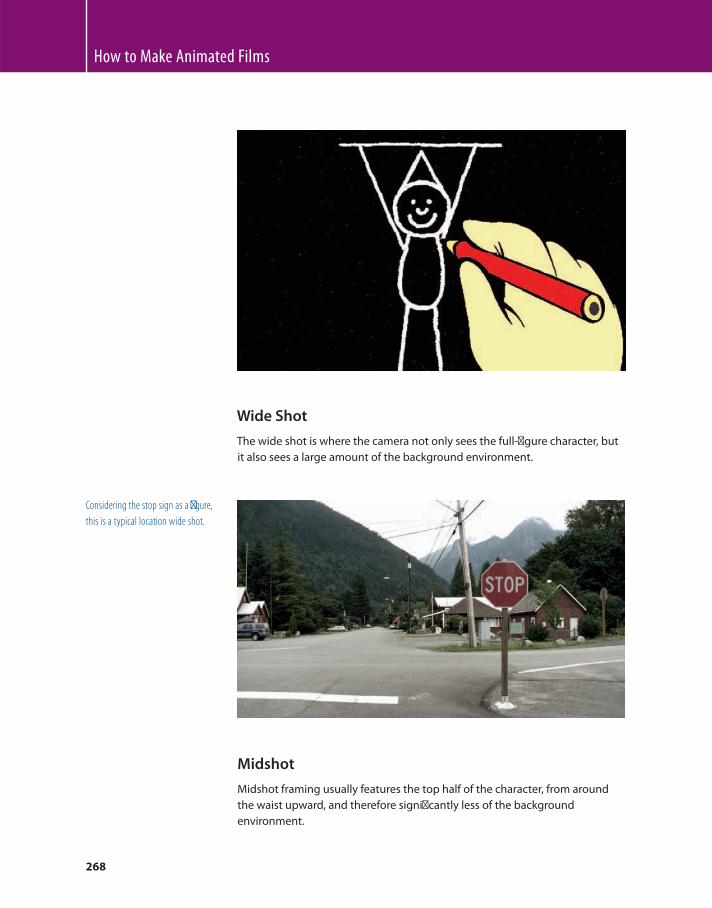
How to Make Animated Films
268
Wide Shot
The wide shot is where the camera not only sees the full-fi gure character, but
it also sees a large amount of the background environment.
Considering the stop sign as a fi gure,
this is a typical location wide shot.
Midshot
Midshot framing usually features the top half of the character, from around
the waist upward, and therefore signifi cantly less of the background
environment.

Filmmaking Techniques
269
Close-Up
The close-up shot focuses mainly on the character’s face, usually from the
neck to just above the top of his or her head.
There art two other framing options you might consider: the ultrawide and
the extreme close-up shots.
Ultrawide Shot
The ultrawide shot minimizes the presence of a character (if the character is
there at all) in a wide, expansive background environment. This is typical of
the large-scale, epic kind of movie because it is wonderful for depicting wide
expanses of landscape or big-city shots.

How to Make Animated Films
270
Extreme Close-Up
The extreme close-up shot frames very tightly on a detail from the shot the
director especially wants the audience to focus on, such as the face of a
wristwatch, a drip coming from a tap, a fl y crawling across food, etc.
Using these fi ve key framing shots you can represent pretty much any
element within your fi lm’s storyline. However, there are a few camera
movements that will help set the scene or pace of the fi lm too.
Locked-Off Shot
The locked-off shot is the basic shot where the camera is in a fi xed position for
the selected framing setup with no movement in or out.
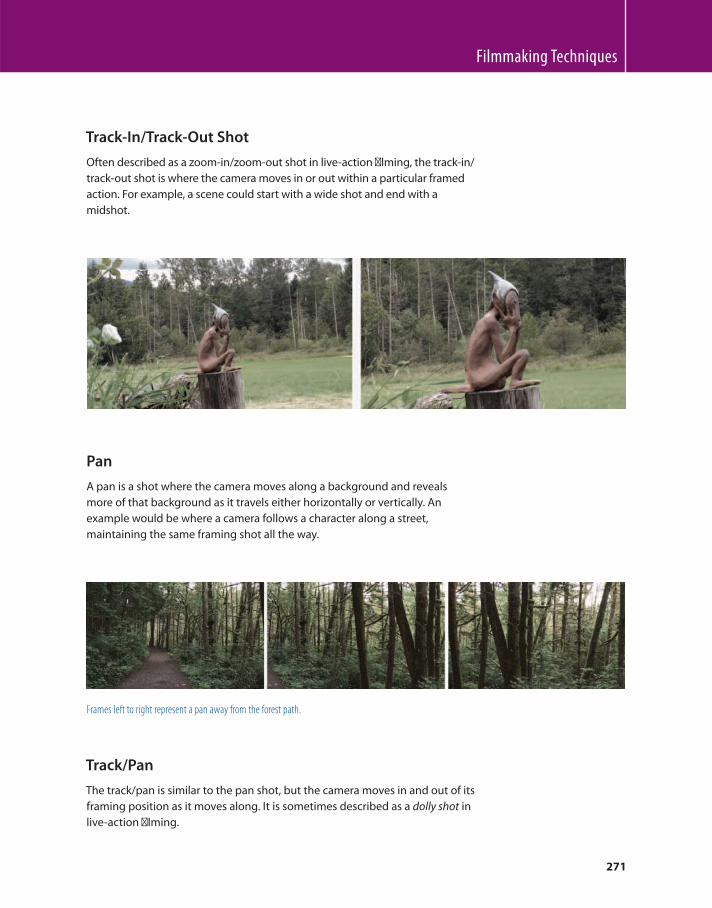
Filmmaking Techniques
271
Track-In/Track-Out Shot
Often described as a zoom-in/zoom-out shot in live-action fi lming, the track-in/
track-out shot is where the camera moves in or out within a particular framed
action. For example, a scene could start with a wide shot and end with a
midshot.
Pan
A pan is a shot where the camera moves along a background and reveals
more of that background as it travels either horizontally or vertically. An
example would be where a camera follows a character along a street,
maintaining the same framing shot all the way.
Frames left to right represent a pan away from the forest path.
Track/Pan
The track/pan is similar to the pan shot, but the camera moves in and out of its
framing position as it moves along. It is sometimes described as a dolly shot in
live-action fi lming.
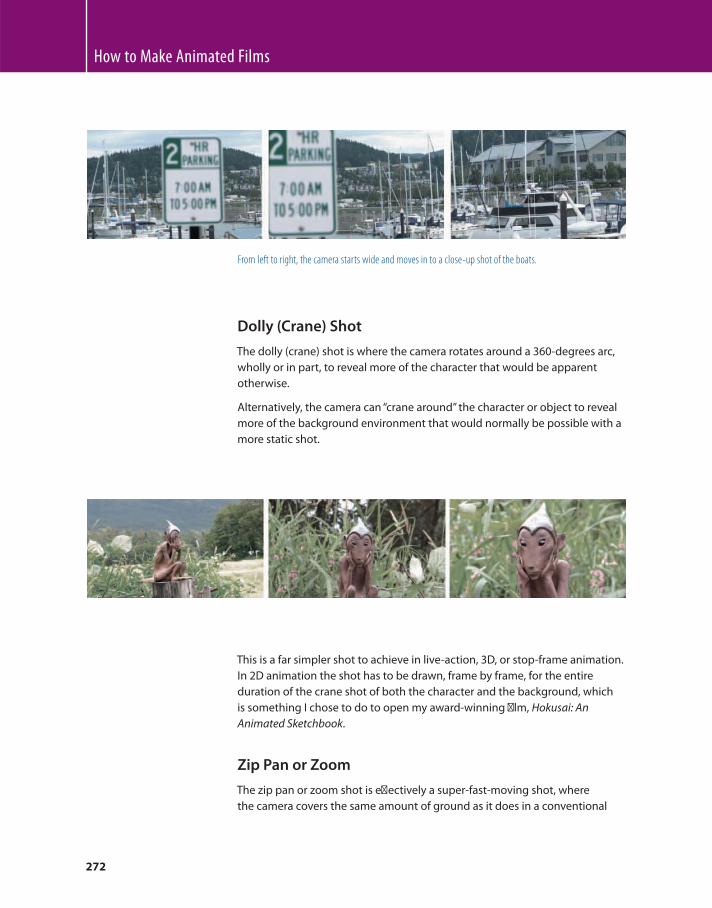
How to Make Animated Films
272
From left to right, the camera starts wide and moves in to a close-up shot of the boats.
Dolly (Crane) Shot
The dolly (crane) shot is where the camera rotates around a 360-degrees arc,
wholly or in part, to reveal more of the character that would be apparent
otherwise.
Alternatively, the camera can “ crane around ” the character or object to reveal
more of the background environment that would normally be possible with a
more static shot.
This is a far simpler shot to achieve in live-action, 3D, or stop-frame animation.
In 2D animation the shot has to be drawn, frame by frame, for the entire
duration of the crane shot of both the character and the background, which
is something I chose to do to open my award-winning fi lm, Hokusai: An
Animated Sketchbook .
Zip Pan or Zoom
The zip pan or zoom shot is eff ectively a super-fast-moving shot, where
the camera covers the same amount of ground as it does in a conventional
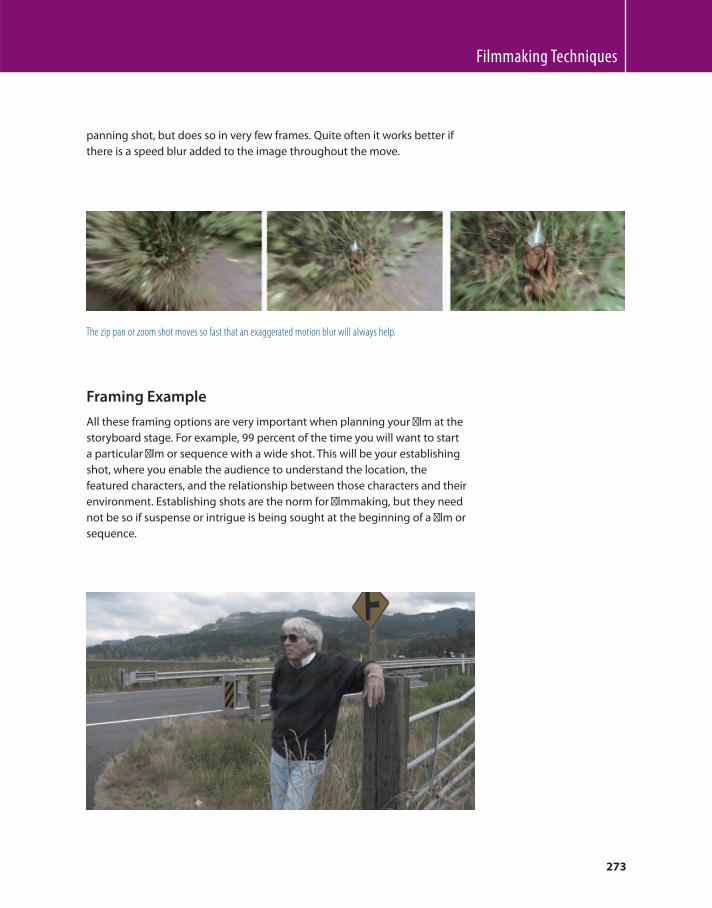
Filmmaking Techniques
273
The zip pan or zoom shot moves so fast that an exaggerated motion blur will always help.
Framing Example
All these framing options are very important when planning your fi lm at the
storyboard stage. For example, 99 percent of the time you will want to start
a particular fi lm or sequence with a wide shot. This will be your establishing
shot, where you enable the audience to understand the location, the
featured characters, and the relationship between those characters and their
environment. Establishing shots are the norm for fi lmmaking, but they need
not be so if suspense or intrigue is being sought at the beginning of a fi lm or
sequence.
panning shot, but does so in very few frames. Quite often it works better if
there is a speed blur added to the image throughout the move.

How to Make Animated Films
274
Next, you might want to go to a close-up or even an extreme close-up shot to
provide the audience with detailed information about what is going on at any
crucial plot moment.
Finally, you might want to return to a wide shot or perhaps two related shots
that show a conclusion to the action.
Once the establishing shot has been made, you might want to draw the
audience into your character with a midshot to give them a little bit more
information about your character or what your character is doing.
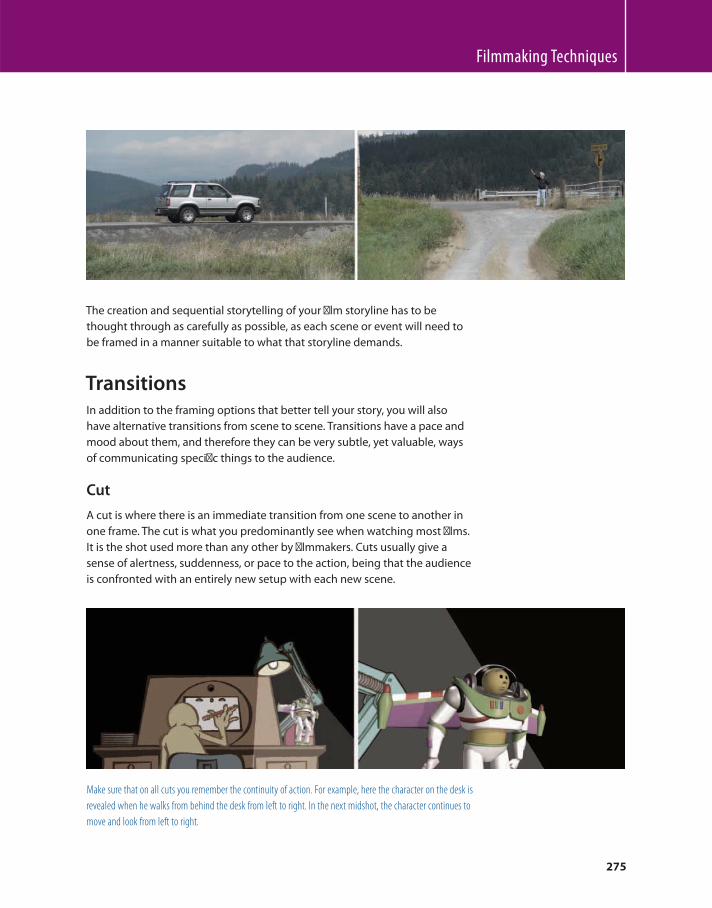
Filmmaking Techniques
275
The creation and sequential storytelling of your fi lm storyline has to be
thought through as carefully as possible, as each scene or event will need to
be framed in a manner suitable to what that storyline demands.
Transitions In addition to the framing options that better tell your story, you will also
have alternative transitions from scene to scene. Transitions have a pace and
mood about them, and therefore they can be very subtle, yet valuable, ways
of communicating specifi c things to the audience.
Cut
A cut is where there is an immediate transition from one scene to another in
one frame. The cut is what you predominantly see when watching most fi lms.
It is the shot used more than any other by fi lmmakers. Cuts usually give a
sense of alertness, suddenness, or pace to the action, being that the audience
is confronted with an entirely new setup with each new scene.
Make sure that on all cuts you remember the continuity of action. For example, here the character on the desk is
revealed when he walks from behind the desk from left to right. In the next midshot, the character continues to
move and look from left to right.
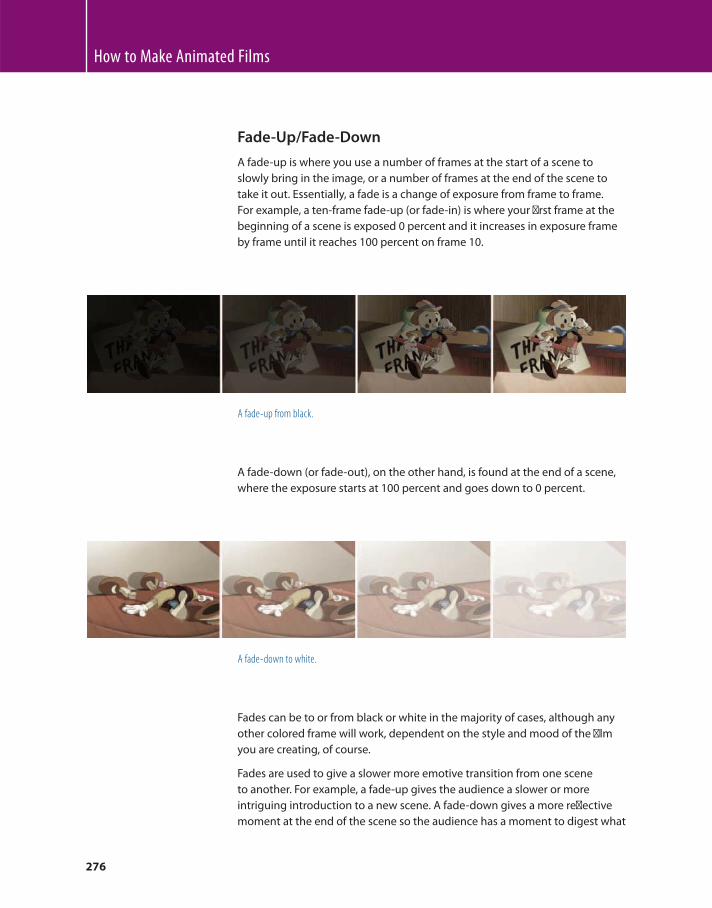
How to Make Animated Films
276
Fade-Up/Fade-Down
A fade-up is where you use a number of frames at the start of a scene to
slowly bring in the image, or a number of frames at the end of the scene to
take it out. Essentially, a fade is a change of exposure from frame to frame.
For example, a ten-frame fade-up (or fade-in) is where your fi rst frame at the
beginning of a scene is exposed 0 percent and it increases in exposure frame
by frame until it reaches 100 percent on frame 10.
A fade-up from black.
A fade-down (or fade-out), on the other hand, is found at the end of a scene,
where the exposure starts at 100 percent and goes down to 0 percent.
A fade-down to white.
Fades can be to or from black or white in the majority of cases, although any
other colored frame will work, dependent on the style and mood of the fi lm
you are creating, of course.
Fades are used to give a slower more emotive transition from one scene
to another. For example, a fade-up gives the audience a slower or more
intriguing introduction to a new scene. A fade-down gives a more refl ective
moment at the end of the scene so the audience has a moment to digest what
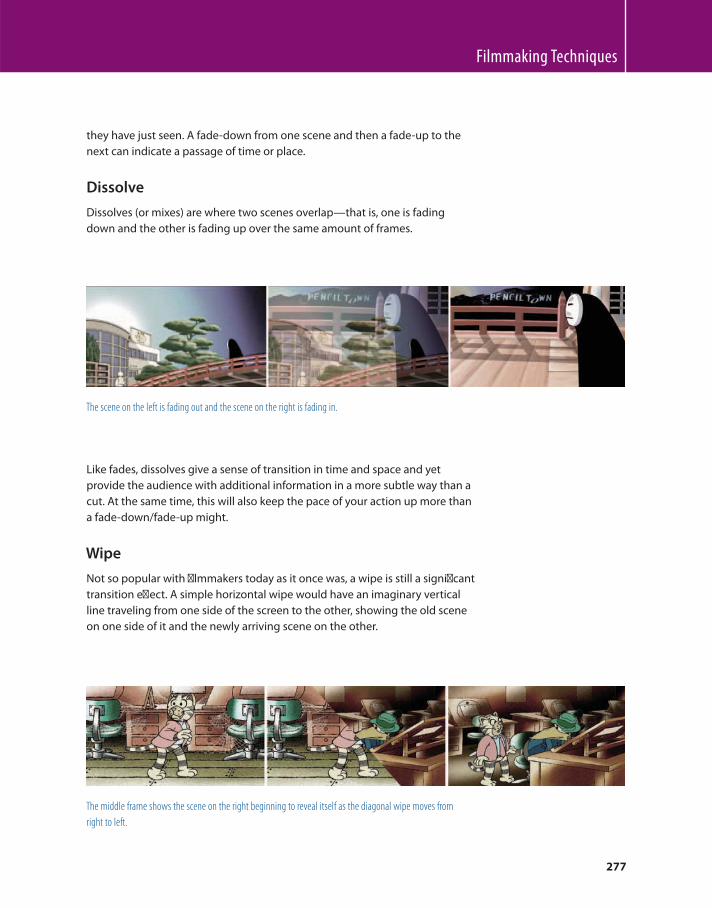
Filmmaking Techniques
277
they have just seen. A fade-down from one scene and then a fade-up to the
next can indicate a passage of time or place.
Dissolve
Dissolves (or mixes) are where two scenes overlap — that is, one is fading
down and the other is fading up over the same amount of frames.
The scene on the left is fading out and the scene on the right is fading in.
Like fades, dissolves give a sense of transition in time and space and yet
provide the audience with additional information in a more subtle way than a
cut. At the same time, this will also keep the pace of your action up more than
a fade-down/fade-up might.
Wipe
Not so popular with fi lmmakers today as it once was, a wipe is still a signifi cant
transition eff ect. A simple horizontal wipe would have an imaginary vertical
line traveling from one side of the screen to the other, showing the old scene
on one side of it and the newly arriving scene on the other.
The middle frame shows the scene on the right beginning to reveal itself as the diagonal wipe moves from
right to left.
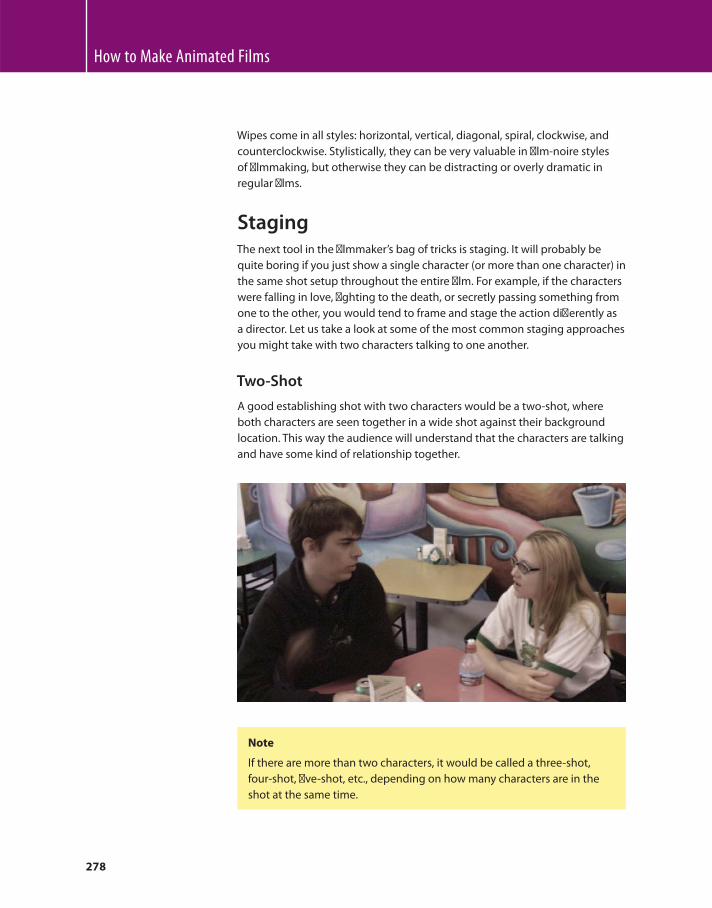
How to Make Animated Films
278
Staging The next tool in the fi lmmaker’s bag of tricks is staging. It will probably be
quite boring if you just show a single character (or more than one character) in
the same shot setup throughout the entire fi lm. For example, if the characters
were falling in love, fi ghting to the death, or secretly passing something from
one to the other, you would tend to frame and stage the action diff erently as
a director. Let us take a look at some of the most common staging approaches
you might take with two characters talking to one another.
Two-Shot
A good establishing shot with two characters would be a two-shot, where
both characters are seen together in a wide shot against their background
location. This way the audience will understand that the characters are talking
and have some kind of relationship together.
Note
If there are more than two characters, it would be called a three-shot,
four-shot, fi ve-shot, etc., depending on how many characters are in the
shot at the same time.
Wipes come in all styles: horizontal, vertical, diagonal, spiral, clockwise, and
counterclockwise. Stylistically, they can be very valuable in fi lm-noire styles
of fi lmmaking, but otherwise they can be distracting or overly dramatic in
regular fi lms.
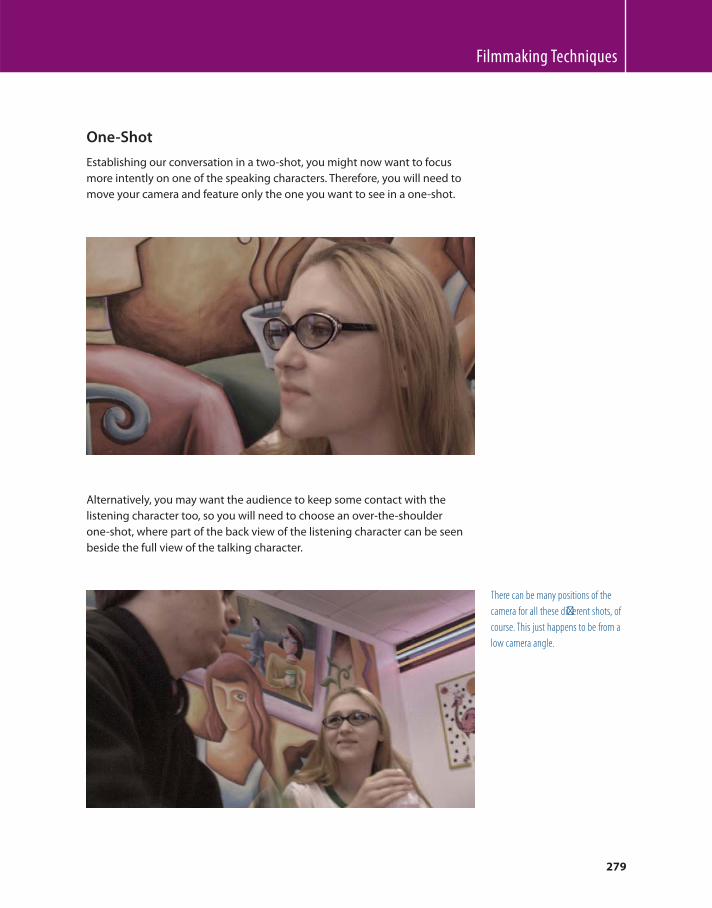
Filmmaking Techniques
279
One-Shot
Establishing our conversation in a two-shot, you might now want to focus
more intently on one of the speaking characters. Therefore, you will need to
move your camera and feature only the one you want to see in a one-shot.
Alternatively, you may want the audience to keep some contact with the
listening character too, so you will need to choose an over-the-shoulder
one-shot, where part of the back view of the listening character can be seen
beside the full view of the talking character.
There can be many positions of the
camera for all these diff erent shots, of
course. This just happens to be from a
low camera angle.
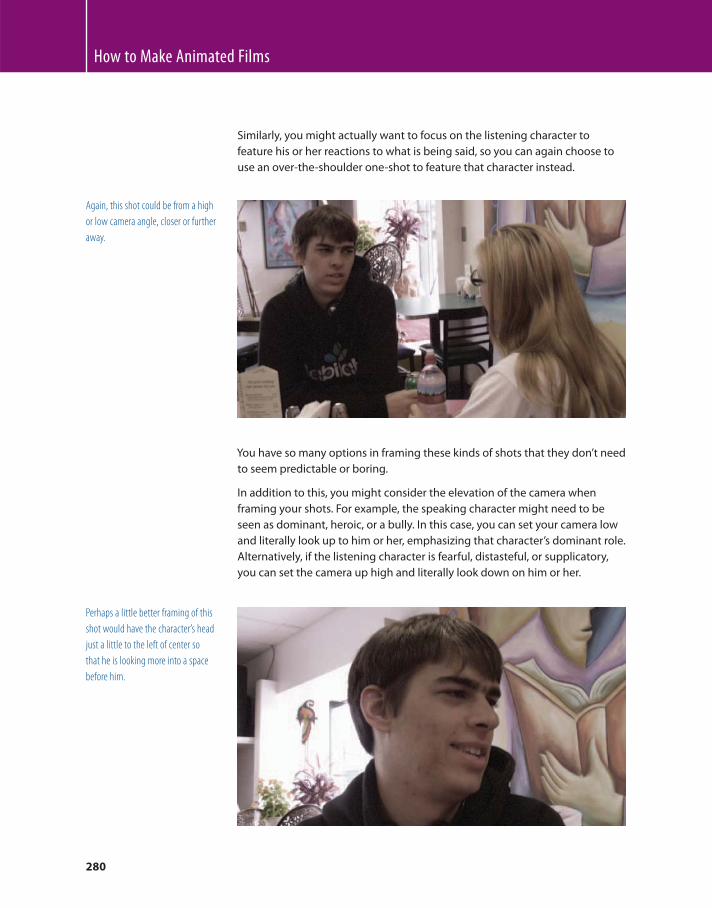
How to Make Animated Films
280
Again, this shot could be from a high
or low camera angle, closer or further
away.
You have so many options in framing these kinds of shots that they don’t need
to seem predictable or boring.
In addition to this, you might consider the elevation of the camera when
framing your shots. For example, the speaking character might need to be
seen as dominant, heroic, or a bully. In this case, you can set your camera low
and literally look up to him or her, emphasizing that character’s dominant role.
Alternatively, if the listening character is fearful, distasteful, or supplicatory,
you can set the camera up high and literally look down on him or her.
Perhaps a little better framing of this
shot would have the character’s head
just a little to the left of center so
that he is looking more into a space
before him.
Similarly, you might actually want to focus on the listening character to
feature his or her reactions to what is being said, so you can again choose to
use an over-the-shoulder one-shot to feature that character instead.
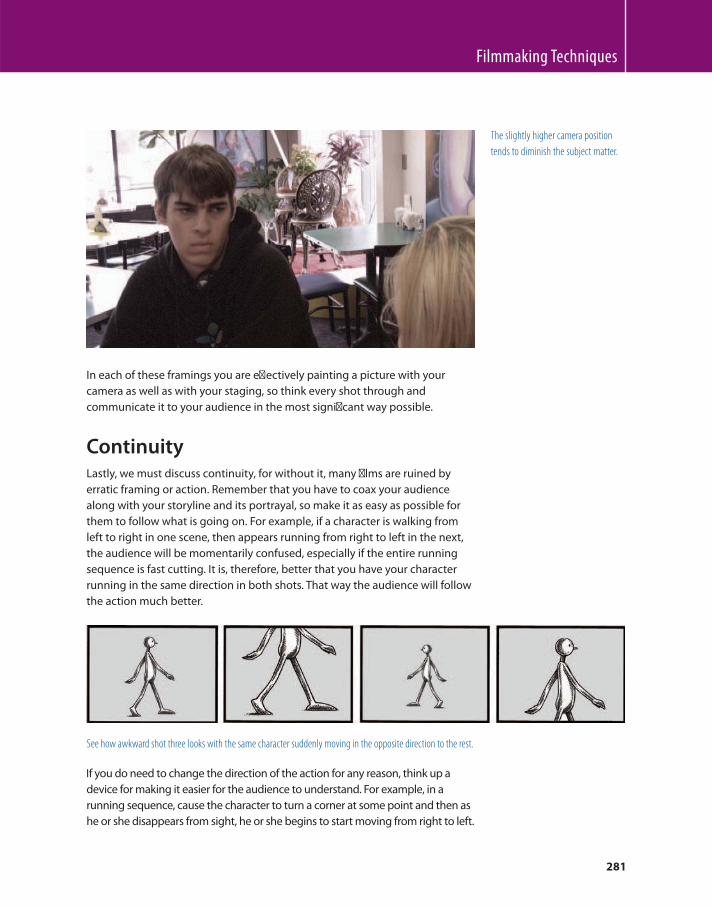
Filmmaking Techniques
281
The slightly higher camera position
tends to diminish the subject matter.
In each of these framings you are eff ectively painting a picture with your
camera as well as with your staging, so think every shot through and
communicate it to your audience in the most signifi cant way possible.
Continuity Lastly, we must discuss continuity, for without it, many fi lms are ruined by
erratic framing or action. Remember that you have to coax your audience
along with your storyline and its portrayal, so make it as easy as possible for
them to follow what is going on. For example, if a character is walking from
left to right in one scene, then appears running from right to left in the next,
the audience will be momentarily confused, especially if the entire running
sequence is fast cutting. It is, therefore, better that you have your character
running in the same direction in both shots. That way the audience will follow
the action much better.
See how awkward shot three looks with the same character suddenly moving in the opposite direction to the rest.
If you do need to change the direction of the action for any reason, think up a
device for making it easier for the audience to understand. For example, in a
running sequence, cause the character to turn a corner at some point and then as
he or she disappears from sight, he or she begins to start moving from right to left.
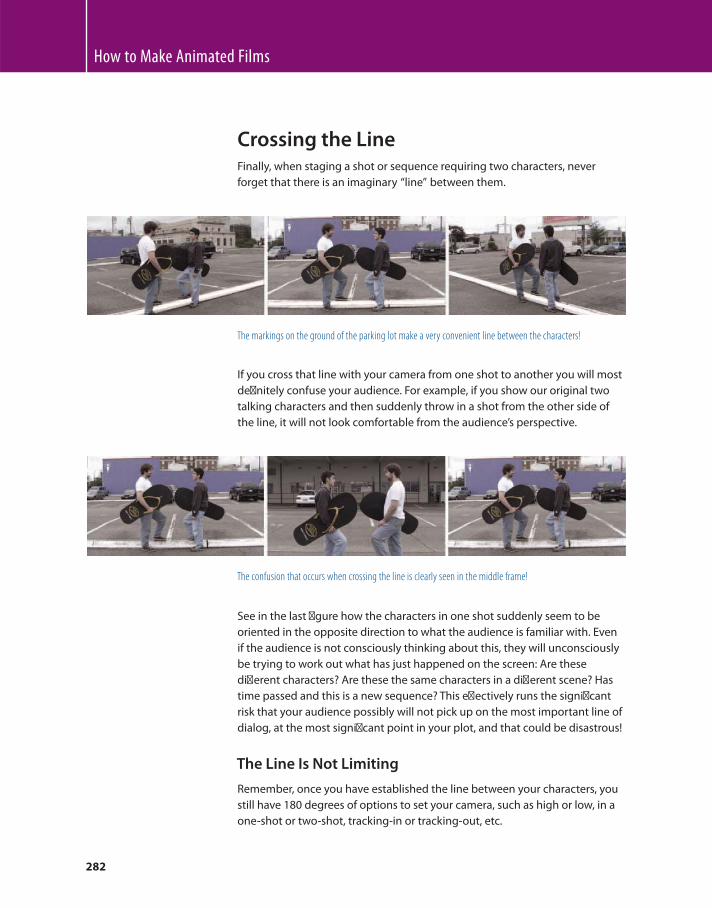
How to Make Animated Films
282
Crossing the Line Finally, when staging a shot or sequence requiring two characters, never
forget that there is an imaginary “ line ” between them.
The markings on the ground of the parking lot make a very convenient line between the characters!
If you cross that line with your camera from one shot to another you will most
defi nitely confuse your audience. For example, if you show our original two
talking characters and then suddenly throw in a shot from the other side of
the line, it will not look comfortable from the audience’s perspective.
The confusion that occurs when crossing the line is clearly seen in the middle frame!
See in the last fi gure how the characters in one shot suddenly seem to be
oriented in the opposite direction to what the audience is familiar with. Even
if the audience is not consciously thinking about this, they will unconsciously
be trying to work out what has just happened on the screen: Are these
diff erent characters? Are these the same characters in a diff erent scene? Has
time passed and this is a new sequence? This eff ectively runs the signifi cant
risk that your audience possibly will not pick up on the most important line of
dialog, at the most signifi cant point in your plot, and that could be disastrous!
The Line Is Not Limiting
Remember, once you have established the line between your characters, you
still have 180 degrees of options to set your camera, such as high or low, in a
one-shot or two-shot, tracking-in or tracking-out, etc.
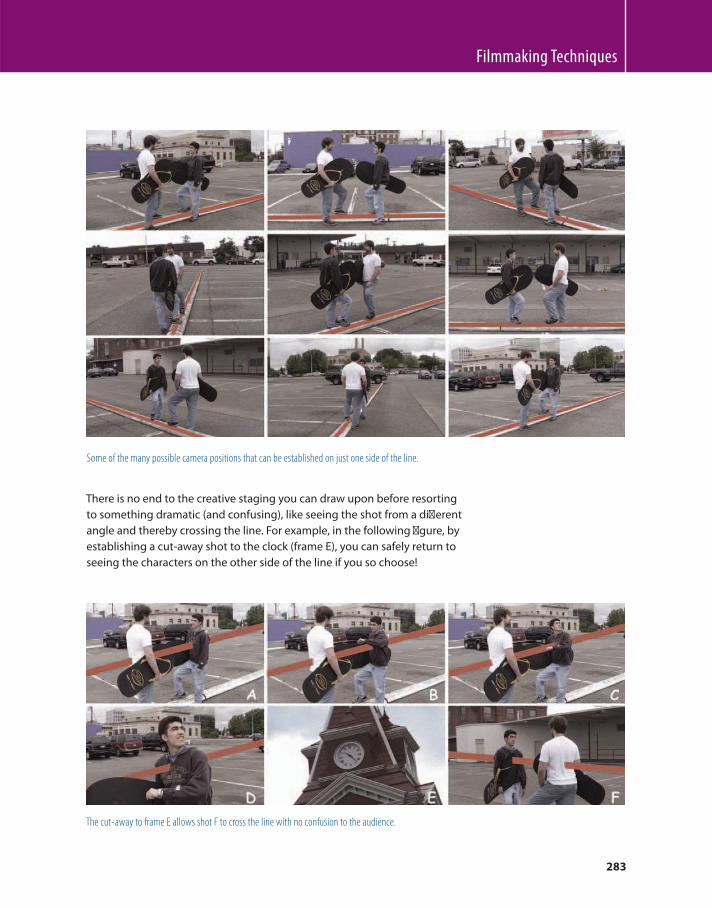
Filmmaking Techniques
283
Some of the many possible camera positions that can be established on just one side of the line.
There is no end to the creative staging you can draw upon before resorting
to something dramatic (and confusing), like seeing the shot from a diff erent
angle and thereby crossing the line. For example, in the following fi gure, by
establishing a cut-away shot to the clock (frame E), you can safely return to
seeing the characters on the other side of the line if you so choose!
The cut-away to frame E allows shot F to cross the line with no confusion to the audience.
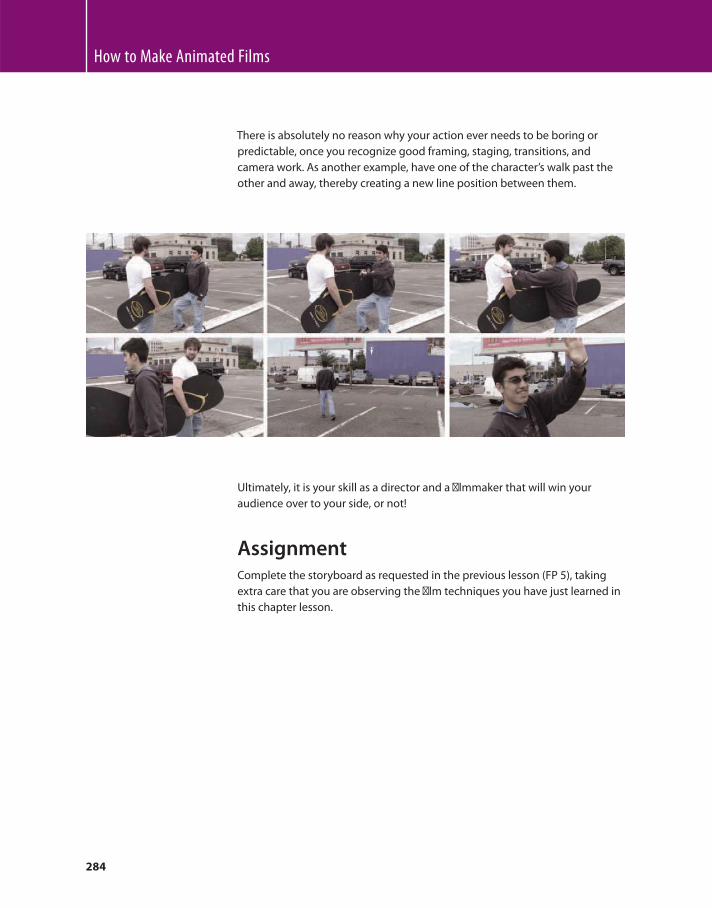
How to Make Animated Films
284
There is absolutely no reason why your action ever needs to be boring or
predictable, once you recognize good framing, staging, transitions, and
camera work. As another example, have one of the character’s walk past the
other and away, thereby creating a new line position between them.
Ultimately, it is your skill as a director and a fi lmmaker that will win your
audience over to your side, or not!
Assignment Complete the storyboard as requested in the previous lesson (FP 5), taking
extra care that you are observing the fi lm techniques you have just learned in
this chapter lesson.
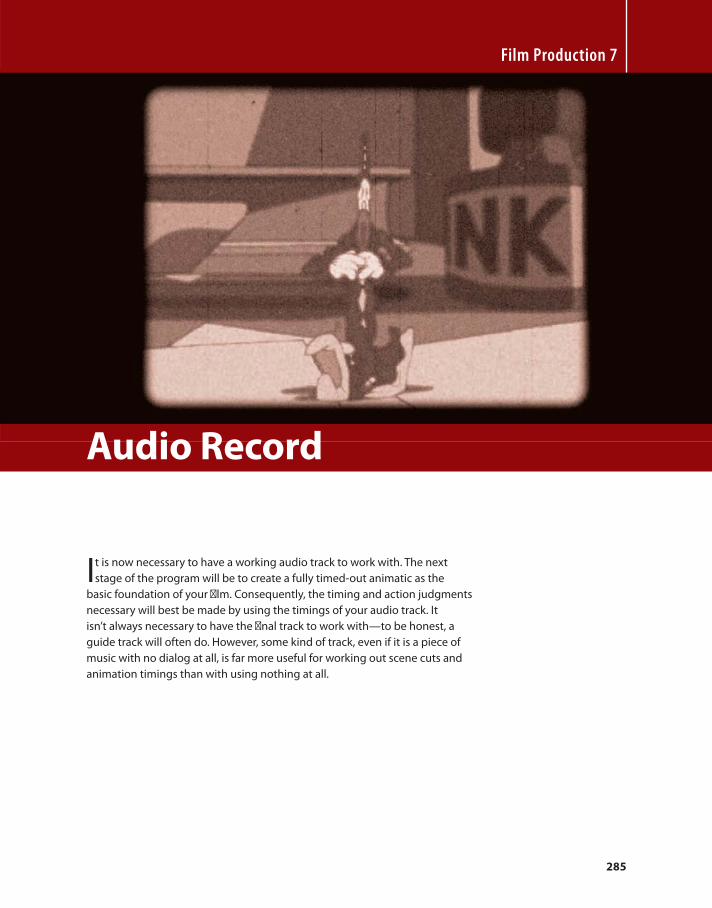
285
It is now necessary to have a working audio track to work with. The next
stage of the program will be to create a fully timed-out animatic as the
basic foundation of your fi lm. Consequently, the timing and action judgments
necessary will best be made by using the timings of your audio track. It
isn’t always necessary to have the fi nal track to work with — to be honest, a
guide track will often do. However, some kind of track, even if it is a piece of
music with no dialog at all, is far more useful for working out scene cuts and
animation timings than with using nothing at all.
Film Production 7
Audio Record
How to Make Animated Films
286
The advent of sound in animation was very crude compared to today ’ s technology!
Source: “Endangered Species”.
Guide Track If precise lip synching is not a priority with your fi lm, then it is perfectly okay
to use a guide track at this stage. If precise dialog is required, however, you
will defi nitely need to create a fi nal track, with fi nal actors and fi nal sync
sound eff ects included. However, based on the notion that you can use a
guide track for now, which is perfectly acceptable for narrative and non lip-
synching approaches, you should have no problems recording what you
need. With your script to read from, it is perfectly acceptable to use
the built-in microphone that most computers have these days. Your own
voice, recorded in the way you want the fi nal actor’s voice to perform the
lines, will certainly give you timing cues that you can use to structure the
images in your animatic and beyond. It is even better if you have a webcam
attached to your machine because it will allow you to both record your track
and see yourself performing the lines, which eventually could be a valuable
visual reference for when you go to animate a character’s performance!
Therefore, you should try as hard as possible to put the same kind of timing
and delivery that you will require the actor or actors to use when you do the
fi nal recording with them.
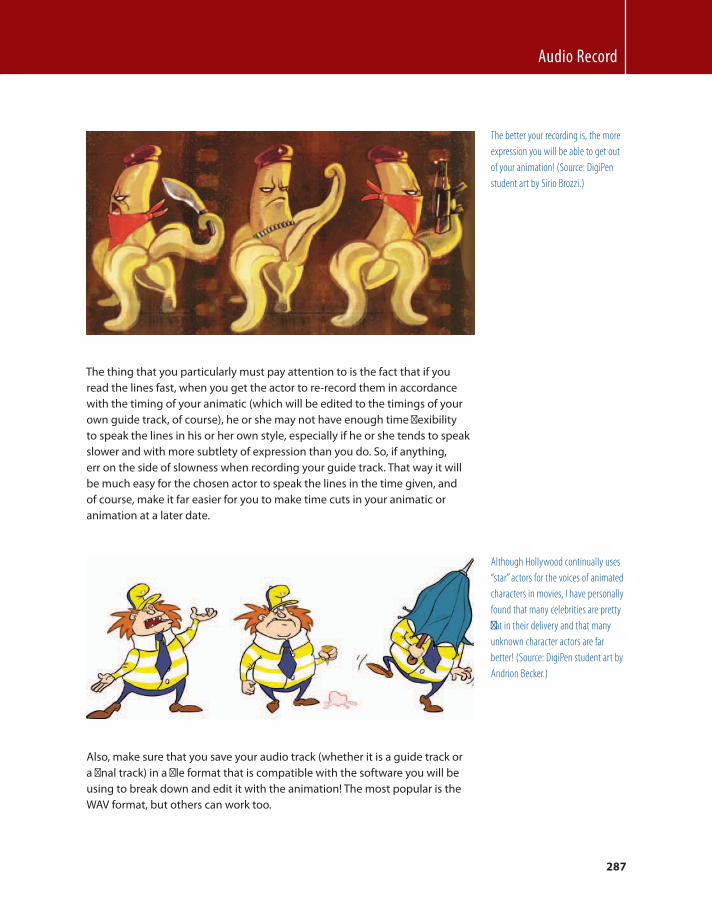
Audio Record
287
The better your recording is, the more
expression you will be able to get out
of your animation! (Source: DigiPen
student art by Sirio Brozzi.)
The thing that you particularly must pay attention to is the fact that if you
read the lines fast, when you get the actor to re-record them in accordance
with the timing of your animatic (which will be edited to the timings of your
own guide track, of course), he or she may not have enough time fl exibility
to speak the lines in his or her own style, especially if he or she tends to speak
slower and with more subtlety of expression than you do. So, if anything,
err on the side of slowness when recording your guide track. That way it will
be much easy for the chosen actor to speak the lines in the time given, and
of course, make it far easier for you to make time cuts in your animatic or
animation at a later date.
Although Hollywood continually uses
“ star ” actors for the voices of animated
characters in movies, I have personally
found that many celebrities are pretty
fl at in their delivery and that many
unknown character actors are far
better! (Source: DigiPen student art by
Andrion Becker.)
Also, make sure that you save your audio track (whether it is a guide track or
a fi nal track) in a fi le format that is compatible with the software you will be
using to break down and edit it with the animation! The most popular is the
WAV format, but others can work too.
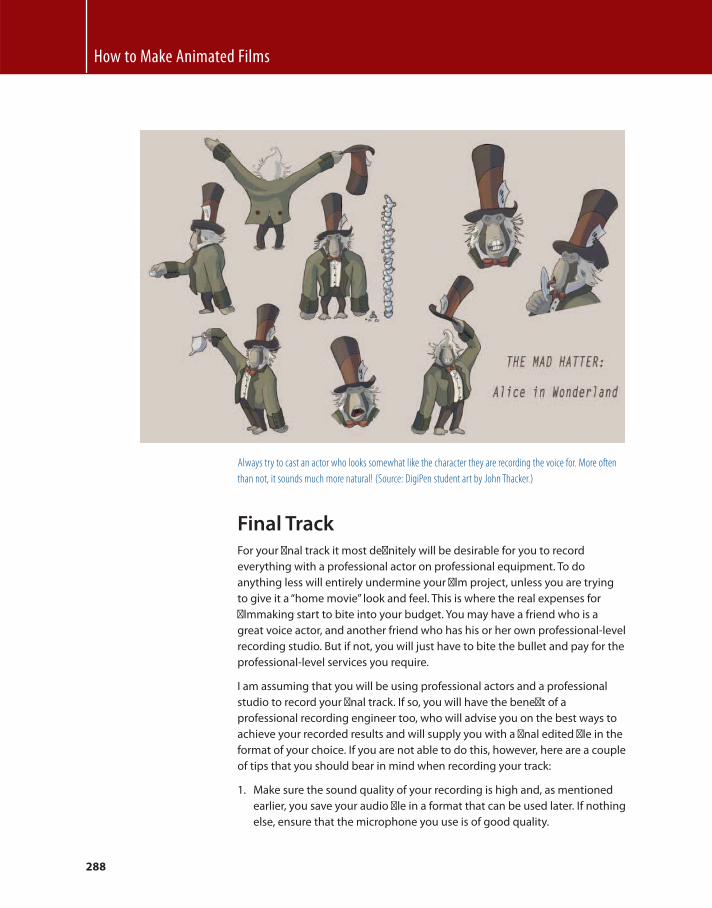
How to Make Animated Films
288
Always try to cast an actor who looks somewhat like the character they are recording the voice for. More often
than not, it sounds much more natural! (Source: DigiPen student art by John Thacker.)
Final Track For your fi nal track it most defi nitely will be desirable for you to record
everything with a professional actor on professional equipment. To do
anything less will entirely undermine your fi lm project, unless you are trying
to give it a “ home movie ” look and feel. This is where the real expenses for
fi lmmaking start to bite into your budget. You may have a friend who is a
great voice actor, and another friend who has his or her own professional-level
recording studio. But if not, you will just have to bite the bullet and pay for the
professional-level services you require.
I am assuming that you will be using professional actors and a professional
studio to record your fi nal track. If so, you will have the benefi t of a
professional recording engineer too, who will advise you on the best ways to
achieve your recorded results and will supply you with a fi nal edited fi le in the
format of your choice. If you are not able to do this, however, here are a couple
of tips that you should bear in mind when recording your track:
1. Make sure the sound quality of your recording is high and, as mentioned
earlier, you save your audio fi le in a format that can be used later. If nothing
else, ensure that the microphone you use is of good quality.
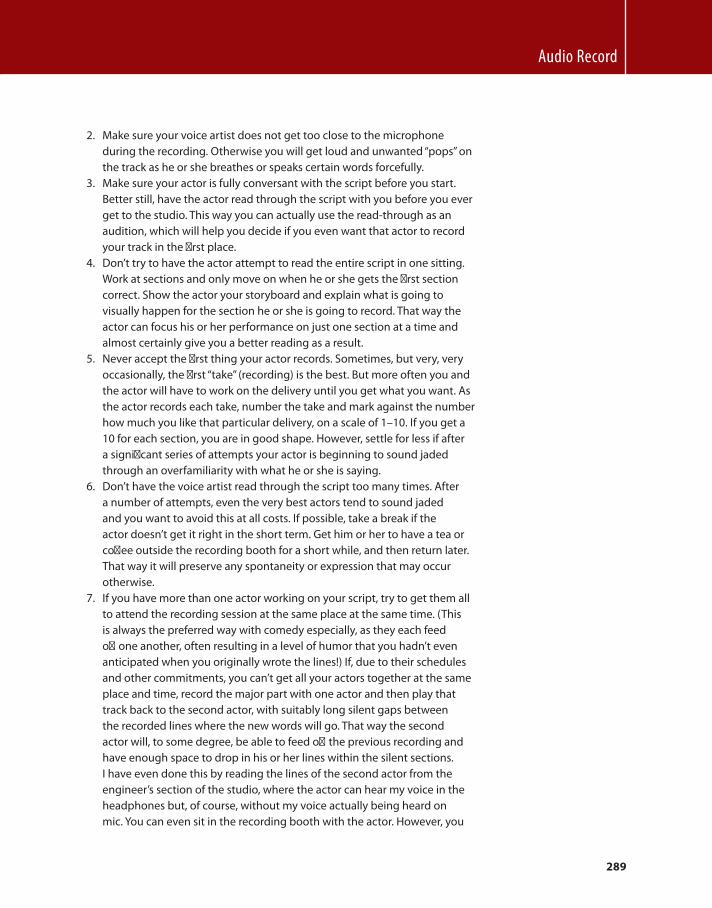
Audio Record
289
2. Make sure your voice artist does not get too close to the microphone
during the recording. Otherwise you will get loud and unwanted “ pops ” on
the track as he or she breathes or speaks certain words forcefully.
3. Make sure your actor is fully conversant with the script before you start.
Better still, have the actor read through the script with you before you ever
get to the studio. This way you can actually use the read-through as an
audition, which will help you decide if you even want that actor to record
your track in the fi rst place.
4. Don’t try to have the actor attempt to read the entire script in one sitting.
Work at sections and only move on when he or she gets the fi rst section
correct. Show the actor your storyboard and explain what is going to
visually happen for the section he or she is going to record. That way the
actor can focus his or her performance on just one section at a time and
almost certainly give you a better reading as a result.
5. Never accept the fi rst thing your actor records. Sometimes, but very, very
occasionally, the fi rst “ take ” (recording) is the best. But more often you and
the actor will have to work on the delivery until you get what you want. As
the actor records each take, number the take and mark against the number
how much you like that particular delivery, on a scale of 1 – 10. If you get a
10 for each section, you are in good shape. However, settle for less if after
a signifi cant series of attempts your actor is beginning to sound jaded
through an overfamiliarity with what he or she is saying.
6. Don’t have the voice artist read through the script too many times. After
a number of attempts, even the very best actors tend to sound jaded
and you want to avoid this at all costs. If possible, take a break if the
actor doesn’t get it right in the short term. Get him or her to have a tea or
coff ee outside the recording booth for a short while, and then return later.
That way it will preserve any spontaneity or expression that may occur
otherwise.
7. If you have more than one actor working on your script, try to get them all
to attend the recording session at the same place at the same time. (This
is always the preferred way with comedy especially, as they each feed
off one another, often resulting in a level of humor that you hadn’t even
anticipated when you originally wrote the lines!) If, due to their schedules
and other commitments, you can’t get all your actors together at the same
place and time, record the major part with one actor and then play that
track back to the second actor, with suitably long silent gaps between
the recorded lines where the new words will go. That way the second
actor will, to some degree, be able to feed off the previous recording and
have enough space to drop in his or her lines within the silent sections.
I have even done this by reading the lines of the second actor from the
engineer’s section of the studio, where the actor can hear my voice in the
headphones but, of course, without my voice actually being heard on
mic. You can even sit in the recording booth with the actor. However, you
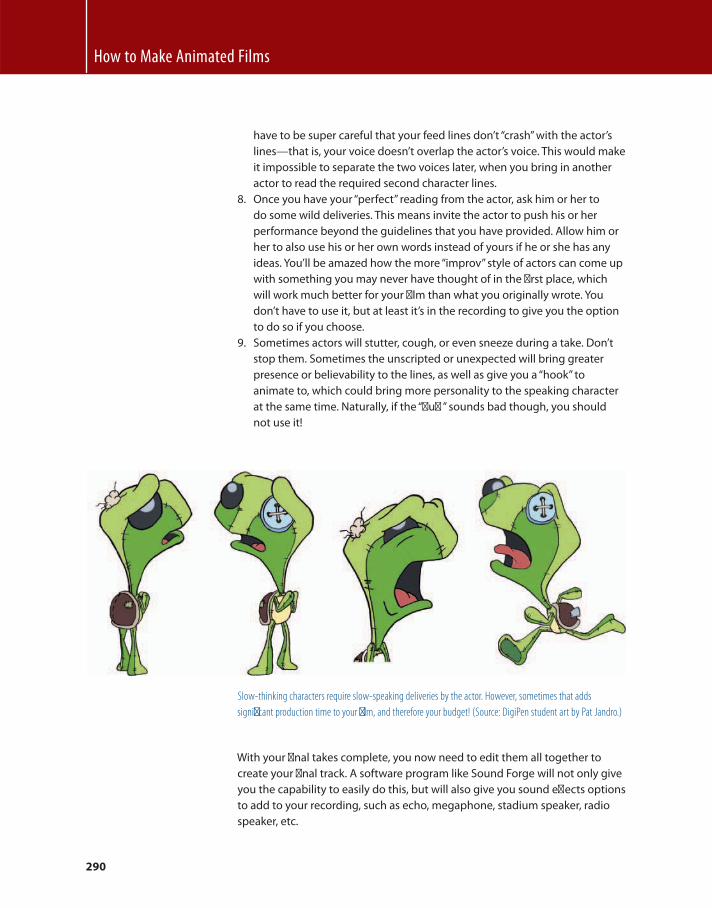
How to Make Animated Films
290
have to be super careful that your feed lines don’t “ crash ” with the actor’s
lines — that is, your voice doesn’t overlap the actor’s voice. This would make
it impossible to separate the two voices later, when you bring in another
actor to read the required second character lines.
8. Once you have your “ perfect ” reading from the actor, ask him or her to
do some wild deliveries. This means invite the actor to push his or her
performance beyond the guidelines that you have provided. Allow him or
her to also use his or her own words instead of yours if he or she has any
ideas. You’ll be amazed how the more “ improv ” style of actors can come up
with something you may never have thought of in the fi rst place, which
will work much better for your fi lm than what you originally wrote. You
don’t have to use it, but at least it’s in the recording to give you the option
to do so if you choose.
9. Sometimes actors will stutter, cough, or even sneeze during a take. Don’t
stop them. Sometimes the unscripted or unexpected will bring greater
presence or believability to the lines, as well as give you a “ hook ” to
animate to, which could bring more personality to the speaking character
at the same time. Naturally, if the “ fl uff ” sounds bad though, you should
not use it!
Slow-thinking characters require slow-speaking deliveries by the actor. However, sometimes that adds
signifi cant production time to your fi lm, and therefore your budget! (Source: DigiPen student art by Pat Jandro.)
With your fi nal takes complete, you now need to edit them all together to
create your fi nal track. A software program like Sound Forge will not only give
you the capability to easily do this, but will also give you sound eff ects options
to add to your recording, such as echo, megaphone, stadium speaker, radio
speaker, etc.
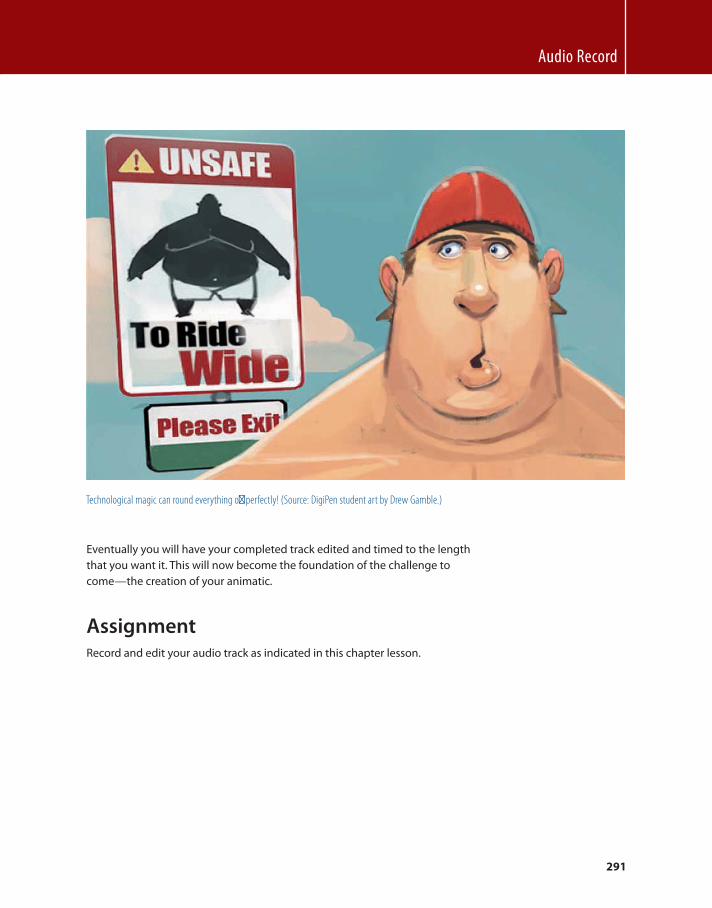
Audio Record
291
Technological magic can round everything off perfectly! (Source: DigiPen student art by Drew Gamble.)
Eventually you will have your completed track edited and timed to the length
that you want it. This will now become the foundation of the challenge to
come — the creation of your animatic.
Assignment Record and edit your audio track as indicated in this chapter lesson.

This page intentionally left blank

293
An animatic is quite simply the fi lming of the fi nished storyboard in
synchronization with the fi nal soundtrack. Technically, it is a very easy
process, but creatively it is very challenging, as the animatic is the foundation on
which everything else in your fi lm will be built. Consequently, the animatic stage
of a production must never be underestimated by the conscientious fi lmmaker.
Film Production 8
Animatic and Bacher Boards
This is the great moment where we
begin to see things appear on the
screen! (Source: DigiPen student art by
Eric Wiley.)
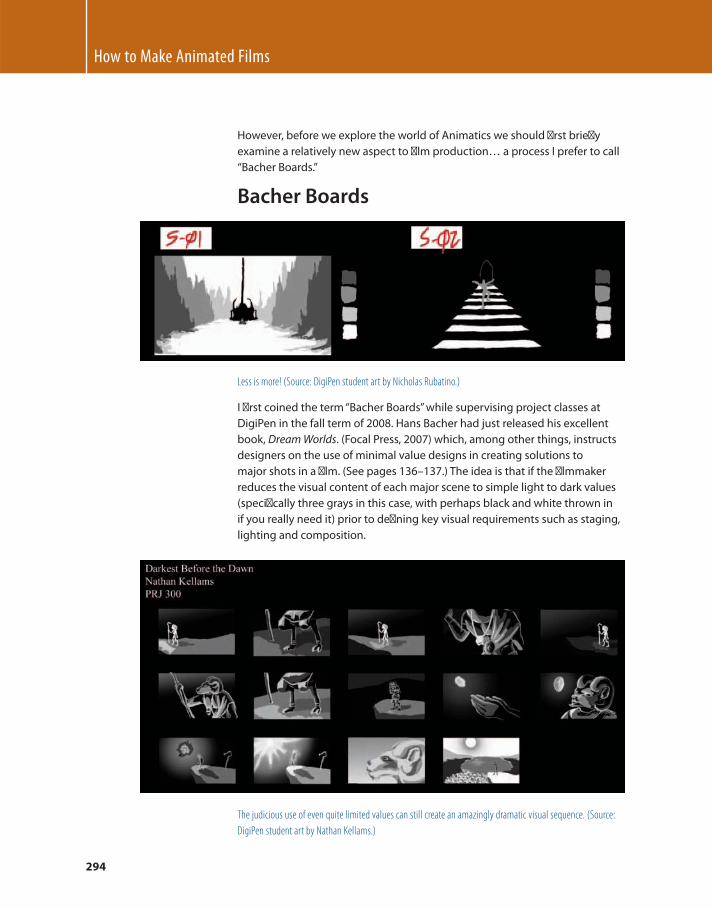
How to Make Animated Films
294
However, before we explore the world of Animatics we should fi rst briefl y
examine a relatively new aspect to fi lm production … a process I prefer to call
“ Bacher Boards. ”
Bacher Boards
Less is more! (Source: DigiPen student art by Nicholas Rubatino.)
I fi rst coined the term “ Bacher Boards ” while supervising project classes at
DigiPen in the fall term of 2008. Hans Bacher had just released his excellent
book, Dream Worlds . (Focal Press, 2007) which, among other things, instructs
designers on the use of minimal value designs in creating solutions to
major shots in a fi lm. (See pages 136–137.) The idea is that if the fi lmmaker
reduces the visual content of each major scene to simple light to dark values
(specifi cally three grays in this case, with perhaps black and white thrown in
if you really need it) prior to defi ning key visual requirements such as staging,
lighting and composition.
The judicious use of even quite limited values can still create an amazingly dramatic visual sequence. (Source:
DigiPen student art by Nathan Kellams.)
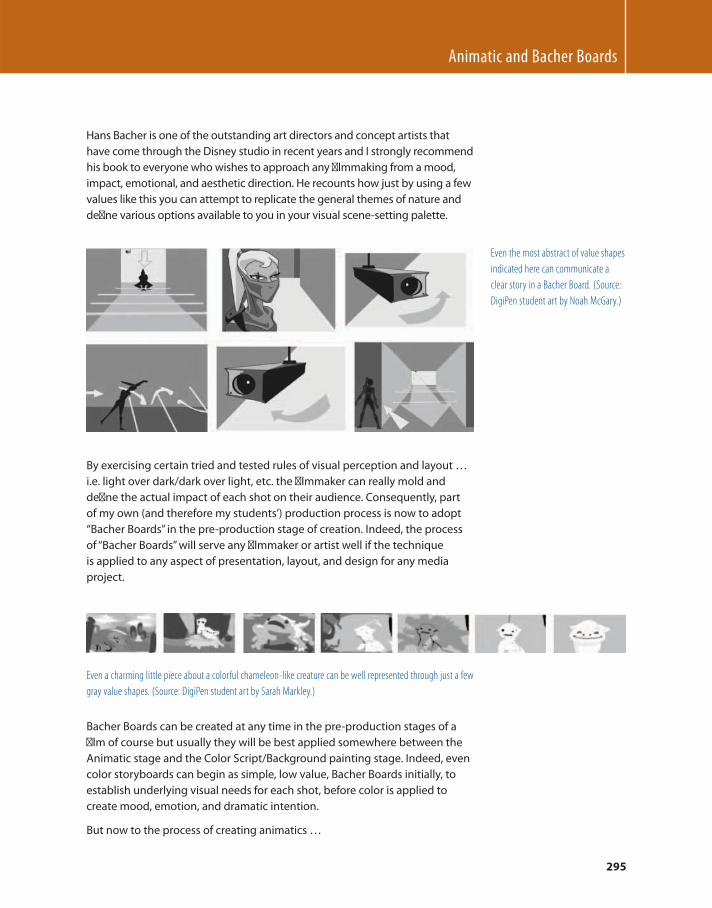
Animatic and Bacher Boards
295
Hans Bacher is one of the outstanding art directors and concept artists that
have come through the Disney studio in recent years and I strongly recommend
his book to everyone who wishes to approach any fi lmmaking from a mood,
impact, emotional, and aesthetic direction. He recounts how just by using a few
values like this you can attempt to replicate the general themes of nature and
defi ne various options available to you in your visual scene-setting palette.
By exercising certain tried and tested rules of visual perception and layout …
i.e. light over dark/dark over light, etc. the fi lmmaker can really mold and
defi ne the actual impact of each shot on their audience. Consequently, part
of my own (and therefore my students ’ ) production process is now to adopt
“ Bacher Boards ” in the pre-production stage of creation. Indeed, the process
of “ Bacher Boards ” will serve any fi lmmaker or artist well if the technique
is applied to any aspect of presentation, layout, and design for any media
project.
Even a charming little piece about a colorful chameleon-like creature can be well represented through just a few
gray value shapes. (Source: DigiPen student art by Sarah Markley.)
Bacher Boards can be created at any time in the pre-production stages of a
fi lm of course but usually they will be best applied somewhere between the
Animatic stage and the Color Script/Background painting stage. Indeed, even
color storyboards can begin as simple, low value, Bacher Boards initially, to
establish underlying visual needs for each shot, before color is applied to
create mood, emotion, and dramatic intention.
But now to the process of creating animatics …
Even the most abstract of value shapes
indicated here can communicate a
clear story in a Bacher Board. (Source:
DigiPen student art by Noah McGary.)
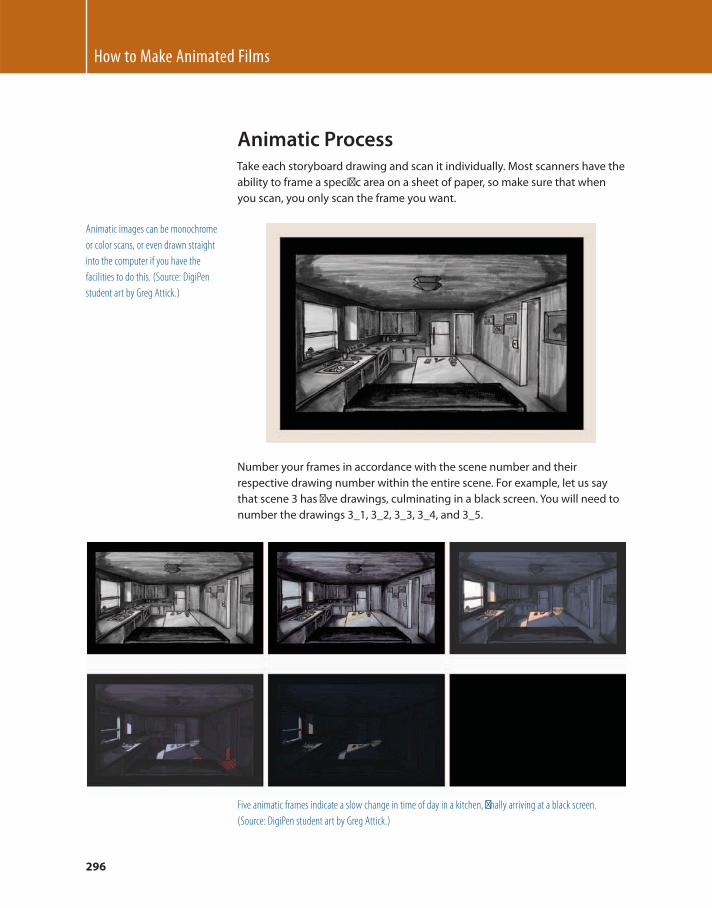
How to Make Animated Films
296
Animatic Process Take each storyboard drawing and scan it individually. Most scanners have the
ability to frame a specifi c area on a sheet of paper, so make sure that when
you scan, you only scan the frame you want.
Animatic images can be monochrome
or color scans, or even drawn straight
into the computer if you have the
facilities to do this. (Source: DigiPen
student art by Greg Attick.)
Number your frames in accordance with the scene number and their
respective drawing number within the entire scene. For example, let us say
that scene 3 has fi ve drawings, culminating in a black screen. You will need to
number the drawings 3_1, 3_2, 3_3, 3_4, and 3_5 .
Five animatic frames indicate a slow change in time of day in a kitchen, fi nally arriving at a black screen.
(Source: DigiPen student art by Greg Attick.)
Animatic and Bacher Boards
297
Initially, each drawing should be numbered outside of the image, until it is certain that each image will appear
in the fi nal animatic. (Source: DigiPen student art by Greg Attick.)
Make sure that you do this for your entire fi lm storyboard without leaving
out any scenes or drawing numbers in the process. I fi nd that it helps to have
the scene/frame number visible in the corner of the screen, so that when you
watch the fi nal movie of your animation, you can see what scene and frame
you’re at during any point in its viewing.
When you are sure that each image is
going to feature in the fi nal animatic
it is important to number each frame
in accordance with what scene it is
in and what order it appears in the
screen. (Source: DigiPen student art by
Greg Attick.)

How to Make Animated Films
298
Actually, you can write these numbers in when you create the storyboard
drawings in the fi rst place, or else you can add them later using the fi lm-
editing software that you will compile the animatic with.
I use Adobe Premiere Pro for creating my animatics. (Source: Fire Gods .)
With all your storyboard drawings separate and numbered according to scene
and frame order within the scene, import them into a fi lm-editing program
such as Adobe Premiere Pro or Apple’s Final Cut. Also import your fi nal track.
Note
When scanning storyboard frames, I tend to scan my drawings with
Adobe Photoshop. In doing so, I actually scan all my storyboard sheets
fi rst. Then I crop and number the individual drawing frames within the
program until I have them all as numbered separate frame fi les.
Animatic and Bacher Boards
299
Then, with the track positioned from frame 1, proceed to add your storyboard
images to it, adjusting them to the timed length you wish them to be seen as
you go. Eventually, it will be possible for you to view your entire storyboard
drawing collection in synchronization with your fi nal audio track. You have
created your fi rst animatic!
It is only when you play back your
animatic and see your ideas and
drawings running in real time on the
screen that you know if they have a
chance of working. (Source: Fire Gods .)
In reality, you will probably have to fi ddle a lot with the lengths of each frame
image until you get the timing and sync just how you want it. This is normal.
Don’t forget, too, that by advancing the picture a few frames ahead of the
audio sync point (as you did for your dialog animation), you will tend to make
that cut/sync point stronger than if it were edited with level sync.
The highlighted area indicates the beginning of the scene drawings on the timeline and the shaded pulses of the
audio track positioned a little behind the start of it. (Source: Fire Gods .)
How to Make Animated Films
300
Also, you will almost certainly fi nd that although you thought your storyboard
was perfect when you fi rst drew it, when it is in sync with the track and played
back on the monitor in the animatic, you could well fi nd that you have missed
something. This will, therefore, be an opportunity for a new shot to be added
or a frame to be taken out if you have done too much to describe the action in
a scene. Therefore, don’t be afraid to cut out drawings to make the sequence
work better on the screen. Likewise, don’t be afraid to add new, quickly
sketched frames if you think the action needs them.
I often scribble out a new frame to
include in the fi rst-pass animatic if I
feel the animatic needs it to keep the
story fl ow going. (Source: Fire Gods .)
Anyone who owns the fantastic Spirited Away movie on DVD will note that as
an extra feature there is eff ectively the entire fi lm animatic that was created
before the animation was begun. As you watch it, you will notice that the
director, the wonderful Hayou Miyazaki, has dropped in quickly scribbled
sketches in addition to his original storyboard drawings to emphasize or add
action where he had missed it before. This is all part of the process of creating
a good animatic for your fi lm, and consequently you should never go with
your fi rst thoughts from the storyboard point of view when creating it.
The Animatic Is Your Film Bible Ultimately, you will arrive at your fi nal animatic, upon which all the action
sequences and scene cuts will be based. This will be your “ bible ” that
everything else will be based on. Therefore, if you have edited your animatic
well, there should be no reason to change or edit your fi lm later, once the
Animatic and Bacher Boards
301
animation is done. All the creative decisions are made and established,
leaving you with just the creative challenge of making the movement
wonderful within each shot.
Check Your Scene Timings Sometimes you’ll fi nd that you don’t have enough time for a particular
sequence of animation to occur within the time you allocated for it within
the animatic. This is a common error with student or novice animators. (It
is also true of professional animators on occasion!) In time, experience will
give you a sense of how much a particular action takes to be animated well
within a scene. However, for the time being, always err on the side of adding
time if you are in doubt. It will always be easier to cut down the length
of a scene later than it will be to add footage if your animatic judgment
has underestimated the time required. That said, try to be as accurate in
everything as you can at the animatic stage, favoring longer rather than
shorter if in doubt. Ultimately though, it is far better never to have to make
any changes in a fi lm when it’s in full production!
Note
If you have underestimated the length of a scene and have to add frames
or actions to it, don’t be afraid to extend the audio track during silent
sections. This will make them longer than they were originally and
will enable you to accommodate the extra animated action you need
to add.
The white vertical band on the audio
timeline in Cool Edit Pro highlights
the area of silence that can be edited
out if the track needs to be shortened.
(Source: Fire Gods .)
How to Make Animated Films
302
Remember, the animatic is the most important establishing moment for
timing and action within your fi lm, so it is really important that you get
everything locked down and fully established at this stage. It cannot be
stressed enough that to make changes later will be far more costly and time
consuming to you as a fi lmmaker, not to mention demoralizing! So, it pays to
focus long and hard on your animatic at this stage to make sure that you are
covering all the bases before the really intensive work begins!
Assignment Finalize your animatic with your fi nal track and original storyboard, adding or
deleting material as you feel fi t. When the animatic is complete, render out the
entire animatic as a movie, so you can easily and repeatedly play it back for
your fi nal checks.
Note
This animatic movie will ultimately be the template for all your future
edits when completing pose tests, pencil tests, and fi nal footage later.
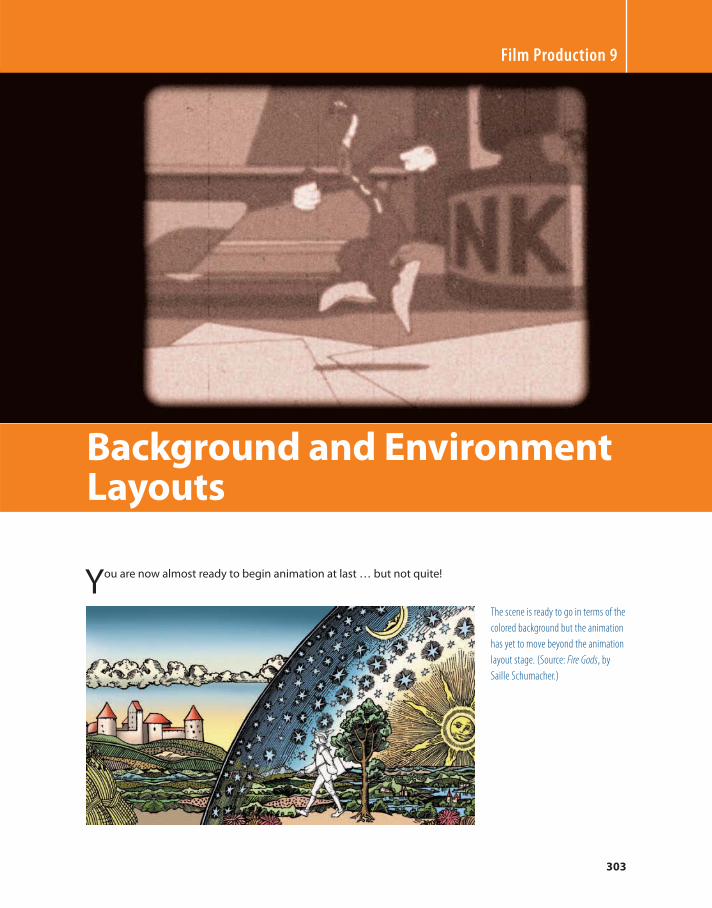
303
You are now almost ready to begin animation at last … but not quite!
Film Production 9
Background and Environment Layouts
The scene is ready to go in terms of the
colored background but the animation
has yet to move beyond the animation
layout stage. (Source: Fire Gods , by
Saille Schumacher.)
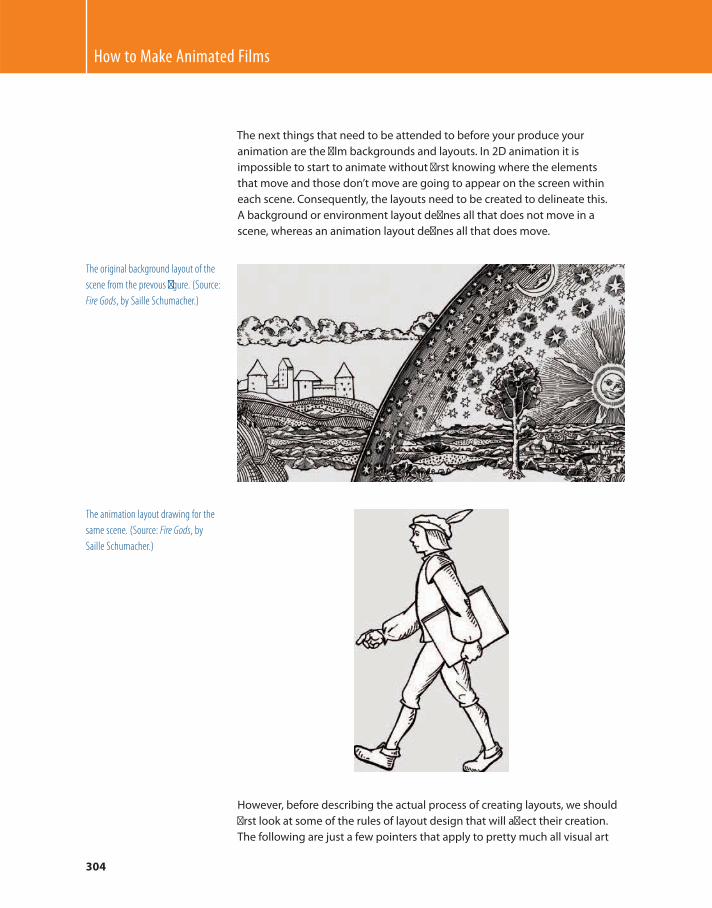
How to Make Animated Films
304
The next things that need to be attended to before your produce your
animation are the fi lm backgrounds and layouts. In 2D animation it is
impossible to start to animate without fi rst knowing where the elements
that move and those don’t move are going to appear on the screen within
each scene. Consequently, the layouts need to be created to delineate this.
A background or environment layout defi nes all that does not move in a
scene, whereas an animation layout defi nes all that does move.
The original background layout of the
scene from the prevous fi gure. (Source:
Fire Gods , by Saille Schumacher.)
The animation layout drawing for the
same scene. (Source: Fire Gods , by
Saille Schumacher.)
However, before describing the actual process of creating layouts, we should
fi rst look at some of the rules of layout design that will aff ect their creation.
The following are just a few pointers that apply to pretty much all visual art
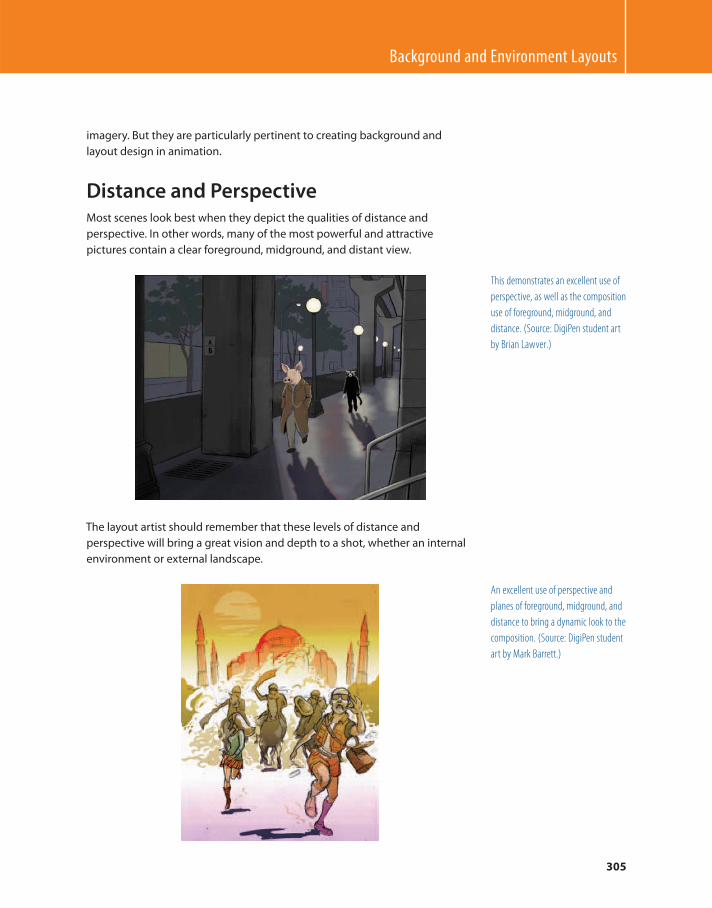
Background and Environment Layouts
305
imagery. But they are particularly pertinent to creating background and
layout design in animation.
Distance and Perspective Most scenes look best when they depict the qualities of distance and
perspective. In other words, many of the most powerful and attractive
pictures contain a clear foreground, midground, and distant view.
This demonstrates an excellent use of
perspective, as well as the composition
use of foreground, midground, and
distance. (Source: DigiPen student art
by Brian Lawver .)
The layout artist should remember that these levels of distance and
perspective will bring a great vision and depth to a shot, whether an internal
environment or external landscape.
An excellent use of perspective and
planes of foreground, midground, and
distance to bring a dynamic look to the
composition. (Source: DigiPen student
art by Mark Barrett.)
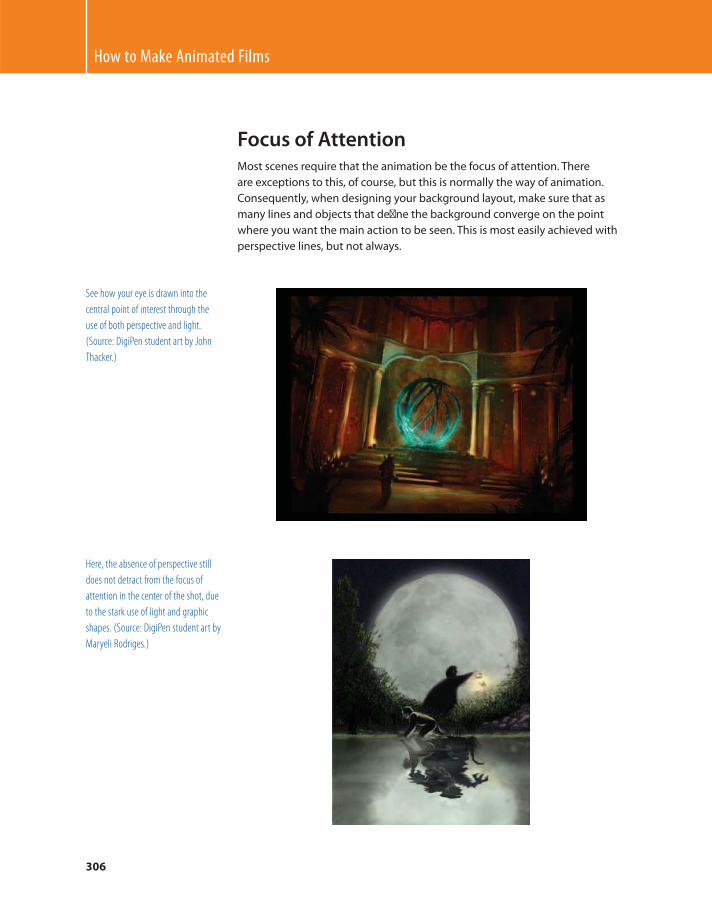
How to Make Animated Films
306
Focus of Attention Most scenes require that the animation be the focus of attention. There
are exceptions to this, of course, but this is normally the way of animation.
Consequently, when designing your background layout, make sure that as
many lines and objects that defi ne the background converge on the point
where you want the main action to be seen. This is most easily achieved with
perspective lines, but not always.
See how your eye is drawn into the
central point of interest through the
use of both perspective and light.
(Source: DigiPen student art by John
Thacker.)
Here, the absence of perspective still
does not detract from the focus of
attention in the center of the shot, due
to the stark use of light and graphic
shapes. (Source: DigiPen student art by
Maryeli Rodriges.)
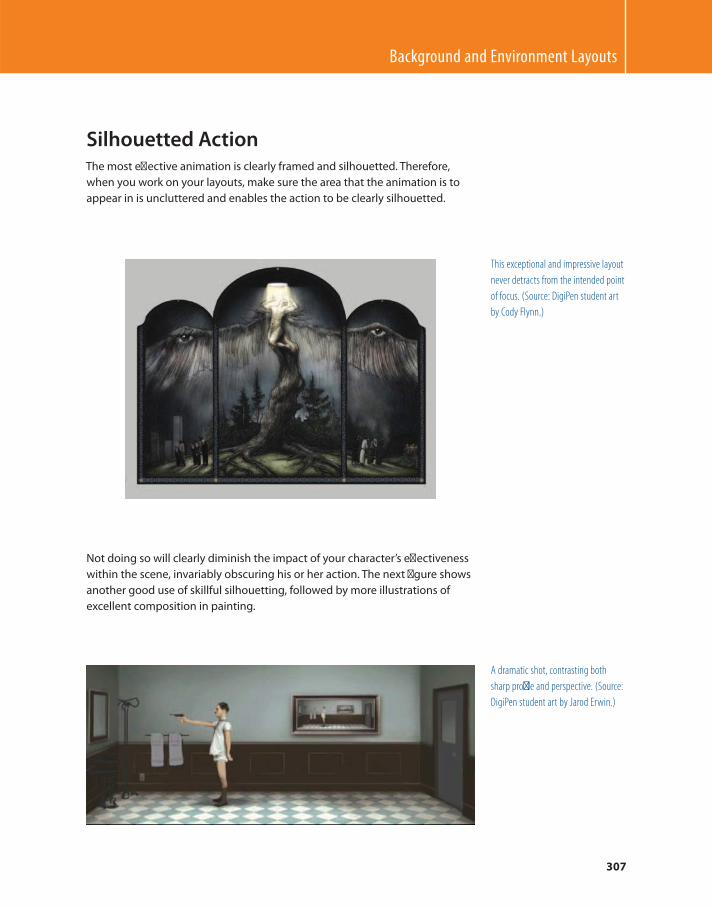
Background and Environment Layouts
307
Silhouetted Action The most eff ective animation is clearly framed and silhouetted. Therefore,
when you work on your layouts, make sure the area that the animation is to
appear in is uncluttered and enables the action to be clearly silhouetted.
This exceptional and impressive layout
never detracts from the intended point
of focus. (Source: DigiPen student art
by Cody Flynn.)
Not doing so will clearly diminish the impact of your character’s eff ectiveness
within the scene, invariably obscuring his or her action. The next fi gure shows
another good use of skillful silhouetting, followed by more illustrations of
excellent composition in painting.
A dramatic shot, contrasting both
sharp profi le and perspective. (Source:
DigiPen student art by Jarod Erwin.)
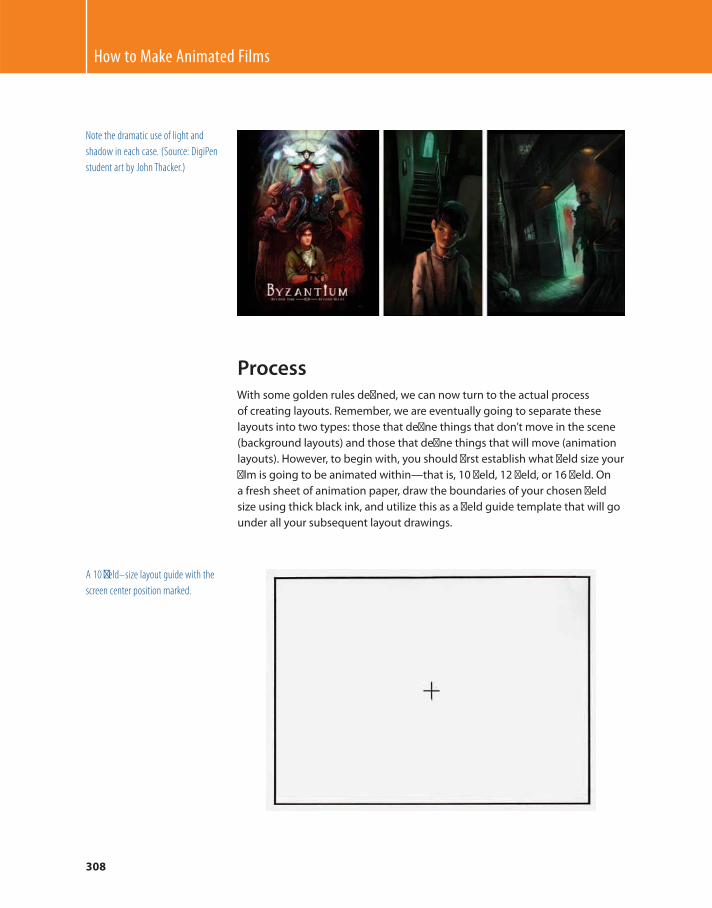
How to Make Animated Films
308
Note the dramatic use of light and
shadow in each case. (Source: DigiPen
student art by John Thacker.)
Process With some golden rules defi ned, we can now turn to the actual process
of creating layouts. Remember, we are eventually going to separate these
layouts into two types: those that defi ne things that don’t move in the scene
(background layouts) and those that defi ne things that will move (animation
layouts). However, to begin with, you should fi rst establish what fi eld size your
fi lm is going to be animated within — that is, 10 fi eld, 12 fi eld, or 16 fi eld. On
a fresh sheet of animation paper, draw the boundaries of your chosen fi eld
size using thick black ink, and utilize this as a fi eld guide template that will go
under all your subsequent layout drawings.
A 10 fi eld – size layout guide with the
screen center position marked.
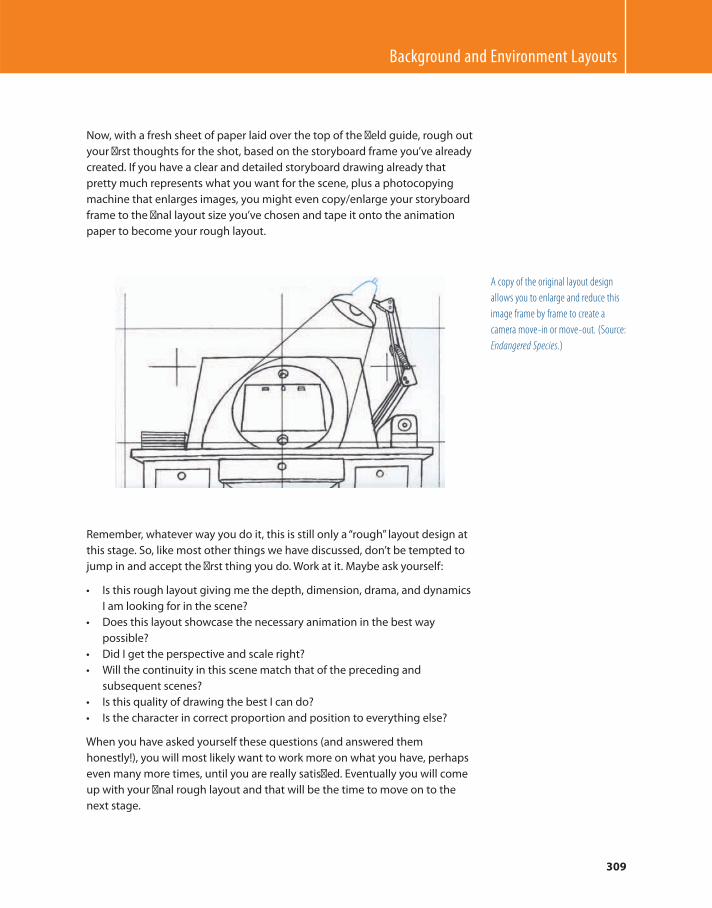
Background and Environment Layouts
309
Now, with a fresh sheet of paper laid over the top of the fi eld guide, rough out
your fi rst thoughts for the shot, based on the storyboard frame you’ve already
created. If you have a clear and detailed storyboard drawing already that
pretty much represents what you want for the scene, plus a photocopying
machine that enlarges images, you might even copy/enlarge your storyboard
frame to the fi nal layout size you’ve chosen and tape it onto the animation
paper to become your rough layout.
A copy of the original layout design
allows you to enlarge and reduce this
image frame by frame to create a
camera move-in or move-out. (Source:
Endangered Species .)
Remember, whatever way you do it, this is still only a “ rough ” layout design at
this stage. So, like most other things we have discussed, don’t be tempted to
jump in and accept the fi rst thing you do. Work at it. Maybe ask yourself:
● Is this rough layout giving me the depth, dimension, drama, and dynamics
I am looking for in the scene?
● Does this layout showcase the necessary animation in the best way
possible?
● Did I get the perspective and scale right?
● Will the continuity in this scene match that of the preceding and
subsequent scenes?
● Is this quality of drawing the best I can do?
● Is the character in correct proportion and position to everything else?
When you have asked yourself these questions (and answered them
honestly!), you will most likely want to work more on what you have, perhaps
even many more times, until you are really satisfi ed. Eventually you will come
up with your fi nal rough layout and that will be the time to move on to the
next stage.
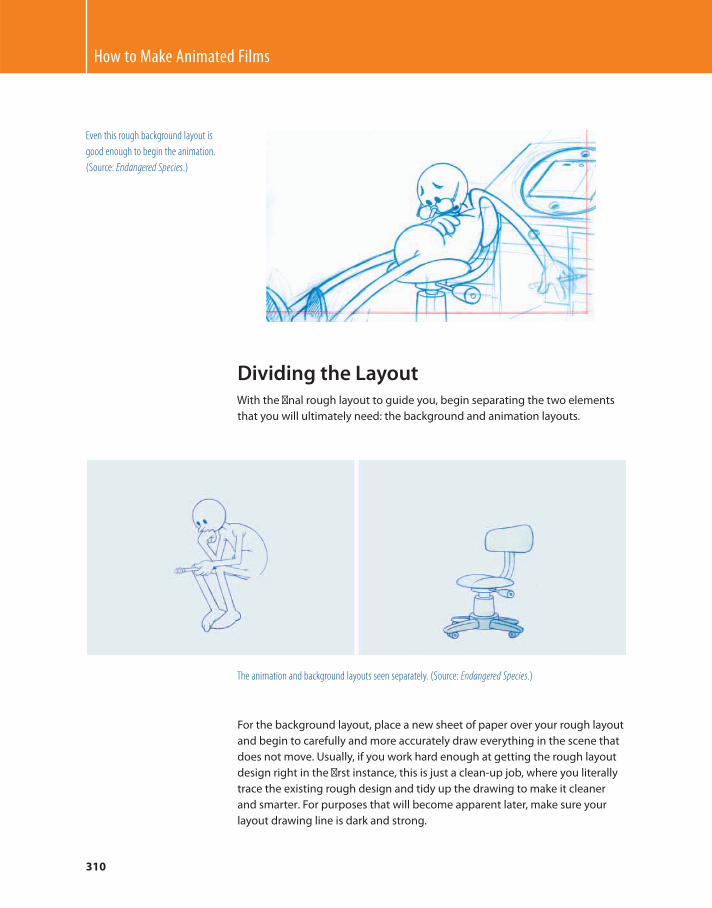
How to Make Animated Films
310
Even this rough background layout is
good enough to begin the animation.
(Source: Endangered Species .)
Dividing the Layout With the fi nal rough layout to guide you, begin separating the two elements
that you will ultimately need: the background and animation layouts.
The animation and background layouts seen separately. (Source: Endangered Species .)
For the background layout, place a new sheet of paper over your rough layout
and begin to carefully and more accurately draw everything in the scene that
does not move. Usually, if you work hard enough at getting the rough layout
design right in the fi rst instance, this is just a clean-up job, where you literally
trace the existing rough design and tidy up the drawing to make it cleaner
and smarter . For purposes that will become apparent later, make sure your
layout drawing line is dark and strong.
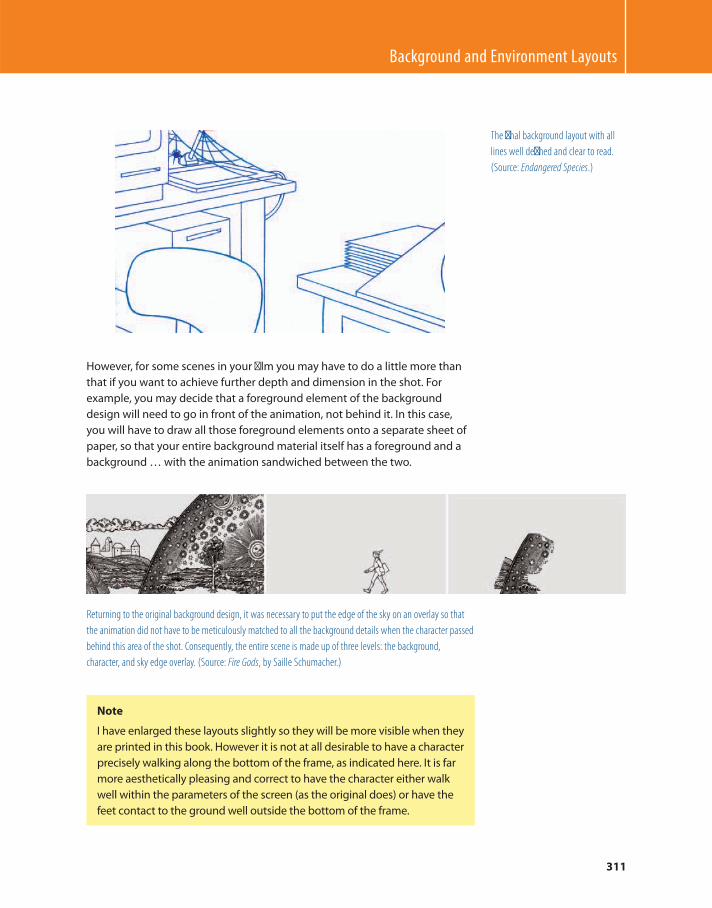
Background and Environment Layouts
311
The fi nal background layout with all
lines well defi ned and clear to read.
(Source: Endangered Species .)
However, for some scenes in your fi lm you may have to do a little more than
that if you want to achieve further depth and dimension in the shot. For
example, you may decide that a foreground element of the background
design will need to go in front of the animation, not behind it. In this case,
you will have to draw all those foreground elements onto a separate sheet of
paper, so that your entire background material itself has a foreground and a
background … with the animation sandwiched between the two.
Returning to the original background design, it was necessary to put the edge of the sky on an overlay so that
the animation did not have to be meticulously matched to all the background details when the character passed
behind this area of the shot. Consequently, the entire scene is made up of three levels: the background,
character, and sky edge overlay. (Source: Fire Gods , by Saille Schumacher.)
Note
I have enlarged these layouts slightly so they will be more visible when they
are printed in this book. However it is not at all desirable to have a character
precisely walking along the bottom of the frame, as indicated here. It is far
more aesthetically pleasing and correct to have the character either walk
well within the parameters of the screen (as the original does) or have the
feet contact to the ground well outside the bottom of the frame.
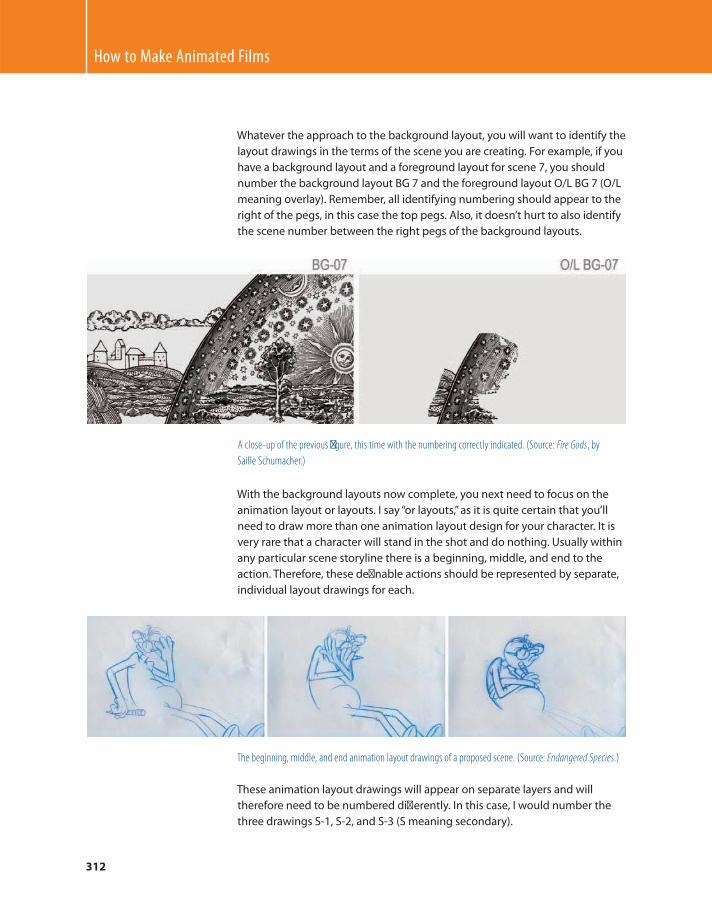
How to Make Animated Films
312
Whatever the approach to the background layout, you will want to identify the
layout drawings in the terms of the scene you are creating. For example, if you
have a background layout and a foreground layout for scene 7, you should
number the background layout BG 7 and the foreground layout O/L BG 7 (O/L
meaning overlay). Remember, all identifying numbering should appear to the
right of the pegs, in this case the top pegs. Also, it doesn’t hurt to also identify
the scene number between the right pegs of the background layouts.
A close-up of the previous fi gure, this time with the numbering correctly indicated. (Source: Fire Gods , by
Saille Schumacher.)
With the background layouts now complete, you next need to focus on the
animation layout or layouts. I say “ or layouts, ” as it is quite certain that you’ll
need to draw more than one animation layout design for your character. It is
very rare that a character will stand in the shot and do nothing. Usually within
any particular scene storyline there is a beginning, middle, and end to the
action. Therefore, these defi nable actions should be represented by separate,
individual layout drawings for each.
The beginning, middle, and end animation layout drawings of a proposed scene. (Source: Endangered Species .)
These animation layout drawings will appear on separate layers and will
therefore need to be numbered diff erently. In this case, I would number the
three drawings S-1, S-2, and S-3 (S meaning secondary).
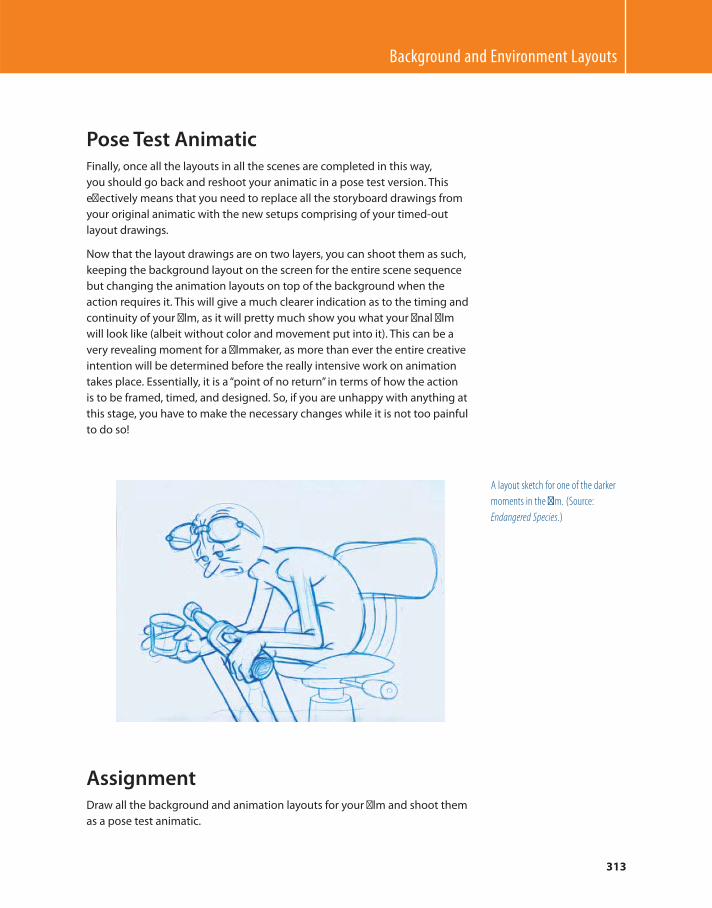
Background and Environment Layouts
313
Pose Test Animatic Finally, once all the layouts in all the scenes are completed in this way,
you should go back and reshoot your animatic in a pose test version. This
eff ectively means that you need to replace all the storyboard drawings from
your original animatic with the new setups comprising of your timed-out
layout drawings.
Now that the layout drawings are on two layers, you can shoot them as such,
keeping the background layout on the screen for the entire scene sequence
but changing the animation layouts on top of the background when the
action requires it. This will give a much clearer indication as to the timing and
continuity of your fi lm, as it will pretty much show you what your fi nal fi lm
will look like (albeit without color and movement put into it). This can be a
very revealing moment for a fi lmmaker, as more than ever the entire creative
intention will be determined before the really intensive work on animation
takes place. Essentially, it is a “ point of no return ” in terms of how the action
is to be framed, timed, and designed. So, if you are unhappy with anything at
this stage, you have to make the necessary changes while it is not too painful
to do so!
A layout sketch for one of the darker
moments in the fi lm. (Source:
Endangered Species .)
Assignment Draw all the background and animation layouts for your fi lm and shoot them
as a pose test animatic.

This page intentionally left blank
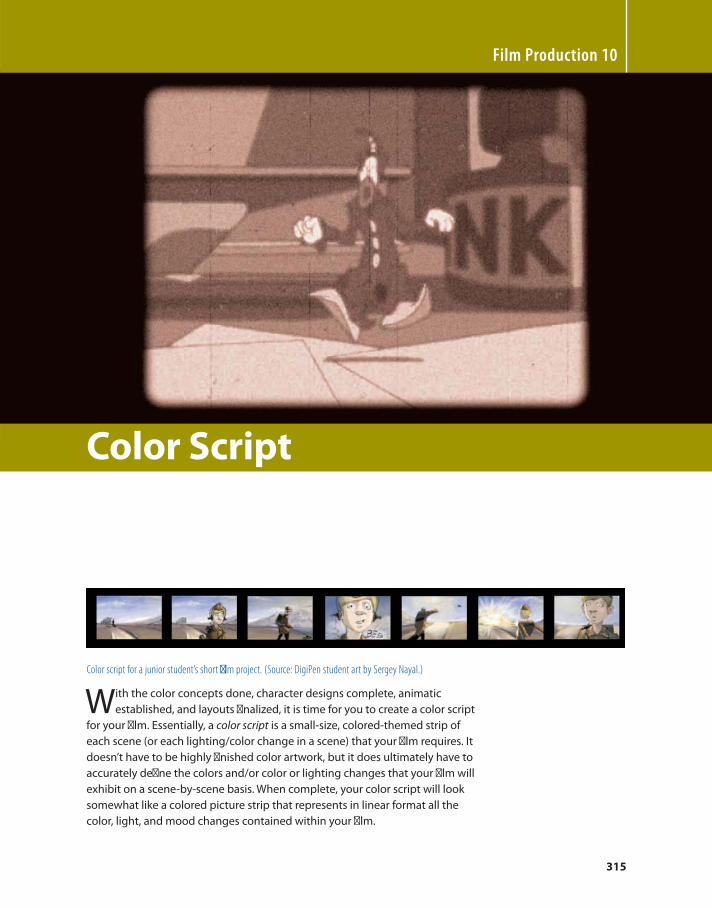
315
Color script for a junior student ’ s short fi lm project. (Source: DigiPen student art by Sergey Nayal.)
With the color concepts done, character designs complete, animatic
established, and layouts fi nalized, it is time for you to create a color script
for your fi lm. Essentially, a color script is a small-size, colored-themed strip of
each scene (or each lighting/color change in a scene) that your fi lm requires. It
doesn’t have to be highly fi nished color artwork, but it does ultimately have to
accurately defi ne the colors and/or color or lighting changes that your fi lm will
exhibit on a scene-by-scene basis. When complete, your color script will look
somewhat like a colored picture strip that represents in linear format all the
color, light, and mood changes contained within your fi lm.
Film Production 10
Color Script
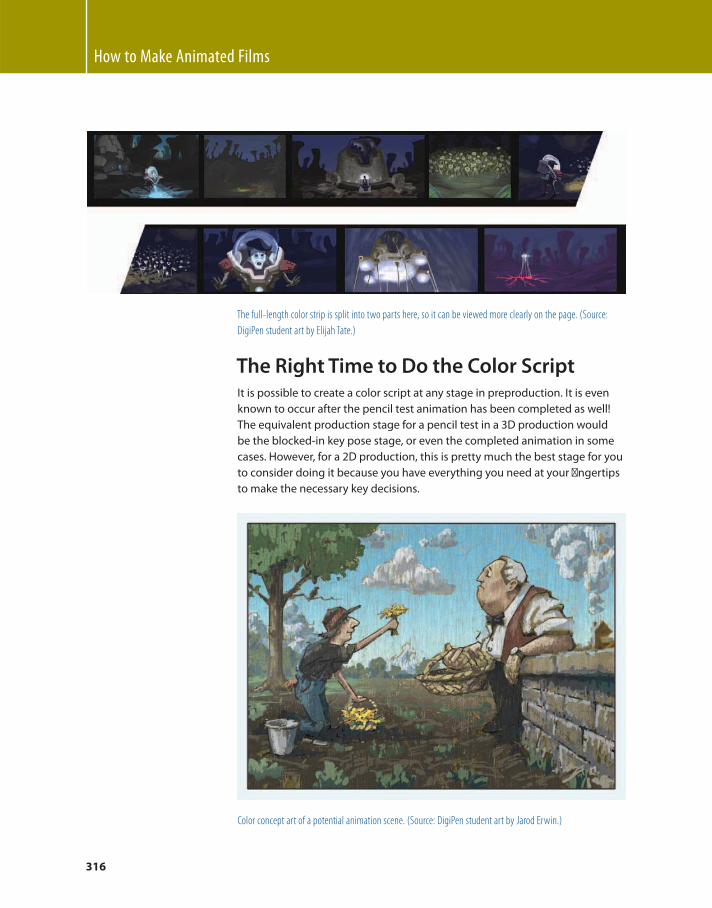
How to Make Animated Films
316
The full-length color strip is split into two parts here, so it can be viewed more clearly on the page. (Source:
DigiPen student art by Elijah Tate.)
The Right Time to Do the Color Script It is possible to create a color script at any stage in preproduction. It is even
known to occur after the pencil test animation has been completed as well!
The equivalent production stage for a pencil test in a 3D production would
be the blocked-in key pose stage, or even the completed animation in some
cases. However, for a 2D production, this is pretty much the best stage for you
to consider doing it because you have everything you need at your fi ngertips
to make the necessary key decisions.
Color concept art of a potential animation scene. (Source: DigiPen student art by Jarod Erwin.)
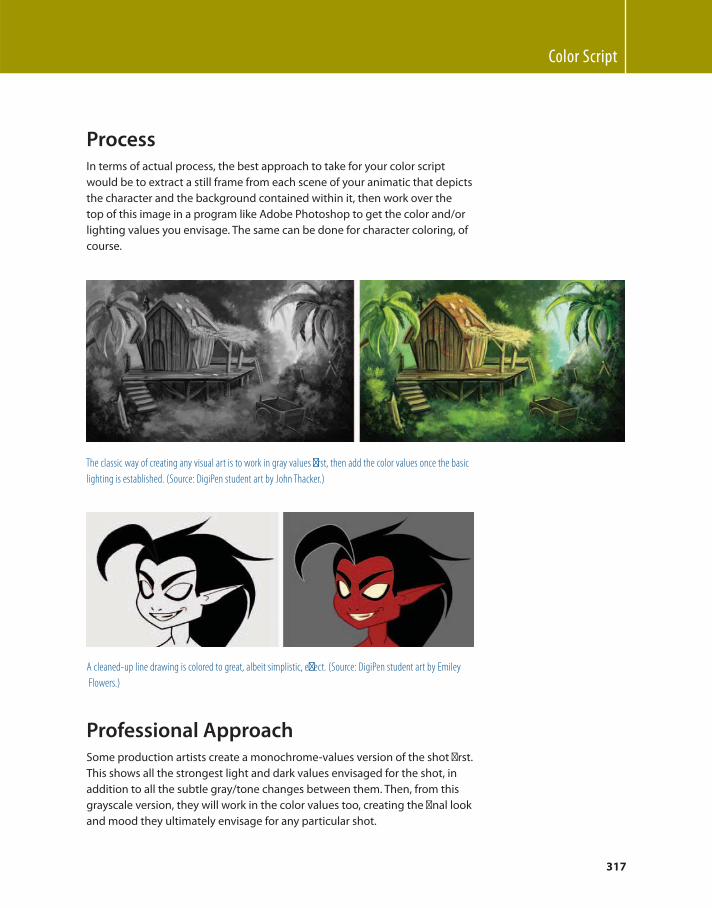
Color Script
317
Process In terms of actual process, the best approach to take for your color script
would be to extract a still frame from each scene of your animatic that depicts
the character and the background contained within it, then work over the
top of this image in a program like Adobe Photoshop to get the color and/or
lighting values you envisage. The same can be done for character coloring, of
course.
The classic way of creating any visual art is to work in gray values fi rst, then add the color values once the basic
lighting is established. (Source: DigiPen student art by John Thacker.)
A cleaned-up line drawing is colored to great, albeit simplistic, eff ect. (Source: DigiPen student art by Emiley
Flowers.)
Professional Approach Some production artists create a monochrome-values version of the shot fi rst.
This shows all the strongest light and dark values envisaged for the shot, in
addition to all the subtle gray/tone changes between them. Then, from this
grayscale version, they will work in the color values too, creating the fi nal look
and mood they ultimately envisage for any particular shot.
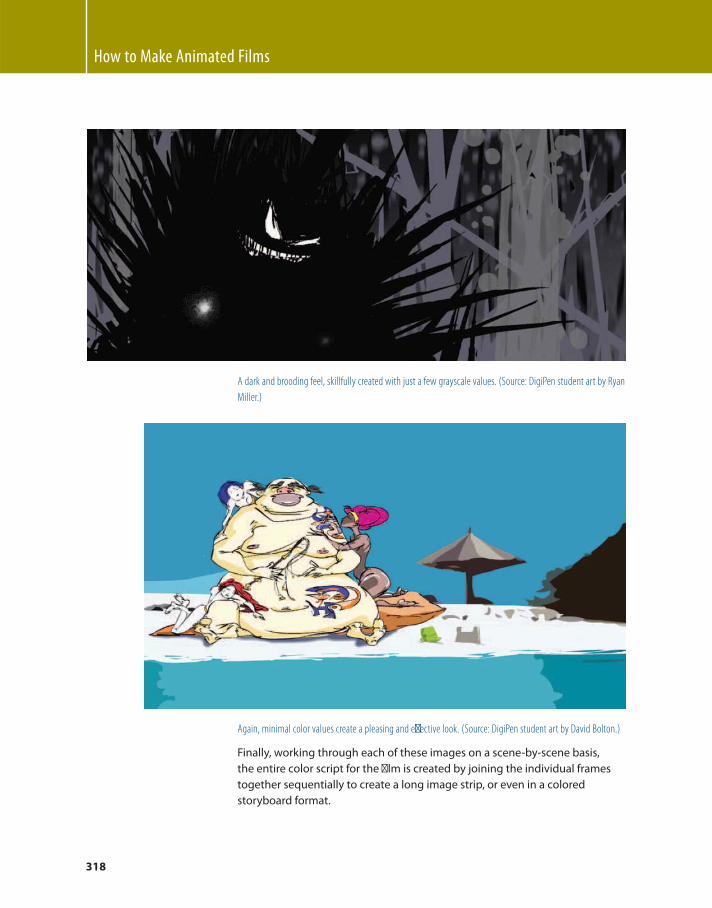
How to Make Animated Films
318
A dark and brooding feel, skillfully created with just a few grayscale values. (Source: DigiPen student art by Ryan
Miller.)
Again, minimal color values create a pleasing and eff ective look. (Source: DigiPen student art by David Bolton.)
Finally, working through each of these images on a scene-by-scene basis,
the entire color script for the fi lm is created by joining the individual frames
together sequentially to create a long image strip, or even in a colored
storyboard format.
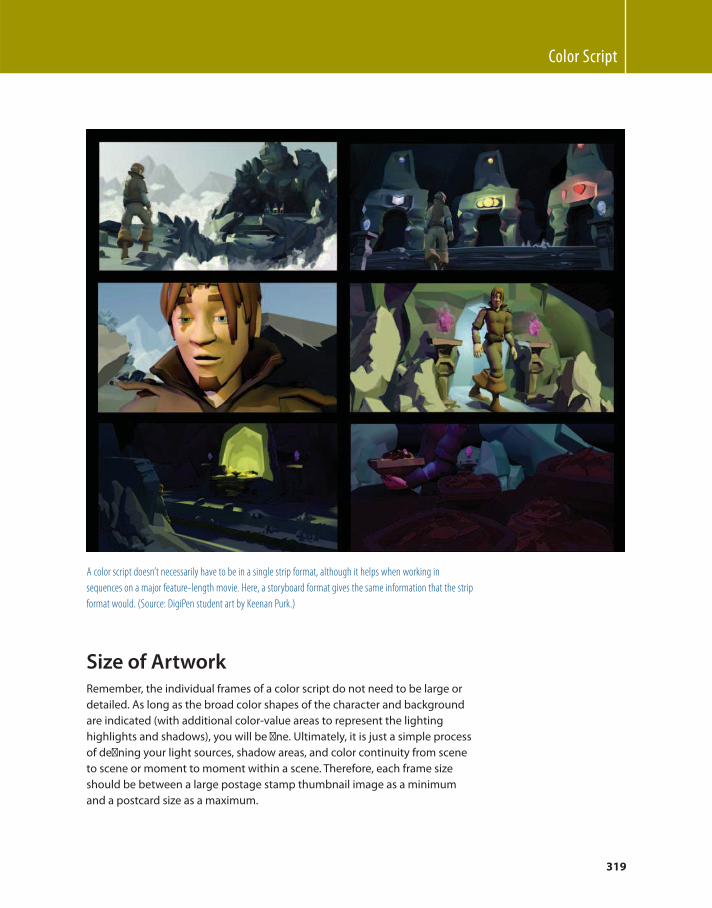
Color Script
319
A color script doesn’t necessarily have to be in a single strip format, although it helps when working in
sequences on a major feature-length movie. Here, a storyboard format gives the same information that the strip
format would. (Source: DigiPen student art by Keenan Purk.)
Size of Artwork Remember, the individual frames of a color script do not need to be large or
detailed. As long as the broad color shapes of the character and background
are indicated (with additional color-value areas to represent the lighting
highlights and shadows), you will be fi ne. Ultimately, it is just a simple process
of defi ning your light sources, shadow areas, and color continuity from scene
to scene or moment to moment within a scene. Therefore, each frame size
should be between a large postage stamp thumbnail image as a minimum
and a postcard size as a maximum.
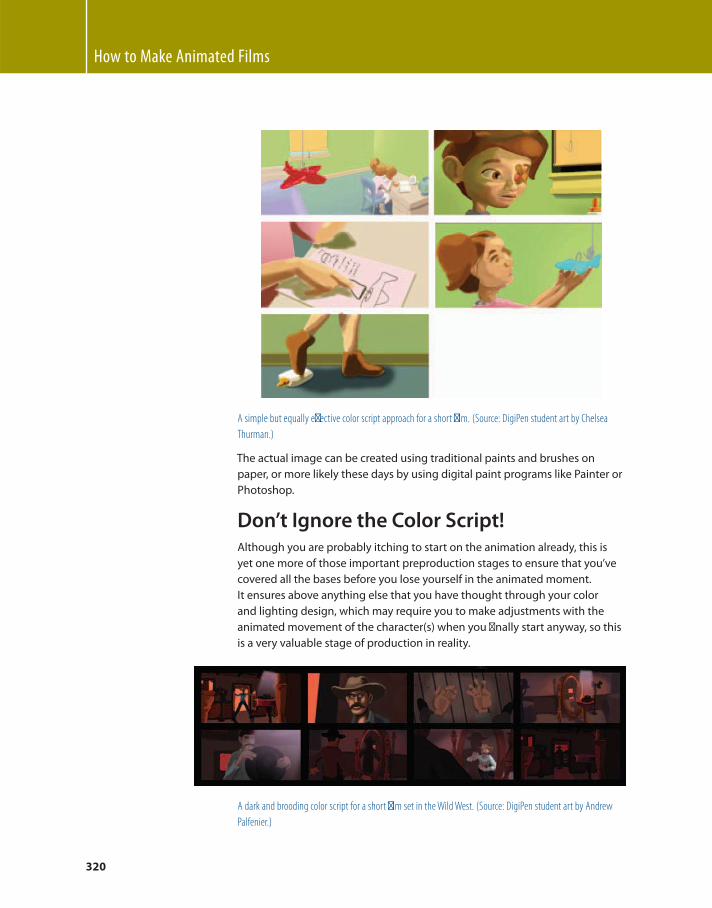
How to Make Animated Films
320
A simple but equally eff ective color script approach for a short fi lm. (Source: DigiPen student art by Chelsea
Thurman.)
The actual image can be created using traditional paints and brushes on
paper, or more likely these days by using digital paint programs like Painter or
Photoshop.
Don’t Ignore the Color Script! Although you are probably itching to start on the animation already, this is
yet one more of those important preproduction stages to ensure that you’ve
covered all the bases before you lose yourself in the animated moment.
It ensures above anything else that you have thought through your color
and lighting design, which may require you to make adjustments with the
animated movement of the character(s) when you fi nally start anyway, so this
is a very valuable stage of production in reality.
A dark and brooding color script for a short fi lm set in the Wild West. (Source: DigiPen student art by Andrew
Palfenier.)
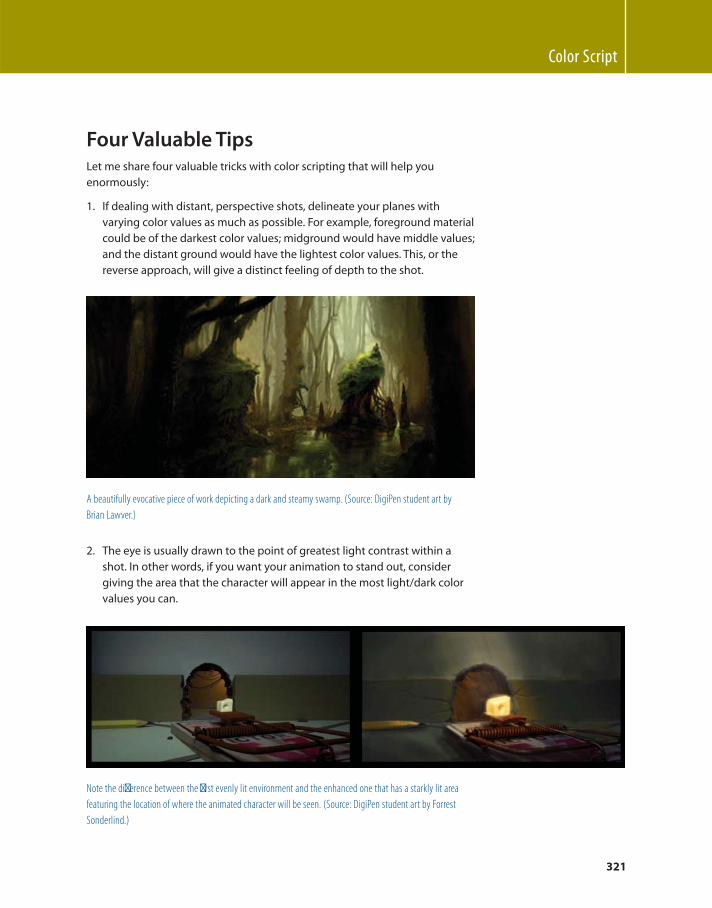
Color Script
321
Four Valuable Tips Let me share four valuable tricks with color scripting that will help you
enormously:
1. If dealing with distant, perspective shots, delineate your planes with
varying color values as much as possible. For example, foreground material
could be of the darkest color values; midground would have middle values;
and the distant ground would have the lightest color values. This, or the
reverse approach, will give a distinct feeling of depth to the shot.
A beautifully evocative piece of work depicting a dark and steamy swamp. (Source: DigiPen student art by
Brian Lawver.)
2. The eye is usually drawn to the point of greatest light contrast within a
shot. In other words, if you want your animation to stand out, consider
giving the area that the character will appear in the most light/dark color
values you can.
Note the diff erence between the fi rst evenly lit environment and the enhanced one that has a starkly lit area
featuring the location of where the animated character will be seen. (Source: DigiPen student art by Forrest
Sonderlind.)
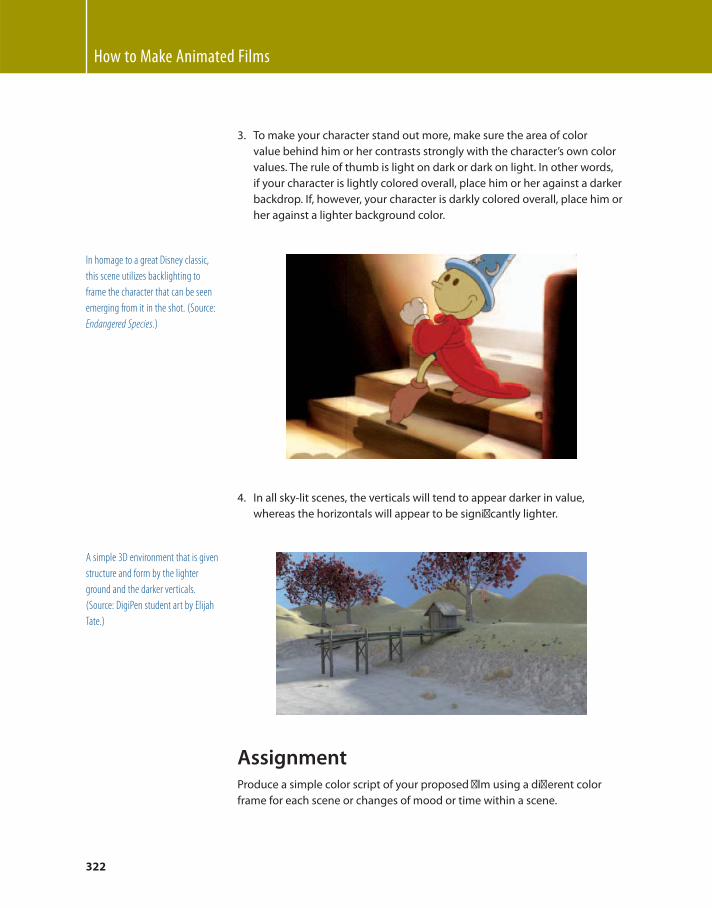
How to Make Animated Films
322
3. To make your character stand out more, make sure the area of color
value behind him or her contrasts strongly with the character’s own color
values. The rule of thumb is light on dark or dark on light. In other words,
if your character is lightly colored overall, place him or her against a darker
backdrop. If, however, your character is darkly colored overall, place him or
her against a lighter background color.
In homage to a great Disney classic,
this scene utilizes backlighting to
frame the character that can be seen
emerging from it in the shot. (Source:
Endangered Species .)
4. In all sky-lit scenes, the verticals will tend to appear darker in value,
whereas the horizontals will appear to be signifi cantly lighter.
A simple 3D environment that is given
structure and form by the lighter
ground and the darker verticals.
(Source: DigiPen student art by Elijah
Tate.)
Assignment Produce a simple color script of your proposed fi lm using a diff erent color
frame for each scene or changes of mood or time within a scene.
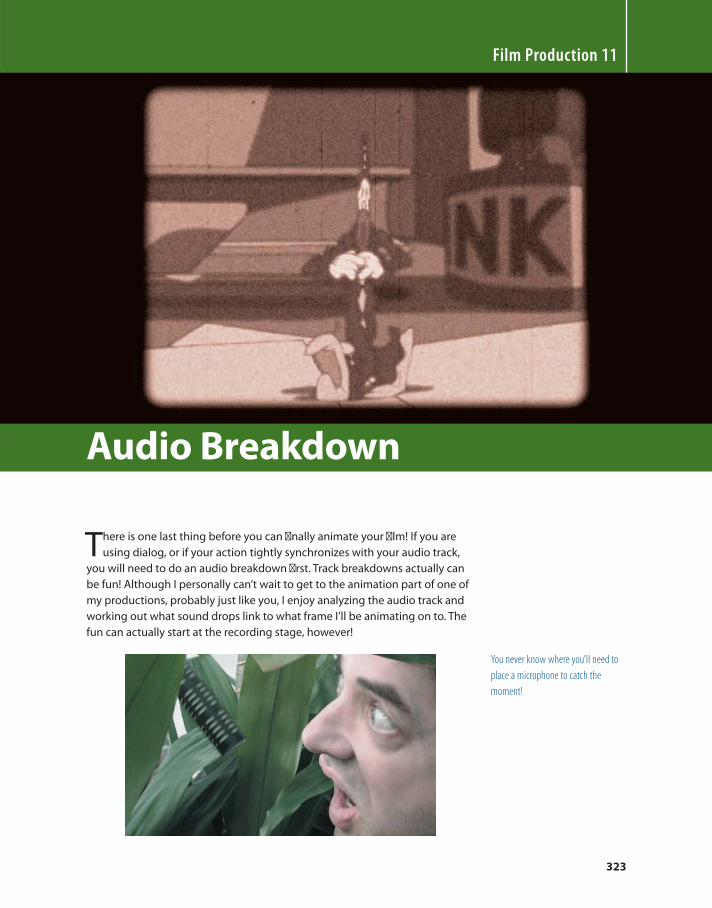
323
Film Production 11
Audio Breakdown
There is one last thing before you can fi nally animate your fi lm! If you are
using dialog, or if your action tightly synchronizes with your audio track,
you will need to do an audio breakdown fi rst. Track breakdowns actually can
be fun! Although I personally can’t wait to get to the animation part of one of
my productions, probably just like you, I enjoy analyzing the audio track and
working out what sound drops link to what frame I’ll be animating on to. The
fun can actually start at the recording stage, however!
You never know where you ’ ll need to
place a microphone to catch the
moment!
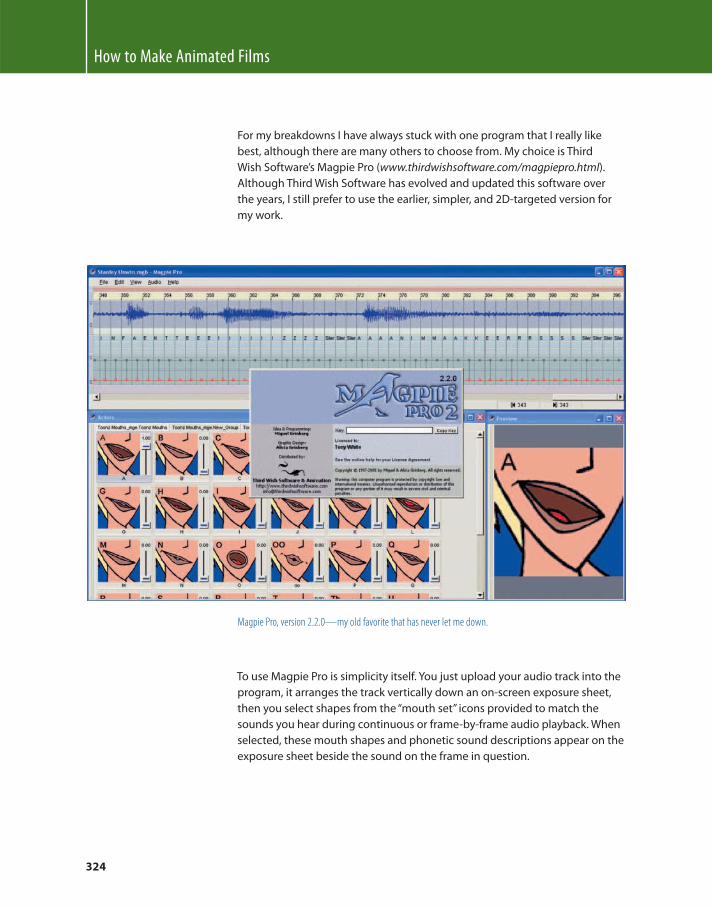
How to Make Animated Films
324
For my breakdowns I have always stuck with one program that I really like
best, although there are many others to choose from. My choice is Third
Wish Software’s Magpie Pro ( www.thirdwishsoftware.com/magpiepro.htm l ).
Although Third Wish Software has evolved and updated this software over
the years, I still prefer to use the earlier, simpler, and 2D-targeted version for
my work.
Magpie Pro, version 2.2.0 — my old favorite that has never let me down.
To use Magpie Pro is simplicity itself. You just upload your audio track into the
program, it arranges the track vertically down an on-screen exposure sheet,
then you select shapes from the “ mouth set ” icons provided to match the
sounds you hear during continuous or frame-by-frame audio playback. When
selected, these mouth shapes and phonetic sound descriptions appear on the
exposure sheet beside the sound on the frame in question.

Audio Breakdown
325
You can create your own mouth sets as you need them in two or three dimensions, and then import them into
the program if you like.
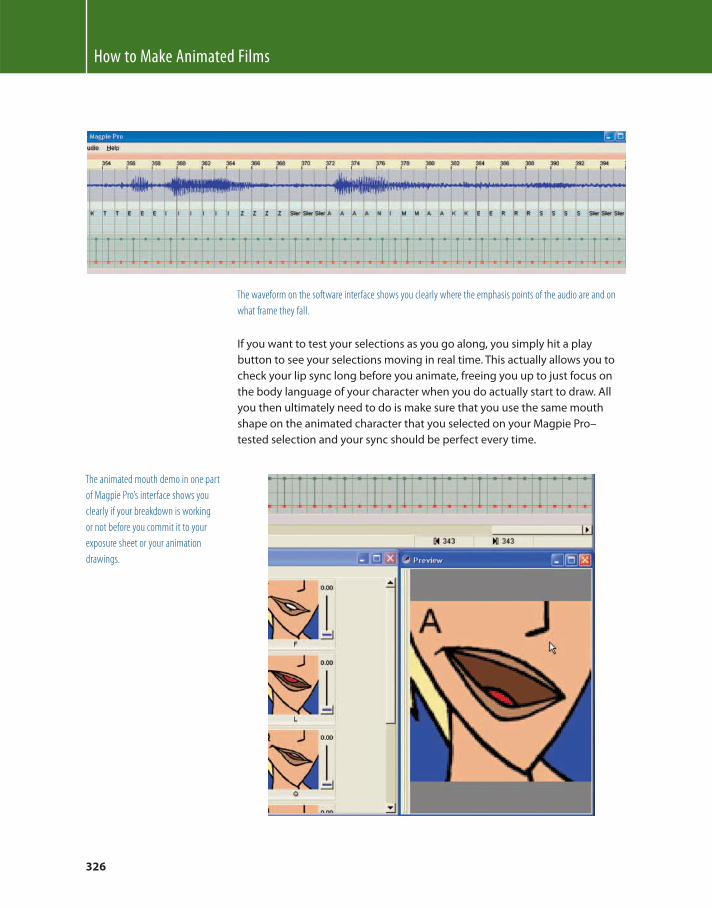
How to Make Animated Films
326
The waveform on the software interface shows you clearly where the emphasis points of the audio are and on
what frame they fall.
If you want to test your selections as you go along, you simply hit a play
button to see your selections moving in real time. This actually allows you to
check your lip sync long before you animate, freeing you up to just focus on
the body language of your character when you do actually start to draw. All
you then ultimately need to do is make sure that you use the same mouth
shape on the animated character that you selected on your Magpie Pro –
tested selection and your sync should be perfect every time.
The animated mouth demo in one part
of Magpie Pro’s interface shows you
clearly if your breakdown is working
or not before you commit it to your
exposure sheet or your animation
drawings.
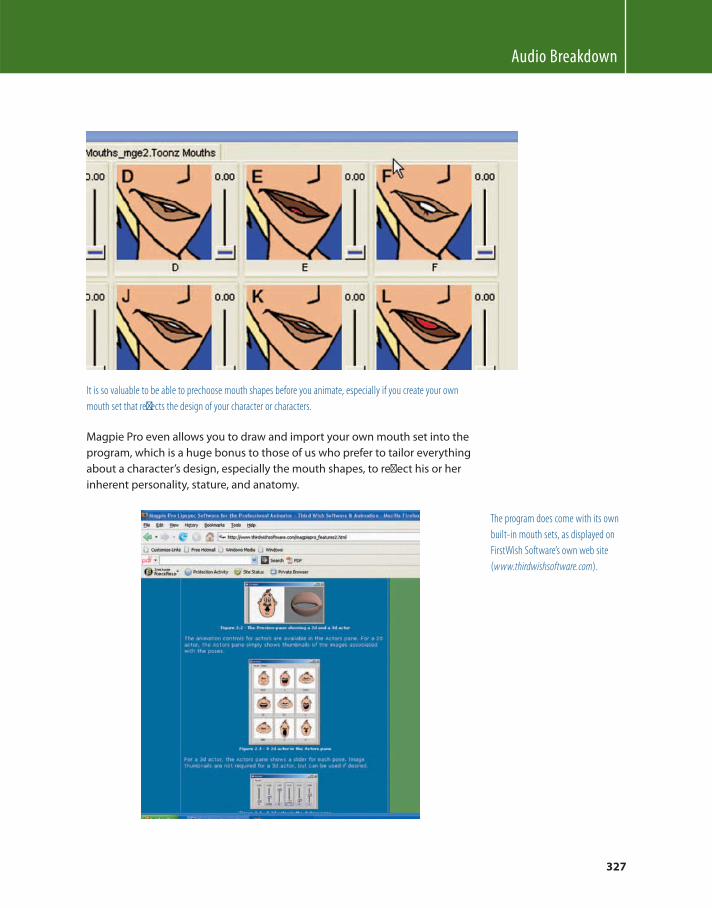
Audio Breakdown
327
It is so valuable to be able to prechoose mouth shapes before you animate, especially if you create your own
mouth set that refl ects the design of your character or characters.
Magpie Pro even allows you to draw and import your own mouth set into the
program, which is a huge bonus to those of us who prefer to tailor everything
about a character’s design, especially the mouth shapes, to refl ect his or her
inherent personality, stature, and anatomy.
The program does come with its own
built-in mouth sets, as displayed on
FirstWish Software’s own web site
( www.thirdwishsoftware.com ).
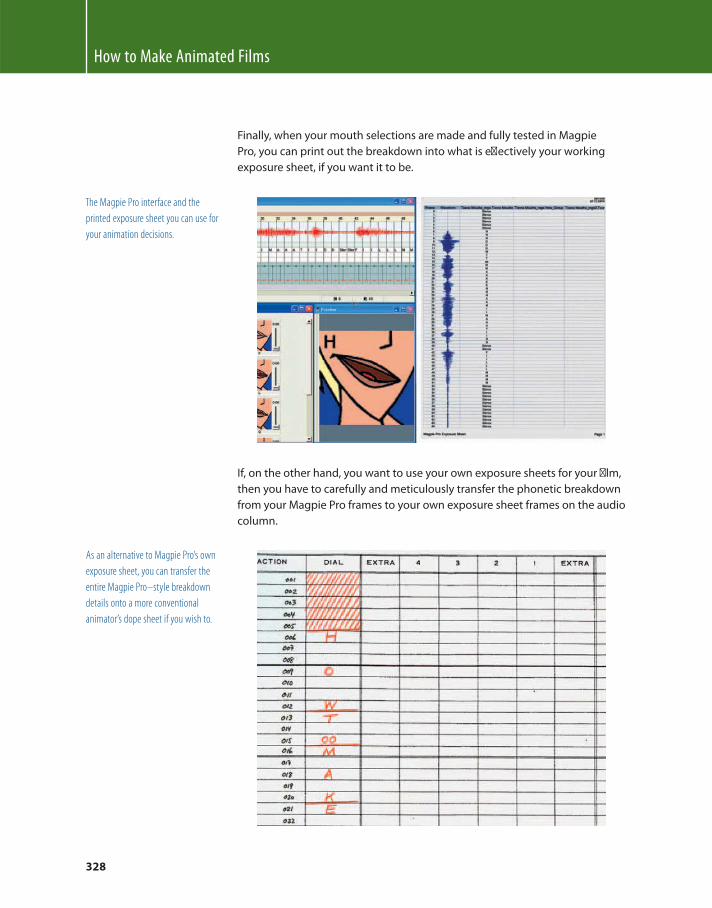
How to Make Animated Films
328
Finally, when your mouth selections are made and fully tested in Magpie
Pro, you can print out the breakdown into what is eff ectively your working
exposure sheet, if you want it to be.
The Magpie Pro interface and the
printed exposure sheet you can use for
your animation decisions.
If, on the other hand, you want to use your own exposure sheets for your fi lm,
then you have to carefully and meticulously transfer the phonetic breakdown
from your Magpie Pro frames to your own exposure sheet frames on the audio
column.
As an alternative to Magpie Pro’s own
exposure sheet, you can transfer the
entire Magpie Pro – style breakdown
details onto a more conventional
animator’s dope sheet if you wish to.
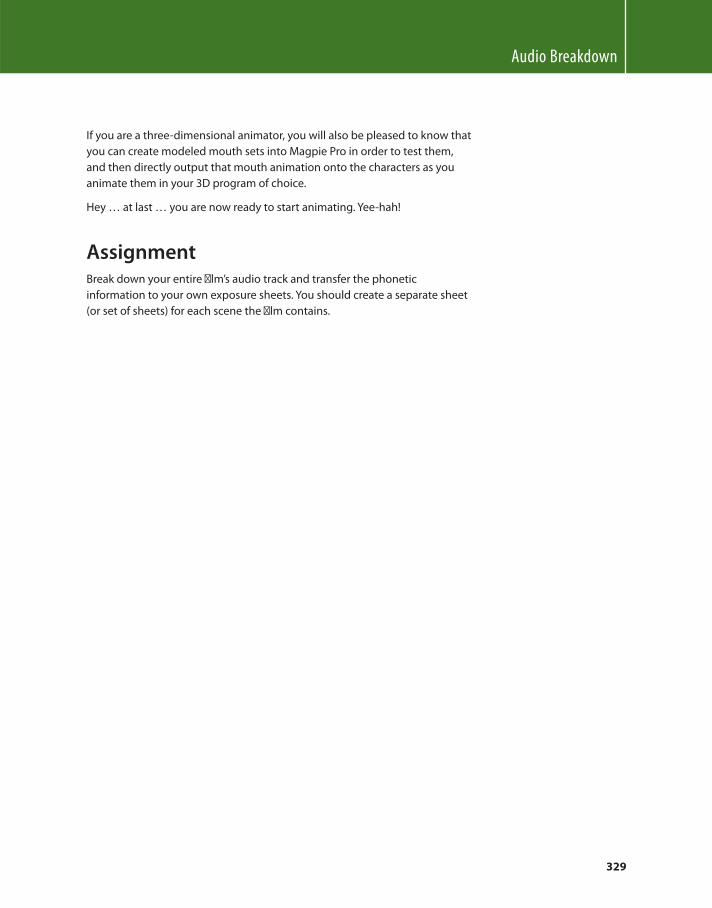
Audio Breakdown
329
If you are a three-dimensional animator, you will also be pleased to know that
you can create modeled mouth sets into Magpie Pro in order to test them,
and then directly output that mouth animation onto the characters as you
animate them in your 3D program of choice.
Hey … at last … you are now ready to start animating. Yee-hah!
Assignment Break down your entire fi lm’s audio track and transfer the phonetic
information to your own exposure sheets. You should create a separate sheet
(or set of sheets) for each scene the fi lm contains.

This page intentionally left blank
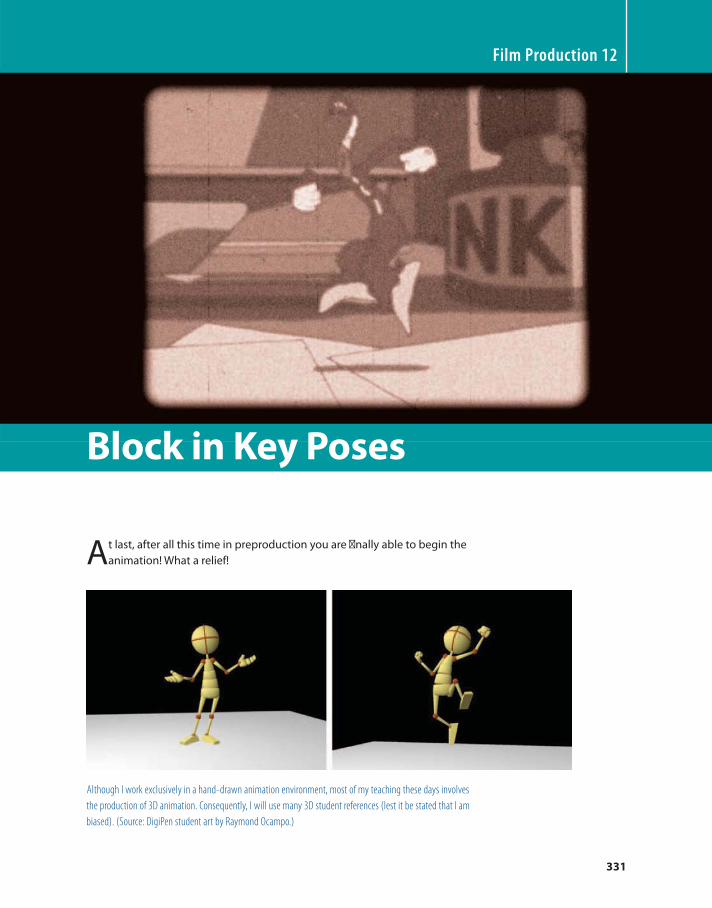
331
At last, after all this time in preproduction you are fi nally able to begin the
animation! What a relief!
Although I work exclusively in a hand-drawn animation environment, most of my teaching these days involves
the production of 3D animation. Consequently, I will use many 3D student references (lest it be stated that I am
biased). (Source: DigiPen student art by Raymond Ocampo.)
Film Production 12
Block in Key Poses

How to Make Animated Films
332
However, I do caution you not to jump right in and start to animate. Even
within the animation period there is a preproduction element too. I personally
like to block in all my keys fi rst. I will even sketch fi nal thumbnail poses to get
into my head the kind of positionings that I want through the scene or scenes.
Even if you are a 3D, clay, or cut-out animator, the process of drawing your
ideas on an exposure sheet or a sketchpad is extremely important.
Intensive sketchbook studies, prior to attempting a 3D animation assignment. (Source: DigiPen student art by
Matt Olch.)
Whatever style of animation is your passion, draw your thoughts for poses
throughout the scene you are about to tackle. Do more than one thumbnail
sketch per scene if you like. Don Crum, the ex-Disney traditional-style
animator who now works at Pixar in three dimensions, demonstrated to
my students on a visit his animation process for a scene in Ratatouille . He
showed his thumbnail sketches and his large-size dynamic pose drawings.
He explained that coming from a 2D tradition he learned that to sketch
everything fi rst, before even addressing his computer, was the best possible
way. As you can see from the accompanying illustrations, this is the core
process we impose on students at this stage of their development at DigiPen.
Crum even showed takes of footage he took of himself acting out the action,
despite his announced embarrassment at doing so. The most interesting thing
that he said was that although he had a good idea of what he wanted to do
with the scene in the fi rst place, it was only by acting out his ideas on video
and then improvising and taking the action further than he had thought to,
that he arrived at the great sequence of animation he ultimately created. If he
hadn’t fi lmed himself and then pushed himself to do something more, then
his scene would be half as good as it is.
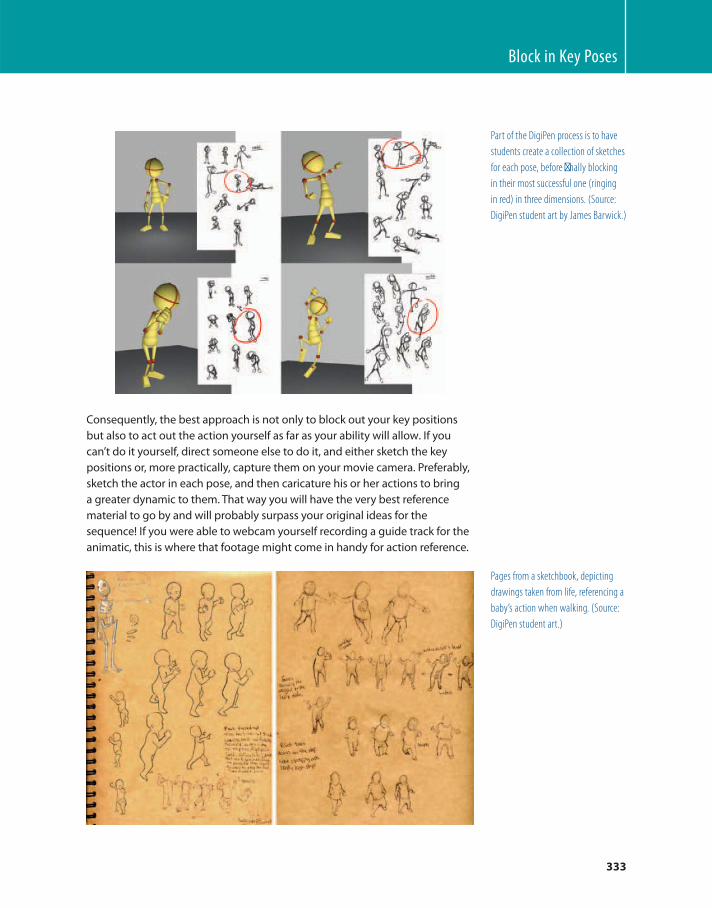
333
Part of the DigiPen process is to have
students create a collection of sketches
for each pose, before fi nally blocking
in their most successful one (ringing
in red) in three dimensions. (Source:
DigiPen student art by James Barwick.)
Consequently, the best approach is not only to block out your key positions
but also to act out the action yourself as far as your ability will allow . If you
can’t do it yourself, direct someone else to do it, and either sketch the key
positions or, more practically, capture them on your movie camera. Preferably,
sketch the actor in each pose, and then caricature his or her actions to bring
a greater dynamic to them. That way you will have the very best reference
material to go by and will probably surpass your original ideas for the
sequence! If you were able to webcam yourself recording a guide track for the
animatic, this is where that footage might come in handy for action reference.
Pages from a sketchbook, depicting
drawings taken from life, referencing a
baby’s action when walking. (Source:
DigiPen student art .)
Block in Key Poses
How to Make Animated Films
334
Once you have all of your key thumbnails blocked out either on your exposure
sheet or sketchbook, draw the poses to full size on your animation paper or block
them in on your computer. Work at these until you really make them strong
and dynamic and completely representative of what you are trying to achieve.
Remember, these are your “ key ” poses, so if they’re not right, your animation will
not be right either. It is always in the key poses that great animation is born!
More dynamic poses, based on sketchbook ideas. Note that the fi rst pose is tested from two separate viewpoints
before being accepted. (Source: DigiPen student art by Drew Mueller.)
Once you have achieved all that you can with the key drawings, test them in
some kind of moving-picture format, viewing them in sync with the audio
track if sync sound is what is required. View the pose test over and over
again … sans inbetweens if possible … until you are sure your poses are
right and the timing will work. Make changes to the poses if something isn’t
working. Focus intently on this as blocking out is probably the most important
stage of the animation process — a “ point of no return, ” if you like. It goes
without saying that everything you do from this moment on relies entirely on
this stage of the production process!
Again, extensive thumbnail poses are worked out before the actual 3D character pose is established. I cannot stress
enough the importance of doing this for all styles of animation! (Source: DigiPen student art by William Patrick.)

335
Assignment Create key poses for all the scenes in your fi lm, and check that not only the
action and timing are what you are looking for, but also that there is broad
continuity from scene to scene.
Block in Key Poses

This page intentionally left blank
337
Not matter what your technique for timing turns out to be,
don ’ t neglect it!
Film Production 13
Placement and Timing
We’ve already discussed placement and timing in Part
1, so this is just a gentle reminder of the things you
should start to think about right now.
With keys blocked out and a pose test shot, you will need
to start considering the number of in-between positions
that will be necessary to link them. By recording the keys
to the frame numbers indicated on the exposure sheet,
hand-drawn 2D animators will be able to both number
their keys and calculate the required in-between drawings.
Other animators will just have to judge by seeing the
number of frames between one pose timing to the next on
the pose test. In case you’ve forgotten, the following fi gure
is what a typical 2D exposure sheet will look like when
everything is doped on two’s.
How to Make Animated Films
338
A quick reminder of how long the
same images on one’s and two’s will
appear on the exposure sheet!
The best way to know how many frames will work between diff erent key
positions will ultimately come entirely from experience — a commodity that
most student animators do not yet have. Consequently, to take the faster
route to experience, I advise you to study the achievements of the past and
see how the great masters from animation’s “ golden age ” tackled it. Part of
my own personal pilgrimage was to make my fi lm, Endangered Species , where
I analyzed and recreated some of the fi nest classic moments in animation
history. The fi lm, part homage, part research, enabled me to study why great
animation actually was great animation. But let’s fi rst remind ourselves of
some core basics we learned earlier.
A chart indicating even in-betweens
linking key positions on two’s.
However, more often than not there will be more in-betweens linking keys,
and so we have to next consider whether or not we need to add slow-ins or
slow-outs to the action.
This chart has both slight slow-out and slow-in indications at both ends!
Placement and Timing
339
Don’t forget that nothing in life moves evenly or in a straight line. All
movement either accelerates or decelerates along an arc of some kind.
Consequently, as an emergent animator you will need to consider just what
eff ect you want to create between the key poses and how to achieve it. This is
where we look to the past for inspiration and information.
The discoveries of movement, particularly at the Walt Disney studio between
the 1930s and 1960s, has defi ned the process of great animation ever since.
Even fi ne Pixar movie animation refl ects this knowledge in their more
contemporary off erings. Therefore, you should examine even more movement
from this classic period of animation’s history to learn the secrets they knew.
Note the bouncy action of the classic walk, as well as the way the character slows-in and slows-out throughout
the up and down moves. Also, everything moves on exaggerated arcs. (Source: Endangered Species .)
There is very little that is traditionally in-betweened in this fabulous dancing ape sequence. Every frame is virtually
a key or an extreme drawing in its own right. Therefore, it is evident that the better and more sophisticated a piece
of animation is, the less it relies on traditional in-between positions. (Source: Endangered Species .)
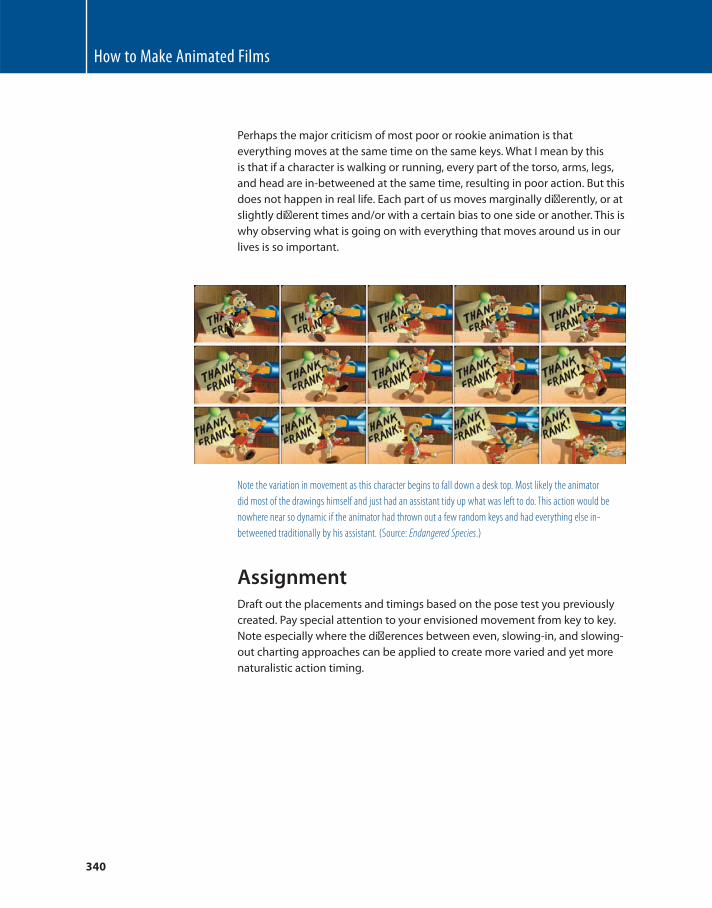
How to Make Animated Films
340
Assignment Draft out the placements and timings based on the pose test you previously
created. Pay special attention to your envisioned movement from key to key.
Note especially where the diff erences between even, slowing-in, and slowing-
out charting approaches can be applied to create more varied and yet more
naturalistic action timing.
Perhaps the major criticism of most poor or rookie animation is that
everything moves at the same time on the same keys. What I mean by this
is that if a character is walking or running, every part of the torso, arms, legs,
and head are in-betweened at the same time, resulting in poor action. But this
does not happen in real life. Each part of us moves marginally diff erently, or at
slightly diff erent times and/or with a certain bias to one side or another. This is
why observing what is going on with everything that moves around us in our
lives is so important.
Note the variation in movement as this character begins to fall down a desk top. Most likely the animator
did most of the drawings himself and just had an assistant tidy up what was left to do. This action would be
nowhere near so dynamic if the animator had thrown out a few random keys and had everything else in-
betweened traditionally by his assistant. (Source: Endangered Species .)
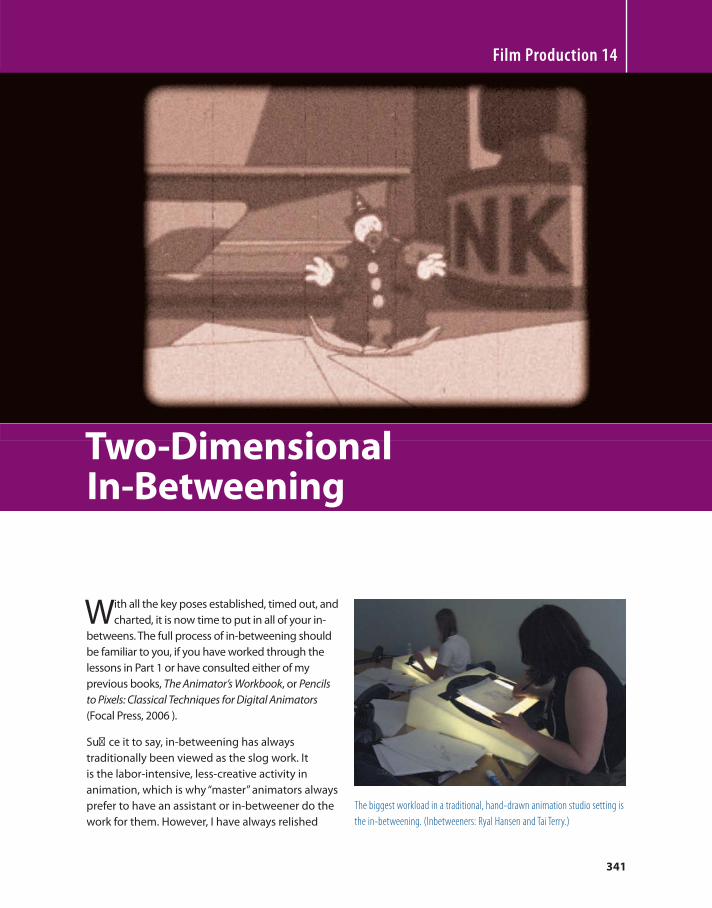
341
With all the key poses established, timed out, and
charted, it is now time to put in all of your in-
betweens. The full process of in-betweening should
be familiar to you, if you have worked through the
lessons in Part 1 or have consulted either of my
previous books, The Animator’s Workbook , or Pencils
to Pixels: Classical Techniques for Digital Animators
(Focal Press, 2006 ) .
Film Production 14
Two-Dimensional In-Betweening
The biggest workload in a traditional, hand-drawn animation studio setting is
the in-betweening. (Inbetweeners: Ryal Hansen and Tai Terry.)
Suffi ce it to say, in-betweening has always
traditionally been viewed as the slog work. It
is the labor-intensive, less-creative activity in
animation, which is why “ master ” animators always
prefer to have an assistant or in-betweener do the
work for them. However, I have always relished
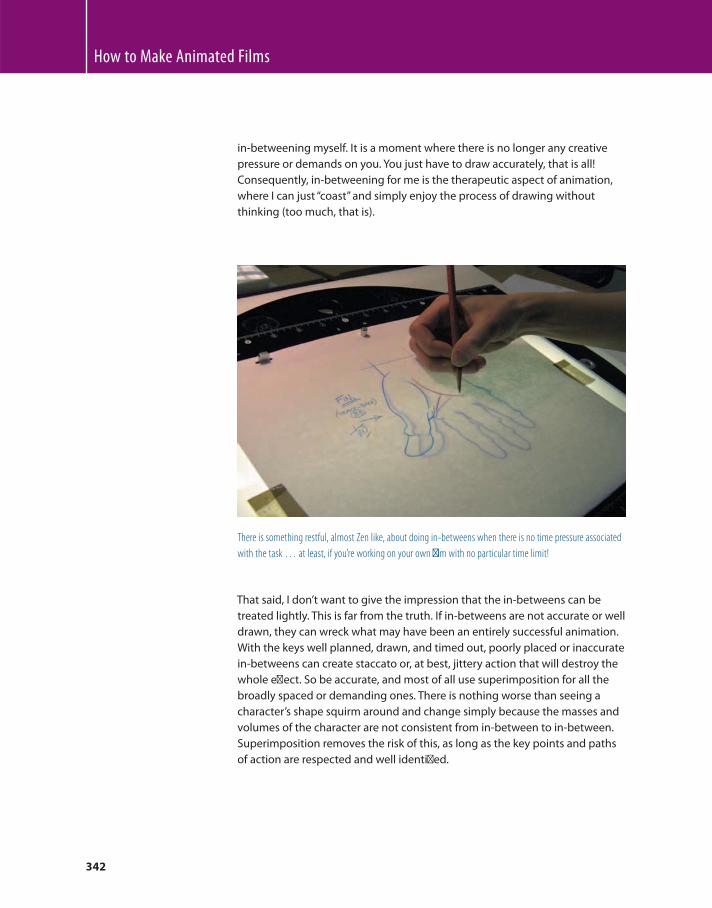
How to Make Animated Films
342
in-betweening myself. It is a moment where there is no longer any creative
pressure or demands on you. You just have to draw accurately, that is all!
Consequently, in-betweening for me is the therapeutic aspect of animation,
where I can just “ coast ” and simply enjoy the process of drawing without
thinking (too much, that is) .
There is something restful, almost Zen like, about doing in-betweens when there is no time pressure associated
with the task … at least, if you ’ re working on your own fi lm with no particular time limit!
That said, I don’t want to give the impression that the in-betweens can be
treated lightly. This is far from the truth. If in-betweens are not accurate or well
drawn, they can wreck what may have been an entirely successful animation.
With the keys well planned, drawn, and timed out, poorly placed or inaccurate
in-betweens can create staccato or, at best, jittery action that will destroy the
whole eff ect. So be accurate, and most of all use superimposition for all the
broadly spaced or demanding ones. There is nothing worse than seeing a
character’s shape squirm around and change simply because the masses and
volumes of the character are not consistent from in-between to in-between.
Superimposition removes the risk of this, as long as the key points and paths
of action are respected and well identifi ed.
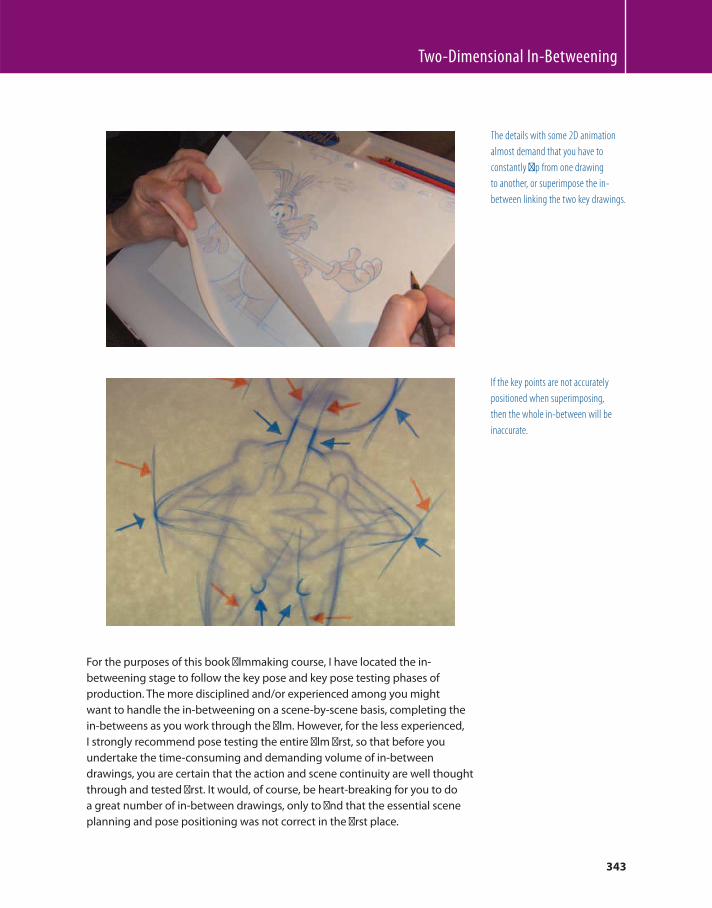
Two-Dimensional In-Betweening
343
The details with some 2D animation
almost demand that you have to
constantly fl ip from one drawing
to another, or superimpose the in-
between linking the two key drawings.
If the key points are not accurately
positioned when superimposing,
then the whole in-between will be
inaccurate.
For the purposes of this book fi lmmaking course, I have located the in-
betweening stage to follow the key pose and key pose testing phases of
production. The more disciplined and/or experienced among you might
want to handle the in-betweening on a scene-by-scene basis, completing the
in-betweens as you work through the fi lm. However, for the less experienced,
I strongly recommend pose testing the entire fi lm fi rst, so that before you
undertake the time-consuming and demanding volume of in-between
drawings, you are certain that the action and scene continuity are well thought
through and tested fi rst. It would, of course, be heart-breaking for you to do
a great number of in-between drawings, only to fi nd that the essential scene
planning and pose positioning was not correct in the fi rst place.
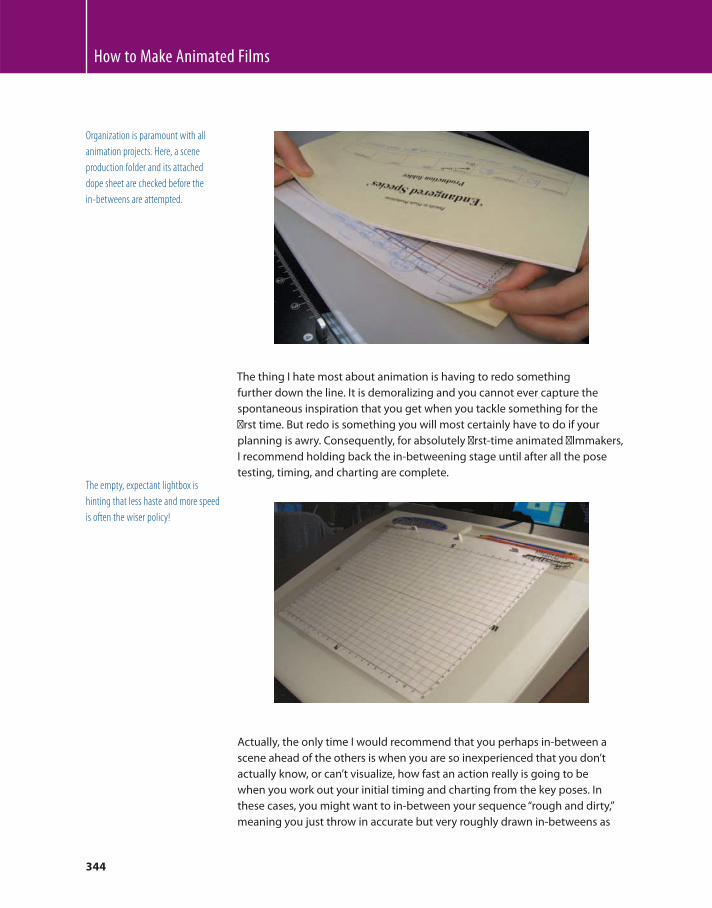
How to Make Animated Films
344
Organization is paramount with all
animation projects. Here, a scene
production folder and its attached
dope sheet are checked before the
in-betweens are attempted.
The thing I hate most about animation is having to redo something
further down the line. It is demoralizing and you cannot ever capture the
spontaneous inspiration that you get when you tackle something for the
fi rst time. But redo is something you will most certainly have to do if your
planning is awry. Consequently, for absolutely fi rst-time animated fi lmmakers,
I recommend holding back the in-betweening stage until after all the pose
testing, timing, and charting are complete.
The empty, expectant lightbox is
hinting that less haste and more speed
is often the wiser policy!
Actually, the only time I would recommend that you perhaps in-between a
scene ahead of the others is when you are so inexperienced that you don’t
actually know, or can’t visualize, how fast an action really is going to be
when you work out your initial timing and charting from the key poses. In
these cases, you might want to in-between your sequence “ rough and dirty, ”
meaning you just throw in accurate but very roughly drawn in-betweens as
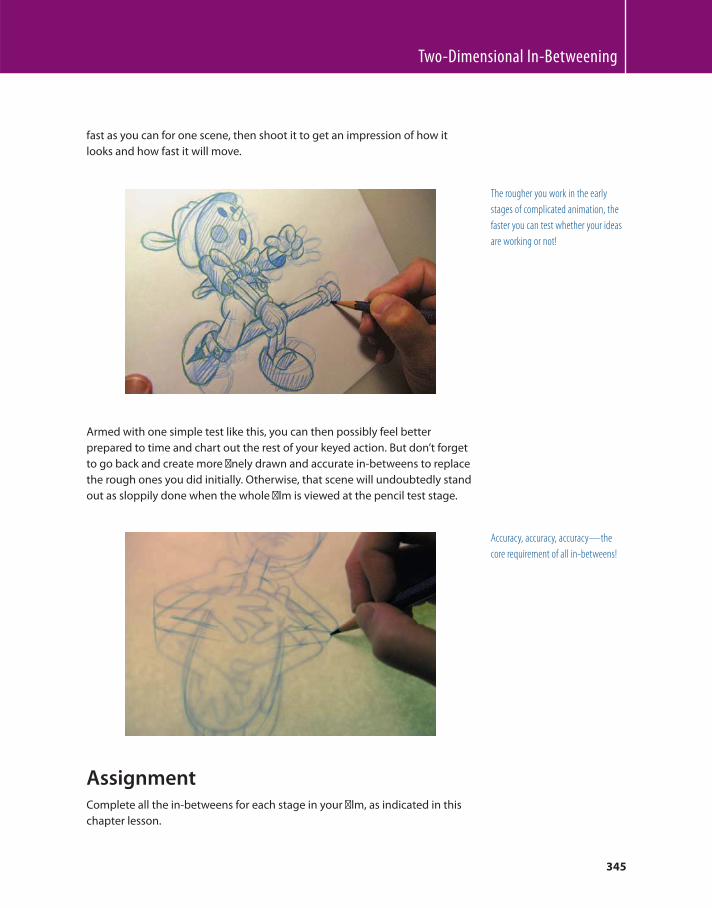
Two-Dimensional In-Betweening
345
fast as you can for one scene, then shoot it to get an impression of how it
looks and how fast it will move.
The rougher you work in the early
stages of complicated animation, the
faster you can test whether your ideas
are working or not!
Armed with one simple test like this, you can then possibly feel better
prepared to time and chart out the rest of your keyed action. But don’t forget
to go back and create more fi nely drawn and accurate in-betweens to replace
the rough ones you did initially. Otherwise, that scene will undoubtedly stand
out as sloppily done when the whole fi lm is viewed at the pencil test stage.
Accuracy, accuracy, accuracy — the
core requirement of all in-betweens!
Assignment Complete all the in-betweens for each stage in your fi lm, as indicated in this
chapter lesson.

This page intentionally left blank
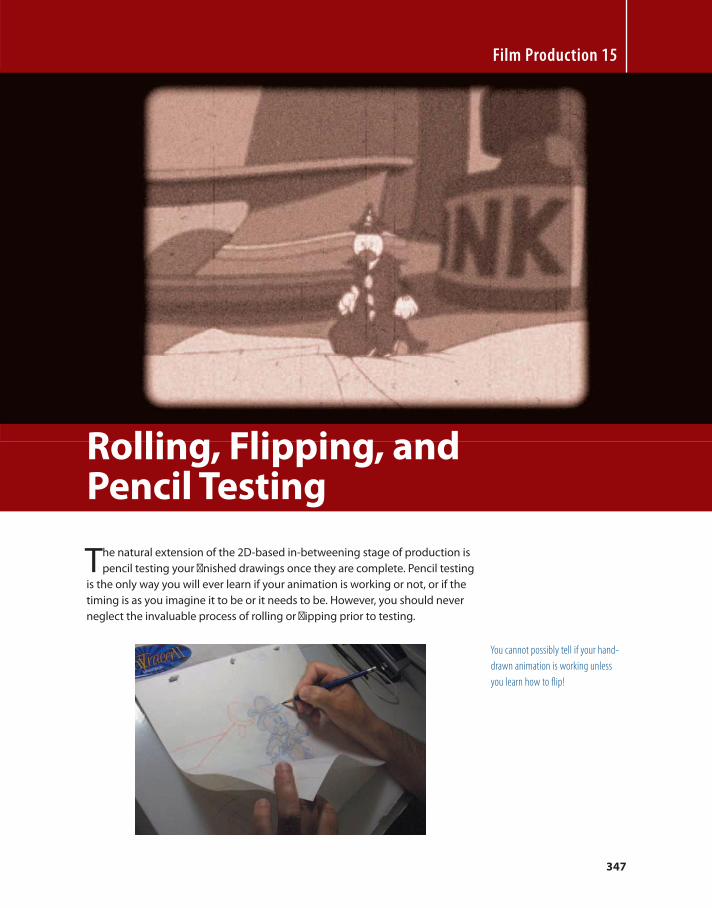
347
The natural extension of the 2D-based in-betweening stage of production is
pencil testing your fi nished drawings once they are complete. Pencil testing
is the only way you will ever learn if your animation is working or not, or if the
timing is as you imagine it to be or it needs to be. However, you should never
neglect the invaluable process of rolling or fl ipping prior to testing.
Film Production 15
Rolling, Flipping, and Pencil Testing
You cannot possibly tell if your hand-
drawn animation is working unless
you learn how to flip!
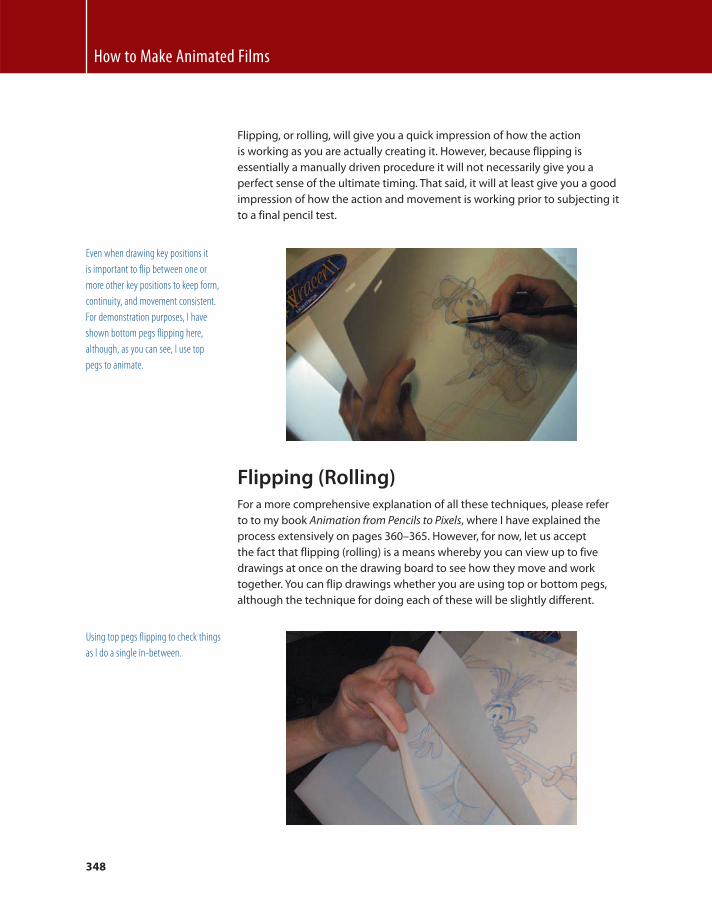
How to Make Animated Films
348
Flipping, or rolling, will give you a quick impression of how the action
is working as you are actually creating it. However, because flipping is
essentially a manually driven procedure it will not necessarily give you a
perfect sense of the ultimate timing. That said, it will at least give you a good
impression of how the action and movement is working prior to subjecting it
to a final pencil test.
Even when drawing key positions it
is important to flip between one or
more other key positions to keep form,
continuity, and movement consistent.
For demonstration purposes, I have
shown bottom pegs flipping here,
although, as you can see, I use top
pegs to animate.
Flipping (Rolling) For a more comprehensive explanation of all these techniques, please refer
to to my book Animation from Pencils to Pixels , where I have explained the
process extensively on pages 360 – 365. However, for now, let us accept
the fact that flipping (rolling) is a means whereby you can view up to five
drawings at once on the drawing board to see how they move and work
together. You can flip drawings whether you are using top or bottom pegs,
although the technique for doing each of these will be slightly different.
Using top pegs flipping to check things
as I do a single in-between.
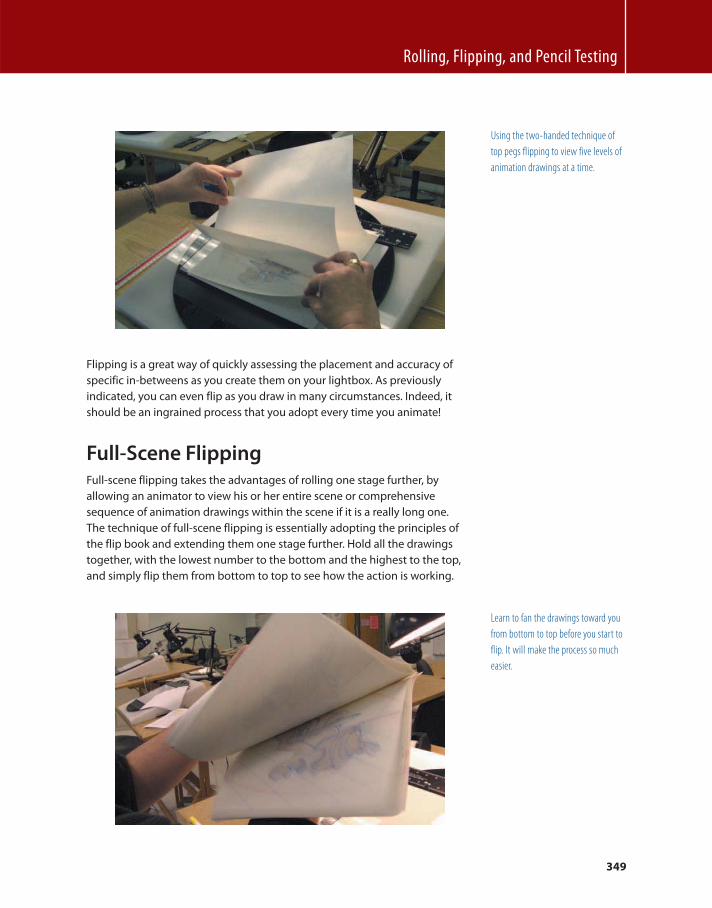
Rolling, Flipping, and Pencil Testing
349
Learn to fan the drawings toward you
from bottom to top before you start to
flip. It will make the process so much
easier.
Flipping is a great way of quickly assessing the placement and accuracy of
specific in-betweens as you create them on your lightbox. As previously
indicated, you can even flip as you draw in many circumstances. Indeed, it
should be an ingrained process that you adopt every time you animate!
Full-Scene Flipping Full-scene flipping takes the advantages of rolling one stage further, by
allowing an animator to view his or her entire scene or comprehensive
sequence of animation drawings within the scene if it is a really long one.
The technique of full-scene flipping is essentially adopting the principles of
the flip book and extending them one stage further. Hold all the drawings
together, with the lowest number to the bottom and the highest to the top,
and simply flip them from bottom to top to see how the action is working.
Using the two-handed technique of
top pegs flipping to view five levels of
animation drawings at a time.
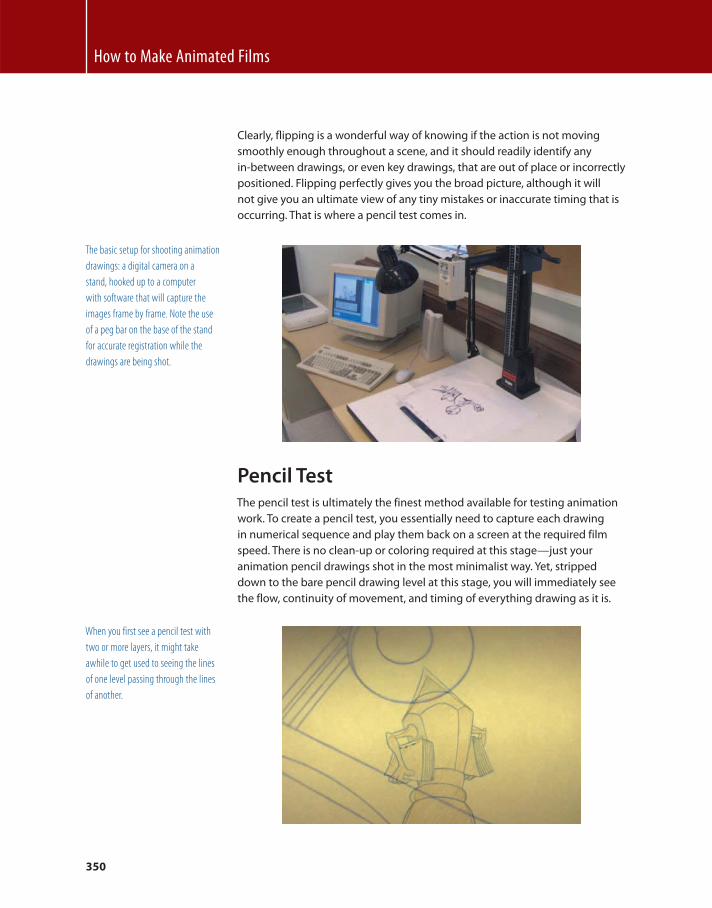
How to Make Animated Films
350
Clearly, flipping is a wonderful way of knowing if the action is not moving
smoothly enough throughout a scene, and it should readily identify any
in-between drawings, or even key drawings, that are out of place or incorrectly
positioned. Flipping perfectly gives you the broad picture, although it will
not give you an ultimate view of any tiny mistakes or inaccurate timing that is
occurring. That is where a pencil test comes in.
The basic setup for shooting animation
drawings: a digital camera on a
stand, hooked up to a computer
with software that will capture the
images frame by frame. Note the use
of a peg bar on the base of the stand
for accurate registration while the
drawings are being shot.
Pencil Test The pencil test is ultimately the finest method available for testing animation
work. To create a pencil test, you essentially need to capture each drawing
in numerical sequence and play them back on a screen at the required film
speed. There is no clean-up or coloring required at this stage — just your
animation pencil drawings shot in the most minimalist way. Yet, stripped
down to the bare pencil drawing level at this stage, you will immediately see
the flow, continuity of movement, and timing of everything drawing as it is.
When you first see a pencil test with
two or more layers, it might take
awhile to get used to seeing the lines
of one level passing through the lines
of another.
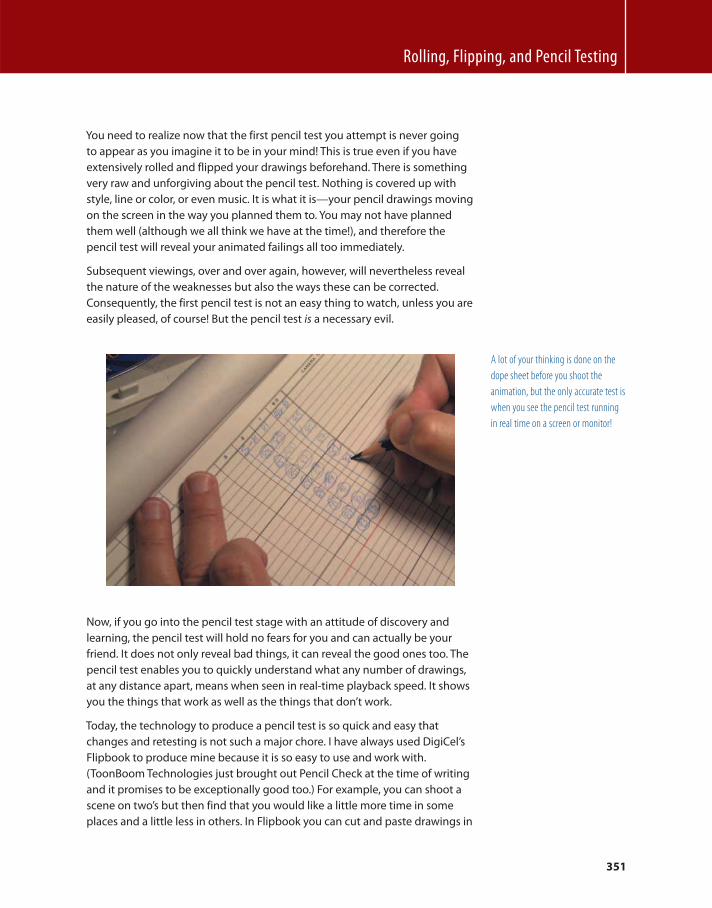
Rolling, Flipping, and Pencil Testing
351
You need to realize now that the first pencil test you attempt is never going
to appear as you imagine it to be in your mind! This is true even if you have
extensively rolled and flipped your drawings beforehand. There is something
very raw and unforgiving about the pencil test. Nothing is covered up with
style, line or color, or even music. It is what it is — your pencil drawings moving
on the screen in the way you planned them to. You may not have planned
them well (although we all think we have at the time!), and therefore the
pencil test will reveal your animated failings all too immediately.
Subsequent viewings, over and over again, however, will nevertheless reveal
the nature of the weaknesses but also the ways these can be corrected.
Consequently, the first pencil test is not an easy thing to watch, unless you are
easily pleased, of course! But the pencil test is a necessary evil.
A lot of your thinking is done on the
dope sheet before you shoot the
animation, but the only accurate test is
when you see the pencil test running
in real time on a screen or monitor!
Now, if you go into the pencil test stage with an attitude of discovery and
learning, the pencil test will hold no fears for you and can actually be your
friend. It does not only reveal bad things, it can reveal the good ones too. The
pencil test enables you to quickly understand what any number of drawings,
at any distance apart, means when seen in real-time playback speed. It shows
you the things that work as well as the things that don’t work.
Today, the technology to produce a pencil test is so quick and easy that
changes and retesting is not such a major chore. I have always used DigiCel’s
Flipbook to produce mine because it is so easy to use and work with.
(ToonBoom Technologies just brought out Pencil Check at the time of writing
and it promises to be exceptionally good too.) For example, you can shoot a
scene on two’s but then find that you would like a little more time in some
places and a little less in others. In Flipbook you can cut and paste drawings in
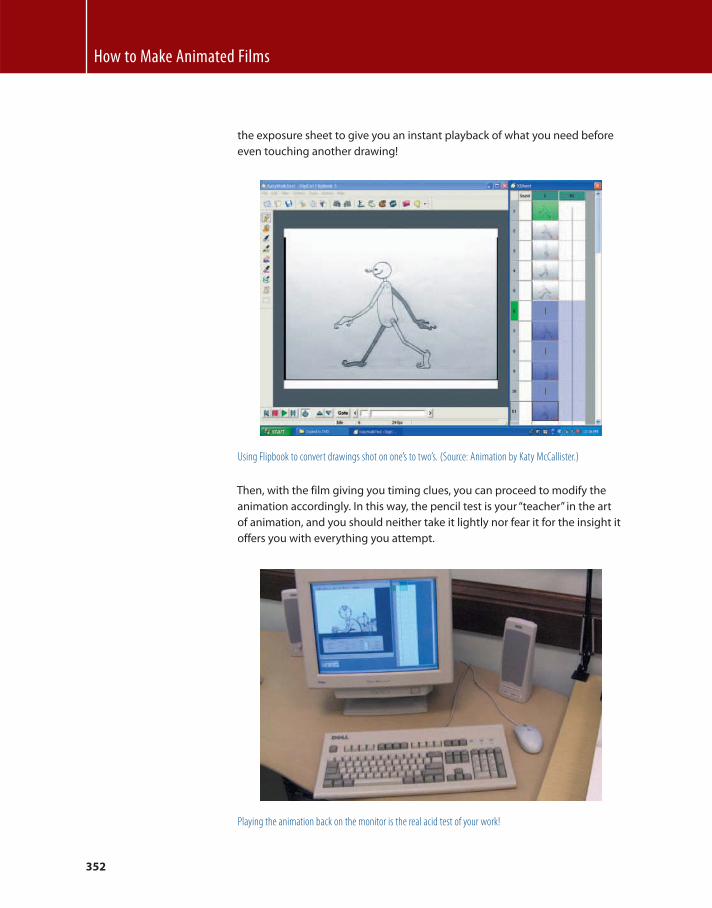
How to Make Animated Films
352
the exposure sheet to give you an instant playback of what you need before
even touching another drawing!
Using Flipbook to convert drawings shot on one’s to two’s. (Source: Animation by Katy McCallister.)
Then, with the film giving you timing clues, you can proceed to modify the
animation accordingly. In this way, the pencil test is your “ teacher ” in the art
of animation, and you should neither take it lightly nor fear it for the insight it
offers you with everything you attempt.
Playing the animation back on the monitor is the real acid test of your work!
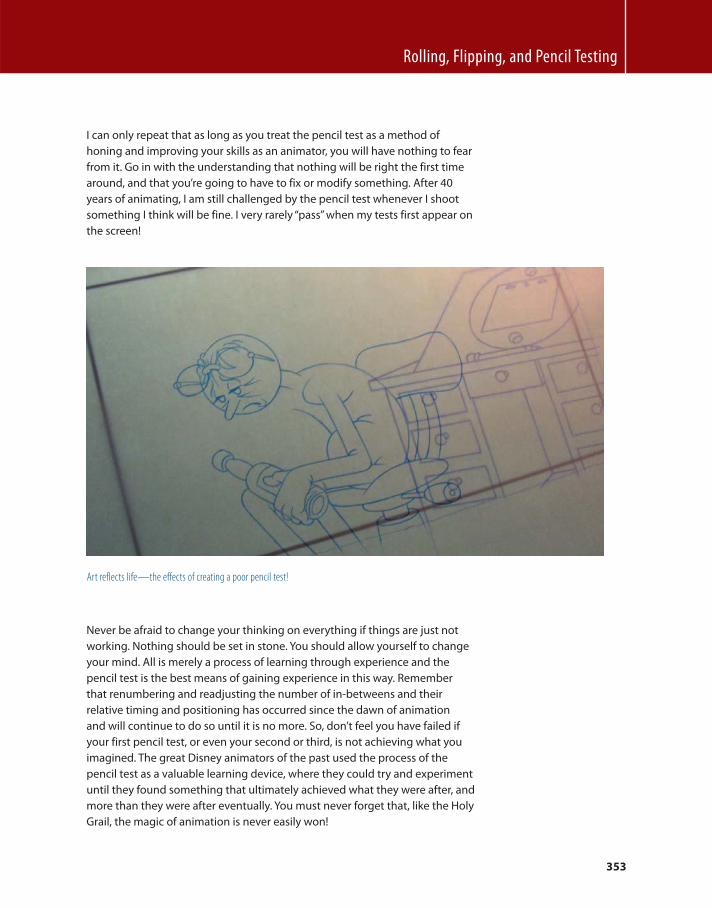
Rolling, Flipping, and Pencil Testing
353
I can only repeat that as long as you treat the pencil test as a method of
honing and improving your skills as an animator, you will have nothing to fear
from it. Go in with the understanding that nothing will be right the first time
around, and that you’re going to have to fix or modify something. After 40
years of animating, I am still challenged by the pencil test whenever I shoot
something I think will be fine. I very rarely “ pass ” when my tests first appear on
the screen!
Art reflects life — the effects of creating a poor pencil test!
Never be afraid to change your thinking on everything if things are just not
working. Nothing should be set in stone. You should allow yourself to change
your mind. All is merely a process of learning through experience and the
pencil test is the best means of gaining experience in this way. Remember
that renumbering and readjusting the number of in-betweens and their
relative timing and positioning has occurred since the dawn of animation
and will continue to do so until it is no more. So, don’t feel you have failed if
your first pencil test, or even your second or third, is not achieving what you
imagined. The great Disney animators of the past used the process of the
pencil test as a valuable learning device, where they could try and experiment
until they found something that ultimately achieved what they were after, and
more than they were after eventually. You must never forget that, like the Holy
Grail, the magic of animation is never easily won!

How to Make Animated Films
354
The altar of the Holy Grail!
Assignment Test (and retest) your animation until everything stands up to the standards
and intentions that you first started with.
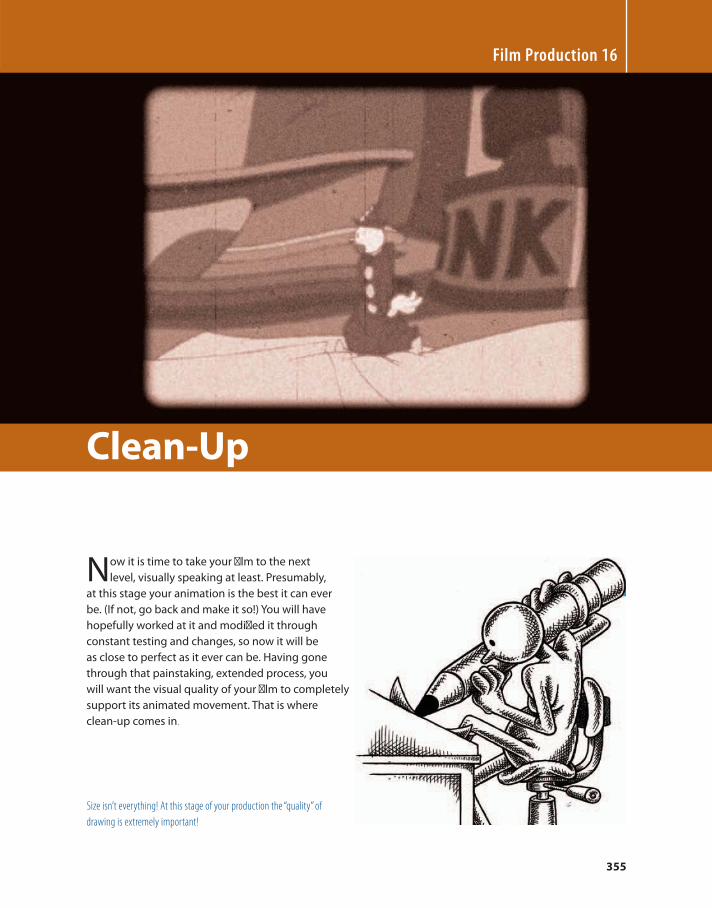
355
Now it is time to take your fi lm to the next
level, visually speaking at least. Presumably,
at this stage your animation is the best it can ever
be. (If not, go back and make it so!) You will have
hopefully worked at it and modifi ed it through
constant testing and changes, so now it will be
as close to perfect as it ever can be. Having gone
through that painstaking, extended process, you
will want the visual quality of your fi lm to completely
support its animated movement. That is where
clean-up comes in.
Film Production 16
Clean-Up
Size isn ’ t everything! At this stage of your production the “ quality ” of
drawing is extremely important!
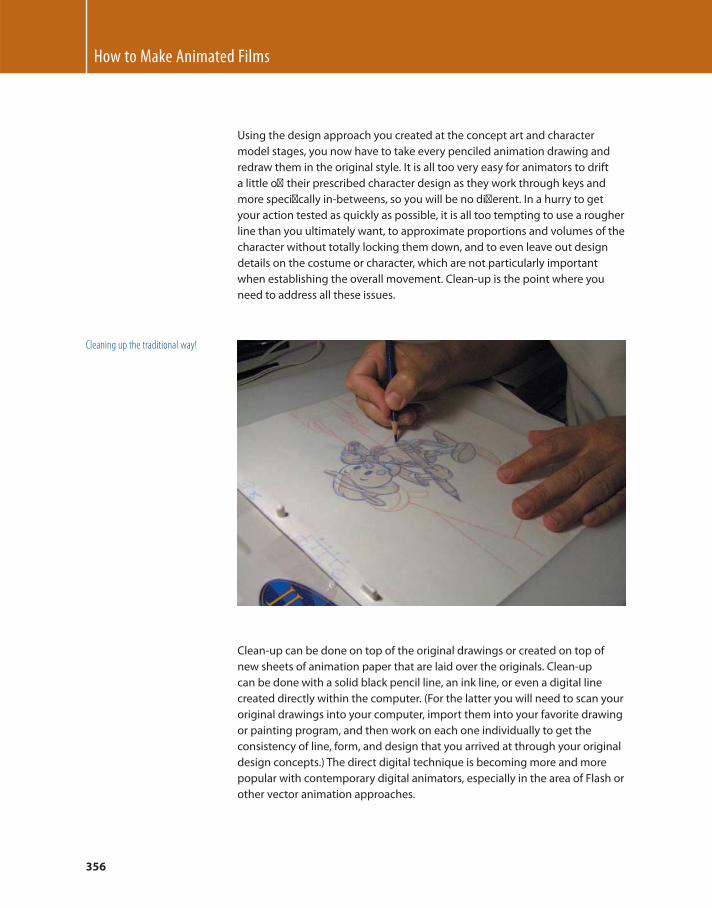
How to Make Animated Films
356
Using the design approach you created at the concept art and character
model stages, you now have to take every penciled animation drawing and
redraw them in the original style. It is all too very easy for animators to drift
a little off their prescribed character design as they work through keys and
more specifi cally in-betweens, so you will be no diff erent. In a hurry to get
your action tested as quickly as possible, it is all too tempting to use a rougher
line than you ultimately want, to approximate proportions and volumes of the
character without totally locking them down, and to even leave out design
details on the costume or character, which are not particularly important
when establishing the overall movement. Clean-up is the point where you
need to address all these issues.
Cleaning up the traditional way!
Clean-up can be done on top of the original drawings or created on top of
new sheets of animation paper that are laid over the originals. Clean-up
can be done with a solid black pencil line, an ink line, or even a digital line
created directly within the computer. (For the latter you will need to scan your
original drawings into your computer, import them into your favorite drawing
or painting program, and then work on each one individually to get the
consistency of line, form, and design that you arrived at through your original
design concepts.) The direct digital technique is becoming more and more
popular with contemporary digital animators, especially in the area of Flash or
other vector animation approaches.
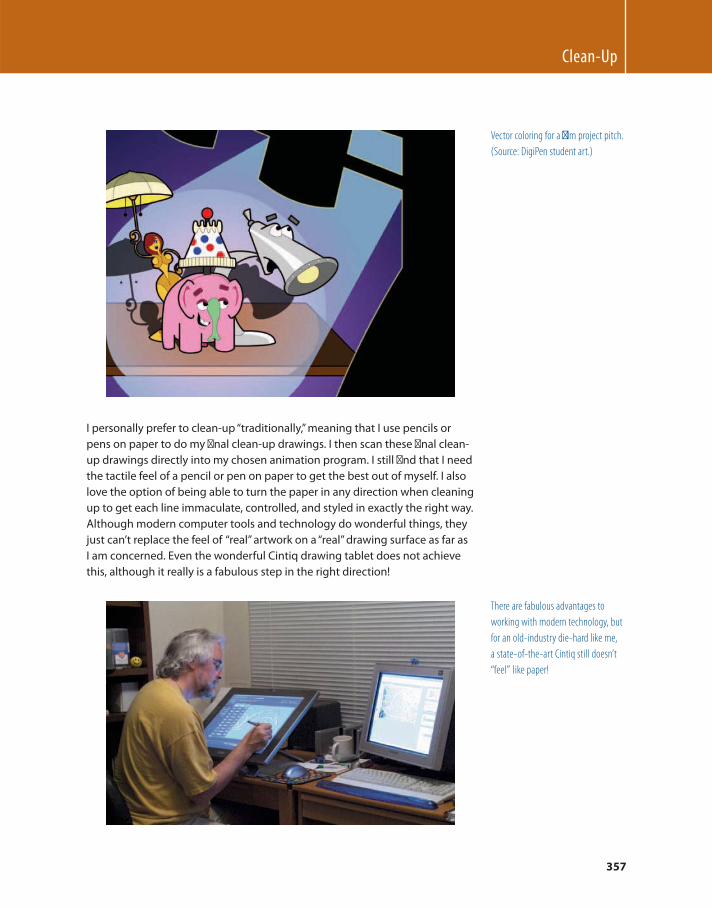
Clean-Up
357
Vector coloring for a fi lm project pitch.
(Source: DigiPen student art.)
I personally prefer to clean-up “ traditionally, ” meaning that I use pencils or
pens on paper to do my fi nal clean-up drawings. I then scan these fi nal clean-
up drawings directly into my chosen animation program. I still fi nd that I need
the tactile feel of a pencil or pen on paper to get the best out of myself. I also
love the option of being able to turn the paper in any direction when cleaning
up to get each line immaculate, controlled, and styled in exactly the right way.
Although modern computer tools and technology do wonderful things, they
just can’t replace the feel of “ real ” artwork on a “ real ” drawing surface as far as
I am concerned. Even the wonderful Cintiq drawing tablet does not achieve
this, although it really is a fabulous step in the right direction!
There are fabulous advantages to
working with modern technology, but
for an old-industry die-hard like me,
a state-of-the-art Cintiq still doesn’t
“ feel ” like paper!
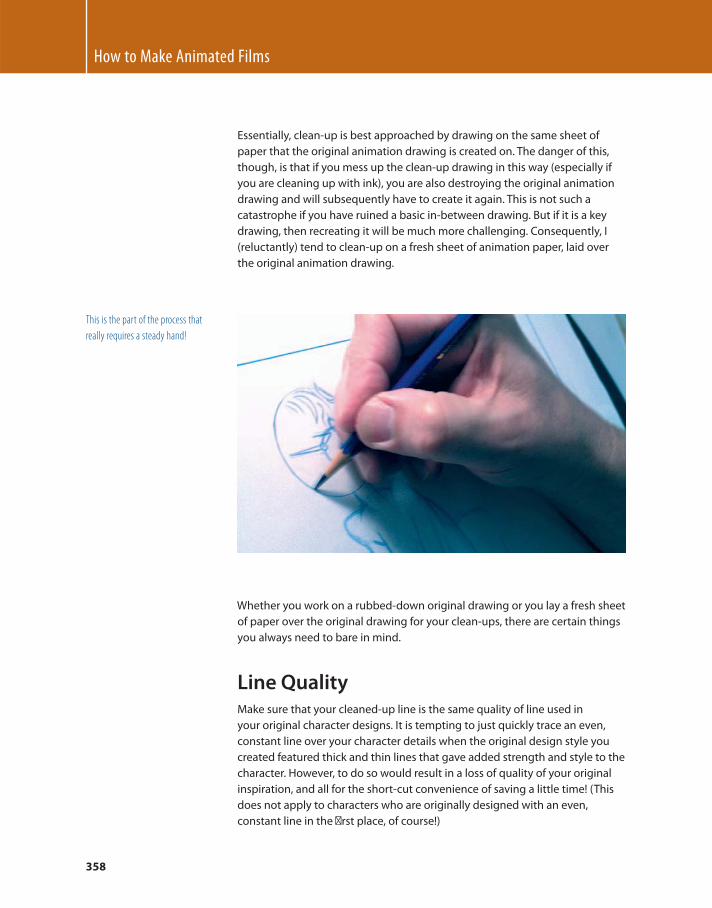
How to Make Animated Films
358
Essentially, clean-up is best approached by drawing on the same sheet of
paper that the original animation drawing is created on. The danger of this,
though, is that if you mess up the clean-up drawing in this way (especially if
you are cleaning up with ink), you are also destroying the original animation
drawing and will subsequently have to create it again. This is not such a
catastrophe if you have ruined a basic in-between drawing. But if it is a key
drawing, then recreating it will be much more challenging. Consequently, I
(reluctantly) tend to clean-up on a fresh sheet of animation paper, laid over
the original animation drawing.
This is the part of the process that
really requires a steady hand!
Whether you work on a rubbed-down original drawing or you lay a fresh sheet
of paper over the original drawing for your clean-ups, there are certain things
you always need to bare in mind.
Line Quality Make sure that your cleaned-up line is the same quality of line used in
your original character designs. It is tempting to just quickly trace an even,
constant line over your character details when the original design style you
created featured thick and thin lines that gave added strength and style to the
character. However, to do so would result in a loss of quality of your original
inspiration, and all for the short-cut convenience of saving a little time! (This
does not apply to characters who are originally designed with an even,
constant line in the fi rst place, of course!)
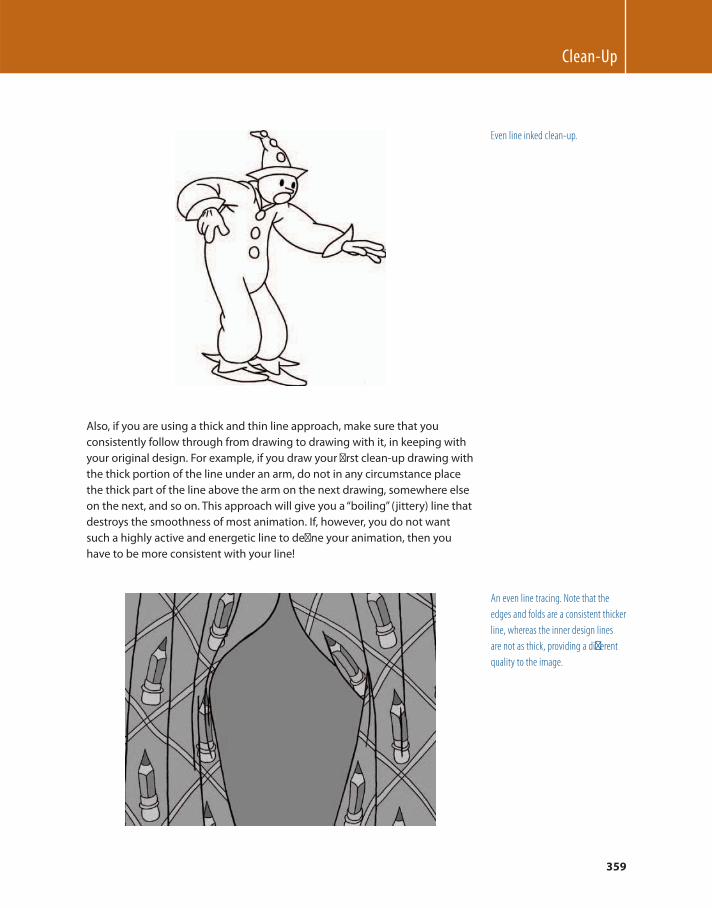
Clean-Up
359
Even line inked clean-up.
Also, if you are using a thick and thin line approach, make sure that you
consistently follow through from drawing to drawing with it, in keeping with
your original design. For example, if you draw your fi rst clean-up drawing with
the thick portion of the line under an arm, do not in any circumstance place
the thick part of the line above the arm on the next drawing, somewhere else
on the next, and so on. This approach will give you a “ boiling ” (jittery) line that
destroys the smoothness of most animation. If, however, you do not want
such a highly active and energetic line to defi ne your animation, then you
have to be more consistent with your line!
An even line tracing. Note that the
edges and folds are a consistent thicker
line, whereas the inner design lines
are not as thick, providing a diff erent
quality to the image.
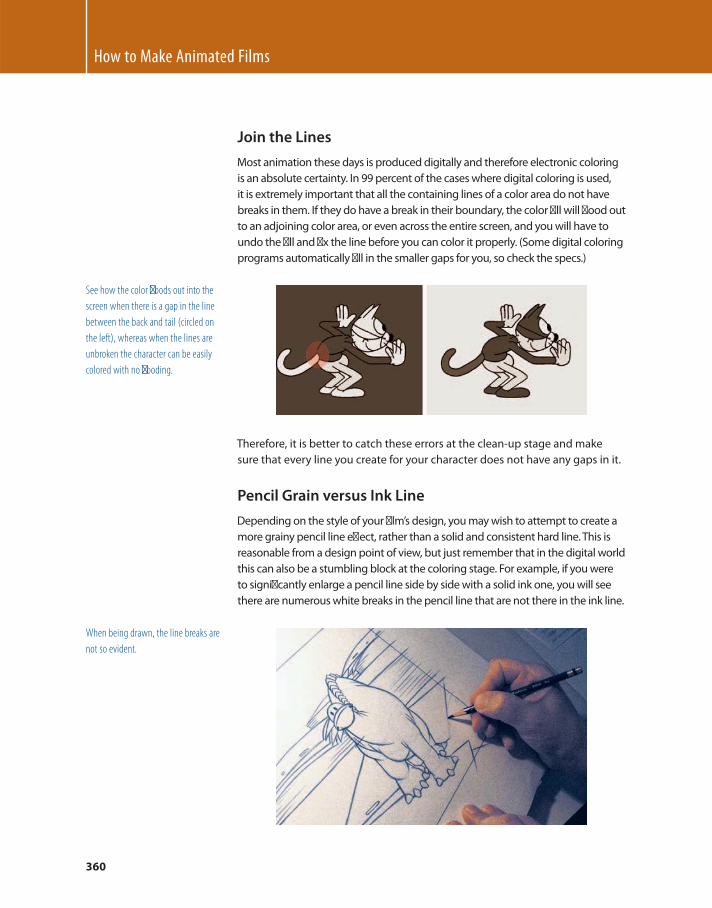
How to Make Animated Films
360
Join the Lines
Most animation these days is produced digitally and therefore electronic coloring
is an absolute certainty. In 99 percent of the cases where digital coloring is used,
it is extremely important that all the containing lines of a color area do not have
breaks in them. If they do have a break in their boundary, the color fi ll will fl ood out
to an adjoining color area, or even across the entire screen, and you will have to
undo the fi ll and fi x the line before you can color it properly. (Some digital coloring
programs automatically fi ll in the smaller gaps for you, so check the specs.)
See how the color fl oods out into the
screen when there is a gap in the line
between the back and tail (circled on
the left), whereas when the lines are
unbroken the character can be easily
colored with no fl ooding.
Therefore, it is better to catch these errors at the clean-up stage and make
sure that every line you create for your character does not have any gaps in it.
Pencil Grain versus Ink Line
Depending on the style of your fi lm’s design, you may wish to attempt to create a
more grainy pencil line eff ect, rather than a solid and consistent hard line. This is
reasonable from a design point of view, but just remember that in the digital world
this can also be a stumbling block at the coloring stage. For example, if you were
to signifi cantly enlarge a pencil line side by side with a solid ink one, you will see
there are numerous white breaks in the pencil line that are not there in the ink line.
When being drawn, the line breaks are
not so evident.
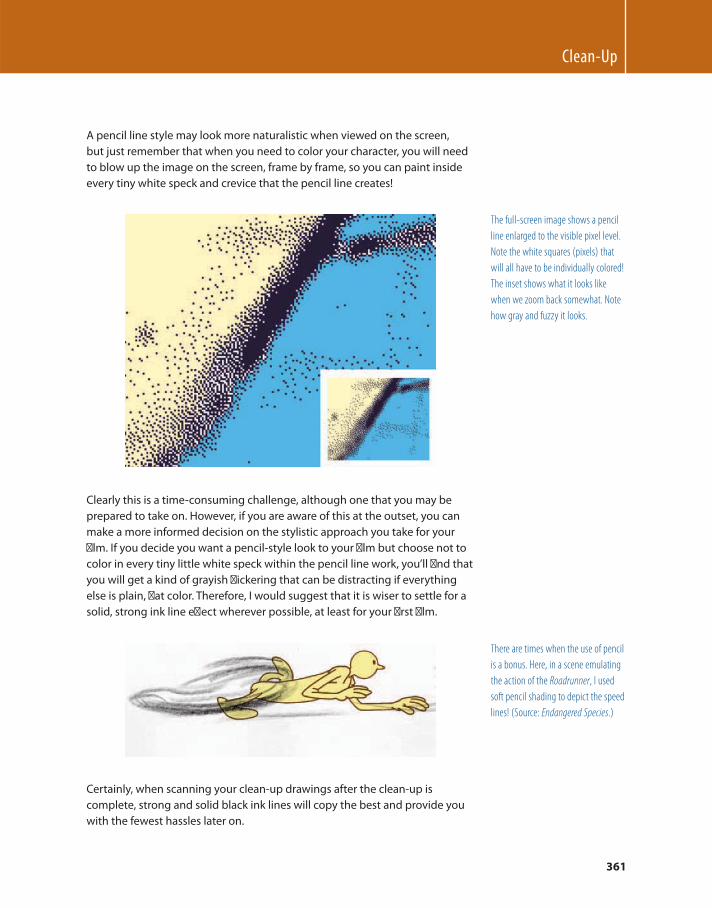
Clean-Up
361
A pencil line style may look more naturalistic when viewed on the screen,
but just remember that when you need to color your character, you will need
to blow up the image on the screen, frame by frame, so you can paint inside
every tiny white speck and crevice that the pencil line creates!
The full-screen image shows a pencil
line enlarged to the visible pixel level.
Note the white squares (pixels) that
will all have to be individually colored!
The inset shows what it looks like
when we zoom back somewhat. Note
how gray and fuzzy it looks.
Clearly this is a time-consuming challenge, although one that you may be
prepared to take on. However, if you are aware of this at the outset, you can
make a more informed decision on the stylistic approach you take for your
fi lm. If you decide you want a pencil-style look to your fi lm but choose not to
color in every tiny little white speck within the pencil line work, you’ll fi nd that
you will get a kind of grayish fl ickering that can be distracting if everything
else is plain, fl at color. Therefore, I would suggest that it is wiser to settle for a
solid, strong ink line eff ect wherever possible, at least for your fi rst fi lm.
There are times when the use of pencil
is a bonus. Here, in a scene emulating
the action of the Roadrunner , I used
soft pencil shading to depict the speed
lines! (Source: Endangered Species .)
Certainly, when scanning your clean-up drawings after the clean-up is
complete, strong and solid black ink lines will copy the best and provide you
with the fewest hassles later on.

How to Make Animated Films
362
Shapes, Dimensions, and Volumes One big danger of 2D animation is that in getting carried away with the
animation process, and especially when liberally using squash and stretch
in the action, it is very easy to have inconsistent shapes, dimensions, and
volumes from animation drawing to animation drawing. For example, in a
walk sequence, a common fault is that the lengths and widths of the calves or
thighs tend to change shape in length and volume from frame to frame with
the work of an inexperienced animator.
A typical Max Fleischer – style scene
from the early days of animation. Note
that even the legs on the same drawing
have slightly diff erent lengths and
volumes! (Source: Endangered Species .)
Consequently, when cleaning up this kind of thing, be aware of this danger
and try to modify the off ending drawings wherever possible. There is, of
course, a danger here of distorting the animation by making too many drastic
changes in signifi cant areas. So be cautious if you change something too
much. A strong tip is to fl ip your drawings at all times so that you can see that
any changes you make are consistent in movement as well as visually.
Never deny the value of fl ipping, whether
you are animating key drawings, in-
betweening, or cleaning up!
Clean-Up
363
Describing Volumes
Remember that even the most rudimentary 2D character will imply that there
is volume to his or her shape and dimension. For example, the typical cartoon
head shape is quite often round in appearance and the rest of the body very
basic in shape compared to human shapes and proportions.
Drawn in Fritz the Cat style. (Source:
Endangered Species .)
Many designs need to imply things like thick necks, broad shoulders, bloated
stomachs, fat butts, etc. Consequently, you will need to continually create this
illusion with the style and approach of the line in your clean-up drawings.
Using thick and thin line variations here is especially valuable. I have found
that by thickening up the lower part of a rounded nose, for example, gives it
shape and body. Of course, using a stronger thick and thin line will produce a
more powerful image too!
Sometimes just the merest fl ick of a
thick and thin line can defi ne a facial
feature.
How to Make Animated Films
364
A stronger, ‘ thick & thin ’ line approach.
Implied Geometry
Often the animation you have created uses perspective and foreshortening to
get a “ to and from ” camera eff ect. Therefore, be sure that when you clean up
these action drawings, you use lines that emphasize the perspective as well as the
overlapping volumes within the character. For example, an arm, hand, and fi nger
directed toward the camera can be emphasized or damaged by the selective use
of a clean-up line. This is where an awareness of implied geometry comes in.
My personal homage to Richard
Williams’s Academy Award – winning
fi lm, A Christmas Carol . (Source:
Endangered Species .)
Essentially, implied geometry is a process of drawing where you ensure the
audience understands what parts of the drawing are nearer and what parts
are farther away. Remember the basic law of perspective states that whatever
is nearer to the viewer will appear proportionately larger than what is farther
away. You can emphasize this by overlapping the lines of a near element over
the lines of one farther away. This will give the audience the illusion that the
object is nearer, and in being so, it cuts off part of the more distant element.

Clean-Up
365
The overlapping lines give the
impression of the nearer shapes
appearing in front of the ones behind
them. By exaggerating the perspective
and using strong thick and thin lines in
the clean-up, the entire eff ect can be
made even more dramatic!
Follow-Through Lines
Quite often characters are structured using a specifi c number of overlapping
shapes, such as spheres, ovals, etc., to form the entire character design. This
was most pronounced in the early days of traditional cartoon animation.
The kind of fat and round design we’ve
seen a million times.
To get a greater understanding of how these characters worked in action,
the animators would often leave their construction lines in to identify for the
clean-up artist just where these shapes connect and where they continue
through to. These were known as follow-through construction lines.
How to Make Animated Films
366
Note how the whole design, drawn
with a red pencil, is almost entirely
made up of circles and linking
construction lines.
Clean-up artists often started their process by using a dark pencil to structure
everything. These clean-up pencil drawings were then inked onto clear
acetate cels, after which they were painted and shot.
The same red animation drawing with
the darker cleaned-up lines added.
Note how all the follow-through lines
are now eliminated.
Consequently, if you are nervous about the structural complications in your own
drawings when cleaning up, consider working lightly drawn follow-through
lines into your preliminary work. Only when this is all established throughout
the scene (and pencil tested!) should you put in your fi nal dark clean-up lines.
Assignment Clean up your entire pencil-tested animation. As you fi nish each cleaned-up
scene, pencil test it again to see that everything you are doing is consistent
and correct before moving on to the next stage.

367
Scanning for modern animators is as important as the animation stand (or
rostrum camera in the United Kingdom) was for traditional cell animators.
Without either of these essential elements of technology, animators would
just not be able to get their drawings up onto the screen.
The animation stand was a huge, precision-made piece of equipment that
comprised of a camera tabletop containing both top and bottom panning
peg bars, two enormous vertical columns, and a full, movie-standard
camera that would rise up and down the columns to fi lm the artwork on the
animation table using a whole range of diff erent fi eld sizes.
Film Production 17
Scanning
A traditional rostrum camera, as used
before the animation digital age
arrived. Preserved by the Animaticus
Foundation and on display in the lobby
of the DigiPen Institute of Technology.
How to Make Animated Films
368
In the latter days of the industry, somewhere in between the 1980s and 1990s,
computers began to be added to drive the whole camera/table mechanism.
Before that, everything was done manually, of course.
Today, pretty much anyone can own a scanner or even a digital camera setup
if they’re lucky. Prices and technology are so accessible that what was once
a very major investment for the ambitious professional animator is now
the standard equipment that enables anyone to have a professional-level,
comprehensive animation studio in their own home.
For the luckier among the home bound enthusiasts, a simple digital camera setup!
The only requirement of the scanner for traditional 2D animators is that it
scans well and evenly, especially in the line/text bitmap format. Although
it is often necessary to scan color imagery for props, backgrounds, or other
animation assets, the bulk of scanning for traditional animators simply will
be to capture black-and-white line images, frame after frame after frame.
Consequently, even the cheapest of scanners should do the trick, as long as
they are consistent in their illumination across the scanning area. I have found
that for old scanners their illumination tends to fade somewhat toward one
edge of the screen, which results in a kind of ugly black, speckly pattern at the
off ending side of the image.
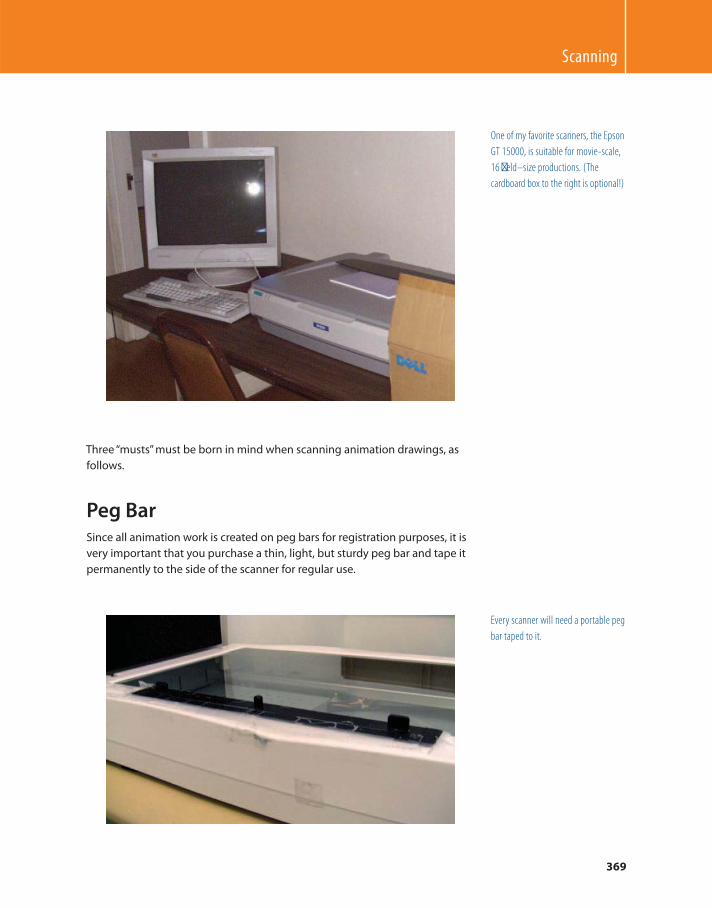
Scanning
369
One of my favorite scanners, the Epson
GT 15000, is suitable for movie-scale,
16 fi eld – size productions. (The
cardboard box to the right is optional!)
Three “ musts ” must be born in mind when scanning animation drawings, as
follows.
Peg Bar Since all animation work is created on peg bars for registration purposes, it is
very important that you purchase a thin, light, but sturdy peg bar and tape it
permanently to the side of the scanner for regular use.
Every scanner will need a portable peg
bar taped to it.
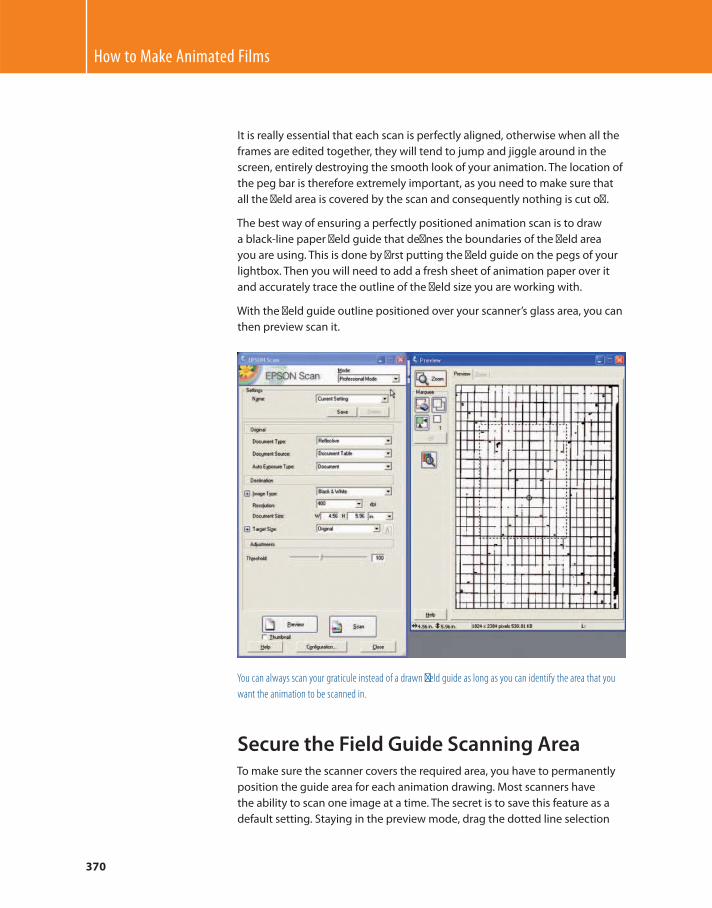
How to Make Animated Films
370
It is really essential that each scan is perfectly aligned, otherwise when all the
frames are edited together, they will tend to jump and jiggle around in the
screen, entirely destroying the smooth look of your animation. The location of
the peg bar is therefore extremely important, as you need to make sure that
all the fi eld area is covered by the scan and consequently nothing is cut off .
The best way of ensuring a perfectly positioned animation scan is to draw
a black-line paper fi eld guide that defi nes the boundaries of the fi eld area
you are using. This is done by fi rst putting the fi eld guide on the pegs of your
lightbox. Then you will need to add a fresh sheet of animation paper over it
and accurately trace the outline of the fi eld size you are working with.
With the fi eld guide outline positioned over your scanner’s glass area, you can
then preview scan it.
You can always scan your graticule instead of a drawn fi eld guide as long as you can identify the area that you
want the animation to be scanned in.
Secure the Field Guide Scanning Area To make sure the scanner covers the required area, you have to permanently
position the guide area for each animation drawing. Most scanners have
the ability to scan one image at a time. The secret is to save this feature as a
default setting. Staying in the preview mode, drag the dotted line selection
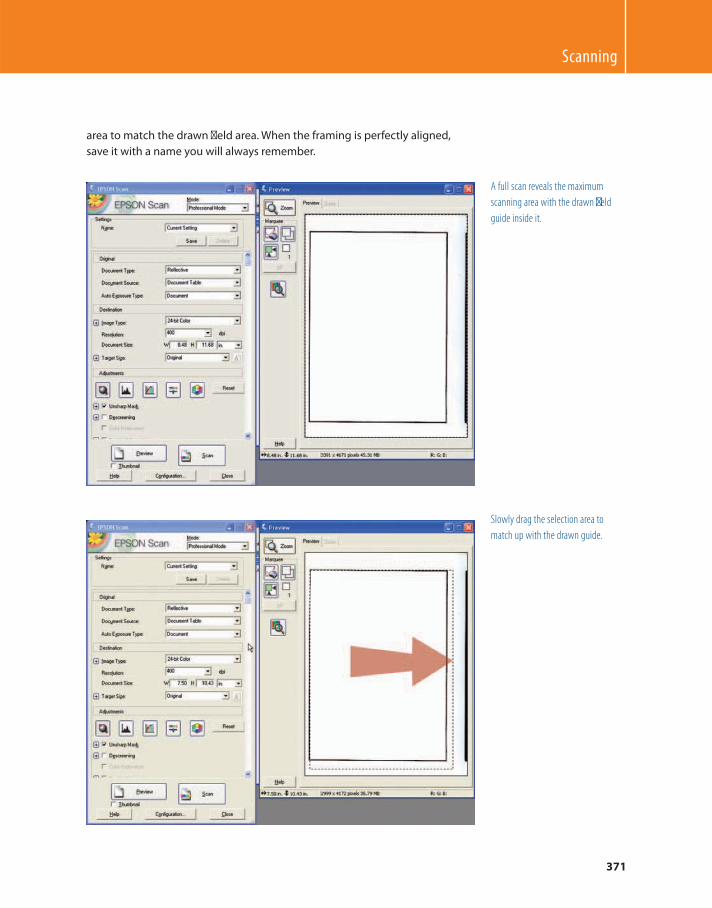
Scanning
371
area to match the drawn fi eld area. When the framing is perfectly aligned,
save it with a name you will always remember.
A full scan reveals the maximum
scanning area with the drawn fi eld
guide inside it.
Slowly drag the selection area to
match up with the drawn guide.
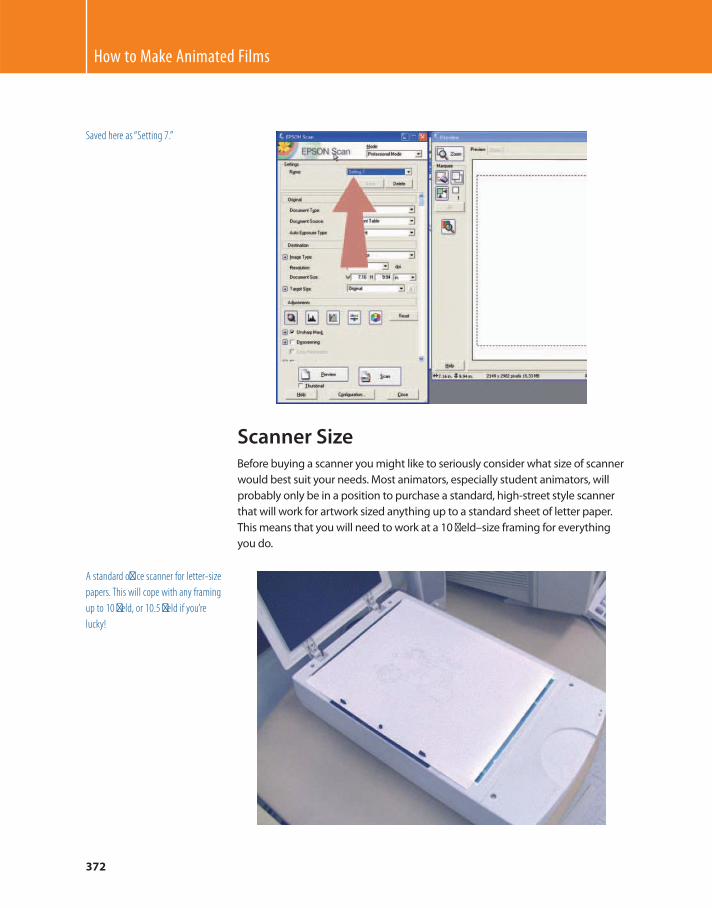
How to Make Animated Films
372
Saved here as “ Setting 7. ”
Scanner Size Before buying a scanner you might like to seriously consider what size of scanner
would best suit your needs. Most animators, especially student animators, will
probably only be in a position to purchase a standard, high-street style scanner
that will work for artwork sized anything up to a standard sheet of letter paper.
This means that you will need to work at a 10 fi eld – size framing for everything
you do.
A standard offi ce scanner for letter-size
papers. This will cope with any framing
up to 10 fi eld, or 10.5 fi eld if you’re
lucky!

Scanning
373
However, if you want to work larger, say a 12 or 16 fi eld (15 fi eld in the United
Kingdom), then you will need to purchase a signifi cantly larger scanner such
as an 11 � 17 – inch one. This, of course, will be signifi cantly more expensive.
However, if you intend to be a career animator, or if you are prepared to make
a lifelong commitment to your animation work, then it will be a most valuable
investment if you want to work with larger formats.
Assignment Scan all of the animation drawings you have created for your fi lm. However,
scan each scene separately and keep the fi les in separate folders so you can
avoid any confusion later in production.
A production folder for keeping all your animation drawings in, together with all the other administrative
materials that are required to make an animated fi lm.
When numbering the saved scans, I recommend adding a prefi x to the frame
number to identify what particular scene it is related to. This is something you
may be glad about later when you are working digitally with a huge collection
of diff erent fi les. For example, if you’re scanning your fi rst frame from scene
3, I would save the scan as “ 03_01 ” ; if you are saving drawing 9 from scene 3, I
would number that “ 03_09 “ ; and so on.
How to Make Animated Films
374
Files should be saved with the scene
number fi rst and the drawing number
second.
Depending on the animation software you are using, it is most likely that
you will need to rotate and resize your scans once they are completed and
scanned. For much of my work I actually use Adobe Photoshop, then edit
and render my scenes in Adobe Premiere. This way I can rotate and resize my
establishing scan (to fi t the ultimate screen frame size I wish to render my fi lm
in) in one “ Actions ” process, and then render out all the remaining drawings in
the folder using the “ Automate/Batch ” function.
The “ Actions ” and “ Automate/Batch ”
processes are the answer to an
animator’s prayers in Adobe
Photoshop.
Other programs may, of course, provide a diff erent way of doing this,
although perhaps using the Adobe Photoshop process will adequately
prepare your scans for any application so they can be imported ready to go.
375
Film Production 18
Backgrounds and Environments
Whether artwork is digitally or traditionally
created, the background and environment
elements within a fi lm are fundamentally
important to the way an audience perceives your
work. The design may be of the fi nest quality and
the animation superb, but as the background
constitutes the majority of the screen area seen in
every shot, the quality of it can make or break the
way the fi lm looks.
The beauty of digital background art is that it can be quite impactful and
multi-dimensional.
How to Make Animated Films
376
Beautifully moody shot, seen in early light. (Source: DigiPen student art by Dan Moyer.)
Backgrounds can be minimalist or extremely elaborate. They can be
cartoonish in style or photorealistic. The one thing they have to be is
compatible with the styling of your animated characters. For example, unless
you are pursuing a totally radical and unorthodox look, you would probably
never deliberately choose to have a fl at-colored, cartoonish 2D character in a
photorealistic setting, or a 2D character in an overtly 3D world.
Pleasing design using 3D toonshading. (Source: DigiPen student art by Jeff Weber.)

Backgrounds and Environments
377
Haunting mood for this short
3D-animated fi lm. (Source: DigiPen
student art by Sergey Naygel.)
Extensive color and compatibility testing for this character and environment. (Source: DigiPen student art by
David Bolton.)
A lot of background painting issues will have been resolved when dealing
with basic principles at the concept art, design, and color scripting stages of
your fi lm’s production. However, the fi nal background art of your fi lm must
strongly refl ect these approaches, therefore it will pay for you to understand
these and more before you begin.
We have dealt with a few of the main principles of color composition in the
color script aspect of the production process especially (see FP 10) . However,
we will return to them, and more, now by way of underlining their importance.
How to Make Animated Films
378
Compositional Color Values Remember, to achieve the greatest impact and sense of depth in your
background art, there must always be signifi cant diff erences in the color
values in the foreground, midground, and background of any environment.
The convention is to have foreground objects be the darkest, midground
values be neutral, and distant objects be the lightest. It is possible to reverse
these to give an entirely diff erent eff ect.
Excellent example of diminishing values in a picture. (Source: DigiPen student
art by Mark Barrett.)
A reverse in values for this painting. (Source: DigiPen student art by
Ronald Kury.)
Horizontals and Verticals It is pretty much universally acknowledged that for most environment art,
especially exterior environment art, the horizontals will be signifi cantly lighter
in value than the verticals. As with everything, a lot will depend on the light
source that aff ects the picture. But by and large these indications can be
implemented for most of the time in your background art.
Light Source and Contrast Remember that all environments will require three main elements of
illumination: highlights, midtones, and shadows.
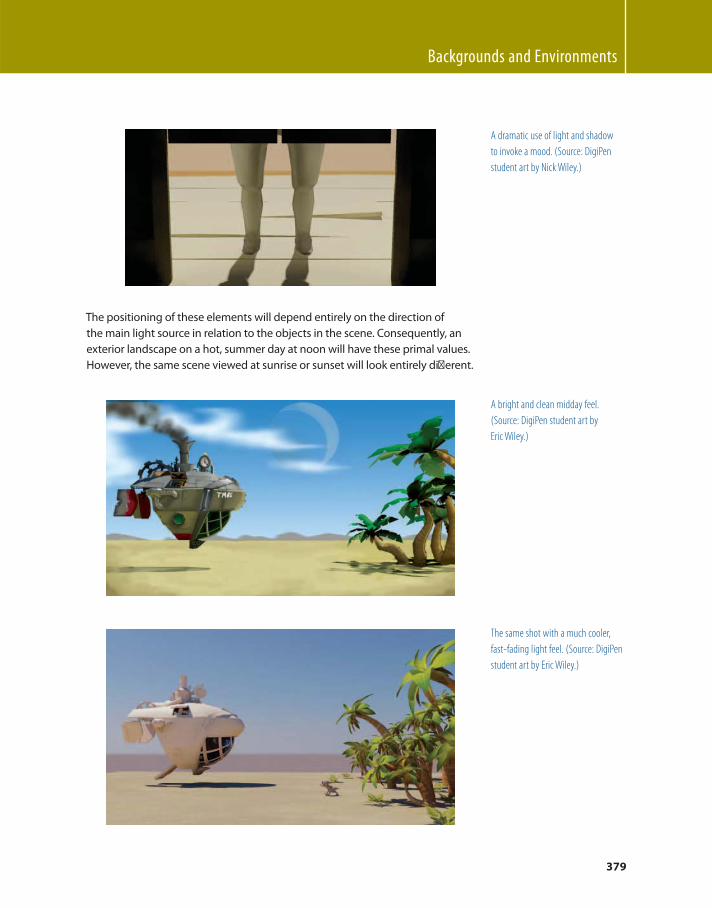
Backgrounds and Environments
379
A dramatic use of light and shadow
to invoke a mood. (Source: DigiPen
student art by Nick Wiley.)
The positioning of these elements will depend entirely on the direction of
the main light source in relation to the objects in the scene. Consequently, an
exterior landscape on a hot, summer day at noon will have these primal values.
However, the same scene viewed at sunrise or sunset will look entirely diff erent.
A bright and clean midday feel.
(Source: DigiPen student art by
Eric Wiley.)
The same shot with a much cooler,
fast-fading light feel. (Source: DigiPen
student art by Eric Wiley.)
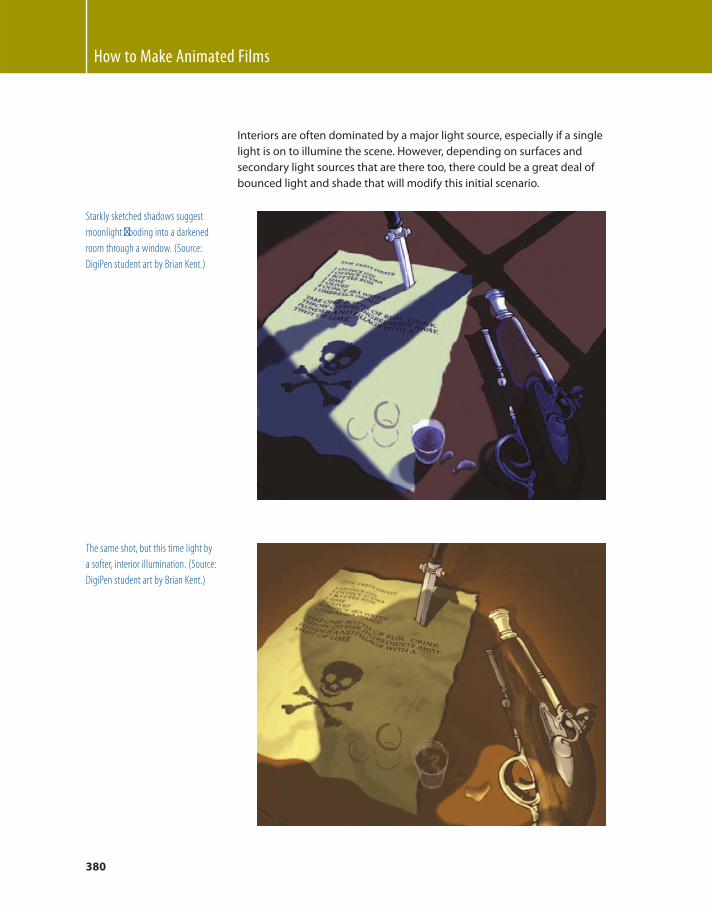
How to Make Animated Films
380
Interiors are often dominated by a major light source, especially if a single
light is on to illumine the scene. However, depending on surfaces and
secondary light sources that are there too, there could be a great deal of
bounced light and shade that will modify this initial scenario.
Starkly sketched shadows suggest
moonlight fl ooding into a darkened
room through a window. (Source:
DigiPen student art by Brian Kent.)
The same shot, but this time light by
a softer, interior illumination. (Source:
DigiPen student art by Brian Kent.)
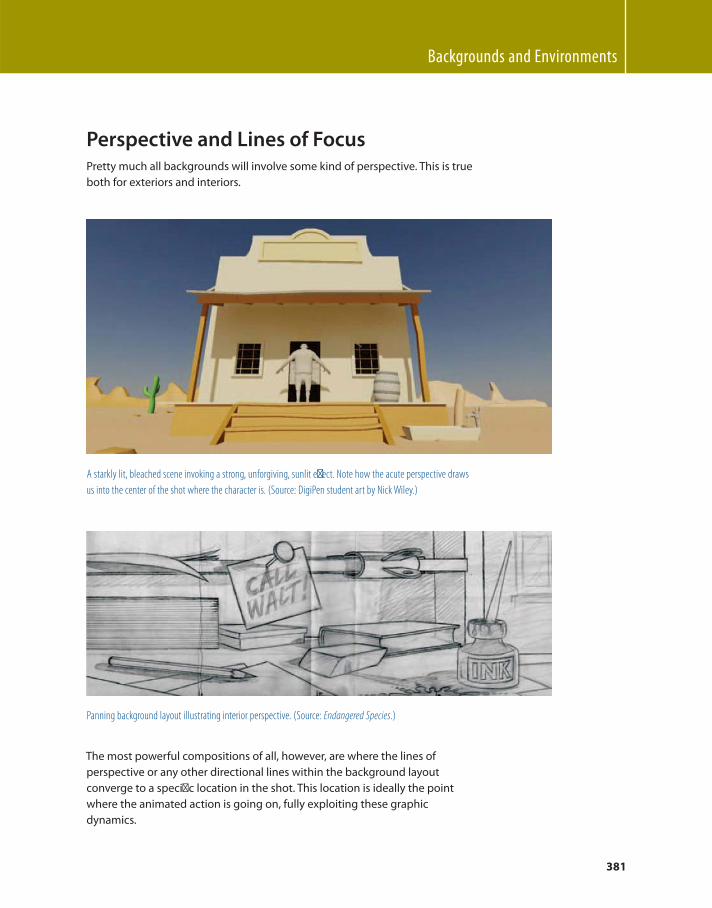
Backgrounds and Environments
381
Perspective and Lines of Focus Pretty much all backgrounds will involve some kind of perspective. This is true
both for exteriors and interiors.
A starkly lit, bleached scene invoking a strong, unforgiving, sunlit eff ect. Note how the acute perspective draws
us into the center of the shot where the character is. (Source: DigiPen student art by Nick Wiley.)
Panning background layout illustrating interior perspective. (Source: Endangered Species .)
The most powerful compositions of all, however, are where the lines of
perspective or any other directional lines within the background layout
converge to a specifi c location in the shot. This location is ideally the point
where the animated action is going on, fully exploiting these graphic
dynamics.
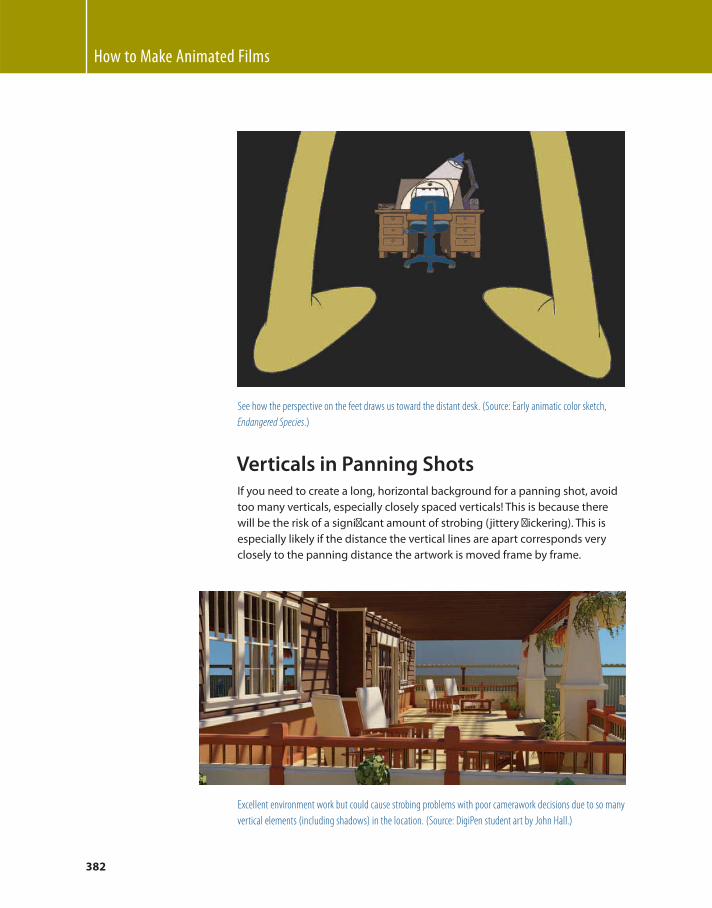
How to Make Animated Films
382
See how the perspective on the feet draws us toward the distant desk. (Source: Early animatic color sketch,
Endangered Species .)
Verticals in Panning Shots If you need to create a long, horizontal background for a panning shot, avoid
too many verticals, especially closely spaced verticals! This is because there
will be the risk of a signifi cant amount of strobing (jittery fl ickering). This is
especially likely if the distance the vertical lines are apart corresponds very
closely to the panning distance the artwork is moved frame by frame.
Excellent environment work but could cause strobing problems with poor camerawork decisions due to so many
vertical elements (including shadows) in the location. (Source: DigiPen student art by John Hall.)
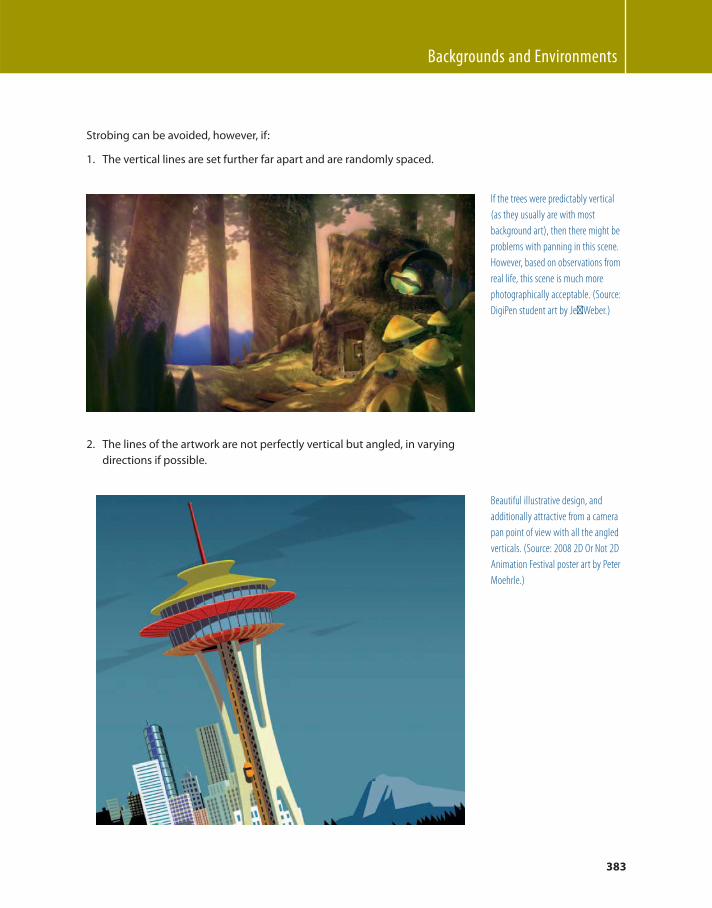
Backgrounds and Environments
383
Strobing can be avoided, however, if:
1. The vertical lines are set further far apart and are randomly spaced.
If the trees were predictably vertical
(as they usually are with most
background art), then there might be
problems with panning in this scene.
However, based on observations from
real life, this scene is much more
photographically acceptable. (Source:
DigiPen student art by Jeff Weber.)
2. The lines of the artwork are not perfectly vertical but angled, in varying
directions if possible.
Beautiful illustrative design, and
additionally attractive from a camera
pan point of view with all the angled
verticals. (Source: 2008 2D Or Not 2D
Animation Festival poster art by Peter
Moehrle.)
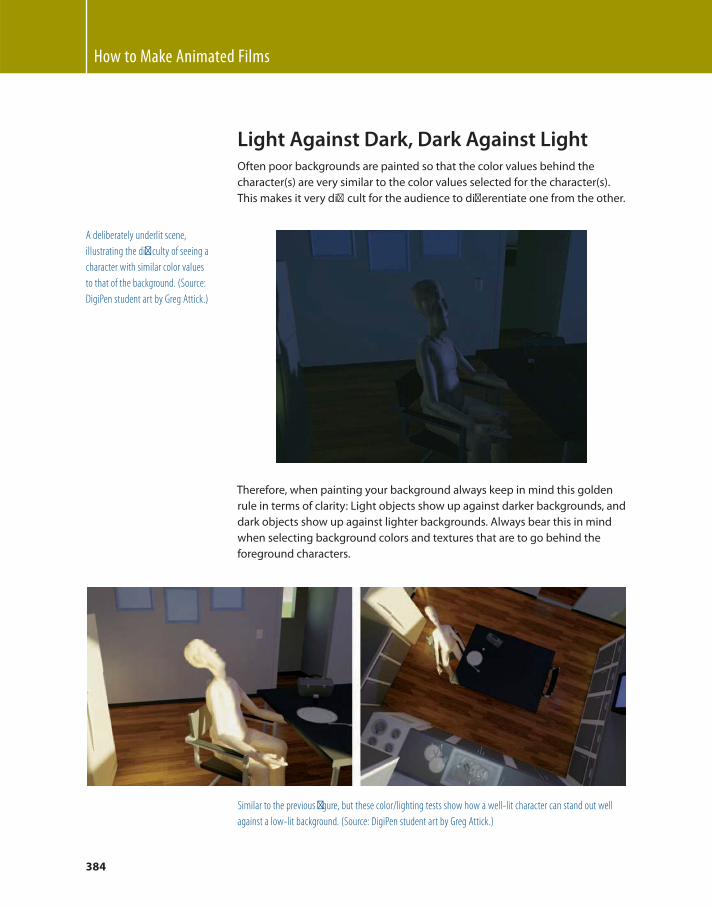
How to Make Animated Films
384
Light Against Dark, Dark Against Light Often poor backgrounds are painted so that the color values behind the
character(s) are very similar to the color values selected for the character(s).
This makes it very diffi cult for the audience to diff erentiate one from the other.
A deliberately underlit scene,
illustrating the diffi culty of seeing a
character with similar color values
to that of the background. (Source:
DigiPen student art by Greg Attick.)
Therefore, when painting your background always keep in mind this golden
rule in terms of clarity: Light objects show up against darker backgrounds, and
dark objects show up against lighter backgrounds. Always bear this in mind
when selecting background colors and textures that are to go behind the
foreground characters.
Similar to the previous fi gure, but these color/lighting tests show how a well-lit character can stand out well
against a low-lit background. (Source: DigiPen student art by Greg Attick.)
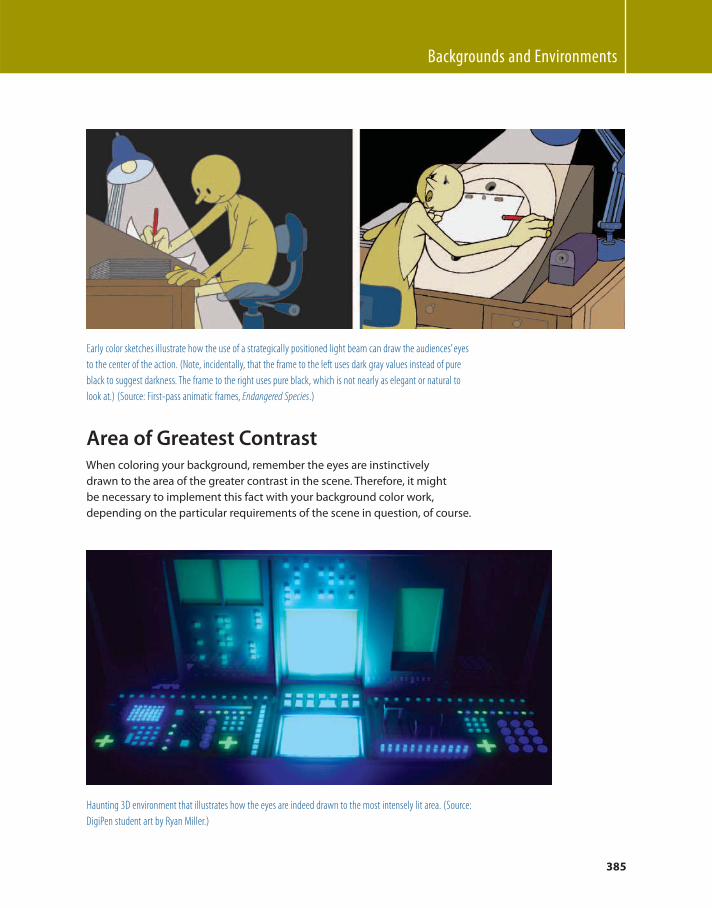
Backgrounds and Environments
385
Early color sketches illustrate how the use of a strategically positioned light beam can draw the audiences ’ eyes
to the center of the action. (Note, incidentally, that the frame to the left uses dark gray values instead of pure
black to suggest darkness. The frame to the right uses pure black, which is not nearly as elegant or natural to
look at.) (Source: First-pass animatic frames, Endangered Species .)
Area of Greatest Contrast When coloring your background, remember the eyes are instinctively
drawn to the area of the greater contrast in the scene. Therefore, it might
be necessary to implement this fact with your background color work,
depending on the particular requirements of the scene in question, of course.
Haunting 3D environment that illustrates how the eyes are indeed drawn to the most intensely lit area. (Source:
DigiPen student art by Ryan Miller.)
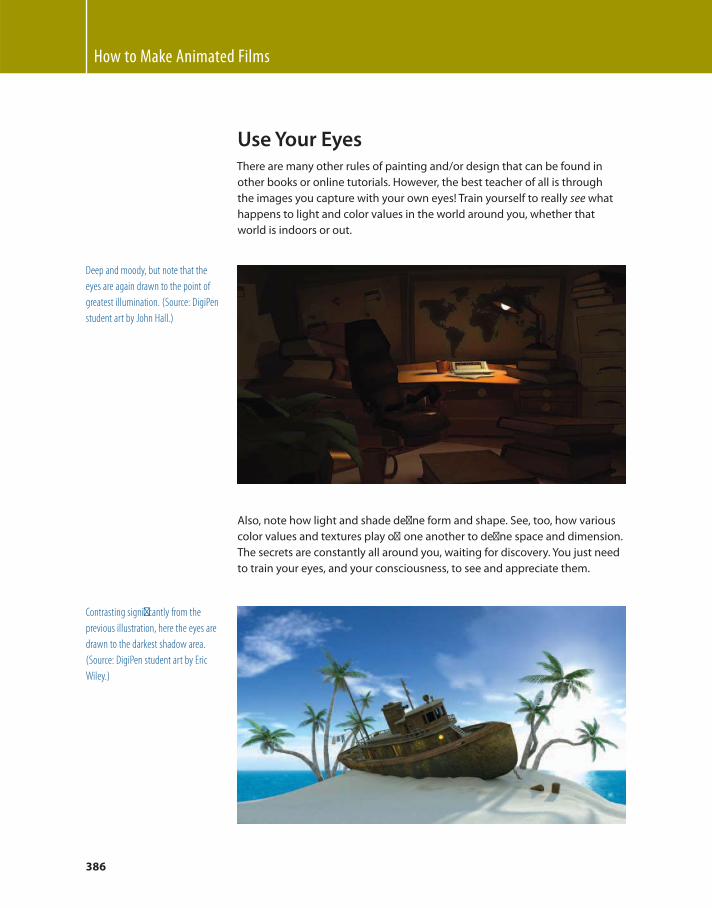
How to Make Animated Films
386
Use Your Eyes There are many other rules of painting and/or design that can be found in
other books or online tutorials. However, the best teacher of all is through
the images you capture with your own eyes! Train yourself to really see what
happens to light and color values in the world around you, whether that
world is indoors or out.
Deep and moody, but note that the
eyes are again drawn to the point of
greatest illumination. (Source: DigiPen
student art by John Hall.)
Also, note how light and shade defi ne form and shape. See, too, how various
color values and textures play off one another to defi ne space and dimension.
The secrets are constantly all around you, waiting for discovery. You just need
to train your eyes, and your consciousness, to see and appreciate them.
Contrasting signifi cantly from the
previous illustration, here the eyes are
drawn to the darkest shadow area.
(Source: DigiPen student art by Eric
Wiley.)
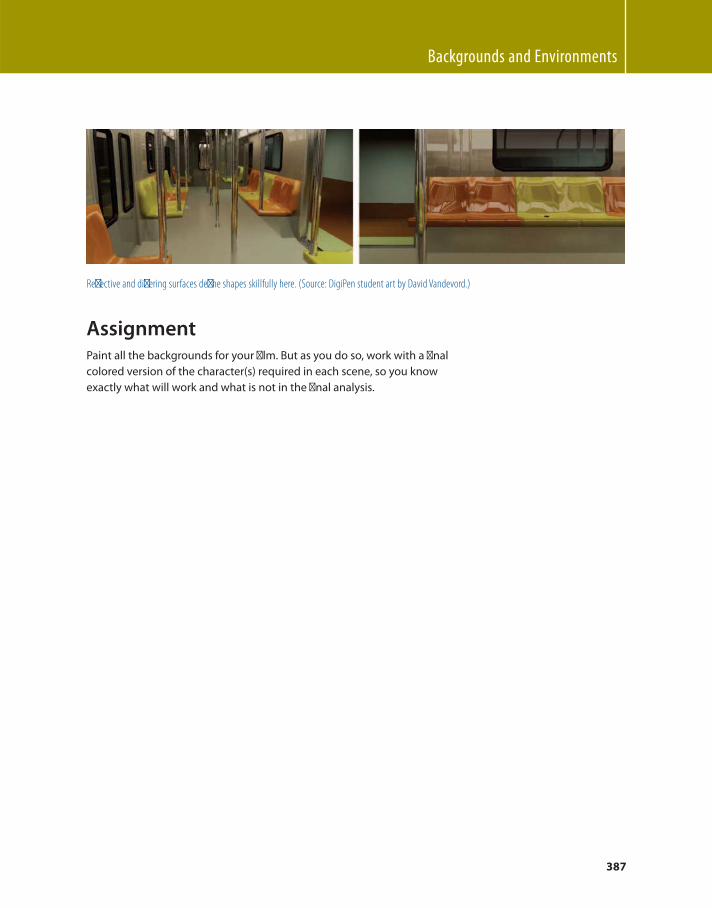
Backgrounds and Environments
387
Refl ective and diff ering surfaces defi ne shapes skillfully here. (Source: DigiPen student art by David Vandevord.)
Assignment Paint all the backgrounds for your fi lm. But as you do so, work with a fi nal
colored version of the character(s) required in each scene, so you know
exactly what will work and what is not in the fi nal analysis.

This page intentionally left blank
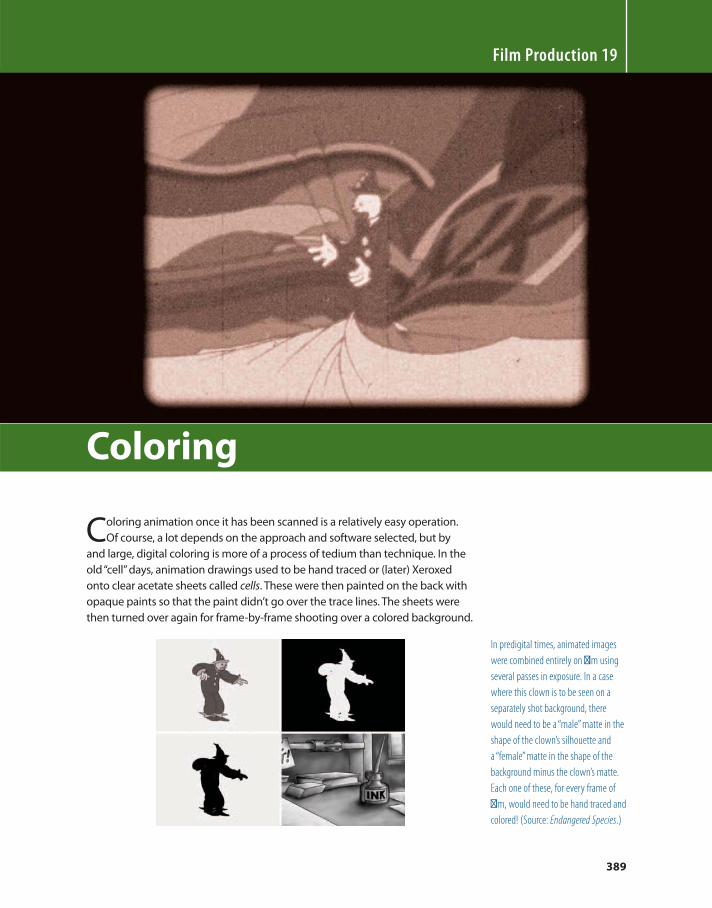
389
Coloring animation once it has been scanned is a relatively easy operation.
Of course, a lot depends on the approach and software selected, but by
and large, digital coloring is more of a process of tedium than technique. In the
old “ cell ” days, animation drawings used to be hand traced or (later) Xeroxed
onto clear acetate sheets called cells . These were then painted on the back with
opaque paints so that the paint didn’t go over the trace lines. The sheets were
then turned over again for frame-by-frame shooting over a colored background.
Film Production 19
Coloring
In predigital times, animated images
were combined entirely on fi lm using
several passes in exposure. In a case
where this clown is to be seen on a
separately shot background, there
would need to be a “ male ” matte in the
shape of the clown’s silhouette and
a “ female ” matte in the shape of the
background minus the clown’s matte.
Each one of these, for every frame of
fi lm, would need to be hand traced and
colored! (Source: Endangered Species .)
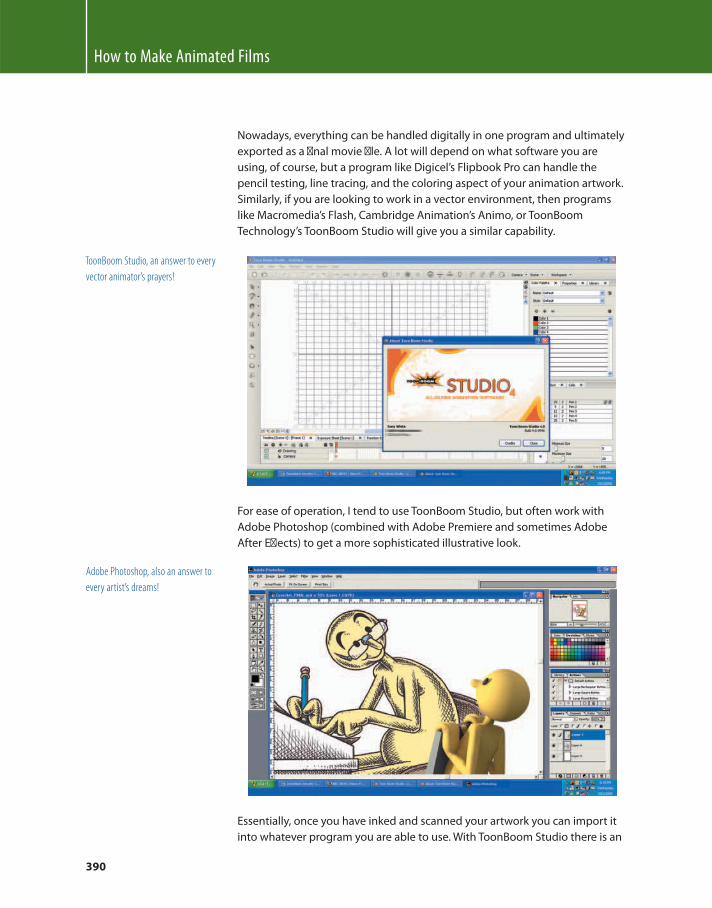
How to Make Animated Films
390
Nowadays, everything can be handled digitally in one program and ultimately
exported as a fi nal movie fi le. A lot will depend on what software you are
using, of course, but a program like Digicel’s Flipbook Pro can handle the
pencil testing, line tracing, and the coloring aspect of your animation artwork.
Similarly, if you are looking to work in a vector environment, then programs
like Macromedia’s Flash, Cambridge Animation’s Animo, or ToonBoom
Technology’s ToonBoom Studio will give you a similar capability.
Essentially, once you have inked and scanned your artwork you can import it
into whatever program you are able to use. With ToonBoom Studio there is an
For ease of operation, I tend to use ToonBoom Studio, but often work with
Adobe Photoshop (combined with Adobe Premiere and sometimes Adobe
After Eff ects) to get a more sophisticated illustrative look.
ToonBoom Studio, an answer to every
vector animator’s prayers!
Adobe Photoshop, also an answer to
every artist’s dreams!
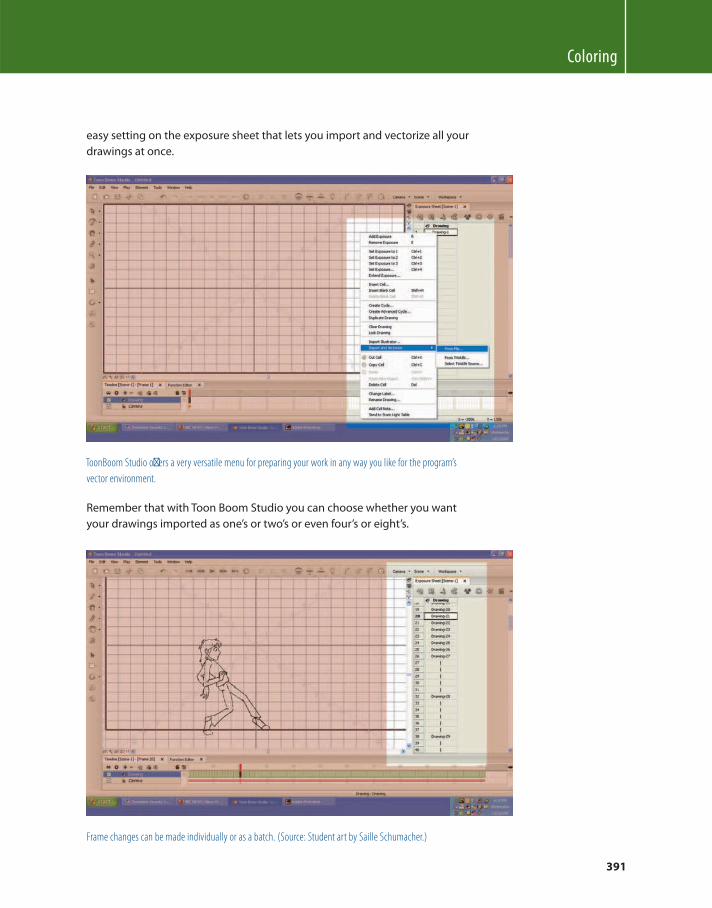
Coloring
391
ToonBoom Studio off ers a very versatile menu for preparing your work in any way you like for the program’s
vector environment.
Remember that with Toon Boom Studio you can choose whether you want
your drawings imported as one’s or two’s or even four’s or eight’s.
Frame changes can be made individually or as a batch. (Source: Student art by Saille Schumacher.)
easy setting on the exposure sheet that lets you import and vectorize all your
drawings at once.
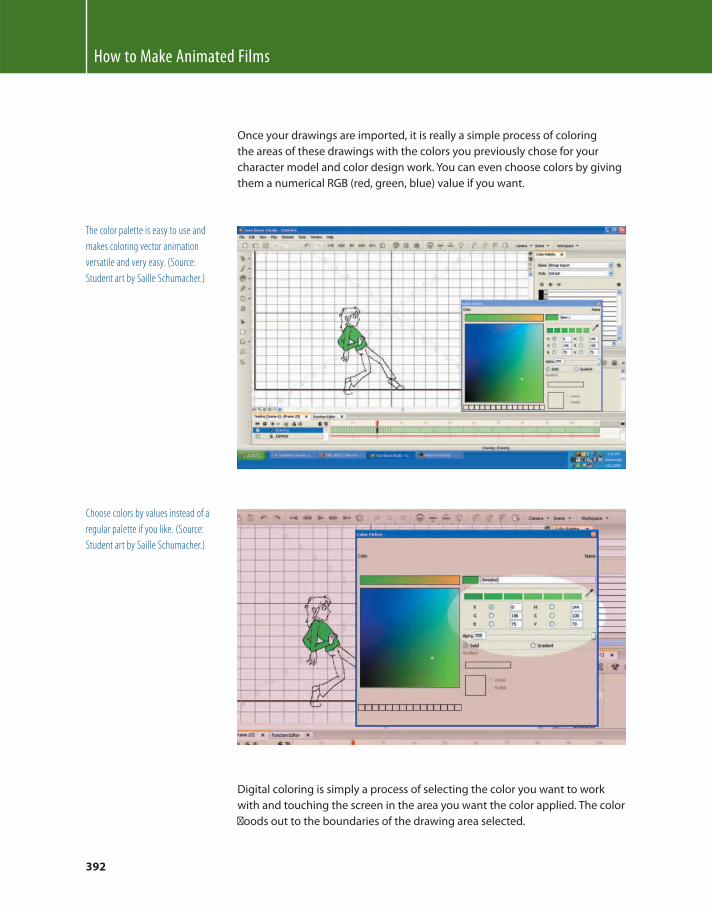
How to Make Animated Films
392
Once your drawings are imported, it is really a simple process of coloring
the areas of these drawings with the colors you previously chose for your
character model and color design work. You can even choose colors by giving
them a numerical RGB (red, green, blue) value if you want.
The color palette is easy to use and
makes coloring vector animation
versatile and very easy. (Source:
Student art by Saille Schumacher.)
Choose colors by values instead of a
regular palette if you like. (Source:
Student art by Saille Schumacher.)
Digital coloring is simply a process of selecting the color you want to work
with and touching the screen in the area you want the color applied. The color
fl oods out to the boundaries of the drawing area selected.
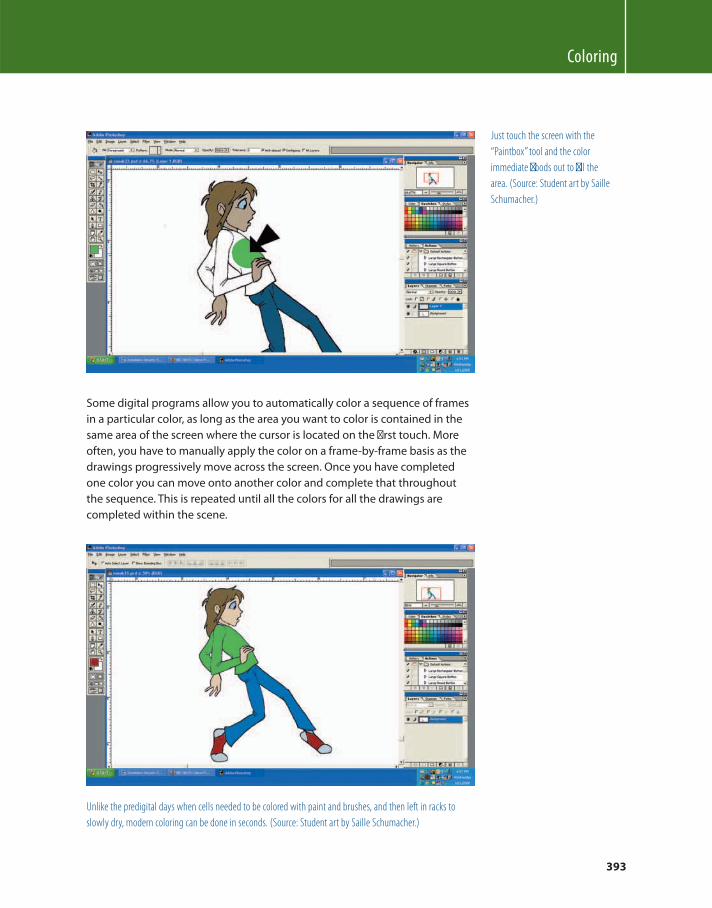
Coloring
393
Just touch the screen with the
“ Paintbox ” tool and the color
immediate fl oods out to fi ll the
area. (Source: Student art by Saille
Schumacher.)
Some digital programs allow you to automatically color a sequence of frames
in a particular color, as long as the area you want to color is contained in the
same area of the screen where the cursor is located on the fi rst touch. More
often, you have to manually apply the color on a frame-by-frame basis as the
drawings progressively move across the screen. Once you have completed
one color you can move onto another color and complete that throughout
the sequence. This is repeated until all the colors for all the drawings are
completed within the scene.
Unlike the predigital days when cells needed to be colored with paint and brushes, and then left in racks to
slowly dry, modern coloring can be done in seconds. (Source: Student art by Saille Schumacher.)
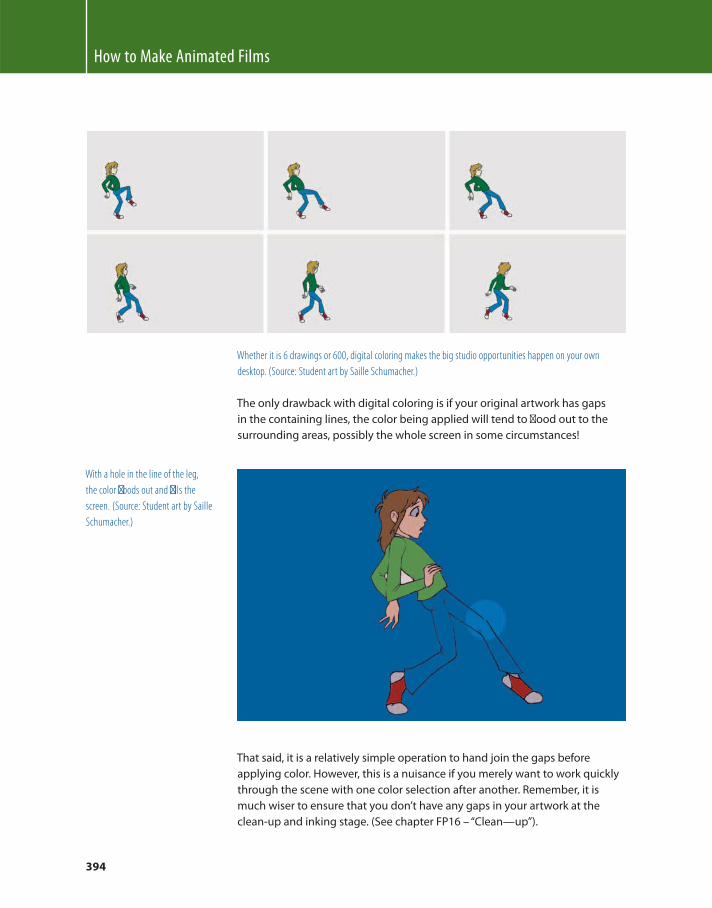
How to Make Animated Films
394
Whether it is 6 drawings or 600, digital coloring makes the big studio opportunities happen on your own
desktop. (Source: Student art by Saille Schumacher.)
The only drawback with digital coloring is if your original artwork has gaps
in the containing lines, the color being applied will tend to fl ood out to the
surrounding areas, possibly the whole screen in some circumstances!
With a hole in the line of the leg,
the color fl oods out and fi lls the
screen. (Source: Student art by Saille
Schumacher.)
That said, it is a relatively simple operation to hand join the gaps before
applying color. However, this is a nuisance if you merely want to work quickly
through the scene with one color selection after another. Remember, it is
much wiser to ensure that you don’t have any gaps in your artwork at the
clean-up and inking stage. (See chapter FP16 – “ Clean — up ” ).
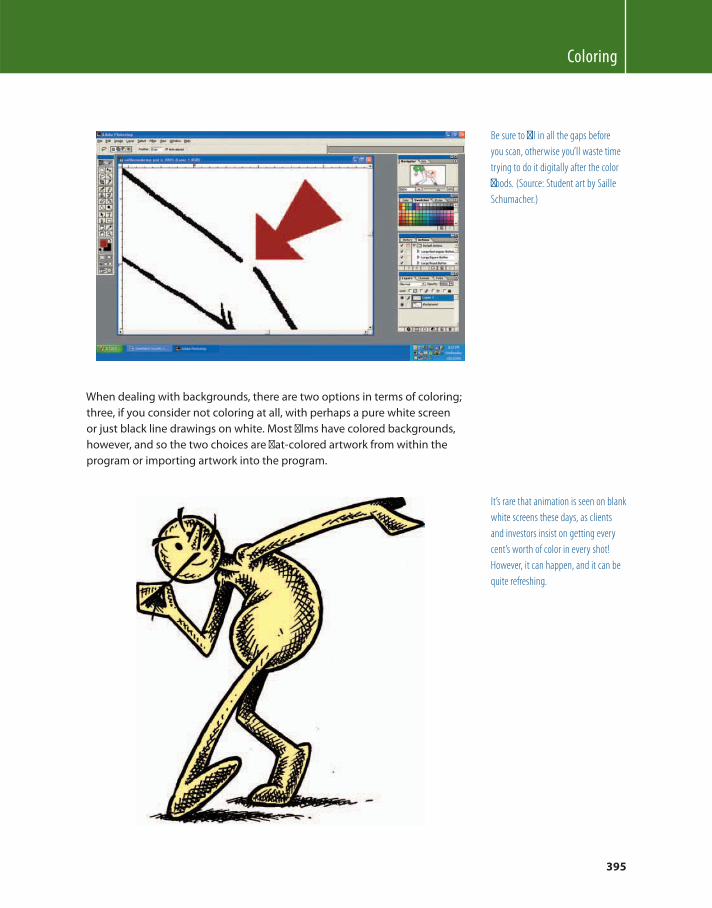
Coloring
395
Be sure to fi ll in all the gaps before
you scan, otherwise you’ll waste time
trying to do it digitally after the color
fl oods. (Source: Student art by Saille
Schumacher.)
When dealing with backgrounds, there are two options in terms of coloring;
three, if you consider not coloring at all, with perhaps a pure white screen
or just black line drawings on white. Most fi lms have colored backgrounds,
however, and so the two choices are fl at-colored artwork from within the
program or importing artwork into the program.
It’s rare that animation is seen on blank
white screens these days, as clients
and investors insist on getting every
cent’s worth of color in every shot!
However, it can happen, and it can be
quite refreshing.
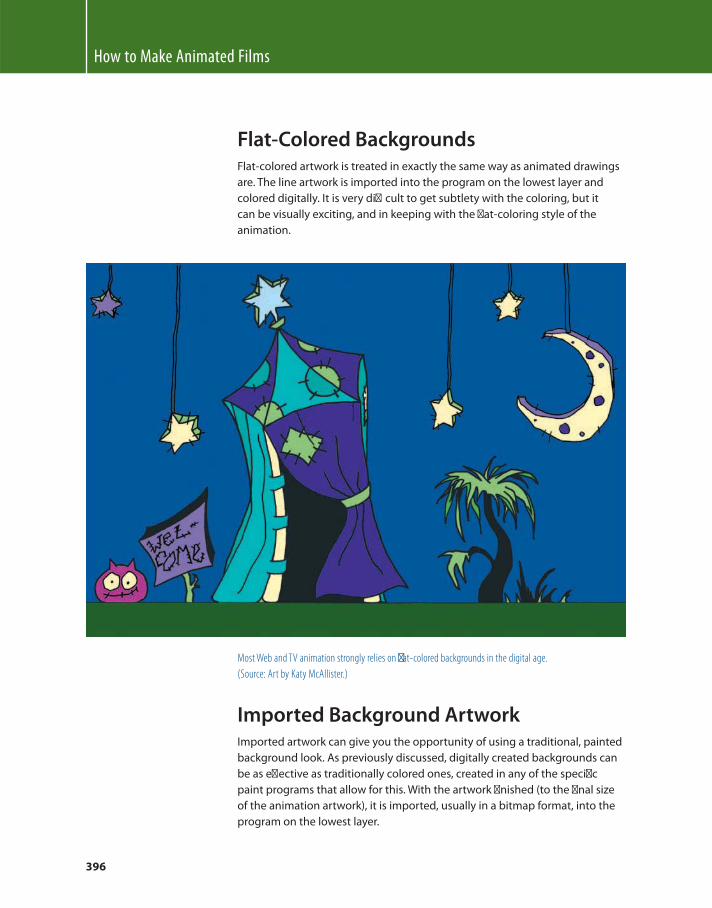
How to Make Animated Films
396
Flat-Colored Backgrounds Flat-colored artwork is treated in exactly the same way as animated drawings
are. The line artwork is imported into the program on the lowest layer and
colored digitally. It is very diffi cult to get subtlety with the coloring, but it
can be visually exciting, and in keeping with the fl at-coloring style of the
animation.
Most Web and TV animation strongly relies on fl at-colored backgrounds in the digital age.
(Source: Art by Katy McAllister.)
Imported Background Artwork Imported artwork can give you the opportunity of using a traditional, painted
background look. As previously discussed, digitally created backgrounds can
be as eff ective as traditionally colored ones, created in any of the specifi c
paint programs that allow for this. With the artwork fi nished (to the fi nal size
of the animation artwork), it is imported, usually in a bitmap format, into the
program on the lowest layer.
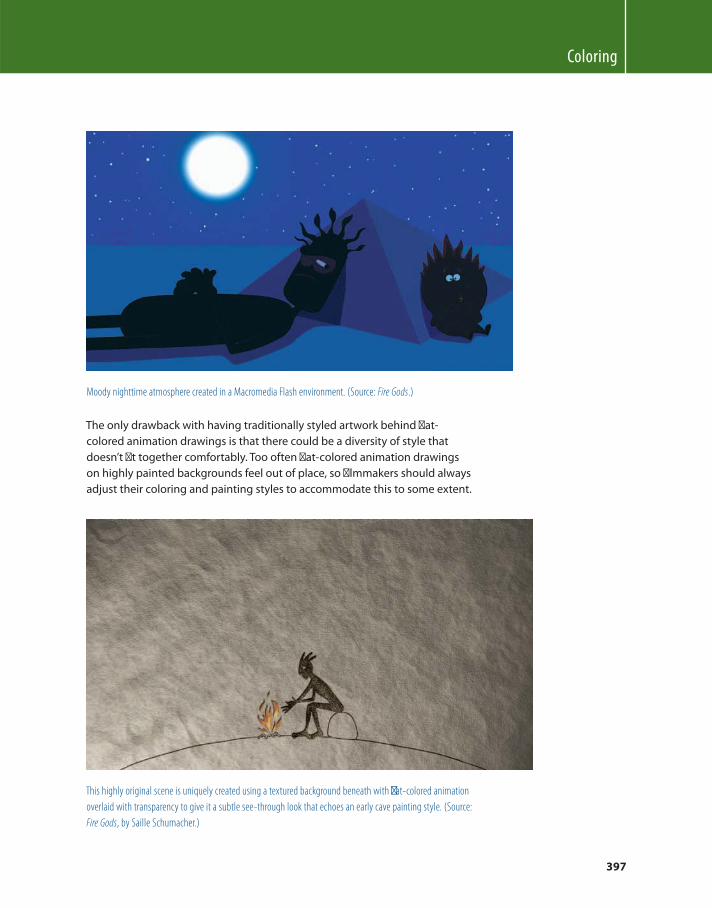
Coloring
397
Moody nighttime atmosphere created in a Macromedia Flash environment. (Source: Fire Gods .)
The only drawback with having traditionally styled artwork behind fl at-
colored animation drawings is that there could be a diversity of style that
doesn’t fi t together comfortably. Too often fl at-colored animation drawings
on highly painted backgrounds feel out of place, so fi lmmakers should always
adjust their coloring and painting styles to accommodate this to some extent.
This highly original scene is uniquely created using a textured background beneath with fl at-colored animation
overlaid with transparency to give it a subtle see-through look that echoes an early cave painting style. (Source:
Fire Gods , by Saille Schumacher.)
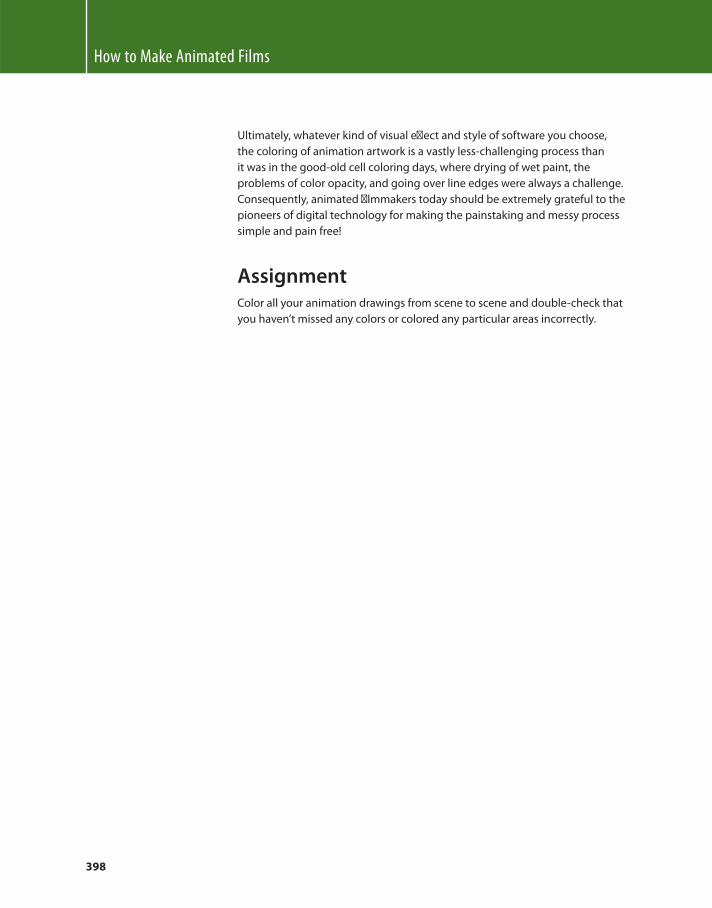
How to Make Animated Films
398
Ultimately, whatever kind of visual eff ect and style of software you choose,
the coloring of animation artwork is a vastly less-challenging process than
it was in the good-old cell coloring days, where drying of wet paint, the
problems of color opacity, and going over line edges were always a challenge.
Consequently, animated fi lmmakers today should be extremely grateful to the
pioneers of digital technology for making the painstaking and messy process
simple and pain free!
Assignment Color all your animation drawings from scene to scene and double-check that
you haven’t missed any colors or colored any particular areas incorrectly.
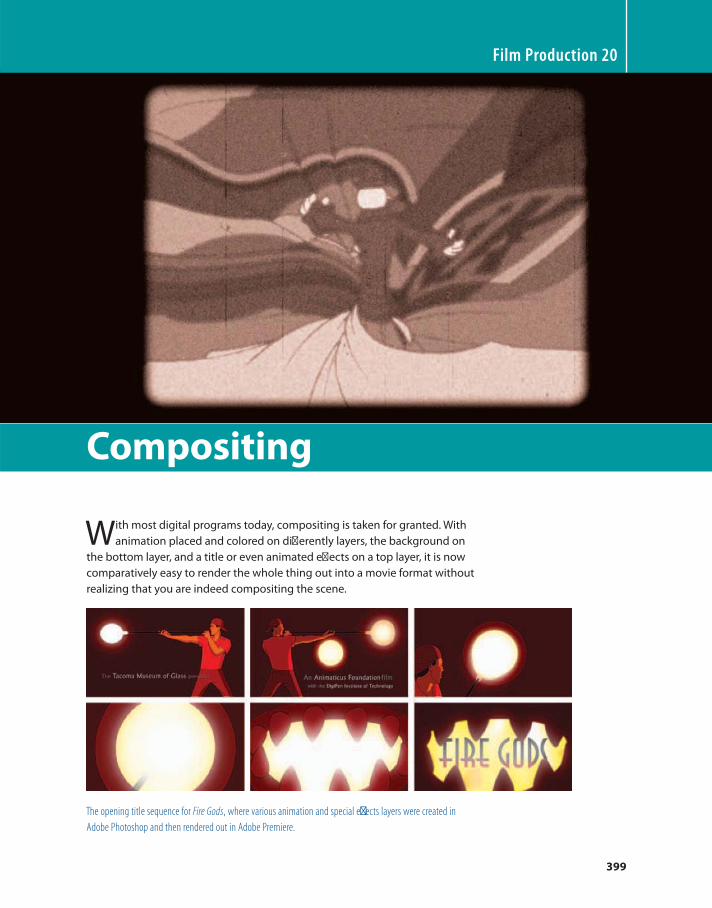
399
With most digital programs today, compositing is taken for granted. With
animation placed and colored on diff erently layers, the background on
the bottom layer, and a title or even animated eff ects on a top layer, it is now
comparatively easy to render the whole thing out into a movie format without
realizing that you are indeed compositing the scene.
Film Production 20
Compositing
The opening title sequence for Fire Gods , where various animation and special eff ects layers were created in
Adobe Photoshop and then rendered out in Adobe Premiere.
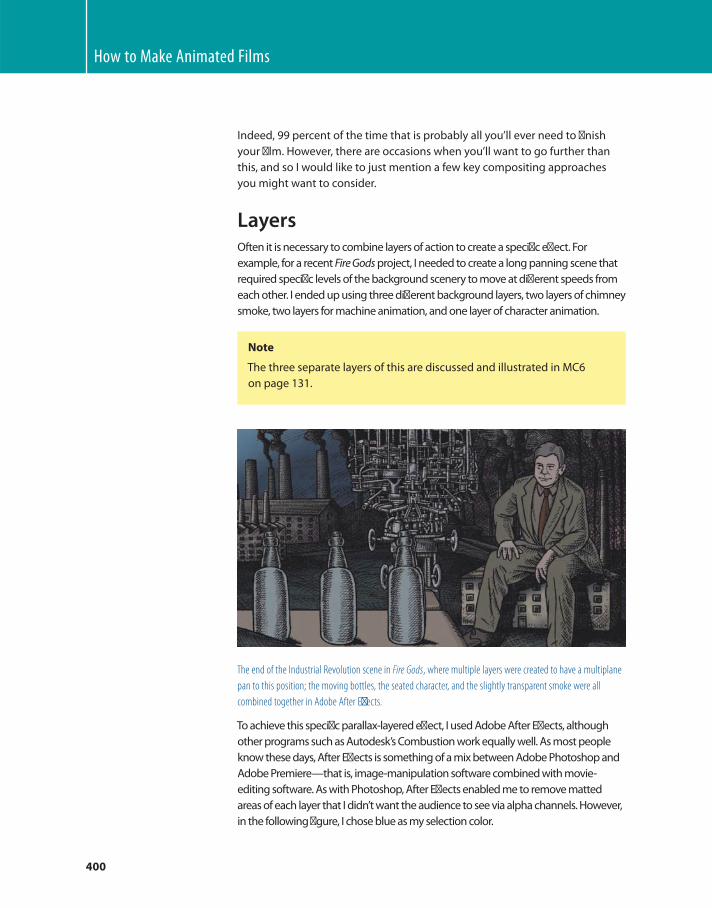
How to Make Animated Films
400
Indeed, 99 percent of the time that is probably all you’ll ever need to fi nish
your fi lm. However, there are occasions when you’ll want to go further than
this, and so I would like to just mention a few key compositing approaches
you might want to consider.
Layers Often it is necessary to combine layers of action to create a specifi c eff ect. For
example, for a recent Fire Gods project, I needed to create a long panning scene that
required specifi c levels of the background scenery to move at diff erent speeds from
each other. I ended up using three diff erent background layers, two layers of chimney
smoke, two layers for machine animation, and one layer of character animation.
Note
The three separate layers of this are discussed and illustrated in MC6
on page 131.
The end of the Industrial Revolution scene in Fire Gods , where multiple layers were created to have a multiplane
pan to this position; the moving bottles, the seated character, and the slightly transparent smoke were all
combined together in Adobe After Eff ects.
To achieve this specifi c parallax-layered eff ect, I used Adobe After Eff ects, although
other programs such as Autodesk’s Combustion work equally well. As most people
know these days, After Eff ects is something of a mix between Adobe Photoshop and
Adobe Premiere — that is, image-manipulation software combined with movie-
editing software. As with Photoshop, After Eff ects enabled me to remove matted
areas of each layer that I didn’t want the audience to see via alpha channels. However,
in the following fi gure, I chose blue as my selection color.
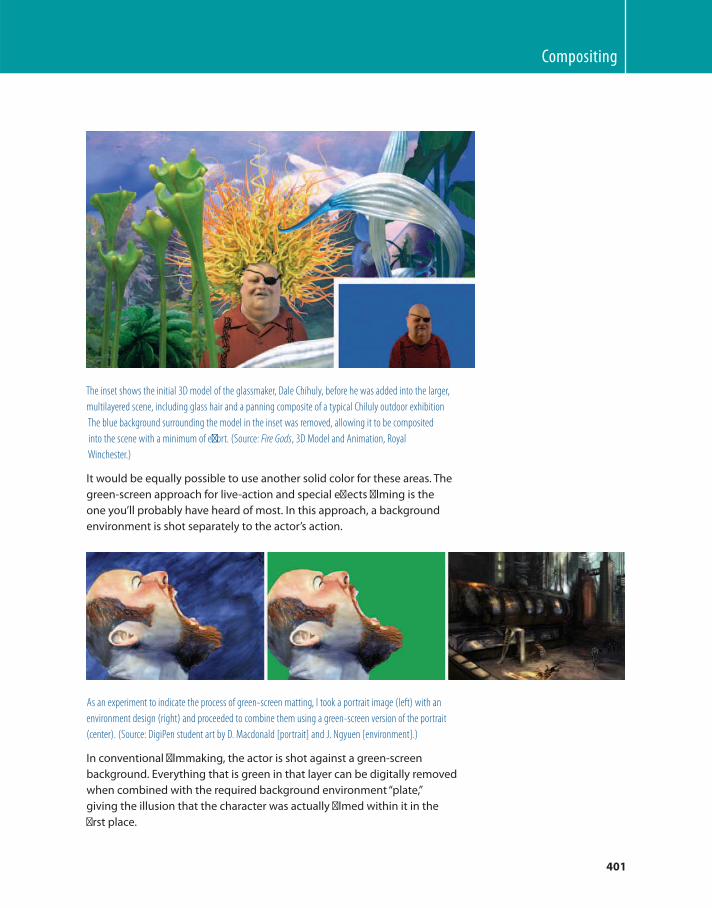
Compositing
401
The inset shows the initial 3D model of the glassmaker, Dale Chihuly, before he was added into the larger,
multilayered scene, including glass hair and a panning composite of a typical Chiluly outdoor exhibition
The blue background surrounding the model in the inset was removed, allowing it to be composited
into the scene with a minimum of eff ort. (Source: Fire Gods , 3D Model and Animation, Royal
Winchester.)
It would be equally possible to use another solid color for these areas. The
green-screen approach for live-action and special eff ects fi lming is the
one you’ll probably have heard of most. In this approach, a background
environment is shot separately to the actor’s action.
As an experiment to indicate the process of green-screen matting, I took a portrait image (left) with an
environment design (right) and proceeded to combine them using a green-screen version of the portrait
(center). (Source: DigiPen student art by D. Macdonald [portrait] and J. Ngyuen [environment].)
In conventional fi lmmaking, the actor is shot against a green-screen
background. Everything that is green in that layer can be digitally removed
when combined with the required background environment “ plate, ”
giving the illusion that the character was actually fi lmed within it in the
fi rst place.
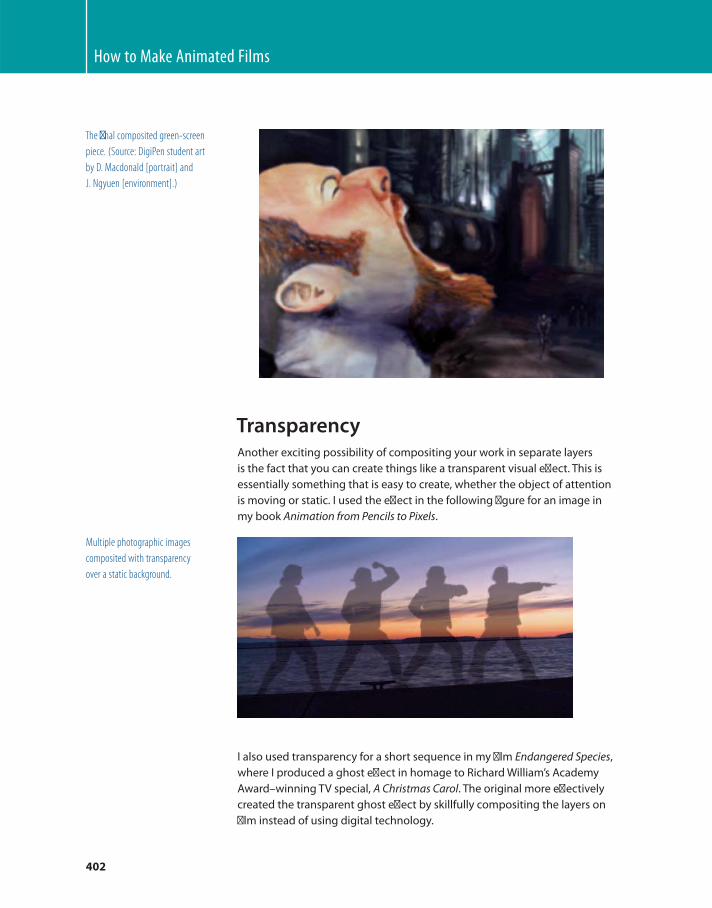
How to Make Animated Films
402
The fi nal composited green-screen
piece. (Source: DigiPen student art
by D. Macdonald [portrait] and
J. Ngyuen [environment].)
Transparency Another exciting possibility of compositing your work in separate layers
is the fact that you can create things like a transparent visual eff ect. This is
essentially something that is easy to create, whether the object of attention
is moving or static. I used the eff ect in the following fi gure for an image in
my book Animation from Pencils to Pixels .
Multiple photographic images
composited with transparency
over a static background.
I also used transparency for a short sequence in my fi lm Endangered Species ,
where I produced a ghost eff ect in homage to Richard William’s Academy
Award – winning TV special, A Christmas Carol . The original more eff ectively
created the transparent ghost eff ect by skillfully compositing the layers on
fi lm instead of using digital technology.
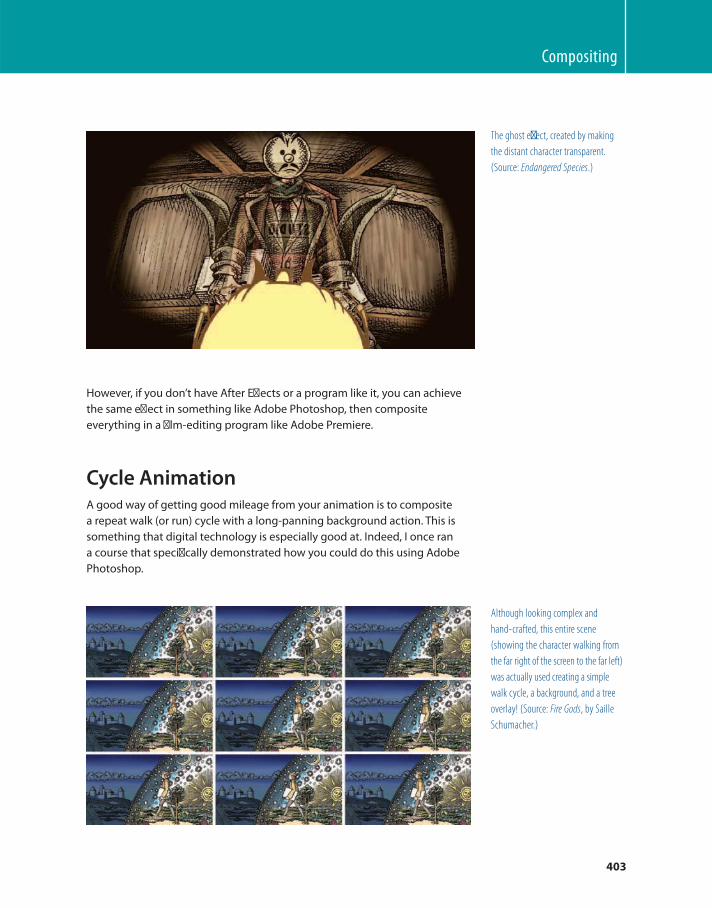
Compositing
403
Although looking complex and
hand-crafted, this entire scene
(showing the character walking from
the far right of the screen to the far left)
was actually used creating a simple
walk cycle, a background, and a tree
overlay! (Source: Fire Gods , by Saille
Schumacher.)
The ghost eff ect, created by making
the distant character transparent.
(Source: Endangered Species .)
However, if you don’t have After Eff ects or a program like it, you can achieve
the same eff ect in something like Adobe Photoshop, then composite
everything in a fi lm-editing program like Adobe Premiere.
Cycle Animation A good way of getting good mileage from your animation is to composite
a repeat walk (or run) cycle with a long-panning background action. This is
something that digital technology is especially good at. Indeed, I once ran
a course that specifi cally demonstrated how you could do this using Adobe
Photoshop.
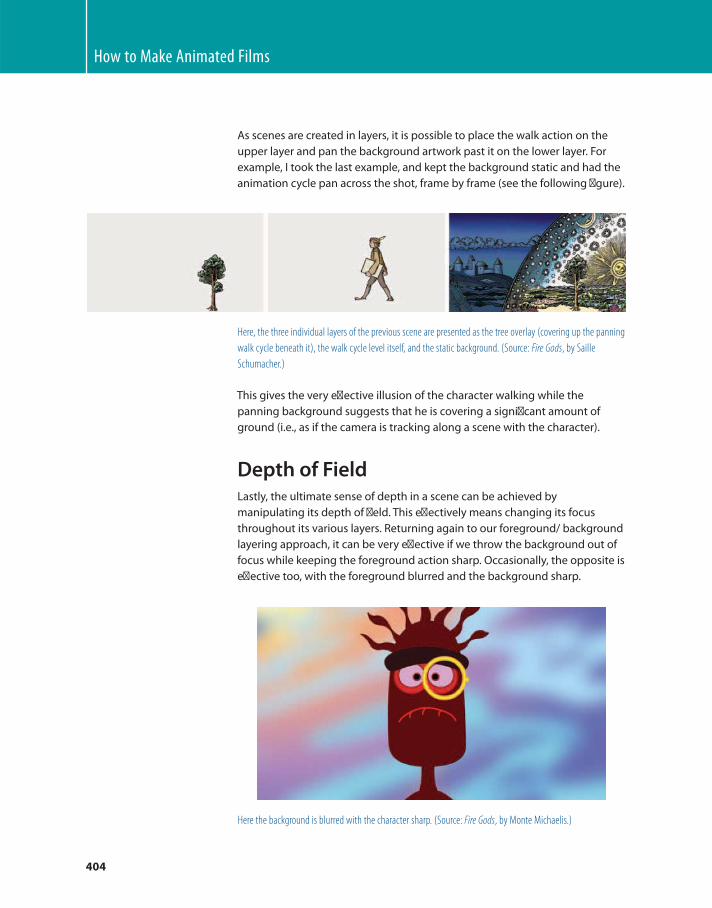
How to Make Animated Films
404
As scenes are created in layers, it is possible to place the walk action on the
upper layer and pan the background artwork past it on the lower layer. For
example, I took the last example, and kept the background static and had the
animation cycle pan across the shot, frame by frame (see the following fi gure).
Here, the three individual layers of the previous scene are presented as the tree overlay (covering up the panning
walk cycle beneath it), the walk cycle level itself, and the static background. (Source: Fire Gods , by Saille
Schumacher.)
Here the background is blurred with the character sharp. (Source: Fire Gods , by Monte Michaelis.)
This gives the very eff ective illusion of the character walking while the
panning background suggests that he is covering a signifi cant amount of
ground (i.e., as if the camera is tracking along a scene with the character).
Depth of Field Lastly, the ultimate sense of depth in a scene can be achieved by
manipulating its depth of fi eld. This eff ectively means changing its focus
throughout its various layers. Returning again to our foreground/ background
layering approach, it can be very eff ective if we throw the background out of
focus while keeping the foreground action sharp. Occasionally, the opposite is
eff ective too, with the foreground blurred and the background sharp.
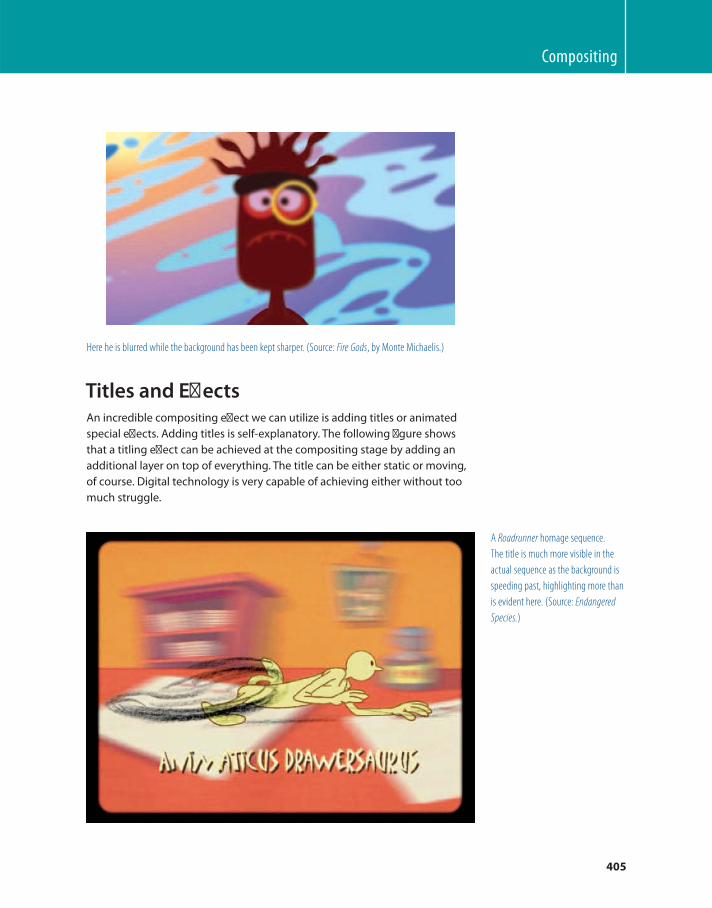
Compositing
405
Here he is blurred while the background has been kept sharper. (Source: Fire Gods , by Monte Michaelis.)
Titles and Eff ects An incredible compositing eff ect we can utilize is adding titles or animated
special eff ects. Adding titles is self-explanatory. The following fi gure shows
that a titling eff ect can be achieved at the compositing stage by adding an
additional layer on top of everything. The title can be either static or moving,
of course. Digital technology is very capable of achieving either without too
much struggle.
A Roadrunner homage sequence.
The title is much more visible in the
actual sequence as the background is
speeding past, highlighting more than
is evident here. (Source: Endangered Species. )

How to Make Animated Films
406
Assignment Create any animated eff ects or titles that you require for your fi lm and then
composite them together on layers. If you fi nd that the eff ects don’t work
in quite the same way that you envisaged, research other techniques and
approaches that might work better for you.
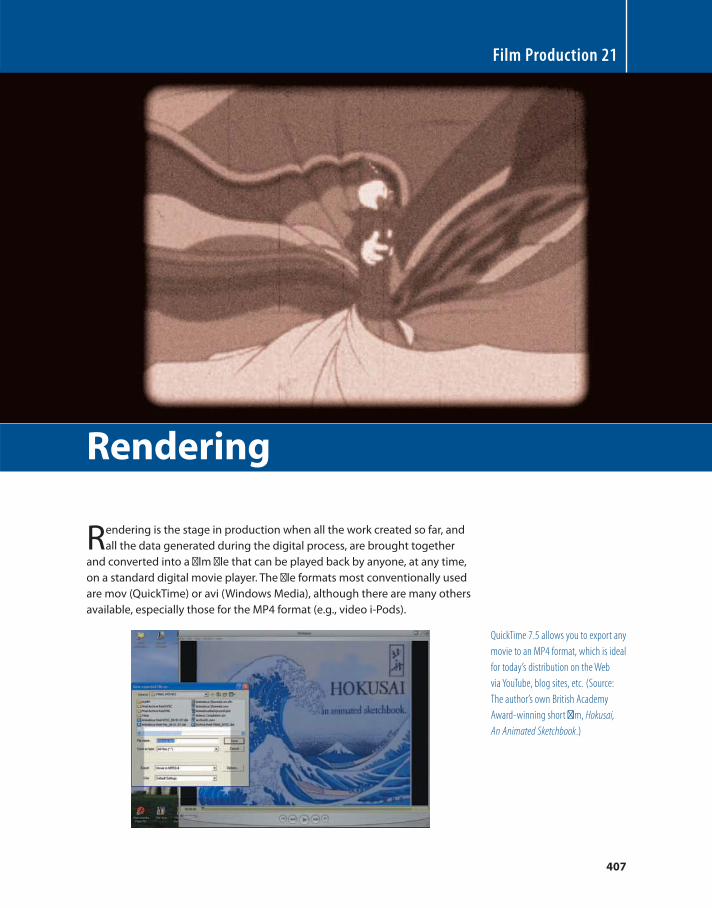
407
Rendering is the stage in production when all the work created so far, and
all the data generated during the digital process, are brought together
and converted into a fi lm fi le that can be played back by anyone, at any time,
on a standard digital movie player. The fi le formats most conventionally used
are mov (QuickTime) or avi (Windows Media), although there are many others
available, especially those for the MP4 format (e.g., video i-Pods).
Film Production 21
Rendering
QuickTime 7.5 allows you to export any
movie to an MP4 format, which is ideal
for today’s distribution on the Web
via YouTube, blog sites, etc. (Source:
The author ’ s own British Academy
Award-winning short fi lm, Hokusai, An Animated Sketchbook .)

How to Make Animated Films
408
Rendered movie fi les can be outputted in a number of diff erent shapes, sizes,
resolutions, and playing speeds. This means that before you even start animating
you really need to consider the size of the screen format you want to use, the
quality of image (i.e., resolution) you need to render, and the speed of frames per
second (fps) that the fi lm will run at when viewed by your target audience.
Screen Format Ratio The screen format ratio really has to be decided right up front, before you
even begin to put pencil to paper, or cursor to screen. The screen format ratio
is basically the shape of screen your fi lm will be seen on. For example, if it is
for a standard TV or computer monitor, you will need to work in an academy
screen format, which is essentially a 4:3 ratio. This means that for every four
units of measurement wide, your artwork should be three units high.
Today, the most common screen format size (outside of regular TV) is widescreen
(or 16 � 9 inches), which is a 1.85:1 format. This requires that for every 1.85 units
the work area is wide, it has to be 1 unit high. This widescreen format ratio is for
cinematic projection; for high-defi nition TV widescreen the format is 1.78:1.
Standard academy format.
Widescreen format.
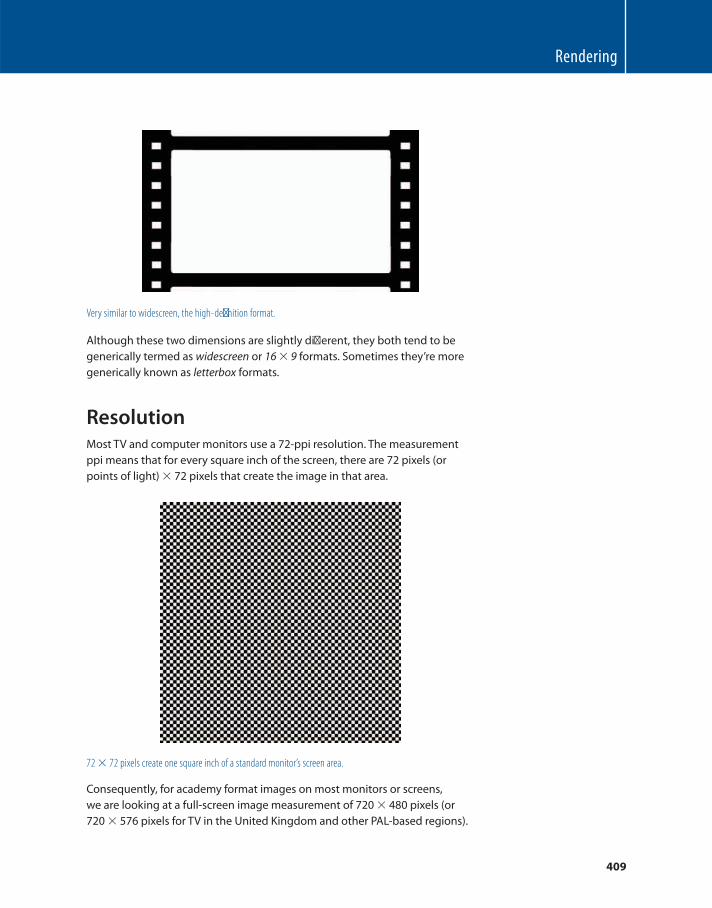
Rendering
409
Very similar to widescreen, the high-defi nition format.
Consequently, for academy format images on most monitors or screens,
we are looking at a full-screen image measurement of 720 � 480 pixels (or
720 � 576 pixels for TV in the United Kingdom and other PAL-based regions).
Although these two dimensions are slightly diff erent, they both tend to be
generically termed as widescreen or 16 � 9 formats. Sometimes they’re more
generically known as letterbox formats.
Resolution Most TV and computer monitors use a 72-ppi resolution. The measurement
ppi means that for every square inch of the screen, there are 72 pixels (or
points of light) � 72 pixels that create the image in that area.
72 � 72 pixels create one square inch of a standard monitor’s screen area.

How to Make Animated Films
410
High-defi nition screens, however, require a larger screen dimension. One of
the most standard is 1920 � 1080 pixels. Others can be used also, as long as
they conform to a basic 16 � 9 screen ratio.
Frame Rates When animating and rendering your fi lm, you should also become aware
of the fps projection rate required at the point of exhibition. As indicated
earlier in this book, the standard projection rate for fi lm is 24 fps. On TV in the
United States and other NTSC broadcast regions around the world, 24 fps or,
more usually, 30 fps is the requirement. In the United Kingdom and other PAL
broadcast regions of the world, the TV projection rate is 25 fps. Computers
run at 30 fps and video games at 60 fps (in this case, “ fi elds ” per second, which
is eff ectively the equivalent of 30 “ frames ” per second). Consequently, it is
essential to know the correct frame rate for your project before you start to
draw or create your animation, as well as when you render your fi nal movie
footage.
Assignment Render all your fi nal scenes at the correct screen ratio, resolution, and frame
rate for your fi lm’s target audience.
Note
You do not have to wait until the very end of your production to render all
your fi nal scenes. It is invariably normal practice to render each scene as
you fi nish it and safely store them all for when you complete your entire
fi nal render and edit.
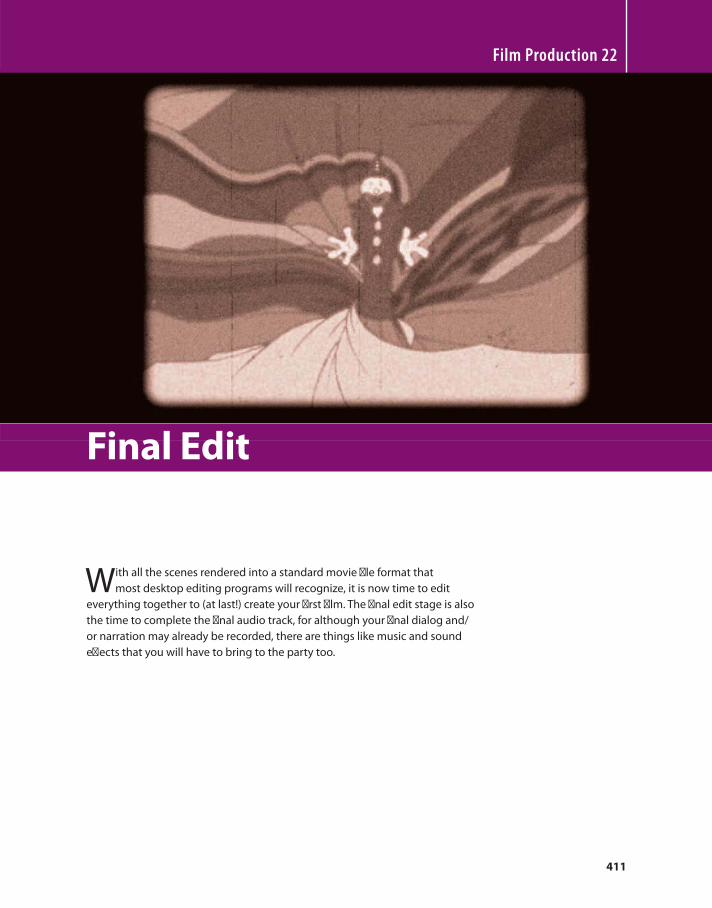
411
With all the scenes rendered into a standard movie fi le format that
most desktop editing programs will recognize, it is now time to edit
everything together to (at last!) create your fi rst fi lm. The fi nal edit stage is also
the time to complete the fi nal audio track, for although your fi nal dialog and/
or narration may already be recorded, there are things like music and sound
eff ects that you will have to bring to the party too.
Film Production 22
Final Edit
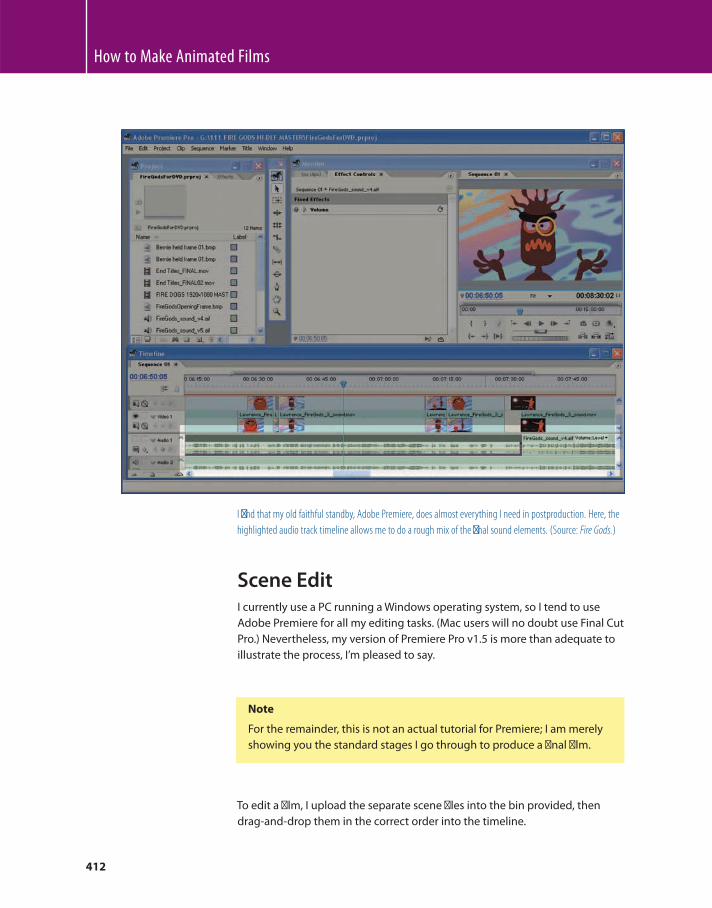
How to Make Animated Films
412
Scene Edit I currently use a PC running a Windows operating system, so I tend to use
Adobe Premiere for all my editing tasks. (Mac users will no doubt use Final Cut
Pro.) Nevertheless, my version of Premiere Pro v1.5 is more than adequate to
illustrate the process, I’m pleased to say.
Note
For the remainder, this is not an actual tutorial for Premiere; I am merely
showing you the standard stages I go through to produce a fi nal fi lm.
To edit a fi lm, I upload the separate scene fi les into the bin provided, then
drag-and-drop them in the correct order into the timeline.
I fi nd that my old faithful standby, Adobe Premiere, does almost everything I need in postproduction. Here, the
highlighted audio track timeline allows me to do a rough mix of the fi nal sound elements. (Source: Fire Gods .)
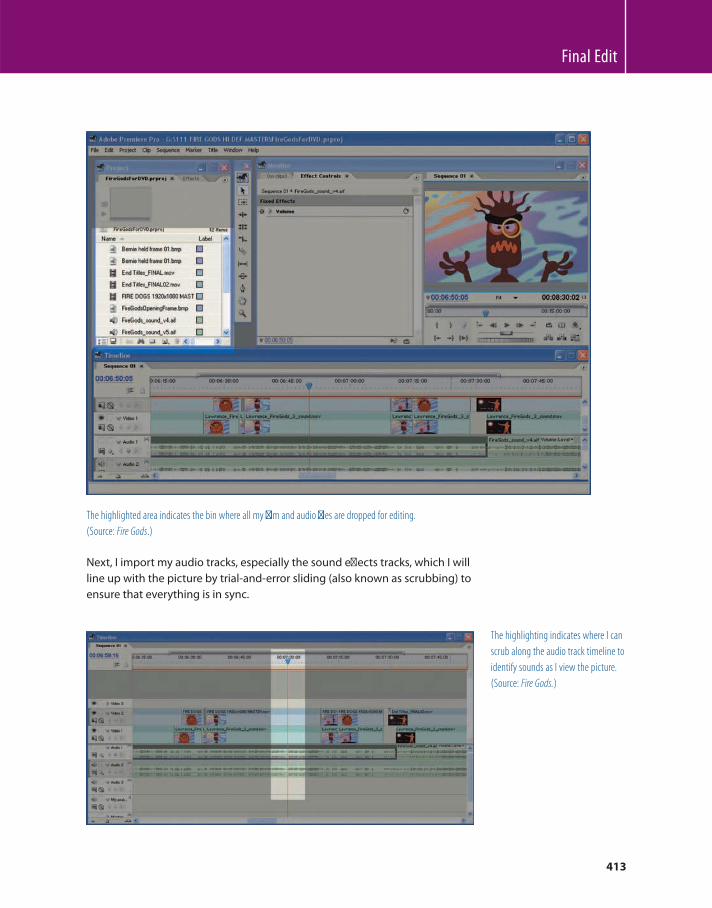
Final Edit
413
The highlighted area indicates the bin where all my fi lm and audio fi les are dropped for editing.
(Source: Fire Gods .)
Next, I import my audio tracks, especially the sound eff ects tracks, which I will
line up with the picture by trial-and-error sliding (also known as scrubbing) to
ensure that everything is in sync.
The highlighting indicates where I can
scrub along the audio track timeline to
identify sounds as I view the picture.
(Source: Fire Gods .)
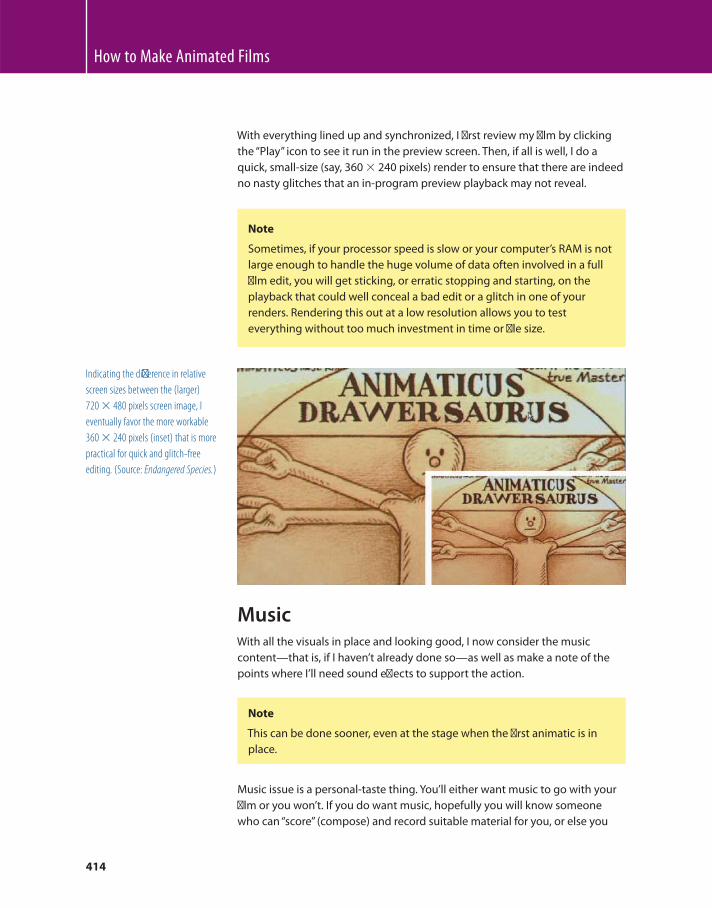
How to Make Animated Films
414
Indicating the diff erence in relative
screen sizes between the (larger)
720 � 480 pixels screen image, I
eventually favor the more workable
360 � 240 pixels (inset) that is more
practical for quick and glitch-free
editing. (Source: Endangered Species .)
Note
Sometimes, if your processor speed is slow or your computer’s RAM is not
large enough to handle the huge volume of data often involved in a full
fi lm edit, you will get sticking, or erratic stopping and starting, on the
playback that could well conceal a bad edit or a glitch in one of your
renders. Rendering this out at a low resolution allows you to test
everything without too much investment in time or fi le size.
With everything lined up and synchronized, I fi rst review my fi lm by clicking
the “ Play ” icon to see it run in the preview screen. Then, if all is well, I do a
quick, small-size (say, 360 � 240 pixels) render to ensure that there are indeed
no nasty glitches that an in-program preview playback may not reveal.
Music With all the visuals in place and looking good, I now consider the music
content — that is, if I haven’t already done so — as well as make a note of the
points where I’ll need sound eff ects to support the action.
Note
This can be done sooner, even at the stage when the fi rst animatic is in
place.
Music issue is a personal-taste thing. You’ll either want music to go with your
fi lm or you won’t. If you do want music, hopefully you will know someone
who can “ score ” (compose) and record suitable material for you, or else you
Final Edit
415
can fi nd a young professional or student fi lm composer who may want to
produce music for you (in exchange for fi lm credits or the opportunity to
compose for an animated fi lm). This way you shouldn’t need much fi nancial
investment to get your music created. Alternatively, you might even be
talented enough to do it yourself, or have a large enough budget to aff ord to
pay a professional to do it for you!
A good place to check out is Hummie Mann’s Pacifi c Northwest Film Scoring
Program in Seattle, WA. Mann is an accomplished professional fi lm composer
in his own right and his credits appear in a large number of mainstream
Hollywood movies. However, in 1997 he formed the fi rst-ever school for
would-be fi lm composers, the Pacifi c Northwest Film Scoring Program. Now,
years later and with many imitators following his lead, this is the premiere
school in the world of composition and scoring for fi lms, with many of his
students now professionally composing scores in Hollywood.
Respected Hollywood composer,
Hummie Mann.
The home page of the Pacifi c
Northwest Film Scoring Program’s
web site.
How to Make Animated Films
416
The really exciting thing for student animated fi lmmakers, however, is the
fact that if you have a completed fi lm, Mann will present it to his students
for their fi nal project selection. Actually, his students will consider a number
of competed fi lms for their fi nal project, but will choose just one that most
inspires them musically. With their fi lm selected, the students will then work
closely with the chosen fi lmmaker to create exactly the kind of score that
they want for their fi lm. The really big advantage of this though is the fact
that the entire fi nished score will be professionally recorded using a large and
accomplished local orchestra. The quality of work produced this way is quite
exceptional, and therefore, it is defi nitely a signifi cant consideration for all
student fi lmmakers working on their initial signature projects.
I used one of Mann’s graduate students, Jamie Hall, to compose the music
for my fi lm Endangered Species , which won a Gold Medal award at the Park
City Film Music Festival in 2007! Further information on Mann’s fi lm scoring/
recording opportunities can be found at www.pnwfi lmmusic.com/default.asp .
Jamie Hall’s home page at
www.jamiehall.net .
However, if you are not lucky enough to be able to take advantage of this, or
the services of an accomplished student or emerging professional composer,
you have the options of either having to pay the full price to get a professional
to produce the music commercially, use existing music and pay a performing
rights fee, or have no music accompaniment at all. That said, unless your fi lm has
a distinctly nonmusic capability, I strongly recommend that you somehow fi nd
Final Edit
417
a way of adding music to your fi lm; if it is well performed, it can elevate even the
most humble of animated material to the level of impressive — even higher!
Sound Eff ects In addition to music, you will also probably need to add sound eff ects (SFX)
to your fi lm to lift the quality of its audio content. For example, if a character
slams a door, you will almost certainly need to hear the sound of the door
slamming to make it convincing. If a character is running on a muddy surface,
you will probably need to hear that surface squelch every time the character’s
foot hits it.
There are two ways of acquiring sound eff ects for your audio track: getting
them ready-made from a sound eff ects library or recording them yourself.
Online sound eff ects libraries, such as www.sounddogs.com , have a vast supply
of sounds that you can listen to online and acquire, either free or for a slight
charge if you want them badly enough. With the latter, you at least don’t have
to step away from your computer to get what you want!
The SoundD ogs home page.
Alternatively, if you need sound eff ects that are entirely original and unique
to your fi lm, you will have to work harder to obtain them. These days a
reasonably good audio recorder is available for not too much cost (or else you
might fi nd someone who will lend you one for your recording purposes).
Most sounds can be created live. However, as you do so, you must always be
aware of the ambient sounds that are all around you threatening to spoil the
recording. For example, if you want a busy-street sound, it is very easy to point
a microphone toward your local main road and record the sounds direct. But,
How to Make Animated Films
418
if you want a clean sound of a car starting, but the only place you have to
record it is a busy road, you will curse the fact that you can hear the rest of the
busy-street ambient sounds that lurk in the background! Planes fl ying over an
otherwise quiet environment can be the cause of much more stress too!
Key sound eff ects are much better
recorded in a Foley studio. Here,
footsteps are being recorded in a
sound-proofed environment with an
assistant walking on gravel in a box!
Another example would be when you want to record the clink of a cup being
set down on a saucer. You will, of course, be better off recording it in a perfect
sound-free environment, such as a recording studio, than in a busy cafeteria
or living room. In any of these kinds of environment, the ambient sound will
always tend to drown or subvert the specifi c sound you are going for.
More Foley eff ects. This time the sound
of a crackling fi re is created by the
assistant ruffl ing a plastic bag fi lled
with dry leaves!
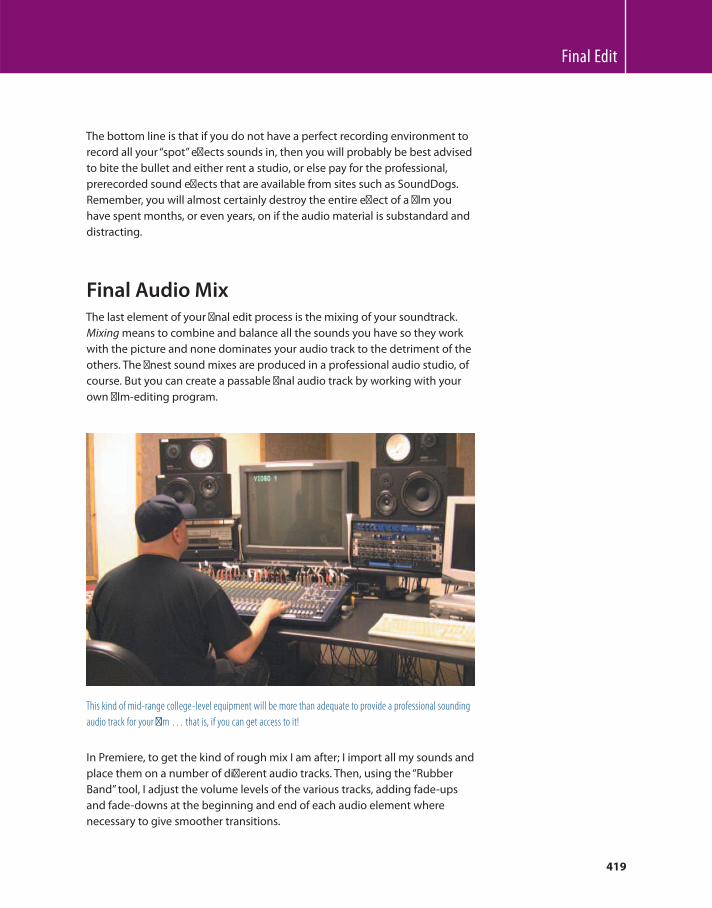
Final Edit
419
The bottom line is that if you do not have a perfect recording environment to
record all your “ spot ” eff ects sounds in, then you will probably be best advised
to bite the bullet and either rent a studio , or else pay for the professional,
prerecorded sound eff ects that are available from sites such as SoundDogs.
Remember, you will almost certainly destroy the entire eff ect of a fi lm you
have spent months, or even years, on if the audio material is substandard and
distracting.
Final Audio Mix The last element of your fi nal edit process is the mixing of your soundtrack.
Mixing means to combine and balance all the sounds you have so they work
with the picture and none dominates your audio track to the detriment of the
others. The fi nest sound mixes are produced in a professional audio studio, of
course. But you can create a passable fi nal audio track by working with your
own fi lm-editing program.
This kind of mid-range college-level equipment will be more than adequate to provide a professional sounding
audio track for your fi lm … that is, if you can get access to it!
In Premiere, to get the kind of rough mix I am after; I import all my sounds and
place them on a number of diff erent audio tracks. Then, using the “ Rubber
Band ” tool, I adjust the volume levels of the various tracks, adding fade-ups
and fade-downs at the beginning and end of each audio element where
necessary to give smoother transitions.
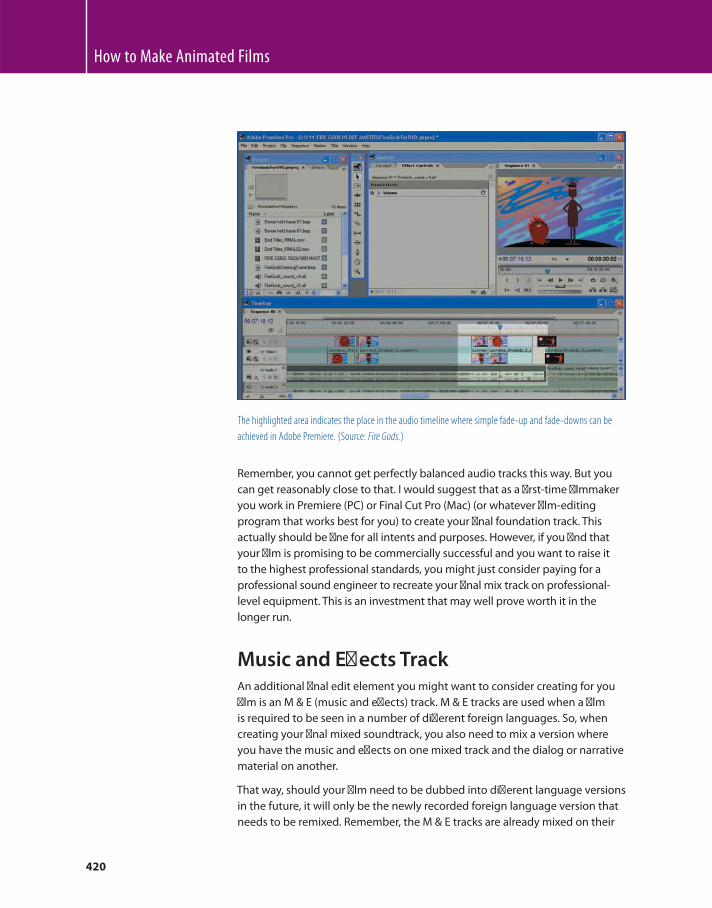
How to Make Animated Films
420
The highlighted area indicates the place in the audio timeline where simple fade-up and fade-downs can be
achieved in Adobe Premiere. (Source: Fire Gods .)
Remember, you cannot get perfectly balanced audio tracks this way. But you
can get reasonably close to that. I would suggest that as a fi rst-time fi lmmaker
you work in Premiere (PC) or Final Cut Pro (Mac) (or whatever fi lm-editing
program that works best for you) to create your fi nal foundation track. This
actually should be fi ne for all intents and purposes. However, if you fi nd that
your fi lm is promising to be commercially successful and you want to raise it
to the highest professional standards, you might just consider paying for a
professional sound engineer to recreate your fi nal mix track on professional-
level equipment. This is an investment that may well prove worth it in the
longer run.
Music and Eff ects Track An additional fi nal edit element you might want to consider creating for you
fi lm is an M & E (music and eff ects) track. M & E tracks are used when a fi lm
is required to be seen in a number of diff erent foreign languages. So, when
creating your fi nal mixed soundtrack, you also need to mix a version where
you have the music and eff ects on one mixed track and the dialog or narrative
material on another.
That way, should your fi lm need to be dubbed into diff erent language versions
in the future, it will only be the newly recorded foreign language version that
needs to be remixed. Remember, the M & E tracks are already mixed on their

Final Edit
421
own level, meaning that it is a comparatively easy job for an audio engineer to
blend the new foreign language material later, once it is available.
Assignment Edit all the fi nal scenes together. Create and mix all the audio elements as one
soundtrack too, and then render your fi nal (FINAL!) version of the fi lm.
Oh, and by the way, CONGRATULATIONS! You are now a proven animated
fi lmmaker in your own right! (So, watch out Pixar or Disney!)

This page intentionally left blank
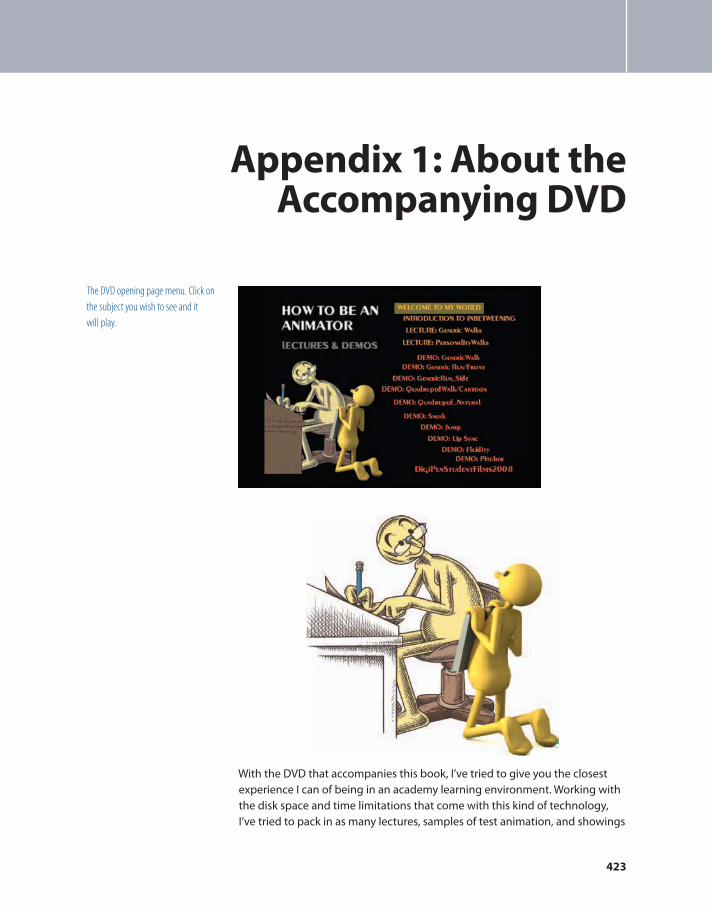
423
Appendix 1: About the Accompanying DVD
The DVD opening page menu. Click on
the subject you wish to see and it
will play.
With the DVD that accompanies this book, I’ve tried to give you the closest
experience I can of being in an academy learning environment. Working with
the disk space and time limitations that come with this kind of technology,
I’ve tried to pack in as many lectures, samples of test animation, and showings
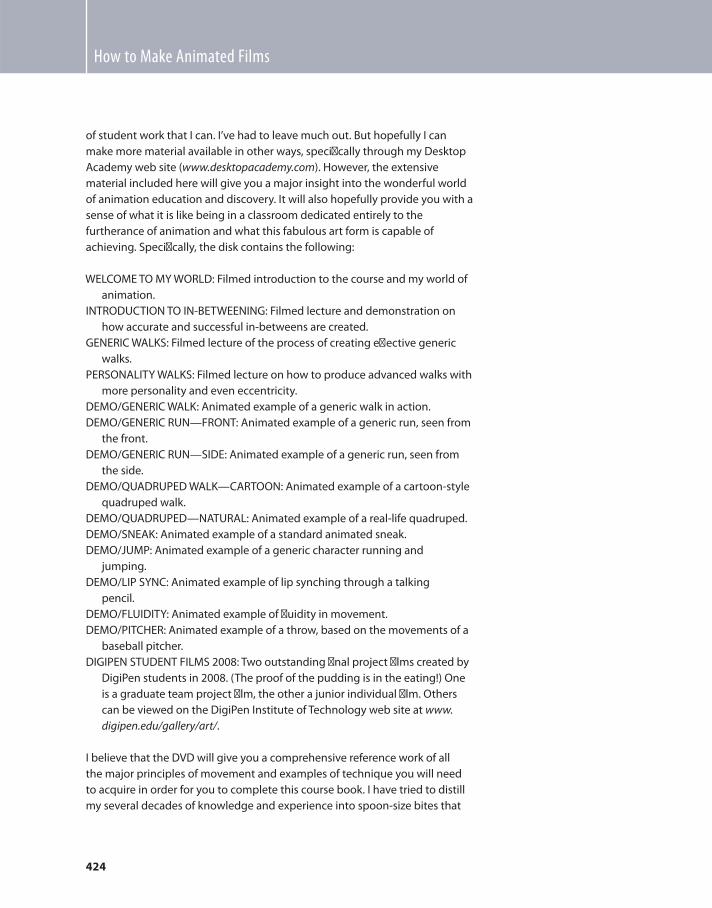
How to Make Animated Films
424
of student work that I can. I’ve had to leave much out. But hopefully I can
make more material available in other ways, specifi cally through my Desktop
Academy web site ( www.desktopacademy.com ). However, the extensive
material included here will give you a major insight into the wonderful world
of animation education and discovery. It will also hopefully provide you with a
sense of what it is like being in a classroom dedicated entirely to the
furtherance of animation and what this fabulous art form is capable of
achieving. Specifi cally, the disk contains the following:
WELCOME TO MY WORLD : Filmed introduction to the course and my world of
animation.
INTRODUCTION TO IN-BETWEENING: Filmed lecture and demonstration on
how accurate and successful in-betweens are created.
GENERIC WALKS: Filmed lecture of the process of creating eff ective generic
walks.
PERSONALITY WALKS: Filmed lecture on how to produce advanced walks with
more personality and even eccentricity.
DEMO/GENERIC WALK: Animated example of a generic walk in action.
DEMO/GENERIC RUN — FRONT: Animated example of a generic run, seen from
the front.
DEMO/GENERIC RUN — SIDE: Animated example of a generic run, seen from
the side.
DEMO/QUADRUPED WALK — CARTOON: Animated example of a cartoon-style
quadruped walk.
DEMO/QUADRUPED — NATURAL: Animated example of a real-life quadruped.
DEMO/SNEAK: Animated example of a standard animated sneak.
DEMO/JUMP: Animated example of a generic character running and
jumping.
DEMO/LIP SYNC: Animated example of lip synching through a talking
pencil.
DEMO/FLUIDITY: Animated example of fl uidity in movement.
DEMO/PITCHER: Animated example of a throw, based on the movements of a
baseball pitcher.
DIGIPEN STUDENT FILMS 2008: Two outstanding fi nal project fi lms created by
DigiPen students in 2008. (The proof of the pudding is in the eating!) One
is a graduate team project fi lm, the other a junior individual fi lm. Others
can be viewed on the DigiPen Institute of Technology web site at www.
digipen.edu/gallery/art/ .
I believe that the DVD will give you a comprehensive reference work of all
the major principles of movement and examples of technique you will need
to acquire in order for you to complete this course book. I have tried to distill
my several decades of knowledge and experience into spoon-size bites that

425
Appendix 1: About the Accompanying DVD
should enable you to better digest your studies more eff ectively. You may
proceed further through the additional material and opportunities I will
continue to add to my Desktop Academy web site. However, I can assure you
that everything within the covers of this book and on the DVD will be more
than suffi cient to make you an animator in your own right. If only I could
be cloned and included with each book too, then you’d have my personal
feedback on your work at your disposal as well!

This page intentionally left blank
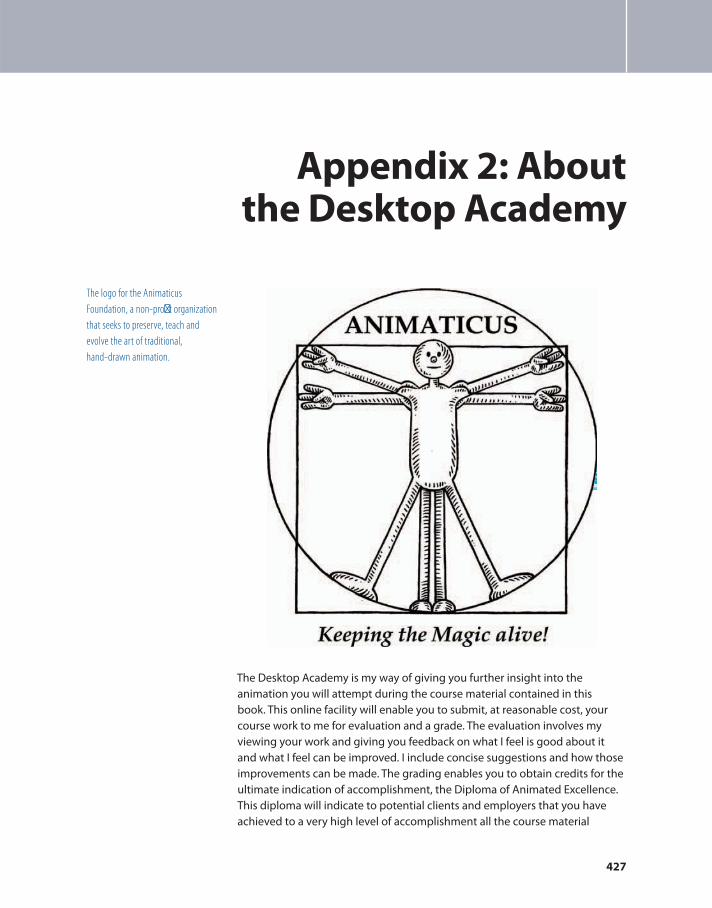
427
Appendix 2: About the Desktop Academy
The logo for the Animaticus
Foundation, a non-profi t organization
that seeks to preserve, teach and
evolve the art of traditional,
hand-drawn animation.
The Desktop Academy is my way of giving you further insight into the
animation you will attempt during the course material contained in this
book. This online facility will enable you to submit, at reasonable cost, your
course work to me for evaluation and a grade. The evaluation involves my
viewing your work and giving you feedback on what I feel is good about it
and what I feel can be improved. I include concise suggestions and how those
improvements can be made. The grading enables you to obtain credits for the
ultimate indication of accomplishment, the Diploma of Animated Excellence.
This diploma will indicate to potential clients and employers that you have
achieved to a very high level of accomplishment all the course material

How to Make Animated Films
428
contained in Part 1 of this book, which is no easy accomplishment,
I can assure you.
Further details on the diploma and other animation opportunities can be
found on the Academy’s web site at www.desktopacademy.com .
Note
The main focus of the Desktop Academy is to advance the skills of
traditional 2D animation in this digital age. However, student animators
of all styles and persuasions can enter the Academy’s Diploma course,
focusing on the animation format of their choice. ‘2D’, ‘3D’, ‘Claymation’,
‘Cut-out’ and animators of other persuasions can also submit their work
not related to this course work for criticism and review in exchange for a
small fee.
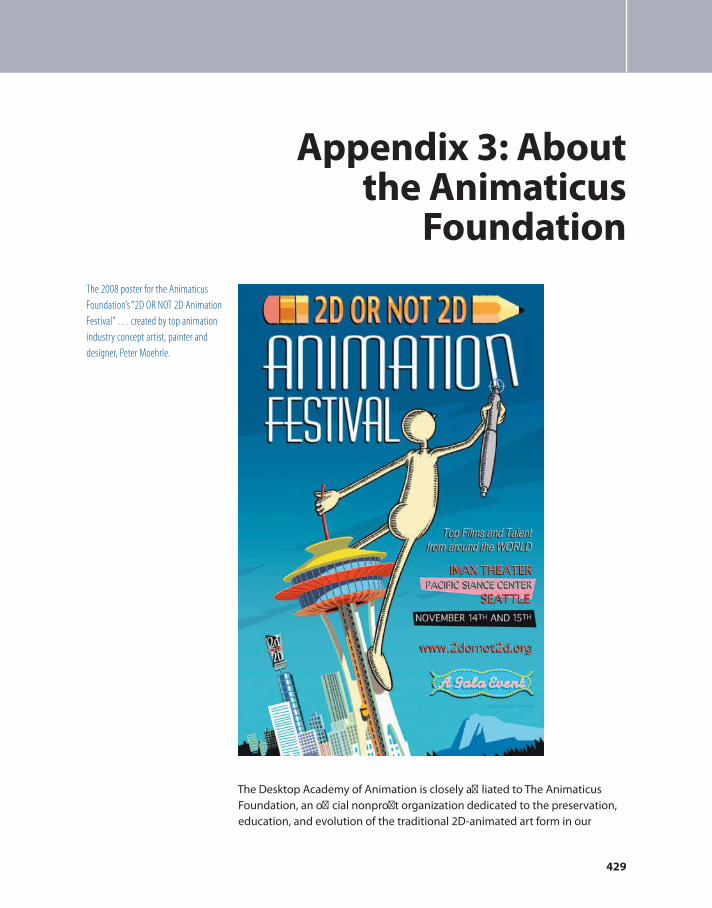
429
Appendix 3: About the Animaticus
Foundation
The 2008 poster for the Animaticus
Foundation ’ s “ 2D OR NOT 2D Animation
Festival ” … created by top animation
industry concept artist, painter and
designer, Peter Moehrle.
The Desktop Academy of Animation is closely affi liated to The Animaticus
Foundation, an offi cial nonprofi t organization dedicated to the preservation,
education, and evolution of the traditional 2D-animated art form in our
How to Make Animated Films
430
digital age. The Animaticus Foundation is host to the annual 2D Or Not
2D Animation Festival, in addition to developing and ultimately producing
ground-breaking animated fi lms and allied productions. With suffi cient
funding, talented students will be partnered with established industry
professionals to create a unique apprenticeship through projects that
explore new ideas and expression of the animated art form.
Further details about The Animaticus Foundation can be found on the
organization’s web site at www.animaticus.com .

431
Appendix 4 : About the DigiPen Institute
of Technology
One of the principal supporters
of the work of the Animaticus
Foundation is DigiPen Institute of
Technology!
When I was asked to be the Program Director and Dean of Fine Art and
Animation at the DigiPen Institute of Technology in Redmond, WA,
in 2008, I was extremely proud. I had long heard of the school’s fast-growing
and award-winning reputation in terms of programming and science,
but when I joined the faculty of the art department in 2005, the new
Bachelor of Fine Arts in Production Animation program was in its infancy.
I was, however, immediately impressed by the philosophy of the owner
of the school, the truly remarkable Mr. Claude Comair, and of its principle
executives, particularly Raymond Yan, chief executive of DigiPen. Even
though the school was set in the heart of the digital revolution — indeed,
the heart of the games industry to be more specifi c — this was a learning
institution that was committed to producing artists fi rst, then digital
maestros second. This eff ectively means that students at DigiPen spend the
fi rst one to two years of their four-year animation experience intensively
studying the classic principles of art — drawing, painting, color theory,
perspective, composition, and anatomy (human and animal) — before they
are even given access to a computer for anything other than logging in to
check their class grades! In addition to their formal classes in all these things,
students are required to keep up an additional sketchbook of drawing,
presenting a minimum of 50 pages per week. This encouragement to
keep up their classic art skills is encouraged throughout the program, up
How to Make Animated Films
432
until graduation, as the value of this is undeniable, both academically and
professionally.
As soon as I began to become a part of this program (by teaching traditional
principles of movement through 2D hand-drawn animation to the freshman
classes), I was overwhelmed by the quality of artists that were being produced
through this program. At the time the school had not graduated anyone
in the BFA program, and so all I could do was rave about the program to
outsiders without actually having any of the fi nal material to show. However,
in 2008, the school saw its fi rst graduates in the spring, and the work I can
now show is quite remarkable. Some of this masterly senior work, and much
of the remaining school work from freshmen to juniors, is evidenced by a
large proportion of the material contained in this book. I think each of these
pictures truly does speak a thousand words!
I have no hesitation in saying that I believe that the current program at
DigiPen is the best animation program in the country, or will very quickly
establish that status if the current evolution of teaching practices
consolidates and evolves. A quick examination of the school’s web site at
www.digipen.edu will detail the school’s various programs and the BFA in
Production Animation program in particular … in addition to science, game
design and programming. The art department gallery page will
more than confi rm what I have said about the quality of the student’s
animation work. Already the industry is becoming acutely aware of the
phenomenon that is DigiPen with many of the current senior students
interning at such signifi cant games studios as Arena Net, Bungie, and
Microsoft. Our fi rst-time 2008 graduates are already employed full time at
many of the major games companies in the Pacifi c Northwest, and other
students have begun to spread further, with one student snapped up by
Rhythm & Hues in Hollywood.
DigiPen pioneers the way that all great animators should be taught, and
I believe its eventual infl uence in the animation industry around the world
will ultimately be signifi cant. Students of DigiPen are not only prepared
extensively for obtaining a job in the industry when they graduate but are
additionally expected to be major “ movers and shakers ” within the industry
when their imprint intensifi es. We expect nothing less of
a DigiPen graduate.
All this is why I am particularly proud of being the Program Director and
Dean of Fine Art and Animation at DigiPen. I am proud, too, of working
with so many amazing faculty members, each of whom is truly outstanding
professional in their own right (and thereby undermining the myth that
“ those who can’t … teach ” )! Together, I hope we are currently preparing a new

Appendix 4: About the DigiPen Institute of Technology
433
generation of artists and animators whose work, in their own way and in their
own time, will ultimately rival the wonderful achievements of Disney, Warner
Brothers, and Pixar. This particular book-based course in traditionally based
animation is very closely allied to the 2D and project programs that from just
a small part of the full DigiPen BFA program in production animation!

This page intentionally left blank
435
Appendix 5: Exposure, Exhibitions,
and Festivals
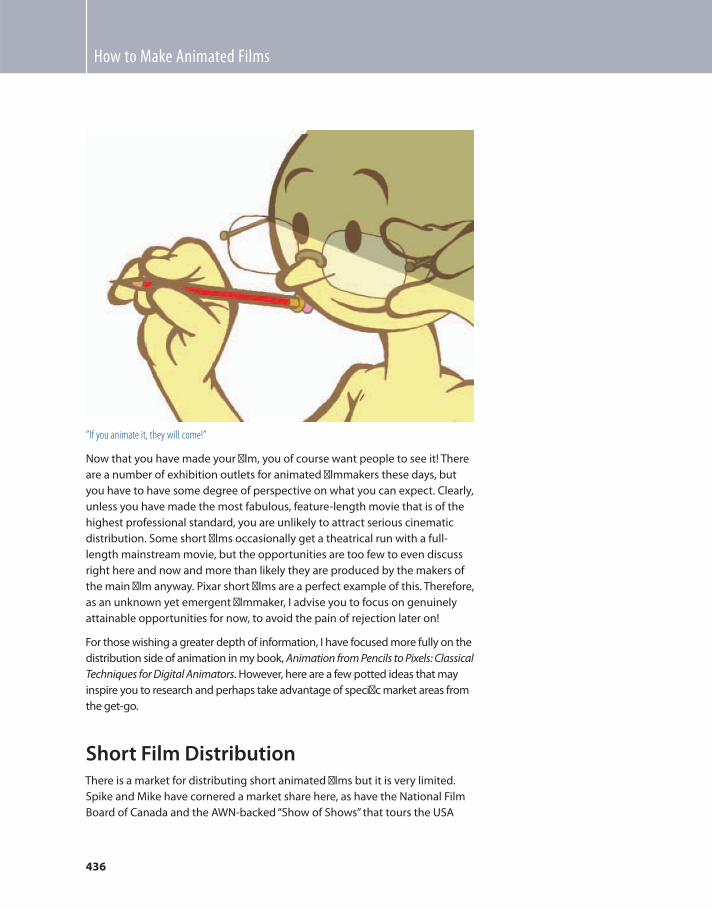
How to Make Animated Films
436
” If you animate it, they will come! ”
Now that you have made your fi lm, you of course want people to see it! There
are a number of exhibition outlets for animated fi lmmakers these days, but
you have to have some degree of perspective on what you can expect. Clearly,
unless you have made the most fabulous, feature-length movie that is of the
highest professional standard, you are unlikely to attract serious cinematic
distribution. Some short fi lms occasionally get a theatrical run with a full-
length mainstream movie, but the opportunities are too few to even discuss
right here and now and more than likely they are produced by the makers of
the main fi lm anyway. Pixar short fi lms are a perfect example of this. Therefore,
as an unknown yet emergent fi lmmaker, I advise you to focus on genuinely
attainable opportunities for now, to avoid the pain of rejection later on!
For those wishing a greater depth of information, I have focused more fully on the
distribution side of animation in my book, Animation from Pencils to Pixels: Classical
Techniques for Digital Animators . However, here are a few potted ideas that may
inspire you to research and perhaps take advantage of specifi c market areas from
the get-go.
Short Film Distribution There is a market for distributing short animated fi lms but it is very limited.
Spike and Mike have cornered a market share here, as have the National Film
Board of Canada and the AWN-backed “ Show of Shows ” that tours the USA
Appendix 5: Exposure, Exhibitions, and Festivals
437
each year to bring the best of animated short fi lm production to an eager
public. That said, it is reasonable to suggest that you may have trouble fi nding
a distributor for your fi lm if it has a running time of something around
20 minutes or less. Nevertheless, it would not hurt for you to investigate
possible short-fi lm distributors via the Web, and then see if there is any
interest with them for what you intend to off er. Currently, there are a whole
number of sites that will screen your fi lm and may even off er you a small fee
for every time it is seen!
Television Unless your fi lm is about 26 minutes long (i.e., a TV half-hour “ special ” length),
there is also little potential for you to exhibit your fi lm in the mainstream. The
best chance you have if your fi lm is really short is to fi nd a slot with a more
established program that allows for these kinds of short fi lms to be featured.
(For example, “ The Simpsons ” phenomenon started as a small animated insert
in “ The Tracy Ultiman Show ” !) Alternatively, some lesser-known cable stations
might possibly show programs that only broadcast animated short fi lms in
the fi rst place, or else they may have “ fi ller ” spots between their programs that
your fi lm might fi t into. The reality is that only half-hour TV specials, TV movie-
length productions, or long-running 26–minute animated series productions
are likely to bring a rewarding opportunity, and a smile of satisfaction on the
face of the animated fi lmmaker!
DVD Sales and Distribution The best chance of getting your fi lm out to the public, and perhaps make
a little money at the same time, is by releasing or distributing your fi lm on
a self-published DVD. That said, if your fi lm is much less than 30 minutes,
there is realistically little chance of you selling a DVD version of your fi lm
in great numbers, unless it is a top-draw, award-winning production with
an international appeal. You could include it with a larger, animated fi lm
compilation release, where you and other fi lmmakers could each donate
a fi lm to the common cause and share the spoils if it happens to take off later.
Alternatively, if your fi lm is good enough and has appeal to a larger audience,
then perhaps if you added bonus features, such as a live-action “ making of ”
documentary and an interactive “ library ” of the fi lm’s artwork, it might
generate enough interest or value-for-the-money appeal to get enough
people to buy your product.
I-Pods, PDAs, Cell Phones, and the Web
How to Make Animated Films
438
Today, there is defi nite mileage in downloadable entities (such as short
animated fi lms) for owners of I-Pods, cell phones, and similar kinds of PDA
devices. Everyone these days seems keen to download material from the Web
that they can carry around with them and watch in their quieter moments. So
your fi lm might just fi ll that bill for them if it is of suffi cient unique interest. You
would have to initiate this process, however, by setting up your own custom-
made web site, where visitors can preview a clip from your fi lm, purchase it
with a credit card, and immediately download it to their various PDA devices
via your computer. This is a costly process, of course. But if you are creating a
product that the public really likes, it could well be an insightful investment to
make on your part.
Festivals The really best way of getting exposure for your short fi lm is by entering it
into the numerous festivals that can be found around the world. There are a
whole new generation of exciting festivals for animated fi lms, in addition to
the evergreen classics such as Annecy, Ottawa, and Zagreb. My own 2D Or Not
2D Animation Festival attracted over 30 fi lms in 2006, its inaugural year, and
then over 65 in 2007. This number of entries went even higher in 2008. Most
of these fi lms were clearly worthy of exhibition, and so we were able to screen
the vast majority of them to an enthusiastic public. On top of this, our Golden
Pencil awards gave eight animated fi lmmakers increasing status, meaning
their fi lms now have a higher profi le and pedigree attached to them when
they are seeking further exposure through television, DVD, the Web, and the
other distribution avenues available. Multiply these eight by all those in the
other animation festivals out there, and you’ll soon see how attractive festivals
are to fi lmmakers in terms of exposure and word-of-mouth reputation.
Additionally, many festivals off er a marketing option, where fi lmmakers can
sell copies of their fi lms to the general public through just giving a small
percentage of the sales to the festival organizers, who have given the fi lms the
chance of exposure and sales opportunity.
Consequently, for all kinds of fi lmmakers who wish to seek this kind of
exposure through fi lm festivals and fi lm festival awards, I highly recommend
Withoutabox ( www.withoutabox.com ) for providing fi lmmakers with a unique
and incredible service. By opening a free annual fi lmmaker account with
Withoutabox, you give yourself instant access to the majority of fi lm festivals
around the world throughout the entire year. Upon joining, you upload all
your production information to your account, including “ press packs ” and
other similar promotional material. Then, by simply clicking on a “ submission ”
link for every festival you wish to enter, your information is automatically sent
to that festival, confi rming your entry. Then, once you have paid your entry
fee via the Withoutabox web site at the same time, you simply have to mail
439
1 Source: From White, T. Animation from Pencils to Pixels: Classical Techniques for Digital
Animators. Boston: Focal Press, 2006, pp. 349 – 359. Reprinted by kind permission of Focal
Press.
Appendix 6: Exposure Sheets and
Production Folders 1
Exposure (Dope) Sheets and Production Folders Although the digital age of animation has well and truly arrived and the
traditional processes are pretty much long gone now, except, of course, the
importance of pencils and paper, I still fi nd two elements of the past worth
clinging to: dope sheets (known as exposure sheets or x-sheets in some
quarters) and production folders. It is a popular belief that animators just sit
and draw funny cartoons all day long. Well, of course, animation is a lot of
that, but it is so much more about time and project management too. A good
animator needs a good organized mind as well as an ability to draw. Now
that animation scenes can run at a variety of diff erent fi lm speeds, through a
variety of diff erent screen formats, and using an infi nite number of action and
special eff ects layers in the digital environment, it is so necessary to have your
thinking processes working well and consistently. Contemporary animation
is now, at its core, an art, a science, and a business management operation all
rolled into one!
There are other practical information elements that have to be implemented
too. For example, every drawing, layout, and background have to have specifi c
information added so they are not lost or misplaced, creating potential chaos
to the production. The necessary information required in these cases would
be the sequence, scene, and drawing numbers if it is a series of animation
drawings or a layout (with each key also containing the required in-between
chart); the sequence, scene, and background numbers, if it is a background;
then all this, plus much more, if it is a production folder! Animation paperwork
can be scary or tedious when you fi rst see it, but, once explained, dope sheets
and production folders can actually become your best friends!
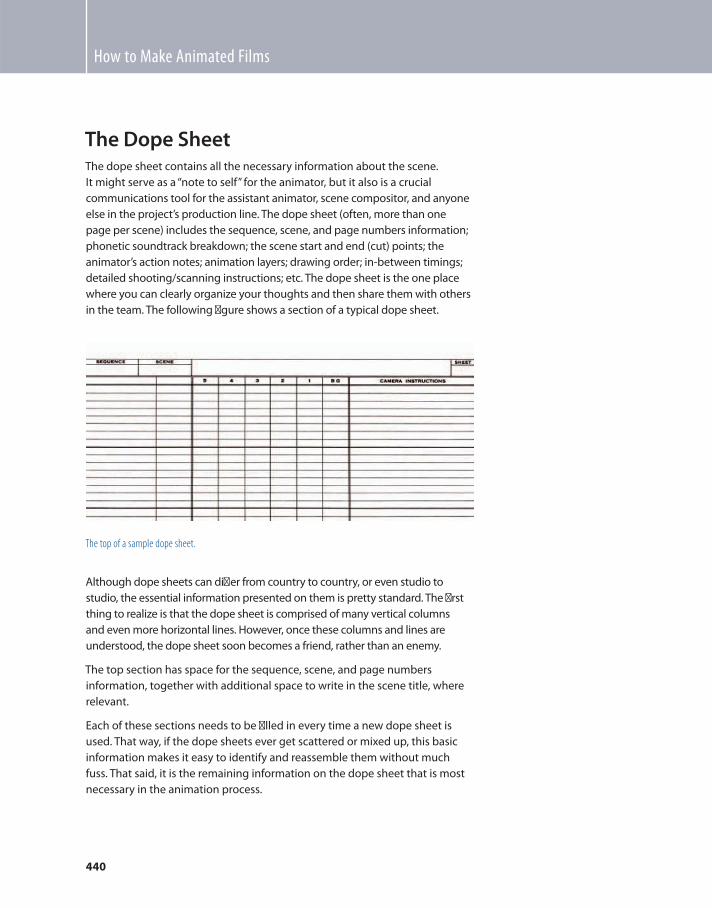
How to Make Animated Films
440
The Dope Sheet The dope sheet contains all the necessary information about the scene.
It might serve as a “ note to self ” for the animator, but it also is a crucial
communications tool for the assistant animator, scene compositor, and anyone
else in the project’s production line. The dope sheet (often, more than one
page per scene) includes the sequence, scene, and page numbers information;
phonetic soundtrack breakdown; the scene start and end (cut) points; the
animator’s action notes; animation layers; drawing order; in-between timings;
detailed shooting/scanning instructions; etc. The dope sheet is the one place
where you can clearly organize your thoughts and then share them with others
in the team. The following fi gure shows a section of a typical dope sheet.
The top of a sample dope sheet.
Although dope sheets can diff er from country to country, or even studio to
studio, the essential information presented on them is pretty standard. The fi rst
thing to realize is that the dope sheet is comprised of many vertical columns
and even more horizontal lines. However, once these columns and lines are
understood, the dope sheet soon becomes a friend, rather than an enemy.
The top section has space for the sequence, scene, and page numbers
information, together with additional space to write in the scene title, where
relevant.
Each of these sections needs to be fi lled in every time a new dope sheet is
used. That way, if the dope sheets ever get scattered or mixed up, this basic
information makes it easy to identify and reassemble them without much
fuss. That said, it is the remaining information on the dope sheet that is most
necessary in the animation process.
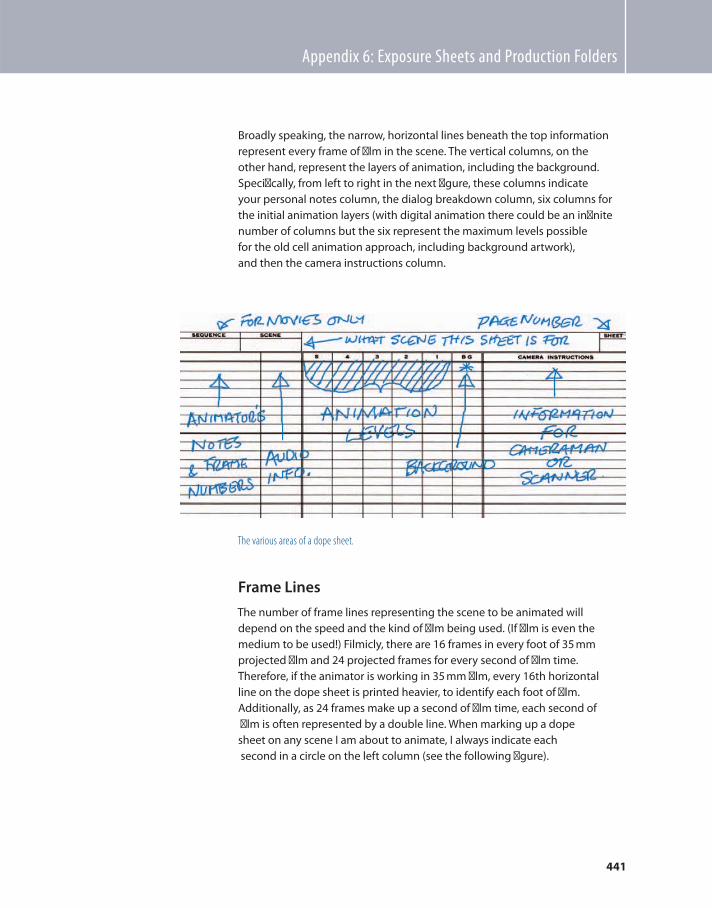
Appendix 6: Exposure Sheets and Production Folders
441
Broadly speaking, the narrow, horizontal lines beneath the top information
represent every frame of fi lm in the scene. The vertical columns, on the
other hand, represent the layers of animation, including the background.
Specifi cally, from left to right in the next fi gure, these columns indicate
your personal notes column, the dialog breakdown column, six columns for
the initial animation layers (with digital animation there could be an infi nite
number of columns but the six represent the maximum levels possible
for the old cell animation approach, including background artwork),
and then the camera instructions column.
The various areas of a dope sheet.
Frame Lines
The number of frame lines representing the scene to be animated will
depend on the speed and the kind of fi lm being used. (If fi lm is even the
medium to be used!) Filmicly, there are 16 frames in every foot of 35 mm
projected fi lm and 24 projected frames for every second of fi lm time.
Therefore, if the animator is working in 35 mm fi lm, every 16th horizontal
line on the dope sheet is printed heavier, to identify each foot of fi lm.
Additionally, as 24 frames make up a second of fi lm time, each second of
fi lm is often represented by a double line. When marking up a dope
sheet on any scene I am about to animate, I always indicate each
second in a circle on the left column (see the following fi gure).

How to Make Animated Films
442
How I mark each second of fi lm on a dope sheet.
Note
You’ll need to modify the number of frame lines if you are working in any other
fi lm format or a digital environment. Most digital software defaults to 29.97
fps (frames per second) but should be taken as 30 fps for convenience sake.
Remember, too, that whereas U.S. (NTSC format) TV can broadcast fi lms
that are produced on both 30 fps and 24 fps, the U.K. (PAL format) TV
broadcasts at 25 fps, which means these traditional 35 mm dope sheet
markings cannot be applied so easily. Flash animation for the Web can
be set to playback at any fps rate required, but the standard is 12 fps. So,
as long as you remember the diff erences in all these formats and tailor
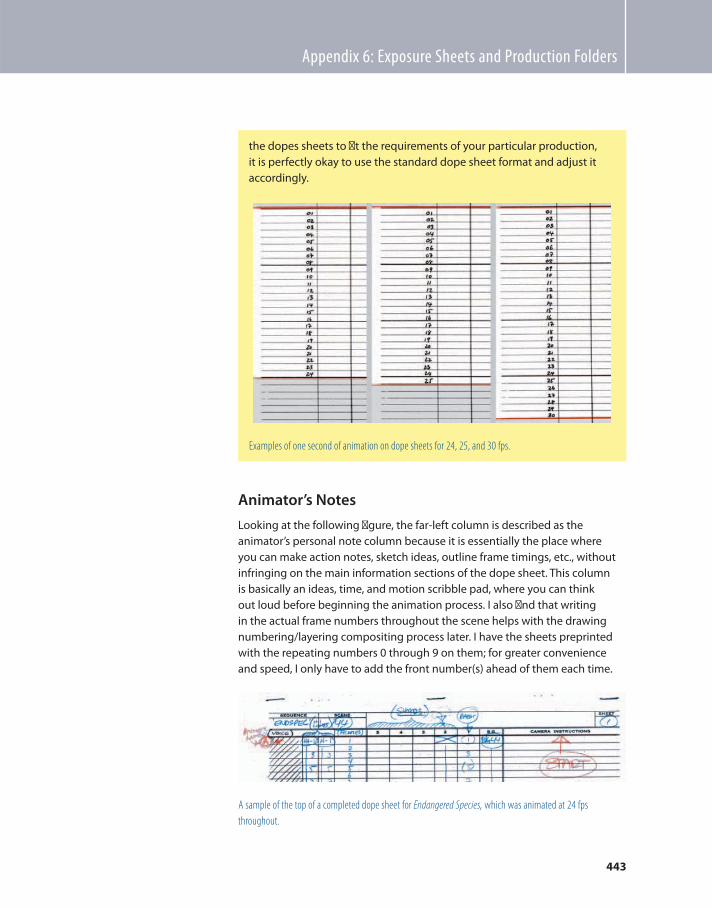
Appendix 6: Exposure Sheets and Production Folders
443
the dopes sheets to fi t the requirements of your particular production,
it is perfectly okay to use the standard dope sheet format and adjust it
accordingly.
Examples of one second of animation on dope sheets for 24, 25, and 30 fps.
Animator’s Notes
Looking at the following fi gure, the far-left column is described as the
animator’s personal note column because it is essentially the place where
you can make action notes, sketch ideas, outline frame timings, etc., without
infringing on the main information sections of the dope sheet. This column
is basically an ideas, time, and motion scribble pad, where you can think
out loud before beginning the animation process. I also fi nd that writing
in the actual frame numbers throughout the scene helps with the drawing
numbering/layering compositing process later. I have the sheets preprinted
with the repeating numbers 0 through 9 on them; for greater convenience
and speed, I only have to add the front number(s) ahead of them each time.
A sample of the top of a completed dope sheet for Endangered Species , which was animated at 24 fps
throughout.
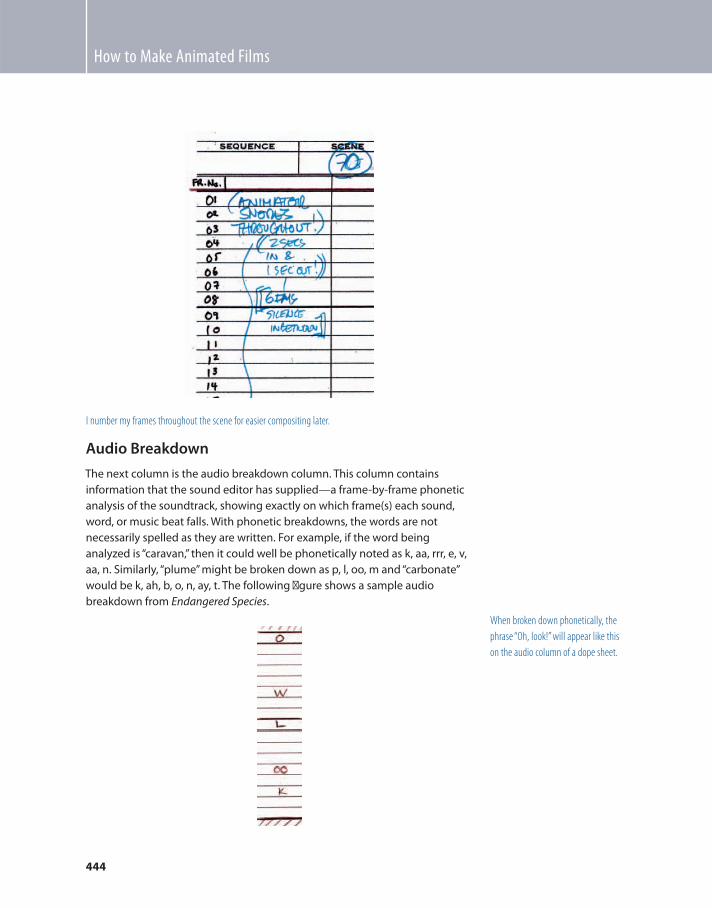
How to Make Animated Films
444
I number my frames throughout the scene for easier compositing later.
Audio Breakdown
The next column is the audio breakdown column. This column contains
information that the sound editor has supplied — a frame-by-frame phonetic
analysis of the soundtrack, showing exactly on which frame(s) each sound,
word, or music beat falls. With phonetic breakdowns, the words are not
necessarily spelled as they are written. For example, if the word being
analyzed is “ caravan, ” then it could well be phonetically noted as k, aa, rrr, e, v,
aa, n. Similarly, “ plume ” might be broken down as p, l, oo, m and “ carbonate ”
would be k, ah, b, o, n, ay, t. The following fi gure shows a sample audio
breakdown from Endangered Species .
When broken down phonetically, the
phrase “ Oh, look! ” will appear like this
on the audio column of a dope sheet.
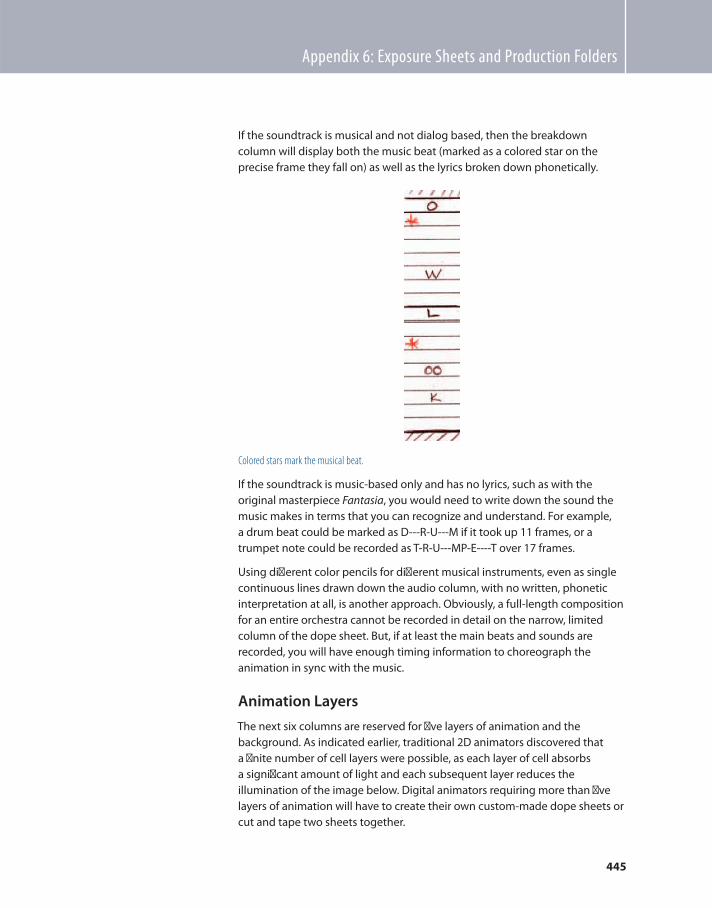
Appendix 6: Exposure Sheets and Production Folders
445
If the soundtrack is musical and not dialog based, then the breakdown
column will display both the music beat (marked as a colored star on the
precise frame they fall on) as well as the lyrics broken down phonetically.
Colored stars mark the musical beat.
If the soundtrack is music-based only and has no lyrics, such as with the
original masterpiece Fantasia , you would need to write down the sound the
music makes in terms that you can recognize and understand. For example,
a drum beat could be marked as D---R-U---M if it took up 11 frames, or a
trumpet note could be recorded as T-R-U---MP-E----T over 17 frames.
Using diff erent color pencils for diff erent musical instruments, even as single
continuous lines drawn down the audio column, with no written, phonetic
interpretation at all, is another approach. Obviously, a full-length composition
for an entire orchestra cannot be recorded in detail on the narrow, limited
column of the dope sheet. But, if at least the main beats and sounds are
recorded, you will have enough timing information to choreograph the
animation in sync with the music.
Animation Layers
The next six columns are reserved for fi ve layers of animation and the
background. As indicated earlier, traditional 2D animators discovered that
a fi nite number of cell layers were possible, as each layer of cell absorbs
a signifi cant amount of light and each subsequent layer reduces the
illumination of the image below. Digital animators requiring more than fi ve
layers of animation will have to create their own custom-made dope sheets or
cut and tape two sheets together.
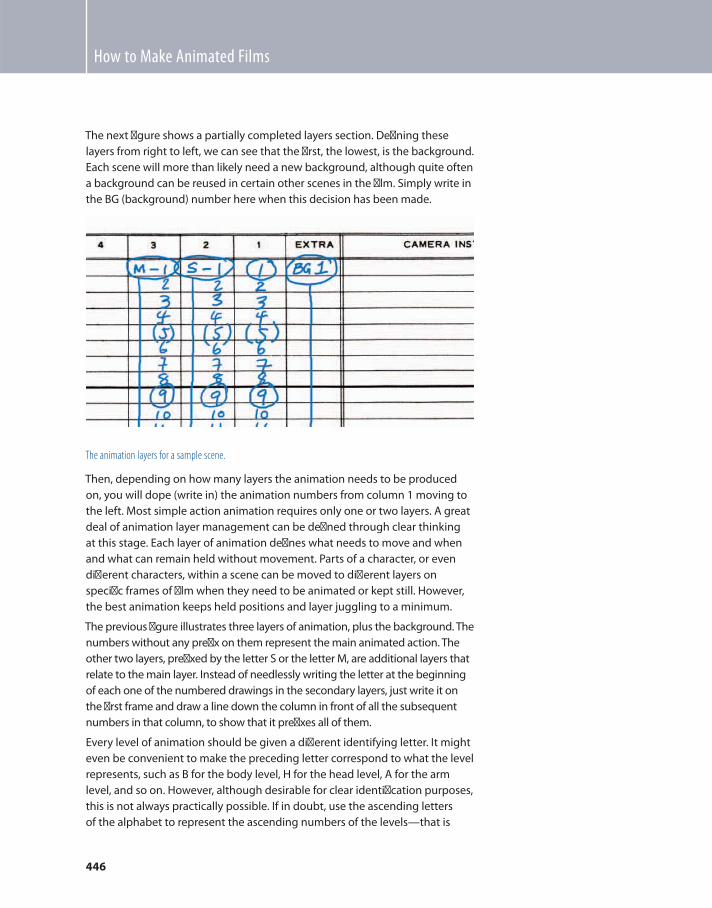
How to Make Animated Films
446
The next fi gure shows a partially completed layers section. Defi ning these
layers from right to left, we can see that the fi rst, the lowest, is the background.
Each scene will more than likely need a new background, although quite often
a background can be reused in certain other scenes in the fi lm. Simply write in
the BG (background) number here when this decision has been made.
The animation layers for a sample scene.
Then, depending on how many layers the animation needs to be produced
on, you will dope (write in) the animation numbers from column 1 moving to
the left. Most simple action animation requires only one or two layers. A great
deal of animation layer management can be defi ned through clear thinking
at this stage. Each layer of animation defi nes what needs to move and when
and what can remain held without movement. Parts of a character, or even
diff erent characters, within a scene can be moved to diff erent layers on
specifi c frames of fi lm when they need to be animated or kept still. However,
the best animation keeps held positions and layer juggling to a minimum.
The previous fi gure illustrates three layers of animation, plus the background. The
numbers without any prefi x on them represent the main animated action. The
other two layers, prefi xed by the letter S or the letter M, are additional layers that
relate to the main layer. Instead of needlessly writing the letter at the beginning
of each one of the numbered drawings in the secondary layers, just write it on
the fi rst frame and draw a line down the column in front of all the subsequent
numbers in that column, to show that it prefi xes all of them.
Every level of animation should be given a diff erent identifying letter. It might
even be convenient to make the preceding letter correspond to what the level
represents, such as B for the body level, H for the head level, A for the arm
level, and so on. However, although desirable for clear identifi cation purposes,
this is not always practically possible. If in doubt, use the ascending letters
of the alphabet to represent the ascending numbers of the levels — that is
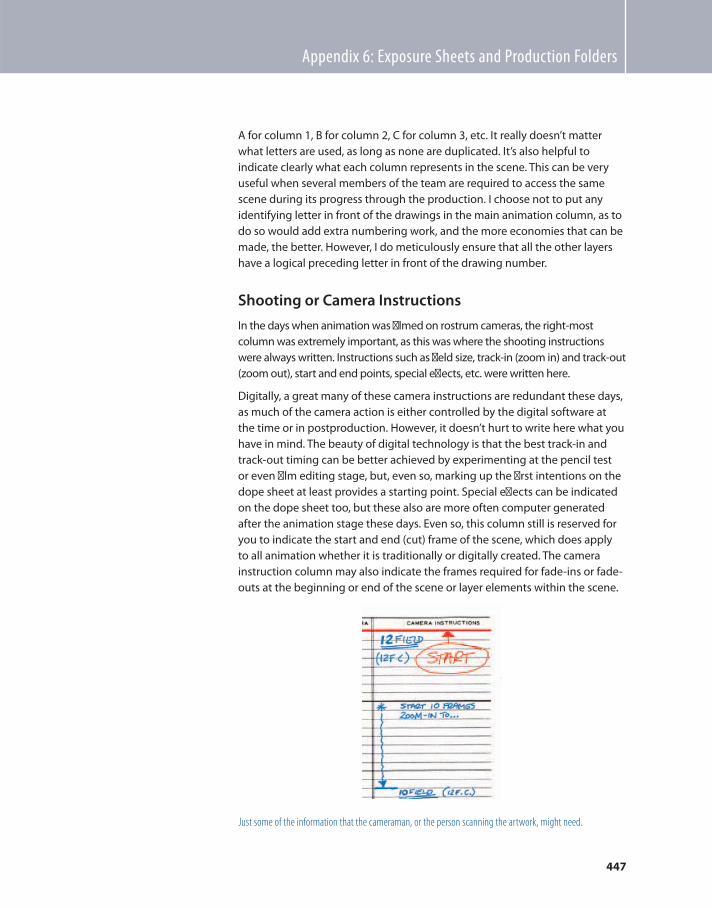
Appendix 6: Exposure Sheets and Production Folders
447
A for column 1, B for column 2, C for column 3, etc. It really doesn’t matter
what letters are used, as long as none are duplicated. It’s also helpful to
indicate clearly what each column represents in the scene. This can be very
useful when several members of the team are required to access the same
scene during its progress through the production. I choose not to put any
identifying letter in front of the drawings in the main animation column, as to
do so would add extra numbering work, and the more economies that can be
made, the better. However, I do meticulously ensure that all the other layers
have a logical preceding letter in front of the drawing number.
Shooting or Camera Instructions
In the days when animation was fi lmed on rostrum cameras, the right-most
column was extremely important, as this was where the shooting instructions
were always written. Instructions such as fi eld size, track-in (zoom in) and track-out
(zoom out), start and end points, special eff ects, etc. were written here.
Digitally, a great many of these camera instructions are redundant these days,
as much of the camera action is either controlled by the digital software at
the time or in postproduction. However, it doesn’t hurt to write here what you
have in mind. The beauty of digital technology is that the best track-in and
track-out timing can be better achieved by experimenting at the pencil test
or even fi lm editing stage, but, even so, marking up the fi rst intentions on the
dope sheet at least provides a starting point. Special eff ects can be indicated
on the dope sheet too, but these also are more often computer generated
after the animation stage these days. Even so, this column still is reserved for
you to indicate the start and end (cut) frame of the scene, which does apply
to all animation whether it is traditionally or digitally created. The camera
instruction column may also indicate the frames required for fade-ins or fade-
outs at the beginning or end of the scene or layer elements within the scene.
Just some of the information that the cameraman, or the person scanning the artwork, might need.
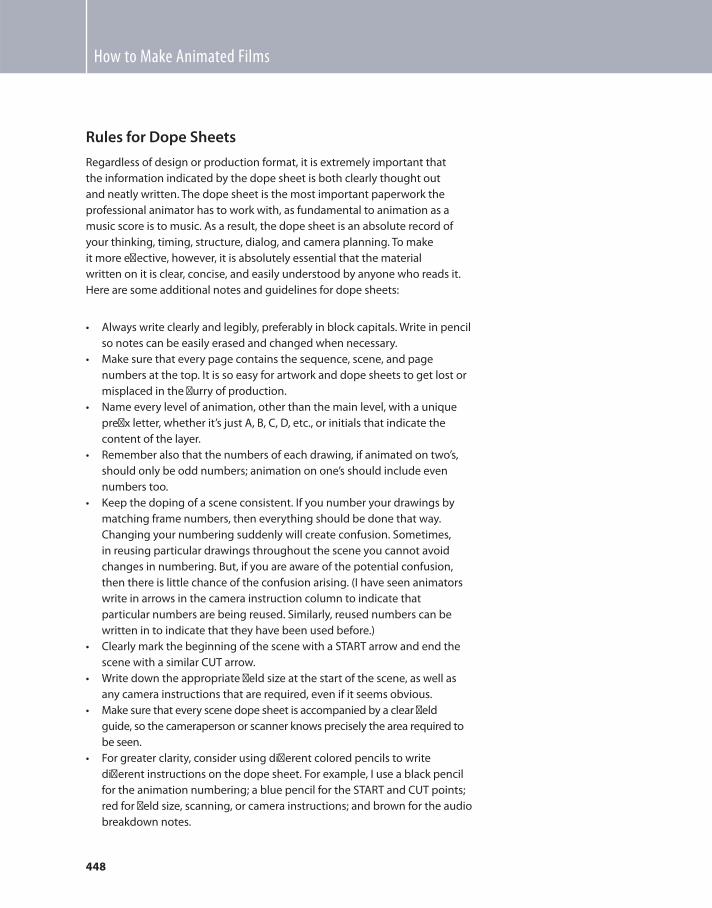
How to Make Animated Films
448
Rules for Dope Sheets
Regardless of design or production format, it is extremely important that
the information indicated by the dope sheet is both clearly thought out
and neatly written. The dope sheet is the most important paperwork the
professional animator has to work with, as fundamental to animation as a
music score is to music. As a result, the dope sheet is an absolute record of
your thinking, timing, structure, dialog, and camera planning. To make
it more eff ective, however, it is absolutely essential that the material
written on it is clear, concise, and easily understood by anyone who reads it.
Here are some additional notes and guidelines for dope sheets:
• Always write clearly and legibly, preferably in block capitals. Write in pencil
so notes can be easily erased and changed when necessary.
• Make sure that every page contains the sequence, scene, and page
numbers at the top. It is so easy for artwork and dope sheets to get lost or
misplaced in the fl urry of production.
• Name every level of animation, other than the main level, with a unique
prefi x letter, whether it’s just A, B, C, D, etc., or initials that indicate the
content of the layer.
• Remember also that the numbers of each drawing, if animated on two’s,
should only be odd numbers; animation on one’s should include even
numbers too.
• Keep the doping of a scene consistent. If you number your drawings by
matching frame numbers, then everything should be done that way.
Changing your numbering suddenly will create confusion. Sometimes,
in reusing particular drawings throughout the scene you cannot avoid
changes in numbering. But, if you are aware of the potential confusion,
then there is little chance of the confusion arising. (I have seen animators
write in arrows in the camera instruction column to indicate that
particular numbers are being reused. Similarly, reused numbers can be
written in to indicate that they have been used before.)
• Clearly mark the beginning of the scene with a START arrow and end the
scene with a similar CUT arrow.
• Write down the appropriate fi eld size at the start of the scene, as well as
any camera instructions that are required, even if it seems obvious.
• Make sure that every scene dope sheet is accompanied by a clear fi eld
guide, so the cameraperson or scanner knows precisely the area required to
be seen.
• For greater clarity, consider using diff erent colored pencils to write
diff erent instructions on the dope sheet. For example, I use a black pencil
for the animation numbering; a blue pencil for the START and CUT points;
red for fi eld size, scanning, or camera instructions; and brown for the audio
breakdown notes.
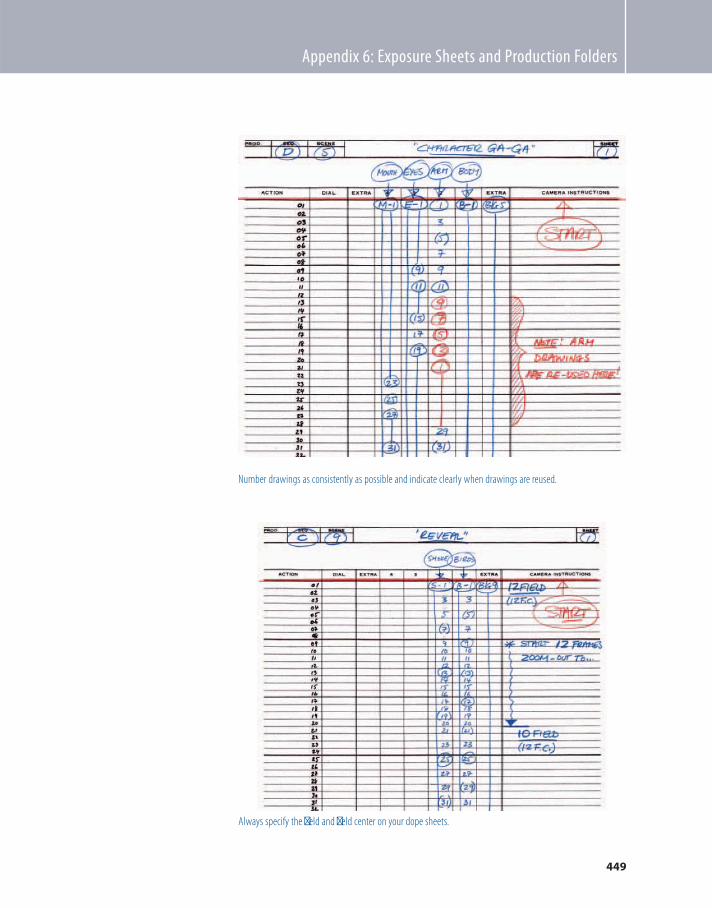
Appendix 6: Exposure Sheets and Production Folders
449
Number drawings as consistently as possible and indicate clearly when drawings are reused.
Always specify the fi eld and fi eld center on your dope sheets.
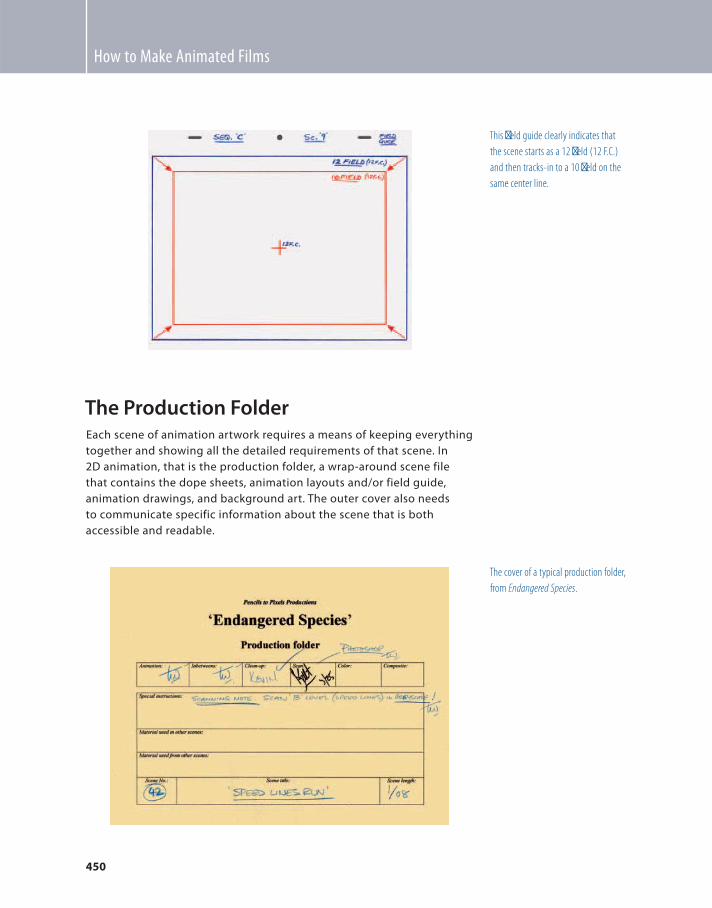
How to Make Animated Films
450
This fi eld guide clearly indicates that
the scene starts as a 12 fi eld (12 F.C.)
and then tracks-in to a 10 fi eld on the
same center line.
The Production Folder Each scene of animation artwork requires a means of keeping everything
together and showing all the detailed requirements of that scene. In
2D animation, that is the production folder, a wrap-around scene file
that contains the dope sheets, animation layouts and/or field guide,
animation drawings, and background art. The outer cover also needs
to communicate specific information about the scene that is both
accessible and readable.
The cover of a typical production folder,
from Endangered Species .
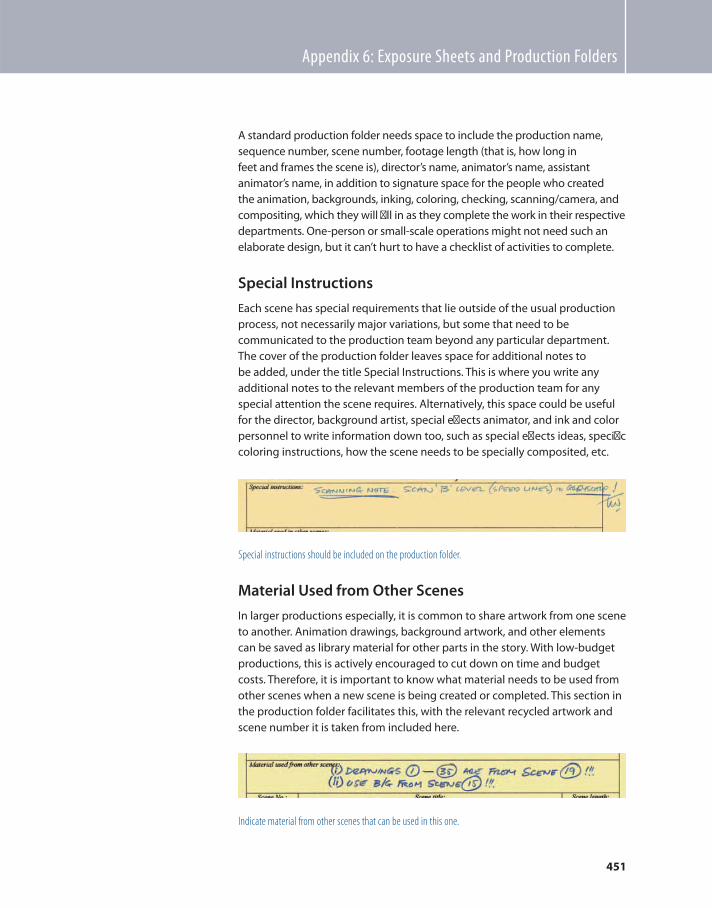
Appendix 6: Exposure Sheets and Production Folders
451
A standard production folder needs space to include the production name,
sequence number, scene number, footage length (that is, how long in
feet and frames the scene is), director’s name, animator’s name, assistant
animator’s name, in addition to signature space for the people who created
the animation, backgrounds, inking, coloring, checking, scanning/camera, and
compositing, which they will fi ll in as they complete the work in their respective
departments. One-person or small-scale operations might not need such an
elaborate design, but it can’t hurt to have a checklist of activities to complete.
Special Instructions
Each scene has special requirements that lie outside of the usual production
process, not necessarily major variations, but some that need to be
communicated to the production team beyond any particular department.
The cover of the production folder leaves space for additional notes to
be added, under the title Special Instructions. This is where you write any
additional notes to the relevant members of the production team for any
special attention the scene requires. Alternatively, this space could be useful
for the director, background artist, special eff ects animator, and ink and color
personnel to write information down too, such as special eff ects ideas, specifi c
coloring instructions, how the scene needs to be specially composited, etc.
Special instructions should be included on the production folder.
Material Used from Other Scenes
In larger productions especially, it is common to share artwork from one scene
to another. Animation drawings, background artwork, and other elements
can be saved as library material for other parts in the story. With low-budget
productions, this is actively encouraged to cut down on time and budget
costs. Therefore, it is important to know what material needs to be used from
other scenes when a new scene is being created or completed. This section in
the production folder facilitates this, with the relevant recycled artwork and
scene number it is taken from included here.
Indicate material from other scenes that can be used in this one.

How to Make Animated Films
452
Material Used in Other Scenes
For the same reasons, it is possible to say what material from the current
scene can be used in other scenes. With such information on the production
folder, team members further down the line know what artwork needs to be
saved and moved into the appropriate scene(s) when the time comes.
Indicate any material from this scene that will be used in others.
Attached Dope Sheet
The scene dope sheet should be included with the scene production folder.
The safest and most certain way of doing this (so that the dope sheet and the
folder do not ever get separated) is to staple the dope sheet to the inside
of the production folder. If this is done in the correct orientation, it will be
possible to read the cover of the folder, open it, and see the information on
the dope sheet from the same point of view.
The production folders and dope sheets for Endangered Species were all printed on standard 11 � 17 – inch
paper, stapled together at the top, and then folded over lengthwise. The production folder was copied on ivory-
colored paper to diff erentiate it from the white dope sheet pages.
453
A Above-the-Line Costs : Costs found in a fi lm budget
that include all expenditures over and above the
production costs of the crew, facilities, and regular budget
expenditures, such as for the producer, director, and
principal cast.
Academy : Standard 4:3 format screen ratio, used in all TV
work and many fi lms.
Accent Sounds : Parts in an audio track that have a special
signifi cance or emphasis, on which the animator can hang
a particular pose or key movement.
Aerial Image : Film process of combining live action with
animation, where the animation is fi lmed conventionally on
a rostrum camera, with top lighting, while the live action is
simultaneously backprojected into the camera lens.
Agency : Advertising agency, the organization responsible
for a company’s advertising strategy, scripted ideas,
marketing, and advertising production.
Agent : See Artist’s Rep.
Analog Tape : Recording tape that reproduces sound or
picture by a magnetic tape process.
Animation Characters : Imagined characters who are
conceived by a designer and are brought to life by an
animator’s skill.
Animation Layout : Accurate drawing that plots out the
size and placement of animated action within a scene,
prior to animation taking place.
Animator : See Key Animator.
Answer Print : The fi nal color-graded fi lm print, containing
the soundtrack and picture combined.
Anticipation : A reactive action in the opposite direction
to the main action, which precedes the main action and
provides added impact or impetus to it.
Arc : Curved path of action through which an animated
movement travels.
Art Director : Artist who is responsible for conceiving the
overall visual styling of a fi lm.
Artist’s Rep : Agent who presents an artist’s or animator’s
work to prospective clients.
Artwork : All the created visual material that makes up an
animated fi lm.
Assistant Animator : Junior (or trainee) animator who
assists the key animator in putting in the major in-betweens
Appendix 7: Glossary of a scene. At the highest level, the assistant animator is
someone who is eff ectively the business manager of the
key animator in all production work, doing pretty much
everything for him or her other than the creation of key
drawings for animation.
Atmos : Background sound eff ects that need to be added
to the audio track of the fi lm to give the scene a natural-
sounding atmosphere (e.g., traffi c sounds, birds singing,
city drone, etc.).
B Background Designs : The styling of artwork that will not
move in a scene.
Background Layout : Accurate drawing that depicts
everything in a scene that is to appear in the background,
prior to the background art being created.
Backgrounds : Finished artwork that depicts all that does
not move in an animation scene, mostly found behind the
animated action.
Bar Sheet : Printed master sheet in traditional 2D
animation that enables the sound editor to plot out the
phonetic content (and timings) of an audio track, frame by
frame.
Below-the-Line Costs : All budgeted costs, other than
those indicated in above-the-line costs.
BETA : Format of industry-standard videotape used for
certain broadcast-quality TV productions.
Bid : Budgeting estimate presented to an agency by a
production company when pitching for a contract to
produce a commercial.
Bi-pack : Traditional method of combining live action with
animation in the camera.
Blank Leader : Black, white, or colored fi lm strip that a
fi lm editor adds to the beginning or end of a scene or
sequence.
Blue- or Green-Screen Background : Method of fi lming
live action that enables the actors to be separated from the
background and composited with another live-action or
animation background later.
Boiling : Used to describe the kind of fl ickering that occurs
when a number of animated images that contain diff ering
textures are fi lmed together in an animation sequence.
How to Make Animated Films
454
Boiling can also occur when there is extensive cross-hatching
involved from drawing to drawing, or if the lines of each
drawing are vastly diff erent in form and substance.
Breakdown Drawing : The fi rst in-between drawing that
is created by the animator (or assistant animator) between
two keys.
Breaking It Down : The process where a sound editor, or
animator, produces a frame-by-frame (phonetic) analysis
of an audio track that contains dialog, narration, or song
lyrics. May also include a similar analysis of the beats and
main instrumentation found in a music track.
Budget : Estimated costs of a production based on a
known script and visual stylings.
Burning-in : Traditional fi lm process of superimposing a
brighter image onto a previously exposed darker one by
means of running the fi lm back and shooting the image to
be superimposed as white (or a bright color) against a pure
black background (e.g., adding a white title to a previously
created fi lm sequence).
C Camera Instruction Sheets : See Dope Sheets.
Camera Operator : Skilled individual who operates the
rostrum camera.
Cash Flow : Projection of how much, and when, the
fi nances estimated in the budget will need to be accessed
throughout the actual production schedule.
Cell Paints : Traditionally used color paints that are applied
to the back of cells once the animation has been traced
onto them.
Cell Punch : Engineered, precision instrument that creates
registration holes in animation paper and cells.
Cells : Sheets of clear acetate onto which the animation
drawings are inked, traced, or xeroxed and painted.
Cell xeroxing : Method of copying drawn artwork onto
cells using a photocopying machine.
Center of Gravity : The inner point within a character
where all his or her volume, weight, and mass are centrally
focused.
Character Design : The visual interpretation of a character
who is to be animated.
Charts : Drawn indicators, written on the key drawings
by the animator, to show the assistant animator (or in-
betweener) where the required number of in-betweens
need to be positioned.
Checker : Member of the 2D animation team who
meticulously checks the animation artwork and dope
sheets prior to them being fi lmed or scanned.
Checking : The process undertaken by the checker.
Cinemascope (Scope) : 2.35:1 fi lm screen ratio, which is
achieved by using a special anamorphic lens on the camera
and projector. They are pretty much exclusively reserved
for large-scale, epic movies.
Clean-up : The process undertaken by the clean-up artist.
Clean-up Artist : The member of an animation team who
converts rough animation drawings into fi nely inked,
fi nished artwork that refl ects the design style of the fi lm
and are ready to be traced or scanned.
Click Track : Guide musical soundtrack, which contains a
metronome beat, allowing the animator to time and pace
the action prior to the fi nal soundtrack being recorded.
(Note: As the click track has to provide the animator with
a precise timing of the action, it is essential that the fi nal
music arrangement is recorded at the same beat as the
guide track, otherwise the animation and the music will
not be synchronized.)
Color Designs : Approved colorings of the various
animated characters/elements featured in the fi lm.
Color Gels : Colored, transparent cells that are laid over the
animation artwork in traditional 2D animation to provide
a mood change (e.g., a deep blue over a scene will give a
nighttime feel).
Color Grading : Fine-tuning color adjustments made to a
fi lm once everything has been completed.
Color Model : Color design of an animated character or
object that defi nes the precise colors that are to be used
when the artwork is complete.
Commissioning Editor : Individual employed by television
companies to seek out, identify, and sign up new projects
for TV broadcasting.
Composer : Individual responsible for writing and
arranging the musical content of the proposed fi lm.
Compositing : The procedure of combining various
separate fi lmic elements (e.g., live action with animation,
layers of animation with other layers of animation and
special eff ects, etc.) through a digital or fi lm optical-editing
process.
Copy : Written material contained in an advertising script.
Copyright Agreement : Legal document that enables
fi lmmakers to work with intellectual property that is not
their own.
Copywriter : Member of an advertising agency creative
team who is responsible for the writing of a script.
Appendix 7: Glossary
455
Corporate Sponsorship : Finance from a major industrial
corporation or business entity that can help fi nance the
production for a fi lm in exchange for the goodwill or
publicity value that such an association can bring to the
company.
Creative Team : Members of the agency personnel who
are related to the visual and written content of a particular
commercial (e.g., art director and copywriter).
Cushion-in/Cushion-out : See Slow-in/Slow-out.
Cut : The point in a fi lm where one scene ends and another
begins.
Cut Outs : Animation artwork that is cut out and moved
under the camera, frame by frame.
Cutting : The process undertaken by the editor when
assembling all the scenes in a fi lm together.
Cutting Copy : A double-head presentation of the
production whereby all selected scenes are projected
on one strip of fi lm, while the soundtrack is played on
another.
Cycle Animation : A process of economizing on animation
whereby the action ends where it began and therefore can
be repeated over and over again (e.g., in walks and runs).
D Dailies : See Rushes.
Dead Zone : The fi rst six frames of a scene where the
human brain cannot detect either image or movement.
Design : See Design Concept.
Design Concept : The overall visual look of the fi lm.
Designer : Member of the production team who is
responsible for the design content of the fi lm.
Design Stage : The phase in the production schedule (at
the beginning of the fi lm) when all the design work is
undertaken.
Development Package : A collection of presentation
material that will allow investors the opportunity of
assessing the production from every angle (e.g., script,
designs, budget, cash fl ow, legal tie-ups, etc.).
Dialog : All the spoken material contained in the
soundtrack.
Diff usion Filter : A fi lter that is placed over the lens of the
camera when shooting that creates a soft, diff used look to
the scene.
Digital Tape : Tape that records sounds or pictures digitally
(as opposed to analog tape).
Director : Member of the production team who is
responsible for the overall interpretation, styling,
structuring, and timing of the fi lm.
Dissolve : The moment in a fi lm where one scene fades out
as another scene fades in.
Distribution Rights : An agreement arranged between a
producer and a distributor whereby the right to distribute
the fi lm through specifi c markets is legally obtained.
Distributor : The individual who distributes a fi lm through
various markets (e.g., cinemas, network TV, cable and
satellite TV, retail video, etc.).
Dope Sheets : Printed sheets that allow the animator
to communicate to the rostrum cameraman how the
animation drawings are to be fi lmed.
Double Bounce : Style of animated walk where the character’s
body bounces up and down twice during one step.
Double Take : An animated character’s exaggerated
reaction to an event that has just taken place in a scene.
Double-head : The fi lm when picture and soundtrack are
projected separately.
Drag : Where one part is delaying behind the main action
(e.g, the hand dragging behind as the arm swings through
on a walk).
Drawing Board : Artist’s work surface.
Dub : Process of mixing the music, dialog, and sound
eff ects onto one soundtrack.
E Edit : The process of joining all the scenes of a fi lm together,
in conjunction with the soundtrack.
Editor : Creative member of the production team who
supervises the edit.
Edit Suit : Facility where all the visual elements of a fi lm are
edited, or dubbed, together.
Electric Pencil Sharpener : Important and time-saving
component of the animator’s toolkit.
Establishing Shot : Scene at the beginning of a fi lm that
establishes the story’s setting.
Exposure Sheets : See Dope Sheets.
Exposure Test : A test undertaken by the rostrum
cameraman to ascertain the correct exposure of a scene (or
the special eff ects within it).
Extra Charges : Costs that are incurred outside of the
original budget which are brought about as a result of an
agency, or client, requesting changes that lie outside of the
original script requirements.
How to Make Animated Films
456
F Feature Film : Full-length movie seen in the cinema or
on TV.
Field Center : The central point within a fi eld guide from
which all measurements are made.
Field Size : Area on the animation artwork that the camera
will see.
Film Lawyer : A legal practitioner who specializes in fi lm
work (very important).
Film Optical : The process of joining live action with
animation, or of adding graphics, titles, dissolves, or visual
eff ects to an existing piece of fi lm.
Film Size : Defi nes the width of fi lm stock being used
(e.g., 35 mm, 16 mm, 8 mm, Super 8, etc.).
Film Stock : Defi nes the nature of fi lm stock being used
(e.g., color, black-and-white, fi lm speed, etc.).
Final Shoot : Stage of fi lming where the fi nished, color
animation artwork is shot.
Final Track : Stage of recording when the soundtrack is
complete and approved.
Fixed Costs : Overheads contained in the budget (e.g., rent,
rates, leases, etc.).
Follow-through : Where one part of an action continues to
move (catch up) when the main action ceases (e.g., a cape
of a running fi gure continues to carry forward, then settles
to a halt after the fi gure has stopped.)
Footage : Length of a fi lm, or sequence, in feet and frames.
Footage Rate : Amount of fi lm footage required to be
completed each week by the animator/assistant animator
in order that the schedule and budget be met.
Frames per Second (FPS) : Rate of speed that the fi lm is
projected: 24 frames per second (cinema and U.S. TV) or 25
frames per second (British TV).
Frame : Name of an individual image contained in a strip
of fi lm.
Freeze : A hold — a moment where an animated character
stops moving and remains that way for a specifi c number
of frames.
Frosted Cells : Diff used-looking acetate that can be drawn
on with regular pencils. When the drawing is complete, the
frosted cell can be sprayed with lacquer, which causes it to
become clear, like standard cells.
Funny Money : Term given to fi lm fi nance derived from
unorthodox sources (e.g., private investors, with a private
interest in the nature of the fi lm envisaged).
FX : Abbreviated form, meaning eff ects (visual or sound).
G Graded Print : A color-corrected fi lm still at the double-
head stage.
Graticule : Precision-drafted guide for allowing the
animator to calculate and defi ne the fi eld sizes of various
pieces of animation artwork.
Green- or Blue-Screen Background : Method of fi lming
live action that enables the actors to be separated from the
background and composited with another live-action or
animation background later.
Guide Track : A roughly recorded soundtrack that gives the
animator an idea of what the fi nal track will be like (often
used at the Leica Reel stage).
H Hand Tracing : Process whereby the animation is traced (by
brush or pen) onto the cell by an inker.
Harry : Electronic device for editing/combining live-action
fi lm and animation on videotape.
High-Defi nition (Hi-Def) : TV system that uses 1000 lines
on the screen, as opposed to 625 (United Kingdom) or 525
(United States).
Highlight : An illuminated eff ect, featured on one part of
the animated image, which suggests that a bright light
is being shone on it (e.g., the opposite side to that of a
shadow).
Highlight Run : An eff ects element used in composited
animation that creates an illumined eff ect on the brighter
side of an animated image.
Hit : Strong emphasis created in the animated action
(usually in synchronization with an important sound on the
soundtrack).
Hot Spot : Area on the animation artwork that is
overexposed due to uneven lighting on the rostrum
camera tabletop.
I In-Between Drawings : Drawings that are created between
two previously existing drawings in accordance with the
instructions of the animator/assistant animator.
In-Betweener : A trainee animator who is required to
produce only in-between drawings.
In-Betweening : The process of doing in-betweens.
Appendix 7: Glossary
457
Independent Filmmaker : Filmmaker (usually a producer)
who creates a fi lm independently of established fi lm
production sources (e.g., TV companies, major
distributors, etc.).
Inker : Member of the fi lm production team who is
responsible for transferring the animation drawing onto
animation cells.
Inking : The process undertaken by an inker.
K Key Animator : Skilled artist with the ability to bring life to
inanimate drawings.
Key Drawing : A major animation drawing created by the
animator that indicates an extreme of movement.
Key Frames : Color presentation artwork that indicates the
design look that those particular sequences of animation
will have in the fi nal fi lm.
L Lab : Film-processing laboratory.
Layout Drawing : Detailed sketch that indicates everything
that appears in a scene.
Leica Reel : Filmed layout drawings that are shown in sync
with the approved soundtrack.
Lightbox : Backlit work surface that is used by most
members of the animation team.
Line Drawing : Pencil drawing that contains no color or
shading.
Line of Action : An invisible line within a character pose
that defi nes the main dynamic of that pose.
Lip Sync : The drawing of animated mouth movements
that move in synchronization with the soundtrack.
Literary Rights Agreement : Negotiated legal arrangement
that allows the fi lmmaker the right to use an existing book,
or published story, for the basis of a fi lm script.
Live Action : The fi lming of actors or natural scenery in real
time as opposed to drawn or animated artwork.
Location : Place where fi lmed action takes place.
M Mag Track : Soundtrack that is recorded onto magnetic fi lm
stock that is the same size as the fi lm stock used for the
picture (e.g., 35 mm, 16 mm, etc.).
Mark-Up : Percentage of profi t indicated in the budget.
Match Cut : An editing device where a character is in a
set position at the end of one scene and in the identical
position at the start of the next scene, where maybe the
background is entirely diff erent. A match cut can work with
a static image or a moving sequence.
Match Lines : Lines on animation drawings indicating
where an animated character is matching to an object
on the background that is intended to appear in the
foreground (and therefore beyond which the animation
cell must not be painted).
Matte : Artwork or similar device used in combining one
or more fi lmic images that blots out background material,
leaving a precise, unexposed area into which the image
that is to be composited in will fi t.
Matte Run : An eff ects element used in compositing work
that carries the required matting artwork.
Merchandising : A means by which extra revenue may be
obtained for fi lm fi nance (where the rights in animated
characters may be sold, so as to produce toys, games,
books, etc.).
Mix : See Dissolve.
Model Sheets : Design sheets that depict the structure
of the approved animation characters from every
conceivable angle.
Moviola : Machine used for viewing fi lm at the double-
head stage.
Multiplane Camera : Specialized camera that off ers the
opportunity of fi lming diff erent (and separate) levels of
animation in a scene, giving the illusion of 3D depth.
Mute : Action that contains no soundtrack.
N Neg Cutting : A process that requires the careful editing
of the fi lm’s negative once the fi nal shoot and edit are
approved.
Negative Pick-up : Distribution deal that states that the
distributor need not pay the fi lm’s producer any money
until the fi nal negative is delivered.
NTSC : TV broadcast system used in the United States and
other countries (525 lines).
O Optical Track : Visual soundtrack stripe that is found along
the edge of an answer (or combined) print.
How to Make Animated Films
458
Option Agreement : Negotiated legal arrangement that
allows the fi lmmaker to purchase the right to develop
copyright material for a specifi c length of time prior to the
fi lm receiving production fi nance and the full rights being
obtained.
Overlapping Action : Technique used by the animator to
create a more fl uid look to the action.
P Pack Shot : Scene (usually at the end of a commercial) that
presents the product that is being advertised.
Paintbox : An electronic painting device that allows
fi lm images to be enhanced or changed once they are
transferred to videotape.
Painter : Member of the fi lm production team who is
responsible for painting the animation drawings once they
have been transferred onto the cell by the inker.
PAL : A TV broadcast system used in the United Kingdom
and other countries (625 lines).
Pan : A fi lm action take that requires the camera to travel
across the artwork to create movement.
Paper/Cell Rack : Part of the studio equipment that allows
wet painted cells to dry individually.
Passing Position : The midway position between two
extreme key positions in an animated walk.
Path of Action : The central line along which and action
takes place (e.g., the center of gravity in a ball as it bounces,
or a character as he or she runs or walks).
Peg Bar : The registration device on which punched
animation paper or cells are placed.
Peghole Reinforcements : Adhesive paper/plastic
reinforcements that are affi xed around the paper or cell
punch holes, preventing them from tearing inadvertently.
Pegholes : Specifi c holes that are punched into animation
paper or cells to aid the precise registration of drawings.
Pencil Test : A fi lmed interim motion test of the animation
produced while the drawings are still at the pencil stage.
Percentage Exposure : A special eff ects technique that
requires one aspect of the artwork within a scene to be
fi lmed at less than 100 percent exposure.
Photo-rotos : Photographic prints, taken frame by frame,
from live-action negative to enable the animator to register
animation drawings to the movements in a live-action/
animation fi lm combination.
Pilot Film : Short presentation sequence of fi nished
animation, created specifi cally to show potential investors
what the overall fi lm will look like.
Producer : Key member of the production team
responsible for ensuring that the fi lm is created on time
and budget, and who negotiates all distribution (and
incidental) deals with outside interests.
Production Company : The organization responsible for
the production of a fi lm.
Production Folders : Preprinted folders containing all the
camera instructions required by the animator, together with
all the information relating to the creation of that scene.
Production Line : The processes involved in the production
of a fi lm.
Production Team : All the relevant personnel required to
produce an animated fi lm.
Projector : Equipment required for the projection of all fi lm
in cinematic conditions.
R Recording Session : Event that occurs when the fi lm
soundtrack is being recorded.
Registration : The process of ensuring that each animation
drawing is in perfect register with the rest in the scene.
Renderer : Member of the fi lm production team who is
responsible for applying the textured shaping to fl at-colored,
animation artwork, creating more of a 3D design look.
Rendering : The work undertaken by a renderer.
Rostrum Camera : Specialized fi lm camera that undertakes
the shooting of animation artwork in a vertical format.
Rotoprints : See Photo-rotos.
Rotoscope : Device invented by Max Fleischer for tracing
live action, frame by frame.
Rotoscoping : The process of tracing live action so that it
looks like 2D-animated action.
Rough Animation : Loosely drawn animation that allows
the animator to rapidly check the action prior to any
detailed and time-consuming drawing being applied to
the animation work.
Rushes : The fi rst processed fi lm print, often received the
day after the animation artwork has been shot.
S Safe Titling : Area within the full academy fi eld size, within
which all titling can be viewed on a TV monitor without it
being cut off around the edges or distorted by the TV screen.

Appendix 7: Glossary
459
Sales Agent : Agent who is able to take a fi lm development
package and sell it to established fi lm fi nanciers on behalf
of the fi lm’s producer (receiving, as a fee, a percentage of
the production budget).
Scene : An individual sequence of visual action that occurs
(with many others) within a fi lm.
Scene Planning : The process by which a director plots a
sequence of scenes to tell a story. The process of assigning
timing and levels to 2D animation on a dope sheet.
Scene Slate : A device shot at the beginning of a scene,
which indicates the relevant production, sequence, and
scene numbers of the material being fi lmed.
Schedule : An analysis of the timing and stages required in
order that a fi lm be successfully completed.
Screenplay : A written description of the story, dialog, and
visual concept of the fi lm, created prior to its production.
Script : See Screenplay.
Scrubbing : A method of manually dragging a cursor of a
pointer along a timeline in order to see a specifi c section of
a fi lm or hear a specifi c section of audio track.
Sequence : Collection of scenes that relate a specifi c phase
of the fi lm’s storyline.
SFX : Abbreviation for sound eff ects.
Shadow : An area superimposed onto an animated image
that suggests a shaded eff ect over everything that is
furthermost from an illumined light source.
Shadow Run : An eff ects element used in compositing
work that carries the required shadowing material.
Show Reel : Collection of previous work collated on
videotape by the production company, showing the best
of their work in the hope of attracting future work from
potential clients.
Slash Animation : Old style of animation, in precell days,
where the character was animated on the lower level and
the background was drawn on an upper level with holes
cut in it to allow the action to show through.
Slug : See Blank Leader.
Sneak : Traditional technique of producing tip-toe walks
with animated characters.
Sound Bench : Workplace used by editors to produce a
breakdown of soundtracks.
Soundtrack : All the recorded audio material used in any fi lm.
Stagger : Animation technique used to create a trembling,
shaking, or juddering visual eff ect.
Steinbeck : Machine used for viewing fi lm at the double-
head stage, utilizing a fl atbed format.
Sticking : A process where a fi lm being viewed on a
computer monitor stops, glitches, or locks up due to an
overload of data being processed or a computer’s RAM
capability being too low.
Sting : Short, sharp note or chord in the soundtrack used to
make a dramatic musical emphasis of the fi lm’s action.
Storyboard : Visual interpretation of the script, produced
by way of a series of small drawings, depicting the content
of each scene’s action.
Storyline : Brief written outline of a fi lm’s dramatic content.
Strobing : A jittery, visual aff ect on the screen, usually
produced by having too many vertical lines in an even
panning shot. Can also occur when an animated character
moves on two’s while the background pans on one’s.
Studio : Place in which the production team works.
Studio Overheads : Costs relating to the noncreative needs
of a production studio (e.g., administrative, telephones,
electricity, etc.).
Superimposition (Animation) : The process of taking 2D
animation drawings off the pegs, then laying one on top of
the other, so as to more clearly create a new in-between.
Superimposition (Title) : The process of overlaying an
image on top of a previously fi lmed scene (e.g., a title over
a product shot in a commercial or a light eff ect through a
window at night).
Sync : The perfect interrelation between sound and picture
in a scene (e.g., lip sync).
Synopsis : See Storyline.
T Telecine : Facility suit used for the electronic transfer of fi lm
imagery to videotape.
Theatrical Film : Feature-length fi lm to be shown in
cinema outlets.
Three-dimensional Animation (3D) : Animation using
models, puppets, and/or solid objects.
Thumbs/Thumbnails : Very simple, fast-drawn sketches
that represent initial ideas for animation poses, or as
storyboard frames when visualizing a storyline.
Tiling : The process of scanning extra-large artwork in
sections, then compositing it back together again by
overlapping and merging the layers within a computer
program such as Photoshop.
Top-lit/Backlit Shoot : The dual shooting of animation
intended for live-action/animation composited work: The
fi rst where the animation artwork is shot top-lit against a
blue-screen or plain background, and the second where the
same artwork is shot in silhouette against backlit, white light.
How to Make Animated Films
460
Tracebacks : Procedure where portions within an
animation drawing (that are not moving) are precisely
traced back from the previous drawing.
Tracer : See Inker.
Tracing Down : Process of transferring the drawing of
a background layout onto a ready-stretched sheet of
watercolor or cartridge paper that is ready for coloring.
Track : See Soundtrack.
Track Breakdown : The process whereby the sound editor
analyses every individual sound on a track, frame by frame.
Transfer : The transferring of the soundtrack from the
original recording tape to the relevant mag track indicated.
Treatment : Document that outlines the director’s concept
for the fi lm at the early, predevelopment stage.
Triple Bidding : Procedure undertaken by many advertising
agencies whereby three competing production companies
are invited to bid on a specifi c commercial script.
Truck- (Track-) In : Action where the camera moves in on
the artwork.
Truck- (Track-) Out : Action where the camera pulls out
from the artwork.
TV Cut-Off : Area within the fi eld size that represents the
outer portion of the artwork that will be automatically cut
off when viewed on a TV monitor.
Two-dimensional Animation (2D) : All animation that is
produced on a two-dimensional plane (e.g., drawn artwork).
V Voiceover : Recorded voice that is heard off screen.
Voice Talent : Actor/actress used for voiceover recordings.
W Wedge Test : A range of varying exposure tests produced
before a fi nal shoot where percentage exposures are being
used.
Weight : Technique in animation that gives the animated
character a real sense of heaviness.
Widescreen : Cinematic screen ratio where a standard
academy format is reduced at the top and bottom to give
the picture an extended landscape look.
Wooden : A word used by animators to describe a
character’s action when it lacks weight, energy, or
fl exibility.
Z Zip Pan : The technique of extremely fast panning across
animation artwork.
Zoom : A fast truck-in or truck-out.
Appendix 7: Glossary
461
“ THE END?. ” … I think that will be up to you!

This page intentionally left blank
463
A Above-the-line costs , 453
Academy , 453
Accelerating . See Slowing-out
Accent sounds , 453
Accuracy
fl ipping for , 349
in-betweens , 345
Action guide , 42
Actions
anticipation benefi ts , 152 – 55
fast , 24
impact , 152
multiplane , 130
overlapping , 79 – 80 , 81 , 119 , 458
path of , 23 – 24 , 34
pauses , 56
silhouetted , 307
slow , 24
speed , 24
speed variance , 25
stagger , 196 – 99
storyline , 312
swinging , 26
underpinning impact of , 196
weight and , 143
Adobe After Eff ects , 400
Adobe Photoshop , 374 , 390 , 400 , 403
Adobe Premiere , 390 , 400
in animatic creation , 166
audio mixing in , 419
editing/rendering in , 374
importing storyboard drawings
into , 298
Aerial images , 453
Agencies , 453
Agents , 453
Analog tape , 453
Animated special eff ects , 405
Animatics
assignment , 302
Bacher Boards process and ,
294 – 95
defi ned , 293
as edit template , 302
as fi lm bible , 300 – 301
frame numbering , 296
frames illustration , 296
images , 296
importance , 302
pose test , 313
process , 296 – 300
stage , 294
sync , 299
timing , 299
Animatic stage , 294 , 295
Animaticus Foundation , 429
Animation
characters . See Characters
cycle , 403 – 4 , 455
paperwork , 439 – 52
rough , 458
slash , 459
stages , 5
three-dimensional (3D) , 459
two-dimensional (2D) , 460
Animation from Pencils to Pixels , 17 , 31 ,
149 , 267 , 341 , 348 , 435 – 36
Animation layouts
assignment , 313
defi ned , 304 , 453
distance and perspective , 305
dividing , 310 – 12
drawings , 312
See also Layouts
Animators
assistant , 453
key , 457
notes , 443 – 44
The Animator’s Handbook , 341
The Animator’s Survival Kit , 89
Answer print , 453
Anticipation , 151 – 59
assignment , 159
benefi ts of , 152 – 55
defi ned , 149
emphasis points , 168
examples , 152 – 53
eyes , 156
frame , 181 – 82
major impact points , 182
opposite , 151
punch , 152 , 158
shutting , 156
subtlety , 159
throw , 153
uses , 156 – 59
Arcs
bouncing ball , 36
concave , 202
defi ned , 453
as path of action , 23 – 24
pendulum , 23 – 24
Argument, two-character dialog ,
188 – 89
Arms
in generic walk , 75
movement , 79
passing position , 75
in personality walk , 77 – 79
in runs , 98
swinging with legs , 75
Art directors , 453
Artist’s rep , 453
Artwork , 453
Assignments
animatics , 302
anticipation , 159
audio record , 291
background , 387
blocking , 335
bouncing fl our sack , 50 – 58
breakdown , 329
character design , 249
clean-up , 366
coloring , 398
color script , 322
compositing , 406
concept art and camera maps ,
233
fi lmmaking techniques ,
284
fi nal edit , 421
generic runs , 102 – 9
generic walk , 76
layout , 313
pendulum , 30 – 31
personality walks , 90
placement and timing , 340
quadruped walks , 135 – 36
rendering , 410
scanning , 373 – 74
storyboards , 266
storytelling , 227
styles , 212
testing , 354
Index
Index
464
Assignments ( Continued )
two-character dialog , 193
two-dimensional in-betweening ,
345
weight , 149 – 50
Assistant animators , 453
Atmos , 453
Attention, focus of , 306
Attitude, in character design , 239
Audio breakdown , 323 – 29
color pencils for instruments , 445
dope sheets , 444 – 45
Audio record , 285 – 91
Audio timeline , 301 , 420
Audio tracks
breaking down , 329
emphasis points , 163
facial expressions and , 177
format , 287
guide , 286 – 87
importing , 413
mixing , 419 – 20
music and eff ects , 420 – 21
playback , 166
saving , 287
scrubbing , 413
timing/delivery , 286
timings of , 285
Avi (Windows Media) fi le format , 407
B Bacher Boards
creating , 295
defi ned , 294 – 95
process , 295
Background layouts
assignment , 313
defi ned , 304 , 453
distance and perspective ,
305
dividing , 310 – 12
drawing identifi cation , 312
focus of attention , 306
panning , 381
process , 308 – 10
resizing , 54
rough , 309 – 10
on separate level , 56
silhouetted action , 307
taping , 54 , 55
See also Layouts
Backgrounds , 375 – 81
area of greatest contrast , 385
assignment , 387
blue-screen , 453 , 456
blurred , 404
color , 322 , 377 , 378
coloring , 395
dark against light , 384
in depth of fi eld , 404 – 5
designs , 453
digital art , 375
distance/speed principle , 129
element positioning , 128
fl at-colored , 396
green-screen , 401 , 453 , 456
imported artwork , 396 – 98
light against dark , 384
lines of perspective , 381
moving , 126 – 28
multilayered , 129 – 31
painting issues , 377
perspective , 381 – 82
sharp , 405
structure elements , 127
style , 236
types of , 376
walk cycle , 127
See also Environments
Balance
head-on run , 101
jump landing , 211
out of, deliberate , 83
personality walk , 81 – 84
upper body , 73
Balls
bowling , 141 – 42
ping pong , 140 – 41
rubber , 138 – 40
See also Bouncing ball
Bar sheets , 453
Below-the-line costs , 453
BETA , 453
Bids , 453
Bi-pack , 453
Bit and chew , 173 – 74
Blank leader , 453
Blinks . See Eye blinks
Blocking
assignment , 335
focus , 334
key poses , 331 – 35
Blue-screen backgrounds , 453 ,
456
Blurred backgrounds , 404
Body
lean , 97 – 98 , 103
quadruped walks , 117 – 19
weight and , 143 – 44 , 147
Body language , 162 – 72
in-betweens , 171
key drawings , 166 ,
168
key poses , 162
pencil test , 171
silhouettes , 190 , 192
in story telling , 190
sync , 167
two-character dialog , 186
See also Dialog
Body rigs , 179
Boiling , 453 – 54
Bottom pegs , 17
Bouncing ball , 33 – 50
animation principles , 34
breakdown positions , 41 , 45
core frames , 33
descending bounce , 47
diminishing bounces , 35
drawings, fl ipping , 44 , 47 – 48
drawings, rolling , 44
drawings, superimposing , 45
fi nal double-checks , 48 – 50
fl exibility , 34
ground shadows , 46
impact , 39
in-between charting , 40
in-betweening , 41 – 46
in-betweens , 39 , 48
key positions , 35
mass , 34 , 40 – 41
mass, distorting , 46
numbering , 40
path of action , 34 , 41
pencil test , 49 – 50
shadow , 46 , 47
slowing-in/slowing-out , 38
squash , 35 – 37
stretch , 37 – 38
timing , 38 – 40
volume and , 46
weight , 34 , 40 – 41
Bouncing fl our sack
background layouts , 50 , 51 , 54
defi ned , 50 – 51
diligent process , 54 – 57
distance , 52 – 54
fl ipping , 54
Index
465
gravity , 52
in-betweens , 54 , 58
key positions , 55
objective , 51 – 52
pose testing , 57 – 58
speed , 52 – 54
tipped over , 52
weight , 52
Bowling ball
bounce comparison , 142 – 43
ground deformation , 141
pencil test , 142
speed , 142
Breakdown drawings
defi ned , 454
fl ipping , 14
numbering , 15
rubber ball , 139
tracing , 13
Breakdown positions
achieving , 12
bouncing ball , 41 , 45
creating , 12 – 16
defi ned , 7 , 12
illustrated , 12
lower body (walks) , 60 – 62
pendulum , 7
rolling , 14
tracing for , 12
Breakdowns , 323 – 29
assignment , 329
defi ned , 460
Magpie Pro for , 324 – 28
phonetic , 328
style details , 328
Breaking it down , 454
Budgets , 454
Burning-in , 454
C Camera instructions , 447 ,
454
Camera maps
assignment , 233
benefi ts , 232
defi ned , 232
illustrated , 232
Camera operators , 454
Camera shake , 199
Cash fl ow , 454
Cell paints , 454
Cell phones , 437
Cell punch , 454
Cells
defi ned , 389 , 454
frosted , 456
in predigital era , 393
Xeroxing , 454
Center, fi eld guide , 10
Center of gravity , 43
defi ned , 454
foot off ground , 82
front and back view , 83
personality walk , 82
unbalanced , 85
Character design , 235 – 49
assignment , 249
attitude , 239
broad characteristics , 245
detail , 242
feedback on , 244
head heights , 240
ideas , 243
machete , 248
minimalism in , 242
mixed-genre , 246
personality , 238
preparation for , 243
process , 243 – 45
proportion , 239 – 40
questions , 245
silhouette , 241 , 244
style , 235 – 38 , 245
three-dimensional , 247
warm-up exercise , 246 – 49
Characters
anticipation , 156 – 57
body language , 162 – 72
defi ned , 453
emotional states , 212
facial expressions , 172 – 79
heavy build , 147
internal skeleton visualization , 183
jumping , 208 – 11
lean-back , 157
listening , 279 , 280
in two-character dialog , 184 – 92
Character sheets , 246 – 47
Charts
creating , 16
defi ned , 454
in-betweens, number of , 16
referring to before in-betweens , 21
representation , 18
timing and variation , 88 – 89
Checkers , 454
Checking
defi ned , 454
in-betweens , 22 , 42 , 48
lip synching , 326
scene timing , 301 – 2
storyboards , 264 – 66
Chewing movement , 174
Cinemascope , 454
Cintiq drawing tablet , 357
Clean-up , 355 – 66
approach , 358
artists , 454
assignment , 366
defi ned , 454
dimensions , 362 – 66
direct digital technique ,
356
drawings , 361 , 366
errors, catching , 360
even line inked , 359
follow-through lines , 365 – 66
on fresh paper , 358
implied geometry and , 364 – 65
issues , 356
line quality , 358 – 61
methods , 356
process, starting , 366
shapes , 362 – 66
traditional , 356
volumes , 362 – 66
Click track , 454
Close-up shot
defi ned , 269
illustrated , 269
use of , 274
See also Shots
Color designs , 454
Colored pencils , 448
Color gels , 454
Color grading , 454
Coloring , 389 – 98
assignment , 398
backgrounds , 395
with Digicel’s Flipbook Pro ,
390
digital , 392 , 394
fl at style , 396
gaps, fi lling , 395
operation , 389
sequence of frames , 393
storyboard frames , 264
Color models , 454
Index
466
Color palette , 392
Colors
background , 322 , 377
choosing by values , 392
model sheet , 249
style , 236
Color scripts , 315 – 22
assignment , 322
best time to create , 316
creating , 318
defi ned , 315
frames , 319
illustrated , 315 , 316 , 319
importance , 320
process , 317
professional approach , 317 – 18
storyboard format , 319
tips , 321 – 22
Commissioning editors , 454
Compatibility testing , 377
Composers , 454
Compositing , 399 – 406
assignment , 406
cycle animation , 403 – 4
defi ned , 454
depth of fi eld , 404 – 5
layers , 400 – 402
titles and eff ects , 405
transparency , 402 – 3
Compositional color values , 378
Concept art , 229 – 32
assignment , 233
color , 316
color and style , 231
fi lm poster , 230
as high art , 229
representation , 232
style , 135
third-party , 231
Contact/squash , 94
Continuity , 281
Contrast , 378 – 80 , 385
Copy , 454
Copyright agreements , 454
Copywriters , 454
Corporate sponsorship , 455
Correction, trial and error , 122
Creative team , 455
Crossing the line , 282 – 84
Curvilinear style , 236
Cushion-in/cushion-out , 455
Cuts
defi ned , 275 , 455
illustrated , 275
Cutting , 455 , 457
Cycle animation , 403 – 4 , 455
D Dailies , 455
Dark against light , 384
Dead zone , 455
Decelerating . See Slowing-in
Depth of fi eld , 404 – 5
Descending bounce , 47
Design concept , 455
Designers , 455
Design stage , 455
Desktop Academy , 427 – 28
defi ned , 427
Diploma of Animated Excellence ,
427
web site , 424 , 428
Detail, in character design ,
242
Development package , 455
Dialog , 161 – 93 , 455
body language , 162 – 72
elements , 161 – 62
emotion , 176
facial animation , 172 – 79
fast-talking , 170
improving on abilities , 184
lip synching , 179 – 84
mirror , 180 – 81
practice , 184
sequence expressions , 162
two-character , 184 – 92
Diff usion fi lter , 455
DigiCel’s Flipbook , 106
audio track playback , 166
for drawing shot conversion ,
352
functions , 390
for pencil tests , 351
DigiPen Institute of Technology , 429 ,
431 – 33
Bachelor of Fine Arts in Production
Animation program , 432
faculty , 433
graduates , 432
process , 333
reputation , 432
students , 433
web site , 432
Digital tape , 455
Diligent process , 54 – 57
Dimension , 311
Directions , 10
Directors , 455
Dissolves
defi ned , 277 , 455
illustrated , 277
Distance
bouncing fl our sack , 52 – 54
foot slide , 70
in layouts , 305
Distribution rights , 455
Distributors , 455
Dolly (crane) shot , 272
Dope sheets . See Exposure sheets
Double bounce , 87 , 455
Double-head , 455
Double take , 455
Drag , 455
Drawing
boards , 455
implied geometry , 364
storyboards , 261
Drawing numbers , 15 – 16
animatic , 298
bottom peg animation , 17
breakdown drawings , 18
choices , 16
consistency , 449
front leg representation ,
113
placing before completion , 57
rear leg representation , 114
rules for , 448
runs , 95 – 96
spare , 16
strides , 64
sync testing and , 116
tail , 125
top peg animation , 17
Drawings
action speed and , 24
animation layout , 312
background layout , 312
breakdown , 13 , 14 , 15 , 454
clean-up , 361 , 366
in-between , 19 , 20 , 22
key , 11 , 13 , 16
layout , 457
line , 457
quality , 355
spacing , 24 – 29
timing , 24 – 29 , 56
Drive-off
characteristics , 92
illustrated , 92 , 94
Index
467
opposite foot , 94
Dub , 455
DVD
sales and distribution , 436 – 37
this book , 423 – 25
E Edit
defi ned , 455
fi nal , 411 – 21
scene , 412 – 17
Editors , 455
Eff ects
animated , 405
FX abbreviation , 456
parallax-layered , 400 – 402
sound , 417 – 19
special , 439 , 458
transparency , 402 – 3
Emotions
character states , 212
shades and tones , 175
two-character dialog , 185
universal, appeal , 221
Emphasis points
advanced indication , 165
anticipation , 168
exposure sheet , 163
strength , 164
Environments , 375 – 81
color values , 378
compatibility testing , 377
contrast , 378 – 80
horizontals , 378
light source , 378 – 80
shadows , 378 , 379 , 380
style , 236
verticals , 378
See also Backgrounds
Epson GT 15000 scanner , 369
Execution , 217
Exposure
DVD sales/distribution , 436 – 37
festivals , 437 – 38
i-Pods, cell phones, and the Web ,
437
short fi lm distribution , 436
television , 436
Exposure sheets , 440 – 50
as absolute record , 448
for alternatively timed options ,
116
animation layers , 445 – 47
animation levels, naming , 448
animator’s notes , 443 – 44
audio breakdown , 444 – 45
benefi ts , 107
colored pencils , 448
custom-made , 445
defi ned , 107 , 439 , 455
doping consistency , 448
elements , 440
expression points , 163
fi eld/fi eld center specifi cation , 449
with fi eld guide , 448
frame lines , 441 – 42
horizontal lines , 441
illustrated , 440
Magpie Pro , 328
neck action , 121
page requirements , 448
in production folder , 452
quadruped walks , 126
rules for , 448 – 50
sections , 440 – 41
shooting/camera instructions ,
447
standard information , 440
top section , 440
writing on , 448
Exposure tests , 455
Exteriors
light source , 379
perspective , 381
Extra charges , 455
Extreme close-up
defi ned , 270
illustrated , 274
use of , 274
See also Shots
Eye blinks , 202 – 6
core , 203
focus on , 202
generic , 203 – 6
importance , 202
in-betweens , 204
lazy , 204 , 206
look direction change and , 205
sequence , 203
Eye brows
angles , 207
curvature , 208
downward , 207
neutral , 207
Eyes
in anticipation , 156
blinking , 175
communication , 203
direction drift , 205
popping , 206
pupil dilation , 206
sudden opening , 204
F Facial expressions , 172 – 79
audio track and , 177
bit and chew , 173 – 74
emotion , 175 – 76
eye blinks , 202 – 6
eye brows , 207 – 8
eyes , 175
key , 177 , 178
process , 177 – 78
studying , 175 – 76
subtle , 176
swallowing/gulping , 174
thumbnail sketches , 178
two-character dialog , 187
working with , 175
See also Dialog
Facial rigs , 179
Fades
to black/white , 276
fade-down , 276 , 277
fade-up , 276
use of , 276 – 77
Fast action , 24
Fastest run , 97
Fast-talking dialog , 170
Feature fi lms , 456
Festivals , 437 – 38
Field center , 456
Field guide
directions , 10
with exposure sheet ,
448
on pegs , 370
scanning area , 370 – 72
scene start location , 450
templates , 308
12 , 10
Field size , 456
File formats , 407
Film
lawyers , 456
optical , 456
posters , 230
projection rates , 31
size , 456
stock , 456
Index
468
Filmmaking
continuity , 281
framing , 267 – 75
line , 282 – 84
rules , 259
staging , 278 – 81
techniques , 267 – 84
transitions , 275 – 78
Final audio mix , 419 – 20
Final Cut Pro , 166 , 298 , 420
Final edit , 411 – 21
assignment , 421
audio mix , 419 – 20
music , 414 – 17
music and eff ects track , 420 – 21
scene edit , 412 – 14
sound eff ects , 417 – 19
stage , 411
Final tracks , 456
editing , 290
expense , 288
line believability , 290
multiple actors and , 289 – 90
need for , 286
recording , 288 – 90
sound quality , 288
takes , 289
tips , 288 – 90
voice artist , 289
wild deliveries , 290
See also Audio tracks
FirstWish Software web site , 327
Fixed costs , 456
Flat-colored drawings , 396 – 97
Flexibility , 34 – 35
Flipping
bouncing ball drawings , 44 , 47 – 48
bouncing fl our sack , 54
defi ned , 14
full-scene , 349 – 50
good , 20
gripping for , 22
hand placement , 14 , 15
importance , 47 , 362
key positions , 348
lower body (walks) , 62
nonfl ipping hand , 62
for placement and accuracy , 349
rolling versus , 22
as skill , 22
things to look for during , 48
top pegs , 348 , 349
upper body (walks) , 75
uses , 22 , 348
walk cycle , 66
See also Rolling
Flour sack . See Bouncing fl our sack
Focus of attention , 306
Foley studio , 418
Follow-through , 365 – 66 , 456
Foot
in drive-off , 92 , 94
in generic walk , 63 , 67
heel movement , 71
heel-to-toe roll , 105
off ground, center of gravity and ,
82
superimposing , 70
in walk cycle , 67
Footage , 456
Foot slides
background movement and ,
128
discrepancy , 130
distance , 70
Foreground
color values , 378
light versus dark , 384
Frame anticipation , 181 – 82
Frame lines , 441 – 43
default , 442
number of , 441 , 442
Frame rates , 410
Frames
animatic , 296 , 297
coloring , 393
colorscript , 319
defi ned , 456
key , 457
numbering , 444
Frames per second (FPS) , 456
Frames (storyboards)
blank , 260
coloring , 264
fi lming and timing , 266
inking in , 264
laying out , 265
rough , 258 , 260
sequential , 258
unfolding-action , 257
Framing , 267 – 75
close-up , 269
dolly (crane) shot , 272
example , 273 – 75
extreme close-up , 270
locked-off shot , 270
midshot , 268
pan , 271
track-in/track-out shot , 271
track/pan , 271
ultrawide shot , 269
wide shot , 268
zip pan , 272 – 73
zoom , 272 – 73
Freeze , 456
Front legs
eccentric action , 114
illustrated , 113
neck action and , 119 , 121
number representation , 113
positioning , 117
See also Quadruped walks
Frosted cells , 456
Full-scene fl ipping , 349 – 50
benefi ts , 349
broad picture , 350
technique , 349
See also Flipping
Funny money , 456
G Games animation , 215 – 16
Generic blink . See Eye blinks
Generic runs . See Runs
Generic walks . See Walks
Geometry, implied , 364
Glossary , 453 – 60
Graded prints , 456
Graticules , 456
Gravity
bouncing fl our sack , 52
centers of , 43 , 82 , 454
in environment , 208 – 11
path of action and , 34
weight and , 147
Green-screen background , 401 , 453 ,
456
Grip, weight and , 150
Guide tracks , 286 – 87
defi ned , 456
lines, reading , 287
recording, webcam , 333
timing/delivery , 286
See also Audio tracks
Gulping , 174
Index
469
H Hand tracing , 456
Harry , 456
Head
body language and , 171
heights , 240
quadruped walk , 122 – 23
rotation , 81 , 122
Head-on runs
balance , 101
distortion , 101
illustrated , 100
weight transfer , 100
See also Runs
High-defi nition (Hi-Def ) , 456
Highlight run , 456
Highlights , 456
Hip movement
in generic walk , 61 , 62
in personality walk , 77 – 79
up and down action , 78
Hit , 456
Horizontals , 378
Hot spots , 456
I Ideas , 217 – 23
bad , 217
best , 222
character design , 243
conceiving/planning , 221
core , 221
good , 217
keywords , 222
presenting , 223
solution , 222 – 23
thumbnail storyboarded , 223
writing down , 222
Impact, bouncing ball , 39
Implied geometry , 364
Imported background artwork ,
396 – 98
Inanimate objects, personality for , 238
In-betweeners , 456
In-betweening , 19 – 22
bounce (fi rst part) , 42 – 44
bounce (second part) , 44 – 46
bouncing ball , 41 – 46
defi ned , 8 , 456
generic walk , 69 – 71
as slog work , 341
slow-ins , 28 – 29
slow-outs , 28 – 29
stage , 344
as therapy , 342
two-dimensional , 341 – 45
In-betweens
accuracy , 43 , 345
body language , 171
bouncing ball , 39 , 48
bouncing fl our sack , 54 , 58
checking , 22 , 42 , 48
defi ned , 7 , 456
eccentric , 42
even , 18
eye blinks , 204
lower body (walks) , 63 – 64
modifi cations , 86
neck action , 121
number needed , 16
pendulum , 7
personality walks , 84 – 86
ping-pong ball , 141
placing on pegs , 19
rubber ball , 139
run assignment , 108 – 9
spacing , 16
staggers , 198
superimposing and , 13
tail , 125
tracing on , 20
Independent fi lmmakers , 457
Inkers , 457
Inking , 457
Interiors
light source , 380
perspective , 381
i-Pods , 437
J Joints
fi nger , 201
range of movement , 199
successive breakouts , 199 – 202
triggering , 200
unfolding , 201
Jumping characters
gravity and , 208 – 11
illustrated , 208
landing balance , 211
plausibility , 211
pushing vertically , 210
See also Character design;
Characters
K Key animators , 457
Key drawings
body language , 166 , 168
charting action between , 25
defi ned , 457
facial expressions , 178
lining up , 13
number, circling , 16
sync position , 168
tracing , 11
Key frames , 457
Key positions
blocking assignment , 335
blocking in , 331 – 35
body language , 162
bouncing ball , 35
bouncing fl our sack , 55
creating , 8 – 12
defi ned , 5
fl ipping , 348
illustrated , 12
linking , 338
lower body (walks) , 60
pendulum , 6
pivot point , 9
positioning frames ahead , 167
sketching , 35
starting location , 8
strides, run , 104 – 8
walking , 5 – 6
L Layers , 400 – 402
connecting , 118
in cycle animation , 403 – 4
exposure sheets , 445 – 47
identifi cation , 115
layout drawings , 313
quadruped walks , 112 , 115 , 126
special eff ects , 439
Layouts , 304 – 13
assignment , 313
design , 304
distance and perspective , 305
dividing , 310 – 12
Index
470
Layouts ( Continued )
drawings , 313 , 457
focus of attention , 306
process , 308 – 10
rough design , 309
silhouetted action , 307
sketch illustration , 313
taping , 54 – 55
types of , 304
See also Animation layouts Back-
ground layouts
Lean-back anticipation , 157
Legs
in contact/squash , 94
in double-bounce walk , 87
in drive-off , 92 , 94
front , 113 – 14
in reach , 93
rear , 114 – 15
in run stride , 93
synching , 115 – 16
weight and , 145
Leica reel , 457
Letterbox formats , 409
Light
against dark , 384
in defi ning form and shape , 386
Lightboxes , 457
Light source , 378 – 80
exterior , 379
interior , 380
for moods , 379
strategically positioned , 385
Line
camera positions and , 283
crossing , 282 – 84
defi ned , 282
as not limiting , 282 – 84
Line breaks , 360
Line drawings , 457
Lines
boiling , 359
energetic , 359
follow-through , 365 – 66
frame , 441 – 43
joining , 360
match , 457
overlapping , 365
pencil , 360 – 61
of perspective , 381
quality , 358 – 61
thick approach , 359
thin approach , 359
tracing , 359
Lip synching , 179 – 84
checking , 326
defi ned , 457
frame anticipation , 181 – 82
mirror use , 180 – 81
mouth movement , 184
practical approach , 183 – 84
teach and bones , 182 – 83
testing , 183
tongue action , 182
two-character dialog , 188
vowel sounds , 179 – 81
See also Dialog Mouth movement
Listening character , 279 , 280
Literary rights agreement , 457
Live action , 457
Locations , 457
Locked-off shot , 270
Lower body (walks)
body rise , 63
fl ipping , 62
foot reach , 63
hip joint , 61 , 62
in-between positions , 63 – 64
key positions , 60
knee bend , 71
passing position , 60 – 62
strides , 63
See also Walks
M Machetes , 248
Magpie Pro , 324 , 326
exposure sheet , 328
interface , 328
mouth demo , 326
mouth sets , 327 , 329
style breakdown details , 328
Mag tracks , 457
Mann Pacifi c Northwest Film Scoring
Program , 415 – 16
Mark-ups , 457
Mass
bouncing ball , 34 , 40 – 41
distorting , 46
Match cut , 457
Match lines , 457
Matte , 457
Matte run , 457
Meaning , 226 – 27
Merchandising , 457
Midground, color values , 378
Midshot
defi ned , 268
illustrated , 268
use of , 274
Minimalism , 242
Mirror, in dialog work , 180 – 81
Mixing
defi ned , 419
fi nal , 419 – 20
Model sheets , 249 , 457
Motivation, in two-character dialog ,
186
Mouth movement
bit and chew , 174 – 75
lips , 183
lips synchronization , 184
smile , 175
speed , 169
teeth , 182 – 83
timing , 172
tongue , 182
Mouth sets , 327 , 329
Mouth shapes
character anatomy and , 180
contrasting , 180
expression , 167
open , 167
open size , 179
passively positioned , 188
prechoosing , 327
rapidly changing , 169
vowel sounds , 179 – 81
Moving backgrounds
defi ned , 126 – 27
distance , 127
element positioning , 128
foot slides and , 128
repeat pattern , 127
walk cycle , 127
Moviola , 457
Mov (QuickTime) fi le format , 407
Multilayered backgrounds
distant layer , 129
midground layer , 129
movement matching , 130
See also Backgrounds
Multiplane action , 130
Multiplane cameras , 457
Music
in fi nal edit , 414 – 17
Pacifi c Northwest Film Scoring
Program and , 415 – 16
Index
471
as personal taste , 414
recommendation , 416 – 17
Music and eff ects (M & E) tracks ,
420 – 21
Mute , 457
N Neck action
exposure chart , 121
front legs and , 119 , 121
quadruped walk , 120 – 21
rotation , 122
Negative pick-up , 457
Neg cutting , 457
Nonwalk pans , 131
NTSC , 457
Numbering drawings , 15 – 16
before completion , 57
choices , 16
rules , 448 , 449
runs , 95 – 96
spare numbers , 16
strides , 64
Numbers
frame , 444
scan , 373
scene , 312 , 374
O Observations , 89
One-shot staging , 279 – 81
camera elevation , 280
defi ned , 279
listening character , 279 , 280
over-the-shoulder , 279 , 280
Open-mouth positions, synching , 167
Optical tracks , 457
Option agreements , 458
Organization , 344
Overlapping action
defi ned , 79 , 458
hands , 79 – 80
on head , 81
places to add , 79
quadruped walks , 119
Overlapping lines , 365
P Pacifi c Northwest Film Scoring
Program , 415 – 16
Pack shot , 458
Paintbox , 458
Painters , 458
PAL , 458
Pans , 271
defi ned , 458
nonwalk , 131
verticals in , 382 – 83
zip , 272 – 73 , 460
Parallax action , 130
Parallax-layered eff ect , 400
Passing positions
arms , 75
body area , 61
defi ned , 60 , 458
illustrated , 61
lower body (walk) , 60 – 62
personality walks , 86
ping-pong ball , 140
rear legs , 115
Path of action , 23 – 24
bouncing ball , 34 , 41
curved , 41
defi ned , 23 , 458
gravity and , 34
remembering , 24
run assignment , 104
Pauses, adding , 56
Peg bars , 369 – 70
defi ned , 458
location , 370
purchasing , 369
Peghole reinforcements , 458
Pegholes , 458
Pegs
bottom , 17
fi eld guide on , 370
putting drawings on , 20 , 21
top , 15 , 17
Pencil Check , 351
Pencil line
at pixel level , 361
style , 360 – 61
Pencil tests , 350 – 54
in animation testing , 350
assignment , 354
attitude , 351
benefi ts , 347 , 350
body language , 171
bouncing ball , 49 – 50
bowling ball , 142
challenge , 353
characteristics , 351
complexity , 49
creating , 350
defi ned , 458
DigiCel’s Flipbook , 351
fi rst , 351
ping-pong ball , 141
poor , 353
rear legs , 114
requirements , 350
rubber ball , 140
shooting , 49 – 50
stage , 351
as “ teacher, ” , 352
technology for , 351
viewing , 50
Pendulum
arc , 23 – 24
assignment , 30 – 31
breakdown position , 7
in-betweens , 7
key positions , 6 , 12
pivotal point , 9 , 21
positions illustration , 8
swinging area , 9
tracing , 11
westward swing , 10 – 11
Percentage exposure , 458
Personality
in character design , 238
inanimate object , 238
Personality walks , 77 – 90
assignment , 90
back view , 83
balance , 81 – 84
center of gravity , 82
chart timing and variation , 88 – 89
double-bounce , 87
dynamic key pose modifi cation ,
84 – 85
front view , 83
hand action , 79 – 80
head rotation , 81
hip rotation , 77 – 79
in-between modifi cations , 86
in-between placement , 84 – 86
overlapping action on head , 81
passing position modifi cation , 86
shoulder rotation , 77 – 79
timing , 84 – 86
torso twist , 78
See also Walks
Perspective
backgrounds , 381 – 82
Index
472
Perspective ( Continued )
in layouts , 305
lines of , 381
Photographic references , 262
Photo-rotos , 458
Pilot fi lms , 458
Ping-pong ball
bounce comparison , 142 – 43
in-betweens , 141
passing positions , 140
pencil test , 141
splash position , 140
Pivotal point
alignment , 20 , 21
lining up , 11
pendulum , 9 , 21
tracing , 11
Placement
fl ipping for , 349
slowing-in/slowing-out and , 27
timing and , 337 – 40
Poses
communication through , 85
dynamic , 334
key, modifi cation , 84 – 85
outlines , 189
passive , 191
thumbnail , 332 , 334
two-character dialog , 186
weight and , 143 – 45
Pose tests
animatic , 313
benefi ts , 57
bouncing fl our sack , 57 – 58
defi ned , 57
playback , 166
two-character dialog , 187
Positions . See Breakdown positions;
In-betweens; Key positions
Practice, animator , 184
Preplanning , 55
Preproduction
Bacher Boards , 295
color script , 316
defi ned , 219
importance , 221
Press packs , 438
Producers , 458
Production challenge , 215 – 16
Production companies , 458
Production folders , 450 – 52
attached dope sheet , 452
contents , 451
cover , 450
defi ned , 450 , 458
material from other scenes , 451
material in other scenes , 452
special instructions , 451
Production team , 458
Projectors , 458
Proportion, in character design ,
239 – 40
Puma quadruped example , 132 – 35
Punches
anticipation , 152 , 158
distorted perspective , 158
Pupil dilation , 206
Q Quadruped walks , 111 – 36
assignment , 135 – 36
body , 117 – 19
challenges , 111
exposure sheet , 126
front legs , 113 – 14
head , 122 – 23
layer identifi cation , 115
layers , 112 , 126
legs, synching , 115 – 16
moving background , 126 – 28
multilayered backgrounds , 129 – 31
neck action , 120 – 21
nonwalk pans , 131
overlapping action , 119
puma example , 132 – 35
realistic , 132 – 35
rear legs , 114 – 15
reference footage , 136
tail , 123 – 26
See also Walks
R Reach , 93
Realistic quadrupeds , 132 – 35
body parts, breaking down , 133
building up , 135
sections, animating , 134
See also Quadruped walks
Rear legs
number representation , 114
passing position , 115
pencil test , 114
positioning , 117
See also Quadruped walks
Recording sessions , 458
Rectilinear style , 237
Reference footage
quadruped walk , 136
walks , 89
References , 261 – 62
Google , 261
photographs , 262
sketch , 262 – 63
Registration , 458
Renderers , 458
Rendering , 407 – 10
assignment , 410
defi ned , 407 , 458
frame rates , 410
at low resolution , 414
outputting , 408
resolution , 409 – 10
screen format ratio , 408 – 9
Resolution , 409 – 10
Rolling
bouncing ball drawings , 44
defi ned , 14
fl ipping versus , 22
good , 20
illustrated , 14
uses , 348
See also Flipping
Rostrum , 367 , 458
Rotations
head , 81 , 122
hip , 77 – 79
importance , 78
neck , 122
shoulder , 77 – 79
Rotoscoping , 458
Rough animation , 458
Rubber ball
bounce comparison , 142 – 43
bouncing , 138
breakdown drawing , 139
in-betweens , 139
pencil test , 140
Run assignment , 102 – 9
action separation , 107
body lean , 103
circular track , 102 – 3
defi ned , 102
fi nal in-betweens , 108 – 9
fi rst drawing/last drawing , 104

Index
473
footfalls , 105
key stride positions , 104 – 8
paths of action , 104
speed , 103
stride length , 103 , 106
strides, plotting , 104
takeover point , 104
Runs , 91 – 109
action , 91
arm action , 98
body lean , 97 – 98
contact/squash , 94
downhill , 100
drawing numbering , 95 – 96
drive-off , 92 , 94
environmental issues , 99 – 100
exercise , 95 – 96
fastest , 97
head-on , 100 – 101
inclines , 99
key stages , 92 – 94
pointers , 96 – 100
reach , 93
slower , 97
speed , 96 – 97
stride length , 98 – 99
strides , 91 , 93
terrain , 99 – 100
up and down movement , 95
Rushes , 458
S Safe titling , 458
Sales agents , 459
Scanners
Epson GT 15000 , 369
peg bar , 369 – 70
requirement , 368
size , 372 – 73
Scanning , 367 – 74
area , 370 – 72
assignment , 373 – 74
clean-up drawings , 361
graticule , 370
importance , 367
one at a time , 370
purpose , 368
Scans
numbering , 373
resizing , 374
rotating , 374
Scenes
animatic frame numbering , 296 ,
297
current, material from , 452
defi ned , 459
doping consistency , 448
drawings on timeline , 299
edits , 412 – 17
length, underestimating , 301
marking beginning of , 448
numbers , 312 , 374
other, material from , 451
planning , 459
timing, checking , 301 – 2
Scene slate , 459
Schedules , 459
Screen, directions , 10
Screen format ratio , 408 – 9
Screenplays , 459
Scriptwriting , 218 , 224
Scrubbing , 459
Sequences , 459
Shade, in defi ning form and shape ,
386
Shadow run , 459
Shadows
bouncing ball , 46 , 47
defi ned , 459
as illumination element , 378 , 379 ,
380
Shapes, clean-up , 362 – 66
Shooting
with DigiCel’s Flipbook , 125
instructions , 447
pencil test , 49 – 50
setup , 350
storyboards , 265
walk cycle , 69 , 72
Short fi lm distribution , 436
Shots
close-up , 269
dimension , 311
distant, perspective , 321
dolly (crane) , 272
establishing , 273
extreme close-up , 270
light contrast , 321
locked-off , 270
midshot , 268
pack , 458
pan , 271
track-in/track-out , 271 , 460
track/pan , 271
ultrawide , 269
using , 274
wide , 268
zip pan , 272 – 73
zoom , 272 – 73
Shoulder rotation , 77 – 79
Show reel , 459
Silhouetted action , 307
Silhouettes , 190 , 192
in character design , 241 , 244
importance , 189
Skeleton visualization , 183
Slash animation , 459
Slow action , 24
Slower runs , 97
Slowing-in , 26 – 27
bouncing ball , 38
defi ned , 27
drawing placement and , 27
guideline positions and , 29
in-betweening , 28 – 29
Slowing-out , 26 – 27
bouncing ball , 38
defi ned , 27
drawing placement and , 27
guideline positions and , 29
in-betweening , 28 – 29
pendulum swing , 28
Sneak , 459
Sound bench , 459
SoundDogs , 417 , 419
Sound eff ects , 417 – 19
acquiring , 417
creating , 417 – 19
in Foley studio , 418
online libraries , 417
original , 417
recording , 418 – 19
spot , 419
tracks , 413
Sound Forge , 290
Soundtracks , 445 , 459
Special eff ects
layers , 439
percentage exposure , 458
Special instructions , 451
Speed
bouncing fl our sack , 52 – 54
fast , 24
mouth , 169
run assignment , 103
Index
474
Speed ( Continued )
runs , 96 – 97
slow , 24
variance , 25
Spot sound eff ects , 419
Squash
apex positions and , 36
application , 46
bouncing ball , 35 – 37
defi ned , 36
distortion , 36
volume and , 46
Staggers , 196 – 99
defi ned , 196 , 459
example , 197 – 99
in-betweens , 198
Staging , 278 – 81
defi ned , 188
one-shot , 279 – 81
silhouettes , 189 , 190 , 192
in story telling , 190
two-character dialog , 188 – 92
two-shot , 278
Steinbeck , 459
Sticking , 459
Sting , 459
Stories
great , 218
scripted scenes , 224
sections , 224
theme emergence , 222
Storyboards , 255 – 66
assignment , 266
checking , 264 – 66
coloring , 264
for complex action , 259
comprehensive sheet template , 257
construction methods , 255
defi ned , 459
“ down and dirty, ” , 265
drawing , 261
drawing synchronization , 299
fi nalizing , 259
illustrated , 256
information , 257
inspiration , 261
litmus test , 265
process , 260 – 64
references , 261 – 63
rough frame , 258
roughing out , 263
sequence number , 257
sequential frames , 258
shooting , 265
starting , 260
thumbnail sequence , 251
thumbnail style , 253 – 54
unfolding-action frames , 257
See also Frames
Storylines , 459
Storytelling
expressing visually , 225
ideas , 217 – 23
meaning , 226 – 27
of storyline , 275
Walt Disney and , 218
WTF question , 226 – 27
Stretch
amount dependencies , 38
application , 46
bouncing ball , 37 – 38
defi ned , 37
dropping-down/rising up eff ects ,
37
length , 45
motion blur eff ect , 37
volume and , 46
Strides
generic run , 91 , 93
generic walk , 64 – 65
length, in run , 98 – 99
in walk cycle , 68 – 69
Strobing , 459
Studio overheads , 459
Studios , 459
Studying, facial expressions , 175 – 77
Style
character design , 235 – 38 , 245
colors , 236
with concept art , 135
curvilinear , 236
environment/background , 236
rectilinear , 237
Superimposition
animation , 459
bouncing ball drawings , 45
defi ned , 13 , 459
feet , 70
guide , 19
title , 459
using , 20
Swallowing , 174
Swing, smoothness , 21
Sync
animatic , 299
body language and sound , 167
defi ned , 459
key drawings , 168
legs , 115 – 16
lip , 179 – 84
moving , 118
open-mouth positions , 167
sound, points , 182
testing , 116
T Tails
animating , 125
back legs and , 124
generic approach , 124
in-betweens , 125
movement , 123 , 124
numbering , 125
See also Quadruped walks
Teeth and bones , 182 – 83
Telecine , 459
Television , 436
10-step foundation course, this book ,
3 – 4
Theatrical fi lms , 459
Three-dimensional (3D) animation , 459
Throws
anticipation , 153
positions , 200
speed and distance from , 200
Thumbnails , 251 – 54
assignment , 254
creating , 252
defi ned , 459
number per scene , 253
pose , 332 , 334
process , 253
storyboard sequence , 251
storyboard style illustration , 254
uses , 251 – 52
Tiling , 459
Timeline
audio , 301 , 420
scene drawings on , 299
Timing
animatic , 299
bouncing ball , 38 – 40
error , 301
ideas, writing , 56
inaccurate , 350
mouth movement , 172
personality walks , 84 – 86
placement and , 337 – 40

Index
475
scene , 301 – 2
two-character dialog , 185
at uppermost apex , 38
Titles , 405
Tongue action , 182
ToonBoom Studio , 125 , 390 , 391
Top-lit/backlit shoots , 459
Top pegs
fl ipping , 348 , 349
numbering drawings and , 15
as preferable , 17
using , 17
See also Pegs
Tracebacks , 460
Tracing
breakdown drawing , 12 , 13
down , 460
key drawings , 11
line , 359
Track-in/track-out shot , 271 , 460
Track/pan , 271
Transfers , 460
Transitions
cut , 275
dissolve , 277
fade-up/fade-down , 276 – 77
pace/mood , 275
wipe , 277 – 78
Transparency
defi ned , 402
eff ect , 402 – 3
Treatments , 460
Trial and error correction , 122
Triple bidding , 460
TV cut-off , 460
Two-character dialog , 184 – 92
argument , 188 – 89
assignment , 193
body language , 186
communication in , 186
defi ned , 184 – 85
delivery timing , 185
emotion , 185 , 186
facial expressions , 187
hearing character , 186
lip sync , 188
motivation , 186
pose , 186
pose test , 187
process , 187 – 88
staging , 188 – 92
storyboard , 188
See also Dialog
Two-dimensional (2D) animation , 460
Two-dimensional (2D) in-betweening ,
341 – 45
Two-shot staging , 278
U Ultrawide shot , 269
Upper body (walks)
arms , 75
balance , 73
fl ipping , 75
forward lean , 73
illustrated , 72
pelvic area alignment , 74
See also Walks
V Verticals , 378 , 382 – 83
Viz dev . See Concept art
Voiceovers , 460
Voice talent , 460
Volume
squash and , 46
stretch and , 46
Vowel sounds , 179 – 80
W Walk cycle , 65 – 69
background , 127
contact feet positions , 67
defi ned , 65
fl ipping , 66
illustrated , 65
middle position , 67
shooting , 69 , 72
slide distances , 70
strides , 63 – 64 , 68 – 69
Walks , 59 – 76
assignment , 76
diffi culty , 59
double-bounce , 87
elements , 59
generic , 59 – 76
in-betweening on one’s , 69 – 71
key positions , 5 – 6
lower body , 60 – 64
observation , 89
reference footage , 89
stages , 59
testing , 72
upper body , 72 – 76
walk cycle , 65 – 69
See also Personality walks ;
Quadruped walks
Web exposure , 437
Wedge tests , 460
Weight , 137 – 50
absence , 146
assignment , 149 – 50
body and , 143 – 44 , 147
bouncing ball , 34 , 40 – 41
bouncing fl ower sack , 52
bowling ball , 141 – 42
character movement and , 149
comparison , 142 – 43
creation tips , 145 – 49
defi ned , 460
gravity and , 147
grip and , 150
illusion , 143
leg strength and , 145
lifting , 147
objects , 146
overview , 137 – 38
ping-pong ball , 140 – 41
pose and , 143 – 45
rubber ball , 138 – 40
struggle with , 150
uses , 137
Weightlessness , 146
Widescreen 16x9 formats , 408 , 409 , 460
Wide shot
defi ned , 268
illustrated , 268
use of , 274
See also Shots
Wipes
defi ned , 277
illustrated , 277
styles , 278
Withoutabox , 437 – 38
Wooden , 460
WTF ( “ What’s that for? ” ) , 226 – 27
X X-sheets . See Exposure sheets
Z Zip pan , 272 – 73 , 460
Zoom , 272 – 73 , 460