gprs ve mms telefonu - gscs cdn b2c service
TRANSCRIPT
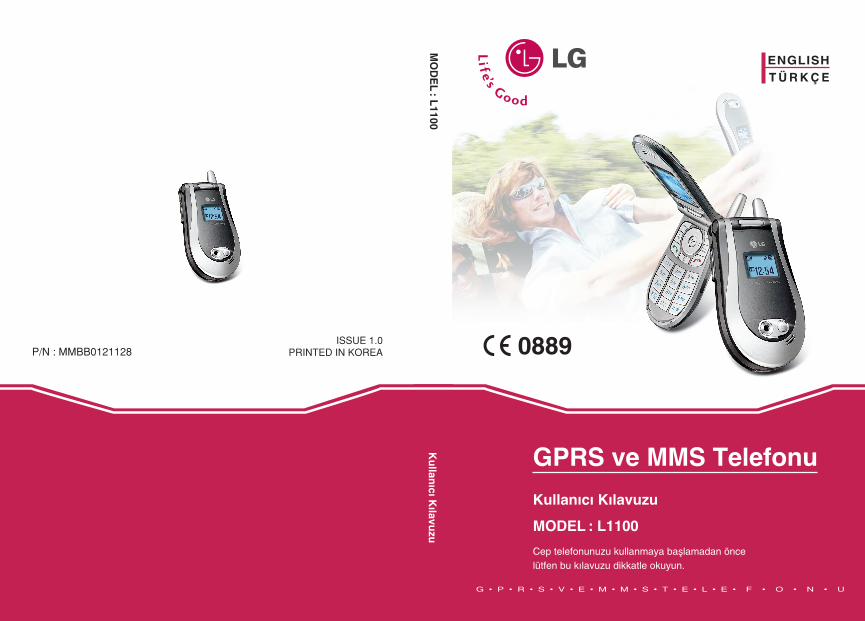
ENGLISHT Ü R K Ç E
P/N : MMBB0121128ISSUE 1.0
PRINTED IN KOREA
MO
DE
L:
L1100
G • P • R • S • V • E • M • M • S • T • E • L • E • F • O • N • U
GPRS ve MMS Telefonu
Kullan\c\ K\lavuzu
MODEL : L1100
Cep telefonunuzu kullanmaya baßlamadan önce lütfen bu k\lavuzu dikkatle okuyun.
Ku
llan\c\K
\lavuzu
TÜRKÇE
GPRS ve MMS TelefonuKullan\c\ K\lavuzu
MODEL: L1100Cep telefonunuzu kullanmaya baßlamadan önce lütfen bu k\lavuzu dikkatle okuyun.
Kullan\c\ k\lavuzunda, bu telefonun kullan\lmas\ veçal\ßt\r\lmas\yla ilgili önemli bilgiler bulunmaktad\r. En iyiperformans\ elde etmek ve telefona gelebilecek hasarlar\ ya datelefonun yanl\ß kullan\lmas\n\ önlemek için burada verilen tümbilgileri dikkatlice okuyun. Bu kullan\c\ k\lavuzunda aç\kçaonaylanmayan de©ißiklikler, cihaz\n garantisini geçersiz k\labilir.
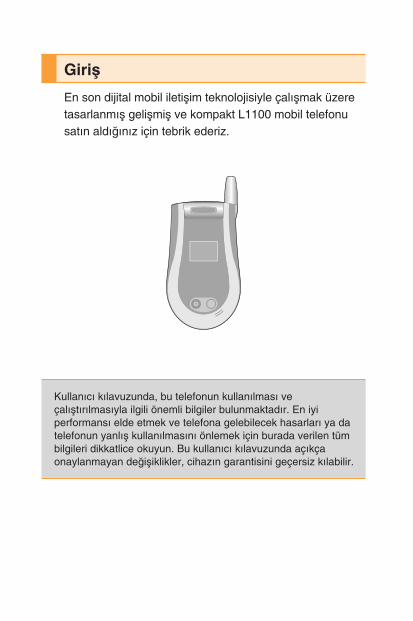
Giriß
En son dijital mobil iletißim teknolojisiyle çal\ßmak üzeretasarlanm\ß gelißmiß ve kompakt L1100 mobil telefonusat\n ald\©\n\z için tebrik ederiz.
3
Lütfen bu basit kurallar\ okuyun. Kurallar\n çi©nenmesi tehlikeli veyasa d\ß\ olabilir. Bu k\lavuzda daha ayr\nt\l\ bilgiler verilmektedir.
Radyo frekans\ enerjisine maruz kalma
Radya dalgas\na maruz kalma ve Özel Emilim H\z\ (SAR - Specific Absorption Rate) bilgileri
L1100 modeli mobil telefon, radyo dalgalar\na maruz kalmayla ilgiligüvenlik gereksinimlerine uyumlu olacak ßekilde tasarlanm\ßt\r. Bugereksinim, yaßa ve sa©l\k durumuna ba©l\ olmaks\z\n tüm kißileringüvenli©ini garanti alt\na almak için tasarlanm\ß güvenlik s\n\rlar\n\içeren bilimsel kurallar\ temel almaktad\r.
• Radyo dalgalar\na maruz kalma kurallar\nda, Özel Emilim H\z\ya da SAR olarak bilinen bir ölçüm birimi kullan\lmaktad\r. SARtestleri, telefonun kullan\lan tüm frekans bantlar\nda onayl\ enyüksek güç seviyesinde iletim yapt\©\ standart bir yöntemkullan\larak gerçekleßtirilmektedir.
• Çeßitli LG telefonu modellerinin SAR seviyeleri aras\ndafarkl\l\klar olmas\na karß\n, tüm modeller radyo dalgalar\namaruz kalmayla ilgili kurallar\n gereklerini yerine getirecekßekilde tasarlanm\ßt\r.
• Uluslararas\ |yonize Olmayan Radyasyon Korumas\ Komisyonu(ICNIRP), önerilen SAR s\n\r\n\ on (10) gram doku üzerinde2W/kg olarak belirlemißtir.
• Kulakta kullan\m için DASY3 ile test edilen bu telefon modelininen yüksek SAR de©eri, 0,691 W/kg’dir (10g).
• Elektrik ve Elektronik Mühendisleri Enstitüsü (IEEE) taraf\ndanbelirlenen SAR s\n\r\n\ benimsemiß ülkeler/bölgelerde (örn. ABD,Kanada, Avustralya ve Tayvan) yaßayan kißiler için SAR verisibilgisi, bir (1) gram doku üzerinde ortalama 1.6 W/kg olacakßekilde belirlenmißtir.
Güvenli ve etkili kullanma kurallar\

4
Ürüne özen ve bak\m
Uyar\: Yaln\zca bu telefon modelinde kullan\lmas\ onaylanm\ßpilleri, ßarj aletlerini ve aksesuarlar\ kullan\n. Di©er türlerdeürünlerin kullan\lmas\, telefonun onaylar\n\ ya da garantisinigeçersiz k\labilir ve tehlikeli olabilir.
• Bu cihaz\ sökmeyin. Onar\m gerekti©inde yetkili bir servisteknisyenine götürün.
• TV, radyo ya da kißisel bilgisayar gibi elektrikli aletlerden uzaktutun.
• Bu ürün, radyatör ve f\r\n gibi \s\ kaynaklar\ndan uzaktutulmal\d\r.
• Düßürmeyin.
• Bu ürünü mekanik titreßim ya da darbelere maruz b\rakmay\n.
• Bu telefonun kaplamas\, ambalaj malzemeleri ya da vinil sarmamalzemeleriyle sar\ld\©\nda bozulabilir.
• Cihaz\n d\ß yüzeyini temizlemek için kuru bir bez kullan\n.(Benzin, tiner ya da alkol gibi solventler kullanmay\n.)
• Bu ürünü aß\r\ duman ya da toza maruz b\rakmay\n.
• Telefonu kredi kartlar\ ya da seyahat biletlerinin yan\nakoymay\n; manyetik ßeritlerin üzerinde bulunan verilerietkileyebilmektedir.
• Ekrana keskin bir nesneyle vurmay\n; aksi takdirde telefonahasar verebilir.
• Telefonun s\v\ya ya da neme maruz kalmas\n\ önleyin.
• Kulakl\k gibi aksesuarlar\ dikkatli kullan\n. Gereksiz yere antenedokunmay\n.
Kurallar
Etkili telefon kullan\m\
En az güç tüketerek en iyi performans\ elde etmek için lütfen:
• Telefonu, di©er telefonlarla konußurken yapt\©\n\z gibi tutun.Do©rudan mikrofona konußurken anteni yukar\ do©rultun veomzunuzun üzerinde kalmas\n\ sa©lay\n. Anten aç\labilir/geriçekilebilir türdeyse, görüßme s\ras\nda aç\lmal\d\r.
• Telefon kullan\l\rken anteni tutmay\n. Anteni tuttu©unuzdagörüßmedeki ses kalitesi bozulabilir ve telefonun gerekti©indenfazla güçle çal\ßarak konußma ve bekleme sürelerinink\salmas\na neden olabilir.
• Mobil telefonunuzun k\z\lötesi özelli©i varsa, k\z\lötesi \ß\n\ aslainsanlar\n gözüne do©rultmay\n.
Elektronik cihazlar
Tüm mobil telefonlar, performans\n\ etkileyen girißimlere nedenolabilir.
• Mobil telefonu, izin almadan t\bbi cihazlar\n yan\ndakullanmay\n. Telefonu, kalp pillerine yak\n yerlere, örne©ingö©sünüzün üzerindeki ceplere yerleßtirmeyin.
• Mobil telefonlar baz\ ißitme cihazlar\nda girißime neden olabilir.
• Küçük çapl\ girißimler TV’leri, radyolar\, PC’leri vs. etkileyebilir.
5

Yol güvenli©i
Araç kulland\©\n\z yerlerde sürüß s\ras\nda mobil telefonkullan\m\yla ilgili yasalar\ ve yönetmelikleri kontrol edin.
• Sürüß s\ras\nda telefonu elde tutarak konußmay\n.
• Sürüß s\ras\nda dikkatinizi tamamen yola verin.
• Mümkünse telefonla uzaktan konußma (handsfree) kitlerinikullan\n.
• Sürüß koßullar\ gerektiriyorsa arama yapmadan ya da gelenaramay\ yan\tlamadan önce kenara çekin ve park edin.
• RF enerjisi, araba teybi, güvenlik cihazlar\ gibi arac\n\z\n baz\elektronik sistemlerini etkileyebilir.
• Arac\n\zda hava yast\©\ varsa, sabit ya da taß\nabilir kablosuzcihazlar\ hava yast\©\n\n aç\lmas\n\ engelleyecek ßekildeyerleßtirmeyin. Hava yast\©\n\n çal\ßmas\n\ etkileyece©indenciddi yaralanmalara neden olabilir.
Patlatma ißlemlerinin yap\ld\©\ alanlarPatlatma ißlemlerinin yap\ld\©\ yerlerde telefonu kullanmay\n.Yasaklara, düzenlemelere ve kurallara uyun.
Patlama riski olan ortamlar• Telefonu yak\t istasyonlar\nda kullanmay\n. Yak\t ya da kimyasal
maddelerin yak\n\nda kullanmay\n.
• |çinde mobil telefonunuz varken patlay\c\ gaz, s\v\ ya da di©erpatlay\c\lar\ arac\n\z\n içinde taß\may\n ya da saklamay\n.
Uçakta
Kablosuz cihazlar uçakta girißime neden olabilmektedir.
• Uçaklara binmeden önce mobil telefonunuzu kapat\n.
• Uçak yerdeyken, mürettebattan izin almadan kullanmay\n.
6
Kurallar
ÇocuklarTelefonu, çocuklar\n ulaßamayaca©\ güvenli bir yerde saklay\n.Üründen söküldü©ünde çocuklarda nefes borusunun t\kanmas\naneden olabilecek küçük parçalar bulunmaktad\r.
Acil aramalarAcil aramalar\, her hücresel ßebekede yapamayabilirsiniz. Bunedenle, acil arama yapmak için asla yaln\zca telefonagüvenmemelisiniz. Bölgenizdeki servis sa©lay\c\yla görüßerek bilgial\n.
Pil bilgisi ve bak\m\• Yeniden ßarj etmeden önce pilin tam bitmesi gerekli de©ildir.
Di©er pil sistemlerinin aksine, pilin performans\n\ etkileyebilecekhaf\za etkisi olmayan piller kullan\lmaktad\r.
• Yaln\zca LG pilleri ve ßarj aletleri kullan\n. LG ßarj aletleri, pilinizinen uzun ömürlü olmas\n\ sa©layacak ßekilde tasarlanm\ßt\r.
• Pili sökmeyin ya da k\sa devre yapt\rmay\n.
• Pilin metal temas yüzeylerini temiz tutun.
• Pil art\k yeterli performans sa©layamad\©\nda de©ißtirin. Pil,de©ißme zaman\ gelene kadar yüzlerce kez ßarj edilebilir.
• En uzun ömre sahip olmas\ uzun süre kullan\lmad\©\nda pili ßarjedin.
• Pil ßarj aletini do©rudan güneß \ß\©\na maruz b\rakmay\n ya dabanyo gibi yüksek nem oran\na sahip yerlerde kullanmay\n.
• Pili so©uk ya da s\cak yerlerde b\rakmay\n. Bu durum pilinperformans\n\ etkileyebilir.
7
8
Telefonunuz ............................................................................. 12
• Telefonun parçalar\ ............................................................... 12
• Telefonunuzun özellikleri ...................................................... 13
• Yan tußlar .............................................................................. 14
• Ekranla ilgili bilgiler ............................................................... 15
Baßlang\ç ................................................................................. 17
• SIM kart\n ve telefonun pilinin tak\lmas\ ............................... 17
• Pilin ßarj edilmesi .................................................................. 18
• Adaptörün ç\kart\lmas\ .......................................................... 19
• Telefonu açmak ve kapatmak ............................................... 20
• Erißim kodlar\ ........................................................................ 20
Genel ißlevler ........................................................................... 23
• Arama yapma ve cevaplama ................................................ 23
• Metin girme ........................................................................... 25
• Telefon rehberi ..................................................................... 29
• Arama içi menüsü ................................................................. 29
• Çok kißili ya da konferans görüßmeler .................................. 31
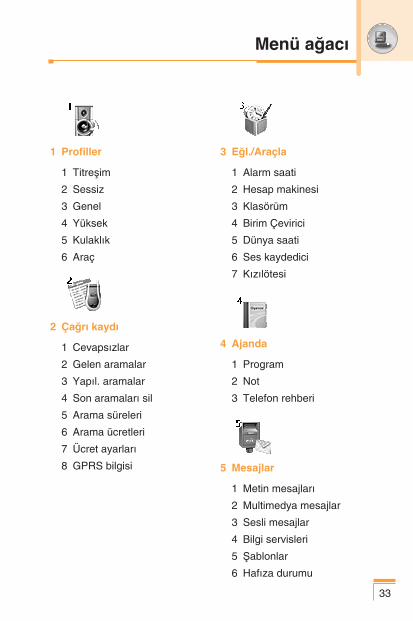
Menü a©ac\ .............................................................................. 33
|ßlevleri ve seçenekleri belirleme .......................................... 35
Profiller [Menü 1] ..................................................................... 36
• Titreßim [Menü 1-1] ............................................................... 36
• Sessiz [Menü 1-2] ................................................................. 36
• Genel [Menü 1-3] .................................................................. 36
• Yüksek [Menü 1-4] .................................................................36
• Kulakl\k [Menü 1-5] .............................................................. 36
• Araç [Menü 1-6] .................................................................... 36
|çindekiler
9
Ça©r\ kayd\ [Menü 2] ............................................................... 38
• Cevapsızlar [Menü 2-1] ......................................................... 38
• Gelen aramalar [Menü 2-2] ................................................... 39
• Yapıl. aramalar [Menü 2-3] ................................................... 40
• Son aramalar\ sil [Menü 2-4] ................................................. 40
• Arama süreleri [Menü 2-5] .................................................... 41
• Arama ücretleri [Menü 2-6] ................................................... 41
• Ücret ayarlar\ [Menü 2-7] ...................................................... 42
• GPRS bilgisi [Menü 2-8] ........................................................ 42
E©l./Araçla [Menü 3] ................................................................ 44
• Alarm saati [Menü 3-1] .......................................................... 44
• Hesap makinesi [Menü 3-2] .................................................. 44
• Klasörüm [Menü 3-3] ............................................................. 45
• Birim Çevirici [Menü 3-4] ....................................................... 46
• Dünya saati [Menü 3-5] ......................................................... 46
• Ses kaydedici [Menü 3-6] ...................................................... 47
• K\z\lötesi [Menü 3-7] ............................................................. 48
Ajanda [Menü 4] ...................................................................... 49
• Program [Menü 4-1] .............................................................. 49
• Not [Menü 4-2] ...................................................................... 50
• Telefon rehberi [Menü 4-3] .................................................... 51
Mesajlar [Menü 5] .................................................................... 58
• Metin mesajlar\ [Menü 5-1] .................................................... 58
• Multimedya mesajlar [Menü 5-2] ........................................... 62
• Sesli mesajlar [Menü 5-3] ..................................................... 69
• Bilgi servisleri [Menü 5-4] ...................................................... 70
10
• Íablonlar [Menü 5-5] ............................................................. 71
• Haf\za durumu [Menü 5-6] ..................................................... 73
Kamera [Menü 6] ..................................................................... 74
• Resim çek [Menü 6-1] ........................................................... 74
• Galeri [Menü 6-2] .................................................................. 76
Java [Menü 7] .......................................................................... 77
• Oyunlar [Menü 7-1] ............................................................... 78
• Uygulamalar [Menü 7-2] ........................................................ 78
• |ndir [Menü 7-3] ..................................................................... 79
• Bilgi [Menü 7-4] ..................................................................... 80
Internet [Menü 8] ..................................................................... 81
• Ana sayfa [Menü 8-1] ............................................................ 82
• Yer imleri [Menü 8-2] ............................................................. 82
• Push mesajlar\ [Menü 8-3] .................................................... 83
• Profiller [Menü 8-4] .................................................................84
• URL’ye git [Menü 8-5] ........................................................... 84
• Önbellek ayarlar\ [Menü 8-6] ................................................. 84
• Güvenlik sertifikasyonlar\ [Menü 8-7] .................................... 85
• Profilleri s\f\rla [Menü 8-8] ..................................................... 85
• WAP bilgisi [Menü 8-9] .......................................................... 85
Ayarlar [Menü 9] ...................................................................... 86
• Tarih ve Saat [Menü 9-1] ...................................................... 86
• Telefon ayarlar\ [Menü 9-2] ................................................... 86
• Ça©r\ ayarlar\ [Menü 9-3] ...................................................... 88
• Güven. ayarlar\ [Menü 9-4] ................................................... 92
|çindekiler
11
• Íebeke ayarlar\ [Menü 9-5] ................................................... 96
• GPRS ayarlar\ [Menü 9-6] ..................................................... 97
• Ayarları sıfırla [Menü 9-7] ...................................................... 98
Soru – Cevap .......................................................................... 99
Aksesuarlar ........................................................................... 102
Technical data ....................................................................... 103
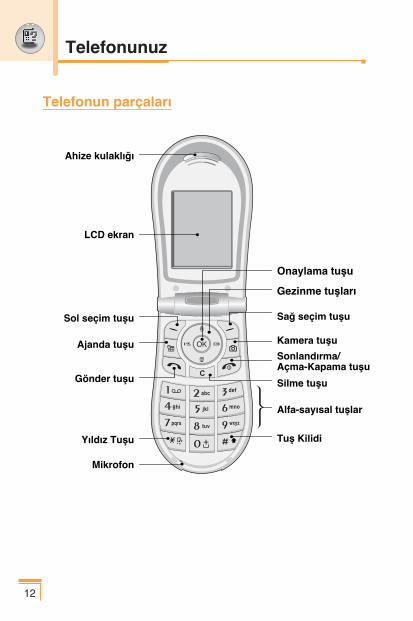
Telefonun parçalar\
Ahize kulakl\©\
LCD ekran
Sol seçim tußu
Ajanda tußu
Gönder tußu
Y\ld\z Tußu
Mikrofon
Sa© seçim tußu
Kamera tußu
Sonland\rma/Açma-Kapama tußu
Silme tußu
Alfa-say\sal tußlar
Tuß Kilidi
Onaylama tußu
Gezinme tußlar\
12
Telefonunuz
13
Telefonunuzun özellikleri
Tuß Aç\klama
Sol seçim tußu/Sa© seçim tußuBu tußlar, ekranda, hemen tußun üzerinde bulunanmetinin belirtti©i ißlevi yerine getirir.
Gezinme tußlar\Telefon ißlevlerine h\zl\ erißim sa©lar.• Yukar\ gezinme tußu
Bu tußa bekleme modunda bast\©\n\zda, telefonrehberinde isme göre arama yapabilirsiniz.
• Aßa©\ gezinme tußuDo©rudan ses kay\t menüsüne gidebilirsiniz. Butußa bas\l\ tutarak do©rudan ses kayd\n\baßlatabilirsiniz.
• Sol gezinme tußuProfil menüsünü açan k\sayol tußu.
• Sa© gezinme tußuMesaj gelen kutusunu açan k\sayol tußu.
Tamam tußu (=Onaylama tußu)Menü seçeneklerini seçer ve ißlemleri onaylar.
Gönder tußuTelefon numaralar\n\ arar ve gelen aramalar\ yan\tlar.Bekleme modunda bu tußa basarak en son gelen,yap\lan ve cevaps\z aramalara çabucakulaßabilirsiniz.
Alfa-say\sal tußlarNumaralar\, harfleri ve baz\ özel karakterleri girmekiçin kullan\l\r.
~0
9
< >
S
14
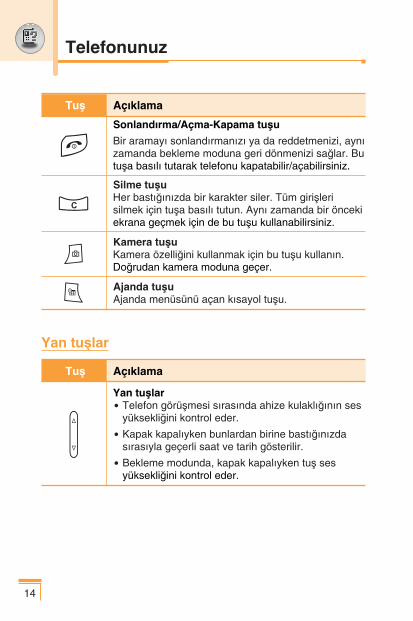
Yan tußlar
Tuß Aç\klama
Sonland\rma/Açma-Kapama tußu
Bir aramay\ sonland\rman\z\ ya da reddetmenizi, ayn\zamanda bekleme moduna geri dönmenizi sa©lar. Butußa bas\l\ tutarak telefonu kapatabilir/açabilirsiniz.
Silme tußuHer bast\©\n\zda bir karakter siler. Tüm girißlerisilmek için tußa bas\l\ tutun. Ayn\ zamanda bir öncekiekrana geçmek için de bu tußu kullanabilirsiniz.
Kamera tußuKamera özelli©ini kullanmak için bu tußu kullan\n.Do©rudan kamera moduna geçer.
Ajanda tußuAjanda menüsünü açan k\sayol tußu.
Tuß Aç\klama
Yan tußlar• Telefon görüßmesi s\ras\nda ahize kulakl\©\n\n ses
yüksekli©ini kontrol eder.
• Kapak kapal\yken bunlardan birine bast\©\n\zdas\ras\yla geçerli saat ve tarih gösterilir.
• Bekleme modunda, kapak kapal\yken tuß sesyüksekli©ini kontrol eder.
C
Q
T
Telefonunuz
E
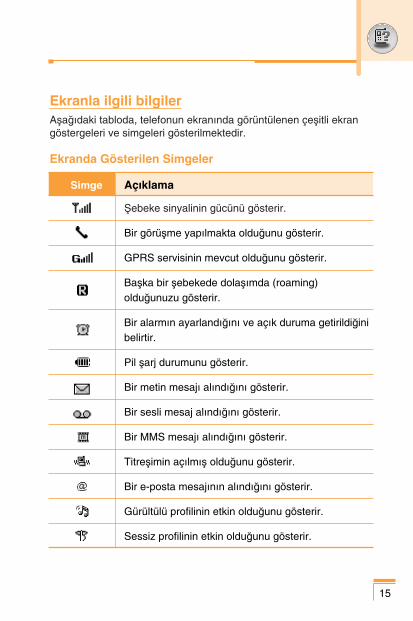
Simge Aç\klama
Íebeke sinyalinin gücünü gösterir.
Bir görüßme yap\lmakta oldu©unu gösterir.
GPRS servisinin mevcut oldu©unu gösterir.
Baßka bir ßebekede dolaß\mda (roaming)oldu©unuzu gösterir.
Bir alarm\n ayarland\©\n\ ve aç\k duruma getirildi©inibelirtir.
Pil ßarj durumunu gösterir.
Bir metin mesaj\ al\nd\©\n\ gösterir.
Bir sesli mesaj al\nd\©\n\ gösterir.
Bir MMS mesaj\ al\nd\©\n\ gösterir.
Titreßimin aç\lm\ß oldu©unu gösterir.
Bir e-posta mesaj\n\n al\nd\©\n\ gösterir.
Gürültülü profilinin etkin oldu©unu gösterir.
Sessiz profilinin etkin oldu©unu gösterir.
15
Ekranla ilgili bilgilerAßa©\daki tabloda, telefonun ekran\nda görüntülenen çeßitli ekrangöstergeleri ve simgeleri gösterilmektedir.
Ekranda Gösterilen Simgeler
16
Telefonunuz
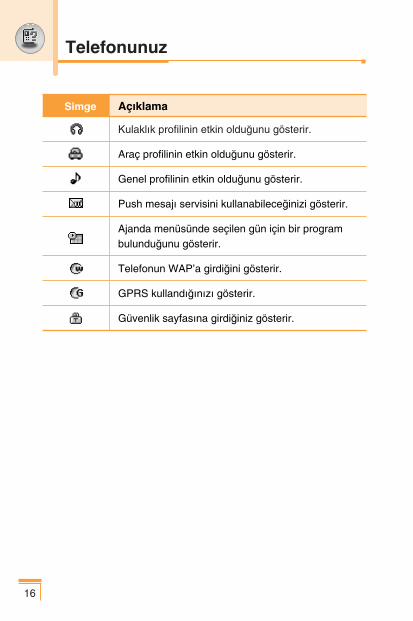
Simge Aç\klama
Kulakl\k profilinin etkin oldu©unu gösterir.
Araç profilinin etkin oldu©unu gösterir.
Genel profilinin etkin oldu©unu gösterir.
Push mesaj\ servisini kullanabilece©inizi gösterir.
Ajanda menüsünde seçilen gün için bir programbulundu©unu gösterir.
Telefonun WAP’a girdi©ini gösterir.
GPRS kulland\©\n\z\ gösterir.
Güvenlik sayfas\na girdi©iniz gösterir.
17
Baßlang\ç
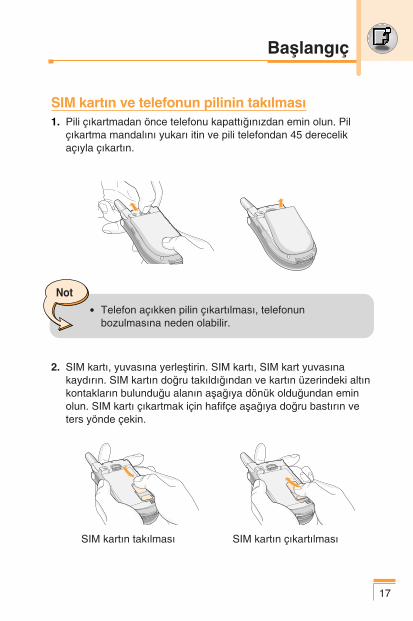
SIM kart\n ve telefonun pilinin tak\lmas\1. Pili ç\kartmadan önce telefonu kapatt\©\n\zdan emin olun. Pil
ç\kartma mandal\n\ yukar\ itin ve pili telefondan 45 derecelikaç\yla ç\kart\n.
2. SIM kart\, yuvas\na yerleßtirin. SIM kart\, SIM kart yuvas\nakayd\r\n. SIM kart\n do©ru tak\ld\©\ndan ve kart\n üzerindeki alt\nkontaklar\n bulundu©u alan\n aßa©\ya dönük oldu©undan eminolun. SIM kart\ ç\kartmak için hafifçe aßa©\ya do©ru bast\r\n veters yönde çekin.
Not
• Telefon aç\kken pilin ç\kart\lmas\, telefonunbozulmas\na neden olabilir.
SIM kart\n tak\lmas\ SIM kart\n ç\kart\lmas\

18
3. Pilin alt taraf\ndaki ç\k\nt\lar\, tutma yerlerine sokun. Ard\ndan,mandaldan klik sesi gelene kadar pilin üst yar\s\n\ yerine itin.
Pilin ßarj edilmesiYaln\zca telefonunuzla birlikte verilen adaptörü kullan\n.
1. Pil telefonda do©ru ßekilde yerleßtirilmiß durumdayken seyahatadaptörünün kablosunu telefonun alt taraf\na tak\n. Kablokonektöründeki okun, telefonun ön taraf\na dönük oldu©undanemin olun.
2. Adaptörün di©er ucunu, elektrik prizine tak\n.
Baßlang\ç
Not
• SIM kart\n metal yüzeyleri, çizilerek kolayca zarargörebilir. SIM kart\ tak\p ç\kart\rken dikkatli olun. SIMkartla birlikte verilen talimatlar\ uygulay\n.
19
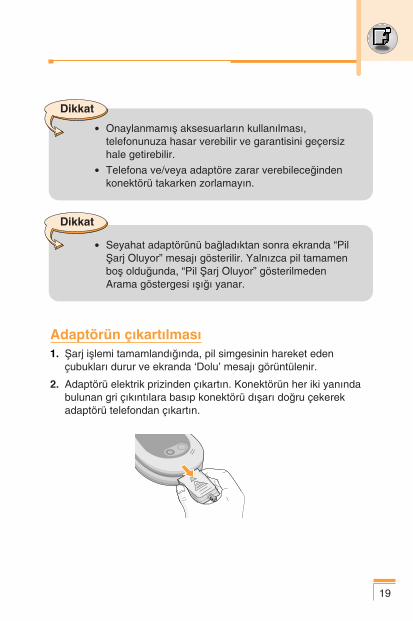
Adaptörün ç\kart\lmas\1. Íarj ißlemi tamamland\©\nda, pil simgesinin hareket eden
çubuklar\ durur ve ekranda ‘Dolu’ mesaj\ görüntülenir.
2. Adaptörü elektrik prizinden ç\kart\n. Konektörün her iki yan\ndabulunan gri ç\k\nt\lara bas\p konektörü d\ßar\ do©ru çekerekadaptörü telefondan ç\kart\n.
Dikkat
• Onaylanmam\ß aksesuarlar\n kullan\lmas\,telefonunuza hasar verebilir ve garantisini geçersizhale getirebilir.
• Telefona ve/veya adaptöre zarar verebilece©indenkonektörü takarken zorlamay\n.
• Seyahat adaptörünü ba©lad\ktan sonra ekranda “PilÍarj Oluyor” mesaj\ gösterilir. Yaln\zca pil tamamenboß oldu©unda, “Pil Íarj Oluyor” gösterilmedenArama göstergesi \ß\©\ yanar.
Dikkat
Telefonu açmak ve kapatmak
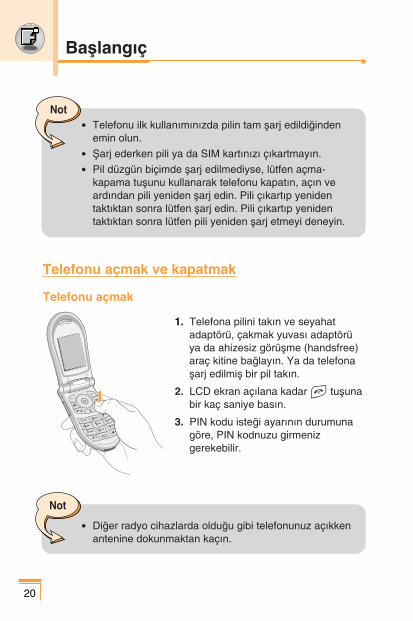
Telefonu açmak
1. Telefona pilini tak\n ve seyahatadaptörü, çakmak yuvas\ adaptörüya da ahizesiz görüßme (handsfree)araç kitine ba©lay\n. Ya da telefonaßarj edilmiß bir pil tak\n.
2. LCD ekran aç\lana kadar E tußunabir kaç saniye bas\n.
3. PIN kodu iste©i ayar\n\n durumunagöre, PIN kodnuzu girmenizgerekebilir.
20
Not• Telefonu ilk kullan\m\n\zda pilin tam ßarj edildi©inden
emin olun.
• Íarj ederken pili ya da SIM kart\n\z\ ç\kartmay\n.
• Pil düzgün biçimde ßarj edilmediyse, lütfen açma-kapama tußunu kullanarak telefonu kapat\n, aç\n veard\ndan pili yeniden ßarj edin. Pili ç\kart\p yenidentakt\ktan sonra lütfen ßarj edin. Pili ç\kart\p yenidentakt\ktan sonra lütfen pili yeniden ßarj etmeyi deneyin.
Not
• Di©er radyo cihazlarda oldu©u gibi telefonunuz aç\kkenantenine dokunmaktan kaç\n.
Baßlang\ç
21
Telefonu kapatmak1. LCD ekran kapanana kadar E tußuna bir kaç saniye bas\n.
Erißim kodlar\Telefonunuzun izinsiz kullan\lmas\n\ önlemek için bu bölümdeaç\klanan erißim kodlar\n\ kullanabilirsiniz. Erißim kodlar\ (PUK vePUK2 kodlar\ d\ß\nda) Kodlar\ de©ißtir ißleviyle [Menü 9-4-5]de©ißtirilebilir. 86. sayfaya bak\n.
PIN kodu (4–8 basamak)PIN (Kißisel Kimlik Numaras\) kodu, SIM kart\n\z\, izinsiz kullan\makarß\ korur. PIN kod genellikle SIM kart\n\zla birlikte verilir. PINkodu iste©i, Aç\k de©erine ayarl\ oldu©unda, telefonunuz heraç\ld\©\nda PIN kod sorulacakt\r. PIN kodu iste©i, Kapal\ de©erineayarl\ oldu©unda, telefonunuz PIN kod sorulmadan do©rudanßebekeye ba©lan\r.
PIN2 kodu (4–8 basamak)Baz\ SIM kartlarla birlikte verilen PIN2 kodu, Arama Ücreti Bilgisive Sabit arama numaras\ gibi ißlevlerin kullan\lmas\ için gereklidir.Bu ißlevler yaln\zca SIM kart\n\z destekledi©inde kullan\labilir. Dahafazla bilgi için ßebeke servis sa©lay\c\n\zla görüßün.
PUK kodu (4–8 basamak)PUK (PIN Bloke Açma Anahtar\) kodu, bloke olmuß PIN kodlar\n\de©ißtirmek için kullan\l\r. PUK kod SIM kart\n\zla birlikte verilebilir.Verilmediyse, kodu ö©renmek için ßebeke operatörünüzle görüßün.Kodu kaybetti©inizde de ßebeke operatörünüzle görüßebilirsiniz.
22
PUK2 kodu (4–8 basamak)Baz\ SIM kartlarla birlikte verilen PUK2 kodu, bloke olmuß PIN2kodunun de©ißtirilmesi için kullan\l\r. Kodu kaybetti©inizde deßebeke operatörünüzle görüßebilirsiniz.
Güvenlik kodu (4–8 basamak)Güvenlik kodu, telefonu, izinsiz kullan\mlara karß\ korur. Varsay\langüvenlik kodu ‘0000’d\r. Güvenlik kodu tüm telefon kay\tlar\n\nsilinmesinde ve Fabrika ayarlar\ menüsünü etkinleßtirmek içinkullan\l\r. Ayn\ zamanda telefonun izinsiz kullan\lmas\n\ önlemekiçin kullan\lan telefon kilidi ißlevini etkinleßtirmek ve kapatmak içinde güvenlik kodu gerekir. Güvenlik kodu varsay\lan ayar\, Güvenlikayarlar\ menülerinde de©ißtirilebilir.
Engelleme ßifresiÇa©r\ engelleme ißlevini kullan\rken engelleme ßifresinin girilmesigerekir. Íifreyi, bu ißleve abone oldu©unuzda ßebekeoperatörünüzden alabilirsiniz. Daha fazla bilgi için 84. sayfayabak\n.
Baßlang\ç
23
Genel ißlevler
Arama yapma ve cevaplama
Arama yapma1. Telefonunuzun aç\k oldu©undan emin olun.
2. Alan koduyla birlikte istedi©iniz telefon numaras\n\ girin. LCDekranda bir telefon numaras\n\ düzenlemek için, sol/sa© gezinmetußlar\na basarak imleci istedi©iniz konuma getirin ve silmetußuna (C) basarak her seferinde birer basamak silerekistedi©iniz düzenlemeyi yap\n.
� Tüm numaray\ silmek için silme tußuna (C) bas\n ve bas\l\tutun.
3. Numaray\ aramak için gönder tußuna (S) bas\n.
4. Aramay\ kapatmak için sonland\rma tußuna (E) ya da sa©seçim tußuna bas\n. Kapa©\ kapatarak da aramayasonland\rabilirsiniz.
Gönderme tußunu kullanarak arama yapma1. Bekleme modunda gönder tußuna (S) bast\©\n\zda, en sonra
gelen, yap\lan ve cevaps\z aramalar\n telefon numaralar\gösterilir.
2. Yukar\/aßa©\ gezinme tußunu kullanarak istedi©iniz numaray\seçin.
3. tußuna bas\n S.
Uluslararas\ aramalar yapma1. Uluslararas\ arama ön kodu için 0 tußuna bas\n ve bas\l\
tutun. ‘+’ karakteri, otomatik olarak uluslararas\ erißim kodunuseçer.
2. Ülke kodunu, alan kodunu ve telefon numaras\n\ girin.
3. tußuna bas\n S.
Aramay\ sonland\rmaGörüßmeniz bitti©inde, sonland\rma (E) tußuna bas\n.
Telefon rehberinde arama yapmaS\k arad\©\n\z isimleri ve telefon numaralar\n\, SIM kart ve/veyatelefon haf\zas\na yani Telefon rehberi’e kaydedebilirsiniz. Telefonrehberinde istedi©iniz ismi bularak, bu isme ba©l\ telefon numaras\n\arayabilirsiniz. Telefon rehberi ißlevi hakk\nda daha fazla bilgi içinlütfen 50-56. sayfalara bak\n.
Ses seviyesinin ayarlanmas\Görüßme s\ras\nda ahize hoparlörünün ses seviyesini ayarlamakiçin yan tußlar\ ( ) kullan\n. Sesi açmak için yukar\ yan tußa,azaltmak için aßa©\ yan tußa bas\n.
Aramalar\n yan\tlanmas\Bir arama geldi©inde, telefonunuz çalar ve ekranda yan\p sönen birtelefon simgesi görüntülenir. Arayan kißinin numaras\ alg\lan\yorsa,bu numara (Rehber’de kay\tl\ysa isim ya da foto©raf) gösterilir.
1. Gelen aramay\ cevaplamak için kapa©\ aç\n.
2. Aramay\ kapatmak için kapa©\ kapat\n ya da E tußuna bas\n.
Genel ißlevler
24
Not
� Rehberi ya da di©er menü ißlevlerini kullan\rken biraramay\ yan\tlayabilirsiniz.
25
T9 moduBu mod, her harf için ilgili tußa bir kez dokunarak sözcüklerigirmenize olanak sa©lar. Tuß tak\m\ndaki her tußa birden fazlaharf atanm\ßt\r. T9 modu, bast\©\n\z tußlar\ otomatik olarak birdahili sözlükle k\yaslayarak do©ru sözcü©ü arar. Dolay\s\ylageleneksel ABC moduna göre çok daha az say\da tußabasarak sözcükleri girebilirsiniz. Bu ißleve bazen ak\ll\ metingirißi de denmektedir.
ABC moduBu modda, harfleri, ilgili tußa harf gösterilene kadar bir, iki, üçya da dört kez basarak girebilirsiniz.
123 modu (Say\ modu)Her numara için ilgili tußa bir kez basman\z yeterlidir. Metingirißi alan\nda 123 moduna geçmek için, 123 modu gösterilenekadar # tußuna bas\n.
Sinyal gücüTelefonun LCD ekran\ndaki sinyal göstergesi ( ) ilebulundu©unuz ortamdaki sinyalin gücünü görebilirsiniz. Sinyal gücü,özellikle binalar\n içlerinde de©ißebilir. Bir pencereye do©ruilerleyerek sinyal gücü al\m\n\n daha iyi hale gelmesinisa©layabilirsiniz.
Metin girmeTelefonun tuß tak\m\n\ kullanarak alfa-say\sal karakterlergirebilirsiniz. Örne©in rehbere isim girme, mesaj yazma, kißiselkarß\lama mesajlar\ ya da ajandaya program etkinlikleri girmeißlevlerinin tümünde metin girmeniz gerekir.
Telefonda, aßa©\daki metin giriß yöntemleri kullan\labilir.
26
Metin girißi modunu de©ißtirme1. Karakterlerin girilmesine olanak sa©layan bir alanda
oldu©unuzda, LCD ekran\n sa© alt kößesinde metin girißi modugöstergesini göreceksiniz.
2. # tußuna basarak metin girißi modunu de©ißtirebilirsiniz.Kullan\lan metin girißi modunu, LCD ekran\n sa© alt kößesindegörebilirsiniz.
� T9 modunun kullan\lmas\T9 ak\ll\ metin girißi modu, tußlara mümkün oldu©unca az say\dabasarak sözcükleri kolay biçimde girmenizi sa©lar. Her tußabast\©\n\zda, telefon, dahili sözlü©üyle k\yaslayarak girmeyeçal\ßt\©\n\z\ düßündü©ü karakterleri göstermeye baßlar. Sözlü©eyeni sözcükler ekleyebilirsiniz. Yeni sözcükler eklendikçe, sözcük,sözlükteki en benzer kayd\ gösterecek ßekilde de©ißir.
1. T9 ak\ll\ metin girißi modundayken 2 – 9 aras\ tußlarabasarak bir sözcük girmeye baßlayabilirsiniz. Her harf için ilgilitußa bir kez bas\n.
– Siz harf girdikçe gösterilen sözcük de©ißecektir. |stedi©inizsözcü©ü tam olarak yazana kadar ekranda gösterilen sözcü©üdikkate almay\n.
– Tümünü yazd\ktan sonra gösterilen istedi©iniz sözcük de©ilse,aßa©\ gezinme tußuna basarak di©er sözcük seçeneklerinigörebilirsiniz.
Örnek
• Good yazmak için 4 6 6 3 tußlar\na bas\n.
• Home yazmak için 4 6 6 3 [Aßa©\gezinme tußu] tußlar\na bas\n.
Genel ißlevler
27
– |stedi©iniz sözcük, sözcük seçenekleri listesinde yoksa, ABCmodunu kullanarak ekleyebilirsiniz.
– T9 modunun dilini de©ißtirebilirsiniz. Sol seçim tußuna[Seçenek] bas\n ve T9 dilleri ö©esini seçin. ya da dilide©ißtirmek için tuß tak\m\ndaki “*” tußuna bas\n. |stedi©inizT9 modu dilini seçin. T9 kapal\ seçerek de T9 modunukapatabilirsiniz. Telefonda T9 modu varsay\lan olarak aç\kdurumdad\r.
2. Ekranda gösterilen harfleri silmeden ya da düzenlemeyeçal\ßmadan önce tüm sözcü©ü girin.
3. Sözcükleri 0 tußuna bas\p boßluk b\rakarak tamamlay\n.Harfleri silmek için C tußuna bas\n. Tüm sözcü©ü silmek içinC tußuna bas\n ve bas\l\ tutun.
� ABC modunun kullan\lmas\Metin girmek için 2 – 9 aras\ tußlar\ kullan\n.
1. Girmek istedi©iniz harfin bulundu©u tußa bas\n:
– |lk harf için bir kez
– |kinci harf için iki kez
– Bu ßekilde devam edin
2. Boßluk girmek için 0 tußuna bir kez bas\n. Harfleri silmek içinC tußuna bas\n. Tüm ekran\ silmek için C tußuna bas\n vebas\l\ tutun.
Not• Girißinizi kaydetmeden metin girißi modundan ç\kmak
için E tußuna bas\n. Telefon yeniden beklememoduna döner.
28
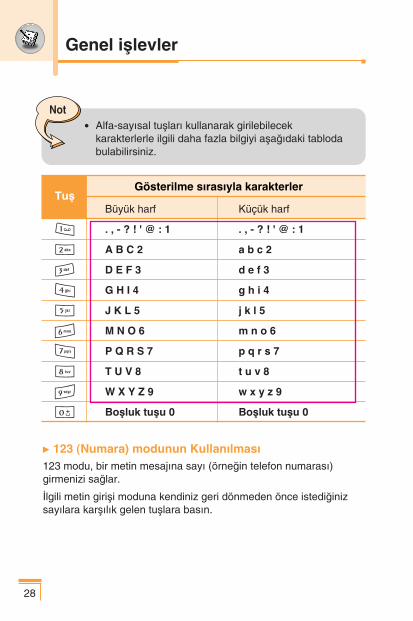
TußGösterilme s\ras\yla karakterler
Büyük harf Küçük harf
1 . , - ? ! ' @ : 1 . , - ? ! ' @ : 1
2 A B C 2 a b c 2
3 D E F 3 d e f 3
4 G H I 4 g h i 4
5 J K L 5 j k l 5
6 M N O 6 m n o 6
7 P Q R S 7 p q r s 7
8 T U V 8 t u v 8
9 W X Y Z 9 w x y z 9
0 Boßluk tußu 0 Boßluk tußu 0
� 123 (Numara) modunun Kullan\lmas\123 modu, bir metin mesaj\na say\ (örne©in telefon numaras\)girmenizi sa©lar.
|lgili metin girißi moduna kendiniz geri dönmeden önce istedi©inizsay\lara karß\l\k gelen tußlara bas\n.
Not• Alfa-say\sal tußlar\ kullanarak girilebilecek
karakterlerle ilgili daha fazla bilgiyi aßa©\daki tablodabulabilirsiniz.
Genel ißlevler
29
Telefon rehberiTelefon numaralar\n\ ve bunlara ba©l\ isimleri SIM kart\n\z\nhaf\zas\nda saklayabilirsiniz.
Ayr\ca telefon haf\zas\nda 255 numara ve isim saklayabilirsiniz.
Telefon rehberi menüsünde SIM kart ve telefon haf\zas\ ayn\ßekilde kullan\lmaktad\r. (Daha fazla bilgi için 50-56 aras\ sayfalara bak\n.)
Arama içi menüsüTelefonunuzda, görüßme s\ras\nda kullanabilece©iniz çeßitli kontrolißlevleri bulunmaktad\r. Görüßme s\ras\nda bu ißlevlere ulaßmak içinsol seçim tußuna [Seçenek] bas\n.
Arama s\ras\ndaBir görüßme s\ras\nda telefonun ekran\nda gösterilen menü ilebekleme modunda gösterilen farkl\d\r ve seçenekler aßa©\daaç\klanm\ßt\r.
|kinci aramay\ yapma|kinci bir arama yapmak için telefon rehberinden istedi©iniz birnumaray\ alabilirsiniz. Sa© seçim tußuna bas\n ve Ara’y\ seçin.Arad\©\n\z numaray\ görüßme s\ras\nda rehbere kaydetmek için sa©seçim tußuna bas\n ve Yeni ekle’yi seçin.
|ki arama aras\ndan geçiß yapma|ki arama aras\nda geçiß yapmak için sol seçim tußuna bas\n veDe©ißtir ö©esini seçin.
Gelen aramay\ yan\tlamaTelefon çald\©\nda gelen aramay\ yan\tlamak için S tußunabasman\z yeterlidir. Görüßme s\ras\nda bile telefonunuz gelenaramada sizi uyarabilir. Ahize hoparlöründe bir ses duyulur veekranda ikinci araman\n bekledi©i gösterilir.
Bu özelli©e Ça©r\ bekletme denir yaln\zca ßebekeniz destekliyorsakullan\labilir. Ça©r\ bekletme’yi [Menü 9-3-4] nas\l tkinleßtirece©inizya da kapataca©\n\zla ilgili bilgi için 81. sayfaya bak\n.
Ça©r\ bekletme etkinse, S tußuna basarak ya da sol seçimtußunu seçip Beklet ve Yan\tla ö©esini seçerek ilk görüßmenizibeklemeye al\p ikinci aramay\ yan\tlayabilirsiniz. Sol seçim tußunabas\p Kapat ve Yan\tla ö©esini seçerek mevcut araman\z\kapatabilir ve bekleyen aramay\ yan\tlayabilirsiniz.
Gelen aramay\ reddetmeE tußuna basarak gelen bir aramay\ reddedebilirsiniz.
Görüßme s\ras\nda gelen aramay\ sol seçim tußuna [Menü] bas\pKonferans/Reddet ö©esini seçerek ya da E tußuna basarakreddedebilirsiniz.
Mikrofonu kapatma[Menu] tußuna bas\p Ses kapal\ seçerek mikrofonu kapatabilirsiniz.Telefon, Ses aç\k ö©esi seçilerek tekrar sesi iletecek halegetirilebilir. Telefon sessiz oldu©unda, görüßtü©ünüz kißi siziduyamaz ama siz onu duymaya devam edersiniz.
Görüßme s\ras\nda DTMF tonlar\na geçmeGörüßme s\ras\nda DTMF tonlar\n\ açmak için sol seçim tußunabas\n ve DTMF aç\k ö©esini seçin. DTMF tonlar\ ayn\ ßekildekapat\labilir. DTMF tonlar\, telefonunuzun otomatik santral ißlevlerinikullanabilmesini sa©lar.
30
Genel ißlevler
31
Çok kißili ya da konferans görüßmelerÇok kißili ya da konferans hizmeti, ßebeke operatörünüzdestekliyorsa birden fazla kißiyle ayn\ anda görüßme yapabilmenizeolanak sa©lar. Çok kißili görüßme yaln\zca her ikisi de yan\tlanm\ßbir etkin bir de beklemede olan arama oldu©unda ayarlanabilir. Çokkißili arama kuruldu©unda, aramay\ kuran kißi taraf\ndan baßkaaramalar eklenebilir, mevcut aramalar kapat\labilir ya da ayr\labilir(yani çok kißili görüßmeden ç\kart\l\r ama sizinle görüßmeye devameder). Bu seçeneklerin tümüne Arama içi menüsünden ulaß\labilir.Çok kißili görüßmede olabilecek maksimum kißi say\s\ beßtir. Çokkißili görüßme baßlad\©\nda tüm kontrol sizde olur ve görüßmeyeyaln\zca siz yeni kißiler ekleyebilirsiniz.
|kinci aramay\ yapmaBir görüßme yaparken ikinci bir arama yapabilirsiniz. |kinci numaray\girin ve S tußuna bas\n. |kinci görüßmeye ba©lan\ld\©\nda birincigörüßme otomatik olarak beklemeye al\n\r. Sol seçim tußuna bas\pDe©ißtir seçerek görüßmeler aras\nda geçiß yapabilirsiniz.
Konferans arama kurmaBir görüßmeyi beklemeye al\n ve etkin arama aç\kken sol seçimtußuna bas\n ve Konferans/Tümünü ba©la ö©esini seçin.
Konferans aramas\n\ beklemeye almaSol seçim tußuna bas\n ve Konferans/Tümünü beklet ö©esiniseçin.
Beklemedeki konferans aramas\n\ etkinleßtirmeSol seçim tußuna bas\n ve Konferans/Tümünü ba©la ö©esiniseçin.
Konferans aramaya kißiler eklemeMevcut konferans aramaya yeni bir kißi eklemek için sol seçimtußuna bas\n ve Konferans/Tümünü ba©la ö©esini seçin.
Konferans aramadaki kißileri görüntülemeTelefonun ekran\nda, konferans aramas\ndaki kißilerin numaralar\aras\nda hareket etmek için yukar\/aßa©\ gezinme tußlar\n\ kullan\n.
Konferans arama s\ras\nda özel bir arama almaKonferans aramadaki bir kißiyle özel bir görüßme yapmak için,görüßme yapmak istedi©iniz kißinin numaras\n\ ekranda bulun ve solseçim tußuna bas\n. Tüm di©er arayanlar\ beklemeye almak içinKonferans/Özel ö©esini seçin.
Konferans aramay\ sonland\rmaKonferans aramadaki o s\rada gösterilen kißi, E tußuna bas\larakgörüßmeden ç\kart\labilir. Konferans aramay\ sonland\rmak için solseçim tußuna bas\n ve Konferans/Çok kißili görüßmeyi kapatö©esini seçin. Sol seçim tußuna bas\p Konferans/Tümünü kapatö©esini seçti©inizde, tüm etkin ve beklemedeki aramalarkapat\lacakt\r.
32
Genel ißlevler
33
Menü a©ac\
1 Profiller
1 Titreßim
2 Sessiz
3 Genel
4 Yüksek
5 Kulakl\k
6 Araç
2 Ça©r\ kayd\
1 Cevapsızlar
2 Gelen aramalar
3 Yapıl. aramalar
4 Son aramalar\ sil
5 Arama süreleri
6 Arama ücretleri
7 Ücret ayarlar\
8 GPRS bilgisi
3 E©l./Araçla
1 Alarm saati
2 Hesap makinesi
3 Klasörüm
4 Birim Çevirici
5 Dünya saati
6 Ses kaydedici
7 K\z\lötesi
4 Ajanda
1 Program
2 Not
3 Telefon rehberi
5 Mesajlar
1 Metin mesajlar\
2 Multimedya mesajlar
3 Sesli mesajlar
4 Bilgi servisleri
5 Íablonlar
6 Haf\za durumu
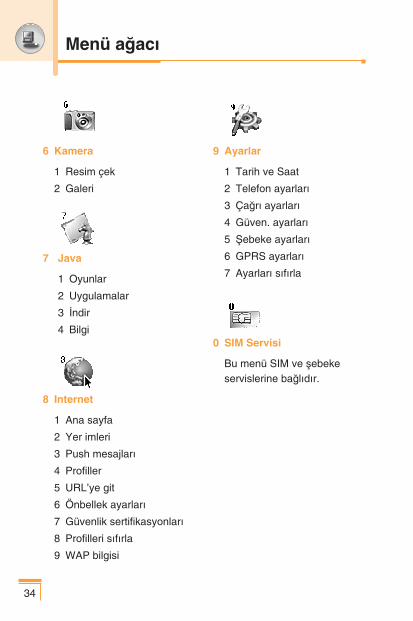
34
Menü a©ac\
6 Kamera
1 Resim çek
2 Galeri
7 Java
1 Oyunlar
2 Uygulamalar
3 |ndir
4 Bilgi
8 Internet
1 Ana sayfa
2 Yer imleri
3 Push mesajlar\
4 Profiller
5 URL’ye git
6 Önbellek ayarlar\
7 Güvenlik sertifikasyonlar\
8 Profilleri s\f\rla
9 WAP bilgisi
9 Ayarlar
1 Tarih ve Saat
2 Telefon ayarlar\
3 Ça©r\ ayarlar\
4 Güven. ayarlar\
5 Íebeke ayarlar\
6 GPRS ayarlar\
7 Ayarları sıfırla
0 SIM Servisi
Bu menü SIM ve ßebekeservislerine ba©l\d\r.
35
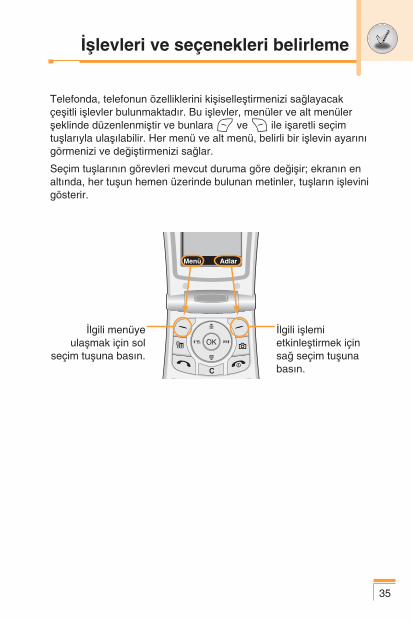
|ßlevleri ve seçenekleri belirleme
Telefonda, telefonun özelliklerini kißiselleßtirmenizi sa©layacakçeßitli ißlevler bulunmaktad\r. Bu ißlevler, menüler ve alt menülerßeklinde düzenlenmißtir ve bunlara < ve > ile ißaretli seçimtußlar\yla ulaß\labilir. Her menü ve alt menü, belirli bir ißlevin ayar\n\görmenizi ve de©ißtirmenizi sa©lar.
Seçim tußlar\n\n görevleri mevcut duruma göre de©ißir; ekran\n enalt\nda, her tußun hemen üzerinde bulunan metinler, tußlar\n ißlevinigösterir.
|lgili menüyeulaßmak için sol
seçim tußuna bas\n.
|lgili ißlemietkinleßtirmek içinsa© seçim tußunabas\n.
36
Profiller [Menü 1]
Profillerde, farkl\ ißlemler, ortamlar ya da arayan gruplar\ içintelefonun seslerini ayarlayabilir ve kißiselleßtirebilirsiniz.
Alt\ önceden ayarlanm\ß profil bulunmaktad\r: Titreßim, Sessiz,Genel, Yüksek, Kulakl\k ve Araç. Tüm profilleri istedi©iniz gibikißiselleßtirebilirsiniz. Titreßim ve Sessiz d\ß\ndaki tüm profillerkißiselleßtirilebilir.
Menü tußuna (<) bas\n ve gezinme tußlar\n\ kullanarak Profiller’iseçin.
Profili de©ißtirme [Menü 1-x-1]1. Profil listesi görüntülenir.
2. Profil listesinde etkinleßtirmek istedi©iniz profile ilerleyin ve solseçim tußuna [Seç] ya da Tamam tußuna bas\n.
3. Ard\ndan Etkinleßtir’i seçin.
Profilleri özelleßtirme – Kißisel [Menü 1-x-2]Profil listesinde istedi©iniz profile ilerleyin. Tamam tußuna ya da solseçim tußuna bast\ktan sonra Kißisel ö©esini seçin. Profil ayar\seçene©i aç\l\r. Seçene©i gerekti©i gibi ayarlay\n.
Gelen uyar\ turü: Gelen aramalar için uyar\ türünü belirleyin.
Zil tonu: Listeden istedi©iniz zil sesini seçin. Yukar\/aßa©\gezinme tußlar\n\ kullanarak listede hareket edebilirsiniz. Seçimyapmadan önce seçilen zil sesini dinleyebilirsiniz.
Zil sesi: Zil sesinin yüksekli©ini ayarlay\n.
Msj. uyar\ türü: Mesajlar için uyar\ türünü belirleyin.
Mesaj tonu: Mesajlar için uyar\ sesini belirleyin.
Tuß sesi: |stedi©iniz tuß sesini seçin.
Tuß tak\m\ sesi: Tuß sesi yüksekli©ini ayarlay\n.
37
Kapak sesi: Kapak aç\l\ß\ ve kapan\ß\nda verilen kapak sesiniayarlay\n.
Efekt ses seviyesi: Efekt sesinin seviyesini belirleyin.
Güç açma/kapama sesi: Telefonu kapat\rken/açarken kullan\lanzil sesinin yüksekli©ini belirleyin.
Otomatik yan\t: (Yaln\zca ve Araç profilinde) Otomatikcevaplama özelli©ini etkinleßtirebilirsiniz. Otomatik cevapverilmeden önce geçecek süreyi belirleyin.
Profilleri özelleßtirme – Yeni ad ver [Menü 1-x-3]Profile istedi©iniz bir ismi verebilirsiniz. Sadece titre, Kulakl\k veAraç profillerine yeni isim verilemez.
1. Profilin ismini de©ißtirmek için profil listesinde istedi©iniz profileilerleyin, Tamam tußuna ya da sol seçim tußuna bas\p Yeni adver ö©esini seçin.
2. |stedi©iniz ismi girin ve Tamam tußuna ya da sol seçim tußuna[Kaydet] bas\n.

38
Íebekeniz, servis alan\ içinde Arayan Hatt\ Kimli©i (CLI) özelli©inidestekliyorsa cevaps\z, gelen ya da yap\lan aramalar\n kay\tlar\n\görebilirsiniz.
Numara ve isimle (varsa), ve resimle (varsa) birlikte, araman\ngerçekleßti©i saat ve tarih de gösterilir. Arama sürelerini veücretlerini de görebilirsiniz.
Menü tußuna (<) bas\n ve gezinme tußlar\n\ kullanarak Ça©r\kayd\’n\ seçin.
Cevapsızlar [Menü 2-1]Bu seçenek en son 10 cevaps\z aramay\ görmenizi sa©lar. Solseçim tußuna [Seçenek] bast\ktan sonra bu ißlemleri deyapabilirsiniz:
• Varsa numaray\ görebilir, arayabilir ya da rehberekaydedebilirsiniz.
• Numara için yeni bir isim girebilir ve rehbere kaydedebilirsiniz.
• Bu numaraya mesaj gönderebilirsiniz.
• Aramay\ listeden silebilirsiniz.
• Rehberde kay\tl\ ismi düzenleyebilirsiniz.
Not
• Son aramalar\ sil menüsünü kullanarak tüm aramakay\tlar\n\ silebilirsiniz.
Not
• |sim yaln\zca Rehber’de kay\tl\ numaralardadüzenlenebilir. Di©er numaralarda (ör. FDN, SDN) isimdüzenlenemez.
Ça©r\ kayd\ [Menü 2]
39
Gelen aramalar [Menü 2-2]Bu seçenek en son 10 gelen aramay\ görmenizi sa©lar. Sol seçimtußuna [Seçenek] bast\ktan sonra bu ißlemleri de yapabilirsiniz:
• Varsa numaray\ görebilir, arayabilir ya da rehberekaydedebilirsiniz.
• Numara için yeni bir isim girebilir ve rehbere kaydedebilirsiniz.
• Bu numaraya mesaj gönderebilirsiniz.
• Aramay\ listeden silebilirsiniz.
• Rehberde kay\tl\ ismi düzenleyebilirsiniz.
Not
• Son aramalar\ sil menüsünü kullanarak tüm aramakay\tlar\n\ silebilirsiniz.
Not
• |sim yaln\zca Rehber’de kay\tl\ numaralardadüzenlenebilir. Di©er numaralarda (ör. FDN, SDN) isimdüzenlenemez.
Yapıl. aramalar [Menü 2-3]Bu seçenek en son 10 yap\lan aramay\ görmenizi sa©lar. [Seçenek]tußunu kullanarak aßa©\daki ißlemleri de yapabilirsiniz:
• Varsa numaray\ görebilir, arayabilir ya da rehberekaydedebilirsiniz.
• Numara için yeni bir isim girebilir ve rehbere kaydedebilirsiniz.
• Bu numaraya mesaj gönderebilirsiniz.
• Aramay\ listeden silebilirsiniz.
• Rehberde kay\tl\ ismi düzenleyebilirsiniz.
Son aramalar\ sil [Menü 2-4]Bu ißlevi, cevaps\z arama, gelen arama ya da yap\lan aramalistelerini silmek için kullan\n. Ayr\ca Tüm aramalar ö©esiniseçerek, tüm arama listelerini tek seferde silebilirsiniz.
40
Not
• Son aramalar\ sil menüsünü kullanarak tüm aramakay\tlar\n\ silebilirsiniz.
Not
• FDN etkinse, [|smi düzenle] menüsü gösterilmez.
Ça©r\ kayd\ [Menü 2]
41
Arama süreleri [Menü 2-5]Gelen ve yap\lan aramalar\n süresini görmek için bu ißlevi kullan\n.Yukar\/aßa©\ gezinme tußlar\yla gezinerek ekran\n alt taraf\ndakiaramalar\n süresini kontrol edebilirsiniz. [Tamam] ya da sol seçimtußuna [S\f\rla] basarak seçilen araman\n sayac\n\ s\f\rlayabilirsiniz.Yanl\ßl\kla s\f\rlamay\ önlemek için, PIN2 kodunu girmeniz istenir.
• Son arama: Son araman\n süresi
• Gelen aramalar: Gelen aramalar\n süresi
• Yap\lan Aramalar: Yap\lan aramalar\n süresi
• Tüm aramalar: Sayac\n son s\f\rlanmas\ndan bu yana yap\lan yada gelen tüm aramalar\n toplam süresi.
Arama ücretleri [Menü 2-6]Bu ßebeke hizmeti, son araman\n ücretini ve toplam arama ücretinigörmenizi sa©lar. Arama ücreti, LCD ekran\n alt taraf\nda gösterilir.Arama ücretlerini s\f\rlamak için sol seçim tußuna [Reset] ya daTamam tußuna bas\n. PIN2 kodunu girmeniz istenir.
Not
• Íebeke özellikleri, faturada rakamlar\n yuvarlanmas\vs. gibi etkenlerden dolay\ aramalar\n\z için servissa©lay\c\n\z\n faturalad\©\ gerçek görüßme süresi farkl\olabilir.
Not• Íebeke özellikleri, faturada rakamlar\n yuvarlanmas\
vs. gibi etkenlerden dolay\ aramalar\n\z için servissa©lay\c\n\z\n faturalad\©\ gerçek görüßme ücreti farkl\olabilir.
Ça©r\ kayd\ [Menü 2]
42
Ücret ayarlar\ [Menü 2-7]• Ücret s\n\r\: Bu ßebeke hizmeti, aramalar\n\z\n ücretini belirli
say\da kontör ya da ilgili para biriminde belirli bir ücretles\n\rland\rman\z\ sa©lar. Belirtilen ücret s\n\r\na kadar aramayapabilir ya da alabilirsiniz. Arama ücreti s\n\r\n\ de©ißtirmek içinPIN2 kodunu girmeniz gereklidir.
• Tarife belirle: Para birimi türünü ve kontör ücretinibelirleyebilirsiniz. Ücretlendirme kontör fiyatlar\n\ ö©renmek içinservis sa©lay\c\n\zla görüßün. Bu menüde Para birimi ya da 1Kontör seçmek için PIN2 kodunu girmeniz gerekecektir.
• Oto. gösteriö: Bu ßebeke hizmeti, son araman\z\n ücretiniotomatik olarak görmenizi sa©lar. Oto. gösterim menüsünde Aç\kde©erini seçerseniz, görüßme tamamland\ktan sonra araman\nücretini görebilirsiniz.
GPRS bilgisi [Menü 2-8]GPRS bilgi seçene©i ile ßebeke üzerinden transfer edilen verimiktar\n\ kontrol edebilirsiniz. Ayr\ca, ne kadar süre ba©l\ kald\©\n\z\da görebilirsiniz. (GPRS, Genel Paket Radyo Servisi’nin (GeneralPacket Radio Service) k\saltmas\d\r.)
• WAP bilgileri
Veri miktar\n\ ve WAP’\n ne kadar süre kullan\ld\©\n\ kontroledebilirsiniz. Menü seçili haldeyken sol seçim tußuna [S\f\rla] ya daTamam tußuna bas\ld\©\nda sayaç s\f\rlan\r.
Not• Tüm kontörler kullan\ld\©\nda, acil aramalar d\ß\nda
hiçbir arama yap\lamaz. SIM karta ba©l\ olarak, aramaücretleri s\n\r\n\ belirlemek için PIN2 kodunu girmenizgerekmektedir.
43
• Harici aygıt
Bir seri ba©lant\ noktas\ gibi harici bir cihazda ne kadar süreGPRS kullan\ld\©\n\ ve ne kadar veri al\ßverißi oldu©unu kontroledebilirsiniz.
• Toplam veri
WAP ve harici cihaz ile ne kadar veri al\ßverißinin yap\ld\©\n\kontrol edebilirsiniz.

44
E©l./Araçla [Menü 3]
Menü tußuna (<) bas\n ve gezinme tußlar\n\ kullanarakE©l./Araçla’\ seçin.
Alarm saati [Menü 3-1]Belirli bir saatte çalmas\ için alarm\ ayarlayabilirsiniz. Alarm Saatimenüsünde, aßa©\daki seçenekler kullan\labilir.
Aç\kAlarm saatini belirleyin.
1. Menüye girin.
2. Sol/sa© gezinme tußlar\n\ kullanarak [Aç\k] ö©esini seçin.
3. Numara tußlar\n\ kullanarak alarm saatini girin.
4. Sol/sa© gezinme tußlar\n\ kullanarak aßa©\daki alarmseçeneklerinden birini seçin: Bir kez, Günlük, Haftal\k ve Ayl\k
5. Alarm melodisi seçimi: Sol/sa© gezinme tußlar\n\ kullanarakistedi©iniz alarm melodisini seçin.
Kapal\Alarm\ kapat\r.
Hesap makinesi [Menü 3-2]Bu ißlevle telefonunuzu bir hesap makinesi olarak kullanabilirsiniz.Hesap makinesi temel aritmetik ißlevleri yerine getirmektedir:ekleme, ç\kartma, çarpma ve bölme. (Girdi©iniz say\lar en fazla ikiondal\k basamak içerebilir)
45
Hesap makinesini kullanma1. Numara tußlar\n\ kullanarak ilk say\y\ girin.
2. |lgili gezinme tußuna basarak yap\lacak matematiksel ißlemiseçin.
3. Sonucu hesaplamak için sol seçim tußuna [Sonuç] ya da Tamamtußuna bas\n.
4. Hesaplamadan sonra ilk duruma geri dönmek için sol seçimtußuna [S\f\rla] bas\n.
Klasörüm [Menü 3-3]Klasörüm’de 3 klasör bulunur: Resim, Animasyon ve Ses. |ndirileniçerikleri görebilir, silebilir ya da kontrol edebilirsiniz. WAPsitelerinde, MMS ya da SMS ile resimler, animasyonlar ya da sesleralabilirsiniz. |çerikleri kontrol ederken bunlar\ SMS, MMS ilegönderebilir, düzenleyebilir ya da silebilirsiniz. Animasyonklasöründe bulunan ö©elerden birini duvar ka©\d\ olarakayarlayabilirsiniz. Sesler klasöründe istedi©iniz sesi, zil sesi olarakayarlayabilirsiniz.
Resim [Menü 3-3-1]
Animasyon [Menü 3-3-2]
Ses [Menü 3-3-3]
Haf\za durumu [Menü 3-3-4]
Not
• Yanl\ß yazd\klar\n\z\ silmek ve ekran\ temizlemek içinC tußuna bas\n. Ondal\k say\ ay\r\c\ eklemek için* tußuna bas\n. Eksi ißareti eklemek için #tußuna bas\n.
46
Birim Çevirici [Menü 3-4]Bu ißlev, herhangi bir ölçü birimini bir di©erine dönüßtürür.Dönüßtürülebilecek 4 veri türü vard\r: Uzunluk, Alan, A©\rl\k veHacim.
1. Sol seçim tußuna [Birim] basarak dört birim türünden birini seçin.
2. Aßa©\ gezinme tußuna basarak geçerli birim bölümüne ilerleyin.
3. Sol/sa© gezinme tußlar\n\ kullanarak dönüßtürmek istedi©inizbirimi seçebilirsiniz.
4. Aßa©\ gezinme tußuna basarak Birim dönüßtürme bölümüneilerleyin.
5. Sol/sa© gezinme tußlar\n\ kullanarak dönüßtürme sonucundaelde etmek istedi©iniz birimi seçebilirsiniz.
6. Numara tußlar\n\ kullanarak say\ girin. Dönüßtürme otomatikolarak hesaplanacakt\r.
Dünya saati [Menü 3-5]Geçerli Greenwich Ortalama Saatini (GMT) görebilir ve sol/sa©seçim tußlar\n\ kullanarak dünya üzerindeki 60 büyük ßehirdeki saatiö©renebilirsiniz.
Bu ekranda ßehir ismi, geçerli tarih ve saat gösterilir. Bulundu©unuzzaman dilimini seçmek için aßa©\dakileri gerçekleßtirin:
1. Sol/sa© gezinme tußlar\na bir ya da daha fazla kez basarakzaman diliminize karß\l\k gelen ßehri seçin. Yerel saat ve tarihgösterilir.
Not
• * tußuna basarak ondal\k say\ girebilirsiniz.
E©l./Araçla [Menü 3]
47
2. Bekleme modunda gösterilen saati, seçilen saate de©ißtirmekistiyorsan\z sol seçim tußuna bas\n [Seçenekler]. Daha sonraAyarla’y\ seçin.
Ses kaydedici [Menü 3-6]Bir ses notu kaydedebilirsiniz. Her biri en fazla 30 saniye sürecek 3ses notu kaydedebilirsiniz. Sol seçim tußuna [Seçenek] basarakkay\tl\ ses notunu çalabilir, silebilir ya da yeni bir ses notukaydedebilirsiniz.
ÇalEn son kaydedilen nottan baßlamak üzere kay\tl\ tüm notlar\çalman\z\ sa©lar. Ekranda notun kaydedildi©i Tarih ve saatgösterilir.
SilBelirli bir notu silmenizi sa©lar.
Yeni kaydetBir ses notu kaydetmenizi sa©lar.
Tümünü silTüm notlar\ silmenizi sa©lar. Onaylamak için sol seçim tußuna [Evet]bas\n.
Not
• Dünya saati menüsünde her ßehrin zaman dilimi ayar\,ßebeke koßullar\ndan etkilenebilir.
48
K\z\lötesi [Menü 3-7]Bu özellik, k\z\lötesi ba©lant\ noktas\ndan veri/faks göndermenizi vealman\z\ sa©lar. K\z\lötesi ba©lant\y\ kullanmak için:
1. Veri/faks göndermek ya da almak için modem sürücüsünüyükleyin.
2. Bilgisayar\n\za ßebeke sa©lay\c\n\z\n verdi©i çevirmeli a©ba©lant\s\ yaz\l\m\n\ ya da faks aramas\ için kullanaca©\n\z faksuygulamas\n\ yükleyin.
3. Bilgisayar\n\zda IrDA uyumlu k\z\lötesi ba©lant\ noktas\n\yap\land\r\n ve etkinleßtirin.
4. Telefonda k\z\lötesi özelli©ini etkinleßtirin; ekran\n sa© alttaraf\nda simgesi gösterilir.
5. Servis sa©lay\c\n\z taraf\ndan verilen ßebeke servis numaras\n\aray\n.
K\z\lötesinin etkinleßtirilmesinden sonraki 30 saniye boyuncatelefonunuz ve IrDA uyumlu cihaz aras\nda herhangi bir iletißimolmazsa, k\z\lötesi otomatik olarak kapat\l\r.
Daha fazla bilgi için ßebeke servis sa©lay\c\n\zla görüßün.
Not
• Bekleme modunda, aßa©\ gezinme tußuna basarakSes kaydedici menüsüne girebilirsiniz.
• Tüm not konumlar\ doluysa, yeni bir not kaydetmedenönce mevcut notlardan birini silmeniz gerekmektedir.
Not• PC Sync, veri kablosu üzerinden PC ve telefon
aras\nda veri al\ßverißini sa©layan bir programd\r.Dolay\s\yla bu ißlevi kullanmak için aksesuar kitini sat\nalman\z gerekmektedir. Daha fazla bilgi için CDüzerindeki PC Sync Yard\m dosyas\n\ kullanabilirsiniz.
E©l./Araçla [Menü 3]
49
Menü tußuna (<) bas\n. Gezinme tußlar\n\ kullanarak Ajanda’y\seçin.
Program [Menü 4-1]Bu menüye girdi©inizde bir takvim aç\l\r. Kare imleç, içindebulundu©unuz tarih üzerindedir. Gezinme tußlar\n\ kullanarak baßkabir tarihe geçebilirsiniz. Herhangi bir gün için kay\tl\ bir program yada bir not oldu©unda, o tarih farkl\ bir renkte görüntülenir. Bu ißlevsize programlar\n\z\ ve notlar\n\z\ hat\rlat\r. Ayarlad\ysan\ztelefonda bir uyar\ sesi duyulur.
Göster [Menü 4-1-1]Seçilen güne yaz\lm\ß notu gösterir. Seçti©iniz notu düzenlemek yada silmek için [Seçenekler] tußuna bas\n.
Düzenle [Menü 4-1-2]Program\ düzenlemek için bu ißlevi kullan\n.
Sil [Menü 4-1-3]Program\ silmek için bu ißlevi kullan\n.
Yeni ekle [Menü 4-1-4]En fazla 30 karakter yazabilir ve 20 not kaydedebilirsiniz.
Takvim [Menü 4-1-5]Takvime geri döner.
Program tonu [Menü 4-1-6]Bu seçenekle, belirli bir etkinli©in programlanm\ß tarihi ya da saatigeldi©inde telefonda bir alarm sesi duyulur.
Ajanda [Menü 4]
50
Tüm prg. göster [Menü 4-1-7]Tüm günler için ayarlanm\ß notlar\ gösterir. Not listelerindegezinmek için yukar\/aßa©\ gezinme tußlar\n\ kullan\n.
Tarihe git [Menü 4-1-8]Belirli bir tarihe atlamak için bunu kullan\n. Numara tußlar\n\ vesol/sa© gezinme tußlar\n\ kullanarak gitmek istedi©iniz tarihi girin.
Geçmißi Sil [Menü 4-1-9]Zaten bildirilmiß, tarihi geçmiß program notlar\n\ silebilirsiniz.
Tümünü sil [Menü 4-1-10]Tüm programlar\ silmek için bu ißlevi kullan\n. Bu ißlemionaylaman\z istenecektir.
Not [Menü 4-2]Belirli bir tarihe not yazabilir, mevcut notlar\ düzenleyebilir vesilebilirsiniz.
1. Notu seçili duruma getirmek için üzerine ilerleyin.
2. Sol seçim tußuna [Ekle] bas\n.
3. Not girin ve sol seçim tußuna [Seçenekler] bas\n.
Aßa©\daki seçenekleri kullanabilirsiniz.
• Kaydet: Bir notu kaydetmenizi sa©lar.
• T9 dilleri: Notta kullanmak istedi©iniz T9 dilini seçebilirsiniz.
• Editörden ç\k: Not editöründen ç\kman\z\ sa©lar.
Notu zaten telefonunuza girdikten sonra,
1. Bir not seçin.
2. Sol seçim tußuna [Seç] bas\n.
3. Sol seçim tußuna [Seçenekler] bas\n.
Ajanda [Menü 4]
Aßa©\daki seçenekleri kullanabilirsiniz.
• Düzenle: Seçilen notu düzenleyebilirsiniz.
• Sil: Seçilen notu siler.
• Yeni ekle: Yeni not ekleyebilirsiniz.
• Tümünü Sil: Tüm notlar\ siler.
Telefon rehberi [Menü 4-3]Telefon numaralar\n\ ve bunlara ba©l\ isimleri SIM kart\n\z\nhaf\zas\nda saklayabilirsiniz. Ayr\ca telefon haf\zas\na 255 numarave isim kaydedebilirsiniz.
- Bekleme modunda sol seçim tußuna [Menü] bas\n ve Ajanda ➝
Telefon rehberi ö©esini seçin.
- Ya da bekleme modunda sa© seçim tußuna [|simler] bas\n.
Ara [Menü 4-3-1]1. Menü modunda Ajanda ➝ Rehber’i, ard\ndan Ara’y\ seçin.
Veya Bekleme modunda sa© seçim tußu [Adlar]’a bas\n ve Ara’y\seçin. Veya bekleme modunda yukar\ gezinme tußuna bas\n.Bulmak istedi©iniz ad\n baßlang\c\n\ girmeniz istenir; ard\ndanistedi©iniz ad\ hemen bulursunuz.
2. |stedi©iniz ismi bulduktan sonra, [gönder] tußuna basarak bukißinin numaras\n\ arayabilirsiniz. Ya da sol seçim tußuna[Seçenek] basarak aßa©\daki seçenekleri kullanabilirsiniz.
• Ayrıntı göster: Seçilen ismin detaylar\n\ gösterir.
• Düzenle: Ad\, numaray\, listeleme grubunu, e-postay\, notu verehber foto©raf\n\ düzenler.
• Sil: Telefon rehberi kayd\n\ siler.
• Metin mesaj\ yaz: Seçilen isme metin mesaj\ göndermek içinbunu kullan\n.
• Multimedya mesaj yaz: Seçilen isme multimedya mesaj\göndermek için bunu kullan\n.
51
• Kopyala: Telefon rehberi kayd\n\ SIM’den telefon haf\zas\naya da tam ters yönde kopyalamak için bu ißlevi kullan\n.
• Ses: Sesle arama için seçilen telefon rehberi kayd\n\n isminikaydeder.
• Ana numara: 2 numaradan fazla kay\tl\ysa, kay\tl\ tüm numaralistelerini göstermek için.
Yeni ekle [Menü 4-3-2]Bu ißlevi kullanarak bir telefon rehberi kayd\ ekleyebilirsiniz.
2 haf\za vard\r: Telefon haf\zas\ ve SIM haf\zas\. Haf\zay\ seçmekiçin Haf\zay\ belirle [Menü 4-3-8-1] ö©esine gidin.
Telefon haf\zas\n\n 255 kay\t haf\zas\ vard\r. Telefon haf\zas\ndanher isme en fazla 20 karakter girebilirsiniz. SIM kart haf\zas\n\nkapasitesi SIM karta ba©l\d\r.
1. Menü modunda Ajanda ➝ Rehber’i seçin veya beklememodunda sa© seçim tußu [Adlar]’a bas\n.
2. Yeni ekle ö©esinin üzerine gelin ve [Tamam] tußuna bas\n.
3. SIM haf\zas\na ya da telefon haf\zas\na yeni telefon rehberikay\tlar\ ekleyebilirsiniz.
• SIM haf\zas\na yeni kay\tlar eklemeBir isim ve numara girebilir ve istedi©iniz grubu seçebilirsiniz.(SIM’e ba©l\d\r)
• Telefon haf\zas\na yeni kay\tlar eklemeBir isim, numaralar (mobil, ev, ofis), e-posta adresi, istenengrup, not ve rehber foto©raf\ girebilirsiniz.
52
Not
• Rehber foto©raf\, yaln\zca telefon haf\zas\na eklenebilir.
Ajanda [Menü 4]
H\zl\ aramalar [Menü 4-3-3]2-9 aras\ tußlar\ istedi©iniz telefon rehberi kayd\naatayabilirsiniz. H\zl\ arama listesinde [Gönder] tußuna basarak veyasol seçim tußu [Seçenekler]’e bas\p Ara seçerek bir numaray\arayabilirsiniz. Veya atanan tußa (2-9) bekleme modunda 2-3saniye kadar basarak do©rudan arama yapabilirsiniz.
1. Menü modunda Ajanda ➝ Rehber'i seçin veya beklememodunda sa© seçim tußu [Adlar]’a bas\n.
2. H\zl\ aramalar’a ilerleyin ve [Tamam] tußuna bas\n.
3. 'a bir numara eklemek için <Boß> seçin ve sol seçim tußu[Ekle]'ye bas\n. Numaray\ rehber'de arayabilir ve [Seç] seçimtußuyla seçebilirsiniz.
4. Sol seçim tußuna [Seçenek] basarak h\zl\ arama numaras\n\de©ißtirebilir ya da silebilir, bir arama yapabilir, metin mesaj\yazabilir ya da ya da multimedya mesaj haz\rlayabilirsiniz.Aßa©\daki alt menüleri görebilirsiniz.
• Çal: Üye listesini de©ißtirir.
• De©ißtir: Üye listesini siler.
• Sil: Telefon numaras\na atanm\ß sesi siler.
• Metin mesaj\ yaz: Seçilen isme metin mesaj\ göndermek içinbunu kullan\n.
• MMS yaz: Seçilen isme multimedya mesaj\ göndermek içinbunu kullan\n.
53
Ses listesi [Menü 4-3-4]Sesli arama için bir kayda ses komutu atayabilirsiniz.
[Gönder] tußuna basarak veya sol seçim tußu [Seçenekler]’e bas\pAra seçerek bir numaray\ arayabilirsiniz.
1. Menü modunda Ajanda ➝ Rehber’i seçin veya beklememodunda sa© seçim tußu [Adlar]’a bas\n.
2. Ses listesi ö©esine ilerleyin ve bu tußa bas\n [Tamam].
3. Ses listesi’ne bir numara eklemek için sol seçim tußuna [Ekle]bas\n. Numaray\ rehber’de arayabilir ve [Seç] seçim tußuylaseçebilirsiniz. Bir numara seçtikten sonra sesi kaydedin.
4. [Seçenekler] seçim tußuna basarak sesi çalabilir, de©ißtirebilir yada silebilir, arama yapabilir, yeni ses listesi ekleyebilir ya da tümses listelerini silebilirsiniz. Aßa©\daki alt menüleri görebilirsiniz.
• Çal: Telefon numaras\na atanm\ß ses etiketini çalar.
• De©ißtir: Telefon numaras\na atanm\ß ses etiketini de©ißtirir.
• Sil: Telefon numaras\na atanm\ß sesi siler.
• Ara: Seçilen numaray\ arar.
• Yeni ekle: Sesle arama listesine yeni bir telefon numaras\ekler.
• Tümünü sil: Tüm sesli arama kullan\lan numaralar\ siler.
54
Not• Sesli arama için en fazla 10 telefon numaras\
girebilirsiniz.
Ajanda [Menü 4]
Arayan gruplar\ [Menü 4-3-5]Liste olußturabilece©iniz 6 önceden tan\mlanm\ß grubun yan\ s\raDi©erleri adl\ ek bir grup daha vard\r.
1. Menü modunda Ajanda ➝ Rehber’i seçin veya beklememodunda sa© seçim tußu [Adlar]’a bas\n.
2. Arayan gruplar\'n\ seçin, ve [Tamam]’a bas\n. Tüm grup listelerigösterilecektir: Aile, VIP, Arkadaßlar, |ß arkadaßlar\, Grup 1,Grup 2 ve Di©erleri.
3. Sol seçim tußuna basarak [Seçenek] yönetmek istedi©iniz grupismini seçin. Di©erleri d\ß\ndaki gruplarda aßa©\daki alt menülergösterilir.
• Üye listesi: Gruptaki üye listesini gösterir.
• Grup zil sesi: Gruptaki bir kißiden sesli telefon aramas\ald\©\n\zda sizi uyarmada kullan\lacak zil sesini seçmek içinbunu kullanabilirsiniz.
• Grup simgesi: Gruptaki bir kißiden arama ald\©\n\zdagösterilecek grafik simgesini seçmek için bunu kullanabilirsiniz.
• Üye ekle: Gruba üye ekler.
• Üye sil: Gruptaki bir üyeyi siler.
• Yeni isim ver: Gruba yeni isim verir.
Tümünü kopyala [Menü 4-3-6]Kay\tlar\ SIM kart haf\zas\ndan telefon haf\zas\na ya da tam tersyönde kopyalayabilirsiniz.
• SIM’den Tel.’e: Bunu, kayd\ SIM karttan Telefon haf\zas\nakopyalamak için kullan\n.
• Tel.’den SIM’e: Bunu, kayd\ Telefon haf\zas\ndan SIM kartakopyalamak için kullan\n.
55

Aßa©\daki seçenekleri kullanabilirsiniz.
– Orijinali sakla: Kopyalama s\ras\nda orijinal arama numaralar\saklan\r.
– Orijinali sil: Kopyalama s\ras\nda orijinal arama numaralar\ silinir.
Tümünü sil [Menü 4-3-7]SIM, Telefon ve Ses listesindeki tüm kay\tlar\ silebilirsiniz. Seslistesi harici alanlardaki kay\tlar\ silmek için güvenlik kodunugirmeniz gerekmektedir.
Ayarlar [Menü 4-3-8]
• Bellek belirle
Telefon rehberi için kullan\lacak belle©i seçebilirsiniz. SIM vetelefon haf\zas\ndan birini tercih edebilirsiniz. De©ißkenseçerseniz, kay\t eklerken telefon numaray\ nereye kaydetmekistedi©inizi soracakt\r.
• Foto©raf gösterimi
Rehberi ararken foto©raf listesinin Foto©raf görünümü ya daListe görünümü'nde gösterilmesini seçebilirsiniz. Foto©rafgörünümü seçerseniz, arama listesi, foto©rafl\ biçimde gösterilir.
Bilgi [Menü 4-3-9]
• Serv. arama no. (SIM’e ba©l\)
Bu ißlev, ßebeke operatörünüz taraf\ndan verilen Servis AramamNumaralar\n\n (SDN) listesini görmek için kullanabilirsiniz (SIMkart destekliyorsa). Bu numaralara acil numaralar, telefon rehberisorgular\ ve telesekreter numaralar\ dahildir.
1. Servis aramas\ numaras\n\ seçin.
2. Kullan\labilir servislerin isimleri gösterilecektir.
3. Bir servis seçmek için yukar\/aßa©\ gezinme tußlar\n\ kullan\n.
56
Ajanda [Menü 4]
57
• Haf\za durumu
SIM kart ve telefon haf\zas\n\n durumunu kontrol edebilirsiniz.
• Kendi numaram (SIM’e ba©l\)
SIM kartta bulunan telefon numaran\z\ görmek için bu özelli©ikullan\n.
Menü tußuna (<) bas\n ve gezinme tußlar\n\ kullanarak Mesajlar’\seçin.
Metin mesajlar\ [Menü 5-1]Telefonunuz sesli posta bildirim mesajlar\n\ ve K\sa Mesaj Servisi(SMS) mesajlar\n\ al\r.
Sesli posta ve SMS ßebeke servisleridir. Daha fazla bilgi için lütfenßebeke operatörüyle görüßün.
simgesi görüntüleniyorsa, bir sesli postan\z vard\r. simgesi, yeni bir metin mesaj\ ald\©\n\z\ gösterir. Mesaj haf\zas\
doluysa, bir mesaj gösterilir, simgesi yan\p sönmeye baßlar veart\k baßka mesaj alamazs\n\z. Gerekli olmayan mesajlar\ silmekiçin Gelen kutusu menüsünde Sil seçene©ini kullan\n. Mesajhaf\zas\nda yer aç\ld\©\nda daha önce gelmeyen SMS mesajlar\al\n\r (yeterli alan olmas\ koßuluyla).
Mesaj yaz [Menü 5-1-1]Metin mesajlar\ yazabilir, mevcut mesajlar\ düzenleyebilirsiniz.
1. Mesaj\n\z\ girin. Nas\l mesaj girece©inizle ilgili daha fazla bilgiiçin 24-27 aras\ sayfalara (Metin Girme) bak\n.
2. Mesaj\ tamamlad\ktan sonra istedi©iniz ißlevi seçmek için solseçim tußuna [Seçenek] bas\n.
Aßa©\daki seçenekleri kullanabilirsiniz.
• Numaraya gönder: Bir numara girin ya da telefon rehberindenveya son kullan\lan numaralardan bir numara seçin. Mesaj\,ayn\ anda 5 kißiye gönderebilirsiniz. Sol seçim tußuna[Seçenekler] bas\n. Aßa©\daki seçenekler görüntülenir.
– Gönder (Yaln\zca bir telefon numaras\ girildikten sonra görünür)– Son numaralar– Bul
58
Mesajlar [Menü 5]

59
• Taslaklara kaydet: Mesaj\ kaydederek daha sonragörebilmenizi sa©lar.
• T9 dilleri: |stedi©iniz T9 modu dilini seçin.
• Metni sil: Tüm metni siler.
• Ç\k\ß: Mesaj yaz menüsünden ç\kman\z\ sa©lar.
3. Mesaj girerken sa© seçim tußuna [Ekle] basarak, mesajla birlikteekler de gönderebilirsiniz.
• Sembol: Özel karakterler ekleyebilirsiniz.
• Resim: ‘Resimli mesaj’ olarak da bilinen resim içeren metinmesajlar\ gönderebilir ve alabilirsiniz. Telefonda bir çok resimbulunmaktad\r. Bu resimlerin yerine di©er kaynaklardanald\©\n\z baßka resimler koyabilirsiniz.
• Animasyon: Mesaja EMS (Enhanced Messaging Service -Gelißmiß Mesaj Servisi) ile animasyon ekleyebilirsiniz.Telefondaki 15 animasyondan birini seçebilirsiniz.
• Ses: Varsa, k\sa mesaja varolan bir ses dosyas\n\ekleyebilirsiniz.
• Metin ßablonu: Telefonda kay\tl\ olan metin ßablonlar\n\kullanabilirsiniz.
• Telefon numaras\: Mesaja telefon numaralar\ ekleyebilirsiniz.
• |mza: |mzan\z\ ekleyebilirsiniz.
Gelenler [Menü 5-1-2]Al\nan metin mesajlar\ ve sayfa mesajlar\nda arama yap\labilir vebunlar\n içerikleri görüntülenebilir.
Al\nan mesajlar tarih s\ras\na göre gösterilir.
Menü tußuna bas\n ve Mesajlar � Metin mesajlar\ � Gelenlerö©esini seçin.
60
Al\nan her mesajda aßa©\daki seçenekler kullan\labilir. Sol seçimtußuna [Seçenekler] bas\n.
• Yan\tla
Al\nan mesaja yan\t verir.
• |let
Al\nan mesaj\ di©er al\c\lara iletir.
• Geri ara
Mesaj\n göndereni aran\r.
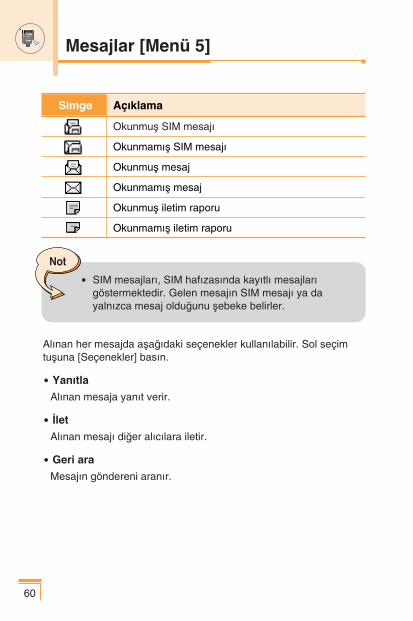
Not
• SIM mesajlar\, SIM haf\zas\nda kay\tl\ mesajlar\göstermektedir. Gelen mesaj\n SIM mesaj\ ya dayaln\zca mesaj oldu©unu ßebeke belirler.
Simge Aç\klama
Okunmuß SIM mesaj\
Okunmam\ß SIM mesaj\
Okunmuß mesaj
Okunmam\ß mesaj
Okunmuß iletim raporu
Okunmam\ß iletim raporu
Mesajlar [Menü 5]
61
• Al
Mesajdaki resmi, sesi, phone number, metin web sayfas\n\ ya dae-posta adresini al\r. Bunlar Klasörlerim, Telefon rehberi ya da yerimlerine kaydedilir.
• Sil
Gelen kutusundaki seçilen mesaj\ siler.
• Bilgileri göster
Seçilen mesajla ilgili daha ayr\nt\l\ bilgiler gösterir.
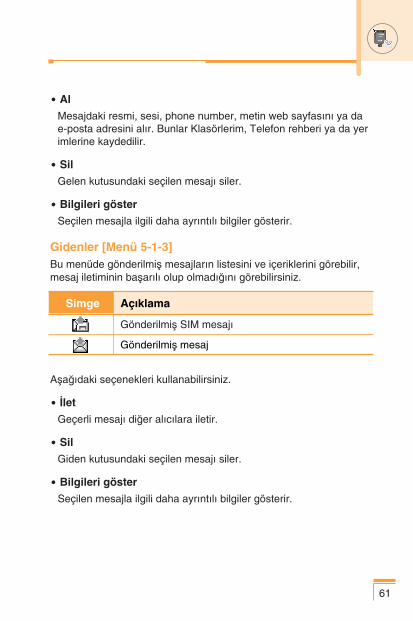
Gidenler [Menü 5-1-3]Bu menüde gönderilmiß mesajlar\n listesini ve içeriklerini görebilir,mesaj iletiminin baßar\l\ olup olmad\©\n\ görebilirsiniz.
Aßa©\daki seçenekleri kullanabilirsiniz.
• |let
Geçerli mesaj\ di©er al\c\lara iletir.
• Sil
Giden kutusundaki seçilen mesaj\ siler.
• Bilgileri göster
Seçilen mesajla ilgili daha ayr\nt\l\ bilgiler gösterir.
Simge Aç\klama
Gönderilmiß SIM mesaj\
Gönderilmiß mesaj
62
Taslak [Menü 5-1-4]Bu menüde, taslak olarak kaydedilen mesajlar\n bir listesinigörebilirsiniz. Yukar\/aßa©\ gezinme tußlar\n\ kullanarak listedehareket edebilirsiniz. Her taslak mesajda aßa©\daki seçeneklerikullanabilirsiniz.
• Gönder
Seçilen mesaj\ di©er al\c\lara gönderir.
• Sil
Seçilen mesaj\ siler.
Ayarlar [Menü 5-1-5]Bu menü, varsay\lan SMS bilgisini ayarlaman\z\ sa©lar.
• Mesaj türleri
Metin, Ses, Faks, Ça©r\, X.400, E-posta ve ERMES türleriaras\ndan varsay\lan mesaj türünü belirler. Íebeke, mesajlar\seçilen biçime dönüßtürebilir.
• Geçerlilik süresi
Metin mesajlar\n\z al\c\ya gönderilmeye çal\ß\l\rken SMSmerkezinde ne kadar süreyle kay\tl\ kalaca©\n\ belirler. Olas\seçenekler 1 saat, 12 saat, 1 gün, 1 hafta ve ßebekeoperatörünüzün izin verdi©i maksimum süredir.
• |letim Raporu
Rapor ißlevini etkinleßtirir ya da kapat\r. Bu ißlevetkinleßtirildi©inde, ßebeke mesaj\n\z\n iletilip iletilmedi©ini sizebildirir.
Mesajlar [Menü 5]

63
• Aynı servis merkeziyle cevapla
Íebeke taraf\ndan destekleniyorsa, SMS mesaj\n\z\ alan kißininsizinle ayn\ mesaj merkezini kullanarak size yan\t göndermesineizin verir.
• SMS merkezi
Metin mesajlar\ göndermede kullan\lan SMS merkezininnumaras\n\ kaydeder ya da de©ißtirir. Bu numaray\ servissa©lay\c\n\zdan almal\s\n\z.
• Taß\y\c\ ayar\
GPRS ya da GSM seçebilirsiniz. Seçilen taß\y\c\n\n, ücretlerinin veba©lant\ h\z\n\n ayarlanmas\yla ilgili daha fazla bilgi için ßebekeoperatörünüz ya da servis sa©lay\c\n\zla görüßün.
Tümünü sil [Menü 5-1-6]Mesaj haf\zas\ndaki tüm mesajlar\ silebilirsiniz.
Multimedya mesajlar [Menü 5-2]Multimedya mesajlar, metin, görüntü ve/veya ses klipleri içerebilir.
Bu özellik, yaln\zca ßebeke operatörü ya da servis sa©lay\c\taraf\ndan destekleniyorsa kullan\labilir. Yaln\zca uyumlumultimedya mesaj ya da e-posta özelliklerine sahip cihazlarmultimedya mesaj gönderebilir ve alabilir.
Yaz [Menü 5-2-1]1. Mesaj baßl\©\n\ yaz\n, ard\ndan Tamam tußuna ya da sol seçim
tußuna bas\n.
2. Metin mesaj\n\ girin. Sa© seçim tußunu kullanarak, semboller,numaralar ve duygu sembolleri girebilir ya da T9 giriß modunukullanabilirsiniz. Metin mesaj\n\ girdikten sonra sol seçim tußuna[Tamam] bas\n.
64
3. Bir görüntü ve/veya ses ekleyin. Yukar\/aßa©\ gezinme tußlar\n\kullanarak bir sonraki bölüme geçebilirsiniz.
4. |mleci üzerine getirip Tamam tußuna ya da sol seçim tußuna[Seç] basarak slayt ekleyebilirsiniz. Sa© seçim tußunu kullanarak[Menü] da slayt ekleyebilirsiniz.
5. Sa© seçim tußuna [Menü] bas\n. Aßa©\daki seçeneklerikullanabilirsiniz.
• Gönder: Birden fazla numara ve e-posta adresini destekler.
• Önizle: Göndermek istedi©iniz multimedya mesaj\ görüntüler.
• Kaydet: Multimedya mesaj\ taslak ya da ßablon olarakkaydeder.
• Sil: MMS mesaj\n\ siler.
• Slayt süresi: Slayt’\n gösterilme süresini belirler.
• Slayt biçimi:Mesaj içeriklerini sa©a, sola, yukar\ ya da aßa©\yahizalar.
• Slayt ekle: Geçerli slayttan önceye ya da sonraya bir slaytekler.
• Slayt\ kald\r: Seçilen slayt\ siler.
Gelenler [Menü 5-2-2]Mesaj ald\©\n\zda size bildirilir. Bunlar gelen kutusuna kaydedilir.Mesajlar\ simgelerine bakarak tan\mlayabilirsiniz. Daha fazla bilgiiçin aßa©\daki simge aç\klamalar\na bak\n.
Mesajlar [Menü 5]
65
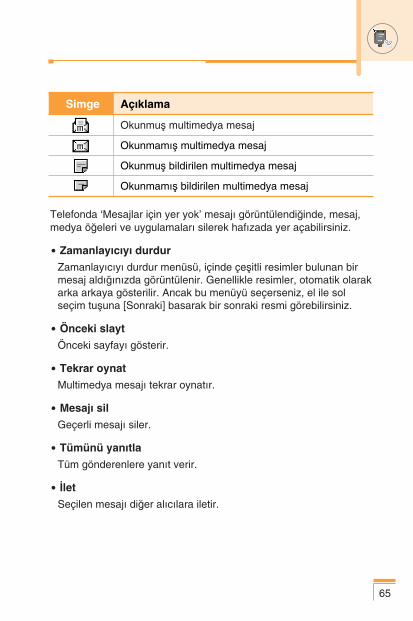
Telefonda ‘Mesajlar için yer yok’ mesaj\ görüntülendi©inde, mesaj,medya ö©eleri ve uygulamalar\ silerek haf\zada yer açabilirsiniz.
• Zamanlay\c\y\ durdur
Zamanlay\c\y\ durdur menüsü, içinde çeßitli resimler bulunan birmesaj ald\©\n\zda görüntülenir. Genellikle resimler, otomatik olarakarka arkaya gösterilir. Ancak bu menüyü seçerseniz, el ile solseçim tußuna [Sonraki] basarak bir sonraki resmi görebilirsiniz.
• Önceki slayt
Önceki sayfay\ gösterir.
• Tekrar oynat
Multimedya mesaj\ tekrar oynat\r.
• Mesaj\ sil
Geçerli mesaj\ siler.
• Tümünü yan\tla
Tüm gönderenlere yan\t verir.
• |let
Seçilen mesaj\ di©er al\c\lara iletir.
Simge Aç\klama
Okunmuß multimedya mesaj
Okunmam\ß multimedya mesaj
Okunmuß bildirilen multimedya mesaj
Okunmam\ß bildirilen multimedya mesaj
66
• Mesaj\ kaydet
Multimedya mesaj\ taslak ya da ßablon olarak kaydeder.
• Ö©eyi kaydet
Resimleri ya da sesleri al\r. Bunlar Klasörlerim ya da Telefonrehberi’ne kaydedilir.
• Detay
Al\nan mesajlarla ilgili, Gönderenin adresi, Konu (yaln\zcaMultimedya mesaj), Mesaj tarihi ve saati, Mesaj türü, Mesaj boyutugibi bilgileri gösterir.
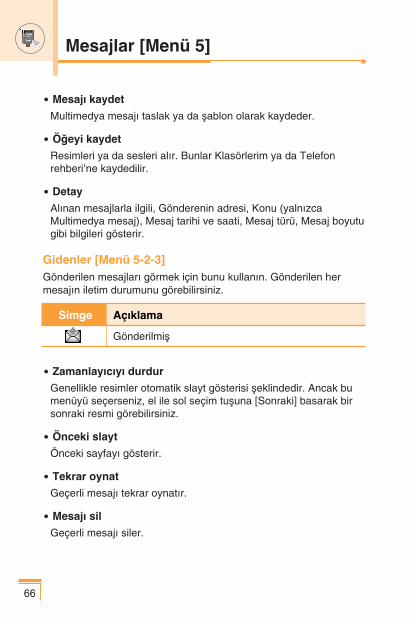
Gidenler [Menü 5-2-3]Gönderilen mesajlar\ görmek için bunu kullan\n. Gönderilen hermesaj\n iletim durumunu görebilirsiniz.
• Zamanlay\c\y\ durdur
Genellikle resimler otomatik slayt gösterisi ßeklindedir. Ancak bumenüyü seçerseniz, el ile sol seçim tußuna [Sonraki] basarak birsonraki resmi görebilirsiniz.
• Önceki slayt
Önceki sayfay\ gösterir.
• Tekrar oynat
Geçerli mesaj\ tekrar oynat\r.
• Mesaj\ sil
Geçerli mesaj\ siler.
Simge Aç\klama
Gönderilmiß
Mesajlar [Menü 5]

67
• |let
Geçerli mesaj\ di©er al\c\lara iletir.
• Mesaj\ kaydet
Multimedya mesaj\ taslak ya da ßablon olarak kaydeder.
• Ö©eyi kaydet
Görüntü, ses ve mesaj ekleri gibi ö©eleri kaydeder.
• Detay
Giden kutusu mesajlar\ hakk\nda bilgiler gösterir. Konu (yaln\zcaMultimedya mesaj), Mesaj tarihi ve saati, Mesaj türü, Mesajboyutu.
• Yan\tla
Geçerli mesaja yan\t verir.
• Tümünü yan\tla
Seçilen mesaj\n tüm al\c\lar\na yan\t verir.
Taslak [Menü 5-2-4]Bu menüyü kullanarak, en s\k kulland\©\n\z beß multimedya mesaj\taslak olarak ayarlayabilirsiniz. Bu menü önceden ayarlanm\ßmultimedya mesaj listesini göstermektedir.
Aßa©\daki seçenekleri kullanabilirsiniz.
• Gönder
Birden fazla üye ve e-posta adresini destekler.
• Önizle
Taslak multimedya mesajlar\ görmenizi sa©lar.
68
• Kaydet
Multimedya mesajlar\ taslak formunda ya da ßablon olarakkaydeder.
• Sil
Mesaj\ siler.
• Ayarlar
Slayt süresini ayarlamak ya da mesaj içeriklerini sa©a, sola,yukar\ya ya da aßa©\ya hizalamak için bunu seçin.
• Slayt ekle
Geçerli slayttan önceye ya da sonraya bir slayt ekler.
• Slayd\ kald\r
Seçilen slayd\ kald\r\r.
Ayarlar [Menü 5-2-5]Bu menüde varsay\lan multimedya mesaj bilgileriniayarlayabilirsiniz.
Aßa©\daki seçenekleri kullanabilirsiniz.
• Slayt süresi
Her slayt için bir süre seçebilirsiniz.
• Hizalama
Mesajlar\n nas\l hizalanaca©\n\ ayarlayabilirsiniz.
• Geçerlilik süresi
Mesajlar\n, ßebeke sunucusu üzerinde ne kadar süreylesaklanaca©\n\ seçebilirsiniz.
Mesajlar [Menü 5]
69
• Otomatik indir
Aç\k: Bunu seçti©inizde, mesajlar al\nd\©\nda otomatik olarakindirilir.
Onayla: Mesaj\ indirmek istedi©inizi onaylaman\z gerekir.
Kapal\: Mesajlar\n indirilmesini sonraya b\rak\r.
• Mesaj merkezi
MMS hizmetinde kullan\lacak MMS sunucusunun adresinigirebilirsiniz.
• Profiller
Daha fazla bilgi için 82. sayfaya bak\n.
Sesli mesajlar [Menü 5-3]Bu menü, sesli mesaj kutunuza (ßebekeniz taraf\ndan sa©lan\yorsa)h\zl\ biçimde ulaßman\z\ sa©lar. Bu özelli©i kullanmadan önceßebeke operatörünüzden ald\©\n\z sesli mesaj sunucusu numaras\n\girmelisiniz.
Yeni mesaj al\nd\©\nda ekranda bir sembol gösterilecektir.Telefonu do©ru biçimde yap\land\rmak için servisle ilgili di©erbilgileri ßebeke operatöründen alabilirsiniz.
Ses. msj. dinle [Menü 5-3-1]Bu seçenek seçildi©inde, sesli mesajlar\ dinlemek için sol seçimtußuna [Tamam] bas\n. Bekleme modunda sesli mesajlar\ dinlemekiçin 1 tußuna da bas\l\ tutabilirsiniz.
Sesli mesaj merk. [Menü 5-3-2]Telesekreter numaras\n\ girebilir ve ayarlayabilirsiniz.
70
Bilgi servisleri [Menü 5-4]Bilgi servisi mesajlar\, ßebeke taraf\ndan mobil telefonkullan\c\lar\na gönderilen metin mesajlar\d\r. Hava raporlar\, trafikhaberleri, taksiler, eczaneler ve hisse senedi fiyatlar\ gibi genelbilgiler sa©larlar.
Bilgi türleri için numaralar belirlenmißtir. Bu numaralar\ ßebekeoperatöründen alabilirsiniz. Bilgi servisi mesaj\ ald\©\n\zda, yenimesaj geldi©ini belirten bir mesaj aç\l\r ya da bilgi servisi mesaj\do©rudan görüntülenir.
Bekleme modunda bilgi servisi mesajlar\n\ görüntülerken aßa©\dakiseçenekler kullan\labilir.
Oku [Menü 5-4-1]Al\nm\ß yay\n mesajlar\n\n listesinde arama yap\labilir ve mesajlar\niçerikleri görüntülenebilir.
Al [Menü 5-4-2]Yay\n mesajlar\n\n al\m\n\ açmak ya da kapatmak için bunukullan\n.
Uyar\ [Menü 5-4-3]Yeni yay\n mesaj\ geldi©inde uyar\lmay\ kapatabilir ya daaçabilirsiniz.
Otomatik göster [Menü 5-4-4]Bu seçene©i Aç\k duruma getirirseniz, tüm al\nan yay\n mesajlar\otomatik olarak görüntülenir.
Diller [Menü 5-4-5] (Íebeke ve aboneli©e ba©l\d\r)Bu seçenek tercih etti©iniz dilleri seçmenizi sa©lar. Hücre yay\n\mesajlar\ seçilen dilde gösterilecektir. Telefonda tüm dillerindesteklenmesini istiyorsan\z, listenin sonundaki Otomatik’i seçin.
Mesajlar [Menü 5]
71
Konular [Menü 5-4-6](Íebeke ve aboneli©e ba©l\d\r)Yeni konular olußturmak için sol seçim tußuna [Seçenek] bas\n veYeni ekle ö©esini seçin. Daha önce girdi©iniz konular varsa bunlar\kapatabilir, düzenleyebilir ya da sol seçim tußunu [Seçenekler]kullanarak silebilirsiniz.
Íablonlar [Menü 5-5]Listede önceden tan\mlanm\ß mesajlar bulunmaktad\r. Íablonmesajlar\n\ görebilir, düzenleyebilir ve yeni mesajlarolußturabilirsiniz. |ki tür ßablon vard\r: Metin ve Multimedya mesaj|mza.
Metin [Menü 5-5-1]
• Düzenle
Yeni bir mesaj yazmak ya da metin ßablonlar\ listesindeki seçilmißßablon mesajlar\n\ düzenlemek için bunu kullanabilirsiniz.
• Sil
Seçilen ßablon mesaj\n\, metin ßablonlar\ listesinden siler.
• Metin mesaj\ gönder
Seçilen ßablon mesaj\n\ SMS ile göndermek için bunu kullan\n.
• Multimedya mesaj\ gönder
Seçilen ßablon mesaj\n\ MMS ile göndermek için bunu kullan\n.
• Yeni ekle
Yeni ßablon olußturmak için bunu kullan\n.
72
Multimedya [Menü 5-5-2]
• Gönder
Multimedya ßablonunu gönderir. Birden fazla numara ve e-postaadresini destekler.
• Önizle
Taslak multimedya mesaj\n\ gösterir.
• Kaydet
Multimedya mesajlar\ taslak formunda ya da ßablon olarakkaydeder.
• Sil
Multimedya ßablonunu siler.
• Slayt süresi
Slayt'\n gösterilme süresini belirler.
• Slayt biçimi
Mesaj içeriklerini sa©a, sola, yukar\ ya da aßa©\ya hizalar.
• Slayt ekle
Geçerli slayttan önceye ya da sonraya bir slayt ekler.
• Slayd\ kald\r
Seçilen slayd\ siler.
• Görüntü ekle
Geçerli görüntüden önce ya da sonra bir görüntü eklemek içinbunu kullan\n.
• Ses Ekle
Geçerli sesten önceye ya da sonraya bir ses ekler.
Mesajlar [Menü 5]
73
|mza [Menü 5-5-3]Bu seçenek kendi |mza göndermenizi sa©lar. |sminizi, mobil telefonnumaran\z\, iß numaran\z\, Faks numaran\z\ ve E-posta adresinigirin.
• Düzenle
Yeni mesaj yazmak ya da seçilen |mza düzenlemek için bunuseçin.
• Sil
Seçilen |mza silmek için bunu kullan\n.
• Metin mesaj\ gönder
Seçilen |mza SMS ile göndermek için bunu kullan\n.
• Multimedya mesaj\ gönder
Seçilen |mza MMS ile gönderir.
Haf\za durumu [Menü 5-6]SMS ve MMS için geçerli haf\za durumunu kontrol edebilirsiniz.
74
L1100’de entegre bir kamera bulunmaktad\r. Yak\nlaßt\rma (zoom),Beyaz dengesi, Renkli/Kahverengi/Siyah-beyaz ayarlar\n\ ve arkaarkaya resim çekme ißlevlerini desteklemektedir.
Resim çek [Menü 6-1]Menü tußuna (<) bas\n ve Kamera ➝ Resim çek ö©esini seçin.Ya da bekleme modunda kamera tußuna (Q) bas\n.
1. Cihaz\, resmi çekilecek nesneye odaklay\n, ard\ndan [Tamam]tußuna ya da kamera k\sayol tußu.
2. Yakalanan görüntünün sol üst taraf\nda ‘Kaydedildi’ mesaj\gösterilir. Çekilen görüntü daha sonra otomatik olarak kaydedilir.
3. Resim çekmeye devam etmek için [Tamam] tußuna bas\n. Veyasilme (C) tußuna basarak görüntüyü silin. Sa© seçim tußunabasarak çekilen görüntüyü içeren MMS resimli mesaj gönderin.
Not
• Kalan haf\za, görüntünün sa© üst kößesinde gösterilir.Yeterli miktarda haf\za varsa, görüntü boyutu otomatikolarak küçültülür. Haf\za doluysa, ‘haf\za dolu’ mesaj\gösterilir ve bundan sonra baßka resim çekemezsiniz.Eski görüntüleri silerek haf\zada yer açabilirsiniz.
Not
• Ön izleme modunda, sol seçim tußuna [Galeri] basarakdo©rudan Galeri’a gidebilirsiniz.
Kamera [Menü 6]
75
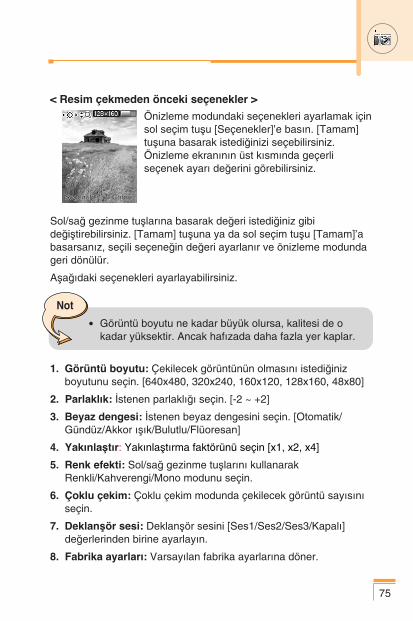
< Resim çekmeden önceki seçenekler >
Önizleme modundaki seçenekleri ayarlamak içinsol seçim tußu [Seçenekler]’e bas\n. [Tamam]tußuna basarak istedi©inizi seçebilirsiniz.Önizleme ekran\n\n üst k\sm\nda geçerliseçenek ayar\ de©erini görebilirsiniz.
Sol/sa© gezinme tußlar\na basarak de©eri istedi©iniz gibide©ißtirebilirsiniz. [Tamam] tußuna ya da sol seçim tußu [Tamam]’abasarsan\z, seçili seçene©in de©eri ayarlan\r ve önizleme modundageri dönülür.
Aßa©\daki seçenekleri ayarlayabilirsiniz.
1. Görüntü boyutu: Çekilecek görüntünün olmas\n\ istedi©inizboyutunu seçin. [640x480, 320x240, 160x120, 128x160, 48x80]
2. Parlakl\k: |stenen parlakl\©\ seçin. [-2 ~ +2]
3. Beyaz dengesi: |stenen beyaz dengesini seçin. [Otomatik/Gündüz/Akkor \ß\k/Bulutlu/Flüoresan]
4. Yak\nlaßt\r: Yak\nlaßt\rma faktörünü seçin [x1, x2, x4]
5. Renk efekti: Sol/sa© gezinme tußlar\n\ kullanarakRenkli/Kahverengi/Mono modunu seçin.
6. Çoklu çekim: Çoklu çekim modunda çekilecek görüntü say\s\n\seçin.
7. Deklanßör sesi: Deklanßör sesini [Ses1/Ses2/Ses3/Kapal\]de©erlerinden birine ayarlay\n.
8. Fabrika ayarlar\: Varsay\lan fabrika ayarlar\na döner.
Not
• Görüntü boyutu ne kadar büyük olursa, kalitesi de okadar yüksektir. Ancak haf\zada daha fazla yer kaplar.
Galeri [Menü 6-2]Ard\ndan görüntü kategorisini seçer. [Tüm resimler/Genel resimler/Rehber resimleri]
Telefonunuzda kay\tl\ resimleri görebilir, düzenleyebilir vegönderebilirsiniz.
1. Tam ekran görmek istedi©iniz resmi seçmek için gezinmetußlar\n\ kullan\n.
2. [Tamam] tußuna bas\n. Görüntünün ismini LCD ekran\n enüstünde göreceksiniz.
3. Aßa©\daki altmenülere girmek için sol seçim tußuna [Seçenekler]bas\n.
• Küçük resim/Büyüt: Seçilen görüntüye bakabilirsiniz.
• Sil: Seçilen görüntüyü siler.
• Multimedya mesajıyla gönder: Seçilen görüntüyü kullananMMS resimli mesajlar\ gönderebilirsiniz. MMS mesajlar\yazmayla ilgili daha fazla bilgi için 60. sayfaya bak\n.
• Duvar ka©\d\ yap: Seçilen görüntüyü duvar ka©\d\ yapar.
• Slayt gösterisi: Tüm resimleri s\ras\yla arka arkaya gösterir.Slayt gösterisini durdurmak için C tußuna bas\n.
• Yeni ad ver: Seçilen görüntünün baßl\©\n\ de©ißtirebilirsiniz.
• Tümünü sil: Seçilen kategorideki tüm görüntüleri siler.
• Detaylar: Seçilen görüntünün baßl\©\n\, boyutunu, tarihini vesaatini görebilirsiniz.
4. Kamera menüsüne geri dönmek için sa© seçim tußuna [Geri]bas\n.
[Haf\za durumu] alt menüsünde, telefonunuzun haf\za durumunukontrol edebilirsiniz.
[toplam boyut/kullan\lan boyut/boß boyut]
76
Kamera [Menü 6]
77
Java [Menü 7]
Java, Sun Microsystems taraf\ndan gelißtirilmiß bir teknolojidir.Netscape ya da MS Internet Explorer taray\c\lar\n\ kullanarak JavaApplet’i indirebilmeniz gibi WAP kullanan telefonlara Java MIDlet’leriindirilebilmektedir. Servis sa©lay\c\ya ba©l\ olarak Java oyunlar\ gibitüm Java tabanl\ programlar indirilebilir ve telefonda çal\ßt\r\labilir.Java program\ indirildikten sonra, uygulamay\ seçebilece©iniz,çal\ßt\rabilece©iniz ya da silebilece©iniz Uygulamalar menüsündegösterilir. Telefona kaydedilen Java program\ dosyalar\ .JAD ve.JAR biçimlerindedir.
Not
• JAR dosyas\, Java program\n\n s\k\ßt\r\lm\ß biçimidir veJAD dosyalar\, tüm ayr\nt\l\ bilgileri içeren birtan\mlama dosyas\d\r. |ndirmeden önce ßebekededosyayla ilgili tüm ayr\nt\l\ bilgileri JAD dosyas\ndagörebilirsiniz.
Uyar\
• Telefon ortam\nda yaln\zca J2ME (Java 2 Micro Edition)tabanl\ programlar çal\ß\r. J2SE (Java 2 StandardEdition) tabanl\ programlar yaln\zca PC ortam\ndaçal\ß\r.
78
Oyunlar [Menü 7-1]Telefonda çeßitli oyunlar bulunmaktad\r.
Uygulamalar [Menü 7-2]Uygulama menüsü WAP kullan\larak indirilen Java programlar\n\nbir listesini gösterir. Uygulama menüsünde daha önce indirilmiß tümprogramlar seçilebilir, silinebilir ya da ayr\nt\l\ biçimdegörüntülenebilir. Uygulama menüsü içindeki listede, aßa©\dakiseçenekler kullan\labilir:
• Aç: Seçilen program\ aç\n. Bu listede, telefonda yüklü tüm Javauygulamalar\ bulunmaktad\r.
• Sil: Seçilen program\ silin. Silindi©inde, yeniden WAP kullan\larakindirilmedi©i sürece program\ geri yükleyemezsiniz.
• Detaylar: Seçilen programla ilgili detayl\ bilgileri gösterir. Bubilgiler aras\nda program ismi, program boyutu, program sürümü,sat\c\ bilgisi ve web sitesi adresi ya da URL bulunur.
Java [Menü 7]
Not
• Kontrol tußlar\, oyuna göre farkl\l\k göstermektedir.Ancak her oyunda ana kontrol tußlar\n\ aç\klayan birgiriß k\sm\ bulunmaktad\r.
[ Ortak tuß ißlevleri ]
< : Oyun menüsü
> : Geri
79
• Ba©lanma seçenekleri: Baz\ Java uygulamalar\, veriba©lant\s\n\n yap\lmas\n\ gerektirebilir. Aßa©\daki seçeneklerdenbirini seçin.
1. Önce sor: Uygulama ba©lant\y\ kurmadan önce size sorulur.
2. |zin verilir: Ba©lant\, herhangi bir bildirimde bulunulmadanan\nda olußturulur.
3. |zin verilmez: Hiçbir ba©lant\ya izin verilmez.
|ndir [Menü 7-3]WAP kullan\larak yeni bir Java program\ indirildi©inde, indirmeninyap\ld\©\ adrese yer imi ad\ verilir. Java menüsünde, Javaprogramlar\n\n indirilebilece©i bir yer imleri listesi bulunur ve bu yerimleri listesi, |ndir menüsünde görülebilir. Yer imlerine ba©lanabilir,görebilir, düzenleyebilir, silebilir ve yeni yer imleri ekleyebilirsiniz.
• Ba©lan: Veri ba©lant\s\ için yer iminde seçilen adres kullan\l\r.Baßar\l\ bir ba©lant\dan sonra, listeden istenilen Java program\indirilebilir.
• Göster: Bir yer imiyle ilgili, belirli sitelere ba©lant\ için gerekli yeriminin adresi ve baßl\©\ gibi ayr\nt\l\ bilgiler görülebilir.
• Düzenle: Seçilen yer imi düzenlenebilir. Yer iminin düzenlenmesiAdres ➝ Baßl\k s\ras\nda yap\l\r. Yeni bir yer imi yarat\l\rken ayn\s\ra takip edilir.
• Sil: Seçilen yer imi silinir. Yer imleri listesi ekran\nda tüm yerimleri tamamen silinebilir. Seçilen yer imi geriyüklenemeyece©inden, silinirken dikkatli olunmal\d\r.
• Yeni ekle: Yeni yer imi ekler. Yeni yer imi ekleme ißleminde, Yerimi düzenleme ißleminde kullan\lan s\ra takip edilir. Yer imimenüsünde Yeni ekle seçene©ini seçin. Herhangi bir yer imiyoksa, Yeni ekle seçene©i, yer imleri listesi ekran\ndan seçilebilir.
80
Bilgi [Menü 7-4]
Haf\za durumu [Menü 7-4-1]Oyun ve uygulama yüklemeleri için kullan\labilecek haf\za boyutunugösterir. Telefonun tüm haf\za durumunu da görebilirsiniz.
Not
• Java MIDlet Sa©lay\c\s\n\n sunucusuna erißmek içinBa©lan ißlevini seçtikten sonra, bir çok Java program\seçene©inden birini indirebilir ve yükleyebilirsiniz.Sunucuya ba©land\ktan sonra seçilen programla ilgiliJAD dosyas\n\ görüntülemek için Git dü©mesinebas\labilir. Al dü©mesi, indirmeyi ve yükleme ißleminibaßlat\r. |ndirme ve yükleme ißlemleri ayn\ anda yap\l\rve indirme tamamland\©\nda Java program\n\ hemençal\ßt\rmaya baßlayabilirsiniz. Yüklenen Javaprogram\n\, daha sonra Uygulama menüsündenseçerek çal\ßt\rabilirsiniz.
Java [Menü 7]
81
Menü tußuna (<) bas\n ve gezinme tußlar\n\ kullanarak Internet’iseçin.
Bankac\l\k, haberler, hava durumu raporlar\ ve uçuß bilgileri gibibirçok WAP (Kablosuz Uygulama Protokolü) hizmetlerineulaßabilirsininiz. Bu hizmetler özel olarak mobil telefonlar içintasarlanm\ßt\r ve WAP servis sa©lay\c\lar\ taraf\ndan sa©lan\r.
Hangi WAP hizmetlerinin sunuldu©unu, fiyatlar\ ve tarifeleri ßebekeoperatörünüzden ve/veya servislerini kullanmak istedi©iniz servissa©lay\c\lardan ö©renebilirsiniz. Servis sa©lay\c\lar, kendiservislerini nas\l kullanabilece©inizle ilgili bilgiler de sa©layacakt\r.
Internet hesab\n\z\ açt\rmak için lütfen ßebeke operatörünüzlegörüßün. Web Taray\c\y\ kullanmak için Kendi numaram menüseçene©i ile (Daha fazla bilgi için 44. sayfaya bak\n) telefonnumaran\z\ belirtmeniz gerekmektedir.
Ba©lan\ld\©\nda ana sayfa görüntülenecektir. Sayfan\n içeri©i servissa©lay\c\ya ba©l\d\r.
URL adresini girerek istedi©iniz web sitesi sayfas\na ulaßabilirsiniz.Taray\c\dan istedi©iniz zaman ç\kmak için E tußuna bas\n.Telefon bekleme moduna geri döner.
WAP taray\c\yla gezinmeTelefon tußlar\ ya da WAP taray\c\ menüsünü kullanarak internettegezebilirsiniz.
Telefon tußlar\n\ kullanmaInternette gezinirken telefon tußlar\, telefon modunda oldu©undanfarkl\ çal\ß\r.
Internet [Menü 8]
82
WAP taray\c\ menüsünün kullan\lmas\Kablosuz Web’de gezerken kullan\labilecek çeßitli menü seçenekleribulunmaktad\r.
Ana sayfa [Menü 8-1]Bir ana sayfaya ba©lan\r. Ana sayfa, etkin profilde tan\mlanm\ß olansite olacakt\r. Etkin profilde tan\mlanmad\ysa, servis sa©lay\c\taraf\ndan tan\mlanacakt\r.
Yer imleri [Menü 8-2]Bulundu©unuz sayfay\ yer imi olarak ayarlayabilir ya da dahaönceden kaydedilmiß bir yer imi sayfas\na gidebilirsiniz.Telefonunuza, LG ile ba©lant\s\ olmayan baz\ siteler için yer imleriönceden yerleßtirilmißtir. LG bu sitelerin içeri©ini garanti etmemekteve onaylamamaktad\r. Bu sitelere girißlerinizde, di©er herhangi birsitede göz önünde bulundurdu©unuz ayn\ güvenlik ve içerikönlemlerine dikkat etmelisiniz.
Internet [Menü 8]
Not
• WAP taray\c\ menüsü, taray\c\ sürümüne göre farkl\l\kgösterebilir.
Tuß Aç\klama
U D |çerikte sat\rlar aras\nda hareket etmenizi sa©lar
C Bir önceki sayfaya dönmenizi sa©lar
O Seçenekleri seçer ve ißlemleri onaylar.
83
E-posta sunucusu [Menü 8-2-1]
• Ba©lan
Yap\land\rm\ß olu©unuz e-posta sunucusuna ba©lan\r.
• Adresi düzenle
E-posta adresini düzenlemenizi sa©lar.
Tümünü sil [Menü 8-2-2]Tüm yer imlerini siler.
Push mesajlar\ [Menü 8-3]
Gelenler [Menü 8-3-1]WAP servis sa©lay\c\lar\ndan Push mesajlar\ gönderiminisa©layabilirsiniz. Push mesajlar\, örne©in haber baßl\klar\ gibiuyar\lard\r ve bir metin mesaj\ ya da WAP servisinin adresiniiçerebilir. Kullan\labilirlik ve abonelik için WAP servis sa©lay\c\n\zlagörüßün. Servis sa©lay\c\lar, her yeni bir Push mesaj\ geldi©indemevcut bir Push mesaj\n\ güncelleyebilirler. Mesajlar, siz onlar\baßka bir klasöre taß\san\z bile güncellenebilir. Push mesajlar\n\nsüresi doldu©unda, otomatik olarak silinirler.
• Bilgi
Al\nan push mesajlar\yla ilgili bilgileri gösterir.
• Yükle
Al\nan push mesajdaki bilgileri kullanarak belirli bir siteye ba©lan\r.
84
• Sil
Seçilen push mesaj\n\ siler.
Al [Menü 8-3-2]Push mesajlar\ almak isteyip istemedi©inizi seçebilirsiniz.
Profiller [Menü 8-4]Daha fazla bilgi için ßebeke operatörünüzle görüßün. Her profilde aßa©\daki alt menüler bulunur:
• Etkinleßtir: Seçilen profili etkinleßtirir.
• Ayarlar: Seçilen profildeki WAP ayarlar\n\ düzenlemek vede©ißtirmek için bunu kullan\n.
• Yeni isim ver: Seçilen profilin ismini de©ißtirebilirsiniz.
• Sil: Listedeki seçilen profili siler.
• Yeni profil: Yeni bir profil ekleyebilirsiniz.
URL’ye git [Menü 8-5]Do©rudan istedi©iniz siteye ba©lanabilirsiniz. Bunu yapmak içinbelirli bir URL girmeniz gerekir.
Önbellek ayarlar\ [Menü 8-6]Girdi©iniz bilgiler ya da servisler, telefonun önbelle©ine kaydedilir.
Not
• Bu seçenekler kullan\larak yap\lan de©ißiklikler, MMSißlevini etkileyebilir.
Internet [Menü 8]
85
Önbelle©i sil [Menü 8-6-1]Önbellekte kay\tl\ tüm içeri©i siler.
Önbelle©i denetle [Menü 8-6-2]Ba©lant\ girißiminin önbellek üzerinden yap\l\p yap\lmad\©\n\gösteren bir de©er belirler.
Güvenlik sertifikasyonlar\ [Menü 8-7]Mevcut sertifikalar\ içeren bir liste gösterilir.
Profilleri s\f\rla [Menü 8-8]Orijinal ayarlara dönmek için profilleri s\f\rlayabilirsiniz.
WAP bilgisi [Menü 8-9]WAP taray\c\ sürümü gösterilir.
Not
• Önbellek, verilerin geçici olarak kaydedilmesi içinkullan\lan bir ara bellektir.
Menü tußuna (<) bas\n ve gezinme tußlar\n\ kullanarak Ayarlar’\seçin.
Tarih ve Saat [Menü 9-1]Bu seçenek, gösterilen geçerli saati ve tarihi de©ißtirmenizi sa©lar.Aßa©\daki seçenekleri kullanabilirsiniz.
Tarihi ayarla [Menü 9-1-1]Gün, ay ve y\l de©erlerini girmek için bunu kullan\n. Tarih biçimimenü seçene©i ile tarih biçimini de©ißtirebilirsiniz.
Tarih biçimi [Menü 9-1-2]Tarih biçimini GG/AA/YYYY, AA/GG/YYYY veya YYYY/AA/GGolarak ayarlayabilirsiniz. (G: Gün / A: Ay / Y: Y\l)
Saati ayarla [Menü 9-1-3]Geçerli saati girmek için bunu kullanabilirsiniz. Saat biçimi menüseçene©i ile saat biçimini seçebilirsiniz.
Zaman biçimi [Menü 9-1-4]Saat biçimini 24 ve 12 saatlik biçimlerden birini seçerek ayarlayabilirsiniz.
Telefon ayarlar\ [Menü 9-2]Telefonunuzun bir çok özelli©i, kendi tercihlerinize uyacak ßekildeözelleßtirilebilir. Tüm bu özelliklere Telefon ayarlar\ menüsündengirebilirsiniz.
Duvar ka©\d\ [Menü 9-2-1]Bekleme modunda LCD ekranda gösterilenleri de©ißtirmek için bunukullan\n.
86
Ayarlar [Menü 9]

87
Karß\lama notu [Menü 9-2-2]Karß\lama notunu bekleme modunda iç LCD’de, ve d\ß LCD’degörüntülenmesini sa©lamak için bunu kullan\n.
Menü rengi [Menü 9-2-3]Telefonunuzda 6 menü rengi temas\ bulunmaktad\r: Seçenekleraras\nda ilerleyip Seç tußuna basarak menü rengini belirleyin.
Diller [Menü 9-2-4]Telefonun kullan\c\ arayüzü dilini seçebilirsiniz. Dil seçene©iOtomatik olarak belirlendi©inde, telefonda kullan\lacak dil, SIMkart\n diline göre otomatik olarak belirlenir. Telefon, SIM kart\n dilinidesteklemiyorsa, |ngilizce seçilir.
Arka ayd\nlatma [Menü 9-2-5]Telefonda arka ayd\nlatman\n kullan\l\p kullan\lmayaca©\n\belirlemek için bunu kullan\n. Bekleme/konußma süresi, arkaayd\nlatma kapat\larak biraz artt\r\labilir.
Tuß tak\m\n\n yukar\da/aßa©\da oldu©u durumlar için arkaayd\nlatmay\ ayr\ ayr\ belirleyebilirsiniz.
LED göstergesi [Menü 9-2-6]Telefonun aç\k oldu©unu gösteren LED Göstergesinin yan\psönmesini ayarlamak için bunu kullan\n.
Íebeke ad\ [Menü 9-2-7]Kulland\©\n\z ßebekenin isminin, bekleme modunda LCD ekrandagösterilmesi için bunu kullan\n.

Ça©r\ ayarlar\ [Menü 9-3]Arama yönlendirme ayarlar\n\ de©ißtirmenizi sa©lar.
Ça©r\ yönlendirme [Menü 9-3-1]Bu ßebeke hizmeti etkinleßtirildi©inde, size gelen aramalar\ baßkabir numaraya, örne©in sesli posta kutusu numaran\zayönlendirebilirsiniz. Daha fazla bilgi için ßebeke operatörünüzlegörüßün. Yönlendirme seçeneklerinden birini seçin. Örne©in birarama geldi©inde numaran\z meßgulse ya da gelen aramalar\reddetti©inizde araman\n yönlendirilmesi için Meßgulse ö©esiniseçin.
Aßa©\daki seçenekleri kullanabilirsiniz.
• Tum sesli ara.
Her durumda tüm sesli aramalar\ yönlendirir.
• Meßgulse
Telefon kullan\mda oldu©unda sesli aramalar\ yönlendirir.
• Cevaplanmazsa
Yan\tlamad\©\n\z sesli aramalar\ yönlendirir.
• Kap. alan\ d\ß\
Telefon kapal\ysa ya da kapsama alan\ d\ß\ndaysa gelenaramalar\ yönlendirir.
• Tum veri ara.
Her durumda PC ba©lant\s\ olan bir numaraya yönlendirir.
• Tum faks ara.
Her durumda faks ba©lant\s\ olan bir numaraya yönlendirir.
88
Ayarlar [Menü 9]
89
Her seçenek, aßa©\daki menüye sahiptir:
- EtkinleßtirGeçerli hizmeti etkinleßtirir.
• Sesli postayaMesaj merkezine yönlendirir. Bu ißlev Tüm veri aramalar\ veTüm faks aramalar\ menüsünde kullan\lamaz.
• Di©er numarayaAramalar\n yönlendirilece©i numaray\ girin.
- |ptalSeçilen arama yönlendirmesini iptal eder.
- Durumu gösterServisin durumunu kontrol edebilirsiniz
• Tümünü iptal et
Tüm arama yönlendirme ayarlar\n\ iptal eder.
Cevaplama modu [Menü 9-3-2]Aramalar\n yan\tlanma ßeklini belirlemenizi sa©lar.
• Kapak açma
Yaln\zca kapa©\ açarak aramay\ cevaplayabilirsiniz.
• Herhangi bir tuß
Telefon çald\©\nda, aramay\ tußu ve sa© seçim tußu (>) d\ß\ndaherhangi bir tußa basarak yan\tlayabilirsiniz.
• Yaln\zca gönder tußu
Aramalar\ yaln\zca gönder tußuna basarak yan\tlayabilirsiniz.
Numaram\ gönder [Menü 9-3-3]Bu ßebeke servisi, telefon numaran\z\n arad\©\n\z kißiyegösterilmesini (Aç\k) ya da gizlenmesini (Kapal\) seçmenizi sa©lar.
Íebeke belirler seçerek, servis sa©lay\c\yla daha önce anlaßt\©\n\zayar\n kullan\lmas\n\ sa©layabilirsiniz.
Ça©rı bek. ser. [Menü 9-3-4](Íebeke Servisi)Görüßme yapt\©\n\z s\ras\nda bir arama geldi©inde ßebeke siziuyar\r. Íebekenin arama bekletmeyi etkinleßtirmesi için Etkinleßtir,kapatmas\ için |ptal, ißlevin etkin olup olmad\©\n\ kontrol etmek içinDurumu göster ö©esini seçin.
Dak. hatırlatma [Menü 9-3-5]Aç\k oldu©unda, bir görüßme s\ras\nda her dakika baß\nda bip sesiile konußman\z\n süresini size hat\rlat\r.
Sesli arama [Menü 9-3-6]Kißinin telefon rehberi kayd\na eklenm©iß ses etiketini söyleyerek okißiyi arayabilirsiniz. Ses etiketi olarak istedi©iniz sözcüklerikullanabilirsiniz. Sesli arama sistemini kullan\rken ßunlar\ hat\rlay\n:
• Ses etiketleri kullan\lan dilden ba©\ms\zd\r. Konußmac\n\n sesineba©l\d\r.
• Ses etiketleri, arka plandaki gürültüden etkilenirler. Sesetiketlerini sessiz ortamlarda kaydedin ve kullan\n.
• Ses etiketi kaydederken ya da ses etiketini söyleyip aramayaparken hoparlör kullan\l\r. Telefonu a©z\n\zdan ve yüzünüzdenbiraz uza©a do©ru tutarak, yak\nl\k sensörünün hoparlörükapatmamas\n\ sa©lay\n.
• Çok k\sa sözcükler kabul edilmez. Uzun sözcükler kullan\n vefarkl\ numaralar için benzer sözcükler kullanmay\n.
90
Ayarlar [Menü 9]
91
- OtomatikTuß tak\m\n\ her aßa©\ya kayd\rd\©\n\zda sesli arama modunagirmek için bunu kullan\n.
- ElleY\ld\z[*/ses] tußuna bas\l\ tutarak sesli arama moduna girmekiçin bunu kullan\n.
Oto. t.arama [Menü 9-3-7]Aç\k seçti©inizde, yap\lan araman\n baßar\s\z olmas\ durumundatelefon en fazla beß kez tekrar arama yapacakt\r.
Kap. kul. grubu [Menü 9-3-8](Íebeke Hizmeti) Bu sizin arayabilece©iniz ve sizi arayabilecek kißilerden olußangrubu tan\mlayan bir ßebeke servisidir. Daha fazla bilgi için ßebekeoperatörünüzle ya da servis sa©lay\c\n\zla görüßün. Bir grup dizinitan\mlanm\ßsa, bu dizin tüm yap\lan aramalar için kullan\lacakt\r.Herhangi bir grup dizini belirtilmediyse, ßebeke tercih edilen dizinikullanacakt\r.(Belirli bir dizin ßebekede kay\tl\d\r.)
• Ön ayar : Seçilen CUG dizinini belirler.
• Aç\k : CUG dizinini düzenleyebilir ve etkinleßtirebilirsiniz.
• Kapal\ : Seçilen CUG’yi siler.
Not
• Sözcükleri, aynen kaydetti©iniz ßekilde söylemenizgerekmektedir. Bu durum gürültülü ortamlardan ya daacil durumlarda zor olabilir. Bu nedenle her durumdayaln\zca sesli aramalara güvenmeyin.

Güven. ayarlar\ [Menü 9-4]Telefonunuzun baz\ özelliklerini korumak için çeßitli ßifrelerkullan\lmaktad\r.
PIN kodu iste©i [Menü 9-4-1]PIN kodu iste©i özelli©i etkin oldu©unda, telefonu her açt\©\n\zdaPIN kodunuzu girmeniz istenir. Dolay\s\yla PIN kodunuzu bilmeyenkißiler, sizin izniniz olmadan telefonunuzu kullanamazlar.
Aßa©\daki seçenekleri kullanabilirsiniz:
• Aç\k
Telefon her aç\ld\©\nda PIN kodunuzu girmeniz gerekir.
• Kapal\
Telefonu açt\©\n\zda do©rudan ßebekeye ba©lan\r.
Telefon kilidi [Menü 9-4-2]Telefon kilidi özelli©i etkinleßtirildi©inde, telefon kilitlenir ve telefonuher açt\©\n\zda telefon ßifresini girmeniz istenir. Íifre, fabrikada0000 olarak ayarlanm\ßt\r. Íifreyi de©ißtirmek için Kodlar\ de©ißtir– Güvenlik kodu menü seçene©ine [Menün 9-4-5-1] bak\n. Do©rußifreyi girdi©inizde, kapatana kadar telefonu kullanabilirsiniz.
92
Not
• PIN kodu iste©i özellli©ini kapatmak için PIN kodunuzugirmeniz istenir.
Ayarlar [Menü 9]
93
Aßa©\daki seçenekleri kullanabilirsiniz:
• Telefonu açma
- EtkinTelefonu açt\©\n\zda telefon ßifresini girmeniz istenir.
- Kapal\Telefonu açt\©\n\zda telefon ßifresini girmeniz gerekmez.
- SIM de©ißti©indeYaln\zca SIM kart\n\z\ de©ißtirdi©inizde güvenlik kodunu girmenizistenecektir.
• Hemen
Do©ru güvenlik kodunu girdikten sonra telefon bekleme modunagirince kilitlenir. Telefon kilidini devre d\ß\ b\rakmak için, sa© seçimtußuna bast\ktan sonra do©ru güvenlik kodunu girmeniz gerekir.Telefon kilitli durumdayken telefonu kapat\rsan\z, telefonu dahasonra açt\©\n\zda yine kilitli durumda olacakt\r.
Ça©r\ eng. ser. [Menü 9-4-3](Íebekeye ba©l\)Arama engelleme, telefondan arama yapman\z\ ve gelen aramalar\alman\z\ k\s\tlar. Bu ißlevi kullanmak için servis sa©lay\c\n\zdanalabilece©iniz engelleme ßifresini kullanman\z gerekmektedir.
Aßa©\daki seçenekleri kullanabilirsiniz:
• Tüm yap\lan
Hiçbir arama yap\lamaz.
• Uluslararası yapılan
Uluslararas\ aramalar yap\lamaz.
• As\l ülke hariç uluslararas\ yap\lan:
Yurtd\ß\ndayken yaln\zca bulundu©unuz ülke içindeki ve kendiülkenizdeki, yani servis sa©lay\c\n\z\n bulundu©u ülkedekinumaralara arama yapabilirsiniz.
• Tüm gelen
Hiçbir arama al\namaz.
• Yurtd\ß\nda gelen
Telefonunuzu as\l ßebekenizin hizmet alan\n\n d\ß\ndakulland\©\n\zdan hiçbir arama al\namaz.
• Tüm engellemeleri iptal et
Tüm arama engelleme ayarlar\ kapat\labilir. Aramalar normalbiçimde al\nabilir ve yap\labilir.
• Parola de©ißtir
Servis sa©lay\c\n\zdan bu ißlevi kullanmak için ald\©\n\z aramaengelleme parolas\n\ de©ißtirebilir ve yeni parola belirleyebilirsiniz.Yeni bir parola belirlemeden önce mevcut parolay\ girmenizgerekir. Yeni parolay\ girdikten sonra, onaylamak için yenidengirmeniz istenir.
94
Not• Arama engelleme servisi’ni kullanmak için ßebeke
parolan\z\ girmeniz gerekmektedir. Aramalar engellioldu©u durumlarda, baz\ ßebekeler acil numaralar\naranmas\na izin verebilmektedir.
Ayarlar [Menü 9]
95
Sabit arama no [Menü 9-4-4](SIM’e ba©l\)SIM kart\n\z destekliyorsa, telefonunuzdaki yap\labilen aramalar\yaln\zca belirli numaralarla s\n\rland\rabilirsiniz. FDN kapasitesi,SIM karta ba©l\d\r. FDN girerken PIN2 kodunu kullanman\z gerekir.
Bu ißlev k\smi numaralar\n (örn. alan kodlar\) kaydedilmesineolanak tan\r.
Örnekler:
E©er FDN listesinde 3 numaraya kay\tl\ysa (0123, 123123, ?89012),aßa©\dakileri arayabilirsiniz:012345678..., 01236789..., yaln\zca 123123, 189012 ve 289012.(“?” herhangi bir numara anlam\na gelmektedir)
FDN listesinde bulunmayan bir numaray\ aramaya çal\ß\rsan\z,“FDN kontrolü” mesaj\ görüntülenir.
• Etkin
FDN etkinse, yaln\zca listedeki numaralar\ arayabilirsiniz. Rehberißlevi k\smen k\s\tl\ hale gelir. SIM’e kay\t ekleyemezsiniz; yaln\zcatelefon haf\zas\na kay\t eklenebilir. Ayr\ca yaln\zca telefonhaf\zas\nda kay\tl\ rehber kay\tlar\n\ arayabilirsiniz.
• Aktif de©il
FDN kapal\ysa, rehber ißlevini kullanabilirsiniz.
• Numara listesi
FDN listesini görebilirsiniz. Sol seçim tußu [Seçenekler]’e basarakFDN ekleyebilir, varolanlar\ düzenleyebilir ve silebilirsiniz.
Not
• Tüm SIM kartlar\nda PIN2 bulunmaz. SIM kart\n\zdayoksa, bu menü seçene©i gösterilmez.
Kodlar\ de©ißtir [Menü 9-4-5]Kodlar\ de©ißtir özelli©i, geçerli ßifrenizi yenisiyle de©ißtirmenizisa©lar. Yeni bir parola belirlemeden önce mevcut parolay\ girmenizgerekir.
Bu ißlevi, erißim kodlar\n\ de©ißtirmek için kullan\n: Güvenlik kodu,PIN kodu, PIN2 kodu
Íebeke ayarlar\ [Menü 9-5]Íebeke ayarlar\ özelli©i, dolaß\mdayken (roaming – as\l ßebekenizd\ß\ndayken) kullan\lacak ßebekenin otomatik olarak, elle ya datercihli olarak seçilmesini belirlemenizi sa©lar.
Otomatik [Menü 9-5-1]Telefonun bulundu©unuz bölgedeki hücresel ßebekelerden biriniotomatik olarak aramas\n\ ve seçmesini sa©lamak için bunu seçin.
Telefon kapat\ld\©\nda standart olarak Otomatik ayar\na geri döner.
96
Not
• PIN: Kißisel Kimlik Numaras\
Not• Ana ßebekeniz d\ß\nda bir ßebeke seçmeniz için, bu
ßebekenin, kendi ßebeke operatörünüzle geçerlidolaß\m (roaming) anlaßmas\ yapm\ß olmas\gerekmektedir.
Ayarlar [Menü 9]
97
Elle [Menü 9-5-2]Íebeke listesinden istedi©iniz ßebekeyi el ile kendiniz seçmekisterseniz bunu kullan\n. Elle seçene©iyle belirlenen ßebekeyle olanba©lant\ kesilirse, telefonda bir hata tonu duyulur ve yeniden birßebeke seçmeniz istenir.
Tercihli [Menü 9-5-3]Telefonun, di©er ßebekelere ulaßmaya çal\ßmadan önceba©lanmay\ denemesini istedi©iniz bir tercihli ßebekeler listesibelirleyebilirsiniz. Bu listeyi, telefonda önceden tan\mlanm\ß olarakgelen bilinen ßebekeler listesinden seçerek olußturabilirsiniz.
Bant seçimi [Menü 9-5-4]Íebekenin kulland\©\ bant olarak GSM 900/1800 ya da GSM1900seçmek için bunu kullan\n.
GPRS ayarlar\ [Menü 9-6]GPRS (Genel Paket Radyo Servisi), mobil telefonlar\n, mobilßebekeler üzerinden veri gönderip almas\n\ sa©layan bir teknolojidir.GPRS, Internet gibi veri a©lar\na kablosuz erißim sunan bir veritaß\y\c\ sistemidir.
GPRS teknolojisini kullanmadan önce
• GPRS servisine abone olman\z gerekmektedir. GPRS servisininkullan\m durumunu ö©renmek ve abone olmak için ßebekeoperatörünüzle ya da servis sa©lay\c\n\zla görüßün.
• GPRS üzerinden kullan\lan uygulamalar için GPRS ayarlar\n\kaydetmeniz gerekmektedir.
Ekle [Menü 9-6-1]Aç\l\rken seçtiyseniz ve GPRS’i destekleyen bir ßebekedeyseniz,telefon GPRS ßebekesine kaydolur ve k\sa mesaj gönderimi GPRSüzerinden yap\l\r. Ayr\ca örne©in e-posta göndermek ve almak içinetkin paket veri al\ßverißi daha h\zl\ olacakt\r.
Gerekti©inde seçerseniz, telefon yaln\zca GPRS kullanan biruygulamay\ ya da ißlemi çal\ßt\rd\©\n\zda GPRS ba©lant\s\kuracakt\r. GPRS ba©lant\s\, art\k gerek kalmad\©\nda kapat\l\r.
Harici ayg\t [Menü 9-6-2]Harici bir cihaz kullanarak GPRS üzerinden Internete girerken, bualt\ profilden birini kullanabilirsiniz. Yeni ad ver, IEN, IP Adresi,DNS, Kullan\c\ Kimli©i ve Íifre.
Ayarları sıfırla [Menü 9-7]Telefonu varsay\lan yap\land\rmas\na s\f\rlayabilirsiniz.
Bunu yapmak için aßa©\daki ißlemleri uygulay\n.
1. Fabrika ayarlar\ menüsünü seçin.
2. 4 basamakl\ güvenlik kodunu girin.
98
Not
• E©er GPRS servisi yoksa ve Otomatik seçtiyseniz,telefon düzenli aral\klarla ba©lant\ kurmaya çal\ßacakt\r.
Not
• Güvenlik kodu fabrikada 0000 olarak ayarlanm\ßt\r.
Ayarlar [Menü 9]
99
Servisi götürmeden ya da bir servis mühendisiyle görüßmeden öncetelefonunuzla ilgili sorununuzun aßa©\daki aç\klan\p aç\klanmad\©\n\kontrol edin.
s Yap\lan aramalar, gelen aramalar ve cevaps\z aramalarlistelerini nas\l görebilirim?
c S tußuna bas\n.
s Tüm arama geçmißini nas\l silebilirim?
c Sol seçim tußuna, ard\ndan 2 4 4 bas\n.
s Telefonda kay\tl\ tüm numaralar\ nas\l görebilirim?
c Sa© seçim tußuna, ard\ndan 1 tußuna bas\n.
s ekrandan gitmiyor.
c Kapsama alan\nda olup olmad\©\n\z\ kontrol edin. ,ißaretini görmeye devam ederseniz, telefonu kapat\n ve yaklaß\k2 dakika bekledikten sonra tekrar aç\n. De©ißiklik yoksa, baßkabir yere gidin ve yeniden deneyin.
s Baz\ yerlerde ba©lant\ kötü ya da ses duyulmuyor.
c Baz\ yerlerde sinyal gücü önemli ölçüde az olabilmektedir.Baßka bir yere gitmeye çal\ß\n. Íebekenin çok yo©un olmas\,ba©lanman\z\ ya da araman\n düzgünlü©ünü etkileyebilir.
s Ba©lant\ sa©lansa bile ses çok bozuk.
c Baz\ yerlerde sinyal gücü önemli ölçüde az olabilmektedir.Baßka bir yere gitmeye çal\ß\n. Íebekenin çok yo©un olmas\,ba©lanman\z\ ya da araman\n düzgünlü©ünü etkileyebilir.
Soru – Cevap

s LCD aç\lm\yor.
c Pili ç\kart\n ve yeniden tak\n. Ard\ndan telefonu tekrar aç\n.Telefon yine de aç\lm\yorsa, pili ßarj edin ve tekrar deneyin.
s Belirli bir alanda belirli bir telefonda görüßürken ses yank\lan\yor.
c Bu duruma ‘Yank\ Sorunu’ ad\ verilir. Ses seviyesi çok yüksekoldu©unda meydana gelir ya da karß\ makinenin bulundu©ukoßullardan (yar\ elektronik telefon santrali) kaynaklanabilir.
s Telefon \s\n\yor.
c Uzun süre görüßme yap\ld\©\nda ya da oyunlar/Internet uzunsüre kullan\ld\©\nda, telefon \s\nabilir. Bu tamamen normaldir veürünün kullan\m ömrüne ya da performans\na herhangi bir etkisiyoktur.
s Zil çalm\yor, ya da lamba veya LCD yaln\zca yan\p sönüyor.
c Telefon, Profiller menüsünde ‘Titreßim’ ya da ‘Sessiz’ modunagetirilmiß. Lütfen ‘Genel’ ya da ‘Gürültülü’ ö©esini seçin.
s Telefonun bekleme süresi giderek azal\yor.
c Pillerin ömürleri k\s\tl\d\r. Pilin kullan\m süresi, orijinal kullan\msüresinin yar\s\na indi©inde de©ißtirilmesi gerekir. Yaln\zcaonayl\ yedek parçalar kullan\n.
s Pilin kullan\m süresi giderek azal\yor.
c Pilin kullan\m süresi k\sald\ysa, bunun nedeni kullan\c\n\nbulundu©u ortam, çok arama yapma ya da sinyal gücünün zay\folmas\d\r.
100
Soru – Cevap
101
s Bir telefon rehberi kayd\n\ aramaya çal\ßt\©\n\z hiçbir telefonnumaras\ çevrilmiyor.
c Telefon rehberinin Bul özelli©ini kullanarak numaralar\n do©rukaydedildi©ini kontrol edin. Gerekiyorsa düzeltip tekrar kaydedin.
s Kimse size ulaßam\yor.
c Telefonunuz aç\k m\ (E tußuna üç saniyeden uzun sürebast\n\z m\)? Do©ru hücresel ßebekeye girdi©inizden eminmisiniz? Gelen arama engellemesi seçene©i aç\k olabilir mi?
s Kilit, PIN ya da PUK kodlar\n\ veya ßifreleri bulam\yorum?
c Varsay\lan kilit kodu ‘0000’d\r. Kilit kodunu unutursan\z ya dakaybederseniz, telefon bayiinizi aray\n. PIN ya da PUK kodlar\n\unuttuysan\z ya da kaybettiyseniz ya da bu kodlar\ hiçalmad\ysan\z, ßebeke servis sa©lay\c\n\zla görüßün.
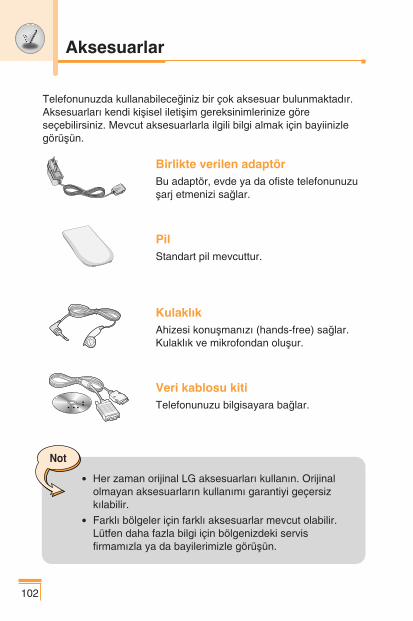
102
Aksesuarlar
Telefonunuzda kullanabilece©iniz bir çok aksesuar bulunmaktad\r.Aksesuarlar\ kendi kißisel iletißim gereksinimlerinize göreseçebilirsiniz. Mevcut aksesuarlarla ilgili bilgi almak için bayiinizlegörüßün.
Birlikte verilen adaptörBu adaptör, evde ya da ofiste telefonunuzußarj etmenizi sa©lar.
PilStandart pil mevcuttur.
Kulakl\kAhizesi konußman\z\ (hands-free) sa©lar.Kulakl\k ve mikrofondan olußur.
Veri kablosu kitiTelefonunuzu bilgisayara ba©lar.
Not
• Her zaman orijinal LG aksesuarlar\ kullan\n. Orijinalolmayan aksesuarlar\n kullan\m\ garantiyi geçersizk\labilir.
• Farkl\ bölgeler için farkl\ aksesuarlar mevcut olabilir.Lütfen daha fazla bilgi için bölgenizdeki servisfirmam\zla ya da bayilerimizle görüßün.
103
Technical data
GeneralProduct name : L1100
System : GSM 900/DCS 1800
Ambient temperaturesMax : +55°C
Min : -10°C

104
Nota
ENGLISH
GPRS PhoneUSER’S MANUAL
MODEL: L1100Please read this manual carefully before operating your mobile phone.Retain it for future reference.

This user’s guide contains important information on the use andoperation of this phone. Please read all the information carefullyfor optimal performance and to prevent any damage to or misuseof the phone. Any changes or modifications not expresslyapproved in this user’s guide could void your warranty for thisequipment.
Introduction
Congratulations on your purchase of the advanced andcompact L1100 mobile phone, designed to operate withthe latest digital mobile communication technology.
3
Read these simple guidelines. Breaking the rules may bedangerous or illegal. Further detailed information is given in thismanual.
Exposure to radio frequency energy
Radio wave exposure and Specific Absorption Rate (SAR) information
This mobile phone model L1100 has been designed to comply withapplicable safety requirement for exposure to radio waves. Thisrequirement is based on scientific guidelines that include safetymargins designed to assure this safety of all persons, regardless ofage and health.
• The radio wave exposure guidelines employ a unit ofmeasurement known as the Specific Absorption Rate, or SAR.Tests for SAR are conducted using standardized method with thephone transmitting at its highest certified power level in all usedfrequency bands.
• While there may be differences between the SAR levels ofvarious LG phone models, they are all designed to meet therelevant guidelines for exposure to radio waves.
• The SAR limit recommended by the international Commission onNon-Ionizing Radiation Protection (ICNIRP), which is 2W/kgaveraged over ten (10) gram of tissue.
• The highest SAR value for this model phone tested by DASY4 foruse at the ear is 0.691 W/kg (10g).
• SAR data information for residents in countries/regions that haveadopted the SAR limit recommended by the Institute of Electricaland Electronics Engineers (IEEE), which is 1.6 W/kg averagedover one (1) gram of tissue.
Guidelines for safe and efficient use
4
Product care and maintenance
Warning: Use only batteries, charger and accessoriesapproved for use with this particular phone model. The use ofany other types may invalidate any approval or warrantyapplying to the phone, and may be dangerous.
• Do not disassemble this unit. Take it to a qualified servicetechnician when repair work is required.
• Keep away from electrical appliance such as a TV, radio orpersonal computer.
• The unit should be kept away from heat sources such asradiators or cookers.
• Do not drop.
• Do not subject this unit to mechanical vibration or shock.
• The coating of the phone may be damaged if covered with wrapor vinyl wrapper.
• Use dry cloth to clean the exterior of the unit. (Do not use solvent such as benzene, thinner or alcohol.)
• Do not subject this unit to excessive smoke or dust.
• Do not keep the phone next to credit cards or transport tickets;it can affect the information on the magnetic strips.
• Do not tap the screen with a sharp object; otherwise, it maydamage the phone.
• Do not expose the phone to liquid or moisture.
• Use the accessories like an earphone cautiously. Do not touch the antenna unnecessarily.
Guidelines for safe and efficient use
Efficient phone operation
To enjoy optimum performance with minimum power consumptionplease:
• Hold the phone as you speak to any other telephone. Whilespeaking directly into the microphone, angle the antenna in adirection up and over your shoulder. If the antenna is extendable/retractable, it should be extended during a call.
• Do not hold the antenna when the phone is in use. If you hold it, itcan affect call quality, it also may cause the phone to operate asa higher power level that needed and shorten talk and standbytimes.
• If your mobile phone supports infrared, never direct the infraredray at anyone’s eye.
Electronics devices
All mobile phones may get interference, which could affectperformance.
• Do not use your mobile phone near medical equipment withoutrequesting permission. Avoid placing the phone over thepacemaker, i.e. in your breast pocket.
• Some hearing aids might be disturbed by mobile phones.
• Minor interference may affect TVs, radios, PCs, etc.
5
Road safety
Check the laws and regulations on the use of mobile phones in theareas when you drive.
• Do not use a hand-held phone while driving.
• Give full attention to driving.
• Use a hands-free kit, if available.
• Pull off the road and park before making or answering a call ifdriving conditions so require.
• RF energy may affect some electronic systems in your motorvehicle such as car stereo, safety equipment.
• When your vehicle is equipped with an air bag, do not obstructwith installed or portable wireless equipment. It can causeserious injury due to improper performance.
Blasting areaDo not use the phone where blasting is in progress. Observerestrictions, and follow any regulations or rules.
Potentially explosive atmospheres• Do not use the phone at a refueling point. Don’t use near fuel or
chemicals.
• Do not transport or store flammable gas, liquid, or explosives inthe compartment of your vehicle, which contains your mobilephone and accessories.
In aircraft
Wireless devices can cause interference in aircraft.
• Turn off your mobile phone before boarding any aircraft.
• Do not use it on the ground without crew permission.
6
Guidelines for safe and efficient use
ChildrenKeep the phone in a safe place out of children’s reach. It includessmall parts which if detached may cause a choking hazard.
Emergency callsEmergency calls may not be available under all cellular networks.Therefore, you should never depend solely on the phone foremergency calls. Check with your local service provider.
Battery information and care• You do not need to completely discharge the battery before
recharging. Unlike other battery systems, there is no memoryeffect that could compromise the battery’s performance.
• Use only LG batteries and chargers. LG chargers are designed tomaximize the battery life.
• Do not disassemble or short-circuit the battery pack.
• Keep the metal contacts of the battery pack clean.
• Replace the battery when it no longer provides acceptableperformance. The battery pack may be recharged hundreds oftimes until it needs replacing.
• Recharge the battery if it has not been used for a long time tomaximize usability.
• Do not expose the battery charger to direct sunlight or use it inhigh humidity, such as the bathroom.
• Do not leave the battery in hot or cold places, this may deterioratethe battery performance.
7
8
Your phone .............................................................................. 12
• Phone components ............................................................... 12
• Your phone’s features ........................................................... 13
• Side of the Key ..................................................................... 14
• Display information ............................................................... 14
Getting started ........................................................................ 16
• Installing the SIM card and the handset battery ................... 16
• Charging the battery ............................................................. 17
• Disconnecting the adapter .................................................... 18
• Turning your phone on and off .............................................. 19
• Access codes ........................................................................ 20
General functions ................................................................... 22
• Making and answering calls .................................................. 22
• Entering text .......................................................................... 24
• Phonebook ........................................................................... 28
• In-call menu .......................................................................... 28
• Multiparty or conference calls ............................................... 30
Menu tree ................................................................................. 32
Selecting functions and options ........................................... 34
Profiles [Menu 1] ..................................................................... 35
• Vibrate Only [Menu 1-1] ........................................................ 35
• Silent [Menu 1-2] ................................................................... 35
• General [Menu 1-3] ............................................................... 35
• Loud [Menu 1-4] .....................................................................35
• Headset [Menu 1-5] .............................................................. 35
• Car [Menu 1-6] ...................................................................... 35
Contents
9
Call register [Menu 2] ............................................................. 37
• Missed calls [Menu 2-1] ........................................................ 37
• Received calls [Menu 2-2] ..................................................... 38
• Dialled calls [Menu 2-3] ......................................................... 39
• Delete recent calls [Menu 2-4] .............................................. 39
• Call durations [Menu 2-5] ...................................................... 40
• Call costs [Menu 2-6] ............................................................ 40
• Cost settings [Menu 2-7] ....................................................... 41
• GPRS information [Menu 2-8] ............................................... 41
Fun & Tools [Menu 3] ............................................................. 43
• Alarm clock [Menu 3-1] ......................................................... 43
• Calculator [Menu 3-2] ............................................................ 43
• My folder [Menu 3-3] ............................................................. 44
• Unit converter [Menu 3-4] ..................................................... 45
• World time [Menu 3-5] ........................................................... 45
• Voice recorder [Menu 3-6] .................................................... 46
• Infrared [Menu 3-7] ............................................................... 47
Organizer [Menu 4] ................................................................. 48
• Schedule [Menu 4-1] ............................................................. 48
• Memo [Menu 4-2] .................................................................. 49
• Phonebook [Menu 4-3] ......................................................... 50
Messages [Menu 5] ................................................................. 57
• Text messages [Menu 5-1] .................................................... 57
• Multimedia messages [Menu 5-2] ......................................... 62
• Voice messages [Menu 5-3] ................................................. 68
• Info services [Menu 5-4] ........................................................ 68
10
• Templates [Menu 5-5] ........................................................... 70
• Memory status [Menu 5-6] .................................................... 72
Camera [Menu 6] ..................................................................... 73
• Take picture [Menu 6-1] ........................................................ 73
• Gallery [Menu 6-2] ................................................................ 75
Games & Apps [Menu 7] ......................................................... 76
• Games [Menu 7-1] ................................................................ 77
• Applications [Menu 7-2] ........................................................ 77
• Download [Menu 7-3] ............................................................ 78
• Information [Menu 7-4] .......................................................... 79
Internet [Menu 8] ..................................................................... 80
• Home [Menu 8-1] .................................................................. 81
• Bookmarks [Menu 8-2] .......................................................... 81
• Push messages [Menu 8-3] .................................................. 82
• Profiles [Menu 8-4] .................................................................82
• Go to URL [Menu 8-5] ........................................................... 83
• Cache settings [Menu 8-6] .................................................... 83
• Security certificates [Menu 8-7] ............................................. 84
• Reset profiles [Menu 8-8] ...................................................... 84
• WAP information [Menu 8-9] ................................................. 84
Settings [Menu 9] .................................................................... 85
• Date & Time [Menu 9-1] ........................................................ 85
• Phone settings [Menu 9-2] .................................................... 85
• Call settings [Menu 9-3] ........................................................ 87
• Security settings [Menu 9-4] ................................................. 91
Contents

11
• Network settings [Menu 9-5] ................................................. 95
• GPRS settings [Menu 9-6] .................................................... 96
• Reset settings [Menu 9-7] ..................................................... 97
Q&A .......................................................................................... 98
Accessories ........................................................................... 101
Technical Data ....................................................................... 102
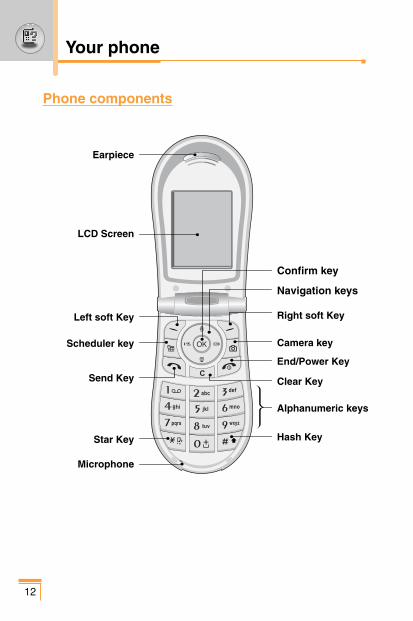
Phone components
Earpiece
LCD Screen
Left soft Key
Scheduler key
Send Key
Star Key
Microphone
Right soft Key
Camera key
End/Power Key
Clear Key
Alphanumeric keys
Hash Key
Confirm key
Navigation keys
12
Your phone

13
Your phone’s features
Key Description
Left soft key / Right soft keyEach of these keys performs the function indicated by the text on the screen immediately above it.
Navigation keysUse for quick access to phone functions.• Up navigation key
By pressing this key in standby mode, you cansearch the phonebook by name.
• Down navigation keyYou can go directly to the voice recording menu.Holding this key down directly starts voicerecording.
• Left navigation keyA shortcut key to the profile menu.
• Right navigation keyA shortcut key to the message inbox.
OK key (=Confirm key)Selects menu options and confirms actions.
Send KeyDials a phone number and answers incoming calls.You can also quickly access the latest incoming,outgoing and missed calls by pressing the key instandby mode.
Alphanumeric keysEnter numbers, letters and some special characters.
End/Power keyUsed to end a call or reject a call and also to go backto standby mode. Hold this key down to turn thephone on/off.
~0
9
< >
S
E
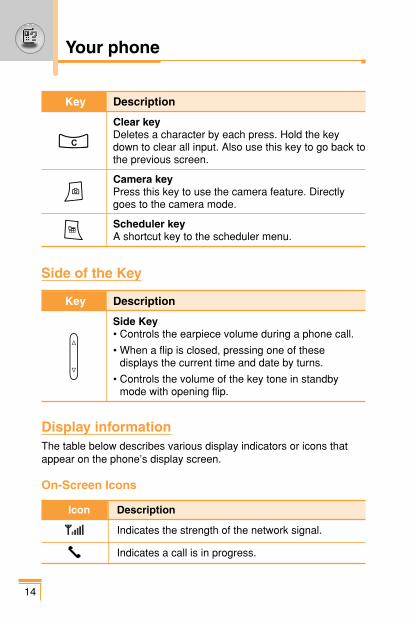
14
Side of the Key
Key Description
Clear keyDeletes a character by each press. Hold the keydown to clear all input. Also use this key to go back tothe previous screen.
Camera keyPress this key to use the camera feature. Directlygoes to the camera mode.
Scheduler key A shortcut key to the scheduler menu.
Key Description
Side Key • Controls the earpiece volume during a phone call.
• When a flip is closed, pressing one of thesedisplays the current time and date by turns.
• Controls the volume of the key tone in standbymode with opening flip.
Display informationThe table below describes various display indicators or icons thatappear on the phone’s display screen.
On-Screen Icons
Icon Description
Indicates the strength of the network signal.
Indicates a call is in progress.
Your phone
C
Q
T

15
Icon Description
Indicates that GPRS service is available.
Indicates that you are roaming on another network.
Indicates the alarm has been set and is on.
Indicates the status of the battery charge.
Indicates the receipt of a text message.
Indicates the receipt of a voice message.
Indicates the receipt of a MMS message.
Indicates that the vibration ringer has been set.
Indicates the receipt of an e-mail message.
Indicates the Loud profile is activated.
Indicates the Silent profile is activated.
Indicates the Headset profile is activated.
Indicates the Car profile is activated.
Indicates the General profile is activated.
Indicates that you can use the push messageservice.
Indicates that you have a schedule for the selectedday in the schedule menu.
Indicates that the phone is accessing the WAP.
Indicates that you are using GPRS.
Indicates that you entered the security page.

16
Installing the SIM card and the handset battery1. Make sure the power is off before you remove the battery.
Press the battery release latch up and remove the battery fromthe phone at a 45 degree angle.
2. Insert the SIM card into the holder. Slide the SIM card into theSIM card holder. Make sure that the SIM card is insertedproperly and that the gold contact area on the card is facingdownwards. To remove the SIM card, press down lightly and pullit in the reverse direction.
Note• Removing the battery from the phone when the power
is on may cause the phone to malfunction.
Note• The metal contact of the SIM card can be easily
damaged by scratches. Pay special attention to the SIMcard while handling. Follow the instructions suppliedwith the SIM card.
To insert the SIM card To remove the SIM card
Getting started
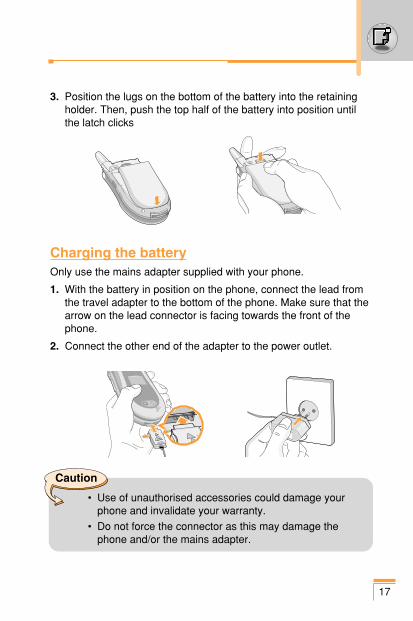
17
3. Position the lugs on the bottom of the battery into the retainingholder. Then, push the top half of the battery into position untilthe latch clicks
Charging the batteryOnly use the mains adapter supplied with your phone.
1. With the battery in position on the phone, connect the lead fromthe travel adapter to the bottom of the phone. Make sure that thearrow on the lead connector is facing towards the front of thephone.
2. Connect the other end of the adapter to the power outlet.
Caution
• Use of unauthorised accessories could damage yourphone and invalidate your warranty.
• Do not force the connector as this may damage thephone and/or the mains adapter.
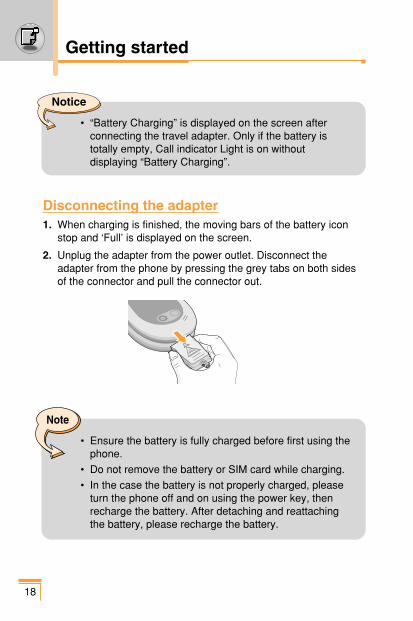
18
Disconnecting the adapter1. When charging is finished, the moving bars of the battery icon
stop and ‘Full’ is displayed on the screen.
2. Unplug the adapter from the power outlet. Disconnect theadapter from the phone by pressing the grey tabs on both sidesof the connector and pull the connector out.
Note
• Ensure the battery is fully charged before first using thephone.
• Do not remove the battery or SIM card while charging.
• In the case the battery is not properly charged, pleaseturn the phone off and on using the power key, thenrecharge the battery. After detaching and reattachingthe battery, please recharge the battery.
Getting started
Notice
• “Battery Charging” is displayed on the screen afterconnecting the travel adapter. Only if the battery istotally empty, Call indicator Light is on withoutdisplaying “Battery Charging”.
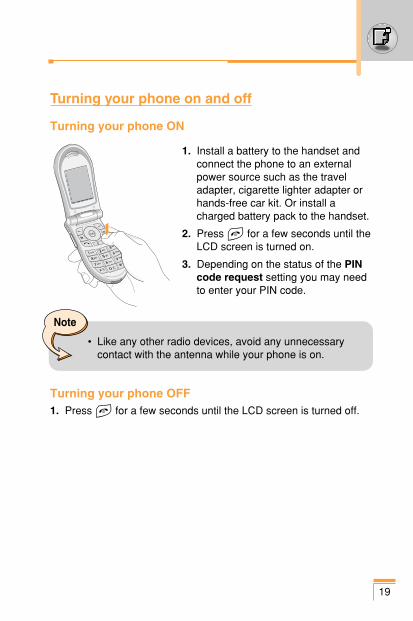
19
Turning your phone on and off
Turning your phone ON
1. Install a battery to the handset andconnect the phone to an externalpower source such as the traveladapter, cigarette lighter adapter orhands-free car kit. Or install acharged battery pack to the handset.
2. Press E for a few seconds until theLCD screen is turned on.
3. Depending on the status of the PINcode request setting you may needto enter your PIN code.
Turning your phone OFF1. Press E for a few seconds until the LCD screen is turned off.
Note
• Like any other radio devices, avoid any unnecessarycontact with the antenna while your phone is on.
20
Getting started
Access codesYou can use the access codes described in this section to avoidunauthorised use of your phone. The access codes (except PUKand PUK2 codes) can be changed by using the Change codesfeature [Menu 9-4-5].
PIN code (4 to 8 digits)The PIN (Personal Identification Number) code protects your SIMcard against unauthorised use. The PIN code is usually suppliedwith the SIM card. When the PIN code request is set to On, yourphone will request the PIN code every time the phone is switchedon. When the PIN code request is set to Off, your phone connectsto the network directly without the PIN code.
PIN2 code (4 to 8 digits)The PIN2 code, supplied with some SIM cards, is required toaccess functions such as Advice of Call Charge and Fixed dialnumber. These functions are only available if supported by yourSIM card. Check with your network for further information.
PUK code (4 to 8 digits)The PUK (PIN Unblocking Key) code is required to change ablocked PIN code. The PUK code may be supplied with the SIMcard. If not, contact your network operator for the code. If you losethe code, also contact your network operator.
PUK2 code (4 to 8 digits)The PUK2 code, supplied with some SIM cards, is required tochange a blocked PIN2 code. If you lose the code, also contact yournetwork operator.
21
Security code (4 to 8 digits)The security code protects the unauthorised use of your phone. The default security code is set to ‘0000’ and the security code isrequired to delete all phone entries and to activate the Resetsettings menu. Also, the security code is required to enable ordisable the phone lock function to prevent unauthorised use of thephone. The security code default setting can be modified from theSecurity settings menu.
Barring passwordThe barring password is required when you use the Call barringfunction. You obtain the password from your network operator whenyou subscribe to this function. See page 92 for further details.
General functions
22
Making and answering calls
Making a call1. Make sure your phone is switched on.
2. Enter a phone number, including the area code. To edit anumber on the LCD screen, press the right/left navigation keys tomove the cursor to the desired position or simply press the clearkey (C) to erase one digit at a time.
� Press and hold the clear key (C) to erase the entire number.
3. Press the send key (S) to call the number.
4. To end the call, press the end key (E) or the right soft key. You can also end the call by closing the flip.
Making a call using the send key1. In standby mode, press the send key (S), and the latest
incoming, outgoing and missed phone numbers will be displayed.
2. Select the desired number by using the up/down navigation key.
3. Press S.
Making an international call1. Press and hold the 0 key for the international prefix. The ‘+’
character automatically selects the international access code.
2. Enter the country code, area code, and the phone number.
3. Press S.
Ending a callWhen you have finished your call, press the end key (E).
23
Making a call from the phonebookYou can save the names and phone numbers dialled regularly in theSIM card and/or phone memory, which is phonebook. You can diala number by simply looking up the desired name in the phonebook.For further details on the phonebook feature, please refer to page50-56.
Adjusting the volumeIf you want to adjust the earpiece volume during a call, use the sidekeys ( ). Press the up side key to increase and down side key todecrease the volume.
Answering a callWhen you receive a call, the phone rings and the flashing phoneicon appears on the screen. If the caller can be identified, thecaller’s phone number (name or photo if saved in the Phonebook) isdisplayed.
1. To answer an incoming call, open the flip.
2. To end the call, close the flip or press the E.
Note
� You can answer a call while using the phonebook orother menu features.
24
General functions
T9 modeThis mode lets you enter words with only one keystroke perletter. Each key on the keypad has more than one letter. TheT9 mode automatically compares your keystrokes with aninternal dictionary to determine the correct word, thus requiringfar fewer keystrokes than the traditional ABC mode. This issometimes known as predictive text.
ABC modeThis mode lets you enter letters by pressing the key labelledwith the required letter once, twice, three or four times until theletter is displayed.
123 mode (Number mode)Type numbers using one keystroke per number. To change to123 mode in a text entry field, press the # key until 123mode is displayed.
Signal strengthYou can check the strength of your signal by the signal indicator ( ) on the LCD screen of your phone. Signal strength can vary,particularly inside buildings. Moving near to a window may improvereception.
Entering textYou can enter alphanumeric characters by using the phone’skeypad. For example, storing names in the Phonebook, writing amessage, creating a personal greeting or scheduling events in thecalendar all require entering text.
The following text input methods are available in the phone.
25
Changing the text input mode1. When you are in a field that allows characters to be entered, you
will notice the text input mode indicator in the lower right cornerof the LCD screen.
2. Change the text input mode by pressing #. You can check thecurrent text input mode in the lower right corner of the LCDscreen.
� Using the T9 mode The T9 predictive text input mode lets you enter words easily with aminimum number of key presses. As you press each key, the phonebegins to display the characters that it thinks you are typing basedon the built-in dictionary. You can also add new words in thedictionary. As new words are added, the word changes to reflect themost likely candidate from the dictionary.
1. When you are in the T9 predictive text input mode, start enteringa word by pressing keys 2 to 9. Press one key per letter.
– The word changes as letters are typed. Ignore what’s on thescreen until the word is typed completely.
– If the word is still incorrect after typing completely, press thedown navigation key once or more to cycle through the otherword options.
Example
• Press 4 6 6 3 to type Good.• Press 4 6 6 3 [Down navigation key] to
type Home.
26
General functions
– If the desired word is missing from the word choice list, add itusing the ABC mode.
– You can select the language of the T9 mode. Press the leftsoft key [Option], then select T9 languages or press the “*”key on your keypad to switch the language. Select the desiredlanguage of T9 mode. You can also turn off the T9 mode byselecting T9 off. The default setting on the phone is T9enabled mode.
2. Enter the whole word before editing or deleting any keystrokes.
3. Complete each word with a space by pressing the 0 key.To delete letters, press C. Press and hold down to erase Centire words.
� Using the ABC modeUse the 2 to 9 keys to enter your text.
1. Press the key labelled with the required letter:
– Once for the first letter
– Twice for the second letter
– And so on
2. To insert a space, press the 0 key once. To delete letters,press the C key. Press and hold down the C key to clearthe whole display.
Note• To exit from the text input mode without saving your
input, press E. The phone goes back to standbymode.
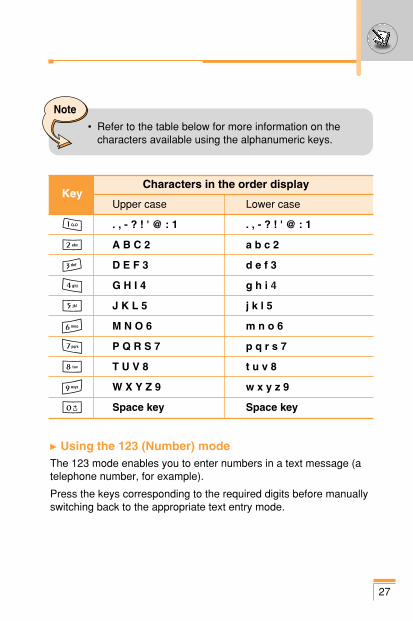
27
KeyCharacters in the order display
Upper case Lower case
1 . , - ? ! ' @ : 1 . , - ? ! ' @ : 1
2 A B C 2 a b c 2
3 D E F 3 d e f 3
4 G H I 4 g h i 4
5 J K L 5 j k l 5
6 M N O 6 m n o 6
7 P Q R S 7 p q r s 7
8 T U V 8 t u v 8
9 W X Y Z 9 w x y z 9
0 Space key Space key
� Using the 123 (Number) modeThe 123 mode enables you to enter numbers in a text message (atelephone number, for example).
Press the keys corresponding to the required digits before manuallyswitching back to the appropriate text entry mode.
Note
• Refer to the table below for more information on thecharacters available using the alphanumeric keys.
PhonebookYou can store phone numbers and their corresponding names in thememory of your SIM card.
In addition, you can store up to 255 numbers and names in thephone memory.
The SIM card and phone are both used in the same way in thePhonebook menu. (Refer to page 50-56 for details.)
In-call menuYour phone provides a number of control functions that you can useduring a call. To access these functions during a call, press the leftsoft key [Options].
During a callThe menu displayed on the handset screen during a call is differentto the default main menu displayed when in standby mode, and theoptions are described below.
Making a second callYou can get a number you wish to dial from the phonebook to makea second call. Press the right soft key then select Search. To savethe dialled number into the Phonebook during a call, press the rightsoft key then select Add new.
Switching between two callsTo switch between two calls, press the left soft key then selectSwap.
28
General functions
Answering an incoming callTo answer an incoming call when the handset is ringing, simplypress the S key. The handset is also able to warn you of anincoming call while you are already on a call. A tone sounds in theearpiece, and the display will show that a second call is waiting.
This feature, known as Call waiting, is only available if yournetwork supports it. For details of how to activate and deactivate itsee [Menu 9-3-4].
If Call waiting is activated, you can put the first call on hold andanswer the second, by pressing S or by selecting left soft key,then Hold & Answer. You can end the current call and answer thewaiting call by selecting left soft key and then End & Answer.
Rejecting an incoming callYou can reject an incoming call without answering by simplypressing the E key.
During a call, you can reject an incoming call by pressing the leftsoft key [Menu] key and selecting the Conference / Reject or bypressing the E.
Muting the microphoneYou can mute the microphone during a call by pressing the [Menu]key then selecting Mute on. The handset can be unmuted byselecting Mute off. When the handset is muted, the caller cannothear you, but you can still hear them.
Switching DTMF tones on during a callTo turn DTMF tones on during a call, press the left soft key, andthen select DTMF on. DTMF tones can be turned off the same way.DTMF tones allow your phone to make use of an automatedswitchboard.
29
Multiparty or conference callsThe multiparty or conference service provides you with the ability tohave a simultaneous conversation with more than one caller, if yournetwork operator supports this feature. A multiparty call can only beset up when you have one active call and one call on hold, bothcalls having been answered. Once a multiparty call is set up, callscan be added, disconnected or separated (that is, removed from themultiparty call but still connected to you) by the person who set upthe multiparty call. These options are all available from the In-Callmenu. The maximum callers in a multiparty call are five. Oncestarted, you are in control of the multiparty call, and only you canadd callers to the multiparty call.
Making a second callYou can make a second call while currently on a call. Enter thesecond number and press the S key. When the second call isconnected, the first call is automatically placed on hold. You canswap between calls by pressing the left soft key then selectingSwap.
Setting up a conference callPlace one call on hold and while the active call is on, press the leftsoft key and then select the Conference / Join all.
Putting a conference call on holdPress the left soft key, then select the Conference / Hold all.
Activate the conference call on hold Press the left soft key, then select the Conference / Join all.
30
General functions

Adding calls to the conference callTo add a call to an existing conference call, press the left soft key,then select the Conference / Join all.
Displaying callers in a conference callTo scroll through the numbers of the callers who make up aconference call on the handset screen, use the up/down navigationkeys.
Taking a private call during a conference callTo have a private call with one caller from a conference call, displaythe number of the caller you wish to talk to on the screen, thenpress the left soft key. Select the Conference / Private to put all theother callers on hold.
Ending a conference callThe currently displayed caller from a conference call can bedisconnected by pressing the E key. To end a conference call,press the left soft key, then select the Conference / Endmultiparty. After pressing the left soft key, selecting Conference /End all will end all the active and on-hold calls.
31
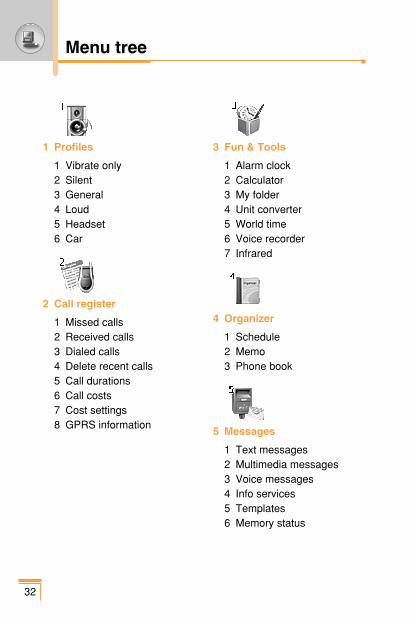
1 Profiles
1 Vibrate only2 Silent3 General4 Loud5 Headset6 Car
2 Call register
1 Missed calls2 Received calls3 Dialed calls4 Delete recent calls5 Call durations6 Call costs7 Cost settings8 GPRS information
3 Fun & Tools
1 Alarm clock2 Calculator3 My folder4 Unit converter5 World time6 Voice recorder7 Infrared
4 Organizer
1 Schedule2 Memo3 Phone book
5 Messages
1 Text messages2 Multimedia messages3 Voice messages4 Info services5 Templates6 Memory status
32
Menu tree

33
6 Camera
1 Take picture2 Gallery
7 Games & Apps
1 Games2 Applications3 Download4 Information
8 Internet
1 Home2 Bookmarks3 Push messages4 Profiles5 Go to URL6 Cache settings7 Security certificates8 Reset profiles9 WAP information
9 Settings
1 Date & Time2 Phone settings3 Call settings4 Security settings5 Network settings6 GPRS settings7 Reset settings
0 SIM Service
This menu depends on SIMand the network services.
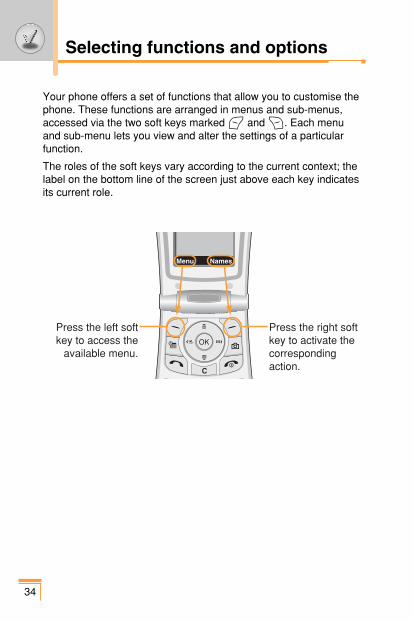
34
Your phone offers a set of functions that allow you to customise thephone. These functions are arranged in menus and sub-menus,accessed via the two soft keys marked < and >. Each menuand sub-menu lets you view and alter the settings of a particularfunction.
The roles of the soft keys vary according to the current context; thelabel on the bottom line of the screen just above each key indicatesits current role.
Menu Names
Press the left softkey to access the
available menu.
Press the right softkey to activate thecorrespondingaction.
Selecting functions and options
35
Profiles [Menu 1]
In Profiles, you can adjust and customise the phone tones fordifferent events, environments, or caller groups.
There are six preset profiles: Vibrate only, Silent, General, Loud,Headset and Car. Each profile can be personalised except Vibrateonly and Silent.
Press the Menu key (<) and select Profiles using navigationkeys.
Changing the profile [Menu 1-x-1]1. A list of Profiles is displayed.
2. In the Profile list, scroll to the profile you want to activate andpress the left soft key [Select] or OK key.
3. Then, select Activate.
Customising profiles – Personalise [Menu 1-x-2]Scroll to the desired profile in the Profile list. After pressing the OKkey or the left soft key, select Personalise. The profile settingoption opens. Set the option as required.
Incoming alert type: Set the alert type for incoming calls.
Ring tone: Select the desired ring tone from the list. Scrollthrough the list using up/down navigation keys. You can hear thedesired tone prior to making a selection.
Ring volume: Set the volume of the ringing tone.
Message alert type: Set the alert type for messages.
Message tone: Select the alert tone for messages.
Key tone: Select the desired keypad tone.
Key volume: Set the volume of keypad tone.
Flip tone: Set the flip tone for flip open and close.
Effect tone volume: Set the volume of effect sound.
Power on/off volume: Set the volume of the ringing tone whenswitching the phone on/off.
Automatic answer: (only in Car profile) You can activate theautomatic answer feature. Select the time before answeringautomatically.
Customising profiles – Rename [Menu 1-x-3]You can rename a profile and give it any name you want. Vibrateonly, Headset and Car profiles cannot be renamed.
1. To change the name of a profile, scroll to the profile in the profilelist and after pressing the OK key or the left soft key, selectRename.
2. Key in the desired name and press the OK key or the left soft key[Save].
36
Profiles [Menu 1]
37
Call register [Menu 2]
You can check the record of missed, received, and dialled calls onlyif the network supports Calling Line Identification (CLI) within theservice area.
The number, the name (if available), and the picture (if available)are displayed together with the date and time at which the call wasmade. You can also view call times and costs.
Press the Menu key (<) and select Call register using navigationkeys.
Missed calls [Menu 2-1]This option lets you view the last 10 unanswered calls. Afterpressing the left soft key [Option], you can also:
• View the number if available and call it or save it in the phonebook.
• Enter a new name for the number and save in the phonebook.
• Send a message to this number.
• Delete the call from the list.
• Edit the name saved in the phonebook.
Note
• You can delete all the call records from the list usingthe Delete recent calls menu.
Note
• It is possible for only a number in the Phonebook to edita name. Another numbers (e.g. FDN, SDN) can’t editnames.
Received calls [Menu 2-2]This option lets you view the last 10 incoming calls. After pressingthe left soft key [Option], you can also:
• View the number if available and call it or save it in the phonebook.
• Enter a new name for the number and save in the phonebook.
• Send a message to this number.
• Delete the call from the list.
• Edit the name saved in the phonebook.
38
Note
• You can delete all the call records from the list usingthe Delete recent calls menu.
Note
• It is possible for only a number in the Phonebook to edita name. Another numbers (e.g. FDN, SDN) can’t editnames.
Call register [Menu 2]
Dialed calls [Menu 2-3]This option lets you view the last 10 outgoing calls (called orattempted). Using the [Option] key, you can also:
• View the number if available and call it or save it in the phonebook.
• Enter a new name for the number and save in the phonebook.
• Send a message to this number.
• Delete the call from the list.
• Edit the name saved in the phonebook.
Delete recent calls [Menu 2-4]Use this to delete the missed call list, received call list, or dialled calllist. You can also delete all call lists at a time selecting All calls.
39
Note
• You can delete all the call records from the list usingthe Delete recent calls menu.
Note
• If the FDN is enabled, the menu [Edit name] will not beshown.
Call durations [Menu 2-5]Use this to view the duration of your incoming and outgoing calls.You can check each call duration at the bottom of screen whilescrolling using the up/down navigation keys. Pressing the [OK] keyor the left soft key [Reset] resets the call timer of selected call. Toprevent accidental reset, you are requested to enter the PIN2 code.
• Last call: Length of the last call
• Received calls: Length of the incoming calls
• Dialed Calls: Length of the outgoing calls
• All calls: Total length of all calls made or received calls since thetimer was last reset.
Call costs [Menu 2-6]This network service allows you to check the last call cost and thetotal call cost. The call cost is displayed on the bottom of the LCDscreen. To reset the call cost, press the left soft key [Reset] or theOK key. You are requested to enter the PIN2 code.
Call register [Menu 2]
40
Note• The actual time invoiced for calls by your service
provide may vary, depending on network features,rounding-off for billing, etc.
Note• The actual cost invoiced for calls by your service
provider may vary, depending on network features,rounding-off for billing, taxes, etc.

41
Cost settings [Menu 2-7]• Call cost’s limit: This network service allows you to limit the cost
of your calls to the number of charging units or units of currency.You can make or receive a call up to the specified cost limit. You can change the call cost’s limit after entering the PIN2 code.
• Set tariff: You can set the currency type and the unit price.Contact your service providers to obtain charging unit prices. To select the Currency or 1 Unit in this menu, you need the PIN2code.
• Auto display: This network service allows you to seeautomatically the cost of your last call. If you select On in Autodisplay menu, you can see the cost of the last call when the call is released.
GPRS information [Menu 2-8]You can check the amount of data transferred over the networkthrough the GPRS information option. In addition, you can also view how much time you are online. (GPRS stands for General Packet Radio Service.)
• WAP information
You can check the data volume and the time spent using WAP. On the selected menu, pressing the left soft key [Reset] or the OKkey clears the counter.
Note• When all units have been used, no calls can be made
except emergency calls. Depending on the SIM card,you need the PIN2 code to set a call cost limit.
42
Call register [Menu 2]
• External device
You can check the data volume and the time spent using GPRSwith an external device such as a serial port.
• Total data
You can check the total amount of data through WAP and theexternal device.
43
Fun & Tools [Menu 3]
Press the Menu key (<) and select Fun & Tools using navigationkeys.
Alarm clock [Menu 3-1]Set the alarm to ring at a specific time. In the Alarm Clock menu,the following options are available.
OnSet the alarm time.
1. Enter the menu.
2. Select [On] by the left/right navigation key.
3. Enter the alarm time using the numeric keys.
4. Using the left/right navigation keys, select one of the alarmoptions: Once, Daily, Weekly, and Monthly.
5. Alarm melody section: select the desired alarm melody using theleft/right navigation keys.
OffDeactivates the alarm.
Calculator [Menu 3-2]Using this feature, you can use the phone as a calculator. Thecalculator provides the basic arithmetic functions: addition,subtraction, multiplication and division. (You can enter numbers upto the second decimal place.)
44
Fun & Tools [Menu 3]
Using the calculator1. Enter the first number using the numeric keys.
2. Press the corresponding navigation key to select a mathematicalfunction.
3. To calculate the result, press the left soft key [Result] or OK key.
4. After calculation, press the left soft key [Reset] to return to theinitial state.
My folder [Menu 3-3]My folder has 3 folders: Picture, Animation and Sound. You canview, delete, or control downloaded contents. You can get pictures,animation or sounds from WAP site, MMS or SMS. While you’rechecking each content, you can send it via SMS or MMS, edit ordelete it. You can set one in the Picture folder or Animation folder asthe wallpaper. For sounds, you can set the desired sound as thering tone.
Picture [Menu 3-3-1]
Animation [Menu 3-3-2]
Sound [Menu 3-3-3]
Memory status [Menu 3-3-4]
Note
• To erase any mistakes and clear the display, press theC key. To include a decimal point, press the *key. To include a minus sign, press the # key.
45
Unit converter [Menu 3-4]This converts any measurement from one unit to another. There are4 types that can be converted into units: Length, Surface, Weightand Volume.
1. Select one of four unit types by pressing the left soft key [Unit].
2. Move to the current unit section by pressing the down navigationkey.
3. Select the unit you want to convert using the left/right navigationkeys.
4. Move to the Convert unit section by pressing the downnavigation key.
5. Select the unit you want to convert to, using the left/rightnavigation keys.
6. Input numbers using the numeric keys. Conversion is calculatedautomatically.
World time [Menu 3-5]You can check the current time of Greenwich Mean Time (GMT)and 60 major cities around the world, using the left/right navigationkeys.
The screen shows the city name, current date and time. To selectthe time zone in which you are located, proceed as follows:
1. Select the city corresponding to your time zone by pressing theleft/right navigation keys one or more times. The local date andtime are displayed.
2. If you want to change the time display in standby mode to theselected time, press the left soft key [Options]. And select Set.
Nota
• You can input a decimal number by pressing * key.
46
Fun & Tools [Menu 3]
Voice recorder [Menu 3-6]You can record a memo. You can record up to 3 voice memos up toa maximum of 30 seconds each. You can play or delete therecorded memo or record new voice memo using the left soft key[Options] key.
PlayAllows you to play back all memos recorded, starting with the mostrecent memo. The screen displays the Date and time when thememo was recorded.
DeleteAllows you to delete a specific memo.
Record newAllows you to record a memo.
Delete allAllows you to delete all memos. Press left key [Select]. Press theleft soft key [Yes] to confirm.
Note
• In standby mode, you can go directly to the Voicerecorder menu by pressing the down navigation key.
• If all memo locations are full, you must delete an oldmemo before recording a new one.
Note
• The time zone setting of each city in World time menumay be affected by network condition.
47
Infrared [Menu 3-7]This feature allows you to send or receive data/fax through theinfrared port. To use an infrared connection:
1. Install the modem driver for receiving or sending the data/fax.
2. Install the network dial-up software supplied by your networkprovider or fax application program for a fax call on your PC.
3. Configure and activate an IrDA-compliant infrared port on yourPC.
4. Activate the infrared feature on the phone; the red IrDA symbolappears on the right side at the bottom of the display.
5. Call the network service number given to you by the serviceprovider.
If there is no communication between your phone and the IrDA-compliant device within 30 seconds of activation of the feature, it isautomatically deactivated.
For further details, contact your network provider.
Note
• PC Sync is a program for data exchange between PCand the phone by a data cable. For more information,you can use the PC Sync Help file on the CD.
48
Organizer [Menu 4]
Press the Menu key (<) and select Organizer using navigationkeys.
Schedule [Menu 4-1]When you enter this menu, a calendar appears. A square cursor islocated on the current date. You can move to another date usingnavigation keys. If a date is shown in a different colour, it meansthat there is a schedule or memo for that day. This function remindsyou of your schedule and memos. The phone will sound an alarmtone if you set the phone to do so.
View [Menu 4-1-1]Shows the note for the chosen day. Press [Options] to delete or editthe note you selected.
Edit [Menu 4-1-2]Use this to edit the schedule.
Delete [Menu 4-1-3]Use this to delete the schedule.
Add new [Menu 4-1-4]You can edit a maximum of 30 characters and take up to 20 notes.
Calendar [Menu 4-1-5]Goes back to the calendar.
Scheduler tone [Menu 4-1-6]The phone can sound an alarm tone when the scheduled date andtime for an event has been reached with this option.
View all schedules [Menu 4-1-7]Shows the notes that are set for all days. Use the up/downnavigation keys to browse through the note lists.
Go to date [Menu 4-1-8]Use this to jump to a specific date. Enter the date using the numerickeys and the left/right navigation keys.
Delete past [Menu 4-1-9]You can delete expired schedule notes that have already beennotified.
Delete all [Menu 4-1-10]Use this to delete all schedules. You are asked to confirm thisaction.
Memo [Menu 4-2]You can write, edit and delete a memo on a specific date.
1. Scroll to highlight Memo.
2. Press the left soft key [Add].
3. Input the memo and then press the left soft key [Options].
The following options are available.
• Save: Allows you to save the memo.
• T9 languages: Select the desired language of T9 mode.
• Exit editor: Allows you to exit from the memo editor.
After a memo is already input in your phone,
1. Select a memo.
2. Press the left soft key [Select].
3. Press the left soft key [Options].
49
The following options are available.
• Edit: You can edit the selected memo.
• Delete: Deletes the selected memo.
• Add new: You can add new memo.
• Delete all: Deletes all memo.
Phone book [Menu 4-3]You can save phone numbers and their corresponding names in thememory of your SIM card. In addition, you can save up to 255numbers and names in the phone memory.
- Press the left soft key [Menu] in standby mode, then selectOrganizer ➝ Phone book.
- Or, press right soft key [Names] in standby mode.
Search [Menu 4-3-1]1. In menu mode, Select an Organizer ➝ Phone book, and select
Search. Or in standby mode, press right soft key [Names] andselect Search. Or in stanby mode, press the navigation up key.You are asked to enter the start of the name that you wish to findand then, you will find the name instantly.
2. After finding the desired name, you can make a call to thenumber by pressing the [Send] key. Or press the left key[Options] to use the following options.
• View detail: To view details of the selected name.
• Edit: Edits the name, number, the listing group, the e-mail, thememo, and the phonebook photo.
• Delete: Deletes the Phonebook entry.
• Write text message: Use this to write a text message to thename.
• Write multimedia message: Use this to write a multimediamessage to the name.
50
Organizer [Menu 4]
• Copy: Use this to copy the Phonebook entry from SIM to thephone memory or vice versa.
• Voice: Records the name of the selected Phonebook entry forvoice-activated dialling.
• Main number: To show all number lists which are saved ifmore than 2 numbers saved.
Add new [Menu 4-3-2]You can add a Phonebook entry using this function.
There are 2 momories : Phone memory and SIM memory. To selectthe memory type, go to Set memory [Menu 4-3-8-1].
The phone memory capacity is 255 entries. You can enter up to 20characters in each name in the phone memory. The SIM cardmemory capacity depends on the SIM card.
1. In menu mode, Select an Organizer ➝ Phone book, or instandby mode, press right soft key [Names].
2. Scroll to highlight Add new, and press [OK].
3. You can add new Phonebook entries to SIM memory or thephone memory.
• Adding new entries into SIM memoryYou can enter a name, a number, and a required group.(Depends on the SIM)
• Adding new entries into the phone memoryYou can enter a name, numbers (mobile, home, office), e-mailaddress, a required group, a memo, and a phonebook photo.
51
Note
• A phonebook photo is able to be added only into thephone memory.
Speed dials [Menu 4-3-3]You can assign any of the keys 2 to 9 with a name list entry.You can make a call to the number by pressing the [Send] key inthe Speed dial list, or press the left key [Options] and select Call.Or, you can call directly by pressing the assigned key (2-9) for2-3 seconds in standby mode.
1. In menu mode, select an Organizer ➝ Phonebook, or instandby mode, press right soft key [Names].
2. Scroll to Speed dials, then press [OK].
3. To add a number to Speed dials, select <Empty> and then,press the left soft key [Add]. You can search and select the nameto press [Select] through the phonebook.
4. You can change or delete a speed dial number, make a call,write text message, or write multimedia message by pressing theleft soft key [Options]. You can see the following submenus.
• Change: Changes the member list.
• Delete: Deletes the member list.
• Call: Makes a call to the number.
• Write text message: Use this to write a text message to thename.
• Write multimedia message: Use this to write a multimediamessage to the name.
52
Organizer [Menu 4]
Voice list [Menu 4-3-4]You can assign a voice with a name list entry for voice-activateddialling.
You can make a call to the number by pressing the [Send] key, orpress the left key [Options] and select Call.
1. In menu mode, Select an Organizer ➝ Phonebook, or instandby mode, press right soft key [Names].
2. Scroll to Voice list, then press [OK].
3. To add a number to Voice list, press the left soft key [Add]. You can search and select the name to press [Select] throughthe phonebook. After selecting a number, record a voice.
4. You can play, change, or delete a voice, make a call, add new ordelete all voice lists by pressing the left soft key [Options]. Youcan see the following submenus.
• Play: Plays back the voice tag assigned to the phone number.
• Change: Changes the voice tag assigned to the phonenumber.
• Delete: Deletes the voice assigned to the phone number.
• Call: Makes a call to the selected number.
• Add new: Adds a new phone number for voice-activateddialling.
• Delete all: Deletes all voice-activated dialling numbers.
53
Note
• You can enter up to 10 phone numbers for voice dial.
Caller groups [Menu 4-3-5]There are 6 pre-defined groups, as well as one additional grouplabelled Others, where you can create lists.
1. In menu mode, select an Organizer ➝ Phonebook, or instandby mode, press right soft key [Names].
2. Scroll to Caller groups, then press [OK]. Every group list will bedisplayed: Family, VIP, Friends, Colleague, Group 1, Group 2,and Others.
3. Select the group name that you want to manage by pressing theleft soft key [Options]. The following options will be displayedexcept for Others.
• Member list: Displays the member list in the group.
• Group ring tone: Use this to select the ring tone to be usedwhen you receive a voice phone call from a person in thegroup.
• Group icon: Use this to select the graphic icon to be displayedwhen you receive a call from a person in the group.
• Add member: Add a member to the group.
• Delete member: Delete a member from the group.
• Rename: Assigns a new name to the group.
Copy all [Menu 4-3-6]You can copy/move entries from the SIM card memory to the phonememory and vice versa.
• SIM to Phone : Use this to copy the entry from the SIM Card toPhone memory.
• Phone to SIM : Use this to copy the entry from the Phone memoryto the SIM Card.
54
Organizer [Menu 4]
55
The following options are available.
– Keep original : When copying, the original dial numbers are kept.
– Delete original: When copying, the original dial numbers will beerased.
Delete all [Menu 4-3-7]You can delete all entries in SIM, Phone, and Voice list. Except forVoice list, this function requires the security code.
Settings [Menu 4-3-8]
• Set memory
You can select the memory for the phonebook feature betweenthe SIM and the phone. If you select Variable, when adding entry,the phone will ask where to save the number.
• Photo display
You can set the photo list by Photo view or List view, when yousearch the phonebook. If you select Photo view, the search listwill be shown with photos.
Information [Menu 4-3-9]
• Service dial number (SIM dependent)
Use this to view the list of Service Dialling Numbers (SDN)assigned by your network operator (if supported by the SIM card).Such numbers include the emergency, directory enquiries andvoice mail numbers.
1. Select the Service dial number.
2. The names of the available services will be shown.
3. Use the up/down navigation keys to select a service.
• Memory status
You can check the current memory status of the SIM card andphone memory.
• Own number (SIM dependent)
Use this to display your phone number in the SIM card.
56
Organizer [Menu 4]
57
Messages [Menu 5]
Press the Menu key (<) and select Messages using navigationkeys.
Text messages [Menu 5-1]Your phone receives voice mail notification messages and ShortMessage Service (SMS) messages.
Voice mail and SMS are network services. Please contact yournetwork operator for more information.
When the icon appears, you have received voice mail. When the icon appears, you have received a new text message.If the message memory is full, a message is displayed, the iconflashes and you cannot receive any new messages. Use the Deleteoption in the Inbox menu to delete obsolete messages. Once there is space in the message memory, any undelivered SMSmessages will be received (provided sufficient space is available).
Write message [Menu 5-1-1]You can write and edit text messages.
1. Key in your message. For details on how to enter text, refer topage 24 through 27 (Entering Text).
2. After you complete the message, to select the required option,press the left soft key [Option].
The following options are available.
• Send to number: Enter the number or select the number fromthe Phonebook or the recent numbers. You can send amessage up to 5 phone numbers at a time. Press the left softkey [Options]. The following options will be displayed.
– Send (It only shows after a phone number is entered)– Recent numbers– Search
58
Messages [Menu 5]
• Save to draft: Allows you to save the message so that it canbe sent later.
• T9 languages: Select the desired language of T9 mode.
• Clear text: Erases the whole text.
• Exit: Allows you to exit from the Write message menu.
3. You can also send attachments with the message by pressingthe right soft key [Attach], while you’re entering a message.
• Symbol: You can attach special characters.
• Picture: You can send and receive text messages that containpictures, known as ‘picture messages’. Several preset picturesare available in the phone and they can be replaced with newones received from other sources.
• Animation: Attaching an animation in a message can be donethrough EMS (Enhanced Messaging Service). You can selectany of 15 animations in the phone.
• Sound: If available, you can attach a sound available for ashort message.
• Text template: You can use text templates already set in thephone.
• Phone number: You can add phone numbers in the message.
• Signature: You can attach your singnature.
Inbox [Menu 5-1-2]Received messages can be searched and the contents can beviewed.
Received messages are displayed in date order.
Press the menu key and select Messages � Text messages �Inbox.
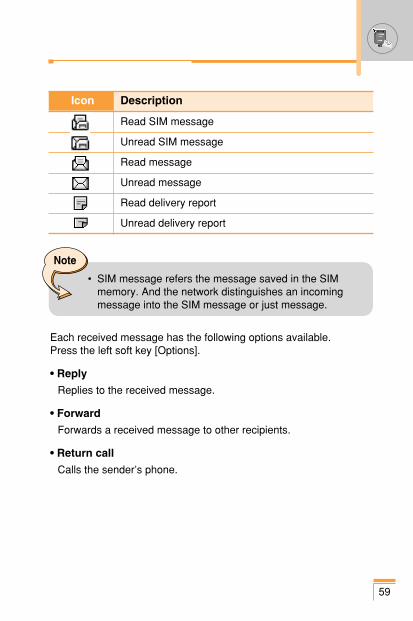
59
Each received message has the following options available. Press the left soft key [Options].
• Reply
Replies to the received message.
• Forward
Forwards a received message to other recipients.
• Return call
Calls the sender’s phone.
Note
• SIM message refers the message saved in the SIMmemory. And the network distinguishes an incomingmessage into the SIM message or just message.
Icon Description
Read SIM message
Unread SIM message
Read message
Unread message
Read delivery report
Unread delivery report
60
Messages [Menu 5]
• Extract
Extracts a picture, animation, sound, phone number, text webpage or email address from the message. These will be saved inMy folder, Phonebook, or bookmarks.
• Delete
Deletes the selected message from the Inbox.
• View information
Shows more detailed information about the selected message.
Outbox [Menu 5-1-3]You can view the list and contents of sent messages in this menuand can also verify if the transmission was successful.
The following options are available.
• Forward
Forwards the current message to other recipients.
• Delete
Deletes the selected message from the Outbox.
• View information
Shows more detailed information about the selected message.
Icon Description
Sent SIM message
Sent message
61
Draft [Menu 5-1-4]In this menu, you can see the message list saved as draft. Scrollthrough the list using the up/down navigation keys. Each draft has the following options.
• Send
Sends the selected message to other recipients.
• Delete
Deletes the selected message.
Settings [Menu 5-1-5]This menu lets you set up default SMS information.
• Message types
Sets the default message type between Text, Voice, Fax, Paging,X.400, E-mail and ERMES. The network can convert themessages into the selected format.
• Validity period
Sets the length of time for which your text messages will be savedat the SMS center while attempts are made to deliver them to therecipient. Possible values are 1 hour, 12 hours, 1 day, 1 week andthe maximum authorised by your network operator.
• Delivery reports
Activates or deactivates the report function. When this function isactivated, the network informs you whether or not your messagehas been delivered.
62
Messages [Menu 5]
• Reply with same service centre
Allows the recipient of your SMS message to send you a reply viayour message centre, if the service is provided by the network.
• SMS centre
Saves or changes the number of your SMS centre when sendingtext messages. You must obtain this number from your serviceprovider.
• Bearer setting
Selects GPRS or GSM. Contact your network operator or serviceprovider for information related to setting a selected bearer, pricingand connection speed.
Delete all [Menu 5-1-6]You can delete all messages in the message memory.
Multimedia messages [Menu 5-2]A multimedia message can contain text, images, and/or sound clips.
This feature can be used only if it is supported by your networkoperator or service provider. Only devices that offer compatibleMultimedia message or e-mail features can receive and sendmultimedia messages.
Write [Menu 5-2-1]1. Write message title, then press OK key or left soft key.
2. Key in the text message. Using the right soft key, you can inputsymbols, numbers and emoticons, or use T9 input mode.After the text message input, press the left soft key [Done].
3. Add an image and/or sound. You can move to the next sectionusing the up/down navigation.
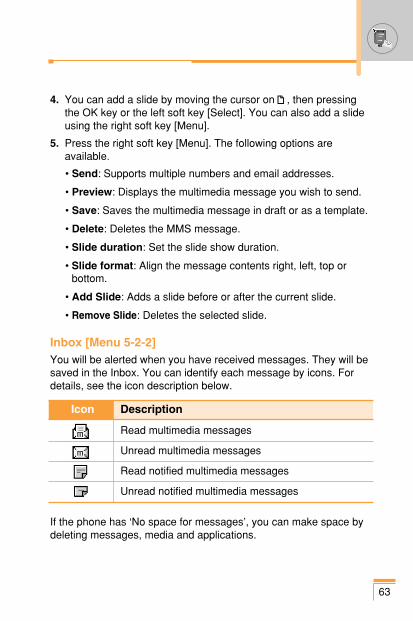
63
4. You can add a slide by moving the cursor on , then pressingthe OK key or the left soft key [Select]. You can also add a slideusing the right soft key [Menu].
5. Press the right soft key [Menu]. The following options areavailable.
• Send: Supports multiple numbers and email addresses.
• Preview: Displays the multimedia message you wish to send.
• Save: Saves the multimedia message in draft or as a template.
• Delete: Deletes the MMS message.
• Slide duration: Set the slide show duration.
• Slide format: Align the message contents right, left, top orbottom.
• Add Slide: Adds a slide before or after the current slide.
• Remove Slide: Deletes the selected slide.
Inbox [Menu 5-2-2]You will be alerted when you have received messages. They will besaved in the Inbox. You can identify each message by icons. Fordetails, see the icon description below.
If the phone has ‘No space for messages’, you can make space bydeleting messages, media and applications.
Icon Description
Read multimedia messages
Unread multimedia messages
Read notified multimedia messages
Unread notified multimedia messages
64
Messages [Menu 5]
• Timer stop
The Timer stop menu is displayed when you receive a messageincluding various pictures. Usually, the pictures are sequentiallydisplayed automatically. However, if you select this menu, you cansee the next picture by pressing the left soft key [Next] manually.
• Previous slide
Displays the previous page.
• Replay
Replays multimedia messages.
• Delete message
Deletes the current message.
• Reply all
Replies to all senders.
• Forward
Forwards the selected message to other recipients.
• Save message
Saves a multimedia message in draft form or as a template.
• Save item
Extracts pictures or sounds. They will be saved in My folder orPhonebook.
• Detail
Displays information about received messages; Sender’s address,Subject (only for Multimedia message), Message date & time,Message type, Message size.
65
Outbox [Menu 5-2-3]Use this to see sent messages. For each sent message, you cansee the delivery status.
• Timer stop
Usually, the pictures are in the form of an automatic slide show.However, if you select this menu, you can see the next picture bypressing the left soft key [Next] manually.
• Previous slide
Displays the previous page.
• Replay
Replays the current message.
• Delete message
Deletes the current message.
• Forward
Forwards the current message to other recipients.
• Save message
Saves a multimedia message in draft form or as a template.
• Save item
Saves items such as images, sound and attachments to amessage.
Icon Description
Sent
66
Messages [Menu 5]
• Detail
Displays information about the outbox messages: Subject (only for Multimedia message), Message date & time,Message type, Message size.
• Reply
Replies to the current message.
• Reply all
Replies to all recipients of the selected message.
Draft [Menu 5-2-4]Using this menu, you can preset up to five multimedia messagesthat you use most frequently. This menu shows the presetmultimedia message list.
The following options are available.
• Send
Supports multiple member and email addresses.
• Preview
To see the draft multimedia message.
• Save
Saves multimedia messages in draft form or as templates.
• Delete
Deletes the message.
• Settings
Select to set the slide duration or align the message contents tothe right, left, top or bottom.
67
• Add slide
Adds a slide before or after the current slide.
• Remove slide
Removes the highlighted slide.
Settings [Menu 5-2-5]Via this menu, you can set up the default multimedia messageinformation.
The following options are available.
• Slide duration
Set the duration of each slide.
• Alignment
Set the alignment of messages.
• Validity period
Set the duration for keeping messages on the network server.
• Auto download
On: If you select this, messages are downloaded automatically onreceipt.
Confirm: Requires you to confirm you want to download themessage.
Off: Defers downloading messages.
• Message centre
Enter the address of an MMS server to use the MMS service.
68
Messages [Menu 5]
• Profiles
See page 82 for further information.
Voice messages [Menu 5-3]This menu provides you with a quick way of accessing your voicemailbox (if provided by your network). Before using this feature, youmust enter the voice server number obtained from your networkoperator.
When new voice message is received, the ( ) symbol will bedisplayed on the screen. Please check with your network providerfor details of their service in order to configure the handset correctly.
Listen to voice mail [Menu 5-3-1]Once this option has been selected, simply press the left soft key[OK] to listen to voice messages. You can also hold down the 1 key in standby mode to listen to voice messages.
Voice mail centre [Menu 5-3-2]You can input and set the voice mailbox number.
Info services [Menu 5-4]Info service messages are text messages sent by the network tomobile phone users. They provide general information such asweather reports, traffic news, taxis, pharmacies, and stock prices.
Each type of information is associated with a number, which can beobtained from the network operator. When you receive an infoservice message, a popup message will indicate a new messagereceipt or the info service message will be displayed directly.
In standby mode, the following options are available when viewinginfo service messages.
69
Read [Menu 5-4-1]The list of received broadcast messages can be searched and thecontents viewed.
Receive [Menu 5-4-2]Use this to enable or disable the reception of broadcast messages.
Alert [Menu 5-4-3]Set alert on or off for a new broadcast message.
Auto display [Menu 5-4-4]If you select this option On, all received broadcast messages will beautomatically displayed.
Languages [Menu 5-4-5] (Dependent to network and subscription) This option lets you select the preferred languages. Cell broadcastmessages will be displayed in the selected language. If you use alllanguages supported by the phone, select Automatic at the end ofthe list.
Topics [Menu 5-4-6](Dependent to network and subscription) To create new topics, press the left soft key [Option] then selectAdd new. If you already have topics, you can cancel, edit, or deletethem by using the left soft key [Options].
70
Messages [Menu 5]
Templates [Menu 5-5]There are pre-defined messages in the list. You can view and editthe template messages or create new messages. Three types oftemplates are available: Text, Multimedia and Signature.
Text [Menu 5-5-1]
• Edit
Use this to write a new message or edit the selected templatemessage from the text template list.
• Delete
Deletes the selected template message from the text template list.
• Send text message
Use this to send the selected template message by SMS.
• Send multimedia message
Use this to send the selected template message by MMS.
• Add new
Use this to create new template.
Multimedia [Menu 5-5-2]
• Send
Sends the multimedia template. Supports multiple numbers andemail addresses.
• Preview
Displays the draft multimedia message.
71
• Save
Saves multimedia messages in draft form or as templates.
• Delete
Deletes the multimedia template.
• Slide duration
Set the slide show duration.
• Slide format
Align the message contents right, left, top or bottom.
• Add Slide
Adds a slide before or after the current slide.
• Remove Slide
Deletes the highlighted slide.
• Add Image
Use this to add an image before or after the current image.
• Add Sound
Adds a sound before or after the current sound.
Signature [Menu 5-5-3]This option helps you to make your own Signature. Key in thename, mobile phone number, office number, Fax number, and E-mail address.
• Edit
Use this to write a new message or edit the selected Signature.
• Delete
Use this to delete the selected signature.
72
Messages [Menu 5]
• Send text message
Use this to send the selected signature by SMS.
• Send multimedia message
Sends the selected signature by MMS.
Memory status [Menu 5-6]You can check the current memory status for SMS and MMS.
73
Camera [Menu 6]
The L1100 has a built-in camera. It supports Zoom, White balance,Colour/Sepia/Grey settings, and Multi burst functions.
Take picture [Menu 6-1]Press the Menu key (<) and select Camera ➝ Take picture. Or, press the camera key (Q) in standby mode.
1. Focus on the subject to capture, then press the [OK] key or thecamera hot key.
2. ‘Saved’ is displayed in the top left of the captured image. Thecaptured image is then automatically saved.
3. Press the [OK] key to continue taking pictures. Or press the clearkey (C) to delete the image. Press the right soft key to sendMMS picture message using the captured image.
Note
• The remaining memory is shown in the top right of theimage. If there is insufficient memory, the image size isautomatically reduced. If the memory is full, ‘memoryfull’ is displayed and you cannot take any more picture.Create space by deleting old images.
Note• In the preview mode, you can immediately go to Gallery
by pressing the right soft key [Gallery].
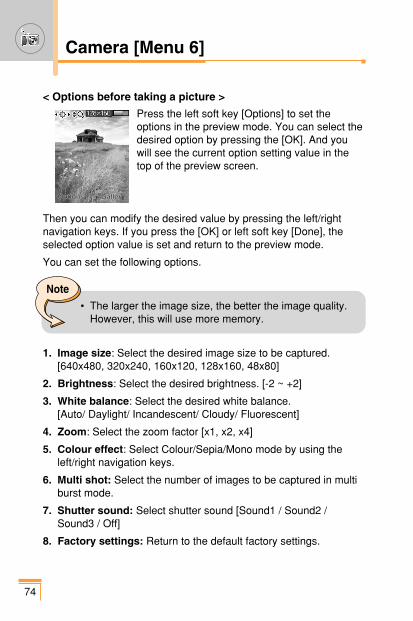
< Options before taking a picture >
Press the left soft key [Options] to set theoptions in the preview mode. You can select thedesired option by pressing the [OK]. And youwill see the current option setting value in thetop of the preview screen.
Then you can modify the desired value by pressing the left/rightnavigation keys. If you press the [OK] or left soft key [Done], theselected option value is set and return to the preview mode.
You can set the following options.
1. Image size: Select the desired image size to be captured. [640x480, 320x240, 160x120, 128x160, 48x80]
2. Brightness: Select the desired brightness. [-2 ~ +2]
3. White balance: Select the desired white balance.[Auto/ Daylight/ Incandescent/ Cloudy/ Fluorescent]
4. Zoom: Select the zoom factor [x1, x2, x4]
5. Colour effect: Select Colour/Sepia/Mono mode by using theleft/right navigation keys.
6. Multi shot: Select the number of images to be captured in multiburst mode.
7. Shutter sound: Select shutter sound [Sound1 / Sound2 /Sound3 / Off]
8. Factory settings: Return to the default factory settings.
74
Camera [Menu 6]
OptionsOptions GallerGallery
Note• The larger the image size, the better the image quality.
However, this will use more memory.
75
Gallery [Menu 6-2]Then select image category. [All pictures / General pictures / Phonebook pictures]You can view, organise and send pictures saved in your phone.
1. Use the navigation keys to select the picture you want a fullscreen view of.
2. Press the [OK] key. You will see the name of the image on top ofthe LCD screen.
3. Press the left soft key [Options] to access the followingsubmenus.
• Thumbnail/Enlarge: You can view the selected image.
• Delete: Deletes the selected image.
• Send multimedia message: Sends MMS picture messagesusing the selected image.
• Set as wallpaper: Set the selected image as wallpaper.
• Slide show: Plays back every image in the selected categoryin succession, in order. To stop the slide show playback, pressthe C key.
• Rename: You can change the title of the selected image.
• Delete all: Deletes all images in the selected category.
• Details: You can check the title, size, date and time of theselected image.
4. To go back to the Camera menu, press the right soft key [Back].
In [Memory status] sub menu, you can check the memory status inyour phone.
[total size / used size / free size]
76
Java is a technology developed by Sun Microsystems. Similar to theway you would download the Java Applet using the standardNetscape or MS Internet Explorer browsers, Java MIDlet can bedownloaded using the WAP enabled phone. Depending on theservice provider, all Java based programs such as Java games canbe downloaded and run on a phone. Once downloaded, the Javaprogram can be viewed within the Applications menu where you canselect, execute, or delete. The Java program files saved in thephone are in .JAD and .JAR formats.
Note
• The JAR file is a compressed format of the Javaprogram and the JAD file is a description file thatincludes all detailed information. From the network, priorto download, you can view all detailed file descriptionsfrom the JAD file.
Warning
• Only J2ME (Java 2 Micro Edition) based programs willrun in a phone environment. The J2SE (Java 2 StandardEdition) based programs will only run in a PCenvironment.
Games & Apps [Menu 7]
77
Games [Menu 7-1]The phone offers you the games to play with.
Applications [Menu 7-2]Application menu displays the list of Java programs downloadedusing the WAP. All previous downloaded programs can be selected,deleted, or viewed in detail within the Application menu. From thelist within the Application menu, the following options are available:
• Open: Open the selected program. The list includes all Javaprograms installed in the phone.
• Delete: Delete the selected program. Once deleted, you will not beable to restore the program unless it is downloaded again usingthe WAP.
• Details: Display detailed information on the selected program.This includes the program name, program size, program version,vendor information and the website address or the URL.
Note
• The control keys are different depending on a game.However, each one has an introduction to explain themain control keys.
[ Common key function ]
< : Game menu
> : Back
78
Games & Apps [Menu 7]
• Connect options: Some Java applications may require dataconnection to be mode. Select one of the following options.
1. Ask first: You will be asked before the application makes theconnection.
2. Allowed: The connection is created immediately without anotification.
3. Not allowed: No connection is allowed.
Download [Menu 7-3]When a new Java program is downloaded using the WAP, theaddress from which a download takes place is known as abookmark. The Java menu includes a bookmark list for downloadingJava programs and this bookmark list can be viewed from theDownload menu. You can connect, view, edit, delete, and add newbookmarks.
• Connect: Selected address in the bookmark is used for dataconnection. After successful connection, desired Java programcan be downloaded from the list.
• View: Detailed information on a bookmark can be viewed such asthe address of bookmark and title of bookmark required forconnecting to certain sites.
• Edit: Selected bookmark can be edited. Editing a bookmark isdone in the order of Address � Title. When creating a newbookmark, same order is followed.
• Delete: Selected bookmark is deleted. All bookmarks can bedeleted completely from the bookmark list screen. Deletedbookmark cannot be restored so caution is required when deletingbookmarks.
• Add new: New bookmark is added. The same order used duringEdit bookmark applies to Add new bookmark. Select the Add newoption from the bookmark menu or when no bookmark exists, thenthe Add new can be selected from the bookmark list screen.
79
Note
• After selecting the Connect function to access the JavaMIDlet Provider’s server, you may choose one of manyJava programs to download and install into your phone.Once connected to the server, the Go button can bepressed to view the JAD information on a desiredprogram. The Get button will begin the download andinstall process. The download and install process willtake place simultaneously and once download iscomplete you can immediately run the Java program.The installed Java program can be selected to run at alater time from the Application menu.
Information [Menu 7-4]
Memory status [Menu 7-4-1]Shows the size of memory available for game and applicationinstallations. You can also see the whole memory status ofHandset.

80
Press the Menu key < and select Internet using navigation keys.
You can access various WAP (Wireless Application Protocol)services such as banking, news, weather reports and flightinformation. These services are specially designed for mobilephones and they are maintained by WAP service providers.
Check the availability of WAP services, pricing and tariffs with yournetwork operator and/or the service provider whose service youwish to use. Service providers will also give you instructions on howto use their services.
Please contact your network operator to open your Internet account.To use the Web Browser, you must indicate your phone number viathe Own number menu option.
Once connected, the homepage is displayed. The content dependson the service provider.
You can access any website page by entering its URL address. Toexit the browser at any time, press the E key. The phone willreturn to the standby mode.
Navigating with the WAP browserYou can surf the Internet using either the phone keys or the WAPbrowser menu.
Using the phone keysWhen surfing the Internet, the phone keys function differently tophone mode.
Key Description
U D Scrolls each line of the content area
C Returns to the previous page
O Selects options and confirms actions
Internet [Menu 8]
81
Using the WAP browser menuThere are various menu options available when surfing the WirelessWeb.
Home [Menu 8-1]Connect to a homepage. The homepage will be the site which isdefined in the activated profile. It will be defined by the serviceprovider if you have not defined it in the activated profile.
Bookmarks [Menu 8-2]Set the current page as a new bookmark or move an establishedbookmark. Your phone may have some pre-installed bookmarks forsites not affiliated with LG. LG does not warrant or endorse thesesites. If you choose to access them, you should use the samesecurity or content precautions as you would with any site.
E-mail server [Menu 8-2-1]
• Connect
Connects to the E-mail server that you configured.
• Edit address
Edit the E-mail address.
Delete all [Menu 8-2-2]Delete all bookmarks.
Note
• The WAP browser menus may vary, depending on yourbrowser version.
82
Push messages [Menu 8-3]
Inbox [Menu 8-3-1]You can order Push messages from WAP service providers. Pushmessages are notifications of, for example, news headlines andthey can contain a text message or the address of a WAP service.For availability and subscription, contact your WAP service provider.Service providers can update an existing Push message every timea new Push message is received. Messages can be updated even ifyou have moved them to another folder. When Push messagesexpire, they are deleted automatically.
• Information
Shows the information of received push messages.
• Load
Connects to a specific site using the information in the receivedpush message.
• Delete
Deletes the selected push message.
Receive [Menu 8-3-2]You can choose whether or not you wish to receive push messages.
Profiles [Menu 8-4]For more information, consult your network operator. Each profile has submenus as follows:
• Activate: Activates the selected profile.
• Settings: Use this to edit and change WAP settings for theselected profile.
Internet [Menu 8]
83
• Rename: You can change the selected profile’s name.
• Delete: Deletes the selected profile from the list.
• New profile: You can add a new profile.
Go to URL [Menu 8-5]You can connect directly to the site you want. To do this, you needto enter a specific URL.
Cache settings [Menu 8-6]The information or services you have accessed are saved in thecache memory of the phone.
Clear cache [Menu 8-6-1]Removes all context saved in cache.
Check cache [Menu 8-6-2]Set a value whether a connection attempt is made through cache ornot.
Note
• The changes using these options may affect the MMSfunction.

Security certificates [Menu 8-7]A list of the available certificates is shown.
Reset profiles [Menu 8-8]You can reset profiles to return to original settings.
WAP information [Menu 8-9]The WAP browser version is displayed.
84
Internet [Menu 8]
Note
• A cache is a buffer memory, which is used to save datatemporarily.
85
Settings [Menu 9]
Press the Menu key (<) and select Settings using navigationkeys.
Date & Time [Menu 9-1]This option lets you change the current time and date displayed.The following options are available.
Set date [Menu 9-1-1]Use this to enter the day, month and year. You can change the dateformat via the Date format menu option.
Date format [Menu 9-1-2]You can set the date format such as DD/MM/YYYY, MM/DD/YYYY,YYYY/MM/DD. (D: Day, M: Month, Y: Year)
Set time [Menu 9-1-3]Use this to enter the current time. You can choose the time formatvia the Time format menu option.
Time format [Menu 9-1-4]You can set the time format between 12 hours and 24 hours.
Phone settings [Menu 9-2]Many features of your phone can be customised to suit yourpreferences. All of these features are accessed via the Phonesettings menu.
Wallpaper [Menu 9-2-1]Use this to set up the display on the LCD screen in the standbymode.
Greeting note [Menu 9-2-2]Use this to show the greeting note on the internal LCD screen in thestandby mode and external LCD.
Menu colour [Menu 9-2-3]Your phone provides you with 4 menu colour themes. Set the menucolour by scrolling and pressing the Select key.
Languages [Menu 9-2-4]You can select the display language. When the language option isset to Automatic, the language is automatically selected accordingto the language of the SIM card used. English will be set if thelanguage on the SIM card is not supported by the phone.
Backlight [Menu 9-2-5]Use this to select whether or not the phone uses the backlight. A small increase in standby/talk time can be achieved by turning thebacklight off.
You set the backlight option for the keypad in the up/down positionindependently.
LED Indication [Menu 9-2-6]Use this to set LED Indication blinking on/off, which shows whetheryour phone is power on.
Network name [Menu 9-2-7]Use this to display network name you use on the LCD screen in thestandby mode.
86
Settings [Menu 9]
87
Call settings [Menu 9-3]To change the settings for call diverting.
Call divert [Menu 9-3-1]When this network service is activated, you can direct yourincoming calls to another number, for example, to your voicemailbox number. For details, contact your network operator. Selectone of the divert options, for example, select If busy to divert voicecalls when your number is busy or when you reject incoming calls.
The following options are available.
• All voice calls
Diverts all voice calls unconditionally.
• If busy
Diverts voice calls when the phone is in use.
• If no reply
Diverts voice calls which you do not answer.
• If out of reach
Diverts voice calls when the phone is switched off or out ofcoverage.
• All data calls
Diverts to a number with a PC connection unconditionally.
• All fax calls
Diverts to a number with a fax connection unconditionally.
Each option has the following menu:
- ActivateActivates the corresponding service.

• To voice mailForwards to message centre. This function does not apply toAll data calls and All fax calls menus.
• To other numberInput the number for call diverting.
- CancelCancels the selected call divert.
- View statusYou can check the status of the service.
• Cancel all
Cancels all call divert settings.
Answer mode [Menu 9-3-2]Select the desired mode to answer a call.
• Flip open
You can receive a call simply by opening the flip.
• Any key
When the phone rings, you can answer a call by pressing any keyexcept the key and the right soft key (>).
• Only send key
You can answer a call only by pressing the send key.
Send my number [Menu 9-3-3]This network service lets you decide whether your phone number isdisplayed (On) or hidden (Off) from the person you are calling.
Select Set by network to reset the phone to the setting that youhave agreed upon with your service provider.
88
Settings [Menu 9]
89
Call waiting [Menu 9-3-4] (Network Service)The network will notify you of a new incoming call while you have acall in progress. Select Activate to request the network to activatecall waiting, Cancel to request the network to deactivate callwaiting, or View status, to check if the function is active or not.
Minute minder [Menu 9-3-5]When set to On, the phone will beep every minute during anoutgoing call to keep you informed of the length of the call.
Voice dial [Menu 9-3-6]You can make a phone call by speaking a voice tag that has beenadded to a contact card. Any spoken word(s) can be a voice tag. Before using voice-activated dialling, note that:
• Voice tags are not language dependent. They are dependent onthe speaker’s voice.
• Voice tags are sensitive to background noise. Record them andmake calls in a quiet environment.
• When recording a voice tag or making a call by saying a voicetag, the loudspeaker is in use. Hold the phone at a short distanceaway from your mouth and face so that the proximity sensor doesnot turn the loudspeaker off.
• Very short names are not accepted. Use long enough names andavoid similar names for different numbers.
- AutomaticUse this to enter voice-activated dialling mode whenever youslide the keypad down.
- ManualUse this to enter voice-activated dialling mode by holding thestar [*/voice] key.
Auto redial [Menu 9-3-7]Select On, and your phone will make a maximum of five attempts toconnect the call after an unsuccessful call attempt.
Closed user group [Menu 9-3-8](Network Service) This is a network service that specifies the group of people who youcan call and who can call you. For more information, contact yournetwork operator or service provider. If a group index is specified, itis used for all outgoing calls. If no group index is specified, thenetwork will use the preferential index. (A specific index is stored inthe network.)
• Preset : Sets the selected CUG index.
• On: You can edit the CUG index and activate it.
• Off: Deletes the selected CUG.
90
Settings [Menu 9]
Note• You must say the name exactly as you said when you
recorded it. This may be difficult, for example, in anoisy environment or during an emergency, so youshould not rely solely upon voice-activated dialling inall circumstances.
91
Security settings [Menu 9-4]Various passwords are used to protect certain features of yourphone.
PIN code request [Menu 9-4-1]When the PIN code request feature is enabled, you must enteryour PIN each time you switch the phone on. Consequently, anyperson who does not have your PIN cannot use your phone withoutyour approval.
The following options are available:
• On
You must enter the PIN each time the phone is switched on.
• Off
The phone connects directly to the network when you switch it on.
Phone lock [Menu 9-4-2]When the Phone lock feature is enabled, the phone is locked andyou must enter the phone password each time the phone isswitched on. The password is factory set to 0000. To change thephone password, refer to the Change codes – Security codemenu option [Menu 9-4-5-1]. Once the correct password has beenentered, you can use the phone until you switch it off.
Note
• Before disabling the PIN code request feature, youmust enter your PIN.
The following options are available:
• Power On
- EnableYou are required to enter the phone password when you switchthe phone on.
- DisableYou do not need to enter the phone password when you switchthe phone on.
- If SIM changedYour phone will request security code only when you changeyour SIM card.
• Immediately
After entering the correct security code, the phone will lock aftergoing into the idle state. If you want to disable this phone lock, youshould enter the right security code after pressing the right softkey. If you power off in the phone lock state, when the phone isnext powered on, the phone is in the lock state.
Call barring service [Menu 9-4-3](Network dependent)Call barring lets you restrict the making and receiving of calls withyour phone. For this function, you need the barring password, whichyou can obtain from your service provider.
The following options are available:
• All outgoing
No call can be made.
92
Settings [Menu 9]
93
• Outgoing international
International calls cannot be made.
• Outgoing international except home country
When abroad, calls can be made only to numbers within thecurrent country and to your home country, No call can the countrywhere your home network provider is located.
• All incoming
No call can be received.
• Incoming when abroad
Calls cannot be received when you are using your phone outsideyour home service area.
• Cancel all barrings
All call barring settings are deactivated; calls can be made andreceived normally.
• Change password
Use this to set and change the call barring password obtainedfrom your service provider using this option. You must enter thecurrent password before you can specify a new one. Once youhave entered a new password, you are asked to confirm it byentering it again.
Note• To use Call barring service, you must input the
network password. When calls are barred, calls may bepossible to certain emergency numbers on somenetworks.
Fixed dial number (FDN) [Menu 9-4-4](SIM dependent)You can restrict outgoing calls to selected phone numbers ifsupported by your SIM card. The FDN capacity to add depends onthe SIM card. When you enter the FDN, the PIN2 code is required.
This Function enables patial numbers (e.g. area codes) to save.
Examples:
If 3 numbers (0123, 123123, ?89012) are stored in the FDN list,then you are allowed to dial:012345678..., 01236789..., 123123 only, 189012, and 289012.(“?” means any numbers )
If you try to make a call which is not added in the FDN list, you can’tmake a call and see a message “FDN Check”.
• Enable
If the FDN is enabled, you can make a call by only number on alist. A phonebook function is restricted partially. You can’t addentries into SIM, but can only add entries into the phone memory.Also, you can search only phonebook entries which are added intothe phone memory.
• Disable
If the FDN is disabled, you can use a phonebook function.
• Number list
You can see the FDN list. You can add, edit and delete the FDNby pressing the left soft key [Options].
94
Note• Not all SIM cards have a PIN2. If your SIM card does
not, this menu option is not displayed.
Settings [Menu 9]
95
Change codes [Menu 9-4-5]The Change codes feature lets you change your current passwordto a new one. You must enter the current password before you canspecify a new one.
Use this to change the access codes: Security code, PIN code,PIN2 code
Network settings [Menu 9-5]The Network settings feature enables you to indicate whether thenetwork used when roaming (outside your home area) is selectedautomatically, manually or preferably.
Automatic [Menu 9-5-1]Use this to set the phone to automatically search for and select oneof the cellular networks available in your area.
The phone will default back to Automatic if it is switched off.
Manual [Menu 9-5-2]If you want to select the desired network manually from a list ofnetwork. If the connection to the manually selected network is lost,the phone will sound an error tone and ask you to select a networkagain.
Note
• PIN: Personal Identification Number
Note• You can select a network other than your home
network only if it has a valid roaming agreement withyour home network.
Preferred [Menu 9-5-3]You can set a list of preferred networks the handset should attemptto register with first, before attempting to register to any othernetworks. This list is created from the handset’s predefined list ofknown networks.
Band selection [Menu 9-5-4]Use this to set the network band between two choices, GSM900/1800 or GSM1900.
GPRS settings [Menu 9-6]GPRS (General Packet Radio Service) is a technology that allowsmobile phones to be used for sending and receiving data over themobile network. GPRS is a data bearer that enables wirelessaccess to data network such as the Internet.
Before you can use GPRS technology;
• You need to subscribe to the GPRS service. For availability andsubscription to GPRS service, contact your network operator orservice provider.
• You need to save the GPRS settings for the applications usedover GPRS.
Attach [Menu 9-6-1]If you select Power on and you are in a network that supportsGPRS, the phone registers to the GPRS network and sending shortmessages will be done via GPRS. Also, starting an active packetdata connection, for example, to send and receive e-mail, is quicker.
If you select When needed, the phone will use a GPRS connectiononly if you start an application or action that needs it. The GPRSconnection is closed after it is no longer required by any application.
96
Settings [Menu 9]
97
External device [Menu 9-6-2]When you use Internet via GPRS by using external device, you canset the following six profiles: Rename, APN, IP address, DNS,User ID, and Password.
Reset settings [Menu 9-7]You can reset your phone to its default configuration.
To do so, proceed, as follows.
1. Select the Reset settings menu option.
2. Enter the 4-digit security code.
Note• If there is no GPRS coverage and you have chosen
Automatic, the phone will periodically try to establish aconnection.
Note
• The security code is preset to 0000.
Please check to see if any problem which you may have with yourphone is described here before taking it for service or calling aservice engineer.
Q How do I view the list of outgoing calls, incoming calls andmissed calls?
A Press S.
Q How do I clear all call history?
A Press the left soft key and then 2 4 4.
Q How do I view all numbers saved in the memory?
A Press the right soft key and then 1.
Q does not disappear from the screen.
A Check whether you are in a service area. If you continue to see, turn off the power and wait for approximately 2 minutes
before turning it back on. If there is no change, relocate toanother area and check again.
Q Connection is poor or is not audible in certain areas.
A In certain areas, signal strength can vary dramatically. Trymoving to a different location. Heavy network traffic may affectthe ability to connect, or the stability of the call.
Q Connection is poor even when established.
A In certain areas, signal strength can vary dramatically. Trymoving to a different location. Heavy network traffic my affectthe ability to connect, or the stability of the call.
98
Q&A
99
Q LCD does not turn on.
A Remove and replace the battery and turn on the power. If thephone still does not turn on, charge the battery and try again.
Q An echo can be heard during connection with a certaintelephone in a certain area.
A It is called ‘Echo Phenomenon’. It occurs if the volume is toohigh or caused by special properties (semi electronic telephoneexchange) of the machine on the other end.
Q The phone gets warm.
A During long calls, or if games/Internet are used for a long time,the phone may become hot. This is perfectly normal and has noeffect upon the life of the product or performance.
Q The bell does not ring, or lamp or LCD blinks only.
A The phone is set to ‘Vibrate’ or ‘Silent’ in the Profiles menu.Please select ‘General’ or ‘Loud’
Q Standby duration of the phone gradually becomes shorter.
A Batteries have a limited life. When the battery lasts for half itsoriginal time, it requires replacement. Only use authorisedreplacement parts.
Q Usage time of battery becomes shorter.
A If the battery time is short, it may be due to the userenvironment, or large volume of calls, or weak signals.
100
Q&A
Q No number is dialled when you recall a phonebook entry.
A Check that the numbers have been saved correctly, by using thephonebook Search feature. Resave them, if necessary.
Q You cannot be contacted.
A Is your phone switched on (E pressed for more than threeseconds)? Are you accessing the right cellular network? Haveyou set an incoming call barring option?
Q I cannot find the lock, PIN, or PUK code, or password?
A The default lock code is ‘0000’. If you forget or lose the lockcode, contact your phone dealer. If you forget or lose a PIN orPUK code, or if you have not received such a code, contact yournetwork service provider.
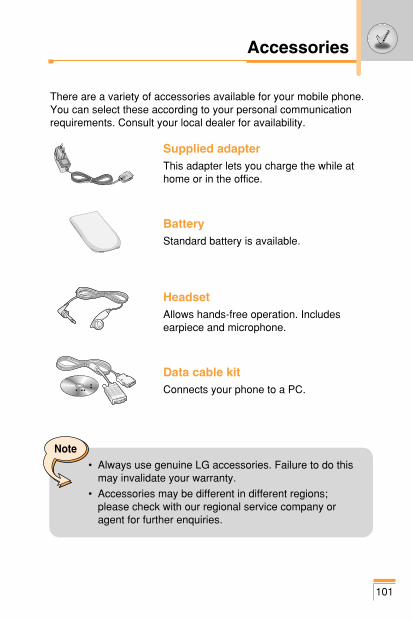
101
Accessories
There are a variety of accessories available for your mobile phone.You can select these according to your personal communicationrequirements. Consult your local dealer for availability.
Supplied adapterThis adapter lets you charge the while athome or in the office.
BatteryStandard battery is available.
HeadsetAllows hands-free operation. Includesearpiece and microphone.
Data cable kitConnects your phone to a PC.
Note• Always use genuine LG accessories. Failure to do this
may invalidate your warranty.
• Accessories may be different in different regions;please check with our regional service company oragent for further enquiries.
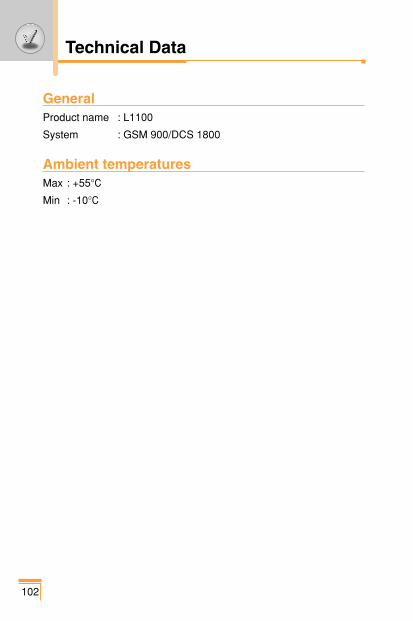
102
Technical Data
GeneralProduct name : L1100
System : GSM 900/DCS 1800
Ambient temperaturesMax : +55°C
Min : -10°C
103

104
Memo