gambit - triple seven gliders
TRANSCRIPT

GAMBIT

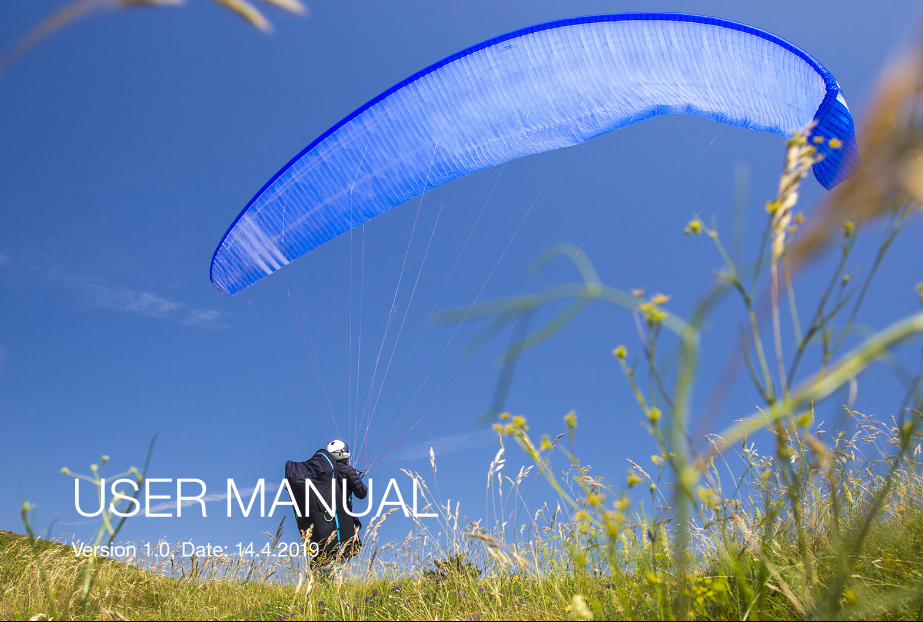
USER MANUALVersion 1.0, Date: 14.4.2019
4
IntroductionWelcomeWelcome to the Triple Seven Team! We are excited that you have chosen to fly the Gambit. Our CCC certified Gambit is developed for maximum performance while remaining comparatively easy to fly. This glider is designed for top level XC and competition flying. We wish you exciting flying adventures!
Triple Seven MissionOur company’s goal is to produce high quality products and technologically innovative gliders of all types and classes. We are striving to develop state of the art paragliders, with the optimum compromise between safety and performance.Your success is our inspiration; our goal is your success.
ManualThis document contains complete product information and instructions to familiarise you with the main characteristics of your new glider. It contains instructions on how to use and maintain the wing, however, its purpose is not to serve as learning material to pilot this kind of wing. As such, this is not a flying manual. Flying can only be taught by flying schools and specially certified instructors.
It is important that you take time to read this manual carefully before the first flight, as thorough knowledge of your equipment enables you to fly safely and to maximize your full potential. If you sell, lend or give your glider to another pilot, please pass this manual on with it.
If any use of Triple Seven equipment remains unclear after having read this manual, please contact: your local paragliding instructor, your Triple Seven importer or Triple Seven. This product manual is subject to changes without prior notice. Please check www.777gliders.com for the latest information regarding our products.
5
1. GAMBIT 12. High performance CCC 3III. Introduction 4III.i. Welcome 4III.ii. Triple Seven Mission 44. Gambit 74.1. Designer’s thoughts 84.2. Who is this glider for? 94.3. Certification 95. Before flight 105.1. Elements, components 105.2. Assembly 105.3. Harness 115.4. Accelerator settings 115.5. Brakes’ adjustments 115.6. Weight range 125.7. Wing inflation 125.8. Modifications on the glider 125.9. Preflight safety 126. Flying Gambit 13
6.1. First Flight 136.2. Preflight check equipment 136.3. Final preflight check 146.4. Inflation, control, take-off 146.5. Line knots or tangles 146.6. Normal flight, best glide 156.7. Minimum sink 156.8. Accelerated flight 156.9. Active flying 156.10. Flying in turbulence 166.11. Fast decent techniques 176.12. Winch launch 196.13. Aerobatics 196.14. Primary controls failure 196.15. Landing 197. Maintenance 207.1. General advice 207.2. PacGambit instructions 207.3. Storage 217.4. Cleaning 217.5. Repair 217.6. Checks and control 21VIII. PacGambit Gambit 229. Technical data 24
9.1. Technical data 269.2. Materials description 269.3. Gambit risers arrangement 279.4. Line plan Gambit 289.5. Line lengths Gambit M 29X. Safety and responsibility 30XI. Guarantee 31XII. Registration information 32XIII. Get involved 32XIV. Contact 33
6
7 7
»Reinforced leading edge (RLE), Smooth trailing edge reinforcements (STE) together with (BPI) for greater stability and good gliding performance on wide speed range »BPI - back position intake technology for spin and stall resistance and good stability at accelerated flight. »Low induced drag wing tip (LDW), optimized washout with two additional floating cells. »Three liner concept, with considerable line reduction (LR) »5 cells diagonals (RLE) reinforced leading edge »Good pitch stability and ease of piloting »Trim speed optimized for good climbing »Clean canopy with refined sail tensions »Direct handling with precise control »Full span distributed panels orientation streamlined to airflow direction » Improved double 3d shaping (ballooning) at the leading edge »High top speed »Easy launch control »CCC certified, dedicated competition and cross country paraglider
8
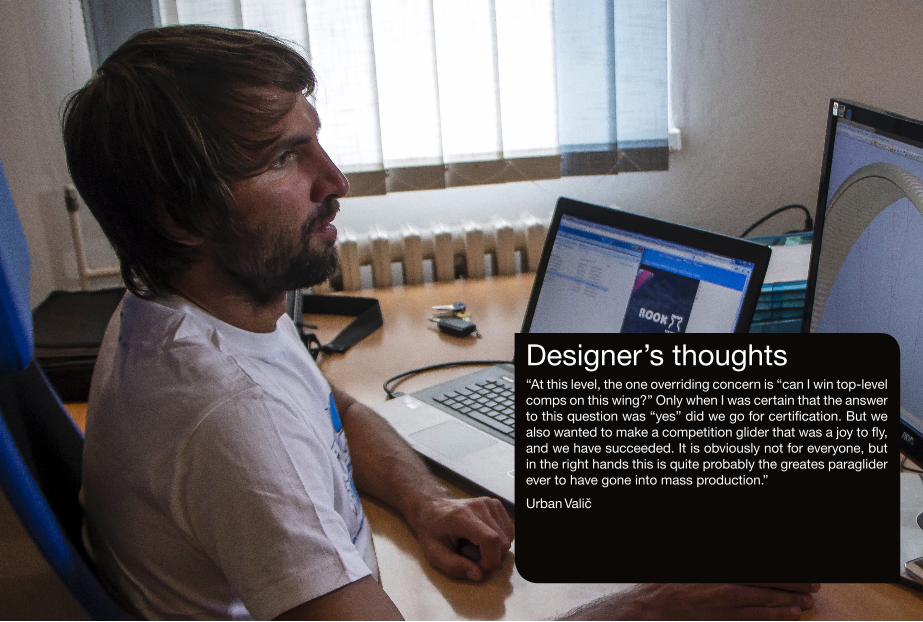
Designer’s thoughts“At this level, the one overriding concern is “can I win top-level comps on this wing?” Only when I was certain that the answer to this question was “yes” did we go for certification. But we also wanted to make a competition glider that was a joy to fly, and we have succeeded. It is obviously not for everyone, but in the right hands this is quite probably the greates paraglider ever to have gone into mass production.”
Urban Valič
9
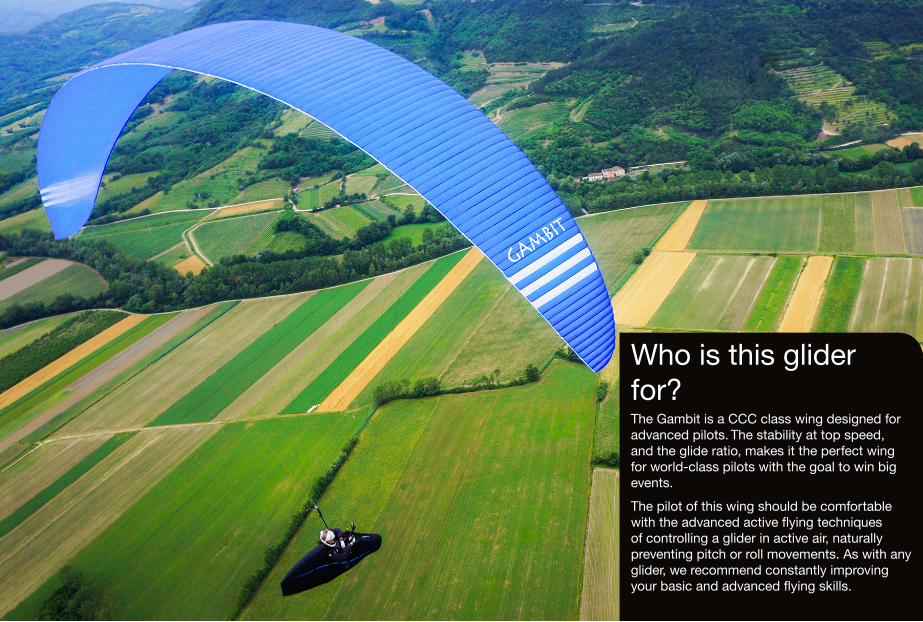
Who is this glider for?The Gambit is a CCC class wing designed for advanced pilots. The stability at top speed, and the glide ratio, makes it the perfect wing for world-class pilots with the goal to win big events.
The pilot of this wing should be comfortable with the advanced active flying techniques of controlling a glider in active air, naturally preventing pitch or roll movements. As with any glider, we recommend constantly improving your basic and advanced flying skills.
10
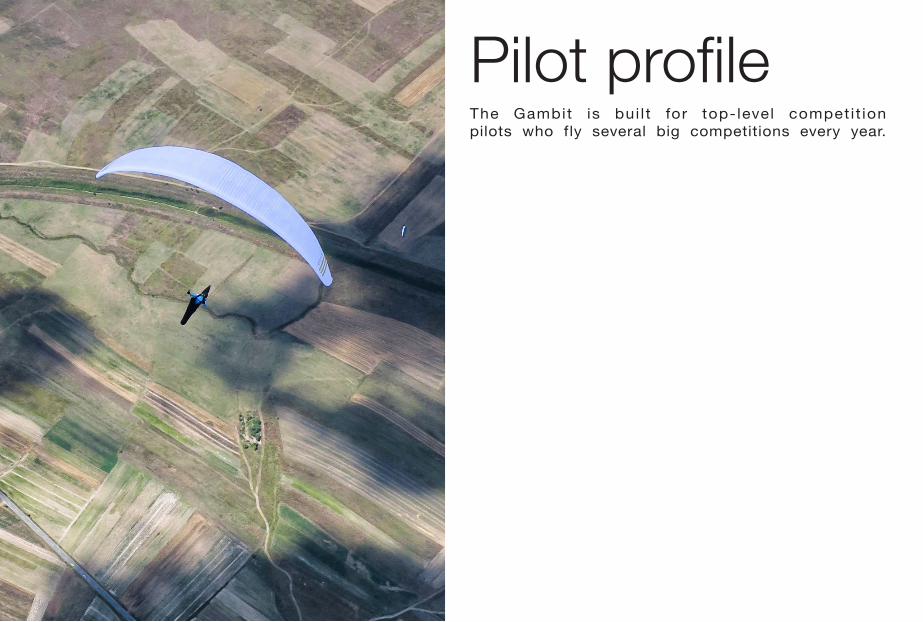
Pilot profileThe Gambit is bui l t for top-level compet i t ion pilots who fly several big competitions every year.
11
AssemblyBefore you rush to the first take-off we recommend you take your time to unpack and test your equipment on a training slope. In this way you will have time and will not be distracted or rushed to prepare your equipment, and you will be able to do your first pre-flight check properly. The place should be flat, free of obstacles, and with light wind. This will enable you to nicely inflate the wing and also familiarize yourself with it while ground handling. Every glider has to be checked by a Triple Seven dealer, however, as a pilot you want to do a proper pre-flight check yourself.
First, prepare and spread out the glider like you would normally do. While you are spreading out and walk along the glider, observe the fabric material for any abnormalities. When you are done with the inspection of the canopy, grab the risers and spread the lines, check if the risers and maillons (carabiners) are properly closed. Identify and disentangle the A1, A2, B risers and the lines including the brake lines. Connect the risers’ main attachment points correctly to the harness, watch for any twists and make sure that the main carabiners are properly closed.
HarnessThe Gambit has passed CCC certification testing using a GH - ABS type harness. This certification allows the Gambit to be flown with most of the harnesses on the market, but keep in mind that changing the harness greatly influences the feeling of the glider, depending on the effectiveness of the harness weight shift. Always check whether your harness is of the proper type.
The length of the harness chest strap affects the distance between the main carabiners and the wing’s handling as well as your stability in the harness. Tightening the chest strap increases your stability, but greatly increases the risk of twisting after a collapse. A tight setting also increases the tendency to maintain a deep spiral. As a rule of thumb, a more opened chest strap gives you more feedback from the glider, which is good for your climbing efficiency and increases safety in a flying incident. But we strongly recommend adjusting the length of the harness chest strap according to the lengths used during certification. This setting varies according to the harness size from 42cm to 50cm.
Check the settings used during testing under the certification specimen section. We recommend that your first flight with the Gambit is not also with a new harness. A rule of thumb is, if you want to experience the feeling of new equipment, change only one part of equipment at a time.
Weight rangeEach size of the Gambit is certified for its own weight range. This total weight includes the weight of the pilot and complete paragliding equipment, together with the glider, harness, all accessories and optional ballast. Every glider changes its characteristics by changing the take-off weight. We recommend that you always fly your glider in the specified weight range. To measure your take-off weight, step on a scale with all your equipment packed in the rucksack.
12
Lower half of the weight rangeFlying the Gambit, as any other glider, in the lower part of the weight range, causes the agility of the glider to decrease, and when flying through turbulence its tendency for collapses increases relatively compared to flying it in the upper wing loading range. However, reactions after a collapse are less dynamic and sink rate improves. Therefore, if you mainly fly in weak conditions, you might prefer this weight range.
Upper half of the weight rangeAgain, as with any other glider, flying the Gambit in the upper part of the weight range increases the stability and agility of the glider. Consequently, there is a slight increase in the glider’s speed and also gliding performance, especially when flying against the wind. If you normally fly in stronger conditions and you prefer relatively more dynamic flying characteristics, you should set the take-off weight in the higher weight range. Reactions after a collapse may be more dynamic in the upper half of the weight range.
Wing inflationStill being on the training slope and having prepared and checked everything, inflate your wing and play with it to get a feel of your new glider while ground handling. By doing this you are making a final check of the canopy and lines, and that everything is in order. You will find that the Gambit inflates very easily and smoothly without excessive energy and with minimum pressure while moving forwards. For inflation and lifting the glider you may use only the A1 riser tab. Do not pull on the risers just with your hands, instead use your whole harness. Your hands should only accompany the rising movement of the wing. When the wing is above you, apply correct pressure on the brake lines and the glider will stay above you.
Modifications on the glider Any modifications of the lines or risers’ speed system cause the loss of the certification, similarly to flying the wing outside the weight range.
13
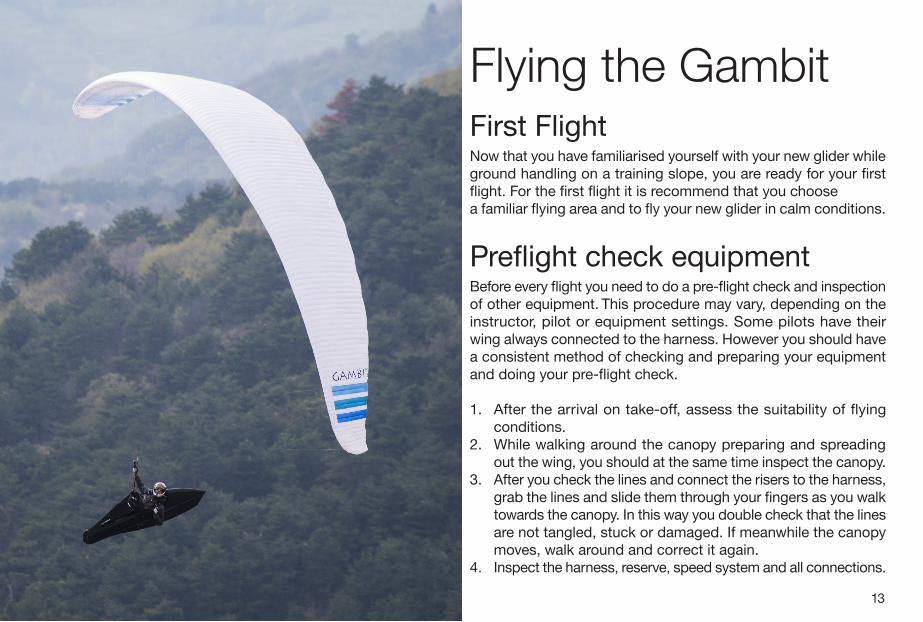
Flying the GambitFirst FlightNow that you have familiarised yourself with your new glider while ground handling on a training slope, you are ready for your first flight. For the first flight it is recommend that you choose a familiar flying area and to fly your new glider in calm conditions.
Preflight check equipmentBefore every flight you need to do a pre-flight check and inspection of other equipment. This procedure may vary, depending on the instructor, pilot or equipment settings. Some pilots have their wing always connected to the harness. However you should have a consistent method of checking and preparing your equipment and doing your pre-flight check.
1. After the arrival on take-off, assess the suitability of flying conditions.
2. While walking around the canopy preparing and spreading out the wing, you should at the same time inspect the canopy.
3. After you check the lines and connect the risers to the harness, grab the lines and slide them through your fingers as you walk towards the canopy. In this way you double check that the lines are not tangled, stuck or damaged. If meanwhile the canopy moves, walk around and correct it again.
4. Inspect the harness, reserve, speed system and all connections.
14
Final preflight check1. Strap into the harness. The leg straps should be the first to be
connected on the take-off and the last ones to be released after the flight. Make sure you are strapped in correctly and wearing a helmet.
2. Check the risers for twists and that the carabiners are properly closed. Check if the speed system is not affecting your risers – accelerating unintentionally.
3. Check the lines. The A riser lines should be on top, and all lines untangled. Check that none of the lines are lying over or below the canopy.
4. Check the canopy. The glider should be spread out in the shape of an arch and all cells open.
5. Check the wind, take-off and airspace. The wind should be favourable for take-off and the pilot’s level of expertise. Airspace should be cleared, together with the take-off area.
Inflation, control, take-offThe Gambit has easy take-off behavior for its class, and does not require any additional advice regarding the forward or reverse launch. Try to divide and practice the take-off procedure in three steps.
1. Inflating and raising the glider2. Controlling the wing and wing check3. Accelerating and take-offIt is always advisable to practice and improve proper launching techniques as this reduces unnecessary additional stress before the take-off.
Wind speeds up to 25 to 30km/h are considered strong and extra care is required for the flight. If you are launching in strong winds we recommend the reverse launch technique, with your brakes in the right hands at all times. Launch the glider with a gentle pull and then walk towards it if necessary to reduce the relative wind force. When the glider is above you, gently control the wing and take off.
Line knots or tanglesIf you fail to observe a line knot or you find yourself flying with a knot before being able to prevent the unintentional, uncontrolled take-off, try to stay away from the ground or other pilots by flying away from the mountain, before taking any corrective action on the wing. This means that you weight shift and/or counter brake the opposite side of the wing and control the flying direction with the least amount of force needed for the wing to fly straight away from the mountain. Be careful not to apply too much brake or to fly too slowly to avoid a stall or spin. When you are at a safe distance away from the mountain and you have gained relative height by flying away, you may want to gently and briefly pull the lines that are tangled with the knot. If the knot is on the brake lines you might want to gently and briefly “pump” the appropriate brake line. Please note that by pulling the lines, the knot may get stuck in a worse position and the situation may escalate also to a stall or spin. Therefore, if you estimate that you can control the wing relatively safely and that the knot is not released by gently and briefly pulling the tangled lines, immediately fly to the landing zone and land safely.
15
Normal flight, best glideWithout any brake applied and without using the accelerator, the wing flies at the so called “trim speed“. In calm air this is theoretically the best glide speed. The best glide speed in real air depends on the glider’s polar and air mass, vertical and horizontal speed. We recommend reading more about the theory of the best glide and McCready theory.
Minimum sinkIf you apply brakes on both sides for about 10 -15 cm you will slow the glider to the theoretical minimum sink speed. But we do not recommend using this speed even for thermalling, as you achieve much better climbing and control by letting the glider fly at “trim speed”. With a proper take-off weight you will find that the glider has great climb, reactions and agility.
Accelerated flightOnce you feel comfortable flying the Gambit, you can start practicing using the speed system, which will provide better performance while gliding against the wind and through a sinking air mass. The Gambit was designed to be stable through its entire speed range, but this requires the use of active flying techniques. Note that any glider becomes less stable while flying accelerated and that the risk of a collapse is higher in accelerated flight. Additionally, the reaction of the glider to a collapse in accelerated flight is more radical in comparison with one which occurs at trim speed.
We recommend that you avoid accelerated flight near the ground and to be very careful using the accelerator in turbulent conditions. Use a soft speed bar, which enables you to accelerate the glider by using only one leg. To control the direction use weight shift. To control the pitch change the amount of the speed bar. Do not use or pull the brakes while using the speed bar. Use the speed bar progressively when accelerating and instantly release when you feel a slight loss of tension, pressure or even a collapse. If you encounter a collapse while using the accelerator, release the speed bar immediately before taking any other corrective action. Always keep more distance to the ground when using the speed bar.
Active flyingThis is a basic flying technique for any pilot. It implies permanent control and the correction of pitch and roll movements together with the prevention of any deflations or collapses. In a nutshell this means flying straight through active or turbulent air, so that the pilot keeps the glider above their head at all times, compensating and correcting any unwanted movements of the wing.
Examples:• While entering a strong thermal, the wing will stay a little bit
behind relative to the pilot. The pilot should let the brakes up allowing the wing to fly faster and to catch up.
• If the wing surges in front of the pilot, the pilot should counter brake until the surge is controlled and then release the brakes to let it fly normally.
• If the pilot feels a loss of tension in the wing or a loss of pressure on the brakes on one side of the wing, they should smoothly apply the brake on the side with loss of pressure and/
16
or weight shift to the opposite side until the pressure returns. After that, again release the brake and/or weight shift to the neutral position and let the glider fly normally.
The key in all cases is to avoid an over-correction and not to maintain any correction longer than necessary. After each action let the glider fly normally again, to re-establish its required flying speed. You can train or get a feeling for most of these movements safely on the ground while ground handling your glider. Good coordination of your movements and coordination with the wing on the ground will enable you a quick progression when actively flying in the air. The next step is to attend SIV courses where you should also get a better understanding of the full brake range and the glider’s speeds.
Flying in turbulenceWing deflations can occur in a strong turbulence. The Gambit is designed and tested within CCC certification rules and needs pilot input for faster rerecover from deflations. To train and understand all the manoeuvres described, attend SIV trainings. Cascade eventsMany reserve deployments are the result of a cascade of over-corrections by the pilot. Over-corrections are usually not problematic because of the input itself or its intensity; but due to the length of time the pilot continues to over-handle. After every input you have to allow the wing to re-establish its normal flying speed. Note that over-corrections are often worse than no input at all.Asymmetric deflationsStrong turbulence may cause the wing to collapse asymmetrically. Before this occurs the brake lines and the feeling of the harness
will transmit a loss of pressure to the pilot. This feedback is used in active piloting to prevent a collapse. Once a collapse has happened, avoid over-braking your wing’s still-open side. This is normally enough to maintain your course and give the glider enough time to recover the collapsed side by itself. To actively reopen the collapsed side after course stabilization, pull the brake line on the collapsed side firmly and release it. You can do this several times with a smooth pumping motion. After the recovery, release the brake lines for your glider to regain its trim speed. You must be aware of the fact that asymmetric collapses are much more radical when flying accelerated. This is due to the difference in weight and the inertia of the canopy and the pilot hanging below.
Symmetric deflationsSymmetric or frontal deflations will normally reopen immediately by themselves without pilot’s input. The glider will then regain its airspeed accompanied by a small surge forwards. To actively control this event, apply both brakes slightly when the collapse occurs and then instantly release the brakes to let the glider fly. Be prepared to compensate for the glider’s slight surge forward while returning to normal flying.
Wing tangle, cravatA cravat may occur after a severe deflation or in a cascading situation, when the wing tip gets caught in the glider’s lines. A pilot should be familiar with the procedure of handling this situation with any glider. If a cravat occurs, the first thing to do is to try to keep the glider flying on a straight course. Do this by weight shifting and counter braking the open side. If normal corrective action is not effective, a brief full stall will generally solve the problem,

17
provided you have sufficient altitude.If you are in a situation where you have a cravat and you are low, in rotation or even with twisted risers, then the only solution is the reserve parachute.
Negative spinIn normal flight you are far from negative spin. But, certain circumstances may lead to it. Should this occur, just release the brake lines progressively and let the wing regain its flying speed. Be prepared for the glider to surge forward, compensating the surge with brake input if necessary.
Full stallA full stall does not occur unintentionally – it happens if you pull both brakes for 100% and hold them. The wing then performs a so called full stall. Releasing the brakes improperly may lead to massive surge of the glider with danger of falling into the canopy. This is a complex manoeuvre and as such outside the scope of this manual. You should practice and learn this manoeuvre only on a SIV course under professional supervision.
Deep stallGenerally when in deep stall, the wing has no forward motion and at the same time high sink speed. When in deep stall the wing is almost fully inflated. With the Gambit it is very unlikely to get into this situation unintentionally. This could possibly happen if you are flying at a very low speed in turbulent conditions. Also the porosity of the material and line stretch on a very old glider can increase the possibility of the deep stall tendency. If you trained this manoeuvre on a SIV course you would realize that it is very
hard to keep the Gambit in deep stall. If you apply the brakes a little bit too much you enter the full stall. If you release the brakes just a little bit too much the wing returns to normal flight. If you want to practice the deep stall on SIV courses, you need to master the full stall first.
Fast decent techniquesSpiral diveThe spiral dive is the only effective way to lose altitude quickly. It should be done in combination with a small drogue chute attached to one main karabiner, and should only be trained gradually and always at high altitude. The spiral dive should be practiced and learned on a SIV course under professional supervision. To enter the spiral, deploy the drogue chute, weight shift to the desired side and gradually apply the brake on the same side. Then let the wing accelerate for two turns and you will enter the spiral dive.
While in the spiral, you can control your descent rate and bank angle by applying more or less inner brake. Depending on how steep the spiral is you may need to use also outer brake. To exit the spiral dive we recommend that the pilot is in the neutral weight shift position. If you release the inner brake, the wing exits the spiral dive by itself.
18
Winch launchThe Gambit is easy to launch using a winch and has no special characteristics considering this kind of launching. To practice this launching technique special training is needed and you have to be aware of the procedures and dangers, which are specific for winching. We do not recommend using any special towing device which accelerates the glider during the winch launch.
Aerobatics The Gambit was not designed for aerobatics, therefore, these may not be performed and shoud be avoided, also increased stress will have influence in logh term glider prerformance on this glider. In addition to this, any extreme manoeuvres place unnecessary stress on the glider and shorten its lifespan.
Primary controls failureIf for any reason you cannot use the brake lines, you have to pilot the wing to the landing place by using the B risers and weight shift. Weight shift should be enough to safely land the glider. Be careful not to over-handle the glider when using the B riser technique when steering. By pulling the B risers too far you may cause a stall or a spin. Land your glider at trim speed without using the B risers, to avoid over-handling the glider low above ground. We recommend using weight shift.
LandingSimilarly to the take-off, the Gambit landing characteristics are easy. In turbulent conditions it is advisable to apply about 15% of brakes, to increase stability and the feeling of the glider. Before landing, adopt the standing position as this is the most effective and the safest way to compensate the touch down with your legs. Always look for possible landing alternatives downwind.
19
MaintenanceGeneral adviceCareful maintenance of your glider and the following simple guidelines will ensure a much longer airworthiness and performance of your wing:• Pack your glider after you land and do not unnecessarily
expose it to UV radiation by leaving it on the landing site unpacked. The sun’s UV radiation degrades the cloth and lines material.
• Fold your glider like recommended under the section “Packing instructions”.
• If the glider is damp or wet when you pack it, partially unfold it at home to allow it to dry. Do not dry it in direct sunlight.
• Avoid exposing the glider to violent shocks, such as the leading edge hitting the ground.
• Avoid dragging the glider on the ground or through rocky terrain as you might damage the lines or canopy.
• Avoid stepping on the lines or canopy, especially when they are lying on a hard surface.
• Avoid exposing the glider to salt water, as it damages the lines and the canopy material (wash with fresh water).
• Avoid bending your lines, especially in a small radius.• Avoid opening your glider in strong winds without first
untangling the lines.• In general, avoid exposing your glider to very hot or humid
environments, UV radiation or chemicals.
Packing instructionsIt is important to correctly pack your glider as this prolongs its lifespan. We recommend that you fold the glider like a harmonica, neatly aligning the cell walls with the leading edge reinforcements side by side. The wing should then be folded in two parts or one folds. The wing should be packed as loosely as possible. While packing, be careful not to trap any grasshoppers inside your canopy as they will tear the canopy cloth. Adhering to these simple rules will make your glider last longer and ensure its best performance.
StorageCorrectly packed, store your glider in a dry place at room temperature. The glider should not be stored damp, wet, sandy, salty or with objects inside the cells of the glider. Keep your equipment away from any chemicals.
CleaningIf necessary always clean your glider with fresh water and a cloth only, without using any cleaning chemicals. This applies to both lines and canopy. More importantly, always remove any stones or sand from the canopy as they will gradually damage the material and reduce the glider’s lifespan.
RepairTo repair small damages (less than 5cm) on the canopy cloth, you can use rip stop tape. Greater damages, including stitches
20
and lines, must be repaired by a specialized repair shop. When replacing a line it should always be compared with the counterpart for adjusting the appropriate length. After the line was repaired, the wing should be inflated before flying, to ensure that everything was done correctly. Major repairs, such as replacing panels, should only be carried out by a Triple Seven distributor or Triple Seven. If you are unsure about the damage or in any doubt please contact Triple Seven.
Checks and controlTo ensure the wing’s airworthiness the Gambit has to be periodically serviced and checked to guarantee that the glider continues to fulfil the EN certification results and to extend your glider’s lifespan. We recommend a line check and trim inspection every 100 hours or 12 months depending what happens first. After that, the glider needs to be fully checked after 150 hours or 24 months of usage, whichever comes earlier. This inspection includes checGambit the suspension lines, line geometry, riser geometry and the permeability of the canopy material. A certified inspector can then define the check interval depending on the glider’s condition. Please note that the condition of the glider can vary considerably depending on the type of usage and environment. Salty coastal air or dunes will considerably affect your wing’s material. For more information please visit our website. iuolulouoll
21
22
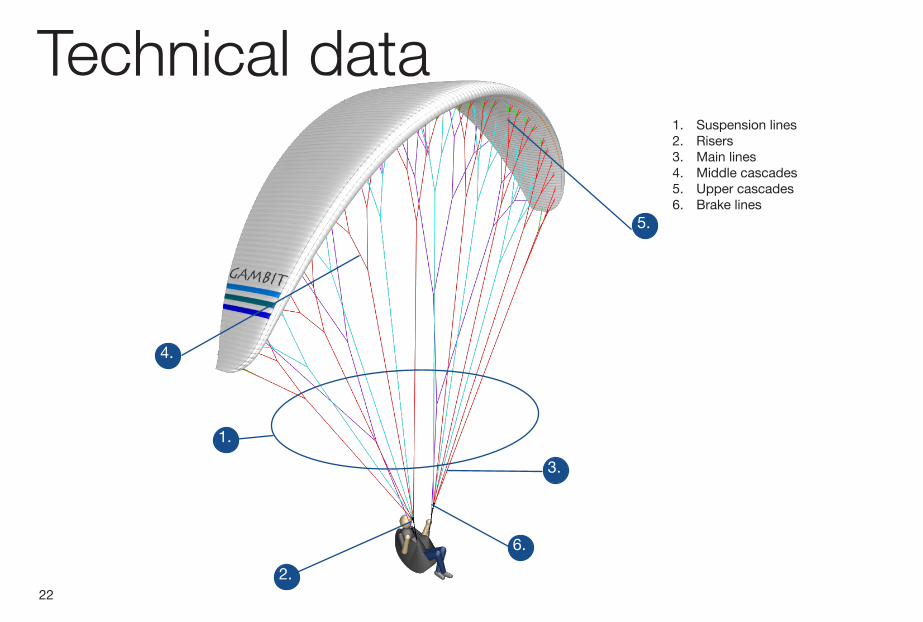
Technical data1. Suspension lines2. Risers3. Main lines4. Middle cascades5. Upper cascades6. Brake lines
1.
2.
3.
6.
4.
5.

23
1. Canopy2. Bottom surface3. Top surface4. Leading edge5. Trailing edge6. Intake cell openings
3.
2.
5.
4.
1.
6.
24
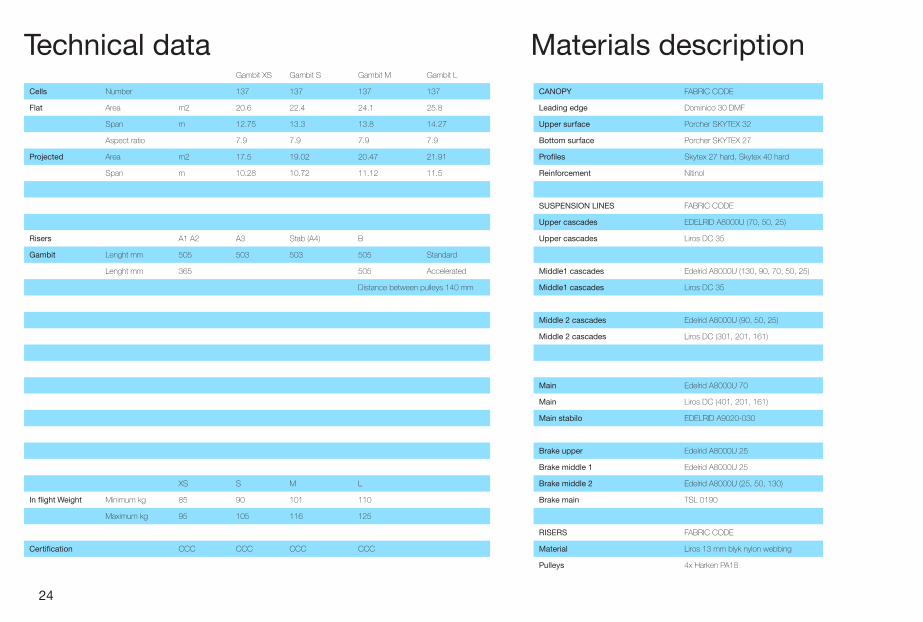
Technical data Materials description Gambit XS Gambit S Gambit M Gambit L
Cells Number 137 137 137 137
Flat Area m2 20.6 22.4 24.1 25.8
Span m 12.75 13.3 13.8 14.27
Aspect ratio 7.9 7.9 7.9 7.9
Projected Area m2 17.5 19.02 20.47 21.91
Span m 10.28 10.72 11.12 11.5
Risers A1 A2 A3 Stab (A4) B
Gambit Lenght mm 505 503 503 505 Standard
Lenght mm 365 505 Accelerated
Distance between pulleys 140 mm
XS S M L
In flight Weight Minimum kg 85 90 101 110
Maximum kg 95 105 116 125
Certification CCC CCC CCC CCC
CANOPY FABRIC CODE
Leading edge Dominico 30 DMF
Upper surface Porcher SKYTEX 32
Bottom surface Porcher SKYTEX 27
Profiles Skytex 27 hard, Skytex 40 hard
Reinforcement Nitinol
SUSPENSION LINES FABRIC CODE
Upper cascades EDELRID A8000U (70, 50, 25)
Upper cascades Liros DC 35
Middle1 cascades Edelrid A8000U (130, 90, 70, 50, 25)
Middle1 cascades Liros DC 35
Middle 2 cascades Edelrid A8000U (90, 50, 25)
Middle 2 cascades Liros DC (301, 201, 161)
Main Edelrid A8000U 70
Main Liros DC (401, 201, 161)
Main stabilo EDELRID A9020-030
Brake upper Edelrid A8000U 25
Brake middle 1 Edelrid A8000U 25
Brake middle 2 Edelrid A8000U (25, 50, 130)
Brake main TSL 0190
RISERS FABRIC CODE
Material Liros 13 mm blyk nylon webbing
Pulleys 4x Harken PA18
25
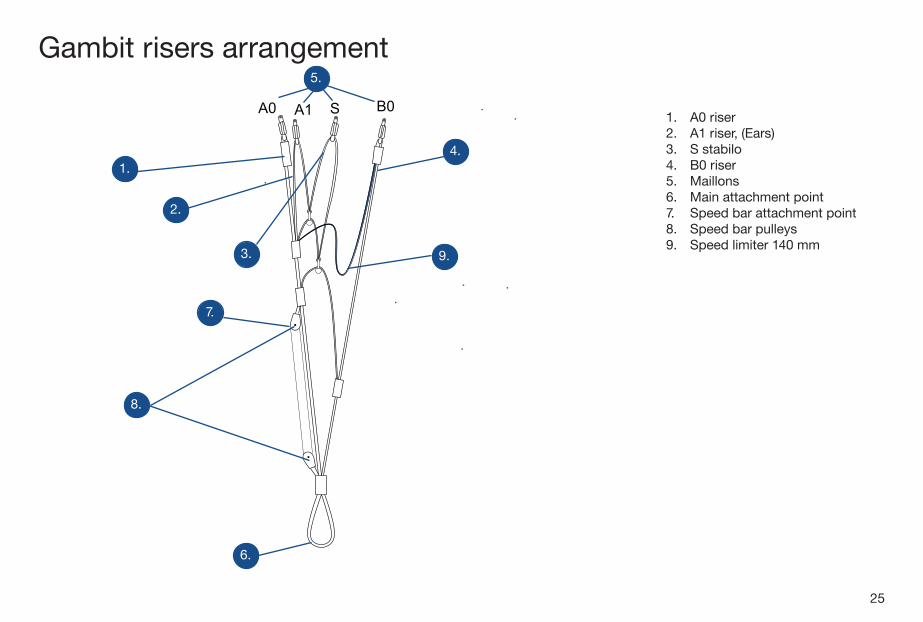
Gambit risers arrangement
1. A0 riser2. A1 riser, (Ears)3. S stabilo4. B0 riser 5. Maillons6. Main attachment point7. Speed bar attachment point8. Speed bar pulleys 9. Speed limiter 140 mm
3.
2.
6.
7.
1.
5.
8.
4.
9.
CANOPY FABRIC CODE
Leading edge Dominico 30 DMF
Upper surface Porcher SKYTEX 32
Bottom surface Porcher SKYTEX 27
Profiles Skytex 27 hard, Skytex 40 hard
Reinforcement Nitinol
SUSPENSION LINES FABRIC CODE
Upper cascades EDELRID A8000U (70, 50, 25)
Upper cascades Liros DC 35
Middle1 cascades Edelrid A8000U (130, 90, 70, 50, 25)
Middle1 cascades Liros DC 35
Middle 2 cascades Edelrid A8000U (90, 50, 25)
Middle 2 cascades Liros DC (301, 201, 161)
Main Edelrid A8000U 70
Main Liros DC (401, 201, 161)
Main stabilo EDELRID A9020-030
Brake upper Edelrid A8000U 25
Brake middle 1 Edelrid A8000U 25
Brake middle 2 Edelrid A8000U (25, 50, 130)
Brake main TSL 0190
RISERS FABRIC CODE
Material Liros 13 mm blyk nylon webbing
Pulleys 4x Harken PA18
7069
6867
6665
646362616059585756555453
52
51
50
49
48
47
46
45
4443
4241
4039
3837
3635
3433
3231
3029
2827
2625
2423
2221
2019
1817
1615 14 13 12 11 10 9 8 7 6 5 4 3 2 1
a30
b22
a29
b21
br12
a28
c24
a27
c23
br11
a26
a25
c22c21
br10
a24a23
c20
br9
a22
c19
a21
c18
a20
b20
br8
a19
b19
c17
a18
b18
a17
b17
c16
br7
c15
a16
b16
a15
b15
c14
br6
c13
a14
b14
a13
b13
c12c11
br5
a12
b12
a11
b11
c10c9
a10
b10
br4
a9
b9
c8c7
a8
b8
br3
a7
b7
c6
a6
b6
c5
a5
b5
br2
c4
d4
a4
b4
c3
d3
a3
b3
br1
a2
b2
c2
d2
a1
b1
c1
d1
C1
2c1
1c1 1c2
1d1
1d2
2c2
1c3 1c4
A1
2a2
1a3 1a4
2a1
1a21a
1
A3
2a6
1a11 1
a12
2a5
1a9
1a10
A4
1s1
s2
s1
2a7
1a13 1
a14
br mainbr
main
1
3br2
1br5
1br6
3br12br2
1br41br3
2br11br21br1
C3
2c51c101c92c6
1c11 1c12
C2
2c4
1c81c7
2c3
1c5 1c6
A2
2a4
1a7 1
a8
2a3
1a5 1
a6
26
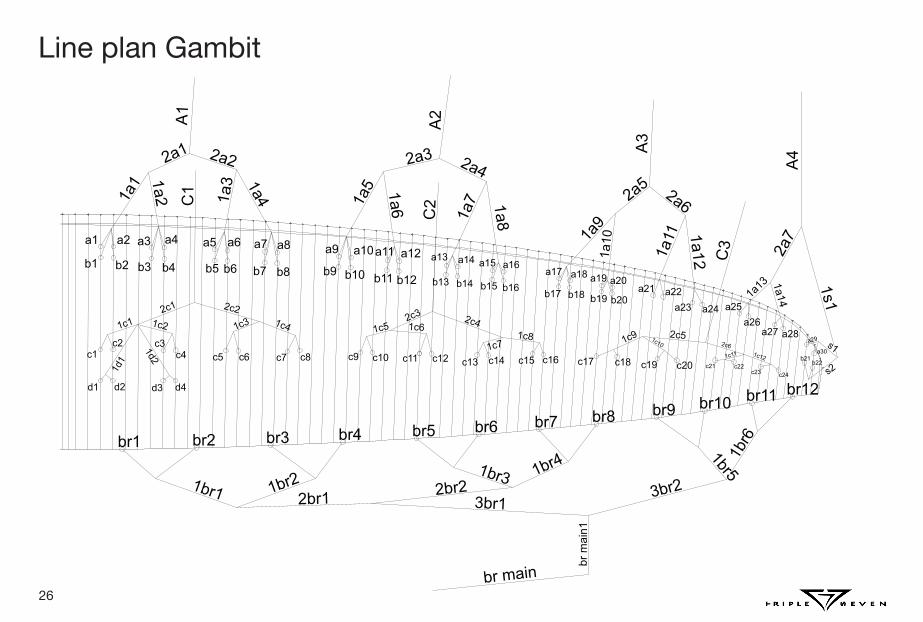
Line plan Gambit
27
28
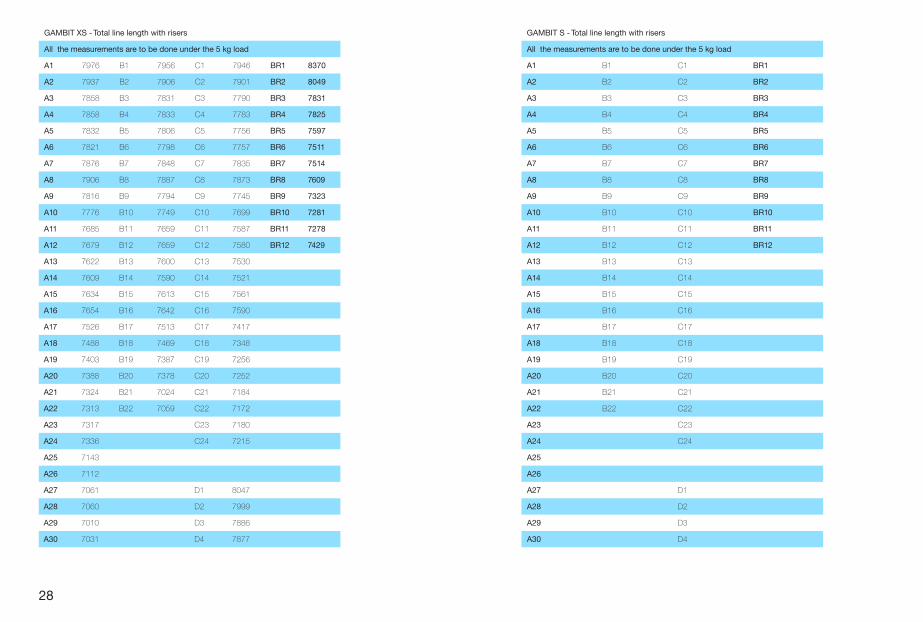
GAMBIT XS - Total line length with risers
All the measurements are to be done under the 5 kg load
A1 7976 B1 7956 C1 7946 BR1 8370
A2 7937 B2 7906 C2 7901 BR2 8049
A3 7858 B3 7831 C3 7790 BR3 7831
A4 7858 B4 7833 C4 7783 BR4 7825
A5 7832 B5 7806 C5 7756 BR5 7597
A6 7821 B6 7798 C6 7757 BR6 7511
A7 7876 B7 7848 C7 7835 BR7 7514
A8 7906 B8 7887 C8 7873 BR8 7609
A9 7816 B9 7794 C9 7745 BR9 7323
A10 7776 B10 7749 C10 7699 BR10 7281
A11 7685 B11 7659 C11 7587 BR11 7278
A12 7679 B12 7659 C12 7580 BR12 7429
A13 7622 B13 7600 C13 7530
A14 7609 B14 7590 C14 7521
A15 7634 B15 7613 C15 7561
A16 7654 B16 7642 C16 7590
A17 7526 B17 7513 C17 7417
A18 7488 B18 7469 C18 7348
A19 7403 B19 7387 C19 7256
A20 7388 B20 7378 C20 7252
A21 7324 B21 7024 C21 7184
A22 7313 B22 7059 C22 7172
A23 7317 C23 7180
A24 7336 C24 7215
A25 7143
A26 7112
A27 7061 D1 8047
A28 7060 D2 7999
A29 7010 D3 7886
A30 7031 D4 7877
GAMBIT S - Total line length with risers
All the measurements are to be done under the 5 kg load
A1 B1 C1 BR1
A2 B2 C2 BR2
A3 B3 C3 BR3
A4 B4 C4 BR4
A5 B5 C5 BR5
A6 B6 C6 BR6
A7 B7 C7 BR7
A8 B8 C8 BR8
A9 B9 C9 BR9
A10 B10 C10 BR10
A11 B11 C11 BR11
A12 B12 C12 BR12
A13 B13 C13
A14 B14 C14
A15 B15 C15
A16 B16 C16
A17 B17 C17
A18 B18 C18
A19 B19 C19
A20 B20 C20
A21 B21 C21
A22 B22 C22
A23 C23
A24 C24
A25
A26
A27 D1
A28 D2
A29 D3
A30 D4
29
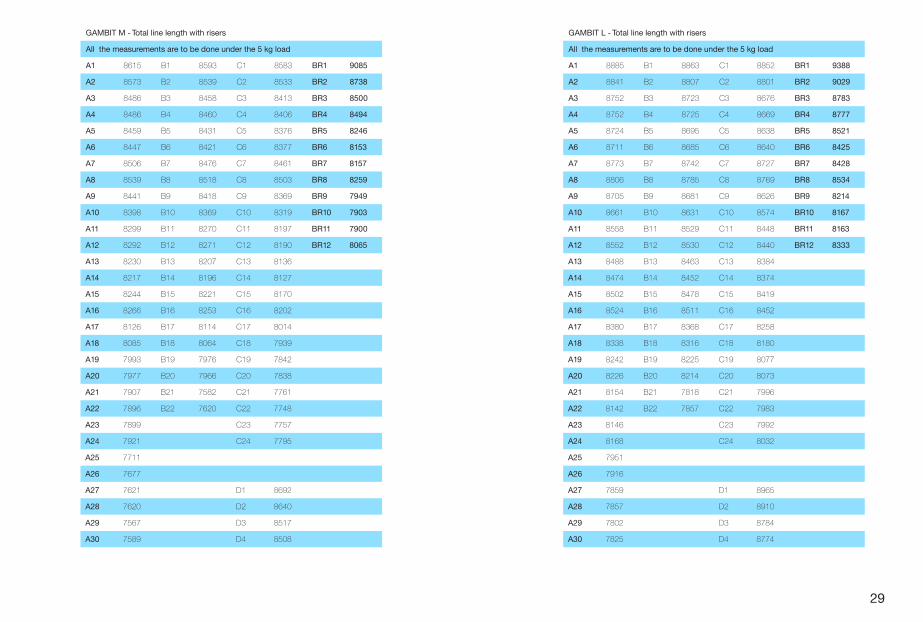
GAMBIT M - Total line length with risers
All the measurements are to be done under the 5 kg load
A1 8615 B1 8593 C1 8583 BR1 9085
A2 8573 B2 8539 C2 8533 BR2 8738
A3 8486 B3 8458 C3 8413 BR3 8500
A4 8486 B4 8460 C4 8406 BR4 8494
A5 8459 B5 8431 C5 8376 BR5 8246
A6 8447 B6 8421 C6 8377 BR6 8153
A7 8506 B7 8476 C7 8461 BR7 8157
A8 8539 B8 8518 C8 8503 BR8 8259
A9 8441 B9 8418 C9 8369 BR9 7949
A10 8398 B10 8369 C10 8319 BR10 7903
A11 8299 B11 8270 C11 8197 BR11 7900
A12 8292 B12 8271 C12 8190 BR12 8065
A13 8230 B13 8207 C13 8136
A14 8217 B14 8196 C14 8127
A15 8244 B15 8221 C15 8170
A16 8266 B16 8253 C16 8202
A17 8126 B17 8114 C17 8014
A18 8085 B18 8064 C18 7939
A19 7993 B19 7976 C19 7842
A20 7977 B20 7966 C20 7838
A21 7907 B21 7582 C21 7761
A22 7896 B22 7620 C22 7748
A23 7899 C23 7757
A24 7921 C24 7795
A25 7711
A26 7677
A27 7621 D1 8692
A28 7620 D2 8640
A29 7567 D3 8517
A30 7589 D4 8508
GAMBIT L - Total line length with risers
All the measurements are to be done under the 5 kg load
A1 8885 B1 8863 C1 8852 BR1 9388
A2 8841 B2 8807 C2 8801 BR2 9029
A3 8752 B3 8723 C3 8676 BR3 8783
A4 8752 B4 8725 C4 8669 BR4 8777
A5 8724 B5 8695 C5 8638 BR5 8521
A6 8711 B6 8685 C6 8640 BR6 8425
A7 8773 B7 8742 C7 8727 BR7 8428
A8 8806 B8 8785 C8 8769 BR8 8534
A9 8705 B9 8681 C9 8626 BR9 8214
A10 8661 B10 8631 C10 8574 BR10 8167
A11 8558 B11 8529 C11 8448 BR11 8163
A12 8552 B12 8530 C12 8440 BR12 8333
A13 8488 B13 8463 C13 8384
A14 8474 B14 8452 C14 8374
A15 8502 B15 8478 C15 8419
A16 8524 B16 8511 C16 8452
A17 8380 B17 8368 C17 8258
A18 8338 B18 8316 C18 8180
A19 8242 B19 8225 C19 8077
A20 8226 B20 8214 C20 8073
A21 8154 B21 7818 C21 7996
A22 8142 B22 7857 C22 7983
A23 8146 C23 7992
A24 8168 C24 8032
A25 7951
A26 7916
A27 7859 D1 8965
A28 7857 D2 8910
A29 7802 D3 8784
A30 7825 D4 8774
30
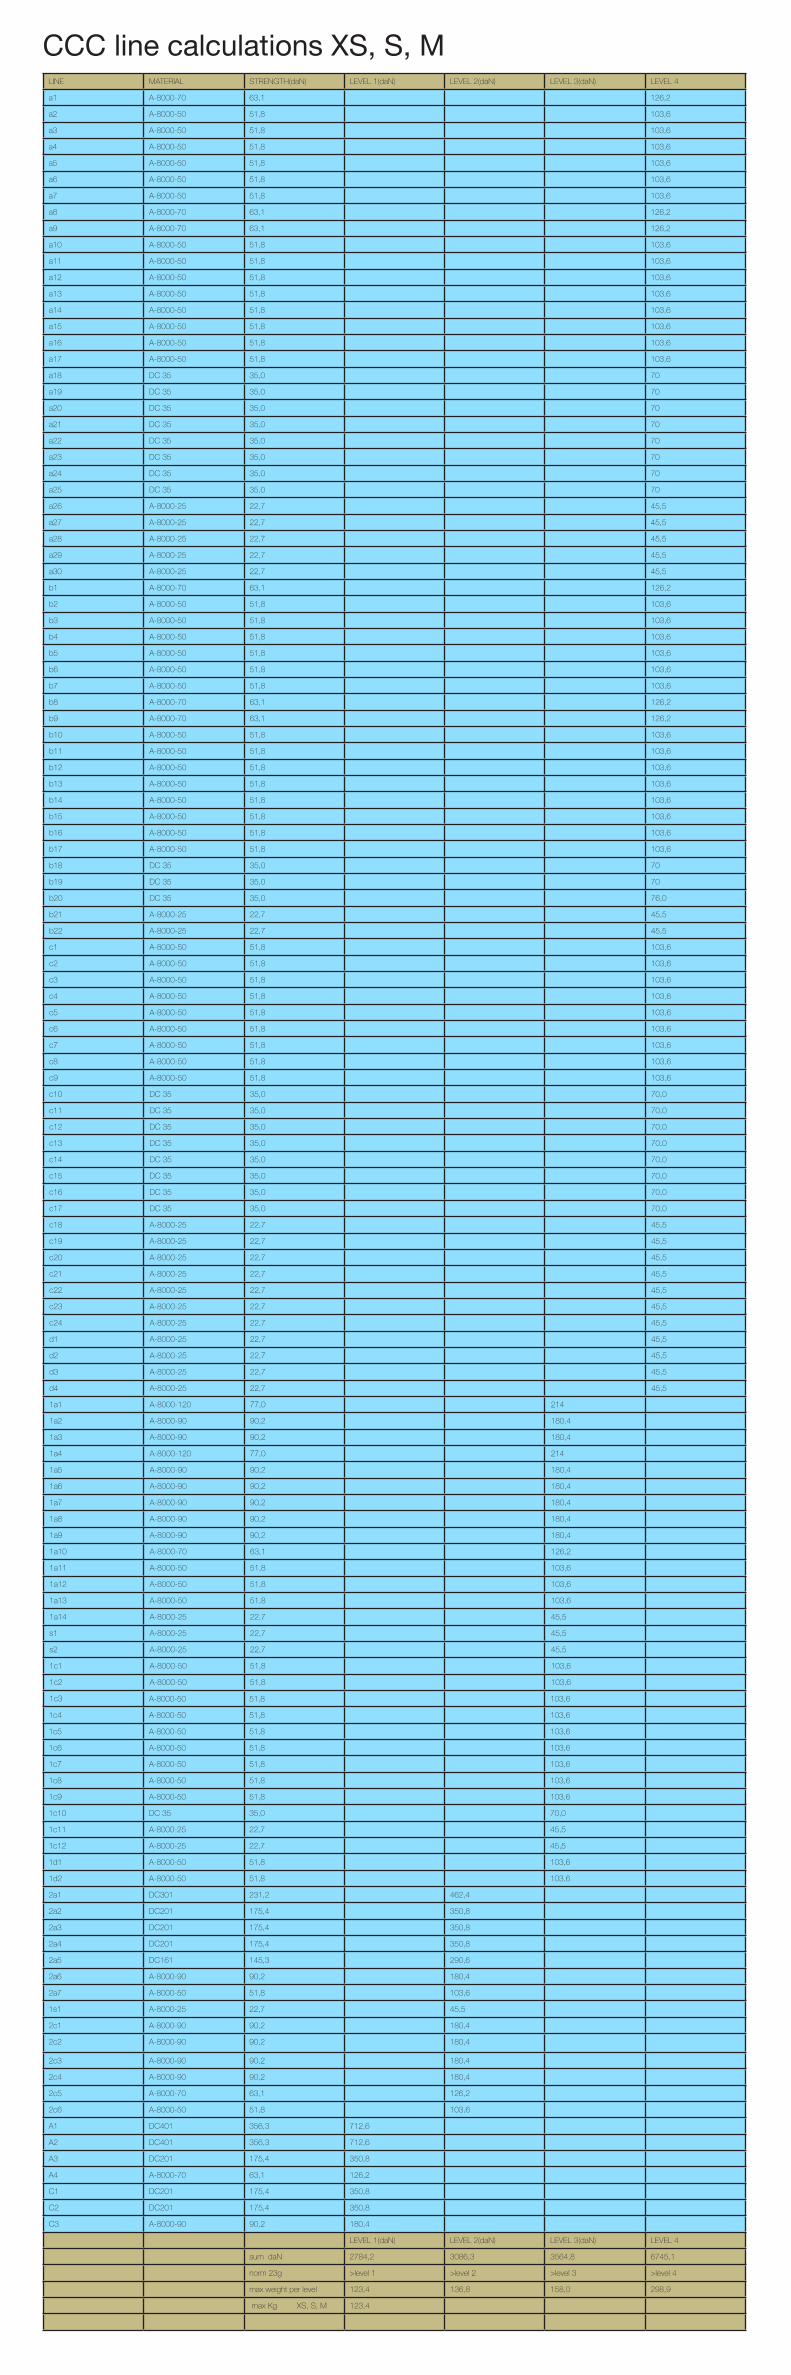
LINE MATERIAL STRENGTH(daN) LEVEL 1(daN) LEVEL 2(daN) LEVEL 3(daN) LEVEL 4
a1 A-8000-70 63,1 126,2
a2 A-8000-50 51,8 103,6
a3 A-8000-50 51,8 103,6
a4 A-8000-50 51,8 103,6
a5 A-8000-50 51,8 103,6
a6 A-8000-50 51,8 103,6
a7 A-8000-50 51,8 103,6
a8 A-8000-70 63,1 126,2
a9 A-8000-70 63,1 126,2
a10 A-8000-50 51,8 103,6
a11 A-8000-50 51,8 103,6
a12 A-8000-50 51,8 103,6
a13 A-8000-50 51,8 103,6
a14 A-8000-50 51,8 103,6
a15 A-8000-50 51,8 103,6
a16 A-8000-50 51,8 103,6
a17 A-8000-50 51,8 103,6
a18 DC 35 35,0 70
a19 DC 35 35,0 70
a20 DC 35 35,0 70
a21 DC 35 35,0 70
a22 DC 35 35,0 70
a23 DC 35 35,0 70
a24 DC 35 35,0 70
a25 DC 35 35,0 70
a26 A-8000-25 22,7 45,5
a27 A-8000-25 22,7 45,5
a28 A-8000-25 22,7 45,5
a29 A-8000-25 22,7 45,5
a30 A-8000-25 22,7 45,5
b1 A-8000-70 63,1 126,2
b2 A-8000-50 51,8 103,6
b3 A-8000-50 51,8 103,6
b4 A-8000-50 51,8 103,6
b5 A-8000-50 51,8 103,6
b6 A-8000-50 51,8 103,6
b7 A-8000-50 51,8 103,6
b8 A-8000-70 63,1 126,2
b9 A-8000-70 63,1 126,2
b10 A-8000-50 51,8 103,6
b11 A-8000-50 51,8 103,6
b12 A-8000-50 51,8 103,6
b13 A-8000-50 51,8 103,6
b14 A-8000-50 51,8 103,6
b15 A-8000-50 51,8 103,6
b16 A-8000-50 51,8 103,6
b17 A-8000-50 51,8 103,6
b18 DC 35 35,0 70
b19 DC 35 35,0 70
b20 DC 35 35,0 76,0
b21 A-8000-25 22,7 45,5
b22 A-8000-25 22,7 45,5
c1 A-8000-50 51,8 103,6
c2 A-8000-50 51,8 103,6
c3 A-8000-50 51,8 103,6
c4 A-8000-50 51,8 103,6
c5 A-8000-50 51,8 103,6
c6 A-8000-50 51,8 103,6
c7 A-8000-50 51,8 103,6
c8 A-8000-50 51,8 103,6
c9 A-8000-50 51,8 103,6
c10 DC 35 35,0 70,0
c11 DC 35 35,0 70,0
c12 DC 35 35,0 70,0
c13 DC 35 35,0 70,0
c14 DC 35 35,0 70,0
c15 DC 35 35,0 70,0
c16 DC 35 35,0 70,0
c17 DC 35 35,0 70,0
c18 A-8000-25 22,7 45,5
c19 A-8000-25 22,7 45,5
c20 A-8000-25 22,7 45,5
c21 A-8000-25 22,7 45,5
c22 A-8000-25 22,7 45,5
c23 A-8000-25 22,7 45,5
c24 A-8000-25 22,7 45,5
d1 A-8000-25 22,7 45,5
d2 A-8000-25 22,7 45,5
d3 A-8000-25 22,7 45,5
d4 A-8000-25 22,7 45,5
1a1 A-8000-120 77,0 214
1a2 A-8000-90 90,2 180,4
1a3 A-8000-90 90,2 180,4
1a4 A-8000-120 77,0 214
1a5 A-8000-90 90,2 180,4
1a6 A-8000-90 90,2 180,4
1a7 A-8000-90 90,2 180,4
1a8 A-8000-90 90,2 180,4
1a9 A-8000-90 90,2 180,4
1a10 A-8000-70 63,1 126,2
1a11 A-8000-50 51,8 103,6
1a12 A-8000-50 51,8 103,6
1a13 A-8000-50 51,8 103,6
1a14 A-8000-25 22,7 45,5
s1 A-8000-25 22,7 45,5
s2 A-8000-25 22,7 45,5
1c1 A-8000-50 51,8 103,6
1c2 A-8000-50 51,8 103,6
1c3 A-8000-50 51,8 103,6
1c4 A-8000-50 51,8 103,6
1c5 A-8000-50 51,8 103,6
1c6 A-8000-50 51,8 103,6
1c7 A-8000-50 51,8 103,6
1c8 A-8000-50 51,8 103,6
1c9 A-8000-50 51,8 103,6
1c10 DC 35 35,0 70,0
1c11 A-8000-25 22,7 45,5
1c12 A-8000-25 22,7 45,5
1d1 A-8000-50 51,8 103,6
1d2 A-8000-50 51,8 103,6
2a1 DC301 231,2 462,4
2a2 DC201 175,4 350,8
2a3 DC201 175,4 350,8
2a4 DC201 175,4 350,8
2a5 DC161 145,3 290,6
2a6 A-8000-90 90,2 180,4
2a7 A-8000-50 51,8 103,6
1s1 A-8000-25 22,7 45,5
2c1 A-8000-90 90,2 180,4
2c2 A-8000-90 90,2 180,4
2c3 A-8000-90 90,2 180,4
2c4 A-8000-90 90,2 180,4
2c5 A-8000-70 63,1 126,2
2c6 A-8000-50 51,8 103,6
A1 DC401 356,3 712,6
A2 DC401 356,3 712,6
A3 DC201 175,4 350,8
A4 A-8000-70 63,1 126,2
C1 DC201 175,4 350,8
C2 DC201 175,4 350,8
C3 A-8000-90 90,2 180,4
LEVEL 1(daN) LEVEL 2(daN) LEVEL 3(daN) LEVEL 4
sum daN 2784,2 3086,3 3564,8 6745,1
norm 23g >level 1 >level 2 >level 3 >level 4
max weight per level 123,4 136,8 158,0 298,9
max Kg XS, S, M 123,4
CCC line calculations XS, S, M
31
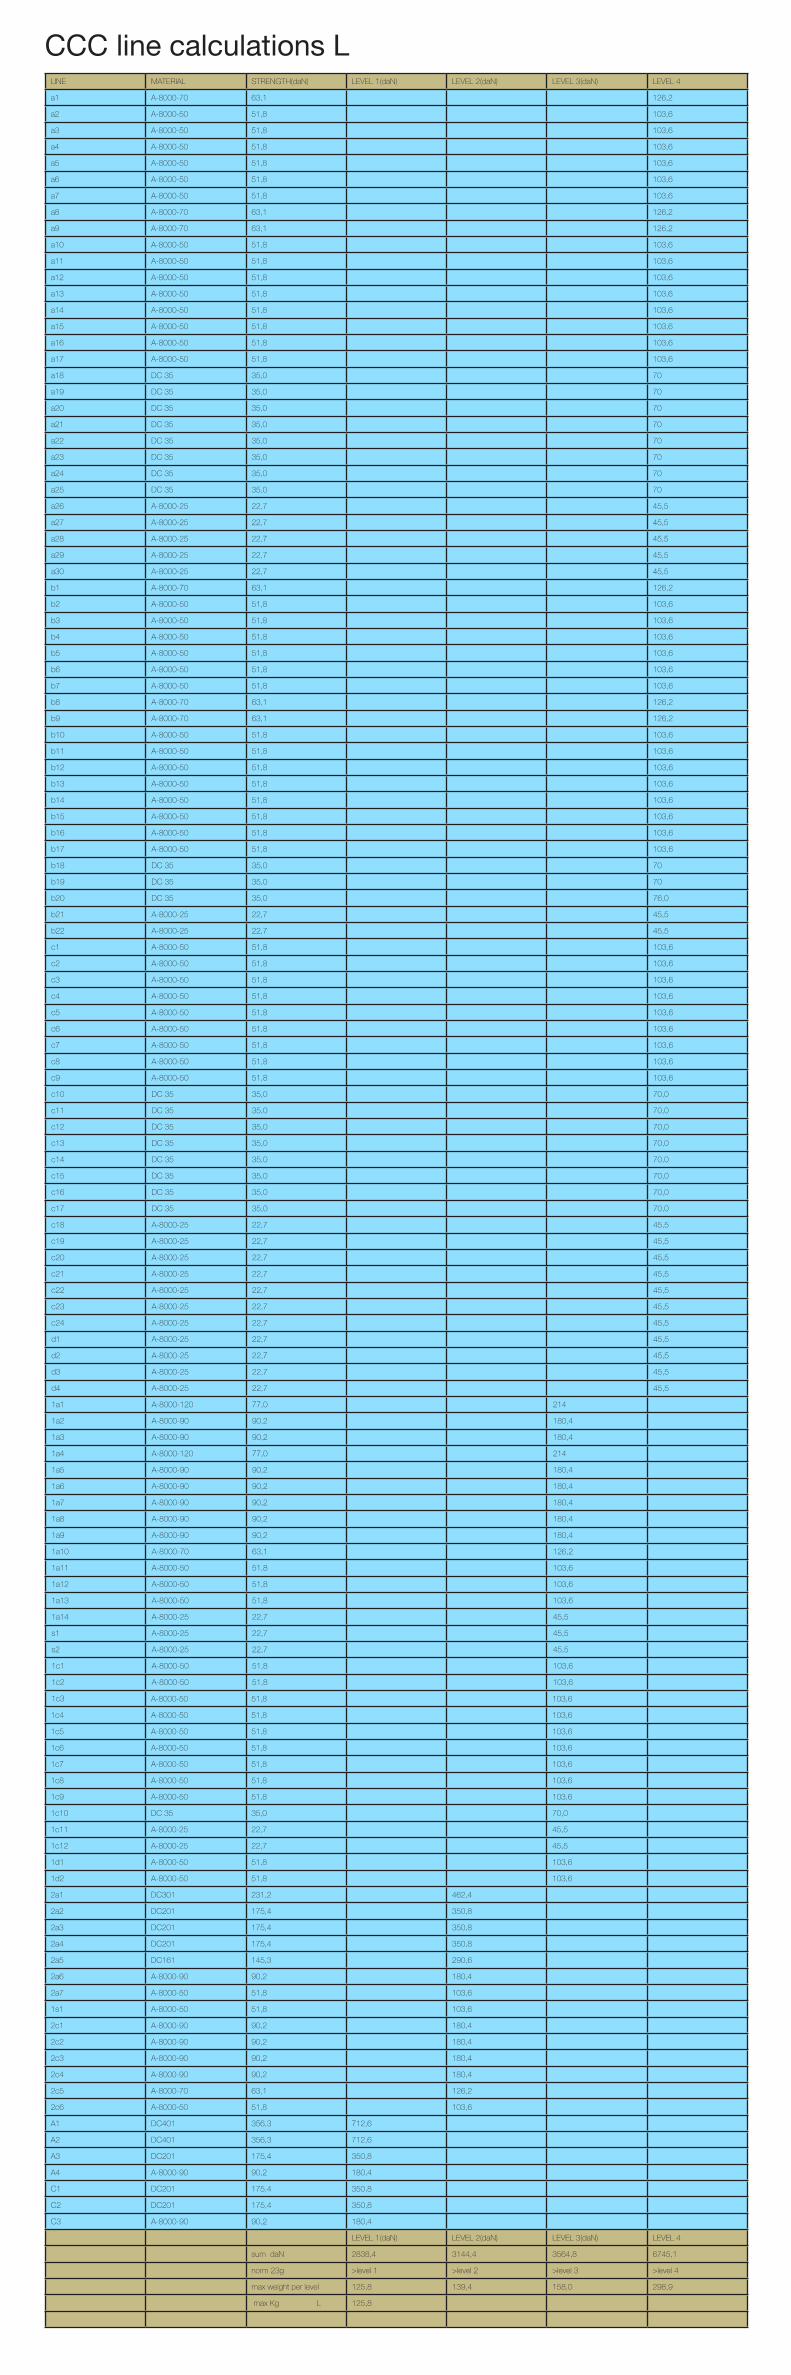
LINE MATERIAL STRENGTH(daN) LEVEL 1(daN) LEVEL 2(daN) LEVEL 3(daN) LEVEL 4
a1 A-8000-70 63,1 126,2
a2 A-8000-50 51,8 103,6
a3 A-8000-50 51,8 103,6
a4 A-8000-50 51,8 103,6
a5 A-8000-50 51,8 103,6
a6 A-8000-50 51,8 103,6
a7 A-8000-50 51,8 103,6
a8 A-8000-70 63,1 126,2
a9 A-8000-70 63,1 126,2
a10 A-8000-50 51,8 103,6
a11 A-8000-50 51,8 103,6
a12 A-8000-50 51,8 103,6
a13 A-8000-50 51,8 103,6
a14 A-8000-50 51,8 103,6
a15 A-8000-50 51,8 103,6
a16 A-8000-50 51,8 103,6
a17 A-8000-50 51,8 103,6
a18 DC 35 35,0 70
a19 DC 35 35,0 70
a20 DC 35 35,0 70
a21 DC 35 35,0 70
a22 DC 35 35,0 70
a23 DC 35 35,0 70
a24 DC 35 35,0 70
a25 DC 35 35,0 70
a26 A-8000-25 22,7 45,5
a27 A-8000-25 22,7 45,5
a28 A-8000-25 22,7 45,5
a29 A-8000-25 22,7 45,5
a30 A-8000-25 22,7 45,5
b1 A-8000-70 63,1 126,2
b2 A-8000-50 51,8 103,6
b3 A-8000-50 51,8 103,6
b4 A-8000-50 51,8 103,6
b5 A-8000-50 51,8 103,6
b6 A-8000-50 51,8 103,6
b7 A-8000-50 51,8 103,6
b8 A-8000-70 63,1 126,2
b9 A-8000-70 63,1 126,2
b10 A-8000-50 51,8 103,6
b11 A-8000-50 51,8 103,6
b12 A-8000-50 51,8 103,6
b13 A-8000-50 51,8 103,6
b14 A-8000-50 51,8 103,6
b15 A-8000-50 51,8 103,6
b16 A-8000-50 51,8 103,6
b17 A-8000-50 51,8 103,6
b18 DC 35 35,0 70
b19 DC 35 35,0 70
b20 DC 35 35,0 76,0
b21 A-8000-25 22,7 45,5
b22 A-8000-25 22,7 45,5
c1 A-8000-50 51,8 103,6
c2 A-8000-50 51,8 103,6
c3 A-8000-50 51,8 103,6
c4 A-8000-50 51,8 103,6
c5 A-8000-50 51,8 103,6
c6 A-8000-50 51,8 103,6
c7 A-8000-50 51,8 103,6
c8 A-8000-50 51,8 103,6
c9 A-8000-50 51,8 103,6
c10 DC 35 35,0 70,0
c11 DC 35 35,0 70,0
c12 DC 35 35,0 70,0
c13 DC 35 35,0 70,0
c14 DC 35 35,0 70,0
c15 DC 35 35,0 70,0
c16 DC 35 35,0 70,0
c17 DC 35 35,0 70,0
c18 A-8000-25 22,7 45,5
c19 A-8000-25 22,7 45,5
c20 A-8000-25 22,7 45,5
c21 A-8000-25 22,7 45,5
c22 A-8000-25 22,7 45,5
c23 A-8000-25 22,7 45,5
c24 A-8000-25 22,7 45,5
d1 A-8000-25 22,7 45,5
d2 A-8000-25 22,7 45,5
d3 A-8000-25 22,7 45,5
d4 A-8000-25 22,7 45,5
1a1 A-8000-120 77,0 214
1a2 A-8000-90 90,2 180,4
1a3 A-8000-90 90,2 180,4
1a4 A-8000-120 77,0 214
1a5 A-8000-90 90,2 180,4
1a6 A-8000-90 90,2 180,4
1a7 A-8000-90 90,2 180,4
1a8 A-8000-90 90,2 180,4
1a9 A-8000-90 90,2 180,4
1a10 A-8000-70 63,1 126,2
1a11 A-8000-50 51,8 103,6
1a12 A-8000-50 51,8 103,6
1a13 A-8000-50 51,8 103,6
1a14 A-8000-25 22,7 45,5
s1 A-8000-25 22,7 45,5
s2 A-8000-25 22,7 45,5
1c1 A-8000-50 51,8 103,6
1c2 A-8000-50 51,8 103,6
1c3 A-8000-50 51,8 103,6
1c4 A-8000-50 51,8 103,6
1c5 A-8000-50 51,8 103,6
1c6 A-8000-50 51,8 103,6
1c7 A-8000-50 51,8 103,6
1c8 A-8000-50 51,8 103,6
1c9 A-8000-50 51,8 103,6
1c10 DC 35 35,0 70,0
1c11 A-8000-25 22,7 45,5
1c12 A-8000-25 22,7 45,5
1d1 A-8000-50 51,8 103,6
1d2 A-8000-50 51,8 103,6
2a1 DC301 231,2 462,4
2a2 DC201 175,4 350,8
2a3 DC201 175,4 350,8
2a4 DC201 175,4 350,8
2a5 DC161 145,3 290,6
2a6 A-8000-90 90,2 180,4
2a7 A-8000-50 51,8 103,6
1s1 A-8000-50 51,8 103,6
2c1 A-8000-90 90,2 180,4
2c2 A-8000-90 90,2 180,4
2c3 A-8000-90 90,2 180,4
2c4 A-8000-90 90,2 180,4
2c5 A-8000-70 63,1 126,2
2c6 A-8000-50 51,8 103,6
A1 DC401 356,3 712,6
A2 DC401 356,3 712,6
A3 DC201 175,4 350,8
A4 A-8000-90 90,2 180,4
C1 DC201 175,4 350,8
C2 DC201 175,4 350,8
C3 A-8000-90 90,2 180,4
LEVEL 1(daN) LEVEL 2(daN) LEVEL 3(daN) LEVEL 4
sum daN 2838,4 3144,4 3564,8 6745,1
norm 23g >level 1 >level 2 >level 3 >level 4
max weight per level 125,8 139,4 158,0 298,9
max Kg L 125,8
CCC line calculations L
3232
Safety and responsibilityParagliding is a dangerous and high risk activity, where safety depends on the person practicing it. By purchasing and using this equipment you declare that you are a certified paragliding pilot, and you accept all risks involved in paragliding activities, including serious injury and death. Improper use or misuse of paragliding equipment considerably increases the risks.
The designer, manufacturer, distributor, wholesaler and retailer cannot and will not guarantee your safety when using this equipment, nor accept responsibility for any damage, injury or death as a result of the use of this equipment. This equipment should only be used by qualified and competent pilots. You must not use this equipment if you are not trained.
You alone as a qualified and competent pilot must take full responsibility to ensure that you understand the correct and safe use and maintenance of this paragliding equipment, to use it only for the purpose that it was designed for, and to practice all proper safety procedures before and during its use.

33
GuaranteeTriple Seven WARRANTY:
All Triple Seven products are fully warranted for 24 months, against material defects that are not the result of normal wear or accidental damage.

34 34
Registration informationTo fully use all Triple Seven maintenance and warranty services you need to register your glider on our website. Wanting to provide good product support, we invite you to do so, even if you bought your glider second-hand. Triple Seven Warranty & Product registration:
http://www.777gliders.com/tripleseven/support
Get involvedAs a new Triple Seven pilot we invite you to contact us in case of any technical or practical issues regarding equipment or techniques. We also invite you to send us your flying photos, videos or even postcards. We would like to hear from you and your exciting adventures with your new glider! Finally, join our Facebook community and share the passion. Have fun!

35 35
ContactTriple Seven GlidersCompany: 777 jadralna padala d.o.o.
Address: Ulica Ane Ziherlove 10
Postal Code / City: 1000 Ljubljana
Country: Slovenia
Tel.: +386 40 777 313
Email: [email protected]
Online resourcesFor complete help, the latest news, product information and support go to: Official website: www.777gliders.com Facebook: www.facebook.com/TripleSevenParagliders
Newsletter register: www.777gliders.com/newsletter/subscriptions
Ask questions, make suggestionsGeneral questions:[email protected]