fibre studio - ocad university
TRANSCRIPT

Fibre Studio
Office of Safety & Risk Management Rosalie Sharpe Pavilion 115 McCaul Room 2210
Stud
ent M
onito
r Tra
inin
g M
anua
l

2 | P a g e

3 | P a g e
CONTENTS
OCCUPATIONAL HEALTH & SAFETY ACT ........................................................................................................................... 5
POLICIES AND PROCEDURES ............................................................................................................................................11
SHOPS & STUDIOS SAFETY ..............................................................................................................................................17
APPENDICES ....................................................................................................................................................................22
Appendix 1: What To Do In Case Of An Incident ..........................................................................................................24
Appendix 2: Incident & Investigation Report Form ......................................................................................................25
Appendix 3: Critical Injury Procedures .........................................................................................................................27
Appendix 4: Work Refusal Policy .................................................................................................................................29
Appendix 5: First Aid Kit Locations...............................................................................................................................31
Appendix 6: Emergency Eyewash and Shower Station Locations .................................................................................32
Appendix 7: Spill Kit Locations .....................................................................................................................................32
Appendix 8: Safe Operating Procedures ......................................................................................................................33

4 | P a g e

5 | P a g e
OCCUPATIONAL HEALTH & SAFETY ACT

6 | P a g e

7 | P a g e
LEGISLATION Ontario Occupational Health & Safety Act
In Ontario, health and safety requirements are legislated under the Ontario Occupational Health & Safety Act (OHSA). The Act outlines the roles and responsibilities of various workplace parties. You can find a copy of The Act located on the Health & Safety board at 100 McCaul’s main floor.
OCAD University, as an employer, is responsible for ensuring compliance with the Act and regulations, and for taking every precaution reasonable for the protection of faculty, staff (Section 25(2) h of the OHSA) and students.
As a Student Monitor, you are now considered a worker at OCAD University and you will have specific rights, roles and responsibilities that you will need to understand which we will discuss further in this section.
Internal Responsibility System The Occupational Health and Safety Act outlines the different roles of the employer, supervisor and worker, and how these parties work together to contribute to making their workplace safe. This is the Internal Responsibility System, or IRS. Communication is a big part of the IRS in any workplace, and the ability to communicate effectively is an important skill. To communicate effectively, you need to be good at both listening and speaking. If a worker sees a hazard or practice that goes against the OHSA or workplace health and safety policies or procedures, that worker has a duty to tell their supervisor or employer. This should be done as soon as possible so that the hazard can be addressed. That’s how employers, supervisors and workers come together to make the workplace safer. This is an example of the Internal Responsibility System in action. You should inform the employer of any health and safety concern, even if you have the ability and authority to handle it yourself. Your employer may need to know about the problem in order to fulfill his or her duties. WORKER RIGHTS & RESPONSIBILITIES 1. WORKER RIGHTS:
The OHSA gives workers three important rights:
a) The right to know about workplace hazards and what to do about them
b) The right to participate in solving workplace health and
safety problems c) The right to refuse work that they believe is unsafe

8 | P a g e
1.1. The Right to Know
It’s the employer’s responsibility to inform the workers about any health or safety hazards and to show them how to work safely. This supports workers’ right to know about hazards to which they might be exposed. For example, the law says workers have to receive information and training on the chemicals or hazardous materials that are used, handled or stored at work. This information is available either on warning labels or information sheets. Sometimes you may also have to give the worker written instructions on how to do the work. The employer supports the workers’ right to know by making sure they get:
• Information about the hazards in the work they are doing • Training to do the work in a healthy and safe way. • Competent supervision to stay healthy and safe. That means the employer has made sure that you know how to do
your job.
1.2. The Right to Participate
Supervisors support the workers’ right to participate in health and safety by encouraging them to get involved. There are various ways to be involved in workplace health and safety such as asking questions, raising concerns and giving positive feedback. One of the most effective ways workers can participate in health and safety is by becoming or communicating with a Joint Health and Safety Committee (JHSC) member.
What is a Joint Health and Safety Committee (JHSC)? In Ontario, organizations that employ more than 20 employees must have a formal Joint Health and Safety Committee. The JHSC consists of worker (union employee) and management members.
Worker representatives are selected by the union and management members are appointed by the employer.
What do OCAD University JHSC Members do? • Act as an advisory body to OCADU in areas of health and safety • Identify hazards and obtain information about them • Assist in resolving work refusal cases • Participate in accident investigations and workplace inspections that involved OCADU employees • Recommend corrective actions required to resolve health and safety concerns • Meet every month to discuss safety issues at OCADU • Inspect the workplace (or at least some areas of the workplace) each month Who are the JHSC Members?
Management Representatives: Contact: Nick Hooper (Studio Management) – Co-Chair Ext. 2202 Connie Arezes-Reis (Human Resources) Ext. 209 Christine Wallace (Facilities and Planning) Ext. 620

9 | P a g e
Worker Representatives: Eric Steenbergen (Printmaking) – Co-Chair Ext. 268 Alvaro Araya (IT Services) Ext. 240 Angela Del Buono (Photography) Ext. 264 Ted Hunter (Faculty) Ext. 313 Myly Pham (IT Services) Ext. 3846 Katrina Tompkins (ED/ID) Ext. 397 Adam Wilkinson (Distribution Services) Ext. 612 Where Can I find the JHSC’s Monthly Meeting Minutes and Inspection Sheets? Your JHSC’s monthly meeting minutes and inspection reports are posted on the Safety & Risk Management Bulletin Board located at the main floor at 100 McCaul. 1.3. The Right to Refuse.
The third right of workers in the OHSA is the right to refuse to do work that you have reason to believe is unsafe for yourself or another worker. The OHSA prohibits the employer from reprising against a worker for such things as complying with the OHSA or seeking its enforcement.
Your supervisor will respect that right by taking “every precaution reasonable” in the circumstances to protect workers and by complying with the process for work refusals specified in the Act. When a worker is refusing to do particular work because it is likely to endanger him or herself, the supervisor must look into the worker’s concerns and do everything they can to help the employer address them. Most of the time, the employer or the supervisor will be able to solve the problem with the worker’s JHSC member. But if an agreement can’t be met on how to solve it and the worker still feels the work is unsafe, a Ministry of Labour inspector will be called in to investigate.
For details on how this process works, refer to our policy: 5004 - Work Refusal Procedures (Attached: Appendix 4).
2. DUTIES OF A WORKER The OHSA gives workers certain duties, as a student monitor you must:
a) Follow the law and the workplace health and safety policies and procedures.
b) Always wear or use the protective equipment that the employer requires.
c) Work and act in a way that won’t hurt them or any other worker.
d) Report any hazard they find in the workplace to your supervisor.

10 | P a g e
SUPERVISOR RIGHTS & RESPONSIBILITIES Every supervisor is also considered to be a worker and has the same workplace duties and rights as a worker. But if you are also supervising others, the OHSA also gives you specific duties related to your role as a supervisor, including: a) Telling workers about hazards and dangers and responding
to their concerns b) Showing workers how to work safely and making sure they
follow the law, and the workplace health and safety policies and procedures
c) Making sure workers wear and use the right protective
equipment d) Doing everything reasonable in the circumstances to protect
workers from being hurt or getting a work related illness

11 | P a g e
POLICIES AND PROCEDURES

12 | P a g e
13 | P a g e
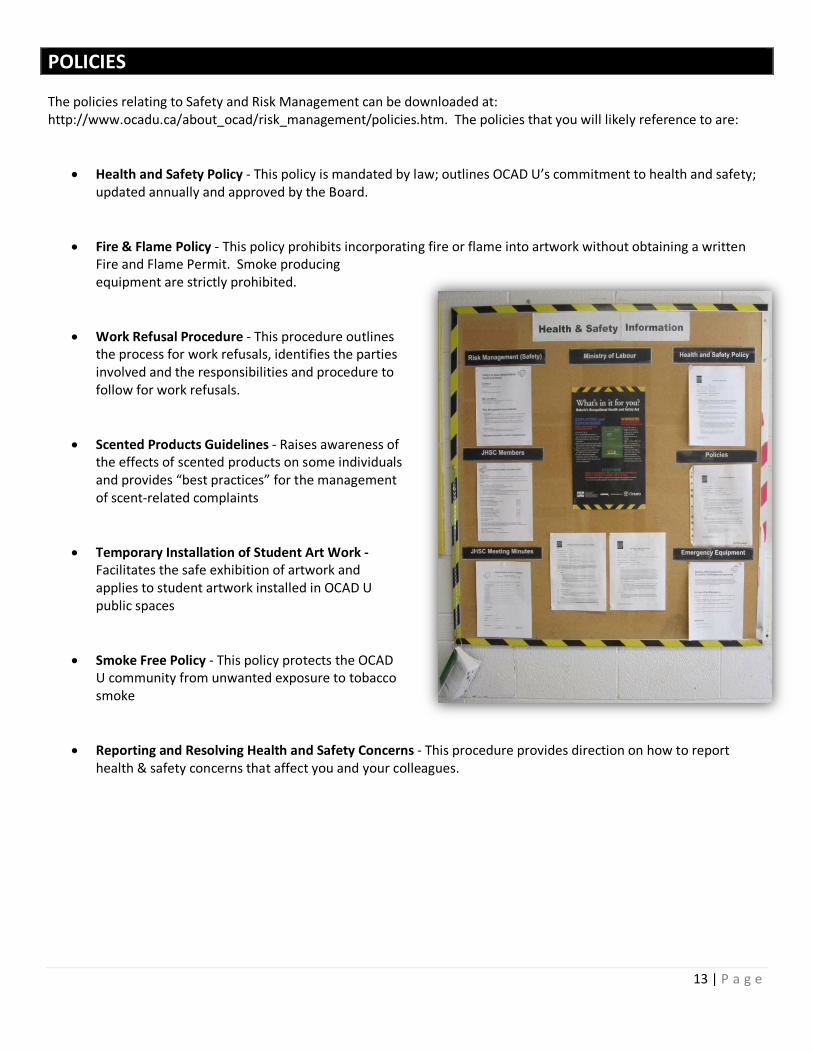
POLICIES
The policies relating to Safety and Risk Management can be downloaded at: http://www.ocadu.ca/about_ocad/risk_management/policies.htm. The policies that you will likely reference to are:
• Health and Safety Policy - This policy is mandated by law; outlines OCAD U’s commitment to health and safety;
updated annually and approved by the Board.
• Fire & Flame Policy - This policy prohibits incorporating fire or flame into artwork without obtaining a written Fire and Flame Permit. Smoke producing equipment are strictly prohibited.
• Work Refusal Procedure - This procedure outlines the process for work refusals, identifies the parties involved and the responsibilities and procedure to follow for work refusals.
• Scented Products Guidelines - Raises awareness of the effects of scented products on some individuals and provides “best practices” for the management of scent-related complaints
• Temporary Installation of Student Art Work - Facilitates the safe exhibition of artwork and applies to student artwork installed in OCAD U public spaces
• Smoke Free Policy - This policy protects the OCAD U community from unwanted exposure to tobacco smoke
• Reporting and Resolving Health and Safety Concerns - This procedure provides direction on how to report health & safety concerns that affect you and your colleagues.

14 | P a g e
PROCEDURES 1) Dealing with Emergencies
In the event of an emergency wherein incidents or behaviours presenting immediate or imminent danger should be reported immediately to OCAD U Security:
a) If you can do so safely, pick up a red emergency phone to connect to Security immediately. (Knocking a red emergency phone off the hook alerts Security of your location and sends assistance).
b) Or, pick up a white courtesy phone or OCAD office phone and dial 511. c) If none of the above options are possible, use a mobile phone to dial 911
2) Injured person(s) Campus Security personnel are certified in First Aid/CPR and will be the first responder for all medical emergency situations on campus. First Aid Kits (Attached: Appendix 5) and A.E.D.s are located throughout the campus and Campus Security is equipped with First Aid Response Bags. The Incident & Investigation Report Form (Attached: Appendix 2) should be filled out following any incident.
Non-injury incidents, near misses or “close calls” should also be reported on the Incident & Investigation Report Form. This will help us ensure that the situation is dealt with and other staff, faculty or students are not exposed to the hazard.
For incidents resulting as a critical injury, where the injury:
a) Places life in jeopardy; b) Produces unconsciousness; c) Results in substantial loss of blood; d) Involves the fracture of a leg or arm but not a finger or toe; e) Involves the amputation of a leg, arm, hand or foot but not a finger or toe; f) Consists of burns to a major portion of the body; or g) Causes the loss of sight in an eye.
Please refer to Policy 5002 – Critical Injury Procedures (Attached: Appendix 3) or online: http://www.ocadu.ca/Assets/pdf_media/ocad/about/policies/administrative_policies_5002_critical_injury_procedures.pdf

15 | P a g e
3) Workplace Violence OCAD University expects that any incidents of violence or threatening behaviour in its work and learning environment will be investigated and dealt with promptly by all relevant parties in a fair, consistent, thorough, and confidential manner Incidents of a potentially violent or threatening nature but not presenting immediate or imminent danger should be reported immediately to:
a) For students – relevant Chair, Associate Dean or Associate VP, Students; b) For staff – relevant Supervising Manager or Director, Human Resources; or c) For faculty – relevant Chair, Associate Dean or Director, Human Resources.
For more information see Policy 5005 – Response to Violent or Threatening Behaviour: http://www.ocadu.ca/Assets/pdf_media/ocad/about/policies/administrative_policies_5005_response_to_threatening_or_disturburing_behaviour_policy.pdf

16 | P a g e

17 | P a g e
SHOPS & STUDIOS SAFETY

18 | P a g e
SHOPS & STUDIOS PROGRAM
This section contains specific information for your studio in relation to: 1. Shop & Studio Dress Code 2. Chemical Safety 3. Equipment Safety
Within the program, you will be provided with the necessary tools and information to help guide you through the processes and procedures to work safely in the shop and studio. This form of work information and instruction is called: Safe Operating Procedures. Safe Operating Procedures (SOPs) are developed to ensure that where hazardous processes, techniques, chemicals or equipment are performed or used there are clear written instructions that identify the potential hazards and the correct steps to follow to complete the task safely. SOPs are used to train new staff and students, as a reference when a task is to be performed, and as documentation of the correct procedure.
The Studio’s chemical, equipment and operational safe operating procedures are included in the appendix 8 for your review.
SHOPS & STUDIOS DRESS CODE Studio Management asks all faculty, staff and students to observe the following rules in all shops, and in certain studios.
Faculty and technicians will expect students' cooperation if they wish to use the shops and studios. Faculty and technicians are empowered to suspend shop privileges if in their opinion a user may be putting him/herself or others in danger.
a) Wear sturdy and appropriate shoes: e.g., sneakers, closed leather shoes or work boots - NOT open-toed sandals, flip-flops or high heels.
b) No bare midriffs if exposure to chemicals or tools/machinery is
likely, wear an apron if necessary. c) Face-shields or safety glasses MUST be worn when using machinery,
and other personal protective equipment (e.g., gloves, splash goggles, dust mask, respirator, hearing protection) must be worn if needed.
d) No long, dangling clothing or accessories: (scarves, flowing sleeves,
chains, long necklaces, etc.). Long hair must be tied back.

19 | P a g e
CHEMICAL SAFETY The Chemical Safety Program includes:
1. Training Requirements WHMIS (Workplace Hazardous Materials Information System) is a Canada-wide system designed to give employers and workers information about hazardous materials used in the workplace. Under WHMIS, there are three ways in which information on hazardous materials is to be provided: • Labels • Material Safety Data Sheets • Worker Education Programs It is important for you to understand the purpose of the WHMIS program. Any worker who handles, works with, or works in proximity to a hazardous material (controlled product) or has a potential for exposure will receive training regarding the potential hazards of exposure. This training program is available online, please log into CANVAS to complete the Chemical Safety Training.
2. Chemical Matrix (Attached: Appendix 8) This is an inventory of all the chemicals for the studio. This will serve as a quick overview of the chemical which includes the WHMIS classification, safe handling, storage and disposal procedures.
3. Spill Kits
Spill kits are found in each studio (Attached: Appendix 7) and used to help contain spills in the case of an accidental spill. Please refer to the procedure - Responding to Chemical Emergencies for further details and instructions.
Inside a spill kit, you will find:
• Sorbent Pads – 17” x 19” • Sorbent Socks – 3” x 48” • Sorbent Pillows – 8” x 18” • Safety Goggles • Nitrile Gloves • Disposal Bag
The Chemical Matrix, Spill Kit and MSDS binder located inside each studio. Ask your Studio Technician to help you find this and if you need additional assistance with any unfamiliarity to chemicals you may have.

20 | P a g e
4. Procedures for working with chemicals Please review the following procedures (Attached: Appendix 8): a) Screening procedures for introducing new chemicals to OCAD U b) Managing MSDS and Labels c) Transporting Chemicals within OCAD U d) Storing Chemicals e) Responding to Chemical Emergencies f) Safety Procedures for Chemical Users g) Chemical Waste Disposal Procedures
5. Personal Protective Equipment (PPE)
The following type of Personal Protective Equipment (PPE) is available in your studio. Please talk to your faculty or technician for more information and how you can obtain the specific PPE to increase your protection.
Please ensure that the students under your care are all wearing the required Personal Protective Equipment.
Type Brand
Safety Glasses
Chemical Splash Goggle Clear Face shield Honeywell North Ratchet Head Gear (for above)
Gloves
Ladies Inspector Glove Superior Terry Lined Neoprene Glove (size 9) Best 18" Green PVC C/W Jersey Lining (size11) Yellow PVC 26" glove Blue 4 mil. Nitrile disposable glove (S-L) Grease Monkey 5 mil black nitrile, Powder Free (S-L) Mapa Stansolv Glove (7-10)
Respirators
3M 1/2 face respirator (S-L) N95 Disposable Respirator OV/AG Cartridge P100 filter P100 filter w. nusiance level organic vapour relief
Aprons Ansell Yellow Urethane 35X45 4oz Yellow Urethane Apron Hearing Protection 3M Ear Muff c/w Headband NRR24

21 | P a g e
EQUPIMENT SAFETY Where specific questions related to machine use arises, they should first be directed to your immediate supervisor. The Office of Safety & Risk Management is also available to assist you in fulfilling the health and safety responsibilities of your job.
1. Studio Equipment Safe Operating Procedures
These SOPs will provide a step-by-step guide on how to use the machines. It is important that you familiarize yourself with these SOPs prior to using any of the equipment in the studio.
The contents of each SOP include: a) Personal Protective Equipment requirements and recommendations b) Pre-use Inspection Checklist c) General Safety Guidelines d) Safe Operating Procedure e) Lockout / Tag-out f) Maintenance and Inspection Checklist
2. Fibre Studio SOPs The following SOP’s are available for your review (Attached: Appendix 8): a) Paper Beater b) Power Washer c) Industrial Sewing Machine d) Floor Loom e) Hydraulic Jack and Press f) SteamJet g) UV Lightbox and Vacuum Table h) Heat Press i) Serger j) Sewing Machine k) Small Steamer l) Vertical Fabric Steamer


22 | P a g e
APPENDICES

23 | P a g e
24 | P a g e
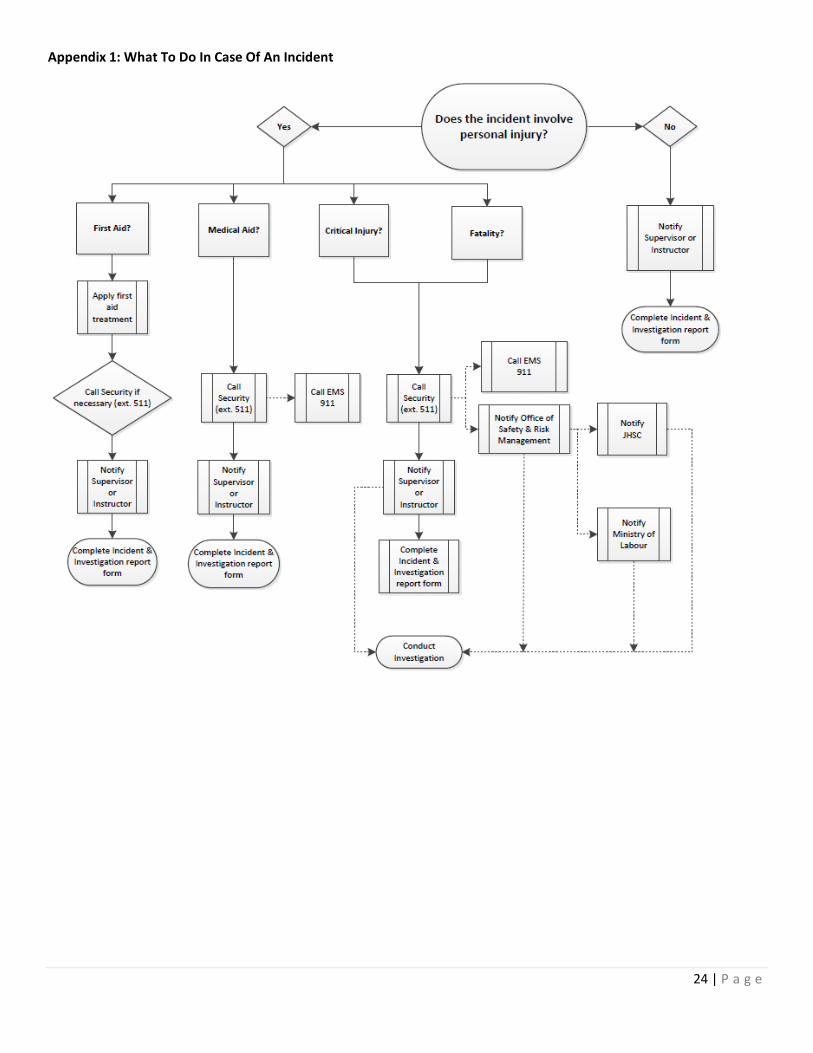
Appendix 1: What To Do In Case Of An Incident

25 | P a g e
Appendix 2: Incident & Investigation Report Form

26 | P a g e

27 | P a g e
Appendix 3: Critical Injury Procedures
1. Purpose
As per the “Occupational Health & Safety Act - Section 51.(1) Notice of death or injury – Where a person is killed or critically injured from any cause at a workplace, the constructor, if any and the employer shall notify an inspector, and the committee, health and safety representative and trade union, if any, immediately of the occurrence by telephone, telegram or other direct means…”. In the case of death or critical injury, OCAD is required to immediately report the incident to the Ministry of Labour.
Further, as per “Section 51.(2) Preservation of wreckage – Where a person is killed or is critically injured at a workplace, no person shall, except for the purpose of,
a. saving life or relieving human suffering; b. maintaining an essential public utility service or a public transportation system; or c. preventing unnecessary damage to equipment or other property,
interfere with, disturb, destroy, alter or carry away any wreckage, article or thing at the scene of or connected with the occurrence until permission so to do has been given by an inspector.”
2. Scope
Following the requirements of OCAD’s Health & Safety Policy # 5001, these procedures apply to all incidents involving a faculty, staff, contractor, or student monitor while working on campus.
As per the “Occupational Health & Safety Act ONT. REG. 834 – CRITICAL INJURY – DEFINED
R.R. O. 1990, Reg. 834, as am. O. Reg., 351/91 (Fr.).
1. For the purposes of the Act and Regulations, ‘critically injured’ means an injury of a serious nature that,
a) places life in jeopardy; b) produces unconsciousness; c) results in substantial loss of blood; d) involves the fracture of a leg or arm but not a finger or toe; e) involves the amputation of a leg, arm, hand or foot but not a finger or toe; f) consists of burns to a major portion of the body; or g) causes the loss of sight in an eye.”

28 | P a g e
3. Policy
The following procedures must be followed carefully:
• Notify Security immediately (x 511) so that the necessary emergency response measures can be taken, and the site secured
• Notify the Director Safety &Risk Management (x 2920) or via cell (647) 210-9611 so that they can: • Immediately notify the Ministry of Labour (MoL) with a brief report.
Note: This is required even if the injury is deemed a “possible” critical injury • Attend the scene to begin investigations • Notify a Joint Health & Safety Committee worker representative to assist with the investigation
• The scene is to be photographed if at all possible • Important - Never move anything at a critical injury site until the MoL Inspector has arrived, except to alleviate
human suffering or to preserve property from further damage.

29 | P a g e
Appendix 4: Work Refusal Policy
1. Purpose:
The purpose of this procedure is to describe the process to address work refusals should they occur; it identifies the various workplace parties involved in a work refusal and the process which must be followed to assure that the safety concern, which triggered the work refusal process, is adequately addressed.
It also ensures that the OCAD University (“OCAD U” or the “University” complies with the Occupational Health and Safety Act (OHSA), R.S.O. 1990, Section 43 (“The Act”).
2. Scope:
This procedure applies to all employees, faculty, and students who are paid to do research, or carrying out any other work that takes place on or off-campus that is under the purview of OCAD U.
3. Definitions:
a. Certified member: a Joint Health and safety Committee member who is certified in accordance with the OHSA.
b. Dangerous circumstance: a situation in which a provision of the Act is contravened; the contravention poses a danger or a hazard to a worker and the danger or hazard is such that any delay in controlling it may seriously endanger a worker.
c. Safety hazard: something that has the potential to cause physical harm to people or damage to property.
4. Procedure:
4.1 Application of OHSA Work Refusals
• All OCAD U employees can exercise their right to refuse unsafe work when they believe a safety hazard or dangerous circumstance exists in the workplace.
• Supervisors and employees must distinguish this work refusal procedure from every day due diligence associated with the recognition, reporting and correcting of workplace safety hazards.
4.2 Initiating OHSA Work Refusals
The worker shall:
• Notify his or her supervisor that he or she is refusing to perform unsafe work because he or she has reason to believe that performing the work may endanger themselves or another worker.
• Please be specific and explain in detail your reason for refusing work. • Remain in a safe place near the workstation until the investigation takes place.

30 | P a g e
4.3 OHSA Work Refusal Investigation
Step 1: Internal Resolution:
a. Upon an employee reporting a work refusal, the Supervisor requests the employee to specifically explain why he or she is refusing work.
b. If the work refusal is not safety related, the work refusal stops, and the employee returns to work, and addresses the concern using other appropriate venues.
c. However, if the work refusal is safety related, the Supervisor must immediately contact: • JHSC worker member (preferably a certified member) • Director, Safety and Risk Management (or designate)
d. Supervisor leads a joint investigation of the matter with the refusing employee, the JHSC worker member, and the Director Safety and Risk Management.
e. If the employee feels that their safety is no longer threatened with the results and corrective measures implemented following the investigation, they may return to work.
Step 2: External Resolution:
a. The employee may not be satisfied with the remedial action that is taken, and they may continue to refuse work if he or she has reasonable grounds to believe that the work is still likely to endanger someone at OCAD U.
b. At this point, a Ministry of Labour inspector must be called in to investigate. The Director, Safety and Risk Management will contact the Ministry of Labour and report the work refusal.
c. Pending the arrival of the Ministry of Labour inspector: • The refusing employee remains in a safe place near the workstation. • The refusing employee may be assigned reasonable alternate work. • The Supervisor may ask another employee to perform the work that was refused; however this
employee must be advised of the other employee’s refusal and of his reasons for the refusal in the presence of the JHSC worker member.
d. Once the Ministry of Labour Inspector is onsite, a joint investigation will be carried out with the MOL inspector, the employee, the Supervisor, the JHSC member, and the Director, Safety and Risk Management.
e. The MOL inspector will issue a directive, and this must be complied with, pending appeals (if necessary) f. The employee, Supervisor, JHSC member, and Director Safety and Risk Management must complete the “Work
Refusal Report”
4. 4 MOL Decision
a. Following the investigation, the MOL will issue a decision. b. The decision must be complied with c. The decision can be appealed, pending which it must still be complied with
5. Related Documents
• Work Refusal Report • Work Refusal Flow Chart

31 | P a g e
Work Refusal Report Form

SECTION A: WORKER INFORMATION (to be completed by employee)Employee Name: Employee #:
Department:
Supervisor Reported to: Date & Time Reported:
Location of work refusal: Task Assigned:
Employee’s reason for work refusal (please provide specific details):
Employee’s Signature: Date:
SECTION B: SUPERVISOR INFORMATION (to be completed by Supervisor)Supervisor Name: Date & Time Notified of Work Refusal:
Immediate action taken (if any):
INVESTIGATION DETAILS: (STEP 1 - INTERNAL RESOLUTION) Date and Time of Investigation:
JHSC Worker Member: Office of Safety and Risk Mgmt:
Supervisor’s observations of existing conditions and hazards during investigation (please provide specific details):
Does Supervisor agree that hazardous conditions exist? YES-Complete Section C Action Plan NO-PROCEED TO SECTION D(2)
Supervisor’s Signature: Date:

SECTION C: RECOMMENDED ACTION PLAN TO RESOLVE CONCERN (completed by Supervisor and Employee)Action
Target Date Completion Date
This Action Plan agreed upon by both the worker and Supervisor on (Date):
Employee’s Signature: Supervisor’s Signature:
Once Action Items are complete, proceed to Section D1 below for signature. If this Action Plan is not agreed upon by Employee and Supervisor, proceed to Section D2.
SECTION D: RESOLUTION OF WORK REFUSAL (completed by Safety and Risk Mgmt. and JHSC Worker Member)D1) COMPLAINT RESOLVED - Employee is satisfied that the work is no longer hazardous Date: Time:
Employee Signature: JHSC Worker Member Signature:
Supervisor Signature: Safety and Risk Mgmt. Signature:
D2) COMPLAINT IS NOT RESOLVED – (STEP 2: EXTERNAL RESOLUTION) Explain why work refusal is not resolved:
Date: Time:
Employee Signature: JHSC Worker Member Signature:
Supervisor Signature: Safety and Risk Mgmt. Signature:
MINISTRY OF LABOUR INSPECTOR TO BE CONTACTED FOR INVESTIGATION & DECISION 1-877-202-0008 Time MOL contacted: Time MOL Inspector arrived: Time MOL Inspector departed:
MOL Investigation Notes (Findings, Decision, Orders Written, etc.):

32 | P a g e
Work Refusal Flow-Chart

Using your right to refuse unsafe work
The Occupational Health and Safety Act, Section 43, gives an employee the right to refuse unsafe work. The flowchart below outlines the procedure to follow when this right is exercised in the workplace.
Is the employee is satisfied with the corrective measures taken to address the safety-related?
An employee may refuse work where he or she has reason to believe: The equipment he or she is using is likely to endanger himself or a co-worker. The physical condition of the workplace may endanger himself or a co-worker. There is a contravention of the Occupational Health & Safety Act.
The employee immediately reports the circumstance to his or her supervisor and remains in a safe place.
The supervisor will ask the employee to explain specifically why he or she is refusing the work (may be in writing). This will enable the supervisor to determine if the concern is safety related.
If the concern IS safety related: If the concern IS NOT safety related:
Supervisor contacts the JHSC worker member, Director Safety and Risk Mgmt., and with the
employee conducts a joint investigation
Work refusal ceases, and employee returns to work.
Supervisor addresses concerns as appropriate
If NO: Work refusal continues, and proceeds to Step 2: External Resolution
If YES: Work refusal ceases, and employee returns to work returns to work
Employee continues to refuse work; must remain in a safe place; may be assigned reasonable alternative work.
Pending the investigation, another employee may perform the work that was refused, provided the employee has been informed of the work refusal by the JHSC worker member.
Director Safety and Risk Mgmt. notifies the Ministry of Labour (MOL) Inspector
MOL Inspector issues decision
Concern is “likely to endanger” employee Concern is “not likely to endanger” employee
Issue order to OCAD U
OCAD U doesn’t comply
OCAD U complies
OCAD U appeals
Possible prosecution
Employee return to work
Appeals hearing
Decision Final
Employee returns to work
Employee does not return to work
Subject to discipline, if no grounds are evident
Appeal (if grounds are evident).
Hearing
Decision Final
STEP 1: Internal Resolution
STEP 2: External Resolution
The MOL Inspector investigates in the presence of the refusing employee, JHSC worker member, Supervisor, and Director Safety and Risk Mgmt.

31 | P a g e
Appendix 5: First Aid Kit Locations
Location Level Room Description
100 McCaul
1
- Front desk lobby 100 Security office 108 Wood Shop 117f Plastics Shop 122 Metal Shop 130 Rapid Prototype 152 Foundry/Mouldmaking Studio 159 First year sculpture installation shop
2
201 Fibre Studio 217 Jewellery Studio 225 Print Services 239 Mail Room 241 Central Storage 253 Ceramics Studio
3
315a Faculty of liberal studies 317a IT Services Helpdesk 341 AV loans 352 Integrated Media 375 Printmaking Studio - Intalglio/etching 384 Printmaking Studio - Relief 387 Printmaking Studio – Lithography 389 Printmaking Studio - Screen printing
4
401 Faculty of Art offices 417 Photography Studio 466 Media and Colour studio 475 Drawing & Painting studio
5 500 Faculty of Design offices 517 ED/ID shop 540 ED/ID open space
6 662 Open space 664 Mobile Computing Helpdesk
49 McCaul 1 - Kitchenette
51 McCaul 1 5120 Campus Life and Career Services 2 5215 Centre for Students with Disabilities
52 McCaul 1 - Kitchenette 2 - Open Studio Space 3 - Open Studio Space
60 McCaul 1 - Kitchenette - Drawing & Painting/Printmaking Studio
205 Richmond
LL 7000 4th year drawing & painting studio G 7110 CCP studio 3 7314 Workspace 4 7415 Assembly space 5 7515 Photocopy room 6 7620 IAMD studio 6 DIGF/CADN studio 7 7701 DMRii office

32 | P a g e
Appendix 6: Emergency Eyewash and Shower Station Locations
Building Department Room Bottle Station Shower
100 McCaul
Foundry 152 √ Mouldmaking 154 √ SCIN 170 √ Metal 123 √ Plastics 117e √ Fibre 201 √ Ceramics 253 √ Jewellery 217 √ Jewellery 218 √ Integrated Media 358 √
Printmaking 375a √ √ Printmaking 387 √ Printmaking 389a √ Printmaking 381a √ Photography 417p √ Photography 417g √ Photography 417 √ Photography Hallway √ D&P 466 √ D&P 475 √ ED/ID 517 √
60 McCaul Kitchenette - √ Open Studio - √
52 McCaul 2nd floor - √ 3rd floor - √
205 Richmond Basement - √
Appendix 7: Spill Kit Locations
Location Level Room Description
100 McCaul
1
108 Wood Shop 117f Plastics Shop 122 Metal Shop 130 Rapid Prototyping 152 Foundry Studio 154 Mouldmaking Studio
159 First year sculpture installation shop
2 201 Fibre Studio 217 Jewellery Studio 253 Ceramics Studio
3 352 Integrated Media 375 Printmaking Studio
4 417 Photography Studio Drawing & Painting Studio
5 517 ED/ID shop

33 | P a g e
Appendix 8: Safe Operating Procedures

Fibre Studio
Office of Safety & Risk Management Rosalie Sharpe Pavilion 115 McCaul Room 2210
Stud
io E
quip
men
t Sa
fe O
pera
ting
Proc
edur
es


Machine Paper Beater
Location Fibre Studio - Room 201
Manufacturer David Reina Designs Address: 78 Guernsey St. Broklyn Ny 11222 Telephone Number: (718) 486-0262
Applicable Legislation
1. CAN/CSA-Z432-04 “Safeguarding of Machinery” 2. CSA Z460-05 “Control of hazardous energy-lockout and other methods”
Sources
Manufacturer’s Manual Safe Work BC, CCOHS, and IAPA resources REA Engineer Specifications Studio Technicians
DO NOT USE THIS MACHINE UNLESS YOU ARE TRAINED IN ITS SAFE USE!
Pape
r Bea
ter

1.0 Personal Protective Equipment (PPE) Requirements
PERSONAL PROTECTIVE EQUIPMENT (PPE) REQUIRED RECOMMENDED
Face Shield / Safety Glasses with side shields
Dust Mask
Respirator
Ear Plugs / Ear Muffs
✔
Gloves
✔
Closed-Toe Foot Wear (no heels)
✔
Lab Coat / Protective Apron
✔
Other
ALWAYS WEAR THE REQUIRED PPE WHEN USING THIS MACHINE!

2.0 Pre-use Inspection Checklist
Check Y N N/A
1 Is the power cord free of frays and damage?
2 Is the paper beater in secure place?
3 Is the area around the paper beater free of slip/trip hazards?
4 Is the safety cover and splash guard in place?
5 Has the pulp from previous operation been removed?
6 Does the crank handle move freely without obstruction?
Comments/Corrective Action:
3.0 Safe Operating Procedure (SOP)
This procedure is outlined as follows: General Safety Guidelines Equipment Specific Safety Operating Procedure
3.1 General Safety Guidelines Before using the machine, perform the following general safety checks:
a) Make sure you understand all of the instructional material before operating this equipment. Failure to follow safety
instruction and warnings may result in serious personal injury, fire or property damage. b) If you have any questions or uncertainties, please ask your studio technician before use.
c) Long hair, scarves, loose clothing, jewellery and ties pose an entanglement hazard. Please make sure these are all
constrained prior to operating the equipment. d) Do not conduct any maintenance or repairs on this equipment. In case of a defect, contact your technician. e) Do not remove or render machine guarding ineffective in any way. f) Ensure the work area is both well-lit and organized.

3.2 Equipment Specific Safe Operating Procedure (SOP)
1. Before using the paper beater
Pict
ure
1 a) Set the count revolution at zero (the point at which the beater roll blade
comes into contact with the bedplate). b) Lower the beater roll blade (picture 1) height by turning the handle (see
picture 2) counter clockwise and at the same time turn the beater roll blade by hand until you feel resistance.
c) Do not rub your hands against the blade. d) Plug in the beater and fill it about 2/3 with water. e) Place the water bucket under the beater. f) Set the beater to 30 complete revolutions of the crank.
Pict
ure
2
2. Using the paper beater
Pict
ure
3
a) Turn on the beater. b) While it is operating, with the water circulating, feed in the pulp slowly. c) Feed the beater from the side of the beater opposite the roller (see picture
3). This will keep your hands away from the intake side of the roll (see picture 4).
d) Let the water and pulp circulate. e) Turn down the beater roll blade closer to the bedplate as needed f) When necessary add water to the beater to maintain efficient water level. g) Let the beater run for desired amount of time. h) If you need to remove excessive water or pulp from the beater. Do this
with a bucket; do not scoop it with your hands. i) If the flow of water and pulp slows down or stops, do not place your hand
in the beater. Instead, unplug the machine, and raise the beater roll blade away from the bedplate to free up the jammed pulp.
j) Do not leave the beater unattended when in operation. k) If anything unexpected occurs, immediately disable the equipment by
switching it off and/or removing the attachment plug.
Pict
ure
4
3. After using the paper beater
Pict
ure
5
a) Once the beating is finished, raise the roll blade back up to about 30 cranks.
b) Turn off the motor. Always unplug the beater when cleaning the beater. c) Thoroughly clean the beater. Do not clean the beater roll blade with your
bare hands as you might cut yourself. Flush it with stream of water. d) Empty the tub and make sure the bedplate area is free of pulp.

4.0 Maintenance and Repair
4.1. Lockout/Tagout (LOTO) Procedure:
LOCKOUT TAGOUT PROCEDURE
Equipment Identification
Equipment Name/Description: Paper Beater
Equipment Location: Fibre Studio Room 201 Total # of Energy Isolation Devices/locks: 1
BEFORE SERVICING THIS MACHINE, NOTIFY AFFECTED PERSONNEL. ONLY PROPERLY TRAINED AND AUTHORIZED PERSONNEL SHALL
PERFORM LOCKOUT TAGOUT PROCEDURE
Energy Source Location Type of EID/lock to be used
Steps for locking & tagging
Verification Procedure
Electrical End of cord Plastic clamshell and padlock
Stop machine, unplug cord, and install clamshell, lock, and tag.
Attempt to start machine, visually confirm it will not start.
IF SYSTEM CANNOT BE LOCKED OUT OR IF SYSTEM FAILS VERIFICATION PROCEDURE, STOP & CONTACT YOUR SUPERVISOR
LOTO Procedure # A-xxxxxxx Revision #: Approved by: Date:

4.2 Inspection Checklist
5.0 Document Control
Any changes or updates to this document must be recorded and maintained.
Initially Created By: The Office of Safety and Risk Management Date: September 2011
Consultation: Studio Managers and Technicians Program Chairs and faculty
Date: January-April 2013 April – May, 2013
Approval By: VPFA and VPA Date: September, 2013
Review and Revisions Made By: Date Revised:
Changes Made(indicate sections):
Revisions Approved By: Date of Approval:
DAILY ✔ Ensure the area around the paper beater is free of slip/trip hazards.
Ensure the paper beater is in a secure place.
Ensure the splash guard and safety cover is in place and cannot be removed.
Inspect the beater roll blade for any defects.
Ensure dried pulp is removed from the machine.
Ensure the beater roll blade is kept clean.
Ensure the crank handle rotates freely.
Ensure the roll blade and the bedplate moves freely.
Inspect the cord, plug and the motor of the machine.
WEEKLY ✔ Check all elements of the paper beater.
MONTHLY ✔ Lubricate the crank adjustment shafts.
Inspect the beater roll blades to determine their sharpness.
ANNUALLY ✔ Check the motor of the machine (replace the drive belt if necessary).


Machine Name: Floor Loom, Laclerc Loom Model: Nilus 4s
Location Fibre Studio, Room 201
Manufacturer Address: 573 Savoie P.O. Box 4 Plessisville Qc. G6L 2Y6 CANADA Telephone Number: 1-819-362-7207
Applicable Legislation
CAN/CSA-Z432-04 “Safeguarding of Machinery”
Sources
Manufacturer’s Manual Safe Work BC, CCOHS, and IAPA resources REA Engineer Specifications Studio Technologists
DO NOT USE THIS MACHINE UNLESS YOU ARE TRAINED IN ITS SAFE USE!
FLO
OR
LOO
M

1.0 Personal Protective Equipment (PPE) Requirements
PERSONAL PROTECTIVE EQUIPMENT (PPE) REQUIRED RECOMMENDED
Face Shield / Safety Glasses with side shields
Dust Mask
Respirator
Ear Plugs / Ear Muffs
Gloves
Closed-Toe Foot Wear (no heels)
✔
Lab Coat / Protective Apron
Other
ALWAYS WEAR THE REQUIRED PPE WHEN USING THIS MACHINE!

2.0 Pre-use Inspection Checklist
Check Y N N/A
1 Is the area around the Loom free of slip/trip hazards?
2 Are all tools/scissor removed from the Loom?
3 Is the press break/treadle in good working condition?
4 Are the heddles in place and in good working order (check for bent or damaged latch)?
5 Comments/Corrective Action
3.0 Safe Operating Procedure (SOP)
This procedure is outlined as follows: General Safety Guidelines Equipment Specific Safety Operating Procedure
3.1 General Safety Guidelines Before using the machine, perform the following general safety checks:
a) Make sure you understand all of the instructional material before operating this equipment. Failure to follow safety
instruction and warnings may result in serious personal injury, fire or property damage. b) If you have any questions or uncertainties, please ask your studio technician before use. c) Do not conduct any maintenance or repairs on this equipment. In case of a defect, contact your technician. d) Do not remove or render machine guarding ineffective in any way. e) Ensure the work area is both well-lit and organized.

3.2 Equipment Specific Safe Operating Procedure (SOP)
1. Operating the Loom
Pi
ctur
e 1
a) Prepare the yarn for the loom (see picture 1)
b) Wind warp onto loom.
c) Pass the thread through the heddles and tie them to the beam.
d) Use the shuttle (see picture 2) to pass the thread horizontally.
e) Depress the treadle to start weaving (see picture 3)
Pi
ctur
e 2
Pi
ctur
e 3
2. Putting away the Loom
Pict
ure
4
a) Clean up all the thread material.
b) Sweep the floor surrounding the Loom.
c) Tuck in the bench.

4.0 Maintenance and Repair
4.1
5.0 Document Control
Any changes or updates to this document must be recorded and maintained.
Initially Created By: The Office of Safety and Risk Management Date: September 2011
Consultation: Studio Managers and Technicians Program Chairs and faculty
Date: January-April 2013 April – May, 2013
Approval By: VPFA and VPA Date: September, 2013
Review and Revisions Made By: Date Revised:
Changes Made(indicate sections):
Revisions Approved By: Date of Approval:
DAILY ✔ Ensure the area around the Loom is free of slip/trip hazards.
WEEKLY ✔ Inspect entire loom and perform maintenance as required.
MONTHLY ✔ Inspect entire loom and perform maintenance as required.
ANNUALLY ✔ Inspect entire machine and perform maintenance as required.


Machine Name: Heat Press Model: LT1500/LT1620
Location Fibre Studio, Room 201
Manufacturer Name: Lancer Group International Address: 311 Saulteaux Crescent, Winnipeg, Manitoba Telephone Number: (204) 885-7792
Applicable Legislation
1. CAN/CSA-Z432-04 “Safeguarding of Machinery” 2. CSA Z460-05 “Control of hazardous energy-lockout and other methods”
Sources
Manufacturer’s Manual Safe Work BC, CCOHS, and IAPA resources REA Engineer Specifications Studio Technicians
DO NOT USE THIS MACHINE UNLESS YOU ARE TRAINED IN ITS SAFE USE!
Hea
t Pre
ss

1.0 Personal Protective Equipment (PPE) Requirements
PERSONAL PROTECTIVE EQUIPMENT (PPE) REQUIRED RECOMMENDED
Face Shield / Safety Glasses with side shields
Dust Mask
Respirator
Ear Plugs / Ear Muffs
Gloves
✔
Closed-Toe Foot Wear (no heels)
✔
Lab Coat / Protective Apron
✔
Other
ALWAYS WEAR THE REQUIRED PPE WHEN USING THIS MACHINE!

2.0 Pre-use Inspection Checklist
Check Y N N/A
1 Is the power cord free of frays and damage?
2 Is the area around the heat press free of slip/trip hazards?
3 Is the surface area of the heater platen free of defects?
4 Does the arm handle and the upper heat platen move freely without obstruction?
5 Has the clamping arm pressure been adjusted? (This will allow you to easily move the
clamping arm up and down).
6 Has the temperature and the timer been set? (150F to 350 F).
7 Is the material/fabric to be pressed ready?
Comments/Corrective Action:
3.0 Safe Operating Procedure (SOP)
This procedure is outlined as follows: General Safety Guidelines Equipment Specific Safety Operating Procedure
3.1 General Safety Guidelines Before using the machine, perform the following general safety checks:
a) Make sure you understand all of the instructional material before operating this equipment. Failure to follow safety
instruction and warnings may result in serious personal injury, fire or property damage. b) If you have any questions or uncertainties, please ask your studio technician before use.
c) Long hair, scarves, loose clothing, jewellery and ties pose an entanglement hazard. Please make sure these are all
constrained prior to operating the equipment. d) Make sure the cord is kept away from heat, oil, sharp edges or moving parts and does not pose a trip hazard. e) Do not conduct any maintenance or repairs on this equipment. In case of a defect, contact your technician. f) Do not remove or render machine guarding ineffective in any way. g) Ensure the work area is both well-lit and organized.

3.2 Equipment Specific Safe Operating Procedure (SOP)
1. Before using the heat press
Pict
ure
1
a) Put on our PPEs b) Turn on the main power switch. c) Ensure the top heater platen is raised to its upper most position (see
picture 1). d) Set the timer for the desired duration. e) Set the temperature to the desired setting. Note: It will take about 30
minutes for the heat press to warm up. f) The exposed surface of the machine will start to heat. Do not touch the
surface of the machine as it is hot g) Do not leave the heat press unattended. h) Notify individuals around you that the machine is on.
2. Using the heat press
Pict
ure
2
a) Place the material on the lower heat platen. b) Stand to the front or side of the press to easily access the arm handle. c) Use the handle and bring down the top heat element and clamp it into
position (see picture 2). d) Ensure nothing else gets caught in the heat press. e) The heat press will be locked into position for a desired time. The time
cycle will become activated when the top heat platen is clamped down. f) Do not touch the heat press during this time period. g) Stay at your work station and do not leave the equipment unattended until
you are done.
3. After using the heat press
Pict
ure
3 a) When the timer sounds, release the clamping arm and slowly move it to its
uppermost position. b) Carefully remove the material and place it on a flat surface to let it cool. c) Handle hot objects and materials with care. d) Turn off the heat press after use. e) Place a “Hot! Use Caution” sign (see picture 3) on the press when it is being
cooled. f) Ensure the heat press remains off and in an open clamshell position when
it’s not being used (see picture 4). g) Clean up after yourself.
Pict
ure
4

4.0 Maintenance and Repair
4.1. Lockout/Tagout (LOTO) Procedure:
LOCKOUT TAGOUT PROCEDURE
Equipment Identification
Equipment Name/Description: Heat Press
Equipment Location: Fibre Studio Room 201
Total # of Energy Isolation Devices/locks:
1
BEFORE SERVICING THIS MACHINE, NOTIFY AFFECTED PERSONNEL. ONLY PROPERLY TRAINED AND AUTHORIZED PERSONNEL SHALL
PERFORM LOCKOUT TAGOUT PROCEDURE
Energy Source
Location Type of EID/lock to be used
Steps for locking & tagging
Verification Procedure
Electrical End of cord Plastic clamshell and padlock
Stop machine, unplug cord, and install clamshell, lock, and tag.
Attempt to start machine, visually confirm it will not start.
IF SYSTEM CANNOT BE LOCKED OUT OR IF SYSTEM FAILS VERIFICATION PROCEDURE, STOP & CONTACT YOUR SUPERVISOR
*LOTO Procedure # A-xxxxxxx Revision #: Approved by: Date:

4.2 Inspection Checklist
5.0 Document Control
Any changes or updates to this document must be recorded and maintained.
Initially Created By: The Office of Safety and Risk Management Date: September 2011
Consultation: Studio Managers and Technicians Program Chairs and faculty
Date: January-April 2013 April – May, 2013
Approval By: VPFA and VPA Date: September, 2013
Review and Revisions Made By: Date Revised:
Changes Made(indicate sections):
Revisions Approved By: Date of Approval:
DAILY ✔ Ensure the area around the heat press is free of slip/trip hazards.
Keep the surface of the heater platen clean. Use normal cleaning solutions to fully clean the platens.
Ensure all controls are working (e.g. temperature and machine timer).
Ensure pressure knob is working properly and is adjustable.
Ensure the heat press arm handle and top heat platen moves freely without obstruction.
Ensure “Warning-Burn Hazard” or “Hot! Use Caution” labels are placed in conspicuous locations to alert
personnel of the thermal hazard(s).
WEEKLY ✔ Ensure the machine is working in good condition and gives off adequate heat.
Wipe down entire machine with damp sponge.
MONTHLY ✔ Check all elements of the machine.
Inspect the wire and plug for any damage. Ensure there are no bends or crimps in the cord. Remove and
repair damaged electrical equipment.
ANNUALLY ✔ Get the machine checked to ensure it is in good working condition.


Machine Name: Paper Press and Hydraulic Jack Type: MVP Pro-lift Model: B-006NC
Location Fibre – Room 201
Manufacturer Name: The Paperwright press Address: 1261 Potland Ave., Ottawa, ON Telephone Number: 1 (613) 731-5417
Applicable Legislation
1. CAN/CSA-Z432-04 “Safeguarding of Machinery” 2. CSA Z460-05 “Control of hazardous energy-lockout and other methods”
Sources
Manufacturer’s Manual Safe Work BC, CCOHS, and IAPA resources REA Engineer Specifications Studio Technicians
DO NOT USE THIS MACHINE UNLESS YOU ARE TRAINED IN ITS SAFE USE!
Pape
r Pre
ss a
nd H
ydra
ulic
Jack

1.0 Personal Protective Equipment (PPE) Requirements
PERSONAL PROTECTIVE EQUIPMENT (PPE) REQUIRED RECOMMENDED
Face Shield / Safety Glasses with side shields
Dust Mask
Respirator
Ear Plugs / Ear Muffs
Gloves
✔
Closed-Toe Foot Wear (no heels)
✔
Lab Coat / Protective Apron
Other
ALWAYS WEAR THE REQUIRED PPE WHEN USING THIS MACHINE!

2.0 Pre-use Inspection Checklist
Check Y N N/A
1 Is the area around the paper press free of slip/trip hazards?
2 Has the material from previous operation been removed?
3 Does the Hydraulic jack release valve move freely without obstruction?
4 Is the Jack handle available?
5 Are plywood boards available?
6 Is the bed press surface free of defects?
7 Is the area around the paper press free of slip/trip hazards?
Comments/Corrective Action:
3.0 Safe Operating Procedure (SOP)
This procedure is outlined as follows: General Safety Guidelines Equipment Specific Safety Operating Procedure
3.1 General Safety Guidelines Before using the machine, perform the following general safety checks:
a) Make sure you understand all of the instructional material before operating this equipment. Failure to follow safety
instruction and warnings may result in serious personal injury, fire or property damage. b) If you have any questions or uncertainties, please ask your studio technician before use.
c) Long hair, scarves, loose clothing, jewellery and ties pose an entanglement hazard. Please make sure these are all
constrained prior to operating the equipment. d) Do not conduct any maintenance or repairs on this equipment. In case of a defect, contact your technician. e) Do not remove or render machine guarding ineffective in any way. f) Ensure the work area is both well-lit and organized.

3.2 Equipment Specific Safe Operating Procedure (SOP)
1. Before using the paper press & hydraulic jack
Pict
ure
1
a) Prepare your paper to be pressed. b) Carefully set the press bed on the steel A-frame (see picture 1) c) The press bed is heavy so be very careful of your fingers when moving it
into position.
2. Using the paper press & hydraulic jack
Pict
ure
2
a) Place your paper on the plywood board on top of the press bed tray. b) Center your paper on the tray. Do not place hard objects on the tray. c) Hold the hydraulic jack (see picture 2) with two hands and place it on top
of the board. d) Place the jack in the center of the boards (see picture 3). Not centering the
jack may cause it to tip and fall off. e) Turn release valve clockwise until tightly closed. f) Insert handle rod in socket and pump the handle g) Hold the handle firmly and pump it till the top of the jack touches the
central support piece of metal at the top of the steel frame. h) Apply pressure slowly as you feel resistance. i) Keep your hands and finger(s) away from the boards when pressing. It’s a
pinch-point hazard. j) Do not let water accumulate on the floor; it can become a slip/fall hazard.
Pict
ure
3
3. After using the paper press & hydraulic jack
Pict
ure
4
a) Once done turn the valve to release the pressure from the jack. b) Carefully remove the jack. Do not leave the jack sitting in water- place it in
a dry place. c) Wipe the tray dry after use with a dry cloth. d) Stack the plywood to dry. e) Clean up after yourself.
4.0 Maintenance and Repair
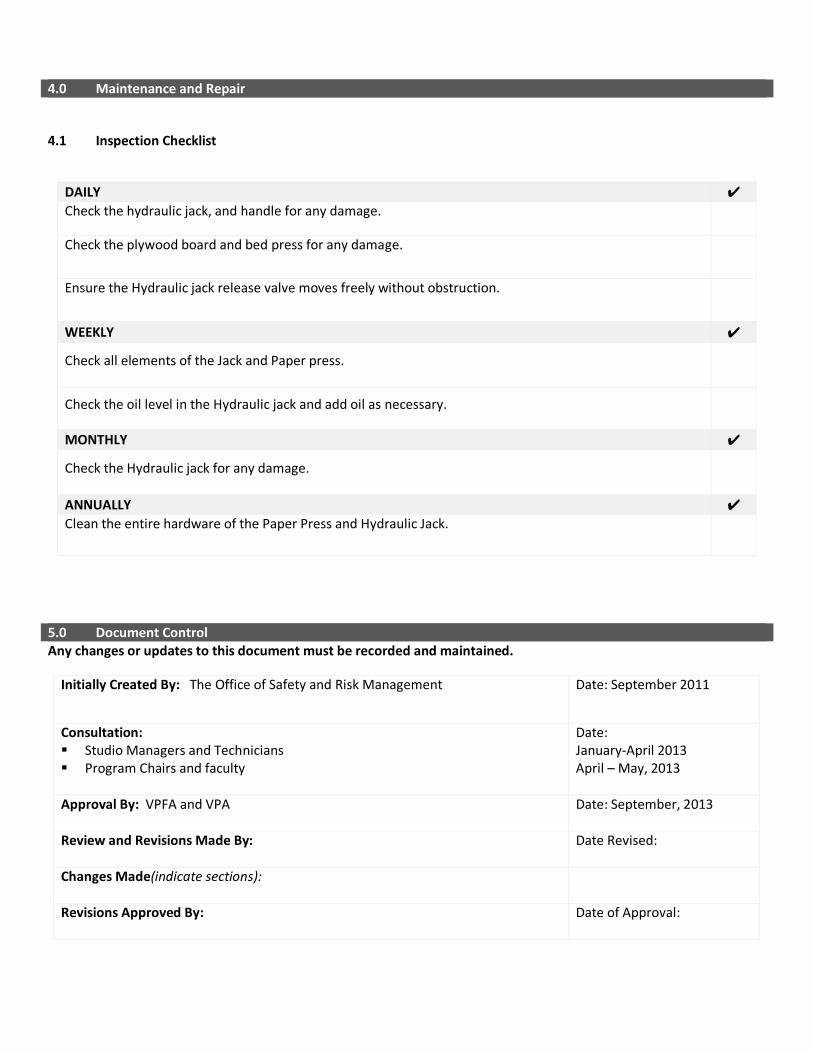
4.1 Inspection Checklist
5.0 Document Control Any changes or updates to this document must be recorded and maintained.
Initially Created By: The Office of Safety and Risk Management Date: September 2011
Consultation: Studio Managers and Technicians Program Chairs and faculty
Date: January-April 2013 April – May, 2013
Approval By: VPFA and VPA Date: September, 2013
Review and Revisions Made By: Date Revised:
Changes Made(indicate sections):
Revisions Approved By: Date of Approval:
DAILY ✔ Check the hydraulic jack, and handle for any damage.
Check the plywood board and bed press for any damage.
Ensure the Hydraulic jack release valve moves freely without obstruction.
WEEKLY ✔
Check all elements of the Jack and Paper press.
Check the oil level in the Hydraulic jack and add oil as necessary.
MONTHLY ✔
Check the Hydraulic jack for any damage.
ANNUALLY ✔ Clean the entire hardware of the Paper Press and Hydraulic Jack.


Machine Industrial Sewing Machine Model: MSK-8900M
Location Fibre Studio – 201
Manufacturer Name: Reliable Corporation Address: Toronto, Ontario M6B 4K7 Canada Telephone Number: (416) -785-0200
Applicable Legislation
1. CAN/CSA-Z432-04 “Safeguarding of Machinery” 2. CSA Z460-05 “Control of hazardous energy-lockout and other methods”
Sources
Manufacturer’s Manual Safe Work BC, CCOHS, and IAPA resources REA Engineer Specifications Studio Technicians
DO NOT USE THIS MACHINE UNLESS YOU ARE TRAINED IN ITS SAFE USE!
Indu
stria
l Sew
ing
Mac
hine

1.0 Personal Protective Equipment (PPE) Requirements
PERSONAL PROTECTIVE EQUIPMENT (PPE) REQUIRED RECOMMENDED
Face Shield / Safety Glasses with side shields
✔
Dust Mask
Respirator
Ear Plugs / Ear Muffs
Gloves
Closed-Toe Foot Wear (no heels)
✔
Lab Coat / Protective Apron
Other:
ALWAYS WEAR THE REQUIRED PPE WHEN USING THIS MACHINE!

2.0 Pre-use Inspection Checklist
Check Y N N/A
1 Is the area around the industrial sewing machine free of slip/trip hazards?
2 Has the debris/material from previous operations been removed?
3 Is the needle free of defects?
4 Is the bobbin securely in place?
5 Does the foot pedal move freely without obstruction?
6 Does the light bulb/switch work?
Comments/Corrective Action:
3.0 Safe Operating Procedure (SOP)
This procedure is outlined as follows: General Safety Guidelines Equipment Specific Safety Operating Procedure
3.1 General Safety Guidelines Before using the machine, perform the following general safety checks:
a) Make sure you understand all of the instructional material before operating this equipment. Failure to follow safety
instruction and warnings may result in serious personal injury, fire or property damage. b) If you have any questions or uncertainties, please ask your studio technician before use.
c) Long hair, scarves, loose clothing, jewellery and ties pose an entanglement hazard. Please make sure these are all
constrained prior to operating the equipment. d) Make sure the cord is kept away from heat, oil, sharp edges or moving parts and does not pose a trip hazard. e) Do not conduct any maintenance or repairs on this equipment. In case of a defect, contact your technician. f) Do not remove or render machine guarding ineffective in any way. g) Ensure the work area is both well-lit and organized.

3.2 Equipment Specific Safe Operating Procedure (SOP)
1. Inserting needle
Pict
ure
1
a) Put on your PPEs b) Ensure the machine is off. c) check needle
2. Bobbin
Pict
ure
2
a) Install the bobbin (see picture 2) from the bobbin case. b) Run the machine to wind the thread on the bobbin. c) Keep your fingers away from the needle when winding the bobbin.
3. Threading
Pict
ure
3
a) Place the thread spool on the spool pin (see picture 3). b) refer to supplied manual for detailed threading instructions

4. Sewing
Pict
ure
4
a) Turn on the machine; the switch is located under the table (see picture 4). b) Raise the presser foot (see picture 5) and slide the fabric underneath. c) Never sew with the presser foot in a raised position. d) Drop the presser foot and begin sewing by pressing on the foot pedal. e) The presser foot and the feed-dog can cause a pinch point hazard. Ensure
your finger(s) does not get caught between them. f) Always keep eyes on the needle. Keep hands away from the needle; place
them at either side of the machine. g) Keep your hands and wrists straight while working. Take occasional breaks. h) Industrial sewing machine speed is very fast. Practice running few scraps of
material to become familiar with the speed. i) Keep your face at a distance to avoid hitting the take-up lever guard (see
picture 6) j) Remember to always remove the pins from your fabric as you sew. k) If anything unexpected occurs, immediately disable the equipment by
switching off the machine and/or removing the attachment plug.
Pict
ure
5
Pict
ure
6
5. After Sewing
a) Raise the presser foot and needle to remove the fabric from underneath. b) Turn the sewing machine off. c) Clean up after yourself.

4.0 Maintenance and Repair
4.1. Lockout/Tagout (LOTO) Procedure:
LOCKOUT TAGOUT PROCEDURE
Equipment Identification
Equipment Name/Description: Industrial Sewing Machine
Equipment Location: Fibre Studio Room 201 Total # of Energy Isolation Devices/locks:
1
BEFORE SERVICING THIS MACHINE, NOTIFY AFFECTED PERSONNEL. ONLY PROPERLY TRAINED AND AUTHORIZED PERSONNEL SHALL
PERFORM LOCKOUT TAGOUT PROCEDURE
Energy Source
Location Type of EID/lock to be used
Steps for locking & tagging
Verification Procedure
Electrical End of cord Plastic clamshell and padlock
Stop machine, unplug cord, and install clamshell, lock, and tag.
Attempt to start machine, visually confirm it will not start.
IF SYSTEM CANNOT BE LOCKED OUT OR IF SYSTEM FAILS VERIFICATION PROCEDURE, STOP & CONTACT YOUR SUPERVISOR
LOTO Procedure # A-xxxxxxx Revision #:
Approved by: Date:

4.2 Inspection Checklist
5.0 Document Control
Any changes or updates to this document must be recorded and maintained.
Initially Created By: The Office of Safety and Risk Management Date: September 2011
Consultation: Studio Managers and Technicians Program Chairs and faculty
Date: January-April 2013 April – May, 2013
Approval By: VPFA and VPA Date: September, 2013
Review and Revisions Made By: Date Revised:
Changes Made(indicate sections):
Revisions Approved By: Date of Approval:
DAILY ✔ Ensure the area around the industrial sewing machine is free of slip/trip hazards.
Ensure the needle and the feed lever guard is in place.
Inspect the needle for damage (chips and defects).
Ensure the needle is secure.
Ensure the foot pedal moves freely without obstruction.
Remove lint and tangled threads from inside and outside the machine.
WEEKLY ✔ Inspect all elements to ensure that they are in good working condition
MONTHLY ✔ Clean the inner components of the machine, including the shuttle race on a monthly basis.
Check the machine oil depending on the usage, lubricate it appropriately, do not over oil the machine.
Inspect the wire and plug for any damage. Ensure there are no bends or crimps in the cord. Remove and
repair damaged electrical equipment.
ANNUALLY ✔ Inspect the foot pedal to ensure that they are operational. Conduct a test run of the machine to ensure
that there are no malfunctions.
Have machine serviced by a licensed technician.
Clean the entire hardware of the machine


Machine Electric Powered Pressure Washer
Location Fibre Studio – Room 201
Manufacturer Name: Princess Auto Ltd. Address: 481 Panet road, Winnipeg Manitoba Telephone Number: (1800)-665-8685
Applicable Legislation
1. CAN/CSA-Z432-04 Safeguarding of Machinery 2. CSA Z460-05 “Control of hazardous energy-lockout and other methods”
Sources
Manufacturer’s Manual Safe Work BC, CCOHS, and IAPA resources REA Engineer Specifications Studio Technicians
DO NOT USE THIS MACHINE UNLESS YOU ARE TRAINED IN ITS SAFE USE!
Pow
er W
ashe
r

1.0 Personal Protective Equipment (PPE) Requirements
PERSONAL PROTECTIVE EQUIPMENT (PPE) REQUIRED RECOMMENDED
Face Shield / Safety Glasses with side shields
✔
Dust Mask
Respirator
Ear Plugs / Ear Muffs
✔
Gloves
✔
Closed-Toe Foot Wear (no heels)
✔
Lab Coat / Protective Apron
✔
Other
ALWAYS WEAR THE REQUIRED PPE WHEN USING THIS MACHINE!

2.0 Pre-use Inspection Checklist
Check Y N N/A
1 Are the power cords free of frays and damage?
2 Is the area around the power washer free of slip/trip hazards?
3 Does the release trigger move freely without obstruction?
Comments/Corrective Action:
3.0 Safe Operating Procedure (SOP)
This procedure is outlined as follows: General Safety Guidelines Equipment Specific Safety Operating Procedure
3.1 General Safety Guidelines Before using the machine, perform the following general safety checks:
a) Make sure you understand all of the instructional material before operating this equipment. Failure to follow safety
instruction and warnings may result in serious personal injury, fire or property damage. b) If you have any questions or uncertainties, please ask your studio technician before use.
c) Long hair, scarves, loose clothing, jewellery and ties pose an entanglement hazard. Please make sure these are all
constrained prior to operating the equipment. d) Do not conduct any maintenance or repairs on this equipment. In case of a defect, contact your technician. e) Do not remove or render machine guarding ineffective in any way. f) Ensure the work area is both well-lit and organized.

3.2 Equipment Specific Safe Operating Procedure (SOP)
1. Before using the power washer
Pict
ure
1
a) Put on your PPEs b) Select the appropriate nozzle size (see picture 1) for the desired pressure
rate. c) Turn on water flow d) Unwrap the pressure hose and position the spray gun away from the
motor.
2. Reclaiming a screen
Pict
ure
2
a) Wear nitrile gloves to avoid skin contact with the solution. b) Wet screen with water. c) Apply small amount of reclaim solution (see picture 2) on your material. d) Use a sponge to spread it on the material or spray it with water.
Pict
ure
3
a) Turn on the motor. b) Hold the spray gun and pull the trigger to start the water flow. Be aware of
the pressure velocity. c) Hold the spray gun with both hands to prevent any backlash (see picture
3). d) Do not place your hand(s) or finger(s) in front of the nozzle when the spray
is on. e) Never point the pressure washer at yourself or others. f) Aim the spray gun at the work from a comfortable distance. g) If anything unexpected occurs, immediately disable the equipment by
switching it off and/or removing the attachment plug.
Pict
ure
4

3. After using the Power washer
Pict
ure
5 a) Once done, release the spray gun trigger and flip the safety latch into position under the trigger (see picture 5).
b) Squeeze the trigger to allow all the water out from the pressure valve. c) Hang the water gun on the hook (see picture 6). d) Turn the motor off when finished. e) Clean the area upon completion of the task. f) Mop the surrounding floor.
Pict
ure
6

4.0 Maintenance and Repair
4.1. Lockout/Tagout (LOTO) Procedure:
LOCKOUT TAGOUT PROCEDURE
Equipment Identification
Equipment Name/Description: Power Washer
Equipment Location: Fibre Studio Room 201d
Total # of Energy Isolation Devices/locks:
1
BEFORE SERVICING THIS MACHINE, NOTIFY AFFECTED PERSONNEL. ONLY PROPERLY TRAINED AND AUTHORIZED PERSONNEL SHALL
PERFORM LOCKOUT TAGOUT PROCEDURE
Energy Source
Location Type of EID/lock to be used
Steps for locking & tagging
Verification Procedure
Electrical End of cord Plastic clamshell and padlock
Stop machine, unplug cord, and install clamshell, lock, and tag.
Attempt to start machine, visually confirm it will not start.
IF SYSTEM CANNOT BE LOCKED OUT OR IF SYSTEM FAILS VERIFICATION PROCEDURE, STOP & CONTACT YOUR SUPERVISOR
LOTO Procedure # A-xxxxxxx Revision #: Approved by: Date:

4.2 Inspection Checklist
5.0 Document Control Any changes or updates to this document must be recorded and maintained.
Initially Created By: The Office of Safety and Risk Management Date: September 2011
Consultation: Studio Managers and Technicians Program Chairs and faculty
Date: January-April 2013 April – May, 2013
Approval By: VPFA and VPA Date: September, 2013
Review and Revisions Made By: Date Revised:
Changes Made(indicate sections):
Revisions Approved By: Date of Approval:
DAILY ✔ Ensure the area around the power washer is free of slip/trip hazards.
Ensure the power washer motor is sitting firmly on a level base.
Ensure water supply is adequate.
Ensure the release trigger moves freely without obstruction.
Check that the nozzle on the spray gun is not clogged.
Inspect the water hose to ensure that it is in good condition.
Inspect the water shut-off switch.
Check that the pump oil level is within operating range. Add oil if necessary.
Check all hardware and replace any damaged or worn components.
WEEKLY ✔
Check pressure valve for any wear and damage.
Check water inlet filter. When necessary remove residual water from the inlet of the gun.
Check the motor and the pump to see if they are in good working condition.
Inspect electrical enclosure, cables, and wiring properly.
MONTHLY ✔ Check the hose and valves for any leaks.
Check the power washer for any rust buildup.
ANNUALLY ✔ Inspect the entire hardware of the machine to ensure that it runs smoothly. Service as required.


Machine Name; Serger Model: 936
Location Fibre Studio – Room 201
Manufacturer Name: Husqvarna Viking Inc. Tele: (416)-487-4438
Applicable Legislation
1. CAN/CSA-Z432-04 “Safeguarding of Machinery” 2. CSA Z460-05 “Control of hazardous energy-lockout and other methods”
Sources
Manufacturer’s Manual Safe Work BC, CCOHS, and IAPA resources REA Engineer Specifications Studio Technicians
DO NOT USE THIS MACHINE UNLESS YOU ARE TRAINED IN ITS SAFE USE!
Serg
er

1.0 Personal Protective Equipment (PPE) Requirements
PERSONAL PROTECTIVE EQUIPMENT (PPE) REQUIRED RECOMMENDED
Face Shield / Safety Glasses with side shields
✔
Dust Mask
Respirator
Ear Plugs / Ear Muffs
Gloves
Closed-Toe Foot Wear (no heels)
✔
Lab Coat / Protective Apron
Other
ALWAYS WEAR THE REQUIRED PPE WHEN USING THIS MACHINE!

2.0 Pre-use Inspection Checklist
Check Y N N/A
1 Are the power cords free of frays and damage?
2 Is the serger placed on a secure surface?
3 Is the area around the serger free of slip/trip hazards?
4 Are the needles free of defects?
5 Are the needles secured in place?
6 Is the cutter engaged in position?
7 Is the front cover closed and is the safety switch in place?
8 Does the foot pedal move freely without obstruction?
9 Is the presser foot in place and does it raise and lower freely?
10 Is the telescopic thread stand to its full height and locked in place?
11 Is the appropriate speed level (slow, medium, fast) selected?
12 Does the light bulb/switch work?
Comments/Corrective Action:
3.0 Safe Operating Procedure (SOP)
This procedure is outlined as follows: General Safety Guidelines Equipment Specific Safety Operating Procedure
3.1 General Safety Guidelines Before using the machine, perform the following general safety checks:
a) Make sure you understand all of the instructional material before operating this equipment. Failure to follow safety
instruction and warnings may result in serious personal injury, fire or property damage. b) If you have any questions or uncertainties, please ask your studio technician before use.
c) Long hair, scarves, loose clothing, jewellery and ties pose an entanglement hazard. Please make sure these are all
constrained prior to operating the equipment. d) Do not conduct any maintenance or repairs on this equipment. In case of a defect, contact your technician. e) Do not remove or render machine guarding ineffective in any way. f) Ensure the work area is both well-lit and organized.

3.2 Equipment Specific Safe Operating Procedure (SOP)
1. Before sewing
Pict
ure
1
a) Put on your PPE b) Connect the foot control cable into the machine. c) Connect the power cable into the machine and the other in the socket. d) Turn the hand wheel until the needle bar is in its highest position.
2. Threading
Pict
ure
2
a) Place the thread spools on the thread spindles (see picture 2). b) Thread the machine. (refer to supplied manual for detailed instructions) c) Adjust the tension dials located on the front of the machine. Each dial
controls a different thread (see picture 4). d) Check the threading diagram (on the front cover) or the manufacture
manual for further detail. Pict
ure
3
Pict
ure
4

3. Sewing
Pict
ure
5
a) Turn the dual light and machine switch on. b) Raise the presser foot and slide the fabric underneath. c) Position the fabric so that the blade of the serger will trim the desired
amount of fabric. The blade is located to the right of the needle (see picture 5).
d) Drop the presser foot and begin sewing by pressing on the foot pedal. e) The presser foot and the feed-dog can cause a pinch point hazard (see
picture 6). Ensure your finger(s) does not get caught between them. f) Always keep eyes on the needles. Keep hands away from the needle; place
them at either side of the machine. g) Keep your hands and wrists straight while working. Take occasional breaks. h) If anything unexpected occurs, immediately disable the equipment by
switching it off and/or removing the attachment plug.
Pict
ure
6
4. After Sewing
a) Raise the presser foot and needle to remove the fabric from underneath. b) Cut the thread chain close to the fabric using the thread cutter. c) Turn the sewing machine off. d) Clean up after yourself

4.0 Maintenance and Repair
4.1. Lockout/Tagout (LOTO) Procedure:
LOCKOUT TAGOUT PROCEDURE
Equipment Identification
Equipment Name/Description: Serger
Equipment Location: Fibre Studio Room 201
Total # of Energy Isolation Devices/locks:
1
BEFORE SERVICING THIS MACHINE, NOTIFY AFFECTED PERSONNEL. ONLY PROPERLY TRAINED AND AUTHORIZED PERSONNEL SHALL
PERFORM LOCKOUT TAGOUT PROCEDURE
Energy Source
Location Type of EID/lock to be used
Steps for locking & tagging
Verification Procedure
Electrical End of cord Plastic clamshell and padlock
Stop machine, unplug cord, and install clamshell, lock, and tag.
Attempt to start machine, visually confirm it will not start.
IF SYSTEM CANNOT BE LOCKED OUT OR IF SYSTEM FAILS VERIFICATION PROCEDURE, STOP & CONTACT YOUR SUPERVISOR
LOTO Procedure # A-xxxxxxx Revision #:
Approved by: Date:

4.2 Inspection Checklist
5.0 Document Control Any changes or updates to this document must be recorded and maintained.
Initially Created By: The Office of Safety and Risk Management Date: September 2011
Consultation: Studio Managers and Technicians Program Chairs and faculty
Date: January-April 2013 April – May, 2013
Approval By: VPFA and VPA Date: September, 2013
Review and Revisions Made By: Date Revised:
Changes Made(indicate sections):
Revisions Approved By: Date of Approval:
DAILY ✔ Ensure serger needles are secure and are free of defects (not chipped or defective).
Ensure the thread cutter works properly.
Ensure the presser foot moves freely without obstruction.
Remove lint and tangled threads from inside and outside the machine.
Ensure serger needles are secure and are free of defects (not chipped or defective).
WEEKLY ✔ Inspect all elements to ensure that they are in good working condition
MONTHLY ✔ Clean the inner components of the machine.
Check the machine oil depending on the usage, lubricate it appropriately, do not over oil the machine.
Inspect the wire and plug for any damage. Ensure there are no bends or crimps in the cord. Remove and repair damaged electrical equipment.
ANNUALLY ✔ Inspect the foot pedal to ensure that it is operational. Conduct a test run of the machine to ensure that
there are no malfunctions.
Clean the entire hardware of the machine
Have machine serviced by a licensed technician.


Machine Name: Sewing Machine Model: 1008
Location Fibre Studio - Room 201
Manufacturer Name: Bernina
Address: 3702 Prairie Lake Court, Aurora, Illinois 60504.
Applicable Legislation
1. CAN/CSA-Z432-04 “Safeguarding of Machinery” 2. CSA Z460-05 “Control of hazardous energy-lockout and other methods”
Sources
Manufacturer’s Manual Safe Work BC, CCOHS, and IAPA resources REA Engineer Specifications Studio Technicians
DO NOT USE THIS MACHINE UNLESS YOU ARE TRAINED IN ITS SAFE USE!
Sew
ing
Mac
hine

1.0 Personal Protective Equipment (PPE) Requirements
PERSONAL PROTECTIVE EQUIPMENT (PPE) REQUIRED RECOMMENDED
Face Shield / Safety Glasses with side shields
✔
Dust Mask
Respirator
Ear Plugs / Ear Muffs
Gloves
Closed-Toe Foot Wear (no heels)
✔
Lab Coat / Protective Apron
Other:
ALWAYS WEAR THE REQUIRED PPE WHEN USING THIS MACHINE!

2.0 Pre-use Inspection Checklist
Check Y N N/A
1 Are the power cords free of frays and damage?
2 Is the sewing machine placed on a secure surface?
3 Is the area around the sewing machine free of slip/trip hazards?
4 Is the needle free of defects (bent, chipped or blunt)?
5 Are the needle and the bobbin secured in place?
6 Does the foot pedal move freely without obstruction?
7 Is the presser foot in place and does it raise and lower freely?
8 Is the tool accessory box available?
9 Does the light bulb/switch work?
Comments/Corrective Action:
3.0 Safe Operating Procedure (SOP)
This procedure is outlined as follows: General Safety Guidelines Equipment Specific Safety Operating Procedure
3.1 General Safety Guidelines Before using the machine, perform the following general safety checks:
a) Make sure you understand all of the instructional material before operating this equipment. Failure to follow safety
instruction and warnings may result in serious personal injury, fire or property damage. b) If you have any questions or uncertainties, please ask your studio technician before use.
c) Long hair, scarves, loose clothing, jewellery and ties pose an entanglement hazard. Please make sure these are all
constrained prior to operating the equipment. d) Do not conduct any maintenance or repairs on this equipment. In case of a defect, contact your technician. e) Do not remove or render machine guarding ineffective in any way. f) Ensure the work area is both well-lit and organized.

3.2 Equipment Specific Safe Operating Procedure (SOP)
1. Before Sewing
Pict
ure
1
a) Put on PPEs b) Connect the foot pedal cable into the machine. c) Plug the power cable into the socket. d) e) Uninstall the bobbin (see picture 2) from the bobbin case and wind the
bobbin with the thread by running the machine. f) Keep your fingers away from the needle and the thread when winding the
bobbin. g) Place the thread spool on the spool pin. h) Take the thread end and pass it through the designated threading points
(through the tension assembly, take up lever i) Put the thread through the eye of the needle with caution. j) Use the switch to set the needle position and stitch width (see picture 3)
Pict
ure
2
Pict
ure
3

2. Sewing
Pict
ure
1
a) Turn the dual light and machine switch on. b) Sit right in front of the needle (in front of the working area). c) Raise the presser foot (see picture 4) and needle to position the fabric
underneath. d) Drop the presser foot and begin sewing by pressing on the foot pedal. e) Never sew with the presser foot in a raised position. f) The presser foot and the feed-dog can cause a pinch point hazard. Ensure
your finger(s) does not get caught between them. g) Always keep eyes on the needle. Keep hands away from the needle; place
them at either side of the machine. h) Keep your hands and wrists straight while working. Take occasional breaks. i) Do not force the fabric forward or backward while sewing. j) Remember to always remove the pins from your fabric as you sew. k) If anything unexpected occurs, immediately disable the equipment by
switching off the machine and/or removing the attachment plug.
3. After sewing
Pict
ure
5
a) Turn the sewing machine off. b) Raise the presser foot and needle to remove the fabric from underneath. c) Take the work out to the rear left and hook both threads into the cutter
(see picture 5.) d) Unplug and clean area.

4.0 Maintenance and Repair
4.1. Lockout/Tagout (LOTO) Procedure:
LOCKOUT TAGOUT PROCEDURE
Equipment Identification
Equipment Name/Description: Sewing Machine
Equipment Location: Fibre Studio Room 201
Total # of Energy Isolation Devices/locks:
1
BEFORE SERVICING THIS MACHINE, NOTIFY AFFECTED PERSONNEL. ONLY PROPERLY TRAINED AND AUTHORIZED PERSONNEL SHALL
PERFORM LOCKOUT TAGOUT PROCEDURE
Energy Source
Location Type of EID/lock to be used
Steps for locking & tagging
Verification Procedure
Electrical End of cord Plastic clamshell and padlock
Stop machine, unplug cord, and install clamshell, lock, and tag.
Attempt to start machine, visually confirm it will not start.
IF SYSTEM CANNOT BE LOCKED OUT OR IF SYSTEM FAILS VERIFICATION PROCEDURE, STOP & CONTACT YOUR SUPERVISOR
LOTO Procedure # A-xxxxxxx Revision #:
Approved by: Date:

4.2 Inspection Checklist
5.0 Document Control Any changes or updates to this document must be recorded and maintained.
Initially Created By: The Office of Safety and Risk Management Date: September 2011
Consultation: Studio Managers and Technicians Program Chairs and faculty
Date: January-April 2013 April – May, 2013
Approval By: VPFA and VPA Date: September, 2013
Review and Revisions Made By: Date Revised:
Changes Made(indicate sections):
Revisions Approved By: Date of Approval:
DAILY ✔ Ensure sewing machine needle is secure and is free of defects (not chipped or defective)
Ensure the thread cutter works properly.
Ensure the presser foot raises and lowers freely.
Regularly inspect the presser foot to ensure that it is operable. In order to change the presser foot ensure
that the machine is turned off and unplugged
Remove lint and tangled threads from inside and outside the machine.
Inspect the foot pedal to ensure that it is operational. Run a test of the machine to ensure that there are no
malfunctions.
WEEKLY ✔ Inspect all elements to ensure that they are in good working condition (i.e. Bobbins, thread cutter)
MONTHLY ✔ Clean the inner components of the machine, including the shuttle race on a monthly basis.
Check the machine oil depending on the usage, lubricate it appropriately, do not over oil the machine.
Inspect the wire and plug for any damage. Ensure there are no bends or crimps in the cord. Remove and
repair damaged electrical equipment.
ANNUALLY ✔ Clean the entire hardware of the machine
Have machine serviced by a licensed technician.


Machine Small Steamer
Location Fibre - Room 201
Manufacturer Applicable Legislation
1. CAN/CSA-Z432-04 “Safeguarding of Machinery” 2. CSA Z460-05 “Control of hazardous energy-lockout and other methods”
Sources
Manufacturer’s Manual Safe Work BC, CCOHS, and IAPA resources REA Engineer Specifications Studio Technicians
DO NOT USE THIS MACHINE UNLESS YOU ARE TRAINED IN ITS SAFE USE!
Smal
l Ste
amer

1.0 Personal Protective Equipment (PPE) Requirements
PERSONAL PROTECTIVE EQUIPMENT (PPE) REQUIRED RECOMMENDED
Face Shield / Safety Glasses with side shields
✔
Dust Mask
Respirator
Ear Plugs / Ear Muffs
Gloves
✔
Closed-Toe Foot Wear (no heels)
✔
Lab Coat / Protective Apron
✔
Other
ALWAYS WEAR THE REQUIRED PPE WHEN USING THIS MACHINE!

2.0 Pre-use Inspection Checklist
Check Y N N/A
1 Are the power cords free of frays and damage?
2 Is the steamer secure on flat surface?
3 Is the area around the steamer free of slip/trip hazards?
4 Has previously used water been removed from the steamer?
5 Is the fabric stick in place?
6 Is the steamer lid and tray in place?
7 Is the stove working?
Comments/Corrective Action:
3.0 Safe Operating Procedure (SOP)
This procedure is outlined as follows: General Safety Guidelines Equipment Specific Safety Operating Procedure
3.1 General Safety Guidelines Before using the machine, perform the following general safety checks:
a) Make sure you understand all of the instructional material before operating this equipment. Failure to follow safety
instruction and warnings may result in serious personal injury, fire or property damage. b) If you have any questions or uncertainties, please ask your studio technician before use.
c) Long hair, scarves, loose clothing, jewellery and ties pose an entanglement hazard. Please make sure these are all
constrained prior to operating the equipment. d) Do not conduct any maintenance or repairs on this equipment. In case of a defect, contact your technician. e) Do not remove or render machine guarding ineffective in any way. f) Ensure the work area is both well-lit and organized.

3.2 Equipment Specific Safe Operating Procedure (SOP)
1. Before Steaming
Pi
ctur
e 1
a) Remove the top lid of the steamer and add water to the base of the
steamer (see picture 1). b) Wrap the fabric around the steamer stick (see picture 2). c) Place the bolt of fabric back into place. d) Position the top lid of the steamer in place. e) Hold the steamer from the side handles and position it on top of the stove
in a diagonal angle.
Pict
ure
2
2. Steaming
a) Turn on the stove. b) Select the appropriate temperature. c) Use caution when the steamer is being heated. d) Do not touch the steamer. e) Once the steam is noticeable, begin timing the process- let it steam for 20
minutes.
3. After Steaming
Pict
ure
3
a) Turn off the stove. b) Using heat resistant gloves or oven mitts (see picture 3) hold the steamer
from the side handles and remove it from the stove. c) The steamer will be very hot, avoid any possible skin contact with the
steamer. d) Remove the top lid of the steamer and remove the fabric stick. e) Go over to the worktable and unroll your fabric. f) Let the steamer cool off. g) Place a “Hot! Use Caution” sign on the steamer when it is being cooled. h) Once the steamer is cooled, dump the used water in the sink. i) Clean up after yourself.

4.0 Maintenance and Repair
4.1 Inspection Checklist
5.0 Document Control Any changes or updates to this document must be recorded and maintained.
Initially Created By: The Office of Safety and Risk Management Date: September 2011
Consultation: Studio Managers and Technicians Program Chairs and faculty
Date: January-April 2013 April – May, 2013
Approval By: VPFA and VPA Date: September, 2013
Review and Revisions Made By: Date Revised:
Changes Made(indicate sections):
Revisions Approved By: Date of Approval:
DAILY ✔ Ensure the steamer is clear of water when it’s not in use.
Ensure the fabric stick is in place and fits on the steamer tray.
Ensure the Steamer lid sits on the steamer securely.
Ensure “Warning-Burn Hazard” or “Hot! Use Caution” labels are placed in conspicuous locations to alert
personnel of the thermal hazard(s).
MONTHLY ✔ Ensure all parts of the steamer fit together.
Ensure there are no water or steam leaks. If so, seal the leaks.
ANNUALLY ✔ Inspect and clean the entire hardware of the steamer with a damp cloth.
Inspect the entire steamer and perform maintenance as required.


Machine Steam Jet
Location Fibre Studio - Room 201
Manufacturer Name: Jacquard Address: Rupert, Gibbon & Spider, Inc. P.O. Box 425, Healdsburg, CA 95448 Telephone: 800-442-0455
Applicable Legislation
1. CAN/CSA-Z432-04 Safeguarding of Machinery 2. CSA Z460-05 “Control of hazardous energy-lockout and other methods”
Sources
Manufacturer’s Manual Safe Work BC, CCOHS, and IAPA resources REA Engineer Specifications Studio Technicians
DO NOT USE THIS MACHINE UNLESS YOU ARE TRAINED IN ITS SAFE USE!
Stea
m Je
t

1.0 Personal Protective Equipment (PPE) Requirements
PERSONAL PROTECTIVE EQUIPMENT (PPE) REQUIRED RECOMMENDED
Face Shield / Safety Glasses with side shields
✔
Dust Mask
Respirator
Ear Plugs / Ear Muffs
Gloves
✔
Closed-Toe Foot Wear (no heels)
✔
Lab Coat / Protective Apron
✔
Other
ALWAYS WEAR THE REQUIRED PPE WHEN USING THIS MACHINE!

2.0 Pre-use Inspection Checklist
Check Y N N/A
1 Is the area around the Steamer free of slip/trip hazards?
2 Is the safety door lock in place?
3 Do the pressure knobs rotate freely?
4 Does the inner and outer steamer door open and close freely without obstruction?
5 Are the temperatures and time control panels working?
6 Is the fabric width greater than the maximum fabric width of 60’’ (152.4 cent.)?
Comments/Corrective Action:
3.0 Safe Operating Procedure (SOP)
This procedure is outlined as follows: General Safety Guidelines Equipment Specific Safety Operating Procedure
3.1 General Safety Guidelines Before using the machine, perform the following general safety checks:
a) Make sure you understand all of the instructional material before operating this equipment. Failure to follow safety
instruction and warnings may result in serious personal injury, fire or property damage. b) If you have any questions or uncertainties, please ask your studio technician before use.
c) Long hair, scarves, loose clothing, jewellery and ties pose an entanglement hazard. Please make sure these are all
constrained prior to operating the equipment. d) Do not conduct any maintenance or repairs on this equipment. In case of a defect, contact your technician. e) Do not remove or render machine guarding ineffective in any way. f) Ensure the work area is both well-lit and organized.

3.2 Equipment Specific Safe Operating Procedure (SOP)
1. Preparation for Steaming
Pict
ure
1
a) Get assistance from the class technician before using the steamer. b) Prepare the fabric for steaming. c) Separate the fabric from the paper and then roll it onto the spring core
(see picture 1). d) Add water to the steamer (see picture 2), the water level lights will
illuminate when the machine is full. e) Place the rolled fabric in the center of the Steam Jet. f) Caution: The steamer door is very heavy. g) Secure the pressure door by hand tightening the four knobs and then close
the outer lockout door (see picture 3). h) Do not operate the Steam Jet unless the outer safety door is closed.
Pict
ure
2
Pict
ure
3
2. Operating the Steam Jet
Pict
ure
4
a) Set the temperature and the time on the steamer (see picture 4). b) Start the cycle for the machine. c) Lock the door and stay away from the machine, as it gets hot d) If anything unexpected occurs, immediately disable the equipment by
using the emergency shut-off switch and/or removing the attachment plug.

3. Unloading the Steam Jet
Pict
ure
5
a) Once the cycle completes, turn the control switch to the standby position (see picture 5).
b) Stand behind or to the side of the door when opening. c) A minimal amount of steam will exit the chamber as the door opens. Wait
till the steam comes out. Keep some distance; do not directly place your face in front of the opening of the Steam Jet.
d) Do not place any part of your body near the doors as it is being opened. e) With assistance remove the fabric spring roll from the machine and place it
on a table (see picture 6). f) Leave the chamber open to cool. g) Leave heat resistant gloves on when unrolling the fabric. h) Turn the steamer doors out when not in use (see picture 7). i) Place a “Hot! Use Caution” or “Warning-Burn Hazard” labels on the
steamer when it is being cooled. j) Clean up after yourself.
Pict
ure
6
Pict
ure
7

4.0 Maintenance and Repair
4.1. Lockout/Tagout (LOTO) Procedure:
LOCKOUT TAGOUT PROCEDURE
Equipment Identification
Equipment Name/Description: Steam Jet
Equipment Location: Fibre Studio Room 201d Total # of Energy Isolation Devices/locks: 1
BEFORE SERVICING THIS MACHINE, NOTIFY AFFECTED PERSONNEL.
ONLY PROPERLY TRAINED AND AUTHORIZED PERSONNEL SHALL PERFORM LOCKOUT TAGOUT PROCEDURE
Energy Source Location Type of EID/lock to be used
Steps for locking & tagging
Verification Procedure
Electrical End of cord Plastic clamshell and padlock
Stop machine, unplug cord, and install clamshell, lock, and tag.
Attempt to start machine, visually confirm it will not start.
IF SYSTEM CANNOT BE LOCKED OUT OR IF SYSTEM FAILS VERIFICATION PROCEDURE, STOP & CONTACT YOUR SUPERVISOR
LOTO Procedure # A-xxxxxxx Revision #: Approved by: Date:

4.2 Inspection Checklist
5.0 Document Control Any changes or updates to this document must be recorded and maintained.
Initially Created By: The Office of Safety and Risk Management Date: September 2011
Consultation: Studio Managers and Technicians Program Chairs and faculty
Date: January-April 2013 April – May, 2013
Approval By: VPFA and VPA Date: September, 2013
Review and Revisions Made By: Date Revised:
Changes Made(indicate sections):
Revisions Approved By: Date of Approval:
DAILY ✔
Ensure the power cord is free of frays and damage.
Ensure the area around the Steamer is free of slip/trip hazards.
Ensure the safety door open and closes without obstruction.
Ensure the pressure knobs rotate freely and lock the door in place.
Check the temperature and time control panels-ensure they are operating.
Ensure “Warning-Burn Hazard” or “Hot! Use Caution” labels are placed in conspicuous locations to alert
personnel of the thermal hazard(s).
WEEKLY ✔
Clean the inner components of the machine,
Inspect the inner lockout door for pressure leak.
MONTHLY ✔
Drain the water tank. Do not drain the water when the water is hot or when the machine is in operation.
Test the emergency Shut-off switch.
Inspect the wire and plug for any damage. Ensure there are no bends or crimps in the cord. Remove and
repair damaged electrical equipment.
ANNUALLY ✔
Clean the entire hardware of the Steamer


Machine Name; Vacuum Table and UV light box Model: 0522-V3-G18DX
Location Fibre Studi - Room 201
Manufacturer Vacuum Table
Name: MFG Corporation Model: 0522-V3-G18DX
Light Box Name: Ink Dezyne Telephone: (416) 789-5711
Applicable Legislation
1. CAN/CSA-Z432-04 “Safeguarding of Machinery” 2. CSA Z460-05 “Control of hazardous energy-lockout and other methods”
Sources
Manufacturer’s Manual Safe Work BC, CCOHS, and IAPA resources REA Engineer Specifications Studio Technicians
DO NOT USE THIS MACHINE UNLESS YOU ARE TRAINED IN ITS SAFE USE!
Vacu
um T
able
an
d U
V lig
ht b
ox

1.0 Personal Protective Equipment (PPE) Requirements
PERSONAL PROTECTIVE EQUIPMENT (PPE) REQUIRED RECOMMENDED
Face Shield / Safety Glasses with side shields
Dust Mask
Respirator
Ear Plugs / Ear Muffs
✔
Gloves
✔
Closed-Toe Foot Wear (no heels)
✔
Lab Coat / Protective Apron
Other
ALWAYS WEAR THE REQUIRED PPE WHEN USING THIS MACHINE!

2.0 Pre-use Inspection Checklist
Check Y N N/A
1 Are the power cords free of frays and damage?
2 Is the area around the vacuum table and UV light box free of slip/trip hazards?
3 Is the vacuum table and UV light box secure?
4 Has the material from previous operation been removed?
5 Is the vacuum pump cord free of defects?
6 Does the vacuum table lock in place?
7 Does the vacuum table move freely?
8 Does the vacuum table open and close freely without obstruction?
9 Does the vacuum table foot pedal work?
10 Is the UV light box control working?
11 Is the screen dry?
Comments/Corrective Action:
3.0 Safe Operating Procedure (SOP)
This procedure is outlined as follows: General Safety Guidelines Equipment Specific Safety Operating Procedure
3.1 General Safety Guidelines Before using the machine, perform the following general safety checks:
a) Make sure you understand all of the instructional material before operating this equipment. Failure to follow safety
instruction and warnings may result in serious personal injury, fire or property damage. b) If you have any questions or uncertainties, please ask your studio technician before use.
c) Long hair, scarves, loose clothing, jewellery and ties pose an entanglement hazard. Please make sure these are all
constrained prior to operating the equipment. d) Do not conduct any maintenance or repairs on this equipment. In case of a defect, contact your technician. e) Do not remove or render machine guarding ineffective in any way. f) Ensure the work area is both well-lit and organized.

3.2 Equipment Specific Safe Operating Procedure (SOP)
1. Before using the Vacuum Table
Pict
ure
1 a) Put on your PPEs
b) Carefully lift the top lid of the vacuum table. c) Place the screen in the center of the table. d) Pull the vacuum pump cord over the screen (see picture 1). e) Bring down the top lid. Keep your hand(s) away from the base of the table
when closing. This can be a pinch-point hazard. f) Lock the Table in place (see picture 2).
Pict
ure
2
2. Using the Vacuum Table
Pict
ure
3
a) Turn on the vacuum pump. b) Let the vacuum pump evacuate all the air out from the table and form a
shape around the screen (see picture 3). c) Turn off the vacuum pump after use. d) Press on the foot pedal (see picture 4) to move the table from its position.
The foot pedal is located on the right bottom corner. e) Keep your foot on the pedal as you bring the table into the vertical position
(see picture 5). f) Once the pedal is released, the spring will click and hold the table in place. g) Do not let go of the table when inverting. h) Caution: The table is very heavy. Get assistance when inverting the table
into the vertical position. i) Ensure the screen is in the center of the table. j) If anything unexpected occurs, immediately disable the equipment by
switching off the motor and/or removing the attachment plug.
Pict
ure
4
Pict
ure
5

3. Using the UV light box
Pict
ure
5
a) Set your exposure box to 250.0 watt. b) Press the “S” Button. c) Turn on the switch (located on the right side). d) Turn off the light and leave the room immediately.
4. After exposing the screen
Pict
ure
6
a) When the timer for UV light box goes off enter the room. b) Turn off the exposure and the machine. c) Bring the table back into the horizontal position. d) Unlock and remove the screen from the vacuum table. e) Clean up after yourself.

4.0 Maintenance and Repair
4.1. Lockout/Tagout (LOTO) Procedure:
LOCKOUT TAGOUT PROCEDURE
Equipment Identification
Equipment Name/Description: UV light Box and Vacuum Table
Equipment Location: Fibre Studio Room 201 Total # of Energy Isolation Devices/locks:
1
BEFORE SERVICING THIS MACHINE, NOTIFY AFFECTED PERSONNEL.
ONLY PROPERLY TRAINED AND AUTHORIZED PERSONNEL SHALL PERFORM LOCKOUT TAGOUT PROCEDURE
Energy Source
Location Type of EID/lock to be used
Steps for locking & tagging
Verification Procedure
Electrical End of cord Plastic clamshell and padlock
Stop machine, unplug cord, and install clamshell, lock, and tag.
Attempt to start machine, visually confirm it will not start.
IF SYSTEM CANNOT BE LOCKED OUT OR IF SYSTEM FAILS VERIFICATION PROCEDURE, STOP & CONTACT YOUR SUPERVISOR
LOTO Procedure # A-xxxxxxx Revision #: Approved by: Date:

4.2 Inspection Checklist
5.0 Document Control Any changes or updates to this document must be recorded and maintained.
Initially Created By: The Office of Safety and Risk Management Date: September 2011
Consultation: Studio Managers and Technicians Program Chairs and faculty
Date: January-April 2013 April – May, 2013
Approval By: VPFA and VPA Date: September, 2013
Review and Revisions Made By: Date Revised:
Changes Made(indicate sections):
Revisions Approved By: Date of Approval:
DAILY ✔
Ensure the power cords are free of frays and damage.
Ensure the area around the UV light box and vacuum table is free of slip/trip hazards.
Ensure the vacuum pump cord is free of defects and is connected to the pump.
Ensure the vacuum table lock is in good working and holds the table in the vertical position.
Ensure the vacuum table moves freely without any obstruction.
Ensure that the vacuum pump cord and all connections are in good condition.
Ensure the UV light box controls are working.
WEEKLY ✔
Clean the vacuum table glass with a damp cloth.
Clean the UV light box screen with a damp cloth.
MONTHLY ✔
Check the oil level of the vacuum pump. Add oil if required, don’t overfill.
Inspect the pump and ensure it is leak-free; confirm leakage by monitoring the vacuum with a
thermocouple gauge while applying vacuum pump oil at connections or suspected leak points.
ANNUALLY ✔
Clean the entire hardware of the UV light box and table pump.
Inspect the Table pump and UV light box and perform maintenance as required.


Machine Vertical Fabric Steamer
Location Fibre – Room 201
Manufacturer Name: Jacquard Address: Rupert, Gibbon & Spider, Inc. P.O. Box 425, Healdsburg, CA 95448 Telephone: 800-442-0455
Applicable Legislation
1. CAN/CSA-Z432-04 Safeguarding of Machinery 2. CSA Z460-05 “Control of hazardous energy-lockout and other methods”
Sources
Manufacturer’s Manual Safe Work BC, CCOHS, and IAPA resources REA Engineer Specifications Studio Technicians
DO NOT USE THIS MACHINE UNLESS YOU ARE TRAINED IN ITS SAFE USE!
Vert
ical
Fab
ric S
team
er

1.0 Personal Protective Equipment (PPE) Requirements
PERSONAL PROTECTIVE EQUIPMENT (PPE) REQUIRED RECOMMENDED
Face Shield / Safety Glasses with side shields
✔
Dust Mask
Respirator
Ear Plugs / Ear Muffs
Gloves
✔
Closed-Toe Foot Wear (no heels)
✔
Lab Coat / Protective Apron
✔
Other
ALWAYS WEAR THE REQUIRED PPE WHEN USING THIS MACHINE!

2.0 Pre-use Inspection Checklist
Check Y N N/A
1 Are the power cords free of frays and damage?
2 Is the area around the steamer free of slip/trip hazards?
3 Has the debris/material from previous operations been removed?
4 Is the water reservoir filled with water?
5 Is the insulation in place?
6 Does the safety switch work properly?
Comments/Corrective Action:
3.0 Safe Operating Procedure (SOP)
This procedure is outlined as follows: General Safety Guidelines Equipment Specific Safety Operating Procedure
3.1 General Safety Guidelines Before using the machine, perform the following general safety checks:
a) Make sure you understand all of the instructional material before operating this equipment. Failure to follow safety
instruction and warnings may result in serious personal injury, fire or property damage. b) If you have any questions or uncertainties, please ask your studio technician before use.
c) Long hair, scarves, loose clothing, jewellery and ties pose an entanglement hazard. Please make sure these are all
constrained prior to operating the equipment. d) Do not conduct any maintenance or repairs on this equipment. In case of a defect, contact your technician. e) Do not remove or render machine guarding ineffective in any way. f) Ensure the work area is both well-lit and organized.

3.2 Equipment Specific Safe Operating Procedure (SOP)
1. Preparation for Steaming
Pict
ure
1
a) Get assistance from the class technician before using the steamer. b) Prepare the fabric for steaming. c) Add water to the base of the steamer (see picture 1). d) Remove the top lid of the steamer and place the bolt of fabric in it (see
picture 2).
Pict
ure
2
2. Operating the Steamer
Pict
ure
3
a) Plug in the steamer and set the temperature. b) Caution: the cylinder will get very hot while it is in use. Stay away from the
steamer when in operation. c) Inform individuals to stay away from the path of the steamer. d) If anything unexpected occurs, immediately disable the equipment by
switching off the machine and/or removing the attachment plug
3. Unloading the Steamer
Pict
ure
4
a) When finished, turn off the steamer and unplug it. Let the steamer cool off. b) Wear heat insulated gloves to prevent your hands from heat burns. c) Remove the top lid and bolt holder (see picture 3). With assistance,
carefully pull the fabric bolt out from the cylinder. d) The steamer will be very hot, avoid any possible skin contact with the
steamer. e) Place the fabric bolt on a table and let it cool. f) Place a “Hot! Use Caution” sign on the steamer when it is being cooled. g) Clean up after you are done.

4.0 Maintenance and Repair
4.1. Lockout/Tagout (LOTO) Procedure:
LOCKOUT TAGOUT PROCEDURE
Equipment Identification
Equipment Name/Description: Vertical Fabric Steamer
Equipment Location: Fibre Studio Room 201d Total # of Energy Isolation Devices/locks: 1
BEFORE SERVICING THIS MACHINE, NOTIFY AFFECTED PERSONNEL.
ONLY PROPERLY TRAINED AND AUTHORIZED PERSONNEL SHALL PERFORM LOCKOUT TAGOUT PROCEDURE
Energy Source
Location Type of EID/lock to be used
Steps for locking & tagging
Verification Procedure
Electrical End of cord Plastic clamshell and padlock
Stop machine, unplug cord, and install clamshell, lock, and tag.
Attempt to start machine, visually confirm it will not start.
IF SYSTEM CANNOT BE LOCKED OUT OR IF SYSTEM FAILS VERIFICATION PROCEDURE, STOP & CONTACT YOUR SUPERVISOR
LOTO Procedure # A-xxxxxxx Revision #: Approved by: Date:

4.2 Inspection Checklist
5.0 Document Control
Any changes or updates to this document must be recorded and maintained.
Initially Created By: The Office of Safety and Risk Management Date: September 2011
Consultation: Studio Managers and Technicians Program Chairs and faculty
Date: January-April 2013 April – May, 2013
Approval By: VPFA and VPA Date: September, 2013
Review and Revisions Made By: Date Revised:
Changes Made(indicate sections):
Revisions Approved By: Date of Approval:
DAILY ✔ Ensure the power cord is free of frays and damage.
Ensure the steamer area is clear of slip/fall hazards.
Ensure the steamer is well insulated-if necessary wrap more foil paper around the steamer.
Clean out the water reservoir. Remove stagnant water from the steamer.
Ensure there are no water or steam leaks.
Ensure “Warning-Burn Hazard” or “Hot! Use Caution” labels are placed in conspicuous locations to alert
personnel of the thermal hazard(s).
WEEKLY ✔ Clean the inner components of the machine.
MONTHLY ✔ Check all elements of the machine
Test the emergency Shut-off switch in the water base.
Inspect the wire and plug for any damage. Ensure there are no bends or crimps in the cord. Remove and
repair damaged electrical equipment
ANNUALLY ✔ Clean the entire hardware of the machine


Fibre Studio
Office of Safety & Risk Management Rosalie Sharpe Pavilion 115 McCaul Room 2210
Chem
ical
Spe
cific
Sa
fe O
pera
ting
Proc
edur
es


Che
mic
al S
afet
y G
lass
es
Face
Shi
eld
Flam
e R
esis
tant
Lab
Coa
t
Che
mic
al S
plas
h A
pron
Che
mic
al P
rote
ctiv
e G
love
s pe
r M
SDS
Nitr
ile G
love
s
Org
anic
Vap
our /
Aci
d G
as
Res
pira
tor
Dis
posa
ble
N95
Res
pira
tor
Acetic Acid, Glacial 99.5% Liquid Acetic Acid, Glacial 99.5% X X X X X X X X XAluminum Potassium Sulphate (Alum) Powder Aluminum Potassium Sulphate X X X X XAluminum Sulphate (Cellulose burn-out) UPT Powder Aluminum Sulphate X X X XAmmonium Sulphate Powder Ammonium Sulphate X X X X XBaking Soda Powder Sodium Bicarbonate X X X X X XBleach (HH) Liquid Chlorine aqueous X X X X X X XCalcium Chloride Powder Powder Calcium chloride X X X Calcium Hydroxide (Lime) Powder Calcium hydroxide X X X X XCalcium Nitrate Powder Calcium nitrate X X X XCitric Acid Powder Citric acid X X X X X XCoagulant X X X X X XComet Cleaner With Bleach Liquid Sodium hydroxide and sodium hypochloride X X XCopper Sulphate Copper sulphate X X X X X XDextrin Corn Powder Dextrin X X X Dextrin Potato Powder Dextrin X X XDischarge Paste Liquid Ammonia 3% and Urea 5% in water X X XDisperse Dyes (Powder) Powder 2-Phenoxy-carbonylphenol
Benzoic acidX X X X X X X
FERRIC AMMONIUM CITRATE Powder Ferric ammonium citrate X X X X X XFERRIC NITRATE Powder Ferric nitrate X X X X X X X X XFerrous Sulphate Powder Ferrous sulphate X X X X X XFibre Reactive Dyes (Large Drums) Powder Variety of large cyclic organics X X X X X X XFinish W1 Liquid Screen filler compound - typically acrylic with dye in aqueous
solutionX X X X
Formation aid Powder X X XG&S Procion H Dyes (Liquid) Liquid Most likely cyclic organics. X X X X X X XG&S Procion MX Fibre Reactive Dyes (Powder) Powder Most likely cyclic organics. X X X X X X X XGelatin Powder Powder Gelatin X X XGlycerine, All Grades, Liquid Liquid Glycerine X X XGuar gum Powder Guar bean endosperm - primarily a polysaccharaide X XLudigol Powder Reportedly not WHMIS controlled X XMetaphos Pro Powder Sodium hexameta-phosphate (thickener and water softener) X X X X X XMethyl Cellulose Powder Methyl cellulose X X Natural Dyes Powder X X X X X X XOxalic acid Powder Oxalic acid X X X X X X X XPaper Pulp Pigments Liquid Water dispersed pigments (aqueous), blue 15 - phthalocyanine;
black 7 - carbon; red170 - ?; yellow 74 - arylide-azo)X X X X X
Photoemulsion Liquid Typically diazo with 4% alcohol in water X X X XPneumatic Lubricating Oil Sae10 AD220 [0009] Liquid X X X XPotassium bitartrate (Cream of Tartar) Powder Potassium bitatrate X X X X X X XPOTASSIUM FERROCYANIDE Powder Potassium ferrocyanide X X X X X X XPotassium permanganate Powder Potassium permanganate X X X X X X XPVA Glue Liquid White glue X XRemazol Fibre Reactive Dyes Liquid ? Vinylsulphone dyes (large polycyclic organics) X X X X X X XRetention Agent Liquid Polyacylamide pH 4-7 (cationic or anionic) X XRICE FLOUR Powder X X X XScavenger X XScreen Strip Remover (Emulsion) Sodium Metaperiodate Powder Sodium metaperiodate X X X X Silk Screen Pigments (Conc Liquid) Liquid X X X X XSodium acetate Powder Sodium acetate X X X X X XSODIUM ALGINATE Powder Sodium alginate powder (non-toxic polysaccharide gum) - uncertain
if contains silica or heavy metalsX X X X X X
Sodium bisulfite Powder Sodium bisulfite X X X X X XSodium carbonate Powder Sodium carbonate X X X X X X XSodium Chlorate Powder Sodium chlorate X X X X X X X XSODIUM HYDROSULPHITE Powder Sodium hydrosulphite X X X X X X X XSodium Hydroxide (Lye) Powder Sodium hydroxide X X X X X X X X
Chemical Matrix - Fibre Studio
Shop
Sto
rage
Roo
m
Product
Storage Location
Flam
mab
le/E
xplo
sive
Com
bust
ible
Pote
ntia
lly S
ensi
tizin
g
Hig
h To
xici
ty
Flam
mab
le C
abin
et
Use
with
Loc
al E
xhau
st V
entil
atio
n fo
r Hot
Imm
ersi
on
Dye
ing
Non
-Haz
Dis
posa
l
Key Hazardous Properties
Form / Phase
Flas
h Po
int F
Stro
ng A
cid/
Bas
e
Stro
ng O
xidi
zer /
Red
ucer
Com
pres
sed
Gas
Key Composition
Haz
Was
te D
ispo
sal
Sani
tary
Dra
in
Non
-Fla
m C
abin
et
Non
-Fla
m C
upbo
ard
/ She
lvin
g / C
ount
er
Recommended Personal Protective Equipment Disposal
Face
Bod
y
Han
ds
Res
pira
tory
Pr
otec
tion
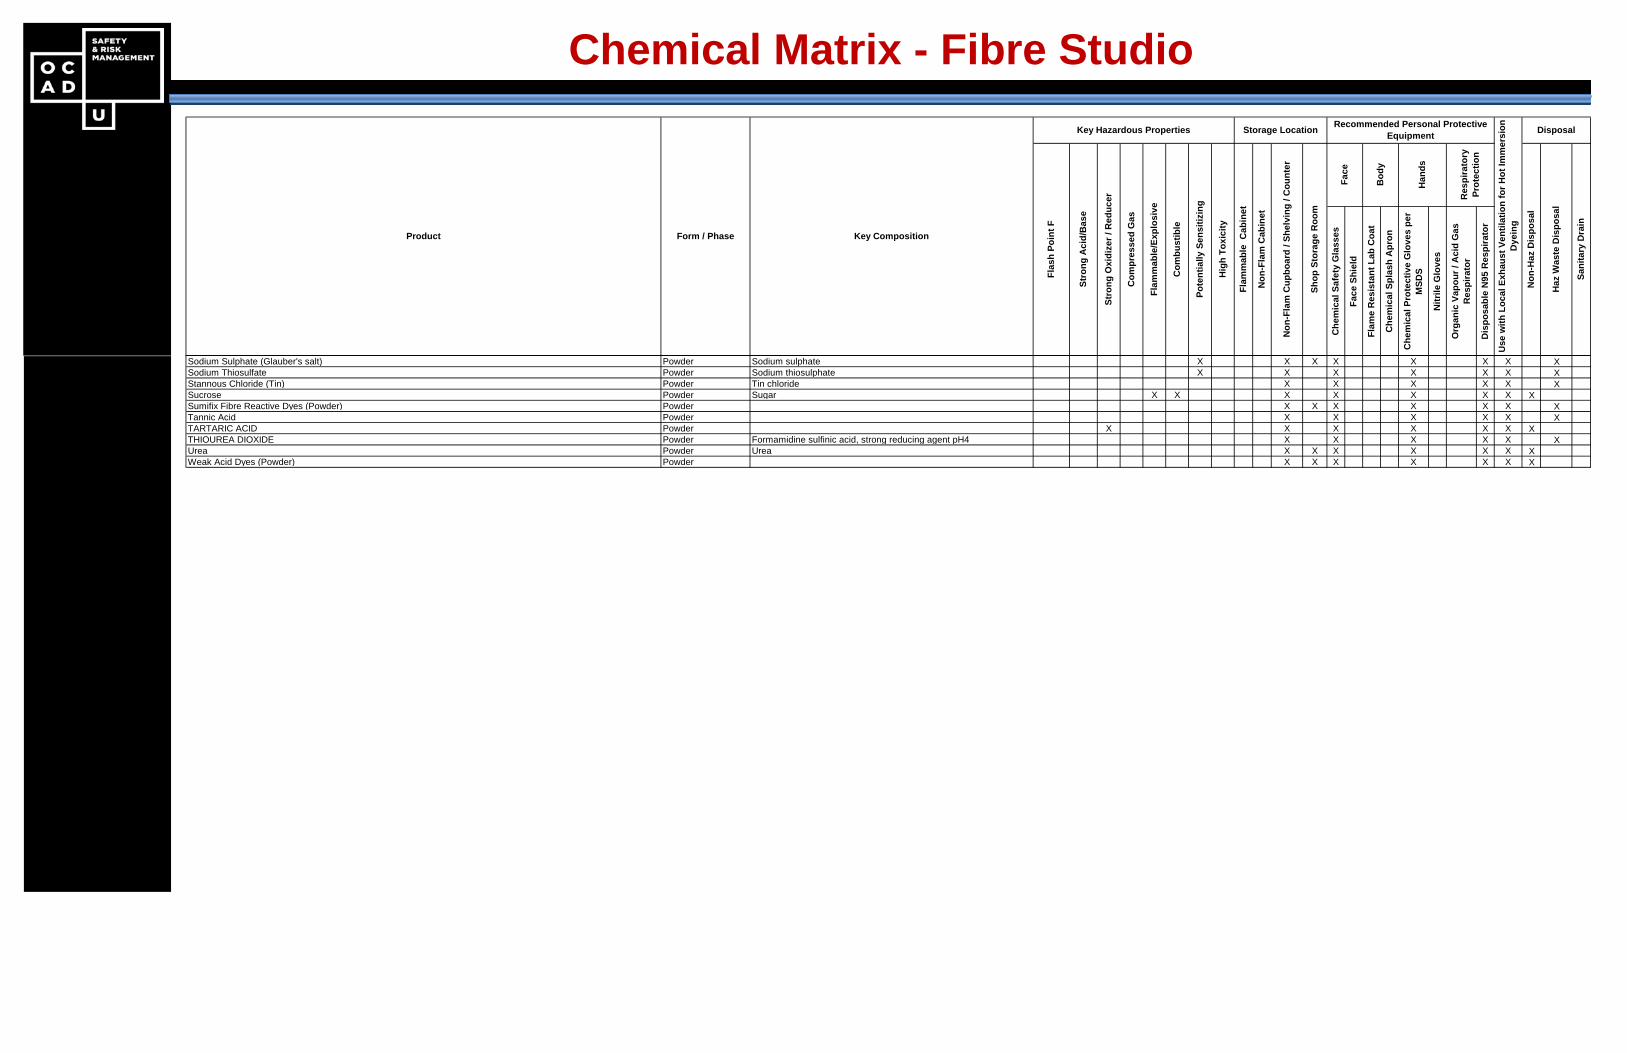
Che
mic
al S
afet
y G
lass
es
Face
Shi
eld
Flam
e R
esis
tant
Lab
Coa
t
Che
mic
al S
plas
h A
pron
Che
mic
al P
rote
ctiv
e G
love
s pe
r M
SDS
Nitr
ile G
love
s
Org
anic
Vap
our /
Aci
d G
as
Res
pira
tor
Dis
posa
ble
N95
Res
pira
tor
Chemical Matrix - Fibre Studio
Shop
Sto
rage
Roo
m
Product
Storage Location
Flam
mab
le/E
xplo
sive
Com
bust
ible
Pote
ntia
lly S
ensi
tizin
g
Hig
h To
xici
ty
Flam
mab
le C
abin
et
Use
with
Loc
al E
xhau
st V
entil
atio
n fo
r Hot
Imm
ersi
on
Dye
ing
Non
-Haz
Dis
posa
l
Key Hazardous Properties
Form / Phase
Flas
h Po
int F
Stro
ng A
cid/
Bas
e
Stro
ng O
xidi
zer /
Red
ucer
Com
pres
sed
Gas
Key Composition
Haz
Was
te D
ispo
sal
Sani
tary
Dra
in
Non
-Fla
m C
abin
et
Non
-Fla
m C
upbo
ard
/ She
lvin
g / C
ount
er
Recommended Personal Protective Equipment Disposal
Face
Bod
y
Han
ds
Res
pira
tory
Pr
otec
tion
Sodium Sulphate (Glauber's salt) Powder Sodium sulphate X X X X X X X XSodium Thiosulfate Powder Sodium thiosulphate X X X X X X XStannous Chloride (Tin) Powder Tin chloride X X X X X XSucrose Powder Sugar X X X X X X X XSumifix Fibre Reactive Dyes (Powder) Powder X X X X X X XTannic Acid Powder X X X X X XTARTARIC ACID Powder X X X X X X XTHIOUREA DIOXIDE Powder Formamidine sulfinic acid, strong reducing agent pH4 X X X X X XUrea Powder Urea X X X X X X XWeak Acid Dyes (Powder) Powder X X X X X X X


1. Screening procedures for Introducing new chemicals OCAD U
Purpose for this Procedure: 1. To define chemical products that are restricted and cannot be introduced to the facility without explicit permission of the Office
of Safety and Risk Management.
2. To the extent practicable, avoid introducing to the facility any new products or chemicals that are: a) highly hazardous to health, safety, the environment, or the property, or b) require significant effort to maintain regulatory compliance.
3. To ensure that we comply with all applicable regulatory requirements and good safety practices in relation to any newly introduced products or chemicals.
4. Describe the information gathering activities and compliance actions that must be taken prior to or in connection with introducing and procuring chemicals and products.
Restricted Substances List: 1. No “new product” containing any substance on the OCAD U Restricted Substance List shall be purchased or brought onto OCAD
U property unless prior written approval is obtained from the Office of Safety and Risk Management. A “new product” is one that was not listed on the OCAD U Master Chemical Inventory, as of December 2011.
2. "OCAD U Restricted Substances" are substances that are subject to significant health, safety or environmental regulatory compliance obligations, and / or may present significant hazards to health, safety or the environment. Approval to purchase or bring onto the property an OCAD U Restricted Substance shall only be granted if the compliance requirements identified in the list are complied with.
3. It is the responsibility of the “new product user” (i.e. the person wishing to obtain the new product, or his / her supervisor or manager) to ensure compliance with the requirements shown on the list.
4. For assistance and guidance in complying with any OCAD U Restricted Substances requirements, contact the Office of Safety and Risk Management.

List of OCAD U Restricted Substances
Restricted Substance Reason for Restriction
Not
Per
mitt
ed o
n O
CAD
U
Prop
erty
Des
igna
ted
Subs
tanc
e As
sess
men
t
Emer
genc
y Re
spon
se P
lan
Subs
tanc
e-Sp
ecifi
c Sa
fety
Pl
an
Spec
ific
Regu
lato
ry T
rain
ing
City
of T
oron
to P
ollu
tion
Prev
entio
n Pl
an
1,1,2,2-tetrachloroethane City of Toronto Appendix 1 substance √
1,2-dichlorobenzene City of Toronto Appendix 1 substance √
1,4-dichlorobenzene City of Toronto Appendix 1 substance √
3,3’-dichlorobenzidine City of Toronto Appendix 1 substance √
acrylonitrile (monomer) Designated substance √ √
aldrin/dieldrin City of Toronto Appendix 1 substance √
alkylphenol ethoxylates City of Toronto Appendix 1 substance √
alkylphenols City of Toronto Appendix 1 substance √
ammonia (as a compressed gas) Inherent hazard √ √ an ozone depleting substance (see Prohibited Substances list)
Federal and provincial environmental law prohibitions √
any radioisotope (unless contained within a consumer product)
Inherent hazard and regulatory control requirements √
arsenic as a salt or in solution OHSA designated substance, and City of Toronto Appendix 1 substance √ √ √
asbestos OHSA designated substance
√
benzene OHSA designated substance, and City of Toronto Appendix 1 substance √ √ √
bis (2-ethylhexyl) phthalate City of Toronto Appendix 1 substance √
carbon tetrachloride Inherent hazard √
chlordane City of Toronto Appendix 1 substance √
chlorine (as a compressed gas) Inherent hazard √ √
chloroform City of Toronto Appendix 1 substance √
chromium (in a metal, salt or in solution) City of Toronto Appendix 1 substance √ √
cis-1,2-dichloroethylene City of Toronto Appendix 1 substance √
cobalt City of Toronto Appendix 1 substance √
copper City of Toronto Appendix 1 substance √
DDT City of Toronto Appendix 1 substance √
di-n-butyl phthalate City of Toronto Appendix 1 substance √
ethyl benzene City of Toronto Appendix 1 substance √
ethylene oxide OHSA designated substance √ √
hexachlorobenzene City of Toronto Appendix 1 substance √
hexachlorocyclohexane City of Toronto Appendix 1 substance √
hydrofluoric acid Inherent hazard √ hydrogen (as a compressed gas) Inherent hazard, Ontario Fire Code requirements √ √
isocyanates (any type of monomer) OHSA designated substance √ √
lead OHSA designated substance, and City of Toronto Appendix 1 substance
√ √
√

Restricted Substance Reason for Restriction
Not
Per
mitt
ed o
n O
CAD
U
Pro
pert
y
Des
igna
ted
Subs
tanc
e As
sess
men
t
Emer
genc
y Re
spon
se
Plan
Subs
tanc
e-Sp
ecifi
c Sa
fety
Pla
n
Spec
ific
Regu
lato
ry
Trai
ning
City
of T
oron
to
Pollu
tion
Prev
entio
n Pl
an
manganese (as a salt or in solution) Toxicity √
mercury OHSA designated substance, and City of Toronto Appendix 1 substance √ √ √
methylene chloride City of Toronto Appendix 1 substance √
mirex City of Toronto Appendix 1 substance √
molybdenum City of Toronto Appendix 1 substance √
nickel (as a salt or in solution) City of Toronto Appendix 1 substance √ √
polychorinated biphenyl City of Toronto Appendix 1 substance, provincial and federal environmental law prohibitions
√
√
pentachlorophenol City of Toronto Appendix 1 substance √
picric acid Inherent hazard √
propane Inherent hazard, Ontario Fire Code requirements √ √ √
selenium City of Toronto Appendix 1 substance √
silica (any crystalline form) OHSA designated substance √ √
styrene (monomer) Inherent hazard √
tetrachloroethylene City of Toronto Appendix 1 substance √
toluene City of Toronto Appendix 1 substance √
xylene City of Toronto Appendix 1 substance √
trans-1,3-dichloropropylene City of Toronto Appendix 1 substance √
trinitrotoluene ("TNT") Inherent hazard √
vermiculite Potential asbestos content, resultant OHSA regulatory controls
√
vinyl chloride (monomer) OHSA designated substance √ √
zinc City of Toronto Appendix 1 substance √

List of OCAD U Prohibited Substances Environmental Protection Act Ozone Depleting Substances
EPA, 718/94 and 717/94 Class 1 ODS CFC-11, also known as fluorotrichloromethane
EPA, 718/94 and 717/94 Class 1 ODS CFC-12, also known as dichlorodifluoromethane
718/94 and 717/94 Class 1 ODS CFC-13, also known as chlorotrifluoromethane
718/94 and 717/94 Class 1 ODS CFC-111, also known as pentachlorofluoroethane
718/94 and 717/94 Class 1 ODS CFC-112, also known as tetrachlorodifluoroethane
EPA, 718/94 and 717/94 Class 1 ODS CFC-113, also known as trichlorotrifluoroethane
EPA, 718/94 and 717/94 Class 1 ODS CFC-114, also known as dichlorotetrafluoroethane
EPA, 718/94 and 717/94 Class 1 ODS CFC-115, also known as monochloropentafluoroethane
718/94 and 717/94 Class 1 ODS CFC-211, also known as fluoroheptachloropropane
718/94 and 717/94 Class 1 ODS CFC-212, also known as difluorohexachloropropane
718/94 and 717/94 Class 1 ODS CFC-213, also known as trifluoropentachloropropane
718/94 and 717/94 Class 1 ODS CFC-214, also known as tetrafluorotetrachloropropane
718/94 and 717/94 Class 1 ODS CFC-215, also known as pentafluorotrichloropropane
718/94 and 717/94 Class 1 ODS CFC-216, also known as hexafluorodichloropropane
718/94 and 717/94 Class 1 ODS CFC-217, also known as heptafluorochloropropane
EPA, 718/94 and 717/94 Class 1 ODS Halon-1211, also known as bromochlorodifluoromethane
EPA, 718/94 and 717/94 Class 1 ODS Halon-1301, also known as bromotrifluoromethane
EPA, 718/94 and 717/94 Class 1 ODS Halon-2402, also known as dibromotetrafluoroethane
718/94 and 717/94 Class 1 ODS carbon tetrachloride
718/94 and 717/94 Class 1 ODS methyl chloroform, also known as 1,1,1 trichloroethane
718/94 and 717/94 Class 1 ODS any hydrobromofluorocarbon
718/94 and 717/94 Class 1 ODS any isomer of any 718/94 or 717/93 Class 1 ODS
718/94 Class 1 ODS any hydrochlorofluorocarbon
717/94 Class 2 ODS HCFC-21, also known as dichlorofluoromethane
717/94 Class 2 ODS HCFC-22, also known as chlorodifluoromethane
717/94 Class 2 ODS HCFC-31, also known as chlorofluoromethane
717/94 Class 2 ODS HCFC-121, also known as tetrachlorofluoroethane
717/94 Class 2 ODS HCFC-122, also known as trichlorodifluoroethane
717/94 Class 2 ODS HCFC-123, also known as dichlorotrifluoroethane
717/94 Class 2 ODS HCFC-124, also known as chlorotetrafluoroethane
717/94 Class 2 ODS HCFC-131, also known as trichlorofluoroethane
717/94 Class 2 ODS HCFC-132, also known as dichlorodifluoroethane
717/94 Class 2 ODS HCFC-133, also known as chlorotrifluoroethane
717/94 Class 2 ODS HCFC-141, also known as dichlorofluoroethane
717/94 Class 2 ODS HCFC-142, also known as chlorodifluoroethane
717/94 Class 2 ODS HCFC-151, also known as chlorofluoroethane
717/94 Class 2 ODS HCFC-221, also known as hexachlorofluoropropane
717/94 Class 2 ODS HCFC-222, also known as pentachlorodifluoropropane
717/94 Class 2 ODS HCFC-223, also known as tetrachlorotrifluoropropane
717/94 Class 2 ODS HCFC-224, also known as trichlorotetrafluoropropane
717/94 Class 2 ODS HCFC-226, also known as chlorohexafluoropropane
717/94 Class 2 ODS HCFC-231, also known as pentachlorofluoropropane
717/94 Class 2 ODS HCFC-232, also known as tetrachlorodifluoropropane
717/94 Class 2 ODS HCFC-233, also known as trichlorotrifluoropropane
717/94 Class 2 ODS HCFC-234, also known as dichlorotetrafluoropropane
717/94 Class 2 ODS HCFC-235, also known as chloropentafluoropropane

Environmental Protection Act Ozone Depleting Substances
717/94 Class 2 ODS HCFC-241, also known as tetrachlorofluoropropane
717/94 Class 2 ODS HCFC-242, also known as trichlorodifluoropropane
717/94 Class 2 ODS HCFC-243, also known as dichlorotrifluoropropane
717/94 Class 2 ODS HCFC-244, also known as chlorotetrafluoropropane
717/94 Class 2 ODS HCFC-251, also known as trichlorofluoropropane
717/94 Class 2 ODS HCFC-252, also known as dichlorodifluoropropane
717/94 Class 2 ODS HCFC-253, also known as chlorotrifluoropropane
717/94 Class 2 ODS HCFC-261, also known as dichlorofluoropropane
717/94 Class 2 ODS HCFC-262, also known as chlorodifluoropropane
717/94 Class 2 ODS HCFC-271, also known as chlorofluoropropane
717/94 Class 2 ODS all other hydrochlorofluorocarbons not specifically named as 717/94 Class 2 ODS, other than HCFC-225, also known as dichloropentafluoropropane
717/94 Class 2 ODS all mixtures containing any 717/94 Class 2 ODS
717/94 Class 3 ODS HCFC-225, also known as dichloropentafluoropropane

Pre-Introduction Screening and Compliance Procedure Flow Diagram:

User Record Keeping Checklist A checklist must be filled in to serve as a record of having completed all of the activities required by the screening and compliance process. The completed checklist must be provided to the responsible manager for verification and signature. The verified and signed checklist must be provided to the Office of Safety and Risk Management for final review and record keeping purposes.
User Record Keeping Checklist OCAD U Department / User:
New Product / Substance:
Proposed Use:
Estimated Quantity to be Kept on Hand:
Estimated Quantity Used per Month:
Name of verifying Manager:
Signature of verifying Manager: Date:
Step Action Completed On Initials 1 Obtain a material safety data sheet or other information that discloses the
ingredients, chemical and physical properties of the substance.
2 Are any of the product ingredients on OCAD Restricted Substance List? 3 Are any of the product ingredients listed as "Not Permitted on OCAD
Property"?
4 Are there any "designated substances" listed as ingredients in the product? If so, designated substance assessment must be carried out in conjunction with purchase.
5 Do any ingredients require preparation of an Emergency Response Plan? 6 Do any ingredients require preparation of a Substance-Specific Safety Plan? 7 Will use of the product result in any chemical waste being generated?
8 Can wastes be disposed of via the drain or in regular garbage, or are the wastes considered to be hazardous waste?
9 If the waste is a hazardous waste, is that waste currently on the OCAD Generator Registration Record? If not, the Generator Registration Record must be updated.
10 Is the chemical a liquid with a flash point under 93.3 Celsius, or a flammable compressed gas?
11 Have provisions been made to ensure compliance with applicable OCAD procedures relating to the use of flammable and combustible liquids (as applicable)?
12 Have provisions been made to ensure compliance with applicable OCAD procedures relating to flammable compressed gases?
13 Is existing available spill response equipment at the site of storage and use adequate for the chemical type and volume?
14 Are existing first aid supplies at the site of storage and use adequate for the chemical type and volume?

Step Action Completed On Initials 15 Do the locations of chemical storage and use require emergency eye wash
and deluge shower? If so, are they present?
16 Is the chemical a "controlled product" under the federal Hazardous Products Act?
17 If the product is a "controlled product", have users received WHMIS training in the chemical?
18 If the product is a "controlled product", ensure that a material safety data sheet published less than 3 years ago will be available at locations where the substance is stored, used or handled.
19 If the product is a "controlled product", ensure that the original container(s) have WHMIS-compliant labels.
20 If the product is a "controlled product", ensure that WHMIS-compliant workplace labels will be available if necessary to affix to temporary storage containers
21 Where on-site will the chemical be stored by the user? Will it be stored beside other chemicals? Are the chemicals with which it will be stored compatible with the new chemical?
22 Is the chemical one that can only be used inside a fume hood? Is one present? Has it been tested / certified to be functioning properly?
24 If the chemical will emit gases, vapour, smoke, fume or mist during handling or use, how are these emissions being contained and vented outdoors?
25 If any emitted gases, vapour, smoke, fume or mist is being released to the indoor atmosphere, is the current general ventilation system a suitable and adequate control measure?
26 If the chemical will emit gases, vapour, smoke, fume or mist, does the existing OCAD Air Certificate of Approval cover these emissions?
27 What personal protective equipment is required to be worn by users? Is it available and have users been trained in proper use?
28 Who will be designated as having ultimate responsibility for compliance with safety requirements relating to the chemical?

Screening Guidance Notes (corresponds with the table on the proceeding page) The following table provides guidance on how to perform the various pre-introduction screening activities.
Screening Guidance Notes Step Action Guidance
1 Obtain a material safety data sheet or other information that discloses the ingredients, chemical and physical properties of the substance.
A material safety data sheet can be obtained from the proposed supplier / vendor. Many suppliers and vendors also make material safety data sheets available via their web sites.
2 Are any of the product ingredients on OCAD U Restricted Substance List?
Compare the ingredients listed on the material safety data sheet with the list of substances in Restricted Substances list.
3 Are any of the product ingredients listed as "Not Permitted on OCAD U Property"?
If "yes", then the product cannot be purchased.
4 Are there any "designated substances" listed as ingredients in the product? If so, designated substance assessment must be carried out in conjunction with purchase.
Restricted Substances list identifies the 11 "designated substances". It is necessary to perform a "designated substance assessment" if any of these substances are to be used.
5 Do any ingredients require preparation of an Emergency Response Plan?
Restricted Substances list identifies substances for which an Emergency Response Plan is required. Plans are required because of the potential for severe harm associated with spills or releases of these substances. Consult the procedure entitled "Preparation of Emergency Response Plans".
6 Do any ingredients require preparation of a Substance-Specific Safety Plan?
Restricted Substances list identifies substances for which a Substance-Specific Safety Plan is required. Plans are required because of the potential for severe harm associated with spills or releases of these substances.
7 Will use of the product result in any chemical waste being generated?
The product user is responsible for determining whether the use of the product will generate waste materials.
8 Can wastes be disposed of via the drain or in regular garbage, or are the wastes considered to be hazardous waste?
Consult the procedure entitled "Chemical Waste Disposal Procedures" to determine if the waste must be treated as hazardous waste, or whether it can be disposed via the drain or in regular garbage.
9 If the waste is a hazardous waste, is that waste currently on the OCAD U Generator Registration Record? If not, the Generator Registration Record must be updated.
Consult with Safety & Risk Management to determine whether the current Generator Registration Record permits OCAD to dispose of these substances. If not, the Generator Registration Record must be updated as a result of the introduction of the product.

Screening Guidance Notes Step Action Guidance 10 Is the chemical a liquid with a
flash point under 93.3 Celcius, or a flammable compressed gas?
This information can be obtained from the material safety data sheet. If the chemical is a liquid and has a flash point between 37.8 C and 93.3 C, it is classed as a "combustible liquid" under the Ontario Fire Code. If the chemical is a liquid with a flash point less than 37.8 C, it is classed as a "flammable liquid" under the Ontario Fire Code. Substance-specific safety plans must be prepared for flammable or combustible liquids, and for flammable compressed gases, and these classes of substances are also subject to additional OCAD procedures that are intended to ensure compliance with Ontario Fire Code and Ontario Electrical Safety Code requirements.
11 Have provisions been made to ensure compliance with applicable OCAD procedures relating to the use of flammable and combustible liquids (as applicable)?
Determine occupancy classification for the proposed storage and usage locations, and ensure the occupancy complies with requirements of the Ontario Fire Code
12 Have provisions been made to ensure compliance with applicable OCAD procedures relating to flammable compressed gases?
Determine occupancy classification for the proposed storage and usage locations, and ensure the occupancy complies with requirements of the Ontario Fire Code
13 Is existing available spill response equipment at the site of storage and use adequate for the chemical type and volume?
Consult the procedure entitled "Chemical Emergency Response", and compare the requirements listed in Restricted Substances list of that procedure with the equipment that is present and available at or in the vicinity of the sites of planned storage and use.
14 Are existing first aid supplies at the site of storage and use adequate for the chemical type and volume?
Consult the procedure entitled " Chemical Emergency Response ", and compare the requirements listed in Restricted Substances list of that procedure with the equipment that is present and available at or in the vicinity of the sites of planned storage and use.
15 Do the locations of chemical storage and use require emergency eye wash and deluge shower? If so, are they present?
Consult the procedure entitled "Requirements for Chemical Emergency Response", and compare the requirements listed in Restricted Substances list of that procedure with the equipment that is present and available at or in the vicinity of the sites of planned storage and use.

Screening Guidance Notes Step Action Guidance 16 Is the chemical a "controlled
product" under the federal Hazardous Products Act?
"Controlled product" is the term used for pure substances and products that possess chemical, physical, toxic, biohazardous or radioactive characteristics defined by the Controlled Products Regulations under the federal Hazardous Products Act. "Controlled products" are also often referred to as "WHMIS products", since those substances and products are subject to the Ontario Workplace Hazardous Materials Information System Regulation. If the material is a "controlled product", the material safety data sheet may specify the "WHMIS Class" or "Controlled Product Class" for the substance, which will be a number or number+letter combination, but it is not mandatory for this information to be on the material safety data sheet. It is also the case that many products that are not "controlled products" have material safety data sheets, despite the absence of a regulatory requirement for one. A sure way of determining if a substance is a "controlled product" is to examine the label. If it is a "controlled product", then the label will have one or more of the symbols shown in "Screening Procedures Prior to the Introduction of New Chemicals or Products to OCAD University" procedure.
17 If the product is a "controlled product", have users received WHMIS training in the chemical?
See the procedure entitled "Training of Personnel in Chemical Safety" for information on arranging this training.
18 If the product is a "controlled product", ensure that a material safety data sheet published less than 3 years ago will be available at locations where the substance is stored, used or handled.
The most practical way of doing so is to copy the material safety data sheet and place the copy into MSDS binders at the appropriate locations.
19 If the product is a "controlled product", ensure that the original container(s) have WHMIS-compliant labels.
It is a responsibility of the manufacturer and supplier to ensure compliant labelling.
20 If the product is a "controlled product", ensure that WHMIS-compliant workplace labels will be available if necessary to affix to temporary storage containers
See the procedure entitled "Requirements for Material Safety Data Sheet and Labels" for guidance on how to when workplace WHMIS labels are required for temporary containers, and how to prepare same.
21 Where on-site will the chemical be stored by the user? Will it be stored beside other chemicals? Are the chemicals with which it will be stored compatible with the new chemical?
Consult the procedure entitled "Chemical Storage Procedures" for advice on safe storage practices.

Screening Guidance Notes Step Action Guidance 22 Is the chemical one that can only
be used inside a fume hood? Is one present? Has it been tested / certified to be functioning properly?
The determination of whether a chemical must be used in a fume hood is based on factors such as: (1) the potential for release of harmful airborne emissions; (2) potential for harmful spills; (3) potential for runaway reactions; (4) potential for explosions. If you are uncertain as to whether usage should be restricted to a fume hood, contact Studio Management or Studio Technician for assistance. If a fumehood is required and is available, it is necessary to verify that it has been tested and certified as functioning properly. If it has been certified, there will be a sticker affixed to the fume hood at a visible place indicating who performed the testing, when the certification occurred, and when it expires.
24 If the chemical will emit gases, vapour, smoke, fume or mist during handling or use, how are these emissions being contained and vented outdoors?
If the chemical is not being used in a fume hood or with other local exhaust ventilation, then any air emissions will be diluted in the general atmosphere inside the building, and will be partially exhausted and partially recirculated by the general ventilation system.
25 If any emitted gases, vapour, smoke, fume or mist is being released to the indoor atmosphere, is the current general ventilation system a suitable and adequate control measure?
Substances that can be emitted into the general atmosphere of the building without perceptible impacts include carbon dioxide, nitrogen, argon, helium, small quantities of low toxicity organic solvents, and residues from the evaporation of cleaning products. If you are uncertain as to the acceptability of emissions to the general atmosphere inside the building, or the adequacy of the general ventilation in the area where the emissions would occur, contact Facilities Planning & Management for assistance.
26 If the chemical will emit gases, vapour, smoke, fume or mist, does the existing OCAD Air Certificate of Approval cover these emissions?
The Office of Safety and Risk Management will make arrangements to add product on the CoA if required.
27 What personal protective equipment is required to be worn by users? Is it available and have users been trained in proper use?
The material safety data sheet for the product will specify the types of personal protective equipment recommended for use by the manufacturer. If you are concerned that additional or lesser protective measures are appropriate, contact Studio Management for assistance. Verify that proposed users have or will have the necessary protective equipment, and that they have been or will be trained in proper use. For guidance on training, see the procedure entitled "Training of Personnel in Chemical Safety" for information on arranging this training.
28 Who will be designated as having ultimate responsibility for compliance with safety requirements relating to the chemical?
This needs to be determined, and should be documented on the screening form. The person assigned should be competent to exercise the necessary responsibilities.
Verification of Implementation Compliance: Following receipt of a “new product”, the verifying manager shall examine the manner of product storage, handling, use and disposal, to verify the correctness of these practices.

2. Procedure for managing MSDS and labels Purpose for this Procedure 1. To ensure that personnel have ready access to information for safe use of chemical products. 2. Comply with requirements of the Workplace Hazardous Materials Information System (“WHMIS”) Regulation. 3. To specify the processes for obtaining and maintaining material safety data sheets (“MSDSs”). 4. To provide instruction on when workplace labels are required, and their format and content.
Regulatory Context 1. The Workplace Hazardous Materials Information System Regulation – made under the Occupational Health and Safety Act,
requires employers to have and make readily available to employees material safety data sheets for all “controlled products”. 2. It also requires employers to ensure that “workplace labels” are prepared and applied to any container into which a controlled
product is decanted (i.e. a container other than the one in which the product was originally received from the supplier).
1. Material Safety Data Sheets (MSDS):
Obtaining Material Safety Data Sheets with Product Orders 1. OCAD University Purchase Order shall contain an instruction to vendors specifying that (a) a MSDS must accompany each
shipment of a chemical substance or product, and (b) OCAD University reserves the right to decline to accept or reject any shipment or delivery of a chemical substance or product that is not accompanied by a MSDS.
2. OCAD University and the Campus Services Department will not release to any user any controlled chemical substance or product
that has been received without being accompanied by a MSDS, unless the user provides the Office of Safety and Risk Management a current MSDS for the chemical substance or product prepared by the actual supplier.
3. In cases where a MSDS has not been received with a shipment or delivery, it is acceptable for an OCAD University user to
download from the internet the supplier’s MSDS for the chemical substance or product, and provide this to Studio Management.
4. The following diagram illustrates the flow of MSDSs:

Process for Maintaining Central Files of Material Safety Data Sheets 1. Studio Management will maintain a set of binders containing MSDSs for all products received or delivered.
2. Studio Management will provide the Office of Safety and Risk Management with an electronic copy of each MSDS received as
described in 4. below.
3. The Office of Safety and Risk Management shall create a PDF file for every MSDS. PDF files shall be named as the name of the product, plus an abbreviation for the supplier, plus the MSDS creation date (in the format YYMMDD), each separated by a period (e.g. Acetone.JTBaker.090430).
4. The electronic directory of MSDS’ shall be located on MSDS Online through the Office of Safety and Risk Management.
Process for Maintaining Binders of MSDSs at Work Locations 1. A white, 3-ring MSDS binder shall be kept in close proximity of locations where chemicals are stored.
2. The binder shall be labeled as follows:
a. Material Safety Data Sheets b. Department Name c. Location (Building, Floor, Room Number)
3. Each binder shall contain a set of “A” through “Z” alphabetic tab dividers. Products starting with numbers shall be filed before
the “A” tab.
4. MSDSs shall be filed in the binder by product name, such that the MSDS is placed behind the tab corresponding to the first letter in the product name (e.g. acetone would be behind the “A” tab).
5. Where there are MSDSs for several products having names starting with the same letter, the MSDSs shall be filed in alphabetical order according to the subsequent letters in the product name (e.g. “acetone” would be filed behind “acetic acid”).
6. A MSDS shall be added to the binder each time a new MSDS is received for a product.
7. When a MSDS is added to the binder, a) the chemical inventory for the location must be updated (see “Chemical Inventory Record Keeping Requirements”), b) any older version of the MSDS for the product shall be removed and disposed.
8. Should any alphanumeric tab divider be empty (due to there being no products having names beginning with that letter), a
sheet shall be inserted that states “NO PRODUCTS IN THIS TAB”.
9. At least once per year, at the time of reviewing and updating the location-specific inventory (see “Chemical Inventory Record Keeping Requirements”), the contents of the MSDS binder must be reconciled against the inventory, and any inconsistencies must be remedied, so that the contents of the MSDS binder match the up-to-date inventory.

2. Labels:
Supplier Container Labeling Obligations It is a responsibility of the manufacturer and supplier to ensure WHMIS compliant labeling of every controlled product container.
Levels of compliance are typically high for Canadian and American suppliers. Should a user contemplate ordering a product from a supplier in another jurisdiction, verify that the containers will have WHMIS compliant labeling before placing the order.
Workplace Labeling Obligations for Decanted Products 1. If a controlled product is decanted or transferred from the original supplier container into a secondary or portable container, or
mixed together with another controlled product or non-controlled product, the user must ensure that a WHMIS-compliant “workplace label” is affixed to the container, except in circumstances described in 3 below.
2. A workplace label can be hand-written, a pre-printed form, or downloaded from MSDS Online so long as the information described in 4. below is present.
3. A workplace label is not required to be affixed to a secondary or portable container if either of the following conditions apply: a) the product will be used immediately in its entirety, or b) the product is,
under the exclusive control of one person, to be used exclusively use of one person, to be used in its entirety during the course of the work shift, and the product name is marked on the container.
4. Workplace labels for secondary containers must contain the following information:
a) The product / substance name (identical to that on the MSDS) b) Safe handling information (a synopsis of key points from the supplier label) c) A statement that an MSDS is available
5. Pre-printed workplace labels can be obtained online from MSDS Online as well as the Sharepoint link created for the Shops and
Studio Technicians.

3. Procedures for transporting chemicals within OCAD U Purpose for this Procedure 1. To ensure that chemical products are moved from place to place within the facility in a safe manner, and reduce the risk of spills
or other incidents.
1. Compressed Gas Cylinders
a) Empty or Full Gas Cylinders – Nominal Height under 38 cm (Except Acetylene) 1. Gas cylinders having a nominal height (i.e. base to top of valve cap) under 38 cm are permitted to
be manually carried from place to place by personnel, so long as the valve stem is protected by a valve cap or other device that prevents leakage or release if the cylinder is dropped or damaged.
2. If it is impractical to manually carry cylinders of these sizes from place to place, you must use a
small cylinder cart as shown here.
3. If necessary to transport between levels in the building, these cylinders may be taken onto elevators, but only outside of public access hours.
b) Empty or Full Gas Cylinders – Nominal Height 38 cm or More (Except Acetylene) 1. Gas cylinders having a nominal height (i.e. base to top of valve cap) of 38 cm or more must be transported using a gas
cylinder cart of the type shown in 2.1 above (for cylinders having diameters under 11 cm), or a dolley (for larger cylinders), as shown here.
2. When using the dolly for transporting large cylinders,
ensure that the cylinder is secured in position by the strap ensure that the valve is fully closed and the valve cap is in place never leave the dolly unattended always keep the dolly in the upright or 4-wheel tilted position never allow the dolly with a cylinder to rest with the cylinder “lying down” in the
horizontal position
3. If necessary to transport between levels in the building, large cylinders requiring dolly transport are not to be taken onto public usage elevators nor onto escalators, and can only be elevated using the service elevator(s)
4. Never transport large cylinders through public access areas during public access hours.

c) Acetylene Cylinders 1. Acetylene cylinders must always be transported using a cart or dolly
2. When using the dolly for transporting large cylinders,
ensure that the cylinder is secured in position by the strap ensure that the valve is fully closed and the valve cap is in place never leave the dolly unattended always keep the cylinder in the upright tilted position – this is particularly important for acetylene cylinders because
they contain a liquid solvent never allow the dolly with a cylinder to rest with the cylinder “lying down” in the horizontal position – this is
particularly important for acetylene cylinders because they contain a liquid solvent
3. If necessary to transport between levels in the building, acetylene cylinders are not to be taken onto public usage elevators nor onto escalators, and can only be elevated using the service elevator(s).
4. Never transport acetylene cylinders through public access areas during public access hours.
2. Solids and Liquids in Supplier Containers or Secondary / Portable Containers Supplier Boxed Shipments (Dock Area to User Storage Location)
1. For hazardous chemicals delivered in boxes (e.g. plastic or glass container(s) inside of a packing box), or in bulk primary containers up to 20 liters, either of the following types of carrier should be used to transport the item(s) from the chemical storage room to the user’s storage location.
2. Chemical kits that are shipped by suppliers in a boxed or containerized format that is inherently protected and designed to
contain spillage (may be transported by being manually carried, or in accordance with Section 3 (b).
3. When using this type of carrier for transporting hazardous chemicals,
a) load the bottom shelf before loading the top shelf (be careful to avoid strains and sprains when lifting and bending) b) make sure that the total weight of the load on the top shelf is not more than about half the weight of the load on the
bottom shelf (this keeps the center of gravity low, making it easier to handle, and reducing risk of toppling over) c) never pile objects on the top shelf at a height that obstructs your view when pushing the carrier d) never stack boxes two high or higher on a shelf without securing the load using straps or heavy tape e) never leave the carrier unattended while in transit
4. The carrier shown above must not be used for transporting any compressed gas.
5. If necessary to transport between levels in the building, these are not to be taken onto public usage elevators during public
access hours, and can only be elevated using the service elevator(s) during public access hours. If it is not possible or practical to use service elevator(s) after public access hours, then public usage elevators or escalators may be used.
6. Never transport hazardous chemicals using these carriers through public access areas during public access hours.
3. Individual Bottles / Containers
1. Transporting individual containers of hazardous chemicals that are not held inside of a kit or other type of secondary container should be avoided if possible.
2. If it is necessary to transport individual bottles or containers of hazardous chemicals, use either of the
types of carriers shown. If the cart for individual bottles and chemicals is used, ensure that the containers placed inside the drawers are secured against tipping over while in transit.

3. If using a carrier to transport two or more chemically incompatible or reactive materials that are not pre-packaged into kits,
separate the incompatible items to reduce potential for mixing in the event of container leakage or breakage.
Hazardous Waste Materials 1. Containers with hazardous waste materials must be transported from their point of production to the chemical waste lock-up by
Campus Services Staff using any of the carriers described above.
2. The choice of carrier must be made on the basis of the type of container holding the hazardous waste.
Markings on Carriers 1. Whenever a chemical container is transported inside of a tote or an enclosed carrier, the person responsible for transporting
the material must ensure that a description of the non-visible contents is provided on the outside of the tote and or carrier.
2. Hand-written paper or cardboard temporary signs, affixed to the container with tape, are adequate, so long as they are legible and can be read at a distance of about 2 meters (e.g. write the contents in capital letters, using a dark magic marker on white paper or cardboard).

4. Procedure for storing chemicals
Principles and Rules Governing Storage Practices 1. Chemicals possess a variety of chemical and physical properties. Some of these properties are incompatible. If chemicals with
incompatible properties are inadvertently or unexpected mixed together, dangerous reactions can occur, resulting in risks to health, safety, property or the environment.
2. For the reasons described above, it is important to store chemicals at locations, and in ways that reduce the potential for incompatible chemicals mixing together as a result of spills, leakage, container rupture, or fires.
3. Chemicals at OCAD University must be stored in accordance with rules contained in this procedure.
Determining Storage Requirements for a Substance 1. To determine the storage requirements for a chemical, consult the relevant sections of this procedure, and the Material Safety
Data Sheet for the chemical. 2. In the event of any contradiction between this Procedure and Material Safety Data Sheets, contact the Office of Safety and Risk
Management for instructions on proper storage procedures.
Standardized Signage and Markings for Storage Locations and Cabinets 1. Storage locations and cabinets for chemical products shall have signage and / or markings as described herein.
1. Flammable or Combustible Liquids 1. A “Flammable Liquid” is one having a flash point less than 37.8 C. 2. A “Combustible Liquid” is one having a flash point between 37.8 C and 93.3 C.
Approval Required to Increase Quantities of Flammable or Combustible Liquids Typically On-Hand 1. The list below presents a listing of flammable and combustible liquids contained in the most recent OCAD University inventory
of hazardous materials.
2. Approval from the Office of Safety and Risk Management is required before any OCAD University user is allowed to increase the quantity of flammable or combustible liquids typically on-hand and under the control of the user.
3. The total quantity of all flammable and combustible liquids at OCAD University shall be kept at less than 500 L at all times. It is
the responsibility of Studio Management to monitor quantities present on site and to take action to prevent accumulation of amounts in excess of 500 L.

Flammable and Combustible Liquids at OCAD University (as of February 2012)
Substance/Product Name Phase Site within OCAD U
Flam
mab
le /
Ex
plos
ive
Com
bust
ible
Flas
h Po
int
Typical Quantity on Hand
Q Units
07730 MSA Varnish w/ UVLS (Gloss) A,B,C,H; 07735 MSA Varnish w/ UVLS (Satin) A,B,C,H,5; 07740 MSA Varnish w/ UVLS (Matte) A,B,C,H,5; 93300 MSA Gel A,B,C; 07742 Hard MSA Varnish w/ UVLS (Gloss) A,H; 07743 Hard MSA Varnish w/ UVLS (Satin) A,H,5; 07744 Hard
Liquid Draw/Print X 41
3M SPRAY MOUNT ARTIST'S ADHESIVE (CANADA) Liquid Ind Design X -50 Acetic Acid, Glacial Liquid Lithography X 104 Acetone Liquid Ceramics X -4 Acetone Liquid Foundry X -4 Acetone Liquid Ind Design X -4 Acetone Liquid Jewellery X -4 Acetone Liquid Lithography X -4 Acetone Liquid Mouldmaking X -4 Acetone Liquid Plastics X -4 Acetone Liquid Sculpture X -4 Acetylene Gas Jewellery X Acetylene Gas Metals X Air Tool Oil Liquid Foundry X 128 Air Tool Oil Liquid Sculpture X 128 Ball Paint Marker Liquid in pen Metals X 88 Blue Marking Ink Kleenscribe Layout Dye Liquid Metals X -4 Boeshield T-9 Liquid Aerosol Ind Design X 120 Boeshield T-9 Liquid Aerosol Photography X 120 Boeshield T-9 Liquid Aerosol Woodworking X 120 Brasso Liquid Etching X 105 CASTALDO Jewelry Mold Release Spray Aerosol Jewellery X
Chalkboard paint Liquid Ceramics X 205 Chalkboard paint Liquid Plastics X 205 Champion Spraypaint Aerosol Woodworking X -5 Charcoal powder / granular Powder Jewellery X X Citric Acid Powder Photography X X Clear Laqueur Thinner Liquid Lithography X 3 Clear Paste Wax Paste Sculpture X Contact 2000 Liquid Photography X 45 CORNSTARCH Powder Jewellery X X Crown Reliable Release Mold Releases - Aerosol, 3423 Reliable Release General Purpose Silicone Mold Release, 3445 Reliable Release Heavy Duty Silicone Mold Release, 3452 Reliable Release Lecithin Mold Release, 3460 Reliable Release Paintable Mold Release
Aerosol Jewellery X
Danish oil Liquid Sculpture X 41 Danish Oil - Natural Liquid Woodworking X 41 Danish Oil - Walnut Liquid Woodworking X 41 DOW CORNING HS II THIXOTROPIC ADDITIVE Liquid Mouldmaking X 153

Substance/Product Name Phase Site within OCAD U
Flam
mab
le /
Ex
plos
ive
Com
bust
ible
Flas
h Po
int
Typical Quantity on Hand
Q Units
Elmer's spray adhesive Aerosol Photography X Ethyl Alcohol, 95% Denatured Liquid Photography X -173 FLUORESCENT PAINT; Fluorescent - White (No. 5779), Fluorescent - Red (No. 5780), Fluorescent - Yellow (No. 5782), Fluorescent - Green (No. 5783), Fluorescent - Blue (No. 5784), Fluorescent - Invisible Blue (No. 5785), Fluorescent - Pink (No. 5786)
Aerosol Ind Design X 0
GAMSOL Liquid Draw/Print X 145 HB PVC 40 GREY CEMENT Liquid Photography X -5 Isopropyl Alcohol – 99% Liquid Lithography X 535 Isopropyl Alcohol Liquid Draw/Print X 53 Kerosene Liquid Sculpture X 100 Kerosene Liquid Foundry X 100 KODAK Farmer's Reducer, Part A Powder Photography X KODAK Farmer's Reducer, Part B Powder Photography X Krylon all purpose spray adhesive (No MSDS) Aerosol Ind Design X <0 Krylon Clear Glaze Aerosol Woodworking X <0 Krylon Grey Glaze Aerosol Woodworking X <0 Krylon H2O Latex Aerosol Paint, White Primer Aerosol Photography X <0
KRYLON Interior/Exterior Paint, Glossy White Aerosol Photography X <0 Lepage - Thinner Rubber Cement Liquid Sculpture X -12 LEPAGE CONTACT CEMENT THINNER/CLEANER Liquid Ind Design X -12
LEPAGE CONTACT CEMENT THINNER/CLEANER Liquid Jewellery X -12 Liberon Wax Solid Woodworking X 100 LIGHTER FLUID/CHARCOAL STARTER Liquid Metals X 42 LIQUID WRENCH PENETRATION OIL (Liquid) Liquid Metals X 137 Methanol (Methyl hydrate) Liquid Foundry X 54 Methanol (Methyl hydrate) Liquid Jewellery X 54 Methanol (Methyl hydrate) Liquid Mouldmaking X 54 Methanol (Methyl hydrate) Liquid Photography X 54 Methanol (Methyl hydrate) Liquid Sculpture X 54 Methanol (Methyl hydrate) Liquid Woodworking X 54 Methyl Hydrate Liquid X 51.8 Mineral Spirits Liquid Draw/Print X 100 Minwax Wood Finish Liquid Sculpture X 100 Minwax Wood Finish Liquid Woodworking X 100 NGR Stain Reducer Liquid Woodworking X 1 NGR Stains - various colours Liquid Woodworking X 0 NGR Stains Liquid Mouldmaking X 0 OATEY CANADIAN PURPLE PRIMER/CLEANER Liquid Photography X 14 Odourless Mineral Spirits Liquid Lithography X 104 ORANGE GLO Liquid Ind Design X 149 Original Wood Finish (linseed oil) Liquid Woodworking X 95 Poly Super Strippa Paint Stripper Liquid Woodworking X 100

Substance/Product Name Phase Site within OCAD U
Flam
mab
le /
Ex
plos
ive
Com
bust
ible
Flas
h Po
int
Typical Quantity on Hand Q Units
Propane Gas Woodworking X Propane Gas Foundry X Renaissance Wax Polish Solid Foundry X 100 RICE FLOUR Powder Fibre X X SODIUM HYDROSULPHITE Powder Fibre X Spray Paint – latex Compressed Gas Etching X < 0 Spray Shellac Aerosol Ind Design X <0 Spray Shellac Aerosol Mouldmaking X <0 Starrett M-1 All Purpose Lubricant Liquid Woodworking X 162 STOP-OFF LACQUER Liquid Jewellery X 0 Stop-out Varnish Liquid Etching X 54 Strontium Powder Ceramics X Strontium Powder Plastics X Sucrose Powder Fibre X X Super Lube Spray Aerosol Woodworking X 25 Top-Cote Aerosol Series Aerosol Ind Design X <0 Top-Cote Aerosol Series Aerosol Jewellery X <0 Tremclad Gloss Black Aerosol Woodworking X <0 Tremclad Real Orange Aerosol Woodworking X <0 Tremclad Red Oxide Primer Aerosol Woodworking X <0 Tremclad Rust Paint Aerosol Sculpture X <0 Tremclad Rust paint Aerosol Woodworking X <0 Turpentine Liquid Woodworking X 95 Turpentine Liquid Jewellery X 95 Universal Release (Liquid) Liquid Mouldmaking X -7 Various spray paints Aerosol Sculpture X <0 Varsol Liquid Foundry X 140 Varsol Liquid Photography X 140 VELVALITE CG35 COATING 32744 Liquid Foundry X 53
VELVALITE SOLVENT 100 Liquid Foundry X 109 WD40 Liquid Metals X 122 WD40 Liquid Sculpture X 122 WD40 Liquid Woodworking X 122 WD-40 Aerosol Aerosol Metals X 122 WD-40 Aerosol Aerosol Photography X 122 Weld - on 16 Liquid Ind Design X 0 White shellac Liquid Ceramics X 54 White shellac Liquid Plastics X 54 White shellac Liquid Woodworking X 54 Witch Hazel Liquid Jewellery X 110 Zinsser - Shellac Liquid Sculpture X 60

Restriction on Locations Where Flammable or Combustible Liquids Can be Stored and Used
1. Flammable or combustible liquids can only be stored at OCAD University at the locations shown below.
Permitted Storage Locations for Flammable or Combustible Liquids
Site within OCAD Permissible Storage Location Printing Making Flammable Storage Cabinet Photography Flammable Storage Cabinet Metals Flammable Storage Cabinet Foundry Flammable Storage Cabinet Sculpture Flammable Storage Cabinet Jewellery Flammable Storage Cabinet Plastics Flammable Storage Cabinet Industrial Design Flammable Storage Cabinet
2. Flammable or combustible liquids can only be used at OCAD University at the locations shown below.
Permitted Usage Locations for Flammable or Combustible Liquids
Printing Making Photography Metals Foundry Sculpture Jewellery Plastics Industrial Design
Equipment Required for Flammable or Combustible Liquid Storage
1. Flammable or combustible liquids must be kept in flammable storage cabinets that, a) conform to ULC-C1275, “Storage Cabinets for Flammable Liquid Containers”, or b) conform to ULI 1275, “Flammable Liquid Storage Cabinets”, or c) are Factory Mutual Research Approved, or d) are listed as meeting NFPA 30.
2. The maximum quantity of flammable and combustible liquids stored in a cabinet shall be 500 L, of which not more than 250 L
shall be “flammable liquids”.
3. Flammable and combustible liquids stored in cabinets shall be in closed containers.
4. Cabinets for container storage shall be labeled in conspicuous lettering to indicate that the cabinet contains flammable materials and that open flames must be kept away.

5. If a flammable or combustible storage cabinets has ventilation openings,
a) the ventilation openings shall be sealed with materials providing fire protection at least equivalent to that required for the construction of the cabinet, or
b) the cabinet shall be vented outdoors using vent piping providing fire protection at least equivalent to that required in Clause a. for seals.
c) Containers for flammable or combustible liquids shall be kept closed when not in use.
6. Flammable or combustible liquids and storage cabinets must not be in or adjacent to exits, including exits to outdoors, elevators or principal routes that provide access to exits.
7. No other type of dangerous good shall be stored in the same cabinet as a flammable or combustible liquid.
Dispensing Practices 1. When any flammable liquid is dispensed from one a container into another,
a) if the container is made of metallic or electrically conducting material, the container must be electrically connected to the
fill stem, or rest on a conductive floor that is electrically connected to the fill stem, or
b) if the container or storage tank is made of non-electrically conducting material, static can be controlled by making an electrical connection between the fluids in the source container and secondary container simply by dipping a thin copper or other metal wire into both liquids inside their containers (ensure that the liquid is compatible with the metal of the wire).
2. Compressed Gases
Restriction on Locations Where Compressed Gases Can be Stored
1. Cylinders containing compressed gas (i.e. not empty) may only be stored indoors at room locations shown below.
Permitted Locations for Storage of Cylinders Containing Compressed Gas
Site within OSC Permitted Current Storage Location
Jewellery Oxygen Wood Working Propane Workbench at location protected from damage
and heat / ignition sources.
Ceramic Propane Foundry Argon Metal Argon, Buleshield AL, Acetylene
2. To the extent practicable, any location where flammable gas cylinders exceeding 100 L in expanded capacity should only be
stored at rooms that are separated from the rest of the building by a 2 hour fire rating.
3. Compressed gas cylinders (whether full or empty) are not permitted to be stored outdoors on OCAD University property.

Facilities Required for Storage of Non-Flammable and Flammable Compressed Gas Cylinders Indoor storage areas for compressed gas cylinders must be kept dry and ventilated. a) Requirements for All Compressed Gas Cylinders Over 38 cm in Height (Measured from Base to Top of Valve Cap)
1. Cylinders containing compressed gas must be stored to hold them securely in place on racks, or by nesting, or in cages, as
shown below.
Cylinder Rack Nested and Chained
Cylinders Small Cylinder Cage Tall Cylinder Cage
2. The valve connection on a cylinder must be unique for the type of gas in order to prevent creation of a hazard by inadvertent connection with a line containing another gas.
3. Gas cylinders must have a valve protection cap in position at all times when the cylinder is not in use.
4. Gas cylinders and valves must be located and /or physically guarded in order to prevent accidental physical damage by
impact with other objects.
b) Requirements for Acetylene Compressed Gas Cylinders Acetylene cylinders must always be stored in an upright position.
c) Requirements for Propane Compressed Gas Cylinders and Other Flammable Compressed Gases that are Heavier than Air Cylinders of propane and other flammable compressed gas which are heavier than air must be stored in a flammable storage cabinet used solely for flammable compressed gases that: has a fire-resistance rating of at least ¾ hr, has an aggregate capacity that does not exceed 100 kg, contains no more than 3 cylinders, and is located in a room that has mechanical ventilation providing at least 1 air change per hour.

3. Corrosives and Oxidizers 1. Containers of acids, bases and oxidizers must be stored in safety cabinets designated for storage of these substances and none
other.
2. Containers of acids and bases are to be stored apart on separate shelves, or if this is not possible separated by distance on the same shelf, in order to minimize potential for mixing in the event of leakage or spillage.
3. Containers shall be kept closed when not in use.
4. Other Hazardous Substances 1. Hazardous substances that are not flammable, combustible, corrosive or oxidizing do not require storage in designated safety
cabinets, and can be stored in ordinary cupboards or other suitable storage cabinets.
2. Cupboards and storage cabinets used for these hazardous substances must have signage or other appropriate markings to indicate the contents therein.
Hazardous Chemical Wastes and Containers 1. Pending removal from site, hazardous chemical wastes shall be,
a) stored in containers suitable for the type of waste, b) labeled as to the type of waste, c) stored in accordance with rules described above for specific classes and properties of chemicals.
2. See the procedure entitled “Chemical Waste Disposal Procedures” for details on hazardous waste storage, labeling, handling and movement.
Hazardous Waste Storage Lock-Up Area by Campus Services 1. Hazardous wastes stored at the lock-up area by Campus Services must be kept segregated by placing incoming wastes into the
appropriate storage cabinet or shelf, as follows: a) flammable or combustible wastes must be stored in the flammable storage cabinet b) corrosive wastes must be stored in the corrosives storage cabinet, placed on the appropriate shelf for acids, bases or
oxidizers c) toxic wastes that are not flammable, combustible or corrosive must be stored in the toxics storage cabinet d) waste batteries in the battery tote e) bags of fluorescent tube breakage waste in the fluorescent tube waste tote

5. Procedure for responding to chemical emergencies
Requisite Equipment and Supplies The list identifies locations where the following equipment and supplies must be present and maintained:
a) spill clean-up kits b) deluge showers c) eye wash stations d) first aid kits
1. The locations of fire extinguishers in the building are shown in the fire safety plan, which is posted at various locations in the facility.
2. Spill clean-up kits and first aid kits shall be inspected at least once every month to verify that contents are complete and in good
condition. The Office of Safety and Risk Management is responsible for performing these inspections, recording findings on the inspection checklists contained with the kits, and advising Studio Management of any deficiencies. The Office of Safety and Risk Management is responsible for replenishing any supplies as necessary.
3. Deluge showers and eye wash stations must be tested to verify functionality at least once every year. The Office of Safety and
Risk Management is responsible for performing these inspections, and advising Studio Management of any deficiencies. Studio Management is responsible for remedying any deficiencies.
Be Prepared in Advance 1. The chances for successfully dealing with a spill, accident or emergency involving a chemical are significantly increased by,
a) thinking before using the chemical about the types of things that could go wrong or cause a spill, accident, or other emergency,
b) planning the work in a manner that minimizes the risk of these scenarios, c) ensuring that you understand the magnitude of the potential hazard that could result from a spill, accident or other
emergency, should it occur, d) ensuring that you or others know what to do in the event of a spill, accident or other emergency, and have the ability to
rapidly and effectively respond to the emergency, in order to protect yourself and others, and e) ensuring that any necessary emergency equipment and supplies are readily accessible for use if needed, and that the
quantities available are sufficient for the potential magnitude of spill or emergency, f) knowing the locations of the nearest eye wash, emergency shower, and washrooms, for use in case of a need to flush skin
or eyes.
2. All chemical users and their supervisors are responsible for “knowing what to do” in case of an emergency involving a chemical under their control.
Actions to Take in Case of a Spill of any Hazardous Material 1. Have unnecessary personnel (employees and students) leave the area of potential danger.
2. If a corrosive chemical has been splashed onto a person’s skin or in their eyes, assist them in getting immediately to the nearest
eye wash station, or emergency shower, or washroom, as appropriate, to flush their skin or eyes. Have another person call for first aid or emergency medical assistance, as appropriate, and continue flushing for at least 10 minutes in the case of minor contact or until emergency medical assistance arrives in the case of major contact.
3. If the substance that has spilled is flammable or combustible, eliminate any nearby sources of ignition, if possible. If the amount spilled is large enough to present a potential fire risk, smother the spilled material with the foam from an ABC fire extinguisher.
4. If the substance is not flammable, have one person obtain a spill control kit and any necessary additional personal protective equipment, while another person remains near the spill to keep persons out of harm’s way.
5. Once the spill kit arrives, use the appropriate materials to stop the spread of the spill, absorb it, and clean it up. Use the appropriate personal protective equipment while cleaning up the spill.
6. If the spilled material is flammable or combustible, have a person stand-by with a fire extinguisher while the spill is being cleaned up, ready to respond if the material catches fire.
7. Used spill clean-up materials must be handled in accordance with applicable procedures for on-site chemical waste transport, and waste storage and handling.

Internal Notifications The Office of Safety and Risk Management and Campus Services shall be promptly advised of the occurrence of any chemical spill or inadvertent release. External Notifications Specific government agencies must be notified of certain kinds of incidents or emergencies involving chemicals, as described below.
a) Reporting Explosions Explosions must be reported to the Technical Standards and Safety Authority (Telephone: 416-734-3327) where they have caused injury, damage to the equipment, or a fire by Facilities Management. Minor ‘delayed ignitions’ would not normally be considered to be reportable.
b) Reporting Liquid Petroleum Spills 1. Any spill of a petroleum product must be reported to the Ministry of Environment Spills Action Centre (Telephone: 1 (800)
268-6060, or (416) 325-3000) if the spill is in excess of: 100 liters at sites restricted from public access 25 liters at sites with public access
2. It is not mandatory to report spills of lesser quantities unless the spill would:
create a hazard to public health or safety contaminate any fresh water source or waterway interfere with the rights of any person, or allow entry of product into a sewer system or underground stream or drainage system.
c) Discovery of a Petroleum Product that has escaped to the Environment or Inside a Building The discovery of a petroleum product that has escaped to the environment or inside a building must be reported to the Ministry of Environment Spills Action Centre (Telephone: 1 (800) 268-6060, or (416) 325-3000) by the Office of Safety and Risk Management.
d) Reporting Spills to the Environment 1. Spills are defined as releases of pollutants into the natural environment originating from a structure, vehicle, or other
container, and that are abnormal in light of all circumstances.
2. Spills must be reported immediately to the Ministry of Environment and to the municipality when they cause or are likely to cause any of the following: impairment to the quality of the natural environment - air, water, or land; injury or damage to property or animal life; adverse health effects; safety risk; making property, plant, or animal life unfit for use; loss of enjoyment of normal use of property; or interference with the normal conduct of business.
3. Spills must be reported to the Ministry of Environment Spills Action Centre (Telephone 1-800-268-6060, or (416) 325-3000,
Fax: (416) 325-3011) by the Office of Safety and Risk Management.
Posting this Procedure This procedure must be posted in close proximity to locations where personnel store and use hazardous chemicals in a manner that presents risk of a hazardous spill, leak or release.

6. Safety Procedures for Chemical Users
Preparation for Use 1. Consult the current material safety data sheet and container label prior to using any chemical substance for the first time. 2. If the chemical is one for which a substance-specific emergency plan, safety plan, or designated substance assessment is
required, consult the appropriate documents prior to use. 3. Ensure that you know the basic minimum personal protective equipment that must be used that it is available, and that you
know how to use it. 4. Ensure that you know the types of harm that can result from overexposure to the chemical, leakage, or spills. 5. Ensure that you know the locations of emergency equipment and supplies (safety showers, emergency eye wash stations, first
aid kits, spill kits, fire extinguishers), and that you know how to use and operate same. 6. Don’t work alone or in isolation with chemicals that are flammable, combustible, or can cause serious injury from skin contact or
inhalation. The idea is to ensure that someone is close enough to render help if necessary. 7. If you don’t fully understand the hazards and safety requirements for a chemical, don’t use it. 8. If you need further information on hazards and safety practices contact your Studio Managers.
Mandatory Personal Protective and Safety Equipment for Employees The following table identifies the minimum personal protective and safety equipment requirements for employees when using hazardous chemicals.
Mandatory Minimum Personal Protective and Safety Equipment Use Requirements
Hazard / Activity
Face Body Hands Feet Kit For Student Demonstrations
Chem
ical
Saf
ety
Gla
sses
Face
Shi
eld
Wel
ding
Hel
met
an
d Le
ns
Flam
e Re
sista
nt L
ab
Coat
Ch
emic
al S
plas
h Ap
ron
Cryo
- Apr
on
Long
Pan
ts, W
orn
Ove
r Foo
twea
r Pa
inte
r's S
hirt
and
Pa
nts o
r Cov
eral
ls Fl
ame
Resis
tant
Sh
op C
oat
Chem
ical
Pro
tect
ive
Glo
ves p
er M
SDS
Cryo
- Glo
ves
Clos
ed F
ootw
ear
Safe
ty F
ootw
ear
Fire
Ext
ingu
isher
w
ithin
5 m
Fi
rst A
id K
it
with
in 5
m
Spill
kit
with
in
5 m
Acids √ √ √ √ √ √ √ √ √ √ Bases √ √ √ √ √ √ √ √ √ √ Oxidizers √ √ √ √ √ √ √ √ √ √ Flammable liquids √ √ √ √ √ √ √ √ Combustible liquids √ √ √ √ √ √ √ √
Flammable or ignitable solids √ √ √ √ √ √ √ √
Toxics with none of the above properties
√ √ √ √ √ √ √ √
Cryogenic liquids, containers, piping √ √ √ √ √ √ √ √ √ √
Using open flame √ √ √ √ √ Welding √ √ √ Painting √ √

7. Chemical Waste Disposal Procedures
Substances that Can and Cannot be Disposed of via Sink Drains or in Regular Solid Refuse Containers 1. It is prohibited to pour down a sink or floor drain, or place into any regular solid refuse container, any of the following
substances: a) a solution with a pH less than 6.0 or greater than 11.5 b) a solution consisting of two or more separate liquid layers c) any liquid with a temperature greater than 60 degrees Celsius d) acute hazardous waste chemicals e) flammable or combustible liquids (i.e. those having a flash point under 93.3 Celsius) f) biomedical waste g) fuels h) ignitable wastes i) hazardous waste chemicals j) pathological waste k) pesticides l) reactive waste m) severely toxic waste n) waste radioactive substances
2. Wastes must not be intentionally mixed with any solid or liquid so that the waste’s hazardous characteristics would be diluted
below a regulatory level.
3. If you uncertain as to the proper manner for disposal of any particular substance, contact the Office of Safety and Risk Management for guidance.
Empty Containers of Hazardous Substances 1. Containers which formerly contained regulated (hazardous) substances must be empty to be classified as a non-hazardous
waste. An empty container is defined as having < 2.5 cm of residue remaining at the bottom of the container or less than 3% of the original contents, whichever is the lesser amount.
2. Former hazardous substances containers that meet the condition described above must be
labeled as shown prior to disposal:
3. Labels may be obtained from the Studio Management Office who is also responsible for maintaining stock of these labels.
Locations Where Hazardous Waste Storage is Permitted and Prohibited 1. Hazardous wastes generated at a user’s location are to be stored (pending removal to the hazardous waste storage area by
Campus Service) in accordance with the procedure entitled “Chemical Storage Procedures”.
2. Hazardous wastes shall not be stored at any location other than the chemical storage room.
3. As soon as practicable after generation, hazardous wastes must be taken to the hazardous waste storage lock-up area located near the Ceramics Studio. Hazardous wastes must be transported within the facility in accordance with the procedure entitled “Procedures for Transporting Hazardous Chemicals within OCAD University”.

4. Once taken to the hazardous waste storage area located near the Ceramics Studio, the hazardous waste must be placed in the appropriate storage cabinet or container, as follows: a) flammable or combustible wastes must be stored in the flammable storage cabinet b) corrosive wastes must be stored in the corrosives storage cabinet, placed on the appropriate shelf for acids, bases or
oxidizers c) toxic wastes that are not flammable, combustible or corrosive must be stored in the toxics storage cabinet d) waste batteries in the battery tote e) bags of fluorescent tube breakage waste in the fluorescent tube waste tote
Segregation, Labeling and Interim Containment Requirements at User Locations 1. Hazardous wastes kept at a user location must be physically segregated from other hazardous materials according to their
physical and chemical properties, in the manner described in the procedure entitled “Chemical Storage Procedures”.
2. Hazardous wastes must be held in containers that are suitable for the chemical and physical properties of the waste (e.g. corrosion resistant). If the hazardous waste has the same properties as the original substance, use a container comparable to the container in which the original substance was held.
3. If you are uncertain as to the proper type of container to use, contact the Office of Safety and Risk Management.
4. All hazardous waste containers must be labeled with the following information. a) Location or activity that produced the waste. b) Major chemical components or trade name of the waste. c) Date the waste was produced. d) Name of the OCAD University contact person. e) When waste is being added to the container over a period of time, the initial START
date as well as the FILLED date, should be written on the container. (This provides a mechanism to determine the storage time and potential need for a change in waste management practices.)
5. If you do not know some or all of the information in 4.a. through 4.e., contact Studio
Management for assistance.
6. The following is an example of a commercially printed label that can be used for waste containers
Hazardous Waste Label Users can obtain hazardous waste labels and packing supplies from Studio Management and Campus Services. Studio Management is responsible for maintaining these items in stock.
Time Limits for On-site Storage of Hazardous Wastes 1. Full hazardous wastes must be transported to the hazardous waste storage area located near the Ceramics Studio as soon as
practicable after being filled.
2. Ontario regulations limit on-site storage of hazardous wastes to 90 days. To comply with this requirement, OCAD University has hazardous waste pick-ups from RPR Environmental occur every 90 days.

Reporting On-Site Storage In Excess of 90 Days 1. In the event that a hazardous waste has been stored on-site for more than 90 days, the following applies, the user responsible
for producing the waste must advise the Office of Safety and Risk Management.
2. The Office of Safety and Risk Management must file a notice with the Ministry of Environmental Regional Director using the form below (form available from the Ministry of Environment web site).
3. The completed notice form must be retained on-file by the Office of Safety and Risk Management for a period of at least two years from the date that the waste is removed from the site.
Packing and Manifesting Hazardous Wastes for Pick-up 1. Prior to pick-up, it is necessary for (1) hazardous wastes in the lock-up area near the Ceramics Studio to be packed into labeled
shipping containers, and (2) a manifest to be prepared.

2. Campus Services is responsible for removing containers of hazardous waste from the lock-up storage cabinets, placing the same
classes of wastes into suitable designated shipping containers for the waste, and labeling the container with the shipping class information. The following provides information for this purpose.
Waste Information Transportation (TDG Information)
Common Waste Name Manifest Required
Hazardous or Non-
Hazardous? Shipping Name PIN Class
Packing
Group Absorbents (Spent Socks, Pads) YES HAZ, Waste Solids Containing Flammable Liquids,
nos, (Technical Name) UN 3175 4.1 II
Absorbents (Spent Socks, Pads) ~ Lube Oil
YES HAZ Waste Environmentally Hazardous Substances, Solid, nos, (Used Oil with Lead)
UN 3077 9 III
Acid Solutions YES HAZ Waste Corrosive Liquids, nos, (Technical Name)
UN 1760 8 II
Activated Carbon ~ Spent YES Testing Required or assume HAZ
Waste Carbon, Activated UN 1362 4.2 I
Aerosol Cans YES HAZ Waste Aerosols, Flammable UN 1950 2.1
Batteries: Alkaline YES HAZ Waste Batteries, Wet, Filled with Alkali, Electric Storage
UN 2795 8 III
Batteries: Lead Acid YES HAZ Waste Batteries, Wet, Filled with Acid, Electric Storage
UN 2794 8 III
Batteries: NiCd YES HAZ Waste Environmentally Hazardous Substances, Solid, nos, (NiCd Batteries)
UN 3077 9 III
Caustic Solutions YES HAZ Waste Corrosive Liquids, nos, (Technical Name)
UN 1760 8 II
Compressed Gas Cylinders ~ Empty NO NHAZ Not TDG Regulated n/a n/a n/a
Construction and Demolition Material ~ Uncontaminated
NO NHAZ Not TDG Regulated n/a n/a n/a
Contaminated Debris & Soil YES Testing Required
To be determined - - -
Desiccants ~ Spent (All Types) YES Testing Required or assume HAZ
NHAZ ~ Not TDG Regulated (instrument air) HAZ~ Waste Water Reactive, Solid, nos, (Technical Name)
UN 2813 4.3 I
Empty Containers (Metal and Plastic Including Drums, Pails, Jugs, etc.) ~ (Refundable)
NO NHAZ Not TDG Regulated n/a n/a n/a
Empty Containers (Metal and Plastic Including Drums, Pails, Jugs, etc.) ~ (Non Refundable)
NO NHAZ Not TDG Regulated n/a n/a n/a
Filters ~ Glycols (EG/TEG) YES HAZ Waste Environmentally Hazardous Substances, Solid, nos, (Technical Name)
UN 3077 9 III
Filters ~ Instrument Air NO NHAZ Not TDG Regulated n/a n/a n/a
Filters ~ Lube Oil (Drained) YES NHAZ Not TDG Regulated n/a n/a n/a
Filters ~ Lube Oil YES HAZ Waste Environmentally Hazardous Substances, Solid, nos, (Technical Name)
UN 3077 9 III
Filters ~ (Raw/Fuel Gas, NGL's, etc.) YES HAZ Waste Solids Containing Flammable Liquids, nos, (Technical Name)
UN 3175 4.1 II
Fluorescent Tubes ~ Spent NO NHAZ Not TDG Regulated n/a n/a n/a
Garbage ~ Domestic Waste NO NHAZ Not TDG Regulated n/a n/a n/a
Gaskets (non-asbestos) NO NHAZ Not TDG Regulated n/a n/a n/a Glycol Solutions (MEG/DEG/TEG) ~ Metals
YES HAZ Waste Environmentally Hazardous Substances, Liquid, nos, (Technical Name)
UN 3082 9 III
Glycol Solutions (MEG/DEG/TEG) NO HAZ Not TDG Regulated n/a n/a n/a
Grease Cartridges ~ Empty NO NHAZ Not TDG Regulated n/a n/a n/a

Waste Information Transportation (TDG Information)
Common Waste Name Manifest Required
Hazardous or Non-
Hazardous? Shipping Name PIN Class
Packing
Group Hydraulic and Transmission Oil (Vehicle and Equipment)
YES HAZ Waste Environmentally Hazardous Substances, Liquid, nos, (Technical Name)
UN 3082 9 III
Insulation/Refractory ~ Non Asbestos NO NHAZ Not TDG regulated n/a n/a n/a
Ion Exchange Resin ~ Water Treatment
NO NHAZ Not TDG regulated n/a n/a n/a
Lab Chemicals YES HAZ Waste Environmentally Hazardous Substances, Liquid, nos, (Technical Name)
- -
Lubricating Oil YES HAZ Waste Environmentally Hazardous Substances, Liquid, nos, (Technical Name)
UN 3082 9 III
Methanol YES HAZ Waste Methanol UN 1230 3(6.1)
II
Office Material (Paper) NO NHAZ Not TDG regulated n/a n/a n/a
Paints (Cans, Drums and Pails) YES HAZ Waste Paint Related Material UN 1263 3 III
Paint Cans (Empty) and Brushes NO NHAZ Not TDG regulated n/a n/a n/a
Pesticides/Herbicides Spent YES HAZ Waste Pesticides, Liquid, Toxic, nos, (Technical Name)
UN 2902 6.1 II
Photo Copier / Laser Printer Toner NO NHAZ Not TDG regulated n/a n/a n/a
Pipe Dope Containers and Brushes ~ Empty
NO NHAZ Not TDG regulated n/a n/a n/a
Pipe Dope/Grease ~ Lead Based YES HAS Waste Environmentally Hazardous Substance, Solid, nos, (Technical Name)
UN 3077 9 III
Pipe Dope/Grease ~ Non Lead Based NO NHAZ Not TDG regulated n/a n/a n/a
Rags ~ Oily YES HAZ Waste Environmentally Hazardous Substance, Solid, nos, (Technical Name)
Un 3077 9 III
Sand Blasting Sand ~ Contaminated YES HAZ Waste Environmentally Hazardous Substance, Solid, nos, (Technical Name)
Un 3077 9 III
Sand Blasting Sand ~ Uncontaminated NO NHAZ Not TDG regulated n/a n/a n/a
Scale (Non-Radioactive) NO NHAZ Not TDG regulated n/a n/a n/a
Scrap Metal (Galvanized, Aluminum, Stainless Steel, etc.)
NO NHAZ Not TDG regulated n/a n/a n/a
Solvents (Non-Halogenated) ~ Spent YES HAZ Waste Flammable Liquid, nos, (Technical Name)
UN 1993 3 II
Varsol YES NHAZ Waste Flammable Liquid, nos, (Varsol) UN 1993 3 II
Wash Fluids ~ Equipment Cleaning Operations
**SPECIFY PARTY
**SPECIFY PARTY
To be determined - - -
Wash Fluids ~ Solvents YES HAZ Waste Flammable Liquid, nos, (Technical Name)
UN 1993 3 II

Waste Manifesting, Disposal and Transportation Information 1. Campus Services is responsible for completing the shipping manifest for each outbound hazardous waste shipment. Manifests
can be prepared on-line using the Ministry of Environment HWIN web site: http://www.hwin.ca/hwin/index.jsp.
2. When using an electronic manifest, OCAD University must provide the hazardous waste hauler with electronic access to the manifest to complete section B (Carrier) of the manifest.
3. When using the electronic manifest, a paper copy does not have to be returned to Ministry of Environment, nor is the generator
required to retain a record.
4. Units to be utilized on the manifest are either L (liters) for liquid wastes or Kg (kilogram) for solid wastes. If waste density is unknown assume 1 L = 1 Kg
Pick-up of Hazardous Wastes by Licensed Hauler for Disposal 1. Campus Services is responsible for arranging pick-up and disposal of hazardous wastes by a licensed hazardous waste disposal
company.
2. In order to ship hazardous wastes off-site via a Ministry of Environment licensed hazardous waste hauler, OCAD University must have a valid Generator Registration Number, covering the classes of waste.
3. The Generator Registration Numbers for OCAD University are: a) 100 McCaul – ON0265000 b) 205 Richmond – ON3600802 c) 230/240 Richmond – ON6138736 d) 51 McCaul – ON 8963623
4. Below are the Active Waste Classes listed on OCAD University’s Generator Registration profile. As of December, 2011, all
hazardous wastes known to be generated at OCAD University were on this Profile. If any activities generate a class of hazardous waste not listed in the Generator Registration Record, it is necessary to advise the Office of Safety and Risk Management to initiate an updating of the Generator Registration Profile.
OCAD University Registered Waste Classes
114-T Liquid OTHER INORGANIC ACID WASTES 145-I Liquid PAINT/PIGMENT/COATING RESIDUES 145-L Liquid PAINT/PIGMENT/COATING RESIDUES 146-T Solid OTHER SPECIFIED INORGANICS 148-I Liquid INORGANIC LABORATORY CHEMICALS 148-I Solid INORGANIC LABORATORY CHEMICALS 148-B Liquid INORGANIC LABORATORY CHEMICALS 148-C Liquid INORGANIC LABORATORY CHEMICALS 148-C Solid INORGANIC LABORATORY CHEMICALS 213-I Liquid PETROLEUM DISTILLATES 252-L Liquid WASTE OILS & LUBRICANTS 263-I Liquid ORGANIC LABORATORY CHEMICALS 263-B Liquid ORGANIC LABORATORY CHEMICALS 264-I Liquid PHOTOPROCESSING WASTES 264-C Liquid PHOTOPROCESSING WASTES 312-P Solid PATHOLOGICAL WASTES 331-I Gas Compressed

Disposition of Empty Compressed Gas Cylinders 1. Empty compressed gas cylinders must be labeled, capped and marked "EMPTY".
2. Empty compressed gas cylinders are to be returned to the supplier – not disposed of.
Disposal of Compact Fluorescent Light Bulbs 1. Compact fluorescent light bulbs and tubes are a hazardous waste as they contain mercury (approximately 5 mg per 25W bulb).
2. Old fluorescent tubes should be stored in used tube boxes at a location protected from damage.
3. Contact Campus Services to arrange disposal.
4. If a compact fluorescent light bulb or tube breaks, sweep up all of the glass fragments and phosphor powder. DO NOT vacuum.
Place in a plastic bag; wipe the area with a damp paper towel to pick up stray shards of glass or fine particles, and place the used towel in the plastic bag.
Disposal of Batteries 1. Spent or still usable batteries should be stored in a secure, dry place.
2. Waste batteries are classes as hazardous waste and must not be discarded or disposed of in regular garbage
3. All waste battery types will be collected for recycling or proper disposal