feature guide - clients & profits
TRANSCRIPT

Contents 1
CLIENTS &̂ PROFITS XFeature Guide
®

Contents 2
Copyright © 2008 Clients & Profits, Inc. All Rights Reserved.
CLIENTS & PROFITS, INC.The Triangle Building4755 Oceanside Blvd., Suite 200Oceanside, CA 92056 USA(760) 945-4334 Voice(760) 945-2365 Fax(800) 272-4488 Sales(800) 521-2166 Helpdesk
Printed in the USA
Fourth Edition
This feature guide documents Clients & Profits® X

Contents 3
How to use thisfeature guide
This Feature Guide illustrates the best features in Clients & Profits X for tracking your clients, jobs, costs, billings, and finances. Together with the web-based Learn-ing Clients & Profits X tutorial (www.cnp-x.com/tutorial), the guide highlights the software’s most important abilities, and walks you through the basics of each win-dow and its functions. After browsing through this guide, you’ll have a good sense of what you can do with Clients & Profits.
■ The first two chapters, Introducing Clients & Profits X and Getting Started, provide a quick overview of the Clients & Profits X software.
■ Chapter 3, Job Tickets, illustrates job tickets, estimating, scheduling, and traffic . To see how to track time, add purchase orders, manage vendor payables, and write checks, see Chapter 4, Job Costing. Chapter 5, Media, describes Clients & Profits X’s media planning, ordering, and tracking capabilities. Clients, Billing, and Accounts Receivable, Chapter 6, guides you through billing client, as well as tracking unpaid invoices, making client payments, and printing statements.
■ To learn how Clients & Profits X manages accounting see Chapter 7, General Ledger. Chapter 8, Snapshots, explains how to print essential reports showing jobs, traffic, costs, work in progress, vendor and client account balances, productivity, and profitability, as well as financial statements.
■ Chapter 9, Settings, Options and Preferences, shows system managers how to set up users, assign access privileges, set up vendors, and customize how Clients & Profits X behaves.
NEED HELP? Call Clients & Profits X Helpdesk at (800) 521-2166 from 7:00 AM - 5:00 PM Pacific Time. Or, send your questions to [email protected].
For up-to-date answers to your agency management questions, check out the Cli-ents & Profits X web site: www.cnp-x.com/support
For help using any part of Clients & Profits X, click the button from any
window to open the on-line user guide. This web-based user guide features
step-by-step instructions, explanations, tips, demonstrations, and links to
FAQs, tech notes, and tutorials from the Clients & Profits X web site. It’s con-
tinually updated, so it’s more timely and helpful than a printed user guide.

Contents 4
Chapter 1: Introducing Clients & Profits
1-2 Introducing Clients & Profits X1-4 Starting Clients & Profits X1-6 Using The Information Center1-7 Using Lookup Lists1-8 Clients & Profits X Menus1-10 Clients & Profits X 5.0 Basics1-12 The Job Ticket Flowchart
Chapter 2: Getting Started
2-4 Getting Started Quickly with Clients & Profits X2-5 Adding Jobs2-6 Printing Daily Traffic reports2-7 Adding Job Costs2-8 Adding Billings2-9 Printing Reports2-10 What to Do First...2-10 Add Users2-11 Add the Chart of Accounts2-11 Enter Your Sales Tax Rates2-12 Add Clients2-12 Add Vendors2-13 Add Staff Members2-13 Add Tasks2-14 Add Status Codes2-14 Add Spec Sheets2-15 Set Your Job Preferences2-15 Set Your Accounting Preferences2-16 What To Do Next...2-16 Add Open Jobs2-17 Add Open Purchase Orders2-17 Add Unpaid Payables2-18 Add Unpaid Receivables2-18 Add G/L Beginning Balances2-19 Add Unbilled Work in Progress2-19 Checking Your Work
2-20 Getting Started Tips
Chapter 3: Job Tickets
3-4 Proposals3-6 Job Tickets3-8 Job Ticket Window3-10 Add New Job Window3-12 Job Tasks3-14 Adding Job Tasks3-16 Creative Briefs3-17 Printing Specifications
Contents

Contents 5
3-18 Estimating3-20 Printing Estimates3-22 Printing Specifications3-24 Traffic3-26 Job Traffic3-28 Job Scheduling3-30 Timeline3-32 Change Orders 3-34 Production Planner3-36 Weekly Traffic Report 3-38 Daily Job Status Report3-40 Work To Do3-42 Asset Manager 3-44 View>Point3-44 Job Snapshot3-46 Printing Job Reports
Chapter 4: Job Costing4-4 Purchase Orders4-8 Adding Purchase Orders4-10 Printing Purchase Orders4-12 Printing Purchase Order Reports4-14 Accounts Payable4-16 The Accounts Payable Window4-18 Job Cost Invoices4-20 Overhead Invoices4-22 Media Accrual Invoices4-24 Add Credit Card Statement4-26 Importing Credit Card Statements4-28 Printing Accounts Payable Reports4-30 Time Cards4-32 Time Sheets4-34 Time Sheet Window4-36 Adding Time Sheets4-38 Import Time4-40 Time Reports4-42 Checkbook4-44 The Checkbook Window4-46 Vendor Checks4-48 Autopay Payables4-50 Job Cost Checks4-52 Add Online Payment4-54 Overhead Expense Checks4-56 Employee Advance Checks4-58 Printing Checks4-60 Checkbook Reports4-62 Bank Reconciliation4-64 Expense Reports4-66 The My Daily Expense Reports Window4-68 Internal Charges

Contents 6
4-70 Job Cost Transfer
Chapter 5: Media
5-4 Overview5-7 The Media Menu5-8 Media Work Flow5-10 Media Calendar5-12 Media Briefs (Campaigns)5-14 Media Estimates5-16 Broadcast Media Plans5-18 Print Media Plans5-20 Insertion/Broadcast Orders5-22 Adding Broadcast Orders5-24 Adding Insertion Orders5-26 Adding Interactive Orders5-28 Adding Outdoor Orders5-30 Media Traffic5-32 Stations5-34 Publications5-36 Make Goods5-37 Media Billing Goals 5-38 Media Reports5-40 Media Link
Chapter 6: Clients, Billing, and Accounts Receivable
6-4 Clients6-8 Client Features6-6 The Clients Window6-8 The Add Client Account Window6-9 Client/Staff Privileges6-10 Client Contacts6-12 Client Billing Information6-14 Client Projects6-15 Client Diary/Call Log6-16 Meeting>Manager6-18 Client Retainers6-20 Client Budgets 6-21 Client Statistics6-22 Client Alerts6-23 Client E-mail6-24 Sales>Maker6-28 Billing/Accounts Receivable6-29 A/R Features6-31 Billing Types6-32 The Billing/Accounts Receivable Window6-34 Job Billing6-36 Estimate Billing6-38 Progress/Final Billing

Contents 7
6-40 WIP Billing6-42 Multi-Job Billing6-44 Media Billing6-46 Retainer Billing6-48 Advance Billing6-50 Miscellaneous Billing6-52 Finance Charge Billing6-54 Automatic Job Billing6-56 The Billing Worksheet6-58 Applying Advances6-59 Applying Retainers6-60 Printing Invoices6-62 Printing A/R Reports6-64 Client Payments6-66 The Client Payments Window6-68 The Add Client Payment Window6-70 Distribute Payments6-71 Split Client Payments6-72 Bank Deposits6-74 Printing Client Payment Reports6-76 Collection Manager
Chapter 7: General Ledger
7-4 General Ledger7-5 G/L Features7-8 The General Ledger window7-12 Profit Centers7-14 Departments7-15 Sub-Classes7-16 Chart of Accounts7-18 The Chart of Accounts Window7-20 The Add New Account Window7-22 The Budget Worksheet Window7-24 The Add Journal Entries Window7-26 Printing G/L Reports7-28 G/L Tools7-30 Importing Payroll7-32 Transfer Account Balances7-33 Add Adjusting JE7-34 G/L Reconciliation7-35 Out of Balance Checker7-36 Auditor7-38 Overhead Allocation Worksheet7-40 Close Year
Chapter 8: Snapshots
8-4 Snapshot Reports8-5 The Snapshots Menu

Contents 8
8-6 Production Reports8-8 Work in Progress Reports8-10 Job Costs Reports8-12 Vendor Account Aging8-14 Client Account Aging8-16 Cash Flash8-18 Profitability Reports8-22 Productivity Reports8-24 Financials8-28 Media Analysis Reports
Chapter 9: Settings, Options, and Preferences
9-4 Users, Passwords, and Access Privileges9-6 The C&P Users window9-8 General Privileges9-10 Menu Privileges9-12 Jobs Privileges9-14 Job Costs Privileges9-16 Accounting Privileges9-18 User Budget Alerts9-20 Who’s Connected9-22 Departments9-24 Staff9-26 The Staff window9-28 Staff Availability9-30 Vendors9-32 The Vendor window9-34 Vendor Account Info window9-36 The Information Center9-38 Status Table9-40 Task Table9-42 Job Types/Spec Sheets9-44 Order Templates9-46 Registration9-48 Preferences9-50 C&P E-mail9-51 Spell Checker9-52 Web Access9-54 Daily Time Card for iPhone and Web
Appendices
Appendix A: Glossary

Contents 9
Appendix B: Using Plug-in Applications
Glossary
Index
A technical supplement, The Clients & Profits X Database Guide, is included at the end of this chapter. It is a step-by-step troubleshooting and maintenance guide to the C&P database. Its contents include:
4 Database Troubleshooting Flow Chart5 Troubleshooting Worksheet6 How to Troubleshoot Database Problems7 Database Myths8 How to Repair Damaged Databases10 How to Export/Import Damaged Databases12 Database Troubleshooting FAQs14 15 Tips for Preventing Data Damage15 Common Causes of Damaged Data16 Inside the Clients & Profits X Database18 Database Size20 Windows Tips

Introduction

1-2
Introducing Clients & Profits X Who uses Clients & Profits X?
Anyone who works with clients, jobs, estimates, traffic, job costs, or accounting can use Clients & Profits X. This includes account executives, production managers, traffic coordinators, bookkeepers, controllers, managers and more.
Everyone who needs information can get it themselves from their own computer. Clients & Profits X lets anyone in the shop see jobs, update traffic, write notes, print reports and more from their desk—if they have the access privileges. Anything they change updates the database instantly. Other users can see these changes immediately, so they’re always working with the most up-to-the-minute information.
Clients & Profits X is people-based, so each staffer is entered as a user and given a password. A manager can independently assign privileges to each user, giving them access to some or all parts of the program. For example, an account executive may be allowed to open jobs but not see costs. Each user can be set up differently for f lexibility and security.
What is Clients & Profits X?
Clients & Profits Xis a software ap-plication, or program, that manages most of the business side of your shop and a lot of its creative side. It’s a single program that can man-age both the production side and accounting side at the same time.
Clients & Profits X is like two big programs in one: On one side is a complete production plan-ning, tracking, costing and billing system. On the other side is a comprehensive accounting system featuring payables, receivables, check writing, cash management and a powerful one-write, double-entry general ledger.
On the production side, it replaces all of your current paper-based systems of job jackets with an electronic job ticket that anyone in the shop can see, change, and print from their own computer. The job ticket is the center of Clients & Profits X; everything else revolves around jobs. Everything about a job is remembered, including esti-mates, change orders, and status as well as costs, time and billings.
Welcome to Clients & Profits X. You’re now using one of the fastest, easiest to use, and most productive management systems ever designed for the advertising and design professions.
Clients & Profits X is designed exclusively for creative businesses, like ad agencies, design studios, production companies, and corporate graphic and communication departments. Because it is designed especially for shops like yours, it speaks your language and works like you do.
Clients & Profits X is based on nearly 20 years experience in a thousand agencies, studios, and departments large and small. It uses the best ideas, methods and procedures used by the most productive shops to make you work better, smarter, and more accurately than before.
Beyond job costing and billing, Clients & Profits X handles the agency’s books. It manages payables, vendor agings, check writing, and bank ac-counts. It tracks client retainers, account balances, budgets, and prints state-ments. Meanwhile, a comprehensive general ledger continuously compiles journal entries into on-demand financial statements. Financial reports, such as the Income Statement and Balance Sheet, can be printed at any time during the month and for any month in the year. They are always up-to-the-minute current, and there’s no month-end closing required.
After a few months, Clients & Profits X will become your agency informa-tion system. It will be your best, most informed source of information on jobs, costs, time, and billings. It will be the first place you go to find out a Job’s status. You’ll quickly discover that Clients & Profits X will become a vital—and indispensable—part of the company.
Introducing Clients & Profits X
For help using any part of Clients & Profits, click the button from any win-
dow to open the on-line user guide. This web-based user guide features step-
by-step instructions, explanations, tips, and links to FAQs, tech notes, and video
tutorials from the Clients & Profits X web site (www.cnp-x.com). It’s continually
updated, so it’s more timely and helpful than a printed user guide.

1-3
Production managers use Clients & Profits X to manage jobs from start to finish.
When a new job is opened by an account executive, it is instantly available to the production man-ager for scheduling and trafficking.
The production manager can track a wealth of detailed informa-tion about each job, such as the production status, billing status, estimate revision, and more. He or she can add a wide variety of tasks to the job, such as artwork, typesetting, stats, etc., that can be independently scheduled. Tasks can be assigned to staff members then given a start date and due date. Work-to-do reports then show each staff member the tasks to complete each day, week, or any time period.
Job lists, reports, and summaries can be printed any time to show the status of all of the agency’s work. These reports show every aspect of the jobs in production, preventing missed deadlines or mistakes. You can even create custom reports to show any specialized information that’s important to completing the work.
Clients & Profits X keeps a diary of the Job’s progress, so the produc-tion manager can track who’s making changes, when they were made, and what happened. Other users can review a Job’s history (and make new entries for client meetings, for example) as needed.
Account executives use Clients & Profits X to open jobs and print reports.
An account executive can open a new job ticket directly from his or her desk, without forms or job books. New jobs are numbered automatically, saving time. New jobs are opened for a specific cli-ent, which lets account executives easily review job reports by client. Once entered, job information (like the client, job title, and specifica-tions) isn’t re-keyed, saving hours of wasted effort. Once saved, estimates can be entered, revised, and printed until they are perfect, without using a word processor or spreadsheet program.
Account executives can quickly review their jobs, or all the jobs for their team. Job specifications can be edited as many times as needed. Change orders can be added and printed for the client’s approval. Clients & Profits X even bills direct-ly all or part of the Job’s estimate, showing as much or as little detail as the client should see. As jobs move from approval to production to billing, account executives can track their progress with the simple click of a mouse.
The accounting depart-ment uses Clients & Prof-its X to track job costs, time, and billings.
Accounting managers can use Clients & Profits X to track every cost on each job for every client. Every time sheet, vendor buyout (accounts payable invoice), cash purchase, and out-of-pocket expense (such as faxes, copies, and computer time) is added and posted to a job and task.
Costs can be marked as billable or unbillable as needed. Markups can be included on all costs, so that commissions are calculated automatically. Each user has a daily time card that can be used throughout the day, anywhere in Clients & Profits X. Or, time sheets can be added in batches at the end of the day or week. Time can be charged to jobs at different billing rates automatically, based on the staffer, client, and job task.
Every job keeps a running total of its unbilled costs. These costs can then be billed automatically during the Job’s progress or when the job is completed. A work in progress re-port gives your account executives a quick summary of what’s unbilled before the invoices are added. Clients & Profits lets you bill one job at a time, or can even bill all unbilled jobs automatically to save time. Of course, you’ve got com-plete f lexibility to transfer costs between jobs, write-off unbillable costs, and even bill for more than the job cost itself.
Clients & Profits X puts important agency information at a manager’s fingertips. An agency principal can learn how to print job lists, client reports, and profit analyses with little training. Managers can spot-check jobs in progress from their desk, seeing schedules, costs, time spent so far, and more—but without becoming a computer expert. This ability lets managers make the most of their time. They can see what they need to know instantly, without disrupting the work f low of the staff. Clients & Profits X gives them the power to manage the information—without letting the system manage them.
Agency principals use Clients & Profits X to get informed quickly and easily.
Introducing Clients & Profits X

1-4
Starting Clients & Profits X 2. If prompted, select and open your database.
Clients & Profits X lists your most-recently opened database in a pop-up menu. The last database you used is selected automatically. In some cases, you will be asked to select and open your database.
■ Moving your mouse over the databases pop-up menu displays the database’s location on your hard disk or file server.
If you’re using Clients & Profits X for the first time, click the New Database button to create a new database for your organization. Once your new database is saved to the file server, any other Clients & Profits user will be able to open it—once you’ve set up their user accounts (see page 9-4).
1. Double-click on the Cli-ents & Profits X applica-tion.
Clients & Profits X starts up like any other Macintosh or Windows applica-tion: simply double-click on the program, open the database, then introduce yourself. Because Clients & Profits X is a multi-user application, many people could be sharing it at any one time. By introducing yourself to Clients & Profits with your initials, the system becomes aware that you’re using it.
Every potential Clients & Profits X user should be added to the Users table separately. When a user starts Clients & Profits X, he or she will be prompted to enter their initials and an optional password. The initials and password combination verifies that they can use all or part of the system. System Managers can give each user access to parts of Clients & Profits X, as well as special preferences (such as window positions, status codes, pop-up warning messages, etc.). These preferences are portable, so they travel with you to any computer you may use in the shop—whether or not it’s a Mac or a PC.
■ All of the important menu commands have keyboard equivalents. You’ll see these keyboard shortcuts listed next to the commands on any menu. Most keyboard shortcuts on a Macintosh use the Apple (i.e., command) key and a letter or number. On Windows-based PCs, pressing the Alt key and a letter or number activates the keyboard shortcut.
Starting Clients & Profits X
This is your Clients & Profits X application on Mac OS X. On Windows XP/Vista, the C&P X application looks identical.
Your clients, jobs, costs, etc. are stored in a single data file, which ends with the .df1 extension. This is the database file you’ll need to back up nightly. Each company you manage will have its own .df1 database file. (Clients & Profits SQL X and Clients & Profits Pro X for MySQL store data inside the SQL database server, so don’t have a .df1 file)
■ On Mac OS X, look in the Appli-cations folder for a Clients & Profits X folder. Inside you’ll find the Clients & Profits X application.
Once the application is running, add it to your dock by clicking once on the program’s icon, hold down your mouse, then choose Keep In Dock. Afterwards, you’ll be able to start Clients & Profits X by clicking on its icon in your dock.
■ On Windows, look for the Clients & Profits X shortcut on your PC’s desktop. If not found, choose Start > Programs > Clients & Profits X to see the Clients & Profits X application.
To make a shortcut, right-click on the Clients & Profits X application to make a shortcut, then move the shortcut onto your desktop or the task bar.

1-5
4. Enter your password, then press Tab.
Passwords are sometimes used to validate who you are to Clients & Profits X. If your System Manager requires passwords, it must be entered.
■ Passwords are case sensitive, which means capital letters are different from lowercase letters. If your password is ROSEBUD, for ex-ample, entering Rosebud wouldn’t work. If you get an error when entering your password, check your case.
■ If you don’t have a password, the Introduce Yourself window closes automatically.
3. Enter your initials, then press Tab.
Your initials help the system track who’s doing what. The system remembers when you start and stop Clients & Profits X, as well as what kinds of entries you make. You must be an authorized user to use Clients & Profits.
■ If you’re using Clients & Profits X for the first time, enter your initials as MGR. This user is your default System Manager, enabling you to add, edit, and delete users. It has no password, so it can be used temporarily until you’ve set up your users and passwords.
■ If you enter your initials and get the message “user not found” then you’re not an authorized user. First, make sure you’re entering the right initials (don’t forget a middle initial, for example). If the message still appears, see your System Manager.
5. Choose any menu command, or click on an icon in your Information Center.
The functions to which you have ac-cess are based on the preferences set by your System Manager. Menu commands that are unavailable to you are dimmed and can’t be used. Otherwise, if the menu command is available, you can use it.
If you’re given access to an Infor-mation Center window, you can click on an icon to quickly open a production or accounting window (depending on your preference). Clicking on an Information Center icon is the equivalent of choosing the menu command.
Starting Clients & Profits X
Getting help. Select the show help bar option to display on-line help for many menu commands, toolbar buttons, and window fields. The help bar appears at the bottom of the window. On a Macintosh, the same on-line help is shown by enabling Balloon Help.
Since Clients & Profits is a multi-user database, it’s very important that every user close the system properly choose File > Quit Clients & Profits X.
■ Quitting Clients & Profits X by turning of the computer’s power (or by doing a forced quit) can damage the database.
To quit Clients & Profits X

1-6
Using The Information Center To change your Infor-mation Center window setting
Only a manager can change the Information Center window setting for each user.
1 Choose Setup > Users, Access & Passwords.
2 Click once on a user name to select it.
3 Click the customize info center link.
4 Make your changes, then click save.
To open your Information Center window
Ordinarily, your Information Center window opens automatically after introducing yourself. It reappears after you close a production window.
The Information Center is optional, so you may not see one. If so:
1 Choose My > My Information Center.
2 Click on any icon to open a window.
The Information Center gives you a quick, convenient way to work through Clients & Profits X. The Information Center window opens automatically whenever you start Clients & Profits X. You can choose an Information Center that best fits the way you work: Production, Accounting, or both. Clicking on the different icons on the Information Center opens various production and accounting windows—just as if you choose them from a menu. When you’ve finished working and close a window, your Information Center returns automatically.
The user sees his or her initials, name, and photo (from the Staff window, if one has been pasted).
The Information Center also features a customizable company message. This message appears on everyone’s Information Center window, alerting the staff to upcoming events, important deadlines, or agency news. The standard message is entered in the Agency Information window, and can be changed anytime. Special messages can be scheduled each day using the Daily Mes-sages utility.
Using The Information Center
Click any button in the Information Center to jump quickly to that window.

1-7Using Lookup Lists
Using Lookup Lists
Lookup lists make it easy to find account numbers, job numbers, and more while you’re working. They show basic information about clients, jobs, staff members, vendors, the chart of accounts, status codes, the task table, groups, and purchase orders:
Lookup lists can be opened anytime, anywhere —even while you’re adding or editing something. For example, you can look up a client while adding a new job ticket. Once you’ve found the client, double-clicking on the record enters it into the “client” field for you.
The list is updated the first time the lookup window is opened, getting the information it needs from the server. (It may take several moments to update the list if there are many records to list, or if the server or network is busy; you can cancel updating by clicking the Cancel button.) When a lookup list is used later, it opens immediately; however, it does not show any recently-added records. Updating a lookup list brings it current, showing everything added into the database so far. You can update a lookup list on some win-dows anytime by clicking the Update button.
To find something using a lookup list
Lookup lists will open automatical-ly whenever you tab past an empty client number, job number, task code, or vendor number field.Also, lookup lists can be opened whenever you want using the Lookup menu. For example, to find a client:
1 Choose Lookup > Clients.
The client lookup list account shows numbers, names, contacts, and phone numbers. You can sort the list by clicking on column head-ings and the up/down symbol.
2 Enter the first letter or number of the client you wish to find.
3 Use your mouse to scroll through the client records (or press the up and down arrow keys).
4 Double-click on a client record to select and use it, or press Return.
If you are adding a new job or an invoice, the client number is en-tered automatically and the lookup window closes.
To print a lookup list A report can be printed show-ing the information found in a lookup list by clicking the Print button. Records in the printed report are sorted in the same order as they appear in the lookup list window.

1-8
Clients & Profits X Menus
Clients & Profits X Menus
Unlike traditional module-based accounting programs, Clients & Profits X combines contact management, job tracking, media buying, job costing, billing, and accounting into a single integrated system. So everything you do in Clients & Profits X is always available through a common set of menus:
The Media Menu All of the media planning, ordering, and traffic functions needed by media buyers are available from the Media menu.
The Production Menu This menu is home to anyone in the production or traffic departments. It’s where you’ll find job tickets, which are the center of the Clients & Profits universe—and around which everything else works.
Proposals start the process, which become jobs upon approval by the client. Estimating and scheduling, as well as the creative brief and work order, are part of job tickets. Once a job has been opened, it’s time to get to work by writing purchase orders and getting the work onto the production planner, daily job status report, and the weekly traffic report.
The My Menu The My menu lets you focus on your own work: Your clients. Your jobs. Your cal-endar. Your time card. Your expense reports.
Choosing these menus commands let you get right to the information you need: clients and contacts, the jobs on which you’re working, your company appointments and events, how you spend your billable time, and what you’re spend-ing your own money on.
Your Information Center can be programmed with shortcuts for other things you do frequently, such as traffic, media planning, or purchase orders.

1-9Clients & Profits X Menus
The Accounting Menu Here’s where you’ll track every dollar that goes in and out of your agency. All kinds of costs are charged against jobs, then rolled up together on client invoices. Costs, expenses, and billings automatically flow into financial statements, which can be printed any time during the month—and for any month of the year. Because production is integrated with accounting, there’s no double-entry. The Lookup Menu There’s no need to memorize
client codes, job numbers, or G/L accounts. With lookup lists, everything you need to know is a mouse-click away. They display up-to-the-minute lists of clients, vendors, jobs, accounts, and more. And double-clicking on a record in the lookup list copies it wherever its needed.
The Setup Menu System managers (who are Clients & Profits users with manager privileges) can define settings, options, and preferences that are used by everyone throughout the shop here.
The Snapshots Menu All of the best production, costing, accounting, and management reports offered by Clients & Profits are printed here. Snapshot reports give you the best big picture of your shop’s performance.

1-10
Clients & Profits X Basics
Windows are opened by choosing a menu command. All commands are listed in the menus, so nothing is hidden. There are no codes to memorize, either. For example: To open the job ticket window, choose Job Tickets from the View menu.
■ Keyboard shortcuts are available for the most commonly used func-tions. The important commands for opening windows use function keys (Command 1-9 on the Macintosh, F1-F9 in Windows). Action com-mands, such as adding or printing, use keyboard shortcuts (such as Command-A on the Macintosh or Option-A in Windows). Using a keyboard shortcut or function key is the same as choosing a menu command.
■ If you use an Information Center, clicking on an icon opens a win-dow. But it’s the same as choosing a command from one of the menus.
■ Menu commands are dimmed if you do not have access to that window or function. Access is set up by managers in the Users, Ac-cess & Privileges window from the Setup menu.
To do something To find something
Most windows let you find informa-tion by name, number, date, or some other meaningful field. In addition, you usually have the op-tion to find the first record added, last record added, or by some other criteria. These selections can help make finding the information you want quick and easy.
Selections for finding a record are entered into a Find dialog box. The Find dialog box opens when you choose Find from the File menu. For example, to find an invoice from the Accounts Payable window: Choose Find from the File menu, enter an invoice number, then click Find. Or, invoices could be found by vendor by selecting vendor from the Find Invoice by pop-up menu.
■ List windows, such as the Chart of Accounts window, don’t have find commands. Because these windows show all records in a list, it’s easy to browse up and down the list with your mouse (or by using the arrow keys). Also, the columns in the list windows can be sorted by clicking on the column heading.
■ The Job Ticket window, like most other windows, has a sophisticated Find dialog that makes it easy to locate many jobs at once. You can find all of the jobs for a client contact, for example, or all of the jobs for a client.
Clients & Profits Basics
One of Clients & Profits X’s strengths is its consistent way of working. The program’s user interface is logical enough that you generally know what’s supposed to happen when you’re working. Because it’s very Macin-tosh-like (or Windows-like), windows open and close like other software you’ve already used. Menus, dialog boxes, and other elements act like you’d expect them to, making Clients & Profits easy to learn and use.
In Clients & Profits X, all windows look and feel similar. So the Job Tickets window looks and feels the same as the Checkbook, Accounts Payable, or Update Job Status windows. Every window has File and Edit menus with unique special-purpose commands. But all have the same commands for find-ing, adding, editing, and printing.
Once you know the basics of one window (finding, adding, editing, printing, etc.) you can easily get around Clients & Profits X.
Sending help e-mail If your Clients & Profits X system is con-nected to an SMTP mail server, you can send e-mail to the C&P Helpdesk while you’re working. This makes it very easy to get answers to questions about C&P when they happen. To send e-mail, close any open window then choose File > Get Help. The Send Help E-mail window lets you compose a brief message then send it to your system manager, or to the C&P Helpdesk, the C&P on-line User Group mailing list, or to the C&P Wish List. If you send a question to the C&P Helpdesk, the answer will be send via a reply to your e-mail. Questions sent to the C&P User Group will be answered by other Clients & Profits X like you who also subscribe to the on-line user group. Messages send to the C&P Wish List are added to the R&D database automatically.

1-11
To add something
Adding a record is how informa-tion gets into your database. Most windows have a “form” designed especially for entering newly added records. These Add windows contain elaborate error-checking to prevent mistakes. Once you’ve added something, it is available im-mediately for others to see and use. For example, to add a client invoice in Accounts Receivable: Choose Add New Invoice from the Edit menu, enter the invoice information in the Add Invoice window, then click Save.
■ Pressing the “Return” key or clicking the “Save” button saves your work. There is no Save com-mand because saving happens automatically. Anything you enter is saved to the database instantly by pressing Return or clicking Save or OK.
■ Anyone who has access to a window can add something. If you don’t want the user to add records, he or she shouldn’t have access to that window.
■ Make sure you save something before choosing Add again. Choos-ing a menu command while adding something cancels whatever you’re entering into the window. It’s a good shortcut instead of clicking Cancel, but you’ll lose your work. Instead, always click Save (or press Enter) before choosing another menu command or closing the window.
■ Use lookup lists when adding to save time. You can easily look up clients, vendors, jobs, tasks, and more while you’re adding some-thing by opening a window from the Lookup menu—without losing whatever you’re entering.
To edit something
In most cases anyone can freely edit anything in the database, de-pending on their access privileges. Everything about a job ticket, except its number, can be changed. Changes are usually made in special Edit windows that contain error-checking to prevent mistakes. Once you’ve made a change, it is available immediately for others to see and use. For example, to edit a journal entry in the General Ledger window: Double-click on one of the transaction’s line items, make the changes in the Edit Journal Entry window, then click Save. The changes you make will appear instantly after saving.
■ Some information can’t be edited after posting. Accounting data that affects the General Ledger, such as account numbers and amounts, can’t be edited to preserve the in-tegrity of your audit trails. In many cases you can edit details that don’t affect the accounting system, such as a description. But amounts and accounts can only be changed by making adjusting entries.
■ You can’t edit something if someone else is editing the same record. If you try to edit a job ticket that’s being edited by another user, your cursor becomes a padlock un-til the change is saved. Once saved, you can edit the job. To cancel a padlock, press Command-period then edit the job later.
To print a reportTo post something
Posting makes a record permanent-ly part of the database. Anything that affects the general ledger needs posting. A check, for ex-ample, doesn’t appear on account-ing reports until it is posted. Before posting, an entry can be changed or deleted. Once posted, it can’t be modified or removed (instead, only adjusting entries can be made to it). Posting updates clients, vendors, jobs, and makes journal entries in the General Ledger.
■ To post something: Choose File > Post, select any options, then click the Post button.
■ Unposted entries can be proofed. The Post dialog box lets you print proof lists before posting. This is highly recommended, since it gives you a chance to make correc-tions before the General Ledger is updated.
■ The Post dialog box can post one entry or a batch of entries. You can post just your entries, or all the unposted entries for a period.
■ Purchase orders aren’t posted since they don’t affect the General Ledger.
■ Time sheets can be optionally approved. An option in Prefer-ences keeps time entries from being posted until approved by a supervisor.
Reports can be printed anywhere, anytime, and from just about any place in Clients & Profits. There are many kinds of reports that show the same information from different perspectives, depending on who needs it. Generally, reports are printed from windows. For example, Checkbook reports are printed from the Checkbook win-dow: Choose File > Print Reports, enter a range of dates, click on a report name to select it, then click Print.
■ Snapshot reports show informa-tion for all parts of Clients & Profits, such as production, job costs, and financials. It’s the best place to get quick insights into the business.
■ General Ledger audit trails and journals show entries created from posting. These reports consolidate the work you’ve entered into payables, receivables, checks, and client payments.
■ Any estimate, creative brief, change order, PO, invoice, or state-ment can be e-mailed as PDF file attachments directly from Clients & Profits X. You’ll be prompted to select the e-mail’s recipients from a list of client or vendor contacts who have e-mail addresses.
Clients & Profits Basics

1-12
EstimatesEvery job gets an estimate. Estimates can be edited as soon as a job ticket is opened. Estimates can be made separately for each new job, or copied (“cloned”) from old jobs. Estimate amounts can be entered for some or all job tasks. You can revise estimates any number of times then print them for client approval. Printed estimates look just like printed invoices. Job reports show just how close you are to reaching estimates.
The Job Ticket FlowchartThe Job Ticket is the heart of Clients & Profits X. Everything you do for clients is estimated, tracked, and billed through job tickets. Open a job ticket when the job is started. Once closed, jobs stay in the database for profitability and produc-tivity reports.
Flow Chart
Schedules and TrafficJob Schedules keep you up to date. Job tasks, such as ART and COPY, can be given start and due dates to make daily traffic reports. Together with weekly job status lists, traffic reports show who’s working on what jobs and tasks. Dates should be updated daily as work is completed and dates change.
♦
♦

1-13
Job CostingKeep your eye on the bottom line. Everything you spend to get a job done is recorded in Clients & Profits X. Invoices from vendors should be entered everyday, as should time sheets. Checks can be added and printed, too. All costs, expenses, and hours update t he job ticket, so it’s easy to know the Job’s bottom line.
General LedgerGet up-to-the-minute financial statements. Reports are updated whenever costs, billings, checks and payments are saved or posted. So you’re always seeing current informa-tion on job summaries, cost reports, and financial statements.
Billing, Accounts Receivable, and Client PaymentsClient billing is automatic. Jobs can be billed from estimates, work in progress, or at completion. Invoices can be made automatically based on the Job’s un-billed costs, including markups. Some or all tasks can appear on invoices. Jobs can be billed any number of times. Printed invoices look just like estimates. Print statements and account agings (which show how much the shop is owed) at any time.
Purchase and Insertion Orders
Flow Chart
Vendor Buyouts
Time
♦
♦♦
♦
♦
♦
♦

Getting Started

2-2
Chapter 2
Chapter 1: Getting Started
GETTING STARTED
2-4 Getting Started Quickly with Clients & Profits X2-5 Adding Jobs2-6 Printing Daily Traffic reports2-7 Adding Job Costs2-8 Adding Billings2-9 Printing Reports2-10 What to Do First...2-10 Add Users2-11 Add the Chart of Accounts2-11 Enter Your Sales Tax Rates2-12 Add Clients2-12 Add Vendors2-13 Add Staff Members2-13 Add Tasks2-14 Add Status Codes2-14 Add Spec Sheets2-15 Set Your Job Preferences2-15 Set Your Accounting Preferences2-16 What To Do Next...2-16 Add Open Jobs2-17 Add Open Purchase Orders2-17 Add Unpaid Payables2-18 Add Unpaid Receivables2-18 Add G/L Beginning Balances2-19 Add Unbilled Work in Progress2-19 Checking Your Work2-20 Getting Started Tips

2-3Getting Started
Getting started with just about anything is challenging, and starting Clients & Prof-its X isn’t much different. Since a system like Clients & Profits X touches so much of your shop—everything from estimates to schedules to billing and accounting—it is one of the most ambitious things you’ll do for your company. This chapter tries to make it easier. In this chapter, you’ll see how to focus on the essential steps you need to take to get started quickly:
■ adding clients, vendors, and staff members
■ adding jobs that are still in production
■ adding beginning balances for clients, vendors, and your general ledger
Also, you’ll get valuable tips and hints from other agencies that have been through this process before. Remember, don’t try to do everything at once. You’ll be working with Clients & Profits X for many years to come—there’s plenty of time to use it all.
Welcome to Clients & Profits X
For help using any part of Clients & Profits X, click the button from any
window to open the on-line user guide. This web-based user guide features
step-by-step instructions, explanations, tips, demonstrations, and links to
FAQs, tech notes, and tutorials from www.cnp-x.com. The web site’s con-
tinually updated, so it’s more timely and helpful than a printed user guide.

2-4 Getting Started
You’ve got Clients & Profits. So what do you do first?
Since Clients & Profits was designed especially for the advertising industry, you’ll probably feel famil-iar with it after only a few days. It’s made to move you smoothly through the steps that every job goes through: estimating, trafficking, costing, and bill-ing—the same steps you go through now. But instead of using a manual system of job jackets and forms, everything will be in Clients & Profits.
A little planning helps: With a clear objective (i.e., “I want to open new jobs, track our costs, and bill the clients by the end of the month”), you’ll have it up-and-running sooner than later. Remember, over 2,500 advertising agencies, design studios, and corporate graphics departments have been down this road be-fore—and survived (and even prospered!).

2-5Getting Started
It all begins with job tickets. The job ticket is an electronic job jacket, just like the ones you’ve been using for years. It’s the heart of your system. The job ticket remembers everything about a job: estimates, schedules, specifications, production status, and traffic milestones—as well as what you’ve spent, what you’ve billed, and how much you’ve made so far. Once you’ve opened a new job ticket, anyone who needs to can see it instantly from their own computer. Jobs have tasks that describe in detail what needs to be done, like copy writing, layout, and printing. Any part of the job ticket can be changed any time.

2-6
Daily traffic reports, always up-to-date. Open jobs are tracked by production status, which categorizes your jobs into stages like estimate pending, in production, ready to bill, and closed. You can use lots of status codes, and they can be changed any time (so don’t obsess over them now). Most of the job reports, includ-ing the daily job hot sheet, select jobs by production status. Anyone can change a Job’s production status anytime during the day—from their own computer—in-stantly updating the traffic reports. It’s really easy, and helps keep your job reports timely and accurate. In ad-dition to job lists, you can also print daily work-to-do reports that list unfinished job tasks by staff member. Used together, these reports make it difficult to forget deadlines.
Getting Started

2-7
Track your job costs. First come job tickets, next come job costs. You need to track everything you spend to get the job done—whether it’s invoices from vendors, hours worked from time sheets, out-of-pocket ex-penses like faxes and stats, or direct costs for which you wrote checks. Everything you do gets a job num-ber and task—that’s how Clients & Profits knows what you’ve spent. Costs are marked up automatically, so billing your clients is easy. Remember, don’t forget any costs!
Getting Started

2-8
Bill quickly, bill often. The billing process is flexible and mostly automatic. You can invoice everything that’s unbilled on your job tickets, or bill only certain jobs by using a billing status code. Invoice billing amounts are figured automatically based on job costs, but you can easily change them. You can even bill tasks that do not yet have any costs. First, you’ll print pre-billing worksheets showing unbilled jobs. Account executives can use these reports to help decide what’s ready to bill. They can review job costs on-the-spot, right from their own computer—then make changes directly to the jobs themselves. The changes they make are automatically reflected when the month’s new invoices are added.
Getting Started

2-9
Add it all up, print it out. Clients & Profits is more than a job tracker—it’s a real accounting program. So it gives you all the invaluable insights you need to run your shop better. Like profitability by client, task, job, or accounting period. Or productivity by staff member, client, or task. You can see how much you owe to ven-dors any day of the month, whether or not the month is closed (which isn’t even needed, actually)—as well as who owes you. Every invoice, check, and client payment automatically updates your General Ledger, which produces your financial statements. These financials can be printed every day if you want to—and they’ll always be up-to-the-minute accurate, based on the work you’ve entered so far. So it’s easy to keep tabs on how well you’re doing.
Getting Started

2-10
What To Do First
You may only need a few days to set up Clients & Profits X—it all depends on your shop’s situation and your own ambition. Setting up your new database (adding clients, vendors, G/L accounts, etc.) isn’t especially time-consuming and certainly isn’t difficult. But deciding what will be entered can take weeks or months.
A system like Clients & Profits X will touch nearly everyone in the shop. So the decisions you’ll make now will affect how others do their work. Getting a consensus, showing people how to use the system, then following through with their feedback is a long-term process than can take a year or more.
But this doesn’t mean Clients & Profits X won’t be valuable right away. That’s why it’s important to know one thing: you don’t need to start everything at once. It’s perfectly alright to only use the parts of the program you need now, such as estimates, time keeping, and billing. By implementing less-critical functions like traffic, check writing, and general ledger later, you’ll keep everyone’s focus on the most productive, most es-sential work. It will also buy you time to get through the learning curve.
Quick Tip Clients & Profits X checks your work interactively, as you tab between fields. Things happen as you tab into and out of fields, such as the client number. For example, lookup lists open automatically when entering a client number. So it’s important to use the Tab key to move from field to field—then press Enter to save the entire record.
Here are the steps you should follow to quickly get started and the order in which to do them:
■ If you’re not sure exactly what Clients & Profits X is, please see the Chap-ter 1, “Introducing Clients & Profits.” This chapter presents a brief overview to the software.
Add your users, access privileges, and passwords
Anyone can open and use Clients & Profits X if they are an authorized user. Users are identified by either their initials or an ID number (it’s your choice). A two or three letter user ID is appropriate. Make sure they’re unique, since the same initials can’t be used twice. If two users have the same initials, both of them should use middle initials to differentiate between them.
There are two types of Clients & Profits X users: regular users and system managers. System managers are responsible for setting up users and assign-ing passwords.
Each user gets his or her own password. Without a valid password, a user can’t access the database. Passwords are typically assigned by the system manager, not by the users themselves, for better security.
Each user has a different combination of access privileges, options, and settings. These settings let you customize what each user sees and does (such as editing estimate, printing financials, etc.). Don’t dwell too much on a user’s access privileges—it’s quick and easy to change these settings later. In fact, new users can be added anytime in just a few minutes.
When a new database is created (which is usually done when installing Clients & Profits), it only has one user—the system manager. The system manager needs to add the various users. Until the system manager adds the users, no one (except the system manager) can use Clients & Profits X.
■ For information about users and access privileges, see page 9-4 in the Set-tings, Options and Preferences chapter.
What To Do First

2-11
Add your chart of accounts Enter your sales tax rates
What To Do First
If you’re going to use Clients & Profits to print financial statements, then you’ll need to enter your General Ledger accounts. Your accounts are entered in the Chart of Accounts window, one-by-one.
Even if you’re not going to print financials, you still should add a basic set of income and expense accounts. These accounts will be used automatically as you enter payables, checks, and billings—giving you an idea of where you are spending and making money.
■ Your beginning balances are entered later as journal entries, not when the accounts are added here.
General ledger account numbers can have up to nine digits. Leading zeros, letters, or special characters, like dashes, can’t be used. The account name, which describes the account, appears on financial statements and audit trails for easy reference. The account classification (asset, liability, etc.) groups accounts on financial reports. You can set up custom subclassifications that further subtotal accounts on financial statements (e.g., Fixed Assets, Inside Sales, etc.).
There are two permanent accounts: 999998.00 for Suspense and 999999.00 for Year-to-Date Net Income. They’re automatically added to your new data-base and can’t be changed. Clients & Profits uses the Suspense account to capture entries made to incorrect accounts by mistake. The Year-to-Date Net Income account is always your income less job costs and expenses.
■ Account number 999999.00, Year-to-Date Net Income, is only used by Clients & Profits. So don’t add journal entries with this account number.
Accounts can be made confidential, which hides them from regular users. They only appear to system managers. Confidential accounts don’t appear on audit trails and journals, as well as in the Chart of Accounts lookup list.
Profit centers aren’t required, and have no affect on your General Ledger. Profit centers are primarily for printing financial statements. You can set up and use up to 99 profit centers. The account number can include the profit center number, but it isn’t necessary.
■ For information about G/L accounts see chapter 7, General Ledger, page 7-16.
Clients & Profits can track two different sales taxes automatically. Each cli-ent has its own sales tax rates, which are copied automatically to estimates and invoices. The job tasks themselves determine whether or not something is taxable. A job task can be taxable or nontaxable, for one or both tax rates.
You should add a G/L liability account to the Chart of Accounts, for each different sales tax you’ll collect. The two most commonly used accounts should be entered into the sales tax preferences window. They will be copied automatically to new client accounts.
The sales tax rates and G/L accounts for each client are entered into the cli-ent Billing Information window.
■ If you enter the client’s sales tax region (e.g., county), the Sales Tax report will subtotal taxable sales for all clients in the same area. This simplifies your sales tax reporting.

2-12
Add your clients Add your vendors
What To Do First
You don’t need to add every client now—just the ones with open jobs. (You can add your other clients later, when you have more time.) Each client ac-count contains a company name, address, contacts, phone numbers, and lots of billing information.
You can’t enter a job ticket, billing invoice, or client payment unless your clients are added to the database.
Clients are identified by account number, which can contain up to 10 let-ters and/or numbers. Most shops use a three-letter code that suggests the client’s name (e.g., Suncoast, Inc. could have a client number SUN). While the client number can contain 10 letters, try to avoid using long numbers. Shorter client numbers are easier to enter (and remember) and work better with the system’s automatic job numbering (especially if you want the job number to include the client code).
Don’t dwell on client numbers, since they can be changed later.
The sales tax settings are copied from Preferences automatically. If a client’s sales tax rates are different than the defaults, you should edit the client’s sales tax rates in the Billing Information window. These rates are copied to estimates and invoices automatically.
Remember, you can change the client’s billing information, notes, contacts, and other details later when you have more time. Try not to spend too much time entering too much client information.
■ Clients can also be added while you’re entering a new job ticket or an invoice in Accounts Receivable, from the client lookup window.
■ For information about clients and contacts, see chapter 6, Clients, Billing, and Accounts Receivable, page 6-4.
After adding users and clients, next comes vendors. Just like clients, you don’t need to add every vendor now—just the ones with unpaid payables. (You can add your other vendors later, when time allows.) Each vendor account contains a company name, address, phone number, and accounts payable information.
Accounts payable invoices can’t be entered unless your vendors are added to the database.
Like clients, vendors are identified by account number, which contain up to five letters. Most shops use a code that suggests the vendor’s name (e.g., Lockwood Litho, Inc. could have a vendor number LOCK). Vendor numbers are entirely user-defined, so they’re up to you. Don’t dwell on vendor numbers, since they can be changed later.
Remember, you can change the vendor’s accounts payable information, in-cluding default G/L accounts and payment terms, later when you have more time. Try not to spend too much time entering too much vendor information.
■ Vendors can also be added while you’re entering a new purchase order or an Accounts Payable invoice, from the vendor lookup window.
■ For information about vendors, see chapter 9, Settings, Options and Prefer-ences, page 9-28.

2-13
Anyone whose time will be tracked with time sheets needs to be added as a staff member. Your database can contain hundreds of staff members, each identified by his or her own initials.
■ Time sheets (or time cards) can’t be entered for people who aren’t added as staff members.
Each staff member has his or her own standard cost and billing rates, in addition to special billing rates based on clients and tasks. If you want to start time keeping now, then you should add everyone—including their billing rates—right away.
When a user is added to the Users list (in the Users, Access & Passwords window), he or she is automatically added to the Staff member list. You don’t need to re-enter the user. However, you will need to enter the staff member’s cost and billing rates.
The cost rate is typically the staff member’s salary plus benefits, divided by the number of hours worked during the year. Or, you can use an agency-wide average cost rate—or a cost rate based on the employee’s level or job title. It’s up to you, but can be changed later.
The hourly billing rate will only be used if you bill your clients by who does the work, and not the work itself. If you bill by the hour, the billing rate can vary by staff member, client, and job task. The rate most commonly used by the staff member should be entered now. It can be changed later.
■ For information about staff members, see chapter 9, Settings, Options and Preferences, page 9-24.
Tasks are different steps you’ll do to complete a job. The Task Table is a list of every task you’ll ever use. Everything you’ll do on a job, such as artwork, typesetting, printing, and design, is a separate task in the Task Table.
Tasks are used for estimating, scheduling, job costing, time keeping, billing, and profit reporting—so they are very important.
Each task features a description that appears on estimates, invoices, job reports, and profitability reports. In addition, each task contains settings for sales tax, grouping and sorting, kind (i.e., estimating and/or scheduling), and more. These details are copied to new job tickets automatically, saving time—as well as making your jobs more consistent.
More tasks can always be added as you need them, so don’t try to add all of them at once. Instead, start with the most common, useful tasks. As new jobs are opened, you can add new tasks interactively.
Tasks are identified by a task code, which contains up to four letters (or num-bers). The best task codes are easily identifiable to everyone, so letters make sense here. Try to use codes that are obvious (e.g., COPY for copy writing) to keep things simple.
■ For information about adding tasks to the Task Table, see chapter 9, Set-tings, Options and Preferences, page 9-38.
Add your staff members Add your tasks to the Task Table
What To Do First

2-14
Spec sheets simplify the process of adding new jobs. You can create standard spec sheets for different kinds of jobs, such as brochures, TV spots, annual reports, and more. The spec sheet contains basic details about a type of job—traffic milestones, estimate options, user-defined field labels, creative brief headings, and a disclaimer—as well as the tasks that should always appear on it (a template).
When a job is opened with a spec sheet, its settings are copied automatically. This makes opening jobs faster, more accurate, and much more consistent regardless of who adds them.
Spec sheets are named for a type of job, such as production. Each job type should be added separately, for better flexibility. You can always add, change, or delete job type/spec sheets later.
■ If time is short and you must get started now, set up a generic “quick start” spec sheet specially for existing jobs. The spec sheet’s template should have only the essential tasks, such as Creative, Copy writing, Design, and Printing (of course, whatever is appropriate to the work you do). When your existing jobs are opened, select this generic job type. Once the jobs are saved, their totals (estimates, hours to date, and costs to date) can be entered for these tasks.
Later, you can create very specific spec sheets tailored to very specific types of jobs, such as media buying. You can have dozens of job type/spec sheets.
■ For information about job type/spec sheets, see chapter 9, Settings, Op-tions and Preferences, page 9-40.
Add your production and billing status codes Add your job type/spec sheets
What To Do First
Status codes are essential for tracking jobs. Every job has a production status and billing status. Status codes are numbers in the Status Table, from 1 to 999, that are used to categorize jobs and tasks. They’re used to group a job based on its progress, such as estimate pending, in production, awaiting ap-proval, ready to bill, and closed.
Status codes are important because they are the best way to select jobs on reports. You can print a report, for example, for only jobs in production by us-ing the status code in production. Jobs with a different status will be ignored, so that the report shows only the jobs you need to see.
Status codes are completely user-defined, so they are very flexible. You can have as few or as many as you need to track your jobs. You need at least three status codes: new, closed, and reopened. These status codes are part of your system preferences, and will be applied to jobs automatically.
Each status code has a description that appears on job lists, traffic reports, and work-to-do summaries. You can change status codes and descriptions any time.
Jobs are sorted by status code on job reports. So use lower status codes for new jobs, and higher status codes for closed jobs. For example, the closed status could be 999—the highest number possible—to make sure closed jobs don’t appear on work in progress reports. You might consider making all status codes over 900 for the types of jobs that you would want to leave off of lists and reports, like non-billable jobs or agency jobs.
You can have separate status codes for production status and billing status. Each job can have either a production status or billing status, or both. Job reports will select jobs using either production or billing status. If you don’t need to track jobs by billing status, then ignore it.
■ For information about status codes, see chapter 9, Settings, Options and Preferences, page 9-36.
2-15
In addition to job type/spec sheets, there are three ways to automate jobs: automatic job numbering, status codes, and estimate print options.
Automatic job numbering: Clients & Profits completely controls job number-ing, eliminating your job book. Jobs can be numbered automatically, or you can enter your own job number. They can be automatically numbered using a system-generated number or a client-based number. If you number jobs sequentially, enter the next job number. If your jobs are numbered differently for each client, enter the next job number in the Clients window. The number format field gives the option for the job number to contain the year or the client number.
■ There’s a special option to number jobs in sequence. This option is the most reliable (i.e., by preventing duplicates) but the new number can’t be modified by users. In addition, jobs can be automatically numbered when they are saved by checking the always prevent duplicates option. This option prevents several people from adding jobs simultaneously and getting the same job number. Jobs numbered sequentially start at 10000.
■ If you choose to have the client code in the job number, and especially if the year is used, the client code should be no more than 3 letters.
Default status codes: Enter a standard, or default, status code for the three essential phases of every job: new, closed, and reopened. These default status codes will be entered automatically whenever a new job is opened, closed, or reopened.
Estimate print options: You can customize printed estimates by setting these report options. Estimates are designed to print on letterhead, not special forms. You can change the estimate’s margins to accommodate your letter-head. The estimate’s heading, disclaimer, standard contingency, and approval names are copied automatically to new jobs. Any standard PICT or Windows bitmap graphic pasted into the Report Options window will appear on the printed estimate. (You can also change the estimate’s fonts separately—choose Report Fonts from the Utilities menu.) The settings in Report Options are used by all estimates. However, if spec sheets are used when setting up a job ticket, its estimate options will be used instead. The job type spec sheet’s settings override the settings in Estimate Options.
Set your job preferences Set your accounting preferences
Clients & Profits has an integrated one-write, double-entry accounting system that’s based on a user-defined fiscal year. It can be customized to fit the way you work:
Accounting periods: Your fiscal year can begin on any month. Every transac-tion gets an accounting period, one through fifteen, that determines which month is updated. First, enter the names of your accounting periods and the first day of the fiscal year in Preferences. Then, enter your current period. This period will be copied automatically to all new payables, receivables, checks, client payments, and G/L journal entries. When the month is over, you can change the accounting period by entering the next period in Preferences. It will update other users instantly, so the work they do next will be added into the new accounting period.
■ Set the first day of your accounting year. It’s the day on which your current accounting year begins. It’s used by Clients & Profits to exclude work from previous years.
Default G/L accounts: Standard accounts for Cash, Accounts Receivable, Accounts Payable, Job Costs, Overhead, Billing/Income, and more can be entered as default accounts. These defaults are copied automatically on new transactions to save time and keep your data consistent.
Account subclasses: General Ledger subclasses categorize accounts on finan-cial statements. Subclasses, such as Current Assets and Long-term Liabilities, are edited in the Chart of Accounts window. Each account can belong to one subclass. They are completely customizable, so you can use as few or as many as you need. They can be changed anytime.
What To Do First

2-16
Your database now has its foundation in place: clients, vendors, staff members, tasks, G/L accounts, status codes, and preferences. It’s now ready for real work—jobs, estimates, schedules, vendor payables, checks, client invoices, client payments, and General Ledger journal entries.
First, pick a date on which to go “live” with your Clients & Profits database. You need a clear point at which everything goes into Clients & Profits—and everything before it stays in the old system. It doesn’t need to be year-end, but it should be the first day of the month.
At this point, it’s important to work fast. You’ll want to get your beginning balances added at the same time so that nothing’s missed. This means having your paperwork in order: a list of open jobs, the A/P and A/R aging, a sum-mary of your unbilled work in progress, open purchase orders, and your latest financial statements. You’ll need this information to quickly and accurately start your database.
■ Try to avoid recreating the year’s past history from your old system. It’s easy to lose valuable time reentering work you’ve already done once—even if it’s in a different system. If you need to see some history, it’s always avail-able in the old system. That’s one good reason to keep only new, current work in Clients & Profits.
Of course, you don’t have to start everything at once. It may be easier (and more practical) to use Clients & Profits for job tracking for a few months, leaving the accounting for later. You can then ease into other functions as you have more time and experience with Clients & Profits.
What To Do Next 1. Add your open jobs
Add only your open job tickets that are now in production. When adding the existing jobs, use a standard spec sheet to speed up the process—the spec sheet’s standard tasks will be copied to the open jobs automatically.
You don’t need to enter every bit of information about your open jobs. Instead, enter only what’s important to your database now—like the job num-ber, production status, estimates, and the due dates of unfinished tasks.
Once your open jobs are finally added, you can print up-to-date daily status reports, job lists, summaries, and traffic reports. Any new job will appear on these reports instantly.
■ For information about opening new jobs, see chapter 3, Job Tickets, page 3-10.
What To Do Next

2-17
If you use purchase orders, it’s important to enter all of your open purchase and insertion orders.
You don’t need to add every bit of information about each purchase order. Instead, enter only the essentials: purchase order number, vendor number, date, job number, task, and balance due.
Be sure to enter the right job number and task. Every purchase order needs at least one job and task, but can contain more. The PO’s balance will appear on the job ticket when it is saved. When you add the vendor invoice, you’ll enter the PO number. When the invoice is posted, the cost amount will move from the Job’s PO column to the Unbilled column—and the PO balance will be zero.
If the purchase order has been partially billed by the vendor, enter only the remaining balance. This way, the job ticket will show the correct PO balance.
■ Purchase orders are optional. They do not affect the General Ledger, so they don’t need account numbers. You can start using them at any time. If you do want to use Purchase Orders from the start, then only enter them for invoices that haven’t been received from the vendor.
■ For information about adding purchase orders, see chapter 4, Job Costing, page 4-8.
2. Add your open purchase orders 3. Add your unpaid vendor payables
Your vendor beginning balances are usually entered from your old system’s vendor aging report. This report should show each unpaid invoice for each vendor, listing each invoice number, date, and balance due. Each invoice is added separately, just as they appear on the aging report.
You don’t need to enter all of its details. Instead, enter only the invoice number, date, vendor, and balance due. These invoices should have the same accounting period. If you’re starting a new accounting year, enter the period as 1.
These invoices shouldn’t have a job number or task. If so, the invoice balance will update the Job’s totals. You’ll be adding the Job’s beginning balances separately (using the Expenses window). If you enter a job and task on these invoices, you’ll probably count the same cost twice—causing inaccurate job totals.
Each invoice should debit and credit the same G/L account, usually your Accounts Payable account. When these invoices are posted, you’ll see a separate debit and credit journal entry in the General Ledger. It’s important to use the same account for the debit and credit—one amount cancels out the other. Otherwise, you’ll increase the account totals on financial statements.
■ The sum of your unpaid vendors payables must equal the beginning bal-ance for Accounts Payable on your balance sheet. These two balances equal each other as part of the accounting system’s error-checking.
■ For information about adding vendor invoices, see chapter 4 Job Costing, page 4-14.
What To Do Next

2-18
Your client beginning balances are usually entered from your old system’s cli-ent aging report. This report should show each unpaid invoice for each client, listing each invoice number, date, and balance due. Each invoice is added separately, just as they appear on the client aging report.
You don’t need to enter all of the invoice details. Instead, enter only the invoice number, date, client, and balance due. These invoices should have the same accounting period. If you’re starting a new accounting year, enter the period as 1.
These invoices are typically added as miscellaneous billings. If you want the billings to update the job totals, then add these beginning balances as job billings.
Each invoice should debit and credit the same G/L account, usually your Accounts Receivable account. When these invoices are posted, you’ll see a separate debit and credit journal entry in the General Ledger. It’s important to use the same account for the debit and credit—one amount cancels out the other. Otherwise, you’ll increase the account totals on financial statements.
■ The sum of your unpaid client receivables must equal the beginning bal-ance for Accounts Receivable on your balance sheet. These two balances equal each other as part of the accounting system’s error-checking.
■ For information about adding client invoices, see chapter 6, Clients, Bill-ing, and Accounts Receivable, page 6-28.
4. Add your unpaid client receivables 5. Add your beginning G/L balances
You’ll need the month-end trial balance from your old system. You’ll need this report to see each account’s ending balance. For each account with a balance, you’ll add a beginning balance journal entry. You’ll add one journal entry for each account on the trial balance, entering the account’s debit or credit balance.
If you are starting a new fiscal year, your beginning balances consist of only assets, liabilities, and equity accounts. Enter your beginning balances into the special “BEG BALN” period, not period 1. The date should be the last day of the previous fiscal year. Also, do not add journal entries for income or expense accounts in the BEG BALN period—instead, use your Retained Earnings account.
If you are starting in the middle of your fiscal year, the beginning balances will include income and expense accounts. Do not use period 1; instead, use the period just prior to the one in which you are entering live data and the date of the journal entry should be the last day of that prior period.
It’s important to enter all of your beginning balances at the same time, since the transaction must balance. Debits must equal credits.
Also, the total invoices on the agings should equal the control accounts for A/P and A/R on the trial balance.
■ Don’t add a beginning balance journal entry for the YTD Net Income ac-count (i.e., 999999.00). This is a system account used by the financial state-ments only. It is calculated automatically as the difference between income and expenses when financials are printed.
■ For information about adding journal entries, see chapter 7, General Ledger, page 7-24.
What To Do Next

2-19
If your jobs have unbilled costs, they’re considered work-in-progress.You can add the Job’s unbilled costs as work-in-progress totals, makingyour job reports immediately useful for the month’s billing.
There are two types of unbilled work in progress: costs and time. Unbilled job costs are added into the Expenses window. Unbilled time is added through Time Sheets.
First, you’ll need to know the unbilled cost totals for all of your open jobs—by job task. You’ll make one large cost entry into Expenses for the total net and gross totals for each job task. The net cost is the Job’s total cost before markups and commissions. The gross amount is the Job’s total cost includ-ing markups. Entries made through Expenses are not posted to the General Ledger; they only affect the job ticket.
■ Don’t enter work in progress totals through Accounts Payable or the Checkbook. If so, you’ll be updating the General Ledger twice—since the original cost amounts are already part of the G/L’s beginning balances.
■ For information about adding time, see chapter 4, Job Costing, page 4-28. For information about adding expense reports, see chapter 4, Job Costing, page 4-60.
6. Add your unbilled work-in-progress
It’s important to check your beginning balances before entering brand-new work. Otherwise, you may overlook an error—and you may not find for months. If so, you’ll spend hours trying to track down the problem. So to prevent problems, follow these steps:
■ Print a YTD trial balance. Compare the totals to amounts on your old system’s trial balance. They should match. Also, the amount on the Total As-sets, Liabilities and Equity line should equal zero in the totals column (in other words, debits equal credits).
■ Print a vendor aging and a client account aging from under the Snapshots menu. The total of each report should match the A/R and A/P amounts in the totals column of the Year-to-Date Trial Balance.
The most important thing you can do for yourself at this stage is to MAKE SURE that the agings match the totals on the trial balance before proceeding to input current, live activity. Once you add invoices in your new fiscal year, the initial aging cannot be reprinted or reproduced. Keep a hard copy of these initial agings. It is good practice to print the agings each month, check them against the balances in those accounts, and keep them as a reference.
■ Remember, the bottom line is that the transitional job tickets are not going to have complete information, but every new job ticket that is added to the database from this point on will be complete in every detail.
Before adding new work, check your totals
What To Do Next

2-20
Creative Dashboard
Creative Dashboard
1 Use the Previous and Next arrow buttons to see the time card and task deadlines for a different day on your work calendar.
2 To view schedules for previous or future months, select the month and year from the drop-down menus. Clicking on a date in the calendar changes your Creative Dashboard to display jobs and deadlines for the selected day.
3 The Dashboard lists the staff member’s time for the day and even displays how many hours they still have to account for (which is an op-tional setting in the staff availability window).
4 Double-clicking on a time entry will open the Time Card window, al-lowing you to change the hours, job, task, or cost notes.
5 The job hot sheet list shows every job on which the staff member is assigned (either as the AE or as one of the traffic assignments) from the traffic system. Double-clicking on a job in the hot sheet will open the Job Ticket window and display the selected job and its tasks.
u i
o
q w
e y
p
r
a
The Creative Dashboard combines a staff member’s daily time card, job hot sheet, and Work To Do into a single window.
t
s

2-21Job Traffic
Choose Setup > Users, Access & Passwords.
Find the staff member’s C&P user account then click on it once to select it.
Click on the at startup, open this window drop-down menu then select the Creative Dashboard.
Click Save of close the Users, Access & Passwords window.
The Dashboard will now open auto-matically whenever the staff member starts Clients & Profits X or when he or she closes a window.
The Dashboard can be set to open automatically whenever C&P is started. Staff members with C&P X admin access can change a users settings including their startup window.

2-22
Getting Started Tips
Back up your Clients & Profits X database every day
Backing up to a reliable medium like tape or cartridge is important. There are software programs for backing up that are very good, like Dantz Retrospect. Trying to backup to floppy disk is time consuming and risky, since they are less reliable. If just one floppy is bad, your entire backup is unusable.
In addition to making daily backups, you should be making weekly and monthly backups as well. Those backups should be rotated out to another site so you have fairly current and older backups at two different locations at all times.
Always open Clients & Profits X by double-clicking on the application, not the database
Clients & Profits always opens the last-used database automatically—even if you double-click on the database itself. It does this for consistency, so that the same database is opened automatically each time. If you use more than one database, you may not realize which one you’re using. Users may not realize they have entered live data into two different databases for days, even weeks. Then they think that their database has lost information. The result is many hours of reentering data! Opening the Clients & Profits application allows you to really know what database you are opening. Everyone should do it.
Always press the Tab key to move from field to field, instead of using your mouse
Clients & Profits features error checking while you’re entering information. Every part of the system offers some degree of checking for correct client numbers, vendor codes, and resource initials. This prevents invoices and job costs from being saved and posted to accounts that don’t exist. If you mouse click past a field, you are preventing the program from performing an impor-tant function that is meant to help you work more accurately.
Use Lookup Lists
The Lookup Lists provide you with current information about the database at all times and from all parts of the program. The menu bar across the top of your screen has the Lookup menu. You can choose lists for Clients, Job Tickets, Staff, Vendors, Chart of Accounts, Status Codes, Task Table, Groups, Purchase Orders, and Job Types/Spec Sheets. Choose the update icon to get the most current list available, the add icon to add new items (except for job tickets, chart of accounts or PO’s) to the file or the print icon for a hard copy of the list. The lists are sortable in ascending or descending order.
Always quit Clients & Profits X by choosing Quit from the File menu—don’t just turn off your computer
Quitting properly tells Clients & Profits that you’re no longer using the sys-
tem. It also logs you out of the database, freeing up a slot for another user. If you don’t quit Clients & Profits X by choosing File > Quit, the file server may still think you’re using it.
Always print—and check—proof lists before you post
This is a step that can save you more work and time down the road.By proofing your work before you post, you check to see if there are any data entry errors or if there has been an incomplete line item entered (maybe some power fluctuation interrupted the saving process.) This proof list gives you a chance to check your work and gives you a hard copy of what you are going to post. If you ever need to see what you posted on a certain day, perhaps to reenter it, you will have good reference material to use.
To print a proof list, choose File > Post. In the Post dialog box, the option to print proof list first is selected. You can print to your screen or to the printer. Printing the proof list gives you a permanent record of transactions to be posted.
Always print a Trial Balance at the end of the month—and make sure it balances
The Trial Balance shows the beginning, current month, and ending balance for each G/L account. The balance of the assets, liabilities, and equity is always zero-if not, you’ve got unbalanced journal entries somewhere. If so, you’ll need to then print journal reports to look for one-sided entries. It is best not to enter new work until the current month is balanced—otherwise it can be difficult to track down old, unbalanced entries.
To check several months at once, print the Year-to-date Trial Balance. This financial report shows a lot in one glance. It’s printed in two parts-first 6 months and second 6 months. Look at the total line for Assets, Liabilities and Equity. It will be zero if you are in balance. What is helpful here is besides seeing that you are in balance, you can scan future months to make sure that there are no stray entries posted to future dates. By catching these errors at the end of the month, you could unpost, edit the date and re-post.
Check the Suspense account often—make sure its balance is zero
The Suspense account is included in every database and serves a useful purpose—it captures amounts that were posted to nonexistent G/L accounts. Even though you proof your work, something might slip through and get posted that has an incorrect general ledger account number. The part of the transaction that is wrong will post to the suspense account. Using the reference number, you can track down the source document that made this journal entry. You can determine what the correct account should have been and correct it. Or, maybe something was posted to the suspense account on purpose. Perhaps when an a/p invoice was posted, you weren’t sure which general ledger account to debit. You could debit suspense (which will keep the financial reports in balance) and decide later what to do. But don’t forget to reverse the transaction out of suspense.
Getting Started Tips

2-23
Check your posted journal entries in your General Ledger
Each time an invoice from Accounts Receivable or Accounts Payable, a check from the Checkbook, or a payment from Client Payments, an automatic entry is made into the General Ledger. You can look up these entries by the prefix they are given plus the invoice or check number. The prefixes are as follows:
Prefix: Posted from: AR# Accounts Receivable AP# Accounts Payable CK# Checkbook PMT# Client Payments
This prefix determines whether an entry belongs on the various journal re-ports. Entries that don’t begin with one of these four prefixes are considered part of the General Journal. Entries you make directly into the General Ledger have a reference number that you give them at the time of entry. The Audit Trail, G/L Journal, and Detailed General Ledger reports display these refer-ence numbers, so you can easily find the transaction you need.
Always enter your own, unique initials when introducing yourself
For security reasons, each user should have his or her own unique set of initials in the Users, Access & Passwords table. Each user can have different access privileges, based on their user record—which is identified by their initials. Also, it can prevent common cases of record locking (i.e., padlocks): if each user simply presses Return without entering their initials, all users end up sharing the same Agency Information record—the most commonly used record in the database. If this happens, you’ll get a padlock cursor nearly every time you add, edit, or delete something. The same thing will happen if two users have the same initials. Make sure everyone is enter-ing unique initials.
Always report error messages and other strange behavior to your system manager
Errors can happen anytime, for all kinds of reasons. But not all errors mean you’ve lost your work. Be aware—and don’t ignore—error messages when they appear. Write down exactly what they say and report it to your systems manager and/or call Clients & Profits X right away. Catching problems early can prevent a worse thing—totally losing your databases—from happening.
If anything strange or out-of-the-ordinary seems to be happening to you as you work, report that, too. Responding quickly to situations as they come up can keep them from becoming big problems.
Getting Started Tips

Job Tickets

3-2 Chapter 2: Job Tickets
JOB TICKETS
3-4 Proposals3-6 Job Tickets3-8 Job Ticket Window3-10 Add New Job Window3-12 Job Tasks3-14 Adding Job Tasks3-16 Creative Briefs3-17 Printing Specifications3-18 Estimating3-20 Printing Estimates3-22 Printing Specifications3-24 Traffic3-26 Job Traffic3-28 Job Scheduling3-30 Timeline3-32 Change Orders 3-34 Production Planner3-36 Weekly Traffic Report 3-38 Daily Job Status Report3-40 Work To Do3-42 Asset Manager 3-44 View>Point3-44 Job Snapshot3-46 Approvals3-48 Printing Job Reports
Chapter 3

3-3
Introduction Clients & Profits X is based on job tickets. A job ticket is an electronic job jacket that tracks estimates, production specifications, schedules, traffic, costs, time, expenses, and billings. Job tickets replace your paper job folders, log books, and other job tracking systems. Clients & Profits X is the only system you need to track jobs. Since jobs are seamlessly integrated with accounting, there’s no double-entry, making your work more timely, accurate, and easier to manage. In this chapter you’ll see how to:
■ open new job tickets■ manage job tasks■ find, change, delete, and print job tickets and job reports■ create and print estimates■ create and print job schedules and traffic reports■ update traffic and job schedules■ add change orders■ track work in progress and review job costs with View>Point■ print job reports, lists, summaries, and labels
For help using any part of Clients & Profits X, click the button from any
window to open the on-line user guide. This web-based user guide features
step-by-step instructions, explanations, tips, demonstrations, and links to
FAQs, tech notes, and tutorials from www.cnp-x.com/support. It’s continu-
ally updated, so it’s more timely and helpful than a printed user guide.

3-4
Proposals
Proposals can be added when pitching an idea to a client. Once your bid is accepted, they can be easily converted into job tickets.
r
y
t
wq
e
i
u
1 Use the window’s toolbar buttons to add, clone, edit, and delete proposals. Clicking on a button is the equivalent to choosing a menu command.
2 Click on the print proposal toolbar button to print a list of requests, which can be sorted by client and status, and limited to a user-defined date range. The proposal prints with a signature line for the client.
3 Click on the approve button to automatically create a job
ticket from the proposal. Click-ing on the kill button changes the proposal’s status to killed, but saves it for future reference.
4 Use the find client search tool to list proposals for one client.
5 Click on a tab to show pending, approved, or killed proposals.
6 Click on the column head-ings to sort the proposals list by client, ID, name, type, budget,
Proposals
or status in ascending or descending order.
7 When the proposal becomes a job, the proposal’s name becomes the job’s name, and its description becomes the job’s description.
8 When you select a proposal, its description appears, giving more detail about the job. Double-clicking on the pro-posal opens the edit proposal window so you can view the full description, creative brief, contact, and other details.

3-5Proposals
Adding a proposal for every potential job gives you an ongoing record of how much work the agency is putting into new business development.
r
y
t
w
q
e
i
u
1 Every proposal is opened for one client. This is the client who will authorize and approve the job.
2 The proposal type classifies a job by the kind of work (e.g., brochures, media, collateral, web site, etc.) from the tem-plates set up as job type/spec sheets.
3 The proposal name/title de-scribes the scope of the work.
4 Add a meaningful start date
and due date. These dates will help the production team better plan schedules and resources for potential jobs.
5 Any name can be typed into requested by, or use the lookup contacts tool to find a client contact.
6 Enter the proposal’s description. When the proposal becomes a job, the proposal’s description becomes the job’s description.
7 The initial budget is used to track what the client initially wants to spend on the job. The charge number/cost center is an optional account number used by corporate accounting systems to charge back to their departments.
8 The creative brief pop-up menu shows the creative brief headings entered in the job type/spec sheet. Only the sec-tions that have text will appear on the printed proposal report.
With the right access privileges, anyone can add proposals. All they need to know is the client, the job name, and a description of the potential work.

3-6
Job Tickets
Job Tickets
Get to work! Production staff members can open frequently-used job windows quickly and easily using their Information Center. The Information Center window also includes an ani-mated daily company message and a photo of the user, just for fun.
Jobs are automatically numbered
New jobs are numbered automatically, so there’s no need to maintain a separate job book with job numbers. Jobs can be numbered automatically based on your job number settings in Preferences. Automatic job numbers can contain client numbers and the year.
If jobs are numbered sequentially by client, the next number will be copied from the client account. Otherwise, the next number will be copied from the system. The automatic job number can be changed.
To enter your own number, type in your new number over the automatic number. Using your own custom number, however, may interrupt the automatic numbering for upcoming jobs.
If at some point during the Job’s existence the job number needs to be changed, a special
Renumber utility, found in Setup > Utilities, must be used. Renumbering a job ticket will change the job number on every time entry, vendor payable, check, job billing, change order, and diary entry that belongs to the job ticket.
Work in progress debits and credits
This is an important distinction, since it differs from other accounting systems. Clients & Profits provides the flexibility to bill anything from a job, whether costs exist or not. A job can be billed for as little or as much as you can get, even if it has no costs. This ability means that your Work in Progress balance may not be what you expect. Because of its flexibility in billing, costs affect the G/L differently than you might expect too. Costs debit the general ledger when they are posted—not when they are billed. You can choose which account is debited, such as a cost of sales account or an un-billed costs inventory account. Posting a client invoice debits A/R and credits income; your cost of sales is unaffected.
The job ticket is the foundation of Clients & Profits. It’s an electronic job jacket that manages nearly everything you do, tracking estimates, schedules, costs, time, billings, and profit.
A job ticket is opened for every project the shop gets, including internal work, client presentations, and pro-bono jobs. Each job ticket is given tasks that describe what’s being produced, such as artwork, copy writing, design, and printing. Job tasks are completely customizable for flexibility. Job tasks serve many purposes, including estimat-ing, scheduling, job costing, and billing. A job always has at least one task, but can have dozens.
Job tickets are always available on any computer in your shop (if you have the access privileges). So it’s easy to review your Job’s progress from start to finish. Anything anyone does for your jobs appears in the Job Ticket windows. These production windows let you easily see a Job’s estimate, task schedules, traffic milestones, or status. You can also analyze the Job’s costs, time sheets, open purchase and insertion orders, and unbilled tasks.
All this makes job tracking much faster than ever before, since there are no more thick job jackets or job binders to sort through. And since everyone in the office works from the same shared database, you’ll instantly see anyone’s changes as they are made—so you’ll always work (and make decisions) from accurate data.
The Job Ticket window has its own File and Edit menu commands for finding and printing jobs. All menu commands work by selecting the File menu with your mouse, then highlighting the command you wish to use.

3-7Job Tickets
Job Ticket Features
Feature How it works, how it’s used
Jobs can be numbered automatically by client or system to alleviate the need to main-tain a manual book of job numbers.
Status codes track a jobs progress from start to finish, such as in production, billed, or closed.
Estimates are based on the Job’s tasks and are flexible so the client can see more or less details.
Change orders document changes made to a Job’s estimate after the estimate has been authorized. The client signs off on the change order authorizing the needed changes.
Schedules are based on a Job’s tasks. Every task on a job can be scheduled with due dates, start dates, and resources responsible for the work.
Each job can contain up to 12 milestones which represent key events or phases of a job (e.g., meetings, approvals)
A Job’s history is logged on a job diary. A diary entry is automatically logged whenever the job is changed, showing the date and time the change was made and who made it.
Print specifications track minute details of printing including color, size, text instruc-tions, inserts, binders, and packaging.
Work orders contain specific information for any production or art direction notes and can include a picture which is copied or pasted in.
The creative brief is a worksheet to start and direct your creative, production, and marketing goals. It contains fifteen user-defined headings and fields.
Job Types/Spec Sheets automate entering jobs by copying preset options and a tem-plate of tasks to each job.
Access to change and view jobs can be limited for each user.
Clients & Profits can automatically notify staff members via e-mail when jobs are opened, when status codes are changed, when jobs are billed, and when job invoices are paid.
Existing job tickets can be cloned into new jobs. Cloning saves time, since the old Job’s details, including its estimates, but not due dates, status, or cost and billing amounts, will be added to the new job.
Tracks the Job’s progress in terms of completed tasks, hours used, costs, estimate, and days left until due.
Two pie charts show how many hours have been used and what percent of the esti-mate has been billed.
Automatic job numbering
Production/billing status codes
Estimates
Change orders
Task scheduling
Traffic milestones
Job diary
Print specifications
Work order
Creative brief
Job type/spec sheets
Access privileges
C&P e-mail
Cloning
Digital displays
Graphs

3-8
q
o
w re
u
i
s
p
t
a
The Job Ticket Window
The Job Ticket Window
g
j
f
d
h k
1 The arrow toolbar buttons can be used to scroll through the previous and next job tickets.
2 These toolbar buttons can be used to add, clone, edit, and delete job tickets. Click the add new job ticket button to add a new job. Existing job tickets can be cloned into new jobs by using the clone job button. Click the edit button to edit the Job’s key information found in the Specs window, such as the client contact, job name/title, project, job type, start date, or
profit center. Click the delete button to delete a job ticket. Once a job ticket has costs, hours, or billings it can’t be de-leted. Instead the job must be closed. Deleting a job is perma-nent and irreversible. However, the deleted Job’s diary entries aren’t affected, allowing anyone to see who deleted the job.
3 Tasks can be easily added or removed from job tickets. Click on the add new job tasks button to add a new task to the job ticket. Tasks can be
added to a job at anytime and will be immediately available for estimating, scheduling, costing, or billing. Click the remove task button to remove a task from a job ticket. A job task can be deleted before any costs, time, purchase orders, or billings have been added to it. A job task with activity can’t be deleted, preventing billable tasks from being deleted (and not billed). Once a job task is deleted, it is gone forever. However, the same task can be added back to the job later if needed.
The job ticket is an electronic job jacket that manages nearly everything you do, tracking estimates, schedules, costs, time, billings, profit, and more.
y

3-9The Job Ticket Window
4 Clicking the pre-bill button lets you quickly bill the client for any portion of the Job’s estimate. 5 Use these buttons to print job reports and estimates.
6 A job ticket can be found by entering in the job number here. Or the find more link can be used to find job tickets by sequence, job number, client, job name, production status, billing status, project, client po, job type, client contact, or charge number/cost center.
7 History keeps track of the job tickets that you previously viewed. Use the pop-up menu to jump to another job ticket.
8 These links allows you to add, edit, view, delete, or print creative briefs, estimates, specs, change orders, work orders, or assets. The creative brief is a worksheet that ex-plains to the client the agency’s creative process for a particular job. The estimate is where you can add, see, and change a Job’s estimate amounts. Specs can be used to describe in detail to the vendor the specific printing requirements for a par-ticular job. Change orders can be added to document changes made to a Job’s estimate after it has been approved. The work order is used to let the produc-tion staff know everything they need to know to start the job (e.g., client, job name/title, and initial budget). The asset man-ager can be used to keep track of the assets (i.e., artwork) belonging to the job ticket.
of the same project and can be tracked together. Many job re-ports can be printed by project. Click the closed checkbox to close a completed job. Closing a job changed its production status to closed automati-cally. A closed job can be easily reopened by clicking the closed checkbox again.
11 The priority status de-scribes the priority level for this job ticket to let staff know which jobs need to be worked on at a quicker pace. Priority levels can be set up in Prefer-ences.
12 A thumbnail from the work order’s sketch or scan appears here for reference.
13 The estimate vs actual hours graph shows the percent of total hours entered on time cards in red; the blue slice is the percent of estimated hours remaining. A quick glance at this chart lets you see how many client-approved hours the shop has left to complete the job. The estimate vs billed graph shows the percent of estimate that has been billed in red; the blue slice is the estimate remaining. As you in-voice for a larger percent of the estimate, the green slice will become proportionally smaller.
14 Job tasks are used to track estimate amounts, costs, hours, billings, and unbilled costs. The job ticket window lists the Job’s tasks, including who’s doing the work (i.e., staff member, vendor, or freelancer). Double-clicking on a task lets you see (and edit) its complete details.
Job tickets are always available on any computer in your shop (if you have the access privileges). So it’s easy to review your job’s progress from start to finish.
15 Clients & Profits X allows you to easily schedule tasks and assign resources to a job and tasks. The Job’s schedul-ing window is where you can setup and edit task due dates and resources. The Job’s traffic window is where you can edit the Job’s key traffic information such as the production status code, status note, or milestone dates. The timeline window shows a linear graph of the job schedule.
16 Production status and billing status codes track a job’s progress from start to finish, such as estimate pending, in production, ready for billing, or billed and closed. The status note is an optional note added to the job to supplement the status code. It can also be used to further describe the job’s current status.
17 The traffic assignments can be used to assign up to six key staff members who are responsible for the job. Traffic assignments are set up in Preferences. A job’s traffic assignments can be made in the traffic window.
18 The digital display gives you an up-to-date look at a job’s key completion stat—a count-down of days left until the job’s due date, the percentage of fin-ished tasks vs unfinished tasks, estimate hours vs actual hours, budget vs costs, or estimate remaining (estimate - billed). The digital display option is set in job preferences (see 9-46).
9 The Job’s view>point pop-up menu contains links to view and track the Job’s progress. Task costs, task billings, task POs, and task IOs/BOs can be used to see the Job’s activities. The job progress window shows on-the-spot totals for things such as how many hours you’ve worked, costs you have incurred for each job task, or the gross margin to date. The Job’s work in progress window is where you can view, edit, transfer, bill, and write-off unbilled costs. The job snapshot window is where you can view and print the Job’s profitability at a glance. The job diary tracks all of the Job’s his-tory so user’s can see what kind of changes have been made since the job was opened.
10 The Job’s key information is listed here for reference. The job number appears on all windows and reports. Jobs are numbered automatically when they are opened. A job is opened for one client. The Job’s title is a brief descrip-tion of the job that appears throughout Clients & Profits. Each job contains a client contact, an agency contact, and phone numbers. These contacts are the people who are most responsible for getting the work done or approved. The opened date shows when the job ticket was added. Closed date shows when the job was closed. Start date shows when a job was opened or authorized. Due date shows when a job should be completed. Jobs can be given an account executive or team code; job lists can be printed by AE/Team Many jobs can be part

3-10 The Add New Job Window
1 Every job is opened for one client who will authorize and approve the work.
2 New jobs are numbered automatically, or can be entered manually. The job number contains up to 10 letters and numbers, but must be unique.
3 Job type/spec sheet classi-fies a job by the kind of work (e.g., brochures, web site, etc.). Details from the job type’s spec sheet, including user-defined fields, are copied to the new job.
on estimates, job reports, and invoices to clearly describe everything about a job that the client needs to see.
7 To keep a job ticket from having billable costs posted to it, click on the always unbill-able checkbox. Each job task can also be marked as billable or unbillable in the Edit Job Task window.
8 New jobs get a default “new” production status when they are added. This status identifies
The Add New Job Window
4 The job name/title describes the scope of the work. It ap-pears on windows, reports, estimates, and invoices.
5 The new job contains a client contact, an agency contact, and phone numbers. These contacts are the people who are most responsible for getting the work done or approved. Start date shows when a job was opened or authorized. Due date shows when a job is to be delivered.
6 The job’s description appears
Any new work should be opened as a job ticket as soon as possible, since purchase orders, time, and other costs can’t be tracked without a job number.
w
q
r
p
u
i
t
s
o
e
y
a
dfg h
A job ticket can be opened anytime after it is conceived, and certainly before the work begins. It’s important to open new jobs as soon as possible, since purchase orders and time can’t be tracked without a job number. Anyone can open a new job ticket if they have the access privileges. All of the job’s details can be changed later.

3-11
Adding a new job is easy: all someone needs to know is the client number, job name or title, and the work’s description or specifications.
The Add New Jobs Window
brand-new jobs on the Daily Job Status report.
9 An AE or team can be as-signed to every new job. Jobs are tracked and printed by AE/team.
10 Every job has six custom-izable fields to track special details that don’t fit anywhere else. The labels are copied from Preferences or from the job type/spec sheet, but they can be changed here. User-defined fields appear on the printed estimate, but not invoices.
11 The production and creative people who are responsible for this job are entered into the assigned to fields. Jobs are tracked by these traffic assign-ments.
12 A job can be opened for an optional profit center. The jobs
assigned to a profit center can only use tasks that belong to that profit center. Job reports can be printed by profit center. The bill rates setting deter-mines how rates will be charged to the job’s tasks.
13 Jobs can be billed by staff, task, or client rates.
14 Enter what the client ini-tially wants to spend on the job on the initial budget line.
15 Charge number/cost center is an optional account number used by corporate accounting systems to charge back their departments. It appears on esti-mates and invoices. The initial budget is used to track what the client initially wants to spend on the job.
16 The initials of the staffer who added the job are auto-matically entered on the added by line.

3-12
1 The remove button can be used to delete the task from this job ticket. Once a task has activity (i.e., costs, billings) it can’t be deleted.
2 The job number and title are listed here for reference.
3 The jump to pop-up menu allows you to quickly view an-other task on the job ticket.
4 Each task can have a custom icon to illustrate its function. Task icons are copied from the
6 Job tasks marked as finished don’t appear on traffic reports.
7 The task’s description appears on printed estimates, invoices.
8 To show the task description on many job reports, check the show description checkbox.
9 Use the always unbillable option to prevent billable costs from being added to a job task. 10 Job tasks can be arranged
Job Tasks
i
p
d
q
w
y
r
u
g
f
h
Each job ticket is given tasks that describe what’s being produced, such as artwork, copy writing, design, and printing. They are completely customizable for flexibility.
Job Tasks
t
Task Table to new job tasks and appear on work to do reports.
5 The task code uniquely identifies the task on costs and billings, like ART or COPY. The task name briefly describes the task’s purpose or function, such as Artwork or Copy writing. Clients see task names, but not task codes, on estimates and invoices. Once added, the task code can’t be changed but can be renumbered using Utilities.
e
o
a
s
j
k

3-13
into user-defined groups by entering an optional group number.
11 Job tasks can be sorted within a group using a sort number.
12 Each task can have its own standard debit G/L account (dGL, for job costing) and credit G/L account (cGL, for billing) that will be automatically cop-ied to A/P invoices, checks, and A/R invoices.
13 A job task can be tracked using a production status, just like the job.
14 Each task can have its own markup, which replaces the vendor’s markup on A/P invoices and POs. A media commission can also be added for each task. The media com-mission is copied to Media and Insertion Orders.
15 Each job task tracks up to two sales taxes, or it can be nontaxable. The task itself determines whether or not the billing amount is taxable. The client account will determine what the tax rate is for estimat-ing and invoicing.
16 Each task can be set as an estimating/billing task, schedul-ing task, both, or neither. Estimating tasks appear only on the estimate window, and will be billed on A/R invoices. Scheduling tasks appear only on the job schedule, and can’t be estimated or billed. Tasks with neither option are for inter-nal job costing only, and won’t be billed.
17 The roll-up option allows you to combine several tasks belonging to the same group to be combined into one task total on the estimate and/or invoice.
Job tasks serve many purposes, including estimating, scheduling, job costing, and billing. A job always has at least one task, but can have dozens.
Job Tasks
18 You can control the billing rate used on time cards and time sheets by choosing a bill-ing rate method. The standard setting is changed in Prefer-ences, then copied to each job. Both clients and staff members can have different sets of bill-ing rates.

3-14 Adding Job Tasks
Adding Job Tasks
1 The job number and name/title appear here for reference.
2 To enter a long task descrip-tion, click on the Task Specs link. The Task Description window opens, containing any notes explaining the task. Notes can also be added or edited by double-clicking on the task from the job ticket window. These notes can appear on the printed estimate, and are copied to invoices.
3 A task code is any combina-
q
e
Jobs need tasks for estimating, scheduling, job costing, and billing. Once a task is added to a job, work can begin.
tion of letters or numbers, up to four characters long. If the task is found in the Task Table, its description, group, and other details are copied to this job ticket.
4 The task description appears on estimates, invoices, sched-ules, and job and cost reports. Clients see the task description, so make it meaningful (and not especially confidential or com-plicated). It is copied from the Task Table, but you can change the task description anytime.
w
r t
yu
5 Groups are used to ar-range and categorize tasks on estimates and invoices. The group number needs to be part of the Groups table (see the Setup menu to create your own group numbers and names). On estimates and invoices, tasks are sub-totaled by group number. Clients don’t see group numbers; instead, they see the group name (in bold). Groups are optional. If you don’t want tasks to be sub-totaled on esti-mates and invoices, leave the
Jobs need tasks for estimating, scheduling, job costing, and billing. What tasks appear on any given job ticket is entirely up to you—you have complete control over the task table. Once a task is added to a job, work can begin. Estimates can be made, schedules can be figured, and costs can be entered.

3-15Adding Job Tasks
group field empty.
6 Tasks are sorted within groups by the sort number. You can use any number you want, and the sort order can be changed any time. If you enter sort numbers, tasks are sorted even if no groups are used. If you don’t enter which they were added.
7 A task can be an estimating task, a scheduling task, or both. The default task kind appears here, but can be changed for each job, with the right access privileges.
A task code is any combination of letters or numbers, up to 4 characters long. If the task is found in the Task Table, its description, group, and other details are copied to this job ticket. The task description appears on estimates, invoices, schedules, and
Add job tasks from the Lookup Tasks table by double-clicking on the task or using the drag-and-drop feature.
q ew
r
1 Click the show all button to see all tasks, including inactive tasks.
2 With the right access privi-leges, staffers can add tasks to the Lookup Task Table. The new task can be used instantly for estimating, scheduling, costing, and billing.
3 Click the print button to print a list of job tasks.
4 The task list shows the task code, a description of the task, its group, and kind. The Lookup Task Table automatically sorts by task code, but you can click on the column headings to sort by other information.
t
5 Add a task to a job by double-clicking on it, or drag-and-drop it. To drag-and-drop a new task to a job, click once on the task to select it, then click again and hold. When the pointer becomes the grabber hand, drag the task from the lookup list to the add task line in the Add Job Tasks window.
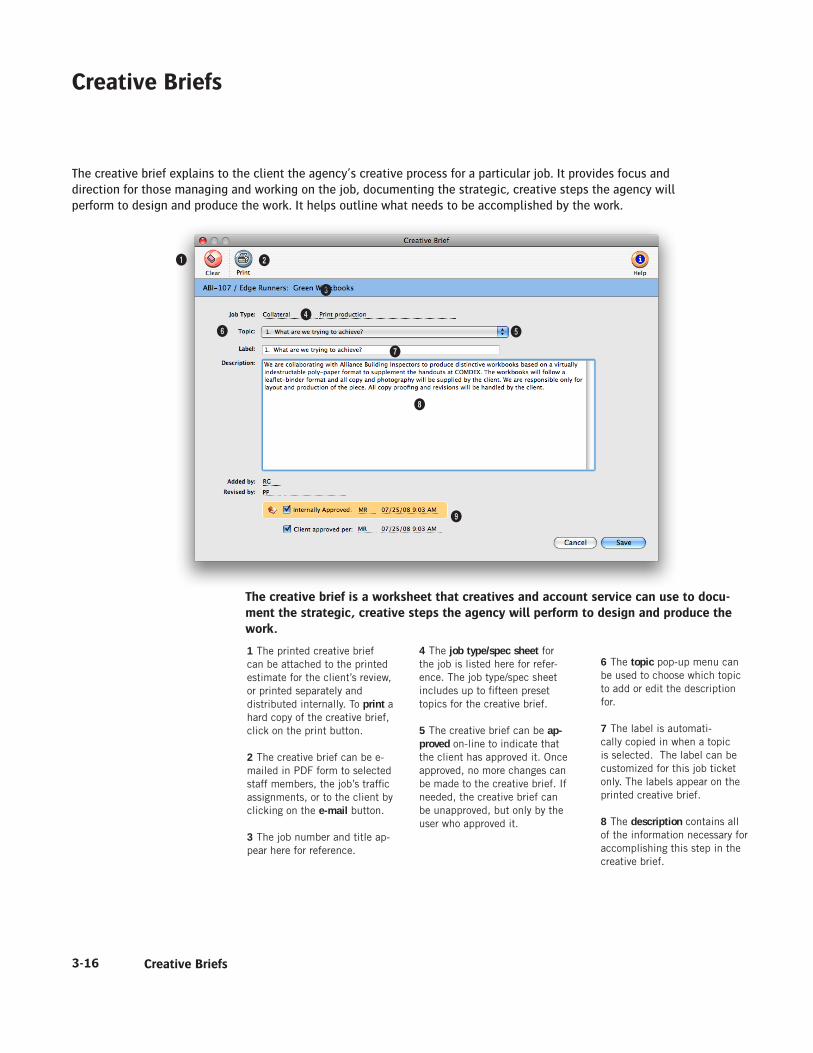
3-16
The creative brief is a worksheet that creatives and account service can use to docu-ment the strategic, creative steps the agency will perform to design and produce the work.
1 The printed creative brief can be attached to the printed estimate for the client’s review, or printed separately and distributed internally. To print a hard copy of the creative brief, click on the print button.
2 The creative brief can be e-mailed in PDF form to selected staff members, the job’s traffic assignments, or to the client by clicking on the e-mail button.
3 The job number and title ap-pear here for reference.
4 The job type/spec sheet for the job is listed here for refer-ence. The job type/spec sheet includes up to fifteen preset topics for the creative brief.
5 The creative brief can be ap-proved on-line to indicate that the client has approved it. Once approved, no more changes can be made to the creative brief. If needed, the creative brief can be unapproved, but only by the user who approved it.
6 The topic pop-up menu can be used to choose which topic to add or edit the description for.
7 The label is automati-cally copied in when a topic is selected. The label can be customized for this job ticket only. The labels appear on the printed creative brief.
8 The description contains all of the information necessary for accomplishing this step in the creative brief.
Creative Briefs
Creative Briefs
r
e
i
w
y
q
u
t
o
The creative brief explains to the client the agency’s creative process for a particular job. It provides focus and direction for those managing and working on the job, documenting the strategic, creative steps the agency will perform to design and produce the work. It helps outline what needs to be accomplished by the work.

3-17
9 The added by initials shows the user who added the creative brief. The revised by initials shows the user who last edited the creative brief. It also includes the date and time the creative brief was last edited. If the creative brief has been approved, the initials of the user who approved it will appear here.
The creative brief is an integral function of the electronic job jacket—anyone with ac-cess to jobs can see it. And because it’s on-line, changes that anyone makes to the creative brief updates the database instantly. Users will always be looking at the most up-to-date version on the creative brief.
Creative Briefs
Original Recipe Design
Creative Brief
Job: 07-ENG-046 Date: 05/21/07Name/Title: Meeting the Customer-Focus Challenge Page: 1Client: Corporate Engineering & ServicesType: Interactive
Project Description (What is it?)
An interactive CD-ROM for HOTEL, Inc. with pockets to hold collateral from existing HOTEL projects such as Team Channel,Celebrate America, and Color Studio.
Target Audience (Who are we talking to?)
Primary: The printing industry, pre-press professionals, independent graphics consultants, power users with corporate graphicsdepartments, industry media (newspapers, trade magazines, journals).
Secondary: Distributors, business partners, financial analysts, individual investors.
Purpose (What must the advertising accomplish)?
The primary purpose of the CD-ROM is to provide information about Corporate Engineering Services, and more importantly,communicate the company's history of innovation, financial stability, and credibility.
The CD-ROM should communicate - to a corporate audience, in a corporate tone - that Corporate Engineering Services is:
• The market leader in pre-press and corporate graphics• A leading source of innovation for the industry• Has a 10-year track record of financial stability• Features a broad range of experience & management• Provide superior customer service from end-users, developers, consultants, and the trade
Style & Tone (What do we want them to think?)
They should look to ENG as a capable, innovative partner in their engineering needs. The brochure should strike a balancebetween hip and corporate, so that it can appeal to all target audiences.
Copy Points (What are we trying to say?)
The client will provide copy, photographs, and graphics that illustrate:
• ENG's history in engineering innovation• ENG's marketing and sales expertise (providing personal service throughout US and Canada)• Experienced management (include a group photo outside new building)• Mission statement ("expect the best")• Financial strength ("10 years of consistent growth")• Progressive, can-do corporate culture (emphasise our low turnover)• ISO 9000 certified
Benefits (What benefits does the project/company offer? What makes us unique?)
• Engineering innovation (cite industry awards, patents)• Experienced management (over a dozen industry veterans in key management positions)• Substantial R&D• Strong corporate culture with intelligent, commited staff• ISO 9000 certified
Call to Action (What do we want the viewer/reader to do?)
Point viewers to new interactive web site: www.eng.com
Legal/Technical Requirements (What information is mandatory to include?)
Clear all fanancial information with legal first -- avoiding forward-looking statements.

3-18
Estimating
Estimating
u
io
q w e
y
p
r
a ds
Estimates are flexible. An estimate can be revised and reprinted as many times as the client or account executive needs.
t
fg
1 Any estimate/billing job task can be added to the job ticket from the estimate window by using the add task button. Only tasks that have no costs, time, or billings can be deleted from the job ticket using the remove task button in the estimate window.
2 To erase the entire estimate, use the clear toolbar button. Estimate amounts can be copied from one column to the next by using the copy amounts
button.
3 Use the print estimates but-ton to print the estimate. 4 The job number and name/title appear here for reference.
5 The job’s initial budget is the ballpark amount that was en-tered when the job was opened and appears here for reference. The initial budget doesn’t ap-pear on the printed estimate.
6 Each job task has it’s own
pop-up estimate worksheet that can contain hours and amounts for up to four staff members (including their own billing rates) and up to four kinds of expenses (including markups). The estimate can be formatted in many different ways by using the estimate options button. The task description button can be used to edit the job’s description, taxable setting, and roll-up task.
7 The job’s previous estimates can be recalled using the show

3-19
Estimates feature three different customizable estimate amounts. All three columns can be used when estimating large jobs with either phases or differently priced options.
Estimating
Estimate options gives you substantial control over the what appears on the printed estimate for a job, overriding the standard settings.
u
q w
e
y
r
t
1 The standard estimate heading appears at the top of the printed estimate, but it can be changed to something more meaningful to the client, such as Authorization.
2 Up to five copies of the same estimate can be printed at once using the distribution list. The names entered print at the bot-tom of the estimate.
3 The pop-up when printed menu and the show hours and hide tasks checkboxes let you control how tasks and estimate amounts are displayed on printed estimates.
4 Tasks without estimate amounts can appear on printed estimates with any kind of text (e.g., No Charge or TBD) instead of $0.00.
5 Up to three approval names can be entered. The approval names appear at the bottom of the estimate along with a signa-ture line for each approval.
6 Click the copy button to copy the client’s regular address to the estimate.
7 An estimate contingency (either a percentage or flat amount) can be added, along with a description. The con-tingency description appears below the contingency amount on the printed estimate.
estimate revision pop-up menu. The menu lists the job’s prior revisions, plus a New Revision option to start a new revision. 8 There are three customiz-able column headings that can be used to format the job’s estimate.
9 The job’s tasks are sorted by group and are identified with an asterisk if they are taxable.
10 The budget is your cost for the task before markups, fees, and commissions. The budget amount is used in reports to compare the budget vs estimate and for budget alerts to warn users when they’re near or over budget on a job task.
11 The estimate hours for a task are the number of hours you estimate it will take to finish the task. Job reports use these hours to compare against actual hours.
12 The estimate amount can be calculated using the esti-mate worksheet. Double-click on the task line to open the estimate worksheet, then enter staff, hours, and rates. The data entered here is copied to the estimate.
13 Before approval, an estimate can have up to three estimate amounts to show clients different versions of the estimate.
14 The final estimate—the one that the client approves—ap-pears on the job ticket window,
job summaries, and other reports.
15 The estimate can be ap-proved on-line to indicate that the client has approved it. Once approved, no more revisions can
be made to it. If needed, the estimate can be unapproved by the user who approved it.

3-20 Printing Estimates
Printing Estimates
Printing project estimates.To print a project estimate that combines all of the jobs that have the same project name, click on the For: pop-up menu, choose the Project option, then en-ter the name of the project.
Presentation-quality estimates can be printed anytime from your job tickets. Estimates are designed especially for laser printers, and have many options (such as font, margins, and company logo) that let you tailor the estimate to your client’s needs. Estimates can be printed individually or by project. A single estimate can be printed, combining all the jobs from one project. Copies of a job estimate can be printed for up to five different names, which are entered in Estimate Options. Estimates can be printed, revised, then reprinted as many times as needed—regardless of job status.
You can show one of the three estimate amounts, or show all three on the same estimate. The All Estimates (totaled) option adds all three estimate amounts together; use this option to estimate jobs with phases, where each phase is a separate estimate column. Changes made to the esti-mate’s heading, copies, and don’t print distri-bution copies affect only this printed estimate.
■ If you have Adobe Acrobat, estimates can be printed as PDF files and attached to e-mails sent directly from Clients & Profits. To save or e-mail an estimate as a PDF file, choose PDF from the print to pop-up menu.
To print estimates
1 From the Job Ticket window, click the (i.e., Print Estimate) button, or choose File > Print Estimates.
The Print Estimates window opens. The currently-displayed job number is entered automatically, but can be changed.
2 Enter a job number.
3 Choose which estimate should be printed, its options, then choose a desti-nation from the Print to pop-up menu.
Use the print distribution copies option to print up to five separate copies of each job estimate. It lets you print copies without using carbonless, multi-
part forms. A copy will be printed for each distribution name entered into the Estimate Options window. If no distribution names have been entered, only one copy of the estimate will be printed.
4 Click Print.
To print a project estimate
Jobs that belong to the same project can be printed to-gether by entering a project name. (Since the word “proj-ect” is customizable, it may be called something else.). The project’s estimate can be printed separately (i.e., one page per job) or combined to show all jobs on a single page (or pages).
1 From the Job Ticket win-
dow, click the (i.e., Print Estimate) button, or choose File > Print Estimates.
2 Choose Project from the For pop-up menu, then enter
a project name.
If you’re not sure about a project name, choose Lookup > Client Projects then double-click on a project name. Its name will be copied to the Print Estimates window.
3 Select the estimate printing options, then click Print.
Use the print one estimate for this project option to combine all of the project’s jobs onto a single estimate. Instead of printing separate pages for each job ticket, the jobs will be shown together. The client will get a single estimate showing separate sections, with subtotals, for each of the project’s jobs. Since the project estimate is unique, not all of the job’s estimate display options may appear.
E-mailing estimates
To e-mail an estimate, first choose “E-mail” from the print to menu in the toolbar, then print the estimate as you normally do. The estimate will be saved as a PDF then attached to an e-mail. You’ll be prompted to choose which client contacts get the estimate. E-mailed estimates won’t get distri-bution copies.

3-21
The printed estimate
Printing Estimates
EstimateDate 05/21/07
Marta Jones Number 06-ABI-173American Bios/Integrated Systems Revision Original
AE/Team AKCost Center: 3-394-94989Due Date: 09/14/06
Name/Title: Bliue Sample & Die Lap Top PackageAcct. Super. Tammy Burns
Phone: 213 999-1927
Desc/Specs: Design/Layout & Production of PackageBlue Sample & DieCopy RefinementName Treatment - colorB&W layouts (rough)Tight B&W LayoutsFinal Mechanical ArtB&W Line Drawings
Description Estimate:
Creative $2,520.00Production $1,770.00Fulfillment $576.00Account Management $330.00
Subtotal $5,196.00
*8.2500 % State Sales Tax: $428.67
TOTAL $5,624.67
Including 10.00% contingency: $6,187.14
This estimate includes only the items listed above, and does not include client revisions that exceed the estimated amount.
Approvals
Client Date:

3-22
The Printing Specifications form explains to the vendor the specific printing require-ments for a particular job.
Printing Specifications
Printing Specifications
With Clients & Profits, printing specifications is an integral function of the electronic job jacket. Like the work order and creative brief, it is just another part of the job ticket. Because it’s part of the job ticket, anyone with access to jobs can see it. And because it’s on-line, changes that anyone makes to the printing specifications form updates the database instantly. Users will always be looking at the most up-to-date printing specifications for the job.
q w
r
e
1 The printing specifications can be deleted at any time by clicking on the delete button.
2 Click on the print button to print a hard copy of the printing specification.
3 Many individual printing specifications can be created for a single job, making it easy to spec complex, multipart printing projects.
4 The printing specifications form itself is comprehensive,
When a job involves large amounts of printing, its printing specifications can be described in a detailed, on-line form. The Printing Specifications form explains to the vendor the specific printing requirements for a particular job. It is a worksheet that production people can use to define a print job’s physical characteristics, such as flat size, binding, and cover stock. It replaces any manual print ordering form you may be using now.
but isn’t customizable. The names of the field labels can’t be changed. In addition not all of the form’s sections needs to be used. The sections that have no text will appear blank on the printed Printing Specifications form.

3-23
The Printing Specifications form
Original Recipe Design
Printing Specifications/Request for Quotation
Job: 07-MLI-689 Date: 01/24/07Name/Title: Summer Sales Brochure Page: 1Prod. Contact: Gayle GreenPhone/E-mail: 760–999–9999 [email protected]
Project Desc: Summer Sales Brochure: 12 pages 4/4 + cover
Format: Folded Brochures NEED QUOTE BY: 02/28/07
Quantity: 12000
Prepress: We will supply final files on disk or FTP site. Printer to provide digital proofs.
P R O D U C T I O N R E Q U I R E M E N T S
Trim/Bleed: full bleed
Folds to: 8.5x11
STOCK:
Weight: 80#Finish: Gloss
Special Stock:Type:
LustroBook
Available from: Xpedx
BINDERY:
Drill: 3 hole
Stitching:Fold/Glue: Glued sleeve [ X ] Cut
SaddleTabs: 2 – yellow
Wrapping: Folded Brochures
Special Items: [ X ] Die Cut [ X ] Spot UV[ ] Foil Stamping [ X ] Special Bind[ ] Laminating [ ] Gluing[ X ] Press Check
Special Notes: Spiral bind on 8.5" side
INK: Color Side 1 Color Side 2 Coverage Side 1 Coverage Side 2
Process: 4/4 4/4 100% 100%
PMS: % %
Metallic: % %
Coating: Spot Varnish Spot Varnish
D E L I V E R Y I N F O R M A T I O N
Delivery Date: 03/18/07
Delivery: Printer to deliver
Deliver to: Advanced Mailing Total Lighting Products Advertising Agency12092 Palomar Airport Road Attn: Creative Services Attn: Account ExecutiveCarlsbad CA 92938 1000 Lighting Way 4755 Oceanside Blvd
Covina CA 94018 Oceanside CA 92056
Qty: 10000 Qty: 1990 Qty: 10

3-24
Traffic
Traffic
Dozens of status codes for jobs and tasks. The Status Table contains dozens of custom status codes for tracking pro-duction, billing, and task status. Each status code can notify staffers when it is added to a job ticket.
Clients & Profits is a complete production/traffic manager, providing an easy way to print daily job status, weekly traffic, and staff work to do reports. The traffic system has four parts: job tickets, production and billing status codes, traffic milestones, and unfinished tasks.
The job ticket is the basis of the production, traffic, and scheduling system. Jobs have status codes that categorize their progress through completion. A standard collection of status codes, called a Status Table, is completely customizable. Everyone uses the same status codes to classify their own jobs, such as Awaiting Approval, Estimate Pending, In Production, and Closed - Ready for Billing. Since status codes offer a consistent, predictable way to track a job’s progress, they make it easy to coordinate many jobs among different account executives or teams.
While jobs and status codes show the big picture, it’s the job tasks and due dates that really get the work done. Every job task can have a due date, start date, and a resource assigned to do the work. Jobs can be scheduled in detail, so you’ll know what’s due every day. Work to do reports show the day’s unfinished job tasks, with a separate page for each person. Job sched-ules can be moved forward, backward, or otherwise rearranged anytime—and the daily work to do reports are updated automatically.
Traffic reports show jobs by status, includ-ing important dates and times. These key events, called milestones, track client meetings, creative approvals, press checks, and more. A job can have up to twelve different traffic milestones (you can use any or all twelve as needed; different kinds of jobs will need more or less detail). Milestones can vary by job type, so they are included as part of a spec sheet. Traffic reports group jobs by job type, showing, for example, all of the brochures, radio spots, ads, etc. for easier job tracking. Jobs may not need milestones unless they are complex.
The key people responsible for getting jobs done can be assigned to each job. These traffic assignments can then be used when printing traffic reports.
Tasks vs. milestones
Each job type has up to 12 milestones to track its key events and dead-lines. Unlike tasks, they’re usually not the individual steps needed to do the job. Tasks, in contrast, track the daily work required to complete the job. Tasks contain much more detail, including start date, due date, who
will do the work, and several different long descriptions. Milestones enhance the status report by showing the job’s vitally important dates and times, instead of every unfinished task. Milestones are best for tracking only the big deadlines that can’t be missed. Traffic reports are printed by status code, while work to do reports are printed by due date. Unlike traffic reports, job and task schedules can be printed for any period of time (e.g., the week after next). Use tasks when you want to schedule each step the job will take. Task reports are more flexible, and can be sorted by many factors such as resource and client for more flexibility.
Production status vs. billing status
A job can have two status codes—one for production, the other for billing—to avoid contention between production people and accounting people. Using a production sta-tus, a production manager can freely track jobs and not worry about the accounting
manager’s unbilled job report. Likewise, the accounting manager can main-tain a job list showing unbilled, closed, or unbillable jobs by billing status without interfering with production. This is because the production status and billing status are essentially unrelated to each other on the job ticket. All job reports can be printed by production or billing status. This way, the produc-tion department and the accounting department can see jobs their own way. The production status and billing status share the same status table, but can have entirely different meanings. Since status codes are user-defined, it’s your choice. The job can have the same status, such as awaiting approval or closed, billed for both the production and billing status.
■ To add, change, or delete a status code, choose Setup > Status Table.

3-25
Traffic Features
Feature How it works, how it’s used
The jobs’ production status can be quickly and easily updated throughout the day, then summarized every morning on the Daily Job Status report.
The Weekly Traffic reports lists open jobs and their traffic milestones. The jobs’ mile-stones can be updated throughout the day as they change, then summarized for weekly traffic meetings.
Anyone who works on jobs can see their week’s deadlines from the Weekly Task Planner window. Scheduled job tasks can viewed for the next four weeks.
Production and traffic managers can review unfinished job tasks by client, staff member, AE/team, etc. from their own PC in real-time. Tasks can be instantly and easily resched-uled here.
Snapshot reports analyze job tasks to track on-time performance, missed deadlines, and more.
Clients & Profits notifies staff members via e-mail when job tasks are due, when a job’s status has been changed, when a client is billed for a job, and when the client pays the job’s invoice. In addition, upcoming follow-up calls can be scheduled for clients in the Client Diary.
The Status Table can contain hundreds of different production, billing, and task status codes. Status codes are use to categorize jobs based on their progress, from start (i.e., “new job”) to finish (i.e., “closed”) and every stage in between. All traffic reports show jobs by status.
Each job can have a customizable status note to briefly describe the job’s current status, or its next step. Status notes appear on the Daily Job Status report and other traffic reports.
Status codes can include customizable status alerts. These alerts can be set to stop a staff member from working on a job that’s not approved, already billed, or closed.
All traffic information for a job can be updated from one window. You can also view a list of unfinished tasks and add lengthy status notes.
The key phases or production steps (i.e., work flow) for every type of job can be pre-defined for traffic reports. The job’s traffic milestones help production and traffic staff manage work flow.
A job’s production/billing status, status notes, milestones, next steps, and due dates can be easily and quickly updated while entering time, as well as from the Job Tickets window.
Daily job status reports
Weekly traffic reports
Weekly task planner
Work to do
Traffic analysis
Automatic e-mail notification
Custom status codes
Status notes
Status alerts
Traffic milestones
Easy traffic updating
Pop-up job traffic window
Traffic

3-26
Job Traffic
Job Traffic
1 The job’s traffic assignments can be cleared any time by clicking on the clear button.
2 Click the print button if you need a hard copy of this job’s traffic report.
3 The job number and name/title appear here for reference.
4 The production status and billing status can be changed by entering a new status code over the old status code. If you’re not sure which status
code to use, choose Status Codes from the Lookup menu. Double-click on a status code from the Lookup window. The status code will be copied to the Traffic window automati-cally. A job diary entry will be created each time the produc-tion or billing status code is changed.
5 The job’s start date and due date can be changed in the Traffic window. Changing these dates here doesn’t affect the job schedule (so Work to Do
reports won’t be affected). To change the stat and due dates for job tasks, use the Resched-ule function in the Job Sched-ule window once the Traffic changes are saved. You can also enter the date closed for the job in this window.
6 The days until due counter keep a running tab on how close the shop is to meeting the job’s due date. The numbers normally appear in green, but when the job is overdue, they turn red and begin counting the days overdue.
u i
o
q w
e y
p
r
a
The Job Traffic window provides a manager’s perspective on the job’s progress with a days until due counter, unfinished task list, and roomy status notes field.
t
s

3-27
7 The status note supplements the job’s current production or billing status. It lets you enter a brief description that appears on the Job Ticket window, on some job lists, and traffic reports.
8 The job’s priority can be changed by clicking on the pop-up menu and choosing one of the six customizable priority levels. A job diary entry will be created each time the job’s priority is changed.
9 The job’s traffic assignments (i.e., traffic names) are the ini-tials of the creative and produc-tion people most responsible for getting the work done. Traffic reports can be printed for any one of the job’s traffic names.
10 The client status notes/comments/next steps can be used to create progress reports for clients (see the Client Status report in the Job Lists) with any kind of information you want.
With the active days counter and unfinished tasks list, traffic managers can easily see what needs to be completed to get the job finished on time.
Job Traffic
With the right access privileges, staffers can open the pop-up Update Traffic window and update the job’s traffic right from their Daily Time Card or Time Sheets.
q
w
e
r
t
1 The job number and name/title appear here for reference.
2 The production status and billing status codes can be changed, and a status note added. If automatic e-mail is enabled, an e-mail will be sent
to the appropriate staffers when the status codes are changed.
3 The job’s due date appears here for reference.
4 Traffic next steps/comments will appear here, and can be
updated as the job progresses.
5 The job’s milestones appear here, and can be updated. When saved, the new milestone information appears on the traf-fic reports.
11 If the job was added using a job type/spec sheet, its traffic milestones can be edited. Jobs without a job type won’t show milestones.
12 The job’s unfinished tasks are listed for an overall view of what needs to be completed. This field shows the task, who it is assigned to, and when it is due. When tasks are marked done, they no longer appears on the this list.

3-28
Job Scheduling
1 Sub-tasks are special tasks used exclusively for scheduling. They are added to schedule different people are multiple deadlines fro the same task. Sub-tasks are scheduled and updated like regular tasks. They also appear on work to do reports, but don’t affect esti-mates, job costing, or billing. Any number of sub-tasks can be added to the job schedule using the add sub-task button.
2 sub-tasks can also be re-moved from the schedule at any
time using the remove sub-task button.
3 The job’s entire schedule can easily be erased using the clear button. Use this shortcut only when the schedule is wrong and you need to start over from scratch. The ballpark schedule button can be used to auto-matically create a job schedule based on either the job’s start date or due date. The ballpark function looks at the job’s tasks, evaluating which tasks are finished first (based on their
schedule sort order) and lead time. The reschedule button works like the ballpark function, except it preserves the relative time (i.e., the days between the start date and due date) for each task, while changing the start date and due dates for each task based on a new job start date or due date. When the resource assigned to a job task can’t do the work (i.e., they’ve been moved to a differ-ent account team, they’ve quit, etc.), the resource’s tasks can be easily reassigned to someone
Job Scheduling
The ability to coordinate hundreds of tasks and resources through a common job schedule is one of Clients and Profits X’ greatest strengths.
p sa d f g
ui
r
y
qw
e
t
o
h j k
l

3-29
else using the Reassign button.
4 Click on the Print Schedule button to print a hard copy of the schedule.
5 The job number and name/title appear here for reference. The job’s start and due dates are used by the Ballpark and Reschedule functions to cal-culate start and due dates for each job task.
6 Clicking on the calendar link opens the job’s calendar win-dow, which lists the deadlines for a selected date.
7 It’s easy to see other dead-lines without closing the job schedule window by using the view>point pop-up window. This task’s schedule option shows deadlines for other jobs for the currently selected task. This resource’s tasks option shows deadlines for other jobs for the currently selected resource person. This day’s tasks option shows the deadlines for other jobs for the currently selected due date.
8 Special instructions can be added or edited for tasks in the job scheduling window. Tasks with special instructions will appear with a red “X” by it’s task name. For convenience, the pop-up estimate worksheet can be viewed from the job schedule window. The task’s estimate amounts, including details such as staff members, estimated hours, and expenses, can be viewed from the pop-up
estimate window.
9 The job’s schedule tasks are listed in the order in which they are completed (i.e., the step number). The step number is copied from the Task Table, then entered for each task. If empty, tasks are sorted by task code.
10 Clicking the show sub-tasks arrow shows or hides the task’s sub-tasks. The job schedule window opens showing sub-tasks automatically.
11 The task name describes the task’s purpose or function. It is copied from the Task Table but can be changed on a job. It appears on estimates, sched-ules, job reports, and invoices. Tasks that have specifications are identified with a red “X”.
12 The due date field is the date on which the task should be completed. Clients & Profits checks due dates against company holidays, which are based on your job scheduling preferences.
13 The due time field indicates when the work is due. Job tasks can be scheduled for a specific time of day, like 3:00 PM.
14 The resource is the staff member, freelancer, or vendor who is responsible for doing the work.
15 The job task’s estimated hours appear here for refer-ence. For regular job tasks, the
estimate hours are entered in the estimates window, not the job schedule window. Estimated hours for a sub-task here. The estimated hours for sub-tasks can’t exceed the regular task’s estimated hours.16 The lead time is the num-ber of days needed to complete the task. If a task is to be completed the next day, enter the lead time as one day. If the task is to be finished on the same day, enter the lead time as zero.
17 The start date is the date on which the task’s work is to begin. It is calculated based on the due date and lead time, but it can be changed. Start date appears on job schedules, the daily work-to-do window, and work-to-do reports.
18 The finished date is the date on which the job task was completed. It isn’t updated au-tomatically, so someone needs to note when each task is done. The finished date can be easily updated from the edit job task window, job schedule window (when you’re updating tasks for the same job), the work-to-do window, the update schedules window (when you’re updating many tasks), or from the time card (using the pop-up edit schedule window). The finished date is optional, but it will tell you how well you’re meet-ing your planned deadlines. Tasks with finished dates no longer appear on the work-to-do reports.
Job Scheduling
Job scheduling is completely flexible. You can schedule jobs when a new job is opened, after the job is approved, or at any other time.
19 The skip Saturdays/Sun-days option lets you prevents users from scheduling tasks on weekends. If the shop works weekends, uncheck the appro-priate days. When the option is enabled, a task that’s scheduled for a Saturday or Sunday will be automatically scheduled for the next Monday.

3-30 Timeline
Timeline
y
tr
ewq
1 The arrow buttons can be used to view the previous month and next month on the timeline. There is no limit to how far into the future you can scroll.
2 The job’s entire schedule can easily be erased using the clear button. Use this shortcut only when the schedule is wrong and you need to start over from scratch. The reschedule button can be used to automatically create a job schedule based on either a new start date or due date for the job ticket. The
reschedule function preserves the relative time (i.e., the days between the start date and due date) for each task, while changing the start date and due dates for each task based on a new job start date or due date. When the resource assigned to a job task can’t do the work (i.e., they’ve been moved to a different account team, they’ve quit, etc.), the resource’s tasks can be easily reassigned to someone else using the reassign button.
The Job Timeline window takes start and due dates from the job schedule and dis-plays them visually by month, showing a quick overview of the job’s tasks.
3 Click the print schedule button to print the job schedule only. To print the job timeline click on the print timeline button.
4 The job number, name/title, start date, and due date appear here for easy reference.
5 The job’s start date and due date are shown here for refer-ence.
6 Specifications can be added or edited for tasks in the timeline window by clicking on
u i o p

3-31Timeline
A job’s tasks can be reassigned, rescheduled between resources, or the job’s sched-ule can be cleared with a single mouse-click.
Rescheduling tasks is easy, quick, and accurate with the reschedule tool.
the task specifications link. For convenience, the pop-up esti-mate worksheet can be viewed from the timeline window. It shows the task’s estimate amounts, including details such as: staff members, estimated hours, and expenses . Clicking the calendar link opens the job’s pop-up calendar window which lists the deadlines for a selected date.
7 The job’s scheduling tasks are listed here in chronological order based on their start dates. Click on any task to select it, then choose the reschedule or reassign toolbar button to edit the task’s schedule or staff as-signment.
8 The task’s start date shows the date assigned in the Job Schedule window. Changing the start date in either the Job Schedule window or with the reschedule tool here will reorder the task list so that tasks are always listed chronologically by start date.
w
q
e
1 Any task can be rescheduled based on its start or due date.
2 The current date will auto-matically copy to the current date field. Enter the new date you want to reschedule the tasks for. Any holidays entered into preference (and Saturdays
and Sundays) are automatically skipped.
3 When you click OK, tasks are automatically rescheduled in the Job Timeline, Job Sched-ule, and Work to Do and other reports.
9 The task’s due date is copied from the Job Schedule window. The due date can be edited either here, using the resched-ule tool, or in the Job Schedule window.
10 The job’s time line shows how tasks on the job relate to each other based on their schedule. Since the task time line is a graphical representa-tion of the tasks’ start and
due dates, editing those dates will recreate the graph. For jobs that span more than six months, use the previous and next toolbar buttons to scroll into the future.

3-32 Change Orders
y
q w re
t
1 These toolbar buttons can be used to add, edit, and delete change orders. Click the add change order button to add a new change order to the job. Click the edit change order but-ton to edit an existing change order’s status, description, amount, and other information. Click the delete button to delete a change order.
2 Click on the approve button to approve a change order. Once a change order has been approved, it can’t be edited or
deleted, so make sure all the information is entered correctly before approving it.
3 Click the print button to print the change order for client approval. The change order template can be set up so that the shop’s logo prints on it, or so that it prints on your let-terhead.
4 Click the send e-mail button to create a PDF file for the change order and automatically e-mail it to the client contact.
5 The job number and name/title are shown in the Change Orders window for reference.
6 The change orders that have been added, and information about them, are listed here. Clicking on any column heading sorts the list by the information in that column. Click on the ar-row tool on the right to sort the information in the ascending or descending order.
7 The date and time the change order was created is
i
Change orders document changes made to a job’s estimate after it has been autho-rized. They prevent potentially costly misunderstandings between the agency and the client when a job has gone over budget.
Change Orders
u o ap s
Change orders document changes made to a job’s estimate after it has been authorized. They prevent potentially costly misunderstandings between the agency and the client when a job has gone over budget. When a change is requested (by either the client or the agency, it doesn’t matter), a change order can be added then printed. The printed change order resembles an estimate.

3-33
shown in the when column.8 The type of change order (additional information, agency corrections, client revisions, FYI, or other) is listed here. Sorting by type will help man-agers better understand where changes are originating.
9 The initials of the person who created the change order are listed in the who column.
10 For a quick summary of what information is on the change order, the order’s subject is listed in the what column.
11 The budget amount of the change order is included here, rather than the estimate amount (the amount the client will pay).
12 The status column shows which change orders have been approved, and if so, when and by whom.
Change orders are better than printing a revised estimate, since it doesn’t remind the client of the job’s total cost. Clients see only the change order amount. A change order doesn’t affect the job’s original estimate, either.
Change Orders
Everything needed to document changes to a job can be added in the Add Change Order window.
y
qw
re
t
i
u
o
1 Change orders are numbered sequentially to track how many change orders have been added to a job.
2 Use the type pop-up menu to categorize the change order. It appears on the printed change order, and includes Additional Info, Agency Corrections, Client Revisions, FYI, and Other, which allows you to create your own change order type name.
3 The date and time the change order was added is en-
tered automatically, along with the staffer’s initials who added the change order.
4 The name of the client con-tact is automatically entered on the to line, but can be changed.
5 Enter a brief description of the change on the subject line.
6 Change orders can contain a lengthy description to document the change. They appear on the printed change order.
7 Every task that is on the job is listed. Add hours, a budget amount (your projected cost) and the estimated amount you’ll show to the client. Only the tasks have amounts will appear when printed.
8 If enabled, an automatic e-mail will be sent to staffers selected in the notify list. There is no limit to the number of staffers you can select.
9 The names chosen using the to be approved by button appear at the bottom of the printed change order.

3-34
Production Planner
Production Planner
The Production Planner gives you an overview of selected job’s key information such as the due date, production status, priority, and schedule timeline.
1 The previous month and next month buttons can be used to see the job timelines for differ-ent months.
2 To change the production status for a selected job ticket, click on the change status button.
3 To change the priority for a selected job ticket, click on the change priority button.
4 To postpone a selected job ticket by start date or due date,
click on the postpone button.
5 A job ticket’s schedule can be rescheduled from the production planner window by clicking on the reschedule but-ton. You can reschedule the job by start date or due date.
6 Selected job tickets can be reassigned by clicking on the reassign button.
7 Jobs can be closed from the production planner window by clicking on the close jobs button.
8 Click the print planner but-ton to print a hard copy of the production planner report.
9 In the production plan-ner window, you can view job tickets for one client or for all clients. To find jobs for one client only, enter the client number into the find field.
10 To view job tickets for a specific priority level, use the show pop-up window to select a priority level.
q w e r
d
s
i
a
po
uyt

3-35
11 A selected job ticket’s traffic information (i.e., status note, milestones, traffic assign-ments, etc.) can be updated by clicking on the traffic button.
12 Jobs can be sorted by job number, name/title, priority, due date, or production status by clicking on a column heading.
13 Double-clicking on a job ticket will automatically take you to the job ticket window for the selected job.
The Rush Manager, a built-in part of the Production Planner, lets you assign prioritize jobs. Rush jobs are automatically moved to the top of the list for immediate attention.
Production Planner
Change a job’s priority any time using the Change Job Priority tool.
The six job priority names are set up in the Clients & Profits system preferences, so you can use names that are most meaningful to your shop. The
names shown here are the de-fault names, but you can enter anything you want, including numbers.

3-36
Weekly Traffic Report
The Weekly Traffic report is the place to go when you need to update the traffic for many jobs at once.
1 Click on the find button to select jobs by AE/Team, client, or traffic assignment, and a range of production or billing status codes.
2 Once you’ve updated your jobs, click the print button to print a weekly traffic report showing your changes.
3 The job type pop-up menu lists the names of your job types. Use the pop-up menu to choose a job type and you’ll see its jobs displayed in the win-
dow. Once you’ve updated a set of jobs, use the pop-up menu to select a different set of jobs by choosing another job type. When you choose a job type, its milestone headings appear above the job table.
4 Click the traffic button to change a selected job’s traf-fic notes, production status, billing status, and other traffic information.
5 Any job that belongs to the chosen job type appears in
the table. Jobs are sorted by job number, and display their traffic milestones—which you can change. It works like a spreadsheet: click on the job milestone you wish to change, make your change, then press Tab. When you’ve made all of your changes, click Save.
Weekly Traffic Report
t
re
w
q
The job’s traffic assignments, milestone headings, and traffic milestones appear in spreadsheet form on the Weekly Traffic Report window. Jobs can be selected for updating at random by clicking on the milestone you want to change. The new traffic information will replace the old in the Job Traffic Milestone window. When the report is updated, it can be instantly printed and distributed to the production and traffic staff.

3-37
The Weekly Traffic report lists the job type’s traffic assignments and milestones at the top of the window.
Weekly Traffic Report
The pop-up job type menu lists the job types, including a total of each open job type.
The job type names are added when Job Type/Spec Sheets are set up and describes the type of job. When adding a job type to a new job, it will automatically be added to the traffic report for the job type.
This pop-up job type menu lets you choose which set of jobs to update, as well as how many of each type of job is currently open in the shop.

3-38
Daily Job Status Report
1 Click on the find button to select jobs by AE/Team, client, or traffic assignment, and a range of production or billing status codes.
2 Click the print button to print the daily job status report. Job status reports can also be printed, with more options, from the job tickets window and from snapshots.
3 Click on the traffic button to update the selected job’s traffic information such as the
milestones, start and due dates, and traffic notes.
4 Jobs can be sorted by job number, name/title, status code, priority, or status note by clicking on a column heading.
5 The job’s production status or billing status will appear here, based on how jobs were found. Highlighting a job’s status selects it, which allows you to change its status code. Pressing tab selects the next job. Tabbing past the status
y
q w
r
e
t
The Daily Job Status report is designed to be printed every morning to summarize the shop’s work in production. The production or billing status for many jobs can be easily and quickly updated every day.
Daily Job Status Report
code displays its description.
6 The job’s status note will ap-pear here and can be edited.

3-39
The Daily Job Status report can be printed by client, resource, or traffic assignment, and can be limited to a production status or billing status range.
Daily Job Status Report
The pop-up Find Job Tickets window lets you quickly review specific jobs.
q
w
r
e
1 Use the pop-up find menu to review jobs by client, AE/team, or for one of the job’s traffic names (e.g., creative director). In the search field, enter the word ALL if you want to see jobs for all clients, all AEs, or all jobs assigned to a traffic name.
2 Click either the production status or billing status button to find job tickets by their status code.
3 Enter the status code range to narrow the search.
4 To move all jobs assigned a rush priority, check this box.

3-40
Work To Do
1 Use the previous and next buttons to scroll through the unfinished job tasks.
2 Click the find button to find a different set of unfinished tasks by client, resource, AE/team, etc. and a range of dates.
3 Several job tasks can be marked as finished at the same time by highlighting one or more tasks and then clicking on the mark as finished but-ton. The selected tasks will be marked as “finished” and will get a finished date as today
automatically.4 Click the print button to print a work to do report showing the currently-displayed unfinished job tasks.
5 The report’s parameters ap-pear here.
6 Use these two links to change a job task’s traffic and schedule information. In the update traffic window you can edit the task’s production and billing status, status note, and other key traffic information. In the update task window you can edit the job task’s scheduling
information.
7 Unfinished job tasks can be sorted by resource, due date, job number, task, description, estimated hours, or start date by clicking on any column heading.
8 The task’s resource is the staff member, freelancer, or vendor who is assigned to do the work.
9 The due date is the task’s deadline.
10 The job number, name/title,
Work to Do
The Work to Do window provides a sophisticated dialog box to find unfinished job tasks by due date, start date, resource, client, or AE/team—for any period of time.
p
o
i
u
y t
rewq
a
s

3-41
task code, and task description appears for each unfinished task listed in the window.
11 Each task’s estimated hours are included for easy reference. To see the task’s actual hours (and hours remaining), double-click on the task.
12 The start date shows the date on which work on the task should be started. Work to do and job schedule reports can be printed by start date.
Work To Do
The Work to Do report automatically sorts by due date, with the most urgent tasks listed first, but can be resorted by clicking on the column headings.
Use Find Work To Do to see what needs to be done so every-one stays on schedule.
e
w
q
1 Click one of these show tasks buttons to list work to do by due or start date, resource, client, or AE/team. Click the unfinished and overdue option to list just those tasks that need immedi-ate attention.
2 Fill in the date fields to nar-row your search to a certain time period. To search for dates
within the current month, just type in the date. Clients & Profits fills in the month and year for you.
3 The resource field will only appear if you are searching by resource, client, or AE/Team. The resource is the initials of the person who is assigned to do the work.

3-42
1 The clear toolbar button deletes all information about the asset in the Job Assets Info window.
2 The job number and name/title is shown here for reference.
3 The asset’s file name is en-tered here. This file name needs to be entered exactly so that it the physical file is recognized by the Asset Manager.
4 The location shows where the
Asset Manager
Asset Manager
file is stored on the art server.
5 Check the protected option if you don’t want this asset’s information deleted or cleared. Only system manager-level users can protect as asset’s information. This setting only protects the asset informa-tion, not the file itself. It won’t prevent someone from moving or deleting the file from the art server.
6 Add a description of the
f
s
d
a
p
i o
u
y
t
r
e
w
q
g
asset so that it can easily be differentiated from similar files. The more detail you add here, the less time you’ll spend open-ing the wrong files later.
7 Use the ownership pop-up menu to show who owns the digital file. The choices include agency, client, artist/writer, stock (royalty-free), or stock (rights restricted).
8 Enter the date the asset was acquired.
The Job Asset Info records legal information about ownership, usage, and more for a job’s asset.

3-43Asset Manager
Enter three keywords for each asset. When you use the find tool to search for an as-set, Clients & Profits will look for these keywords.
9 Enter the asset’s original source, if applicable. Since as-sets are usually purchased, the source is a vendor code.
10 Paste a thumbnail of the graphic to help better recognize the image later on.
11 Add copyright information, if applicable, so the appropri-ate copyright information can be included when the asset is used.
12 The author of an asset is the contact person most respon-sible for creating it. If you ever need to request another file, changes, or additional informa-tion, the person entered here will be the person to contact. Be sure to add their phone number as well.
13 There are five customiz-able user fields to enter any specific information that your shop needs to track. Enter any information here that is meaningful.
14 Enter any usage restrictions here to minimize any misuse of the asset.
15 The three keywords entered here are the search words. When searching for a graphic based on keywords, every asset that has that word listed in one of the keywords field will appear in the search results list.
All of a job’s assets are listed in the Asset Manager window, and can be opened (and their application launched) right from Clients & Profits.
t
r
ew
q
1 Use the arrow buttons to select the previous and next job asset. Use the find button to search for an asset by keyword. The print list button prints a list of the job’s assets.
2 The job number and name appear here for reference.
3 After selecting an asset from the list, click the open file button to launch the asset’s ap-plication and open the file.
4 All of the job’s assets appear with a file type icon, file name, size, and created and modified date. The assets can be sorted
by any of this information by clicking on the column heading.
5 The asset’s description (from the Job Asset Info window) ap-pears here.

3-44 View>Point
View>Point
Each job ticket has a diary that tracks the job’s history, offering complete accountabil-ity from the job’s start to its finish. It helps users see what kind of changes have been made since the job was opened through when the job was closed.
Clients & Profits provides many ways to track a job’s progress on-line. Use the pop-up view>point menu as a fast way to gather information you need about a job, such as task costs, billing, POs, IOs, and BOs. You’ll also find job progress reports, work in progress reports, the job snapshot, and the job diary.
Task costs Click on the view tasks option to see the Job Costs (by Task) report. This report sorts a job’s costs by the task, date, number, and hours. It also shows the net and gross costs, the unbilled cost amount, and whether or not the task has billings applied to it. The report is totaled for a quick sum-mary of how much time and money the shop has invested in the job, and what the gross revenue to date is.
Task billings Click on any task in the job ticket, then choose the view task billings option to see the hours and amount billed for a specific task.
Task POs Click on any task in the job ticket that a purchase order was created for, then choose the view task POs option to see the job commitments (POs) report. The report shows the PO number, the date the PO was created, the vendor the PO was created for, the net and gross cost (net cost times the markup), and the purchase order status.
Task IOs/BOs Click on any media task in the job ticket that an insertion order or broadcast order was created for, then choose the view task IOs/BOs option to see the job commitments (i.e., IOs/BOs) report. The report shows the insertion or broadcast order number, the date the order was created, the vendor the order was created for, the net and gross cost (net times the markup), and the order status.
Job Progress Click on the view job progress option to open the Job Progress
Who deleted that task?” Job diary entries are made automatically whenever tasks are added or removed, traffic is edited, and more. Double-clicking on a diary entry shows its full details. Selected entries can be printed by pressing down the Command (or Ctr in Windows) key then highlighting the entries to print then clicking the Print button.
window. To review a job’s progress. The job progress window shows on-the-spot totals to date. This window lets you quickly see how many hours you’ve worked and the costs you’ve incurred for each job task. You’ll get an analysis of the job’s total estimate, estimated hours, gross margin to date, and budget remaining. These amounts are updated as costs are posted, so the Job Prog-ress window is always current. You can’t change the amounts on job tasks here, since they are made up of vendor payables, time sheets, change orders,
and more. You can however use the window’s toolbar buttons to print the job’s costs, as well as, its billings and purchase orders. Other toolbar buttons let you verify the job’s costs and bill-ings, and print the job’s Job Progress report. For jobs with large numbers of tasks, the Show Groups pop-up menu lets you compare the progress of differ-ent groups of tasks at one time.
WIP Managing work in progress—the job’s unbilled costs, time, and expenses—is completely automatic. There are three ways to look at work in progress: from jobs and tasks, from the costs themselves, and from the general ledger. Each has important distinctions, and all three work together to track your billable costs. Anyone with access to costs can edit work in progress.
Work in progress is primarily a function of job billing. Adding costs starts the work in progress system. A cost, whether it is a vendor purchase, a time entry, a check, or an out-of-pocket expense is given a job number and a task. The cost’s net and gross amount (which include your markup) are posted to a job task. Billing is based on the job task’s unbilled amount. When you bill a job, its tasks are copied to the invoice—including their billable amounts. You can freely change the invoice’s billing amount up or down, regardless of the task’s actual costs. So billing isn’t literally connected to a job’s costs.
Costs track when they’re billed automatically. When you bill a job, the task’s billing amount is applied to its costs. The billing amount updates the oldest cost first, then works forward through the remaining costs. You can find a cost and see its billing information: the invoice date, amount billed, and invoice number. For more accurate job costing, costs can have a billing status (e.g., unbilled, billed, or partial). Costs can be flagged with a billing status to keep them from being billed (e.g., on hold, unbillable). Work in progress reports show either unbilled job tasks or costs to help you plan your

3-45
The Job Progress window gives managers a summary of the job’s progress and profit-ability to date, including completion totals for hour hours and costs. Get drill-down task information on costs and billings using the three tools at the top right.
View>Point
invoices better.
Job Snapshot The Job Snapshot window supplies account executives, ac-count coordinators, and others with an up-to-the-minute snapshot of a job’s progress. Quick cal-culations show the job’s remaining estimate and profitability. This helps users catch any problems before they become serious—and expensive or troublesome to fix. A job’s advance bill-ing balance appears in the Snapshotwindow. The balance is the amount you can apply against upcom-ing invoices for this job.
Account executives can use the Job Snapshot to better plan the upcoming billings. By entering the date and amount of the job’s next billing, pre-billing reports can be printed. These reports show what’s expected to be billed during the next billing cycle. The job’s account executive will be notified by e-mail on the billing date. Account ex-ecutives can use the job snapshot to review a job’s estimates vs. actuals. If a job looks like it is costing too much, the over budget amount can be entered into the snapshot window. Progress reports can be printed showing these problem jobs, so that they can be watched more closely.
Job Diary Each job ticket has a diary that tracks the job’s history. The job diary helps users see what kind of changes have been made since the job was opened. A production manager can see a job’s history from his or her own computer, instead of tracking down and interrogating everyone who worked on it.
Job diary entries are made automatically when many kinds of changes are made. Entries are made when the job is opened, then any time the specifica-
tions, estimates, or sched-ules are edited. They are also made whenever new tasks are added, removed, or changed as well as when the status is updated. Clos-ing the job makes a diary entry, as does deleting a job. A deleted job’s diary stays in the database—so it’s easy to know who deleted a job ticket. The deleted job’s diary can be printed from job reports.
Each diary entry shows the date and time a change was made and who made it. A short, default description describes each entry. In addition, a user can include a longer explanation if
needed. The information on an existing diary entry, except for the notes, can’t be changed. New entries can be added manually to document client meet-ings, memos, and phone calls important to a job’s progress. The Show Diary Entries option allows a user to see all diary entries, user generated entries only, or system generated entries only. Diary entries don’t appear on client reports, but can be printed with job reports.
Up-to-date task totals The Job Progress window shows a job task’s totals to date. For each job task you’ll see its budgeted hours and budgeted costs compared with the its actual hours and actual costs. The percentage of budget used is calculated for each job task, easily showing how much of its budget remains.

3-46
Approvals
1 Anyone can add a request for a generic job approval, or an approval for content, by clicking the add button in the Job Ap-provals window.
2 To edit an existing approval, select it from the list, then click the edit button. Or simply double-click the approval to open the edit Job Approval window.
3 Delete an approval by high-lighting it from the list, then click the delete button.
4 Click the Send button to send a selected approval request via e-mail. 5 To print a hard-copy of a request to the printer, select the approval, then click the print button.
6 Approve or unapprove a re-quest by selecting it, then click the approve/unapprove button.
7 Job approval requests can be rejected outright by clicking once on an approval request to
yq w re t
The Job Approvals window tracks all of a job’s pending, approved, and rejected appproval requests from its start to its completion, keeping a record of all of the approved, rejected, and pending approvals for estimates, schedules, content, change orders, and tasks.
Approvals
select it, then click the reject button. 8 Approval requests are displayed separately by status: Pending, Approved, and Re-jected. Click any tab to see all requests for a particular job.
9 Approval requests are listed by date needed, oldest first. Requests shown in the list can be sorted by clicking on any column heading. Double-clicking on an approval request displays its complete details.
u
i
o

3-47
Anyone can request an approval for any step during a job’s lifetime. These steps can be ok’d by any staff member with the correct approval access privileges.
Approvals
q
w
r
e
1 The step/description describes the type of request being made. It identifies this request on the Approval Manager window and makes up the subject on the notification e-mail.
2 All of the staff members who can approval this type of request, as well as the client contacts with content approval, appear in the to be approved by drop-down menu.
3 Enter the date and time you need the approval by in the needed when field. If you want this approval request rushed, click on the RUSH checkbox.
4 The optional instructions can be used to explain why you need this request approved. 5 The optional status note can be used to give this approval request a little more informa-tion. It works similarly to the
t
y
status note on job tickets and purchase orders.
6 If this approval request involves content (i.e., artwork, copy, layouts, etc.) you can select any digital file to attach to the notification e-mail. To at-tach a file, click the Get File to Approve button the choose the file from the Open dialog box.

3-48
Approval Manager
1 Edit any approval by select-ing it from the list, then click-ing the edit button.
2 To delete an approval, select it from the list and click the delete button.
3 Delete an approval by high-lighting it from the list, then click the delete button.
4 To approve a request, click once on an approval request to select it, then click the ap-prove button. Once approved,
the person who requested the approval will be notified via e-mail that it was approved with changes -- which are included in the e-mail.
5 If an approval needs to be sent a second time, select it from the list, then click the re-send button.
6 To print an approval request, select it from the list, then click the print button. The printed approval request displays the job, client, requestor, step/
yq w re t
The Approval Manager simplifies and automates the entire approval process for jobs, art-work and content, estimates, purchase and insertion orders, media plans, vendor invoice, and client invoices.
Approval Manager
description, date needed, the optional file to approve, and any accompanying instructions on a single printed page.
7 The window will display both the requests awaiting your approval as well as the requests you’ve made yourself. To see the approval request you’ve made, choose “I made” from the “show approval requests” drop-down menu. 8 Approval requests are displayed separately by kind:
u
i
o

3-49
All of the different approval requests are gathered together in the Approval Manager window. It shows all of the requests you made -- and the requests made of you. From this window you can track the status of your requests, as well as approve new requests.
Approval Manager
qw
re
1 The job number for the approval request being edited appears here.
2 The person who initially added the approval request is listed here.
3 The step/description de-scribes which step of the job requires approval.
4 The name of the person who needs to approve this request
appears here. 5 The date the requested step is to be completed goes here. If this job is a rush, click the RUSH checkbox.
6 Special instructions for this step go here. This should be as detailed as you wish.
7 A customized status of this step can be added here, for instance, the day it’s needed by.
t
y
8 If this approval is for a job asset, the complete path to the file is listed here. If the file is not final, click the Draft checkbox.
9 A thumbnail of the file can appear here.
10 If there are special condi-tions or reasons why this step has been rejected, or yet to be approved, they should be listed here.
ui
o
1)
proposals, jobs, purchase or-ders, media, A/P invoices, and A/R invoices). Click on a tab to see the approval requests. Double-clicking on an approval request displays its complete detail.Pending, Approved, and Rejected. Click any tab to see all requests for a particular job.
9 Approval requests are initials listed by date needed, oldest first. Requests shown in the list can be sorted by clicking on any column heading. To reverse the sort order of a column, click on the column heading again. Urgent requests are identi-fied as “RUSH” in the Priority column but are still ordered by date needed.
The Approval Manager window only shows pending approval requests. Once a request is approved, it is removed from the list. The approved request is saved in the Clients & Profits database for auditing on cus-tom reports, but can no longer be displayed (except for jobs, which saves and displays ap-proved and rejected requests).

3-50
Printing Job Reports
Job Reports
Job Production Everything someone needs to know about a job’s production can be printed here, including production specifications, schedule and traffic details. There is something for everyone: Account executives can print their own job tickets, seeing the job’s essential specifications. Production manag-ers can print their own schedules, helping them juggle the who’s, what’s, and how’s of each job. Traffic managers can print their own daily traffic checklists, making it easier to get the right people working on the right tasks—and getting the work done on time. Creatives can print work orders and creative briefs giving them all the details they need.Reports can be printed for one job ticket or for one project.
Job Accounting Job account-ing reports help keep you well informed about the most important parts of your busi-ness: jobs, costs, billings, and profits. All the job’s monetary details can be printed here, including outside costs, time, and what needs to be billed. Account coordinators can print their own job progress, cost, and billing reports, help-ing them plan the month’s billings as the costs occur—not weeks later.
The numbers you see on job reports are always timely, since jobs are updated instantly as costs are posted. So you’ll always know that what you’re looking at isn’t outdated and inaccurate, helping you make better, more informed decisions. Reports can be printed for one job at a time, or for many jobs selected by project.
Lists Job list reports give you an overview of your jobs. The Job lists can be printed for all jobs or jobs for just one client, project, or AE/Team. The lists can also be printed for a range of status codes and dates.
You can easily see all the jobs currently in-progress, or all the jobs opened for a specific client this year. Account executives can print a list of their own job tickets, seeing the job’s essential specifications. Production managers can get a list of all the jobs currently in-progress. Reports can be printed for many jobs selected by a production or billing status range and a date range.
Summaries Job Summary reports give you an overview of each job. The reports provide a way to evaluate the progress of jobs. The reports can be sorted by project code, job type, client, or AE/team.
The numbers you see on job reports are always timely, since jobs are updated instantly as costs are posted. So you’ll always know that what you’re looking at isn’t outdated and inaccurate, helping you make better, more informed decisions. Reports are printed for many jobs selected by client or project.
Analysis Job Analysis reports compare estimates to actual billings and bud-gets to actual costs. Potential problems can be spotted before they become real problems. Account executives can identify jobs that may be going over
budget, giving you time to talk to the client and issue a change order before the final billing.
Miscellaneous Miscellaneous job reports are reports that aren’t used for production, accounting, or analysis. Instead, these reports have special purposes and are used infrequently. They are printed like other job reports. The Job Archive Directory report lists closed jobs and the location of their digital files. The report shows the job’s archived on field to help creatives, production people, and account executives find old, stored digital artwork for clients quickly and easily.
■ The information you see on job reports is always timely, since jobs are updated instantly as schedules and traffic are updated. So you’ll always know that what you’re looking at isn’t outdated and inaccurate, helping you make better, more informed decisions.
■ Job reports can be printed to the printer, screen, or exported to a spread-sheet-compatible text file by using the Print to pop-up menu.

3-51
Job Ticket
Job Ticket + Tasks
Job Schedule
Job Traffic
Creative Brief
Work Order
Print Specifications
Job Diary
The Job Ticket shows the basic details of a new job, including the job number, name/title, and specifications. It is an ideal report for informing everyone about new jobs. It can also be used as a cover sheet for the job jacket or attached to artwork.
The Job Ticket + Tasks shows all the information on the Job Ticket report and includes job tasks, estimates, estimated hours, budget (the amount you’ll spend before markups), task due date, and the person who is to do the work.
The Job Schedule shows the job tasks, due dates, and start dates. Job tasks are sorted by the schedule sort number—which should be the order in which tasks are performed—then due date. As tasks are completed, the finished date is updated and appears on the printed Job Schedule.
The Job Traffic report shows jobs and traffic milestones. The job’s milestones and traffic comments/next steps appear at the bottom of the report for easy reference. Jobs without milestones don’t show milestone information.
The Creative Brief provides fifteen user-defined fields and headings designed to direct your creative, production, and marketing goals.
The Work Order report is used for any production or art direction notes.
The Printing Specifications report outlines every minute detail about printing.
The Job Diary report shows the job’s history (e.g., when tasks were added, specs changed, etc.). Diary entries are sorted by date and time, showing who did the entry and what hap-pened. Since job diary entries aren’t purged, they provide a good audit trail for deleted jobs. When a job suddenly disappears, you can see who deleted it by printing this report for the deleted job’s number. The last diary entry on the report will show who deleted it.
Job Reports
Job Reports
Job Production
Job Accounting
Job Summary
Detailed Job Summary
Job Costs
Unbilled Job Costs
Job Billings
Job Commitments
The Job Summary shows the job’s estimates, change orders, estimated hours, actual hours, net POs, total costs, billings to date, and currently unbilled balances for each task. Job tasks are sub-totaled by group, then sorted by each task’s sort number. The show budgets option replaces the change order amounts on each job with the budget amount. The Detailed Job Summary shows all the information of a Job Summary, but calculates vendor buyouts, time cost, outside gross costs, and estimate remaining.
The Job Costs report shows vendor purchases (from A/P), time sheets, checks, in-house expenses, and job cost transfers. Costs are sub-totaled by kind (i.e., payables, time, etc.) or by task by choosing the Kind or Task option. Unposted job costs won’t appear. The show cost amounts option shows or hides the net cost amount on job costs. If this option is selected, you’ll only see gross amounts—the net cost and cost rates will be hidden.
The Unbilled Job Costs report shows only costs that need to be billed; it’s a better pre-bill-ing analysis report than the standard Job Cost report.
The Job Billings report lists posted client invoices, including advance billing amounts and unpaid balances. It also includes unposted invoices, which are marked with an asterisk for identification.
The Commitments report shows purchase, insertion, and broadcast orders. The report shows the balance remaining on an order based on A/P invoices. The Open PO amount is the balance remaining on a PO based on posted vendor invoices, using the gross amounts.

3-52
Change Orders
Job Progress
Job List
Job List by AE/Team
Client Job List
Client Status Report
Job List by Job Type
Project Job List
Job List (wall chart)
Job Log
Job Summary
The Job Change Orders report summarizes change orders added for client revisions, additional information, agency corrections, F-Y-I’s, and other changes.
The Job Progress report is identical to the Job Summary, but shows only gross amounts. Each task’s estimate, estimate hours, actual hours, open purchase orders, billings, change orders, and unbilled amounts with commissions and markups are shown.
This report lists jobs by job number. It’s a simple report, showing jobs sorted alphabetically by job number. For each job you’ll see the job number, client, job name, start or due date, and production or billing status.
This report lists jobs by client, but also shows the job’s totals to date. A separate page is printed for each AE/team for easy distribution. AE’s can use these reports to track client budgets on jobs weekly, while there’s still time to make changes. For each job you’ll see job number, job name, status—plus the total estimate, billings, and unbilled amounts. The estimate remaining percentage is calculated automatically for each job, showing how much of the estimate hasn’t been billed.
This simple report lists jobs by client. For each client, jobs are sorted alphabetically by job number. For each job you’ll see the job number, job name, start date, due date, job type, and production or billing status.
This report lists jobs by production or billing status. Jobs are grouped by status, based on whether you selected production or billing status, then sorted alphabetically by job number. For each job you’ll see the job number, job name, client, start date, due date, AE/Team, contact, and status note.
This report lists the jobs by job type. For each job type, jobs are sorted alphabetically by job number. For each job you’ll see the job number, job name, production or billing status, and the job’s traffic milestones.
This report lists jobs by project name. Jobs are grouped by project name, showing the job number, job name, start and due dates, and production status. Jobs without project names are listed first.
This report is designed to be an easy-to-read, quick reference job list. It lists jobs by client using an extra-large font size. Each job shows its job number, job name, start date, and due date. This jumbo job list can be posted on studio walls each week to track job numbers for each client.
This report replaces your manual job book. It lists jobs by job number, and shows the job name, client, start date, due date, AE/team, project, and job type. A prompt will give the option to include the task schedules. With this option, jobs are listed alphabetically by job number, but also show tasks with start or due dates. For each job you’ll see the job number, job name, due date, start date, and production status. Each job task shows its task code, task name, due date, start date, resource, and status.
The Job Summary shows the job’s estimates, change orders, estimated hours, actual hours, net POs, total costs, billings to date, and currently unbilled balances for each task. Job tasks are sub-totaled by group, then sorted by each task’s sort number. The show budgets option replaces the change order amounts on each job with the budget amount.
Job Reports
Job Reports (con’t)
Job Lists
Job Summary

3-53 Job Reports
Detailed Job Summary
Project Job Summary
Job Type Summary
Client Job Summary
AE/Team Job Summary
Snapshot Worksheet
Estimates vs Billings
Projected Revenue
Advanced Billings
Small Jobs
Large Jobs
Client/Job Budget Analysis
Over-Budget Jobs (Watch List)
Unbillable Jobs
Job Archive Directory
The Detailed Job Summary shows all the information on a Job Summary, but also includes vendor buyouts, time costs, outside gross costs, and calculates the estimate remaining.
The Project Job Summary shows all the Job Summary information summarized by job and groups the jobs by project with totals for each project.
The Job Type Summary shows all the Job Summary information summarized by job and groups the jobs by job type with totals for each job type.
The Client Job Summary shows all the Job Summary information summarized by job and groups the jobs by client with totals for each client.
The AE/Team Job Summary shows almost all the Job Summary information summa-rized by job and groups the jobs by AE with totals for each AE.
The Snapshot Worksheet shows jobs that have been updated in the Job Snapshot window. The report lists jobs and their next billing date, costs needed to finish the job, and time needed to finish the job. Account executives can use this report to plan next month’s billings or track each job’s completion.
This report shows a summary of each job by client. The total estimate, change orders, amount billed, and remaining unbilled costs are shown for each job. A remaining estimate amount is calculated based on the total estimate (and change orders) minus the total amount of billings and unbilled costs.
Each job is listed by client. The projected revenue is calculated for each job based on the job’s estimate and budget amounts.
The Advanced Billing report lists all jobs with an advanced billing amount. For each client, the jobs are listed showing the job number, job name, start date, due date, advanced billing amount, and the production or billing status.
The Small Jobs report shows a list of jobs where the estimate, billings, estimate hours, or actual hours are less than a chosen amount (e.g., all jobs with billings less than $10,000.00).
The Large Job report shows a list of all jobs where the estimate, billings, estimate hours, or actual hours are more than a chosen amount (e.g., all jobs with actual hours more than 100 hours).
This report shows jobs by client and compares each job’s budget amount to the actual costs incurred.
This report lists jobs by client and shows only those jobs whose costs exceed the job’s budget.
This report lists all jobs that are marked with the Always Unbillable option.
This report lists closed jobs and the location of their digital files. The report shows the job’s archived on field to help creatives, production people, and account executives find old, stored digital artwork for clients quickly and easily.
Job Analysis
Job Miscellaneous
Job Reports (con’t)

Job Costing

4-2
JOB COSTING
4-4 Purchase Orders4-8 Adding Purchase Orders4-10 Printing Purchase Orders4-12 Printing Purchase Order Reports4-14 Accounts Payable4-16 The Accounts Payable Window4-18 Job Cost Invoices4-20 Overhead Invoices4-22 Media Accrual Invoices4-24 Add Credit Card Statement4-26 Importing Credit Card Statements4-28 Printing Accounts Payable Reports4-30 Time Cards4-32 Time Sheets4-34 Time Sheet Window4-36 Adding Time Sheets4-38 Import Time4-40 Time Reports4-42 Checkbook4-44 The Checkbook Window4-46 Vendor Checks4-48 Autopay Payables4-50 Job Cost Checks4-52 Add Online Payment4-54 Overhead Expense Checks4-56 Employee Advance Checks4-58 Printing Checks4-60 Checkbook Reports4-62 Bank Reconciliation4-64 Expense Reports4-66 The My Daily Expense Reports Window4-68 Internal Charges4-70 Job Cost Transfers
Chapter 4

4-3
This chapter shows how to track purchase orders, costs, time, and expenses with job tickets. It explains how costs are tracked against clients, jobs, and tasks—and how costs are totaled for billing. In this chapter you’ll learn about:
■ adding and printing purchase orders■ tracking staff hours with the daily/weekly time card■ adding vendor invoices in Accounts Payable■ tracking overhead expenses■ writing checks for vendor payments, job costs, and overhead expenses■ reconciling bank accounts■ adding employee expense reports■ tracking internal charges, like CD duplication■ transferring costs between jobs and tasks
Introduction
For help using any part of Clients & Profits X, click the button from any
window to open the on-line user guide. This web-based user guide features
step-by-step instructions, explanations, tips, demonstrations, and links to
FAQs, tech notes, and video tutorials from www.cnp-x.com/support. It’s
continually updated, so it’s more timely and helpful than a printed user
guide.

4-4
Purchase Orders
Purchase, insertion, and broadcast orders account for purchases you make from vendors on a client’s behalf. They are not required by Clients & Profits X, but give you control over your purchases. That’s because purchase orders provide written verification for the goods and services you order.
Anyone can add their own purchase orders, up to a user-defined dollar limit. POs have at least one job and task, but can contain several for better cost ac-counting. Amounts from the purchase order update job tickets automatically. Up to five copies of a purchase order can then be printed on plain paper, so special forms aren’t needed. When the vendor’s invoice is posted and the PO is referenced, the PO is reconciled automatically.
Tracking purchase orders can be essentially paperless, since you can add, change, and see everything about a PO directly from your computer. The cost of your orders will appear on job reports. Purchase orders aren’t true job costs; instead, they are commitments you’ve made for a job cost. They are essential for accurate cost accounting, since they track the purchases you’ve made throughout the month, but still haven’t received the vendor’s invoice. Purchase orders can be billed individually or by task in Accounts Receivable.
A job ticket can have hundreds of purchase orders; there’s no real limit. Job commitment reports can be quickly printed (or reviewed directly from your computer) showing just what you’ve ordered—and whether or not it has been invoiced by the vendor. Many parts of the purchase order are customizable to save time. Templates, which contain basic details about a kind of purchase, can be applied to a new purchase order, for faster data entry. Cloning dupli-cates an existing purchase order when you’re ordering the same or similar thing again.
When the cost is eventually invoiced by the vendor, the purchase order’s balance decreases. The purchase order keeps a running balance of open com-mitments, showing you how much you’ve purchased from vendors that hasn’t been invoiced. Once the invoice is posted in Accounts Payable, a purchase order can’t be changed.
■ Many users can add purchase orders at the same time. Sometimes your cursor becomes a padlock, indicating that someone else is using a record that you need. In these cases, the padlock will disappear—and your purchase order can be entered—when the other user saves his or her work.
■ For information about adding broadcast, print, interactive, and outdoor orders, please see the Media chapter.
Purchase Orders
Job tickets track both the net and gross amounts of your purchase orders. These totals, which are up-dated whenever you add and save a purchase order, show the balance of the commitments you’ve made for job costs.
When a purchase order is added, you’ll enter a net amount and (optionally) a gross amount. The net amount is the actual cost of the purchase, before markups and com-missions. The gross amount is what you’ll eventually bill the client for this purchase. Each line item on a PO can have a different net and gross amount. The PO’s totals are based on all of its line items.
Saving the purchase order increases the job’s committed total—but the cost total is unchanged. This is because a purchase order isn’t a real job cost yet. It will be, once the vendor does its job, sending an invoice. Posting the vendor’s invoice in Accounts Payable moves the amount from the commitment column to the cost column on the job ticket. The job’s Net and Gross PO balances decrease, since they have been invoiced.
Posting the PO isn’t required, since it doesn’t affect the General Ledger. Purchase orders don’t affect the vendor’s balance, either. They can be freely edited until the vendor’s invoices are posted into Accounts Payable. Changing a purchase order updates its job tasks accordingly.
How Clients & Profits X manages purchase orders
Standard information for purchase orders can be customized to save time. These settings, called de-faults, are copied to new purchase orders automatically. Purchase order default settings can be edited anytime in Preferences.
Purchase order preferences include: a standard distribution list for printing copies of a purchase order; three standard approval names; five standard user-defined fields for tracking special details; a standard disclaimer that prints at the bottom of the printed purchase order; your company logo (which prints at the top of the printed purchase order); margins for printed purchase orders; and the option to show the client’s name on the PO.
These settings can be copied to all users, or they can be personalized for each user. Giving different users their own special defaults saves them time; when they add their own purchase orders, their settings are entered automatically.
The automatic PO numbering setting is changed in Preferences, too. To change your purchase order defaults, choose Purchase Orders from the Preferences pop-up menu under Setup.
The PO heading, can be customized to Work Order or Change Order in Names preferences (see page 9-46).
Purchase order defaults

4-5
POs are automatically numbered when they’re added based on a starting number from Prefer-ences. This eliminates the need for preprinted PO forms or a purchase order log book.
Anyone with the right access privileges can add (up to their dollar limit), edit, and print their own POs from any workstation. Access is based on settings in the User Access Privileges win-dow.
When a user adds a purchase order, Clients & Profits X automatically checks for the user’s order limit. This is the maximum amount for which a user can place an order. Order limits are flex-ible, so can be changed as a user is authorized to make larger purchases.
Purchase orders can be written for any kind of purchase, from billable client production costs to agency overhead expenses (printing, advertising, etc.). POs can update any job and task.
When the vendor’s invoice is added into Accounts Payable, it can be self-reconciled with its purchase order. The order’s vendor, job, task, and amounts are copied to the invoice window as a shortcut (which also makes verifying the order vs. actual cost easier). The vendor’s actual cost amounts from the invoice are posted automatically back to the purchase order. POs show outstanding balances (i.e., order amounts vs. actual costs) so you’ll always know which ones are still open.
Purchase orders are designed to print on plain paper, so no expensive forms are needed.
Up to 5 copies of each PO can be printed without using multipart forms. Each printed copy shows a user-defined distribution name (e.g., Vendor, Job Jacket, Accounting, etc.) at the bot-tom of the page. Once a purchase order is revised, the revision counter increments automatically. The current revision number appears on the printed order.
Selected users can be authorized to approve purchase orders in their Access Privileges. These users can approve POs on-line from any computer running Clients & Profits X. When a purchase order is printed, the scanned image of approver’s signature appears at the bottom of the page.
The details from routine purchase orders can be added to PO templates. When a user adds a new purchase order and chooses a template, its details are copied to the new order. This saves time as well as making common purchase orders more consistent.
Existing POs can be “cloned” to instantly make new orders. Cloning saves time, since the origi-nal order’s details (including specs, jobs, tasks, and cost amounts) are copied to the new one.
User-defined alerts can warn users that their purchase order is close to or actually exceed-ing the job’s budget—before they can save the order. This can’t prevent a job from going over budget, but it means users can’t say they didn’t realize it was happening.
Every open purchase order can have a user-defined status to help track outstanding orders.
A single mouse click pre-bills a purchase or insertion order.
Purchase orders that will be used repeatedly for multiple purchases from the same vendor can be marked as blanket POs. These purchase orders won’t close automatically when applied to A/P invoices.
Information about the vendor, including the address, A/P invoices, and the vendor diary, are all accessible with a single mouse click.
Purchase Orders
Purchase Order Features
Feature How it works, how it’s used
Automatic numbering
Anyone can add purchase orders
User-based order limits
Order anything
Self-reconciles with invoices
No preprinted forms needed
Print distribution copies
Automatic revision tracking
On-line approvals
Purchase order templates
Clone purchase orders
Budget alerts
Open order status tracking
Pre-bill purchase orders
Blanket POs
Vendor links

4-6
Purchase Orders
Purchase Orders
1 Use the previous and next buttons to scroll through pur-chase orders.
2 Purchase orders can be easily added, cloned, edited, or deleted. Click the add new purchase order button to add a new purchase order. Or click on the clone purchase order button to make an exact copy of an existing purchase order. Click the edit button to edit the purchase order’s key details, such as the status, description, or approvals. Click the delete
button to delete the purchase order. Once a purchase order has been invoiced by the vendor or pre-billed to the client it can’t be deleted—even if it was only partially invoiced. Like jobs, this feature prevents billable purchase orders from being inadvertently deleted and, therefore, not billed. Always let Clients & Profits X automati-cally number the next purchase order to avoid confusion from using the numbers of deleted purchase orders over again.
q w e r t
y u
i
o
p
s
a
d
h
g
j
f
lk
3 Click the add amounts button to add new amounts to an order. The remove amounts button deletes one or more selected costs from an order. Only line items that haven’t been invoiced by the vendor or pre-billed to the client can be deleted. Once a line item is removed, it is gone forever: its net cost and gross amounts are deducted from the job task permanently. However, if needed, the same line item can be added back to the purchase order later.
Tracking purchase orders can be essentially paperless, since you can add, change, and see everything about a PO directly from your computer.
;

4-7Purchase Orders
8 Use these links to edit the order’s description/status, vendor information, or delivery details and to view vendor in-voices or the vendor diary. The description/status window can be used to edit the purchase order’s key details, such as the description, order date, ordered by, due date, status, or sales tax exemption. The vendor in-formation window can be used to customize the vendor’s name and address on this purchase order only. The delivery infor-mation/options window contains special delivery instructions, a due date, a disclaimer, and a delivery address that can be edited. The vendor invoices window lists the accounts pay-ables invoices that have been applied to the purchase order. The vendor diary window can be used to view, add, or edit diary entries for the purchase order’s vendor.
9 Every order has a unique number. New orders are numbered automatically, but custom, user-defined numbers can be entered instead.
10 The order date is the date the PO was added. The client number does not show on the printed PO; there is an option in PO Preferences to show the cli-ent name. The ordered by field shows the initials of the person who added the order. POs can be printed in batches by user. The due date shows when the goods or services are due to be delivered or performed.
4 Any purchase order can be pre-billed using the Pre-bill button. Pre-billing automati-cally creates an invoice for the purchase order’s gross amounts and shows the job and task like any other invoice. The pre-billing invoice is unposted, so it can be proofed, posted, and then printed with other invoices. There are two options available when pre-billing an order. The show totals only option combines all of the pur-chase order’s amounts together, so that the invoice shows only one billing amount. The show item-by-item detail creates a separate billing amount for every line item on the purchase order. Also, the purchase order’s billing can be added to an existing unposted pre-billing invoice by entering the number of the existing pre-billing invoice into the pre-bill dialog box.
5 The print reports and print orders buttons are used to print purchase order reports and forms.
6 If you know the purchase order number you want to find, simply enter the number into the find order field. Use the find more link to find one or more purchase orders by se-quence, vendor, number, date, or job.
7 The history pop-up menu can be used to jump to a previously viewed purchase order.
11 The vendor’s name and address are copied to the purchase order, but can be changed. This lets you send a PO to a different address for the same vendor. A PO can include only one vendor; if you’re buy-ing something from multiple vendors, each vendor gets its own PO. 12 The PO amount is the total amount of the purchase order’s line items.
13 The balance amount shows the amount remaining on the purchase order that has not been invoiced to vendor invoic-es. When the purchase order is closed, the balance amount will automatically change to $0.00.
14 The PO will be closed automatically when applied to a payable for the full balance due. If a PO needs to be closed for any reason, click on the closed box.
15 Each order can have dozens of different order amounts (i.e., line items), each with its own job, task, description, and net and gross amount. Line items are sorted on the printed purchase order by line number. Net cost is the amount you’re paying for the goods or services, before markups or commis-sions. Gross is the amount you’ll eventually bill your client, including markups and com-missions.
16 A lengthy description pro-vides a detailed explanation of the order to the vendor.
Anything purchased from a vendor should be tracked with purchase orders. They are es-sential for job costing, since they allow a cost to be committed to a job ticket before the vendor’s invoice is posted.
17 POs that are used repeat-edly for the same vendor can be marked as a Blanket PO. They are not automatically closed when applied to payables.
18 The order’s current revision number increments auto-matically each time someone edits the order. To start the automatic revision numbering, a “1” must be entered into the revision box in the specifica-tions window.
19 The status is user-defined note that describes the order’s current progress and appears on the printed purchase order. PO reports can be printed showing only orders with a certain status (i.e., on-hold, change order, etc.).
20 If an order has been approved, the approver’s initials and date appear on the Purchase Order window. Once approved, purchase orders can’t be edited. Only the user who approved the PO can unapprove the PO.

4-8 Adding Purchase Orders
Adding Purchase Orders
1 The order number identifies a PO on windows, reports, and forms. New POs are numbered automatically, or a user-defined number can be entered.
2 Choosing a PO template copies details about routine purchases to the new purchase order. 3 Purchase orders are added for only one vendor.
4 The order date shows when the purchase order was added. Due date shows when the work
is to be delivered or performed.
5 POs that will be used repeat-edly by the same vendor can be added as a blanket PO to prevent them from being closed automatically when applied to payables.
6 The description explains what is being ordered. It ap-pears at the top of the printed purchase order, above the line items. The label Description: can be customized by entering a new label.
7 The charge to many job tickets and tasks option lets you add many jobs and tasks to this order.
8 If this order applies to only one job and task, both are entered here. When this order is saved, its net and gross amount will appear on the job ticket.
9 Net cost is the amount you’ll pay the vendor, before commis-sions and markups. Vendors see only the net cost. Markup is used to calculate the gross
q
w
e
r
t
y
u
i
op
a s
d
Adding the purchase order doesn’t have to be complicated, since all that a purchase order needs is a number, an order date, a vendor, a job and task, and an amount.

4-9
amount and is copied from the vendor first, then from the task. The task rate overrides the vendor rate. The billable option, is copied from the job task. The order’s gross amount is the amount you’ll eventually bill your client, including markups and commissions. The vendor doesn’t see the gross amount.
10 The item description is cop-ied from the task’s description, but can be changed. It appears on the printed purchase order, so vendors will see it.
11 User-defined fields track special information unique to each purchase order, from production specifications to account codes.
12 The sales tax exempt op-tion, if selected, prints “Sales Tax Exempt” on the printed purchase order so the vendor doesn’t include sales tax on your invoice. Clicking the hold (don’t print) option prevents the purchase order from being printed. Use it to keep unap-proved POs from being acciden-tally printed. Once the order is saved, the hold option can be deselected in the Specifications window.
13 A PO can be printed show-ing more or less detail by choosing a form option. The simple form hides the unit and unit cost, showing just the line item’s total. The detailed form shows the PO’s full details.
Adding Purchase Orders
Anything purchased from a vendor should be tracked with purchase orders. They are essential for job costing, since they allow a cost to be committed to a job ticket before the vendor’s invoice is posted.
q
we
r t y u i o p a
s
The Add Order Amounts window lists the PO’s existing line items. Every order amount (i.e., line item) has a line number that identifies the amount.
1 The clear button removes all amounts from the purchase order.
2 The PO number and vendor are listed here for reference.
3 Click the notes button to add detailed information about the purchase order line item. The notes will print on the PO under the line item description.
4 Every item on the PO is assigned a line number, which tracks the amount through the system for accurate job costing.
5 Assign a job number to attach the cost to the job for profitability reporting.
6 Enter the task code for the job’s task. If you don’t remem-ber the task code, press Tab to open the job’s Lookup Job Tasks window.
7 Enter the quantity of materi-als being purchased.
8 The description automati-cally fills in from the task code. If you want more detail, use the notes tool.
9 Enter the cost for each item purchased. The unit is how many individual item are in each unit (e.g., each, dozen, or gross).
10 The net cost is automati-cally calculated by multiplying the quantity times the unit cost.
11 The markup percent is automatically copied from the task table to compute the gross amount.
12 The net and gross costs are totaled here.

4-10
Printing Purchase Orders
Printing Purchase Orders
Printing purchase orders is fast and easy. You can print one order at a time, or print several in batches. Anyone who can access purchase orders can print them from any computer running Clients & Profits X.
The printed purchase order is designed for plain paper, so no special pre-printed forms are required. Purchase orders can be printed using either laser, inkjet, or a continuous-form dot matrix printers.
■ POs print much faster using a laser printer but can’t print mul-tipart forms. Clients & Profits X can print up to five copies of each purchase order, based on a customizable distribution list.
The design and layout of the printed purchase order can’t be changed. If you use your own preprinted form for purchase orders, design it around a typical printed purchase order printed from Clients & Profits X.
■ Purchase orders don’t have to be printed. Printing does not affect the purchase order in any way, so it isn’t necessary. Also, a purchase order can be reprinted as needed without affecting your database.
■ Purchase orders that have the Hold (don’t print) option selected will not print.
To print a purchase order
1 Click the (i.e., Print Orders) but-ton, or choose File > Print Purchase Orders.
The Print Purchase/Insertion Orders window opens, prompting you to enter a range of order numbers and options for printing.
2 Enter an order number, or a range of order numbers.
The currently-displayed order’s number is entered by default. Any number of orders can be selected and printed in one batch. Any purchase, broadcast, or insertion order that has a number within this range will be printed. Randomly-numbered purchase orders (e.g., 99, 1025, 837, etc.) and order numbers that contain letters (e.g., 222a) can’t be printed together and must be printed individually.
Print your POs only. You can print your own purchase orders by entering your initials into the and added by field. Everyone else’s POs will be skipped, printing hard-copies of only the purchase orders you’ve added. A copy of the job’s printing specifications can be included with the printed PO, if applicable.
3 To print only orders added by one person, enter their initials. To print all orders, enter the initials as ALL.
4 Choose an order type from the pop-up menu, or choose All Orders.
This option lets you print a batch of only insertion orders, for example.
5 Select the print options, if needed.
The show gross amounts only option replaces the purchase order’s net cost with the gross amount. Use it when you don’t want the vendor to see the cost amount before commissions. The print distribution copies option prints up to five copies of each purchase order on plain paper (expensive multipart forms aren’t needed).
6 Choose a destination for these orders from the print to pop-up menu, then click Print.
Purchase orders can be printed to screen for a quick preview.
Once they appear on screen, you can print the orders to paper by clicking the Print Page button.
■ If you have Adobe Acrobat, purchase orders can be printed as PDF files and attached to e-mails sent directly to vendor contacts from Clients & Profits X. To save or e-mail a purchase order as a PDF file, choose File > Print Destination > PDF.

4-11
Purchase Order
Advertising Agency, Inc.10001 Century Blvd., Suite 1100Los Angeles, CA 90010213 555-5555 Number 1582
Date 04/02/94TO Ordered by DFAdvanced Printing and Litho, Inc. Due date June 4 1996Attn: Anne White Vendor LITHO1020 Airport Parkway Charge #: --Irvine, CA 92147
Description: Use PMS 412/PMS 412 + PMS 540 (1c/2c)Need 1 set of Matchprints + 1 Blueline for final approvalSeparated lasers, Output sheet, Disc Index & Disc included
Line Qty Job Description Unit Cost Unit Amount
1 50000 94-CB-288 Sale Postcard printing 0.1579 each $7,895.00Process Syquest Disk named: Artwork 12(Please return this cartridge with proof.)
2 1 94-CB-288 Cutting, folding, scoring 0.0000 Each $1,000.00
3 1 94-CB-288 Shipping 0.0000 Each $175.00
TOTAL NOT TO EXCEED: $9,070.00Flat Size: 8" x 8-3/4"Folded Size: 4" x 8-3/4"Colors: 3 PMS + varnishStock: 65# CoverQuantity: 50,000Instructions:(1) Ship 10,000 to: David James, Cole Stores/Los Angeles, 100 Mission Rd., Los Angeles, 90010(2) Ship 20,000 to: Advaned Mailing Services, 230 Victory Blvd., N. Hollywood.(3) Ship 100 to: Advertising Agency, Inc. as samples.(4) Ship remaining to warehouse:
Deliver to: Warehouse:Cole Stores4500 Engineer Road - MS 4Los Angeles, CA 90011
Approvals
Account Exec Date:
Art Director Date:
Advertising Agency, Inc. is acting strictly as an agency for this work on behalf of the client. As such, Advertising Agency, Inc. makes no claim of direct financial liability for this work.Partial shipments are not accepted. Please contact Advertising Agency, Inc. prior to shipment. Please provide two copies of all invoices. To ensure prompt payment, this purchase ordernumber must appear on all deliveries, invoices, and statements.
Vendor
Printing Purchase Orders
The printed purchase order
Purchase OrderRUSH
Original Recipe DesignNumber 2598Date 03/02/07Ordered by MSW
TODue date 03/21/07
Applied GraphicsVendor AG
Attn: Pat SmithCharge #: 12-99333
8417 El Camino Real #203Date printed 05/21/07
San Diego CA 92038REVISION: Original
Description: Use PMS 412/PMS 412 + PMS 540 (1c/2c).Need 1 set of matchprints + 1 blueline for final approval.
** Separated laser proofs, output sheet, disk index + disk are included **
Line Qty Job Description Unit Cost Unit Amount
1 15 MLI-678 Mechanical Art Assembly 123.0000 Each $1,845.00notes for mech art can go here
2 10000 MLI-678 Typesetting 0.2500 Each $2,500.00notes for typesetting can go here
TOTAL NOT TO EXCEED: $4,345.00Flat size 8" x 5-1/2"Folded size 4" x 5-1/2"Colors 3 PMS + varnishStock 65# coverQuantity 50,000Instructions:Please deliver to our warehouse. Their direct phone number is: 619/234-9090. Ask for Mel Jones if you havequestions.
Deliver to: 1200 Main Street
Building 2
Approvals
05/21/07 3:51 PM
AE: Date
DateProd Mgr:Outrageous Ad Agency is acting strictly as an agency for this work on behalf of the client. As such, Outrageous Ad Agency makes no claim of direct financial liability for this work. Please provide two copies of all invoices. To ensure prompt payment, this purchase order number must appear on all deliveries, invoices, and statements.

4-12
Printing PO Reports
Printing PO Reports
Purchase order reports review, summarize, and analyze what you’re ordering from vendors. Reports can be printed showing one type (such as insertion orders only) or all types. Purchase orders are selected for a range of dates (us-ing date added or due date) and either vendor, client, status, or by the buyer (i.e., ordered by initials).
The Print Purchase Order Reports window shows the different purchase order reports types (i.e., Lists, Summaries, Analysis). Clicking on a report type shows the different reports along with options for selecting POs for printing. Reports are printed by selecting a report name. Reports can be printed then reprinted with different selections, as often as needed.
■ Purchase orders aren’t posted, so they always appear on PO reports. For this reason, there’s also no proof list for purchase orders.
Use the Print to pop-up menu to choose where you want these reports printed. Reports can be printed to the printer (for a hard copy on paper), the window (so you can preview the reports on-screen first), or exported to disk (to create a text file that can be opened and edited in a spreadsheet).
Tips for printing PO reports
Reports select purchase orders primarily by the date ordered. By entering a range of dates, you can select all purchase orders added today, last week, or all month. There’s no limit to the range you can use.
■ To see only purchase orders with the same status (e.g., on-hold), choose “status” from the select orders by pop-up menu, then enter a status. To see all purchase orders, regardless of status, enter the status as “ALL”.
■ To see only one type of order, such as insertion orders, select Insertion Orders from the ...and for type pop-up menu.
■ To see the description for each purchase order on the reports, select the show description option.
■ The PO Lists can be selected by vendor, client, ordered by, or status by selecting the select orders by pop-up menu.
To print purchase order reports
1 Click the (i.e., Print Reports) button, or choose File > Print PO Reports.
2 Select a type of report (e.g., Lists, Summaries, or Analysis).
3 Choose date added or due date from the pop-up menu, then enter a range of dates.
4 Choose a selection option to print orders by vendor, client, status, or ordered by initials, then enter a selection value.
The selection value is either a vendor number, client number, status, or a buyer’s initials. To print only your orders, for example, choose Ordered by from the pop-up menu then enter your initials.
6 Select the report you wish to print.
7 Choose any additional op-tions.
The show description option can make the report very long, depending on the length of your PO descriptions.
8 Click Print.

4-13Printing PO Reports
The PO Log lists orders by order number.
The PO List by Type lists orders by type, showing separate sections for purchase orders, insertion orders, and broadcast orders.
The PO List by Vendor lists orders by vendor. Use this report to analyze purchases or-dered for each vendor for the last quarter, for example.
The PO Status List lists orders by order number, displaying each order’s current status.
The PO Summary shows the orders and their line items, instead of showing totals only.
The Unapproved Orders report gives managers a list of orders awaiting their approval.
The Open Orders report is a comprehensive listing of the shop’s outstanding orders.
The Over & Under Orders report shows only orders that have balances. The balance can be a positive or negative amount.
The Blanket PO report shows the line items, instead of totals only for purchase orders marked as blanket POs.
PO Log
PO List by Type
PO List by Vendor
PO Status List
PO Summary
Unapproved Orders
Open Orders
Over & Under Orders
Blanket POs
Purchase Order Reports
Lists
Summaries
Analysis

4-14 Accounts Payable
Accounts Payable
Everything you buy from a vendor on account, whether for a job or for the shop, is an accounts payable entry. These purchases, which are usually recorded from vendor invoices, are added into Accounts Payable. Since Accounts Payable is integrated with the General Ledger, there’s no double-entry—information entered on invoices becomes part of the G/L. The A/P file tracks everything about your purchases:
■ What you’ve bought ■ From whom it was purchased ■ How much it cost ■ When the invoice should be paid ■ The purchase’s markup and gross amount ■ When the invoice was paid
Vendor invoices should be added daily, to keep your accounting files and job cost reports timely and accurate. Invoices with job costs can be billable or unbillable, or any combination. They can contain one or more jobs and tasks for flexible job costing. Invoices for overhead (which are unbillable by nature) can debit any number of G/L accounts.
Accounts Payable is seamlessly integrated with the vendor files, jobs and tasks, and the general ledger. This means that when an invoice is posted, many things are updated at once: the vendor balance increases; the invoice’s cost and gross amounts increase the job’s totals; and debit and credit entries are created in the General Ledger. Vendor invoices are also integrated with purchase orders. When an invoice is added with a purchase order number, the PO’s job and cost information is copied to the invoice automatically—sav-ing entry time. Posting the invoice updates the purchase order’s balance, automatically closing open POs. Posting the A/P invoice also reconciles the committed totals on jobs and tasks.
Vendor invoices don’t update vendors, jobs, or the G/L until they are posted. Invoices are saved as unposted entries, and can be changed or deleted; however, unposted invoices only appear on the proof list, and not on cost or accounting reports. Posting makes invoices permanent, for better account-ability. Once posted, an invoice can not be changed—only adjusting entries can be made against it. Or an invoice can be unposted, edited, and reposted.
■ Invoices from vendors shouldn’t be added into Accounts Payable if they’ve been prepaid with a check. Instead, write the check as a job cost.
Debit and credit journal entries are created automatically when payables are posted. Every invoice makes a credit entry (usually A/P) and one or more debit entries (ei-ther job cost or overhead expense). Default debit and credit accounts are entered for you automatically.
■ The invoice’s credit account is always a payable account, which is copied from the G/L preferences or from the vendor’s default cGL.
■ Invoice line items have debit ac-counts (the “dGL”). An invoice can have many line items, distributing a cost to dozens of debit (i.e., cost or expense) accounts. The debit account for job costs is copied from the job task’s dGL. Vendors can have default expense dGL accounts, which are copied to overhead invoices. The dGL will be copied from G/L Preferences, if no other default is set up.
■ Journal entries from payables are posted into the Purchases journal. The entry’s reference number is a combination of the prefix, AP#, and the invoice number.
■ Journal entries aren’t created, and the G/L account balances aren’t updated, until an invoice is posted. In the General Ledger, the Purchases journal can be printed showing the journal entries posted from Accounts Payable.
Accounts Payable and the General Ledger
Cloning duplicates an existing accounts payable invoice creating a new invoice. The cloned invoice has all of the descriptions, instruc-tions, options, and line items of the original. Cloning is especially useful when you’re purchasing the same kind of products or services routine-ly. Since cloning copies an invoice completely, you’ll spend much less time keying in the details.
Any job cost or overhead invoice can be cloned. The cloned invoice has the same vendor, but it can be changed. In fact, anything about the cloned invoice can be changed. The cloned invoice gets its own unique invoice number.
Cloning an accounts payable invoice is simple: First, find the invoice you wish to copy. Choose Clone from the Edit menu, enter any changes, then save the new invoice. The original invoice’s line items will be copied, too, but they can be changed. The original accounts payable invoice is unaf-fected by cloning. An invoice can be cloned any number of times.
The Clone window closely resem-bles the Add Job Cost Invoice or Add Overhead Invoice window (de-pending on which type of invoice you are cloning). Information from the original invoice, including the vendor, description, and amounts is copied automatically from the original invoice. Changing the new invoice doesn’t affect the original invoice.
Cloning A/P Invoices

4-15
A/P Features
Accounts Payable
Every kind of invoice for any kind of cost or expense is added into Accounts Payable. Invoices update the G/L, job tickets, and vendor account balances automatically.
Vendor invoices for job costs are added with job numbers and tasks for easy job costing. An invoice can be split between dozens of different clients, jobs, and tasks—each with their own customizable markup for your commission (or billed at net for your fee-based clients).
Vendor invoices for overhead expenses are added without job numbers or tasks. An over-head invoice can be distributed among dozens of different debit G/L accounts, making it easy to split expenses between departments.
Media invoices automatically post media WIP accrual entries into the General Ledger, offsetting the accrual entries posted from the client’s media billing. This helps automate WIP accounting for media clients.
An invoice amount can be split between job costs and overhead expenses. The same invoice can contain both billable client costs as well as unbillable overhead expenses. There’s no need to enter the invoice twice.
A/P invoices are dynamically linked to POs. When an invoice is added with a PO number and line item number, Clients & Profits X self-reconciles the actual cost with the order amounts. The PO’s balance is updated automatically each time an invoice is posted.
If a vendor offers early payment discounts, its terms are copied to invoices automatically. The invoice will calculate the day it should be paid to take the discount, then show this information on the A/P aging reports.
Routine payables, such as insurance, rent, and office services, can be scheduled for the entire year. Any overhead expense can be made into recurring payables very easily.
An existing vendor invoice can be duplicated, or cloned, to make a new copy into the cur-rent accounting period. This saves time, since commonly-used invoices don’t have to be rekeyed each month. A cloned invoice can be easily modified, proofed, then posted.
Invoice balances are updated automatically when checks are posted. Users can see up-to-the-minute balances whenever needed, such as when a vendor calls asking about payment. A user can look up an invoice’s payment history with a single mouse click.
The diary records the when, where, and who was involved for major events and meetings. Because the diary is easily accessed, details of conversations and events are preserved. The record can also be e-mailed for streamlined communication.
Credit invoices can be added to adjust cost and gross amounts from A/P invoices. They are added just like regular invoices, but have negative amounts, to adjust for mistakes, over-billings, or returns by vendors. They lower vendor account balances, job cost balances, job cost totals, and the General Ledger when they’re posted.
Credit card statements can be easily imported into Clients & Profits X. A special window in Preferences allows you to enter in your credit card accounts and merchants/payees. Once a credit card is entered, statements can be imported into Accounts Payable and paid through the checkbook like any other payable.
A/P tracks everything
Job costing
Overhead cost accounting
Media accruals
Mix costs and overhead expenses
Self-reconciling POs
Intelligent payment terms
Recurring payables
Cloning payables
On-line, real-time queries
Vendor diary
Credit invoice
Importing credit card statements
Feature: How it works, how it’s used

4-16 Accounts Payable
The Accounts Payable window
the edit button to edit the invoice’s details. You can edit the invoice’s date, accounting period, credit G/L account, number and amount until it is unposted. Once the invoice is posted, only the description can be edited. Click the delete button to delete an unposted accounts payable invoice.
3 To change the distribution of an invoice, click on the redistribute button. Redistrib-uting an invoice will delete all the line items allowing you to
1 Use these toolbar buttons to find the previous and next accounts payable invoice.
2 Accounts payable invoices can be easily added, cloned, edited, and deleted. Click the add new invoice button to add a job cost payable. (To add an overhead expense, media accrual invoice or to import credit card statements , go to Edit > Add New Invoice.) An existing payable can be cloned into a new payable, by clicking on the clone button. Click
y
i
o
s
u
ap
d
fhg
k
eq w r t
j
l
read them with a new distribu-tion. Only use this option if you have to completely redo the entire distribution or add new amounts. If you only need to remove an amount from the invoice, click on the remove button. Removing an amount from the accounts payable invoice automatically updates the invoice’s total amount.
4 The repeat button can be used to create recurring entries for an overhead expense invoice. This is a useful
Vendor invoices should be added daily, to keep your accounting files and job cost reports timely and accurate.
;z
2@
2#

4-17Accounts Payables
feature for monthly or quarterly payments such as rent, insur-ance, or an equipment lease. Whenever the Accounts Payable window is opened, Clients & Profits X checks for the day’s scheduled recurring payables. If found, the user is prompted to convert them to regular invoices which can be proofed and posted with other invoices.
5 Use the Print button to print accounts payable reports.
6 Accounts payable invoices can be found by entering in the invoice number here. Or the find more link can be used to find payables by sequence, invoice number, date, or vendor.
7 History keeps track of the accounts payable invoices that you previously viewed. Use the pop-up menu to jump to another invoice.
8 Vendor diary entries can be viewed or added by clicking on the vendor diary link. An accounts payable invoice’s pay-ments can be viewed by click-ing on the payments link.
9 The vendor’s invoice number is entered from the printed invoice. It appears on all cost and G/L reports, identifying the invoice. The same number can’t be used twice for the same vendor. If an invoice doesn’t have a number, create one that contains the vendor number (e.g., ABC090194).
10 There are four kinds of A/P
invoices: Job Costs, Overhead, Media Accruals, or Credit Card Statement.
11 The vendor number identi-fies from whom something was purchased. An invoice has only one vendor.
12 The date is from the invoice itself, not when the invoice was added. It is used by the aging reports to calculate the age of your payables.
13 Payment terms are copied from the vendor account. They are used to calculate early-pay-ment discounts (if taken), as well as the invoice’s pay date. Pay date is the date on which you plan to pay the invoice. This date is used to schedule payments by the cash flow reports.
14 The invoice’s description is user-defined and explains what was purchased. It appears on cost, A/P, and G/L reports.
15 The amount is the total cost of the invoice. It’s the amount you’ll pay the vendor, before discounts and adjustments. It is not the amount you’ll bill to your client.
16 The cGL is the invoice’s credit G/L account, usually A/P.
17 The invoice’s balance due decreases when the vendor’s check is posted.
18 The posted date shows when the invoice updated the
When an invoice is added with a purchase order number, the PO’s job and cost infor-mation is copied to the invoice automatically—saving entry time.
General Ledger.
19 The accounting period shows which G/L period was updated when the invoice was posted.
20 The client paid date shows if this job cost has been billed to the client and when or if it has been paid.
21 The days until due box shows a countdown to the ac-counts payable invoice’s due date.
22 A invoice can be distrib-uted to dozens of jobs, tasks, POs, and dGL accounts. Any combination of billable, unbill-able, and overhead costs can be included on the same invoice. Net cost is the cost amount before commissions. This is what the work cost the shop. The net amount is posted to the G/L. Gross is the billable cost amount, including markups and commissions. This is what the client will be eventually billed. The gross amount does not affect the G/L. The dGL is the invoice line item’s debit G/L account, usually a job cost or overhead expense account. All of this can be edited while the invoice is unposted. In the Edit Invoice Cost Amount window, the cost’s billing information can be viewed, which includes: the billing status, when it was billed, the A/R invoice number, invoice date, and billing amount.
23 The user’s initials who
added the invoice are appear on the Accounts Payable window.

4-18
Job Cost Invoices
A job cost invoice can have one or many invoice line items. Each line item is a separate job cost, and contains a job, task, net amount, billable amount, and debit G/L account.
Job Cost Invoices
y
u
t
o
re
w
q
i
1 If the job cost invoice is for a purchase order, enter the PO number here. If the invoice is for more than one PO number, leave this field blank. If a PO is entered, the details from the purchase order will be copied to the invoice’s distribution box.
2 Every invoice needs a vendor number which links the invoice with the vendor account.
3 The invoice number identi-fies the payable everywhere—cost reports, journal entries,
and vendor account agings. For this reason, the invoice number must be unique. You will get a warning message if you enter in a number that has already been used for the same vendor.
4 The invoice date should be entered from the invoice itself. It is the date the vendor issued the invoice and is used to calculate the age of your unpaid payables on aging reports.
5 The invoice can be posted into any unlocked accounting
period. The period determines which month will be updated when the invoice is posted.
6 The invoice’s payment terms tell when and how the invoice should be paid, including what discounts can be taken if paid early. The pay date is the date you plan to pay this invoice. Cash flow reports show unpaid invoices for a range of pay dates and checks can be written au-tomatically for invoices selected through a pay date. Pay date doesn’t affect the G/L, so it is not required.
1) 1! 1@ 1# 1$ 1% 1^ 1&

4-19Job Cost Invoices
7 This is the amount that you will pay the vendor. It should include sales tax, shipping, and any other additional charges.
8 The credit G/L account should always be a liability account, usually your Accounts Payable account. If a liability account is not used, your sub-sidiary ledger won’t equal your balance sheet.
9 The description explains what was purchased and ap-pears everywhere, including job cost reports and the General Ledger.
10 If a purchase order number has already been entered, the line numbers will automatically appear here. If a purchase or-der wasn’t already entered, you can enter the PO number here. If you don’t know the exact PO number, click the Lookup button to see the vendor’s open orders. Double-clicking on an order number copies it to the invoice line item.
11 The line number is auto-matically entered as 1. (Most
POs typically have only one line item.) The line number is im-portant, because it points to the exact line item on the purchase order. It’s used to reconcile the PO’s order amount with the actual cost from the invoice.
12 The job number is essential for accurate cost accounting. If you entered a PO number, its job number is copied to the invoice automatically. Tabbing past the job number verifies that the job is valid. The jobs lookup list can be used to find a specific job.
13 The task is important for job costing, since it tracks both the planned cost and actual cost for each purchase order.
14 The net cost is the amount the agency will pay for this purchase. It doesn’t include commissions or markups. The client doesn’t see the net cost.
15 The markup is copied from the vendor and the job task. The invoice’s gross amount is calculated using the net cost and the markup. It is customiz-
When an invoice is distributed to jobs and tasks, the amount distributed must equal the invoice’s total amount. If not, the user will be prompted to adjust the invoice’s distribution amounts until they balance.
able, so any percentage markup can be entered.
16 The gross amount is what the client will eventually be billed for this purchase. It includes markups and commis-sions. The client will see the gross amount on the job’s bill-ing, as well as on the optional Invoice Detail Report. The invoice’s gross amount can be modified by simply typing in a new amount over the automatic amount.
17 The dGL is a job cost G/L account. It is copied from the job task, but can be changed. A debit journal entry will be cre-ated for this G/L account when the invoice is posted.

4-20 Overhead Invoices
q
we r
t
y
u
i
o
p a
fies from whom something was purchased.
3 The vendor’s invoice number is entered from the printed invoice. It appears on all cost and G/L reports, identifying the invoice. The same number can’t be used twice for the same vendor. If an invoice doesn’t have a number, create one that contains the vendor number (e.g., ABC090194).
4 The date is from the invoice itself, not when the invoice was
1 If the overhead expense invoice is for a purchase order, enter the PO number here. If the invoice is for more than one PO number, leave this field blank. If a PO is entered, the details from the purchase order will be copied to the invoice’s distribution box.
2 The vendor is copied from the purchase order, if appli-cable. If a PO wasn’t used, enter the vendor number or use the Vendors lookup list to select one. The vendor number identi-
added. It is used by the aging reports to calculate the age of your payables.
5 The accounting period indicates which G/L period will be updated when the invoice was posted. Any unlocked period can be chosen to better match this cost with the client’s billing.
6 Payment terms are copied from the vendor account. They are used to calculate early-pay-ment discounts (if taken), as
Overhead Invoices
s d f
Like job costs, vendor invoices for overhead expenses are added into Accounts Pay-able as they are received in the mail. They can have one or many invoice line items.

4-21
well the invoice’s pay date. Pay date is the date on which you plan to pay the invoice. This date is used to schedule pay-ments by the cash flow reports.
7 The amount due is the total cost of the invoice. It is what you’ll pay the vendor, before discounts.
8 The cGL is one of your Ac-counts Payable G/L accounts. The default A/P account is cop-ied from Preferences, but can be changed. When the invoice is posted, its amount due will be credited to the A/P account.
9 Use the invoice’s description to explains what was purchased. It appears on cost, A/P, and G/L reports.
10 If a purchase order number has already been entered, the line numbers will automatically appear here. If a purchase or-der wasn’t already entered, you can enter the PO number here. If you don’t know the exact PO number, click the Lookup
Overhead invoices are added without jobs and tasks, since they don’t affect clients. These invoices won’t affect your profitability reports, instead they will be included only on your agency’s financials.
Overhead Invoices
button to see the vendor’s open orders. Double-clicking on an order number copies it to the invoice line item.
11 The line number is auto-matically entered as 1. (Most POs typically have only one line item.) The line number is im-portant, because it points to the exact line item on the purchase order. It’s used to reconcile the PO’s order amount with the actual cost from the invoice.
12 A description can be entered for each invoice line item to explain what is being purchased.
13 The cost amount is the amount that you are paying the vendor for this invoice line item.
14 The dGL would be one of your overhead expense ac-counts, such as Office Supplies. When an overhead invoice is posted, its amount due will be debited to an expense G/L account.

4-22 Media Accrual Invoices
q
w
e
r t
y
u i o p a s
4 Payment terms are copied from the vendor. They are used to calculate early-payment discounts (if offered), as well the invoice’s pay date. Pay date is the date on which you plan to pay the invoice. This date is used to schedule payments by the cash flow reports.
5 The amount due is the total cost of the invoice. It is what you’ll pay the vendor, before discounts. It is the net amount, not the gross amount that the client pays. It does not include commissions.
1 The vendor number identifies the station or publication from whom the media was ordered.
2 The vendor’s invoice number is entered from the printed invoice. It appears on all cost and G/L reports, identifying the invoice.
3 The accounting period indicates which G/L period will be updated when the invoice is posted. Any unlocked period can be chosen to better match this cost with the client’s bill-ing.
6 The cGL is your Media Payables G/L account. The default A/P account is copied from Preferences, but can be changed. When the invoice is posted, its amount due will be credited to the A/P account. If you have a separate AP liability account for Media Payables. Each vendor can be setup with a different AP account that will be used instead of the default account in Preferences.
7 Enter the invoice’s insertion order or broadcast order number
Media Accrual Invoices
Before media accrual invoices can be entered, the insertion order or broadcast order must be pre-billed.

4-23
here. If the vendor’s invoice doesn’t show order numbers, press Tab to open the vendor’s POs lookup list. The lookup list show the vendor’s open orders. Double-clicking on an order from the lookup list copies it to the invoice line item.
8 A media invoice can be distributed to many different broadcast or insertion order me-dia buys. Buys are reconciled with invoices using the order’s line number. The line number links the ordered amount with the invoice’s actual cost.
9 For broadcast orders, enter the number of spots that actual-ly ran here. These actual spots will be reconciled with order’s planned spots.
10 The invoice’s gross amount is the total cost of all of the spots on the line item, includ-ing your commission. The difference between the invoice’s gross amount and the order’s gross amount will be billed (or
When the “automatic WIP accrual” option is enabled, accrual entries are created from media billings for the media’s estimated cost, and then reconciled with the actual costs from the vendor’s invoices—the media accrual invoices.
Media Accrual Invoices
credited, if fewer spots actually ran) to the client.
11 The commission percent-age is used to calculate the invoice’s net amount. The net cost is what the agency pays for media, not what the client was billed.
12 The dGL is the media cost account, which is debited with the invoice’s net cost when the invoice is posted.

4-24
Add Credit Card Statement
Add Credit Card Statement
i
p
o
y u
t
rew
q
1 Choose the credit card that corresponds to the statement being entered. This list is generated from the Credit Cards Preferences window. When selecting a credit card it will automatically enter the vendor code and cGL account associ-ated with this credit card.
2 Enter the statement’s closing date here. This date will also be used to auto-generate the invoice number.
3 This pay date prints on the
invoice aging as well as being used in the Auto-Pay Payables feature in Checkbook where a user can choose to list all invoices due through a certain pay date. Make sure a date is entered to allow enough time for the payment to post against the credit card to avoid a late charge or interest to be changed against the card.
4 Enter the invoice number here. Clients & Profits X will auto-generate an invoice number that’s a combination of
the vendor code and the state-ment’s closing date, which will always ensures a unique invoice number. However, this number can be overwritten if so desired. 5 Enter the invoice period here. Choose into which accounting period this statement should go. It will default to the cur-rent accounting period in the Accounting Periods preference window.
6 New activity includes charg-es, refunds/credits, and interest
Clients & Profits X has made this process of paying open A/P invoices with a credit card easy to do through the Add Credit Card Statement window.
a
s
Adding a credit card statement has all the benefits of adding a job cost A/P invoice, where job costs & overhead charges can be added on one invoice. However, it has an additional benefit: it can pay any A/P invoice with an outstanding balance. It’s not uncommon in today’s agency to pay off A/P invoices with a credit card for reasons such as earning credit cardbenefits (e.g. frequent ffllier miles) to addressing a temporary cash f low pinch.

4-25
Paying open A/P invoices with a credit card is done when adding the monthly credit card statement, not at the time the invoice was paid by the credit card. An A/P in-voice can be marked as paid by a credit card when it is added to expedite this process by pre-selecting this invoice as paid in the Add Credit Card Statement window.
for the statement period. New activity does not include prior payments applied or the previ-ous balance, which are used to calculate the statement’s new ending balance. However, the statement’s ending balance should equal the balance of this credit card’s cGL account in the general ledger after this state-ment is posted. The only time the statement’s ending balance will equal the statement’s new activity amount is when the card is paid off in full each month, preventing an interest charge.
7 When selecting a credit card it will automatically enter the vendor code and cGL account associated with this credit card. It’s recommended to have a unique cGL for each credit card.
8 Enter an invoice description here. Any notes pertinent to this statement may be entered here, such as explanations for certain credits, late charges, etc. one
may find helpful if this invoice were later reviewed by another person. The distribution on a credit card statement includes three areas. Interest, paying invoices, and the job cost/over-head distribution.
9 Clients & Profits X will auto-select those open invoices entered as being paid by this credit card. However, if an in-voice was not entered as being paid by this credit card, but was later paid by this credit card, it can be manually selected for payment in this window. The balance due on the invoice will be automatically entered into the amount field.
10 The remaining charges on the statement had not already been entered as A/P invoices, so they will be added for the first time through the credit card statement. Enter them against job tasks and overhead expense account accordingly. When selecting a job and a task, the auto-entered markup
Add Credit Card Statement
percentage and job cost dGL account will pull from this task’s settings on that job ticket. For overhead charges, enter the job number as NONE and press tab. C&P X will move the cursor to the Net Amount field (since job tasks don’t ap-ply to overhead costs), and after a Net Amount is added, when pressing tab it will jump the cursor to the dGL field to enter the overhead expense account (since markups also don’t apply to overhead costs).
11 The total amount of unen-tered charges appears here.
12 Once the statement’s new activity amount equals the total interest, the amount paid column in the invoice selection window, and the net amount column in the job cost/overhead distribution window, then the invoice can be saved.

4-26
Importing Credit Card Statements
Importing Credit Card Statements
od
s
ap
r
ew
q
t
u
y
i
Credit card statements imported as unposted A/P invoices. Once posted, they are paid from the checkbook just like other vendor invoices.
1 Choose a credit card from the account pop-up menu. This will be the account you will be reconciling.
2 Date is entered as either the date when the statement was imported or as the date printed on the statement.
3 Pay date indicates when you plan to pay the invoice. This date is used to schedule pay-ments by the cash flow reports and appears on the Accounting calendar.
4 The accounting period indicates which G/L period will be updated when the invoice is posted. Any unlocked period can be chosen.
5 The invoice number identi-fies the payable on accounting reports. Since credit card statements aren’t numbered like conventional invoices, the number is calculated as the vendor code plus the file name. You can change it, but the invoice number you enter must be unique. A warning appears if you enter in a number that has
already been used for the same account.
6 The cGL is one of your Ac-counts Payable G/L accounts. The default A/P account is cop-ied from Preferences, but can be changed. When the invoice is posted, its amount due will be credited to the A/P account.
7 Use the description to describe the purchases . It appears on the A/P list but not on job reports (which show the notes entered for each cost entry).
Clients & Profits X can import Quicken-formatted credit card statements into Accounts Payable. These statements, which are downloaded from the credit card company’s web site, contain every transaction made on the account for the billing period. Importing is faster since it saves you from manually typing in each transaction every month.
f

4-27Importing Credit Card Statements
8 The amount due is the bal-ance owed to the credit card company.
8 Click on the notecard button to enter a note documenting a selected credit card job cost or expense. For billable job costs, these notes appear on job cost reports and on the client’s invoice detail report.
9 The imported transactions are listed by merchant and amount just as the appear on the printed statement.
10 The job and task are es-sential for accurate accounting of job costs purchased on credit cards. . Tabbing past the job number verifies that the job is valid. The jobs lookup list can be used to find a specific job. If the credit card expense is for overhead, enter “NONE” as the job number. The task identifies where the cost goes on the job ticket.
11 Each purchase’s descrip-
Every one of your company’s credit cards should be set up as an account in Preferences. As statements are import-ed, Clients & Profits X builds a list of the merchants you use. By entering each merchant’s job, task, and debit G/L account, future statements will be imported more accurately and completely.
1 Each of the company’s credit cards should be added as its own account with its own cG/L. This account will then be used automatically each time the account’s statement is imported.
2 Use the add, edit, and delete links to add new credit card ac-counts as well as make changes to existing accounts.
3 The names of the mer-chants/payees from which you purchase are imported into Preferences each time you import a statement. Any job, task, and dGL (either a job cost or expense account) you enter for a merchant will be used automatically next month when the new statement is imported. Jobs and tasks are only needed
for merchants that supply bill-able goods and services; leave those fields blank for overhead suppliers.
4 Click the delete link to delete the selected merchant/payee. This won’t affect any existing statements. Without a merchant, you’ll always have to enter a job, task, and dGL each time a statement is imported.
Merchant names are imported into Preferences automatically. Giving them default jobs, tasks, and dGL accounts will automate your cost accounting.
tion is imported directly from the credit card statement. For accountability reasons it can’t be changed, since it needs to match exactly what’s on your printed statement. However, you can enter a note about the pur-chase by clicking the Notecard button (see below).
12 Click on the notecard but-ton to enter a lengthy descrip-tion for a selected credit card expense.
13 The cost is the amount that you were charge for each trans-action by the merchant.
r
e
wq
14 Each transaction gets a debit G/L account, or dGL. When the statement is im-ported, the default expense account is copied from Prefer-ences. If the merchant has a default dGL, then it is used instead. A debit JE is created for each transaction when the invoice is posted.

4-28
Printing A/P Reports
Printing A/P Reports
Accounts payable reports summarize invoices, showing what you’ve pur-chased from vendors, by job and G/L account.A/P reports can be used for reporting job costs, tracking invoices by vendor, and auditing your purchases by G/L account. There are several different reports that show your payables from various perspectives.
Invoices can be summarized for any period of time (choosing either invoice date or date posted), for one period or all periods, and for one vendor or all vendors. These options let you find the invoices for a specific purpose, such as the quarter’s purchases for vendor ABC.
A/P reports show only posted invoices; un-posted invoices appear only on proof lists.
■ Accounts payable reports are different from vendor account agings, since they show both paid and unpaid invoices (aging reports show only unpaid invoices).
Tips for printing A/P reports
■ Invoices are selected primarily by invoice date or date posted. This option lets you show only invoices added in July, for example, instead of the entire year. By entering a range of dates, you can select all invoices added today, last week, or all month—whatever time period you need. There’s no limit to which range of dates you can use.
■ One or more reports can be printed at once by clicking on a report’s name, but all reports will use the same selections. Reports can be printed then reprinted with different selections, as often as needed.
■ You can print A/P reports to screen (for a quick on-screen preview), the printer (for a hard copy), or to disk (to create a text file that can be opened and edited in a spreadsheet) by choosing an option from the print to pop-up menu.
■ To show the invoice description, click on the Show Description option. This option makes your A/P reports longer, but more descriptive.
To print A/P reports
1 Click the (i.e., Print Reports) button, or choose File > Print A/P Reports.
2 Select invoice date or date posted from the From pop-up menu, then enter a range of dates. 3 Select an account-ing period, or choose All Periods to see invoices by date only.
4 Enter a client number, or leave the selection as ALL.
To see invoices for one accounting period only, regardless of date, choose a period from the pop-up menu then enter a very large range of dates (e.g., 1/1/02 - 12/31/02).
5 Select the report you wish to print.
6 Click Print.
Printing Payables A/P reports can be printed to the screen, the printer, to the computer’s Clip-board, or exported to a Microsoft Excel using the Print to pop-up menu.

4-29Printing A/P Reports
Accounts Payable Reports
The A/P List - Invoices by Date provides a concise checklist of all invoices added for a time period, but does not show the line item detail.
The A/P List - Invoices by Vendor shows all invoices added for a time period and subto-tals by vendor number.
The A/P Journal shows invoices along with line item and G/L details. Use the A/P Journal to get a detailed listing of costs for a time period.
The A/P Summary (Costs by dGL) shows all invoices added for a time period and subto-tals by the debit general ledger account.
The Vendor Discounts Analysis shows all invoices added for a time period, their current balance, and whether or not a payment discount was taken.
The Open Client-Paid Payables report shows unpaid vendor invoices that have been billed to and paid by clients. If you only pay vendors once the client has paid you, then this report is essential. Together with the Vendor Aging report, it’s how you’ll know which invoices to pay now.
The Vendor Purchases Analysis summarizes by vendor total purchases for a time period and what percentage of total purchases each amount represents.
The Recurring Payables Pending report shows all pending invoices for a vendor within a specified time period. Once an invoice is created, it no longer appears on this report.
The Vendor Last A/P report lists active vendors and the date of their last purchase. It’s an easy way to see which vendors need to be made inactive—or used again.
A/P List - Invoices by Date
A/P List - Invoice by Vendor
A/P Journal
A/P Summary (Costs by dGL)
Vendor Discounts Analysis
Open Client-Paid Payables
Vendor Purchases Analysis
Recurring Payable Pending
Vendor Last A/P
Lists
Journals
Analysis
Miscellaneous

4-30
1 Since time cards are meant to be used throughout the day, today’s time card appears automatically. You can see the week’s time cards by clicking on the previous day and next day arrows.
2 The time card has a stopwatch that can track your time on a project while you’re working. The stopwatch works by remembering when you’ve clicked the start and stop but-tons for a selected job and task on the Time Card. To use the
stopwatch function, you first need to enter a job and task. Make sure that either the job or task is selected, then click the start button to start the clock. Later, click on the same job and task again then click the stop button to stop the clock. The elapsed time will be calculated and entered for you.
The stopwatch is just a short-cut, so it doesn’t dictate how your time is spent. You can still change the time worked on a job and task by changing the
hours—replacing the hours entered on the time card. 3 Click remove to delete an unsaved entry from the timecard. 4 Click print timecard to print a report showing today’s time card, for quick reference.
5 To find the timecard for a specific day, enter the date into this field and click on the find button.
6 These links can be used
q w e r
t
y
ui
o
p
a
Time Cards
s
Time Cards
The daily time card keeps a daily record of the jobs and tasks on which you work for both billable and/or unbillable time for any client, including agency time.

4-31Time Cards
to see your tasks and update information for a job task. The show my tasks link can be used to automatically copy in all job tasks that are due for the user. All the user needs to do is fill in the hours. The show schedule link lets you see (and maybe edit) the job task’s due date, status specifications, and other details. Clicking the Finished checkbox removes the task from schedule and work to do reports. Any changes you make are saved immedi-ately. The show traffic link lets you see (and maybe edit) the job’s production status, billing status, milestones and traffic notes/next steps. The show notes button allows the user to add a lengthy description for the time entry.
7 Your name appears here for reference. You can only see and use your own time card. Your time card will open regardless of which computer you’re using anywhere in the shop.
8 The hours to go box shows the number of hours needed to meet the user’s planned hours for the day. Planned hours can be set in the Staff file for each day of the week.
9 Many different jobs and tasks can a be entered onto the day’s time card. If you don’t know a job number or a job task, leave the field blank, then press Tab to open the Lookup List.
10 Each time entry can be marked as overtime. Overtime
Time is entered in numbers (e.g., 2.75 hours) and not in minutes (e.g., 35 minutes). Cost and billing rates are applied automatically when the time card is saved; they can’t be seen or changed on the time card.
is billed at different (and usu-ally higher) rates than regular time, using an overtime rate from the Staff file.
11 Today’s hours shows how many hours are entered so far. An option can be set in your Staff record to force you to ac-count for a minimum number of hours each day.
12 Click cancel to stop entering time. Clicking Cancel doesn’t erase any time previous-ly saved on the time card, just the hours you’ve entered now. Previously saved time entries are marked with an X. Click save to save the jobs, tasks, and hours you’ve just entered. The time will automatically post when it is saved.
The weekly time card works similarly to the daily time card, but has fewer options for track-ing billable time to jobs and tasks. It’s designed to help staff members who routinely do the same work all week enter their time with little effort.
1 A staff member can use either the daily or weekly time
card (but not both) based on the access privilege set by the system manager. Anyone can use the weekly time card, but it’s more useful to administra-tive employees who work on relatively few jobs.
2 Any job and task can be entered onto the weekly time card. All hours will be saved as
billable or unbillable depend-ing on the job or task settings. Any notes entered applies to all entries for that job and task.
3 The staffer’s remaining hours to go are calculated automati-cally as hours are entered onto the weekly time card.
The weeky time card is a particularly handy way for administrative staffers to track their time quickly and easily.
e
w
q

4-32
Time Sheets
The need to keep detailed, accurate records of how everyone in the shop spends their time is vital to staffing, billing, productivity, and profitability. Unlike other accounting systems, time keeping is a fundamental feature in Clients & Profits X. That’s why there are so many ways to track time, whether it’s billable or unbillable.
Time can be tracked either through daily time cards, weekly time cards or time sheets. There’s no real difference between them; in fact, time entered on time cards becomes a time sheet when the time card is saved. But the time card has the advantage of being available to users all day, while they’re working. The time sheet, in comparison, is designed for users who enter their time weekly, not daily, or in agencies that have one person input the time for all staff members.
Time added into a time sheet is posted as it is saved—so jobs, tasks, and cost reports are updated immediately. Unlike time cards, the time sheet has the option to show cost and billing rates. This option, which can be set for each user, lets a user adjust cost and billing rates. Time entries can be added, edited, and deleted as needed—any time, if the user has the necessary access privileges. There are no limits to how many time entries can be added. Any time entry can be made unbillable by unchecking the Billable checkbox; if so, the time’s cost amount will appear on the job, but the billable amount will be zero.
Time reports can be printed daily, weekly, or for any period of time. Time reports can show time by staff member or for one job number. The time card reports analyze the week’s time by department or team, for better account-ability. Productivity reports, which are printed from Snapshots, show total hours by staffer, task, client, or job—and are excellent ways to analyze how people work.
As a time saver, Clients & Profits X can import Tab-delimited time entries exported from applications such as Microsoft Excel, Timeslip’s LapTrack, FileMaker, and even custom programs created just for tracking hours. While importing time has it’s benefits, keep in mind that users aren’t con-nected to the Clients & Profits X database so there is nothing to prevent users from entering incorrect information (i.e., wrong job number, wrong tasks, entering the same hours twice, etc.) nor will they see the over-budget alerts for time.
If you choose to import time, you need to use a program that saves hours into a generic “text” file. This text file, which has a special format and contains only the raw data and no column headings or calculations, is then copied into Clients & Profits X as unposted “imported” time entries. Each time entry is validated as it is imported and billing rates are automatically added. If any kind of error is found (such as an invalid job number, nonexistent task, wrong initials), the entry is marked as “bad” and won’t be posted so that it can be edited or deleted. These imported time entries become regular Clients & Profits X time sheets once they are verified and posted.
Time Sheets
In most shops, freelancers are treated like employees—their hours are added into time sheets. But what about the freelancer’s invoice? The answer depends on the freelancer’s time sheets: if you give the freelancer a billing rate, but no cost rate, then just his or her billable hours are posted to the job as an unbilled cost. Since the billable time is already on the job, the freelancer’s invoice is added as a non-billable A/P invoice (it will only have a cost amount). The freelancer is added as both a staff member and a vendor, but with different numbers (ex: staff initials ABC vs. vendor number AC) to keep them separate on cost reports.
■ Time sheets don’t affect the General Ledger. Clients & Profits X uses time sheets for productivity and job costing, but not payroll. Your financial statements show payroll costs from the checkbook or manual journal entries.
Time sheets, freelancers, and the General Ledger
Time sheets and billing rates
Clients & Profits X gives you a variety of ways to program rates on time sheets, especially billing rates. This means you have the flexibility to set rates by staff member, job task, or client. They are applied automatically, making your time accounting more accurate.
Cost rates: Cost rates are set by staff member. Each staffer has a standard cost rate plus an overtime cost rate. Cost rates don’t vary by client, job, or task (since someone usually makes the same salary re-gardless of what they do). You can change the cost rate while adding a time sheet if you have the proper access privileges.
Billing rates: Billing rates are much more variable. To accommodate different clients, you can create special rates for staff members or clients. Or, job tasks can have special rates that guarantee the same billing rates regardless of who works on the task.
Jobs are assigned a billing rate based on the option always pull billing rate from task, staff or cli-ent. This option can be set up as a default in general Preferences, as well as by job type and even job task. This rate is then used on timesheets

4-33
Time Sheet Features
Feature How it works, how it’s used
Unlike the daily time card, time sheets let users enter their hours for the entire week at the same time. Entering weekly time sheets is fast and easy, even for the most computer-phobic creative.
Time sheets are designed for batch entry, which lets one person enter the time from many people. If users insist on keeping paper time slips, their hours can be entered weekly by an accounting clerk quickly and easily.
The integrated Import Time window imports specially-formatted text files from Excel, FileMaker, and any other custom time keeping program. These time entries are verified for accuracy during the importing process, and bad entries (i.e., entries with invalid clients, jobs, tasks, etc.) are flagged. Only accurate time entries are then posted to time sheets. Bad entries can be fixed then posted.
Each morning the C&P TimeCop checks every user’s previous day’s time card/time sheet, comparing their actual hours worked with their planned hours. Users who haven’t logged enough hours are notified by e-mail to finish yesterday’s time card (and so is their supervi-sor). The C&P TimeCop can be set to check a user’s daily time card/time sheet when they quit Clients & Profits X, prompting them to finish entering their hours before the application can quit.
Every user can have an automatic budget alert that warns them when they’re spending too much time on any particular job task. Every user’s budget setting can be customized, so different users can have different kinds of warnings (i.e., some more hostile than others, depending on the person).
Any time entry can be marked as overtime. Special overtime rates can be set up for each user, which are applied to overtime entries. Overtime reports will show who’s working the most overtime.
Every time entry can contain a long description to explain the work performed. These notes appear on job cost and invoice detail reports. They can be invaluable for documenting your hours to clients.
Users have special access privilege settings to time sheets, including the ability to see (or not see) and change their billing rates.
If a user can see billing rates on time sheets, he or she can enter custom billing rates on particular time entries. This flexibility gives you precise control over how time is billed to clients.
Time sheets for freelancers can be summarized on special time and productivity reports, helping you analyze the value of freelance time vs. staff time on each client.
Routine time sheets for administrative staff can be cloned into the current week. For people who’s time keeping doesn’t vary much, cloning saves the effort of rekeying the same hours every week.
Every time entry tracks its billing status. Billable time tracks when it was billed, displaying the client’s A/R invoice number, billed date, and billing amount. When the client eventually pays the invoice, the payment date is posted back to the time sheet.
Time and productivity reports analyze staff time from many perspectives, for any day, week, month, or year. These reports provide invaluable insights into how people spend their time.
Users enter time for entire week
Batch time entry
Import time
TimeCop
Budget warnings
Overtime
Time entry notes
Show/hide cost/bill rates
Customizable billing rates
Freelance time tracking
Clone time sheets
Billing status
Time, productivity reports
Time Sheets

4-34
The Time Sheet window
Time Sheets
1 Use the arrow buttons to find the previous and next time entries for the selected staff member.
2 Time sheets can be eas-ily added, cloned, edited, or deleted. Click the add new time sheet button to add a new time sheet for a staff member. Or click on the clone time sheet button to make an exact copy of an existing time sheet. Click the edit button to edit the selected time entry. If the time entry has already been billed, nothing can be changed.
However, if the time entry is unbilled, almost everything can be changed. If you change the job number and task, the time will be removed from the original job task and posted to the new one. Changing the hours or rates recalculates the net cost and gross amounts. (If you don’t have access to rates, they’ll be invisible.) You can change the entry’s billing status (from unbilled to unbillable, for example) by simply typing over the existing status. Any unbilled time entry can be de-
q w e r t
y
u
i o p a s
leted by clicking on the remove button. Once a time entry has been billed it can’t be deleted. When a time entry is deleted, the cost and gross amounts are deducted from the job task. To delete the entire time sheet, click the delete time sheet button. Any unbilled time entry on the time sheet will be deleted (if a time entry has been billed, it will be skipped). When a time sheet is deleted, the cost and gross amounts are deducted from the job task for each time entry. Remember, deleting a time sheet is perma-
fd
The Time Sheets window shows both hours entered from weekly time sheets as well as from daily time cards.

4-35
nent, although the time can be reentered again.
3 Time entries can be imported from other applications such as Microsoft Excel, Filemaker, or custom programs by using the Import button.
4 Time sheets can be approved on-line by a department man-ager, by clicking on the approve button.
5 Click on the print reports button to print time sheet reports.
6 To find your time sheet for a specific date, enter in the date here. To find time for a differ-ent staff member or by time entry number, click on the find more link.
7 If at least one time entry has been approved on a time sheet, the approval box will appear in the Time Sheet window with the user’s initials who approved the time entry and the date it was approved.
8 The staff member’s name appears here for reference.
9 Each time entry on a time sheet has a date that shows when the work was performed. To see a time entry’s complete details, double-click on a time entry.
10 Every time entry, even unbillable staff time, has a job number. Time and productivity reports can analyze time by job using this number.
11 Every time entry has a job task. When a time entry is saved, its cost and gross amounts (hours x cost and billing rates, respectively) are posted back to the job task’s totals.
12 The client number is copied from the job ticket when the time entry is added. Time re-ports can be printed by client.
13 Hours are entered as num-bers with two decimal places
Time Sheets
A time sheet is a collection of a day’s time entries for one person. Each time entry is a separate record of a person’s work containing the date, job number, task, the num-ber of hours, cost and billing rates, and a short description.
(e.g., 2.75 hours), letting you bill in as small as 5 minute increments. Overtime entries will appear with an “X” in the checkbox.
14 Net is the cost amount of the time entry, based on its hours and cost rate. The net cost increases the job task’s labor total. Clients don’t see the net cost amount. Unbillable time has a net amount (since it is an actual cost), but no gross amount.
15 Gross is the billable amount of the time entry, based on its hours and billing rate. The gross amount increases the job task’s unbilled total. This is the amount the client will eventu-ally be billed. Unbillable time has no gross amount.
16 Each time entry can be a descriptive note to explain what work was performed for these hours. These notes appear on job cost reports, as well as the Invoice Detail report that the client can get with their invoice.

4-36 Adding a Time Sheet
ut
q
w
r
y o
e
i
Adding a Time Sheet
p
a
1 Use the remove button to remove an entry from a time sheet. The clear button will clear all entries from the time sheet.
2 Enter the initials of the staff member who did the work. Your initials are automatically en-tered, but they can be changed if you are entering a time sheet for someone else.
3 Choose an accounting period for this time sheet from the pop-up menu. Time entries
don’t affect the G/L, the period is important for the Overhead Allocation Worksheet and the job and client P&L reports.
4 These buttons can be used to see tasks for the staff member a time sheet is being added for. The show my tasks button can be used to automatically copy in all job tasks that are due for the user. All the user needs to do is fill in the hours. The show schedule button lets you see (and edit, if you have access privileges) the job task’s
due date, status specifications, and other details. Clicking on the finished checkbox in the job’s schedule removes the task from schedule and work to do reports. Any changes you make are saved immediately. The show traffic button lets you see (and maybe edit) the job’s production status, billing status, milestones and traffic next steps/comments. The show notes button allows the user to add a lengthy description for the time entry.
The Add Time Sheets window is more flexible than the Time Card, since it lets you enter hours for an entire month at one time and for other staff members.

4-37Adding a Time Sheet
Helpful, thoughtful, or just nasty warning alerts can appear when a staffer is near or over the job task’s estimated hours. Each user can have their own customizable message. Note, that a user’s alerts don’t appear if you are entering time for another staff member.
5 Each time sheet entry has a date. It’s important to use the time entry’s actual work date, since all of the job costs, productivity, and profitability reports use it. An accurate work date makes your time sheets more like a daily time log, which makes it easier to be account-able to clients.
6 Enter the job number here. If you’re not sure about a job number, leave it blank and press Tab. The jobs lookup list opens, listing the open jobs. Double-clicking on a job copies it to the time sheet.
7 If you have a standard task in your Staff record, it will be cop-ied to the time sheet automati-cally. You can change the task by typing over the standard task.
8 Enter the hours worked. Every time entry, including un-billable time, has some amount of hours. Enter the hours as numbers with up to two decimal places.
9 Click the OT checkbox to make a time entry “overtime.” Overtime entries can be billed at an overtime rate, which is defined for each user. Overtime entries can be analyzed sepa-rately on time and productivity reports.
10 Enter a short description of the work done in the notes field.
11 If you have access privi-leges to see rates, you’ll see the entry’s cost rate and bill rate here. These rates are used to calculate the time entry’s net and gross amounts. To make an entry unbillable, enter the bill-ing rate as zero. These amounts are calculated when the time sheet is saved.

4-38 Impost Time
Import Time
1 Use the arrow buttons to find the previous and next imported time entries.
2 Click the import button to begin importing time data from a standard “text” file, such as Microsoft Excel, Timeslip’s Lap Track, FileMaker, or your custom program. If you are synchroniz-ing time entries from the Clients & Profits X Palm O/S-based time card, click the import button to begin synchronizing. Once the files have been imported, the entries can be proofed, edited,
then posted.
3 Click the verify button to verify the client, job, task, and rates on imported time entries.
4 Use the edit button to make any changes to time entries. The remove button will remove one time entry, while the delete all button will clear all imported time entries that haven’t been posted yet. The save button saves and posts all imported time entries. Bad time entries won’t be posted.
q
w e r t y
u
i
5 Click the print proof list but-ton to print a list of imported time entries. Since saved imported time entries become regular Clients & Profits X time sheet once they are verified and posted, proofing before saving is a good idea.
6 Use the setup sync button to setup and edit the synchro-nization settings of your Palm O/S hand-held computer. You’ll need to edit the Setup Palm Sync - Time window periodically to update it with current jobs and tasks.
Clients & Profits X imports a standard “text” file to capture time sheet, or synchro-nizes with the Clients & Profits X Palm O/S-based time card.

4-39
7 The name of the staffer you are importing time for appears here.
8 Every imported time entry lists the entry’s work date, job number, task, client, hours, and a time entry note. The cost and billing rates are calculated au-tomatically based on the same formulas as regular time sheets. Entries marked as “bad” con-tain invalid data (e.g., invalid job numbers, nonexistent tasks, or wrong user initials). Bad en-tries can be edited or deleted.
Import Time
If you change the job number and task, the time will be removed from the original job task and posted to the new one automatically.

4-40
Time Reports
Time Reports
Time reports summarize hours from time cards and time sheets, showing where and how the staff spent their time. They can be used to analyze time by job, client, staffer, or task. Time can be summarized for any range of dates (e.g., this week, last month, year-to-date, etc.) by work date or date posted, for one period or all periods, and for one staffer or all staff members. These options let you find the time for a specific person, for example, to check their total hours.
Time entries are selected by work date or date posted using the ...from pop-up menu. You can also print time for only one accounting period by using the period pop-up menu. This option lets you show only time added in July, for example, in addition to the work dates.
Tips for printing time reports
■ By entering a range of dates, you can select all time added today, last week, or all month—whatever time period you need. There’s no limit to which range of dates you can use.
■ The summary reports are differentbecause time list reports show day-to-day time in detail, while the summary reports show totals only.So the time summary reports are much smaller (and probably easier to read)than the time list reports. But if you need the most detail, print time list reports instead.
■ You can print time reports to the window (for a quick on-screen preview), the printer (for a hard copy), or to disk (to create a text file that can be opened and edited in a spreadsheet).
■ To show the time entry notes, click on the show notes option. This option makes your time reports longer, but more descriptive.
To print time reports
1 Choose Accounting > Time Sheets.
2 Click the (i.e., Print Reports) button, or choose File > Print Time Reports.
3 Select work date or date posted from the from pop-up menu, then enter a range of dates. 4 Select an accounting pe-riod, or choose All Periods to see time by date only.
5 Enter a staff member’s initials or leave the selec-tion as ALL to select time for all staffers.
To see time for one ac-counting period only, regardless of date, choose a period from the pop-up menu then enter a very large range of dates (e.g., 1/1/08 - 12/31/08).
6 Click on a report then select the report’s options.
To show the time entry notes, click on the show notes option. To hide the rates on the time reports, click on the show hours only option. Use this option when printing time summaries for your staff members. They’ll see the hours but not the rates or dollar amounts. If you don’t have access to rates, this option will be checked automatically. Select to show freelance time only to have only the staff members marked as freelancers appear on the time report.
7 Click Print.
Time reports can be printed to the screen, the printer, to the computer’s Clipboard, or ex-ported to disk using the Print to pop-up menu. Any report export to disk can be opened and edited in a spreadsheet program like Microsoft Excel.

4-41Time Reports
Time Reports
The Time by Staff report lists all time entries in detail, for a select period of time, and subtotals the entries by staff.
The Time by Task report lists all time entries in detail, for a select period of time, and subtotals the entries by task.
The Time by Job report lists all time entries in detail, for a select period of time, and subtotals the entries by job.
The Time by Client report lists all time entries in detail, for a select period of time, and subtotals the entries by date, then by client.
The Time Audit List shows all time entries in detail, for a select period of time, and subtotals the entries by date. This list shows which entries are marked as overtime.
The Unbillable Time report shows only those time entries marked as ‘Unbillable’.
The Staff Time by Client report shows the total hours each staff member worked and summarizes their time by client.
The Staff Time by Job report shows the total hours each staff member worked and sum-marizes their time by job.
The Staff Time by Task report shows the total hours each staff member worked and summarizes their time by task.
The Client Time by Staff report summarizes the total hours worked by staff for each client.
The Client Time by Task report summarizes the total hours worked by task for each client.
The Job Time by Staff report shows the total hours worked on each job and summarizes the time by staff.
Time by Staff
Time by Task
Time by Job
Time by Client
Time Audit List
Unbillable Time
Staff Time by Client
Staff Time by Job
Staff Time by Task
Client Time by Staff
Client Time by Task
Job Time by Staff
Lists
Summaries

4-42
Checkbook
Checkbook
Clients & Profits X can write and print checks for vendor invoices, job costs, overhead expenses, and employee advances. Clients & Profits X keeps a com-plete, detailed check register for all of your bank accounts—and can help you easily reconcile the accounts each month. Checks are numbered automati-cally as they are written. Different checking accounts should have different numbering sequences, which you can easily set in the Chart of Accounts.
You can write checks any time. You can write one check at a time, or many checks at once. Checks are written individually for a vendor and unpaid invoices. Every check you write, including handwritten checks, should be added into Clients & Profits X. A check can be written as a vendor payment on account, a job cost, or an overhead expense. This means, for example, the same check can’t combine payments to vendors and overhead. Checks can be written as direct disbursements for job costs, charging one or more jobs and tasks for prepaid costs like printing, postage, and delivery—including markups.
Writing a check to a vendor is easy: Open the Checkbook window, choose Write Check from the Edit menu, select Vendor Payment, enter the check’s vendor, account, date, and amount, then save it. The vendor’s unpaid in-voices are listed, and the check amount is applied automatically to the oldest payable. You can decide for yourself which invoices to pay, as well as the payment amounts. Posting the check reduces the vendor’s balance, pays off the unpaid invoices, and creates journal entries in the General Ledger.
The Auto-Pay Payables option makes writing checks for many vendors even easier. This command pays unpaid payables automatically, based on a date. Clients & Profits X finds the unpaid invoices, then automatically writes the check—one for each vendor. These checks are unposted, so they can be eas-ily proofed and edited before posting.
Checks are printed using industry-standard, preprinted check stock. These checks, which are easily ordered from Deluxe Business Forums (see page 55), work best with Clients & Profits X. Checks can be printed individually, or in batches by check number.
The checkbook is seamlessly integrated with the General Ledger. There’s no double-entry, so the information you enter on a check becomes part of the G/L. Whenever checks are posted, debit and credit journals entries are cre-ated automatically. Every check makes a credit entry (usually cash) and one or more debit entries (either A/P, job costs, or overhead expense). Default debit and credit accounts are entered for you automatically.
Posting a check updates job tickets, Accounts Payable invoices, the vendor account, and the General Ledger. When checks are added, they are unposted. Unposted checks can be changed, letting you edit job cost or overhead expense amounts before the accounts are updated. They also don’t appear on job, cost, or financial reports.
Checks and the General Ledger
Handwritten checks
■ Handwritten checks aren’t dif-ferent from other checks, except that they aren’t printed. They are entered exactly the same way, but usually from the handwritten check’s stub. You’ll still want to enter the job cost or overhead expense information (job, task, debit account, etc.). But check the Handwritten check option before the check is saved. This option pre-vents a handwritten check (or any check, for that matter) from being printed. When you select checks for printing, checks with this option chosen will be skipped.
■ You can enter checks out of or-der, so be careful to enter the right check number when adding hand-written checks. The check number in Clients & Profits X should match the preprinted check number on the handwritten check stub.
■ The check’s credit account is always a cash account. The cash account is copied from your G/L account preferences. Checks de-crease your cash balance. You can change the check’s credit account to withdraw funds from an alternate account, such as a money-market account.
■ Every line item on a check has a debit account (the “dGL”). One check may have dozens of line items, each of which creates a debit journal entry. For vendor payments, the line item’s dGL is copied from the A/P invoice’s credit account (usually A/P). Checks for job costs get the dGL first from the job task’s debit account, then from your G/L preferences. Checks written for overhead expenses can be debited to any expense account.
■ Journal entries from checks are posted into the Cash Disbursements journal. The entry’s reference num-ber is a combination of the prefix CK# and the check number. The Cash Disbursements journal shows entries posted from the Checkbook.
■ Journal entries aren’t created, and the G/L account balances aren’t updated, until a check is posted.

4-43
Checkbook Features
Feature How it works, how it’s used
The Auto-Pay Payables window automatically cuts checks for unpaid payables. Unpaid invoices can be selected by vendor, A/P account (such as Media Payables), and up through a scheduled pay date.
Checks can be written for vendor payments, which are distributed automatically to a vendor’s unpaid invoices. You’ve got complete control over which invoices are marked for payment by each check. The invoices paid for a check appear on the check stub.
Checks can be written directly for job costs when there is no Accounts Payable invoice, such as postage. These checks can be distributed to dozens of different jobs and task, and include markups.
Checks can be written for overhead expenses, like rent. One overhead check can be ex-pensed to dozens of different debit accounts, for flexible cost accounting.
Checks can be written for employee expense advances. Advance checks update a special G/L account so that employee receivables appear on the financial statements. Expense advance checks are reconciled through the special Employee Expense Reports window in Expenses. When a employee enters their expense report, they are either prompted for a personal check (if they owe the company money) or a check is cut to them (if they spent more than their expense advance) automatically.
Any check can be marked as “handwritten” when added, which prevents it from being printed during the next check printing run.
Checks can be written for dozens of different checking accounts. Each account is set up as a separate G/L number. Checks are numbered separately for each checking account.
Each bank account can be reconciled on-line. The Bank Reconciliation window lists the account’s checks, deposits, etc. Clicking on an entry clears it, removing it from next month’s reconciliation.
When a vendor payment is distributed to invoices, adjustments and discounts can be taken without making separate entries. When the check is posted, special JEs will be created for the adjustments.
These useful tools let you renumber a batch of misprinted checks, void one or more checks, and add vendor credits.
Year-end 1099 reports and forms are printed using vendor information entered onto the year’s checks, including the vendor’s tax ID.
The diary records the when, where, and who was involved for major events and meetings. Because the diary is easily accessed, details of conversations and events are preserved. The record can also be e-mailed for streamlined communication.
Auto-pay payables
Vendor checks
Job cost checks
Overhead expense checks
Employee expense advances
Handwritten checks
Multiple checking accounts
Bank reconciliation
Adjustments, discounts
Check tools
Year-end 1099s
Vendor diary
Checkbook

4-44 Checkbook
The Checkbook Window
1 Use the arrow buttons to find the previous and next checks.
2 The auto-pay button can be used to automatically cut checks for unpaid payables selected by vendor and A/P account for through a selected pay date.
3 Checks can be easily added, edited, deleted, and redistrib-uted in the Checkbook window. Click the add button to write a vendor check. To add a dif-ferent type of check, use Edit
> Write Check. Checks can be edited by clicking on the edit button. To keep the check from becoming unbalanced, only the check date, memo, payee address, and 1099 information can be edited. To change the payee, amounts, jobs and tasks, paid invoices, or G/L numbers you’ll need to delete the check then reenter it. To delete a check click on the delete but-ton. Unposted checks will be deleted from the system. If it was the last-added check, its number will be reused. If the
check has already been posted, clicking the Delete button will instead void the check. Voiding a check leaves the original check intact, but changes the amount to “***VOID***” and makes reversing G/L entries. If the check’s distribution is wrong, click on the redistribute button.
4 Click on the print reports button to print checkbook re-ports. To print checks, click on the print checks button.
q
u
a
p
i o
s
d
f
g
l
y
trew
h
j
k
Clients & Profits X keeps a complete, detailed check register for all of your bank accounts—and can help you easily reconcile the accounts each month.

4-45
5 These toolbar buttons can be used to print cash disbursement reports and checks.
6 To find a specific check, enter the check number here. Use the find more link to find one or more checks by se-quence, check number, vendor, payee, or date.
7 Click on history to jump to a previously viewed check.
8 Your checking accounts are listed here. Any asset account from your Chart of Accounts can be marked as a checking account. Choosing an account from this pop-up menu displays its last-written check.
9 Click on the see checks but-ton to display a list of recently added checks for this checking account (see below right). Click-ing on a check in the list will display its details.
10 Checks are numbered au-tomatically as they are added. Each checking account has its own numbering series.
11 The check’s paid to (i.e., payee) name is copied from the vendor account, and is usually the vendor name. It indicates to whom the check was written. Check reports can be printed by payee as an option.
12 The date shows the date the check was added. It ap-pears on the printed check. Reports select checks by date.
13 The amount is the check’s total amount.
14 Checks have line items that contain the job cost, overhead expense, or A/P invoice informa-tion. A check’s distribution can be changed until the check is posted. Double-clicking on a line item shows the distribution item’s details.
15 The memo is a short description of the check. It appears on the printed check, checkbook reports, and on journal entries.
16 Checks that are marked as 1099 payments appear on the year-end 1099 report.
17 Checks that are marked as cleared have already been reconciled in the bank recon-ciliation.
18 The cGL is the check’s credit G/L account. Checks can be written from many different bank accounts simultaneously. Each checking account has its
Checkbook
Checks are numbered automatically as they are written. Different checking accounts should have different numbering sequences, which you can easily set in the Chart of Accounts.
own check numbering series. A check can be written for any open accounting period. The period determines which month is updated when the check is posted. The posted date is when the check updated A/P and the General Ledger. The posted date can be different from the check date. Check re-ports can be printed by posted date or check date.
19 The initials of the person who wrote the check appears here for reference.
The checking account’s recently activity can displays by clicking on the see checks button.

4-46
1 Enter the cG/L number for the bank account from which the check is written here. Each bank account has its own check numbering sequence, so the check is numbered automati-cally.
2 The bank account’s current account balance shows here for reference. The balance does not include unposted checks or deposits.
3 Checks are numbered automatically in sequence
as they are added. The next check number, which you can set, is copied from the Chart of Accounts.
4 Handwritten checks aren’t printed during check runs. 5 The date shows when the check was added. It appears on the printed check. Reports select checks by date added or date posted.
6 A check can be written for any open accounting period.
The period determines which month is updated when the check is posted.
7 Checks can be written to vendors for unpaid payables by entering a vendor number. Paid to lists the name of the company the check is written to, and is usually the vendor’s name.
8 The check’s amount will be applied to the vendor’s unpaid payables. The written amount is calculated automatically as you tab past the dollar amount.
q w
e r
t
yu
i o
p
a
Vendor Checks
Vendor Checks
Vendor checks can be written to one vendor only. Tabbing past the vendor code auto-matically copies in the vendor address and account balance to the check.
s
A vendor check pays off unpaid invoices from Accounts Payable. Oldest invoices are paid off first, using the auto-al-locate option, but can be changed. So you can decide which invoices should be paid with a check—and which ones shouldn’t. Vendor payments credit the cash account and debit the A/P liability account.

4-47
9 The auto-allocate option se-lects and pays unpaid invoices automatically. The vendor’s oldest invoices are paid first. When the check is saved, you’ll have an opportunity to fine-tune the check’s payments. To apply payment to selected invoices, uncheck the auto-allocate box. After saving, the Apply Vendor Payment window opens.
10 The check’s memo is a short description that appears on the printed check, check-book reports, and on journal entries.
11 The check’s address is cop-ied from the vendor account, but can be customized. Chang-ing the check’s address doesn’t affect the vendor file. The year-end 1099 report uses this address on its printed forms.
12 The option to include on year-end 1099 report flags this check as a vendor payment for tax reporting purposes. The 1099 setting is copied from the vendor automatically.
Vendor Checks
Discounts or other adjustments can be included with each payment, making it easy to track early-payment discounts offered by vendors. Adjustments and discounts debit your A/P account and credit your earned discounts account.
q
w
e r t y u i o
Vendor payments can be added for multiple vendor invoices and adjusted as added.
1 The check number and vendor name appear here for reference.
2 The check amount appears here.
3 Invoices with balances due are listed here. To pay an invoice (all or part), click on the checkbox.
4 The invoice date appears here. Invoices are automatically listed oldest to newest.
5 The unpaid invoice balance appears here.
6 Add any invoice adjustment amount here. When an adjust-ment is entered, Clients & Prof-its X automatically recalculates the payment amount to equal the invoice balance less the adjustment.
7 The general ledger account that will be credited is copied from the vendor account infor-
mation. It can be changed if needed.
8 Enter the amount of the invoice to pay. The invoice does not need to be paid in full, but the total payments need to equal the amount the check is written for.
9 The general ledger account that will be debited appears here and can be changed if needed.

4-48
q
w
e
r
t
y
Auto-Pay Payables
Auto-Pay Payables
The Auto-Pay Payables function automatically writes checks for unpaid vendor invoices. Invoices are selected by pay date, which is entered in Accounts Payable when invoices are added. Clients & Profits X then searches for ev-ery unpaid invoice through this pay date, groups them by vendor, then writes one check for each vendor. There’s no difference no difference between an automatically-written check and one you’ve added yourself. The checks aren’t posted, so they can be proofed and edited (or even deleted) before posting.
The Auto-pay function writes checks for selected payables, paying off the invoices automatically.
1 The pay through date lets you select payables you plan to pay up to a specified pay date. The pay date is scheduled when the vendor invoice was added, usually based on the vendor’s payment terms.
2 Invoices can be selected in three different ways. The all A/P G/L accounts option will se-lect all invoices through the pay date selected. The for one G/L option lets you auto-pay only overhead expense payables, for example, instead of all pay-ables, by entering the overhead
payables G/L number. The for one vendor option allows you to quickly write checks for a specific vendor only.
3 There are two other auto-pay options available. The auto-pay everything options selects all invoices for payment, creates check line items for each invoice’s balance due; if unchecked, you’ll be prompted to select which invoices should be paid. The select only A/P’s paid by clients option allows you to just select invoices that
have been billed to a client and the client’s payment has been received.
4 The checking account num-ber is entered in automatically from preferences, but can be changed.
5 The next starting check num-ber is entered in automatically, but it can be changed.
6 Checks can be written for any open accounting period. The period determines which month is updated when the check is posted.

4-49Auto-Pay Payables
q
w e
rt
y
ui
1 Click the print button to print a hard-copy printout of the Auto-Pay Payables window. Click the find button to choose a different set of invoices.
2 Unpaid invoices are selected for payment using the pay invoices through pay date. Any invoices without pay dates will be also be included.
3 Today’s date is automatically used as the check date, but it can be changed.
4 You can change the sort order of the unpaid invoices by clicking on a column heading.
5 Unpaid invoices are grouped by vendor, then sorted by pay date. You can change the order of the invoices by clicking on the column headings.
6 Click on the invoice’s check-box to select it for payment.
7 Each invoice is listed with their vendor code, vendor name, invoice number, pay date, and
balance due. 8 The amount paid is copied from the invoice’s balance, but can be changed.
9 An early-payment discount can be taken on each invoice by entering the discount amount.
o
The Auto-Pay Payables report can be printed out to show the invoices you have se-lected for payment.

4-50
Job Cost Checks
Job Cost Checks
i p
o
y
u
tre
wq
1 Enter the cG/L number for the bank account from which the check is written here. Each bank account has its own check numbering sequence, so the check is numbered automati-cally.
2 The bank account’s current account balance shows here for reference. The balance does not include unposted checks or deposits.
3 Checks are numbered automatically in sequence as they are added. The next
check number, which you can set, is copied from the Chart of Accounts.
4 Handwritten checks aren’t printed during check runs. 5 The date shows when the check was added. It appears on the printed check. Reports select checks by date added or date posted.
6 A check can be written for any open accounting period. The period determines which month is updated when the
check is posted.
7 Job Cost checks can be writ-ten to any payee. If the check is for a vendor, entering the vendor number will copy in the vendor name and address.
8 The check’s amount will be applied to the vendor’s unpaid payables. The written amount is calculated automatically as you tab past the dollar amount.
9 The check’s memo is a short description that appears on the printed check, checkbook
The job and task are essential for accurate cost accounting. Tabbing past the job num-ber verifies that the job number exists.
a
s
d f g h
Writing checks for job costs is similar to writing checks to vendors, but checks for job costs don’t pay outstanding A/P invoices. Otherwise, everything you’ll enter about a check is the same for all checks. A check can be written to anyone; they don’t have to be vendors, either. One check can be split over dozens of jobs and tasks. Any line item on a check can include a markup and a gross amount—which will be billed to clients. These checks appear on job cost reports.
j k
l

4-51
Writing checks for job costs saves you the step of entering the vendor’s invoice into Account Payable. If you pay job costs directly with checks, no invoice is necessary—just make sure no one adds the invoice by mistake.
reports, and on journal entries.
10 The check’s address is cop-ied from the vendor account, but can be customized. Chang-ing the check’s address doesn’t affect the vendor file. The year-end 1099 report uses this address on its printed forms.
11 The option to include on year-end 1099 report flags this check as a vendor payment for tax reporting purposes. The 1099 setting is copied from the vendor automatically.
12 Each job cost will be en-tered individually here for this invoice. A job cost check can be distributed among dozens of different jobs, tasks, and job cost G/L accounts.
13 The job and task are essential for accurate cost accounting. Tabbing past the job number verifies that the job number exists; if it isn’t cor-rect, the job Lookup List opens listing open jobs. Information
from the job task, such as the markup and billable status, will be copied automatically to the job cost line item. If you are mixing overhead expenses and job costs, enter in “NONE” for the job number.
14 The task determines which line on the job ticket will be charges for this cost. If you don’t know the task, leave the field blank then press Tab to open the job’s task lookup list.
15 This is the net cost amount the agency will pay. It is what this work cost the shop, before markups, fees, or commissions.
16 Enter the markup as a num-ber (i.e., 17.65, not .1765). You can use any markup per-centage. The gross amount is calculated automatically as the net times the markup percent-age.
17 Enter the gross (i.e., billable) amount. The gross amount will be automatically
Job Cost Checks
calculated for you, but it can be changed. To make the line item unbillable, enter the gross amount as zero. The invoice’s cost amount will update the job task, but it will not have an amount to bill the client. Also, if the job task is unbillable, the billable amount will be zero—and can’t be changed.
18 The debit G/L (i.e., dGL) is a job cost or expense account. It is copied from the job task, but can be changed.
19 The payment to go field shows the remaining check amount that needs to be distrib-uted in order to save the check. A check can be saved only when the total check amount matches the total net cost of the check line amounts.

4-52
Add Online Payment
Job Cost Checks
i
p
oy u
tr
ew
q
1 Enter the checking account’s G/L number here. The G/L ac-count number determines from which bank account this online payment was made.
2 Enter the online payment number. Online payments are numbered automatically based on the cash account’s G/L number. You can change the number by typing in a new number over the old. Changing the online payment’s number doesn’t affect the next pay-ment’s number -- it will be the
next online payment number in sequence.
3 Enter the check date here. This is the date the online payment was added. It does not affect posting or the General Ledger (unlike the period).
4 The accounting period deter-mines how this check will affect your financial statements. The current period is copied from Preferences > Accounting Pe-riods, but can be changed. An online payment can be posted
into any unlocked accounting period. 5 If the bank gave you a confir-mation (or transaction) number for this online payment, enter it here for reference. A confirma-tion number isn’t required.
6 The vendor number associates this check with a vendor ac-count. A check can only be writ-ten to one vendor. Tabbing past the vendor number copies the address and account balance to the check. The check’s address
Online payments affect the general ledger exactly like conventional printed checks, crediting a cash account and debiting a payables account.
a s
The online payments feature in Clients & Profits X lets you track payments made to electronically though your bank, in-stead of writing checks to vendors. Clients & Profits X does not make electronic payments directly. Instead, you’ll make the electronic payments from your bank’s online banking or bill-pay service then record the payments in Clients & Profits X. Online payments are added into Clients & Profits X through the checkbook, just like a conventional printed check.
1# 1$
a
1%

4-53
Each checking account has a separate numbering sequence for printed checks and online payments. You can record online payments into C&P X as soon as you make them, or record them later from your bank statement.
(which appears on the printed check) can be changed without affecting the vendor account. The vendor’s account balance is copied into the check amount; Clients & Profits makes an assumption that you’re paying off the vendor’s balance in full, as a shortcut. The vendor name is copied into the paid to (i.e., payee) name, but can be changed.
7 The paid to name appears on the printed check, so it can be edited to include an account number, mail stop, or some other kind of information.
8 Enter the amount you elec-tronically paid to the vendor, less any discounts or adjust-ments. that will be distributed to the vendor’s unpaid invoices. Tabbing past the check amount displays the written amount, which can’t be edited. You can write a check for more than the vendor’s balance; if so, one of the vendor’s invoices will be overpaid. When the online pay-ment is posted, the vendor will
have a credit balance. Later, this credit balance can be ap-plied to upcoming invoices.
9 The auto-allocate option will automatically pay off the ven-dor’s oldest invoices first. Using this option saves time when paying off many invoices for vendors like Federal Express, who send many invoices during the month. Even with the auto-allocate option, you can still change which invoices are paid with this online payment.
10 The memo describes the payment’s purpose (e.g., pay-ment on account, credit, etc.) on cash reports and G/L reports. A default memo can be set up on the vendor account. The memo is user-defined, and can be changed later.
11 This checkbox controls if this check will be included in the total amount printed on the 1099 for this vendor. It will be checked by default if this vendor is set to include checks and online payments on the
Job Cost Checks
1099 (Setup > Vendors, then select this option setting in the Account Info window).
12 Click on an invoice to select it for payment. 13 If your vendor offers dis-counts for early payments, you can enter them when applying the payment amount. Discounts decrease the invoice’s bal-ance due, just like a payment amount. The debit to A/P in the General Ledger will be the amount of your discount plus the amount of the check. You can enter discounts on any invoice, without limitations. The credit goes to the early-payment discount account. 14 The dGL is the invoice’s Accounts Payable (i.e., its cGL), and is copied from the invoice itself -- not your G/L prefer-ences.
15 The unallocated payment amount is the total that has yet to be paid to balance the amount you’re paying the vendor.

4-54
Overhead Expense Checks
Writing checks for overhead expenses is similar to writing checks for job costs. An overhead expense check can be distributed to many different expense G/L accounts.
Add Online Payment
1 Enter the cG/L—the credit G/L number—for the bank ac-count from which the check is written.
2 The bank account’s current account balance shows here for reference. The balance does not include unposted checks or deposits.
3 Each bank account has its own check numbering sequence, so the check is num-bered in sequence automati-cally. The next check number,
which you can set, is copied from the Chart of Accounts.
4 Handwritten checks aren’t printed during check runs. 5 The date shows when the check was added. It appears on the printed check. Reports select checks by date added or date posted.
6 A check can be written for any open accounting period. The period determines which month is updated when the
check is posted.
7 Overhead expense checks can be written to any payee. If the check is for a vendor, entering the vendor number will copy in the vendor name and address.
8 The check’s amount will be applied to the vendor’s unpaid payables. The written amount is calculated automatically as you tab past the dollar amount.
9 If the check only needs to
po
iu
te
wq
r
y
a
s
d f g
h
Overhead checks are written for expenses for which there are no vendors, such as onetime suppliers like delivery services. Otherwise, everything you’ll enter about an overhead expense check is the same—account number, check number, date, amount, accounting period, and a memo that describes the purchase.

4-55
be distributed to one debit G/L account, enter it into the dGL field here.
9 The check’s memo is a short description that appears on the printed check, checkbook reports, and on journal entries.
10 The check’s address is cop-ied from the vendor account, but can be customized. Chang-ing the check’s address doesn’t affect the vendor file. The year-end 1099 report uses this address on its printed forms.
11 The option to include on year-end 1099 report flags this check as a vendor payment for tax reporting purposes. The 1099 setting is copied from the vendor automatically.
12 The amounts on overhead expense checks can be split be-tween any number of different expense debit G/L accounts.
13 The dGL is the expense ac-
The only difference is overhead checks are written for expenses for which there are no vendors, such as onetime suppliers like delivery services. The distribution total must equal the check amount in order to be saved.
Add Online Payment
count that will be debited when this check is posted. If you’re not sure about a G/L account number, leave the field empty then press Tab. The Chart of Accounts lookup list opens, listing your G/L accounts. When you find the right account, double-click on it to copy it to this expense item.
14 This is the amount of the expense charged to the line item’s dGL.
15 Use the expense’s optional description to document what was being purchased. This description is added to the check’s debit JEs when it is posted.
16 The payment to go field shows the remaining check amount that needs to be distrib-uted in order to save the check. A check can be saved only when the total check amount matches the total net cost of the check line amounts.

4-56
Employee Advance Checks
Employee Advance Checks
o
p
i
u
yt
re
wq
1 Enter the cG/L number for the bank account from which the employee expense advance check is written here. Each bank account has its own check numbering sequence, so the check is numbered automati-cally.
2 The bank account’s current account balance shows here for reference. The balance does not include unposted checks or deposits.
3 Checks are numbered automatically in sequence as they are added. The next check number, which you can set, is copied from the Chart of Accounts.
4 Handwritten checks aren’t printed during check runs. 5 The date shows when the check was added. It appears on the printed check. Reports
a
select checks by date added or date posted.
6 A check can be written for any open accounting period. The period determines which month is updated when the check is posted.
7 Employee expense advances are written for active staff members only. Tabbing past the staff member’s initials will
Before writing employee expense advances, you must create a G/L account to track employee receivables. This account number, which is an asset, also need to be en-tered into your accounting preferences.
Clients & Profits X automates the entire process of employee expense reporting. There are two parts to employee expense accounting: (1) writing the expense advance check, then (2) adding the employee’s expense report. The expense advances are added in the Checkbook, while the expense reports at added in Expense Reports.

4-57
automatically copy in their name and address from the staff file.
8 The amount of the advance is the amount that will need to be reconciled with an employee expense report in Accounting > Expenses.
9 The dGL account should be the employee receivables G/L account.
10 The memo is a short description of what the advance is for. It appears on the printed check, checkbook reports, and on journal entries.
11 The check’s address is cop-ied from the staff file, but can be customized. Changing the check’s address doesn’t affect the staff file.
Employee Advance Checks
Before writing employee expense advances, you must create a G/L account to track employee receivables. This account number, which is an asset, also need to be en-tered into your accounting preferences.

4-58
Printing Checks
Printing Checks
Checks can be printed to any laser, inkjet, or dot matrix printer. Printing checks on laser printers is faster, cleaner, and less troublesome. Laser print-ers are very easy to load with check forms, and rarely jam like dot-matrix printers. (There are no form-feeds to remove from laser checks, too.) Ink jet printers have the same advantages as laser printers, but can be slower. The only disadvantage to printing checks on laser or ink jet printers is that they can’t print copies. The only way to get copies of printed checks is to print a separate set of checks on plain paper after they are printed on check stock.
■ If you need copies of checks, try this: instead of reprinting checks on plain paper, consider making photocopies of the actual signed checks. Not only will you have a hard-copy of the check to attach to invoices, but you’ll have a copy of the signature, too.
Your check stock should be preprinted with a check number. When a check is printed, the check number will be printed from Clients & Profits X beneath the preprinted number. For better account-ability, these numbers should match. This means you should print checks in the same order as the pre-printed checks. If a check jams, you should renumber the check in the Checkbook then re-print it using the next check number.
■ The check stock used by Clients & Profits X is easily available from Deluxe Business Systems. If you order checks from a bank or a third-party supplier, the alignment cannot be guaranteed—use them at your own risk. Be sure to test print several checks on your check stock before accepting them. Note: checks are not customizable.
■ Clients & Profits X will remember the check form you selected last time checks were printed.
■ Consider dedicating a printer just for printing checks. Sharing the same printer with other users, especially graphic artists, can cause problems (it’s very easy for them to accidentally print something while you’re printing checks).
To renumber misprinted checks
When a batch of checks misprints, they need to be voided, reentered, then reprinted on fresh check forms. The Renumber tool does it all in a single step: it voids the batch of checks then reenters exact copies of the checks, giving them brand-new check numbers. A complete audit trail of the voids and new checks will be posted to the General Ledger, and none of the
renumbered check JEs are affected.
1 Find the check you wish to renumber.
2 Choose Edit > Check Tools > Renumber Checks.
3 Enter the checking G/L account, then the range of check numbers to renumber.
4 Enter the starting num-ber for the new batch of checks, then click OK.
Ordering checks
Clients & Profits X uses standard laser-compatible check stock. You can order checks from Deluxe Business Forms by calling (800) 328-0304 (see below). If you order checks from a bank or a third-party supplier, the alignment cannot be guaranteed—use them at your own risk. Note: checks are not customizable.
Print checks any time. Checks can be printed individually or in batches for a range of check numbers. They can be printed at any time, but should be posted first.

4-59Printing Checks
The Printed Check

4-60
Checkbook Reports
Checkbook Reports
Cash disbursement reports summarize checks, showing what you’ve paid to vendors (using the payee field), jobs and tasks, and G/L accounts.
Checkbook reports can be used for reporting overhead expenses, tracking payments to vendors, and auditing your accounting. There are several differ-ent reports that show your cash disbursements from various perspectives; all reports, however, are based on posted checks.
Checks (including vendor credits) can be summarized for any period of time (choos-ing either check date or date posted), for one period or all periods, and for one payee or all payees. These options let you find the checks for a specific payee, such as the year’s payments for a freelancer.
Checkbook reports show only posted checks; unposted checks appear only on proof lists. You can print check-book reports to the window (for a quick on-screen pre-view), the printer (for a hard copy), or to disk (to create a text file that can be opened and edited in a spreadsheet).
■ Cash disbursement reports are different from A/P reports, since they show only the payments, and not the invoice’s job costs. They show you what you paid to vendors. But they don’t show what the invoices originally bought.
Tips for printing checkbook reports
■ Cash reports select checks by date added (i.e., check date) or date posted. This option lets you show only checks added in July, for example, instead of the entire year. By entering a range of dates, you can select all checks added today, last week, or all month—whatever time period you need. There’s no limit to which range of dates you can use.
■ You can print checkbook reports to the window (for a quick on-screen preview), the printer (for a hard copy), or exported to disk (to create a text file that can be opened and edited in a spreadsheet).
■ To show the check description (i.e., memo), click on the show description option. This option makes your check reports longer, but more descriptive.
To print checkbook reports
1 Click the (i.e., Print Reports) button, or choose File > Print Cash Reports.
2 Select date added or date posted from the From pop-up menu, then enter a range of dates. 3 Select an accounting period, or choose All Periods to see checks by date only.
To see invoices for one accounting period only, regardless of date, choose a period from the pop-up menu then enter a very large range of dates (e.g., 11/1/08 - 12/31/08).
4 Enter a payee (i.e., paid to) name, or leave the selection as ALL.
5 Enter a checking account’s G/L number to print checks for a specific checking account, or leave the field blank to select checks for all accounts.
6 Select the report you wish to print.
7 Click Print.
Printing cash reports. Check-book reports can be printed to the screen, the printer, to the computer’s Clipboard, or exported to disk using the Print to pop-up menu. Any report exported to disk can be opened and edited in a spreadsheet program like Microsoft Excel.

4-61Checkbook Reports
Checkbook Reports
This check register lists checks sorted by type (i.e., checks, vendor credits, etc.) then by check number. A new page prints for each type of check. The report does not include job cost or vendor payment details.
This check register lists checks sorted by payee then by check number. The report does not include job cost or vendor payment details.
The Voided Checks report is a check register listing voided checks only.
This report provides a detailed listing of checks, including job costing and vendor payment information (i.e., line items).
The Checkbook Summary shows only check line items (i.e., job costs, vendor pay-ments) and is used for auditing.
This report lists employee expense advance checks only.
Check List (Checks by Type)
Check List (Checks by Payee)
Voided Checks
Cash Disbursement Journal
Checkbook Summary
Employee Advances
Lists
Journals
Analysis

4-62
Bank Reconciliation
There are two parts to bank reconciliation: selecting the bank account, then choosing which entries have (or haven’t) cleared. The first step involves entering the G/L account number and the bank statement’s ending balance. Clients & Profits X lists the account’s uncleared checks, client payments, and adjusting entries from the General Ledger. Un-cleared items (or cleared items; it’s your choice) are marked as cleared until the account balance is correct—then the entries are saved.m Reconciliation doesn’t affect your G/L or checking accounts.
w
e
tr
q
1 This is the G/L account num-ber that you want to reconcile. Your default checking account number will be automati-cally copied in, but it can be changed.
2 The statement ending date is the date that is on your actual bank statement.
3 The statement ending bal-ance is the amount on your bank statement that the bank has specified as the ending bal-ance amount.
4 The clear all entries option will mark all entries as cleared automatically. It should be used if most of the account’s items are likely to be cleared, which saves time. Otherwise, leave it unchecked to manually clear the account’s entries.
5 To save time the show depos-its by batch number option can be selected. It will group the deposits from one batch into a single line item.
Bank Reconciliation
Any bank account can be quickly reconciled with your monthly bank statement using the Reconciliation function. Clients & Profits X reconciles bank accounts separately, so you’ll enter one account’s balance at a time.

4-63Bank Reconciliation
1 Click the print button to print one of three bank recon-ciliation reports: Outstanding Items Only shows entries that have not been marked as cleared. Cleared Items Only shows all entries that have been marked cleared. Bank Reconciliation Worksheet (Out-standing and Cleared Items) shows all entries listed in the bank reconciliation window with their transaction amount and outstanding amount. 2 This is the name of the checking account being recon-ciled.
3 The ending date is shown for reference. It doesn’t affect how entries are reconciled.
4 The account’s uncleared client payments and bank deposits are listed by refer-ence number. Payments can be sorted by clicking on the column headings. If the entry hasn’t cleared, click on it to re-move the “X”—the entry won’t be cleared when the reconcilia-tion is saved.
5 The total amount of out-standing payments changes as payments are cleared.
6 The account’s uncleared checks are listed by check number.
7 This is the amount of out-standing checks remaining.
8 The account’s uncleared JEs are listed by reference number along with the date and amount.
9 The outstanding JEs are totaled here.
10 When the difference equals zero, the account is reconciled and can be saved.
q
w e
r
t
y
u
i
o
p
The bank reconciliation is precise—your account balance must equal the ac-count’s outstanding items exactly or it can’t be permanently saved.

4-64
Expense Reports
Expense Reports
Expenses are job costs that you incur while getting work done: faxes, computers, scanners, CDs, telephone calls, videotapes, color output, mat board, etc. They aren’t payables, since there isn’t an invoice. And they aren’t checks, since you’re not actually paying for them. Expenses are unique because you’ve already paid for them in the course of running the agency, so there’s no check to write or invoice to add.
There are three kinds of expenses: in-house expenses, employee expense reports, and internal charges.
In-house expenses: In-house expenses include charges for supplies and services such as telephone calls, faxes, and other out-of-pocket costs. Unlike vendor purchases, in-house expenses charge clients for services that the agency has already paid for, like fax machines. By tracking these expenses, you’ll be able to recover some of your overhead expenses for commonly-used equipment and supplies.
Employee expense reports: Employees with expense advances can enter their own expense reports on-line, tracking the inci-dental costs such as parking, travel, phone calls from home, etc. to client job and tasks. Expense reports are automatically reconciled with the employee’s expense advance check. Employee expenses can be billed at their actual cost or marked up.
Internal charges: Shops with in-house output, duplication, and production equipment can set up a price list for every kind of internal charge they’d bill to a client (e.g., videotapes, slides, film output, pre-press, etc.). The Internal Charge Items table keeps a detailed listing of items and their prices, which are then used for expense tracking. Charges for internal items can be charged to any job and task, including quantities, which then appear job cost reports—and eventually on the client invoice.
Expenses can be added in batches for the same equipment. They can be added, changed, and deleted freely (until they are posted). Expenses appear on job cost reports along with time, vendor invoices, and checks.
In-house expenses and the General Ledger
In-house expenses and internal charges don’t affect the General Ledger. They only update jobs and tasks. Journal entries are not created. Equipment like faxes or computer time are capitalized on your balance sheet already—so journal entries aren’t needed.
For example: A fax machine isn’t bought for one job. Instead, the agency bought it as office equipment, charging it to overhead. There are other costs
associated with a fax machine, like fax paper, maintenance, and depreciation, that are paid as overhead. If faxes are sent on a client’s behalf, all of these costs need to be charged to a client’s job and task. Your financial statements already show the cost of your faxes, so the cost shouldn’t affect the General Ledger. But the costs need to appear on the job tickets so they can be billed. This is what’s special about expenses—the Expenses window lets you track out-of-pocket expenses to jobs and tasks without creating G/L journal entries.
In-house expenses and internal charges do not appear on audit trails, journals, or financial statements. Instead, they appear only on job cost reports.
The only exception, however, is employee expense reports. They do affect the General Ledger in order to reconcile the employee’s expense advance. The employee advance check is recorded as a prepaid expense (an asset) in the General Ledger. Employee expense reports move this amount to the appropriate expense accounts.
Approving expenses
Approving an employee’s expense report updates job tickets. When a staff member
adds an expense report, its entries are saved as unapproved entries. Unap-proved expenses can be easily edited or deleted, letting the staff member or supervisor change them before its jobs are updated. Unapproved expenses don’t appear on job, cost, or financial reports. This offers users an opportu-nity to proof their work before posting.
Expense reports must be approved by any Clients & Profits X with the right access privileges to approve them. Each day’s expense reports are approved in whole, so certain expenses can’t be approved individually. are approved. (Approving expense reports daily posting ensures that your job, cost, and expense reports are timely and accurate.) Expense reports can be approved while others are using Clients & Profits X; however, other users may notice slower performance and possibly temporary padlocks.
If an expense is approved by mistake, or otherwise needs to be changed, it can be unapproved by un. Unposting reverses the updates made during posting: the cost is removed from the job and task. Once an expense is unapproved, it can be freely changed then approved again.

4-65Expense Reports
The Expense Reports window
1 The previous and next buttons can be used to find expense reports for a different day.
2 Use these toolbar buttons to add, edit, remove, and delete expense reports. Click the add button to add an expense report. To edit an expense’s description, click on the edit button. To remove an expense item from the expense report, click on the remove button. To delete the entire expense report, click the delete button.
3 Click on the approve button to approve on-line an expense. Once approved, an expense can’t be deleted. To reimburse
the staffer, first approve the expense report, then click the reimburse button to open the Expense Reimbursement window. From there, you can either reduce the balance on an already-issued expense advance check, enter a new reimburse-ment check, or (if the employee owes you money) add a staff payment.
4 To print expense reports, click the print reports button.
5 Expense reports can be found for one user at a time for a specific date. Enter in the user’s initials and the date you want to find an expense report for here. Or you can use the
q r
y
u
find more link to find expense reports.
6 Expenses are listed by date with their category, job, task, net cost, and description. The date shows when the expense occurred. The what describes the kind of services or supplies used by the expense. Every expense is charged to one job and task. The net cost amount shows what the expense cost the agency, before markups and commissions. The expense’s de-scription explains or documents why the expense was needed.
7 An expense listed with an “X” is an approved expense item.
w e
t

4-66 The My Daily Expense Report window
1 Use the previous and next buttons to see expense reports for sequential days.
2 As long as an expense hasn’t been approved yet, it can be removed using the remove expense button. The clear expenses button will delete the entire expense report.
3 To print this expense report, click the print button.
4 Find an expense report for a specific date by entering it in the show date field then click-ing find. The day of the week is shown for reference.
5 To see detailed informa-tion about a line item on the expense report, click the show cost notes button.
6 If the expense line item has been approved, an X will appear here.
7 The category column lists a general description of what the expense was for, such as mile-age, tolls, meals, etc.
8 Every expense is assigned to a job for accurate job costing. Every expense is charged to one task.
9 The expense description is a brief note explaining the expense. For details, click the show cost notes button.
Before writing employee expense advances, you must create a G/L account to track employee receivables. This account number, which is an asset, also need to be en-tered into your accounting preferences.
q w e
r
t
y
u i o p
The My Daily Expense Reports Window

4-67
10 The cost column shows the net amount of the expense (the shop’s cost before markup).
Employee expense advances are tracked on financial statements, as well as on a check report. These reports make it easy to manage expense advances. The checks issued for advances can be reconciled to the employees’ expense reports. This lets you track the advances to the employees and accurately distribute them to the correct job or expense account.
The My Daily Expense Report window

4-68
Internal Charges
Internal charges are out-of-pocket expenses that you charge to a client on a per-unit basis. You can track thousands of different items with different price combinations and sizes.
e
tr
Internal Charges
Each item is identified by an item code and a size code, so that thousands of different internal charge items can be added to the Internal Charge Items Table.
1 Internal charge items can be added, edited and deleted at any time using the add, edit, and delete toolbar buttons.
2 Internal charge items can be easily exported and imported from other applications by clicking on the export and import buttons.
3 A printout of the Internal Charge Items Table can be printed by clicking on the print button
4 The item code identifies the
item in general (i.e., film, CD-ROM, slides, etc.).
5 Each item is added for a size to further identify it on internal charges.
6 The description describes the particular item and size combi-nation, and appears on job cost reports and the Internal Charge price list.
7 A default task is used to indicate what task is most com-monly associated with this kind of internal charge item. This
task will be copied to internal charge expenses when added, but can be changed.
8 The unit of measure is for reference only, and is optional.
9 The unit cost is usually the average cost needed to produce the internal charge item.
10 The gross amount is the retail price of the item, which the client will be billed.
y u i o p
q w

4-69Internal Charges
1 Use the previous day and next day buttons to view internal charges for consecutive days.
2 Click the add button to enter internal charges. Click edit to change the selected charge (or double-click on the charge). To remove a single internal charge, click on the charge then click remove. To delete all of the day’s internal charges, click delete.
3 Click print button to print an internal charges list for a date range, period, or charge item.
4 Click find to search for inter-nal charges added on a certain date.
5 Click internal charge items to see the Internal Charge Items table. With the right access privileges, you can add, edit, and delete an internal charge items.
6 The day’s internal charges are listed individually by job and task.
7 Each charge entry includes the date when the internal
charge occured, the internal charge item and size, job and task, quantity, and cost and gross amounts. The charge’s cost amounts appears on job costs reports. The charge’s gross amounts are billed to the client.
8 The optional description field (or cost note) is used to docu-ment how and why this internal charge was used. These de-scriptions, like other cost notes, appears on job cost reports and on the client invoice’s billing details reports.
q w e
rt
y
u
Internal charges account for equipment and services already paid for through overhead expenses, so adding internal charges doesn’t affect the General Ledger.
Each internal charge item has a standard price, but it can be changed when the item is entered. This makes it easy to charge different clients different prices.
i

4-70
1 Click add to enter a new job cost transfer. To erase a job cost transfer that hasn’t been saved and start over, click the clear button. To transfer all of the job’s costs in a single step, click the move all button. Click print report to get a hard-copy printout of the costs being transferred. The list can be used to proof the entries before they are saved.
2 The memo can be used to document why these costs were being transferred. The memo
is appended to the default description that Clients & Prof-its X adds to job cost transfer entries. These notes appear on job cost reports.
3 Enter the from job number as the job from which the costs will be transferred. Tabbing past this field lists the job’s unbilled costs—these are the costs that can be transferred.
4 Enter the to job number as the job to which these costs will be transferred.
q
w
e r
t
y
i
5 Double-clicking on a job cost moves it from the from job list to the to job list. The job cost transfers isn’t permanent until you click Save, so it’s easy to undo a cost transfer.
6 Click the move to button to move a cost from the from job to the to job. Clicking the move back button transfers the cost back to its original job.
7 The costs that will be trans-ferred appear here. To move a
Job Cost Transfers
Job Cost Transfers
Every transfer can move both a cost amount and a gross (i.e., billable) amount. However, you should move only the gross amount to keep your job cost totals more accurate.
Costs can be easily transferred between jobs and tasks. Costs transfers are always added in pairs: you’ll enter the job and task from which the cost is being transferred, then the job and task that will get the transfer. Any cost and gross amount can be transferred, up to the total unbilled cost amounts on the job task. Otherwise, there’s no limit to how costs can be transferred.
u

4-71
Hours are not moved when a time cost is transferred; only the cost and gross amounts are transferred. Instead, add adjusting time entries to move hours between jobs.
Job Cost Transfers
job cost back to its original job, double-click on it.
8 The transfer net amounts only option moves the costs’ net amounts along with the gross amounts to the new job. This option removes the costs entirely from the original job, but should be used with cau-tion. Usually, you’ll only want to move the gross (i.e., unbilled) amounts so that the original job shows its true cost. Transfer-ring only the billable amount keeps the job’s total cost ac-curate, which keeps profitability reports more accurate, too.

Media

5-2
Chapter 5 MEDIA
5-4 Overview5-7 The Media Menu5-8 Media Work Flow5-10 Media Calendar5-12 Media Briefs (Campaigns)5-14 Media Estimates5-16 Broadcast Media Plans5-18 Print Media Plans5-20 Insertion/Broadcast Orders5-22 Adding Broadcast Orders5-24 Adding Insertion Orders5-26 Adding Interactive Orders5-28 Adding Outdoor Orders5-30 Media Traffic5-32 Stations5-34 Publications5-36 Make Goods5-37 Media Billing Goals 5-38 Media Reports5-40 Media Link

5-3
Clients & Profits X has built-in full-featured media planning, buying, and tracking capabilities. These media functions seamlessly integrate with job tickets, job cost-ing, and client billing. The media system lets you build detailed broadcast, print, in-teractive, and outdoor media orders based on TV, newspaper, magazine, and alterna-tive media buys, as well as simple media estimates. Clients & Profits X keeps a list of publications, media companies, and stations, as well as the available ad sizes and program times that are most commonly used. By using these lists, you can create media plans with little rekeying. In this chapter you’ll learn about:
■ creating lists of stations/programs and publications/ad sizes■ adding broadcast and print media plans■ adding and printing media estimates■ making insertion and broadcast orders automatically from plans and estimates■ adding and printing broadcast orders and insertion orders■ tracking materials due and space closing dates■ printing media plans, estimates, and reports■ automatically import media buys from SmartPlus, Strata, and TAPSCAN
For help using any part of Clients & Profits X, click the button from any
window to open the on-line user guide. This web-based user guide features
step-by-step instructions, explanations, tips, demonstrations, and links to
FAQs, tech notes, and tutorials from www.cnp-x.com/support. The web site is
continually updated, so it’s more timely and helpful than a printed user guide.
Introduction

5-4
Overview: How Clients & Profits X Manages Media
How Clients & Profits X Manages Media
The media functions in Clients & Profits X are designed to replace the database or spreadsheet-based custom systems that most shops now use to plan, buy, and track media. It doesn’t try to replace high-volume media buying systems like SmartPlus, TAPSCAN, or Strata. Instead, it is designed for shops that buy a relatively small amount of media—and whose planning and analytical needs are simple.
Although it can create broadcast buys, Clients & Profits X is optimized for print media planning, buying, and tracking. It works best in shops that primarily buy business-to-business media, instead of consumer broadcast media. That’s because it doesn’t import and process ratings data from media services like Nielsen and Arbitron. Instead, you’ll set up and maintain your own station, publication, program, ad size, and rate information. It’s a big job to maintain these files, so it’s only practical if the number of media plans you do is small.
There are two ways to buy media with Clients & Profits: media plans and media estimates. Media plans are elaborate and automatically lookup ad rates, while media estimates are simple and added manually. They both print a professional-looking report for your client to sign, authorizing your media buys. Otherwise, they have different purposes.
Media estimates vs. media plans
Media plans use the station and publication data (which you’ll set up) to automate the planning process—so there’s no rekeying information from the rate table to the media plan. Media estimates skip the planning process—in-stead, you’ll simply type in the details about the media buy each time you need one. There are also specially-designed media windows and forms for broadcast and print plans.
Media estimates, however, are free-form. You can customize the information on media estimates as needed. Every media estimate you do could conceiv-ably have different labels and headings, depending on the different kinds of media that you buy. Since there’s less to set up, creating a media estimate is much faster than creating a media plan (which may be reason enough to use them).
If you don’t need a planning system, or use another system (like a spread-sheet or Tapscan) to plan your buys, consider using only media estimates. Once the media estimate is added, it can easily create insertion orders automatically without rekeying. This saves lots of time and effort, as well as keeps your insertion orders more accurate.
Publications, ad sizes, and contract rates
The Publications/Ad Sizes/Contract Rates window lists the publications you most commonly use, as well as the various ad sizes available for each publication. Each publication can have dozens of ad sizes, each with details about its position, commission, space close, and materials close dates. These production specifications are carried over to the media plan and to media
reports, for easy reference. Each publication ad size has a standard rate. In addition, you can set up contract rates for each client. This option lets you specify special ad sizes and rates that are only available to a client. So when a print buy is added for a particular publication, the client’s special rate will be used instead.
Stations, programs, and contract rates
The Stations/Programs/Contract Rates window lists the stations you most commonly use, as well as the programs/times for each station. You can enter a virtually unlimited number of stations. And each station can have hundreds of different programs and times. A station can have a set of programs, each with its rating and a standard cost. Or, you can set up contract rates for spe-cific programs and clients. Each client can have its own table of contract rates for each station. So when a broadcast buy is added for a particular station, the client’s special contract rate will be used automatically.
Insertion orders, broadcast orders
Insertion orders can be added manually into the Insertion Order window, or created automatically from print media plans or media estimates. When creat-ed automatically, there’s no rekeying—the media buy’s publication, ad name, position, cost, and other details are copied directly to the insertion order. You can make insertion orders from media plans and estimates on demand; the entire process takes less than a minute. Once the insertion order is saved, you can review it, make changes, then print it for the publication.
Broadcast orders can be added manually into the Broadcast Order window, or created automatically from broadcast media plans. When created automati-cally, the media buy’s station, rating, number of spots, and other details are copied directly to the broadcast order. Once the broadcast order is saved, you can review it, make changes, then print it for the station.
Interactive orders, outdoor orders
Clients & Profits X can print interactive orders specifically designed to buy on-line advertising. Outdoor orders are designed especially for buying media space on billboards, buildings, and other out-of-home locations. Interactive and outdoor orders are added like print and broadcast orders; they get job numbers and job tasks, are costed from vendor invoices added in Accounts Payable, and can be billed in one step in Accounts Receivable.
Media estimates
If you buy mostly print media (magazines and newspapers) for your clients and you’re planning needs are basic, use a media estimate. Adding a media estimate is similar to adding a job: the media estimate has a number, a client, a description, and line items just like a job has tasks.
Media estimates are very customizable. Each media estimate has five column labels (e.g., publication name, issue date, close date, ad caption, and ad size)

5-5Media Features
Clients & Profits X features an integrated media calendar. The calendar, which convenient-ly appears whenever users work with media, lists upcoming space closing and material due dates as well as user-defined calendar “tickler” entries. These scheduled entries can be automatically e-mailed to media planners, buyers, and vendors.
The names, addresses, and phone numbers of the most commonly-used publications and their various ad sizes (including prices) can be set up before adding print media plans. The information entered for each publication and ad size is copied automatically to new print plans, saving time and reducing data-entry errors. The publications table can be updated any time as information changes.
The Stations table lists the name, address, and account details for hundreds of different radio, television, and cable stations. The Times/Programs table contains descriptions and costs of the time slots offered by each station. This information is used automatically by broadcast media plans, and is copied to broadcast orders.
Simple, quick media estimates can be created for clients showing them a schedule of media buys for any number of publications or stations. The printed media estimate looks like a job estimate, and includes a client approval signature line. Insertion orders can be made automatically from media estimates.
Detailed broadcast media plans can be created that show scheduled radio, television, cable, buys, including the number of spots, rating, cost per point, and more. Broadcast orders can be generated directly from broadcast media plans.
Complete print media plans can be made that show schedule ad placements for daily newspapers, weekly periodicals, or monthly magazines. Insertion orders can be created from print media plans without rekeying.
Orders can be created automatically from broadcast and print media plans. Orders can be placed any time using the information already saved on the media plan, saving time and eliminating rekeying errors. Orders are saved directly in the Media Orders table, where they can be proofed, printed, then billed—without retyping.
Once insertion and broadcast orders are created from media plans, they can be easily and quickly billed. Orders can be pre-billed directly from the Insertion/Broadcast/Interactive/Outdoor Orders window (choose Edit > Pre-bill) one-by-one, or billed together in batches by client in Accounts Receivable. Insertion and broadcast orders remember the client’s invoice number, so it’s easy to keep track of unbilled media.
Media accruals for work in progress are posted automatically from media billing. The net cost of the insertion or broadcast order is used for accrual journal entries, which update a special WIP accrual G/L account. When the media vendor’s invoice is entered, it reconciles the actual cost of the media with the accrued cost then makes the automatic reversing entry.
In Accounts Payable, the actual number of broadcast spots or ad placements is reconciled with the planned spots from the insertion or broadcast order. Each order keeps its own running balance of planned cost vs. actual cost, making it easy to bill clients accurately.
The built-in Media Link imports broadcast orders from MRP’s SmartPlus, TAPSCAN, and Strata. Imported buys appear automatically in the Broadcast Orders window, where they can be billed like other broadcast orders. A “standard media interface” lets any other media buying system export buys to Clients & Profits X using a simple-to-program import file format.
Media Calendar
Publications/ad sizes/media companies tables
Stations/programs tables
Media estimates
Broadcast media plans
Print media plans
Insertion orders, broadcast orders
Media billing
Media WIP accounting
Media reconciliation
Importing SmartPlus, TAP-SCAN, and Strata media buys
Media Features
Feature How it works, how it’s used

5-6
Overview (con’t)
How Clients & Profits X Manages Media
that you can change for different kinds of media buys. You can enter a long description, a campaign code (for post-buy tracking), a standard disclaimer, and up to three approval names. These details appear on the printed media estimate.
Media estimates don’t affect job tickets until the insertion orders are created.
Print and broadcast media plans
On the media plan for a client, enter a plan number, name, and other details, then add separate buys for each station or publication.
Print media plans can be set up for monthly, weekly, or daily publica-tions. For magazines, these periods can represent months during the year. For newspapers, they can rep-resent different weeks. Since these periods are customizable, they can handle any kind of time range; how-ever, the periods you enter apply to every buy on the media plan.
Adding media buys is like adding tasks to jobs. You’ll enter the pub-lication or station code, which behaves like the task code. You can see the publication’s ad sizes (or the station’s programs/times) from a pop-up Lookup List. Double-clicking on an ad size (or program) enters it onto the media plan. Most importantly, the rate is copied to the media buy automatically. For broadcast buys, you’ll enter the number of times the spot will run—and the total cost and rating points are calculated automatically. You can add many different buys for many different publications (or stations) onto the same media plan.
When the media plan is printed, the buys you’ve entered are grouped together by publication (or station).
Media billing
There are two ways to bill media in Clients & Profits: pre-billing an individual insertion (or broadcast) order or summary billing one or more orders.
An insertion or broadcast order can be easily and quickly pre-billed directly from the Insertion/Broadcast Order window. It’s simple: find the order, then choose Pre-bill Order from the Edit menu. The order’s details are copied in-stantly to a special pre-billing invoice. The invoice is numbered automatical-ly. You can see pre-bill invoices on the proof list, make any needed changes, then post them. Once posted, the pre-bill invoice information updates the
insertion or broadcast order so it can’t be billed twice.
It’s also easy to bill many insertion or broadcast orders at once. The media billing option in Accounts Receivable displays a window listing the client’s unbilled insertion or broadcast orders. You can select one, many, or all orders for billing by clicking on the checkbox next to the order line item. The media billing invoice has a different layout than regular job billings; it shows the
publication or station, ad name, ad size, issue date, and gross cost.
Media preferences
Your media preferences let you standardize some of the information seen on insertion and broadcast orders. This information, such as the disclaimer, logo, and print copies are copied to orders automatically to save time. You can even order media under a different name and address, which is ideal for in-house agencies. You can customize how insertion and broadcast orders are automatically numbered, including entering the next order number.
Media and the General Ledger
There is no direct link between media plans and the General Ledger. Adding a media plan doesn’t affect jobs. The job ticket is updated when an insertion or-der is created from a media plan; the job task’s Net and Gross total increases to show that you’ve ordered something. Insertion orders, like purchase orders, don’t affect the General Ledger either. The General Ledger is only affected when the station or publication’s invoice arrives or the insertion is billed.
You can account for insertion orders made during the month with general journal entries to a media G/L account. A list of insertion orders added during the month can be printed from the Media Reports window; this total would be added as a journal entry, then reversed next month. The difference between the month’s insertions is your actual media cost.

5-7The Media Menu
The Media menu
1 The Media Calendar displays all of the month’s space clos-ings (from media plans and es-timates) and material due dates (from insertion and broadcast orders).
2 Media Briefs are like creative briefs for media plans and estimates. They organize the objectives, goals, and budgets for a client’s media buys.
3 Media Estimates are simple summaries of the media buys that you place for a variety of publications and a range of dates. It’s the quickest way to show a client all of the buys you plan to make on their behalf.
4 Broadcast Media Plans are used to make detailed plans of spot tv, cable, and radio ads
for a client media campaign. Broadcast plans can be created for any broadcast month and can contain buys for dozens of different stations.
5 Print Media Plans are used to make detailed plans for space buys in magazines, news-papers, billboards, and other print media. Print plans can be created by day, week, month, or year.
6 Insertion/Broadcast Orders take buy details from estimates and plans to create orders for media vendors. Media orders can also be added directly, bypassing the media estimate and media plan steps. They update jobs and tasks, and are the start of the job costing and billing process.
q
w
e
r
t
y
u
io
p
7 The Media Traffic window lists space reservation deadlines and dates for materials due by week for the next four weeks.
8 The stations table lists media stations and their times and programs. Both are used on broadcast media plans and orders.
9 The publications table lists media publications and their space buy details (such as ad size). Both are used on print media plans, media estimates, and insertion orders.
10 The optional Media Billing Goals window lets you plan a year’s worth of billings by type of media (e.g., broadcast, interactive, etc.) for all clients. Media analysis reports will compare actual media billing with these goals.

5-8
Media Work Flow
Media Work Flow
TV / RADIO / CABLE
1. Add stations, programs, and cli-
ent contract rates
2.Add broadcast media plan
3.Add media buys for broadcast
plan
4.Print the broadcast media plan
for review
5.Make revisions, then print the broadcast media plan for client
approval
6.Print station’s broadcast work-
sheet
7.Make broadcast orders
8.Pre-bill the broadcast orders
or create a Media billing
MAGAZINES / NEWSPAPERS
1. Add publications, ad sizes, and client
contract rates
2.Add print media plan
3.Add space buys for print plan
4.Print the print media plan for review
5.Make revisions, then print the
print media plan for client approval
6.Make insertion orders
7.Pre-bill insertion orders or
create Media billing

5-9Media Work Flow
INTERACTIVE
1. Add media companies and stan-
dard, client contract rates
2.Add interactive media estimate
3.Print the interactive media esti-
mate for client review
4.
Make revisions, then print the final media estimate for client
approval
5.Generate the interactive media
orders from the estimate
6.Pre-bill the interactive orders
or create a media billing
OUTDOOR
1. Add media companies and stan-
dard, client contract rates
2.Add outdoor media estimate
3.Print the outdoor media estimate
for client review
4.
Make revisions, then print the final media estimate for client
approval
5.Generate the outdoor media
orders from the estimate
6.Pre-bill the outdoor ordersor create a media billing

5-10
w e
Media Calendar
Media Calendar
1 Use the calendar pop-up menu to choose which calendar to add the media calendar entry for.
2 Date and time tells when the media event will happen.
3 Location describes where the media calendar entry will happen.
4 The action/event is a short description of the media event. It will appear on the Media Calendar window, so it should be meaningful to other users.
5 Use the description field to further describe the details of the media action/event.
6 You can determine the importance/urgency level of the media event using the priority pop-up menu. In the Day-at-a-Glance Calendar, each media event will be designated as high, normal, or low priority with a colored icon (red for high, yellow for normal, and green for low) so users can eas-ily see the priority level.
q
r
t
y
u
i
o
p
Media calendar entries keep track of important media dates. Tickler entries can be scheduled for any future date and can be automatically e-mailed when they’re due.
The Media Calendar window is a useful tool for managing media. Media calendar entries can be entered at any time to help users remember important media-related dates, such as client presentations, vendor meetings, confer-ences, and planning sessions. Double-clicking on any date in the Media Calendar window will open the Day-at-a-Glance window. This special window shows a listing of all the calendar entries for the selected date with their priority level conveniently color coded. To view all the details of a calendar entry, just double-click on it.
7 Specify an automatic lead time warning e-mail in days prior to a media action/event.
8 A media calendar entry can be added for any client.
9 A status can be assigned to the media calendar entry.
10 The added by field shows the initials of the person who added this media calendar entry.

5-11Media Calendar
q w e
r
t
y
1 Use these toolbar buttons to scroll through the previous and next months of the media calendar.
2 You can create a media calendar entry by clicking on the add button.
3 To get a hard-copy printout of the media calendar, click on the print calendar button.
4 Enter a date here to find media calendar entries for a specific date. To jump to today’s
media calendar entries, click on the show today link.
5 Use the month and year pop-up menus to choose which month of the media calendar you want to view. The media calendar allows you to create entries for three years.
6 Click on a date in the Media Calendar window to open the Day-at-a-Glance Calendar. This window will allow you to view the details of a media calen-dar entry, as well as add new entries.
The Media Calendar keeps your media staff informed by letting them see at-a-glance what important media events are fast approaching.

5-12
q w e
r
t
u
Media Briefs (Campaigns)
Media Briefs (Campaigns)
A media brief is a worksheet that the media department can use to define and document the media process your agency follows to purchase media. It helps outline what needs to be accomplished by the media purchased; they fo-cus on what needs to be done to start buying media; and track the necessary, minute details of the media buying pro-cess. The media brief can be printed with all its important planning details to be distributed to the AEs and clients.
Use media briefs to keep the media department and the AE’s on the same page about media planning, ordering, targeting audience, budget, etc.
1 Media briefs can be easily added, cloned, edited, and deleted. To add a new media brief, click on the add button. Or use the clone button to clone a media brief into a new one. Cloning copies all of the details from an existing media brief, then lets you edit it. To change the media brief’s details (i.e., target group, objective, media budget, etc.), click on the edit button. Media briefs are flexi-ble so they can be edited at any time. To delete a media brief, click on the delete button.
2 To print media reports, click on the print reports button. To print a hard-copy printout of the media brief, click on the print brief button.
3 Click on a tab pane to switch between pending media briefs, killed media briefs, and ap-proved media briefs.
4 To find a media brief, enter a client code here.
5 Media briefs are listed in order by client. You can change
the sort order by clicking on any of the column headings.
6 Media briefs are displayed with their client code, campaign ID number, campaign name, start date, end date, and status. Double-click on a campaign to view its details.
7 The objective for a selected media brief appears here for reference.
y

5-13Media Briefs (Campaigns)
qw
er
t y u
i
1 Each media brief is entered for one client only.
2 The campaign ID code is usually a combination of the client code and a number.
3 The campaign name should briefly describe the campaign.
4 The start date and end date note when the campaign was opened and when it will close.
5 The media rep is the person responsible for planning and buying this campaign’s media.
6 Campaigns can be given an optional AE. Custom reports can analyze campaigns by AE.
7 The added by initials are the person who added this campaign.
8 An objective can be added to explain the primary goal of this campaign. It appears in the Media Brief window so it should be clear and meaningful to other users.
9 Use the details pop-up menu
o
Add a media brief to keep track of all your important details (i.e., target age, media schedule, supporting exhibits, etc.) for a campaign in one easy to find place.
p
a
to enter in the details for the campaigns target age, target gender, target occupation, target lifestyle, media recom-mendations, media schedule, and supporting exhibits.
10 A media budget can be entered for the campaign. It is broken out by media type (i.e., broadcast, cable, radio, etc.).
11 An optional status can be used to track campaigns from start to finish using the same Status Table as jobs.

5-14
Media Estimates
Media Estimates
q w e r t
y
The media estimate provides a simple way to show clients how and where their ads will be placed. There’s no limit to how many media estimates you can add for a client.
u
f
1 Use these toolbar buttons to scroll through the previous and next media estimates.
2 Media estimates can be eas-ily added, cloned, edited, and deleted. To add a new media estimate, click on the add but-ton. Or use the clone button to clone a media estimate into a new one. Cloning copies all of the details and buys from an existing media estimate, then lets you edit it. To change the media estimate’s key details (i.e., client, approvals, date,
commission, etc.), click on the edit button. Media estimates are flexible so they can be edited at any time. To delete a media estimate, click on the delete button.
3 The media estimate is incomplete without media buys. The buys indicate exactly which ads are running on each publi-cation. A single media estimate can contain one or many media buys from one or many different publications. To add a media buy to the media estimate, click
on the add buy button. Media buys can be deleted at any time before they are ordered (that is, an insertion order has been created for it). To remove a media buy, click on the remove buy button.
4 Insertion orders can be cre-ated automatically from your media estimate by clicking on the make order button. You can make an insertion order for one selected space buy, or for all space buys on the media esti-mate. One insertion order will
g
i
d
o
h j
k
a
s
p
l

5-15Media Estimates
A media estimate is added in two parts, much like adding a job ticket. First, open the new media estimate, which includes the estimate number, client, campaign name, and description. Next, add media buys for each time an ad will run for this estimate.
be created for each publication.
5 To print media reports, click on the print reports button. To print a hard-copy printout of the media estimate, click on the print estimate button.
6 Enter a media estimate number here to find a media estimate. Or use the find more link to find media estimates by sequence, number, client, description, date, or campaign.
7 Use the history pop-up menu to jump to a previously viewed media estimate.
8 A media estimate is opened for only one client. This would be the client who will be re-sponsible for authorizing these media buys.
9 Media estimates are num-bered automatically by client, like job tickets. The estimate number is the combination of the client number and its next estimate number. You can enter any kind of estimate number you like.
10 A media estimate can be
marked as closed after its buys have been ordered. Placing a media estimate on-hold makes it inactive, but keeps it open for future use. Closed and on-hold orders don’t appear on media status lists and traffic reports.
11 Category is the media kind that has been selected for the media estimate’s vendor. It is used on some media reports to group media estimates together.
12 The description can contain any kind of notes, specifica-tions, objectives, or strategies that should appear on the printed media estimate. The description is changed by click-ing on the Edit button.
13 A media estimate can contain dozens of individual buys, which represent different dates in which an ad will run. The column headings for media buys are customizable—each media estimate can have differ-ent labels, for flexibility. They can be changed by clicking the edit button.
14 The publication code indicates from which magazine,
newspaper, outdoor, or other media this buy is being ordered.
15 The issue date shows when the ad will run.
16 The ad number, caption, and size describe the ad space that will be ordered from this estimate. These details appear on the printed insertion order and the client’s media billing.
17 Gross cost is the amount you’re charging the client for this ad. The commission is cop-ied from the client, and is used to calculate the ad’s net cost. Net cost is the amount you’ll pay the publication for the ad.
18 If the selected media buy has already been ordered on an insertion order, the IO number, date, and actual order amount will appear here for reference.
19 Media estimates can be tracked from start to finish by status on reports. The status is optional, and is completely customizable. It is not related to the job production/billing status codes.

5-16
Broadcast Media Plans
Broadcast Media Plans
q w e r t
y
Most of the information entered on a broadcast media plan is included on the printed broadcast plan that the client will approve. It can be revised and reprinted many times.
u
a
1 Use these toolbar buttons to scroll through the previous and next broadcast media plans.
2 Broadcast media plans can be easily added, cloned, edited, and deleted. To add a new broadcast media plan, click on the add button. Or use the clone button to clone a broadcast media plan into a new one. Cloning copies all of the details and buys from an existing broadcast media plan, then lets you edit it. To change the broadcast media plan’s key
details (i.e., client, approvals, flight dates, commission, etc.), click on the edit button. Broad-cast media plans are flexible so they can be edited at any time. To delete a broadcast media plan, click on the delete button.
3 The broadcast media plan is incomplete without spot buys for times and programs. A separate spot buy should be added for each time or program during which the ad will run. To add a broadcast buy to the broadcast media plan, click on
the add buy button. Broadcast buys can be deleted at any time before they are ordered (that is, a broadcast order has been created for it). To remove a broadcast buy, click on the remove buy button.
4 To print media reports, click on the print reports button. Click the print worksheet button to print the Broadcast Work-sheet which shows the plan’s buys in detail by station and the total number of spots, cost, and
sipo
d
f
g jh k l ;
z

5-17Broadcast Media Plans
Broadcast media plans can be created for many kinds of radio, television, cable, or even Internet-based media buys. A broadcast media plan is similar to a job ticket: it is opened for one client, has a number to track it, can be changed many times as needed, and printed for a client’s approval.
rating for each station and for the entire plan. To print a hard-copy printout of the broad-cast media plan, click on the print plan button.
5 Broadcast orders can be created automatically from your broadcast media plan by click-ing on the make order button. You can make a broadcast order for one selected broadcast buy, or for all broadcast buys on the broadcast media plan. One broadcast order will be created for each station.
6 Enter a broadcast media plan number here to find a broadcast media plan. Or use the advanced search link to find broadcast media plans by se-quence, number, client, name/title, start date, or campaign.
7 Use the history pop-up menu to jump to a previously viewed broadcast media plan.
8 Each broadcast media plan is tracked by a media plan number. Media plans are num-bered automatically by client. Each client has its own number-ing sequence for easy tracking. A media plan’s number can’t be changed. Broadcast media plans are opened for a single client. The client number will be copied from the media plan to broadcast orders and, even-tually, to media invoices. The media plan’s name/title appears here for reference and is usually
a brief description of the plan’s objective. The broadcast plan’s flight schedule is customizable. These are the days on which the spots will run.
9 A broadcast media plan can be marked as closed after its buys have been ordered.
10 Placing a broadcast media plan on-hold makes it inactive, but keeps it open for future use. Closed and on-hold orders don’t appear on media status lists and traffic reports.
11 The buyer initials are copied as the person adding the media plan, but can be changed.
12 The broadcast media plan’s total spots, rating, cost, and other summary totals appear here for easy reference. The CPP is the cost per rating point and the CPS is the cost per spot.
13 The campaign code is dis-played here for easy reference. The media plan’s optional bud-get, if entered, appears here.
14 The broadcast media plan’s spot buys are listed by station. Each spot buy contains a sta-tion name, the time/program name during which the spots will be running, the length of each spot, the number of spots, total rating points, and the spot buy’s total gross cost. Double-
clicking on a spot buy displays its complete details.
15 The station is who you bought the broadcast buy to run during a time or program.
16 Market shows where the broadcast buy’s spots will run.
17 Dates shows when the broadcast buy’s spots will run.
18 The time/program field contains the name of the time or program the broadcast buy will run.
19 Length describes how long the broadcast buy’s spots will run. Spots shows the number of times the broadcast buy will run during the time or program. Rating shows what the time or program’s rating is.
20 Gross/Each shows how much each spot run for the broadcast buy will cost.
21 The status field can be used to track broadcast media plans. It appears here for reference, but it can be edited in the Edit Broadcast Media Plan window.

5-18
Print Media Plans
Print Media Plans
q w e r t
y
Print media plans can be created for three kinds of periods: daily (for newspapers), weekly (for newspapers, journals, etc.), and monthly (for magazines).
u
a
1 Use these toolbar buttons to scroll through the previous and next print media plans.
2 Print media plans can be easily added, cloned, edited, and deleted. To add a new print media plan, click on the add button. Or use the clone button to clone a print media plan into a new one. Cloning copies all of the details and buys from an existing print media plan, then lets you edit it. To change the print media plan’s key details (i.e.,
campaign, start date, end date, approvals, kind, etc.), click on the edit button. Print media plans are flexible so they can be edited at any time. To delete a print media plan, click on the delete button.
3 The print media plan is incomplete without buys for ad space. Space buys indicate exactly which ads are running on each publication during each of the plan’s twelve months, weeks, etc. One print media plan can contain space buys for
dozens of different publica-tions, or many buys for the same publication. To add a space buy to the print media plan, click on the add buy button. Space buys can be deleted at any time before they are ordered (that is, an insertion order has been created for it). To remove a space buy, click on the remove buy button.
4 Insertion orders can be cre-ated automatically from your print media plan by clicking on the make order button. You can
s
ip
o
d g h
j
f

5-19Print Media Plans
The print media plan is incomplete without buys for ad space. One print media plan can contain space buys for dozens of different publications, or many buys for the same publication.
make an insertion order for one selected space buy, or for all space buys on the print media plan. One insertion order will be created for each publication.
5 To print media reports, click on the print reports button. To print a hard-copy printout of the print media plan, click on the print plan button.
6 Enter a print media plan number here to find a print media plan. Or use the find more link to find print media plans by sequence, number, client, name/title, start date, or campaign.
7 Use the history pop-up menu to jump to a previously viewed print media plan.
8 Use the specifications link to view the print media plan’s details. Use the vendor info link to view or edit the vendor’s address. Use the delivery info link to enter special delivery instructions for the print media plan. Use the periods link to view or edit the buy periods for the print media plan.
9 Print media plans are opened for a single client, just like a job ticket. The client number will be copied from the media plan to insertion orders and, eventually, to media invoices.
The name/title is a brief de-scription of the plan’s objective, market, or product. It appears on the printed media plan, so clients see it.
Each print media plan is tracked by a unique media plan number. For easy tracking, each client has it’s own numbering sequence. The media plan number is a combination of the client account number and its special media plan number. A media plan’s number can’t be changed.
The print media plans kind ap-pears here for reference. Print media plans can be created for three kinds of periods: daily (for newspapers), weekly (for weekly newspapers, trade journals, and weekly periodicals), and monthly (for magazines). Daily print media plans let you plan buys for a single seven-day pe-riod. Weekly print media plans let you buy space for any twelve periods. Monthly print media plans let you place ads for up to twelve months.
10 A print media plan can be marked as closed after its buys have been ordered. Placing a print media plan on-hold makes it inactive, but keeps it open for future use. Closed and on-hold orders don’t appear on media status lists and traffic reports.
11 The campaign and budget are displayed here for easy reference. The optional budget can be used to show the amount expected for the total of the print media plan’s space buys.
12 The media plan’s space buys are listed here by publica-tion code. Double-clicking on a space buy displays its complete details, including the day, week, or month in which the ads will run.
13 The pub code and publica-tion indicated the publication from whom you’re buying the space to run the ad.
14 Market shows where the space buy’s ads will run.
15 The ad number/caption identifies the ad on the printed media plan, insertions orders, and media invoices. Any kind of description text or ID code can be used.
16 The ad’s gross cost (i.e., the amount the client will pay, including your commission) appears here for reference. The ad’s net cost will be calculated using the gross cost and plan’s media commission.
17 An optional status can be used to track print media plans from start to finish using the same Status Table as jobs.

5-20
Insertion/Broadcast/Interactive/Outdoor Or-
Insertion/Broadcast/Interactive/Outdoor Orders
q w e r t
y
Orders can be revised has many times as you want. To make the first revision and start the revision counter, simply enter a “1” in the Description/Status window.
u
a
1 Use the previous and next buttons to scroll through inser-tion and broadcast orders.
2 Insertion and broadcast orders can be easily added, cloned, edited, or deleted. Click the add button to add a new insertion order. (To add a broadcast order, go to Edit > Add > Broadcast Order). Or click on the clone button to make an exact copy of an exist-ing order. Click the edit button to edit the order’s key details, such as the vendor, campaign,
or brand. Click the delete but-ton to delete an order. Once an insertion or broadcast order has been invoiced by the vendor or pre-billed to the client it can’t be deleted—even if it was only partially invoiced. Like jobs, this feature prevents billable orders from being inadvertently deleted and, therefore, not billed. Always let Clients & Profits X automatically number the next media order to avoid confusion from using the numbers of deleted orders over again.
3 Click the add buy button to add new amounts to an order. The remove buy button deletes one or more selected costs from an order. Only line items that haven’t been invoiced by the vendor or pre-billed to the client can be deleted. Once a line item is removed, it is gone forever: its net cost and gross amounts are deducted from the job task permanently. However, if needed, the same line item can be added back to the order later.
s
i
p
o
d
g
j
h
k
f
lz
;
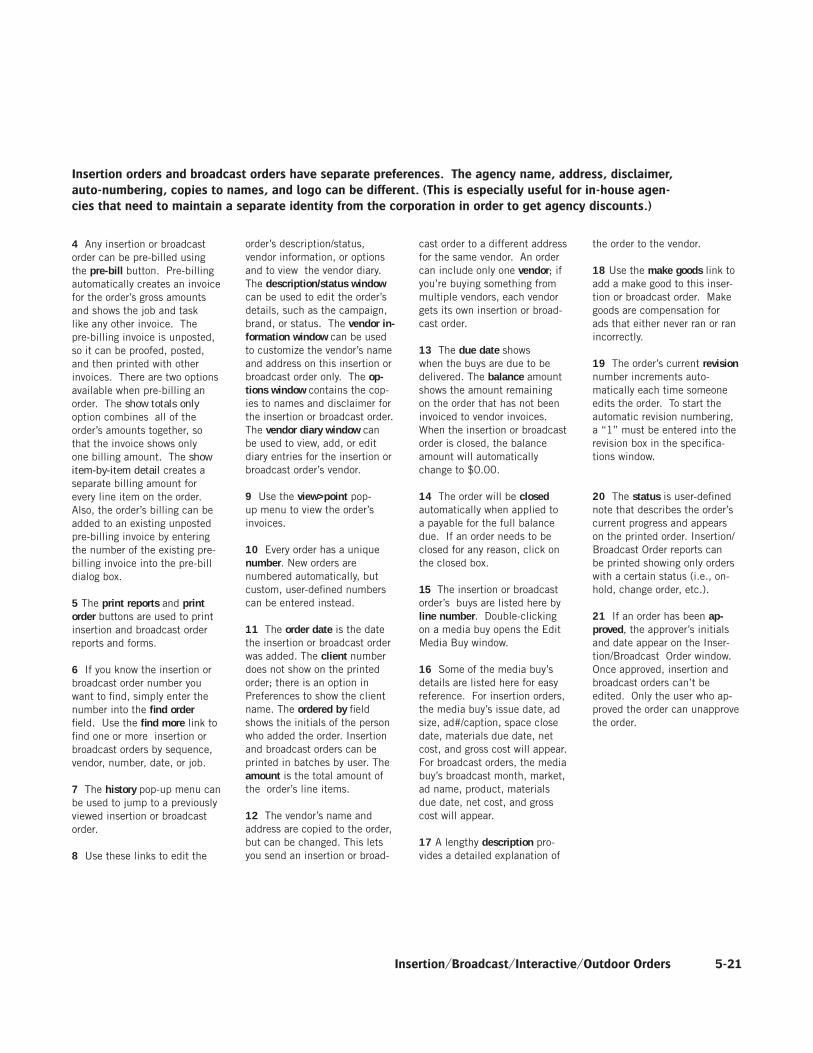
5-21Insertion/Broadcast/Interactive/Outdoor Orders
Insertion orders and broadcast orders have separate preferences. The agency name, address, disclaimer, auto-numbering, copies to names, and logo can be different. (This is especially useful for in-house agen-cies that need to maintain a separate identity from the corporation in order to get agency discounts.)
4 Any insertion or broadcast order can be pre-billed using the pre-bill button. Pre-billing automatically creates an invoice for the order’s gross amounts and shows the job and task like any other invoice. The pre-billing invoice is unposted, so it can be proofed, posted, and then printed with other invoices. There are two options available when pre-billing an order. The show totals only option combines all of the order’s amounts together, so that the invoice shows only one billing amount. The show item-by-item detail creates a separate billing amount for every line item on the order. Also, the order’s billing can be added to an existing unposted pre-billing invoice by entering the number of the existing pre-billing invoice into the pre-bill dialog box.
5 The print reports and print order buttons are used to print insertion and broadcast order reports and forms.
6 If you know the insertion or broadcast order number you want to find, simply enter the number into the find order field. Use the find more link to find one or more insertion or broadcast orders by sequence, vendor, number, date, or job.
7 The history pop-up menu can be used to jump to a previously viewed insertion or broadcast order.
8 Use these links to edit the
order’s description/status, vendor information, or options and to view the vendor diary. The description/status window can be used to edit the order’s details, such as the campaign, brand, or status. The vendor in-formation window can be used to customize the vendor’s name and address on this insertion or broadcast order only. The op-tions window contains the cop-ies to names and disclaimer for the insertion or broadcast order. The vendor diary window can be used to view, add, or edit diary entries for the insertion or broadcast order’s vendor.
9 Use the view>point pop-up menu to view the order’s invoices.
10 Every order has a unique number. New orders are numbered automatically, but custom, user-defined numbers can be entered instead.
11 The order date is the date the insertion or broadcast order was added. The client number does not show on the printed order; there is an option in Preferences to show the client name. The ordered by field shows the initials of the person who added the order. Insertion and broadcast orders can be printed in batches by user. The amount is the total amount of the order’s line items.
12 The vendor’s name and address are copied to the order, but can be changed. This lets you send an insertion or broad-
cast order to a different address for the same vendor. An order can include only one vendor; if you’re buying something from multiple vendors, each vendor gets its own insertion or broad-cast order.
13 The due date shows when the buys are due to be delivered. The balance amount shows the amount remaining on the order that has not been invoiced to vendor invoices. When the insertion or broadcast order is closed, the balance amount will automatically change to $0.00.
14 The order will be closed automatically when applied to a payable for the full balance due. If an order needs to be closed for any reason, click on the closed box.
15 The insertion or broadcast order’s buys are listed here by line number. Double-clicking on a media buy opens the Edit Media Buy window.
16 Some of the media buy’s details are listed here for easy reference. For insertion orders, the media buy’s issue date, ad size, ad#/caption, space close date, materials due date, net cost, and gross cost will appear. For broadcast orders, the media buy’s broadcast month, market, ad name, product, materials due date, net cost, and gross cost will appear.
17 A lengthy description pro-vides a detailed explanation of
the order to the vendor.
18 Use the make goods link to add a make good to this inser-tion or broadcast order. Make goods are compensation for ads that either never ran or ran incorrectly.
19 The order’s current revision number increments auto-matically each time someone edits the order. To start the automatic revision numbering, a “1” must be entered into the revision box in the specifica-tions window.
20 The status is user-defined note that describes the order’s current progress and appears on the printed order. Insertion/Broadcast Order reports can be printed showing only orders with a certain status (i.e., on-hold, change order, etc.).
21 If an order has been ap-proved, the approver’s initials and date appear on the Inser-tion/Broadcast Order window. Once approved, insertion and broadcast orders can’t be edited. Only the user who ap-proved the order can unapprove the order.

5-22
Adding Broadcast Orders
Adding Broadcast Orders
q
w
er
t
y
Radio, cable, and broadcast tv spots ordered on behalf of a client should be tracked with broadcast orders. They can be created one-by-one or from broadcast media plans.
u
a
1 The number identifies a broadcast order on windows, reports, and forms. Broadcast orders are numbered auto-matically when added or when saved, based on your prefer-ences. Or, you can number your orders manually.
2 Use the template pop-up menu to select a template. Choosing a template copies the template’s default details to the new broadcast order.
3 An order has only one vendor which is usually the company
that owns the station (or it might be the station itself). The vendor’s name and address appear on the printed broadcast order, but can be customized on each order.
4 The order date is the date on which the order was added. It appears on the printed broadcast order. Ordered by is the initials of the person who added the insertion order. Later, broadcast orders can be printed in batches by these ordered by initials. The commission is
copied from the vendor, and is used to calculate the buy’s net cost.
5 Every insertion order needs a job and task for accurate cost accounting. The broadcast order’s cost will update the job task’s Net POs total.
6 The flight dates are when the programs will run.
7 Campaign and brand are optional fields that are used by media analysis reports.
s
i
p
o

5-23Adding Broadcast Orders
Once the Add Broadcast Order window is saved, you can add media buys to the broad-cast order. Media buys contain the specific details about each spot that will run on the broadcast order. A separate media buy should be added for each combination of run dates, times, and programs. A broadcast order can have dozens of media buys on it.
8 The body of the broadcast or-der is completely customizable. The standard field labels are designed for broadcast orders. The default labels are broadcast month, ad name, market, and product. Information added for these user-fields appear on the printed broadcast order.
9 The materials due date is used by traffic reports and ap-plies to first spot on the broad-cast order. It can be customized for each media buy.
10 The description field is a long text block. The label itself is customizable for flexibility. Any kind of notes or details can be entered here. This text appears in the heading of the printed broadcast order.
11 The special instructions field provide a space for details. It prints on the broadcast order below the line items.
12 The Media Buyer and Media Rep OK fields create approval lines on the printed broadcast or order along with the rep instructions.

5-24
Adding Insertion Orders
Adding Insertion Orders
Insertion orders are essential for accurate job costing. They allow media costs to be committed to a job before the publication’s invoice is posted.
1 The order number identifies an insertion order on windows, reports, and forms. IOs are numbered automatically when added or when saved, based on preferences, or manually.
2 Use the template pop-up menu to select a template. Choosing a template copies the template’s default details to the new broadcast order.
3 An IO has only one vendor. It is usually the company that owns the publication (or it
might be the publication itself).
4 The order date is the date on which the insertion order was added. It appears on the printed insertion order.
5 Ordered by is the initials of the person who added the inser-tion order. Later, insertion or-ders can be printed in batches by ordered by initials.
6 Every insertion order needs a job and task for accurate cost accounting. The insertion’s
cost will update the job task’s Net POs total.
7 The publication name is copied from the Publications table, which links the pub’s ad sizes with insertion orders.
8 The campaign code can be used to categorize media expenses. The brand name helps to identify the product line being advertised. Both are optional.
9 The issue date shows the
q
w
e
r t
y
u
a
d
i
po
f
s

5-25Adding Insertion Orders
Any kind of ad space ordered on behalf of a client should be tracked with insertion or-ders. An insertion order can have one or dozens of different media buys for one vendor. Each media buy can specify a different ad to run, another set of run dates, or a special space buy for a certain ad and will appear as a separate line on the printed order.
week, month, or period of time each media buy runs. The ad/caption describes the spe-cific advertisement that’s being run for this space buy. The ad name/size is a combination of the ad/caption and ad size fields, but can be changed. It appears on media billings.
10 Space close is the date on which you must place this order with the publication.
11 Materials due is the date on which the ad’s film, disk, or other materials must reach the publication.
12 Position is a customizable text field that can store notes or special instructions that appear on the printed insertion order.
13 Gross cost is the amount you’re charging the client for this ad. The commission is cop-ied from the client, and is used to calculate the ad’s net cost. Net cost is the amount you’ll pay the publication for the ad.
14 The bill net, not gross op-tion lets you pass the ad’s true cost along to the client, without any agency commission.

5-26
Adding Interactive Orders
Adding Interactive Orders
Interactive orders can be used to buy advertising space on web sites, digital kiosks, point-of-sale locations—anything that’s electronic.
Internet Advertising is are ads that appears on websites. As the on-line population rapidly grows, so does the placement of ads on the world wide web. One advantage it has over traditional advertising is that enables clients to interact with the advertisement, so with a mouseclick anyone on-line can get more information about a product, subscribe for news and updates, or purchase it right then and there.
1 The order number identifies
an interactive order on windows, reports, and forms. Orders are numbered automatically when added or when saved, based on preferences, or manually.
2 Use the template pop-up menu to select a template. Choosing a template copies the template’s default details to the new order.
3 An interactive order has only one vendor, which is the company that owns web site or network.
4 The order date is the date on which the interactive order was added and appears on the printed order.
5 Ordered by is the initials of the person who added the inser-tion order. Later, orders can be printed in batches by these initials.
6 Every interactive order needs a job and task for accurate cost accounting. The order’s cost will update the job task’s Net POs total.
q
w
er t
y
u
a
d
i
p
o
f
s

5-27Adding Interactive Orders
Internet ads also provides advertisers with an opportunity to precisely target its audi-ence, enabling them to deliver advertisements that are customized to each consum-er’s particular interests and tastes.
7 The website/network name is copied from the Publications/Media Companies table, which links the media company’s ad sizes with interactive orders. The run dates show the days, weeks, or months the interac-tive ad will appear on the site. The ad/caption describes the specific advertisement that’s being run for this space buy. The banner size is the size of the ad in pixels. To see a list of ad sizes, leave the banner size empty then press tab. A lookup list will appear listing the media company’s ad sizes that have been added into Publica-tions/Media Companies table. You can then choose an ad size from the list or type in your own size. The linking URL indicates to the media company the web page should be opened when a viewer clicks on the ad.
8 The campaign code can be used to categorize media expenses. The brand name helps to identify the product line being advertised. Both are optional.
9 The # impressions shows the number of time the ad will be seen by readers per month. It is used to calculate the ad’s cost per thousand (CPM).
10 Space close is the date on which you must place this order with the media company. Materials due is the date on which the digital artwork must reach the media company.
11 File size the media compa-ny how large the digital artwork will be when it is sent.
12 Use special instructions to
note any unique information or specific details about how this interactive ad should be run. They appear on the printed interactive order.
13 Gross cost is the amount you’re charging the client for this ad. The commission is cop-ied from the client, and is used to calculate the ad’s net cost. Net cost is the amount you’ll pay the publication for the ad.
14 The bill net, not gross op-tion lets you pass the ad’s true cost along to the client, without any agency commission.

5-28
Adding Outdoor Orders
Adding Outdoor Orders
Outdoor media orders are used to place any kind of out-of-doors advertising, such as billboards, mass transit signage, kiosks, building walls, and more.
Outdoor advertising can reach a lot of people and build a strong identity within a local market. Each board is assigned to a location, which displays it’s message to a percentage of the population. You can project your message on one or numer-ous boards, to reach a total number of impressions that equal a percentage of the area’s population.
1 The order number identi-fies an interactive order on
windows, reports, and forms. Orders are numbered auto-matically when added or when saved, based on preferences, or manually.
2 Use the template pop-up menu to select a template. Choosing a template copies the template’s default details to the new order.
3 Each outdoor order has only one vendor, which is the media company that owns or manages the billboard, signage, etc.
4 The order date is the date on which the outdoor order was added and appears on the printed order.
5 Ordered by is the initials of the person who added the outdoor order. Later, orders can be printed in batches by these initials.
6 Every outdoor order needs a job and task for accurate cost accounting. The order’s cost will update the job task’s Net POs total.
q
we
r t
y
u
a
d
i
p
o
f
sg

5-29Adding Outdoor Orders
The outdoor locations you buy most often can be added to the Publications/Media Companies table with specifications and rates, which will be copied to new outdoor orders automatically.
7 The size/number identifies the specific ad space or location being ordered for this media buy. To see a list of the media company’s ad sizes/numbers, leave the field empty then press Tab.
Illuminated indicates whether the outdoor advertisement is lighted and, if so, how many hours it is lit. The type/location describes the specific location that this advertisement will ap-pear. Posting date shows when the media company will install or present the outdoor ad.
8 The campaign code can be used to categorize media expenses. The brand name helps to identify the product line being advertised. Both are optional.
9 Materials due is the date on which the digital artwork must reach the media company.
10 Space close is the date on which you must place this order with the media company.
11 Use special instructions to note any unique information or specific details about how this outdoor ad should be present-ed. These notes appear on the printed outdoor order.
12 Contact term tells the media company how long (in months) this outdoor ad will run. It is the rate basis for the ad’s cost.
13 Monthly rate is the amount you’re charging the client for this ad per month. The commis-sion is copied from the client,
and is used to calculate the ad’s net cost. Total net is the amount you’ll pay the media company for the placement for the full contract term. Total gross is the total amount your client will pay for the ad’s entire run.
14 The bill net, not gross op-tion lets you pass the ad’s true cost along to the client, without any agency commission.
15 Special charges are op-tional additional costs above and beyond the outdoor ad’s contract rate. They are one-time charges that are added to the total gross the client will pay. Special charges are commis-sionable, so the net charge will be added to the orders’t total net.

5-30
Media Traffic
Media Traffic
The Media Traffic window gives media planners and buyers a one-stop place to check upcoming deadlines for space closings and materials due.
1 Use the prev week and next week toolbar buttons to scroll through the four weeks of media deadlines available to be viewed.
2 To print a hard-copy printout of the Media Traffic window, click on the print report button.
3 The Media Traffic window can list space closing and mate-rial due dates for the next four weeks by using the show week pop-up menu. Only one week can be viewed at a time.
4 The space closing list shows upcoming space deadlines from broadcast and print media plans. The space closing date can be entered separately for each buy on a media plan.
5 The materials due list shows upcoming traffic deadlines from actual insertion and broadcast orders.
q w
e
r
t

5-31Media Traffic

5-32
q w
r
t
Stations
Stations
1 Use the station toolbar but-tons to add, edit, and delete TV, radio, and cable stations as well as print a station list.
2 Use the time/program toolbar buttons to add, edit, and delete programs, times, and contract rates for the currently selected station. You can also print a list of programs/times by click-ing the Print button.
3 Each station can have doz-ens of different programs/times. You can set up standard rates
for each program or time slot, as well as special program/rate combinations for each client. When a broadcast media plan is created, the right rate will be copied to the spot buy au-tomatically. Selecting a client from the pop-up menu displays that client’s special contract rates. The program/times/rate table needs to be frequently up-dated as the rates and programs change.
4 Your stations are listed here, sorted alphabetically. Clicking once on a station displays its
programs/times and standard rates. Double-clicking on a station ID opens the Stations window, where you can make changes to its details.
5 The times/programs and standard rates for the selected station are listed here. Double-clicking a time/program record opens the Times/Programs/Con-tract Rates window, where you can change the spot’s details.
Clients & Profits keeps a detailed table of the stations you use on broadcast media plans. A broadcast media plan is com-posed of different spot buys for a two-week period. Each program/time is added as a separate spot buy on a broadcast media plan, along with the number of spots that will run each day of the flight. When you’re adding a spot buy, you’ll select a station from the Stations lookup list—which links the media buy with the station’s programs, times, and rates.
The Stations window shows both your stations (television, radio, and cable) and their programs/times. There’s no limit to how many stations and programs you can add.
e

5-33Stations
q
w
e
rt
y
u
1 Each station must be as-sociated with a vendor in the Vendor table. The vendor and the station can be the same, but must be added separately. One vendor can have many stations.
2 The station code is used for sorting and sub-totaling media buys on reports and client invoices, so clients will see it. Each station code must be unique. The code is customiz-able and user-defined.
3 The station’s name and address are entered here and appear on printed media orders.
4 An ad rep for the station can be entered here with their phone number, and fax number.
5 The commission rate will be copied to broadcast media plans when this station is used.
6 Any notes about the publica-tion can be entered here. They don’t appear on media reports.
7 The publication’s market can be entered here for future reference.
Anyone using Clients & Profits can see and update the station’s information, including the ad representative’s name, address, and phone number.

5-34
q w
e
r
Publications/Media Companies
Publications/Media Companies
The Publications/Ad Sizes/Media Companies window shows a detailed listing of all the publications and their ad sizes that you use for media print buying.
1 Use these toolbar buttons to add, edit, and delete publica-tions as well as print a publica-tion list. Use these arrow toolbar buttons to change the sort direction the publications are listed in.
2 Use these toolbar buttons to add, edit, and delete ad sizes and contract rates for the currently selected publica-tion. You can also print a list of ad sizes/rates by clicking the print button. Use these arrow toolbar buttons to change the
sort direction the ad sizes are listed in.
3 A publication can have dozens of ad sizes/rates. You can set up standard rates for each ad size, as well as special size/rate combinations for each client. Selecting a client from the pop-up menu displays that client’s special contract rates.
4 Your publications are listed here, sorted alphabetically by publication code. To sort the list by publication name, click
on the publication heading. Clicking once on a publica-tion displays its ad sizes and standard rates. Double-click-ing on a publication opens the Publication window, where you can make changes to the publication’s information.
5 The ad sizes and standard rates for the selected publica-tion are listed here by ad size. To sort the list by gross cost, click on the gross cost heading. Double-clicking on an ad size opens the Print Ad Size window, where you can change the ad’s details.
t
Clients & Profits X keeps a detailed listing of the publications you use for media print buying and media companies you use for outdoor advertising. Each pub and media company belongs to a vendor in the Vendor table. One vendor can have dozens of publications, each with its own collection of various ad sizes and rates.

5-35Publications/Media Companies
q
w e
r
t
y
u
i
1 Each publication/media com-pany needs to be associated with a vendor in the Vendor table. The vendor and the pub-lication/media company can be the same, but must be added separately. One vendor can have many publications.
2 The publication code is used for sorting and sub-totaling me-dia buys on reports and client invoices, so clients will see it. Each publication code must be unique. The code is customiz-able and user-defined.
3 The commission rate will be copied to media estimates and print media plans when this publication is used.
4 The publication and media company’s name, address, phone number, and fax number are entered here and appear on printed media orders.
5 The publication’s issue date, close date, and circulation can be entered here for future reference.
6 An ad rep for the publication can be entered here with their phone number. It is optional, but appears on printed media orders.
7 The publication’s market can be entered here for future reference. The market is copied to orders added for this publica-tion or media company.
8 Any notes about the publica-tion can be entered here. They don’t appear on media reports.
Anyone using Clients & Profits X can see and update the pub/media company’s infor-mation, including the ad representative’s name, address, and phone number.

5-36
Make Goods
Make Goods
Make goods are compensation for ads that either never ran or ran incorrectly. There are many different ways a print ad or radio/tv spot can be compro-mised, providing less value for your client. For example, you ordered for a guaranteed position in a magazine, but the ad actually ran in a different, less desirable place. Or, you placed a radio spot to air during a certain show, but the ad ran during a different program. In these situations, the publication or station will either offer to run the ad or spot again, credit the entire amount of the ad’s cost, or issue a partial credit.
Make goods need to be added to the original insertion order or broadcast order so that the shop’s job costing is accurate. If make goods aren’t entered as they happen, your job costs won’t match up with your com-mitments.
It’s the media buyer’s respon-sibility to match the station’s affidavits or the publication’s tear sheets to verify that the ads or spots that actually ran match what the shop ordered. Any discrepancies needs to be noted on the client’s broadcast or insertion orders by adding make goods.
Make goods are simply additional media buys appended to an insertion order or broadcast order after the ads or spots have been run. They’re functionally nodifferent from an order’s regular media buys—each make good line item includesdetails about the dates, times, programs, etc. of the affected print ad or radio/tv spot. Make goods will have a negative cost amount if the station/publication is offering a credit; otherwise, free make good ads will have a no cost at all.
When make goods are added, they update the job’s commitment totals just like the original order. They appear on media reports just like other media buys. When the station or publication media invoice is added into Accounts Payable, they are reconciled along with the order’s original media buys.
To add a make good for a broadcast order
1 From the Insertion/Broadcast Orders window, find the broadcast order that needs the make good.
2 Click once to highlight the media buy wasn’t run or run incorrectly.
3 Click the link or choose Edit > Add Make Good.
The Add Broadcast Make Good window opens, prompting you to enter the make good’s details. The media buy’s details are copied to the make good line item except for the date, time, and program.
4 Enter the dates, days, time, and program for which this make good spot will run.
The dates, days, etc. is based the compensation negotiated with the station.
5 Enter the rate, spots, amounts, and other details for this make good, then click Save.
To add a make good for an insertion order
1 Find the insertion order that needs the make good.
2 Click once to highlight the
media buy wasn’t run or run incorrectly, then click the link or choose Edit > Add Make Good.
3 Enter the issue date, ad caption, and ad size for which this make good ad will run, based the compensation negotiated with the publication.
4 Enter the space close and materials due dates for this make good, then click Save.
Reprinting the revised broadcast or insertion order
Once the make good is saved, the broadcast or insertion order can be reprinted and faxed to the station, if necessary. For clarity, the reprinted order will show the original media buys plus the make goods.
1 Choose File > Print Orders then follow the prompts.
Editing a broadcast media buy. Broadcast orders are added, edited, revised, printed, and billed like pur-chase orders and insertion orders. Dozens of separate media buys can be added for the same station on a broadcast order.

5-37Media Billing Goals
Media Billing Goals
The Media Group Performance - Trend Analysis report compares actual media spending for each kind of media (e.g., broadcast TV, radio, etc.) with the media department’s billing goals. For these reports to work properly, the shop’s billing goals for each media kind must be entered in the Media Goals window. Media billing goals, which are based on gross amounts on broadcast and print insertion orders, can be entered for each quarter of the calendar year.
These media billing goals can be edited any time. They are used only for media reports, and don’t affect job tickets, media plans or estimates, job costing, or the General Ledger.
q
w
e
r
The Media Billing Goals window allows the agency to record media spending goals per media type, per fiscal quarter, and also calculates a total for each media type, quarter, and year-to-date. In media analysis reports, these amounts are measured against actual gross amounts derived from media spending.
1 Click print to get a report of the year’s billing goals by media kind and quarter.
2 The media kind is used to categorize different types of media (e.g., tv, radio, news-paper, etc.) and is a vendor setting. When media perfor-mance reports are printed (see Snapshots > Media), C&P X
will summarize media billings by vendor, sub-totaling by the vendor’s media kind setting.
3 Enter the billing goals for each kind of media for each quarter of the year.
4 The quarterly and media kind totals are calculated as you tab between fields.

5-38
Media Reports
Clients & Profits prints two kinds of media reports: status and traffic. Status reports are used by media buyers and the media department to track open media plans, media estimates, media deadlines, and unbilled media. Traffic reports allow you to see the scheduled buys based on space closing and materials due dates, which are entered for each line item on a media plan or estimate.
To print media reports
Media reports can be printed from the Media Estimates, Broadcast Media Plans, or Print Media Plans windows.
1 Choose File > Print Media Reports.
Media reports are grouped together by category (i.e., Status or Traffic). Each category has a collection of media reports that can be printed. Only one report can be printed at a time. 2 Select a report category to show the reports that can be printed.
3 Choose a report by clicking on a report name.
4 Enter a range of dates and select any available options.
Status and traffic reports are based on media plans and media estimates, so the date range entered will select plans or estimates based on the date they were added.
5 Click Print.
■ Any print or broadcast media plan that is marked as “closed” or “inactive” will not be included on media status reports or media traffic reports.
Media Reports
Media reports help different departments manage clients. Status and traffic reports track the day-to-day media plans and estimates. Post-buy reports help media buys track what’s been ordered. Account service can use client spending reports to analyze each client’s media spend-ing. Group performance reports summarize how well the media department manages spending trends, client media profitability, and spending volumes.

5-39
Media Reports
Media Reports
Media Estimate List
Media Estimate Status Report
Media Plan List
Media Plan Status Report
Unbilled Media
Client Media Calendar
Space Closings
Material Due
Media Job List
The Media Estimate List lists all media estimates for a range of dates.
The Media Estimate Status Report lists open media estimates sorted by status, which is user-defined.
The Media Plan List prints all broadcast media and print media plans for a range of dates.
The Media Plan Status Report lists open broadcast media and print media plans sorted by status, which is user-defined.
The Unbilled Media Report lists all insertion orders and broadcast orders that have not been billed to the client. The orders are grouped by client and sorted by order number.
The Client Media Calendar lists media buys by billing period, which is based on your ac-counting periods. Media buys are grouped by client, then subtotaled by month. The month’s media buys are then sorted by close date and issue date. Each media buy shows its publica-tion, issue date, ad name, ad size, space closing date, and materials due date.
The Space Closings Reports lists the selected space closing dates of media estimate buys, sorted by media buyer and date. It can be printed for planned or ordered media buys.
The Materials Due Reports lists the selected material due dates of media estimate buys, sorted by media buyer and date. It can be printed for planned or ordered media buys.
The Media Job List shows the job number, job name, AE, job due date, status, and status note for each job with a media estimate, and sorts it by client.
Status Reports
Traffic Reports

5-40
Media Link
Media Link
q w e
r
t y
Media Link imports broadcast orders, print insertion orders, and vendor invoices into Clients & Profits from media buying system that support the Standard Media Interface.
u
Media buying systems that sup-port SMI export media orders from media plans into specially-formatted text files, one for each broadcast order, insertion order, or vendor invoice. These files the order details (e.g., station ID, run dates, number of spots, rating, cost, etc.) or invoice needed by Clients & Profits X for job costing, billing, and media accounting.
How it works: A media buyer enters broadcast orders, inser-tion orders, and vendor invoices into SmartPlus, TAPSCAN, or
Strata. The media buying sys-tem exports a copy of the order or invoice into a designated media_buys folder on your file server. The Media Link looks for these media buy files then imports them into your C&P X database as broadcast orders, insertion orders, or vendor invoices—just as if you’d typed them in yourself. These orders can be billed to clients just like any other media order. Imported invoices appear in Accounts Payable.
1 Clicking import tells C&P
X to look for any export files inside the media_buys folder then import them.
2 Click the clear log button to erase the Media Link activity log. Clearing the log deletes the entries permanently.
3 Click the print button to get a hard-copy report of the Media Link’s log entries.
4 The database name is shown for reference. If you use multiple databases, be sure
The Media Link imports broadcast orders, print insertion orders, and vendor invoices into Client & Profits X from lead-ing media buying systems, including SmartPlus, TAPSCAN, Strata, and other systems that support the Standard Media Interface. .

5-41Media Link
Media Link really pays off when you’re buying large amounts of broadcast or print me-dia. Rekeying dozens of buys each week into Clients & Profits would be tedious and probably error-prone. There’s no double-entry and no missing data.
to double-check the database name—otherwise you might im-port media buys into the wrong database.
5 The Media Link Log tab displays your recent activity. Each time an order or invoice is imported, a log entry is created.
6 The Preferences tab (see right) offers settings and op-tions that let you control how some parts of the Media Link will behave. These settings let you turn on and off certain functions.
7 For each imported order you’ll see the date/time it was imported, the order number (as entered into the media buying system), the initials of the person who imported the order, and the order’s import status. The status notes any problems with the imported media order.
1 Click the Preferences tab to edit the Media Link’s options and settings. The changes you make are saved automatically and take affect immediately.
2 Choose your media buying system from the import media buys from pop-up menu.
3 If you bill a different com-mission rate than that in your media system, select “Clients & Profits” from the use BO or IO commission from checkbox. This is usually done if you bill at a lower commission than
the standard 15%. The gross amount will be recalculated during the import using the commission rate entered in client’s Billing Info window.
4 If your shop doesn’t charge media commissions to clients, check the always bill net op-tion. This forces all imported orders to be billed at net cost instead of gross cost. But make sure your media buying system is not already exporting at this lower gross cost, otherwise you will incorrectly reduce your billing amount if you choose to
use the Clients & Profits com-mission rate. If it is already exporting the gross cost at the lower commission then leave the setting at your media buy-ing system.
5 Uncheck the enable log op-tion if you don’t need to record the Media Link’s activity.
6 Use the notify option to send an e-mail to any staff member (such as a bookkeeper) when-ever a new order or invoice is imported automatically.
Media Link imports media buys from leading media buying systems, such as Smart-Plus, Strata, TAPSCAN, and other systems that support the Standard Media Interface.
q
w
e
rt
y

Clients/Billing/Accounts Receivable

6-2
CLIENTS/BILLING/ACCOUNTS RECEIVABLE
6-4 Clients6-8 Client Features6-6 The Clients Window6-8 The Add Client Account Window6-9 Client/Staff Privileges6-10 Client Contacts6-12 Client Billing Information6-14 Client Projects6-15 Client Diary/Call Log6-16 Meeting>Manager6-18 Client Retainers6-20 Client Budgets 6-21 Client Statistics6-22 Client Alerts6-23 Client E-mail6-24 Sales>Maker6-28 Billing/Accounts Receivable6-29 A/R Features6-31 Billing Types6-32 The Billing/Accounts Receivable Window6-34 Job Billing6-36 Estimate Billing6-38 Progress/Final Billing6-40 WIP Billing6-42 Multi-Job Billing6-44 Media Billing6-46 Retainer Billing6-48 Advance Billing6-50 Miscellaneous Billing6-52 Finance Charge Billing6-54 Automatic Job Billing6-56 The Billing Worksheet6-58 Applying Advances6-59 Applying Retainers6-60 Printing Invoices6-62 Printing A/R Reports6-64 Client Payments6-66 The Client Payments Window6-68 The Add Client Payment Window6-70 Distribute Payments6-71 Split Client Payments6-72 Bank Deposits6-74 Printing Client Payment Reports6-76 Collection Manager
Chapter 6

6-3
Introduction Client billing is based on jobs, tasks, and the costs you’ve posted against them. Job tickets track everything you spend by task, whether it’s time, buyouts, or out-of-pocket expenses. Invoices are created automatically from jobs and tasks using these unbilled amounts, making billing very fast, accurate, and easy. This chapter explains in detail how to add different kinds of invoices depending on what—and whom—you’re billing. You’ll see how the billing process works from start to finish. In this chapter you’ll learn about:
■ managing client accounts ■ using the Sales>Maker to manage client contacts and sales campaigns■ using the Meeting>Manager to coordinate staff and client meetings■ client retainers■ job invoices for different kinds of clients■ billing estimates■ billing media insertion orders very easily■ tracking advance billings and retainers■ printing A/R invoices■ using the Billing Worksheet to manage how costs are billed■ printing A/R reports■ tracking client payments
For help using any part of Clients & Profits X, click the button from any
window to open the on-line user guide. This web-based user guide features
step-by-step instructions, explanations, tips, demonstrations, and links to
FAQs, tech notes, and tutorials from www.cnp-x.com/support. The web site is
continually updated, so it’s more timely and helpful than a printed user guide.

6-4
Clients
Clients
Clients are the most essential part of your Clients & Profits X database for a simple reason: A job ticket can’t be opened without one. Every job ticket is opened for one client. The client account maintains important details about your customers; name, contacts, address, telephone numbers, and balances. Clients & Profits X can manage jobs, estimates, costs, and billings for hun-dreds of clients. In fact, there’s no real limit to the number of clients in your database (the limitations are based mostly on your hardware and network; more clients require faster systems).
Every client has a unique account number or code. This code identi-fies the client throughout the system. Everything you do (time sheets, POs, payables, journal entries) gets a client code, which is copied automatically from the job ticket. This makes it easy to print job lists, cost summaries, and profitability reports by client.
For better job tracking, you can have many clients from the same organi-zation. A large corporate client, for example, might have 100 different departments or contacts who initiate jobs. Anyone who authorizes work can be added as a separate client account. When jobs are billed, the work from several different clients can be combined on one invoice—and even billed to an entirely different client account.
Costs, billings, and the unbilled amount are tracked on the client’s job(s). Work in Progress reports are printed to subtotal by client, or printed for just one client or job. The unbilled amount on the client’s job is updated when-ever costs or billings are posted. So you can analyze the client’s costs and billings anytime during the month.
Clients can be billed automatically, based on the costs on the job. When the cost is posted, both the cost and the billable amounts update the job ticket. So when it’s time to bill, the total unbilled amount—or any part of it—is quickly and accurately invoiced. Many different billing types and options are available to customize invoices for different clients. Outstanding balances are tracked by client, so you’ll always know just who owes you money—and for how long—by printing client account aging reports from Snapshots. You can choose to age each invoice and subtotal by client, or just show totals for each client.
Choosing client numbers
Client numbers are very important, since they appear throughout Clients & Profits X—and are used by everyone. There’s a real art to picking the right
client codes. You must choose a number that’s easy for everyone to remem-ber, but meaningful enough to distinguish one client from another.
The client number itself can contain up to ten characters, including letters, numbers, and symbols. If your job numbers are set to contain the client number, then your options are much more limited. Since the job number itself can’t exceed ten digits, your client codes must be small if the job number is to contain the year, client, a dash, and the sequential number.
Example: A client code RETAIL won’t work if your jobs are numbered with the year and a dash. If the next job is 1024, the new job number for RETAIL would be 02-RETAIL-1024. Since the job number itself can’t exceed 10 let-ters, it would appear as 98-RETAIL-1, missing three important digits. So it’s best to use short, simple client num-bers (like ABC, RET, FRG, etc.).
■ If you are worried about users not being able to recognize abbreviated client codes, remember that the client lookup list is available throughout the program. The client lookup list shows both the client code and complete client name.
Divisions and departments
Clients & Profits manages different departments and divisions. Both are added as clients into your database. First, the division should be added as a client. Then every department that authorizes jobs should be added as a separate client account. Every client account has its own account number, which you choose.
Departments are associated with the division by the division’s client number. Each department client has a field for division—this is the division’s account number. Client account agings, client statements, profitability, and productiv-ity reports can be run by division.
New job tickets should be opened for the department client number, not the division. This lets you track jobs by department, which is more informative. When a job is billed, you can change the client number on the invoice to another department—or the division itself. By changing the invoice’s client number, you’re billing the work to a different client. Regardless of who is billed for the work, the job is updated in the same way. For flexibility, the invoice’s billing address can be changed. Changing the invoice’s billing information only affects the invoice itself.

6-5
A division can have many clients. The division is entered as a client, then the division’s cli-ent code is entered to each client account in the division field.
Default billing information, entered in the client account, is copied to the client’s invoice, (i.e. sales tax rate, finance charge, payment terms, a blanket PO number, and where copies are distributed to). Billing rates are copied to job tickets which bill using the client rate. Account and retainer balances are tracked in the client account, as well as media job num-ber, task, commission, and current media estimate number.
Contacts include the people responsible for the job, those who receive the statements and “other” contacts that may need to be referenced. A billing address can be entered if differ-ent from the client’s address.
The client’s quarterly billings and a graph comparing each quarter statistically are found in the client account. Last year’s totals, if available, are also reported in Client Statistics.
Monthly client budgets are entered and tracked against actual billings.
Alerts are messages that are added for new jobs, A/R invoices, and payments. When a job or transaction is added for the client, the alert is displayed.
The diary records the when, where, and who was involved for major events or meetings. Because the diary is easily accessed, details of conversations and events are preserved. The record can also be e-mailed for streamlined communication.
E-mail is set up to be automatically sent to people working with the client when jobs, in-voices, and payments are added for the client.
A list of the client’s projects opens when a job is opened for the client. Enter a project code on a job to track the project’s progress on reports.
The Staff Access Privileges window restricts staff access to the client’s jobs.
Schedule the client’s retainer billings in the client file. The invoice number is automatically entered to the schedule as the retainers are billed. The balances of unused and unpaid retainers for the client are displayed.
Rates can be set up by task in the client account. These special billing rates are only used if “always use billing rates from client” is chosen on the job’s task.
Many clients can belong to the same profit center. If a profit center is assigned to a client, then only tasks with the client’s profit center can be added to the client’s job tickets.
Client Features
Client Fea-
Feature How it works, how it’s used
Divisions
Billing information
Contacts
Account statistics
Budgets
Alerts
Client diary
Automatic e-mail
Projects
Staff access privileges
Retainer schedules
Billing rates
Profit Centers

6-6 Clients
The Clients Window
1 The arrow toolbar buttons can be used to scroll through the previous and next clients.
2 Clients can be easily added, edited, and deleted from the Clients window. To add a new client, click on the add button. Once the client is added, it can be seen and used immediately by other users. Click on the edit button to edit the client’s account information such as the status, address, key client contact, phone number, web site, account note, etc. To
q w re
t y
u i
po
delete a client, click on the delete button. If a client has a balance or a job ticket, it can’t be deleted. Instead, make the client “inactive.”
3 Click on the access privileges button to view or edit who has access to the client’s jobs. A user with access can see the client’s jobs including the job tasks, costs, estimates, and billings.
4 To print a hard-copy printout of the client list, click on the
print list button. To print client labels, click on the print labels button.
5 Enter in a client code here to find a client. Or use the find more link to find a client by account number, organization name, cost center, or sequence.
6 Use the show pop-up menu to see clients for one specific status or all statuses.
7 These links can be used to add, view, or edit the client’s
a
s
d
f
g
h
j kl
z;
Clients are added, edited, and deleted in the Clients window. The client information is easily changed, but the client code can’t be edited once the client has jobs or billings.

6-7Clients
information. Click on the bill-ing info link to view or edit the client’s billing details, sales tax settings, retainer account, me-dia defaults, copies to names, and billing address. To add, view, or edit client projects, click on the projects link. The diary /calls link can be used to keep track of a client’s activity. The meetings link is similar to the client diary, except it is used to keep track of the details from all meetings with the client. To set up a retainer schedule for the client, click on the retainers link.
8 The view>point pop-up menu can be used to view the client’s job tickets, invoices, budget recap, account statistics, and job requests.
9 A client number is a 10-digit letter or number code that is customizable. It must be unique. It can only be changed on clients without jobs or billings; once a job is opened, the client number can only be renumbered.
10 This is the status of the client. The client status can be selected in the Account Information window. Status levels can be added or edited in Preferences > CRM (Client Relationship Manager).
11 In-house clients are used to track internal time. Time for in-house clients won’t appear on client Profit & Loss statements.
12 The client’s organization name and address appear on printed estimates, invoices, and statements. A separate billing address can be entered on the Addresses window or Billing Info window.
13 The retainer graph shows the client’s retainer. To view or edit the retainer schedule, click on the graph or use the retainer link.
14 The monthly billings graph shows the client’s billings for the year broken down by each month.
15 The client’s contacts are listed here and can be easily added, edited, and viewed us-ing these links.
16 The client’s open jobs appear here for easy reference. Double-click on a job number to jump to that job’s Job Ticket window.
17 Click on the notes link to add a note for the client. Notes can be used to document any-thing about a client. They don’t appear on jobs or invoices, so
they can include proprietary information about your relation-ship with the client.
18 A division is group of cli-ents that belong to the same or-ganization. One client account is set up as a division account; its client number becomes the division number. Both the division itself and its clients are separate client accounts.
19 This field shows the number of job tickets that have been opened for the client in the current accounting year.
20 The sales>maker link lets you keep track of sales informa-tion for the client, such as sales letters, sales e-mails, call scripts, and campaigns.
21 The next follow-up field shows when the client will next be contacted.
A client can be assigned to a division. Divisions are used to group together clients who belong to the same organization. Some job reports and accounts receivable re-ports can be printed by division. Billings can also be added for a division.

6-8
The Add Client Account Win-
p
a
y
t
r
ewq
i o
u
1 The client number is a unique customizable, 10-digit letter or number code.
2 Each client can belong to a division.
3 Use the status pop-up menu to choose a status for the client.
4 The client’s organization name and address will appear on printed estimates and invoices.
5 In-house clients are used to track internal time. Time for in-
house clients won’t appear on client Profit & Loss statements.
6 The key contact is the person most responsible for approving the client’s jobs. It is copied to new jobs automatically.
7 Every client can be assigned an account executive or team.
8 For corporate clients, a Chg #/Cost Ctr code can be used for chargeback billing reports.
9 An optional profit center groups this client with others
in the same business unit. If used, only tasks with the same profit center can be added to this client’s jobs.
10 Clients that will never be billed for their job costs should be marked as always unbillable.
11 If the client has more than one contact, they can be entered here with their e-mail address and phone number.
12 The account note contains any important information about the client, such as billing instructions.
The Add Client Account Window
New clients can also be added while you are working elsewhere using the client’s Lookup List.

6-9Client/Staff Access Privileges
The client’s staff access privileges controls who can see a client’s job tasks. If a user is given “no access” to a client, he or she can’t see the job’s tasks, estimates, costs, or billings. This option lets you define on a client-by-client basis just who can work with certain clients. Staff access privileges for clients only affect a user’s access to the job’s tasks. Access to other client-related areas in Clients & Profits (which includes most of the database) are not affected by these settings. When new staff members join the company, be sure to check their access to clients. Also, when a staff member leaves be sure to remove them from their client access privileges by clicking the “no access” checkbox.
Client/Staff Access Privileges
The staff access privileges are designed for shops with competitive account teams. For security and accountability reasons, they would be prevented from seeing the jobs for other clients.
r
e
w
q
1 To keep all users from ac-cessing the client’s job tasks, click on the no access button. To give all users access to the client’s job tasks, click on the all access button.
2 To print a hard-copy printout of the Staff Access List, click on the print list button.
3 All staff members are listed by their staff code. You can change the sort order by clicking on any of the column headings.
4 To deny a staff member ac-cess to a client’s job tasks, click on the no access box.

6-10
The Client Contacts window is an excellent way to keep track of all the contacts for a client. For each client contact you can enter in their full name, title, phone numbers for both work and home, fax numbers for both work and home, cell phone number, pager number, e-mail address, notes, an address, last time they called, the next expected phone call, and whether or not they are a decision-maker.
For easy reference, the Clients window lists all client contacts with their work phone number and e-mail address.
Client Contacts
1 The client name appears here for reference.
2 Enter the client’s first name, middle initial, and last name. Type the salutation you wish to use, including the punctuation (e.g., Mr. Nigash: or Phil,).
3 Enter the client contact’s title.
4 Make a note here of the last time you contacted the client, then schedule your next call so you’ll be sure to follow up.
5 Enter the client’s work and home e-mail addresses.
6 You can add up to four dif-ferent telephone numbers, and two fax numbers. Additional numbers can be added to the notes window.
7 Enter the contact’s primary address here.
8 The options checkboxes let you indicate whether a client contact is a decision maker, and whether to send them sales e-mail.
e
wq
Client Contacts
t
u
r
y
o
i
9 Add any notes here about the client to help jog your memory about likes and dislikes, favorite sports teams, who their supervi-sor is, and more.

6-11Client Contacts
You can add an unlimited number of client contacts to each client, so you’ll never lose track of someone.
e
w
q
1 Contacts can be easily add-ed, edited, or deleted from the Client Contacts window. To add a new client contact, click on the add button. To edit a client contact’s information, click on the edit button. To delete a contact, click on the delete button. To print the contact list, click the print button.
2 The client name appears here for reference.
3 The client contacts window lists contacts’ name, title, work e-mail, and work phone, since this is the most commonly used information.

6-12
Client Billing Information
Client Billing Information
1 To print a hard-copy printout of the Client Billing Info report, click on the print button.
2 The name of the current cli-ent you are editing is displayed here.
3 The client’s standard billing rate is copied to new job tasks, if the Preference setting is set to always copy billing rate from client. If entered, any time added for this client gets this rate, regardless of who did the work.
4 This markup overrides all other markups on job costs, regardless of the vendor. It is copied to job tasks, where it is used on A/P invoices and checks. Don’t enter a markup here unless it is to be used everywhere.
5 This monthly finance charge is copied to new invoices. Finance charges are calculated on agings and statements, but don’t affect the General Ledger. If you actually charge—and get paid—the finance charge, it can
be added as an adjustment on the client payment.
6 The payment terms are copied to new invoices. They appear on the printed invoice for the client to see. It is a text field, so any kind of terms can be entered.
7 If a client issues a blanket PO for its jobs, enter it here. It will be copied to every new job.
8 A credit limit can be as-signed to a client. When an
The Billing Information window offers a wealth of details about the client. This billing information affects the client’s jobs, costs, and A/R invoices.
q
w
er
ty
ui o
p
a
s d
f

6-13
invoice is entered for the client that is over its credit limit, a warning message will appear.
9 Click the credit hold box to place a client on hold when they have reached their credit limit or have a history of not paying on time. A client on hold won’t be able to have new jobs or billings added for them.
10 Every client can have two different sales tax rates. Sales taxes are calculated on taxable job tasks only, using the rates entered here. Sales tax rates can vary by client for flexibility. The sales tax county is used to subtotal invoices on the sales tax report.
11 Up to five copies of an invoice can be printed auto-matically, without using special forms. You can enter up to five distribution names here, which are copied to new invoices. These names appear at the bot-tom of the printed invoices.
12 The unused balance is the balance of the retainers billed to clients (or retainer client payments), less amount applied to invoices. It is the amount you can apply as payments to up-coming invoices. Retainer dGL, cGL is the client’s default debit and credit G/L accounts.
Client Billing Information
A client’s billing information can be changed anytime. Some of this information appears on the client list, but most doesn’t. Any part of the billing information can be printed us-ing custom reports.
13 The media job number, task and standard commis-sion are copied to new media plans added for this client. The client’s media debit G/L number replaces the default A/R num-ber on invoices when adding a media billing. The media est# field shows the media estimate number last used for this client.
14 A separate billing address can be added for the client here. You can use the copy link to have the client’s address automatically entered for you. To clear the address, click on the clear link.

6-14
Client Projects
It’s common for clients to track what they spend by project, program, or some other kind of category. When a new job is opened for a client, you can enter one of these codes into the project field. To keep your job tracking more consistent, you can establish a standard list of dozens of projects for each client. With projects, you’ll be able to easily show your clients how they spent their advertising dollars without creating spreadsheets.
Client Projects
q w
e
r t y u
The word “project” is customizable as a system-wide preference. To rename “project,” choose Preferences from the Setup menu, then select the Names preferences.
1 Client projects can be easily added, edited, and deleted. To add a new project, click on the add button. You can add dozens of projects for one client. To edit a project’s details, click on the edit button. Because projects are used for reporting purposes and don’t affect the G/L, they can be edited at any time. To delete a project, click on the delete button.
2 To print the Client Project List, click on the print list button.
3 Client projects are listed by project name. They can be resorted by clicking on any of the column headings.
4 The project name identi-fies the project on job tickets, estimates, invoices, and other reports. The name must be unique and should be a nick-name for the project that other users will understand.
5 The description can be used to explain in detail what the project entails.
6 The status is used to de-scribe what phase the project is currently in. The status is optional and can be shown in custom reports.
7 The budget can be used to show how much the client wants to spend on the project. The budget is optional and can be shown in custom reports.

6-15
Unlike the job diary, the client diary does not keep an automatic log of every client activity—it would generate an immense number of entries. Instead, the client diary is used like a daily log. Each client diary entry includes the date and time it was added, as well as initials of the staff member who added it. The entry’s subject and description are user-defined. Client diary entries can be useful for tracking problems, such as overdue invoices. Since each entry has a “resolved” checkbox, the Client Diary window clearly shows at-a-glance which entries are still pending. Once the client’s issue is closed, anyone can mark the entry as “resolved.”
Client Diary/Call Log
Client Diary/Call Log
Client diary entries are part of the C&P e-mail system, and will automatically notify users at the right time and can be e-mailed to any staff member.
1 To add a new diary entry, click on the add button. Client diary entries can also be added from the Accounts Receivable and Client Payments window.
2 Diary entries can be easily edited and deleted. To edit a diary entry, click on the edit button. They can be edited at any time. To delete a diary en-try, click on the delete button. Only diary entries that you’ve added can be deleted.
q w e
r
t y u i
3 To print the Client Diary report, click on the print report button.
4 Client diary entries are sorted in the window by oldest entries first. The entries can be resorted by clicking on any column heading.
5 When is the date a diary entry was added. The checkbox shows which entries have been resolved by marking them with an “X”.
6 Who is the person that added the client diary entry.
7 Event/action tells you what the subject of the client di-ary entry is. Double-click on a diary entry to see its full description.
8 An optional invoice number can be entered for each client diary entry. This field is useful when adding an entry for chang-es or notes about a particular client billing.

6-16
Meeting>Manager
Meeting>Manager
The meeting manager works like the client diary/call log. It allows account executives and others to keep track of meetings. Anyone working with this client’s jobs can add an entry to record the notes, the location, the time, the attendees, the coordinator, and the topic discussed at a client meeting. The meeting manager also allows a meeting coordinator to e-mail all the attendees of a meeting of new changes or for the times of future follow-up meetings.
t
r
e
wq
y u i o
p a
1 Client meeting entries can be easily added, edited, deleted, and canceled. To add a new client meeting entry, click on the add button. Client meeting entries can be scheduled in advance or added after they have taken place. To edit the details of a meeting entry, click on the edit button. To delete a meeting entry, click on the delete button. Entries can be deleted at any time. However, for better accountability, it is better to mark a meeting as “canceled” by clicking on the
cancel button. Cancelling a meeting retains all of the details of a planned meeting for future reference. If an entry is deleted, then no details will appear in the Meetings Manager window.
2 To print the Client Meet-ing List, click on the print list button. To printout a worksheet of a client meeting entry with a summary of the discussion and action items, click on the print worksheet button.
3 Click on the meeting sum-mary link to add the details of the meeting discussion, to list the action items, to schedule a follow-up meeting, and to e-mail the attendees.
4 Client meeting entries are sorted by most recent entry first. You can resort the list by clicking on any column head-ing.
5 Date is when the meeting took place or when the entry was added. An “X” in the
Instead of deleting planned meetings that never happened, cancel them instead. Canceling lets you keep all the details and makes it easier to reschedule if necessary.

6-17
checkbox, identifies client meeting entries that have a completed meeting summary.
6 The location is the place a meeting took place.
7 Coordinator is the person who was in charge of the meet-ing. Typically, this person is a department manager or an account executive.
8 Topic is a brief description of what a meeting was about. To see the full details of a meeting entry, double-click on it.
9 Job identifies what job ticket the meeting was called for. It is optional.
10 The meeting address/direc-tions gives you the directions of how to get to the location of a meeting.
11 Attendees shows who attended, or is scheduled to at-tend, a particular meeting.
Use the meeting summary to keep a record of the discussion and action items of a meet-ing. You can also automatically setup a follow-up meeting and notify via e-mail the at-tendees of that client meeting.
Meeting>Manager
tr
e w
q
y
u
i
o
1 Click on the delete button to completely remove informa-tion about the meeting from the database. If the meeting is ten-tative, go ahead and schedule it, then mark it cancelled later, or edit the date and time.Use the print button to print a meeting worksheet—a great tool for keeping notes at the meet-ing and completing the meeting summary.
2 The status line will be blank until you click save. After sav-ing, the meeting status defaults to upcoming. The initials of the person who added the meeting are automatically filled in.
3 Enter the date and time for the meeting. Time is entered on a 24-hour clock (i.e., mili-tary time), but appears with a
12-hour AM/PM configuration.
4 Enter the initials of the per-son coordinating the meeting. Clients & Profits automatically adds the person who is adding the meeting.
5 Enter a brief description of what the meeting is about in the topic field.
6 The location is where the meeting will be held, such as a conference room, hotel, or client’s office. Enter the loca-tion address and any necessary information about getting there, such as parking, tricky exits, or other caveats.
7 If the meeting is about a particular job, enter its job number here. Because this
isn’t required, the Lookup Job Tickets list won’t automatically open, but you can access it by choosing Lookup > Job Tickets.
8 Enter the meeting objectives so everyone knows what the goals are.
9 Click on the names of meeting attendees. To choose several names, hold down the command (Mac) or control (Windows) key.
10 Check the notify all attend-ees box to send an e-mail to everyone who will be attending the meeting. To send an e-mail to someone who isn’t on the attendees list—but needs to know about the meeting—enter an e-mail address here.
p
Details about a client meeting can be automatically e-mailed to every attendee when-ever the meeting’s status changes.
6-18
Client Retainers
Client Retainers
Client retainers can be automated in Clients & Profits through retainer schedules. Retainers in Clients & Profits are not flat monthly fees for certain services. Instead, they are prepayments for services that will eventually be billed. The retainer will then be applied to the future billings.
The retainer schedule lets you plan up to twelve different retainer billings. The retainer description and amount is copied to a special billing type in Accounts Receivable, the retainer invoice. The retainer invoices can bill one or more of the scheduled billings—without rekeying. The retainer schedule window also tracks your retainer invoices. When a retainer invoice is created, the invoice date and number update the retainer schedule. It’s easy to see just what retainers have and haven’t been invoiced.
You can enter a default debit and credit G/L account for your retainers. These accounts are copied automatically to retainer invoices. If you set up special retainer payable and receivable accounts, you can easily show retainers on your financial statements.
Retainers are tracked separately from regular billings on the client account and aging reports. Payments can be applied to unposted invoices from the retainer balance. When the invoice is posted, the client’s retainer balance decreases. When the invoice is printed, its balance due includes the payment from the retainer. Clients & Profits also tracks the retainer balance—based on whether clients have paid their retainer invoices.
Scheduling retainers doesn’t actually create invoices; instead, it simply sets up standard information for the retainer invoice. You’ll still bill a retainer at the beginning of each month, quarter, or other in-terval. The retainer invoice doesn’t have a job or tasks. It isn’t taxable, since you’re not creating anything. The retainer invoice is posted and printed just like other invoices.
Retainers can be applied to any invoice, including billings for non-job charges like account fees. They are applied to unposted invoices, and act like client payments. The invoice is posted in full to the General Ledger, like other invoices. But the retainer you apply to the invoice debits and credits the G/L just like a client payment.
Retainer invoices are different from advanced billings. Retainers are billings to clients, but not for a specific job. To bill a job for a deposit, an advance billing should be used instead. An advanced billing invoices a selected job for a prepayment. Advances don’t have tasks and aren’t taxable. Advance billings don’t affect the job’s total billings; instead, they update the job’s advanced billings totals.
1 Choose My > My Clients.
2 Find the client whose retainer billings you wish to schedule.
3 Click the Retainers link.
The Retainer Schedule window opens, displaying the client’s retainer schedule, retainer billings, and balances. If the client has been previously billed for retainers, you’ll see their billing dates and invoice numbers.
4 Enter the retainer’s description (i.e., the month) and retainer billing amount.
This description is copied to re-tainer invoices, so the client sees it.
5 Click Save.
Retainers, jobs, and A/R invoices
To edit the client’s re-tainer schedule

6-19
1 The retainer schedule can be printed by clicking print. Click clear to erase the client’s retainer schedule.
2 This description is copied to the retainer invoice when it is created. It can be changed anytime as needed.
3 The retainer amount is copied to retainer invoices au-tomatically, but it can be edited anytime. Once a retainer is billed, it can’t be changed.
4 The date and invoice number are updated when the retainer is invoiced, for quick reference. 5 The unused retainers amount shows the balance of the re-tainer billings that haven’t been applied to invoices yet. This is the amount you can apply as a payment to unposted invoices. This amount is usually a liabil-ity on your financials, since it represents unearned income.
6 The unpaid retainers amount is the balance due from the
client for retainer invoices. As the client pays their retainer billings, this balance decreases.
7 You can enter default debit and credit G/L accounts for retainers. These accounts are copied automatically to retainer invoices. If you set up retainer payable and receivable accounts, you can automatically track retainer balances on the balance sheet.
Client Retainer Schedule
A client’s retainer balance can also be seen in the Clients window in graph form. To access the Retainer Schedule window, double-click on the graph.
q
y
w
e
r
ut
Client Retainer Schedule

6-20
Monthly budget amounts can be entered for each client account. These budget numbers are summarized with the client’s billings on the Budget Recap report. The Budgets window shows the year’s current billings (including sales tax). The Client Budget Recap shows billings for the current fiscal year, You’ll see the year’s invoices subtotaled by period, compared with the monthly budget you’ve entered for the client. This report is only available if you’ve entered budgets for the client; if not, you’ll see a simple invoice list instead.
Client Budgets
Client Budgets
1 Clicking on the graph button displays a colorful bar graph.
2 To print the graph and bud-get numbers simply click on the print button.
3 Client budgets can be entered for each period of the current accounting year.
4 The remaining amount shows how much of the budget has not been used.
5 The client budget vs actual
graph shows visually the client’s monthly billing totals compared the monthly budget amounts entered for a client.
Budgets entered into the Client Budgets window are used on the View Budget Recap report found under the view>point pop-up menu.
r
te
wq

6-21
While Clients & Profits keeps track of each client’s billings forever, the Client Statistics window conveniently graphs the last two years billings. The Stats window is a great place for account people and agency principals to see a snap-shot of a client’s billing. The Client Statistics window shows the billings by quarter, using invoice totals posted in Ac-counts Receivable. For each quarter you’ll see the total billings, the percent of total billings, and the average payment information.
Client Statistics
The Client Statistics window and the report don’t show the client’s profitability, so are relatively safe to show to clients and agency staff members.
y
t
r
e
wq
1 To see the client quarterly billings graph, click on the update graph button.
2 To print the Client Stats report, click on the print button.
3 The Client Stats window can show statistics for this year or last year. To select which year you want to see stats for, use the show pop-up menu.
4 The quarterly billings amount is the sum of the invoices for the three periods that make
up each quarter. The percent field lets you easily see trends in each client’s billing. It can help you see the highs and lows for each client, helping you better plan next year’s budget and cash flow. The avg pay number counts the number of days the client needed to pay off each invoice added during the quarter. You can use this information to analyze how quickly or how slowly a client is paying their invoices from quarter to quarter. It’s a great way to spot clients whose pay-
ments are slowing down—a sure danger sign that the account is in trouble.
5 The total number of jobs opened during each quarter are shown for comparison. The ratio of jobs opened to total billings can provide an interesting in-sight into the client’s work from quarter to quarter (i.e., more jobs with the same billings means those jobs were smaller, etc.).
6 The clients quarterly billings graph shows visually what the billings were for the client per quarter.
Client Statistics

6-22
Client Alerts
Client alerts are customizable, on-line warnings that appear when you add jobs, billings, or payments for a cli-ent. They’re optional, and can be changed anytime. These alerts don’t stop anyone from working with this client; instead, they simply warn the user regarding something about this client. For example, the job alert can inform users to use a certain status code, markup, or spec sheet. Or, the billing alert can remind users how to compose an invoice.
Alerts are unique to each client. They can be set up to prompt the user when adding a new job, A/R invoice, or client payment. Remember, alerts only warn—not stop—users.
Client Alerts
1 Since alerts are custom-ized for each client, the name of the client appears here for reference.
2 Three kinds of events trigger an automatic e-mail: when a client opens a new job, when a client is invoiced, and when a client payment is added. The e-mail message itself is cus-tomizable for each client and each kind of event. Click the New Job Alert! button to add a customized message, which will pop up on the user’s screen
when they add a new job for the client.
3 To add a customized alert that pops up when an Accounts Receivable invoice is added, click on the A/R Alert! button.
4 You can add a customized alert for client payments by clicking on the Payment Alert! button. This alert will pop up when a client payment is added.
5 Enter the message here.
t
rew
q
You’ll have plenty of room to type whatever you want, but remember—the staffer has to read it too!

6-23
Client E-mail
If Clients & Profits is connected to an SMTP-based mail server, it can send electronic mail when a client opens a job, is billed, or makes a client payment. Each client can have its own special e-mail settings, which Clients & Profits uses to automatically notify the client’s account manager or agency principal. These messages are sent via the internet to e-mail programs such as Netscape Mail, Microsoft Outlook, Eudora, etc. It enables a staff member to keep up to date about a client’s new jobs, billing, and payments without actually using Clients & Profits.
Client E-mail
1 Since alerts are custom-ized for each client, the name of the client appears here for reference.
2 The job e-mail will send and e-mail message whenever a new job is opened for this client.
3 The A/R e-mail will send an e-mail message when this client is billed.
4 The payment e-mail is sent when this client pays an invoice.
5 The e-mail message itself is customizable for each client and each kind of event (e.g., “here’s a new job!” or “the cli-ent just paid!”).
6 Each message can be sent to one or more Clients & Profits staff members. For example, the “new job” e-mail can be sent to the accounting depart-ment, while the “payment” e-mail might be sent to the agency principal.
C&P e-mail can be sent to e-mail-enabled cell phones, papers, and PDAs. Each mes-sage is unique to each client.
y
t
rew
q

6-24
Sales>Maker
Sales>Maker
1 Sales actions can be easily added, edited, and deleted from the Sales > Maker window. To add a new sales action, click on the add button. To edit a sales action, click on the edit button. To delete a sales ac-tion, click delete.
2 To schedule a campaign for future sales follow-up actions, click on the schedule campaign button.
3 To print a hard-copy printout of a list of sales actions, click on the print list button.
q
t
r
ew
4 There are several types of sales actions that can be sent to the client. Click on the sales letters link to view, add, edit, clone, delete, or print a list of current and expired sales let-ters. Click on the sales e-mails link to view, add, edit, clone, delete, or print a list of cur-rent and expired sales e-mails. Click on the call scripts link to view, add, edit, clone, delete, or print a list of current and expired sales calls.
5 Dozens of campaigns can be
added for a client. Campaigns make scheduling follow-up sales actions easy. To view, add, edit, clone, delete, or print a list of campaigns, click on the campaign link.
6 Every sales action for a client are listed by date, but the sort can be changed by clicking on any column heading.
y
The Sales>Maker is part of Clients & Profits’ client relationship manager. It lets marketing directors and business de-velopment managers create integrated marketing campaigns that include printed sales letters, follow up e-mail, and script-based telemarketing. Automatic sales campaigns can be scheduled for individual clients and their contacts.
The Sales>Maker keeps track of all your standard sales letters, e-mails, call scripts, and campaigns in one place for everyone in Account Service to use.

6-25Sales>Maker
Sales letters, e-mails, and call scripts must be approved before they can be used on campaigns. Every piece has an expiration that keeps it from being used too long.
1 From the pop-up show menu, choose either expired or current letter.
2 All the the letters entered into Clients & Profits are listed here. To view the letter, just click on its letter name.
3 When adding a new letter, give it a descriptive name so you can easily find in in the letters list.
4 The initials of the person who entered the letter automati-cally appear in the author field.
5 When the letter is approved by a user with the right access privileges, their initials will ap-pear here.
6 Enter a description about the letter’s purpose here.
7 Enter the effective dates for the letter here to prevent an old letter from being used inadvertently.
8 Enter the letter’s subject here. The subject prints on the letter.
u
t
r
ew
q
y
i
o
p
9 Enter the body of the letter here. You can type it directly into Clients & Profits, or paste it from a word processing ap-plication.
10 Enter the letter’s postscript here, including “P.S.”
11 To see how the letter will look when printed, click the print preview button. The client address won’t print; instead, you’ll see several lines for data.
Once created and approved, a sales campaign can be scheduled for individual client contacts. Campaigns can be used repeatedly for different contacts.
a

6-26
Sales>Maker (con’t)
Sales>Maker
Sales campaigns are scheduled for specific client contacts, giving each sales piece a personal touch. This also allows for different contacts to get different sales campaigns, each running concurrently or at different times. All of the day’s scheduled sales letters, e-mails, and calls are processed together when someone runs the Sales>Maker Follow-ups.
tr
e
w
q
y
1 Since campaigns are scheduled for specific clients, the client name fills in automatically.
2 Enter the initials for the staffer who will be responsible for handing the sales campaign. This person’s name will appear on printed letters.
3 Choose the client contact from the pop-up menu.
4 Enter the date on which the cam-paign will start. Clients & Profits will automatically schedule the follow-up pieces (from your campaign) based on this start date.
5 Choose the campaign from the pop-up campaign menu. A descrip-tion of the campaign appears below the menu.
6 The follow-ups scheduled for the campaign are listed here for easy reference.
Once added, the campaign can be assigned to many different clients and client con-tacts—and used several times.

6-27Sales>Maker
Clicking the toolbar buttons will print any unsent sales letter, send any unsent sales e-mail, and print the day’s call scripts.
1 To add a sales letter, click the add button. To edit a sales letter, select it from the list, then click the edit button.
2 Delete a sales letter by se-lecting it in the list below, then click the delete button.
3 To schedule a campaign, click the schedule button.
4 Sales>Maker follow-up report are accessible using the print report button.
5 The client’s name appears here for reference.
6 Sales letters, e-mails, call scripts, and campaigns can be accessed here by clicking on the appropriate link.
7 Every sales action for a client are listed by date, but the sort can be changed by clicking on any column heading. This at-a-glance screen includes the kind of action, which staffer in the agency the action is from, to
The Sales>Maker Follow-up window lists all of today’s scheduled sales letters, e-mails, and calls in chronological order, making it easy for account executives to review the day’s follow-ups.
u
t
rewq
y
which client contact it’s going, which sales follow-up it is, and which campaign the follow-up is linked to.

6-28
Billing/Accounts Receivable
Everything you do for a client is billed by adding an invoice into Accounts Receivable. Clients can be billed for anything you do—whether you’re billing an estimate, an advance, a retainer, a service charge, or a job’s final costs. A/R invoices are seamlessly integrated with jobs and costs, so billing is particularly quick and easy—and can be mostly automatic.
Every kind of client invoice—including deposits, retainers, advances, credits, and discounts—should be added into Accounts Receivable. Invoices have one or more line items, which contain the actual billing amounts. Every task on a job can be billed as a separate line item on an invoice, providing your clients with a clear, detailed billing—one that looks like their estimate.
Invoices can be created for job tickets, anytime, one at a time or all jobs at once. All you need to know is the job number; Clients & Profits X copies the job’s tasks, descriptions, and unbilled amounts to the invoice automati-cally. The printed invoice shows the job’s details, such as specifications, contacts, and billing information.
■ A job can be billed at anytime, as many times as needed. An invoice can bill one job ticket, or contain billings for many different jobs and tasks—even jobs for different clients.
Billing is one of the job’s most important steps. It summarizes all of the work you’ve done on a job—including payables, time, checks, and expenses—on a simple, concise printed invoice. Invoices can be added at the end of the month, or throughout the month as jobs are completed. Billing works like this:
1) Unbilled jobs are reviewed on work in progress reports to see what’s ready to bill;
2) Account executives can adjust unbilled amounts, if needed, to fine-tune what will be billed. Costs, time, and expenses can be transferred between jobs to the same task;
3) From these work in progress reports, invoices are added for each job’s un-billed tasks. The auto-bill option can bill these jobs automatically in one step;
4) These new invoices are proofed, edited, then posted. Posting updates the client’s balance, job totals, and the financial statements;
5) The new invoices are printed, then mailed to clients;
6) When the client sends a payment, it is added into Client Payments and applied to these unpaid invoices.
This completes the billing cycle. Everything you bill affects the client account and the General Ledger when invoices are posted. Invoices are posted to update clients, jobs, and the General Ledger. Posting an A/R invoice creates G/L journal entries automatically. The invoice’s total makes a debit entry, usually updating the A/R account; each invoice line item makes a credit
Billing/Accounts Receivable
entry, usually for an income account. Posted invoices appear on job reports, billing reports, statements, and client aging reports.
Where do billing amounts come from?
An invoice’s billing amounts come from job tasks. Each job task keeps a running total of its costs, time, checks, and expenses from the day the job began. The job task’s unbilled balance shows its unbilled gross costs (which includes markups, commissions, and billing rates) less what’s been billed before.
Job costs aren’t literally billed on the invoice. Instead, the invoice bills the job’s tasks—specifically, each task’s unbilled amount. When you bill a job, every task that has unbilled costs can appear on the invoice (either automati-cally or manually, your choice). The invoice’s billing amount is copied from the job task’s unbilled amount. So clients don’t see every cost, time entry, and expense on invoices; instead, they only see job tasks.
You can freely change the invoice’s billing amounts. The job’s costs are unaf-fected, giving you the flexibility to bill any amount you wish without making complex, time-consuming adjusting entries.
How do I know what to bill?
Job tickets keep running balances of billings and unbilled costs, so knowing what’s to be billed at any point is easy: just look at the job ticket. Instead of reviewing jobs separately, work in progress reports search your database for unbilled jobs.
WIP reports make it easy to pinpoint which jobs need to be billed now, which is especially useful when there are hundreds of open jobs. Work in progress reports select jobs by status. A job has a different production and billing sta-tus, for flexibility. Billing status can be used by account executives to track billable jobs, without interfering with the production manager’s job status.
Before billing, WIP reports can be distributed to your various account execu-tives for review. Once the unbilled jobs have been adjusted as needed, these reports can be used as checklists for the month’s invoicing.
Credits, adjustments, and finance charges
Credits can be made for a client by entering an invoice with negative billing amounts. When a credit invoice is added as a job billing, the credits will re-duce the amount billed on the job ticket; if not, the credit will only affect the client balance and the General Ledger. Credits, as well as finance charges, can also be applied when the client payment is added (which doesn’t affect the job either). Finance charges can also be billed separately.

6-29
A/R Features
Feature How it works, how it’s used
When a job ticket is referenced on a cost or billing, the job ticket is updated when the invoice or check is posted to the G/L. So the job tracks what needs to be billed and what’s already been billed.
The amount to be billed is copied from the job ticket to the invoice automatically.
There’s a billing style for every need. Billing types include estimate, progress/final, multi-job, media, retainer, advance, miscellaneous, finance charge, and job billing.
Options allow you to show more or less detail to customize the client’s invoice. Tasks can be rolled up, grouped, or totaled with the group and hidden. For more detail, the description or hours billed can be included. The estimate and previous billings can also be shown as an option.
The Billing Worksheet shows which costs are billed on the invoice. The amounts, per cost, can be edited as long as the total of the invoice total remains the same.
Up to two sales tax rates can be entered on each task. The sales tax account(s) to be cred-ited and the rates are copied from the client account when the job is open.
Miscellaneous or finance charge invoices update the client account, but don’t affect the job.
Retainers are deposits from clients which do not update the job. When the job is billed, the retainer is applied to it. Advance billings are deposits for a specific job, and are applied to the same job when it is billed.
Up to five copies of each invoice can be printed without using expensive multipart forms.
The diary records the when, where, and who was involved for major events or meetings. Because the diary is easily accessed, details of conversations and events are preserved. The record can also be e-mailed for streamlined communication.
Integrated with job tickets
Automatic billing
Flexible billing styles
Invoice options
Billing worksheet
Two sales tax rates
Non-job invoices
Retainers and advances
Distribution copies
Client diary
A/R Features

6-30
When do I bill something?
There are no real rules when it comes to billing in Clients & Profits. Any kind of invoice can be added, posted, and printed anytime during the month. A job can be billed when it is opened, using its estimate (or any percentage of its estimate). Jobs can be billed progressively, or at completion.
Invoices can be added for anything that needs billing, whether or not it involves a job. This means you can bill client retainers, finance charges, consulting fees, and more where no job exists. Whatever way you choose to bill, jobs always remember what you’ve billed so far. The Job Ticket window shows the job’s billings and unbilled totals. You can see at a glance what’s to be billed on a job ticket
Invoices and Work in Progress
Every job cost remembers when it was billed, including the invoice number, date, and billed amount. Costs are billed when the invoice is created, automatically.
The process starts when a cost is added: All job costs are marked as unbilled (unless the job task is unbillable). When the job is billed, its unbilled amount is copied to the invoice—task by task—where you can change it. When the invoice is saved, the billing amount for each task is applied to its costs—starting with the oldest first, until no billing amount remains. The costs that aren’t billed remain on the work in progress report, providing the dollar amount of your unbilled costs for your financial statements. It’s all automatic, so there’s very little you need to do.
Sales Tax
Sales tax is calculated automatically on invoices. Sales tax is based on two factors: the client’s sales tax rate, and whether or not the invoice’s billing amounts are taxable. Two different sales taxes can be tracked, such as a lo-cal sales tax and a state sales tax. A sales tax report shows invoices and tax you have billed your clients.
There are standard sales tax rates, names, and liability accounts in Prefer-ences. Job tasks are set as taxable/nontaxable in the Task Table. Tax rates aren’t part of the job task; instead, they are part of the client account. The client sales tax rate is copied to new invoices, but can be changed. Changing the invoice’s sales tax rates doesn’t affect the client account. When the invoice is posted, sales tax will be calculated using the invoice’s rates—not the rates found in the client account. Taxable settings are copied from the job task to the invoice, where they can be changed.
Making a billing amount taxable (or not taxable) only affects that invoice. Sales tax isn’t calculated until posting. Once posted, the sales tax rate and account can’t be changed. Posting creates journal entries that credit your sales tax liability accounts, which appear on your balance sheet. When
Billing/Accounts Receivable
you write a check to pay your sales tax, the check should debit the sales tax liability account.
Billing hints, tips, and shortcuts
■ A Progress/Final Billing invoice is the fastest way to bill a job’s costs completely. This option creates the invoice for one job, copying the billing amounts and description from each job task in one step.
■ Using the auto-billing option for one client can instantly add invoices for the client’s unbilled jobs, without time-consuming data entry.
■ The job’s specifications can be shown on the invoice by checking the Show Job Specs option, instead of retyping them onto the invoice.
■ The invoice’s credit G/L accounts, which track income on the financial statements, are copied from the job tasks. Job tasks, in turn, get their cGLs from the Task Table. If you set up your default cGL accounts on the Task Table, you won’t have to worry about the G/L accounts on new invoices, sav-ing time and making your reports more accurate.
■ The billing address can be changed on the invoice itself without affecting the client account or other invoices.
■ A job can be billed to any client. To bill a different client, simply enter a new client number over the old number. The jobs on the invoice will show the right billings, even though a different client got the bill.
A/R invoices and client payments
Clients & Profits X makes it easy to view the payments a client makes on its invoices. The invoice’s unpaid balance due appears at top-right corner of the Accounts Receivable window. It is updated automatically every time a client payment is posted. An invoice’s payment history can be viewed by clicking the Payments button on the A/R window, which opens the Client Payments window. The Client Payments window lists the invoice’s payments, oldest first. For each payment you’ll see the date the payment was added, who added the payment, the client’s check number, and any discounts taken. A list of an invoice’s payments can be printed by clicking the Print button.
Billing/Accounts Receivable (con’t)

6-31
Billing Types
Billing Types
Job billings lets you create an invoice by selecting any job’s tasks.
Advances bill jobs from their estimates, before work has begun. Tasks aren’t billed; instead, the client only sees an advance billing amount. You can bill all or part of the estimate. The job’s total billings aren’t affected; instead, it updates the job’s advance billing total. Advance billings can be applied like a payment to later invoices. Addi-tionally, they don’t affect income, instead they credit a liability account (e.g., unearned income).
Invoices a job’s unbilled tasks in one step.
WIP billing lets you bill unbilled job costs for any user-defined time period, such as a month. The WIP billing window lists costs one-by-one, prompting you to choose which ones should be billed on the invoice. When the invoice is saved, the selected costs will be billed together by job task.
Estimate billings invoice a job’s estimates, showing tasks. Unlike advances, they increase the job’s billed totals.
This option lists unbilled insertion orders or broadcast orders. Each insertion appears as a separate billing amount, showing its publication, issue date, ad#/caption, and gross cost.
This option lets you bill one client for one or more jobs and their tasks.
This billing type invoices clients for non-job charges like consulting fees.
Retainers bill clients for account service fees, based on a schedule. They don’t affect jobs. Retainers can be applied as payments to upcoming invoices. Additionally, they don’t affect income, instead they credit a liability account (e.g., deposits).
This option invoices clients for non-job finance charges.
Job Billing
Advance Billing
Progress/Final Billing
WIP Billing
Estimate Billing
Media Billing
Multi-job Billing
Miscellaneous
Retainer
Finance Charge
Billing type: How it works:

6-32
The Billing/Accounts Receivable Window
progress/final billing, etc.), choose Edit > Add New Invoice. Clicking on the edit button lets you edit the billing’s invoice description. If the billing is un-posted you can edit the client, invoice date, period, payment terms, due date, description, dGL, contacts, AE/team, PO number, and sales tax rates. If the billing has already been posted, only the description can be edited. To change billing amounts, click on the edit amounts button. Billing amounts can be edited for only
1 Use the arrow toolbar buttons to scroll through the previous and next accounts receivable invoices.
2 To automatically bill clients or projects for selected unbilled job tickets, click on the auto-bill button.
3 Accounts Receivable invoices can be easily added, edited, and deleted. To add a new job billing invoice, click on the add button. To add another type of billing (i.e., estimate billing,
unposted invoices. Remember that changing an invoice line item’s billing amount doesn’t change the cost’s billing information for the task. If you change a billing amount for a job billing, you may need to ad-just your cost’s billed amount in the billing worksheet. To delete a billing, click on the delete button. Only unposted invoices can be deleted. If the invoice has already been posted you can either unpost the invoice and then delete it or you can add another invoice that adjusts
q we
r t
y u
i
o ps
Billing/Accounts Receivable
f
g
j
h
k
l
a
d
Double-click on a billing amount to edit the task’s description. The task code can’t be changed. Only the task description appears on the printed invoice.

6-33Client Billing/Billings/Chargebacks
the account balance.
4 Amounts can be easily added and removed from an unposted billing using the add amount and remove amount buttons.
5 Use the print reports and print invoices buttons to print Accounts Receivable reports and invoices.
6 Enter the invoice number here to find a billing. Or use the find more link to find invoices by sequence, invoice number, job number, client number, date, PO number, or due date.
7 Use the history pop-up menu to jump to a previously viewed billing.
8 Click on these links to quickly see the most important parts of an invoice, then make changes. Click on the descrip-tion link to view or edit the billing’s client, invoice date, pe-riod, payment terms, due date, description, dGL, contacts, AE/team, po number, and sales tax rates. If the billing has already been posted, only the descrip-tion can be edited. Click on the options link to view or edit the billing’s display options, copies to names, finance charge, or
billing address. Click on the worksheet link to view or edit the billing’s worksheet, which lists the billing’s job costs. Click on the payments link to view all client payments posted for this billing. Click the client diary link to add, view, or print the client’s diary entries.
9 Invoices are automatically numbered or you can enter your own invoice number. The next invoice number can be set in Preferences. It can contain up to 10 numbers.
10 The billing type indicates what kind of charges were billed on this invoice (e.g., estimate, progress/final, media, advance, retainer, miscellaneous, etc.).
11 The added by initials show which user added the invoice.
12 Every invoice includes one client number, one or more job numbers, a description, and an invoice date. This information appears on the printed invoice.
13 The client’s PO number is copied from the job ticket. The payment terms are copied from the client account. Both appear on the printed invoice.
14 The due date is the date
on which the invoice’s payment is expected, and is used by the Cash Flash report. Clients never see the due date.
15 The Balance due shows the invoice’s total charges (includ-ing sales tax) less any retainer, advance, or client payments. The posted date shows when the invoice was finalized and posted to the G/L. Posting updates the client account, jobs and tasks, and the General Led-ger. Posting an invoice updates the G/L based on its accounting period.
16 The days due box shows a countdown of how many days are left until the invoice reaches it’s due date.
17 Each invoice line item can include a job, task, description, and billing amount. Double-click on a line item to see and edit a billing amount.
18 If a retainer or advance payment was applied to an invoice, its description and amount appear at the bottom of the window—and the printed invoice.
19 The total amount of the billing includes sales tax plus the total of all invoice line item amounts.
The Delete All Unposted Invoices can be used to delete any kind of invoice—not just au-tomatic billings—regardless of how it was added. In fact, it will delete every A/R invoice that isn’t posted.

6-34
Job Billing
Job Billing
qw
se
r t y
ui
o
p
a
1 Invoices are numbered automatically based on a user-defined number in Preferences. The invoice number can be changed by selecting it and then entering your own number. The invoice number appears on all windows, reports, and forms.
2 The job number indicates which job was billed on an invoice. The last-used job number is used entered auto-matically as a time saver, but it can be changed. Invoices usually bill one job at a time
(but the multi-job billing type lets you bill several on the same invoice).
3 An invoice can be billed to only one client. This is the one who will eventually pay for the invoice. The client number is copied automatically from the job, but it can be changed--which allows you to bill the job to a different client.
4 The invoice date appears on the printed invoice. It is used by the aging reports to calculate
the age of unpaid invoices.
5 The accounting period speci-fies which month in the General Ledger should be affected when an invoice is posted. The invoice date and the accounting period can be different, for flex-ibility. This means an invoice can be dated in this month, but the invoice can be posted to next month’s financial period.
6 The due date is the date on which payment is expected. It’s for internal cash-flow planning
When a job task is entered, the unbilled amount and billing information from the task is copied to the invoice line item.

6-35Job Billing
only; the client never sees it.
7 The client’s purchase order and charge number are copied from the job ticket. The invoice’s payment terms are copied from the client account. The terms appear on the printed invoice.
8 The debit account, which is usually Accounts Receivable, is copied from Preferences. This account is debited for the invoice’s total, including sales tax, when the invoice is posted.
9 Invoice notes explain what you’ve billed. They appear on the printed invoice, above the billing amounts.
10 An invoice can include dozens of different billing amounts, each of which contain a job task, billing amounts, hours billed, and an income G/L account. Billing amounts are subtotaled by group, just like amounts on printed estimates.
11 The roll up billing amounts by task option lets you custom-ize how billing amounts appear on the printed invoice. The roll-up option gives you the most flexibility in billing, since it combines selected tasks into another task.
Billing a job for its unbilled costs is the easiest, fastest way to add an invoice. All you need to know is the job number. Since jobs are integrated with billing and ac-counts receivable, there’s no rekeying to make an invoice.
12 The client’s billing address is copied to invoices automati-cally. Click the billing address button to customize the bill-to address on this invoice. Click the traffic button to update the job’s traffic status, including milestones, while adding the invoice.

6-36
1 Invoices are numbered automatically based on a user-defined number in Preferences. The invoice number can be changed by selecting it and then entering your own number. The invoice number appears on all windows, reports, and forms.
2 The job number indicates which job was billed on an invoice. The last-used job number is used entered auto-matically as a time saver, but it can be changed. Invoices usually bill one job at a time
e
i
s
q
r
f
w
u
o
a
(but the multi-job billing type lets you bill several on the same invoice).
3 An invoice can be billed to only one client. This is the one who will eventually pay for the invoice. The client number is copied automatically from the job, but it can be changed—which allows you to bill the job to a different client.
4 The invoice date appears on the printed invoice. It is used by the aging reports to calculate
the age of unpaid invoices.
5 The accounting period speci-fies which month in the General Ledger should be affected when an invoice is posted. The invoice date and the accounting period can be different, for flex-ibility. This means an invoice can be dated in this month, but the invoice can be posted to next month’s financial period.
6 The due date is the date on which payment is expected. It’s for internal cash-flow planning
p
d
Estimate Billing
Estimate Billing
An estimate billing is fast (and accurate) because it creates an invoice using the job’s estimate amounts, not costs. All you need to know is the job’s number.
t y

6-37Estimate Billing
If you always bill jobs based on a fixed estimate, then you’ll use the estimate billing option often. If you generally bill jobs at completion, the estimate billing option is useful when you sometimes need to bill a job—or any part of it—up front (such as a big printing job).
only; the client never sees it.
7 The client’s purchase order and charge number are copied from the job ticket. The invoice’s payment terms are copied from the client account. The terms appear on the printed invoice.
8 The debit account, which is usually Accounts Receivable, is copied from Preferences. This account is debited for the invoice’s total, including sales tax, when the invoice is posted.
9 Invoice notes explain what you’ve billed. They appear on the printed invoice, above the billing amounts.
10 The billing amounts will be calculated using a percentage of the job’s estimate. Billing amounts are copied for every task on the estimate. Any por-tion of the job’s estimate can be billed, depending on your agreement with the client.
11 Job tasks are billed on estimate billings by checking the “X” checkbox. If you don’t want a particular task to appear on this estimate, uncheck it. The task’s description, billing amount, and income cGL num-ber can be changed. Editing the task’s billing amount does not affect its estimate—the change only appears on the estimate billing.
12 The include change orders option causes the task’s change order total to be added into its
billing amount.
13 The roll up billing amounts by task option lets you custom-ize how billing amounts appear on the printed invoice. The roll-up option gives you the most flexibility in billing, since it combines selected tasks into another task.
14 The client’s billing address is copied to invoices automati-cally. Click the billing address button to customize the bill-to address on this invoice. Click the traffic button to update the job’s traffic status, including milestones, while adding the invoice.

6-38
1 Invoices are numbered automatically based on a user-defined number in Preferences. The invoice number can be changed by selecting it and then entering your own number. The invoice number appears on all windows, reports, and forms.
2 The job number indicates which job was billed on an invoice. The last-used job number is entered automatically as a time saver, but it can be changed. Invoices usually bill one job at a time (but the multi-
job billing type lets you bill several on the same invoice).
3 An invoice can be billed to only one client. This is the one who will eventually pay for the invoice. The client number is copied automatically from the job, but it can be changed--which allows you to bill the job to a different client.
4 The invoice date appears on the printed invoice. It is used by the aging reports to calculate the age of unpaid invoices.
5 The accounting period speci-fies which month in the General Ledger should be affected when an invoice is posted. The invoice date and the accounting period can be different, for flex-ibility. This means an invoice can be dated in this month, but the invoice can be posted to next month’s financial period.
6 The invoice’s payment terms are copied from the client ac-count. The terms appear on the printed invoice.
q
e
r ty
i
o p
a
w
s
Progress/Final Billing
Progress/Final Billing
d
u
A progress/final billing is a faster, easier way to invoice a job’s costs. It’s fast because billing amounts are created automatically for the job’s tasks for the job number entered.

6-39Progress/Final Billing
There’s no distinction between a progress billing and a final billing. Both kinds of billings are treated the same way: both create an invoice using the job’s unbilled tasks. Use the progress/final option when you need to bill a job for costs, even if it isn’t finished.
7 The due date is the date on which payment is expected. It’s for internal cash-flow planning only; the client never sees it.
8 The debit account, which is usually Accounts Receivable, is copied from Preferences. This account is debited for the invoice’s total, including sales tax, when the invoice is posted.
9 Invoice notes explain what you’ve billed. They appear on the printed invoice, above the billing amounts.
10 The billing amounts will be calculated using a percentage of the job’s estimate. Billing amounts are copied for every task on the estimate. Any por-tion of the job’s estimate can be billed, depending on your agreement with the client.
11 The job task’s descrip-tion, unbilled amount, unbilled hours, and cGL are copied to the invoice. The billing amount is copied from the job task, but
can be freely modified. You can bill any amount, whether the job task has costs or not. The billing amount will be credited to the job task’s cGL (i.e., in-come) account. The line item’s cGL can be changed to a differ-ent account, if needed, without affecting the job task.
12 The include change orders option causes the task’s change order total to be added into its billing amount. The include unbilled POs/IOs option causes the task’s unbilled order totals to be added into its billing amount. The roll up billing amounts by task option lets you customize how billing amounts appear on the printed invoice. The roll-up option gives you the most flexibility in billing, since it combines selected tasks into another task. The show hours billed option will show each task’s billed hours on the printed invoice.
13 The client’s purchase order and charge number are copied from the job ticket.

6-40
WIP Billing
WIP Billing
1 Invoices are numbered automatically based on a user-defined number in Preferences. The invoice number can be changed by selecting it and then entering your own number. The invoice number appears on all windows, reports, and forms.
2 The job number indicates which job was billed on an invoice. The last-used job number is used entered auto-matically as a time saver, but it can be changed. Invoices usually bill one job at a time
(but the multi-job billing type lets you bill several on the same invoice).
3 An invoice can be billed to only one client. This is the one who will eventually pay for the invoice. The client number is copied automatically from the job, but it can be changed—which allows you to bill the job to a different client.
4 The invoice date appears on the printed invoice. It is used by the aging reports to calculate
the age of unpaid invoices.5 The accounting period speci-fies which month in the General Ledger should be affected when an invoice is posted. The invoice date and the accounting period can be different, for flex-ibility. This means an invoice can be dated in this month, but the invoice can be posted to next month’s financial period.
6 The client’s purchase order is copied from the job ticket.
7 The invoice’s payment terms
f
d
sa
w
e
r t
y i
o
u
p
q
WIP billings are fast and easy. Your unbilled costs are entered automatically based on a date range that you specify.

6-41WIP Billing
are copied from the client ac-count. The terms appear on the printed invoice.
8 The due date is the date on which payment is expected. It’s for internal cash-flow planning only; the client never sees it.
9 The debit account, which is usually Accounts Receivable, is copied from Preferences. This account is debited for the invoice’s total, including sales tax, when the invoice is posted.
10 The charge number is copied from the job ticket.
11 Unbilled job costs are selected from the job ticket for a specified date range.
12 The roll up billing amounts by task option lets you custom-ize how billing amounts appear on the printed invoice. The roll-up option gives you the most flexibility in billing, since it combines selected tasks into another task.
What’s the difference between a progress/final billing and a WIP billing? Progress/final billings pull every unbilled costs. WIP billings only pull unbilled costs for your specified date range. WIP billing makes it easy for you to bill costs for a certain month without having to add your billing on the first or last day of the month.
13 The unbilled job costs that are dated within your selected date range will be automatically listed here with their billing detail. The amounts and hours can be edited.
14 Invoice notes explain what you’ve billed. They appear on the printed invoice, above the billing amounts.

6-42
Multi-job billings can be created to bill for many jobs and tasks on a single invoice. You can consolidate jobs from various clients onto a single invoice—for one client. Multi-job invoices can make billing large companies much easier, especially when you do work for many departments or divisions of a corporation. Multi-job invoices also work well when one client has a tremendous volume of work to bill at once.
1 Invoices are numbered automatically based on a user-defined number in Preferences. The invoice number can be changed by selecting it and then entering your own number. The invoice number appears on all windows, reports, and forms.
2 An invoice can be billed to only one client. This is the one who will eventually pay for the invoice.
3 The invoice date appears on the printed invoice. It is used
by the aging reports to calculate the age of unpaid invoices.
4 The accounting period speci-fies which month in the General Ledger should be affected when an invoice is posted. The invoice date and the accounting period can be different, for flex-ibility. This means an invoice can be dated in this month, but the invoice can be posted to next month’s financial period.
5 The due date is the date on which payment is expected. It’s
f
y
w
e tr
q
for internal cash-flow planning only; the client never sees it.
6 The client’s purchase order and charge number can be entered here. The invoice’s payment terms are copied from the client account. They all ap-pear on the printed invoice.
7 The debit account, which is usually Accounts Receivable, is copied from Preferences. This account is debited for the invoice’s total, including sales tax, when the invoice is posted.
Multi-Job Billing
Multi-Job Billing
u
i
o
d
p a s
Multi-job billings let you consolidate jobs from various clients onto a single invoice—for one client. It makes billing large companies with various departments much easier.

6-43Multi-Job Billing
8 Invoice notes explain what you’ve billed. They appear on the printed invoice, above the billing amounts.
9 Every invoice line item gets a job number. Any client’s jobs can be included on multi-job billings.
10 Tabbing past the job’s task copies its description, unbilled amount, unbilled hours, and cGL to the invoice.
11 The billing amount is cop-ied from the job task, but can be freely modified. You can bill any amount, whether the job task has costs or not.
12 The billing amount will be credited to the job task’s cGL (i.e., income) account. The line item’s cGL can be changed to a different account, if needed, without affecting the job task.
The printed invoice for a multi-job billing is tightly formatted, so it doesn’t have all display options available as do other billing types.
13 The roll up billing amounts by task option lets you custom-ize how billing amounts appear on the printed invoice. The roll-up option gives you the most flexibility in billing, since it combines selected tasks into another task.
14 The client’s billing address is copied to invoices automati-cally. Click the billing address button to customize the bill-to address on this invoice. Click the traffic button to update the job’s traffic status, including milestones, while adding the jobs to the invoice.

6-44
Media Billing
Media Billing
1 Invoices are numbered automatically based on a user-defined number in Preferences. The invoice number can be changed by selecting it and then entering your own number. The invoice number appears on all windows, reports, and forms.
2 An invoice can be billed to only one client. This is the one who will eventually pay for the invoice. The client number is copied automatically from the job, but it can be changed —which allows you to bill the job
Billing broadcast, print, interactive, and outdoor orders is a snap—a completed invoice is just a few clicks away. There’s nothing to rekey, since invoices are based on media orders. All you need to know is the client number and the run date.
qwe r
t
u i
o
p s
a
y
to a different client.
3 The invoice date appears on the printed invoice. It is used by the aging reports to calculate the age of unpaid invoices.
4 The accounting period speci-fies which month in the General Ledger should be affected when an invoice is posted. The invoice date and the accounting period can be different, for flex-ibility. This means an invoice can be dated in this month, but the invoice can be posted to
next month’s financial period.
5 The client’s purchase order can be entered here. The invoice’s payment terms are copied from the client account. They both appear on the printed invoice.
6 The debit account, which is usually Accounts Receivable, is copied from Preferences. This account is debited for the invoice’s total, including sales tax, when the invoice is posted.
Multi-job billings let you consolidate jobs from various clients onto a single invoice—for one client. It makes billing large companies with various departments much easier.

6-45Media Billing
Unlike pre-billings, media billings can be added after insertion or broadcast orders have their costs invoiced by the publication/station. Each media invoice can contain dozens of inser-tion or broadcast orders which will each appear as separate billing amounts on the printed invoice.
7 The client’s charge number can be entered here. It appears on the printed invoice.
8 The due date is the date on which payment is expected. It’s for internal cash-flow planning only; the client never sees it.
9 Invoice notes explain what you’ve billed. They appear on the printed invoice, above the billing amounts.
10 A media billing can be added to bill a client’s insertion orders or broadcast orders.
11 If a client pays the media directly, it can be billed for commission amounts only by choosing the bill commission only option. Every media buy from the insertion or broadcast order will appear on the invoice. The media commission is calcu-lated as the difference between the media buy’s gross amount less its net amount.
12 If you selected to bill the client for insertion orders, then enter in the space close date here. This is the date that unbilled insertion orders will be pulled from. If you selected to bill the client for broad-cast orders, then enter in the broadcast month here. Unbilled broadcast orders will be pulled for this month only.
1 The Media Billings window will list unbilled orders by num-ber, generally with the oldest ones shown first.
2 Insertion orders and broad-cast orders are added to media invoices by checking the “X” checkbox.
17 The order’s publication/station and ad name/program appear here for reference. The ad’s issue date appears on the printed invoice.
3 The media buy’s net and gross amounts are shown for reference.
4 Depending on the option chosen when the invoice was added, the media buy’s gross amount, net amount, or com-mission only amount will be in-cluded on the invoice as the bill amount. You can change the media buy’s billing amount by entering a new number. Media buys that are billed as net not gross (i.e., if the “bill net, not gross” option was checked) are
indicated with a small “n” next to the amount.

6-46
1 Invoices are numbered automatically based on a user-defined number in Preferences. The invoice number can be changed by selecting it and then entering your own number. The invoice number appears on all windows, reports, and forms.
2 A retainer invoice can be billed to only one client.
3 Invoice date appears on the printed invoice. It is used by the aging reports to calculate the age of unpaid invoices.
q
Retainer Billing
Retainer Billing
Client retainers are special-purpose invoices that bill clients, but don’t count as income. Instead, retainers are billed as deposits against future billings. Retainers can only be billed from each client’s retainer schedule which. contains descriptions and amounts for up to twelve monthly billings. When you add a retainer invoice, you’ll be prompted to select a retainer to bill from the client’s schedule copying in all the details from the client account. When a retainer is posted, the balance updates the client’s retainer balance.
When a retainer is applied to an unposted invoice, the retainer amount appears after the invoice’s line items and billing amounts, sales tax, and grand total.
4 The accounting period speci-fies which month in the General Ledger should be affected when an invoice is posted. The invoice date and the accounting period can be different, for flex-ibility. This means an invoice can be dated in this month, but the invoice can be posted to next month’s financial period.
5 The client’s purchase order is copied from the client account.
6 The invoice’s payment terms are copied from the client ac-
count. They all appear on the printed invoice.
7 The debit account, which is usually Accounts Receivable, is copied from the client’s retainer schedule.
8 The credit account, which is usually a liability account (e.g., deposits), is also copied from the client’s retainer schedule.
9 The due date is the date on which payment is expected. It’s for internal cash-flow planning only; the client never sees it.
we r
t
yui
o
p
a

6-47Retainer Billing
If a client pays you a flat monthly fee that isn’t applied to job billings, then it shouldn’t be billed as a retainer. These fees, which usually cover the client’s account service hours, are really earned income because you won’t give the money back if you do no work.
10 To add a retainer billing to this invoice, click the “X” checkbox for a selected month. Previously billed retainers will have the checkbox already marked.
11 When a scheduled retainer is actually billed (by clicking on the “X”), its billed date is en-tered automatically. The billed date appears for reference on previously billed retainers.

6-48
How it works: When an advance billing is posted, a debit journal entry is posted into Accounts Receivable and a credit journal entry is posted into Client Advances. Unlike retainers, advance billings do increase the client’s balance. Advance invoices appear on ag-ing reports, and are paid off in Client Payments just like other invoices.
■ Advance billing is only avail-able in Clients & Profits Pro X and Clients & Profits SQL X.
q
Advance Billing
Advance Billing
Advances are special invoices that bill a job’s estimate before the work has started. They are special because the billing amounts on advance invoices aren’t considered income; instead, they are counted as unearned revenue, or a liability on the financial statements.
1 Invoices are numbered automatically based on a user-defined number in Preferences. The invoice number can be changed by selecting it and then entering your own number. The invoice number appears on all windows, reports, and forms.
2 The job number shows which job was billed on the invoice. Only one job can be billed on each advanced billing.
3 An invoice can be billed to only one client. This is the one
who will eventually pay for the invoice. The client number is copied automatically from the job, but it can be changed—which allows you to bill the job to a different client.
4 Invoice date appears on the printed invoice. It is used by the aging reports to calculate the age of unpaid invoices.
5 The accounting period speci-fies which month in the General Ledger should be affected when an invoice is posted.
Advances act like client retainers, but are associated with one specific job. They let you bill up front for a job, then apply these billings later when the actual costs are billed.
w
p
i
uy
er
o
t
a

6-49Advance Billing
6 The client’s purchase order is copied from the job ticket. The invoice’s payment terms are copied from the client account. They all appear on the printed invoice.
7 The debit account, which is usually Accounts Receivable, is copied from Preferences.
8 The due date is the date on which payment is expected. It’s for internal cash-flow planning only; the client never sees it.
9 Invoice notes explain what you’ve billed. They appear on the printed invoice, above the billing amounts.
10 The estimate and ad-vance billed-to-date totals are copied from the job ticket. Any percentage, up to 100%, of this job’s estimate can be billed. The billing amount is calcu-
The advance billing amount appears on the bottom right side of the Job Snapshot window (Production > Job Tickets > view>point > Job Snapshot). It is the running total of the job’s advance billings, less any amounts applied to the job’s invoices.
lated, based on the estimate, by tabbing past the percent-age. The advance billing cGL account number should be a liability account (e.g., unearned revenue).
11 To print a copy of the job’s estimate at the same time the invoice is printed, select the option also print estimate with this invoice.
12 The client’s billing address is copied to invoices automati-cally. Click the billing address button to customize the bill-to address on this invoice. Click the traffic button to update the job’s traffic status, including milestones, while adding the invoice.

6-50
Miscellaneous Billing
Miscellaneous Billing
Miscellaneous billings don’t affect jobs. They’re ideal for onetime billings for small charges like consulting, royalties, expense reimbursements, and fees.
1 Invoices are numbered automatically based on a user-defined number in Preferences. The invoice number can be changed by selecting it and then entering your own number. The invoice number appears on all windows, reports, and forms.
2 An invoice can be billed to only one client. This is the one who will eventually pay for the invoice.
3 The invoice date appears on the printed invoice. It is used
by the aging reports to calculate the age of unpaid invoices.
4 The accounting period speci-fies which month in the General Ledger should be affected when an invoice is posted. The invoice date and the accounting period can be different, for flex-ibility. This means an invoice can be dated in this month, but the invoice can be posted to next month’s financial period.
5 The client’s purchase order can be entered here. The
invoice’s payment terms are copied from the client account. They both appear on the printed invoice.
6 The debit account, which is usually Accounts Receivable, is copied from Preferences. This account is debited for the invoice’s total when the invoice is posted.
7 The client’s charge number can be entered here. It appears on the printed invoice.
u
yt
re
w
q
i
o
pa
s

6-51
Invoices don’t have to reference a job numbers or tasks. These billings, called miscellaneous invoices (as op-posed to job invoices), let you bill clients for non-job charges such as consulting fees, commissions, and service charges—as well as credits and adjustments—without affecting job tickets.
8 The due date is the date on which payment is expected. It’s for internal cash-flow planning only; the client never sees it.
9 Invoice notes explain what you’ve billed. They appear on the printed invoice, above the billing amounts.
10 The description field can be used to describe the billing amount. It appears in the body of the printed invoice. When the invoice is posted, this description becomes the credit journal entry’s description in the General Ledger.
11 This is the amount the invoice is being billed for.
12 The credit G/L account is entered automatically from pref-erences, but it can be changed.
13 The client’s billing address is copied to invoices automati-cally. Click the billing address button to customize the bill-to address on this invoice.
Miscellaneous Billing

6-52
Finance Charge Billing
Finance Charge Billing
1 Invoices are numbered automatically based on a user-defined number in Preferences. The invoice number can be changed by selecting it and then entering your own number. The invoice number appears on all windows, reports, and forms.
2 An invoice can be billed to only one client. This is the one who will eventually pay for the invoice.
3 The invoice date appears on the printed invoice. It is used by
the aging reports to calculate the age of unpaid invoices.
4 The accounting period speci-fies which month in the General Ledger should be affected when an invoice is posted. The invoice date and the accounting period can be different, for flex-ibility. This means an invoice can be dated in this month, but the invoice can be posted to next month’s financial period.
5 The client’s purchase order can be entered here. The
invoice’s payment terms are copied from the client account. They both appear on the printed invoice.
6 The debit account, which is usually Accounts Receivable, is copied from Preferences. This account is debited for the invoice’s total when the invoice is posted.
7 The client’s charge number can be entered here. It appears on the printed invoice.
Finance charge billings are used to bill a late-paying client for finance or service charges. They look like regular invoices, and aren’t handled differently by Clients & Profits.
q
w
er
ty
u i
o
p
a
s

6-53
While finance charges are calculated on aging reports, they aren’t automatically billed to clients. Instead, separate finance charge invoices are added then printed for the client.
8 The due date is the date on which payment is expected. It’s for internal cash-flow planning only; the client never sees it.
9 Invoice notes explain what you’ve billed. They appear on the printed invoice, above the billing amounts.
10 The description field can be used to describe the billing amount. It appears in the body of the printed invoice. When the invoice is posted, this description becomes the credit journal entry’s description in the General Ledger.
11 This is the amount the invoice is being billed for.
12 The credit G/L account is entered automatically from pref-erences, but it can be changed.
13 The client’s billing address is copied to invoices automati-cally. Click the billing address button to customize the bill-to address on this invoice.
Finance Charge Billing

6-54
Automatic Job Billing
Automatic Job Billing
Clients & Profits X provides a unique feature that creates invoices automatically for all of your unbilled jobs. It’s the same result as if you’d entered an invoice for each of your unbilled jobs. Instead, auto-billing does the work for you. The auto-billing process is simple: unbilled jobs are chosen by production or billing status. Invoices are made auto-matically, including a line item for every unbilled task on the job ticket. There’s no retyping.
1 Choose production status or billing status from the from pop-up menu, then enter a range of status codes. To bill all jobs with unbilled tasks, enter the status range of 0 to 999. This range of status codes will include jobs without a billing status. To only bill jobs with a specific status, enter a more limited range of status codes (e.g., 30 - 50).
2 Choose client or project from the and for pop-up menu, then enter a client number or
project code. Unbilled jobs can be selected for one client or project or all clients and all projects. This option lets you easily bill one client’s unbilled at the same time. It also gives you the option to easily bill one project’s jobs together on the same invoice.
3 The invoice date is the date that appears on the printed in-voice. The client sees this date as the date of the billing. It is used by the aging reports to cal-culate an invoice’s age (i.e., 30
days, 60 days, 90 days). The date defaults to today, but can be changed. It does not affect the posted date.
4 The next invoice number lets you set the numbering sequence for this batch of invoices. The next number, based on the last invoice, is entered automatically. If the last invoice number contained letters, the next number can’t increment-—and you’ll have to enter your own number.
When auto-billing, costs are billed automatically as invoices are saved. Use the Billing Worksheet window to change billing amounts on a job cost before posting an invoice.
i
uy
t
r
e
w
q

6-55Automatic Job Billing
If for some reason you want to delete all of the auto-billed invoices and start the process over again, use the Delete All Unposted A/R command. Keep in mind that it will delete all unposted invoices, not just your automatic billings.
5 The accounting period speci-fies which month in the General Ledger should be affected when an invoice is posted. The invoice date and the accounting period can be different, for flex-ibility. This means an invoice can be dated in this month, but the invoice can be posted to next month’s financial period.
6 Instead of creating a sepa-rate invoice for each job with unbilled amounts, the make one invoice per client option will combine the client’s jobs on one invoice.
7 To show the hours billed on the printed invoices, select the show hours billed option.
8 Clicking OK automatically creates the invoices. The auto-bill function creates invoices by first compiling a list of unbilled jobs, based on your selections. The unbilled job’s tasks are analyzed, then invoice billing amounts are saved. These
line items are then compiled together by job number to com-plete the finished invoices.

6-56
The Billing Worksheet
The Billing Worksheet
Although the job’s costs don’t actually appear on the invoice, they are billed when you add an invoice. This means that you’ll always know when vendor invoices, time entries, checks, and expenses were billed to a client, the amount billed, and the client’s invoice number. Because Clients & Profits X automatically applies what you’re billing to job costs, extra data entry isn’t needed. Instead, billing amounts are applied to each task’s costs, oldest first.
Every cost tracks when it was billed, the invoice number, the invoice date, and the amount billed. This information makes it easy for anyone in the agency to see when (or if) a cost was billed. Every cost window (A/P, check-book, time sheets, and expenses) shows billing information.
■ Client billings are based on job tasks, not literally the job’s costs. This means when you bill a job, the amount that’s billed is copied from the job task. The job task gets the unbilled total from job costs, but it’s a separate amount. This gives you the ability to bill for more or less than the job’s costs, without making adjusting cost entries. Instead, you simply bill what you want to bill—and Clients & Profits keeps track of the unbilled work in progress automatically.
The automatic cost billing will work for most of your invoices, since most bill-ings are straightforward. However, in some cases you may need to selectively bill some costs, but not others. So the invoice’s Billing Worksheet window lets you change how the billings are distributed to the job’s costs.
■ Editing the Billing Worksheet has no direct effect on your General Ledger. That’s because costs update the General Ledger when they are posted as accounts payable and checks.
How does billing work in progress affect the General Ledger?
Costs from Accounts Payable or from the Checkbook debit the G/L when the vendor invoices or checks are posted. Posting vendor invoices credits the A/P liability account, while posting checks credits the Cash asset account.
Posting client invoices credits your income account only. A separate credit JE is posted for each line item/billing amount on your invoice. The invoice total debits your A/R asset account. These are the only G/L entries posted by Accounts Receivable.
The journal entries posted from A/P and A/R are automatic. You may need to make adjusting G/L entries to accommodate complete inventory account-ing for job costs. You’ve got complete control over which debit and credit accounts are used.
Since WIP reports show costs by billing status (e.g., unbilled, unbillable, billed, on-hold, partial, etc.) you can easily run a month-end report showing everything billed, unbilled, etc. These reports can be used as the source for your inventory journal entries. For more information see the WIP FAQ on the
Clients & Profits web site.
How billing amounts are applied to a job’s costs
The distribution of billing amounts to job costs is automatic. Costs are updat-ed as billing amounts are saved (e.g., after a new task is added to an invoice). You’ll see a progress message while the line item is being saved. At this point, the line item’s billing amount is applied to the task’s oldest, unbilled cost first. Then billing amounts are applied methodically to the next-oldest cost, and so on until there is no billing amount left.
For example: A job task ART has $1,000 in unbilled costs, based on 10 time entries, 4 vendor purchases, and 1 check. When you add an invoice for the job, then enter the task ART, the line item’s billing amount becomes $1,000 automatically (it is copied from the task’s unbilled total). When the line item is saved, the $1,000 billing amount is applied to the task’s costs (oldest costs first). Its costs are marked as billed, one-by-one, until no billing amount remains. If you bill less than the task’s unbilled amount, some of your costs will remain unbilled or maybe partially billed.
■ Costs with a billing status of on-hold or unbillable don’t get billing amounts. You can change the cost’s billing status in the job ticket’s Work in Progress window prior to adding the invoice.
You can change the distribution of billing amounts to job costs before post-ing, letting you change how costs were billed by an invoice.
To use the Billing Worksheet
1 From the Accounts Receivable window, find an invoice.
2 Click on the Worksheet button, or choose Edit > Billing Worksheet.
The costs that were billed by this invoice are listed in order by date. Each cost shows the date, number, cost amount, gross (i.e., billable) amount, hours, and amount billed. You can change the invoice’s cost billing any time before posting. Once an invoice is posted, its costs can’t be changed.
3 Make your changes the cost status and billing amounts, then click Save.
Tabbing past the status field saves your changes to the cost and the next cost is selected for editing. There are no restrictions on the billing amount, includ-ing billing a cost for more than its gross amount. Changing a cost’s billing information doesn’t affect the invoice, the client balance, or the General Led-ger. Instead, the changes you make will appear only on the job’s cost reports and on the work in progress summary, which shows unbilled costs for all jobs.
To see a cost’s billing information
Every job cost remembers when and how it was billed. The cost’s billing information is easy to see:

6-57The Billing Worksheet
The cost’s billing status affects the job’s unbilled total. The job’s unbilled total is the sum of its unbilled costs. Only costs having the status of un-billed or partial (for partially-billed costs) will be included in the job task’s unbilled total.
■ To see when an Accounts Payable invoice was billed: From the Accounts Payable window, find the invoice. Then double-click on any of its line items. You’ll see the billing information at the bottom of the window. Since each cost on an A/P invoice could be billed at different times, they may have dif-ferent billing dates and invoice numbers.
■ To see when a time entry was billed: From the Time Sheets window, find the time sheet. Then double-click on any of its en-tries. You’ll see the time entry’s billing information at the bottom of the window.
■ To see when a check was billed: From the Check-book window, find a check, then double-click on any of the line items. You’ll see the billing information at the bottom of the window. Since each cost on a check could be billed at different times, they may have different billing dates and invoice numbers. Checks for payments to vendor accounts won’t have billing infor-mation, since they aren’t job costs.
■ To see when an expense was billed: From the Expenses window, find the expense (by number or date, for example). You’ll see the expense’s billing information at the bottom of the window.
To see your job’s unbilled costs
Costs and their billing information can be reviewed by task or for the entire job.
■ To see costs for one task: From the Job Tickets window, click once on a
job task. Then choose View Task Costs from the pop-up view>point menu. The date when the cost was billed appears on the right side of the report.
■ To see costs for one job: From the Job Ticket window, choose File > Print Job Reports. Click on the Job Accounting reports heading, then click on Job Costs reports. The billing status for each job cost appears on the right side of the report.
■ To see costs and billing information for all jobs: Choose Snapshots > Work in Progress. From the Unbilled Cost reports, select Unbilled Costs by Job, then enter a range of job status codes. Costs will be shown for all jobs within the status range selected.

6-58
Applying Advances
Applying Advances
When a job is billed in advance, its billing is saved on the job ticket like a deposit. Advance billings (see page 38), which are usually added to pre-bill for printing, postage, or creative, don’t affect the job’s total billings. Instead, advances only appear on prepayments on the job’s Snapshot window. Ad-vances have no affect on the income statement of job profit and loss.
When the job is finally billed, either with a job billing, a multi-job billing, or a progress/final billing, its unbilled costs are billed in full. Once the invoice is saved, the job’s advance billing can be applied to the invoice like a payment. The Apply Advance Billings window makes it easy (see illustration).
■ A job’s advance billing can only be applied to its own invoices. It can’t be applied to a different client or a different job.
When the invoice is posted, the invoice’s total—not including the advance pay-ment you applied—debits your Accounts Receivable G/L account. The advance payment is posted as separate journal entries, but with the same reference number. (If you look up the transaction in the General Ledger, you’ll see both the invoice’s charges and the advance payment.) The advance payment credits A/R and debits your advance billings liability account.
To apply an advance billing to an invoice
1 First, add the invoice for the job with the advance billing.
Advance billings can only be applied to invoices added for the same job number. However, you can apply a job’s advance billings to any kind of job billing (i.e., job billing, progress/final billing and estimate billing). Advances can only be applied to unposted invoices, so don’t post it yet.
2 Once the invoice is saved, choose Edit > Edit > Apply Advance Billings.
The Apply Advance Billing window opens, displaying the invoice’s total charges and the job’s advance billing balance. The invoice’s total charges includes all of its billing amounts plus sales tax. This is the total to which the job’s advance billing is applied.
3 Enter the amount of the advance billing that should be applied to this invoice.
Typically you’d apply the entire advance billing to this invoice. However, you can apply any portion of the job’s advance billing now, then save the bal-ance for future invoices. In any case, the payment applied can’t exceed the invoice’s total.
Advance billings are applied to unposted job billings, where they appear as pay-ments. The client sees the invoice’s total, including sales tax, but the balance due is less the advance payment you’ve made. You can apply all or some of the job’s ad-vance billings to an invoice. If you apply the same amount as the invoice’s total, then the invoice’s balance will be zero.
■ Press Tab and you’ll see the invoice’s new balance due.
4 Enter the payment’s memo.
The payment memo appears at the bot-tom of the printed invoice, next to the advance payment amount. You can use this memo to describe what you’ve ap-plied as payment, or why it was applied at all. Each invoice has its own advance
payment memo.
5 Enter the payment’s debit G/L account, then click Save.
The payment’s dGL is debited when the invoice is posted. During posting a separate set of debit and credit entries are posted for the amount of the pay-ment—just as if you’d added the payment yourself in Client Payments. The amount of the payment credits Accounts Receivable, since the client owes less money, then debits the “deposits/advances” liability account (which should have been set up before the advance was billed, as well as entered in the Preferences as a default G/L account).
Once the payment is applied, you’ll see it and the payment’s memo at the bottom of the Accounts Receivable window. The advance payment amount can be changed any time before the invoice is posted.
Clients see the advance’s memo. The memo field ap-pears on the printed invoice to explain why and how the job’s advance billing was applied. It’s completely customizable.

6-59Applying Retainers
Applying Retainers
Retainers are applied to unposted invoices, where they appear as payments. The client sees the invoice’s total, including sales tax, but the balance due is reduced by the retainer’s payment. You can apply all or some of the client’s retainer balance to an invoice. If you apply the same amount as the invoice’s total, then the invoice’s balance will be zero.
When the invoice is posted, the invoice’s total—not including the retainer—debits your accounts receivable G/L account. The retainer is posted as separate journal entries, but with the same reference number. (If you look up the transaction in the General Ledger, you’ll see both the invoice’s charges and the retainer payment.) The retainer payment credits A/R and debits your client deposit/retainers account.
■ Unlike advances, retainers can be applied to any invoice added for the client. This means any job billing, progress/final billing, multi-job bill-ing, media billing, or miscellaneous billing can be paid off by applying the client’s retainer.
To apply a retainer
1 Find a client’s unposted invoice.
2 Choose Edit > Edit > Apply Re-tainer.
The Apply Retainer window opens, displaying the client’s current retainer balance and the invoice’s total charges, including sales tax. Any part of the client’s retainer balance can be applied to the invoice’s total.
3 Enter the payment amount that should be applied from the retainer bal-ance to this invoice.
You can apply any amount of the retainer to this invoice, but the retainer pay-ment can’t exceed the invoice’s total. As you enter the payment amount and press Tab, you’ll see the invoice’s new recalculated balance due.
4 Enter the payment’s memo.
The memo appears at the bottom of the printed invoice, next to the retainer payment amount. You can use this memo to describe what you’ve applied as payment, or why it was applied at all. Each invoice has its own retainer
payment memo.
5 Enter the payment’s debit G/L account, then click Save.
The payment’s dGL is debited when the invoice is posted. During posting a separate set of debit and credit entries are posted for the amount of the payment—just as if you’d added the payment yourself in Client Payments.
The amount of the payment credits Accounts Receivable, since the client owes less money, then debits the “deposits/advances” liability account (which should have been set up before the advance was billed, as well as entered in the Preferences as a default G/L account).
The retainer’s memo is cus-tomizable. The memo explains why the retainer amount was applied as a payment to an invoice. It appears on the printed invoice, so clients will see it

6-60
Printing Invoices
Printing Invoices
Client invoices can be printed any time after they are posted. Invoices can be printed individually, or in batches for a range of invoice numbers. A batch of invoices can also be printed for the same client and a range of invoice dates; this option lets you print the month’s invoices for one client quickly and easily.
The printed invoice shows the line items, billing amounts, descriptions, and notes you’ve entered into the invoices. Each invoice can have its own set of options and settings (e.g., display options, group and sort, show or hide totals, etc.) that affect the look of the billing. So printing a large number of invoices at the same time may show a wide variety of invoice styles.
Invoices are designed to print on your letterhead. The invoice margins are customizable, and can be set by choosing Invoice Options from the Preferences pop-up menu. None of the invoice’s options can be changed at the time invoices are printed. To change these options you must make your changes first, then print the invoice. The optional agency billing address is printed from Agency Informa-tion, where it can be changed.
An invoice can be printed then reprinted any number of times. As an option, a job cost report can be printed showing costs billed on these invoices. This invoice detail report can be used to back up the billing amounts on invoices, if you bill strictly based on costs. If you bill for more than your costs, don’t print this report—your client will wonder why you’re overbilling them.
■ Unposted invoices will print if they are part of the selection, but will be printed as “billing previews” until they are posted.
To print client invoices
1 Click on the Print Invoices button, or choose File > Print Invoices.
The Print Invoices window lets you select a batch of invoices selected by in-voice number (e.g., 6006 - 6015), one particular client, and a range of invoice dates. The currently display invoice’s number is entered by default, but can be changed.
2 Enter a range of invoice numbers and an optional client number.
Any invoice numbered within the range of numbers you enter will be printed (or reprinted, in some cases). Enter a client number to print only invoices added for one client; the option is useful when a client asks for a reprint of the month’s billings.
3 Enter an optional range of invoice dates and options.
The currently displayed invoice’s date is entered by default. Use this option only when you need to print a set of invoices added on the same day or within the same time period.
Use the print invoice detail report option to include a copy of the job cost report with each invoice. Since job costs and billing amounts are linked, your clients can easily see the costs billed specifically on an invoice. The Invoice Detail Report shows gross amounts only,
so clients won’t actually see what the agency paid for the job’s costs.
Since each invoice can contain up to five distribution names, up to five copies of an invoice can be printed automatically. Since laser printers don’t handle multipart forms, Clients & Profits prints the distribution name (e.g., Acct Exec, Client, Job Jacket, etc.) at the bottom of each invoice. The print distribution copies option should be unchecked when printing invoices on multipart forms to high-speed dot-matrix printers.
4 Click Print.
■ Since an invoice can be reprinted many times, be careful not to mail out duplicate copies of the same invoice just because it printed again.
■ If you have Adobe Acrobat, invoices can be printed as PDF files and at-tached to e-mails sent directly to client contacts from Clients & Profits. To save or e-mail an invoice as a PDF file, choose PDF from the print to pop-up menu.

6-61Printing Invoices
The printed invoice
Invoice
Corporate Communications7405 Von Karmen AvenueLos Angeles CA 90012
Don Gibbs Number 11027Audience Technologies Inc. Date 01/01/07200 Long Canyon Job Number ATT-150Palm Springs CA PO# --93029 Charge# --
Job Name: Reseller Channel Web SiteAgency Exec. Tammy BurnsDescription: Monthly web site managment - Reseller Channel web site
Description Hours Billed Amount
Creative Concepting 8.00 $800.00Copywriting 5.00 $500.00 *Creative Subtotal: 13.00 $1,300.00
Photography 5.00 $750.00 *Production Subtotal: 5.00 $750.00
Computer Graphics/Programming 15.00 $1,500.00 *Fulfillment Subtotal: 15.00 $1,500.00
Project Management 2.50 $225.00 *Account Management Subtotal: 2.50 $225.00
SUB-TOTAL: 35.50 $3,775.00
*7.7500% State Sales Tax: $230.56
TOTAL: 35.50 $4,005.56
PAYMENT TERMS: Net 15
Thank you for your business and prompt payment!

6-62
Printing A/R Reports
Printing A/R Reports
Accounts receivable reports summarize invoices, showing what you’ve billed to clients, jobs, and G/L accounts. A/R reports can be used for reporting sales, tracking billings by client, and auditing your accounting. There are several different reports that show your billings from various perspectives; all reports, however, are based on posted invoices.
Invoices can be summarized for any period of time (choosing either invoice date or date posted), for one period or all periods, and for one client or all clients. These options let you find the billings for a specific purpose, such as the quarter’s billings for client ABC.
A/R reports show only posted invoices; unposted invoices appear only on proof lists.
Tips for printing A/R reports
■ Invoices are selected primarily by invoice date or date posted. This option lets you show only invoices added in July, for example, instead of the entire year. By entering a range of dates, you can select all in-voices added today, last week, or all month—whatever time period you need. There’s no limit to which range of dates you can use.
■ Reports can be printed one at a time by clicking on a report name. The print window remains open after print the report. This allows you to run another report with the same criteria, or edit the selections and rerun the same report. Reports can be printed then reprinted with different selections, as often as needed.
■ You can print A/R reports to the window (for a quick on-screen preview), the printer (for a hard copy), to export (to create a file that can be opened and edited in a spreadsheet program), or to clipboard (so it can be copy pasted into a spreadsheet program like Excel).
■ To show the invoice description, click on the Show Description option. This option makes your billing reports longer, but more descriptive.
To print A/R reports
1 Click the Print Reports button, or choose File > Print A/R Reports.
2 Select invoice date or date posted from the From pop-up menu, then enter a range of dates. 3 Select an accounting period, or choose All Periods to see invoices by date only.
4 Enter a client number, or leave the selection as ALL.
To see invoices for one accounting period only, regardless of date, choose a period from the pop-up menu then enter a very large range of dates (e.g., 1/1/02 - 12/31/02).
5 Select the report you wish to print.
6 Click Print.
To print another report repeat steps 2-6.

6-63Printing A/R Reports
Billing and A/R Reports
The A/R List - Invoices by Date provides a concise checklist of all invoices added for a time period, but does not show the line item detail.
The A/R List - Invoices by Client shows all invoices added for a time period and subtotals by client number.
The A/R List - Invoices by Billing Type shows all invoices added for a time period and subtotals by billing type. It prints one page per billing type.
The A/R List - Invoices by AE shows all invoices added for a time period for an AE and subtotals them by client. It prints one page per AE.
The A/R List - Invoices by Division shows all invoices added for a time period for a division and subtotals them by client. It prints one page per division.
The A/R Journal shows invoices along with line item and G/L details. Use the A/R Journal to get a detailed listing of billings for a time period.
The A/R Summary - Billings by cGL lists all invoices added for a time period and subtotals by credit account. It is a helpful auditing report since it corresponds to the G/L audit trail for income accounts.
The Group Billings report shows billing amounts subtotaled by task groups. Choose to show line-by-line detail (i.e. individual invoices) or task group totals only.
The Client Billing Summary is a cover sheet for a batch of printed invoices. It can be attached to a large batch of client invoices (which are printed together) to make the billing amounts clearer to the client’s accounting department.
The Sales Tax report is useful when preparing sales tax returns.
The Billing Analysis by AE lists invoices by added for each account executive, which subtotals by client. Together with the Billing Recap, these reports can be used to compare billings for each account exec or account team.
The Billing Recap by AE report show each AE’s billings as a percentage of total billings. Account execs and account teams are ranked by total billings.
The Billing Analysis by Project lists invoices added for each project, subtotaled by client.
The Billing Analysis by Group lists invoices added for each task group, subtotaled by client.
A/R List - Invoices by Date
A/R List - Invoice by Client
A/R List - Invoice by Billing Type
A/R List - Invoice by AE
A/R List - Invoice by Division
A/R Journal
A/R Summary - Billings by cGL
Group Billings
Client Billing Summary (Cover Sheets)
Sales Tax
Billing Analysis - by AE
Billing Recap - by AE
Billing Analysis - by Project
Billing Analysis - by Group
Lists
Journals
Summaries
Analysis

6-64 Client Payments
Client Payments
Entries that affect accounts receivable are entered into Client Payments—in-cluding payments from clients, adjustments, and write-offs. Entries added into Client Payments affect client balances, unpaid client invoices, and the general ledger at the same time. Client Payments is where you’ll account for most of the shop’s incoming cash.
Client payments are typically entered each day as you receive checks from clients. Payments are added using the open-item method, which means you’ll apply each payment to specific unpaid invoices. Here’s how it works: The client’s check is added, then saved. The client’s unpaid invoices are listed by date, oldest first. The check’s amount is applied to invoices automatically, until the payment is fully applied. For flexibility, you can adjust how a pay-ment is applied to invoices.
Client payments must be balanced, which means the payments to invoices must equal the check’s amount. If not, the check can’t be saved. Early-pay-ment discounts can be applied to unpaid invoices, which post to a special discount account in the general ledger.
Client payments aren’t posted automatically. A new client payment can be saved, then edited or deleted, any time before it is posted. Posting makes the client payment permanent. Reports can be printed from Client Payments showing payments made by clients for any range of dates and an accounting period. These reports can be compared to audit trails and journals from the G/L for easy auditing.
■ Only entries added into Client Payments affect client balances and unpaid A/R invoices. If you post entries into the general ledger to update your A/R or cash balances, these entries will not affect client invoices.
■ Other kinds of cash deposits, such as interest income, media commissions paid, and tax refunds, can be added in Client Payments. These entries aren’t added for clients, so they don’t affect accounts receivable or client balances. Instead, journal entries are posted into the general ledger only.
■ Client payments can be grouped together in batches. The batch can be shown as a single-line item on the Bank Reconciliation.
■ A payment sent from a large corporation, that pays invoices from several different divisions, can be entered as one payment and split among the divi-sions (which are set up as separate clients).
Client payments are seamlessly integrated with the general ledger. Whenever client payments are posted, debit and credit journal entries are created automatically. Every client payment makes a debit (usually cash) and one or more credits (usually accounts receivable). Default debit and credit accounts are entered for you automatically.
■ The debit account is your primary cash account, and is copied from your G/L account preferences. Client payments increase your cash balance. You can change the payment’s debit account to deposit the funds into an alternate account, such as a money-market account.
■ The credit account is usually your accounts receivable account, and is copied from the client’s invoice. Client payments decrease your A/R balance, since the client now owes less. You can change the payment’s credit account separately, invoice-by-invoice. However, the credit account usually isn’t changed.
■ Journal entries from client payments are posted into the Cash Receipts journal. The entry’s reference number is a combination of the prefix PMT# and the client’s check number.
■ Journal entries aren’t created, and the G/L account balances aren’t updated, until a client pay-ment is posted.
How client payments af-fect the general ledger
Splitting client payments between clients
If your shop has large corporations for clients, you probably work on jobs for different departments within the corporation. In most cor-porations, checks are written from a centralized accounting department. These checks typically cover all of the agency’s billings for some time period, which could include dozens of different department’s invoices. How are these payments handled in Clients & Profits? There are two options:
Bill all jobs to the accounting department: Although each job is opened by the department that is requesting the work, the invoices can be billed to the accounting department. When the invoice is added, you’ll replace the job’s cli-ent number with the client number for the accounting department (which assumes that you set one up). The advantage here is that all of the corporation’s invoices appear together on the aging report and on billing reports. The drawback is that you can’t easily track down unpaid invoices for each depart-ment (because they weren’t directly billed for them).
Split the client payment: With this option, all jobs are billed to the job’s client—not a central ac-counting department. But when the payment arrives, it is split between all of the department’s invoices paid on the check. When a client payment is added, you’ll mark the split option; you’ll be prompted to enter the client number and invoice number for each payment. Unlike regular client payments, split payments can’t be automatically al-located to unpaid invoices (which is the only drawback). The advantage is that a single check can elegantly pay off any client’s unpaid invoices.

6-65Client Payment Features
Client Payment Features
Feature How it works, how it’s used
When a client payment is added, it’s payments can be automatically allocated to the client’s unpaid invoices, oldest first. This can be a significant time saver for clients with large num-bers of invoices, since it saves users the tedious step of applying payments one-by-one. The auto-allocation is flexible, though, and can be fine-tuned by the user before the payment is saved.
A single payment can be split between different client’s unpaid invoices. This allows, for example, a check for a corporation accounting department to pay off invoices from its vari-ous departments.
Client payments can be posted into any accounting period, not just the current period. This lets you properly account for payments in the proper period, regardless of when they were actually added.
When a client payment is added, Clients & Profits can send an automatic e-mail notification to an account supervisor, agency prinicipal, CFO, or any other staff member. This convenient feature keeps management better informed about incoming cash. This can be especially important when slow-paying clients finally pay their bills.
Every client payment can be given a batch number. Batch numbers match the number pre-printed on most deposit slips. They can be used to track bank deposits with client checks. Also, the Bank Reconciliation can reconcile deposits in batches, which can be simpler than reconciling hundreds of separate client payments.
There is no limit to the number of invoices that can be paid off by one client payment.
Because Clients & Profits is an integrated accounting system, a client payment automatically updates the client’s unpaid job costs (i.e., Accounts Payable invoices). Each vendor invoice keeps track of when it was billed, then when the client paid it. The A/P Aging report has a special column showing whether or not the client has paid the job’s invoice; if so, then the vendor’s invoice is ready to be paid. This feature is essential if you don’t pay your vendors until the client pays you.
Client prepayments, deposits, and advances can be added as retainers without actually creating an invoice in Accounts Receivable. Payments added as retainers update the client’s retainer balance, then can be applied later to unpaid A/R invoices.
Adjusts to an invoice’s balance can be made on-the-spot while distributing a client pay-ment. These adjustments, which can account for service charges, late fees, or early-payment discounts, update the General Ledger when the payment is posted.
Auto-allocated payments
Splits
Accounting periods
Automatic C&P e-mail
Deposit batches
Unlimited distribution
Client paid A/P invoices
Retainers, advances
Discounts, adjustments
The diary records the when, where, and who was involved for major events or meetings. Because the diary is easily accessed, details of conversations and events are preserved. The record can also be e-mailed for streamlined communication.
Client Diary
Bank deposits When a check is received that doesn’t pay off a client’s invoice balance due, a bank deposit can be used. Deposits don’t affect accounts receivable and do not affect the client agings.

6-66 The Client Payment Window
Client Payments window
1 The arrow toolbar buttons can be used to scroll through the previous and next client payments.
2 Client payments can be eas-ily added, edited, redistributed, and deleted using these four toolbar buttons. To add a new client payment, click on the add button. (To add a bank deposit, choose Edit > Add Bank Deposit.) To edit a client payment, click on the edit button. If the client payment is unposted, you can change
the payment’s check number, date, check date, accounting period, dGL, description, bank ID number, and batch number. If posted, only the payment’s description can be edited. You can’t change the payment’s client number because it is distributed to specific client invoices. The amount can’t be changed either to prevent an unbalanced entry. If these fields need to be changed, you’ll need to delete the pay-ment using the delete button and re-add it. Once a payment has been posted it can’t be de-
leted, you will need to unpost it first. When you need to change the payment’s distribution, click on the redistribute button. Redistributing a payment erases its existing line items and al-lows you to apply the payment’s total amount to a new set of client invoices.
3 To print client payment re-ports, click on the print reports button.
4 Enter a client payment number here to find a payment.
q w e
r t
y
ui
op
a
s
j
d
h gf
Entries added into Client Payments affect client balances, unpaid client invoices, and the general ledger at the same time.

6-67
Batch numbers simplify bank deposits. Deposit slips can be printed from Clients & Profits totaling checks by batch number. The batch number is entered from the pre-printed deposit slip and any user-defined number or date.
The Client Payments window
Or use the find more link to find one or more payments by check number, date, client, check date, deposit batch, amount, or sequence. 5 Use the history pop-up menu to jump to a previously viewed client payment.
6 Click on the client diary link to view, add or delete client diary entries.
7 Every payment (except split payments) gets a client number. The client number links the payment to the client’s invoices.
8 This is the date the client payment was added.
9 The description explains something about a payment (e.g., payment on account). It is copied to the payment’s journal entries, so appears on G/L reports.
10 The check date is the date on which the client’s check was
written and the G/L accounting period is the period the client payment was posted. The dGL is the client payment’s debit G/L account, usually the cash account. The dGL is copied automatically from your G/L preferences.
11 Type identifies a payment record as a client payment, a write-off, a bank deposit, or some other user-defined type.
12 This is the date the client payment was posted into the General Ledger.
13 This is the total amount the client paid, including any discounts or adjustments. This amount is applied to the client’s unpaid invoices.
14 The payment’s batch number is used to group the day’s checks together. It can be the preprinted number from the bank’s deposit slip, or a user-defined code (such as the date).
15 Added by are the initials of the person who added the client payment.
16 This is the number printed on the client’s check. It is used for finding checks later, so it should be unique. It is required.
17 Client payments are distrib-uted to one or many unpaid in-voices. Every invoice payment can include a discount amount and a discount G/L account. Every client payment must be applied to at least one invoice. Double-clicking on a line item shows its details.

6-68
q
d
s
o
a
r
u
i
t
p
y
w
e
Client payments should be added when you receive the client’s check. You’ll track your cash better, since deposits will be accounted for faster. Client payments are applied to unpaid invoices. When the payment is posted, the invoices will appear as paid.
The Add Client Payment Window
The Add Client Payment Window
1 The client number links the payment with the client’s unpaid invoices.
2 Tabbing past the client looks up its up-to-the-minute balance due.
3 To split the payment between several clients use the split payment option. A single check from a large corporation can be split and distributed to out-standing invoices from several divisions or departments.
4 A client payment can be
added as either a payment on account, a write-off, retainer/deposits/advances, or a user-defined type of payment. Payments, write-offs, and user-defined payment types are ap-plied to unpaid invoices. Only retainer/deposits/advances are handled differently. They are added to the client’s retainer balance and you’ll need to enter a cGL account (e.g., client retainers or deposits) for them.
5 The auto-allocate option au-tomatically applies a payment amount to the client’s unpaid
invoices. If you don’t select this option, you’ll have to apply payments to invoices manually.
6 The payment amount is entered from the client’s check. It will be applied to the client’s unpaid invoices.
7 The description describes this payment. It defaults to “payment on account”, but can be changed. The payment’s description is copied to journal entries and appears on client payment reports.

6-69
8 Check date is the date from the client’s check. It is the date the client wrote the check.
9 A client payment can be posted into any unlocked ac-counting period.
10 This is the check number from the client’s check. You can find client payments by check number. Payment date is the date on which the payment was added. Client payment reports can be printed for this payment date.
11 The bank ID number is the bank’s identification number that appears on the check and prints out on deposit tickets.
12 The deposit batch is a
The Add Client Payment Window
The auto-allocate option is a time saver. If selected, clicking the Save button will automatically apply the payment’s total amount to the client’s oldest unpaid invoices for you. If necessary, the actual amounts applied to invoices can be changed.
user-defined field that groups the payments with the same batch number together. Enter the number from the preprinted deposit slips, if available; oth-erwise, enter the deposit date. Reports can be printed showing payments by deposit date, which is useful for reconciling your cash account. Deposits can also be consolidated on the Bank Reconciliation window to show as one batch total.
13 The client’s check amount debits your cash account in the General Ledger, and is ap-plied to unpaid invoices. The payment’s debit account, which is usually the primary check-ing account, is copied from the G/L preferences but can be changed.

6-70
1 The client payment’s client, description, and amount appear here for reference.
2 The client’s unpaid invoices are listed here. Clicking on an invoice in this list selects it for payment, then prompts you to enter a payment amount.
3 The client’s unpaid invoices are sorted by invoice number, but can be sorted by clicking on any column heading.
4 The invoice’s balance
includes any prior payments. Only posted payments affect the invoice’s balance.
5 Enter any early-payment discount, finance charge, or any other kind of adjustment to the invoice’s balance here. Adjustment amounts affect the invoice, client, and General Ledger; jobs are not affected by adjustments.
6 The discount G/L number is a debit account.
7 Enter the payment amount here. When the payment is posted, both the adjustment amount and the payment amount updates the invoice.
8 The payment’s cGL is copied from the invoice’s dGL (i.e., A/R)
9 The unallocated payment is the amount of the payment that has yet to be applied to the client’s invoices. The client pay-ment can’t be saved until this amount is zero—which means the payment is fully applied to receivables.
The Distribute Payments window
Distribute Payments
Once a payment is saved, the Distribute Payment window opens, listing the client’s unpaid receivables. Only posted invoices appear on the payment distribution window.
q
w
r ute i
o
y

6-71Split Client Payments
Split Client Payments
Split client payments are added like standard client payments, but have a few differences: the auto-allocate option isn’t applicable, and you’ll be prompted to enter a combination of client and invoice numbers for every invoice that will be paid by a split payment. Since split payments can’t be automatically allocated, you’ll need to have a list of invoices (including client numbers) that will be paid with the split client payment.
1 Enter in the client number.
2 Enter the client’s invoice number. If you don’t know the exact invoice number, leave the field blank then press Tab. The Client Invoices lookup list opens, listing the client’s unpaid invoices. Double-click-ing on an invoice copies it to the Distribute Client Payments window.
3 Tabbing past the invoice number displays its balance due and the credit G/L number
(i.e., A/R).4 Enter the discount amount and discount G/L account, if applicable. The discount amount will affect the invoice, client, and General Ledger; jobs are not affected by adjust-ments.
5 Enter the invoice payment amount. This is the amount of the client payment that will be applied to this client invoice.
6 The credit G/L account already appears, but it can be
changed.
7 The unallocated payment box shows you how much of the payment that has yet to be applied to client invoices. The split client payment can’t be saved until this amount is zero—which means the payment is fully applied to receivables.
Split client payments makes it easy to pay invoices from several different divisions of a large corporation.
q w r
u
te y

6-72
1 The date added is the date on which the bank deposit was added.
2 The bank deposit amount debits your cash account in the General Ledger. The payment’s debit account, which is usually the primary checking account, is copied from the G/L prefer-ences but can be changed.
3 This amount is entered from the bank deposit’s check.
4 The description describes
this bank deposit. The bank deposit’s description is copied to journal entries.
5 Check date is the date from the bank deposit’s check. It is the date the check was written.
6 This is the check number from the bank deposit’s check. You can find client payments by check number.
7 A bank deposit can be posted into any unlocked ac-counting period.
8 The Bank ID number is the bank’s identification number that appears on the check and prints on deposit tickets.
9 The deposit batch is a user-defined field that groups the payments and/or bank deposits with the same batch number to-gether. Enter the number from the preprinted deposit slips, if available; otherwise, enter the deposit date. Reports can be printed showing payments by deposit date, which is useful for reconciling your cash account.
Bank Deposits
Bank Deposits
Since deposits aren’t added for a client, they do not affect accounts receivable or client balances. When posted, they update the General Ledger and Bank Reconciliation only.
i
q
w
e
r
t
y u
o
p a

6-73
Deposits can also be consoli-dated on the Bank Reconcili-ation window to show as one batch total.
10 The bank deposit can be distributed to one or more cGL accounts.
11 This is the total amount of the bank deposit’s distribu-tion amounts. This total must equal the amount shown on the deposit slip.
Bank deposits are a special payment type used when your agency receives a check that doesn’t pay off a client’s invoice. Bank deposits can be used to add checks for such things as cash deposits, interest income, media commissions paid, or tax refunds.
Bank Deposits

6-74
Printing Client Payment Reports
Printing Client Payment Reports
Client payment reports summarize payments, write-offs, and other transac-tions that affect client account balances. These reports show what has been paid by clients, including invoice numbers and G/L accounts.
There are several different reports that show your client payments from vari-ous perspectives; all reports, however, are based on posted payments. Payments can be summarized for any period of time (choosing either pay-ment date or date posted), for one period or all periods, and for one client or all clients. These options let you find the clients for a specific purpose, such as the year’s payments by client ABC.
Client payment reports show only posted payments; unposted payments appear only on proof lists.
Tips for printing cli-ent payment reports
■ Payments are selected primarily by payment date or date posted. These options let you show only payments added in July, for example, instead of the entire year. By entering a range of dates, you can select all payments added today, last week, or all month—whatever time period you need. There’s no limit to which range of dates you can use.
■ You can print client payment reports to the window (for a quick on-screen preview), the printer (for a hard copy), to export (to create a file that can be opened and edited in a spreadsheet program), or to clipboard (so it can be copy pasted into a spreadsheet program like Excel).
■ To show the payment’s description, click on the Show Description option. This option makes your payment reports longer, but more descriptive.
To print client payment reports
1 Click the (i.e., Print Reports) button, or choose File > Print Client Payment Reports.
2 Select date added or date posted from the From pop-up menu, then enter a range of dates. 3 Select an accounting period, or choose All Periods to see invoices by date only.
4 Enter a client number, or leave the selection as ALL.
To see invoices for one accounting period only, regardless of date, choose a period from the pop-up menu then enter a very large range of dates (e.g., 1/1/02 - 12/31/02).
■ Client payment reports can also be printed by deposit batch numbers by choosing Deposit Batch from the ...and pop-up menu, then entering the batch
number.
5 Select the report you wish to print.
6 Click Print.
To print another report repeat steps 2-6.
To print deposit tickets
Deposit tickets can be printed for any batch of client payments, deposits, or retainers that have been posted. Since deposit tick-ets can be printed directly from Clients & Profits (using standard preprinted forms), it saves you the time and effort of filling out your
bank deposit tickets by hand.
Clients & Profits uses a standard laser-compatible deposit ticket form from Deluxe Business Forms. Any deposit ticket form can be used, but remember to test print a deposit ticket before ordering from another vendor.
1 Choose File > Print Deposit Tickets.
2 Enter the batch number, or leave the selection as ALL.
3 Enter a range of posted dates.
4 Click Print.

6-75Printing Client Payment Reports
Client Payment Reports
Client Payment List
Client Payment Journal
Client Payment Summary
Deposit Summary
The Client Payment List provides a concise checklist of all payments added for a time period, but does not show line item detail. The report can be run for one client or one deposit batch.
Client Payment Journal to get a detail listing of payments for a time period.
The Client Payment Summary lists payments by credit account.
The Deposit Slip report lists the client payments subtotaled by the deposit batch number and shows individual check numbers, check dates, and amounts.
Lists
Journals
Miscellaneous
Clients & Profits uses a standard laser-compat-ible deposit ticket form from Deluxe Business Forms. Any deposit ticket form can be used, but remember to test print a deposit ticket before ordering from another vendor.

6-76
Collection Manager
Collection Manager
The Collection Manager is a terrific tool for improving how you get paid. It’s like a Daily Job Status report for your unpaid invoices, listing everything owed to you by your clients. Receivables are color-coded by age, highlighting the problem invoices so that they can get the top priority by the billing department.
When the Collection Manager window is opened, it lists every posted, unpaid invoice from Accounts Receivable. Every invoice for every account executive or account team is included.
Only C&P X users with access to the Collection Manager can open this window.
Invoices are grouped together by client then sorted by invoice number. For each invoice you’ll see its billing date, due date,
total billed, balance due, and payment status. Clicking on an invoice displays its billing, payment, and collection status in the tab area at the bottom of the window.
1 Clicking the change status button will update the payment status on one or more selected invoices. The payment statuses documents what has last hap-pened to get the bill paid. They are preset in Clients & Profits X (they can’t be customized) and are arranged in roughly the
order they should be performed. They include: Invoice sent, courtesy call, resent invoice + reminder, sent statement, follow-up call, account on credit hold, sent demand letter, last chance call, sent FINAL NOTICE, payment doubtful, sent to collections, write-off, and disputed billing.
2 Click the print button to get a hard-copy report of the Col-lection Manager window, which subtotals all unpaid receivables by client.
Clicking on an unpaid invoice displays helpful information, including payment status and past collection calls. It also lets you plan the next follow-up action.
t
r
e
wq

6-77Collection Manager
Use the collection status to track what you’ve done to get an invoice paid, similar to the billing work flow for unbilled jobs. The different statuses methodically walk through the collection process until the invoice is paid—or written off as uncollectable.
3 To focus on unpaid invoices for one client, choose the client from the client pop-up menu.
4 The payment status classifies each invoice by the last collec-tion follow-up. Newly posted A/R invoices automatically get the invoice sent payment status. When an invoice is paid, it stops appearing on the Collection Manager. Color coding identifies each invoice’s age. Invoices less than 60 days past due appear in green, while invoices less than 90 days old appear in yellow. Invoices past due 90 days or more appear in red. In addition, an optional payment status note can be included to better explain the invoice’s payment status.
5 Clicking on an invoice in the Collection Manager displays
billing and payment details. Clicking on a tab displays the invoice description, payment status, past collection actions, and the next collection action.
About This Invoice shows the invoice’s billing type (e.g., progress/final billing, estimate billing, advance billing, etc.), the client contact to whom the invoice was billed, the invoice’s job number, the invoice descrip-tion, who added the invoice, and the invoice’s days until due (or past due).
Payment Status displays the invoice’s current status, which you can change by selecting a status from the pop-up menu. In addition, you can enter an optional note to document more about the invoice’s pay-ment status. To change an
invoice’s collection status, enter your changes then click on another tab or click on a different invoice in the list, which will prompt you to save the changes.
Collection Actions lists prior phone calls, letters, and meet-ing notes from the client diary that were added with an invoice number.
Next Action lets you schedule a follow-up phone call, letter, or e-mail for the selected invoice. You can assign an upcoming collection action to any staff number (for example, the cli-ent’s account executive) by en-tering their initials in the “by” field. These collection actions will appear on the Account-ing Calendar and in the staff member’s personal calendar.
To change an invoice’s next action, add your changes then click on another tab or click on a different invoice in the list, which will prompt you to save the changes.

General Ledger

7-2
Chapter 7 GENERAL LEDGER
7-4 General Ledger7-5 G/L Features7-8 The General Ledger window7-12 Profit Centers7-14 Departments7-15 Sub-Classes7-16 Chart of Accounts7-18 The Chart of Accounts Window7-20 The Add New Account Window7-22 The Budget Worksheet Window7-24 The Add Journal Entries Window7-26 Printing G/L Reports7-28 G/L Tools7-30 Importing Payroll7-32 Transfer Account Balances7-33 Add Adjusting JE7-34 G/L Reconciliation7-35 Out of Balance Checker7-36 Auditor7-38 Overhead Allocation Worksheet7-40 Close Year

7-3Introduction
Clients & Profits X is based on an industry-standard, one-write, double-entry general ledger accounting system. So in addition to tracking production, Clients & Profits X can be used to track the shop’s finances. Every A/P, A/R, checkbook, and client payment entry creates G/L journal entries automatically using a custom Chart of Accounts. Your G/L accounts are updated automatically as records are posted. This means you can print financial statements, like a trial balance, an income statement, and a balance sheet, any time. They’re always up-to-the-minute accurate. In this chapter, you’ll see how to:
■ set up your chart of accounts■ sort accounts by subclass and profit center■ set up budgets for income and expenses■ print audit trails and journals from the General Ledger■ add journal entries into the general journal■ import payroll entries■ set up profit centers■ set up departments■ allocate overhead expenses to clients■ reconcile accounts and make adjusting entries■ close the year
Introduction
For help using any part of Clients & Profits X, click the button from any
window to open the on-line user guide. This web-based user guide features
step-by-step instructions, explanations, tips, demonstrations, and links to
FAQs, tech notes, and tutorials from www.cnp-x.com/support. The web site is
continually updated, so it’s more timely and helpful than a printed user guide.

7-4
General Ledger
Clients & Profits X is built around a one-write, double-entry general ledger. This comprehensive, accrual accounting system automatically tracks your income, costs, and expenses using a custom, user-defined Chart of Accounts. Your G/L accounts track activity totals for multiple accounting periods (24 in Clients & Profits Pro X and C&P SQL X, 15 in Clients & Profits Classic X). The system provides agency-tailored financial statements, including income statements, balance sheets, trial balances, detailed general ledgers, journals, and audit trails.
The General Ledger is used for financial accounting. This is different than job accounting, which deals with costs, billings, and expenses from the job’s point-of-view. The General Ledger consolidates all of the work you do—both job costs and overhead expenses—to provide a true look at the shop’s net income.
■ Clients & Profits X has everything you need to produce financial state-ments, so it replaces any existing accounting systems you may be using. You do not need additional software programs to manage your books.
Unlike other systems you may have used, not everything affects your General Ledger. In fact, only those transactions that involve actual money (such as purchases, checks, and client payments) update the G/L; job costs (such as time, out-of-pocket expenses, and purchase orders) do not affect your finan-cial statements. This is important to understand, since it determines how you’ll manage your books with Clients & Profits.
Financial reports provide comprehensive auditing and analysis information. Financial accounting takes into consideration every expense and income dollar in the shop, not just job profitability. Overhead expenses, salaries and miscellaneous income are included on the Income Statement along with job-related transactions. Assets, accumulated depreciation, liabilities, and equity are reported on the Balance Sheet. Audit trails, journals, and ledgers help track the transactions included in the financial statement calculations. General Ledger account budgets are easily added and printed to analyze the account activity more closely.
Cash vs. accrual explained: Cash basis and accrual basis accounting are the two most widely recognized methods of tracking a companies income and expenses. The primary difference between the two methods has to do with when the recognition of income and expenses occur. Under the cash method, income is recognized when a payment is received and expenses when a check is written. This method does not let you match revenues generated with the costs associated to them, an important financial accounting con-cept. Under the accrual method (the one used by Clients & Profits X), income is recognized when the invoice is sent to the client (posted) and expenses are recognized when the payable is recorded on the companies books. It’s a better way of recognizing income and expenses for financial purposes as it relates the income and expenses more closely to the actual events causing them and gives you the ability to properly match the income generated with the expenses incurred to produce them.
General Ledger
Automatic vs. manual journal entries
Profit centers and departments
Journal entries are added to the General Ledger automatically when payables, receivables, checks, and client payments are posted.
Invoices that you enter into Ac-counts Payable, billings that you enter into Accounts Receivable, checks that you write in the Check-book, deposits that you enter into Client Payments, and employee expense reports that you enter into Expenses are distinct records. Each record creates a sepa-rate journal entry into the General Ledger. So when you see a G/L report, you are actually looking at the journal entries—not the source records, such as the invoice.
Any manual entries you make directly into the General Ledger appear on G/L reports; they won’t appear on payable, receivable, or cash reports. This gives you the flexibility of managing your cost accounting apart from your finan-cial accounting.
Profit centers are set up to track a division’s finances and each profit center has its own chart of ac-counts. The profit center’s financial statements include only general ledger numbers that are assigned to that profit center. The profit center’s transactions post to the G/L like any other accounts. The only difference is that the option can be chosen to print financial statements for only those accounts. There’s no limit to the number of profit centers which can be set up.
Departments are used to track costs incurred by a group of staff members (e.g., the Art Department). Separate expense accounts are set up for each department and are distinguished by a two digit code that follows the account number. Each account is listed separately on financial statements unless the roll-up option is used.

7-5General Ledger Features
Clients & Profits is a single accounting system, so there are no complicated modules to integrate, maintain, or close.
When someone adds a vendor invoice, check, client invoice, payment, or employee expense report, Clients & Profits posts debit and credit journal entries into the Gen-eral Ledger automatically. Standard (“default”) debit and credit account numbers are entered automatically, too, but can be changed. This gives users the flexibility they need to accurately account for all kinds of billings, costs, and expenses. In addition, general journal entries can be added directly into the General Ledger.
The entries users make don’t update the G/L until they are posted. Each user can double-check their own work before posting using proof lists. Proof lists show the debits and credits for each transaction they added.
Any vendor invoice, client invoice, check or employee expense report can be coded with one or more job numbers and tasks. This tells Clients & Profits to update the job ticket as well as the General Ledger. Because the accounting system is integrated with job tracking, there’s no double-entry. In addition to job costs, all kinds of overhead expenses are tracked by Clients & Profits. Overhead invoices and checks can debit many expense accounts (and can even be split between job cost and overhead G/L accounts).
The General Ledger is updated every time an invoice, check, or payment is posted, so financial reports are also up-to-the-minute accurate. No month-end closing is required to print financial statements or aging reports.
Clients & Profits Pro can have 24 months open simultaneously; Clients & Profits Classic can have 15 months. Fiscal years are customizable, so they can start at any time during the year. Accounting, job costing, and financial analysis reports can be printed for any period.
The chart of accounts supports hundreds of separate G/L accounts. A separate set of accounts can be created for profit centers or departments for better accountability. Each account can have up to a 9-digit account number, as well as customizable class, subclass, cash flow, and ratio category settings.
Built-in auditing and reporting tools make it easy to analyze, query, and troubleshoot your accounting. Detailed audit trails and journals can show journal entries for any time period and for a range of accounts. The innovative Auditor lets you verify your General Ledger quickly and easily.
Clients & Profits can handle dozens of different profit centers. Profit centers are inte-grated with jobs, tasks, staff members, and clients for better accountability. Financial statements can be printed for one profit center or for all profit centers. Departmental G/L accounts can be set up and used within a profit center for better cost tracking and analysis.
Monthly budget amounts can be entered for every G/L account, reducing the need for separate budget spreadsheets. Budget amounts can be reviewed on-screen or printed for any accounting period or quarter.
One-write, double-entry G/L
Automatic journal entries
Posting with proof lists
Integrated job costing, billing
Overhead accounting
Real-time financials
Multiple accounting periods
Chart of accounts
Auditing tools
Profit centers, departments
Budgeting
General Ledger Features
Feature How it works, how it’s used

7-6 General Ledger
Job costing and the G/L WIP accounting Overhead accounting Payroll
Direct disbursement checks (e.g., postage, prepaid printing, etc.) and vendors invoices are costed to one or more job tickets. When a check or invoice is entered, it’ll be given a job number and a job task, which is updated when the entry is posted. Job tasks are updated with the entry’s net cost and gross (i.e., bill-able) amounts during posting.
When the client is billed, the job’s gross amounts are copied automatically from the job ticket to the invoice. When the A/R invoice is posted, the invoice’s billing amounts update the job’s billed totals instantly. So the job has an up-to-the-minute accounting for all costs and billings.
Costs and billings actually copy the G/L account numbers from the task when the invoices are added. Be-cause a task usually uses the same G/L accounts, (e.g. printing is cost-ed to printing expense and billed to a specific income account), those account numbers are entered on the task table and copied to the job ticket when the task is added. This makes the accounting quicker and more consistent and reduces errors in the General Ledger.
Because billing clients is faster with Clients & Profits, it’s much easier to create invoices. Where billing may have been generated at month-end, jobs can now be billed immediately upon comple-tion. Because billing is so much more timely, Clients & Profits has a unique way of handling unbilled work in progress.
Unlike old systems, job costs are not accrued into a “WIP” (i.e., work in process) liability account. Instead, when job costs are posted they debit your job costs (i.e., cost of sales) G/L accounts immediately. This means your Income Statement always shows the month’s actual job costs, whether they’ve been billed or not. When clients are billed, the Income Statement will show the billings as income; the difference between your income and job costs is your gross margin (i.e., gross profit).
There are always some costs that aren’t billed by month-end, but they’re typically a fraction of the month’s total costs. After the month’s billing is finally posted, a special G/L Accrual report (see Snapshots > Work in Progress > Misc) can be printed detailing the shop’s unbilled job costs—your WIP—for each job cost debit G/L account. From this report, a set of simple auto-reversing G/L journal entries can be added to credit the job cost G/L account and debit the WIP account.
Once these entries are posted, your financial statements will properly reflect the month’s billings, costs, and unbilled WIP.
General and administrative ex-penses that are not directly related to clients are specially handled by Clients & Profits.
In fact, every overhead expense (e.g., rent utilities, office supplies, legal fees, etc.) needs to be entered into Clients & Profits. Overhead expenses can be added from vendor invoices in Accounts Payable and from checks written for non-job ex-penses, like office supplies. These expenses will appear on financial statements and G/L reports.
Every expense, whether added in A/P or the checkbook, can be distributed to one or more debit “overhead expense” G/L accounts. These expenses appear on the In-come Statement in the “expenses” section.
A standard (i.e., default) overhead expense G/L account can be set in Preferences (see Setup > Prefer-ences > G/L Accounts). In addition, each overhead vendor can be assigned its own special overhead G/L account. This account is copied automatically to overhead expense A/P entries and checks, saving time and making expense accounting more accurate.
Overhead amounts can be easily allocated to each client based on month-to-date costs, hours, bill-ings, or income using the Overhead Allocation Worksheet (see page 38). The overhead allocation then appears on the Client P&L report (see page 7-24).
While Clients & Profits does not calculate payroll or print pay checks, the shop’s payroll expenses must be entered into the General Ledger to appear on financial state-ments.
There are two ways to handle payroll: using a separate payroll program to calculate and print payroll checks, or use an outside payroll service (e.g., Paychex, ADP, etc.).
In both cases, G/L entries need to be added after each payroll. If you’re using an outside payroll service, the paycheck summary report should provide a list of debits for salary expense as well as the various deductions for taxes, contributions, and benefits.
■ For privacy reasons, don’t iden-tify the employee on the payroll entries. The details you enter on payroll JEs will appear on G/L reports.
If payroll is produced in-house on a payroll program like CheckMark, journal entries can be imported into Clients & Profits .

7-7General Ledger
Default settings and ac-counting preferences
Sales tax Year-end closing
Defaults are user-defined settings that customize how Clients & Prof-its works. Default settings let you tailor your accounting periods, G/L accounts, account classifications, and other options to make data entry more efficient and accurate. They are part of the system’s Pref-erences, and are very flexible.
Just as the cost and billing G/L ac-counts are set up on the Task Table, the most essential accounts (e.g., checking, A/R, A/P, Income, etc.) are entered as preferences. Once entered, they are copied to new entries automatically. For example, when a vendor invoice is entered, the A/P account number is copied to the cGL field. Likewise, the A/R account number is copied to the client invoice dGL field.
■ For more information, see Set-tings, section 9.
Clients & Profits calculates, charges, and tracks sales tax by cli-ent. The sales tax system involves clients, job tasks, and Accounts Receivable.
First, a standard tax rate for two different sales taxes for your area can be entered into Preferences (see Setup > Preferences > Sales Tax). This rate is copied automati-cally to new clients. Each client can have its own separate sales tax rates, or none at all. Sales tax is calculated in A/R by multiplying an invoice’s taxable billing amounts by the client’s sales tax rate (or rates). Sales tax also appears on printed estimates.
Sales tax is calculated on taxable job tasks. Each task in the Task Table can be marked as taxable or nontaxable. When the task is added to a job ticket, it’s taxable status is copied automatically. However, sales tax on a job ticket is fully cus-tomizable: a particular job can be fully taxable, partially taxable (i.e., by task), or completely nontaxable.
Sales tax only affects the General Ledger when the client’s invoice in A/R is posted (which credits the sales tax liability account) and when a sales tax check is written to the State (which then reconciles the sales tax liability). The shop’s current sales tax liability appears on the Balance Sheet. In addition, a detailed sales tax analysis report can be printed from A/R to show sales tax charges by client and tax area (i.e., county).
■ For information on GST, please call the Clients & Profits Helpdesk at (800) 521-2166,
Clients & Profits keeps the current year’s accounting on-line and avail-able until the fiscal year is closed. Closing the fiscal year moves the G/L totals from the “current year” column to the “last year” column, then erases the year’s journal entries.
There’s no real urgency to close the year, since Clients & Profits can handle two full fiscal years. The first fiscal year can be closed any time during the following twelve months. New work for the second fiscal year can be added into periods 13, 14, 15, etc. just like any other period. When the fiscal year is eventually closed, periods 13, 14, and 15 become periods 1, 2, and 3 of the new fiscal year. The year-end closing procedure automates every-thing, and can be run unattended (see page 6-46).
■ Year-end closing only affects the General Ledger. All of the year’s job tickets, agings, time sheets, POs, and other activity remain intact and unchanged.
■ Once the fiscal year has closed, no financial statements or G/L reports can be printed it. These reports will only show data for the new fiscal year. That’s why it’s important to print all year-end and year-to-date financial reports, as well as make a permanent, archive copy of your C&P database, BEFORE closing the year. (If you ever need to see some G/L records from a previous fiscal year, they’ll be on the backup archive copy).
A fiscal year is a twelve-month period from which your accounting year starts and ends. In Clients & Profits, the fiscal year includes 24 periods which generally correspond to the months in the year (i.e., pe-riod 12 for December), but they’re user-defined.
The costs, billings, and expenses you enter are posted into a user-defined accounting period. The cur-rent period, which is user-defined, is copied automatically onto all entries during that month. Account-ing periods don’t automatically change at the beginning on each new month. Instead, the current period is updated manually once most of the previous month’s work has been entered.
Financial statements are printed for one or more accounting periods, showing the total costs, billings, and expenses posted so far into that period. All of the year’s ac-counting periods are potentially open, and reports can be printed for any period throughout the year.
One of the first things you’ll do when starting Clients & Profits is to define your fiscal years and accounting periods in Preferences (see Setup > Preferences > Ac-counting Periods). Your fiscal year can begin on the first day of any month.
■ Be sure to consult your CPA before setting your accounting preferences. Once you’ve begun entering work into the fiscal year, it is very difficult to change your accounting periods.
Accounting periods and fiscal years

7-8
The General Ledger window
The General Ledger window
Reference numbers
Each journal entry has a unique reference number. This number identifies the source of the journal entry, and can be used to find any particular transaction.
Most journal entries are numbered automatically. This reference num-ber is based on the transaction’s source. Entries posted from Ac-counts Receivable have the prefix AR#. Similarly, Accounts Payable is AP#, Checkbook is CK#, and Client Payments is PMT#. You can tell where and how a journal entry was added by its reference number.
Entries posted directly in the gen-eral ledger may have a user-defined reference number. Normally the default JE number is used. But any kind of number, including any com-bination of letters and numbers, can be used. A starting JE number can be set in Preferences.
Entry dates, posting dates, and accounting periods
Journal entries are dated automati-cally. Dates are used for reference on audit trails and journals, but don’t affect the general ledger or financial statements. G/L reports can be printed showing journal entries by date added (the invoice, payment, or check date) or date posted.
Financials are updated exclusively using the journal entry’s accounting period. So the dates on journal en-tries don’t affect the general ledger or financial statements.
The dates on automatic journal entries (i.e., those posted in A/P, A/R, the Checkbook, and Client Payments) are copied from the vendor invoices, client invoices, checks, and client payments themselves. The date added and date posted won’t always be the same; for instance, you may post an entry several days after it has been added.
A period is chosen for each transaction. The current period, set up in Preferences, is entered by default but can be changed. The transaction posts into the selected accounting period.
The General Ledger window is the “operations center” of your accounting system. It’s where you see G/L transactions (i.e., vendor invoices, client pay-ments, checks, adjusting entries, etc.), add manual general journal entries, and use the built-in G/L tools to audit your books.
The G/L window lets you see the many A/P, A/R, checkbook, and client payment journal entries in your General Ledger. In fact, it’s the only window where you can see the transactions from your General Ledger.
Journal entries are listed on General Journal reports and update financial statements when posted. Manually added JEs appear on audit trails, journals, and the Detailed G/L report together with automatic journal entries (i.e., those posted from Accounts Payable, Accounts Receivable, the Checkbook, Client Payments, and Employee Expense Reports). Both kinds of entries affect your financials equally; manual entries, however, don’t affect job totals, cli-ent balances, or vendor balances.
Journal entries are grouped together by reference number so you can see the complete transaction in its full debit-and-credit detail. The window displays a transaction’s journal entries
The window’s toolbar buttons let you browse through journal entries, as well as add new ones. The window’s File and Edit menus contain commands for adding, editing, deleting journal entries, as well as printing G/L reports.
■ Printing one G/L transaction: You can easily print contents of the G/L window, giving you a hard-copy report of the currently-displayed entry, by choosing File > Print Window.
Reference NumbersPrefix: Posted from
AR# Accounts Receivable
AP# Accounts Payable
CK# Checkbook
PMT# Client Payments
JE# General Ledger
WIP# Media Accruals
EXP# Employee Expense Reports

7-9The General Ledger window
Cloning Journal Entries Proofing Journal Entries
Cloning makes an exact duplicate of an existing transaction’s debit and credit journal entries. You can clone any general journal entry, even from previous accounting periods.
To clone a journal entry:
1 Use the find link to locate the general journal transaction you wish to clone.
2 Click on the clone button in the General Ledger window.
The Add Journal Entries window opens, displaying the newly-cloned transaction. The new entry has today’s date, the current period, and the next automatic reference number (copied from your account-ing preferences). But the descrip-tion and debit and credit journal entries are identical to the original transaction.
3 Make any necessary changes to the cloned debits and credits, then click Save.
Once saved, the cloned entry can be proofed and posted like any other entry.
Proofing is very important, since it allows users to fix errors before the entries become permanent. The General Ledger proof list shows all unposted journal entries which were added directly into the General Ledger. Journal entries are grouped by transaction, according to the reference number. Each entry lists its account number, debit or credit amount, and description.
There are several useful proofing options:
■ Proof/post only JEs added by: Since newly-added journal entries are automatically tagged with the user’s initials, it’s easy for users to print their own proof lists. Only the entries that they added will be shown on the proof list. You can print proof lists for them by clicking the “proof/post only JEs added by” option then entering their initials. This is especially useful if many people add G/L entries. A user’s access privileges can even be restricted so they can only post their own entries.
■ Proof/post only JEs for period: At month-end there may be times when you’re adding G/L entries for both the current period and the next period (or maybe even a previous period, as long as it’s not locked). Rather than see all unposted entries, you can print a proof list showing only those entries in the current pe-riod by using this option. Any period can be entered, so a proof list can be printed only showing unposted entries for the previous period, the current period, and the next period.
■ Include recurring entries: If you’ve scheduled recurring entries far into the future, the only way to print a re-port of recurring entries is to include them on a proof list.
Posting updates the account totals in your General Ledger. When a general journal transaction is added, its journal entries (there could be many) are not posted. Unposted entries can be easily and quickly changed, letting you edit an entry’s reference number, description, and other details.
Unposted journal entries don’t appear on audit trails, journals, or financial statements. This offers users a chance to proof their work before posting. Posting makes the entries permanent. It is a me-thodical process that updates your account balances. The process is the same whether you’re posting entries from one transaction or many transactions.
Journal entries must be posted. They can be posted individually by transaction, as needed. Or, they can be posted in batches. Journal entries should be proofed for accu-racy before posting. Proofing lets you check your entries for errors, then make changes. Proofing lets you avoid making time-consuming adjusting or reversing entries.
■ Only manually-added journal entries can be posted from the General Ledger. Most journal entries are created automatically when payables, receivables, checks, client pay-ments, and employee expense reports are posted.
■ Posting journal entries does not affect clients, vendors, jobs, or tasks. Only your G/L account balances are updated.
Posting Journal Entries

7-10 The General Ledger window
The General Ledger window (con’t)
1 The arrow toolbar buttons can be used to scroll through the previous and next journal entries.
2 Use these toolbar buttons to add, clone, edit, edit amounts, and delete journal entries. Click on the add button to add a new journal entry. Existing general journal entries can be easily cloned into new journal entries by using the clone button. To edit the journal entry, click on the edit button. The entry’s account number,
reference number, description, client number, job number, and vendor number can be changed. If the journal entry is posted, only the description can be changed. An entry’s date can’t be changed, whether or not the entry has been posted. To change the distribution of a journal entry’s amount, click on the edit amounts button. You can edit the amounts by simply typing in the new amounts over the old ones, but the total deb-its must equal the total credits or else your changes won’t be
q e r
t y
uio p
a
w
s
d
f
g
saved. To delete a journal entry, click on the delete button. Only unposted entries can be deleted. (Once a journal entry is posted, it can’t be deleted--however, adjusting entries can be made to reverse it or it can be unposted.) Journal entries are deleted by transaction, not by individual entry, to prevent unbalanced entries.
3 Click on the print reports button to print journal reports and audit trails.
The General Ledger window displays journal entries from A/P, A/R, the Checkbook, and Client Payments as well as manual entries you’ve made directly into the G/L.

7-11
4 The verify button checks the accuracy of the currently-displayed G/L transactions. Clients & Profits analyzes the transaction’s journal entries for one-sided entries, missing entries, entries without a valid G/L account, Suspense account entries, and other typical data errors—then automatically makes the appropriate fixes.
5 Enter in the reference number here to find a journal entry. Use the find more link to find journal entries by refer-ence number, account number, date, date posted, amount or sequence.
6 Use the history pop-up menu to jump to a previously viewed journal entry. 7 The journal entry’s source indicates where the transac-tion was posted from —either General, Purchases, Sales, Cash Disbursements, or Cash Receipts.
The General Ledger window
8 The entry date is the invoice date on payables and receiv-ables, the check date on checks or client payments.
9 The reference number identi-fies each transaction. Reference numbers that begin with either AP#, AR#, CK#, or PMT# were posted automatically; all other reference numbers were added by users directly into the Gen-eral Ledger.
10 Every entry is identified by its kind: user entry (which is most common), auto-reversing, recurring, or adjusting entry.
11 Every transaction can con-tain a full description for better accountability.
12 The accounting period is used during posting to update the fiscal period’s account bal-ances and reports.
13 The date posted shows when the transaction was posted. Each journal entry
When editing one journal entry’s reference number, be sure to change it on the other entries in a transaction. Since entries are shown by reference number, entries with different numbers won’t appear together.
shows the initials of the person who added it. Entries within the same transaction can have different added by initials if two different people worked on the entry.
14 The window shows each debit and credit journal entry for a transaction. Entries are sorted by the order in which they were posted.
15 The total debits and credits appear at the bottom of the window to easily spot out-of-balance entries.

7-12
Profit Centers
Profit Centers
Profit centers let you track the financial performance of different parts of your business without maintaining a separate set of books. Each profit center has its own chart of accounts. Every account can belong to a profit center, but it is not required. Profits centers are part of the Chart of Accounts.
Profit centers are used primarily for printing financial statements. Income statements, trial balances, balance sheets, and other financials can be print-ed for one profit center or all profit centers. Printing financials for one profit center shows only the accounts that have the selected profit center number. Printing financial statements for all profit centers will show all accounts, whether they have a profit center number or not. You can also print budgets, detailed general ledgers, and analysis reports by profit center.
■ Profit centers aren’t required, and have no other affect on the General Ledger.
Profit centers can also be added to clients, jobs, tasks on the Task Table, and staff members. Whether a client, job, task, or staff member has a profit center doesn’t affect the General Ledger; the G/L is only updated from debit and credit accounts. Instead, having profit centers on clients, jobs, tasks, and staff members gives you more flexible and insightful production and job accounting reports.
The profit center isn’t needed when adding invoices and other entries. Since the G/L account knows its profit center, all you need to enter is the right account number. This also lets you move accounts between profit centers as needed without making time-consuming adjusting journal entries.
Customizing the Word “Profit Center”
The word “profit center” is custom-izable as part of your Preferences. It can be changed to “department”, “office”, or any term you use to identify different parts of your business. To rename the words “profit center,” choose Preferences from the Setup menu, then choose Names from the pop-up menu. En-ter the new term for “profit center” over the old then click Save. Once saved, the new name will appear everywhere the words “profit center” are used.
Assigning a Profit Center
A profit center can be assigned to G/L accounts, tasks, job tickets, and staff members.
■ Adding a profit center to a G/L account: The profit center is in-dependent of the account number. The account number doesn’t have to be changed to move an account into a different profit center. Any account with a profit center selected belongs to the entire company.
■ Adding a profit center to a task in the Task Table: Any task can be as-signed a profit center. When a job is opened, it can be given a profit center; once saved, only tasks that belong to the job’s profit center can be added to that job.
■ Adding a profit center to a job ticket: When a new job is opened, the profit center is copied from the client automatically. If the client doesn’t have a profit center, then the job’s profit center is blank. Once a job is saved, its profit center can be edited in the Specs window. If a job has a profit center, only tasks that also belong to the same profit center can be added to the job.
■ Adding a profit center to a staff member: Although a staff member can have a profit center, he or she can still work on any job. Also, a staffer’s profit center number has no affect on their access privileges. It’s strictly an option field that’s useful for sorting staffers on custom reports.

7-13Profit Centers
To set up a profit center, you will add a unique set of G/L accounts. The account num-bers can include the profit center number to distinguish them from the other accounts.
1 Click on the add button to add a new profit center. You can add as many profit centers as you need.
2 To print a hard-copy of the profit center list, click on the print button.
3 Each profit center is identi-fied by a user-defined code which has a maximum of 10 letters or numbers.
4 The description is the name of profit center. The description will appear on printed reports and financials.
qw
er

7-14 Departments
q
w
e r t
1 Departments can be easily added, edited, or deleted at any time using these toolbar buttons. To print a hard-copy list of departments, click on the print button.
2 Clicking on a column head-ing sorts the department list. To edit a department, double-click on a department name.
3 Each department has a unique number from 1 to 99. When a G/L account is added for a department, its number is appended to the account
number (e.g., 101000.10).
4 The department name is a short description, or nickname, of the department.
5 Each department can have an optional description that explains its purpose or function.
6 The initials of the depart-ment manager are used by C&P Mail. Each day, Clients & Profits’ TimeCop feature checks the previous day’s time cards and time sheets, comparing
Departments
each staff member’s planned hours with their actual hours. If a staff member hasn’t entered enough hours, the C&P TimeCop automatically e-mails a gentle reminder (or not-so-gentle, since it can be customized by the system manager). A copy of the message is sent to the staff member’s department manager. If the department doesn’t have a manager’s initials here, no copy of the message can be e-mailed.
7 The optional office field indicates in which office the department exists.
The same department table is used for G/L accounts as well as for users/staff mem-bers (e.g., Admin, Acct Serv, Creative, Pub Rel, On-line, Pre-Press, etc.)
y u

7-15
Subclasses
q
w
e
1 Subclasses can be added, edited, or deleted at any time. To add a subclass, click on the add button. To change the number or name of a subclass, click on the edit button. To delete a subclass, click the delete button.
2 Subclasses are identified by a number. The number can be up to three digits long.
3 The description is the name of the subclass. It appears on the financials. Some common
Subclasses make your financial statements easier to read by sorting and subtotaling G/L accounts together that have the same kind of function.
names of subclasses include: current assets, fixed assets, cur-rent liabilities, and long-term liabilities. Many shops also subclassify income and job cost accounts; Product Sales and Service Sales, for example.
Subclasses

7-16
ability, and equity accounts appear on the Balance Sheet. Income (billings), costs, expenses, other income, income taxes, and other expenses appear on the Income Statement. All accounts appear on the Trial Balance and the Detailed General Ledger. The classes themselves are preset, but their names can be changed in Preferences.
Accounts are subtotaled within each class using a subclass. Subclasses are optional and user-defined, so you can create as many as needed. An account’s subclass can be edited anytime. Each account can belong to one profit center and one depart-ment. Profit centers are user-defined, so you can create as many as needed. Financial statements can be printed for one profit center at a time, or all profit centers.
Default accounts
Clients & Profits X has the ability to preprogram standard, or default, ac-counts into your database. These default accounts are entered automatically when payables, checks, receivables, and client payments are added. Default accounts can be overridden by simply entering an account number when a transaction is added. Default account numbers can be entered for these accounts: Cash/Checking; Accounts Receivable; Accounts Payable; Client Retainers; Billing/Income; Employee Advances; Media Accruals; Media Costs; Overhead Expenses; Retained Earnings; Advance Billings; A/R Discount Given; A/P Discount Taken. Default G/L accounts are optional, but can help make your accounting more consistent and reduce errors. The de-fault account numbers are entered in the G/L accounts Preferences window.
Active/inactive accounts
Accounts marked inactive do not appear on the lookup list and cannot be entered on transactions. To mark an account as inactive, highlight the ac-count in Chart of Accounts, click the Edit button, then uncheck the account’s active checkbox.
Rollup account only
Accounts which need to be hidden on financial statements can roll up into a designated account (marked as “Rollup account only”) when a statement is printed. Roll-up only accounts can not have entries added to them and don’t carry a balance. To set up a rollup account, highlight the account in the Chart of Accounts, click the Edit button, then select the rollup account only option.
Chart of Accounts
The Chart of Accounts contains your G/L accounts. These accounts are the basis of your accounting system, keeping monthly totals of income, costs, expenses, assets, and liabilities. The balances that appear on income state-ments, balance sheets, trial balances, and other financials are based on the account totals in the chart of accounts.
The Clients & Profits X chart of accounts is completely customizable. You can have as few or as many accounts as you need (there’s no real limit to the quantity of accounts). Each account has an account number, classification, subclass, and categories for cash flow and ratio reports. Separate accounts can be set up for different profit centers and departments. Every account keeps real-time running balances for up to 24 accounting periods in Clients & Profits Pro X and C&P SQL X, 15 accounting periods in Clients & Profits Classic X, and 12 accounting periods in Job Tracker X.
Budget amounts can be quickly set up for any or all accounts and periods using last year’s totals. Account totals can roll up into other accounts. The accounts are set up with the rollup information in the Chart of Accounts. Choose the rollup option when printing financials to rollup, or hide, the account totals in the designated account. Accounts can also be made confidential. Confidential accounts work like regular accounts, but can’t be used by non-managers. They don’t appear on the printed account list or the lookup list.
You can add, edit, and delete accounts from your Chart of Accounts anytime (except for accounts with activity). Accounts with activity can be edited (except the number) and reclassified, but not deleted.
Account numbers
There are no rigid rules about numbering G/L accounts, although the number has a limited length (11-digits, including a 2-digit department number). You choose your own account numbers, so you can use any numbering system that conforms to accounting standards. Also, the same account number can’t be used twice. Account numbers are numeric, so they can’t contain letters or characters (i.e., dashes, etc.). An account number can’t be changed if the account has activity (i.e., journal entries) or a balance. Account numbers can’t contain leading zeros (e.g., 001000).
Account classes, subclass-es, and profit centers
Accounts are categorized three ways: a major class (e.g., asset, liability, sales, etc.), a subclass (e.g., current assets, fixed assets, etc.), and a profit center. The class organizes accounts as assets, liabilities, equities, sales, costs, expenses, other income, income taxes, or other expenses. Asset, li-
Chart of Accounts

7-17
Confidential accounts
Accounts can be made confidential for privacy. Confidential accounts func-tion like other G/L accounts, but can’t be used by non-managers. Commonly-used accounts, such as a checking account, shouldn’t be confidential since many users need them. Typically confidential accounts would track such accounts as employee bonuses, executive loans, and stock options.
Cash Flow and Ratio categories
A Statement of Cash Flows report, as well as a set of ratio analysis reports, can be printed any time from Financials. The cash flow and ratio categories are optional fields which enable you to print these powerful accounting reports. The cash flow category assigns the account to a category used in calculating the Statement of Cash Flow Report. The ratio category assigns the account to a subclass which is used in ratio analysis in the Financials menu.
■ To assign cash flow or ratio categories, highlight the account in the Chart of Accounts then click the Edit button. Then choose a category from the pop-up menu:
Year-to-date net in-come, retained earn-ings
The Year-to-Date Net Income and Retained Earnings accounts are necessary to your financial statements. The year-to-date net income account (which is always 999999) is calculated each time a financial state-ment is printed. The account’s balance is always the income less costs and expenses. While the account number can’t be changed, you can name the account whatever you want. You can’t post entries directly to the YTD income account; instead,
entries should be posted to income, costs, expenses, or Retained Earnings.
The Retained Earnings account tracks net income (or loss) from the previous accounting years. It’s an equity account of your choosing. The account is only used at year-end closing and for adjustments. Unlike the year-to-date net in-come account, you can post journal entries to the Retained Earnings account when you need to adjust last year’s ending balances.
The suspense account
The suspense account (999998) is updated when the program isn’t able to find the account entered on the transaction. It’s an important account because it acts as a safety net when the wrong account, or no account, is entered. When entries are found in the suspense account, they are reversed out of suspense and into the correct account.
Chart of Accounts

7-18
Once accounts are set up in the Chart of Accounts, their properties can be edited. This flexibility allows you to customize the appearance of your financial statements.
Chart of Accounts
1 G/L accounts can be added, edited, budgeted, or deleted from the Chart of Accounts window. To add a new G/L ac-count, click on the add button.
2 To edit a G/L account’s infor-mation, click on the edit but-ton. An account’s budget can be added, edited, viewed, or deleted by clicking on the edit budget button. The Monthly Budget window shows you the monthly totals for this year and last year, as well as the budget for the selected G/L account. To
delete an account, click on the delete button. If an account has a balance or journal entries posted against it, it can’t be de-leted. Instead, you can make the account inactive.
3 To print a hard-copy of the account list, click on the print button. The list shows each account’s number, name, class, subclass, and profit center.
4 Enter an account number here to find a G/L account.
5 Clicking the view history link let’s you quickly view and print all G/L entries for a selected account. All periods with activ-ity appear and the debits and credits are subtotaled. Then the period is reported. The account’s balance is calculated at the end of the report. Each transaction’s date, reference number, and description are also given.
6 Profit centers, subclasses, and budget worksheets can be added, edited, viewed, and
The Chart of Accounts window
q
y
w e
r
t
u
io

7-19
deleted from the Chart of Ac-counts window. Clicking on the profit centers link opens the Profit Centers window, where you can add, edit, and delete PCs. Profit centers are used to track the financial perfor-mance of different parts of your business without maintaining a separate set of books. Click the subclasses link to add, edit, delete, and print account subclasses. Subclasses are used to arrange and subtotal accounts on financial state-ments. Examples of standard subclasses are Current Assets and Long-Term Liabilities. An account can belong to any (but only one) subclass. Click on the budget worksheet link to enter or edit the budget for the year. All the G/L accounts and periods are displayed.
7 Double-click on the account class to view its accounts. G/L accounts are listed numerically by account number with their name/description, profit center, and subclass.
Chart of Accounts
Monthly budget amounts for a selected account can be reviewed on-line by clicking on the edit budgets button. This window also compares budgets with actual totals for th current fiscal year.
8 Double-clicking on an ac-count lets you change the G/L account information, such as its name. G/L accounts are added, edited, or deleted in the Chart of Accounts window only.
9 The name of the G/L account appears here for easy reference.

7-20 Adding G/L Accounts
The Add New Account window
q w
e
r
p
a
s
t
y
u
i
o
1 The account number can contain up to 6 digits plus a 2-digit dept. number. They’re customizable, but can’t be changed once the account has a balance.
2 Active accounts appear everywhere. Making an account “inactive” prevents it from be-ing used for new work. Inactive accounts will appear in the Chart of Accounts window and the lookup list with an “*” next to it.
3 The account name is a short
description of the account’s purpose.
4 Each account belongs to a class (e.g., assets, liabilities, etc.). The class is used to organize accounts and deter-mines what accounts are on the Balance Sheet and Income Statement.
5 An optional subclass can be used for making subtotals on financial statements.
6 An account can belong to a profit center by entering its
number here.
7 An account can belong to a department by entering its number here. The dept. number is appended to the account number, so it can’t be changed if the account has a balance.
8 Several like accounts can be combined together by entering a roll-up account here. When financials are printed with the roll-up option, only the roll-up accounts will appear. It’s an easy way to print consolidated reports.
d
New accounts can be added to the Chart of Accounts any time during the fiscal year. Once an account is added, it’s available to anyone in the agency to see and use it.

7-21
For checking accounts only, the next check number appears in the Edit Account win-dow in Chart of Accounts. You can have as many checking accounts as necessary and each account tracks its own check numbers.
9 The description explains where, when, and how an account should be used. It’s a great way to document your accounting procedures.
10 Roll-up only accounts are used for display purposes on financial statements, and are only used for printing. They can’t be used otherwise. Confidential accounts are only available to managers, and can’t be seen or used by regular users. They are typically used for hiding private or controver-sial accounts (like profit sharing for officers, etc.) from lookup lists and accounting reports.
11 Any vendor payable or client receivable account should be marked as a control account. They are used by the Auditor to verify that aging reports equal the balance sheet.
Adding G/L Accounts
12 Only accounts marked as a checking account can be used for check writing. Each account has its own check numbering series. The starting (or current) number is user-defined to match your check forms.
13 The cash flow category is used to sort an account properly on the Cash Flow report. The ratio category is used by the financials to calculate business ratios.

7-22 G/L Budgeting
The Budget Worksheet window
1 The revert button erases any unsaved changes, then displays the last-saved budget work-sheet. Click the clear button to delete budget —or all periods—for the currently selected G/L account.
2 The auto-calculate function automatically calculates the account’s annual budget based on last year’s actual totals. If the previous year’s account totals are accurate, this is good shortcut.
3 Clicking the copy button copies the currently selected account’s budget amount to all other periods.
4 Click the bump button to increase an account’s budget by any percentage.
5 Click the print button to print the budget worksheet.
6 Clicking the export but-ton creates a spreadsheet-compatible text file of your G/L accounts and their budget
t y
u i
o
q w e r
amounts. This text file can be opened by Microsoft Excel. The budget amounts can be edited in the spreadsheet, then saved back into a text file (this is important—don’t save it as a regular spreadsheet file). Once saved, those budget amounts can be imported into Clients & Profits.
Clicking the import button brings the budget amounts from the text file back into Clients & Profits. Importing replaces any budget amounts currently in the
p
The Budget Worksheet is an excellent tool to use in the new year because you can calculate the budget automatically based on last year’s totals.

7-23G/L Budgeting
Budget Worksheet with the ones you’ve edited in the spread-sheet program.
7 Budgets can only be edited for one fiscal year at a time. This heading shows which fiscal year is selected.
8 Choosing a profit center from the show pop-up menu shows only those accounts that belong to the profit center. It lets you easily work on budgets for one profit center at a time. Once you’ve entered the profit center’s budgets, you must click Save; otherwise, the budget amounts won’t be saved.
9 The filter pop-up menu shows only accounts for a selected class (e.g., Income ac-counts only), which can simplify budgeting when there’s a large number of accounts.
Each G/L account can have monthly budgets for each of the 24 accounting periods of both fiscal years. These budgets can be compared with actuals anytime during a month by printing the Budget vs. Actual financial report in Snapshots.
10 Budget amounts are en-tered for each G/L account and each accounting period. A bud-get amount for every account or every accounting period is not required.

7-24
1 The entry date shows when a journal entry was added. New journal entries are automatically given today’s date, which can be changed. The date doesn’t affect the G/L, since the ac-counting in Clients & Profits is based on periods.
2 Reference numbers are used to identify journal entries, like an invoice number. Journal entries are numbered auto-matically from your accounting preferences, but are flexible. You can change the reference
number by entering any com-bination of letters or numbers. Even the prefix “JE#” can be changed.
3 Any unlocked period can be chosen from the period pop-up menu.
4 The auto-reversing option automatically creates reversing debit and credit entries into the next accounting period (i.e., the debit entry is reversed as a credit entry, and vice versa). Auto-reversing entries keep
q
w
er
p
t
y
u i o
you from forgetting to back out entries such as month-end accruals.
5 By checking the recurring option, the same transaction will be repeated in up to 23 periods. This option saves you from having to rekey the same depreciation, amortization, etc. entries each month. Recur-ring entries can’t be scheduled into locked accounting periods. Recurring entries aren’t posted until the month for which they are scheduled is the current
The Add Journal Entries window
Manual journal entries can be added any time during the month for all kinds of miscel-laneous entries such as: payroll, insurance expenses, bank fees, interest income, etc.
Adding JEs
a

7-25Adding JEs
period. They can be seen on the proof list by checking the “include recurring entries” option.
6 The optional description will appear on audit trails, journals, and detailed G/L reports to explain anything about the transaction. It can be changed on a specific JE later by double-clicking on an entry in the G/L window.
7 Enter each journal entry’s G/L account number here. If you’re not sure about a G/L number, leave the field blank then press Tab. The Chart of Accounts lookup list opens, displaying your G/L accounts. Double-clicking on an account enters it onto the journal entry.
8 The G/L account’s name is shown for quick reference.
Every journal entry can contain a client number, job number, and vendor number. This information is used for printing audit trails and journals, but has no affect on client balances, job totals, or vendor balances.
9 Every journal entry can be given a job number. Journal entries don’t affect the job ticket directly; instead, you’d only enter a job number here if this amount should affect the Client P&L reports. You should only enter a job number here if you’re allocating overhead expenses directly to a job or a client. When you enter a job number, its client number is copied automatically to this journal entry.
10 Each journal entry needs a debit or credit amount.
11 The total of the debits and credits must equal or the trans-action won’t be saved.

7-26
Printing G/L Reports
Printing G/L Reports
G/L reports show journal entries from the General Ledger. They do not show time entries, out-of-pocket job expenses, or purchase orders (since these entries don’t directly affect the G/L). Instead, they show the entry-by-entry detail for the account totals shown on financial statements.
Since journal entries include both a date added and a date posted, G/L reports can be printed showing entries either added or posted for any time period (e.g., today, last week, the entire month or year, etc.). A journal entry can have an op-tional job number, client number, and vendor number, which can be used to select entries for the Audit Trail reports. Job, client, and vendor numbers are auto-matically included on JEs posted from A/P, A/R, checkbook, client payments, and employee expense reports. They can be entered manually on general journal entries. Audit trails can be printed showing only those entries added for a particular job, client, or vendor number.
Clients & Profits prints three kinds of G/L reports: journals, audit trails, and analysis re-ports. While audit trails and journals both show G/L entries, they have distinctly different purposes. Which one you’ll print depends on just what you need to see.
Audit trails are used to see the detailed entries that comprise your G/L account balances. They show JEs totaled by G/L account, while journals show entries grouped by reference number. This makes audit trails best for reviewing an account’s activity (especially to see how an account balance really adds up).
Journals are most useful for reviewing the debits and credits for each transac-tion. They show what you’ve entered into the G/L, transaction-by-transac-tion. Journal entries are sorted by reference number for easier auditing. Each journal entry shows its account number, date, description, period, and debit or credit amount. Journals can be printed for all kinds of transactions, or for only general ledger, payables, receivables, checks, and client payments.
Analysis reports list specific types of journal entries: clearing, recurring, auto-reversing, adjusting and auto-WIP entries.
■ Audit trails, journals, and analysis reports can be printed to the window,
instead of the printer, for a quick review of your work. The print to option automatically prints all reports to the screen. To print a report to the printer, simply choose Printer from the pop-up menu. To export the report to a spreadsheet, choose Export from the pop-up menu; you’ll be prompted to name the report, which will be saved to your hard disk as a file. To copy the report to the clipboard choose Clipboard from the pop-up menu, then you can paste the report into a spreadsheet program like Excel.
To print a journal
1 From the General Ledger window, choose File > Print G/L Reports.
2 Click on the “Journals” label.
3 Enter your report selections, including a range of dates, peri-ods, and account numbers.
4 Choose a journal report by clicking on a report name.
5 Click Print.
To print an audit trail
1 From the General Ledger win-dow, choose File > Print G/L Reports.
2 Click on the Audit Trail report option.
3 Enter your report selections, including a range of dates, periods, and ac-count numbers. Audit trails can be printed for a specific job, client, or vendor by entering and ...and for value (i.e., a job number, client number, or vendor number). If entered, only journal entries for that job, client, or vendor will be printed, then click Print.
To print an analysis report
1 From the General Ledger window, choose File > Print G/L Reports.
2 Click on the “Analysis” label.
3 Enter your report selections, including a range of dates, periods, and ac-count numbers.
4 Choose an analysis report by clicking on a report name, then click Print.
Print for any period. G/L reports can be printed for any one of the 24 accounting periods, as well as for a range of selected periods (e.g., periods 1-6) using the and period menu.

7-27Printing G/L Reports
General Ledger Reports
Report Name Description
Auto-Reversing Entries
Media WIP accrual entries
Recurring Entries
Adjusting Entries
Clearing Entries
General Journal
Purchases Journal
Sales Journal
Cash Disbursements Journal
Cash Receipts Journal
Audit Trail
JEs marked as auto-reversing entries post a reversing entry into the next period. Print the report by date range, period or range of periods and by account or range of ac-counts.
WIP accrual entries are automatically created by the media buying system for tracking media work in progress. The accounts debited and credited, dates, and invoice num-bers are reported for media accrual AP invoices and pre-billed insertion orders. They are posted by client media billings (i.e., broadcast and print media) from Accounts Receivable and the media accrual invoices from Accounts Payable. Together they properly account for media pre-billings by estimating the cost of the media. When the vendor’s final media invoice arrives, the actual media cost is reconciled with the accrual.
JEs marked as recurring entries are reported by date range, period range and account range.
JEs entered as Adjusting JEs to balance a transaction are listed on this report. Print the report by date, period or account.
This report lists the JEs posted from Transfer Account Balances in G/L Tools. The ac-counts transferred from (cleared) and the accounts transferred to are listed. Print the report by date, period, and account.
Only manual journal entries (JEs) are reported in the General Journal. The report can be printed by period and date range. The debits, credits, G/L accounts, and date are listed.
Accounts payable invoices (APs) are found in this journal. The debit for the cost or expense account, and the credit to the AP account, are reported along with their amounts. Print the journal for one day or a range of dates. Or print for one period, or for all periods.
Accounts receivable invoices (ARs) are reported by date range or period in this jour-nal. Both the credit to the income account and the debit to accounts receivable are listed with the amounts.
All types of checks––vendor payments, direct disbursements, overhead checks––are listed here. See the credit and debit accounts and the amounts, listed in check number order.
Client payments and bank deposits (PMTs) are reported in this journal. Use this report to audit which bank accounts were debited, whether the entries balance, and what the total receipts were for the period or date range entered.
Audit an account’s entries, or print a range of accounts totaled account-by-account. The audit trail can be printed for a range of dates and periods. Print for a specific job, client, or vendor to see how it affects the account.

7-28
Clients & Profits X provides a comprehensive set of tools to help manage your General Ledger. These timesaving utilities are easy to use, and prevent a lot of time-consuming manual work to audit, verify, and adjust your account-ing.
Anyone with access to the General Ledger can potentially use the G/L tools. Each tool has its own separate access privilege (see User Access & Pass-words) for flexibility. This gives different users access to some G/L tools and not others. The G/L tools include:
The Auditor
The Auditor is a collection of utilities to verify selected parts of your Clients & Profits X database. It lets you double-check your G/L account balances, A/R totals, A/P totals, and other files to ensure their accuracy. Each utility can be run independently, or all of the utilities can be run together.
Transfer Account Balances
A G/L account number can’t be changed once it has a balance. So what happens when you decide to reorganize your chart of accounts? One option is to wait until the year is closed, when all of the income, cost, and expense accounts are zeroed out. But what about asset, liability, and equity accounts that always keep their balances? That’s when you’d use the Transfer Account Balances tool. It lets you move an account’s balance to another account. It happens automatically, which simplifies the process and keeps it more accurate.
G/L Reconciliation
The task of auditing prepaid and accrual accounts is simplified with the G/L Reconciliation. It lists an account’s entries from the General Ledger. The entries are then marked as cleared. Once saved, the cleared items will be removed from the reconciliation window. A G/L reconciliation report can be printed to prove your Balance Sheet account balances.
Add Adjusting JE
This tool lets you make up journal entries that weren’t posted with the original transaction, typically due to a system crash or some kind of network problem during posting. Normally, journal entries can’t be saved unless the
General Ledger Tools
General Ledger Tools
Auditing tools and more. Each users can have dif-ferent access privileges to the G/L tools. Each tool has its own user access privilege, giving managers very specific control over who can run them.
transaction’s debits equals its credits. It should only be used to fix a one-sided entry. Otherwise, the entries you make with the Add Adjusting JE tool will make your financials out of balance.
Import Payroll
If you produce your own payroll checks using the CheckMark Payroll soft-ware, payroll data can be imported into Clients & Profits X. CheckMark has the ability to export payroll information into a standard text file. Clients &
Profits X then imports this text file into the General Ledger as an unposted payroll journal entries.
■ For more information on CheckMark Pay-roll, contact CheckMark at www.checkmark.com or (800) 444-9922.
Overhead Allocation Worksheet
This tool calculates each client’s share of the agency’s overhead expenses for any selected month. The overhead allocation worksheet adds up the hours worked by each staff member, then allocates a proportion of the overhead expenses to each client based upon the specific method. The worksheet lets you
enter the month’s payroll totals for each employee, which then becomes part of the client’s overhead allocation. The client overhead totals are then used on the Client P&L Analysis report (see Financials).
Close Year
Clients & Profits X can handle two open fiscal years, for a total of 24 ac-counting periods. So while there’s no real urgency to close the first year, at some point it’s necessary. Year-end closing is very easy and mostly auto-matic—Clients & Profits X handles everything. Once you’ve entered the year’s remaining entries, you’ll run the Close Year procedure. It presents a checklist of steps it goes through to close out the fiscal year. Once you’ve started the close year process, it runs unattended until it finishes. Afterwards, you can print a log of steps completed by the Close Year tool.

7-29
At month-end, or at any time as needed. The Auditor features several utilities for audit-ing different job and accounting data files. It lets you run one utility, all utilities, or any number of utilities at one time. When you suspect a specific problem, the Auditor helps you troubleshoot the cause and, in most cases, will solve it.
As needed when one account needs to be merged with another.
At month-end, or whenever adjusting entries need to be made to prepaid expense (such as insurance), amortization, and depreciation accounts.
As needed to fix a one-sided (or otherwise unbalanced) G/L transaction. The Add Adjusting Entry tool lets you add back in missing items caused by system crashes or freezes during posting.
Each time a payroll is made. At month-end. The overhead allocation worksheet calculates overhead expenses for each client based on the hours worked during a month. It uses payroll totals for each employee that worked during the month, so it shouldn’t be run until the month’s payroll is paid. You can run the overhead allocation worksheet without payroll numbers, but the report will only show direct job costs -- but no labor cost.
At year-end, as soon as all of the year’s work has been posted. Since Clients & Profits supports 24 accounting periods (two fiscal years), the year doesn’t have to be closed until well into the next year (after your year-end adjustments from your accountant are posted).
General Ledger Tools
The Auditor
Transfer Account Balances
G/L Reconciliation
Add Adjusting JE
Import Payroll
Overhead Allocation Worksheet
Close Year
Using the General Ledger Tools
Tool name When to use it

7-30
Importing Payroll
Because of its frequent revisions, Clients & Profits X doesn’t handle payroll accounting directly. Instead, it works with a payroll program called Check-Mark Payroll by CheckMark Software.
CheckMark is a stand-alone system that tracks employees, deductions, and other payroll issues apart from Clients & Profits X. Information about your payroll, however, can be extracted from CheckMark Payroll on a monthly basis then imported into Clients & Profits.
Importing payroll eliminates entering payroll records twice, so it saves time. Your payroll costs are imported, verified, then saved as unposted journal entries. You can then proof these payroll entries just like other journal entries, make changes, then post them. Posting updates your payroll and cash balances on your financial statements.
Since Clients & Profits X and CheckMark Payroll are not actu-ally linked, you’ll need to make sure your G/L accounts are the same in both programs. Payroll entries exported from Check-Mark get a G/L account number, which is verified when the data is imported. If the account number is wrong for any reason, the journal entry will be saved into Suspense—and should be changed before it is posted.
■ For more information on CheckMark Payroll call (800) 444-9922 or see their web site: www.checkmark.com.
To export your payroll data from CheckMark Payroll
1 From the CheckMark Payroll program, Choose Reports > Check Informa-tion.
2 Select the correct month.
3 Highlight the payroll checks to be included in this journal entry.
4 Select Posting Summary.
5 Choose M.Y.O.B. from the text file format pop-up menu.
Importing Payroll
6 Click on the Text button to export the payroll summary data.
7 Name the text file something like 11/04 Payroll then click OK.
This text file, containing your payroll entries, will be saved to your hard drive. Now it is ready to import to Clients & Profits.
8 Quit CheckMark Payroll.
To import your payroll data into Clients & Profits
1 Choose Accounting > General Ledger
2 Choose Edit > G/L Tools > Import Payroll.
The Import Payroll window opens, prompting you to enter an accounting period.
3 Enter an accounting period.
The accounting period is used by the payroll entries to update your financial statements. Your
current accounting period is entered automatically, but can be changed. Any unlocked period can be used.
4 Click Import.
You’ll be prompted to find the payroll text file. Any kind of text file will appear in the Import dialog box, so be careful to select the right text file.
You’ll then be prompted to open your payroll text file.
5 Select your payroll text file, then click OK.
Your payroll entries import one after another (you’ll see the record count as they’re imported).
■ If the text file isn’t tab-delimited, you’ll get an error message. Payroll text files must be tab-delimited.
Once imported, the G/L account number of the entries is verified. If an account on the payroll entry doesn’t exist, the entry will be posted to the Suspense account (#999998). You’ll see these entries on the proof list; they should be fixed before they are posted.
Exporting payroll. The Post-ing Summary report contains accounting data from a month’s payroll checks. Be sure to change the text file format to M.Y.O.B to properly export your payroll data.
Need more info about payroll? Get a list of frequently-asked ques-tions from www.cnp-x.com/support/FAQs

7-31Importing Payroll
Importing payroll. Ac-counting data from payroll checks is exported from CheckMark as a text file. This file, which contains the date, account number, and payroll amount (but not the staff name or salaries), is imported as unposted journal entries. Once the data is imported, you can proof it, make changes, then post the entries.
■ Be very careful not to import that same payroll text file more than once. If so, your payroll entries may be posted twice. For security, trash (or otherwise file away) your payroll text files once they’ve been successfully posted.
■ Any payroll entry that has the G/L account of #999998 had an invalid ac-count, and should be fixed. Don’t post these entries until they’re correct.

7-32
Transfer Account Balances
Transfer Account Balances moves a G/L account’s balances, from a selected period, to another account. This tool is helpful if you decide to reorganize your chart of accounts by renumbering some accounts or need to combine two accounts. A journal entry is automatically created for each accounting period in the date range selected. The journal entries reverse the balances from the original account and distributes them to the new account. A log of the unposted journal entries is automatically printed. The unposted entries should be proofed and then can be posted through the General Ledger.
Transfer Account Balances
1 Enter in the G/L account number that you are transfer-ring balances from.
2 Enter in the G/L account number that you are transfer-ring the balances to.
3 Choose a range of accounting periods from the period pop-up menus.
4 When you click on the ok button, a log of the unposted journal entries will be printed. This proof list needs to be care-
fully reviewed and compared to the YTD Trial Balance before posting the entries. Once posted, the original account’s balances will be zero and the new account will reflect the balances.
The Transfer Account Balances doesn’t move the actual activity from the original ac-count to the new account. Instead, just the balances are transferred via the journal entries.
q
w
e
r

7-33
Add Adjusting JE
The Add Adjusting JE window lets you make one-sided, unbalanced journal entries into your G/L. Journal entries otherwise can’t be added without being in balance.
Add Adjusting JE
1 Enter in the adjusting journal entry’s G/L account number. Usually, this is the account that is causing the out of balance
2 Enter in the accounting pe-riod that the adjusting entry will be posted to. Usually, it should be the same accounting period as the original transaction.
3 Enter in the date of the ad-justing journal entry. It can be the date of the original transac-tion or today’s date.
4 Enter in the reference number. It must be the same number that was entered onto the original entry. If not, the adjusting entry won’t appear together with the original jour-nal entry.
5 Enter in an optional de-scription to explain why the adjusting journal entry is being added.
6 Enter in the job number, client number, and/or ven-dor number for the adjusting
journal entry. These fields are optional.
7 Enter in the adjusting journal entry’s debit or credit amount. This should be the amount for which the original transaction is out of balance, otherwise you’ll still be out of balance.
8 Clicking on the save button will add the adjusting entry to the original journal entry as an unposted entry.
q
w
e
y
r
t
i
u

7-34
G/L Reconciliation
1 Click the Print button to print the list of outstanding items.
2 This is the account you’re currently reconciling. Each ac-count is reconciled separately.
3 The list shows all year to date entries through this ac-counting period.
4 A description of the entry is displayed from the journal entry for reference.
5 Depending on the G/L ac-
count reconciled, the Vendor or Client codes appear here for reference.
6 Uncleared entries are listed for the G/L account. Entries are sorted by vendor or client. You can sort the entries differently by clicking on the date, refer-ence, period, or description col-umn headings. The checkbox is marked if an item has cleared.
7 The reconciled balance is the total of the uncleared items. The G/L balance is the account
balance from your balance sheet. It is the balance as of the accounting period selected.
8 The total debits and credits are totaled for the uncleared items.
G/L Reconciliation
The G/L Reconciliation allows you to audit your balance sheet accounts. Also, it is precise - so your reconciled balance must equal the G/L balance or it can’t be saved.
q
w e
y
r t
iu

7-35Out of Balance Checker
Out of Balance Checker
It’s possible for your general ledger to become out-of-balance because of system crashes during posting. This happens when one side of a transaction (either a debit or credit) is posted, but the system crashes before the other side is finished. The problem can happen at any time, and it is difficult to prevent (since it is always system related). For performance reasons, Clients & Profits doesn’t automatically warn you when you’re out of balance. But it’s easy to see if your G/L is out of balance: simply look at the bottom line of the Balance Sheet (it’ll show the out of balance amount), or at Total Assets, Li-abilities, and Equity section on the Trial Balance (which should always be zero).
The key to solving an out-of-balance G/L problem is to find the missing (or duplicated) journal entries. Since all JEs for a particular transaction have the same refer-ence number, it’s easy to track down the bad entries. To make troubleshooting your G/L easy, Clients & Profits provides a special Out of Balance Checker utility.
How the Out of Balance Checker works
The Out of Balance Checker utility works by analyzing your G/L journal entries transaction-by-transaction. It adds up the total of each transac-tion’s debits and credits (i.e., JEs with the same reference number), then highlights the ones that don’t balance. The Out of Balance report only shows the transactions that need fixing.
■ The Out of Balance Checker only finds unbalanced entries that need to be corrected. It does not change your general ledger in any way. You’ll need to make your own judgments about how to correct an unbal-anced entry (that is, making the appropriate debit or credit adjusting entry).
■ The total debits and credits for each reference on the Out of Balance checker report correspond to the total debits and credits in the G/L window for that transaction.
The total amount of the entries on the report should equal the out-of-balance
amount on the Balance Sheet or Trial Balance.
Verifying journal entries
A quick an easy way to fix an entry listed on the Out of Balance Checker re-port is to use the Verify JE button. It will verify the accuracy of the currently displayed journal entry, and will automatically fix any common problems that are causing the out of balance by adding adjusting je’s for you to proof
and post. If the source of the journal entry has a problem, the Verify JE button cannot fix the problem. Instead it will tell you to correct the source. The Verify JE button can be used on journal entries created from Accounts Payable, Accounts Receivable, Client Payments, Expenses, and the Checkbook. Manually entered journal entries can’t be fixed by the Verify JE button.
To use the Verify JE button
1 Find the journal entry that needs to be verified.
2 Click on the (i.e., Verify JE) button.
If a problem was found, then adjusting journal entries will be automatically created for you. If
no problem was found, then the message will tell you the journal entry has been verified.
Details of the out of bal-ance entries are listed, including the reference number, date, accounting period and amount. This information can be used to research why the entry is out of balance and how it should be corrected.

7-36 The Auditor
The Auditor
The Auditor performs automatic self-checks on your Accounts Payable, Ac-counts Receivable, and General Ledger totals. It’s used for troubleshooting data entry and posting problems. Because it automatically double-checks account totals against the records that make them up (e.g., G/L account balances and their journal entries), it saves users from having to print and analyze hundreds of pages of reports to find accounting problems.
How the Auditor works
The Auditor works by double-checking the records in your A/P, A/R, and G/L data files. The complete auditing process includes checking for out-of-balance G/L entries, making sure that the A/P and A/R agings equal the Balance Sheet totals, and ensuring that billable time entries contain a client number. Each auditing step has a different function, which is described below.
■ Everyone can keep working in Clients & Profits while the Auditor is work-ing, and it can be canceled any time without damaging the database.
■ The Auditor can be run any time during the month, and as frequently as needed.
Also, don’t mistake the Auditor for a traditional accountant-based financial audit. The Auditor can only check the account totals themselves, ensuring that they add up correctly. It can’t make value judgement about how users have entered data (for example, it can point out that the wrong expense ac-count was used). It doesn’t replace a professional accounting audit. Instead, it is only a useful tool for finding the source of accounting problems.
Auditing steps
All of the Auditor’s steps can be performed at the same time, or individual steps can be chosen to run independently. If time allows, all of the steps can be run together; however, if you suspect a specific problem that the Auditor can confirm and time is tight, you can choose to run only one step at a time.
Out of Balance Checker This step points out one-sided or otherwise unbal-ance journal entries from the General Ledger. If your Trial Balance shows an out-of-balance total, the Out of Balance Checker will show you precisely where the problem occurs. For more information on using the Out of Balance Checker see page 7-35.
Account Totals Checker This utility compares totals on your financial state-ments to the journal entries in your general ledger.
AP Quick Check This report compares the total of your vendor aging to the total of a/p control accounts designated under Setup>Chart of Accounts. This is a quick way to make sure your agings stay in balance.
Vendor Totals Checker This utility compares the vendor totals listed under setup > vendors to the total unpaid invoices on your vendor aging.
A/P Exception Report This utility looks for incorrect uses of a/p control accounts. Example, you should not credit accounts payable when writing a check. The a/p exception report would flag this transaction.
A/R Quick Check This report compares the total of your client aging to the total of a/r control accounts designated under Setup>Chart of Accounts. This is a quick way to make sure your agings stay in balance.
Client Totals Checker This utility compares the client totals listed under view > clients to the total unpaid invoices on your client aging.
A/R Exception Report This utility looks for incorrect uses of a/r control ac-counts. Example, you should not debit accounts receivable when entering a client payment. The a/r exception report would flag this transaction.
JE Client Number Checker The JE Client Number checker will list any je to an income or job cost account that does not have a client code. This could affect the overhead allocation and Client P & L report.
Time Entry Client Checker The time entry client number checker will list any time entries in the current year that do not have a client code. This could affect the overhead allocation and Client P & L report.
Task Kind Checker The task kind checker looks for tasks on open jobs that have unbilled amounts, but the estimating/billing checkbox is not selected for that task.

7-37The Auditor
The Auditor window
q w
e
r
t
y
1 Click the All button to select all of the Auditor’s steps.
2 A log showing the steps completed by the Auditor can be printed by clicking the Print button.
3 The steps needed to audit the books are listed here, in the order in which they’re per-formed.
4 You can selectively choose which steps to perform by click-ing on a step’s checkbox. Only
those steps that are checked will be performed.
5 The completed column indicates when each auditing step has finished. You can use the completed times to track how much time was needed to perform each audit.
6 The status message keeps you constantly informed about the process of the auditor.
The Auditor can only check the account totals themselves, ensuring that they add up correctly. It can’t make value judgements about how users have entered data.

7-38
The Overhead Allocation Worksheet helps calculate the true cost of servicing your clients. It works by first adding up the total hours worked by staff mem-bers on each client account, using entries from time sheets and time cards. Then the agency’s total overhead is calculated from the income statement. The agency’s total overhead is then divided up by client using one of four for-mulas: agency direct service costs, agency billings, agency income, or agency direct client hours. Based on the formula you’ve chosen, Clients & Profits allocates each client’s share of the overhead expenses.
At the top of the Overhead Allocation Worksheet report you’ll see the month-to-date total overhead expenses, direct service costs (i.e., staff salaries), net overhead expenses (i.e., total overhead less staff sala-ries), and total client hours. The report then shows two sections: one for client hours and one for overhead allocation. The “client hours” section lists clients and their month-to-date total hours, in order by hours used. The “overhead allocation” section lists clients and their share of the agency’s overheadexpenses.
Overhead expenses are allocated based on four different formulas. There are no restrictions on how you use these formulas (for example, you can run four separate reports for same month using each of the four different formulas). The overhead allocation formulas include:
Agency Direct Service Costs This popular formula allocates overhead ex-penses based on the percentage of staff salary dollars used by each client. It looks at the actual cost (using the real payroll amounts, which you enter into the worksheet) of the hours worked on each client by each staff member. It’s the most commonly used method for allocating overhead.
Agency Billings This formula allocates overhead based on each client’s total billings. For example, if a client represents 50% of the month’s total billings, then half the agency’s expenses are allocated to the client.Agency Income This formula allocates overhead based on each client’s gross
Overhead Allocation Worksheet
Overhead Allocation Worksheet
profit. Unlike the Agency Billings formula, this formula allocates expenses based on the client’s billings less its job costs. With this formula, clients that are more profitable get a higher proportion of the agency’s expenses.
Agency Direct Client Hours This formula allocates overhead based strictly on the amount of billable hours worked by staff members on each client. Unlike the other formulas, non-billable administrative time is not a factor. Only time
added specifically for a client is used. With this formula, clients with the most direct staff hours will get the most allocated overhead.
■ The amounts in the Overhead Allocation Worksheet report will appear on the Client P&L report. For security reasons, the staff salary and client overhead allocation amounts aren’t saved. Also, they only appear on the overhead allocation
worksheet report. The allocation amounts are recalculated each time the worksheet is run.
Allocate overhead. The Overhead Allocation Worksheet is run for one accounting period at a time. Clients & Profits X compares the agency’s overhead expenses with client hours and the actual payroll costs to calculate each client’s share.

7-39Overhead Allocation Worksheet
The Overhead Allocation Worksheet window
q w
e
r
t
1 The payroll amounts can be cleared from the Overhead Al-location Worksheet by clicking the clear button.
2 The Overhead Allocation Worksheet can be printed by clicking on the print button.
3 Choose to print the Overhead Allocation Worksheet report to the screen or to the printer from the print to pop-up menu. The report is automatically printed when the worksheet is saved.
4 The Overhead Allocation Worksheet can be run for one accounting period at a time.
5 The formula used to calculate each client’s portion of the overhead costs is selected from the Use allocation formula pop-up menu.
6 A list of each staff member that has time entered for the period selected, will be listed with a MTD column to manually list their payroll amounts. The total of the MTD payroll column
will be deducted from the total overhead costs for the month to give the net overhead expenses. The net overhead expenses will be allocated to each client based on the formula selected.
y
For security reasons, the staff salary and client overhead allocation amounts aren’t saved and only appear on the overhead allocation worksheet report.

7-40 Close Year
Close Year
Closing the year in Clients & Profits X is extremely important and should be done sometime after the end of your fiscal year. Since Clients & Profits supports two simultaneous fiscal years (for a total of 24 accounting periods), there’s no real sense of urgency about year-end closing. The year can be closed well into the next fiscal year. Throughout that time you can enter data into both the current year and last year, then print financial statements for any accounting period.
Once in the new fiscal year, you should run the Close Year tool as soon as you’ve made any remaining adjusting entries. Closing is performed by a special tool that prepares your database for the next year’s accounting work. Closing the year does not affect job tickets, time sheets, accounts payable invoices, purchase orders, client invoices, payments, or checks in the check-book. Instead, closing only resets the General Ledger.
■ You can’t enter data into a year that is closed: Once an accounting year is closed, its journal entries are permanently purged in preparation for the new year. So you can’t enter any last-minute entries into last year once it is closed. Any forgotten entries will have to be entered into the new accounting year.
Closing the year takes all day (or all night), so don’t start the process until you have free computer time. Remember, no one can use Clients & Profits X while you’re closing the year. (If they do, they’ll lose their work.) You’ll see an “ok” message when the year has been successfully closed. Once the year has been closed, you and your users can start entering work into the new year. Before you close the year you should be able to answer “yes” to the following questions:
■ Have you posted everything? All transactions should be posted before the close year process is performed. Transactions posted to periods 13-24 will be automatically moved to their corresponding periods 1-12 and will become part of the next year’s financial data.
■ Have you printed any desired or required year-end reports? Once the year is closed, the year’s income statements, audit trails, and other financials can’t be printed because the information is no longer part of the database. Also, consider printing client, vendor, and resource summaries before closing the year, as well as the most recent financial statements. These reports will be cleared and reset for the new year as the year is closed.
■ Have you backed up your database? Closing is irreversible. Once the year is closed, it cannot be “unclosed” for any reason. Because of this it is important to make a permanent backup of your database, to allow you to reference the previous year’s general ledger if you ever need to.
The Retained Earnings account
The Retained Earnings account keeps track of your net income/loss from year to year. To close the year, you must have a Retained Earnings account.
You’ll be prompted to enter the Retained Earnings account, which must be an equity account, when closing the year. Clients & Profits calculates the agency’s net income by subtracting job costs and overhead expenses from total income. The amount of your profit is then posted to retained earnings, an equity (or “net worth”) account. This is the same as manual entries which close income, costs, and ex-penses into retained earnings––it’s just automated. Clients & Profits will prompt you if the account does not exist.
■ Retained Earnings is a separate Equity account, and is not the same as the Year-to-Date Profit account #999999.
1 Reconcile your bank accounts from the Checkbook.
2 Reconcile other balance sheet accounts using the G/L Reconcili-ation.
3 Print any last-minute financial statements, including A/R and A/P agings for your hard-copy files.
4 Make a permanent backup of the current year’s database on a Zip, Jaz, Syquest, or other kind of drive or tape.
You may need to refer to a previous year’s journal entries some time in the future, so having a permanent (and easily accessible) backup is handy.
5 Choose Accounting > General Ledger, then choose Edit > G/L Tools > Close Year.
6 Enter your Retained Earnings account, then click OK.
The completed steps are checked off in a list so you can check the progress. The close year process takes several hours. It can be run unattended overnight or over a weekend. For best performance, run the close year utility from the file server itself, not a user’s worksta-tion (so you can avoid working across the network).
7 Confirm that the year was closed successfully by printing a YTD Trial Balance.
The Balance Sheet should not have a net income account listed under “equity.” The Income Statement should not have any balances. And the Year-to-Date Trial Balance should only have amounts for the beginning balances of the balance sheet accounts.
To close the year
Need more info about closing the year? Get a list of frequently-asked questions from the Clients & Profits X web site: www.cnp-x.com/support

7-41
The Close Year window
1 A log showing the steps completed during the year-end closing can be printed by click-ing the Print button.
2 The Close Year tool takes the shop’s YTD income (i.e., income less job costs and expenses) and moves it to your retained earnings (or owner’s equity) account. The retained earnings equity account keeps a year-to-year running total of the shop’s profit.
3 The steps needed to close the
q
w
e
r
t
books are listed here, in the or-der in which they’re performed.
4 The completed column indicates when each step of the year-end closing process has finished. You can use the completed times to track how much time was needed to close the year.
5 The status message keeps you constantly informed about the process of the year-end closing.
Close Year
Closing is irreversible. Make sure all last minute entries have been entered before you close. Otherwise, any forgotten entries will be added to the new accounting year.

Snapshots

8-2
SNAPSHOTS
8-4 Snapshot Reports8-5 The Snapshots Menu8-6 Production Reports8-8 Work in Progress Reports8-10 Job Costs Reports8-12 Vendor Account Aging8-14 Client Account Aging8-16 Cash Flash8-18 Profitability Reports8-22 Productivity Reports8-24 Financials8-28 Media Analysis Reports
Chapter 8

8-3
Snapshot reports summarize key parts of your database, including jobs, costs, pay-ables, receivables, and financials. These reports use information posted throughout Clients & Profits X, so they’re always accurate and timely. In this chapter you’ll see how to:
■ print production and traffic reports for open jobs and tasks■ print job cost reports showing buyouts, time, and in-house expenses■ print work in progress reports for billing■ print client and vendor account agings■ print productivity reports that analyze time■ print profitability reports from jobs and tasks■ print cash f lash reports■ print financial statements■ print media analysis reports
Introduction
For help using any part of Clients & Profits X, click the button from any window to open the on-line user guide. This web-based user guide features step-by-step instructions, explanations, tips, demonstrations, and links to FAQs, tech notes, and tutorials from www.cnp-x.com/support. The web site is continually updated, so it’s more timely and helpful than a printed user guide.

8-4
Snapshot Reports
Snapshot reports provide a simple way to see essential information about the business. The idea behind snapshot reports is simple: Snapshot reports are designed to give managers quick “snapshots” of jobs, costs, billings, and financial information that are easy to print without programming.
Snapshot reports summarize data from all parts of Clients & Profits X: Pro-duction reports show status, traffic and schedules from jobs and tasks. Work in Progress reports show estimates, costs, and to-be-billed amounts from jobs and tasks. Job Cost reports summarize purchases, time, expenses, and checks by job, task, or client. Vendor Account Aging reports show unpaid invoices from Accounts Payable. Client Account Aging reports show unpaid invoices from Accounts Receivable. The Cash Flash window shows the current cash status —the current cash balance and outstanding account balances for A/R and A/P. Productivity reports show how time was spent from Time Sheets. Profitability reports show profit and loss from jobs and tasks. Financials are financial statements printed from your General Ledger. Media Analysis summarize client spending for different kinds of media from insertion and broadcast orders.
The snapshot reports are flexible, offering many options for selecting, sorting, and printing data. Snapshot reports do not replace reports found in the Job Tickets, Accounts Payable, and other windows; instead, they work together to give you the most complete picture possible of your work.
Printing snapshot reports is easy: Simply choose a command from the Snap-shots menu, make your selections, then click Print. Report options determine how data will be selected, sorted, and printed. Your report can be printed to the window (for a quick on-screen review of the data), to the printer, or to disk as a word processor text file. Every snapshot window lets you select from various options, all of which make your report slightly different. That’s why there isn’t really one “snapshot” report for production, for example; different versions of the same basic report let you somewhat tailor the report to your exact needs. Some snapshot windows have more options than others, depending on what’s being printed.
■ Anyone can print snapshot reports if they have the proper access privi-leges. If a user has access to a particular snapshot window, he or she can use any of the window’s reports and options.
Snapshot reports vs. other reports
Snapshot reports consolidate data from all parts of your Clients & Profits X database, such as job tickets, accounts payable, time sheets, checkbook, and accounts receivable. They specialize in summarizing mammoth amounts of data into clear, concise reports.
Snapshot reports use the same data as reports printed from Job Tickets, A/P, A/R, etc. So you’ll see the same data on a job summary printed from Job Tickets as you would on a Snapshot report. The difference is the snapshot
Snapshot Reports
report shows many jobs—while a job report from Job Tickets usually shows one job ticket.
The record-by-record detail for a snapshot report can always be printed separately. The individual time entries in a Productivity report, for example, can be printed as time reports from Time Sheets. Or, the journal entries that comprise the totals on your Balance Sheet can be printed in audit trails from the General Ledger.
Tips for printing snapshot reports
■ Printing reports to the window is faster than printing to the printer. A report can be reviewed more quickly when it’s on the window, since it doesn’t have to wait for the printer or the network. Once in the window, you can print one page or all pages using the Print pop-up menu at the top-right corner of the window.
■ Every snapshot window features a variety of options which affect how data appears on reports. This means you may get slightly different results when printing the same report over again. When you’ve finally discovered the right combination of options on a report, make a note on the report of the op-tion you’ve chosen. So whenever someone else needs the same report, they’ll know the right options to use.
■ Managers can prevent users from printing certain kinds of snapshot reports by changing their access privileges: Choose Setup > Users, Access, and Privileges; from the Menus access options, uncheck the snapshot reports the user shouldn’t print; click Save. These changes will take affect the next time the user introduces himself or herself.
■ Any snapshot report can be printed to a disk as a text file. The text file, however, is unformatted (no fonts or styles). It can be opened by any word processor, but not a spreadsheet, then edited as needed.

8-5
The Snapshots menu
Snapshots Reports
1 Production reports show sta-tus, traffic and schedules from jobs and tasks. It’s the only way to get job status lists, traffic re-ports, and job schedules for all of your jobs in production. Jobs can be selected by production or billing status.
2 Work in Progress reports compare estimates, costs, open purchase orders, and unbilled costs from jobs and clients.
3 Job Costs reports summarize purchases, time, expenses, and checks by job, task, or client—every cost you’ve incurred for a week, month, or any period by client, job, or task.
4 Vendor Account Aging reports
show unpaid invoices from A/P. You can see unpaid invoices in detail, or just see each vendor’s balance due. The vendor aging can be run as of the current date or through any prior period. Client Account Aging reports show unpaid invoices from Accounts Receivable. You can see each unpaid invoice, or just the total balance due for each client. Invoice aging reports have many options; for example, you can print an aging for one client or for all clients within one division. The client aging can be run as of the cur-rent date or through any prior period.
5 The Cash Flash window shows your current cash balance and
outstanding A/P and A/R bal-ances. A schedule of payments and cash receipts can be set up to help you plan your cash needs.
6 Profitability reports show profit and loss from jobs and tasks. You can analyze the job’s profit to date, or just profit earned for the month’s billings and costs.
7 Productivity reports show how time was spent from Time Sheets. You can quickly see how your staff is utilizing their time by client, department, or profit center—for a week, a month, or any period of time. There are reports to analyze overtime and show you which
staff members have not ac-counted for all their hours.
8 Financials include the Income Statement, Balance Sheet, Trial Balance, Detailed General Ledger, and Statement of Cash Flows. You can print financials anytime during the month, seeing your up-to-the-minute balances. The financials can be run for any of the 24 accounting periods or quarterly financials can be run.
9 Media Analysis reports can be used by media buyers and account service to see how advertising was purchased. Ac-count management can use me-dia analysis reports to analyze how well the media department is managing themselves.
y
i
o
u
q
w
r
e
t

8-6
Production Reports
Production Reports
Production reports are your best source of up-to-date information on open jobs, traffic, and task schedules. A complete picture of your work in production is available here: job status lists, traffic reports showing mile-stones, work-to-do schedules for tasks and resources, and a customizable schedule chart that shows selected unfinished tasks.
The Job Hot Sheet reports show jobs by production status, sorted by job number. Each job shows its job number, job name, client, and status. The Job Hot Sheet can show jobs selected for a range of start dates, due dates, added dates, or closed dates. It’s like the job lists you can also print from the Job Ticket window.
Traffic reports show jobs by production status, and feature milestones. Jobs are grouped by job type, so that like jobs are shown together. The traffic re-ports can be run for one client, AE, or one of six key production people. The job’s status note (which is a customizable status code entered in the job’s Traffic window) appears on the right side of the report. If you use FileMaker, this report is prob-ably very similar to the job report you’re now using.
Schedules/work to do reports show unfinished job tasks by resource, client, AE, department, or task. These work-to-do reports can be printed daily to show everyone what they’re to do each day. Or, weekly schedules can be printed in advance for production meetings to help manage the week’s work load.
The schedule chart is a combination traffic/schedule report. It charts a user-defined selection of tasks by due date. You can pick-and-choose the unfinished tasks you want to see, sorted by job number. You can also sort the unfinished tasks by client. So instead of seeing every unfinished task for the week, you can print just ART, COPY, and DES (i.e., design) instead. Any com-bination of tasks can be charted. This ability lets you easily chart work-to-do for different work groups, such as creative teams. For flexibility, the chart’s title is even customizable.
The analysis reports allow you to see which tasks were completed on time and which were late, or a list of missed deadlines can be printed for each staff member
■ Each of the production reports has its own unique purpose. You may not need every one to help you manage your jobs. Instead of printing every report, experiment with each report (and its various options) to see which one gives you the best information you need to keep track of jobs.
To print production reports
Each production report has its own selections, which don’t affect the other reports. For example, you can print a status report listing jobs with status 1-50, while also printing a traffic report showing jobs with status 1-999.
1 Choose Production from the Snapshots menu.
2 Select the kind of report (i.e., Hot Sheets, Traffic, Schedules/Work to Do).
3 Make your report selections.
4 Click Print.
Production reports with more information will take longer to print than shorter reports.
Tips for printing production reports
■ Use the Job Hot Sheet as your basic production report. Since it shows the job’s key facts—job number, job name, client, due date, production status, and status notes—it’s a great way to see your open jobs at a glance. If you need to see more detail about a job, print a job summary (from Job Tickets).
■ Production reports are less detailed than regular job reports. Job lists printed from Job Tickets, for example, include many more options (such as showing the job specifications). However, other job reports are longer since they show more information. This makes them a little more complicated, since there are more pages used.
■ Don’t use production reports for billing. Since production reports are designed to manage work in production, you won’t see estimates, costs, billing, or other amounts. Instead, print either Work in Progress reports (from Snapshots) or job lists and job summaries (from Job Tickets).

8-7
Production Reports
Production Reports
Job Hot Sheet
Traffic Hot Sheet
Traffic by Job Type
Traffic by Client
Traffic by Job Number
Traffic by Production Status
Traffic by AE/Team
Work to Do (by Due Date)
Work to Do (by Start Date)
Daily Task Calendar
Client Deadlines
Department Task Checklist
Job Schedule
Schedule Chart
On-Time Performance
Missed Deadlines
The Job Hot Sheet shows the job’s key facts—job number, production status, and status notes.
The Traffic Hot Sheet shows the job’s number, production status, and traffic assignments.
The Traffic by Job Type report lists each job within a job type and shows each jobs’ milestones and status notes. Each job type prints on a separate page.
The Traffic by Client report lists each clients’ jobs by job type, showing the jobs’ milestones. A separate page is printed for each client’s jobs.
This report lists each jobs’ milestones and sorts the jobs within each job type by job number.
This traffic reports shows each jobs’ milestones, sorting jobs within each job type by produc-tion status.
The Traffic by AE/Team lists job milestones and sorts the jobs within each job type by AE/Team.
The Work to Do report (by Due Date) shows unfinished tasks by due date and sorts by resource.
The Work to Do (by Start Date) shows unfinished tasks by start date and sorts by resource.
This report shows a checklist of unfinished tasks by due date. The client, job, resource, and time of day each task is due is listed with a check box so the printed report can be used as a manual checklist.
The Client Deadlines report shows unfinished tasks for each client and sorts them by due date. The job number, job name, resource, and time due are listed for each task.
The Department Tasks Checklist shows unfinished tasks for each department, sorted by due date. The task’s due date, time due and resource are shown along with the resource’s backup person.
The Job Schedule report gives a list of unfinished tasks by start or due date. For each task the estimate hours and hours remaining are shown.
The Schedule Chart lets you choose the unfinished tasks you want to see and sorts them by job number or client. So instead of seeing every unfinished task for the week you can print just a select few (e.g., artwork, copy writing, and design).
The On-Time Performance report compares the due date of each client’s unfinished tasks to the actual date the task was finished. The number of days the task was late is calculated and the performance of meeting the due dates is analyzed by showing what percentage of the tasks were early, on-time, late, or very late.
The Missed Deadlines report shows tasks that were finished after the scheduled due date for each person. The number of days the task was late is calculated.
Production Hot Sheets
Traffic Reports
Schedule/Work To Do Reports
Schedule Charts
Production Analysis Reports

8-8
profit center by using the select by pop-up menu. They can show unbilled costs by production status or billing status, letting you see only jobs marked as ready to bill, for example. By using billing status, accounting managers can print their own reports.
Change orders aren’t costs, so don’t appear on the work in progress reports. Since they may influence a month’s billing, change order reports and forms
can be printed from the Work in Progress window. The Change Order Report lists change orders for all jobs for a range of dates. The option change orders prints a list of all change orders for a time period.
■ Tasks without unbilled costs aren’t included on work in progress reports.
Billing worksheet re-port options include:
■ Include overbilled tasks. Only unbilled tasks appear on WIP reports. Overbilled tasks (which may have been billed by estimates) aren’t included. Why
exclude overbilled tasks? These amounts will decrease the unbilled total for the job, and you may not bill enough to cover the job’s actual costs. Since the job summary and job progress reports show all tasks, you should use this option if you compare them with work in progress reports.
■ Show overbilled jobs. This option looks at the unbilled total of the job, rather than the individual tasks. If the unbilled total on the job is a negative amount (i.e., the job is overbilled), then the job will not appear on the report unless this option is selected.
To print work in progress reports
1 Choose Work in Progress from the Snapshot menu.
2 Select the kind of report (i.e., Billing Worksheets, Unbilled Costs, Unbilled Media, etc.).
3 Make your report selection.
4 Click Print.
Work in Progress Reports
Work in progress reports are based on jobs and tasks—and not general ledger journal entries. Unlike older agency accounting systems, the general ledger does not automatically track your unbilled costs. This is done for two reasons: (1) Clients & Profits can track costs and billing without needing the General Ledger, which other systems can’t; and (2) only actual costs and billings af-fect the general ledger anyway.
Here’s how it works: When a vendor invoice or check is add-ed, every line item gets a debit account (typically a job cost or expense). During posting, the line item amount debits the gen-eral ledger—increasing the cost or expense account’s balance. The entry is counted as a cost against income immediately; it is not counted as an asset. When the job is billed, an income ac-count is credited and Accounts Receivable is debited—that’s all. Billing does not affect your cost or expense accounts.
Here’s why: The system assumes that you’ll bill costs in the same period that they’re entered. It’s simpler, since agencies can bill costs more quickly now with Clients & Profits. This eliminates the need to initially post costs to WIP, then reverse the costs that were later billed. So in-stead of booking the month’s costs as they’re added, you only need to make a month-end entry for the value of unbilled costs. And you’ll get this amount from the work in progress reports.
This method of cost accounting only applies to payables and checks. Purchase orders, insertion order, time sheets, out-of-pocket expenses, cost transfers, and job change orders don’t post journal entries into the general ledger Work in progress reports summarize unbilled costs. These reports are the best way to see what you’ve spent on jobs so far, even if they’ve been billed before. Work in progress reports can show what’s to be billed by client, making the month’s billing easier. Other reports help you account for your change orders.
The various work in progress reports show jobs, tasks, and costs in differ-ent ways, so have different purposes. The Billing Hot Sheet report is a great pre-billing report, since it lists your unbilled jobs by client. It summarizes the unbilled totals by job, so it is a very compact report; however, it doesn’t show much detail.
WIP reports can show jobs, tasks, and costs for one client, AE, project, or
Work in Progress Reports

8-9
Work in Progress Reports
Work in Progress Reports
Billing Hot Sheet
Job Billing Worksheet
Unbilled Costs by Job
Unbilled Costs by Task
Partially-Billed Costs
Costs On-Hold
Unbilled Media (all kinds)
Unbilled Broadcast Orders
Unbilled Insertion Orders
Write-offs
Markdowns
Overbilled Tasks
Unbillable Costs
G/L Accrual (Costs by dGL)
Change Orders
The Billing Hot Sheet shows unbilled jobs by client—including each job’s estimate (plus change orders), billed, and remaining unbilled amounts. A checklist of the billing work-flow steps is listed for each job.
The Job Billing Worksheet shows unbilled jobs and their tasks—including each task’s budget, costs, commitments, billings-to-date, and a space to enter the amount to bill now. Every job is printed on its own page, making the report easy to distribute to AEs.
The Unbilled costs by Job report can be selected by cost status. This option lets you see unbilled costs that are on-hold, for example, or cancelled. All other costs will be excluded from the report.
The Unbilled Costs by Task report lists unbilled vendor purchases, time entries, expenses, checks, and transfers by task. Use this to easily see total unbilled printing, layout, etc. at month-end. To see unbilled costs for a time period, choose Job Costs from the Snapshots menu.
The Partially-Billed Costs report lists any cost with a status of Partial. The costs are sorted by client, then job.
The Costs On-Hold report lists any cost with a status of On-Hold.
The Unbilled Media (all kinds) report lists all insertion and broadcast orders that have not been billed to the client. The orders are grouped by client and sorted by order number.
The Unbilled Broadcast Orders lists all broadcast order not yet billed to the client. Each broadcast order is listed with its station, flight dates, number of spots, and net and gross amounts. A separate page is printed for each client’s orders.
The Unbilled Insertion Orders lists all insertion orders not yet billed to the client. Each insertion order is listed with its publication, issue date, ad size, and gross amount. A separate page is printed for each client’s orders.
The Write-offs report analyzes costs that have been written off for some time period.
The Markdowns report shows costs that have been billed for less than their gross amounts.
The Overbilled Tasks lists job tasks that have been billed for more than their actual costs.
The Unbillable Costs report lists unbillable costs by job or task.
The G/L Accrual summarizes unbilled job costs by debit G/L# for making manual WIP entries.
The Change Orders report lists change orders added for any time period.
Billing Worksheets
Unbilled Costs
Unbilled Media
Analysis
Miscellaneous

8-10
date, including billing information. Costs can also be sorted by kind, instead of task.
■ To see time in detail by day: Choose Accounting > Time Sheets then choose File > Print Time Reports. Enter a range of dates, then click Print. Time re-ports show time by day, staff member, job, task, or client. In addition, you can print time entries by date added or date posted, unlike the Job Cost reports.
■ To see time totals: Choose Productivity from the Snap-shots menu; enter a range of work dates; select some options; then click Print. The productivity reports summarize time sheets in various ways. You’ll see clear, concise totals and not all of the time detail, making it a very efficient, effective management report.
To print Job Cost Reports
1 Choose Snapshots > Job Costs.
2 Select the kind of report (i.e., Job Costs, Client Job Costs, Task Costs, etc.)
3 Make your report selections.
4 Click Print.
Tips for printing job cost reports
■ Only posted costs appear on Job Cost reports. Unposted costs, including unposted daily time cards, are simply excluded until they are posted.
■ If a user doesn’t have access to cost amounts, they will not be able to print Job Cost reports, so there’s no way for the user to see cost rates and net amounts.
Job Cost Reports
Job cost reports are very detailed listings of vendor purchases (buyouts), time sheets, checks written for job costs, out-of-pocket expenses, and job cost transfers.
Job costs are selected by work date (i.e., when the time was used, the vendor’s invoice date, or the date a check was written for job costs) or posted date. This makes it easy to see what you bought and where you spent your time for a week, month, or any time period. In addition, costs can be sorted by job number, client, or task for better analysis.
The basic job cost report shows each cost’s refer-ence number (i.e., invoice number, check number, time ID number), date, vendor or staff member, job number, task, hours (if it is a time entry), net cost amount and gross amount. As an option, you can show the cost’s notes.
You’ve got a substantial amount of control over how the report is arranged. Cost reports can be printed showing any combination of vendor costs, time entries, expenses, and cost transfers.
Since costs are connected to jobs, you can print cost reports using status codes. You can select costs by the job’s production or billing status. This abil-ity lets you see job costs, for example, for only open jobs. Or, you can print job costs for closed jobs, jobs on hold, etc. You can also show costs for one job number, one client, or one task. There’s no limit to how you can print job cost reports.
■ Purchase orders are not job costs (yet), but a purchase/insertion order report can be printed from the Job Cost Report window.
Job Cost reports vs. other cost reports
The Job Cost report is best for seeing costs for all jobs for some time period. But there are other reports that may be more useful in different situations, for different needs.
■ To see the costs for one job only: Choose View > Job Tickets then find the job you want. Then choose File > Print Job Reports, select the job cost report, then click Print. This report prints all costs, regardless of
Job Cost Reports

8-11
Job Cost Reports
Job Cost Reports
Job Costs
Client Job Costs
Task Costs
Purchase Orders
Change Orders
The Job Costs report is simple, showing costs by job and task. All costs can be selected or any combination of outside costs, time, in-house expenses, or internal charges.
The Client Job Costs report shows costs by client, then by job number. A separate page is printed for each client. All costs can be selected or any combination of outside costs, time, in-house expenses, or internal charges.
The Task Costs report shows costs by client first, then by job task. You’ll see how time and money was spent by client, task, and the vendor or staff member. A separate page is printed for each client, too.
The Purchase Order report can be printed for one or all types of orders (broadcast, insertion, purchase). Each order’s number, vendor, date, cost, gross, and balance is shown.
The Change Order report can be printed for approved or unapproved orders. Each change order’s number, date, description, and status are shown, along with the hours, budget, and estimate amounts being changed.
Job Costs
Client Job Costs
Purchase Orders/Insertion Orders
Change Orders
Task Costs

8-12
Vendor Account Aging
Vendor aging reports show unpaid invoices from Accounts Payable. These reports show how much you owe to vendors. Both show essentially the same information—accounts payable—but in more or less detail. The Vendor Invoice Aging shows individual unpaid invoices by vendor. The Vendor Account Aging doesn’t show invoices; instead, it shows account totals only.
Both reports are useful to management, but have different purposes. The Vendor Invoice Aging shows every unpaid invoice, along with the aged balances. It’s most commonly used when preparing to write checks, since it can be used as a checklist of the bills to pay. The invoice aging can be a long report if you have large unpaid balances. The Vendor Account Aging is a short report, since it shows only one line per vendor—but may not show enough information to help plan your cash requirements. Its most practical use is to quickly see to whom you owe money.
Vendor agings can be printed any time during the month, but especially at month-end. Vendor aging reports are always up-to-the-minute accurate, showing any posted invoice with a balance due. They can show what you owe as of the moment the report is printed or what was owed through a prior accounting period.
Vendor account balances can be aged into the current period and three user-defined periods (e.g., 30, 60, 90 days). These periods are flexible and can be changed any time the agings are printed. Any set of aging periods can be used. The aging option recalculates the unpaid balance based on today’s date and your aging periods. Your aged balances will only be accurate as of the last aging.
Vendor agings and the General Ledger
Vendor aging reports aren’t based on data from the General Ledger. Instead, vendor aging reports are based exclusively on unpaid invoices from Accounts Payable. So what you’re seeing on vendor agings comes from your payables, not from journal entries.
For this reason, they have the potential to be confusing. The vendor aging reports show a grand total at the bottom of each report. The balances on the vendor invoice aging will always match the vendor account aging—they’re both based on unpaid payables, after all. Since Accounts Payable is inte-grated with your General Ledger, your payables’ balances on the Balance Sheet should equal the balances on the aging reports. In some cases, they won’t match—for an obvious reason: journal entries posted directly into the General Ledger for the A/P account do not affect vendor balances, and there-fore the vendor account agings. For this reason, don’t make adjusting entries to the G/L for the A/P account; instead, make your adjustment directly into Accounts Payable.
Vendor agings can be printed for some date in the past. The total balance due should always match the Balance Sheet printed for the same accounting period.
Vendor Account Aging
To print a vendor aging report
1 Choose Snapshots > Vendor Account Aging.
2 Choose the kind of aging report (i.e., Invoice Aging or Account Aging).
3 Select to show balances through today or through a prior period.
4 Enter your aging periods.
These periods are used to calculate aged balances for every invoice, based on the invoice date and today’s date. You can use any set of aging periods, including a different set each time you print vendor agings.
5 Choose your aging options.
To see only invoices for one vendor, enter the vendor code, or use ALL for all vendors. To see invoices for one specific A/P account, enter the payable account number.
6 Click Print.
The aging process can take some time if you have many unpaid payables. Since aging is a demanding procedure, it’s best to age your accounts when few users are using Clients & Profits Pro. Here’s what happens: Clients & Profits Pro first clears the existing balances for every vendor. Next, the program checks Accounts Payable for unpaid invoices. Every unpaid payable is evaluated, and its balance aged based on the invoice’s date, today’s date, and your aging periods. The invoice then updates the vendor’s balances.
■ The Client Paid column on the Invoice Aging report helps you pay only the A/P invoices that have been billed and paid by the client. When a client pays their A/R invoice, the A/P invoices billed on that invoice are updated with the date the client paid. In order for the Client Paid column to be updated, the accounts payable invoice must be posted first, then the client is billed with an accounts receivable invoice that bills the actual cost, next the accounts receivable invoice that bills the cost needs to be paid.

8-13
The Vendor Account Aging window
Vendor Account Aging
1 The aging report can be pre-viewed on-screen by choosing Screen from the Print to pop-up menu. The report can also be exported to a spreadsheet by choosing Export from the pop-up menu.
2 The Invoice Aging report shows all unpaid payables, subtotaled by vendor number. Use this op-tion to see everything you owe, in detail.
3 The Account Aging report shows totals by vendor only, and not unpaid payables. The vendor’s unpaid invoices roll up into the account totals, making
the report more concise.
4 The show balances through option allows you to select to age the balances as of today or through a prior period.
5 Choose to print the aging report for one vendor or type ALL to select invoices for all vendors.
6 Aging periods are customiz-able. They are used to catego-rize unpaid payables by their relative age. For flexibility, any set of aging periods can be used.
7 The vendor invoice ag-
y
q
w
re
t
u
ing report has an option to subtotal invoices for a selected A/P account, such as a media payables account. This option prints a smaller report, since only media payables (for exam-ple) would be printed. To print an invoice aging report for one A/P account, enter the account number here. Use this option to print an aging report for only media payables, for example. Any invoice with this credit G/L# will be printed; the others will be excluded. To combine invoices from all A/P accounts together on the same report, leave this option unchecked.

8-14
Client Account Aging
Client aging reports show unpaid invoices from Accounts Receivable. These reports show how much clients owe you. Both show essentially the same in-formation—accounts receivable—but in more or less detail. The Client Invoice Aging shows individual unpaid invoices by client. The Client Account Aging doesn’t show invoices; instead, it shows account totals only.
Both reports are useful to management, but have different purposes. The Cli-ent Invoice Aging shows every unpaid invoice, along with the aged balances. It’s most often used to track down late-paying clients and their invoices. The invoice aging can be a long report if you have a large number of unpaid invoices. The Client Account Aging is a short report, since it shows only one line per client—but may not show enough information to help plan your cash requirements. Its most practical use is to quickly see who owes you money.
Client agings can be printed any time during the month, but especially at month-end. Client aging reports are always up-to-the-minute accurate, show-ing any posted invoice with a balance due. They can show what the client owes as of the moment the report is printed or through a prior period. For better accountability, unpaid invoices can be selected for one A/R account.
Client account balances can be aged into the current period and three user-defined periods (e.g., 30, 60, 90 days). These periods are flexible and can be changed any time the agings are printed. Any set of aging periods can be used. The aging option recalculates the unpaid balance based on today’s date and your aging periods. Your aged balances will only be accurate as of the last aging.
Client agings and the General Ledger
Client aging reports aren’t based on data from the General Ledger. Instead, client aging reports are based exclusively on unpaid invoices from Accounts Receivable. So what you’re seeing on client agings comes from your receiv-ables, not from journal entries.
For this reason, they have the potential to be confusing. The client aging reports show a grand total at the bottom of each report. The balances on the client invoice aging will always match the client account aging—they’re both based on unpaid receivables, after all. Since Accounts Receivable is inte-grated with your General Ledger, your receivables’ balances on the Balance Sheet should equal the balances on the aging reports. In some cases, they won’t match—for an obvious reason: journal entries posted directly into the General Ledger for the A/R account do not affect client balances, and there-fore the client account agings. For this reason, don’t make adjusting entries to the G/L for the A/R account; instead, make your adjustment directly into Accounts Receivable.
Client agings can be printed for some date in the past. The total balance due should always match the Balance Sheet printed for the same accounting period.
Client Account Aging
To print a client aging report
1 Choose Snapshots > Client Account Aging.
2 Choose the kind of aging report (i.e., Invoice Aging, Account Aging, or Retainer Aging)
3 Select to show balances through today or through a prior period.
4 Enter your aging periods.
These periods are used to calculate aged balances for every invoice, based on the invoice date and today’s date. You can use any set of aging periods, including a different set each time you print client agings.
5 Choose your aging options.
To see invoices for one specific A/R account, enter the receivable account number.
6 Click Print.

8-15
The Client Account Aging window
Client Account Aging
1 The aging report can be pre-viewed on-screen by choosing Screen from the print to pop-up menu. The report can also be exported to a spreadsheet by choosing Export from the pop-up menu.
2 The Invoice Aging report shows all unpaid receivables, subtotaled by client number.
3 The Account Aging report shows totals by client only, and not unpaid receivables.
4 Use the Retainer Aging report to print an aging report showing only clients with retainer balances.
5 The show balances through option allows you to run the cli-ent aging as of today or through a prior period.
6 Choose to run the client ag-ing for one client by entering a client number here. To print the aging for a particular division and its clients, choose divisions from the for pop-up menu then enter the division’s client number.
7 Invoices are aged based on aging periods. These periods are used to calculate aged balances for every invoice, based on the invoice date.
8 Use the subtotal invoices for a selected A/R account to print invoices for a selected A/R account.
9 The apply finance charges first option will apply a finance charge to any invoice with a 30-day-or-greater balance. The show YTD billings option displays the client’s year-to-date billings on the aging report. The show client names option shows (or hides) the client’s organiza-tion name on the printed aging report.
y
i
u
q
w
r
e t
o

8-16
Cash Flash
Cash Flash
Cash f lash reports show unpaid receivables and unpaid payables, as well as scheduled payments and deposits, for any time period. They are based on invoices from Accounts Payable and Accounts Receivable, as well as sched-uled entries entered in the Cash Flash window. The Cash Flash report helps you plan your cash requirements by comparing expected client payments and deposits with planned vendor payments and other outlays.
Cash f low reports can select unpaid invoices for any range of pay dates. An invoice’s pay date can be edited anytime, even if it is posted. Since cash f low reports only show unpaid client or vendor invoices, they don’t include any payment not posted into A/P or A/R. Your rent check, for example, won’t appear on the cash f low report unless the landlord’s invoice is added into Accounts Payable.
To update today’s balances
1 Choose Snapshots > Cash Flash.
2 Click the (i.e., Update Now) button.
Clients & Profits adds up the current bank balances from the G/L accounts marked with a cash f low category as Cash, the vendor balances from the A/P aging, and the client balances from the A/R aging. Today’s payments and checks are calculating the day’s posted client payments and checked.
To send today’s cash flash via e-mail
1 From the Cash Flash window, click the
(i.e., Send Mail) button.
The Cash Flash can be sent to any active staff member. You’ll be prompted to select a staff member’s name, then enter a note (which is added to the body of the e-mail message). The cash f lash can also be cc’d to two additional e-mail addresses.
■ Since the shop’s account balances are highly confidential, be careful to only send the cash f lash to an authorized staff member.
To print the cash flash report
1 From the Cash Flash window, click the (i.e., Print) button.
To add a cash flow calendar entry
1 From the Cash Flash window, click
the (i.e., Add) button.
2 Enter the scheduled payment or deposit’s date and amount.
If the entry is for a payment (cash out) the amount needs to be entered as a negative amount.
3 Enter who the money will be sent to or received from and a description.
4 Select to notify a staff member via e-mail of entry, then click OK.
To repeat a scheduled cash flash entry
Cash flash entries can be scheduled to repeat many times. To repeat an entry, select it in the Cash Flash window
then click the (i.e., Repeat) button. The Repeat Entry dialog box opens, prompting you to enter the repeat interval (i.e., the number of days between entries), the number of times when the entry should be repeated, and when the scheduled entries should start. These entries only affect the Cash Flash window and report, and have no affect on A/P, A/R, or the General Ledger. They’re simple reminders for better cash management.
Scheduling future payments. Upcoming cash outlays can be easily scheduled in the Cash Flow Calendar. Incoming deposits (e.g., tax refunds, proceeds from asset sales, royalties, etc.) can also be scheduled. Notification of cash flow entries will be e-mailed to any selected staff member on the day it is due.

8-17
The Cash Flow window
Cash Flash
1 Click on the update button to update today’s cash flow and account balances. Click the print button to print the cash flash report or other cash reports. Click on the e-mail button to generate an e-mail message with the cash flash information.
2 Click these buttons to add, edit, or delete a scheduled pay-ment or deposit.
3 Click the repeat button to set a schedule to repeat a sched-uled payment or deposit.
4 The ending cash balance for the day is then calculated
based on the beginning cash balance and any payments and checks recorded today.
5 The current client and vendor aged balances are listed to help plan your cash requirements by comparing expected client pay-ments with outstanding vendor payments.
6 Select to view a different month’s scheduled payments and deposits from the month pop-up menu.
7 When you click on a day in the Cash Flow Calendar you’ll
y
u
q w
r
e
t
see the day’s scheduled entries. Double-clicking on an entry lets you edit it.

8-18 Profitability Reports
Profitability Reports
There are many kinds of job profitability reports. Each report gets its informa-tion from a different source, so each has a slightly different focus—and usefulness. The Job Profitability reports show costs, time, and billings for jobs and tasks. The Client Profitability reports are based on journal entries from the General Ledger, including overhead expenses you’ve directly allocated to clients, for one accounting period. The Gross Margin report compares costs, time, expenses, and billings for a week, a month, or any period of time—so it’s the most flexible way to track your shop’s performance.
The foundation of the Job Profitability reports is the job task. Jobs remember everything purchased and billed by job task. Job tasks keep job-to-date totals for costs, time, expenses, and billings from the date the job was started. Since job tasks are connected to jobs and clients, they are an ideal basis for analyzing profitability. Job-to-date profitability reports search for job tasks for a period of time (using the job’s start date) and billing status (such as closed jobs, for example). These tasks are rearranged, subtotaled, and printed by job, project, client, task, etc. based on the options selected in the Profitability window. In most cases, the job tasks themselves are hidden to save space; what you see instead are just the job’s totals. These totals are based on the same job tasks you’d see in a Job Summary report.
■ The Job P&L and Client P&L, which is based on G/L journal entries from billing and job costs, is printed from Financials. Every journal entry can be given a client number and a job number. If a journal entry has a job number, it is selected for the job income statement. The Job P&L is printed for one accounting period, just like the agency’s income statement. It can reflect the client’s overhead allocation, if entered into the Overhead Allocation Worksheet. You can print the report for one job or one client. The job income statement doesn’t show time, expenses, or any other amount not posted in the General Ledger—so it may be drastically different (and probably less ac-curate) then the other profitability reports.
The Gross Margin report compares costs and profit for any period of time, such as a month or a quarter. This report is distinctive because it shows profit both before and after labor. Direct costs are the total vendor purchases, checks, and expenses. Net Revenue is billings less direct costs. Direct Labor
is the total time cost for the month. Profit is net revenue less direct labor. Jobs are subtotaled by client for easy comparison. The last bill date is shown from the last invoice billed for the job.
Job profitability vs. agency profitability
You can see profitability two ways: Job profit is focused on job costs—vendor purchases, labor, cash disbursements from checks, and out-of-pocket
expenses—and job billings. Agency profit is based strictly on income and expenses for everything—whether they were the result of jobs or not.
You can’t rely on just one profit report to keep you informed. Job profitability and the income statement emphasize different things: job profitability reports are based solely on jobs, tasks, and clients; income state-ments are based only on the general ledger.
Job profitability shows only costs and billings for jobs and tasks, and does not ac-count for overhead expenses like rent. Income statements
don’t reflect the cost of time spent working on jobs, only the total payroll expense. Income statements take into account other non-job income, like fees and interest income; job profitability doesn’t reflect adjusting entries to the General Ledger.
What’s the difference between gross margin and net income? Gross margin, as it is used in Clients & Profits, is based on jobs and tasks. It is the difference between a task’s billings and its costs—vendor purchases, time sheets, and expenses. Net income, as it is used on the income state-ment, is the agency’s real profit after overhead expenses.
Job Profitability vs. the Income Statement
Both reports show important information about how well you’re doing. Job profitability shows exactly where your revenue is being earned, even showing each client’s total contribution to profit. Income statements can’t show this kind of detail without a lot of extra work on your accountant’s

8-19Profitability Reports
part. However, the job profitability doesn’t include overhead—so it’s not a complete picture either. When used together, both reports provide the com-plete picture you need to stay informed. Differences include:
Job Profitability -- Job-based -- Uses tasks to calculate totals -- Shows job-to-date totals -- Based on job start dates -- Shows Income based on job billings -- Shows labor based on cost rate -- Reflects job cost transfers -- Shows open POs -- Can show profit by client, task, project, or job type
Job P&L
-- General Ledger-based-- Uses G/L to calculate totals-- Shows month-to-date account totals-- Based on accounting periods (i.e., months)-- Shows income on agency billings-- Shows labor costs based on payroll-- Doesn’t account for down time (includes down time as part of payroll)-- Transfers don’t affect the G/L-- POs aren’t reflected in job totals
Cost rates and profitability
Cost rates are important because they directly affect the job’s profitability. Time sheets use cost rates to calculate the cost amount of labor automati-cally. The total cost of each time sheet increases the job task’s cost amount when time is posted. Costs rates are flexible, giving you complete control over rates for each staff member. Carefully choosing resource cost rates is an important and necessary step to make your profitability reports meaningful. Each staff has his or her own individual cost rate. For flexibility, cost rates are completely customizable. The staff’s cost rate is entered onto each time sheet automatically, but can be changed.
What if you don’t use cost rates on time sheets? Your profitability reports will be significantly affected. Your jobs will appear much more profitable, which is wrong. The job’s cost totals would show only vendor purchases and checks, and won’t reflect the value of your time. You’re not required to use cost rates, however. But if you don’t, be consistent—don’t use cost rates on any time for any job. And just be aware that when you look at a profitability report, the total profit doesn’t include labor.
Unbillable jobs and job profitability
Unbillable jobs can be included on the gross margin report if they have the same selections (billing status and start date) as other jobs. It’s a good idea to include these jobs on the report, since it makes your client totals more re-alistic. Your total billings, costs, and margin for clients will be more accurate, since the cost of the unbillable jobs will be included.
To see the most accurate job totals, you should include your agency overhead jobs as well. To include these jobs, make sure they have a billing status and a start date. When you print a profitability report, enter the billing status that includes your agency jobs as well as the billable client jobs.
Job costing and profitability
It is important to be consistent about how you track job costs. On profitability reports, the cost total includes all vendor purchases, time sheets (using the resource’s cost rates), expenses, and checks written for job costs. The cost total is the total amount you’ve spent to complete the job (so far). If you don’t include all costs that you really incurred for a job, then your cost total will be too low—and the job’s profit will be overstated. Likewise, if you don’t enter time with accurate cost rates, the cost total won’t include the cost of the labor used to complete the work—and the job’s profit will be too high.
Tips for printing profitability reports
■ You can look at profitability from the production perspective and see a different picture than the agency profitability. This isn’t a problem. The two sides look at what you make and what you spend differently intentionally, providing insights into where the money’s coming from and where it’s going. Without these different points of view, there’s a big chance you’ll miss some key details.
■ Knowing where your profit is coming from is much more important than knowing how much profit you’ve made. Because in an advertising agency or design studio, there are really only two ways to improve profits: get more cli-ents and bill them for more jobs; or, know where you’re spending every dollar.
■ All of the job profitability reports are based on job tasks. While the reports don’t show the tasks in detail, the costs and billings on these tasks are calcu-lated and totaled on the reports.

8-20 Profitability Reports
Gross Margin by Job
Projected Gross Margin
Projected vs. Actual Gross Margin
Gross Margin by Client
Project Profitability
Division Profitability
Client vs. Client Gross Margin
Comparative Client Profitability
Projected Gross Margin by Client
Gross Margin by AE/Team
AE/Team Projected Gross Margin
AE/Team Projected vs. Actual Gross Margin
Gross Margin by Profit Center
Profit Center Projected Gross Margin
Profit Center Projected vs. Actual Gross Margin
The Gross Margin by Job report compares costs and profit for each job, subtotaled by job type. The net revenue is calculated based on the billings less direct costs, and the gross margin (or profit) is calculated by the net revenue less direct labor costs.
The Projected Gross Margin report calculates a projected gross margin based on the job’s estimate less the costs expected to be incurred to complete the job (i.e., budget).
The Projected vs Actual Gross Margin report compares the job’s actual gross margin to the projected gross margin. The job’s are subtotaled by job type.
The Gross Margin by Client report shows the net revenue for every client’s jobs.
The Project Profitability report compares gross margin for jobs within each project.
The Division Profitability report compares profit between divisions and their clients.
The Client vs Client Gross Margin report shows the costs and profit for each client and calculates each client’s net revenue and gross margin.
The Comparative Client Profitability report compares this year’s and last year’s profit.
The Projected Gross Margin by Client report calculates a projected gross margin based on the job’s estimate less the costs expected to be incurred to complete the job (i.e., budget) and the jobs are subtotaled by client.
The Gross Margin by AE/Team report calculates the net revenue and gross margin for each job and subtotals the jobs by AE/Team.
The AE/Team Projected Gross Margin report calculates the projected gross margin based on the job’s estimate less its budget. The job’s are subtotaled by AE/Team.
The AE/Team Projected vs Actual Gross Margin report compares the projected gross margin to the actual gross margin for each job and subtotals the jobs by AE/Team.
The Gross Margin by Profit Center report calculates the net revenue and gross margin for each job and subtotals the jobs by client, then by profit center.
The Profit Center Projected Gross Margin report calculates the projected gross margin figure for each job based on the projected billings (the job’s estimate) less the costs expected to be incurred to complete the job (the job’s budget). The job’s are subto-taled by client, then by profit center.
The Profit Center Projected vs Actual Gross Margin report compares the projected gross margin to the actual gross margin for each job and subtotals the jobs by client and PC.
Job Profitability
Client Profitability
AE/Team
Profit Center
Profitability Reports

8-21Profitability Reports
Miscellaneous
Task Profitability
Task/Group Profitability
The Task Profitability report compares profit by client for each task.
The Task/Group Profitability report shows profit earned by each task and group.

8-22
Productivity Reports
Productivity Reports
Productivity reports use time sheets to show how the shop’s time is spent. These reports are the best way see how people work—by client, job, or task. Productivity reports show the hours, cost amounts, and billable amounts for both billable and non-billable hours, so you’ll see a complete picture of your work.
Productivity reports show time by work date. Like time reports, productivity reports show hours posted from time cards and time sheets. But unlike time reports, productivity reports only show totals—so you won’t see individual time entries. This makes productivity reports much more concise (and prob-ably more usable) than time reports.
Productivity reports don’t show billings. They’re less concerned with how the time was billed (or not billed) than with how the time was actually spent, since the cost of your staff is mostly fixed (unless they’re freelancers, that is). One reason for printing productivity reports is to see how time is being used, and especially if is it being managed properly. One of the reasons to track productivity is to en-sure that the right people work on the right clients (i.e., the higher-paid staffers should only work on the most profitable clients, etc.).
Productivity reports can also help you balance your work load. If one staff member is consistently logging more hours than other staff, you’ll see it in their total hours—they’ll be higher than others. You can use this information to move work around, so that everyone is working more efficiently.
Time reports vs. productivity reports
Productivity reports show time in summary, while time reports show time in detail. Productivity reports are designed to give managers a clear idea of how the staff spends their time over a week, month, quarter, or year.
Time reports, in contrast, are designed for day-to-day time accountability. Time reports show every time entry, including a lot of extra information (like rates and descriptions) that is interesting but not meaningful to manage-ment. For productivity purposes, time reports simply show too much detail.
Time reports are ideal, however, for seeing time before billing. Since time reports show the time entry’s detail, they give you enough information to intelligently decide what to bill — and what not to bill.
Tips for tracking staff productivity
■ Productivity reports for a long time period can take some time to print, depending on the quantity of time sheets selected.
■ Print productivity week-ly to analyze how everyone managed their time.
■ The cost and billable amounts are totaled from time sheets using the task’s or staff member’s cost and billing rates. If someone’s cost or billable amounts seem strange, print a time report for the same range of work dates to see the time details. If you print both reports for the same time period, their totals will equal.
■ The cost and billable to-tals on productivity reports combine the different rates used on the staffer’s time sheets. Your billable totals
will reflect different rates for different tasks on time sheets added for the selected time period.
To print productivity reports
1 Choose Snapshots > Productivity.
2 Select the kind of report (i.e., General, Staff Utilization, Dept Performance, Client Analysis, Profit Centers)
3 Make your report selection.
4 Click Print.

8-23
Daily Department Time Analysis
Weekly Time Summary, Analysis
Missing Time
Overtime
Staff Utilization
YTD Staff Utilization by Client
Freelance Time Analysis
Unbillable Time Analysis
Billable/Unbillable Time Summary
Staff Realization
Dept/Group Productivity
Team Productivity
Team/Staff Productivity
Monthly Client Time Summary
Client Productivity by Job
Division Productivity
Division/Client Productivity
Division/Staff Productivity
Profit Center Productivity
Profit Center/Client Productivity
Profit Center/Staff Productivity
Productivity Reports
Productivity reports
The Daily Dept Time Analysis report shows total hours by day for everyone who worked, including planned vs. actual hours by day for each staff member and department.
The Weekly Time Summary report shows total hours spent for each staff member for a 7-day period, subtotaled by department. The Weekly Time Analysis report shows total hours spent for each staff member and the jobs they worked on for a 7-day period, subtotaled by department.
The Missing Time report lists each staff member by department showing their planned hours vs. their actual hours. It shows who hasn’t accounted for all of their time.
The Overtime report only shows time entries marked as “overtime”.
This report compares each staff member’s total hours vs. their billable hours.
The YTD Staff Utilization by Client report compares period vs. year-to-date staff time.
The Freelance Time Analysis compares client hours for employees vs. freelancers.
This report compares the percentage of unbillable staff time by client.
The Billable/Unbillable Time Summary report compares billable to unbillable hours.
The Staff Realization report compares each staff member’s total hours vs. their billed hours. The report is based on what percent of their total hours has actually been billed.
This report compares each staff member’s total hours vs. their billable hours by depart-ment.
The Team Productivity report compares each team’s total hours vs. their billable hours and calculates the team’s utilization (percentage of billable hours).
The Team/Staff Productivity report compares each staff member’s total hours vs. their billable hours. The staff members are subtotaled by team.
The Monthly Client Time Summary report shows total hours worked by staffer per client.
The Client Productivity by Job report shows total hours worked by job and client.
The Division Productivity report compares each division’s total hours vs. billable hours.
The Division/Client Productivity report analyzes total hours for each division and client.
The Division/Staff Productivity report compares staff hours by division and client
This report compares each PC’s total hours vs. billable hours to calculated its utiliza-tion.
This report analyzes each profit center’s total hours and billable hours for each client.
The Profit Center/Staff Productivity report shows total hours by staff worked by PC.
General
Staff Utilization
Profit Centers
Client Analysis
Dept Performance

8-24 Financials
Financials
Clients & Profits X prints standard financial statements tailored especially for the advertising industry. These financial reports are used for auditing, track-ing, and reporting your G/L accounts balances. You can print trial balances, income statements, balance sheets, and detailed general ledger reports for any accounting period—at any time during the month.
Financial statements show account balances from the General Ledger and the Chart of Accounts. These account balances are updated when entries are posted, so the financial statements are always timely and accurate whenever they’re printed.
The account totals on the financial statements are copied from the Chart of Accounts. (To see one account’s totals: Choose Setup > Chart of Accounts. Click once on an account to select it, then choose Edit > Monthly Budgets. The center column, actuals, is the total from posted entries.) Entries added in the General Ledger affect financial statements when they’re posted. Unposted entries won’t appear on financial reports. Be sure to post everything before printing financial statements.
■ There is no month-end procedure required to print financials. Since the G/L account balances are updated whenever entries are posted, your financial statements will always be up-to-date throughout the month.
The AGI Income Statement
The income statement shows the agency’s profit and loss. There are two kinds of income statements, the standard form and the agency gross income form. Both forms show the same accounts, but have different subtotals. These subtotals affect how the percentages are calculated.
The standard income statement subtotals income accounts, job cost ac-counts, and expense accounts. Gross profit is calculated as billings minus job costs. A gross profit percentage is calculated showing job costs as a fraction of the total billings. An account can appear in the income or job cost section, based on its classification (which is user-defined). Expenses are listed below the gross profit. The expense percentage for each overhead account is calcu-lated as a percent of the billings, not gross profit. This calculation shows your ratio of overhead to total billings.
The AGI income statement combines your billing and job cost accounts into
the same section. The gross profit is calculated as the billings minus job costs (like media, typesetting, printing, etc.). This amount is your agency gross income. Expenses are listed below the AGI. The expense percentage for each overhead account is calculated as a percent of gross profit, not billings. This calculation shows the ratio of overhead to gross profit—the agency’s gross income.
To print financials
1 Choose Snapshots > Financials.
2 Select the kind of report (i.e., Trial Balance, Detail G/L, Income Statement, etc.)
3 Make your report selection.
4 Click Print.
Tips for printing finan-cials
■ Financial reports can be printed to the screen for quick review, before the report is committed to paper.
■ Financial statements can be printed for previous periods—even if the period is locked—by choosing the period from the pop-up menu.
■ Unless a period is locked, anyone can post entries into prior periods. This means your past financials might change after they’ve been printed. If some-one adds costs or billings after you’ve printed the month’s financials, be sure to reprint the reports over again.
■ Account totals on financial statements can be audited by printing audit trails and journals from the General Ledger.
■ If your audit trails and journals don’t equal the financial statements, post-ing may have crashed during the month. Use the verify G/L account balances utility to recover the correct totals.
■ The date and time a financial statement was printed appears at the top of each report. When you’re printing financial reports repeatedly, use this date to determine the most-recently printed report.

8-25
The Trial Balance shows assets, liabilities, equity, income, costs, and expenses. You’ll see each account’s beginning balance, current balance, and ending balance. Assets, costs, and expenses have positive balances; liability, equity, and income ac-counts have negative balances.
The Year-to-Date Trial Balance report shows balances for each accounting period for assets, liabilities, equity, income, job costs, and expenses—for the entire year. The report is split into two sections: the first six months and the last six months.
The Trial Balance Worksheet shows each account’s current and ending balance plus two blank columns, so the printed report can be used as a worksheet to calculate adjustment and adjusted balance amounts.
The Detailed General Ledger report shows the period’s journal entries for each ac-count. Each account includes its beginning and ending balances for quick reference. For easy auditing, journal entries can be printed for selected accounts.
The Detailed G/L (expanded) report shows all the information on the Detailed G/L along with each journal entry’s job, client, and vendor information.
The Income Statement shows income, job cost, and expense accounts as well as net profit/loss for the shop. The standard format shows gross profit as billings less job costs. It also shows expense ratios as part of total billings. The AGI format shows expense ratios as part of gross profit, not total billings.
The Comparative Income Statement compares this years income, job cost, and expense accounts to the amounts from last year.
The Client P&L report shows billings, direct costs, gross profit, and gross profit by client. Unlike the Client P&L Analysis, it does not break out each client’s share of overhead.
The Client P&L Analysis shows each client’s income, costs, direct labor, direct expenses, plus their share of the overhead allocation. The net income earned is calculated by client.
The Job P&L shows billing, direct costs, expenses, and gross margin for one period.
The Balance Sheet shows ending balances for assets, liabilities, and equity. It shows your net worth.
The Comparative Balance Sheet compares assets, liabilities, and equity between two fiscal years.
Financials
Financial Statements
Trial Balance
Year-to-date Trial Balance
Trial Balance Worksheet
Detailed G/L
Detailed G/L (expanded)
Income Statement
Comparative Income Statement
Client P&L
Client P&L Analysis
Job P&L
Balance Sheet
Comparative Balance Sheet
Trial Balance
Detailed G/L
Income Statement
Balance Sheet

8-26
The Budget vs. Actual report compares each G/L account’s budget with its current balance. Budgets are entered for each account in the Chart of Accounts. You’ll have the option to compare month-to-date and year-to-date totals, including percentage variances.
The Comparative Budget vs. Actual report compares G/L account budgets with actuals for the current period and the year-to-date.
The Monthly Budget Worksheet lists G/L accounts with the current month’s budget. An extra column is included to make manual revisions, which would be entered later into the Budget Worksheet window.
The YTD Budget Worksheet lists G/L accounts and their year-to-date budgets, plus an extra column for making revisions to the budget amounts.
The Proforma Income Statement projects the shop’s income using the period’s bud-gets.
The Statement of Cash Flows report uses each G/L account’s cash flow category to calculate operating, investing, and financial activities totals for the period.
This report shows detail of the amounts on the Statement of Cash Flows. It is used to analyze the amounts use to calculate the totals shown on the Statement of Cash Flows.
The Media WIP Analysis report is used to audit balance of the Media WIP Accruals liability account, which is updated from media billing and vendor invoices.
The Liquidity Analysis report measures the ability of the company to meet cash re-quirements. It’s based on the ratio categories entered for each G/L account.
The Profitability Analysis report measures how well the company is utilizing its re-sources
The Solvency Analysis report measures how the company’s financial health with ratios such as debt-to-equity, cash flow to interest, debt-to-assets, and more.
Budget vs. Actual
Comparative Budget vs. Actual
Monthly Budget Worksheet
YTD Budget Worksheet
Proforma Income Statement
Statement of Cash Flows
Cash Flow Detail Report
Media WIP Analysis
Liquidity Analysis
Profitability Analysis
Solvency Analysis
Financial Statements (con’t)
Budgets
Analysis
Ratios
Financials

8-27Financials
Clients & Profits Sample DATA 08/20/98, 10:14 AM, Page 2Balance SheetFor period 3 - MarchProfit Center: ALL
LIABILITIES AND EQUITY
Current Liabilities:
Accounts Payable - Production $ 342,560.19Sales Tax Payable $ 9,474.04Client Deposits/Advances/Retainers $ 157,047.87Media Payables $ 35,823.20
Total Current Liabilities: $ 544,905.30
Long-Term Liabilities:
Note Payable - Bank of America $ 136,000.00Unearned Rent $ 9,560.16Deferred Taxes $ 123,067.00
Total Long-Term Liabilities: $ 268,627.16
Equity:
Common Stock $ 25,000.00Paid-in Capital $ 31,570.54Retained Earnings $ 333,705.17Suspense $-17,911.78Current Earnings - 1998 $ 43,893.14
Total Equity: $ 416,257.07
TOTAL LIABILITIES AND EQUITY $ 1,229,789.53
Unregistered Clients & Profits X 05/22/07, 3:36 PM, Page 1
Balance SheetFor period 15 - MarchProfit Center: ALL All
ASSETS
Assets:
name $7,479.85name $5,345.00
Total Assets: $12,824.85
Current Assets:
Cash $-1,576.00Petty Cash $-396.00Petty Cash $0.01Cash - Bank of America $313,868.89Accounts Receivable $-170.30Accounts Receivable - Production $-54,200.18Accounts Receivable - Media $107,644.38Accounts Receivable - Retainers $-28,920.00Work In Process $16,758.79Amortized Expenses $20.00Prepaid Taxes $-20.00Prepaid Computer Services $1,068.75Employee Advances $2,153.00
Total Current Assets: $356,231.34
Long-Term Assets:
Notes Receivable $10,692.91Notes Receivable $-50.00Amortized Supplies $-10,113.73Amortized Professional Fees $3,424.96Amortized Prop. Insurance $-2,361.94Equipment $-1,000.00Furniture & Fixtures $-12,842.87Office Equipment $56,207.26Automobiles $-4,145.17Computer Equipment $32,060.10Office Equipment $-4,440.11Fine Art $-3,092.77Leases - HP Fax $-2,164.90Accum Dep - Furn & Fixt $15,617.74Accum Dep - Office quip $6,337.00Accum Dep - Automobiles $18,106.70Accum Dep - Computers $-1,985.77Accum Dep - Office Equip $-7,640.10Accum Dep - Telephone PBX $9,224.70Notes Rec - Officers $-4,192.10
Total Long-Term Assets: $97,641.91
TOTAL ASSETS $466,698.10
Unregistered Clients & Profits X 05/22/07, 3:36 PM, Page 2
Balance SheetFor period 15 - MarchProfit Center: ALL All
LIABILITIES AND EQUITY
Liabilities:
Notes Payable $-55.00
Total Liabilities: $-55.00
Current Liabilities:
Accounts Payable - Production $-122,996.67Sales Tax Payable $77.54Sales Tax Payable - Out-of-State $207.59Client Deposits/Advances/Retainers $2,850.15
Total Current Liabilities: $-119,861.39
Equity:
Suspense $1,900.00Current Earnings - 2006 $-6,892.22Current Earnings - 2007 $3,106.28
Total Equity: $-1,885.94
TOTAL LIABILITIES AND EQUITY $-121,802.33
Out of Balance (see Out of Balance Checker utility): $588,500.43

8-28
Media Analysis Reports
Media Analysis reports
Clients & Profits X prints three kinds of media analysis reports: post-buy, client spending, and group performance. Post-buy reports are used by media buyers to see in detail the media buys that were ordered on broadcast and insertion orders. Post-buy reports can subtotal media buys by client or sta-tion/publication. Client spending reports are used by account service to show clients how and where their advertising budget has been spent. Finally, the agency’s management can use group performance reports to analyze how well the media department is managing themselves.
Media goals and media reports
The Media Group Performance - Trend Analysis report compares actual media spending for each kind of media (e.g., broadcast TV, radio, etc.) with the media department’s billing goals. For these reports to work properly, the shop’s billing goals for each media kind must be entered in the Media Goals window. Media billing goals, which are based on gross amounts on broadcast and print insertion orders, can be entered for each quarter of the calendar year. For more informa-tion about media goals, see the Media chapter.
To print media reports
1 Chose Snapshots > Media Analysis Reports.
Media reports are grouped together by category (i.e., Status, Traffic, Post-Buy, etc.). Each category has a collection of media reports that can be printed. Only one report can be printed at a time. 3 Select a report category to show the reports that can be printed.
4 Choose a report by clicking on a report name.
5 Enter a range of dates and select any available options.
Post-buy, client spending, and group performance reports are based on media buys from broadcast orders and insertion orders. These reports will select media buys from the broadcast or insertion order’s order date.
6 Click Print.
■ Any print or broadcast media plan that is marked as “closed” or “inactive” will not be included on media status reports or media traffic reports.
Media reports help different de-partments manage clients. Status and traffic reports track the day-to-day media plans and estimates. Post-buy reports help media buys track what’s been ordered. Account service can use client spending reports to analyze each client’s media spending. Group performance reports summarize how well the media department manages spending trends, client media profitability, and spending volumes.

8-29
Media Snapshot Reports
Post-Buy Reports
The Media Recap lists buys on insertion and broadcast orders for a selected date range and sorts them by client or pub/station and month, showing the issue/flight date, ad size/program, and more.
This report lists any insertion or broadcast order discrepancies between the gross and net amounts ordered vs. the actual gross and net amounts invoiced by the publication or station. The report includes each buy’s A/P number and A/P date. It can be printed by client or pub/station.
The Reconciliation report compares an insertion or broadcast order’s gross/net amounts vs. the actual gross/net amounts invoiced by the publication or station. It shows the A/R invoice number the IO or BO was billed on and whether a client payment is posted, and the A/P invoice number the IO or BO was applied to and whether a vendor payment is posted.
The Mix Analysis report compares total spending with quarterly totals for each kind of media for all clients and all stations/publications.
The Market Analysis report compares TV/radio spending by quarter for each market (which is optionally entered on each broadcast order or insertion order)
The Product Analysis report compares TV/radio spending by quarter for each product, using the user-defined “product” field on broadcast and insertion orders.
This report summarizes media spending by client by quarter for each station or publication.
The Division Analysis report summarizes media spending for each division and its clients. It helps AEs track the total spending for corporate clients that have many business units or groups.
The Monthly Media Analysis report summarizes total media spending for each month of the cal-endar year for each station/publication. This report helps media buyers and account supervisors analyze which stations and publications are getting the most media dollars from the agency.
The Trend Analysis report compares quarterly media spending vs. the media department’s spend-ing goals. It shows how the shop’s media spending is changing from the beginning of the year.
This report analyzes media billings, cost, gross profit, and average commission for each client’s media spending. The report is based on the gross and net amounts from the client’s media orders.
The Commission Analysis report analyzes commissions generated by each different type of media (e.g., broadcast TV, radio, newspaper, etc.) for each client. It calculates the commission based on the order’s total gross and total net. The commission is not calculated on the actual net cost from the vendor’s A/P invoice or the gross amounts from the client’s A/R media invoice.
The Buyer Analysis report compares each media buyer’s billings, costs, and commissions for each client. The year’s totals are compared to last year’s to highlight any improvements (or decreases) and calculates the average commission for each media buyer. These totals are based on broadcast orders and insertion orders, and not calculated on the actual billings from A/R or actual costs from A/P. This report can be useful for measuring the performance of each media buyer.
This report summarizes gross and net totals (as well as calculating the average commission) for each different kind of media. Totals are shown for each station or publication for broadcast TV, radio, etc. The report calculates the percentage increase/decrease in billings for each station/publication.
Media Recap
Discrepancy
Reconciliation
Mix Analysis
Market Analysis (TV/Radio)
Product Analysis (TV/Radio)
Station/Publication Analysis
Division Analysis
Monthly Media Analysis
Trend Analysis
Client Profitability
Commissions Analysis
Buyer Analysis
Media Vendor Volume Analysis
Client Spending Reports
Group Performance Reports
Media Analysis Reports

9-1
Settings

9-2
SETTINGS, OPTIONS, & PREFERENCES
9-4 Users, Passwords, and Access Privileges9-6 The C&P Users window9-8 General Privileges9-10 Menu Privileges9-12 Jobs Privileges9-14 Job Costs Privileges9-16 Accounting Privileges9-18 User Budget Alerts9-20 Who’s Connected9-22 Departments9-24 Staff9-26 The Staff window9-28 Staff Availability9-30 Vendors9-32 The Vendor window9-34 Vendor Account Info window9-36 The Information Center9-38 Status Table9-40 Task Table9-42 Job Types/Spec Sheets9-44 Order Templates9-46 Registration9-48 Preferences9-50 C&P E-mail9-51 Spell Checker9-52 Web Access9-54 Daily Time Card for iPhone and Web
Chapter 9

9-3
Introduction Clients & Profits X is highly customizable, so it can be tailored to how you work. It’s easy, since all settings, options, and preferences can be changed without program-ming. You’re never locked into these decisions, either. Since they can be changed anytime—and as many times as you need. This chapter explains, in depth, how to set up Clients & Profits X. In this chapter you’ll learn how to:
■ add users to your database■ set up user passwords and access privileges■ add staff members, cost rates, and billing rates■ add, edit, and delete vendors■ use the Information Center■ create a custom Task Table■ set up status codes■ set up groups■ set up job spec sheets with job templates■ register your Clients & Profits X software and activate your database■ set your system’s preferences
For help using any part of Clients & Profits X, click the button from any
window to open the on-line user guide. This web-based user guide features
step-by-step instructions, explanations, tips, demonstrations, and links to
FAQs, tech notes, and tutorials from www.cnp-x.com/support. The web site is
continually updated, so it’s more timely and helpful than a printed user guide.

9-4
Users, Access & Passwords
Users, Passwords, and Access Privileges
Clients & Profits X features a sophisticated user-based password system to keep your database secure. The system tracks who’s using the database based on user initials. Access privileges to different parts of the system can be made available—or disabled—for individual users. This ability lets you limit what users can see, change, and print. There is virtually no limit to the quan-tity of users in your user list. Anyone who will ever use Clients & Profits X, even just once, must first be added as a user. Every user is identified by his or her initials (or some other code; it’s your choice) and a password. Every user has his or her own password, which is unique. When a user starts Clients & Profits X, they will be prompted to enter their initials and password; if the password is wrong (they get three tries), they can’t open the C&P database.
■ Manager-level users can add, edit, and delete regular users, plus they can change the system’s default settings (e.g., Preferences, Report Options).
The Users file is different from the Staff file. Users are people who can access Clients & Profits X, while Staff members are the shop’s employees. They are usually identical, since most employees typically use C&P. Every-one who works for the company should be added as a staff member, while only those people who will use Clients & Profits X should be added as “us-ers.” Staff members and Clients & Profits users may have the same initials. Changing the user’s name or initials doesn’t update the staff information, and vice versa; if you change information in one window, you should change the other as well.
Once the new user is saved, you can give the user his or her access privi-leges.
Access Privileges
Access privileges are the foundation of your database’s security system. By carefully and thoughtfully assigning access privileges, you can provide users access to the things they need to see—and keep them from seeing and work-ing on things they shouldn’t.
Every user has his or her unique set of access privileges. This ability lets you tailor the system to a user’s special needs for information. For example, you can selectively give a user access to adding, editing, and deleting job tickets—but prevent them from seeing costs.
You can provide access to specific menu commands, as needed. When a user doesn’t have access to a menu command, it appears dimmed and can’t be chosen. This prevents a user from working in some place they shouldn’t. For example, you can give a user access to Media, to add, change, and print media plans, but not Accounts Payable or the Checkbook.
Access privileges are very flexible, so they can be changed at any time. The changes you make take affect the next time the user enters their
initials in the Introduce Yourself window.
■ Any manager can change a user’s access privileges, including their password.
Over 40 user-based access privileges give system managers a greater ability to pick-and-choose just what a user can see and do. These new access privileges are not automatically enabled when you first install Clients & Profits X. Instead, they need to be set individually for each user. To accommodate these expanded ac-cess privileges, they are organized into five functional windows: General, Menus, Jobs, Costs, and
Accounting.

9-5
A user’s access settings are setup in the General Privileges window. The access settings include selecting what type of user the user is, adding a password with an expiration date, a special no access after date, an optional quit time, assigning an AE/Team, an option to dis-able the spell checker, assigning a department, and selecting to always print to the printer or screen.
The Menus Privileges window determines what areas of Clients & Profits that a user can access. A user can have access to all, none, or some of the menu options available. This allows system managers to give users who specialize in one part of the job process (e.g., an accounts payable clerk) access to only the menus they need to use and see.
The Job Privileges window allows a system manager to customize how a user views and works with job tasks, job tickets, and traffic. There are many options to choose from to get the perfect settings to fit each user’s needs. For example, a user can have access to just view job tickets for a limited production status code range or to only update job schedules in the job ticket window.
The Costs Privileges window allows a system manager to customize how a user views and works with time, purchase/insertion/broadcast orders, costs, cost transfers, and checks. There are many options to choose from to get the perfect settings to fit each user’s needs.
How a user can work with Accounts Receivable and the General Ledger are determined in the Accounting Privileges window. A system manager can choose what G/L tools a user can see and use, what kind of g/l accounts the user can add/edit/delete, if a user can post every-one’s entries or only their own, and whether or not they can change the sales tax settings on estimates and invoices.
User Access Privileges
Category Access privileges that can be customized
General
Menus
Jobs
Costs
Accounting
Users, Passwords, and Access Privileges

9-6
Clients & Profits Users window
Users, Passwords, and Access Privileges
1 Users can be easily added, cloned, edited, and deleted using these toolbar buttons. To add a new Clients & Profits X user, click on the add but-ton. Cloning makes an exact duplicate of a user’s access privileges with a new user code and name. To clone a user, click on the clone button. Users can be edited at any time by a system manager. To edit a user’s settings and access privileges, click on the edit button. To delete a user, click on the
delete button. A user can be deleted at any time and it is permanent. However, a user can be re-added if necessary.
2 Click the print report button to print a hard-copy user list.
3 Enter a user ID (either their initials or a code) here to find a user account.
4 To change a user’s infor-mation center, click on the customize info center link.
q w
e
y
System Managers use the Clients & Profits Users window to quickly and easily man-age the staffers, freelancers, and temps who need access to the database.
5 A listing of every user with their respective e-mail ad-dresses and departments can be viewed, edited, and printed by clicking on the e-mail ad-dresses link.
6 To enter the automatic quit times for every user, click on the set quit times link. This op-tion forces Clients & Profits X to quit automatically at a certain time. By quitting automatically, the nightly backup won’t be stopped if a user forgets to quit Clients & Profits X.
r tu
i

9-7Users, Passwords, and Access Privileges
7 View who’s online, who’s not, and what screen in C&P they visited last in the Who’s Con-nected windoow.
8 Clicking on a department name shows all of the C&P X users who belong in the depart-ment.
9 Click on one of the tabs to edit a user’s different access privileges and the option budget alerts. The changes you make are saved automatically.
General privileges contain essential account information, such as password.
Menus controls which Clients & Profits X features are available to the user.
Jobs manages just what a user can and can’t do with jobs, esti-mates, schedules, traffic, etc.
Costs sets limits on how a user can track time, add job costs, and approve time cards and expense reports.
Accounting manages access to billing, posting, WIP, and the General Ledger.
With optional budget alerts, each user can have different warnings setup to appear when a user is near or over budget while adding purchase orders, job costs, or time entries. To add, edit, or remove a user’s budget alerts, click on the budget alerts tab.
Deleting a user doesn’t erase the work he or she has done. You’ll still see his or her initials on invoices, jobs, time sheets, etc. Also, the user’s Staff Member record is not deleted; instead, the Staff record is marked as inactive.

9-8
General Access Privileges
Users, Passwords, and Access Privileges
Passwords are an integral part of Clients & Profits X security system. Make sure each user has a password and periodically change them to help keep the database secure.1 Click on a user name then the General tab to edit the user’s general access privileges.
2 A user can be set as a regular Clients & Profits X user or as a system manager. Users can use most typical add, edit, delete, and print operations, while managers can access special functions, such as set-ting access privileges. A staff member can be changed from user to manager, and vice versa, as needed. A Quick Check is performed on the database
whenever a manager-level user introduces himself or herself.
3 The user’s password controls their access to Clients & Profits X. A user can’t open the database without entering a correct password. Passwords are defined by system manag-ers, not by users. Users can’t change their own passwords. Passwords are especially im-portant in larger shops, where dozens of staffers will use Clients & Profits X. The security system provides two important
features: it keeps confidential data private, by restricting ac-cess; and, it keeps people from accidently adding, changing, or deleting information they’re not supposed to change.
A password can be set to expire by entering an expiration date. If a user’s password has expired, he or she can’t open the database until a system manager resets the expiration date.
4 Entering a date in the no
qw
e
y
rt
ui

9-9Users, Passwords, and Access Privileges
A system manager can add, edit, and delete regular users. They can also change the system’s default settings, such as Preferences, Access Privileges, and Custom Re-ports. Managers also have special access to management-type functions, like unpost-ing and doing database repairs. There can be more than one manager-level user.
access after field allows a user (like a temp or a freelancer) to use Clients & Profits X for a limited time.
5 User accounts can be sorted by AE/Team on reports to man-age large groups of users more easily. Each user can belong to a department by entering a department code here.
6 A user’s information center can be customized to fit their individual needs. To customize a user’s information center, use the customize info center link in the Clients & Profits Users window.
7 Check the disable spell checking option for a user who doesn’t want the spell checking window to open when the Save button is selected. Check the always quit option to force Clients & Profits to shut itself down at a certain time at night. Use this option to prevent a user from keeping Clients & Profits X open at the same time as the scheduled backup. The Software Update option allows a user to download and install new versions of Clients & Profits X. For security and control reasons, you may want to limit software updates to system managers only by unchecking this option. If unchecked, a system manager will have to download new updates on each user workstation.
8 The e-mail reports option al-lows a user to send a electronic version of any Clients & Profits X reports or form (e.g., estimate or invoice) via e-mail.

9-10
Menu Access Privileges
Users, Passwords, and Access Privileges
User access to menu options can be easily tailored to fit their needs. What menu access a user has is at the discretion of the system manager.
qw e
y
r
t
i
o
p
u
1 Access privileges are set for one user at a time. The user ID/name identifies the user whose access privileges are be-ing changed.
2 Click on one of these buttons to edit a different set of access privileges for the user.
3 Click the all button to give the selected user access to all menus. Or, click the none button to prevent the user from using everything in Clients & Profits except time cards and
lookup lists (this setting is ideal for creatives and freelancers who don’t do estimates or schedules).
4 Access can be given to Cli-ents and Custom Reports in the My menu options section. Giv-ing users access to Clients lets them see everything about your clients, including account bal-ances and activity. Checking the add/delete option lets users add and delete client accounts; un-check this option to give a user a view-only access to clients.
Giving clients access to Custom Reports/ODBC lets them create their own reports using the hundreds of fields found in the program. NOTE: Checking the custom reports/ODBC settings gives complete access to the C&P database, including finan-cials and passwords, via custom reports and ODBC.
5 Users who have access to media can add, edit, and print media plans, estimates, and more.

9-11Users, Passwords, and Access Privileges
Keep in mind that even though a user may have restricted access, if they have access to custom reports they will be able to access everything in the database by creating a new report using any of the fields and records available in Clients & Profits.
6 Access to the Setup menu should be carefully considered, since these tables are used throughout Clients & Profits. That’s because giving someone access to the Task Table means they can add, change, and delete tasks without any restric-tions. Giving a user access to Staff means he or she can see a staff member’s billing and cost rates; if these rates are confi-dential, access to Staff should be especially limited. The restricted access option allows a user to only see his or her own staff record, but no other staff members.
7 Access can be given to Job Tickets and Purchase Orders in the Production menu options section. Giving users access to Job Tickets is more customiz-able, since specific access privileges to jobs can be defined in the Job Privileges window. Giving users access to Purchase Orders can also be customized in the Costs Privileges window.
8 Users can be restricted to seeing only certain lookup lists by checking and unchecking the various Lookup menu set-tings. For example, if the Staff lookup option is unchecked, the user can’t open the staff lookup list and see the shop’s staff members. These settings only affect whether users can see lookup lists; they do not prevent users from seeing this information on other windows and reports, or from adding records with it.
9 Giving users access to menu commands in the Accounting menu lets them add, edit, delete, and print records. A user can be assigned any combination of accounting access privileges, depending on the kind of work they do. For example, an accounting clerk might have access to purchase orders and accounts payable, but not to the checkbook. This would allow the clerk to enter POs and reconcile them with vendor invoices, but not write checks.
10 Users who can access Snapshots menu commands can print production, finan-cial (e.g., income statement, balance sheet), profitability, productivity, and media analysis (e.g., post-buy, client spend-ing, etc.) reports. Access to Snapshots doesn’t override any access privileges to clients, jobs, or the accounting—they only let users print reports.

9-12
Job Access Privileges
Job Access Privileges
Every user can see only the parts of the job ticket that pertains to the type of work they do by choosing different options in the Job Privileges window.
qw e
y
r
t
i
o
p
u
1 Access privileges are set for one user at a time. The user ID/name identifies the user whose access privileges are be-ing changed.
2 Click on one of these buttons to edit a different set of access privileges for the user.
3 Click the all button to give the selected user access to all job privileges. Or, click the none button to limit a user’s access to jobs to only essential functions (this setting is ideal
for creatives, account execs, and others who shouldn’t touch job information).
4 These settings control just what a user can do with jobs and estimates.
5 Use the show settings to customize the job ticket window to fit the individual user’s needs. The default settings for the job ticket window columns are resource, estimate, change orders, estimate hours, billed, and unbilled. Any combina-
tion can be chosen and it can be changed at any time by a system manager.
6 The always lookup jobs option automatically loads the user’s Jobs lookup list at start-up. If set, Clients & Profits only lists jobs that have a production status within the range entered here. You could use these fields to list only your open jobs in the database.
7 The limit task lookup group option restricts the user to see-

9-13Job Access Privileges
Each user can have their job ticket window customized to show just the information they need to see. An AE may want to see costs, labor, billed, and unbilled while a production manager may want to see estimated hours and actual hours.
ing only tasks that belong to a specific group. 8 The tasks settings control how and when a user can add new tasks to job tickets. The anywhere, anytime option is the most flexible, giving the user complete access to tasks. It’s the best option for the produc-tion managers.
The only from existing tasks option prevents brand-new tasks from being added to the Task Table. The user can add new tasks anywhere from C&P as long as the task is already part of the Task Table. This option prevents the same tasks from being added with slightly different task codes (i.e., where a “miscellaneous” task is added as MISC, MIS, MIS1, etc.).
The can’t add tasks option re-stricts this user from adding any task at all; he or she can only work with existing job tasks.
The only in the Job Tickets window option prevents a user from adding new job tasks from the time card or other windows. It prevents unauthorized (or maybe just unwanted) tasks from suddenly appearing on job tickets. Give this option to users who often misjudge what kinds of tasks they are working on.
9 The traffic settings allow a user to change a Job’s produc-tion status, billing status, traf-fic, or job schedules.
10 The limit status changes option restricts users to choos-ing only a range of status codes, based on the status category, on jobs. For example, it keeps us-ers who aren’t allowed to close jobs from entering a “closed” status, based on the status category.

9-14
Job Costing Access Privileges
Job Costing Access Privileges
Customize how a user can enter time in the Job Costing Privileges window. For ex-ample, users who should only see their time should be restricted to time cards only.
q
w
e
y
r
t
i
o
p
u
a
s
1 Access privileges are set for one user at a time. The user ID/name identifies the user whose access privileges are be-ing changed.
2 Click on one of these tabs to edit a different set of access privileges for the user.
3 Click the all button to give users the most access to job costing, or click none to give them no access.
4 The time settings control
how and when a user can add, view, or edit their time. The add/view his/her own time op-tion restricts users to entering only their own hours. It’s best used when a user shouldn’t see other people’s time. The add/view/delete his/her own time adds the ability to delete a user’s own hours. The add/view/delete anyone’s time option is best given to manag-ers who need to proof and fix time sheets. It’s also ideal for accounting staffers who need to enter other people’s hours from
paper-based time sheets. The only add his/her time option lets users add their own hours, but not see, edit, delete, or print their time sheets. The only use the Time Card option restricts users to entering hours from their Time Card only.
5 The past days option prevents a user from adding or editing time too far back or forward in time. For example, if you enter 5 days, Clients & Profits won’t let the user enter a time more than a week old—or beyond next week.
d

9-15Job Costing Access Privileges
Users who can approve purchase orders will have their signature automatically added to printed purchase orders approved by the user. A user’s signature can be scanned into the program and saved in their Staff file.
6 The hide rates on time sheets setting keeps a user from seeing cost and billing rates on time sheets. If this option isn’t checked, the user can also change rates on time sheets. The import time setting lets us-ers import time sheet text files.
7 The show cost amounts op-tions lets users see the actual cost of vendor invoices and time sheets. If cost amounts should stay confidential, be sure to uncheck this setting.
8 The POs settings determine how users can add, edit, and approve purchase, insertion, and broadcast orders.
9 Limits can be set for each user for purchase order amounts and insertion/broad-cast order amounts. Entering a limit amount prevents a user from saving orders that are for more than they are authorized to order.
10 The transfer option lets users move costs between jobs using the Job Cost Transfer utility.
11 The checks settings lets users add employee advance checks (which is usually a very restricted privilege) and write direct disbursement checks to vendors for costs without invoices.
12 Users can be setup to approve time. If a user can approve time, they can approve time for everyone or for only users in their department.
13 Users can be setup to ap-prove expense reports. If a user can approve expense reports, they can approve them for everyone or for expense reports added for users in their depart-ment only.

9-16
Accounting Access Privileges
Accounting Access Privileges
To prevent users from accidentally posting other people’s work that isn’t ready for posting, restrict users to only posting his/her own entries.
1 Access privileges are set for one user at a time. The user ID/name identifies the user whose access privileges are be-ing changed.
2 Click on one of these buttons to edit a different set of access privileges for the user.
3 Click the all button to give users the greatest access to the C&P accounting system, or click none to give them no access.
4 The only post his/her own
entries option prevents a user from posting someone else’s work. It’s especially useful when several people add the same thing, such as media payables and production payables. For example, it lets media people post their own invoices without accidently posting production payables. The unpost option al-lows users to unpost an invoice, check, client payment, or G/L entry.
5 The change sales tax option keeps a user from changing a
task’s sales tax settings on job tickets and A/R invoices. If a user can’t change sales tax, then the tax setting from the Task Table is always used—a user can’t override it unless he or she can change sales tax. If a particular user is often changing a task’s sales tax incorrectly, this option should be unchecked.
6 The can’t add/edit/delete A/R option prevents someone from adding, changing, and delet-ing client invoices. It doesn’t
q
we
y
r
t
i
u
o

9-17Accounting Access Privileges
To keep your sales tax reports accurate, restrict access to editing sales tax. Dese-lecting the “can change sales tax settings on estimates and invoices” option for your users will prevent unauthorized users from entering incorrect sales tax rates.
prevent a user from seeing client invoices (that’s controlled by menu access privileges). It’s most useful for users who need to see whether an invoice has been paid (such as an acct. exec.), but otherwise doesn’t need access to A/R.
7 The edit work in progress setting lets a user change a cost’s billing status (e.g., “un-billed” to “unbillable”). A user shouldn’t have access to editing WIP unless he or she complete-ly understands how the cost status affects billing—and has the authority and responsibility for managing unbilled job costs. Don’t give this option to users who shouldn’t see how much something costs.
8 Anyone with access to the General Ledger window (via the
General Ledger menu access privilege) can add, edit, delete, and post journal entries. But access to G/L tools can be re-stricted individually with these settings.
9 Access to G/L accounts can be limited with these settings. Unchecking the default G/L#s option prevents a user from changing the default account number on invoices, checks, billings, and client payments. This option ensures that the preset account settings aren’t changed by unauthorized users. Unchecking the add/edit/delete G/L accounts option prevents a user from changing the Chart of Accounts. This option prevents people from making up their own G/L accounts. The edit G/L budgets option prevents a user from using the Budget Worksheet.

9-18
User Budget Alerts
User Budget Alerts
Why use budget alerts? They remind a user just how much has been spent on a job task up to that moment, which helps to prevent overruns.
Budget alerts warn users when they are working near or over a Job’s budget. These warnings appear whenever us-ers add job costs, time, or purchase orders. The warning itself can be customized for each user, so different users can get different kinds of messages. Managers have complete control over how and when budget warnings ap-pear. Different alerts are used for purchase orders, time, and job costs for flexibility and can be set to appear at any percentage of the budget remaining (e.g., when the costs are within 10% of the task’s budget). The alert is based on the amount of the job cost that the user is adding. There are no master alerts that affect everyone (except, that is,
3 Click the cost alerts tab to change the user’s budget alerts when adding job costs, includ-ing A/P invoices and expenses.
4 Click the time alerts tab to set the user’s time card/time sheet budget alerts. These set-tings will be used whenever the user adds time.
1 Every user has his or her own unique budget alerts, based on their user initials. You can use any combination of the three different budget alerts (i.e., purchase orders, costs, and time), including all three at the same time. Alerts for different users must be changed one at a time.
2 Click the purchase order alerts tab to edit the user’s budget warnings for purchase orders and insertion orders.
we r
q

9-19User Budget Alerts
The alert dialog box shows the jobs’s budget, estimated hours, actual hours, and the amount of the budget remaining—as well as the special message entered by a manager.
e
r
t
adds a cost that’s near the job task’s budget. Since the budget percentage is customiz-able, different users can have different thresholds that trigger an alert. For example, one user might be warned when 10% of the budget is reached, while others might need more advance notice—maybe when the job task reaches 25% of budget. The stop when option displays a special over-budget alert message and only appears when the job task’s budget has been exceeded. Setting budget
1 Budget alerts are set for one user at a time. The user ID/name identifies the user whose budget alerts are being changed.
2 Click on one of these buttons to edit a different budget alert for the user.
3 There are three alert options. The don’t alert option, which is the default setting, ignores the task’s budget when costs are added. The alert when option warns the user when he or she
qw
alerts to appear at 99% causes a warning to appear nearly every time a cost is added.
4 Each user can have his or her own special near-budget warning. A more gentle, helpful message should be entered here.
5 This warning message only appears when the job task is over budget. A more aggressive, instructive message should be entered here.

9-20
Who’s Connected
Who’s Connected
View who’s online, who’s not, and where they were last working in Clients & Profits using the Who’s Connected window. You can even log off connected users with one click.
1 Selecting a user, then click-ing the Send Email button will bring up a prompt to send a quick email to that user.
2 You can log any connected user off of Clients & Profits anytime by simply selecting the user from the list, then click-ing the Log off selected users button. The user will receive an alert on their computer that they will be logged out of C&P in 5 minutes. Logging out users is particularly useful when a user leaves for the day
and forgets to quit Clients & Profits, which may adversely affect other users from logging into the program if you have reached your maximum number of concurrent connections.
3 Click the Print List button to print a complete list of Clients & Profits Users, when they were last connected, for how long, and what area of Clients & Profits they were last using.
4 The number of users you are presently licensed to use
Clients & Profits concurrently is listed here. Once you have reached the maximum number of connections, users attempt-ing to log into the software will be denied access.
5 All active and inactive users who have connected to your Clients & Profits database are listed here. Select any user from the list to perform a func-tion, such as Sending an email or logging them out of C&P.
q w e
r
t

9-21Who’s Connected
The Who’s Connected report contains a complete list of Clients & Profits users, when they last logged in, logged out, which window of the program they last used, as well as their IP address.

9-22
Departments
Departments
In larger companies staff members are usually organized into departments, such as account service, production/traf-fic, media, accounting, and administration. Clients & Profits X allows users to be grouped together into departments in the same way. Departments are indirectly used throughout Clients & Profits X. Every user can belong to one de-partment, which is entered in the user’s General access privileges window. A department table can be created with codes and names that describe each department. Each department is identified with a number (from 1 - 99), a short name, and a long description of the department’s function (which is optional).
Departments can be viewed anywhere in Clients & Profits by choosing Lookup > Departments.
1 Click the print button to print the department list.
2 Departments are listed by department number. Click on any column heading to change the sort order.window.
w
q

9-23Departments
By arranging users into departments, it’s easier to track, compare, and manage the performance of a shop’s different departments.
1 Departments can be easily added, edited, and deleted us-ing these toolbar buttons.
2 To print a hard-copy printout of the Department List, click on the print button.
3 Departments are listed by number, but can be sorted by clicking on a column heading. Double-clicking on a depart-ment edits it.
4 Each department gets a number between 1 and 99.
5 The name briefly identifies the department.
6 The description is an optional explanation or note describing the department’s purpose or function.
7 Each department can have a manager. This person’s name will appear on most depart-ment-oriented reports. When the TimeCop is enabled, the department manager will be notified by e-mail whenever a department member doesn’t
finish their time card.
8 An optional office number can be given to each depart-ment. If you’re using Clients & Profits across multiple offices, this number helps identify the department within each loca-tion. If you don’t have multiple offices, the department number can be left empty.
q w
e
t y u i
r

9-24
Staff
Staff
The Staff file contains the company’s employees. Staff records are used by time cards and time sheets. Anyone whose time is tracked is added as a staff member. The staff window contains information about each staff member, in-cluding name, address, department, billing rates, and a personal photograph. You can add hundreds of names to the staff file. Staff reports can be printed anytime to make employee and department lists.
Each staff member can have his or her own set of standard and special bill-ing rates. Every user has his or her own standard cost and billing rates, which are copied automatically to their time sheets. In addition, special billing rates can be made for any combination of staff member, client, and task. Also, a special overtime billing rate can be entered for charging rush charges. These rates are applied to time sheets and time cards automatically. Users may or may not see these rates, depending on their access privileges.
There’s no special method for calculating a cost rate—it’s completely customiz-able. You can choose to use an average cost per hour, which equalizes your time accounting. Or you can make the cost rate equal to the staffer’s actual hourly salary or wage, plus benefits. Don’t include overhead (or an overhead factor) in your cost rates, since they keep the job reports from showing an accurate gross profit (labor costs are typically treated as overhead, based on your payroll expense entries).
Staff members can be limited to seeing jobs for only certain clients by setting the client’s staff access privileges. If a staff member doesn’t have access to the client’s jobs, they can’t see its job tasks.
■ Staff members can be quickly found anywhere in Clients & Profits X using the Staff lookup list: To open the lookup list, choose Lookup > Staff.
How Clients & Profits manages cost and billing rates
The billing rate and the cost rate are not inherently related; in both cases you can enter any rate you want for any staff member. The cost rate, however, is important since it’s used for job costing. The cost rate calculates the dollar cost of your staff time on job summaries. The cost rate doesn’t affect bill-ings—only the Job’s labor cost.
Here’s how they work: Someone’s cost and billing rates are copied to the time sheet when time is added. The cost rate is based on the staffer’s salary, so it is generally unchanged. The billing rate, however, can change for many reasons: you’ve negotiated a rate with a client, etc. If the staff member has
special billing rates, they will replace the standard billing rate. If the job task itself has a preferred billing rate, it is used instead. Or, the billing rate can be changed while the time sheet is being added (if the user has access to rates and costs).
Staff members and time tracking
Time keeping has always been a contentious issue within ad agencies and design studios. Clients & Profits doesn’t try to solve the political or cultural problems with time keeping; instead, it simply tries to make it easier, faster, and more accurate.
The argument for time keeping is substantial: Clients are demanding more accountability (they want to know where and why you’re spending your time) and today’s lower profit margins don’t support unproductive work. So the only way to know if everyone is working productively is to somehow track where they spend their time.
By tracking time for each staff member, you’ll get productivity reports that compare billable versus unbillable time,
time by client, time by task, and more. With practice, these reports can help you see where people are working most effectively.
There are different strategies for tracking time (see Time Sheets for more information), but the effort pays off in a greater awareness of your business. Generally, you should track all time, including unbillable time, meetings, administrative time, and sick/vacation/personal time (using an unbillable administrative job ticket works well for tracking unbillable time).
Staff statistics
The Staff Stats window displays the staff member’s total hours for the current year (i.e., the first day of the fiscal year through today), broken down by quar-ter. All totals are calculated from the staff member’s time sheets. The graph compares billing hours by quarter. To graph the top client hours, choose Top Client Hours from the show graph pop-up window. You can also display last year’s total hours by choosing Last Year from the Show pop-up menu.
Staff billing rates
While every staff member can have a standard billing rate, Clients & Profits X supports a flexible combination of billing rates based on any combination of staff member, client, and job task. Billing rates are copied to time sheets or time cards automatically based on the time entry’s client, job, or task.

9-25Staff
You can establish different billing rates for one or more tasks, so different kinds of work are billed higher (e.g., computer design time). Each billing rate includes a short note that describes why and how this rate is used. There’s no limit to the number of billing rate combinations for a staff member, although more than 25 become difficult to manage and remember. However, special billing rates must be entered individually for each staff member, and not as a group.
There is no special cost rate, since the amount you pay your staff usually doesn’t vary by client or task. You can, however, change the cost rate when adding a time sheet (with the right access privileges).
■ A flat overtime rate is also available for each staff mem-ber. The overtime rate, which is edited in the Billing Rates window, replaces all rates—including special rates. In addition to an overtime billing rate, an overtime cost rate can be used. This means the cost of your overtime hours will be properly accounted for on your job cost reports.
To automatically create special billing rates
A complete set of special billing rates can be automatically created by clicking the Auto button. A special billing rate record is created for every client using the staffer’s standard task. Once special billing rates are automatically created, you should proof and refine them to make them more accurate.
Time sheets, clients, tasks, and special billing rates
You’ve got complete control over cost and billing rates on time sheets and time cards. You can manage many different combinations of billing rates by staff member, client, and task—as well as by the job itself. This ability makes
it easier to deal with the needs and demands of various kinds of clients. When a time sheet is added, cost and billing rates are copied to time sheets like this:
1) When the staff initials are entered, his or her cost and billing rates are copied to the time sheet. These standard rates are used first.
2) When a job and task are entered, Clients & Profits X checks the staff member’s record for any special rates. If a special rate exists for the staffer, the client, and the task, it is copied to the time sheet —replacing the staffer’s standard billing rate.
3) If the job task has a billing rate, it is used instead—replac-ing any standard or special billing rate. If the client has a guaranteed billing rate, it is copied from the client account when the task is added to the job ticket. The job task’s billing rate always has the top priority.
4) Once the rates are copied to a time sheet, they can be changed by entering new
rates over the old. Changing a rate on a time sheet is temporary, and doesn’t change your standard or special rates in the staff file. Also, there’s no limit to what rates can be used.
Custom client billing rates. Every client can have dozens of custom task-based billing rates. These rates can be set up to guarantee a client a special rate for certain tasks. If the job is set to always use client rates, the client’s special billing rate will be used automatically when time sheets or time cards are added.

9-26 Staff window
1 Use these toolbar buttons to scroll through the previous and next staff members.
2 Staff members can be easily added, edited, and deleted using these toolbar buttons. To add a new staff member, click on the add button. Click on the edit button to edit the staff member’s key information such as the staff member’s address, title, and work e-mail address. You can also add a scanned signature for sales e-mails and on-line PO approvals. To delete a staff member, click on the
delete button. Deleting a staff member is permanent. Once deleted, the same initials can be reused by someone else, or the staff member can be added again later. A staff member with time sheets can’t be deleted. Instead mark them as inactive.
3 To print a hard-copy printout of the Staff List, click on the print list button.
4 Enter a staff member’s initials here to find a staff member.
5 Click on these links to see and edit information about the staff member. The availability link lets you schedule a staffer using an on-line calendar, as well as enter planned hours for each day. The billing rates link contains special billing rates for the staff member. It also allows you to enter in the cost, billing, overtime cost, and overtime billing rate for the staff member. The stats link compares the staffer’s hours for each quarter, then graphs the results for last year or the current year.
The Staff window
q
r
t
yf
g
i
s
d
w e
u
op
a
Every staff member can be assigned a profit center, such as a business unit or division. Productivity reports can be printed by profit center for better accountability.

9-27Staff window
6 Each staff member is identified by unique initials or employee number. The same initials can’t be used twice.
7 Every staff member can be-long to a department, which is used by Productivity reports.
8 Department supervisors will appear with an “X” in the checkbox here. 9 The staff member’s title is copied to new jobs automati-cally.
10 Clients & Profits uses this e-mail address to notify users about deadlines, status changes, and missing time.
11 Every staff member can belong to an optional account team. Productivity reports can be printed by team, which com-pares time spent by its team members.
12 Using the availability link, staff members can mark them-
selves unavailable for a day or parts of a day. Unavailable times for a staff member for the current month will appear here for easy reference.
13 The notes link lets you en-ter personal information about the staff member. It appears here for easy reference.
14 Ex-staff members can be made inactive. Inactive staffers don’t appear on lookup lists and can’t be used on time cards.If a staff member is freelance, check this setting. Freelance time is added just like regular staff time, but can be analyzed separately on productivity reports.
15 A digitized photo or scanned illustration can be placed for each staffer to make the system more personal. This graphic appears on the user’s Information Center window.
Each staff member has one hourly cost rate, which can be based on their actual salary or some kind of average. The standard billing rate will be used unless replaced by a staff, client, or task special rate. Use the billing rate link to enter these rates for the staffer.

9-28
The Staff Availability function lets users schedule themselves as unavailable for any day, morning, or afternoon for up to twelve months in advance. When a user is scheduled for a job task, Clients & Profits checks their availability on the task’s due date. If the user is unavailable, the person scheduling the job is prompted to choose another per-son—Clients & Profits X even proposes a backup person, which can be preset for each staff member.
Staff Availability
Staff Availability
A staff member’s backup person can be reassigned a staff member’s work automati-cally by using the reassign tasks option.
1 Click the update button to calculate the week’s actual hours from the staff member’s time cards and time sheets.
2 Click on the reassign tasks button to have all of a staff member’s work reassigned to their designated backup person. Tasks that are due can be reassigned for the current day, the current week, the current month, or all tasks.
3 Use these toolbar buttons to add, edit, delete, and print
a staff member’s availability entries. Click on the add but-ton to add a new availability entry making the staff member unavailable for a day or part of a day. Click on the edit button to edit an availability entry. To delete an entry, click on the delete button. To print a list of the staff member’s availabil-ity entries, click on the print button.
4 The staff member’s name appears here for easy reference.
q w e
r
t
y
u
o
p
5 The week’s planned hours are used by the time cards and time sheets to help users track the right amount of hours each day. The week’s actual hours aren’t displayed unless the update button is clicked to save time. This is a great way for a user to instantly check their time for the week.
6 A backup person can be as-signed to each staff member. If a staff member’s tasks need to be reassigned for any day, week, or month—or all tasks, should
i

9-29Staff Availability
To make sure that users aren’t quitting Clients & Profits X without adding their time first, use the time keeping options available for each user. Use one of the options or both to keep your staff members in line when it comes to entering their time.
the staff member quit—they will then belong to the backup person.
7 The require daily timekeep-ing option tells Clients & Profits to compare the staff member’s planned hours with their actual hours. The send missing time e-mail option will send a reminder e-mail in the morning when the user did not enter in enough time for the previous day. The days hours = planned hours option takes it a step further, not letting the user quit Clients & Profits X until they have added enough hours to their time sheet or time card.
8 The Availability calendar lets users check their schedule for any month. Days on which the user will be unavailable in the morning or afternoon appear in yellow. Days in which the user is out entirely appear in red. Choosing a month from the pop-up menu lets users check their availability for any month in the future.
9 To check on a day’s avail-ability, click on a day cell in the calendar. Any scheduled job tasks will appear in the deadlines list, as well as any scheduled unavailability entries.
10 Unfinished job tasks appear in the deadlines list when the user clicks on a day in the calendar.

9-30
Vendors
Vendors
Vendors are suppliers from whom you purchase goods and services through Accounts Payable. The vendor file contains every vendor you’ll ever do business with, including account number, name, address, and some account information.
Anyone who bills you with an invoice would be a vendor, especially freelanc-ers. Vendors are paid with checks written in the Checkbook against their unpaid invoices.
The vendor code tracks purchases and invoices for the things you buy. The vendor account keeps a running account balance, so it’s easy to see at-a-glance just how much you owe someone. When an invoice is added into Accounts Payable, you’ll enter the vendor number first—this links the invoice to the vendor account on reports, especially the account agings.
Deciding who is a vendor is simple: if someone invoices you for things or services you buy, they’re a vendor. You can’t add a payable invoice un-less the vendor exists (although you can add a vendor at the same time as the invoice). Once a vendor is added, it can be used again by entering in the vendor number.
Detailed account information can be easily maintained for each vendor, including task, markup, and notes. This information stays in a central location (your Clients & Profits database) and is generally accessible to everyone. This makes finding vendor information much faster than using someone’s Rolodex cards or filing system. This information can be entered, changed, or deleted, any time.
■ A vendor with a balance or any activity (including paid invoices) can’t be deleted. Otherwise, its invoices wouldn’t have a vendor account balance to update on aging reports.
How Clients & Profits X manages vendor markups
One of the ways in which markups are managed is through the vendor ac-count. Every vendor can have a special markup percentage. This percentage is copied automatically to every invoice you’ll add for the vendor. It’s a useful way to precisely control your markups, for more consistency and accuracy.Here’s how it works: When a vendor is first added, it gets a markup from your
accounting preferences. This is the standard agency markup. When an invoice is added for this vendor, its markup is copied to the invoice. If a job task has a guaranteed markup (which you would have set up on the client account or task table, per some arrangement), it replaces the vendor’s markup. Of course, you can still change the invoice’s markup without affecting the job or the vendor account.
This ability lets you program basic markups for different vendors. Some vendors, like printers, might always have the standard 17.65% markup (which calculates to a 15% commis-sion on the cost). Other vendors, like typesetters, might have a 50% mark-up since their invoices are smaller. Or, a large vendor (like a media firm) might have a 12% markup because of the relatively high dollar volume. In all cases, it’s your choice—and one that you can make or change anytime, very easily.
Vendors, staffers, free-lancers, and temps
Staff members aren’t vendors, since they’re paid through payroll. Staff time is accounted for with time sheets, not A/P invoices.
Just what is a freelancer? A freelanc-er can be both a staff member and a vendor. If you’ll track a freelancer’s time on an hourly basis with Time Cards or Time Sheets, then he or she is added as a staff member. But if the freelancer is also added as a vendor, then he or she should be added twice—once as a vendor then again as a staff member.
■ The staff member’s initials must be different from the vendor number. If a staff member has the same code as a vendor, costs will appear duplicated on job cost reports—but it’s just a cosmetic problem. To prevent this problem, give the freelancer slightly different vendor and staff codes.
What are temps? A temp acquired from a temporary placement agency is not a vendor; instead, he or she is a staff member. So who is the vendor? The placement agency is the vendor, since they’ll be sending you bills for the temp’s hours worked.
To see a vendor’s statistics
The Vendor Statistics window displays the total purchases (including the number of invoices) for each quarter of the current year. To see last year’s to-tals, choose Last Year from the Show pop-up menu. Clicking the Graph button
The vendors lookup list can be opened any time by choosing Lookup > Vendors.

9-31
calculates the quarterly totals and draws a graph. Clicking the Print button prints a hard-copy version of the stats window.
To print a vendor’s account ledger
The account ledger shows a detailed listing of the vendor’s invoices. The report shows at a glance just what you’ve purchased from a vendor. It can be a helpful report, giving you valuable financial data that you can use when negotiating better prices.
Recurring payables
Each vendor can setup a schedule of recurring pay-ables for overhead expense items that are paid monthly or quarterly, such as rent or equipment lease payments. Recurring payables are a real time saver. Once a recurring payable has been added, it can be scheduled to recur for as many times as you like in the upcoming year. Whenev-er a user opens the Accounts Payable window, Clients & Profits will check for the days scheduled recurring payables. If found, the user is prompted to convert them to regular invoices. Once converted, these invoices are like any other an can be proofed and posted.
■ Recurring payables can also be scheduled for a specific overhead expense payable from the Accounts Payable window.
The vendor diary
The vendor diary does not keep an automatic log of every vendor activity. That would create an immense number of entries. Instead, the vendor diary is used like a daily log. Anyone who works with one vendor account can make notes about phone calls, meetings, etc. These entries are intended to help accounting people to manage vendor accounts and to track payables and payments.
Each vendor diary entry includes the date and time it was added, as well as the initials of the staff member who added it. The entry’s subject and description are user-defined. Vendor diary entries can be useful for tracking
Vendors
problems, such as overdue invoices, credits pending, etc.... Since each entry has a “resolved” checkbox, the Vendor Diary window clearly shows at-a-glance which entries are still pending. Once the vendor’s issue is closed, anyone can mark the entry as “resolved.”

9-32 The Vendor window
Who is a vendor? A vendor is someone who invoices you for things or services you buy.
The Vendor window
3 To print a hard-copy printout of the Vendor List report, click on the print list button. To print a set of vendor labels, click on the print labels button.
4 Enter a vendor code here to find a vendor. Or click on the find more link to find vendors by sequence, number, or orga-nization.
5 Click on these links to add/edit/view the vendor’s account information, vendor diary/call log, recurring payables, and ad-
1 Use the toolbar buttons to scroll through the previous and next vendors.
2 Vendors can be easily added, edited, and deleted using these toolbar buttons. To add a new vendor, click on the add button. To edit the vendor’s account information, click on the edit button. To delete a vendor, click on the delete button. Any vendor with a balance or any activity (including paid invoic-es) can’t be deleted. Instead, mark them as inactive.
dresses. The vendor’s key infor-mation (i.e., organization name, address, markup %, terms, etc.) can be edited by clicking on the account info link. The diary/calls link lets you keep track of important phone calls and other communications with the vendor in one place. Diary entries can also be e-mailed to staff members and the vendor. Repeating invoices for overhead expenses such as rent, lease payments, and insurance can be set up as recurring payables by clicking on the recurring
sap
j
o
iu
yt
r
ewq
l
k
g
fd
h

9-33
payables link. A routine expense can be scheduled up to one year in advance, making unposted entries into Accounts Payable automatically on any scheduled date. Each recurring payable can debit up to six G/L accounts. If a vendor has a separate address that purchase orders and checks need to be mailed to, click on the ad-dresses link to enter them.
6 Use the view>point pop-up menu to view the vendor’s account ledger or account statistics. The View Account Ledger window shows a listing of all the payables added for the vendor with their respec-tive payments and balance. The Account Statistics window displays the vendor’s total pur-chases for the current year (i.e., the first day of the fiscal year through today), broken down by quarter. The window also displays a graph of the vendor’s quarterly purchases for the cur-rent year or last year.
7 Each vendor is identified by a customizable 10-character number or a code. Any combi-nation of letters or numbers can be used, but it must be unique.
8 If a vendor has an “X” in the active checkbox, then it is an active vendor. Vendors that are no longer used can be made in-active by unchecking the active checkbox in the Edit Vendor Account Info window. Inactive vendors don’t appear on the lookup list nor can purchase orders or payables be added for them.
9 The vendor’s organiza-tion name, address, phone number, fax number, and the key contact’s e-mail address appear here for easy reference. The vendor’s company name and address appears on printed checks. Vendor lists and mail-ing labels can also be printed with addresses.
10 Vendors can be catego-rized by a user-defined type code. This code can be used on custom reports to list all of your media publications, for example.
11 The date of the last-added A/P invoice for this vendor ap-pears here for easy reference.
12 The vendor’s web site address appears here for easy reference.
13 The vendor’s balance due is updated instantly as A/P invoices and checks are posted.
14 The vendor’s market ap-pears here for easy reference.
15 A vendor can be put on-hold for any reason (e.g., the production manager is mad at them, the owner wants better prices, a credit still hasn’t been made, etc.). When a user tries to add a purchase order or an A/P invoice for an on-hold vendor, the why? message ap-pears—and they can’t add their entry.
16 Click on the contacts link to add/edit/delete contacts for the vendor.
17 The vendor’s contacts are displayed here with their e-mail addresses and phone numbers for easy reference.
18 The vendor’s unpaid payables are displayed here for easy reference.
19 Click on the notes link to enter descriptive notes about the vendor. These notes are for internal use, and don’t appear on reports or checks.
The vendor file is a central location to maintain all of the detailed account information for your vendors that is generally accessible to everyone. This makes finding vendor information much faster than using someone’s Rolodex cards or filing system.
The Vendor window

9-34
Vendor Account Information
i
p
l
k
j
a
h
g
f
d
s
rew
q
o
u
y
t
1 The vendors name appears here for reference.
2 A vendor can be put on-hold for any reason (e.g., the produc-tion manager is mad at them, the owner wants better prices, a credit still hasn’t been made, etc.). When a user tries to add a purchase order or an A/P in-voice for an on-hold vendor, the why? message appears—and they can’t add their entry.
3 The vendor’s organization name appears here.
4 You can change the vendor name by entering it here. The name appears as the payee when a check is added for this vendor.
5 This is the vendor’s main address. A separate address can be entered for checks and/or purchase orders in the Vendor Address window.
6 This is the vendor’s key contact. More contacts can be entered in the Vendor Contacts window.
7 This is the vendor’s company web site address.8 The vendor’s market can be entered here. It is primarily used by media vendors.
9 Production vendors (i.e., vendors who work on jobs) can have a default job task. When a payable invoice is added for this vendor, its task will be entered automatically. It’s not required, but can make job costing more consistent (e.g., a printing vendor’s costs will always be charged to the task PRNT).
Utilize the pop-up A/P note to remind your A/P clerks of important information (e.g., “terms are different, net 45) about the vendor before they add a payable for the vendor.
Vendor Account Information

9-35
To simplify your tax reportings at the end of the year, use the include checks on year-end 1099 report option. This option automatically marks all the vendor’s checks for 1099 status when they are added and copies in the vendor’s tax id number.
Overhead vendors don’t need a default task since their invoices don’t affect jobs.
10 Every vendor can have default payable and discount G/L accounts. These accounts are copied to new invoices au-tomatically, where they can be changed if needed. The default cost account will be used when overhead costs are entered for the vendor.
11 The pop-up A/P note is an on-line reminder to users who add this vendor’s invoices. The note appears every time an invoice is added for this vendor. 12 Each vendor can have an optional type that catego-rizes the kind of work they do. Custom reports can be created analyzing purchases by type of vendor.
13 The vendor’s tax ID appears on year-end 1099 forms.
14 The vendor’s payment terms are copied to new invoices. They are used to calculate ear-ly-payment discount amounts, as well as for cash flow analysis.
15 Production vendors can also have a standard markup. This percentage will be copied to ev-ery invoice from this vendor, but is superceded by the job task’s markup (if one was entered).
16 This check memo (e.g., “payment on account”) is cop-ied to every check written for this vendor. To not print a check memo, leave this field blank.
17 Check this option if the vendor typically gets a 1099 form (e.g., freelancers, consul-tants, small businesses, etc.). If checked, every check written for this vendor will be totaled on the year-end 1099 report.
18 If you tend to always pay off a vendor’s unpaid invoices on time, checking the auto-allo-cate checks option saves a step.
Vendor Account Information
19 Use this section if the vendor is a TV/radio station, publication, or other media company. Use the media kind pop-up menu to choose what type of media the vendor sells. The media vendor ID number field is used by the C&P Media Link to find a station or publica-tion that has a different number in a media buying system like TAPSCAN, Strata, or SmartPlus. The media commission is cop-ied to broadcast and insertion orders.

9-36
My Information Center
My Information Center
Custom Information Centers Each user can have his or her own customized My Informa-tion Center shortcut window. The window’s shortcuts are programmed by a system manager in the Users, Access & Passwords window. Each button’s graphics can be customized, too.
The My Information Center window is an intuitive, visual alternative to using menu commands to open windows. There are three kinds of Information Cen-ter windows, depending on what kind of work a user performs: Production, Accounting, and Production/Accounting. Each window has different buttons for using jobs, time cards, purchase orders, etc.
Clicking one of the Information Center’s buttons is the equivalent of choosing a menu command—there’s no difference between using a button or choosing a command.
The Information Center is optional for each user; if set, the window appears nearly every time another window is closed. This makes the Information Center a valuable, consis-tent reference for your us-ers. The Information Center window also contains a system-wide information message (which is entered in Agency Information) and an optional photograph of the staff member.
To show a staff photo in the Infor-mation Center
The user’s photograph in the Information Center is shown from the Staff window. A user’s photo-graph needs to be pasted into the Staff account using a graphic program like Photoshop. The staff photo can be any digitized black-and-white or color photo (or illustration, if it’s more f lattering).
To include a message in the Information Center
Any kind of short message can be included on Information Center windows. The message itself is entered into the general preferences, then it is copied to other users. It can be changed anytime (once a day, throughout the day, weekly, etc.).
■ The Information Center message is animated, so it will scroll, flash, and otherwise try to grab the user’s attention.
■ To minimize padlocks, it’s best to only change the Info Center message when no one is using Clients & Profits X (e.g., when others are at lunch, early morning, at night, etc.)
To include a special message in the Information Center
Daily messages replace the standard message on your Information Center window. The standard message, which is entered in general preferences, ap-
pears automatically when the Information Center window is opened. But if you create daily mes-sages, they will be shown instead.
In addition, a special message can be entered that appears whenever staff members use their time cards. These mes-sages can remind users of staff meetings, vacation days, client presenta-tions, or other events. Everyone sees the same daily messages each time their Information Center window opens. Up to a
year’s worth of daily messages can be scheduled.
■ Clients & Profits X allows you to create up to a year’s worth of daily mes-sage records starting with today’s date.

9-37My Information Center
Every Clients & Profits X user can have their Information Center window customized to fit their individual needs.
q
w
e
1 Each custom My Information Center window is unique for each staff member.
2 The My Information Center window can have up to six shortcuts. When the Custom-ized My Information Center window is first opened, the default shortcuts and graphics are entered automatically.
3 For each shortcut you can choose a command from the pop-up menu (see right) and paste any kind of graphic for the shortcut.
Each user can have his or her own customized My Information Center window. It will open automatically when other windows are closed, providing users will a quick way to access their most frequently used Clients & Profits X functions.

9-38
Status Codes
Status Codes
Default status codes can be set as preferences and will be applied automatically whenever a new job is added, billed, paid, closed, or reopened.
The status code is the single most important tool you have for managing jobs. Status codes are the basis for the daily and weekly job lists and traffic reports. Jobs are categorized by status, so you’ll always know how many jobs are pending client approval, in production, or awaiting final billing. Every job has a production status and a billing status. From the moment a job is opened, it has a status code. As the job progresses, its status will change. This enables anyone who cares about jobs—account executives, coordinators, production managers, and more—to see their exact status. Also, job tasks can also be tracked and managed with status codes.
q w
t
1 Status codes can be easily added, edited, and deleted. To add a new status code, click on the add button. Status codes can be changed at anytime by clicking on the edit button. Changing the status descrip-tion affects what appears on windows, job lists, and traffic reports. If you change the status code’s number, it doesn’t change the same status code on existing jobs. To delete a status code, click on the delete button.
2 To print the Status Table report, click on the print button.
3 Users can be notified when-ever a job status changes by setting up status e-mail for a status code using the status e-mail link. Status e-mail can be sent to a user’s e-mail account or even a pager.
4 The Status Table lists status codes by number, but you can resort the list by clicking on any column heading. Each status code appears with their
code, description, and category. Double-click on a status code to view its details and alert settings.
5 The status category is used to classify status codes as: Pending, Work in Progress, Finished, or Closed. Status categories are optional, but they provide an extra level of security in larger shops because you can restrict users (in their Access Privileges) to only choosing status codes within a selected category.
e
r

9-39Status Codes
Users can be notified whenever a job status changes by setting up status e-mail for a status code. Status e-mail can be sent to the user’s e-mail program or even a pager.
q
w
e
r
1 The status code and de-scription appear here for easy reference.
2 Select one or several staff members to send the status e-mail to when a Job’s status changes. 3 A special text message can be entered for the status e-mail notification.
4 Additional staff members or someone outside the company can also be notified by typing in their e-mail address in the cc: or bcc: fields.

9-40
1 Tasks can be easily added, edited, and deleted. To add a new task, click on the add button. Once a task is saved, it appears in the Task Table for others to see and use immedi-ately. To edit a task’s informa-tion, click on the edit button. To delete a task, click on the delete button. A task can only be deleted if it isn’t used any-where in the program.
2 To print the Task Table report, click on the print button.
3 Enter a task code here to find a task.
4 Use the show profit center pop-up menu to see tasks for all profit centers or only one specific profit center.
5 Tasks are listed in order by the task code. You can change the sort order by clicking on any column heading.
6 Tasks are displayed with their code, name, group, profit cen-ter, and status. Double-click on a task to edit it.
Task Table
Task Table
Tasks are the basis for estimating, scheduling, job costing, billing, and job profitability reports. Since they serve so many functions, they’re very important. Tasks are flexible. Every job has at least one task, but may have dozens. The task table is a central warehouse for every task you’ve ever used, or will use. The task table itself may contain hundreds of tasks. Each task has standard details, or defaults, that are copied to your jobs. This information, includ-ing sales tax settings, markups, and billing rates, automate much of your job tracking. You can add new tasks, make changes, or delete tasks anytime, for any reason.
The tasks you add to your Task Table reflect the diversity of the work you do. Your tasks are completely customizable. That’s why no two companies have the same tasks.
t
re
wq
y

9-41Task Table
q ew
t
r
y
u
i o
p
Every task can have an optional custom icon. These task icons appear on selected job and traffic reports.
1 The task code identifies the task in the program and con-tains up to four letters or num-bers. The task name describes its function or purpose.
2 Tasks that are currently being used on jobs are active. Inactive tasks don’t appear on lookup lists and can’t be added to jobs.
3 If a task is marked as always unbillable, all costs added to it won’t calculate a gross amount.
4 Group is used to subtotal tasks together on reports, estimates, and invoices . Also,
a roll-up task code can be en-tered to combine this task with another task.
5 An optional description can be added. It appears on esti-mates and invoices.
6 A default cGL and dGL can be added for the task. They will be automatically copied to invoices, payables, and checks when the task is used.
7 A task assigned to a profit center can only be added to jobs added for the same profit center.
8 A default billing rate and markup can be added for bill-ing and job costing purposes. A lead time, sort, and sort on schedule can be added to facili-tate job scheduling.
9 Scheduling-only tasks will appear in the job schedule. Estimating/billing only tasks can be used on estimates and billings. 10 Use this option to copy your changes to existing job tickets.

9-42
Job Type/Spec Sheets
Job Type/Spec Sheets
Spec sheets are used for speeding up the process of opening routine jobs. They help keep jobs of the same type more consistent, since they include the same basic details.
q w
e
r
1 Job types can be easily added and deleted. To add a new job type, click on the add button. You can add dozens of job types. To delete a job type, click on the delete button.
2 To print a hard-copy printout of a list of job types, click on the print button.
3 Use these links to edit the default settings for a job type. Click on the job template link to add/edit a job type spec sheet. A spec sheet contains all the
y
t
tasks, estimate hours, and lead times for a job type.
Use the milestones link to add a job type’s traffic milestones. Milestones are the key, big events in a Job’s life: creative meetings, client presentations, management approvals, print dates, and more. Milestones are used to show the Big Picture of open jobs on traffic reports and job lists. They help you keep from missing the Job’s most vital and critical dates, from its start to completion. Milestone
headings are always copied from the Spec Sheet to the job ticket. To be consistent with other jobs of the same type, they can’t be modified on an individual job ticket. The head-ings themselves can only be changed in Spec Sheets—which will affect every open job that has the same job type.
Click on the estimate options link to enter the job type’s standard estimate options (e.g., disclaimer, user-defined fields, sales tax, etc.).

9-43Job Type/Spec Sheets
There is no difference between a job type and a spec sheet. A job type is simply a name that identifies a spec sheet. Each type of job has its own unique characteristics that affect how you track, estimate, cost, and bill your work. The spec sheet simply organizes these various characteristics in one place, where they can be used later on new jobs.
Click on the job specs link to enter in a default description for a job type.
Click on the creative brief link to enter in default headings for the job type’s creative brief. If a job ticket is added for a job type without default creative brief headings, a creative brief can’t be entered for the job ticket.
4 Job type/spec sheets are listed in order by their job type name.
5 The name describes the job type. Jobs are sorted by job type on job lists, traf-fic reports, and profitability reports, so the name should be meaningful. The same name can’t be used twice.
6 A description can be added for a job type/spec sheet to further describe the job type/spec sheet.

9-44
Order Templates
Order Templates
Order templates help automate adding routine purchase or media orders. They contain common, but important, information about a kind of purchase.
1 Order templates can be easily added, edited, and deleted. To add a new order template, click on the add but-ton. Dozens of order templates can be added at any time. To change the settings for an order template, click on the edit but-ton. To delete a template, click on the delete button. Deleting a template doesn’t affect any orders that used it. Once a template is deleted, its name can be reused later on a new template.
2 To print a hard-copy printout of the Order Templates list, click on the print list button.
3 Click the help button to use the web-based user guide.
4 Use the show template pop-up menu to find and view an order template.
5 The template name identifies the template. It should be short, unique, and descriptive. When orders are added, the
templates appear in the show template pop-up menu.
6 Use the kind pop-up menu to create an order template for a purchase, insertion, or broad-cast order.
7 A template can be created for one vendor, such as a print-er, if it has special information (like shipping instructions). If left empty, you’ll be prompted to enter a vendor number when adding the order.
q w
e
y
r
t
i
u
o
p a
s
d
f g

9-45Order Templates
When an order is added, you’ll select a template by selecting a template name from the pop-up menu. The order template’s information will be automatically copied to the new order where it can be edited to make it more exact for that particular order.
8 The standard description is copied to new purchase orders as a time-saver. The description label is also customizable (e.g., Description, Quantity, or In-structions). Both the label and the description can be changed on the purchase/insertion/broadcast order itself without affecting the template.
9 The item description appears next to the amount in the body of the printed order.
10 The template’s user fields correspond to user fields on purchase orders. These optional fields are used to store and display special information on purchase, insertion, or broad-cast orders.
11 Three standard approval names can be defined for each template. These approvals are copied to new orders.
12 The print copies setting prints separate copies of a pur-chase, insertion, or broadcast order for up to five people (or places, such as Job Jacket).
13 Shipping instructions explain how an order is to be delivered or otherwise handled.
14 The shipping address shows where an order is to be delivered.
15 The Sales tax exempt set-ting instructs the vendor not to charge sales tax on their invoices.

9-46
Software Registration
Software Registration
Every Clients & Profits X database you use needs to be registered and activated separately to show the correct organization name and address.
q w e
y
r
t
u
1 Clicking activate updates your database’s organization name and address. Activation also installs your C&P se-rial number, which allows the database to be shared between many users. Your database must be registered before activation (see below). The activation pro-cess requires an internet con-nection. Any user can activate a database.
2 Click the register button to register your Clients & Profits X database. Registration is a one-time procedure that’s required
Software registration does two things: It registers your software with the C&P Helpdesk and activates the database with your installation of Clients & Profits X.
Software registration only needs to be run once for each data-base. Each workstation, how-ever, will need to be activated the first time Clients & Profits X is used. The activation step process automatically installs the C&P X serial number, which controls multi-user access to your database.
You can use Clients & Profits X for multiple databases as long as they are used by the same people in the same location (as described in our license agreement). However, each database needs to be registered and activated from the Software Registration window.
Clients & Profits respects your privacy. No other information about your organization or your database is transmitted or stored. Your encrypted database information is used for software registration purposes only.
Clients & Profits X uses an internet-based registration system to validate each software installation. The registration process take only seconds and helps the C&P Helpdesk know who’s using the Clients & Profits X software. Software registration is required to change your database’s agency information.
i

9-47Software Registration
when you open a database for the first time. The Regis-ter Database pop-up window prompts you for the database’s setup information, including its system manager. This informa-tion—and nothing else—is encrypted then e-mailed to the C&P Helpdesk for verification. Once your registration details have been verified, you’ll be no-tified by e-mail to activate your database. Once activated, your organization name will appear on printed reports.
3 Click the change registration button to update the database’s organization name, address, and system manager. Once the new registration information is verified, you’ll be notified via e-mail to activate the database. Once activated, you’ll see the new organization name on printed reports immediately. Only system managers can re-register a database.
Clicking “Activate” looks up your Clients & Profits serial number, which controls how many users can share the database concurrently. So there’s no need to enter it manu-ally. When you add additional users later, the serial number is updated automatically.
Only system managers can register software. The data-base’s organization name and address can be changed any time by clicking the Change Registration button, en-ter the name information, then clicking Register. The new details will be sent to the C&P Helpdesk, who will verify the change then notify you by e-mail. Upon notification, click the Activate button to complete the registration.
4 This is the name and loca-tion of the currently opened Clients & Profits X database.
5 The organization name and address identify this database. The name appears at the top of every report. 6 The serial number con-trols multi-user access to the database. The middle set of characters shows how many simultaneous users can work at the same time (e.g., 002W means you have a 2-user serial number). The serial number can only be changed by registering the database then clicking the activate button.
7 The system manager is the person most responsible for op-erating and maintaining Clients & Profits X and its database. This person will be the key con-tact for the C&P Helpdesk.
8 The C&P Helpdesk ID identi-fies your Clients & Profits X software installation. The C&P Client # is your customer num-ber in our CRM system. Both are printed on your sales invoice or are available by calling the Clients & Profits Helpdesk at (800) 521-2166.

9-48
Preferences
Preferences
Preferences lets you tailor Clients & Profits X to fit your organization’s needs. You can customize things such as job numbering, accounting periods, sales tax, etc.
You can customize Clients & Profits X without programming by setting its preferences. These preferences change the way Clients & Profits X behaves, so you can tailor it more closely to how you work. Most of the important system settings are changed from the Preferences window. This window lets you select and modify each of the dif-ferent settings separately, for simplicity.
To change the system’s prefer-ences, like the General preferences shown above: On Mac OS X, choose Preferences from the Apple menu. On Windows, choose Setup > Preferences. Once the Preferences window opens, click on a prefer-ence category from the list.
Make your changes then either click the window’s close box or choose another preference; your changes are saved automatically.The changes take affect instantly.
Since these settings are used by everyone system-wide, every user’s preferences are updated when these changes are saved. To prevent record-locking, it’s best—but not required—that no one uses Clients & Profits while you’re changing your system preferences.
■ To change your organization name and address (which appears on reports and forms), choose Setup > Software Registration. This information can only be changed by a system manager.

9-49Preferences
Disable G/L journal entries (if you don’t use the G/L), vendor balances (if you don’t use C&P for A/P), client balances (if you don’t use C&P for billing); standard billing rate (staff, client, or task); the next JE and A/R number; options for using WIP accruals, always printing proof lists to the printer, and time approvals; standard markup.
The names of the two fiscal years and accounting months; current period; first day of your fiscal year.
The option to automatically create a folder for new jobs; the name of the art server; asset file types (including their icon); optional custom fields for the Asset Info window.
Prevent duplicate invoice numbering; next A/R number; billing workflow.
Media department name and address; standard disclaimer; auto-numbering options; next order number; logo for printed order; distribution copies for printed broadcast orders.
SMTP mail server; system manager e-mail address; automatic e-mail settings.
Accounts for importing downloaded credit card statements; merchant list with default ac-counts.
Terms for labelling different kinds lead customers (e.g. ,past clients, current lists, hot leads, etc.)
Heading; standard disclaimer, approval names, and contingency; margins; logo for printed estimate.
Terms for labelling different types of G/L account classes on financial reports.
Default account numbers for cash, A/R, A/P, income, expenses, media accruals, etc.
Date format; spell checking, find time by Staff or Number, animated intro, paper size, etc.
Media department name and address; standard disclaimer for print orders; auto-numbering options; next order number; logo for printed order; distribution copies for insertion orders.
Heading and logo for printed invoice; standard invoice note; e-mail body for sending in-voices.
Setting for automatically numbering new jobs, including the next number.
A list of holidays to skip when scheduling job tasks.
Traffic names; billing workflow; priority levels; settings to require charge numbers and job types; options to keep jobs from being closed; show completion setting for the Job’s digital display.
Customizable labels for terms like clients, jobs, profit centers, etc.
Distribution copies; standard user-defined field labels; approval names; standard disclaimer; logo for printed purchase orders; settings for automatic numbering; margins.
Standard settings for two different sales taxes, including tax rates and liability G/L accounts.
Default status codes used for new, closed, reopened, billed, and paid jobs.
Preferences
Preference Settings that can be customized
Accounting
Accounting Periods
Asset Manager
Billing
Broadcast Orders
C&P>Mail
Credit Cards
CRM
Estimate Options
G/L Account Classes
G/L Accounts
General
Insertion Orders
Invoice Options
Job Numbering
Job Scheduling
Jobs
Names
Purchase Orders
Sales Tax
Status Codes

9-50
C&P E-mail
C&P E-mail
Updating e-mail ad-dresses. The Update Departments window lets you easily update the department and e-mail address settings for all staff members at one time.
One of the key features in Clients & Profits X is the innovative use of internet-based electronic mail. It works with industry-standard SMTP-based mail servers to automatically send e-mail from Clients & Profits X to staff members. C&P e-mail is sent automatically (such as when a job is opened or its status codes changes) or based on scheduled entries added by users.
Two things make C&P e-mail work: a SMTP server and e-mail ad-dresses for each staff member. To start send-ing automatic e-mail, you’ll first need to enter the name of your SMTP server into Clients & Profits. It must be a standard SMTP-based mail server, and not a proprietary server like ccMail, QuickMail, etc. (unless you’re using a newer version that speaks SMTP). The mail server must be avail-able full-time because Clients & Profits sends mail throughout the day.
Every staffer must have an e-mail address (e.g., [email protected]). For security reasons, C&P e-mail is generally sent only to staff members and not to people outside the shop. This prevents confidential information from being sent to clients, vendors, and possibly competitors. However, “cc’s” (i.e., carbon copies) and “bcc’s” (i.e., blind carbon copies) have no such limitation. This means users who manually send e-mail from Clients & Profits can potentially send it to anyone.
■ E-mail that is sent from the Help E-mail window to the C&P Helpdesk is considered to be confidential and private. However, e-mail sent to the C&P User Group or the C&P Wish List is considered public and can be read by anyone subscribing to those mailing lists.
The Clients & Profits e-mail system is based on a built-in calendar. Stored mail is automatically checked each morning when the first user opens the database. Any pending mail is then sent. E-mail is automatically sent from these areas:
TimeCop Staff members who haven’t accounted for enough hours (i.e., actual vs. planned) on the previous day’s time card/time sheet get a user-defined reminder via e-mail. A copy is sent to their department manger.
Quick Check The system manager is notified via e-mail if the periodic Quick Check finds a problem with the database.
Media Calendar Scheduled entries from the media calendar can remind media department staffers of space closing dates, material due dates, dates of special promotions, and meeting dates.
Cash Flash A daily “cash flash” of the shop’s current cash, A/R, and A/P balances can be e-mailed to agency management. In addition, e-mail “ticklers” can be scheduled to remind the accounting staff about unpaid invoices, tax deposits, appointments, and other follow-up items.
Client Diary When a user adds a diary entry, a copy can be e-mailed to selected staff members. Entries can be scheduled to be sent in the future to automate account follow-up.
Job Tickets E-mail can be automatically sent to accounting, production, or man-agement when a new job is opened, its status code is changed, or the job is closed. Production people are notified of impending task deadlines several days ahead of time via e-mail. A copy of a job diary entry can be e-mailed when it is added. E-mail is also sent whenever a new change order is saved.

9-51Spell Checker
Spell Checker
Clients & Profits X features a powerful built-in spell checker that’s optimized for both databases and the advertising and design industries. It works like a spell checker in a word processor, except that it is designed especially for a Clients & Profits X database, which uses form-based windows instead of paragraphs of text.
The spell checker automatically checks selected fields when a window is saved, looking for misspelled words, duplicate words, and unique words and terms using a customizable user dictionary.
(In a few windows, such as the Time Card, the spell checker checks each field interactively as you tab from field to field.)
Not every field is checked for spelling. Fields like the job number, invoice date, project, contact names, and user-defined fields are skipped since they typically have unique words, phrases, and abbreviations that aren’t usually found in dictionaries.
■ The spell checker does not check for bad grammar or miss-ing (or misused) punctuation.
The spell checker’s standard dictionary contains over 100,000 words, including commonly used advertising, design, and production terms like “PMS”, “4C”, “mailer”, “1/4-page”, etc.
In addition, each user has his or her own custom dictionary. Words can be added to the user dictionary by clicking the Add button from the spell checker window.
To enable the spell checker
1 Choose Preferences > General.
2 Click on the Check Spelling When Saving, then click Save.
The spelling checker will start checking for misspelled words immediately. It can be easily disabled by unchecking the setting in Preferences.
User dictionary
The user dictionary is stored in the Clients & Profits X database, so is shared among all of your C&P X users. This means if one person adds a new work to the user dictionary, it is instantly available to everyone else’s spell checker.
Spell checker options
When the spell checker window opens its options can be customized by clicking the Options button. The Spell Checker Options windows lets you open additional dictionaries, as well as set the spell checker to ignore certain kinds of words.
Checking for misspellings Like other spell checkers, the C&P spell check suggests the correct spelling for the misspelled word. Clicking Change All or Ignore All skips a word until you quit Clients & Profits X.

9-52
Web Access
Web Access
Any staff member with a web password can access their web-based time card. Only a system manager can change web passwords and start the C&P X web server.
The built-in Clients & Profits X web server lets any staff mem-ber use their time card from a web browser, whether they’re inside the office, on the road, working from home, or visiting a client.
The web server allows an unlim-ited number of staff members to use the web time card, based on what your server hardware can handle.
Complete instructions for installing, configuring, and run-
ning the Clients & Profits X web server is available at: www.cnp-x.com/user_guide 1 Clicking start tells the C&P X web server to start listening for incoming requests. When a request is made by a staff member’s web browser, Clients & Profits X prompts them for their user ID and password. If the user enters a valid ID (the same one they use in the Intro-duce Yourself window) and web password, they’ll see their daily time card web page. They’ll be
q w e
r
t
y
Clients & Profits X’s web-based time card allows any staff member to track their hours worked from any internet-connected web browser. It offers real-time access to the shop’s database of clients, jobs, and tasks. The time they entered on their web-based time card appears on job reports instantly, just like the standard C&P X time card.
able to enter hours for any job and task, including unbillable administrative jobs. Convenient lookup lists are available that list the shop’s open jobs and their jobs; clicking on a job or task copies it onto the web time card.
To stop the web server, simply click the Cancel button in the web server status message box.
2 The activity log records every request, letting the system manager track who’s access-

9-53Web Access
The web-based time card requires a dedicated PC to as a web server, but does not need any special server software. It can host internal users or both internal and exter-nal users if it has a full-time outside IP address.
ing the Clients & Profits X web server. Clicking the clear log button permanently erases the entries from the web server’s activity log.
3 Click print to get a hard-copy report of the web server’s activ-ity log.
4 The name of the database currently been hosted by the Clients & Profits X web server appears here for reference. Only one database can be hosted per web server.
5 Clicking on a tab displays different information about the Clients & Profits X web server.
The current activity tab shows web server’s current status (e.g., “running”, “idle”, etc.) as well as a log showing today’s requests by users.
The web users tab lists all staff members by department, along with their web password.
The preferences tab (see below) lets system managers control some functions of the web server.
The log tab shows the web server’s complete activity. The web log stores all requests, or hits, since the web server was started until the system man-ager clears the log.
6 Entering a web password here enables the staffers to ac-cess the web-based time card. Passwords can only be chosen by the system manager and can only be entered here. Web pass-
words are encrypted and should be changed often. If a staff member doesn’t have a web password, they won’t be allowed into their web time card.
Web access can be available 24/7. It can shut itself down automatically at a selected time for the nightly backup, then restart itself the next morning.
■ For step-by-step installation instructions, please see: www.cnp-x.com/userguide

9-54
Daily Time Card for iPhone and Web
Daily Time Card for iPhone and Web
iPhone users can now access their daily time card anytime, anywhere from their phone with the new daily time card, specifically designed for the iPhone.
1 When you enter your server’s address from your iPhone, Cli-ents & Profits Web Access is de-signed to automatically dectect that you’re accessing C&P from your phone and displays a cus-tom page designed specifically for the iPhone. If you turn your phone, the web access page will even automatically scale to fit the screen.
2 Today’s date will appear here. If you wish to view, add or edit time from a previous or future day, click the previous or next
arrows. The number of days users are able to view forward or backward is set in Users, Ac-cess & Passwords for each user in Clients & Profits.
3 Clicking the add link will take you to the add time web page, where you can add time entries for the jobs in which you are assigned tasks. The add time page uses data-driven drop down menus that allow you to select jobs and tasks easily.
Clients & Profits X’s web-based time card allows any staff member to track their hours worked from a web browser or Apple iPhone®. It offers real-time access to the shop’s database of clients, jobs, and tasks. The time they entered on their web-based time card appears on job reports instantly, just like the standard C&P X time card.
4 To edit time entries, simply click once on the time entry from the list, then click the edit link. Simply clicking the edit link without selecting a job will prompt you to select an entry first.
5 To remove a time entry, select the entry from the list, then click the remove link.
6 Time entries can also be edited by clicking on the time entry’s hours links.
q
we r t
y

9-55Web Access web page
q
ew
t
r
y
u
i
Resembling the Creative Dashboard, the newly re-designed web-based Daily Time Card now includes deadlines as well as your job hot sheet and In/Out Board.
1 You can customize your web access page to display your company’s logo. Simply change the link to the logo file in web access preferences to point to your logo hosted on your server.
2 The database you’re connect-ed to, as well as who’s logged in will always be displayed here.
3 The current calendar is always displayed her. To jump to a previous or future month, click the next and previous links.
4 To add time to your time card, click the add button. To edit a time entry, select it from the list, then click the edit button. To remove a time entry, select it from the list then click the remove button. To print your time card, click the print but-ton. The time card will appear in a separate pop-up window which you can print directly to your printer.
5 Clicking on any of the hour links will open the edit time window, allowing you to edit
those time entries..
6 The Job Hot Sheet lists all jobs that contain tasks which you are responsible for. This list can be filtered using the job status drop-down menu.
7 Your active deadlines are listed in the deadlines table, including due dates and times, tasks and estimated hours. 8 The In/Out board displays the current status of all C&P users in your shop.

Appendix

Glossary
Clients & Profits X Glossary
See the Clients & Profits X web site for an up-to-date glossary: www.cnp-x.com/support/glossary.html.
Active: Clients, vendors, and staff members are active or inactive depending on their status. Active clients may have recent billings, but it’s an agency decision. Inactive clients can be prospective new clients or old clients. Lists, reports, and mailing labels can be printed for active, inactive, or both kinds of clients, vendors, and staff members.
Aging Periods: Aging periods define when an invoice amount is past due. Default aging periods are 30, 60, and 90 days, but can be easily edited at any time. Once changed, choosing Client Account Aging from Snapshots will update your receivables and summarize the outstanding balances in the new periods.
Average Pay: Clients & Profits counts the number days a client waits to pay the entire invoice. This count is figured each time you age your invoices, and is the invoice date less the payment date.
Bank Balance: A running total of deposits (through Client Payments and the Checkbook) and withdrawals (from the Checkbook). The bank balance is calculated whenever a payment is made or a check is written and posted.
Billable: The amount for which you are billing a cost. Billable amounts are also called gross amounts. They are based on markups or billing rates on time sheets. The billable is the amount that comes up automatically for client invoices for each task on a job. It is just a guideline, not what necessarily of client invoices posted for a job ticket. The billable is continuously calculated as the total billable amount for a job task less whatever has already been billed for that same job task.
Billing Preview: An unposted client invoice. Unposted invoices can be printed as part of the billing review process. These unposted invoices, called Billing Previews, let account executives see what looks like the final invoice, including sales tax. But since the invoices aren’t posted, they can be easily changed. The words “billing preview” appear at the top of unposted invoices to prevent them from being accidently sent to clients.
Budget: Budget is the amount which the agency will pay to complete a task. It is the cost before markups. This amount does not appear on the printed Estimate form, and is a net amount.
cGL: Credit general ledger account.
Closed Jobs: Jobs should be closed when the work is completed, all costs have been accounted for, and all billings are posted. Checking the Closed box closes a job, while unchecking the box opens the job. Closed jobs get a status automatically from Preferences, which can be changed. Job lists can be printed for closed jobs by entering the closed job status when printing reports.
Default: A standard setting or entry that is added automatically.
Deposits: All clients make payments against specific invoices. Any deposit or prepayment must be applied to an invoice created for the deposit amount. For deposits against a job, add an advanced billing invoice using that job number and a task. Once posted, the deposit can be applied as a payment to the job’s future invoices.
dGL: Debit general ledger account.
Discount Date: Date on which an early-payment discount is earned.
Due Date: Date on which a vendor invoice is consider due, based on the invoice date and the vendor’s terms.
Enter key: Pressing the Enter key confirms an action, or saves your work.
Estimate: The actual amount the client will (or may) pay for the job ticket. This amount appears on the printed Estimate form, and should include all markups and commissions.
Expenses: In-house expenses for materials like art boards, tolls, and parking should be added into the Expenses window. In-house expenses paid by check should be added into the Checkbook.
Finance charges: Clients & Profits does not automatically add finance charges to overdue client invoices. But it will calculate and print the finance charge amounts on the Client Account Aging report. Each client can have its own finance charge rate; enter it into the client Notes window.
Finished: A completed task. Finished tasks do not appear on Traffic reports. Tasks can be marked as finished from job tickets or from time sheets.
Freelancer: Anyone who charges time through time sheets but bills with an accounts payable invoice. They should be added as both a vendor and a resource.
Group: Groups are user-defined numbers into which job tasks are catego-rized. Job tasks can be categorized into groups on estimates and invoices. Groups are sorted numerically. The group number never appears on the printed estimate or invoice; instead, the group description (such as fees or expenses) appears. Tasks are sub-totaled by group. Groups are optional. You can have many different groups, too. On job tasks, leaving the group number empty keeps the tasks from sub-totaling.
History: Clients & Profits X remembers running monthly activity for clients, vendors, and resources. Monthly client billings are updated during posting accounts receivable. Monthly vendor purchases are updated while posting ac-counts payable. And monthly billable dollars for resources are updated while posting time sheets. These monthly amounts are compared against last year’s figures on the Client, Vendor, and Resource History window, which is opened
A-1

Clients & Profits X Glossary
from the Work menu.
Initials: Clients & Profits X uses initials to identify who added any record (like a job ticket, a client, or an invoice) as well as the date and time. Dupli-cate initials are not allowed, but are not checked.
Job Number: Clients & Profits X uses a unique job number to identify a job ticket and everything related to it. A job number may include any ten letters, numbers, or both. Jobs are numbered automatically—optionally by client—but may have custom job numbers.
Job Type: A customizable label that classifies similar jobs, such as print, media, brochure, can have spec sheets that contain standard information about a type of job, including estimate disclaimers and a job template (i.e., a preset collection of tasks).
Last Work: The date of the last time sheet posted for a job task.
Lead: The number of days needed to complete a task. It is used, together with the due date, to select job tasks on the Traffic reports.
Message: Two lines of customizable, temporary text that appears at the bot-tom of Estimates, Invoices, Statements, and Purchase Orders.
Overhead: Any cost that is not charged directly to a job. To skip job costing when adding an accounts payable invoice, time sheet, or cash disbursement for overhead, enter NONE in place of a job number.
Pay date: The date on which a vendor invoice is scheduled to be paid, regardless of terms.
Posting: Posting takes transactions and makes them permanent. Since jobs, the general ledger, and clients and vendors aren’t updated until posting, transactions can be entered as they happen without much concern over accuracy.
Preferences: Clients & Profits X can be customized to your liking through “preferences.” Preferences include client aging periods, default general ledger accounts, and several miscellaneous settings. To change preferences, choose Preferences from the Setup menu, make your changes, then click OK. New preferences take effect immediately.
Preferred Tasks: Each vendor and resource can have a preferred task indicat-ing the usual task one performs. For example, if vendor CENTR is a typesetter, and almost always provides type, it should have a preferred task of TYPE. The preferred task is a time-saver, since it is entered by default on purchase or-ders, accounts payable, and time sheets. Preferred task is entered on mailing label window for vendors, and on the Rates window for resources.
Profitability: The gross profit (i.e., gross margin) calculated as: Job Billing - Job Costs. Profitability reports summarize job profitability from three per-
A-2
spectives: job, task, client, and type. Each report shows total cost, billings, and gross profit margin. The “job” report lists jobs numerically. The “task” report lists tasks alphabetically—for all jobs to date. The “client” report summarizes all job tasks by client for easy comparison from client to client. “Type” shows profitability by job type.
Project: Job tickets can have a “project” name or number. A project can indicate several separate jobs for one campaign, or identify like jobs (such as “Print” or “Media”). Reports, such as job summaries, can be batch printed for a selected project. Projects can be set up by client. The word “project” is customizable in the Names window in Preferences.
Proof List: A summary unposting records for error-checking prior to posting. The proof list is printed automatically during batch posting.
Report Heading: The titles of the Estimate and Invoice forms can be changed temporarily, but only for the reports printed. For example, the word “esti-mate” can be changed to “authorization” or “quotation” as needed.
Revision: The number of times and estimate was edited on a job ticket. All new estimates has a “0” revision number, which prints on the Estimate as original. Once the user has started the first revision, Clients & Profits X will count the number of times the estimate is revised. When you print out revised Estimates, the current revision number prints too.
Sales Tax: Clients & Profits X can add two different taxes to your client invoices. Tax rates are set in Agency Information with a description and a de-fault general ledger accounts. Each client, as well as job tasks, can have two special tax rates. Tax rates are passed from the Task Table to the Job Ticket to the Invoice automatically, but can be changed at any point along the way. Sales tax isn’t calculated until an invoice is posted.
Scheduling Task: Job tasks checked as scheduling only do not appear on Estimates and do not get billed automatically. (However, they can be billed if desired, but Clients & Profits X will alert you that this task is internal.) Internal tasks should be any task that is not chargeable to the client, such as Account Service.
Standard Client Terms: These terms (such as Net 30) are standard terms entered automatically to every client when they are added. A client’s terms can be edited at any time by entering new terms over the old.
Standard Markup: A default setting for your standard agency percentage markup on goods and services purchased from vendors. The standard, or default, markup is entered automatically to every new vendor when added, but can be changed.
Status: Job status indicates something about the job’s progress, based on a number from 1-999. Status codes are completely customizable. Define your own terms.

Clients & Profits X GlossaryA-3
Suspense: A general ledger account used to track unallocated amounts. During posting, Clients & Profits X checks your debit and credit GL numbers against the Chart of Accounts. If found, the amount is added to the right account. However, if an account number is not found, the amount is added to Suspense. Any suspense amount should be manually adjusted with a journal entry, usually at the end of the month. The suspense account number, 999998, is reserved and can’t be changed or deleted.
Tab key: Pressing Tab moves forward one field to the next. Pressing the Shift key and pressing Tab moves backwards to the previous field.
Task: A task tracks estimate, budget, cost, committed, and billing amounts—as well as billable and non-billable hours. Each task supports two taxable rates. A job ticket can have from one to hundreds of tasks (10-20 tasks are typical). Each task can include several lines of notes, which may or may not appear on estimates and invoices. Tasks remember the last date worked from time sheets. Tasks can be grouped on estimates and invoices, then sorted. A task’s income and expense settings—the dGL and cGL—are added to vendor and client invoices automatically.
Template: A user-defined set of job tasks that saves time when adding rou-tine job tickets. Templates are part of the job type spec sheet. You can create many spec sheets, each with its own template. Templates can’t be applied to existing jobs, only new jobs.
Year-to-date net income: A general ledger account used to track net income. Net income is calculated while the financial reports are printing, and is the difference between your revenue and expenses. The year-to-date profit and loss account number, 999999, is reserved and can’t be changed or deleted.
Glossary (con’t)

Clients & Profits X Glossary A-4

Using Plug-in Applications
Plug-ins are special mini-programs that can be opened and run while you’re using Clients & Profits X They add new custom features to Clients & Profits and are very convenient to use.
Plug-in applications give Clients & Profits X the unique ability to expand its abilities without becoming a custom program. Plug-ins can be created to print complex reports, import data from other systems, perform mass changes to your database, and more—without customizing the Clients & Profits X application itself.
Plug-ins are available from the Clients & Profits X web site:
www.cnp-x.com/support/plug_ins.html
■ Custom plug-in applications can be created by experienced Omnis Studio developers. They are produced by programming Omnis Studio 4, the rela-tional database in which Clients & Profits is built (www.omnis.net).
Creating your own plug-in applications
To open a plug-in applica-tion
The Clients & Profits X installer includes a sample plug-in applica-tion named UpdateTaskTax.lbs on Windows. This plug-in application copies the sales tax status from the Task Table to job tasks. Plug-ins like this one are useful for updating many records at once, instead of manually changing one record at a time. Since you can’t easily update the sales tax status for many job tasks at once, this mini-application makes the system more powerful without customization.
1 Start Clients & Profits X.
2 Choose File > Open Plug-in Ap-plication.
3 Select and open the plug-in application called “Update Tax on Tasks”
4 Click OK.
Each plug-in application installs a menu called “Fix” or “Plug-in” or “Print” at the end of menu bar—next to the Snapshots menu. Use this menu command to run the plug-in (there may be more than one function).
To close a plug-in application, choose Close Plug-in from the Plug-in’s menu.
You can create your own custom plug-in applications that interface with your Clients & Profits X database. The possibilities include exporting data to mainframes, compiling sophisticated custom reports, and adding completely new functions to Clients & Profits X. To make your own plug-in applica-tions, you’ll need the Omnis Studio development kit.
This $250 kit includes using the Omnis Studio development system for Mac OS X or Windows on CD. It’s the complete software for pro-gramming applications, including comprehensive Adobe Acrobat-based documentation. Omnis Studio is a highly programmable relational database—don’t expect something like FileMaker. But it is substantially more powerful thanf lat-file database or spreadsheets.
Clients & Profits X provides only limited technical support for creat-ing your own plug-ins. However, technical support, training, and programming are available from Omnis.
■ To order an Omnis Studio devel-opment kit, please see:
www.omnis.net/products/studio/standard.html
Using Plug-in ApplicationsB-1

1
Index
CR = Custom Reports GuideD = Database GuideU = Utilities Guide
1099s on checks 4-44, 4-49, 4-51 on vendors 9-35 reports 4-47, 4-51, 4-55, 9-35
A
A/P see Accounts PayableA/R see Accounts ReceivableA/R date on A/R invoices 6-33, 6-34, 6-36—6-38, 6-40, 6-42A/R e-mail sending when a client is billed 6-5, 6-23access privileges client/staff 6-9, 9-16 users overview 9-4 accounting 9-16 costs 9-14 general 9-8 jobs 9-12 menus 9-10
restricted access 9-11account classes 7-16, 7-19 assigning accounts to 7-16 names, customizing 7-16 see also chart of accounts see also subclassesaccount codes 7-14, 7-15account execs see AE/teamaccount history 7-26account info, vendor 9-30account ledger, vendor 9-29account note client 6-7, 6-8 vendor 9-31account numbers clients 6-4, 6-7 on A/R invoices 6-33, 6-34, 6-36—6-42, 6-44—6-50 on client payments 6-66, 6-70, 6-71 general ledger 7-14—17 using 7-14, 7-15, 7-18 vendor 9-28 on A/P invoices 4-16—4-22 on checks 4-44, 4-45, 4-47, 4-48 on POs 4-7, 4-8, 4-9account reconciliation 7-32, 7-33, 7-38,
7-39account types see account classes
accounting basics 7-4 cash vs. accrual 7-4 preferences 9-49Accounting menu 9-16accounting periods changing 9-49 choosing periods on A/R invoices 6-33—44, 6-46, 6-
48, 6-50, 6-52, 6-54 on A/P invoices 4-17, 4-18, 4-20,
4-22, 4-24 on checks 4-44, 4-46, 4-48, 4-50,
4-52 on client payments 6-68, 6-72 on journal entries 7-8, 7-9, 7-24,
7-25 on time sheets 4-34, 4-38 setting up 7-7Accounting preferences 2-15, 9-46—9-47accounts, G/L adding 7-18, 7-20, 9-47 balancing 7-34—7-35 beginning balances for 2-18 chart of 7-14—7-18 defaults 4-14, 7-7, 7-16 reconciling 7-34 types see account classes see also chart of accountsAccounts Payable overview 4-14—4-15 accounting periods on 4-17, 4-18, 4-
20, 4-22, 4-26, 4-28 aging reports 2-19, 8-12, 8-13 and the General Ledger 4-14 balance due 4-16, 4-17 beginning balances, adding 2-17 cGL on A/P invoices 4-17, 4-19, 4-21,
4-22, 4-26 default 3-13, 6-13, 9-32 vendor default 9-32 client paid 4-17 cloning 4-14, 4-16 control account 7-21 description 4-14, 4-15 dGL on A/P invoices 4-17, 4-19, 4-21,
4-23, 4-25 default 3-13, 4-14, 6-13, 6-18, 9-32 vendor default 4-14, 9-32 diary see vendor diary finding invoices 4-17 invoices adding adjustments 4-19 adding job costs 4-18, 4-19 adding media accruals 4-22, 4-23 adding overhead expenses 4-20,
4-21 editing 4-16 editing line items 4-17
posting 4-14, 7-9 proofing 2-20, 7-9 redistributing 4-16 unposting 1-11 make recurring entry see recurring entries; recurring payables pay date 4-17, 4-18, 4-20, 4-22, 4-24 payment terms 4-16 entering 4-17, 4-18, 4-20, 4-22, 4-24 vendor payment terms 9-33 payments, making vendor 4-44 posting 4-14, 7-9 printing A/P reports 4-26 aging reports 8-12, 8-13 proof list 2-20 proofing 7-9 reconciling with POs 4-18, 4-20 recurring payables 4-16 seeing a vendor’s recurring
payables 9-32 reports 4-28 terms see payment terms unposting 1-11 vendor credits 4-15 viewing vendor payments 4-45 see also invoices; vendorsAccounts Receivable overview 6-28—6-31 accounting periods on 6-33—44, 6-46,
6-48, 6-50, 6-52, 6-54 adding see invoices aging reports 2-19, 8-14, 8-15 and the General Ledger 6-28, 6-56 applying advances 6-58 applying retainers 6-59 see also retainers automatic job billing 6-54 balance due 6-32, 6-33 beginning balances, adding 2-18 billing types description 6-31 advance billing 6-48—6-49 auto-billing 6-54—6-55 estimate billing 6-36—6-37 finance charge 6-52—6-53 job billing 6-34—6-35 media billing 6-44—6-45 miscellaneous billing 6-50—6-51 multi-job billing 6-42—6-43 progress/final billing 6-38—6-39 retainer billing 6-46—6-47 billing hot sheet 8-9 billing worksheet 6-56—6-57 cGL on A/R invoices 6-13, 6-19, 6-32,
6-34—6-39, 6-42—6-43, 6-46, 6-48—6-52 default 3-13, 6-12, 6-18, 9-32 defaults for retainers 6-18

2
clients and 6-12, 6-18,—6-21, 6-63 control account 7-20 dGL on A/R invoices 6-13, 6-19, 6-34—6-52 default 3-13, 6-12, 6-18, 9-32 defaults for retainers 6-18 due date 6-32—6-52, 6-57 editing, deleting 6-32 finance charges 6-12, 6-52—6-53 on aging reports 8-14—8-15 showing on statements 6-60, 9-47 finding invoices 6-32—6-33 invoice number 6-32, 9-47
setting the next number 9-47 invoices see invoices media accruals see media accruals notes 6-34—6-52 payment terms 6-34—6-52 posting 1-11 see also unposting pre-billing from purchase orders 4-6 from insertion orders 5-20 from broadcast orders 5-20 printing A/R reports 6-62 aging reports 8-14—8-15 billing previews 6-56 invoice detail report 6-60 invoices 6-60 reports see printing retainers and see client retainers sales tax 6-12 see also sales tax terms see payment terms unposting 1-11 viewing client payments 6-66 work in progress 6-40—6-41 to review a job’s WIP 3-44—3-45 see also clients; invoicesaccruals for media see media accruals for unbilled costs 8-9 see also work in progressactive clients 6-4, 6-6—6-7 G/L accounts 7-16, 7-18 staff members 9-6 tasks 9-40—9-41 vendors 9-30actuals, budget vs. 8-26ad number/caption on insertion orders 5-20—5-21 on media estimates 5-14—5-15 on print media plans 5-18—5-19ad size on insertion orders 5-20—5-21 on print media plans 5-18—5-19 on publications 5-4—5-7, 5-14—5-15adjusting journal entries 7-33add vendor credit 4-15added by
on change orders 3-33 on client payments 6-66 on expenses 4-64 on insertion orders 5-24 on job diary entries 3-45 on jobs 3-10 on purchase orders 4-6—4-7adding A/P invoices for job costs 4-18—4-19 for media 4-24—4-25 for overhead expenses 4-20—4-21 A/R invoices automatic job billings 6-54—6-55 for advances 6-48—6-49 for estimates 6-36—6-37 for jobs 6-34—6-35 for media 6-44—6-45 for miscellaneous charges 6-50 for retainers 6-46—6-47 bank deposits 6-72—6-73 broadcast media plans 5-16 broadcast orders 5-20 making from media plans 5-20 chart of accounts 2-11 checks auto-pay payables 4-48 for employee advances 4-56 for job costs 4-50 for overhead expenses 4-50 for vendor payments 4-46 client payments 6-66 clients 2-12, 6-6—6-8 employee expense reports 4-60 G/L accounts 2-11, 7-20 insertion orders 5-20, 5-24—5-25 making from media estimates 5-14 making from print plans 5-18 internal charges 4-68 jobs 2-16, 3-8—3-11 see also cloning job tasks 3-14 job type/spec sheets 2-14, 9-40 journal entries 7-24—7-25 media estimates 5-14—5-15 print media plans 5-18—5-19 proposals 3-5 purchase orders 2-17, 4-6 see also
cloning sales tax rates 2-11 staff members 2-10, 2-13, 9-24 status codes 2-14, 9-36 sub-tasks 3-28 tasks on the Task Table 2-13, 3-15, 9-38 time card 4-30 time sheets 4-34—4-35 users 9-4—9-23 vendors 2-12, 9-30addresses client bill-to address 6-12
client mailing address 6-6—6-10 estimate address 3-19 payee address, checks 4-46, 4-50—4-52 PO delivery address 4-6—4-7 publications 5-31 vendor address 9-32 see also ship to addressadjusted gross income see AGIadjustments on client payments 6-66—6-69 on vendor checks 4-47advance billings adding 6-48 viewing advances on jobs 3-8—3-9advances, employee see adding checks for
employee advancesAE/team changing on existing jobs 3-8—3-9 finding jobs by 3-8—3-9 on jobs 3-10—3-11 on media 5-13 on users 9-8agency commission see media commissionsagency contact entering a default client contact 6-8 on A/R invoices 6-13agency gross income see AGIagency information 9-46agency name see agency informationAGI 8-24aging periods on client aging reports 8-14—8-15 on vendor aging reports 8-12—8-13agings 8-4—8-5, 8-12—8-15 aging periods 8-12—8-15 client account aging 8-14—8-15 client invoice aging 8-14—8-15 retainer aging 8-15 vendor account aging 8-12—8-13 vendor invoice aging 8-12—8-13alert users for status option 3-25, 9-36—9-
37alerts client alerts new job alert 6-22—6-23 new A/R alert 6-22—6-23 new client payment alert 6-22 user budget alerts costs 9-20—9-21 purchase orders 9-20—9-21 time 9-20—9-21allocating overhead 7-38—7-39always lookup jobs option 9-5always open database/path option 9-46always print proof lists to printer option
9-49always print to option 9-8always send e-mail options 9-38, 9-49always taxable option on job types/spec sheets 9-42—9-43always unbillable option

3Index
on client accounts 6-8 on jobs 3-10 on job tasks 3-12 on tasks in the Task Table 9-41always use billing rate setting 9-49 see also billing ratesamounts A/P invoice amounts 4-16—4-22 billing amounts 6-32—6-53, 6-57 discounts, client 6-65 discounts, vendor 4-16—4-23, 9-23 estimate amounts 3-18—3-19 expense amounts 4-60 payment amounts 4-42—4-52 see also billed amounts; billing
amounts; gross amounts; net costs
analysis reports A/P 4-27, 8-11 A/R 6-63, 8-20 checks 4-56—4-57 client payments 6-74 financials 8-24—8-26 G/L 7-26—7-27 jobs 3-45—3-49 production 8-6—8-7 productivity 8-22—8-23 purchase orders 4-12 work in progress 8-8—8-9animated info center message 9-46apply finance charges first option 8-15apply retainers 6-18—6-19, 6-46—6-47, 6-65—6-67 see also retainersapproval manager 3-48approval names on broadcast orders 5-20, 9-42 on change orders 3-32, 9-42 on job estimates entering 3-19 setting default approvals 9-47 on purchase orders entering 4-6—4-7 setting default approvals 9-44, 9-49 approving change orders 3-32approving estimates 3-19—3-20 access privileges for 9-12approving POs 4-6—4-7 user access privilege to 9-14archiving data see purgeAsset Manager see job assetsassets asset accounts 7-16—7-18 current assets subclass 7-17 entering beginning balances for 2-18 fixed assets, G/L category 7-16, 7-18 long-term assets subclass 7-16, 7-18 setting up a default G/L account 7-16assigned to entering on new jobs 3-10 updating for one job 3-26—3-29 updating for many jobs 3-24—3-25
setting defaults in Preferences 9-49 see also traffic assignmentsaudit trail printing 7-37Auditor 7-36—7-37automatic numbering on A/R invoices 9-49 on broadcast orders 9-49 on insertion orders 9-49 on jobs 2-15, 3-7, 9-49 on journal entries 7-8, 9-49 on purchase orders 4-5, 9-49auto-pay payables 4-48auto-reversing JEs 7-24auto-scheduling (“ballpark”) 3-28automatic quit times setting for many users 9-6—9-7 setting for one user 9-6—9-7automatically post WIP accrual entries for
media option 9-47availability, staff reassigning someone’s deadlines 3-
28, 3-29 setting up for staff members 9-24 see also backup person; scheduling,
job average pay 6-6—6-7
B
backing up 2-20, D-8 vs. repairing damaged data U-12backup person entering one for a staff member 9-26 on job schedules 3-28balance adjustment, while reconciling see bank reconciliationbalance sheet accounts 7-15, 7-16 classifying accounts as 7-16, 7-17 viewing balances for 7-18, 7-20 see also assetsbalances bank balances 4-46, 4-63 beginning A/P 2-17, 7-10 A/R 2-18, 7-10 clients 2-18, 6-5 vendors 2, 17, 9-32 transferring G/L account 7-32, 7-33 viewing account clients 6-12, 6-32—6-33, 6-63 vendors 4-27, 9-32 G/L accounts 7-27 when writing checks 4-44—4-46balancing accounts see bank reconciliationballpark schedules 3-28bank accounts see checking accountsbank deposits 6-72—6-73Bank ID number 6-72bank reconciliation 4-60—4-63bank statements, reconciling see bank
reconciliation
batch posting see postingbatch printing checks 4-58 estimates 3-20 invoices 6-60 statements 6-63batch totals on G/L entries 7-24batch numbers on client payments 6-67bcc see C&P mailbeginning balances for clients 2-18, 6-5 for G/L accounts 2-17—2-18, 7-10 for open jobs 2-16 for vendors 4-29, 9-30bids see estimatesbill payments see checkbookbill rates see billing ratesbilled amount on A/R invoices 6-32—6-43, 6-46—6-53 on billed costs 6-56—6-57 on expenses 4-18—4-19 on POs 4-6—4-7 on time entries 4-34—4-37 see also gross amountsbilled status see cost statusbilling see Accounts Receivablebilling address clients 6-12—6-13 in Agency Information 9-44billing amounts adding 6-34—43, 6-46—53 changing 6-32, 6-39 removing 6-32—6-33 reviewing on billed costs 6-57 on job reports 3-45, 3-47—3-49 on job tasks 3-44 on WIP reports 8-8—8-9 see also gross amountsbilling info, client see billing informationbilling information on A/R invoices 6-32 on clients 6-5, 6-12—6-13 on estimates 3-18 —3-19, 6-36—6-37 on jobs 3-8—3-9, 3-12—3-13billing notes 6-34—6-38, 6-42—6-44, 6-48—6-52billing preferences 9-49billing rates always use preference setting defaults 9-49 on jobs 3-10 on job tasks 3-12 on imported time 4-32, 4-38 on job tasks 9-41 on tasks in the Task Table 9-41 on time cards 4-33 setting up defaults on job type/spec sheets 9-41

4
on job tasks 3-12, 9-39 special rates for clients 6-5 special rates for staff members 9-25
standard staff billing rate 9-24billing statements see statementsbilling status overview 3-8 auto-billing and 6-54 defaults 9-5, 9-49 printing reports for 3-46, 3-47, 8-8—8-9 status alert for 9-38 updating billing status for one job 3-
26 see also status codesbilling workflow 6-28 on Billing Hot Sheet 8-8—8-9 setting default billing workflow steps
in Preferences 9-49
billing worksheet on A/R invoices 6-29, 6-56billings graph, client 6-6, 6-21bills see Accounts Payableblanket client PO number 6-12blanket POs 4-5, 4-7, 4-9brand 5-22—5-24brief, creative see creative briefbroadcast media plans overview 5-4—5-8 adding 5-16—5-17 adding media buys to 5-16 editing 5-16, 5-17 buys adding 5-16 changing, deleting buys 5-16 deleting 5-16 making broadcast orders from 5-16, 5-20 printing 5-16 using stations on 5-16, 5-28broadcast orders overview 5-4, 5-20, 5-21 adding 5-20 adding media buys to 5-20 approving 5-20 billing 6-44, 6-45 editing 5-20 deleting 5-20, 5-21 jobs and tasks on 5-20 make goods 5-32 pre-billing 4-5, 5-20—5-21 printing copies 5-20 broadcast orders 5-20 lists 5-20 status reports 5-20 unbilled orders 5-20 removing media buys from 5-20 user fields on 5-20 see also purchase ordersbroadcast worksheet 5-16
budget worksheet 7-22budgets on broadcast media plans 5-16 on change orders 3-33 on client accounts 6-5 on client projects 6-14 on estimates 3-18 on G/L accounts 7-22 entering budgets for one account
7-22 budget worksheet 7-22 viewing vs. actual 7-5, 7-22 on jobs 3-10 entering on estimates 3-18 entering on change orders 3-33 entering the job’s initial budget 3-10 on print media plans 5-18 over-budget alerts 4-5 enabling user budget alerts 9-20 enabling automatic over-budget e-mail 9-50buyer, media on broadcast media plans 5-16 on broadcast orders 5-20 on insertion orders 5-20 on media estimates 5-14 on print media plans 5-18buyouts, vendor see Accounts Payablebuys, media see media
C
C&P mail always send e-mail about overdue
tasks option 9-49, 9-50
always send e-mail about over-budget tasks option 9-50
always test for mail server option 9-49 client e-mail 3-20, 3-32, 6-6 e-mail addresses for staff members 9-26 for C&P users 9-26 for clients 6-6 status e-mail 3-27, 9-37 see also alerts; notify; TimeCopcampaign 5-12, 5-13, 6-24—6-27cash balance on financial statements 8-24 on the Cash Flash 8-16, 8-17 seeing when writing checks 4-44 sending to management via e-mail 8-16cash flash description 8-16 adding scheduled entries 8-16 deleting scheduled entries 8-17 printing 8-16 scheduling reminders 8-16 sending by e-mail 8-16 updating current balances 8-16
viewing scheduled entries 8-17cash flow categories 7-18 statement of cash flows 7-18, 8-5, 8-16category cash flow 7-17 ratio 7-17, 7-19 status 9-38cc see C&P mailcGL for sales tax 9-49 on A/R invoices 6-32—6-43 on clients 6-12 setting default tax rates 9-49 on A/P invoices 4-17—4-23 on checks 4-46, 4-48, 4-50, 4-52,
4-54 on client payments 6-65, 6-67, 6-70,
6-71 on clients for retainers 6-46 for sales tax 6-12 on job tasks 3-13 on recurring payables 4-16, 9-29 on tasks in the Task Table 9-41 on vendors for discounts 9-30, 9-31change orders adding 3-33 approving 3-33 billing on A/R invoices 6-32, 6-33 changing 3-32 deleting 3-32 printing change order form 3-32 on Job Costs reports 8-10 on WIP reports 8-8, 8-9 showing on job summaries 3-32charge to many jobs option on purchase orders 4-6 on A/P invoices 4-16, 4-17changing current accounting periods 9-49 sales tax rates 6-12, 9-47 see also editingcharges finance see finance chargeschart of accounts overview 7-5, 7-16—7-19 accounts 7-15 active vs. inactive 7-16 adding 7-18—7-19 budgeting see budgets checking account option 7-20 combining accounts see roll-up confidential option 7-17, 7-20 control accounts 7-17 defaults, setting up 7-16 deleting 7-18 editing 7-18

5Index
entering beginning balances for 7-18, 9-47 history, viewing 7-18 merging 7-32 names 7-16, 7-17, 7-20 numbering 7-16, 7-17, 7-20 options for 7-17, 7-19 roll-up 7-16, 7-17, 7-19 setting default G/L accounts 7-16 sub-accounts 7-15, 7-16, 7-17, 7-18, 7-19 types see account types account types see account classes auto-create G/L accounts for department 7-12, 7-13, 7-14, 7-19 beginning balances, entering 2-17 budget worksheet 7-22—7-23 budgets entering for one account 7-22 entering for many accounts 7-22 calculating from last year’s totals
7-22 cash flow categories 7-17, 7-19 class see account classes combining accounts see roll-up option departments 7-14, 7-16, 7-17, 9-20 profit centers 7-12—7-13 printing account history 7-18 account list 7-18 budget worksheet 7-22—7-23 ratio category 7-17, 7-19 roll-up option 7-16, 7-17, 7-19 setting default G/L accounts in
Preferences 9-49 sorting accounts 7-16 subclasses 7-15 —7-18 viewing account history 7-18 see also General Ledgercheck memo setting default memo on vendors 9-49check writing see checkbookcheckbook overview 4-42, 4-43 adding checks employee advances 4-54, 4-55 job cost checks 4-50
overhead expense checks 4-52 vendor payments 4-46 and the G/L 4-42 auto-pay payables 4-48, 4-49 bank accounts see checking account cGl 4-44 —4-46, 4-50, 4-52—4-55 setting the default cash G/L 7-20, 9-47 deleting 4-42, 7-16 dGL 4-44—4-47, 4-50, 4-52—4-55 editing checks 4-44 employee advances 4-54
finding checks 4-44 form types 4-58, 4-59 handwritten checks 4-42 job cost checks 4-43 making adjustments on 4-42, 4-44 memo 4-44 numbering checks 4-44, 7-16 entering beginning check numbers
7-17, 7-18, 7-20 renumbering misprinted checks 4-58 ordering checks 4-58 overhead checks 4-52 payroll see importing payroll posting 1-11, 4-42 printing checks 4-58 reports 4-60
reprinting checks 4-58 proofing 4-45 reconciliation 4-62 redistributing checks 4-44 renumbering checks 4-44 reports see printing tools 4-43 add vendor credit 4-15 print 1099 reports and forms 4-45 reconcile 4-62 renumber checks 4-58 void checks 4-42, 4-44 unposting 1-11 vendor credits 4-46 viewing payments for A/P 4-46 voiding checks 4-42, 4-42 writing checks see adding checks writing by hand see handwritten
checkschecking accounts beginning balance for 7-20, 9-49 checking account option on G/L 7-20 accounts 7-17, 7-18 classifying on financials 7-19 deleting 7-18 editing 7-18 reconciling 4-62 setting up 9-49checks see checkbookcollection manager 6-76classes see account classesclear amounts on Budget Worksheet 7-22 amounts on estimate window 3-18 dates on a job schedule 3-28cleared checks 4-62clearing entries 7-16client agings 8-4, 8-5, 8-14, 8-15client billing see Accounts Receivable; invoicesclient diary 6-5—6-7, 6-15, 6-65client e-mail see C&P Mailclient payments accounting periods 6-66, 6-68
adding 6-68 allocating to unpaid invoices 6-64 and the General Ledger 6-64 applying advances 6-65 applying to A/R invoices 6-66 bad debits, writing off 6-68 bank ID number 6-68, 6-72 batch numbers 6-66, 6-68, 6-72 cGL 6-66, 6-70, 6-71, 6-72 clients on 6-66, 6-68, 6-70, 6-71 credits, applying 6-65 deleting 6-66 description 6-64 dGL 6-68, 6-72 discounts for early payment 6-65 editing 6-66 finding 6-66 notifying management via e-mail 6-
23, 9-47 printing reports for 6-74, 6-75 redistribute 6-66 reports 6-74, 6-75 retainers 6-18, 6-19, 6-65 splitting between many clients 6-64,
6-71 viewing for A/R invoices 6-32client PO on A/R invoices 6-34, 6-36, 6-40—6-
52 on jobs 3-10, 3-11 setting a blanket PO for a client 6-5, 6-12client profitability 8-18, 8-19client retainers see retainersclients overview 6-4 access privileges for staffers 6-5, 6-9 adding 6-8 alerts 6-5, 6-22 see also alerts allocating overhead to 7-38 always unbillable option 6-8 see also always unbillable balances 6-6, 6-12, 6-68 bill to account on A/R invoices 6-34 billing info 6-12, 6-34 budgets 6-5, 6-12, 6-20 charge number 6-8 client status note/next steps 6-6 contacts 6-6—6-8, 6-10—6-11 on jobs 3-7, 3-8, 3-9 setting up 6-8 cost center see charge number credit limit 6-12 current balance 6-12 deleting 6-6 diary see client diary discounts for early payments 6-65—6-67 divisions see divisions e-mail see C&P Mail editing 6-6, 6-8

6
finance charges adding invoices for 6-52 including on statements 6-52 setting up 6-12 showing on A/R aging report 8-15 finding 6-6 in-house option 6-7 invoice copies to see copies to 6-12 last job number 6-12 last media plan 6-12 looking up 6-6 making payments see client payments media information job and task 6-12 commission 6-12 numbering clients 6-4 on A/R invoices 6-32—6-52 on G/L journal entries 7-33 on jobs 3-8, 3-9, 3-10 finding jobs by client 3-8 on purchase orders 4-7 on time entries 4-34 payment terms 6-5, 6-12, 6-32—6-52 setting up 6-12 payments adding 6-66, 6-68 finding payment by client 6-66 printing payment reports 6-74, 6-
75 printing A/R invoices for 6-60 client aging reports 8-14, 8-15 client lists 6-6 client payment reports 6-74, 6-75 profit center on 6-5, 6-8 projects 6-14 on jobs 3-8—3-10 retainers 6-18 adding A/R invoices for 6-46 applying to invoices 6-46, 6-59 printing a retainer aging 8-14 scheduling retainers 6-19 unused retainer balance 6-19 see also retainers sales tax 6-12 see also sales tax special billing rates 6-12, 9-23 staff access privileges to 6-9, 9-6, 9-7 standard billing rate 6-5, 6-12, 6-14, 9-25 standard markup 6-12, 9-23 stats 6-5, 6-21 tax rates, see sales tax unused retainer 6-19 view budget recap 6-20 viewing jobs 6-6, 8-7cloning A/P invoices 4-16 broadcast orders 5-20 insertion orders 5-20 jobs 3-8 media estimates 5-14 purchase orders 4-6
time sheets 4-34 users 9-6close date see space closingclose year 7-40, 7-41closed jobs 3-8 can’t close preferences 9-12 purchase orders 4-4, 4-5 insertion orders 5-20, 5-21 setting the default “closed” status in Preferences 9-38 status e-mail 9-39closing accounting year 7-40 broadcast media plans 5-16 broadcast orders 5-20 fiscal year 7-40 insertion orders 5-20 jobs 3-8 media estimates 5-14 print media plans 5-18 purchase orders 4-6, 4-7companies, multiple agency name 9-46 opening a different database 9-46 starting an additional database
see Installation Guide company address see agency informationcompany information see agency informa-
tioncomparing this year vs. last year income 8-25, 8-26compensation see payrollconfidential G/L accounts 7-17contacts client see client contacts vendor see vendorscontingency on estimates 3-19, 9-49 setting defaults in Preferences 9-47control accounts 7-17copies to option on A/R invoices 6-12 on client accounts 6-12 on estimates 3-19 on insertion orders 5-23, 9-47 on purchase orders 4-5, 9-47 setting defaults on PO templates 9-47 correcting mistakes see adjustments; editing; unpost;
reversingcost amounts see net costcost of goods see job costingcost rates for overtime 9-25—9-26 on time cards 4-30—4-31 on time sheets 4-30 setting for staff members 9-25—9-26 vs. billing rates 8-19, 9-22cost status on expenses 4-64
writing off unbilled costs 3-9creative brief 3-16 setting default headings for job types 3-7, 9-41credit card statements, adding 4-26—4-27credit invoice, vendor 4-15credit limit 6-12currency setting in Agency Information 9-46current accounting period changing 9-49 locking 9-49current balances clients 6-6, 6-12, 6-68 vendors 9-32current period, changing 9-49current system number 9-49current year, on auto job numbers 2-15,
9-49custom fields see user fieldscustomers see clientscustomizable fields see user fieldscustomizing Clients & Profits agency information 9-46 aging periods 8-12, 8-14 job numbering 2-15, 9-49 margins on estimates 9-49 on invoices 9-49 on purchase orders 9-44, 9-49 names 9-49 preferences 9-49
D
daily cash flash 8-16, 8-17Daily Job Status 3-38database path 9-46
date format preference 9-48dates check date 4-44—4-46, 4-50—4-54 client payments 6-66, 6-68, 6-72 vendor checks 4-46, 4-47 date added 4-45 date closed 3-8, 3-26, 3-27 date posted on A/P invoices 4-16, 4-17 on A/R invoices 6-32, 6-33
on checks 4-44, 4-45 on client payments 6-66, 6-67 on journal entries 7-10, 7-11 due date for materials due 5-20—5-26, 5-35 for space closing 5-20—5-26, 5-35 on A/R invoices 6-32—6-53
on jobs 3-8—3-10, 3-26—3-31, 3-34, 3-37
on job tasks 3-28—3-31, 3-40 on POs 4-6, 4-7, 4-8 finished dates 3-28, 3-29 first day of fiscal year 2-15, 9-47 flight dates

7Index
on media plans 5-16, 5-17 invoice date 6-32—6-54 journal entries 7-10, 7-11, 7-24 materials due on broadcast orders 5-20—5-23 on insertion orders 5-20, 5-21, 5-24, 5-25 order date, POs 4-6, 4-7, 4-8 pay date 4-16, 4-17, 4-18, 4-20, 4-21,
4-22 payment date 6-68, 6-69 space closing on broadcast orders 5-20, 5-21 on insertion orders 5-20, 5-21, 5-24, 5-25 start date 3-8—3-10, 3-26—3-31, 3-
34, 5-13 see also due datesday’s hours = planned hours option 9-28, 9-29debits 7-5, 7-10, 7-11, 7-24, 7-25defaults billing rates 6-12, 9-23, 9-47 G/L accounts 3-13, 4-14, 6-12, 6-13, 6-18, 9-32 markups 6-12, 9-39, 9-49 sales tax rates 9-49 see also sales tax see also preferencesdeleting A/P invoices 4-16 A/R invoices 6-32 accounts 7-16, 7-18 all unposted A/R invoices 6-32 all unposted JEs 7-10 broadcast orders 5-20 change orders 3-32 checks 4-44 client payments 6-66 clients 6-6 insertion orders 5-20 job diary entries 3-45 job tasks 3-8, 9-38 job types/spec sheets 9-42, 9-43 jobs 3-8 journal entries 7-10 media estimates 5-14 purchase orders 4-6 recurring entries 7-10 staff members 9-26 time 4-34 vendors 9-32, 9-33 vs. voiding checks 4-44deliver to address, POs 4-6, 4-7 see also addressesdepartments adding 7-14 assigning to staff members 9-26, 9-27 assigning to users 9-6, 9-7 editing, deleting 7-14 looking up 7-14 on G/L accounts 7-20 printing lists of 7-14
setting up 7-14deposit batch 6-65—6-69, 6-72deposit tickets 6-74, 6-75deposits, bank 6-65, 6-72, 6-73depreciation 7-4description entering default description on
job types/spec sheets 9-42, 9-43 on A/P invoices 4-16—4-21, 4-26,
4-27 on A/R invoices 6-33—6-44, 6-48— 6-53 on broadcast media plans 5-16, 5-17 on broadcast orders 5-20, 5-22, 5-23 on change orders 3-33 on checks see check memo on client payments 6-66, 6-67, 6-68, 6-72 on G/L accounts 7-20 on insertion orders 5-20, 5-24, 5-25 on job tickets 3-8, 3-9, 3-10 on journal entries 7-10, 7-24, 7-25 on media estimates 5-14, 5-15 on print plans 5-18, 5-19 on printing specifications 3-22, 3-23 on purchase orders 4-6, 4-7, 4-8 on time cards 4-30, 4-31 on time sheets 4-33, 4-35, 4-37Detailed General Ledger 8-25detailed POs 4-8, 4-9dGL on A/P invoices 4-16—4-25 on A/R invoices 6-34—6-42, 6-44, 6-46, 6-48, 6-50, 6-52 on checks 4-42, 6-43, 6-45, 6-48—6-
53 on client payments 6-68, 6-69, 6-72 on clients 6-12, 6-13 for retainers 6-12, 6-13, 6-19 on job tasks 3-12, 3-13 on tasks in the Task Table 9-41 on vendors 9-33, 9-34 for discounts 9-34, 9-35 for payables 9-34, 9-35diaries clients see client diary jobs see job diary vendors see vendor diarydisabling automatic job diary entries 9-49 client balances 9-49 G/L journal entries 9-49 vendor balances 9-49disbursements see checkbookdisclaimers on broadcast orders 9-49 on estimates 3-19 on insertion orders 9-49 on job type/spec sheets 9-42 on purchase orders 4-4 setting the default BO disclaimer 9-49
setting the default estimate disclaimer 9-49 setting the default IO disclaimer 9-49 setting the default PO disclaimer 9-
49discount cGL 6-70, 6-71discounts on client payments 6-66, 6-67, 6-70, 6-71 on vendor payments 4-16, 4-17, 4-18, 4-20, 4-21distribute to many jobs option on purchase orders 4-8distribution copies see copies todivisions description 6-7 and A/R invoices 6-42 and client payments 6-71
see also split payment setting up clients as 6-8dockets see job ticketsdue dates materials due 5-20—5-26, 5-35 on A/R invoices 6-32—6-52 on job tasks 3-28—3-31, 3-40 on jobs 3-8, 3-9, 3-10, 3-26—3-34 on POs 4-6, 4-7, 4-8 space closing 5-20, 5-21, 5-24—5-26, 5-35duplicates, preventing invoice numbers 9-49 job numbers 9-49 PO numbers 9-49
E
e-mail see C&P mailearly payment discounts for clients 6-66, 6-67, 6-70, 6-71 from vendors 4-16—4-22editing A/P invoices 4-16 A/R invoices 6-32 account information 7-18 clients 6-6 G/L accounts 7-18 vendors 9-32, 9-33, 9-35 account opening balances clients 2-18 vendors 2-17 agency information 9-46, 9-47 broadcast orders 5-20 checks 4-44 client payments 6-66 G/L journal entries 7-10 job tasks 3-12, 3-13 finished dates 3-28, 3-29 resources 3-28, 3-29 schedules 3-28, 3-29 start, due dates 3-28, 3-29 job types/spec sheets 9-42, 9-43 jobs 3-18

8
change orders 3-32 creative brief 3-16
printing specifications 3-22 snapshot 3-45 specs 3-8, 3-9 work in progress 3-44, 3-45 media estimates 5-14 media plans 5-16, 5-18 preferences 9-49 purchase orders 4-6 staff members 9-26 time 4-34 users 9-6, 9-7 vendors 9-32—9-35employee see staffemployee expense reports 4-64 adding employee expense reports
4-65 printing expense advance report 4-65 reconciling expense reports with advances 4-66, 4-67 writing checks for advances 4-56, 4-57employees see staff members end-of-year see close yearending balances on G/L accounts 7-18 on the Trial Balance 8-24, 8-25entering see addingequity classifying on Balance Sheet 7-16 entering beginning balances for 2-18,
7-16erasing see deletingerror messages 2-5errors using the Auditor to check for 7-28, 7-29, 7-36, 7-37 using the Out of Balance Checker to
check for 7-28, 7-29, 7-36, 7-37
estimate approvals 3-18 access privileges for 9-12estimate options on job type/spec sheets 9-42, 9-43 on jobs 3-19 setting default estimate options 9-49estimate/billing tasks setting job tasks as 3-12, 3-13 setting tasks in the Task Table as 9-39 vs. scheduling tasks 3-12, 3-13estimate worksheet for job tasks 3-18 for job tracking see job snapshotestimated hours entering on job schedules 3-28, 3-29 entering on job tasks 3-18, 3-19 entering on sub-tasks 3-28, 3-29 entering on the pop-up estimate
worksheet 3-18, 3-19 showing on printed estimates 3-19estimates, job
overview 3-7, 3-18, 3-19 actuals, comparing to 3-47—3-49, 8-8, 8-9 adding tasks to 3-18 approvals 3-18, 3-19 billing address 3-19 billing estimates 6-36, 6-37 budget amounts on 3-18 clearing amounts from 3-18 cloning an estimate to a new job 3-7 columns, adding and changing 3-18 contingency see contingency copying amounts between columns 3-18 creating 3-19 customizing 3-19 deleting 3-18 descriptions 3-8, 3-18, 3-19 disclaimers see disclaimers editing 3-18, 3-19 estimate options 3-19 estimate worksheet 3-18 final estimates 3-18, 3-19 choosing a final estimate 3-19 from job templates 9-42, 9-43 headings, customizing 3-18, 3-19 on job type/spec sheets 9-42 hours, entering estimated 3-18, 3-19 margins 3-20, 9-47 preferences for 9-47 printing 3-20, 3-21 estimate amounts on job reports
3-47—3-49 estimates 3-20, 3-21 project estimates 3-20 projects 3-20 removing tasks from 3-18 revisions 3-18, 3-19 making a new revision 3-18, 3-19 making a prior rev. current 3-18,
3-19 on printed estimates 3-21 recalling a previous revision 3-18,
3-19 showing on A/R invoices 6-60 toolbar buttons 3-18, 3-19estimates, media see media estimatesexpense accounts description 7-16 classifying 7-16 entering beginning balances for 2-18, 7-16 entering budgets 7-22, 7-33 see also budgets viewing account balances 7-27 see also chart of accountsexpense advances see employee expense
reportsexpense reports see employee expense
reportsExpenses adding 4-64, 4-65
and the G/L 4-64 changing, deleting 4-65 in-house expenses 4-64 internal expenses see internal charges on Job Cost reports 8-10, 8-11 printing reports 4-65, 4-66 viewing expenses on job tickets 3-44exporting accounts from the Budget Worksheet 7-22 from printing reports 3-46, 4-12, 4-28,
4-42, 4-60, 5-34, 6-62, 6-74, 7-26
F
federal tax ID number entering 9-46, 9-47 on vendors 9-34, 9-35 printing on 1099 reports, forms 4-43fields, user-defined see user fieldsfilter accounts on Budget Worksheet 7-22, 7-23final estimate 3-18finance charges adding invoices for 6-52, 6-53 billing separately 6-52, 6-53 monthly rate setting for clients 6-12 on A/R aging reports 8-15 setting rates on A/R invoices 6-28financial accounting 7-4financial statements 8-4, 8-5, 8-24—8-27finding A/P invoices 4-16, 4-17 A/R invoices 6-32, 6-33 broadcast media plans 5-16, 5-17 checks 4-44, 4-45 client payments 6-66 clients 6-6 expenses 4-61 G/L journal entries 7-10, 7-11 jobs 3-8, 3-9 media estimates 5-14, 5-15 print media plans 5-18, 5-19 purchase orders 4-6, 4-7 staff 9-24 time 4-34, 4-35 vendors 9-32 internal charges 4-69 media briefs 5-12 insertion orders 5-20, 5-21 broadcast orders 5-20, 5-21 see also lookup listsfinished checkbox on job schedules 3-28, 3-29 on job tasks 3-12 on Work To Do window 3-40finished date on job schedules 3-28, 3-29 on job tasks 3-12fiscal year description 7-7

9
changing 9-49 closing 7-40, 7-41 comparing G/L totals for 7-23, 8-25, 8-26 entering account period 9-49 first day of 9-49 printing reports for 7-26, 7-27, 8-24—8-26 setting defaults in Preferences 9-49 vs. calendar year 7-7 see also account periodsflight dates on A/R media invoices 6-44 on broadcast media plans 5-16, 5-17 on broadcast orders 5-22flow charts 1-12, 1-13, 5-9fonts installing see Installation Guideformatting A/R invoices 6-32, 6-33 estimates 3-19forms, ordering preprinted checks 4-58free-lancers 9-24, 9-25 comparing productivity of 8-22 entering freelance hours 4-32, 4-33 freelance time vs. staff time 4-32 option on Staff window 9-26, 9-27 printing productivity reports for 8-22, 8-23
G
G/L account classes see account classesG/L accounts see chart of accountsG/L budgets editing one account’s budget 7-18, 7-19 editing the budget worksheet 7-22, 7-23 printing budget vs. actual reports 8-26 user access privileges to 9-16, 9-17G/L Tools 7-28, 7-29 Add adjusting JEs 7-28, 7-29, 7-33 Close year 7-28, 7-29, 7-40, 7-41 G/L reconciliation 7-28, 7-29, 7-34 Import payroll 7-28—7-31 Out of balance checker 7-28, 7-29, 7-35 Overhead allocation worksheet 7-28, 7-29, 7-38, 7-39 The Auditor 7-28, 7-29, 7-36, 7-37 Transfer account balances 7-28, 7-29, 7-32Gaant chart see timelinegeneral journal adding entries to 7-24, 7-25 printing 7-26, 7-27General Ledger overview 7-4—7-7 accounting periods and 7-4—7-8 and agings 8-12—8-15
allocating overhead see overhead auditing 7-5 automatic vs. manual 7-4 cash vs. accrual 7-4 departments and 7-4, 7-5, 7-14 disabling 9-49 entries see journal entries finding JEs 7-10, 7-11 job costing and 7-5, 7-6 limiting user access to 9-16, 9-17 media accruals and 4-15, 4-22, 4-23, 5-8 overhead accounting 7-5, 7-6 payroll 7-6, 7-7 see also payroll posting into 7-4, 7-5 printing reports 7-26, 7-27 window 7-8 profit centers 7-4, 7-5, 7-12, 7-13 see also profit centers reconciling G/L accounts 7-28, 7-29, 7-34 reference numbers 7-10, 7-11, 7-24 sales tax and 7-7 see also sales tax setting preferences 9-47 the General Ledger window 7-10, 7-11 G/L Tools 7-28, 7-29 verify 7-10, 7-11 WIP and 7-6 see also work in progress year-end closing 7-7, 7-28, 7-29, 7-
40, 7-41 see also chart of accounts; depart- ments; financial accountingGeneral preferences 9-8, 9-9getting started 2-20, 2-21Glossary A-1, A-2, A3graphs A/P balances on aging report 8-12 A/R balances on aging report 8-14 client budgets 6-20 client stats 6-21 staff stats 9-26 vendor stats 9-33graphics on reports see logogross amounts hiding amounts on POs 4-10 limiting user access to seeing 9-14, 9-15 on A/P invoices 4-16—4-19, 4-22,
4-23 on broadcast media plans 5-16, 5-17 on broadcast orders 5-20, 5-21 on checks for job costs 4-50, 4-51 on imported time 4-38 on in-house expenses 4-64 on insertion orders 5-20, 5-21, 5-24, 5-25 on internal charges 4-68, 4-69 on job cost transfers 4-66, 4-67 on media estimates 5-14, 5-15
on print media plans 5-18, 5-19 on time sheets 4-34, 4-35 on times/programs 5-28 show gross amount only option 8-10 vs. net amounts 4-4 see also net amounts; commissions;
markupsgross margin 7-6, 8-18 on job reports 3-46, 3-47 on profitability reports 8-18, 8-19 vs. net income 8-18gross profit on job Snapshot 3-45groups limiting user task lookup to 9-12 looking up 2-7 on A/R invoices 6-60, 6-61 on estimates 3-19, 3-21 on job tasks 3-12—3-14 on tasks in the Task Table 9-40, 9-41 subtotaling tasks by on A/R invoices 6-60, 6-61 on estimates 3-19
H
handwritten checks 4-42, 4-43, 4-46, 4-50, 4-52, 4-54
hardware see Installation Guideheading on estimates 3-19 setting the default heading 9-49 setting on job type/spec sheets
9-42, 9-43 on invoices setting the default heading 9-49 sub-heading on financials 8-24help showing the Help bar 2-5hide rates on time sheets user access privi-
lege 9-14hiding billing amounts on printed invoices 6-60 G/L accounts on financials 7-20, 7-21 gross amounts on POs 4-10 tasks on printed estimates 3-19history see job diary; client diary; account historyhistory pop-up menu 3-8, 4-6, 4-16, 4-42, 5-14—5-21, 6-32, 6-66, 7-10 holidays, scheduling 9-49 blocking on job schedules 9-49hourly rate see cost rates; billing rateshours billable hours by staff member 8-23 see also staff stats day’s hours = planned hours option 9-28 entering on time cards 4-30, 4-31 entering on time sheets 4-36, 4-37 estimated hours on Job Tickets 3-9

10
hours billed on A/R line items 6-34, 6-38, 6-40, 6-42 on time entries 4-31 on change orders 3-33 on estimates, showing 3-18, 3-19 on imported time entries 4-38, 4-39 on job Snapshot window 3-45 on the estimate worksheet 3-18 planned hours planned vs. actual 4-33, 9-26 see also TimeCop show estimated hours option on estimates 3-19 on invoices 6-60 show hours billed on printed invoice
option 6-60 showing hours on printed estimates 3-19, 3-21 on printed invoices 6-61hours to go 4-30, 4-31hours worked see productivityhours worksheet see job snapshot
I
icons pasting icons on tasks in the Task
Table 9-41
ID number see account numbersimporting budget worksheet 7-22 credit card statements 4-26—4-27 internal charge items 4-68 job templates 9-42, 9-43 payroll 7-28—7-31 setting user access privilege for
importing payroll 9-16, 9-17 time entries 4-38, 4-39 setting user access privilege for
importing time 9-14, 9-15inactive clients 6-8 G/L accounts 7-20 staff members 9-26, 9-27 vendors 9-32in-house clients 6-6—6-8in-house expenses 4-64, 4-65 adding 4-65, 4-66 editing, deleting 4-65, 4-66 printing expense reports 4-65income description 7-4, 7-16 entering beginning balances for 7-16 classifying 7-16 entering budgets 7-22, 7-23 see also
budgets viewing account balances 7-18 see also chart of accounts
include on year-end 1099 report option for checks 4-45—4-46, 4-50—4-53 setting defaults for vendors 9-25, 9-35 see also 1099sIncome Statement 8-24, 8-25Information Center adding a staff photo to 9-33, 9-36 choosing one 2-6, 9-8, 9-9 disabling 9-47 entering the animated message 9-36, 9-46, 9-47 opening 2-6 using shorcuts 9-34, 9-35initial budget 3-10, 3-11initials entering at startup 2-5 setting up for users 9-6 setting up for staff members 9-17,
9-26 see also passwordsinsertion orders 5-20, 5-21, 5-24, 5-25 overview 5-20, 5-21 adding 5-24, 5-25 adding buys to 5-20 cloning 5-20 editing, deleting 5-20 make goods 5-20, 5-21, 5-32 making from media estimates 5-14 making from print media plans 5-18 materials due date 5-25 pre-billing 5-20 printing 5-21 space closing date 5-25 updating status of 5-21 see also media; purchase ordersinstallation see Installation Guideinstructions, special on a job work order 3-9, 3-47 on purchase orders 4-7interface, media see Media Linkinternal charges 4-68, 4-69 adding internal charges 4-68, 4-69 printing internal charges price list 4-68 internal expense reports 4-69Introduce yourself window 1-5invoice numbers entering a starting A/R number 9-49 on A/P invoices 4-18—4-22 on A/R invoices 6-32—6-55invoice options setting defaults in Preferences 9-49 editing options on invoices 6-33invoices A/P 4-14 accounting periods and 4-18— 4-28 adding job cost invoices 4-18, 4-19 overhead invoices 4-20, 4-21 media accrual invoices 4-22, 4-23
adding cost amounts to 4-17 cloning 4-16 commissionable net and 4-19 deleting 4-16 discounts, entering 4-17, 4-18, 4-
20, 4-22 editing 4-16 editing cost amounts 4-17 jobs and tasks on 4-16—4-19 net and gross amounts on 4-17, 4-
19, 4-23 POs and 4-17, 4-19, 4-21 printing reports for 4-28, 4-29 reconciling POs with 4-19 recurring entries for 9-32 redistributing 4-16 removing costs see redistributing terms 4-17, 4-18, 4-20, 4-22 vendors on 4-17, 4-18, 4-20, 4-22 see also A/P A/R accounting periods and 6-34— 6-55 adding billing amounts to invoices 6-32—6-34
adding invoices advance billings 6-48, 6-49 auto-billings 6-54, 6-55 estimate billings 6-36, 6-37 finance charges 6-52, 6-53 for a job’s WIP 3-38, 3-39 job billings 6-34, 6-35 media billings 6-44, 6-45 miscellaneous billings 6-50, 6-51 multi-job billings 6-42, 6-43 progress/final billings 6-38, 6-39 retainer billings 6-46, 6-47 automatically billing jobs 6-54, 6-55 bill to address 6-12 clients on 6-32—6-55 credit memo 6-28 deleting 6-32 deleting all unposted invoices 6-32 discounts 6-66, 6-67, 6-70, 6-71 editing 6-32 billing amounts 6-31, 6-32 finance charges 6-12, 6-52 formatting invoices 9-49 margins, customization 9-49 options for 9-49 posting 1-11 see also
unposting printing billing previews 6-60 billing reports 6-62—6-63 copies to option 6-29, 6-31 invoice detail reports 6-60 invoices 6-60

11
iPhone web access 9-54issue date on A/R media invoices 6-44 on insertion orders 5-20 on media estimates 5-14, 5-15item descriptions on A/R billing amounts 6-33 on in-house expense 4-66 on internal charges 4-68 on purchase orders 4-7 setting defaults on PO templates 9-44, 9-45items see internal charges
J
JEs see journal entriesjob assets 3-42—3-43 acquisition date 3-42 asset ownership 3-42 job asset info 3-42 location 3-42, 9-49 opening asset file from C&P 3-43 protecting 3-42 setting up server for 9-47 thumbnail of 3-42, 3-43 usage restrictions for 3-42job bag see job ticketsjob billing 6-34, 6-35Job Cost reports 8-10job cost transfers 4-66, 4-67job costing overview 1-13 and purchase orders 4-4 and the General Ledger 7-6 for in-house expenses 4-66 for media buys 4-22, 4-23 for vendor buyouts 4-18, 4-50 for staff time 4-30 - 4-41 for freelance time 4-32, 4-33 for costs paid by check 4-50 see also cost ratesjob diary overview 3-7, 3-9, 3-45 adding diary entries 3-45 printing diary entries for a deleted job 3-45 one job’s diary 3-45job dockets see job ticketsjob e-mail see C&P MailJob Hot Sheet 8-6, 8-7job jackets see job ticketsjob name/title 3-9job numbers automatic numbering 3-6, 6-54 last job number for client 6-7 on A/P invoices 4-16 - 4-19 on A/R invoices 6-32—6-54 on broadcast media plans 5-16, 5-17 on broadcast orders 5-22 on checks 4-51 on employee expense reports 4-66
on in-house expenses 4-69 on insertion orders 5-22 on internal charges 4-69 on job cost transfers 4-70 on jobs 3-7 - 3-10 on journal entries 7-11 on purchase orders 4-7—4-9 on time cards 4-31 on time sheets 4-35, 4-37Job preferences 9-49Job Profitability 8-18, 8-19, 8-20 vs. agency profitability 8-18 vs. income statement 8-18job progress 3-9job reports printing a job’s cost report 3-46, 3-47 printing change orders 3-46, 3-48 printing estimates 3-20 printing job analysis reports 3-46, 3-
49 printing job lists 3-46, 3-48 printing job schedules 3-29 printing job summaries 3-46, 3-47 printing job timelines 3-30 printing production reports 3-46, 3-47 printing the Daily Job Status report 3-25 printing the job ticket 3-46, 3-47 printing the print specs form 3-22 printing the Weekly Traffic report 3-25 printing work orders 3-46, 3-47 printing Work To Do reports 3-40job see job ticketsjob scheduling see scheduling, jobjob scheduling preferences 9-47job snapshot 3-45job tasks overview 3-12 active 9-39 adding new tasks to jobs 3-14 from the estimate window 3-18 from the Job Ticket window 3-8 from the schedule window 3-28 always unbillable option 3-10 always use billing rate option 3-13 billing rates for 9-39 cGL 3-13, 9-39 description 3-12, 9-37 editing 3-12, 9-37 showing on estimates, invoices 3-12 dGL 3-13, 9-39 due date 3-27 editing 3-12, 9-39 estimate/billing tasks 3-12 estimated hours 3-9, 3-19 estimating 3-9, 3-18 finished checkbox 3-12 finished date 3-29 updating from time cards and time
sheets 4-31 updating from Work to Do window
3-40 grouping and sorting 2-13, 3-12 hiding on printed estimates 3-13, 3-19 icon 3-12, 9-39 kind setting 3-13, 9-39 lead time 3-29, 9-39 looking up 3-15 marking as finished 3-12 markup 3-13, 9-39 media commission for 3-12 name 3-12 on A/R invoices 6-32—6-43, 6-60 on job costs on A/P invoices 4-17, 4-19, 4-27 on broadcast media plans 5-16 on broadcast orders 5-22 on checks 4-50 on employee expense reports 4-65 on insertion orders 5-24 on internal charges 4-68, 4-69 on job cost transfers 4-70 on media estimates 5-14 on print media plans 5-18 on purchase orders 4-7, 4-8, 4-9 on time cards 4-31 on time sheets 4-35, 4-37 on jobs 3-9 profit center 7-12, 9-37 reassigning deadlines 3-28, 3-29 removing tasks from jobs 3-8 from the estimate window 3-18 from the Job Ticket window 3-8 from the schedule window 3-28 roll-up option 3-12 sales tax for 3-12, 9-39 schedules ballpark 3-28 clearing dates from 3-28, 3-30 rescheduling 3-31 see also scheduling scheduling 3-12 show description option 3-12 sorting and grouping 2-13, 3-12, 3-13 special instructions 3-29 start date 3-26, 3-29, 3-31 rescheduling 3-31 status 3-13 steps 3-29 sub-tasks 3-28 taxable, nontaxable 3-13 see also sales tax update existing job tasks 9-39 viewing billings for 3-44 viewing costs for 3-44 viewing POs for 3-44job templates applying to new jobs 3-10 setting up 9-40 see also job types/spec sheetsjob tickets overview 3-6 adding new jobs 3-10

12
adding tasks 3-8, 3-14 see also job tasks AE/team and 3-9, 3-10 always unbillable option 3-10, 3-12 always use billing rate option 3-12 and projects 3-9 assigned to see traffic assignments assigning clients to 3-8, 3-10 billable label 3-9, 3-10 billed amounts on 3-9 billing for costs 4-18, 6-26 billing information 6-5, 6-6 change orders overview 3-7, 3-32 adding 3-32, 3-33 printing 3-32 reviewing 8-11 see also change orders cloning 3-8 closed checkbox 3-9 closing to close a job 3-9 setting the default “closed” status
code 9-49 can’t close jobs preferences 9-49 see also reopening jobs
contacts 3-9—3-10 cost centers 3-11 creative brief 3-16 dates date added 3-26 date closed 3-26 date opened see date added due date 3-9, 3-10, 3-26, 3-28 last billing date 3-45 start date 3-9, 3-10, 3-26, 3-29, 3-31 deleting 3-8 and the job diary 3-9, 3-45 tasks see removing job tasks description 3-10, 3-12 due date 3-9, 3-10, 3-26, 3-28 see also dates e-mail when a job opens 3-7 when the status changes 3-7 when the job is billed 6-5 editing 3-8, 3-12 estimates overview 1-12 approvals 3-19 disclaimers 3-19 display options 3-19 entering estimate amounts 3-18 estimate options 3-19 heading 3-19 printing 3-20 revising 3-18 setting default estimate options 9-42 setting estimate options on job
type/spec sheets 9-42
see also estimates; jobs finding 3-9 names/titles 3-9, 3-10 numbering 3-6, 3-9, 3-10 setting the auto-numbering format
9-47 opening new jobs see adding new jobs 3-10 preferences, setting 9-49 printing 3-9 printing a job’s cost report 3-47,
8-10 printing change orders 3-32 printing estimates 3-20 printing job accounting 3-46, 3-47 printing job analysis reports 3-49 printing job lists 3-48 printing job schedules 3-29, 3-47 printing job summary 3-47 printing production reports 3-47 printing the Daily Job Status report 3-38 printing the job ticket 3-47 printing the print specs form 3-22 printing the Weekly Traffic report
3-25, 3-36 printing work orders 3-47 printing Work To Do reports 3-40 printing specifications 3-22 profit center 3-11, 7-12 see also profit centers progress, tracking 3-9 projects 3-9, 3-11 printing project estimates 3-20 see also client projects reopening jobs see reopening jobs 3-9 restricting access to 3-7 revising estimates 3-18 see also estimating schedules overview 1-12 assigning resources 3-28, 3-29 auto-scheduling 3-28 ballpark scheduling 3-28 calendar 3-29 entering due dates for job tasks 3-29 estimated hours on 3-29 finished date entering dates for 3-12 can’t close jobs with unfinished
tasks preference 9-49 lead time 3-29 looking up resource schedules 3-29 looking up task schedules 3-29 printing one job’s schedule 3-29 job schedule reports 3-47 work to do 3-40 rescheduling tasks 3-28
special instructions 3-29 see also scheduling; traffic setting up templates for 9-40 snapshot window 3-9 specs 3-9 start date 3-9, 3-10, 3-26, 3-29 see also dates status see billing status; production;
status; status codes toolbar buttons 3-8 traffic assigned to name 3-9, 3-27 client status notes/next steps 3-27 milestones 3-24, 3-27, 9-40 status 3-26 status note 3-27 types 3-10, 9-40 unbilled amounts on 3-9 updating status for 3-26 updating traffic for 3-27 user-defined fields see user fields WIP 3-8, 8-8 work order 3-9job tracking analyzing unbilled costs 3-9 analyzing work in progress 3-9, 8-8 printing job accounting reports 3-46,
3-47 printing the Billing Hot Sheet 8-9 reviewing a job’s billings to date 3-9 reviewing a job’s costs 3-9 reviewing a job’s open orders 3-9 seeing the job snapshot 3-9 unfinished job tasks 3-40, 8-7 viewing job progress 3-8job types/spec sheets description 3-7, 9-42 changing on existing jobs 3-8 on new jobs 3-10 printing reports for 3-49 sorting jobs on Update Traffic by 3-36 setting up 9-40journal entries accounting periods and 7-8 adding 7-10, 7-24 adjusting JEs 7-32, 7-33, 7-37 auto-reversing 7-24 cloning 7-10 deleting 7-10 description 7-25 editing 7-10 entry dates and 7-11 finding 7-11 numbering 9-49 posting 7-9, 7-10 printing 7-10 proofing 7-9 recurring 7-24 reference numbers 7-11

13
verifying journal entries 7-10journals adding G/L entries into 7-24 printing A/P journals 4-17 printing A/R journals 6-31 printing cash disbursement (check-
book) journals 4-44 printing cash receipts (client pay-
ments) journals 7-10 printing G/L journals 7-10
K
keyboard shortcuts 1-8, 1-9key contact, client 6-8kind on tasks in the Task Table 3-15 on job tasks 3-13
L
labels printing client labels 6-6 printing vendor labels 9-32labor on Client P&L reports 8-18, 8-25 on overhead allocation worksheet 7-
39lead time on job schedules 3-29 on job tasks 3-29 on job templates 9-41 on tasks in the Task Table 9-41liabilities entering beginning balances for 2-18 current liabilities subclass 2-11 long-term liabilities subclass 2-11line items on A/P invoices 4-17 on A/R invoices 6-33 on broadcast orders 5-21 on checks 4-45 on client payments 6-67 on insertion orders 5-21 on purchase orders 4-7line numbers on A/P invoices 4-17, 4-19, 4-21 on insertion orders 5-21 on media accrual invoices 4-25 on purchase orders 4-7logo pasting logos on broadcast orders 9-49 pasting logos onto estimates 9-49 pasting logos onto insertion orders 9-49 pasting logos onto invoices 9-49 pasting logos onto purchase orders 9-49long-term liabilities
entering beginning balances for 2-18 long-term liabilities subclass 2-11lookup lists 1-9
M
Mac OS see Installation Guidemailing labels see labelsmake broadcast order 5-20—5-23make insertion order 5-20—5-25make one invoice per client option 6-55makegoods 5-21managers, system access privileges for 9-4 vs. users 9-4margins on estimates 9-49 on invoices 9-49 on purchase orders 9-49markups on A/P invoices 4-19 on checks 4-51 on clients 6-10 on expenses 4-64 on estimates 3-18 on job tasks 3-13 on tasks in the Task Table 9-41 on vendors 9-30, 9-35 on purchase orders 4-8, 4-9 vs. commissions 9-30 setting the standard markup in Preferences 9-30, 9-35materials due on broadcast orders 5-23 on insertion orders 5-25 printing reports showing 5-35materials see expensesmedia overview 5-3—5-8 ad sizes 5-15, 5-21, 5-24, 5-30 adding A/P invoices for 4-22 see also media accruals and the General Ledger 5-6, 5-8 billing 5-6 adding A/R media invoices 6-44 pre-billing 5-20, 5-21 see also accounts receivable broadcast media plans 5-16, 5-17 adding 5-16 adding media buys to 5-16 editing, deleting 5-16 finding 5-17 making broadcast orders from 5-17 printing 5-16 broadcast orders 5-20—5-23 calendar 5-10, 5-11 adding entries for 5-10 printing 5-11 sending reminder e-mail 5-10 showing different months 5-11
commissions on broadcast media plans 5-16 on broadcast orders 5-22 on insertion orders 5-25 on job tasks 3-13 on media estimates 5-14 on print media plans 5-18 on publications 5-31 on stations 5-29 on vendors 9-33 estimates 5-4, 5-6, 5-14, 5-15 adding 5-14 adding media buys to 5-14 editing, deleting 5-14 finding 5-15 making insertion orders from 5-14 printing 5-15 flow chart 5-9 goals 5-7, 5-33 insertion orders 5-20—5-25
interface to media buying systems see Media Link
job numbers on 5-24 link see Media Link
media goals 5-33 media accruals see media accruals pre-billing from orders 5-20 preferences 9-47 print media plans 5-18, 5-19 adding 5-18 adding media buys to 5-18 editing, deleting 5-18 finding 5-19 making insertion orders from 5-18 printing 5-19 publications 5-30, 5-31 setting up ad sizes for 5-30 using on media estimates 5-6, 5-15 using on print media plans 5-19 recap 8-29 reports 5-34, 8-28 stations 5-28 setting up times/programs for 5-28 using on broadcast plans 5-17 times/programs 5-28 vendors setting up media rep info 9-35 see also broadcast orders see also insertion ordersmedia accruals 4-22, 4-23 A/R invoices and media accruals 6-44 and the General Ledger 4-23 enabling automatic media accruals 9-47 entering media accrual invoices 4-22,
4-23 setting default media accrual G/L accounts 9-49media billing see mediamedia calendar 5-10—5-11

14
media estimates 5-4, 5-5, 5-6, 5-14, 5-15 adding 5-14 adding media buys to 5-14 cloning 5-14 editing, deleting 5-14 finding 5-15 making insertion orders from 5-14 printing 5-15 vs. media plans 5-4Media Link 5-5, 5-6memo on checks see check memo on job cost transfers 4-70menus using 1-8, 1-9 setting user access privileges to 9-10 keyboard shortcuts for 1-8, 1-9messages daily messages for Info. Center 9-36 missing time 9-49 on budget alerts 9-21 on client e-mail alerts 6-25 on job e-mail alerts 6-22 system manager help e-mail 9-49mileage, job costing for 4-64, 4-66milestones description 3-24 on job type/spec sheets 9-42 on jobs 3-24 printing milestone reports 3-26, 3-36 setting up default milestones 9-42 updating for many jobs 9-42 updating for one job 3-27 updating from time cards 4-31 updating from time sheets 4-36miscellaneous billing 6-48month see accounting periodsmulti-job billing 6-40
N name/title on broadcast media plans 5-17 on jobs 3-10 on print media plans 5-19names changing in Preferences 9-49 client names 6-7, 6-8 company name 9-46 vendor names 9-30net amounts see net costsnet costs on A/P invoices 4-17 on expenses 4-64, 4-67 on insertion orders 5-21 on internal charges 4-68, 4-69 on job cost transfers 4-71 on purchase orders 4-7 on time sheets 4-35 show cost amounts access privilege 9-14 see also media commissions
net income 8-25net worth see financialsnetworking Clients & Profits see Installation
Guidenew company, setting up see Installation
Guidenew database, creating see Installation
Guidenew job status enabling “new” status e-mail 9-39 entering on new jobs 3-10 setting defaults 9-49next A/R# setting 9-49next JE# setting 9-49no access option 6-9, 9-9nontaxable A/R line items 6-28 job tasks 3-13 setting clients as 6-6note when status changes option 3-26notes about clients 6-7 about staff 9-27 about vendors 9-33 on A/R invoices 6-33 on time sheets 4-36notes button on time sheets 4-36notify cash flash e-mail 8-16 client diary e-mail 6-13 client e-mail 6-5—6-8 missing daily time e-mail 4-33 over-budget job tasks e-mail 9-49 overdue jobs 9-49 status e-mail 9-39numbering G/L accounts 7-8numbering jobs automatic vs. manual 3-6 changing a job number 3-6 preventing duplicates 9-49 renumbering jobs 3-6 setting the client’s next job number 9-49 setting up automatic job numbering 9-49numbers A/P invoice 4-17, 4-18, 4-20, 4-22 A/R invoice 6-32—6-54 broadcast media plan 5-17 broadcast order 5-21, 9-47 check 4-45, 4-46 on client payments 6-67, 6-69 client 6-4 department 7-14 expense 4-64 G/L account 7-10, 7-11 insertion order 5-21, 5-24, 9-49 job 3-9, 9-49 see also numbering jobs journal entries 7-10, 7-11 media estimate 5-15
office 9-46 print media plan 5-19 profit center 7-12, 7-13 purchase order 4-7, 4-8 vendor 9-30 see also account numbers
O
office number 9-46on-hold vendor 9-34Open Database see Installation Guideon-line help 1-2online payment, adding 4-56open invoices see unpaid invoicesopen purchase orders 4-13opening balances see beginning balancesoptions on A/R invoices 6-31 on estimates 3-18, 3-19 on G/L accounts 9-49 on job type/spec sheets 9-42 on purchase orders 4-7 setting default estimate options 9-49 setting default invoice options 9-49ordered by 4-7, 5-21, 5-24ordered on IO# 5-15ordering checks 4-58orders see purchase orders; insertion orders;
broadcast ordersorganization name for clients 6-7, 6-8 in Agency Information 9-46OT option on time cards 4-29Other Expenses 9-49Other Income 9-49Out of Balance Checker 7-35overdue invoices see agingsoverdue job tasks see work to dooverhead allocation worksheet 7-38overhead expenses entering JEs 7-24, 7-25 entering overhead invoices 4-20, 4-21 writing overhead checks 4-52, 4-53overtime entering on time cards 4-31 entering on time sheets 4-37 printing overtime reports 8-22, 8-23 setting overtime rates 9-25
P
P&L see profit and loss reportsPalm O/S interface 6-36—6-37partial payments on A/R invoices 6-66—6-71 on A/P invoices 4-47, 4-49passing expenses through from a vendor 4-18passwords entering at startup 2-10

15
expiration date for 9-8 setting up 9-8pay dates on A/P invoices 4-17, 4-18, 4-20, 4-
22 on A/R invoices 6-33payables see Accounts Payablepaychecks see payrollpayment date 6-67payment e-mail sending when a client payment is received 6-23payment reminders see cash f lashpayment terms on A/P invoices 4-17, 4-18, 4-20, 4-
22 on A/R invoices 6-30—6-50 setting default on client accounts 6-
10payment type 6-64—6-68payments, client see client paymentspayments, vendor see checkspayroll 7-6 expenses on client P&L 8-25 importing 7-30, 7-31 journal entries for 7-10periods see accounting periodsphases see milestonesphone numbers for media reps 5-29, 5-31 on client accounts 6-8, 6-10, 6-11 on job tickets 3-9 on vendor accounts 9-33 setting in Agency Information 9-44photo for staff members 9-27 on Information Center window 9-36 on job work orders 3-7, 3-9pictures for job photo 3-7, 3-9 for staff members 9-27 for status alert 9-38 on Information Center 9-36planned hours entering for staff members 9-26 on time cards 4-31 vs. actual hours (graph) 9-26PO numbers on A/P invoices 4-18, 4-20 on A/R invoices 6-32—6-52 on clients (“blanket PO”) 6-12 on purchase orders 4-7, 4-8 setting the next number 9-47PO templates setting up 9-44 applying to new POs 4-8pop-up A/P note (vendor) 9-32postpone 3-34—3-35posting A/P invoices 1-11, 4-14 A/R invoices 1-11
and the General Ledger 7-9 checks 1-11, 4-42 client payments 6-64, 6-66, 6-67 G/L journal entries 7-9 limiting user access to 9-11 unposting see unpostingpreferences accounting 9-51 accounting periods 9-51 agency information 9-51 billing 9-51 broadcast orders 9-51 C&P e-mail 9-51 estimate options 9-51 G/L account classes 9-51 G/L accounts 9-51 general 9-51 insertion orders 9-51 Introduce Yourself graphic 9-51 invoice options 9-51 job numbering 9-51 job scheduling 9-51 jobs 9-51 names 9-51 purchase orders 9-51 sales tax 9-51 status codes 9-51prepayments 6-65preset G/L accounts see defaultsPreview Alert button 9-38preview, billing see billing previewprices, for internal charge items 4-68print copies to see copies to optionprint insertion orders see insertion ordersprint media plans overview 5-4, 5-5 adding 5-18 adding buys to 5-18 edit dates 5-18 editing, deleting 5-18 finding 5-19 kind 5-19 make insertion orders from 5-18 printing 5-19print plans see media plansprint specifications 3-22printing audit trails 7-26, 7-27 broadcast orders 5-21 checks 4-44, 4-58 estimates 3-20 financials 8-24 from lookup lists 1-7 insertion orders 5-21 invoices 6-60 laser printers vs. ink jet printers 4-58 letterhead, printing on 6-50, 9-49 logos on broadcast orders 9-49 on estimates 9-49 on insertion orders 9-49 on invoices 9-49
on purchase orders 9-49 purchase orders 4-10 reports 1-11prioritzing jobs 3-34—3-35Production Planner 3-34—3-35production reports 8-6, 8-7production status overview 3-7 auto-billing and 6-54 defaults 9-49 printing job lists for 3-46, 8-6 status alert for 9-38 updating billing status for one job 3-26, 3-27 updating billing status for many jobs 3-38 see also status; status tableproductivity reports 8-22, 8-23products see internal charge itemsprofit and loss reports printing job P&L 8-18 printing client P&L 8-18 overhead allocation on 7-38 vs. the Income Statement 8-18profit centers description 7-12 adding 7-13 customizing the word “profit center” 7-12 editing, deleting 7-13 looking up 1-9 numbering 7-13 on clients 6-8 on G/L accounts 7-18, 7-19, 7-20 on job tickets 3-11, 7-12 on staff members 7-12 on tasks in the Task Table 7-12, 9-40 printing list of 7-13 productivity by 8-23 profitability by 8-20 financials for 8-24 setting up 7-13profit worksheet see job snapshotprofitability reports 8-18, 8-19 and cost rates 8-19 and job costing 8-19 client profitability 8-20 Gross Margin report 8-20 job profitability 8-20 vs. agency profitability 8-18 vs. income statement 8-18 profit centers 8-19 tips 8-19programs see times/programsprogress, job see job progressprogress/final billing 6-36, 6-37projects, client entering on new jobs 3-11 looking up 6-12 printing reports for 3-49 setting up 6-14

16
proof lists always print to printer preference 9-9
printing for A/P invoices 1-11 printing for A/R invoices 1-11 printing for checks 4-60 printing for client payments 6-74, 6-
75 printing for expenses 4-65 printing for G/L journal entries 7-26proposals 3-4—3-5 adding 3-5 approving 3-4 budget on 3-5 cloning 3-4 creative brief on 3-5 description on 3-5 kill 3-4publications 5-4, 5-30 adding 5-30 and ad sizes for 5-30 and vendors 5-31 editing, deleting 5-30 on insertion orders 5-21, 5-24 on media estimates 5-15 on print media plans 5-19 setting up 5-31 see also ad sizes; print media plans;
insertion orderspurchase orders overview 4-4 adding 4-8 adding amounts for 4-9 and job costing 4-4 and job tickets 4-4 and the General Ledger 4-4 and WIP 4-4 applying templates 4-8 approval names 4-6 on PO templates 9-45 setting default approvals 9-49 approving 4-7 unapproving POs 4-7 billing on A/R invoices 6-39 blanket po’s 4-6, 4-8 budget alerts for 9-20 charge to many jobs and tasks option 4-8 cloning 4-6 closing 4-7 copies to 4-6 setting default copies to 9-49 deleting 4-6 delivery info 4-7 description on 4-7, 4-8 disclaimers on 4-7 setting default disclaimers 9-49 due date 4-7, 4-8 editing 4-6 finding 4-7 hold, don’t print option 4-7 limiting user access to 9-12
line numbers on 4-7 looking up 1-9 margins 9-49 markups on 4-9 net vs. gross amounts on 4-7 numbering automatically 9-49 entering numbers manually 4-8 OK’d by see approvals options 4-7 pasting a logo on 9-47 pre-billing 4-6, 4-7 preferences vs. templates 9-44, 9-49 printing copies of 4-7 purchase orders 4-10 reports 4-12 reconciling with A/P invoices 4-5 removing amounts from 4-6 rep name, phone, fax 4-7 revisions 4-7 sales tax exempt option 4-7, on PO templates 9-45 setting default preferences for 9-49 simple option 4-9 special instructions 4-6 status 4-7 show gross amounts only 4-10 total not to exceed option 9-49 updating status for 4-7 use template option 4-8 user-defined fields 4-9 on PO templates 9-49 setting defaults 9-49 vendor info 4-7 viewing POs for job tasks 3-9purge D-13, see also Utility Guide
Q
quantity on purchase orders 4-6 on internal charges 4-69quotes see estimatesquarterly reports see financialsquit times, automatic 9-9quitting Clients & Profits 1-5, 2-20
R
RAM see system requirementsrate kind on job tasks 3-13rates billing rates see billing rate cost rates see cost rate overtime see overtime sales tax see sales tax
publications 5-30 TV/radio spots
on broadcast media plans 5-17 on broadcast orders 5-21 setting up rates for times/ programs 5-28 on time sheets 4-37 see also rate kindratings on broadcast media plans 5-17 on stations 5-28ratio category 7-21reassign deadlines for one job’s tasks 3-28, 3-29recap, media see media recapreceipts, cash see client paymentsreceivables see accounts receivablereconciliation bank see bank reconciliation G/L 7-28 media 5-5recurring entries adding 7-24, 7-25 posting 1-11 printing 7-26, 7-27 see also recurring payablesrecurring payables adding in Vendors 9-32, 9-33
redistribute A/P invoices 4-16 checks 4-44 client payments 6-64register, check see checkbookreimbursable expenses charging for 4-65 job costing for 4-65reminders see cash flashremoving billing amounts from A/R invoices 6-32, 6-33 buy items from broadcast orders 5-20 buy items from insertion orders 5-20 buys from broadcast media plans 5-16 buys from media estimates 5-14 job tasks from job tickets from the Job Tickets window 3-8 from the Estimates window 3-18 order amounts from POs 4-6 print buys from media plans 5-18 sub-tasks 3-28 see also deletingrenaming job tickets 3-8 job tasks 3-12 A/R invoice tasks 6-30renumbering checks 4-58 G/L accounts 7-10 jobs 9-47reopening jobs 3-9 setting the default status for 9-49

17
reordering see sortingrep instructions 5-23rep name on broadcast orders 5-23 on publications 5-31 on stations 5-29 on vendors 9-33reports, custom see custom reportsreports custom see custom reports margins, changing on estimates 9-49 on invoices 9-49 on purchase orders 9-49 printing accounts payable 4-12 accounts receivable 6-62 audit trails 7-26 cash disbursements (checks) 4-58 cash flash 8-16 cash receipts (clients) 6-74, 6-75 client account agings 8-14, 8-15 client payments 6-74, 6-75 financial statements 8-24, 8-25, 8-26 job cost 8-10, 8-11 jobs accounting 3-46—3-48 analysis 3-46, 3-49 lists 3-46, 3-48 production 3-46, 3-47, 8-6 summaries 3-46, 3-48, 3-49 media 5-34, 5-35 pre-billing 3-49 production 3-46, 3-47, 8-6, 8-7 productivity 8-22, 8-23 profitability 8-18—8-21 purchase orders 4-12, 4-13 traffic 3-26 vendor account agings 8-12, 8-13 work in progress 8-8, 8-9reprinting checks 4-58require charge numbers 9-49require job types 9-49resource on job schedules 3-29 printing work to do for 3-41 reassigning tasks to another staffer for one job 3-29restricting access see access privilegesRetained Earnings (“999999”) description 7-17 adding a G/L account 7-16 on Close Year window 7-40, 7-41 setting the default G/L account 9-47retainers adding invoices for 6-46 aging report 8-14, 8-15 applying to invoices 6-58 printing 5-19, 6-60 scheduling for clients 6-18, 6-19
setting the default G/L account 9-51 unused retainer balance 6-19, 6-59 viewing a client’s retainer schedule 6-19reversing entries 7-24revisions on estimates 3-18 adding a new revision 3-18 recalling a previous revision 3-18 making a prior revision current 3-18 on purchase orders 4-5, 4-6, 4-7roll-up A/R invoices editing the roll-up 6-32 printing invoices with the roll-up
option 6-32 roll-up billing amounts by task
option 6-32—6-43 G/L accounts setting up roll-up accounts 7-21 printing financials with the roll-up
option 8-24 editing the roll-up for other
accounts 7-20 roll-up only account option 7-16,
7-17 roll up into option 7-20 tasks setting up roll-up tasks in the Task Table 9-41 printing estimates with roll-up
option 3-19 editing the roll-up on job tasks 3-12
S
salaries entering on the Overhead Allocation
Worksheet 7-38, 7-39 showing on the Client P&L 7-38sales see Accounts Receivablesales reports see A/R reportssales tax overview 6-30 accounting for 6-28, 7-7 applying to A/R invoices 6-29, 6-33 defaults, setting 9-49 limiting user access to 9-16 nontaxable billing amounts on A/R invoices 6-29 estimate amounts 3-13 job tasks 3-13 tasks on Task Table 9-41 on job tasks 3-13 on job type/spec sheets 9-42, 9-43 on PO templates 9-45 on purchase orders 4-9 on tasks in the Task Table 9-41
passing through to jobs 9-51 paying 6-62, 6-63
preferences 9-51 printing the sales tax report 6-62, 6-
63 rates for clients 6-12 setting default rates 9-49sales tax exempt option on purchase orders 4-9 setting defaults on PO templates 9-45saving 1-11, 2-20schedule sort 3-13 setting defaults on tasks on the Task Table 9-41scheduling, job overview 1-12, 3-28 adding subtasks 3-28 auto-scheduling 3-28 availability of staffers 3-29 backup person 9-28 ballpark scheduling 3-28 calendar 3-29 clearing dates from 3-28, 3-30 due dates 3-29 due times 3-29 entering job schedules 3-28 estimated hours on 3-29 estimates, looking up 3-29 finished date entering dates for 3-28 can’t close jobs with unfinished
tasks preference 9-47 holidays, skipping 3-29, 9-47lead time 3-29 on job templates 9-42 on tasks in the Task Table 9-41
looking up resource schedules 3-29 looking up task schedules 3-29 preferences, setting 9-49 printing job schedule 3-29 schedule chart 8-7 schedule reports 8-7 timeline 3-30 weekly traffic report 3-36 work to do reports 3-40, 8-7 reassigning deadlines 3-28, 3-29 rescheduling tasks 3-31 resources 3-29 see also staff skip Saturday/Sunday option 3-29 special instructions 3-29 staff availability on 3-29 see also availability; staff timeline 3-30 toolbar buttons 3-28 updating schedules for one job 3-28 on time cards 4-31 on time sheets 4-36 on the Weekly Task Planner 3-36

18
screen, print to user setting 9-8searching see findingSend Help e-mail 9-48serial number 9-46, 9-47 see also Installation Guidesetting up agency information 9-46, 9-47 beginning balances for clients 2-18 for G/L accounts 2-18 for unbilled job costs 2-19 for vendors 2-12, 2-17 chart of accounts 7-16—7-19 clients 6-8 defaults 9-49 estimate options 9-49 groups 9-40 invoice options 9-49 open jobs 2-16 sales tax rates 9-49 staff members 9-26, 9-27 status codes 9-38 tasks 9-40 vendors 9-32, 9-33share pictures between Macs and PCs pref-
erence 9-49ship to address on PO templates 9-44, 9-45 on purchase orders 4-6, 4-7show estimated hours option 3-19show hours billed option 6-38, 6-39show info center option 9-8show zero as option on printed estimates 3-19simple POs 4-8size, for internal charge items 4-64, 4-65SmartPlus see Media LinkSMTP server 9-46, 9-50snapshot, job 3-45Snapshots reports 8-4, 8-5 Cash Flash 8-4, 8-5, 8-16, 8-17 Client Account Aging 8-4, 8-5, 8-14, 8-15 Financials 8-4, 8-5, 8-24, 8-25, 8-26 Job Costs 8-4, 8-5, 8-10, 8-11 Media Analysis 8-4, 8-5, 8-28,
8-29 Production 8-4, 8-5, 8-6, 8-7 Productivity 8-4, 8-5, 8-22, 8-23 Profitability 8-4, 8-5, 8-18—8-20 tips 8-4 Vendor Account Aging 8-4, 8-5, 8-12,
8-13 vs. other reports 8-4 Work in Progress 8-4, 8-5, 8-8, 8-9sort on schedule option 9-41 on tasks in the Task Table 9-41sorting G/L accounts 7-19 see also roll-up job tasks on estimates 3-18, 3-19 job tasks on schedules 3-28, 3-29
tasks on the Task Table 9-40, 9-41space closing on broadcast orders 5-20, 5-21 on insertion orders 5-20, 5-21, 5-24, 5-25 printing reports showing 5-35 spec sheets adding 9-42 applying to jobs 3-10 edit, delete 9-42 see also job type/spec sheetspecial billing rates see rates 6-12, 9-24, 9-25specs job specs 3-8, 3-10 on purchase orders 4-7, 8-6 print specifications 3-8, 9-24, 9-25 showing on printed estimates 3-12 task specs 3-12spell checker 9-51split payment option 6-64, 6-65, 6-68, 6-71staff description 9-24 access privileges to C&P see users active 9-26, 9-27 adding 9-26 availability 9-26, 9-28, 9-29 billing rates for 9-24—9-26 client/staff access privileges 6-9 cost rates for 9-24, 9-25 e-mail address 9-26, 9-27 editing, deleting 9-26 entering time for 4-30, 4-31, 4-36, 4-37 freelance option 9-26 inactive 9-26, 9-27 looking up 2-7 on time cards 4-30 on time sheets 4-34, 4-36, 4-38 photos 9-28, 9-29 printing productivity reports for 8-22,
8-23 printing time reports for 4-40, 4-41 profit centers, assigning to 7-12, 9-26,
9-27 teams, assigning to 9-26, 9-27 vs. users 9-4 see also resource; usersstandard billing rate, client 6-12standard markup 9-49standard markup, client 6-12start date on jobs 3-8—3-10, 3-26—3-30 on job tasks 3-28—3-31start timer 4-30, 4-31starting Clients & Profits 2-4, 2-5state/prov tax ID# 9-46, 9-47stations 5-28, 5-29 adding times/programs for 5-28 editing, deleting 5-28 entering on broadcast media plans 5-16, 5-17
setting up 5-29 see also times/programs; broadcast media plans; broadcast ordersstats client 6-5, 6-21 staff 9-24, 9-26 vendor 9-31, 9-33status codes see status table cost see cost status looking up status codes 9-38 note when status changes option 3-26 notifying changes via C&P mail 9-38,
9-39 on broadcast media plans 5-16, 5-17 on broadcast orders 5-20, 5-21 on insertion orders 5-20, 5-21 on job costs see also billing worksheet; job work in progress on job tasks 3-12, 3-13 on jobs 3-8, 3-9, 3-26, 3-27 updating job status 3-26, 3-27 updating job status from time cards 4-30, 4-31 on media estimates 5-14, 5-15 on print media plans 5-18, 5-19 on purchase orders 4-5, 4-6 printing job reports for 3-48 production vs. billing 3-24 updating status for many jobs 3-34, 3-35 see also status tablestatus notes printing on job reports 3-48 updating for one job 3-26, 3-27 updating from time cards 4-30, 4-31 updating from time sheets 4-36status table description 9-38 adding 9-38 alerts, enabling 9-38, 9-39 automatic e-mail, enabling 9-39 categories 9-38 edit, delete 9-38 limiting user access to 9-10, 9-11 looking up 2-7 production vs. billing 3-24 setting defaults in Preferences 9-49 updating see status warnings see alertsStrata see Media Linkstockholders Equity account 7-16stop timer 4-30stopwatch, time card 4-30subclasses 7-16 assigning to G/L accounts 7-20 setting up 7-15 see also classessub-accounts see roll-up accountssubtasks 3-28

19
Suspense account (“999998”) 7-17system manager 9-8system requirements see Installation Guide
T
tab-delimited files see exportingTapscan see Media LinkTask Table description 9-40 printing a task list 9-40 setting up 9-41 see also tasks tasks description 3-12, 3-13, 9-38 adding 9-41 adding to job templates 9-42, 9-43 adding to jobs 3-14, 3-15 editing, deleting 9-40 kind on job tasks 3-12, 3-13 on tasks in the Task Table 9-40, 9-41 looking up 3-15 on A/R invoices 6-32—6-41 on broadcast orders 5-22 on change orders 3-32, 3-33 on checks 4-52 on estimates 3-18, 3-19 on expenses 4-69 on insertion orders 5-24 on internal charge items 4-72 on jobs 3-8, 3-9, 3-12, 3-13 on purchase orders 4-7—4-10 on time cards 4-32 on time sheets 4-36 on vendors 9-34 printing 3-15, 9-40 vs. milestones 3-24 see also job taskstax ID on checks 4-46—4-55 on vendor accounts 9-34, 9-35 setting defaults for 9-46, 9-47taxable items on A/R invoices 6-30 on estimates 3-13 see also sales taxtaxes payroll see payroll sales see sales tax tax year see fiscal yearteams assigning to jobs 3-10, 3-11 assigning to staff members 9-25, 9-26 assigning to users 9-8, 9-9 see also AE/Teamtechnical support call (800) 522-2166template name 9-42, 9-43templates job
applying to new jobs 3-10 setting up job templates 9-40, 9-41 purchase order applying to new POs 4-8, 4-9 setting up PO templates 9-44, 9-45temps 9-30terminology see namesterms, payment on A/P invoices 4-16, 4-17, 4-18, 4-
20, 4-22 on A/R invoices 6-32—6-38, 6-40—6-42, 6-44, 6-46, 6-48, 6-50, 6-52 setting up for clients 6-12 setting up for vendors 9-34, 9-35time overview 4-34 and billing rates 4-34, 4-38, 4-39 and the G/L 4-34 billed status, how it is updated 4-31, 6-56, 6-57 billing time on A/R invoices 6-28 cloning 4-35 cost and billing rates see rates cost notes 4-35, 4-38 day’s hours = planned hours option 4-35, 9-28, 9-29 editing, deleting 4-34 e-mail notification of missing time 9-28, 9-29, 9-50 entering hours on estimates 3-18 entering time cards 4-32 entering time sheets 4-38 finding time on time cards 4-32 time on time sheets 4-36 setting the find by preference 9-49 freelancers and 4-34 importing 4-35, 4-36, 4-40 restricting user access to 9-14, 9-15 missing time see Time Cop on job cost reports 8-10, 8-11 on job reports 3-47, 3-48, 3-49 overtime entering on time cards 4-33 entering on time sheets 4-38 rates for staffers 9-24, 9-25 printing a time card 4-33 imported time 4-40 productivity reports 8-22, 8-23 time reports 4-42 require daily timekeeping option 9-28,
9-29 staff members and 9-24, 9-25 time cards see time cards transferring between jobs 4-73 unbillable time
making billable time unbillable 4-37 on time sheets 4-37 on imported time 4-38 printing reports for 8-22, 8-23 vs productivity reports 8-22 see also time cards; time sheets; time
reports; productivitytime cards overview 4-32 adding 4-32 browsing daily time using 4-32
entering cost notes 4-33 hours to go 4-32 overtime and 4-33 stopwatch 4-32 planned hours vs. actual hours 4-33 printing a time card 4-33 see also timeTime Cop 9-50 description 9-33 on time sheets 4-35 enabling automatic e-mail for 9-48 setting up for staff members 9-28,
9-29 see also C&P e-mailtime line 3-30, 3-31time reports 4-42 see also productivitytime sheets see timetimer see stopwatchtimes/programs and stations 5-28, 5-29 on broadcast media plans 5-16, 5-17 on A/R media invoices 6-44, 6-45 see also stations; broadcast media
plans; broadcast orderstitle for job contacts 3-10, 3-11 for staff members 9-26, 9-27 setting defaults on spec sheets 9-42,
9-43 see also job name/titleto do lists 3-40, 3-41to/from 8-16today’s hours 4-32tools check 4-45 G/L 7-28, 7-29tracking jobs archived files 3-49 estimate revisions 3-18 G/L budgets 7-22, 7-23 job costs 3-44, 3-45 job status 3-26 PO revisions 4-6, 4-7 sales tax 6-30, 6-63 staff productivity 8-22 time 4-42 unbilled job costs 3-45 WIP 3-44, 3-45, 8-8, 8-9

20
traffic overview 3-24, 3-25 assignments entering on jobs 3-8, 3-10, 3-11,
3-26, 3-27 setting defaults in Preferences 9-47 milestones 3-24, 3-25, 3-36 updating on one job 3-27 updating on many jobs 3-25, 3-36 updating from A/R 6-34—6-37, 6-40—6-43, 6-48, 6-49 updating from time cards 3-27 updating from time sheets 3-27 see also production reports; schedul-
ing; status transactions, G/L 7-8 see also journal entriesTransfer Account Balances utility 7-28,
7-29, 7-32transfer net amounts option 4-74transferring a job from one client to another 4-74
balances from one G/L account to another 7-28, 7-29, 7-32
job costs 4-52, 4-75 see also job cost transferTrial Balance 8-24, 8-25troubleshooting call (800) 522-2166TV buys see broadcast ordersTV stations see stationstypes on change orders 3-32, 3-33 on G/L journal entries 7-10, 7-11 on jobs 3-10 see also job types
U
unapproving broadcast orders 5-20, 5-21 change orders 3-32 expense reports 4-64 insertion orders 5-20, 5-21 purchase orders 4-6, 4-7 see also approving change orders;
approving POsunavailable see availabilityunbillable clients 6-8 costs on A/P invoices 4-17 on expenses 4-65 on job cost checks 4-51 on time sheets 4-37, 4-39 jobs 3-10 job tasks 3-12 tasks on the Task Table 9-39 see also always unbillable optionunbilled costs 3-44, 3-45, 8-8, 8-9, 8-19 costs for existing jobs 8-19 changing cost bill status to 3-44, 3-45
jobs 3-8 job tasks 3-44 transferring unbilled costs 4-70, 4-71 writing off unbilled costs 3-44, 3-45unfinished job tasks marking tasks as finished 3-12, 3-40 finding 3-40, 3-41 printing reports for 8-6, 8-7 and the Work to Do window 3-40, 3-
41 can’t close jobs with unfinished tasks preference 9-49unpaid invoices entering for clients 2-18 entering for vendors 2-17unpost 1-11unused retainer 6-12, 6-13, 6-19Update Traffic window 3-26, 3-27updating billing status 3-26, 3-27, 3-36, 3-38,
3-40 job schedules 3-28—3-31, 3-34, 3-35,
3-40 traffic 3-26, 3-27 production status 3-26, 3-27, 3-36, 3-38, 3-40 status on purchase orders 4-6, 4-7 status on media estimates 5-14, 5-15 status on media plans 5-16—5-19user entry 7-9user fields on broadcast media plans 5-16, 5-17 on broadcast orders 5-22, 5-23, 9-47 on insertion orders 5-24, 5-25, 9-47 on job type/spec sheets 9-42, 9-43 on jobs 3-10, 3-11 on media estimates 5-14, 5-15 on print media plans 5-18, 5-19 on purchase orders 4-8, 4-9, 9-49 setting defaults in Preferences 9-49 setting defaults on job type/spec sheets 9-42, 9-43 setting defaults on PO templates
9-44, 9-45user ID entering on Introduce Yourself window 2-5 vs. staff initials 9-4 see also initialsuser password see passwordsuser-defined fields see user fieldsusers access privileges, setting 9-6 accounting 9-16, 9-17 costs 9-14, 9-15 general 9-8, 9-9 jobs 9-12, 9-13 menus 9-10, 9-11 adding 9-6 assigning departments to 9-6, 9-7 see also departments automatic quit times, setting 9-6, 9-7
budget alerts, setting 9-20 job costs 9-20, 9-21 purchase orders 9-20, 9-21 time 9-20, 9-21 editing names of 9-6, 9-7 deleting 9-6 e-mail address, setting 9-6, 9-7 on Introduce Yourself window 2-5 passwords 9-8 photo of 9-26, 9-27 printing a list of 9-6 vs. managers 9-4 vs. staff members 9-4 see also staff
V
vendors overview 9-30 1099s entering on checks 4-48, 4-49, 4-52—4-55 setting up vendor tax ID 9-34, 9-35 account info for 9-34, 9-35 active checkbox 9-32, 9-33 adding 9-32 adding invoices for see Accounts
Payable addresses editing 9-32—9-34 on broadcast orders 9-49 on insertion orders 9-49 on purchase orders 9-49 auto-allocate checks option 9-33,
9-34 balances disabling 9-49 printing an aging report 8-12, 8-
13 seeing when writing checks 4-48,
4-52, 4-54, 4-56 contacts 9-32, 9-33 on purchase orders 9-49 discounts entering for vendors 9-34, 9-35 taking discounts on checks 4-47,
4-49 setting the discount cGL 9-49 editing, deleting 9-32 finding 9-32 looking up 2-7 markups and vendors 9-34, 9-35 copying to A/P invoices 4-18, 4-19 setting up for each vendor 9-34,
9-35 media information 9-34, 9-35
notes 9-32, 9-33 on-hold option 9-32—9-35

21
printing account agings for 8-12, 8-13 publications and 5-30, 5-31 recurring payables for 4-15, 9-31
stations and 5-28, 5-29 stats 9-32, 9-33 tax ID see 1099s type 9-32—9-35 viewing account ledger for 9-32, 9-33
vs. staffers and freelancers 9-32 vs. temps 9-30 writing checks to see checkbookvendor number entering on vendors 9-30 on A/P invoices 4-16—4-18, 4-20, 4-22 on broadcast orders 5-22 on checks 4-44—4-50 on insertion orders 5-24 on media accrual invoices 4-22 on purchase orders 4-6—4-9 on publications 5-30, 5-31 on stations 5-28, 5-29 printing audit trails by 7-26, 7-27vendor agings 8-4, 8-5 account aging vs. invoice aging 8-12 printing 8-12, 8-13 printing for a prior period 8-13 aging periods, changing 8-12, 8-13vendor buyouts see accounts payablevendor diary 4-16, 4-17, 9-31—9-33vendor discounts 9-34, 9-35vendor payments see checkbookView>Point 3-44—3-45voiding checks 4-42
W
wages see salarieswarnings, setting up over-budget alerts for users 9-20,
9-21 status alerts 9-38, 9-39 vendor warning on A/P invoices 9-34,
9-35 client warning on A/R invoices 6-22 see also alertsWeb Access 9-54 for iPhone 9-56weekly traffic reports 3-36, 3-37, 8-6, 8-7who on media calendar 5-10, 5-11 on job schedules (“resource”) 3-28, 3-29Who’s Connected? 9-22Windows 3.11 see Installation GuideWindows 95/98 see Installation GuideWindows NT see Installation GuideWIP see work in progresswork in progress description 3-44, 3-45 and the General Ledger 7-6
on jobs 3-8, 3-9, 3-44, 3-45 printing one job’s WIP 3-44, 3-45 billing one job’s WIP 3-44, 3-45 writing off one job’s WIP 3-44, 3-45 printing Snapshot reports for 8-4, 8-5
8-8, 8-9 transferring costs and 4-70, 4-71work order 3-8, 3-9Work to Do finding unfinished job tasks 3-40,
3-41 printing your work to do 3-40 printing production reports for 8-6,
8-7 sorting job tasks on 3-40 updating job schedules from the Work
to Do window 3-40write off all unbilled costs option 9-47writing checks see check writingwriting purchase orders see purchase ordersworksheet, billing see billing worksheet
Y
YTD Trial Balance 8-25year, fiscal see fiscal yearyear-end closing 7-28, 7-29, 7-40, 7-41year-to-date amounts, seeing for G/L accounts 7-18, 7-27Year-to-date net income account (“999999”)
7-17, 7-40