enabled services unified data collector - honeywell
TRANSCRIPT

1
ENABLED SERVICES
Unified Data Collector
R101.1
___________________________________
Unified Data
Collector
Installation and
Configuration
Guide
___________________________________
ERDOC-X670-en-101A
October 2020

INTRODUCTION
2
3
DISCLAIMER
This document contains Honeywell proprietary information. Information contained herein is to be used solely for the purpose
submitted, and no part of this document or its contents shall be reproduced, published, or disclosed to a third party without
the express permission of Honeywell International Sàrl.
While this information is presented in good faith and believed to be accurate, Honeywell disclaims the implied warranties of
merchantability and fitness for a purpose and makes no express warranties except as may be stated in its written agreement
with and for its customer.
In no event is Honeywell liable to anyone for any direct, special, or consequential damages. The information and specifications
in this document are subject to change without notice.
Copyright 2020- Honeywell International Sàrl.
4
Table of contents
Chapter 1 Introduction 6
1.1 About this guide 6
1.2 Revision history 6
Chapter 2 Product Overview 7
2.1 Components 7
2.2 Network Level 7
Chapter 3 Prerequisites 9
3.1 System requirements 9
3.1.1 Software 9
3.1.2 Server Name and IP Address 9
3.1.3 User accounts and groups 9
3.1.4 Network and directory servers 10
3.1.5 Firewall Configuration 11
3.1.6 Certificate Requirements for Secure Web Communications 12
3.2 Prerequisites 12
Installation Prerequisites 12
Device Discovery and Agent Deployment Prerequisites 12
3.3 Understanding the Unified Data Collector’s footprint 13
3.3.1 Asset Configuration (Discovery) 13
3.3.2 Monitoring 14
3.3.3 Disk and Memory Utilization 14
Chapter 4 Security Considerations 15
4.1 Restricted Access to the Unified Data Collector Server 15
4.2 Restricted Access to Monitored Computers 15
4.3 Secure Network Infrastructure 15
4.4 Domain security 15
4.5 Asset Configuration user 16
4.6 Read Only access settings 16
4.7 Certificate Considerations 16
Chapter 5 Unified Data Collector Installation 17
5.1 Installing Unified Data Collector 17
INTRODUCTION
5
Chapter 6 Asset Configuration (Discovery) 23
6.1 Overview 23
6.2 Starting Asset Configuration 23
6.3 Update Switch Configuration 26
6.4 Deploying Agents 26
6.5 Discovering TPN Assets 28
6.6 Refresh Assets 28
6.7 Collection Agent Status 29
Chapter 7 Authorizing Users 31
7.1 Who is authorized 31
7.2 Adding/Removing users 31
7.3 Using Domain Groups 31
7.4 User Registration 31
Chapter 8 Uninstalling Unified Data Collector 32
8.1 Uninstallation of the Unified Data Collector 32
Chapter 9 Prerequisites for the Unified Data Collector L4 IOT Client 34
9.1 Installation Prerequisites 34
9.2 Software 34
Chapter 10 Installation and usage of the Unified Data Collector L4 IOT Client 35
11.1 Installing the Unified Data Collector L4 IOT Client 35
11.2 Data Collection and File Movement 40
Chapter 11 Uninstallation of the Unified Data Collector L4 IOT Client 42
11.1 Uninstalling the Unified Data Collector L4 IOT Client 42
Chapter 12 Applying Patch for Unified Data Collector and L4 IoT Client 44
12.1 Applying Patch on Unified Data Collector 44
12.2 Applying Patch on L4 IoT Client 44
Notices 45
6
Chapter 1 Introduction
1.1 About this guide
This guide provides detailed information on the installation, setup and maintenance of Unified Data Collector product
site.
1.2 Revision history
Version Date Description
1 October 2020 Revised release of the document.

PRODUCT OVERVIEW
7
Chapter 2 Product Overview
Unified Data Collector is a solution that provides continuous data collection for system’s various type of configurations, such as
performance, security, network, graphics and generic Experion configurations and versions.
UNIFIED DATA COLLECTOR provides the collection results for Enabled Services for running compliance checks and displays
overall score results for overall site.
This guide covers the pre-requisites and installation of UNIFIED DATA COLLECTOR for supporting an Enabled Services offering.
2.1 Components
Asset Configuration Application
.Net 4.5.2
Microsoft SQL Server 2014 Express LocalDB
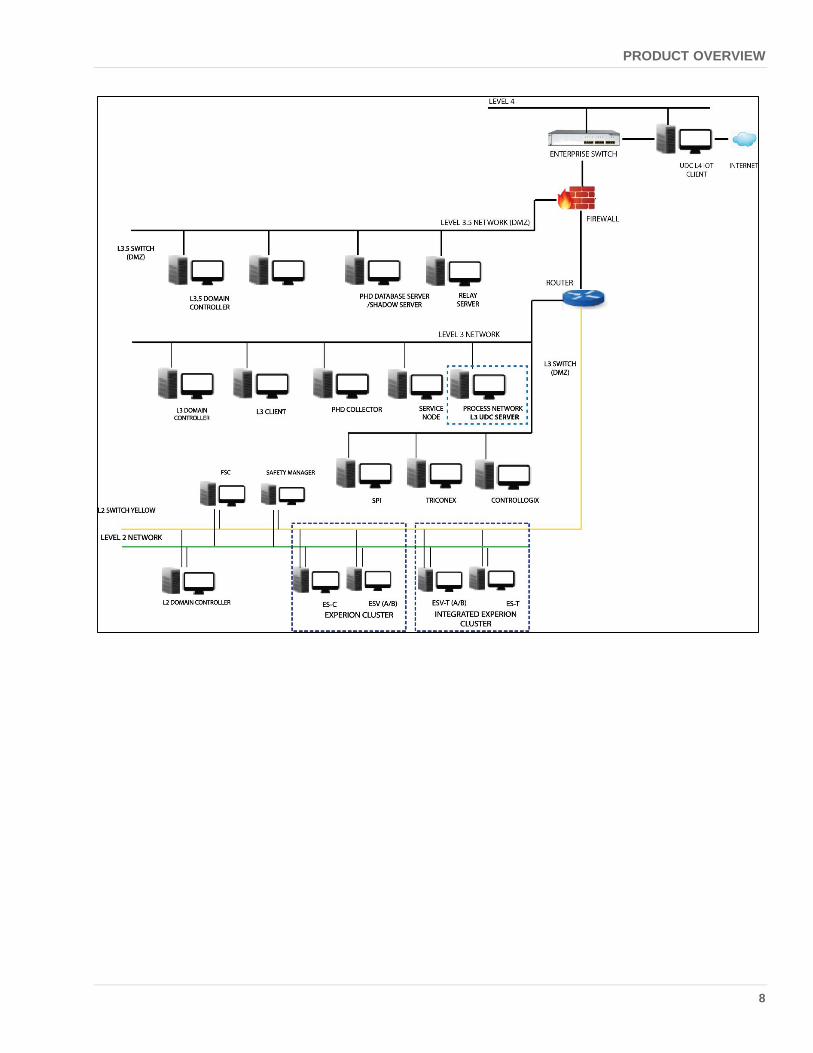
2.2 Network Level
UNIFIED DATA COLLECTOR resides on an existing node at Level 3 with connections and agents across multiple network layers
(Level 2 and Level 3), as shown in the following image.
UNIFIED DATA COLLECTOR L4 IOT client resides on an existing node at Level 4.
The data from UNIFIED DATA COLLECTOR L4 IOT client node is pushed to Enabled Services cloud for further process. The data
processed at cloud is shown in the dashboard. Refer Enabled Services User’s Guide to view Main Dashboard.
PRODUCT OVERVIEW
8
PREREQUISITES
9
Chapter 3 Prerequisites
This chapter describes the requirements for installing and configuring the Unified Data Collector
3.1 System requirements
3.1.1 Software
Software requirements for on-premises the Unified Data Collector server are as follows:
Windows Server 2016 Standard x64
Windows Server 2012 R2 x64
Windows 10 x64
NOTE: Unified Data Collector Server is required to install on Level 3.
3.1.2 Server Name and IP Address
NOTE: The Unified Data Collector does not support host name change. However, you can change the IP address of the Unified
Data Collector server.
3.1.3 User accounts and groups
Domain Topology
The Unified Data Collector Server English (United States)
Node on which the Unified Data Collector
is installed
Must be joined to Domain and remain connected.
Person doing the installation must Run as Administrator.
User should be a domain user or a local user with local administrator privileges.
NOTE: Domain user is always recommended.
PREREQUISITES
10
The UDC Group is created
Created by the installer, the required service accounts and users are added to
the group on the Unified Data Collector Server.
No additional action is required.
Discovery user
This should be a domain account and must have administrative access to all
agent nodes which are to be monitored including the Unified Data Collector
server.
This account must be an Experion user (with at least view-only permission) on
Experion servers to monitor Experion devices.
Active directory domain
Currently, the Unified Data Collector deployment only supports single domain environment (flat domain and parent-child).
There should be a trust relationship between Parent (L3) and child domain (L2).
The Unified Data Collector installation supports Domain topology:
o Flat and Parent-child topology. (two-way trust)
The Unified Data Collector does not support Workgroup topology.
3.1.4 Network and directory servers
The following table lists the requirements for the network and the directory servers.
Component Requirement
Domain controllers All domain controllers in the forest need to be running one of the following:
Windows Server 2008 R2 Standard or Enterprise (or newer)
Windows Server 2008 R2 Datacenter RTM (or newer)
Windows Server 2008 Standard, Enterprise, or Datacenter (or newer)
Active Directory forest The Active Directory forest functionality level needs to be at Windows Server 2008 or
newer.
PREREQUISITES
11
Component Requirement
DNS namespace support Unified Data Collector supports the following domain name system (DNS) namespaces:
Contiguous
Non-contiguous
Single-label domains
Disjoint
NOTE: The Unified Data Collector does not support changing the domain name and
host name post-installation of the Unified Data Collector.
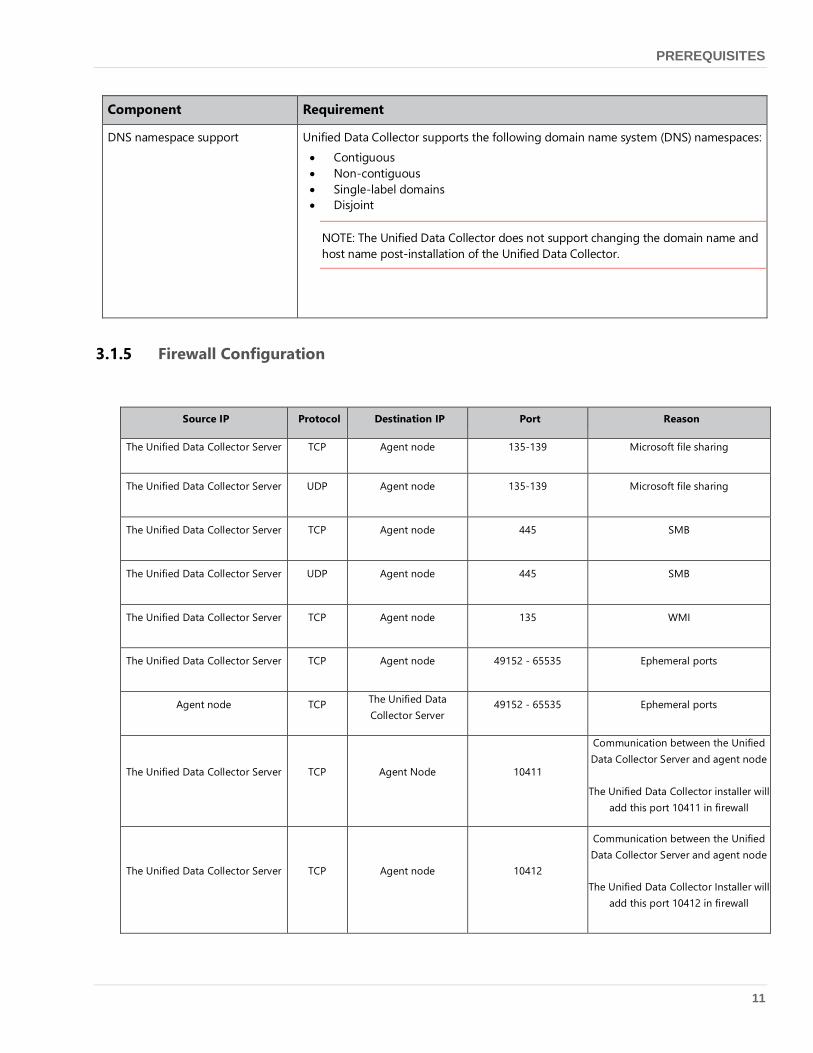
3.1.5 Firewall Configuration
Source IP Protocol Destination IP Port Reason
The Unified Data Collector Server TCP Agent node 135-139 Microsoft file sharing
The Unified Data Collector Server UDP Agent node 135-139 Microsoft file sharing
The Unified Data Collector Server TCP Agent node 445 SMB
The Unified Data Collector Server UDP Agent node 445 SMB
The Unified Data Collector Server TCP Agent node 135 WMI
The Unified Data Collector Server TCP Agent node 49152 - 65535 Ephemeral ports
Agent node TCP The Unified Data
Collector Server 49152 - 65535 Ephemeral ports
The Unified Data Collector Server TCP Agent Node 10411
Communication between the Unified
Data Collector Server and agent node
The Unified Data Collector installer will
add this port 10411 in firewall
The Unified Data Collector Server TCP Agent node 10412
Communication between the Unified
Data Collector Server and agent node
The Unified Data Collector Installer will
add this port 10412 in firewall
PREREQUISITES
12
NOTE: If these ports (10411 & 10412) are already in use then the Unified Data Collector will look for next ports in sequence.
For the appropriate Ephemeral port range, see the following link: https://support.microsoft.com/en-
us/help/832017/service-overview-and-network-port-requirements-for-windows
Note that after setup only the HTTPS connection is required for normal operation.
3.1.6 Certificate Requirements for Secure Web Communications
Self-signed certificates
- If the installer generated self-signed certificate is used on the Unified Data Collector server, the same
certificate will be installed by the Unified Data Collector installer on all the agent nodes.
- Refer section “Certificate Considerations” on page 15 for guidance on certificates.
3.2 Prerequisites
Installation Prerequisites
The installer checks for the following prerequisites before it installs the Unified Data Collector. It automatically
installs the prerequisites that does not exist on the host machine. You do not need to install any prerequisites
separately.
Dot NET (.Net) Framework 4.5.2 - Installer will check if .Net 4.5.2 or above version available on node, if not available
then the Unified Data Collector installer will install .Net 4.5.2. This may require a reboot after installation.
Microsoft SQL Server 2014 Express Local DB - Installer will check if version 2014 is not installed, then the Unified
Data Collector installer will install Microsoft SQL Server 2014 Express Local DB.
User account requirements for the Unified Data Collector installation is mentioned in section “User accounts and
groups” on page 8.
Device Discovery and Agent Deployment Prerequisites
Asset configuration is run under a single user account.
- This account must have administrative access to all assets which are to be monitored.
- This account must be an Experion user (with at least view-only permission) on Experion servers.
PREREQUISITES
13
Computers to be monitored must have the Remote Registry service enabled during discovery and agent
deployment.
- To enable the Remote Registry service:
o On the computers where you want monitoring, click Start, in the Start Search box, type services.msc,
and then press ENTER. Microsoft Management Console will start with the Services snap-in open.
o In the console pane, right-click Remote Registry and click Start.
WMI should be enabled on the agent node.
Active Directory Domain with trust between L3 Parent Domain and L2 Child domains.
The Unified Data Collector server hostname must be resolvable by L2 hosts and vice-versa.
The system time on the Domain Controller, the Unified Data Collector server, and all nodes to be monitored
should be in sync for successful node discovery and data collection.
Network ports must be open as described in Chapter 2 “Product Overview” on page 6.
TPS Data Collection is dependent on having the SY TPS Unit mapped to an Experion Asset. If this mapping has not
been performed, the Unified Data Collector will be unable to collect data from the corresponding ESVT. For more
details, see section “Map TPS Units to Experion Assets” (specifically the “SY Unit mapping to Assets” subsection) in
the Integrated Experion-TPS User’s Guide (available in the Experion book set).
3.3 Understanding the Unified Data Collector’s footprint
To reduce security exposure and network traffic, the Unified Data Collector’s approach to collecting asset information,
system health and performance data is to place light weight agents on the system which will be monitored. On the surface
it can appear that products using WMI alone to collect data reduce such impact, but in fact when you look at the security
level at which these products run and the amount of network traffic required to pull everything back to the server, you find
their impact to be much greater. The Unified Data Collector only requires Administrative credentials when setting up the
collection environment. Once setup it uses restricted runtime credentials for actual data collection. The Unified Data
Collector stores no high privileged credentials anywhere at any time. It also reduces network traffic by allowing local
decisions about minute by minute collection requirements.
3.3.1 Asset Configuration (Discovery)
During the discovery process, the Unified Data Collector will download a small (<20MB) folder containing the scanning
executable. This executable is run on server only during the discovery process and the inventory results are sent back to
the Unified Data Collector server where you will see them listed in the discovery application.
PREREQUISITES
14
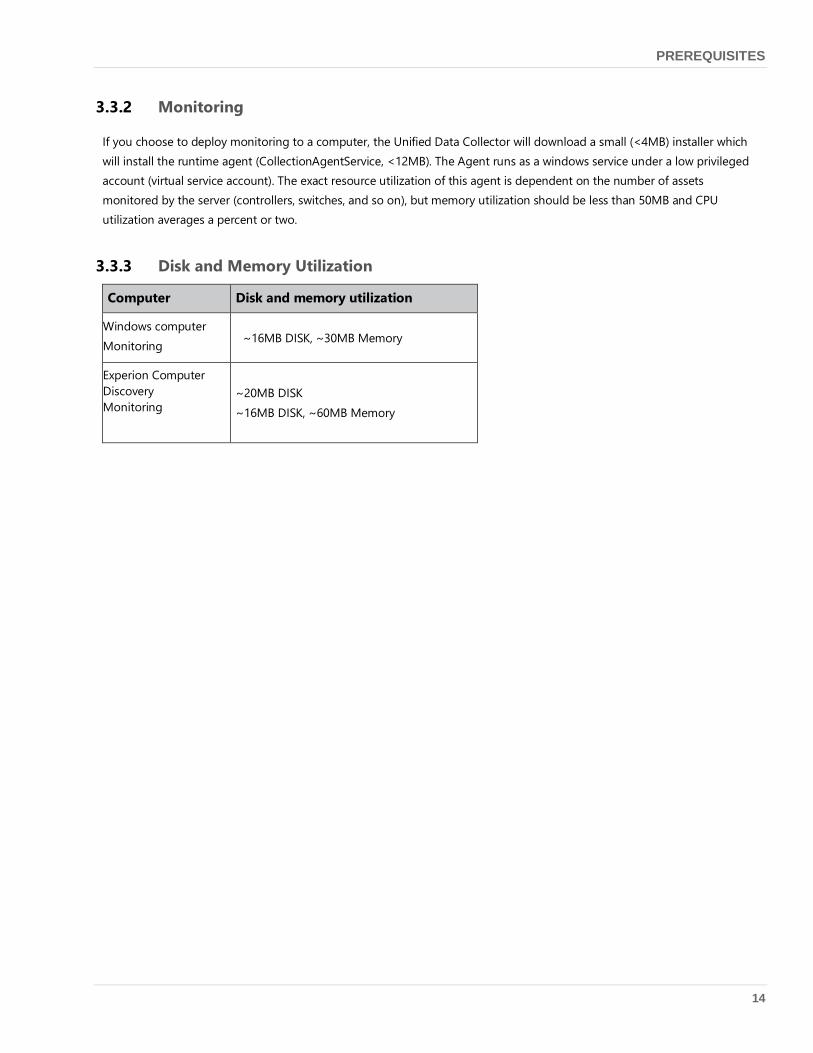
3.3.2 Monitoring
If you choose to deploy monitoring to a computer, the Unified Data Collector will download a small (<4MB) installer which
will install the runtime agent (CollectionAgentService, <12MB). The Agent runs as a windows service under a low privileged
account (virtual service account). The exact resource utilization of this agent is dependent on the number of assets
monitored by the server (controllers, switches, and so on), but memory utilization should be less than 50MB and CPU
utilization averages a percent or two.
3.3.3 Disk and Memory Utilization
Computer Disk and memory utilization
Windows computer
Monitoring ~16MB DISK, ~30MB Memory
Experion Computer
Discovery
Monitoring
~20MB DISK
~16MB DISK, ~60MB Memory
SECURITY CONSIDERATIONS
15
Chapter 4 Security Considerations
The Unified Data Collector installation and operation are fully designed with the security of the Unified Data Collector server,
domain environment and control systems in mind. But there are aspects of security that can only be managed at the site
and are the responsibility of the user.
4.1 Restricted Access to the Unified Data Collector Server
The Unified Data Collector server is intended as a secured server and should not be used for normal user interaction. Direct, or
suitably secure remote access is required for installation and for running asset discovery scanning (Asset Configuration). User
logins access should be restricted to the user account(s) required for these actions. In addition, the Unified Data Collector
server should be hosted in a secured environment that limits physical access to the computer.
The Unified Data Collector server contains sensitive information and hence the physical access to the Unified Data Collector
server should be restricted.
4.2 Restricted Access to Monitored Computers
The Unified Data Collector collects information from Experion and other Microsoft Windows servers by installing a light weight
agent which can run locally on that server. This limits security risks by isolating operation to a single, tightly controlled user
account on the remote server and a single encrypted communication pipe (https). It is recommended to deny remote use of
local admin credentials to log into systems.
4.3 Secure Network Infrastructure
Intercommunications between computers over a network can be impacted by improper or malicious software use. Standard
security practices should be followed to insure your network infrastructure is safe from such attacks. The Unified Data Collector
is most vulnerable during Asset Configuration because that process runs under administrative credentials, transferring data
and commands to multiple computers. It is particularly important to insure your network is functioning properly at that time.
During normal operation data is encrypted and connections are authenticated; but loss of data flow is possible if the network
is compromised.
4.4 Domain security
The Unified Data Collector security depends on reliable active directory services. Failure to adequately protect your domain
services infrastructure can open up a number of security threats.
During Asset Discovery file transfer and remote execution occurs under an Administrative account, so it is particularly
important to insure computers contacted over the network with active directory are properly identified and authenticated.
SECURITY CONSIDERATIONS
16
4.5 Asset Configuration user
Asset Discovery requires use of a single user who has administrative access to every computer which will be monitored. If the
system consists of parent-child domains, then the user must have administrative access across all the domains to be
monitored. The easiest way to honor this requirement is to use the domain administrator as long as a user with these
credentials can run discovery. A more secure approach is to create a user specifically for this purpose, giving that user
administrative rights to all of the computers to be monitored and using that account for discovery. This account can then be
disabled when not in use. Protecting access to these credentials is critical to the security of the entire domain.
4.6 Read Only access settings
The Unified Data Collector data collection connects to too many types of devices to list them here; you can view the entire list
of computers and devices when during the asset configuration. It may be necessary to open communications to some of these
devices for data collection to work. Whenever possible, you should only open the device for reading as the Unified Data
Collector never requires write access.
4.7 Certificate Considerations
If the Agent Certificate gets compromised.
Undeploy the agent and deploy it back again, new agent registration certificate gets deployed on the agent node.
If the Unified Data Collector Server Self signed certificate gets compromised.
Uninstall and re-install the Unified Data Collector software, new Self signed certificate is generated.
NOTE: To replace your certificates with the Unified Data Collector installed certificates, contact Honeywell Process Customer
Contact Center. (CCC)
NOTE: To report security vulnerability issues, refer Section “How to report a security Vulnerability” on page 46 for detailed
process.

UNIFIED DATA COLLECTOR INSTALLATION
17
Chapter 5 Unified Data Collector Installation
5.1 Installing Unified Data Collector
This section describes the steps required to install the Unified Data Collector. Refer Chapter 3 “Prerequisites” on page 8 for
user account prerequisites and installation prerequisites.
1. Make sure the Operating System is up-to-date and all the Knowledge Base (KB) updates are installed.
2. Right-click on HoneywellunifiedDataCollectorInvoker.exe file and then select Run as Administrator with
recommended user account type.
3. The Installer will prompt for .NET installation; if .NET is not installed on the system, the installation will install the
.Net Framework [dotnet 4.5.2].
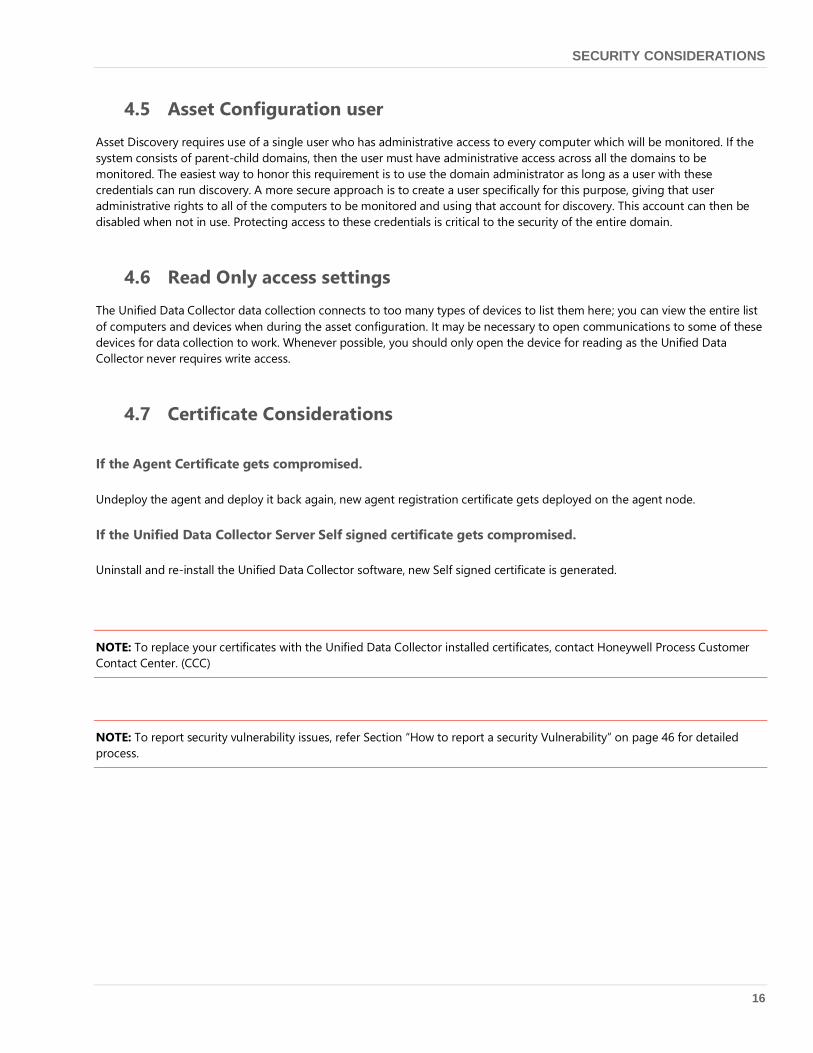
4. Post .NET installation, following prompt appears to restart the system before configuration of Honeywell Unified
Data Collector can continue install. Click Yes to restart now.
UNIFIED DATA COLLECTOR INSTALLATION
18
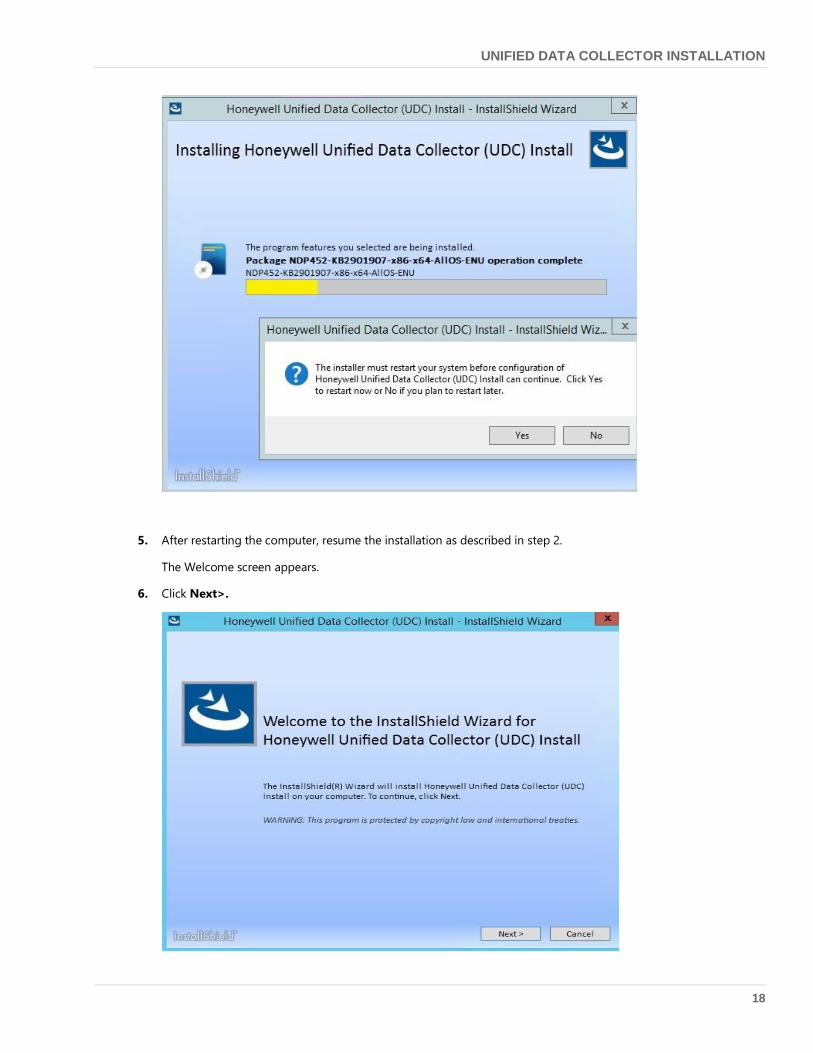
5. After restarting the computer, resume the installation as described in step 2.
The Welcome screen appears.
6. Click Next>.
UNIFIED DATA COLLECTOR INSTALLATION
19
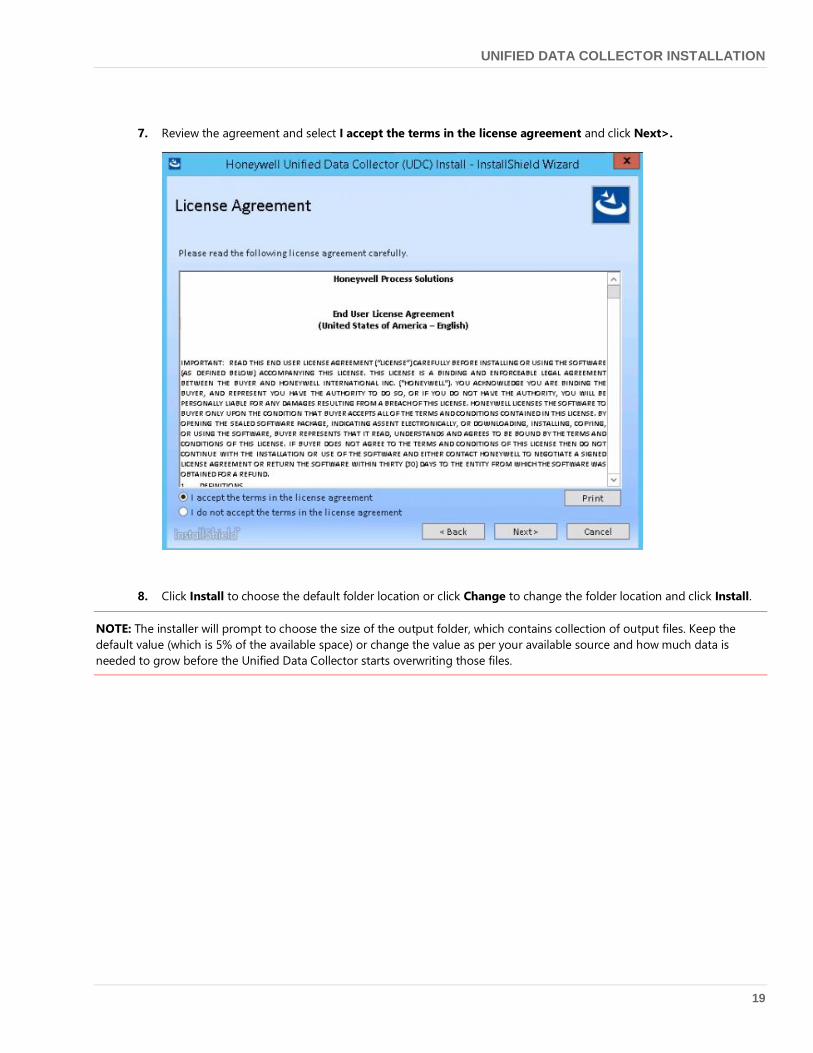
7. Review the agreement and select I accept the terms in the license agreement and click Next>.
8. Click Install to choose the default folder location or click Change to change the folder location and click Install.
NOTE: The installer will prompt to choose the size of the output folder, which contains collection of output files. Keep the
default value (which is 5% of the available space) or change the value as per your available source and how much data is
needed to grow before the Unified Data Collector starts overwriting those files.

UNIFIED DATA COLLECTOR INSTALLATION
20
NOTE: If SQL Server 2014 Express LocalDB is not installed in the system; the installer will install it.
The InstallSheild Wizard installing the Honeywell Unified Data Collector on the system.
UNIFIED DATA COLLECTOR INSTALLATION
21
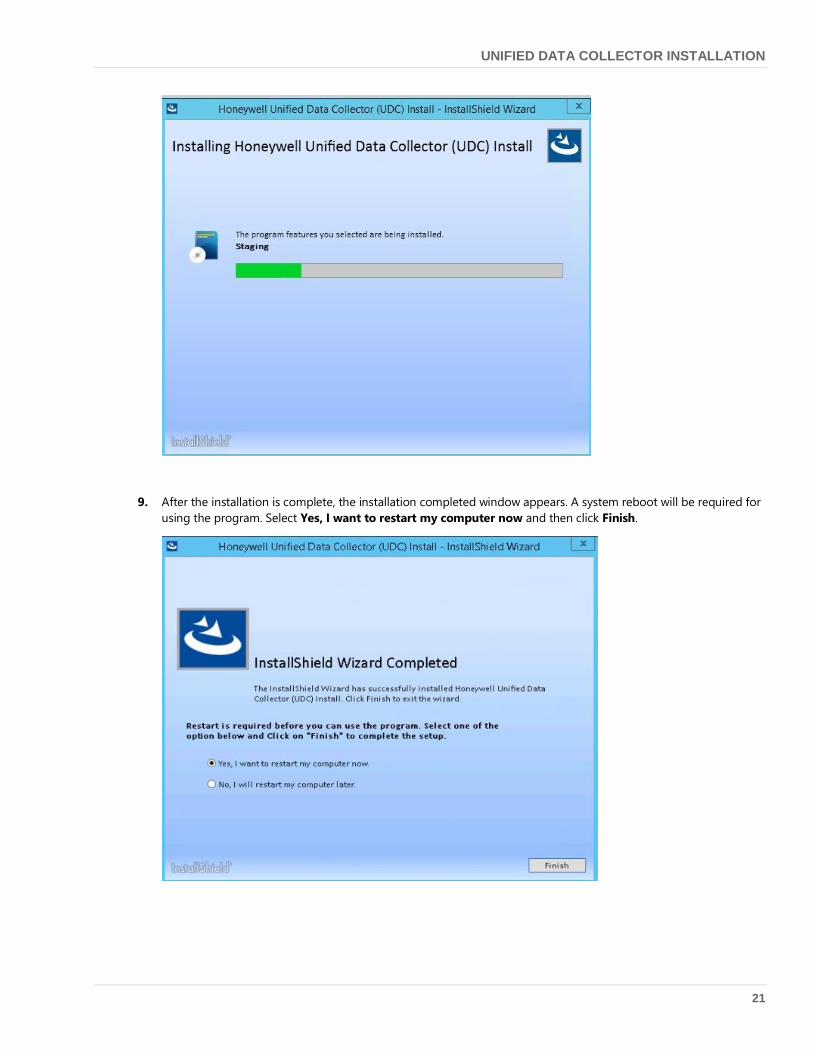
9. After the installation is complete, the installation completed window appears. A system reboot will be required for
using the program. Select Yes, I want to restart my computer now and then click Finish.
UNIFIED DATA COLLECTOR INSTALLATION
22
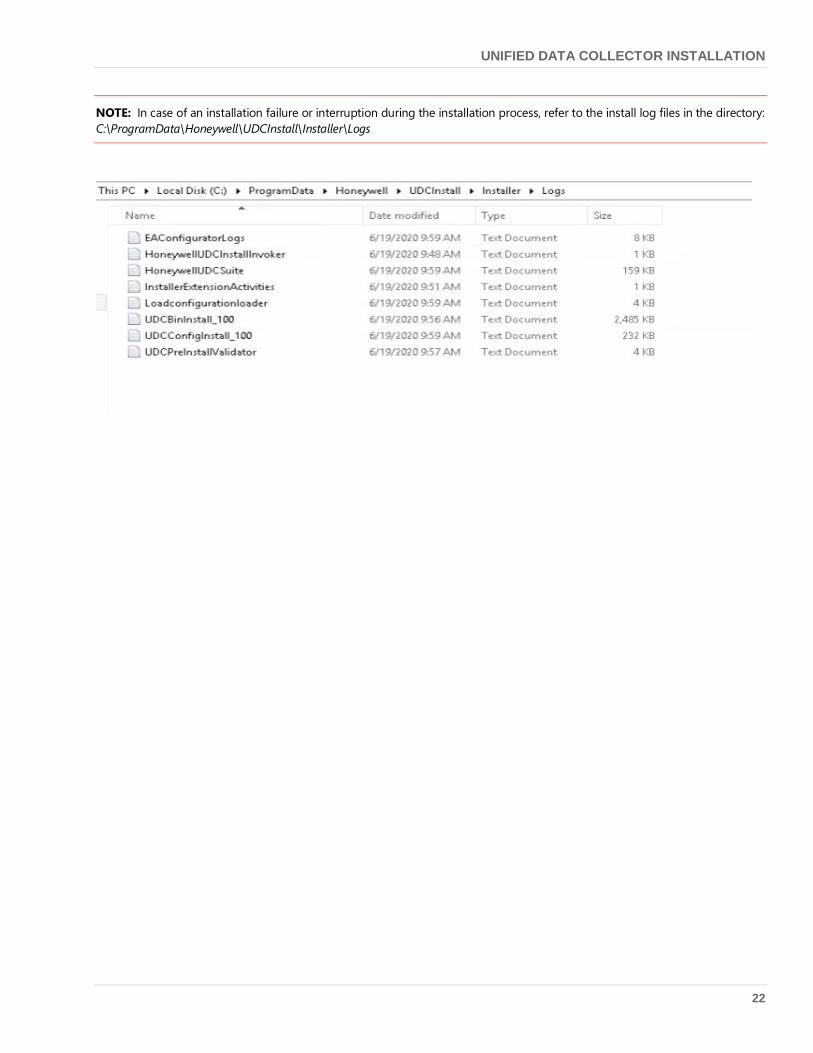
NOTE: In case of an installation failure or interruption during the installation process, refer to the install log files in the directory:
C:\ProgramData\Honeywell\UDCInstall\Installer\Logs
ASSET CONFIGURATION (DISCOVERY)
23
Chapter 6 Asset Configuration (Discovery)
6.1 Overview
In order to collect data for analysis and KPIs, the Unified Data Collector first needs to determine which computers and devices
should be monitored within your domain. This is accomplished through the Asset Configuration application. This application will
discover and categorize all of the computers in your domain, allow you to select which computers to monitor and provision those
computers for data collection.
NOTE: If you have TPS devices please note pre-requirements in section “Discovering TPN Assets” on page 27 required for TPS
discovery. Specifically, that a current LVRLOG must be generated and moved to the Unified Data Collector server.
6.2 Starting Asset Configuration
Login to the Unified Data Collector Server with sufficient domain administration and Experion access rights as described in
Chapter 4 “Security Considerations” on page 15.
The Honeywell Unified Data Collector installation will create a shortcut in the Start Menu under Honeywell Unified Data Collector.
Select the “Asset Configuration” option, then right click and select “Run as administrator” option.
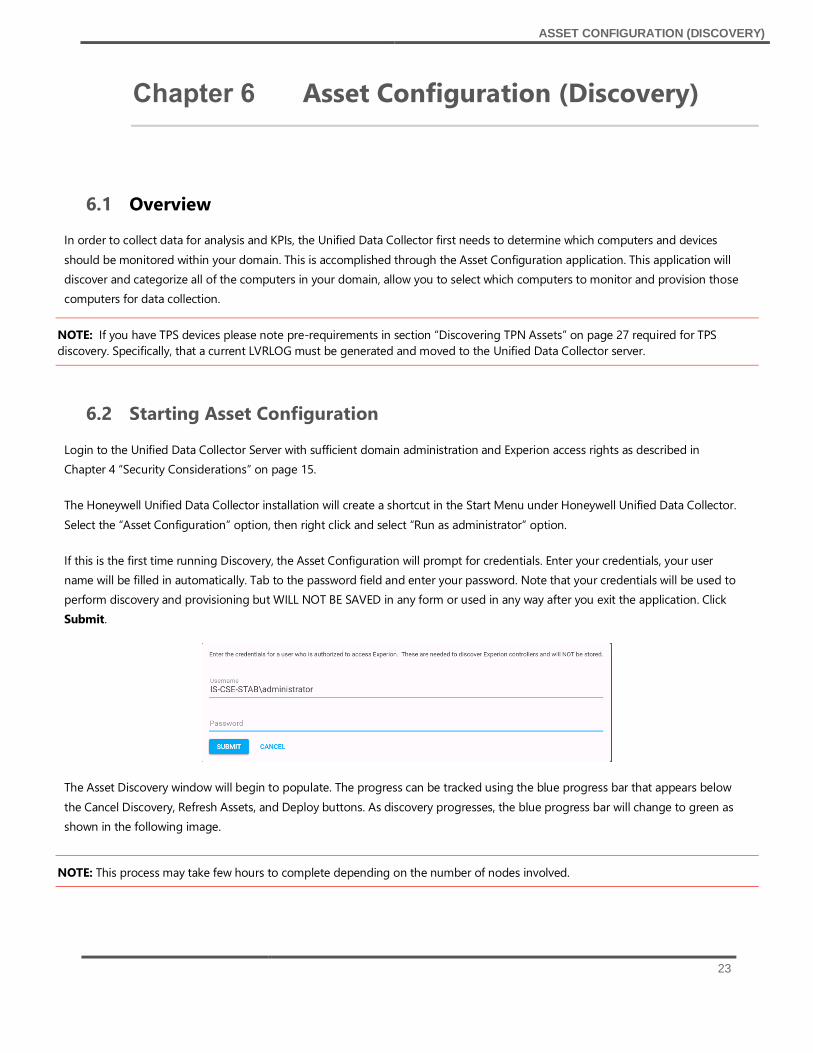
If this is the first time running Discovery, the Asset Configuration will prompt for credentials. Enter your credentials, your user
name will be filled in automatically. Tab to the password field and enter your password. Note that your credentials will be used to
perform discovery and provisioning but WILL NOT BE SAVED in any form or used in any way after you exit the application. Click
Submit.
The Asset Discovery window will begin to populate. The progress can be tracked using the blue progress bar that appears below
the Cancel Discovery, Refresh Assets, and Deploy buttons. As discovery progresses, the blue progress bar will change to green as
shown in the following image.
NOTE: This process may take few hours to complete depending on the number of nodes involved.

ASSET CONFIGURATION (DISCOVERY)
24
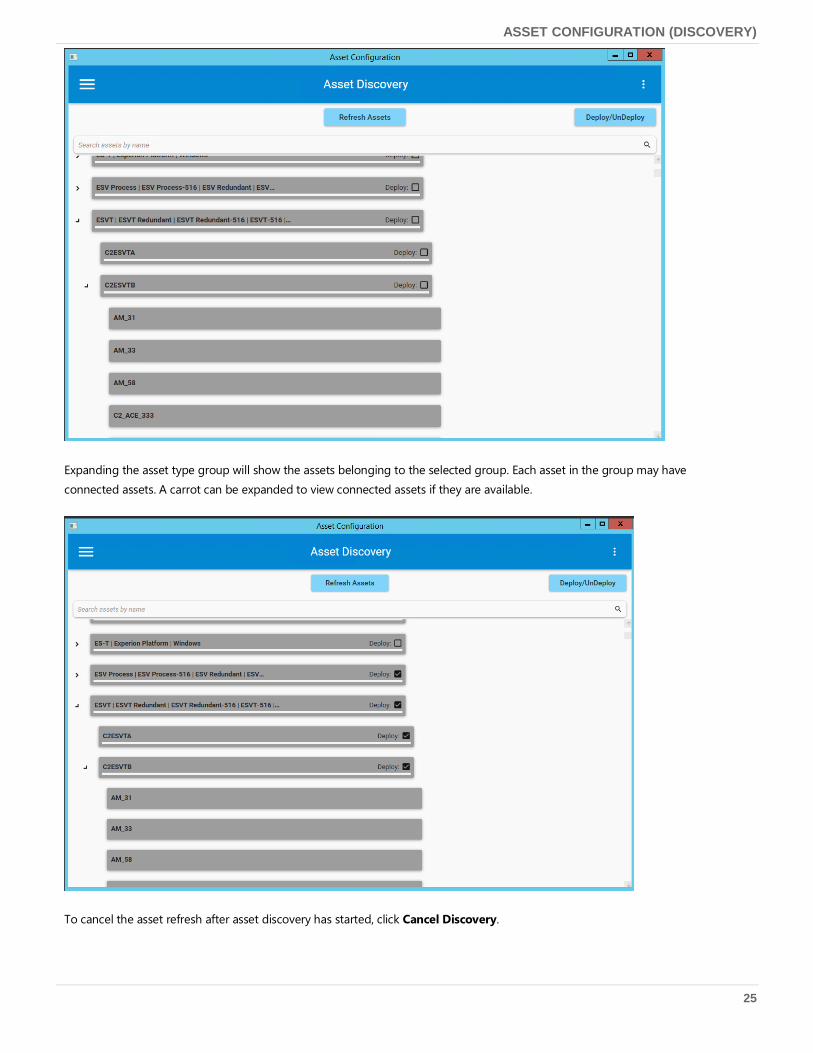
Once complete, the green progress bar will no longer be visible and a list of asset type groups will be available. To expand an
asset type group, click the carrot pointing to the desired group name.
ASSET CONFIGURATION (DISCOVERY)
25
Expanding the asset type group will show the assets belonging to the selected group. Each asset in the group may have
connected assets. A carrot can be expanded to view connected assets if they are available.
To cancel the asset refresh after asset discovery has started, click Cancel Discovery.
ASSET CONFIGURATION (DISCOVERY)
26
NOTE: This process may take few minutes to complete.
AssetConfiguration log files (AssetConfiguation.log) are collected and these logs explain the reason for unknown node. These log
files are stored on the Unified Data Collector server in the following directory:
C:\Users\superuser\AppData\Local\Honeywell\ServiceLine\Logs.
Where “superuser” is the user running the discovery.
Refer section “Node is shown under unknown” on page 31 to check out the reasons for the unknown node.
6.3 Update Switch Configuration
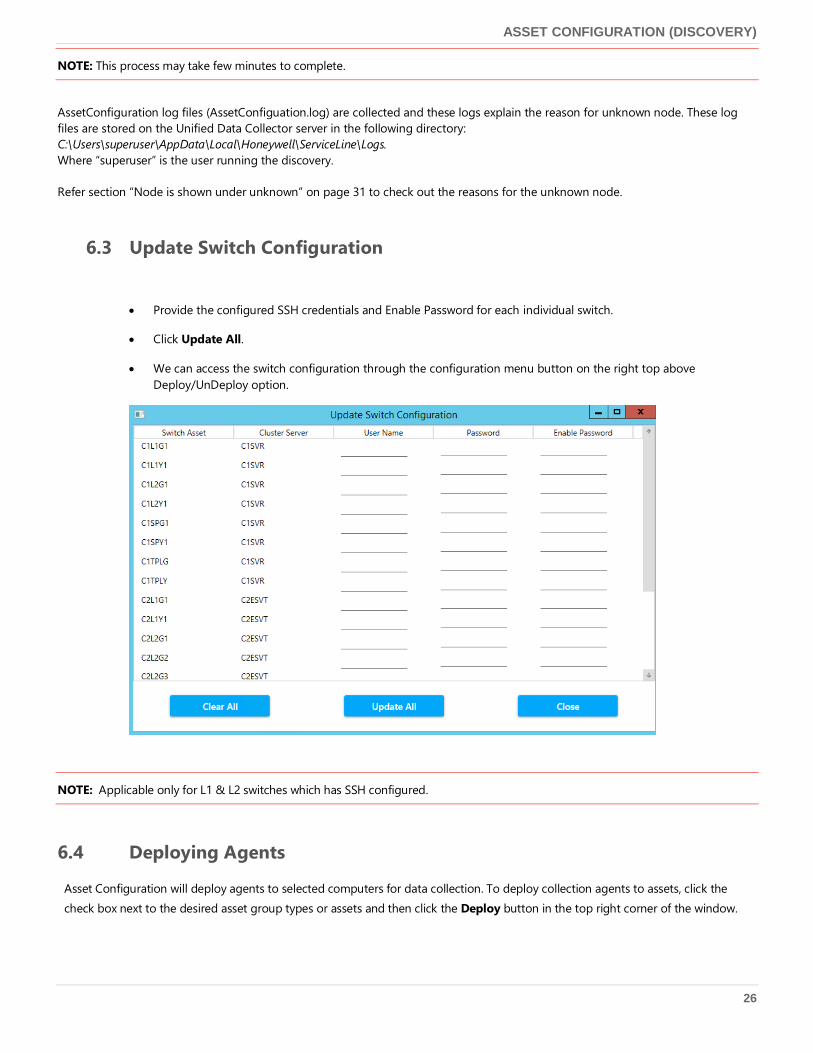
Provide the configured SSH credentials and Enable Password for each individual switch.
Click Update All.
We can access the switch configuration through the configuration menu button on the right top above
Deploy/UnDeploy option.
NOTE: Applicable only for L1 & L2 switches which has SSH configured.
6.4 Deploying Agents
Asset Configuration will deploy agents to selected computers for data collection. To deploy collection agents to assets, click the
check box next to the desired asset group types or assets and then click the Deploy button in the top right corner of the window.
ASSET CONFIGURATION (DISCOVERY)
27
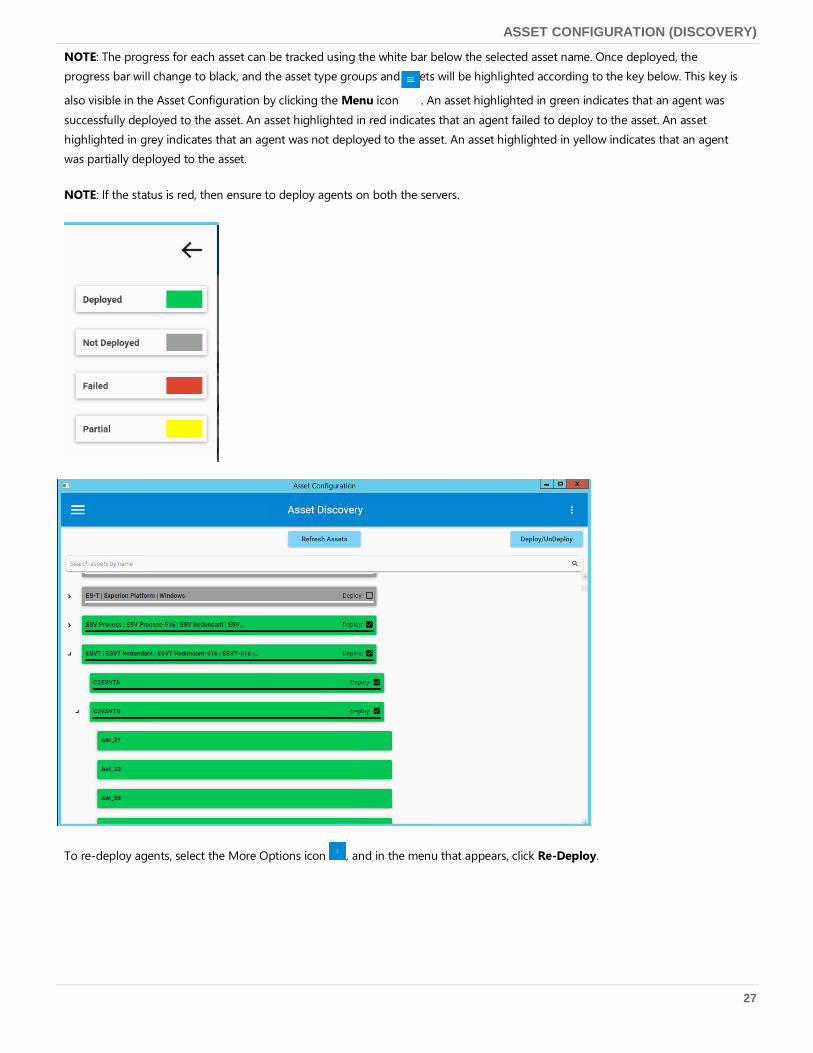
NOTE: The progress for each asset can be tracked using the white bar below the selected asset name. Once deployed, the
progress bar will change to black, and the asset type groups and assets will be highlighted according to the key below. This key is
also visible in the Asset Configuration by clicking the Menu icon . An asset highlighted in green indicates that an agent was
successfully deployed to the asset. An asset highlighted in red indicates that an agent failed to deploy to the asset. An asset
highlighted in grey indicates that an agent was not deployed to the asset. An asset highlighted in yellow indicates that an agent
was partially deployed to the asset.
NOTE: If the status is red, then ensure to deploy agents on both the servers.
To re-deploy agents, select the More Options icon , and in the menu that appears, click Re-Deploy.
ASSET CONFIGURATION (DISCOVERY)
28
To UnDeploy an agent from a node, uncheck the node and select Deploy.
NOTE: On electing Re-Deploy, an existing agent gets undeployed and a new agent is deployed.
Selecting Deploy has no impact on an existing deployed agent.
NOTE: All the L2 nodes like Controllers, Switches, CF8s, SM are always listed under Server B in case of a redundant server
deployment. The discovered nodes are categorized base on the Experion version and the node type.
6.5 Discovering TPN Assets
To discover TPN devices a current LVRLOG must be already generated. The Asset Configuration will not generate an LVRLOG file.
Once the LVRLOG file is generated, perform the following steps:
1. Rename the LVRLOG.RE file using the cluster name, for example, “STBC-COA.RE” or “STBE-ESVT01.RE”.
2. If the installation directory is C:\Program Files (x86)\, copy the renamed LVRLOG.RE file into the following directory:
C:\Program Files (x86)\Honeywell\UDC\LVRLOG\
3. Follow the instructions in section “Starting Asset Configuration” on page 22 to refresh assets.
4. Once the refresh is complete, the assets from the LVRLOG will be displayed under the cluster indicated in the filename. If
the cluster name provided is a redundant server, it will be displayed under the B server of the redundant pair, for
example, STBE-ESVT01B.
5. If TPN devices change, regenerate the LVRLOG file and repeat this discovery process.
6.6 Refresh Assets
If you wish to include or remove additional computers or controllers to the system, you can adjust the list of monitored assets by
re-launching the Asset Configuration application. It will start by displaying the asset list from the previous discovery. To update
the list with new information, click Refresh. When prompted for credentials, enter your credentials.
ASSET CONFIGURATION (DISCOVERY)
29
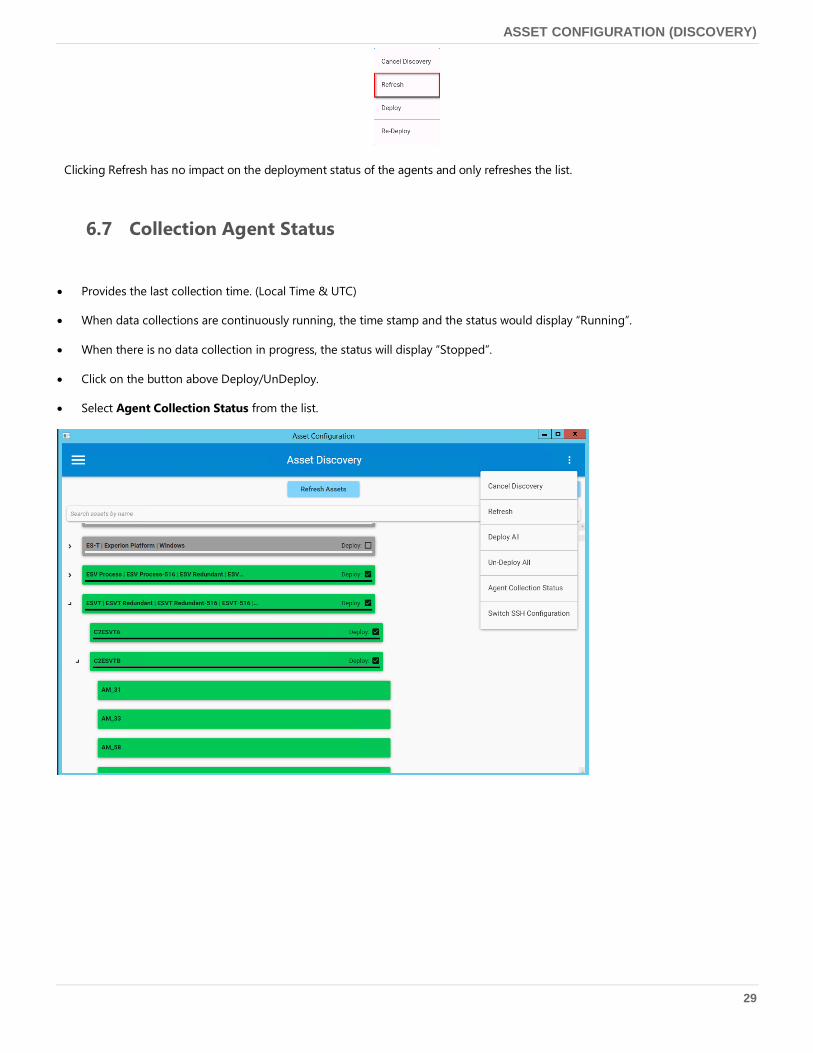
Clicking Refresh has no impact on the deployment status of the agents and only refreshes the list.
6.7 Collection Agent Status
Provides the last collection time. (Local Time & UTC)
When data collections are continuously running, the time stamp and the status would display “Running”.
When there is no data collection in progress, the status will display “Stopped”.
Click on the button above Deploy/UnDeploy.
Select Agent Collection Status from the list.
ASSET CONFIGURATION (DISCOVERY)
30
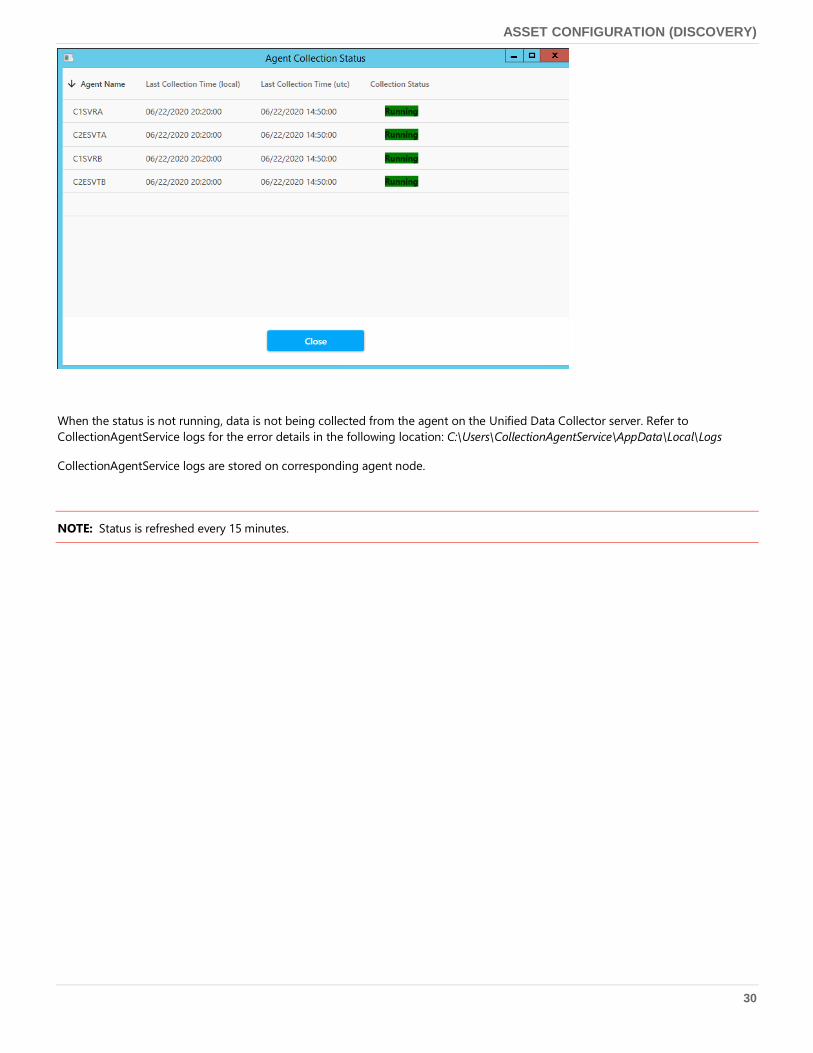
When the status is not running, data is not being collected from the agent on the Unified Data Collector server. Refer to
CollectionAgentService logs for the error details in the following location: C:\Users\CollectionAgentService\AppData\Local\Logs
CollectionAgentService logs are stored on corresponding agent node.
NOTE: Status is refreshed every 15 minutes.
AUTHORIZING USERS
31
Chapter 7 Authorizing Users
7.1 Who is authorized
Users are authorized to use the Unified Data Collector if they are members of the local "The UDC Group” on the Unified Data
Collector server. As Windows user groups can contain other windows groups as members, including domain user groups with this
approach provides a great deal of flexibility.
7.2 Adding/Removing users
Add the user directly to "The UDC Group" windows group on the Unified Data Collector server. To remove access, remove the user’s
membership.
7.3 Using Domain Groups
Add the UDC Users group to your domain and then add this group to "The UDC Group” in the Unified Data Collector server. You
can then authorize users by adding them to your domain group. Users added to the domain group are also members of the local
"The UDC Group” and therefore authorized to use the Unified Data Collector.
7.4 User Registration
Once the user becomes a member of “The UDC Group”, either directly or indirectly via a Domain group, the user is authorized to
access the system. However, the user is required to connect to the system at least once to be fully registered with the Unified Data
Collector. The user account will not appear in selection lists until he has accessed the system at least once. For example, an alert
cannot be assigned to a user until that user has registered.
UNINSTALLING UNIFIED DATA COLLECTOR
32
Chapter 8 Uninstalling Unified Data Collector
This chapter describes uninstalling the Unified Data Collector.
8.1 Uninstallation of the Unified Data Collector
1. Uninstall all the agents before uninstalling the Unified Data Collector, refer section “Deploying Agents” on page 25.
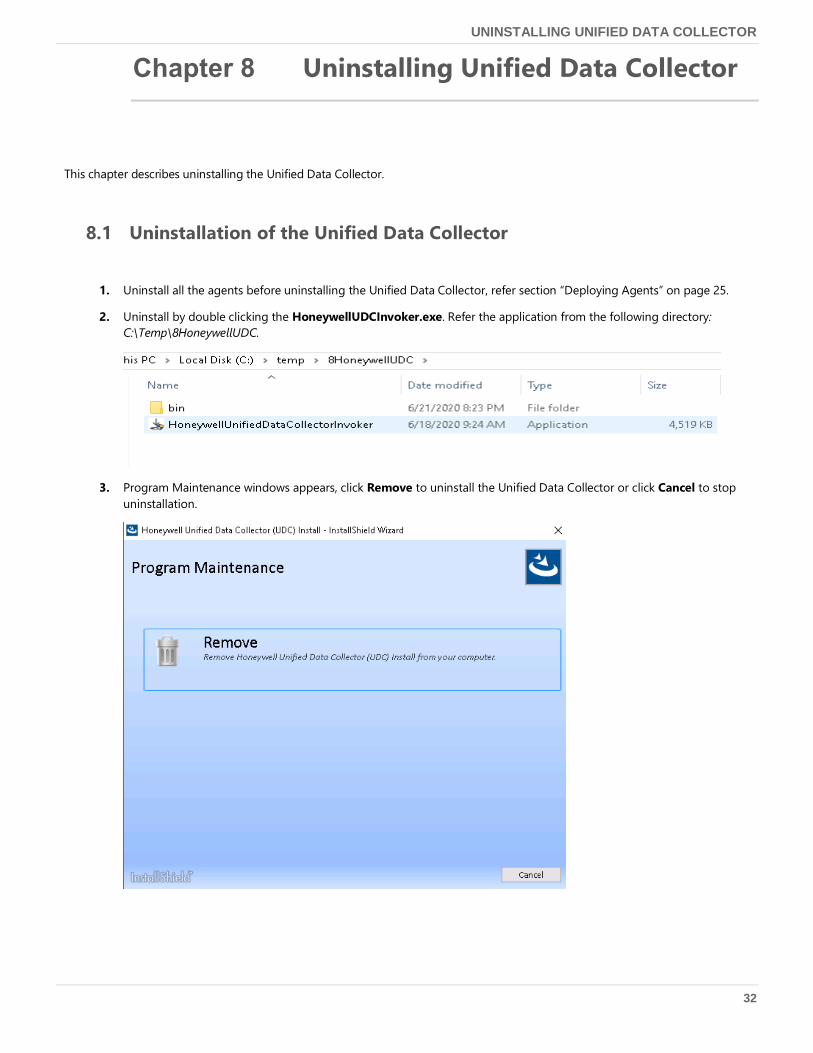
2. Uninstall by double clicking the HoneywellUDCInvoker.exe. Refer the application from the following directory:
C:\Temp\8HoneywellUDC.
3. Program Maintenance windows appears, click Remove to uninstall the Unified Data Collector or click Cancel to stop
uninstallation.
UNINSTALLING UNIFIED DATA COLLECTOR
33
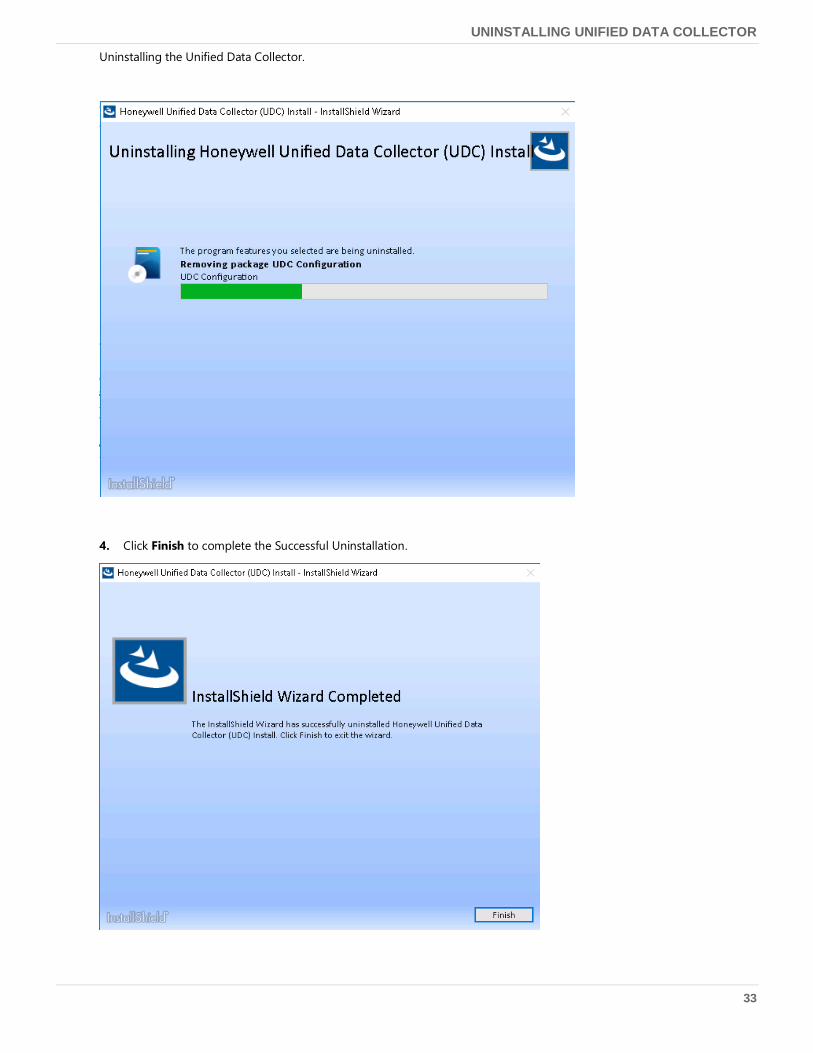
Uninstalling the Unified Data Collector.
4. Click Finish to complete the Successful Uninstallation.
PREREQUISITES FOR THE UNIFIED DATA COLLECTOR L4 IOT CLIENT
34
Chapter 9 Prerequisites for the Unified Data
Collector L4 IOT Client
This chapter describes the Prerequisites and requirements for installing the Unified Data Collector L4 IOT Client.
The Unified Data Collector L4 IOT Client is a utility to transfer the Unified Data Collector collected data to Enabled Services cloud.
9.1 Installation Prerequisites
The installer checks for the following prerequisites before it installs the Unified Data Collector L4 IOT Client. It automatically
installs the prerequisites that does not exist on the host machine.
Users should have local administrator privileges.
9.2 Software
Software requirements for on-premises the Unified Data Collector server are as follows:
Windows 7 x64
Windows 8.1 x64
Windows 10 x64

INSTALLATION AND USAGE OF THE UNIFIED DATA COLLECTOR L4 IOT CLIENT
35
Chapter 10 Installation and usage of the
Unified Data Collector L4 IOT Client
11.1 Installing the Unified Data Collector L4 IOT Client
This section describes the steps required to install the Unified Data Collector L4 IOT Client.
1. Ensure that the Operating System is up-to-date and all the Knowledge Base(KB) updates are installed.
2. Right-click on HoneywellUDCL4ClientInstall.exe file and then select Run as Administrator.
The Welcome screen appears.
NOTE: The two steps are specific for Window 7 System.
The Installer will prompt for Microsoft VC++ 2015 and Windows update KB2533623 to be installed. Click Yes to
continue.
Post Microsoft VC++ 2015 and Windows update KB2533623 installation, following prompt appears asking to
reboot the system to continue Honeywell Unified Data Collector L4 installation. Select Yes, I want to restart
my computer now to restart.
INSTALLATION AND USAGE OF THE UNIFIED DATA COLLECTOR L4 IOT CLIENT
36
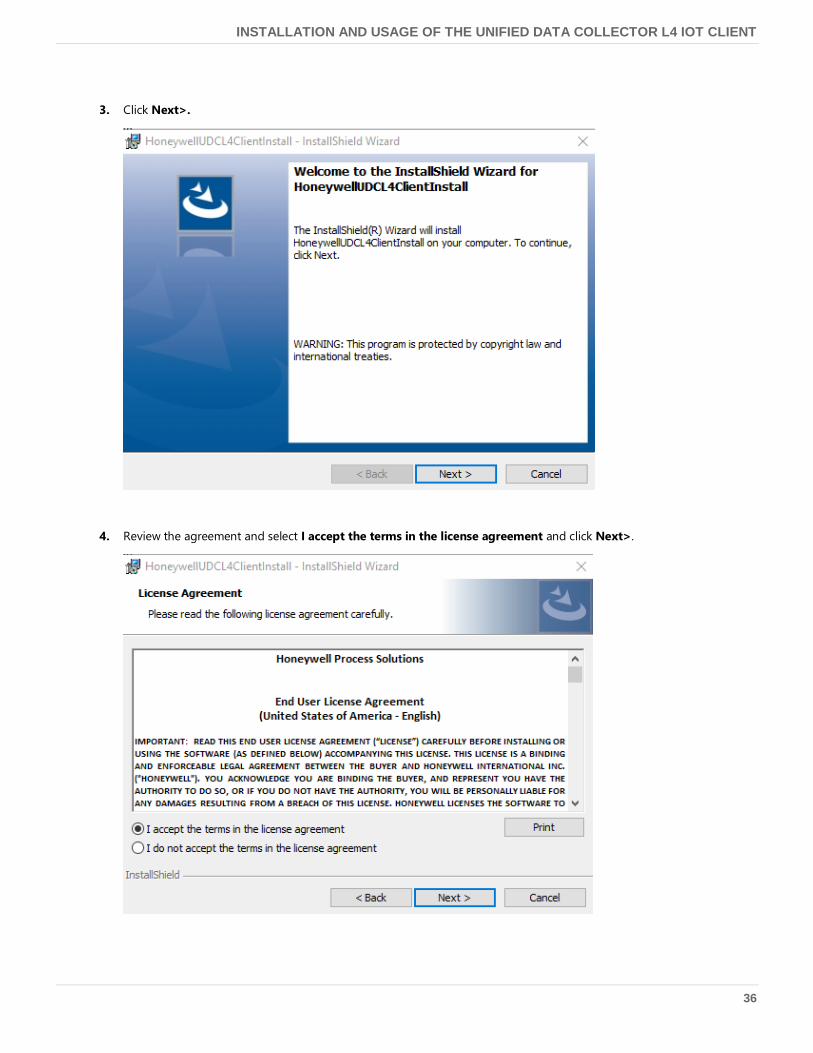
3. Click Next>.
4. Review the agreement and select I accept the terms in the license agreement and click Next>.
INSTALLATION AND USAGE OF THE UNIFIED DATA COLLECTOR L4 IOT CLIENT
37
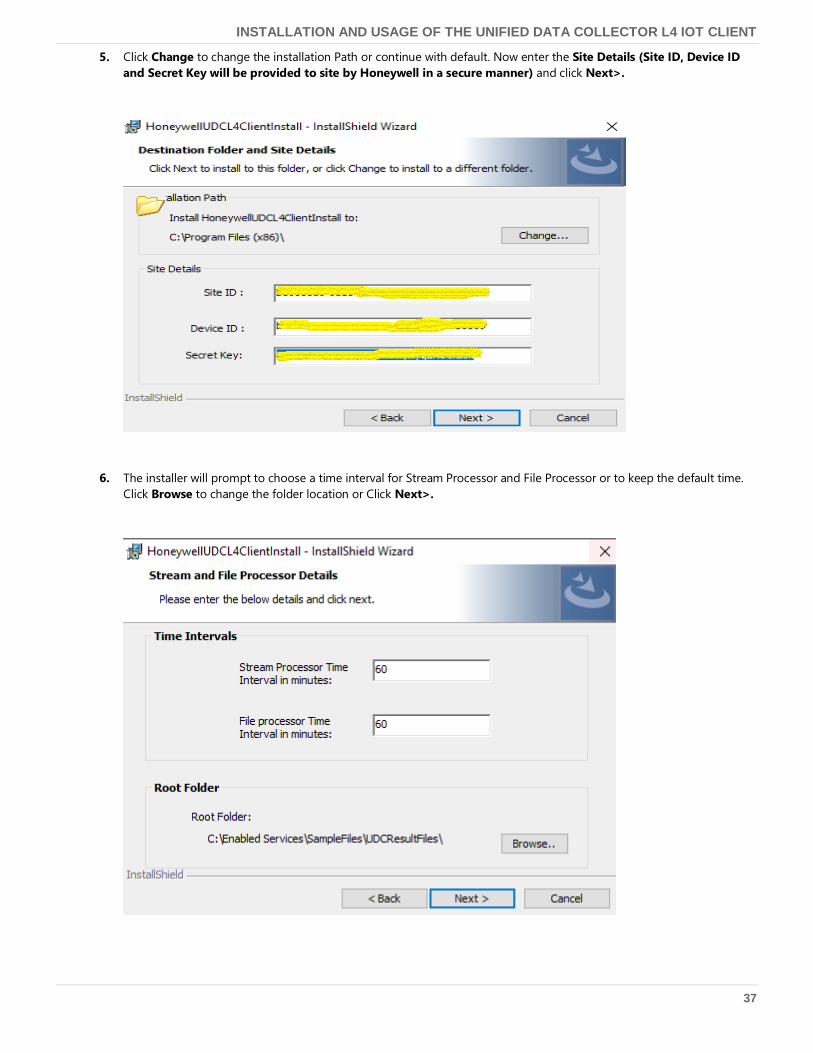
5. Click Change to change the installation Path or continue with default. Now enter the Site Details (Site ID, Device ID
and Secret Key will be provided to site by Honeywell in a secure manner) and click Next>.
6. The installer will prompt to choose a time interval for Stream Processor and File Processor or to keep the default time.
Click Browse to change the folder location or Click Next>.
INSTALLATION AND USAGE OF THE UNIFIED DATA COLLECTOR L4 IOT CLIENT
38
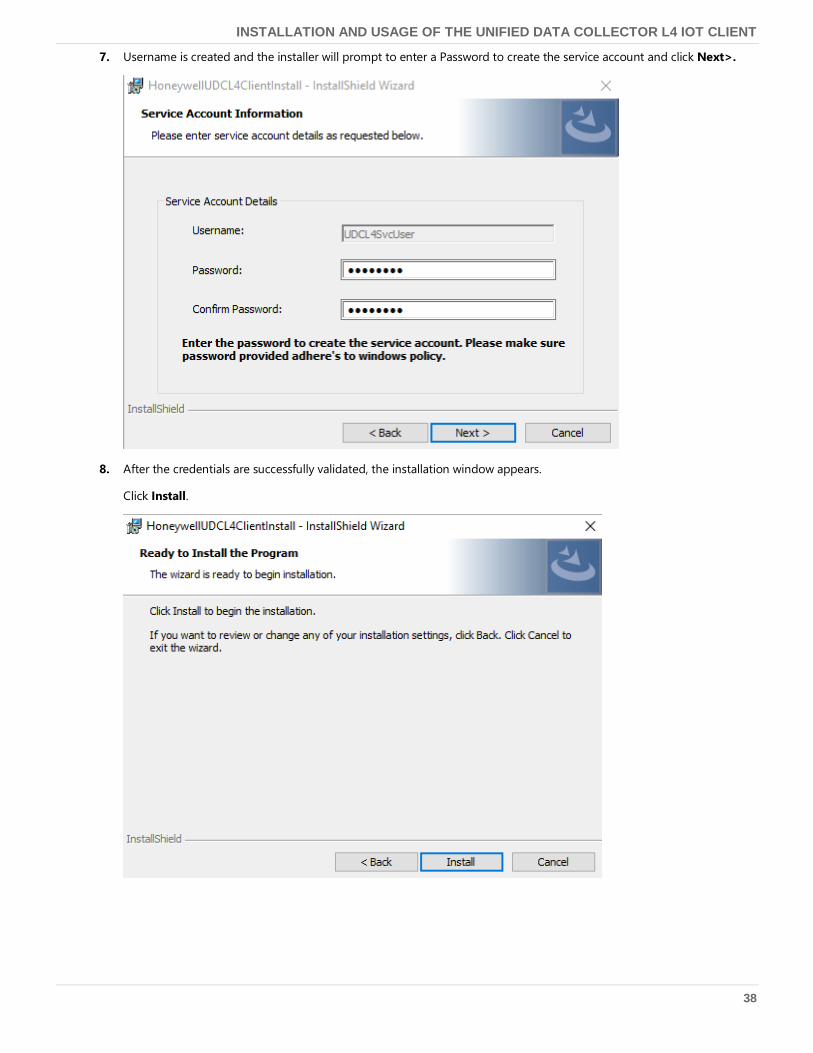
7. Username is created and the installer will prompt to enter a Password to create the service account and click Next>.
8. After the credentials are successfully validated, the installation window appears.
Click Install.
INSTALLATION AND USAGE OF THE UNIFIED DATA COLLECTOR L4 IOT CLIENT
39
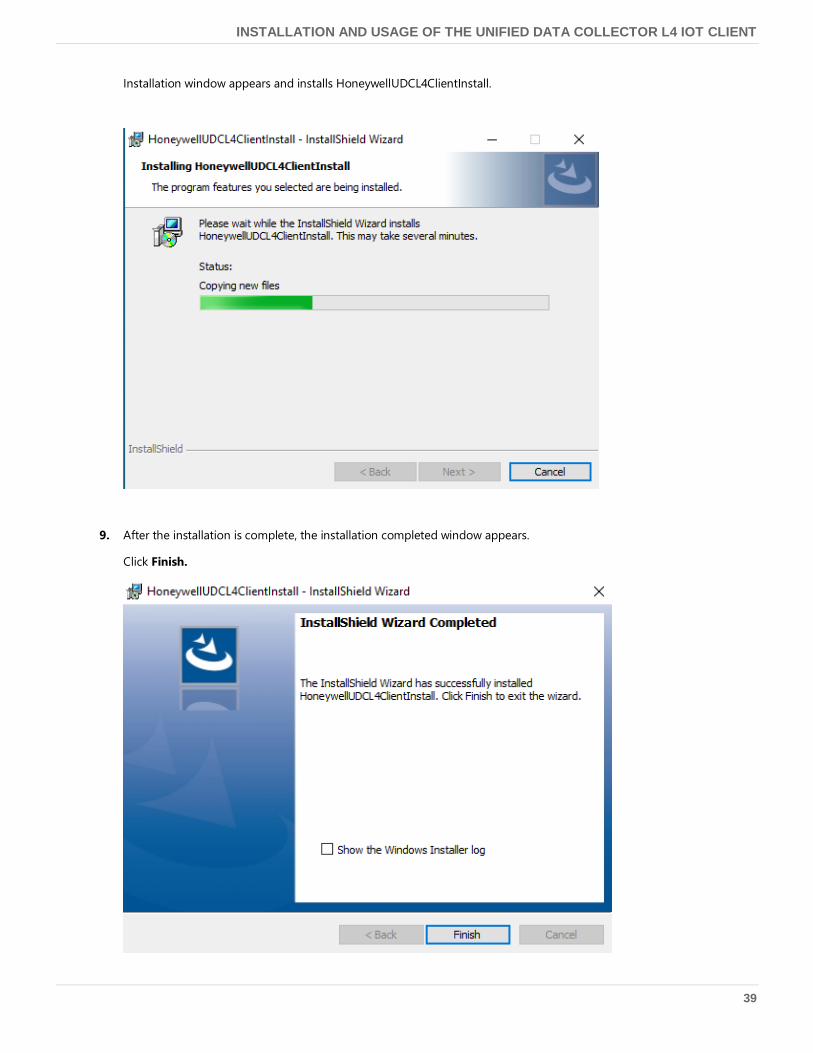
Installation window appears and installs HoneywellUDCL4ClientInstall.
9. After the installation is complete, the installation completed window appears.
Click Finish.
INSTALLATION AND USAGE OF THE UNIFIED DATA COLLECTOR L4 IOT CLIENT
40
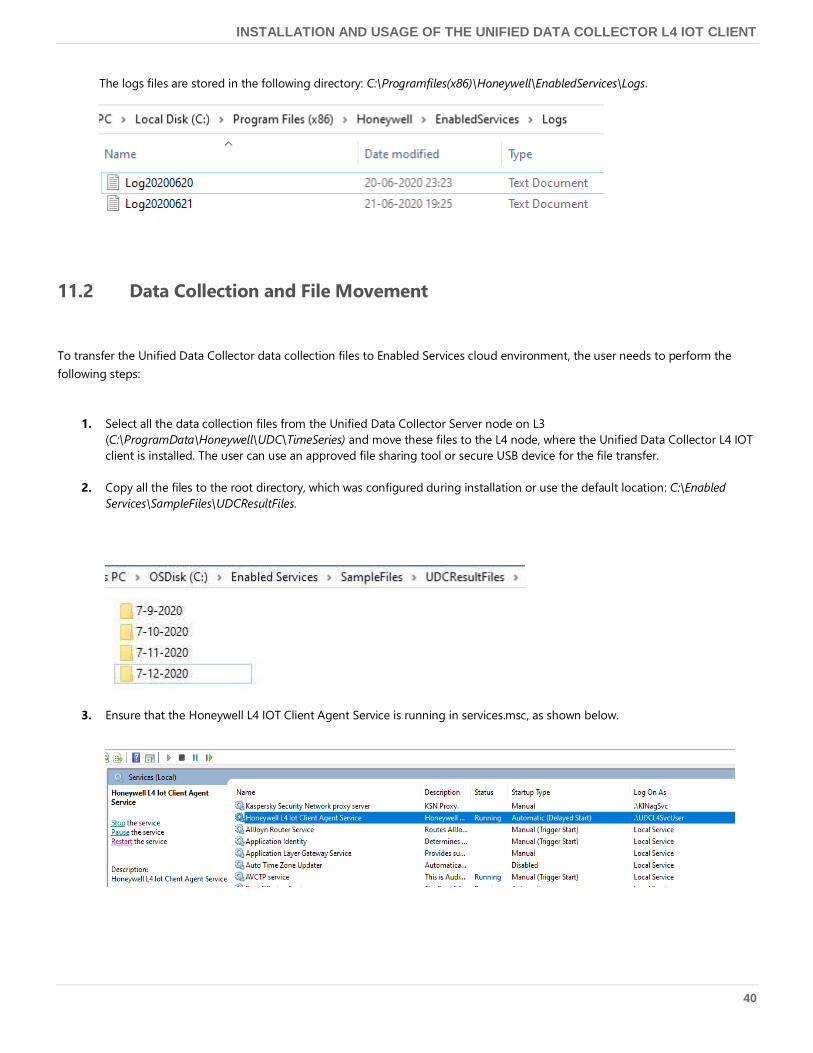
The logs files are stored in the following directory: C:\Programfiles(x86)\Honeywell\EnabledServices\Logs.
11.2 Data Collection and File Movement
To transfer the Unified Data Collector data collection files to Enabled Services cloud environment, the user needs to perform the
following steps:
1. Select all the data collection files from the Unified Data Collector Server node on L3
(C:\ProgramData\Honeywell\UDC\TimeSeries) and move these files to the L4 node, where the Unified Data Collector L4 IOT
client is installed. The user can use an approved file sharing tool or secure USB device for the file transfer.
2. Copy all the files to the root directory, which was configured during installation or use the default location: C:\Enabled
Services\SampleFiles\UDCResultFiles.
3. Ensure that the Honeywell L4 IOT Client Agent Service is running in services.msc, as shown below.
INSTALLATION AND USAGE OF THE UNIFIED DATA COLLECTOR L4 IOT CLIENT
41
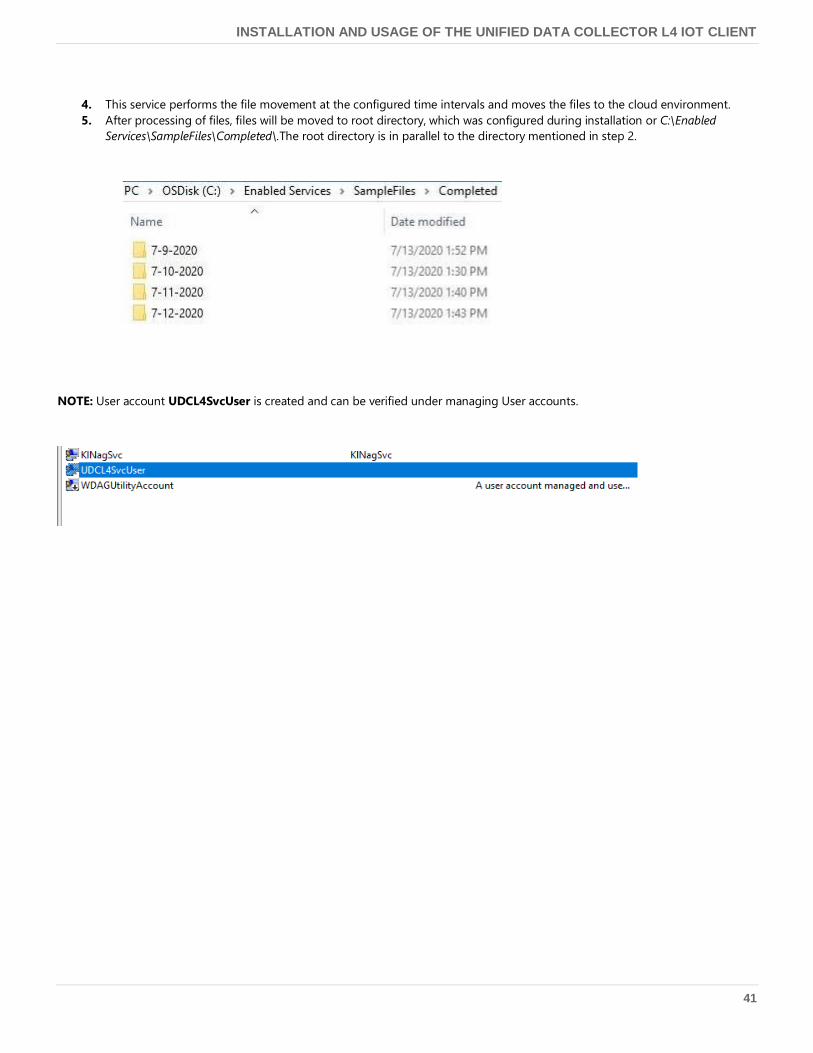
4. This service performs the file movement at the configured time intervals and moves the files to the cloud environment.
5. After processing of files, files will be moved to root directory, which was configured during installation or C:\Enabled
Services\SampleFiles\Completed\.The root directory is in parallel to the directory mentioned in step 2.
NOTE: User account UDCL4SvcUser is created and can be verified under managing User accounts.

UNINSTALLATION OF THE UNIFIED DATA COLLECTOR L4 IOT CLIENT
42
Chapter 11 Uninstallation of the Unified Data
Collector L4 IOT Client
This chapter describes uninstalling the Unified Data Collector L4 IOT Client.
11.1 Uninstalling the Unified Data Collector L4 IOT Client
1. Find the "HoneywellUDCL4Client" in the Control Panel >Programs > Uninstall a Program list
2. Select “HoneywellUDCL4Client” and uninstall.
3. Uninstallation Window appears, click Remove to remove HoneywellUDCL4Client.
UNINSTALLATION OF THE UNIFIED DATA COLLECTOR L4 IOT CLIENT
43
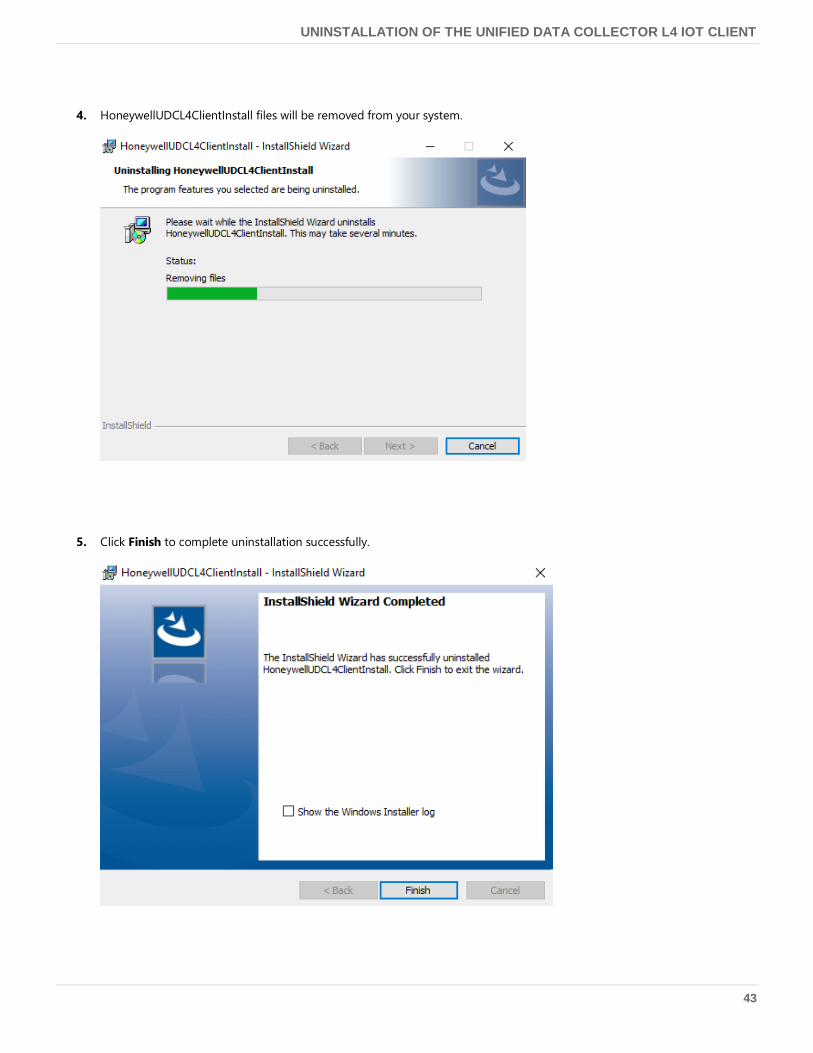
4. HoneywellUDCL4ClientInstall files will be removed from your system.
5. Click Finish to complete uninstallation successfully.
APPLYING PATCH FOR UNIFIED DATA COLLECTOR AND L4 IOT CLIENT
44
Chapter 12 Applying Patch for Unified Data
Collector and L4 IoT Client
This chapter provides the instructions to apply Patch for Unified Data Collector and L4 IoT Client.
12.1 Applying Patch on Unified Data Collector
Instructions for applying L3 Patch
1. Download the L3 Patch.zip file from http://honeywellprocess.com/
2. Extract the contents of the above zip file, it contains CollectionAgentServiceInstaller.msi
3. Un deploy the agents from Asset Discovery UI tool on UDC Server.
4. Close Asset Discovery UI tool.
5. Create a backup of existing CollectionAgentServiceInstaller.msi present at "$\UDC\AssetConfiguration" folder (default
location C:\Program Files (x86)\Honeywell\UDC\AssetConfiguration)
6. Copy the patch i.e. CollectionAgentServiceInstaller.msi to the folder mentioned in the above step.
7. Launch Asset Discovery UI tool using Run as Administrator option.
8. Deploy the agents on the Experion nodes (all target nodes).
9. Verify the collection results files are created at C:\ProgramData\Honeywell\UDC you will have folder with today’s date and
encrypted result files will be created in the internal folders (This is a verification step).
12.2 Applying Patch on L4 IoT Client
Instructions for applying L4 IoT Client Patch
1. Download the L4 Patch.zip file from http://honeywellprocess.com/
2. Select ‘ApplyPatch.bat’ and Run as Administrator.
3. Stop Honeywell L4 IoT Client Agent Service from windows services.
4. Modify the appsettings.json file available in the following directory: $\Program Files (x86)\Honeywell\EnabledServices.
5. Take a backup of appsettings.json file before any modifications.
6. Change the value of the key "UploaderType" from "AzureBlob" to "AzureAppService".
7. Start the service Honeywell L4 IoT Client Agent Service.
Note:
Patch would be applied and required service would be restarted automatically.
Patch files gets replaced and the backup of the existing files would be moved to $\Honeywell\EnabledServices\Backup.
NOTICES
45
Notices
Trademarks
Experion®, PlantScape®, SafeBrowse®, TotalPlant®, and TDC 3000® are registered trademarks of Honeywell International, Inc.
ControlEdge™ is a trademark of Honeywell International, Inc.
OneWireless™ is a trademark of Honeywell International, Inc.
Matrikon® and MatrikonOPC™ are trademarks of Matrikon International. Matrikon International is a business unit of Honeywell
International, Inc.
Movilizer® is a registered trademark of Movilizer GmbH. Movilizer GmbH is a business unit of Honeywell International, Inc.
Other trademarks
Microsoft and SQL Server are either registered trademarks or trademarks of Microsoft Corporation in the United States and/or other
countries.
Trademarks that appear in this document are used only to the benefit of the trademark owner, with no intention of trademark
infringement.
Third-party licenses
This product may contain or be derived from materials, including software, of third parties. The third party materials may be subject
to licenses, notices, restrictions and obligations imposed by the licensor.
The licenses, notices, restrictions and obligations, if any, may be found in the materials accompanying the product, in the documents
or files accompanying such third party materials, in a file named third_party_licenses on the media containing the product, or at
http://www.honeywell.com/ps/thirdpartylicenses.
Documentation feedback
You can find the most up-to-date documents on the Honeywell Process Solutions support website at:
https://www.honeywellprocess.com/support
Use this email address to provide feedback, or to report errors and omissions in the documentation. For immediate help with a
technical problem, contact your local Honeywell Process Solutions Customer Contact Center (CCC) or Honeywell Technical
Assistance Center (TAC).
NOTICES
46
How to report a security vulnerability
For the purpose of submission, a security vulnerability is defined as a software defect or weakness that can be exploited to reduce
the operational or security capabilities of the software.
Honeywell investigates all reports of security vulnerabilities affecting Honeywell products and services.
To report a potential security vulnerability against any Honeywell product, please follow the instructions at:
https://honeywell.com/pages/vulnerabilityreporting.aspx
Submit the requested information to Honeywell using one of the following methods:
Send an email to [email protected]
or,
Contact your local Honeywell Process Solutions Customer Contact Center (CCC)
Support
For support, contact your local Honeywell Process Solutions Customer Contact Center (CCC).
Training classes
Honeywell holds technical training classes that are taught by process control systems experts. For more information about these
classes, contact your Honeywell representative, or see http://www.automationcollege.com.
NOTICES
Honeywell Process Solutions
Building #2101, City West Blvd, Houston, TX
77042
www.honeywellprocess.com
October 2020
© 2020 Honeywell International Sàrl