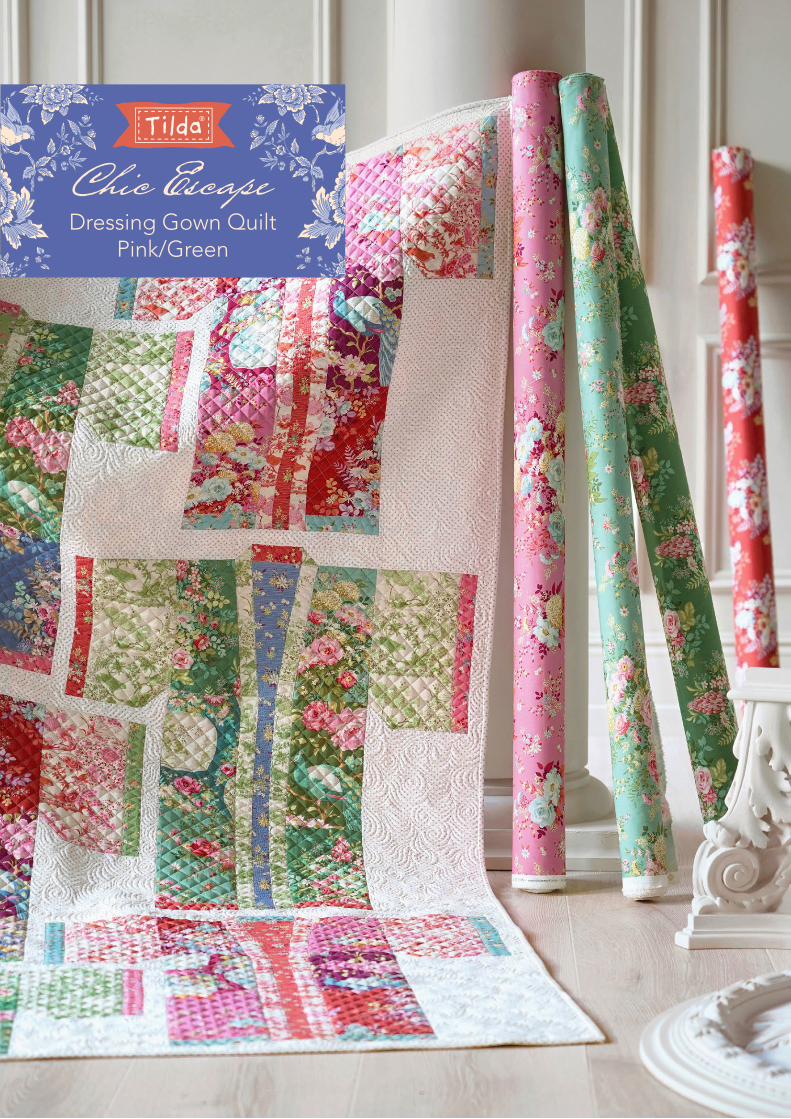
dressing gown quilt pink/green | tildas world
TRANSCRIPT
Dressing Gown QuiltBlue/Mustard
Coctail Hour PillowsBlue/Mustard/Pink/Green
Coctail Hour QuiltBlue/Mustard
Coctail Hour QuiltPink/Green
Flea Market QuiltDove White
Flea Market QuiltAubergine
Dressing Gown QuiltPink/Green
2
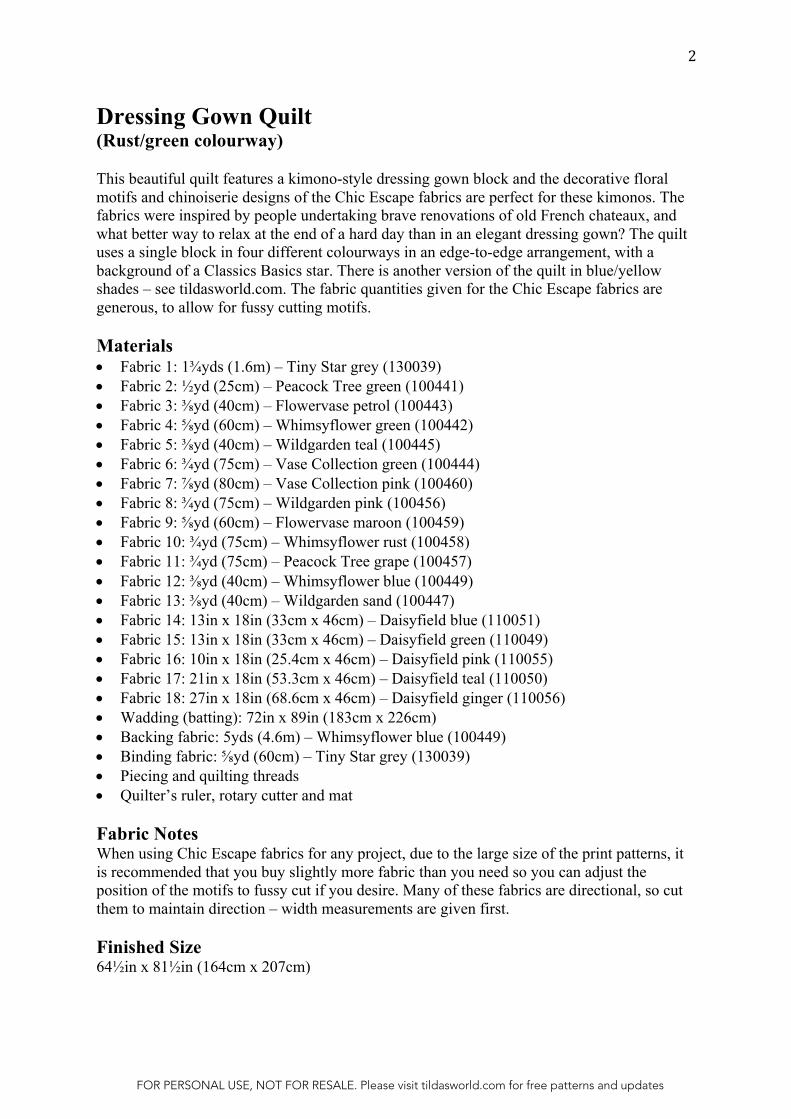
Dressing Gown Quilt (Rust/green colourway)
This beautiful quilt features a kimono-style dressing gown block and the decorative floral motifs and chinoiserie designs of the Chic Escape fabrics are perfect for these kimonos. The fabrics were inspired by people undertaking brave renovations of old French chateaux, and what better way to relax at the end of a hard day than in an elegant dressing gown? The quilt uses a single block in four different colourways in an edge-to-edge arrangement, with a background of a Classics Basics star. There is another version of the quilt in blue/yellow shades – see tildasworld.com. The fabric quantities given for the Chic Escape fabrics are generous, to allow for fussy cutting motifs.
Materials • Fabric 1: 1¾yds (1.6m) – Tiny Star grey (130039)• Fabric 2: ½yd (25cm) – Peacock Tree green (100441)• Fabric 3: ⅜yd (40cm) – Flowervase petrol (100443)• Fabric 4: ⅝yd (60cm) – Whimsyflower green (100442)• Fabric 5: ⅜yd (40cm) – Wildgarden teal (100445)• Fabric 6: ¾yd (75cm) – Vase Collection green (100444)• Fabric 7: ⅞yd (80cm) – Vase Collection pink (100460)• Fabric 8: ¾yd (75cm) – Wildgarden pink (100456)• Fabric 9: ⅝yd (60cm) – Flowervase maroon (100459)• Fabric 10: ¾yd (75cm) – Whimsyflower rust (100458)• Fabric 11: ¾yd (75cm) – Peacock Tree grape (100457)• Fabric 12: ⅜yd (40cm) – Whimsyflower blue (100449)• Fabric 13: ⅜yd (40cm) – Wildgarden sand (100447)• Fabric 14: 13in x 18in (33cm x 46cm) – Daisyfield blue (110051)• Fabric 15: 13in x 18in (33cm x 46cm) – Daisyfield green (110049)• Fabric 16: 10in x 18in (25.4cm x 46cm) – Daisyfield pink (110055)• Fabric 17: 21in x 18in (53.3cm x 46cm) – Daisyfield teal (110050)• Fabric 18: 27in x 18in (68.6cm x 46cm) – Daisyfield ginger (110056)• Wadding (batting): 72in x 89in (183cm x 226cm)• Backing fabric: 5yds (4.6m) – Whimsyflower blue (100449)• Binding fabric: ⅝yd (60cm) – Tiny Star grey (130039)• Piecing and quilting threads• Quilter’s ruler, rotary cutter and mat
Fabric Notes When using Chic Escape fabrics for any project, due to the large size of the print patterns, it is recommended that you buy slightly more fabric than you need so you can adjust the position of the motifs to fussy cut if you desire. Many of these fabrics are directional, so cut them to maintain direction – width measurements are given first.
Finished Size 64½in x 81½in (164cm x 207cm)
FOR PERSONAL USE, NOT FOR RESALE. Please visit tildasworld.com for free patterns and updates
3
General Notes • Fabric quantities are based on a usable width of 42in (107cm), unless otherwise stated.• Measurements are in imperial inches with metric conversions in brackets – use only one
system throughout (preferably inches).• Width measurements are generally given first.• Press all fabrics before cutting.• Use ¼in (6mm) seams unless otherwise instructed.• Read all the instructions through before you start.• Always make one complete block as a test before going on to make the remaining blocks.
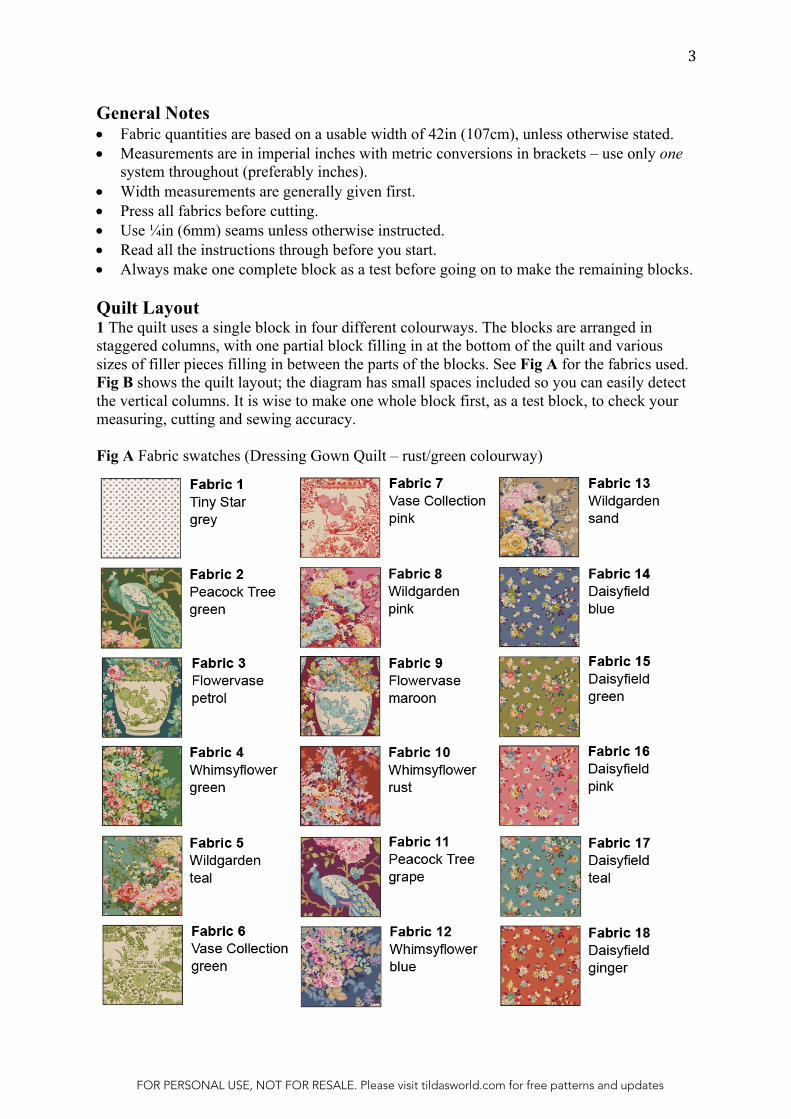
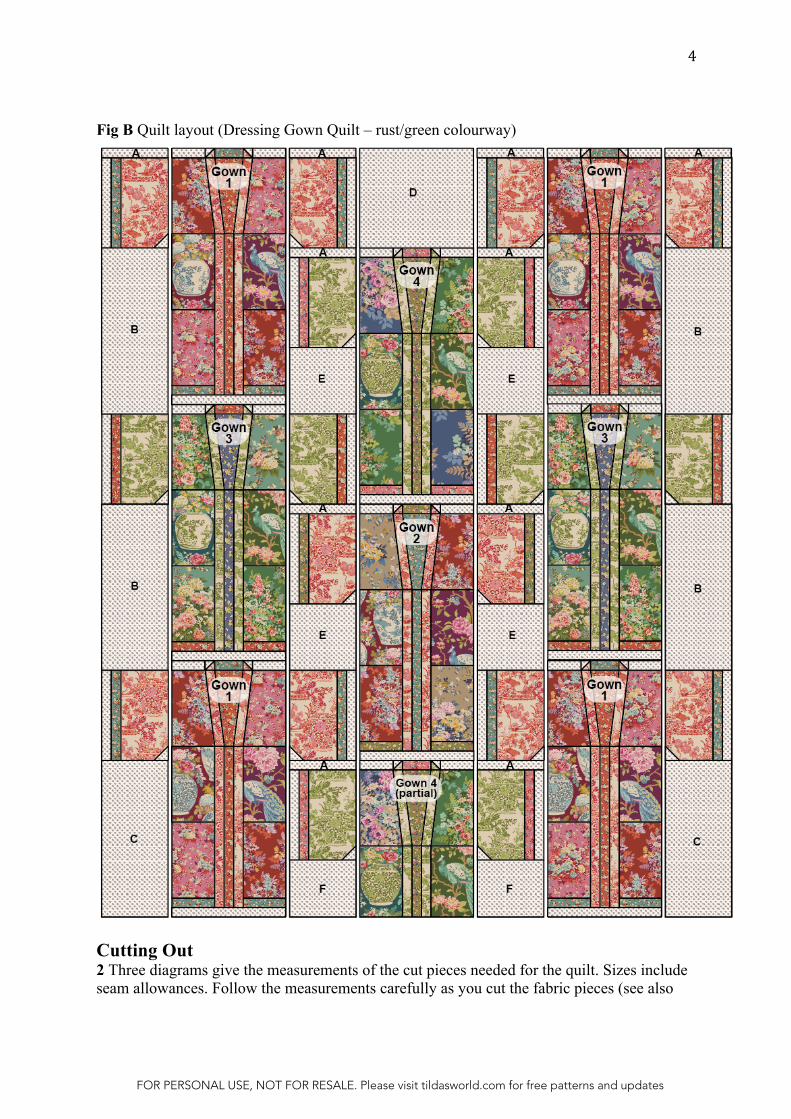
Quilt Layout 1 The quilt uses a single block in four different colourways. The blocks are arranged in staggered columns, with one partial block filling in at the bottom of the quilt and various sizes of filler pieces filling in between the parts of the blocks. See Fig A for the fabrics used. Fig B shows the quilt layout; the diagram has small spaces included so you can easily detect the vertical columns. It is wise to make one whole block first, as a test block, to check your measuring, cutting and sewing accuracy.
Fig A Fabric swatches (Dressing Gown Quilt – rust/green colourway)
FOR PERSONAL USE, NOT FOR RESALE. Please visit tildasworld.com for free patterns and updates
4
Fig B Quilt layout (Dressing Gown Quilt – rust/green colourway)
Cutting Out 2 Three diagrams give the measurements of the cut pieces needed for the quilt. Sizes include seam allowances. Follow the measurements carefully as you cut the fabric pieces (see also
FOR PERSONAL USE, NOT FOR RESALE. Please visit tildasworld.com for free patterns and updates
5
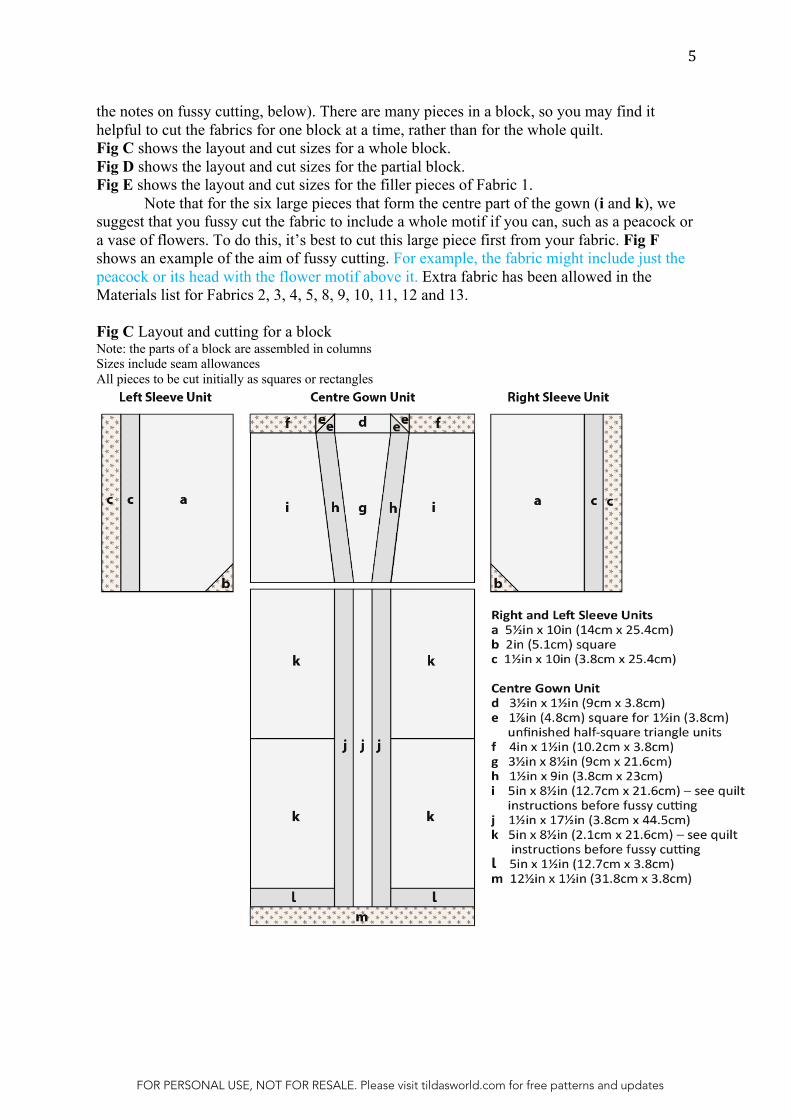
the notes on fussy cutting, below). There are many pieces in a block, so you may find it helpful to cut the fabrics for one block at a time, rather than for the whole quilt. Fig C shows the layout and cut sizes for a whole block. Fig D shows the layout and cut sizes for the partial block. Fig E shows the layout and cut sizes for the filler pieces of Fabric 1.
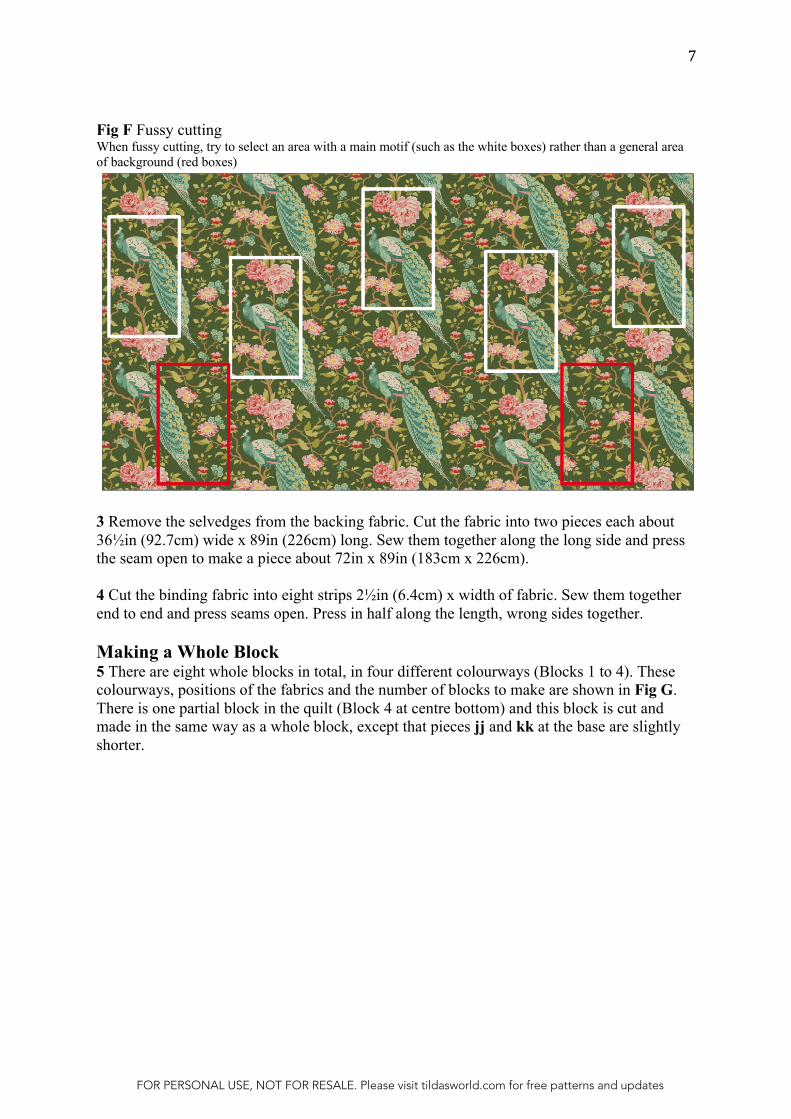
Note that for the six large pieces that form the centre part of the gown (i and k), we suggest that you fussy cut the fabric to include a whole motif if you can, such as a peacock or a vase of flowers. To do this, it’s best to cut this large piece first from your fabric. Fig F shows an example of the aim of fussy cutting. For example, the fabric might include just the peacock or its head with the flower motif above it. Extra fabric has been allowed in the Materials list for Fabrics 2, 3, 4, 5, 8, 9, 10, 11, 12 and 13.
Fig C Layout and cutting for a block Note: the parts of a block are assembled in columns Sizes include seam allowances All pieces to be cut initially as squares or rectangles
FOR PERSONAL USE, NOT FOR RESALE. Please visit tildasworld.com for free patterns and updates

6
Fig D Layout and cutting for the partial block Sizes include seam allowances All pieces to be cut initially as squares or rectangles
Fig E Positions and sizes of the filler pieces
FOR PERSONAL USE, NOT FOR RESALE. Please visit tildasworld.com for free patterns and updates
7
Fig F Fussy cutting When fussy cutting, try to select an area with a main motif (such as the white boxes) rather than a general area of background (red boxes)
3 Remove the selvedges from the backing fabric. Cut the fabric into two pieces each about 36½in (92.7cm) wide x 89in (226cm) long. Sew them together along the long side and press the seam open to make a piece about 72in x 89in (183cm x 226cm).
4 Cut the binding fabric into eight strips 2½in (6.4cm) x width of fabric. Sew them together end to end and press seams open. Press in half along the length, wrong sides together.
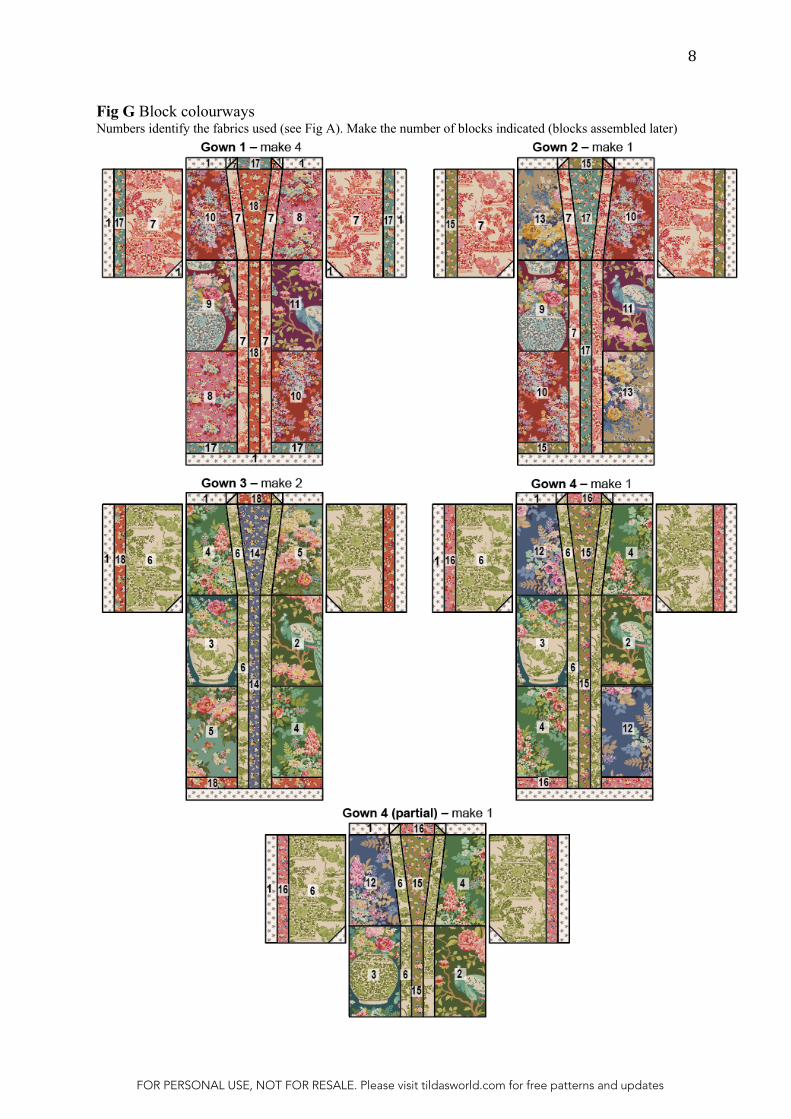
Making a Whole Block 5 There are eight whole blocks in total, in four different colourways (Blocks 1 to 4). These colourways, positions of the fabrics and the number of blocks to make are shown in Fig G. There is one partial block in the quilt (Block 4 at centre bottom) and this block is cut and made in the same way as a whole block, except that pieces jj and kk at the base are slightly shorter.
FOR PERSONAL USE, NOT FOR RESALE. Please visit tildasworld.com for free patterns and updates
8
Fig G Block colourways Numbers identify the fabrics used (see Fig A). Make the number of blocks indicated (blocks assembled later)
FOR PERSONAL USE, NOT FOR RESALE. Please visit tildasworld.com for free patterns and updates
9
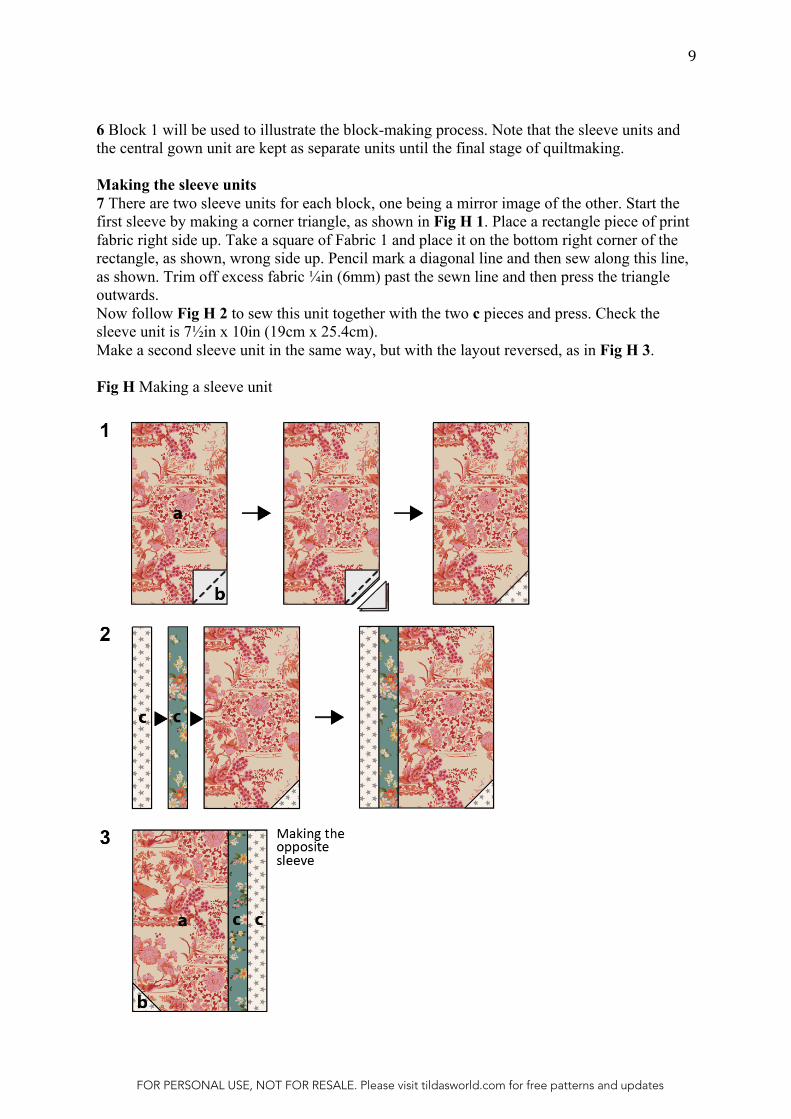
6 Block 1 will be used to illustrate the block-making process. Note that the sleeve units and the central gown unit are kept as separate units until the final stage of quiltmaking.
Making the sleeve units 7 There are two sleeve units for each block, one being a mirror image of the other. Start the first sleeve by making a corner triangle, as shown in Fig H 1. Place a rectangle piece of print fabric right side up. Take a square of Fabric 1 and place it on the bottom right corner of the rectangle, as shown, wrong side up. Pencil mark a diagonal line and then sew along this line, as shown. Trim off excess fabric ¼in (6mm) past the sewn line and then press the triangle outwards. Now follow Fig H 2 to sew this unit together with the two c pieces and press. Check the sleeve unit is 7½in x 10in (19cm x 25.4cm). Make a second sleeve unit in the same way, but with the layout reversed, as in Fig H 3.
Fig H Making a sleeve unit
FOR PERSONAL USE, NOT FOR RESALE. Please visit tildasworld.com for free patterns and updates
10
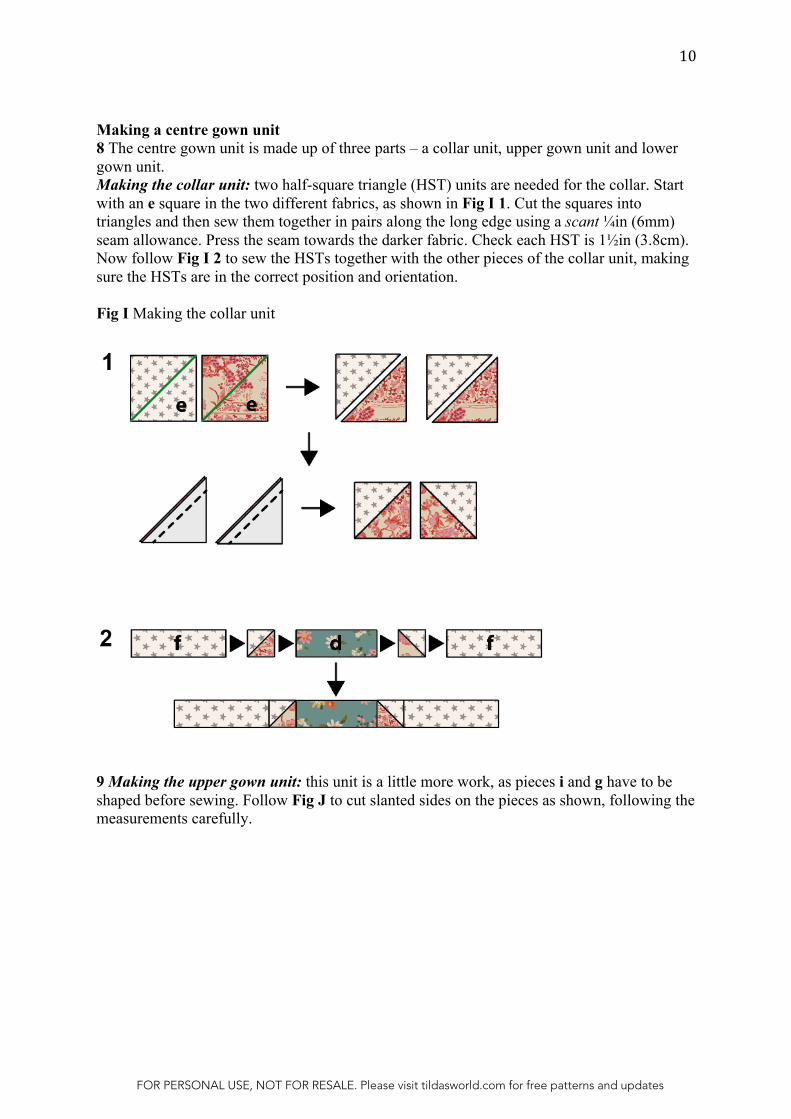
Making a centre gown unit 8 The centre gown unit is made up of three parts – a collar unit, upper gown unit and lower gown unit. Making the collar unit: two half-square triangle (HST) units are needed for the collar. Start with an e square in the two different fabrics, as shown in Fig I 1. Cut the squares into triangles and then sew them together in pairs along the long edge using a scant ¼in (6mm) seam allowance. Press the seam towards the darker fabric. Check each HST is 1½in (3.8cm). Now follow Fig I 2 to sew the HSTs together with the other pieces of the collar unit, making sure the HSTs are in the correct position and orientation.
Fig I Making the collar unit
9 Making the upper gown unit: this unit is a little more work, as pieces i and g have to be shaped before sewing. Follow Fig J to cut slanted sides on the pieces as shown, following the measurements carefully.
FOR PERSONAL USE, NOT FOR RESALE. Please visit tildasworld.com for free patterns and updates

11
Fig J Shaping the i and g pieces for the upper gown unit
10 In order to sew the slanted pieces together correctly, it’s best to mark the halfway points on each piece first, as shown in Fig K. You can do this by folding each piece in half and creasing a line, or by using a temporary marker.
Fig K Marking the i, h and g pieces
FOR PERSONAL USE, NOT FOR RESALE. Please visit tildasworld.com for free patterns and updates
12
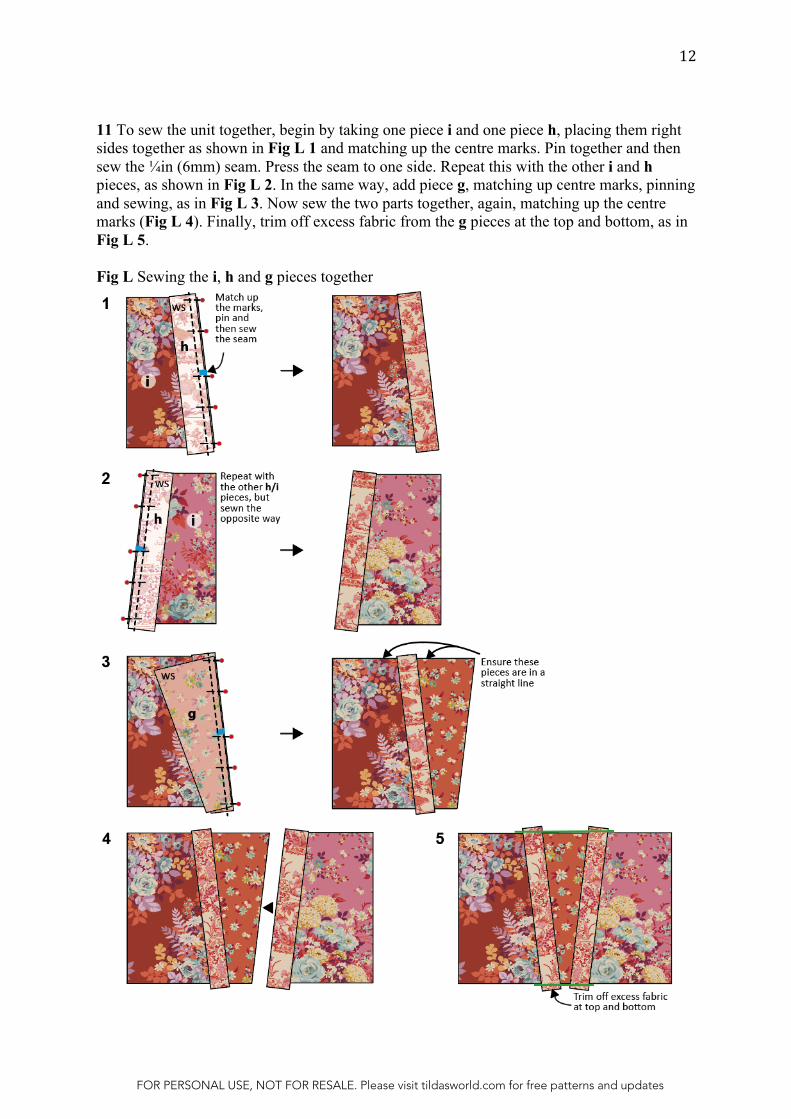
11 To sew the unit together, begin by taking one piece i and one piece h, placing them right sides together as shown in Fig L 1 and matching up the centre marks. Pin together and then sew the ¼in (6mm) seam. Press the seam to one side. Repeat this with the other i and h pieces, as shown in Fig L 2. In the same way, add piece g, matching up centre marks, pinning and sewing, as in Fig L 3. Now sew the two parts together, again, matching up the centre marks (Fig L 4). Finally, trim off excess fabric from the g pieces at the top and bottom, as in Fig L 5.
Fig L Sewing the i, h and g pieces together
FOR PERSONAL USE, NOT FOR RESALE. Please visit tildasworld.com for free patterns and updates
13
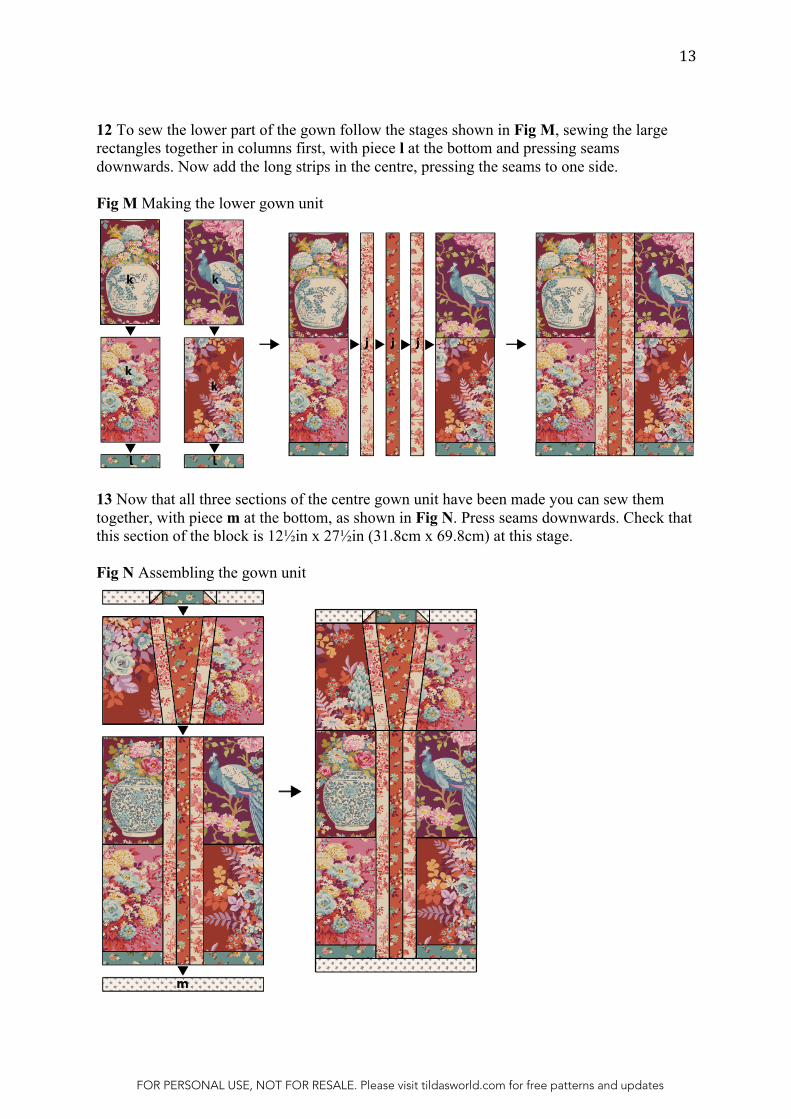
12 To sew the lower part of the gown follow the stages shown in Fig M, sewing the large rectangles together in columns first, with piece l at the bottom and pressing seams downwards. Now add the long strips in the centre, pressing the seams to one side.
Fig M Making the lower gown unit
13 Now that all three sections of the centre gown unit have been made you can sew them together, with piece m at the bottom, as shown in Fig N. Press seams downwards. Check that this section of the block is 12½in x 27½in (31.8cm x 69.8cm) at this stage.
Fig N Assembling the gown unit
FOR PERSONAL USE, NOT FOR RESALE. Please visit tildasworld.com for free patterns and updates
14
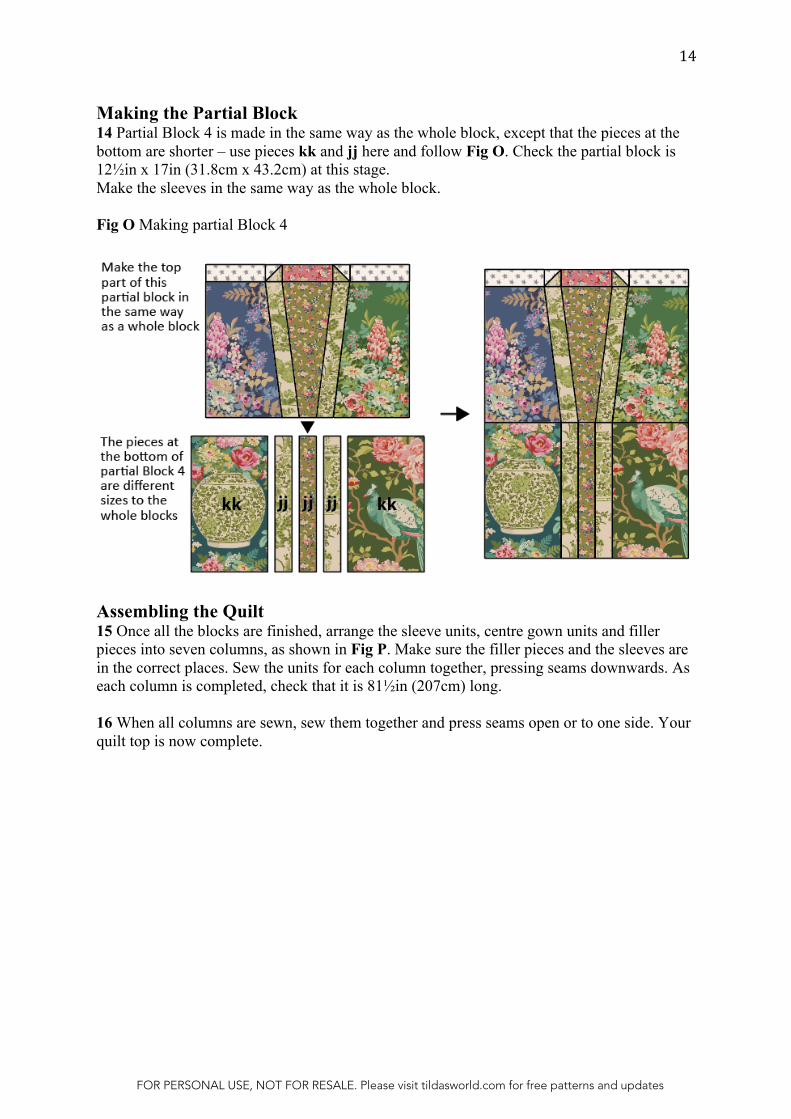
Making the Partial Block 14 Partial Block 4 is made in the same way as the whole block, except that the pieces at the bottom are shorter – use pieces kk and jj here and follow Fig O. Check the partial block is 12½in x 17in (31.8cm x 43.2cm) at this stage. Make the sleeves in the same way as the whole block.
Fig O Making partial Block 4
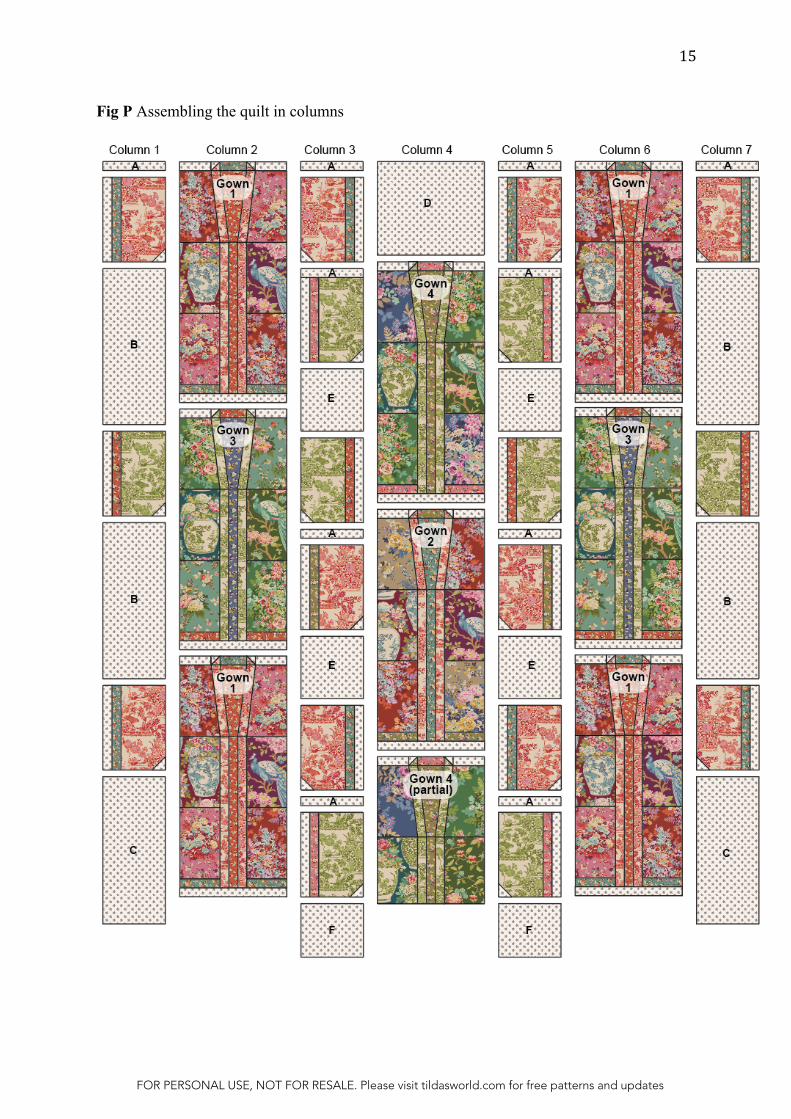
Assembling the Quilt 15 Once all the blocks are finished, arrange the sleeve units, centre gown units and filler pieces into seven columns, as shown in Fig P. Make sure the filler pieces and the sleeves are in the correct places. Sew the units for each column together, pressing seams downwards. As each column is completed, check that it is 81½in (207cm) long.
16 When all columns are sewn, sew them together and press seams open or to one side. Your quilt top is now complete.
FOR PERSONAL USE, NOT FOR RESALE. Please visit tildasworld.com for free patterns and updates
15
Fig P Assembling the quilt in columns
FOR PERSONAL USE, NOT FOR RESALE. Please visit tildasworld.com for free patterns and updates

16
Quilting and Finishing 17 If you are quilting the quilt yourself you now need to make a quilt sandwich – you can do this in various ways, as follows. • Use large stitches to tack (baste) a grid through the layers of the quilt in both directions,
with lines about 4in (10cm) apart.• Use pins or safety pins to fix the layers together.• Use fabric glue sprayed onto the wadding (batting) to fix the layers together.If you are sending the quilt off to be commercially long-arm quilted you won’t need to makea sandwich, as this is done when the quilt is mounted on the machine. When the layers of thequilt are secured you can quilt as desired.
18 When all quilting is finished, square up the quilt ready for binding.
19 Use the prepared double-fold binding strip to bind your quilt. Sew the binding to the quilt by pinning the raw edge of the folded binding against the raw edge of the quilt. Don’t start at a corner. Using a ¼in (6mm) seam, sew the binding in place, starting at least 6in (15.2cm) away from the end of the binding. Sew to within a ¼in (6mm) of a corner and stop. Take the quilt off the machine and fold the binding upwards, creating a mitred corner. Hold this in place, fold the binding back down and pin it in place. Begin sewing the ¼in (6mm) seam again from the top of the folded binding to within ¼in (6mm) of the next corner and then repeat the folding process. Do this on all corners. Leave a 6in (15.2cm) ‘tail’ of unsewn binding at the end.
20 To join the two ends of the binding, open up the beginning and end of the binding tails, lay them flat and fold the ends back so the two ends touch. Mark these folds by creasing or with pins – this is where your seam needs to be. Open out the binding and sew the pieces together at these creases. Trim off excess fabric and press the seam. Re-fold the binding and finish stitching it in place on the front of the quilt.
21 With the quilt right side up, use a medium-hot iron to press the binding outwards all round. Now begin to turn the binding over to the back of the quilt, pinning it in place. Use matching sewing thread and tiny stitches to slipstitch the binding in place all round, creating neat mitres at each corner. Press the binding and your fabulous quilt is finished.
FOR PERSONAL USE, NOT FOR RESALE. Please visit tildasworld.com for free patterns and updates