diy vinyl click & lock planks installation guide
TRANSCRIPT

Office, Storage & Display:
Business Hours: 3 – 9 Cook Rd, Marrickville, NSW, 2204
P: (02) 9519 8785 or M: 0414 266 267
F: (02) 9519 9810
Monday to Friday – 9am to 5pm
Saturday – 9am to 3pm. Other times
including Sundays can be arranged by
appointment. Email: [email protected] Call Vince Perry on Mobile: 0414 266 267
Warehouse number and mobile number will be answered 7 days & 7 nights per week.
DIY VINYL CLICK & LOCK PLANKS INSTALLATION GUIDE
Installing Vinyl CLICK & LOCK Planks yourself is not
difficult and an average room can be completed in just
a few hours after the necessary preparations have
been completed. As with all DIY projects the end result
depends upon using the right tools and methods from
preparation to completion.
This Guide is intended to give you an understanding of
the fundamentals of laying your Vinyl CLICK & LOCK
Planks and some tips on how to get it right the first
time.
Depending upon what style of vinyl flooring you have
purchased you will naturally have an idea of the
design you want to create, and a “mind’s eye” view of your finished project. These CLICK & LOCK Planks are
designed to be installed as a floating floor, without the use of adhesive. This allows the floor to expand and
contract with weather. As such it is recommended for use in areas that maintain a fairly constant temperature
and generally remain between 12˚C and 30˚C on a daily basis.
We will now attempt to explain to you the logical order for your project to proceed from start to finish.
Tools for the Job.
So you have gone to Carpet Tiles 1 and purchased your Vinyl CLICK & LOCK Planks. Installation is a lot easier when
you have the right tools available to you to complete the job. What are the other essential items you should have
on your shopping list? Consider this list:
A heavy duty utility
knife or “Stanley
knife” with extra
brand new heavy
A solid scraper, heat gun
and / or sanding
equipment if you need to
remove stubborn old glue.
A metal straight edge to cut along (at
least) or at best a straight metal edge
with a right angle, like a “Try Square”
or Carpenters square. This is ideal to
A Rubber Hammer/Mallet, Tap-
Block and spacers – Consider
buying a Laminate flooring
Installation Tool Kit from the

Office, Storage & Display:
Business Hours: 3 – 9 Cook Rd, Marrickville, NSW, 2204
P: (02) 9519 8785 or M: 0414 266 267
F: (02) 9519 9810
Monday to Friday – 9am to 5pm
Saturday – 9am to 3pm. Other times
including Sundays can be arranged by
appointment. Email: [email protected] Call Vince Perry on Mobile: 0414 266 267
Warehouse number and mobile number will be answered 7 days & 7 nights per week.
duty blades. make sure your cuts are all straight. local hardware store.
(OP
TIO
NA
L)
A chalk line for
finding and
marking the
centre of your
room. (more
on this later)
A marker
pen.
A wooden surface
or dedicated
cutting mat to cut
and trim down
your vinyl planks
if needed.
Prybar / Flathead Screwdriver /
Hammer. Tools to remove and
replace skirting-boards /
kickboards, Architraves and
Mouldings.
For a professional finish it’s worth
hiring a roller from a hire company
to bed the planks together properly.
Also consider an undercutting saw to
trim the bottom of doorframes.
Surface Preparation.
More so than with any other flooring type, particular care needs to be paid to surface preparation before laying
your Vinyl CLICK & LOCK Planks. By their nature, vinyl flooring will show through any imperfections with the
subfloor, so it is essential to spend adequate time and be patient to prepare the subfloor before laying your Vinyl
CLICK & LOCK Planks.
Vinyl CLICK & LOCK Planks are versatile in that they can be laid over any subfloor, but given that they will
telegraph any imperfections with the sub-floor we strongly recommend fixing all imperfections and levelling the
subfloor or we recommend using levelling sheets to take out any imperfections.
� Carefully remove all the Skirting / Kickboard from around the room and mark where each piece
came from so they can be reattached in the correct spot at the completion of the install.
The Vinyl CLICK & LOCK Planks are designed to install as a free floating floor. Remove the Skirting, being careful to
protect your walls, and mark where each piece came from. The flooring will install below the Skirting / Architrave
allowing for it to expand and contract without showing any gaps to the room. Carefully remove the screws / nails
from the walls.

Office, Storage & Display:
Business Hours: 3 – 9 Cook Rd, Marrickville, NSW, 2204
P: (02) 9519 8785 or M: 0414 266 267
F: (02) 9519 9810
Monday to Friday – 9am to 5pm
Saturday – 9am to 3pm. Other times
including Sundays can be arranged by
appointment. Email: [email protected] Call Vince Perry on Mobile: 0414 266 267
Warehouse number and mobile number will be answered 7 days & 7 nights per week.
If you do not want to remove skirtings, you can use mouldings or Scotia to attach at the base of your skirting. This
creates space for expansion joints without removing the skirting. Carpet Tiles 1 carries a range of Scotia that will
easily cover the expansion gaps, attach easily to your existing skirting, and come in a range of colours.
� Whatever the subfloor surface you are laying on, all traces of old carpet, carpet gripping, nails
or screws, old glue, dirt and grime must be removed completely.
Just like painting, spending time properly preparing the surface that will be under your planks will ensure your
end result. Take the extra time at this stage to ensure that your installation comes up to the best possible
� The floor surface should then be swept, mopped then vacuumed.
� Fill any holes and seal the surface of your floor. This should be completed at this stage so you
end up with the optimal fresh clean flat and level surface to begin your job.

Office, Storage & Display:
Business Hours: 3 – 9 Cook Rd, Marrickville, NSW, 2204
P: (02) 9519 8785 or M: 0414 266 267
F: (02) 9519 9810
Monday to Friday – 9am to 5pm
Saturday – 9am to 3pm. Other times
including Sundays can be arranged by
appointment. Email: [email protected] Call Vince Perry on Mobile: 0414 266 267
Warehouse number and mobile number will be answered 7 days & 7 nights per week.
� Laying new Vinyl CLICK & LOCK Planks over the top of old Ceramic Tiles.
Vinyl CLICK & LOCK Planks makes an easy way to recover your floors and freshen up a room. Often they can go
right over the top of existing floors. In the case of ceramic tiles, it’s essential to use a hammer and chisel to
chip out any damaged or uneven tiles. These should then be filled in with levelling compound or mortar.
Once you have removed the imperfections, use a good quality ceramic tile sealer ( we recommend one from
Holdfast ) as this prepares the tiles for accepting a new layer above, and seals them to ensure they don’t
leach the Levelling compound into the ceramic tile, starving it from water and preventing it from setting
correctly.
Once your tiles are sealed, use Ardex Feather Finish to infill grout lines and any other differences in the
surface, to ensure your floor is perfectly level. When dry, you are ready to start your installation.
� Laying new Vinyl CLICK & LOCK Planks over the top of old sheet Vinyl or old Vinyl Tiles.
Similar to laying over Ceramic tiles above, it is essential to remove any damaged tiles, infill any holes, and
level the surface. Make sure you seal the old flooring to prepare it for levelling compound.
Again, infill the gaps and holes and level with Feather Finish to get your final subfloor surface prepared for
laying your new planks as outlined in the below steps.

Office, Storage & Display:
Business Hours: 3 – 9 Cook Rd, Marrickville, NSW, 2204
P: (02) 9519 8785 or M: 0414 266 267
F: (02) 9519 9810
Monday to Friday – 9am to 5pm
Saturday – 9am to 3pm. Other times
including Sundays can be arranged by
appointment. Email: [email protected] Call Vince Perry on Mobile: 0414 266 267
Warehouse number and mobile number will be answered 7 days & 7 nights per week.
� If there is any variance across your floor we recommend installing subfloor sheets, to level out
the surface, remove any imperfections, rise or falls in your subfloor.
Vinyl flooring will show up any imperfections and changes in the subfloor, so if you are not able to get a
perfectly level and clean surface with your existing subfloor we recommend that you install subfloor sheets to
level out the imperfections.
Cut and lay your sheets and fix them with screws or construction adhesive. It is important to make sure they
will not move once the vinyl is laid onto them.
� Fill any imperfections. We do stock self- leveller if you need it to help level and fill faults with
your under-floor surface.
Fill any seams between panels or
planks, screw heads, nail holes or
any other variance in the surface.
Similarly if you are laying over
concrete, ceramic tile or other
subfloor surface, make sure you fill
and level all of the floor. We
suggest using Feather Finish to fill
these, as it dries in 15 minutes and
provides a superior surface ready for you to install your Vinyl CLICK & LOCK
Planks over the top.
Ardex Feather Finish is designed to give a hard durable flat surface very quickly
so that any seams or imperfections can be filled and levelled before they
become a problem. Skim coat the joints between subfloor panels, boards,
screw heads nails or any other variance in the surface.
Allow the Feather Finish to dry, then sand to a smooth finish. In the meantime
remove the planks from their boxes and allow them to acclimatise.
Office, Storage & Display:
Business Hours: 3 – 9 Cook Rd, Marrickville, NSW, 2204
P: (02) 9519 8785 or M: 0414 266 267
F: (02) 9519 9810
Monday to Friday – 9am to 5pm
Saturday – 9am to 3pm. Other times
including Sundays can be arranged by
appointment. Email: [email protected] Call Vince Perry on Mobile: 0414 266 267
Warehouse number and mobile number will be answered 7 days & 7 nights per week.
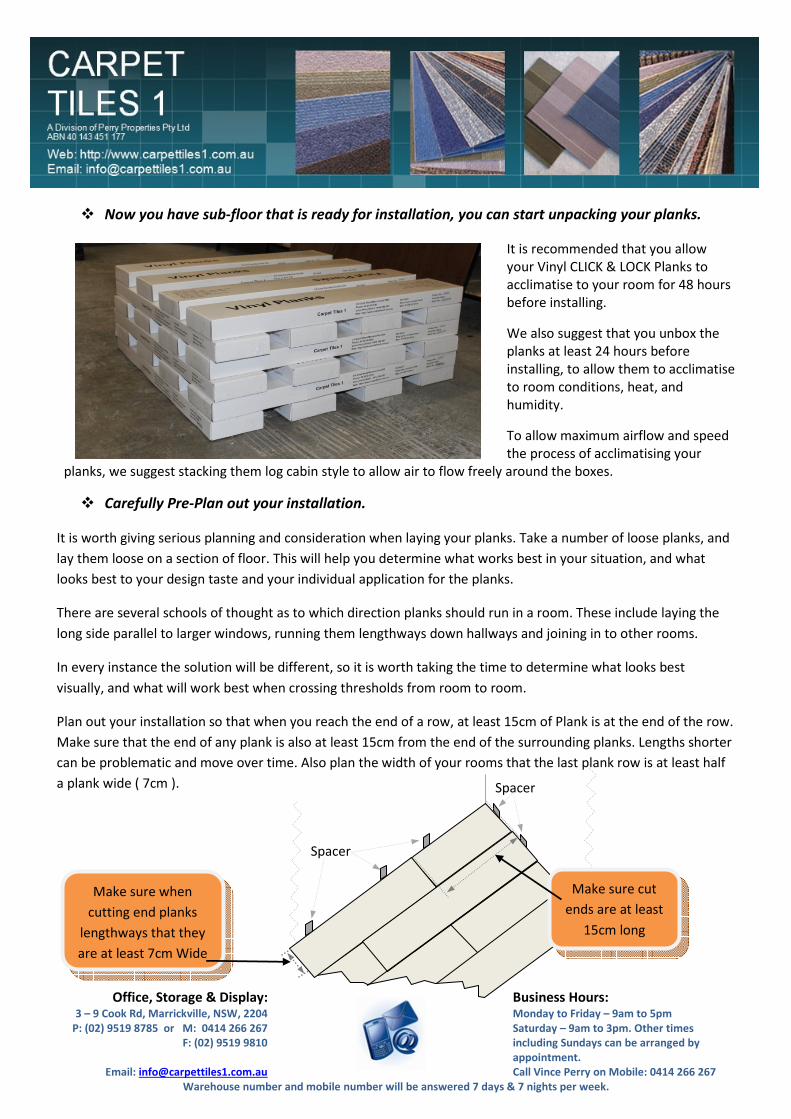
� Now you have sub-floor that is ready for installation, you can start unpacking your planks.
It is recommended that you allow
your Vinyl CLICK & LOCK Planks to
acclimatise to your room for 48 hours
before installing.
We also suggest that you unbox the
planks at least 24 hours before
installing, to allow them to acclimatise
to room conditions, heat, and
humidity.
To allow maximum airflow and speed
the process of acclimatising your planks, we suggest stacking them log cabin style to allow air to flow freely around the boxes.
� Carefully Pre-Plan out your installation.
It is worth giving serious planning and consideration when laying your planks. Take a number of loose planks, and
lay them loose on a section of floor. This will help you determine what works best in your situation, and what
looks best to your design taste and your individual application for the planks.
There are several schools of thought as to which direction planks should run in a room. These include laying the
long side parallel to larger windows, running them lengthways down hallways and joining in to other rooms.
In every instance the solution will be different, so it is worth taking the time to determine what looks best
visually, and what will work best when crossing thresholds from room to room.
Plan out your installation so that when you reach the end of a row, at least 15cm of Plank is at the end of the row.
Make sure that the end of any plank is also at least 15cm from the end of the surrounding planks. Lengths shorter
can be problematic and move over time. Also plan the width of your rooms that the last plank row is at least half
a plank wide ( 7cm ).
Spacer
Spacer
Make sure when
cutting end planks
lengthways that they
are at least 7cm Wide
Make sure cut
ends are at least
15cm long

Office, Storage & Display:
Business Hours: 3 – 9 Cook Rd, Marrickville, NSW, 2204
P: (02) 9519 8785 or M: 0414 266 267
F: (02) 9519 9810
Monday to Friday – 9am to 5pm
Saturday – 9am to 3pm. Other times
including Sundays can be arranged by
appointment. Email: [email protected] Call Vince Perry on Mobile: 0414 266 267
Warehouse number and mobile number will be answered 7 days & 7 nights per week.
“Plank Method” –
Lay each row of planks to
ensure that the joins do
not match previous rows
nearby. The idea here is
to create a random
pattern where planks
join at random places
just like normal wood planks. Offset by at least
15cm to create a stepped or staggered look.
Where a room is not perfectly square, this
method is also great to disguise the problem.
Planks can be offset by varying amounts to
create different looks, for example offset by half, a third, or a quarter of a plank. The whole point is to mimic
the look of floorboards. Just remember to always have at least 15cm of plank at each end of each row, 15 cm
from joins surrounding your current plank joint, and plan out the width of your room so that both sides of the
room have at least 7cm of plank width along the walls. This is to add stability to cut rows and planks and also
to provide a move visually pleasing look to the room.
� Find and Mark the middle of the room.
Using your chalk line its time to work out the centre of the room.
Measure along the length of your walls and mark the centre point of
each of the walls.
It is important to measure each wall as often rooms are not exactly
square and can be slightly out.
Position your chalk line and mark lines across the floor from side to
side.
Doing this across all walls should end up with a cross point in the centre
of the room. It is important that these lines are square as they will be
the guide for all your future efforts. Take a moment and determine if
they are square using the following methods.

Office, Storage & Display:
Business Hours: 3 – 9 Cook Rd, Marrickville, NSW, 2204
P: (02) 9519 8785 or M: 0414 266 267
F: (02) 9519 9810
Monday to Friday – 9am to 5pm
Saturday – 9am to 3pm. Other times
including Sundays can be arranged by
appointment. Email: [email protected] Call Vince Perry on Mobile: 0414 266 267
Warehouse number and mobile number will be answered 7 days & 7 nights per week.
If you do have a “Try Square” available, use it to place along the lines
and make sure they line up square.
If you do not have a Try Square, it is not a problem as there is a simple
way to work out if your lines are square.
Using a tape or ruler, measure and mark from the cross point out 40
centimetres. Now measure and mark along the other line out from the
cross point out 30 centimetres.
Finally measure from one mark to the other mark. The distance
between the two should be 50cm.
If it is not 50cm or your try square does not line up with your lines on
both sides, your lines and room are not square and your planks will not
line up exactly with the walls. It is very common for rooms to be slightly
out from square so do not worry if this is the case.
Assuming that your room is not square, there are several techniques you can use to mark your start lines square.
Following on from above we will use the same techniques described above to measure out points and mark lines
that are square.
� Squaring up your guide lines.
Without a try Square:
Pick the opposite walls where the length of the walls is the closest, and
use the chalk line from the centre of those walls to be your starting
point.
Now that we know the centre point of that line ( from the step above )
measure back up that line 40cm on each side of the centre point.
From each of these points 40cm off centre, measure out 50cm and
mark a small curve at 50cm from each of these points.
Next measure 30cm each side of the centre point and mark a small
curve at 30cm from the centre point.
Finally line your chalk line to mark a straight line from one wall through
the point where the three arcs meet, then through the centre point on
the middle line, then through the other meeting point of the arcs on the other side, and finally out to the wall on
the other side. If done correctly, these lines will now be square and you are ready to progress to the next step.
50cm
30cm
30cm
Try
Square
40cm 50cm
40cm
40cm
30cm
50cm
Office, Storage & Display:
Business Hours: 3 – 9 Cook Rd, Marrickville, NSW, 2204
P: (02) 9519 8785 or M: 0414 266 267
F: (02) 9519 9810
Monday to Friday – 9am to 5pm
Saturday – 9am to 3pm. Other times
including Sundays can be arranged by
appointment. Email: [email protected] Call Vince Perry on Mobile: 0414 266 267
Warehouse number and mobile number will be answered 7 days & 7 nights per week.
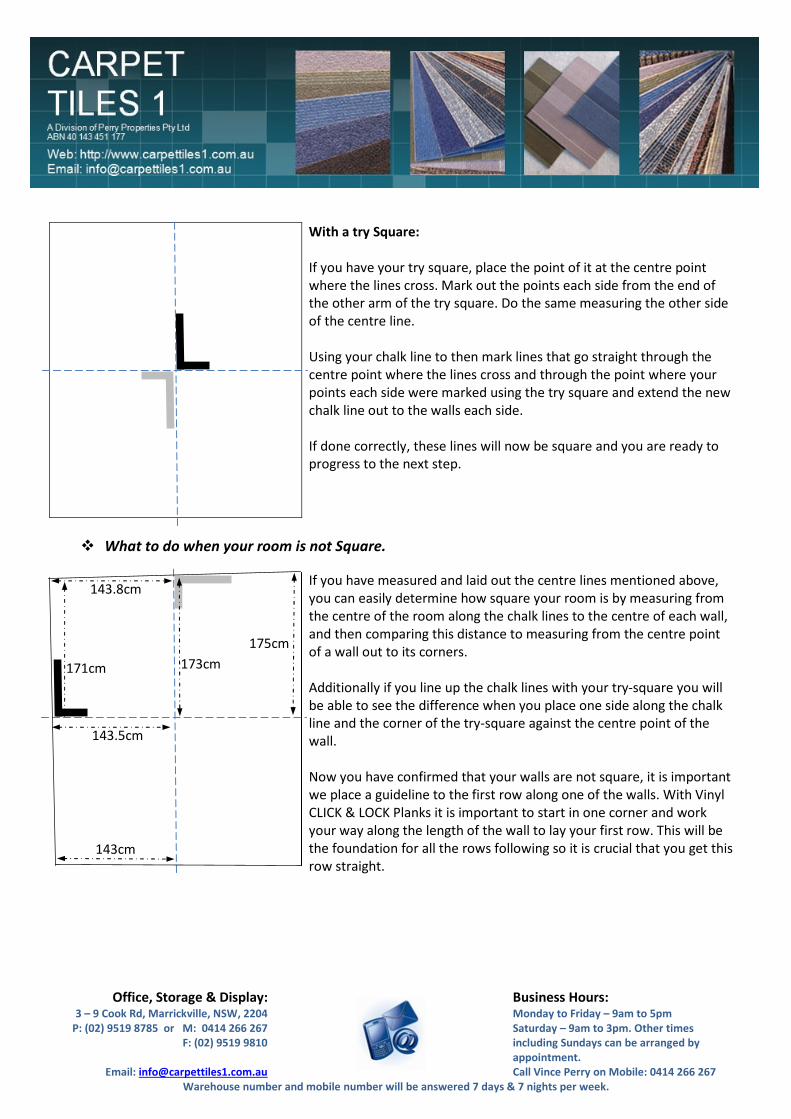
With a try Square:
If you have your try square, place the point of it at the centre point
where the lines cross. Mark out the points each side from the end of
the other arm of the try square. Do the same measuring the other side
of the centre line.
Using your chalk line to then mark lines that go straight through the
centre point where the lines cross and through the point where your
points each side were marked using the try square and extend the new
chalk line out to the walls each side.
If done correctly, these lines will now be square and you are ready to
progress to the next step.
� What to do when your room is not Square.
If you have measured and laid out the centre lines mentioned above,
you can easily determine how square your room is by measuring from
the centre of the room along the chalk lines to the centre of each wall,
and then comparing this distance to measuring from the centre point
of a wall out to its corners.
Additionally if you line up the chalk lines with your try-square you will
be able to see the difference when you place one side along the chalk
line and the corner of the try-square against the centre point of the
wall.
Now you have confirmed that your walls are not square, it is important
we place a guideline to the first row along one of the walls. With Vinyl
CLICK & LOCK Planks it is important to start in one corner and work
your way along the length of the wall to lay your first row. This will be
the foundation for all the rows following so it is crucial that you get this
row straight.
143cm
175cm
173cm 171cm
143.5cm
143.8cm
Office, Storage & Display:
Business Hours: 3 – 9 Cook Rd, Marrickville, NSW, 2204
P: (02) 9519 8785 or M: 0414 266 267
F: (02) 9519 9810
Monday to Friday – 9am to 5pm
Saturday – 9am to 3pm. Other times
including Sundays can be arranged by
appointment. Email: [email protected] Call Vince Perry on Mobile: 0414 266 267
Warehouse number and mobile number will be answered 7 days & 7 nights per week.
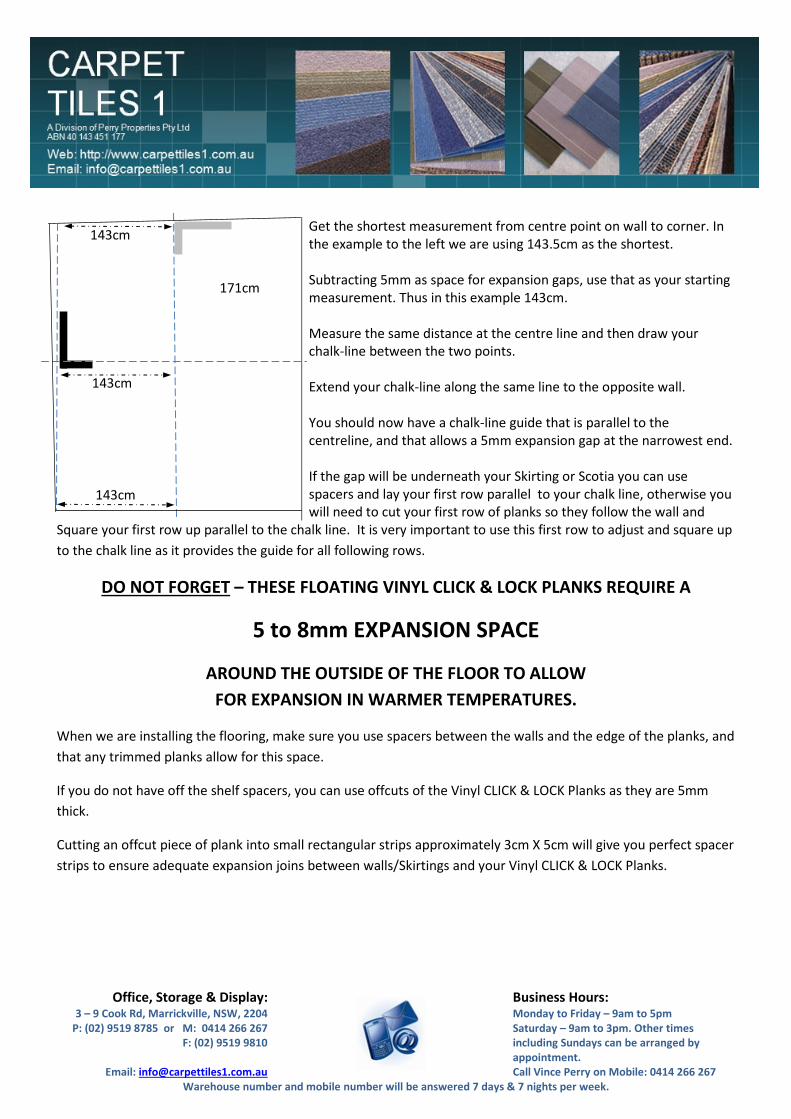
Get the shortest measurement from centre point on wall to corner. In
the example to the left we are using 143.5cm as the shortest.
Subtracting 5mm as space for expansion gaps, use that as your starting
measurement. Thus in this example 143cm.
Measure the same distance at the centre line and then draw your
chalk-line between the two points.
Extend your chalk-line along the same line to the opposite wall.
You should now have a chalk-line guide that is parallel to the
centreline, and that allows a 5mm expansion gap at the narrowest end.
If the gap will be underneath your Skirting or Scotia you can use
spacers and lay your first row parallel to your chalk line, otherwise you
will need to cut your first row of planks so they follow the wall and
Square your first row up parallel to the chalk line. It is very important to use this first row to adjust and square up
to the chalk line as it provides the guide for all following rows.
DO NOT FORGET – THESE FLOATING VINYL CLICK & LOCK PLANKS REQUIRE A
5 to 8mm EXPANSION SPACE
AROUND THE OUTSIDE OF THE FLOOR TO ALLOW
FOR EXPANSION IN WARMER TEMPERATURES.
When we are installing the flooring, make sure you use spacers between the walls and the edge of the planks, and
that any trimmed planks allow for this space.
If you do not have off the shelf spacers, you can use offcuts of the Vinyl CLICK & LOCK Planks as they are 5mm
thick.
Cutting an offcut piece of plank into small rectangular strips approximately 3cm X 5cm will give you perfect spacer
strips to ensure adequate expansion joins between walls/Skirtings and your Vinyl CLICK & LOCK Planks.
143cm
143cm
171cm
143cm

Office, Storage & Display:
Business Hours: 3 – 9 Cook Rd, Marrickville, NSW, 2204
P: (02) 9519 8785 or M: 0414 266 267
F: (02) 9519 9810
Monday to Friday – 9am to 5pm
Saturday – 9am to 3pm. Other times
including Sundays can be arranged by
appointment. Email: [email protected] Call Vince Perry on Mobile: 0414 266 267
Warehouse number and mobile number will be answered 7 days & 7 nights per week.
� Be careful not to damage.
The Planks are designed with
profiles built into the edges to
allow them to interlock.
They have been engineered to
lock together and maintain
their connections when
installed.
The flooring will naturally expand and contract from room conditions, hence the expansion space required around
them. They should however remain clicked together tight during expansion.
Be extremely careful when handling
planks, stacking them and transporting
them.
Impacts to the engineered edge can
prevent the planks from properly
locking together.
Make sure that you protect the edges
when moving planks around your installation, unpacking them, or transporting them.
You can trim around damage, or clean out the damaged area to allow the planks to lock together correctly.
There are several different methods to installing these planks and which long edge should be against your starting
wall. In our case we use the method where the tongue ( the underfloor protruding piece) is closest to the start
wall, leaving the overhang facing towards the room for attaching to the next plank. There is no right or wrong it’s
a case of personal preference. Our installers simply find the above method to be easier when starting off.
Tongue Overhang
( Shape indicative only )
Installation is dramatically easier when using the right tools. We recommend using an off the shelf laminate /
engineered flooring installation kits, available from most local hardware stores. Additionally we use a soft-faced
hammer when installing to help avoid damage to the engineered edge of the planks.
Off the shelf Engineered Flooring
/ Laminate flooring kit.
Pull Tool for snugging up end planks.

Office, Storage & Display:
Business Hours: 3 – 9 Cook Rd, Marrickville, NSW, 2204
P: (02) 9519 8785 or M: 0414 266 267
F: (02) 9519 9810
Monday to Friday – 9am to 5pm
Saturday – 9am to 3pm. Other times
including Sundays can be arranged by
appointment. Email: [email protected] Call Vince Perry on Mobile: 0414 266 267
Warehouse number and mobile number will be answered 7 days & 7 nights per week.
Spacers. – These
particular ones allow
us to put two facing
together and vary the
width along walls to
make sure we remain
straight. You can also
use offcuts of planks.
Tap Block – Used between
the soft-faced hammer and
the engineered edge.
Tapped gently this lets you
ease the flooring snug to
the surrounding pieces.
Soft-Faced Hammer. – This eases the impact when hitting the Tap Block /
or Pull Tool, and absorbs part of the impact. This makes it easier to install
the flooring without damaging the edge.
Given that you are not hitting the CLICK & LOCK Planks directly, you can
use a standard claw hammer as well. Just be careful to moderate your
force so that you do not damage the edge of the planks.
Facing the long wall you are starting with, place spacers against the
wall and then line your CLICK & LOCK Plank up against them. It is
important to take your time with this first row, as it will square
everything else that follows. Make sure your planks line up and follow
your chalk line from the earlier steps.
Insert or reduce spacers as needed to keep your planks supported and
remain square along the chalk line.
Often walls will go in and out along their length so you may need to
reduce spacer width in some places and make it wider in others.
Just keep in mind that any gap needs to be less than the skirting board
you will replace or the Scotia used to cover the gap.
When you get to the end of the row, measure and cut your plank to fit
the gap – don’t forget to allow room for spacers
Remember that your planks need to allow space for expansion, but also follow the contour of the wall. Your
Skirting or Scotia will only hide so much of a gap. It might be necessary to cut this starting row lengthways down
planks to maintain a 5mm gap along the wall and to keep the other side parallel with your chalk line and square to
the room.
1
2
3 Spacers

Office, Storage & Display:
Business Hours: 3 – 9 Cook Rd, Marrickville, NSW, 2204
P: (02) 9519 8785 or M: 0414 266 267
F: (02) 9519 9810
Monday to Friday – 9am to 5pm
Saturday – 9am to 3pm. Other times
including Sundays can be arranged by
appointment. Email: [email protected] Call Vince Perry on Mobile: 0414 266 267
Warehouse number and mobile number will be answered 7 days & 7 nights per week.
Once you have the first CLICK & LOCK Plank in position (Plank 1 in the diagram) line up your second plank, and
raise the end of it slightly to angle the next plank into position. Once it is in position, lower it flat.
Use the Tap Block to gently tap the end of the plank so that it Locks into the Plank next to it. When done correctly
the planks should sit snug next to each other and none of the base material or tongue should be visible. There
should be no gap between planks.
Continue to the end of the row in the same fashion. Cut your end plank per the instructions below to fit at the
end.
Cut an end Plank to be longer than 15cm ( 4 ) and to ensure that the
join will not be within 15cm of the end of the planks in the previous
row (Joint between Planks 1 & 2).
It is important that you calculate out the length so that your end plank
in the row ( 7 ) will also be longer than 15cm and not within 15cm of
the join for the previous row (Joint between Planks 2 & 3). Don’t forget
to allow room for the spacers.
As the ends of the rows will be covered by Skirting board or Scotia, cut
them to conform to the angle of the wall. Plan your cuts to be towards
the wall side so they will be hidden by the Skirting or Scotia. Keep your
offcut pieces, as these can often be used to start or end another row.
To insert your new Planks, insert the short end to the plank before (e.g.
Planks 5 to Plank 4 ) and make sure that connection is tight. Then
slightly raise the plank and gently tap the plank on the long edge to
slide it sideways and connect with the preceding row ( Plank 5 Connecting to Planks 1 and 2 ).
1
2
3 Spacers
5
6
4
7

Office, Storage & Display:
Business Hours: 3 – 9 Cook Rd, Marrickville, NSW, 2204
P: (02) 9519 8785 or M: 0414 266 267
F: (02) 9519 9810
Monday to Friday – 9am to 5pm
Saturday – 9am to 3pm. Other times
including Sundays can be arranged by
appointment. Email: [email protected] Call Vince Perry on Mobile: 0414 266 267
Warehouse number and mobile number will be answered 7 days & 7 nights per week.
When you get to the last plank in the row, use the Pull Tool to snug the last plank in the row ( 7 ) tight against the
previous plank ( 6 )
Continue working your way across the room.
Keep an eye on the previous rows to ensure you don’t separate their
connections when tapping or inserting planks.
It is best to take your time and tap / ease planks gently into position.
Excessive tapping / hitting planks can damage them, or make them
separate from previous rows.
Keeping all connections snug when laying your floor will ensure that
they do not separate when you start using the floor.
Move spacers so that they support the ends of each row and at least
two spacers for the long edge of planks. Others can be removed as you
go to reuse as you work across the floor. If you need extra spacers, you
can cut an offcut of plank (they are 5mm thick) and use the pieces as
spacers to complete your floor.
Work your way all the way across the room to the last row. Cut your planks to include spacers along the last side
wall once inserted. Ease your CLICK & LOCK Planks into position using the Pull Tool to lift the side closest to the
wall to aid connecting them. Once in place, use the Pull Tool to snug the plank to the row before. When finally in
place, insert spacers between this last plank and the wall.
1
2
3 Spacers
5
6
4
7
9
8
10
11
12
13
14
18
17
16
15

Office, Storage & Display:
Business Hours: 3 – 9 Cook Rd, Marrickville, NSW, 2204
P: (02) 9519 8785 or M: 0414 266 267
F: (02) 9519 9810
Monday to Friday – 9am to 5pm
Saturday – 9am to 3pm. Other times
including Sundays can be arranged by
appointment. Email: [email protected] Call Vince Perry on Mobile: 0414 266 267
Warehouse number and mobile number will be answered 7 days & 7 nights per week.
� Finishing up.
Now you have your floor down, carefully remove the spacers from one wall, and then attach the Skirting or Scotia
to the wall covering the expansion gap. Work your way around all the walls cutting and reattaching the Skirting or
Scotia. Where you need to join between your new flooring, and existing floor in different room, or over an
expansion gap, use metal Coverstrips to make the transition. If you have stairs that leave off from your Vinyl CLICK
& LOCK Planks, attach stairnosings to the leading edge of the stairs to provide protection and ensure appropriate
grip on your stairs.
� Cutting your planks to walls and obstacles.
Where you need to cut your planks to fit between walls and the remaining planks, or around obstacles in the
room it is best to “measure twice cut once”. Remember to make sure that you take care to ensure you allow
space for expansion, so always allow 5mm between the edge of the planks and any wall or obstacle. Remember
that you measure the top layer of the plank only, do not include the tongue of the plank as this inserts to the
preceding plank.
WA
LL
Gap needing cut Vinyl Plank. Layed Vinyl Plank
Metal Straight
Edge.
Keeping this side
of Plank to Lay
Get your marked plank and put it face up, on the cutting mat or board.
Line up your metal straight edge or T-square between the two marks
towards the side that will be laid so that if you accidentally make a mistake
it will not affect the portion that will get laid on the floor.
Use your Utility knife or Stanley knife to cut a straight line in the “surface
wear” layer along the metal straight edge. The surface wear layer is the top
layer of the planks, not the underside. Bend the plank back and forwards
and the remainder of the plank will break along your cut line
Measure each side of the
Gap and mark the plank on
each side using the pen.
Cut along the dotted line on top side of the Plank.
Make sure you use the correct end of plank to join to
preceding plank and hide your cut at the wall end.

Office, Storage & Display:
Business Hours: 3 – 9 Cook Rd, Marrickville, NSW, 2204
P: (02) 9519 8785 or M: 0414 266 267
F: (02) 9519 9810
Monday to Friday – 9am to 5pm
Saturday – 9am to 3pm. Other times
including Sundays can be arranged by
appointment. Email: [email protected] Call Vince Perry on Mobile: 0414 266 267
Warehouse number and mobile number will be answered 7 days & 7 nights per week.
Be very careful to take it slow so that your knife does not wander away from the straight edge. Cut and fit your
plank, then move on to repeat the process for the remaining planks.
Where you have poles, pillars and other obstacles, measure out where you need to cut your plank including 5mm
for the expansion gap, and then follow the above instructions. Always remember it is better to cut out less plank
than more, as you can always trim it down to fit in better. If you cut out too much you will then have a gap too
large or have to cut other slivers of plank to infill the mistake.
� Roll / Mallet the Seams and Joints of the Vinyl CLICK & LOCK Planks ( Optional ).
As a final step, consider using a roller or rubber mallet to bed the vinyl planks down. Rollers can be hired from
most equipment hire businesses for reasonable prices, of you can buy small hand rollers at most hardware stores,
and use your body weight to apply pressure when rolling seams. This will ensure that your Vinyl CLICK & LOCK
Planks properly bond together, and remain in place for years to come.
Carpet Tiles 1 are always happy to answer any questions you may have about installing your Vinyl CLICK & LOCK
Planks, to ensure you get the best installation possible for your room. If you have any questions give us a call on
02 9519 8785 or 0414 266267 and we will gladly answer your questions.
Vince Perry.