cycle time job aid
TRANSCRIPT
Cycle Time Job Aid
Cycle time is the total elapsed time, from submission to final approval, of a transaction. Agencies can use cycle time information to track their agency’s performance. Departments can also use this information to measure individual performance to identify any potential bottlenecks within the approval process. Reducing the duration of key activities in the procurement to payment cycle can reduce the time it takes to complete transactions within MyFloridaMarketPlace. Customers can access average cycle time information by leveraging MFMP Secure Reports and further identify potential bottlenecks in approval flows and an individual’s performance in MFMP Analysis.
MFMP Secure Cycle Time Reports
To calculate an agency’s average cycle time, customers can utilize the Invoice Payment and the Requisitioning to Purchase Order Cycle Time Reports on the Department of Management Services (DMS) Secure Report site.
Step 1: Open the Secure Reports Site (http://dms-purchasing-ftp.state.fl.us/xx00/).
Step 2: Select the desired agency's OLO folder.
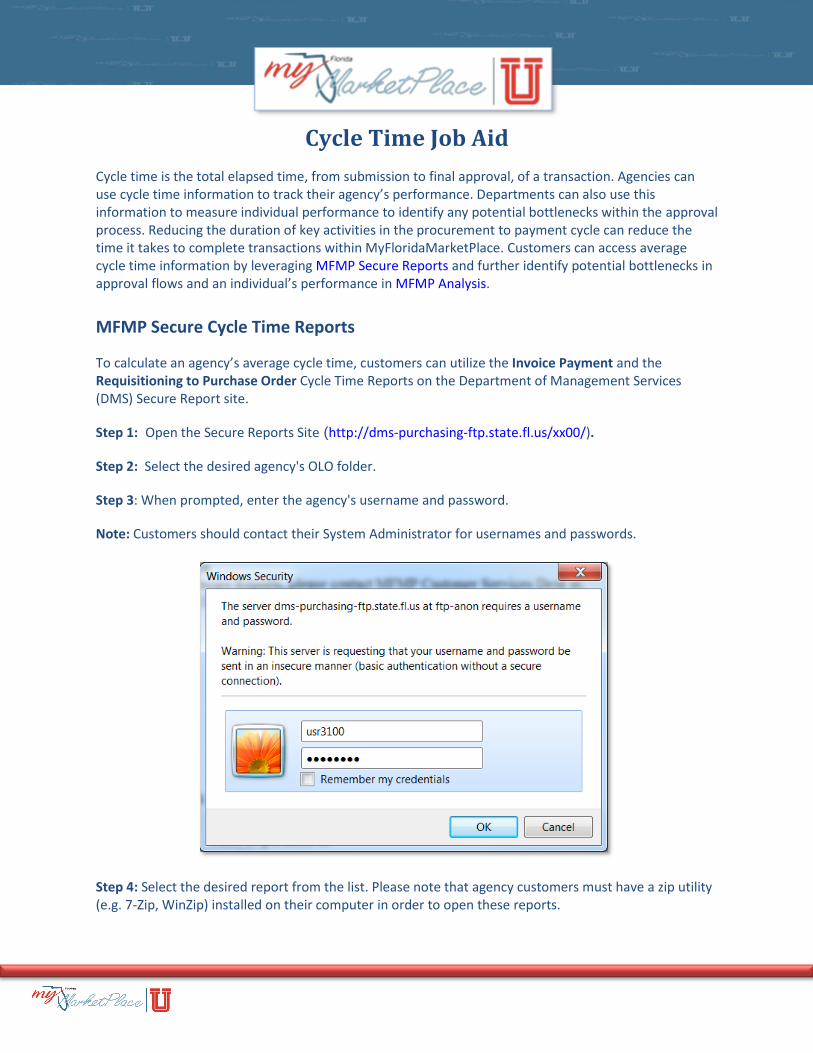
Step 3: When prompted, enter the agency's username and password.
Note: Customers should contact their System Administrator for usernames and passwords.
Step 4: Select the desired report from the list. Please note that agency customers must have a zip utility (e.g. 7-Zip, WinZip) installed on their computer in order to open these reports.
Cycle Time Job Aid | 2
Available Cycle Time Secure Reports
Invoice Payment Cycle Time This report is contained within the ‘Invoice_Payment Cycle_Time_MFMP’ zip and provides invoice to payment cycle time information. The following data fields are contained within this report:
PUI Agency MFMP Invoice # IR# Invoice Created Date
Paid Date IR Cycle Time Vendor Name FEIN ASN Flag
Requisition to Cycle Time This report is contained within the ‘Req_to_PO_Cycle_Time’ zip and provides requisition cycle time information. The following data fields are contained within this report:
PUI Agency PR # PO# Ordered Date
Submitted Date PR Cycle Time MOP Vendor Name FEIN
Calculating Average Cycle Time
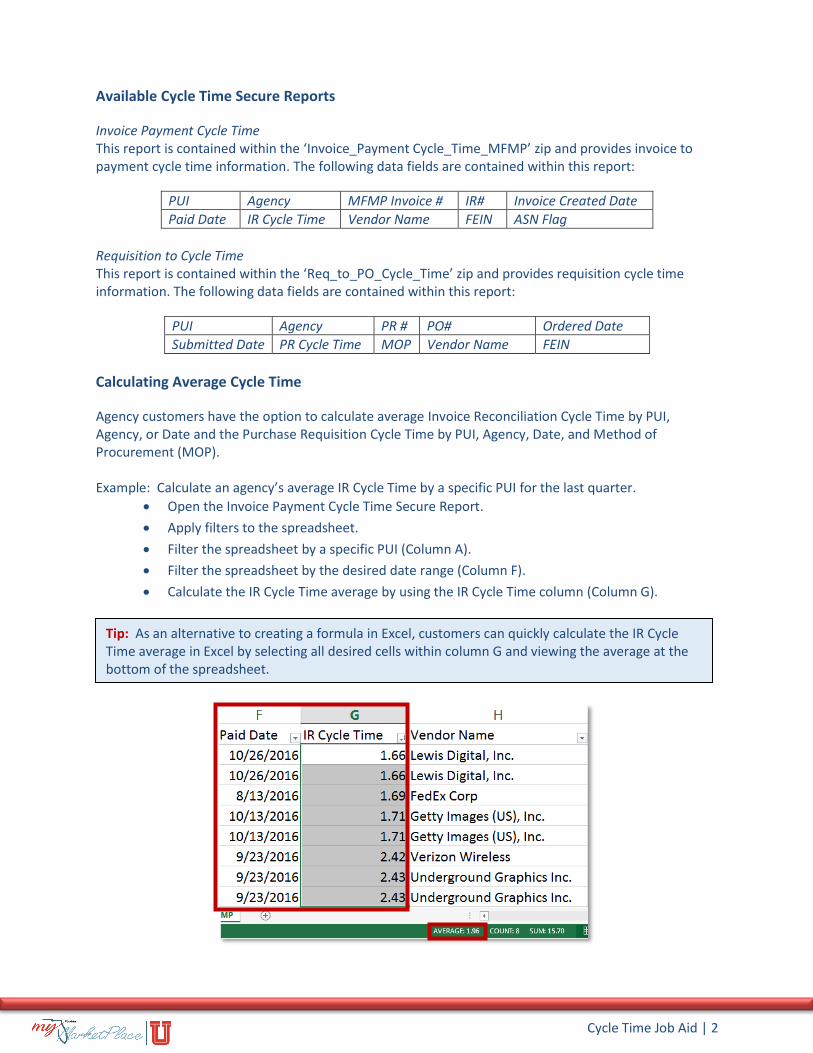
Agency customers have the option to calculate average Invoice Reconciliation Cycle Time by PUI, Agency, or Date and the Purchase Requisition Cycle Time by PUI, Agency, Date, and Method of Procurement (MOP). Example: Calculate an agency’s average IR Cycle Time by a specific PUI for the last quarter.
• Open the Invoice Payment Cycle Time Secure Report.
• Apply filters to the spreadsheet.
• Filter the spreadsheet by a specific PUI (Column A).
• Filter the spreadsheet by the desired date range (Column F).
• Calculate the IR Cycle Time average by using the IR Cycle Time column (Column G).
Tip: As an alternative to creating a formula in Excel, customers can quickly calculate the IR Cycle Time average in Excel by selecting all desired cells within column G and viewing the average at the bottom of the spreadsheet.
Cycle Time Job Aid | 3
MFMP Analysis Cycle Time Reports
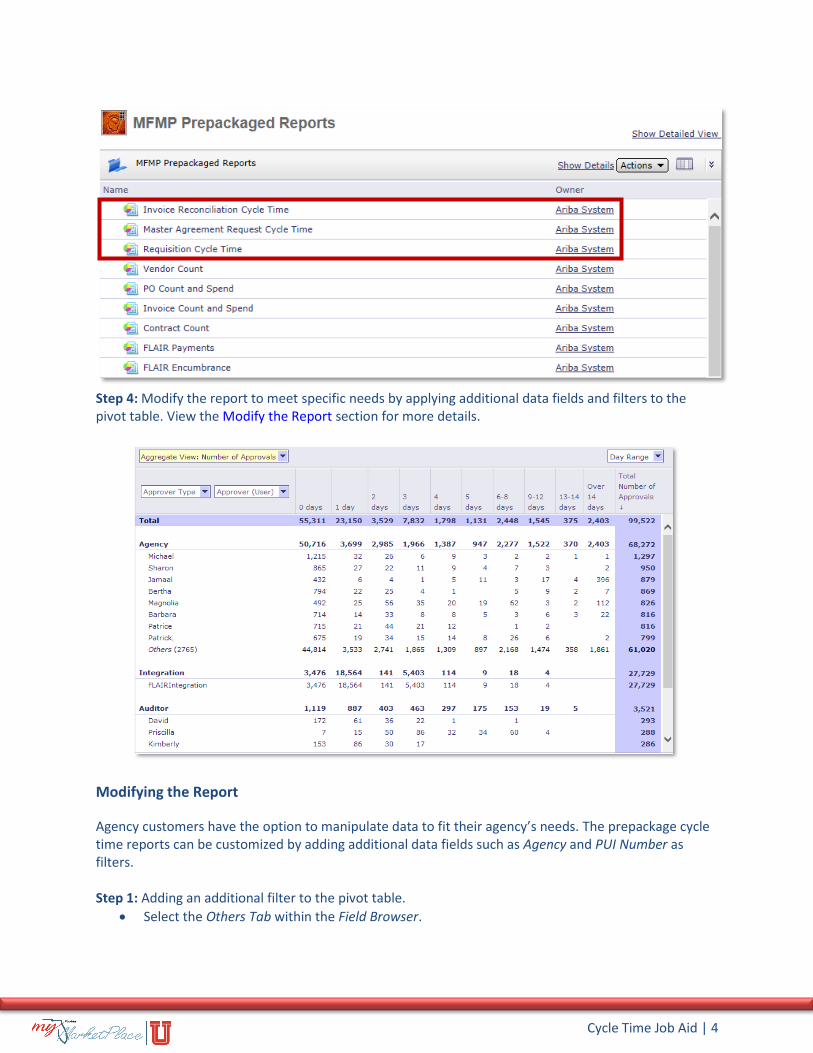
In order to obtain more detailed cycle time information, agency customers can leverage the Invoice Reconciliation, Master Agreement Request, and/or the Requisition Cycle Time Prepackaged Reports in Analysis. The MFMP team developed these three cycle time reports to provide agency customers with an aggregate view of the number of approvals by day range, name of the approver (user), and the Approver Type (Agency, Integration, or Auditor).
Accessing Prepackage Reports
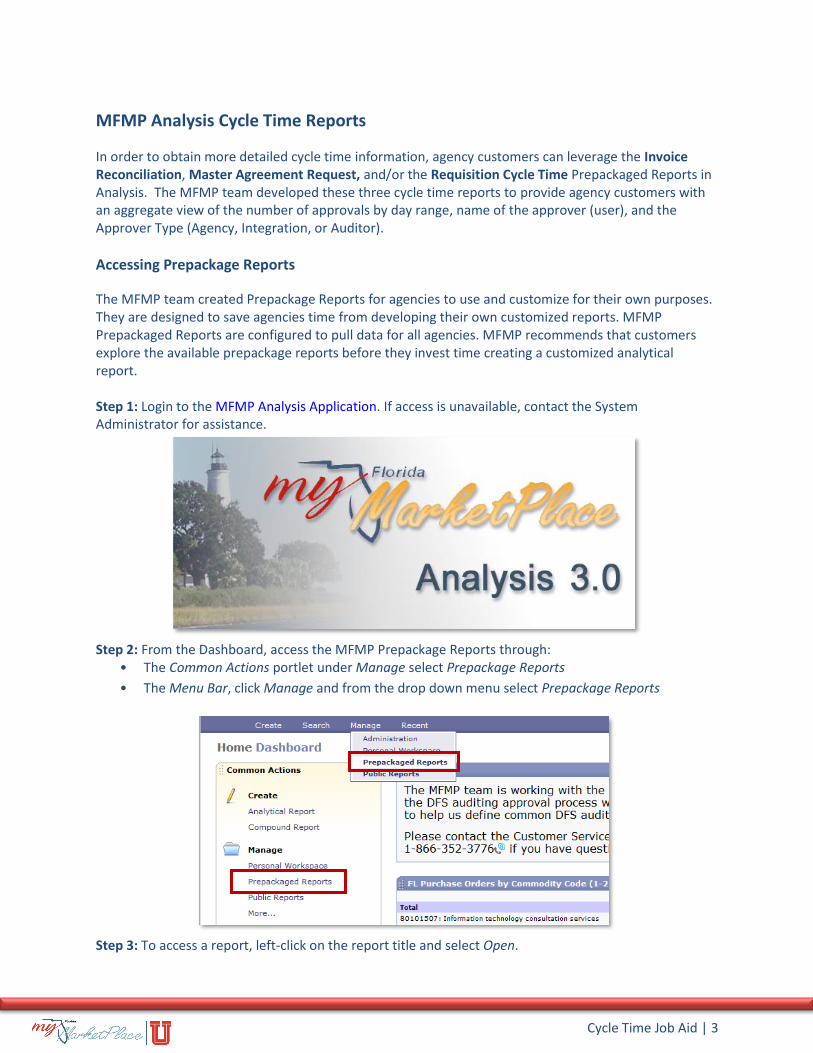
The MFMP team created Prepackage Reports for agencies to use and customize for their own purposes. They are designed to save agencies time from developing their own customized reports. MFMP Prepackaged Reports are configured to pull data for all agencies. MFMP recommends that customers explore the available prepackage reports before they invest time creating a customized analytical report. Step 1: Login to the MFMP Analysis Application. If access is unavailable, contact the System Administrator for assistance.
Step 2: From the Dashboard, access the MFMP Prepackage Reports through:
• The Common Actions portlet under Manage select Prepackage Reports
• The Menu Bar, click Manage and from the drop down menu select Prepackage Reports
Step 3: To access a report, left-click on the report title and select Open.
Cycle Time Job Aid | 4
Step 4: Modify the report to meet specific needs by applying additional data fields and filters to the pivot table. View the Modify the Report section for more details.
Modifying the Report
Agency customers have the option to manipulate data to fit their agency’s needs. The prepackage cycle time reports can be customized by adding additional data fields such as Agency and PUI Number as filters. Step 1: Adding an additional filter to the pivot table.
• Select the Others Tab within the Field Browser.
Cycle Time Job Aid | 5
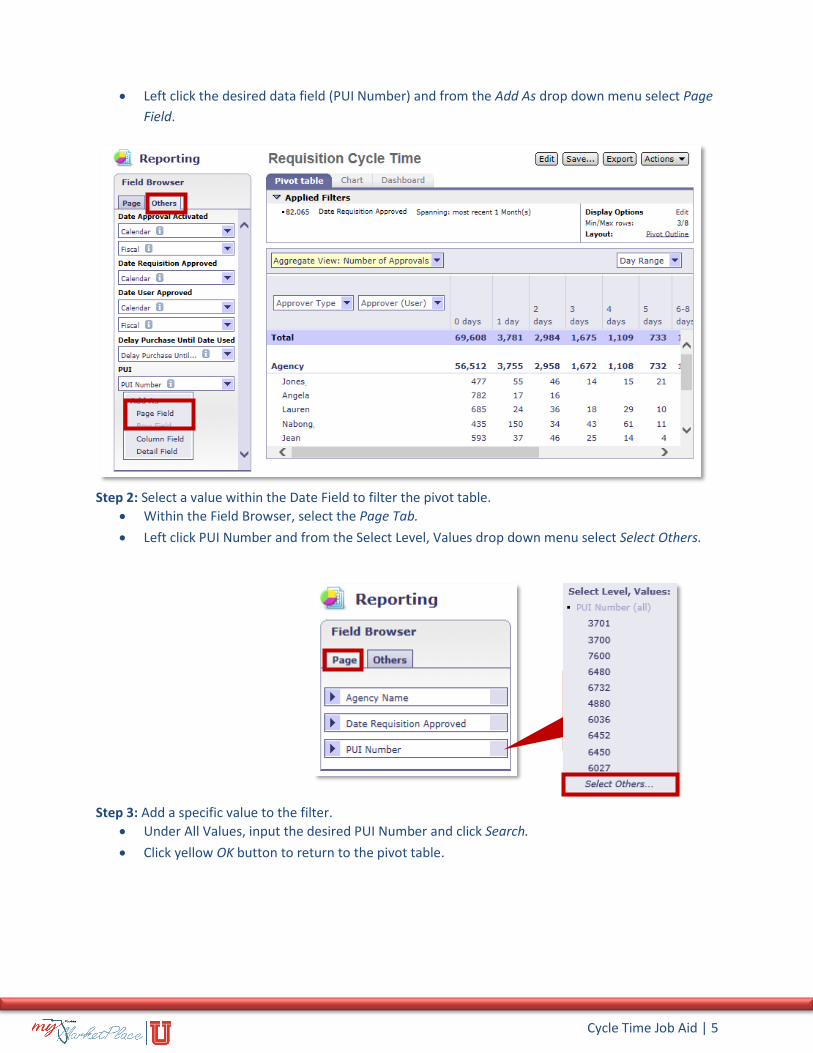
• Left click the desired data field (PUI Number) and from the Add As drop down menu select Page
Field.
Step 2: Select a value within the Date Field to filter the pivot table.
• Within the Field Browser, select the Page Tab.
• Left click PUI Number and from the Select Level, Values drop down menu select Select Others.
Step 3: Add a specific value to the filter.
• Under All Values, input the desired PUI Number and click Search.
• Click yellow OK button to return to the pivot table.

Cycle Time Job Aid | 6
Step 4: Add multiple values to the filter. (Optional)
• To add multiple PUI Numbers, enter the second PUI before clicking the yellow OK button and
then click the Search button.
• Click yellow OK button to return to the pivot table.
Step 5: Review the Applied Filters.
• Under the Applied Filters section, the new PUI Numbers search filters will be listed.
Cycle Time Job Aid | 7
Analyzing Data
MFMP Analysis cycle time reports give agencies the ability to identify potential bottlenecks and track an individual’s performance within MFMP. Once the pivot tables have been modified by applying additional filters (see the Modifying the Report section for more information), customers will be able to interpret the data.
Cycle Time Job Aid | 8
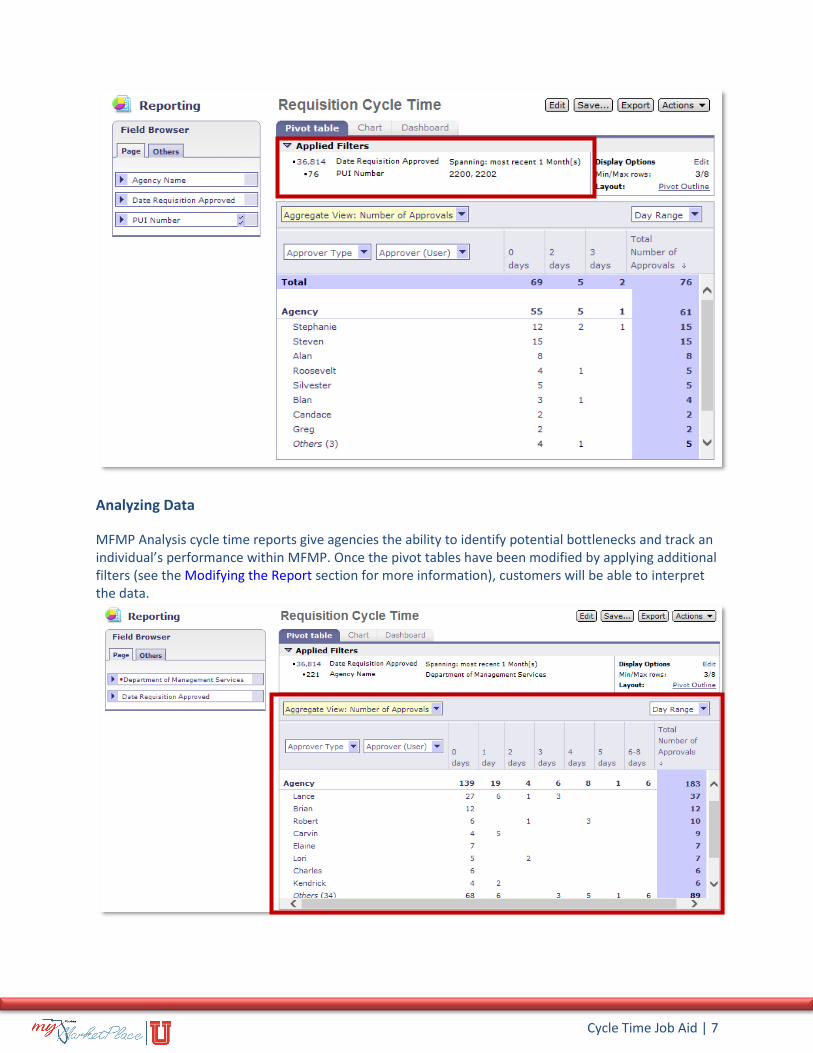
The above pivot table is constructed to provide a list of customers for a specific agency by Approver Type (Agency, Auditor, and Integration) and Approver (Users) for a specific period. The pivot table provides the total number of approvals each customer made for a specific day range (example, 1 day). For this example, a Department of Management Services customer was assigned to create a report that shows each user’s requisition cycle time for the most recent month.
• Lance - Approved a total of 37 requisitions, 27 in less than a day, and 10 within 1-3 days.
• Calvin – Approved all 12 of his requisitions in less than a day.
• Robert – Approved 7 of his requisitions with 0-2 days; however, he took 4 days to approve 3 of
his requisitions.
This data shows that Robert is taking longer to approve some of his requisitions. This could be caused by multiple reasons; for instance, maybe Robert went on vacation and forgot to setup his delegation of authority. Another reason could be that those three requisitions may require more information before they could be approved.
Exporting Reports
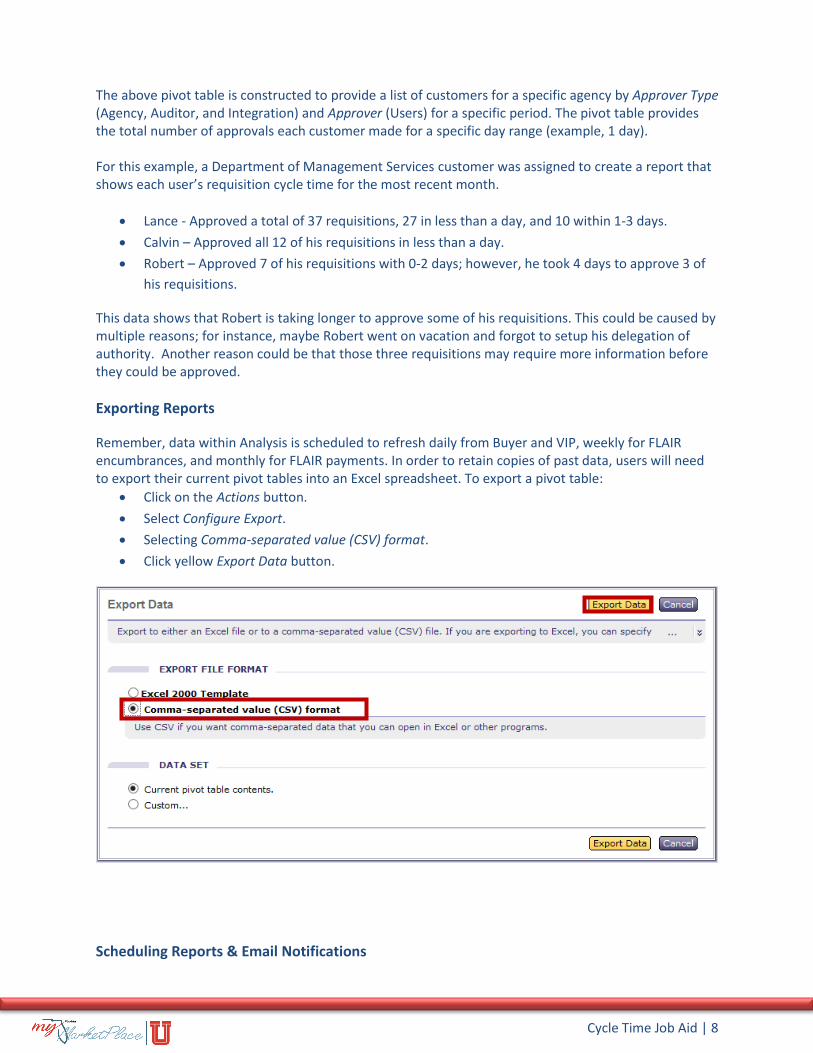
Remember, data within Analysis is scheduled to refresh daily from Buyer and VIP, weekly for FLAIR encumbrances, and monthly for FLAIR payments. In order to retain copies of past data, users will need to export their current pivot tables into an Excel spreadsheet. To export a pivot table:
• Click on the Actions button.
• Select Configure Export.
• Selecting Comma-separated value (CSV) format.
• Click yellow Export Data button.
Scheduling Reports & Email Notifications
Cycle Time Job Aid | 9
In Analysis, customers can schedule a report to run in the background once or in regular intervals. The report will run at its schedule time even if they are not logged into the application and they will receive an email notification when the report has run. Keep in mind that scheduled reports are a snapshot of the report data at the time they are run.
Customers may receive their results via email as an attached .zip file or they can log into Analysis and
view the results. If they select to receive their results via email, they will need access to a zip utility such
as WinZip or 7-Zip.
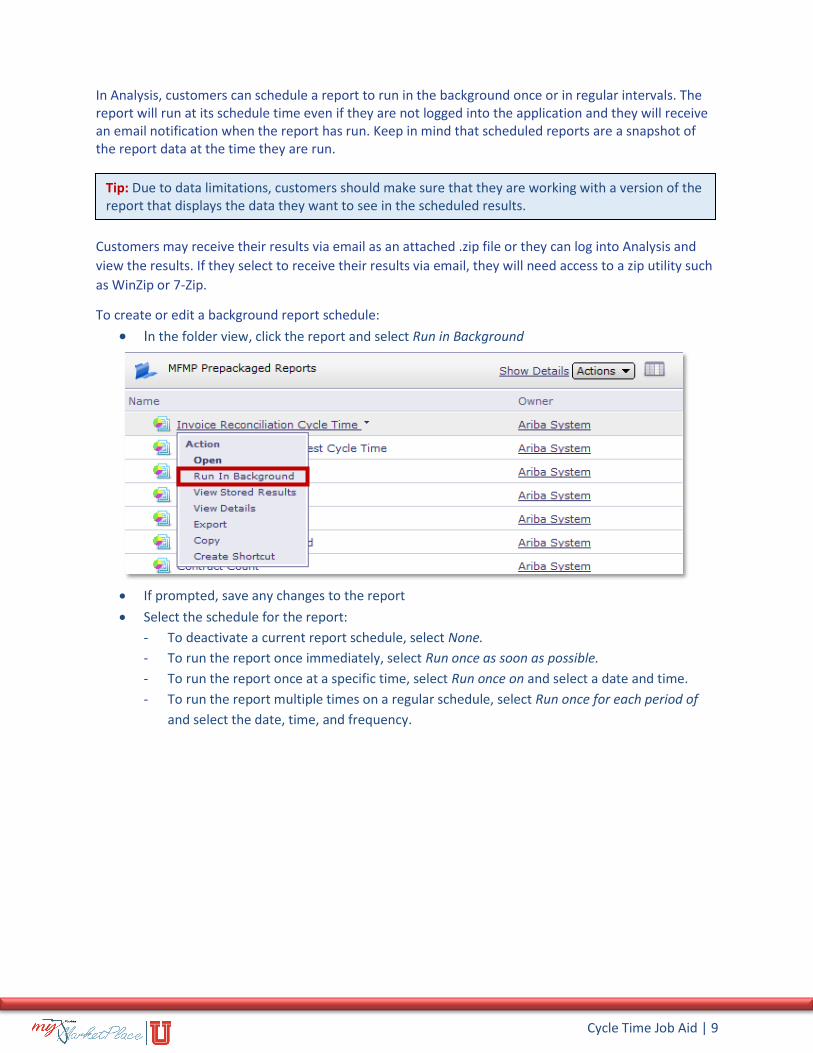
To create or edit a background report schedule:
• In the folder view, click the report and select Run in Background
• If prompted, save any changes to the report
• Select the schedule for the report:
- To deactivate a current report schedule, select None.
- To run the report once immediately, select Run once as soon as possible.
- To run the report once at a specific time, select Run once on and select a date and time.
- To run the report multiple times on a regular schedule, select Run once for each period of
and select the date, time, and frequency.
Tip: Due to data limitations, customers should make sure that they are working with a version of the report that displays the data they want to see in the scheduled results.
Cycle Time Job Aid | 10
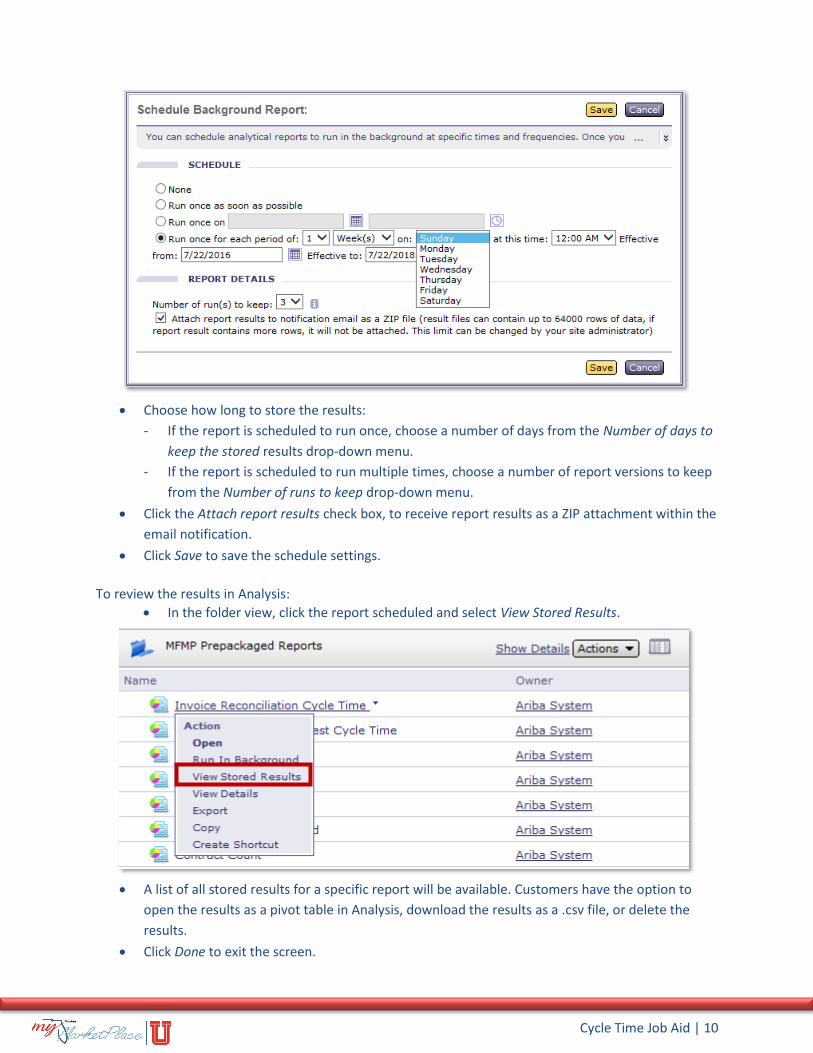
• Choose how long to store the results:
- If the report is scheduled to run once, choose a number of days from the Number of days to
keep the stored results drop-down menu.
- If the report is scheduled to run multiple times, choose a number of report versions to keep
from the Number of runs to keep drop-down menu.
• Click the Attach report results check box, to receive report results as a ZIP attachment within the
email notification.
• Click Save to save the schedule settings.
To review the results in Analysis:
• In the folder view, click the report scheduled and select View Stored Results.
• A list of all stored results for a specific report will be available. Customers have the option to
open the results as a pivot table in Analysis, download the results as a .csv file, or delete the
results.
• Click Done to exit the screen.