customer 360 - 10.4 hotfix 3 - portal configuration tool guide
TRANSCRIPT

Informatica® MDM - Customer 36010.4 HotFix 3
Portal Configuration Tool Guide

Informatica MDM - Customer 360 Portal Configuration Tool Guide10.4 HotFix 3October 2021
© Copyright Informatica LLC 2020, 2021
This software and documentation are provided only under a separate license agreement containing restrictions on use and disclosure. No part of this document may be reproduced or transmitted in any form, by any means (electronic, photocopying, recording or otherwise) without prior consent of Informatica LLC.
U.S. GOVERNMENT RIGHTS Programs, software, databases, and related documentation and technical data delivered to U.S. Government customers are "commercial computer software" or "commercial technical data" pursuant to the applicable Federal Acquisition Regulation and agency-specific supplemental regulations. As such, the use, duplication, disclosure, modification, and adaptation is subject to the restrictions and license terms set forth in the applicable Government contract, and, to the extent applicable by the terms of the Government contract, the additional rights set forth in FAR 52.227-19, Commercial Computer Software License.
Informatica and the Informatica logo are trademarks or registered trademarks of Informatica LLC in the United States and many jurisdictions throughout the world. A current list of Informatica trademarks is available on the web at https://www.informatica.com/trademarks.html. Other company and product names may be trade names or trademarks of their respective owners.
The information in this documentation is subject to change without notice. If you find any problems in this documentation, report them to us at [email protected].
Informatica products are warranted according to the terms and conditions of the agreements under which they are provided. INFORMATICA PROVIDES THE INFORMATION IN THIS DOCUMENT "AS IS" WITHOUT WARRANTY OF ANY KIND, EXPRESS OR IMPLIED, INCLUDING WITHOUT ANY WARRANTIES OF MERCHANTABILITY, FITNESS FOR A PARTICULAR PURPOSE AND ANY WARRANTY OR CONDITION OF NON-INFRINGEMENT.
Publication Date: 2021-10-28

Table of Contents
Preface . . . . . . . . . . . . . . . . . . . . . . . . . . . . . . . . . . . . . . . . . . . . . . . . . . . . . . . . . . . . . . . . . . . . . . 5Informatica Resources. . . . . . . . . . . . . . . . . . . . . . . . . . . . . . . . . . . . . . . . . . . . . . . . . . . 5
Informatica Network. . . . . . . . . . . . . . . . . . . . . . . . . . . . . . . . . . . . . . . . . . . . . . . . . 5
Informatica Knowledge Base. . . . . . . . . . . . . . . . . . . . . . . . . . . . . . . . . . . . . . . . . . . . 5
Informatica Documentation. . . . . . . . . . . . . . . . . . . . . . . . . . . . . . . . . . . . . . . . . . . . . 5
Informatica Product Availability Matrices. . . . . . . . . . . . . . . . . . . . . . . . . . . . . . . . . . . . 6
Informatica Velocity. . . . . . . . . . . . . . . . . . . . . . . . . . . . . . . . . . . . . . . . . . . . . . . . . . 6
Informatica Marketplace. . . . . . . . . . . . . . . . . . . . . . . . . . . . . . . . . . . . . . . . . . . . . . . 6
Informatica Global Customer Support. . . . . . . . . . . . . . . . . . . . . . . . . . . . . . . . . . . . . . 6
Chapter 1: Introduction to Portal Configuration Tool. . . . . . . . . . . . . . . . . . . . . . . . . . 7Portal Configuration Tool Overview. . . . . . . . . . . . . . . . . . . . . . . . . . . . . . . . . . . . . . . . . . . 7
Logging In to the Portal Configuration Tool. . . . . . . . . . . . . . . . . . . . . . . . . . . . . . . . . . . . . . 7
Chapter 2: Getting Started with the Portal. . . . . . . . . . . . . . . . . . . . . . . . . . . . . . . . . . . . . 9Getting Started with a Portal Overview. . . . . . . . . . . . . . . . . . . . . . . . . . . . . . . . . . . . . . . . . 9
Importing the Preconfigured Portal. . . . . . . . . . . . . . . . . . . . . . . . . . . . . . . . . . . . . . . . . . . 9
Editing a Portal. . . . . . . . . . . . . . . . . . . . . . . . . . . . . . . . . . . . . . . . . . . . . . . . . . . . . . . 10
Starting a Portal. . . . . . . . . . . . . . . . . . . . . . . . . . . . . . . . . . . . . . . . . . . . . . . . . . . . . . 10
Chapter 3: Creating a Portal. . . . . . . . . . . . . . . . . . . . . . . . . . . . . . . . . . . . . . . . . . . . . . . . . 11Creating a Portal Overview. . . . . . . . . . . . . . . . . . . . . . . . . . . . . . . . . . . . . . . . . . . . . . . . 11
Portal State Management. . . . . . . . . . . . . . . . . . . . . . . . . . . . . . . . . . . . . . . . . . . . . . . . 11
Creating a Portal. . . . . . . . . . . . . . . . . . . . . . . . . . . . . . . . . . . . . . . . . . . . . . . . . . . . . . 12
Configuring the General Settings for the Portal. . . . . . . . . . . . . . . . . . . . . . . . . . . . . . . . 12
Configuring the Log In Page Settings for the Portal. . . . . . . . . . . . . . . . . . . . . . . . . . . . . 13
Configuring the User Creation Page Settings for the Portal. . . . . . . . . . . . . . . . . . . . . . . . 15
Configuring the Registration Page Settings for the Portal. . . . . . . . . . . . . . . . . . . . . . . . . 16
Chapter 4: Adding Pages to Portal. . . . . . . . . . . . . . . . . . . . . . . . . . . . . . . . . . . . . . . . . . . 18Adding Pages to Portal Overview. . . . . . . . . . . . . . . . . . . . . . . . . . . . . . . . . . . . . . . . . . . . 18
Type of Pages. . . . . . . . . . . . . . . . . . . . . . . . . . . . . . . . . . . . . . . . . . . . . . . . . . . . . . . . 18
Type of Views. . . . . . . . . . . . . . . . . . . . . . . . . . . . . . . . . . . . . . . . . . . . . . . . . . . . . . . . 19
Views for Business Entity Fields. . . . . . . . . . . . . . . . . . . . . . . . . . . . . . . . . . . . . . . . . 19
Views for One-to-Many Fields. . . . . . . . . . . . . . . . . . . . . . . . . . . . . . . . . . . . . . . . . . . 19
Creating a Record Page. . . . . . . . . . . . . . . . . . . . . . . . . . . . . . . . . . . . . . . . . . . . . . . . . . 21
Creating a Custom Page. . . . . . . . . . . . . . . . . . . . . . . . . . . . . . . . . . . . . . . . . . . . . . . . . 22
Configuring Components for a Custom Page. . . . . . . . . . . . . . . . . . . . . . . . . . . . . . . . . . . . 23
Configuring a Wizard Component. . . . . . . . . . . . . . . . . . . . . . . . . . . . . . . . . . . . . . . . 23
Configuring an External Link Component. . . . . . . . . . . . . . . . . . . . . . . . . . . . . . . . . . . . 25
Table of Contents 3

Configuring a Product 360 Timeline Component. . . . . . . . . . . . . . . . . . . . . . . . . . . . . . . 25
Configuring a Product 360 Task View Component. . . . . . . . . . . . . . . . . . . . . . . . . . . . . . 26
Configuring a Product 360 Catalog Component. . . . . . . . . . . . . . . . . . . . . . . . . . . . . . . 27
Configuring a Product 360 Catalog Upload Component. . . . . . . . . . . . . . . . . . . . . . . . . . 27
Configuring a Twitter Feed Component. . . . . . . . . . . . . . . . . . . . . . . . . . . . . . . . . . . . . 28
Configuring a Text Component. . . . . . . . . . . . . . . . . . . . . . . . . . . . . . . . . . . . . . . . . . 29
Configuring Field Properties. . . . . . . . . . . . . . . . . . . . . . . . . . . . . . . . . . . . . . . . . . . . . . . 29
Configuring Properties of a Field with Text View. . . . . . . . . . . . . . . . . . . . . . . . . . . . . . . 29
Configuring Properties of a Field with Radio Button or Checkbox View. . . . . . . . . . . . . . . . . 30
Configuring Properties of a Field with Drop-down List View. . . . . . . . . . . . . . . . . . . . . . . . 30
Configuring Properties of Field with Card View. . . . . . . . . . . . . . . . . . . . . . . . . . . . . . . . 30
Configuring Properties of a Field with Grid View. . . . . . . . . . . . . . . . . . . . . . . . . . . . . . . 31
Configuring Properties of a Field with Checkbox List View. . . . . . . . . . . . . . . . . . . . . . . . 31
Configuring Properties of a Field with Dynamic Card View. . . . . . . . . . . . . . . . . . . . . . . . . 32
Chapter 5: Managing a Portal. . . . . . . . . . . . . . . . . . . . . . . . . . . . . . . . . . . . . . . . . . . . . . . . 35Managing a Portal Overview. . . . . . . . . . . . . . . . . . . . . . . . . . . . . . . . . . . . . . . . . . . . . . . 35
Configuring the Runtime Settings for a Portal. . . . . . . . . . . . . . . . . . . . . . . . . . . . . . . . . . . . 35
Starting a Portal. . . . . . . . . . . . . . . . . . . . . . . . . . . . . . . . . . . . . . . . . . . . . . . . . . . . . . 36
Stopping a Portal. . . . . . . . . . . . . . . . . . . . . . . . . . . . . . . . . . . . . . . . . . . . . . . . . . . . . . 36
Editing a Portal. . . . . . . . . . . . . . . . . . . . . . . . . . . . . . . . . . . . . . . . . . . . . . . . . . . . . . . 37
Exporting a Portal. . . . . . . . . . . . . . . . . . . . . . . . . . . . . . . . . . . . . . . . . . . . . . . . . . . . . 37
Importing a Portal. . . . . . . . . . . . . . . . . . . . . . . . . . . . . . . . . . . . . . . . . . . . . . . . . . . . . 37
Configuring Single Sign-On for a Portal. . . . . . . . . . . . . . . . . . . . . . . . . . . . . . . . . . . . . . . . 38
Chapter 6: Localizing a Portal. . . . . . . . . . . . . . . . . . . . . . . . . . . . . . . . . . . . . . . . . . . . . . . 40Localizing a Portal Overview. . . . . . . . . . . . . . . . . . . . . . . . . . . . . . . . . . . . . . . . . . . . . . . 40
Exporting the Language Bundle. . . . . . . . . . . . . . . . . . . . . . . . . . . . . . . . . . . . . . . . . . . . . 40
Importing the Language Bundle. . . . . . . . . . . . . . . . . . . . . . . . . . . . . . . . . . . . . . . . . . . . . 40
Chapter 7: Deploying a Sample Portal. . . . . . . . . . . . . . . . . . . . . . . . . . . . . . . . . . . . . . . 42Requirements of the Sample Customer Portal. . . . . . . . . . . . . . . . . . . . . . . . . . . . . . . . . . . 42
Creating the Sample Portal. . . . . . . . . . . . . . . . . . . . . . . . . . . . . . . . . . . . . . . . . . . . . . . 43
Adding Pages to the Sample Portal. . . . . . . . . . . . . . . . . . . . . . . . . . . . . . . . . . . . . . . . . . 43
Starting the Sample Portal. . . . . . . . . . . . . . . . . . . . . . . . . . . . . . . . . . . . . . . . . . . . . . . . 44
Index. . . . . . . . . . . . . . . . . . . . . . . . . . . . . . . . . . . . . . . . . . . . . . . . . . . . . . . . . . . . 45
4 Table of Contents

PrefaceUse the Informatica® MDM - Customer 360 Portal Configuration Tool Guide to learn how to create, manage, and localize a portal using the Portal Configuration tool. Learn how to add pages and configure fields in a portal.
Informatica ResourcesInformatica provides you with a range of product resources through the Informatica Network and other online portals. Use the resources to get the most from your Informatica products and solutions and to learn from other Informatica users and subject matter experts.
Informatica NetworkThe Informatica Network is the gateway to many resources, including the Informatica Knowledge Base and Informatica Global Customer Support. To enter the Informatica Network, visit https://network.informatica.com.
As an Informatica Network member, you have the following options:
• Search the Knowledge Base for product resources.
• View product availability information.
• Create and review your support cases.
• Find your local Informatica User Group Network and collaborate with your peers.
Informatica Knowledge BaseUse the Informatica Knowledge Base to find product resources such as how-to articles, best practices, video tutorials, and answers to frequently asked questions.
To search the Knowledge Base, visit https://search.informatica.com. If you have questions, comments, or ideas about the Knowledge Base, contact the Informatica Knowledge Base team at [email protected].
Informatica DocumentationUse the Informatica Documentation Portal to explore an extensive library of documentation for current and recent product releases. To explore the Documentation Portal, visit https://docs.informatica.com.
If you have questions, comments, or ideas about the product documentation, contact the Informatica Documentation team at [email protected].
5

Informatica Product Availability MatricesProduct Availability Matrices (PAMs) indicate the versions of the operating systems, databases, and types of data sources and targets that a product release supports. You can browse the Informatica PAMs at https://network.informatica.com/community/informatica-network/product-availability-matrices.
Informatica VelocityInformatica Velocity is a collection of tips and best practices developed by Informatica Professional Services and based on real-world experiences from hundreds of data management projects. Informatica Velocity represents the collective knowledge of Informatica consultants who work with organizations around the world to plan, develop, deploy, and maintain successful data management solutions.
You can find Informatica Velocity resources at http://velocity.informatica.com. If you have questions, comments, or ideas about Informatica Velocity, contact Informatica Professional Services at [email protected].
Informatica MarketplaceThe Informatica Marketplace is a forum where you can find solutions that extend and enhance your Informatica implementations. Leverage any of the hundreds of solutions from Informatica developers and partners on the Marketplace to improve your productivity and speed up time to implementation on your projects. You can find the Informatica Marketplace at https://marketplace.informatica.com.
Informatica Global Customer SupportYou can contact a Global Support Center by telephone or through the Informatica Network.
To find your local Informatica Global Customer Support telephone number, visit the Informatica website at the following link: https://www.informatica.com/services-and-training/customer-success-services/contact-us.html.
To find online support resources on the Informatica Network, visit https://network.informatica.com and select the eSupport option.
6 Preface

C h a p t e r 1
Introduction to Portal Configuration Tool
This chapter includes the following topics:
• Portal Configuration Tool Overview, 7
• Logging In to the Portal Configuration Tool, 7
Portal Configuration Tool OverviewUse the Portal Configuration tool to import and customize a preconfigured portal. You can also create a custom portal based on your requirement. You can use a portal to create business entity records.
A portal contains multiple pages. When you customize a portal, you can edit any page of the portal. Each page contains one or more sections. Each section contains one or more components. Each component displays one or more fields. You can edit the sections, components, and fields of a page. You can create or remove pages from the portal.
When you create a custom portal, you can create all the pages from scratch and configure the sections, components, and fields for each page.
Logging In to the Portal Configuration ToolTo log in, you need the URL for the Portal Configuration tool and your user credentials. The URL contains the MDM Hub server host name and port number. If you do not have this information, contact your MDM administrator.
1. Open a supported browser.
2. Enter the URL for the Portal Configuration tool.
The URL has the following format:
• Secure connections. https://<MDM Hub Server host name>:<MDM Server port number>/portal-config/
• Non-secure connections. http://<MDM Hub Server host name>:<MDM Server port number>/portal-config/
7
The Log In page opens.
3. Enter your user name and password.
4. Click Log In.
The Portal Configuration tool opens and displays the Home page.
8 Chapter 1: Introduction to Portal Configuration Tool

C h a p t e r 2
Getting Started with the PortalThis chapter includes the following topics:
• Getting Started with a Portal Overview, 9
• Importing the Preconfigured Portal, 9
• Editing a Portal, 10
• Starting a Portal, 10
Getting Started with a Portal OverviewAfter you log in to the Portal Configuration tool, you can import a preconfigured portal. A preconfigured portal contains multiple pages that are preconfigured for you to get started immediately.
After you import a portal, you can start the portal and access it in a browser.
Importing the Preconfigured PortalAfter you log in to the Portal Configuration tool, import the preconfigured portal.
1. Log in to the Portal Configuration tool.
For more information about logging in to the Portal Configuration tool, see “Logging In to the Portal Configuration Tool” on page 7.
2. Click Import Portal.
The Import Portal dialog box appears.
3. Navigate to the following directory:
<MDM Installation Directory>/app/tcr/CustomerB2BPortal4. Select the CustomerB2BPortalConfig.zip file.
5. Select the Operational Reference Store for the portal to use.
6. Select the source system for the portal to use.
7. Enter a unique name for the portal.
8. Click Import.
The selected portal is imported.
9

Editing a PortalIf you plan to edit a portal that is already deployed, ensure that you stop the portal before you edit it.
Note: For more information about stopping the portal, see “Stopping a Portal” on page 36.
1. In the Portal Configuration tool, click the Action icon on the portal that you want to edit.
2. Select Edit.
The portal configuration is available in the edit mode.
3. To edit the portal settings, perform the following tasks:
a. Click Portal Settings.
The portal configuration is available in the edit mode.
b. Edit the required settings, and click Save.
4. To edit a page, perform the following tasks:
a. Click the page that you want to edit.
The page is available in the edit mode.
b. Edit the page configuration, and click Save.
Starting a PortalAfter you start the portal, the portal is deployed, and you can access the portal with the portal URL.
1. In the Portal Configuration tool, click the Action icon on the portal that you want to start.
2. Select Start Portal.
If the portal is deployed successfully, you get a green icon on the portal.
3. To get the portal URL, click the Action icon on the portal, and select Copy URL.
The portal URL is copied to the clipboard. You can paste the URL in your browser.
10 Chapter 2: Getting Started with the Portal

C h a p t e r 3
Creating a PortalThis chapter includes the following topics:
• Creating a Portal Overview, 11
• Portal State Management, 11
• Creating a Portal, 12
Creating a Portal OverviewIf you do not want to use the preconfigured portals, you can create a custom portal based on your requirement. A portal can contain multiple pages, such as log in page, sign up page, and registration page. When you create a portal, you can create all these pages and configure the business entity fields from which you want retrieve and store data. You can assign states to the pages and control access to the pages.
You can also configure the following elements for the portal:
• Header and footer.
• Business entity fields to store the user inputs.
• Email templates to use for different scenarios.
Portal State ManagementWhen you create a portal, you can enable the portal state management. Use the portal state management to refer to the status of records and control access to the portal pages.
You can assign one ore more states to each page. Based on the status of the records, the users get access to the corresponding pages.
For example, define portal states, such as registered, submitted, approved, rejected, and sent back. When a user signs up, the record is associated to the registered state. The user will be able to see pages that are associated to the registered state. If you associate the registration page to the registered state, the user can access the registration page to submit additional details. After the user submits additional details, the record is associated to the submitted state. The user will be able to see pages that are associated to the submitted state. After the record is approved, the user will be able to see pages that are associated to the approved state.
Note: After you create a portal, you cannot enable or disable the portal state management.
11

Creating a PortalBefore you create a portal, ensure that you have a good understanding of the data model of your environment.
1. Log in to the Portal Configuration tool.
For more information about logging in to the Portal Configuration tool, see “Logging In to the Portal Configuration Tool” on page 7.
2. Click Create Portal.
The General page appears.
Configuring the General Settings for the PortalYou must configure a title for the portal and the business entity for which you want to create records. You can also configure a header and a footer for the portal.
1. On the General page, configure the following portal details:
Field Description
Portal Name Unique identifier for the portal.
Portal Title Display name of the portal that appears on the header of the portal.
Database Operational Reference Store for the portal to use.
Business Entity Business entity to which you want to add records through the portal.
Source System Name of the source system to assign to the records created through the portal.
Enable Portal State Indicates whether to use portal states to refer to the status of the records. You can also use the portal states to control access to the portal pages.
External Authentication Indicates whether to use an external authentication system for the portal.
2. If you enable portal states, configure the following state settings:
Field Description
Reference Entity Containing States
Name of the reference entity that stores the state values.
Field Containing States Name of the field that contains the state values.To see the list of state values that the field contains, click View List of States.
Field Containing Filters Name of the field based on which you want to filter the state values so that you can use only a subset of state values in the portal.
Filter Value Value based on which you want to filter the states.
12 Chapter 3: Creating a Portal
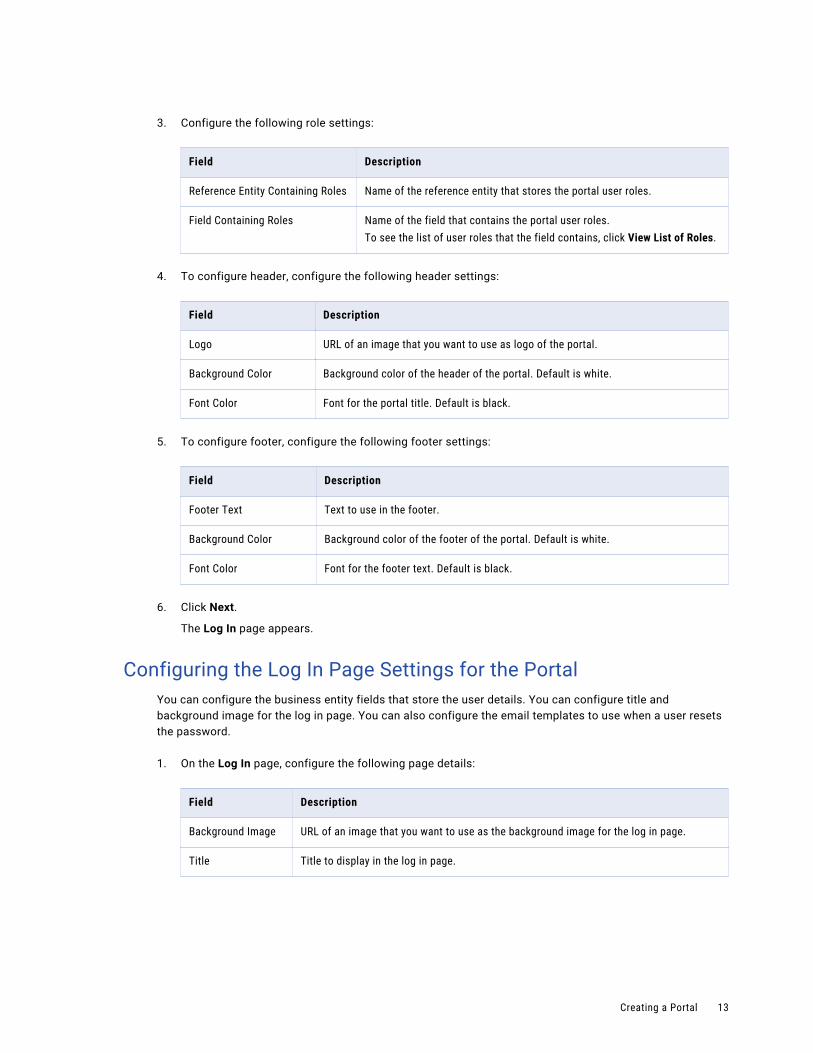
3. Configure the following role settings:
Field Description
Reference Entity Containing Roles Name of the reference entity that stores the portal user roles.
Field Containing Roles Name of the field that contains the portal user roles.To see the list of user roles that the field contains, click View List of Roles.
4. To configure header, configure the following header settings:
Field Description
Logo URL of an image that you want to use as logo of the portal.
Background Color Background color of the header of the portal. Default is white.
Font Color Font for the portal title. Default is black.
5. To configure footer, configure the following footer settings:
Field Description
Footer Text Text to use in the footer.
Background Color Background color of the footer of the portal. Default is white.
Font Color Font for the footer text. Default is black.
6. Click Next.
The Log In page appears.
Configuring the Log In Page Settings for the PortalYou can configure the business entity fields that store the user details. You can configure title and background image for the log in page. You can also configure the email templates to use when a user resets the password.
1. On the Log In page, configure the following page details:
Field Description
Background Image URL of an image that you want to use as the background image for the log in page.
Title Title to display in the log in page.
Creating a Portal 13

2. Specify the business entity fields that store the following user details:
Field Description
Email Address Name of the business entity field that stores the email addresses. For example, Contacts.contacts.ContactElectronicAddress.etrncAddr.
User Name Name of the business entity field that stores the user names. For example, Contacts.contacts.prtlUsrNm.
User Role Name of the business entity field stores the user roles. For example, Contacts.contacts.prtlUsrRle.roleCode.
Portal State Details
Name of the business entity field that stores the portal state values. For example, Status.prtyStsVal.partyStatusValue.
3. To configure the email templates to use when users reset their password, configure the following details:
Field Description
Reset Password Name of the email template to use when users request to reset their passwords. For example, resetPassword.You can find the email templates in the following directory:<MDM Installation Directory>/app/portal/email-config/templates_others/avos-templates
Successful Reset of Password
Name of the email template to use after a password is reset successfully.
Note: When you set the portal to use external authentication, you cannot configure the email templates through the Portal Configuration tool. Configure the email templates through the external authentication system.
4. To configure external authentication for the portal, configure the following details:
Field Description
Enable Single Sign-On (SSO) Indicates whether the external authentication is enabled for the portal.
Forgot Password URL The URL of the site that contains information on how to reset the password.
5. Click Next.
The User Creation page appears.
14 Chapter 3: Creating a Portal

Configuring the User Creation Page Settings for the PortalAfter you configure the log in page, you can configure the business entity fields to store the user details. You can also enable whether you want the users to create additional users.
1. On the User Creation page, on the Field Mapping tab, configure the following settings:
Field Description
Business Entity View Business entity view that you want to use for the registration process.
Default Section Heading Title for the section that lists the business entity fields in the registration page.
2. Configure the following user details:
Field Description
Create additional users Indicates whether you want users to create additional users in the portal.Note: If you set the portal to use external authentication, this field remains disabled. The user management must be a part of the external authentication system.
Field with One to Many Relationship
Name of the field with one-to-many relationship. When you select a field, this section displays only the child fields of the selected field.
User Role Name of the business entity field to store the user roles.
Email Address Name of the business entity field to store the email addresses.
Use email address as user name
Indicates whether you want to use email address as user name.
User Name Required if you do not want to use email address as user name. Name of the business entity field to store the user names.
First Name Name of the business entity field to store the first names.
Last Name Name of the business entity field to store the last names.
Country Dialing Code Name of the business entity field to store the country dialing codes.
Phone Number Name of the business entity field to store the phone numbers.
Title Name of the business entity field to store the job titles.
3. If you enable portal states, configure the following details:
Field Description
Portal State Name of the business entity field that contains the portal state values.
4. If you enable users to create additional users, on the Additional Users tab, configure the following settings:
Creating a Portal 15

Note: If you set the portal to use external authentication, the Additional Users tab remains disabled.
Field Description
Allowed Roles to Create Additional Users
List of roles with permission to create additional users in the portal.
Allowed States to Create Additional Users
List of portal states with permission to create additional users in the portal.
Hide User Role Field Indicates whether you want to hide the User Role field in the portal. For example, when the user role does not have permission to create additional users, enable this option so that the users do not have to specify their role in the portal.
Invite User Name of the email template to use when additional users are invited to the portal. For example, setPassword.You can find the email templates in the following directory:<MDM Installation Directory>/app/portal/email-config/templates_others/avos-templates
Successful Reset of Password
Name of the email template to use after a password is reset successfully.
5. Click Next.
The Registration page appears.
Configuring the Registration Page Settings for the PortalAfter you configure the user creation details, you can configure the business entity fields that you want to use for the registration process. When you set the portal to use external authentication, you cannot register portal users. The user registration process must be a part of the external authentication system.
1. On the Registration page, on the Page Details tab, configure the following settings:
Field Description
Disable Registration Indicates whether you want the portal user to register online. To allow users to register online, clear the check box.Note: If you set the portal to use external authentication, this field remains disabled.
Background Image URL of an image that you want to use as the background image for the registration page.
Title Title for the registration page. For example, Sign Up Form.
Welcome Text Text to display in the registration page to welcome the user. For example, Fill in the fields to create an account.
Default User Role Default user role to assign after a user registers.
16 Chapter 3: Creating a Portal

Field Description
Default Portal State Default portal state to assign after a user registers.
Maximum Number of Fields to Display in a Row
Maximum number of fields that you want to display in each row of the page.
Successful Registration
Name of the email template to use after a user is successfully registered.You can find the email templates in the following directory:<MDM Installation Directory>/app/portal/email-config/templates_others/avos-templates
2. On the Layout tab, perform the following tasks:
a. Enter a name for the default section.
Note: If you want to hide the section name, select Hide header.
b. From the list of available fields, select a field that you want to add to the section, and then click Add.
c. To add more fields, repeat step 2.
To add all the fields, click Add All. To change the order of selected fields, click Move Up, Move Down, Move to Top, or Move to Bottom.
d. From the list of selected fields, select each field to configure the field properties.
e. To add more sections to the page layout, click Add a section and repeat step 1 through 4.
Note: If you want to change the order in which sections appear, click Move section up or Move section down.
f. Click Save.
Creating a Portal 17
C h a p t e r 4
Adding Pages to PortalThis chapter includes the following topics:
• Adding Pages to Portal Overview, 18
• Type of Pages, 18
• Type of Views, 19
• Creating a Record Page, 21
• Creating a Custom Page, 22
• Configuring Components for a Custom Page, 23
• Configuring Field Properties, 29
Adding Pages to Portal OverviewAfter you create a portal, you can create pages for the portal. You can create predefined pages or custom pages.
Each page can contain one or more sections. Each section can contain one more components. Each component can contain one ore more fields. Based on the types of a field, you can configure how you want to view the field in the page.
Type of PagesYou can create the following types of pages for your portal:
Record Page
A predefined page with a form layout. You can have one or more sections and select the fields that you want to view in each section. Use a record page to create a form containing business entity fields based on a business entity view.
Custom Page
A page with a custom layout. You can add one or more sections to a page. For each section, you can add one or more predefined components. For example, add a wizard component to streamline a series of forms that a portal user can fill in. You can then select the fields that you want to view in each component.
18
Type of ViewsBased on the types of fields, you can configure how you want to view the field in a portal page.
When you configure a business entity field, you can set the view of the field as a radio button, drop-down list, checkbox, text area, or a text box based on the input data type of the field. When you use a one-to-many field, you can configure to view the fields as a card, grid, checkbox list, or dynamic card.
Views for Business Entity FieldsWhen you add a business entity field to a portal page, you can use one of the following views for the field based on the type of the field:
Text Field
For short text input. Use it for fields that store names, identifiers, postal code, website URL, and so on.
Text Area
For long text input. Use it for fields that store description and address.
Radio Button or Checkbox
For displaying boolean values. Use it when you want to display boolean values for the field but store only one option. For example, a checkbox to enable auto notifications.
Drop-down list
For displaying multiple options. Use it when you want to display and store multiple options for the field. For example, address type is a field where you can select multiple types for a single address.
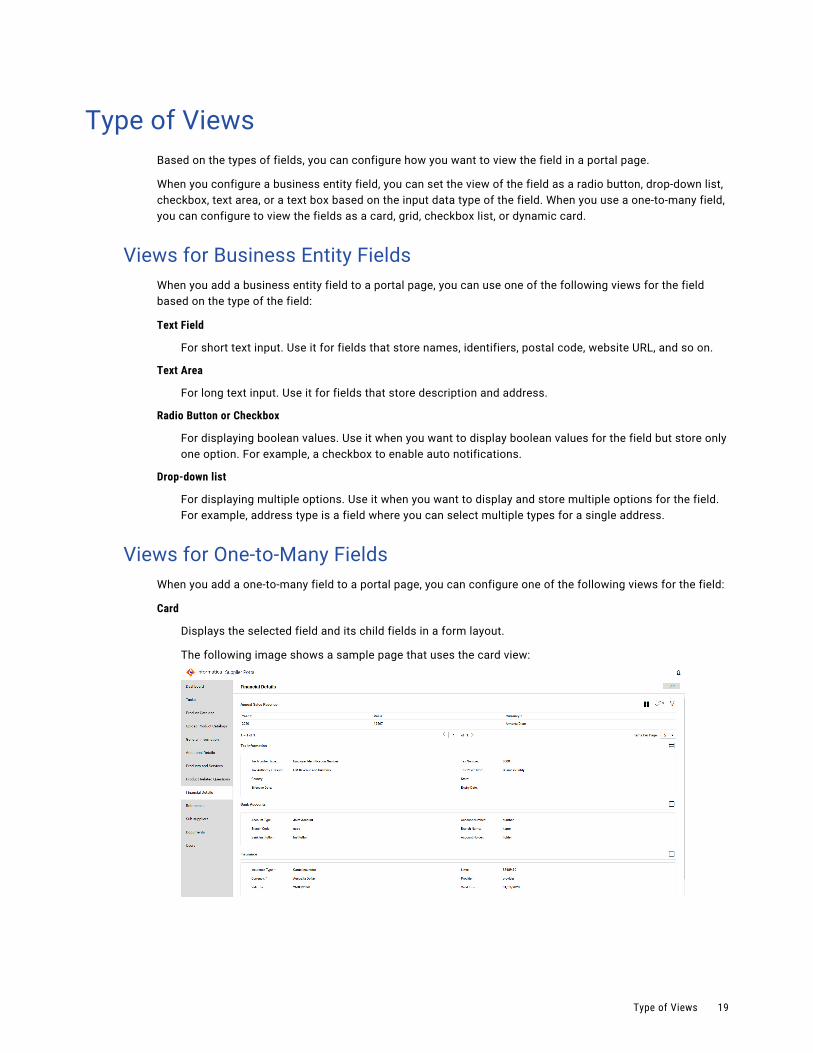
Views for One-to-Many FieldsWhen you add a one-to-many field to a portal page, you can configure one of the following views for the field:
Card
Displays the selected field and its child fields in a form layout.
The following image shows a sample page that uses the card view:
Type of Views 19
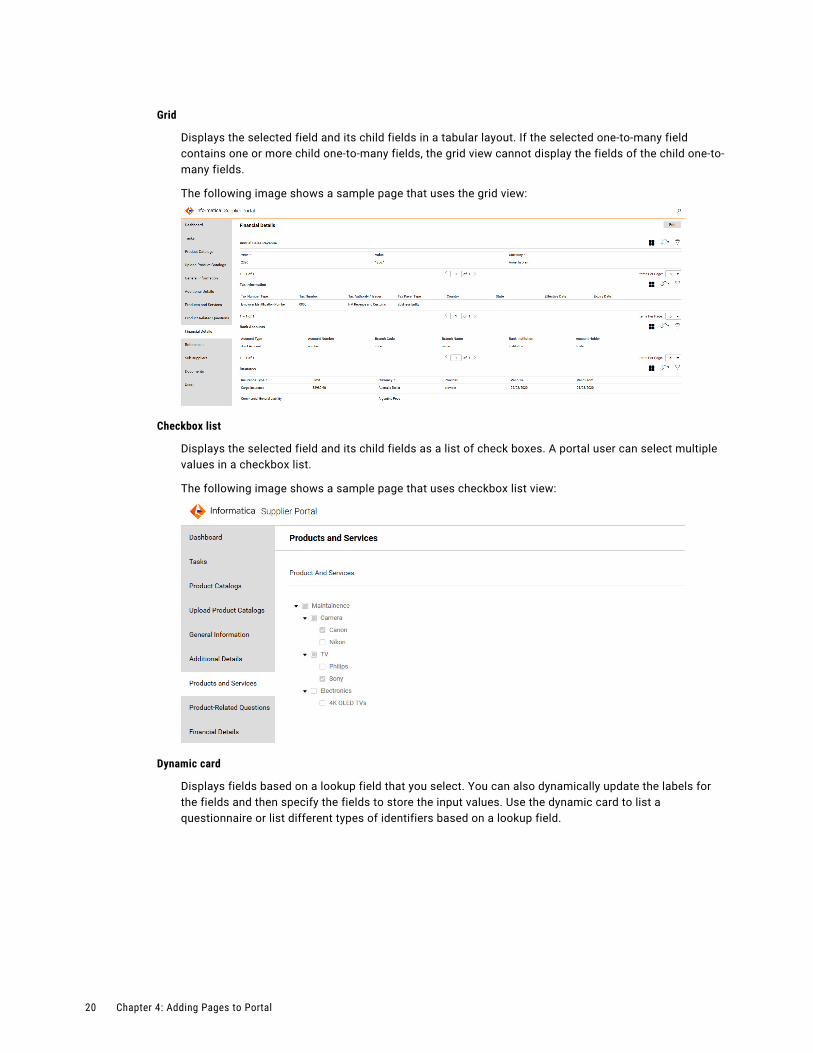
Grid
Displays the selected field and its child fields in a tabular layout. If the selected one-to-many field contains one or more child one-to-many fields, the grid view cannot display the fields of the child one-to-many fields.
The following image shows a sample page that uses the grid view:
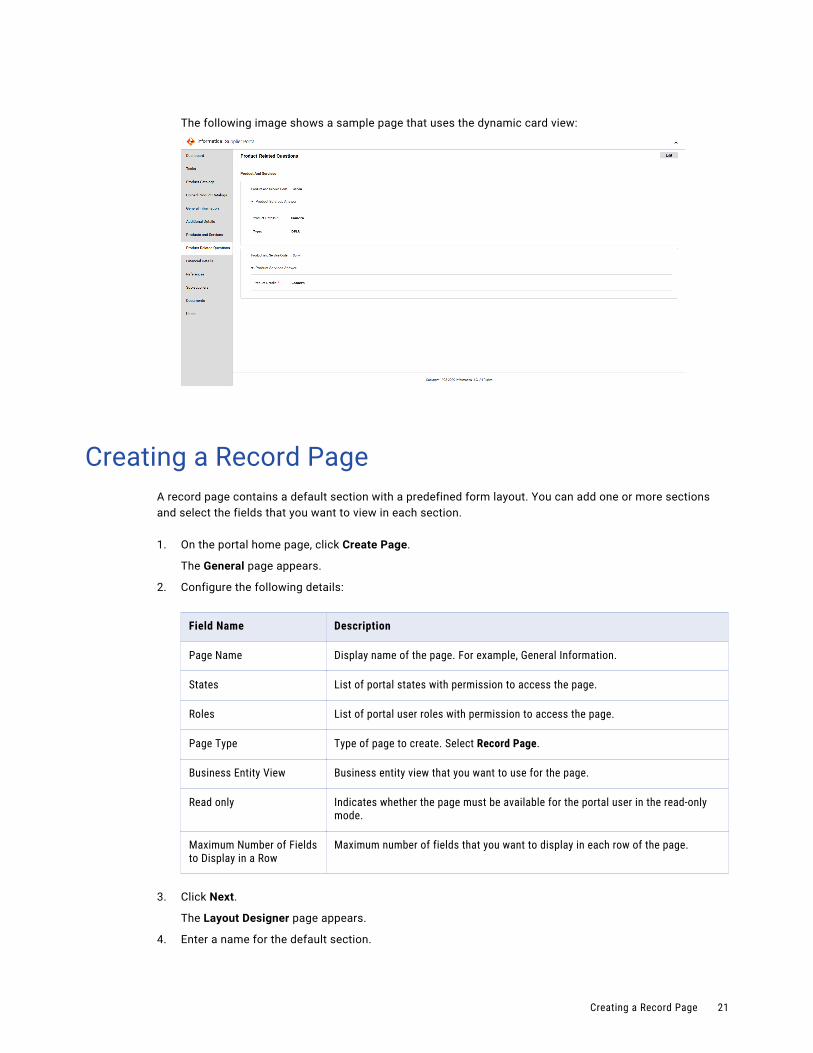
Checkbox list
Displays the selected field and its child fields as a list of check boxes. A portal user can select multiple values in a checkbox list.
The following image shows a sample page that uses checkbox list view:
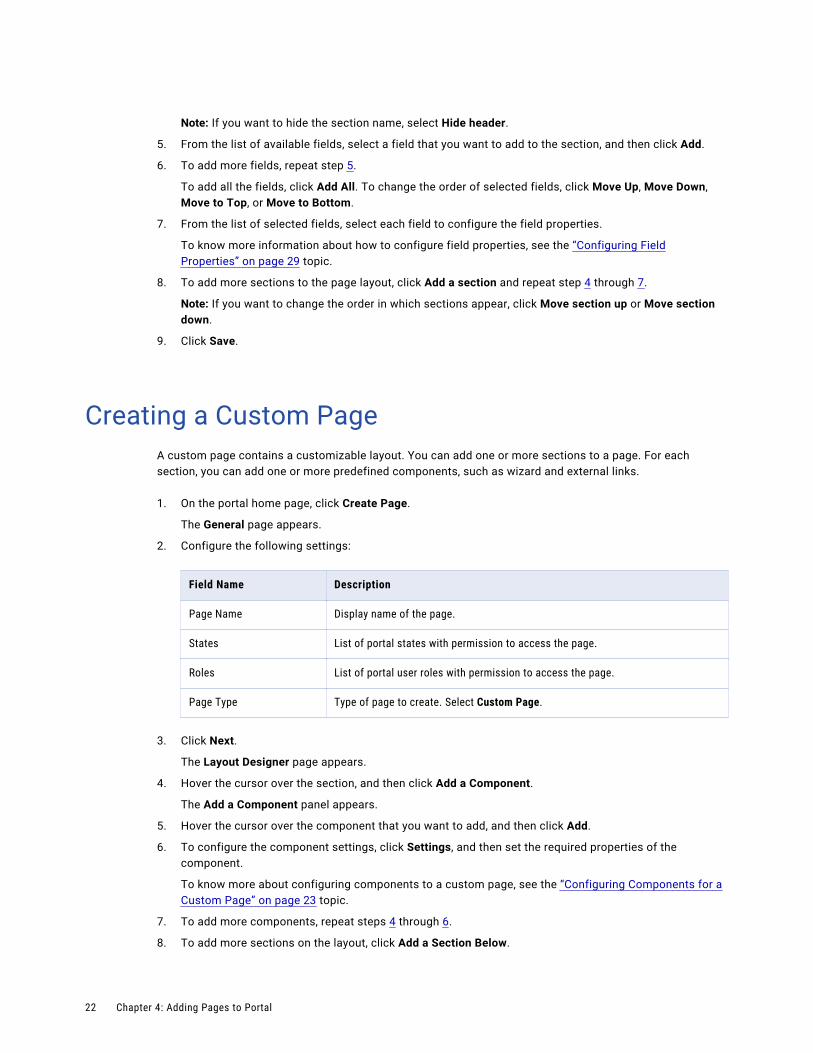
Dynamic card
Displays fields based on a lookup field that you select. You can also dynamically update the labels for the fields and then specify the fields to store the input values. Use the dynamic card to list a questionnaire or list different types of identifiers based on a lookup field.
20 Chapter 4: Adding Pages to Portal
The following image shows a sample page that uses the dynamic card view:
Creating a Record PageA record page contains a default section with a predefined form layout. You can add one or more sections and select the fields that you want to view in each section.
1. On the portal home page, click Create Page.
The General page appears.
2. Configure the following details:
Field Name Description
Page Name Display name of the page. For example, General Information.
States List of portal states with permission to access the page.
Roles List of portal user roles with permission to access the page.
Page Type Type of page to create. Select Record Page.
Business Entity View Business entity view that you want to use for the page.
Read only Indicates whether the page must be available for the portal user in the read-only mode.
Maximum Number of Fields to Display in a Row
Maximum number of fields that you want to display in each row of the page.
3. Click Next.
The Layout Designer page appears.
4. Enter a name for the default section.
Creating a Record Page 21
Note: If you want to hide the section name, select Hide header.
5. From the list of available fields, select a field that you want to add to the section, and then click Add.
6. To add more fields, repeat step 5.
To add all the fields, click Add All. To change the order of selected fields, click Move Up, Move Down, Move to Top, or Move to Bottom.
7. From the list of selected fields, select each field to configure the field properties.
To know more information about how to configure field properties, see the “Configuring Field Properties” on page 29 topic.
8. To add more sections to the page layout, click Add a section and repeat step 4 through 7.
Note: If you want to change the order in which sections appear, click Move section up or Move section down.
9. Click Save.
Creating a Custom PageA custom page contains a customizable layout. You can add one or more sections to a page. For each section, you can add one or more predefined components, such as wizard and external links.
1. On the portal home page, click Create Page.
The General page appears.
2. Configure the following settings:
Field Name Description
Page Name Display name of the page.
States List of portal states with permission to access the page.
Roles List of portal user roles with permission to access the page.
Page Type Type of page to create. Select Custom Page.
3. Click Next.
The Layout Designer page appears.
4. Hover the cursor over the section, and then click Add a Component.
The Add a Component panel appears.
5. Hover the cursor over the component that you want to add, and then click Add.
6. To configure the component settings, click Settings, and then set the required properties of the component.
To know more about configuring components to a custom page, see the “Configuring Components for a Custom Page” on page 23 topic.
7. To add more components, repeat steps 4 through 6.
8. To add more sections on the layout, click Add a Section Below.
22 Chapter 4: Adding Pages to Portal

A new section appears below the existing section.
9. To add a component to the section, repeat steps 4 through 7.
10. Click Save.
Configuring Components for a Custom PageYou can add and configure the following components for a custom page:
• Wizard
• External Link
• Product 360 Timeline
• Product 360 Task View
• Product 360 Catalog
• Product 360 Catalog Upload
• Twitter Feed
• Text
Configuring a Wizard ComponentUse the wizard component to create a series of steps containing fields. You can associate a business process with the wizard that dictates the possible actions that a portal user can perform on the wizard. For example, you can associate a business process that requires the portal user to fill in the fields, provide comments, and then submit the filled in information for a review process.
1. Add a wizard component to a section of a custom page.
The wizard component is added to the page.
2. Click Settings.
3. On the General tab, configure the following settings for the page:
Field Name Description
Title Display title of the wizard. For example, Registration Form.
Dimension Style Height of the wizard panel.Use one of the following options:- Fit to Content. Adjusts the height automatically based on the content.- Custom. Sets the height based on the value you specify.
Height Size of the wizard in pixel.
Configuring Components for a Custom Page 23
4. On the Component tab, configure the following settings:
Field Name Description
Associated Task Name of the task that you want to associate with the wizard. The portal user can perform the actions associated with the task. For example, AVOSBeDraftState.
Default Action Default action to display on the wizard. For example, Submit.
Logout Actions Comma-separated list of actions to log out a portal user after the user performs one of the specified actions.
Business Entity View Business entity view for the wizard.
Overview step Indicates whether you want to have an overview page for the wizard. Select this option to include an overview page.
Show Comments Indicates whether you want to include the comment option in the wizard. You can configure the task associated with the wizard to make the comments mandatory.
5. To add a step, click Add a step.
A step is added.
6. Enter a title for the step.
7. Enter a name for the section.
Note: If you want to hide the section name, select Hide header.
8. From the list of available fields, select a field that you want to add to the section, and then click Add.
Note: Repeat the step to add more fields. If you want to add all the fields, click Add All.
To know more information about how to configure field properties, see the “Configuring Field Properties” on page 29 topic.
9. To add more steps, repeat steps 5 through step 8.
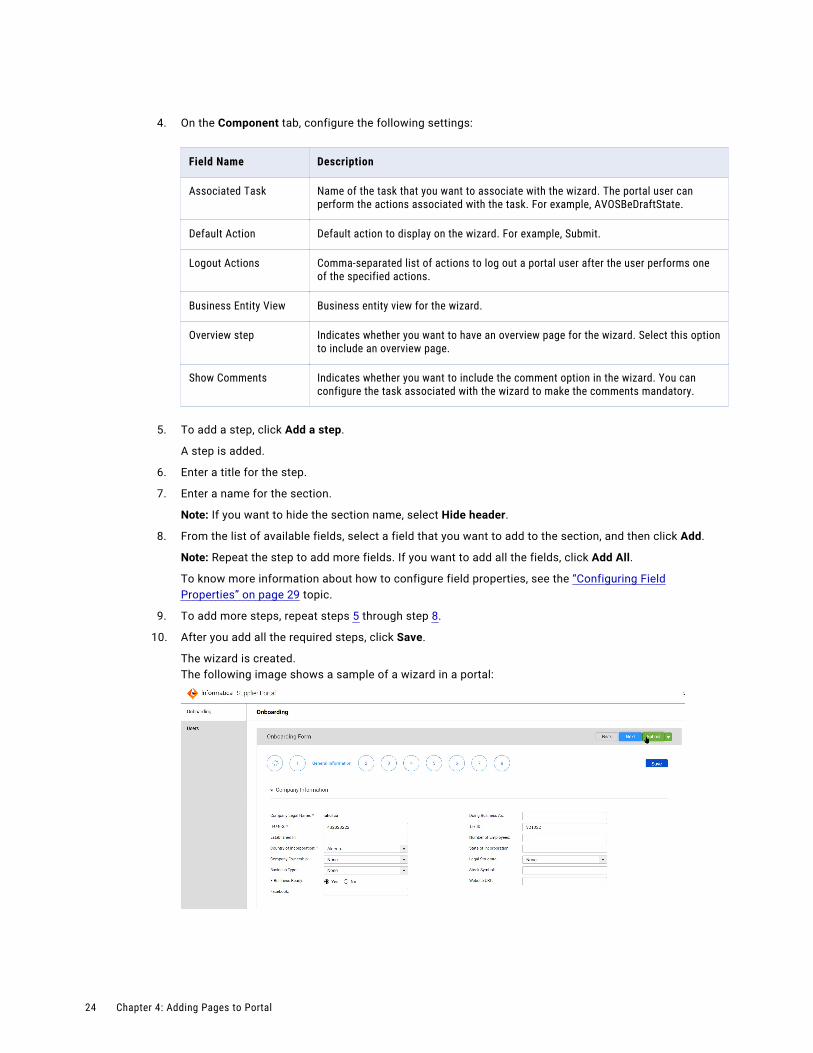
10. After you add all the required steps, click Save.
The wizard is created.The following image shows a sample of a wizard in a portal:
24 Chapter 4: Adding Pages to Portal

Configuring an External Link ComponentUse an external link component to display the content of an HTML page requested from an external URL. When you configure an external link, you can use certain parameters to append to the URL.
1. Add an external link component to a section of a custom page.
The external link component is added.
2. Click Settings.
3. On the General tab, configure the following settings for the page:
Field Name Description
Title Display title of the external link component.
Dimension Style Height of the external link panel.Use one of the following options:- Fit to Content. Adjusts the height automatically based on the content.- Custom. Sets the height based on the value you specify.
Height Size of the component in pixel.
4. On the Component tab, configure the following details for the page.
Field Name Description
URL URL of the external page that you want to display on the portal.
Business Entity Name Indicates whether you want to use the business entity of the portal as a parameter to filter the content of the external page.
Row ID Indicates whether you want to use the Row ID of the records as a parameter to filter the content of the external page.
5. Click Save.
Configuring a Product 360 Timeline ComponentUse the Product 360 Timeline component to display the timeline component of the Product 360 Supplier Portal. The messages appearing on the timeline are sorted based on the time of receipt. You can filter or delete messages on the timeline.
1. Add a Product 360 Timeline component to a section of a custom page.
The Product 360 timeline component is added to the page.
2. Click Settings.
Configuring Components for a Custom Page 25

3. On the General tab, configure the following settings:
Field Name Description
Title Display title of the Product 360 Timeline component.
Dimension Style Height of the component panel.Use one of the following options:- Fit to Content. Adjusts the height automatically based on the content.- Custom. Sets the height based on the value you specify.
Height Size of the component in pixel.
4. On the Component tab, configure the following details for the page:
Field Name Description
Server URL URL to access the MDM - Product 360 Supplier Portal.
5. Click Save.
Configuring a Product 360 Task View ComponentUse the Product 360 Task view component to displays the Task view of the Product 360 Supplier Portal. The Tasks View component displays all the tasks created manually or by a workflow. When you add the Product 360 Task View component to a page, the portal users can view and manage the tasks related to Product 360.
1. Add a Product 360 Task View component to a section of a custom page.
The Product 360 Task View component is added.
2. Click Settings.
3. On the General tab, configure the following settings:
Field Name Description
Title Display title of the Product 360 Task View component.
Dimension Style Height of the component panel.Use one of the following options:- Fit to Content. Adjusts the height automatically based on the content.- Custom. Sets the height based on the value you specify.
Height Size of the component in pixel.
4. On the Component tab, configure the following details for the page:
Field Name Description
Server URL URL to access the MDM - Product 360 Supplier Portal.
5. Click Save.
26 Chapter 4: Adding Pages to Portal

Configuring a Product 360 Catalog ComponentUse the Product 360 Catalog component to display the catalog component of the Product 360 Supplier Portal. The Product 360 Catalog displays the product details.
1. Add a Product 360 Catalog component to a section of a custom page.
The Product 360 Catalog component is added.
2. Click Settings.
3. On the General tab, configure the following settings:
Field Name Description
Title Display title of the Product 360 Catalog component.
Dimension Style Height of the component panel.Use one of the following options:- Fit to Content. Adjusts the height automatically based on the content.- Custom. Sets the height based on the value you specify.
Height Size of the component in pixel.
4. On the Component tab, configure the following details for the page:
Field Name Description
Server URL URL to access the MDM - Product 360 Supplier Portal.
User Name of the user with administrative privileges to access the Product 360 Supplier Portal.
5. Click Save.
Configuring a Product 360 Catalog Upload ComponentUse the Product 360 Catalog Upload component to display the catalog upload component of the Product 360 Supplier Portal. The portal users can use the catalog component to upload the product catalogs to Product 360.
1. Add a Product 360 Catalog Upload component to a section of a custom page.
The Product 360 Catalog Upload component is added.
2. Click Settings.
Configuring Components for a Custom Page 27

3. On the General tab, configure the following settings:
Field Name Description
Title Display title of the Product 360 Catalog Upload component.
Dimension Style Height of the component panel.Use one of the following options:- Fit to Content. Adjusts the height automatically based on the content.- Custom. Sets the height based on the value you specify.
Height Size of the component in pixel.
4. On the Component tab, configure the following details for the page:
Field Name Description
Server URL URL to access the MDM - Product 360 Supplier Portal.
User Name of the user with administrative privileges to access the Product 360 Supplier Portal.
5. Click Save.
Configuring a Twitter Feed ComponentUse the Twitter feed component to display Twitter feeds from a Twitter account.
1. Add a Twitter feed component to a section of a custom page
The Twitter feed component is added.
2. Click Settings.
3. On the General tab, configure the following settings:
Field Name Description
Title Display title of the Twitter feed component.
Dimension Style Height of the component panel.Use one of the following options:- Fit to Content. Adjusts the height automatically based on the content.- Custom. Sets the height based on the value you specify.
Height Size of the component in pixel.
4. On the Component tab, configure the following details for the page:
Field Name Description
Twitter URL URL of the Twitter account from which you want to retrieve the Twitter feeds.
28 Chapter 4: Adding Pages to Portal

5. Click Save.
Configuring a Text ComponentUse a text component to display a static text on the portal.
1. Add a text component to a section of a custom page
The text component is added.
2. Click Settings.
3. On the General tab, configure the following settings:
Field Name Description
Title Display title of the text component.
Dimension Style The style or measurement you want for the component size. You can select Fit to Content or a Custom style. If you select the Custom style, enter the details of the size in the following field.
Height Size of the component in pixel.
4. On the Component tab, configure the following details for the page:
Field Name Description
Heading Heading for the descriptive text that you want to display.
Body Descriptive text to display.
5. Click Save.
Configuring Field PropertiesWhen you add fields to the pages of a portal, you can configure the properties of the field with a view of your choice.
The types of views available for a field depend on the data type of the field you want to configure. For example, if you want to configure a lookup field with multiple options, you can select the drop-down list or radio button view. If you want to limit the portal user from selecting more than one option, then select the radio button view.
Configuring Properties of a Field with Text ViewUse text field for a shorter text, such as name, email address, and phone number. Use text area for a descriptive text, such as description and address. The descriptive text wraps in the text area.
1. In a section, select the field that you want to configure.
The Properties panel for the field appears.
Configuring Field Properties 29

2. Select one of the following options: .
• Text field. For a shorter text.
• Text area. For a descriptive text.
3. To set the field as a required field, select Required.
4. To hide the field on the page, select Hidden field.
5. To set the field as a read-only field, select Read-only.
6. Click Save.
Configuring Properties of a Field with Radio Button or Checkbox View
If you want to display multiple options for a field but receive a single input, configure the radio button or checkbox view for the field.
1. In a section, select the field that you want to configure.
The Properties panel for the field appears.
2. Select Radio button or Checkbox.
3. To set the field as a required field, select Required.
4. To hide the field on the page, select Hidden field.
5. To set the field as a read-only field, select Read-only.
6. Click Save.
Configuring Properties of a Field with Drop-down List ViewIf you want to display multiple options and store one or more inputs, configure the drop-down list view for the field.
1. In a section, select the field that you want to configure.
The Properties panel for the field appears.
2. Select Drop-down list.
3. To set the field as a required field, select Required.
4. To hide the field on the page, select Hidden field.
5. To set the field as a read-only field, select Read-only.
6. Click Save.
Configuring Properties of Field with Card ViewIf you want to display a one-to-many field and its child fields in a card layout, configure the card view for the field.
1. In a section, select the one-to-many field that you want to configure.
The Properties panel for the field appears.
2. Select Card.
3. To set the node or a field as a required field, select Required.
30 Chapter 4: Adding Pages to Portal
4. If you want to let the portal user switch between card and grid views, select Enable switching between card and grid views.
5. If you want to validate the input values of the field, select Enable validation.
6. Click Save.
Configuring Properties of a Field with Grid ViewIf you want to display a one-to-many field and its child fields in a tabular layout, configure the grid view for the field.
1. In a section, select the one-to-many field that you want to configure.
The Properties panel for the field appears.
2. Select Grid.
Note: If the selected one-to-many field contains one or more child one-to-many fields, the grid view cannot display the fields of the child one-to-many fields.
3. If you want to let the portal user switch between card and grid views, select Enable switching between card and grid views..
4. If you want to validate the input values of the field, select Enable validation.
5. To set the node or a field as a required field, select Required.
6. Click Save.
Configuring Properties of a Field with Checkbox List ViewIf you want to display a one-to-many field and its child fields as a list of checkboxes, configure the checkbox list view for the field. For example, if you want the portal user to select multiple product categories in a page that shows various product categories, use the checkbox list view.
1. In a section, select the one-to-many field that you want to configure.
The Properties panel for the field appears.
2. Select Checkbox list.
3. Select a lookup field that contains the values you want to display as a list of check boxes.
4. To display the field values in a hierarchical format, select a parent lookup field.
5. To set the node or a field as a required field, select Required.
Configuring Field Properties 31

6. Click Save.
The following image shows a sample of the checkbox list view on a portal:
Configuring Properties of a Field with Dynamic Card ViewIf you want to display fields based a lookup field, configure dynamic card view for a one-to-many field. When you use dynamic card view on a one-to-many field, select a child field of the one-to-many field as a lookup. The portal can then populate the fields based on the values of the lookup reference you select.
1. In a section, select the one-to-many field that you want to configure.
The Properties panel for the field appears.
2. Select Dynamic card.
3. Configure the following properties:
Property Name Description
Dynamic Card On Name of the one-to-many field based on which you want to create the dynamic card.
Lookup Field Lookup field based on which you want to display the fields. For example, the lookup field contains account types, such as Savings Account and Current Account. The card displays Savings Account and Current Account as fields.
Enable field grouping Indicates whether you want to group the fields based on a lookup field. For example, you have a set of questions. You want to categorize the questions based on products. You can enable this option to categorize the questions based on a lookup field that contains the list of products.You get this option only when you select a child one-to-many field for the dynamic card view.
Field Containing Group Values Required only when you enable field grouping. Lookup field based on which you want to group the fields in the card.
Enable advanced field configuration
Indicates whether you want to dynamically override the properties of the fields that you want to view.
32 Chapter 4: Adding Pages to Portal

Property Name Description
Field Containing Labels Lookup field containing the labels for the fields that you want to view.This field is available if you enable advanced field configuration.
Field Containing Required Indicator
Lookup field containing the values that indicate whether the field is required.This field is available if you enable advanced field configuration.
Field Containing Data Types Lookup field containing the data types for the input values.This field is available if you enable advanced field configuration.
Field Containing Lookup Values Required only if you select lookup data type. Lookup field containing the lookup values for the field. For example, you have a set of questions. To provide predefined options to the portal user, specify the field that contains options for the question.This field is available if you enable advanced field configuration.
Field to Store Input Values Name of the field to store the input values that a portal user enters in the card.This field is available if you enable advanced field configuration.
The following image shows a sample configuration of the dynamic card view for product-related questions in a preconfigured portal:
Configuring Field Properties 33
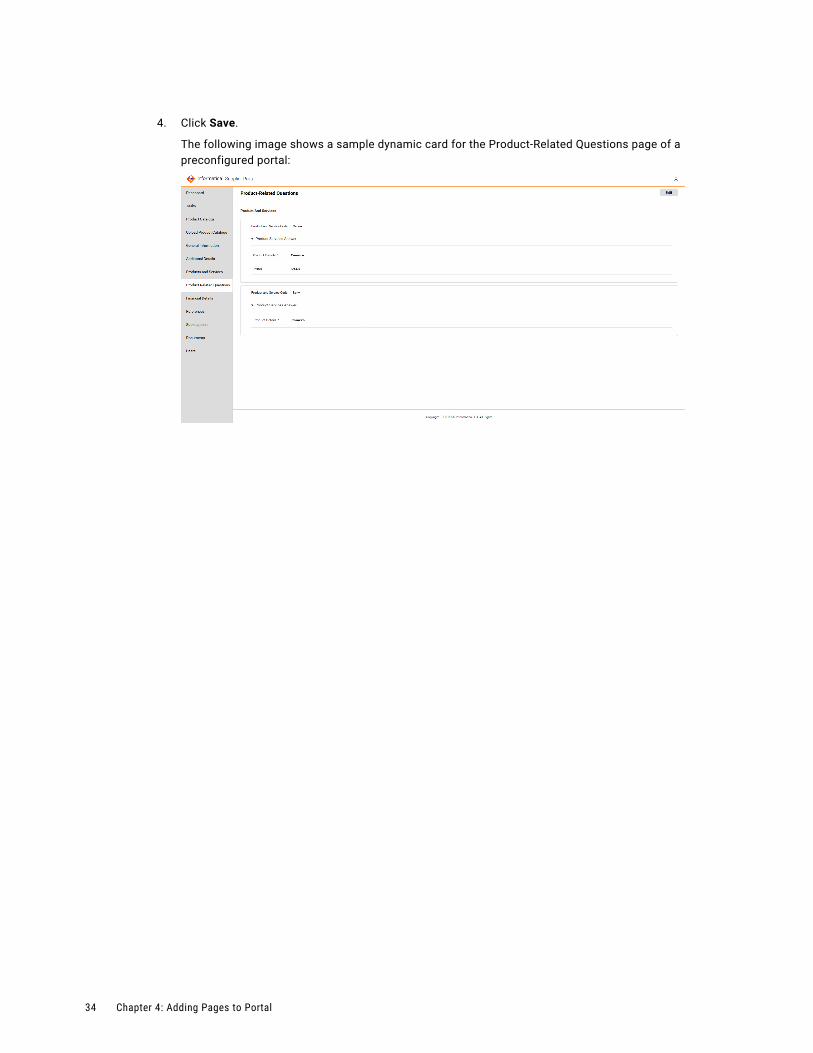
4. Click Save.
The following image shows a sample dynamic card for the Product-Related Questions page of a preconfigured portal:
34 Chapter 4: Adding Pages to Portal

C h a p t e r 5
Managing a PortalThis chapter includes the following topics:
• Managing a Portal Overview, 35
• Configuring the Runtime Settings for a Portal, 35
• Starting a Portal, 36
• Stopping a Portal, 36
• Editing a Portal, 37
• Exporting a Portal, 37
• Importing a Portal, 37
• Configuring Single Sign-On for a Portal, 38
Managing a Portal OverviewAfter you create a portal, you can start the portal to deploy it. You can copy the URL of the portal to check how the portal looks. If you want to reconfigure any page, you can stop the portal and edit it.
You can export the portal configuration to a ZIP file so that you can share it with other users. You can also import a portal configuration.
Before you start a portal, ensure that you verify the default runtime configuration settings and configure them according to your requirement.
Configuring the Runtime Settings for a PortalThe runtime settings include timeout interval, password reset link expiry time, and password policy.
1. In the Portal Configuration tool, click the Action icon on the portal for which you want to configure the runtime settings.
2. Select Runtime Settings.
The Runtime Settings page appears.
35

3. Configure the following settings:
Session Timeout Interval
Idle time after which a login session times out. Default is 420 minutes.
Session Timeout Warning Time
Number of minutes before a session times out you want to display a warning message. Default is 60 minutes.
Password Reset Link Expiry Time
Time period after which the password reset link must expire. Use the hh:mm:ss format. Default is 1:00:00.
Password Policy
Password policy that you want to use for the portal. The policy appears in the sign up page.
Username
Name of the user with administrative privileges to access the portal.
Note: Ensure that you add a unique administrator user for the portal.
Starting a PortalAfter you start the portal, the portal is deployed, and you can access the portal with the portal URL.
1. In the Portal Configuration tool, click the Action icon on the portal that you want to start.
2. Select Start Portal.
If the portal is deployed successfully, you get a green icon on the portal.
3. To get the portal URL, click the Action icon on the portal, and select Copy URL.
The portal URL is copied to the clipboard. You can paste the URL in your browser.
Stopping a PortalYou can stop a portal that is already deployed. After you stop the portal, the users cannot access the portal.
1. In the Portal Configuration tool, click the Action icon on the portal that you want to stop.
2. Select Stop Portal.
You get a red icon on the portal.
36 Chapter 5: Managing a Portal

Editing a PortalIf you plan to edit a portal that is already deployed, ensure that you stop the portal before you edit it.
Note: For more information about stopping the portal, see “Stopping a Portal” on page 36.
1. In the Portal Configuration tool, click the Action icon on the portal that you want to edit.
2. Select Edit.
The portal configuration is available in the edit mode.
3. To edit the portal settings, perform the following tasks:
a. Click Portal Settings.
The portal configuration is available in the edit mode.
b. Edit the required settings, and click Save.
4. To edit a page, perform the following tasks:
a. Click the page that you want to edit.
The page is available in the edit mode.
b. Edit the page configuration, and click Save.
Exporting a PortalYou can export a portal as a ZIP file and share the portal configuration with other users.
1. In the Portal Configuration tool, click the Action icon on the portal that you want to export.
2. Select Export.
The portal configuration is downloaded as a ZIP file.
Importing a PortalYou can import a portal as a ZIP file. When you import a portal, you can create a portal or replace an existing portal.
1. In the Portal Configuration tool, click Import Portal.
The Import Portal dialog box appears.
2. Navigate to the ZIP file that you want to import.
3. Select the Operational Reference Store for the portal to use.
4. Select the source system for the portal to use.
5. If you want to replace an existing portal, perform the following tasks:
a. Select Replace an existing portal.
b. Select the portal that you want to replace.
6. If you want to create a portal, enter an unique name for the portal.
Editing a Portal 37

7. To enable external authentication for the portal, click Yes.
8. Click Import.
The selected portal is imported.
Configuring Single Sign-On for a PortalSingle sign-on is an authentication service that allows a user to use one set of credentials to access multiple applications. It allows users to sign in to an identity provider application for authentication and grants access to other applications your service provider hosts.
An identity provider is an entity that manages authentication information and provides authentication services through the use of security tokens. For example, Microsoft Azure or Okta. A service provider is an entity that provides web services to users. For example, an entity that hosts web applications. You can configure single sign-on for the portal you create or import through the Portal Configuration tool. You must enable external authentication to configure single sign-on when you create or import a portal.
Note: Before you configure single sign-on, ensure that you add the provider property provider.type and set its value to SAML in Portal Login Module in Security Providers tool of the Hub Console.
1. On the Home page, select the portal for which you want to configure single sign-on.
2. Click the Action icon on the portal, and select SSO Configurations.
Note: The SSO Configurations option appears only on published portals.
When you configure for the first time, the SSO Quick Setup Steps dialog box appears.
3. Read through the instructions, and click OK.
Note: To see the quick setup steps again, click SSO Quick Setup Steps in the Service Provider Settings section.
4. Click Download Service Provider Metadata.
The service provider metadata XML file is downloaded.
5. To digitally sign in the authentication request before sending it to your identity provider, select Sign Authentication Request.
6. To digitally sign in the log out request before sending it to your identity provider, select Sign Logout Request.
7. Upload the service provider metadata file to your identity provider application. For example, to upload the service provider metadata file to Microsoft Azure, perform the following steps:
a. Log in to Microsoft Azure portal.
b. Select the enterprise application that you want to configure.
c. Click Set up single sign on.
The Select a single sign-on method page appears.
d. Click SAML.
The Set up Single Sign-On with SAML page appears.
e. Click Upload metadata file.
f. Navigate to the service provider metadata file that you downloaded, and click Add.
38 Chapter 5: Managing a Portal

The Basic SAML Configuration page appears displaying values from the service provider metadata file.
Note: If the upload fails and the values do not appear on the Basic SAML Configuration page, navigate to the Set up Single Sign-On with SAML page and click Edit to add the values manually from the service provider metadata file.
g. To redirect the user to a page after the user logs out, enter a logout URL.
h. Click Save and Close.
i. Download the federation metadata XML file from the SAML Signing Certificate section on the Set up Single Sign-On with SAML page.
8. In the Identity Provider Settings section of the Portal Configuration tool, click Choose File.
9. Navigate to the federation metadata XML file that you downloaded, and click Open.
Note: By default, the NameID element is mapped to the User Name Mapping field. You can also map the path to the email address in the User Name Mapping field.
The fields in the Identity Provider Settings section populates with values from the federation metadata XML file.
10. Click Save.
Configuring Single Sign-On for a Portal 39

C h a p t e r 6
Localizing a PortalThis chapter includes the following topics:
• Localizing a Portal Overview, 40
• Exporting the Language Bundle, 40
• Importing the Language Bundle, 40
Localizing a Portal OverviewAfter you create a portal, you can localize the portal resources, such as portal title and page labels. You can export the labels that the portal uses, get them localized, and then import them back to the portal.
Exporting the Language BundleThe language bundle is a ZIP file that contains language file for each language. Each language file contains the portal labels in the corresponding language.
1. In the Portal Configuration tool, click the Action icon on the portal that you want to export.
2. Select Localization > Export Language Bundle.
The language bundle is downloaded as a ZIP file.
Importing the Language BundleAfter you export the language bundle, you can update the language files with the localized strings. After you update the language files, you can import the updated language bundle file so that the localized strings are available in the portal.
Before you import a language bundle, ensure that the portal is not in the draft state.
1. In the Portal Configuration tool, click the Action icon on the portal that you want to import.
2. Select Localization > Import Language Bundle.
The Import Language Bundle dialog box appears.
40

3. Navigate to the language bundle ZIP file that you want to import.
4. Click Import.
Note: For the imported language bundle to take effect, you must stop the portal and then start it.
Importing the Language Bundle 41

C h a p t e r 7
Deploying a Sample PortalThis chapter includes the following topics:
• Requirements of the Sample Customer Portal, 42
• Creating the Sample Portal, 43
• Adding Pages to the Sample Portal, 43
• Starting the Sample Portal, 44
Requirements of the Sample Customer PortalYou work for a beverages manufacturing company called XYZ Distilleries. Numerous restaurants procure beverages from the company. The management team finds it difficult to onboard new restaurants and maintain the customer information. You propose to create a customer portal to onboard new restaurants. The restaurant representatives can use the portal to sign up and initiate a relationship with your organization as customers. After business users in your organization approve a customer, the restaurant representatives can use the customer portal to onboard their profile into the database of XYZ Distilleries and communicate regarding their interest to procure beverages.
For the proposed customer portal, you come up with the following requirements:
• Capability for the customers to sign up using a sign up page.
• Capability for the customers to log in to the portal using a login page.
• Capability for the customers to self-register using a registration page.
• Capability for the customers to provide additional details about them.
• Capability for the customers to manage users by adding or removing additional users.
• Capability to display pages based on the status of the customer record. After customers submit their application, the portal must not allow them to edit their applications until they are approved.
42

Creating the Sample PortalYou can create a portal with multiple pages, such as sign up page, log in page, and registration page. You can configure the business entity fields from which you want retrieve and store data.
1. Log in to the Portal Configuration tool.
For more information about logging in to the Portal Configuration tool, see “Logging In to the Portal Configuration Tool” on page 7.
2. Click Create Portal.
The General page appears.
3. Configure the general settings of the portal, such as portal title and business entity.
For more information about configuring general settings, see “Configuring the General Settings for the Portal” on page 12.
4. To configure the portal to display pages based on the status of the portal user, set the Enable Portal State field to Yes and then configure the state settings.
5. Click Next.
The Log In page appears.
6. Configure the log in page settings for the portal, such as email address and user name.
For more information about configuring the log in page settings, see “Configuring the Log In Page Settings for the Portal” on page 13.
7. Click Next.
The User Creation page appears.
8. Configure the user creation details to store the user details.
For more information about configuring the user creation page settings, see “Configuring the User Creation Page Settings for the Portal” on page 15.
9. To enable creation of additional users, select Create additional users and configure the settings on the Additional Users tab.
10. Click Next.
The Registration page appears.
11. Configure the registration settings, such as default user role and default portal state.
Note: To allow the users to sign up online, ensure that you clear the Disable Signup check box
For more information about configuring registration page settings, see “Configuring the Registration Page Settings for the Portal” on page 16.
12. Click Save.
You have successfully created a portal as per your business requirements.
Adding Pages to the Sample PortalAfter you create a portal, you can add pages based on your business requirements.
1. On the portal home page, click Create Page.
The General page appears.
Creating the Sample Portal 43

2. Add the required components and configure the component settings.
3. Add the required fields and configure the field properties.
4. Click Save.
For more information about adding pages, see Chapter 4, “Adding Pages to Portal” on page 18.
Starting the Sample PortalWhen you start the portal, the portal is deployed, and you can access the portal with the portal URL.
1. In the Portal Configuration tool, click the Action icon on the portal that you want to start.
2. Select Start Portal.
If the portal is deployed successfully, you get a green icon on the portal.
3. To get the portal URL, click the Action icon on the portal, and select Copy URL.
The portal URL is copied to the clipboard. You can paste the URL in your browser.
44 Chapter 7: Deploying a Sample Portal

I n d e x
Ccard 19card view 30checkbox list 19checkbox list view 31configure
external link component 25Product 360 Catalog Upload component 27Product 360 Task View component 26Product 360 Timeline component 25Text component 29Twitter Feed component 28wizard component 23
configure field view drop-down list 30radio button 30text area 29text field 29
configure one-to-many field card 30
configure one-to-many view checkbox list 31dynamic card 32grid 31
create custom page 22record page 21
create portal general settings 12log in page 13overview 11registration page 16user creation page 15
custom page create 22
Ddrop-down list
configure 30dynamic card 19dynamic card view 32
Eedit a portal 10, 36, 37export
language bundle 40portal 37
external link component 25
Ffield views
drop-down list 19radio button 19text area 19text field 19
Ggeneral settings
portal 12grid 19grid view 31
Iimport
language bundle 40portal 37preconfigured portal 9
Llanguage bundle
export 40import 40
localize portal export language bundle 40import language bundle 40
logging in 7
Mmanage a portal
edit 10, 36, 37export 37import 37start 10, 36
Oone-to-many field views
card 19checkbox list 19dynamic card 19grid 19
45

Ppassword policy 35Portal Configuration tool
overview 7Portal Configuration Tool
logging in 7preconfigured portal
import 9Product 360 Catalog component 27Product 360 Catalog Upload component 27Product 360 Task View component 26Product 360 Timeline component 25
Rradio button
configure 30record page
create 21runtime settings
password policy 35password reset link expiry time 35session timeout 35
Ssession timeout 35settings
log in page 13registration page 16user creation page 15
start a portal 10, 36
Ttext area
configure 29text field
configure 29Twitter Feed component 28, 29
Wwizard component 23
46 Index